
Log Cabin Quilt Tote Bag Ideas with Creative Patchwork and Fabric Strips
Log Cabin Quilt Tote Bag Ideas bring traditional patchwork into everyday accessories, combining colorful fabric strips, textured quilting, and practical bag construction. The familiar Log Cabin block begins with a center square surrounded by fabric strips, or logs, that can create spiraling frames, bold diamonds, stepped bands, and striking geometric arrangements. Changing the widths, colors, and placement of these strips gives each design a different personality, from orderly vintage patchwork to lively improvisational compositions. Quilted tote bags also offer a useful way to work with fabric remnants, coordinated quilting cottons, and reclaimed textiles. With thoughtful construction, the finished bags can combine the character of handmade quilts with the strength and functionality needed for shopping, books, travel, or everyday essentials.
Log Cabin Quilt Tote Bag Ideas
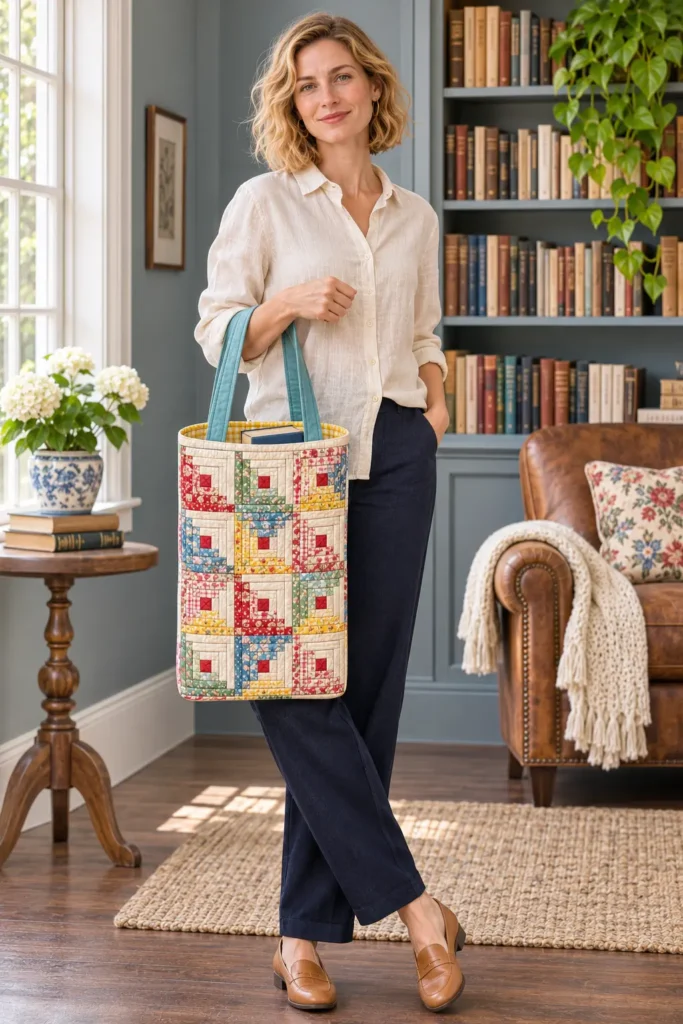
The designs in this collection explore twelve interpretations of Log Cabin patchwork, ranging from traditional red-centered blocks and rainbow Barn Raising diamonds to modern Wonky Log Cabin arrangements and sharply contrasting Courthouse Steps. Some focus on distinctive fabric choices, including vintage feed sack-inspired prints, reclaimed denim, and colorful batiks. Others introduce practical variations such as zippered openings, reversible construction, oversized beach totes, and tall book bags.
Each design offers a different balance of pattern, proportion, color, and texture. The accompanying sewing guides explore how these ideas can be constructed, including fabric preparation, patchwork assembly, quilting, handles, lining, and finishing. Understanding how the blocks are arranged and how the bag will be used helps turn an appealing design into a more practical sewing project.
See also: – Chic Jelly Roll Quilt Tote Bag – Elegant Boho Quilt Tote Bag – Jelly Roll Christmas Quilt Jacket and Vest – Japanese Quilted Bag – Chic Jelly Roll Quilt Tote Bag Ideas – Stylish Quilted Tote Bag
Why Make Log Cabin Quilt Tote Bags?
Log Cabin patchwork offers an appealing combination of recognizable geometry and creative flexibility. Its basic construction uses fabric strips sewn around a central square, making it possible to create dramatically different arrangements from relatively simple shapes. A conventional Log Cabin block has an orderly appearance, while variations such as Wonky Log Cabin introduce irregular angles and unexpected color placement. Carefully rotated blocks can also form diamonds, zigzags, or repeating light-and-dark patterns.
Tote bags provide a manageable surface for exploring these techniques without committing to a bed-sized quilt. Smaller blocks can create detailed patchwork across a compact book tote, while one oversized block can become the centerpiece of a spacious beach bag. Fabric scraps from previous projects may be suitable for many designs, provided their weight, condition, and available dimensions meet the construction requirements.
The quilting itself contributes both texture and stability. Stitching through the exterior fabric and batting adds dimension to the patchwork, while appropriate interfacing, lining, and reinforced handles support the bag’s intended use. Beyond their decorative appeal, these bags can be useful everyday accessories or thoughtful handmade gifts, with fabric colors and construction details tailored to the recipient.
What Makes These Designs Different?
Although all twelve designs belong to the Log Cabin family, their construction and visual effects vary considerably. The Classic Log Cabin tote uses colorful strips surrounding traditional red center squares, while Barn Raising arranges contrasting Log Cabin blocks to create large, concentric rainbow-and-cream diamonds. Courthouse Steps follows a different construction sequence, adding strips to opposite sides of a center in pairs to produce symmetrical stepped rectangles rather than the conventional spiral arrangement.
Other variations change the geometry more noticeably. Half Log Cabin blocks build bands along two adjacent sides, creating L-shaped corner arrangements. Off-Center Log Cabin uses deliberately unequal log widths to shift the center and, through carefully planned block rotation, suggest sweeping curves. Wonky Log Cabin takes a freer approach, incorporating irregular strip widths and angled seams. Sunshine and Shadow uses repeated light-and-dark groupings to develop alternating diamond effects, while Streak of Lightning relies on block orientation to create continuous zigzag paths.
Bag construction provides another important distinction. Miniature blocks make a tall book tote visually detailed, while a single enlarged block gives the beach tote a bold, uncluttered appearance. Quilt-as-you-go denim panels combine piecing and quilting during construction, and reversible designs introduce two coordinated fabric treatments within one functional bag.
Choosing Fabrics and Building a Color Palette
Fabric selection strongly influences how clearly a Log Cabin pattern appears. Traditional quilting cotton is particularly suitable for precise strip piecing because its stable woven structure makes cutting, pressing, and joining relatively manageable. Solid cottons emphasize seam direction and block geometry, while small-scale florals, checks, and reproduction feed sack prints introduce vintage character without hiding the individual fabric pieces. Batiks offer another distinctive surface, often combining saturated colors with subtle variations across the fabric.
Light-and-dark contrast is especially important in arrangements such as Barn Raising, Sunshine and Shadow, and Streak of Lightning. Cream strips help separate the rainbow diamonds in Barn Raising, while charcoal and golden yellow create the contrasting sections of Sunshine and Shadow. Navy, coral, and cream establish clearly differentiated sides around the Courthouse Steps centers. In these designs, color placement matters as much as the colors themselves.
Other totes benefit from a less structured palette. Bright solid fabrics make the angled seams of Wonky Log Cabin blocks more visible, while teal and tangerine batiks emphasize the flowing effect of Off-Center Log Cabin arrangements. Reclaimed denim introduces variations in blue, fading, and woven texture that can be complemented by small amounts of colorful quilting cotton.
For dependable construction, consider fabric weight, laundering requirements, and how different textiles behave together. Heavy denim may need reduced seam bulk, while lightweight cottons may benefit from stabilizing materials. Additional yardage may also be necessary for lining, handles, backgrounds, or binding beyond the fabrics used in the patchwork.
Planning Tote Bag Size, Shape, and Everyday Use
The intended use of a quilted tote should guide its proportions and structural details. A tall book tote benefits from enough vertical space for books or notebooks, along with securely attached handles and a supportive base. A wide beach tote needs a generous opening, comfortable shoulder straps, and materials suited to carrying bulkier items. Everyday shopping totes may benefit from boxed corners, interior pockets, or a stable lining, while a zippered design requires careful planning around the opening and its additional fabric layers.
Patchwork scale must also suit the bag’s shape. Large Log Cabin blocks show their geometry clearly across an oversized exterior panel, whereas miniature blocks create a detailed, repeated surface. The proportions of the finished panels need to account for seam allowances, any boxed-bottom construction, and the space required for handles or closures. A complicated block arrangement can lose its intended visual effect when too much of it disappears into side seams or bottom corners.
Handle placement deserves particular attention. Handles should be balanced, securely reinforced, and long enough for the intended carrying position. Lining fabric, interfacing, and batting should support the bag without making it unnecessarily stiff or bulky. Planning these structural elements before finalizing the patchwork dimensions helps maintain both the appearance and functionality of the finished tote.
Quilting Texture, Durable Details, and Common Mistakes
Quilting stitches help define the surface of a Log Cabin tote while stabilizing its layered fabrics. Straight-line quilting works particularly well with geometric patchwork, following the direction of the logs or crossing them at carefully chosen intervals. Stitching near the pieced seams can emphasize the rectangular arrangement, while restrained diagonal or echo quilting adds texture without overwhelming the pattern. Quilt-as-you-go construction offers a different approach, securing fabric strips to batting or a prepared foundation as the panel develops.
The amount of quilting affects flexibility and structure. Dense stitching can make a tote panel firmer, while widely spaced quilting may provide less support than the chosen batting requires. For lined bags, the exterior quilting and interior construction should work together without creating uncomfortable thickness around seams, corners, or handles.
Common problems include inconsistent seam allowances, distorted blocks, mismatched panel dimensions, and excessive bulk where several fabric layers meet. Angled or improvisational blocks should be carefully measured and trimmed before assembly. Reclaimed denim requires particular attention around zipper openings and handle attachments, while reversible bags need neatly finished construction on both visible sides.
Before final assembly, compare the exterior and lining dimensions, confirm the intended block orientation, and check handle placement. These details often make the difference between attractive patchwork and a bag that also functions comfortably.
About the Design Inspiration Images
The images accompanying these Log Cabin quilt tote bag ideas are intended to illustrate possible fabric combinations, patchwork arrangements, and finished styles. Some may be AI-generated or digitally modified, while certain designs draw inspiration from established quilting traditions or existing textile concepts. They should not be interpreted as photographs of physically completed or tested projects. Where sewing instructions are provided, they describe proposed construction methods with calculated measurements rather than physically tested patterns. The illustrations may not reproduce every seam or assembly detail exactly. Readers should follow the written measurements and instructions, verify dimensions before cutting, and adapt the designs to their materials and sewing experience.
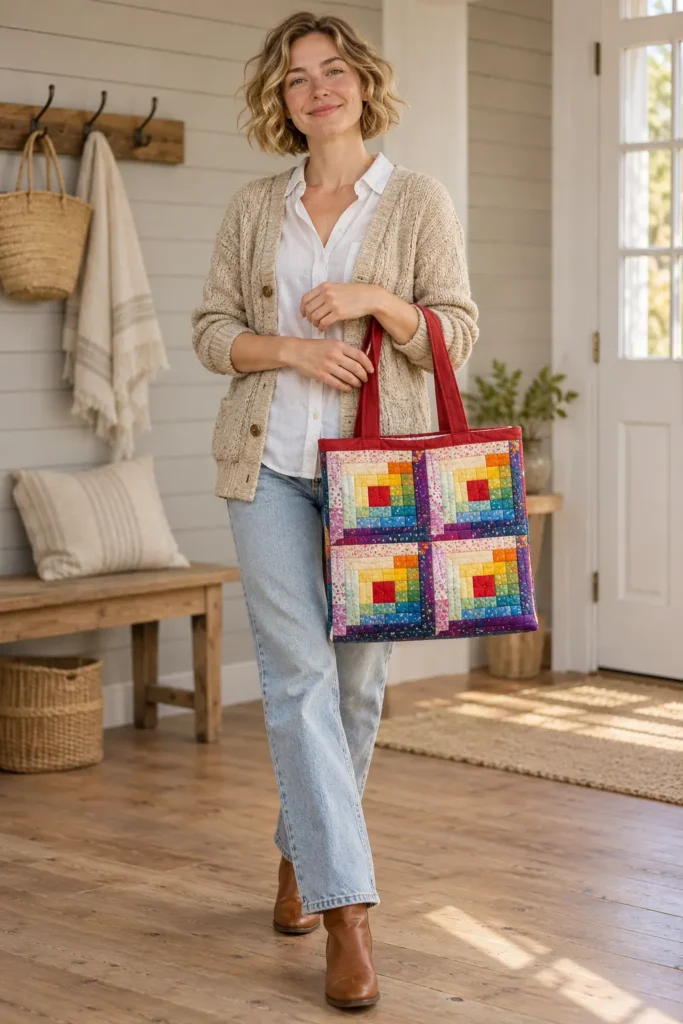
1. Classic Log Cabin Quilt Tote with Red Centers and Rainbow Strips
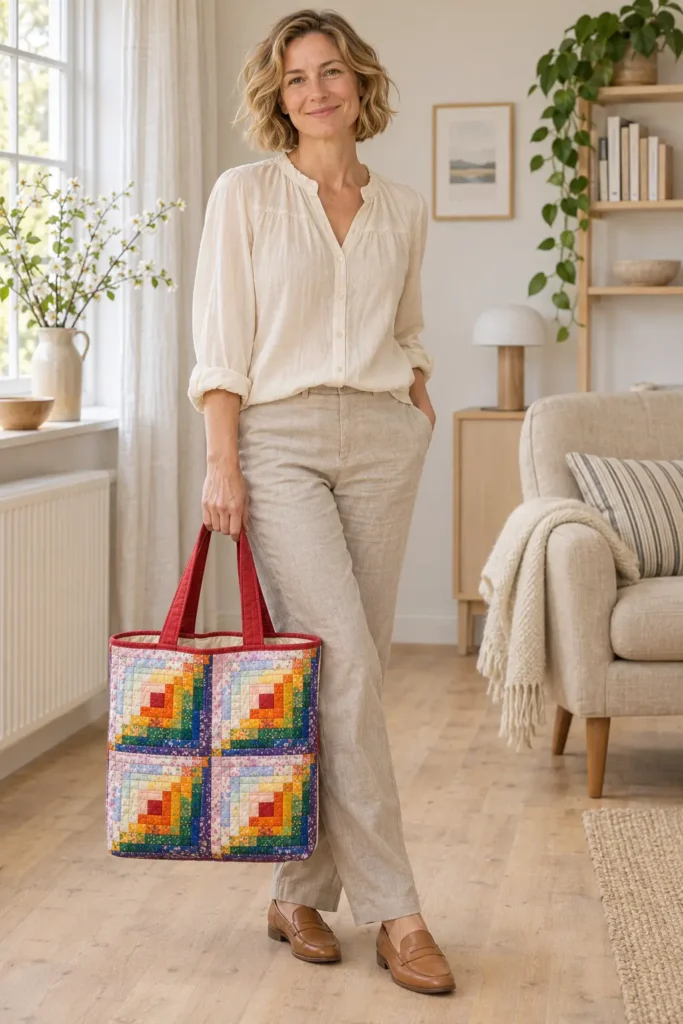
This Classic Log Cabin quilt tote puts the most familiar version of the block front and center. Each side of the bag carries four Log Cabin blocks in a two-by-two grid, and every block starts with a small red square, the traditional hearth at the center of the cabin. Narrow strips, or logs, spiral outward from that center in three rounds.
The upper-left half of each block is built from soft pastel tints of blush, butter yellow, mint, sky blue, and lilac, while the lower-right half switches to saturated orange, golden yellow, emerald, cobalt, and violet. Because all four blocks face the same direction, the bag reads as an orderly grid of rainbow squares, each split diagonally into light and bright.
The tote itself is a medium everyday size, 14″ wide, 13″ tall, and 4″ deep, with a boxed bottom that lets it stand on its own. Two red fabric handles echo the centers, and a cream cotton lining with an interior slip pocket keeps the inside clean and practical. Quilting in concentric squares around each red center gives the patchwork gentle texture and enough body for books, groceries, or a project bag. The blocks are sized so that the grid fills the front of the bag exactly, with no cropped strips at the sides.
Design Inspirations – Digitally Modified Images. Texture and color may vary from the actual product.
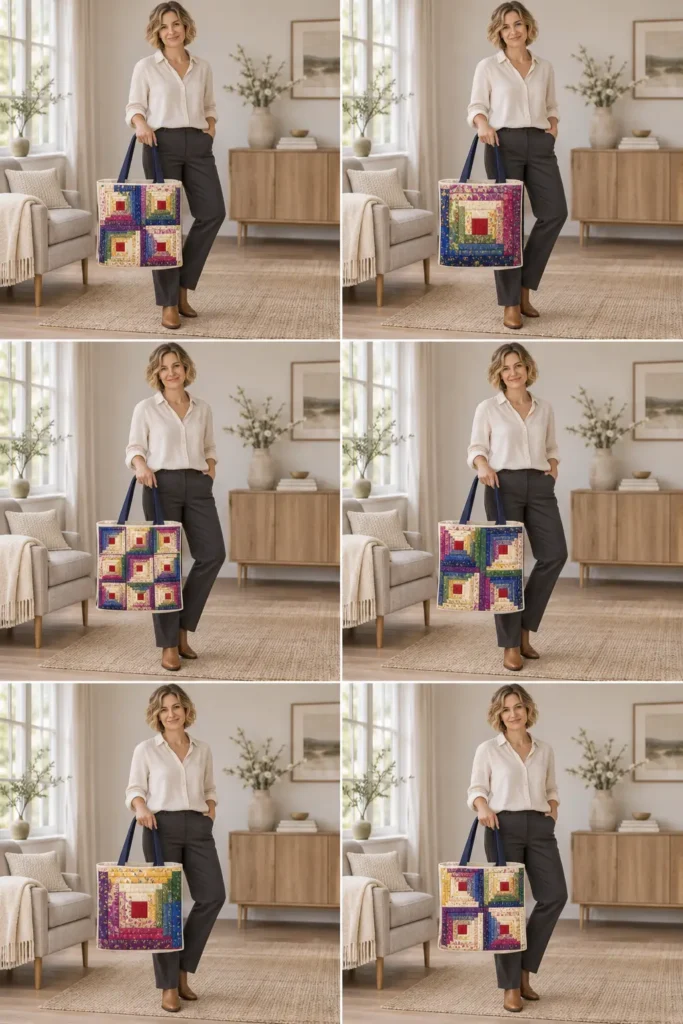
How the Classic Log Cabin Block Builds the Rainbow
A Classic Log Cabin block grows in a spiral. Starting with the red center, you add one log to the top, then the left, then the bottom, then the right, and each log is a little longer than the one before because it spans everything already sewn. One full trip around the center is a round, and this tote uses three. The secret to the diagonal split is that the top and left logs of every round come from the pastel group, while the bottom and right logs come from the saturated group. That simple rule gives every block a light half and a bright half without any extra cutting.
Here, the logs are cut 1¼” wide and finish at ¾”, narrower than a standard precut strip. That narrower width is what lets three full rounds fit inside a 7″ block, so the grid of four blocks lands at exactly 14″, the width of the bag. With wider strips, the blocks would either need fewer rounds or would spill past the side seams and lose their outer logs.
Choosing Fabrics for the Pastel and Saturated Halves
The design depends on value contrast more than on the exact colors. The pastel half should read clearly lighter than the saturated half when you squint at your fabrics. Golden yellow is the one to watch, since it is the lightest of the saturated colors and sits right beside butter yellow in the block. Choose a deep, warm gold rather than a lemon shade so it stays on the bright side of the split.
With logs finishing at only ¾” wide, print scale matters. Solids, tone-on-tones, tiny dots, and small-scale florals stay readable, while large prints break into meaningless fragments. A true red solid or a red tone-on-tone works best for the centers and handles, because it reads as one strong accent across the whole bag. Cream is used for the border, lining, and pocket, which keeps the interior calm and lets the narrow border disappear into the side seams.
Quilting cotton is the right weight throughout. It presses flat, holds an accurate ¼” seam, and quilts smoothly onto low-loft batting. Prewash all fabrics or none, since saturated colors such as cobalt and violet can bleed onto pastels in the wash.
Materials and Tools Needed
Fabric
- Red solid or tone-on-tone quilting cotton: ⅓ yard (handles and center squares)
- Pastel quilting cottons: ¼ yard each of blush, butter yellow, mint, sky blue, and lilac
- Saturated quilting cottons: ¼ yard each of orange, golden yellow, emerald, cobalt, and violet
- Cream quilting cotton: 1 yard (border, lining, and pocket)
- Muslin for the quilt foundation: two 21″ × 21″ pieces (⅝ yard if your muslin has 42″ of usable width; otherwise 1¼ yards)
- Low-loft cotton or cotton-blend batting: two 21″ × 21″ pieces (⅝ yard of 45″-wide or wider batting)
Notions and Tools
- Neutral cotton piecing thread
- Cream and red thread for quilting and topstitching
- Sewing machine with a ¼” piecing foot and a walking foot
- Size 90/14 machine needle for quilting and bag assembly
- Rotary cutter, self-healing cutting mat, and a 6″ × 24″ quilting ruler
- Small square ruler (6½” or 8½”) for checking blocks
- Curved safety pins or basting spray
- Fabric clips
- Iron and pressing surface
- Point turner and fabric marking pen
Finished Tote Bag Size
- Width at the top: 14″, measured flat across the opening from side seam to side seam
- Height: 13″, measured along a side seam from the top edge to the base
- Depth: 4″, measured across the base from front to back
- Base: 10″ × 4″
- Handles: 1″ wide, 23″ visible length
- Handle drop: about 8″ (calculated at 8½”; the curve of the handle in use makes it slightly shorter)
- Interior slip pocket: 8″ wide × 6″ tall
Cutting Measurements
All strips are cut across the width of fabric, with 40″ of usable length assumed after removing selvages.
| Piece | Quantity | Cut Size (W × H) | Purpose |
|---|---|---|---|
| Red handle strips | 2 | 4″ × 24″ | Handles |
| Red center squares | 8 | 3″ × 3″ | Block centers (cut from handle strip leftovers) |
| Log L1, blush | 8 | 1¼” × 3″ | Round 1, top |
| Log L2, butter yellow | 8 | 1¼” × 3¾” | Round 1, left |
| Log L3, orange | 8 | 1¼” × 3¾” | Round 1, bottom |
| Log L4, golden yellow | 8 | 1¼” × 4½” | Round 1, right |
| Log L5, mint | 8 | 1¼” × 4½” | Round 2, top |
| Log L6, sky blue | 8 | 1¼” × 5¼” | Round 2, left |
| Log L7, emerald | 8 | 1¼” × 5¼” | Round 2, bottom |
| Log L8, cobalt | 8 | 1¼” × 6″ | Round 2, right |
| Log L9, lilac | 8 | 1¼” × 6″ | Round 3, top |
| Log L10, blush | 8 | 1¼” × 6¾” | Round 3, left |
| Log L11, violet | 8 | 1¼” × 6¾” | Round 3, bottom |
| Log L12, orange | 8 | 1¼” × 7½” | Round 3, right |
| Cream side borders | 4 | 2½” × 14½” | Panel borders |
| Cream top and bottom borders | 4 | 2½” × 18½” | Panel borders |
| Muslin foundation | 2 | 21″ × 21″ | Quilt backing (oversized; trimmed with the panel) |
| Batting | 2 | 21″ × 21″ | Quilt middle layer (oversized; trimmed with the panel) |
| Cream lining panels | 2 | 15″ × 16″ | Lining |
| Cream slip pocket | 1 | 9″ × 13″ | Interior pocket |
The pieced tops measure 18½” × 18½” and are trimmed to 15″ × 16″ after quilting.
Strips to cut for the logs (1¼” × width of fabric): blush 2, butter yellow 1, orange 3, golden yellow 1, mint 1, sky blue 2, emerald 2, cobalt 2, lilac 2, violet 2.
Assembly at a Glance
- Cut and Sort the Fabrics
- Sew the Eight Log Cabin Blocks
- Arrange the Front Panel Layout
- Sew the Front Patchwork Panel
- Sew the Back Patchwork Panel
- Press and Measure Both Patchwork Tops
- Layer and Baste the Quilt Sandwiches
- Quilt Both Panels
- Trim the Quilted Panels and Cut the Corner Squares
- Make the Two Handles
- Make the Interior Pocket
- Prepare the Lining Panels
- Sew the Outer Bag Side and Bottom Seams
- Box the Outer Corners and Turn the Outer Bag Right Side Out
- Sew and Box the Lining, Leaving a Turning Gap
- Baste the Handles to the Outer Bag
- Sew the Outer Bag and Lining Together at the Top Edge
- Turn Through the Gap, Close It, Press, and Topstitch
Step-by-Step Sewing Tutorial
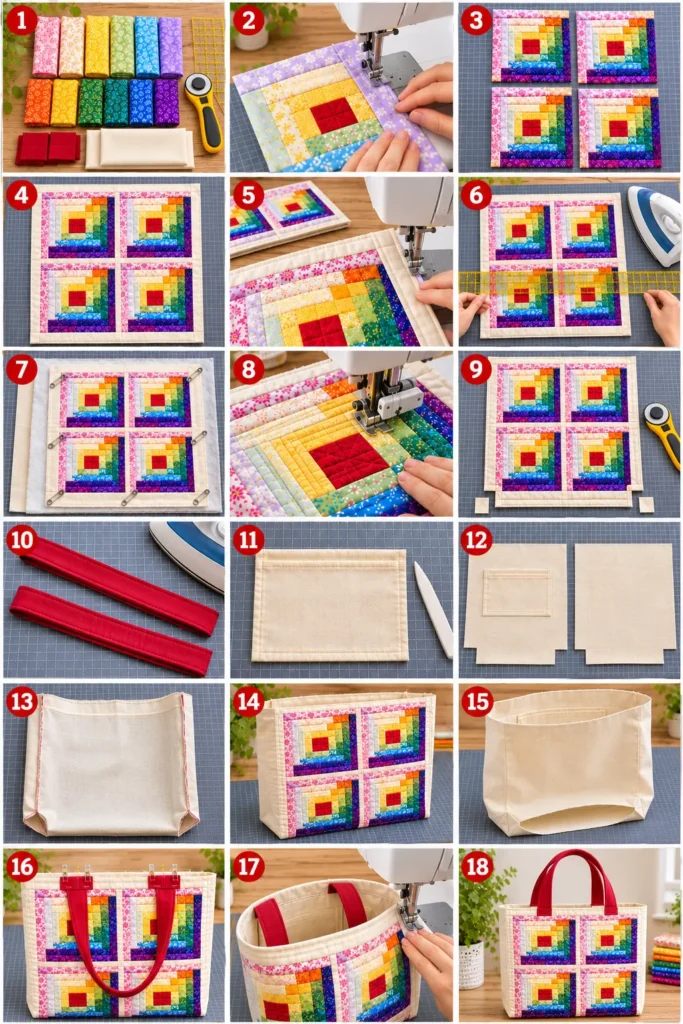
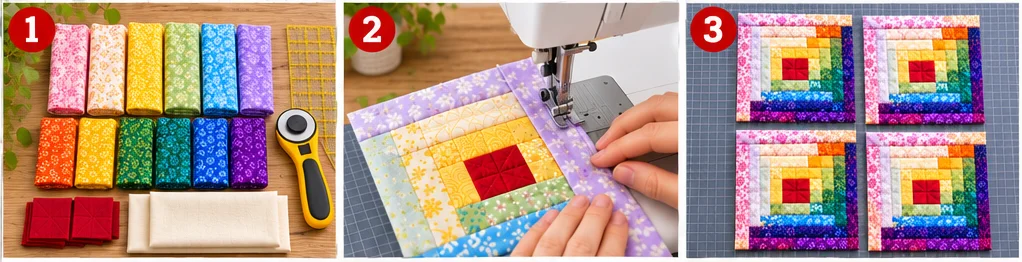
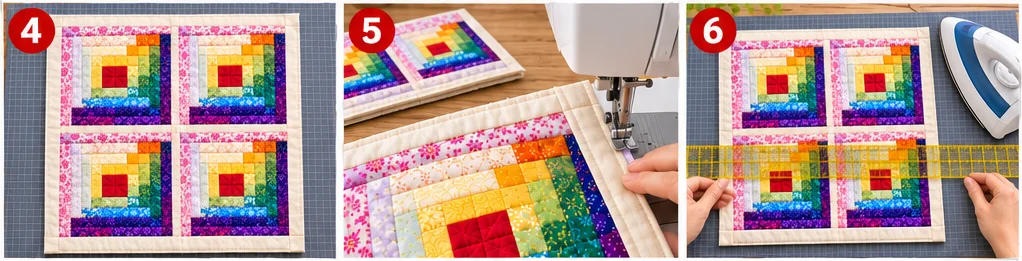
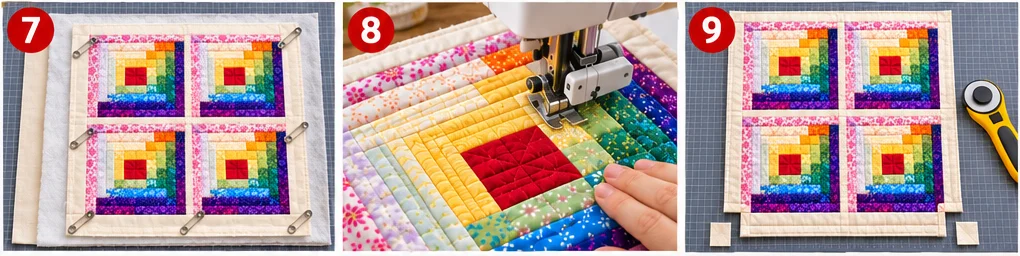
Step-by-Step Illustration – Digitally Created Image. Follow the written steps for measurements and details.
Step 1 – Cut and Sort the Fabrics
From the red fabric, cut two 4″ × width-of-fabric strips. Cut one 4″ × 24″ handle strip from each. Trim each leftover piece to 3″ wide and cut it into 3″ squares until you have eight red center squares. From each log color, cut the number of 1¼”-wide strips listed above, then subcut the logs to the lengths in the cutting table. Cut the cream border strips, lining panels, and pocket, plus the muslin and batting squares.
Sort the logs into twelve labeled piles, L1 through L12, in the order you will sew them.
Result: every piece is cut, and the logs sit in twelve labeled piles of eight.
Step 2 – Sew the Eight Log Cabin Blocks
Sew all seams with an accurate ¼” seam allowance, right sides together. Build each block in a counterclockwise spiral:
- Sew L1 (blush) to the top edge of a red center square.
- Sew L2 (butter yellow) to the left edge.
- Sew L3 (orange) to the bottom edge.
- Sew L4 (golden yellow) to the right edge. The unit should measure 4½” square.
- Repeat the same order with L5 to L8 (mint top, sky blue left, emerald bottom, cobalt right). The unit should measure 6″ square.
- Finish with L9 to L12 (lilac top, blush left, violet bottom, orange right). The block should measure 7½” square.
After each log, press the seam away from the center, toward the newest log. Chain-piecing all eight blocks one log at a time keeps the sequence consistent.
Result: eight 7½” square blocks, each with a pastel upper-left half and a saturated lower-right half.
Step 3 – Arrange the Front Panel Layout
On your cutting mat, lay out four blocks right side up in two rows of two. Turn every block so the pastel half sits at the upper left and the red center reads in the same position in each block. Lay the remaining four blocks in the same arrangement nearby for the back panel. Check both layouts from a few steps away before sewing.
Result: two unsewn layouts of four blocks, all facing the same direction.
Step 4 – Sew the Front Patchwork Panel
Sew the two blocks in the top row right sides together along their shared edge with a ¼” seam, then sew the bottom row the same way. Press the row seams in opposite directions so they nest. Pin the rows right sides together, matching the center seams, and sew the long seam. The four-block unit should measure 14½” square.
Sew a 2½” × 14½” cream side border to the left and right edges, right sides together, and press toward the border. The panel now measures 18½” × 14½”. Sew a 2½” × 18½” cream border to the top and bottom edges and press toward the border.
Result: the front patchwork top, 18½” × 18½”, with four blocks framed by cream.
Step 5 – Sew the Back Patchwork Panel
Repeat Step 4 with the second layout to make the back patchwork top. Keep the blocks in the same orientation as the front, so both sides of the bag match.
Result: two identical patchwork tops, each 18½” × 18½”.
Step 6 – Press and Measure Both Patchwork Tops
Press both tops from the wrong side first, then from the right side, lifting and lowering the iron instead of sliding it so the narrow logs do not stretch. Measure each top across the middle and at both edges in both directions. Each should measure 18½” square. A top that is slightly smaller is fine, because Step 9 measures the trim from the blocks.
Result: two flat, measured patchwork tops.
Step 7 – Layer and Baste the Quilt Sandwiches
Place a 21″ muslin square on the table, then a 21″ batting square on top, smoothing out any wrinkles. Center a patchwork top on the batting, right side up, so about 1¼” of batting and muslin show on every side. Baste the three layers with curved safety pins every 3″ to 4″, or with basting spray, working from the center outward. Repeat for the second top.
Result: two basted quilt sandwiches, patchwork side up.
Step 8 – Quilt Both Panels
Attach a walking foot and set a stitch length of about 3.0 mm. First, stitch in the ditch along the seams that join the blocks and along the cream border seams. Then quilt each block in concentric squares: stitch in the ditch around the red center, around the outer edge of round 1, and around the outer edge of round 2. Pivot at each corner with the needle down. These lines fall ¾” apart and follow the spiral’s structure without hiding it. Repeat on the second panel.
Result: two quilted panels with concentric square quilting in every block.
Step 9 – Trim the Quilted Panels and Cut the Corner Squares
Lay a quilted panel right side up. Using your long ruler, trim the left and right edges so ½” of cream remains beyond the blocks on each side. Trim the top edge so ½” of cream remains above the top row of blocks, and trim the bottom edge so 1½” remains below the bottom row. The panel should now measure 15″ wide × 16″ tall.
Cut a 2″ × 2″ square from both bottom corners, measuring from the raw edges. Mark the top edge with a pin so you do not turn the panel upside down later. Repeat for the second panel.
Result: two outer panels, each 15″ × 16″, with 2″ notches at the bottom corners.
Step 10 – Make the Two Handles
Fold a 4″ × 24″ red handle strip in half lengthwise, wrong sides together, and press. Open it, fold both long raw edges to the center crease, and press again. Refold along the original crease to enclose the raw edges. The handle now measures 1″ × 24″. Edgestitch ⅛” from both long edges. Repeat for the second handle.
Result: two finished red handles, each 1″ wide and 24″ long.
Step 11 – Make the Interior Pocket
Fold the 9″ × 13″ cream pocket piece in half, right sides together, so it measures 9″ wide × 6½” tall, with the fold at the top. Sew the sides and bottom with a ½” seam, leaving a 3″ gap in the middle of the bottom edge. Clip the corners, turn right side out, push out the corners with a point turner, and press, folding the gap allowances inside. Topstitch ⅛” along the folded top edge.
Result: a finished pocket measuring 8″ wide × 6″ tall.
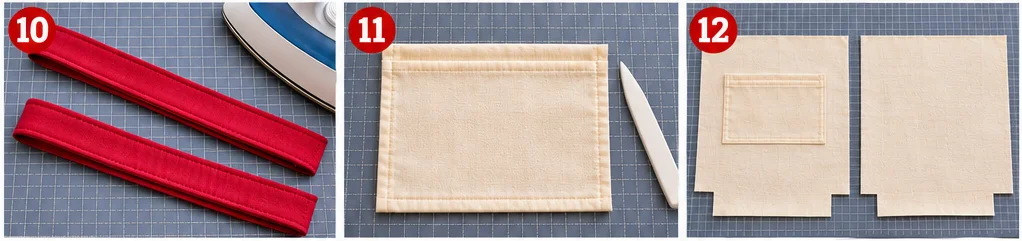
Step 12 – Prepare the Lining Panels
Cut a 2″ × 2″ square from both bottom corners of each 15″ × 16″ cream lining panel. Place one lining panel right side up. Position the pocket right side up, centered side to side (3½” from each side edge), with its top edge 3″ below the top raw edge of the lining. Edgestitch the sides and bottom ⅛” from the edge, closing the turning gap as you go. Backstitch or bar-tack at both top corners of the pocket.
Result: two notched lining panels, one with the slip pocket attached.
Step 13 – Sew the Outer Bag Side and Bottom Seams
Place the two quilted outer panels right sides together, top edges aligned, and clip the edges. Check that the block row seams line up at the sides. Sew the two side seams and the bottom seam with a ½” seam allowance, leaving the corner notches open; you will sew them closed when you box the corners in Step 14. Backstitch at the start and end of each seam. Trim the batting out of the seam allowances close to the stitching, then press the seams open.
Result: the outer bag shell, wrong side out, with the side and bottom seams sewn and the corner notches still open.
Step 14 – Box the Outer Corners and Turn the Outer Bag Right Side Out
At one bottom corner, pull the front and back apart so the side seam lies directly on top of the bottom seam. The notch’s raw edges now form one straight line. Clip it and sew across with a ½” seam, backstitching at both ends. This seam closes the notch and forms the boxed corner. Repeat at the other corner. Turn the outer bag right side out and push the corners into shape.
Result: the outer bag, right side out, 14″ wide with a 4″-deep boxed bottom and a raw top edge.
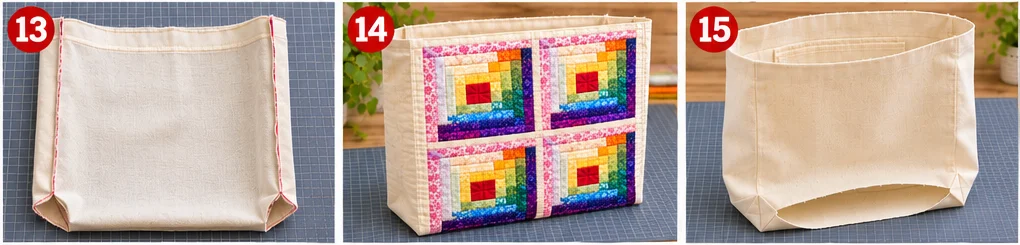
Step 15 – Sew and Box the Lining, Leaving a Turning Gap
Place the lining panels right sides together, with the pocket inside. Sew the side seams with a ½” seam. Sew the bottom seam with a ½” seam, but leave a 5″ gap centered in it, backstitching on both sides of the gap. You will turn the bag through this gap and sew it closed in Step 18. Box both corners the same way as Step 14, sewing across each notch to close it. Leave the lining wrong side out.
Result: the boxed lining, wrong side out, with a 5″ gap in the bottom seam.
Step 16 – Baste the Handles to the Outer Bag
With the outer bag right side out, lay one handle against the front panel. Place each end so its center is 4″ from the nearest side seam, with the raw ends aligned with the top raw edge and the loop hanging down toward the bottom of the bag. Check that the handle is not twisted. Clip, then baste ¼” from the top edge. Repeat on the back with the second handle, matching the front positions exactly.
Result: the outer bag with both handles basted to the right side, loops hanging down.
Step 17 – Sew the Outer Bag and Lining Together at the Top Edge
Slip the outer bag, still right side out, inside the lining, which is still wrong side out. The right sides now face each other, and the handles are sandwiched between the layers. Align the side seams and the top raw edges, and clip all the way around. Sew around the top edge with a ½” seam, going slowly over the handle ends.
Result: the outer bag and lining joined along a continuous 28″ top seam, with the handles hidden inside.
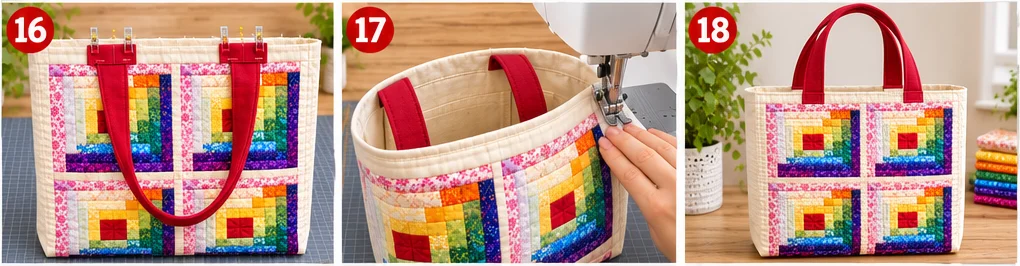
Step 18 – Turn Through the Gap, Close It, Press, and Topstitch
Reach through the gap in the lining and pull the outer bag through until the whole bag is right side out. The lining now hangs outside the bag, so the gap is easy to reach. Close the gap: fold both raw edges inward ½”, in line with the rest of the bottom seam, press, and edgestitch ⅛” from the folded edges, or close it by hand with a ladder stitch. Push the lining down inside the bag and press the top edge so the seam sits exactly at the edge. Pull the handles upright. Topstitch around the opening ⅛” from the top edge, then again ⅜” from the top edge. The second line catches the handle ends and secures them.
Result: a finished tote measuring 14″ wide, 13″ tall, and 4″ deep, with the lining gap closed, red handles, a cream lining, and an interior pocket.
Keeping the Log Cabin Blocks Square and the Halves Aligned
- Blocks finish too small: narrow logs magnify seam errors, because each block has twelve seams. Check the unit at 4½”, 6″, and 7½” after each round, and adjust your seam guide as soon as a round measures off.
- Blocks look wavy or stretched: press each log as you add it, lifting the iron instead of sliding it, and trim any wobbly log flush with the unit before adding the next one.
- The diagonal split looks muddy: usually the golden yellow is too light or a pastel is too strong. Swap the offending fabric before sewing all eight blocks.
- One block faces the wrong way: turn it before joining the rows. Once quilted, a rotated block is very hard to fix.
- Bulky boxed corners: trim the batting out of the seam allowances and press the side and bottom seams open before boxing, then finger-press the corner seam open as well.
- Twisted handles: before Step 17, lay the bag flat and check that each handle runs smoothly from one end to the other without a turn.
Design Inspiration and Tutorial Note: The images in this section may be AI-generated or digitally developed to illustrate the design and the sewing sequence. The instructions describe a proposed construction method with measurements calculated for the stated finished size. They are not a physically tested pattern. Measure your blocks and panels as you go, and check the panel size before trimming and cutting.
Other Design Inspirations – Digitally Modified Images. Texture and color may vary from the actual product.
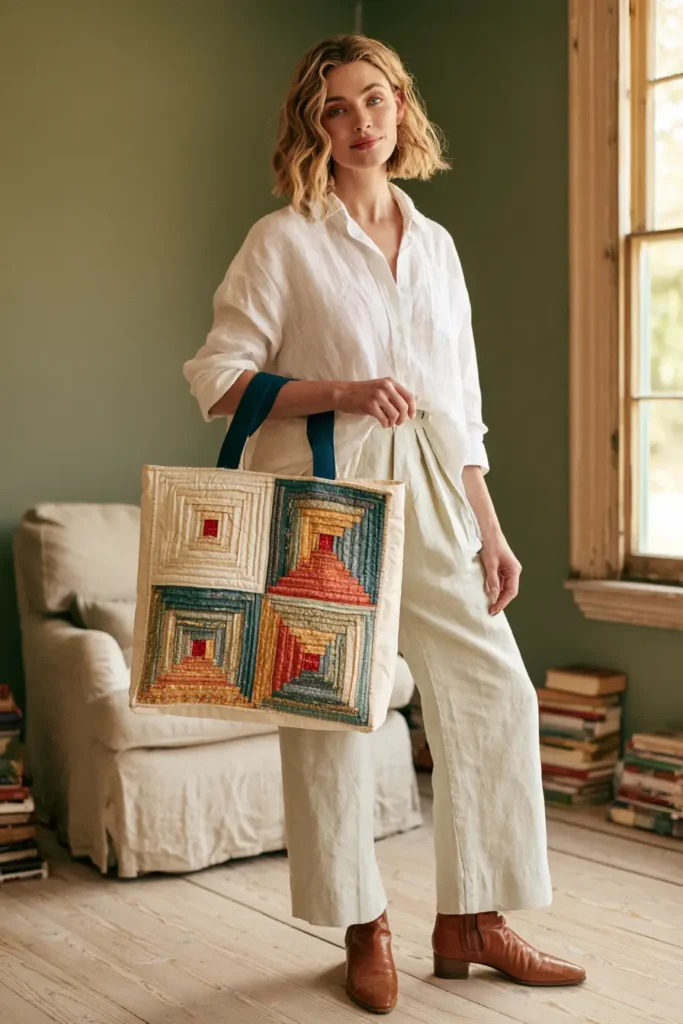
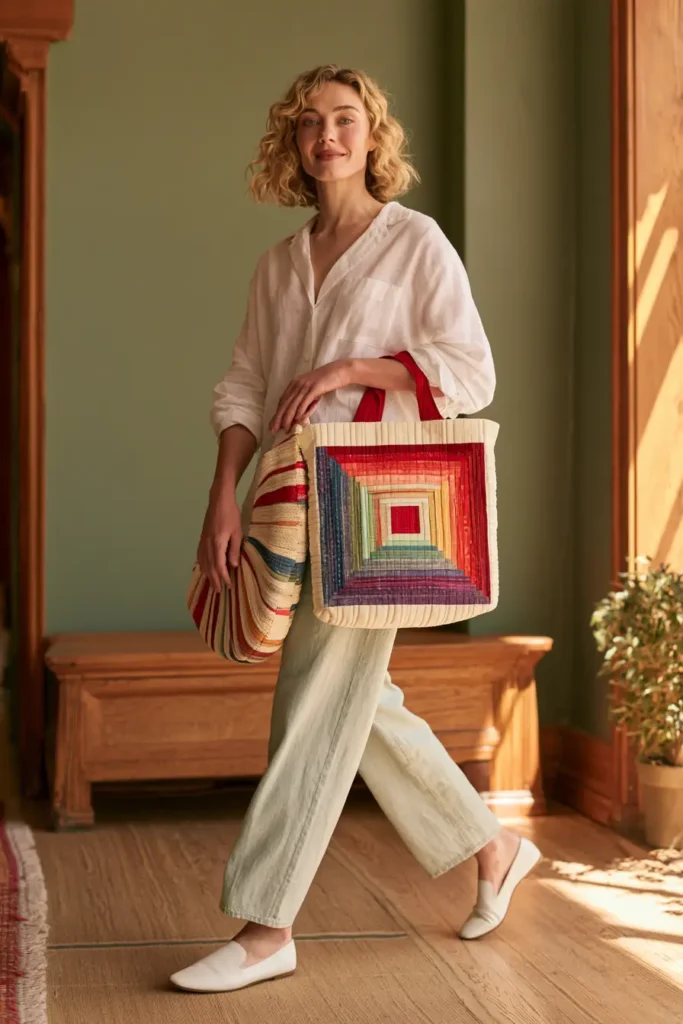
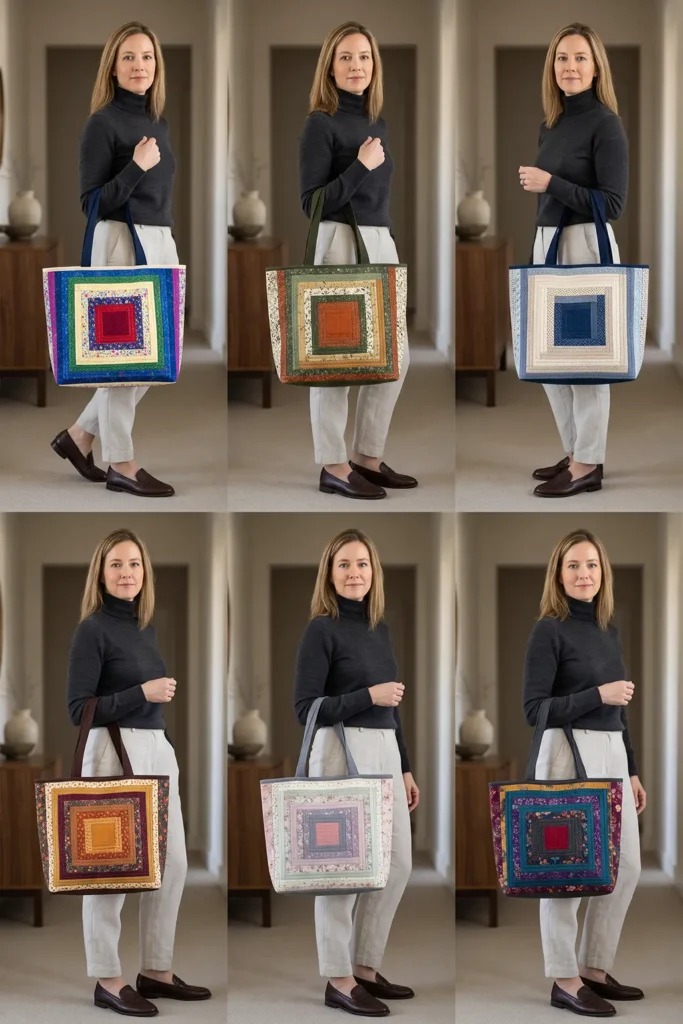
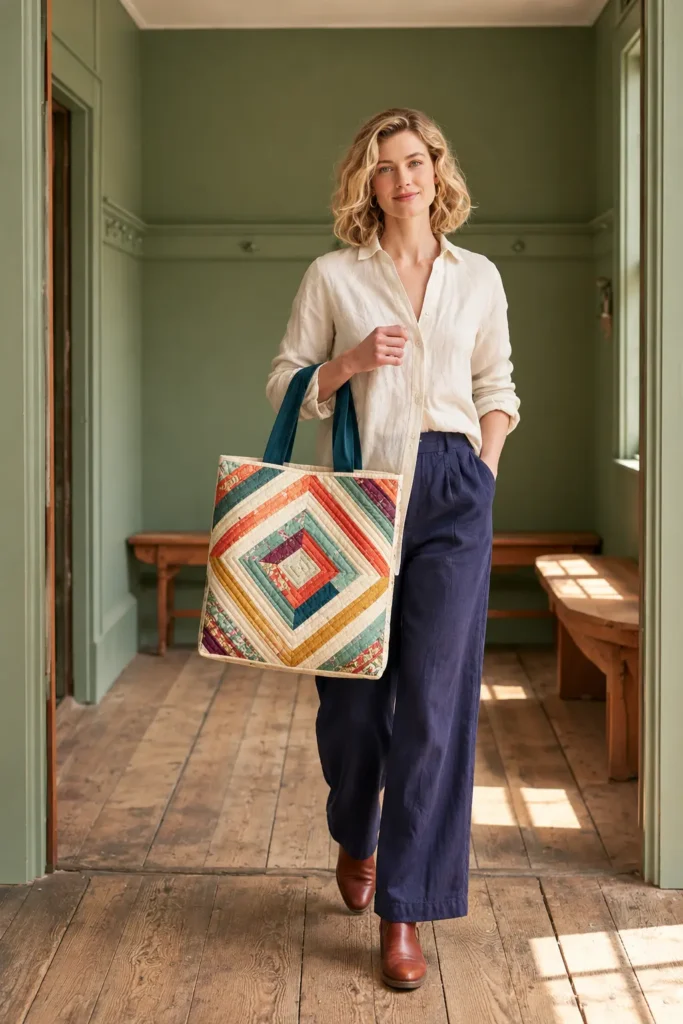
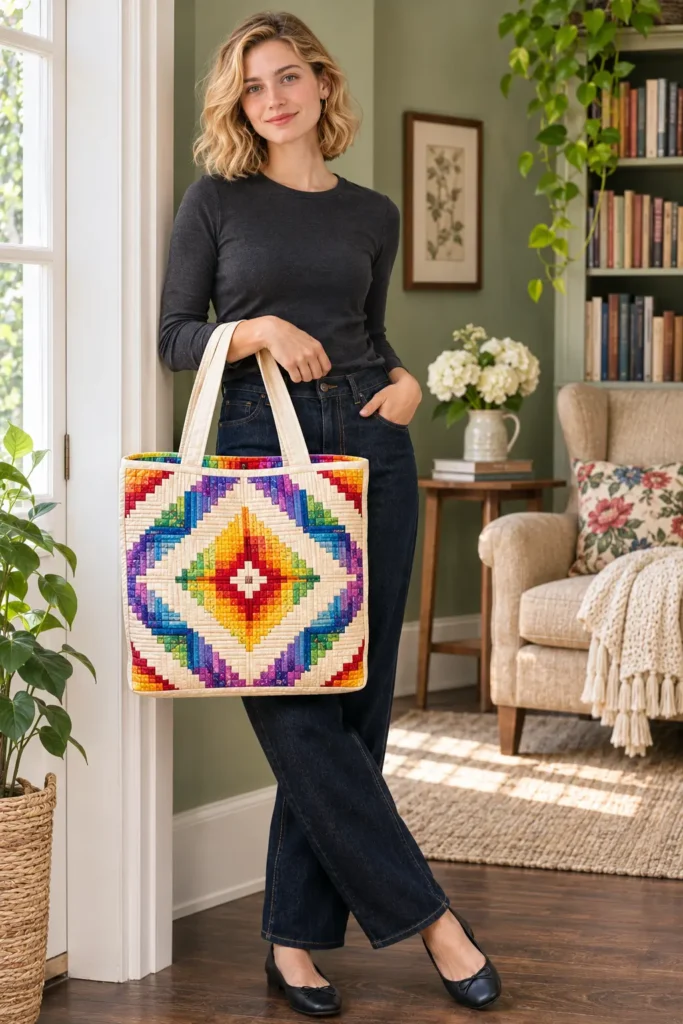
2. Barn Raising Log Cabin Quilt Tote Bag in Rainbow and Cream Diamonds
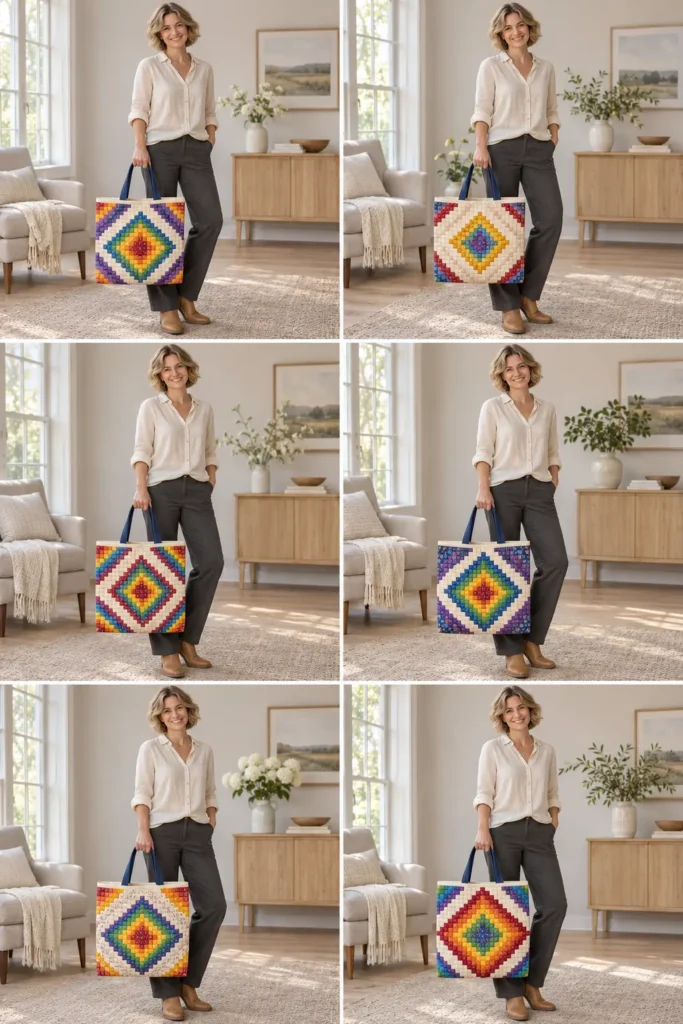
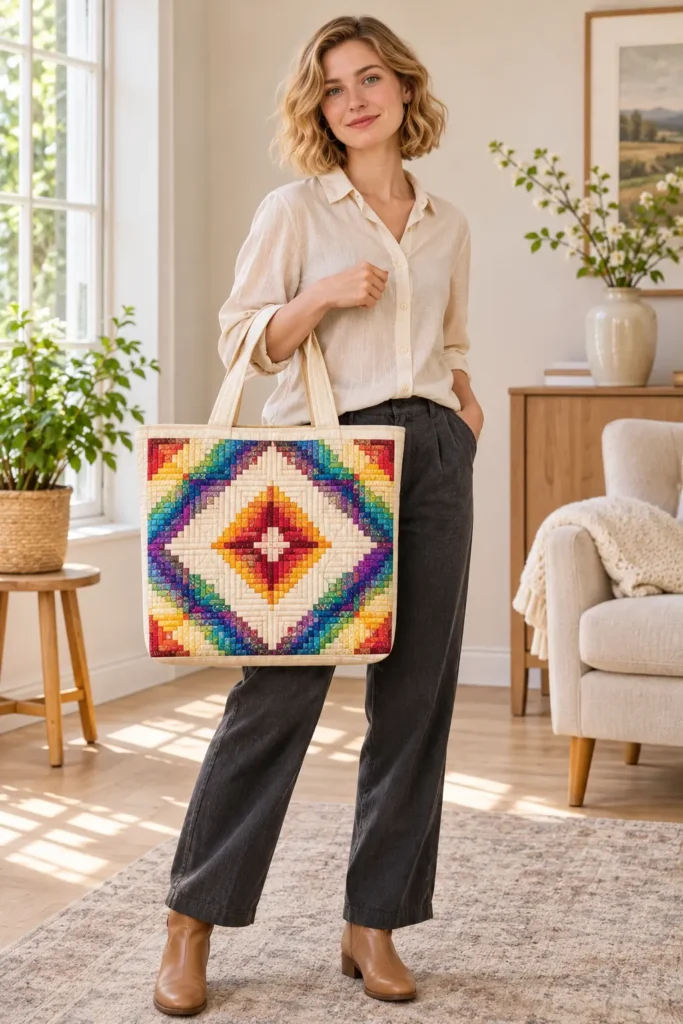
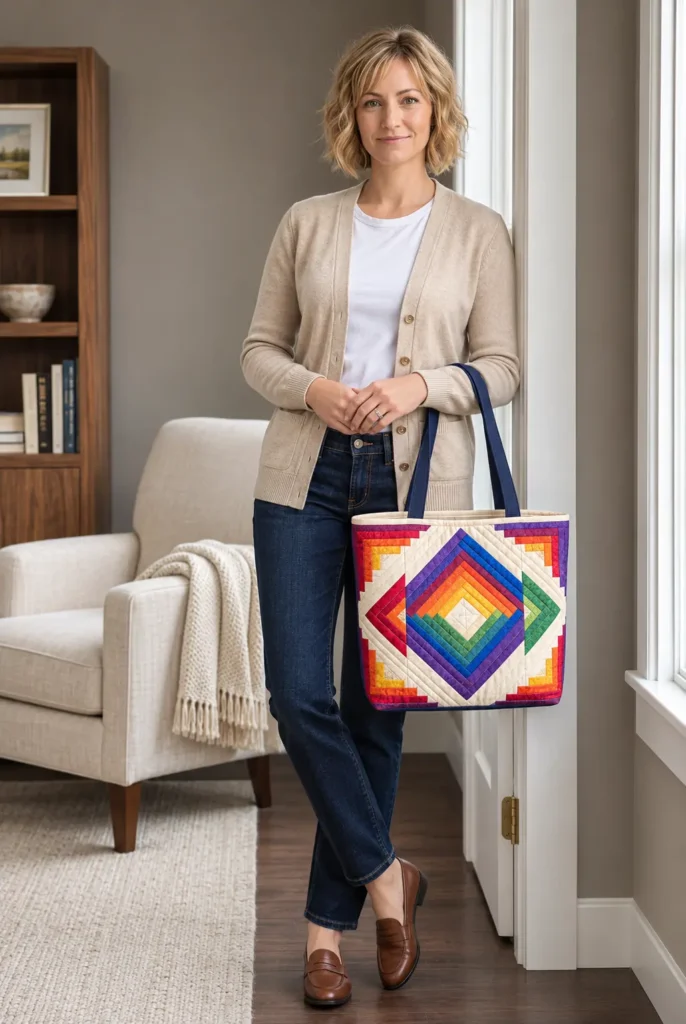
This Barn Raising Log Cabin quilt tote turns sixteen small blocks into one large graphic pattern. Each block is a classic Log Cabin, with narrow strips spiraling around a tiny red center, and each is split diagonally into a cream half and a scrappy rainbow half of red, orange, sunny yellow, green, blue, and violet. On their own, the blocks look simple. Turned in a precise sequence across a four-by-four grid, their halves line up into concentric diamonds: a rainbow diamond in the middle, a cream ring around it, a rainbow band reaching into the corners, and small cream triangles at the very edges. The effect looks like light radiating from the center of the bag.
The tote is a generous everyday size, 16″ wide, 16″ tall, and 4″ deep, sized so the whole grid fits the front exactly and every diamond point lands on an edge instead of disappearing into a seam. A cream base and lining keep the rainbow on the outside, two cobalt blue handles add a strong accent, and an interior slip pocket holds keys or a phone. Diagonal quilting lines trace the diamond rings, so the stitching reinforces the pattern while giving the panels enough body for books, groceries, or a weekend project bag.
Design Inspirations – Digitally Modified Images. Texture and color may vary from the actual product.
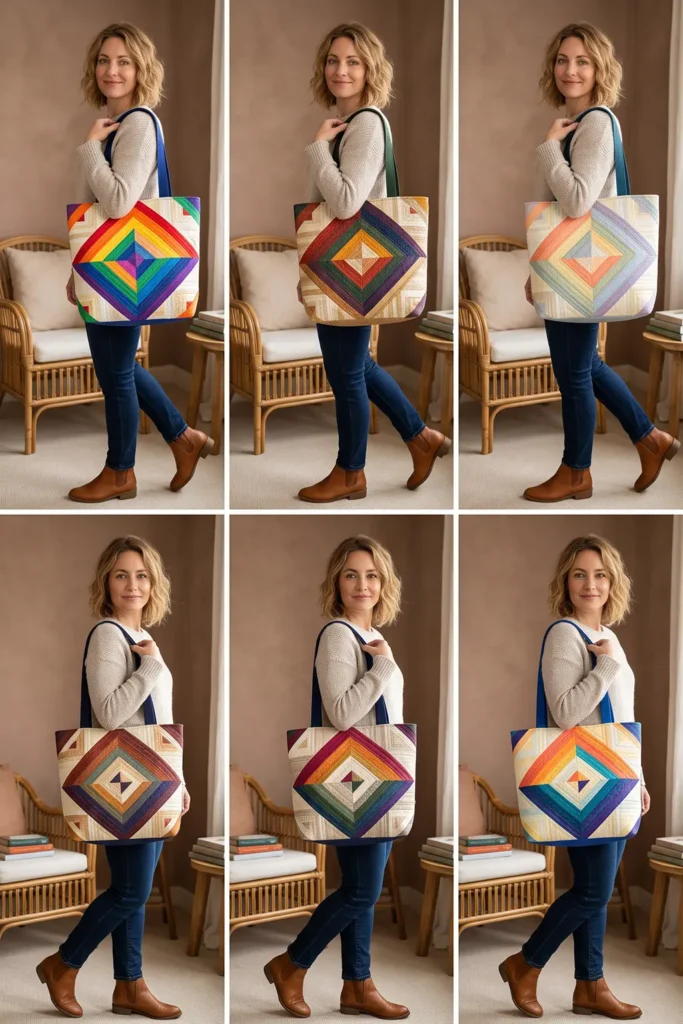
How Block Rotation Creates the Barn Raising Diamonds
Barn Raising is a setting, not a different block. Every one of the 32 blocks in this tote is identical: the top and left logs are cream, the bottom and right logs are rainbow, so the block divides along the diagonal from its upper-right corner to its lower-left corner. The diamonds appear only when the blocks are turned. The four blocks at the center of the panel point their rainbow halves inward, which forms the rainbow diamond. The eight blocks around them point their rainbow halves outward, so their cream halves meet the center blocks’ cream halves and form a cream ring. The four corner blocks point inward again, adding a rainbow band and leaving cream triangles at the outer corners.
Because the whole effect depends on rotation, the layout step matters more than any single seam. One block turned the wrong way breaks a ring. That is why the tutorial gives a block-by-block orientation chart and asks you to lay out and photograph the full grid before sewing any rows.
The grid size matters too. A four-by-four grid is the smallest arrangement that shows more than one ring, and it needs the full grid visible to read clearly. The bag is sized to that grid rather than the other way around.
Choosing Rainbow and Cream Fabrics That Keep the Rings Clear
The rings read from value contrast, so the cream needs to stay clearly lighter than every rainbow fabric. Choose a warm cream solid or a cream tone-on-tone, and use the same cream throughout so the cream ring looks continuous. For the rainbow half, pick saturated mid-to-dark versions of each color. A pale lemon or baby blue would sit too close to the cream and blur the edge of a diamond, so lean toward sunny gold-yellow and medium blue.
Mixing the six rainbow colors scrappily within each block gives the diamonds a confetti-like rainbow texture. Small-scale prints, tone-on-tones, and solids all work at this scale, because each log finishes only ¾” wide. Large prints lose their motifs entirely.
The tiny red centers are a traditional touch, a small spark at the heart of each block. Cobalt handles pick up the blue in the rainbow without competing with the pattern. Prewash all fabrics or none, and test saturated reds and violets for bleeding, since they sit right beside cream.
Materials and Tools Needed
Fabric
- Red solid or tone-on-tone: ⅛ yard (centers)
- Rainbow quilting cottons: ¼ yard each of red, orange, sunny yellow, green, blue, and violet
- Cream solid or tone-on-tone quilting cotton: 1⅝ yards (logs, borders, lining, and pocket)
- Cobalt blue quilting cotton: ⅓ yard (handles)
- Muslin for the quilt foundation: 1½ yards
- Low-loft cotton or cotton-blend batting: ¾ yard of 90″-wide, or 1½ yards of 45″-wide
Notions and Tools
- Neutral cotton piecing thread
- Cream and cobalt thread for quilting and topstitching
- Sewing machine with a ¼” piecing foot and a walking foot
- Size 90/14 machine needle for quilting and bag assembly
- Rotary cutter, self-healing cutting mat, and a 6″ × 24″ quilting ruler
- Small square ruler (4½” or 6½”) for checking blocks
- Fabric marking pen
- Curved safety pins or basting spray
- Fabric clips
- Iron and pressing surface
- Point turner
Finished Tote Bag Size
- Width at the top: 16″, measured flat across the opening from side seam to side seam
- Height: 16″, measured along a side seam from the top edge to the base
- Depth: 4″, measured across the base from front to back
- Base: 12″ × 4″
- Handles: 1″ wide, 23″ visible length
- Handle drop: about 8″ (calculated at 8½”; the curve of the handle in use makes it slightly shorter)
- Interior slip pocket: 8″ wide × 6″ tall
Cutting Measurements
All strips are cut across the width of fabric, with 40″ of usable length assumed after removing selvages.
| Piece | Quantity | Cut Size (W × H) | Purpose |
|---|---|---|---|
| Red center squares | 32 | 1½” × 1½” | Block centers |
| Log L1, cream | 32 | 1¼” × 1½” | Round 1, top |
| Log L2, cream | 32 | 1¼” × 2¼” | Round 1, left |
| Log L3, rainbow | 36 (6 per color) | 1¼” × 2¼” | Round 1, bottom |
| Log L4, rainbow | 36 (6 per color) | 1¼” × 3″ | Round 1, right |
| Log L5, cream | 32 | 1¼” × 3″ | Round 2, top |
| Log L6, cream | 32 | 1¼” × 3¾” | Round 2, left |
| Log L7, rainbow | 36 (6 per color) | 1¼” × 3¾” | Round 2, bottom |
| Log L8, rainbow | 36 (6 per color) | 1¼” × 4½” | Round 2, right |
| Cream side borders | 4 | 2½” × 16½” | Panel borders |
| Cream top borders | 2 | 2½” × 20½” | Panel borders |
| Cream bottom borders | 2 | 3½” × 20½” | Panel borders and base |
| Muslin foundation | 2 | 23″ × 24″ | Quilt backing (oversized; trimmed with the panel) |
| Batting | 2 | 23″ × 24″ | Quilt middle layer (oversized; trimmed with the panel) |
| Cream lining panels | 2 | 17″ × 19″ | Lining |
| Cream slip pocket | 1 | 9″ × 13″ | Interior pocket |
| Cobalt handle strips | 2 | 4″ × 24″ | Handles |
The rainbow logs include four spares of each length. The pieced tops measure 20½” × 21½” and are trimmed to 17″ × 19″ after quilting.
Strips to cut: red, two 1½” strips; cream, nine 1¼” strips for logs, three 2½” strips and two 3½” strips for borders, one 19″ strip for lining, and one 9″ strip for the pocket; each rainbow color, three 1¼” strips; cobalt, two 4″ strips.
Assembly at a Glance
- Cut and Sort the Fabrics
- Sew the Thirty-Two Log Cabin Blocks
- Arrange the Front Panel in the Barn Raising Layout
- Sew the Front Patchwork Panel
- Sew the Back Patchwork Panel
- Press and Measure Both Patchwork Tops
- Layer and Baste the Quilt Sandwiches
- Quilt Both Panels
- Trim the Quilted Panels and Cut the Corner Squares
- Make the Two Handles
- Make the Interior Pocket
- Prepare the Lining Panels
- Sew the Outer Bag Side and Bottom Seams
- Box the Outer Corners and Turn the Outer Bag Right Side Out
- Sew and Box the Lining, Leaving a Turning Gap
- Baste the Handles to the Outer Bag
- Sew the Outer Bag and Lining Together at the Top Edge
- Turn Through the Gap, Close It, Press, and Topstitch
Step-by-Step Sewing Tutorial
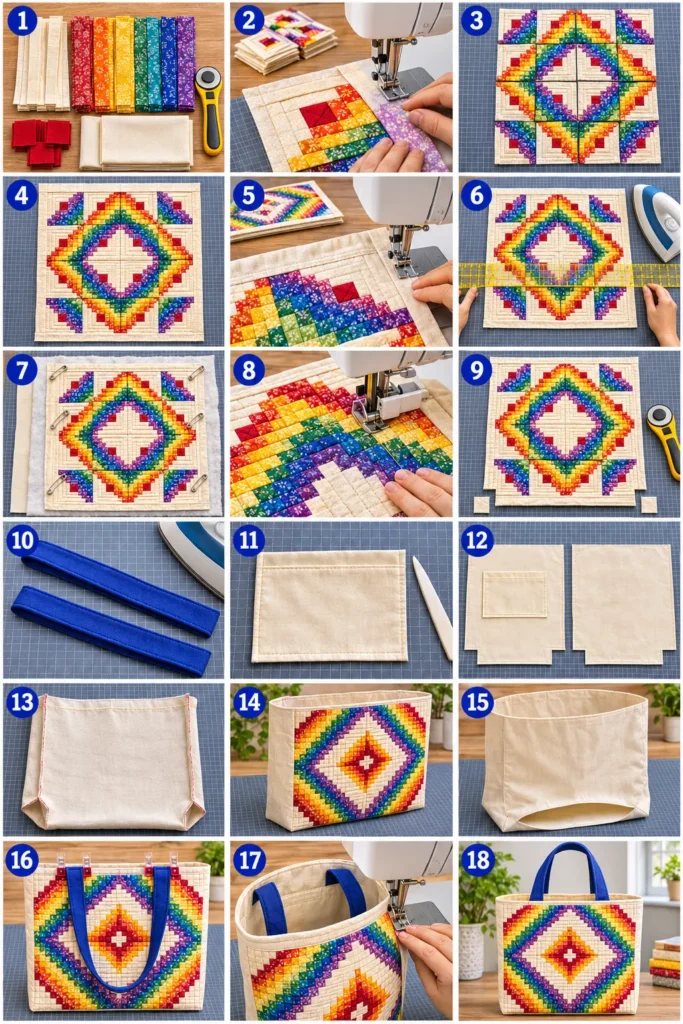
Step-by-Step Illustration – Digitally Created Image. Follow the written steps for measurements and details.
Step 1 – Cut and Sort the Fabrics
Cut all strips listed above, then subcut the logs, centers, borders, lining, pocket, handles, muslin, and batting to the sizes in the cutting table. Sort the logs into eight piles, L1 through L8. Keep the four rainbow piles mixed, with all six colors shuffled together, so you can pick colors at random as you sew.
Result: every piece is cut, with logs in eight labeled piles and the rainbow logs color-mixed.
Step 2 – Sew the Thirty-Two Log Cabin Blocks
Sew all seams with an accurate ¼” seam allowance, right sides together, and press each seam away from the center after every log. Build each block in a counterclockwise spiral:
- Sew a cream L1 to the top of a red center, then a cream L2 to the left side.
- Sew a rainbow L3 to the bottom, then a rainbow L4 to the right. The unit should measure 3″ square.
- Sew a cream L5 to the top and a cream L6 to the left.
- Sew a rainbow L7 to the bottom and a rainbow L8 to the right. The block should measure 4½” square.
Choose rainbow logs at random, but avoid putting the same color on L3 and L4, or on L7 and L8, in one block. Chain-piece all 32 blocks one log at a time to keep the sequence consistent.
Result: 32 identical 4½” blocks, each with a cream upper-left half and a rainbow lower-right half.
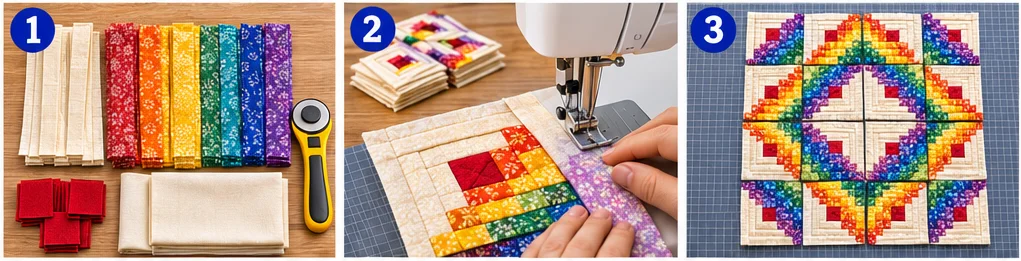
Step 3 – Arrange the Front Panel in the Barn Raising Layout
Lay 16 blocks right side up in four rows of four. Turn each block so its rainbow half points toward the corner shown below (UL = upper left, UR = upper right, LL = lower left, LR = lower right):
| Column 1 | Column 2 | Column 3 | Column 4 | |
|---|---|---|---|---|
| Row 1 | LR | UL | UR | LL |
| Row 2 | UL | LR | LL | UR |
| Row 3 | LL | UR | UL | LR |
| Row 4 | UR | LL | LR | UL |
Step back and check the rings: a rainbow diamond at the center, a cream ring around it, rainbow bands toward the corners, and cream triangles in the four corners. Photograph the layout with your phone, then lay out the remaining 16 blocks the same way for the back.
Result: two unsewn four-by-four Barn Raising layouts.
Step 4 – Sew the Front Patchwork Panel
Working one row at a time and keeping each block in its turned position, sew the four blocks of each row together with ¼” seams. Each row measures 16½” × 4½”. Press the seams in rows 1 and 3 to the left and in rows 2 and 4 to the right so they nest. Sew the rows together, matching block seams, to make a 16½” square grid. Check the layout against your photo after each row.
Sew a 2½” × 16½” cream side border to the left and right edges, then a 2½” × 20½” border to the top edge and a 3½” × 20½” border to the bottom edge, pressing each seam toward the border.
Result: the front patchwork top, 20½” wide × 21½” tall, with the wider cream border at the bottom.
Step 5 – Sew the Back Patchwork Panel
Repeat Step 4 with the second layout to make the back patchwork top. Use the same orientation chart so both sides of the bag match.
Result: two identical Barn Raising patchwork tops, each 20½” × 21½”.
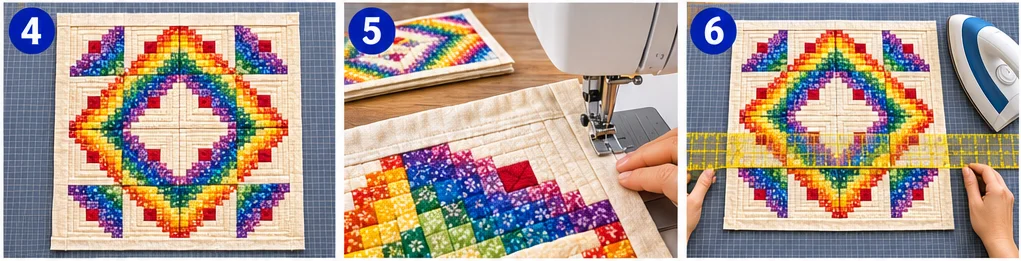
Step 6 – Press and Measure Both Patchwork Tops
Press both tops from the wrong side, then the right side, lifting the iron rather than sliding it so the narrow logs stay straight. Measure the block grid on each top. It should measure 16½” square raw, or 16″ between the border seams. Confirm the wider bottom border is at the bottom, beneath the row that starts with UR.
Result: two flat, measured tops with the grid at 16″ between border seams.
Step 7 – Layer and Baste the Quilt Sandwiches
Place a 23″ × 24″ muslin piece on the table, then a 23″ × 24″ batting piece on top, smoothing out wrinkles. Center a patchwork top on the batting, right side up, with about 1¼” of batting showing on every side. Baste every 3″ to 4″ with curved safety pins or basting spray, working from the center outward. Repeat for the second top.
Result: two basted quilt sandwiches, patchwork side up.
Step 8 – Quilt Both Panels
Attach a walking foot and set a stitch length of about 3.0 mm. Stitch in the ditch along all the horizontal and vertical seams between blocks and along the border seams. Then, with a marking pen and ruler, mark the diagonal line where each block’s cream and rainbow halves meet. These lines connect from block to block into continuous diamonds. Stitch along each diamond, pivoting at the points. Repeat on the second panel.
Result: two quilted panels with a block-grid outline and concentric diamond quilting lines.
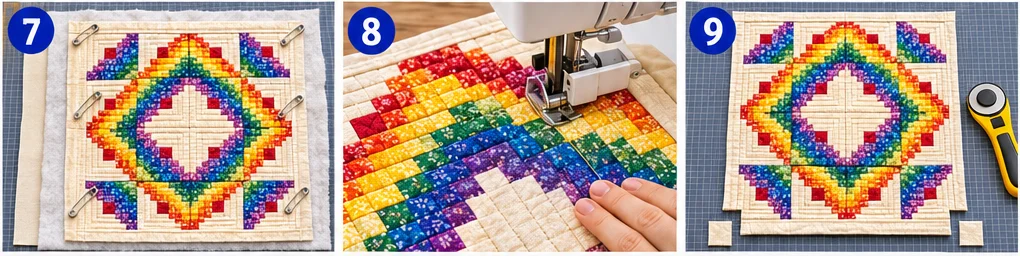
Step 9 – Trim the Quilted Panels and Cut the Corner Squares
Lay a quilted panel right side up. Trim the left, right, and top edges so ½” of cream remains beyond the block grid. Trim the bottom edge so 2½” of cream remains below the grid. The panel should measure 17″ wide × 19″ tall.
Cut a 2″ × 2″ square from both bottom corners, measuring from the raw edges. These notches fall entirely in the cream border. Repeat for the second panel.
Result: two outer panels, each 17″ × 19″, with 2″ notches at the bottom corners.
Step 10 – Make the Two Handles
Fold a 4″ × 24″ cobalt handle strip in half lengthwise, wrong sides together, and press. Open it, fold both long raw edges to the center crease, and press. Refold along the original crease. The handle now measures 1″ × 24″. Edgestitch ⅛” from both long edges. Repeat for the second handle.
Result: two finished cobalt handles, each 1″ wide and 24″ long.
Step 11 – Make the Interior Pocket
Fold the 9″ × 13″ cream pocket piece in half, right sides together, so it measures 9″ wide × 6½” tall, with the fold at the top. Sew the sides and bottom with a ½” seam, leaving a 3″ gap in the middle of the bottom edge. Clip the corners, turn right side out, push out the corners, and press with the gap allowances folded inside. Topstitch ⅛” along the folded top edge.
Result: a finished pocket, 8″ wide × 6″ tall.
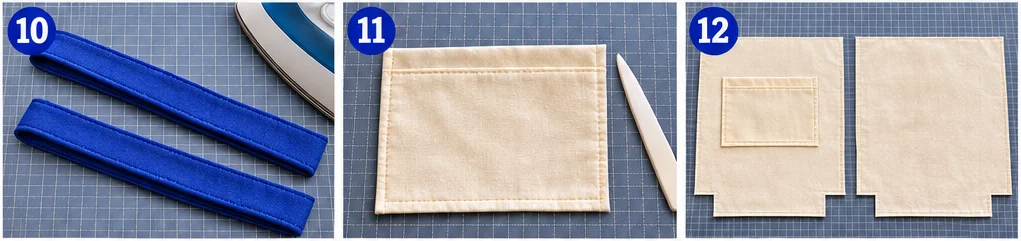
Step 12 – Prepare the Lining Panels
Cut a 2″ × 2″ square from both bottom corners of each 17″ × 19″ lining panel. On one panel, right side up, position the pocket right side up, centered side to side (4½” from each side edge), with its top edge 3″ below the top raw edge. Edgestitch the sides and bottom ⅛” from the edge, which also closes the pocket’s turning gap. Bar-tack both top corners.
Result: two notched lining panels, one with the slip pocket attached.
Step 13 – Sew the Outer Bag Side and Bottom Seams
Place the two quilted outer panels right sides together, top edges aligned, and clip. Match the horizontal block seams at the sides. Sew both side seams and the bottom seam with a ½” seam, leaving the corner notches open; you will sew them closed when you box the corners in Step 14. Backstitch at each end. Trim the batting out of the seam allowances and press the seams open.
Result: the outer bag shell, wrong side out, with open corner notches.
Step 14 – Box the Outer Corners and Turn the Outer Bag Right Side Out
At one bottom corner, pull the front and back apart so the side seam lies directly on top of the bottom seam. The notch’s raw edges now form one straight line. Clip and sew across with a ½” seam, backstitching at both ends. This seam closes the notch and forms the boxed corner. Repeat at the other corner. Turn the outer bag right side out and push the corners into shape.
Result: the outer bag, right side out, 16″ wide with a 4″-deep cream base and a raw top edge.
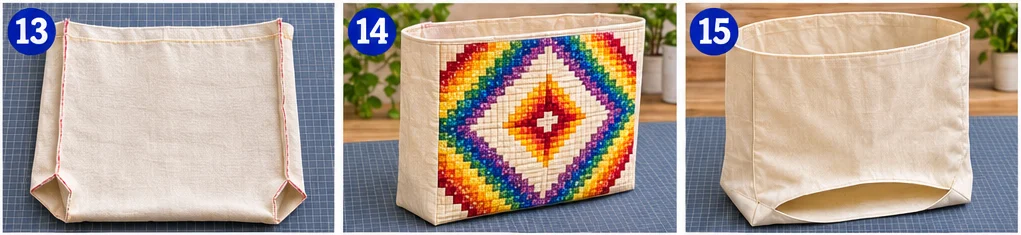
Step 15 – Sew and Box the Lining, Leaving a Turning Gap
Place the lining panels right sides together, pocket inside. Sew the side seams with a ½” seam. Sew the bottom seam with a ½” seam, leaving a 5″ gap centered in it and backstitching on both sides. You will turn the bag through this gap and sew it closed in Step 18. Box both corners the same way as Step 14, sewing across each notch to close it. Leave the lining wrong side out.
Result: the boxed lining, wrong side out, with a 5″ gap in the bottom seam.
Step 16 – Baste the Handles to the Outer Bag
With the outer bag right side out, lay one handle against the front. Place each end so its center is 5″ from the nearest side seam, raw ends aligned with the top raw edge and the loop hanging down over the front, untwisted. Clip and baste ¼” from the top edge. Repeat on the back, matching the front positions exactly.
Result: the outer bag with both handles basted to the right side, loops hanging down.
Step 17 – Sew the Outer Bag and Lining Together at the Top Edge
Slip the outer bag, still right side out, inside the lining, still wrong side out. Right sides now face each other, with the handles sandwiched between. Align the side seams and top raw edges, clip all the way around, and sew with a ½” seam, going slowly over the handle ends.
Result: the outer bag and lining joined along a continuous 32″ top seam, handles hidden inside.
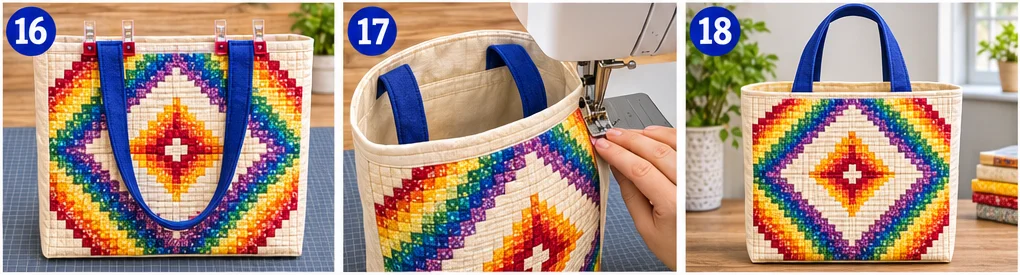
Step 18 – Turn Through the Gap, Close It, Press, and Topstitch
Pull the outer bag through the lining gap until the whole bag is right side out. The lining now hangs outside the bag, so the gap is easy to reach. Fold both raw edges of the gap inward ½”, in line with the rest of the seam, press, and edgestitch ⅛” from the folds, or close it by hand with a ladder stitch. Push the lining into the bag, press the top edge so the seam sits exactly at the edge, and pull the handles upright. Topstitch around the opening ⅛” from the top edge, then ⅜” from the top edge. The second line catches the handle ends and secures them.
Result: a finished tote, 16″ wide, 16″ tall, and 4″ deep, with the lining gap closed, cobalt handles, and the Barn Raising diamonds filling the front and back.
Keeping the Barn Raising Rings Crisp
- A ring has a break in it: a block is turned the wrong way. Check every row against the orientation chart and your layout photo before sewing the rows together. After quilting, the only fix is unpicking.
- The diamonds look blurry: a rainbow fabric is too light. Pale yellow and light blue are the usual culprits. Swap them for deeper shades before sewing all 32 blocks.
- Blocks finish at different sizes: with eight seams per block and 32 blocks, small seam errors add up. Check every block at 3″ after round 1 and 4½” at the end, and correct your seam guide immediately.
- Diamond points miss each other at the block seams: press row seams in alternating directions so they nest, and pin at every block intersection before sewing rows together.
- Diamond quilting lines wander: mark each diagonal with a ruler before stitching, and sew the long diagonals first, then the shorter ones near the corners.
- Bulky boxed corners: trim the batting out of the seam allowances and press the seams open before boxing.
Design Inspiration and Tutorial Note: The images in this section may be AI-generated or digitally developed to illustrate the design and the sewing sequence. The instructions describe a proposed construction method with measurements calculated for the stated finished size. They are not a physically tested pattern. Measure your blocks and panels as you go, and check the panel size before trimming and cutting.
Other Design Inspirations – Digitally Modified Images. Texture and color may vary from the actual product.
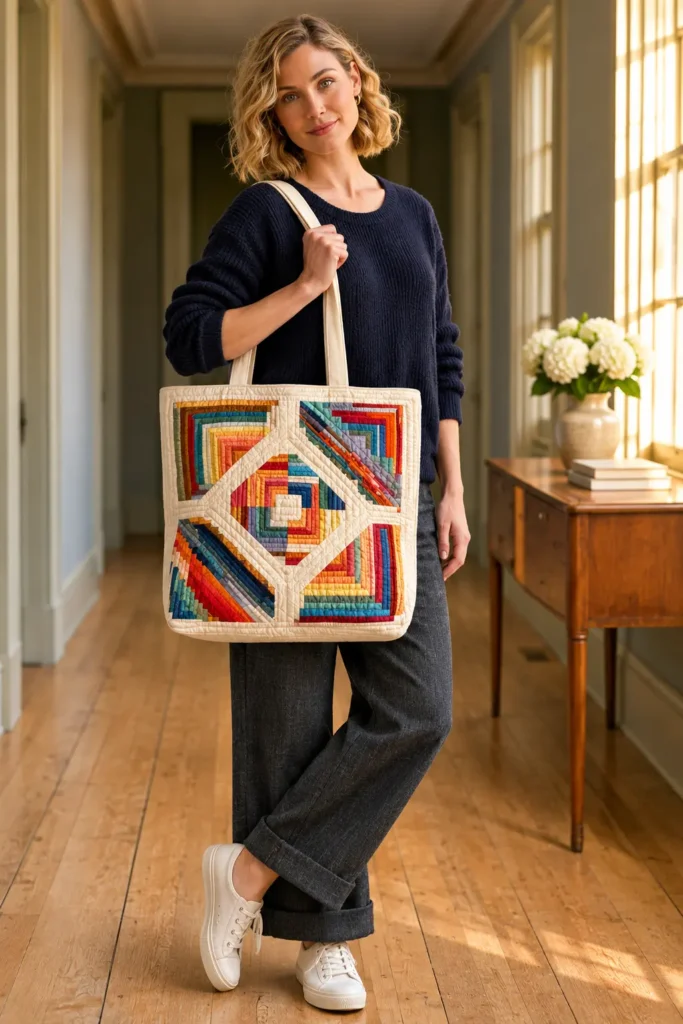
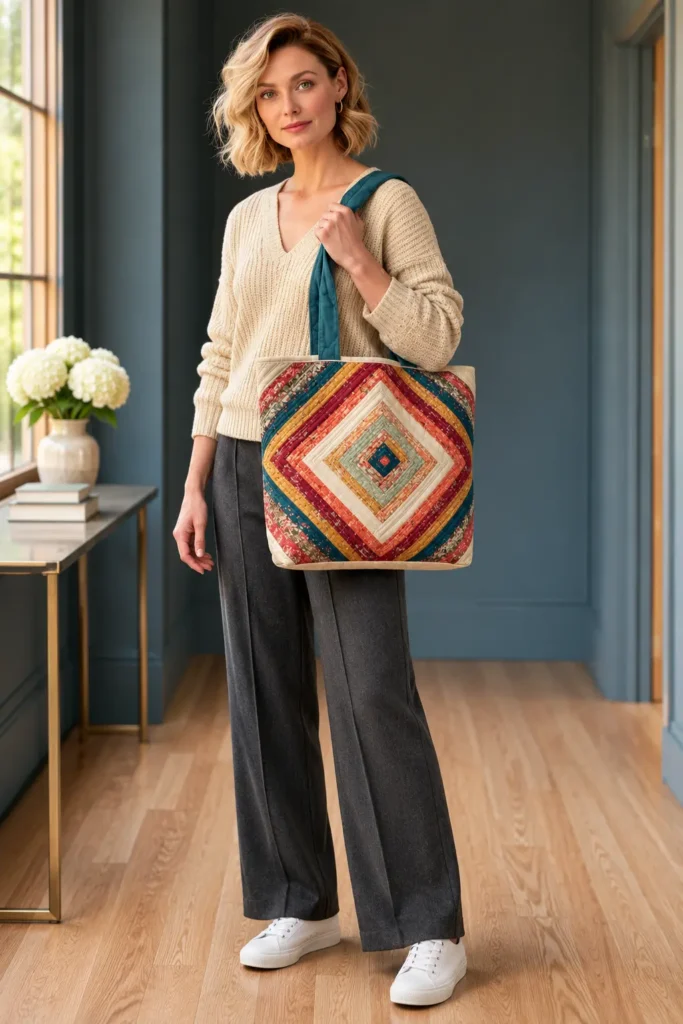
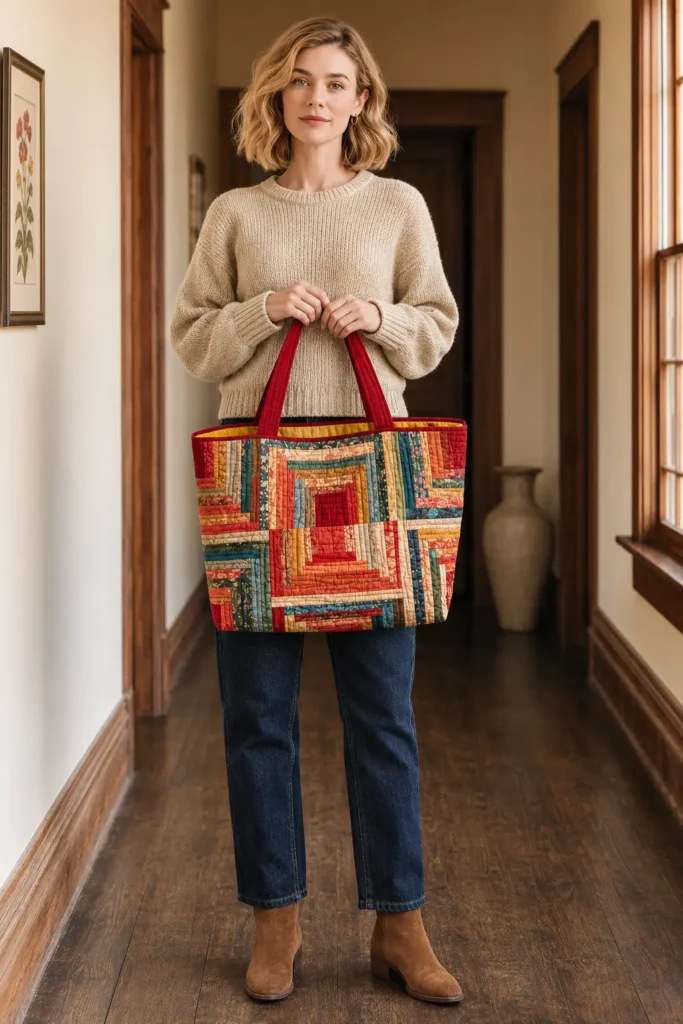
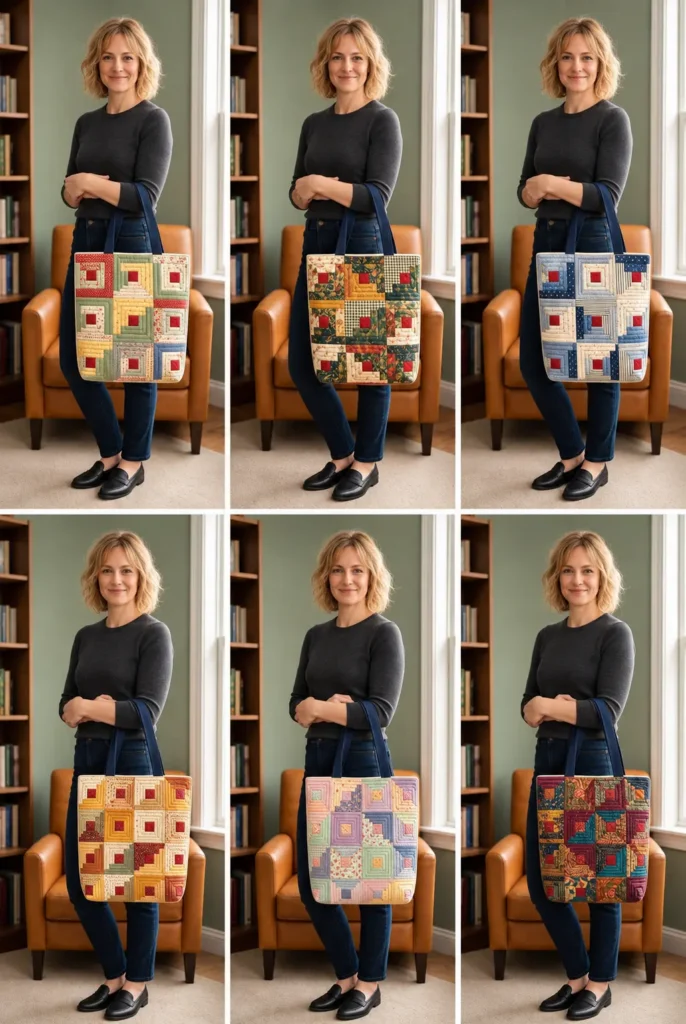
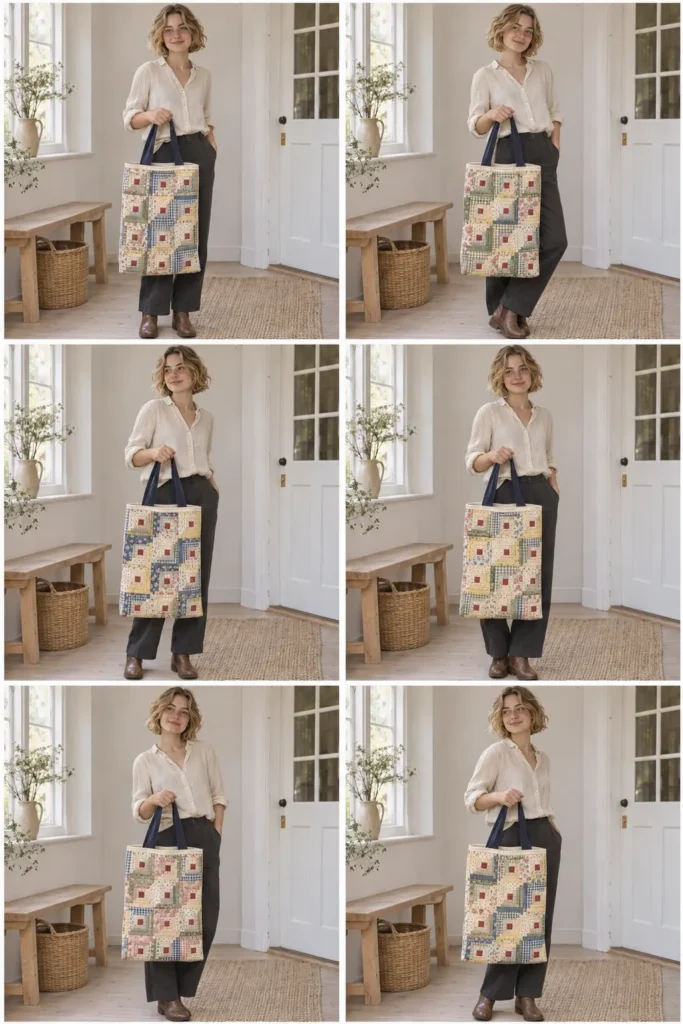
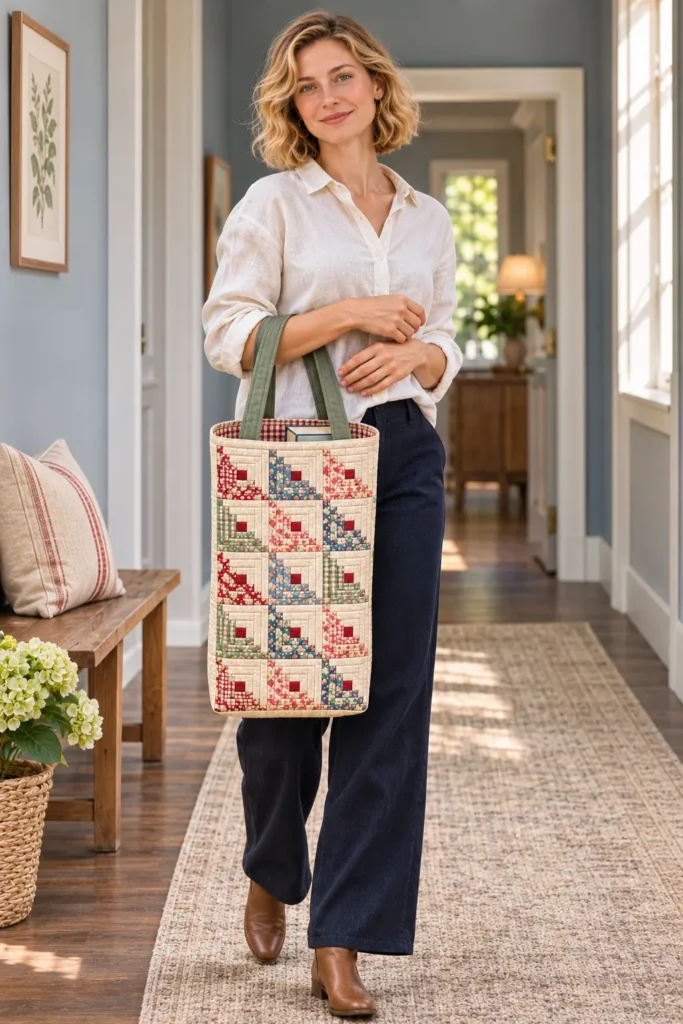
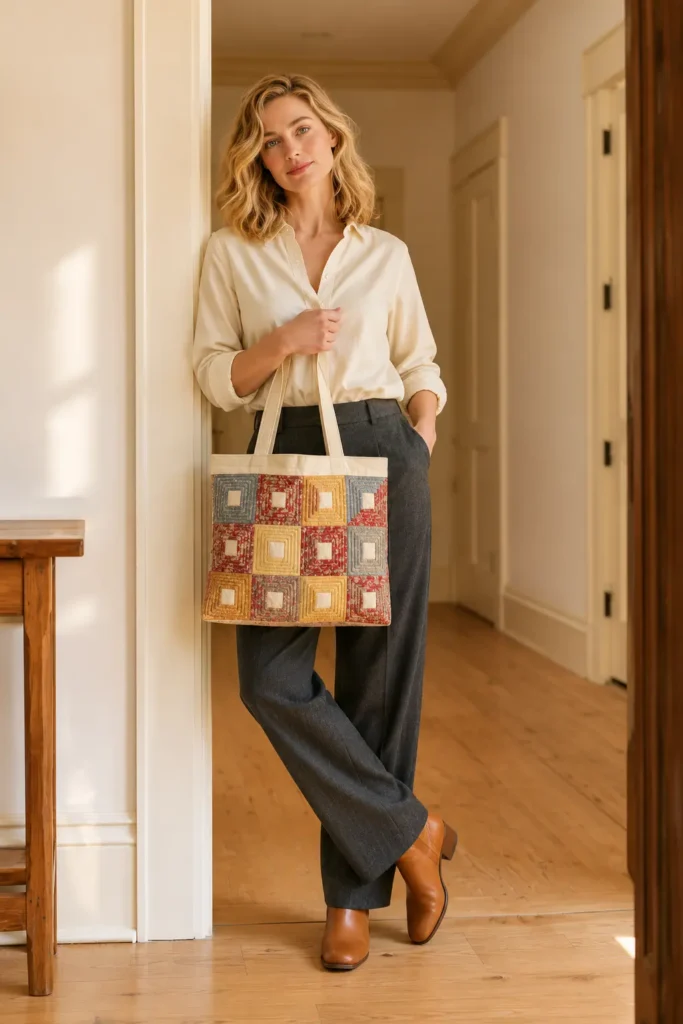
3. Mini Log Cabin Blocks on a Tall Book Tote in Vintage Feed Sack Prints
This tall book tote covers its front and back with a grid of small Log Cabin blocks, three across and four rows high, each just 4″ square. Every block starts with a tiny cherry red center, and narrow strips spiral around it in two rounds. The upper-left half of each block uses white-ground feed sack prints, with little flowers, dots, and checks scattered on white, while the lower-right half switches to bolder prints on cherry red, sunny yellow, robin’s egg blue, mint green, and rose pink grounds. Because all the blocks face the same way, the grid reads as a neat repeat of light and bright diagonals, busy up close and orderly from across the room.
The bag is shaped for books: 12″ wide, 16″ tall, and 3″ deep, taller than it is wide, with a slim boxed base that keeps hardcovers upright. Robin’s egg blue handles and a matching blue base frame the patchwork, and a buttercup yellow gingham lining with an interior slip pocket adds a cheerful surprise when the bag opens. Straight-line quilting along the block grid gives the panels enough body to carry a stack of library books or a laptop sleeve without sagging.
Design Inspirations – Digitally Modified Images. Texture and color may vary from the actual product.
Why Small Blocks Suit Feed Sack Prints
Feed sack prints have a distinctive look: small, cheerful motifs, often flowers, dots, plaids, and novelty geometrics, printed in clear colors. The originals were printed on the cotton sacks used for flour and feed in the early to mid twentieth century, and home sewists reused the fabric for clothing and quilts. Today, reproduction prints in the same style are widely available as quilting cotton, and they are what this tote uses.
Those small-scale motifs are a natural match for mini blocks. A log that finishes only ¾” wide shows just a few flowers or dots, which is enough to read as a print without breaking a large motif into fragments. Twenty-four small blocks also give room for real variety, so every print appears many times across the bag without any two blocks looking identical.
The block itself is a standard Log Cabin. The top and left logs of each round come from the white-ground group, and the bottom and right logs come from the bold group. That simple rule creates the diagonal split in every block and keeps a scrappy mix of prints looking planned.
Building Contrast Between White-Ground and Bold Prints
With so many prints in play, value keeps the design readable. Sort your feed sack fabrics into two clear piles before cutting. White-ground prints should be mostly white, with small, widely spaced motifs. Bold prints should have colored backgrounds, so they read as solid color from a distance. A print that falls in between, such as a dense floral on white, blurs the diagonal and is better left out.
Choose five of each, one per color: cherry red, sunny yellow, robin’s egg blue, mint green, and rose pink. The tiny cherry red centers tie into the red prints, while robin’s egg blue for the handles, border, and base gives the busy patchwork a calm frame. The blue base also wears better than white on the bottom of a bag that gets set down on floors and library tables.
Buttercup yellow gingham for the lining keeps the vintage mood inside the bag. If you want the checks to line up at the side seams, cut both lining panels from the same position in the gingham. Prewash all fabrics or none, and test the red and pink prints for bleeding, since they sit beside white grounds.
Materials and Tools Needed
Fabric
- Cherry red solid: ⅛ yard (centers)
- White-ground feed sack prints: ⅛ yard each of five prints, one featuring each color (cherry red, sunny yellow, robin’s egg blue, mint green, rose pink)
- Bold colored-ground feed sack prints: ⅛ yard each of five prints, one in each of the same colors
- Robin’s egg blue solid: ⅝ yard (border, base, and handles)
- Buttercup yellow gingham: ⅝ yard (lining and pocket)
- Muslin for the quilt foundation: ¾ yard
- Low-loft cotton or cotton-blend batting: ¾ yard of 45″-wide or wider
Notions and Tools
- Neutral cotton piecing thread
- Robin’s egg blue thread for quilting and topstitching
- Sewing machine with a ¼” piecing foot and a walking foot
- Size 90/14 machine needle for quilting and bag assembly
- Rotary cutter, self-healing cutting mat, and a 6″ × 24″ quilting ruler
- Small square ruler (4½” or 6½”) for checking blocks
- Curved safety pins or basting spray
- Fabric clips
- Iron and pressing surface
- Point turner
Finished Tote Bag Size
- Width at the top: 12″, measured flat across the opening from side seam to side seam
- Height: 16″, measured along a side seam from the top edge to the base
- Depth: 3″, measured across the base from front to back
- Base: 9″ × 3″
- Handles: 1″ wide, 23″ visible length
- Handle drop: about 8½” (calculated at 9″; the curve of the handle in use makes it slightly shorter)
- Interior slip pocket: 8″ wide × 6″ tall
Cutting Measurements
All strips are cut across the width of fabric, with 40″ of usable length assumed after removing selvages.
| Piece | Quantity | Cut Size (W × H) | Purpose |
|---|---|---|---|
| Cherry red center squares | 24 | 1½” × 1½” | Block centers |
| Log L1, white-ground | 25 (5 per print) | 1¼” × 1½” | Round 1, top |
| Log L2, white-ground | 25 (5 per print) | 1¼” × 2¼” | Round 1, left |
| Log L3, bold | 25 (5 per print) | 1¼” × 2¼” | Round 1, bottom |
| Log L4, bold | 25 (5 per print) | 1¼” × 3″ | Round 1, right |
| Log L5, white-ground | 25 (5 per print) | 1¼” × 3″ | Round 2, top |
| Log L6, white-ground | 25 (5 per print) | 1¼” × 3¾” | Round 2, left |
| Log L7, bold | 25 (5 per print) | 1¼” × 3¾” | Round 2, bottom |
| Log L8, bold | 25 (5 per print) | 1¼” × 4½” | Round 2, right |
| Blue side and top borders | 6 | 2½” × 16½” | Panel borders |
| Blue bottom borders | 2 | 3½” × 16½” | Panel borders and base |
| Blue handle strips | 2 | 4″ × 24″ | Handles |
| Muslin foundation | 2 | 19″ × 24″ | Quilt backing (oversized; trimmed with the panel) |
| Batting | 2 | 19″ × 24″ | Quilt middle layer (oversized; trimmed with the panel) |
| Gingham lining panels | 2 | 13″ × 18½” | Lining |
| Gingham slip pocket | 1 | 9″ × 13″ | Interior pocket |
Each log length includes one spare. The pieced tops measure 16½” × 21½” and are trimmed to 13″ × 18½” after quilting.
Strips to cut: cherry red, one 1½” strip; each of the ten feed sack prints, two 1¼” strips; robin’s egg blue, three 2½” strips, one 3½” strip, and two 4″ strips; gingham, one 18½” strip.
Assembly at a Glance
- Cut and Sort the Fabrics
- Sew the Twenty-Four Mini Log Cabin Blocks
- Arrange the Front Panel Grid
- Sew the Front Patchwork Panel
- Sew the Back Patchwork Panel
- Press and Measure Both Patchwork Tops
- Layer and Baste the Quilt Sandwiches
- Quilt Both Panels
- Trim the Quilted Panels and Cut the Corner Squares
- Make the Two Handles
- Make the Interior Pocket
- Prepare the Lining Panels
- Sew the Outer Bag Side and Bottom Seams
- Box the Outer Corners and Turn the Outer Bag Right Side Out
- Sew and Box the Lining, Leaving a Turning Gap
- Baste the Handles to the Outer Bag
- Sew the Outer Bag and Lining Together at the Top Edge
- Turn Through the Gap, Close It, Press, and Topstitch
Step-by-Step Sewing Tutorial
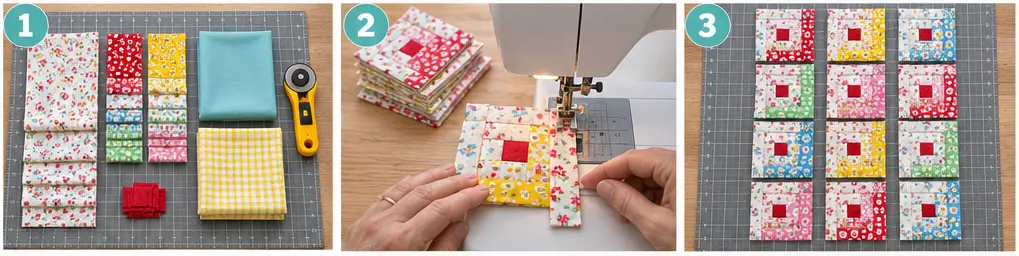
Step-by-Step Illustration – Digitally Created Image. Follow the written steps for measurements and details.
Step 1 – Cut and Sort the Fabrics
Cut all strips listed above, then subcut the logs, centers, borders, handles, lining, pocket, muslin, and batting to the sizes in the cutting table. Sort the logs into eight piles, L1 through L8. Within each pile, shuffle the five prints together so you can pick them at random as you sew.
Result: every piece is cut, with logs in eight labeled piles and the prints mixed within each pile.
Step 2 – Sew the Twenty-Four Mini Log Cabin Blocks
Sew all seams with an accurate ¼” seam allowance, right sides together, and press each seam away from the center after every log. Build each block in a counterclockwise spiral:
- Sew a white-ground L1 to the top of a cherry red center, then a white-ground L2 to the left side.
- Sew a bold L3 to the bottom, then a bold L4 to the right. The unit should measure 3″ square.
- Sew a white-ground L5 to the top and a white-ground L6 to the left.
- Sew a bold L7 to the bottom and a bold L8 to the right. The block should measure 4½” square.
Avoid repeating the same print on two neighboring logs. Chain-piece all 24 blocks one log at a time to keep the sequence consistent.
Result: 24 blocks, each 4½” square, with a white-ground upper-left half and a bold lower-right half.
Step 3 – Arrange the Front Panel Grid
Lay 12 blocks right side up in four rows of three, all turned the same way, with the white-ground half at the upper left. Move blocks around until no two neighbors share a dominant color, then lay out the remaining 12 blocks the same way for the back. Photograph both layouts.
Result: two unsewn grids, each three blocks across and four rows high.
Step 4 – Sew the Front Patchwork Panel
Sew the three blocks in each row together with ¼” seams. Each row measures 12½” × 4½”. Press the seams in rows 1 and 3 to the left and in rows 2 and 4 to the right so they nest. Sew the rows together, matching block seams, to make a grid 12½” wide × 16½” tall.
Sew a 2½” × 16½” blue border to the left and right edges, then a 2½” × 16½” border to the top edge and a 3½” × 16½” border to the bottom edge, pressing each seam toward the border.
Result: the front patchwork top, 16½” wide × 21½” tall, with the wider blue border at the bottom.
Step 5 – Sew the Back Patchwork Panel
Repeat Step 4 with the second layout to make the back patchwork top, keeping all blocks in the same orientation.
Result: two patchwork tops, each 16½” × 21½”.
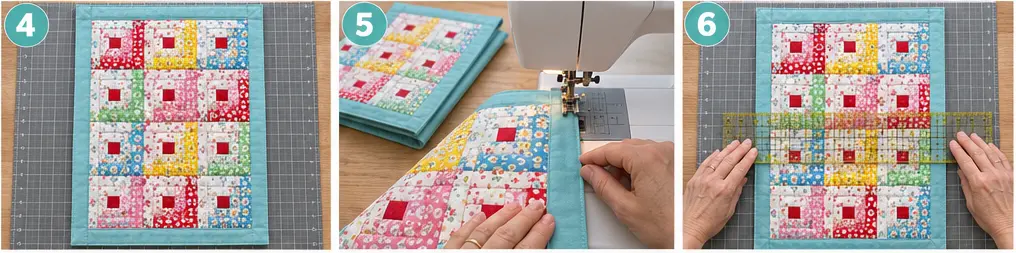
Step 6 – Press and Measure Both Patchwork Tops
Press both tops from the wrong side, then the right side, lifting the iron rather than sliding it so the narrow logs stay straight. Measure the block grid on each top: 12½” × 16½” raw, or 12″ × 16″ between the border seams.
Result: two flat, measured tops.
Step 7 – Layer and Baste the Quilt Sandwiches
Place a 19″ × 24″ muslin piece on the table, then a 19″ × 24″ batting piece on top. Center a patchwork top on the batting, right side up, with about 1¼” of batting showing on every side. Baste every 3″ to 4″ with curved safety pins or basting spray, working from the center outward. Repeat for the second top.
Result: two basted quilt sandwiches, patchwork side up.
Step 8 – Quilt Both Panels
Attach a walking foot, thread it with robin’s egg blue, and set a stitch length of about 3.0 mm. Quilt ¼” on each side of every vertical and horizontal seam between the blocks, and ¼” inside the border seams. Each grid seam ends up framed by two parallel lines, which outline every block without crossing the small logs.
Result: two quilted panels with double straight lines along the block grid.
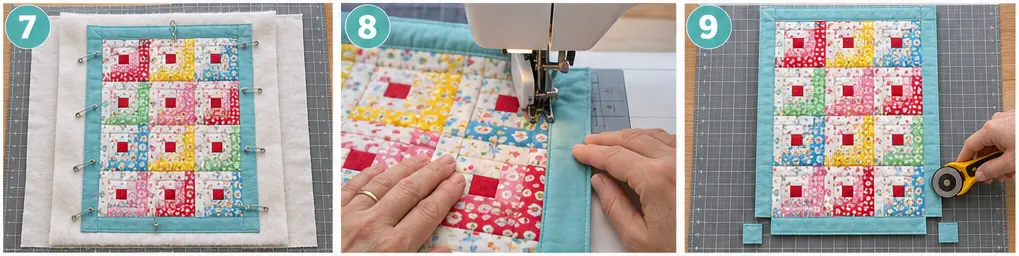
Step 9 – Trim the Quilted Panels and Cut the Corner Squares
Lay a quilted panel right side up. Trim the left, right, and top edges so ½” of blue border remains beyond the block grid. Trim the bottom edge so 2″ of blue remains below the grid. The panel should measure 13″ wide × 18½” tall.
Cut a 1½” × 1½” square from both bottom corners, measuring from the raw edges. These notches fall entirely in the blue border. Repeat for the second panel.
Result: two outer panels, each 13″ × 18½”, with 1½” notches at the bottom corners.
Step 10 – Make the Two Handles
Fold a 4″ × 24″ blue handle strip in half lengthwise, wrong sides together, and press. Open it, fold both long raw edges to the center crease, and press. Refold along the original crease. The handle now measures 1″ × 24″. Edgestitch ⅛” from both long edges. Repeat for the second handle.
Result: two finished robin’s egg blue handles, each 1″ wide and 24″ long.
Step 11 – Make the Interior Pocket
Fold the 9″ × 13″ gingham pocket piece in half, right sides together, so it measures 9″ wide × 6½” tall, with the fold at the top. Sew the sides and bottom with a ½” seam, leaving a 3″ gap in the middle of the bottom edge. Clip the corners, turn right side out, push out the corners, and press with the gap allowances folded inside. Topstitch ⅛” along the folded top edge.
Result: a finished gingham pocket, 8″ wide × 6″ tall.
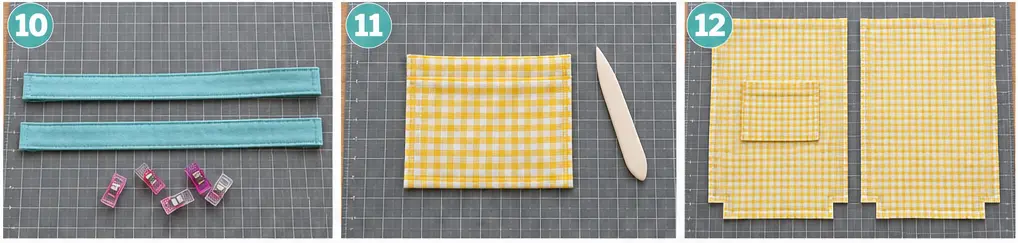
Step 12 – Prepare the Lining Panels
Cut a 1½” × 1½” square from both bottom corners of each 13″ × 18½” gingham lining panel. On one panel, right side up, position the pocket right side up, centered side to side (2½” from each side edge), with its top edge 3″ below the top raw edge. Edgestitch the sides and bottom ⅛” from the edge, which also closes the pocket’s turning gap. Bar-tack both top corners.
Result: two notched lining panels, one with the slip pocket attached.
Step 13 – Sew the Outer Bag Side and Bottom Seams
Place the two quilted outer panels right sides together, top edges aligned, and clip. Match the horizontal block seams at the sides. Sew both side seams and the bottom seam with a ½” seam, leaving the corner notches open; you will sew them closed when you box the corners in Step 14. Backstitch at each end. Trim the batting out of the seam allowances and press the seams open.
Result: the outer bag shell, wrong side out, with open corner notches.
Step 14 – Box the Outer Corners and Turn the Outer Bag Right Side Out
At one bottom corner, pull the front and back apart so the side seam lies directly on top of the bottom seam. The notch’s raw edges now form one straight line. Clip and sew across with a ½” seam, backstitching at both ends. This seam closes the notch and forms the boxed corner. Repeat at the other corner. Turn the outer bag right side out and push the corners into shape.
Result: the outer bag, right side out, 12″ wide with a 3″-deep blue base and a raw top edge.
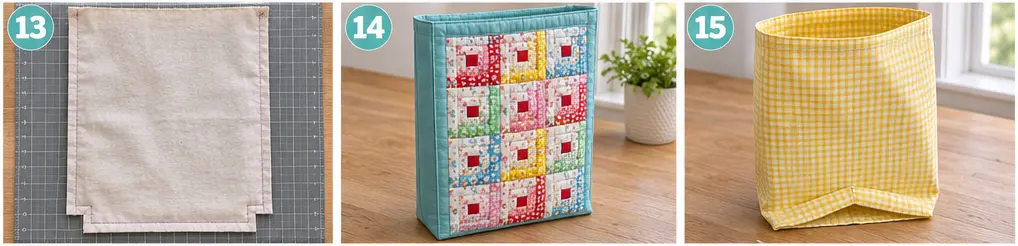
Step 15 – Sew and Box the Lining, Leaving a Turning Gap
Place the lining panels right sides together, pocket inside. Sew the side seams with a ½” seam. Sew the bottom seam with a ½” seam, leaving a 5″ gap centered in it and backstitching on both sides. You will turn the bag through this gap and sew it closed in Step 18. Box both corners the same way as Step 14, sewing across each notch to close it. Leave the lining wrong side out.
Result: the boxed lining, wrong side out, with a 5″ gap in the bottom seam.
Step 16 – Baste the Handles to the Outer Bag
With the outer bag right side out, lay one handle against the front. Place each end so its center is 3½” from the nearest side seam, raw ends aligned with the top raw edge and the loop hanging down over the front, untwisted. Clip and baste ¼” from the top edge. Repeat on the back, matching the front positions exactly.
Result: the outer bag with both handles basted to the right side, loops hanging down.
Step 17 – Sew the Outer Bag and Lining Together at the Top Edge
Slip the outer bag, still right side out, inside the lining, still wrong side out. Right sides now face each other, with the handles sandwiched between. Align the side seams and top raw edges, clip all the way around, and sew with a ½” seam, going slowly over the handle ends.
Result: the outer bag and lining joined along a continuous 24″ top seam, handles hidden inside.
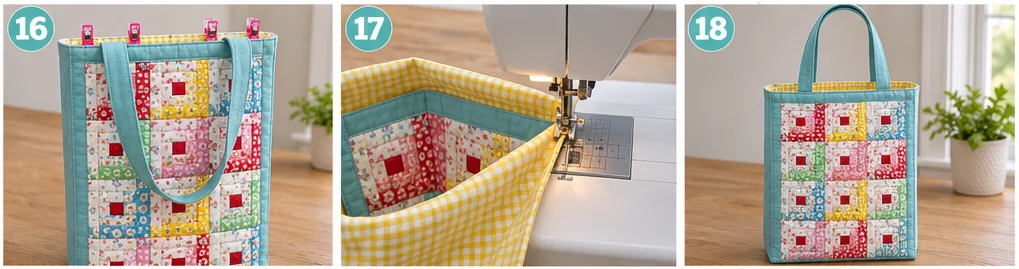
Step 18 – Turn Through the Gap, Close It, Press, and Topstitch
Pull the outer bag through the lining gap until the whole bag is right side out. The lining now hangs outside the bag, so the gap is easy to reach. Fold both raw edges of the gap inward ½”, in line with the rest of the seam, press, and edgestitch ⅛” from the folds, or close it by hand with a ladder stitch. Push the lining into the bag, press the top edge so the seam sits exactly at the edge, and pull the handles upright. Topstitch around the opening ⅛” from the top edge, then ⅜” from the top edge. The second line catches the handle ends and secures them.
Result: a finished book tote, 12″ wide, 16″ tall, and 3″ deep, with the lining gap closed, blue handles, and a gingham lining.
Keeping Mini Blocks Accurate and the Prints Readable
- Blocks finish at different sizes: small blocks show seam errors quickly. Check each block at 3″ after round 1 and 4½” at the end, and trim any wobbly log flush before adding the next one.
- The diagonal split disappears: a print sits in the wrong value group. Pull any white-ground print with dense motifs, or any bold print with a pale background, before sewing more blocks.
- The grid looks blotchy: two neighboring blocks share the same dominant color. Rearrange blocks in Step 3, while they are still loose.
- Block corners do not meet: press row seams in alternating directions so they nest, and pin at each intersection before sewing rows together.
- The bag slumps when loaded with books: keep the quilting lines no more than about 4″ apart, and use cotton batting rather than polyester for a firmer panel.
- Bulky corners on the narrow base: trim the batting out of the seam allowances before boxing, and finger-press the boxing seams open.
Design Inspiration and Tutorial Note: The images in this section may be AI-generated or digitally developed to illustrate the design and the sewing sequence. The instructions describe a proposed construction method with measurements calculated for the stated finished size. They are not a physically tested pattern. Measure your blocks and panels as you go, and check the panel size before trimming and cutting.
Other Design Inspirations – Digitally Modified Images. Texture and color may vary from the actual product.
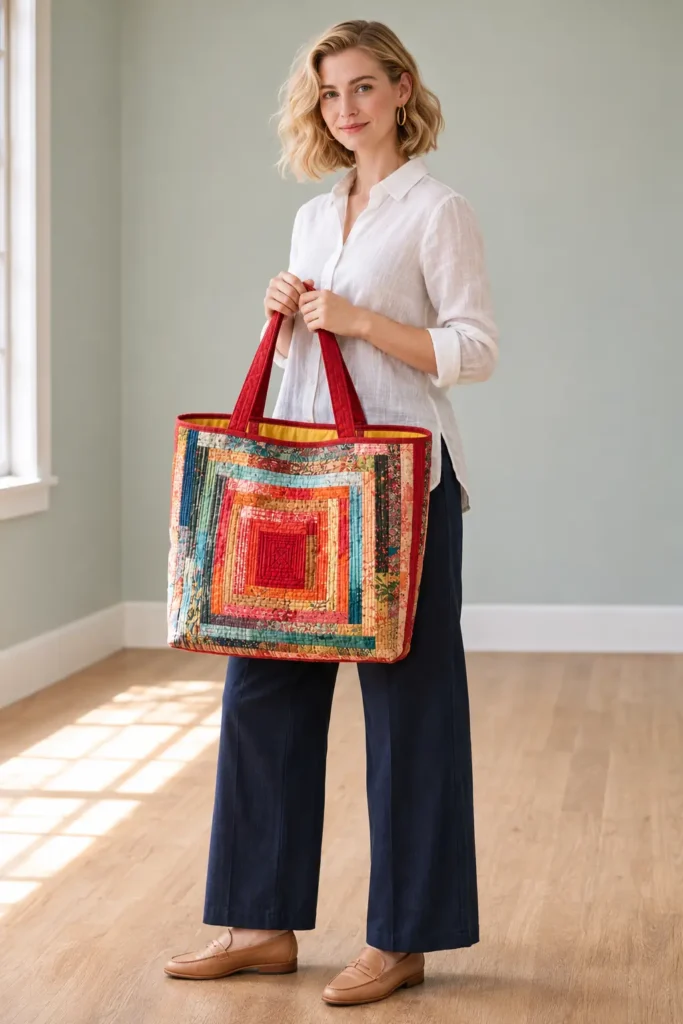
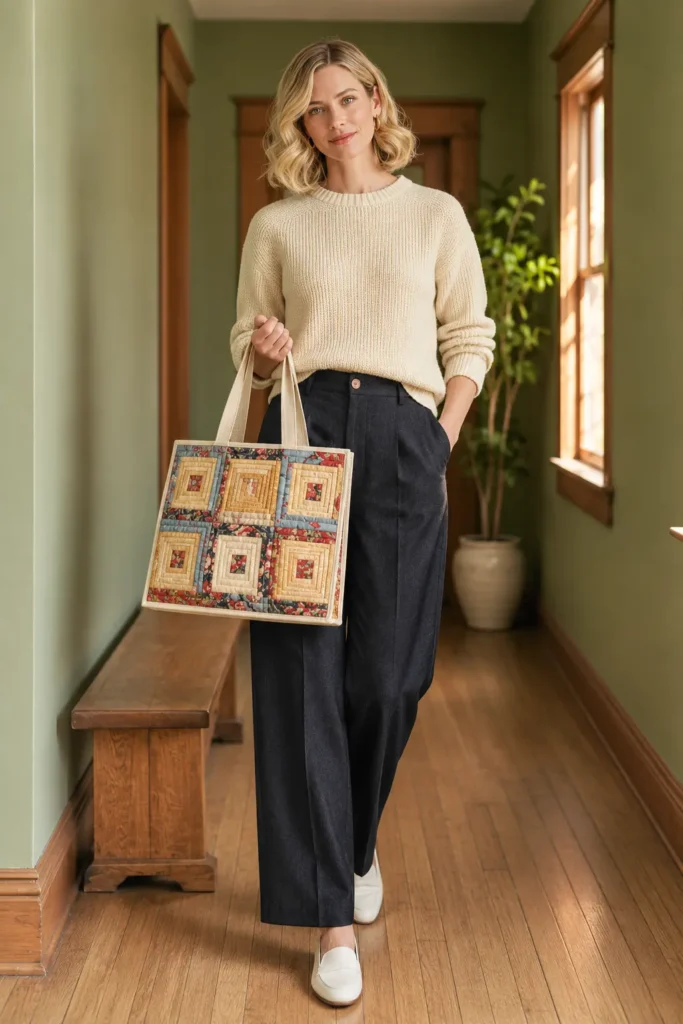
4. Quilt-As-You-Go Log Cabin Zippered Tote with Reclaimed Denim Strips
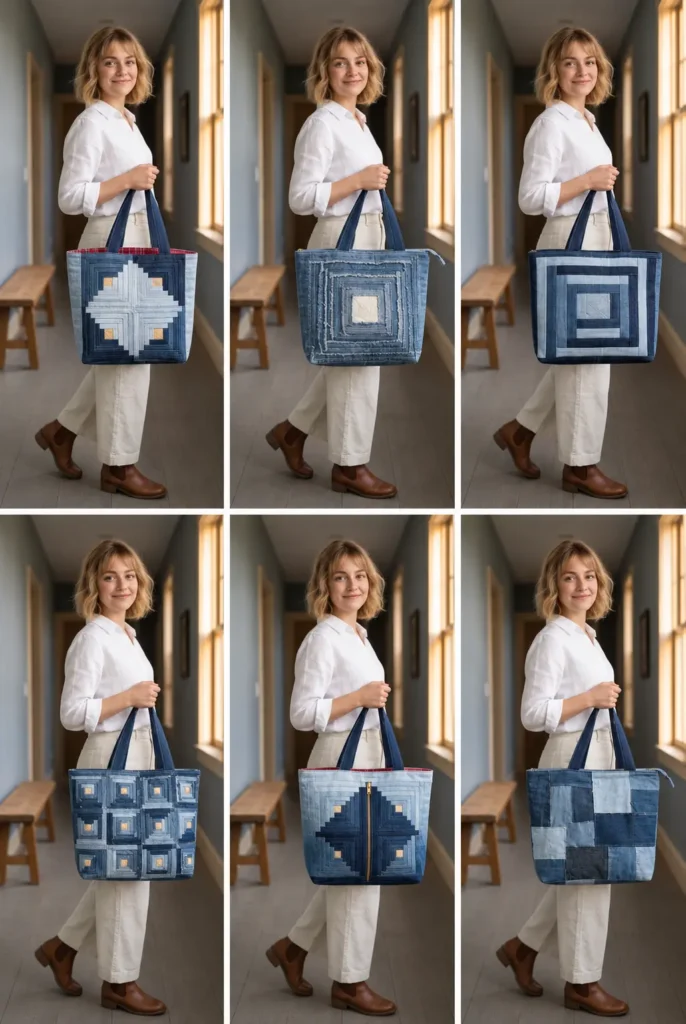
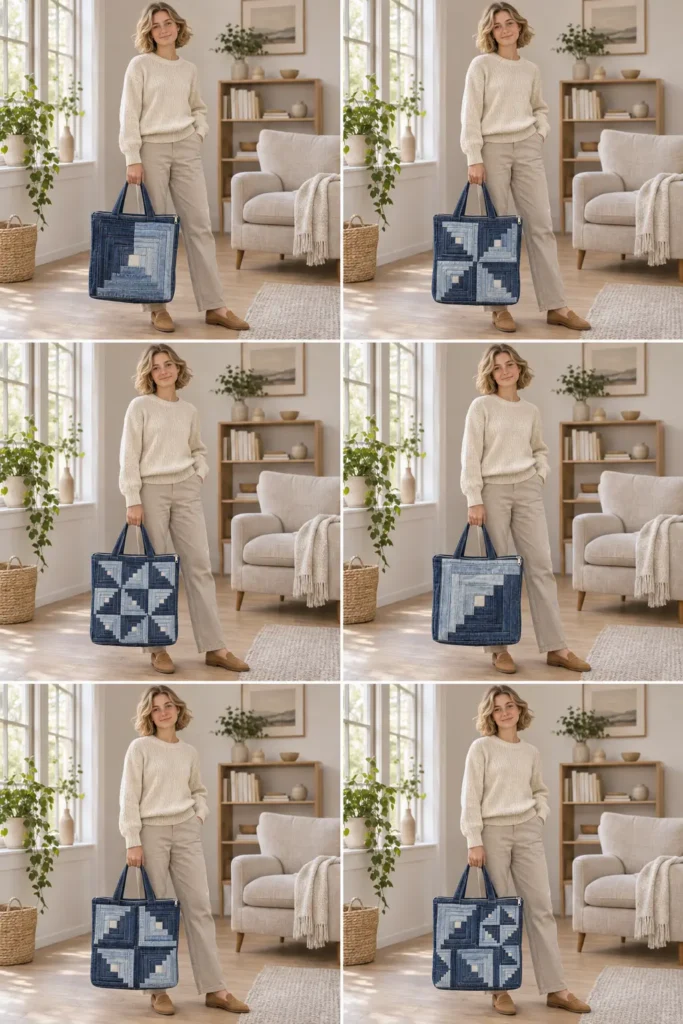
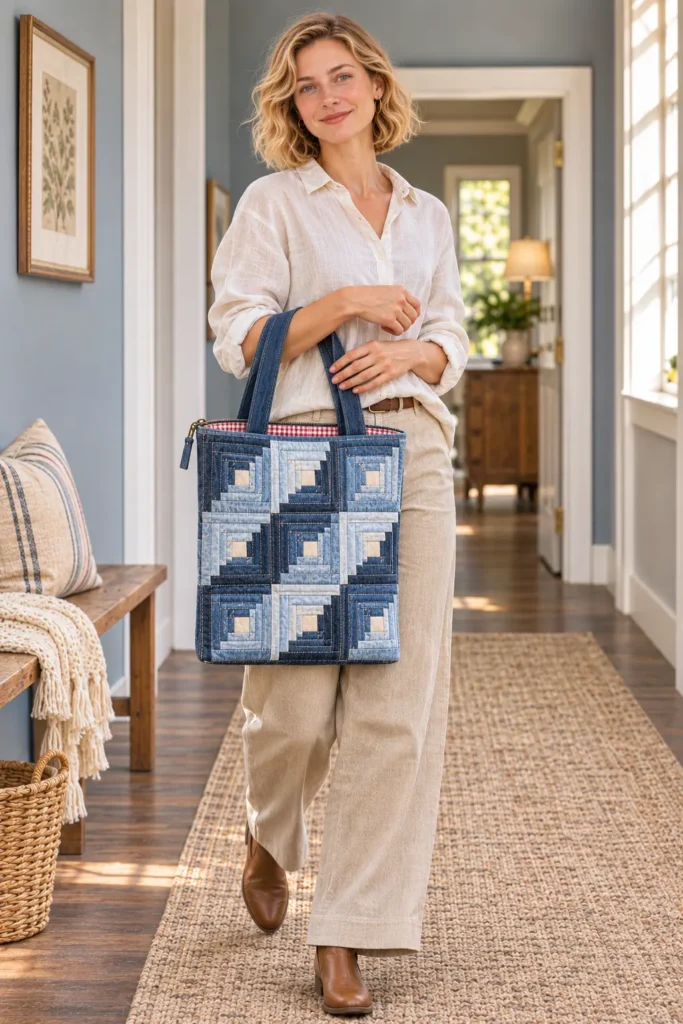
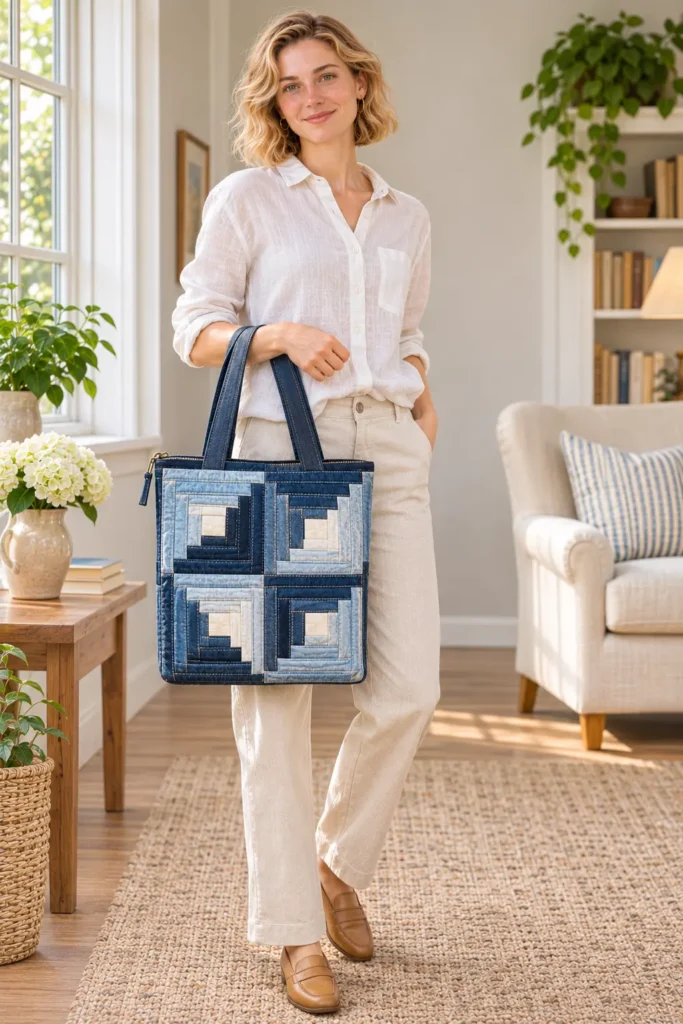
This zippered tote turns old jeans into one large Log Cabin block on each side of the bag. A small tomato red square sits at the center, and denim strips spiral out around it in three rounds: light, faded denim on the upper-left half and dark indigo denim on the lower-right half, so the block splits into the classic light-and-dark diagonal. Two accent strips, one mustard and one tomato red, break up the blue and keep the bag from reading as a solid denim panel. Every strip is topstitched with gold thread, the same detail that gives jeans their look, so the quilting lines become part of the design.
The bag is built quilt-as-you-go, meaning each strip is sewn straight through the denim, batting, and backing in a single pass. The finished tote is 14″ square with a 4″-deep dark denim base, a navy zipper across the top, red handles stitched to the outside with box-and-X reinforcement, and a cream lining with an interior slip pocket. The zipper keeps a laptop sleeve, notebooks, or groceries secure, and the reinforced handles are sized for the weight denim adds.
Design Inspirations – Digitally Modified Images. Texture and color may vary from the actual product.
How Quilt-As-You-Go Builds the Log Cabin in One Pass
In a standard quilted bag, you piece a patchwork top, then layer it with batting and backing and quilt it as a separate stage. Quilt-as-you-go combines the two. You start with a layer of muslin and a layer of batting, place the red center square on top, and sew each new strip to the growing block right through all three layers. When you flip the strip open, it is already attached to the batting and backing. A line of topstitching ⅛” from the seam then holds it flat and adds the visible quilting.
Log Cabin suits this method especially well, because the block grows outward from the center one strip at a time. You never need to match intersections or join separate blocks, which matters with denim, where bulky seams are hard to line up. The spiral order is the same as any Log Cabin: top, left, bottom, right, with each strip a little longer than the last because it spans everything sewn so far.
This tote adds a fourth round of dark denim around the block. That outer round is mostly trimmed away or hidden in seams, but it supplies the seam allowances and forms the dark base, so the full 14″ block shows on the face of the bag with no cropped strips.
Working With Reclaimed Denim
One pair of light-wash jeans and one pair of dark-wash jeans supply all the denim. Cut away the waistband, pockets, and thick flat-felled seams, then open each leg along its seams to get a flat piece about 20″ wide and 28″ long. Cut the strips along the length of the leg, which keeps them stable and gives the longest pieces you need (19½”).
Choose jeans with a clear difference in wash. The diagonal split depends on the light denim reading noticeably paler than the dark denim, so a faded light-wash pair paired with a deep indigo pair works best. Avoid denim with heavy stretch, which can ripple when you topstitch it.
Denim is heavier than quilting cotton, so a few tools help: a size 100/16 denim needle, a slightly longer stitch length (about 3.0 mm), and a walking foot for the topstitching. Use a light, low-loft cotton batting so the finished panels stay flexible.
Planning the Zipper Top and Handles
The zipper is sandwiched between the outer panel and the lining along the top edge, one side at a time, and sewn with a ¼” seam close to the teeth. Using an 18″ nylon coil zipper on a 15″-wide panel lets the zipper run past both edges, so the metal stops end up outside the bag. The side seams then stitch straight across the nylon coil and become the new stops, and the excess is trimmed away.
A zipper seam is too shallow to anchor handles, so the handles are stitched to the outside of the bag instead. Each end is turned under and sewn down with a box-and-X pattern just below the zipper, before the zipper goes in. That keeps the stress of a heavy load on a strong, reinforced patch rather than on the zipper seam.
Materials and Tools Needed
Fabric
- One pair of light-wash adult jeans (or ¼ yard light denim)
- One pair of dark-wash adult jeans (or ⅝ yard dark denim)
- Tomato red quilting cotton: ⅓ yard (centers, accent strips, and handles)
- Mustard quilting cotton: ⅛ yard or a scrap at least 2½” × 13″
- Cream quilting cotton: ½ yard (lining and pocket)
- Muslin for the foundations: ⅝ yard
- Low-loft cotton batting: ⅝ yard of 45″-wide or wider
Notions and Tools
- 18″ #5 nylon coil zipper in navy
- Gold or copper denim topstitching thread, plus neutral all-purpose thread
- Size 100/16 denim needles
- Sewing machine with a walking foot and a zipper foot
- Seam ripper and sharp scissors for taking apart the jeans
- Rotary cutter, self-healing cutting mat, and a 6″ × 24″ quilting ruler
- Fabric marking pen
- Fabric clips
- Basting spray or safety pins
- Iron and pressing surface
- Point turner
Finished Tote Bag Size
- Width at the top: 14″, measured flat along the zipper from side seam to side seam
- Height: 14″, measured along a side seam from the zipper seam to the base
- Depth: 4″, measured across the base from front to back
- Base: 10″ × 4″
- Zipper opening: about 13″
- Handles: 1″ wide; drop about 8″ (calculated at 8¼”; the curve in use makes it slightly shorter)
- Interior slip pocket: 8″ wide × 6″ tall
Cutting Measurements
Cut denim strips along the length of the jeans legs. Cut cotton strips across the width of fabric.
| Piece | Quantity | Cut Size (W × H) | Purpose |
|---|---|---|---|
| Red center squares | 2 | 2½” × 2½” | Block centers |
| L1, light denim | 2 | 2½” × 2½” | Round 1, top |
| L2, light denim | 2 | 2½” × 4½” | Round 1, left |
| L3, dark denim | 2 | 2½” × 4½” | Round 1, bottom |
| L4, dark denim | 2 | 2½” × 6½” | Round 1, right |
| L5, mustard | 2 | 2½” × 6½” | Round 2, top (accent) |
| L6, light denim | 2 | 2½” × 8½” | Round 2, left |
| L7, dark denim | 2 | 2½” × 8½” | Round 2, bottom |
| L8, dark denim | 2 | 2½” × 10½” | Round 2, right |
| L9, light denim | 2 | 2½” × 10½” | Round 3, top |
| L10, light denim | 2 | 2½” × 12½” | Round 3, left |
| L11, red | 2 | 2½” × 12½” | Round 3, bottom (accent) |
| L12, dark denim | 2 | 2½” × 14½” | Round 3, right |
| L13, dark denim | 2 | 2½” × 14½” | Frame, top |
| L14, dark denim | 2 | 2½” × 16½” | Frame, left |
| L15, dark denim | 2 | 3½” × 16½” | Frame, bottom (base) |
| L16, dark denim | 2 | 2½” × 19½” | Frame, right |
| Muslin foundations | 2 | 17″ × 19″ | Quilt-as-you-go backing |
| Batting | 2 | 17″ × 19″ | Quilt-as-you-go middle layer |
| Red handle strips | 2 | 4″ × 28″ | Handles |
| Cream lining panels | 2 | 15″ × 16¾” | Lining |
| Cream slip pocket | 1 | 9″ × 13″ | Interior pocket |
The finished panels measure about 18½” × 19½” and are trimmed to 15″ × 16¾”.
Assembly at a Glance
- Cut and Sort the Denim and Fabrics
- Layer and Mark the Two Foundations
- Stitch the Center and Round 1 to the Front Foundation
- Add Rounds 2 and 3 to the Front Panel
- Add the Dark Denim Frame Round to the Front Panel
- Build the Back Panel the Same Way
- Trim Both Panels and Cut the Corner Squares
- Make the Two Handles
- Stitch the Handles to the Outer Panels
- Make the Interior Pocket
- Prepare the Lining Panels
- Sew the Zipper to the Front Outer and Lining Panels
- Sew the Zipper to the Back Outer and Lining Panels
- Topstitch Both Sides of the Zipper
- Open the Zipper and Sew the Side and Bottom Seams
- Box All Four Corners
- Turn the Bag Right Side Out Through the Gap
- Close the Lining Gap and Finish the Bag
Step-by-Step Sewing Tutorial
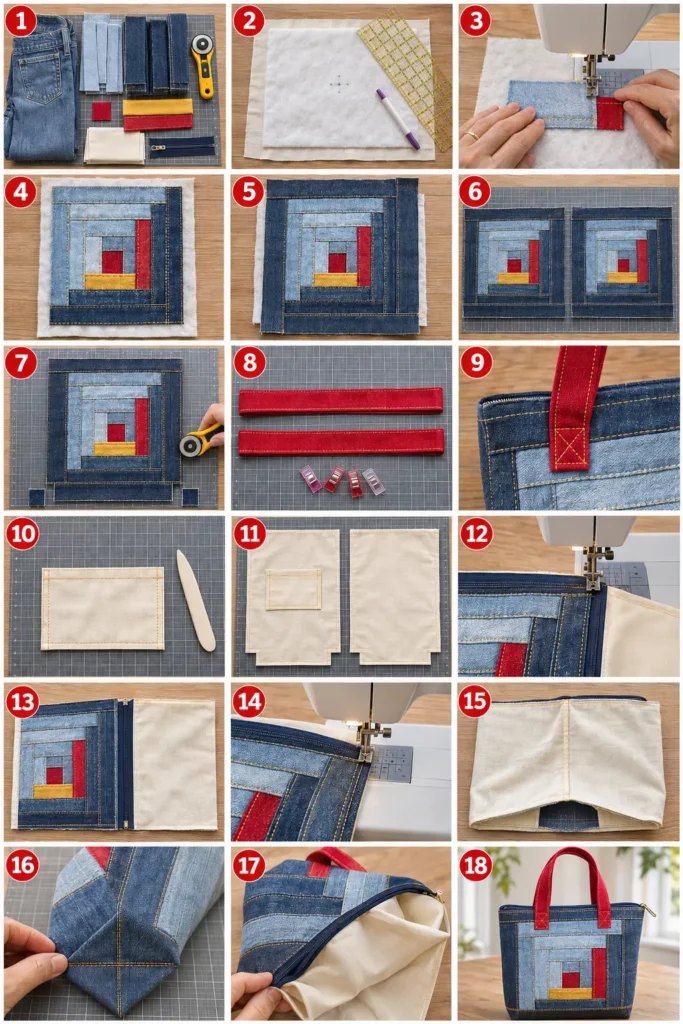
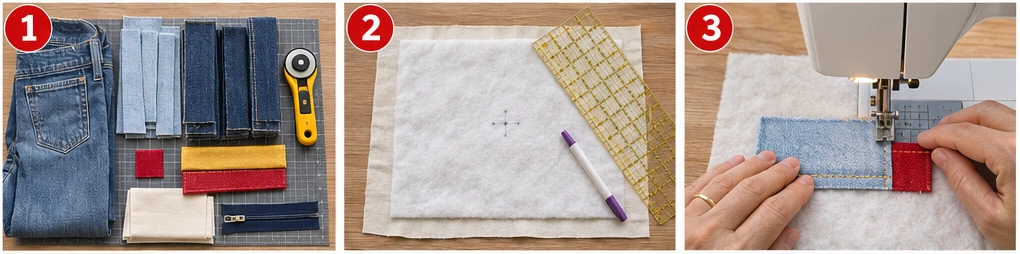
Step-by-Step Illustration – Digitally Created Image. Follow the written steps for measurements and details.
Step 1 – Cut and Sort the Denim and Fabrics
Cut the waistbands, pockets, and thick seams off both pairs of jeans and open each leg flat. Cut the denim logs along the length of the legs, then cut the red, mustard, cream, muslin, and batting pieces from the cutting table. Arrange the logs in order from L1 to L16, in two matching sets, one for each panel.
Result: every piece is cut, with two sets of logs laid out in sewing order.
Step 2 – Layer and Mark the Two Foundations
Place a 17″ × 19″ batting piece on a 17″ × 19″ muslin piece, edges matched, and baste them together with spray or a few safety pins. Mark the top edge. Measure 7¼” down from the top and 7¼” in from the left side, and mark that point. It is where the top-left corner of the red center square will go. Repeat for the second foundation.
Result: two batting-on-muslin foundations, each marked for the center square.
Step 3 – Stitch the Center and Round 1 to the Front Foundation
Pin a red center square right side up on the batting, with its top-left corner on the mark. Place L1 (light denim) right sides together along the top edge of the center and sew through all layers with a ¼” seam. Flip L1 up, press, and topstitch ⅛” from the seam on the denim side using gold thread. Repeat with L2 (light) on the left, L3 (dark) on the bottom, and L4 (dark) on the right. Each strip is sewn, flipped, pressed, and topstitched before the next one is added.
Result: the front foundation with the red center and round 1, a block measuring 6½” square.
Step 4 – Add Rounds 2 and 3 to the Front Panel
Continue the same sew, flip, press, and topstitch sequence around the block. Round 2: L5 (mustard) on top, L6 (light) on the left, L7 (dark) on the bottom, L8 (dark) on the right. Round 3: L9 (light) on top, L10 (light) on the left, L11 (red) on the bottom, L12 (dark) on the right. Check that each round lies flat before starting the next.
Result: a 14½” square Log Cabin block quilted to the front foundation, with a light upper-left half and a dark lower-right half.
Step 5 – Add the Dark Denim Frame Round to the Front Panel
Add the frame in the same order: L13 on top, L14 on the left, the wider L15 on the bottom, and L16 on the right, all in dark denim. Sew, flip, press, and topstitch each one. These strips run past the foundation edges in places, which is fine, since the excess will be trimmed.
Result: the completed front panel, about 18½” × 19½”, fully covering the foundation.
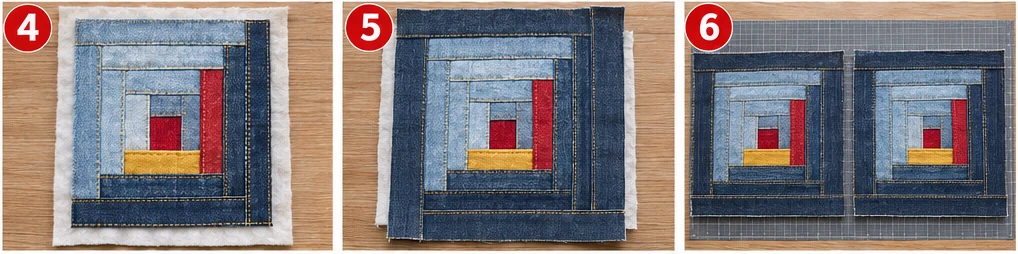
Step 6 – Build the Back Panel the Same Way
Repeat Steps 3 to 5 on the second foundation, using the same strip order and colors, so the back panel matches the front.
Result: two matching quilt-as-you-go Log Cabin panels.
Step 7 – Trim Both Panels and Cut the Corner Squares
Lay the front panel right side up. The block edge is the seam between round 3 and the frame. Trim so ½” of frame remains beyond the block on the left and right, ¼” above the block, and 2½” below it. The panel should measure 15″ wide × 16¾” tall. Cut a 2″ × 2″ square from both bottom corners, measuring from the raw edges. Repeat for the back panel.
Result: two outer panels, each 15″ × 16¾”, with 2″ notches at the bottom corners.
Step 8 – Make the Two Handles
Fold a 4″ × 28″ red handle strip in half lengthwise, wrong sides together, and press. Open it, fold both long raw edges to the center crease, press, and refold. The handle now measures 1″ × 28″. Edgestitch ⅛” from both long edges. Repeat for the second handle.
Result: two red handles, each 1″ wide and 28″ long.
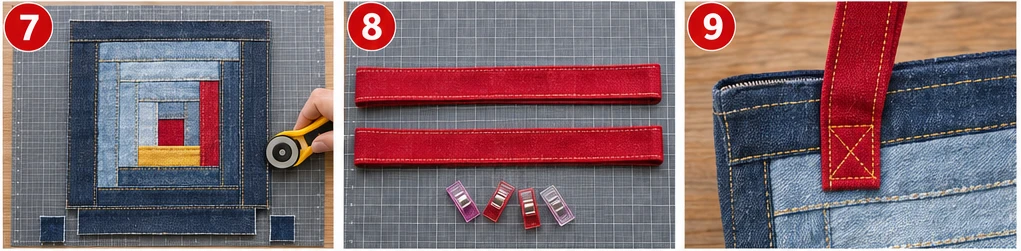
Step 9 – Stitch the Handles to the Outer Panels
Turn each handle end under ½” and press. On the front panel, right side up, place one end with its folded edge pointing down, 2½” below the top raw edge, and its center 4½” from the side raw edge (4″ from the finished side seam). Point the handle straight up past the top edge. Stitch a 1″ square box with an X through it, from 1½” to 2½” below the top raw edge. Stitch the other end of the same handle 4½” from the opposite side, checking that the handle is not twisted. Repeat on the back panel with the second handle.
Result: both outer panels with handles box-stitched in place, loops pointing up past the top edge.
Step 10 – Make the Interior Pocket
Fold the 9″ × 13″ cream pocket piece in half, right sides together, so it measures 9″ wide × 6½” tall, with the fold at the top. Sew the sides and bottom with a ½” seam, leaving a 3″ gap in the bottom. Clip the corners, turn right side out, and press with the gap allowances folded in. Topstitch ⅛” along the top fold.
Result: a finished pocket, 8″ wide × 6″ tall.
Step 11 – Prepare the Lining Panels
Cut a 2″ × 2″ square from both bottom corners of each 15″ × 16¾” cream lining panel. On one panel, right side up, place the pocket right side up, centered side to side (3½” from each side edge), with its top edge 3″ below the top raw edge. Edgestitch the sides and bottom, closing the pocket’s turning gap, and bar-tack the top corners.
Result: two notched lining panels, one with the slip pocket attached.
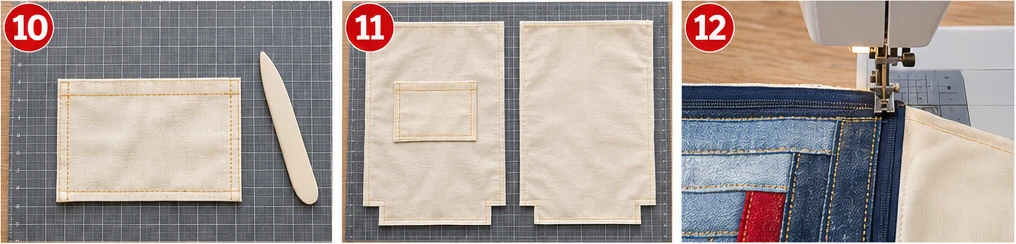
Step 12 – Sew the Zipper to the Front Outer and Lining Panels
Fold the front handle down onto the panel and pin it clear of the top edge. Lay the front outer panel right side up. Place the zipper face down along the top edge, with the zipper tape edge aligned with the raw edge and the zipper centered so about 1½” extends past each side. Lay the front lining panel right side down on top, top edges aligned, so the zipper is sandwiched between the outer and lining. Using a zipper foot, sew through all layers with a ¼” seam. Fold the outer and lining away from the zipper, wrong sides together, and press.
Result: the front outer and lining joined to one side of the zipper.
Step 13 – Sew the Zipper to the Back Outer and Lining Panels
Pin the back handle down, clear of the top edge. Lay the back outer panel right side up and place the free side of the zipper face down along its top edge, so the front panel lies directly over the back. Lay the back lining right side down on top, sew a ¼” seam with the zipper foot, then fold the back outer and lining away from the zipper and press.
Result: both sides of the zipper sewn, with outer panels and lining panels attached and lying flat.
Step 14 – Topstitch Both Sides of the Zipper
With the outer and lining folded wrong sides together on each side, topstitch ⅛” from the fold beside the zipper, through the outer panel and lining, on both sides. Remove the pins holding the handles down. This keeps the fabric away from the zipper teeth.
Result: a flat unit with the zipper topstitched on both sides and the handles free.
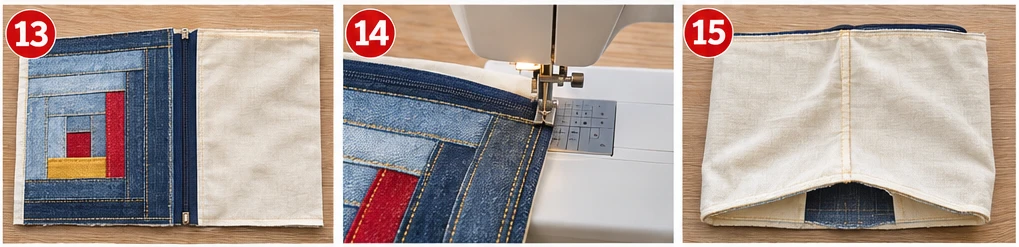
Step 15 – Open the Zipper and Sew the Side and Bottom Seams
Slide the zipper pull to the center, so the zipper is about halfway open. This is essential, because you will turn the bag through it. Rearrange the unit so the two outer panels are right sides together and the two lining panels are right sides together, with the zipper folded toward the lining. Clip around the edges. Sew with a ½” seam: both side seams from the outer bottom notch, across the zipper ends, to the lining bottom notch; the outer bottom seam; and the lining bottom seam, leaving a 5″ gap centered in it. Leave all four corner notches open; you will sew them closed when you box the corners in Step 16. Sew slowly across the zipper coil, then trim the zipper ends even with the seam allowance and trim the batting out of the outer seam allowances.
Result: the bag and lining sewn around their sides and bottoms, inside out, with four open notches and a 5″ gap in the lining bottom.
Step 16 – Box All Four Corners
At each outer bottom corner, pull the front and back apart so the side seam lies on top of the bottom seam; the notch’s raw edges form one straight line. Sew across with a ½” seam, which closes the notch and forms the boxed corner. Repeat for both lining corners.
Result: the outer bag and lining both boxed to a 4″ depth, still inside out, with the lining gap open.
Step 17 – Turn the Bag Right Side Out Through the Gap
Reach through the 5″ gap in the lining, through the open zipper, and pull the outer bag through until it is right side out. Push out the corners with a point turner. The lining now hangs outside the bag. You will close the gap in Step 18.
Result: the outer bag right side out, with the lining pulled out through the zipper and the gap still open.
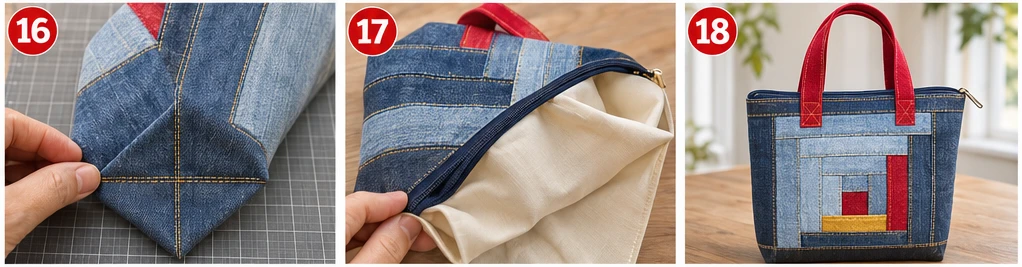
Step 18 – Close the Lining Gap and Finish the Bag
Fold both raw edges of the gap inward ½”, in line with the rest of the seam, and edgestitch ⅛” from the folds, or close it by hand with a ladder stitch. Push the lining down inside the bag, smoothing it into the boxed corners. Press the fabric along both sides of the zipper, then close the zipper fully to check that it runs smoothly from end to end.
Result: a finished tote, 14″ wide, 14″ tall, and 4″ deep, with the lining gap closed, a working top zipper, and red handles reinforced with box-and-X stitching.
Managing Denim Bulk and Keeping the Zipper Smooth
- The machine struggles at the frame seams: denim plus batting plus muslin is thick. Use a 100/16 denim needle, lengthen the stitch to about 3.0 mm, and sew slowly over crossing seams.
- Strips ripple as you add them: press each strip flat before topstitching, and do not stretch the denim as you sew. Stretch denim ripples more, so choose jeans with little or no stretch.
- The block looks off-center after trimming: measure from the block edges, not the foundation edges, since quilt-as-you-go panels can shift slightly as they grow.
- The zipper seam waves: keep the tape edge aligned with the raw edge and sew with the zipper foot right beside the coil. Topstitching in Step 14 then holds the fabric back from the teeth.
- The bag will not turn: the zipper was closed when the side seams were sewn. The pull must sit at the center before Step 15.
- Handles feel loose under weight: check that each box-and-X catches the full folded end, and backstitch at the start and end of each box.
Design Inspiration and Tutorial Note: The images in this section may be AI-generated or digitally developed to illustrate the design and the sewing sequence. The instructions describe a proposed construction method with measurements calculated for the stated finished size. They are not a physically tested pattern. Measure your panels as you go, and check the panel size before trimming and cutting.
Other Design Inspirations – Digitally Modified Images. Texture and color may vary from the actual product.
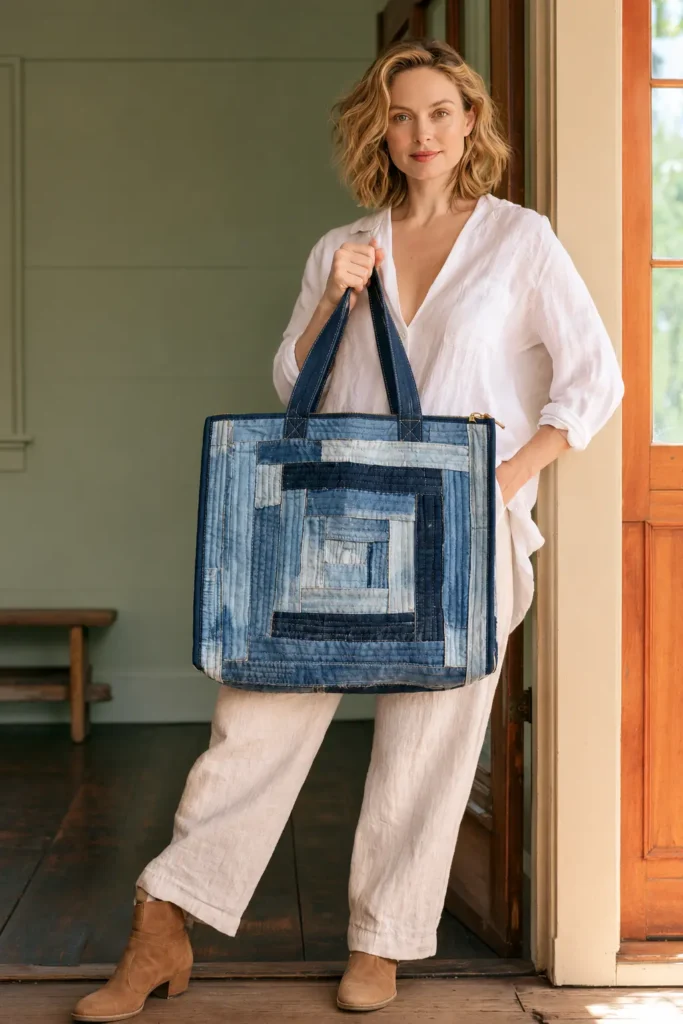
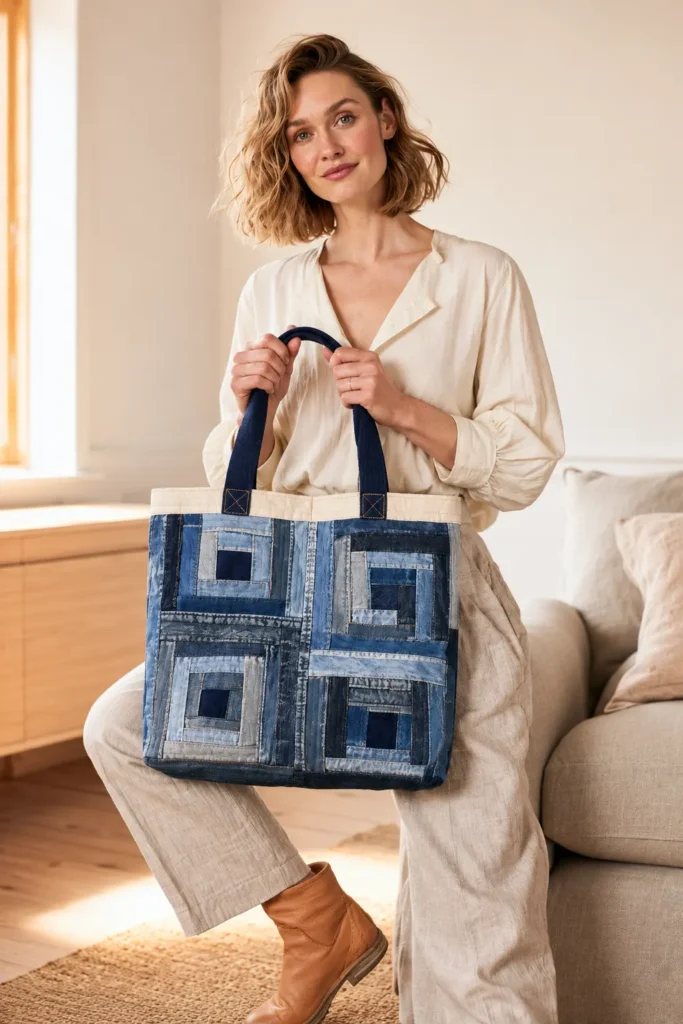
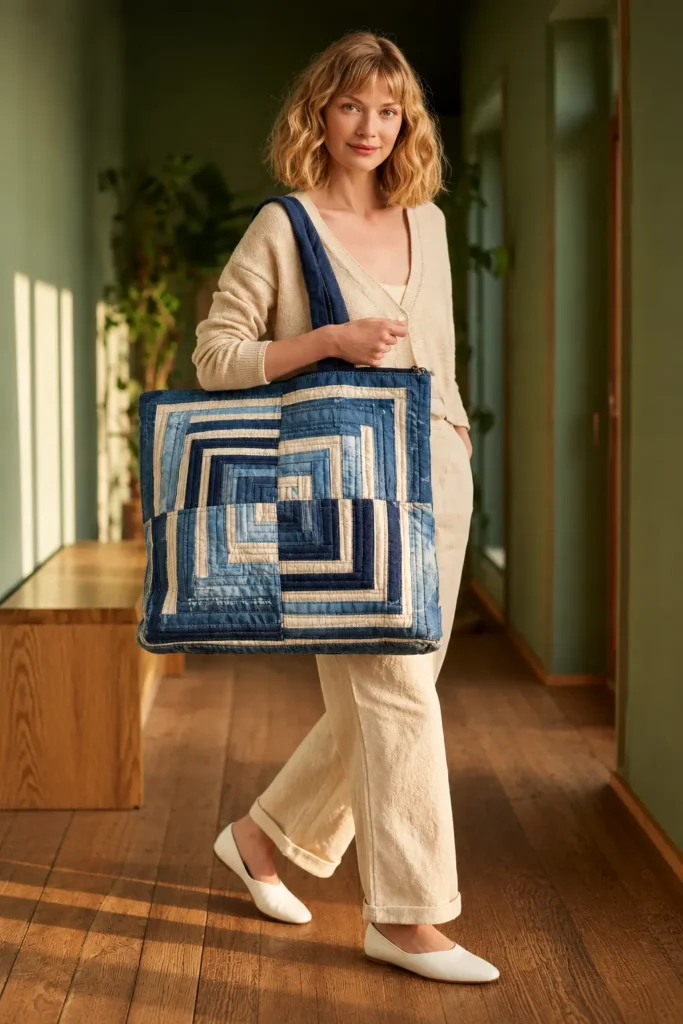
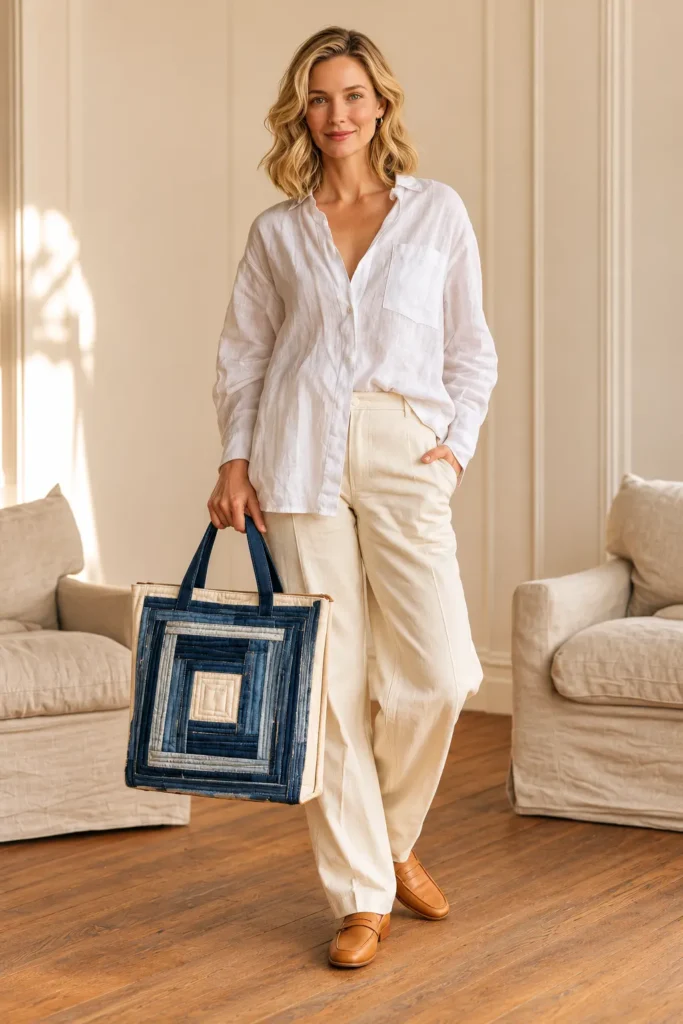
5. Wonky Log Cabin Quilt Tote Bag with Improv Strips in Bright Solids
This wonky Log Cabin tote keeps the familiar structure of the block, strips spiraling around a center square, and lets every line lean. Each of the four blocks on the front starts with a small square set at a tilt, and the strips around it taper from wide to narrow, so no two seams run parallel and no two blocks match. The fabrics are all bright solids: tomato red, tangerine, lemon yellow, kelly green, turquoise, and magenta, mixed freely so each strip contrasts with its neighbor. Because there are no prints, the eye goes straight to the angled seam lines, which is where the character of the design lives.
The tote is an everyday size, 14″ wide, 13″ tall, and 4″ deep, with a boxed bottom so it stands on its own. A narrow cream border frames the four blocks and disappears into the seams, tomato red handles tie into the palette, and a cream lining with an interior slip pocket keeps the inside simple. Straight vertical quilting lines in white thread give the panels body and a modern contrast to the tilted patchwork, making the bag sturdy enough for a library run, a farmers market, or a project bag.
Design Inspirations – Digitally Modified Images. Texture and color may vary from the actual product.
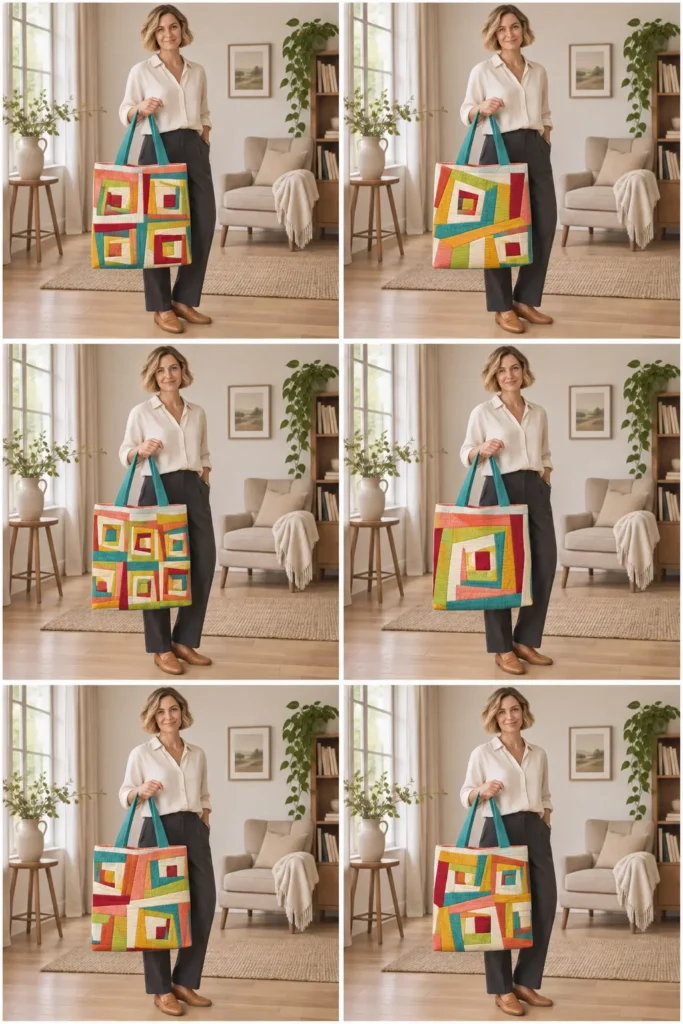
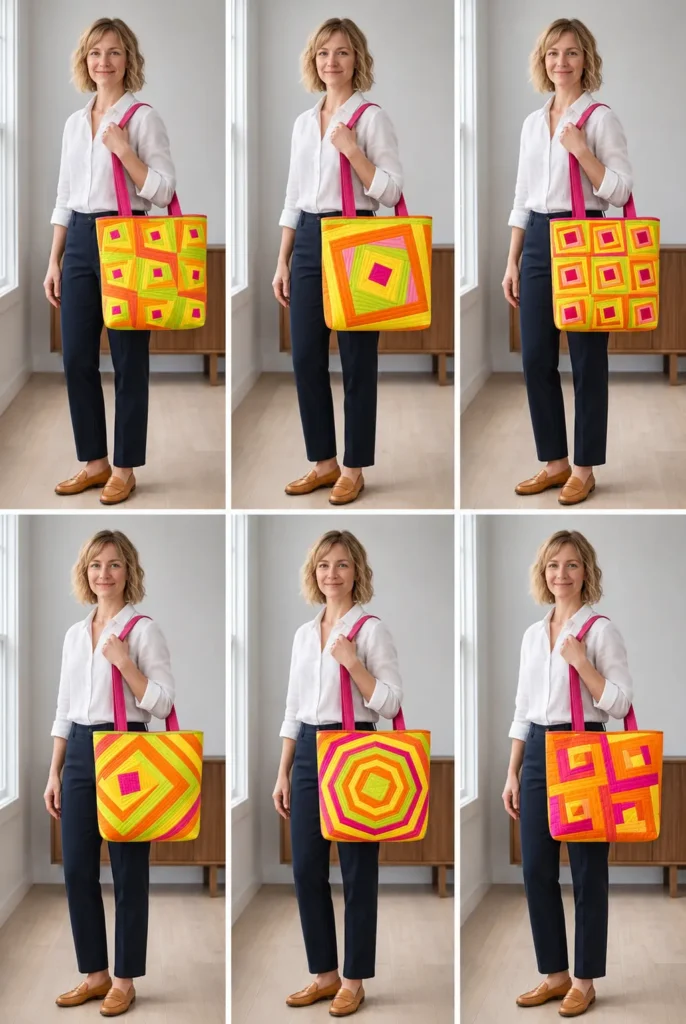
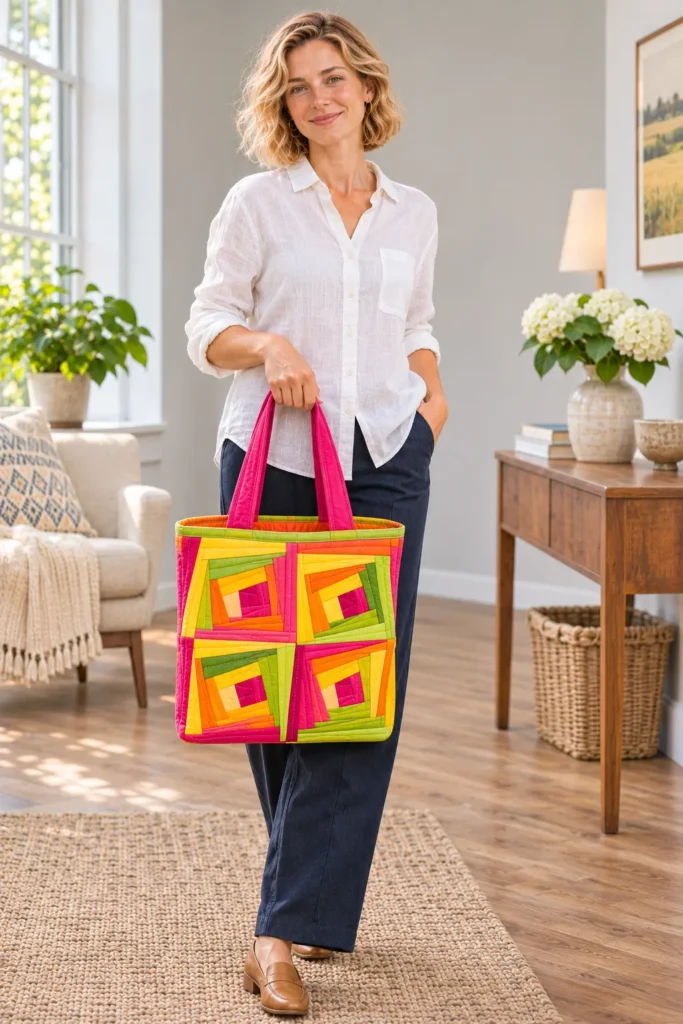
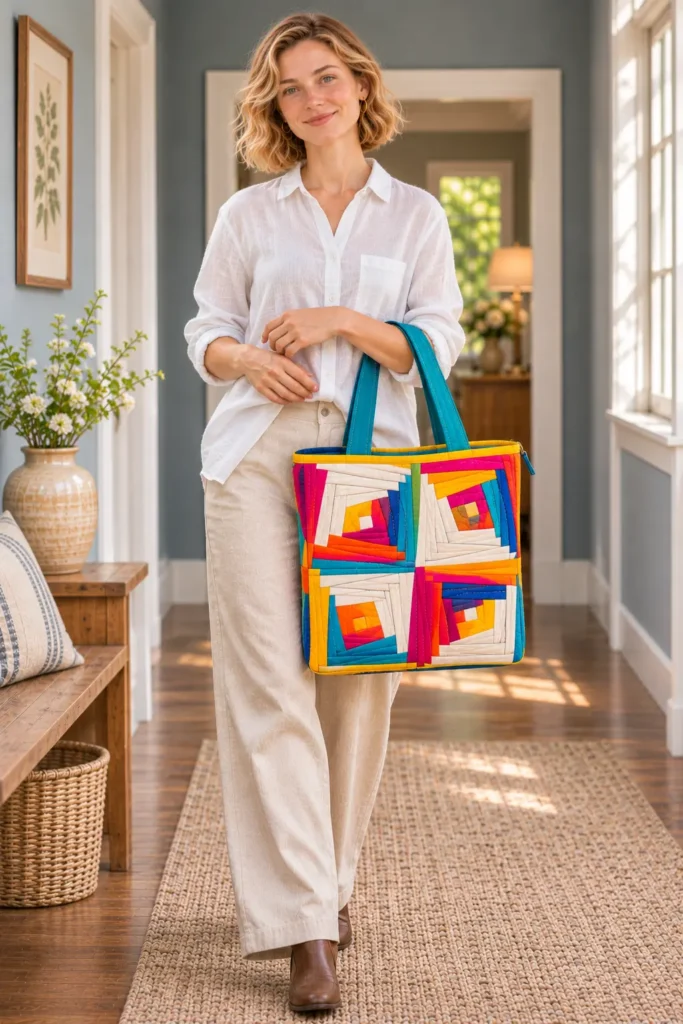
How Improv Piecing Makes a Log Cabin Wonky
A wonky Log Cabin uses the same spiral order as a classic block: one strip on the top, then the left, the bottom, and the right, round after round. The difference is what happens after each strip is sewn. Instead of keeping every edge square, you lay a ruler across the new strip at a slight angle and trim it, so the strip is wider at one end than the other. The next strip is sewn to that angled edge, and the tilt carries through the block.
There are no templates and no exact strip lengths. The only measurements that matter are the strip widths you start with and a single minimum: keep every strip at least 1″ wide at its narrowest point, so it still shows clearly after the next seam. After three rounds, each block is trimmed to exactly 7½” square. That final trim is what lets four improv blocks fit together into a neat grid, and tilting the ruler as you trim pushes the center a little off-axis for even more movement.
This is different from an off-center Log Cabin, where narrow and wide strips follow a planned system. Here, every angle is a choice you make as you sew, so each block becomes one of a kind.
Choosing and Placing Bright Solids
Solids are what make the wonky seams readable. With prints, the eye follows the motifs; with solids, it follows the edges between colors, so every tilted seam stands out. Choose six clear, saturated solids that are roughly equal in intensity, so no single color dominates. The palette here, tomato red, tangerine, lemon yellow, kelly green, turquoise, and magenta, covers the color wheel while staying bright.
When you add strips, place contrasting colors next to each other: yellow beside turquoise, magenta beside green, orange beside red only when another color sits between them. Avoid putting the same color on two strips that touch, and change the center color from block to block. Laying out all eight finished blocks before sewing gives one more chance to spread the colors evenly across both panels.
Quilting cotton solids are ideal because they press flat and hold crisp seams, even on narrow tapered strips. The cream border and lining keep the frame calm, and red handles repeat one of the six solids rather than adding a seventh color.
Materials and Tools Needed
Fabric
- Bright quilting cotton solids: ¼ yard each of tangerine, lemon yellow, kelly green, turquoise, and magenta
- Tomato red quilting cotton solid: ½ yard (strips and handles)
- Cream quilting cotton: 1 yard (border, lining, and pocket)
- Muslin for the quilt foundation: two 21″ × 21″ pieces (⅝ yard if your muslin has 42″ of usable width; otherwise 1¼ yards)
- Low-loft cotton or cotton-blend batting: two 21″ × 21″ pieces (⅝ yard of 45″-wide or wider)
Notions and Tools
- Neutral cotton piecing thread
- White thread for quilting and topstitching
- Sewing machine with a ¼” piecing foot and a walking foot
- Size 90/14 machine needle
- Rotary cutter, self-healing cutting mat, and a 6″ × 24″ quilting ruler
- 8½” or 9½” square ruler for trimming blocks
- Curved safety pins or basting spray
- Fabric marking pen
- Fabric clips
- Iron and pressing surface
- Point turner
Finished Tote Bag Size
- Width at the top: 14″, measured flat across the opening from side seam to side seam
- Height: 13″, measured along a side seam from the top edge to the base
- Depth: 4″, measured across the base from front to back
- Base: 10″ × 4″
- Handles: 1″ wide, 23″ visible length
- Handle drop: about 8″ (calculated at 8½”; the curve of the handle in use makes it slightly shorter)
- Interior slip pocket: 8″ wide × 6″ tall
Cutting Measurements
Improv strips are cut in three widths and then cut to length as you sew, so the table lists strips rather than individual logs. Fabric amounts include room for the angled trimming.
| Piece | Quantity | Cut Size (W × H) | Purpose |
|---|---|---|---|
| Solid strips, 1½” | 1 per solid (6) | 1½” × WOF | Narrow logs |
| Solid strips, 2″ | 1 per solid (6) | 2″ × WOF | Medium logs |
| Solid strips, 2½” | 1 per solid (6) | 2½” × WOF | Wide logs |
| Center squares | 8 | 3″ × 3″ | Block centers, mixed colors |
| Red handle strips | 2 | 4″ × 24″ | Handles |
| Cream side borders | 4 | 2½” × 14½” | Panel borders |
| Cream top and bottom borders | 4 | 2½” × 18½” | Panel borders |
| Muslin foundation | 2 | 21″ × 21″ | Quilt backing (oversized; trimmed with the panel) |
| Batting | 2 | 21″ × 21″ | Quilt middle layer (oversized; trimmed with the panel) |
| Cream lining panels | 2 | 15″ × 16″ | Lining |
| Cream slip pocket | 1 | 9″ × 13″ | Interior pocket |
Cut additional strips from the remaining solids if you run short. Each block is built to at least 8½” square and trimmed to 7½”. The pieced tops measure 18½” × 18½” and are trimmed to 15″ × 16″ after quilting.
Assembly at a Glance
- Cut the Solid Strips and Sort the Fabrics
- Build the Eight Wonky Log Cabin Blocks
- Trim Each Block to 7½ Inches Square
- Arrange the Front and Back Layouts
- Sew the Front Patchwork Panel
- Sew the Back Patchwork Panel
- Layer and Baste the Quilt Sandwiches
- Quilt Both Panels
- Trim the Quilted Panels and Cut the Corner Squares
- Make the Two Handles
- Make the Interior Pocket
- Prepare the Lining Panels
- Sew the Outer Bag Side and Bottom Seams
- Box the Outer Corners and Turn the Outer Bag Right Side Out
- Sew and Box the Lining, Leaving a Turning Gap
- Baste the Handles to the Outer Bag
- Sew the Outer Bag and Lining Together at the Top Edge
- Turn Through the Gap, Close It, Press, and Topstitch
Step-by-Step Sewing Tutorial
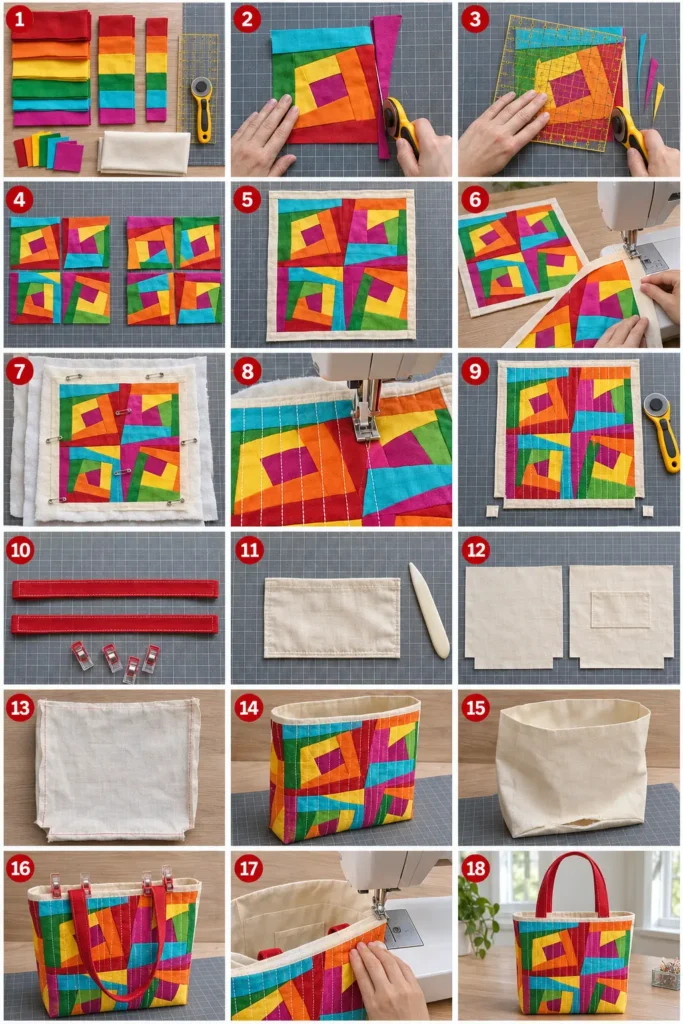
Step-by-Step Illustration – Digitally Created Image. Follow the written steps for measurements and details.
Step 1 – Cut the Solid Strips and Sort the Fabrics
From each of the six solids, cut one strip each 1½”, 2″, and 2½” wide across the width of fabric. Cut eight 3″ center squares from the remaining fabric, mixing the colors. From the tomato red, also cut two 4″ × 24″ handle strips. Cut the cream borders, lining panels, and pocket, and the muslin and batting squares. Group the strips by color so you can see every option at once.
Result: strips in three widths for all six solids, eight centers, and all bag pieces cut.
Step 2 – Build the Eight Wonky Log Cabin Blocks
Sew all seams with a ¼” seam allowance, right sides together, and press each seam away from the center. For each block:
- Trim a 3″ center square at a slight angle on all four sides, so it becomes a tilted shape about 2½” across.
- Sew a strip of any width to the top edge, cut it to length, and press it open. Lay your ruler across the new strip at a slight angle and trim, leaving at least 1″ of strip at its narrowest point.
- Repeat on the left, bottom, and right edges to complete the round, trimming each new strip at an angle.
- Add two more rounds the same way, changing colors and strip widths as you go.
Each block should measure at least 8½” square after three rounds. If one side is short, add one more strip to that side.
Result: eight untrimmed wonky blocks, each at least 8½” square, with tilted seams and mixed bright solids.
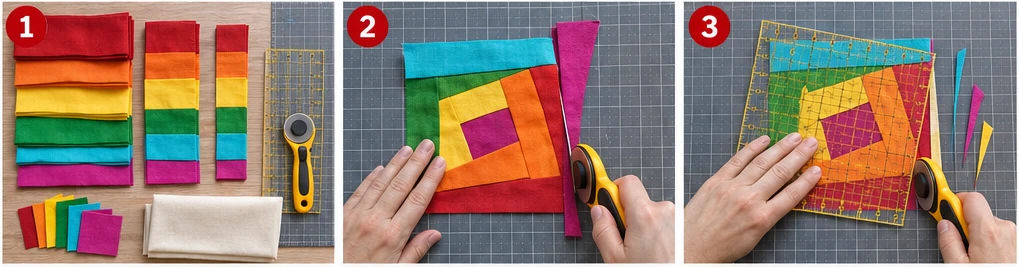
Step 3 – Trim Each Block to 7½ Inches Square
Place a square ruler on a block, tilted slightly so the center leans off-axis, and check that the center sits at least 1″ inside every edge of the ruler. Trim all four sides to 7½” square. Repeat for all eight blocks.
Result: eight wonky blocks, each exactly 7½” square.
Step 4 – Arrange the Front and Back Layouts
Lay out the blocks right side up in two groups of four, each in two rows of two. Turn and swap blocks until no two neighboring blocks share a color along their touching edge, and the colors look balanced across both groups. Photograph both layouts.
Result: two unsewn 2 × 2 layouts with the colors spread evenly.
Step 5 – Sew the Front Patchwork Panel
Sew the two blocks in each row right sides together with a ¼” seam, then press the row seams in opposite directions. Sew the rows together, matching the center seam, to make a 14½” square. Sew a 2½” × 14½” cream border to the left and right edges, then a 2½” × 18½” border to the top and bottom edges, pressing toward the border. Press the finished top from the wrong side, then the right side.
Result: the front patchwork top, 18½” × 18½”, with four wonky blocks framed in cream.
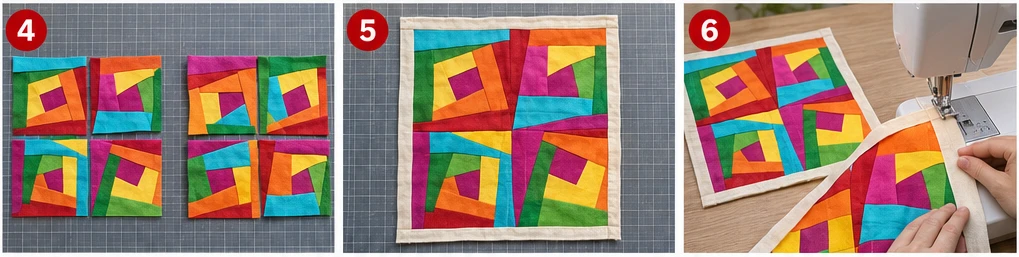
Step 6 – Sew the Back Patchwork Panel
Repeat Step 5 with the second layout to make the back patchwork top, then press it.
Result: two patchwork tops, each 18½” × 18½”.
Step 7 – Layer and Baste the Quilt Sandwiches
Place a 21″ muslin square on the table, then a 21″ batting square on top. Center a patchwork top on the batting, right side up, with about 1¼” of batting showing on every side. Baste every 3″ to 4″ with curved safety pins or basting spray, working from the center outward. Repeat for the second top.
Result: two basted quilt sandwiches, patchwork side up.
Step 8 – Quilt Both Panels
Attach a walking foot, thread it with white thread, and set a stitch length of about 3.0 mm. Draw a vertical line down the center of the panel and quilt along it. Quilt more vertical lines across the whole panel, spacing them about ¾” apart and varying the spacing a little for an improv feel. The straight lines contrast with the tilted seams. Repeat on the second panel.
Result: two quilted panels with straight vertical white quilting lines across the patchwork.
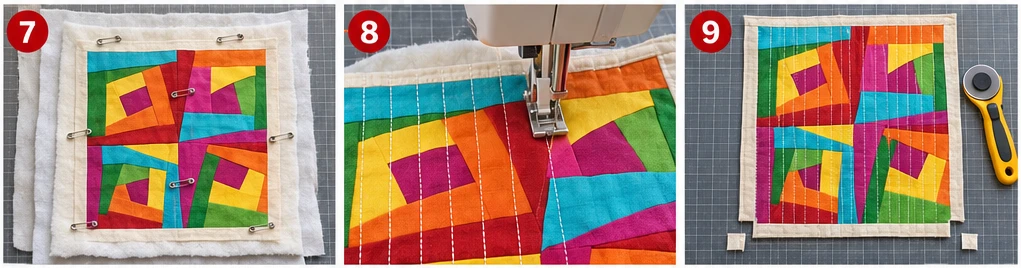
Step 9 – Trim the Quilted Panels and Cut the Corner Squares
Lay a quilted panel right side up. Trim the left, right, and top edges so ½” of cream remains beyond the blocks, and trim the bottom edge so 1½” of cream remains below the blocks. The panel should measure 15″ wide × 16″ tall. Cut a 2″ × 2″ square from both bottom corners, measuring from the raw edges. Repeat for the second panel.
Result: two outer panels, each 15″ × 16″, with 2″ notches at the bottom corners.
Step 10 – Make the Two Handles
Fold a 4″ × 24″ red handle strip in half lengthwise, wrong sides together, and press. Open it, fold both long raw edges to the center crease, press, and refold. The handle now measures 1″ × 24″. Edgestitch ⅛” from both long edges. Repeat for the second handle.
Result: two tomato red handles, each 1″ wide and 24″ long.
Step 11 – Make the Interior Pocket
Fold the 9″ × 13″ cream pocket piece in half, right sides together, so it measures 9″ wide × 6½” tall, with the fold at the top. Sew the sides and bottom with a ½” seam, leaving a 3″ gap in the bottom. Clip the corners, turn right side out, and press with the gap allowances folded in. Topstitch ⅛” along the top fold.
Result: a finished pocket, 8″ wide × 6″ tall.
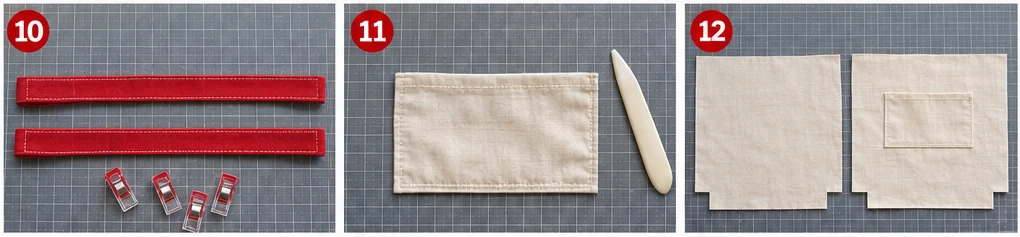
Step 12 – Prepare the Lining Panels
Cut a 2″ × 2″ square from both bottom corners of each 15″ × 16″ cream lining panel. On one panel, right side up, place the pocket right side up, centered side to side (3½” from each side edge), with its top edge 3″ below the top raw edge. Edgestitch the sides and bottom, closing the pocket’s turning gap, and bar-tack the top corners.
Result: two notched lining panels, one with the slip pocket attached.
Step 13 – Sew the Outer Bag Side and Bottom Seams
Place the two quilted outer panels right sides together, top edges aligned, and clip. Sew both side seams and the bottom seam with a ½” seam, leaving the corner notches open; you will sew them closed when you box the corners in Step 14. Backstitch at each end. Trim the batting out of the seam allowances and press the seams open.
Result: the outer bag shell, wrong side out, with open corner notches.
Step 14 – Box the Outer Corners and Turn the Outer Bag Right Side Out
At one bottom corner, pull the front and back apart so the side seam lies directly on top of the bottom seam; the notch’s raw edges form one straight line. Sew across with a ½” seam, backstitching at both ends. This seam closes the notch and forms the boxed corner. Repeat at the other corner. Turn the outer bag right side out and push the corners into shape.
Result: the outer bag, right side out, 14″ wide with a 4″-deep boxed bottom and a raw top edge.
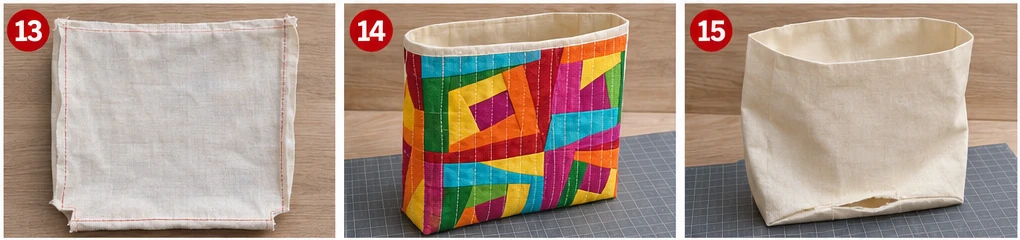
Step 15 – Sew and Box the Lining, Leaving a Turning Gap
Place the lining panels right sides together, pocket inside. Sew the side seams with a ½” seam. Sew the bottom seam with a ½” seam, leaving a 5″ gap centered in it and backstitching on both sides. You will turn the bag through this gap and sew it closed in Step 18. Box both corners the same way as Step 14, sewing across each notch to close it. Leave the lining wrong side out.
Result: the boxed lining, wrong side out, with a 5″ gap in the bottom seam.
Step 16 – Baste the Handles to the Outer Bag
With the outer bag right side out, lay one handle against the front. Place each end so its center is 4″ from the nearest side seam, raw ends aligned with the top raw edge and the loop hanging down over the front, untwisted. Clip and baste ¼” from the top edge. Repeat on the back, matching the front positions exactly.
Result: the outer bag with both handles basted to the right side, loops hanging down.
Step 17 – Sew the Outer Bag and Lining Together at the Top Edge
Slip the outer bag, still right side out, inside the lining, still wrong side out. Right sides now face each other, with the handles sandwiched between. Align the side seams and top raw edges, clip all the way around, and sew with a ½” seam.
Result: the outer bag and lining joined along a continuous 28″ top seam, handles hidden inside.
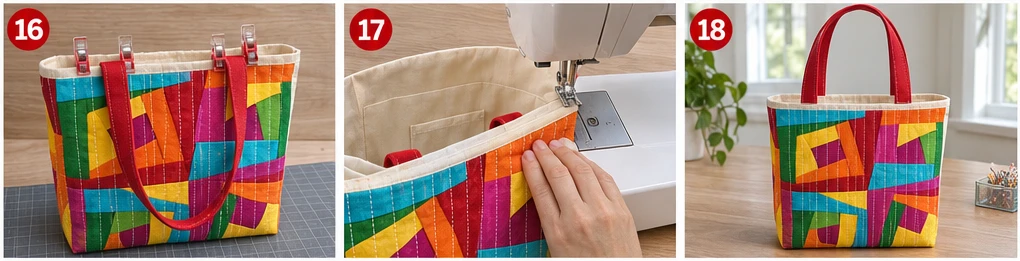
Step 18 – Turn Through the Gap, Close It, Press, and Topstitch
Pull the outer bag through the lining gap until the whole bag is right side out. The lining now hangs outside the bag, so the gap is easy to reach. Fold both raw edges of the gap inward ½”, in line with the rest of the seam, press, and edgestitch ⅛” from the folds, or close it by hand with a ladder stitch. Push the lining into the bag, press the top edge so the seam sits exactly at the edge, and pull the handles upright. Topstitch around the opening ⅛” from the top edge, then ⅜” from the top edge. The second line catches the handle ends and secures them.
Result: a finished tote, 14″ wide, 13″ tall, and 4″ deep, with the lining gap closed, red handles, and four wonky blocks on each side.
Keeping Improv Blocks Wonky but Usable
- A block comes out smaller than 8½”: the angled trims took too much. Add an extra strip to the short side before the final trim rather than trimming the block smaller.
- A strip disappears into the next seam: it was trimmed too narrow. Keep at least 1″ at the narrowest point, which leaves ¾” visible after the next seam.
- The blocks look too tame: the angles are too gentle. Tilt the ruler more, up to about 15 degrees, on some trims, and vary the strip widths more.
- The blocks look chaotic: the same colors are touching. Separate matching solids, and repeat each color at least once in every block so the grid holds together.
- Bias edges stretch: angled trims create edges that stretch easily. Handle trimmed blocks gently, and press with an up-and-down motion instead of sliding the iron.
- A center lands too close to a seam: check in Step 3 that the center sits at least 1″ inside the trim lines before you cut.
Design Inspiration and Tutorial Note: The images in this section may be AI-generated or digitally developed to illustrate the design and the sewing sequence. The instructions describe a proposed construction method with measurements calculated for the stated finished size. They are not a physically tested pattern, and improv fabric use will vary. Measure your blocks and panels as you go, and check the panel size before trimming and cutting.
Other Design Inspirations – Digitally Modified Images. Texture and color may vary from the actual product.
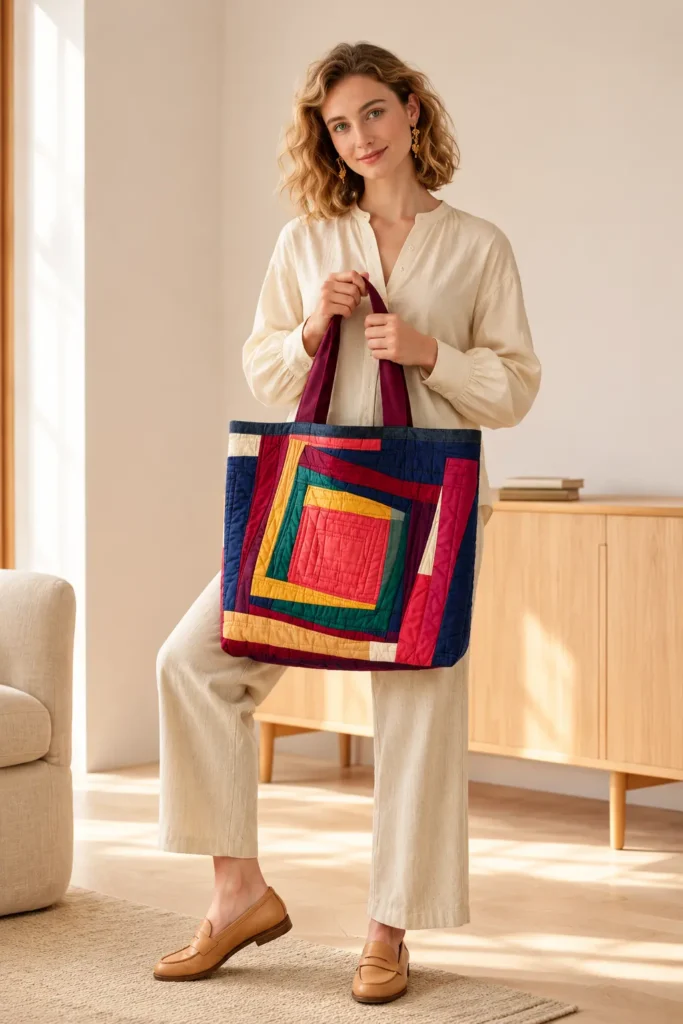
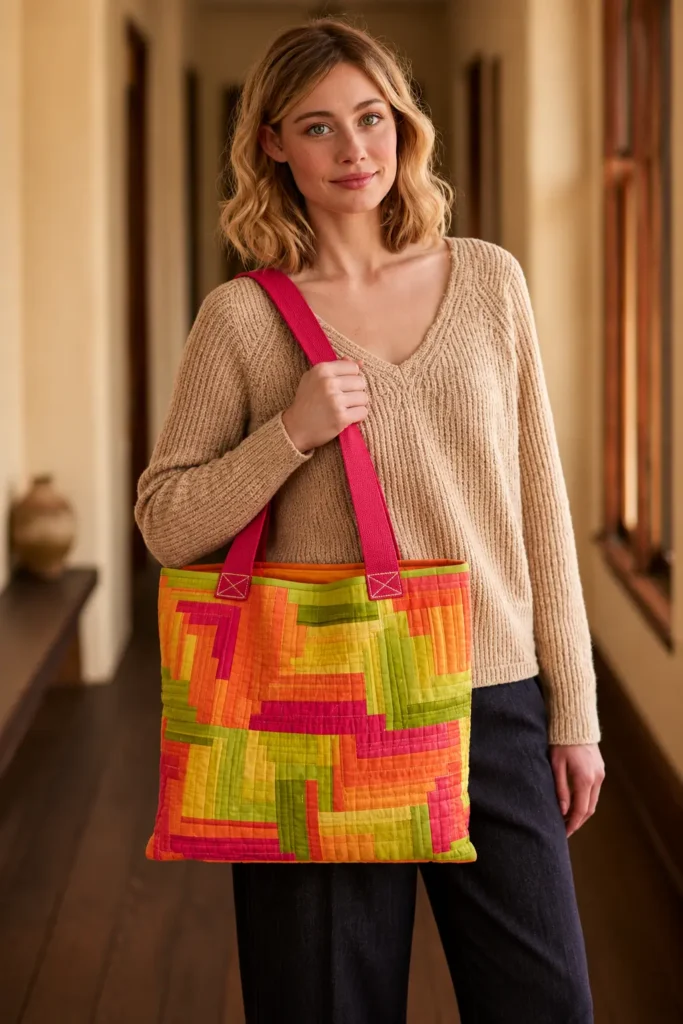
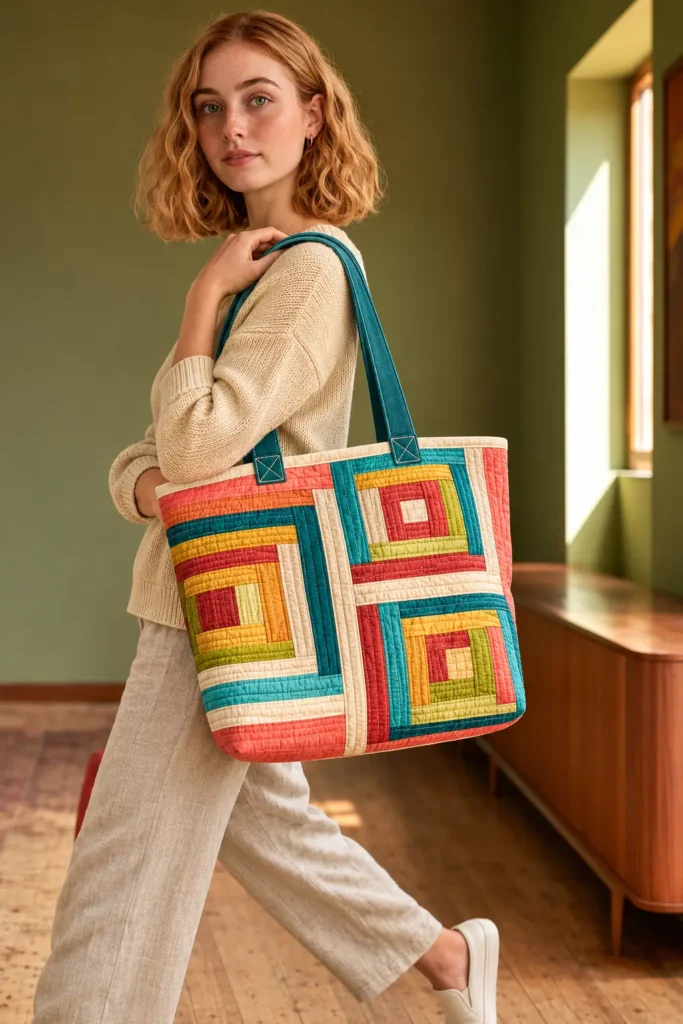
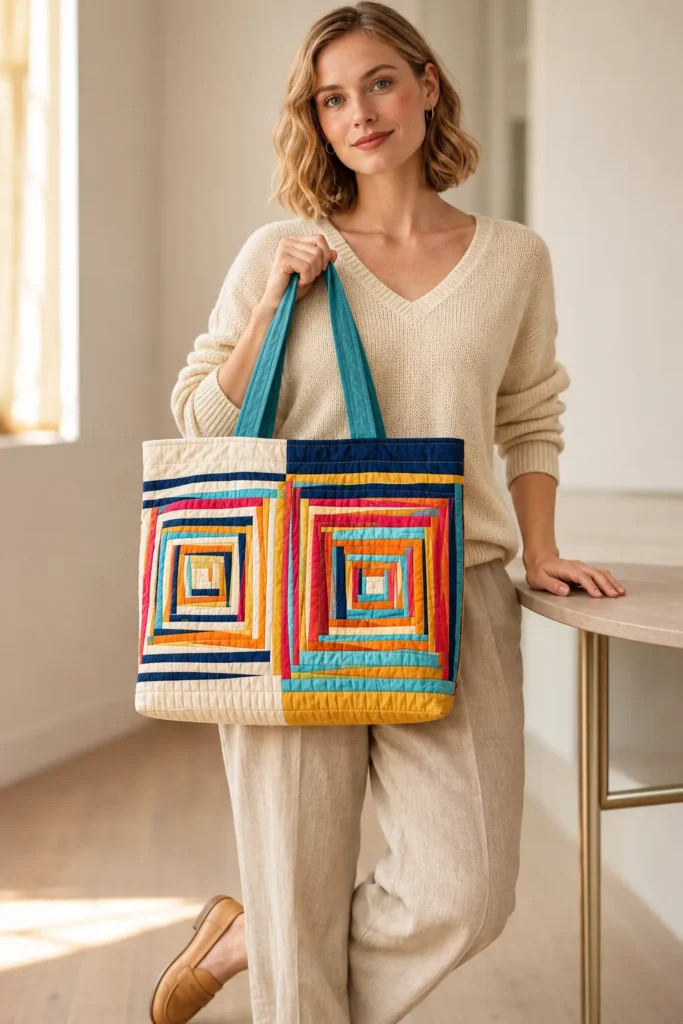
6. Reversible Log Cabin Quilt Tote Bag with Scrappy and Low-Volume Sides
Design Inspirations – Digitally Modified Images. Texture and color may vary from the actual product.
Other Design Inspirations – Digitally Modified Images. Texture and color may vary from the actual product.
More to come …
7. Courthouse Steps Log Cabin Quilt Tote Bag in Navy, Coral, and Cream
8. Half Log Cabin Quilt Tote Bag with Saffron and Violet Corner Bands
9. Oversized Single-Block Log Cabin Beach Tote in Hot Pink and Lime
10. Sunshine and Shadow Log Cabin Quilt Tote Bag in Charcoal and Yellow
11. Off-Center Log Cabin Quilt Tote Bag in Teal and Tangerine Batiks
12. Streak of Lightning Log Cabin Tote with Red, White, and Navy Zigzags
Final Thoughts on Log Cabin Quilt Tote Bag Ideas
The appeal of Log Cabin quilt tote bags comes from the relationship between simple fabric strips and the many patterns they can create. Traditional red-centered blocks retain the familiar character of Log Cabin quilts, while rainbow diamonds, contrasting Courthouse Steps, and repeating light-and-dark arrangements demonstrate how block placement changes the overall design. More contemporary approaches, including asymmetrical blocks, improvisational piecing, and bright solid fabrics, bring a different visual rhythm to the same quilting tradition. Fabric choice adds another layer of variety, from vintage-inspired prints to textured denim and richly colored batiks. Together, these designs show how scale, construction, quilting texture, and thoughtful color placement influence both the appearance and character of a handmade tote.
When choosing a project, begin with the patchwork technique that interests you and the type of bag you will actually use. A conventional Log Cabin tote offers a clear introduction to strip piecing, while miniature blocks and complex rotational settings demand more careful cutting and layout planning. Consider whether the bag needs a zipper, reinforced base, longer handles, or a reversible finish before deciding on dimensions and fabric quantities. Keep enough contrast between important color groups to make the pattern readable, and choose quilting and stabilizing materials appropriate to the intended load. A well-planned design should balance the pleasure of colorful patchwork with comfortable carrying, sound construction, and a finished shape that suits its purpose.

