Artful Heritage: 20 Timeless Nakshi Kantha Design Ideas for an Elegant and Comfortable Home
Nakshi Kantha: What I Know From Living With It
I grew up around Nakshi Kantha. It was part of daily life in a way that made it easy to take for granted – quilts folded in cupboards, soft layers used without ceremony, pieces that felt familiar before I understood what they were. Recently, I gifted one to my niece for her wedding, and the experience of choosing it—handling several pieces, thinking about which one carried the right weight and character for that moment—reminded me how much these textiles still mean and how naturally they move between the practical and the personal.
That quality is what separates Nakshi Kantha from most other quilting traditions. These were not made in workshops according to a pattern. They were made at home, over months or sometimes years, during ordinary moments of daily life. The motifs—flowers, animals, village scenes, religious symbols, geometric forms—reflect what the maker saw, remembered, and believed. Each piece is a quiet personal record, shaped entirely by hand and time.
What Nakshi Kantha Actually Is
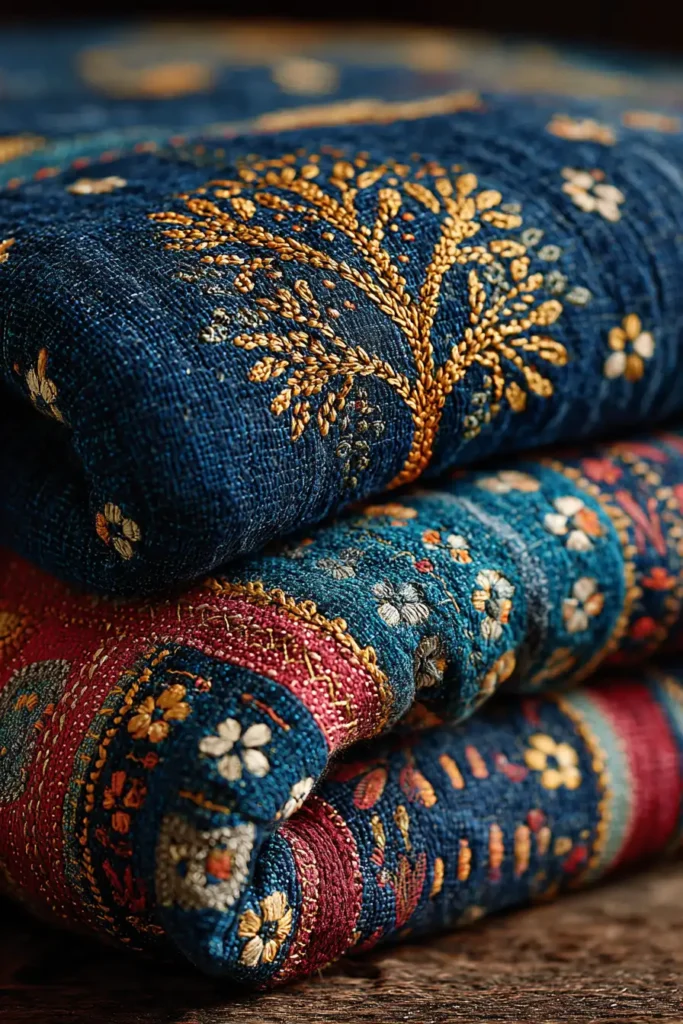
The tradition originates in the Bengal region – primarily Bangladesh and parts of eastern India. The construction is straightforward in description and demanding in practice: layers of repurposed fabric, typically old saris, lungis, or dhotis, stitched together with a continuous running stitch. The word nakshi comes from naksha, meaning pattern or design, and the stitched surface is where all the meaning lives.
The variety within the tradition is wider than it first appears. Lohori kantha is known for its flowing, wave-like lines that create movement across the fabric. Lik or Anarasi kantha introduces more structured, often geometric forms. Sujni Kantha emphasizes balanced floral and vine compositions. Cross-stitch influences were absorbed and adapted over time. Across all of these variations, three qualities remain consistent: resourcefulness in materials, patience in construction, and a strong instinct for visual storytelling.
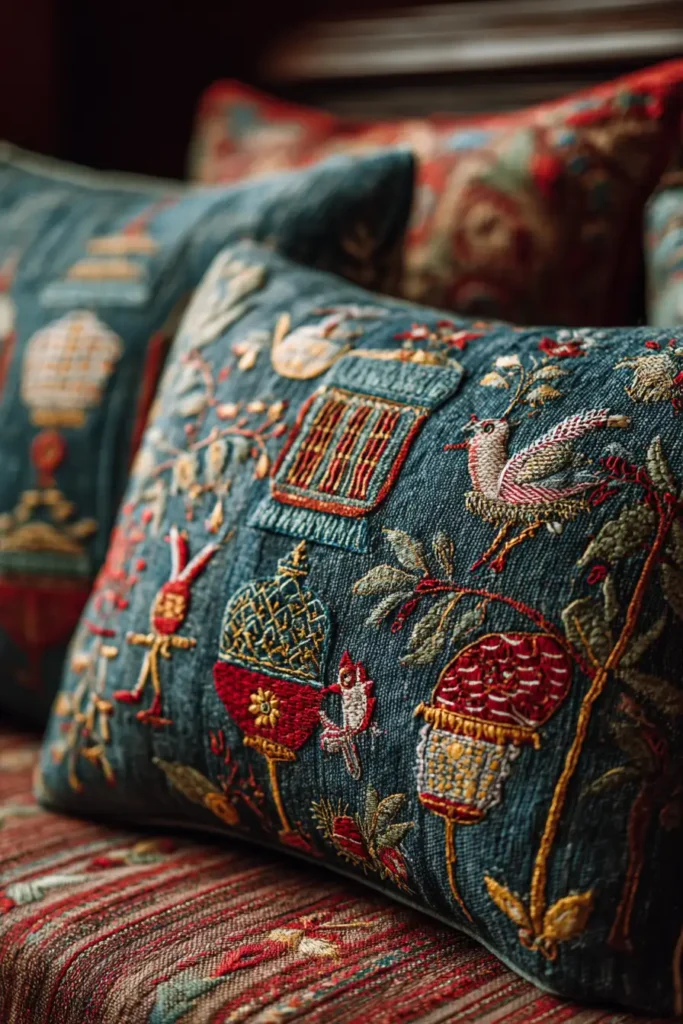
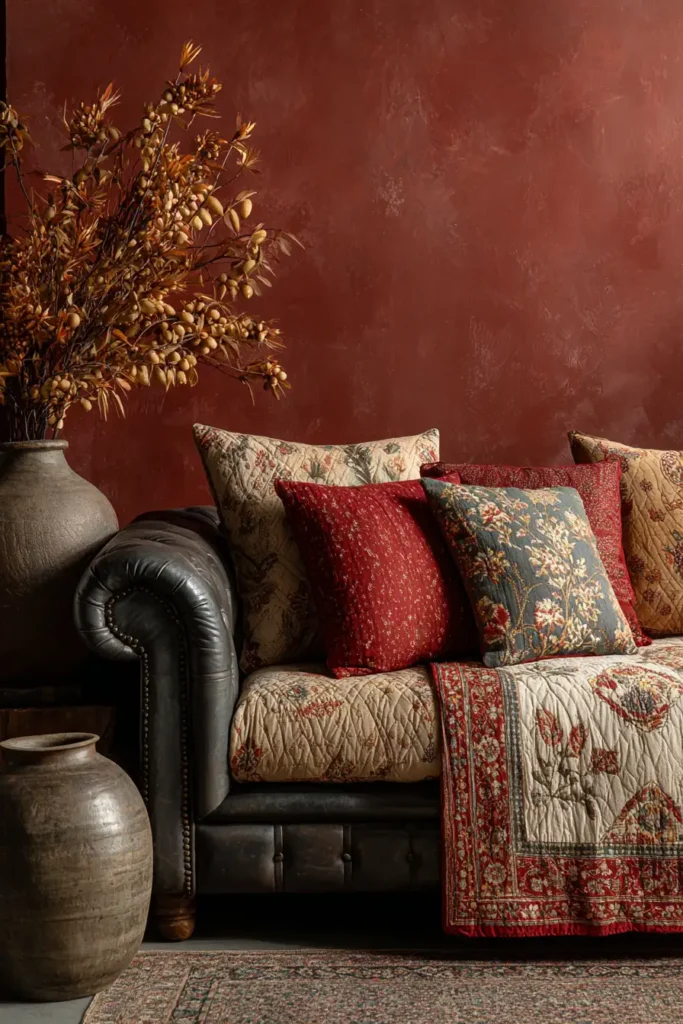
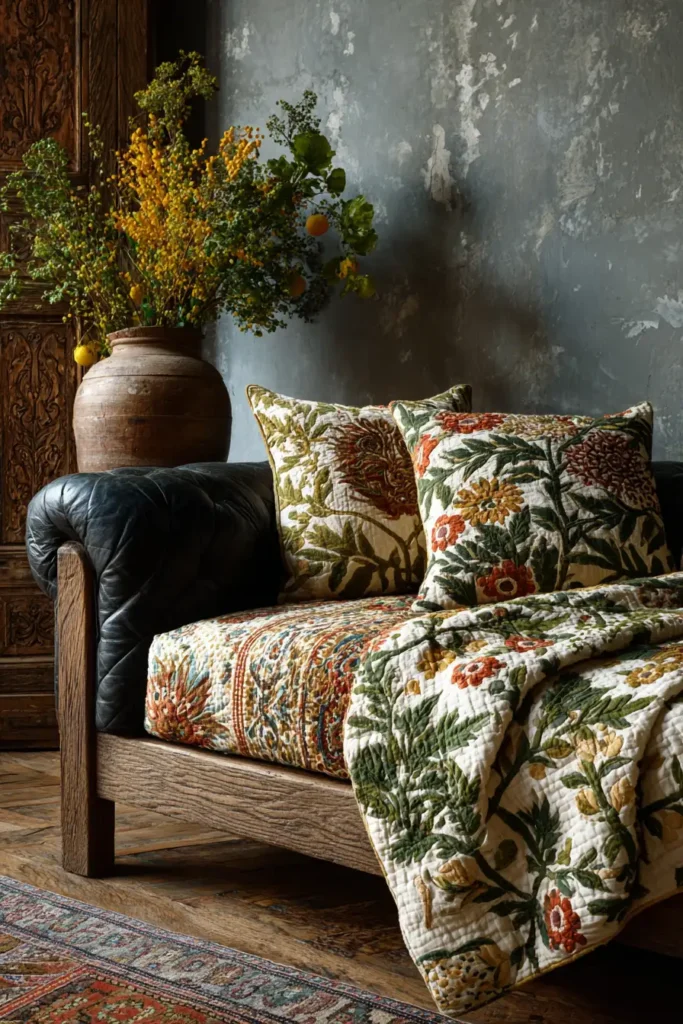
What I find most interesting, having grown up with Nakshi Kantha and watched how it sits in contemporary spaces, is how naturally it fits. It does not feel like a museum piece or a cultural artifact placed for effect. The softness, the slight irregularity of the hand stitching, the warmth of layered natural fabric — these qualities balance out cleaner, more structured modern interiors in a way that precisely manufactured textiles cannot replicate.
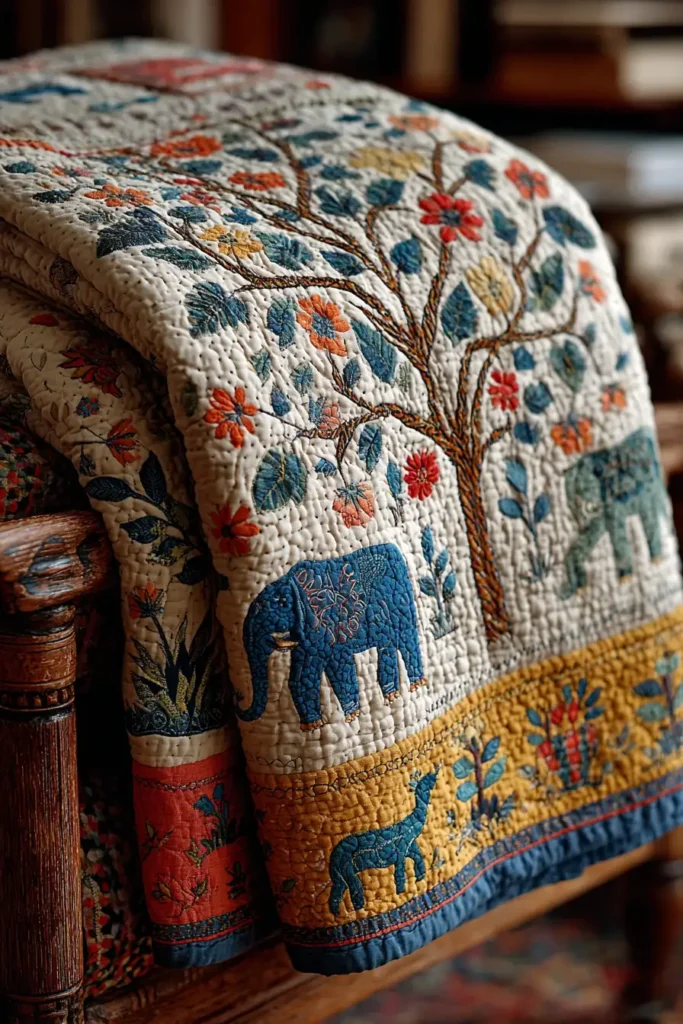
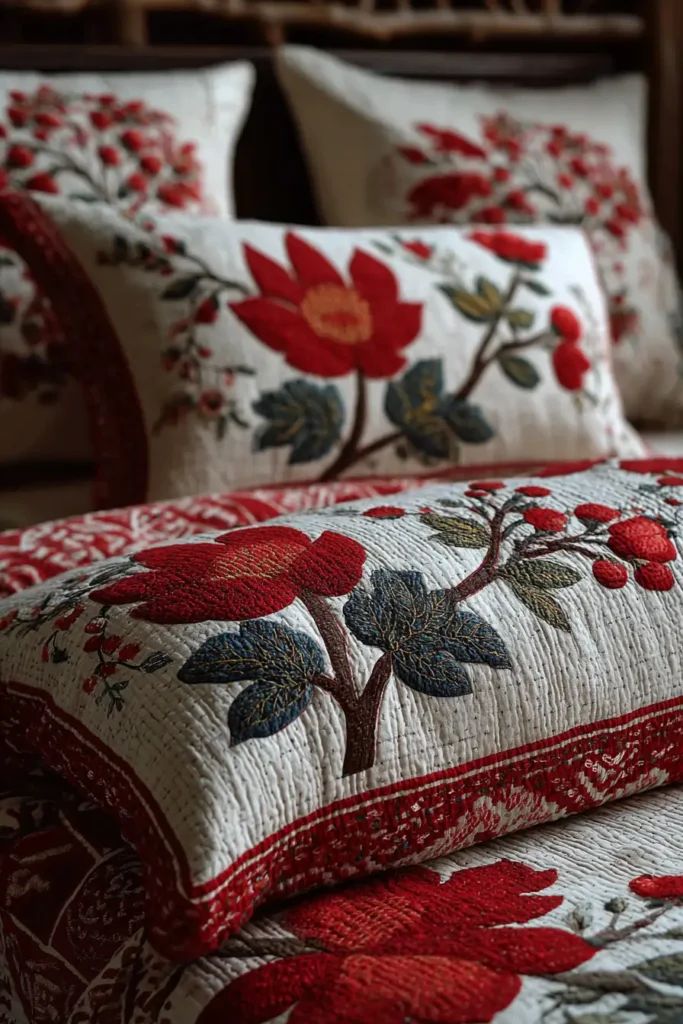
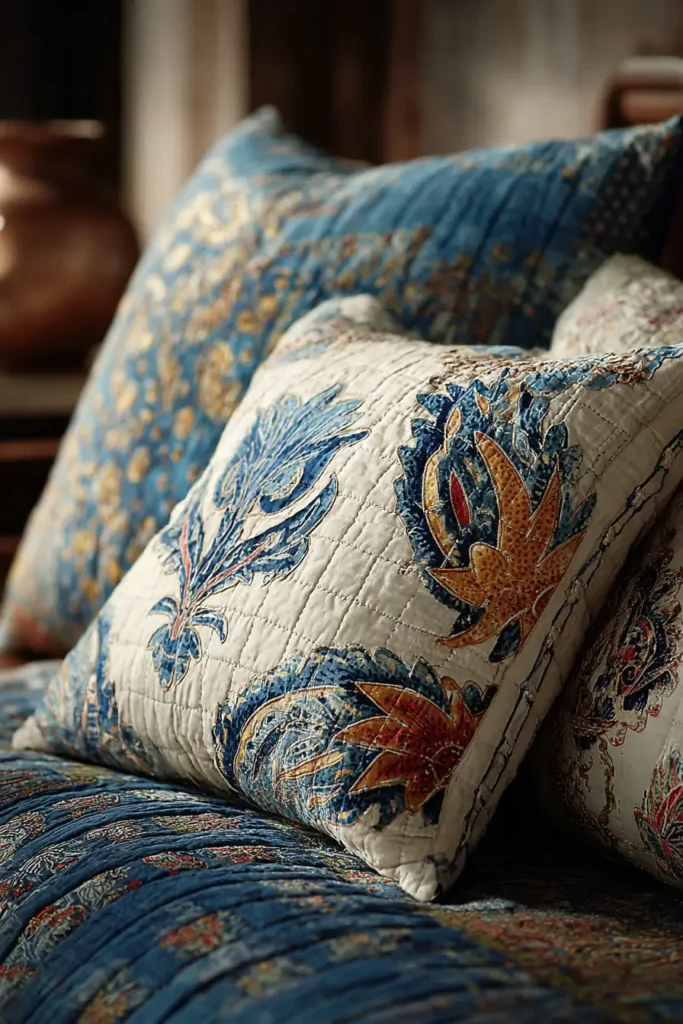
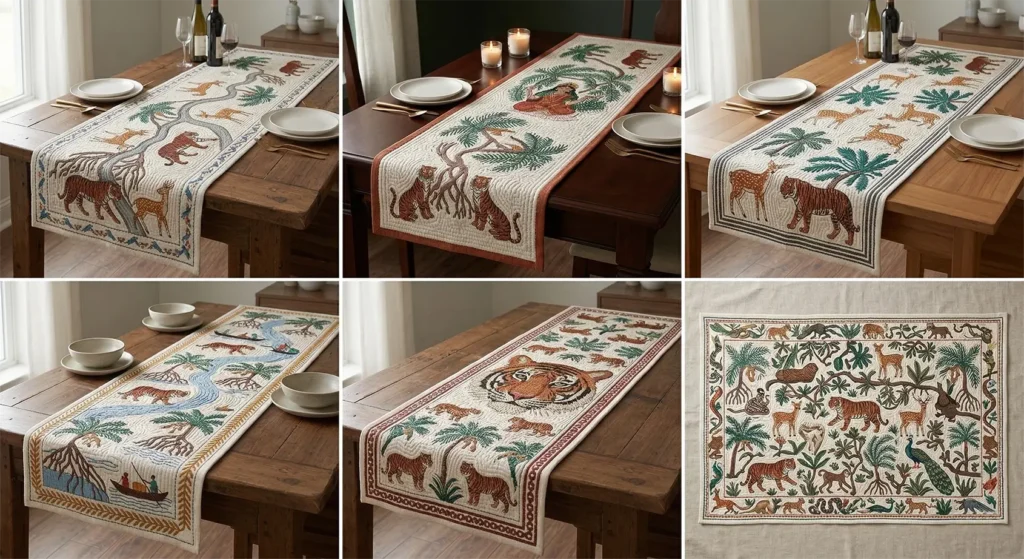
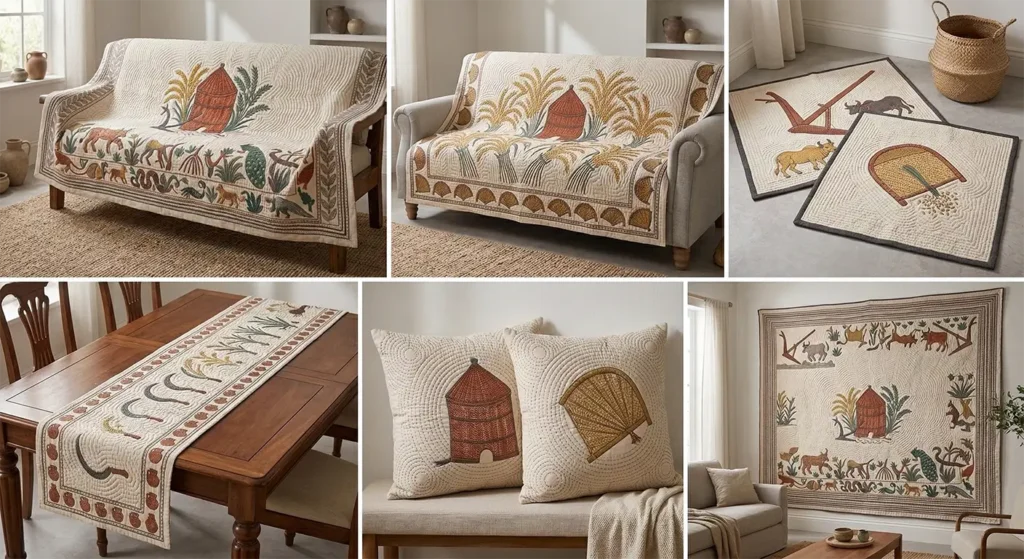
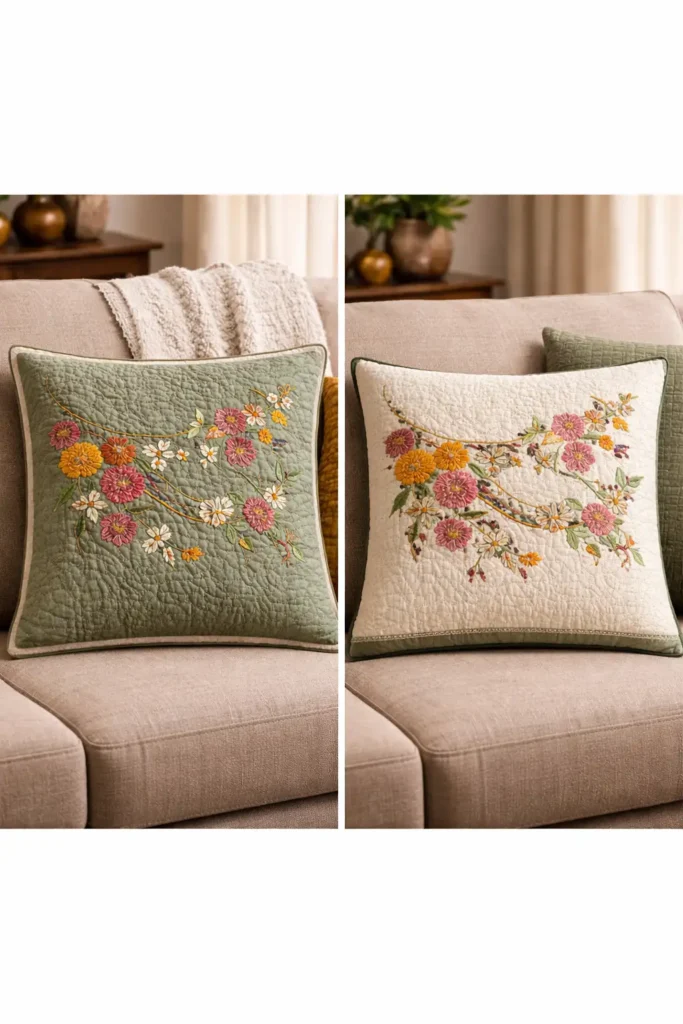
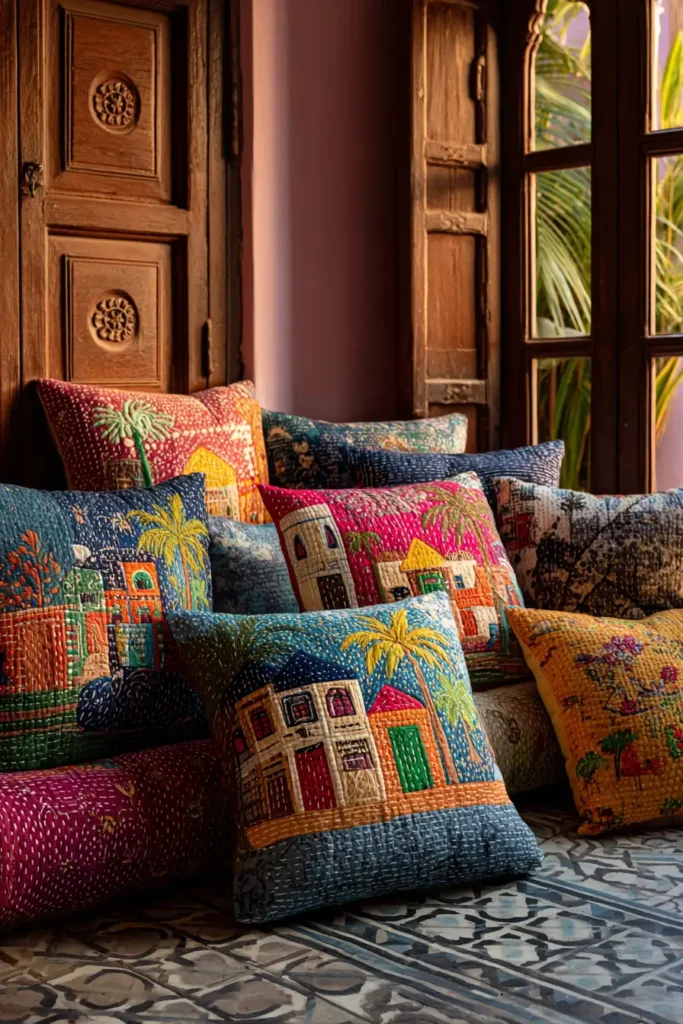
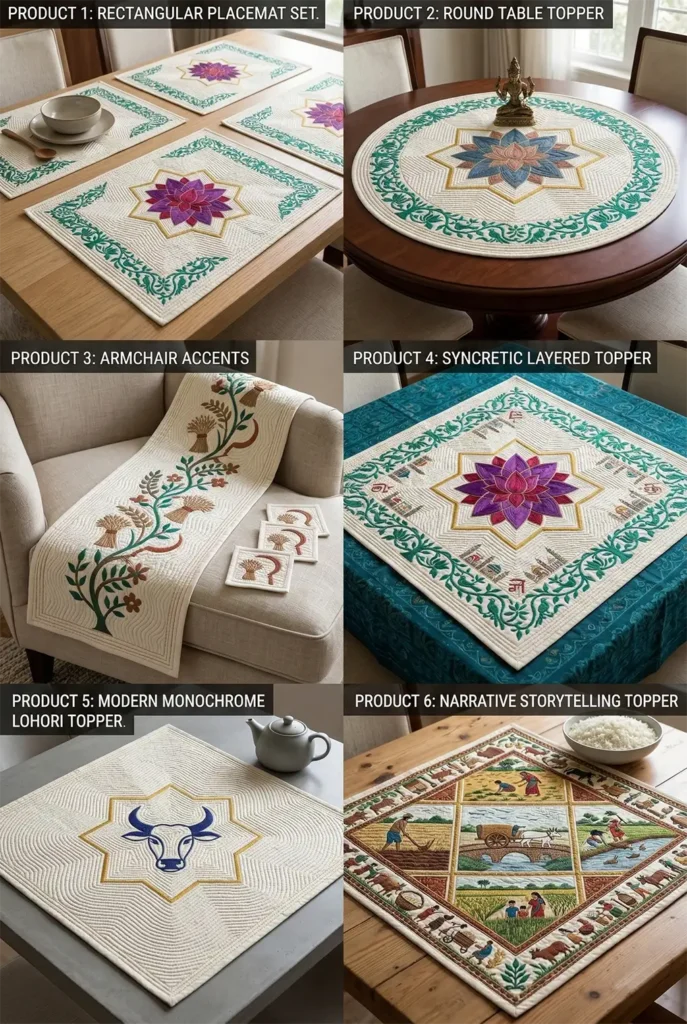
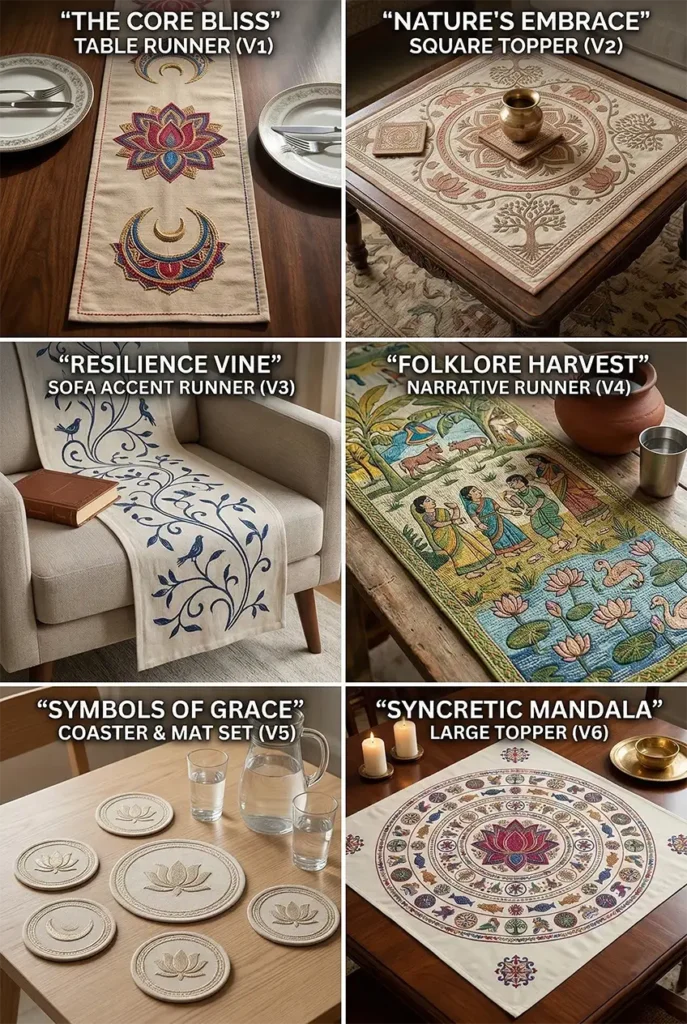
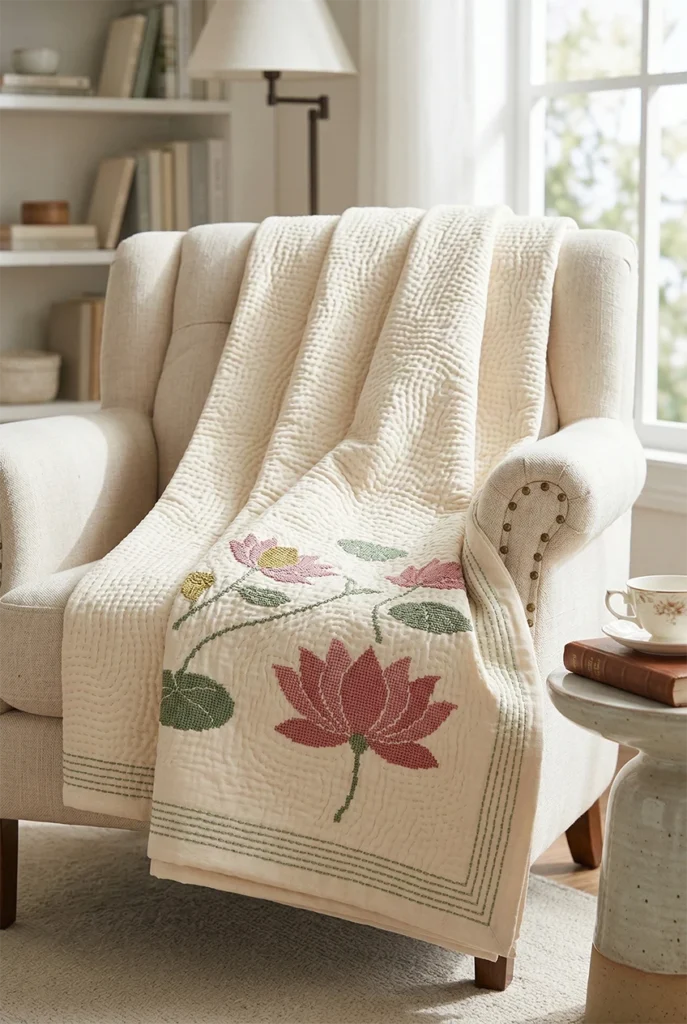
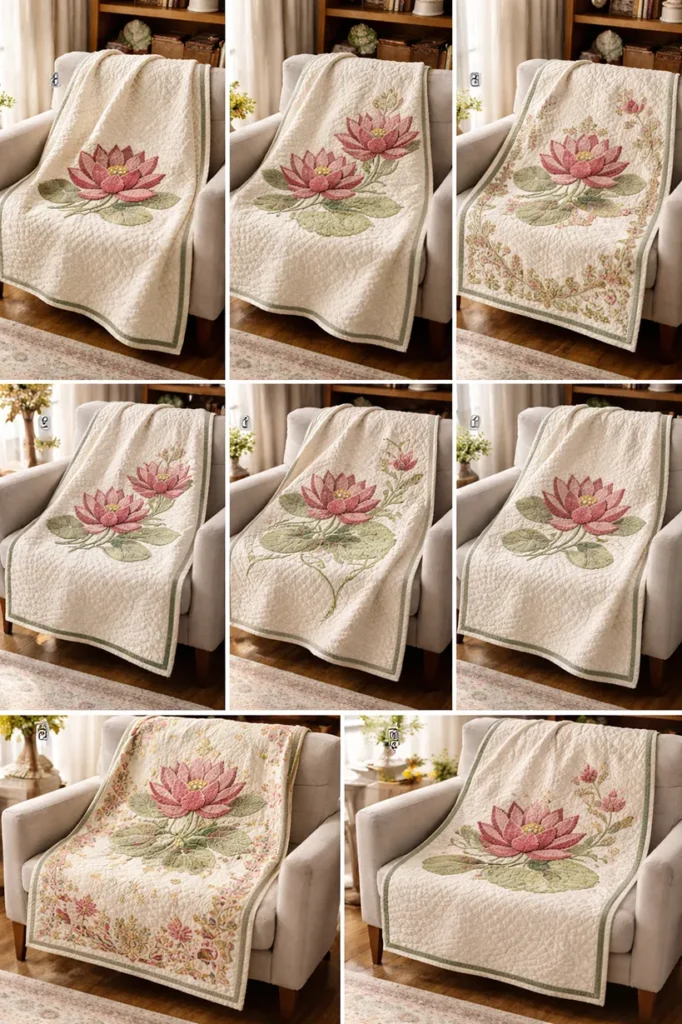
This collection stays entirely within Nakshi Kantha — no adjacent traditions, no hybrid styles. The focus is on how this single tradition can move across a home while remaining honest to its origins. Bed covers with traditional narrative motifs. Pillow covers and throws that carry smaller design elements without overwhelming a room. Floor cushions, table textiles, and everyday accents that bring warmth into ordinary use. A lotus motif is thrown on a chair. A geometric running-stitch cushion on a sofa. Pieces that are useful first and beautiful as a consequence — which is exactly how Nakshi Kantha was always meant to be.
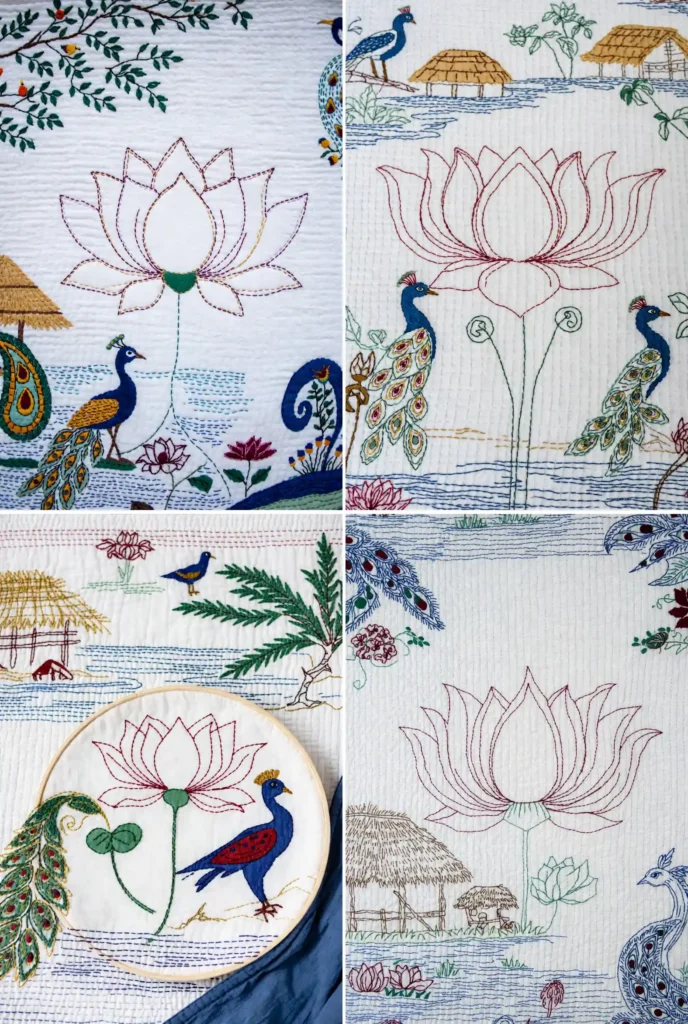
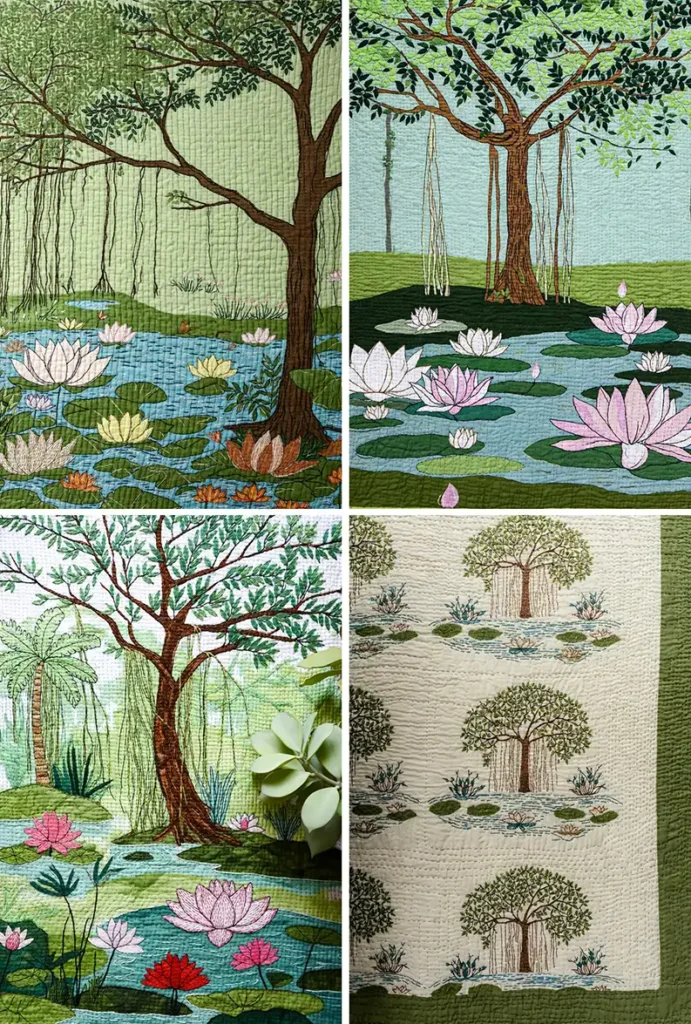
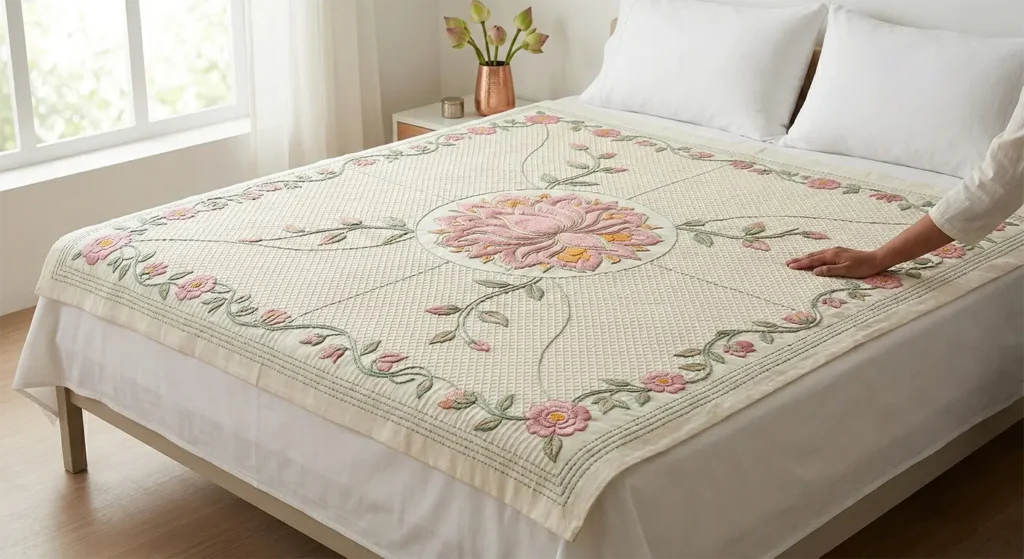
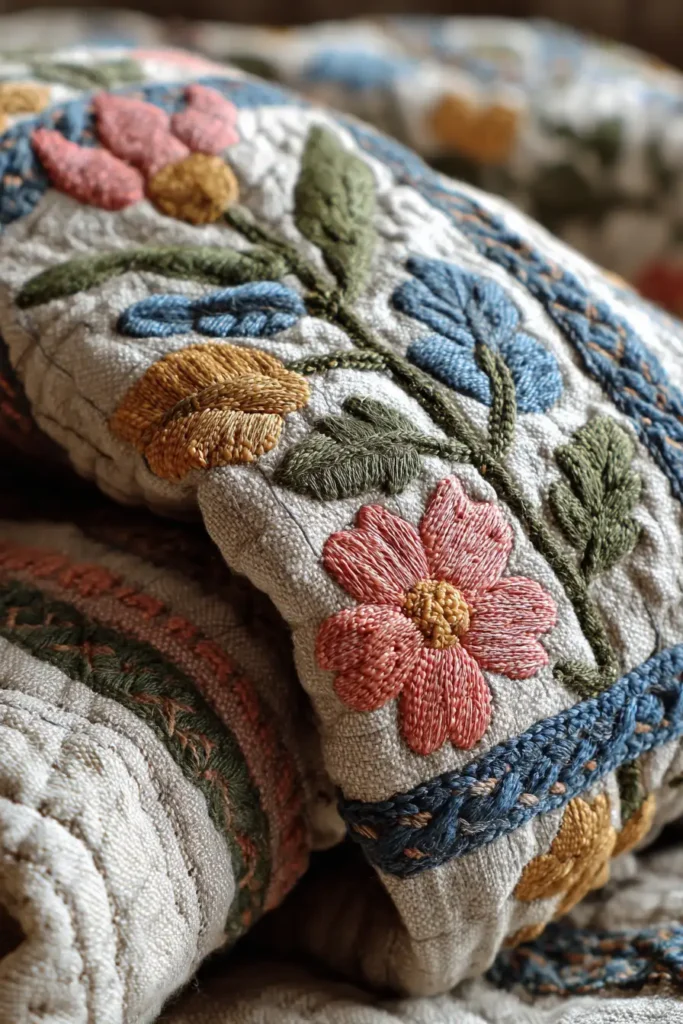
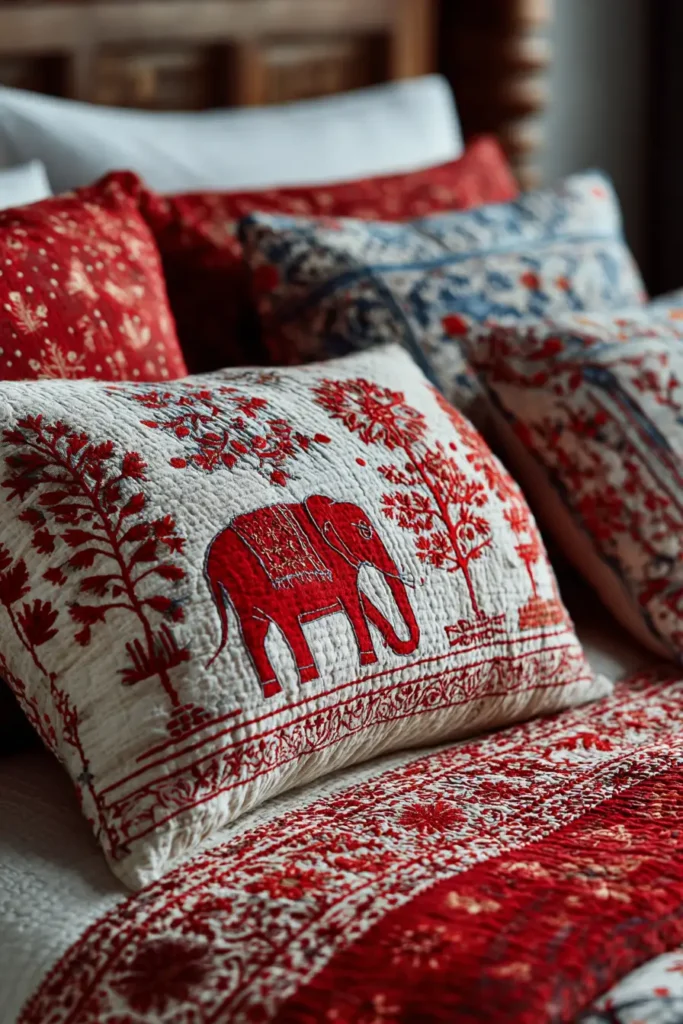
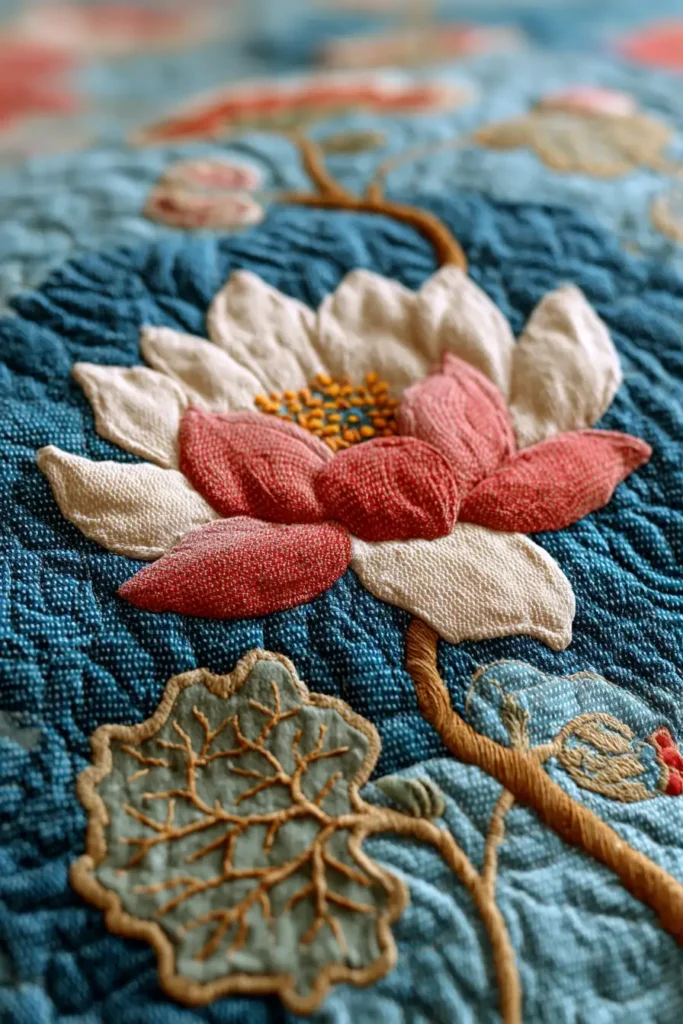
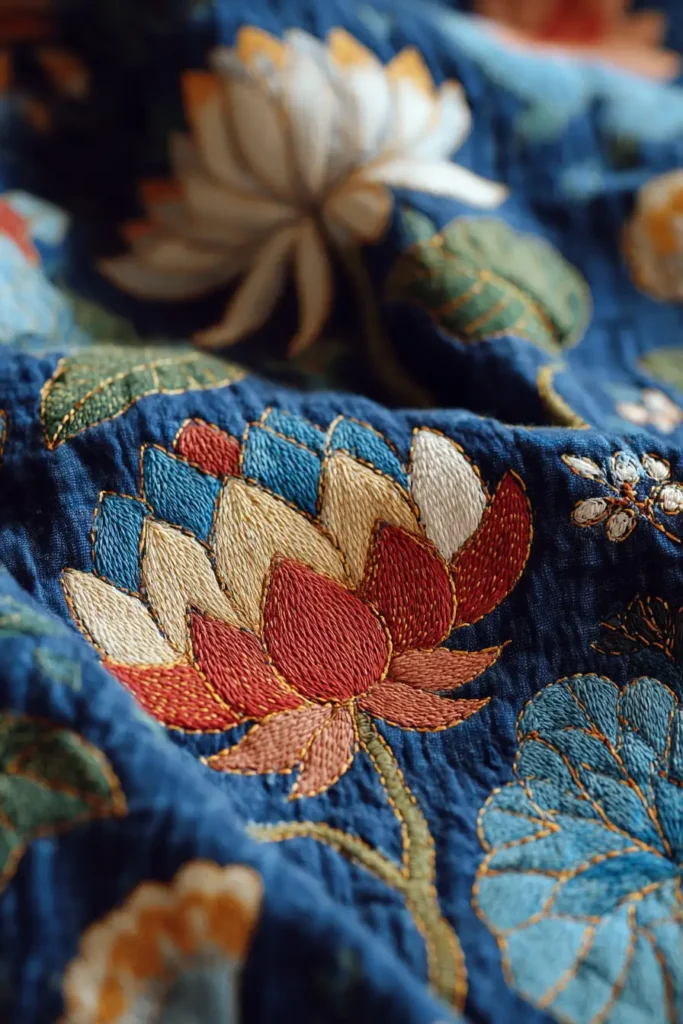
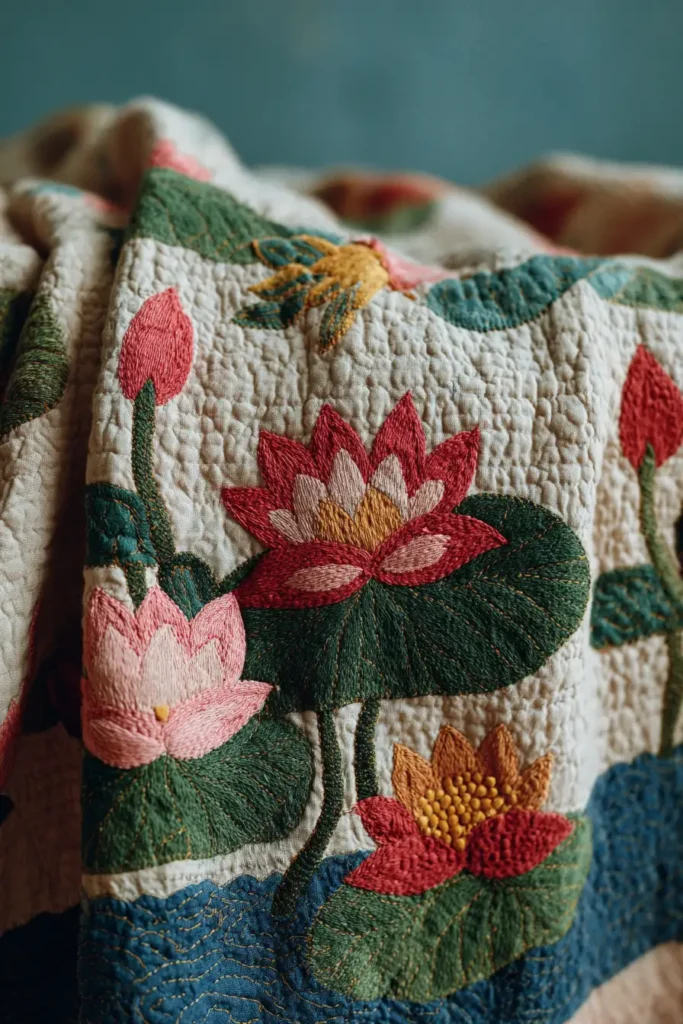
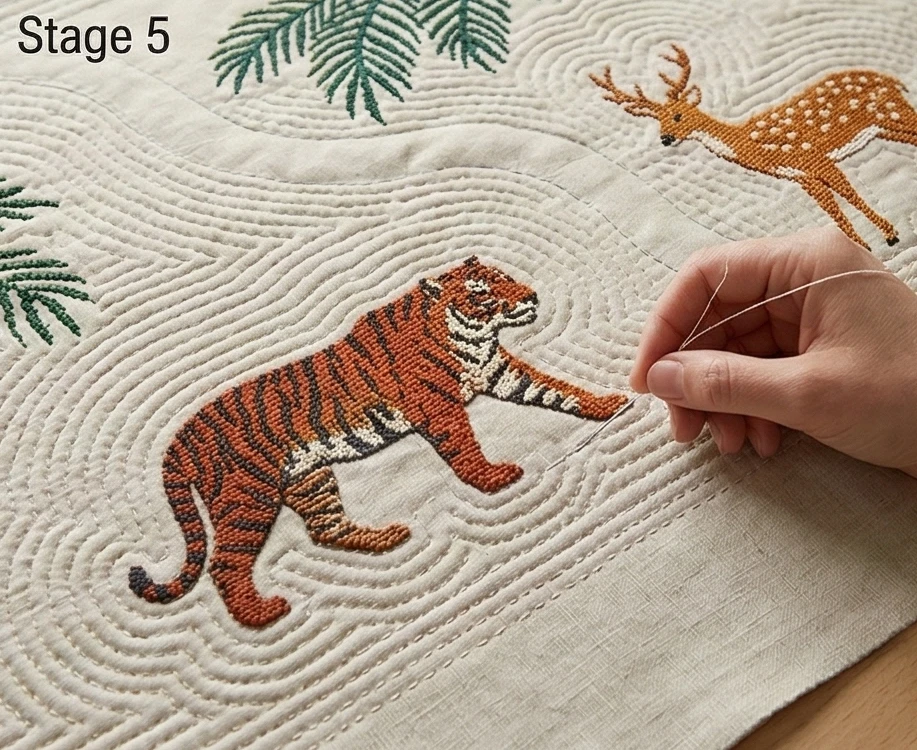
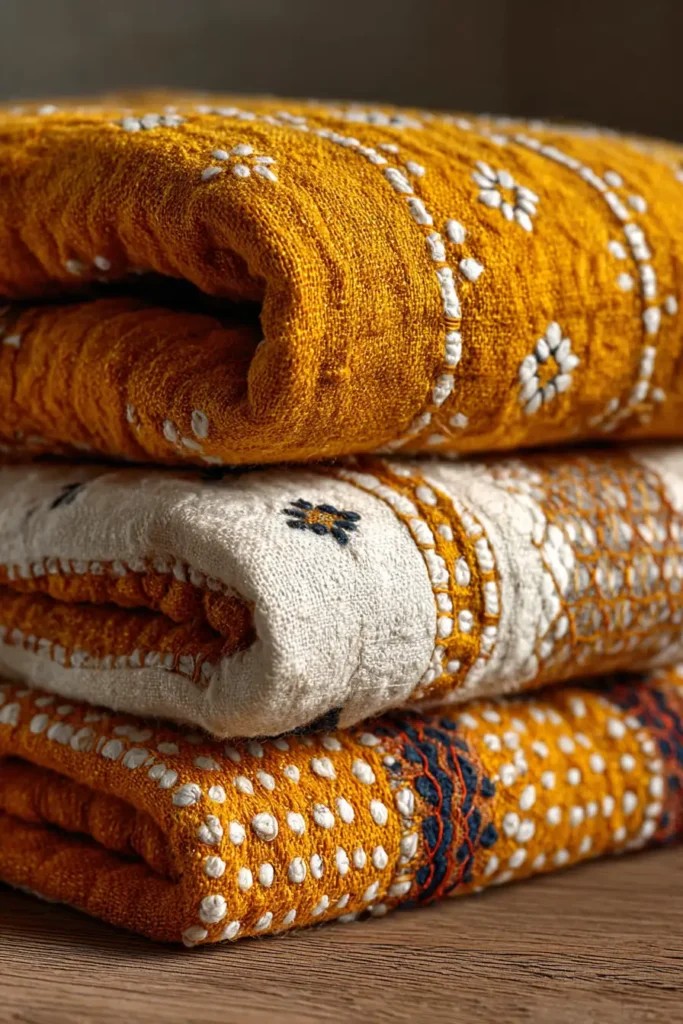
To bring a Nakshi Kantha into your home is to drape your living space in a profound, hand-stitched narrative. Unlike structured, pieced geometric quilts, the beauty of Nakshi Kantha lies in its fluid, freehand embroidery and the incredibly soft, rippled texture created by thousands of simple running stitches.
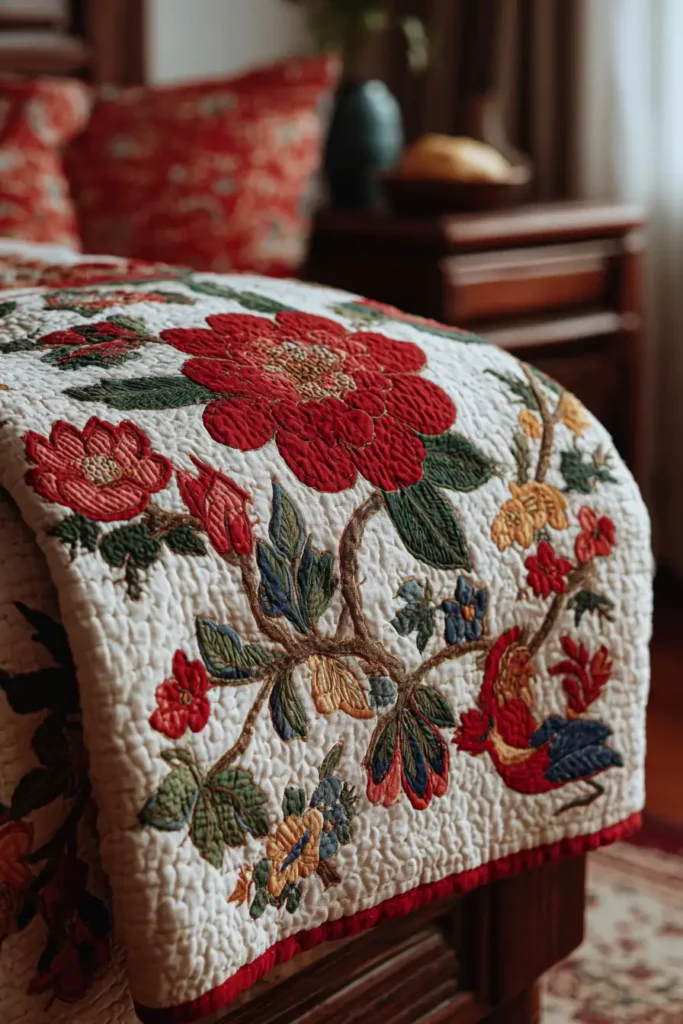
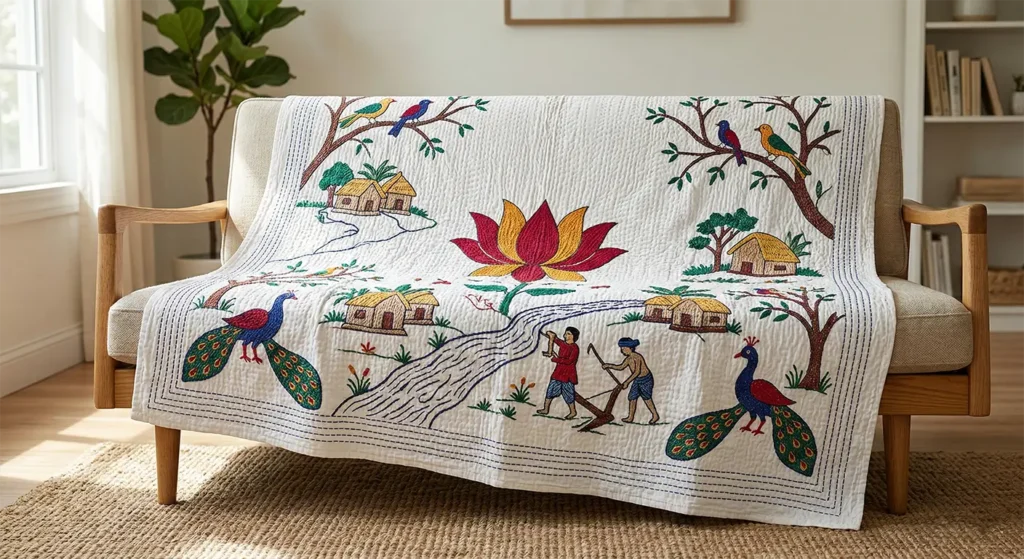
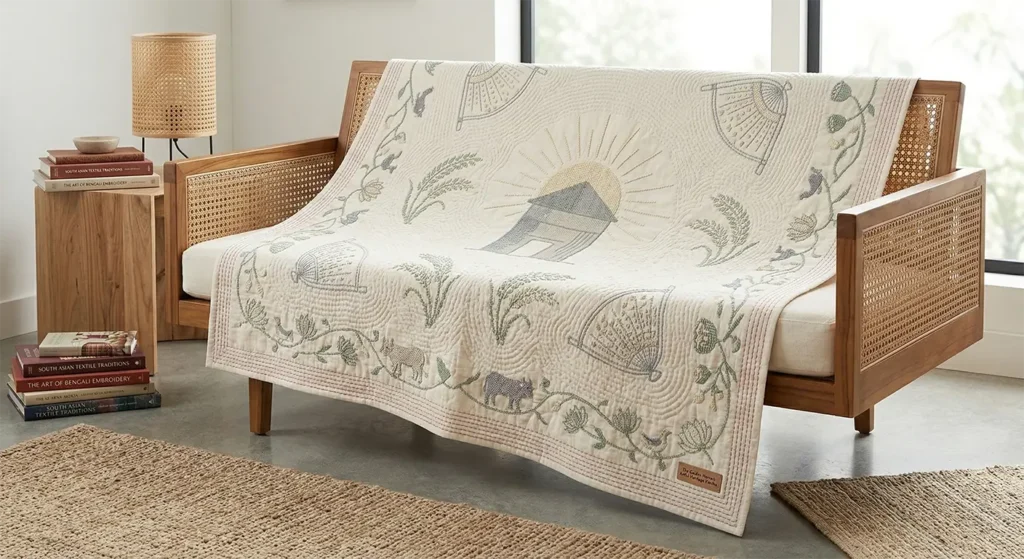
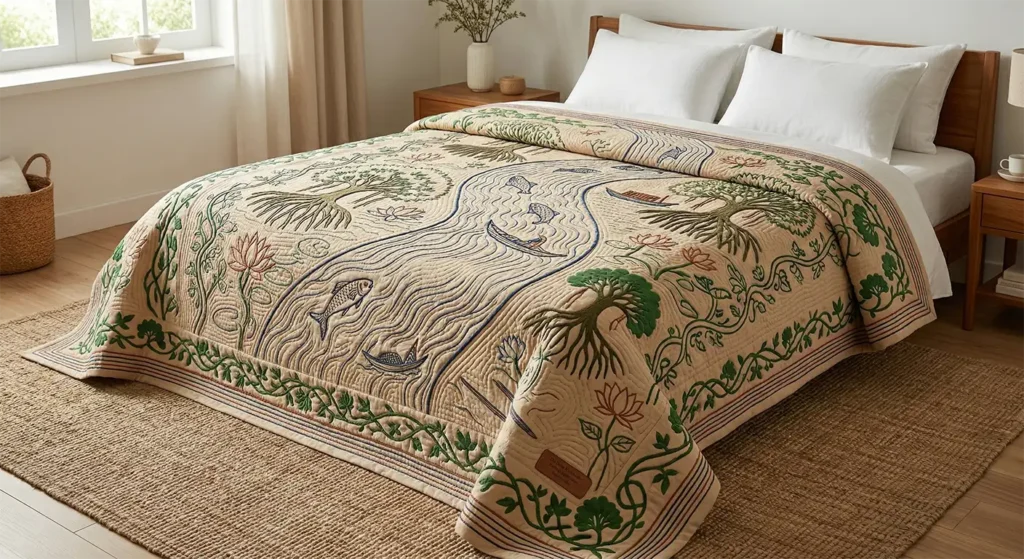
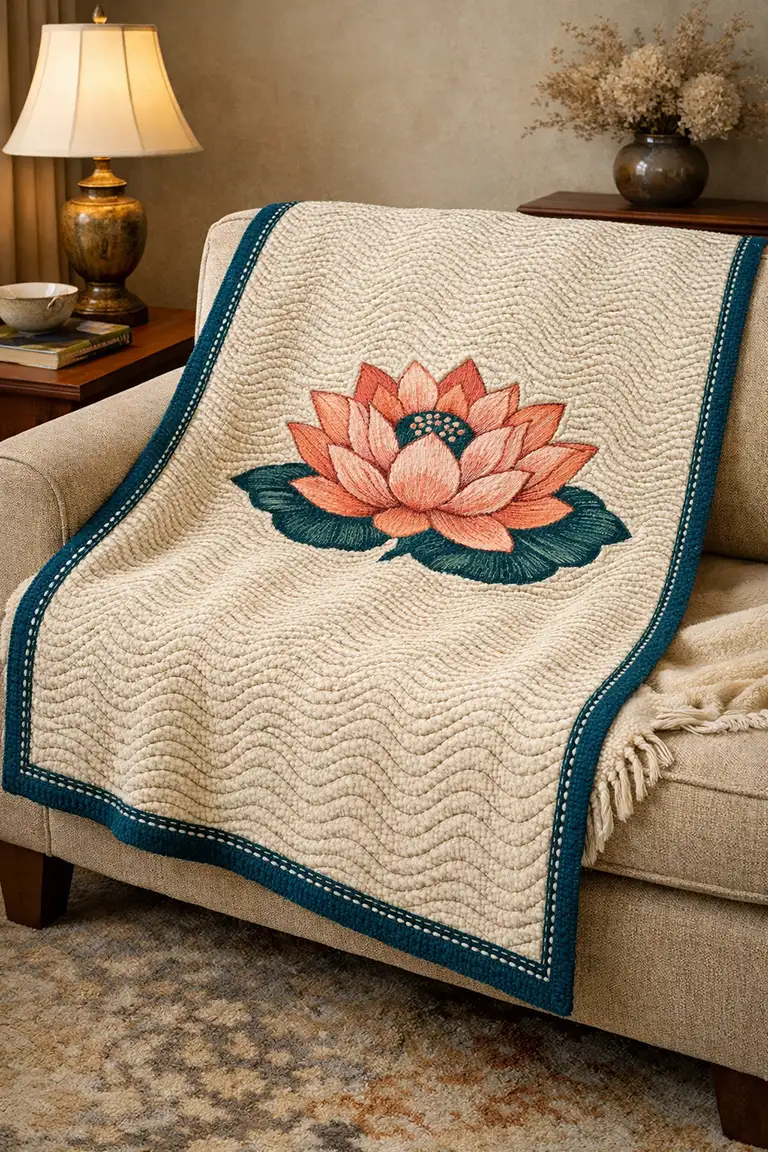
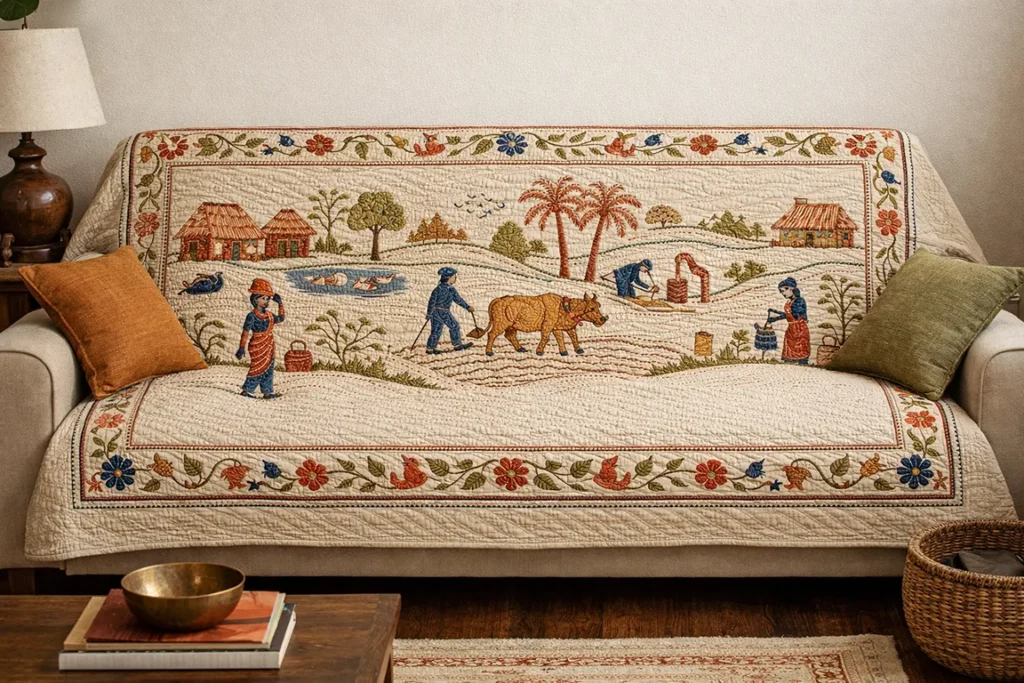
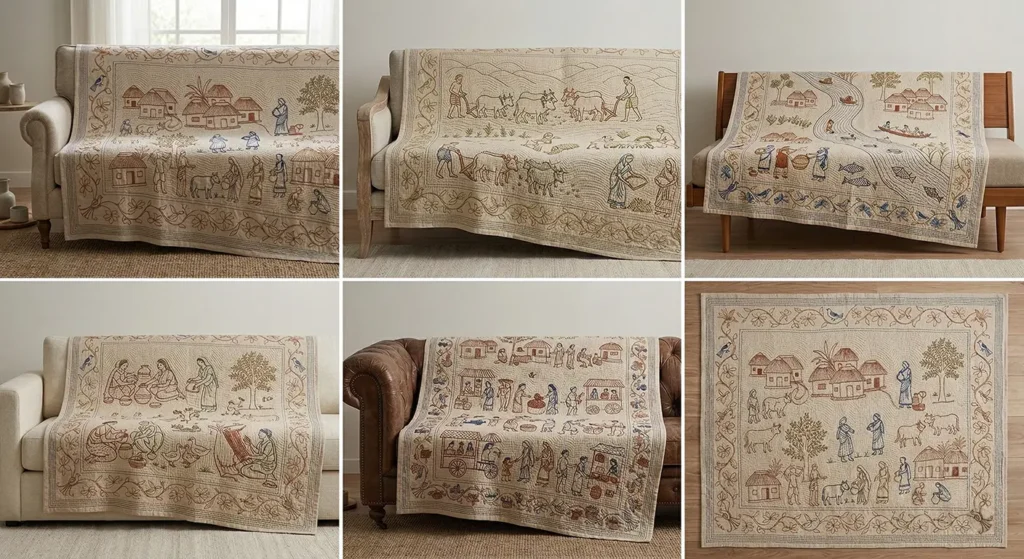
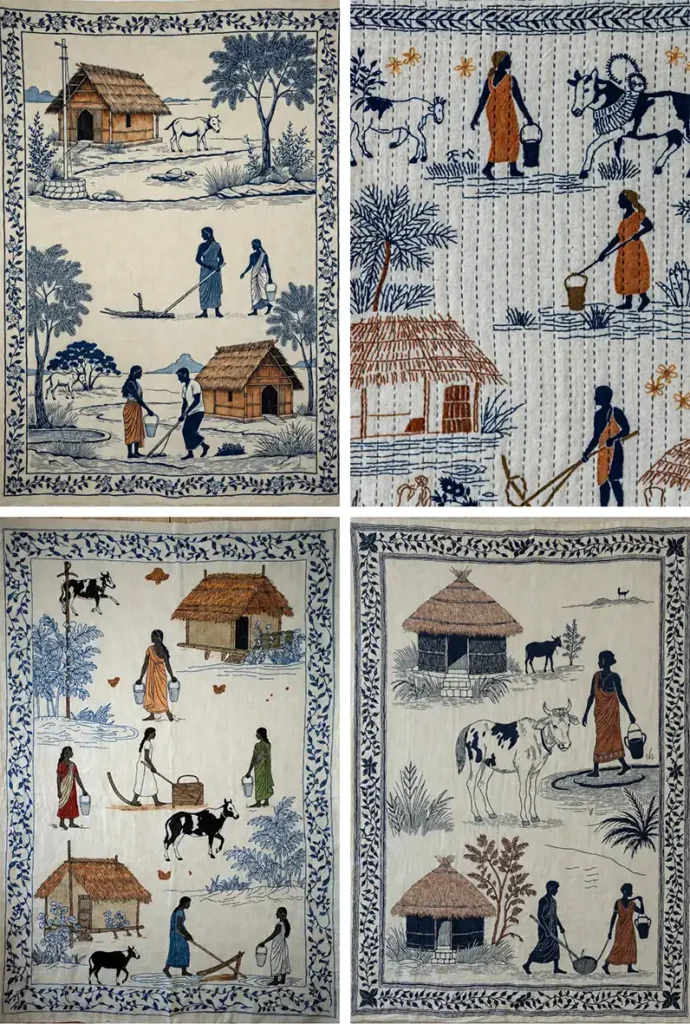
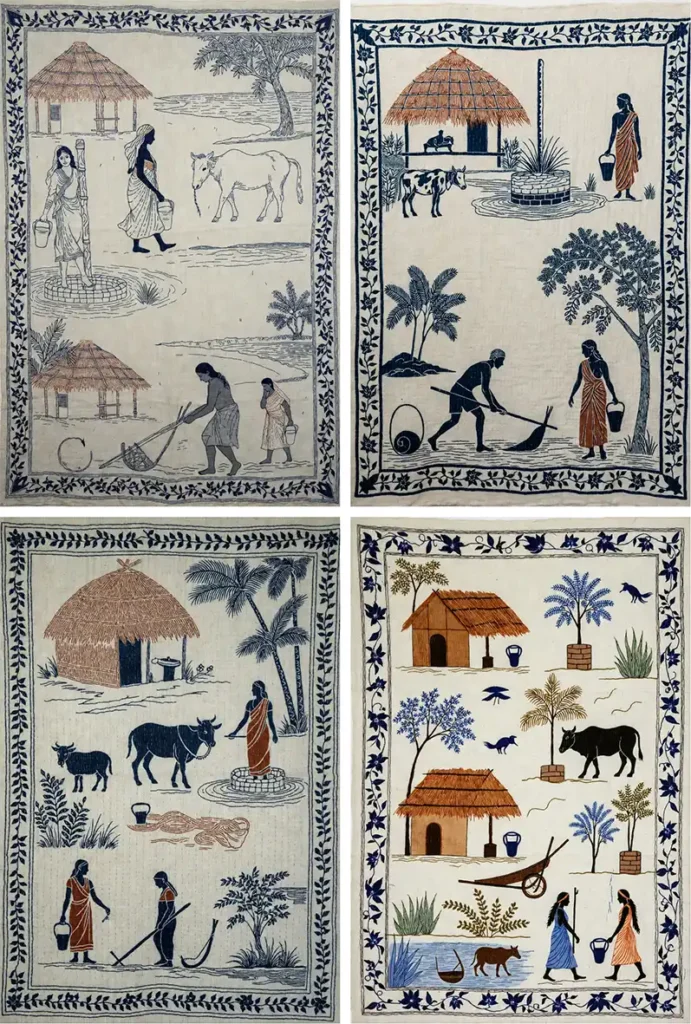
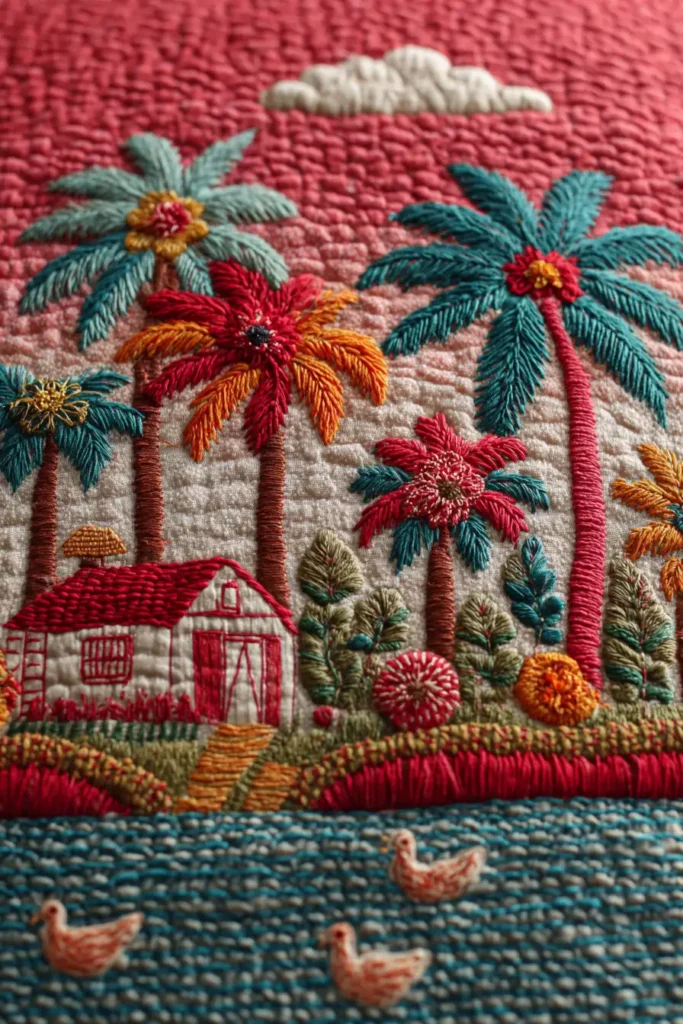
“The Sonar Bangla” (Golden Bengal) honors this centuries-old tradition by depicting charming, idyllic scenes of rural life—thatched huts, winding rivers, lotus flowers, and local birds—embroidered in rich Indigo, Crimson, and Marigold threads across a canvas of Pristine White or Unbleached Muslin. By utilizing layers of incredibly soft, lightweight cotton rather than thick batting, this throw provides unparalleled, breathable comfort, perfect for elegant summer layering or wrapping up on a breezy evening.
Finished Dimensions: Generous Sofa Throw or Summer Bed Layer, 50″ x 60″.
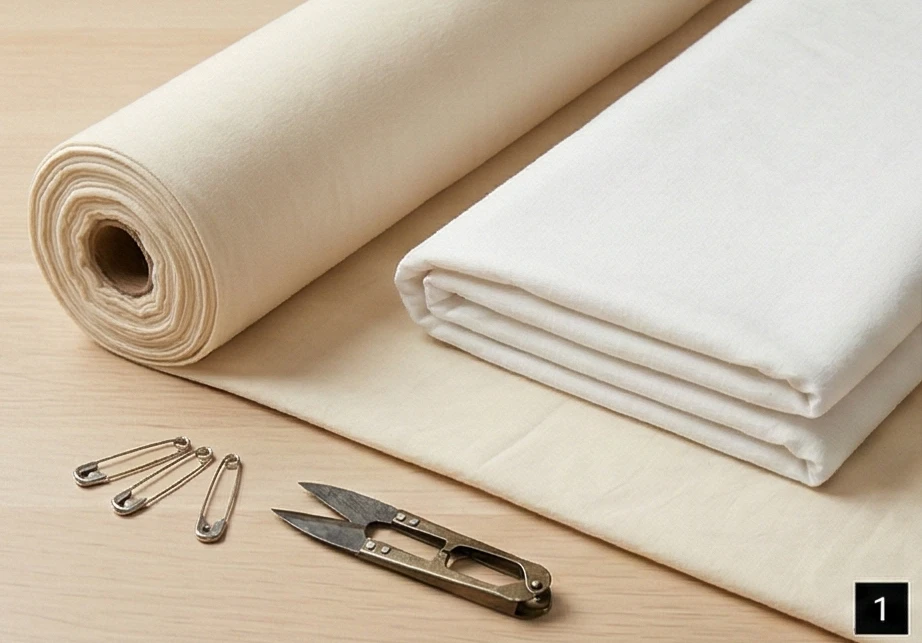
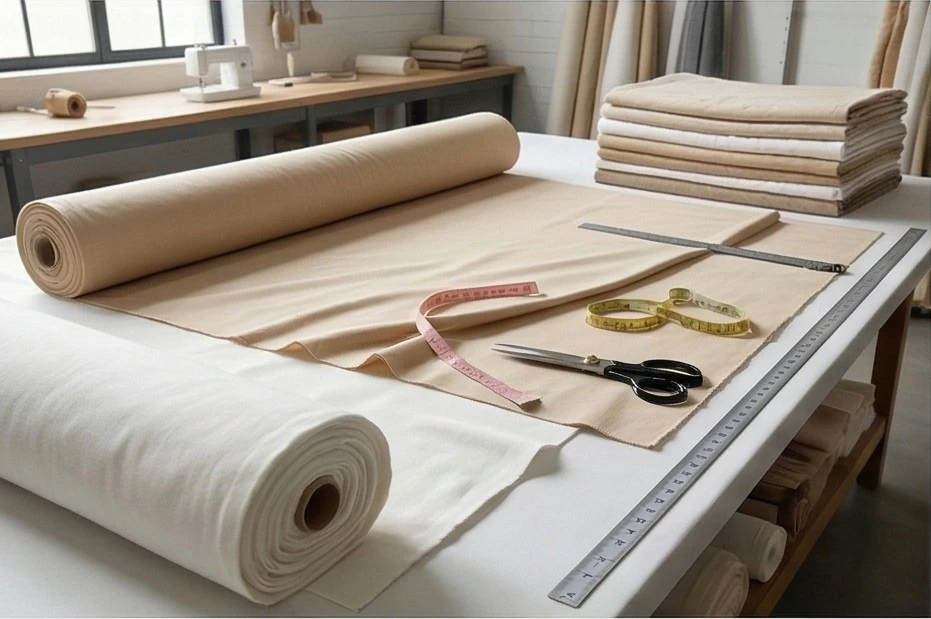
Materials Needed:
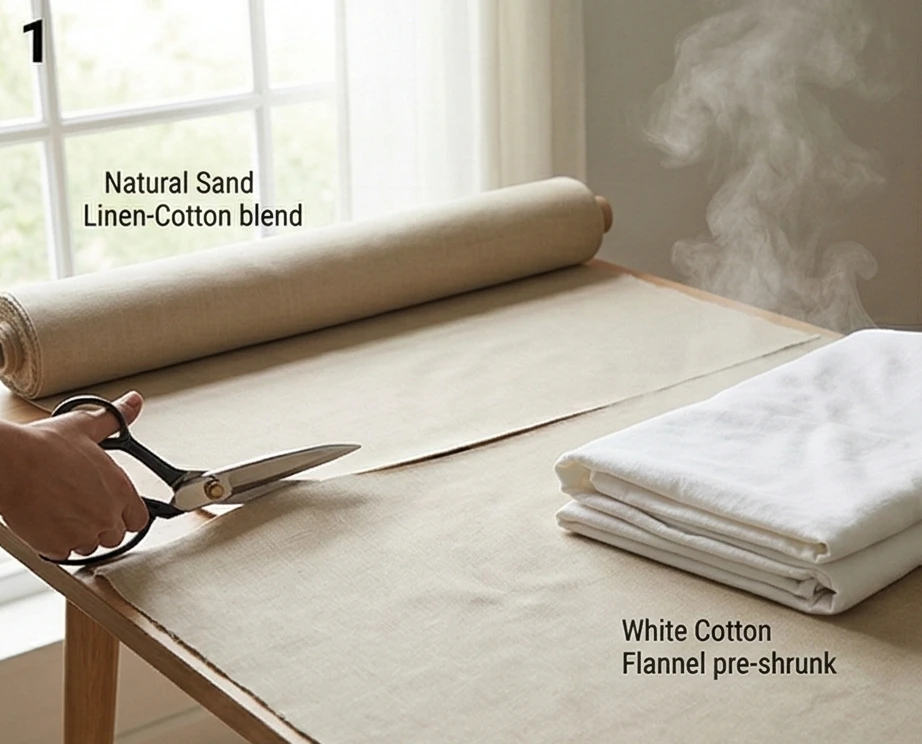
The “Canvas” (Outer Layers): 3.5 yards of high-quality, ultra-soft White Cotton Voile or fine Muslin.
The “Core” (Inner Layer): 1.75 yards of soft, pre-washed White Cotton Flannel or a repurposed, incredibly soft vintage cotton sheet.
Why: Traditional Kantha does not use puffy polyester or wool batting. Instead, it relies on stacking 3 to 6 layers of old, ultra-soft saris. To recreate this exquisite, fluid drape while maintaining modern elegance, a core layer of soft cotton flannel provides the perfect weight without adding stiff loft.
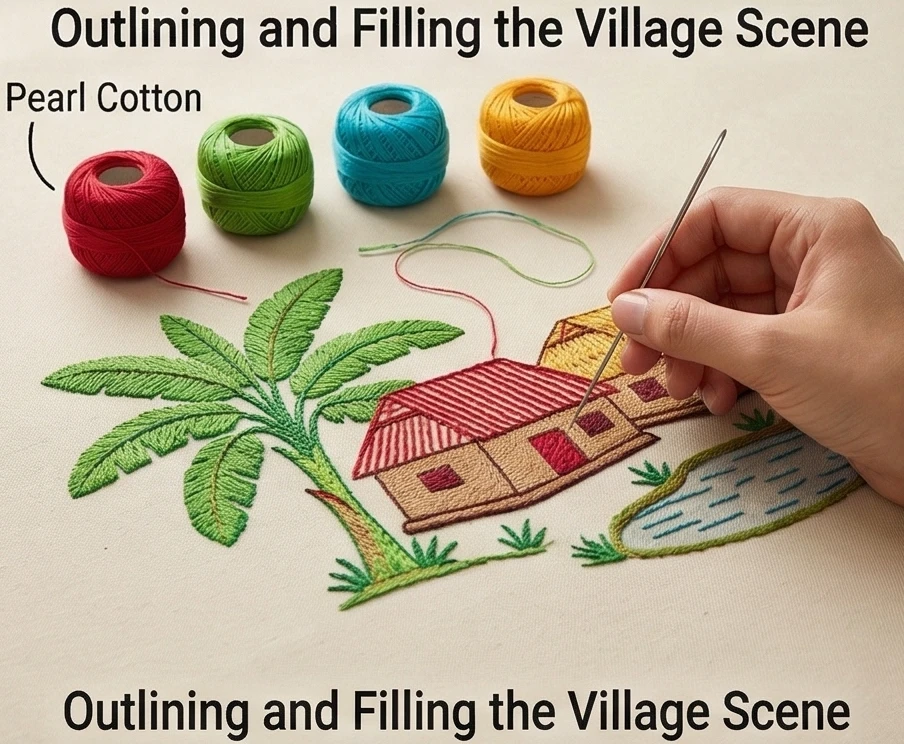
The “Story” (Thread): High-quality Pearl Cotton (Size 8) embroidery thread in Indigo Blue, Crimson Red, Marigold Yellow, and Emerald Green.
Notions: A water-soluble fabric marking pen, a long Sashiko or Kantha embroidery needle, an embroidery hoop (optional, though traditionalists stitch without one), and curved safety pins.
Cultural Backstory:The word “Kantha” essentially translates to “rags” in Sanskrit. In rural Bengal (encompassing modern-day Bangladesh and West Bengal, India), resourcefulness birthed an art form. Women would salvage old, threadbare saris and dhotis—fabrics made incredibly soft from years of washing. They layered them and stitched them together using a simple running stitch to create warm blankets for the monsoon season. When they added “Naksha” (artistic designs) depicting their daily village lives, hopes, and local flora, it became Nakshi Kantha. Creating this quilt connects you directly to a matrilineal tradition of storytelling, sustainability, and transforming the mundane into breathtaking heirlooms.
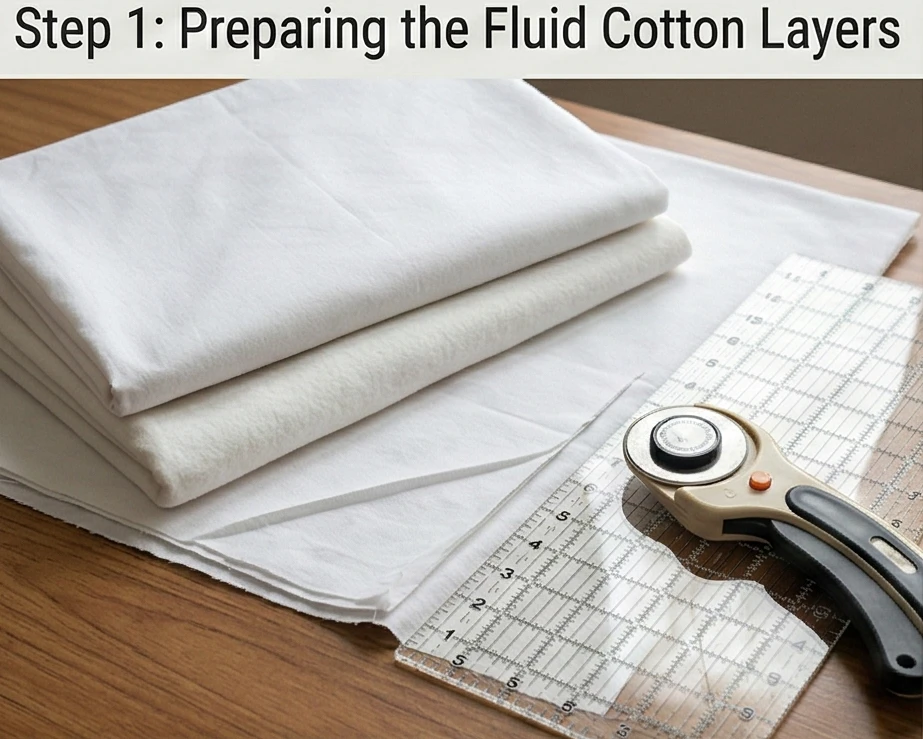
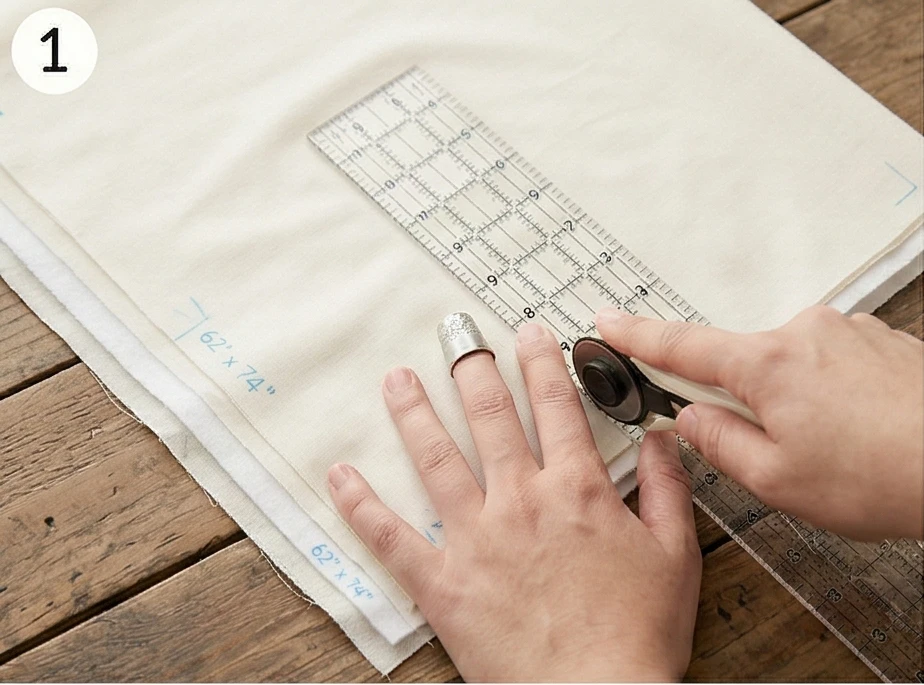
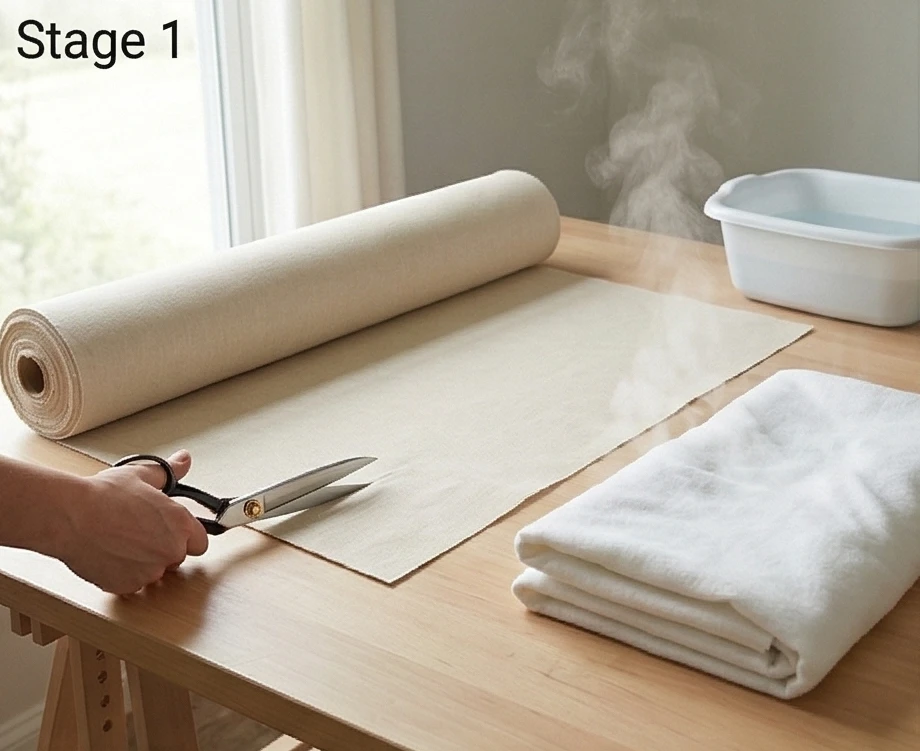
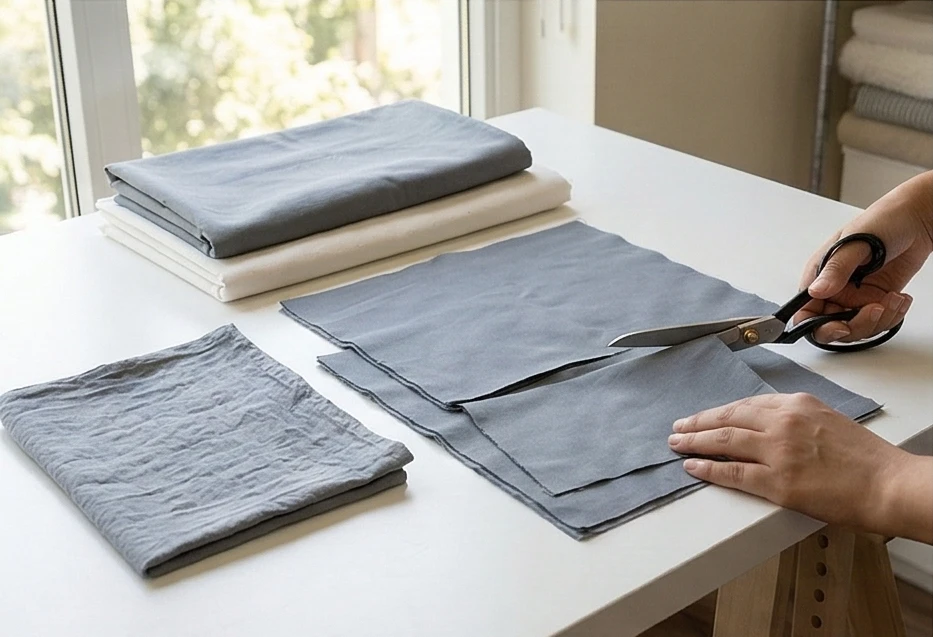
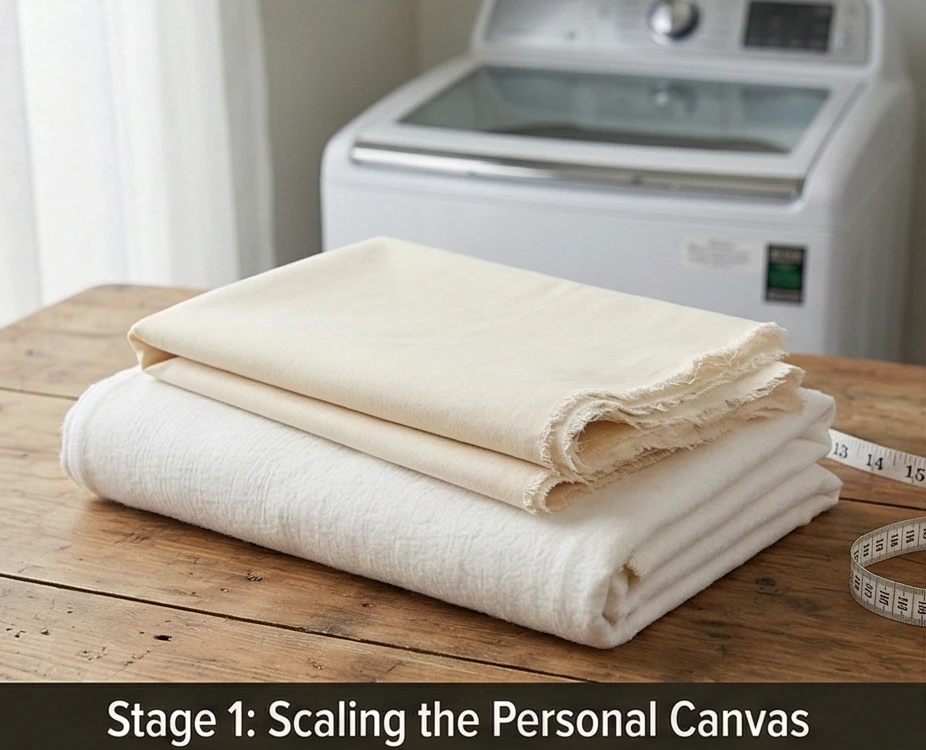
Step 1: Preparing the Fluid Cotton Layers
Creating the soft foundation for your needlework.
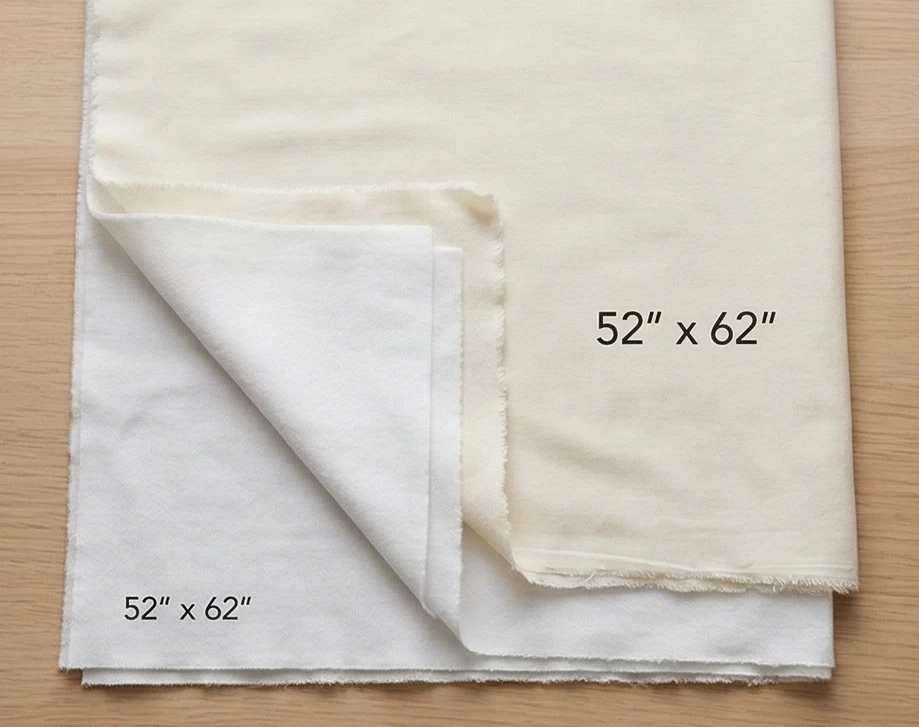
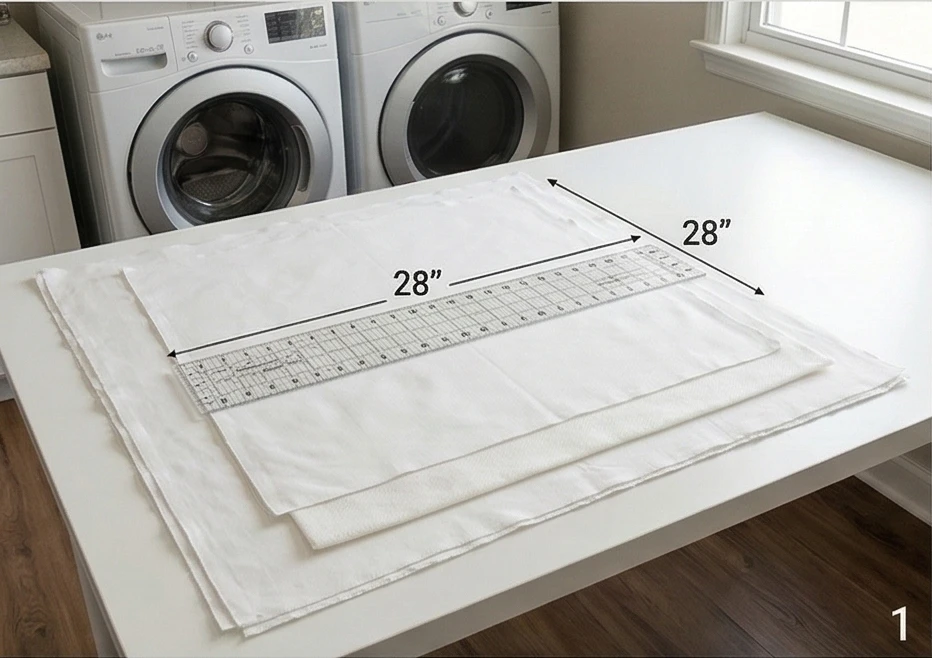
Cut the Canvas: From your White Cotton Voile or Muslin, cut two massive panels measuring exactly 52″ wide by 62″ long (one for the front, one for the back).
Cut the Core: Cut your inner Flannel layer to the exact same dimension: 52″ x 62″.
Pre-Wash Everything: Nakshi Kantha relies on the fabric puckering slightly. Pre-washing all three layers ensures they shrink to their final size and become incredibly soft before you begin stitching.
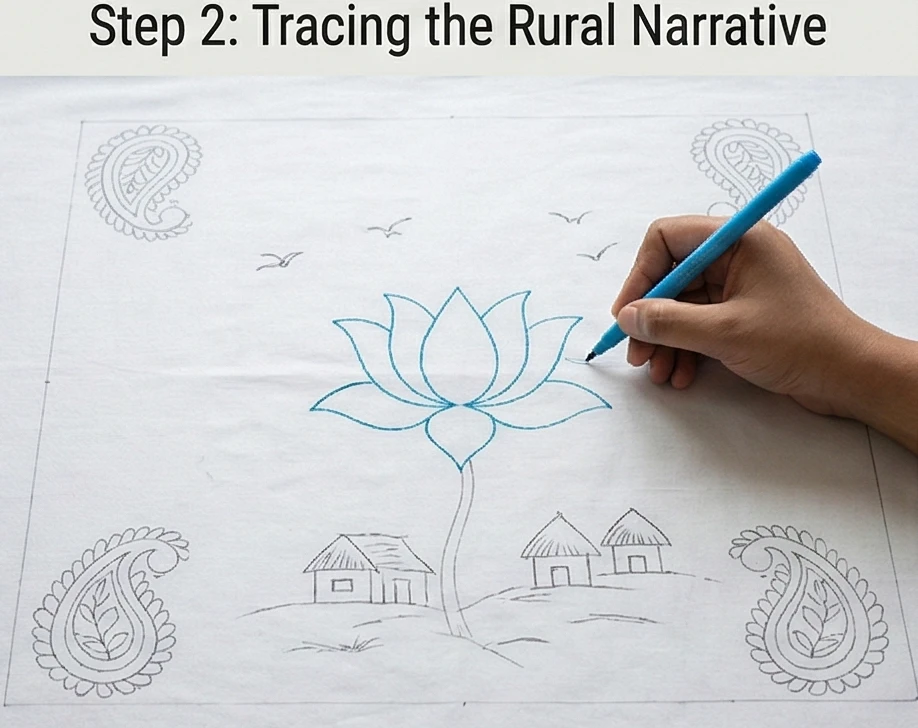
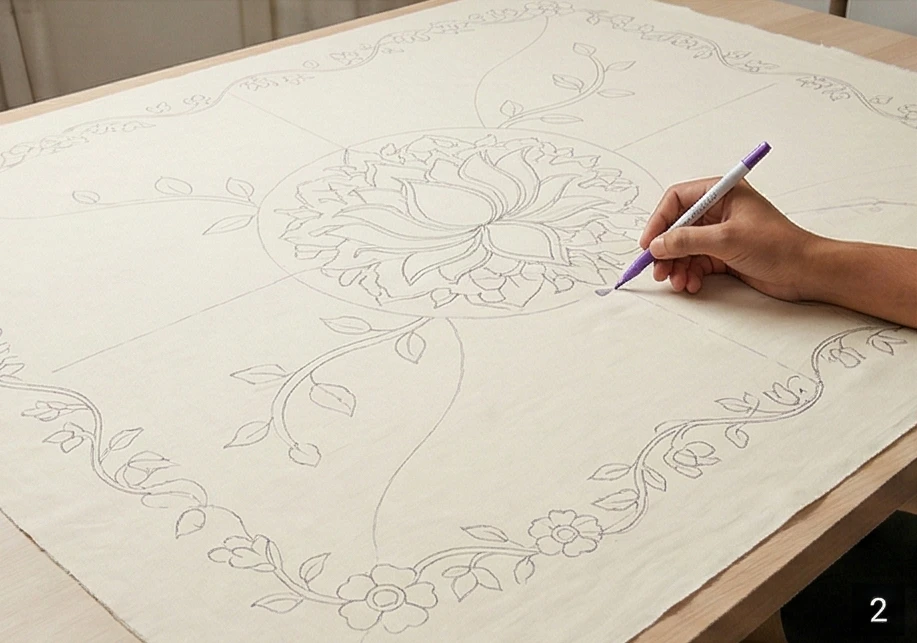
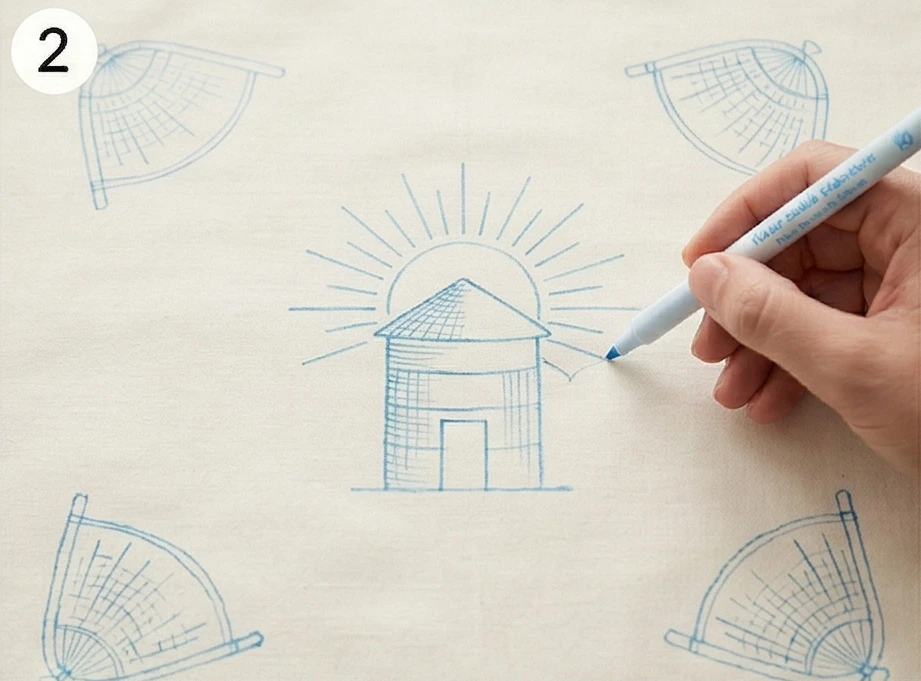
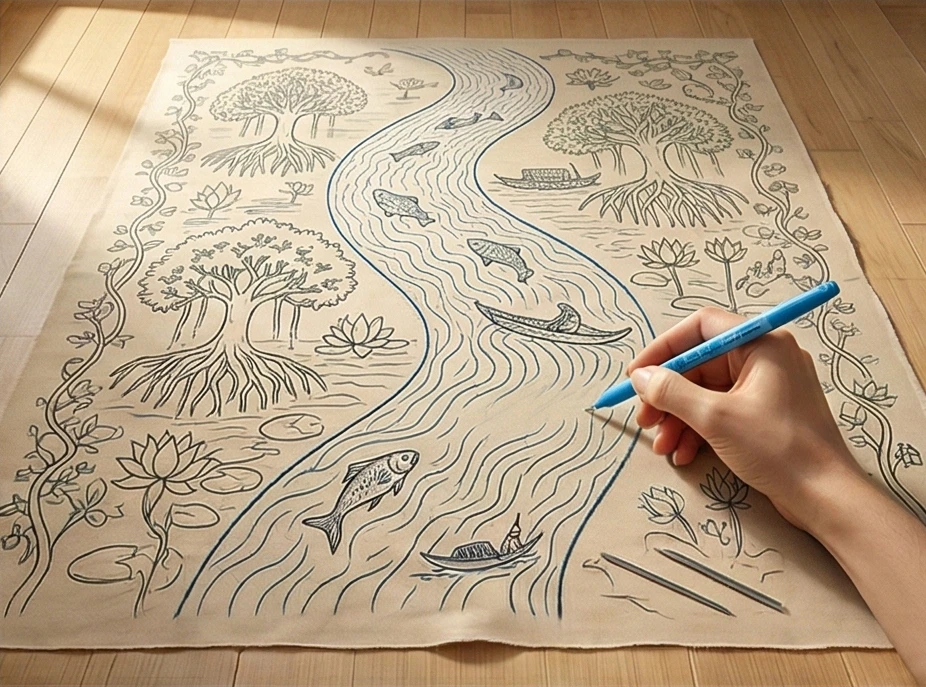
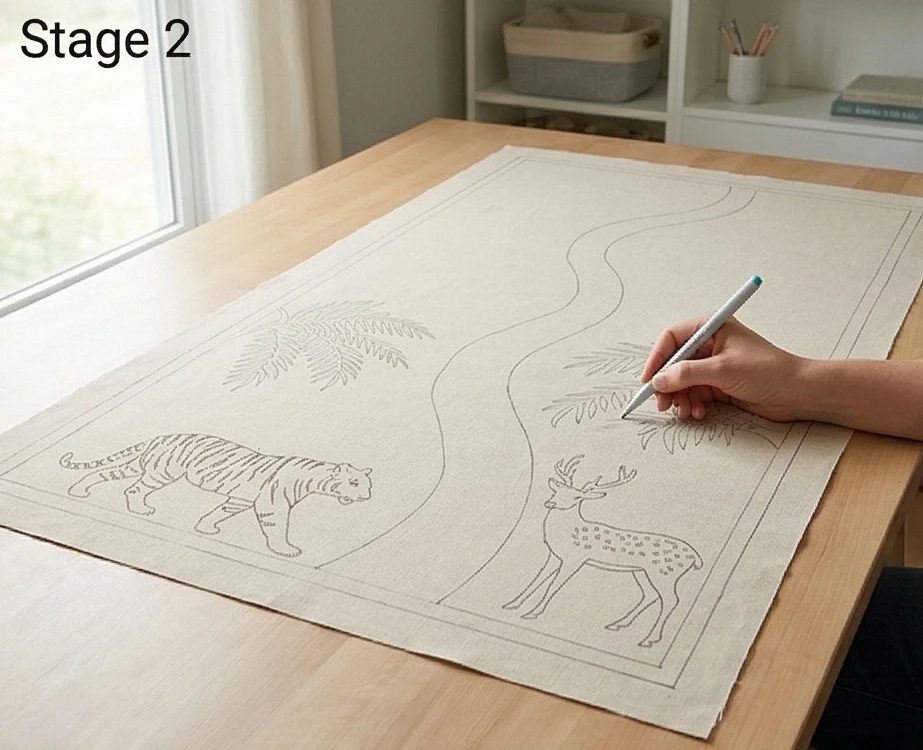
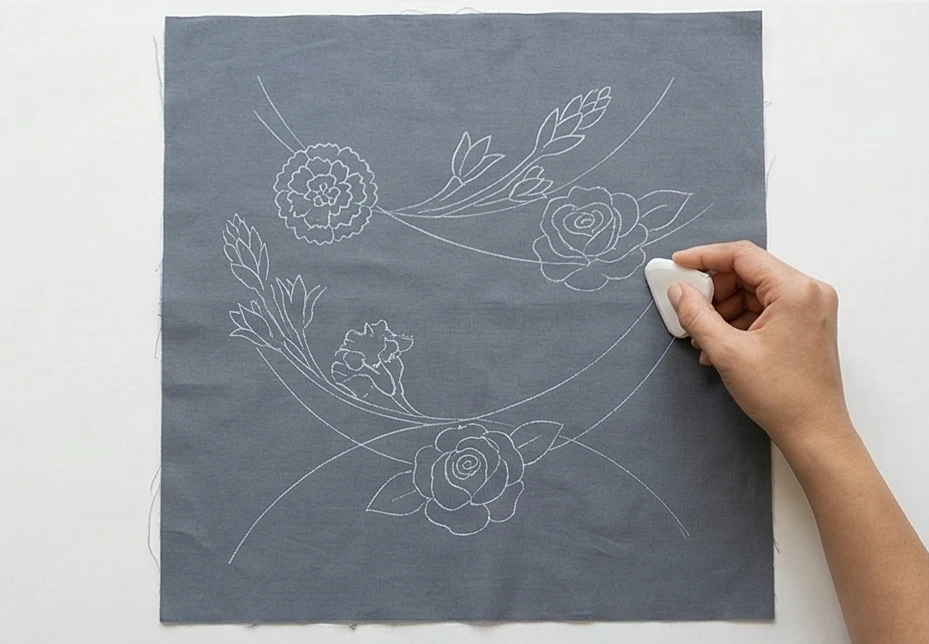
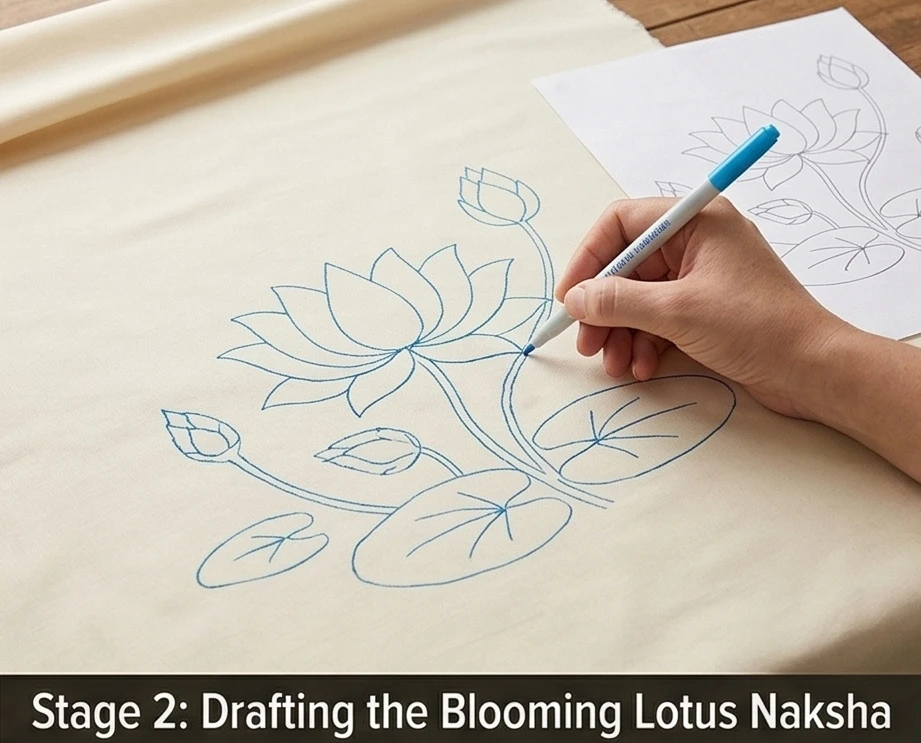
Step 2: Tracing the Rural Narrative (The Naksha)
Designing the charming village motifs.
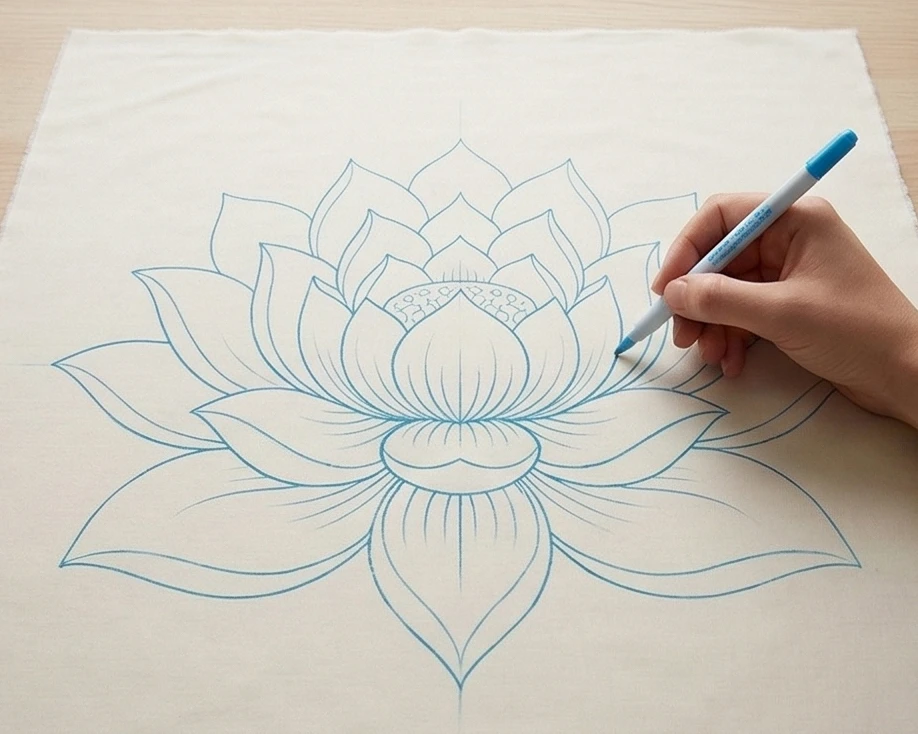
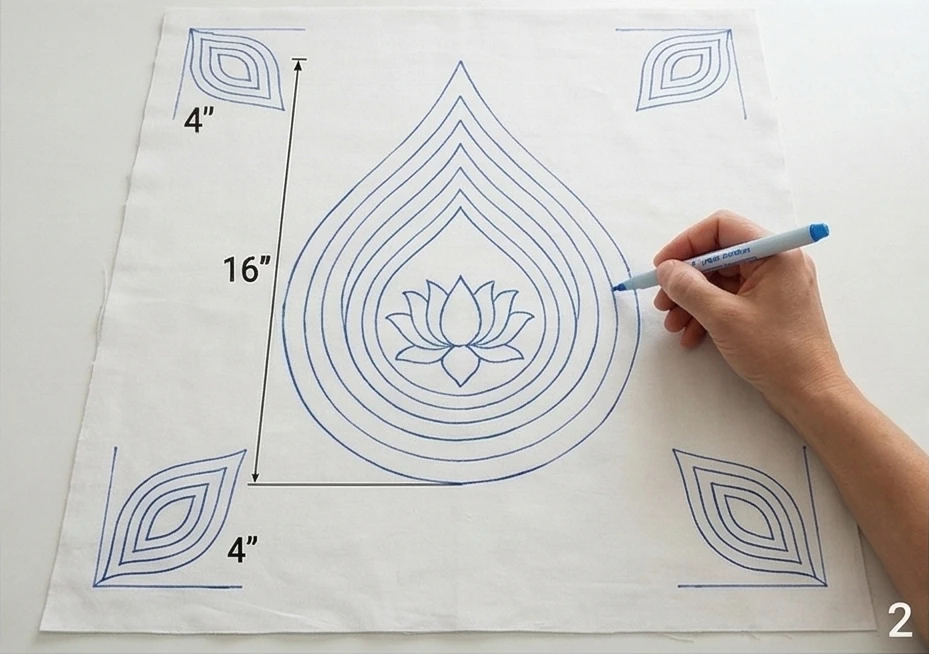
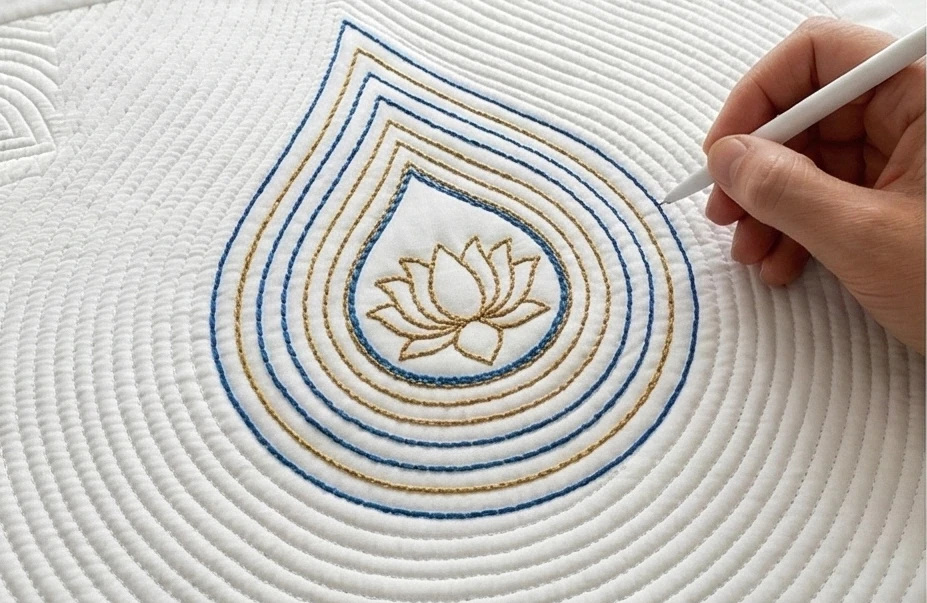
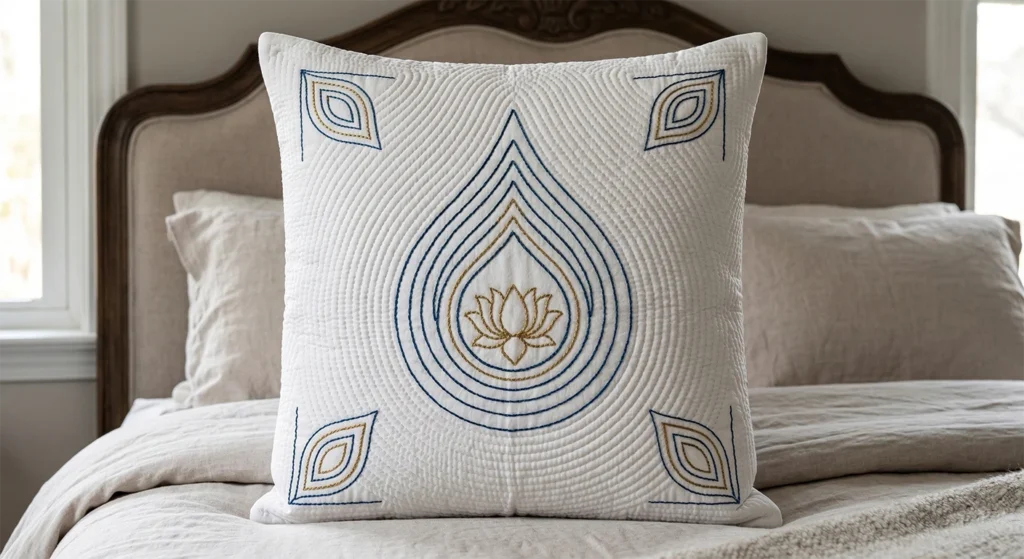
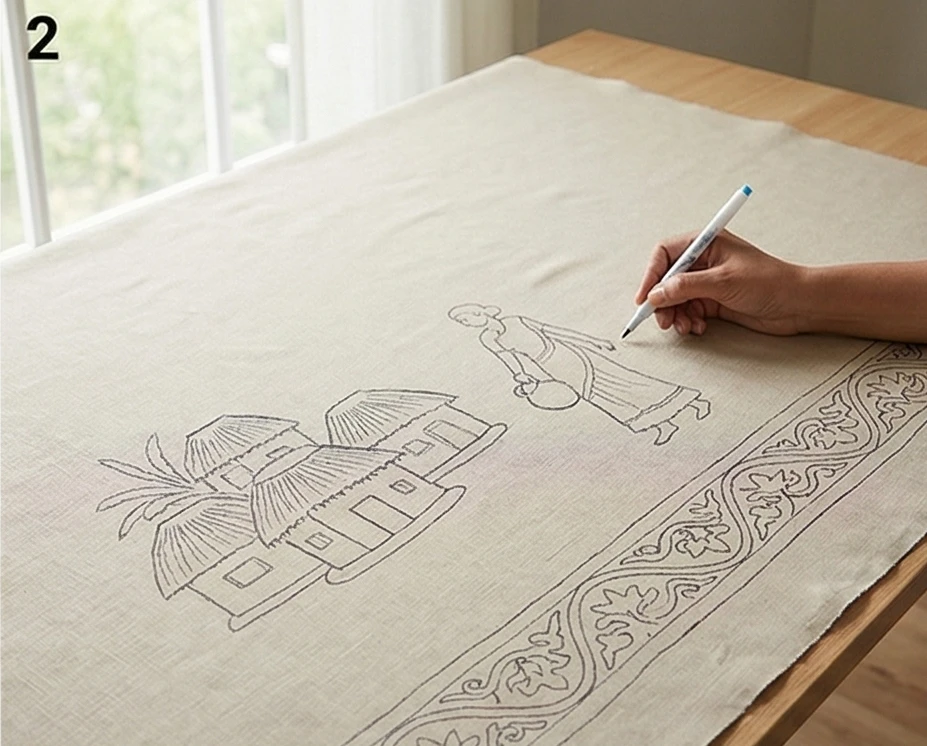
The Central Medallion: Lay your top piece of White Voile completely flat. Using your water-soluble pen, draw a large, traditional “Padma” (lotus flower) exactly in the center, measuring roughly 12 inches across.
The Four Corners: In each of the four corners, draw a classic “Kalka” (paisley motif) or a beautifully stylized peacock facing inward toward the lotus.
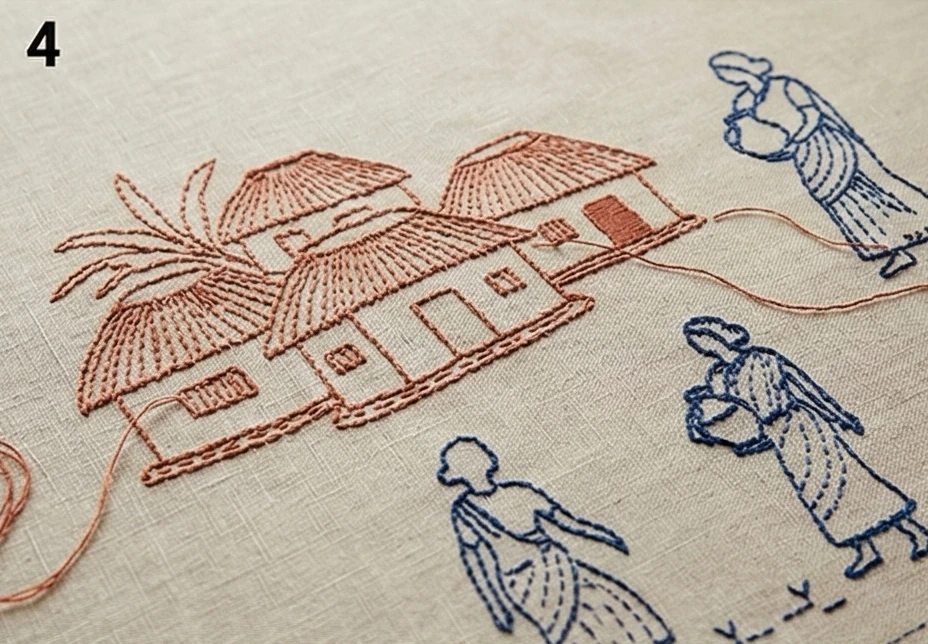
The Rural Canvas: Fill the negative space between the center and the corners with charming rural scenes. Sketch small thatched-roof huts, a winding river, a farmer with a plow, or local birds sitting on stylized tree branches. Do not worry about rigid perfection; the charm of Nakshi Kantha lies in its freehand, folk-art fluidity.
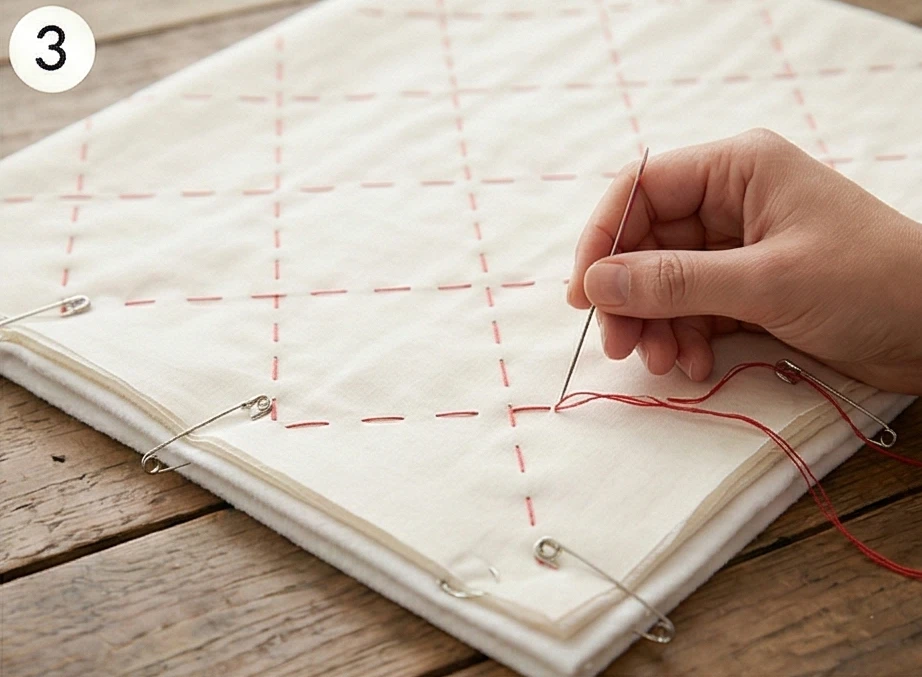
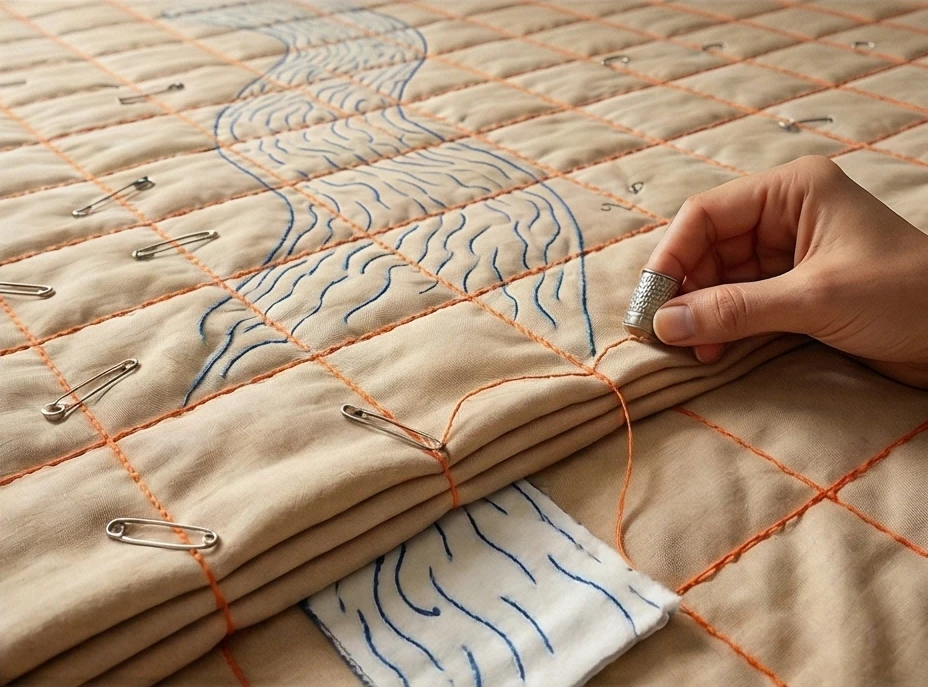
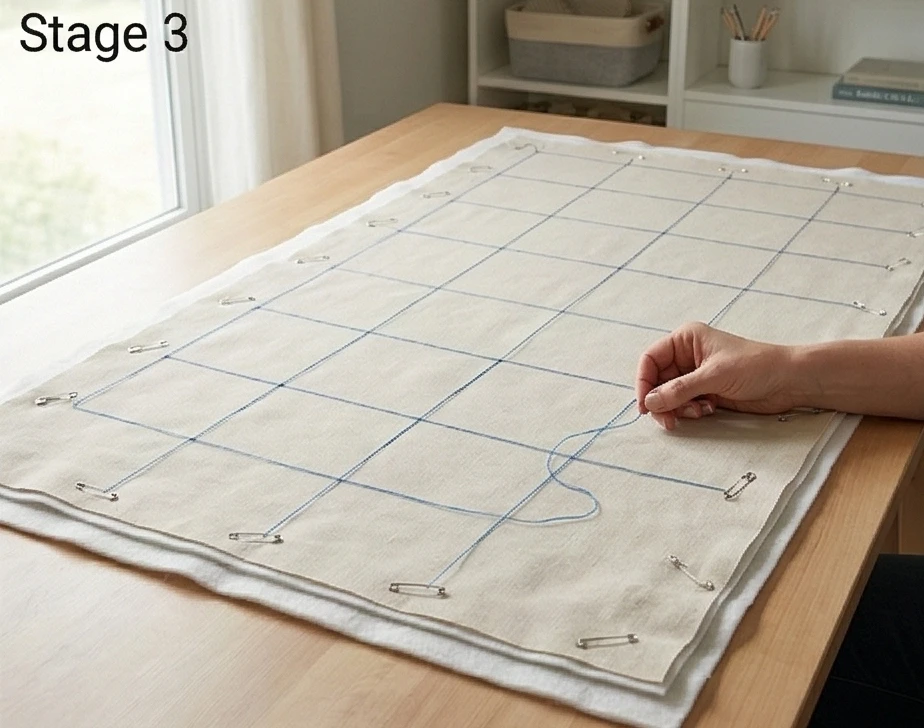
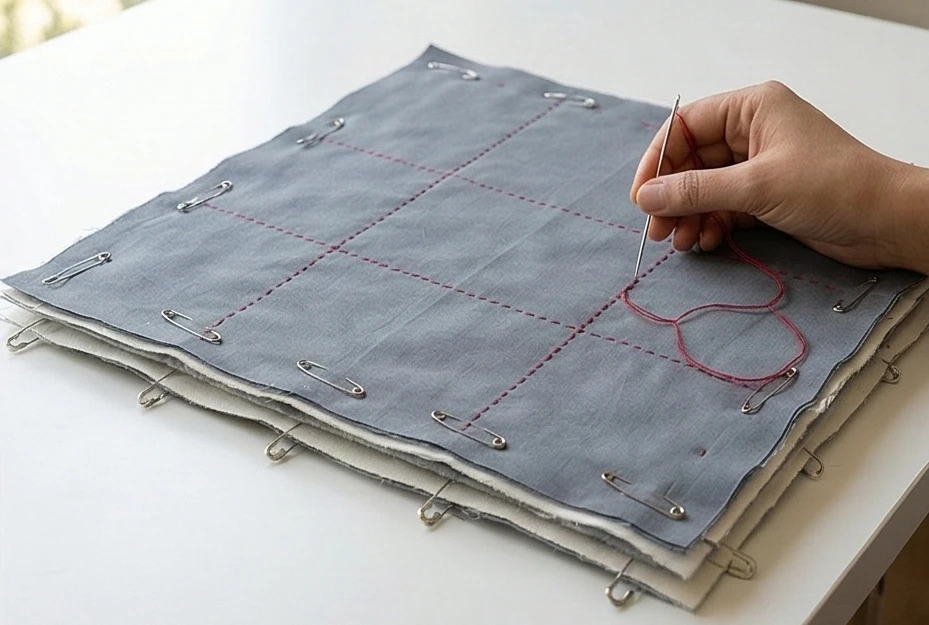
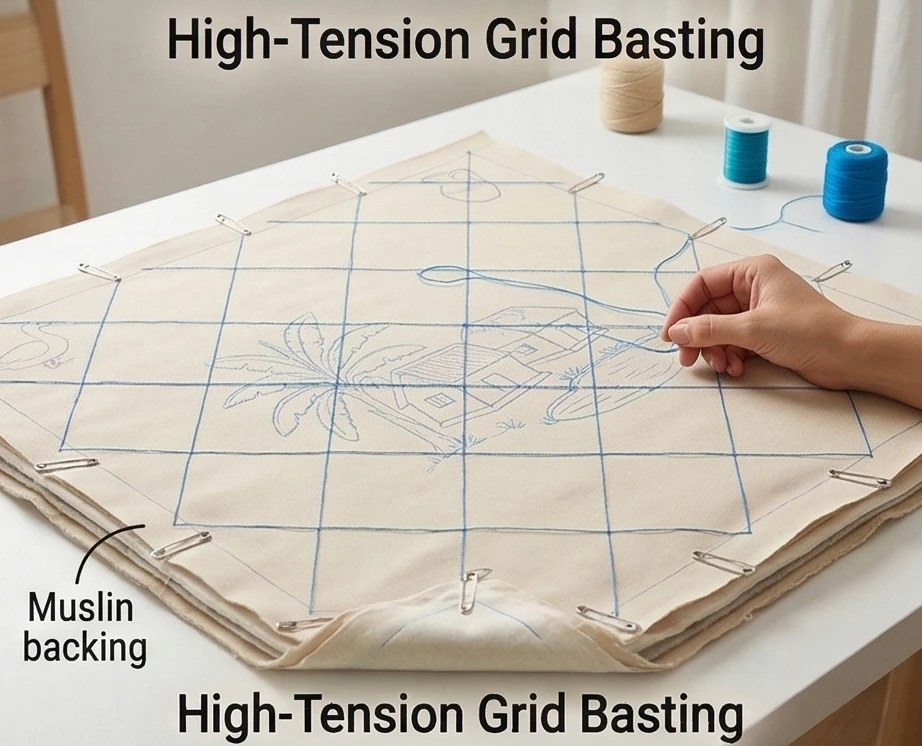
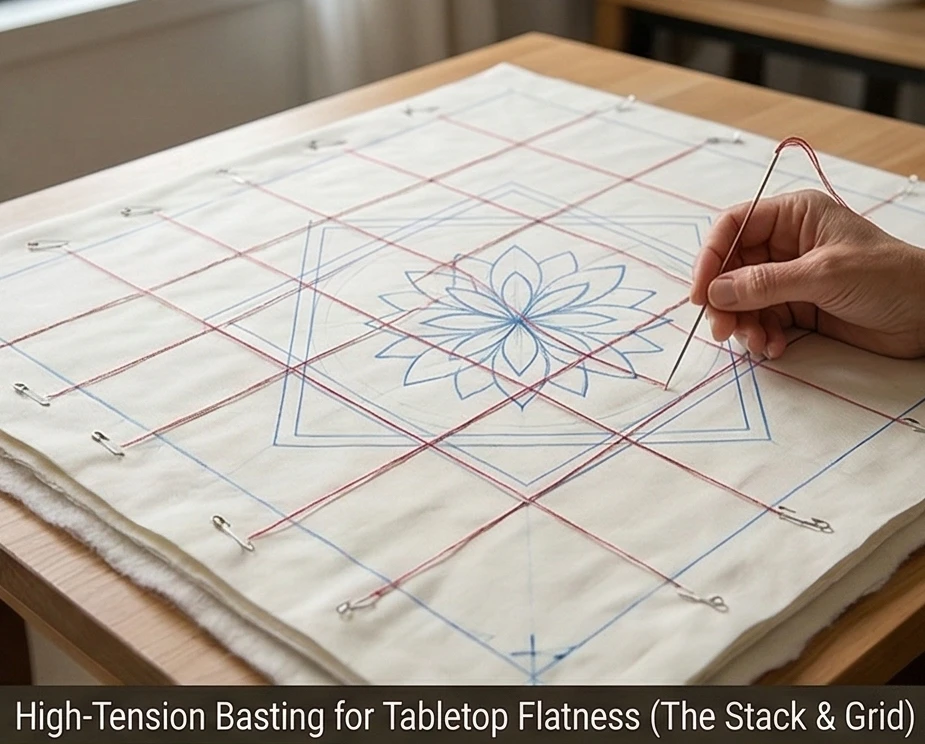
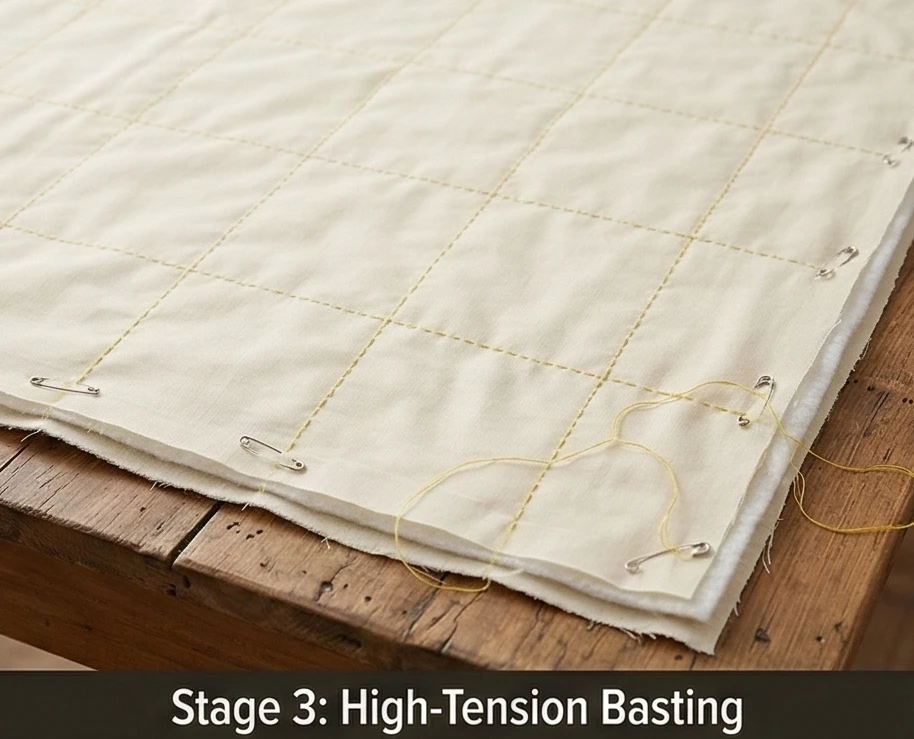
Step 3: Basting the Canvas
Securing the layers to prevent shifting during intensive hand-sewing.
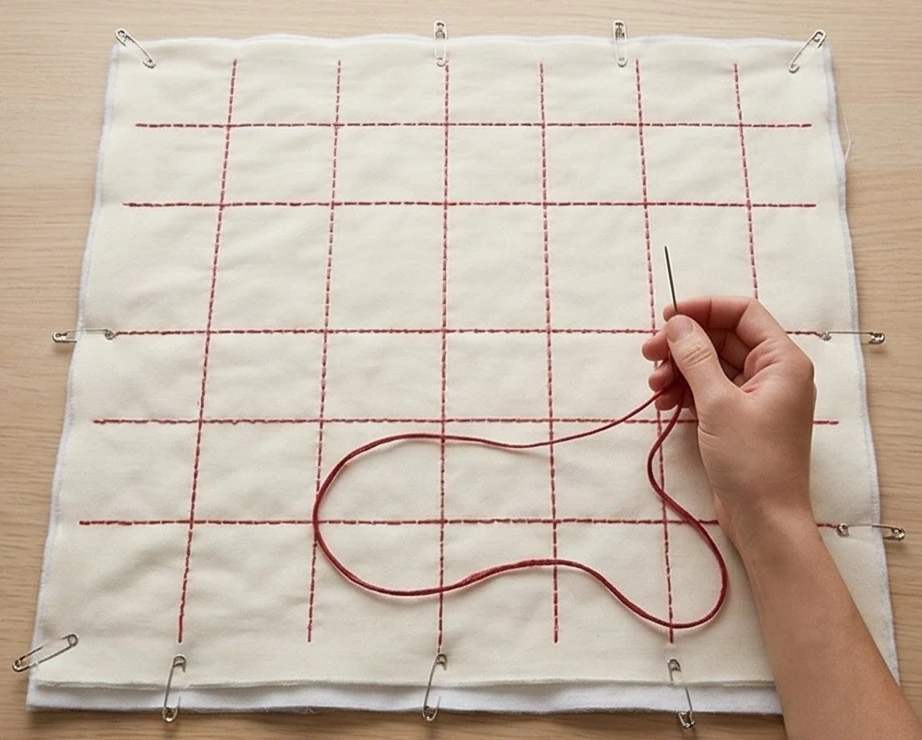
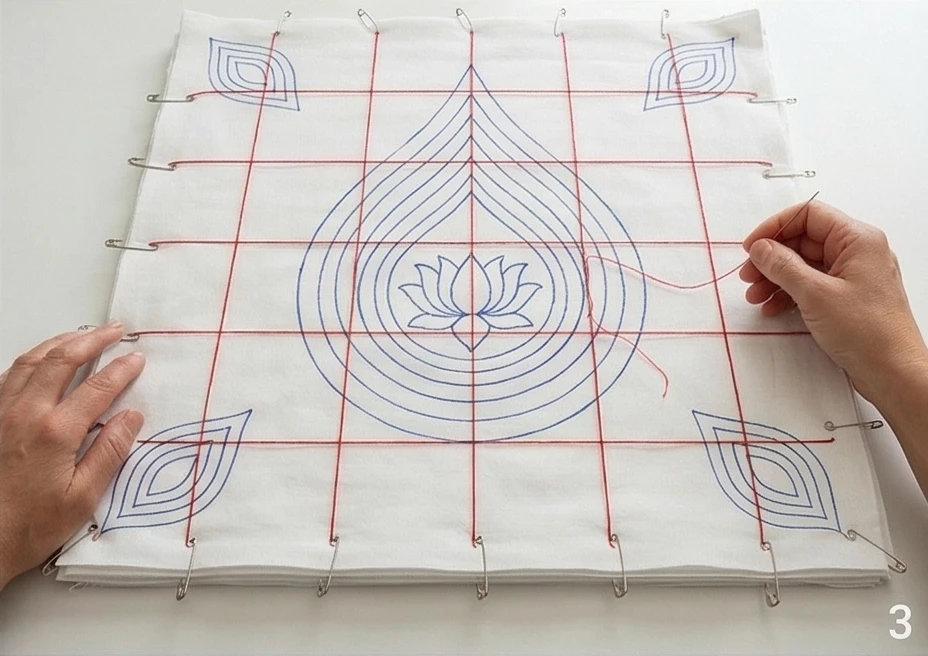
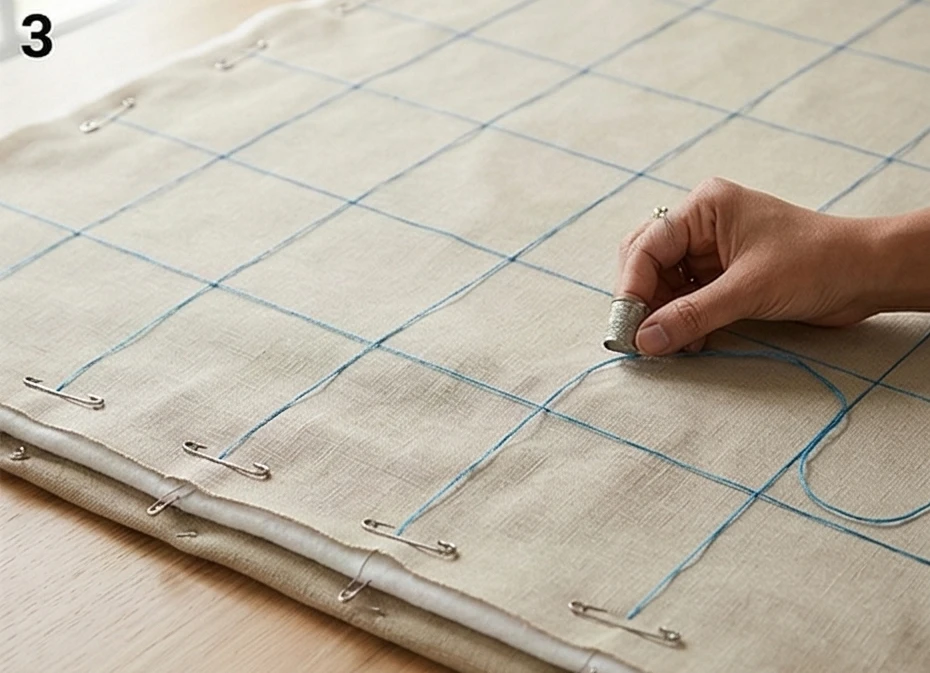
The Stack: Lay the White Voile backing flat on a table or floor, smoothing out all wrinkles. Place the Flannel core on top, followed by the marked White Voile front panel.
Heavy Basting: Because you will be manipulating this fabric by hand for hours, standard pinning is insufficient. Use curved safety pins every 4 inches, or better yet, use a needle and white thread to baste large, 6-inch grid lines across the entire 52″ x 62″ quilt.
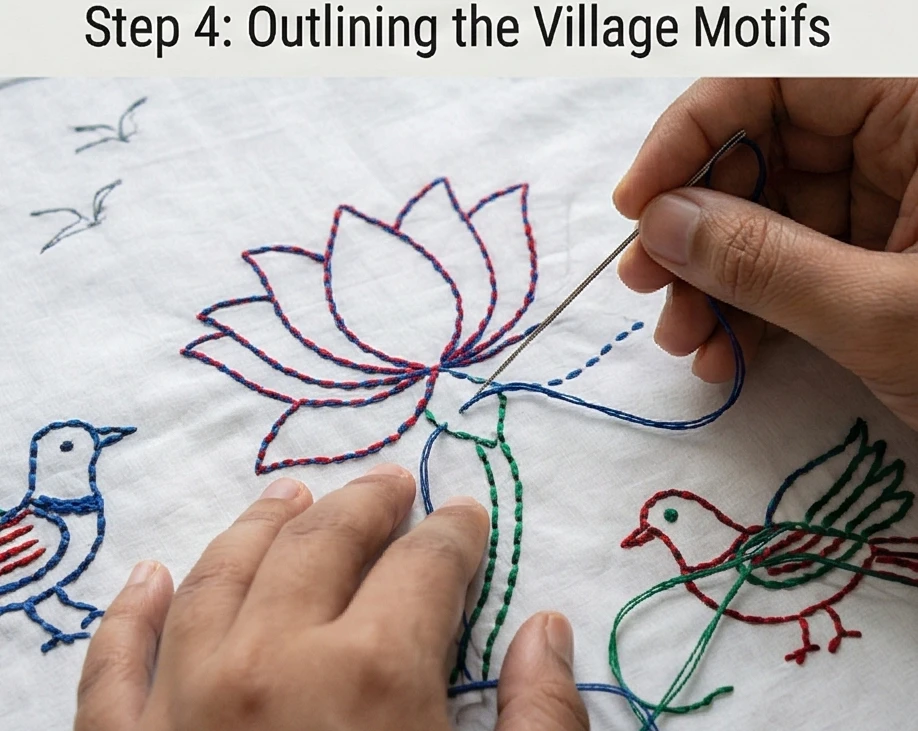
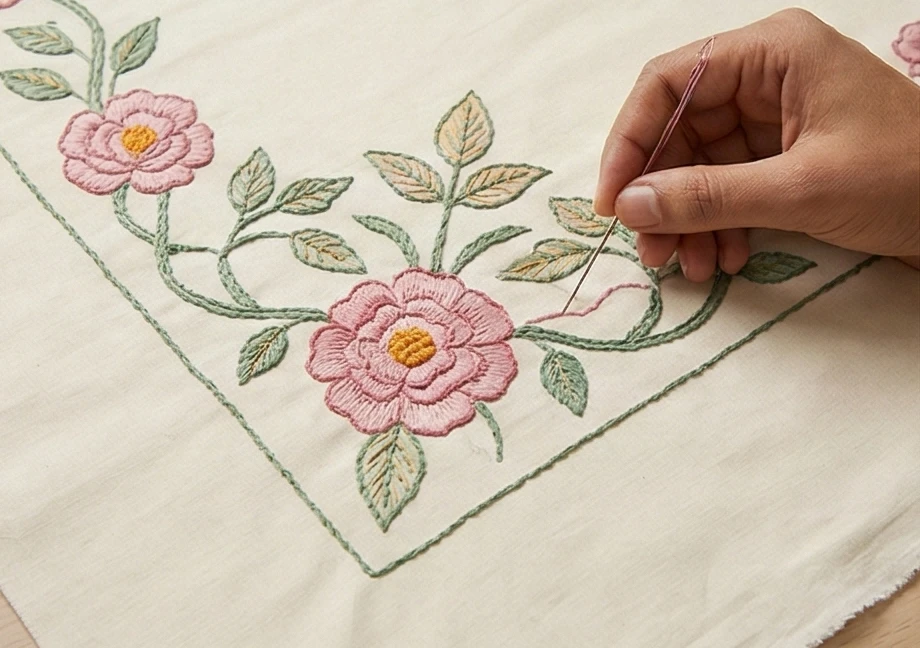
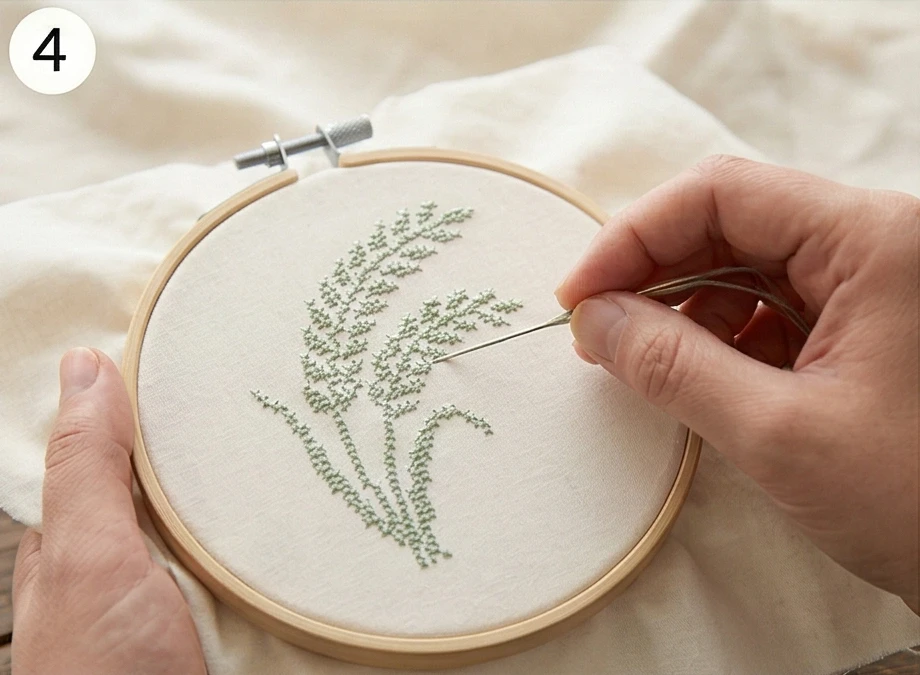
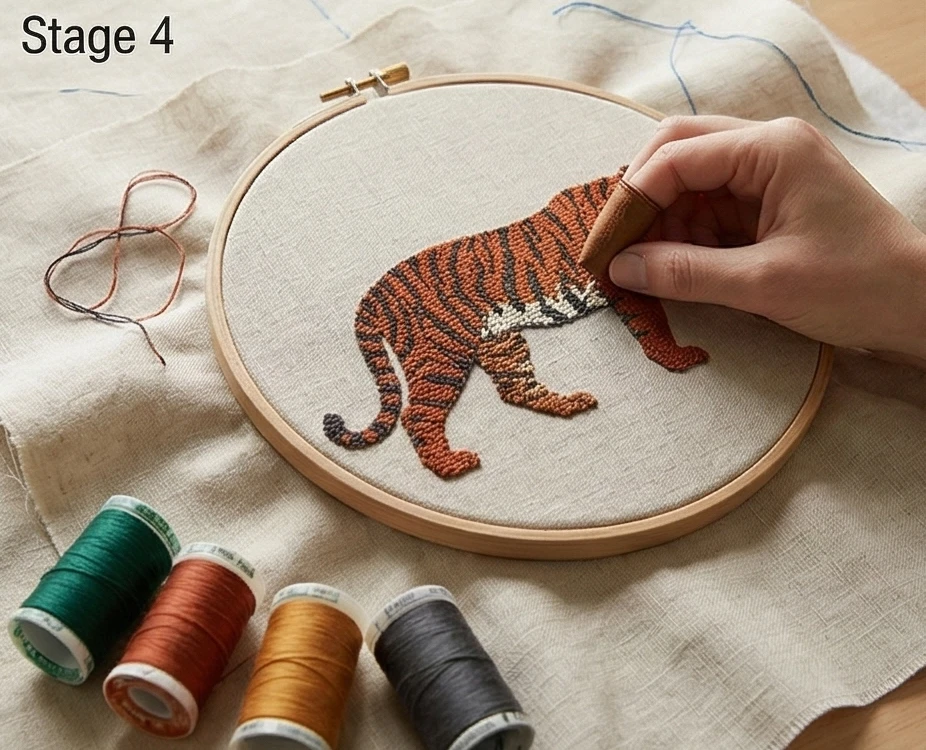
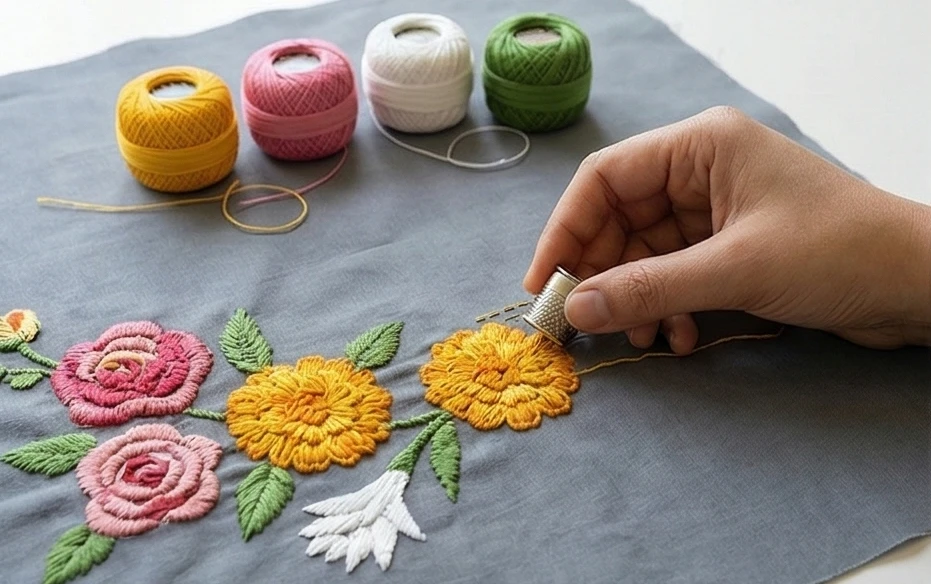
Step 4: Outlining the Village Motifs
Bringing the story to life with color.
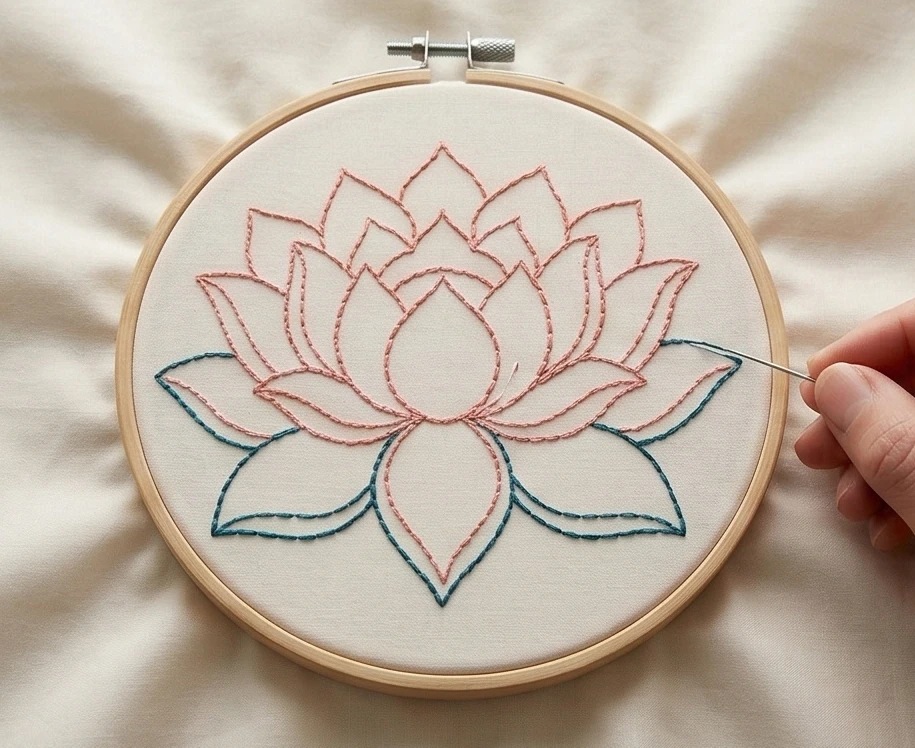
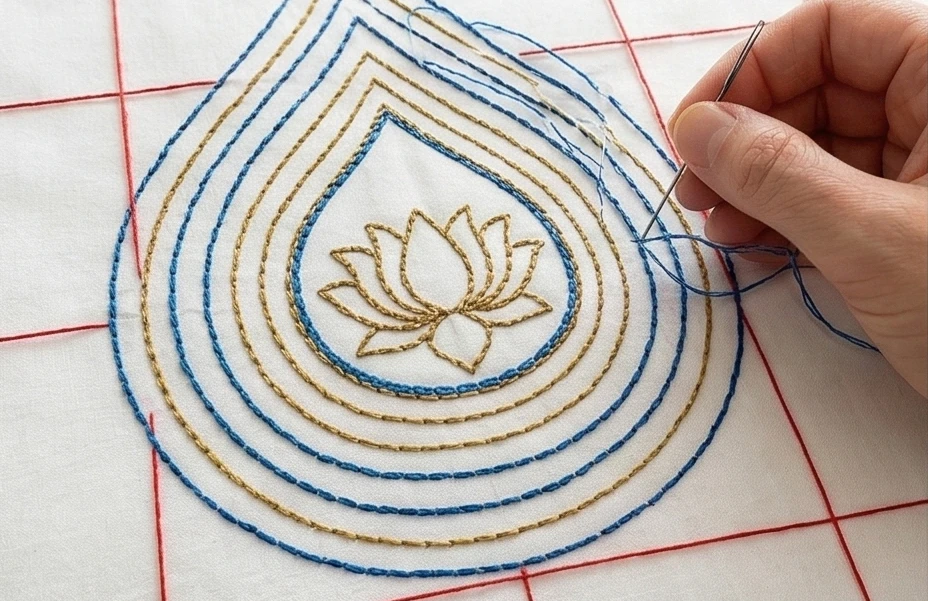
The Outline Stitch: Thread your Kantha needle with the colored Pearl Cotton. Begin outlining your drawn motifs using a simple, continuous running stitch (stitching up and down through all three layers).
Color Placement: Use Indigo for the winding rivers and outlines of the huts, Crimson for the lotus petals and birds, and Emerald for the foliage. Ensure your stitches are relatively small and even, but embrace the organic, handmade look.
No Knots on the Back: Traditionally, knots are hidden. Bury your starting and stopping knots carefully between the layers of the fabric so the back of the quilt remains as elegant and neat as the front.
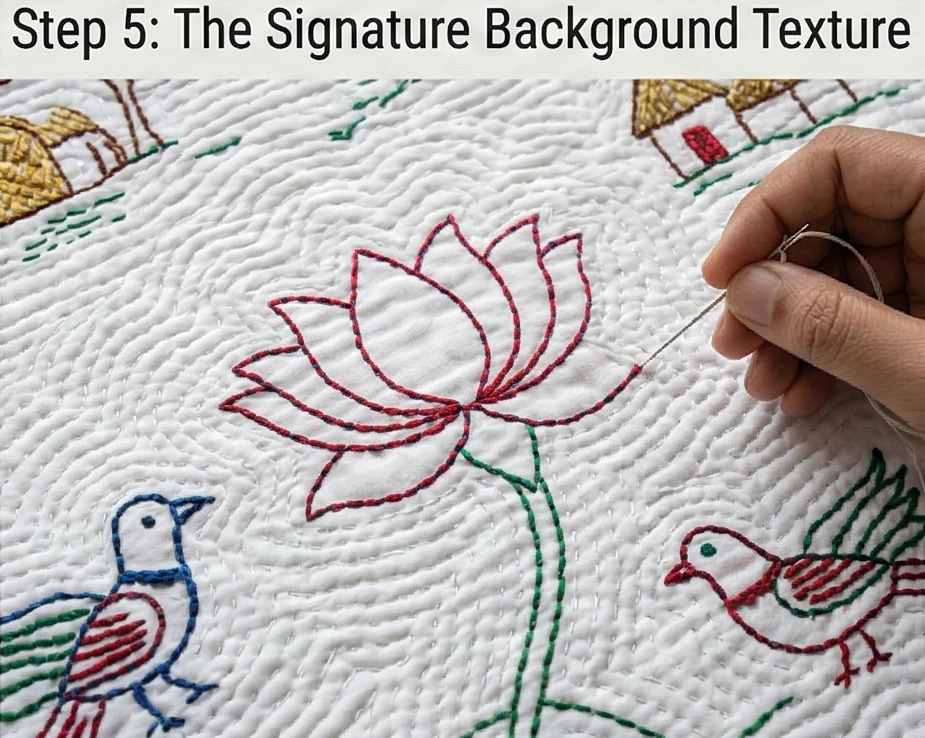
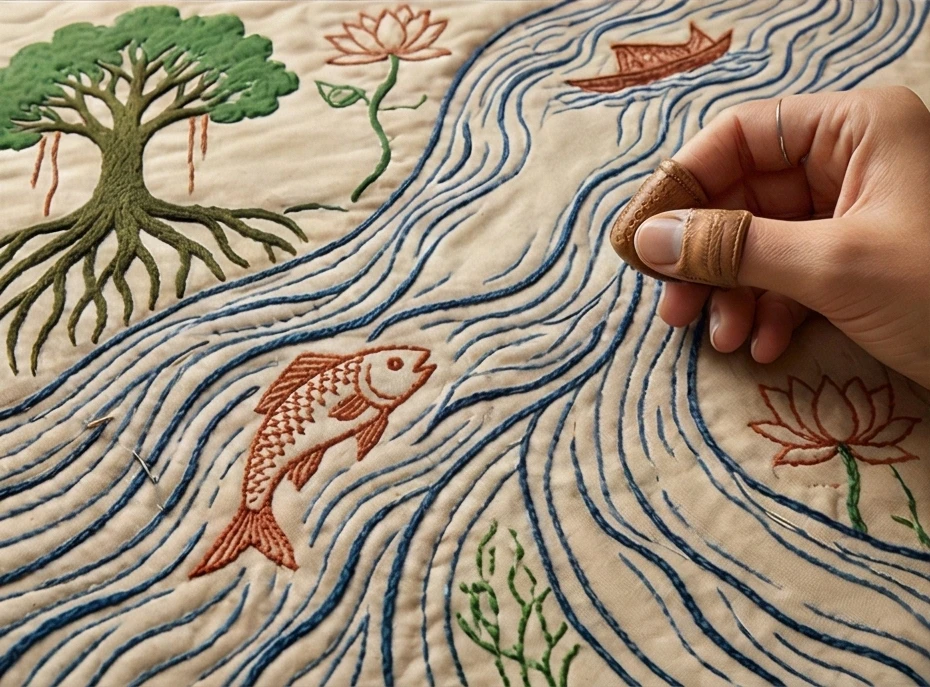
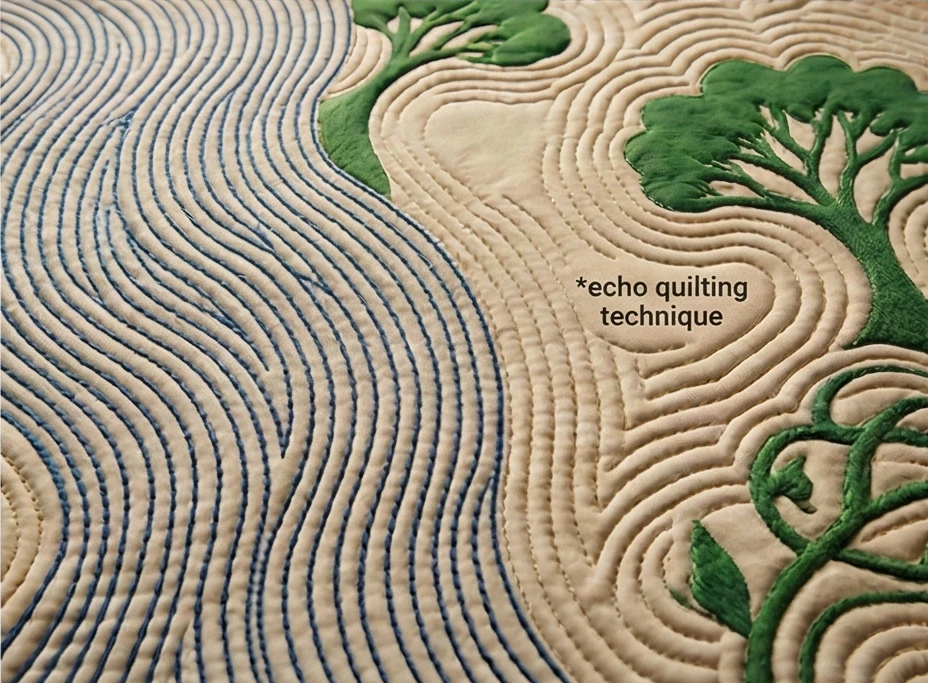
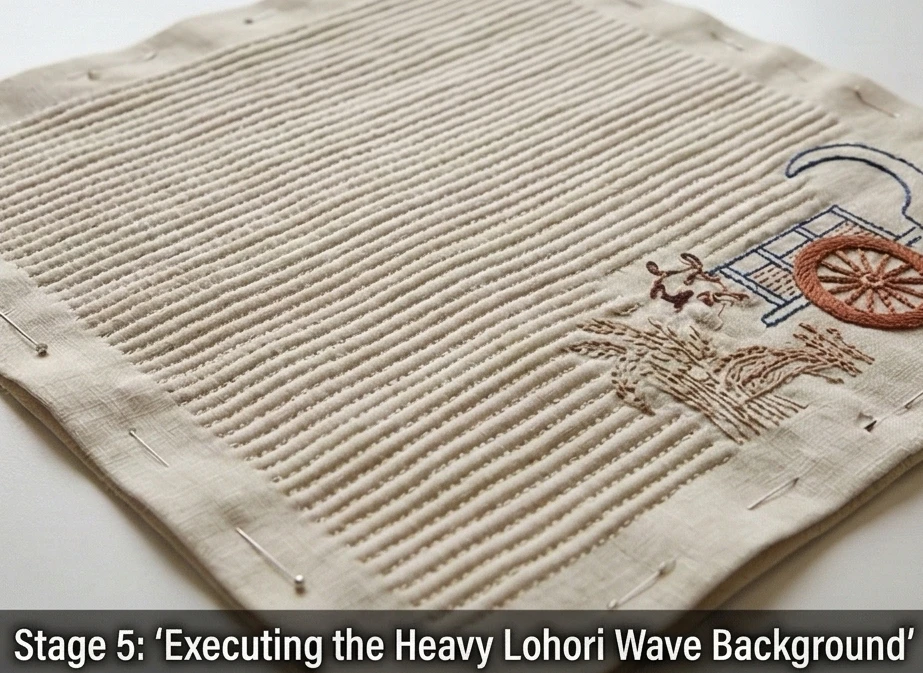
Step 5: The Signature Background Texture
Creating the iconic Nakshi Kantha “ripple.”
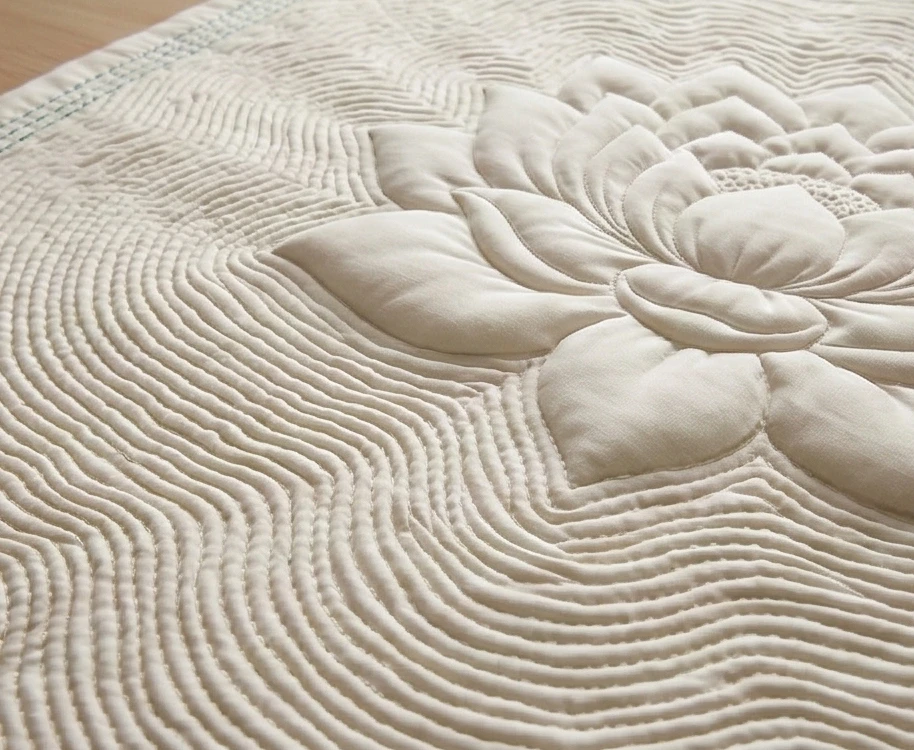
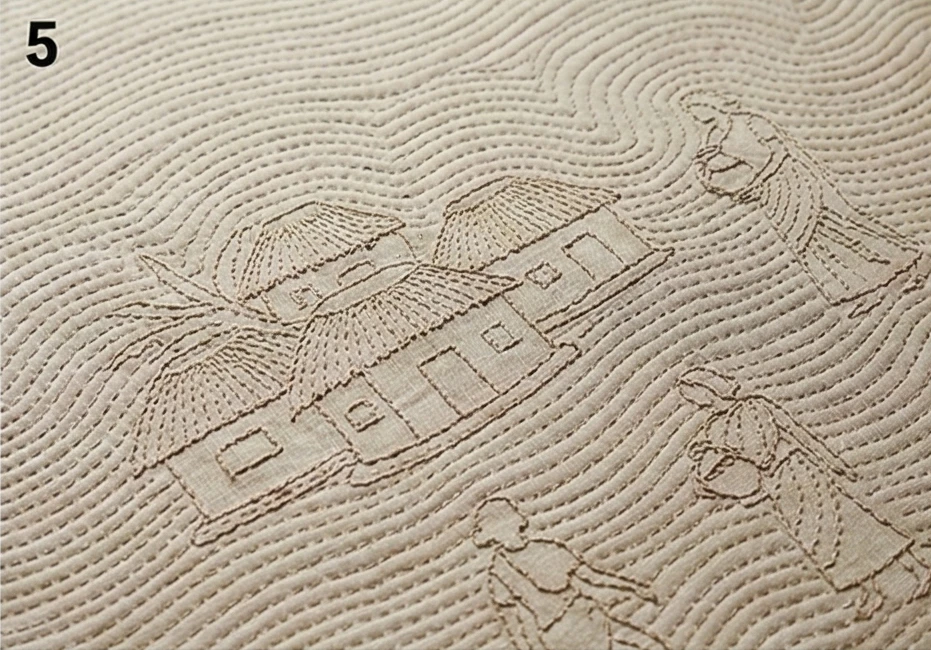
The Echo Stitching: Once all the motifs are outlined in color, thread your needle with white thread (matching the background fabric).
Filling the Negative Space: Stitch closely spaced, parallel lines of running stitches across the entire background. These lines should echo the shapes of your motifs (e.g., stitching concentric circles around the lotus, and wavy lines mirroring the river).
The Spacing: Space these parallel rows about 1/8 to 1/4 inch apart.
Why: This dense, parallel stitching is the soul of Nakshi Kantha. It binds the layers together tightly, causing the unstitched motifs to puff up slightly, creating an incredibly soft, deeply textured, crinkled surface that drapes like liquid cotton.
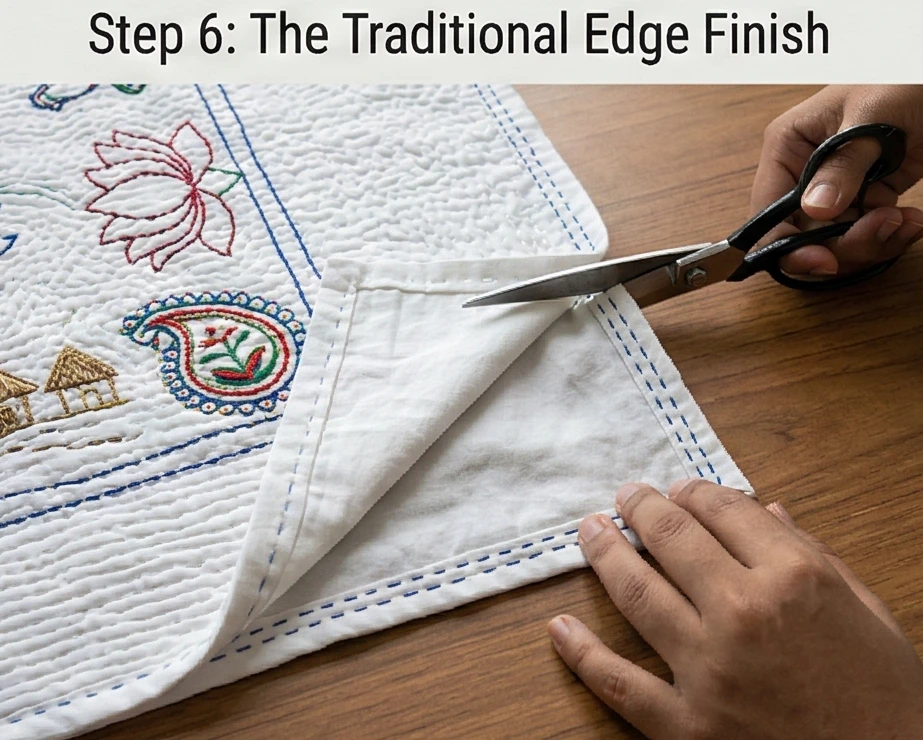
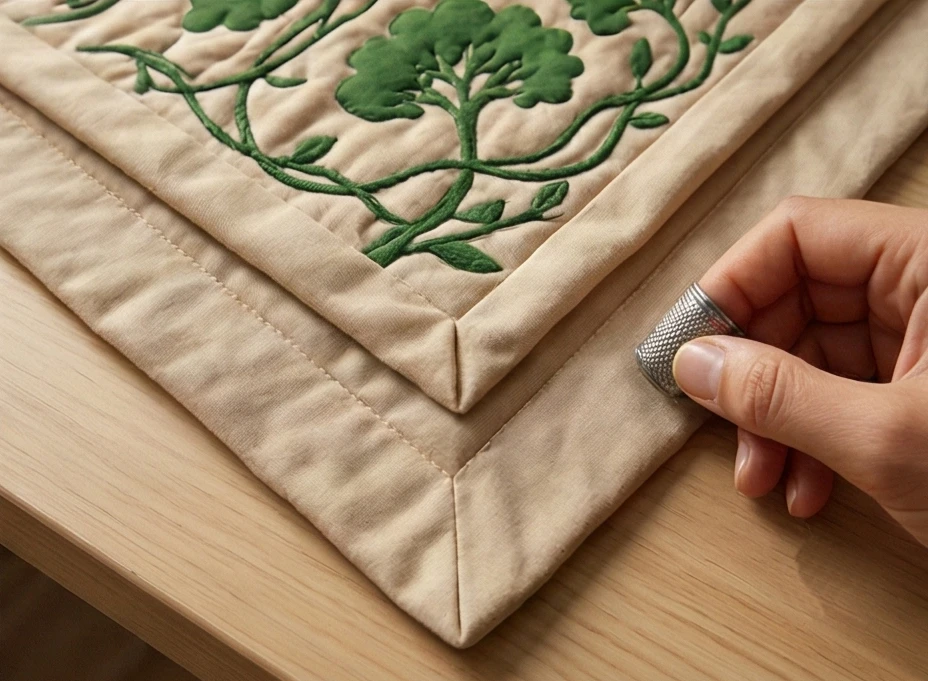
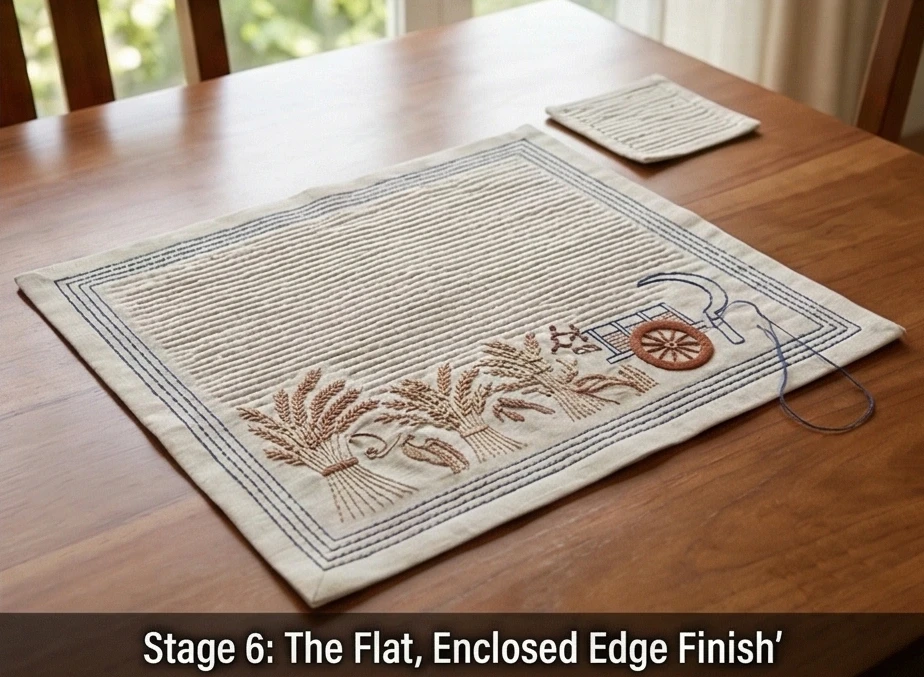
Step 6: The Traditional Edge Finish
Securing the perimeter elegantly.
Trim the Excess: Once the entire piece is heavily quilted, trim the edges perfectly straight to square the throw to its final 50″ x 60″ dimensions.
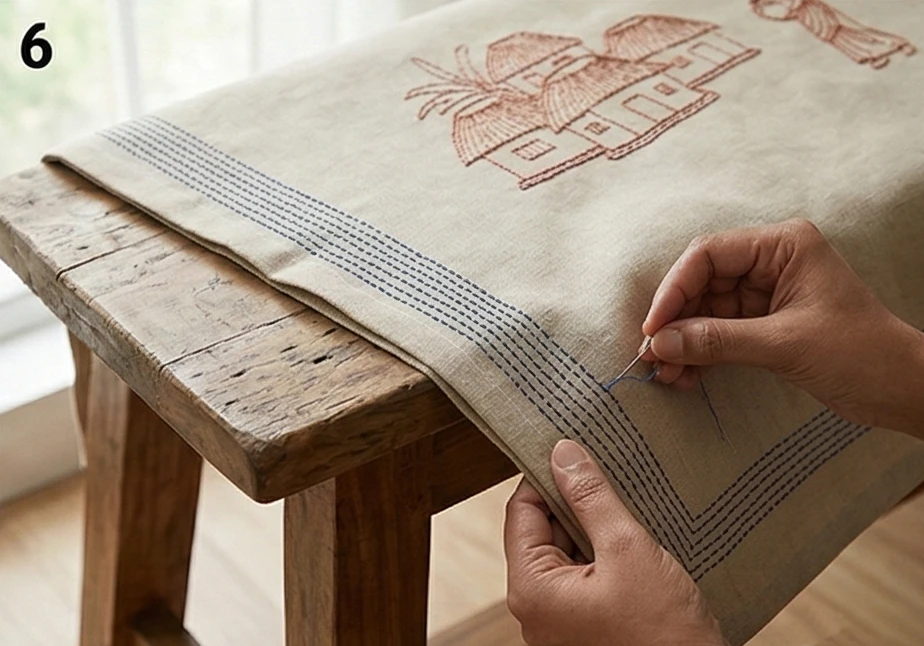
The Folded Edge: Traditional Kantha rarely uses an applied binding strip. Instead, fold the raw edges of the top and bottom fabrics inward by 1/2 inch so they meet, encasing the flannel core. Pin heavily.
The Border Stitch: Using your colored Pearl Cotton (e.g., Indigo), sew three or four parallel rows of running stitches closely together around the entire perimeter to permanently seal the edge and frame the rural tapestry.
Usability Note:The magic of a true Nakshi Kantha is that it becomes softer and more beautifully crinkled with every wash. Because the Pearl Cotton threads are colorfast, you can machine wash this throw on a cold, delicate cycle. Tumble dry on low or line dry in the breeze. The dense background stitching ensures the internal flannel core will never shift or bunch.
More Recommended Supplies
“As an Amazon Associate, I earn from qualifying purchases.“
2.a. Elegant Sujni Kantha Bed Covers Woven with Meaningful Religious (Muslim) Symbols
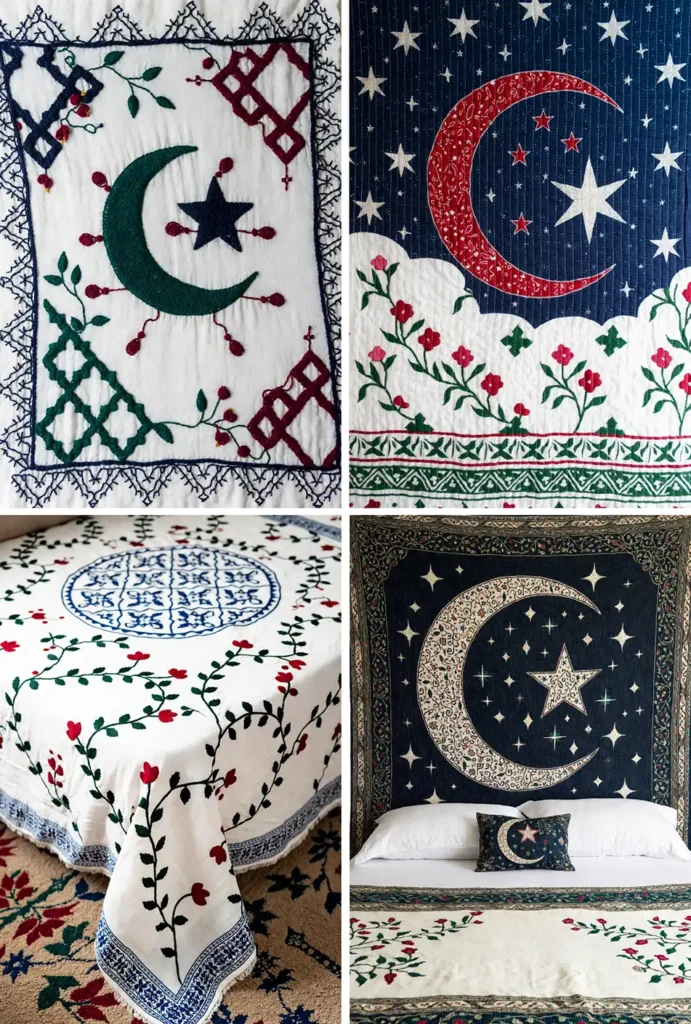
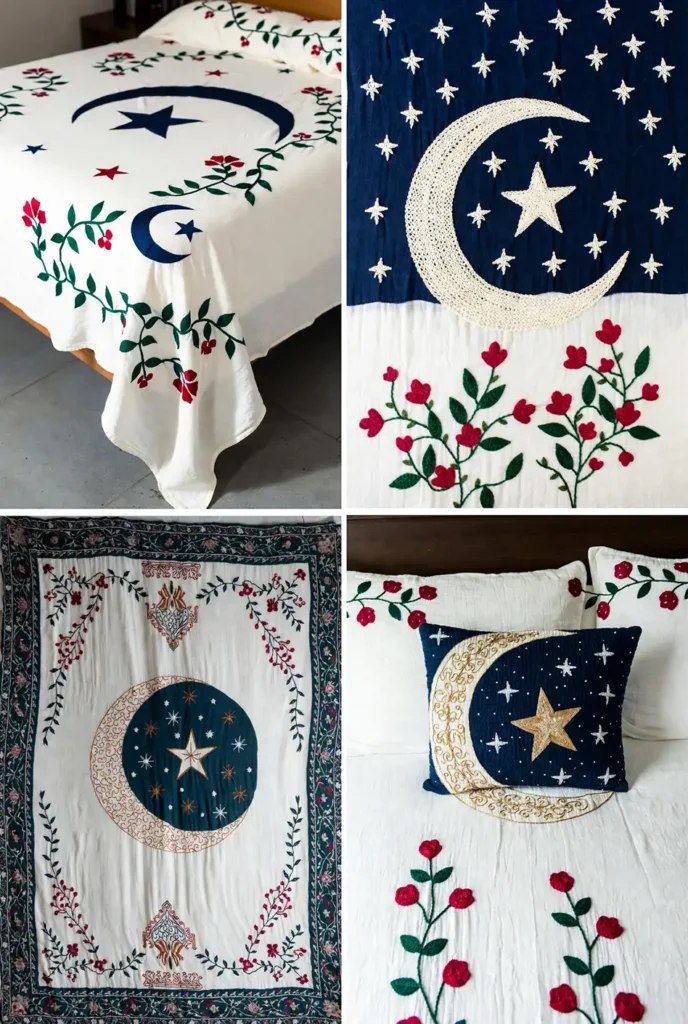
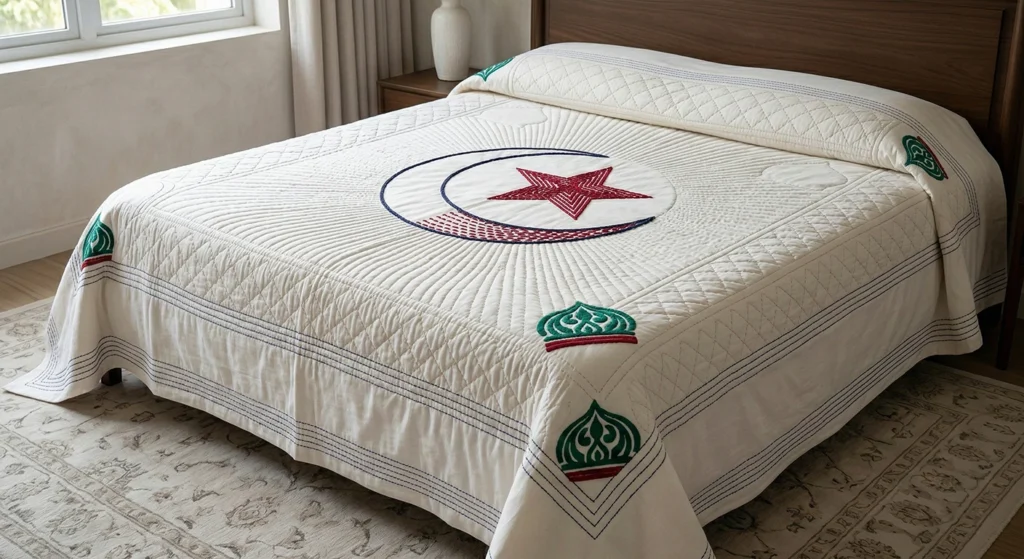
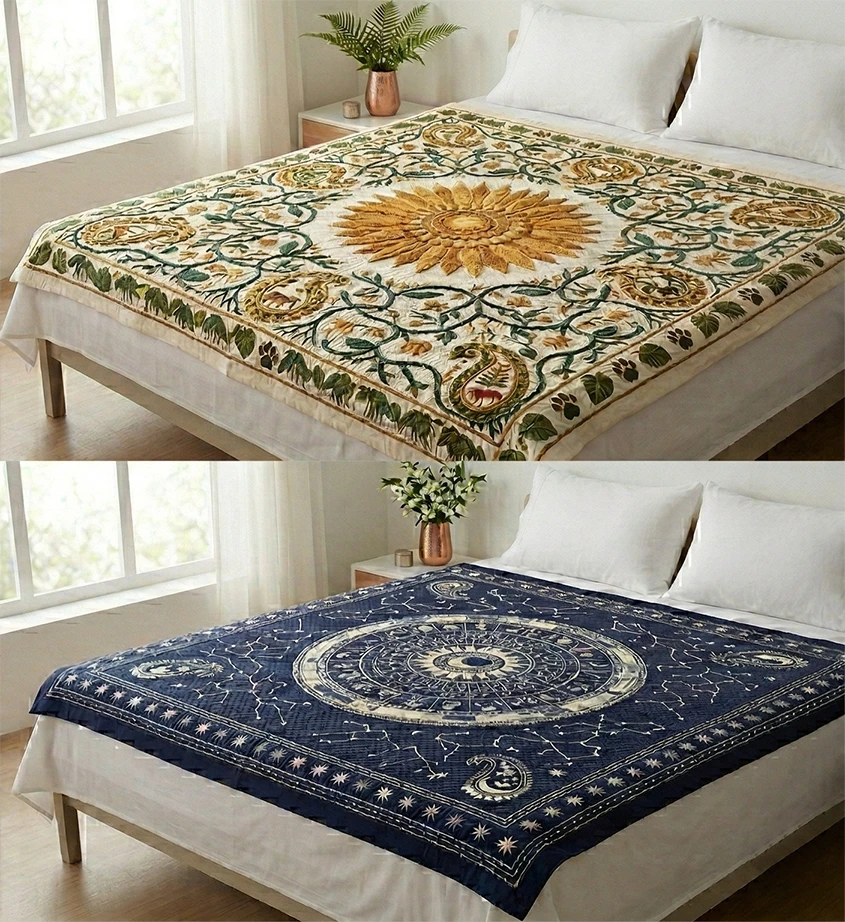
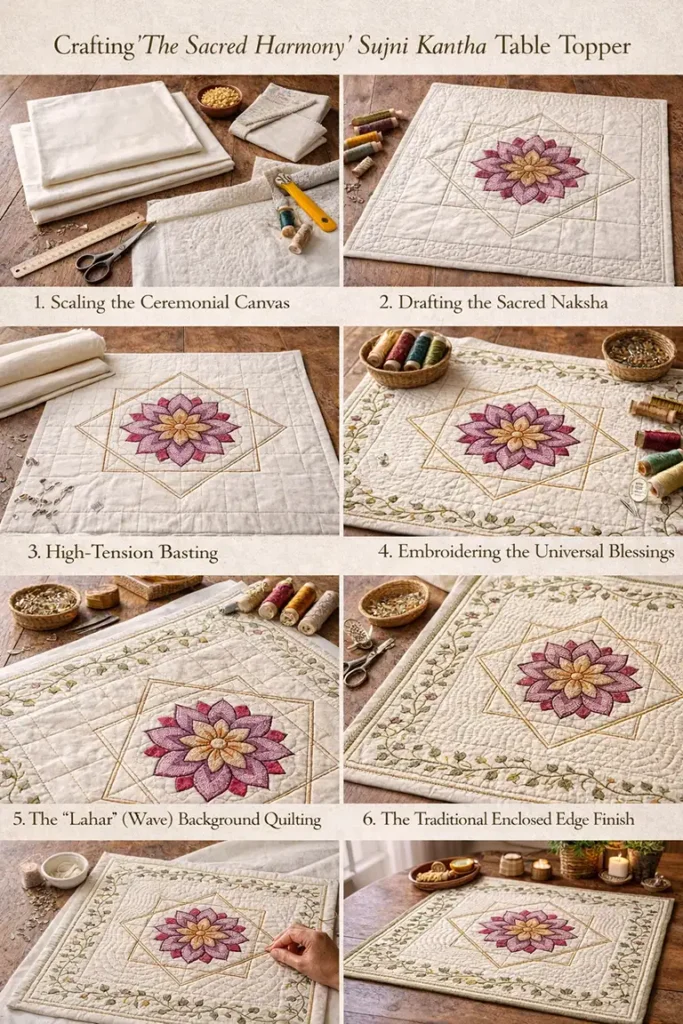
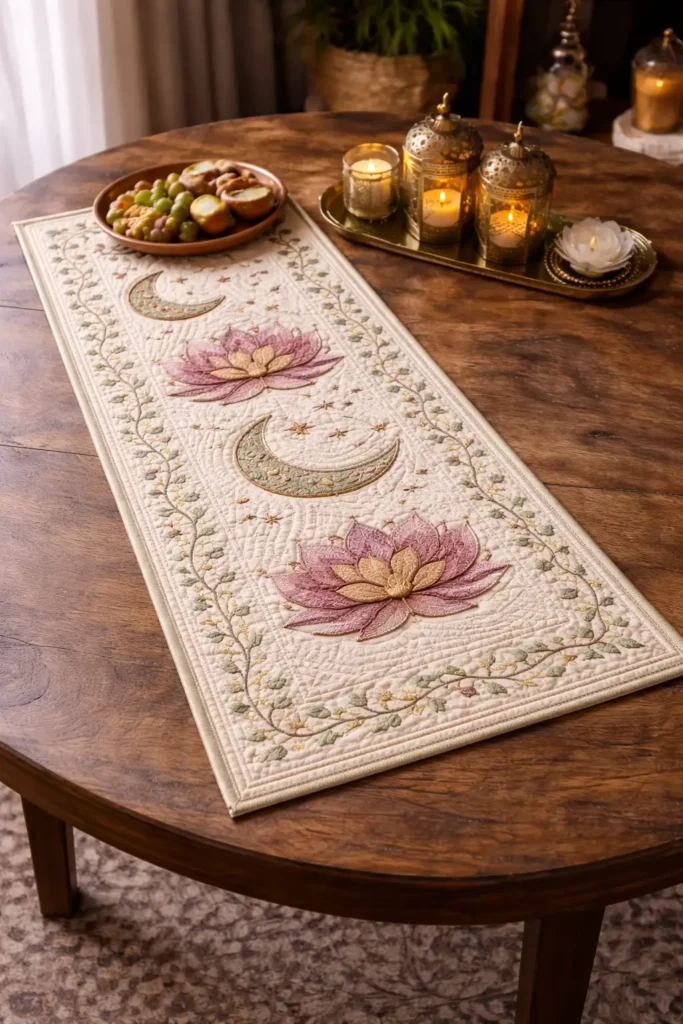
“The Celestial Crescent” Islamic Motif Sujni Kantha Bed Cover
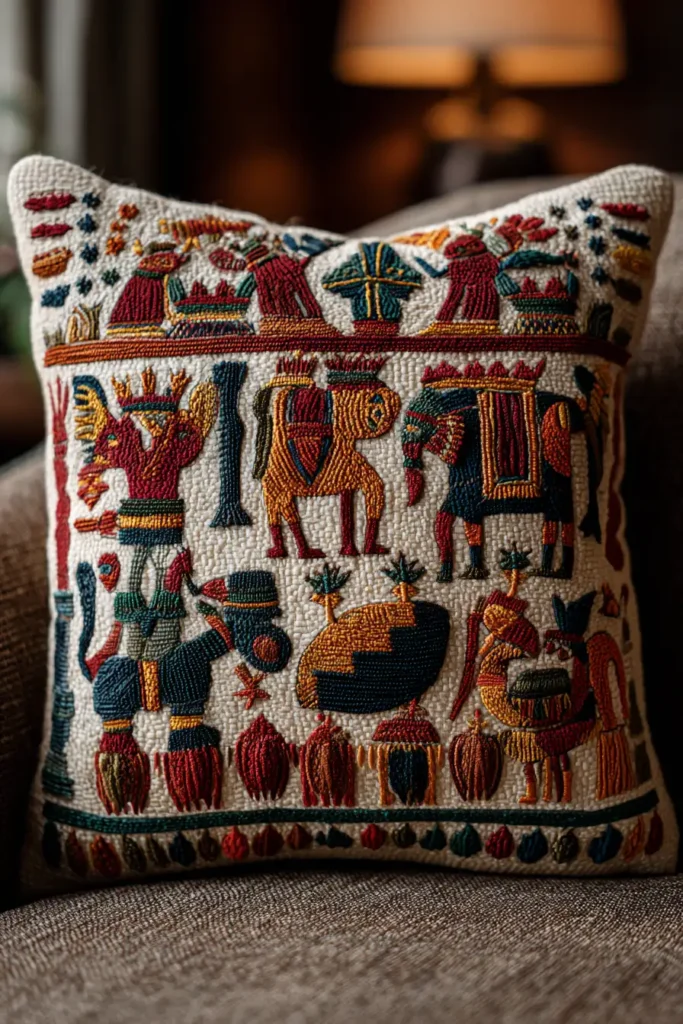
The rich tapestry of Bengali textile art has been profoundly shaped by Islamic artistry, bringing breathtaking geometric precision and celestial symbolism to the fluid, organic world of Nakshi Kantha. “The Celestial Crescent” master bed cover honors this specific heritage by weaving profound Muslim motifs—the guiding Chand-Tara (crescent moon and star), the intricate Jaal (geometric trellis), and the blossoming vines of Jannah (paradise)—across a vast expanse of Pristine White Muslin. Embroidered in deeply symbolic hues of Emerald Green, Deep Indigo, and Crimson, this Sujni Kantha transforms your bed into a sanctuary of peace, divine reflection, and unparalleled, breathable comfort perfectly suited for restful nights.
Finished Dimensions: Elegant Queen/King Master Bed Coverlet, 90″ x 100″ (Providing a luxurious, flowing drape over the edges of a modern mattress).
Materials Needed:
The “Canvas” (Outer Layers): 6 yards of 90-inch wide, high-quality Unbleached Muslin or fine Cotton Percale.
The “Core” (Inner Layer): 3 yards of 90-inch wide, ultra-soft White Cotton Flannel.
Why: A true Sujni Kantha must drape effortlessly. Thick, modern synthetic batting traps heat and disrupts the blanket’s fluidity. A core layer of pre-washed cotton flannel provides the perfect comforting weight while remaining exceptionally breathable.
The “Thread of Devotion” (Embroidery): High-quality Size 8 Pearl Cotton thread in Emerald Green, Deep Indigo, and Crimson Red. Plus, several spools of standard Cream cotton thread for the dense background texturing.
Notions: A large, water-soluble fabric marking pen, specialized long Kantha or Sashiko needles, and hundreds of curved safety pins.
Cultural Backstory:In the Bengal delta, Muslim women historically utilized the Kantha tradition to express their faith and bestow blessings upon their households. Because strict Islamic art often avoids depicting sentient beings, the weavers turned to breathtaking geometric patterns, elaborate floral arabesques representing the gardens of Paradise, and the ‘Chand-Tara’ representing divine light and the Islamic calendar. These Sujni (ceremonial) quilts were painstakingly stitched to be laid out for honored guests, during Eid celebrations, or as prized dowry pieces, turning a simple cotton blanket into a canvas of devotion.
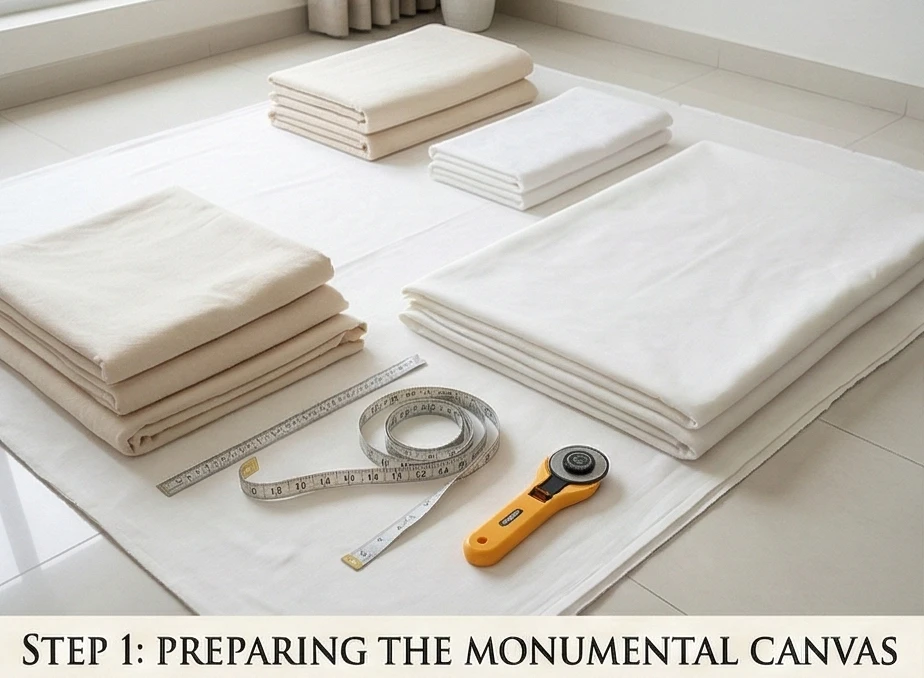
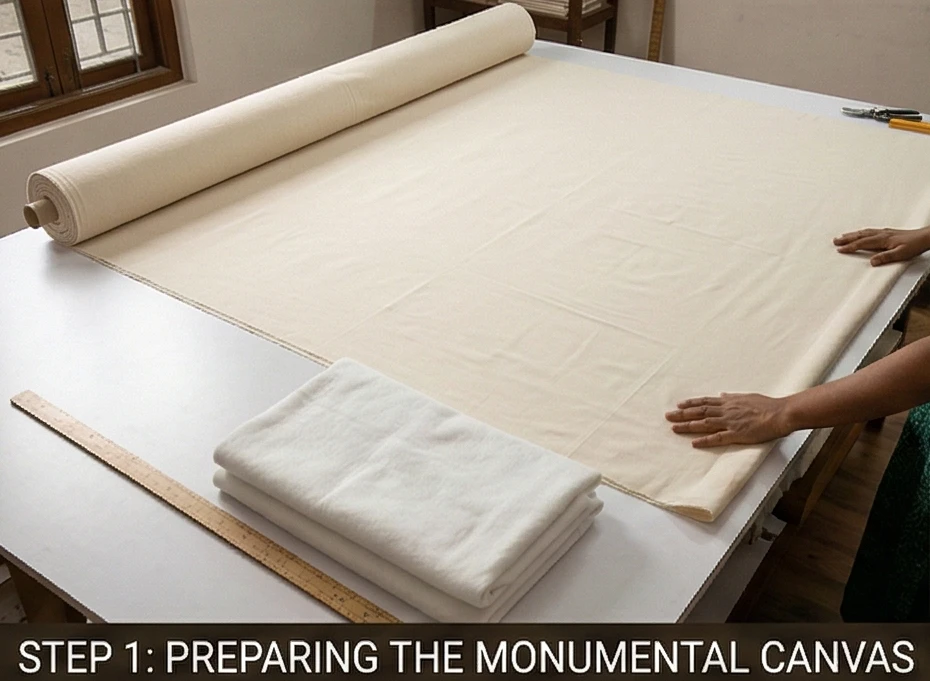
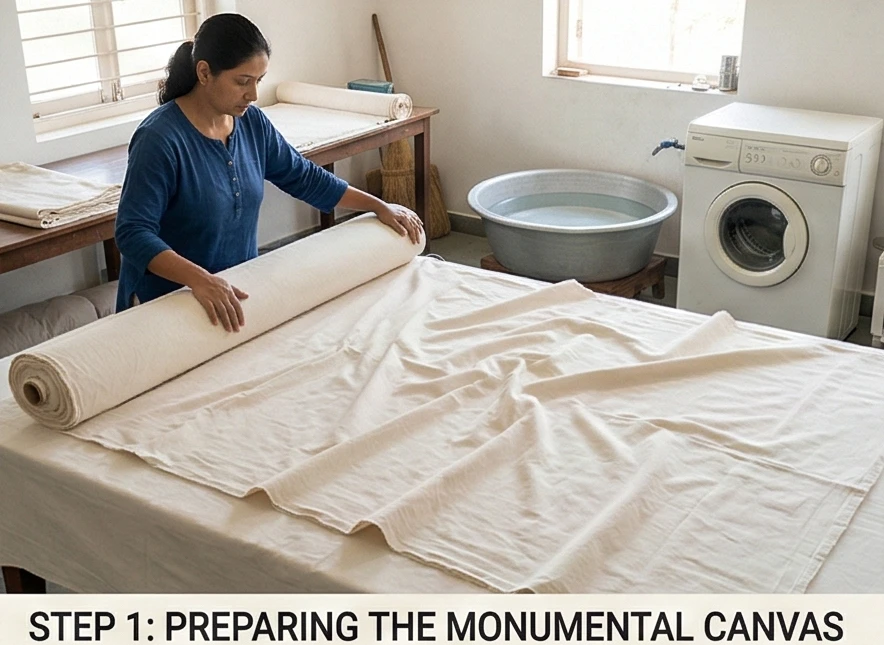
Step 1: Preparing the Monumental Canvas
Creating the soft foundation for a masterwork.
Cut the Expanse: From your 90-inch wide Muslin, cut two massive panels measuring exactly 92″ x 102″ (one for the top, one for the backing).
Cut the Core: Cut your inner Flannel layer to the identical 92″ x 102″ dimension.
The Crucial Pre-Wash: You must wash and tumble dry all three layers before drawing or stitching. This process pre-shrinks the cotton fibers, ensuring that your meticulous, hand-sewn geometry remains flat and flawless after its first laundering.
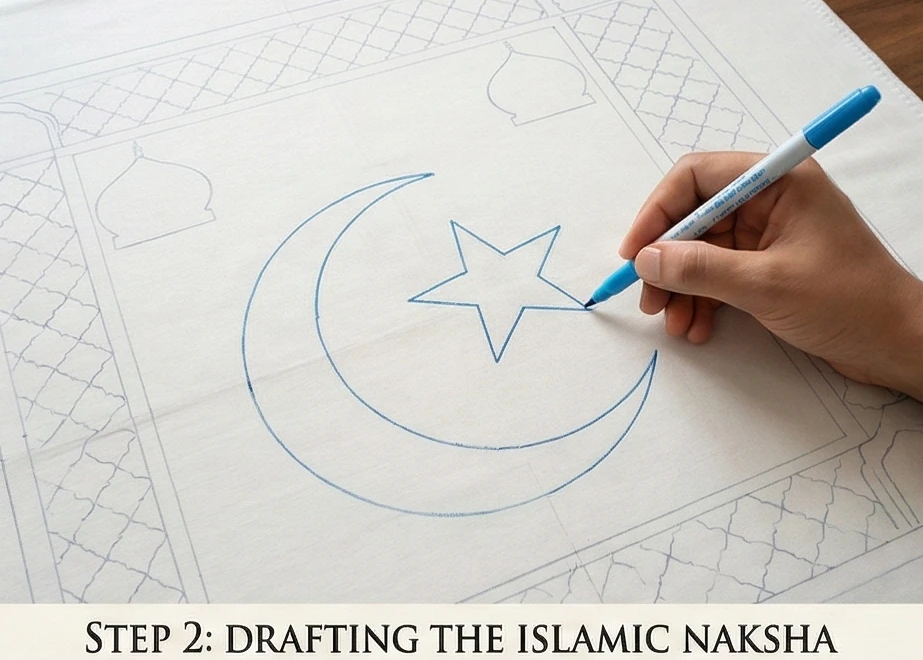
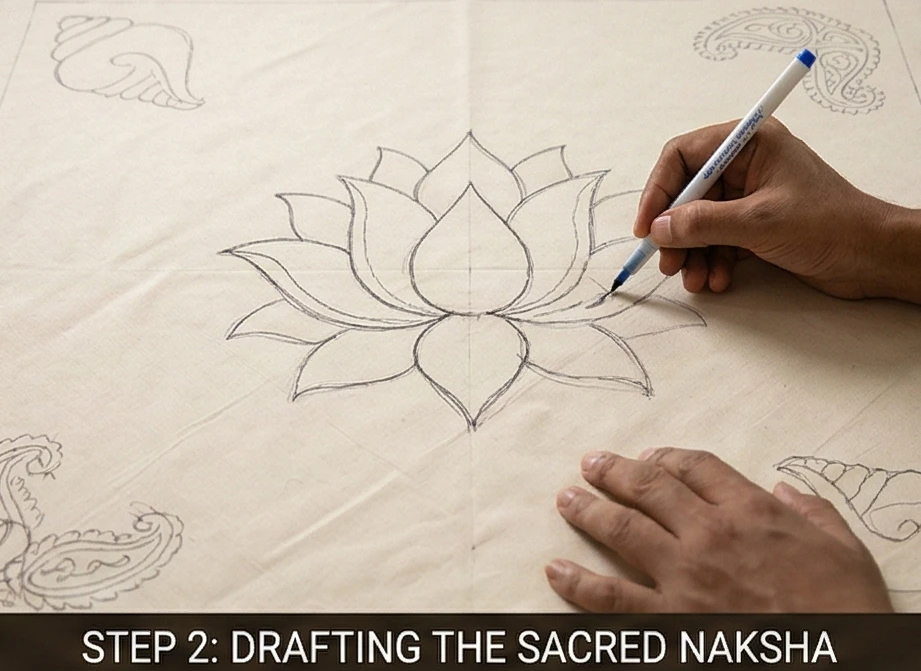
Step 2: Drafting the Islamic Naksha
Designing the layout of celestial blessings.
The Celestial Center: Lay the top muslin layer completely flat. Using your water-soluble pen, draw a large, elegant Chand-Tara (crescent moon enclosing a multi-pointed star) in the exact center, spanning roughly 20 inches across.
The Arabesque Corners: In the four corners of the bedspread, draw stylized Taj (dome) motifs or blossoming floral medallions evocative of Persian-influenced gardens.
The Geometric Jaal Border: Draw wide, concentric borders around the entire perimeter. Instead of flowing vines, fill the main border with a structured Jaal (trellis)—an interlocking geometric pattern of diamonds and hexagons. This provides a stunning architectural frame for the organic center.
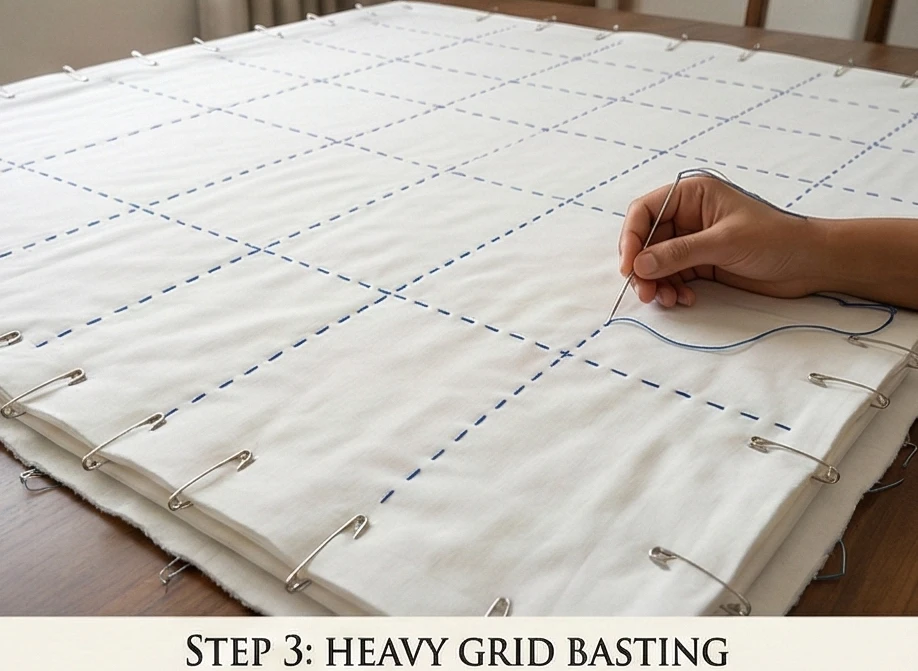
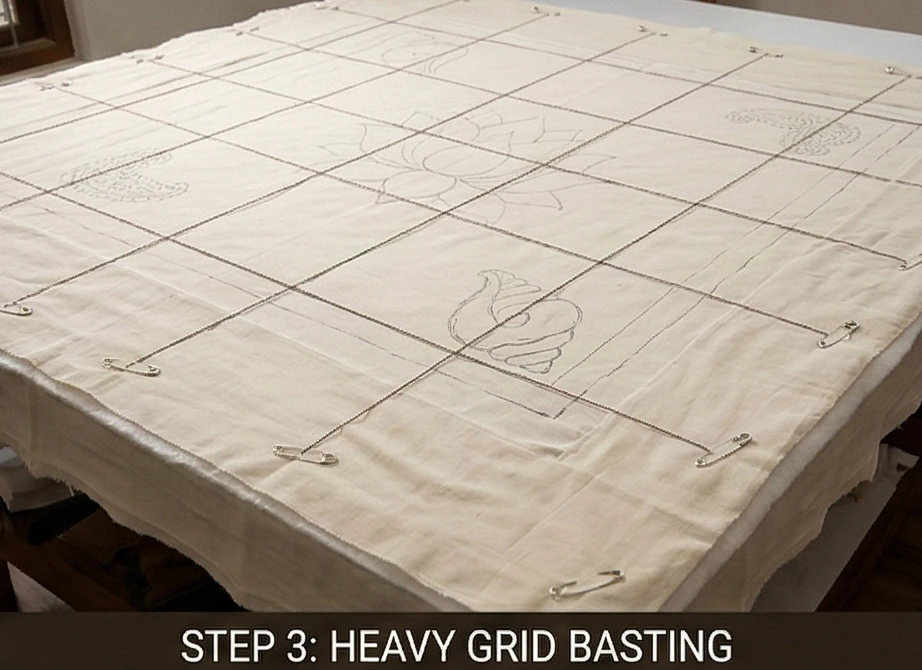
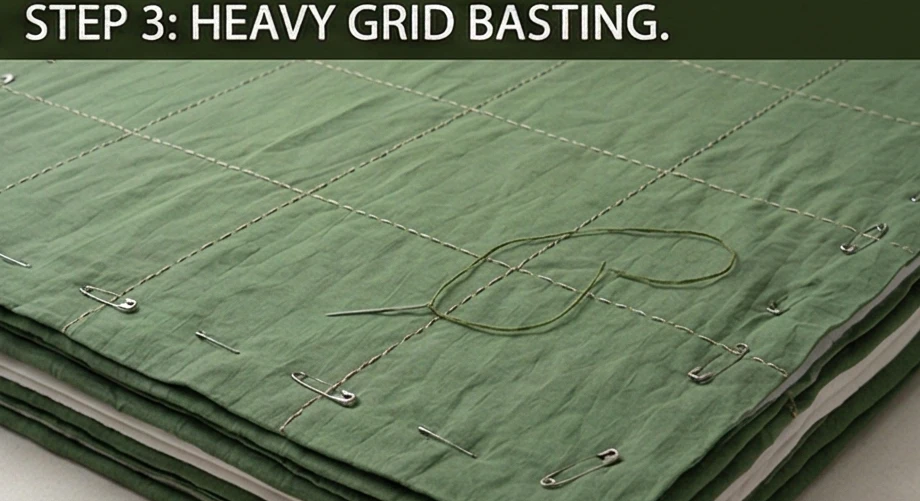
Step 3: Heavy Grid Basting for a Grand Scale
Securing the massive layers for the stitching journey.
The Stack: Lay the backing flat, followed by the flannel core, and finally the marked top layer. Smooth out every single wrinkle from the center outward.
Grid Basting: Because a master bed cover takes significant time to hand-stitch, standard pinning will inevitably fail. Thread a needle with contrasting, easily removable thread and stitch a giant 10-inch grid across the entire 90×100-inch quilt. This permanently locks the three layers together.
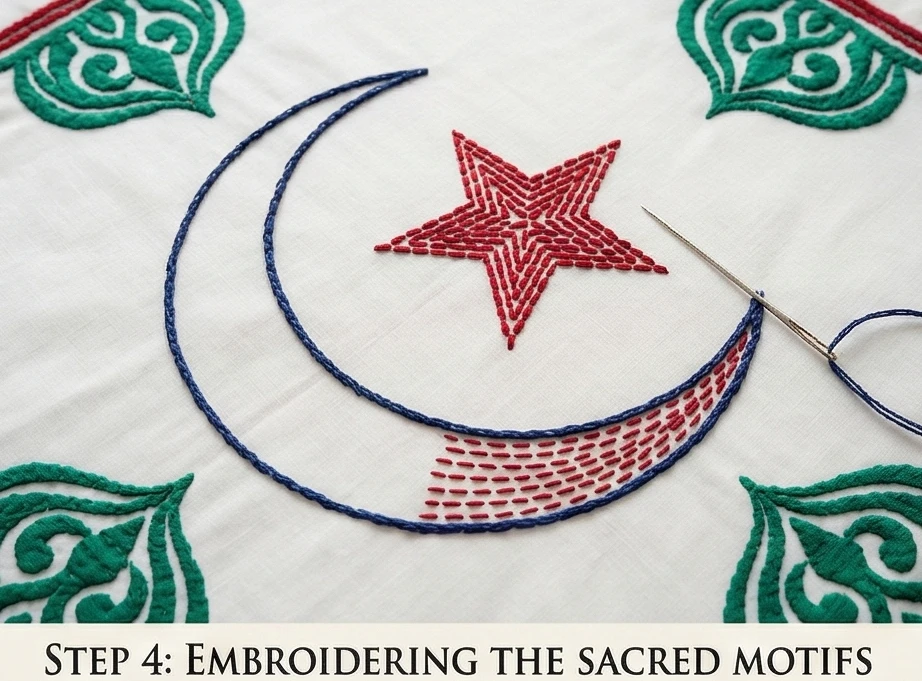
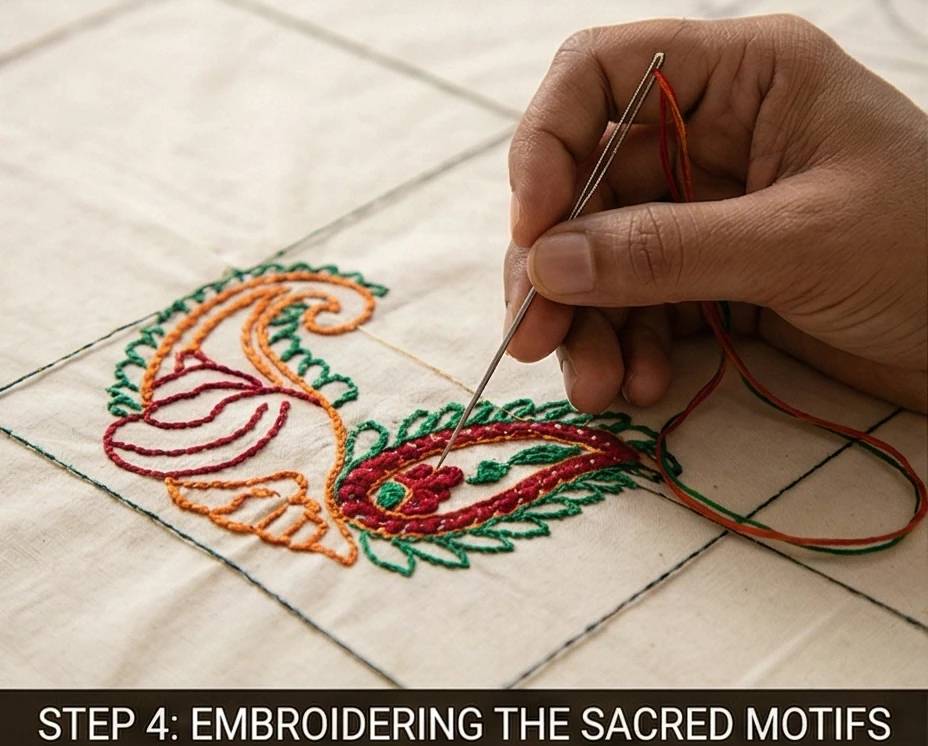
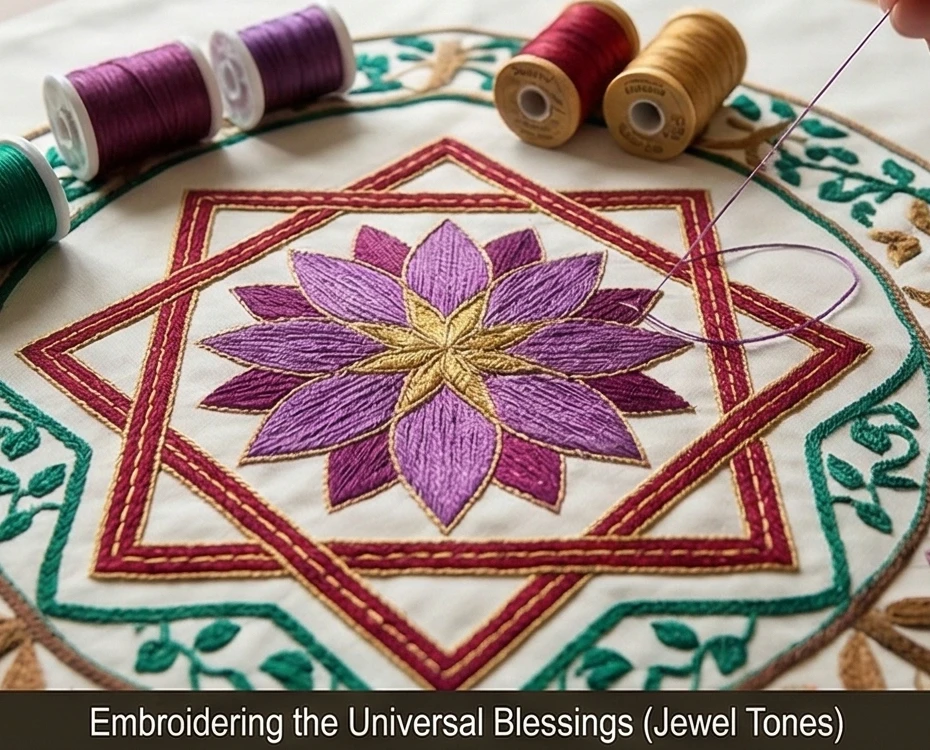
Step 4: Embroidering the Sacred Motifs
Bringing the design to life with colored thread.
The Rhythmic Outline: Thread your Kantha needle with the Deep Indigo or Emerald Green Pearl Cotton. Begin outlining your drawn crescent, stars, domes, and geometric trellis using a simple, rhythmic running stitch. Pierce completely through all three layers with every stitch.
Filling the Blessings: Once the outlines are complete, use the Crimson and Emerald threads to add dense, parallel rows of running stitches within the stars and floral medallions, creating vibrant, solid color blocks that catch the eye.
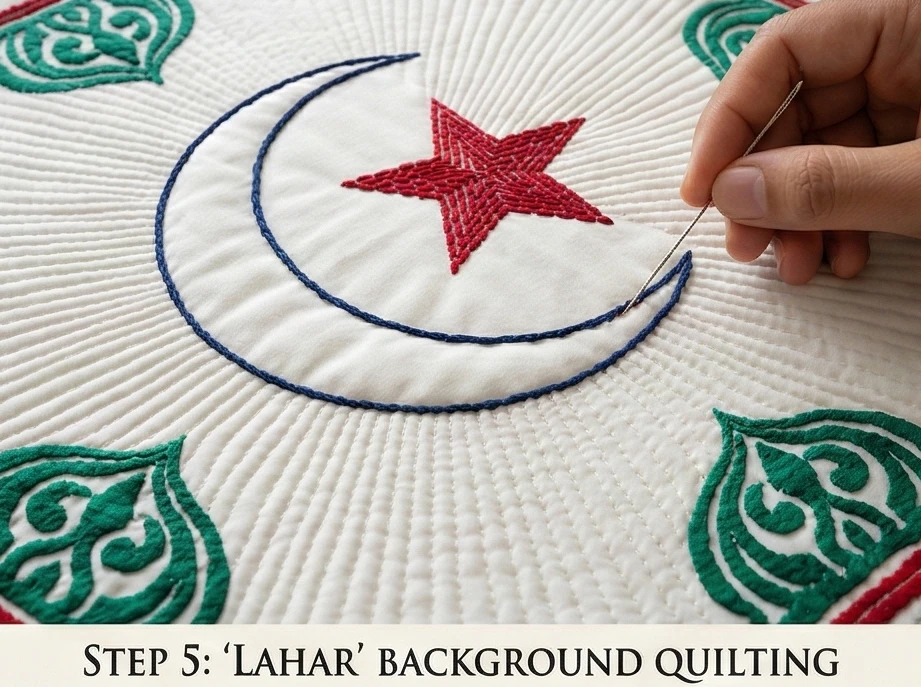
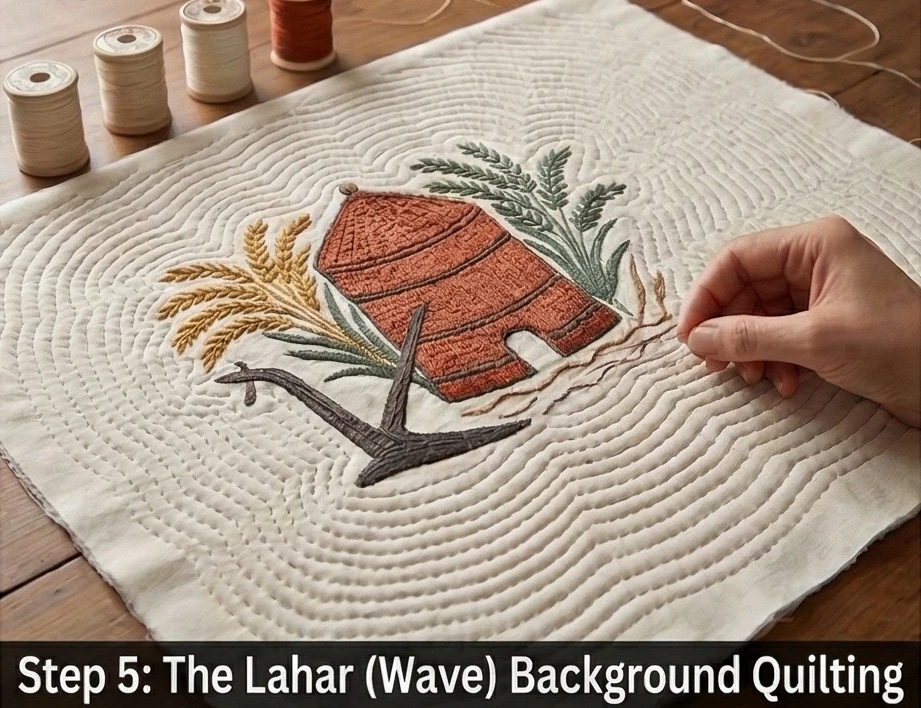
Step 5: The “Lahar” (Wave) Background Quilting
Creating the signature crinkled texture.
The Unifying Thread: Switch to your standard Cream cotton thread. This step transforms the flat fabric into a deeply textured, 3D quilt.
Echoing the Light: Starting from the central Chand-Tara and the corner domes, stitch continuous, closely spaced parallel lines of running stitches radiating outward. Echo the shapes of the religious motifs, creating ripples as if light were radiating from the crescent moon.
The Density: Space these rows exactly 1/4-inch apart across the entire negative space of the coverlet. This dense background stitching tightly binds the layers together, forcing the unstitched colored motifs to puff up elegantly in bas-relief.
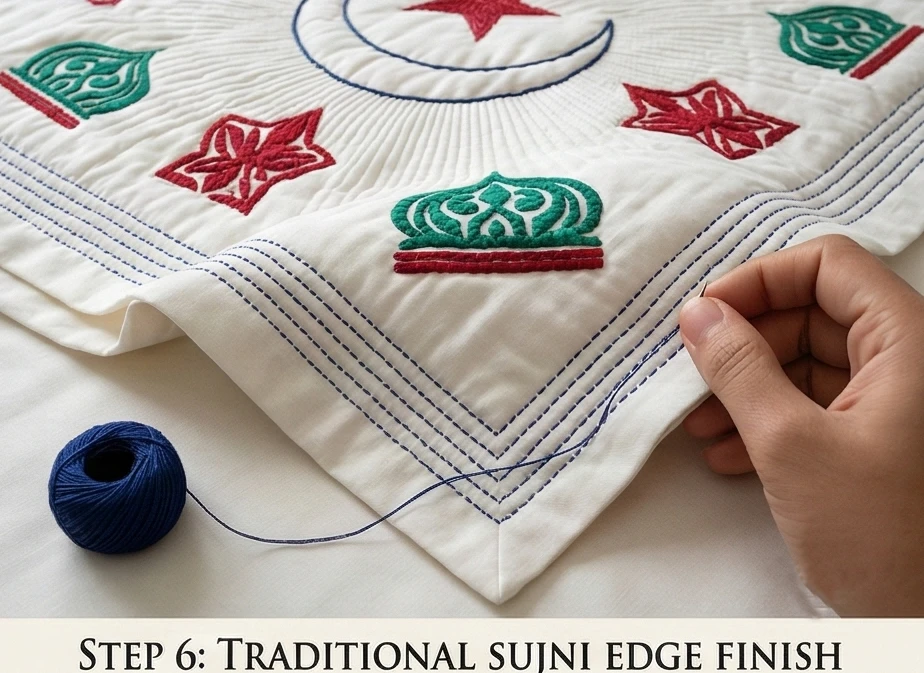
Step 6: The Traditional Sujni Edge Finish
Sealing the edges without modern binding.
Trim and Fold: Once the vast expanse is completely quilted, trim the raw edges perfectly straight to the final 90″ x 100″ dimension. Fold the raw edges of the top and bottom muslin inward by 1/2 inch to enclose the flannel core, and pin heavily.
The Border Stitch: Do not apply a separate, bulky quilt binding. Instead, thread your needle with Deep Indigo. Sew five to seven densely packed, parallel rows of running stitches around the entire perimeter. This historic finishing technique seals the edges permanently and provides a stunning, highly tailored frame for the bedspread.
Usability Note:A Sujni Kantha is designed to be cherished and used daily. The dense background stitching ensures the internal core will never warp. Machine wash this grand bed cover on a cold, delicate cycle. As it air-dries, the thousands of tiny stitches will naturally contract slightly, resulting in an incredibly soft, crinkled drape that feels like a comforting embrace.
2.b. Elegant Sujni Kantha Bed Covers Woven with Meaningful Religious (Hindu) Symbols
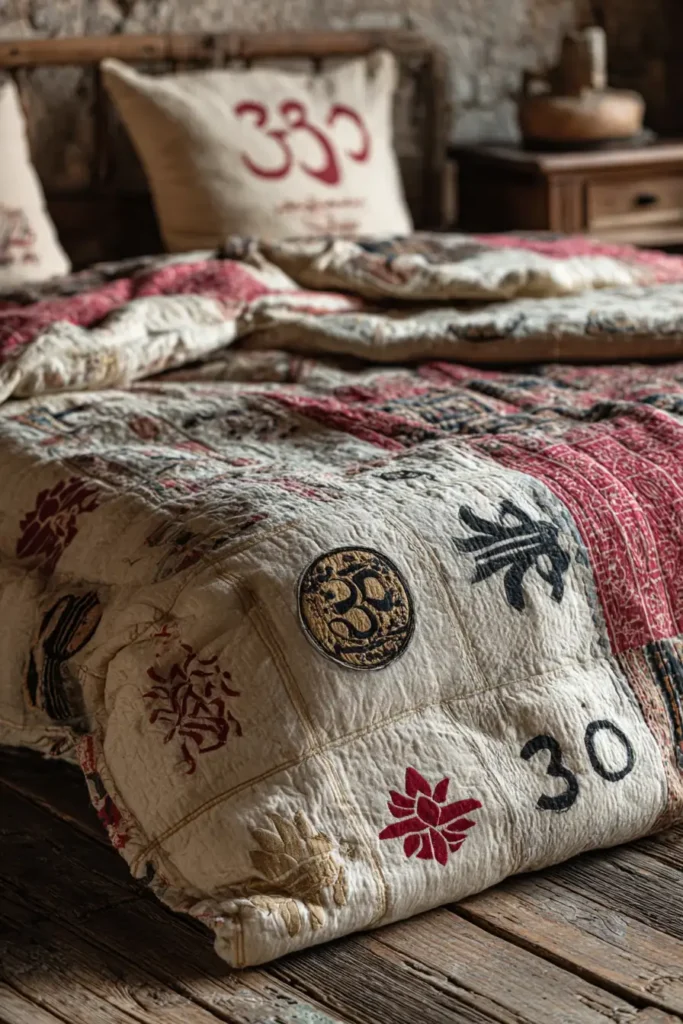
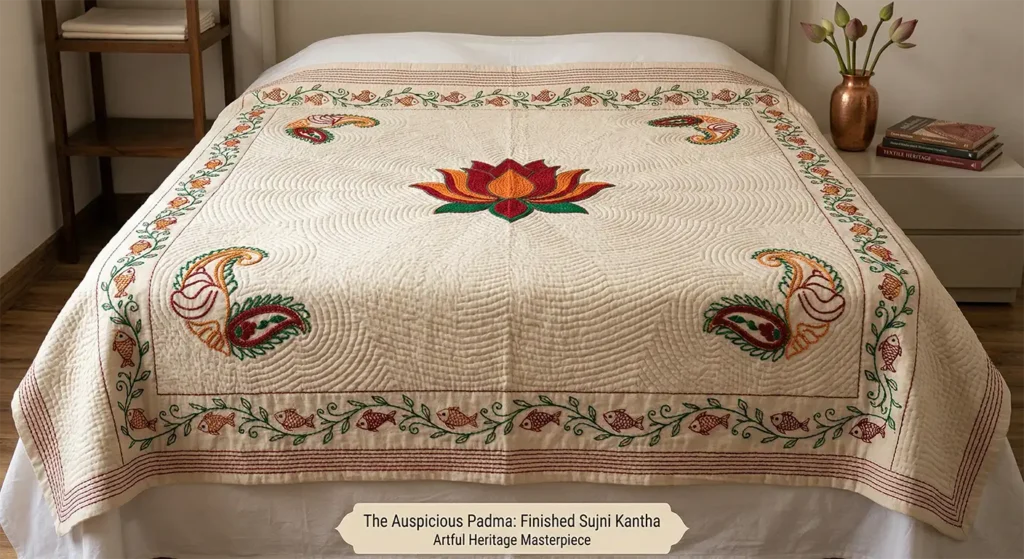
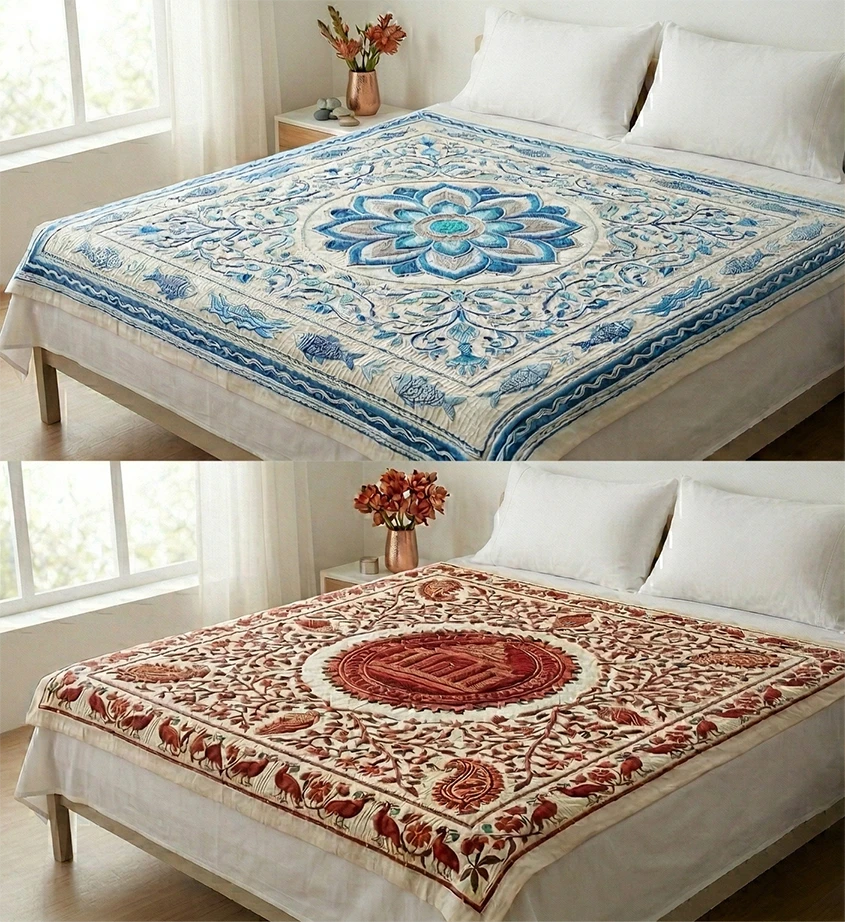
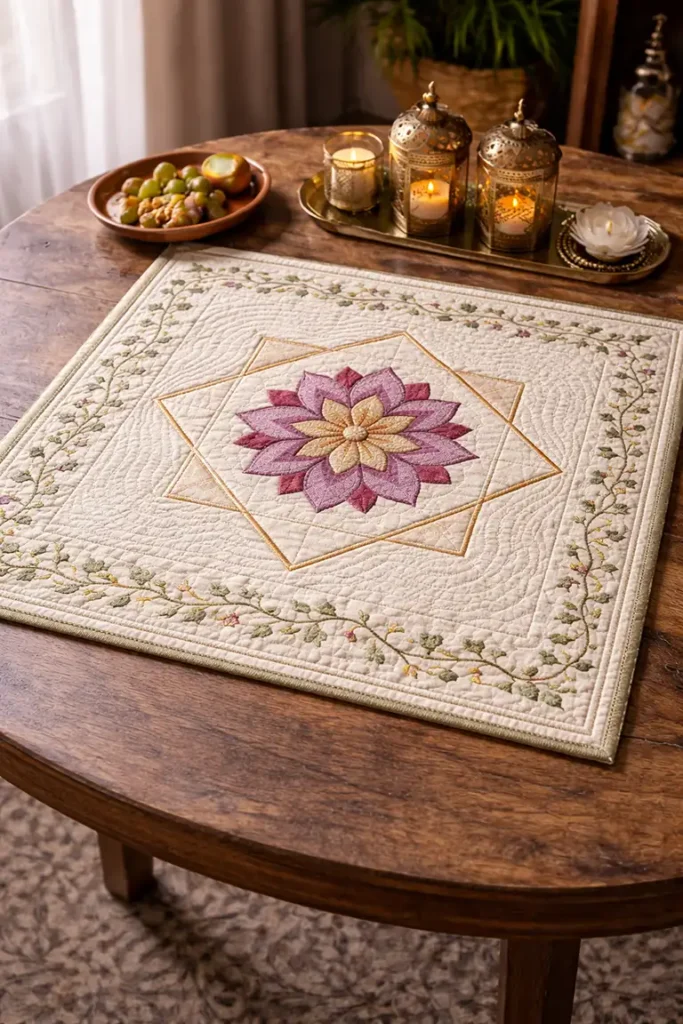
“The Auspicious Padma” Hindu Motif Sujni Kantha Bed Cover
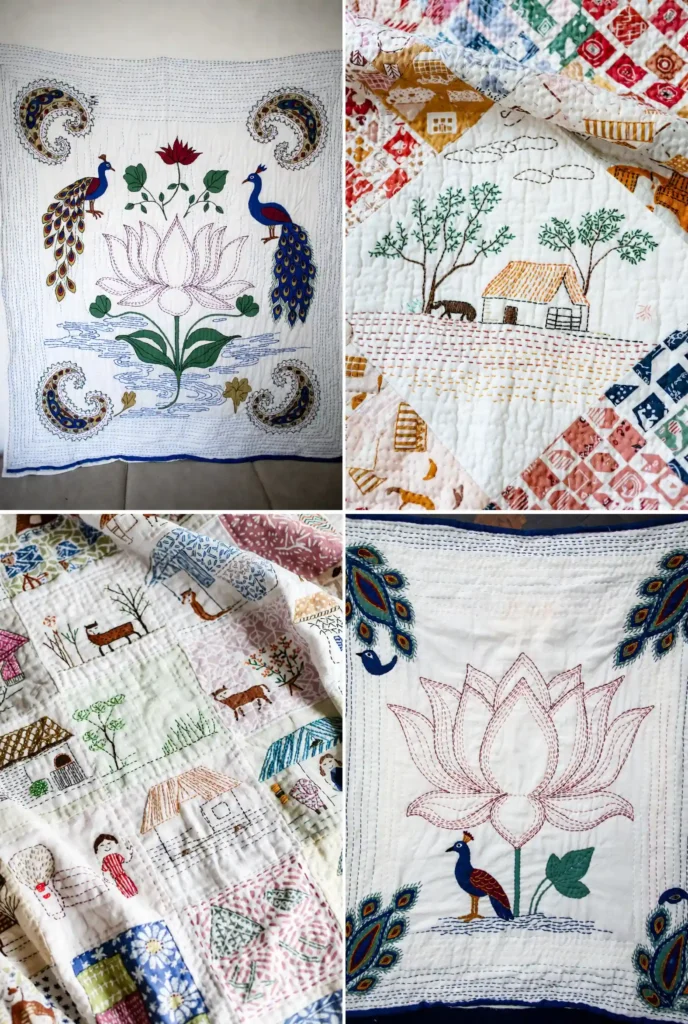
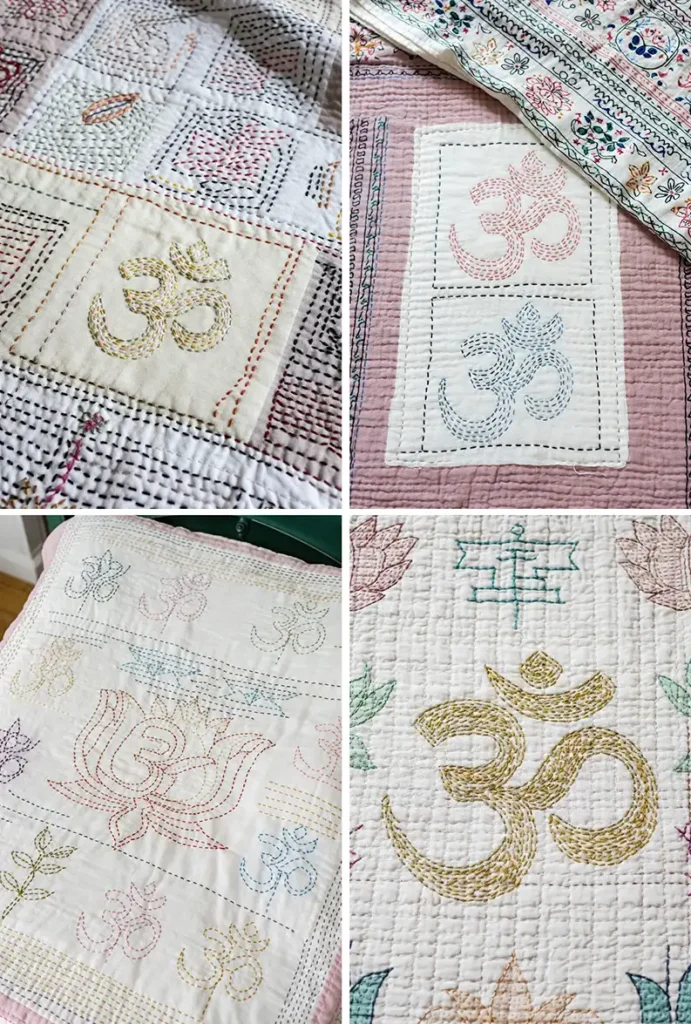
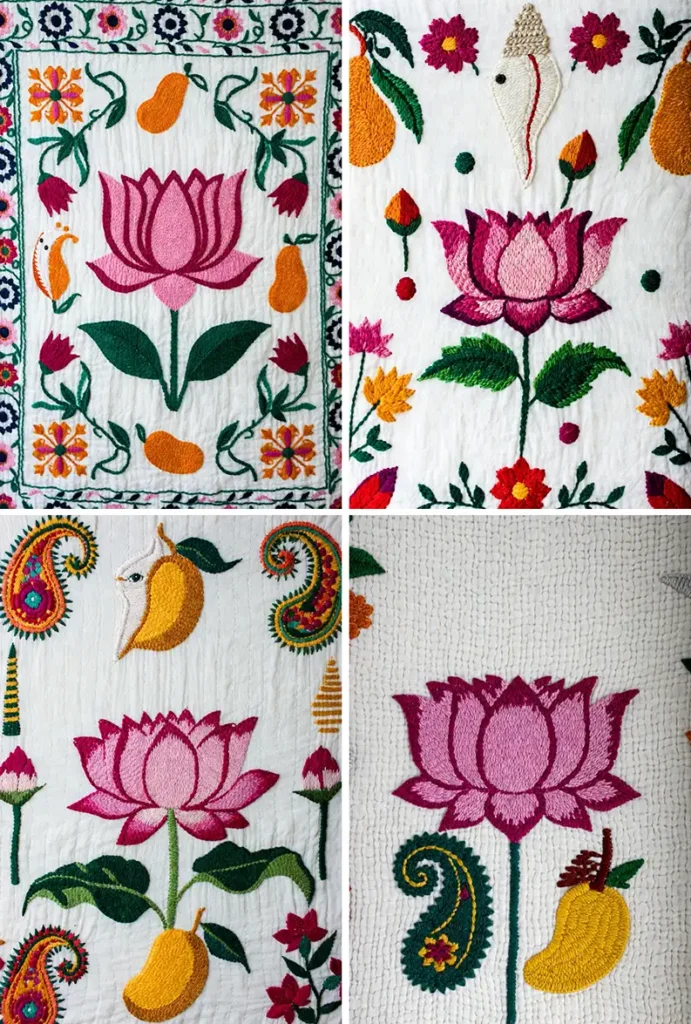
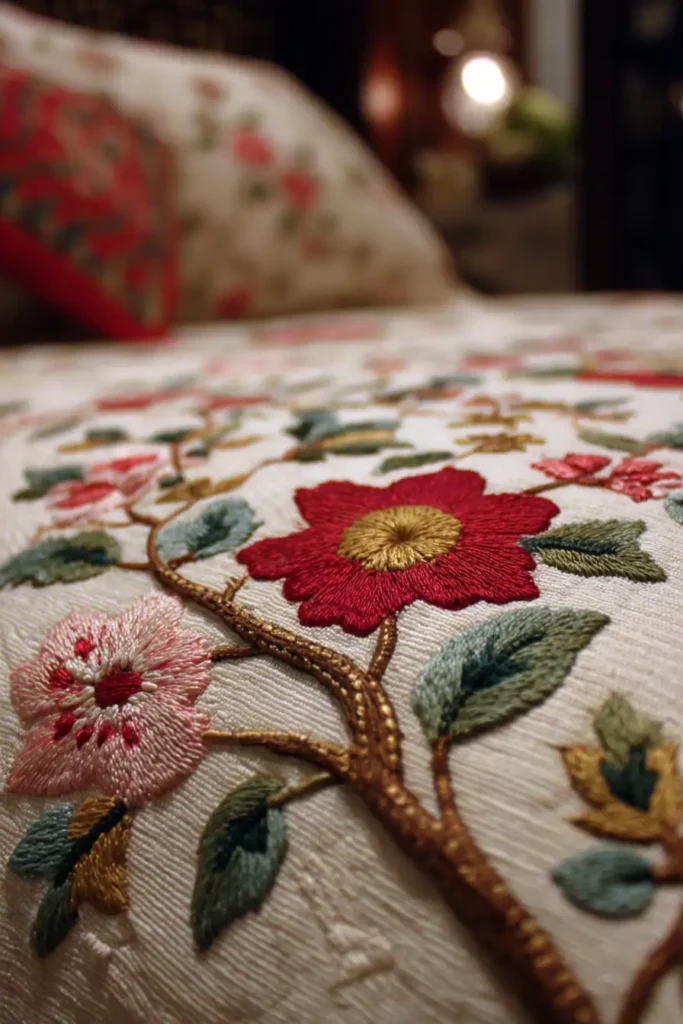
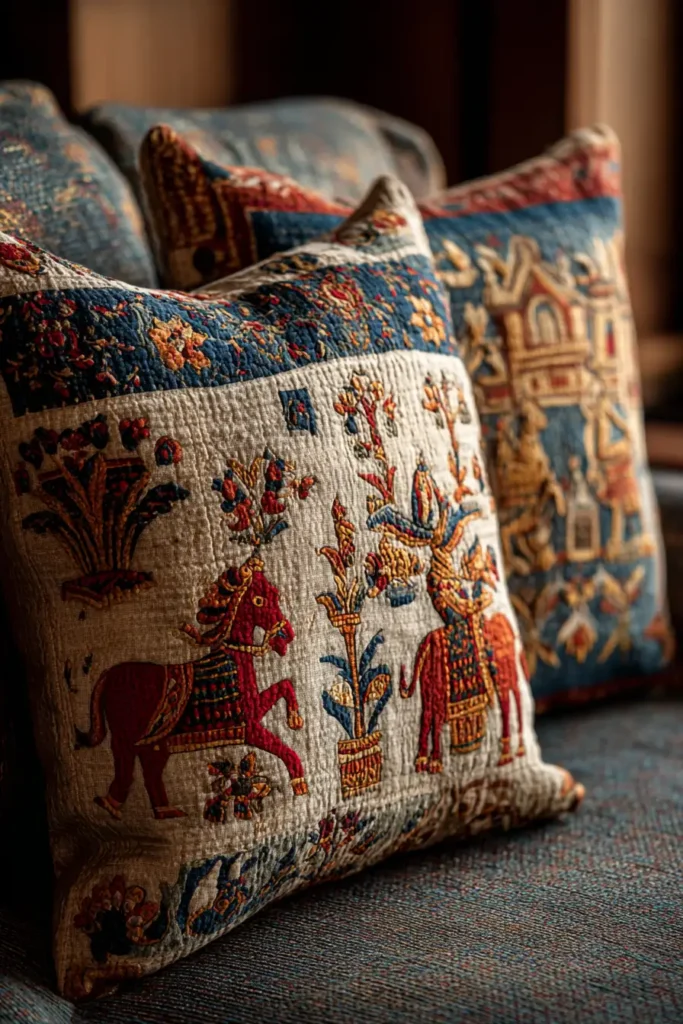
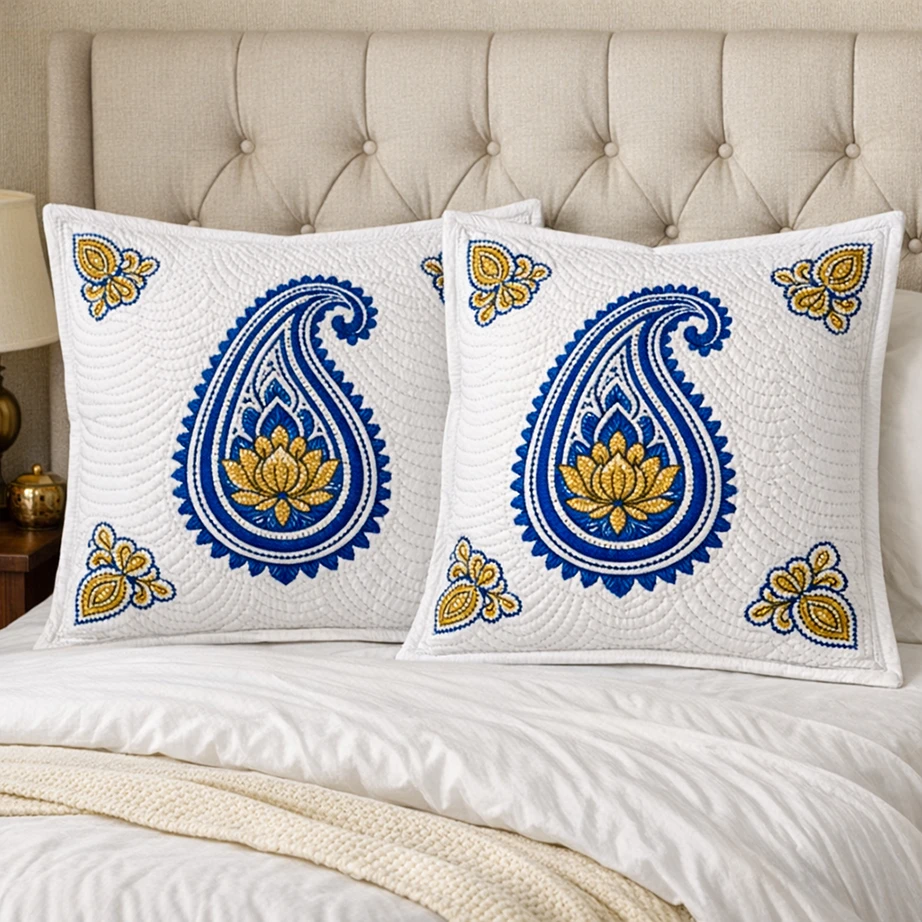
In the vibrant textile heritage of Bengal, the Sujni Kantha serves as a magnificent canvas for spiritual devotion and domestic blessings. For centuries, Bengali Hindu women have stitched their prayers directly into the fabric of their homes. “The Auspicious Padma” master bed cover celebrates this deeply rooted tradition by prominently featuring iconic Hindu symbols—the fully bloomed Padma (lotus), the sacred Shankha (conch shell), and the life-affirming Kalka (mango/paisley). Hand-embroidered in spiritually resonant shades of Saffron, Deep Crimson, and Emerald Green across an expansive canvas of Unbleached Muslin, this breathtaking coverlet wraps you in a lightweight, rippling texture of handmade artistry and eternal blessings.
Finished Dimensions: Elegant Queen/King Master Bed Coverlet, 90″ x 100″ (Providing a luxurious, flowing drape over the edges of a modern mattress).
Materials Needed:
The “Canvas” (Outer Layers): 6 yards of 90-inch wide, high-quality Unbleached Muslin or fine Cotton Percale.
The “Core” (Inner Layer): 3 yards of 90-inch wide, ultra-soft White Cotton Flannel.
Why: A Sujni Kantha was historically made of layered, threadbare saris to achieve an effortlessly fluid drape. Modern polyester batting traps heat, ruining this signature fluidity. A core layer of pre-washed cotton flannel provides the perfect comforting weight while remaining exceptionally breathable for warm nights.
The “Thread of Devotion” (Embroidery): High-quality Size 8 Pearl Cotton thread in Saffron, Deep Crimson, and Emerald Green. Plus, several spools of standard Cream cotton thread for the dense background texturing.
Notions: A large, water-soluble fabric marking pen, specialized long Kantha or Sashiko needles, and hundreds of curved safety pins.
Cultural Backstory:In Bengali Hindu tradition, the Sujni Kantha was often created as a ceremonial quilt, laid out during religious pujas or gifted to a bride to ensure a blessed marriage. The motifs are deeply intentional. The central ‘Padma’ (hundred-petaled lotus) represents purity, spiritual awakening, and the seat of deities like Lakshmi and Brahma. The ‘Shankha’ (conch) blown at the start of rituals signifies the dispelling of negative energy, while the ‘Kalka’ represents the mango, a symbol of fertility and the sweetness of life. Stitching these symbols is an active meditation, turning the quilt into a protective talisman for the home.
Step 1: Preparing the Monumental Canvas
Creating the soft foundation for a masterwork.
Cut the Expanse: From your 90-inch wide Muslin, cut two massive panels measuring exactly 92″ x 102″ (one for the top, one for the backing).
Cut the Core: Cut your inner Flannel layer to the identical 92″ x 102″ dimension.
The Crucial Pre-Wash: You must wash and tumble dry all three layers before drawing or stitching. This process pre-shrinks the cotton fibers, ensuring that your meticulous, hand-sewn geometry remains flat and flawless after its first laundering.
Step 2: Drafting the Sacred Naksha
Designing the layout of domestic blessings.
The Divine Center: Lay the top muslin layer completely flat. Using your water-soluble pen, draw a massive, multi-petaled Padma (lotus) in the exact center, spanning roughly 24 inches across.
The Auspicious Corners: In the four corners of the bedspread, draw graceful Shankha (conch shell) motifs, flanked by elegant, inward-facing Kalkas (paisleys).
The Border of Life: Draw three concentric, undulating borders around the entire perimeter. Fill the main border with a continuous, creeping vine intermixed with small Matsya (fish) motifs, symbolizing abundance and the flowing rivers of Bengal.
Step 3: Heavy Grid Basting for a Grand Scale
Securing the massive layers for the stitching journey.
The Stack: Lay the backing flat, followed by the flannel core, and finally the marked top layer. Smooth out every single wrinkle from the center outward.
Grid Basting: Because a master bed cover takes significant time to hand-stitch, standard pinning will inevitably fail. Thread a needle with contrasting, easily removable thread and stitch a giant 10-inch grid across the entire 90×100-inch quilt. This permanently locks the three layers together.
Step 4: Embroidering the Sacred Motifs
Bringing the design to life with colored thread.
The Rhythmic Outline: Thread your Kantha needle with the Deep Crimson or Emerald Green Pearl Cotton. Begin outlining your drawn lotus, conch shells, paisleys, and border vines using a simple, rhythmic running stitch. Pierce completely through all three layers with every stitch.
Filling the Blessings: Once the outlines are complete, use the Saffron and Crimson threads to add dense, parallel rows of running stitches inside the lotus petals and kalkas, giving them vibrant, solid color blocks that catch the eye and highlight the intricate shapes.
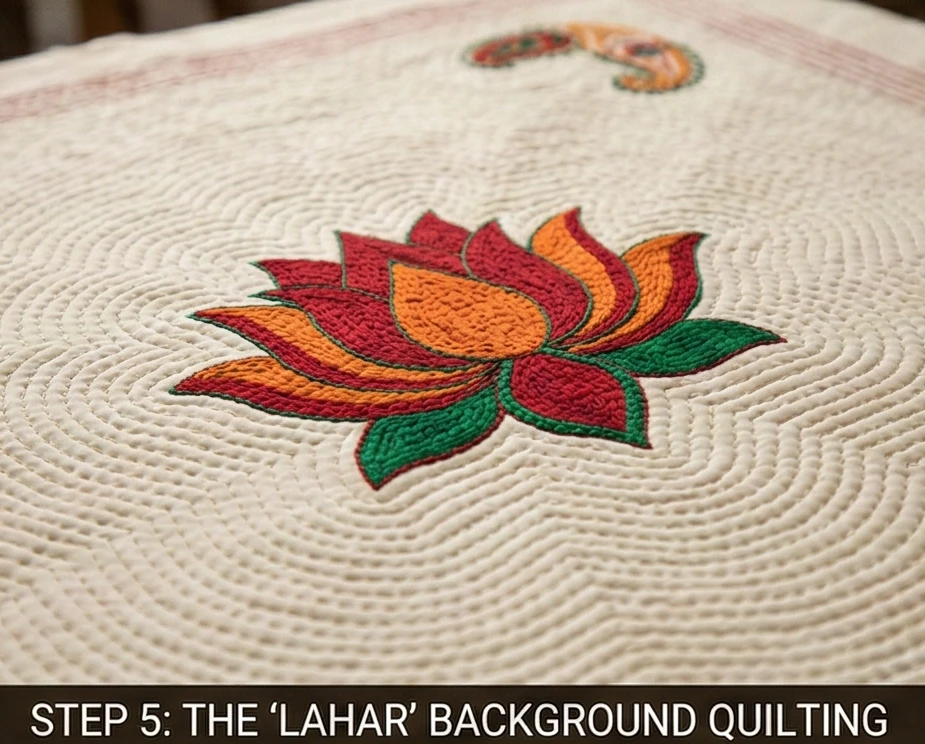
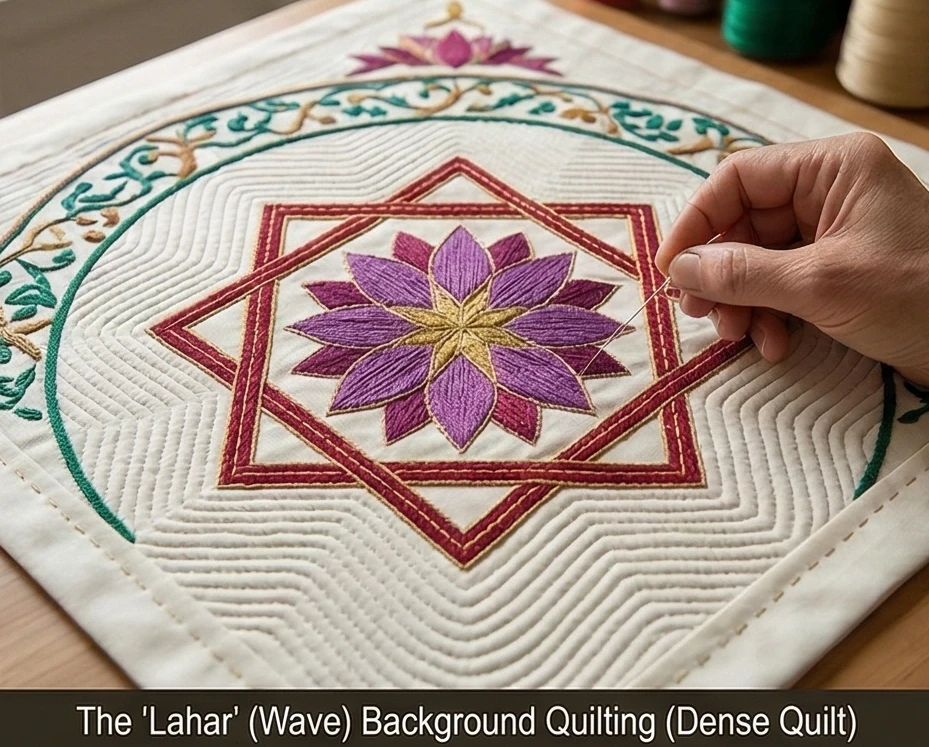
Step 5: The “Lahar” (Wave) Background Quilting
Creating the signature crinkled texture.
The Unifying Thread: Switch to your standard Cream cotton thread. This step transforms the flat fabric into a deeply textured, 3D quilt.
Echoing the Divine: Starting from the central Padma and the corner motifs, stitch continuous, closely spaced parallel lines of running stitches radiating outward. Echo the shapes of the religious motifs, creating ripples as if spiritual energy were radiating from the lotus.
The Density: Space these rows exactly 1/4-inch apart across the entire negative space of the coverlet. This dense background stitching tightly binds the layers together, forcing the unstitched colored motifs to puff up elegantly in bas-relief.
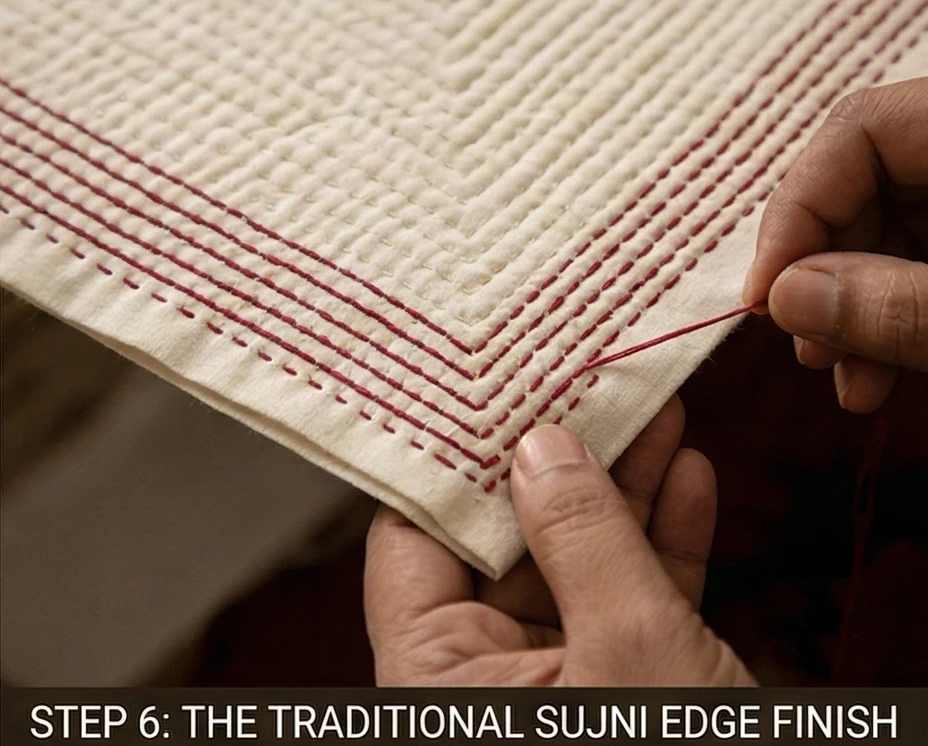
Step 6: The Traditional Sujni Edge Finish
Sealing the edges without modern binding.
Trim and Fold: Once the vast expanse is completely quilted, trim the raw edges perfectly straight to the final 90″ x 100″ dimension. Fold the raw edges of the top and bottom muslin inward by 1/2 inch to enclose the flannel core, and pin heavily.
The Border Stitch: Do not apply a separate, bulky quilt binding. Instead, thread your needle with Deep Crimson. Sew five to seven densely packed, parallel rows of running stitches around the entire perimeter. This historic finishing technique seals the edges permanently and provides a stunning, highly tailored frame for the bedspread.
Usability Note:A Sujni Kantha is designed to be cherished and used daily. The dense background stitching ensures the internal core will never warp. Machine wash this grand bed cover on a cold, delicate cycle. As it air-dries, the thousands of tiny stitches will naturally contract slightly, resulting in an incredibly soft, crinkled drape that feels like a comforting embrace.
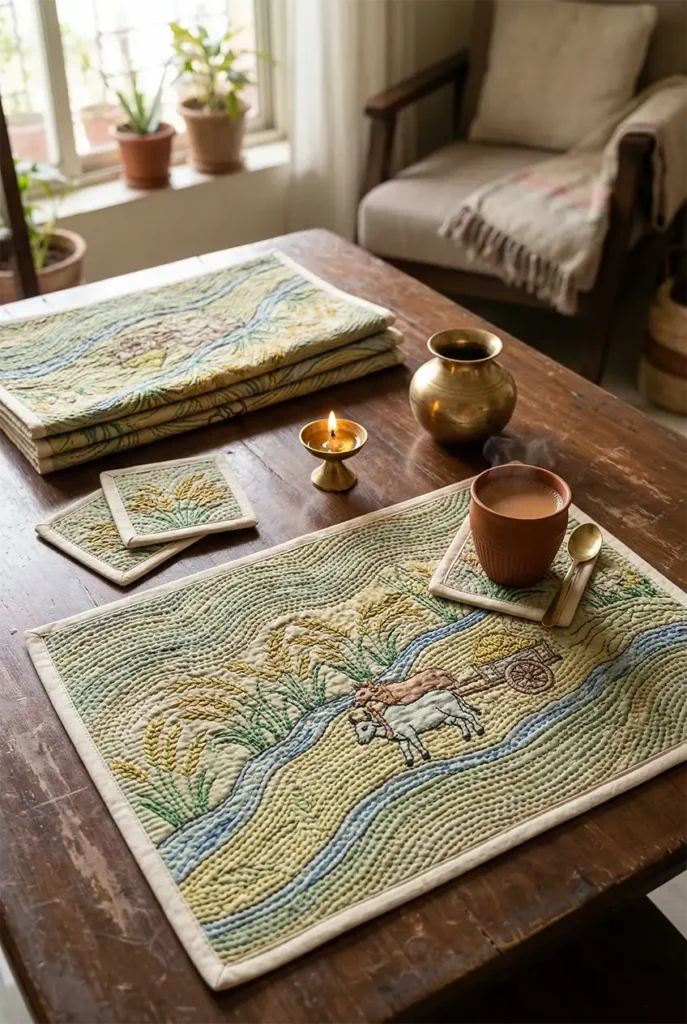
3. Luxurious Lohori Kantha Bed Sheets Inspired by the Lush Forests of Bengal
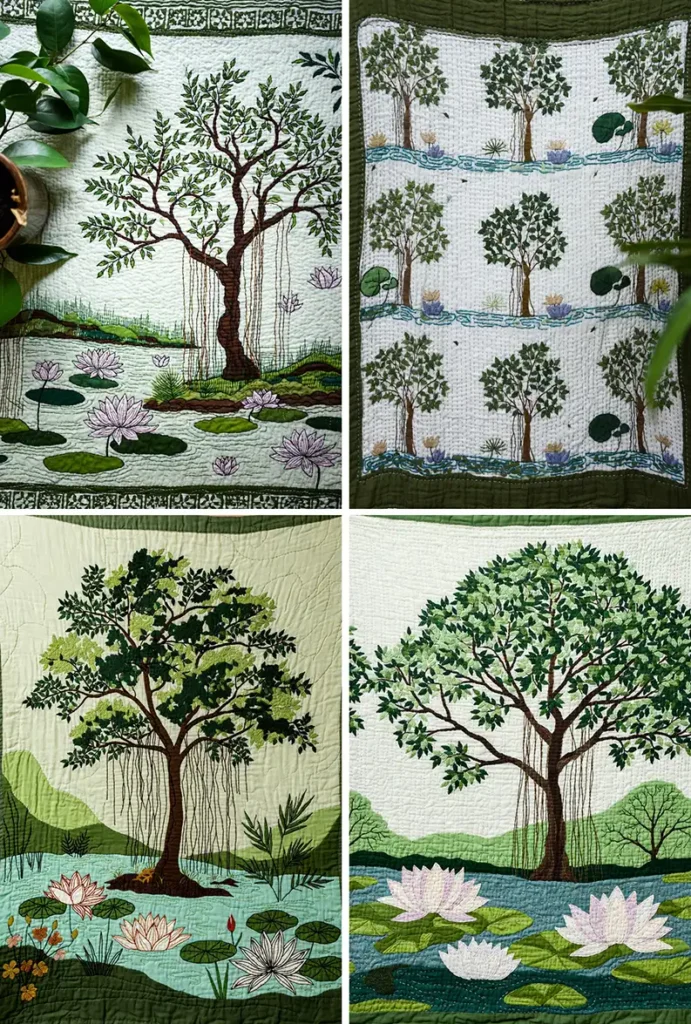
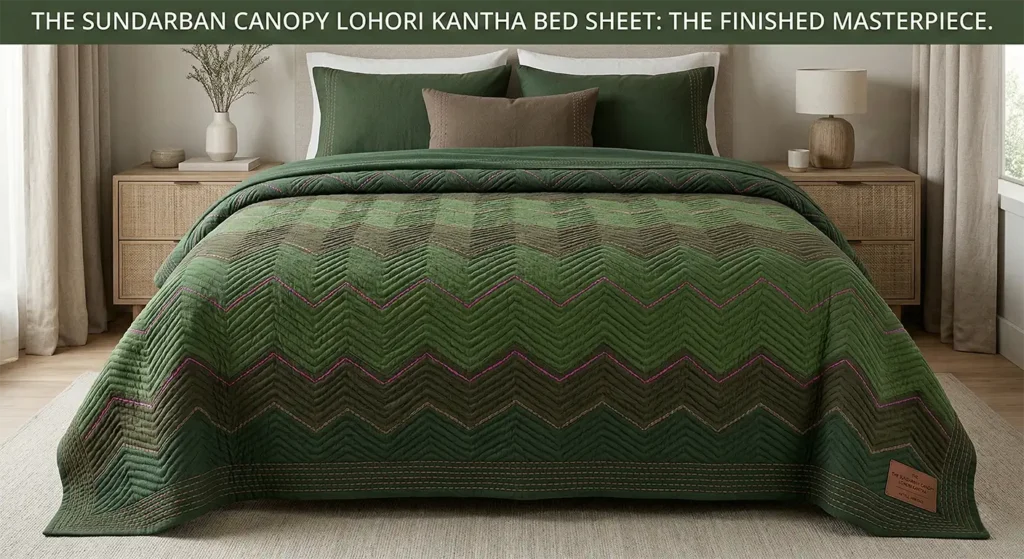
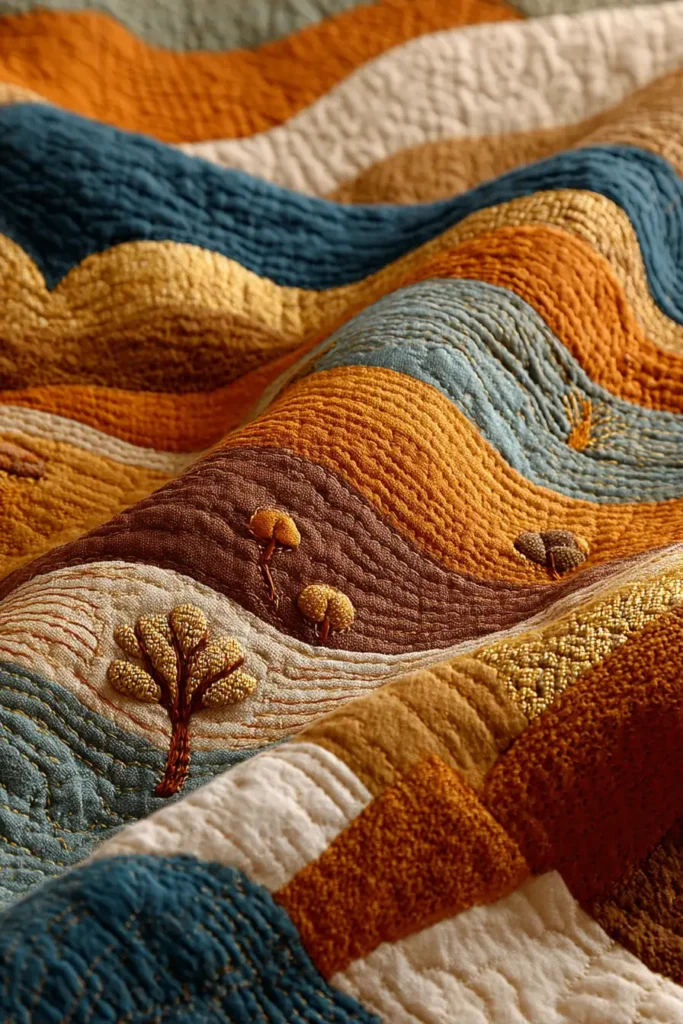
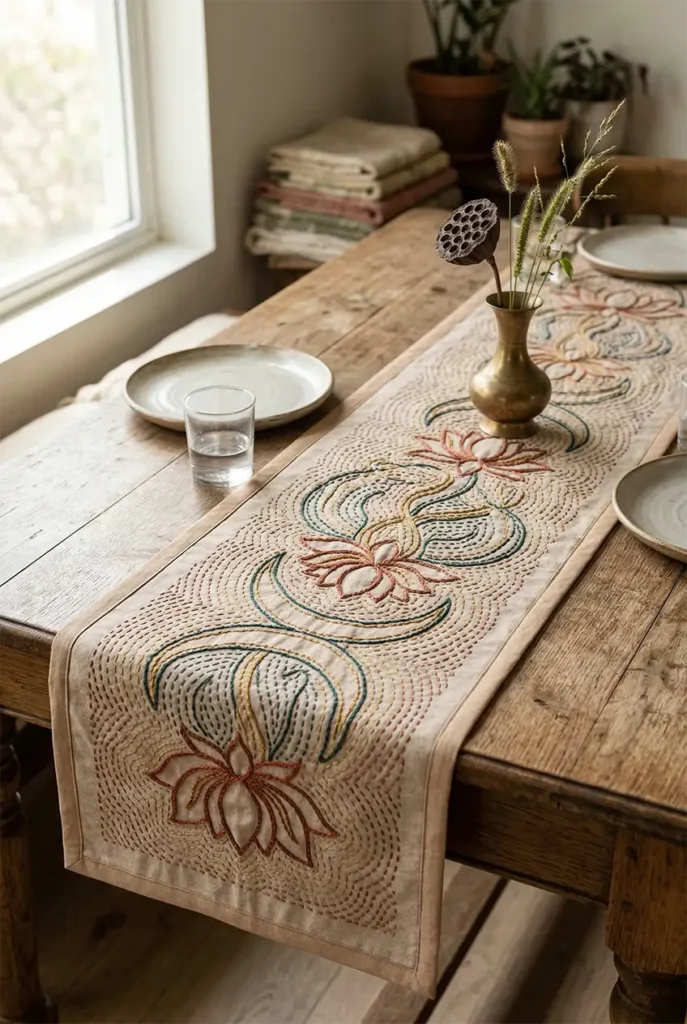
“The Sundarban Canopy” Lohori Kantha Bed Sheet
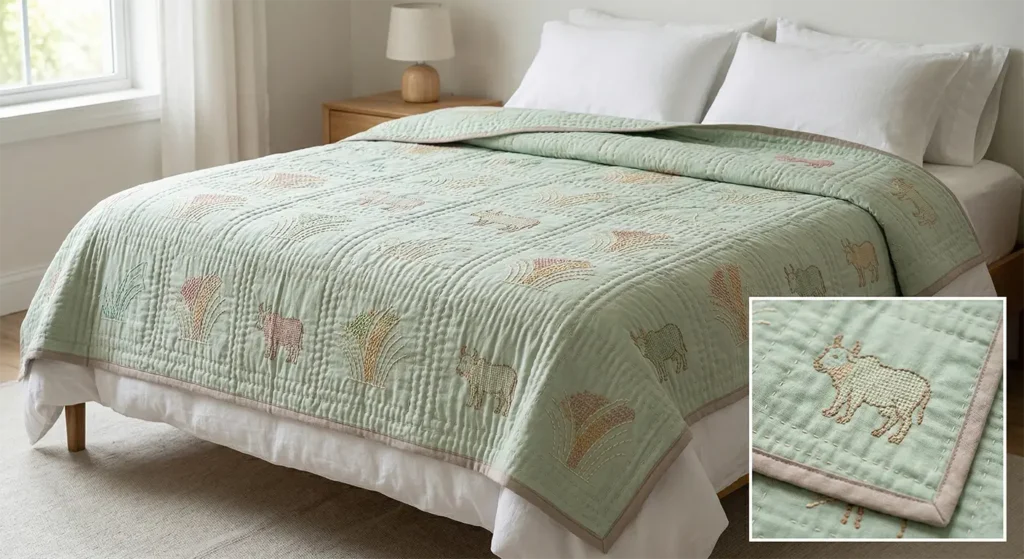
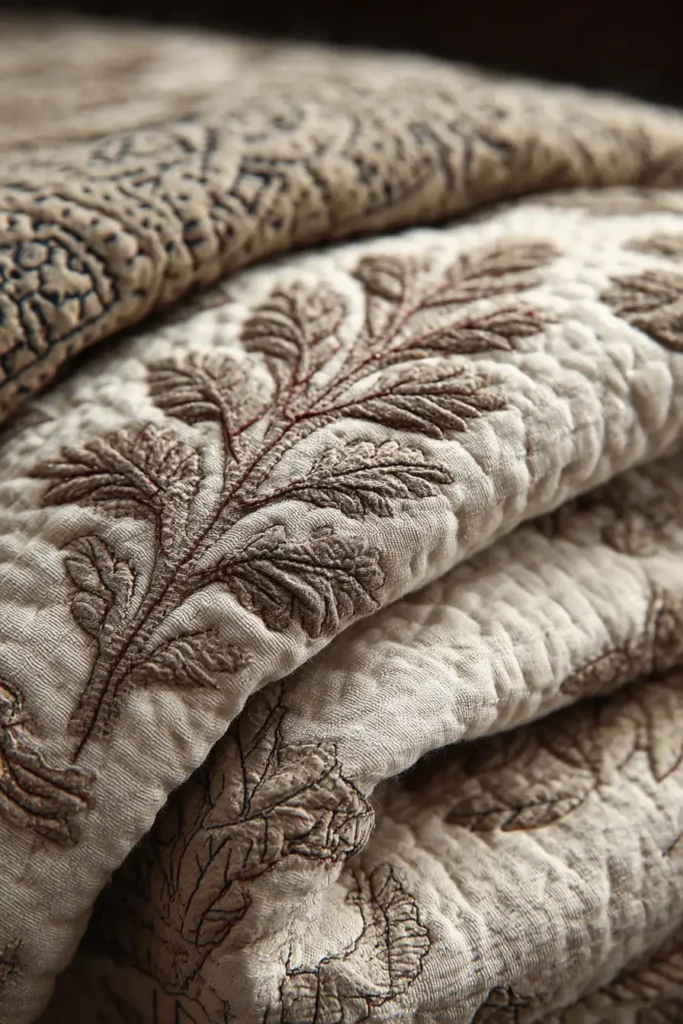
While Nakshi Kantha is celebrated for its intricate floral and figurative motifs, the Lohori Kantha style focuses entirely on the profound beauty of rhythmic, geometric texture. Derived from the word lohor (meaning “wave”), this technique utilizes closely spaced, continuous stitching to create a lush, corrugated surface. “The Sundarban Canopy” bed sheet honors this tradition by translating the dense, undulating foliage of Bengal’s ancient mangrove forests into textile form. Executed on a deeply soothing base of Forest Fern cotton, and stitched entirely in varying shades of Moss Green, Earthy Bark, and Wild Orchid, this heavy-drape bed sheet relies on the tactile luxury of the Lohori wave to provide immense, breathable comfort and sophisticated, monochromatic elegance.
Finished Dimensions: Elegant Queen/King Lightweight Bed Sheet / Summer Coverlet, 90″ x 100″.
Materials Needed:
The “Canvas” (Outer Layers): 6 yards of 90-inch wide, ultra-soft Forest Fern Cotton Voile or fine Muslin.
The “Core” (Inner Layer): 3 yards of 90-inch wide, incredibly lightweight White Cotton Flannel or a repurposed, threadbare cotton sheet.
Why: A bed sheet meant for direct skin contact must remain incredibly pliable. The magic of Lohori Kantha is that the dense stitching naturally thickens the fabric. Using a very thin, single-core layer ensures the final piece possesses a luxurious, heavy drape without becoming stiff or overly warm.
The “Vines” (Thread): High-quality Size 8 Pearl Cotton thread in Moss Green, Deep Olive, Earthy Bark, and a subtle pop of Wild Orchid. (Lohori traditionally uses a thicker thread to emphasize the ribbed texture.)
Notions: A water-soluble fabric marking pen, a long Kantha or Sashiko needle, and hundreds of curved safety pins.
Cultural Backstory:The Lohori Kantha style, historically prominent in the Rajshahi region of Bengal, is a masterclass in minimalism and texture. Instead of drawing pictures, women would stitch thick, parallel “waves,” chevrons, or stepped lines across the entire fabric. As the stitches pulled the fabric tightly together, it created a ribbed, corrugated effect that trapped tiny pockets of air, making the Kantha exceptionally insulating yet breathable. By employing shades of green to create these waves, this design mimics the layered, undulating vines and dense canopy of the Sundarbans—the magnificent, untamed forest of the Bengal delta.
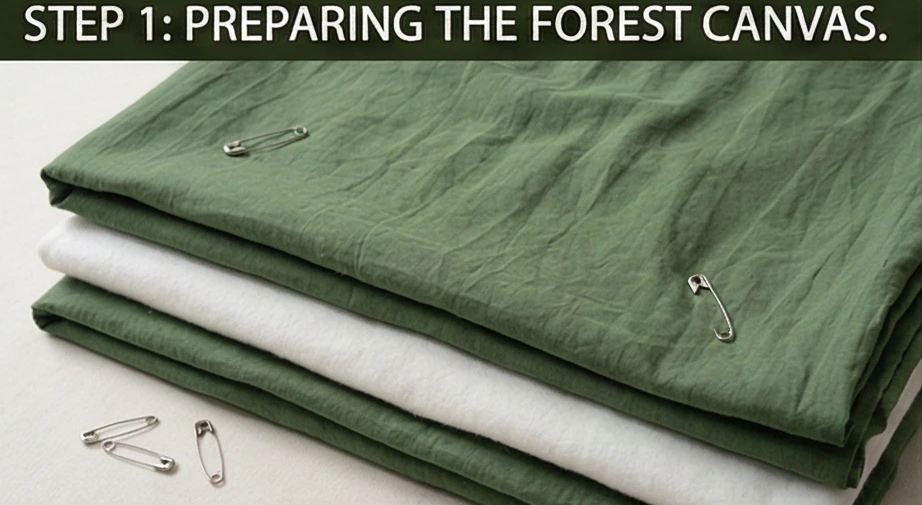
Step 1: Preparing the Forest Canvas
Establishing the soft, fluid foundation.
Cut the Expanse: From your 90-inch wide Forest Fern cotton, cut two massive panels measuring exactly 92″ x 102″ (one for the top, one for the backing).
Cut the Core: Cut your inner Flannel layer to the identical 92″ x 102″ dimension.
The Crucial Pre-Wash: You must wash and tumble dry all three layers before doing any work. This pre-shrinks the fibers and softens the voile, ensuring your dense, wave-like stitching won’t cause the sheet to warp unpredictably after its first wash.
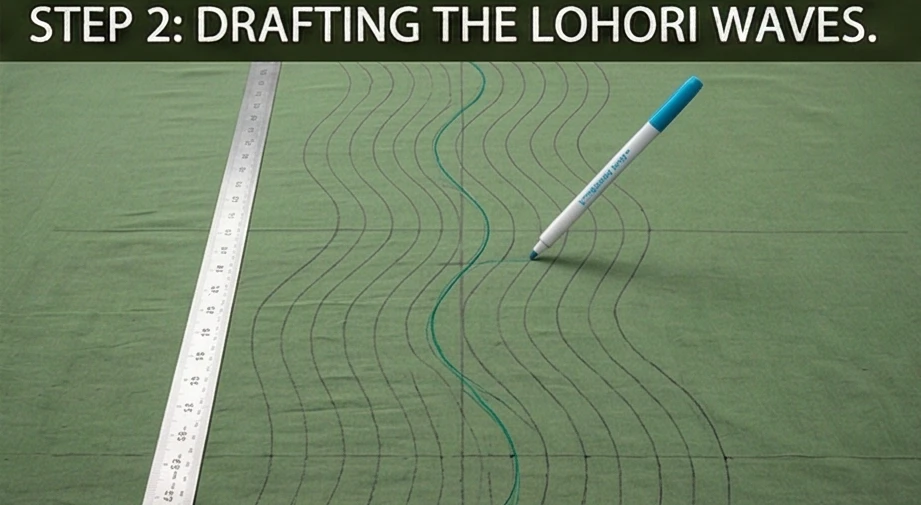
Step 2: Drafting the Lohori Waves (The Geometry)
Mapping the rhythmic forest canopy.
The Center Anchor: Lay the top green layer completely flat. Instead of drawing a central medallion, use a long ruler and your water-soluble pen to draw a single, straight vertical line directly down the center of the 92-inch width.
The Chevron/Wave Guidelines: Lohori often utilizes a chevron (V-shape) or scalloped wave pattern that repeats outward. Draw a large, continuous, undulating wave or zigzag cascading down that center line.
The Echo Lines: Draw parallel guide lines, spaced about 2 inches apart, that echo the initial wave, radiating toward the left and right edges of the fabric. These lines will guide your needle, ensuring the “waves” remain uniform across the massive 90×100-inch surface.
Step 3: Heavy Grid Basting for a Grand Scale
Locking the layers for intensive texture work.
The Stack: Lay the backing flat, followed by the flannel core, and finally the marked top layer. Smooth out every wrinkle, sweeping your hands from the center out to the edges.
Grid Basting: Lohori stitching requires pulling the thread with consistent tension, which easily distorts loose fabric. Thread a needle with contrasting, easily removable thread and stitch a heavy 10-inch grid across the entire quilt. This firmly locks the three layers together.
Step 4: The Rhythmic Wave Stitching
Building the corrugated forest floor.
The First Ripple: Thread your Kantha needle with the Deep Olive Pearl Cotton. Starting at the centerline, follow your drawn wave pattern with a continuous, even running stitch. Pierce through all three layers.
Creating the Ribs: The hallmark of Lohori is density. Once the first line is stitched, stitch the next row perfectly parallel to it, spacing it no more than 1/8 to 1/4 inch from the first line.
Thread Tension: Pull your stitches with a firm, even tension. You want the fabric between the stitched lines to pucker and bubble slightly. This is what creates the luxurious, corrugated texture.
Step 5: Layering the Canopy Colors
Introducing depth to the monochromatic waves.
Color Shifting: To mimic the dappled light and dense layers of a forest, alternate your thread colors in wide bands. Stitch twenty parallel rows in Moss Green, followed by five rows in Earthy Bark, and fifty rows in Deep Olive.
The Orchid Spark: Sparingly introduce a single row of Wild Orchid thread every few inches. Like tropical flowers hidden in a deep forest, these subtle flashes of vibrant pink against the massive expanse of green provide breathtaking visual elegance.
Complete the Expanse: Continue echoing the waves until the entire 90×100-inch surface is covered in dense, undulating, parallel rows.
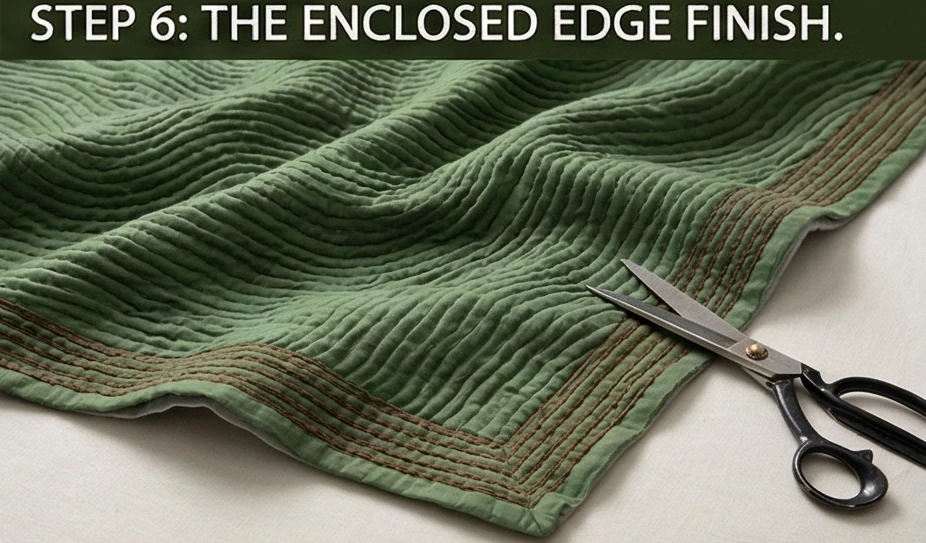
Step 6: The Enclosed Edge Finish
Framing the rhythmic texture.
Trim and Fold: Once the entire sheet is corrugated with stitches, trim the raw edges perfectly straight to the final 90″ x 100″ dimension. Fold the raw edges of the top and bottom cotton inward by 1/2 inch to seamlessly enclose the flannel core, and pin heavily.
The Boundary Stitch: Thread your needle with Earthy Bark. Sew five to seven densely packed, straight, parallel rows of running stitches around the entire perimeter. This straight frame acts as a beautiful visual boundary, containing the wild, undulating waves of the interior.
Usability Note:A Lohori Kantha bed sheet is a tactile masterpiece. The dense, ribbed stitching gives the lightweight cotton a comforting, weighted drape that hugs the body perfectly, making it an ideal standalone summer blanket or a luxurious layering piece in winter. Machine wash on a cold, delicate cycle. Tumble drying on low will enhance the corrugated puckers, making the “waves” even softer and more pronounced.
4. Timeless Lik or Anarasi Stitch Nakshi Kantha Bed Sheets Featuring Floral Garden Tales
“The Bagh-e-Bahar” Anarasi Stitch Garden Bed Sheet
While the traditional running stitch creates a fluid, rippling wave, the Lik or Anarasi (pineapple) stitch introduces a breathtaking, geometric complexity to Nakshi Kantha. This specific technique utilizes intersecting diagonal or perpendicular lines to create a dense, highly textured grid that mimics the diamond-patterned skin of a pineapple. “The Bagh-e-Bahar” (Garden of Spring) bed sheet pairs this structured, architectural background stitch with flowing, organic tales of a blooming floral garden. Executed on a base of Warm Cream Muslin with embroidery in Soft Rose, Sage Green, and Marigold, this heavy-drape bed sheet offers the ultimate tactile luxury. The dense Anarasi grid provides a comforting, slightly weighted feel, transforming your bed into a serene, tactile garden.
Finished Dimensions: Elegant Queen/King Lightweight Bed Sheet / Summer Coverlet, 90″ x 100″.
Materials Needed:
The “Canvas” (Outer Layers): 6 yards of 90-inch wide, ultra-soft Warm Cream Cotton Voile or fine Muslin.
The “Core” (Inner Layer): 3 yards of 90-inch wide, incredibly lightweight White Cotton Flannel.
Why: The intersecting Anarasi stitch makes the fabric noticeably thicker and denser than a standard running stitch Kantha. To prevent the bed sheet from becoming stiff like a rug, you must use the thinnest possible flannel core or a well-worn, vintage flat sheet.
The “Garden” (Thread): High-quality Size 8 Pearl Cotton thread in Soft Rose (for blossoms), Sage Green (for vines), Marigold (for floral centers), and standard Cream cotton thread (for the Anarasi background grid).
Notions: A water-soluble fabric marking pen, a long Kantha or Sashiko needle, and hundreds of curved safety pins.
Cultural Backstory:In Bengali embroidery, ‘Lik’ refers to a continuous line, and ‘Anarasi’ translates directly to ‘pineapple’. This style originated in regions like Jessore and Faridpur, where weavers sought to make quilts warmer and more durable for the brief but chilly winter months. By crossing their running stitches in tight, diagonal grids, they created a fabric that trapped air in tiny, diamond-shaped pockets. When paired with intricate floral motifs (Naksha), the geometric background pushes the smooth, unstitched flowers forward in striking 3D relief. Crafting an Anarasi Kantha is an incredible labor of love, resulting in an heirloom that acts as a breathable, weighted blanket.
Step 1: Preparing the Garden Canvas
Establishing the soft, fluid foundation.
Cut the Expanse: From your 90-inch wide Cream Muslin, cut two massive panels measuring exactly 92″ x 102″ (one for the top, one for the backing).
Cut the Core: Cut your inner Flannel layer to the identical 92″ x 102″ dimension.
The Crucial Pre-Wash: You must wash and tumble dry all three layers. Because the Anarasi stitch is so dense, skipping this step will cause the fabric to warp dramatically during the first laundering.
Step 2: Drafting the Floral Narrative (The Naksha)
Designing the organic garden elements.
The Central Blossom: Lay the top layer completely flat. In the exact center, draw a sprawling, multi-petaled Lotus or Rose medallion, spanning about 18 inches across.
The Garden Vines: From the center, draw four main vines curving out toward the corners of the sheet, sprouting smaller blossoms, buds, and delicate teardrop leaves.
The Border: Draw a 6-inch wide border around the entire perimeter, filling it with a continuous, winding floral garland. The space between the flowers and vines is your “negative space,” which will soon be filled with the geometric Anarasi texture.
Step 3: Heavy Grid Basting for a Grand Scale
Locking the layers for intensive grid work.
The Stack: Lay the backing flat, followed by the flannel core, and finally the marked top layer. Smooth out every wrinkle from the center outward.
Grid Basting: The cross-hatching of the Anarasi stitch pulls the fabric in multiple directions. Thread a needle with contrasting thread and stitch a very secure 8-inch grid across the entire 90×100-inch surface.
Step 4: Outlining the Garden
Securing the organic shapes before building the grid.
The Outline: Thread your needle with the colored Pearl Cotton (Soft Rose and Sage Green). Stitch the outlines of every single drawn flower, petal, leaf, and vine using a standard, small running stitch.
Color Saturation: Fill the petals with closely spaced running stitches in Rose, and the centers with Marigold. Leave the background completely blank for now.
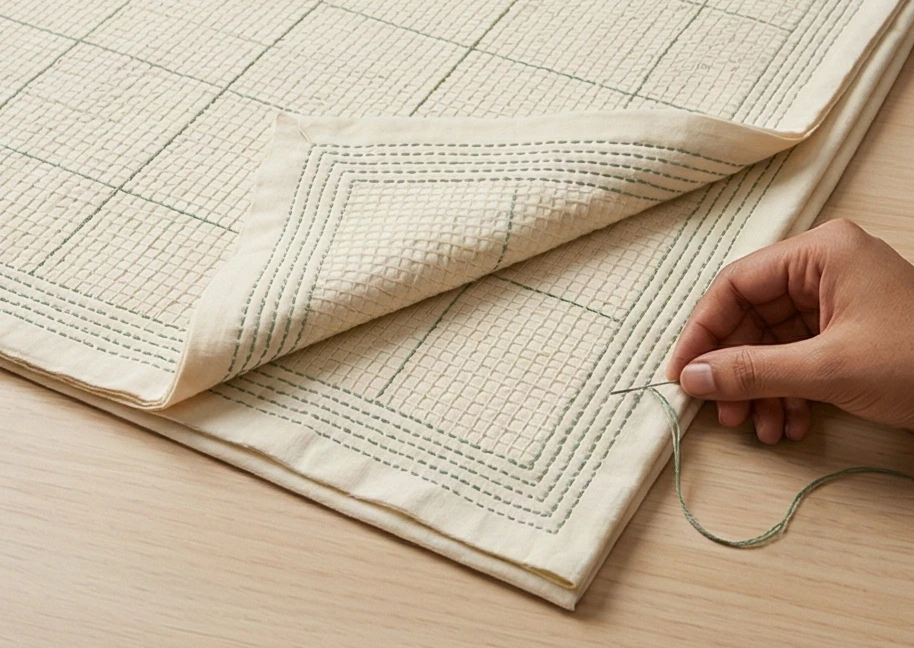
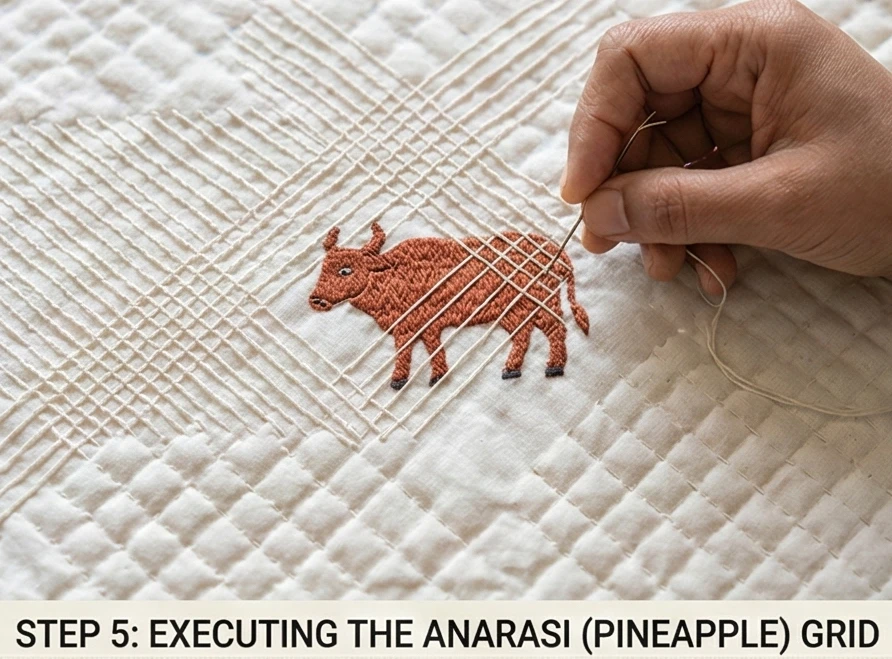
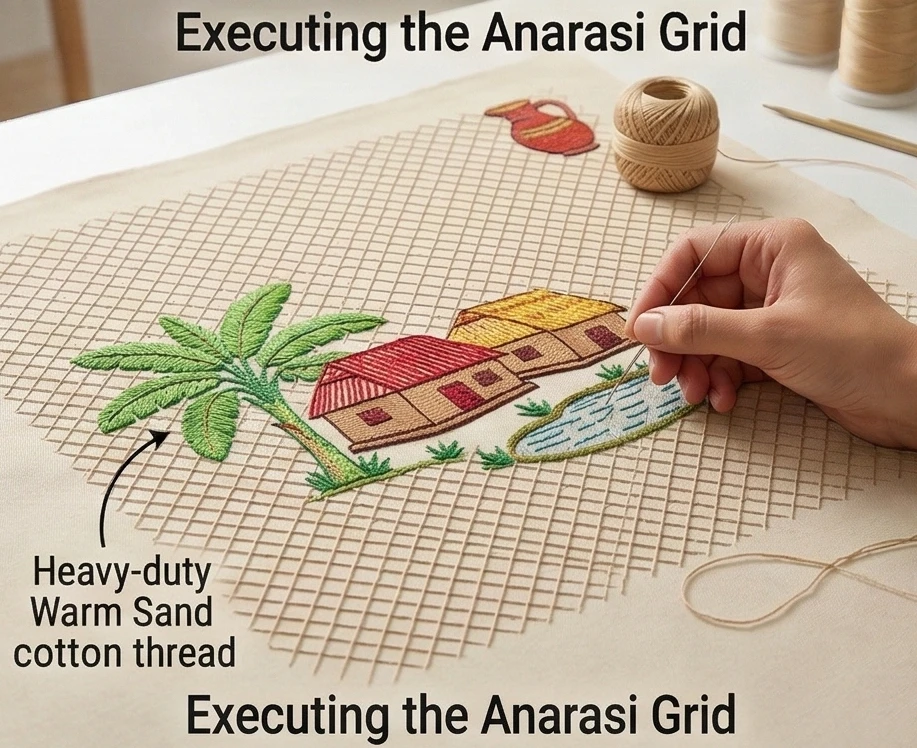
Step 5: Executing the Anarasi (Pineapple) Stitch
Building the geometric, diamond-textured background.
The First Diagonal: Switch to your standard Cream cotton thread. Starting in the negative space near the central flower, stitch a continuous, straight diagonal line of running stitches.
The Parallel Rows: Stitch parallel diagonal lines, spacing them exactly 1/4-inch apart, covering the entire negative space of the quilt (stopping and starting your thread whenever you hit an embroidered flower).
The Cross-Hatch: Once the entire background is covered in one direction, stitch a second set of diagonal lines perpendicular to the first set.
The Technique: As these lines cross over the first set, they form tiny, perfect squares or diamonds.
The Magic: This intersecting grid pulls the fabric tightly around tiny, unstitched centers, causing the muslin to puff up like the faceted scales of a pineapple. The floral motifs, which do not have this grid, will stand out smoothly against the deeply textured background.
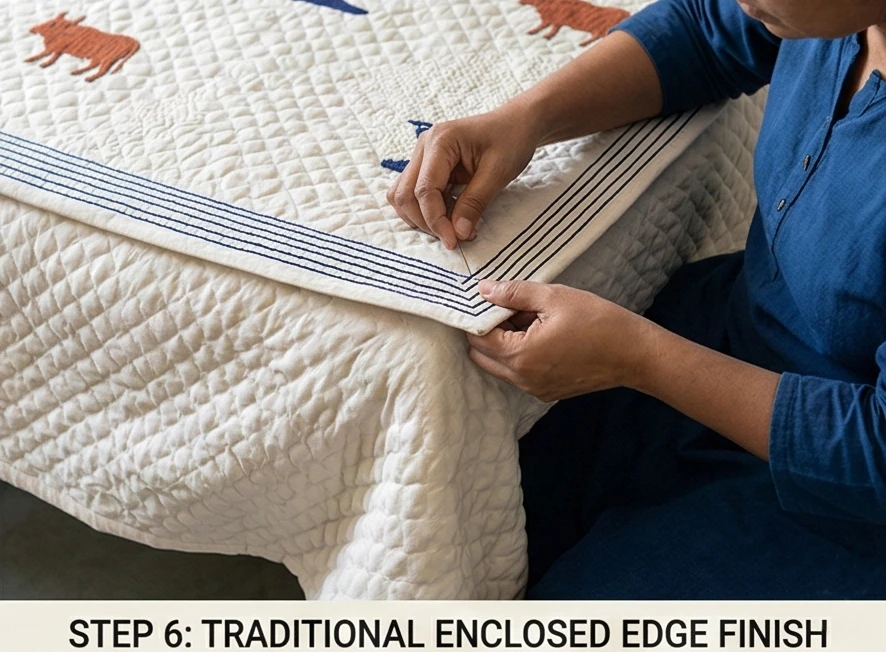
Step 6: The Enclosed Edge Finish
Framing the heavy, textured textile.
Trim and Fold: Once the exhausting but magnificent grid is complete, trim the raw edges perfectly straight to the final 90″ x 100″ dimension. Fold the raw edges of the top and bottom cotton inward by 1/2 inch to enclose the flannel core, and pin heavily.
The Boundary Stitch: Thread your needle with Sage Green. Sew five to seven densely packed, straight, parallel rows of running stitches around the entire perimeter. This frames the winding floral border and contains the dense geometric grid of the interior.
Usability Note:The Anarasi stitch creates a phenomenally durable, slightly heavier textile. It acts similarly to a modern weighted blanket, providing deep pressure comfort while remaining 100% breathable cotton. Machine wash this masterpiece on a cold, delicate cycle. Tumble drying on low heat will dramatically enhance the “pineapple” texture, making the grid incredibly pronounced and soft to the touch.
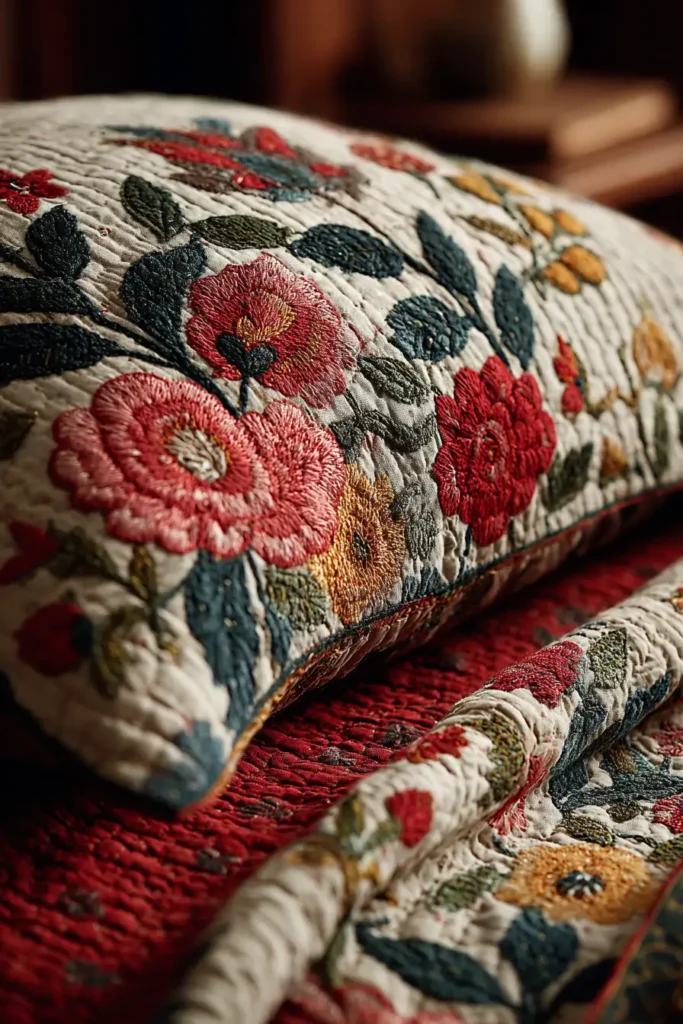
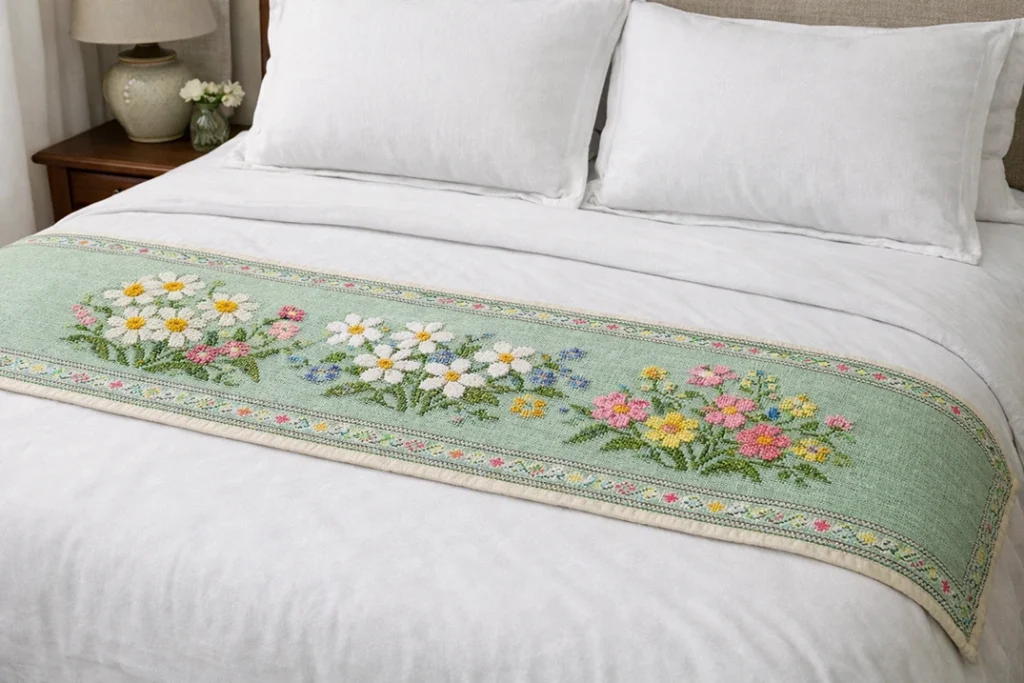
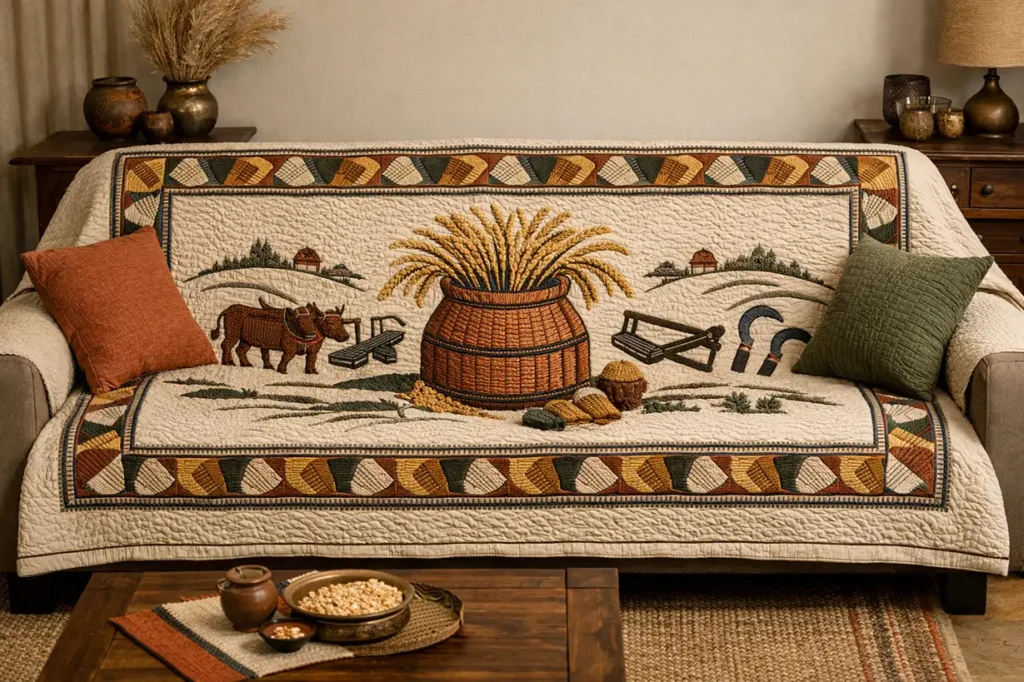
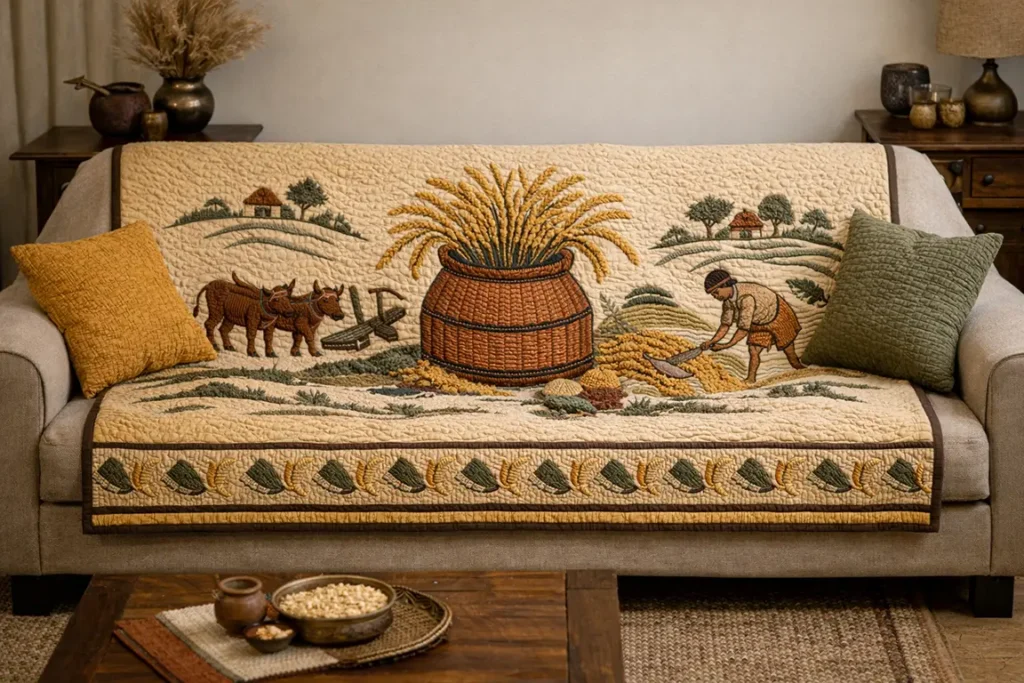
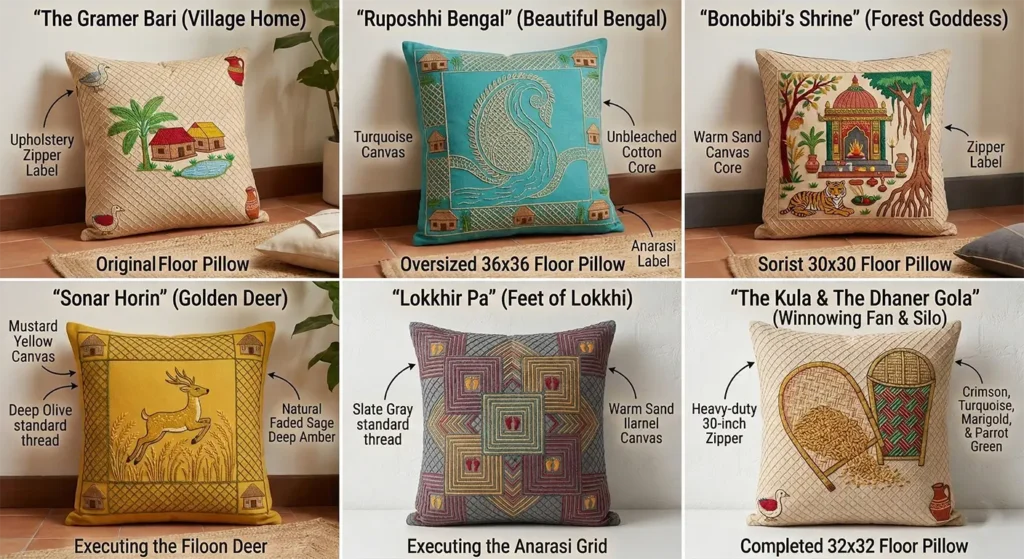
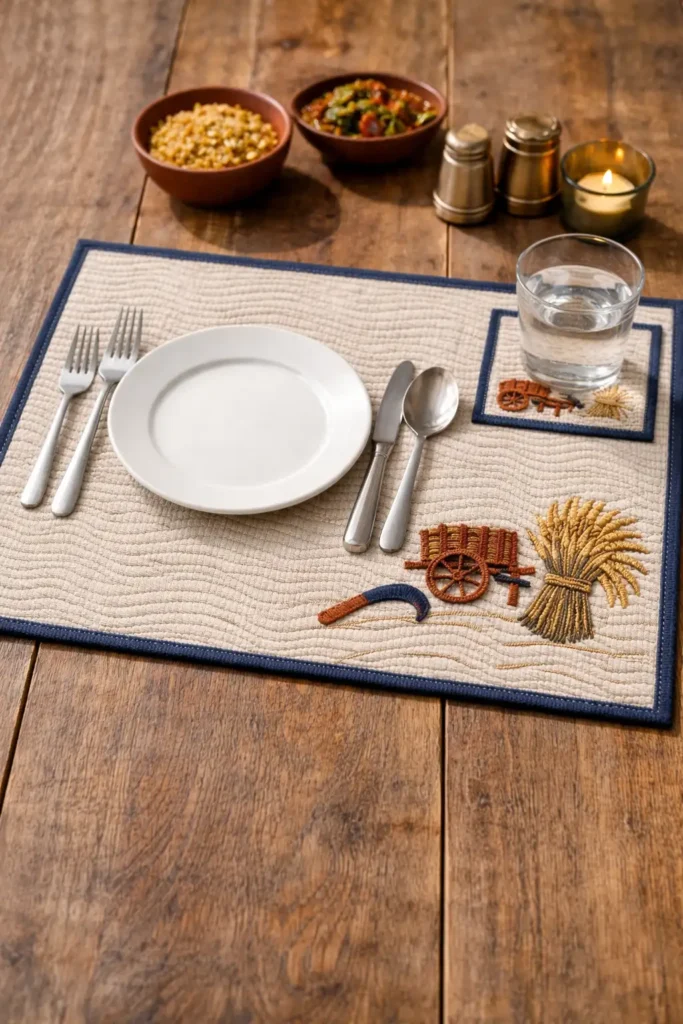
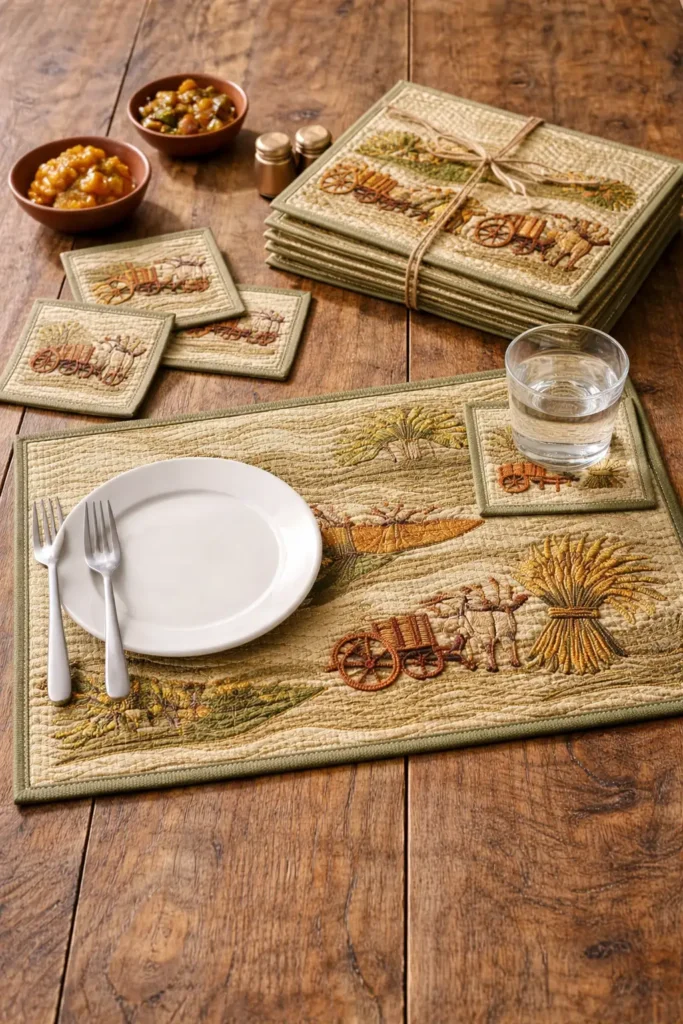
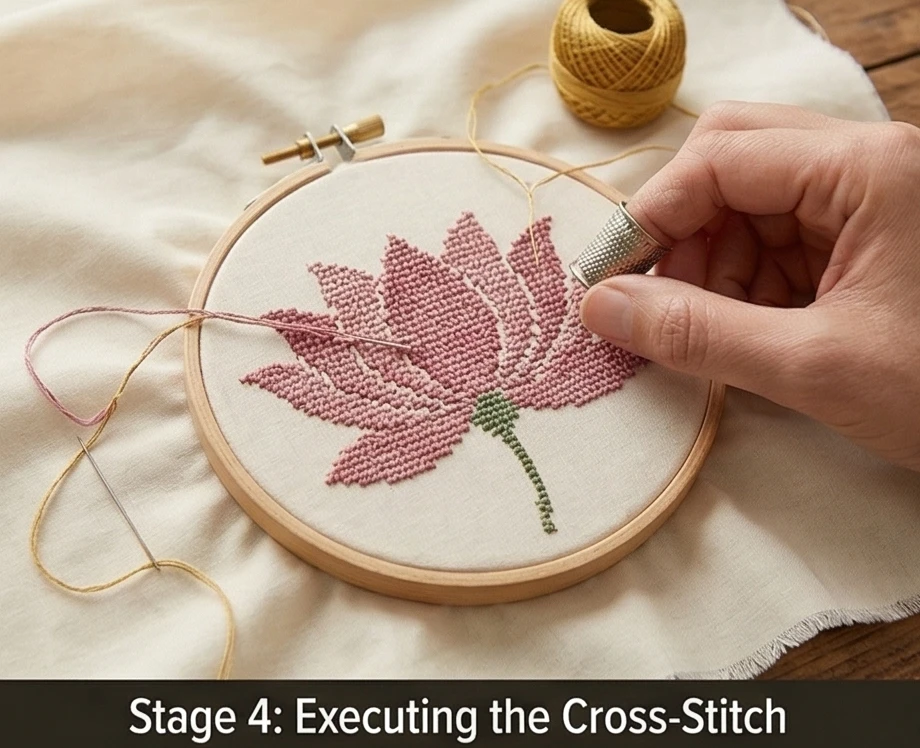
“The Golden Harvest” Pastel Cross-Stitch Kantha Throw
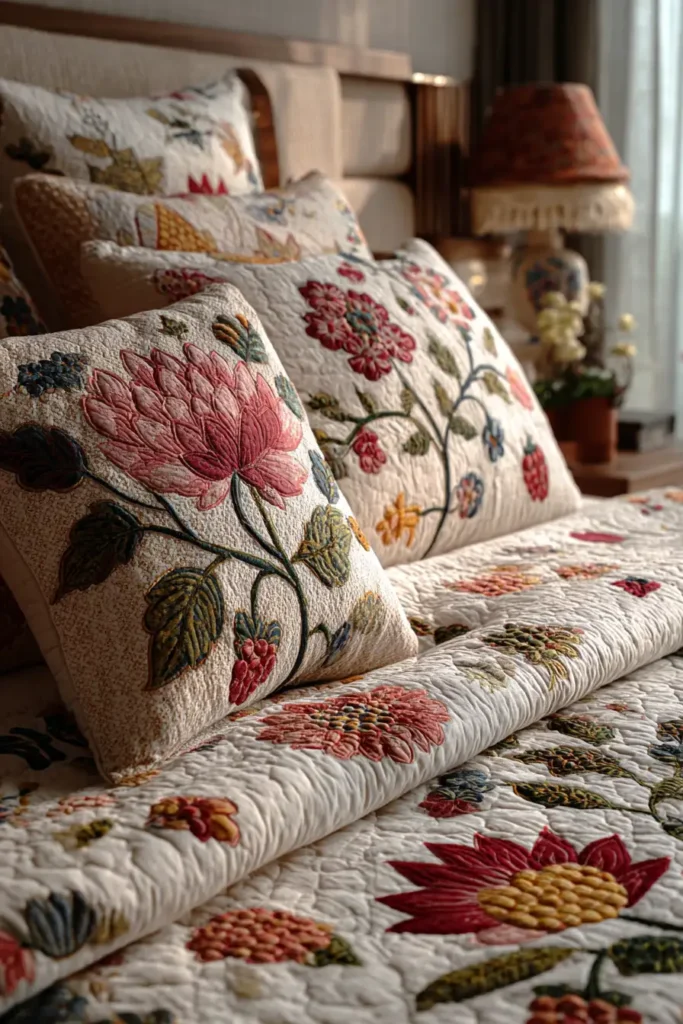
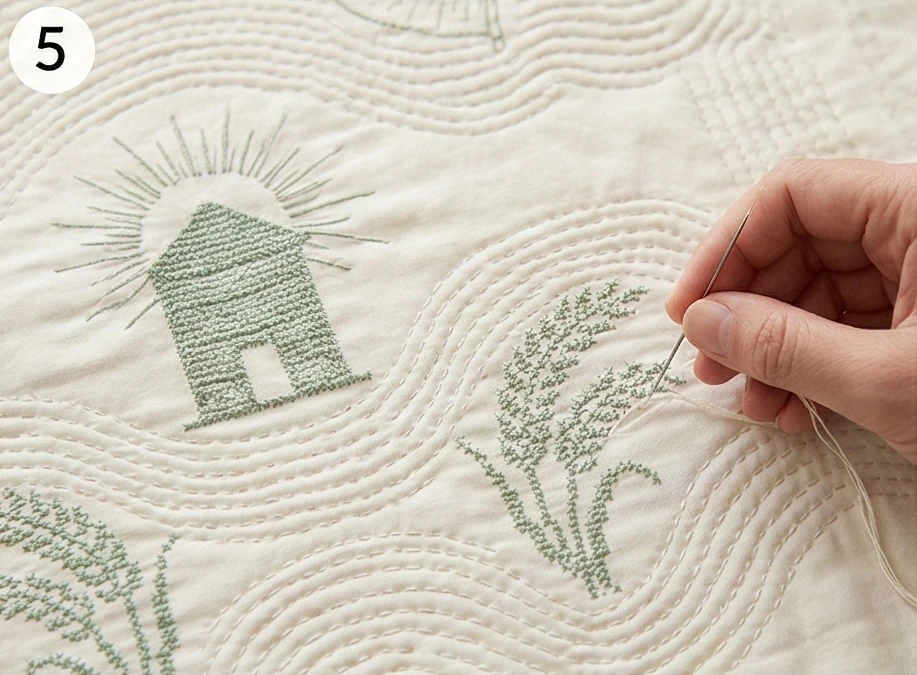
In the agrarian heartlands of Bengal, life is intricately tied to the rhythm of the harvest. Traditional Nakshi Kantha often depicts these rustic scenes using primary colors and a simple running stitch. “The Golden Harvest” quilt elevates this rustic heritage into a piece of refined, modern elegance by introducing a sophisticated Pastel Palette (Soft Sage, Dusty Rose, Buttercream, and Dove Gray) and utilizing dense Cross-Stitch (a variation of the traditional bhorat filling stitch) to give the agricultural motifs a plush, raised texture. Set against an incredibly soft background of Warm Ivory Muslin, this oversized throw marries the structural beauty of counted-thread embroidery with the fluid, rippling drape of classic Kantha, resulting in a breathable, comforting heirloom.
Finished Dimensions: Oversized Sofa Throw or Lap Quilt, 60″ x 72″ (Perfect for wrapping up on a chilly evening while reading or conversing).
Materials Needed:
The “Canvas” (Outer Layers): 4 yards of 44-inch wide, high-quality Warm Ivory Cotton Voile or fine Muslin.
The “Core” (Inner Layer): 2 yards of 60-inch wide, ultra-soft White Cotton Flannel.
Why: The dense nature of cross-stitch requires a stable but soft foundation. Flannel provides just enough grip for intricate threadwork while maintaining the lightweight, breathable drape essential for a comfortable throw.
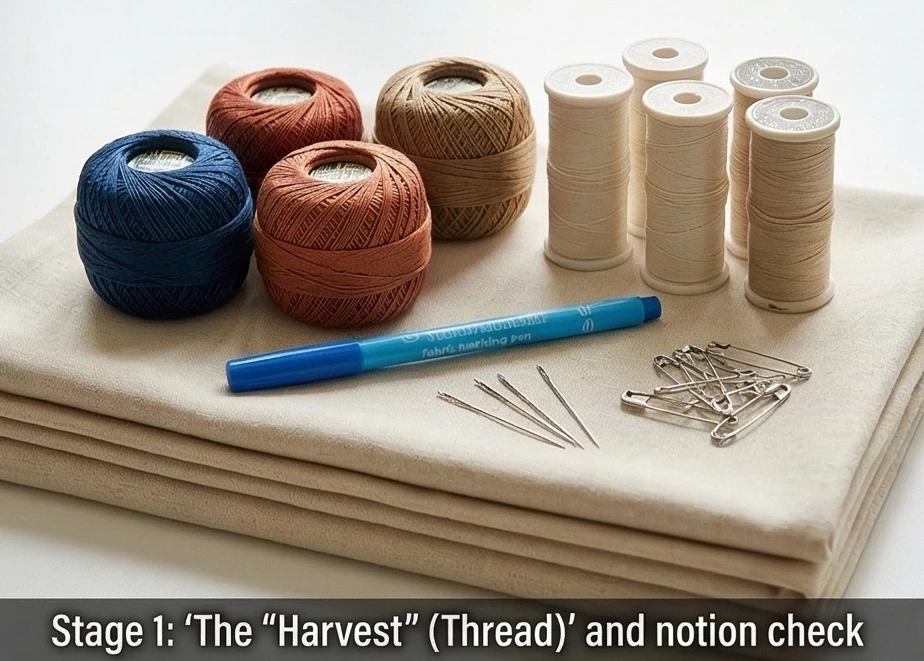
The “Harvest” (Thread): High-quality Size 8 Pearl Cotton thread in Soft Sage (for rice stalks), Buttercream (for grain and sun motifs), Dusty Rose (for blooming lotuses), and Dove Gray (for the farmer’s plow or woven baskets). You will also need standard Ivory cotton thread for the background texturing.
Notions: A water-soluble fabric marking pen, a specialized Kantha needle (or a sharp embroidery needle), an embroidery hoop (helpful for the cross-stitch sections), and curved safety pins.
Cultural Backstory:Agriculture is the soul of the Bengal delta. Historically, after the ‘Nabanna’ (new harvest) festival, women would sit together in the mild winter sun to stitch Kanthas, telling stories of the fields. While the running stitch is the heartbeat of Kantha, artisans occasionally employed a dense cross-stitch—locally adapted as a form of ‘bhorat’ (filling)—to create highly textured, durable motifs that stood out in 3D relief. Translating the golden rice paddies, the ‘kula’ (winnowing fan), and the gentle cattle into soft, elegant pastels brings the serenity of the countryside into a sophisticated modern living space.
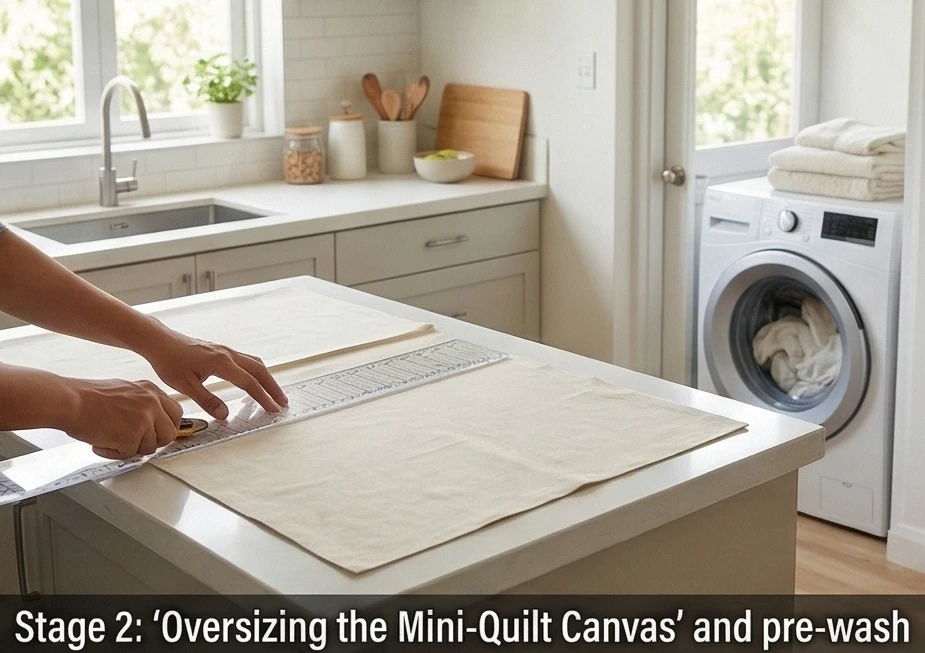
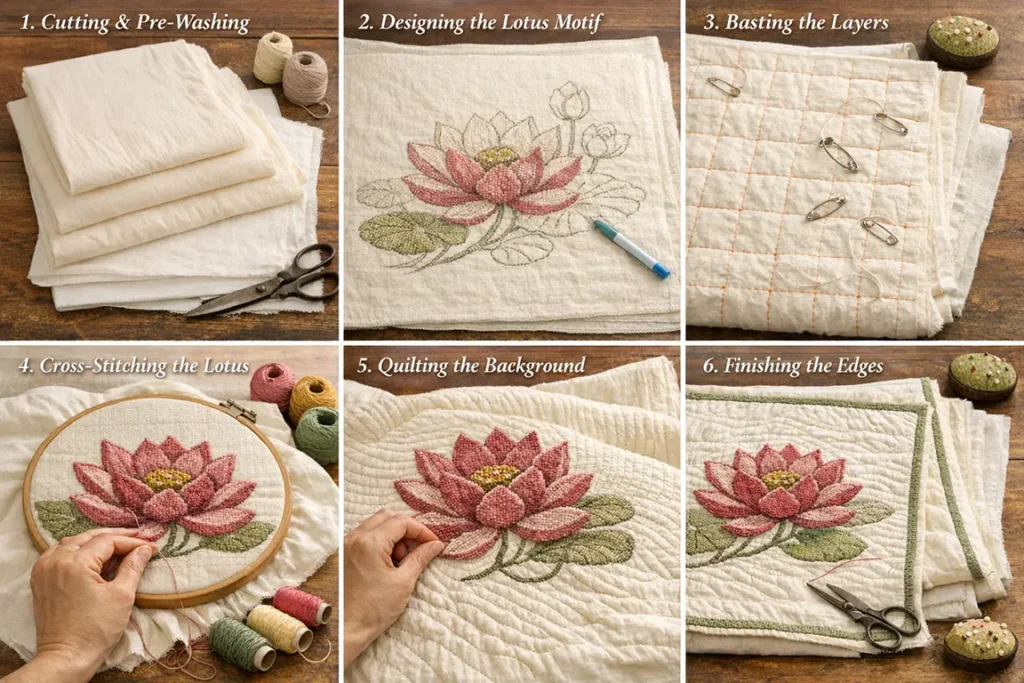
Step 1: Preparing and Sizing the Ivory Canvas
Establishing a soft, flawless foundation.
Cut the Expanse: From your Ivory Cotton Voile, cut two large panels measuring exactly 62″ x 74″ (one for the top, one for the backing).
Cut the Core: Cut your inner Flannel layer to the identical 62″ x 74″ dimension.
The Crucial Pre-Wash: You must wash and tumble dry all three layers. Because cross-stitch creates concentrated areas of tight thread tension, skipping this step will cause the fabric to pucker violently and lose its elegant drape after the first laundering.
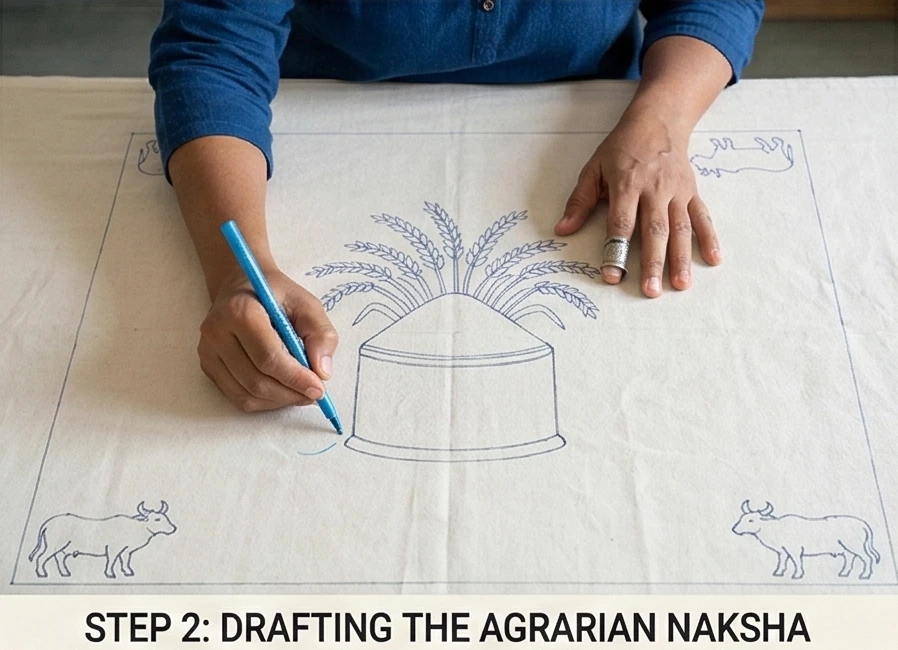
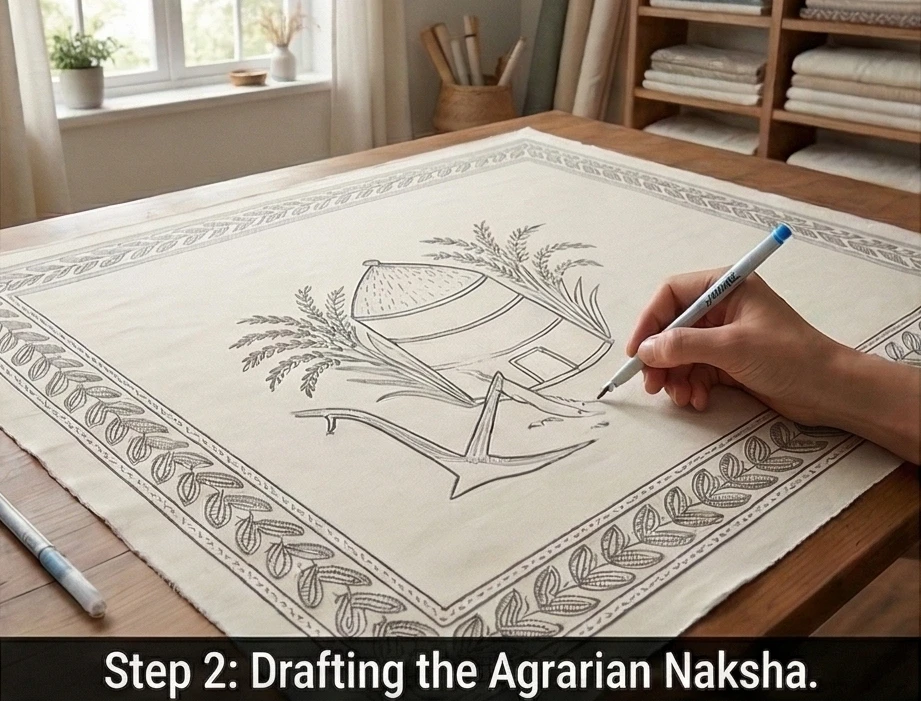
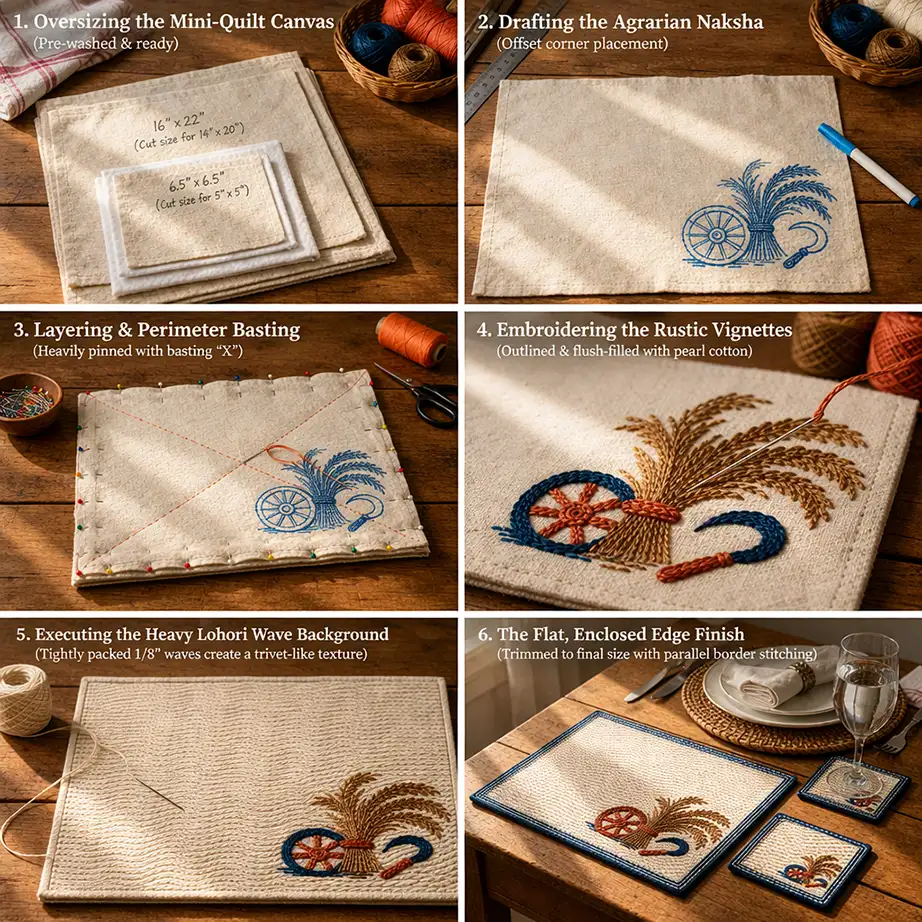
Step 2: Drafting the Agrarian Naksha (The Narrative)
Designing the harvest motifs.
The Central Motif: Lay the top voile layer completely flat. In the center, draw a large, stylized Dhaner Gola (traditional woven grain silo) or a sunburst surrounded by stalks of rice (dhan).
The Corner Anchors: In the four corners, sketch elegant, sweeping Kula (winnowing fans) spilling over with tiny floral or grain shapes.
The Pastoral Border: Draw a 5-inch wide border around the perimeter. Fill it with a continuous, creeping vine intermixed with small, stylized birds and lotus pods.
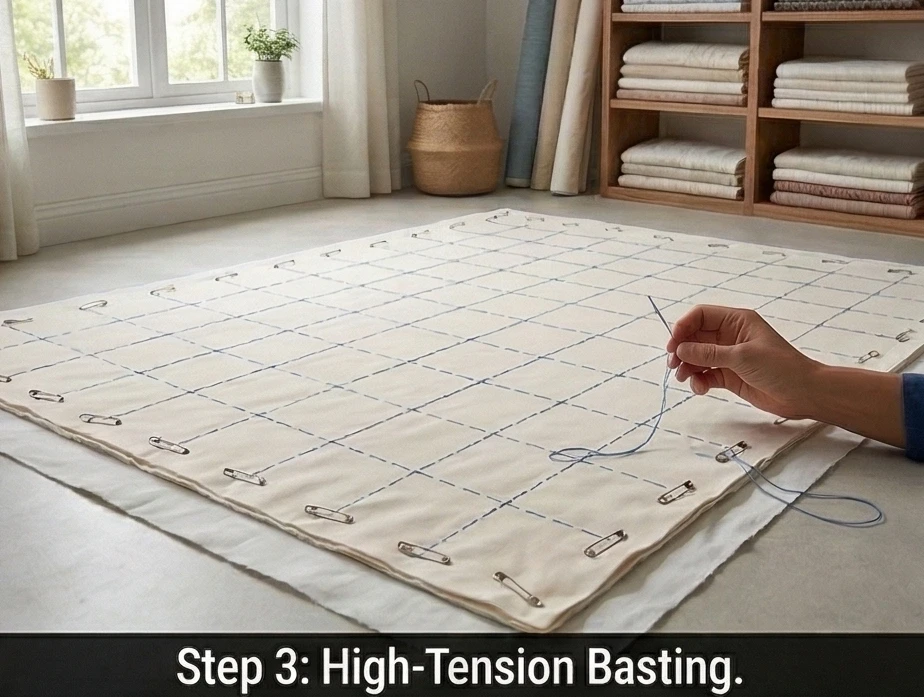
Step 3: Heavy Basting for Dual-Stitch Techniques
Securing the layers for intensive needlework.
The Stack: Lay the backing flat on a large table or the floor, followed by the flannel core, and finally the marked top layer. Smooth out every wrinkle from the center outward.
Grid Basting: Because you are combining dense cross-stitch with fluid running stitches, the fabric is prone to shifting. Thread a needle with contrasting thread and stitch a highly secure 6-inch grid across the entire 60×72-inch surface.
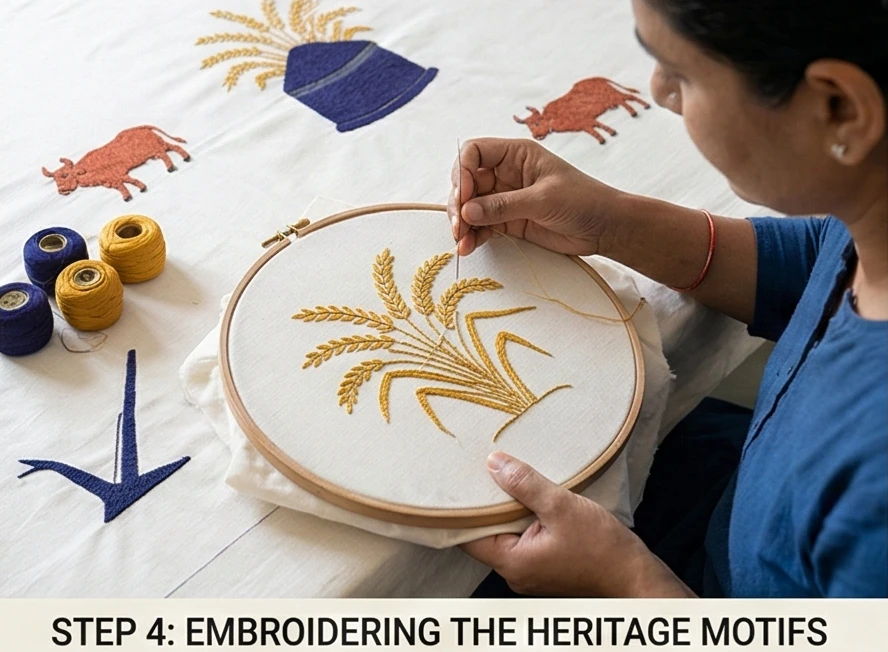
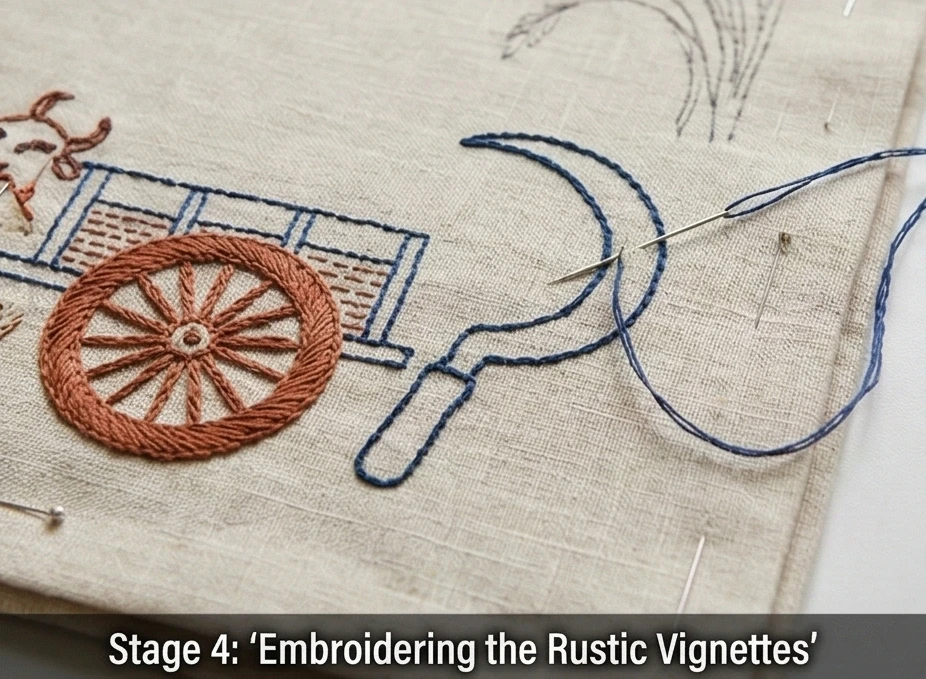
Step 4: Executing the Pastel Cross-Stitch (Bhorat)
Building the plush, raised agricultural motifs.
Framing the Work: Place a small embroidery hoop over one of your drawn motifs (e.g., a rice stalk) to keep the tension perfectly even.
The Cross-Stitch Filling: Thread your needle with the Soft Sage Pearl Cotton. Instead of outlining, fill the drawn shape entirely with tiny, meticulous cross-stitches (X). Pierce through all three layers (top, flannel, and backing) with every stitch.
Building Texture: Use Buttercream for the grains of rice and Dove Gray for the woven textures of the baskets. The dense cross-stitching will make these specific motifs feel heavy, plush, and incredibly tactile against the smooth muslin.
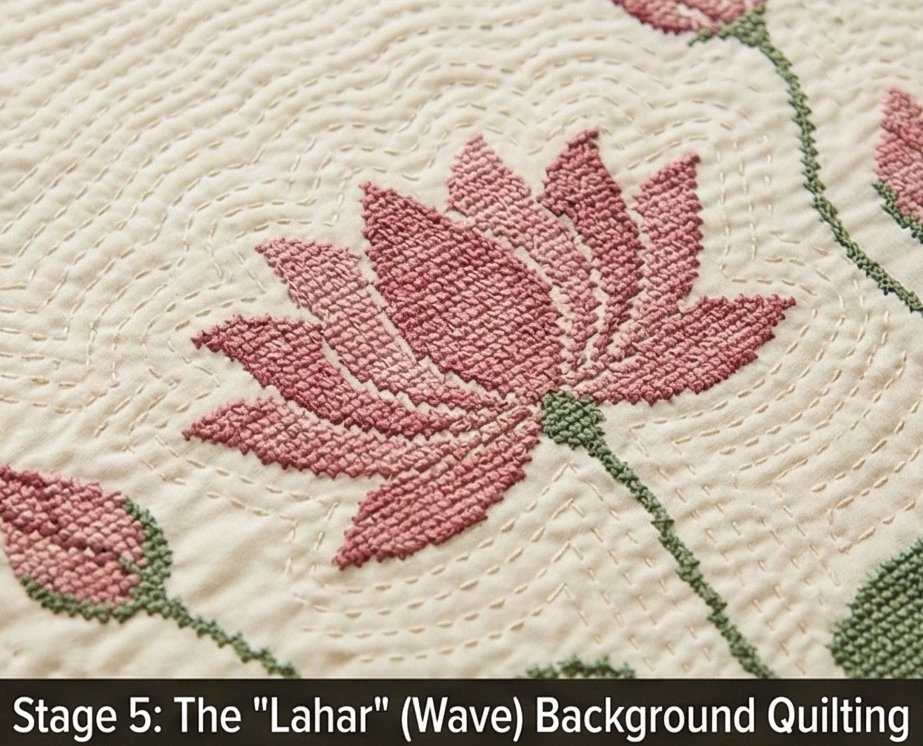
Step 5: The “Lahar” (Wave) Background Quilting
Creating the signature Kantha crinkle and drape.
The Unifying Thread: Once all the pastel motifs are completely filled with cross-stitch, remove the hoop. Switch to your standard Ivory cotton thread.
Echoing the Harvest: Starting from the edges of your cross-stitched motifs, sew continuous, closely spaced parallel lines of standard running stitches. Echo the shapes of the silos, rice stalks, and birds, creating ripples that radiate outward.
The Density: Space these rows exactly 1/4-inch apart across the entire negative space of the throw. This dense background stitching tightly binds the three layers, forcing the heavy, cross-stitched motifs to puff up beautifully in bas-relief.
Step 6: The Tailored Edge Finish
Sealing the edges to frame the harvest.
Trim and Fold: Once the background quilting is complete, trim the raw edges to the final 60″ x 72″ dimensions. Fold the raw edges of the top and bottom ivory voile inward by 1/2 inch to enclose the flannel core, and pin heavily.
The Border Stitch: Thread your needle with Dusty Rose or Soft Sage. Sew five closely packed, parallel rows of running stitches strictly around the perimeter. This historic finishing technique seals the edges permanently without adding the stiff bulk of a modern quilt binding, preserving the throw’s fluid, elegant drape.
Usability Note:The combination of heavy cross-stitch and rippling Kantha makes this throw incredibly comforting, providing a gentle, weighted feel. To preserve the soft pastel threads, machine wash on a cold, delicate cycle with a mild detergent. Tumble dry on low heat to enhance the crinkled “Lahar” texture, rendering the throw softer and more inviting with every wash.
6. Sophisticated Cross-Stitch Nakshi Kantha Bed Runners Featuring Wildflower Motifs
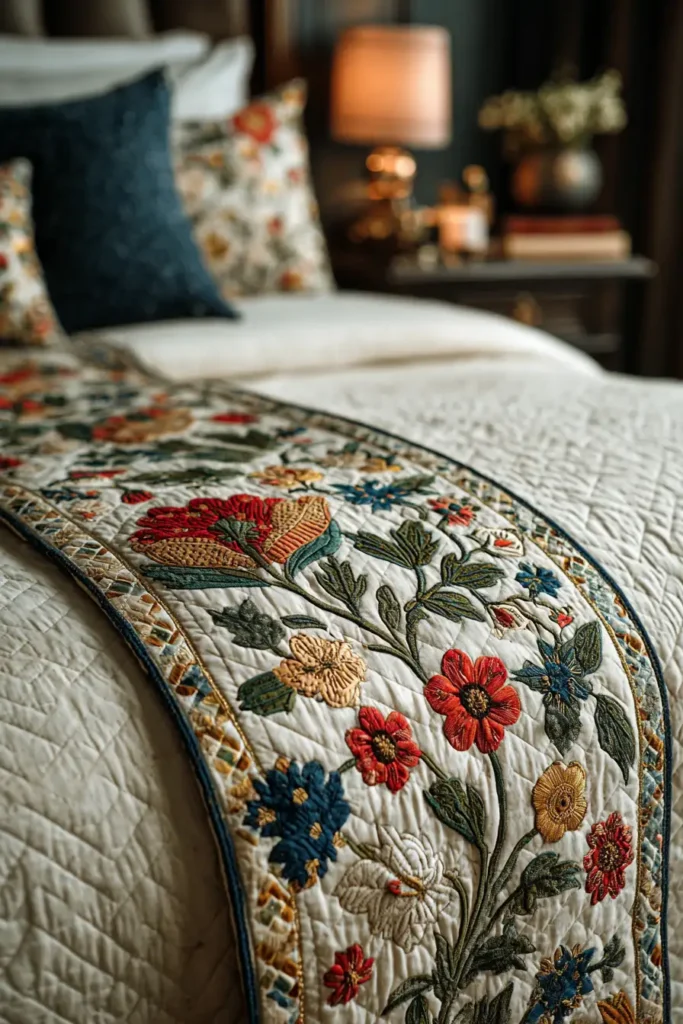
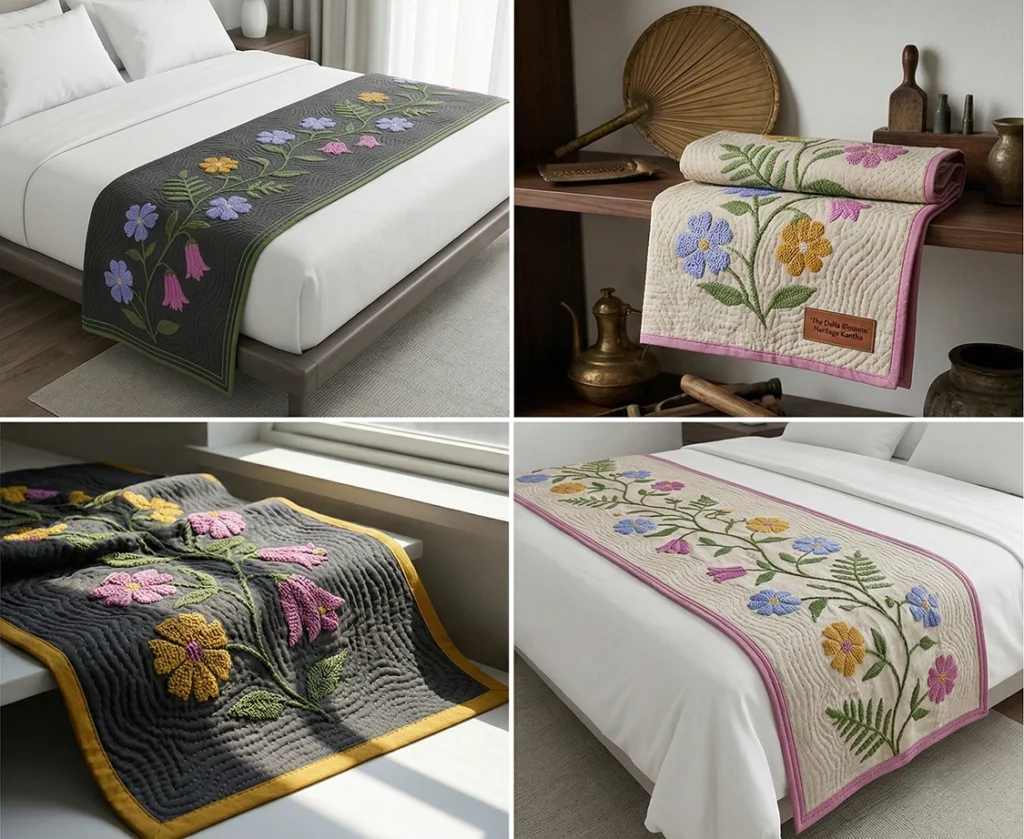
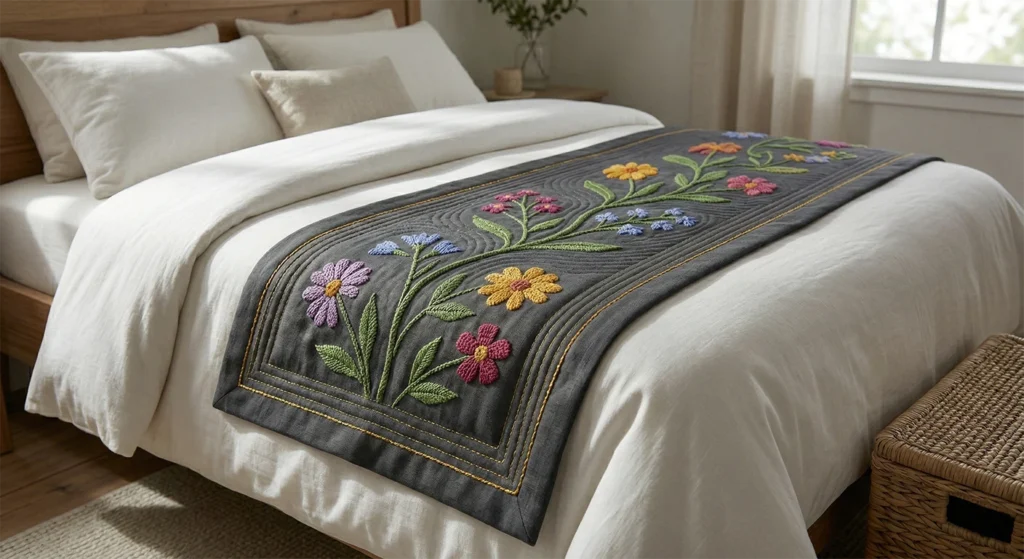
“The Delta Blossom” Wildflower Nakshi Kantha Bed Runner
A full master bed cover is magnificent, but sometimes modern bedroom design calls for a more understated touch of elegance. A bed runner draped across the foot of the bed provides a striking focal point and an extra layer of warmth without overwhelming the room. “The Delta Blossom” brings the uncultivated, wild beauty of riverbank flora into the home. Combining the raised, plush texture of cross-stitch (bhorat) with the fluid ripple of the traditional Kantha running stitch, this piece features delicate, trailing wildflowers in Periwinkle, Wild Mustard, and Soft Magenta against a crisp Charcoal Gray or Natural Linen background. The result is a highly tailored, sophisticated textile that perfectly balances rustic heritage with contemporary chic.
Finished Dimensions: Elegant Queen/King Bed Runner, 24″ wide x 90″ long (Designed to drape beautifully over the sides of the mattress).
Materials Needed:
The “Canvas” (Outer Layers): 3 yards of 44-inch wide Charcoal Gray Linen-Cotton Blend or fine Muslin.
The “Core” (Inner Layer): 1.5 yards of 44-inch wide, ultra-soft White Cotton Flannel.
Why: A bed runner needs enough structural weight to stay put at the foot of the bed when you pull the blankets up. Flannel provides this necessary grip and weight without adding the stiff, unnatural loft of synthetic batting.
The “Flora” (Thread): High-quality Size 8 Pearl Cotton thread in Periwinkle Blue, Wild Mustard Yellow, Soft Magenta, and Fern Green. You will also need standard Charcoal Gray cotton thread for the background Kantha stitching.
Notions: A water-soluble fabric marking pen (or tailor’s chalk for dark fabric), an embroidery hoop, a long Kantha needle, and curved safety pins.
Cultural Backstory:The most breathtaking Nakshi Kantha motifs often come not from manicured gardens, but from the artisan’s immediate, untamed surroundings. The vibrant, uncultivated flora found along the water bodies and winding paths of the Bengal delta—like the creeping Kalmi (water bindweed) blossoms, wild mustard flowers, and local ferns—have historically served as profound inspiration. Stitching these resilient wildflowers using a dense cross-stitch elevates them, celebrating the quiet, everyday beauty of the deltaic landscape and preserving it as a sophisticated heirloom.
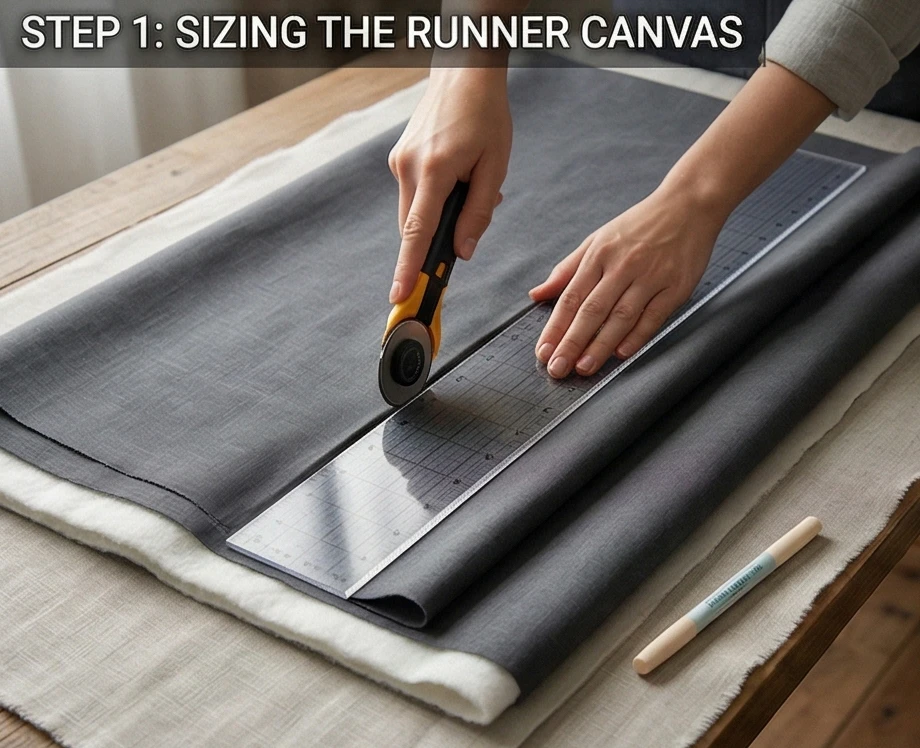
Step 1: Sizing the Runner Canvas
Preparing the elegant, elongated foundation.
Cut the Expanse: From your Charcoal Gray fabric, cut two long panels measuring exactly 26″ wide by 92″ long (one for the top face, one for the backing).
Cut the Core: Cut your inner Flannel layer to the exact same dimensions: 26″ x 92″.
The Crucial Pre-Wash: Wash and tumble dry all three layers on a warm setting. Cross-stitching pulls the fabric tight; if you do not pre-shrink the linen and flannel, the runner will warp and lose its perfect rectangular shape during its first wash.
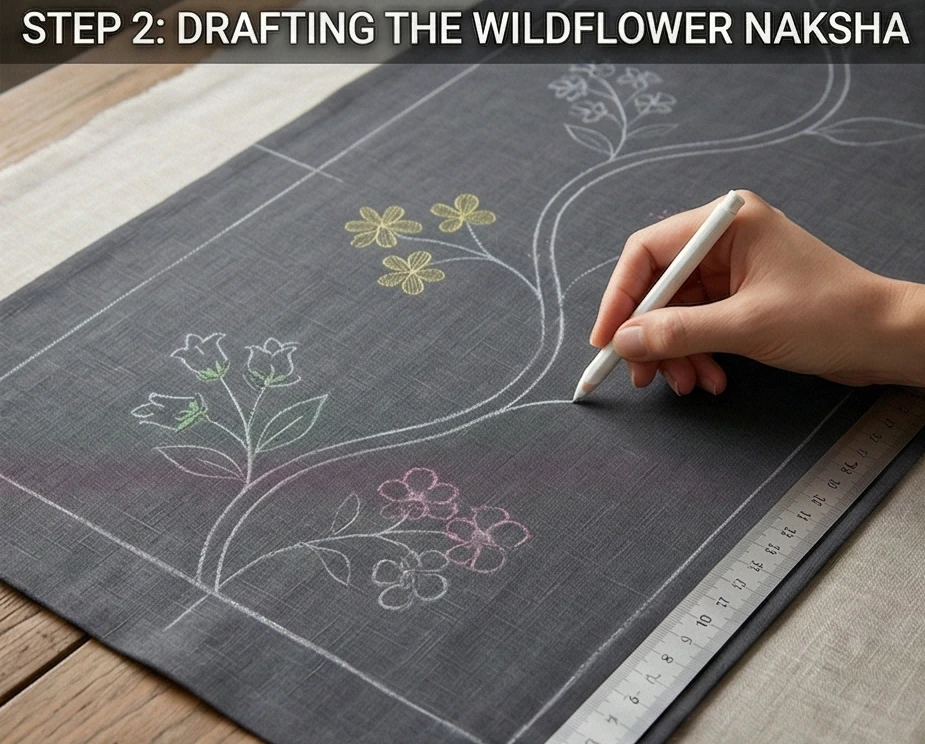
Step 2: Drafting the Wildflower Naksha (The Narrative)
Designing the trailing botanical motifs.
The Creeping Vine: Lay the top charcoal layer completely flat. Using tailor’s chalk or a light-colored marking pen, draw a gentle, undulating vine that sweeps continuously from one end of the 92-inch runner to the other.
The Blossoms: Along this central vine, sketch clusters of delicate wildflowers—five-petaled blooms, small bell-shaped flowers, and tiny buds.
The Tailored Border: Draw a crisp, 2-inch wide border around the entire perimeter of the runner. Leave the negative space around the central vine open; this will later be filled with the textured background stitching.
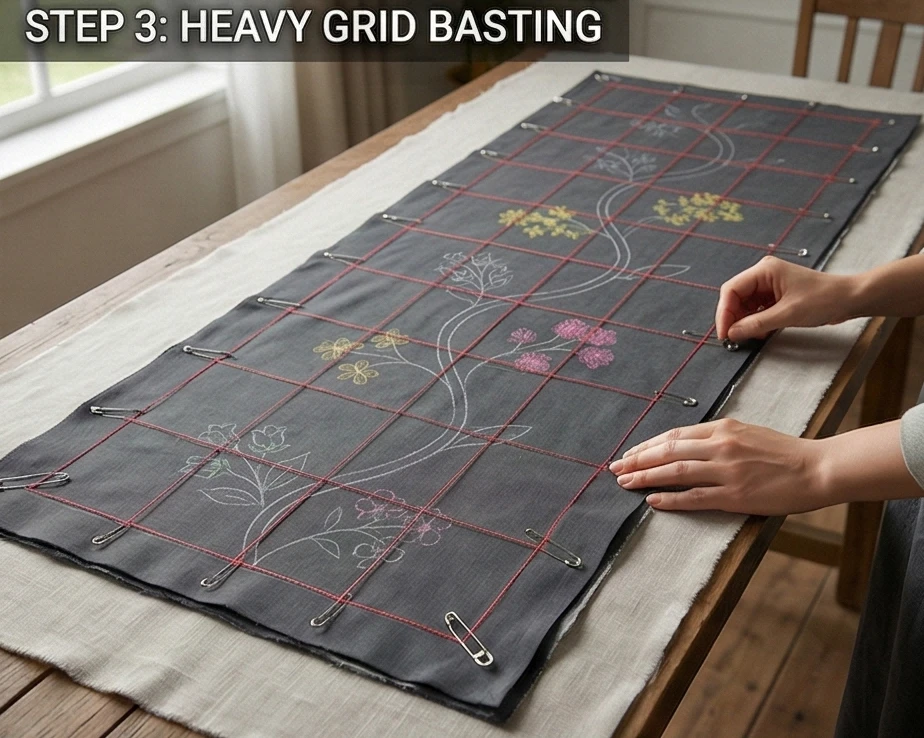
Step 3: Heavy Grid Basting for Structural Integrity
Securing the long layers for precise needlework.
The Stack: Lay the backing flat on a long table, followed by the flannel core, and finally the marked top layer. Smooth out every wrinkle, working from the center outward.
Grid Basting: An elongated bed runner is prone to shifting on the bias. Thread a needle with highly visible, contrasting thread and stitch a secure 4-inch grid across the entire 26×92-inch surface to lock the layers in place.
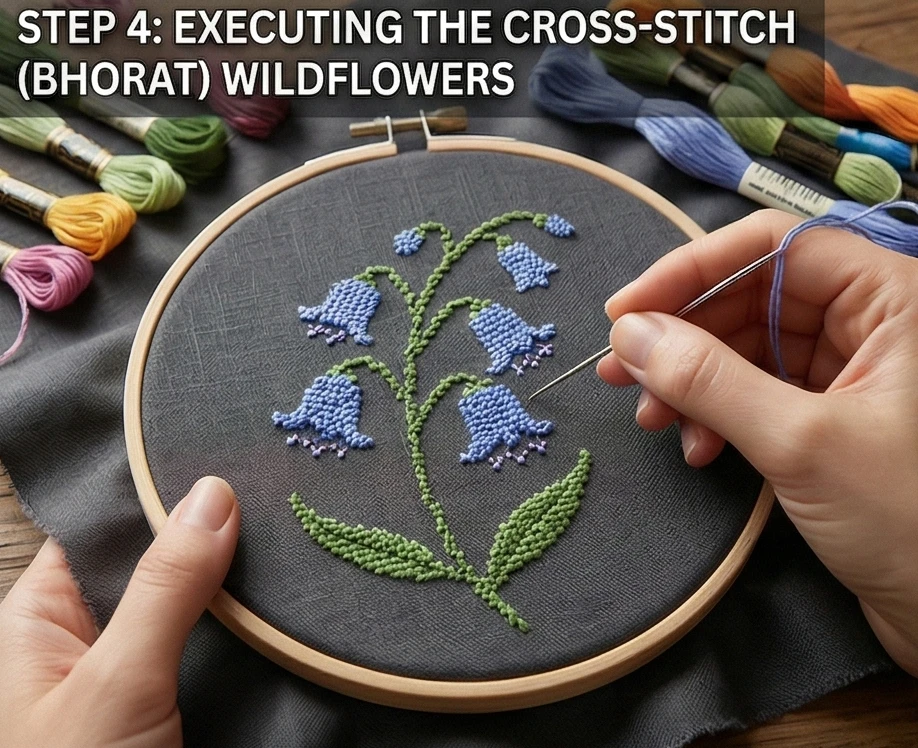
Step 4: Executing the Cross-Stitch (Bhorat) Wildflowers
Building the plush, 3D botanical textures.
Isolate the Blooms: Place a small embroidery hoop over one cluster of drawn wildflowers to maintain even tension.
The Cross-Stitch Filling: Thread your needle with the Periwinkle or Soft Magenta Pearl Cotton. Instead of merely outlining the petals, fill the entire drawn shape of each flower with tiny, uniform cross-stitches (X). Pierce through all three layers with every stitch.
The Stems and Leaves: Use Fern Green to stitch the central vine and leaves. The density of the cross-stitch gives these wildflowers a heavy, raised, tapestry-like feel against the smooth linen background.
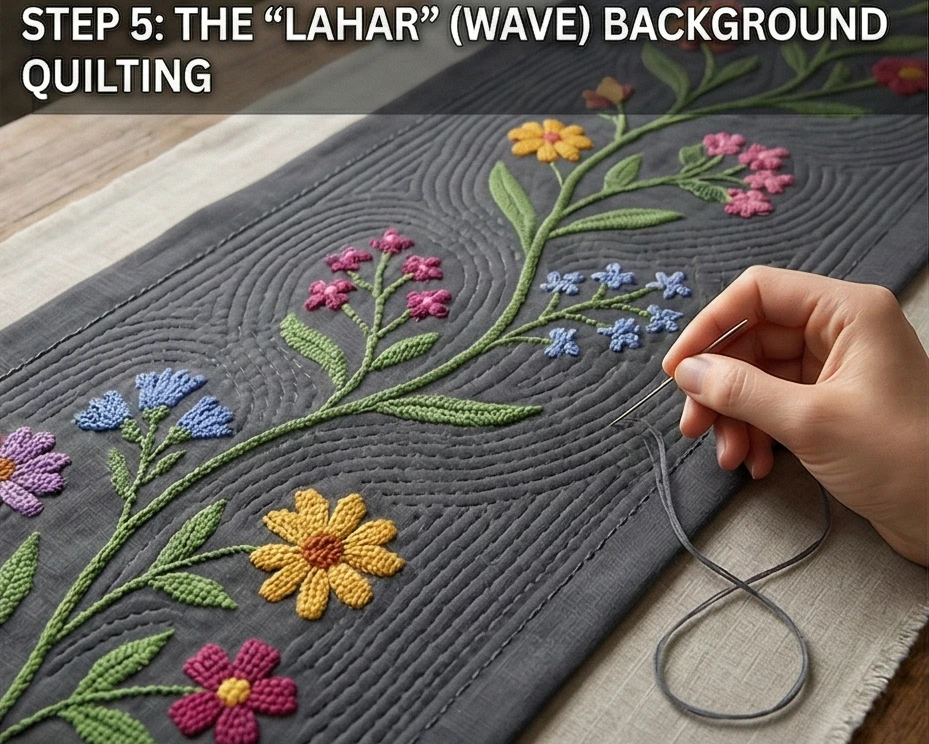
Step 5: The “Lahar” (Wave) Background Quilting
Creating the signature Kantha drape.
The Unifying Thread: Once all the colorful wildflowers are completely filled in with cross-stitch, remove the hoop. Switch to your standard Charcoal Gray thread.
Echoing the Flora: Sew continuous, parallel lines of standard running stitches closely around the edges of your cross-stitched flowers and vines. Echo the curves of the botanical shapes to create ripples in the fabric.
The Density: Space these rows exactly 1/4-inch apart across the entire negative space of the runner. This incredibly dense background stitching tightly binds the three layers, forcing the heavy, brightly colored wildflowers to puff up in stunning bas-relief.
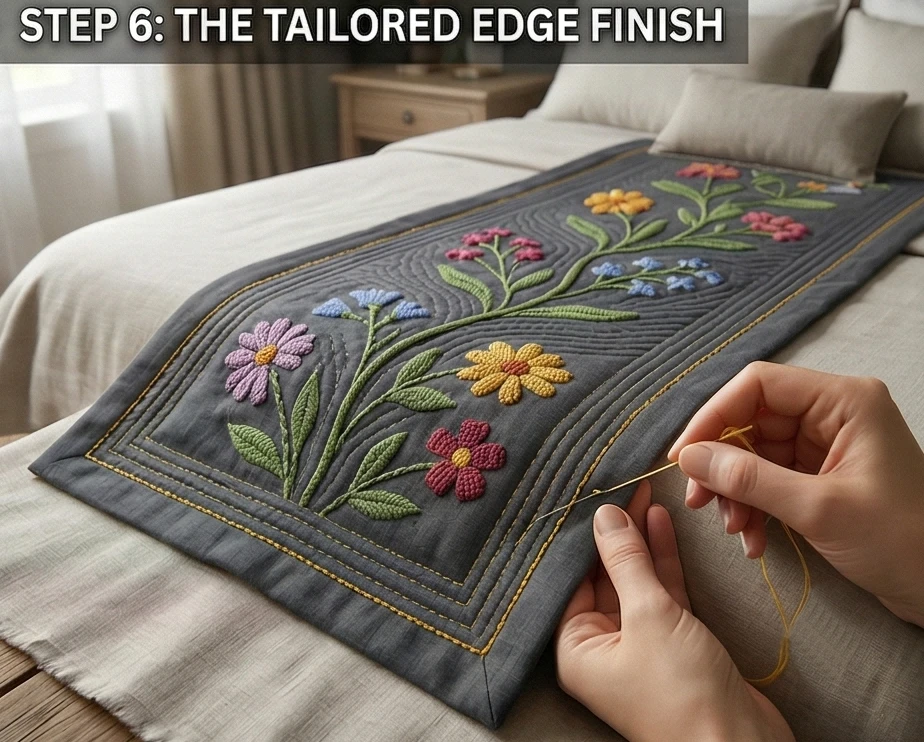
Step 6: The Tailored Edge Finish
Framing the runner for the modern bedroom.
Trim and Fold: Once the background quilting reaches the border lines, trim the raw edges perfectly straight to the final 24″ x 90″ dimension. Fold the raw edges of the top and bottom fabric inward by 1/2 inch to enclose the flannel core, and pin heavily.
The Border Stitch: Thread your needle with Wild Mustard or Fern Green Pearl Cotton to add a final pop of color. Sew five to seven closely packed, perfectly straight parallel rows of running stitches around the entire perimeter. This creates a sharp, tailored frame that seals the edges permanently without the need for a bulky, modern quilt binding.
Usability Note:The combination of a heavy linen-blend canvas, dense cross-stitch, and an internal flannel core gives this bed runner a luxurious, weighted drape that stays perfectly in place at the foot of your bed. Machine wash on a cold, gentle cycle and lay flat or tumble dry on low. The background Kantha stitching will subtly crinkle, adding to the textile’s deep, tactile comfort.
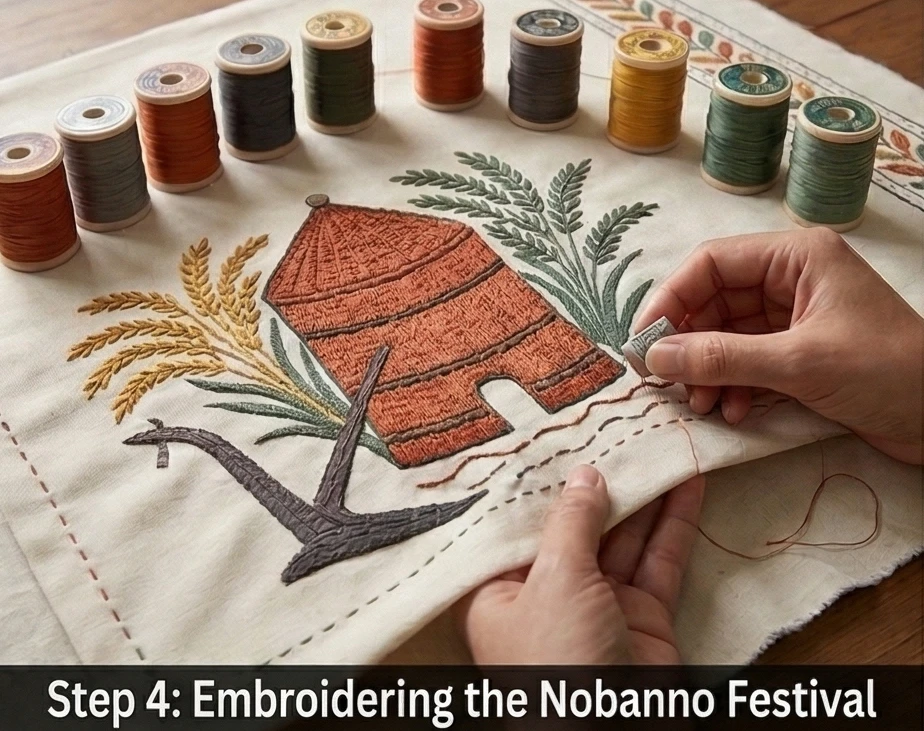
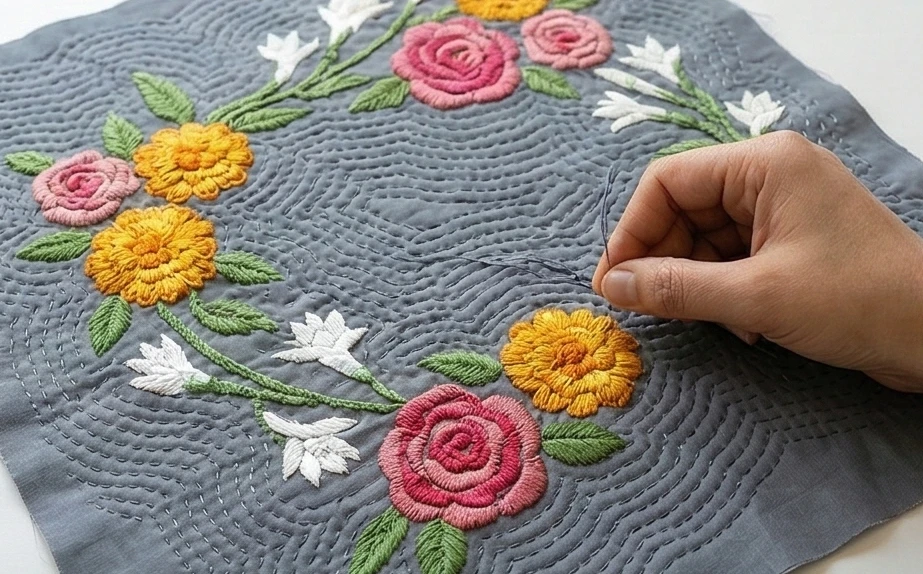
7. Artistic Running Stitch Nakshi Kantha Pillow Covers Showcasing Village Festival Scenes
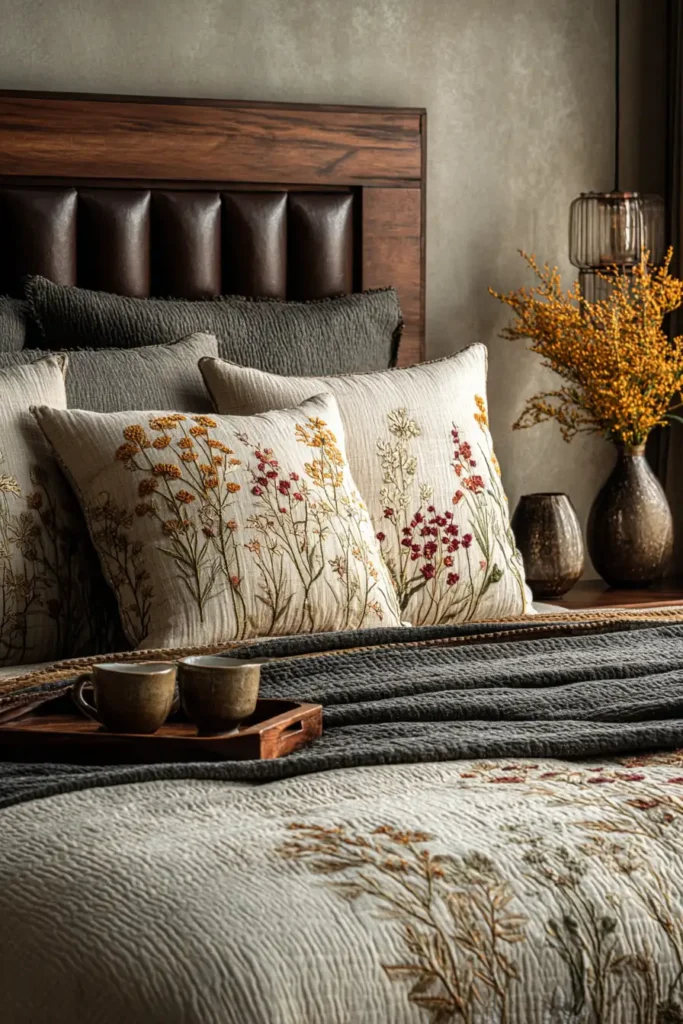
“The Boishakhi Mela” Festival Scene Pillow Cover
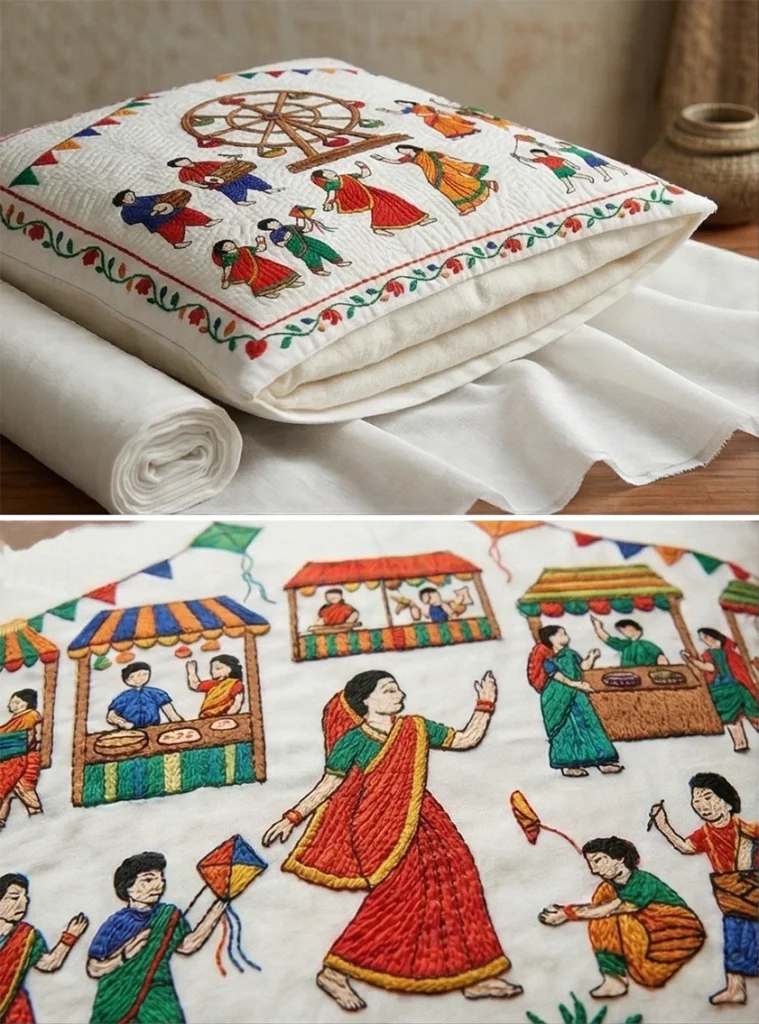
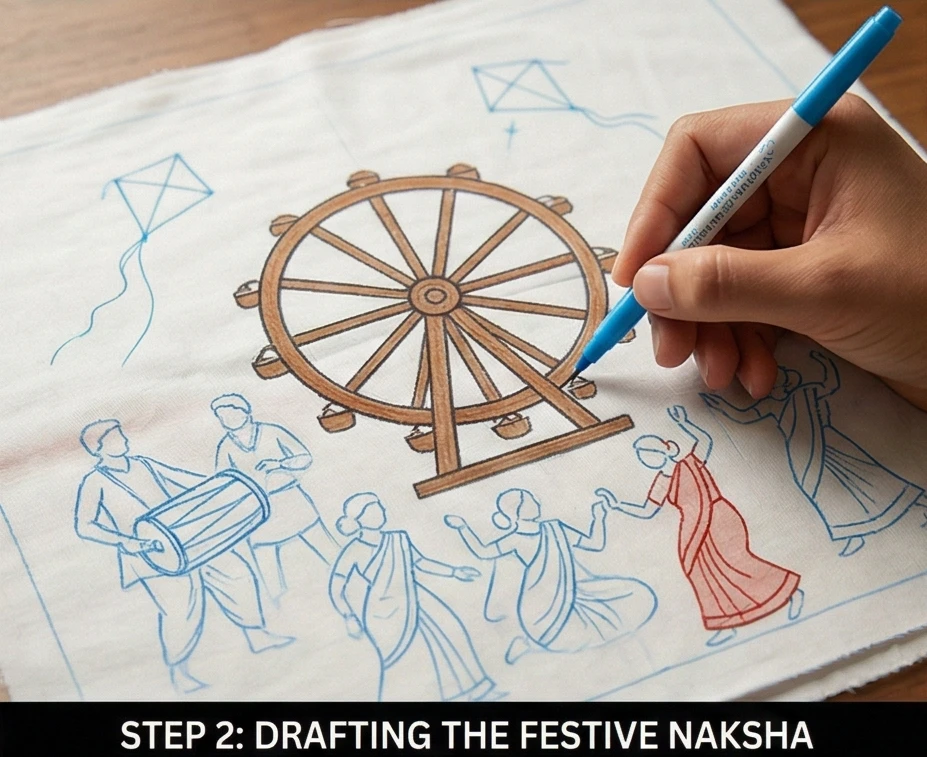
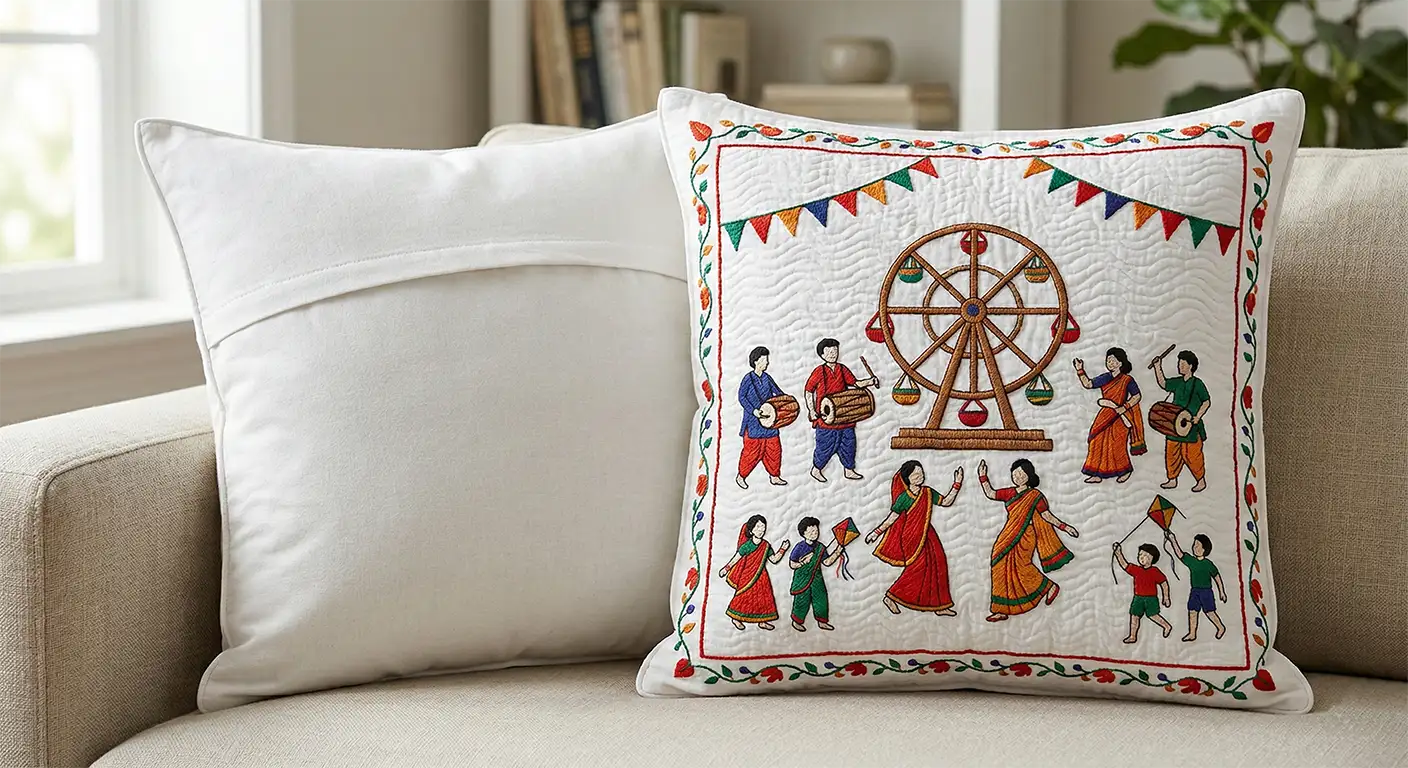
A living room sofa or a cozy reading chair is instantly elevated when adorned with textiles that tell a story. While geometric patterns offer modern structure, figurative Nakshi Kantha offers a window into a vibrant, living culture. “The Boishakhi Mela” pillow cover captures the jubilant energy of a traditional Bengali village fair—complete with dhol (drum) players, dancing figures, and the iconic nagordola (wooden Ferris wheel).
Embroidered entirely in the fluid, traditional running stitch using joyful shades of Vermilion Red, Saffron, Indigo, and Emerald Green against a crisp White Muslin background, this pillow cover is a piece of functional folk art. The dense background stitching ensures the cover is not only visually stunning but also incredibly soft, tactile, and durable enough for daily lounging.
Finished Dimensions: Standard Throw Pillow Cover, 18″ x 18″ (Designed to fit a plush 20×20-inch insert for a full, luxurious look).
Materials Needed:
The “Canvas” (Outer Layers): 1 yard of 44-inch wide, high-quality White Cotton Voile or fine Muslin.
The “Core” (Inner Layer): 1/2 yard of ultra-soft White Cotton Flannel.
Why: A pillow cover requires a bit of structure to prevent the embroidery threads from catching on the insert, but thick batting will make the pillow stiff. A single layer of cotton flannel provides the perfect weight, allowing the Kantha stitches to create their signature soft, crinkled texture.
The “Festival” (Thread): Size 8 Pearl Cotton thread in Vermilion Red, Saffron, Indigo, and Emerald Green. You will also need standard White cotton thread for the dense background quilting.
Notions: A water-soluble fabric marking pen, a long Kantha or Sashiko needle, and curved safety pins.
Cultural Backstory:The ‘Mela’ (village fair) is the beating heart of rural Bengali social life, particularly during Pohela Boishakh (the Bengali New Year) or the autumn harvests. These festivals are explosions of color, music, sweet treats, and community gathering. Historically, women would record these joyous occasions in their Nakshi Kantha, treating the cloth as a diary. Stitching a ‘Mela’ scene was a way to weave the happiness and vitality of the community directly into the blankets that would warm their families during the winter.
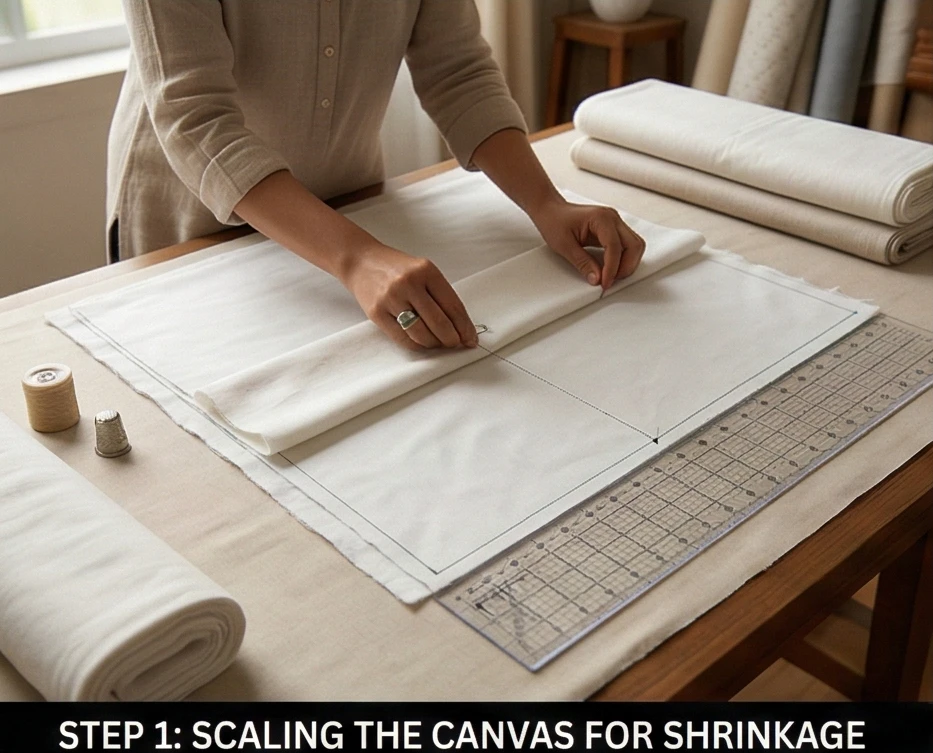
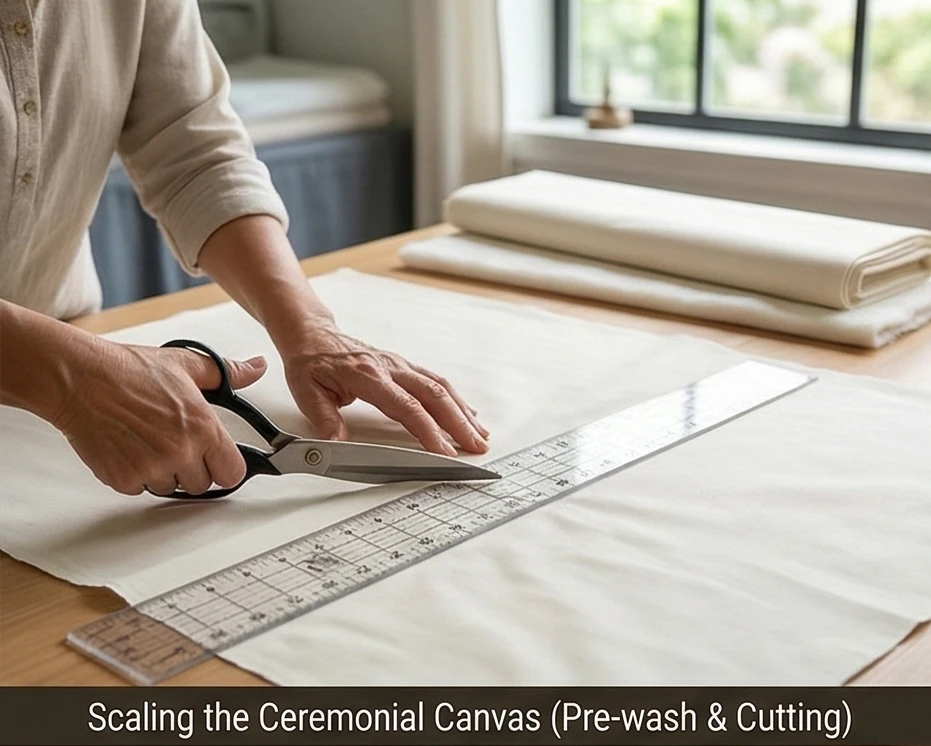
Step 1: Scaling the Canvas for Shrinkage
Preparing the layers for the pillow front.
Cut the Quilted Front: Nakshi Kantha stitching significantly shrinks the fabric. To achieve an 18.5″ x 18.5″ unfinished front panel, cut two squares of White Muslin measuring exactly 20″ x 20″.
Cut the Core: Cut your inner Flannel layer to the exact same 20″ x 20″ dimension.
Pre-Wash: Wash and tumble dry all three squares. This pre-shrinks the cotton, ensuring your intricate festival scene does not warp when you eventually wash the finished pillow cover.
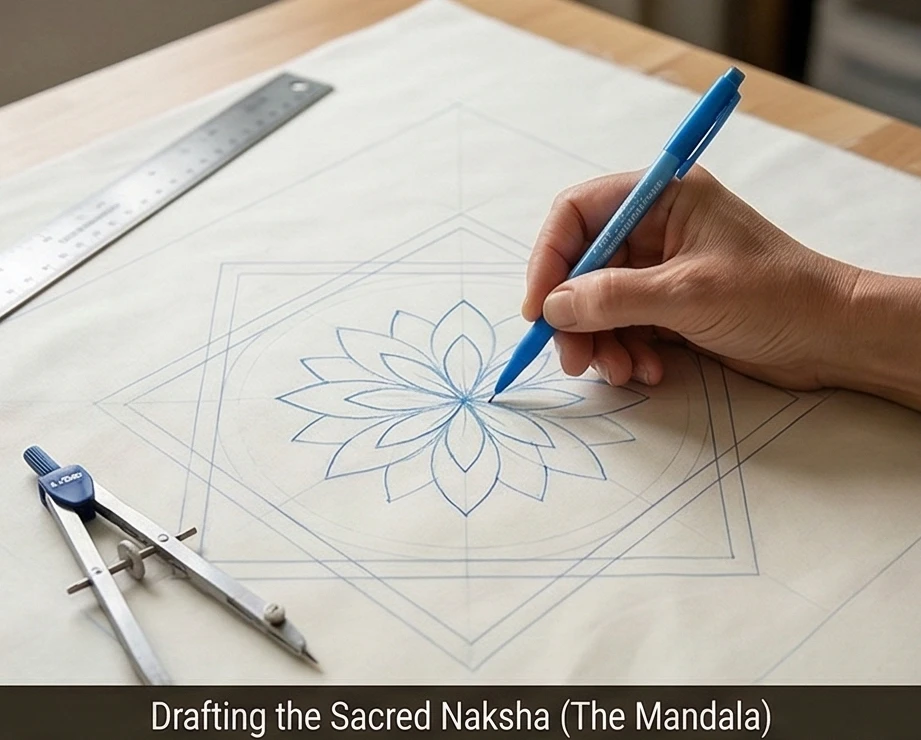
Step 2: Drafting the Festive Naksha (The Narrative)
Drawing the joyful village celebration.
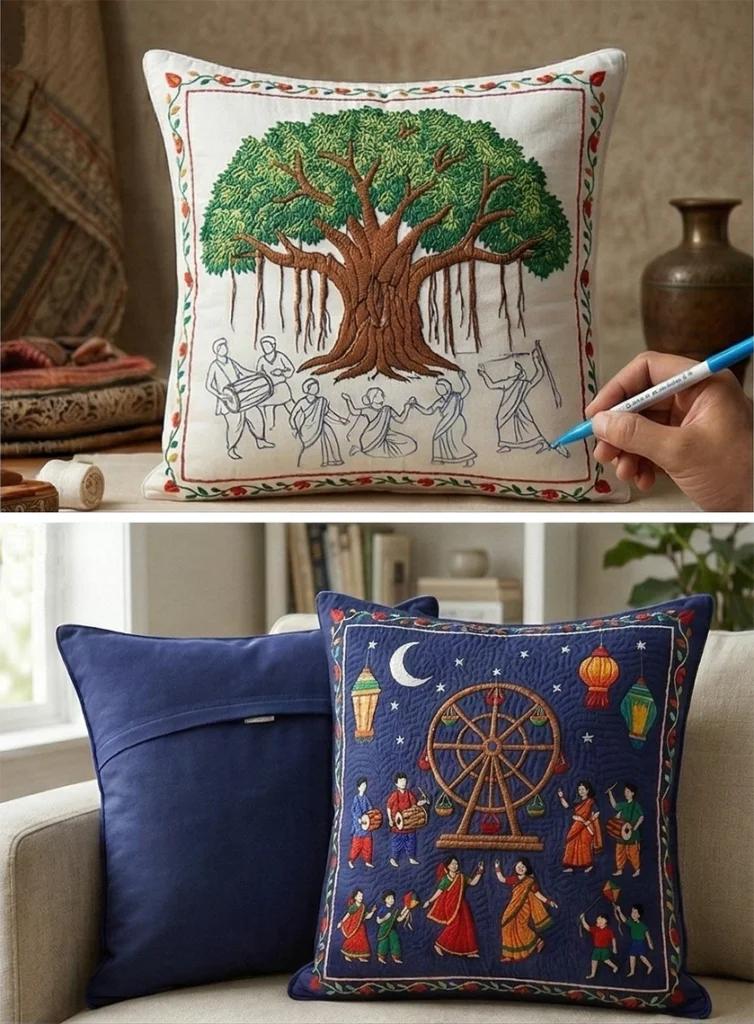
The Centerpiece: Lay the top muslin square flat. Using your water-soluble pen, draw the focal point of the festival in the center—such as a traditional nagordola (a small, hand-cranked wooden Ferris wheel) or a large Banyan tree providing shade.
The Musicians and Dancers: Around the centerpiece, sketch the lively figures. Draw a musician beating a dhol (cylindrical drum), women in flowing saris, and children running with kites. Nakshi Kantha figures are traditionally stylized and silhouetted, focusing on movement rather than intricate facial details.
The Festive Border: Draw a 2-inch border around the perimeter, filling it with a simple, undulating vine or repeating pennant flags to frame the celebration.
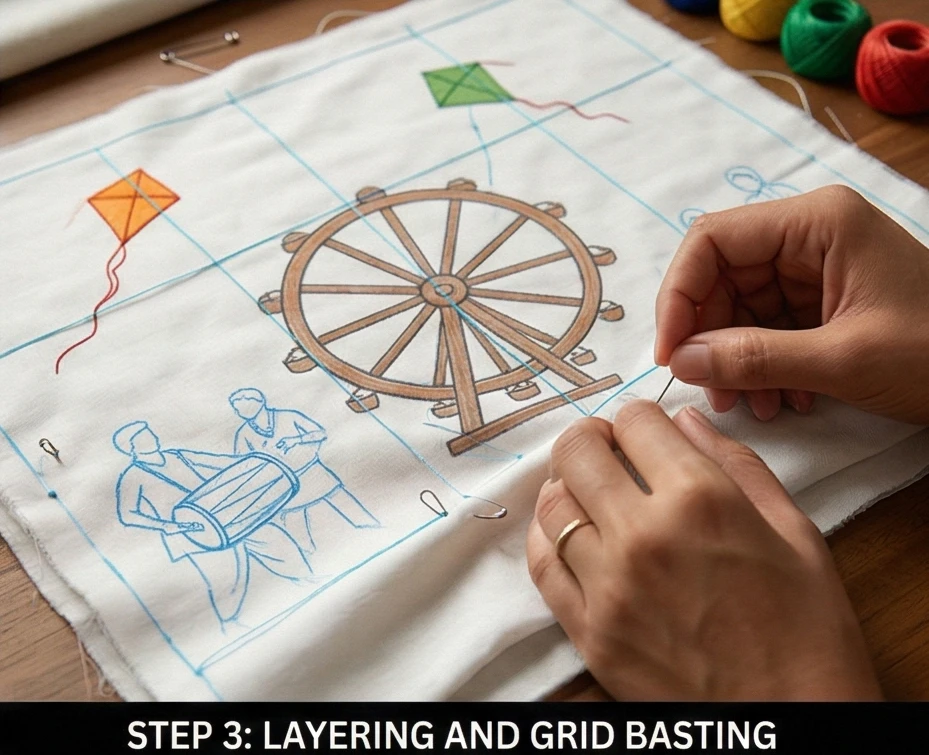
Step 3: Layering and Grid Basting
Securing the 20-inch square for intensive stitching.
The Stack: Lay the backing muslin flat, place the flannel core on top, and finish with the marked top layer. Smooth out all wrinkles.
Grid Basting: Thread a needle with contrasting thread and baste a heavy 4-inch grid across the entire 20×20-inch square. This locks the three layers together, preventing the fabric from distorting as you manipulate it in your hands.
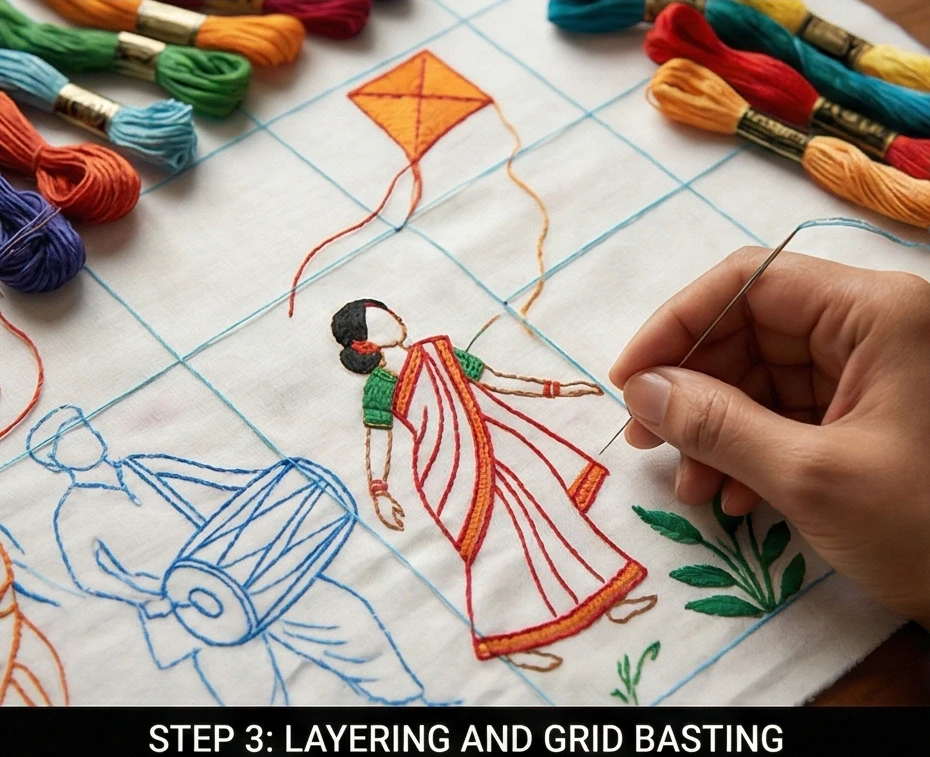
Step 4: Outlining the Celebration
Bringing the festival to life with vibrant threads.
The Running Stitch: Thread your Kantha needle with the colored Pearl Cotton. Using a simple, continuous running stitch, outline all the drawn figures, the Ferris wheel, and the border. Pierce completely through all three layers with every stitch.
Color Placement: Use Vermilion and Saffron for the garments and flags, Indigo for the structural lines of the wheel and drums, and Emerald Green for the foliage.
Internal Textures: Instead of leaving the figures completely empty, use widely spaced running stitches inside the garments to represent the saris’ folds and the texture of the wood.
Step 5: The “Lahar” (Wave) Background Quilting
Creating the signature Kantha ripple effect.
The White-on-White Thread: Switch to your standard White cotton thread. This step transforms the flat drawing into a deeply textured, tactile pillow front.
Echoing the Joy: Starting closely around the edges of your embroidered figures, sew continuous, closely spaced parallel lines of standard running stitches. Echo the shapes of the dancers and the wheel, filling the entire “sky” and “ground” of the negative space.
The Density: Space these rows exactly 1/4-inch apart. This incredibly dense background stitching binds the three layers tightly together, forcing the colorful, unstitched festival figures to puff up beautifully in bas-relief.
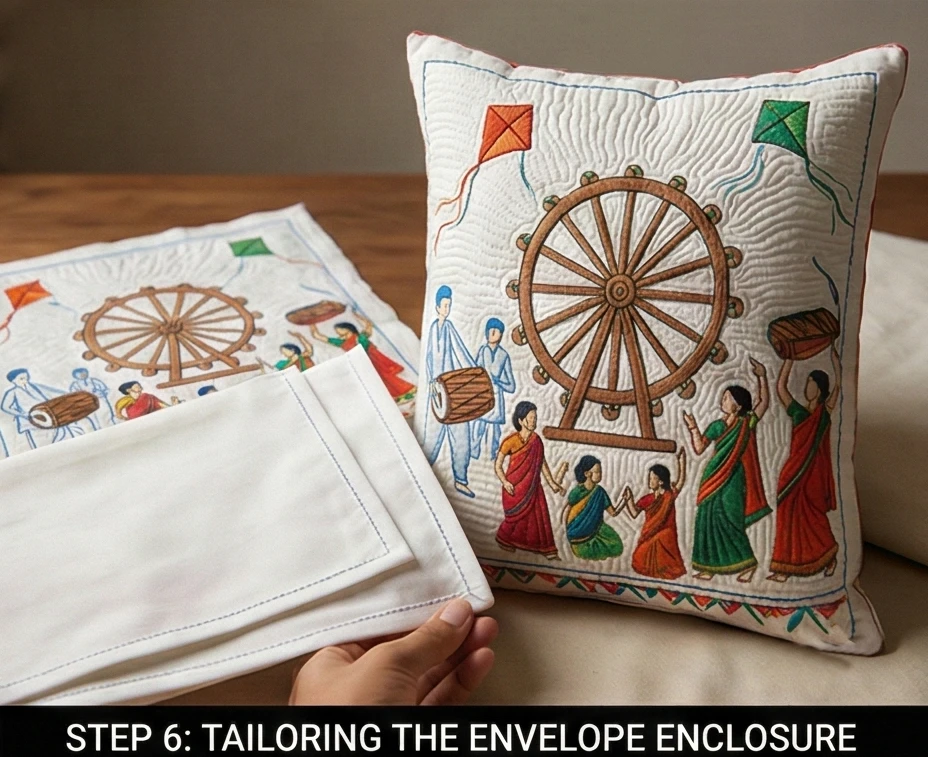
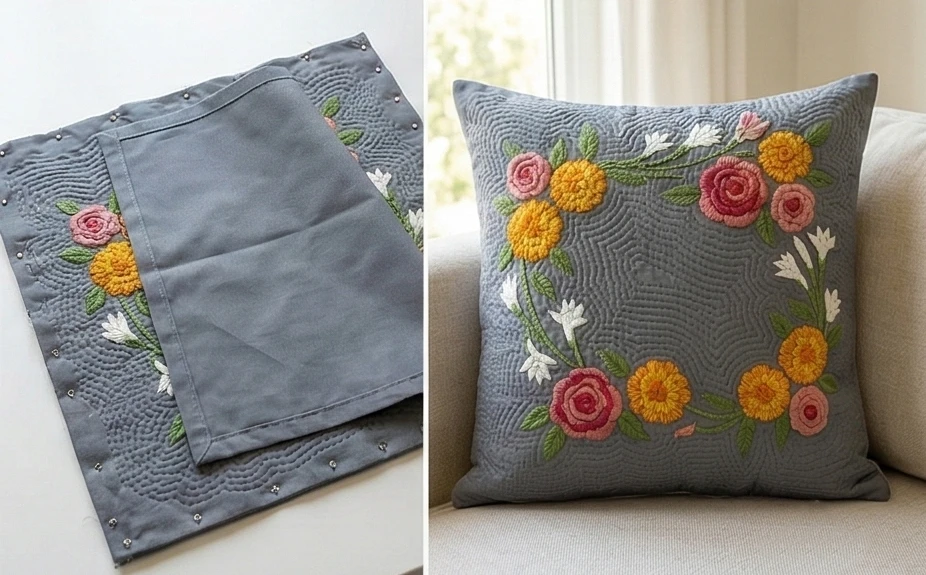
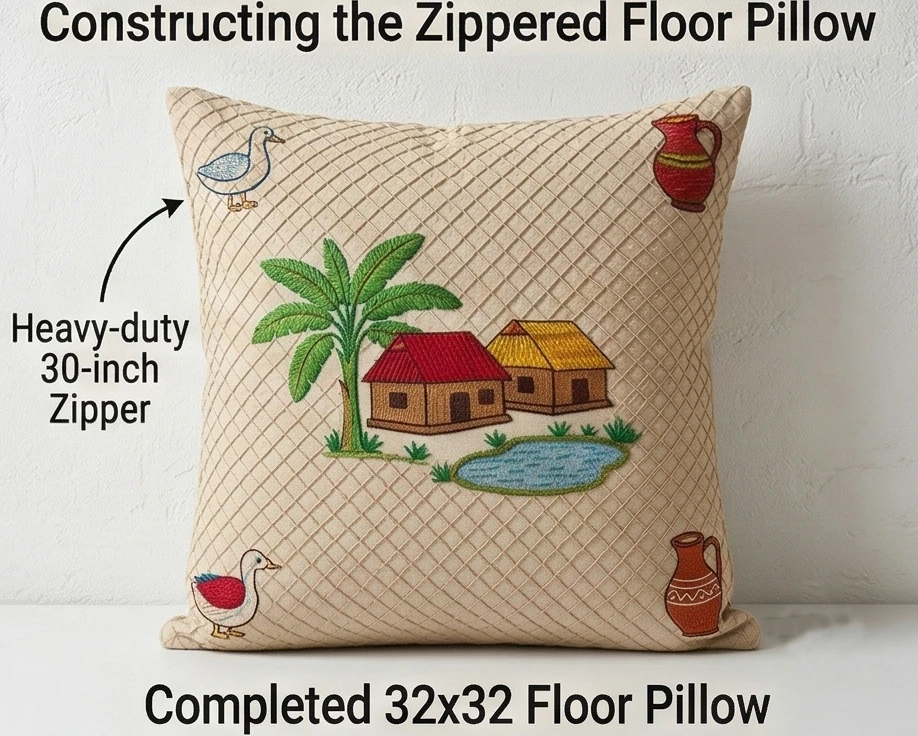
Step 6: Tailoring the Envelope Enclosure
Transforming the quilted art into a functional cover.
Square the Front: Once the entire 20×20 panel is heavily quilted, trim the edges perfectly straight so the panel measures exactly 18.5″ x 18.5″.
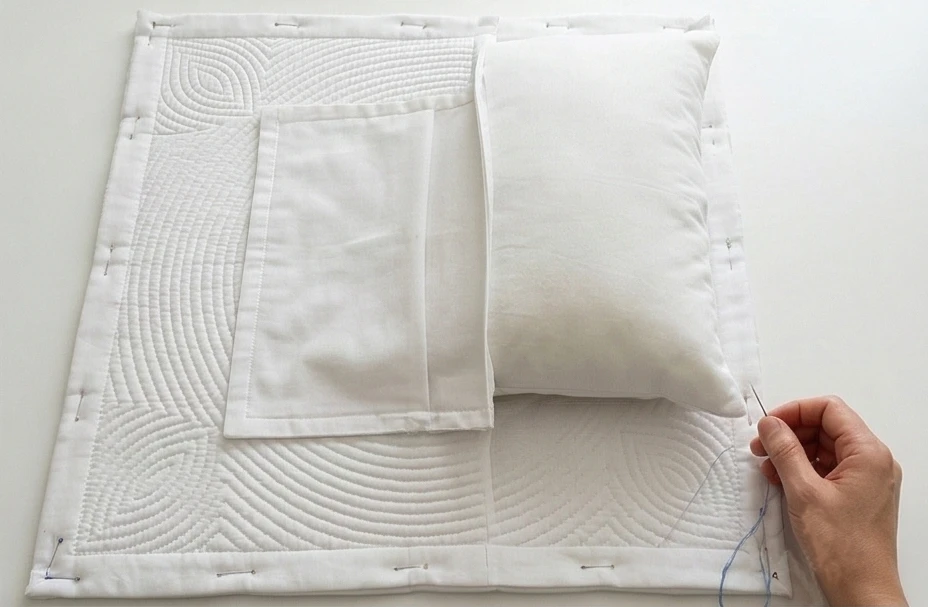
Prepare the Envelope Back: Cut two rectangles of White Muslin measuring 18.5″ wide by 13″ tall. On one long edge of each rectangle, fold the fabric over by 1/2 inch twice, press, and topstitch to create a clean hem.
The Final Assembly: Lay your heavily quilted festival front panel right-side up. Place the two backing rectangles face down on top of it, ensuring the hemmed edges overlap in the center by several inches to create the envelope opening. Pin the outer perimeter heavily.
Sew and Turn: Sew around the entire 18.5″ x 18.5″ perimeter with a 1/4-inch seam allowance. Clip the four corners to reduce bulk, turn the cover right-side out through the envelope opening, and press the edges crisply. Insert your 20×20 pillow form for a beautifully plump, perfectly tailored finish.
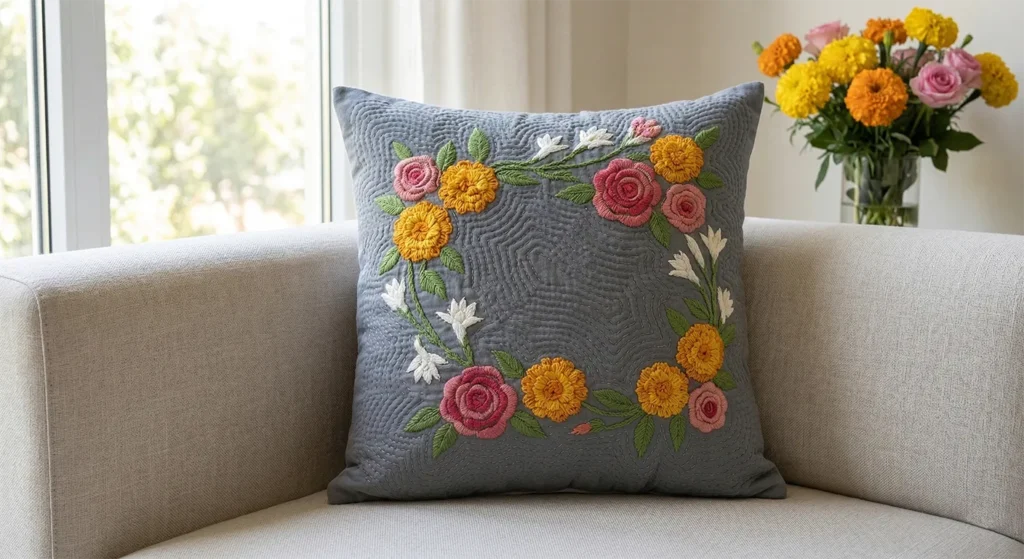
Usability Note:A Nakshi Kantha pillow cover thrives on use. The dense background stitching ensures the internal flannel core will never shift. When it needs cleaning, machine wash the cover on a cold, delicate cycle and tumble dry on low. The washing process actually enhances the crinkled texture, making the pillow softer to the touch over time.
8. Vintage Heritage Lik or Anarasi Stitch Bedspreads Inspired by Agricultural Life
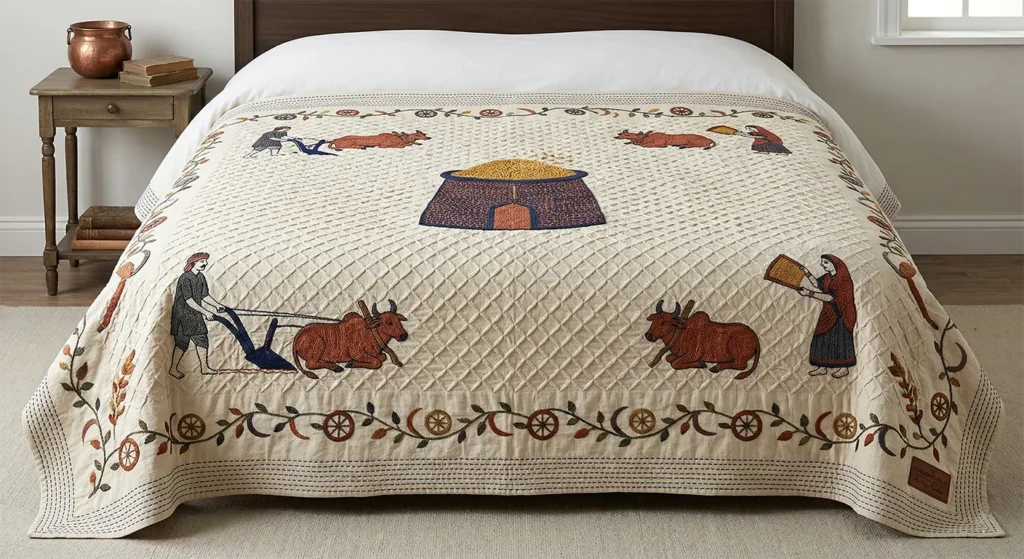
“The Furrowed Field” Heritage Anarasi Bedspread
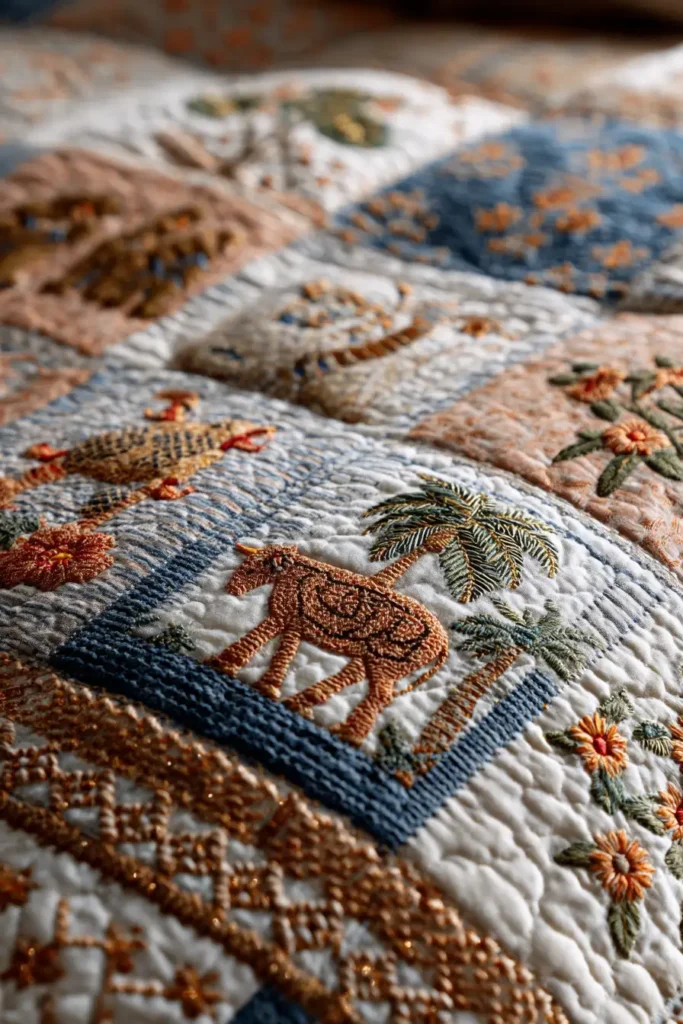
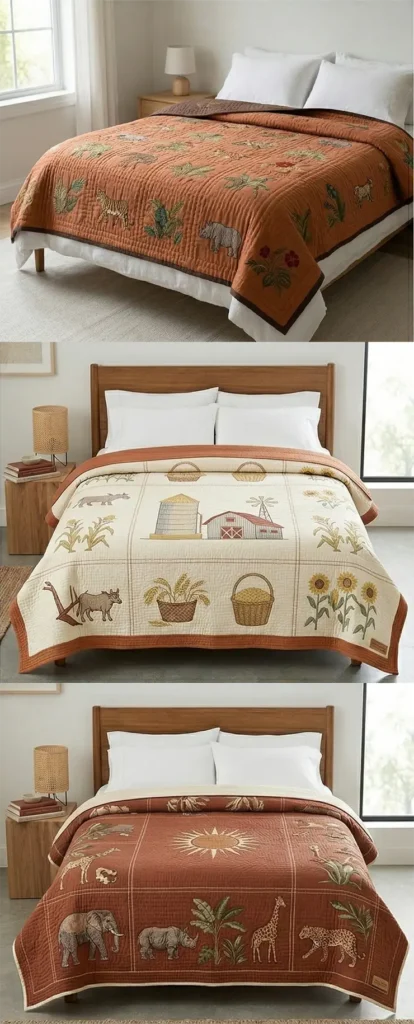
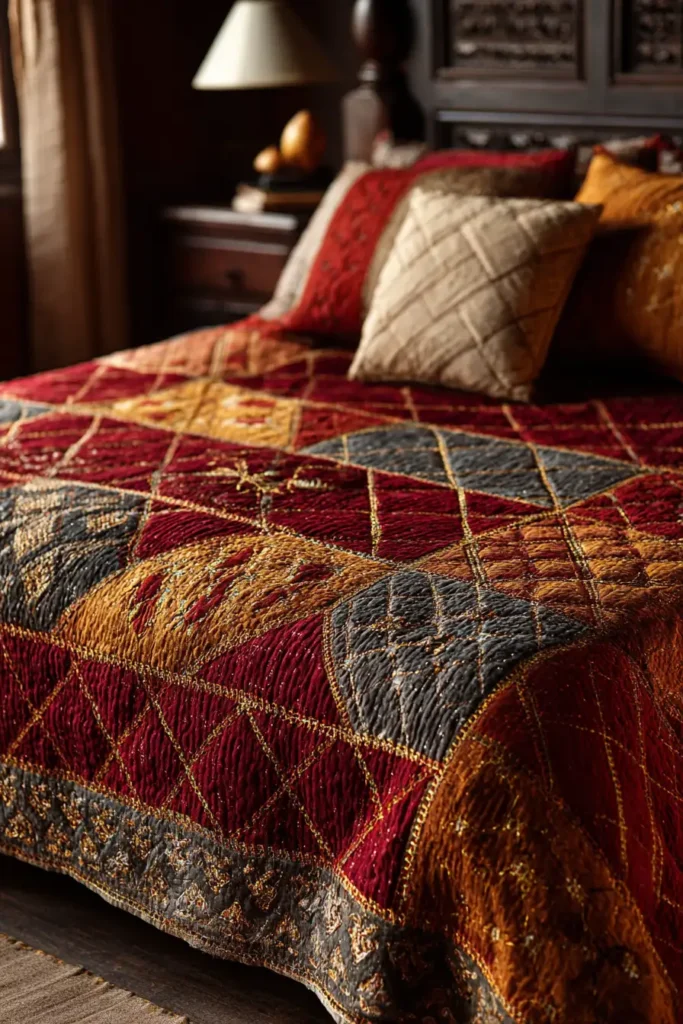
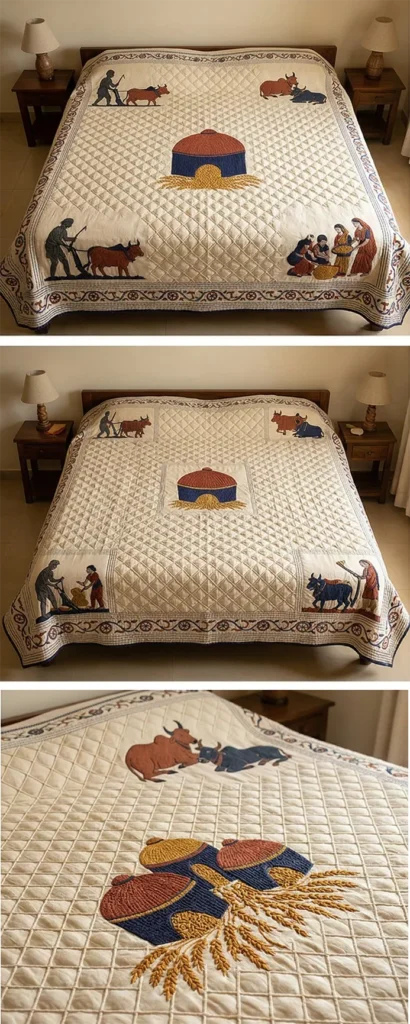
The Anarasi (pineapple) or Lik stitch is one of the most structurally fascinating techniques in the Bengali Kantha repertoire. By crossing diagonal running stitches over one another, artisans create a dense, faceted grid that acts as both exquisite decoration and profound insulation. “The Furrowed Field” bedspread marries this highly architectural, geometric background stitch with the rustic, vintage motifs of rural agricultural life.
Executed on a canvas of Unbleached Vintage Muslin with threadwork in deeply grounded, earthy tones of Terracotta, Deep Indigo, Goldenrod, and Charcoal, this masterpiece transforms a bedspread into a tactile homage to the harvest. The intersecting Anarasi grid mimics the look of freshly plowed earth, providing a comforting, weighted drape that is perfectly suited for an elegant, heritage-inspired bedroom.
Finished Dimensions: Grand Queen/King Heritage Bedspread, 90″ x 100″ (Providing a substantial, luxurious drape over the edges of a modern mattress).
Materials Needed:
The “Canvas” (Outer Layers): 6 yards of 90-inch wide, high-quality Unbleached Muslin or fine, vintage-washed Cotton Percale.
The “Core” (Inner Layer): 3 yards of 90-inch wide, ultra-thin White Cotton Flannel or a repurposed, well-worn flat sheet.
Why: The intersecting Anarasi stitch creates a very dense, heavy fabric. Using a thick modern batting would result in a stiff, rug-like textile. A thin, breathable cotton flannel core provides just enough volume for the “pineapple” scales to puff up without sacrificing the bedspread’s fluid, comforting drape.
The “Harvest” (Thread): High-quality Size 8 Pearl Cotton thread in Terracotta (for clay pots and figures), Deep Indigo (for plows and wheels), and Goldenrod (for rice stalks/paddy). You will need dozens of spools of standard Cream or Unbleached cotton thread for the massive Anarasi background grid.
Notions: A water-soluble fabric marking pen, a long Sashiko or Kantha needle, and hundreds of curved safety pins.
Cultural Backstory:The ‘Lik’ or ‘Anarasi’ stitch was historically favored in the cooler districts of the Bengal delta, such as Jessore and Faridpur. Women realized that by stitching a tight, intersecting grid, they could trap tiny pockets of air within the layers of old saris, making the quilt significantly warmer and more durable. When pairing this geometric grid with agricultural motifs—such as the ‘dhaner sheesh’ (sheaf of paddy), the wooden plow, and the bullock—the background grid naturally took on the visual poetry of a plowed field waiting for seed. Creating this bedspread is a profound meditation on the cycles of nature and human resilience.
Step 1: Preparing the Monumental Canvas
Establishing the soft, pre-shrunk foundation.
Cut the Expanse: From your 90-inch wide Unbleached Muslin, cut two massive panels measuring exactly 92″ x 102″ (one for the top, one for the backing).
Cut the Core: Cut your inner Flannel layer to the identical 92″ x 102″ dimension.
The Crucial Pre-Wash: You must wash and tumble dry all three layers before drawing or stitching. The Anarasi stitch pulls the fabric aggressively in multiple directions; pre-shrinking the cotton ensures your intricate grid won’t warp disastrously after its first laundering.
Step 2: Drafting the Agrarian Naksha
Designing the vintage narrative.
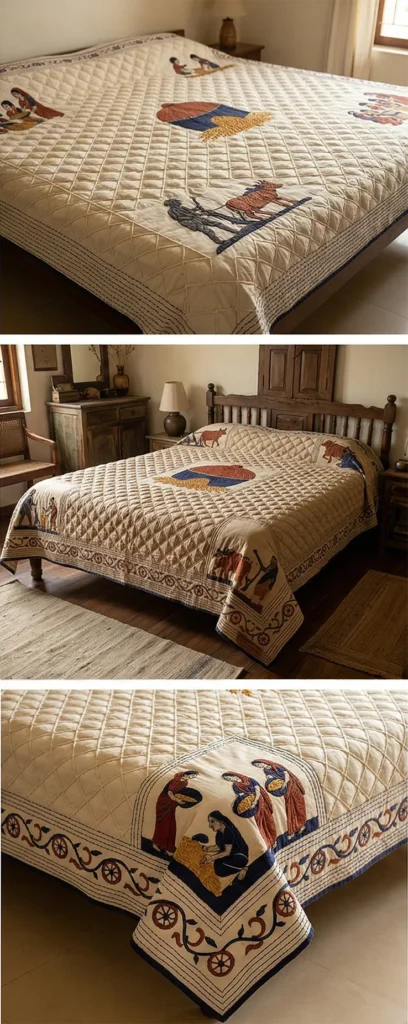
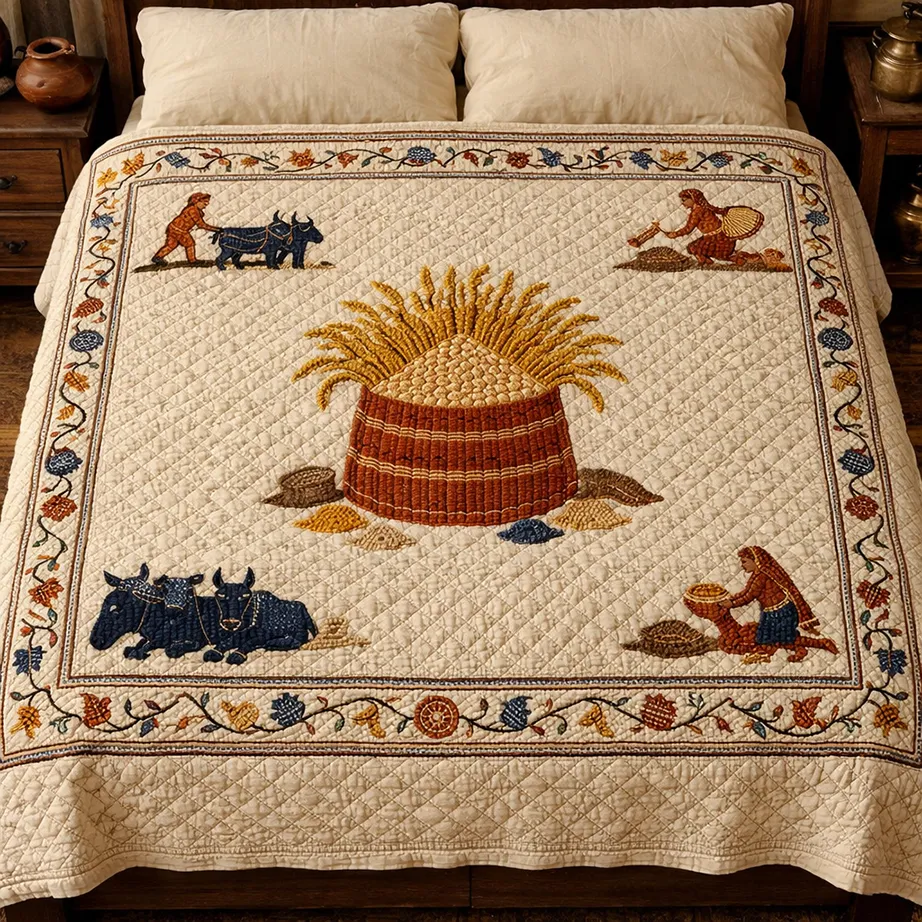
The Central Harvest: Lay the top muslin layer completely flat. At the exact center, draw a large, stylized Dhaner Gola (woven-grain silo) overflowing with stylized rice stalks (paddy), spanning roughly 24 inches across.
The Field Corners: In the four corners, sketch rustic scenes: a farmer guiding a wooden plow, a pair of resting bullocks, or women using a kula (winnowing fan). Keep the silhouettes bold and stylized.
The Boundary Border: Draw a 5-inch wide border around the entire perimeter, filling it with a continuous, creeping vine intermixed with small sickle or wheel motifs. Leave all the negative space completely blank for the upcoming grid.
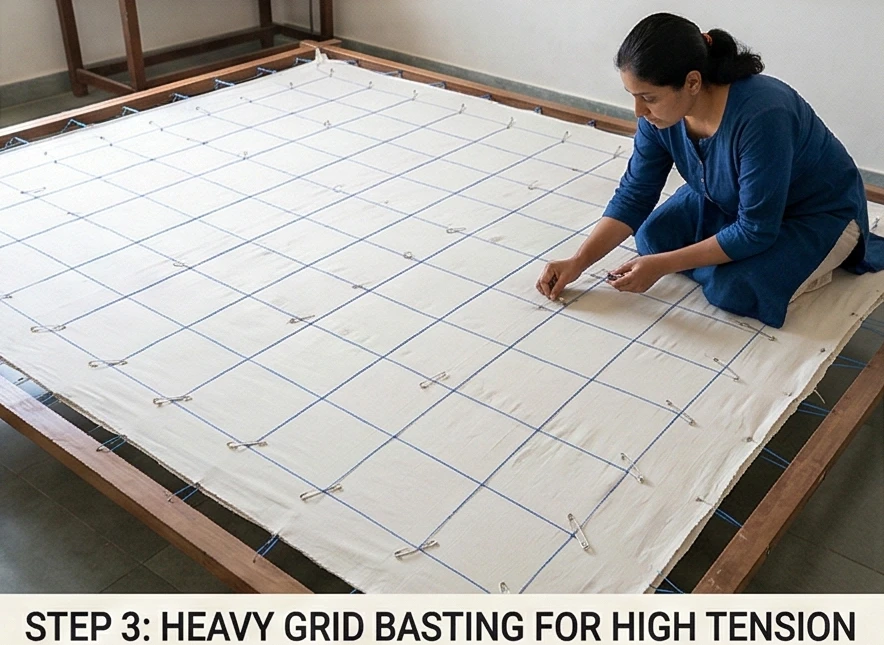
Step 3: Heavy Grid Basting for High Tension
Securing the long layers for architectural needlework.
The Stack: Lay the backing flat on a large surface, followed by the flannel core, and finally the marked top layer. Smooth out every wrinkle from the center outward.
Grid Basting: Because the cross-hatching of the Anarasi stitch creates high tension, standard pinning is insufficient. Thread a needle with contrasting, easily removable thread and stitch a highly secure 6-inch grid across the entire 90×100-inch surface.
Step 4: Embroidering the Heritage Motifs
Securing the organic shapes before building the grid.
The Outline and Fill: Thread your needle with the colored Pearl Cotton (Terracotta, Indigo, and Goldenrod). Stitch the outlines of every single drawn agricultural figure, grain stalk, and border motif using a small, precise running stitch.
Color Saturation: Fill the figures’ internal shapes and the grain with closely spaced running stitches in the corresponding colors. Leave the negative space surrounding these figures entirely untouched.
Step 5: Executing the Anarasi (Pineapple) Grid
Building the geometric, plowed-earth background.
The First Furrows (Diagonal Lines): Switch to your standard Cream/Unbleached cotton thread. Starting in the negative space near the central motif, stitch a continuous, perfectly straight diagonal line of running stitches.
The Parallel Rows: Stitch parallel diagonal lines, spacing them exactly 1/4-inch apart, covering the entire negative space of the bedspread. Stop and bury your thread whenever you intersect with an embroidered agricultural motif, then resume on the other side.
The Cross-Hatch: Once the entire background is covered in one diagonal direction, stitch a second set of diagonal lines perpendicular to the first set.
The Magic: As these lines cross over the first set, they pull the fabric into tiny, raised diamond facets. The unbleached muslin puffs up remarkably, creating a 3D texture that looks exactly like the geometric scales of a pineapple or the rhythmic furrows of a freshly tilled field.
Step 6: The Traditional Enclosed Edge Finish
Framing the heavy, textured textile.
Trim and Fold: Once the exhausting but breathtaking background grid reaches the borders, trim the raw edges perfectly straight to the final 90″ x 100″ dimension. Fold the raw edges of the top and bottom muslin inward by 1/2 inch to enclose the flannel core, and pin heavily.
The Boundary Stitch: Thread your needle with Deep Indigo Pearl Cotton. Sew five to seven densely packed, straight, parallel rows of running stitches around the entire perimeter. This frames the agricultural border and firmly contains the immense tension of the geometric grid.
Usability Note:The dense, intersecting nature of the Anarasi stitch creates a phenomenally durable bedspread that functions much like a modern weighted blanket, providing deep pressure comfort while remaining highly breathable. Machine wash this heirloom on a cold, delicate cycle. Tumble drying on low heat will dramatically enhance the “pineapple” texture, making the grid incredibly pronounced, soft, and inviting to the touch.
9. Heavyweight Sujni Kantha Quilts Featuring Bengal Forest and River Motifs
“The Delta Riverbank” Heavyweight Sujni Kantha Quilt
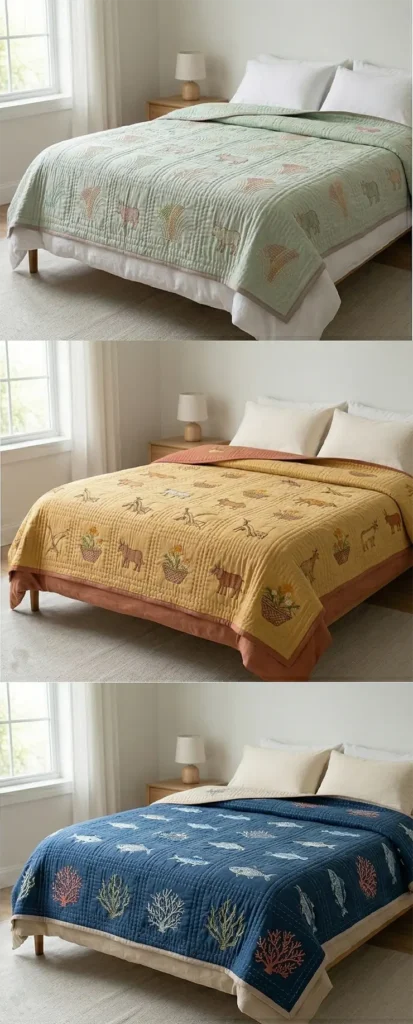
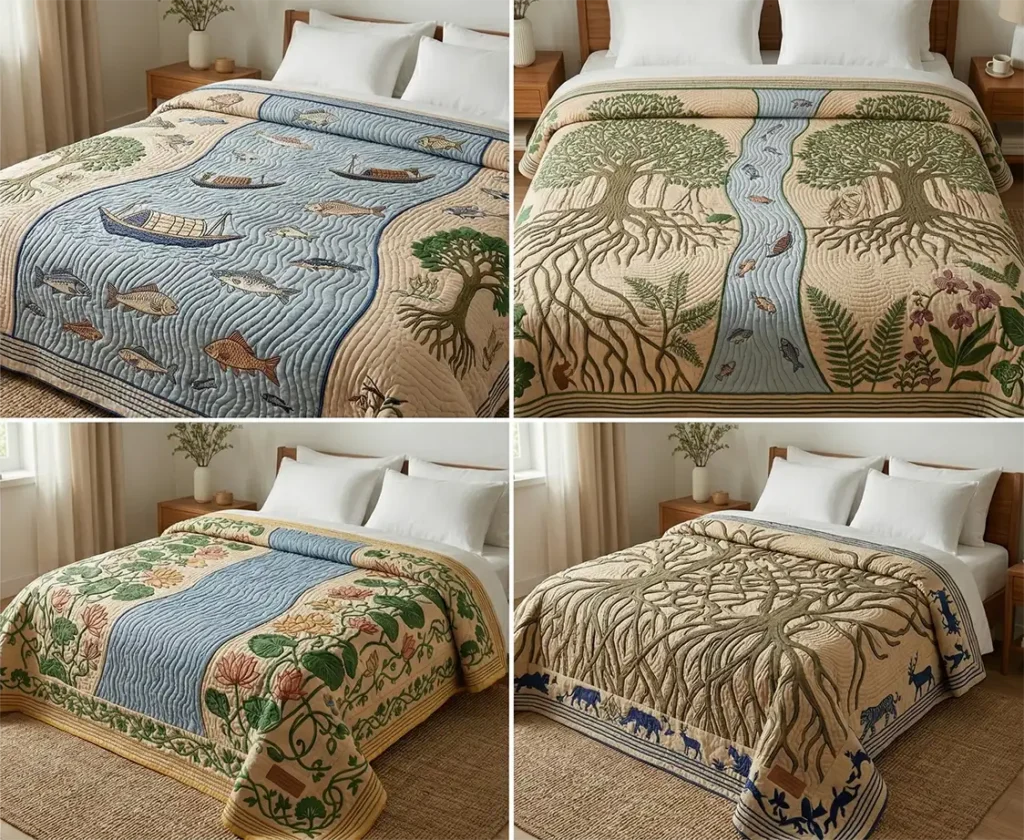
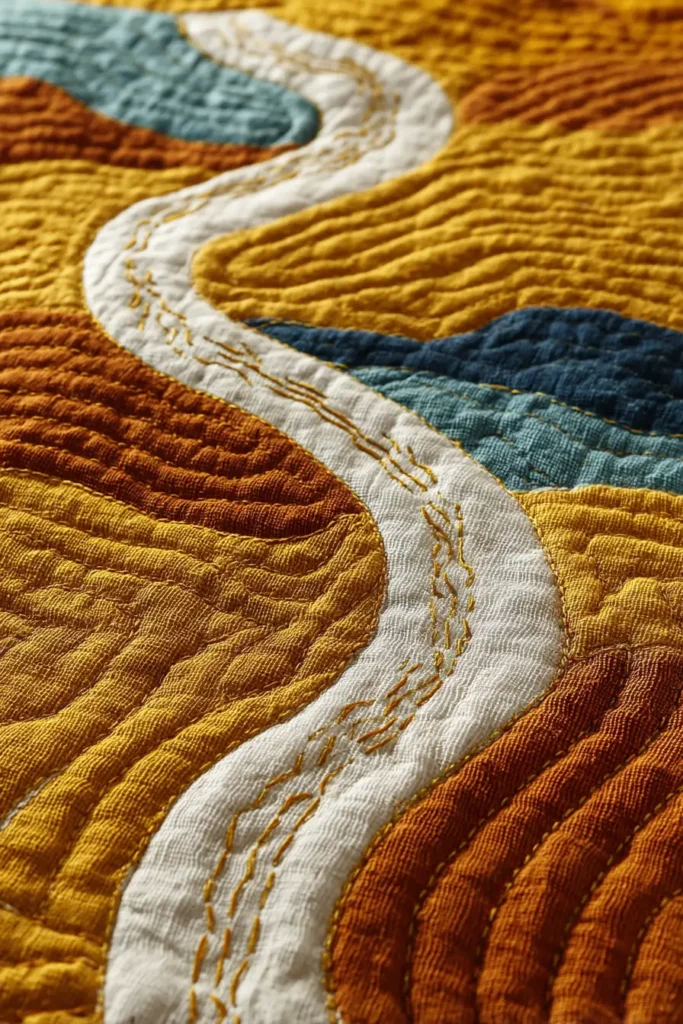
The geography of Bengal is defined by two overwhelming forces: the sprawling, untamed mangrove forests of the Sundarbans and the mighty, intertwining rivers that carve through the delta. “The Delta Riverbank” captures this breathtaking ecological drama in textile form.
Unlike the lightweight summer sheets, this Sujni Kantha is engineered for the cooler winter months, utilizing multiple internal layers to create a deeply comforting, heavy drape. Embroidered with motifs of winding river currents, indigenous fish (matsya), mangrove roots, and the elusive flora of the deep forest, this quilt uses a rich, earthy palette of Deep River Blue, Mangrove Green, Terracotta, and Mustard Yellow on a base of Warm Sand Muslin. It is a profound statement piece that wraps you in the literal and figurative weight of Bengal’s natural heritage.
Finished Dimensions: Heavyweight Queen/King Winter Quilt, 90″ x 100″ (Providing substantial, comforting weight and a luxurious drape).
Materials Needed:
The “Canvas” (Outer Layers): 6 yards of 90-inch wide, high-quality Warm Sand Cotton Voile or fine Muslin.
The “Core” (Inner Layers): 6 yards of 90-inch wide, ultra-soft White Cotton Flannel (cut into two 3-yard pieces).
Why: Traditional winter Kantha achieved its heavyweight by layering six to eight old, softened saris. To recreate this comforting, heavy drape without creating a stiff, board-like modern quilt, we use two layers of pre-washed cotton flannel. This adds significant weight and warmth while maintaining the fluid, rippling flexibility essential to Kantha.
The “Ecosystem” (Thread): High-quality Size 8 Pearl Cotton thread in Deep River Blue, Mangrove Green, Terracotta, and Mustard Yellow. You will also need standard Warm Sand cotton thread for the dense background quilting.
Notions: A water-soluble fabric marking pen, specialized long Kantha or Sashiko needles, a leather thimble (crucial for pushing through four layers of fabric), and hundreds of curved safety pins.
Cultural Backstory:The rivers (Nodi) and forests (Bon) are not just geography in Bengal; they are the source of folklore, livelihood, and spirituality. The Sujni Kantha—the grand ceremonial quilt—was the perfect canvas to map this world. Weavers would stitch the ‘Nodi’ as flowing, undulating waves running down the center of the quilt, flanked by the protective canopy of the forest. Fish motifs were stitched as prayers for a bountiful catch and prosperity. By crafting a heavyweight quilt with these motifs, you are honoring a centuries-old tradition of seeking warmth, protection, and abundance from the natural world.
Step 1: Preparing the Heavyweight Foundation
Establishing the thick, insulating base.
Cut the Expanse: From your Warm Sand Muslin, cut two massive panels measuring exactly 92″ x 102″ (one for the top, one for the backing).
Cut the Double Core: From your Flannel, cut two separate panels, each measuring 92″ x 102″.
The Crucial Pre-Wash: Wash and tumble dry all four massive layers on a warm setting. Because you are working with a heavily layered textile, pre-shrinking is mandatory to prevent extreme, uneven warping during its first wash as a finished quilt.
Step 2: Drafting the River and Forest Naksha
Designing the ecological narrative.
The Mighty River: Lay the top muslin layer completely flat. Down the absolute center of the 92-inch width, draw a wide, winding river channel spanning about 20 inches across. Fill the channel with undulating wave lines and leaping fish (matsya) and traditional wooden boats (nouka).
The Mangrove Banks: On the left and right sides of the river, sketch the dense forest canopy. Draw stylized trees with sprawling, visible roots (mimicking the Sundarbans’ mangroves), intertwining vines, and blooming lotus flowers near the water’s edge.
The Forest Border: Draw a 6-inch wide border around the entire perimeter, filling it with a continuous, creeping forest vine to frame the ecosystem.
Step 3: High-Tension Basting for Four Layers
Securing the heavy quilt for intensive needlework.
The Thick Stack: Lay the backing flat on a large floor space. Place the two flannel layers on top, then the marked top layer. Smooth out every wrinkle, sweeping your hands from the center outward.
Heavy Grid Basting: You are now working with a thick, heavy textile. Pin generously, then thread a needle with contrasting thread and stitch a highly secure 5-inch grid across the entire 90×100-inch surface. This step is critical; if the layers shift now, the heavy quilt will buckle.
Step 4: Embroidering the Flora, Fauna, and Flow
Securing the narrative shapes through the thick layers.
The Rhythmic Outline: Using your thimble, thread your Kantha needle with the colored Pearl Cotton. Use Deep River Blue for the water lines and boats, Mangrove Green for the trees and vines, and Terracotta/Mustard for the fish and flowers.
The Heavy Stitch: Pierce completely through all four layers with a simple, continuous running stitch. Because the quilt is thick, your stitches will naturally be slightly longer and more robust than on a summer throw—embrace this structural, rustic look.
Color Filling: Fill the internal shapes of the fish, leaves, and boats with closely spaced, parallel rows of colored running stitches.
Step 5: The Dual-Texture Background Quilting
Creating the signature Kantha drape and highlighting the currents.
The River Waves: Thread your needle with Deep River Blue. Inside the drawn river channel, stitch dense, parallel, undulating lines following the curve of the water. Space these rows exactly 1/4-inch apart. This Lohori (wave) technique will make the river visually dynamic and highly textured.
The Forest Air: Switch to your standard Warm Sand cotton thread. For the negative space surrounding the trees and vines, stitch closely spaced, concentric lines echoing the shapes of the flora.
The Transformation: This incredibly dense background stitching binds the four thick layers together, forcing the heavy fabric to puff up in bas-relief. The quilt will physically shrink slightly as the thousands of stitches draw the fabric in, creating a luxurious, weighted drape.
Step 6: The Enclosed Tailored Edge
Sealing the heavy layers with traditional elegance.
Trim and Fold: Trim the raw edges perfectly straight to the final 90″ x 100″ dimension. Fold the raw edges of the top and bottom muslin inward by 1/2 inch to seamlessly enclose the double flannel core. Pin heavily.
The Boundary Stitch: Thread your needle with Terracotta or Deep River Blue Pearl Cotton. Sew five to seven densely packed, straight, parallel rows of running stitches around the entire perimeter. This creates a sharp, tailored frame that is strong enough to contain the heavy, four-layer quilt.
Usability Note:This heavyweight Sujni Kantha acts much like a modern weighted blanket, providing deep pressure therapy and immense warmth while remaining highly breathable due to its 100% cotton construction. Machine wash this heirloom on a cold, heavy-duty cycle. Tumble drying on low heat will dramatically enhance the quilt’s crinkled texture, making it remarkably soft and supple despite its weight.
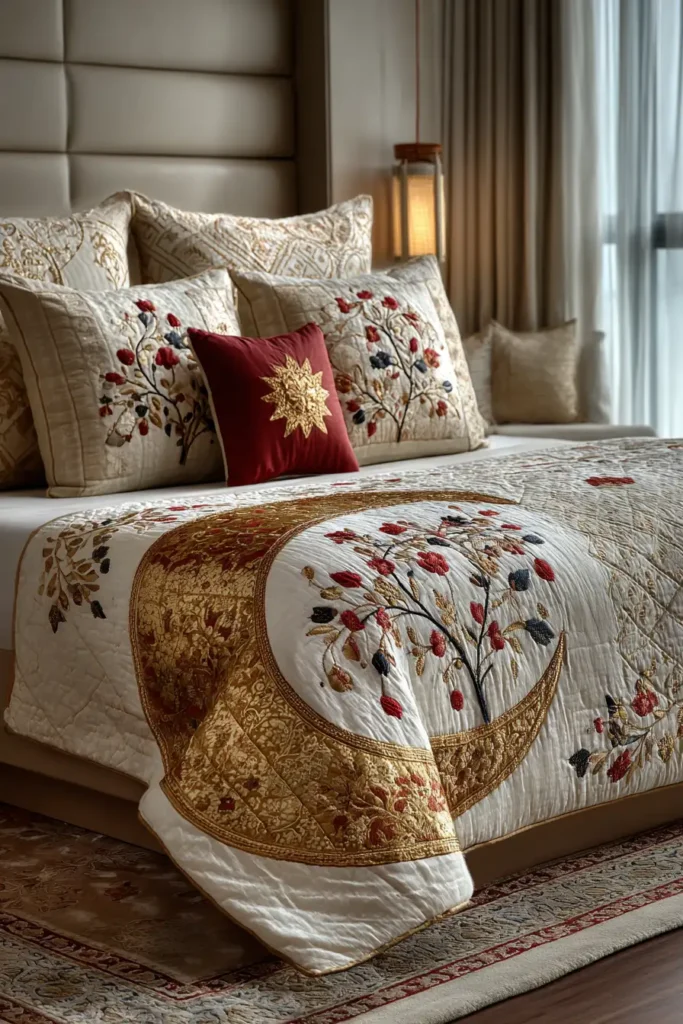
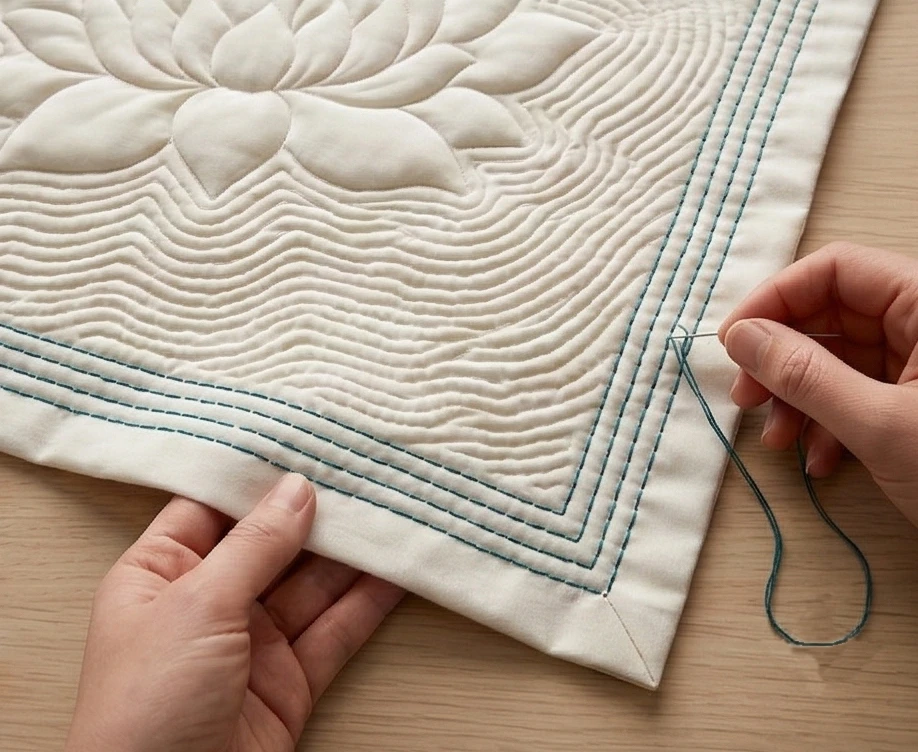
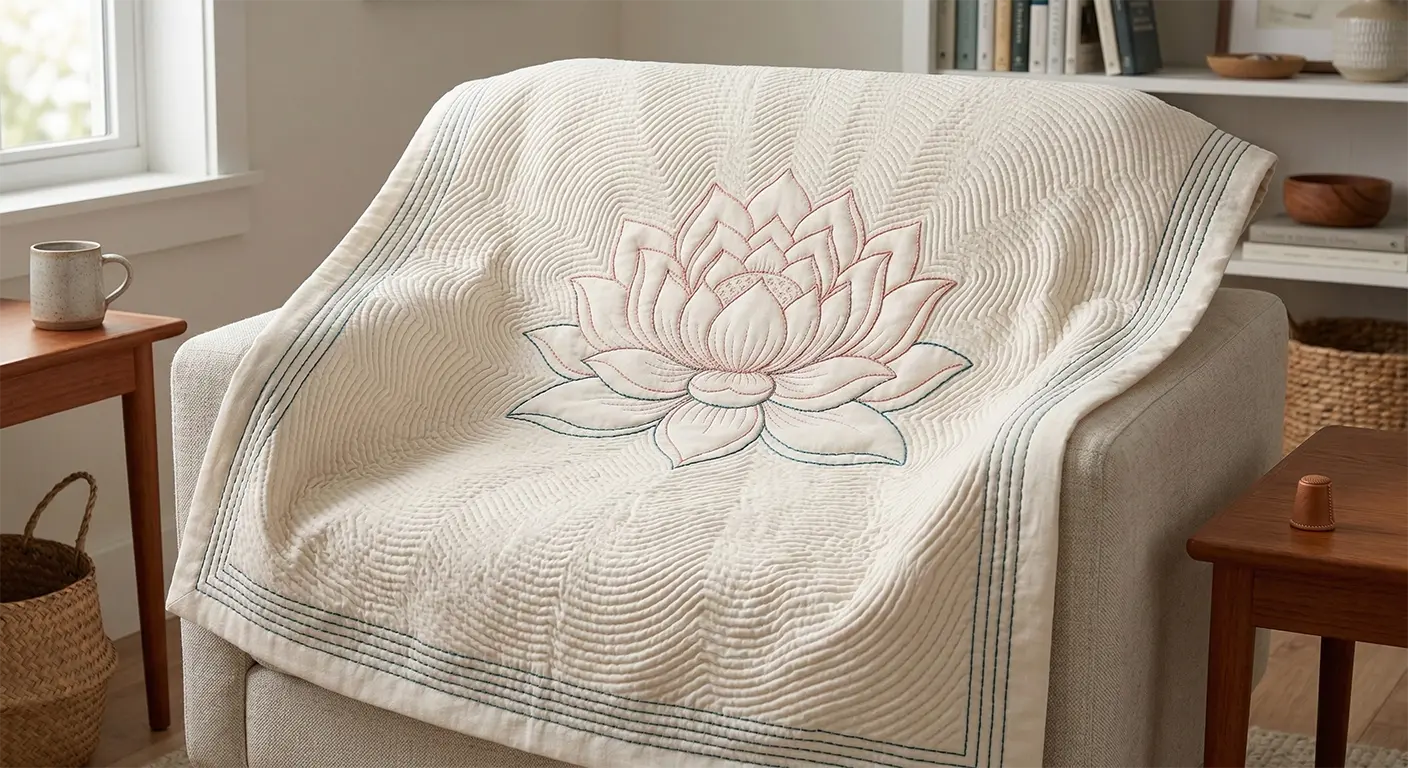
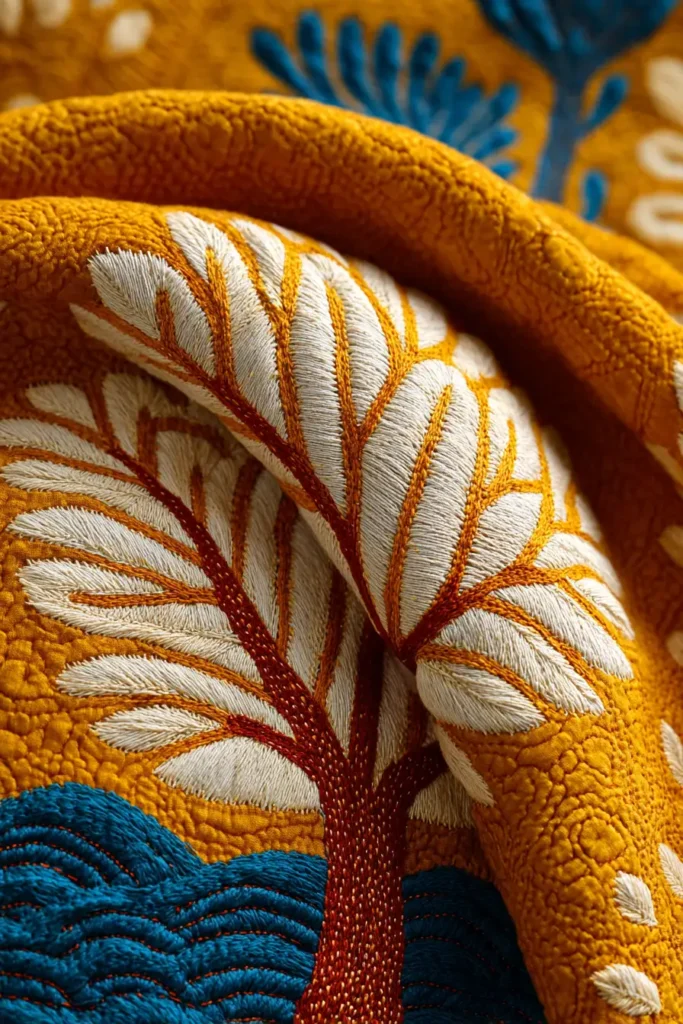
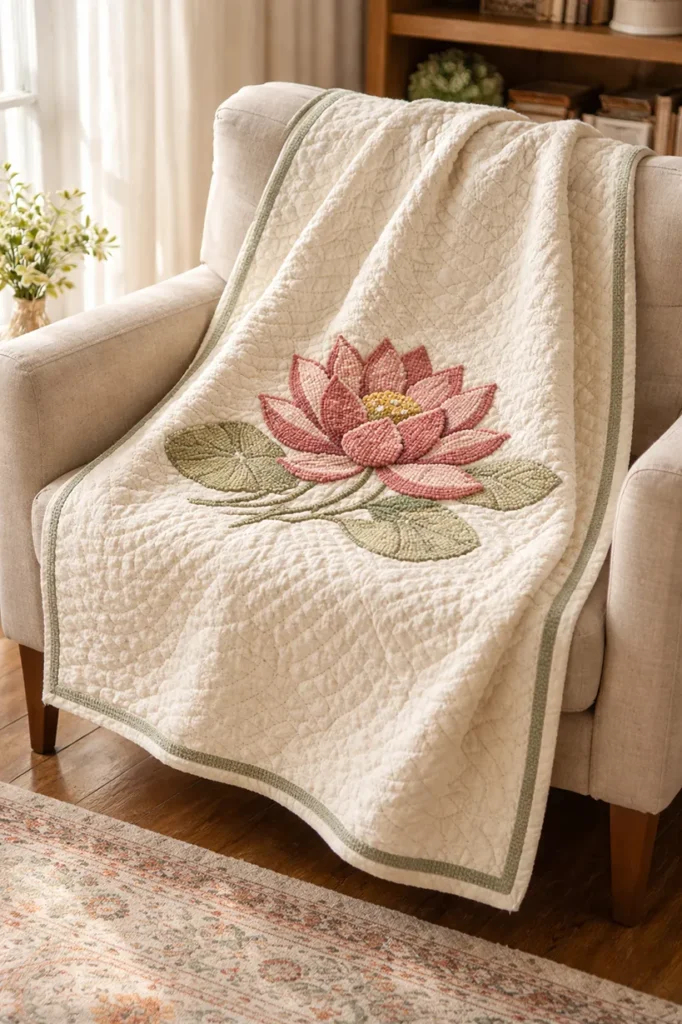
“The Rippling Padma” Lotus Motif & Lohori Wave Throw Blanket
The true mastery of Bengali textile art is revealed when two distinct techniques are brought into perfect harmony. While the Nakshi element focuses on narrative and botanical motifs, the Lohori (wave) technique is entirely textural, creating a heavy, corrugated surface through closely packed, rhythmic stitching. “The Rippling Padma” throw blanket marries these two philosophies. Featuring a striking, unstitched Soft Coral and Deep TealPadma (lotus) medallion floating in the center, the entire background is consumed by dense, undulating Lohori waves stitched in Warm Ivory. This creates a breathtaking bas-relief effect where the smooth lotus appears to literally float on a textured, rippling pond. The resulting throw offers immense breathability and sophisticated tactile elegance for your living space.
Finished Dimensions: Standard Sofa Throw or Lap Blanket, 50″ x 60″ (Perfect for elegant draping over a reading chair or wrapping up on a cool evening).
Materials Needed:
The “Canvas” (Outer Layers): 3.5 yards of 44-inch wide, ultra-soft Warm Ivory Cotton Voile or fine Muslin.
The “Core” (Inner Layer): 1.75 yards of 60-inch wide, lightweight White Cotton Flannel.
Why: The dense Lohori wave stitching naturally condenses and thickens the fabric. Using a lightweight flannel core ensures the blanket achieves a comforting, weighted drape without becoming stiff or bulky.
The “Pond” (Thread): High-quality Size 8 Pearl Cotton thread in Soft Coral and Deep Teal for the lotus. You will need multiple spools of standard Warm Ivory cotton thread for the extensive Lohori background waves.
Notions: A water-soluble fabric marking pen, long Kantha or Sashiko embroidery needles, a small embroidery hoop, and curved safety pins.
Cultural Backstory:In the iconography of the Bengal delta, the ‘Padma’ (hundred-petaled lotus) is the ultimate symbol of purity, cosmic harmony, and the seat of the divine, blooming flawlessly above muddy waters. The ‘Lohori’ stitch, originating in the Rajshahi district, mimics the endless, rhythmic waves of the region’s massive river systems. Combining them in a single Kantha represents the profound connection between the spiritual world and the physical, water-bound geography of Bengal. Women would stitch these specific quilts to offer both physical warmth and spiritual tranquility to their families.
Step 1: Preparing the Fluid Foundation
Sizing and softening the layers.
Cut the Expanse: From your Warm Ivory Voile, cut two panels measuring exactly 52″ x 62″ (one for the top, one for the backing).
Cut the Core: Cut your inner Flannel layer to the exact same dimensions: 52″ x 62″.
The Crucial Pre-Wash: You must wash and tumble dry all three layers before drawing or stitching. The Lohori wave stitch significantly shrinks fabric; pre-washing ensures the quilt maintains its structural integrity after its first laundering.
Step 2: Drafting the Floating Padma (The Naksha)
Designing the central botanical anchor.
The Central Medallion: Lay the top voile layer completely flat. In the exact center, use your water-soluble pen to draw a massive, multi-petaled Padma (Lotus), spanning roughly 18 to 20 inches across.
The Petal Architecture: Draw concentric layers of pointed petals radiating from a central pod. Add a few stylized, sweeping lotus leaves (pads) directly beneath the flower.
Leave the Background Blank: Do not draw any borders or corner motifs. The beauty of this design lies in the dramatic contrast between the central lotus and the vast, undulating waves that surround it.
Step 3: High-Tension Grid Basting
Locking the canvas for heavy textural work.
The Stack: Lay the backing flat on a large surface, followed by the flannel core, and finally the marked top layer. Smooth out every wrinkle from the center outward.
Grid Basting: The continuous Lohori stitching will aggressively pull the fabric. Thread a needle with contrasting, easily removable thread and stitch a highly secure 4-inch grid across the entire 52×62-inch surface to prevent the layers from shifting.
Step 4: Embroidering the Smooth Lotus
Securing the focal point before creating the waves.
The Colored Outline: Thread your needle with the Soft Coral and Deep Teal Pearl Cotton. Stitch the precise outlines of the lotus petals, pod, and leaves using a simple, continuous running stitch that pierces through all three layers.
The Smooth Interior: Fill the petals and leaves with widely spaced, delicate lines of running stitches. You want the lotus to remain relatively smooth and flat, which will contrast sharply with the heavy background texture to come.
Step 5: Executing the Lohori Wave Background
Building the deep, corrugated texture of the pond.
The First Ripple: Switch to your standard Warm Ivory cotton thread. Starting immediately outside the stitched lotus petals, draw a single, undulating wave line echoing the shape of the flower. Stitch along this line.
The Parallel Corrugation: The magic of Lohori is pure density. Stitch parallel wave lines radiating outward toward the edges of the blanket. Space these lines no more than 1/8 to 1/4 inch apart.
The Tension: Pull your stitches with a firm, even tension. As the incredibly dense rows of stitches build up, the fabric between the lines will buckle and pucker, creating a deep, luxurious, ribbed texture that feels like a heavy wave. The sparsely stitched lotus in the center will puff up like a smooth 3D relief against this corrugated background.
Step 6: The Tailored Edge Finish
Framing the rippling water.
Trim and Fold: Once the exhausting but magnificent Lohori waves reach the edges of the fabric, trim the raw edges perfectly straight to the final 50″ x 60″ dimension. Fold the raw edges of the top and bottom ivory voile inward by 1/2 inch to seamlessly enclose the flannel core, and pin heavily.
The Boundary Stitch: Thread your needle with the Deep Teal Pearl Cotton used in the lotus leaves. Sew five densely packed, perfectly straight parallel rows of running stitches around the entire perimeter. This sharp, tailored frame elegantly contains the wild, rippling waves of the interior.
Usability Note:The dense Lohori stitching transforms lightweight cotton into a comforting, weighted throw that provides deep pressure relief while remaining 100% breathable. Machine wash this masterpiece on a cold, delicate cycle. Tumble drying on low heat will dramatically enhance the corrugated puckers, making the “waves” even softer and more pronounced with every wash.
11. Decorative Running Stitch Nakshi Kantha Euro Shams for a Polished Bed Look
“The Royal Kalka” Nakshi Kantha Euro Sham
A masterfully styled bed requires dimension, and Euro shams (large, square pillows placed against the headboard) provide the perfect architectural height to anchor your bedding ensemble. “The Royal Kalka” elevates this modern bedding staple with the ancient, profound artistry of Bengali Nakshi Kantha. Featuring a large, elegant Kalka (paisley) motif in Sapphire Blue and Antique Gold against a crisp White Muslin background, this sham is a functional piece of art. The heavily quilted front panel utilizes the traditional running stitch to create a stiff, highly textured face that stands crisply upright on your bed, while providing a deeply soft, touchable surface.
Finished Dimensions: Large Euro Sham, 26″ x 26″ (Designed to fit a plump 26×26-inch Euro pillow insert perfectly).
Materials Needed:
The “Canvas” (Outer Layers): 1.5 yards of 44-inch wide, high-quality White Cotton Voile or Muslin.
The “Core” (Inner Layer): 1 yard of 44-inch wide, ultra-soft White Cotton Flannel.
Why: Euro shams must stand upright against a headboard. A single layer of cotton flannel inside the quilted front panel provides just enough structural rigidity to keep the pillow from slouching, without losing the signature soft drape of traditional Kantha.
The “Heritage” (Thread): High-quality Size 8 Pearl Cotton thread in Sapphire Blue and Antique Gold. You will also need standard White cotton thread for the dense background quilting.
Notions: A water-soluble fabric marking pen, a long Kantha or Sashiko needle, and curved safety pins.
Cultural Backstory:The ‘Kalka’ (known globally as the paisley) originated in Persia as the ‘Boteh’, representing a stylized floral spray or a cypress tree bent by the wind. As the motif traveled via the Silk Road and Mughal courts into Bengal, it was deeply embraced by Kantha artisans. In local folklore, the Kalka came to represent the beloved mango—a profound symbol of fertility, the sweetness of life, and auspicious beginnings. Placing the Kalka at the head of your bed serves as a beautiful, historic blessing for a restful and prosperous home.
Step 1: Scaling the Quilted Canvas for Shrinkage
Preparing the layers for the heavy front panel.
Cut the Quilted Front: The dense running stitches of Kantha will significantly shrink the fabric. To achieve a 26.5″ x 26.5″ unfinished front panel, cut two squares of White Muslin measuring exactly 28″ x 28″.
Cut the Core: Cut your inner Flannel layer to the exact same dimensions: 28″ x 28″.
Pre-Wash: Wash and tumble dry all three squares on a warm setting. This pre-shrinks the cotton, ensuring your intricate motif does not warp or pucker unevenly during future launderings.
Step 2: Drafting the Royal Kalka (The Naksha)
Designing the elegant, auspicious motif.
The Central Axis: Lay the top muslin square completely flat. Using your water-soluble pen, draw a large, sweeping Kalka right in the center, spanning roughly 16 inches tall.
The Internal Details: The beauty of the Kalka lies in its internal geometry. Draw concentric teardrop shapes within the main outline. Fill the innermost teardrop with a stylized blooming lotus or a dense floral medallion.
The Corner Flourishes: In the four corners of the 28-inch square, draw smaller 4-inch Kalkas that point inward toward the central motif to perfectly frame the pillow.
Step 3: Layering and Grid Basting
Securing the large square for intensive stitching.
The Stack: Lay the backing muslin flat, place the flannel core on top, and finish with the marked top layer. Smooth out all wrinkles with your hands.
Grid Basting: Thread a needle with contrasting, easily removable thread and baste a heavy 4-inch grid across the entire 28×28-inch square. This locks the three layers together, preventing the fabric from distorting as you manipulate it.
Step 4: Embroidering the Royal Motif
Bringing the symbol of fertility to life with vibrant threads.
The Rhythmic Outline: Thread your Kantha needle with the Sapphire Blue Pearl Cotton. Using a simple, continuous running stitch, outline the large central Kalka, the internal teardrops, and the corner motifs. Pierce completely through all three layers with every stitch.
The Golden Fill: Switch to the Antique Gold thread to fill the internal lotus medallion and the smaller corner flourishes.
Textural Contrast: Leave the negative space inside the main Kalka relatively unstitched, allowing the smooth white muslin to stand out against the heavily colored outlines.
Step 5: The “Lahar” (Wave) Background Quilting
Creating the signature Kantha ripple and structural stiffness.
The White-on-White Thread: Switch to your standard White cotton thread.
Echoing the Kalka: Starting closely around the edges of your embroidered motifs, sew continuous, closely spaced parallel lines of standard running stitches. Echo the sweeping curve of the Kalka, rippling outward to fill the entire square.
The Density: Space these rows exactly 1/4-inch apart. This incredibly dense background stitching binds the three layers tightly together, stiffening the panel so it stands upright, while forcing the unstitched colored motifs to puff up beautifully in bas-relief.
Step 6: Constructing the Euro Envelope Sham
Transforming the quilted art into a polished bedding accessory.
Square the Front: Once the entire 28×28 panel is heavily quilted, trim the edges perfectly straight so the panel measures exactly 26.5″ x 26.5″ (this accounts for a 1/4-inch seam allowance).
Prepare the Envelope Back: From your remaining White Muslin, cut two rectangles measuring 26.5″ wide by 18″ tall. On one long 26.5-inch edge of each rectangle, fold the fabric over by 1/2 inch twice, press, and topstitch to create a clean, finished hem.
The Final Assembly: Lay your heavily quilted Kalka front panel right-side up. Place the two backing rectangles face down on top of it, ensuring the hemmed edges overlap in the center by several inches to create the envelope opening. Pin the outer perimeter heavily.
Sew and Turn: Sew around the entire 26.5″ x 26.5″ perimeter with a 1/4-inch seam allowance. Clip the four corners to reduce bulk, turn the sham right-side out through the envelope opening, and press the edges crisp. Insert your plump 26×26 Euro pillow form.
Usability Note:The dense background quilting creates a wonderfully supportive, sturdy pillow face that won’t slouch on your bed. To clean, remove the insert and machine wash the cover on a cold, delicate cycle. Tumble drying on low heat will enhance the crinkled texture, making the sham softer to the touch while retaining its structural elegance.
12. Stylish Running Stitch Nakshi Kantha Sofa Covers Telling Stories of Everyday Rural Life
Stylish Running Stitch Nakshi Kantha Sofa Covers Telling Stories of Everyday Rural Life
“The Gramin Jibon” (Village Life) Narrative Sofa Cover
A sofa cover must balance immense durability with inviting comfort, acting as both a protective layer for your furniture and a primary canvas for the room’s aesthetic. “The Gramin Jibon” transforms the utilitarian sofa throw into a sprawling, visual diary of Bengal’s agricultural heartland. By utilizing the classic running stitch to sketch vignettes of daily rural life—women carrying water pitchers, farmers tending to cattle, thatched-roof huts, and blooming tube wells—this textile brings profound narrative warmth to a modern living room.
Stitched in grounding tones of Terracotta, Indigo, Ochre, and Faded Olive against a highly durable Natural Sand Linen-Cotton blend, this cover provides a sophisticated, breathable, and deeply tactile barrier that protects your upholstery while telling a timeless story.
Finished Dimensions: Generous Sofa Throw / Seat Protector, 70″ x 90″ (Designed to elegantly drape over the back and seat of a standard three-seater sofa).
Materials Needed:
The “Canvas” (Outer Layers): 2.5 yards of 90-inch wide, heavyweight Natural Sand Linen-Cotton Blend (for durability against friction) and a matching muslin for the backing.
The “Core” (Inner Layer): 2.5 yards of 90-inch wide, pre-washed White Cotton Flannel.
Why: A sofa cover takes a lot of wear. A flannel core provides enough friction to keep the layers from sliding against each other under the weight of people sitting, while remaining entirely breathable and soft.
The “Story” (Thread): High-quality Size 8 Pearl Cotton thread in Terracotta, Indigo, Ochre, and Faded Olive. You will also need standard Sand cotton thread for the dense background quilting.
Notions: A water-soluble fabric marking pen, long Kantha or Sashiko needles, a leather thimble, and hundreds of curved safety pins.
Cultural Backstory:Historically, Nakshi Kantha was the primary medium of expression for women in rural Bengal who did not have access to formal literacy. The ‘Gramin Jibon’ (village life) designs are essentially woven autobiographies. Artisans would stitch their immediate surroundings—domestic animals, the village pond, the courtyard—turning a simple blanket into a vibrant record of their daily joys and labors. Draping this narrative over a modern sofa bridges generations, honoring the unrecognized artistic legacy of rural women and bringing the quiet rhythm of village life into the bustling modern home.
Step 1: Sizing and Pre-Shrinking the Heavyweight Canvas
Preparing a robust foundation for daily seating.
Cut the Expanse: From your 90-inch wide Linen-Cotton blend, cut two massive panels measuring exactly 72″ x 92″ (one for the top face, one for the backing).
Cut the Core: Cut your inner Flannel layer to the exact same dimensions: 72″ x 92″.
The Crucial Pre-Wash: You must wash and tumble dry all three layers on a hot setting. Sofa covers must be laundered frequently; aggressively pre-shrinking these natural fibers guarantees your intricate narrative scenes won’t distort or pucker unevenly after their first wash.
Step 2: Drafting the Gramin Jibon (The Naksha)
Designing the flowing vignettes of daily life.
The Village Layout: Lay the top linen layer completely flat. Instead of a single central medallion, divide the canvas into a flowing, organic grid or winding path.
Sketching the Vignettes: Using your water-soluble pen, draw distinct scenes in different sections of the cloth. Sketch a cluster of thatched-roof huts (Chala) in one corner, a woman carrying a kolshi (water pitcher) near a stylized pond in another, and a farmer with a wooden plow in the center. Keep the figures stylized and silhouetted—the charm is in the folk-art simplicity, not hyper-realism.
The Narrative Border: Draw a 4-inch-wide border around the entire perimeter, filling it with a continuous motif of blooming vines or stylized birds, framing the village scenes like a window.
Step 3: High-Tension Basting for Upholstery Use
Securing the layers to withstand heavy friction.
The Stack: Lay the backing flat on a large floor space, followed by the flannel core, and finally the marked top layer. Smooth out every wrinkle with a sweeping motion from the center to the edges.
Grid Basting: Because people will be sitting and shifting on this textile, it requires ultimate stability. Thread a needle with highly visible, contrasting thread and stitch a very secure 4-inch grid across the entire 72×92-inch surface.
Step 4: Embroidering the Village Tale
Bringing the folk-art silhouettes to life.
The Rhythmic Outline: Thread your Kantha needle with the colored Pearl Cotton. Use Terracotta for the huts and water pitchers, Indigo for the human figures, and Ochre/Olive for the landscape and animals.
The Continuous Stitch: Outline every drawn figure using a simple, continuous running stitch, ensuring you pierce completely through all three layers.
Internal Textures: Rather than solid satin stitching, fill the bodies of the figures, the roofs of the huts, and the bodies of the animals with widely spaced, parallel lines of running stitches. This preserves the rustic Kantha aesthetic and keeps the fabric pliable.
Step 5: The “Lahar” (Wave) Background Quilting
Creating the protective, crinkled armor.
The Unifying Thread: Switch to your standard Sand cotton thread matching the background fabric.
Echoing the Landscape: Starting closely around the edges of your embroidered village scenes, sew continuous, parallel lines of standard running stitches. Echo the shapes of the huts and figures, creating ripples that look like wind moving across a field.
The Density: Space these rows exactly 1/4-inch apart across the entire negative space of the cover. This incredibly dense background stitching acts as structural armor; it binds the heavy linen firmly to the flannel core, preventing the fabric from stretching or warping when someone sits on the sofa.
Step 6: The Enclosed, Tailored Edge Finish
Sealing the heavy layers for frequent handling.
Trim and Fold: Once the background quilting is complete, trim the raw edges to the final 70″ x 90″ dimensions. Fold the raw edges of the top and bottom linen inward by 1/2 inch to seamlessly enclose the flannel core, and pin heavily.
The Upholstery Border Stitch: Thread your needle with Indigo or Terracotta Pearl Cotton. Sew seven to ten densely packed, perfectly straight parallel rows of running stitches around the entire perimeter. This creates a sharp, tailored, and highly reinforced frame that can withstand being tucked into sofa cushions and pulled daily.
Usability Note:This sofa cover is engineered for real life. The dense background stitching and linen-blend canvas make it highly resistant to abrasion. Machine wash on a cold, normal cycle with mild detergent. Tumble drying on low heat will dramatically enhance the crinkled “Lahar” texture, rendering the throw softer and more inviting with every wash while maintaining its structural integrity.
“The Sundarban Trail” Cross-Stitch Kantha Table Runner
A dining table is a place of gathering, nourishment, and storytelling. Anchoring this space with a meticulously crafted table runner not only protects your wood surfaces but also introduces an incredible conversational centerpiece. “The Sundarban Trail” table runner moves away from domestic village scenes to celebrate the untamed, majestic beauty of the Bengal delta’s mangrove forests. Featuring stylized Royal Bengal tigers, spotted deer (chital), and sprawling Golpata (mangrove) fronds, this piece utilizes the dense, plush texture of cross-stitch (bhorat) to bring the wild to life. Embroidered in earthy, sophisticated shades of Deep Emerald, Rust/Terracotta, Ochre, and Charcoal against a heavy Ivory Linen canvas, this runner offers exceptional durability, heat protection, and breathtaking dining room elegance.
Finished Dimensions: Standard Long Dining Runner, 16″ wide x 72″ long (Perfect for a 6-to-8 seater rectangular dining table).
Materials Needed:
The “Canvas” (Outer Layers): 2.5 yards of 44-inch wide, heavyweight Ivory Linen-Cotton Blend.
Why: Table runners endure spills, hot plates, and constant friction. A linen-cotton blend offers an elegant, slightly rustic drape while providing the intense durability required for dining use.
The “Core” (Inner Layer): 2.5 yards of thin, 100% Cotton Batting or Flannel.
Why: To protect your table from warm serving dishes, a thermal barrier is needed. Thin cotton batting provides this protection while allowing the runner to lay perfectly flat.
The “Wilderness” (Thread): High-quality Size 8 Pearl Cotton thread in Deep Emerald, Rust/Terracotta, Ochre, and Charcoal. You will also need standard Ivory cotton thread for the dense background quilting.
Notions: A water-soluble fabric marking pen, an embroidery hoop, a Kantha or Sashiko needle, and curved safety pins.
Cultural Backstory:The Sundarbans, the largest contiguous mangrove forest in the world, holds a mystical place in Bengali folklore. It is a beautiful but dangerous landscape ruled by the Royal Bengal Tiger, often personified in local mythology as ‘Dakshin Ray’. Historically, women living on the edge of the forest would stitch Kantha depicting these wild animals and the protective forest goddess ‘Bonbibi’ as a form of spiritual talisman, praying for the safety of their husbands who ventured into the mangroves to collect honey and fish. Bringing these motifs to the dining table honors this deep reverence for nature’s raw power.
Step 1: Sizing and Shrinking the Dining Canvas
Preparing a perfectly flat foundation.
Cut the Expanse: From your Ivory Linen-Cotton blend, cut two long panels measuring exactly 18″ wide by 74″ long (one for the top face, one for the backing).
Cut the Core: Cut your inner cotton batting layer to the exact same 18″ x 74″ dimension.
The Crucial Pre-Wash: Wash and tumble dry all three layers on a warm setting. Cross-stitching creates high tension; aggressively pre-shrinking these natural fibers guarantees your table runner will lay flawlessly flat and won’t warp when washed after a dinner party spill.
Step 2: Drafting the Sundarban Naksha (The Narrative)
Designing the ecological tapestry.
The Flowing River Center: Lay the top linen layer completely flat. Draw a subtle, meandering river line straight down the middle of the 74-inch length.
The Mangrove Canopy: Along the edges of the river, sketch stylized, overarching mangrove roots and sprawling fronds.
The Wildlife Silhouettes: Nestled within the flora, draw the silhouettes of the forest inhabitants. Place a majestic, striding tiger near the center, and perhaps a delicate spotted deer or a preening peacock near the ends. Keep the designs stylized and folk-art inspired.
The Border: Draw a crisp, 1-inch wide border around the entire perimeter to frame the forest scene.
Step 3: High-Tension Basting for Tabletop Flatness
Securing the layers to ensure glasses don’t tip.
The Stack: Lay the backing flat on a long table, followed by the cotton core, and finally the marked top layer. Smooth out every wrinkle from the center outward.
Grid Basting: A table runner must be completely devoid of hidden lumps. Thread a needle with contrasting thread and stitch a very secure 3-inch grid across the entire 18×74-inch surface.
Step 4: Executing the Cross-Stitch (Bhorat) Wildlife
Building the plush, raised motifs.
Isolate the Motifs: Place your embroidery hoop over one of the drawn animals (e.g., the tiger) to keep the linen taut and flat.
The Cross-Stitch Filling: Thread your needle with the Rust/Terracotta Pearl Cotton. Do not merely outline the tiger; fill the entire body shape with tiny, uniform cross-stitches (X), piercing completely through all three layers. Add Charcoal cross-stitches for the stripes.
The Flora: Use Deep Emerald to fill in the mangrove leaves and Ochre for the riverbanks. This dense filling technique creates a heavy, raised, tapestry-like texture for the forest elements.
Step 5: The “Lahar” (Wave) Background Quilting
Creating the protective, flat armor.
The Unifying Thread: Once all the wildlife and flora are completely filled in, switch to your standard Ivory cotton thread.
Echoing the Wild: Starting closely around the edges of your cross-stitched motifs, sew continuous, parallel lines of standard running stitches. Echo the curves of the river and the animals, creating ripples that look like wind through the trees.
The Density: Space these rows exactly 1/8 to 1/4-inch apart across the entire negative space of the runner. This incredibly dense background stitching acts as structural armor; it flattens the linen tightly against the batting, ensuring that wine glasses and dinner plates will sit perfectly level on the table, while the unstitched cross-stitch motifs pop up beautifully in bas-relief.
Step 6: The Enclosed, Tailored Edge Finish
Sealing the runner for a polished dining aesthetic.
Trim and Fold: Once the background quilting is complete, trim the raw edges perfectly straight to the final 16″ x 72″ dimension. Fold the raw edges of the top and bottom linen inward by 1/2 inch to seamlessly enclose the batting core, and pin heavily.
The Border Stitch: Thread your needle with Charcoal or Deep Emerald Pearl Cotton. Sew five densely packed, perfectly straight parallel rows of running stitches around the entire perimeter. This creates a sharp, tailored frame that finishes the piece beautifully without the bulk of an applied binding.
Usability Note:This runner is designed to be used and loved during meals. The dense background stitching makes it highly resistant to heat and wear. When spills occur, spot treat immediately. For a full clean, machine wash on a cold, gentle cycle with mild detergent. Lay the runner completely flat on a towel to air dry to maintain its crisp, rectangular architecture, then press the back lightly with a warm iron if needed.
14. Artful Sujni Kantha Couch Covers Celebrating the Harvest and Farming Traditions
“The Nobanno Harvest” Sujni Kantha Couch Cover
In agrarian Bengal, the most celebrated time of the year is Nobanno, the festival of the new harvest. It is a season of abundance, community, and gratitude, historically recorded in the intricate threads of ceremonial Sujni Kantha quilts. “The Nobanno Harvest” couch cover transforms this joyous tradition into a highly functional, elegant living room centerpiece. Designed to drape generously over a modern sofa, this cover acts as a heavy, protective textile that is exquisitely comfortable for lounging. Embroidered with motifs of dhaner sheesh (rice stalks), woven grain silos, and traditional wooden plows, this piece utilizes a grounding palette of Goldenrod, Earthy Terracotta, Deep Sage, and Charcoal against a durable base of Unbleached Heavyweight Muslin.
Finished Dimensions: Generous Sofa Throw / Couch Cover, 75″ x 100″ (Providing ample fabric to tuck securely into the cushions and drape elegantly over the back and arms of a standard three-seater).
Materials Needed:
The “Canvas” (Outer Layers): 6 yards of 90-inch wide, heavyweight Unbleached Muslin or a highly durable Linen-Cotton blend.
The “Core” (Inner Layer): 3 yards of 90-inch wide, ultra-soft White Cotton Flannel.
Why: Couch covers endure constant friction, pulling, and weight. A traditional Sujni Kantha used layers of old cloth; replacing this with a sturdy flannel core gives the cover the necessary internal grip and structural integrity to lay flat and resist stretching when sat upon, while retaining a breathable, soft drape.
The “Harvest” (Thread): High-quality Size 8 Pearl Cotton thread in Goldenrod, Earthy Terracotta, Deep Sage, and Charcoal. You will also need large spools of standard Unbleached/Cream cotton thread for the dense background quilting.
Notions: A water-soluble fabric marking pen, specialized long Kantha or Sashiko needles, a leather thimble for pushing through thick layers, and hundreds of curved safety pins.
Cultural Backstory:Sujni Kantha differs slightly from everyday Nakshi Kantha; it was historically crafted as a specialized seating mat or ceremonial blanket for honored guests and weddings. Because of its public nature, the embroidery was often denser and the motifs more grandiose. Depicting the harvest on a Sujni was the ultimate symbol of a household’s prosperity and hospitality. The ‘kula’ (winnowing fan) stitched into the borders symbolizes separating the wheat from the chaff—a metaphor for keeping the good and discarding the negative from one’s home.
Step 1: Engineering the Heavyweight Canvas
Preparing a robust foundation that will withstand daily seating.
Cut the Expanse: From your heavy unbleached muslin, cut two massive panels measuring exactly 77″ x 102″ (one for the top face, one for the backing).
Cut the Core: Cut your inner flannel layer to the identical 77″ x 102″ dimension.
The Crucial Pre-Wash: You must wash and tumble dry all three layers on a hot setting. Because couch covers are laundered frequently, aggressively pre-shrinking these natural fibers guarantees your intricate harvest scenes won’t warp or buckle unevenly after their first wash.
Step 2: Drafting the Agrarian Naksha (The Narrative)
Designing the landscape of abundance.
The Centerpiece: Lay the top muslin layer completely flat. In the center, draw a large, stylized Dhaner Gola (woven bamboo grain silo) overflowing with sweeping, arched stalks of rice.
The Agrarian Vignettes: Around the central silo, sketch the tools of the trade: a wooden plow (langol), a pair of stylized bullocks, and crescent-shaped sickles (kaste). Keep the outlines bold and rooted in traditional folk-art silhouettes.
The Bountiful Border: Draw a wide, 5-inch border around the entire perimeter. Fill this border with a repeating pattern of the Kula (winnowing fan) interlocked with geometric paddy seeds.
Step 3: High-Tension Basting for Upholstery Use
Securing the massive layers for intense structural needlework.
The Stack: Lay the backing flat on a large, clean floor space, followed by the flannel core, and finally the marked top layer. Smooth out every wrinkle, sweeping your hands from the center directly out to the edges.
Grid Basting: Since people will be sitting, shifting, and laying on this textile, it requires ultimate stability during the sewing process. Thread a needle with highly visible, contrasting thread and stitch a very secure 5-inch grid across the entire 75×100-inch surface.
Step 4: Embroidering the Nobanno Festival
Bringing the folk-art silhouettes to life with rich color.
The Rhythmic Outline: Thread your Kantha needle with the colored Pearl Cotton. Use Terracotta for the silos, Charcoal for the plows and sickles, Goldenrod for the rice stalks, and Deep Sage for the landscape elements.
The Continuous Stitch: Outline every drawn figure using a simple, continuous running stitch, ensuring your needle pierces completely through the top, the flannel, and the backing.
Internal Textures: Fill the bodies of the silos and animals with widely spaced, parallel lines of running stitches. This creates blocks of vibrant color while ensuring the thick fabric remains pliable and comfortable for lounging.
Step 5: The “Lahar” (Wave) Background Quilting
Creating the protective, crinkled armor of the cover.
The Unifying Thread: Switch to your standard Unbleached/Cream cotton thread matching the background fabric.
Echoing the Fields: Starting closely around the edges of your embroidered harvest scenes, sew continuous, parallel lines of standard running stitches. Echo the shapes of the rice stalks and tools, creating ripples that look like wind moving across a golden paddy field.
The Density: Space these rows exactly 1/4-inch apart across the entire negative space of the cover. This incredibly dense background stitching acts as structural armor; it binds the heavy muslin firmly to the flannel core, preventing the fabric from stretching, sagging, or tearing under the friction of daily seating.
Step 6: The Traditional Sujni Edge Finish
Sealing the heavy layers for frequent handling.
Trim and Fold: Once the background quilting reaches the borders, trim the raw edges perfectly straight to the final 75″ x 100″ dimension. Fold the raw edges of the top and bottom muslin inward by 1/2 inch to seamlessly enclose the flannel core, and pin heavily.
The Boundary Stitch: Do not use a separate quilt binding, which can look bulky on a couch. Instead, thread your needle with Charcoal or Terracotta Pearl Cotton. Sew seven to ten densely packed, perfectly straight parallel rows of running stitches around the entire perimeter. This historic finishing technique creates a sharp, tailored, and highly reinforced frame that can withstand being tucked tightly into sofa cushions.
Usability Note:The dense background stitching and heavyweight canvas make this couch cover a highly durable household staple. Machine wash on a cold, normal cycle with mild detergent. Tumble drying on low heat will dramatically enhance the crinkled “Lahar” texture, rendering the throw softer, thicker, and more inviting with every wash while maintaining its structural armor.
“The Phool Mandi” Floral Garland Nakshi Kantha Cushion Cover
No sensory experience in Bengal quite matches the intoxicating vibrance of the local phool mandi (flower market). From the historic Mullik Ghat in Kolkata to the bustling intersections of Shahbag in Dhaka, these markets are daily explosions of color, piled high with garlands of marigolds, tuberoses, and roses. “The Phool Mandi” cushion cover captures this breathtaking floral chaos and refines it into elegant, functional home decor. Featuring sweeping strings of blossoms embroidered in Marigold Yellow, Rose Pink, Tuberose White, and Fern Green against a sophisticated Soft Slate Gray Muslin background, this cover brings a vibrant yet grounded pop of color to your sofa or bed.
Finished Dimensions: Standard Throw Cushion Cover, 18″ x 18″ (Engineered to fit a plump 20″ x 20″ feather or down-alternative insert perfectly, ensuring a luxurious, overstuffed look).
Materials Needed:
The “Canvas” (Outer Layers): 1 yard of 44-inch wide, high-quality Soft Slate Gray Cotton Voile or fine Muslin.
The “Core” (Inner Layer): 1/2 yard of ultra-soft White Cotton Flannel.
Why: A decorative cushion needs structure to sit handsomely on a sofa without slouching, but traditional batting makes it feel like a stiff board. A single cotton flannel core provides the perfect middle ground—giving the floral motifs volume while keeping the cushion cover incredibly soft to lean against.
The “Blooms” (Thread): High-quality Size 8 Pearl Cotton thread in Marigold Yellow, Rose Pink, Tuberose White, and Fern Green. You will also need standard Slate Gray cotton thread for the dense background quilting.
Notions: A water-soluble fabric marking pen (or white tailor’s chalk for the dark fabric), a long Kantha needle, and curved safety pins.
Cultural Backstory:The craft of stringing floral garlands (mala) in Bengal requires a meditative, repetitive rhythm—much like the rhythmic running stitch of Kantha. Women in rural villages would often draw inspiration from these festive garlands, stitching them into the borders of their quilts to symbolize celebration, devotion, and welcoming energy. Translating these trailing floral strings onto a decorative cushion honors the fleeting beauty of the flower market by preserving it permanently in thread.
Step 1: Scaling the Canvas for Quilt Shrinkage
Preparing the layers for the heavy front panel.
Cut the Quilted Front: Dense Kantha stitching naturally draws the fabric in. To achieve an 18.5″ x 18.5″ unfinished front panel, cut two squares of your Slate Gray Muslin measuring exactly 20″ x 20″.
Cut the Core: Cut your inner Flannel layer to the exact same 20″ x 20″ dimension.
Pre-Wash: Wash and tumble dry all three squares on a warm setting. Pre-shrinking the cotton ensures your perfectly tailored cushion cover won’t twist out of shape during future launderings.
Step 2: Drafting the Floral Garland Naksha
Designing the trailing botanical elements.
The Sweeping Garlands: Lay the top Slate Gray square completely flat. Using white tailor’s chalk, draw three sweeping, intersecting crescent lines across the center of the fabric to represent the strings of the garland.
The Market Blooms: Along these lines, sketch clusters of recognizable market flowers: the heavily ruffled heads of marigolds (borda), the elegant, pointed buds of the tuberose (rajanigandha), and the wide, open faces of roses.
The Foliage: Add small, delicate teardrop leaves interspersed between the heavy blossoms to balance the composition. Do not draw a border; allow the garlands to elegantly run off the edges of the canvas.
Step 3: Layering and Grid Basting
Securing the 20-inch square for intensive stitching.
The Stack: Lay the backing muslin flat, place the flannel core on top, and finish with the marked top layer. Smooth out all wrinkles with your hands.
Grid Basting: Thread a needle with contrasting, easily removable thread and baste a heavy 4-inch grid across the entire 20×20-inch square. This locks the three layers together, preventing the fabric from buckling as you stitch the complex floral curves.
Step 4: Embroidering the Market Flowers
Bringing the vibrant blooms to life.
The Colorful Outline: Thread your Kantha needle with the brightly colored Pearl Cotton. Using a simple, continuous running stitch, outline every petal, bud, and leaf. Pierce completely through all three layers with every stitch to anchor the core.
The Textural Fill: Use widely spaced running stitches to fill the inside of the rose petals in Rose Pink and the marigolds in Marigold Yellow. For the tuberoses, use Tuberose White to heavily outline the buds, letting the gray background fabric peek through the center for visual depth. Use Fern Green to stitch the continuous stems, binding the garlands together.
Step 5: The “Lahar” (Wave) Background Quilting
Creating the signature Kantha ripple and structural softness.
The Slate-on-Slate Thread: Switch to your standard Slate Gray cotton thread.
Echoing the Garlands: Starting tightly around the edges of your embroidered flowers, sew continuous, closely spaced parallel lines of standard running stitches. Echo the sweeping curves of the garlands, rippling outward to fill the entire gray negative space.
The Density: Space these rows exactly 1/4-inch apart. This incredibly dense background stitching binds the three layers tightly together and forces the unstitched, brightly colored floral motifs to puff up beautifully in 3D relief.
Step 6: Constructing the Envelope Cushion Cover
Transforming the quilted art into a polished accessory.
Square the Front: Once the entire 20×20 panel is heavily quilted, trim the edges perfectly straight so the panel measures exactly 18.5″ x 18.5″ (this accounts for a 1/4-inch seam allowance).
Prepare the Envelope Back: From your remaining Slate Gray fabric, cut two rectangles measuring 18.5″ wide by 13″ tall. On one long 18.5-inch edge of each rectangle, fold the fabric over by 1/2 inch twice, press, and topstitch to create a clean, finished hem.
The Final Assembly: Lay your heavily quilted floral front panel right-side up. Place the two backing rectangles face down on top of it, ensuring the hemmed edges overlap in the center to create the envelope opening. Pin the outer perimeter heavily.
Sew and Turn: Sew around the entire 18.5″ x 18.5″ perimeter with a 1/4-inch seam allowance. Clip the four corners diagonally to reduce bulk, turn the cover right-side out through the envelope opening, and press the edges crisply. Insert your plump 20×20 cushion form.
Usability Note:The dense background quilting creates a highly durable, structured cushion face that won’t lose its shape when you lean against it. To clean, remove the insert and machine wash the cover on a cold, delicate cycle. Tumble drying on low heat will enhance the crinkled texture, making the gray background softer to the touch while allowing the vibrant threads to stand out even more.
16. Traditional Lohori Kantha Sofa Throws Inspired by Golden Paddy Fields and Rivers
“The Golden Delta” Lohori Kantha Sofa Throw
The Bengal delta is a breathtaking tapestry woven from two primary elements: the endless, meandering river systems and the vast expanses of golden paddy fields awaiting harvest. “The Golden Delta” sofa throw translates this sweeping landscape into pure texture. Relying entirely on the Lohori (wave) stitching technique, this throw eschews drawn pictures in favor of rhythmic, geometric lines. By alternating sweeping, undulating curves representing river currents in Deep River Blue and Azure with sharp, stepped chevrons representing terraced rice fields in Amber and Goldenrod, this piece becomes a tactile masterpiece. Set against a warm Mustard Yellow voile, the dense stitching creates a deeply ribbed, weighted textile that offers unparalleled comfort and a sophisticated, modern aesthetic for your living room.
Finished Dimensions: Generous Sofa Throw, 60″ x 70″ (Perfect for draping elegantly over the back of a sofa or wrapping up in on a breezy evening).
Materials Needed:
The “Canvas” (Outer Layers): 4 yards of 44-inch wide, ultra-soft Mustard Yellow Cotton Voile or fine Muslin.
The “Core” (Inner Layer): 2 yards of 60-inch wide, lightweight White Cotton Flannel.
Why: The intense density of Lohori stitching condenses the fabric significantly. A single core layer of lightweight flannel ensures the throw achieves a luxurious, weighted drape without becoming stiff, allowing it to mold perfectly to the body while remaining breathable in humid, deltaic climates.
The “Landscape” (Thread): High-quality Size 8 Pearl Cotton thread in Deep River Blue, Azure, Amber, and Goldenrod.
Notions: A water-soluble fabric marking pen, a long Kantha or Sashiko needle, a ruler, and hundreds of curved safety pins.
Cultural Backstory:The Lohori style is the zenith of Kantha’s textural ingenuity, originating largely in the Rajshahi district. The word ‘lohor’ translates to ‘wave’, a direct nod to the riverine geography of the region. While narrative Kantha tells a story with pictures, Lohori tells a story through rhythm and tension. As the autumn winds ripple through the golden Aman paddy, and the river currents swirl alongside them, the artisans mirrored this movement by alternating smooth, curving stitches with sharp, angular ones. This technique not only paid homage to the landscape but created a highly insulating, corrugated fabric.
Step 1: Preparing the Delta Canvas
Sizing and softening the foundational layers.
Cut the Expanse: From your Mustard Yellow Voile, cut two large panels measuring exactly 62″ x 72″ (one for the top face, one for the backing).
Cut the Core: Cut your inner Flannel layer to the exact same dimensions: 62″ x 72″.
The Crucial Pre-Wash: Wash and tumble dry all three layers on a warm setting. Lohori stitching pulls the fabric tightly together; pre-shrinking is an absolute necessity to ensure the throw does not warp into an hourglass shape after its first wash.
Step 2: Drafting the River and Field Geometry
Mapping the structural waves and chevrons.
The Central River Channel: Lay the top mustard layer completely flat. Using a long ruler and your water-soluble pen, draw a gentle, undulating wave 10 inches wide that snakes diagonally from the top-left corner to the bottom-right corner. This represents the river.
The Paddy Terraces: In the negative space on either side of the “river,” draft the fields. Instead of curves, draw wide, repeating chevron (V-shaped) patterns or stepped zigzags.
The Guidelines: Draw parallel guide lines inside your curves and chevrons every 2 inches. Because Lohori requires absolute uniformity over a massive area, these guidelines will keep your hand-stitching perfectly aligned.
Step 3: High-Tension Grid Basting
Locking the canvas for heavy textural work.
The Stack: Lay the backing flat on a large surface, followed by the flannel core, and finally the marked top layer. Smooth out every wrinkle, sweeping your hands from the center directly to the edges.
Grid Basting: The continuous pulling of Lohori stitches will aggressively shift loose fabric. Thread a needle with contrasting, easily removable thread and stitch a highly secure 4-inch grid across the entire 60×70-inch surface.
Step 4: Stitching the River Currents
Building the deep, undulating water texture.
The First Ripple: Thread your Kantha needle with Deep River Blue. Starting at the center of your drawn diagonal river channel, stitch a continuous line following the sweeping curve, piercing through all three layers.
Building the Current: Stitch the next row perfectly parallel to the first, spacing it no more than 1/8 to 1/4 inch from the first. Alternate occasionally with Azure thread to mimic the play of light on water.
The Corrugation: Pull your stitches with a firm, even tension. As these closely packed rows build up, the mustard fabric between the blue lines will buckle and pucker, creating a deep, ribbed wave texture.
Step 5: Stitching the Golden Paddy
Contrasting the curves with sharp, harvest geometry.
The Chevron Shift: Once the river channel is completely filled, move to the drafted field areas. Thread your needle with Amber.
The Terraced Ribs: Follow your sharp, zigzagging chevron lines with continuous running stitches. Just as with the river, stitch parallel rows packed 1/8 to 1/4 inch apart, occasionally blending in rows of Goldenrod thread.
The Textural Harmony: The sharp, angular puckers of the chevron sections will perfectly offset the smooth, sweeping puckers of the river section. The entire 60×70 surface will eventually be covered in this dense, tactile ribbing, leaving no flat fabric behind.
Step 6: The Tailored Boundary Finish
Framing the rhythmic, heavy textile.
Trim and Fold: Once the exhausting but magnificent Lohori corrugation covers the entire expanse, trim the raw edges perfectly straight to the final 60″ x 70″ dimension. Fold the raw edges of the top and bottom voile inward by 1/2 inch to enclose the flannel core, and pin heavily.
The Frame Stitch: Thread your needle with Deep River Blue Pearl Cotton. Sew five densely packed, perfectly straight parallel rows of running stitches around the entire perimeter. This strong, straight boundary aesthetically contains the wild geometry of the interior and seals the heavy throw for daily use.
Usability Note:The sheer density of the Lohori stitch transforms lightweight voile into a substantial, comforting weighted throw that provides deep pressure relief. Machine wash this heirloom on a cold, delicate cycle. Tumble drying on low heat is highly recommended, as the gentle heat and tumbling will dramatically enhance the corrugated puckers, making the throw remarkably softer and more pronounced with age.
17. Colorful Lik or Anarasi Stitch Nakshi Kantha Floor Pillows Depicting Rural Village Scenes
“The Gramer Bari” (Village Home) Anarasi Floor Pillow
Floor seating demands textiles that are not just beautiful, but exceptionally resilient. The Anarasi (pineapple) or Lik stitch is uniquely suited for this purpose. By overlapping diagonal rows of running stitches to create a dense, faceted grid, artisans historically created heavy, durable mats (known as ason) for floor seating. “The Gramer Bari” floor pillow revives this technique, pairing the highly structural, architectural background grid with bursts of brightly colored rural folk art. Embroidered on a robust Warm Sand Canvas, the vibrant village vignettes—featuring mud huts, banana trees, and wandering ducks in Crimson, Turquoise, Marigold, and Parrot Green—puff up beautifully against the tightly bound, diamond-textured background.
Finished Dimensions: Oversized Square Floor Cushion Cover, 32″ x 32″ (Engineered to hold a heavy, firm 34″ x 34″ floor insert for luxurious, low-profile lounge seating).
Materials Needed:
The “Canvas” (Outer Layers): 2.5 yards of 44-inch wide, heavyweight Warm Sand Cotton Canvas or Duck Cloth.
The “Core” (Inner Layer): 1 yard of 44-inch wide, medium-weight Cotton Flannel or thin cotton batting.
Why: Floor pillows take the full weight of the human body and provide constant friction against the floor. A robust canvas exterior paired with a flannel core ensures the complex embroidery threads have a deep base to anchor into, preventing them from snapping under pressure while remaining soft to sit on.
The “Village” (Thread): High-quality Size 8 Pearl Cotton thread in Crimson, Turquoise, Marigold, and Parrot Green. You will need multiple large spools of standard Warm Sand heavy-duty cotton thread for the dense Anarasi background grid.
Notions: A water-soluble fabric marking pen, a long Sashiko or Kantha needle, a heavy-duty 30-inch upholstery zipper, a leather thimble, and safety pins.
Cultural Backstory:In traditional Bengali homes, guests were often welcomed to sit on the floor upon a specially crafted, heavily quilted mat called an ‘ason’. Because these mats took so much wear and tear, women utilized the ‘Lik’ or ‘Anarasi’ cross-hatching technique to reinforce the fabric, making it nearly as thick as a modern rug. To make the seating festive and welcoming, they would embroider scenes of the ‘Gramer Bari’ (the village home)—depicting the courtyard, the pond, and local flora. It was a beautiful way of offering a guest a literal and figurative seat within the heart of the home.
Step 1: Engineering the Floor Canvas
Preparing a robust foundation for heavy upholstery use.
Cut the Expanse: From your heavyweight canvas, cut one large square measuring exactly 34″ x 34″ for the quilted top front. Cut two rectangles measuring 34″ x 18″ for the zippered backing.
Cut the Core: Cut your inner Flannel layer to a 34″ x 34″ square to match the front panel.
The Crucial Pre-Wash: Wash and tumble dry all layers on hot. The dense, intersecting Anarasi grid will shrink the fabric aggressively. Failing to pre-shrink heavy canvas will result in a warped, lumpy floor pillow after its first wash.
Step 2: Drafting the Gramer Bari Naksha
Sketching the colorful village vignettes.
The Central Courtyard: Lay the 34×34 canvas top completely flat. In the center, draw a vibrant rural vignette spanning about 16 inches. Sketch a traditional chala (curved-roof mud hut), flanked by a sweeping banana tree and a small pond.
The Corner Flourishes: In the four corners of the canvas, draw smaller, supporting motifs: a wandering duck, a stylized sun, a blooming lotus, and a terracotta water pitcher. Keep the silhouettes simple and bold.
Leave the Background Blank: Do not draw any borders or filler patterns. The extensive negative space is required for the geometric Anarasi grid.
Step 3: High-Tension Grid Basting
Locking the thick layers for intense structural needlework.
The Stack: Lay a piece of scrap muslin (34×34) flat as an unseen backing, followed by the flannel core, and finally the marked canvas top layer. Smooth out every wrinkle.
Grid Basting: Because the canvas is heavy and the cross-hatching tension is high, thread a needle with contrasting thread and stitch a very secure 4-inch grid across the entire surface to lock the three layers together permanently.
Step 4: Outlining and Filling the Village Scene
Anchoring the folk art before building the background grid.
The Bright Fill: Thread your Kantha needle with the vibrant Pearl Cottons (Crimson for roofs, Parrot Green for trees, Turquoise for the pond).
Stitching the Narrative: Outline every drawn figure, piercing through all three layers. Fill the internal shapes of the huts, leaves, and ducks with closely spaced, parallel rows of standard running stitches.
Step 5: Executing the Anarasi (Pineapple) Grid
Building the geometric, friction-resistant background.
The First Diagonals: Switch to your standard heavy-duty Warm Sand cotton thread. Starting in the negative space near the central hut, stitch a continuous, perfectly straight diagonal line of running stitches across the canvas.
The Parallel Furrows: Stitch parallel diagonal lines, spacing them exactly 1/4-inch apart, covering the entire negative space of the pillow front. Stop, knot, and restart your thread whenever you intersect with an embroidered village motif.
The Intersecting Cross-Hatch: Once the entire background is covered in one diagonal direction, stitch a second set of diagonal lines perpendicular to the first set.
The Mechanical Benefit: As these lines cross, they pull the heavy canvas into tiny, raised diamond facets. This creates an incredibly durable, stiffened, pineapple-like texture that resists wear and tear from floor friction, while forcing the brightly colored, ungridded village scenes to stand out in beautiful 3D relief.
Step 6: Constructing the Zippered Floor Pillow
Transforming the heavy textile into functional lounge seating.
Square the Front: Once the exhausting but magnificent grid is complete, trim the edges perfectly straight so the heavy front panel measures exactly 33″ x 33″ (accounting for a 1/2-inch seam allowance).
Prepare the Zippered Back: Take your two 34″ x 18″ canvas backing rectangles. Install the heavy-duty 30-inch upholstery zipper along the long edges to join them, creating a single 34″ x 34″ backing panel with a zipper hidden in the center. Unzip it halfway.
The Final Assembly: Lay your heavily quilted, textured front panel right-side up. Place the zippered backing panel face down on top of it. Pin the outer perimeter with heavy-duty clips or safety pins.
Sew and Turn: Sew around the entire perimeter with a 1/2-inch seam allowance. Clip the corners heavily, turn the cover right-side out through the open zipper, and use a chopstick to push the corners out crisp. Insert your firm 34×34 floor pillow form.
Usability Note:The combination of heavy canvas and the dense, intersecting Anarasi stitch creates a floor cushion that is nearly indestructible, mimicking the protective qualities of a traditional ‘ason’ mat. Machine wash the cover on a cold, heavy-duty cycle with mild detergent. Air drying flat will maintain the sharp, faceted texture of the background grid.
18. Rustic Lohori Kantha Placemats and Coasters Showcase Agricultural Scenes
“The Krishak’s Tapestry” Lohori Kantha Placemat & Coaster Set
A beautifully set dining table requires a delicate balance of elegance and intense functionality. Table linens must protect your wood surfaces from heat, condensation, and spills while anchoring your dinnerware beautifully. “The Krishak’s Tapestry” set (honoring the Krishak, or Bengali farmer) achieves this by fusing deeply narrative rural art with the heavy, corrugated architecture of the Lohori (wave) stitch. Embroidering rustic vignettes—sweeping sheaves of paddy (dhaner sheesh), traditional curved sickles (kaste), and the iconic bullock cart—in Deep Indigo, Earthy Terracotta, and Jute Brown, these mini-quilts act as both storytelling canvases and robust heat shields. The dense Lohori background stitching transforms the Unbleached Linen into a heavily ribbed, trivet-like surface, ensuring your elegant table setting is fully protected.
Finished Dimensions: * Standard Dining Placemat, 14″ x 20″ (Providing ample room for a dinner plate, cutlery, and water glass).
Matching Beverage Coasters, 5″ x 5″.
Materials Needed:
The “Canvas” (Outer Layers): 2 yards of 44-inch wide, heavyweight Unbleached Linen-Cotton Blend (enough for 6 placemats and 6 coasters).
The “Core” (Inner Layer): 2 yards of 44-inch wide, 100% Cotton Flannel.
Why: Polyester batting melts under hot plates, creating a lumpy surface where wine glasses easily tip over. Using two thin layers of 100% cotton flannel inside your placemats creates a perfectly flat, highly heat-resistant barrier that absorbs condensation flawlessly.
The “Harvest” (Thread): High-quality Size 8 Pearl Cotton thread in Deep Indigo, Earthy Terracotta, and Jute Brown. You will also need multiple spools of heavy-duty Unbleached/Cream cotton thread for the dense background waves.
Notions: A water-soluble fabric marking pen, specialized short embroidery needles (for working on smaller, tight canvases), and safety pins.
Cultural Backstory:In rural Bengal, the harvest is the crux of survival and community joy. The Nakshi Kantha was traditionally a domestic craft, but the imagery always looked outward to the fields. The ‘Lohori’ wave stitch—traditionally used to mimic the flowing rivers of the delta—is brilliantly repurposed here. By surrounding the agricultural motifs with Lohori waves, the artisan acknowledges that the golden paddy fields are entirely sustained by the life-giving rivers of the Bengal delta. Crafting these for a dining table is a beautiful, daily reminder of where our nourishment originates.
Step 1: Oversizing the Mini-Quilt Canvas
Accounting for the aggressive shrinkage of the wave stitch.
Cut the Placemat Expanse: The Lohori stitch will pull the fabric inward dramatically. For a 14×20 finished placemat, cut your top linen and backing linen pieces to 16″ x 22″.
Cut the Coaster Expanse: For a 5×5 finished coaster, cut your linen pieces to 6.5″ x 6.5″.
Cut the Cores: Cut your cotton flannel pieces to perfectly match these oversized dimensions.
The Crucial Pre-Wash: Wash and tumble dry all layers on a hot setting. Dining linens must endure frequent, heavy laundering. Aggressive pre-shrinking ensures your perfectly rectangular placemats won’t warp into hourglass shapes after a dinner party.
Step 2: Drafting the Agrarian Naksha
Designing the rustic focal points.
The Offset Placement: For a modern, elegant table setting, do not place the motif in the dead center where the dinner plate will cover it. Instead, lay your 16×22 linen flat and draw the agricultural vignettes in the bottom-right or top-left corners.
Sketching the Harvest: Using your water-soluble pen, draw a sweeping bundle of rice stalks tied together, a rustic wooden wheel, or a farmer’s sickle. Keep the silhouettes folk-art inspired and stylized.
Leave the Main Canvas Open: Leave the vast majority of the placemat entirely blank. This negative space is crucial; it will soon become the heavily corrugated resting place for your hot plates.
Step 3: Layering and Perimeter Basting
Securing the small canvases for high-tension work.
The Stack: Lay the backing linen flat, followed by the flannel core, and finally the marked top layer.
Secure the Edges: Because these are small canvases, you do not need a massive basting grid. Instead, heavily pin the perimeter and baste a large “X” edge-to-edge across the center of the placemats and coasters with contrasting thread.
Step 4: Embroidering the Rustic Vignettes
Anchoring the folk art before building the textured shield.
The Running Outline: Thread your needle with the colored Pearl Cotton (Indigo for tools, Terracotta for wheels, Jute Brown for paddy).
The Flush Fill: Outline every drawn figure, piercing through all three layers. Fill the internal shapes of the harvest motifs with closely spaced, parallel rows of running stitches. You want these motifs to sit relatively flush against the fabric so they do not create uneven lumps on the table.
Step 5: Executing the Heavy Lohori Wave Background
Building the heat-resistant, trivet-like architecture.
The First Ripple: Switch to your standard heavy-duty Unbleached cotton thread. Starting immediately next to your embroidered agricultural corner, stitch a continuous, gently undulating line across the placemat’s open space.
The Heat-Shield Corrugation: Stitch parallel wave lines radiating outward, covering the entire placemat. Here is the secret to a Kantha placemat: space these rows incredibly tight—no more than 1/8 inch apart.
The Trivet Effect: By packing these stitches so tightly and pulling with firm tension, the unbleached linen physically puckers and thickens, transforming into a dense, heavily ribbed pad. This corrugation traps air, turning the placemat into a literal thermal barrier (a trivet) that will prevent hot serving dishes from leaving white heat marks on your dining table.
Step 6: The Flat, Enclosed Edge Finish
Sealing the table linens without bulky bindings.
Trim to Final Size: Once the entire background is heavily corrugated, trim the raw edges perfectly straight to the final 14″ x 20″ (placemats) and 5″ x 5″ (coasters).
The Fold: Fold the raw edges of the top and bottom linen inward by 1/2 inch to seamlessly enclose the flannel core, and pin heavily.
The Flat Border Stitch: Do not use a traditional rolled quilt binding—it creates a raised lip that causes wine glasses to sit unevenly. Instead, thread your needle with Deep Indigo. Sew five to seven densely packed, perfectly straight parallel rows of running stitches around the entire perimeter. This creates a razor-sharp, flat, tailored frame that is visually stunning and functionally flawless.
Usability Note:These linens are built for rigorous use. The dense background stitching makes them highly resistant to heat, friction, and warping. Machine wash on a warm, normal cycle with mild detergent. Lay flat to air dry to maintain their sharp rectangular shape, and press lightly on the reverse side with a hot iron if desired.
19. Layered Sujni Kantha Table Toppers Woven with Meaningful Religious Symbols
“The Sacred Harmony” Sujni Kantha Table Topper
A table topper serves as the focal point of a dining or living room—a decorative textile layered over a bare table or a larger tablecloth to anchor centerpieces, candles, or serving dishes. “The Sacred Harmony” elevates this domestic staple into a piece of profound ceremonial art.
Drawing from the syncretic spiritual heritage of the Bengal delta, this square Sujni Kantha weaves together universal symbols of blessing: the Hindu Padma (lotus) representing purity and divine birth, enclosed within a classic Islamic eight-pointed geometric star (Khatam), framed by a continuous Tree of Life vine. Embroidered in rich jewel tones of Amethyst Purple, Ruby Red, Topaz Gold, and Emerald Green on a crisp Ivory Cotton Percale, this table topper brings a spirit of peace, unity, and exceptional elegance to your gathering space.
Finished Dimensions: Elegant Square Table Topper, 36″ x 36″ (Perfectly sized to sit beautifully in the center of a round or square dining table, or draped diagonally over a coffee table).
Materials Needed:
The “Canvas” (Outer Layers): 2.5 yards of 44-inch wide, tightly woven Ivory Cotton Percale.
Why Percale: Percale has a crisp, smooth finish that resists pilling and looks highly refined in a dining setting, making the vibrant jewel-toned threads pop brilliantly.
The “Core” (Inner Layer): 1.5 yards of thin, 100% Cotton Batting or double-layered Cotton Flannel.
Why: A Sujni is traditionally layered and slightly padded. For a table topper, you need just enough thermal padding to protect your wood from warm serving bowls, but it must remain flat enough so that stemmed water glasses will not tip over.
The “Blessings” (Thread): High-quality Size 8 Pearl Cotton thread in Amethyst, Ruby, Topaz, and Emerald. You will also need standard Ivory cotton thread for the dense background quilting.
Notions: A water-soluble fabric marking pen, a ruler, a compass (for drawing perfect circles/stars), long Kantha needles, and safety pins.
Cultural Backstory:The Sujni Kantha was explicitly designed for ceremonial and public display, unlike the personal, everyday Nakshi Kantha. When hosting honored guests, a family would lay out a Sujni as a gesture of immense respect. By incorporating religious symbols from multiple faiths—a common practice in the historically intertwined communities of Bengal—the artisan was essentially weaving a universal prayer of protection, prosperity, and harmony for anyone who gathered around the food or sat upon the mat. It is a textile meant to bless the shared space.
Step 1: Scaling the Ceremonial Canvas
Preparing the layers to accommodate stitching shrinkage.
Cut the Expanse: Because dense Kantha stitching shrinks the fabric, cut your top and backing Ivory Percale panels to 38″ x 38″ to achieve the final 36-inch size.
Cut the Core: Cut your inner cotton batting or flannel to the exact same dimensions: 38″ x 38″.
The Crucial Pre-Wash: Machine-wash and tumble-dry all layers on a warm setting. Shrinking the fibers before sewing is absolutely critical, so your elegant square table topper does not warp into an uneven rhombus after a post-dinner wash.
Step 2: Drafting the Sacred Naksha (The Mandala)
Designing the geometry of shared blessings.
The Syncretic Center: Lay the top percale layer completely flat. Find the exact dead center. Using a compass, draw a large, multi-petaled Padma (Lotus) spanning about 12 inches across.
The Geometric Enclosure: Around the lotus, use a ruler to draft a classic Islamic eight-pointed star (two overlapping squares), expanding the central motif to roughly 20 inches in diameter.
The Tree of Life Border: Draw a crisp 3-inch-wide border around the entire 38-inch perimeter. Fill this border with a continuously winding vine sprouting leaves and small, stylized birds—a universal symbol of life, growth, and connection.
Step 3: High-Tension Basting for Tabletop Flatness
Securing the layers to ensure a perfectly level dining surface.
The Stack: Lay the backing flat on a large table, followed by the cotton core, and finally the marked top layer. Smooth out every single wrinkle, working from the center outward.
Grid Basting: A table topper cannot have any hidden lumps. Thread a needle with contrasting, easily removable thread and stitch a very tight, highly secure 3-inch grid across the entire 38×38-inch surface.
Step 4: Embroidering the Universal Blessings
Anchoring the sacred folk art in jewel tones.
The Rhythmic Outline: Thread your needle with the colored Pearl Cotton. Use Amethyst and Ruby for the lotus petals, Topaz Gold for the sharp lines of the geometric star, and Emerald Green for the winding border vines.
The Flush Fill: Outline every drawn figure, piercing completely through all three layers to anchor the batting. Fill the internal shapes of the lotus and leaves with closely spaced, parallel rows of running stitches. Ensure your tension is even so the motifs lie relatively flush with the fabric.
Step 5: The “Lahar” (Wave) Background Quilting
Creating the flat, protective, and textured shield.
The Ivory-on-Ivory Thread: Once the colorful mandala and borders are complete, switch to your standard Ivory cotton thread.
Echoing the Harmony: Starting closely around the edges of your central star and lotus, sew continuous, parallel lines of standard running stitches. Echo the geometric and organic shapes, creating ripples that radiate outward to meet the border.
The Density: Space these rows exactly 1/8 to 1/4-inch apart across the entire negative space. This incredibly dense background stitching acts as structural armor; it tightly flattens the percale against the batting, ensuring that delicate tableware sits perfectly level, while the unstitched colored symbols pop up beautifully in bas-relief.
Step 6: The Traditional Enclosed Edge Finish
Sealing the table topper for a polished, tailored aesthetic.
Trim and Fold: Once the background quilting reaches the borders, use a rotary cutter and a large square ruler to trim the raw edges perfectly straight to the final 36″ x 36″ dimension, ensuring perfect 90-degree corners. Fold the raw edges of the top and bottom percale inward by 1/2 inch to seamlessly enclose the core, and pin heavily.
The Border Stitch: Do not apply a separate quilt binding—it creates a raised lip that disrupts the flat plane of a table topper. Instead, thread your needle with Topaz Gold. Sew five to seven densely packed, perfectly straight parallel rows of running stitches around the entire perimeter. This creates a razor-sharp, flat, and highly reinforced frame.
Usability Note:This table topper is designed for both visual impact and practical dining use. The dense background stitching makes it highly resistant to heat and wear. Spot treat spills immediately. For a full clean, machine wash on a cold, gentle cycle with mild detergent. Lay the topper completely flat on a dry towel to air-dry and maintain its crisp, perfectly square architecture, then press the back lightly with a warm iron.
“The Padma Blossom” Cross-Stitch Kantha Armchair Throw
An armchair is a personal sanctuary—a place for solitary reading, quiet reflection, or a warm cup of tea. A throw designed for this specific space should be smaller than a bed quilt, highly tactile, and exquisitely detailed to be appreciated up close.
“The Padma Blossom” armchair throw achieves this by combining the plush, raised texture of cross-stitch (bhorat) with the iconic Bengali Padma (lotus) motif. Embroidered in soft, inviting shades of Dusty Rose, Antique Gold, and Sage Green against a backdrop of Warm Cream Muslin, this piece is a study in elegant contrast. The heavy cross-stitched flowers provide a tapestry-like focal point, while the deeply rippled running-stitch background ensures the throw remains incredibly fluid, draping perfectly over the shoulders or the arms of a chair.
Finished Dimensions: Elegant Armchair Throw / Lap Quilt, 45″ x 55″ (Ideally proportioned to drape neatly without dragging on the floor).
Materials Needed:
The “Canvas” (Outer Layers): 3 yards of 44-inch wide, ultra-soft Warm Cream Cotton Voile or fine Muslin.
The “Core” (Inner Layer): 1.5 yards of 44-inch wide, lightweight White Cotton Flannel.
Why: An armchair throw must envelop the user effortlessly. A single layer of cotton flannel provides just enough structural grip for the heavy cross-stitch embroidery without compromising the finished blanket’s buttery, liquid drape.
The “Blossom” (Thread): High-quality Size 8 Pearl Cotton thread in Dusty Rose (for the petals), Antique Gold (for the pod and accents), and Sage Green (for the lily pads and stems). You will need standard cotton thread for the dense background quilting.
Notions: A water-soluble fabric marking pen, a small embroidery hoop, specialized Kantha or Sashiko needles, and curved safety pins.
Cultural Backstory:In the Nakshi Kantha tradition, the ‘bhorat’ (filling) stitch is reserved for the most important elements of a design. While a standard running stitch implies movement, the dense cross-stitch creates a solid, structural presence. The Padma (lotus) is perhaps the most universally revered motif in Bengal, emerging flawlessly clean from muddy waters—a symbol of spiritual resilience and pure beauty. Stitching a heavy, cross-stitched lotus in the center of an armchair throw is meant to offer the sitter a focal point of peace, grounding, and rejuvenation.
Step 1: Scaling the Personal Canvas
Preparing the layers for heavy textural shrinkage.
Cut the Expanse: The combination of dense cross-stitch and background quilting will noticeably shrink this throw. From your Cream Voile, cut two panels measuring exactly 47″ x 57″ (one for the top, one for the backing).
Cut the Core: Cut your inner Flannel layer to the exact same dimensions: 47″ x 57″.
The Crucial Pre-Wash: Machine-wash and tumble-dry all three layers on a warm setting. This pre-shrinks the fibers, ensuring that your meticulously stitched lotus does not pucker or distort when you eventually launder the finished throw.
Step 2: Drafting the Blooming Lotus Naksha
Designing the botanical centerpiece.
The Central Anchor: Lay the top voile layer flat. Because an armchair throw is often folded or draped, center placement works best. Draw a large, fully blooming Padma (Lotus) in the exact center, spanning roughly 16 inches in diameter.
The Trailing Buds: From the base of the main lotus, sketch elegant, winding stems that trail toward the top left and bottom right corners, sprouting smaller, half-opened lotus buds and broad, circular lily pads.
Embrace Negative Space: Do not draw a heavy border. Leave the perimeter and the surrounding canvas open to highlight the textural contrast of the background quilting later.
Step 3: High-Tension Basting
Securing the layers for plush, 3D embroidery.
The Stack: Lay the backing flat, followed by the flannel core, and finish with the marked top layer. Smooth out all wrinkles from the center outward.
Grid Basting: Thread a needle with contrasting, easily removable thread. Stitch a secure 4-inch grid across the entire 47×57-inch surface. Because you will be using an embroidery hoop for the cross-stitch, this grid is vital to prevent the three layers from shifting independently.
Step 4: Executing the Cross-Stitch (Bhorat)
Building the raised, tapestry-like blossoms.
Isolate the Blooms: Place your embroidery hoop gently over the central lotus to maintain taut, even tension.
The Plush Fill: Thread your Kantha needle with the Dusty Rose Pearl Cotton. Instead of merely outlining the petals, fill the entire drawn shape of each petal with tiny, uniform cross-stitches (X). Pierce completely through all three layers (top, flannel, and backing) with every single stitch.
The Botanical Details: Use Antique Gold to heavily cross-stitch the lotus’s central seed pod. Switch to Sage Green to fill in the lily pads and outline the trailing stems. The sheer density of the thread will make the flowers feel slightly weighted and remarkably plush to the touch.
Step 5: The “Lahar” (Wave) Background Quilting
Creating the signature crinkled drape of Kantha.
The Unifying Thread: Once all the colorful botanical elements are completely filled, remove the hoop and switch to your standard Cream cotton thread.
Echoing the Bloom: Starting immediately adjacent to your heavy cross-stitched lotus petals, sew continuous, closely spaced parallel lines of standard running stitches. Echo the curves of the flower, the buds, and the stems, creating ripples as if the lotus were sitting in a quiet pond.
The Density: Space these rows exactly 1/4-inch apart across the entire negative space of the throw. This dense background stitching acts as a structural foil; it pulls the cream muslin tightly against the flannel core, forcing the heavy, un-quilted cross-stitch flowers to puff up beautifully in 3D relief.
Step 6: The Tailored Enclosed Edge Finish
Sealing the lap quilt for daily comfort.
Trim and Fold: Once the background quilting covers the entire expanse, trim the raw edges perfectly straight to the final 45″ x 55″ dimension. Fold the raw edges of the top and bottom voile inward by 1/2 inch to enclose the flannel core, and pin heavily.
The Boundary Stitch: Thread your needle with the Sage Green Pearl Cotton to provide a subtle framing accent. Sew five closely packed, perfectly straight parallel rows of running stitches around the entire perimeter. This historic finishing technique permanently seals the edges, keeping the throw incredibly soft and free of the stiff bulk associated with modern bindings.
Usability Note:This throw is designed to be lived in. The heavy cross-stitch provides a comforting, tactile weight, while the rippled background allows it to mold perfectly over your lap. Machine wash on a cold, delicate cycle with a gentle detergent. Tumble drying on low heat will dramatically enhance the crinkled texture, rendering the throw softer and more inviting with every wash.
Conclusion
The journey through these twenty nakshi kantha designs reveals far more than beautiful textiles—it uncovers a living tradition where art, heritage, and daily life intertwine. Each piece, whether a Heavyweight Sujni Kantha Quilt featuring Bengal forest and river motifs or a set of Decorative Running Stitch Cushion Covers inspired by flower markets, carries forward the legacy of Bengali women who, for centuries, transformed worn cloth into cherished heirlooms. The motifs they chose—lotus blossoms symbolizing purity and cosmic order, undulating vines representing life’s continuity, crescent moons reflecting Islamic heritage, and village scenes preserving rural memories—create a visual language that speaks across generations, connecting us to the rhythms, beliefs, and creativity of Bengal’s countryside.
Incorporating these nakshi kantha pieces into contemporary homes does more than add elegance and comfort; it weaves stories into the fabric of daily living. A Sophisticated Cross-Stitch Bed Runner with wildflower motifs becomes a conversation starter at family gatherings. A Rustic Lohori Kantha Sofa Throw inspired by golden paddy fields wraps loved ones in warmth while honoring agricultural traditions. These textiles remind us that true luxury lies not in perfection but in the visible traces of human hands—the slight irregularities of hand-stitched running stitches, the personal interpretation of traditional patterns, the careful selection of colors and motifs that reflect individual artistry within a shared cultural framework.
Let this collection inspire you to embrace nakshi kantha not merely as decor but as a meaningful connection to Bangladesh and West Bengal’s intangible cultural heritage. By choosing a Layered Sujni Kantha Table Topper woven with religious symbols for your dining space, or a Vintage Heritage Lik or Anarasi Stitch Bedspread inspired by agricultural life for your guest room, you help preserve and celebrate this remarkable art form. These pieces transform houses into homes filled with stories, where every embroidered lotus, wave, and village scene whispers of the women who stitched their world into cloth—creating beauty, preserving memory, and warming generations with their artful heritage.
Originally from Dhaka, I have developed a lasting appreciation for craftsmanship by watching artisans create traditional textiles like Nakshi Kantha and Jamdani. Now a Business and Data Analyst in Canada with a background in computer science, I see clear parallels between data work and design through their shared focus on patterns and thoughtful structure. My passion for interior design, especially textiles, reflects my belief that homes should feel meaningful and personal. Through projects like Comfy Dwell, I try to combines my technical skills with this passion, bringing a perspective shaped by both data and a lifelong connection to traditional craft.