
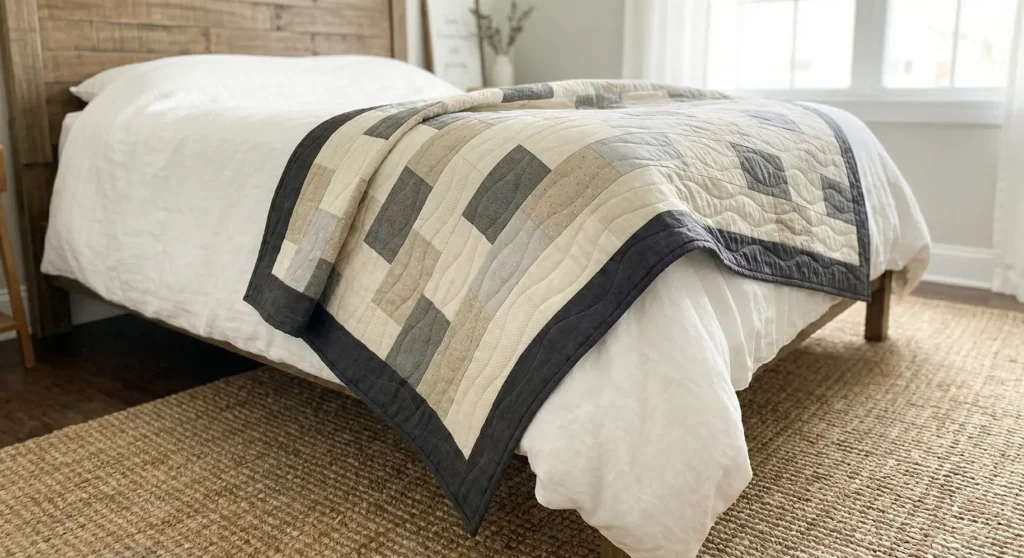
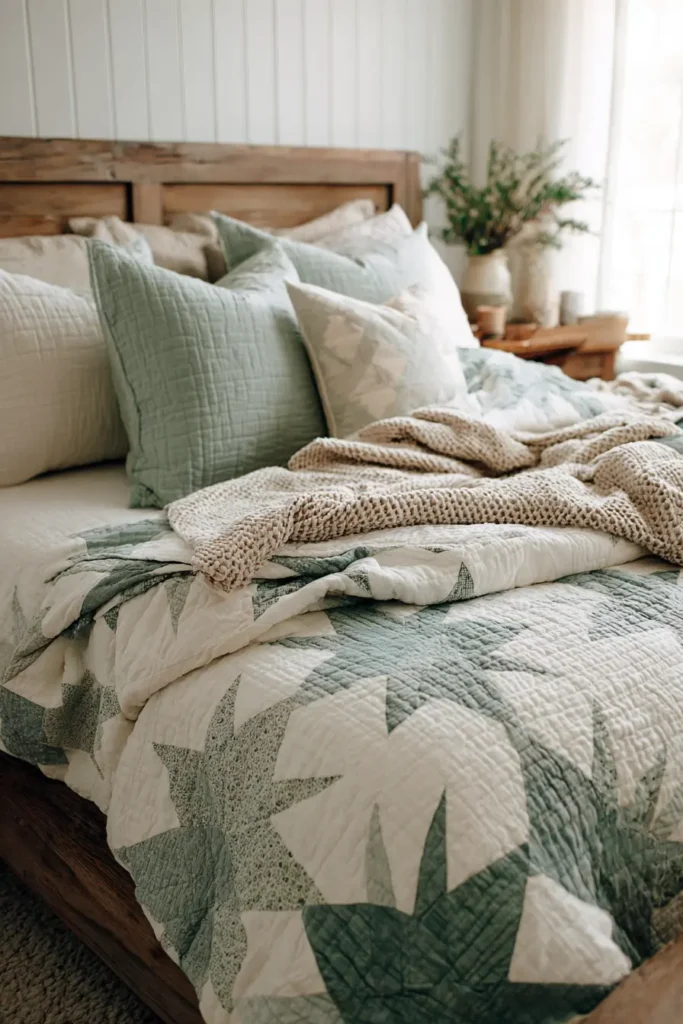
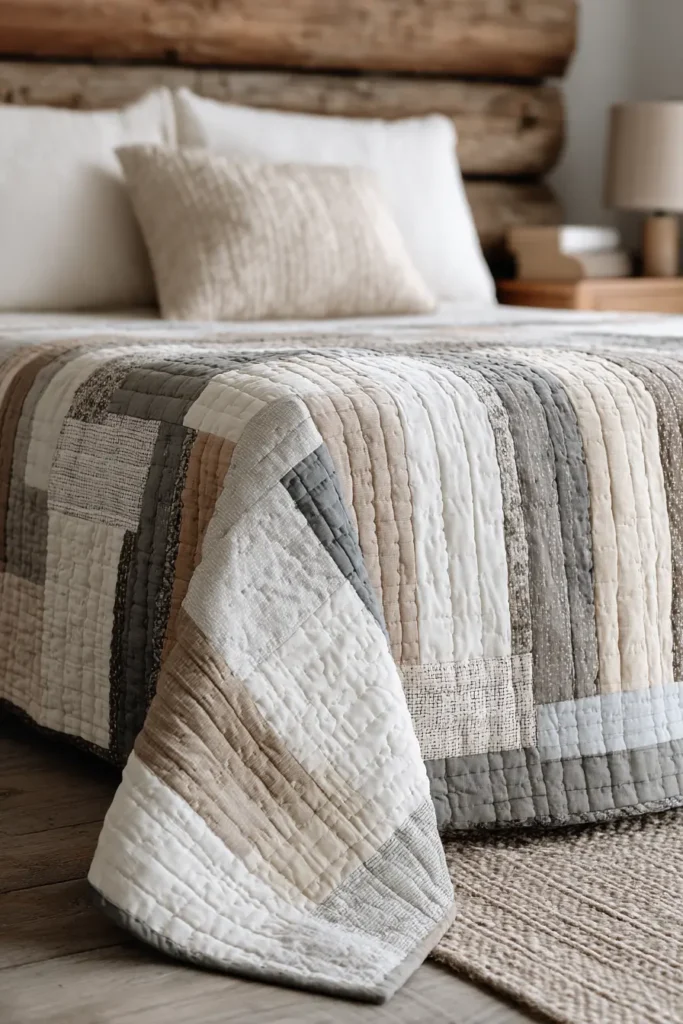
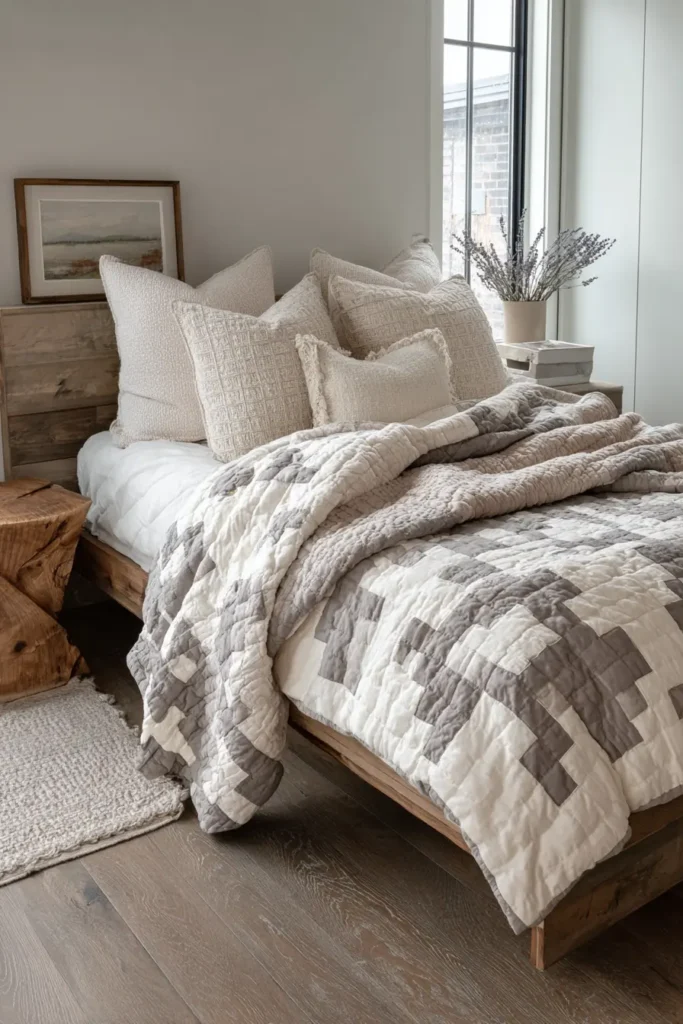
20 Modern Farmhouse Quilt Patterns to Transform Your Bedroom
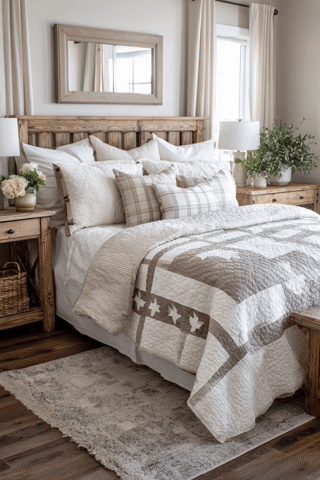
What Makes a Farmhouse Quilt?
The farmhouse quilt sits at an interesting crossroads: part classic patchwork tradition, part contemporary styling, part modern simplicity. It is what designers call a transitional style – one foot in rustic heritage, the other in clean, modern living. That range is exactly what makes it so adaptable, and exactly what makes “farmhouse quilt” such a broad term.
This collection covers the full spectrum – from patterns with deep traditional roots like Plaids and Log Cabins, to high-contrast minimalism like Black and White quilts and Scandinavian Fusion. My goal was to bring the many expressions of farmhouse quilting under one honest umbrella, while being clear that these styles are not interchangeable. Different farmhouse quilts suit different tastes, different rooms, and different moods.
I’ll give you a personal example. My own preference leans toward the Buffalo Check – bold, graphic, and unapologetically cozy. My daughter, on the other hand, gravitates immediately toward the Shabby Chic Farmhouse pattern: soft, layered, and a little romantic. We are both right, and that difference in preference is actually the point of this guide.
Because context matters here more than in most quilt categories. A Buffalo Check quilt is wonderful in a rustic weekend cabin or a lived-in family bedroom – but it can feel too casual for a formal guest room. In that setting, the Soft Gray and Cream or the Log Cabin Mosaic offers something closer to quiet luxury: understated, refined, and still unmistakably warm.
If the goal is a calming, Zen-like retreat, the Scandinavian Farmhouse Fusion or a simple Soft Linen and Cotton pattern provides visual rest in a way that a bold plaid never will. And for rooms that already skew modern – clean lines, minimal clutter, contemporary furniture – a Swiss Cross or Simple Strip Quilt integrates more seamlessly than anything with a heavy folk-art feel.
Farmhouse Quilt Patterns
Contents
- 1 Farmhouse Quilt Patterns
- 2 1. Classic Neutral Modern Farmhouse Quilt Patterns with Soft Whites and Greige
- 3 2. Buffalo Check and Plaid Quilt Patterns for Warm Farmhouse Charm
- 4 3. Rustic Patchwork Farmhouse Quilts for a Cozy Bedroom Tapestry
- 5 4. Cozy Neutral Patchwork Quilts for Small Farmhouse Bedrooms
- 6 5. Herb Garden Patchwork Quilt Ideas
- 7 6. Rustic Rag Quilts with Frayed Edges
- 8 7. Soft Linen and Cotton Farmhouse Quilts with Natural Texture
- 9 8. Handmade Farmhouse Quilts with Neutral Color Palettes
- 10 9. Hand-Stitched Farmhouse Quilts with Intricate, Heirloom Appeal
- 11 10. Floral Farmhouse Quilt Patterns with a Subtle Verdant Touch
- 12 11. Strip and Rectangle Farmhouse Quilts: Simple Patterns, Big Impact
- 13 12. Black and White Modern Farmhouse Quilt Patterns for Bold Contrast
- 14 13. Soft Gray and Cream Farmhouse Quilts for Timeless Elegance
- 15 14. Scandinavian Farmhouse Fusion: Minimalist Quilt Patterns for Your Bed
- 16 15. Swiss Cross or Plus Sign Farmhouse Quilts
- 17 16. Log Cabin Farmhouse Quilts with a Fresh, Modern Mosaic Look
- 18 17. Layered Farmhouse Bedding Quilts for a Warm, Inviting Look
- 19 18. Simple Strip Quilts for an Effortless Modern Farmhouse Bedroom
- 20 19. Textured Farmhouse Quilts with Channel and Cross Stitching
- 21 20. Shabby Chic Farmhouse Quilt Patterns for Cozy Bedrooms
- 22 Conclusion
Which farmhouse vibe are you?
Before you scroll through the patterns, it helps to know what you’re actually after. Here’s a quick way to orient yourself:
- Bold, cozy, winter cabin → Buffalo Check or Log Cabin
- Soft, romantic, feminine, or spring-ready → Shabby Chic or Floral Farmhouse
- Clean, minimalist, and contemporary → Scandinavian Fusion, Swiss Cross, or Soft Gray and Cream
- Tactile, textured, and genuinely rustic → Rag Quilt or Textured Linen
Whichever direction you’re heading, the patterns below are organized to help you find it. Whether you’re building a cozy winter retreat, a serene minimalist bedroom, or a soft vintage-feeling space, there is a farmhouse quilt here that fits the room you’re imagining.
Not sure farmhouse is the right fit? My guides on Modern, Contemporary, and Boho quilt patterns might be closer to what your room is asking for.
Some of the Most Popular Farmhouse Quilts on Amazon
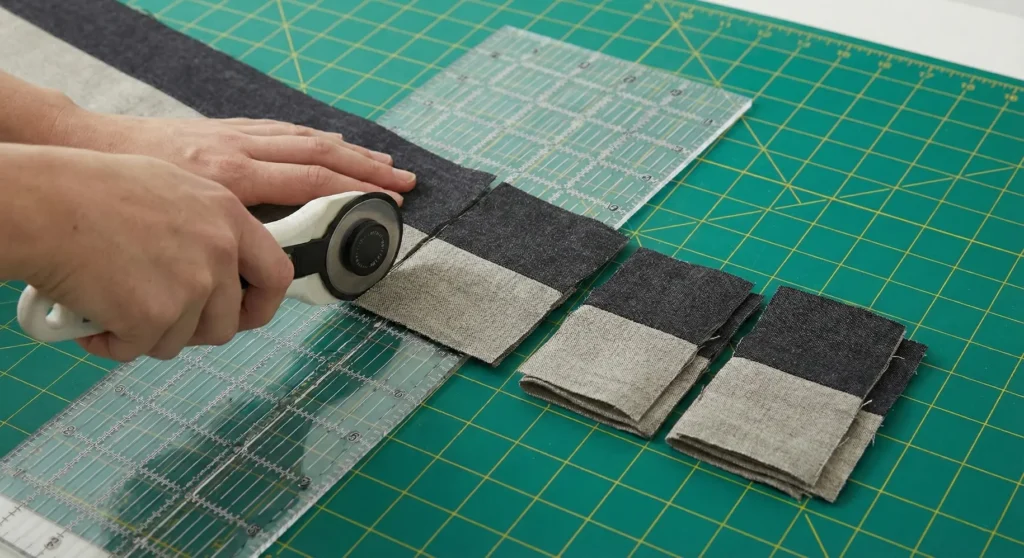
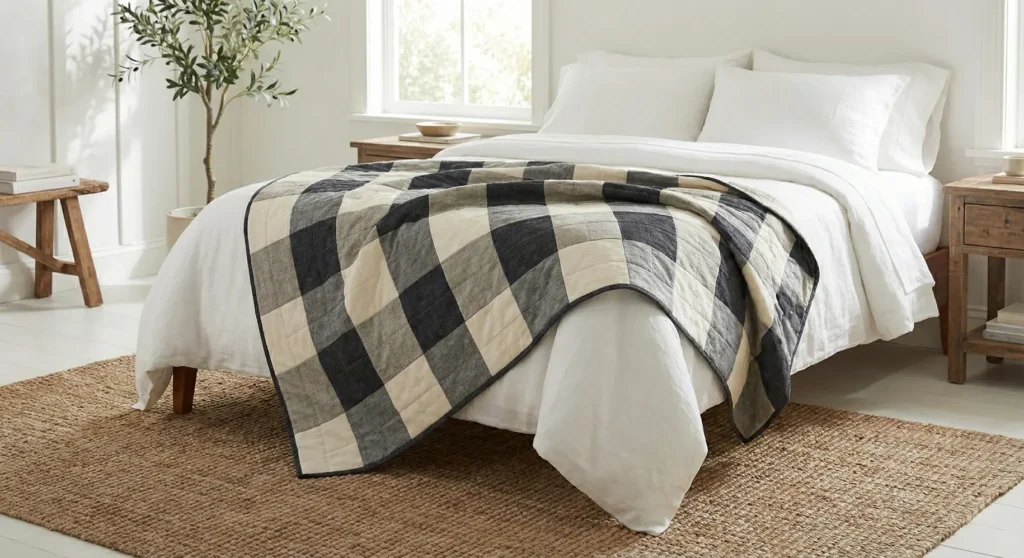
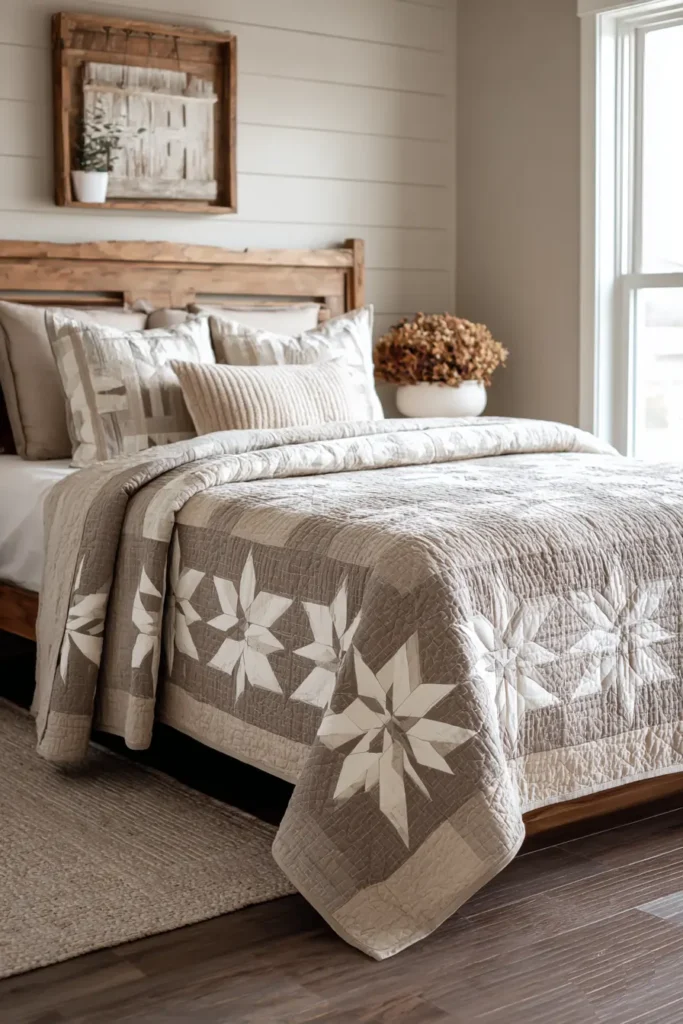
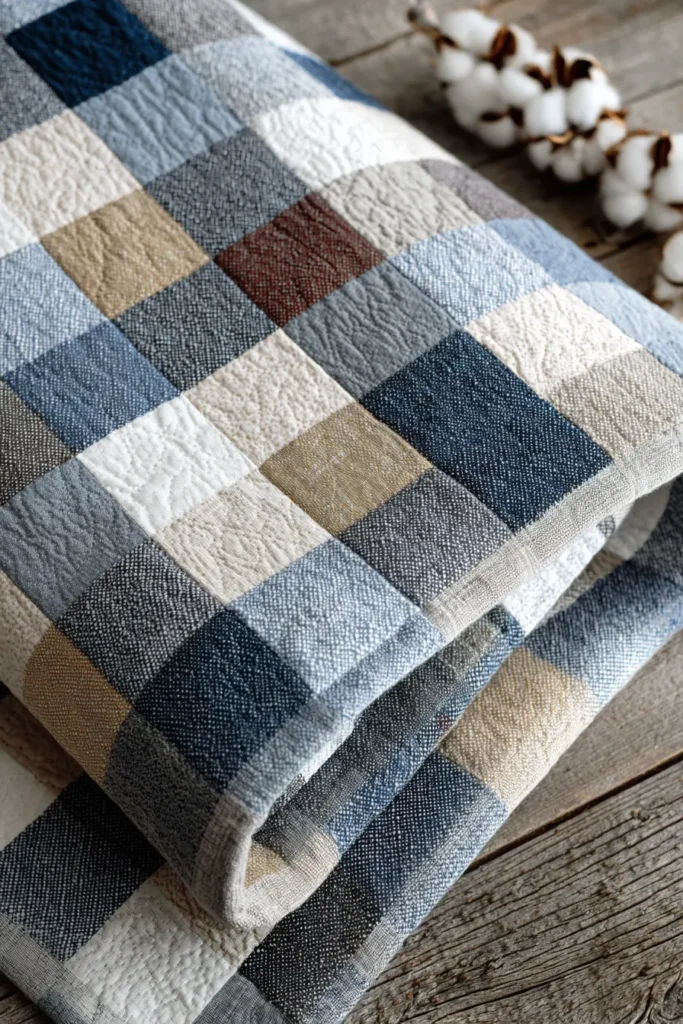
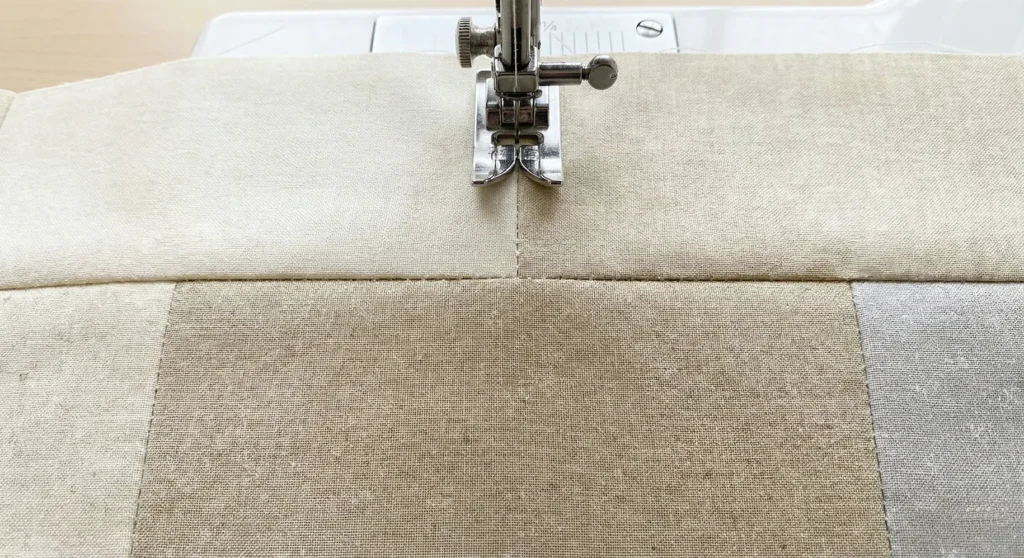
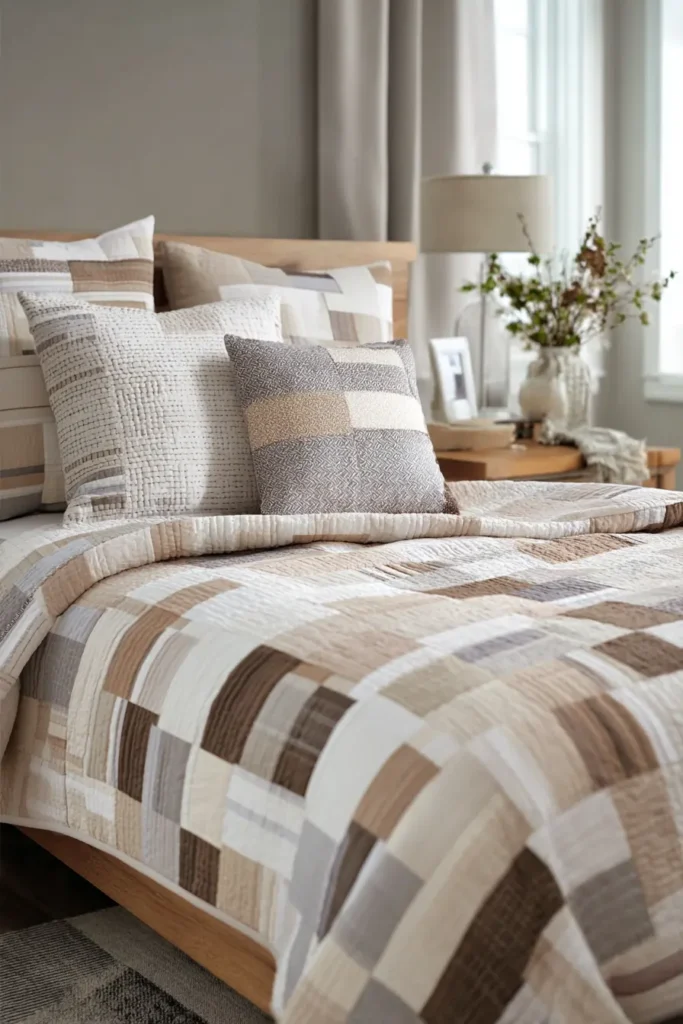
1. Classic Neutral Modern Farmhouse Quilt Patterns with Soft Whites and Greige
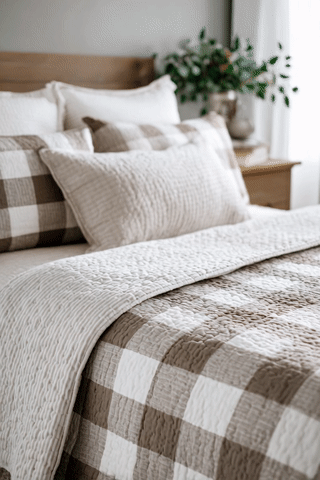
Neutral Modern Farmhouse Quilt Patterns
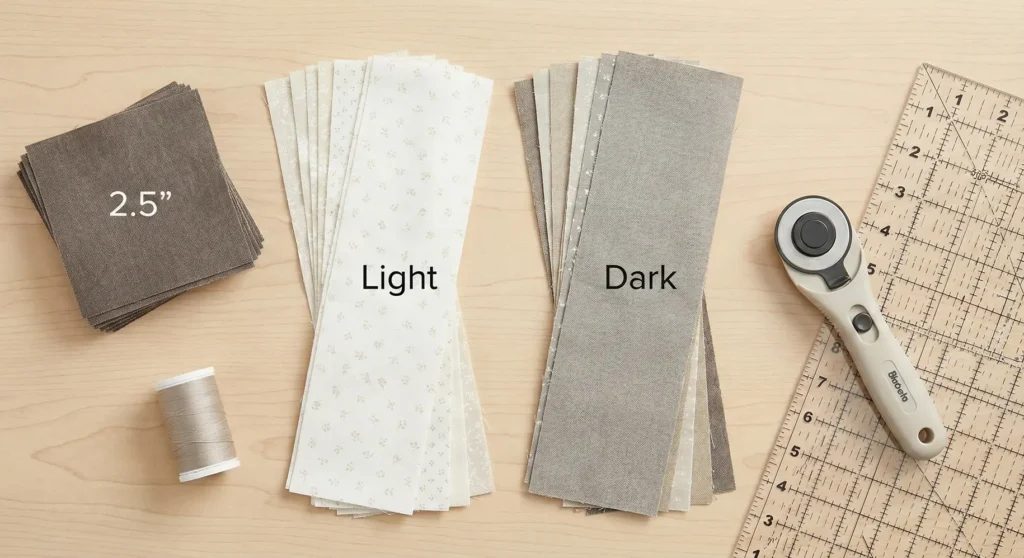
The quintessential “Modern Farmhouse” look relies on high-contrast textures and a soothing, neutral palette. This pattern creates a timeless “Greige Gingham” (Buffalo Check) effect. By using three values of fabric (Light, Medium, and Dark), you create the optical illusion of transparent layers overlapping, a staple of farmhouse design.
Finished Dimensions: Throw Size, approximately 60″ x 70″.
Materials Needed:
- Fabric A (Dark): 1.5 yards of dark Taupe or Charcoal.
- Fabric B (Medium): 2.5 yards of “Greige” (Oatmeal or Light Grey). This is the blender color that connects the dark and light.
- Fabric C (Light): 1.5 yards of Soft White or Cream.
- Backing Fabric: 4 yards.
- Batting: Twin-size batting (72″ x 90″).
- Binding: 1/2 yard.
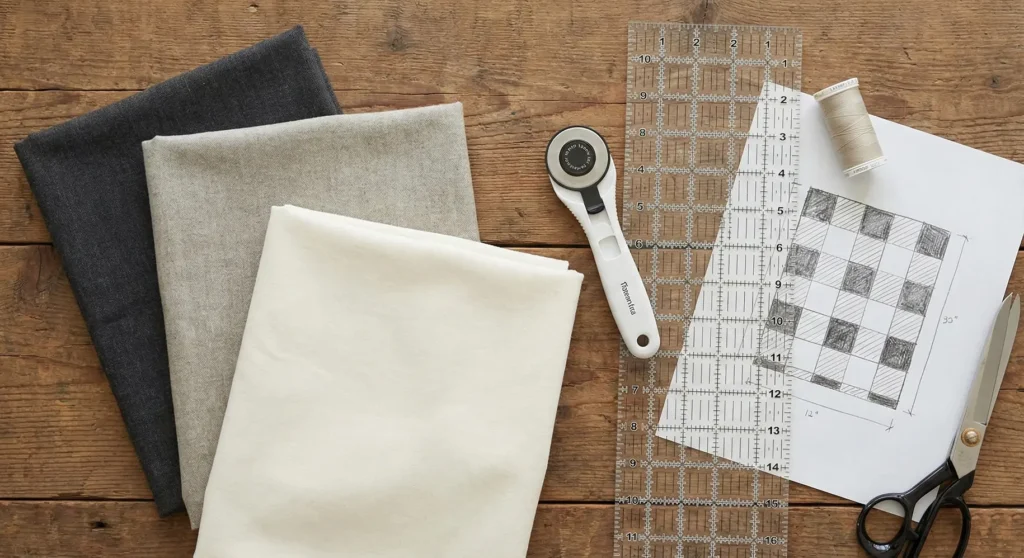
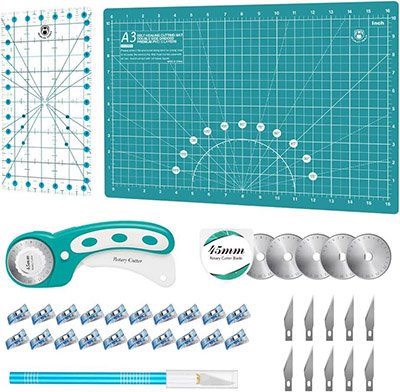
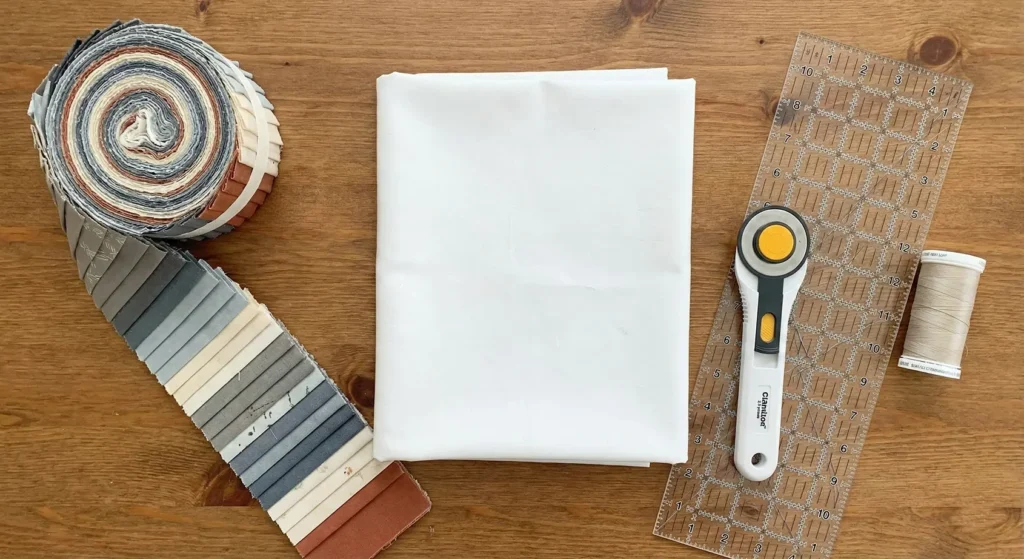
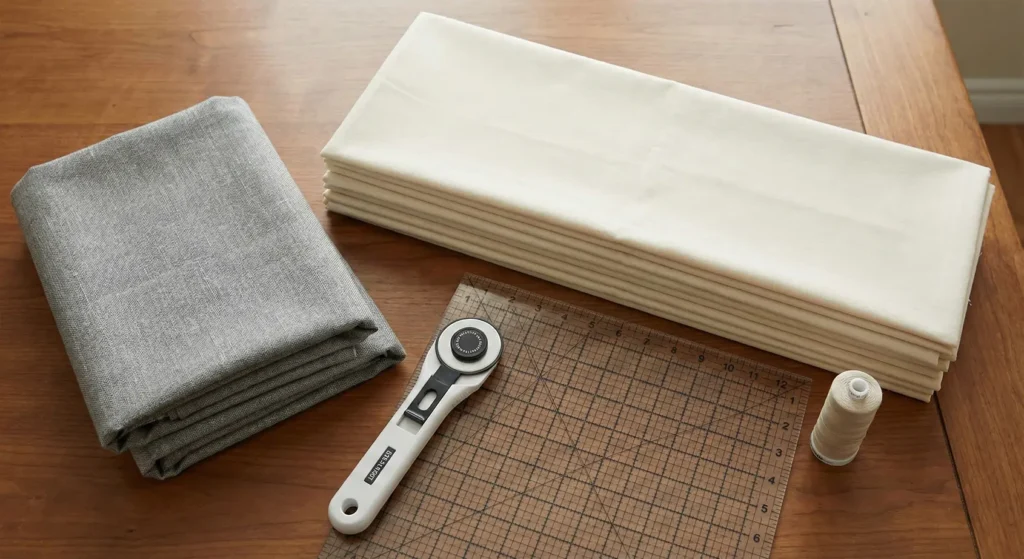
- Notions: Rotary cutter, 6″ x 24″ acrylic ruler, neutral thread.
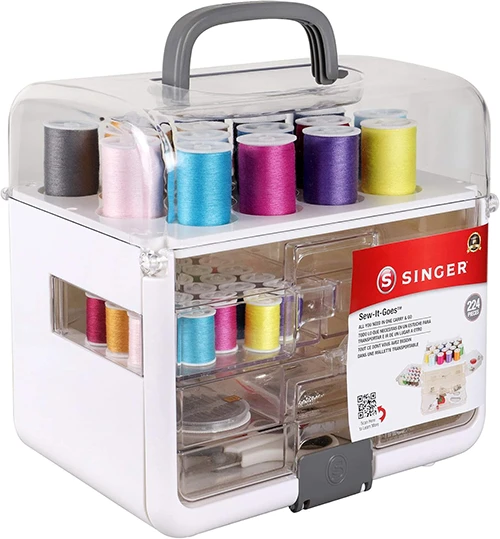
Helpful Sewing Kits for New Quilters


Step 1: Cut Your Strips
Efficiency is key here. Instead of cutting hundreds of individual squares, we will use strip piecing.
- From Fabric A (Dark), cut 7 strips, each 5.5″ wide by Width of Fabric (WOF).
- From Fabric C (Light), cut 7 strips, each 5.5″ wide by WOF.
- From Fabric B (Medium), cut 14 strips, each 5.5″ wide by WOF.
Step 2: Sew Strip Sets
You need to create two different types of long strip sets. Use a 1/4″ seam allowance throughout.
- Strip Set 1 (Dark/Medium): Sew one Fabric A (Dark) strip to one Fabric B (Medium) strip lengthwise. Press the seam toward the darker fabric. Make 7 of these sets.
- Strip Set 2 (Medium/Light): Sew one Fabric B (Medium) strip to one Fabric C (Light) strip lengthwise. Press the seam toward the medium fabric. Make 7 of these sets.
- Result: You should have long tubes of two-tone fabric, roughly 10.5″ wide.
Step 3: Sub-Cut the Strip Sets
Now, turn those long strips back into rectangular units.
- Take Strip Set 1 (Dark/Medium). Align your ruler and cross-cut it into 5.5″ wide segments. You will need 42 segments total.
- Take Strip Set 2 (Medium/Light). Cross-cut it into 5.5″ wide segments. You will need 42 segments total.
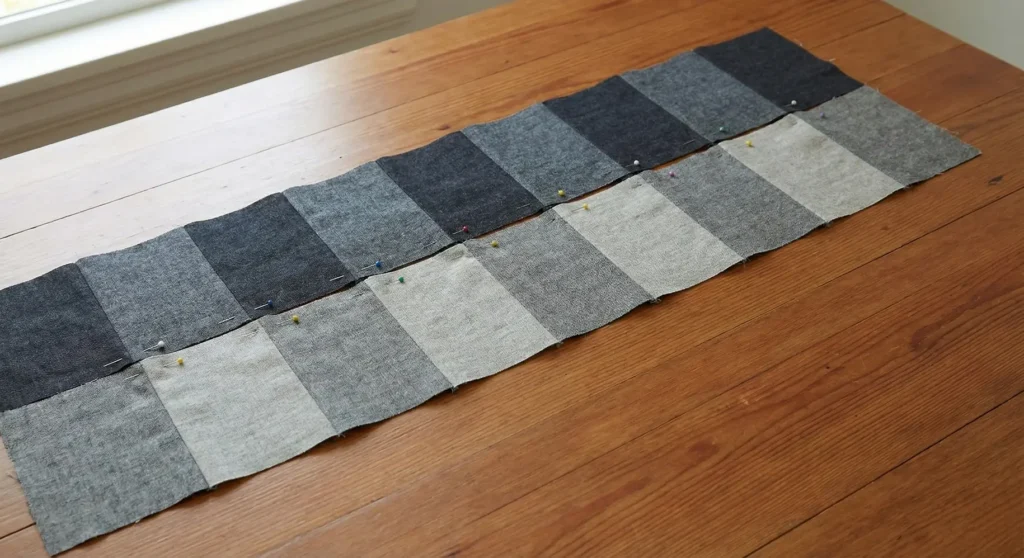
Step 4: Arrange the Rows
To create the Gingham illusion, you must alternate the rows correctly.
- Row Type A: Sew the (Dark/Medium) segments together end-to-end. Ensure the orientation is consistent (Dark, Medium, Dark, Medium…). Use six segments per row to make a row that is 60″ wide. Make 7 of these rows.
- Row Type B: Sew the (Medium/Light) segments together end-to-end. Orientation: (Medium, Light, Medium, Light…). Use six segments per row. Make 7 of these rows.
Step 5: Assemble the Quilt Top
- Lay out your rows on the floor. Start with Row Type A, then place Row Type B below it.
- Check the pattern: The “Dark” square should always be diagonal to a “Light” square. The “Medium” squares should touch each other on all sides to create the background connection.
- Pin the rows together, carefully nesting your seams (locking the seam allowances against each other) to ensure perfectly sharp corners.
- Sew all 14 rows together. Press the long horizontal seams open or to one side.
Step 6: Basting and Quilting
- Sandwich your backing (face down), batting, and quilt top (face up).
- Baste with safety pins or spray adhesive.
- Quilting: For a farmhouse look, use Straight Line Quilting. Stitch straight vertical lines and straight horizontal lines through the center of each square (about 2.5″ apart). This grid quilting enhances the quilt’s geometric plaid look.
Step 7: Bind and Finish
- Cut your binding fabric into 2.5″ strips. Sew them into one long continuous strip.
- Fold in half lengthwise and press.
- Sew the binding to the front of the quilt, miter the corners, and fold it over to the back to hand-stitch or machine-finish.
- Wash and dry the quilt to achieve that signature “crinkled” cozy texture.
Pro Design Tip: The success of a buffalo check quilt depends entirely on Color Value. To check whether your fabrics will work, snap a photo of them with your phone and apply a “Black and White” filter. If you can clearly see three distinct shades of grey (dark, medium, light), the pattern will pop. If two look the same, the check pattern will disappear.
Budget Consideration: For the “Medium” (Greige) and “Light” (Cream) fabrics, consider using high-quality cotton bed sheets (200 thread count or lower, 100% cotton). Sheets are wide and inexpensive, offering considerable yardage for these neutral background colors.
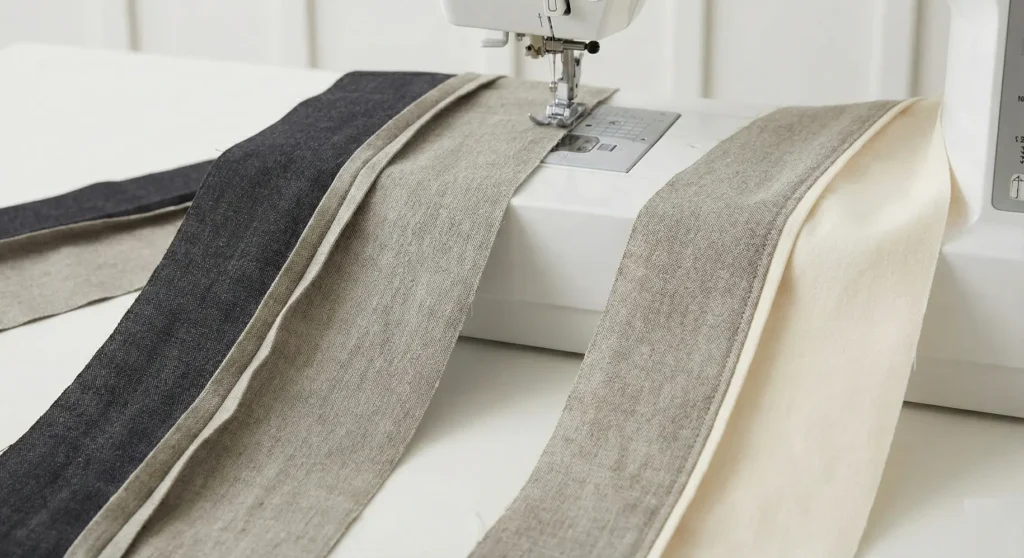
Tools for Cutting, Pressing, and Sewing


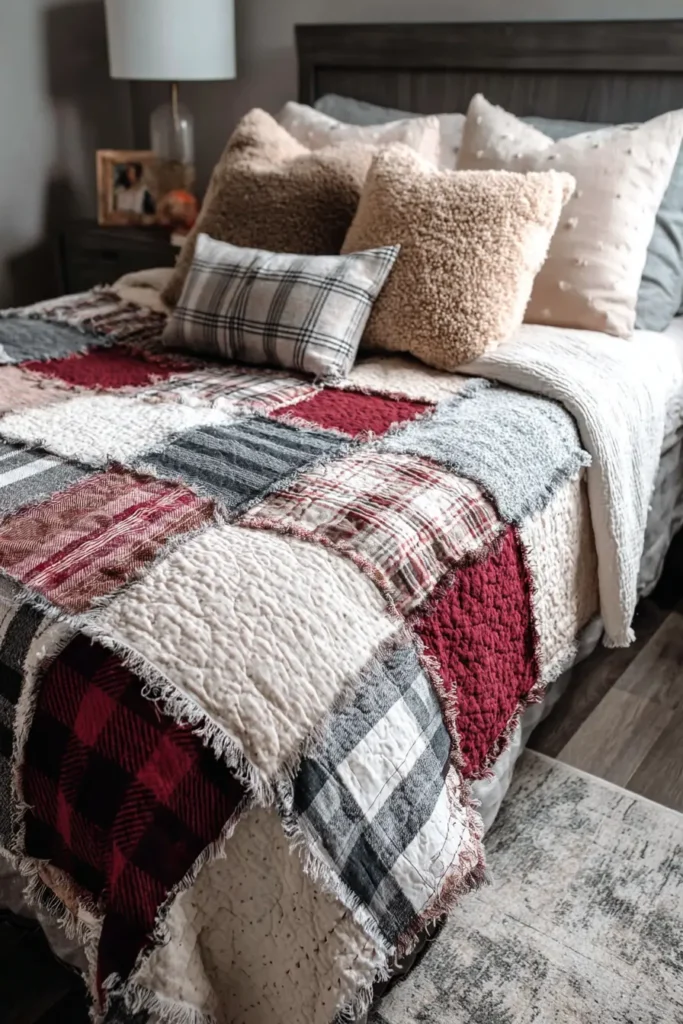
2. Buffalo Check and Plaid Quilt Patterns for Warm Farmhouse Charm
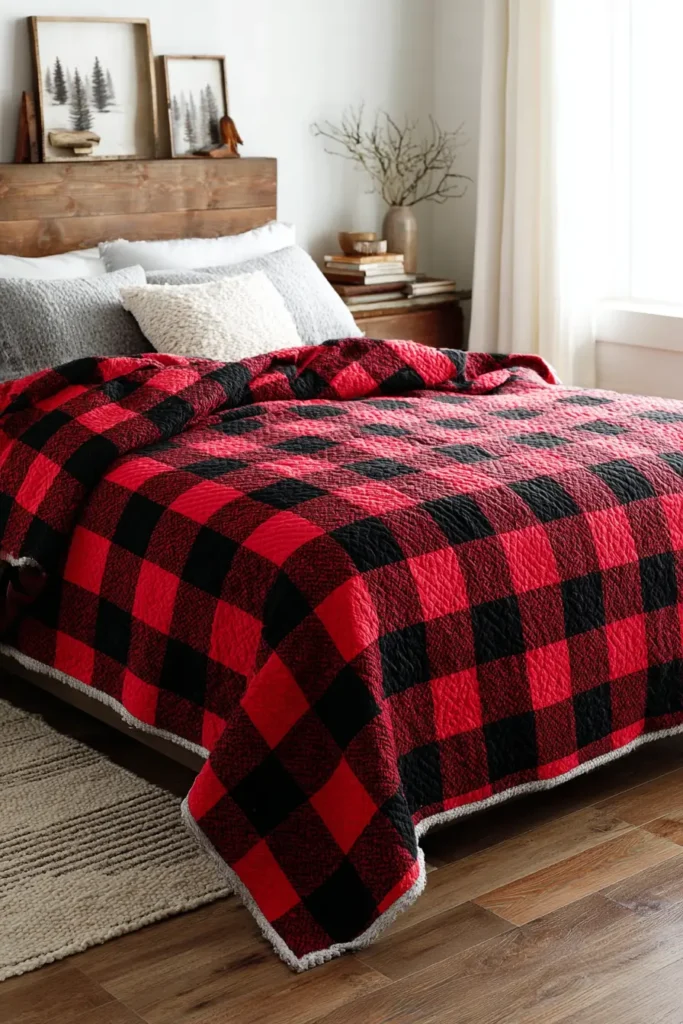
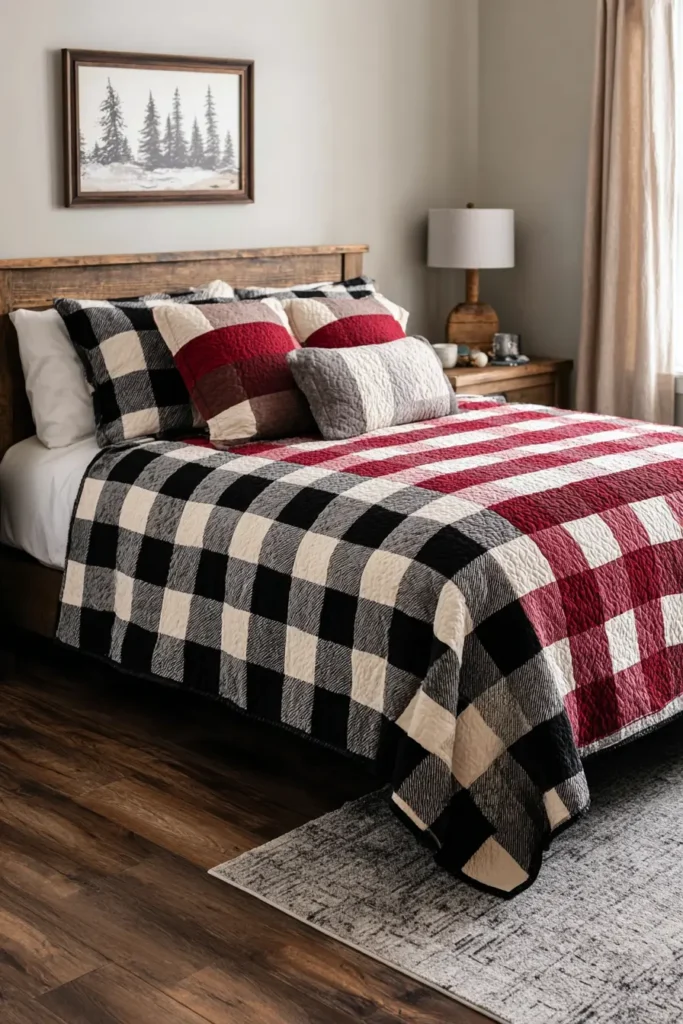
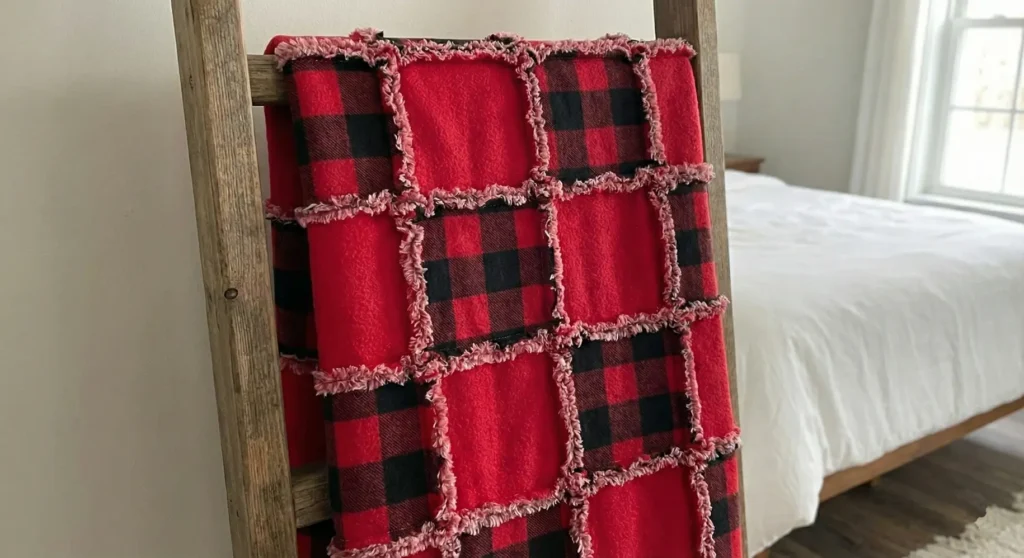
Cozy Buffalo Plaid Rag Quilt
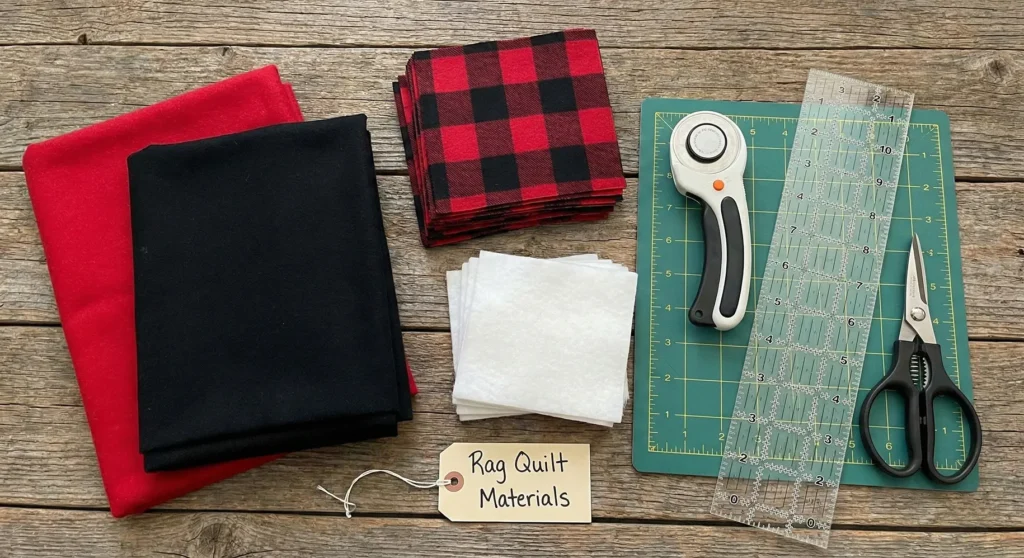
While the previous pattern focused on optical illusion piecing, this pattern focuses on texture. A “Rag Quilt” is the ultimate farmhouse staple. It uses exposed seams, clipped and washed, to create soft, frayed edges around every square. It is traditionally made with flannel for maximum coziness.
Finished Dimensions: Large Throw, approximately 55″ x 66″.
Materials Needed:
- Fabric A (Red Flannel): 4 yards (for top and backing).
- Fabric B (Black Flannel): 4 yards (for top and backing).
- Note: This creates a 2-color checkerboard. For a 3-color plaid, add a maroon/dark red.
- Batting: 3 yards of low-loft cotton batting or flannel sheeting.
- Notions: Spring-loaded snipping scissors (essential for hand health), rotary cutter, ruler, and walking foot.
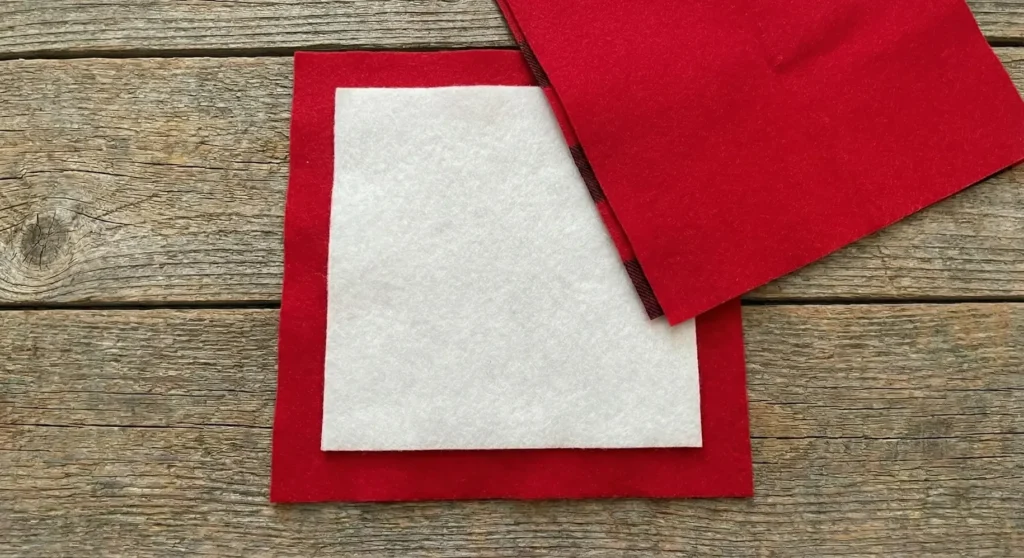
Step 1: Cut the Squares (The “Sandwich” Ingredients)
Rag quilts are built block-by-block. You need to cut squares for the top, the batting, and the backing.
- Top & Backing Fabrics: Cut 242 squares total, each 6″ x 6″.
- 121 squares of Red Flannel.
- 121 squares of Black Flannel.
- Batting: Cut 121 squares, each 5″ x 5″.
- Crucial: The batting squares must be 1 inch smaller than the fabric squares. This keeps the batting out of the seam allowance so the fringe is fluffy, not lumpy.
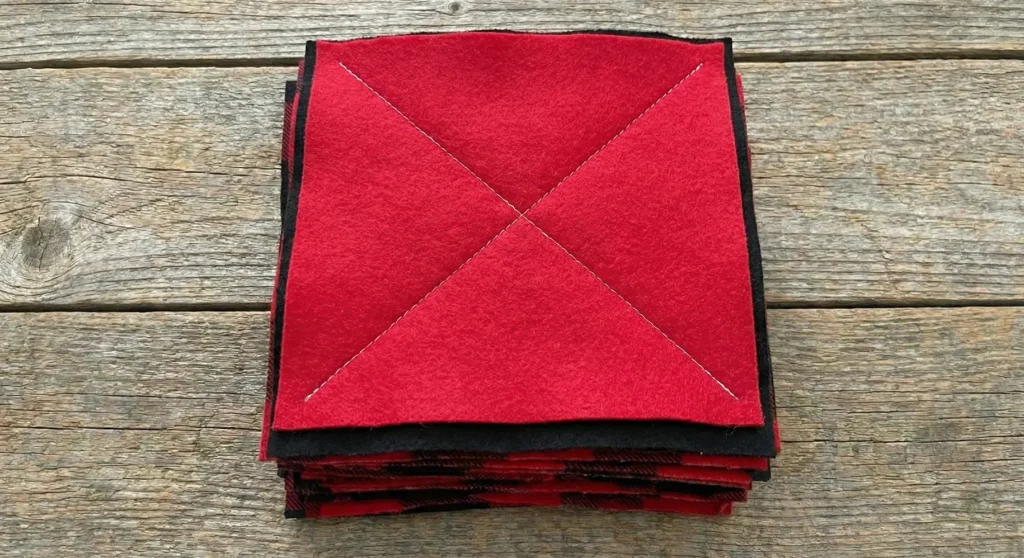
Step 2: Build the Block Sandwiches
- Lay one Backing Square (wrong side up) on the table.
- Center one Batting Square on top of it.
- Lay the matching Top Square (right side up) on top.
- You now have a “sandwich” with batting in the middle and fabric on both outsides. Make 121 sandwiches (mix of Red and Black).
Step 3: Quilt Each Block
- Before sewing the blocks together, you must secure the batting.
- Sew a large “X” across each sandwich, corner to corner.
- You don’t need to backstitch; the ends will be caught in the seams later. This “X” adds the classic quilted look and holds the batting in place during washing.
Step 4: Assemble the Rows (Wrong Sides Together!)
This is the opposite of regular quilting.
- Arrange your blocks on the floor in an alternating checkerboard pattern (11 blocks wide x 11 blocks tall).
- Take the first two blocks. Place them Wrong Sides Together (so the Backing sides are touching each other).
- Sew them together with a generous 1/2″ seam allowance.
- Open them up. You will see the raw seam sticking up on the front (top) of the quilt. This is correct!
- Continue joining blocks to finish the row. Make 11 rows.
Step 5: Join the Rows
- Place Row 1 and Row 2 with the wrong sides together, aligning the block seams.
- Pin heavily at the seam intersections. Open the seam allowances flat so you are sewing through open flaps, or nest them if you prefer, but open seams fray better.
- Sew the rows together with a 1/2″ seam allowance.
- Repeat until all 11 rows are joined. Sew a final 1/2″ seam around the entire outer perimeter of the quilt to seal the edges.
Step 6: Clip the Fringe (The “Rag” Step)
- Using sharp, spring-loaded scissors, make snips into all the exposed seam allowances (vertical, horizontal, and outer edges).
- Space the snips about 1/4″ to 1/2″ apart.
- Stop cutting 1/8″ before the seam line. Do not cut your thread!
- This step takes time and hand strength, so take breaks.

Step 7: Wash and Fluff
- Take the quilt to a laundromat (recommended for the first wash to avoid clogging your home drain with lint) or check your filter frequently.
- Wash on a cold cycle with a heavy spin.
- Dry on high heat. The dryer is where the magic happens—the tumbling turns those snipped edges into soft, fuzzy “caterpillars” of fringe.
- Clean your lint trap halfway through the cycle; it will be full!
Pro Design Tip: For a “Lumberjack Plaid” look that mimics woven fabric, you need three colors: Light (Red), Medium (Dark Red/Maroon), and Dark (Black). Arrange them diagonally: The Medium color runs in diagonal lines, with the Light and Dark filling the alternating spots. This creates the visual overlap of an authentic plaid weave.
Budget Consideration: Instead of buying expensive quilt batting, use old flannel sheets or cheap fleece blankets from the thrift store for the middle layer. Cut them into 5″ squares. They add warmth and fray nicely along with the outer layers.
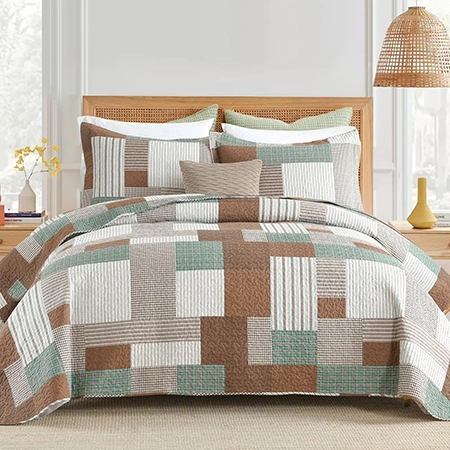
3. Rustic Patchwork Farmhouse Quilts for a Cozy Bedroom Tapestry
Rustic Scrappy Postage Stamp Quilt
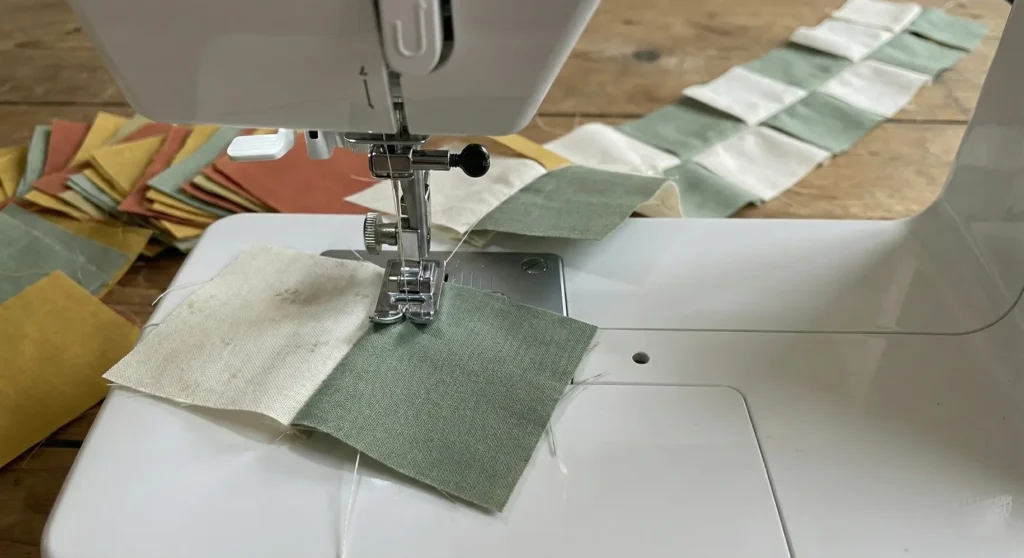
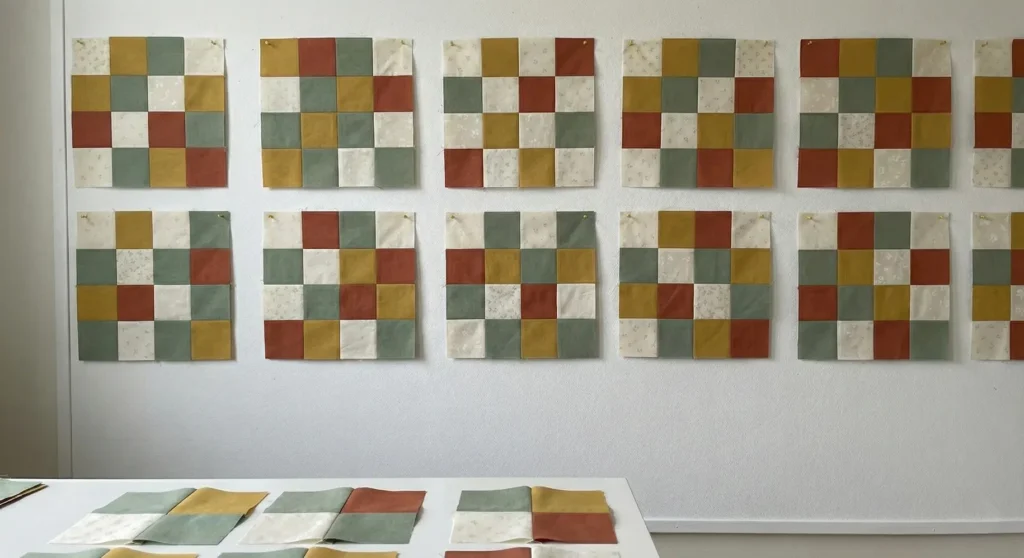
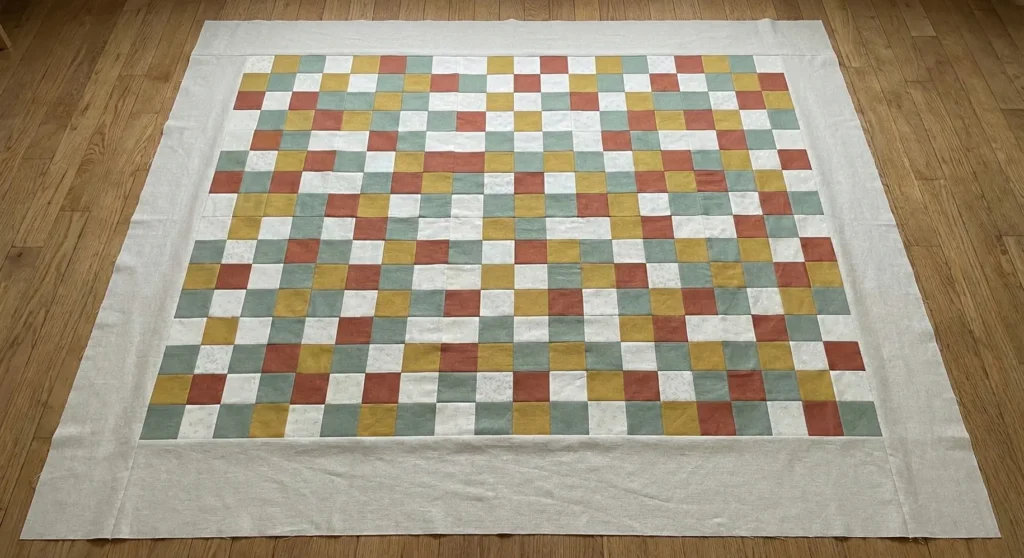
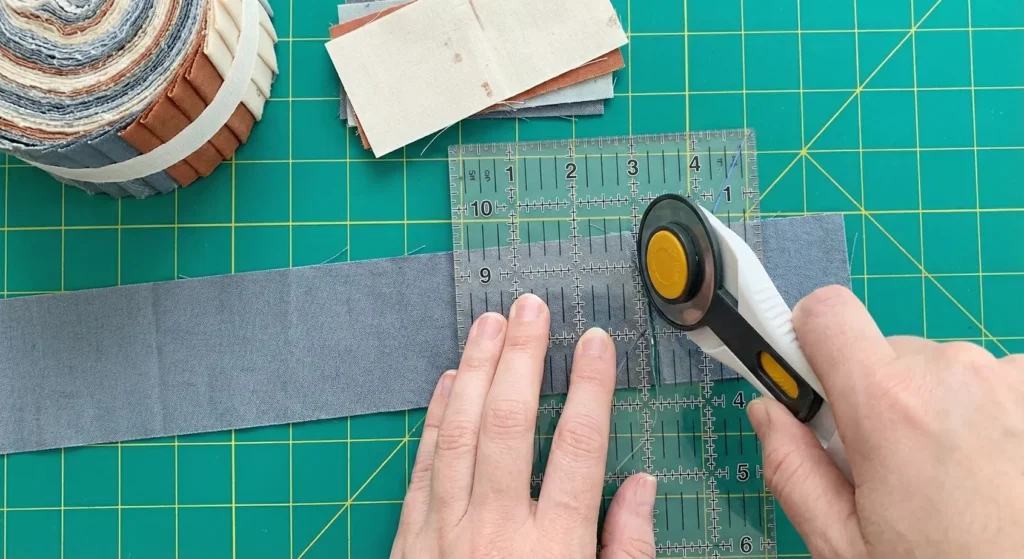
This pattern creates a dense, tapestry-like effect by using hundreds of small 2.5-inch squares. The “Postage Stamp” design is a classic way to use up every scrap of fabric you own. To achieve the modern farmhouse look, focus on “low volume” backgrounds (whites with subtle patterns) mixed with muted earth tones like sage green, mustard yellow, rusty red, and denim blue.
Finished Dimensions: Large Throw/Coverlet, approximately 64″ x 72″.
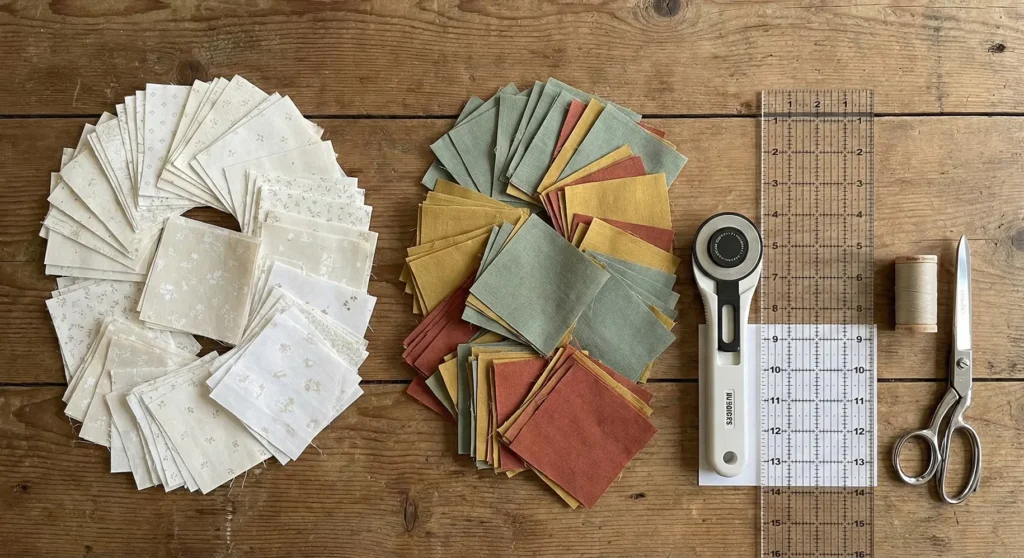
Batting, Measuring, Marking, and Clipping Supplies for Quilts
“As an Amazon Associate, I earn from qualifying purchases.“


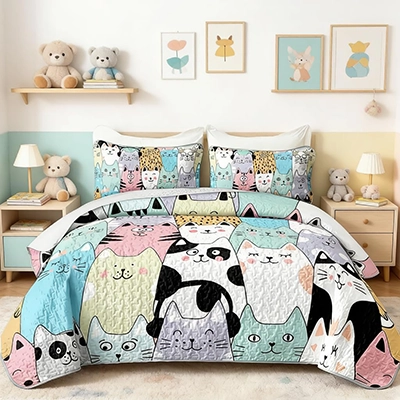
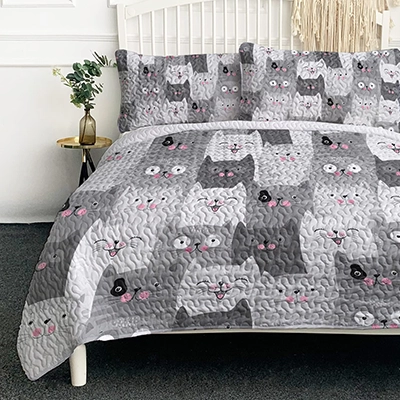
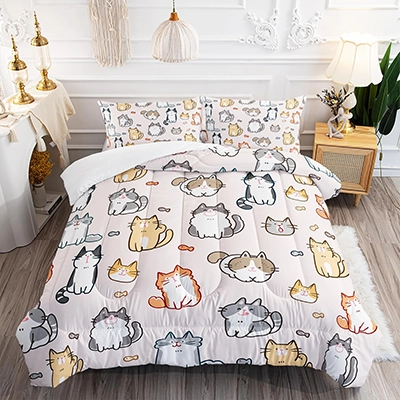
Recommended Ready-Made Cat Quilts
“As an Amazon Associate, I earn from qualifying purchases.“
Materials Needed:
- Scraps: A large variety of cotton scraps to cut 1,152 squares (2.5″ x 2.5″).
- Ratio: roughly 50% “Low Volume” (creams/whites) and 50% “Muted Colors”.
- Border Fabric (Optional): 1.5 yards of natural linen or unbleached muslin.
- Backing Fabric: 4 yards.
- Batting: Twin size (72″ x 90″).
- Thread: Beige or grey cotton thread (blends better than bright white).
- Notions: Rotary cutter, quilting ruler (ideally a specialized 2.5″ strip ruler), large design wall or floor space.
Step 1: The Great Cut
- Iron your scraps flat.
- Cut everything into 2.5-inch squares.
- You need a total of 1,152 squares. This sounds like a lot, but it goes quickly if you stack fabric layers and cut multiple squares at once.
- Sort them into two piles: Lights (Low Volume backgrounds) and Darks (Colors).
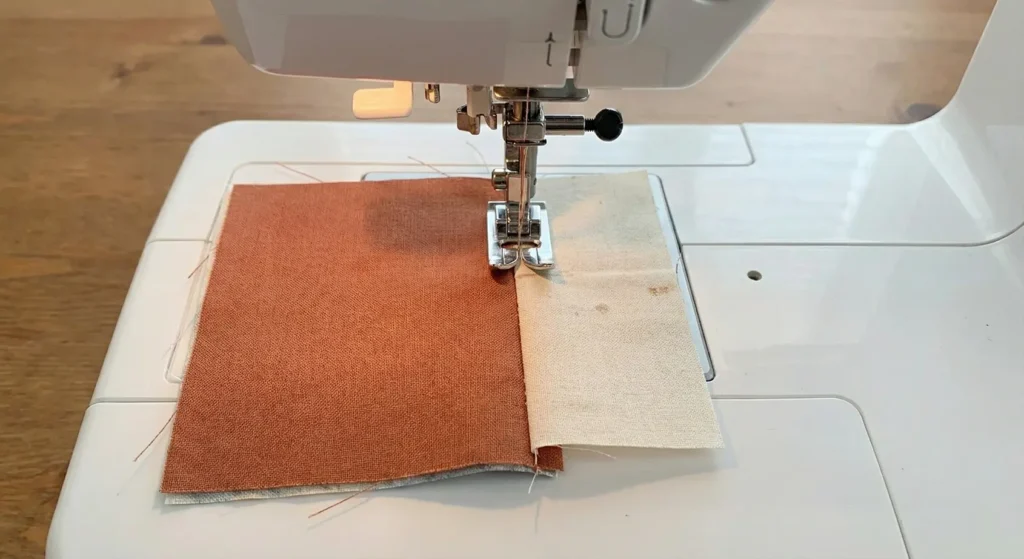
Step 2: Chain Piece into Pairs
- Sit at your machine with your two piles.
- Take one Light and one Dark. Sew them together (Right Sides Together) with a 1/4″ seam allowance.
- Do not cut the thread. Keep feeding pairs through the machine, creating a long “chain” of connected squares.
- Sew about 50-100 pairs at a time.
- Clip the threads between the pairs. Press the seams toward the Dark fabric.
Step 3: Create 4-Patches
- Take two pairs from Step 2.
- Flip one pair so the Dark square is opposite the Light square of the other pair (checkerboard style).
- Next, the center seams together (they should lock in place because you pressed toward the dark).
- Sew them together to make a 4-Patch unit (unfinished size 4.5″ x 4.5″).
- Repeat until all squares are converted into 4-patches. You should have 288 4-patch units.
Step 4: Create 16-Patch Blocks
- Sew four 4-patch units together to create a larger 16-Patch Block (4 squares wide x 4 squares tall).
- Ensure you maintain the checkerboard pattern (Light/Dark alternating).
- You will need 72 of these large blocks (8 blocks wide x 9 blocks tall).
- Why do we block? It is much easier to keep rows straight when sewing big blocks together than trying to sew 32 tiny individual squares into a single row without warping.
Step 5: Assemble the Quilt Top
- Lay out your 72 blocks on the floor (8 columns, 9 rows).
- Move them around to balance the colors. Make sure you don’t have a cluster of red scraps in one corner and all blue in another. The “tapestry” look comes from a uniform distribution of color.
- Sew the blocks into rows. Press seams open (to reduce bulk at the many intersections).
- Sew the rows together to complete the center top.
Step 6: Add a Linen Border (The Farmhouse Frame)
- To calm the busy patchwork, add a solid border.
- Cut 5.5″ wide strips of natural linen.
- Measure the vertical length of your quilt (center). Sew the side borders on.
- Measure the horizontal width (including the new side borders). Sew the top and bottom borders on.
- This wide, textured frame transforms the scrappy center into a sophisticated piece of art.
Step 7: Big Stitch Quilting
- Sandwich your quilt (Backing, Batting, Top). Baste well.
- Instead of machine quilting, use “Big Stitch” hand quilting.
- Use Perle Cotton Size 8 thread (slightly thicker than regular thread) in a contrasting color, such as mustard or sashiko white.
- Hand stitch large running stitches diagonally through the light squares. The visible hand stitching adds a massive amount of “rustic” charm that machines cannot replicate.
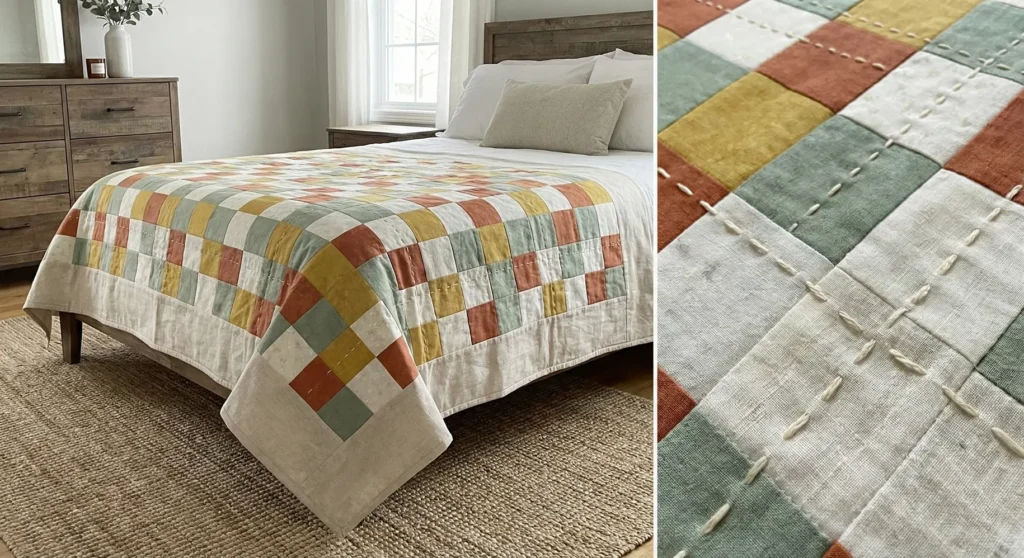
Pro Design Tip: Tea Dyeing. If your white scraps look too “bright and new” compared to your rustic linen border, soak the finished quilt top (before batting/backing) in a bathtub with strong black tea for 20 minutes. This knocks back the brightness and gives the whole tapestry a cohesive, vintage antique glow.
Budget Consideration: This is the ultimate “Shirt Quilt.” Go to the thrift store on “dollar day” and buy XXXL men’s button-down shirts in plaids, stripes, and solids. One large shirt yields a massive amount of 2.5″ squares. The woven texture of shirt fabric (Oxford cloth, poplin) feels much more “farmhouse” than printed quilting cotton.

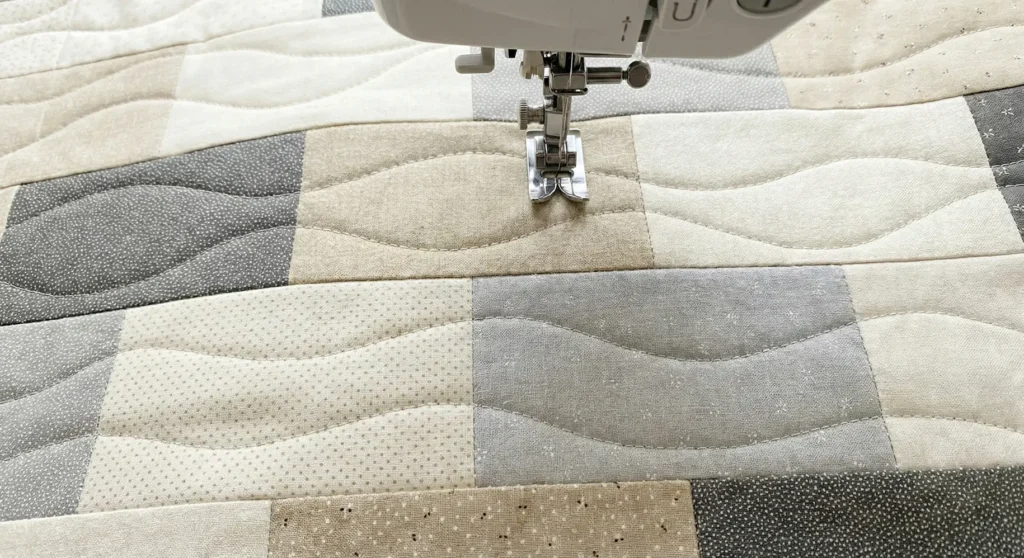
4. Cozy Neutral Patchwork Quilts for Small Farmhouse Bedrooms

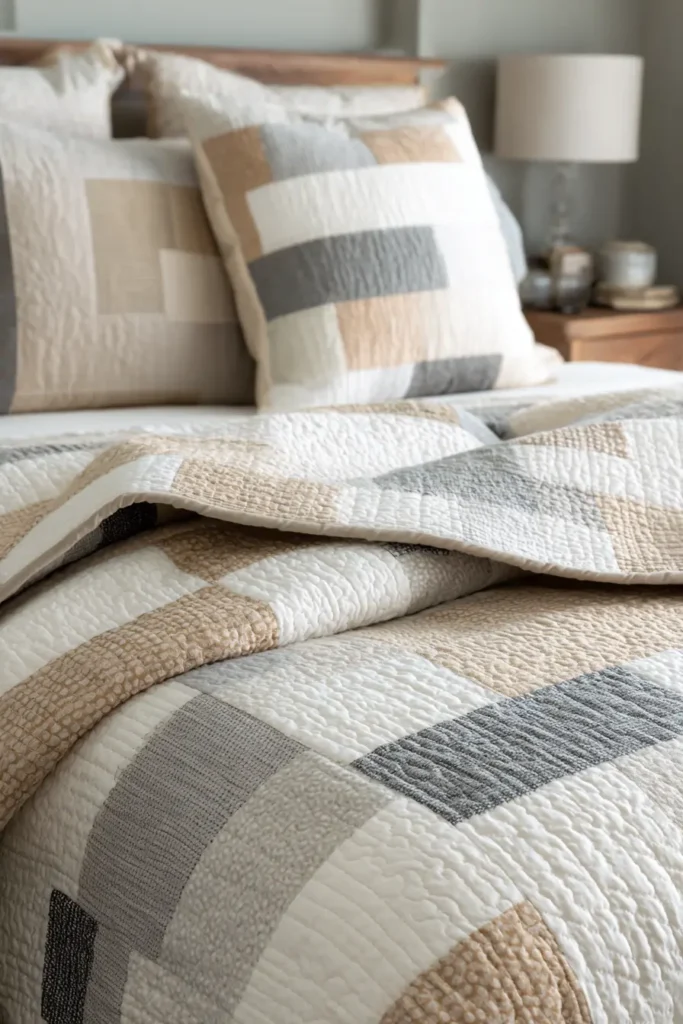
The “Neutral Tile” Brick Quilt
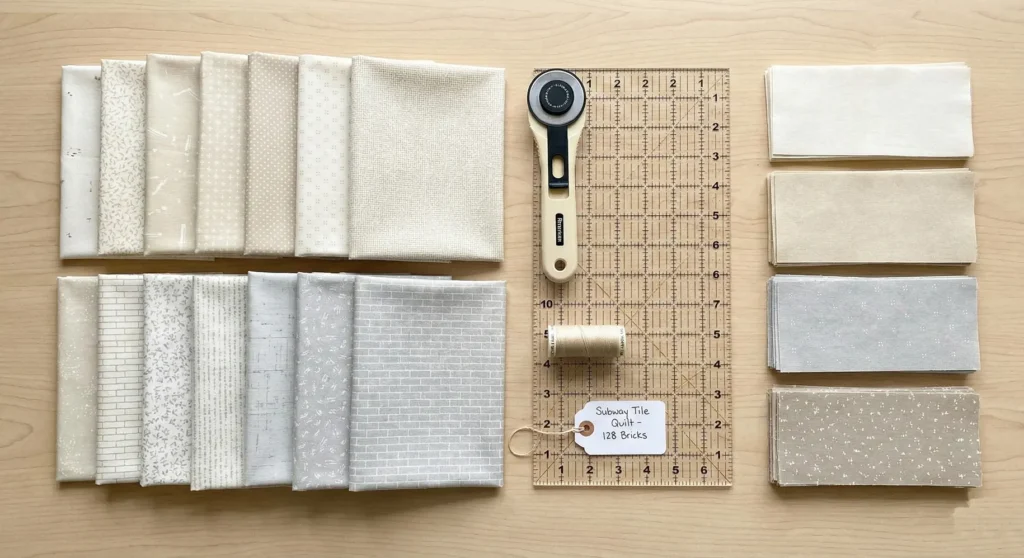
Small bedrooms can easily be overwhelmed by busy, intricate quilt patterns. This design borrows the classic “subway tile” look found in modern farmhouse kitchens. By using large, rectangular “bricks” in varying shades of cream, oatmeal, and soft grey, you create a restful, organized patchwork that makes a small room feel wider and more open.
Finished Dimensions: Large Throw / Twin Accent, approximately 60″ x 70″.
Materials Needed:
- Fabric: 15 Fat Quarters (18″ x 22″ cuts) in a mix of low-volume neutrals.
- Palette: 5 Cream/White prints, 5 Beige/Tan textures, 5 Light Grey/Greige prints.
- Backing Fabric: 4 yards.
- Batting: Twin size (72″ x 90″).
- Binding: 1/2 yard of a solid, darker charcoal or taupe (to frame the soft colors).
- Notions: Rotary cutter, 6″ x 24″ ruler, neutral beige thread (50wt).
Step 1: Cut the “Bricks”
- Press your Fat Quarters flat.
- From each Fat Quarter, cut strips that are 4.5 inches wide.
- Sub-cut those strips into rectangles measuring 4.5″ x 8.5″.
- You need a total of 128 bricks. (8 bricks per row x 16 rows = 128).
- Note: Using this 2:1 ratio (twice as long as it is tall) mimics the look of real subway tiles.
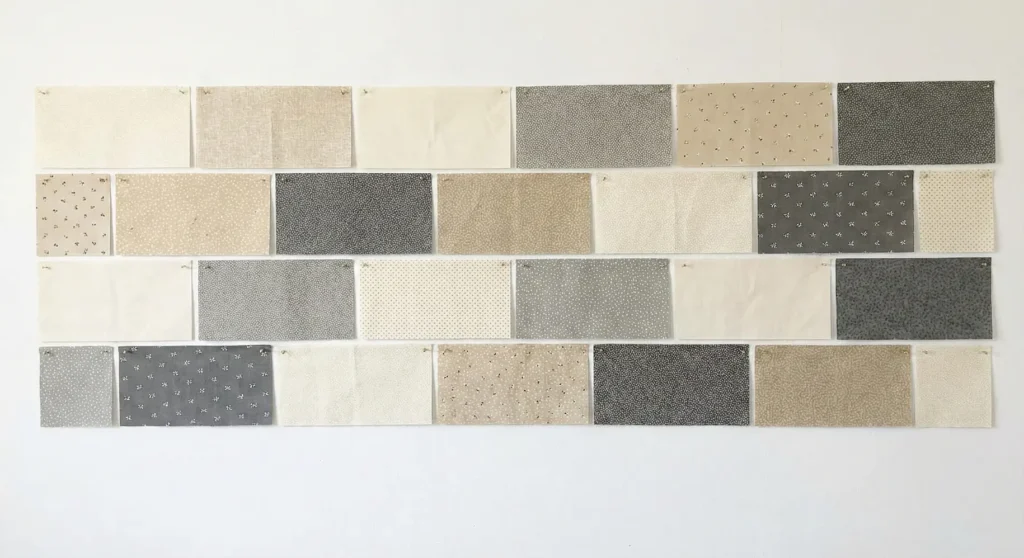
Step 2: Establish the Layout
- Find an ample floor space or design a wall.
- Arrange your bricks in 16 horizontal rows.
- The Stagger: This is crucial for the “brick” look.
- Row 1: Start with a full brick. Lay out 8 full bricks.
- Row 2: Start with a half-brick (cut one 4.5″ x 8.5″ brick in half to make two 4.5″ x 4.25″ squares). Place the half-brick first, followed by 7 full bricks, and end with the other half-brick.
- Row 3: Repeat Row 1 layout.
- Row 4: Repeat Row 2 layout.
- Shuffle the colors so that no two greys touch or form a “clump” of beige in one spot. Aim for a balanced, scrappy mix.
Step 3: Sew the Rows
- Stack the bricks for Row 1 in order.
- Sew them together end-to-end (short side to short side) with a 1/4″ seam allowance.
- Press the seams to the right.
- Sew Row 2. Press the seams to the left.
- Why alternate pressing? This allows the seams to “nest” (lock together flat) when you join the rows later, preventing bulky lumps.
Step 4: Join the Rows
- Pin Row 1 to Row 2, Right Sides Together.
- Match the center of a brick in Row 1 with the seam line in Row 2. (This is the “running bond” pattern).
- Sew the long horizontal seam.
- Continue adding rows until all 16 rows are joined.
- Press the long horizontal seams open to keep the quilt top flat.
Step 5: Texture Quilting
- Baste your sandwich (Backing, Batting, Top).
- Quilting Design: To keep it cozy and soft, avoid rigid straight lines here. Use a Walking Foot to quilt organic, gentle waves horizontally across the quilt.
- Space the wave lines about 1.5 to 2 inches apart. The curves soften the blocky geometry of the bricks, adding to the “cozy” factor.
Step 6: Contrast Binding
- Trim the quilt square, cutting off any uneven ends from the staggered rows.
- Prepare your binding strips (2.5″ wide).
- Sew the binding to the front. A dark charcoal binding acts like a picture frame, containing the soft neutral patchwork and giving the eye a place to rest in a small room.
Pro Design Tip: Mix Your Substrates. Don’t just use quilting cotton. Incorporate some Essex Linen (cotton/linen blend) or Woven Chambrays into your bricks. The slight difference in texture and weave adds a luxury hotel vibe to the simple patchwork.
Budget Consideration: This pattern creates very little waste. To save money, look for “Layer Cakes” (pre-cut 10″ squares) on sale. A one-layer cake usually contains 42 squares. If you cut them in half, you get 84 bricks instantly. Two-layer cakes (or one and some yardage) are often cheaper than buying many separate fabric cuts.
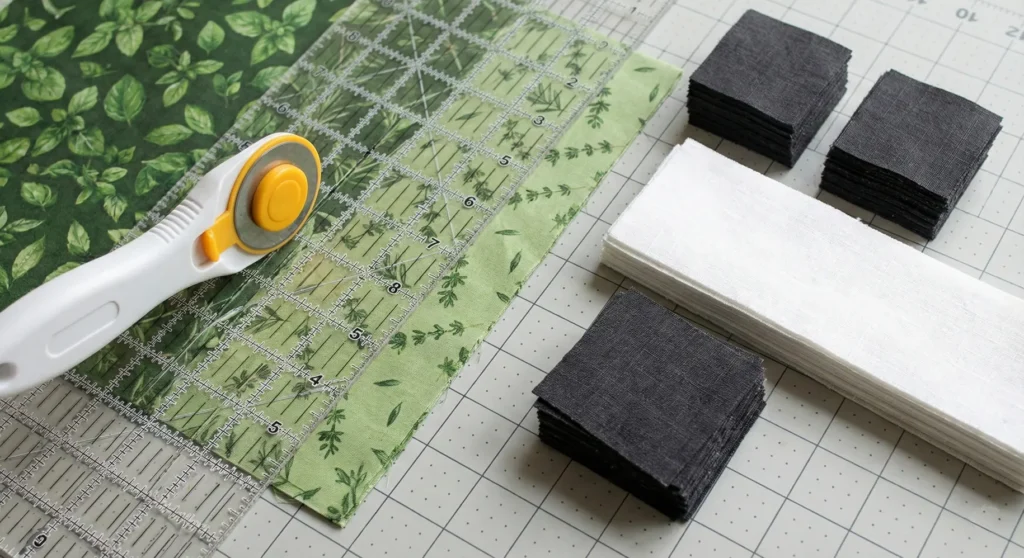
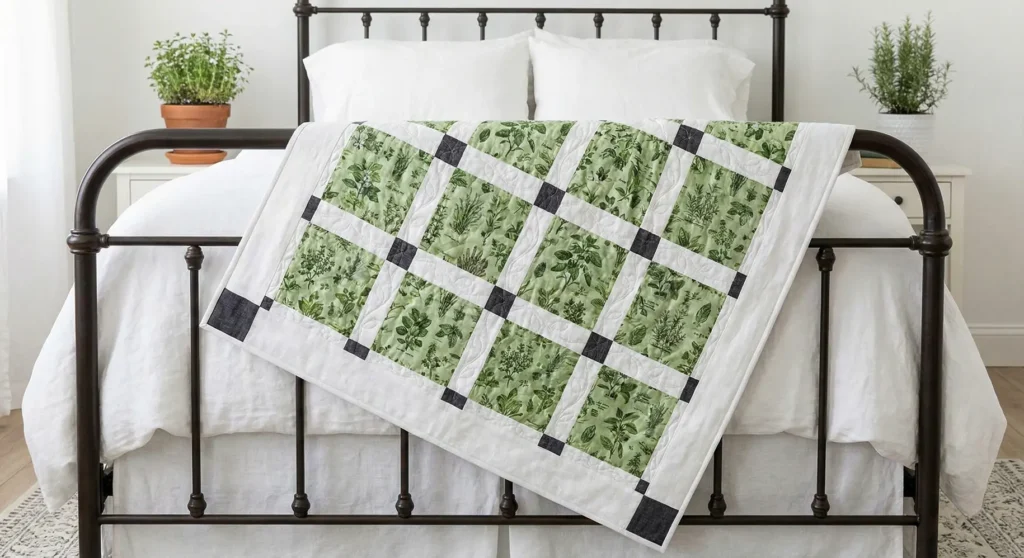
5. Herb Garden Patchwork Quilt Ideas
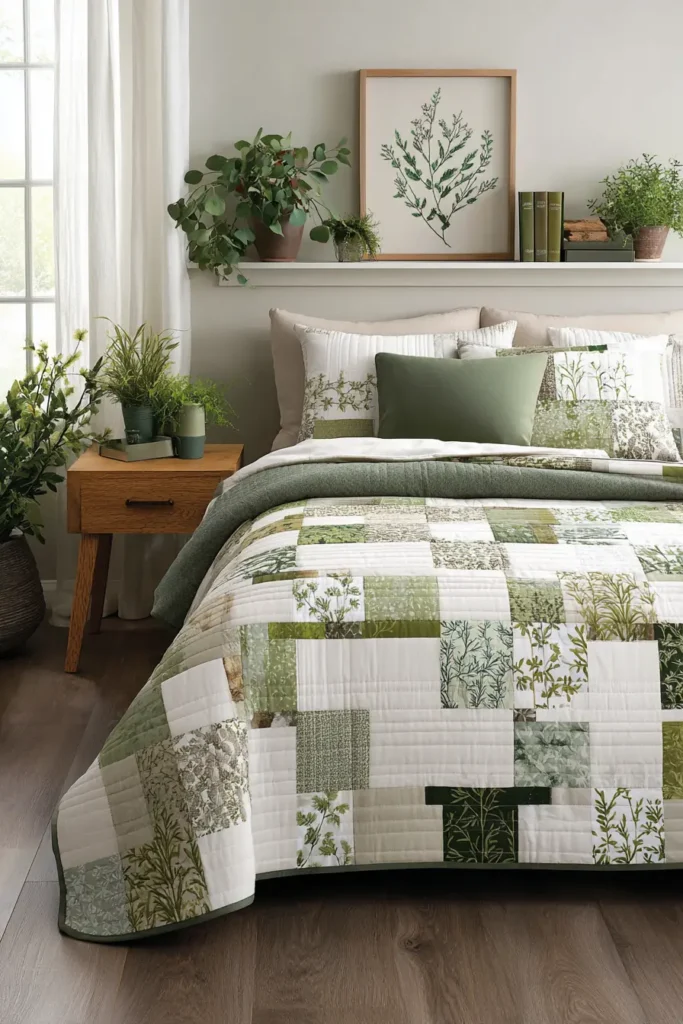
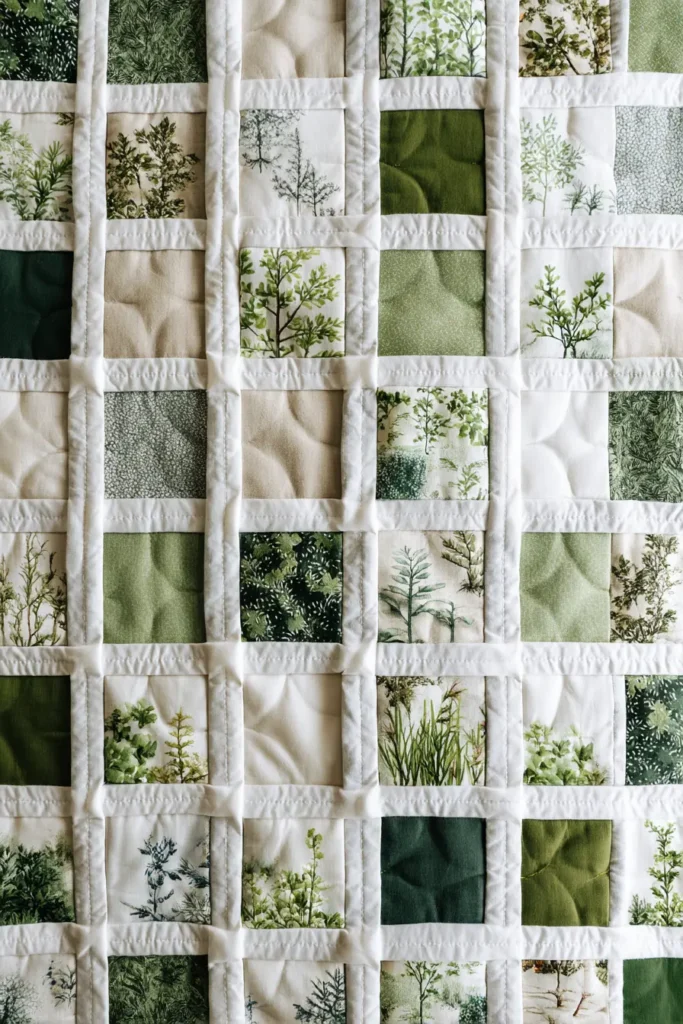
The “Sage & Trellis” Garden Quilt
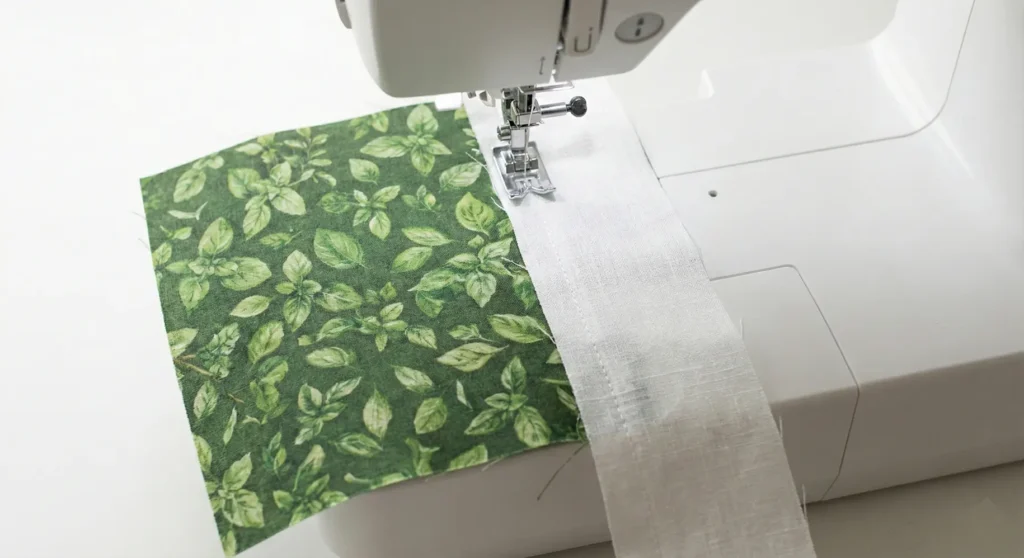
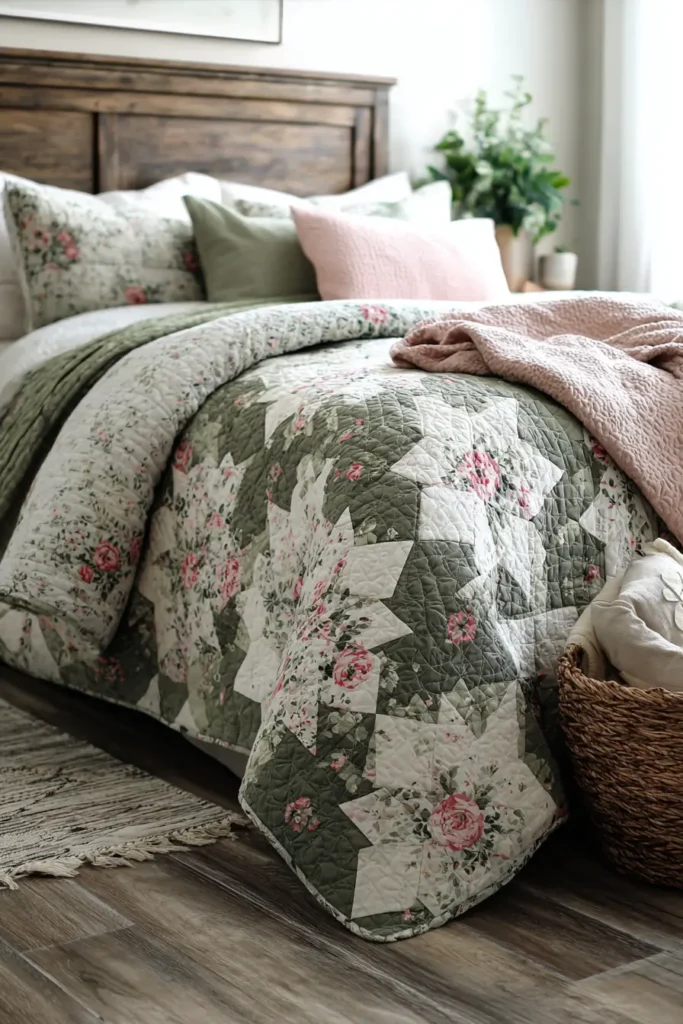
This pattern brings the outdoors in by focusing on a specific color story: the muted, dusty greens of a kitchen garden (Sage, Rosemary, Basil, and Thyme) set against crisp white sashing. The layout mimics a garden trellis, separating “beds” of botanical prints with clean, organized pathways. It is fresh, organic, and perfectly suited for a farmhouse bedroom.
Finished Dimensions: Large Throw, approximately 58″ x 70″.
Materials Needed:
- “Herb” Fabrics (The Garden Beds): 12 Fat Quarters in various shades of green (botanical prints, tonals, small florals).
- Sashing Fabric (The Lattice): 1.5 yards of Solid White, Cream, or White Linen.
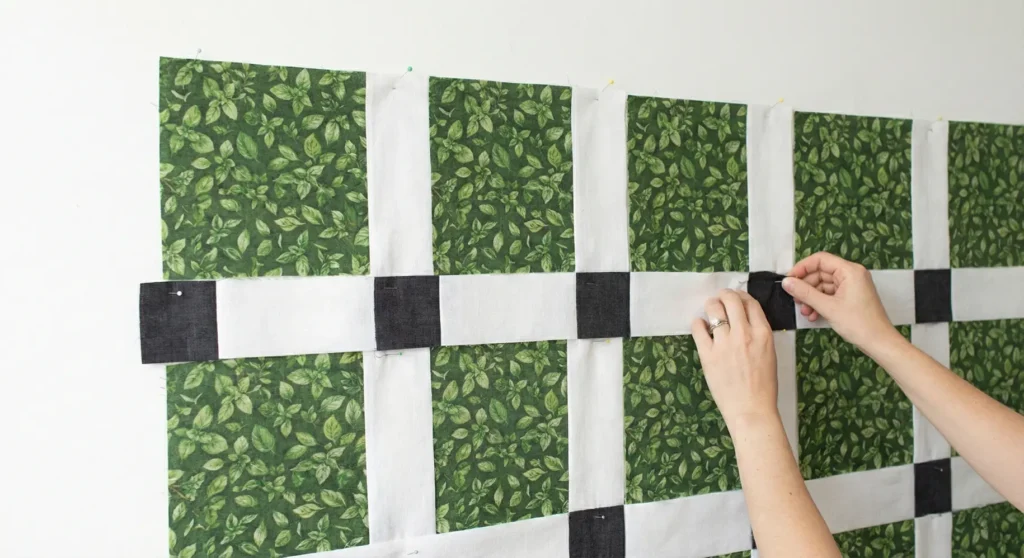
- Cornerstones (The Accents): 1/4 yard of Dark Charcoal or Deep Forest Green (to add contrast at the intersections).
- Backing Fabric: 4 yards.
- Batting: Twin size (72″ x 90″).
- Notions: Rotary cutter, ruler, neutral thread.
Step 1: Cultivate Your Blocks (Cutting)
- Herb Fabrics: From your green Fat Quarters, cut 30 squares, each measuring 9.5″ x 9.5″. (Select the prettiest parts of the print if using large florals—this is called “fussy cutting”).
- Sashing (White): Cut 16 strips by Width of Fabric (WOF) at 2.5″ wide.
- Sub-cut these into 71 rectangles, each 2.5″ x 9.5″.
- Cornerstones (Dark): Cut 3 strips by WOF at 2.5″ wide.
- Sub-cut these into 42 small squares, each 2.5″ x 2.5″.

Step 2: Plant the Rows (Block Assembly)
- Arrange your 30 Green Squares into a grid of 5 columns x 6 rows. Move them around until the colors are balanced.
- Take the first row (5 Green Squares). Sew a White Sashing Rectangle (2.5″ x 9.5″) between each square.
- Sew a Sashing Rectangle to the very beginning and very end of the row as well.
- Row Formula: Sashing + Block + Sashing + Block + Sashing + Block + Sashing + Block + Sashing + Block + Sashing.
- Repeat this for all 6 rows of blocks. Press seams toward the sashing.
Step 3: Build the Trellis (Sashing Rows)
Now you need to make the horizontal strips that separate the rows of blocks.
- Take your Dark Cornerstone Squares and remaining White Sashing Rectangles.
- Sew them together in a long strip, alternating them.
- Trellis Row Formula: Cornerstone + Sashing + Cornerstone + Sashing… ending with a Cornerstone.
- You need 6 Cornerstones and 5 Sashing Rectangles per row.
- Make 7 of these Trellis Rows. Press seams toward the dark cornerstones.
Step 4: Assemble the Garden Grid
- Lay out a Trellis Row at the top.
- Place a Block Row underneath it.
- Place another Trellis Row underneath that.
- Continue alternating until you end with the 7th Trellis Row at the bottom.
- Pin carefully: The most important part is nesting the seams where the vertical sashing meets the horizontal sashing at the cornerstones. Use plenty of pins to keep the grid straight.
- Sew all the rows together.
Step 5: Add the Border (The Fence)
- Your quilt center now measures roughly 57″ x 69″ (unfinished).
- Cut 3.5″ wide strips from your remaining White Sashing fabric (or use a new fabric like a green stripe).
- Sew the side borders first, then the top and bottom borders.
- This final white frame creates negative space that allows the eye to rest, enhancing the modern farmhouse aesthetic.
Step 6: Vine Quilting
- Baste your quilt sandwich.
- Quilting Design: Use a free-motion foot to stitch a Looped Vine-and-Leaf pattern into the white sashing strips.
- For the Green Herb blocks, do simple straight-line diagonal quilting (an “X” through the square) to represent the structure of garden beds.
- Bind with the Dark Charcoal/Forest Green fabric to match the cornerstones and frame the “garden” sharply.
Pro Design Tip: Use Linen for Sashing. Instead of standard quilting cotton, use Essex Linen in “Bleached White” for the sashing and borders. The nubby texture of the linen contrasts beautifully with the smooth cotton prints of the herbs, adding that tactile, rustic luxury essential to farmhouse style.
Budget Consideration: Check the napkin/tablecloth aisle at discount home stores (like TJ Maxx or HomeGoods). You can often find sets of cotton napkins in “Herbal” prints (leaves, olives, ferns) for very cheap. These pre-hemmed squares can sometimes be used as-is, or cut down to 9.5″ squares for a fraction of the price of fabric by the yard.
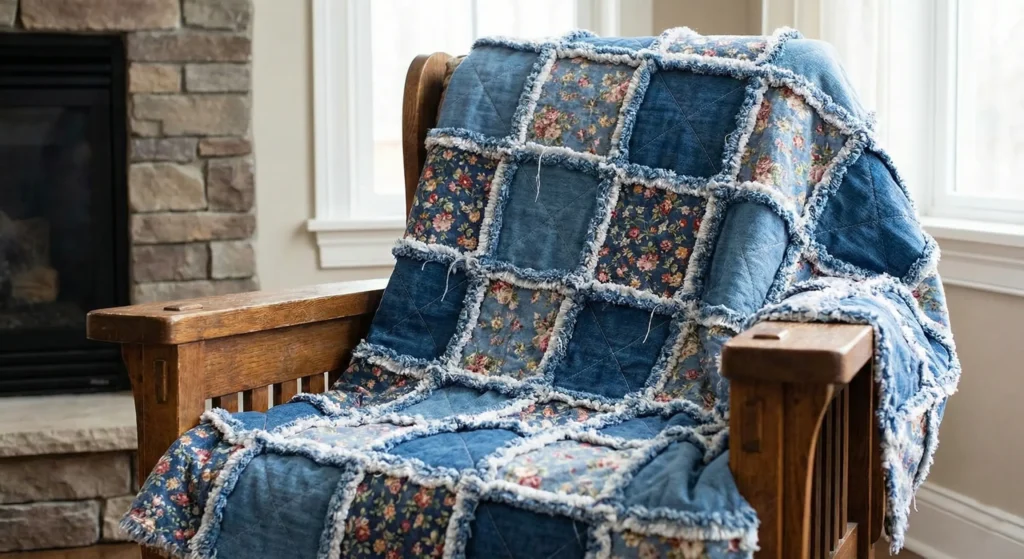
6. Rustic Rag Quilts with Frayed Edges
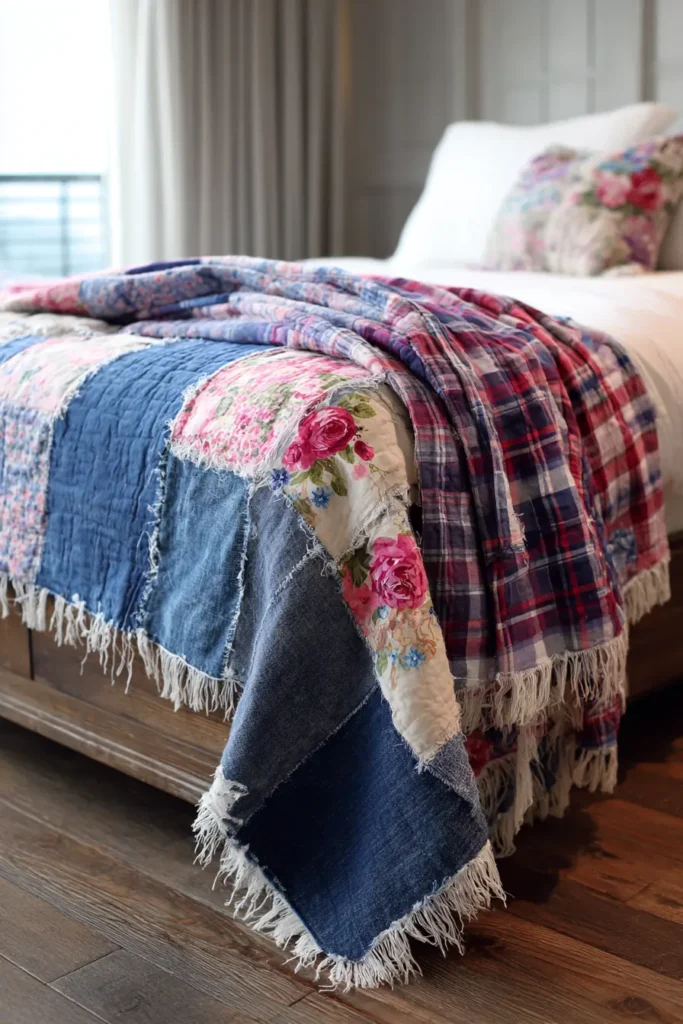
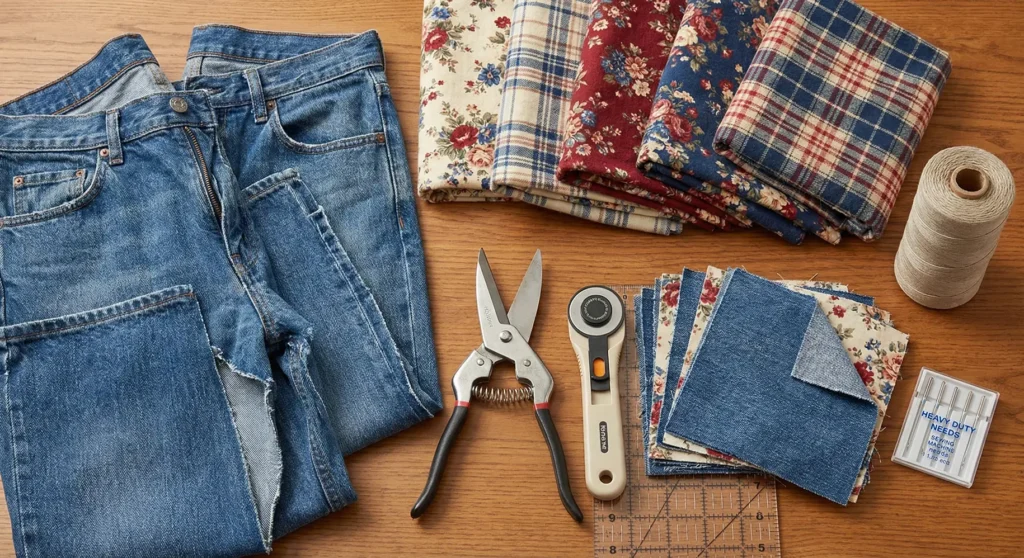
Scrappy “Prairie Style” Denim & Flannel Rag Quilt
While the Buffalo Plaid rag quilt (mentioned earlier) relies on a strict color pattern, this rustic version embraces the “perfectly imperfect” nature of authentic farmhouse living. By mixing durable upcycled denim with soft floral flannels, you create a heavy, weighted blanket that feels like a family heirloom. The frayed edges of denim create a beautiful white-and-indigo fringe that contrasts with the colorful flannel.
Finished Dimensions: Heavy Throw, approximately 54″ x 63″.
Materials Needed:
- Front Fabric A (Denim): 3-4 pairs of old jeans (legs only) OR 2 yards of lightweight denim/chambray.
- Front Fabric B (Flannel): 2 yards of assorted floral or plaid flannels.
- Backing Fabric: 4 yards of soft flannel (can be the same as the front or a solid color).
- Middle Layer (Batting Substitute): Because denim is heavy, standard batting can make this quilt too stiff. Instead, use a layer of solid cotton flannel or inexpensive fleece in the middle. You need about 3 yards.
- Notions: Heavy-duty denim needle (Size 100/16), spring-loaded rag quilting snips (essential for cutting denim seams).
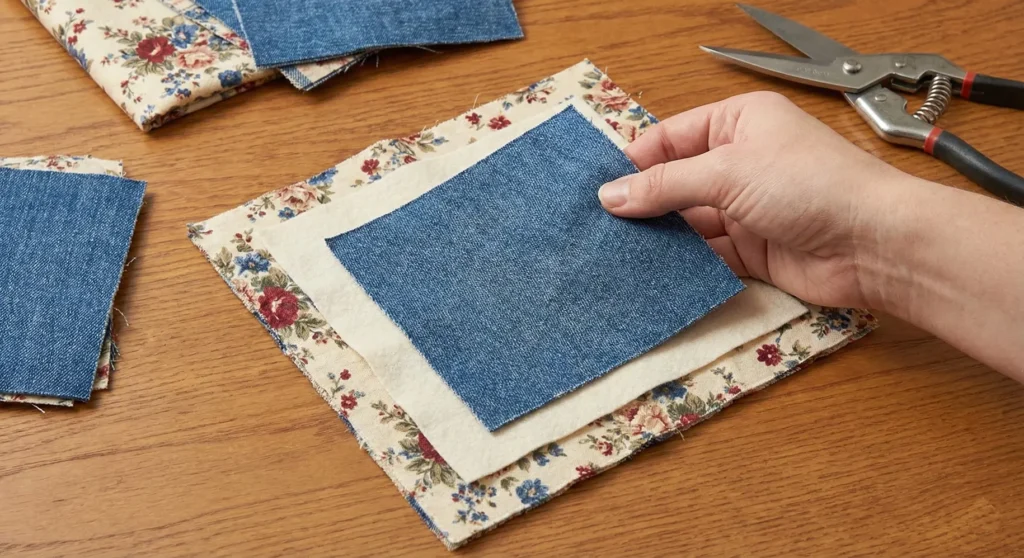
Step 1: Cut the Squares
- Denim: Cut squares from the jeans, avoiding thick side seams or pockets. Cut 63 squares measuring 6″ x 6″.
- Floral Flannel: Cut 63 squares measuring 6″ x 6″.
- Backing: Cut 126 squares measuring 6″ x 6″.
- Middle Layer: Cut 126 squares measuring 5″ x 5″ (Remember: The middle layer must be 1 inch smaller so it doesn’t get caught in the fringe).
Step 2: Assemble the “Sandwiches”
- Place a Backing Square face down.
- Center a Middle Layer Square on top of it.
- Place a Top Square (either Denim or Floral) face up on top.
- Make 126 sandwiches total. Shuffle them so you have a good mix of denim and floral ready to go.
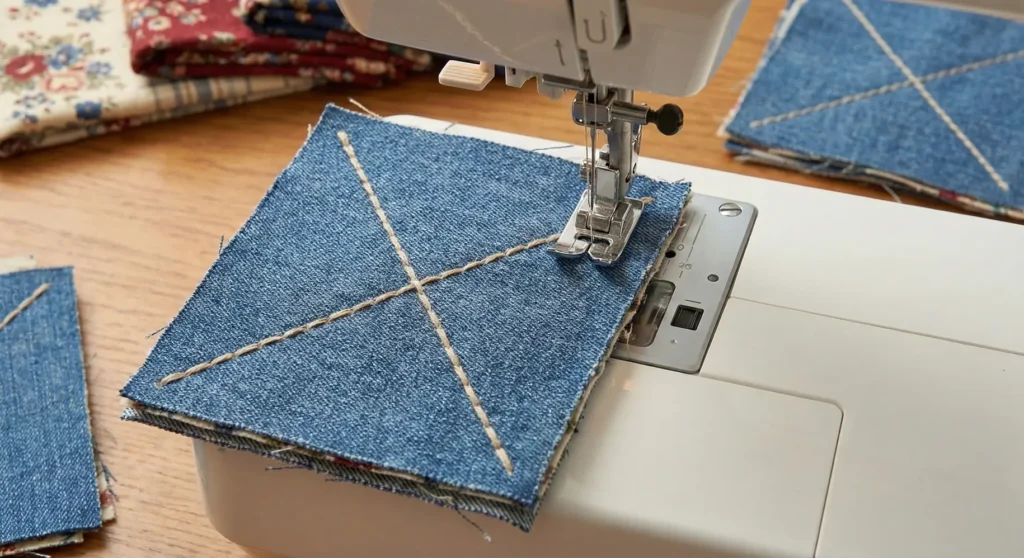
Step 3: Quilt the “X”
- Sew diagonally from corner to corner across each sandwich.
- Sew the opposite diagonal to create an “X”.
- Tip: Use a longer stitch length (3.0mm) to help the machine get through the thick denim layers without skipping stitches.
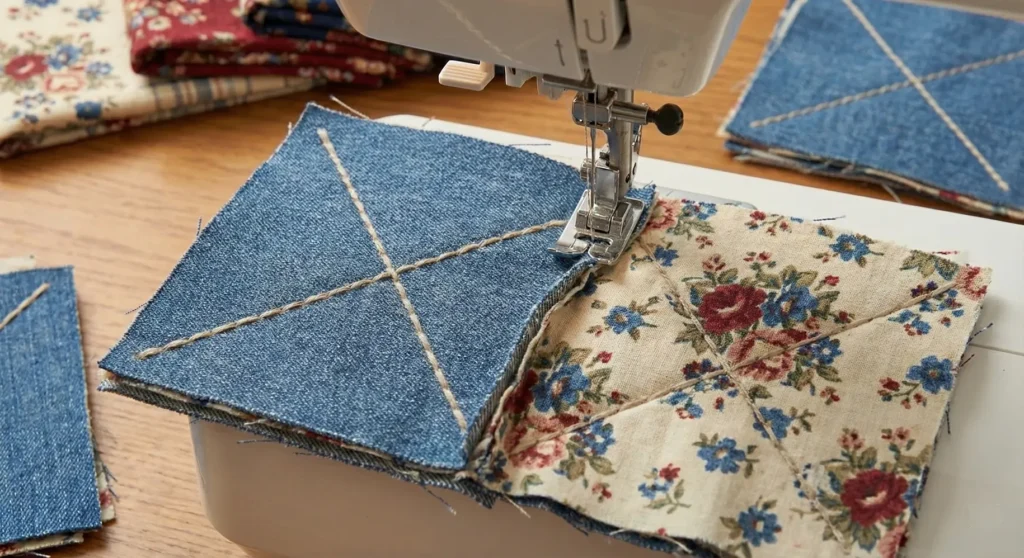
Step 4: Arrange and Sew Rows (Exposed Seams)
- Lay out your blocks in a grid: 9 blocks wide x 14 blocks tall. Alternate the Denim and Floral blocks in a checkerboard pattern.
- Take the first two blocks. Place them Wrong Sides Together (Backing touching Backing).
- Sew them together with a 1/2″ seam allowance. Note: Denim frays beautifully, but it needs a wide seam allowance to hold together.
- Continue joining blocks to create 14 rows. The raw edges should be standing up on the front of the quilt.
Step 5: Join the Rows
- Pin Row 1 to Row 2 (Wrong Sides Together).
- Match the seams carefully. Since denim is thick, you may need to “nest” the seams (push one seam allowance to the left and the other to the right) to get your machine over the hump, or hammer the thick spots gently with a mallet to flatten them before sewing.
- Sew the rows together with a 1/2″ seam allowance.
- Sew a final straight stitch around the entire outside border of the quilt, 1/2″ from the edge.
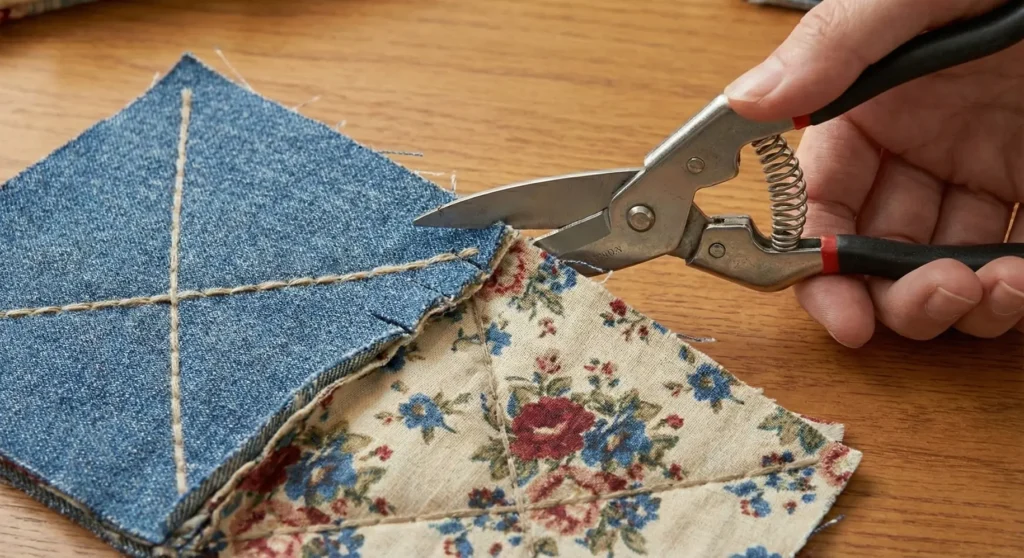
Step 6: Clip the Fringe
- This is the most challenging part with denim. Use sharp snips.
- Cut slits into the standing seam allowances every 1/2 inch.
- Crucial: Do not cut through the stitching line! Stop about 1/8″ away.
- Clip all vertical seams, horizontal seams, and the outer border.
Step 7: The “Bloom” Wash
- Take the quilt to a laundromat (denim sheds a massive amount of fiber that can clog home pipes).
- Wash on cold with fabric softener.
- Dry on high heat.
- The denim edges will fray into a thick, white-and-blue “chenille” texture, while the flannel will soften. Shake the quilt vigorously outside after drying to remove loose threads.
Pro Design Tip: Bleach Pen Detail. Before you assemble the quilt, take your plain denim squares and use a Clorox bleach pen to draw simple designs (hearts, stars, or words like “HOME”) on the center of a few squares. Let it sit for 10 minutes, then rinse. This adds a custom, faded vintage look to the denim blocks.
Budget Consideration: This project is a “stash buster.” You don’t need to buy a new flannel. Use old plaid button-down shirts or pajama pants for the floral/plaid squares. The softer and more worn the fabric is, the better the final rag quilt will feel.
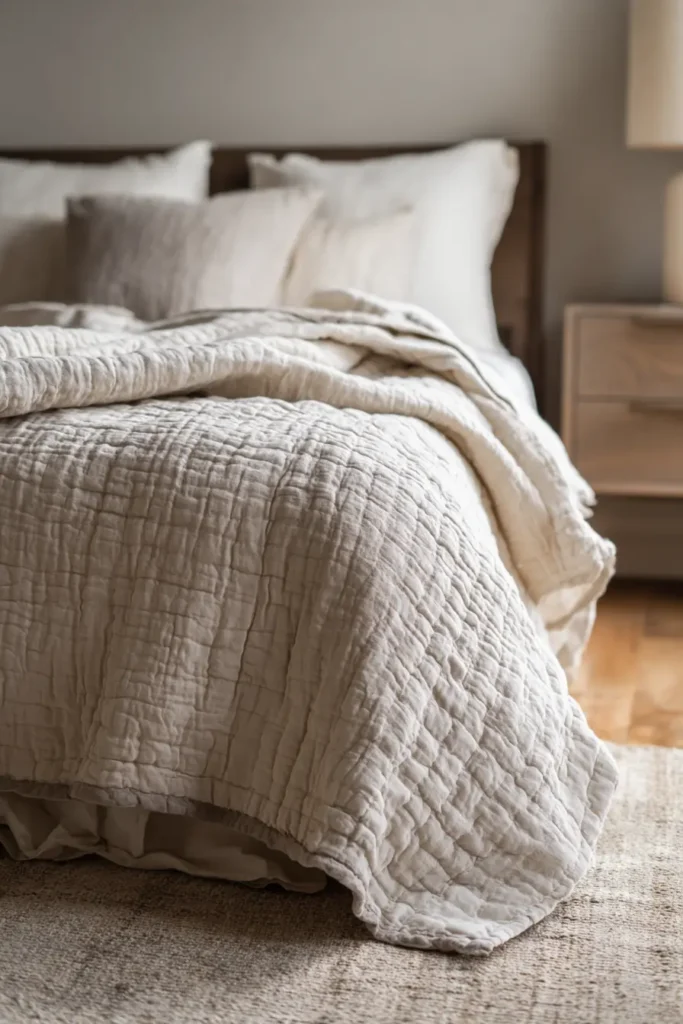
7. Soft Linen and Cotton Farmhouse Quilts with Natural Texture
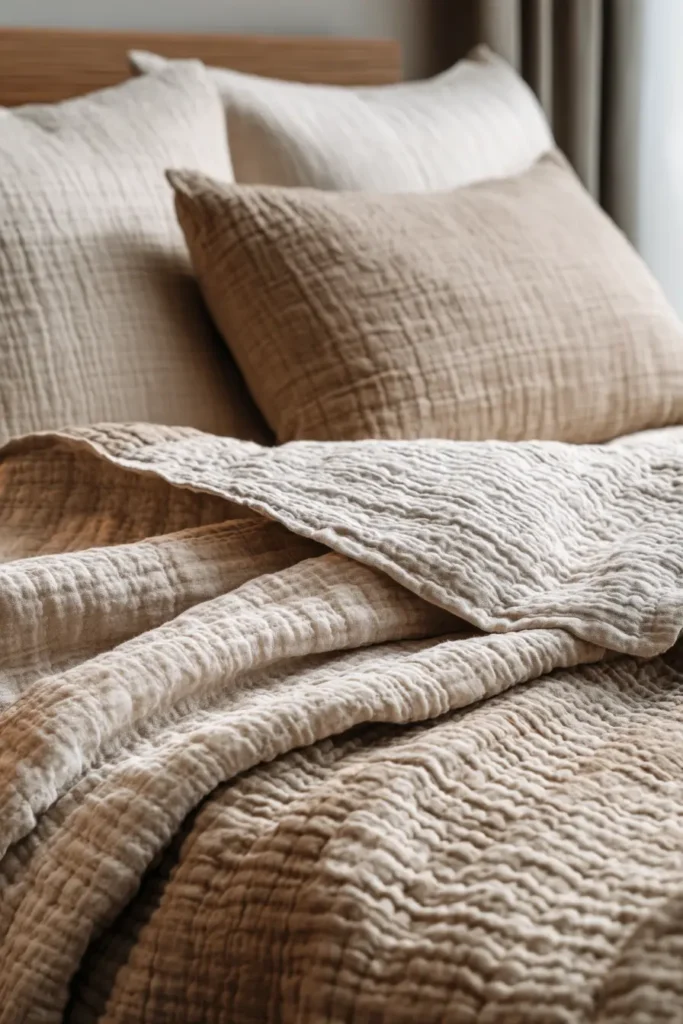
Minimalist Whole Cloth Linen Quilt with Hand Ties
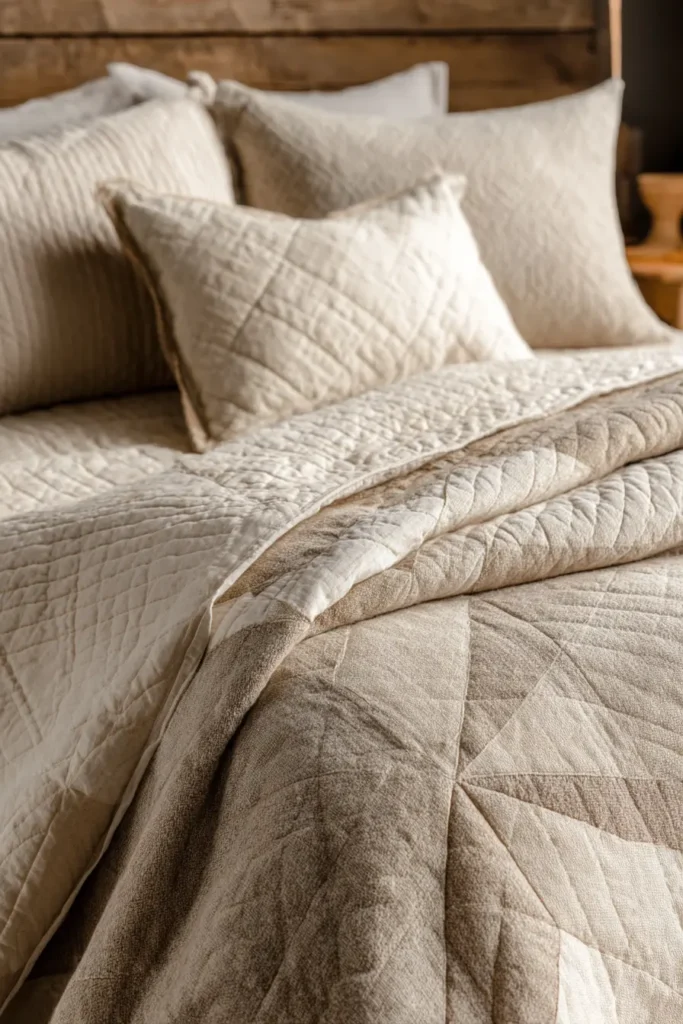
This quilt skips the complex piecing entirely to focus on the luxurious, wrinkled texture of pure linen. Instead of machine quilting, this design uses “hand tying” (or tufting) with thick thread. This vintage technique creates soft dimples in the fabric, resulting in a lofty, cloud-like duvet alternative that defines the “Soft Farmhouse” aesthetic.
Finished Dimensions: Queen Size, approximately 90″ x 90″.
Materials Needed:
- Top Fabric: 5 yards of “Wide Width” Linen (108″ wide) OR standard linen seamed together.
- Color Suggestion: Unbleached Flax, Oatmeal, or Soft Blush.
- Backing Fabric: 5 yards of Wide Width Cotton Sateen or Percale (for a smoother feel against the skin).
- Batting: Queen Size (93″ x 93″). Choose a high-loft wool or poly-down blend. Since there is no heavy stitching to crush it, a fluffy batting makes this quilt feel like a comforter.
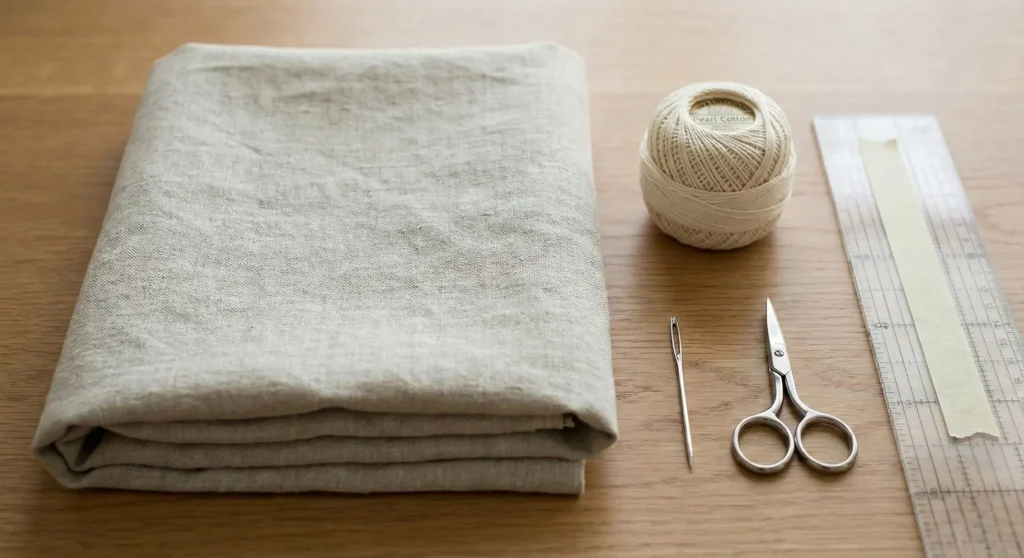
- Tying Thread: Pearl Cotton (Size 8) or Embroidery Floss in a contrasting natural color (like Cream or Brown).
- Needle: Chenille or Embroidery needle with a large eye and sharp point.
- Notions: Masking tape, safety pins.
Step 1: Pre-Wash is Non-Negotiable
- Linen shrinks significantly (sometimes up to 10%). You must wash and dry both your Top and Backing fabrics on hot settings before cutting.
- This pre-shrinking ensures that when you wash the finished quilt later, it won’t distort or bunch up unevenly.
- Do not iron the linen perfectly flat; the natural crinkle is part of the charm and helps hide measuring imperfections.
Step 2: Prepare the “Whole Cloth”
- If you bought 108″ wide backing fabric, trim your Top and Back pieces to 94″ x 94″ (squaring them up).
- If using standard-width fabric (approx. 54″), you must sew two lengths together.
- Cut two pieces 94″ long.
- Sew them together lengthwise.
- Tip: Do not put the seam in the exact center. Cut one piece in half lengthwise and sew these narrower strips to the sides of the whole center panel. This looks more intentional and avoids a bulky seam running down the middle of the bed.
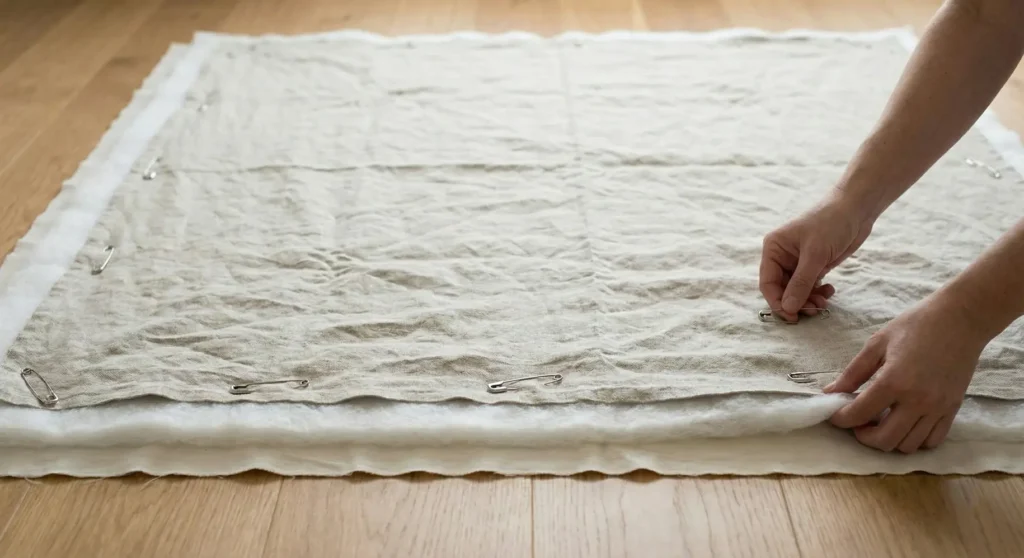
Step 3: Baste the Sandwich
- Lay the Backing fabric face down on an ample floor space. Tape the corners taut.
- Lay the Batting on top. Smooth gently.
- Lay the Linen Top face up.
- Baste: Use safety pins to secure the layers every 6-8 inches. Since we aren’t machine quilting, the basting doesn’t need to be quite as dense, but it does need to be enough to hold it for handling.
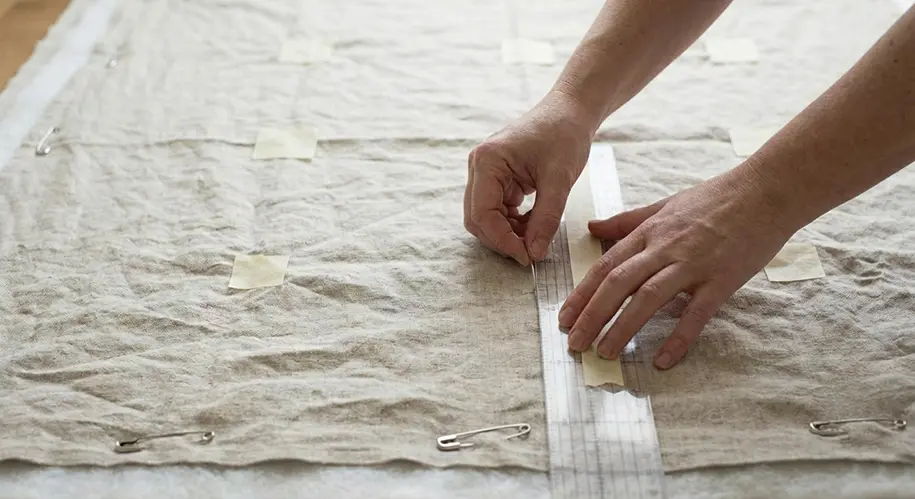
Step 4: Mark the Grid
- Use a ruler and masking tape to mark your tying grid.
- Place small pieces of tape every 4 to 5 inches in a grid pattern across the quilt.
- Alternatively, for a more organic look, don’t measure. Just eyeball the spacing to create a randomized “starry sky” effect.
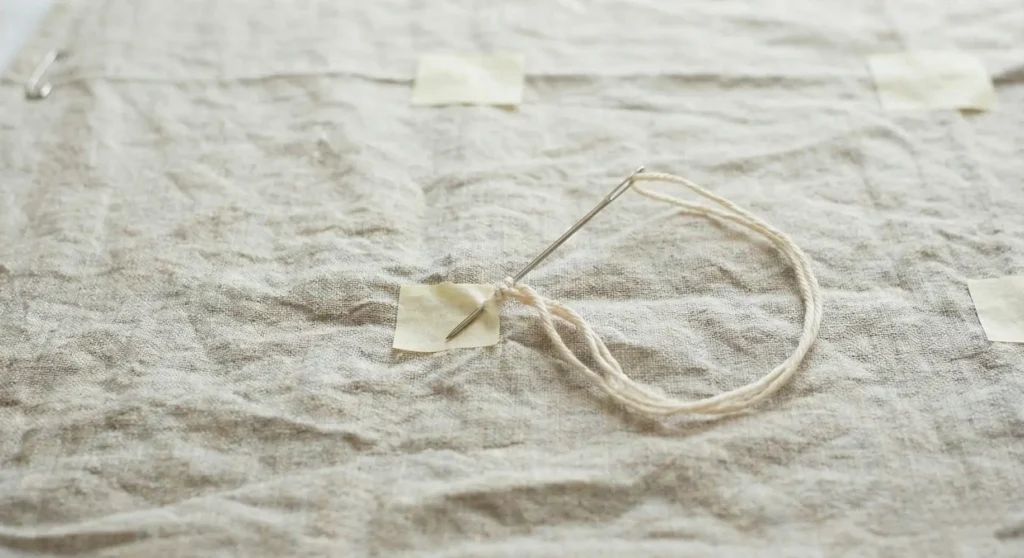
Step 5: Hand Tie the Quilt
- Thread your needle with the Pearl Cotton. Do not knot the end yet.
- Insert the needle down through all three layers at one of your marked spots.
- Bring the needle back up about 1/4 inch away from the insertion point.
- Cut the thread, leaving 2-inch tails on both sides.
- Tie a Square Knot: Right over Left, then Left over Right. Pull tight.
- Trim the tails to about 1/2 inch so they stand up like little tufts.
- Repeat across the entire quilt. This replaces machine quilting and holds the batting in place.
Step 6: Pillowcase Binding (The Clean Finish)
Since linen is bulky, a traditional binding can be tricky. This method is cleaner.
- Correction: The Pillowcase method requires sewing before tying. Since we have already basted for tying, we will use a Self-Binding method instead.
- Trim: Trim the Batting and Backing so they are exactly the same size. Trim the Linen Top so it extends 1 inch wider than the backing on all sides.
- Fold: Fold the excess 1-inch of linen over the edge of the backing. Fold it under itself to hide the raw edge.
- Stitch: Hand-stitch or machine-topstitch this folded linen edge down onto the backing. This creates a neat, self-framed linen edge without needing an extra binding strip.

Pro Design Tip: The “Big Stitch” Variation. If you don’t like the loose thread tails of the ties, do “Big Stitch” tacking instead. Use the same thick thread to sew a tiny “Plus Sign” (+) or a small circle at every interval. Bury the knots between the layers for a smooth finish that still retains the handmade, dimpled look.
Budget Consideration: Canvas Drop Cloths. For a fraction of the price of linen, buy 100% Cotton Canvas Drop Cloths from the hardware store (ensure they are seamless if possible). Bleach them in your washing machine (wash with bleach 2-3 times) to turn the beige canvas into a soft, nearly white fabric that perfectly mimics the weight and texture of heavy antique linen.
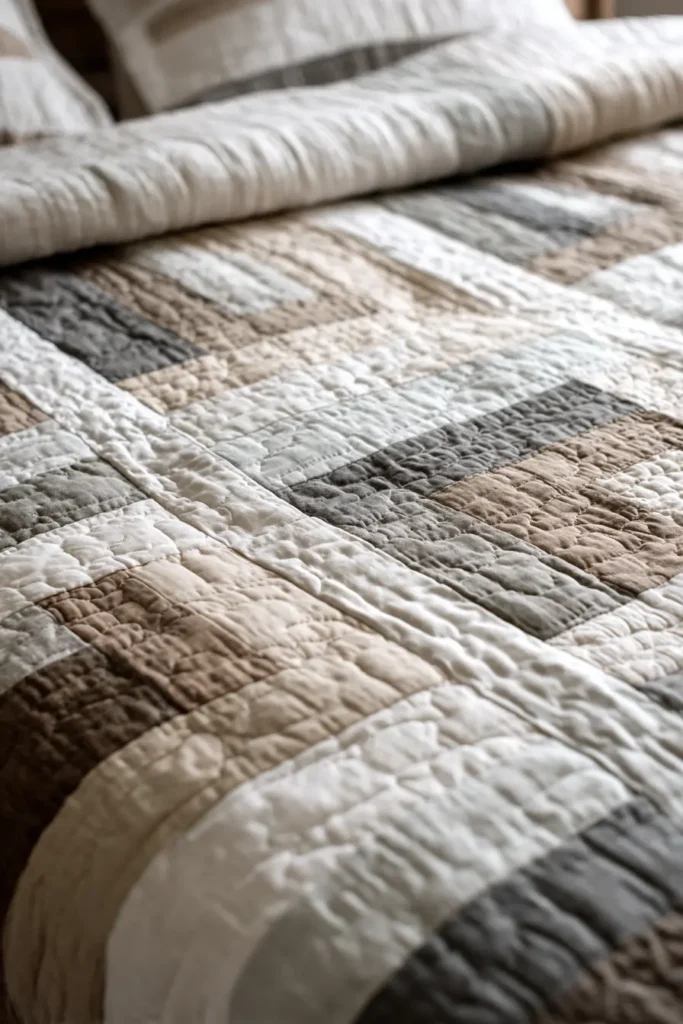
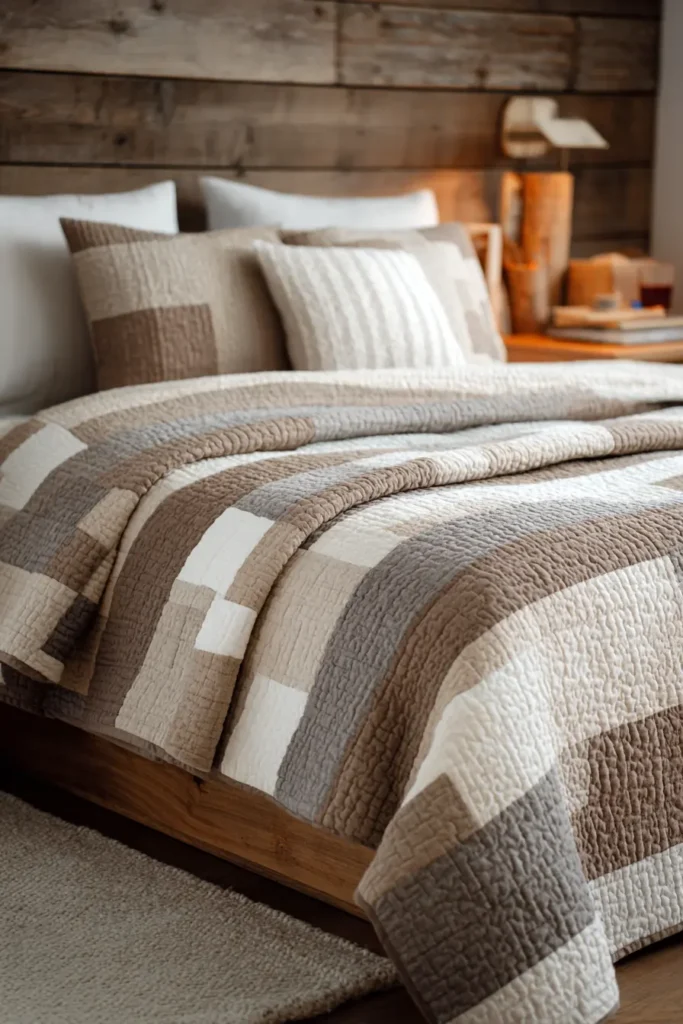
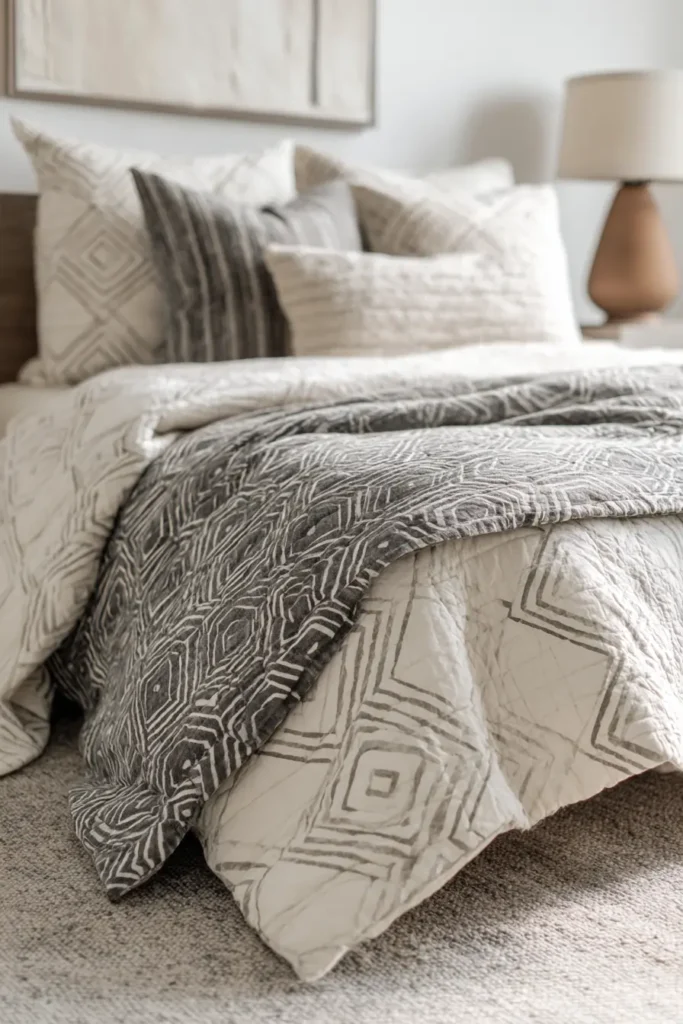
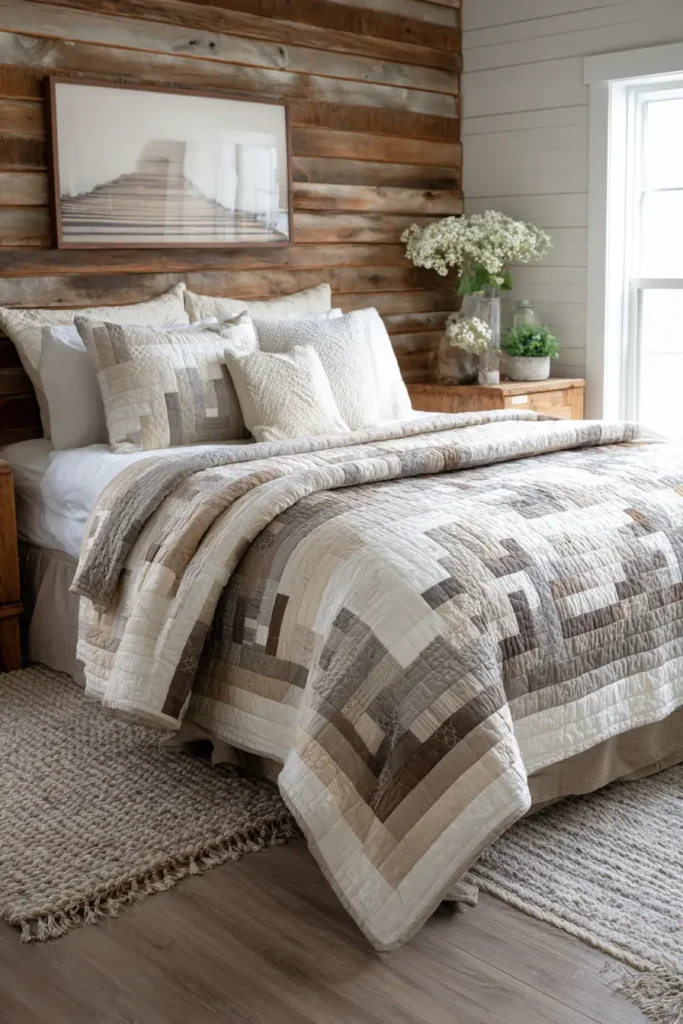
8. Handmade Farmhouse Quilts with Neutral Color Palettes
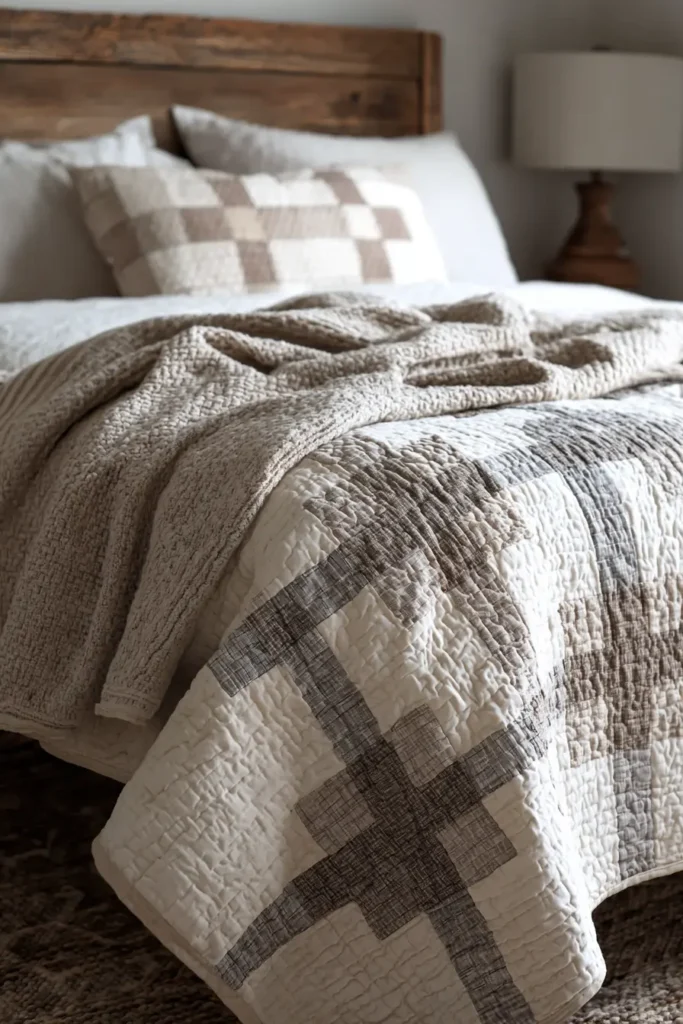
The “Courthouse Steps” Neutral Texture Quilt
The Courthouse Steps block is a variation of the Log Cabin that feels cleaner and more architectural. By sticking to a strict palette of varying whites, creams, sands, and soft greys, you emphasize the geometry of the lines. This quilt relies on texture rather than color contrast to hold interest.
Finished Dimensions: Queen Size, approximately 84″ x 84″.
Materials Needed:
- Center Squares: 1/2 yard of a textured darker neutral (e.g., Taupe Linen or Dark Grey Chambray).
- “Light” Side Fabrics: 2 yards total of assorted low-volume prints (white on white, cream, pale oatmeal).
- “Dark” Side Fabrics: 2 yards total of assorted mid-tone neutrals (beige, greige, light grey, tan).
- Backing Fabric: 7.5 yards.
- Batting: Queen Size (90″ x 108″).
- Binding: 3/4 yard.
- Notions: Rotary cutter, quilting ruler, neutral thread.
Step 1: Cut the Components
Unlike a Log Cabin, where you go around in a circle, Courthouse Steps work in pairs.
- Center Squares: Cut 64 squares, measuring 2.5″ x 2.5″.
- Strips: Cut all your Light and Dark fabrics into 2.5″ wide strips.
- From these strips, you will need to cut specific lengths as you build, or just chain piece and trim as you go (the “modern” method).
- Lengths needed per block:
- Round 1: Two 2.5″ pieces (Dark) & Two 6.5″ pieces (Light).
- Round 2: Two 6.5″ pieces (Dark) & Two 10.5″ pieces (Light).
- Round 3: Two 10.5″ pieces (Dark) & Two 14.5″ pieces (Light).
Step 2: Start the Block (Round 1)
- Take a Center Square.
- Sew a 2.5″ Dark Strip to the Top and Bottom of the center square. Press seams out.
- Sew a 6.5″ Light Strip to the Left and Right sides of that unit. Press seams out.
- Visual Check: You now have a center square sandwiched by dark top/bottom, and light sides.
Step 3: Add Round 2
- Sew a 6.5″ Dark Strip to the Top and Bottom of the current block. Press.
- Sew a 10.5″ Light Strip to the Left and Right sides. Press.
- Your block now measures 10.5″ square unfinished.
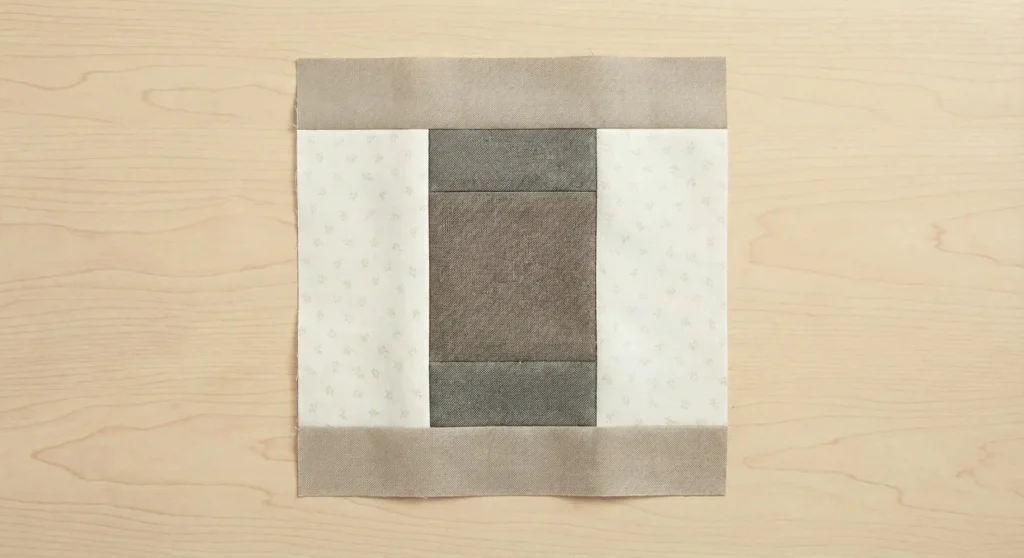
Step 4: Add Round 3 (Final Round)
- Sew a 10.5″ Dark Strip to the Top and Bottom.
- Sew a 14.5″ Light Strip to the Left and Right.
- The finished block should measure 14.5″ x 14.5″.
- Repeat this process to make a total of 64 blocks.
Step 5: Arrange the Layout
- Lay out the blocks in an 8 x 8 grid.
- Design Option A (Ordered): Arrange all blocks the same way (Darks top/bottom, Lights sides) for a linear, striped look.
- Design Option B (Barn Raising): Rotate the blocks to create large diamond ripples radiating from the center. This is the classic farmhouse look.
- Sew the blocks into rows, then sew the rows together.
Step 6: Quilting “In the Ditch”
- Baste your quilt sandwich.
- Quilting: Because this pattern is so linear, the best quilting method is “Stitch in the Ditch”.
- Sew exactly inside the seam lines between the strips. This hides the quilting stitches and makes the strips look puffy and dimensional, like rows of planted crops.
Pro Design Tip: Texture Mixing. Since you aren’t using color, use weave to create depth. Use a mix of Cotton Poplin, Essex Linen, Woven Shot Cotton, and even light Corduroy. The difference in how these fabrics catch the light will make the neutral quilt look expensive and designer-made.
Budget Consideration: Drop Cloths & Muslin. Use unbleached muslin ($3/yard) for all your “Light” strips and washed canvas drop cloth ($10 for a huge sheet) for your “Dark” strips. The colors are perfectly farmhouse-neutral, and the materials are incredibly durable and inexpensive.
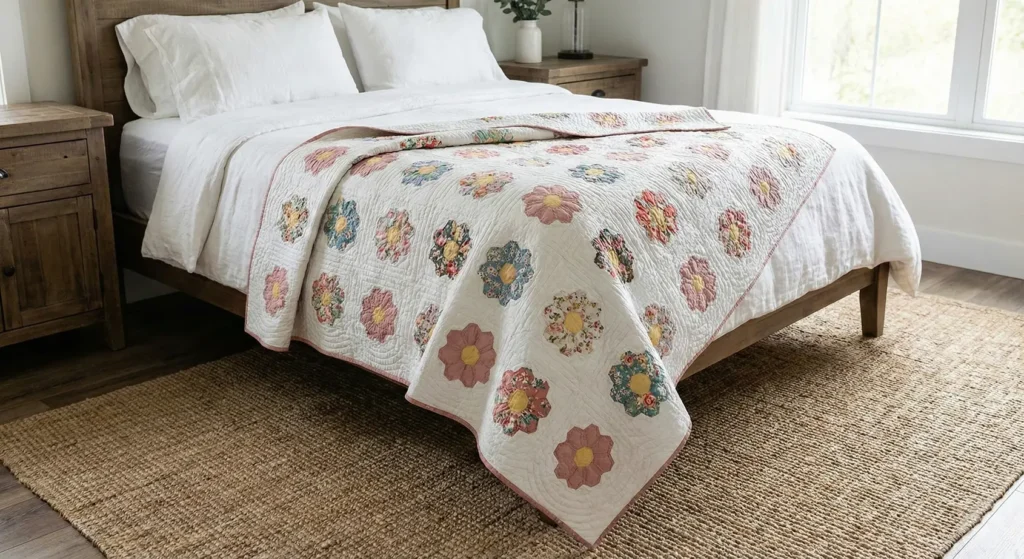
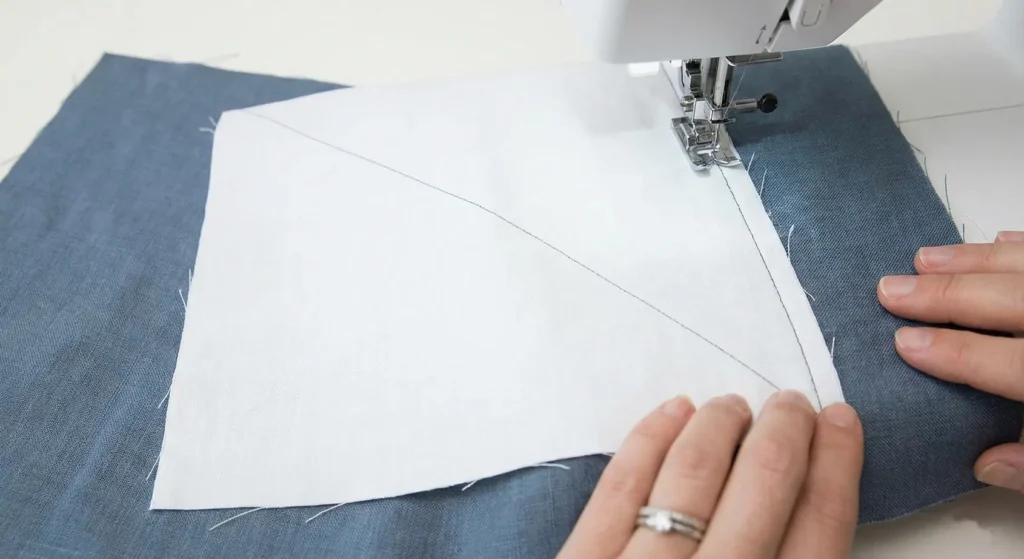
9. Hand-Stitched Farmhouse Quilts with Intricate, Heirloom Appeal
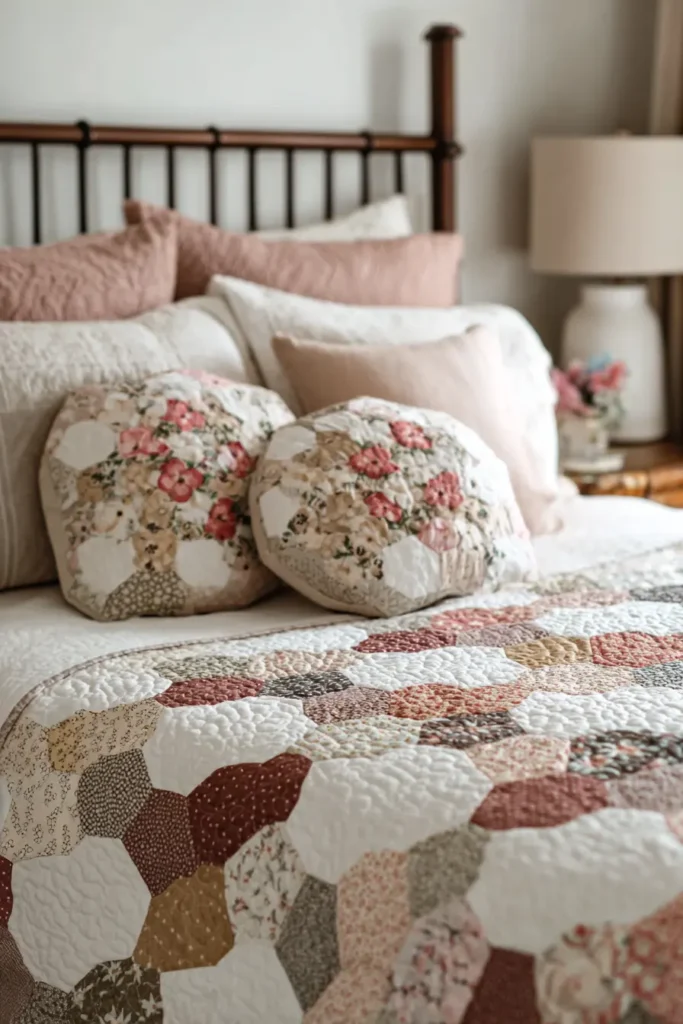
Heirloom English Paper Pieced (EPP) Hexagon Flower Quilt
Nothing says “heirloom” quite like English Paper Piecing. This slow, hand-stitching technique creates precise geometric shapes that machines struggle to replicate perfectly. While a traditional “Grandmother’s Flower Garden” quilt is made entirely of hexagons, this modern farmhouse version floats the intricate flowers on crisp white square blocks. This gives you the vintage charm without the decade-long commitment of sewing thousands of hexagons together.
Finished Dimensions: Queen Size, approximately 84″ x 84″.
Materials Needed:
- Hexagon Templates: 150 cardstock hexagon templates (1-inch size).
- Flower Fabric: Scraps of vintage florals, feed sacks, or dusty pinks/mustards. You need enough to cut approximately. 1,000 small squares (2.5″).
- Background Fabric: 6 yards of Solid White or Cream Kona Cotton.
- Needles: Milliners Needles (Size 10 or 11) – these are long and thin for precise hand work.
- Thread: 50wt cotton thread (neutral color like Dove Grey blends with everything).
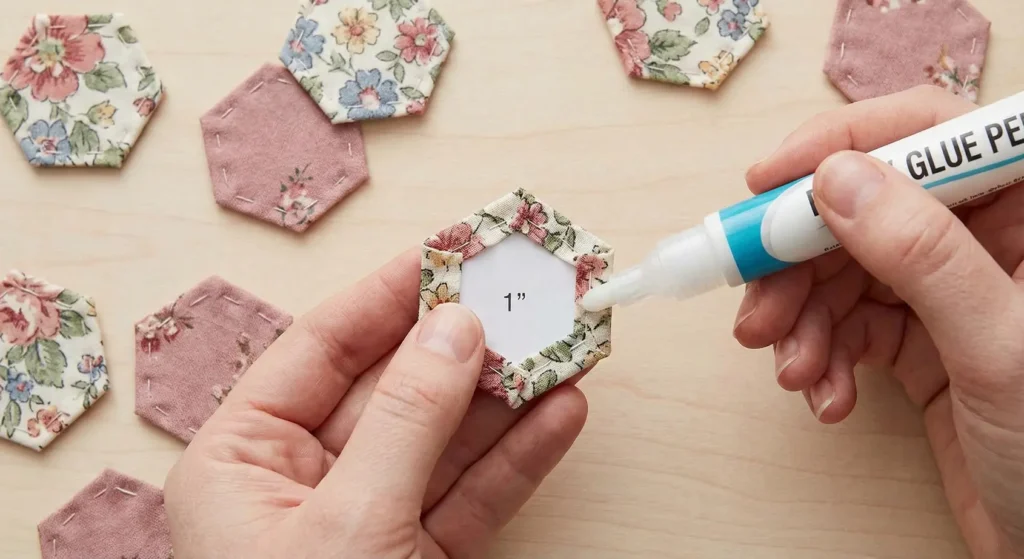
- Notions: Fabric glue pen (for basting), thimble, small sharp scissors.
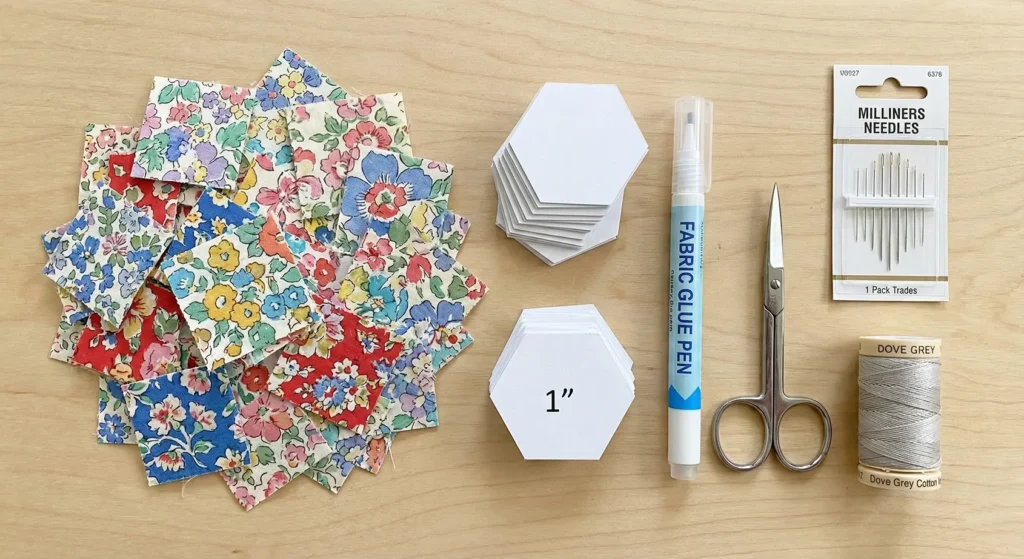
Step 1: Baste the Hexagons
- Cut your colored fabric scraps into 2.5-inch squares.
- Place a paper hexagon template in the center of the wrong side of a fabric square.
- Glue Baste: Run a thin line of fabric glue along the edge of the paper. Fold the fabric over the paper edge and press firmly. Repeat for all 6 sides.
- Goal: You need 7 basted hexagons to make one flower (1 center + 6 petals).
- Make enough for 49 flowers (Total: 343 hexagons). Note: This is a perfect “TV watching” activity.
Step 2: Stitch the Flowers (The “Rosette”)
- Take two basted hexagons (one center, one petal). Place them Right Sides Together.
- Whipstitch: Using your fine needle and thread, sew along one edge. Catch only a few threads of the fabric fold; do not pierce the paper.
- Open them up. Place the next petal against the center and the side of the first petal. Stitch the center seam, then stitch the side seam connecting the petals.
- Continue until 6 petals surround the center.
- Press the flower flat with a hot iron.
- Remove Papers: carefully pop the papers out from the back (you can reuse them!). Press the flower again to set the shape.

Step 3: Prepare the Background Blocks
- From your White Background fabric, cut 49 squares, each measuring 12.5″ x 12.5″.
- Fold each square in half diagonally twice to lightly crease the center point. This helps you align the flower perfectly.
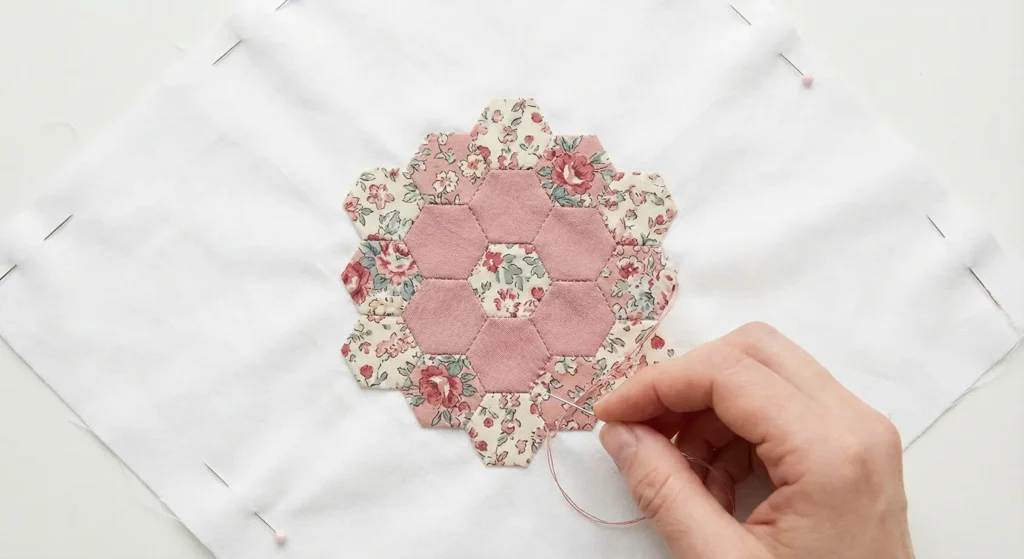
Step 4: Appliqué the Flowers
- Center one EPP Flower on a square on a white background. Pin or use a dab of glue to hold it.
- Appliqué: Hand stitch the flower to the background using a blind hem stitch (tiny bites into the flower edge, sliding the needle through the background fabric). Use a matching thread.
- Repeat for all 49 blocks. The result is a clean grid of floating vintage flowers.
Step 5: Assemble the Quilt Top
- Arrange your blocks in a 7 x 7 grid.
- Sew the blocks together into rows using a sewing machine (or hand piecing if you are a purist). Use a 1/4″ seam allowance.
- Sew the rows together.
- Press seams open to reduce bulk.
Step 6: Hand Echo Quilting
To honor the intricate hand-piecing, use hand-quilting to finish.
- Baste the sandwich (Backing, Batting, Top).
- Using a slightly thicker thread (like Perle Cotton #12), hand quilt 1/4 inch inside the hexagon flower shape.
- Then, quilt echo lines (concentric ripples) radiate outward from the flower into the white background. Space the ripples about 1 inch apart.
- This texture mimics water ripples and highlights the intricate shape of the hexagons.
Pro Design Tip: Fussy Cutting. For an authentic heirloom look, use a clear acrylic template to cut your fabric. Center a specific rose bud or motif in the middle of every hexagon before you cut. When you sew them together, these motifs create a kaleidoscope effect that looks incredibly complex and intentional.
Budget Consideration: Paper Templates. Never buy pre-cut paper shapes if you are on a budget. Buy a 1-inch hexagon paper punch from a craft store ($10-15) and punch thousands of templates from junk mail envelopes or old greeting cards. It’s free and creates the perfect weight cardstock for EPP.
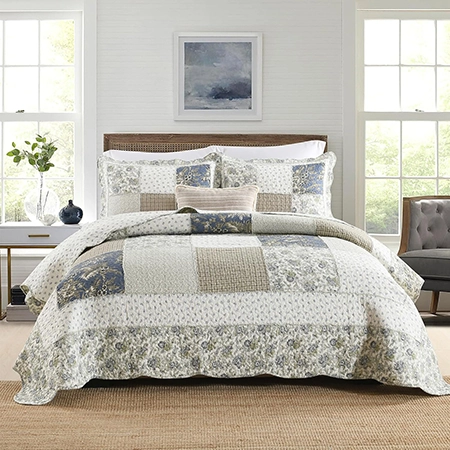
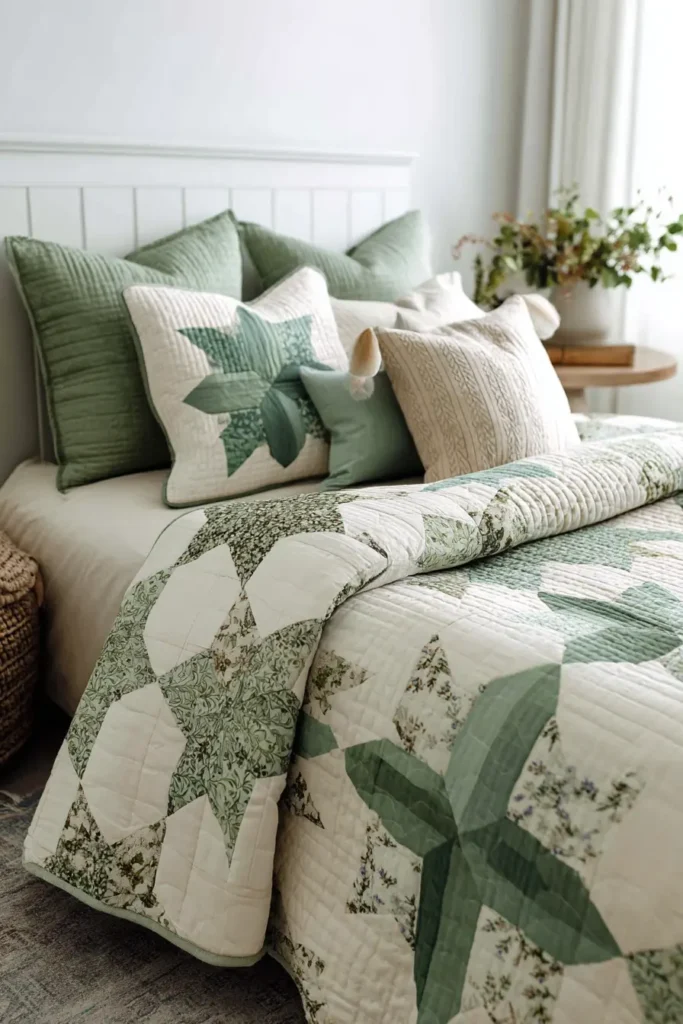
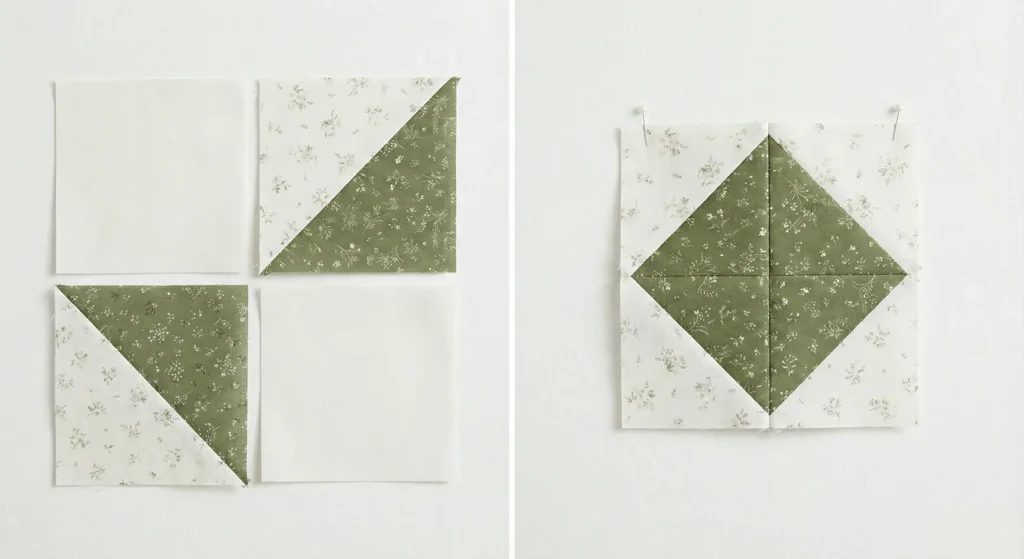
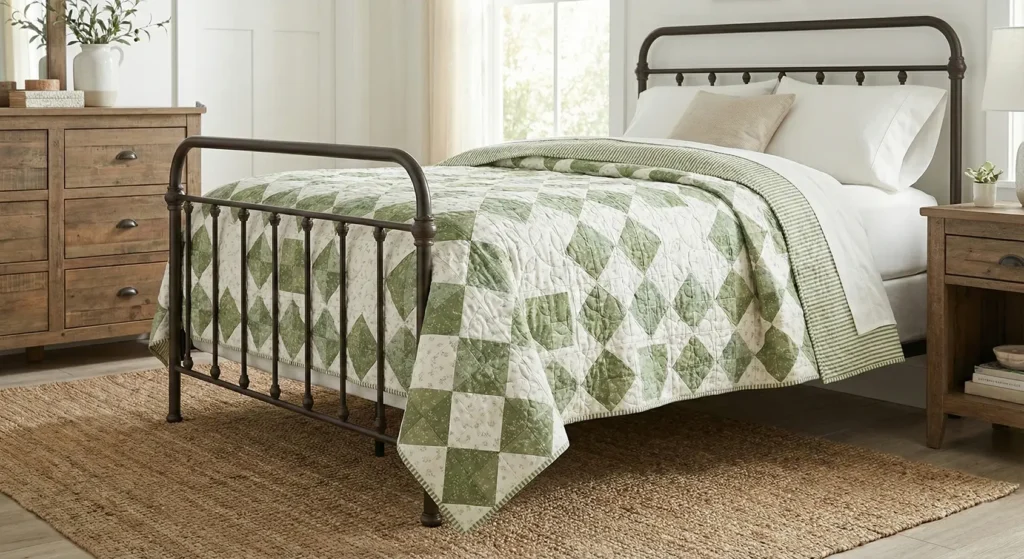
10. Floral Farmhouse Quilt Patterns with a Subtle Verdant Touch
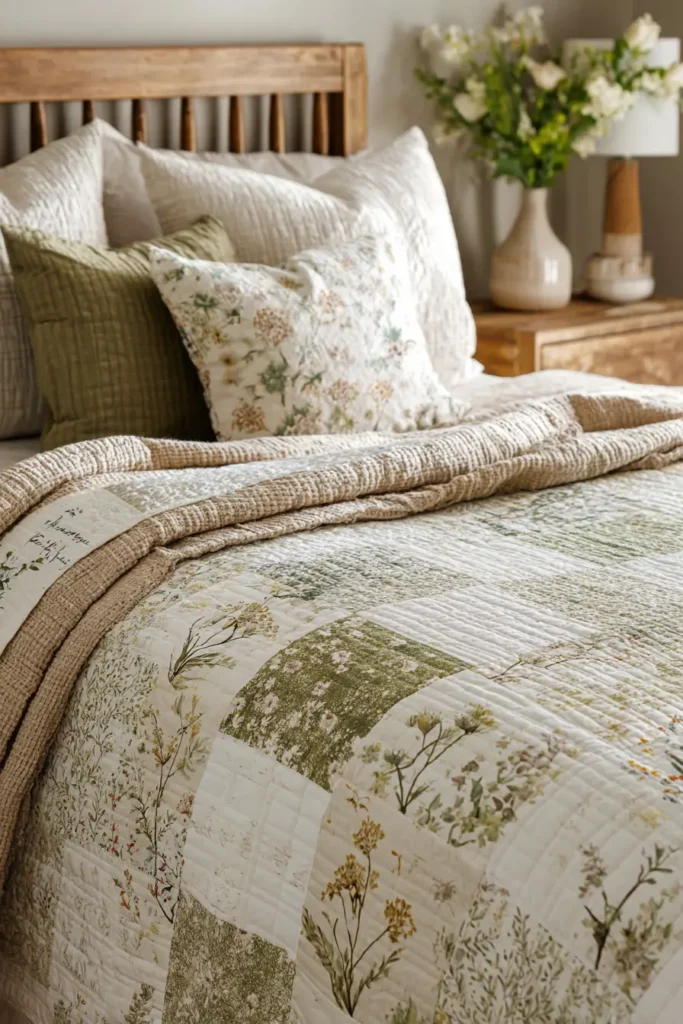
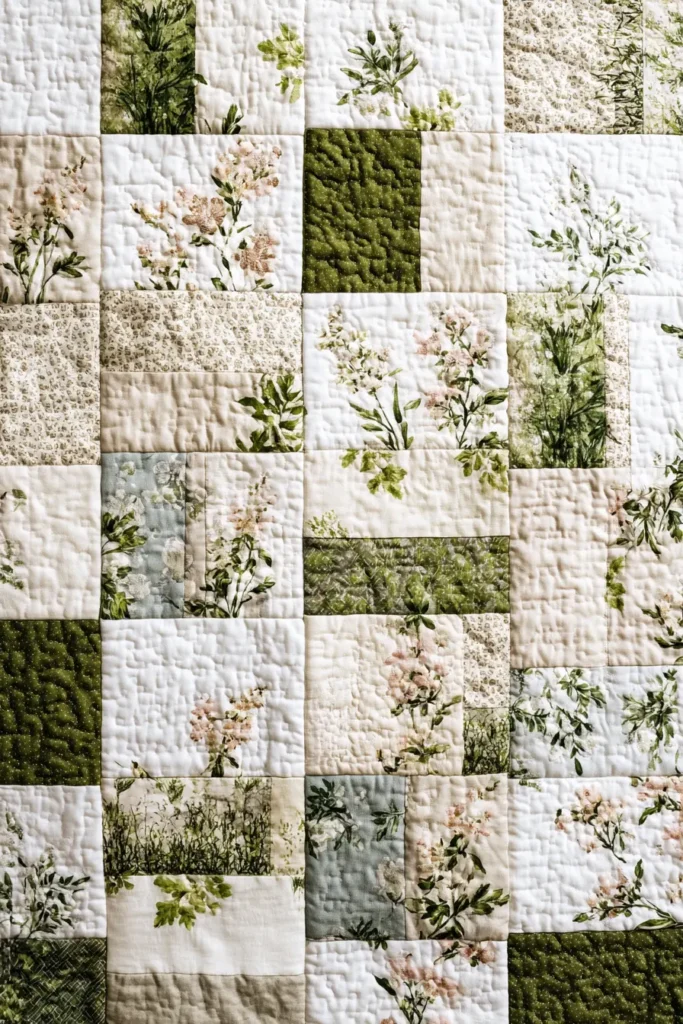
The “Wildflower Meadow” Low Volume Quilt
This pattern captures the essence of an overgrown farmhouse garden by using “Low Volume” fabrics—prints that read as white or cream from a distance but reveal delicate floral sketches up close. The addition of scattered “Greenery” blocks in soft sage and olive creates a subtle, verdant texture without screaming “GREEN.” It’s whisper-soft and romantic.
Finished Dimensions: Full/Queen Size, approximately 80″ x 80″.
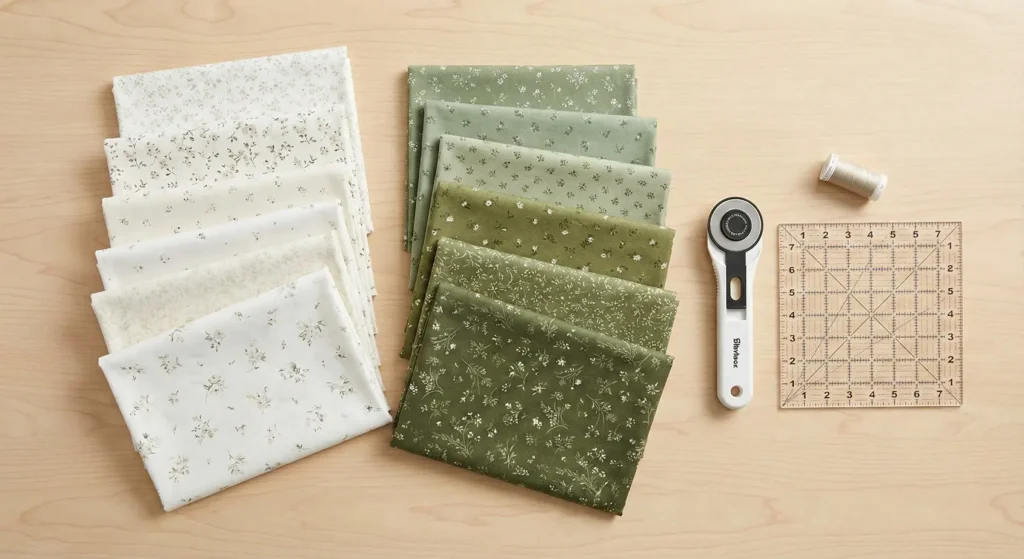
Materials Needed:
- Low Volume Florals (Background): 4 yards total of assorted white/cream prints with tiny grey, tan, or pale pink flowers.
- Verdant Accents (Leaves): 1.5 yards total of assorted sage, olive, and moss green prints.
- Backing Fabric: 5 yards (Wide width or pieced).
- Batting: Queen Size (90″ x 90″).
- Binding: 3/4 yard of a green ticking stripe.
- Notions: Rotary cutter, 6.5″ square ruler.
Step 1: Cutting the “Garden”
This quilt uses a simple Half Square Triangle (HST) as the building block to create leaves and stems.
- Low-Volume Fabrics: Cut 160 squares measuring 5″ x 5″.
- Verdant Green Fabrics: Cut 160 squares, measuring 5″ x 5″.
- Solid Low Volume Squares (Plain Blocks): From the remaining Low Volume fabric, cut 160 solid squares measuring 4.5″ x 4.5″. These will be the “space” in the meadow.
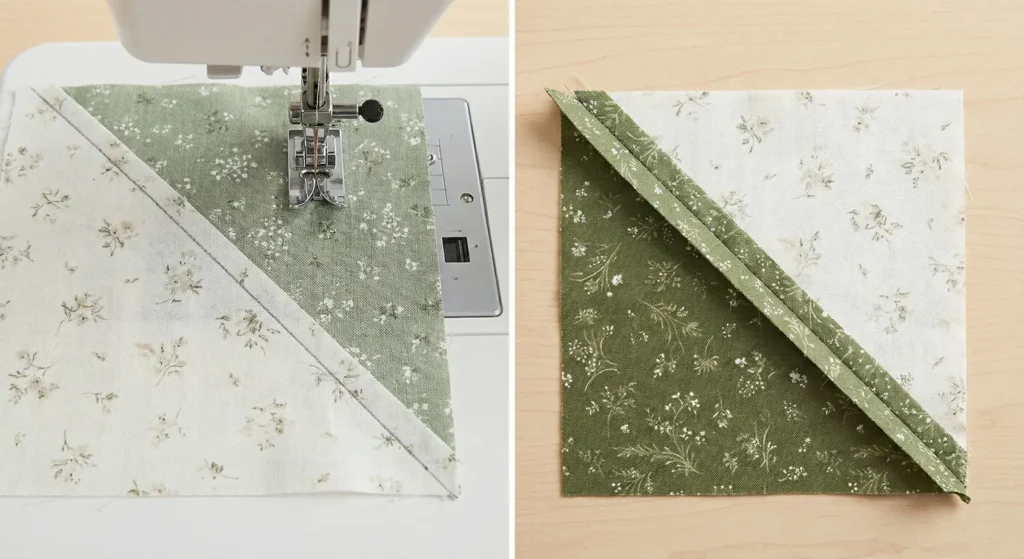
Step 2: Make Half Square Triangles (HSTs)
- Draw a diagonal line on the wrong side of every Low Volume 5″ square.
- Place a Low Volume square and a Green square, Right Sides Together.
- Sew a scant 1/4″ seam on both sides of the drawn diagonal line.
- Cut along the drawn line. You now have two HST units.
- Press seams toward the green fabric.
- Trim: Trim every HST unit to exactly 4.5″ x 4.5″. You should have 320 Green/White HSTs.
Step 3: Create the “Leaf” Block
- Take 2 HSTs and 2 Solid Low Volume Squares (4.5″).
- Arrange them in a 4-patch grid:
- Top Left: Solid Low Volume Square.
- Top Right: HST (Green triangle pointing up/right).
- Bottom Left: HST (Green triangle pointing down/left).
- Bottom Right: Solid Low Volume Square.
- Sew the top row together. Sew the bottom row together.
- Sew the rows together.
- This creates a block in which two green triangles touch at the center, resembling two leaves on a stem.
- Make 80 Leaf Blocks.
Step 4: The “Scattered” Layout
The modern farmhouse look avoids rigid patterns. We want a random scatter.
- Lay out your 80 Leaf Blocks on the floor in a 9 x 9 grid (you will have one block left over, or add a solid square to complete the row).
- Rotate them randomly. Have some leaves pointing up, some down, some left, some right.
- Optional: If it feels too crowded, replace some Leaf Blocks with plain 8.5″ squares of low-volume fabric to create “clearing” spots in the meadow.
- Shuffle the greens so you don’t have all the dark olives in one corner.
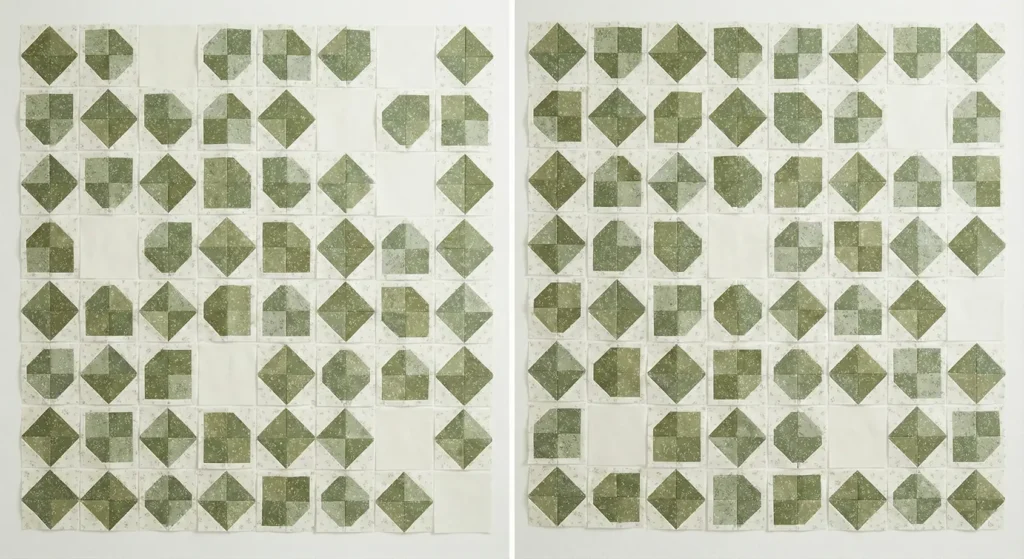
Step 5: Assemble the Top
- Sew the blocks into horizontal rows.
- Press the seams open to keep the quilt flat.
- Sew the rows together. Match the intersections carefully so the corners of the blocks align.
Step 6: Organic Vine Quilting
- Baste your quilt sandwich.
- Quilting: Use a Free Motion foot.
- Stitch a loose, meandering vine pattern with occasional loops or leaf shapes. Avoid dense quilting; keep the lines about 2-3 inches apart.
- Use a variegated green thread (from very pale green to white) for quilting. This adds another layer of subtle color that appears and disappears across the white background.
Pro Design Tip: The “Faded” Look. To make the green fabrics look sun-bleached and vintage immediately, wash them in warm water with a cup of baking soda before cutting. This softens the dye slightly and breaks down the stiffness of new cotton, making it blend better with the delicate, low-volume prints.
Budget Consideration: Vintage Sheets. Look for vintage floral flat sheets (from the 60s/70s) at thrift stores. One King-size sheet provides enough fabric for the entire background and backing. The muted, washed-out florals on vintage percale are impossible to replicate with modern fabric and cost pennies on the dollar.
11. Strip and Rectangle Farmhouse Quilts: Simple Patterns, Big Impact
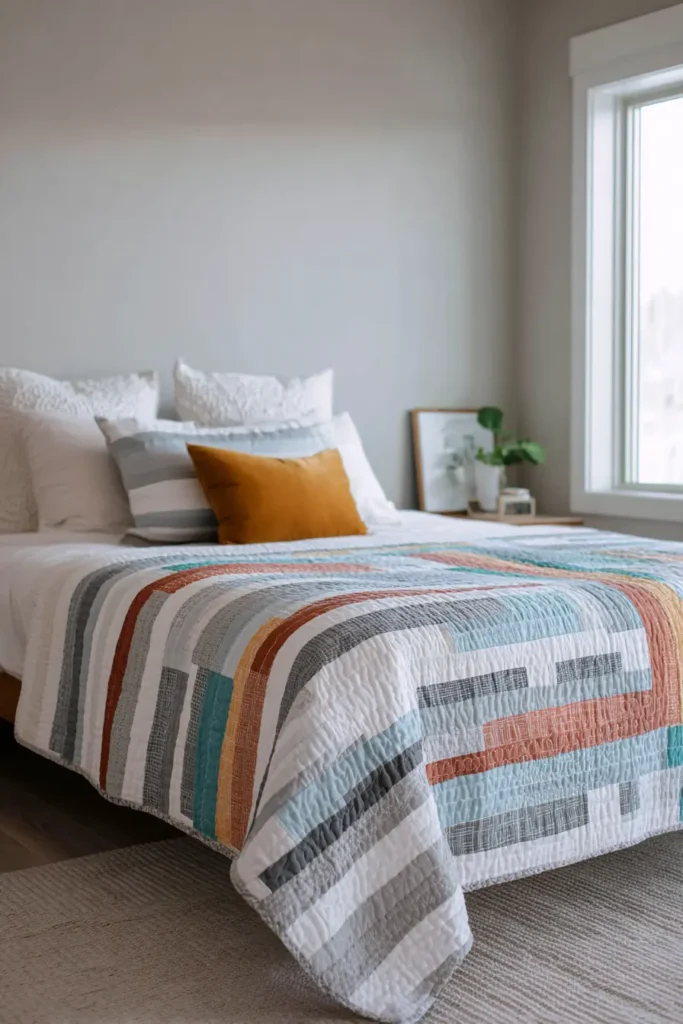
The Modern “Stacked Coin” Quilt
This pattern is the epitome of “low effort, high reward.” It uses pre-cut strips (Jelly Rolls) or scraps cut into uniform rectangles stacked in tall vertical columns. The result mimics the look of vertical shiplap or stacked stone, creating a clean, linear aesthetic that elongates the bed.
Finished Dimensions: Large Throw, approximately 60″ x 72″.
Materials Needed:
- “Coin” Fabric: 1 Jelly Roll (40 strips, 2.5″ wide x 42″ long) OR roughly 3 yards of assorted scraps cut into 2.5″ strips.
- Palette: Mix of greys, muted blues, creams, and one “pop” color like mustard or rust.
- Sashing Fabric (The Spacers): 2.5 yards of Solid White, Linen, or Charcoal.
- Backing Fabric: 4 yards.
- Batting: Twin Size (72″ x 90″).
- Notions: Rotary cutter, ruler, neutral thread.
Step 1: Mint the “Coins”
- Unroll your Jelly Roll (or take your 2.5″ wide scrap strips).
- Sub-cut the long strips into small rectangles measuring 2.5″ x 5″.
- You need approximately 336 rectangles (coins).
- Math: 7 columns x 48 coins per column = 336 coins.
- Note: You can vary the width of the coins (e.g., some 4″, some 6″) for an “improv” look, but for this guide, we will keep them uniform at 5″ for ease.
Step 2: Cut the Sashing Strips
- From your Sashing Fabric, cut 8 long vertical strips.
- Width: Cut them 4.5″ wide (by the width of the fabric).
- Length: You need them to be at least 72″ long. Since fabric is usually only 42″ wide, you will need to sew two strips together end-to-end to create the length, then trim to 72″.
Step 3: Stack the Columns
- Sort your coins into 7 piles (48 coins in each pile). Shuffle the colors so they are well distributed.
- Take Pile 1. Place two coins Right Sides Together.
- Sew them together along the 5-inch long edge with a 1/4″ seam allowance.
- Open and press. Add the next coin to the stack.
- Continue sewing until you have a long vertical column of 48 stacked rectangles.
- Repeat for all 7 piles.
- Press: Press all seams in one direction (e.g., all downward).
Step 4: Trim the Columns
- Your sewn columns will likely be slightly wobbly or uneven in length due to variations in seam allowances.
- Lay each column flat on the floor or cutting mat.
- Trim the sides of the column so they are perfectly straight and exactly 4.5″ wide. (You originally cut them 5″ wide, so you have 1/2″ of wiggle room to trim off jagged edges).
- Trim the top and bottom so the column is exactly 72″ tall (or whatever height your shortest column turned out to be).
Step 5: Assembly (The Rail Fence)
- Lay out your quilt top: Sashing – Coin Column – Sashing – Coin Column… ending with Sashing.
- Formula: 8 Sashing Strips + 7 Coin Columns.
- Pin the long vertical seams heavily.
- Sew the columns and sashing strips together.
- Press seams toward the sashing (the flat fabric is less bulky than the coin seams).
Step 6: Straight Line Quilting
- Baste your sandwich.
- Quilting: Keep the modern vibe by stitching straight vertical lines.
- Stitch “in the ditch” along the long vertical seams where the coins meet the sashing.
- Then, stitch one straight line down the center of each sashing strip.
- Then, stitch one straight line down the center of each coin column.
- This creates a consistent vertical channel texture that complements the design.
Pro Design Tip: The “Ombre” Stack. Instead of mixing the colors randomly, arrange the coins in each column by gradient. Start with dark charcoal coins at the bottom, transition to medium greys in the middle, and whites/creams at the top. This draws the eye upward, making the ceiling feel higher.
Budget Consideration: Sample Swatches. This pattern is perfect for using those heavy “upholstery fabric sample books” that furniture stores often throw away. Since you are cutting small rectangles, the stiff/heavy fabric works well for the “coins” and adds incredible texture. Just be sure to use a heavy-duty needle (Jeans needle) when sewing.
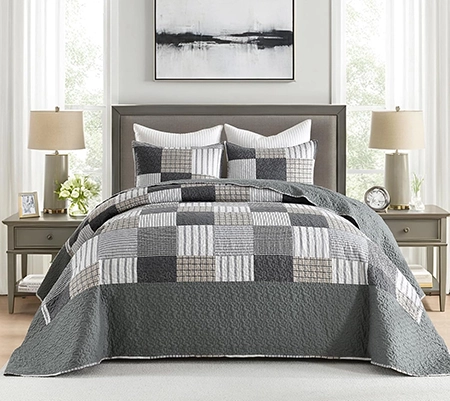
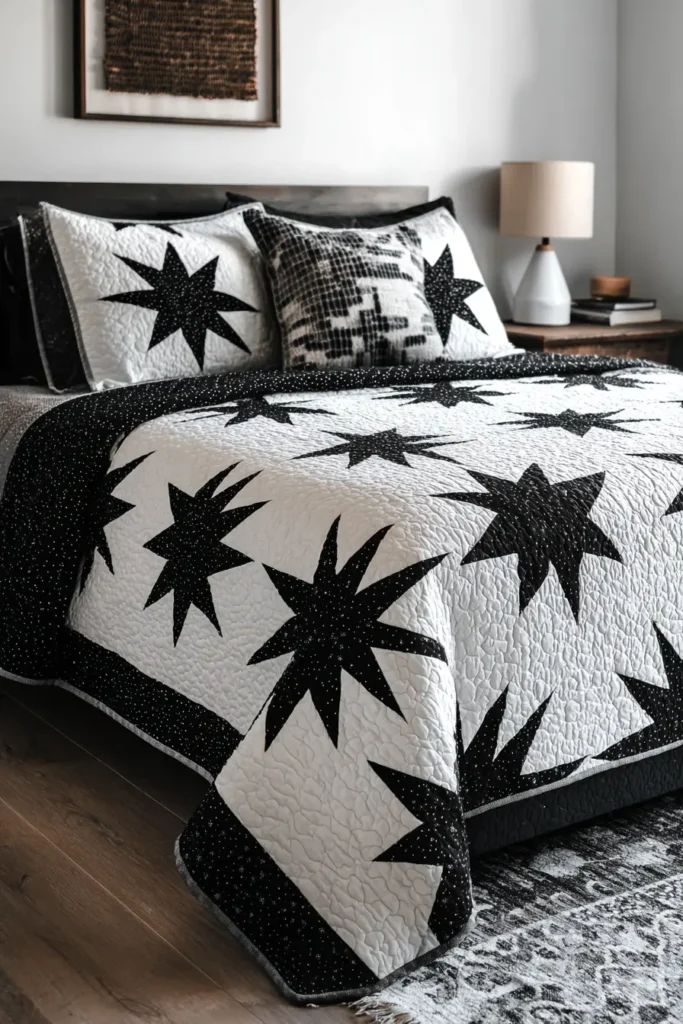
12. Black and White Modern Farmhouse Quilt Patterns for Bold Contrast

The “Modern Swiss Cross” Quilt
This striking minimalist design uses high-contrast black and white to create a bold graphic statement. The “Swiss Cross” (or positive sign) is a staple of Scandinavian-inspired farmhouse decor. By using “negative space” effectively, you create a quilt that feels clean, modern, and uncluttered.
Finished Dimensions: Queen Size, approximately 80″ x 80″.
Materials Needed:
- Fabric A (Black): 2.5 yards of Solid Black or a subtle Black-on-Black print.
- Fabric B (White Background): 5 yards of Solid White or very low-volume white print.
- Backing Fabric: 5 yards (Black-and-White Buffalo Check looks great here).
- Batting: Queen Size (90″ x 90″).
- Binding: 3/4 yard of Black and White stripe.
- Notions: Rotary cutter, ruler, white or black thread (choose one and stick to it; white usually blends better into the seams).
Step 1: Cut the Squares
This quilt is pixelated; it is made entirely of uniform squares.
- From Fabric A (Black): Cut 85 squares, each measuring 4.5″ x 4.5″.
- From Fabric B (White): Cut 315 squares, each measuring 4.5″ x 4.5″.
- Total Squares: 400 squares (Grid of 20 x 20).
Step 2: Construct the Cross Blocks
Instead of sewing 400 squares individually into rows (which takes forever), we will first build “Cross Units”.
- Anatomy of a Cross Unit: It takes 5 Black Squares and 4 White Squares to make one 9-patch block that looks like a plus sign.
- Row 1: White – Black – White
- Row 2: Black – Black – Black
- Row 3: White – Black – White
- Sew these 9 squares together to create one Cross Block (Finished size: 12.5″ x 12.5″).
- Make 17 Cross Blocks.
- Note: This quilt uses a “floating” layout, so you won’t use all squares in these blocks; the rest act as spacing.
Step 3: Layout the Grid
- Find a large floor space. We are creating a 20 x 20 grid of 4.5″ squares.
- Spacing: Arrange your 17 Cross Blocks on the floor.
- A standard layout is staggered: Place a cross, leave 3-4 squares of white space, place another cross.
- Or do a regular X pattern: 5 crosses in the top row, 4 in the next, etc.
- Fill in all the empty spaces around the crosses with your remaining White Squares.
- Stand back and squint. Ensure the crosses are evenly spaced, and the black-and-white balance feels right.
Step 4: Web Piecing (Speed Assembly)
Since this is a giant grid of identical squares, use “Web Piecing” to keep it organized.
- Stack the squares for Column 1 in order (top to bottom). Label it “1”.
- Stack Column 2, Column 3, etc., up to Column 20.
- Sit at the machine. Take the top square from Col 1 and Col 2. Sew them together. Do not cut the thread.
- Take the next square from Col 1 and Col 2. Sew them.
- Continue until you have a long “chain ladder” connecting Columns 1 and 2.
- Repeat, adding Column 3 to Column 2, then Column 4, until thread chains connect the entire quilt top.
Step 5: Press and Finish Seams
- Threads now hold the quilt top together, but the vertical seams are open.
- Sew the long vertical seams between the columns.
- Pressing: Press the horizontal seams of Row 1 to the Left, Row 2 to the Right, Row 3 to the Left, etc. This creates locking seams for perfect corners.
Step 6: High-Contrast Quilting
- Baste the sandwich.
- Quilting: Choose a thread color that matches your background (White).
- Design: Geometric quilting works best.
- Grid: Quilt straight lines horizontally and vertically through the center of every square (creating a grid on top of the grid).
- Diagonal: Quilt large X’s through the center of the crosses.
- Avoid: Don’t do flowy floral quilting; it clashes with the stark pixelated graphic.
Pro Design Tip: The “Imperfect” Cross. For a more organic farmhouse feel, don’t use solid black. Use charcoal, slate, and ink colored scraps for the crosses. The slight variation in the dark tones softens the harshness of the black-and-white contrast, making it feel more like a cozy wool blanket than a modern art piece.
Budget Consideration: Flat Sheets for Background. Since you need 5 yards of white, buying high-quality quilting cotton can be $60+. A King-Size 100% Cotton Flat Sheet (check the tag for “Percale” or “Cotton”; avoid microfiber) costs about $15-20 and provides nearly 6 yards of usable fabric. It is wide enough that you won’t have to piece the backing, either.
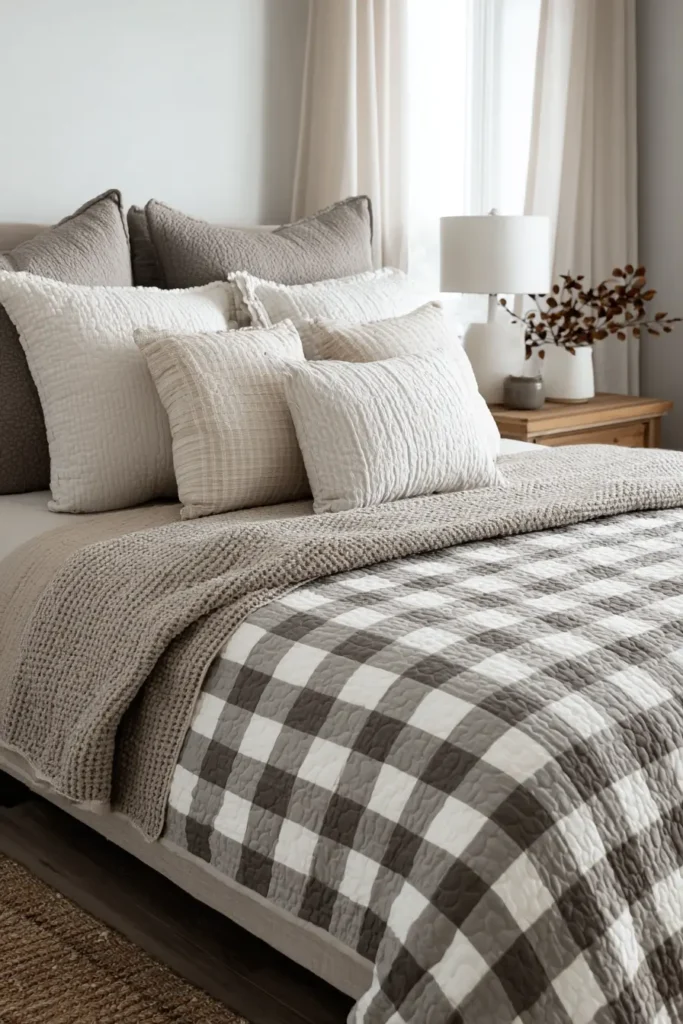
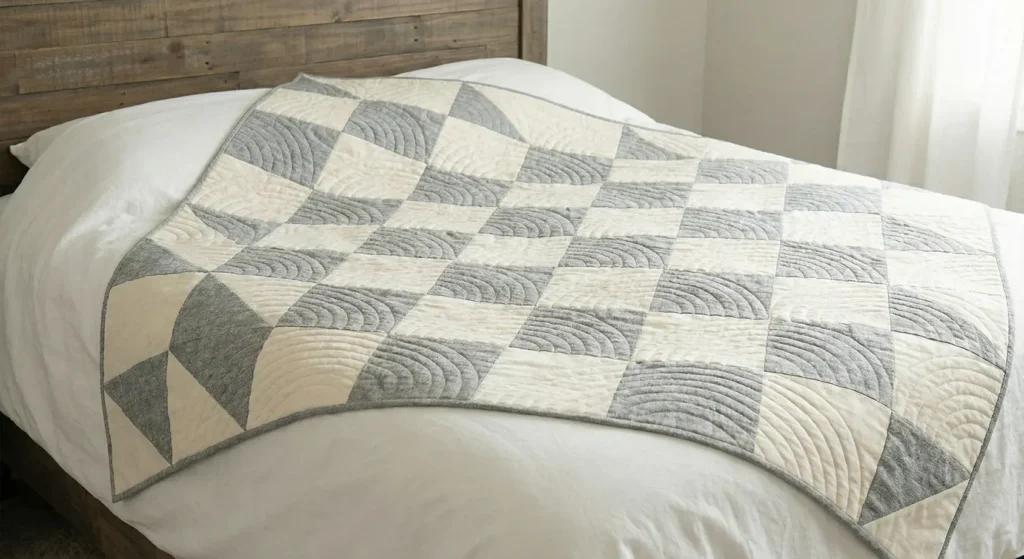
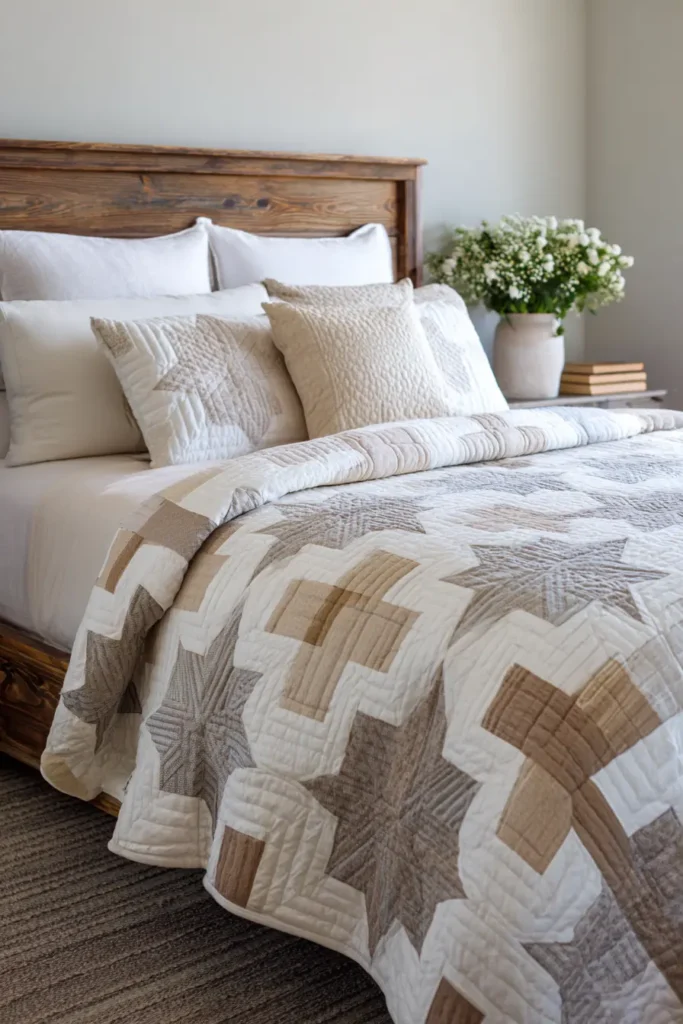
13. Soft Gray and Cream Farmhouse Quilts for Timeless Elegance
The “Churn Dash” Cream & Charcoal Quilt
The Churn Dash is an iconic 19th-century block that looks incredibly modern when simplified to two colors. By using a soft, warm gray (Greige) against a rich Cream background, you create an elegant, understated quilt that feels like a vintage stone floor. The geometric lines are crisp, but the low-contrast colors keep it restful.
Finished Dimensions: Queen Size, approximately 84″ x 84″.
Materials Needed:
- Fabric A (Gray/Greige): 3 yards of a linen-texture print or solid.
- Fabric B (Cream Background): 4.5 yards of solid Kona Bone or similar warm white.
- Backing Fabric: 7.5 yards.
- Batting: Queen Size (90″ x 108″).
- Binding: 3/4 yard of Fabric A.
- Notions: Rotary cutter, 6.5″ or 12.5″ square ruler, neutral thread.
Step 1: Cutting for One Block
We will make large, statement blocks (12″ finished). You need 49 Blocks total. For ONE block, cut:
- Fabric A (Gray):
- Four rectangles: 2.5″ x 6.5″ (for the rails).
- Two squares: 3″ x 3″ (for the Half Square Triangles).
- Fabric B (Cream):
- One center square: 6.5″ x 6.5″.
- Four rectangles: 2.5″ x 6.5″.
- Two squares: 3″ x 3″.
Multiply these cuts by 49 for the full quilt.
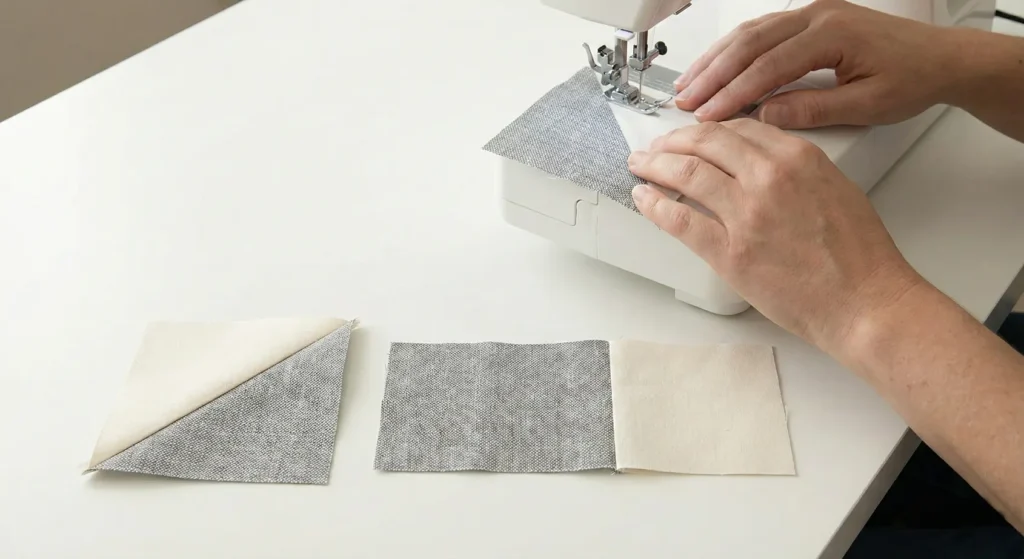
Step 2: Make the Half Square Triangles (Corners)
- Take your 3″ Gray squares and 3″ Cream squares.
- Draw a diagonal line on the back of the Cream squares.
- Place one Cream and one Gray square Right Sides Together.
- Sew a 1/4″ seam on both sides of the line.
- Cut on the line. Press seams toward the Gray.
- Trim: Trim these units to perfectly 2.5″ x 2.5″.
- You need 4 HSTs per block.
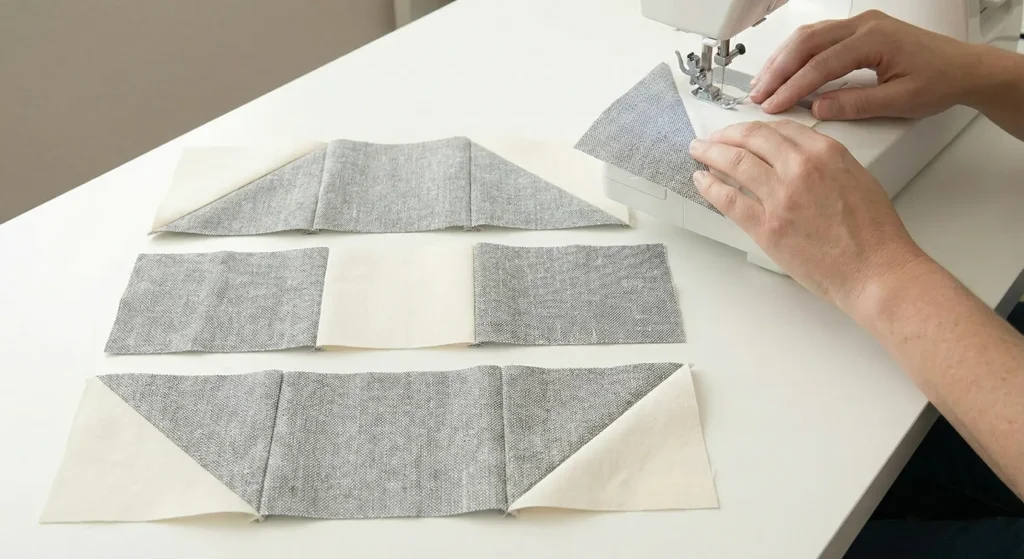
Step 3: Make the Rail Units (Sides)
- Sew one Gray Rectangle (2.5″ x 6.5″) to one Cream Rectangle (2.5″ x 6.5″) along the long edge.
- Press the seam toward the Gray.
- This unit should measure 4.5″ x 6.5″.
- Make 4 Rail Units per block.
Step 4: Assemble the Block Rows
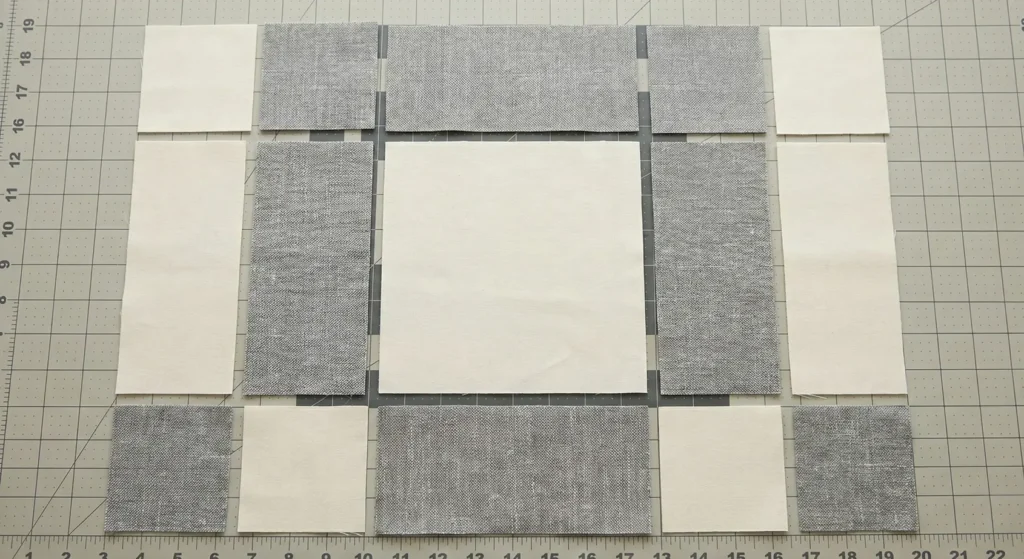
Lay out the pieces in a 9-patch grid:
- Top Row: HST (Gray corner out) – Rail Unit (Gray strip top) – HST (Gray corner out).
- Middle Row: Rail Unit (Gray strip left) – Cream Center Square (6.5″) – Rail Unit (Gray strip right).
- Bottom Row: HST (Gray corner out) – Rail Unit (Gray strip bottom) – HST (Gray corner out).
Step 5: Sew the Block
- Sew the Top Row together.
- Sew the Middle Row together.
- Sew the Bottom Row together.
- Join the three rows to complete the Churn Dash block.
- It should measure 12.5″ x 12.5″ (unfinished).
Step 6: Quilt Assembly and Finishing
- Lay out the blocks in a 7 x 7 grid.
- Sew the blocks into rows. Press seams open.
- Sew the rows together.
- Baste and Quilt:
- Design Idea: Use a Baptist Fan pattern (concentric arches). This traditional quilting design adds soft curves that contrast beautifully with the straight lines of the Churn Dash blocks.
- Bind with the Gray fabric to frame the soft cream center.
Pro Design Tip: The “Inverted” Block. To add visual interest without adding a third color, make half of your blocks “positive” (Gray dash on Cream) and half “negative” (Cream dash on Gray). Arrange them in a checkerboard pattern for a sophisticated tile effect.
Budget Consideration: Wide Backings. Instead of buying 7+ yards of standard-width fabric for the backing and sewing a massive seam, buy 108″ Wide Quilt Backing. You only need roughly 2.5 yards of Wide fabric to cover a Queen quilt. It is often cheaper per square inch and saves you the headache of piecing the back.

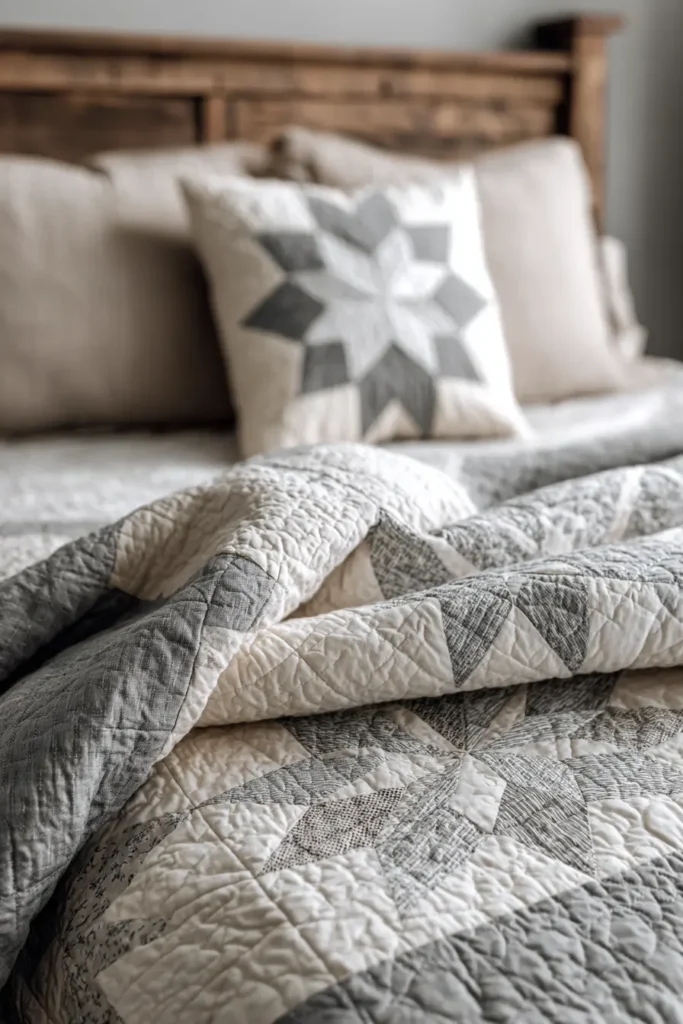
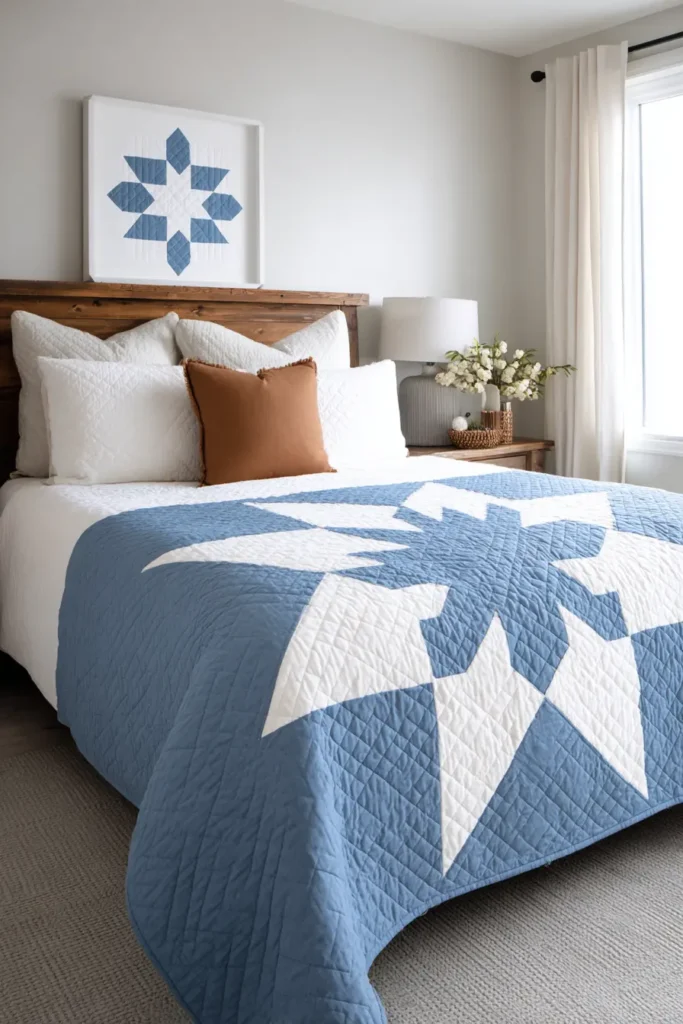

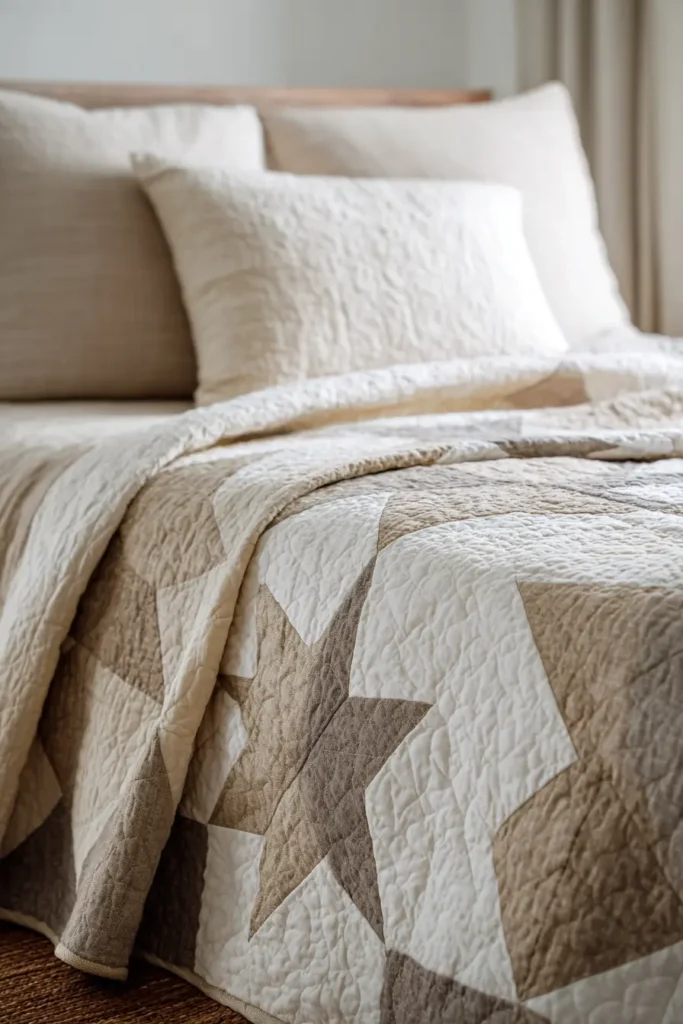
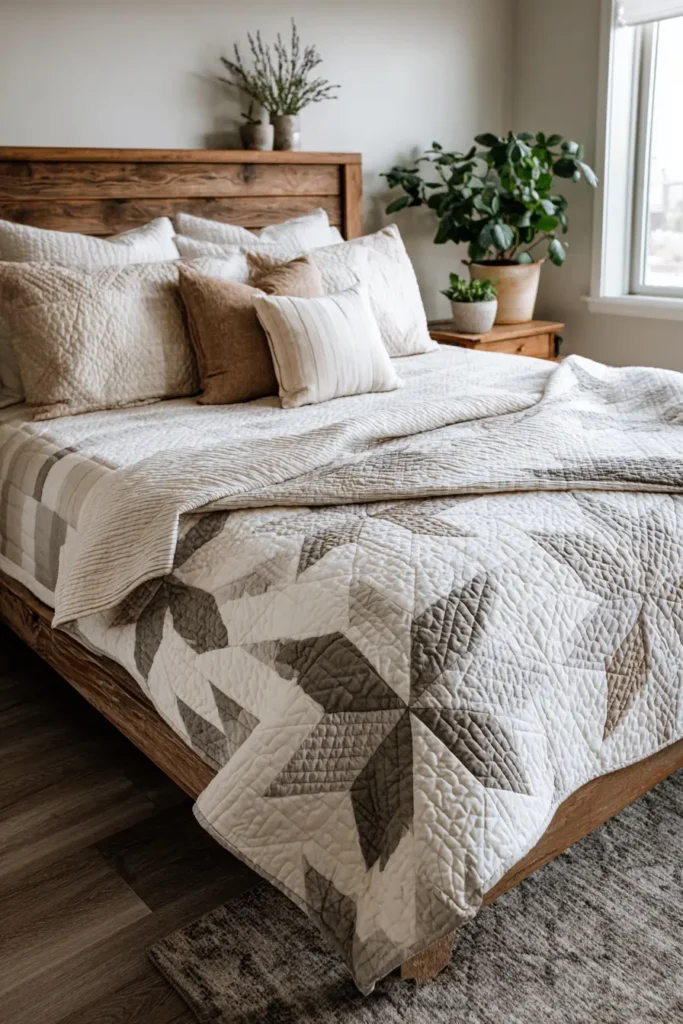
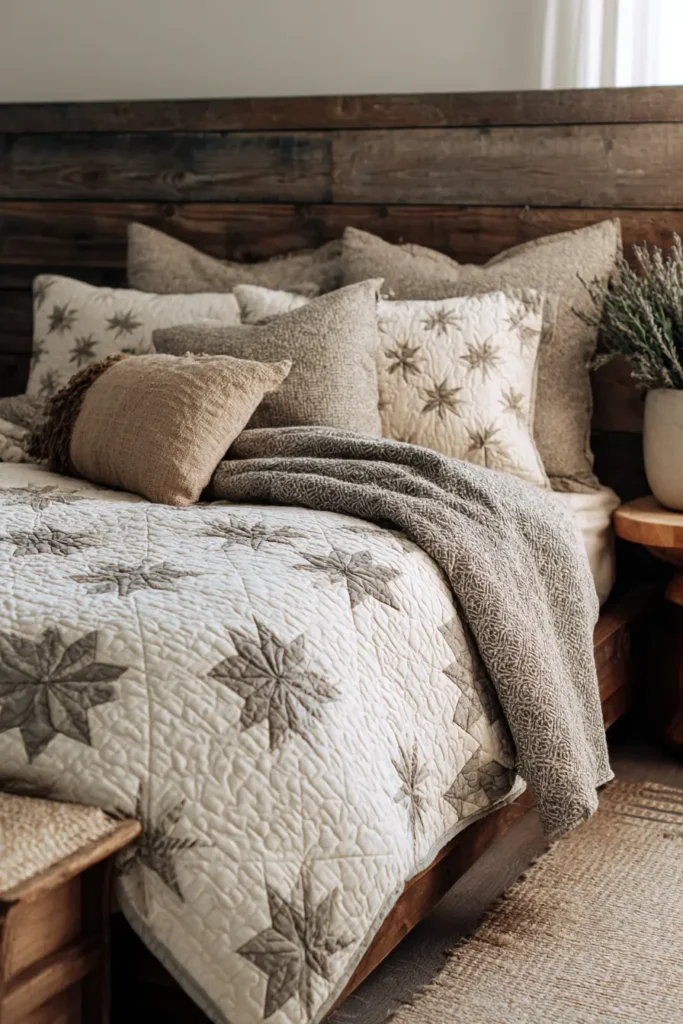
The “Nordic Star” Two-Tone Quilt
This pattern blends the rustic warmth of farmhouse style with the stark, clean lines of Scandinavian design. It features a single, oversized “Eight-Pointed Star” (or Lemoyne Star derivative) set on an expanse of negative space. The beauty lies in its restraint—using just two colors (typically a cool Slate Blue and bright White) to create a striking focal point.
Finished Dimensions: Queen Size, approximately 90″ x 90″.
Materials Needed:
- Star Fabric (Color): 2 yards of Slate Blue, Charcoal, or Mustard Linen.
- Background Fabric (White): 6 yards of Crisp White Cotton or bleached linen.
- Backing Fabric: 8 yards.
- Batting: Queen Size (96″ x 96″).
- Binding: 3/4 yard.
- Notions: Rotary cutter, huge acrylic ruler (24″ length), marking pen.
Step 1: Create the Oversized Half Square Triangles (HSTs)
The star is made of giant HSTs. We will make 8 large units.
- Cut Squares:
- From Star Fabric: Cut 4 squares, measuring 16″ x 16″.
- From Background Fabric: Cut 4 squares, measuring 16″ x 16″.
- Mark and Sew:
- Draw a diagonal line on the back of the White squares.
- Place a White square and a Blue square Right Sides Together.
- Sew a 1/4″ seam on both sides of the line.
- Cut and Press:
- Cut along the drawn line. Press seams toward the darker fabric.
- Trim: Square up these units to exactly 15.5″ x 15.5″. You now have 8 Blue/White HSTs.
Step 2: Cut the Background Squares (Negative Space)
The star floats in the center, so we need plain white blocks for the corners and edges.
- From Background Fabric, cut 8 squares, measuring 15.5″ x 15.5″.
- Note: These large expanses of white are what give the quilt its “Scandi” minimalism.
Step 3: Arrange the Center Star Layout
Lay this out on the floor; it’s big! You are building a 4×4 grid (16 blocks total).
- Center 4 Blocks (The Core): Use 4 HSTs. Arrange them so the Blue triangles touch in the center, forming a diamond.
- Surrounding Ring (The Points):
- Place the remaining 4 HSTs adjacent to the center diamond to form the star points. (Blue points should radiate outward).
- Place the 8 Background Squares in the corners and along the edges to fill the rest of the 4×4 grid.
Step 4: Assemble the Quilt Top
- Sew Rows: Join the blocks into 4 rows of 4 blocks each.
- Tip: Use pins at every intersection. With blocks this large, even a tiny shift creates a wonky star.
- Press: Press seams open to reduce bulk at the center point where 8 points converge.
- Join Rows: Sew the 4 rows together to complete the 60″ x 60″ center medallion.

Step 5: Add Borders for Size
Currently, the quilt is a 60″ square throw. Let’s make it a Queen.
- Side Borders: Cut two strips of White Background fabric: 15.5″ x 60.5″. Sew to the Left and Right sides.
- Top/Bottom Borders: Cut two strips of White Background fabric: 15.5″ x 90.5″. Sew to the Top and Bottom.
- Result: The star is now centered in a massive field of white, creating that airy Scandinavian feel.
Step 6: “Big Stitch” Sashiko Quilting
Machine quilting can look too stiff here. Hand quilting adds the “Farmhouse” touch.
- Baste the sandwich firmly.
- Use Navy Blue embroidery floss or Perle Cotton (high contrast).
- Quilt concentric stars: Start 1 inch outside the blue star. Stitch a large running stitch outlining the star shape.
- Move out another 2 inches and echo the shape again. Continue until the ripples fade into the white borders.
- This “echo quilting” highlights the star without distracting from the clean lines.
Pro Design Tip: Texture Over Pattern. In true Scandi fashion, avoid floral prints. If you need texture, use yarn-dyed fabrics (like Chambray or Essex Linen) where the color comes from the weave, not a print. This keeps the look sophisticated and gender-neutral.
Budget Consideration: IKEA Duvet Covers. For the large amount of white background fabric, buy a King-size white cotton duvet cover from IKEA (often $30-$40). It provides two huge seamless sheets of fabric that are perfect for quilt tops and backings, often cheaper than buying 6 yards of Kona cotton.

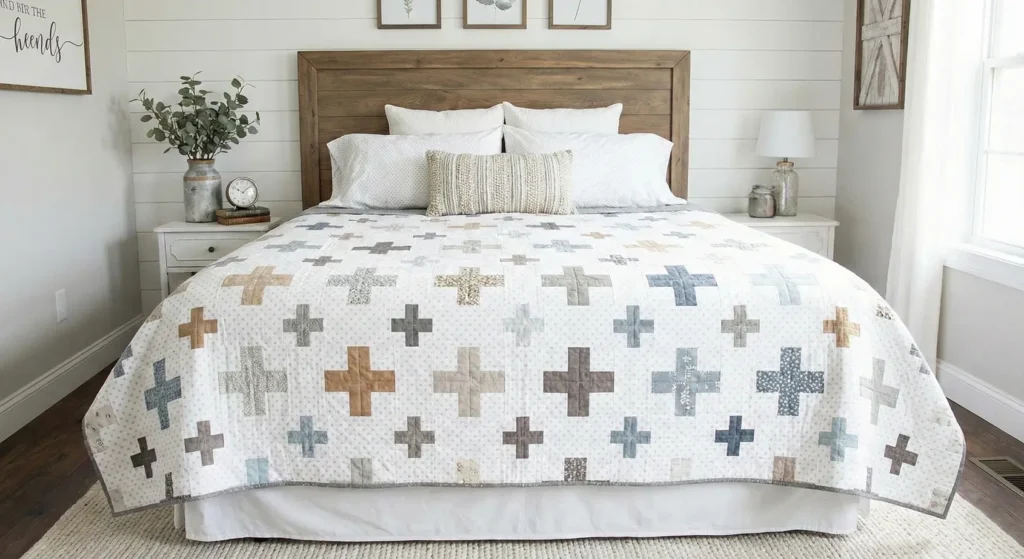
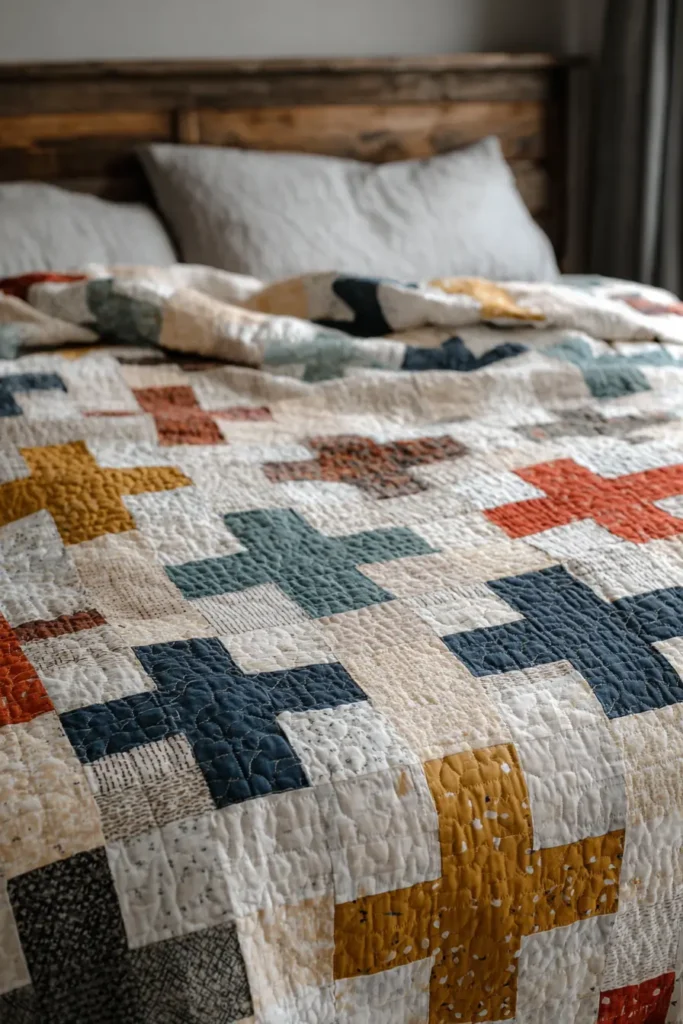
15. Swiss Cross or Plus Sign Farmhouse Quilts
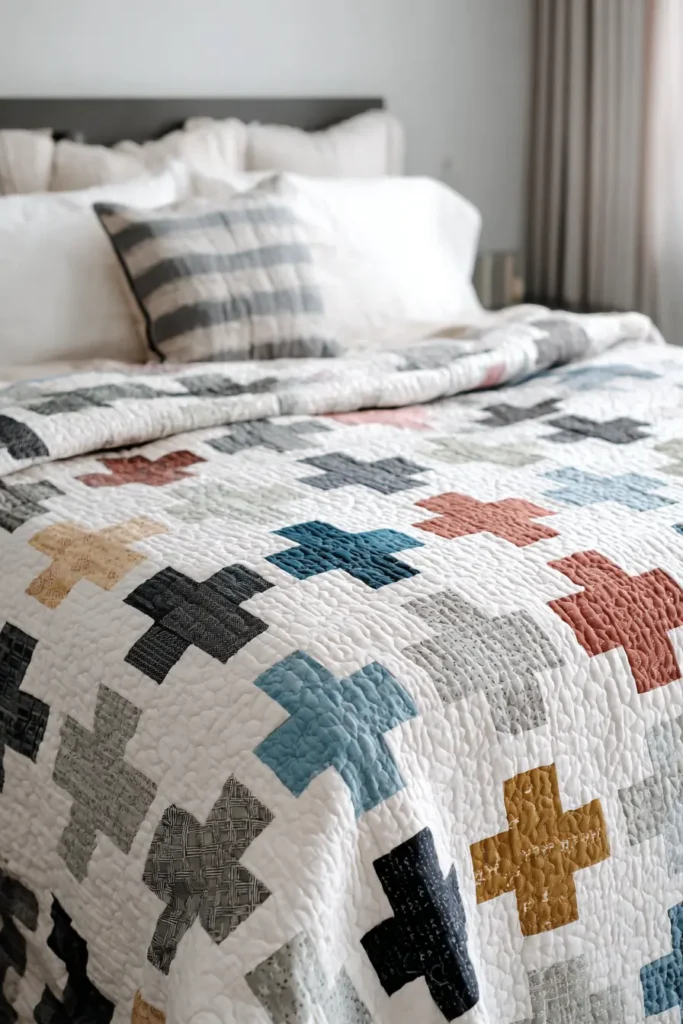
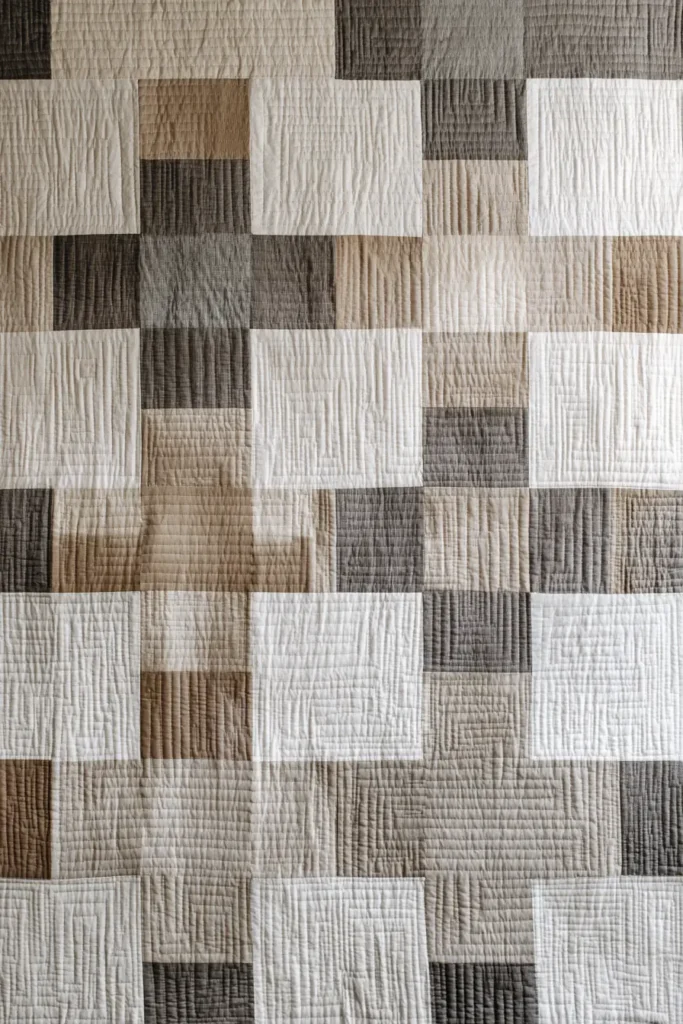
The “Scrappy Low-Volume” Plus Sign Quilt
While the Black and White cross quilt (mentioned earlier) creates a bold graphic statement, this version embraces the “scrappy” side of farmhouse style. By using a variety of warm neutrals, soft greys, and faded blues for the crosses against a low-volume (subtly patterned white) background, you create a quilt that looks collected and cozy rather than strictly modern.
Finished Dimensions: Large Throw, approximately 64″ x 76″.
Materials Needed:
- Cross Fabrics: 15-20 Fat Quarters (or large scraps) in a mix of farmhouse colors (denim blue, sage, mustard, rust, charcoal).
- Background Fabric: 3.5 yards of a “Low Volume” print (white with tiny polka dots or text).
- Backing Fabric: 4.5 yards.
- Batting: Twin Size (72″ x 90″).
- Binding: 5/8 yard.
- Notions: Rotary cutter, ruler, neutral thread.
Step 1: Cut the Components
We will build 5-square “Plus” blocks and alternate them with solid plain blocks.
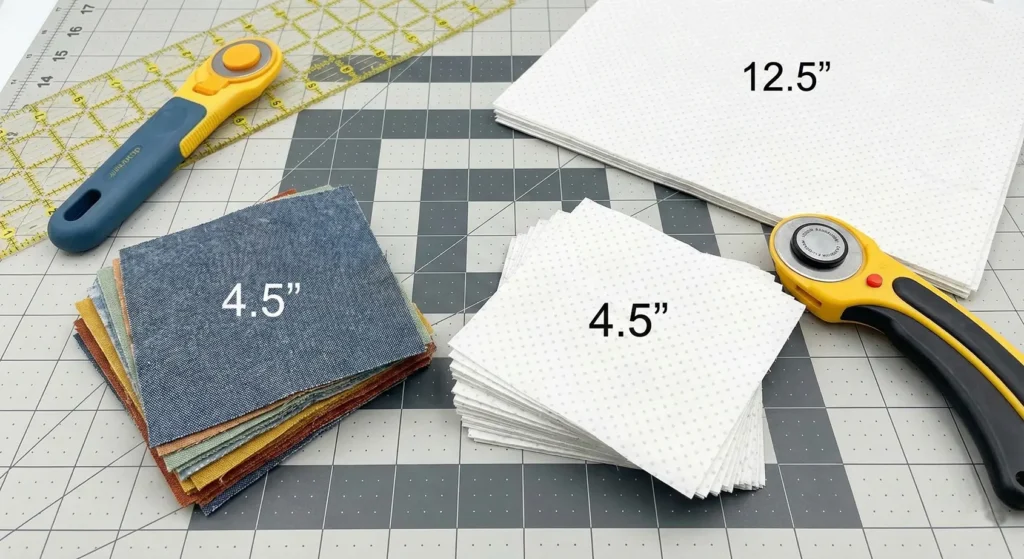
- From Cross Fabrics (Scraps): Cut 155 squares, measuring 4.5″ x 4.5″.
- From Background Fabric:
- Cut 31 squares measuring 4.5″ x 4.5″ (these are the centers of the alternating blocks; if you want a floating look, use solid background squares instead).
- Correction for easier assembly: The easiest way to make a Scrappy Plus quilt is to alternate a “Plus Block” with a “Solid Block”.
- Background Squares (for the Plus Blocks): Cut 124 squares, measuring 4.5″ x 4.5″. (These form the corners of the plus block).
- Solid Alternating Blocks: Cut 31 large squares, measuring 12.5″ x 12.5″ from the background fabric.
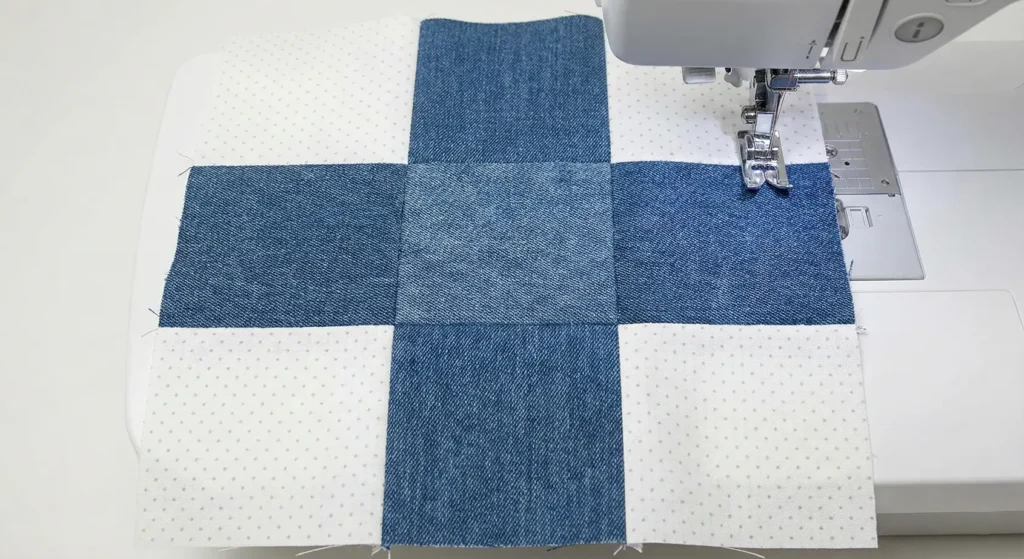
Step 2: Construct the “Plus” Blocks
You need to make 31 Plus Blocks. Each block is a 9-patch grid.
- Gather your pieces for ONE block:
- 5 Colored Scrappy Squares (4.5″) arranged in a plus sign (Center, Up, Down, Left, Right).
- 4 Background Squares (4.5″) for the empty corners.
- Row 1: Background – Color – Background. Sew together.
- Row 2: Color – Color – Color. Sew together.
- Row 3: Background – Color – Background. Sew together.
- Sew the three rows together.
- The block should measure 12.5″ x 12.5″ unfinished. Make 31 of these.
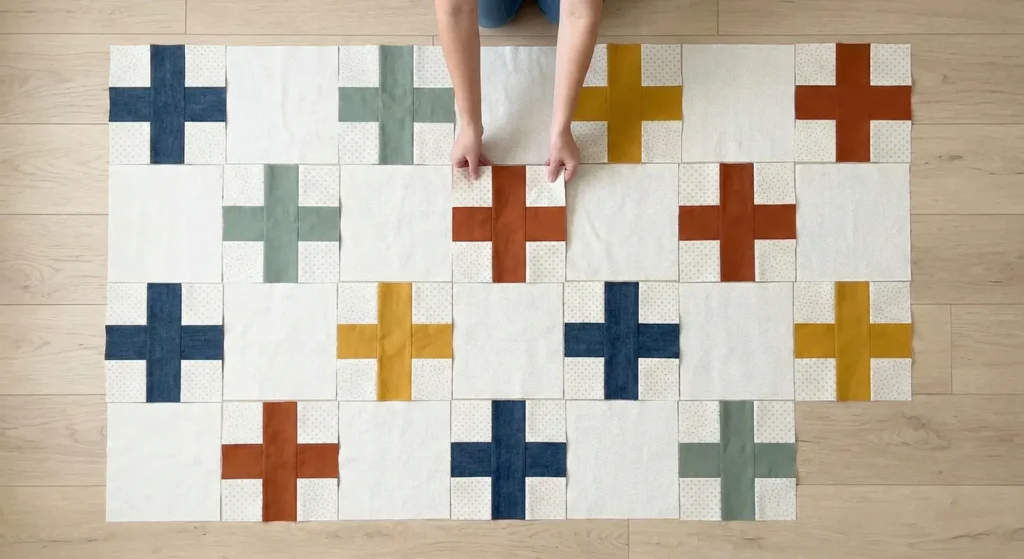
Step 3: Arrange the Layout (Checkerboard)
- Lay out your blocks on the floor.
- We are creating a grid that is 7 blocks wide x 9 blocks tall (Total 63 blocks).
- Note: You have 31 Plus Blocks and 31 Solid Background Blocks (12.5″). You need one more of either to finish the count (make one extra Plus block for a total of 32).
- Checkerboard Pattern: Alternate a Plus Block with a Solid Background Block.
- Row 1: Plus – Solid – Plus – Solid – Plus – Solid – Plus.
- Row 2: Solid – Plus – Solid – Plus – Solid – Plus – Solid.
- This layout gives the crosses “breathing room” so the quilt doesn’t look too crowded.
Step 4: Sew the Grid
- Stack your rows (label them 1-9).
- Sew the blocks in each row together using a 1/4″ seam allowance.
- Press seams toward the Solid Blocks (this creates less bulk than pressing toward the pieced Plus blocks).
Step 5: Assemble the Top
- Pin Row 1 to Row 2. Match the intersections where the block corners meet.
- Sew across.
- Repeat until all 9 rows are joined.
- Press horizontal seams open.
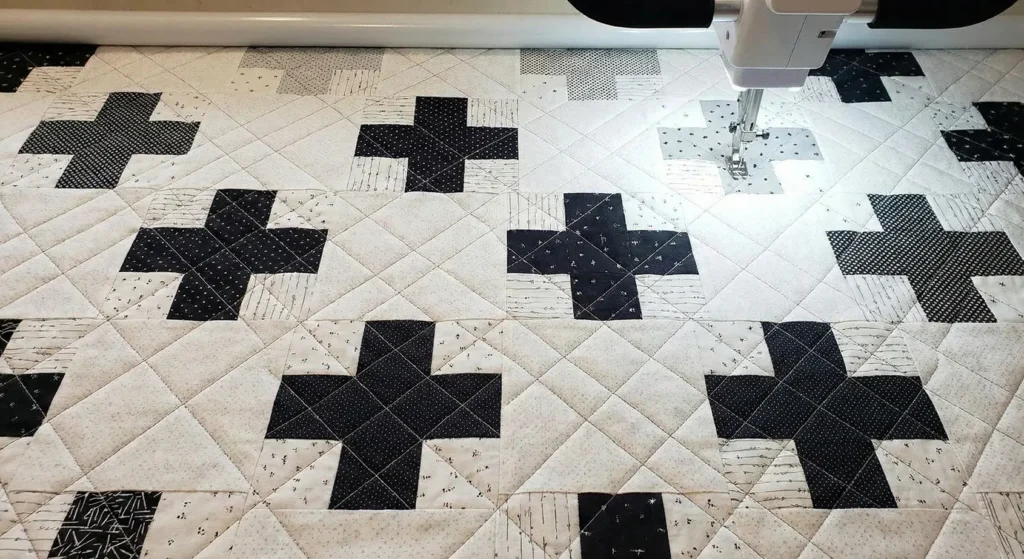
Step 6: “Grid” Quilting with a Twist
- Baste your sandwich (Backing, Batting, Top).
- Quilting: Diagonal Cross-Hatch.
- Instead of quilting straight up and down, quilt diagonal lines spaced 2 inches apart across the entire quilt.
- This creates a diamond texture that runs through the plus signs, adding dynamic movement to the static grid shape.
Pro Design Tip: The “Improv” Center. For one or two of the Plus blocks, substitute the center square with a different fabric from the arms (e.g., a blue cross with a mustard center). This “spark” adds a whimsical, handmade charm that distinguishes it from a mass-produced blanket.
Budget Consideration: Men’s Shirting. This is the quintessential pattern for using up old work shirts. The plaids, stripes, and checks from 10 different button-down shirts make for the most authentic “Farmhouse Scrappy” palette. The different fabric weights (Oxford, flannel, poplin) add a lovely tactile variety.
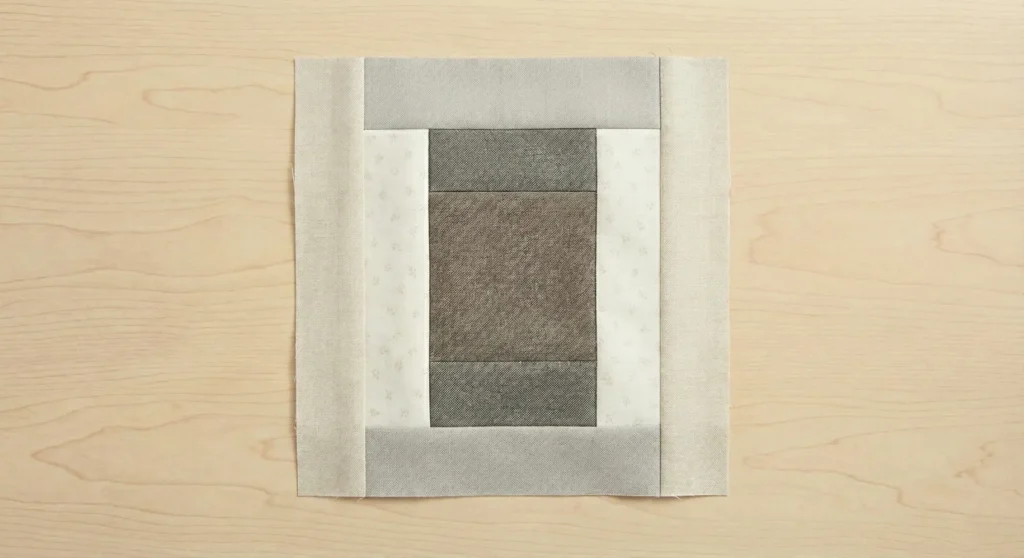
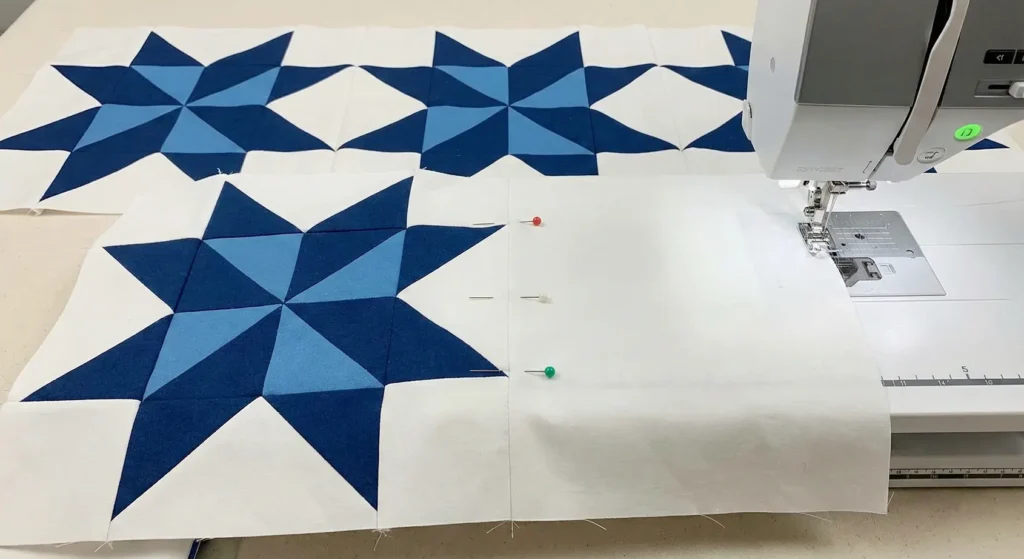
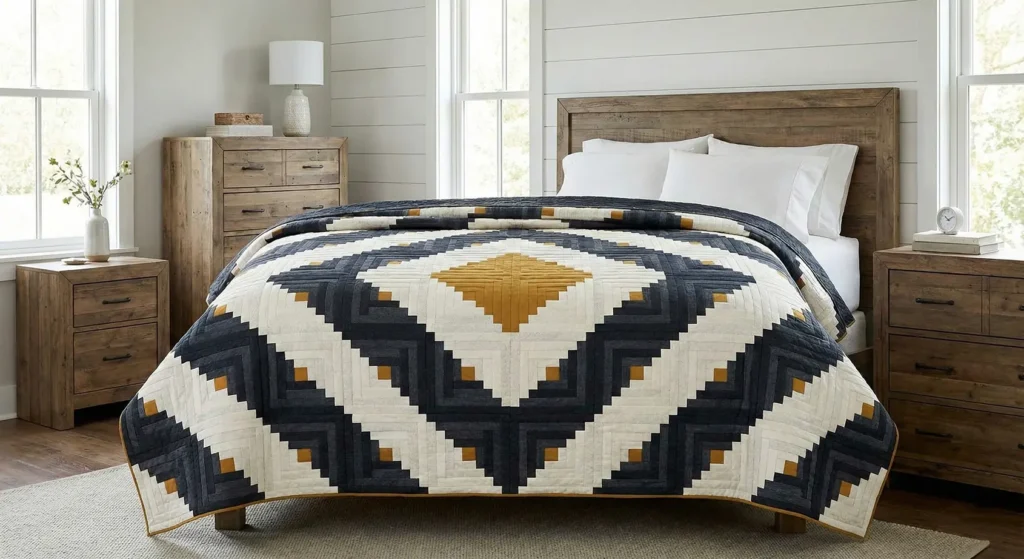
16. Log Cabin Farmhouse Quilts with a Fresh, Modern Mosaic Look
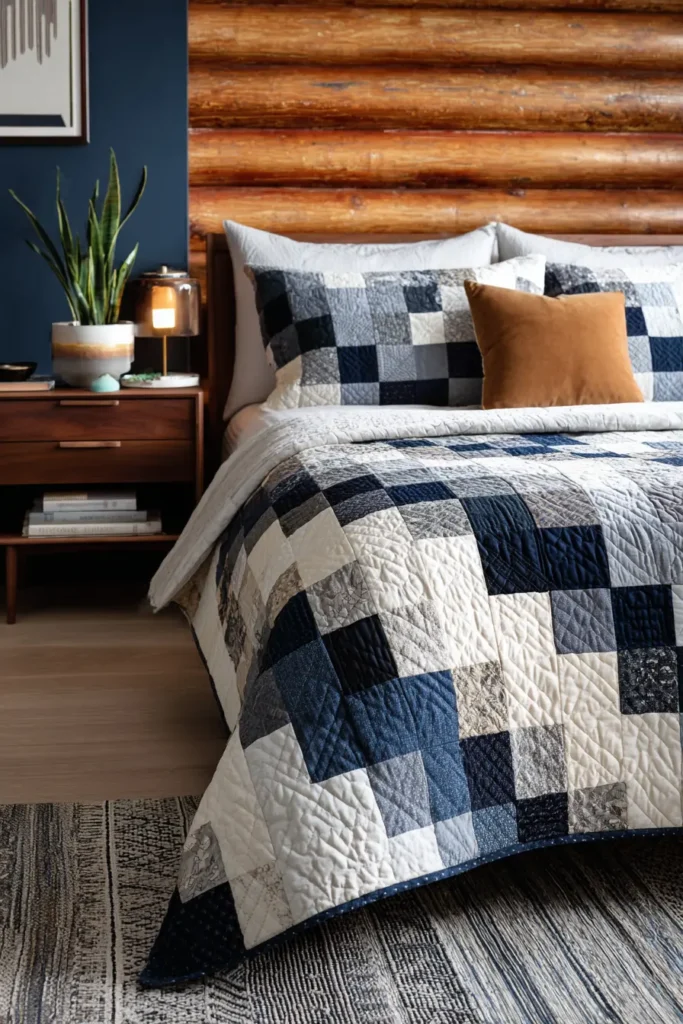
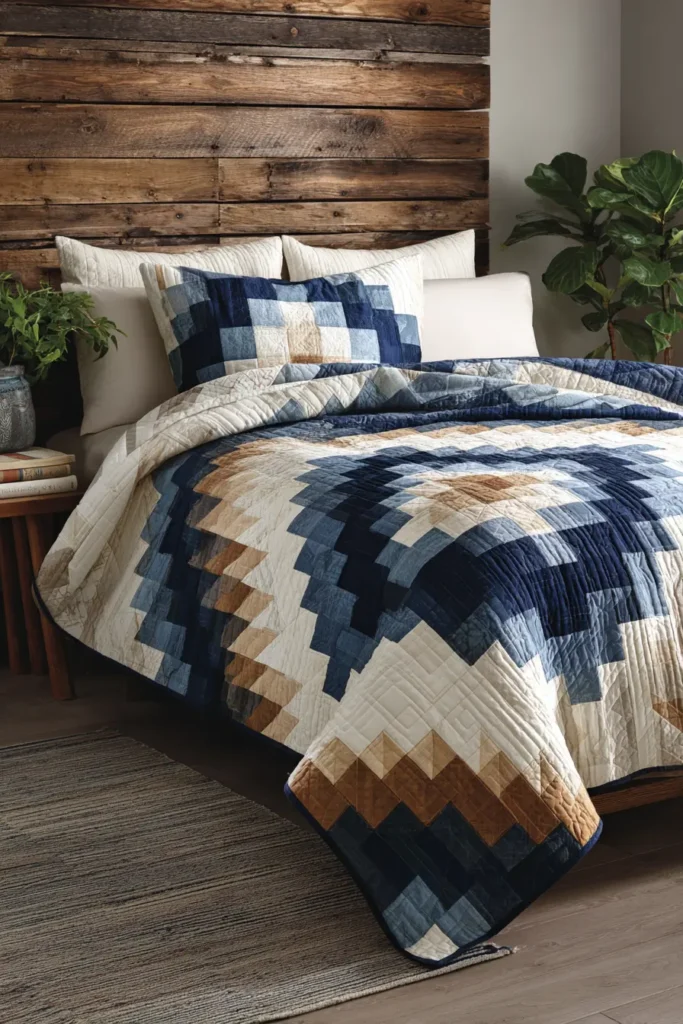
The Log Cabin is the most recognizable quilt block in history. To give it a modern farmhouse update, we use a high-contrast palette—Deep Navy (or Charcoal) versus Stark Cream—and arrange the blocks in a “Barn Raising” layout. This creates a massive diamond-mosaic effect that ripples outward from the center of the bed, turning hundreds of scrap strips into a cohesive, graphic masterpiece.
Finished Dimensions: Queen Size, approximately 84″ x 84″.
Materials Needed:
- Center “Hearth” Squares: 1/4 yard of a warm accent color (Mustard Yellow, Rust, or Leather-look cotton).
- “Light” Fabrics (Logs): 3 yards total of assorted low-volume creams, whites, and oatmeals.
- “Dark” Fabrics (Logs): 3 yards total of assorted Navy, Indigo, Charcoal, and Black prints.
- Backing Fabric: 7.5 yards.
- Batting: Queen Size (90″ x 90″).
- Notions: Rotary cutter, 12.5″ square ruler, neutral thread.
Step 1: Prep Your Strips (The Mise-en-place)
The key to a Log Cabin is organization.
- Center Squares: Cut 49 squares, measuring 2.5″ x 2.5″.
- Strips: Cut all your Light and Dark fabrics into 2.5″ wide strips.
- Note: You can cut them to exact lengths now, or use the “chain piece and trim” method (recommended for speed).
- Lengths needed per block (if pre-cutting):
- Round 1: Two 2.5″ Lights, Two 2.5″ Darks.
- Round 2: Two 6.5″ Lights, Two 6.5″ Darks.
- Round 3: Two 10.5″ Lights, Two 10.5″ Darks.
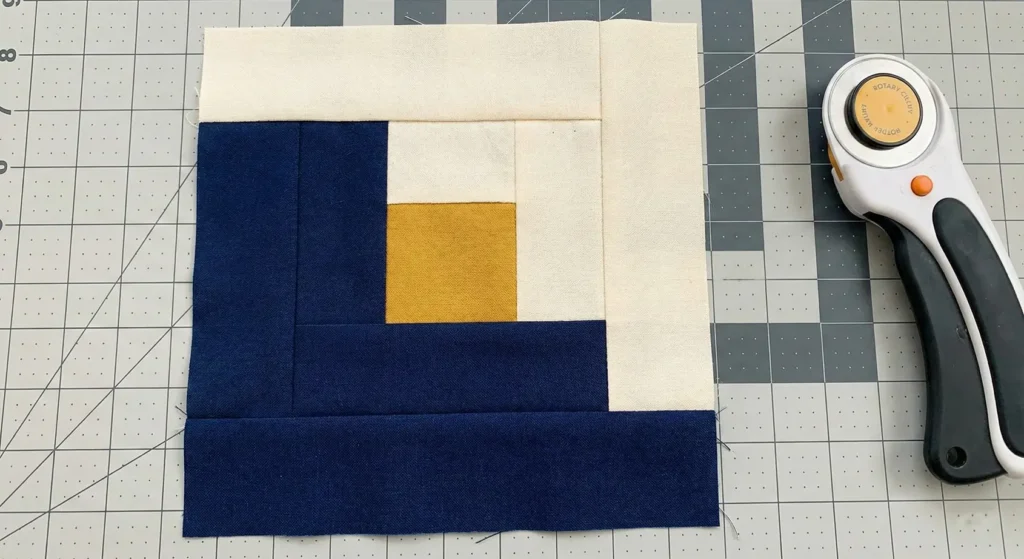
Step 2: Start the Block (Round 1)
The rule for a Light/Dark Log Cabin: One half of the block is always Light, the other half is always Dark.
- Take a Center Square (Mustard).
- Sew a 2.5″ Light square to the Top. Press seam out.
- Sew a 2.5″ x 4.5″ Light strip to the Right side. Press out.
- Sew a 2.5″ x 4.5″ Dark strip to the Bottom. Press out.
- Sew a 2.5″ x 6.5″ Dark strip to the Left side. Press out.
- Result: You have a center square surrounded by logs. The Top/Right are Light; the Bottom/Left are Dark.
Step 3: Build Outward (Round 2 & 3)
Continue adding strips in a Counter-Clockwise spiral, maintaining the color sides.
- Round 2:
- Sew a Light strip to the Top.
- Sew a Light strip to the Right.
- Sew a Dark strip to the Bottom.
- Sew a Dark strip to the Left.
- Round 3: Repeat the sequence (Top/Right = Light, Bottom/Left = Dark).
- The finished block should measure 12.5″ x 12.5″.
- Repeat this process to make 49 Blocks.
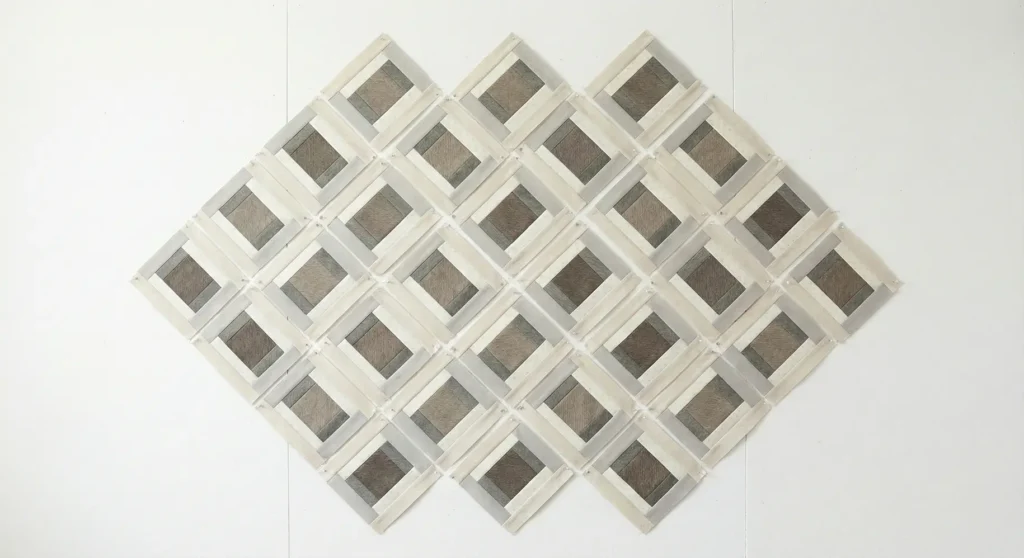
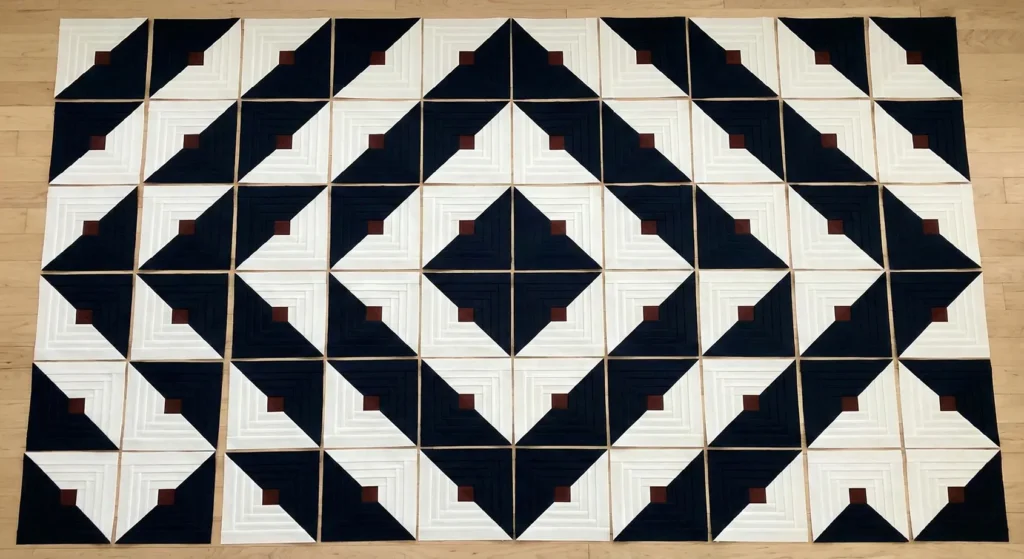
Step 4: The “Barn Raising” Mosaic Layout
This is where the magic happens.
- Find a large floor space. You are building a 7 x 7 grid.
- Center Block: Place one block in the exact center (Row 4, Column 4). Orient it so the Dark Half points toward the bottom-right.
- Ring 1: Place blocks around the center. Rotate them so the Light Halves face inward toward the center block. This creates a “diamond” of light in the middle.
- Ring 2: Place the next ring of blocks. Rotate them so the Dark Halves touch the Dark Halves of the previous ring.
- Visual Check: You should see concentric diamonds radiating outward: A center Light diamond, surrounded by a Dark diamond ring, surrounded by a Light diamond ring.
Step 5: Web Assembly
- Once your mosaic is laid out perfectly (take a photo!), stack your rows.
- Sew the blocks into rows.
- Pressing: Press the seams of Row 1 to the left, Row 2 to the right, etc.
- Sew the rows together to complete the top.
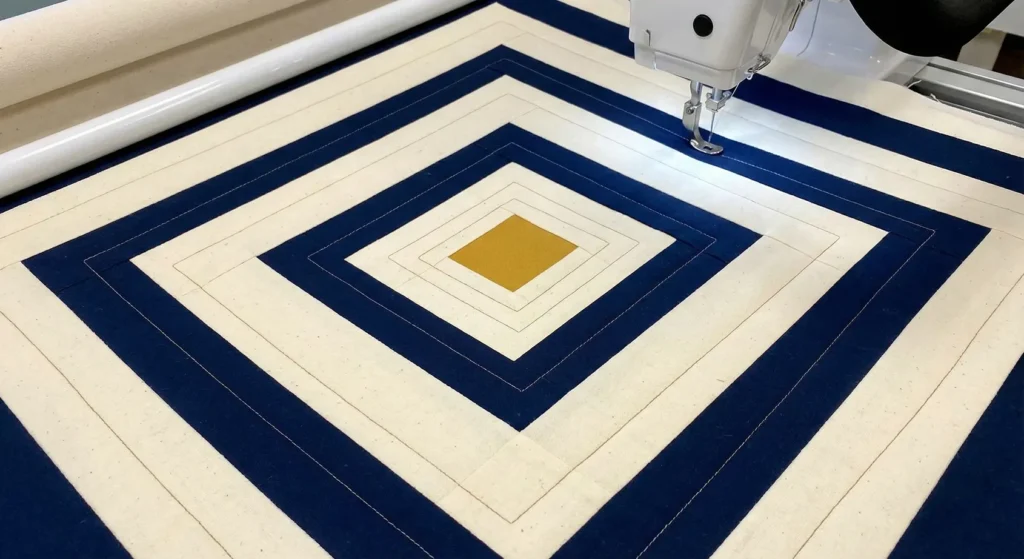
Step 6: Spiral Quilting
- Baste the sandwich.
- Quilting: Complement the “building out” nature of the blocks with a Square Spiral.
- Start in the dead center of the quilt. Stitch a square spiral that gets wider and wider, moving outward across the concentric diamonds.
- Space the lines about 2 inches apart. This reinforces the geometric drama of the mosaic.
Pro Design Tip: The “Scrappy” Rule. To make this look like a modern art piece rather than a mess, keep your Lights very Light (mostly white/cream) and your Darks very Dark (Navy/Black). If you use “Medium” blues or tans, the sharp lines of the diamond mosaic will blur and be lost. Contrast is king here.
Budget Consideration: Jelly Rolls. This pattern creates a lot of scrap waste if you cut from yardage. Buying “Jelly Rolls” (pre-cut 2.5″ strips) saves time and fabric. You will need about 3 Jelly Rolls (1 Light, 2 Dark) to finish a quilt this size without cutting a single strip yourself.
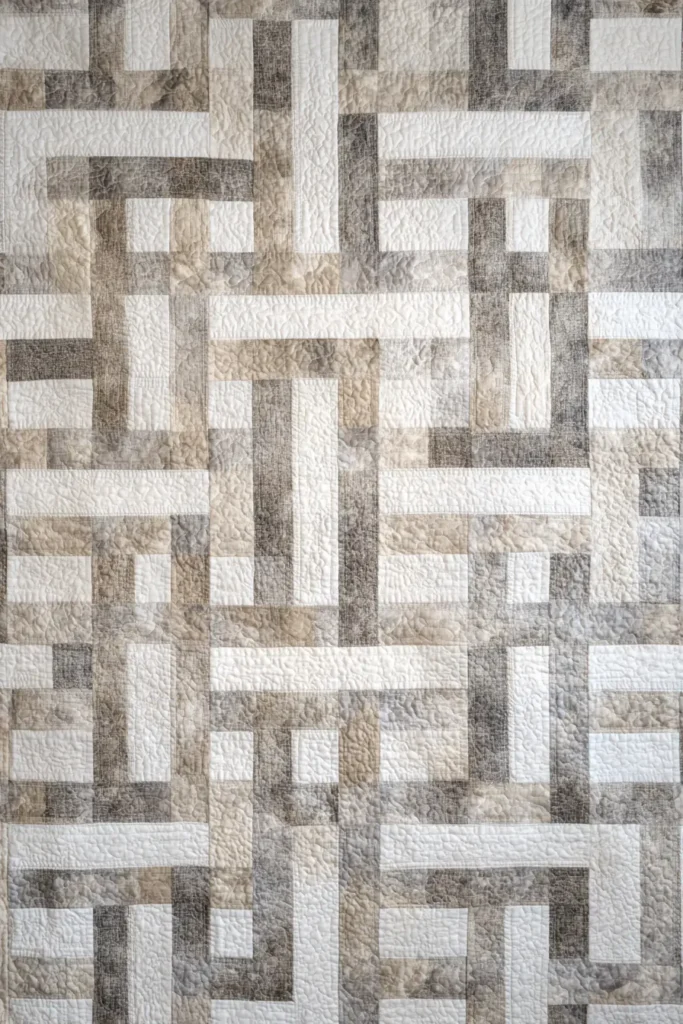
17. Layered Farmhouse Bedding Quilts for a Warm, Inviting Look
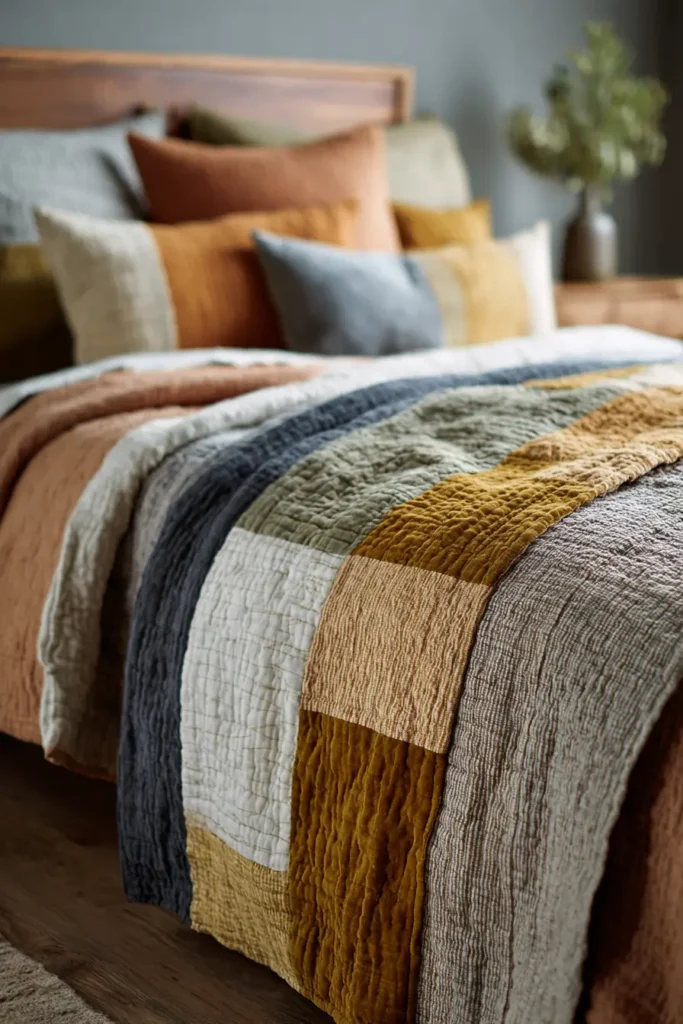
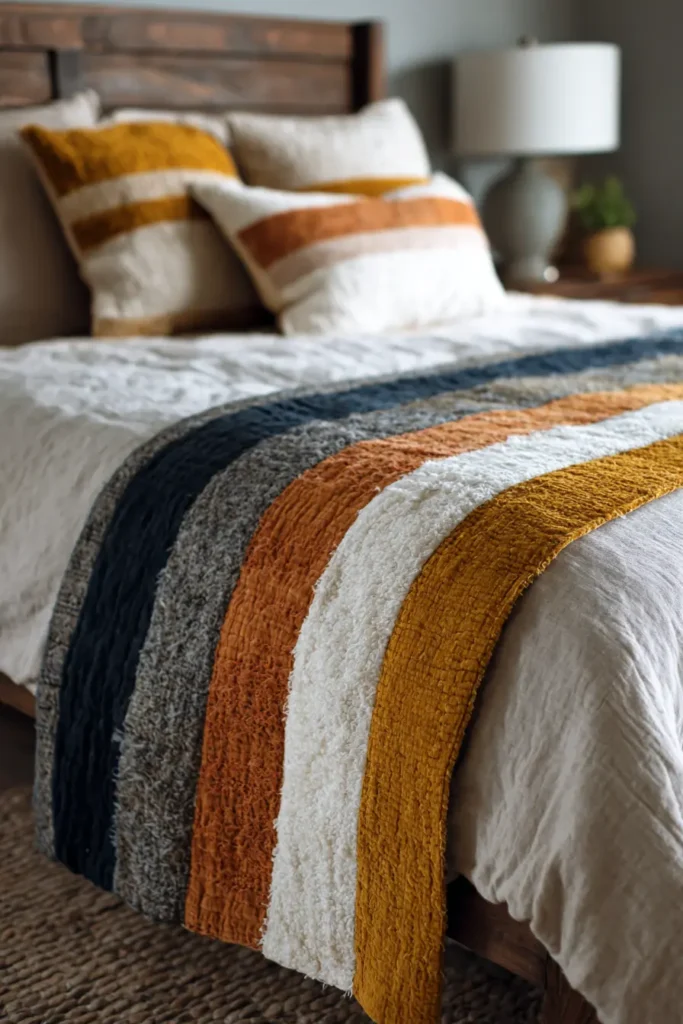
The “Sunday Morning” Mixed-Texture Bed Runner
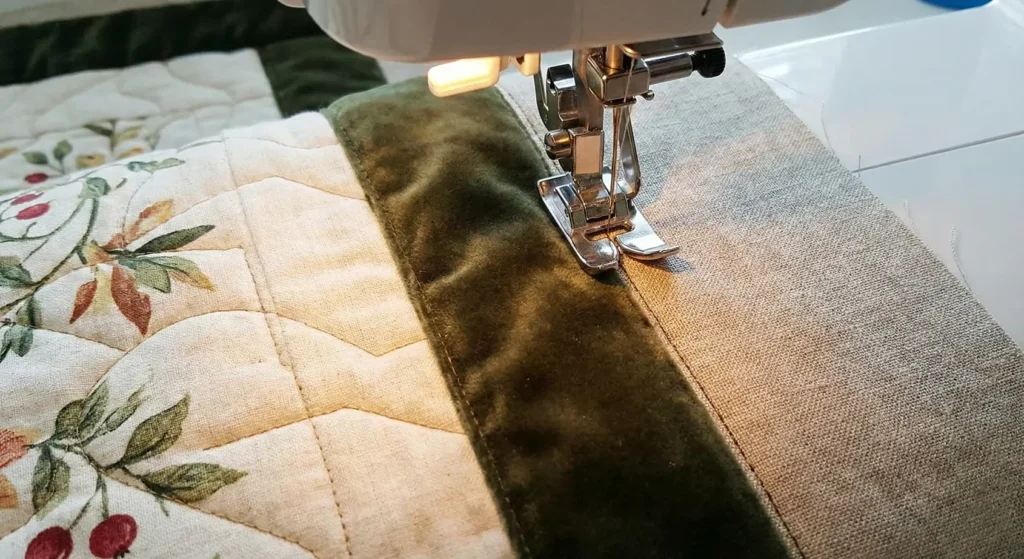
The secret to that fluffy, layered farmhouse “bedscape” isn’t just piling on blankets—it’s mixing textures. This project is a Bed Runner (or Bed Scarf) explicitly designed to lie across the foot of your duvet. It combines rough Linen, luxurious Cotton Velvet, and soft Double Gauze in wide horizontal stripes. It adds the visual weight and warmth of a second quilt without the bulk of covering the entire bed.
Finished Dimensions: Queen/King Bed Runner, approximately 26″ x 90″.
Materials Needed:
- Fabric A (Texture – Linen): 1 yard of natural Oatmeal or Grey Linen.
- Fabric B (Softness – Double Gauze/Flannel): 1 yard of White or Cream Double Gauze (or soft Flannel).
- Fabric C (Luxury – Cotton Velvet): 3/4 yard of Golden Mustard, Rust, or Sage Green Cotton Velvet.
- Backing Fabric: 3 yards of soft cotton lawn or voile (since this might touch your feet, keep it soft!).
- Batting: 1 yard of High-Loft Polyester or Wool batting (You want this puffy!).
- Binding: 1/2 yard of Linen (matches Fabric A).
- Notions: Walking foot (essential for velvet), clips (pins leave holes in velvet).
Step 1: Cut the Wide Strips
This pattern uses wide, panoramic strips to showcase the fabric’s quality.
- Fabric A (Linen): Cut 2 strips, each 6.5″ x WOF (Width of Fabric, approx 42″).
- Note: You will need to sew strips together end-to-end to achieve the 90″ length.
- Fabric B (Gauze): Cut 2 strips, each 8.5″ x WOF.
- Fabric C (Velvet): Cut 1 strip, 8.5″ x WOF.
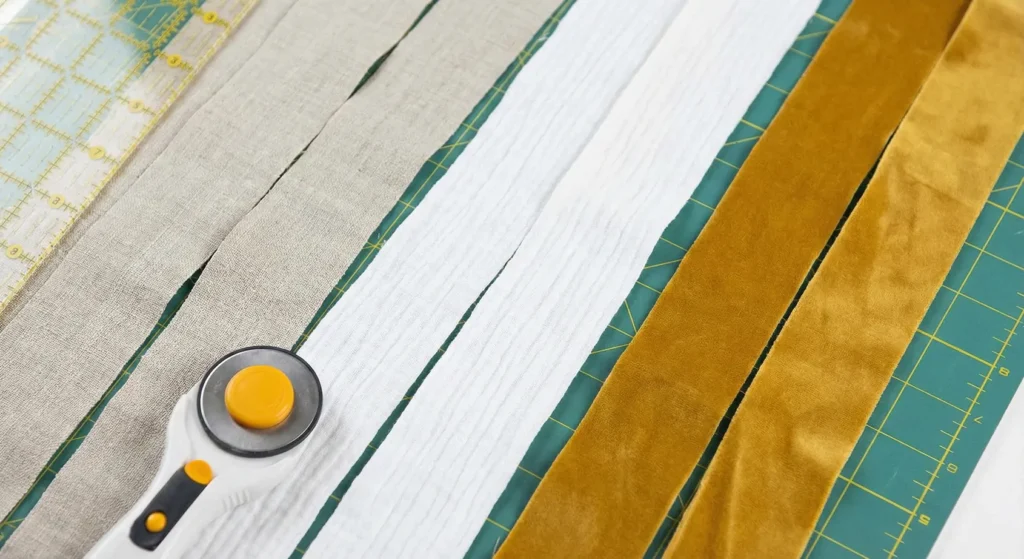
Step 2: Create the Long Panels
Since standard fabric is only ~42″ wide and a King bed is ~80-90″ wide, we must lengthen the strips.
- Take your Fabric A strips. Sew them together end-to-end. Trim the total length to 90.5″.
- Repeat for Fabric B and C.
- Tip: When joining velvet, shave the fuzz off the seam allowance area first to reduce bulk, or press the seam open firmly with a steaming cloth (don’t iron velvet directly!).
Step 3: Arrange the Stripe Layout
We are creating a symmetrical “Oreo” layout.
- Lay the strips out on the floor:
- Top: Fabric B (Gauze) – 8.5″ wide.
- Middle Top: Fabric A (Linen) – 6.5″ wide.
- Center: Fabric C (Velvet) – 8.5″ wide.
- Middle Bottom: Fabric A (Linen) – 6.5″ wide.
- Bottom: Fabric B (Gauze) – 8.5″ wide.
- This arrangement puts the heavy, durable velvet in the center and the softest gauze at the edges where your hands might grab it.
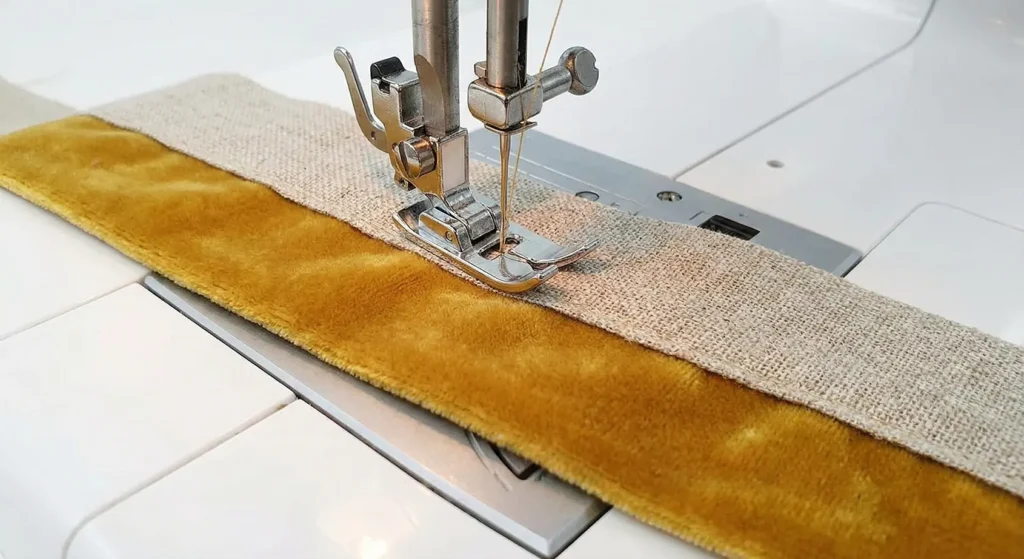
Step 4: Sew the Channels
- Sew the strips together along the long edges using a 1/2″ seam allowance.
- Pressing:
- Press away from the Velvet (it is too bulky).
- Press toward the Linen.
- Crucial: Use a lower heat setting for the Double Gauze so it doesn’t crinkle up too much before quilting.
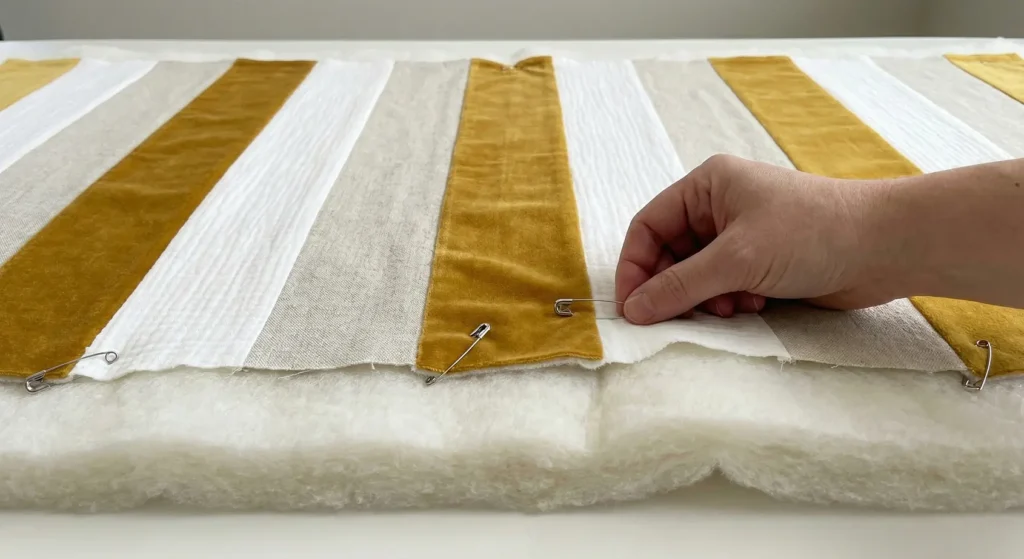
Step 5: Basting with Loft
- Tape your Backing fabric face down.
- Lay your High Loft Batting on top.
- Lay the striped Top face up.
- Baste: Use curved safety pins or spray baste. Do not skimp here; velvet likes to slide (“creep”) while sewing. Use twice as many pins as usual.
Step 6: Channel Quilting
- Use a Walking Foot (Even Feed Foot). This is non-negotiable when mixing slippery velvet and crinkly gauze.
- Stitch in the Ditch: Sew straight lines exactly in the seam lines where the fabrics meet. This makes the strips puff up like channels.
- Echo Stitching: Sew one additional straight line 1 inch away from the seam on the Linen side. This creates a crisp flange look.
- Bind the runner with the Linen fabric to finish.
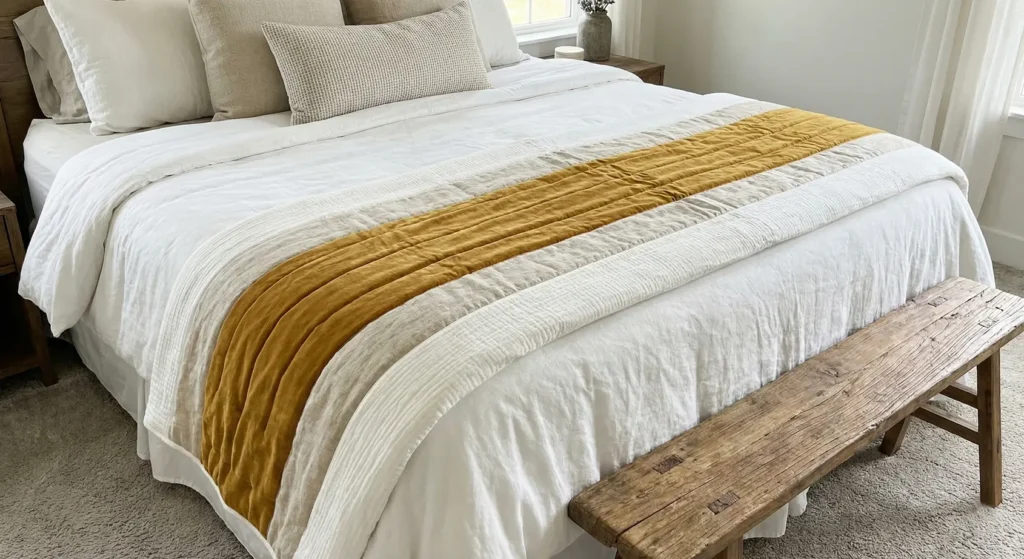
Pro Design Tip: The “Fray” Finish. For an ultra-rustic farmhouse look, skip the binding. Instead, cut your backing 2 inches wider than the top. Fold the backing over to the front (raw edge turned under) and topstitch. Or, leave the raw edges exposed and sew a straight stitch 1/2″ in from the edge, then wash to let it fray naturally (best if using Linen for all layers).
Budget Consideration: Curtains as Fabric. Velvet by the yard is expensive ($20+/yard). Check the clearance aisle for Velvet Curtains (often found at IKEA or Target). One heavy velvet curtain panel provides a huge amount of yardage for a fraction of the price, and it is usually pre-treated for durability.
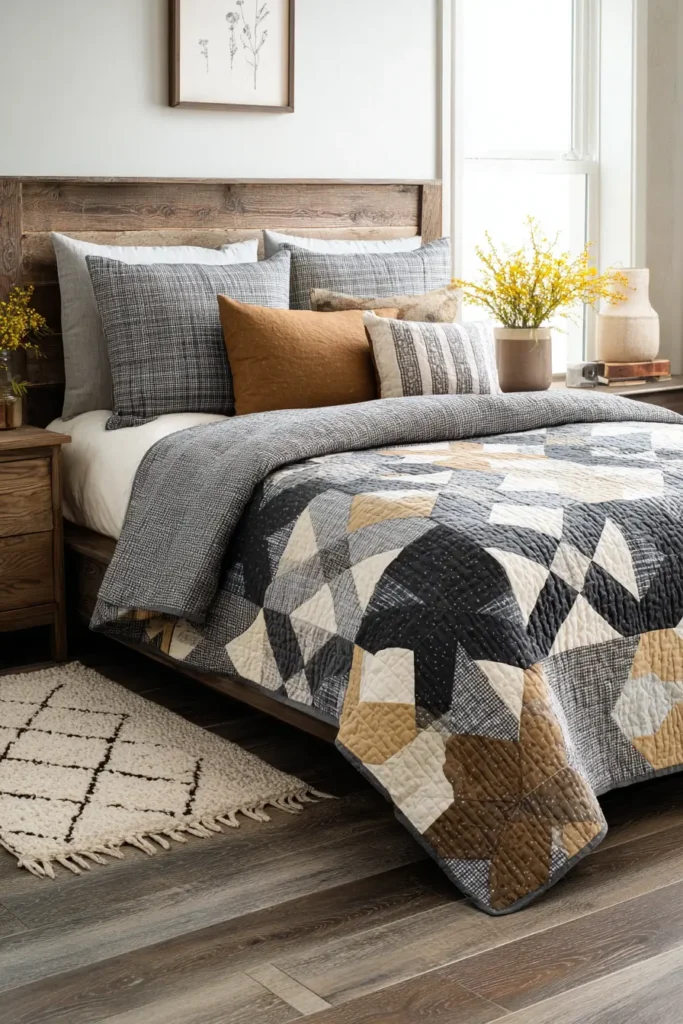
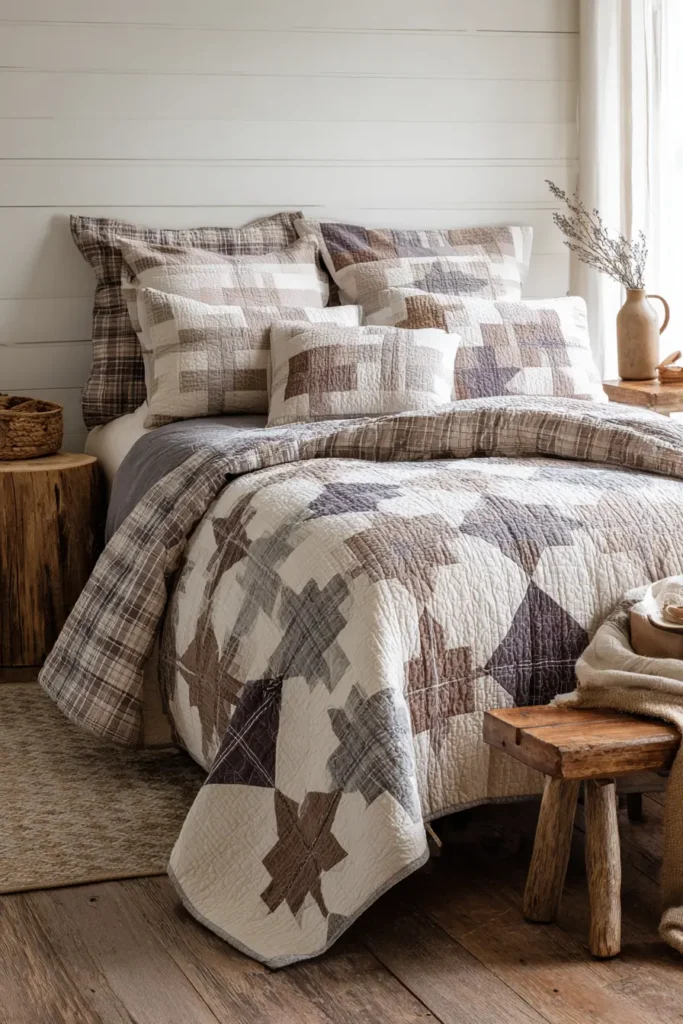
18. Simple Strip Quilts for an Effortless Modern Farmhouse Bedroom
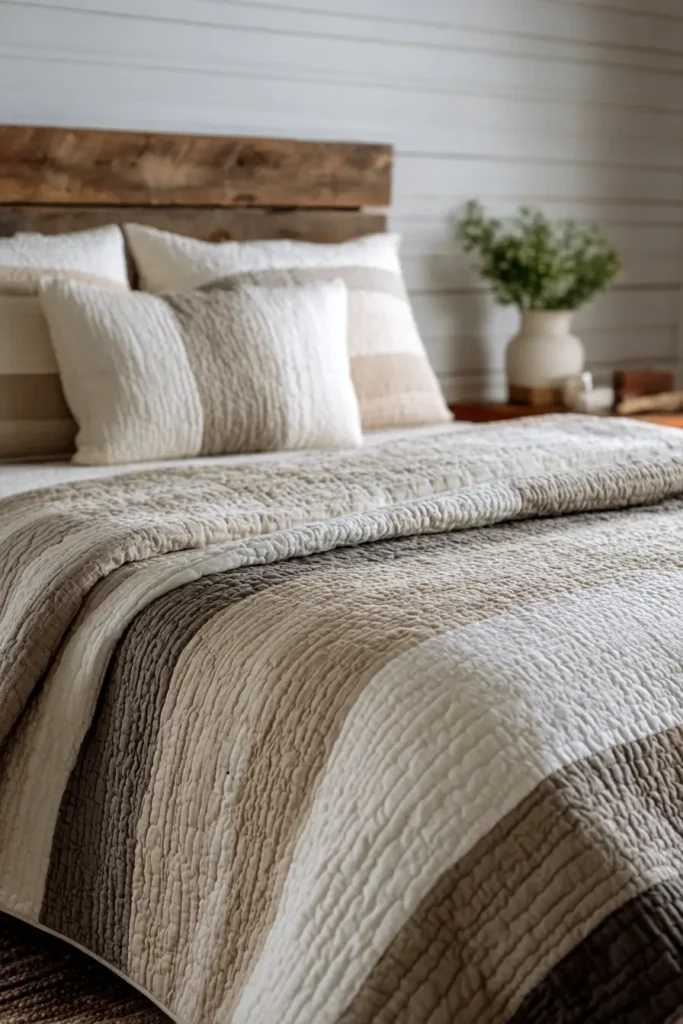
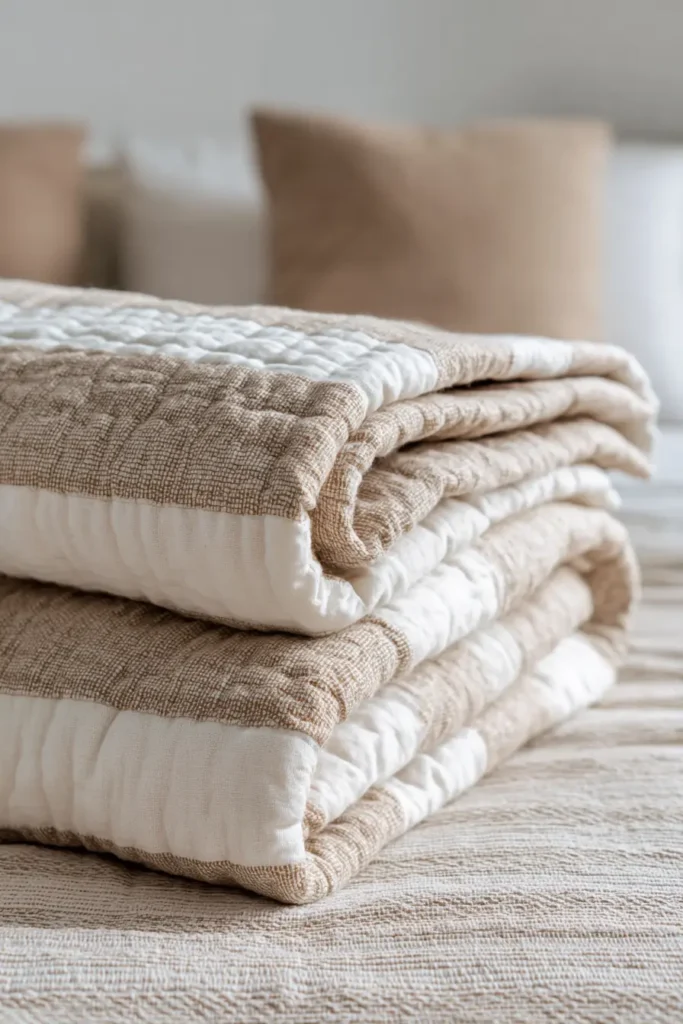
The “Modern Rail Fence” Strip Quilt
The Rail Fence is the ultimate beginner-friendly quilt that looks surprisingly sophisticated. By alternating the direction of simple strip blocks (horizontal vs. vertical), you create a woven “parquet floor” effect. Using a palette of soft greys, whites, and wood-tone browns creates a texture that mimics a farmhouse basket weave.
Finished Dimensions: Throw Size, approximately 56″ x 68″.
Materials Needed:
- Fabric: 1 “Jelly Roll” (40 pre-cut strips, 2.5″ wide x 42″ long) OR cut 40 strips from scraps (2.5″ wide).
- Color Strategy: Ensure you have a mix of Light, Medium, and Dark strips to make the “weave” visible.
- Backing Fabric: 3.5 yards.
- Batting: Throw Size (60″ x 80″).
- Binding: 1/2 yard.
- Notions: Rotary cutter, 6.5″ square ruler (essential for trimming), neutral thread.
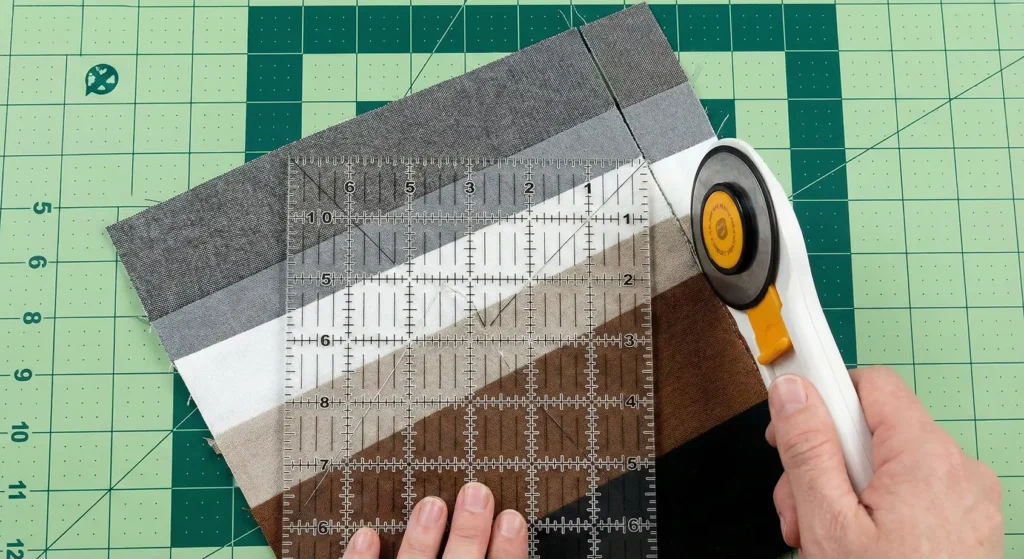
Step 1: Sort and Sew Strip Sets
- Divide your 40 strips into 10 groups of 4 strips each.
- Try to vary the contrast in each group (e.g., Dark-Light-Medium-Dark).
- Take the first group of 4 strips. Sew them together lengthwise (long side to long side) using a 1/4″ seam allowance.
- Press the seams open or to one side (all in the same direction).
- Repeat for all 10 groups. You now have 10 long “strip sets” that measure approximately 8.5″ wide x 42″ long.
Step 2: Cut the Blocks
- Take one sewn strip set to your cutting mat.
- Trim the uneven selvage edge off one end.
- Measure and Cut: Cut the long strip into squares.
- Since you used four 2.5″ strips (minus seam allowances), the height of your strip set should be 8.5″.
- Therefore, cut segments that are 8.5″ wide.
- You should get 4 squares (8.5″ x 8.5″) from each strip set.
- Repeat for all sets. You need a total of 48 blocks. (You will have a few extras/scraps).

Step 3: Layout the “Weave”
- Find a floor space. Arrange the blocks in a 6-block-wide x 8-block-tall grid.
- The Pattern:
- Block 1: Place with stripes running vertically.
- Block 2: Place with stripes running horizontally.
- Block 3: Vertically.
- Block 4: Horizontally.
- Continue alternating across the row.
- Row 2: Start with Horizontal (opposite of the block above it) to maintain the checkerboard effect.
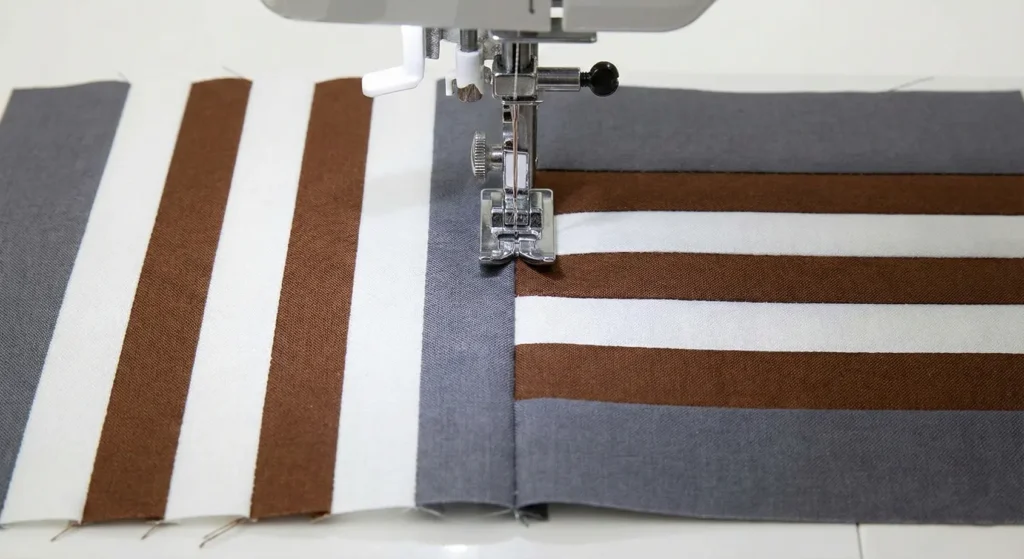
Step 4: Assemble the Rows
- Stack the blocks for Row 1.
- Sew them together.
- Tip: When sewing a Vertical block to a Horizontal block, there are no seams to match/nest! This makes it incredibly fast and forgiving.
- Press seams toward the Vertical blocks (this usually follows the grain and lies flatter).
- Repeat for all 8 rows.
Step 5: Join the Rows
- Pin Row 1 to Row 2.
- Match the intersections where the block corners meet.
- Sew the rows together.
- Press seams open.
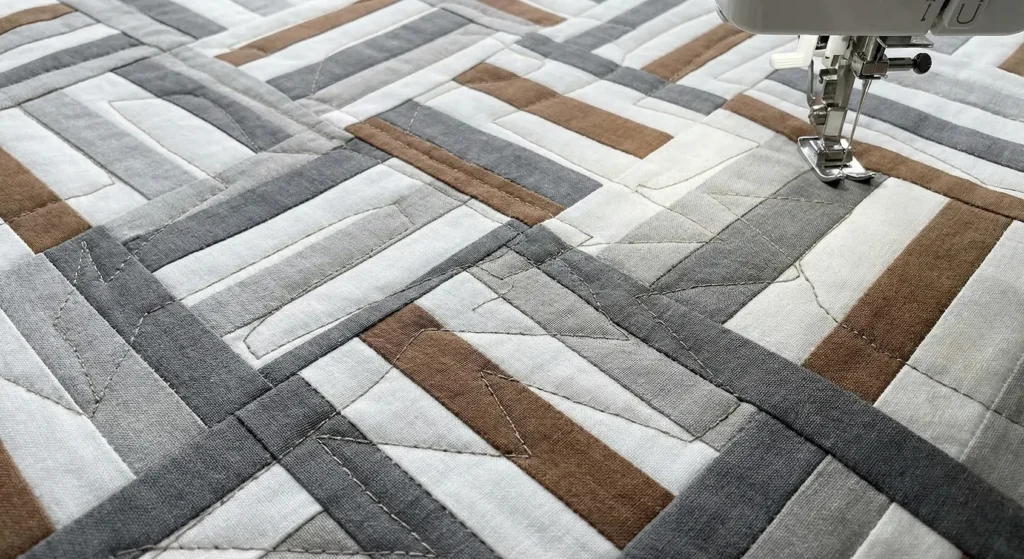
Step 6: “Zig-Zag” Quilting
- Baste your quilt sandwich.
- Quilting: Instead of straight lines, set your sewing machine to a wide Zig-Zag stitch (or a serpentine wave stitch if you have it).
- Quilt diagonally across the blocks. The zig-zag stitch mimics the “woven” texture of the rail fence pattern and adds a playful, modern touch to the rigid geometric lines.
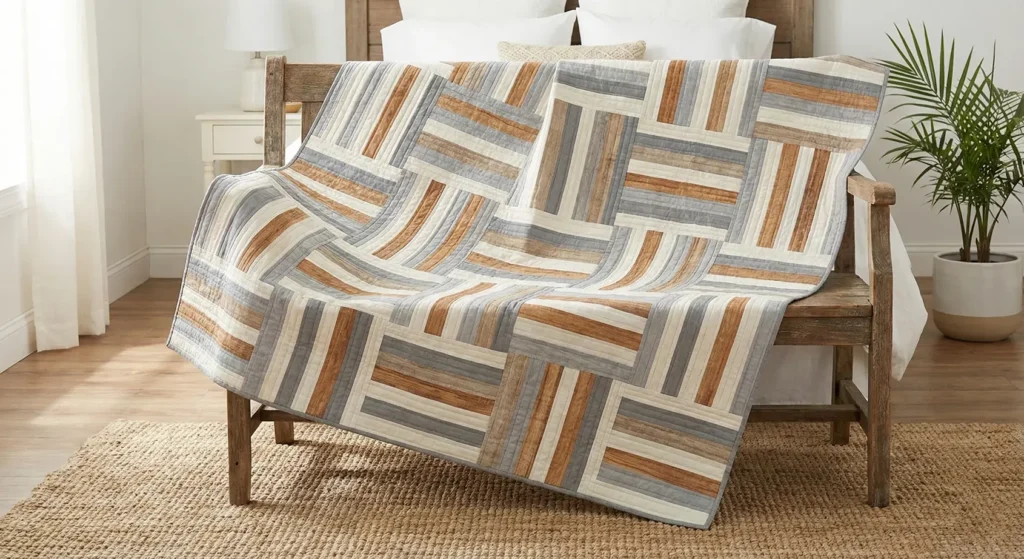
Pro Design Tip: The “Wood Grain” Effect. If you really want to lean into the farmhouse aesthetic, choose fabrics with a wood-grain texture or brushed cottons in shades of oak, walnut, and birch. The resulting quilt looks like a cozy wooden parquet floor.
Budget Consideration: Strip Swaps. This is an excellent pattern for a “Guild Swap.” If you belong to a sewing group, have everyone bring ten 2.5″ strips of their favorite farmhouse fabric. Swap them around. You’ll end up with a wide variety of prints for free, giving your quilt a scrappy, community-made feel without buying 40 different fabrics.
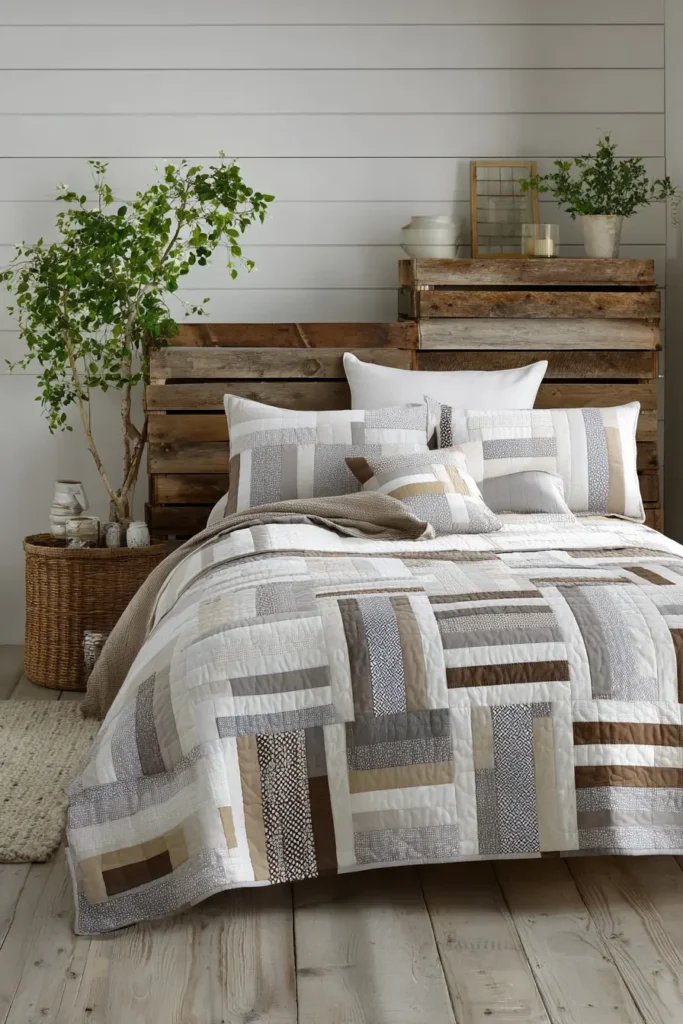
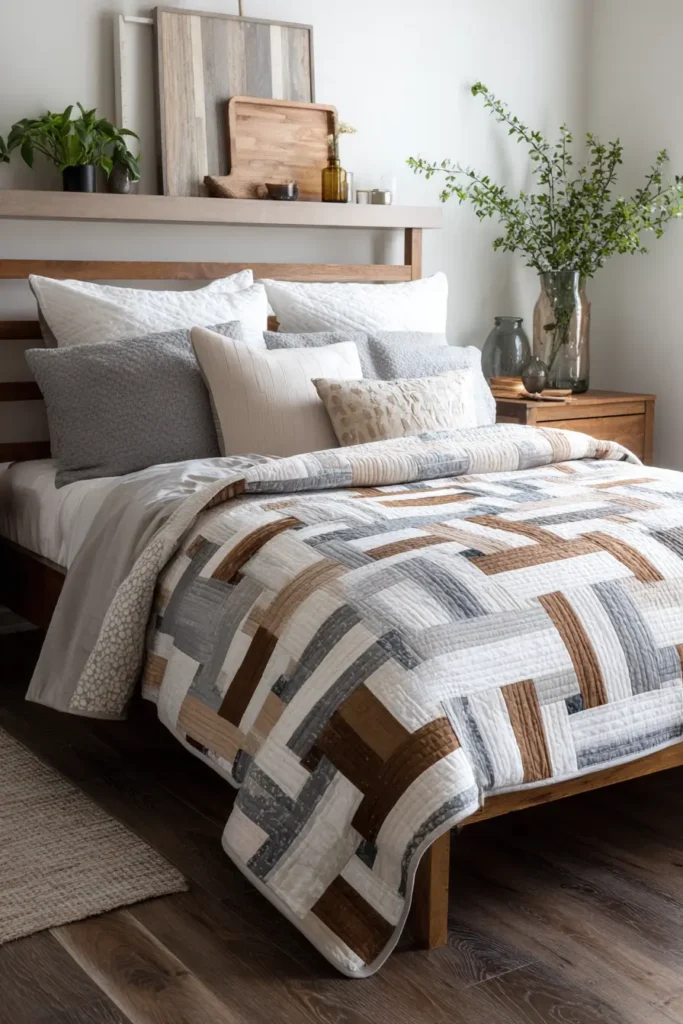
19. Textured Farmhouse Quilts with Channel and Cross Stitching
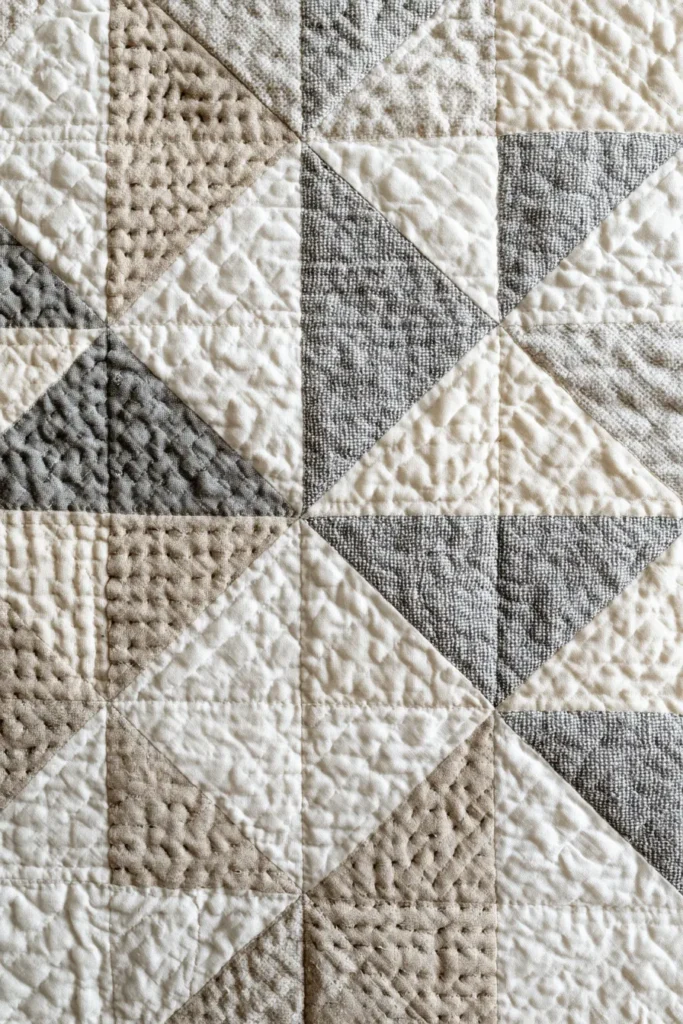
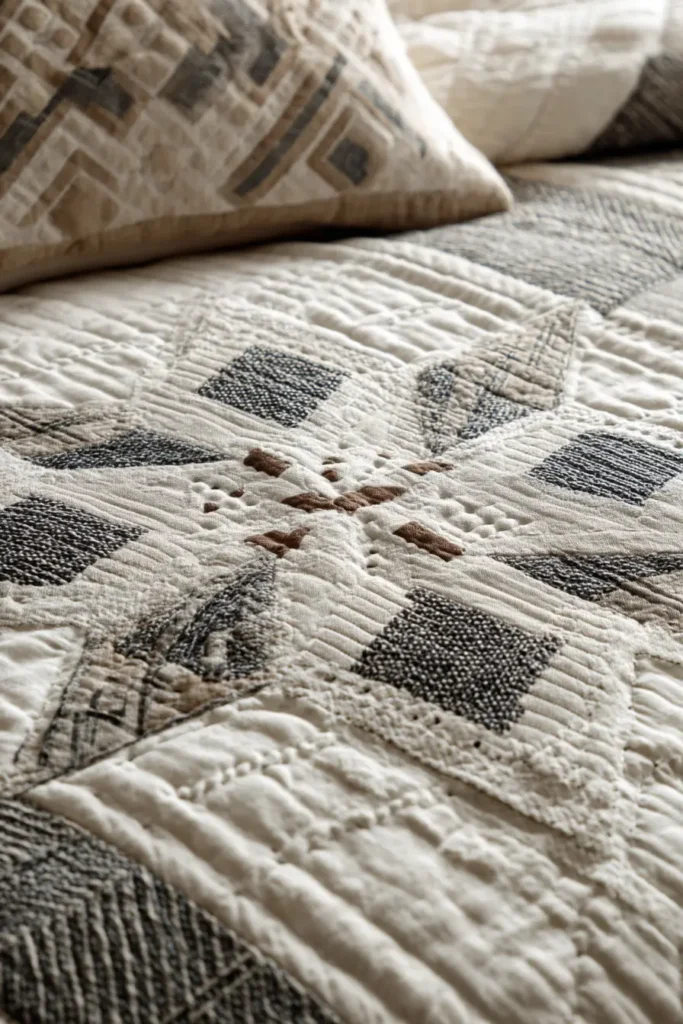
The “Broken Dishes” Texture Quilt
This pattern relies on an ancient block called “Broken Dishes” (made of 4 triangles) to create a subtle, spinning geometric pattern. The “Modern Farmhouse” twist comes from the finish: instead of standard machine quilting, we combine machine “channel” quilting with hand-embroidered “cross stitches” at the intersections. This mixed-media approach adds incredible tactile depth.
Finished Dimensions: Queen Size, approximately 80″ x 80″.
Materials Needed:
- Light Fabric: 4 yards of textured cream (Essex Linen or Monk’s Cloth).
- Dark Fabric: 4 yards of textured grey or taupe (Chambray or Woven Cotton).
- Backing Fabric: 5 yards.
- Batting: Queen Size (90″ x 90″).
- Embroidery Floss: Black or Dark Grey (Size 8 Perle Cotton is best).
- Notions: Rotary cutter, 6″ square ruler, marking tape (painter’s tape).
Step 1: Mass Produce Half Square Triangles (HSTs)
The entire quilt is made of 6-inch finished HSTs.
- Cut Squares:
- From Light Fabric: Cut 64 squares, measuring 7″ x 7″.
- From Dark Fabric: Cut 64 squares, measuring 7″ x 7″.
- Mark and Sew:
- Draw a diagonal line on the back of all Light squares.
- Pair them with Dark squares (Right Sides Together).
- Sew a 1/4″ seam on both sides of the line.
- Cut and Trim:
- Cut on the center line. Open and press toward the Dark fabric.
- Trim: Square up every unit to exactly 6.5″ x 6.5″.
- You now have 128 HSTs.
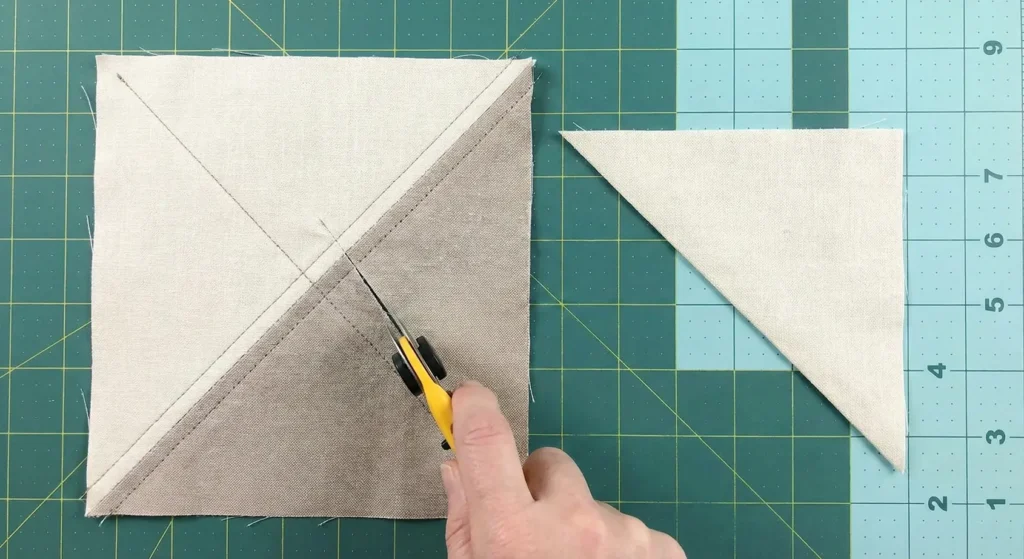
Step 2: Assemble the “Broken Dishes” Block
A Broken Dishes block is made of 4 HSTs spinning around a center point.
- Take 4 HSTs.
- Arrange them in a 2×2 grid so all the Light triangles touch the center.
- Top Left: Dark outer / Light inner.
- Top Right: Light inner / Dark outer.
- Bottom Left: Light inner / Dark outer.
- Bottom Right: Dark outer / Light inner.
- Sew the top pair together. Sew the bottom pair together.
- Sew the two rows together.
- Result: A square block with a light diamond in the center and dark corners. Make 32 Blocks.
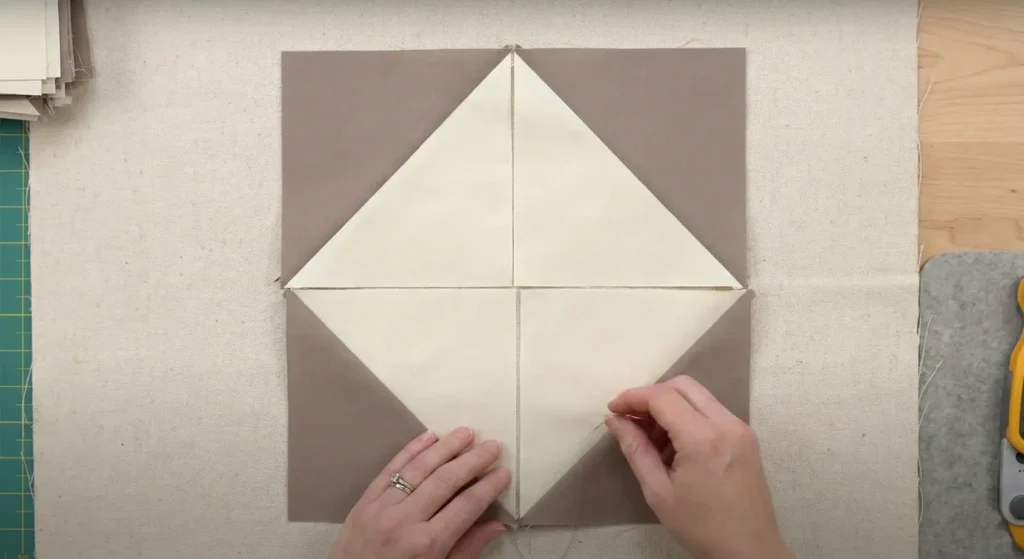
Step 3: Layout the Quilt Top
- Arrange the 32 blocks in a grid of 6 blocks wide x 6 blocks high (Wait, 6×6=36. We need 4 more blocks! Correction: Make 36 Blocks total in Step 2).
- Orientation:
- Place all blocks in the same orientation.
- Alternatively, rotate every other block 90 degrees for a more chaotic “shattered glass” look.
- Sew the blocks into rows. Press seams open.
- Sew the rows together.

Step 4: Machine Channel Quilting
This is Layer 1 of the texture.
- Baste the sandwich.
- Use a walking foot.
- Channel Lines: Sew straight vertical lines down the length of the quilt.
- Spacing: Space them 1 inch apart.
- Tip: Use a piece of 1-inch-wide painter’s tape as a guide. Stick it down, sew next to it, move it over.
- This dense vertical quilting makes the quilt feel modern and structured.
Step 5: Hand “Cross Stitch” Accents
This is Layer 2 of the texture.
- Thread a hand needle with Black Perle Cotton.
- Focus on the intersections where the blocks meet (the corners).
- Sew a large, simple “X” (about 1/2 inch size) over the machine quilting at every block intersection.
- Tie the knots securely and bury them in the batting layer.
- These pops of handmade black stitching against the dense vertical machine lines create a stunning “wabi-sabi” effect.
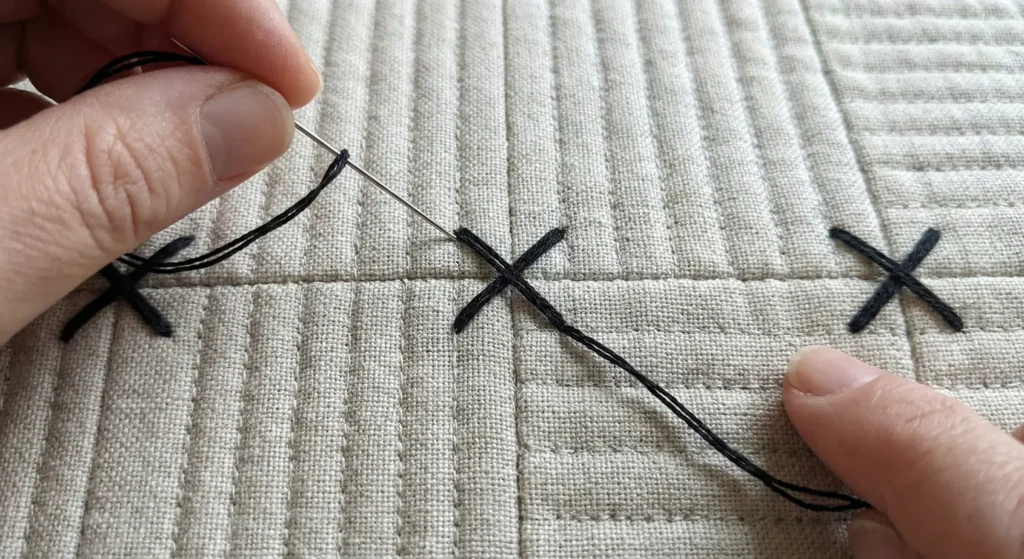
Step 6: Binding
- Cut 2.5″ strips of the Dark Fabric.
- Sew into a long binding strip.
- Bind the quilt.
- Texture Tip: Machine sew the binding to the front, but hand stitch it to the back using big, visible whipstitches in the same Black Perle Cotton used for the crosses.
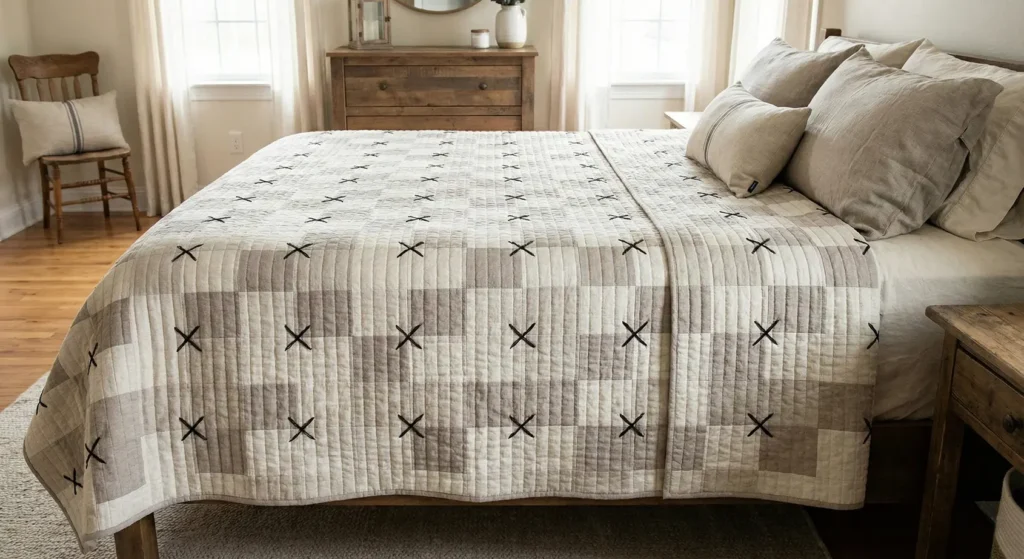
Pro Design Tip: The “Inside Out” Seam. For maximum farmhouse texture, sew your blocks with the seam allowances exposed on the front (like a rag quilt), but instead of snipping them to fray, press them flat and topstitch them down. This creates a raw, deconstructed grid that looks architectural.
Budget Consideration: Painters’ Drop Cloths. This pattern requires a lot of textured neutral fabric. Heavy-duty canvas drop cloths (bleached) are the cheapest way to get 4+ yards of heavy, linen-look fabric. Just be sure to wash them multiple times to soften the stiffness before sewing.
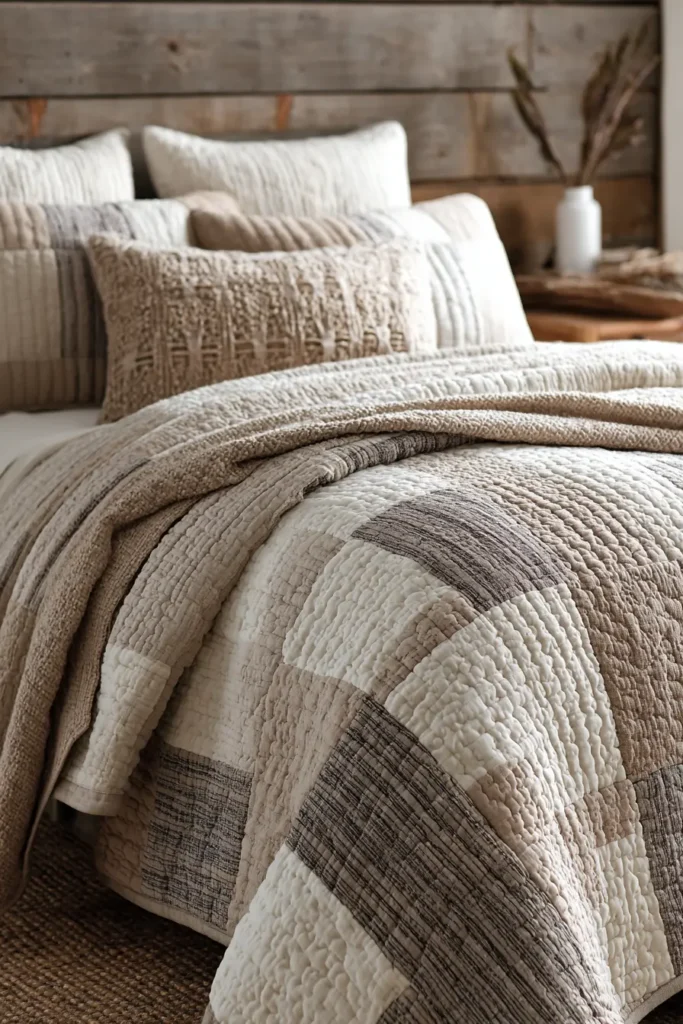

20. Shabby Chic Farmhouse Quilt Patterns for Cozy Bedrooms
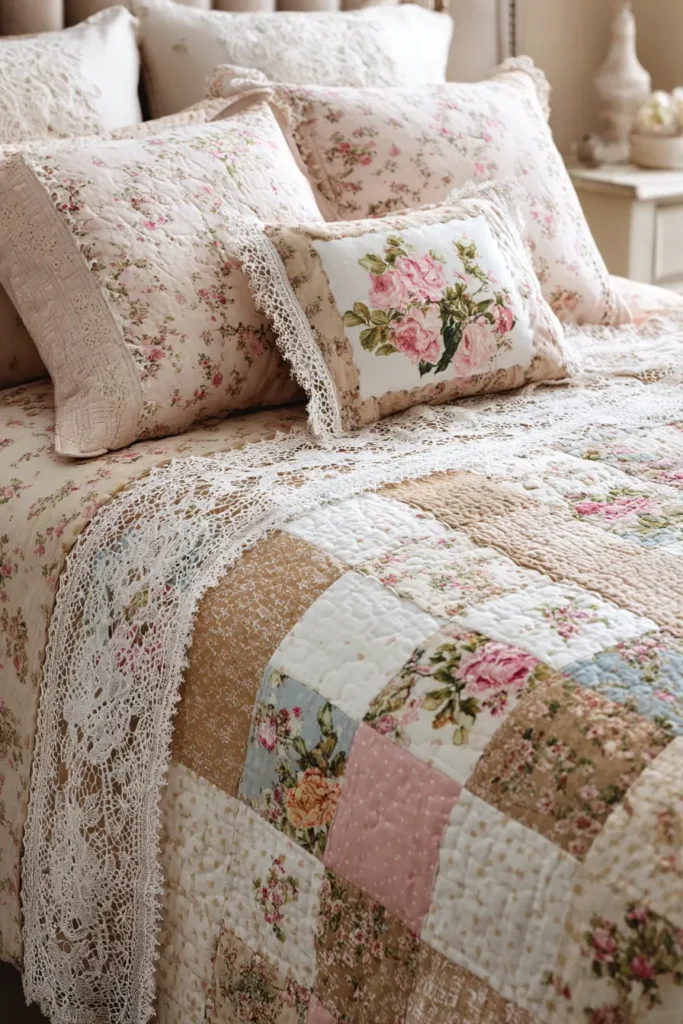
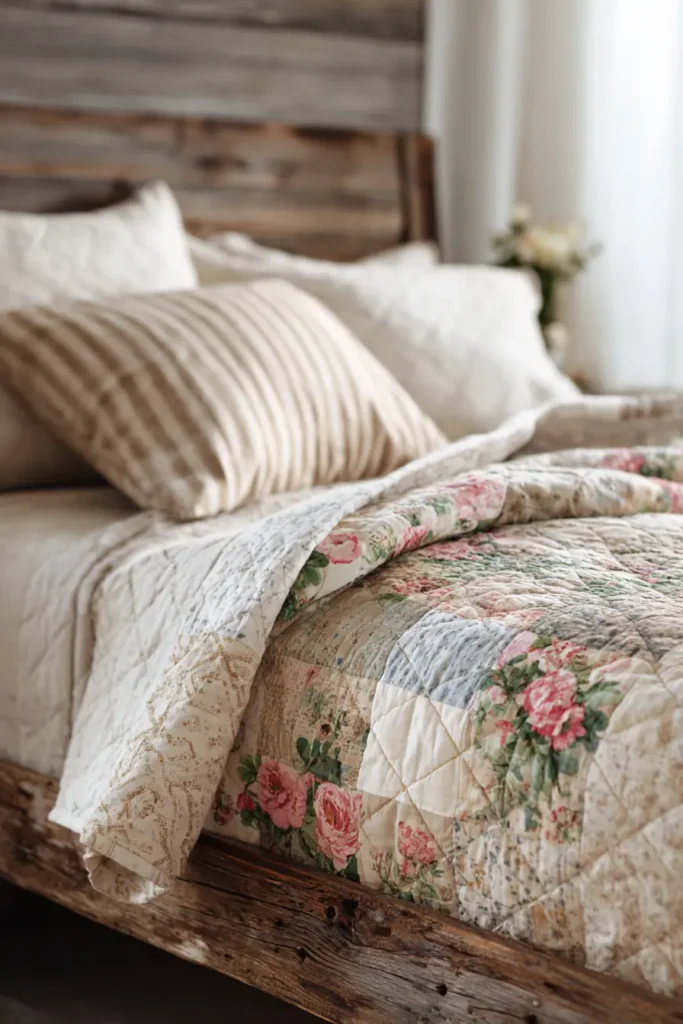
The “Faded Floral” Nine-Patch with Lace Accents
This pattern captures the romantic, nostalgic side of farmhouse style. It uses the classic Nine-Patch block—a staple of pioneer quilting—rendered in soft pastel florals and bleached muslin. The “Shabby Chic” twist comes from the addition of vintage lace doilies or crocheted trim appliquéd directly onto the quilt top, adding 3D texture and feminine charm.
Finished Dimensions: Twin/Full Bedspread, approximately 70″ x 90″.
Materials Needed:
- Floral Fabrics: 2 yards total of assorted pastel prints (faded pinks, sage greens, baby blues, soft yellows).
- Background Fabric: 4 yards of Bleached Muslin or White Eyelet Cotton.
- Lace Accents: 6-10 vintage crochet doilies or 2 yards of wide lace trim.
- Backing Fabric: 5.5 yards.
- Batting: Full Size (81″ x 96″).
- Notions: Rotary cutter, ruler, neutral thread, fabric glue stick (for positioning lace).
Step 1: Create Strip Sets (Speed Piecing)
The Nine-Patch is made of 9 small squares. We will strip piece them for speed.
- Cut your Floral Fabrics and Background Fabric into 2.5″ wide strips.
- Set A (Dark Outer): Sew strips in this order: Floral – Background – Floral. Press toward the floral. Make 15 of these sets.
- Set B (Light Outer): Sew strips in this order: Background – Floral – Background. Press toward the floral. Make 8 of these sets.
- You now have long, striped fabric tubes.
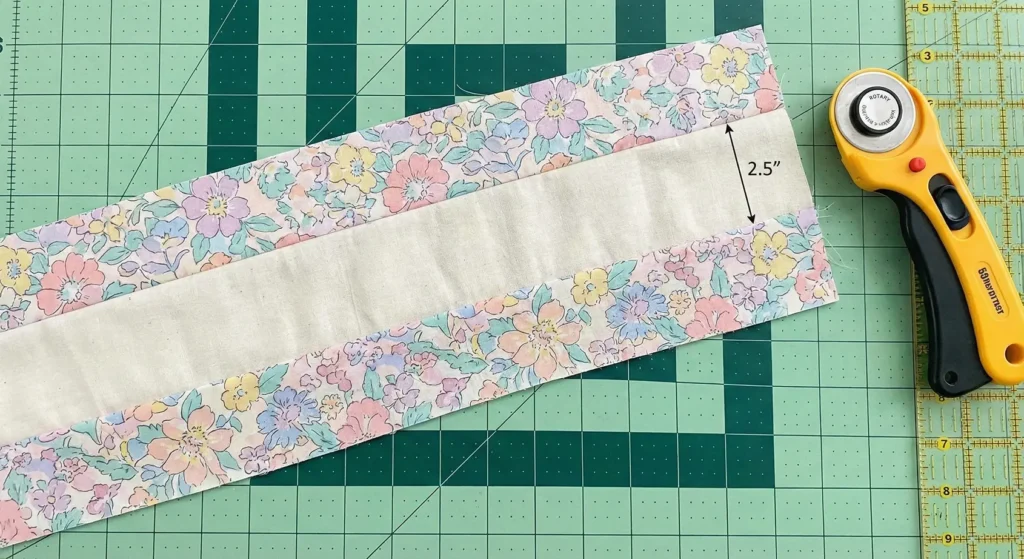
Step 2: Sub-Cut the Units
- Take your strip sets to the cutting mat.
- Cross-cut them into 2.5″ wide segments.
- From Set A, you need 126 segments.
- From Set B, you need 63 segments.
Step 3: Assemble the Nine-Patch Blocks
- Sandwich one Set B segment between two Set A segments.
- Check alignment: The center strip of Set B (Floral) should line up with the center strips of Set A (Background).
- Sew them together to form a checkerboard block.
- The finished block should measure 6.5″ x 6.5″.
- Make 63 Nine-Patch Blocks.
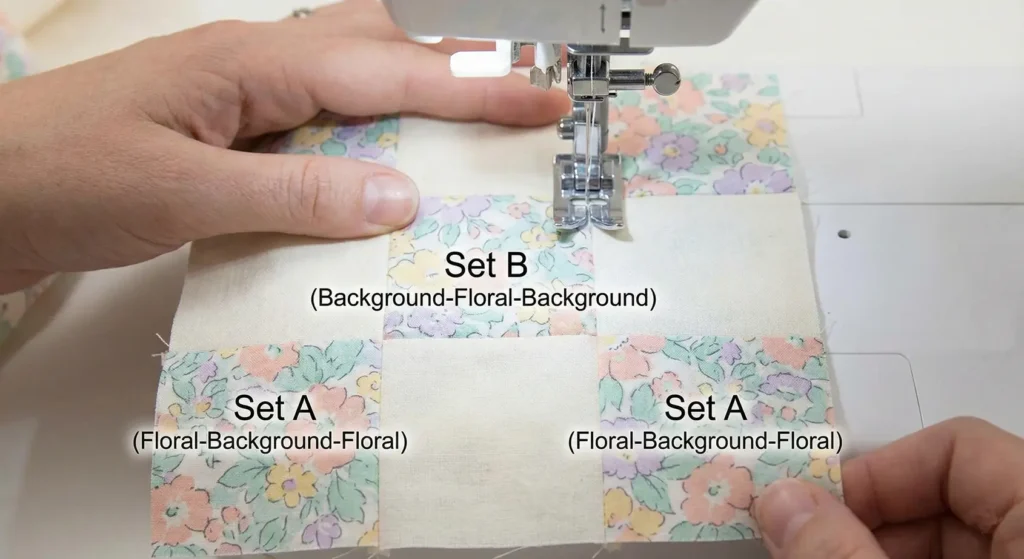
Step 4: Cut Setting Squares (Alternate Blocks)
To prevent the quilt from looking too busy, we will alternate the patchwork with plain squares.
- From your Background Fabric, cut 63 solid squares, each measuring 6.5″ x 6.5″.
- Design Note: Using a textured white fabric here, like White-on-White dot or Swiss Dot, adds lovely subtlety.
Step 5: The “Shabby” Lace Appliqué
This is the defining step.
- Take your Solid Background Squares.
- Position your Lace Doilies or strips of lace trim in the center of random squares (e.g., every 3rd square).
- Secure: Use a dab of fabric glue to hold them in place.
- Stitch: Machine-stitch around the lace with a zigzag stitch, or hand-sew it down. Do this before assembling the whole quilt top so you don’t have to wrestle the whole blanket.
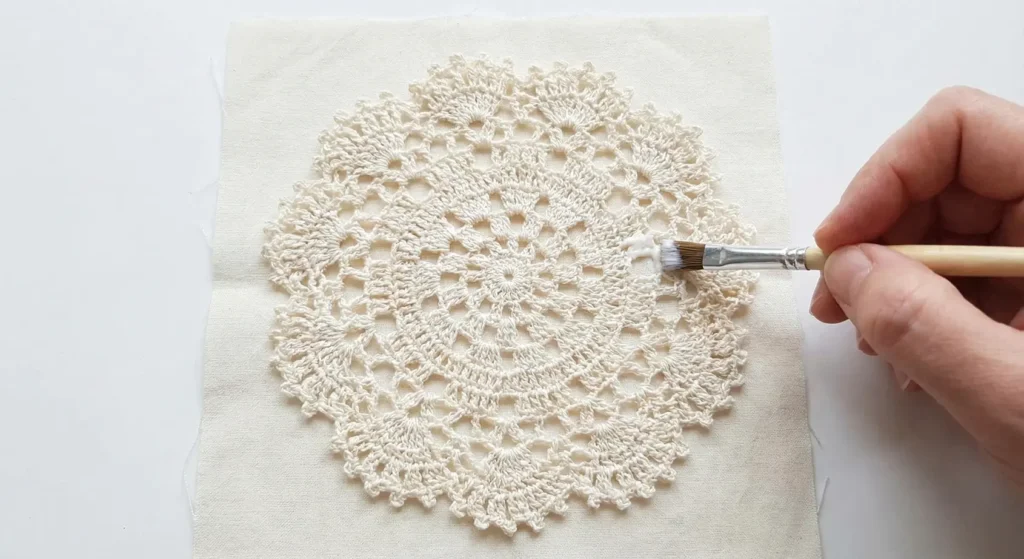
Step 6: Assemble the Quilt Top
- Lay out the blocks in a 9 x 14 grid (9 blocks wide, 14 rows tall).
- Checkerboard Pattern: Alternate a Nine-Patch Block with a Solid (Lace) Block.
- Row 1: 9-Patch, Solid, 9-Patch, Solid…
- Row 2: Solid, 9-Patch, Solid, 9-Patch…
- Sew the blocks into rows. Press seams toward the Solid blocks.
- Sew the rows together.
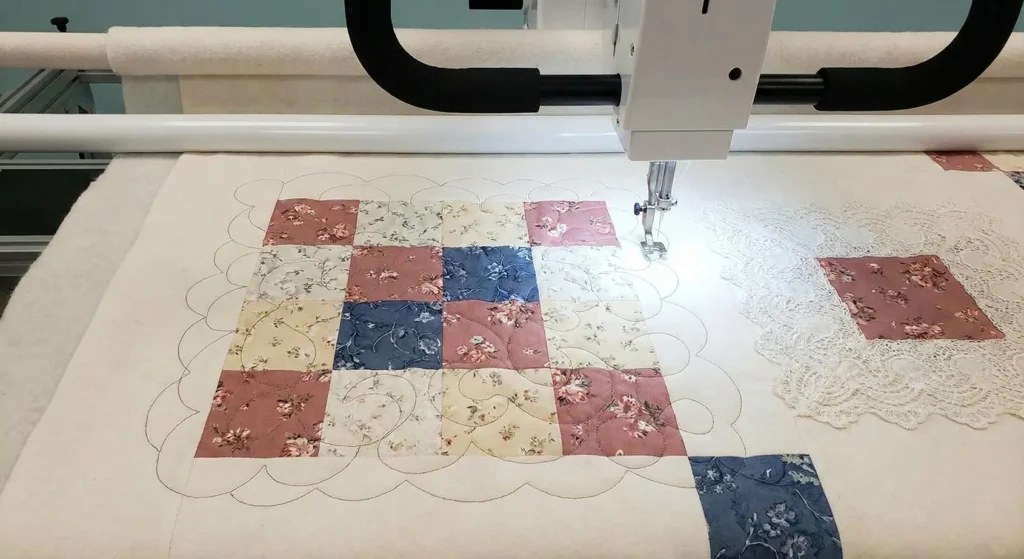
Step 7: “Cloud” Quilting
- Baste the sandwich.
- Quilting: Avoid geometric lines. Use a Free Motion Looping pattern (meandering loops that look like clouds or scribbles).
- This soft, rounded quilting style suits the floral prints and won’t fight with the texture of the lace appliqués.
- Binding: Bind with a bias-cut floral strip or, for extra shabby style, use a Ruffled Binding (a strip of fabric gathered before sewing it to the edge).
Pro Design Tip: The Tea Stain. If your new white muslin looks too stark against your vintage florals, tea-stain the fabric before cutting. Soak the muslin in a bucket of hot water with 5-6 black tea bags for 30 minutes. Rinse and dry. This gives the fabric an antique, parchment-colored glow that screams “farmhouse heirloom.”
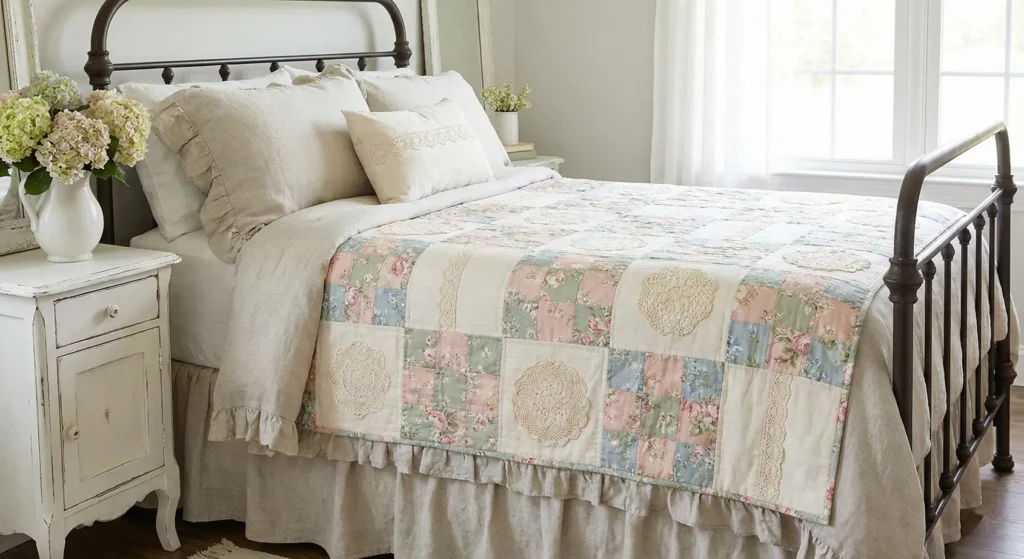
Budget Consideration: Hankies and Tablecloths. Instead of buying expensive lace, raid local estate sales for vintage handkerchiefs or damaged lace tablecloths. You can cut out good sections from a stained tablecloth to use as your appliqué pieces. Handkerchiefs can be sewn directly onto the solid blocks for a beautiful, folded-flower effect.
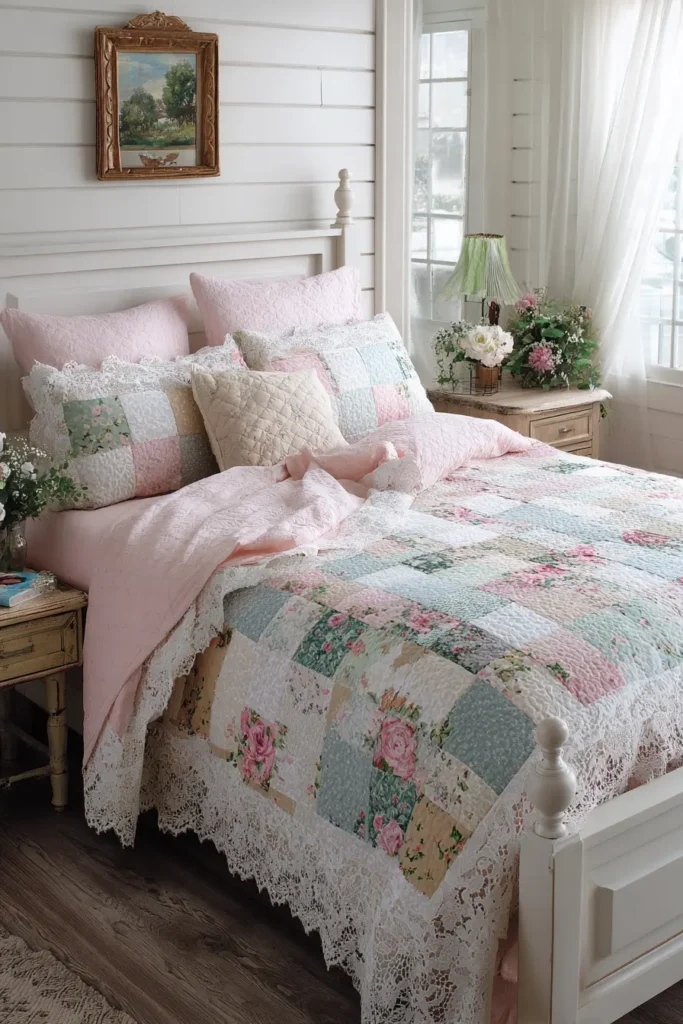
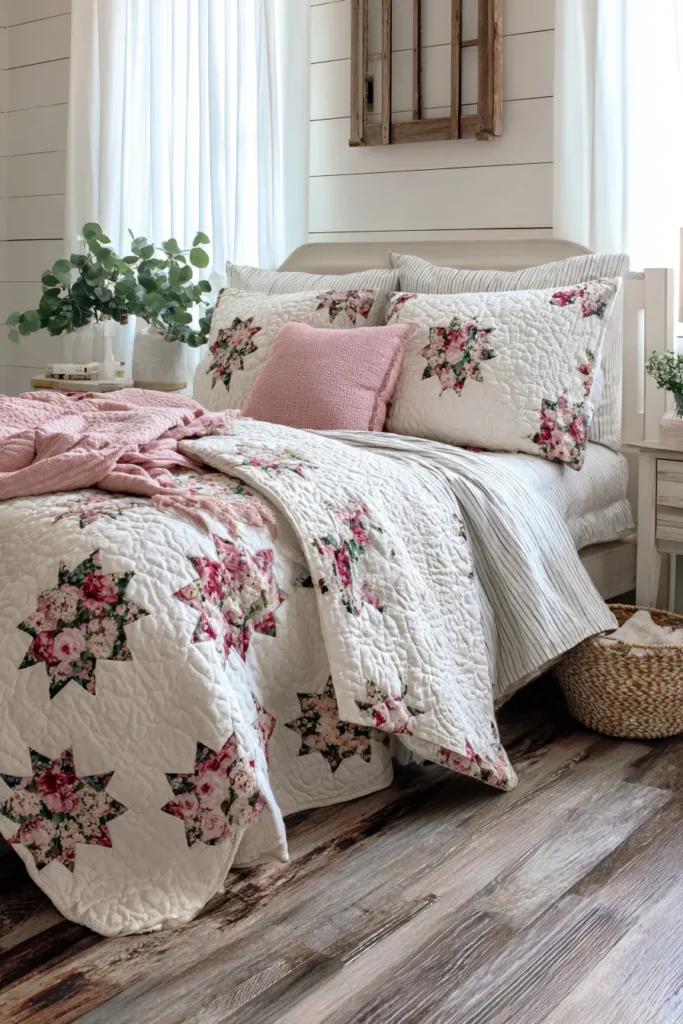
Conclusion
In the quest to create a bedroom that is both a haven of rest and a reflection of personal style, the modern farmhouse quilt stands out as a uniquely powerful tool. The twenty pattern ideas explored here, from the rustic tapestry of a cozy patchwork to the bold geometry of a black-and-white design, demonstrate that this style is far from monolithic. It is a rich, adaptable aesthetic that welcomes individual interpretation, allowing you to mix the simplicity of Scandinavian minimalism with the textured warmth of a channel-stitched piece or the gentle romance of a faded floral.
Ultimately, selecting or creating a modern farmhouse quilt is about more than choosing a color scheme or a pattern; it’s about investing in the atmosphere of your home. A handmade quilt, with its nuances of stitch and texture, carries an authenticity and soul that mass-produced items cannot replicate. It invites you to layer in other elements—perhaps a knitted throw, some vintage pillows, or woven baskets—to build a space that feels intentionally curated, deeply comfortable, and authentically you.
As you consider the array of options, from the effortless appeal of simple strip quilts to the intricate heirloom appeal of hand-stitched designs, remember that the best choice is the one that speaks to your sense of comfort and beauty. Let your quilt be the anchor that grounds your room in warmth and welcome, a daily reminder of the simple, enduring joys of home. Whether you embark on a DIY journey or select a cherished artisan piece, this final layer is the key to completing your modern farmhouse bedroom transformation.
We hope this collection has ignited your imagination and shown you that the perfect blend of rustic charm and modern elegance is not only achievable but can be wonderfully expressed through the timeless art of the quilt. Your dream bedroom, wrapped in cozy, stylish comfort, awaits
