
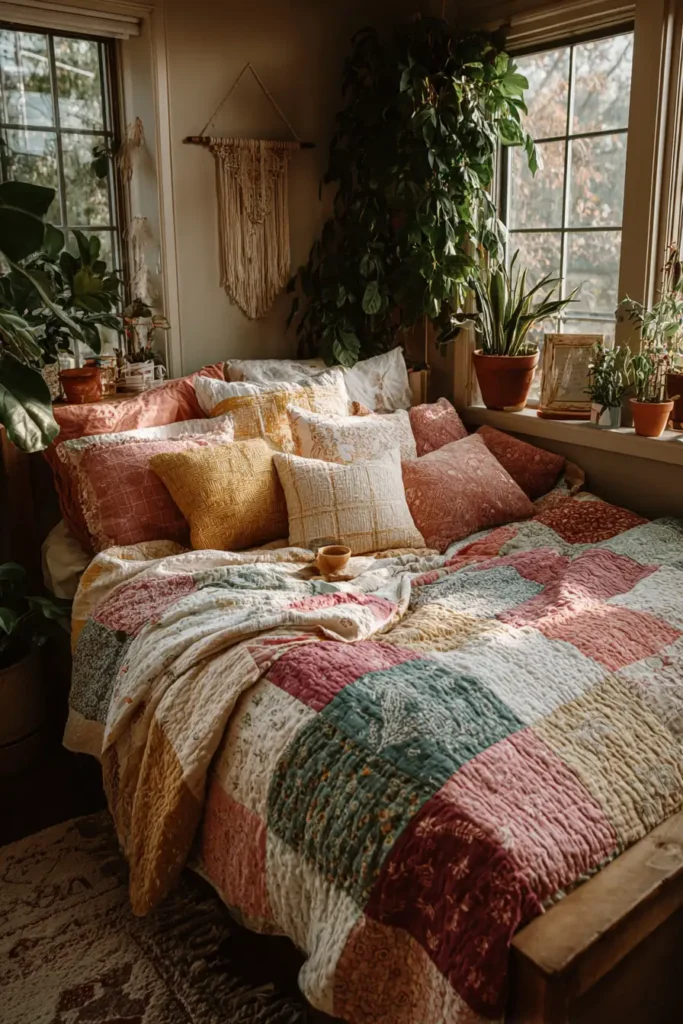
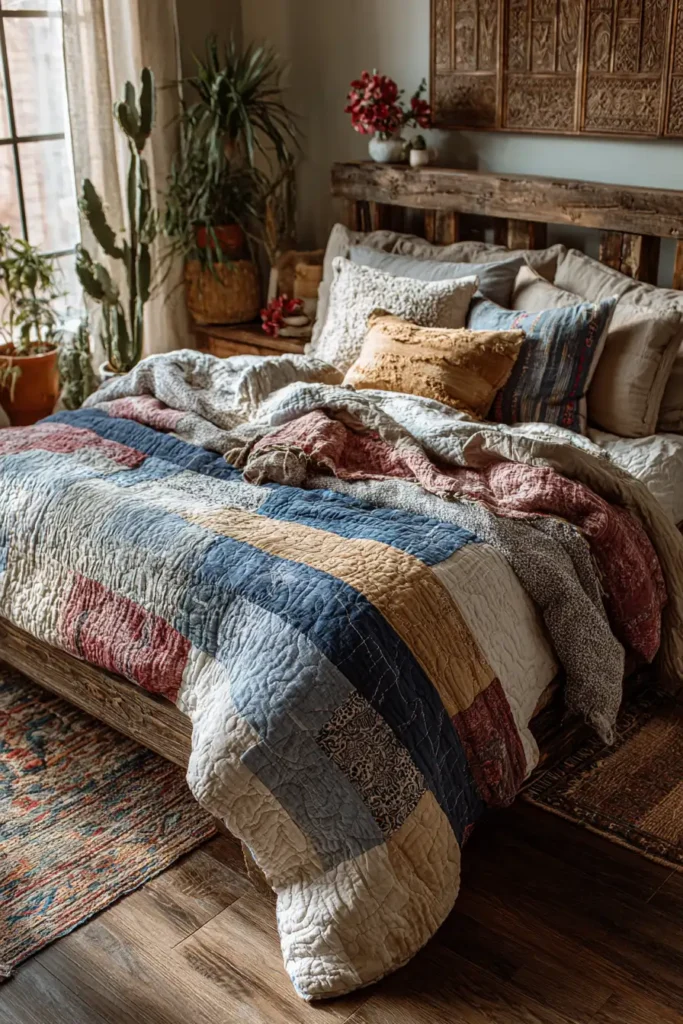
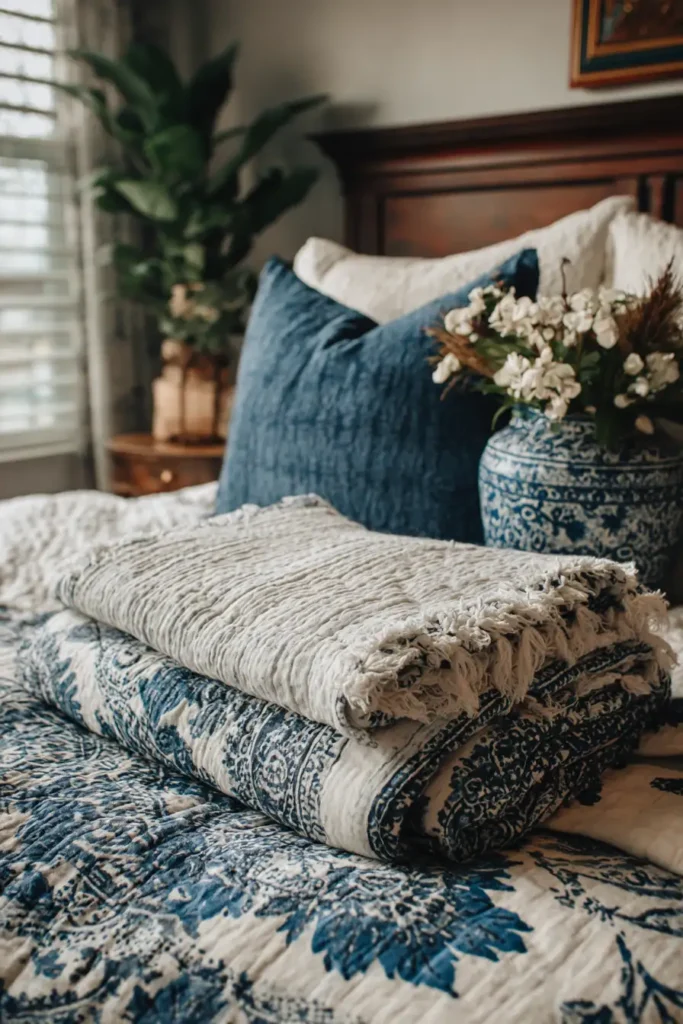
Effortlessly Elegant And Cozy: 20 Boho Quilt Pattern Ideas for Creating a Stylish and Relaxed Sanctuary
What Boho Quilting Actually Is – and Isn’t
Boho is probably the most misused word in home decor, and quilting is no exception. It gets applied to anything with fringe, anything with earth tones, anything that looks vaguely eclectic or slightly undone. That is not what boho quilting is – or at least, it is not what it is at its best.
At its best, boho quilting is a design philosophy built on three genuine principles. The first is artistic freedom over technical perfection: asymmetry is not a mistake to be corrected but a choice to be made. The second is personal expression over uniformity: a boho quilt should look like it was assembled by someone with a specific point of view, not produced according to a formula. The third is texture over precision: the tactile quality of the finished object – the fringe, the chenille, the layered fabrics – matters as much as how it looks from across the room.
What distinguishes boho from simply eclectic or maximalist is the global textile vocabulary it draws from. Kantha stitching from Bengal, mudcloth patterns from West Africa, tribal motifs from Central Asia and South America – boho quilting borrows from all of these traditions, reinterpreting them through a contemporary lens. Done thoughtfully, the result feels collected rather than constructed. Done carelessly, it looks like cultural decoration without context. The difference is whether the maker understands what they are drawing from – and why.
A Personal Note on Getting Boho Wrong
I want to say something honest here, because I have made this mistake in my own design work: the most common boho error is confusing layering with accumulation. More throws, more patterns, more textures – more everything – until the room stops feeling curated and starts feeling cluttered. The boho aesthetic looks effortless precisely because restraint lies beneath it. Every element that made the final room what it was earned its place. The ones that didn’t get edited out, even if they were beautiful individually.
My working rule, developed over years of interior design projects: choose your dominant textile first — in this context, your quilt — and let everything else respond to it. If the quilt is doing the heavy lifting visually, the throw pillows and floor cushions can be quieter. If the quilt is understated, the surrounding textiles can be bolder. The quilt should anchor the room, not compete with it.
That principle shaped how this collection was assembled. Each pattern here has a clear visual identity — something it does well enough to hold a room together rather than just adding to it.
Boho Quilt Pattern Ideas
Contents
- 1 Boho Quilt Pattern Ideas
- 2 1. Modern Bohemian Patchwork Quilt Patterns for Dreamy Bedrooms
- 3 2. Minimalist Earth Tone Bed Quilts for Serene Sanctuaries
- 4 3. Vintage Kantha Style Quilt Patterns for Heirloom Elegance
- 5 4. Textured Chenille and Fringe Bed Covers for Cozy Layers
- 6 5. Large Scale Mandala Quilt Patterns for Statement Bedding
- 7 6. Eclectic Scrappy Boho Bed Runners for Stylish Accents
- 8 7. Tribal Mudcloth Inspired Quilt Designs for Bold Bedroom Decor
- 9 8. Dreamcatcher Motif Quilt Patterns for Whimsical Sleep
- 10 9. Macramé Inspired Quilted Pillow Shams for Texture
- 11 10. Reversible Boho Floral Quilt Designs for Versatile Bedding
- 12 11. Oversized Tassel Quilt Throws for Cozy Living Rooms
- 13 12. Geometric Boho Cushion Covers for Elegant Sofa Styling
- 14 13. Round Quilted Floor Pillow Patterns for Relaxed Seating
- 15 14. Durable Boho Patchwork Sofa Covers for Stylish Protection
- 16 15. Rustic Tribal Table Runners for Eclectic Dining Rooms
- 17 16. Patchwork Placemats and Coasters for Bohemian Tablescapes
- 18 17. Sherpa-Backed Boho Lap Quilts for Ultimate Living Room Comfort
- 19 18. Mixed Media Boho Table Toppers for Artistic Dining
- 20 19. Celestial Sun and Moon Quilt Patterns for Mystical Wall Art
- 21 20. Tapestry Style Quilted Wall Hangings for Focal Points
- 22 Conclusion
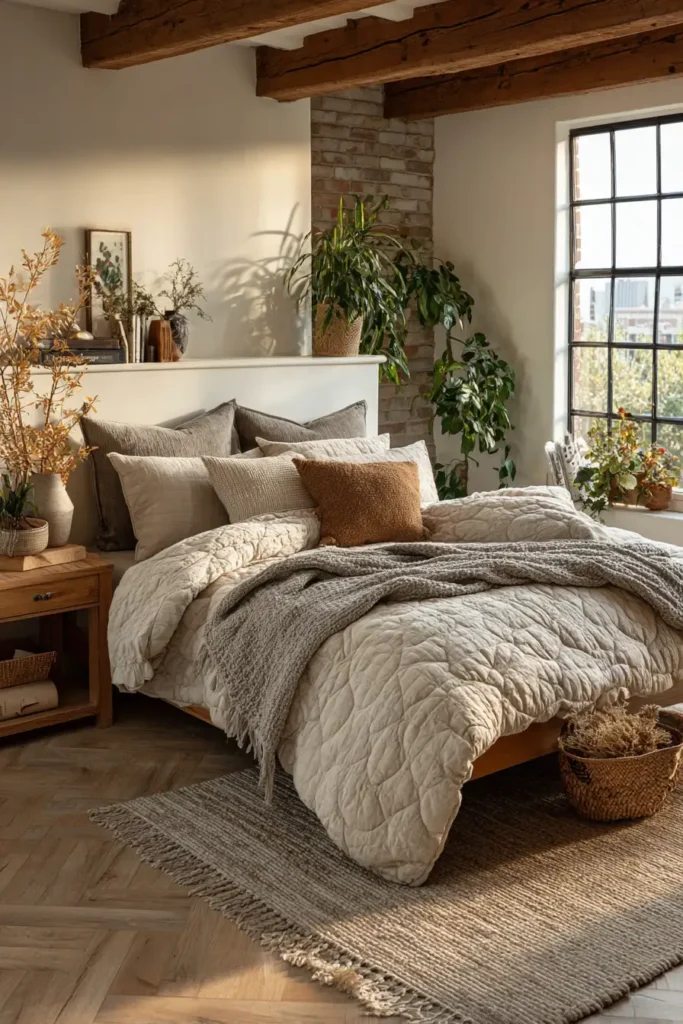
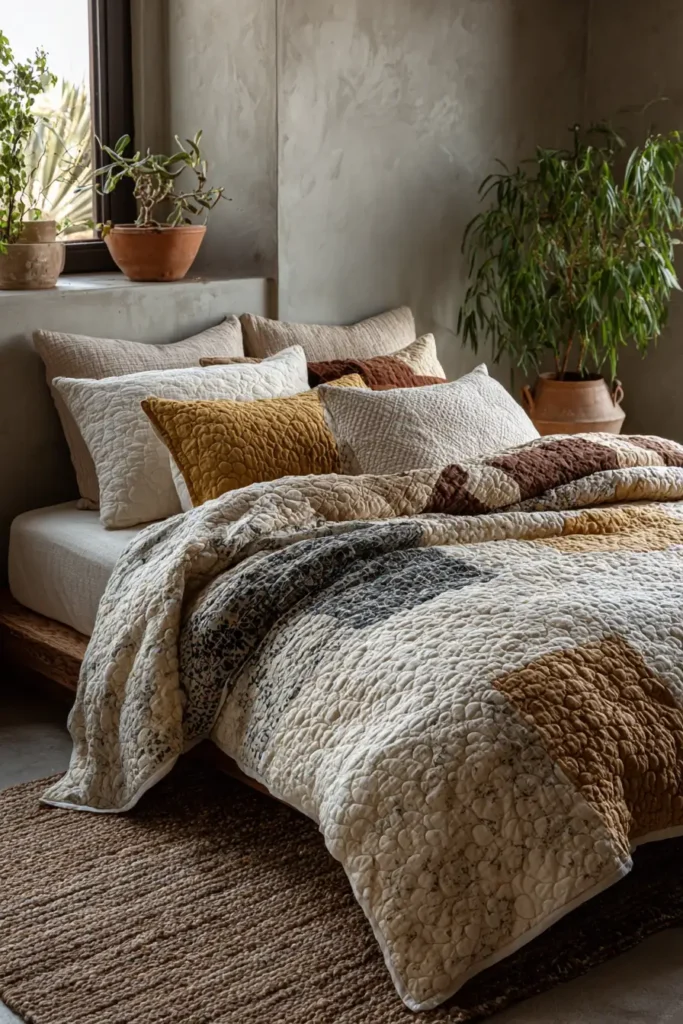
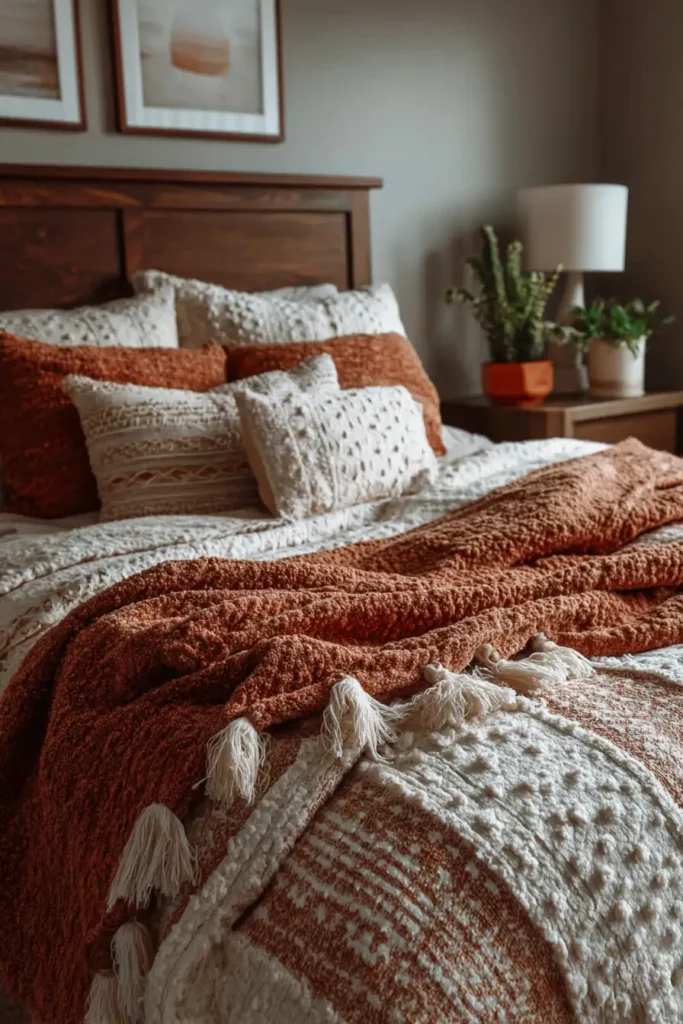
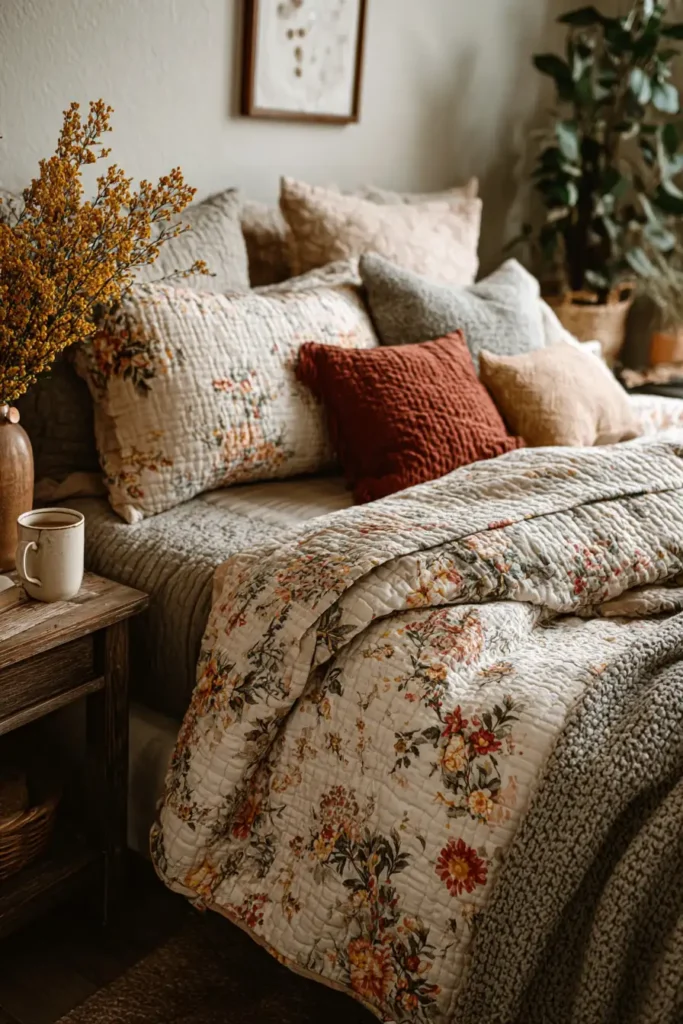
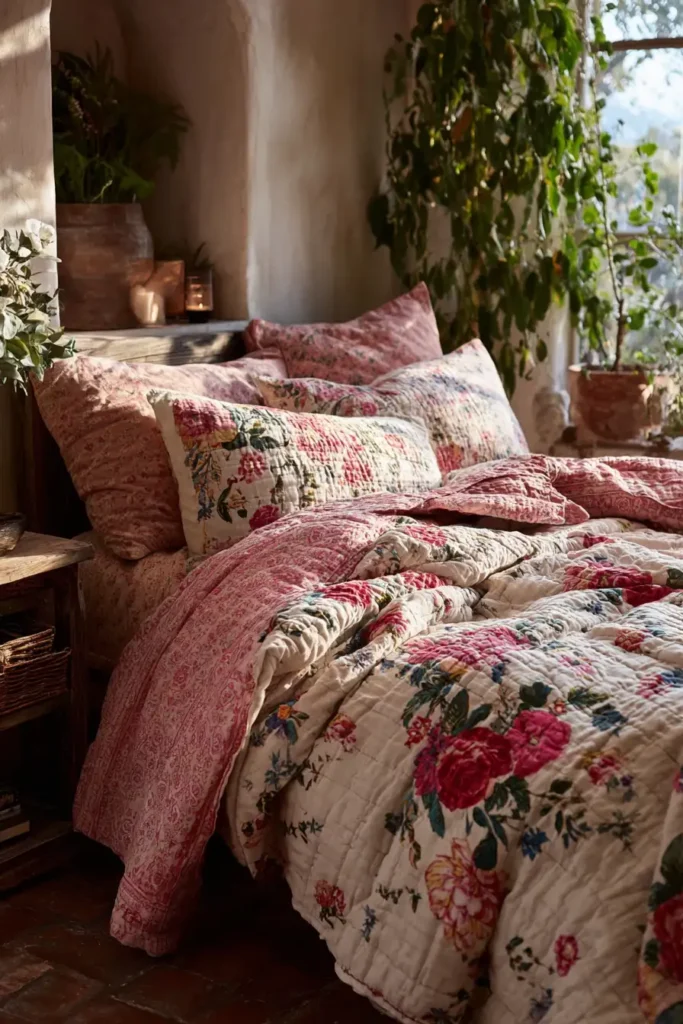
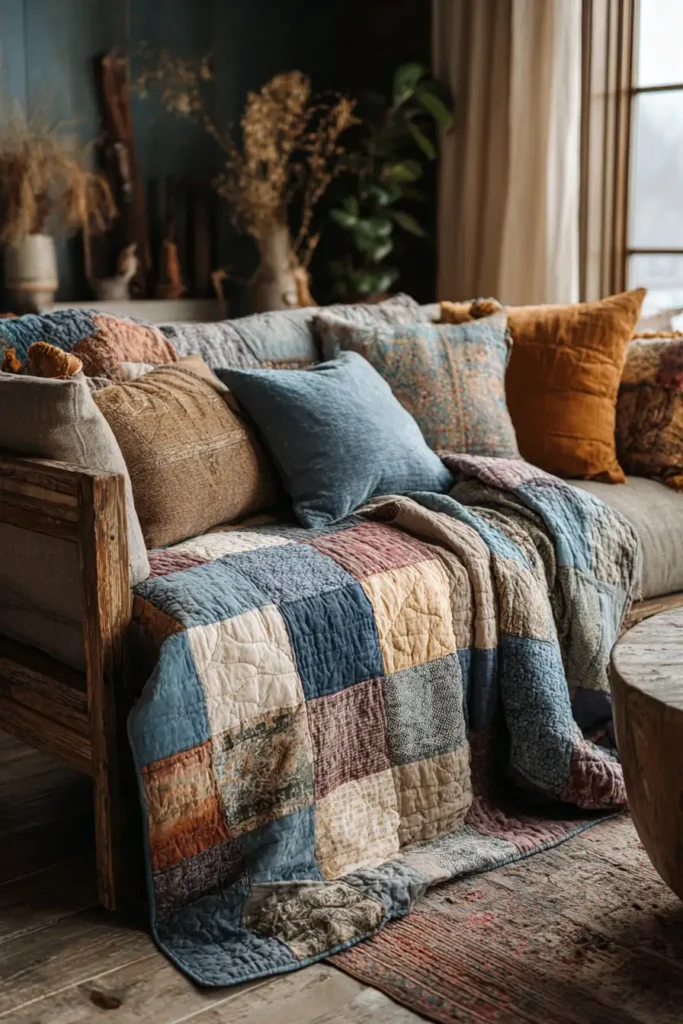
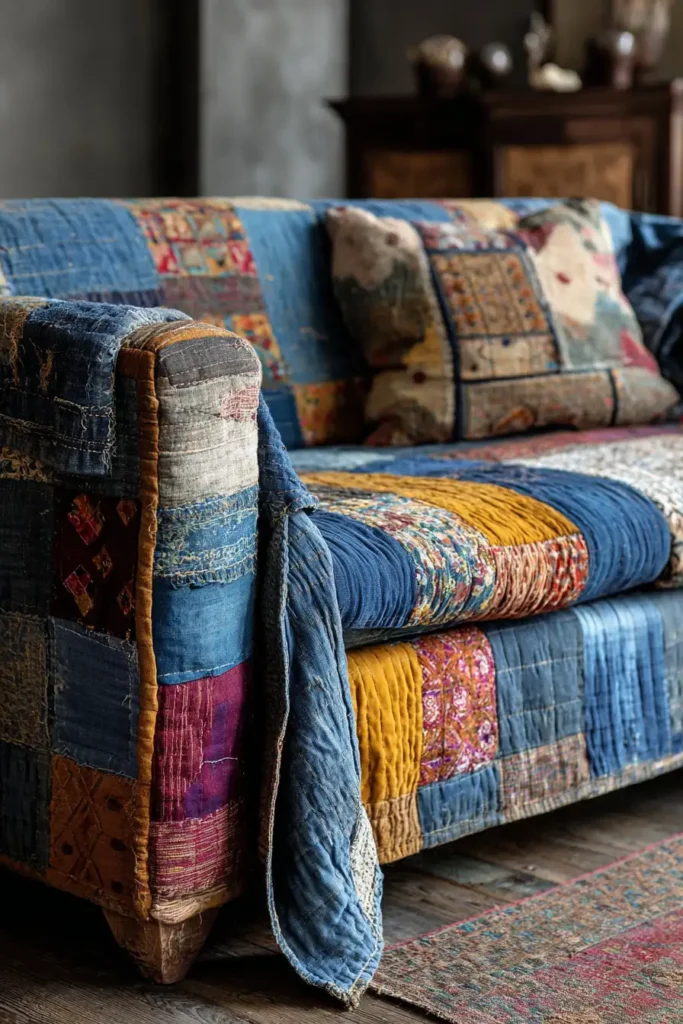
Boho Quilts for Every Space
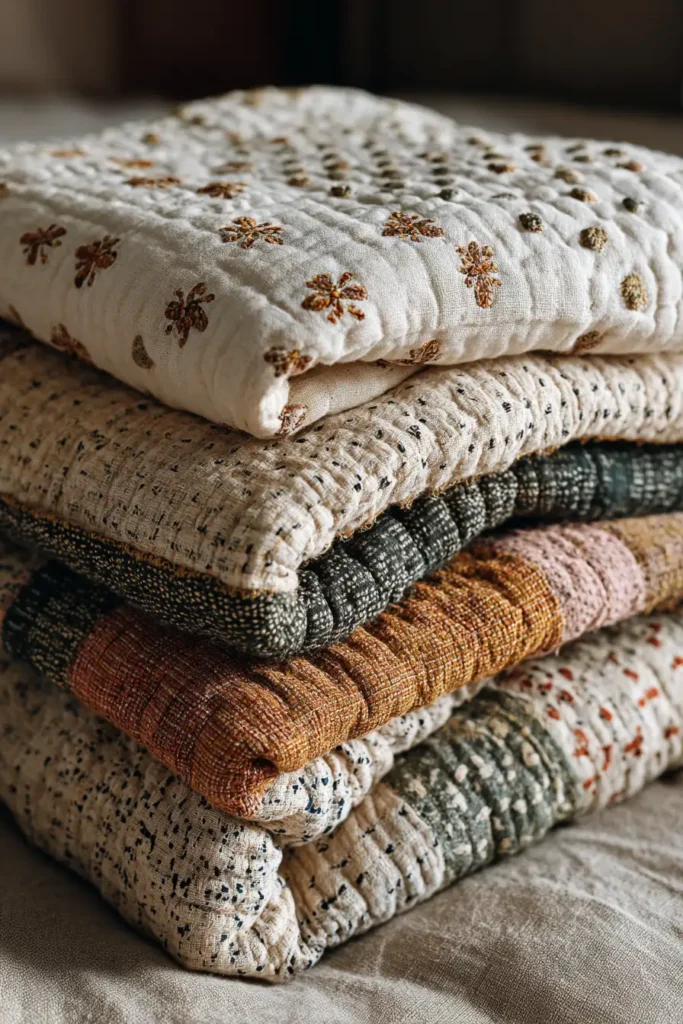
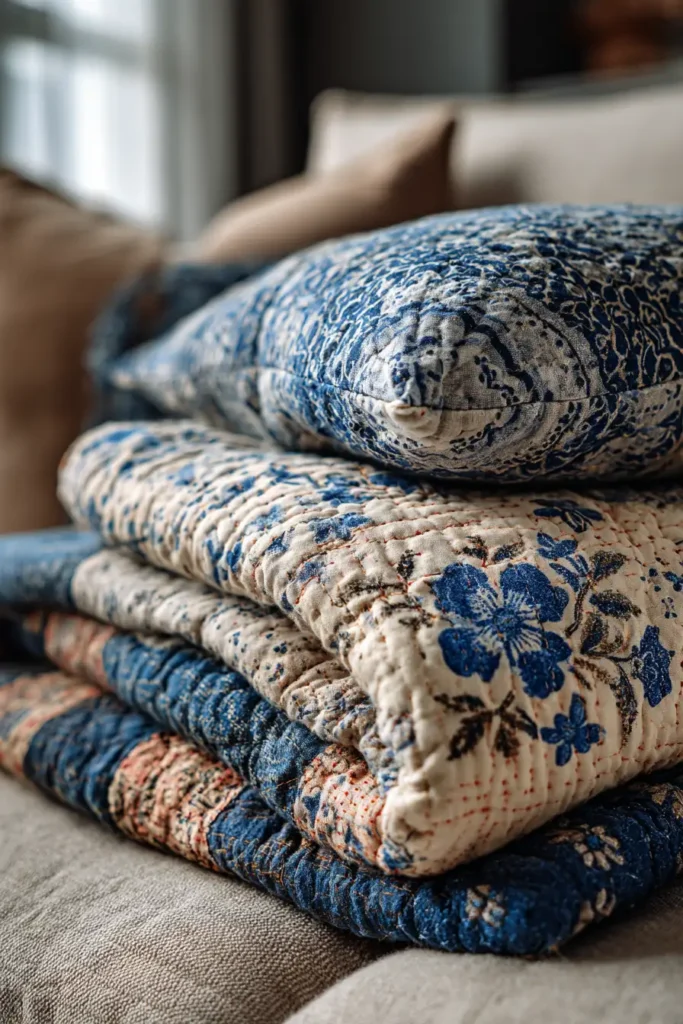
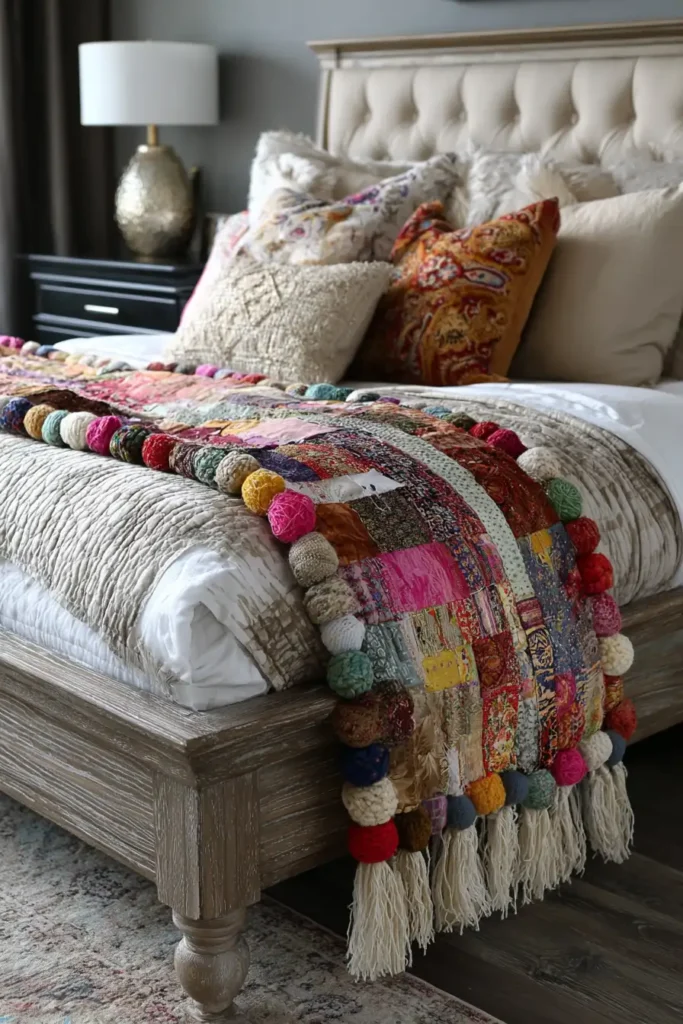
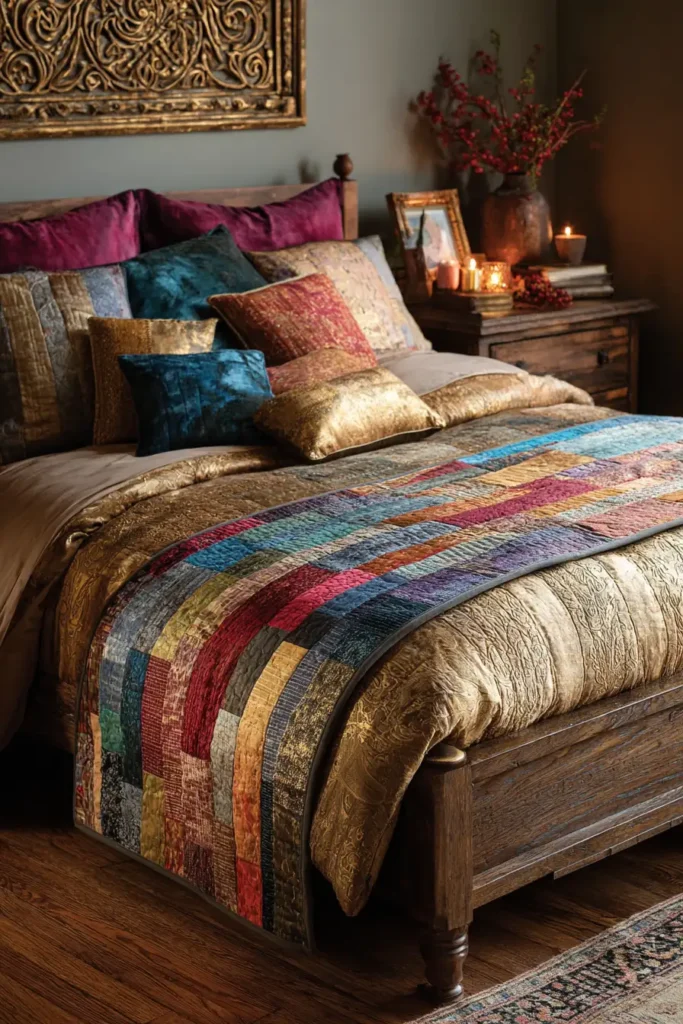
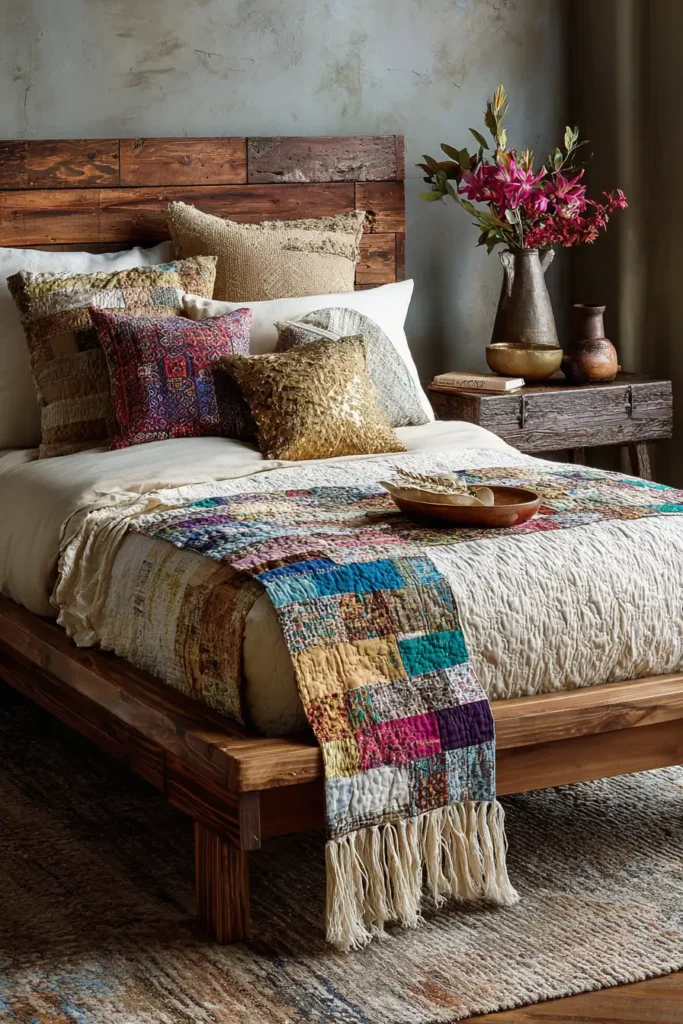
The bedroom is where boho quilting makes its most natural home, and where this collection is most concentrated. Kantha-style stitching – running stitch patterns that echo the Bengali tradition I grew up around – sits alongside mudcloth-inspired geometric patterns and large-scale mandala designs. These are quilts that function as the room’s focal point: textural, layered, and specific enough to give a space genuine character. Details like chenille textures, fringe edges, and macramé-inspired accents add dimension without requiring a complete room overhaul. A single well-chosen boho quilt can shift the entire feeling of a bedroom.
Beyond the bedroom, the same design logic extends naturally into living and dining spaces – though it requires a lighter touch. A patchwork sofa cover or an oversized tassel throw adds warmth and visual interest to a living room without overwhelming a space that has to function for more than sleep. Round quilted floor cushions create flexible, welcoming seating that suits a relaxed interior without permanent commitment. Decorative pieces – sun-and-moon wall art, reversible floral throws – soften the harder lines of modern furniture and add warmth without weight.
The One Rule of Boho Design
Mix materials. Embrace imperfection. Design intuitively. These are the instructions every boho guide gives, and they are all true – but they miss the underlying logic that makes them work.
The actual rule is simpler: every element should feel chosen, not defaulted to. A boho room that works is not one where anything goes. It is one where everything present is there because someone decided it belonged. The lived-in, layered quality that defines the aesthetic at its best is the result of editing as much as accumulating – knowing what to take out as well as what to put in.
That is what these 20 patterns are designed to support: not a perfectly matched set, but a cohesive, considered space that feels genuinely relaxed because it was genuinely thought about.
Boho quilts share a design sensibility with several other styles in our collection. See Contemporary quilt patterns for a more structured take on the same aesthetic freedom, Nakshi Kantha designs for the Bengali textile tradition that influences many boho techniques, and 20 Modern Quilt Pattern Ideas for the minimalist counterpoint to boho’s maximalism.
Recommended Supplies
“As an Amazon Associate, I earn from qualifying purchases.“
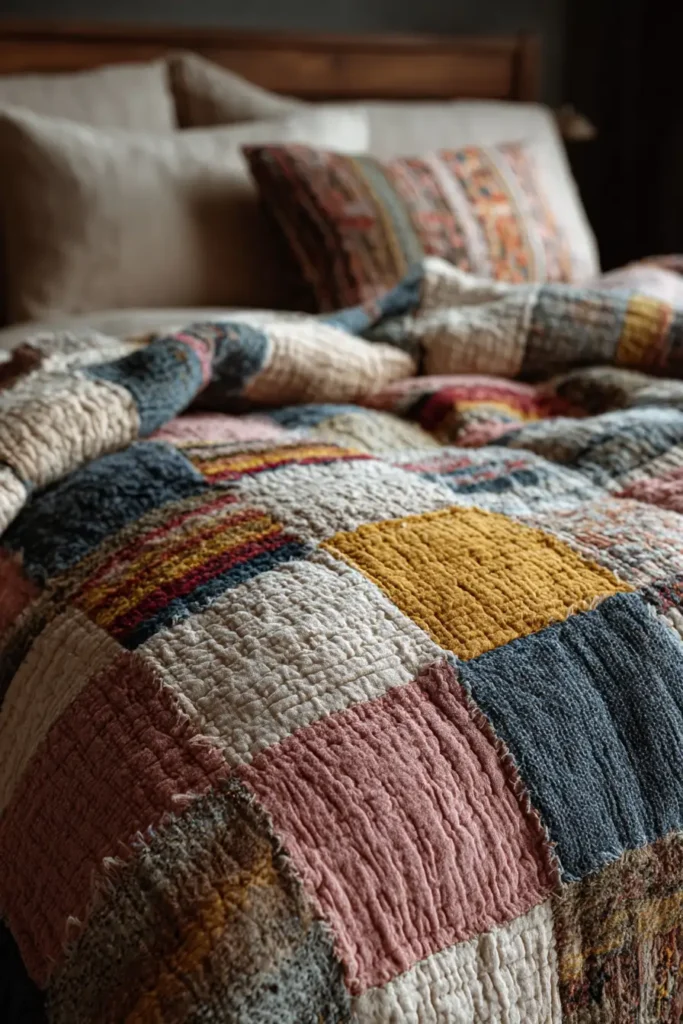
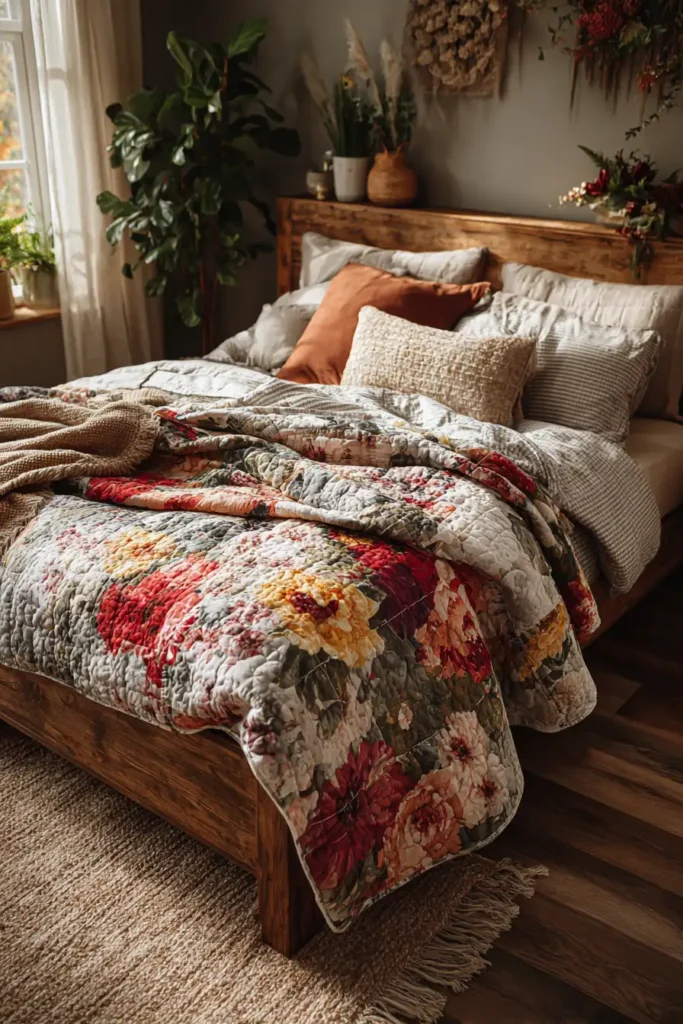
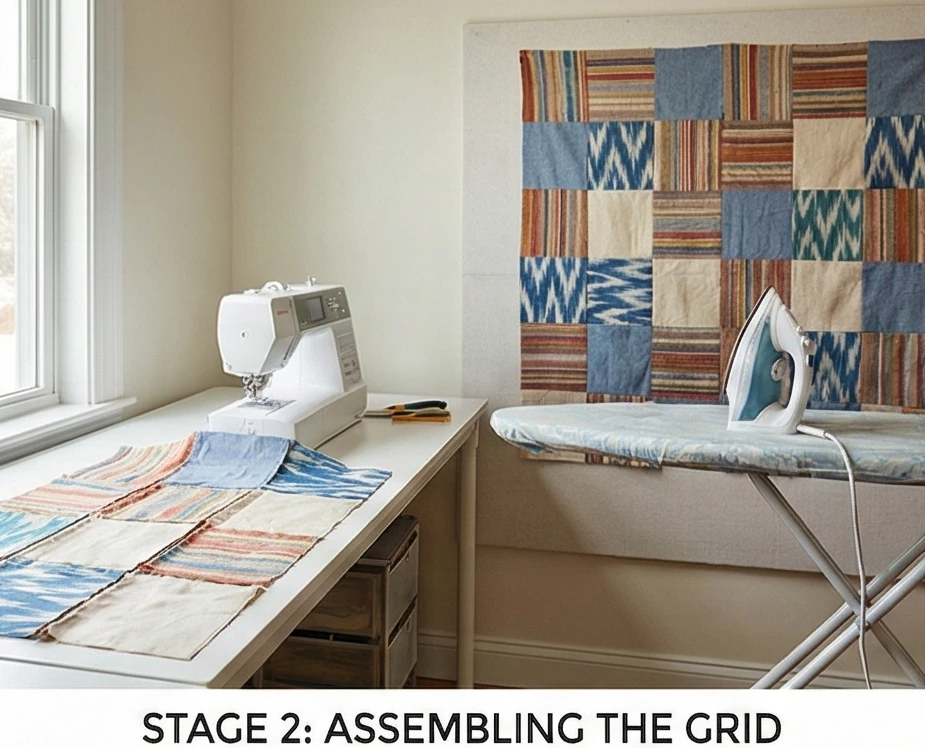
1. Modern Bohemian Patchwork Quilt Patterns for Dreamy Bedrooms
“The Gypsy Dreamer” Improv Coin Quilt
The essence of the “Boho” (Bohemian) aesthetic is a relaxed, unconventional mix of textures, cultures, and eras. It rejects rigid rules in favor of artistic expression. The “Gypsy Dreamer” quilt captures this spirit using an Improvisational Coin (or “Chinese Coins”) layout. Instead of perfect, matching squares, we stack horizontal rectangles of varying heights. By mixing high-texture fabrics like Linen, Double Gauze, and Chambray with earthy tribal prints, the quilt feels like a collection of souvenirs from global travels—effortlessly cool, soft, and inviting.
Finished Dimensions: Queen Bed Size, 90″ x 90″.
Materials Needed:
- The “Coins” (Scraps & Cuts): 4-5 yards total of assorted fabrics.
- Texture Mix: Use 50% quilting cotton (prints) and 50% textured solids (Linen, Ikat, Shot Cotton, Double Gauze).
- Palette: Earthy tones (Terracotta, Ochre, Sage, Clay) mixed with Low-Volume creams.
- The Sashing (The Pause): 3 yards of Natural Unbleached Linen or Chambray.
- Backing: 8.5 yards of a soft cotton lawn or a vintage floral sheet.
- Batting: Bamboo blend (for incredible drape and breathability).
- Notions: Rotary cutter, embroidery needle (for big stitch quilting), Perle Cotton thread (Size 8).
Cultural Backstory: The “Chinese Coins” quilt pattern is an antique design where small rectangles are stacked in vertical columns, resembling strings of ancient coins with holes in the center. In the Bohemian context, this vertical stacking mimics the look of textile weaving or beaded curtains often found in 1970s boho interiors. It allows for a “scrappy” look that feels curated rather than chaotic.
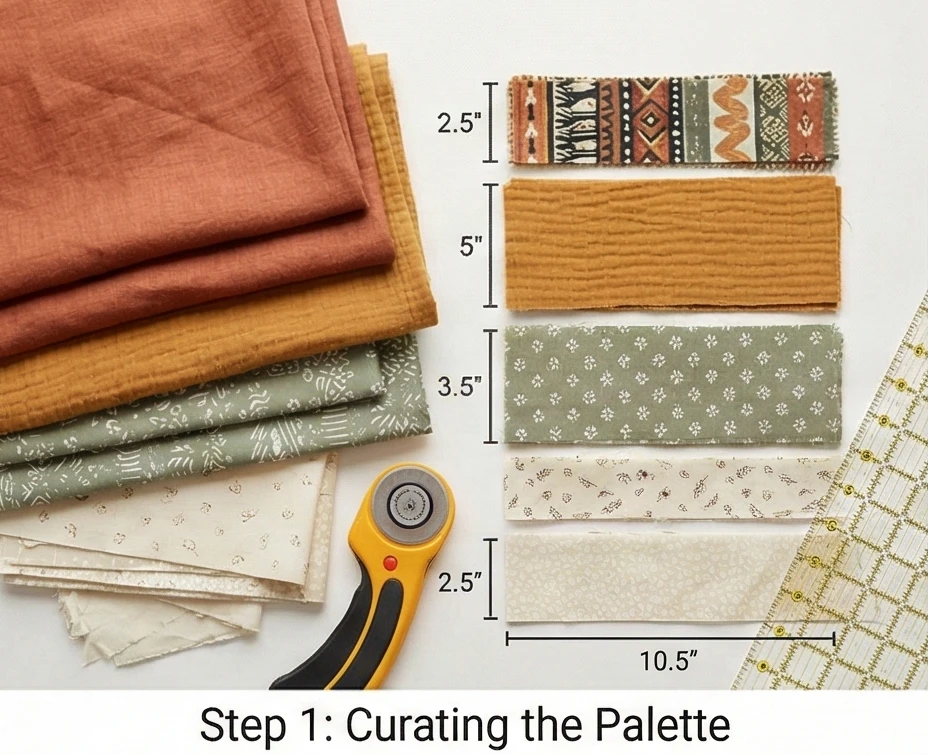
Step 1: Curating the Palette (The “Vibe” Check)
Boho is about the mix, not the match.
- Selection: Gather your fabrics. Aim for “perfectly imperfect.”
- Don’t worry if the weaves are different in tightness (e.g., mixing linen with cotton).
- Tip: Include a few “ugly” or jarring colors (like a hit of Acid Green or Hot Pink) to keep the quilt from looking too safe or beige.
- Cutting the Coins: Cut your fabric into 10.5-inch-wide strips.
- Variation: From these wide strips, cross-cut rectangles of varying heights. Cut some 2.5″ tall, some 5″ tall, some 3.5″ tall.
- Result: A pile of rectangles that are all 10.5″ wide but different heights.
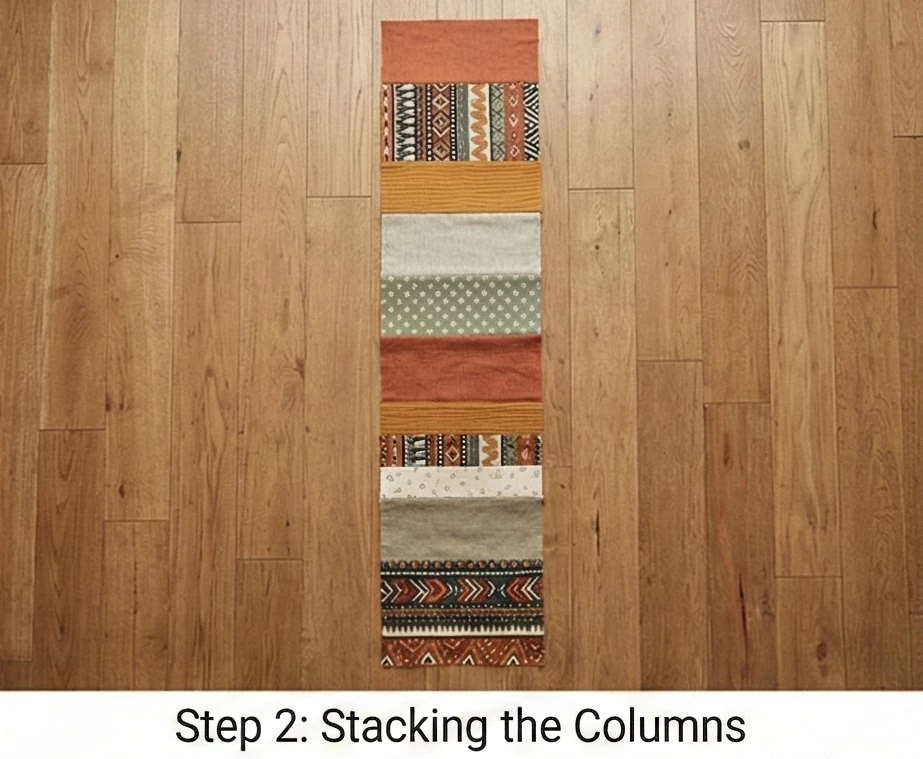
Step 2: Stacking the Columns
Improv piecing means no two columns are alike.
- Layout: Lay out your rectangles in a single vertical column on the floor until it reaches 90 inches long.
- Balance: Alternate between “Busy” (Prints) and “Quiet” (Solids/Textures).
- Sew: Stitch the rectangles together along the long (10.5″) edges.
- Pressing: Press seams open. This is crucial when mixing bulky fabrics like linen.
- Quantity: Create 7 distinct columns, each measuring 10.5″ x 90″.
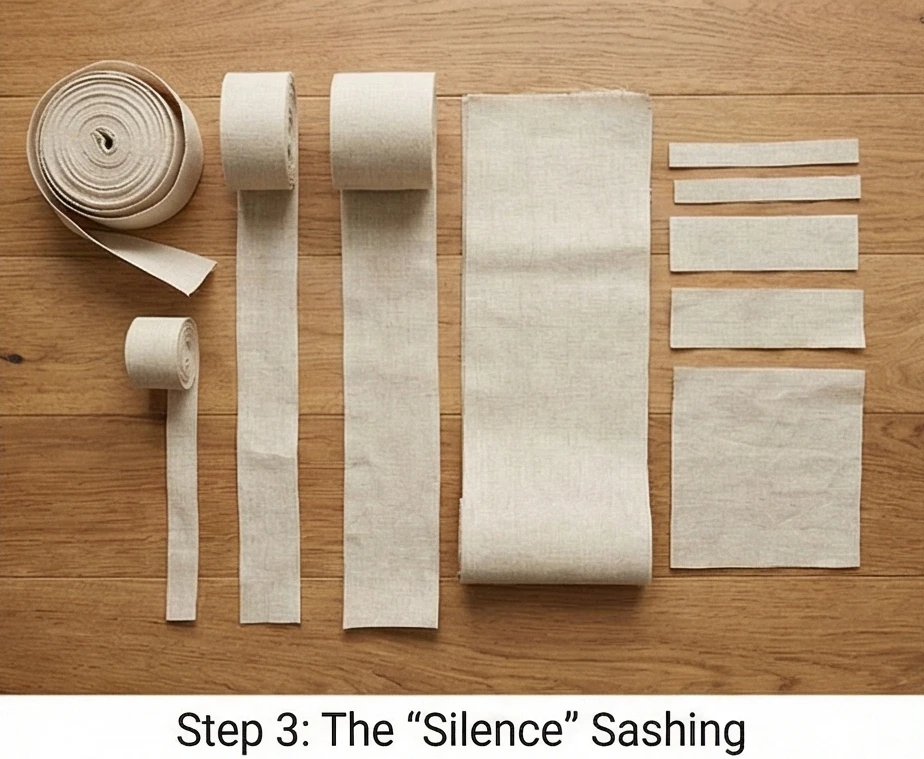
Step 3: The “Silence” (Sashing)
Negative space lets the prints breathe.
- Cut Sashing: Cut 6 long strips of your Natural Linen (The Sashing fabric).
- Width: You can vary the widths for a truly modern boho look. Cut some 3.5″ wide and some 5.5″ wide.
- Length: They must be 90 inches long (you will likely need to piece strips together to get the length).
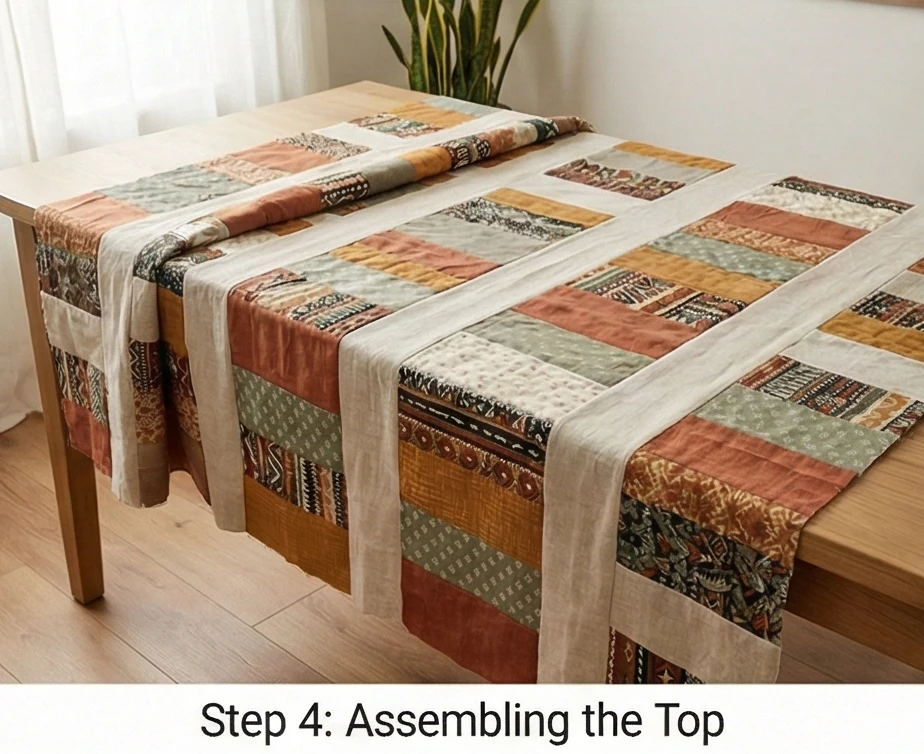
Step 4: Assembling the Top
- Arrangement: Alternate your Coin Columns with your Linen Sashing strips.
- [Column] – [Sashing] – [Column] – [Sashing]…
- Sew: Stitch the long vertical rows together.
- Pinning: Use plenty of pins. Linen can stretch and shift more than cotton.
- Trim: Once assembled, trim the top and bottom edges straight if they are jagged.
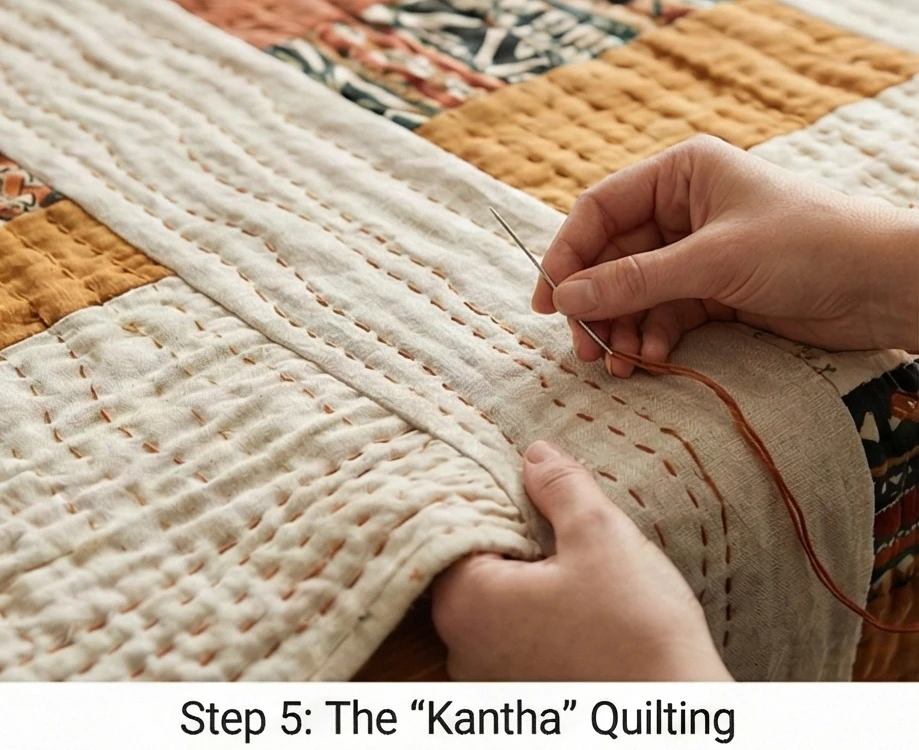
Step 5: The “Kantha” Quilting (Essential Step)
Machine quilting looks too stiff for Boho. You want the drape of hand stitching.
- Baste: Sandwich the quilt layers. (Bamboo batting is recommended for that “puddling” effect on the bed).
- Thread: Use Perle Cotton #8 in a contrasting color (like Sashiko white on dark fabrics, or Mustard thread on grey).
- Stitch: Use a “Big Stitch” (running stitch) roughly 1/4 inch long.
- Design: Stitch long, vertical lines running down the length of the quilt.
- Imperfection: Do not use a ruler. Let the lines wobble and wave slightly. This organic texture is the hallmark of the “Kantha” style (a traditional Bengali embroidery technique) often associated with boho decor.
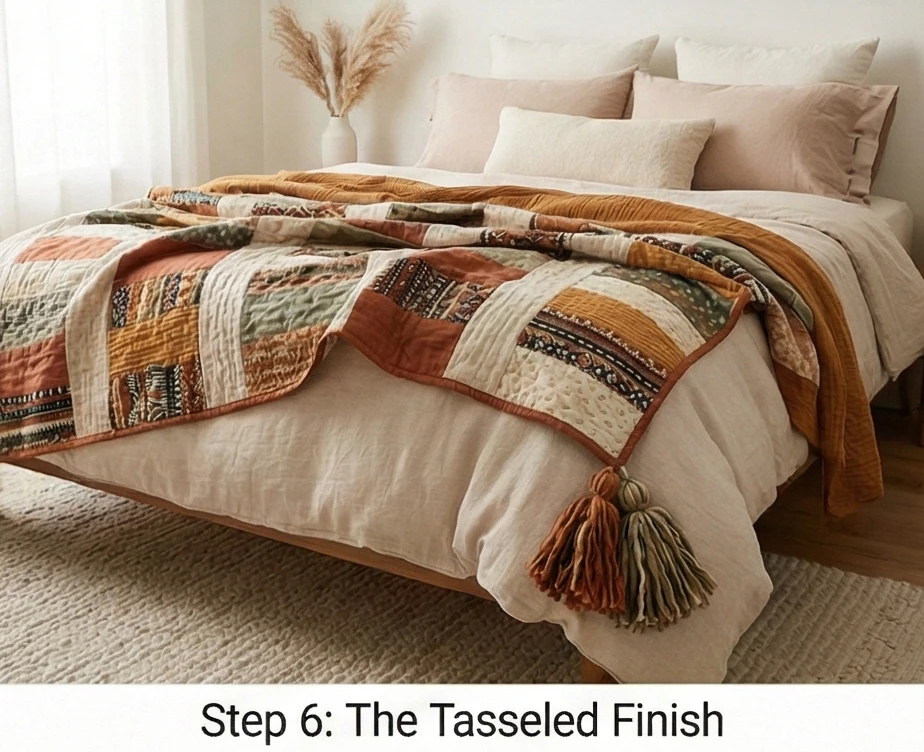
Step 6: The Tasseled Finish (Optional)
Boho loves a tassel.
- Bind: Bind the quilt using the backing fabric brought around to the front (Self-Binding) or a scrappy binding.
- Decorate: Hand-sew chunky yarn tassels to the four corners of the quilt.
- Warning: Only add tassels if the quilt is for adults; they can be a choking hazard for babies or pets.
Usability Note: The mix of Linen and Double Gauze creates a quilt that gets softer and “crinklier” with every wash. It feels like a well-worn favorite t-shirt immediately. Because of the loose weave of these fabrics, use a gentle cycle when washing and air-dry or tumble dry on low to prevent excessive shrinkage.
More Recommended Supplies
“As an Amazon Associate, I earn from qualifying purchases.“
2. Minimalist Earth Tone Bed Quilts for Serene Sanctuaries
“The Canyon Solitude” Gradient HST Quilt
Minimalism isn’t just about white walls; it’s about reducing visual noise to create a sense of calm. The “Canyon Solitude” quilt uses large-scale Half-Square Triangles (HSTs) to create a soft, ombre gradient. By blending earthy hues—Terracotta, Clay, Sand, and Sage—the quilt mimics the layers of a desert horizon at dusk. This design eschews busy prints in favor of the texture of Linen-Cotton Blends, creating a bed cover that is breathable, substantial, and incredibly grounding.
Finished Dimensions: Queen Bed Size, 90″ x 90″.
Materials Needed:
- Fabric A (Dark Earth): 2 yards of Rust or Burnt Sienna (Linen blend).
- Fabric B (Mid Earth): 2 yards of Camel or Warm Ochre.
- Fabric C (Light Earth): 2 yards of Unbleached Muslin or Oatmeal.
- Fabric D (Background/Sky): 3 yards of Cloud White or Pale Grey.
- Backing: 8.5 yards of a soft double gauze or wide-back sateen.
- Batting: Bamboo or Wool (for a heavy, luxurious drape).
- Notions: Rotary cutter, 12″ square ruler, masking tape (for quilting guide).
Cultural Backstory: Earth tones have experienced a significant resurgence in modern interior design, driven by the “Millennial Grey” era. Psychologically, colors found in nature—like clay, moss, and stone—signal safety and stability to the brain, lowering cortisol levels and promoting deeper sleep. This quilt is designed specifically to promote rest.
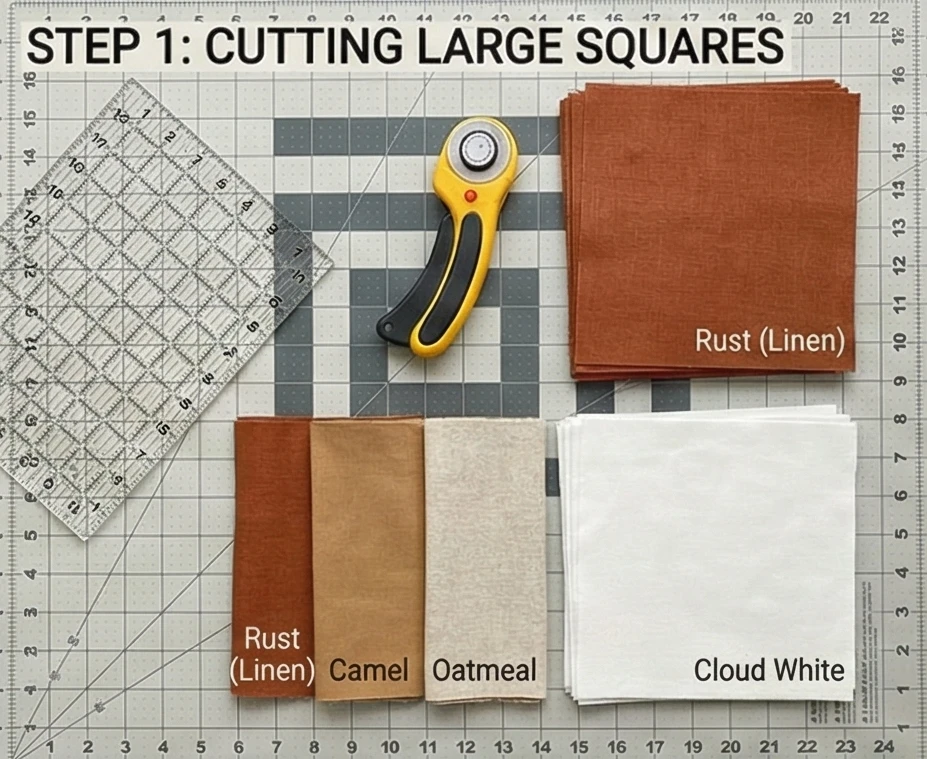
Step 1: Cutting Large Squares
We are using large blocks (9″ finished) to keep the look modern and uncrowded.
- Cut Color Squares:
- From Fabric A (Dark): Cut 15 squares measuring 10″ x 10″.
- From Fabric B (Mid): Cut 15 squares measuring 10″ x 10″.
- From Fabric C (Light): Cut 15 squares measuring 10″ x 10″.
- Cut Background Squares:
- From Fabric D (Background): Cut 45 squares measuring 10″ x 10″.
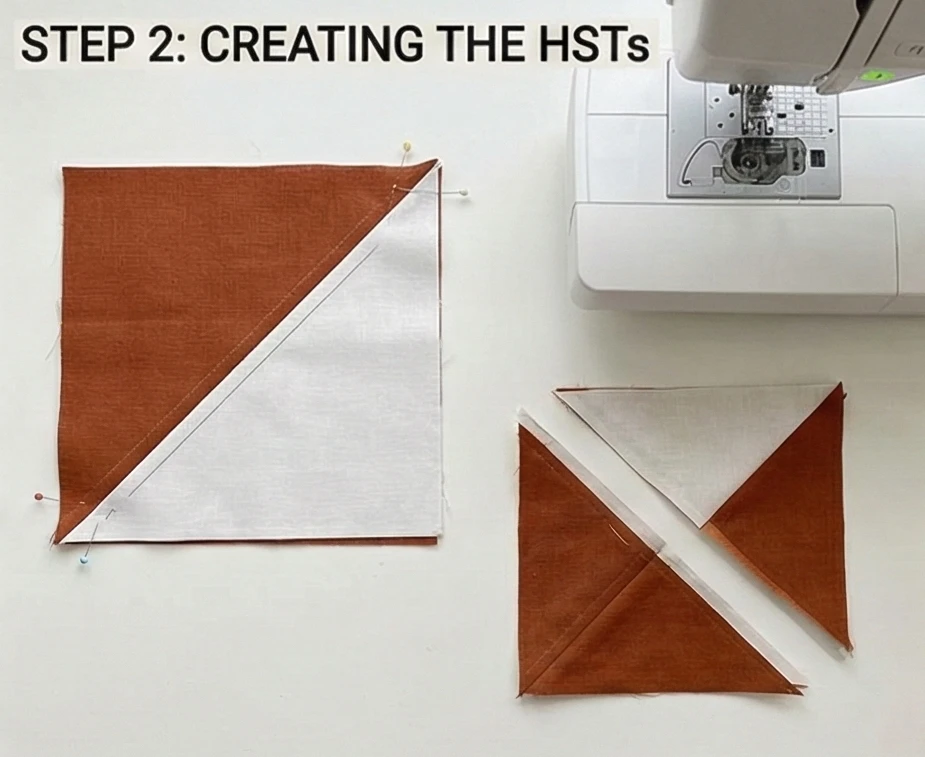
Step 2: Creating the Half-Square Triangles (HSTs)
The “Two-at-a-Time” method is efficient and accurate.
- Mark: Draw a diagonal line corner-to-corner on the back of every Background (Fabric D) square.
- Pair: Place a Background square Right Sides Together with a Color square (A, B, or C).
- Sew: Stitch a straight line 1/4 inch away from the drawn center line on both sides of the line.
- Cut: Cut along the drawn center line.
- Press: Open the units and press the seam toward the darker fabric.
- Yield: You now have 90 HSTs (30 Dark/Background, 30 Mid/Background, 30 Light/Background).
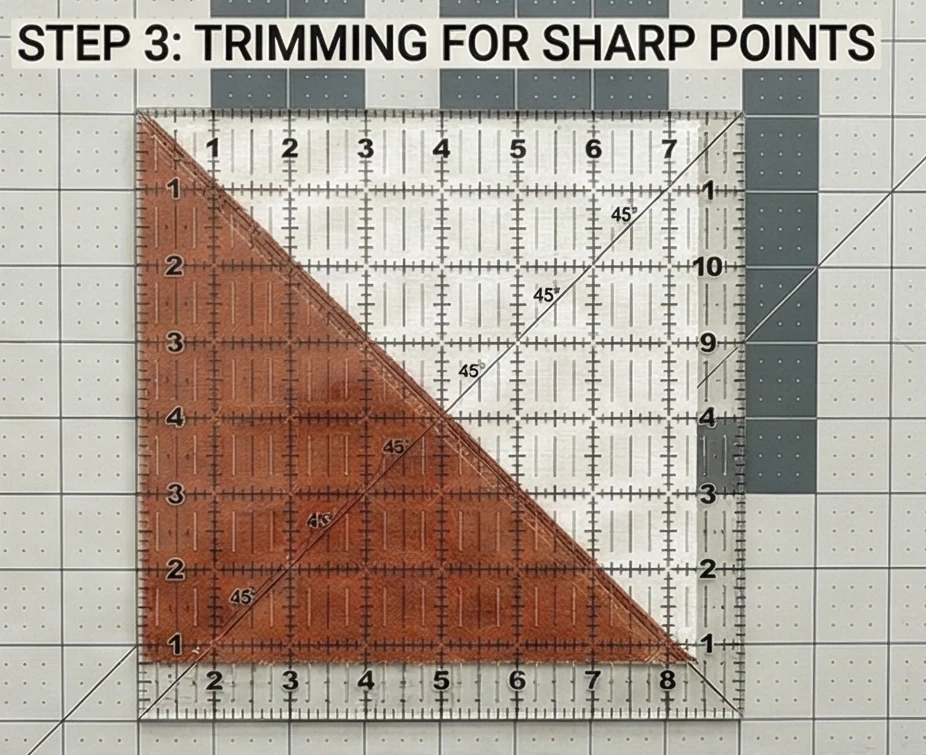
Step 3: Trimming for Sharp Points
Minimalism demands precision. If points are cut off, the serenity is broken.
- Trim: Using your square ruler, trim every single HST unit to exactly 9.5″ x 9.5″.
- Tip: Align the 45-degree line on your ruler with the seam line of the block to ensure the block stays square.
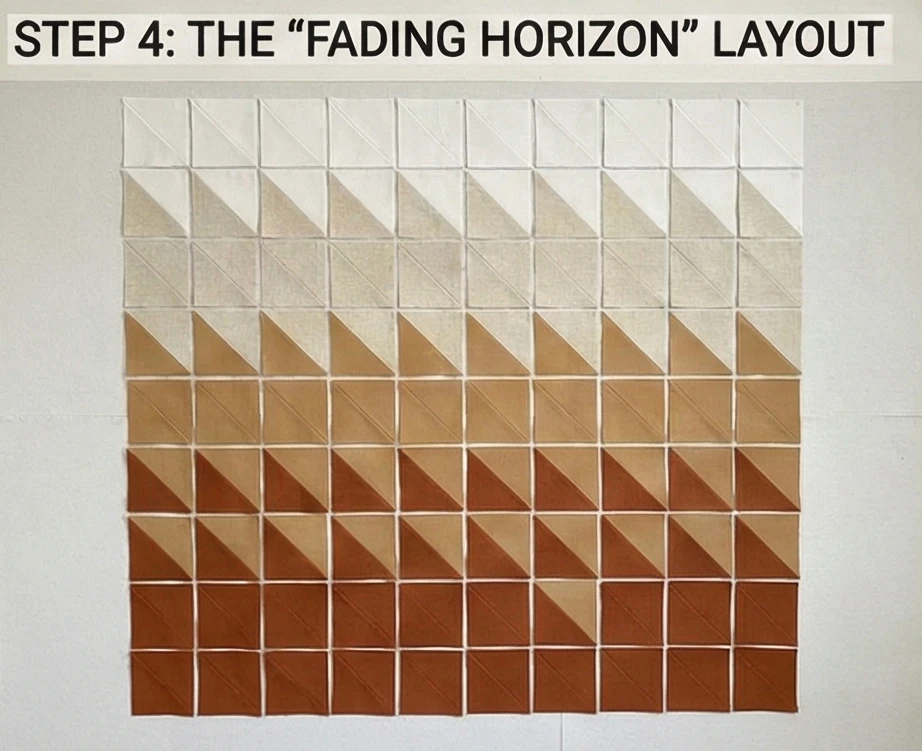
Step 4: The “Fading Horizon” Layout
This arrangement creates a soothing visual effect.
- Grid: The quilt is 10 blocks wide x 10 blocks tall.
- Rows 1-3 (Top): Use mostly Light Earth (C) HSTs mixed with solid Background squares. Point the triangles randomly or all upward.
- Rows 4-7 (Middle): Transition to Mid Earth (B) HSTs.
- Rows 8-10 (Bottom): Anchor the quilt with Dark Earth (A) HSTs.
- Design Choice: You can arrange them all pointing “Up” (like mountains) or mix them randomly for a “scattered stone” look. The key is the color transition from Dark at the foot of the bed to Light near the pillows.
Step 5: Assembly
- Sew Rows: Stitch the blocks into horizontal rows. Press seams in alternating directions (Row 1 left, Row 2 right, etc.) so they “nest” together flat.
- Join Rows: Sew the 10 rows together to complete the top.
Step 6: “Organic Grid” Quilting
Machine quilting that looks hand-drawn.
- Baste: Sandwich the quilt layers.
- Marking: Do not mark perfect lines. Instead, use painter’s tape to mark a general straight line across the quilt.
- Quilt: Stitch straight-ish lines across the width of the quilt, spaced roughly 2 inches apart.
- The “Wobble”: Don’t try to be a robot. Let the line waver slightly. This “organic straight line” texture softens the hard geometry of the triangles and complements the linen fabric.
Usability Note: Linen blends have a “living” finish. They will wrinkle, and that is part of the charm. Do not iron this quilt perfectly flat after washing; the rumpled texture traps heat and feels cozy, creating a “wabi-sabi” (perfectly imperfect) aesthetic.
3. Vintage Kantha Style Quilt Patterns for Heirloom Elegance
“The Bengal Scroll” Wholecloth Kantha Throw
Kantha is an ancient embroidery tradition from the Bengal region of South Asia (India and Bangladesh). Traditionally, women layered old, soft saris and stitched them together with thousands of running stitches to create thin, incredibly soft blankets. “The Bengal Scroll” recreates this heirloom feel by skipping complex patchwork entirely. Instead, it focuses on the beauty of the Running Stitch on high-quality Cotton Voile or Lawn. The result is a reversible, lightweight coverlet that drapes like water—the ultimate accessory for a boho sanctuary.
Finished Dimensions: Large Throw / Twin Coverlet, 60″ x 80″.
Materials Needed:
- Top Layer: 2.5 yards of Cotton Voile, Batiste, or Liberty Lawn (Solid color or subtle block print).
- Middle Layer (The “Filler”): 2.5 yards of White Cotton Flannel.
- Note: Traditional Kantha uses layers of fabric, not puffy batting. Using flannel adds warmth but keeps the quilt thin and drapey.
- Backing Layer: 2.5 yards of a contrasting Voile or soft Shot Cotton.
- Thread: 4-5 balls of Perle Cotton (Size 8) in a contrasting color (e.g., Indigo thread on White fabric, or Gold thread on Indigo).
- Needles: Sashiko needles or Embroidery needles (sharp with a large eye).
- Notions: Safety pins for basting, masking tape.
Cultural Backstory: The word “Kantha” refers to both the style of running stitch and the finished cloth. Historically, these quilts were functional art—mothers would stitch protective motifs and family stories into the blankets for their children. It is a slow, meditative process, often called “slow stitching,” which aligns perfectly with the mindful sanctuary aesthetic.
Step 1: Preparing the “Sandwich”
Because we are using delicate fabrics (Voile), handle them gently.
- Wash & Press: Pre-wash all three layers (Top, Flannel, Backing). Voile shrinks differently from flannel, so this is non-negotiable. Press them while slightly damp to ensure they are perfectly flat.
- Layer: Lay the Backing (face down) on the floor. Place the Flannel in the middle. Place the Top (face up) on top.
- Smooth: Spend time smoothing out wrinkles from the center outward. The fabric is slippery, so take your time.

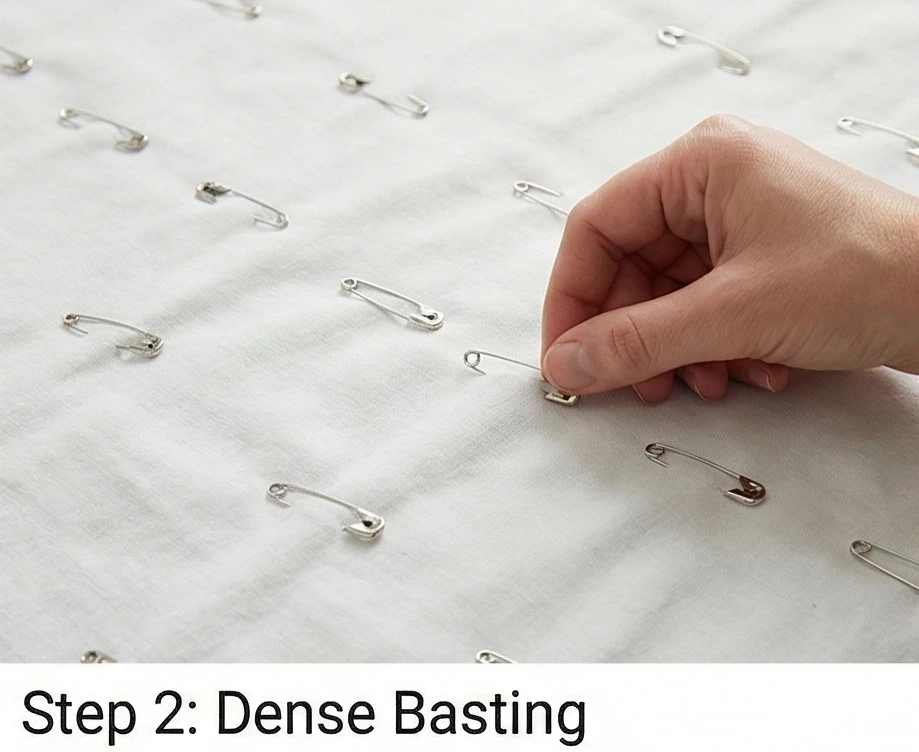
Step 2: Dense Basting
Hand quilting shifts the fabric more than machine quilting.
- Pin: Use safety pins to baste the layers together at 3-4-inch intervals.
- Grid: Start from the center and grid outwards. Secure edges well.
- Tip: If you have a large table, clamp the layers down. If working on the floor, tape the backing down to keep it taut while pinning.
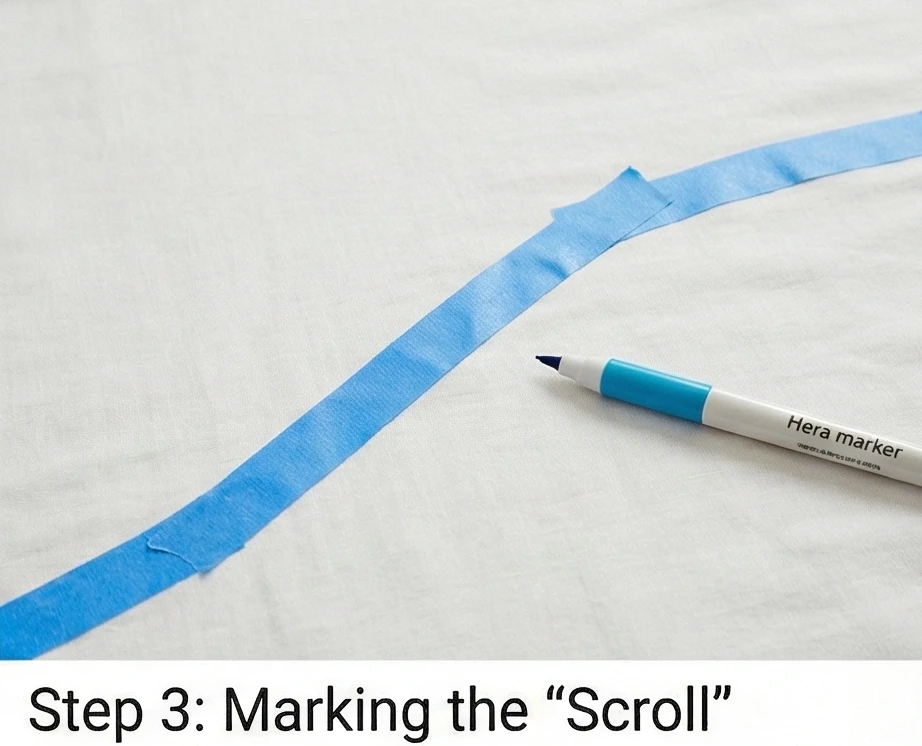
Step 3: Marking the “Scroll”
Kantha rarely has perfectly straight lines; it flows.
- The Guide: You don’t need to mark every line. Use Painter’s Tape or a Hera Marker to mark a single, gentle wavy line diagonally across the quilt from corner to corner.
- Concept: This initial wave will be your guide. All subsequent lines will simply echo this first curve.
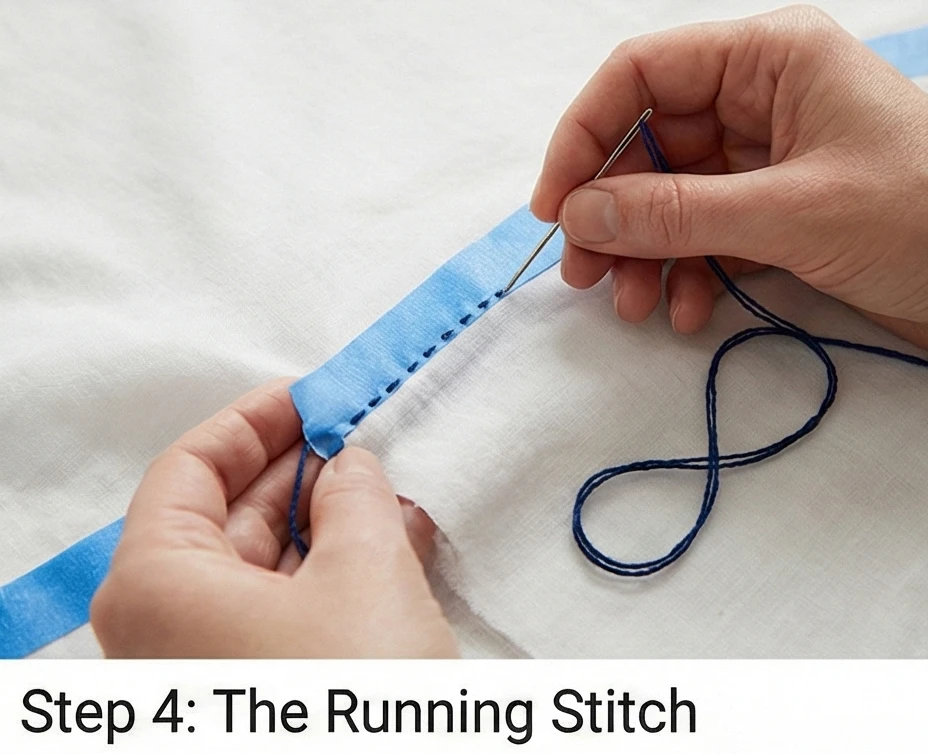
Step 4: The Running Stitch (The Motion)
The goal is a rhythmic, visible stitch.
- Thread Up: Cut a piece of Perle Cotton thread (about 18 inches). Tie a knot at the end.
- The Stitch: Start in the center of your marked line. Bury the knot between the layers.
- Rocking: Load 3-4 stitches onto the needle at once by rocking the needle up and down through the fabric layers before pulling the thread through.
- Size: Aim for stitches that are about 1/4 inch long. The spaces between stitches should be slightly smaller than the stitch itself.
- Direction: Stitch all the way to the edge of the quilt.
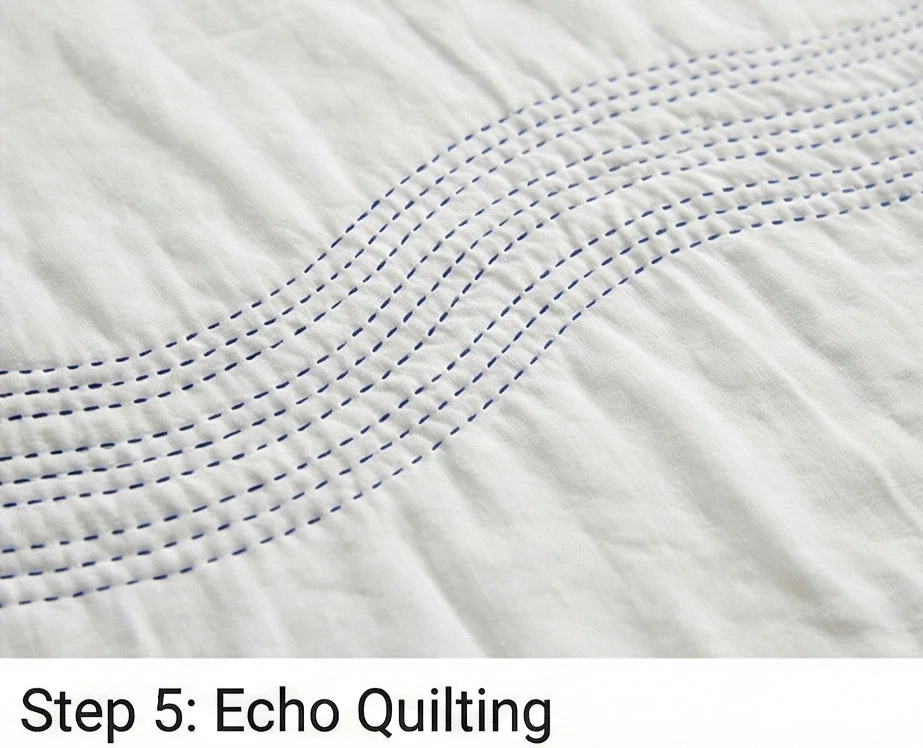
Step 5: Echo Quilting
This is where the texture develops.
- Spacing: Start your next line of stitching about 1/2 inch away from the first line.
- Echo: Follow the curve of the previous line. You don’t need to mark it; just eyeball the distance.
- Repeat: Continue stitching parallel lines until the entire quilt is covered in rippling waves.
- Aesthetic: The slight irregularities in your hand stitching create the “puckered” texture that defines the vintage Kantha look.
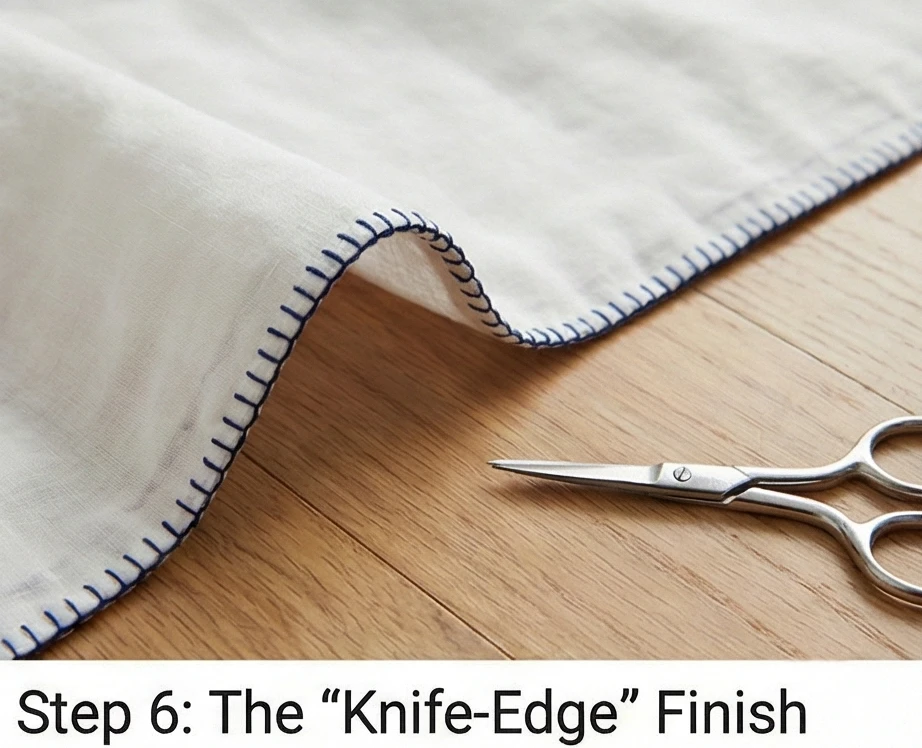
Step 6: The “Knife-Edge” Finish
Binding adds bulk. A knife-edge keeps it light.
- Trim: Once quilting is complete, trim the edges to ensure all three layers are perfectly even.
- Turn In: Fold the top fabric and the backing fabric inward (toward each other) by 1/2 inch. The flannel middle layer should be enclosed inside.
- Topstitch: Pin the folded edges shut. Use your Perle Cotton thread to do a tiny Whip Stitch or a neat Running Stitch very close to the edge to seal the quilt.
- Result: A crisp, thin edge that looks modern and refined.
Usability Note: A Kantha quilt is the most versatile bedding you can own. In summer, it acts as a breathable top sheet. In winter, it adds weight and texture to a duvet. Because it has no lofty batting, it folds down very small, making it easy to store in a basket or chest at the foot of the bed.
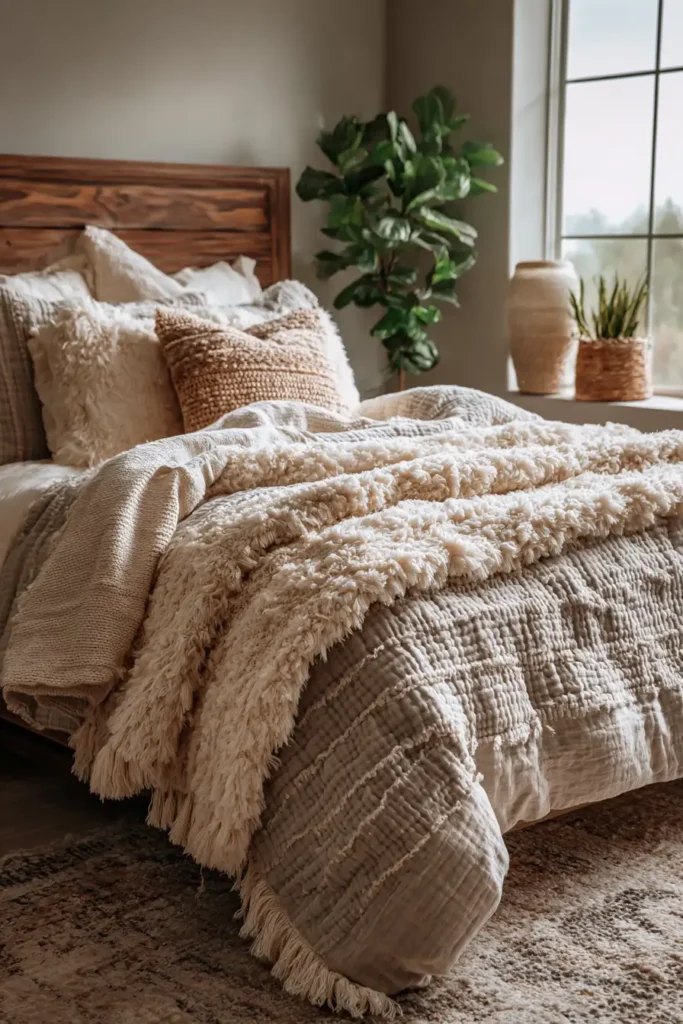
4. Textured Chenille and Fringe Bed Covers for Cozy Layers

“The Moroccan Tuft” Faux Chenille Bedspread
Nothing says “Boho Sanctuary” quite like the tactile, velvety softness of chenille. While true chenille is woven, you can recreate the look of a vintage tufted bedspread or a plush Moroccan rug using the Faux Chenille (Slash-and-Wash) technique. By stacking layers of loose-weave cotton or flannel, stitching channels, and then slashing through the top layers, you create rows of raw edges that “bloom” in the washing machine into soft, fuzzy caterpillars. Finished with a knotted macramé fringe, this bedspread is heavy, warm, and unapologetically romantic.
Finished Dimensions: Queen Bedspread, 90″ x 90″.
Materials Needed:
- The Layers (You need 3 layers minimum):
- Top Layer (Aesthetics): 5 yards of Bleached Muslin or Light Grey Flannel.
- Middle Layer (Volume): 5 yards of White Flannel (This fluffs up best).
- Base Layer (Structure): 5 yards of Wide-Back Cotton or high-quality sheeting. (Do not cut through this layer!)
- The Fringe: 10 yards of Cotton Bullion Fringe or 2 spools of Chunky Macramé Cord to make your own.
- Tools: A Chenille Cutter (Essential—using scissors will blister your hands), Walking Foot for sewing machine, stiff brush.
Cultural Backstory: The word “Chenille” is French for “Caterpillar,” named for the fuzzy texture of the yarn. In the 1930s and 40s, chenille bedspreads became a craze in the American South (specifically around Dalton, Georgia), where families would hand-tuft patterns like peacocks and flowers onto sheets. This “cottage industry” eventually grew into the massive American carpet industry.
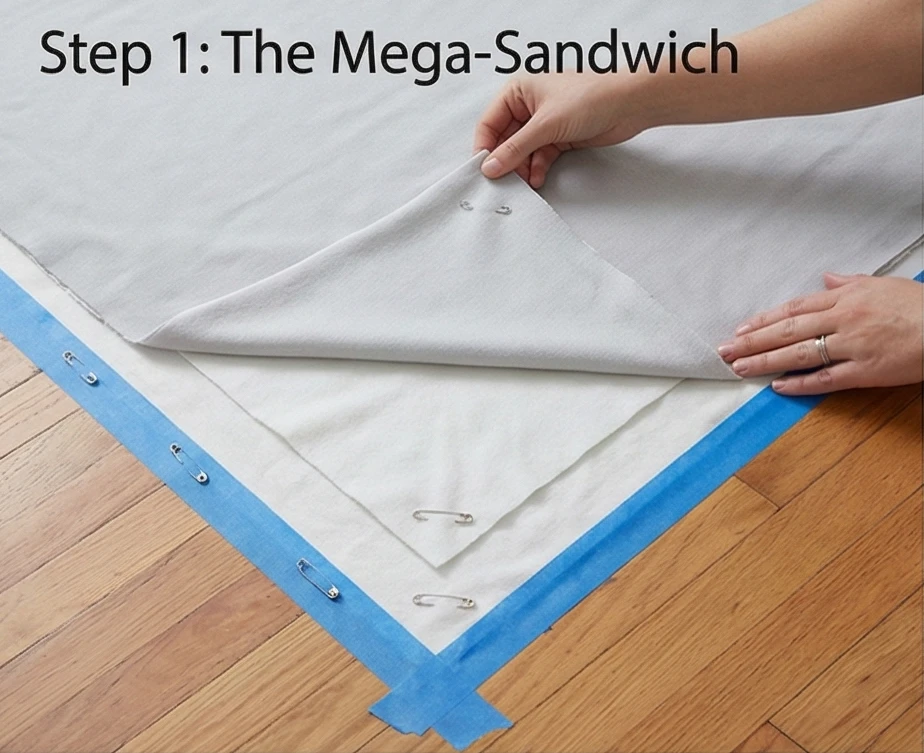
Step 1: The Mega-Sandwich
Preparation is key. Wrinkles now become permanent later.
- Press: Iron all three large cuts of fabric perfectly flat.
- Layer:
- Lay the Base Layer face down on a large floor space. Tape the edges to the floor to keep it taut.
- Lay the Middle Layer (Flannel) on top. Smooth it out.
- Lay the Top Layer (Muslin/Color) on top.
- Baste: Use safety pins every 6-8 inches. You need this sandwich to be secure because you will be sewing thousands of inches of straight lines.
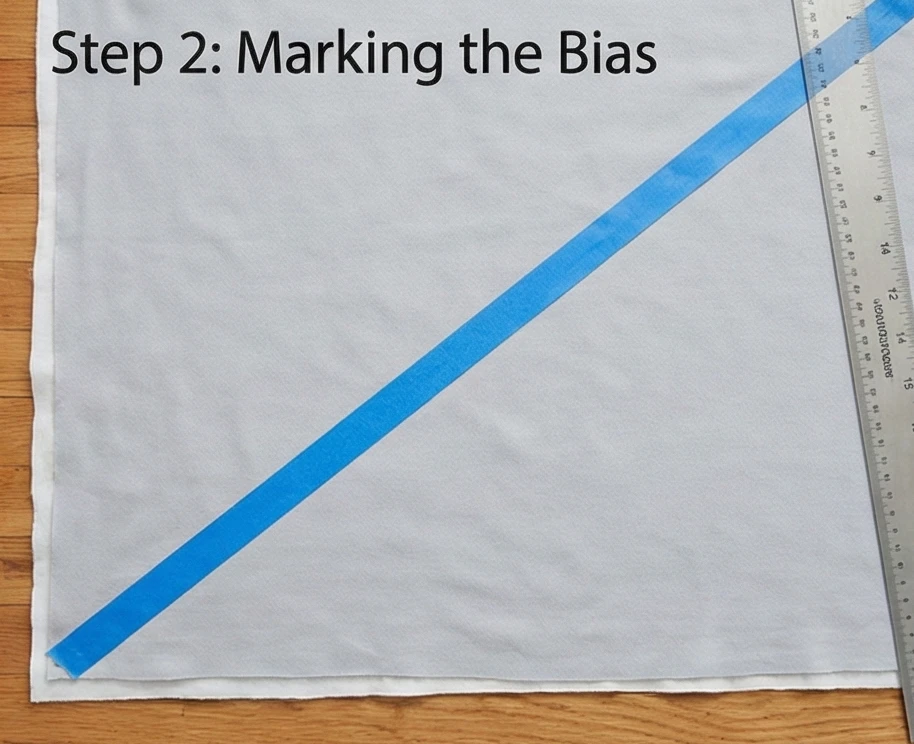
Step 2: Marking the Bias
Cutting on the bias (diagonal) makes the fray softer and prevents strings from unraveling messily.
- Mark: Using a long ruler and painter’s tape, mark a single 45-degree diagonal line across the exact center of the quilt.
- Guide: This is your pilot line. All stitching will run parallel to this.
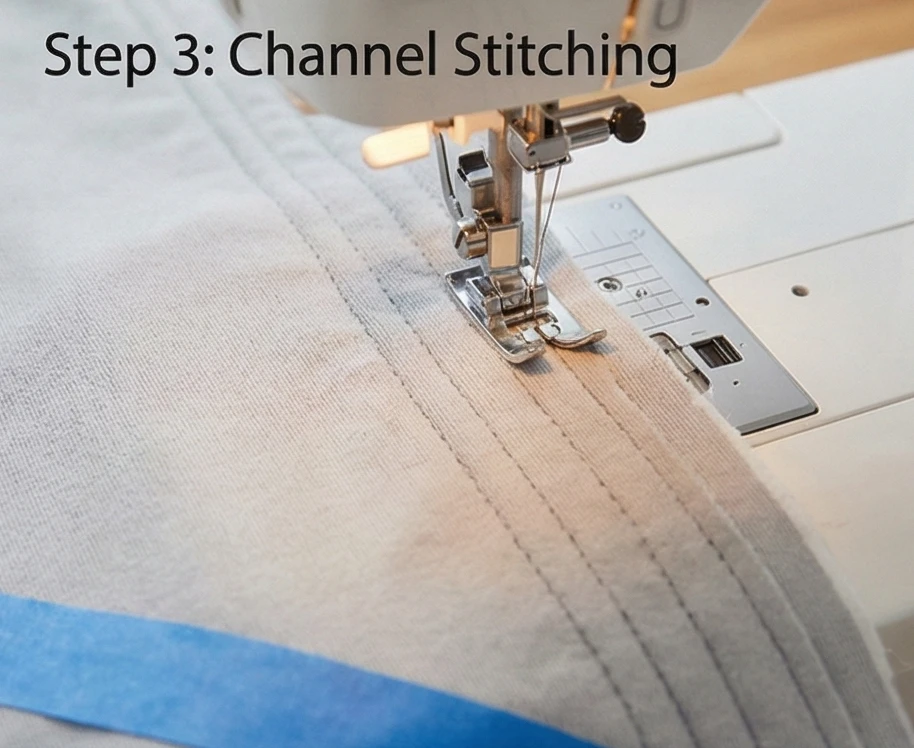
Step 3: Channel Stitching
This is the meditative (or tedious) part. Put on a podcast.
- Stitch: Sew a straight line following your tape mark through all three layers.
- Echo: Using your walking foot as a guide, sew a parallel line exactly 1/2 inch away from the first line.
- Repeat: Continue sewing parallel lines 1/2 inch apart until the entire bedspread is covered in diagonal channels.
- Tip: Do not rush. If the layers shift, you’ll get puckers.
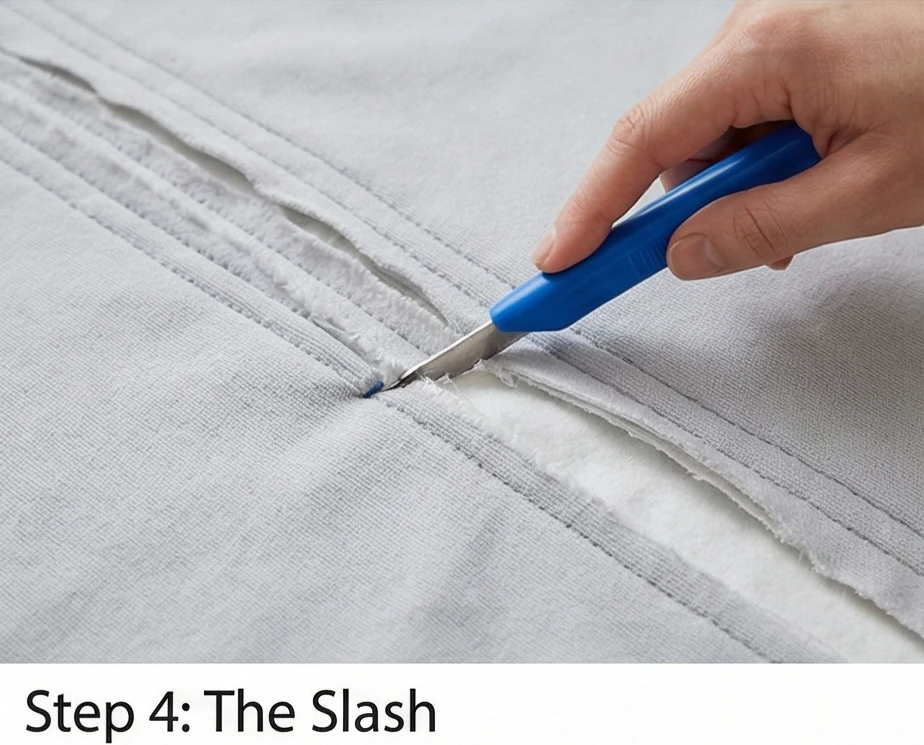
Step 4: The Slash (Creating the Texture)
Be careful! One slip and you ruin the base layer.
- Insert Tool: Insert the guide of your Chenille Cutter (or sharp scissors) into a channel between two stitch lines.
- Cut: Slice through the Top Layer and the Middle Layer only.
- STOP: Do NOT cut the Base Layer. The base layer holds the whole blanket together.
- Process: Work your way across the quilt, slashing every single channel open. You should see the base layer peeking through the slit.
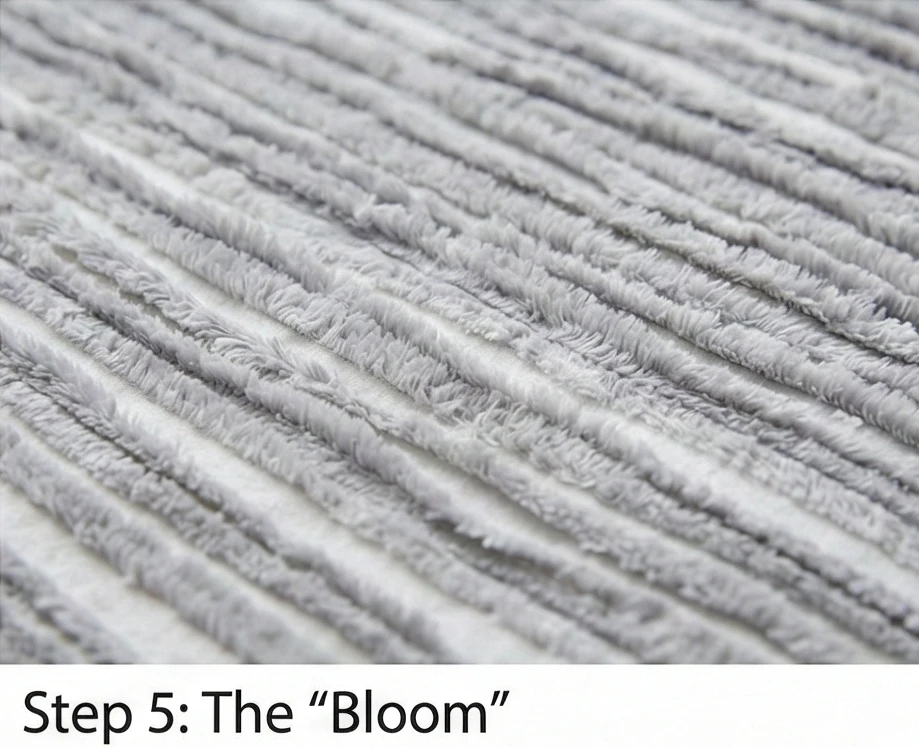
Step 5: The “Bloom” (Washing)
The magic happens in the machine.
- Wash: Throw the slashed quilt into the washing machine on a Cold, Heavy Duty cycle. Use a small amount of detergent.
- Agitation: The agitation of the water rubs the raw edges of the slashed fabric against each other, causing them to fray and fluff up into “caterpillars.”
- Dry: Tumble dry on medium heat. Empty the lint trap every 15 minutes (it will be full!).
- Result: When it comes out, the straight lines will have transformed into soft, velvety ridges.
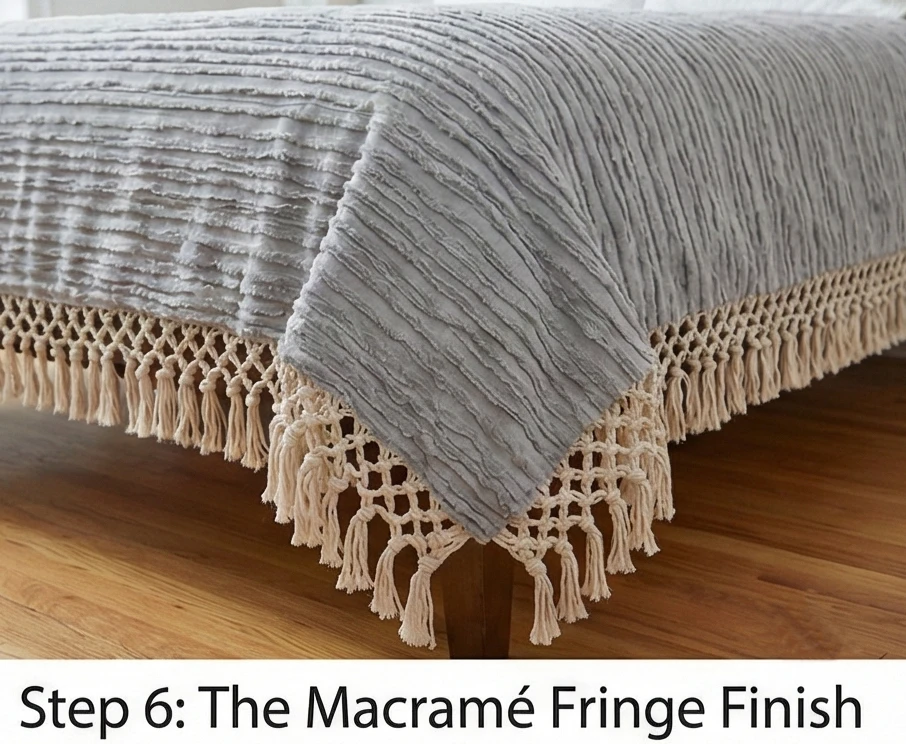
Step 6: The Macramé Fringe Finish
A boho bedspread needs a dramatic edge.
- Trim: Square up the edges of the fluffed quilt.
- Attach:
- Option A (Store Bought): Sew a heavy cotton bullion fringe around the perimeter.
- Option B (Handmade): Punch holes every 1 inch along the hem using an awl or grommet tool. Cut 12-inch lengths of macramé cord. Fold a cord in half, loop it through a hole, and pull the tails through the loop (Lark’s Head Knot).
- Knot: Tie the hanging cords together in a simple diamond pattern for that 1970s finish.
Usability Note: The first wash of a faux chenille quilt produces an enormous amount of lint. Do not wash this with other clothes (they will be covered in fuzz). If you have a septic system, consider washing it at a laundromat for the first cycle to avoid clogging your pipes.
5. Large Scale Mandala Quilt Patterns for Statement Bedding
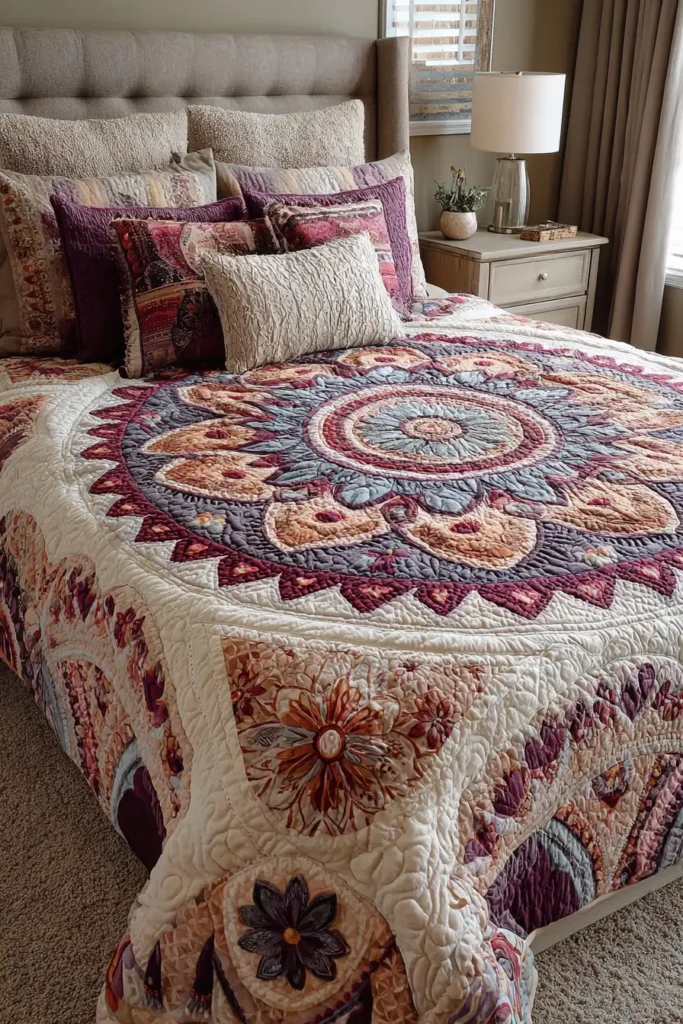
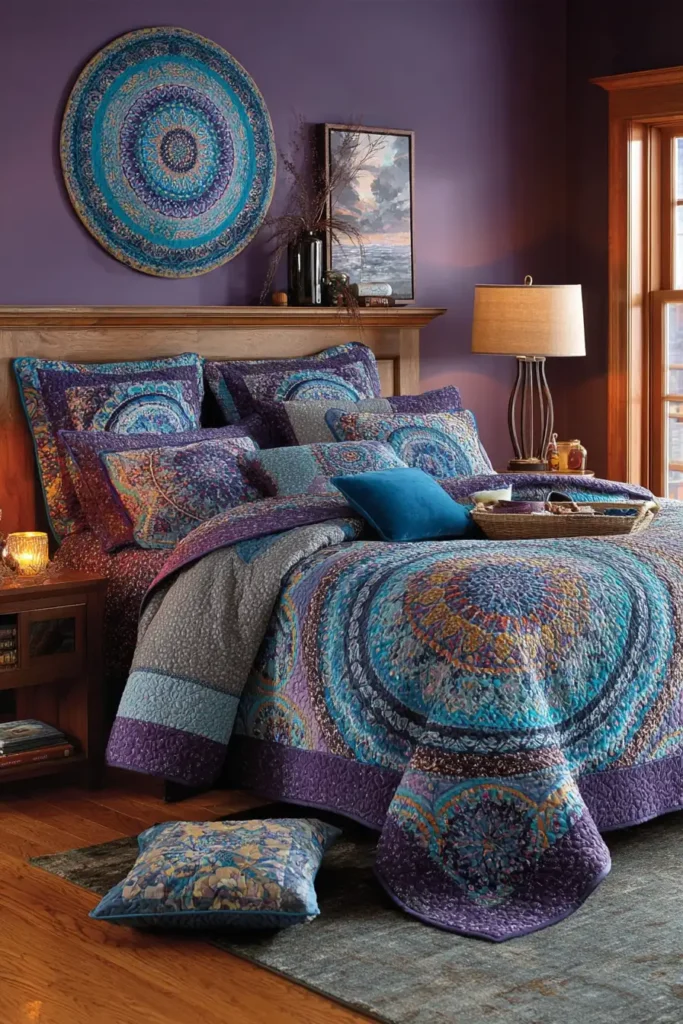
“The Sacred Lotus” Giant Dresden Mandala
A Mandala (“circle” in Sanskrit) represents the universe, wholeness, and the cycle of life. Placing a large-scale mandala on a bed creates an immediate focal point, grounding the room’s energy at the center of the sanctuary. “The Sacred Lotus” uses the classic Dresden Plate technique but scales it up to massive proportions. Instead of a small plate on a quilt block, the entire quilt is the plate. By using raw-edge appliqué on a linen background, we achieve a look that is both majestic and relaxed—perfect for a boho bedroom.
Finished Dimensions: King/Queen Bedspread, 96″ x 96″.
Materials Needed:
- The Petals (The Mandala): 4 yards total of assorted prints.
- Boho Mix: Combine Batiks, Large Florals, and Solid Linens. You need about 20 different strips (or repeat fabrics).
- The Center: 1/2 yard of a solid accent color (Gold or Deep Teal).
- The Background: 6 yards of Natural Linen or Unbleached Muslin (You will likely need to piece two lengths together to get a 96″ width).
- Batting: Low-loft cotton (you want this to drape over the bed edges).
- Notions: A Dresden Ruler (18-degree wedge) or a paper template, Fusible Web (Lite Steam-A-Seam).
Cultural Backstory: While the Dresden Plate is a German-named American quilt pattern from the 1920s/30s, the concept of the “Great Circle” appears in almost every culture—from Native American medicine wheels to Tibetan sand mandalas and Gothic rose windows. In the 1960s and 70s, the counter-culture movement reclaimed the mandala as a symbol of spiritual awakening and cosmic connection.
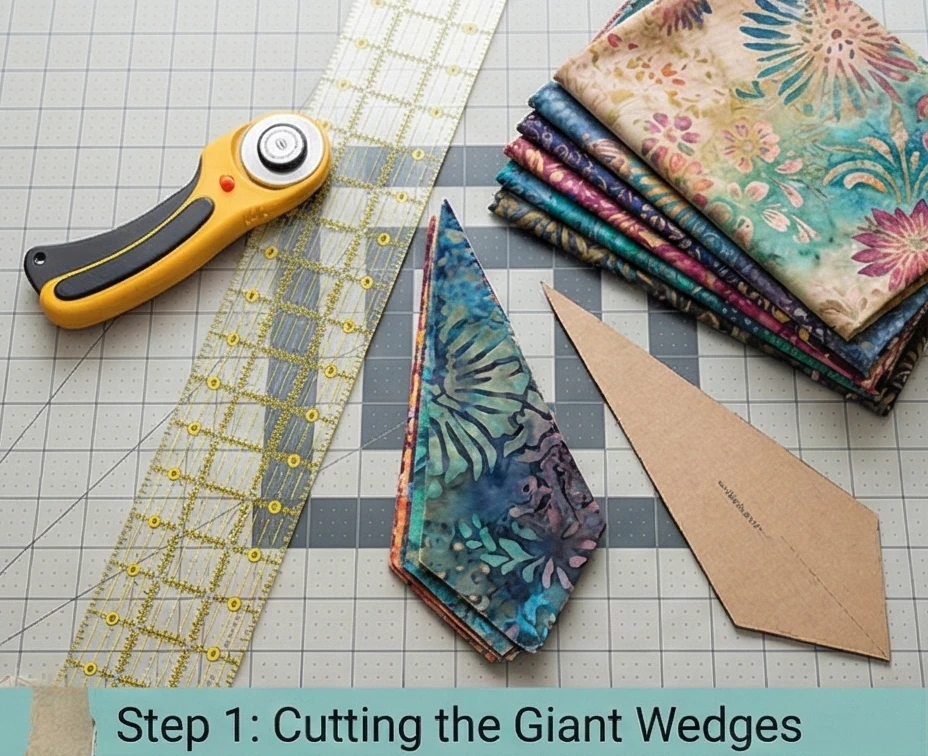
Step 1: Cutting the Giant Wedges
We are making a sunburst.
- The Template: If you don’t have a plastic Dresden ruler, draw a wedge on cardboard.
- Dimensions: Top width: 8 inches, Bottom width: 2 inches, Height: 22 inches.
- The Cut: Cut 20 Wedges from your assorted fabrics.
- Grain: Try to cut the wedge lengthwise with the fabric grain so the edges don’t stretch.
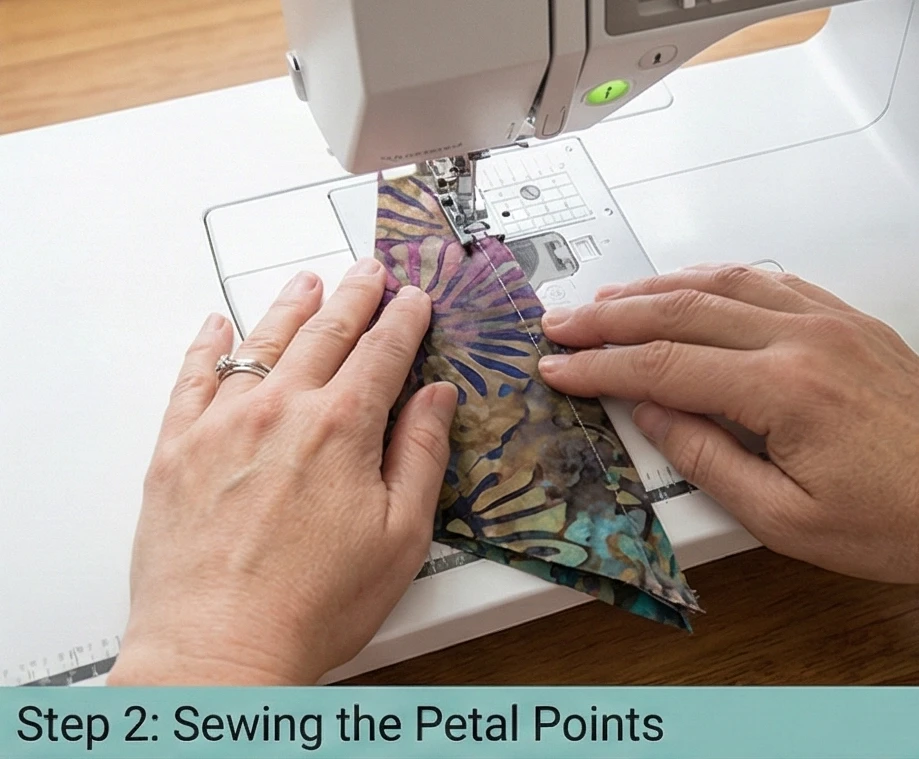
Step 2: Rounding the Petals (The Lotus Look)
Standard Dresdens are pointy; Lotus petals are soft.
- Fold: Fold the wide top edge of a wedge in half (Right Sides Together).
- Stitch: Sew a scant 1/4″ seam across the top edge.
- Turn: Turn the point right side out and poke it with a chopstick.
- Result: You now have a smoothly rounded or pointed tip at the top of the wedge, finished beautifully with no raw edges visible.
- Repeat: Do this for all 20 wedges.
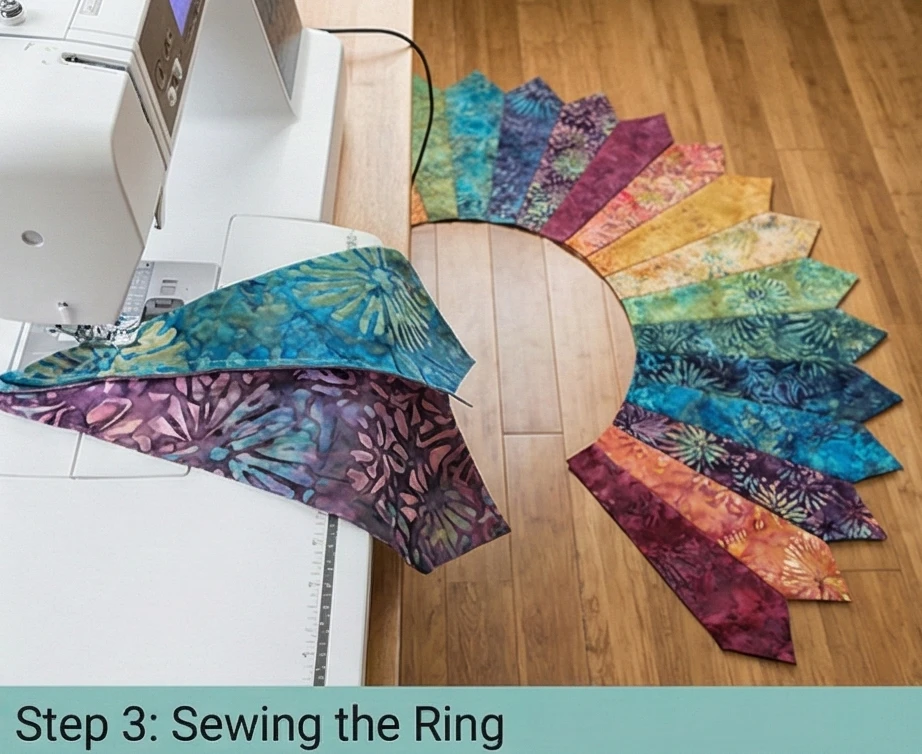
Step 3: Sewing the Ring
- Layout: Arrange your 20 wedges in a circle on the floor. Play with the color gradation. Do you want a rainbow? Or a random scatter?
- Join: Sew the long sides of the wedges together, starting from the wide top and moving down to the narrow bottom.
- Pressing: Press all seams open to reduce bulk.
- The Hole: You will have a raw, open circle in the center where the points meet. Don’t worry about it yet.
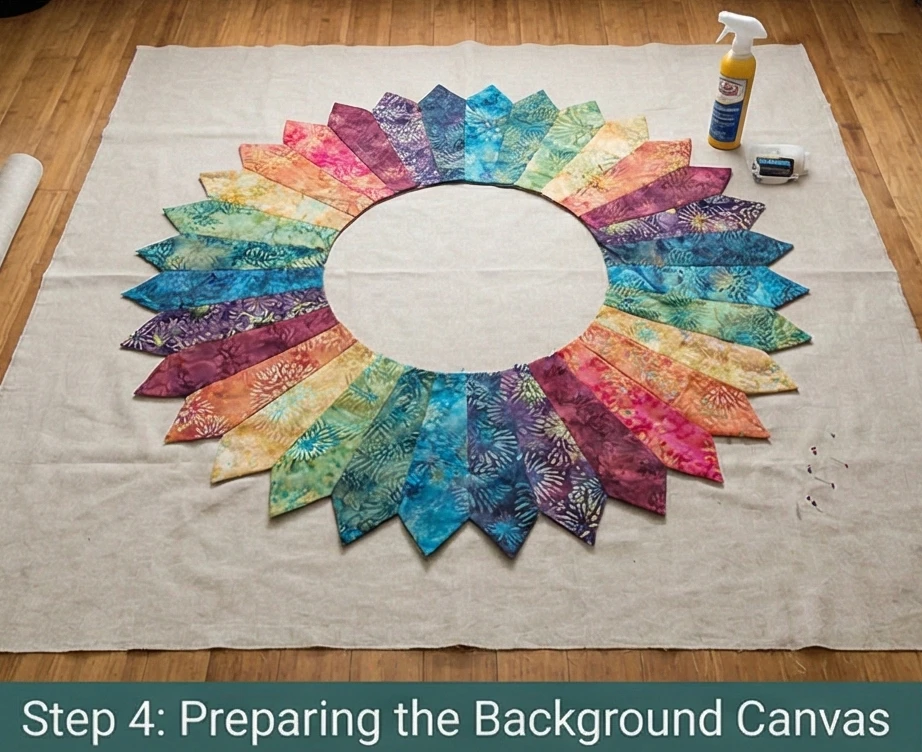
Step 4: Preparing the Background Canvas
The negative space is just as important as the design.
- Join Background: Cut your Linen into two 3-yard lengths. Sew them together along the long edge to create a giant 108″ x 96″ sheet. Trim to 96″ x 96″.
- Mark Center: Fold the background into quarters and press to find the exact center point.
- Placement: Lay the background flat. Place your giant Dresden Ring on top, aligning the center of the ring with the center crease of the background.
- Secure: Use Spray Baste or hundreds of pins to hold the ring flat. It is heavy, so gravity will try to shift it.
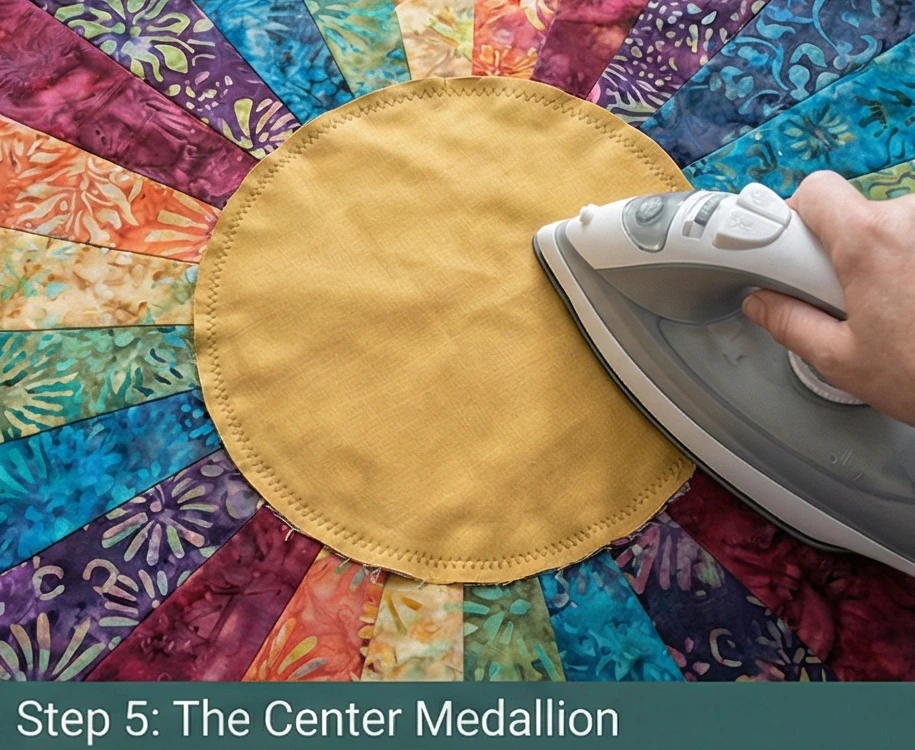
Step 5: The Center Medallion
Hiding the mess.
- Cut Circle: Cut a circle from your Accent fabric (Gold) that is 2 inches wider than the opening in the center of your ring.
- Appliqué:
- Method A (Turned): Baste the edge under and hand stitch.
- Method B (Raw Boho): Apply fusible web to the back of the circle. Iron it over the center hole. Zig-zag stitch or blanket stitch around the edge.
- Note: A raw edge adds to the rustic, earthy texture.
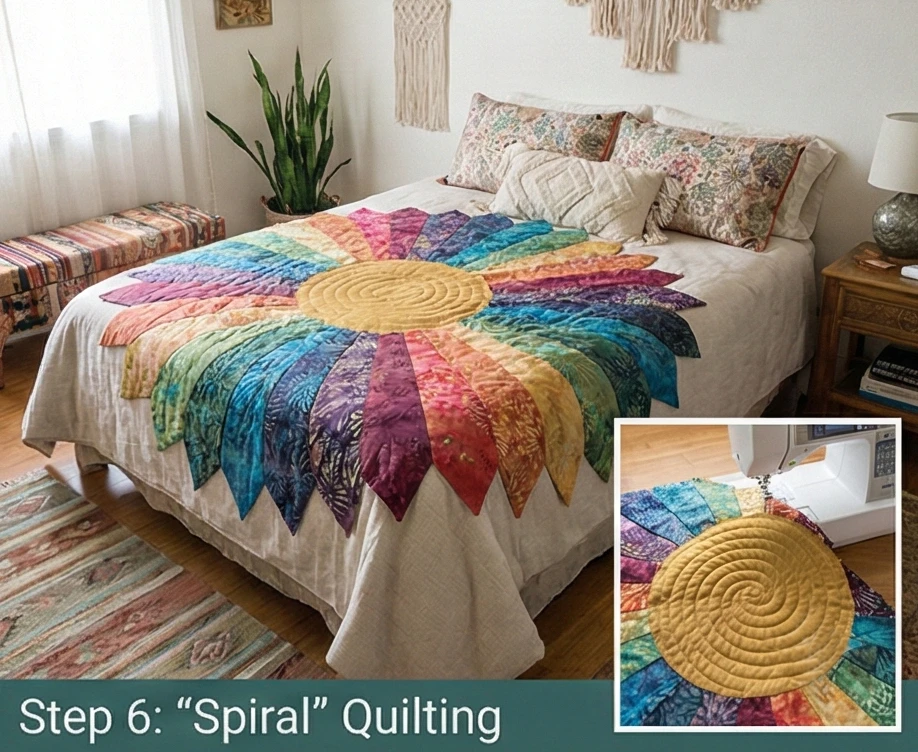
Step 6: “Spiral” Quilting
The quilting should enhance the energy of the mandala.
- Start: Start quilting in the absolute center of the Gold circle.
- Spiral: Stitch a continuous spiral outward.
- Spacing: Keep lines 1.5 to 2 inches apart.
- Continue: Keep spiraling past the gold center, through the petals, and out into the linen background.
- Effect: The spiral lines create a rippling water effect, making the mandala look like it is vibrating or radiating energy outward to the edges of the bed.
Usability Note: Large appliqué quilts can be stiff if you use too much fusible web. If possible, use the “Window Pane” method for fusible web (cutting out the center of the adhesive sheet), so you are only gluing the fabric edges, leaving the middle soft and drapable.
6. Eclectic Scrappy Boho Bed Runners for Stylish Accents
“The Bazaar Path” Scrappy String Runner
A bed runner is the perfect low-commitment way to inject the “Boho” vibe into a neutral bedroom. “The Bazaar Path” uses the String Quilting technique (sewing thin, uneven strips onto a foundation). This method produces a dense, heavy, and highly durable fabric that resembles a woven rug or a piece of global textile art found in a Moroccan souk. Because you are sewing onto a foundation layer, you can use even the wildest, most frayed scraps of silk, velvet, and cotton without them falling apart.
Finished Dimensions: King/Queen Bed Runner, 24″ x 90″.
Materials Needed:
- The “Strings”: A large bag of fabric strips.
- Width: Anything from 1 inch to 3 inches. They do not need to be straight or even.
- Texture: Mix Velvet, Silk, Cotton, and Linen. This textural variety is key to the eclectic look.
- The Foundation: 2 yards of Muslin or an old, thin cotton sheet. (This will be inside the quilt, so color doesn’t matter).
- Backing: 2 yards of a fun print (e.g., a Paisley or Mandala sheet).
- Batting: Thin cotton batting (optional—the foundation layer adds weight, so you might not need batting if you want a lighter drape).
- Notions: Rotary cutter, 12.5″ square ruler.
Cultural Backstory: String quilts were the ultimate “make-do” project during the Great Depression. Quilters would use the tiniest slivers of fabric—too small for regular blocks—and sew them onto pages of phone books or newspapers for stability. In a boho context, this “chaos” mimics the vibrant, strip-woven textiles of West Africa (Kente) or the rag rugs of Scandinavia.
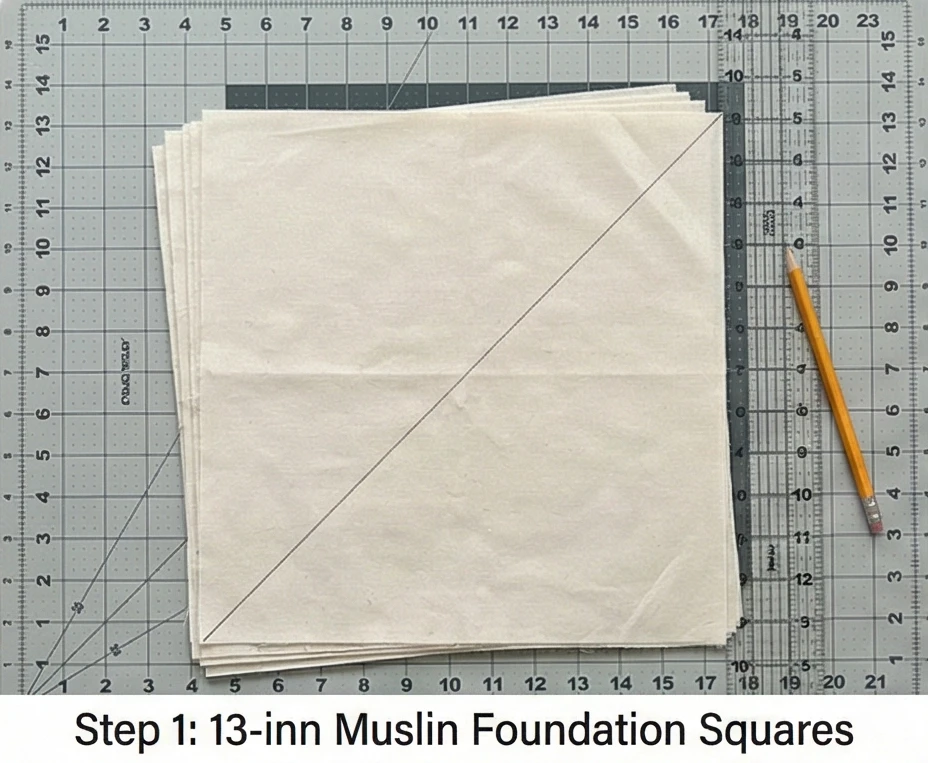
Step 1: Preparing the Foundations
We are building this block-by-block.
- Cut Foundation Squares: Cut your muslin/old sheet into squares measuring 13″ x 13″.
- Quantity: You need 14 squares (for a 2×7 layout) or 16 squares (for a longer drape).
- Mark Diagonal: Draw a diagonal line corner-to-corner on each muslin square. This is your guide to keep the strings oriented correctly.
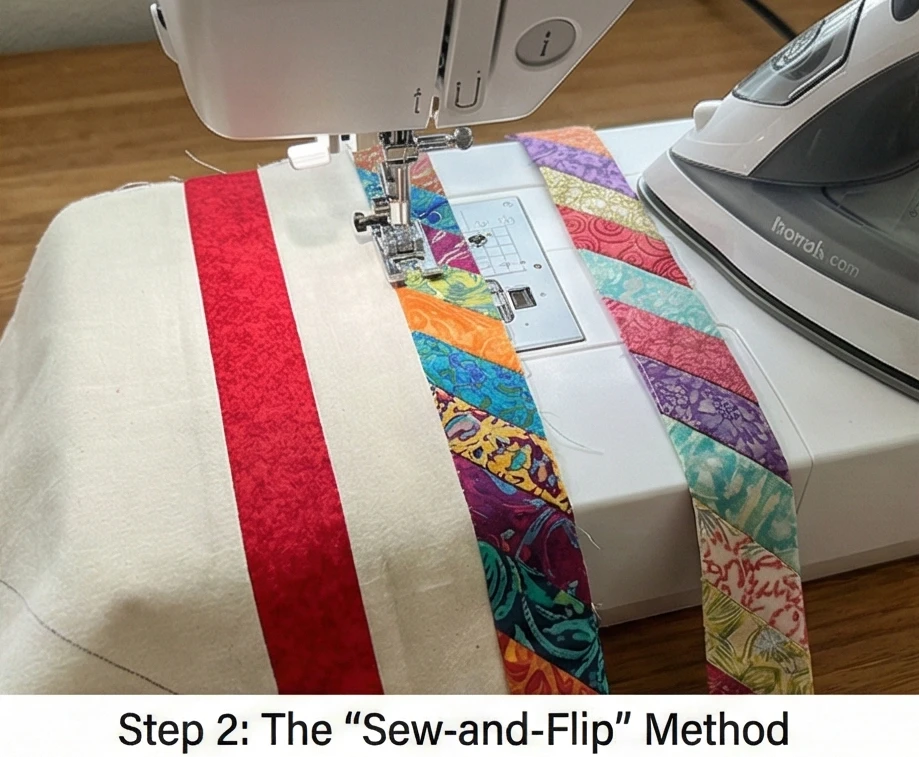
Step 2: The “Sew-and-Flip” Method
No measuring required!
- First Strip: Place your first strip (choose a bold color like Red or Gold) Right Side Up exactly centered over the diagonal line.
- Second Strip: Place a second strip Right Side Down on top of the first strip, aligning the raw edges on one side.
- Stitch: Sew a 1/4″ seam along the edge.
- Flip: Flip the second strip open and press it flat with your finger or an iron.
- Continue: Place a third strip Right Side Down on the raw edge of the second strip. Sew, flip, press. *
- Repeat: Continue adding strips outward in both directions until the entire muslin square is covered in fabric.
Step 3: Trimming the “Chaos”
Order from disorder.
- Flip Over: Flip your covered block so the muslin side is facing up. You will see the messy tails of the strips hanging over the edges.
- Trim: Use your square ruler to trim the block down to exactly 12.5″ x 12.5″, using the muslin square as your guide.
- Result: You now have a perfect square block composed of diagonal stripes.
Step 4: The Diamond Layout
Orientation changes everything.
- Layout: Arrange your blocks in 2 rows of 7.
- Rotate:
- Block 1: Stripes run Bottom-Left to Top-Right (/).
- Block 2: Stripes run Top-Left to Bottom-Right ().
- Effect: When placed side-by-side, the diagonal lines will meet to form large Diamonds or “V” shapes. This creates a visually striking “ikat” or “chevron” effect that looks intentional and high-end.

Step 5: Joining the “Rug”
- Sew Rows: Stitch the blocks together into two long rows.
- Tip: Use many pins where the diagonal seams meet to ensure the “V” points are sharp.
- Join Rows: Sew the top row to the bottom row.
- Press Open: Press the long center seam open to reduce the bulk (there are many layers of fabric here!).
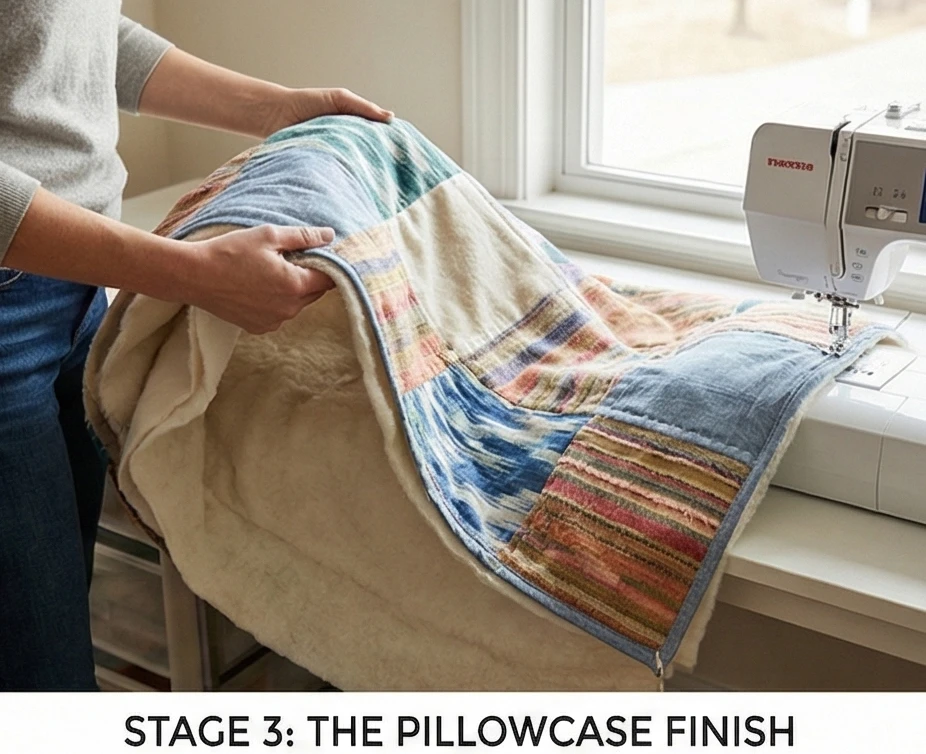
Step 6: The “Pillowcase” Finish (No Binding)
A relaxed runner doesn’t need a stiff binding.
- Layer: Place your Backing fabric Right Side Up on the floor. Place your Patchwork Top Right Side Down on top of it. (Right Sides Together).
- Note: If using batting, place it under the backing.
- Sew: Stitch around the entire perimeter, leaving a 10-inch gap on one side for turning.
- Turn: Turn the runner right side out through the gap. Poke out the corners with a chopstick.
- Topstitch: Press the edges crisp and topstitch 1/8″ around the entire runner, closing the gap as you sew.
- Ties (Optional): Instead of quilting, use heavy embroidery floss to tie simple knots in the center of each diamond.
Usability Note: String quilts are heavy. The foundation layer and the strips together form a dense fabric. This is excellent for a bed runner because the weight helps it stay in place at the foot of the bed and prevents it from sliding off when you kick your feet in your sleep.
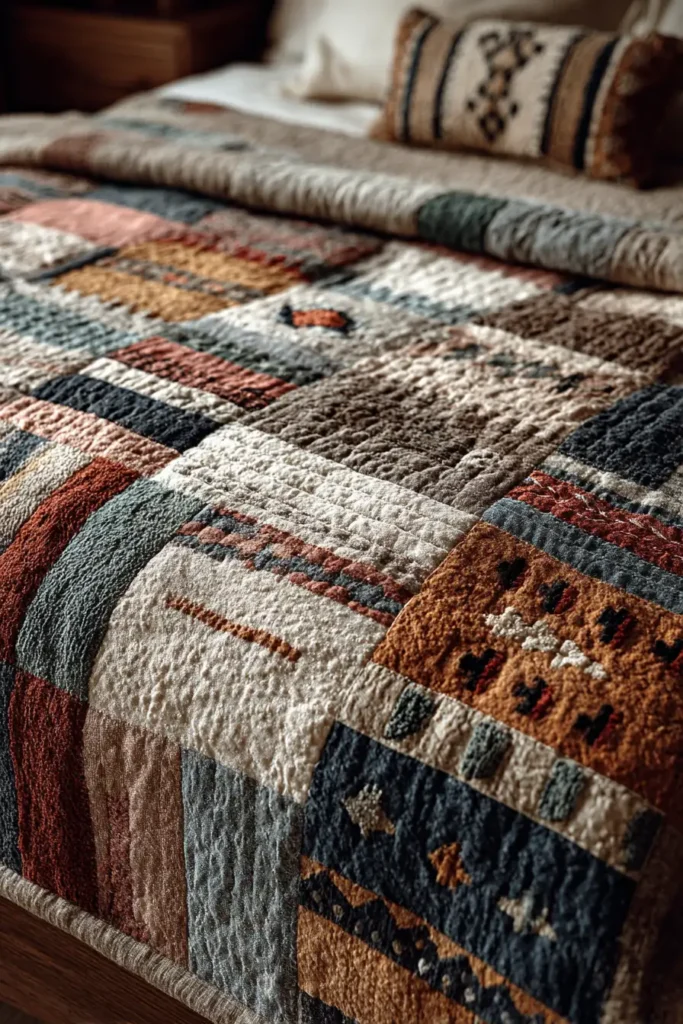
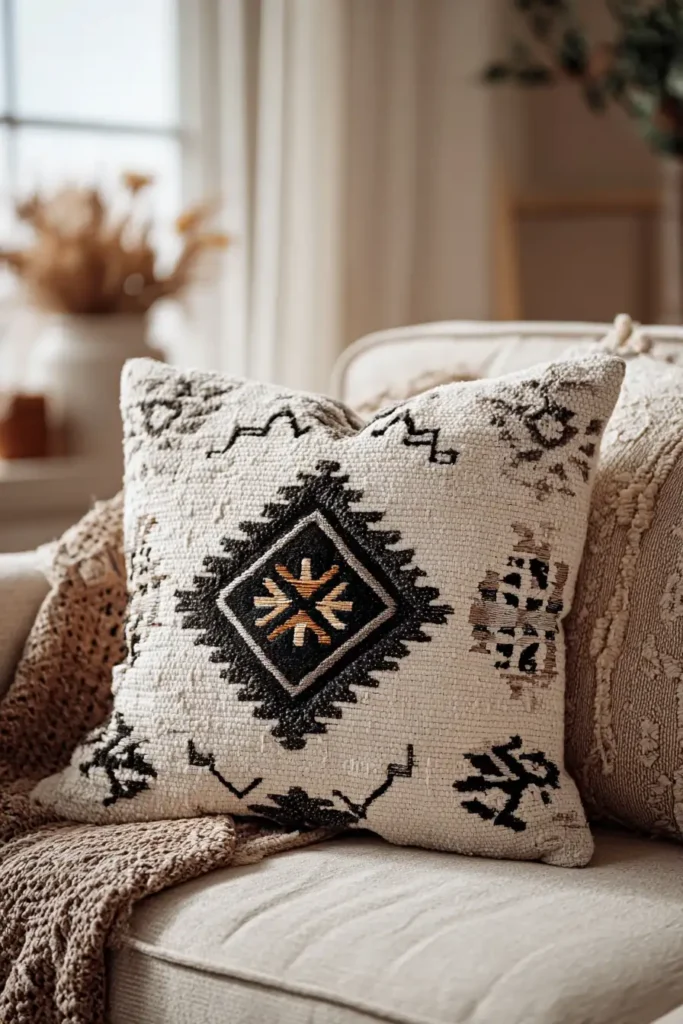
7. Tribal Mudcloth Inspired Quilt Designs for Bold Bedroom Decor
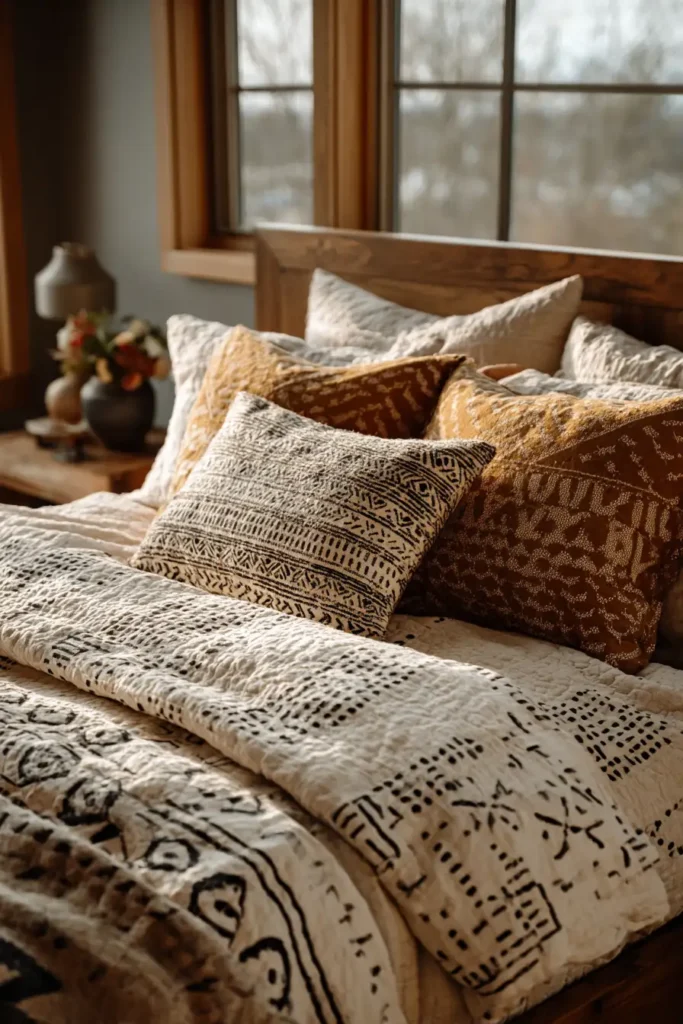
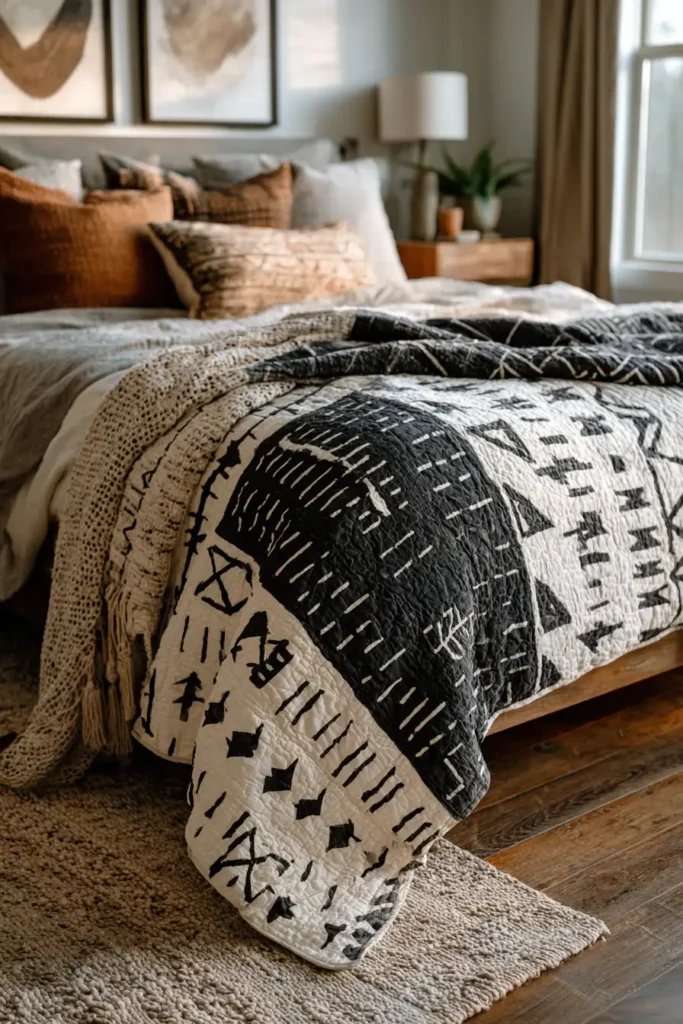
“The Sahel Arrow” Mudcloth Tribute Quilt
Authentic Mudcloth (or Bògòlanfini) is a handmade Malian cotton fabric traditionally dyed with fermented mud. It is known for its bold, high-contrast geometric symbols—arrows, zig-zags, and diamonds—that convey protection and status. “The Sahel Arrow” pattern captures this graphic energy using the classic Flying Geese block. By scaling the blocks up and arranging them in horizontal bands separated by negative space, we recreate the strip-woven look of the original textile. The result is a striking, monochromatic statement piece that anchors a boho room.
Finished Dimensions: Queen Bed Size, 90″ x 90″.
Materials Needed:
- Fabric A (The Background/Mud): 6 yards of Solid Black, Charcoal, or Rust (use a textured solid like Linen or Shot Cotton for authenticity).
- Fabric B (The Motifs/Bleach): 3 yards of Natural Unbleached Muslin or Cream.
- Backing: 8.5 yards of a simple geometric print or solid black.
- Batting: Low-loft Cotton (traditional mudcloth is heavy but thin, not puffy).
- Notions: Rotary cutter, 6×12″ ruler, white marking pencil.
Cultural Backstory: The Bamana people of Mali developed the technique of dyeing cloth with iron-rich river mud over centuries. The symbols are not random; they are a language. The “Chevron” or arrow often represents the path of a hero or the backbone of a fish. Using high-contrast black and white in a bedroom creates a “grounding” effect, visually weighting the space.
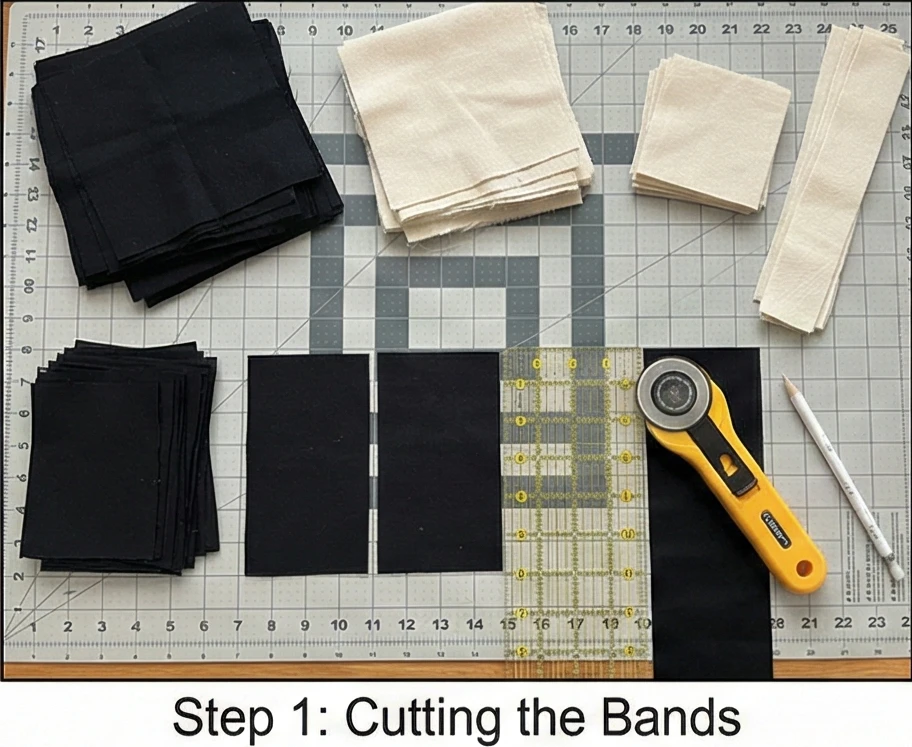
Step 1: Cutting the Bands
Mudcloth is traditionally made of narrow woven strips sewn together. We will mimic this by building the quilt in horizontal rows.
- The Geese (Arrows):
- Cut 40 rectangles of Fabric A (Black) measuring 4.5″ x 8.5″.
- Cut 80 squares of Fabric B (Cream) measuring 4.5″ x 4.5″.
- The Spacer Strips:
- Cut 10 strips of Fabric A (Black) measuring 8.5″ x width of fabric (WOF).
- Cut 5 strips of Fabric B (Cream) measuring 2.5″ x WOF (for accent lines).
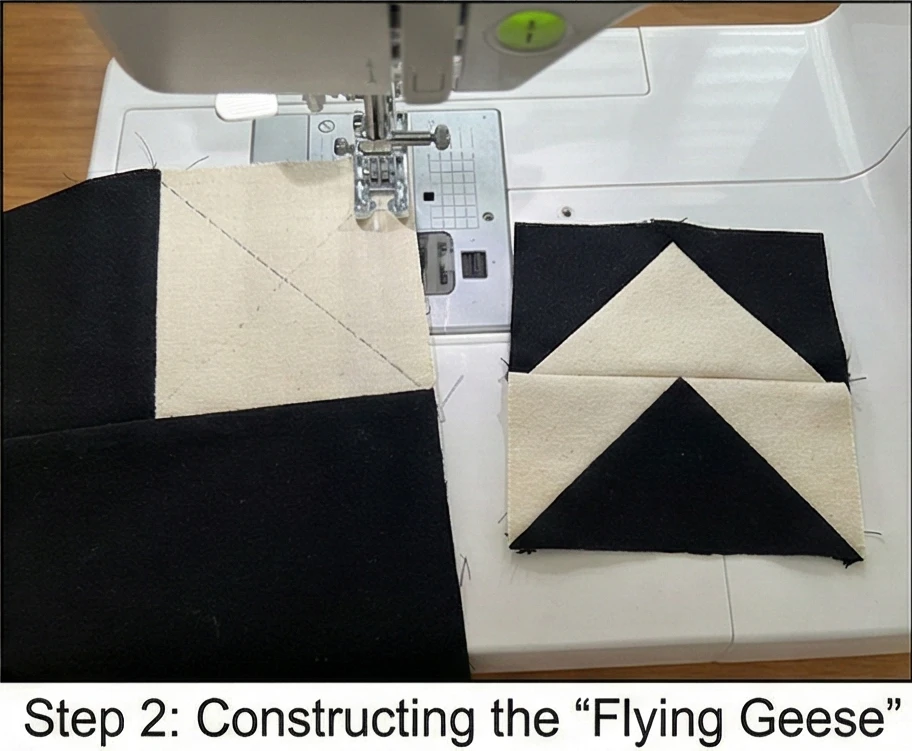
Step 2: Constructing the “Flying Geese”
This creates the iconic arrowhead shape.
- Mark: Draw a diagonal line on the back of every Cream square.
- Sew Side 1:
- Place a Cream square on the left side of a Black rectangle (Right Sides Together).
- Sew on the diagonal line. Trim the excess corner fabric, leaving a 1/4″ seam. Press the Cream triangle open.
- Sew Side 2:
- Place another Cream square on the right side of the Black rectangle.
- Sew on the diagonal line. Trim and press open.
- Result: You have a Black rectangle with a large Cream “V” or arrow in the middle.
- Size: Trim to exactly 4.5″ x 8.5″. Make 40 units.
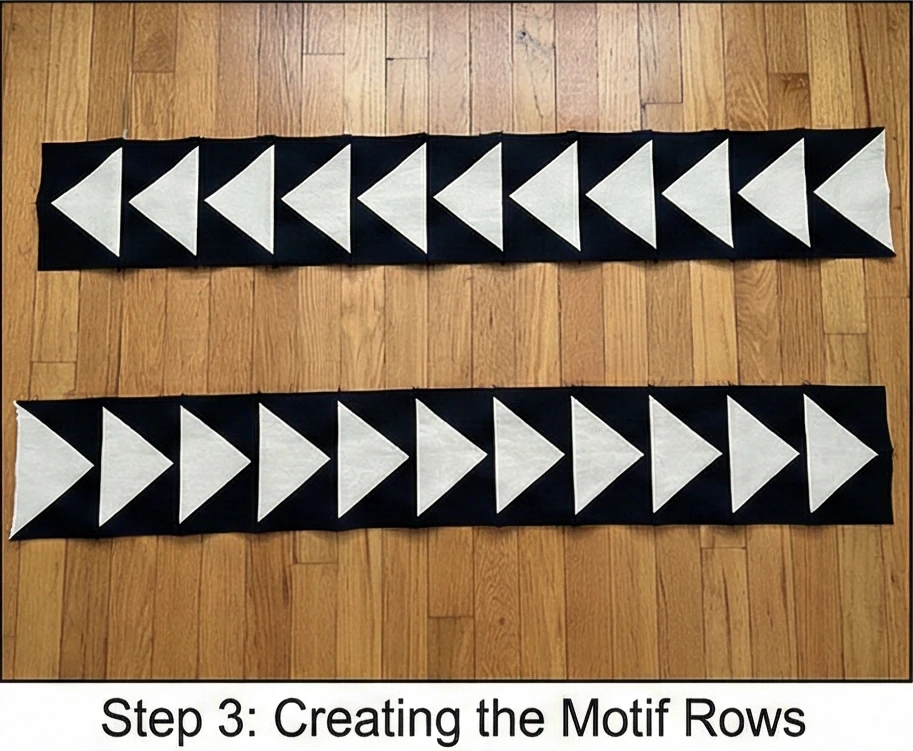
Step 3: Creating the Motif Rows
We want bands of arrows pointing in different directions.
- Row A (The Eastward Path): Sew 10 Flying Geese together side-by-side, creating a long horizontal strip.
- Row B (The Westward Path): Sew 10 Flying Geese together, but rotate them 180 degrees so the arrows point the other way.
- Variation: You can also stack them vertically to make columns, but horizontal bands are more traditional to the weaving style.
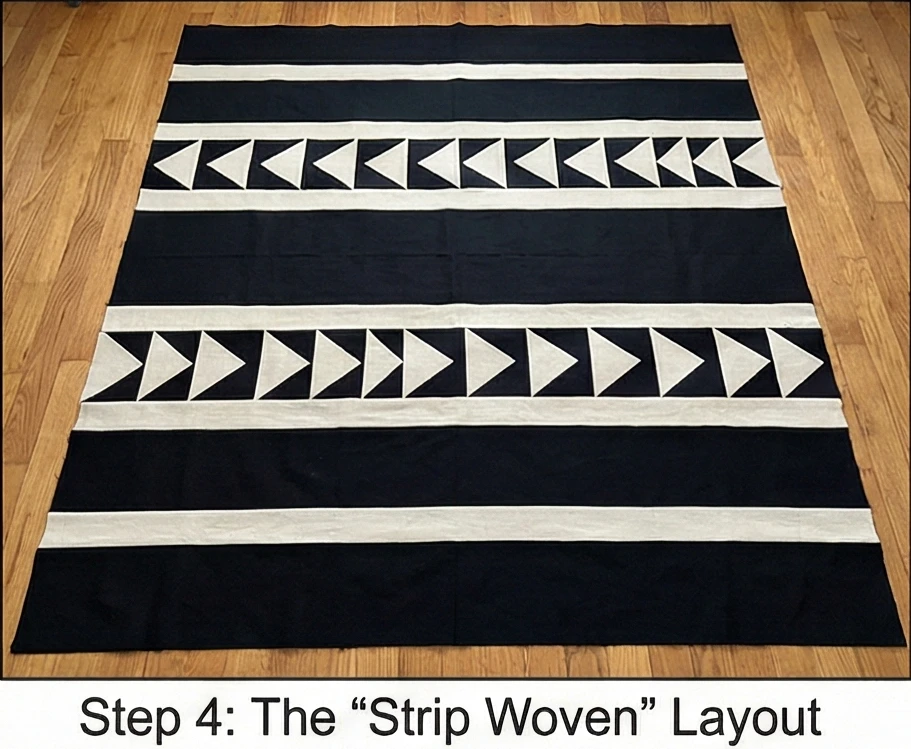
Step 4: The “Strip Woven” Layout
Recreating the rhythm of the loom.
- Assembly: Arrange your quilt in horizontal sections on the floor:
- Section 1: A wide band of Solid Black (approx 10″).
- Section 2: A thin accent strip of Solid Cream (2″).
- Section 3: A row of Flying Geese (Arrows).
- Section 4: Another wide band of Solid Black.
- Section 5: A row of Flying Geese pointing in the opposite direction.
- Repeat: Continue this pattern until the quilt reaches 90 inches long.
- Tip: Mudcloth is rarely perfectly symmetrical. Feel free to make one black section wider than another.
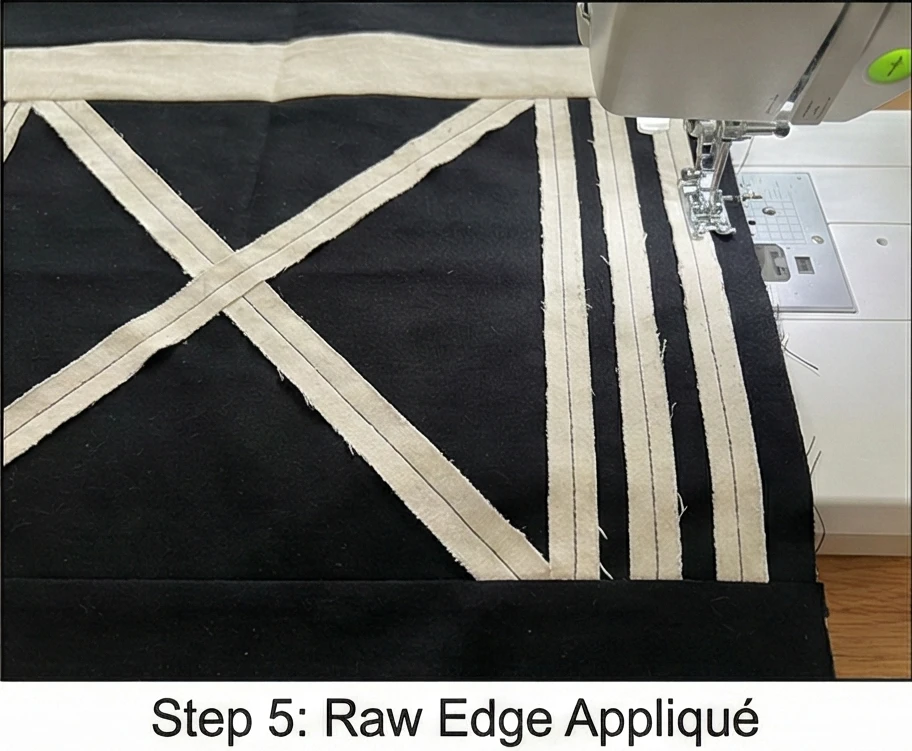
Step 5: Raw Edge Appliqué (Optional Texture)
Authentic mudcloth has hand-painted lines.
- Cut: Cut thin strips of Cream fabric (1 inch wide).
- Apply: Lay these strips randomly on the wide Black sections to form “X” shapes or parallel lines (|||).
- Stitch: Sew straight down the middle of these strips. Leave the edges raw. Over time, they will fray, mimicking the fuzzy texture of hand-spun cotton.
Step 6: “Sashiko” Contrast Quilting
The quilting stitch acts as the final design element.
- Thread: Use a thick White or Cream thread (Perle Cotton #8) against the Black fabric.
- Design: Stitch vertical straight lines through the entire quilt, perpendicular to the horizontal bands.
- Why: This cross-hatching mimics the warp and weft of woven fabric.
- Density: Space lines about 1 inch apart. The high contrast between the white thread and the black fabric makes the quilting stand out, turning simple stitches into a decorative feature.
Usability Note: Black fabric (especially cotton solids) attracts lint like a magnet. To keep this quilt looking elegant, keep a lint roller nearby, or choose Charcoal Grey or Textured Linen instead of flat black, as the texture hides dust and pet hair more effectively.
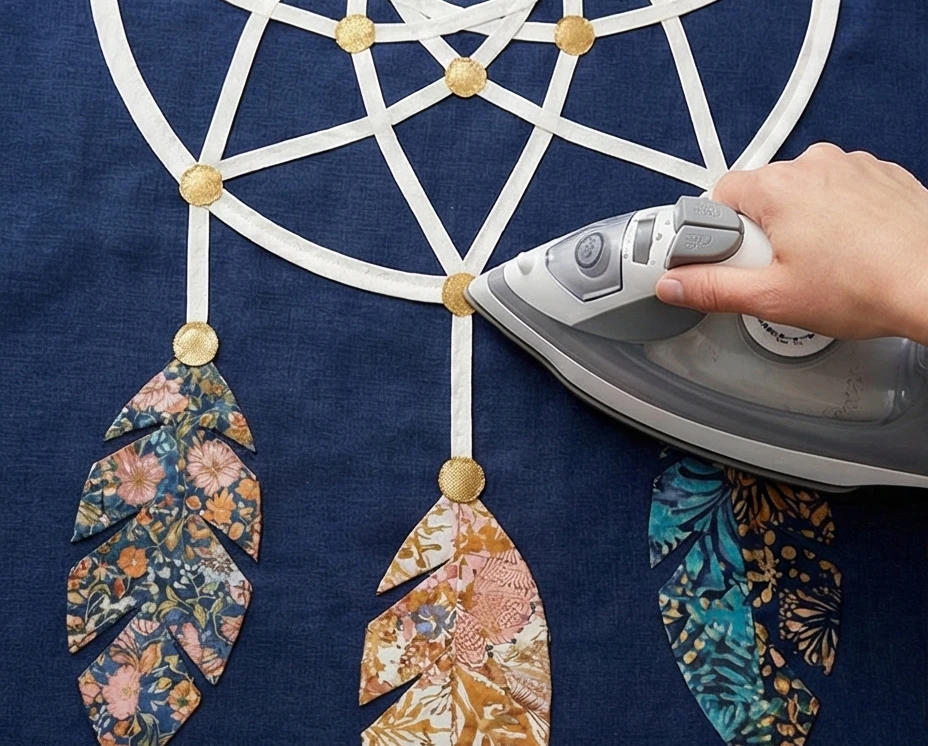
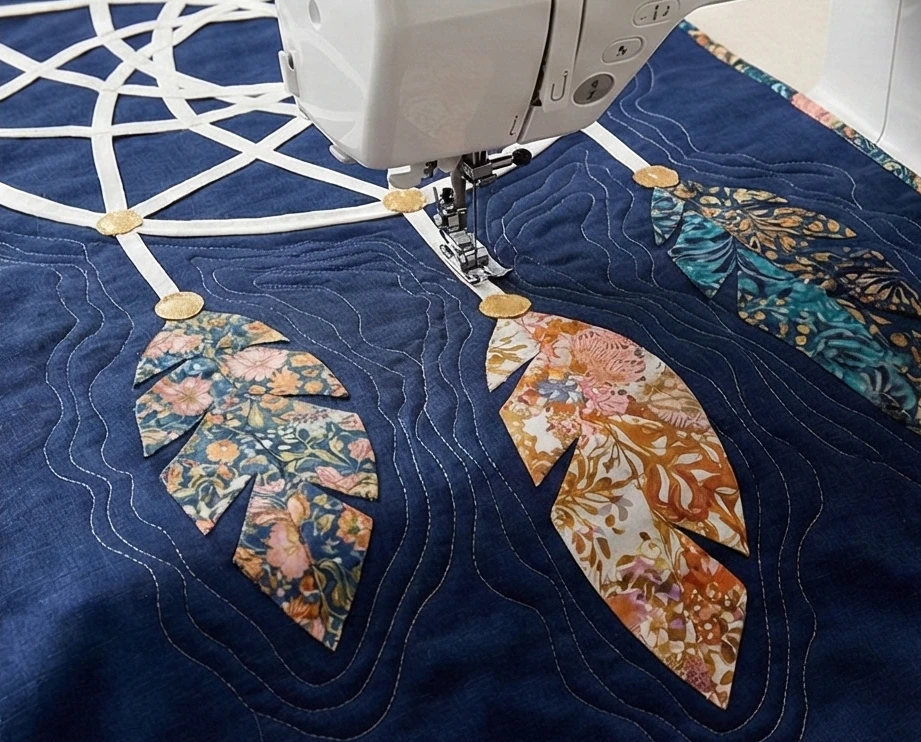
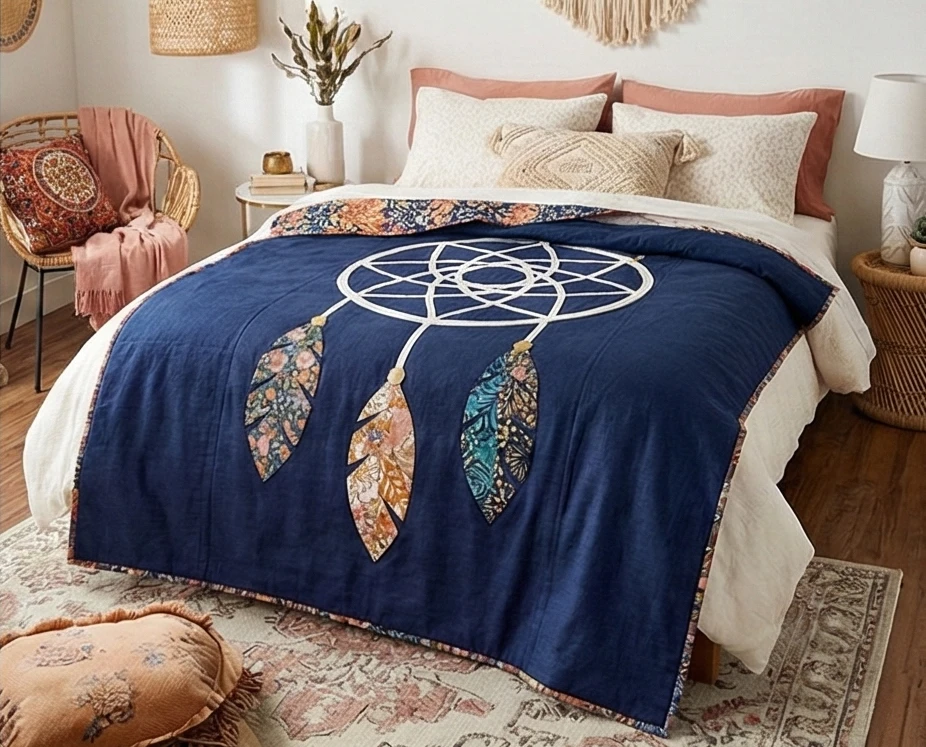
8. Dreamcatcher Motif Quilt Patterns for Whimsical Sleep
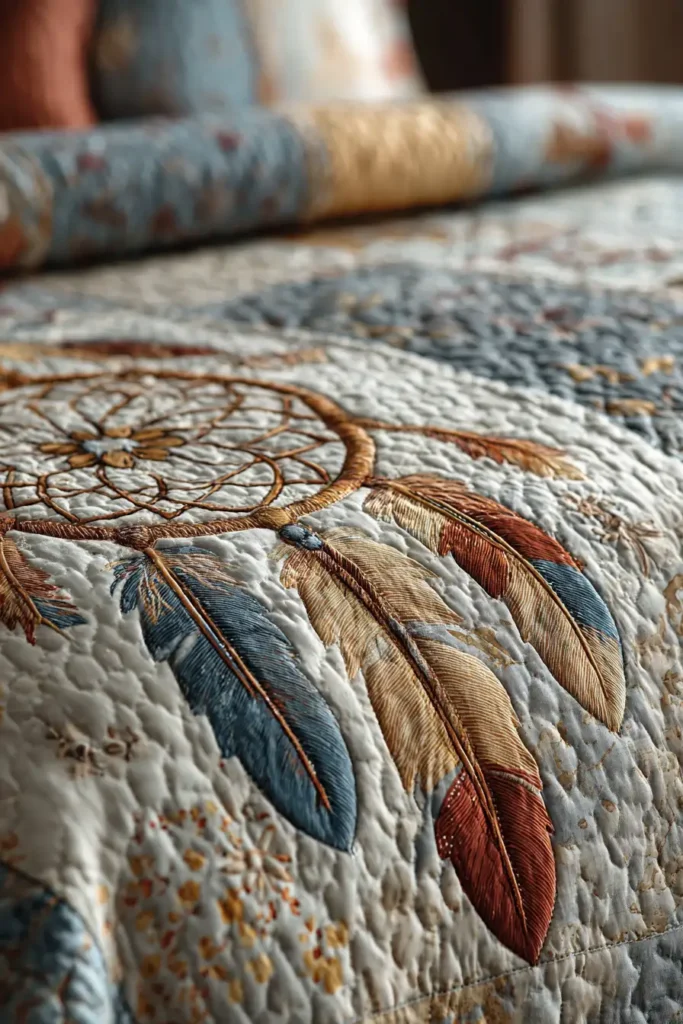
“The Night Weaver” Dreamcatcher Appliqué Quilt
In Ojibwe tradition, the dreamcatcher (asabikeshiinh) filters dreams, allowing only the good ones to pass through the center hole to the sleeper while trapping bad dreams in the web to be destroyed by the morning sun. “The Night Weaver” interprets this protective symbol as a soft, giant appliqué set against a “sky” of Midnight Blue or Blush Pink. Instead of using scratchy beads or real feathers (which aren’t practical for bedding), we use Bias Tape to create the web and Soft Fabric Appliqué for the feathers, ensuring the quilt remains smooth and washable.
Finished Dimensions: Twin/Full Bed Cover, 70″ x 90″.
Materials Needed:
- Fabric A (The Sky/Background): 5 yards of Navy Blue, Sage, or Blush Linen.
- Fabric B (The Web): 1 roll of 1/4″ Bias Tape (White, Gold, or Silver) OR 1/2 yard of fabric to make your own bias strips.
- Fabric Group C (Feathers): Scraps of 5-6 different boho prints (florals, batiks).
- Fabric D (Beads): Small scraps of Metallic Gold or Turquoise.
- Fusible Web: 2 yards of paper-backed fusible web (e.g., HeatnBond Lite).
- Notions: A piece of string and a pencil (compass), a water-soluble glue stick.
Cultural Backstory: Originally made by the Ojibwe people using willow hoops and sinew, the dreamcatcher became a pan-Native American symbol during the 1960s and 70s. In the boho aesthetic, it represents a connection to the spiritual world and a desire for peace. Placing this symbol on a bed quilt is a literal interpretation of its original purpose: to protect sleep.
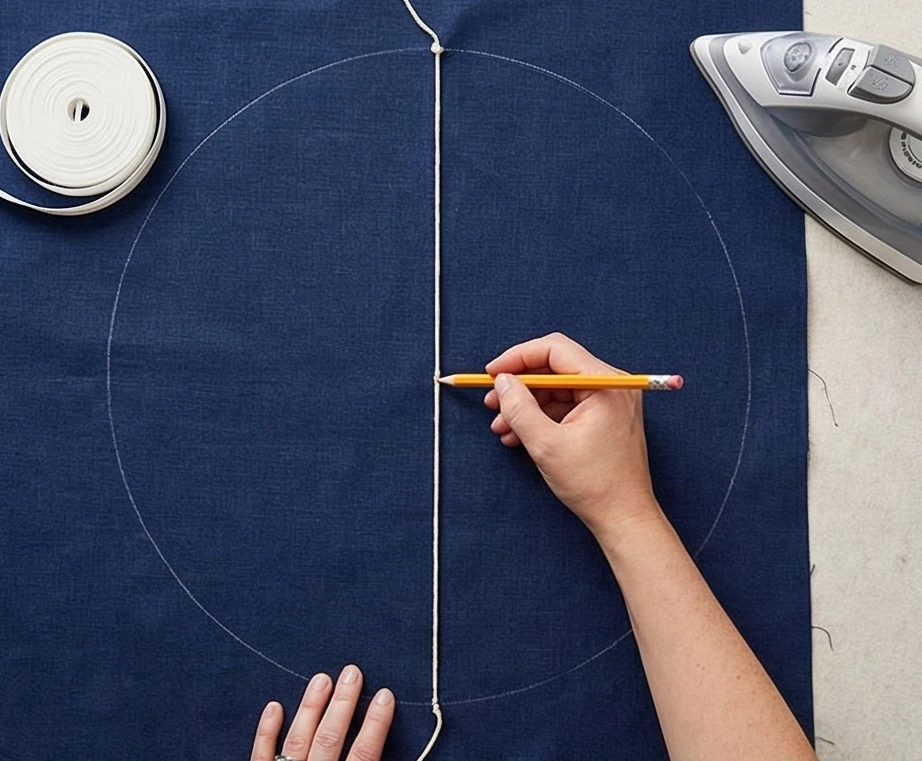
Step 1: Creating the “Hoop”
The foundation of the design.
- Prepare Background: Piece your background fabric to create a panel roughly 70″ x 90″. Fold it in quarters to find the upper-middle center point.
- Draw the Circle: Tie a string to a pencil. Pin the string end to the center point (about 20 inches down from the top edge). Extend the pencil 15 inches and draw a large circle (30-inch diameter) directly onto the fabric.
- Apply Bias Tape:
- Take your Bias Tape and press it into a curve using a steam iron.
- Lay the tape over your drawn pencil line.
- Stitch: Edgestitch along both sides of the tape to secure the “Hoop.”
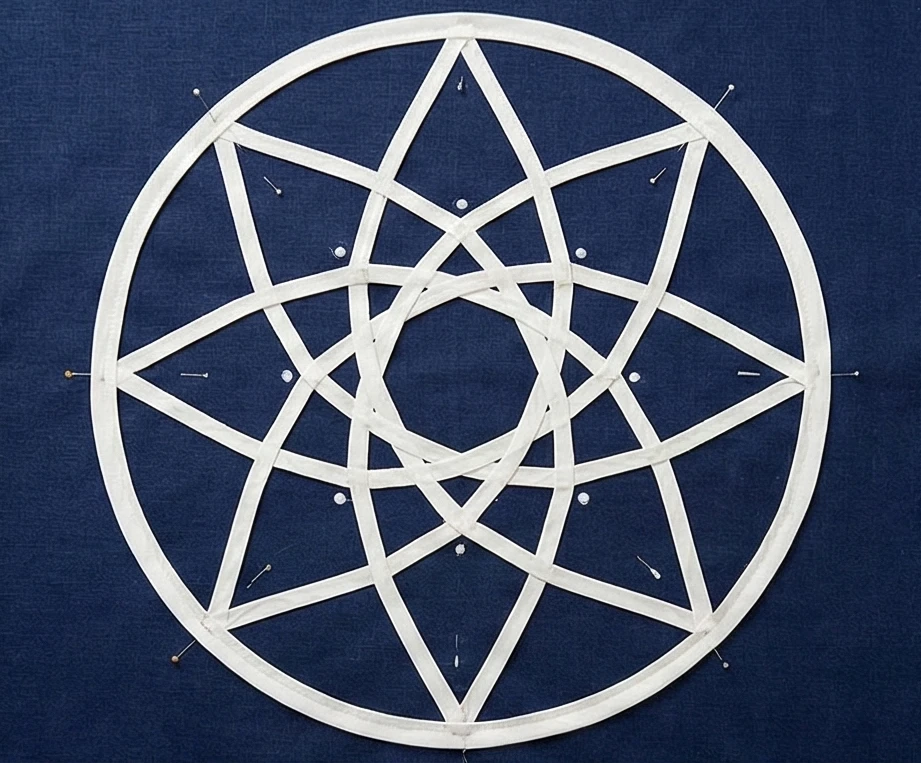
Step 2: Weaving the “Web”
Geometric geometry made simple.
- Mark Points: Mark 8 or 12 evenly spaced points around the hoop (like a clock face).
- Layer 1 (The Hexagon): Lay strips of bias tape connecting these points (e.g., 12 to 2, 2 to 4, etc.) to create a polygon shape inside the hoop. Glue them in place.
- Layer 2 (The Inner Star): Lay a second set of strips connecting the midpoints of the first layer of strips.
- Visual: The strips should crisscross to form a star or spiderweb pattern.
- Center Hole: Leave a small open space in the absolute center (the passage for good dreams).
- Sew: Topstitch all the straight web strips down.
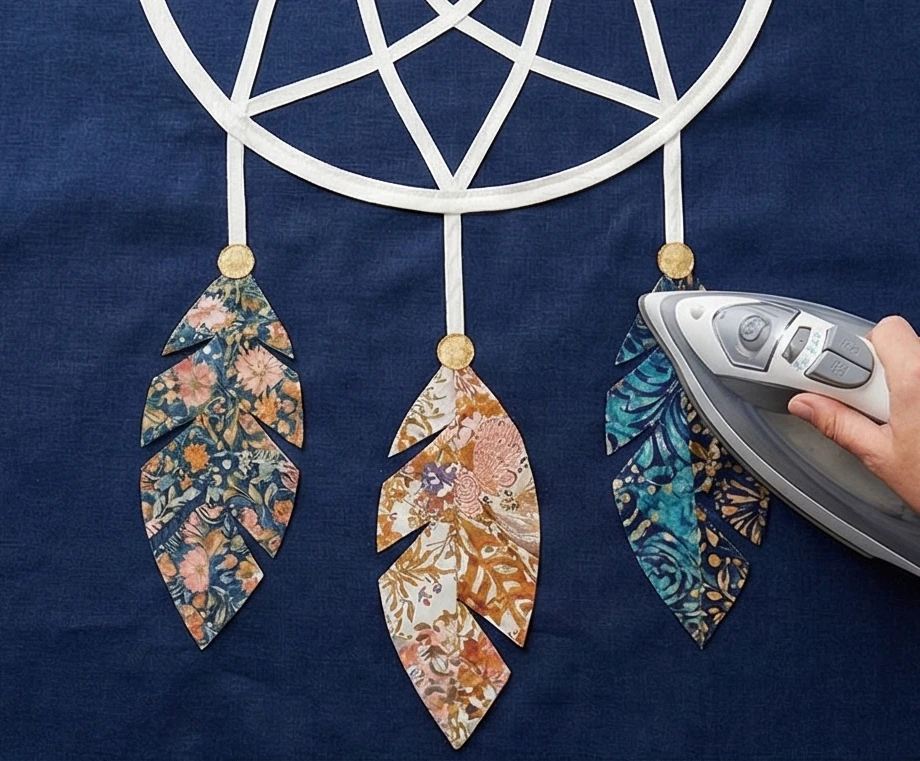
Step 3: The “Feathers” (Soft Appliqué)
Feathers represent breath or air.
- Trace: Draw large, leaf-shaped feather outlines (approx. 10-12 inches long) onto the paper side of your Fusible Web. Make 3 or 5 feathers.
- Fuse: Iron the fusible web onto the wrong side of your Fabric C scraps. Cut out the feather shapes.
- Place: Peel off the paper backing. Arrange the feathers hanging from the bottom of the hoop.
- Design: Have them hang at different lengths. You can use bias tape to create the “strings” connecting the feathers to the hoop.
- Iron: Press them in place to fuse them to the background.
Step 4: The “Beads” (Metallic Pops)
Adding sparkle without the lumpiness of real beads.
- Cut Circles: Cut small circles (1 inch diameter) from your Metallic Gold fabric using fusible web (same method as feathers).
- Place: Iron these gold dots at the points where the “strings” meet the feathers, or scattered within the web.
- Stitch: Use a dense Satin Stitch (tight zig-zag) or a Blanket Stitch around the edges of the feathers and beads to secure them permanently.
Step 5: “Wind” Quilting
Enhance the airy theme.
- Baste: Sandwich the quilt layers.
- Quilt: Do not quilt over the appliqué shapes (or just outline them).
- Background: Quilt swirling, wavy lines that look like wind blowing through the feathers.
- Inside the Web: Quilt simple straight lines following the web pattern to reinforce the geometry.
Step 6: The Binding
- Choice: Choose a binding that contrasts with the background sky—perhaps the same color as the feathers to tie the design together.
- Attach: Bind using standard double-fold binding.
Usability Note: While real dreamcatchers often have hanging leather strips and real feathers, avoid adding 3D elements to a bed quilt. Strings can wrap around toes, and real feathers will get crushed or ruined in the wash. This appliqué method captures the look while keeping the quilt soft, safe, and durable.
9. Macramé Inspired Quilted Pillow Shams for Texture
“The Weaver’s Knot” Faux-Macramé Couching Sham
Macramé—the art of knotting cord—is the defining texture of the Boho aesthetic. However, sleeping on actual hard knots is uncomfortable. “The Weaver’s Knot” sham captures the look of a macramé wall hanging but keeps it soft enough for a bed. We achieve this using a technique called Couching. By zigzagging thick cotton cord onto a linen background in geometric diamond patterns, we mimic the “ropes” of macramé without the bulk. Finished with heavy side fringe, it transforms a plain pillow into a textual masterpiece.
Finished Dimensions: Standard Pillow Sham, 20″ x 26″ (plus fringe).
Materials Needed:
- Fabric A (Background): 1 yard of Natural Linen, Canvas, or Oatmeal Cotton. (Texture is key here; avoid smooth broadcloth).
- The “Rope”: 10 yards of 3/16″ Cotton Clothesline or Chunky Macramé Cord (Natural/Cream color).
- The Fringe: 2 yards of Cotton Bullion Fringe or extra cord to make your own.
- Backing: 1 yard of matching cotton.
- Batting: Thin cotton batting (to give the couching some loft).
- Notions: Water-soluble marking pen, zigzag foot for sewing machine, matching or clear monofilament thread.
Cultural Backstory: Macramé originated with 13th-century Arabic weavers (migramah means “fringe”) but gained popularity in the 1970s. It represented a shift away from mass-produced plastics toward handmade natural fibers. Today, it is the anchor of the “Jungalow” or modern boho style, bringing vertical texture to flat walls and beds.
Step 1: Marking the “Diamond” Grid
Macramé usually follows a diamond lattice pattern.
- Cut Top: Cut your background linen to 22″ x 28″ (slightly larger than finished size to account for shrinkage from quilting).
- Mark Center: Find the center of the panel.
- Draw Grid: Using a ruler and soluble pen, draw a large diamond grid across the fabric.
- Scale: Draw diagonal lines spaced 3 inches apart in both directions.
- Result: You should have a lattice of diamonds covering the entire sham front.
Step 2: Couching the Cord (The “Rope” Look)
Couching is the process of sewing a cord into fabric.
- Setup: Install your Zigzag Foot. Set stitch width to 4.0mm (wide enough to span the cord) and length to 2.5mm.
- Placement: Lay your chunky cord along the first marked diagonal line.
- Tip: Leave 1 inch of cord hanging off the edge of the fabric.
- Stitch: Sew over the cord. The needle should jump left and right, trapping the cord against the fabric. Use a thread that matches the cord perfectly to make the stitches invisible.
- Repeat: Couch cord along every marked line in one direction first.

Step 3: The Intersections (The “Knots”)
Real macramé has knots where ropes cross. We need to mimic this.
- Cross Over: Now, couch the cord in the opposite direction to complete the diamonds.
- The Bump: When you reach an intersection where a new cord crosses an existing cord, stitch over it slowly. The bulk of the two crossing cords creates a natural “bump” that looks exactly like a knot.
- Optional Detail: For added texture, stop at each intersection and tie a small piece of cord into a square knot by hand, stitching it down securely.
Step 4: Adding the “Bobbles” (Texture)
Macramé often has a popcorn-like texture.
- Hand Embellish: Thread a needle with the same chunky cord or thick yarn.
- French Knots: In the center of every diamond (the empty space between ropes), sew a large French Knot or stitch a wooden bead.
- Effect: This fills the negative space and adds that tactile, bumpy quality associated with vintage macramé.
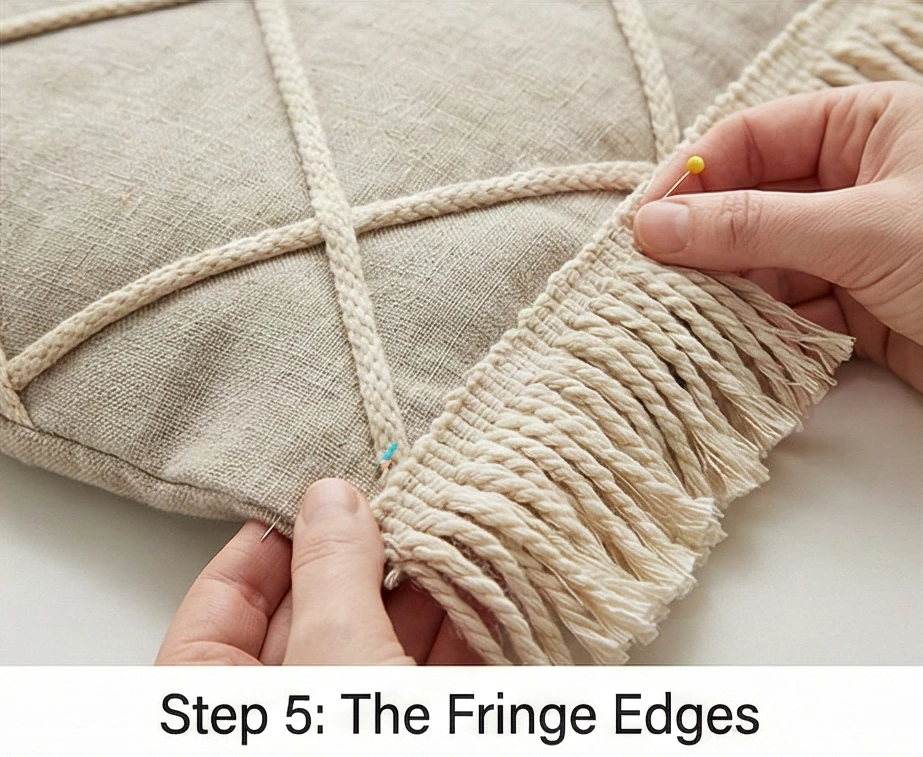
Step 5: The Fringe Edges
It isn’t boho without fringe.
- Trim: Trim the quilted top down to exactly 20.5″ x 26.5″.
- Baste Fringe: Pin your heavy Bullion Fringe or loose macramé cords to the side edges (the short 20″ sides) of the sham top, facing inward.
- Secure: Baste them in place with a 1/8″ seam.
- Why Sides? Putting fringe on the top/bottom can tickle your neck while sleeping. Side fringe is purely decorative.
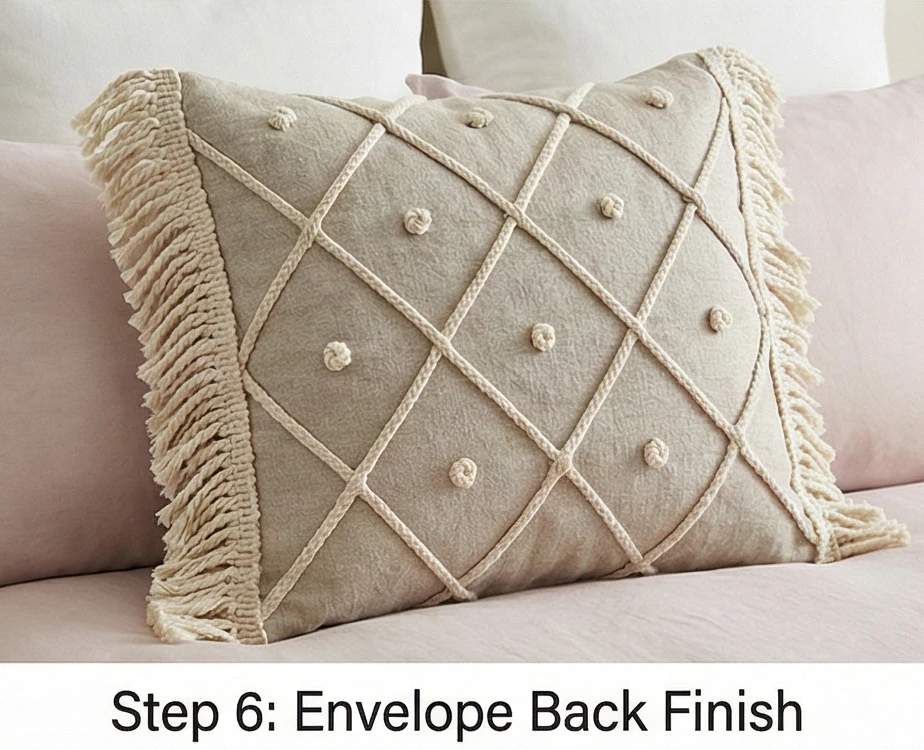
Step 6: Envelope Back Finish
- Cut Backing: Cut two pieces of backing fabric: 20.5″ x 20″ and 20.5″ x 14″.
- Hem: Hem one long edge of each backing piece.
- Assemble:
- Place the quilted top right side up.
- Place the backing pieces right-side down, overlapping the hemmed edges in the middle.
- Sandwich: The fringe should be sandwiched inside.
- Sew: Stitch around the entire perimeter with a 1/2 inch seam. Backstitch over the thick fringe areas.
- Turn: Turn right side out through the envelope opening. Push out corners.
- Result: The ropes pop, the fringe hangs loose, and you have the vibe of a hanging planter in pillow form.
Usability Note: Use 100% Cotton Cord for the couching. Polyester or nylon cord can be scratchy against the face and may melt when ironed. Cotton is soft, washable, and ages beautifully.
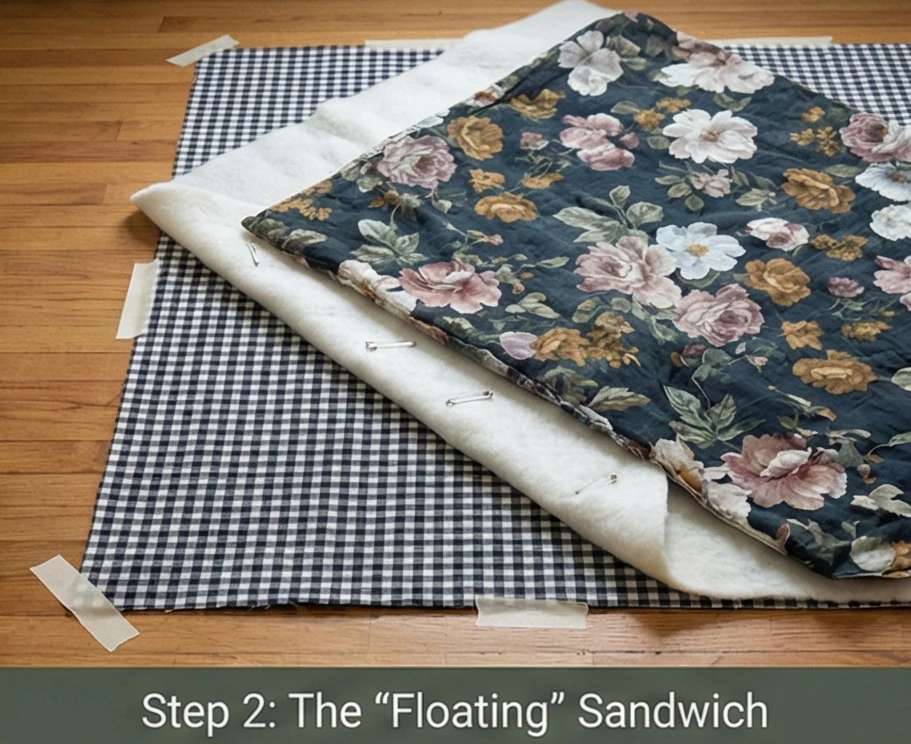
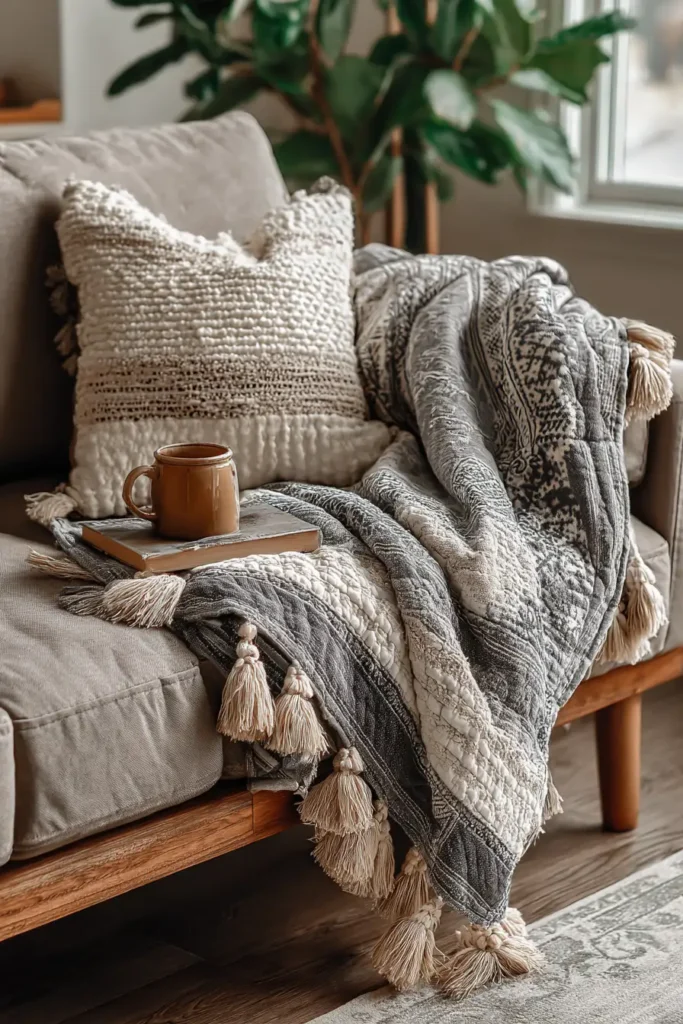
10. Reversible Boho Floral Quilt Designs for Versatile Bedding
“The Garden & The Grid” Reversible Tied Quilt
True Bohemian style embraces contradictions: vintage yet modern, busy yet calm. “The Garden & The Grid” quilt offers maximum versatility by pairing a Maximalist Floral on the front with a structured Gingham or Stripe on the back. Instead of stiff machine quilting, this project uses the retro technique of Hand Tying (or tufting). This leaves the batting lofty and airy, creating a “cloud-like” duvet feel that is effortlessly elegant and reversible depending on your mood.
Finished Dimensions: Large Lounge Throw, 60″ x 70″.
Materials Needed:
- Side A (The Garden): 2 yards of Wide-Width Voile or Art Gallery Rayon in a large-scale, moody floral print. (Using wide fabric avoids seams interrupting the print).
- Side B (The Grid): 2 yards of Woven Gingham, Buffalo Check, or Ticking Stripe (Linen or Cotton).
- Batting: Bamboo or Silk Blend.
- Why: You want a drape. Standard polyester is too stiff. Bamboo puddles beautifully.
- Ties: 1 skein of Perle Cotton #8 or Embroidery Floss in a high-contrast color (e.g., Mustard Yellow or Neon Pink).
- Needle: Chenille or Tapestry needle (sharp point, large eye).
- Binding: 1/2 yard of a solid color that matches both sides.
Cultural Backstory: In the 1940s and 50s, “Utility Quilts” or “Summer Spreads” were often tied rather than quilted because it was faster and didn’t require a sewing machine. In the Boho revival, this technique has returned as a style choice. The visible little tufts of thread add a tactile, handmade quality that machine stitching simply cannot replicate.
Step 1: Preparing the “Wholecloth” Canvas
We are letting the fabric print do the work.
- Wash & Press: Pre-washing is non-negotiable here because Voile and Linen shrink at different rates. Wash on hot, dry on hot.
- Square Up: Lay both Side A (Floral) and Side B (Grid) flat. Trim them to exactly 62″ x 72″.
- Seaming: If your fabric isn’t wide enough, sew two lengths together. Try to pattern-match the floral print so the seam disappears.

Step 2: The “Floating” Sandwich
Tied quilts need less basting than machine quilts.
- Layer:
- Lay Side B (Grid) face down. Tape edges to the floor.
- Lay Batting on top. Smooth gently.
- Lay Side A (Floral) face up.
- Pin: Use safety pins to baste the three layers together. You only need to pin every 8-10 inches since we aren’t wrestling it through a machine.
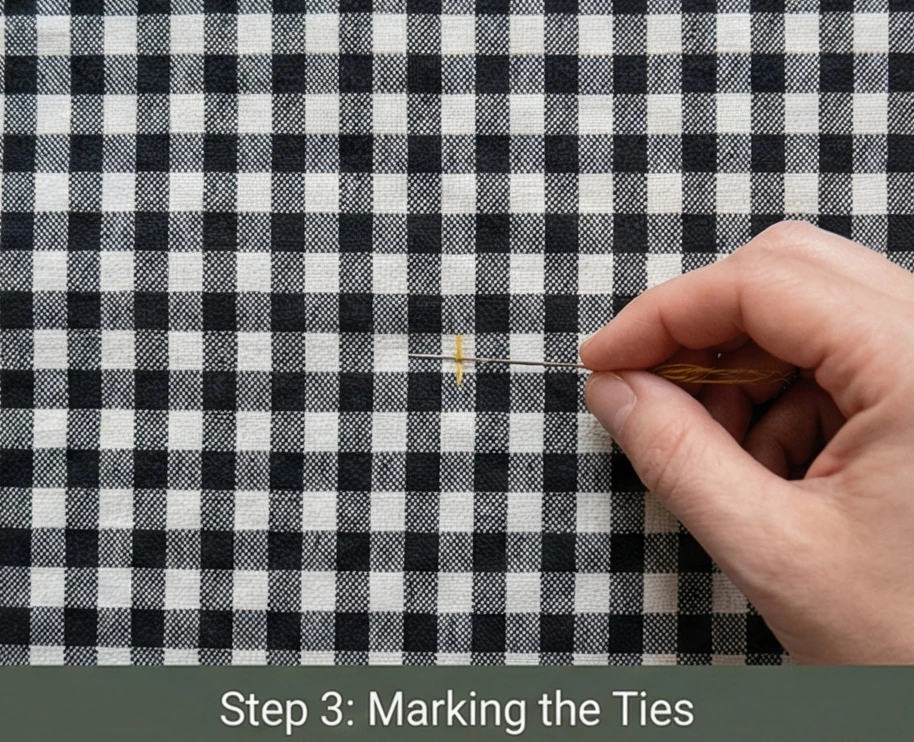
Step 3: Marking the Ties (The Grid Method)
The back of the quilt tells you where to sew.
- Flip: Turn the quilt sandwich over so the Gingham/Grid (Side B) is facing up.
- Use the Pattern: You don’t need to mark dots! Use the checks in the fabric as your guide.
- Plan: Place a tie every 4 to 5 inches. (e.g., “Every 4th black square”).
- Visual: This ensures your ties are perfectly spaced without measuring.
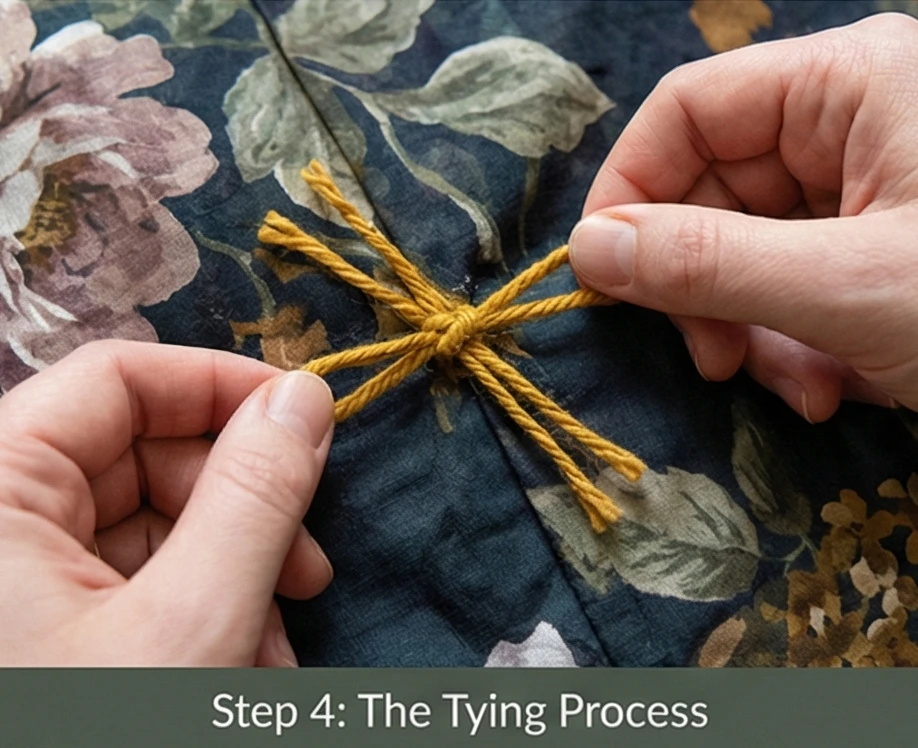
Step 4: The Tying Process (The Meditation)
This is the “slow craft” part.
- Thread Up: Cut a long strand of embroidery floss (don’t separate the strands; use all 6). Thread your needle.
- Stitch:
- Insert the needle from the Top (Floral) down through to the back.
- Bring it back up about 1/4 inch away.
- Tip: Do not cut the thread yet. Leave a 2-inch tail.
- Tie: Tie the two ends (the tail and the working thread) into a Square Knot (Right over Left, Left over Right). *
- Tightness: Pull tight enough to snug the layers, but not so tight that the fabric puckers.
- Trim: Trim the tails to 1/2 inch.
- Repeat: Work your way across the quilt grid.
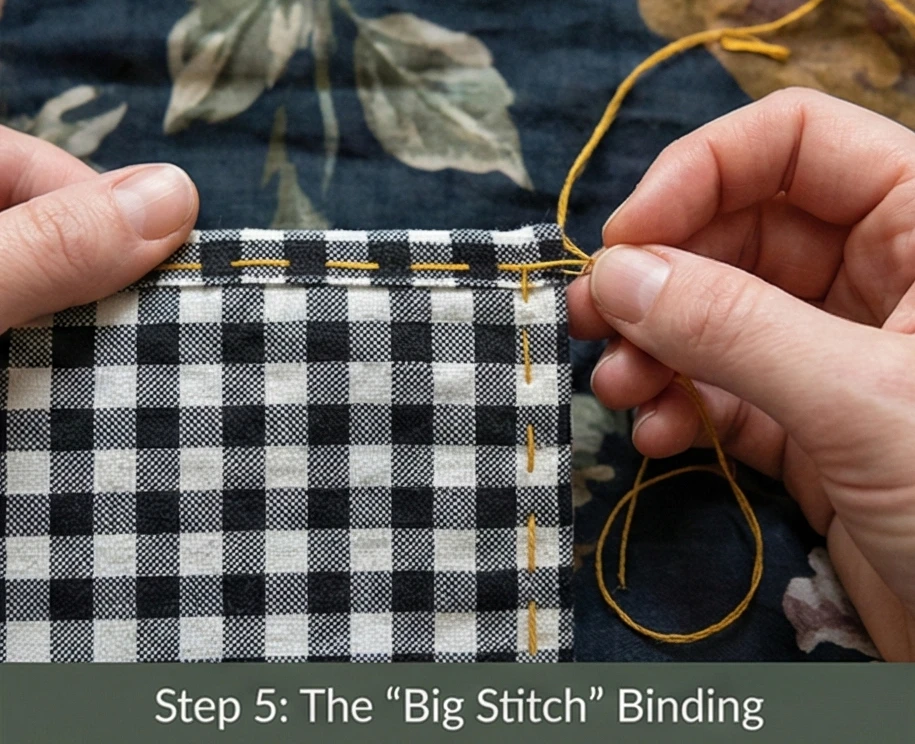
Step 5: The “Big Stitch” Binding
A visible binding enhances the bohemian charm.
- Trim: Trim the batting and backing even with the top.
- Make Binding: Cut 2.5-inch strips of your binding fabric. Iron in half.
- Attach: Sew the binding to the Floral Side by machine.
- Finish: Fold the binding over to the Grid Side. Instead of machine stitching or invisible hand stitching, use your Perle Cotton thread to hand-sew the binding down with large, visible running stitches.
- Aesthetic: This chunky stitching on the edge mirrors the ties in the center.
Step 6: The “Fluff” Cycle
Washing sets the ties.
- Wash: Wash the finished quilt on cold.
- Dry: Tumble dry.
- Result: The fabric will crinkle around the ties, creating a luscious, textured surface that looks like a cloud. The ties will “bloom” slightly at the ends.
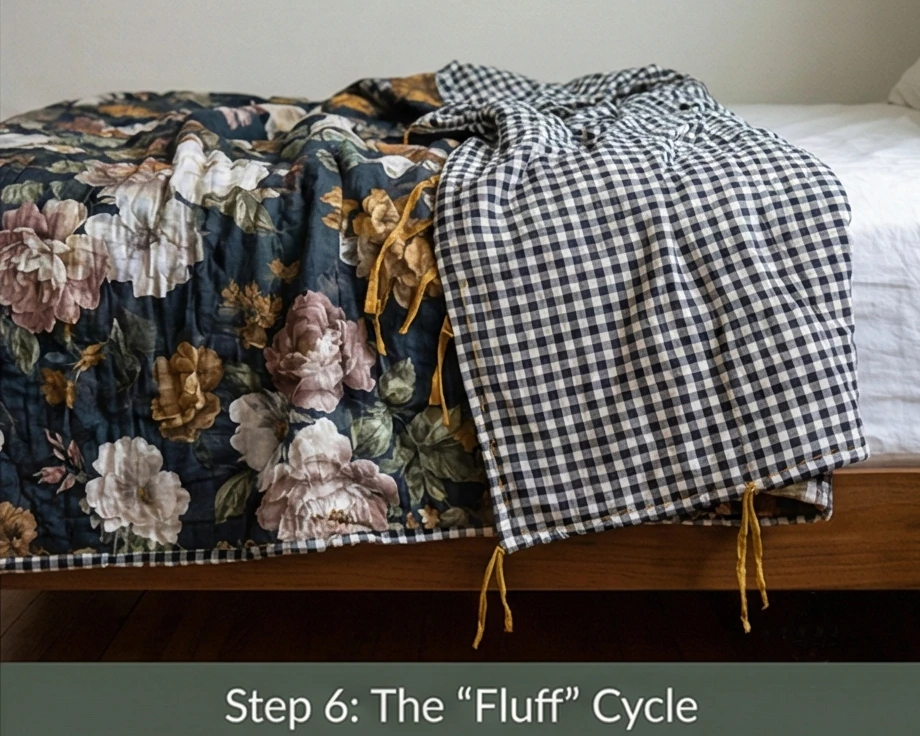
Usability Note: Tied quilts are incredibly warm because the batting isn’t compressed by thousands of stitch lines. However, be careful with pets—cat claws can sometimes snag the loops of the ties. If you have active pets, make sure your knots are double-tight, and tails are trimmed short.
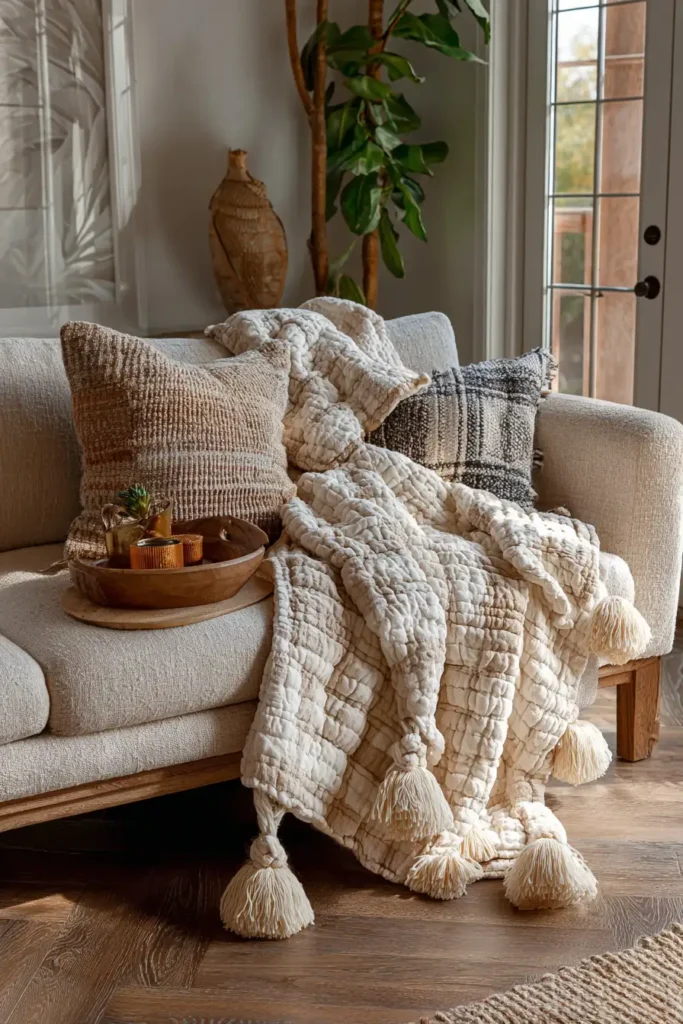
11. Oversized Tassel Quilt Throws for Cozy Living Rooms
“The Casbah Comfort” Chunky Tassel Throw
Nothing defines the Bohemian aesthetic quite like the Tassel. It represents the nomadic spirit, adding movement, weight, and playfulness to textiles. “The Casbah Comfort” throw takes a simple patchwork grid and elevates it into a statement piece by adding Oversized Yarn Tassels to the corners and using Chunky Wool Ties instead of standard quilting stitches. The weight of the tassels keeps the throw draped perfectly over the arm of a sofa, preventing it from sliding off.
Finished Dimensions: Large Sofa Throw, 60″ x 70″.
Materials Needed:
- The Fabric (Scrappy Squares): 3 yards total of mixed fabrics.
- Texture: Use “homespun” textures like Woven Stripes, Ikat, Chambray, and Flannel.
- Backing: 4 yards of a soft, brushed cotton or Minky (for maximum snuggle factor).
- Batting: Wool or High-Loft Polyester (you want this quilt to be puffy).
- The Tassels: 2 skeins of Chunky Wool Yarn or Cotton Rope (Cream, Mustard, or Rust).
- Notions: A 5-inch piece of cardboard (for making tassels), a large eye tapestry needle.
Cultural Backstory: Tassels were originally functional—they were the knots used to finish off the warp threads of a woven rug or blanket to keep it from unraveling. Over centuries, in cultures from the Middle East to the Andes, these knots became larger and more decorative, eventually becoming a status symbol. In a modern boho home, they add that crucial “collected” and “traveled” look.
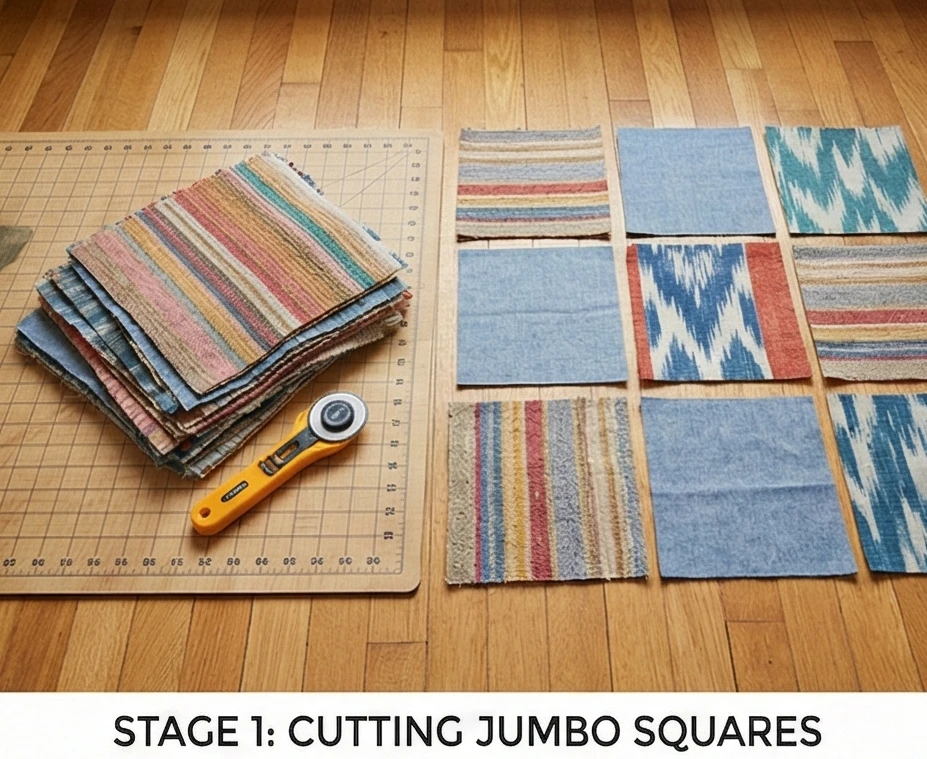
Step 1: Cutting the “Jumbo” Squares
Boho style is relaxed, so we use large, easy pieces.
- Cut: Cut your assorted fabrics into 10.5-inch squares.
- Quantity: You need 42 squares (6 wide x 7 high).
- Layout: Arrange the squares on the floor.
- Balance: Try to distribute colors evenly. If you have a very dark square, don’t put it right next to another dark one. Spread the visual weight.
Step 2: Assembling the Grid
- Sew Rows: Stitch the squares together into 7 rows of 6 squares each.
- Pressing: Press seams open. This helps the throw lie flat despite the heavy textured fabrics.
- Join Rows: Sew the rows together to complete the top (approx. 60.5″ x 70.5″).
Step 3: The “Pillowcase” Finish (No Binding)
A binding can look too stiff for this style. We want soft edges.
- Layer:
- Place the batting on the floor.
- Place the backing fabric Right Side Up on top of the batting.
- Place the quilt top, right side down, on top of the backing.
- Sew: Stitch around the entire perimeter with a 1/2 inch seam, leaving a 10-inch gap for turning.
- Trim & Turn: Trim excess batting. Turn the quilt right side out through the gap. Poke corners out.
- Topstitch: Press the edges well and topstitch 1/4″ from the edge around the whole quilt, closing the gap.
Step 4: Making the Giant Tassels (The Feature)
Make 4 massive tassels.
- Wind: Wrap your chunky yarn around the 5-inch cardboard piece about 50-60 times. (More wraps = fatter tassel).
- Tie Top: Slide a piece of strong yarn under the wraps at one end of the cardboard and tie it tightly. This is your “hanging loop.”
- Cut Bottom: Cut the yarn strands at the opposite end of the cardboard.
- Create Head: Cut another piece of yarn. Wrap it tightly around the “neck” of the tassel (about 1 inch down from the top tie) to create a round head. Knot securely and bury the ends inside the tassel.
- Trim: Trim the bottom fringe to be even.
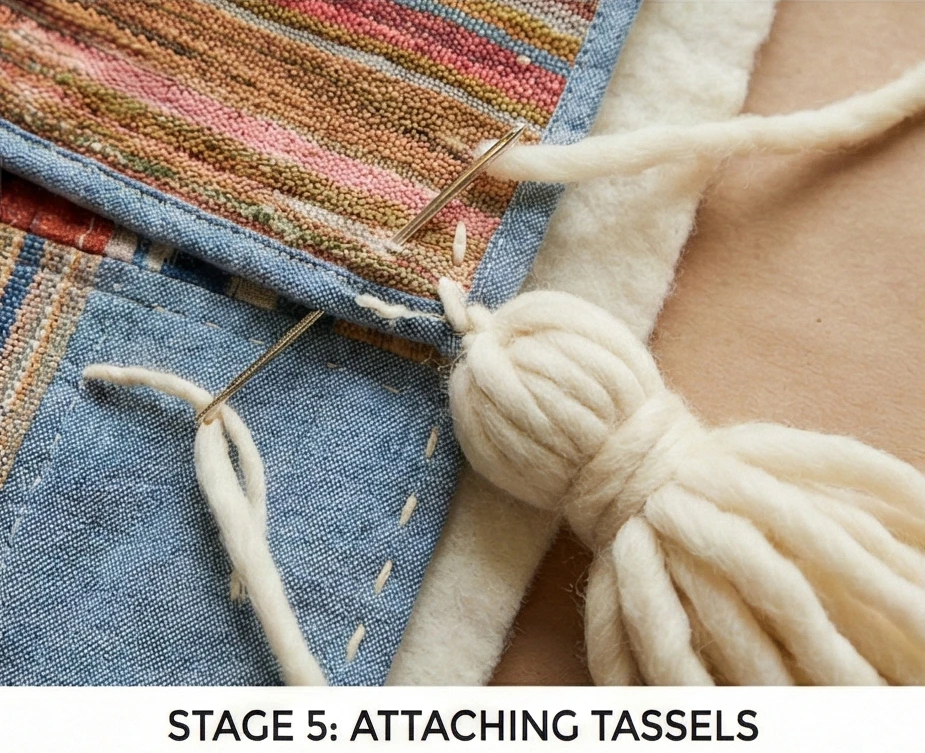
Step 5: Attaching the Tassels
They need to be secure; otherwise, they will be ripped off.
- Placement: Place a tassel at each of the 4 corners of the throw.
- Sew: Using a large tapestry needle and strong thread (or the same yarn), sew the “hanging loop” of the tassel securely into the corner of the quilt.
- Reinforce: Stitch through all layers (top, batting, back) multiple times.
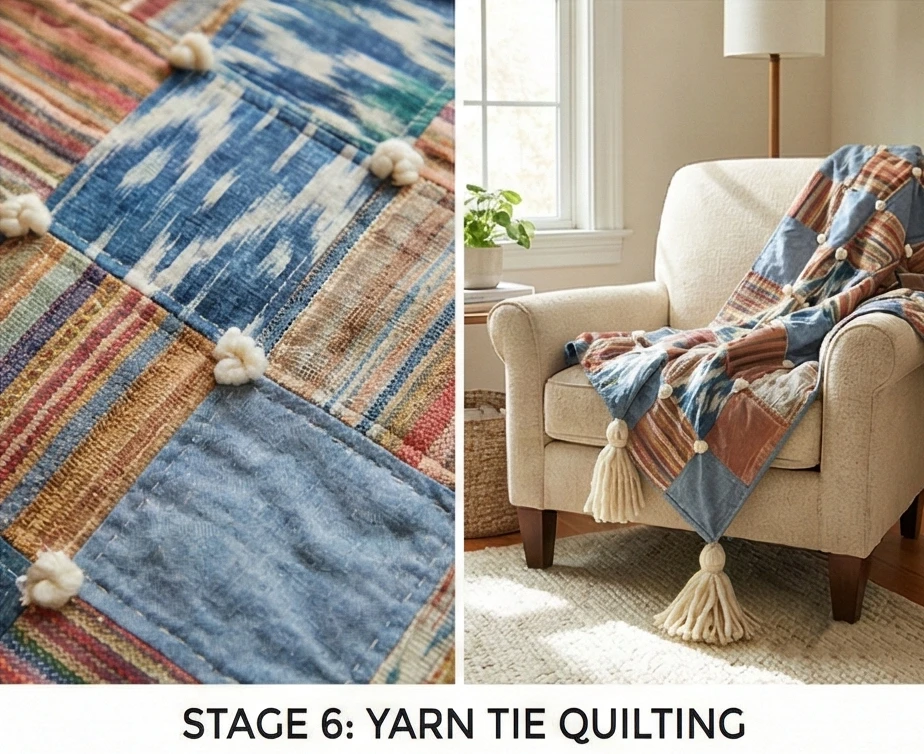
Step 6: The “Yarn Tie” Quilting
Matching the tassels.
- Thread Up: Thread your tapestry needle with the same chunky yarn used for the tassels.
- Tie: Instead of quilting lines, tie a knot at the intersection of every square (where four corners meet).
- Technique: Go down through the quilt, come back up 1/4 inch away, and tie a square knot. Trim tails to 1 inch.
- Result: The yarn tufts on the quilt’s surface echo the giant tassels at the corners, visually tying the design.
Usability Note: Large tassels are magnets for cats and puppies. If you have playful pets, you might want to make the tassels detachable (using a sturdy button or clasp) so you can remove them when you aren’t in the room, or for washing.
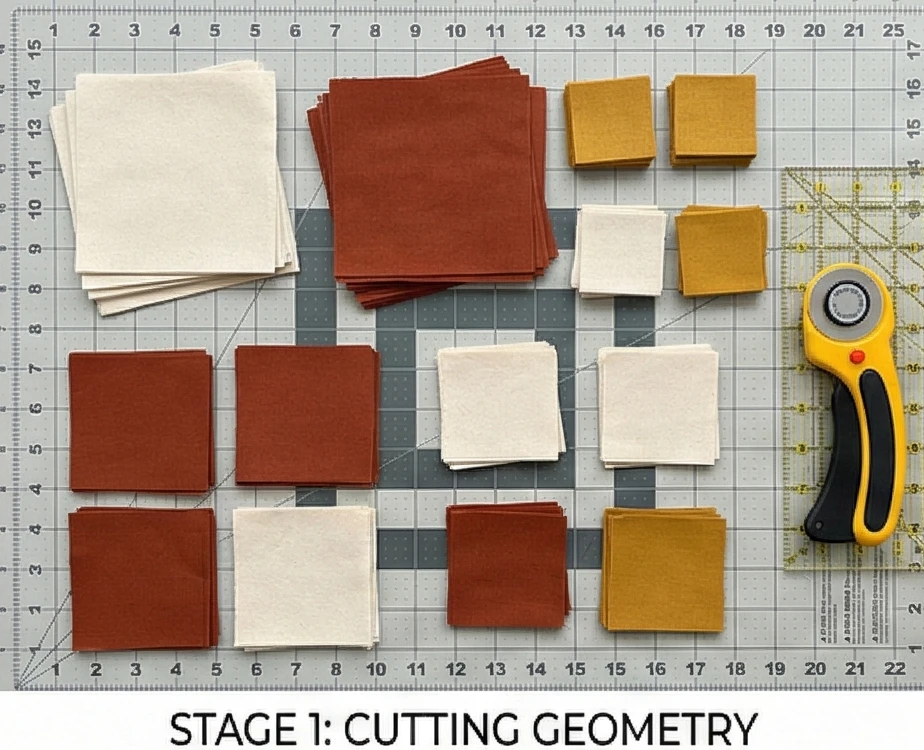
12. Geometric Boho Cushion Covers for Elegant Sofa Styling
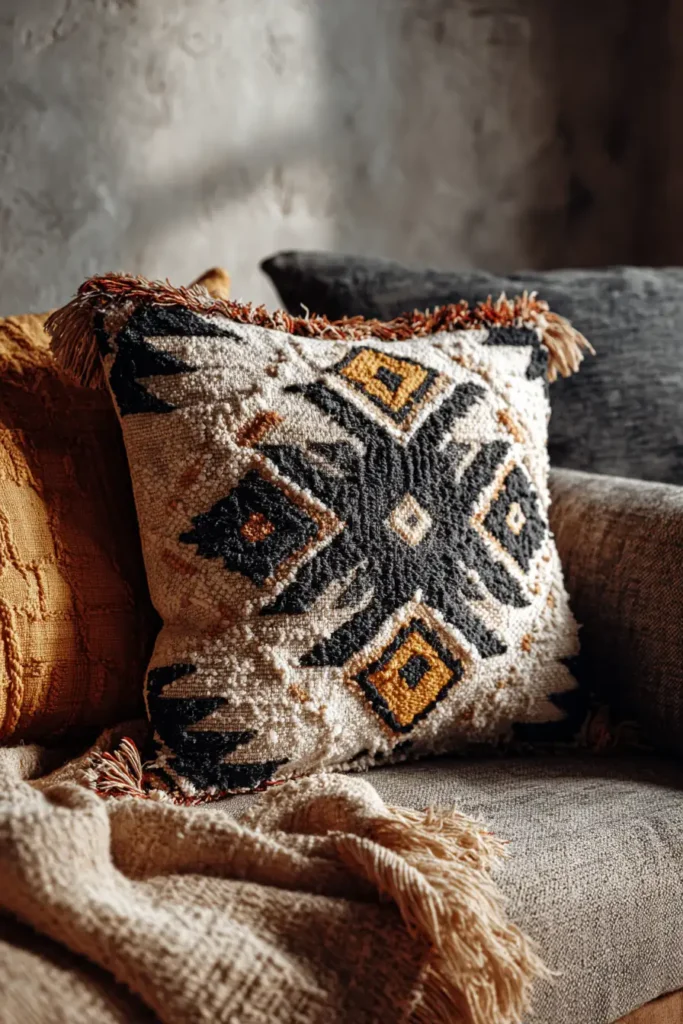
“The Desert Prism” Aztec Diamond Cushion
A key element of the Bohemian aesthetic is the incorporation of global geometries—patterns that evoke the weaving traditions of the American Southwest, the Atlas Mountains, or the Andes. The “The Desert Prism” cushion cover brings this energy to your sofa with a bold, Aztec-inspired Diamond motif. By contrasting sharp, graphic lines with soft, textured fabrics such as linen or Mudcloth, you create a piece that feels both ancient and modern. The high-contrast design acts as an anchor among softer, flowery boho prints.
Finished Dimensions: Standard Decorator Square, 20″ x 20″.
Materials Needed:
- Fabric A (The Background): 1/2 yard of Natural Canvas, Oatmeal Linen, or Drop Cloth (needs texture).
- Fabric B (The Motif/Dark): 1/4 yard of Black, Rust, or Deep Indigo.
- Fabric C (The Accent/Pop): Scraps of Mustard Gold or Pale Blush.
- Backing: 1/2 yard of durable cotton canvas.
- Insert: A 22″ down-feather insert (always size up 2 inches for a plump, “choppable” look).
- Notions: 4 large wool pom-poms (optional), 18″ zipper, rotary cutter.
Cultural Backstory: The stepped diamond motif is ubiquitous in weaving cultures, from Navajo rugs to Turkish Kilims. In these traditions, the diamond often represents the “eye” of protection or the four corners of the earth. In modern boho decor, these geometric “kilim pillows” are prized for adding masculine structure to feminine spaces.
Step 1: Cutting the Geometry
We use Half-Square Triangles (HSTs) to build the steps.
- Cut Background (A):
- Cut 8 squares measuring 3.5″ x 3.5″.
- Cut 4 squares measuring 3″ x 3″ (corners).
- Cut Dark Motif (B):
- Cut 8 squares measuring 3.5″ x 3.5″.
- Cut 1 center square measuring 3″ x 3″.
- Cut Accent (C):
- Cut 4 squares measuring 3″ x 3″.
Step 2: Making the Half-Square Triangles (HSTs)
The building blocks of the diamond.
- Mark: Draw a diagonal line on the back of the 8 Background (A) squares (the 3.5″ ones).
- Pair: Place each Background square Right Sides Together with a Dark Motif (B) square.
- Sew: Stitch 1/4 inch away from both sides of the drawn line.
- Cut: Cut directly on the drawn line.
- Press: Open and press toward the dark fabric.
- Trim: Trim all HST units to exactly 3″ x 3″.
- Yield: You now have 16 Black/Cream HSTs.

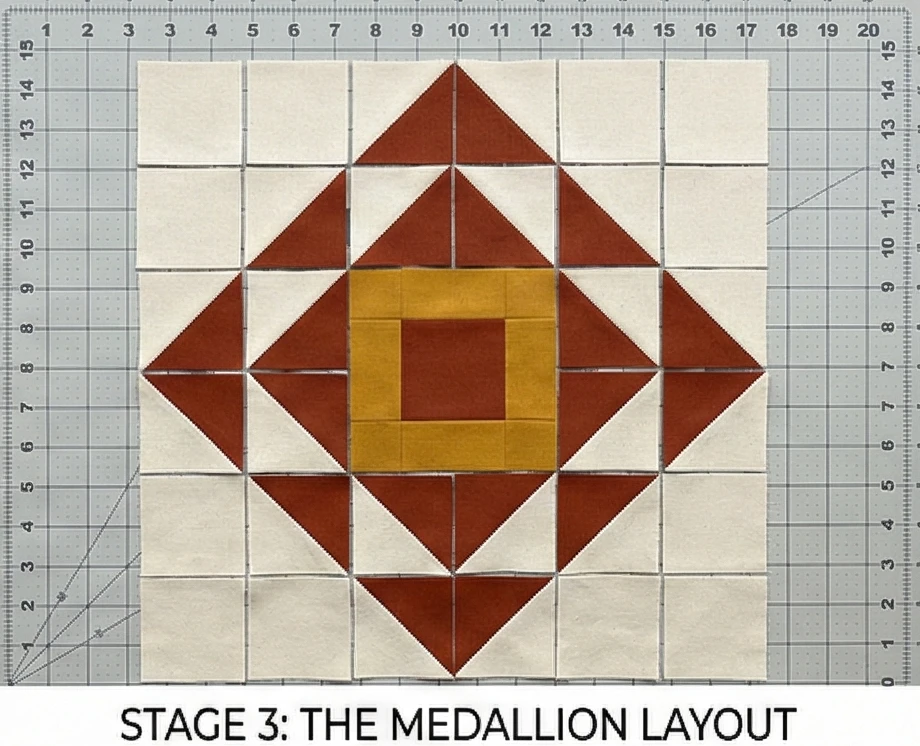
Step 3: The “Medallion” Layout
This is where the pattern emerges.
- Grid: Lay out your units in a 5 x 5 grid (25 squares total).
- The Center: Place the solid Black (B) square in the absolute center.
- The Accent Ring: Place the 4 Accent (C) squares above, below, left, and right of the center.
- The Diamond Outline: Use your 16 HSTs to form a large diamond shape surrounding the center cross.
- Orientation: Rotate the triangles so the dark sides touch to form a solid jagged line.
- The Corners: Use the 4 solid Background (A) squares to fill in the four outer corners of the grid.
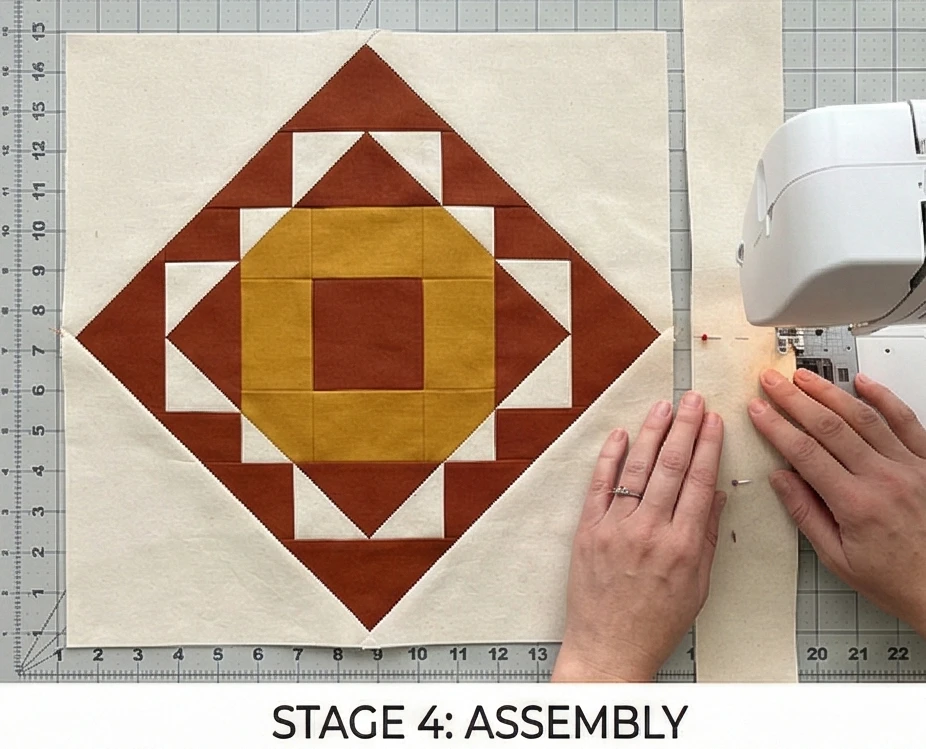
Step 4: Assembly
Precision is key to keeping the diamond sharp.
- Sew Rows: Stitch the squares into 5 horizontal rows.
- Pressing: Press odd rows (1, 3, 5) to the left and even rows (2, 4) to the right. This allows seams to “nest” perfectly.
- Join Rows: Sew the 5 rows together.
- Border: The block currently measures 13″ x 13″. Add a 4-inch wide border of Background Fabric (A) around all four sides to bring the pillow up to the full 20.5″ size.
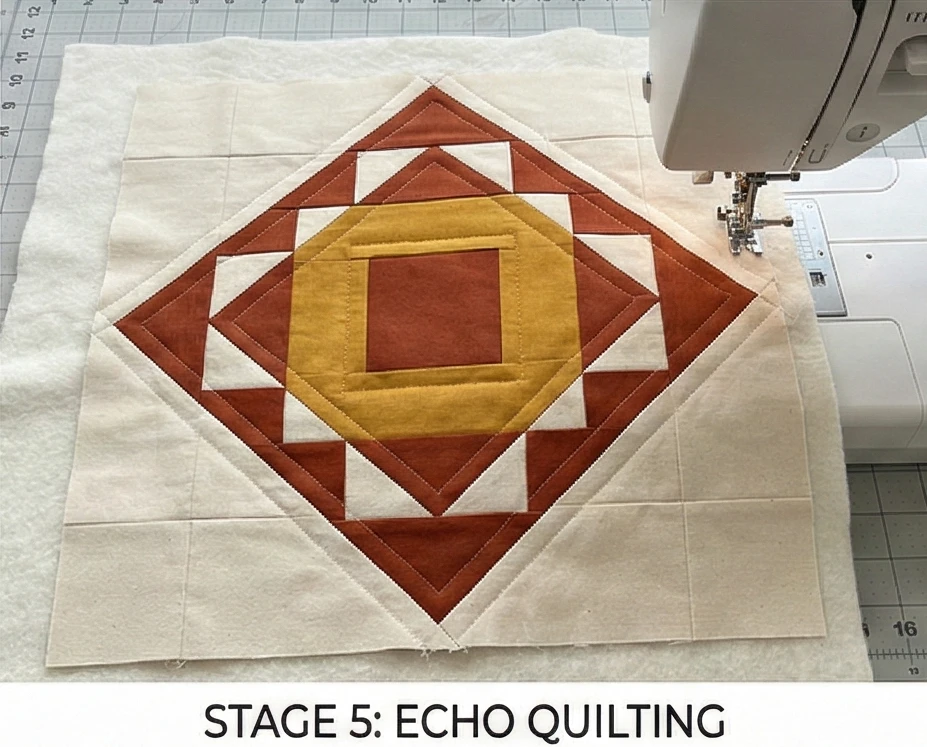
Step 5: “Echo” Quilting
Texture over pattern.
- Baste: Layer the top with thin batting and a muslin scrap (you don’t need a nice backing for the inside).
- Quilt: Stitch straight lines that mimic the diamond shape.
- Technique: Stitch “in the ditch” of your diamond seams first. Then, stitch parallel lines about 1/2 inch away inside and outside the shape.
- Effect: This rippling texture makes the pillow feel sturdy and high-end.
Step 6: The Zipper Finish
A professional closure is more elegant than an envelope back.
- Install Zipper: Sew the bottom edge of your Quilted Top to the bottom edge of your Backing Fabric, inserting a zipper between them.
- Finish Perimeter: Open the zipper halfway (crucial!). Place the Top and Backing Right Sides Together. Sew the remaining three sides.
- Turn: Turn right side out through the zipper.
- Adorn (Optional): Hand-sew a chunky Wool Pom-Pom or a tassel to each of the four corners for that playful boho finish.
Usability Note: Textured fabrics such as canvas and linen can fray easily. Before washing the finished cover, turn it inside out and ensure all raw seams are zig-zagged or serged. Always use a gentle cycle and air-dry to prevent the cotton canvas from shrinking or warping the zipper.
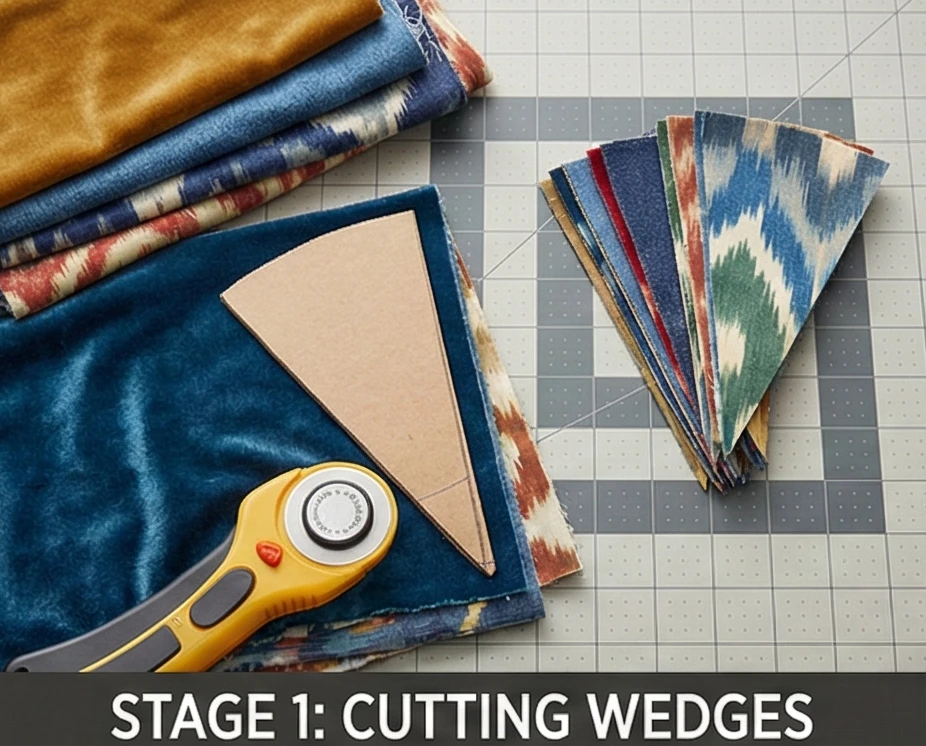
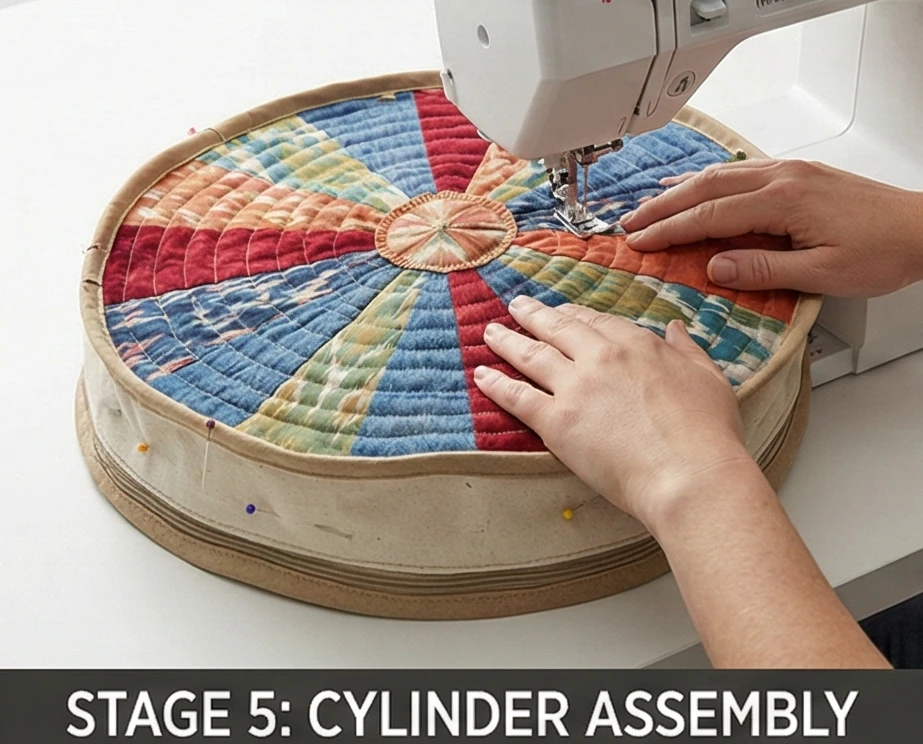
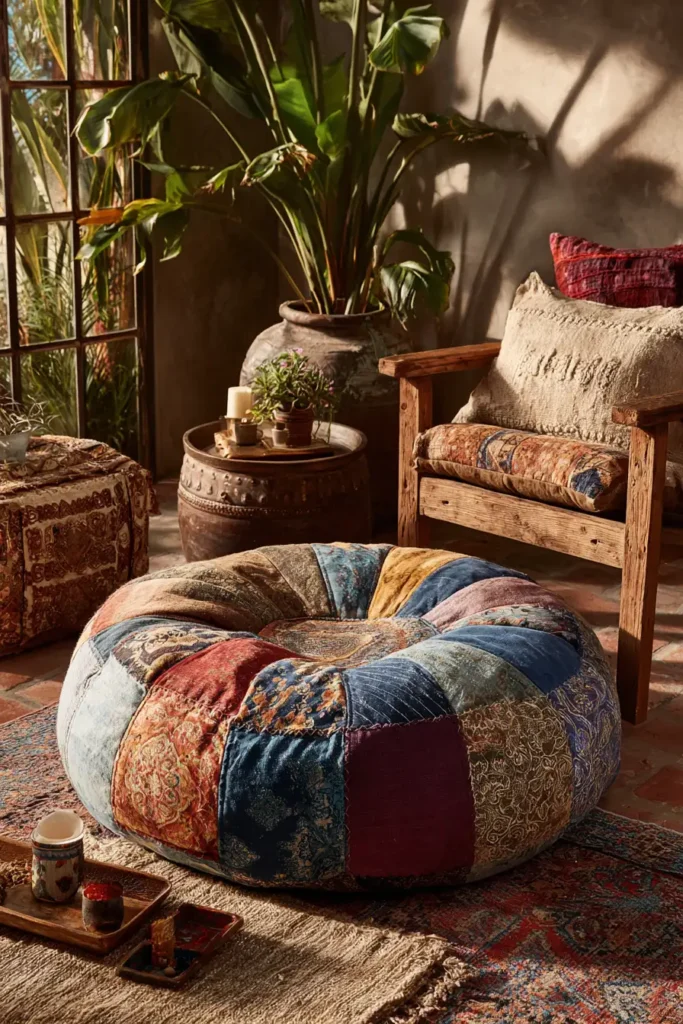
13. Round Quilted Floor Pillow Patterns for Relaxed Seating

“The Sun Salutation” Round Patchwork Pouf
Floor seating is the hallmark of the Bohemian sanctuary. It invites guests to sit low, relax, and ground themselves. “The Sun Salutation” is a large, drum-shaped floor cushion constructed from 12 pieced wedges. This radial design allows you to mix scraps of heavy textiles—Velvet, Denim, Canvas, and Ikat—into a sunburst pattern. Unlike a beanbag, which collapses, this pouf has structured sides (a gusset) and piping, making it elegant enough to serve as a low table or a meditation seat.
Finished Dimensions: Large Floor Cushion, 24″ Diameter x 6″ Height.
Materials Needed:
- The Wedges (Top): Scraps of 6-12 different heavyweight fabrics.
- Texture: Mix smooth (Cotton) with rough (Burlap/Linen) for tactile interest.
- The Side Wall (Gusset): 1 yard of sturdy Canvas or Upholstery Weight Fabric.
- The Bottom: 1 yard of durable Denim or Canvas (needs to withstand sliding on the floor).
- Piping: 5 yards of pre-made piping (or cord to make your own).
- Stuffing: 5 lbs of Shredded Memory Foam, Poly-Fil, or (for a heavy, eco-friendly option) old towels and fabric scraps.
- Notions: A 22-inch heavy-duty zipper, strong upholstery thread.
Cultural Backstory: Low seating cultures—from the Majlis of the Middle East to the Zabuton of Japan—believe that sitting near the floor keeps you grounded and humble. The “Pouf” (from the French pouff, meaning “puff”) became a staple of 1960s and 70s interior design, representing a rejection of stiff, formal Victorian furniture in favor of communal, relaxed lounging.
Step 1: Cutting the Wedges (The Geometry)
A circle is 360 degrees. We need 12 wedges, so each must be 30 degrees.
- Template: Make a cardboard template.
- Draw a triangle with a base of 6.5 inches and a height of 12.5 inches.
- Tip: The point should be sharp.
- Cut: Cut 12 wedges from your assorted fabrics.
- Grain: Try to keep the grain line running down the center of the wedge to prevent stretching.
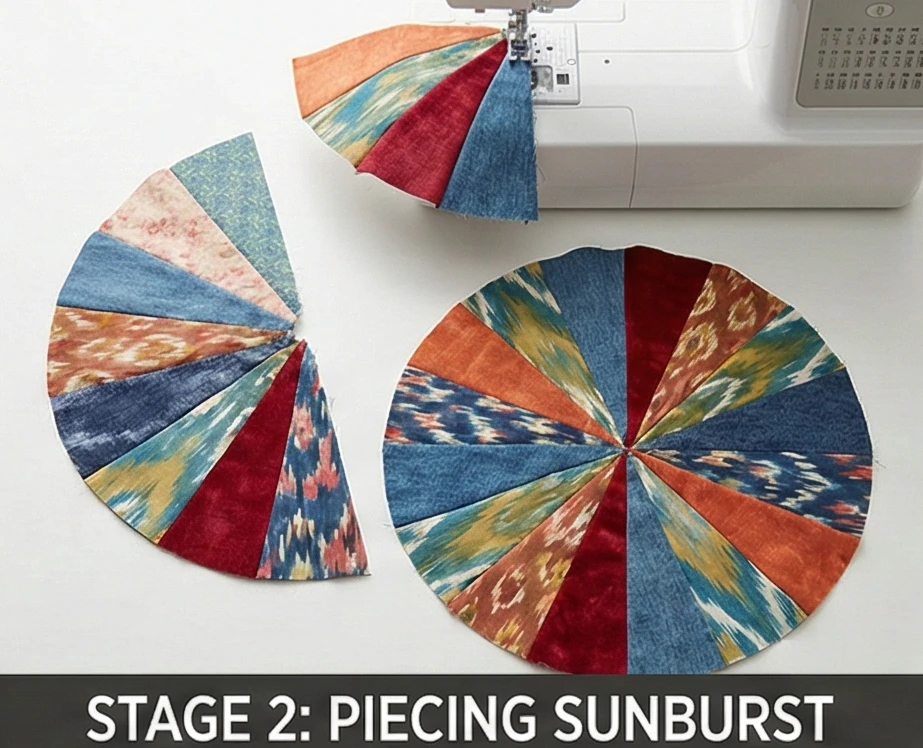
Step 2: Piecing the Sunburst
Handling the bulk at the center is key.
- Sew Pairs: Sew two wedges together along the long side (Right Sides Together). Repeat until you have 6 pairs.
- Sew Halves: Sew pairs together until you have two half-circles (6 wedges each).
- Join: Sew the two halves together to complete the circle.
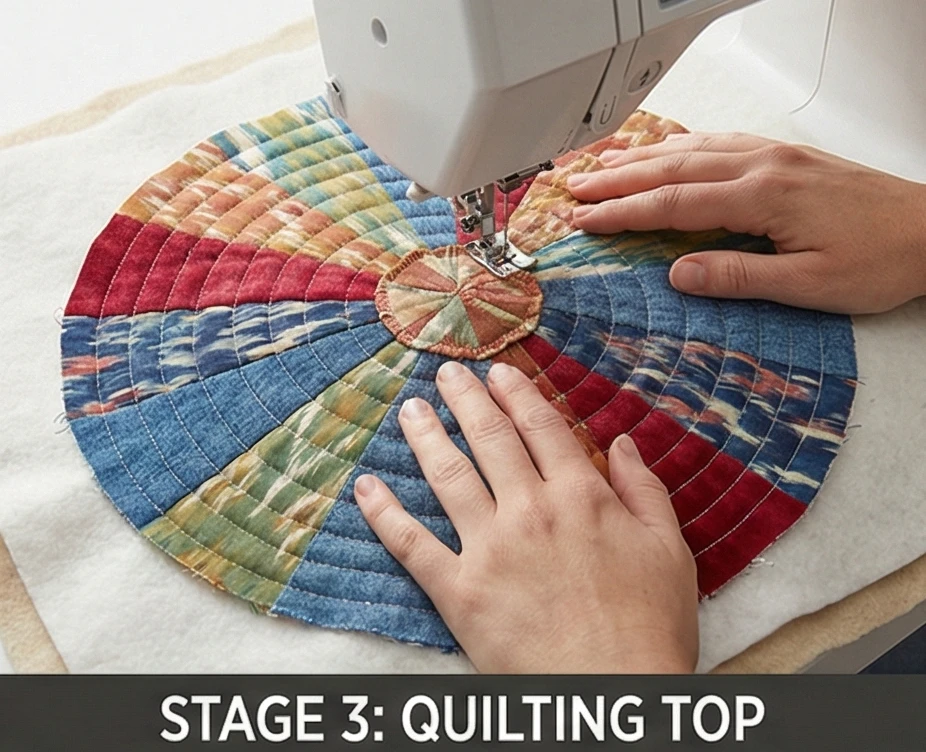
- The Center: If the center point is messy or bulky (common with thick fabrics), appliqué a small 3-inch circle of velvet or leather over the center to hide the intersection.
Step 3: Quilting the Top
We quilt the fabric before assembly to give it structure.
- Sandwich: Place your pieced circle on a square of batting and a scrap of muslin backing.
- Quilt: Stitch “in the ditch” between every wedge.
- Detail: Add concentric circles (spirals) starting from the center to reinforce the fabric.
- Trim: Trim the batting/backing to match the circle shape perfectly.
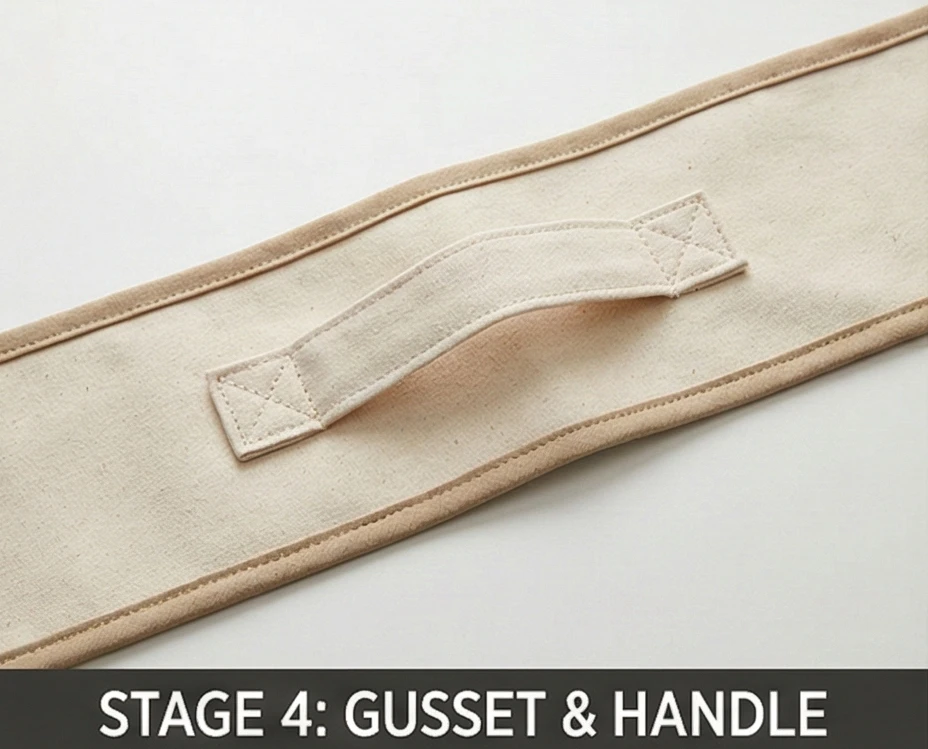
Step 4: The Side Wall (Gusset) & Handle
A handle is essential for moving a heavy floor pillow.
- Cut Strip: Cut a long strip of your Gusset fabric measuring 7 inches tall x 76 inches long. (You may need to piece strips together).
- Make Handle: Cut a rectangle 4″ x 10″. Fold into a strap. Sew it securely to the center of the long gusset strip.
- Reinforce: Box-stitch the handle ends to prevent them from ripping out when you lift the heavy pouf.
- Add Piping (Crucial for Elegance): Sew piping along the top and bottom raw edges of the gusset strip. This structured edge is what makes it look like furniture rather than a dog bed.
Step 5: The Cylinder Assembly
- Join Ends: Sew the short ends of the gusset strip together to form a ring. (Diameter should match your top circle).
- Attach Top: Pin the Gusset Ring to the Quilted Top Circle (Right Sides Together). Sew around the edge, following the piping stitch line.
- The Bottom: Cut a 24-inch circle of Bottom fabric. Cut it in half and install the Zipper across the center.
- Attach Bottom: Sew the Bottom Circle to the bottom edge of the Gusset Ring. Open the zipper before finishing so you can turn it!
Step 6: Stuffing for Stability
A pouf needs to be firm.
- Turn: Turn the case right side out.
- Fill:
- Core: If using fabric scraps/old towels, fold them flat and stack them in the center (this makes it heavy and firm).
- Softness: Stuff Poly-Fil or Shredded Foam around the edges and top to smooth out the lumps.
- Test: Sit on it. If you sink, add more stuffing. It should feel firm.

Usability Note: If you are using this on a hard floor, consider spraying the bottom fabric with Non-Slip Rug Spray or sewing small patches of non-slip shelf liner to the bottom. This prevents the pouf from shifting when you sit.
14. Durable Boho Patchwork Sofa Covers for Stylish Protection

“The Nomad’s Shield” Heavyweight Patchwork Throw
A sofa is the anchor of the living room, but it is also the most vulnerable piece of furniture. “The Nomad’s Shield” is a quilt designed specifically for utility. It uses Heavyweight Fabrics (Denim, Canvas, upholstery scraps) and Quilt-As-You-Go (QAYG) construction to create an armor that protects your couch from pets, kids, and spills while looking like a high-end designer textile. The weight of these fabrics helps keep the cover tucked in and prevents it from sliding off when someone sits.
Finished Dimensions: Large Sofa Drape, 70″ x 100″ (covers back, seat, and arms of a standard 3-seater).
Materials Needed:
- The Patches (Top): 4-5 yards of heavy scraps.
- Texture Mix: Old Blue Jeans (Denim), Coffee Sacks (Burlap), Canvas Drop Cloth, Velvet, and Corduroy.
- Tip: Do not use thin quilting cotton here; it wears out too quickly.
- Backing: 6 yards of Flannel or a heavy, brushed cotton sheet (prevents slipping).
- Batting: Thin cotton batting or an old woolen blanket (adds weight without too much puff).
- Notions: Denim needles (Size 100/16), strong polyester thread (Topstitching thread works well).
Cultural Backstory: The “Boro” textiles of Japan serve as the inspiration here. Boro (meaning “tattered” or “ragged”) was a necessity for 19th-century peasants who patched their clothes and bedding for generations with scraps of indigo cotton. Today, this mended aesthetic is prized in boho interiors because it tells a story of survival, history, and the beauty of imperfection.
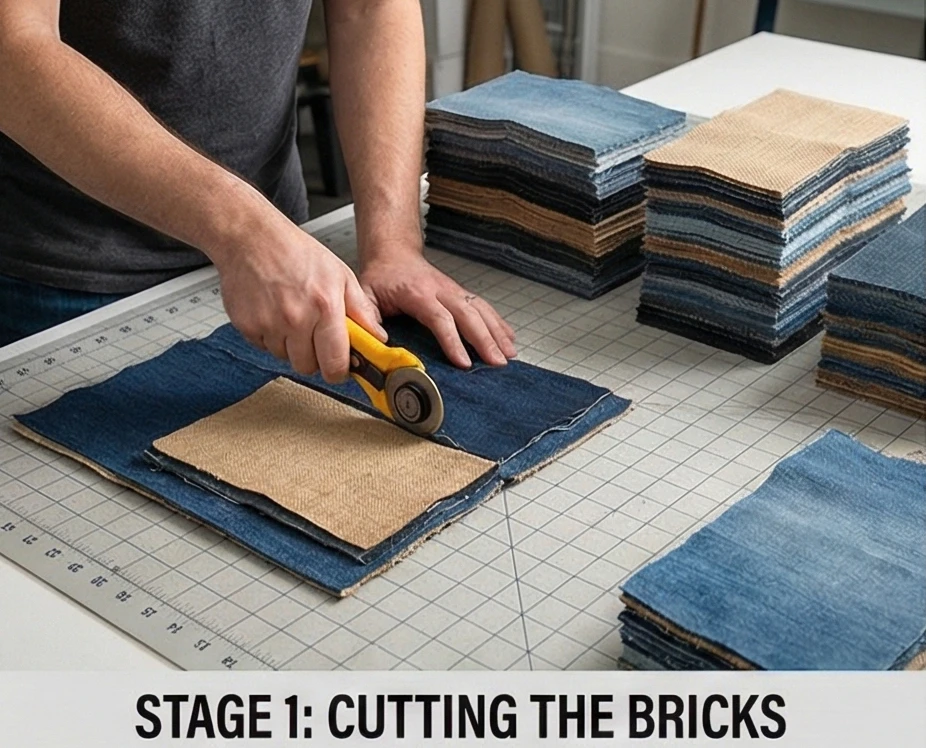
Step 1: Cutting the “Bricks”
We use rectangles instead of squares to mimic the look of masonry or weaving.
- Cut: Cut your heavy fabrics into uniform rectangles measuring 6.5″ x 10.5″.
- Quantity: You will need roughly 110 bricks.
- Prep: If using old denim or burlap, zigzag-stitch the raw edges of each brick before assembly to prevent fraying within the quilt.
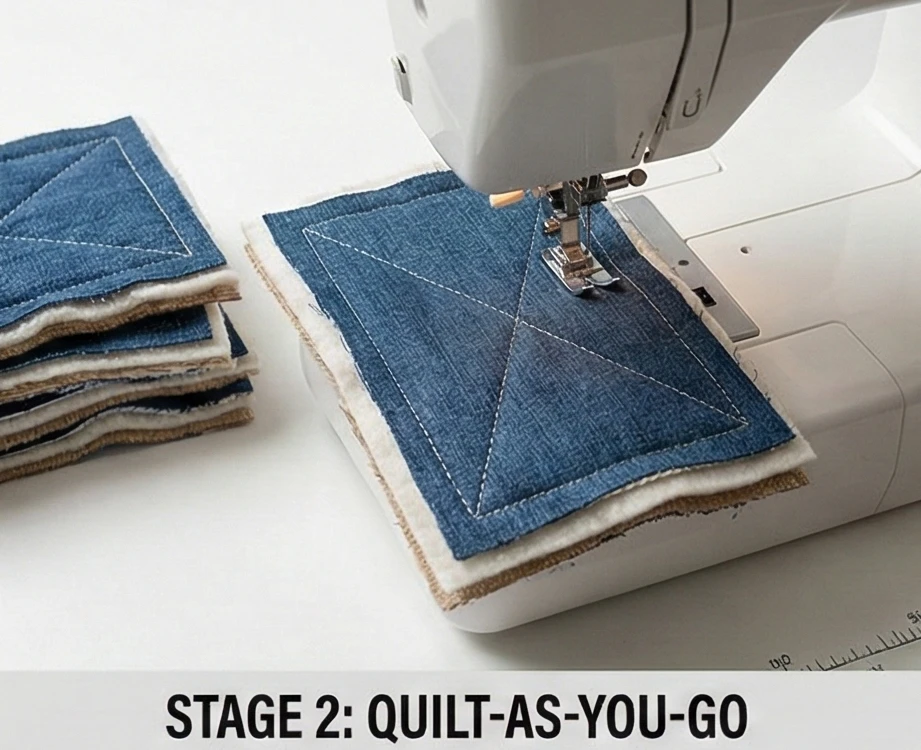
Step 2: Quilt-As-You-Go (The “Shield” Construction)
This method builds the quilt block by block, making it easier to handle heavy fabrics.
- Cut Batting/Backing: Cut your batting and backing into rectangles slightly larger than your bricks (e.g., 7″ x 11″).
- Sandwich Unit:
- Place the backing rectangle face down.
- Place the batting rectangle on top.
- Place the top fabric brick face up.
- Quilt Unit: Quilt a simple “X” or straight lines across each individual brick.
- Why: This secures the layers immediately. You are now holding a stack of 110 finished mini-quilts.
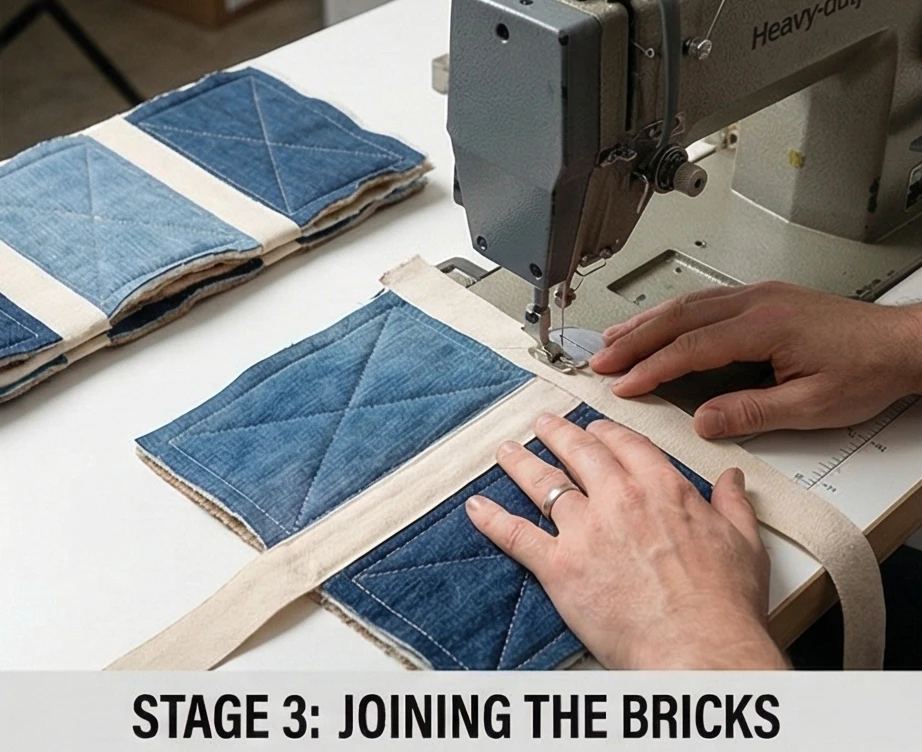
Step 3: Joining the Bricks (The Sashing Method)
Because the layers are thick, we use sashing to join them flat.
- Cut Sashing: Cut strips of a contrasting fabric (e.g., Natural Canvas) measuring 1.5 inches wide.
- Sew Front:
- Place two Quilted Bricks side-by-side.
- Place a sashing strip face down over the seam where they meet.
- Sew through all layers (Brick 1, Sashing, Brick 2).
- Press & Topstitch:
- Press the sashing strip open to cover the raw seam.
- Topstitch down both sides of the sashing strip.
- Result: A flat, durable joint that looks like a frame around each brick.
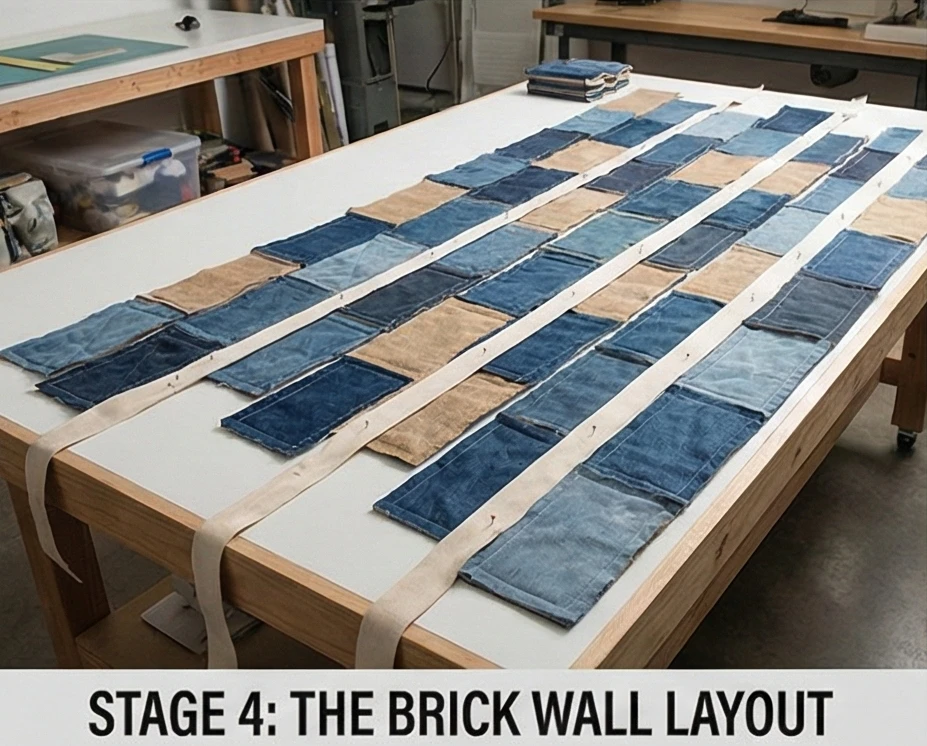
Step 4: The “Brick Wall” Layout
- Rows: Join 10 bricks together into a long horizontal row. Make 11 rows total.
- Offset: For a true brick look, start every other row with a half-brick (5.25″ x 6.5″) so the vertical seams don’t line up. This makes the quilt stronger because stress is distributed evenly.
- Join Rows: Use long sashing strips to join the rows together horizontally.
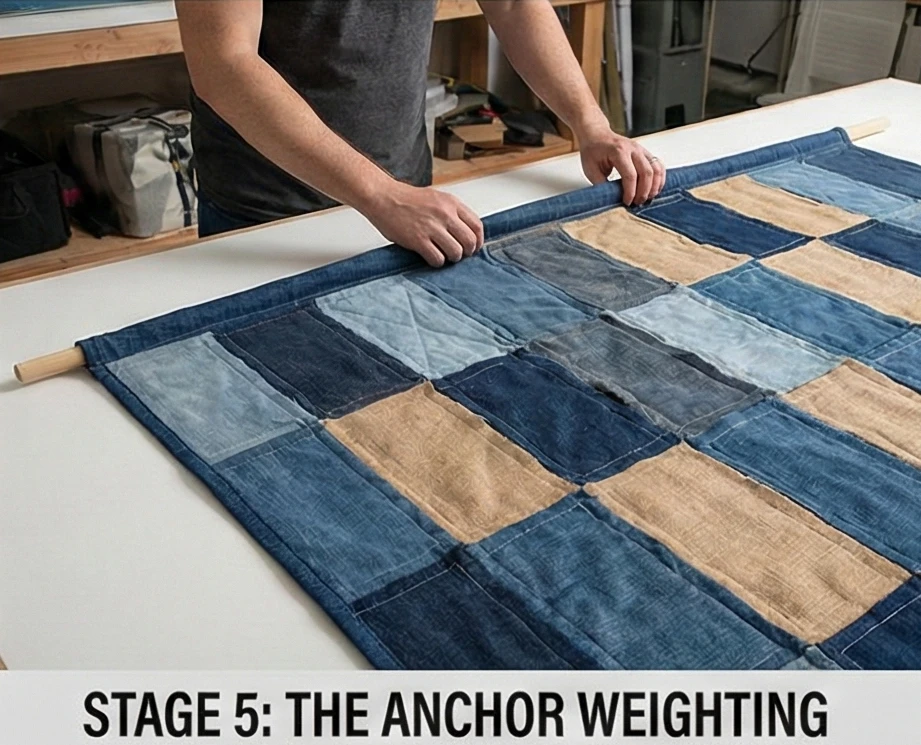
Step 5: The “Anchor” Weighting
The secret to a sofa cover that works.
- The Overhang: The quilt is designed to drape over the back of the sofa.
- Weighting: Sew a channel or “hem” along the top edge of the quilt.
- Insert: Insert a heavy Wooden Dowel or a small chain (wrapped in fabric) into this channel.
- Physics: This weight hangs behind the sofa, acting as a counter-balance that prevents the quilt from sliding down when you sit on it.
Step 6: Binding with Durability
- Material: Use wide Bias Tape made from Denim or Canvas.
- Attach: Bind the edges using a double-fold method.
- Stitch: Use a triple-stitch or a heavy zigzag to secure the binding. This edge will experience the most friction-related wear.

Usability Note: If you have pets, choose your fabrics strategically. Velvet releases pet hair easily with a lint brush. Bouclé or loose weaves trap hair and claws. Stick to tight weaves, such as Denim and Canvas, for the main seating areas.
15. Rustic Tribal Table Runners for Eclectic Dining Rooms
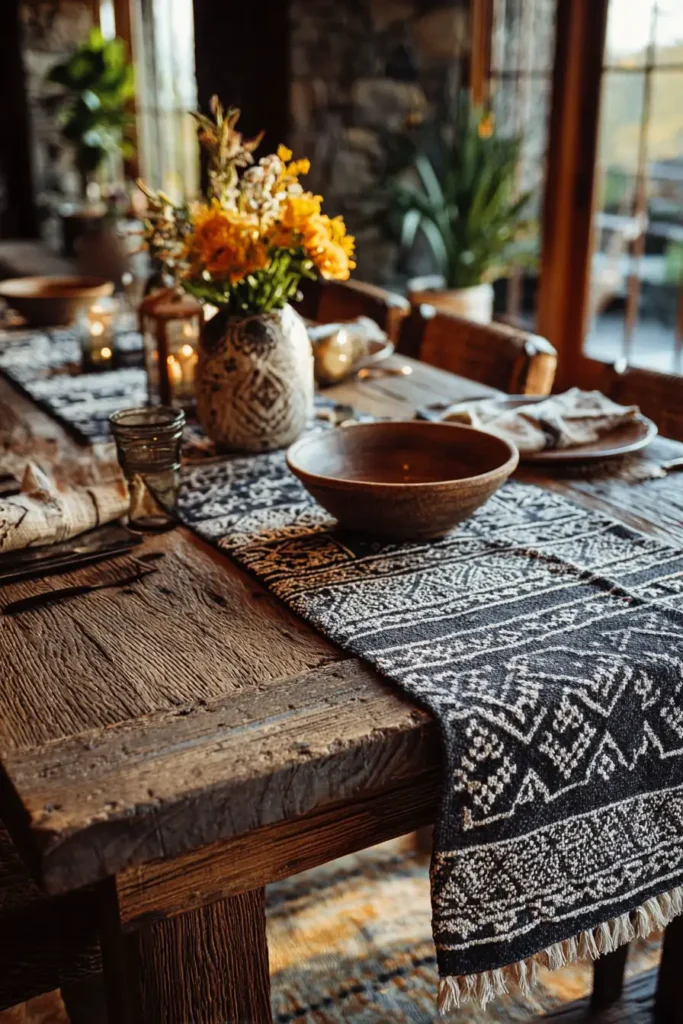
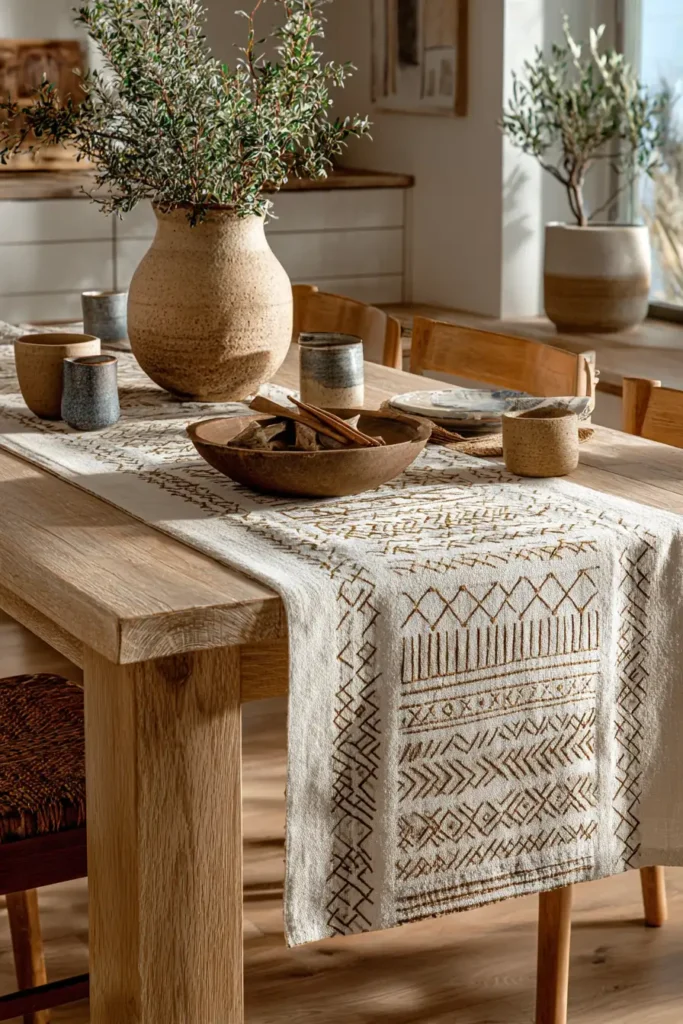
“The Canyon Trek” Southwest Geometric Runner
A dining table is the gathering place of the home, and in a boho sanctuary, it should feel grounded and earthy. “The Canyon Trek” runner draws inspiration from the bold, geometric weaving traditions of the American Southwest (Navajo and Kilim styles). By using Heavyweight Canvas or Linen as the base and appliquéing or piecing a serrated diamond motif down the center, you create a focal point that is rustic, durable, and strikingly elegant. The heavy texture contrasts beautifully with smooth ceramics and glassware.
Finished Dimensions: Extra Long Runner, 14″ x 84″ (Adjust length by adding/subtracting blocks).
Materials Needed:
- Fabric A (Background): 1 yard of Natural Canvas, Drop Cloth, or Oatmeal Linen (Heavy texture is essential).
- Fabric B (The Motif/Dark): 1/2 yard of Black, Rust, or Espresso.
- Fabric C (The Accent): Scraps of Turquoise, Mustard, or Terracotta.
- Backing: 1 yard of matching canvas (to make it reversible).
- Batting: Very thin cotton batting or flannel (you want it flat so wine glasses don’t tip).
- Notions: 4 skeins of embroidery floss (for tassels), rotary cutter.
Cultural Backstory: The “Serrated Diamond” is one of the most recognizable motifs in indigenous weaving, particularly in Navajo “Eye Dazzler” rugs. The stepped edges of the diamond represent the landscape—mountains, valleys, and the steps of life. Placing this symbol on a table honors the earth and the food it provides.
Step 1: Cutting the “Steps”
We will build the diamonds using Half-Square Triangles (HSTs) to achieve the jagged, woven look.
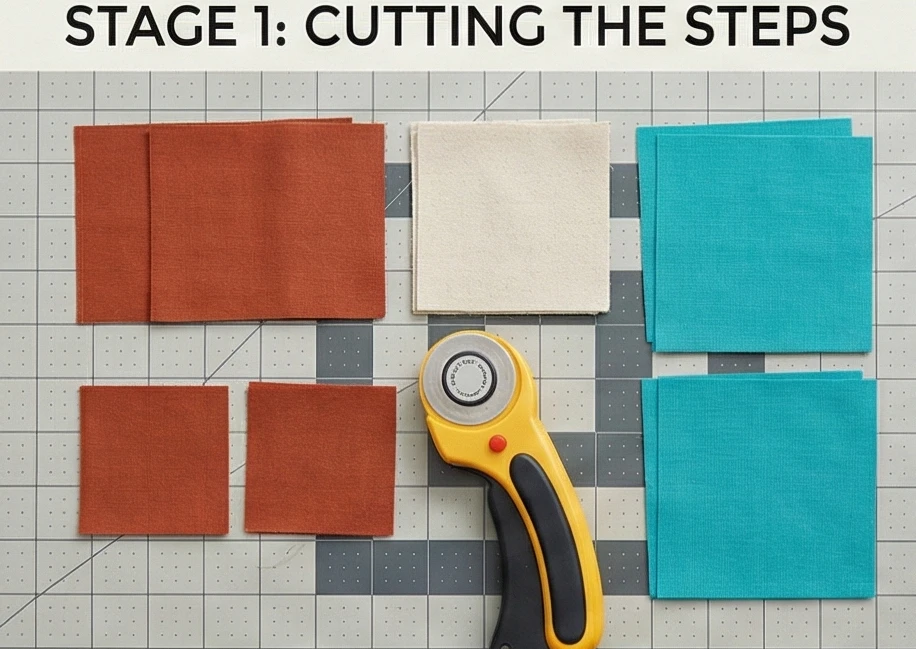
- Cut Background (A): Cut 32 squares measuring 3″ x 3″.
- Cut Motif (B): Cut 32 squares measuring 3″ x 3″.
- Cut Centers: Cut 4 large squares of Fabric C (Accent) measuring 4.5″ x 4.5″.
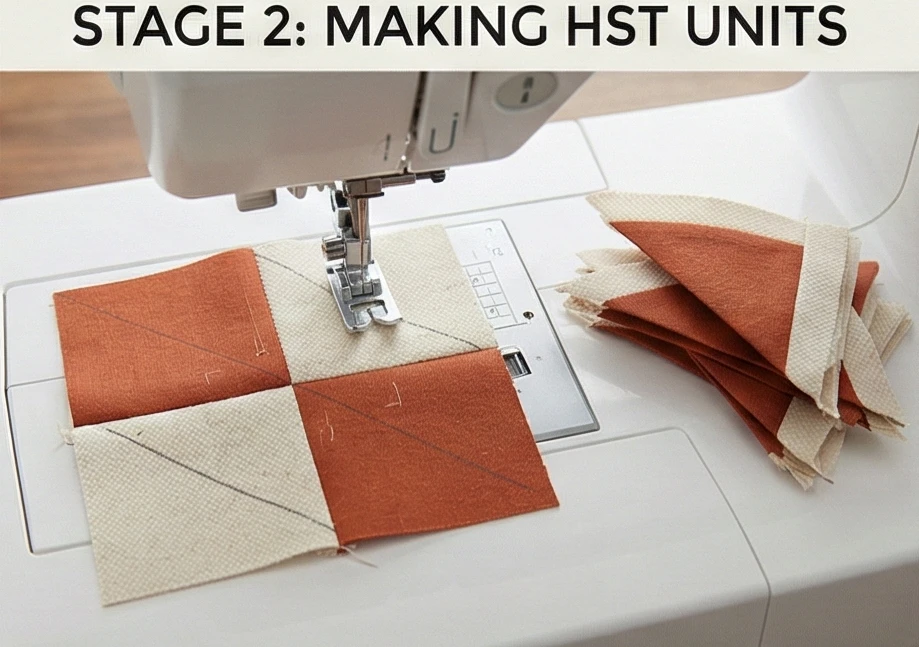
Step 2: Making the HST Units
Efficiency is key.
- Mark: Draw a diagonal line on the back of all 32 Background (A) squares.
- Pair: Match each Background square with a Motif (B) square (Right Sides Together).
- Sew: Stitch 1/4 inch away from both sides of the line. Cut on the line. Press open toward the dark side.
- Trim: Trim all HST units to exactly 2.5″ x 2.5″.
- Yield: You now have 64 HSTs.
Step 3: Assembling the “Canyon” Block
We are making 4 large diamond blocks.
- The Center: Take one large 4.5″ Accent Square (Fabric C).
- The Frame: Arrange 16 HSTs around this center square to form a larger diamond shape.
- Orientation: Point the dark triangles outward to create a jagged, serrated edge, or inward to frame the center.
- Corner Fillers: You will need 4 small squares (2.5″) of Background fabric for the absolute corners of the block to square it up.
- Sew: Stitch the units into rows, then sew the rows together to complete the block.
- Size: Each block should measure roughly 12.5″ x 12.5″.
- Repeat: Make 4 Blocks.
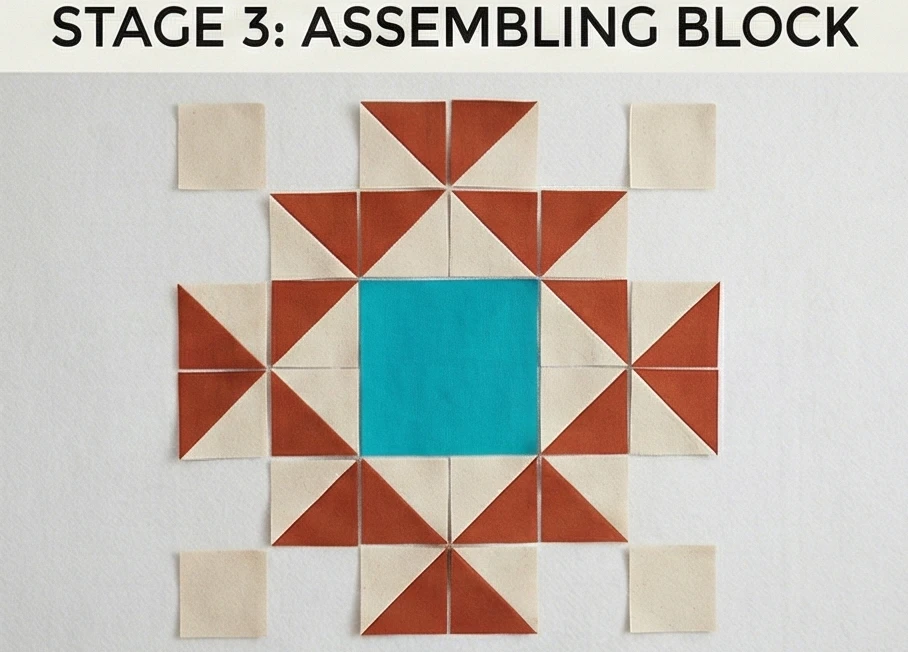
Step 4: The Runner Layout
- Sashing: Cut 5 strips of Background fabric measuring 2.5″ x 12.5″.
- Arrange: Lay out the runner:
- Sashing – Block 1 – Sashing – Block 2 – Sashing – Block 3 – Sashing – Block 4 – Sashing.
- Sew: Stitch the row together.
- Border: Add a 1.5-inch border of Background fabric around the entire long perimeter to frame the design.
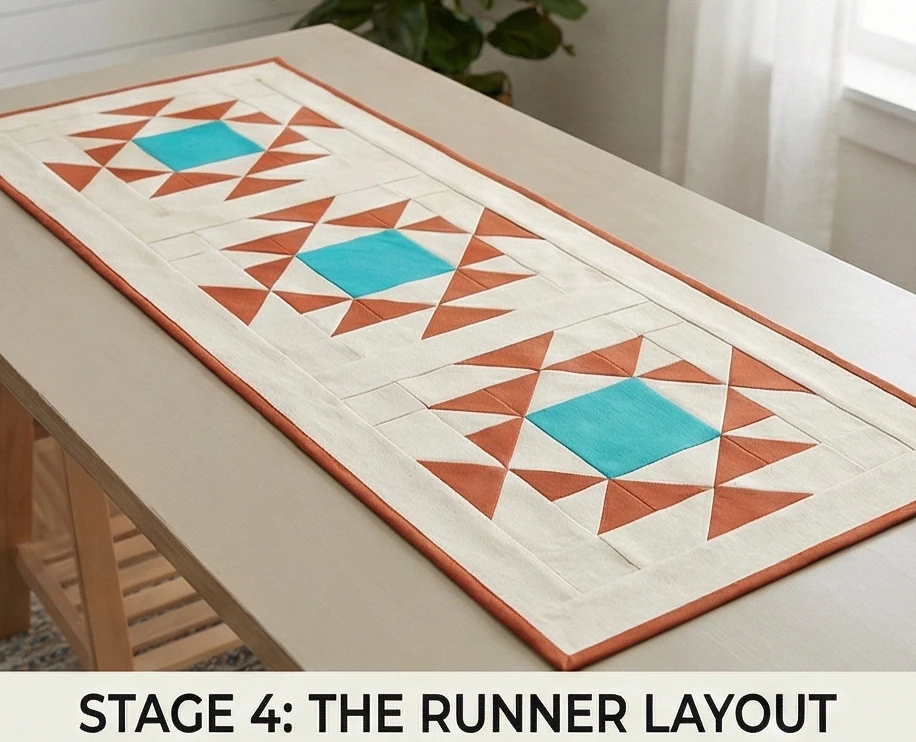
Step 5: “Sashiko” Stitching
Hand quilting adds the tribal feel.
- Baste: Sandwich the runner with thin batting and backing.
- Thread: Use thick Pearl Cotton or Embroidery Floss in a contrasting color (e.g., White thread on Rust fabric).
- Stitch: Sew large running stitches (about 1/4 inch long).
- Design: Stitch concentric diamonds inside the blocks. On the plain canvas border, stitch simple “X” shapes or parallel lines.
- Texture: Do not pull tight. Let the stitches sit on top of the fabric like beads.
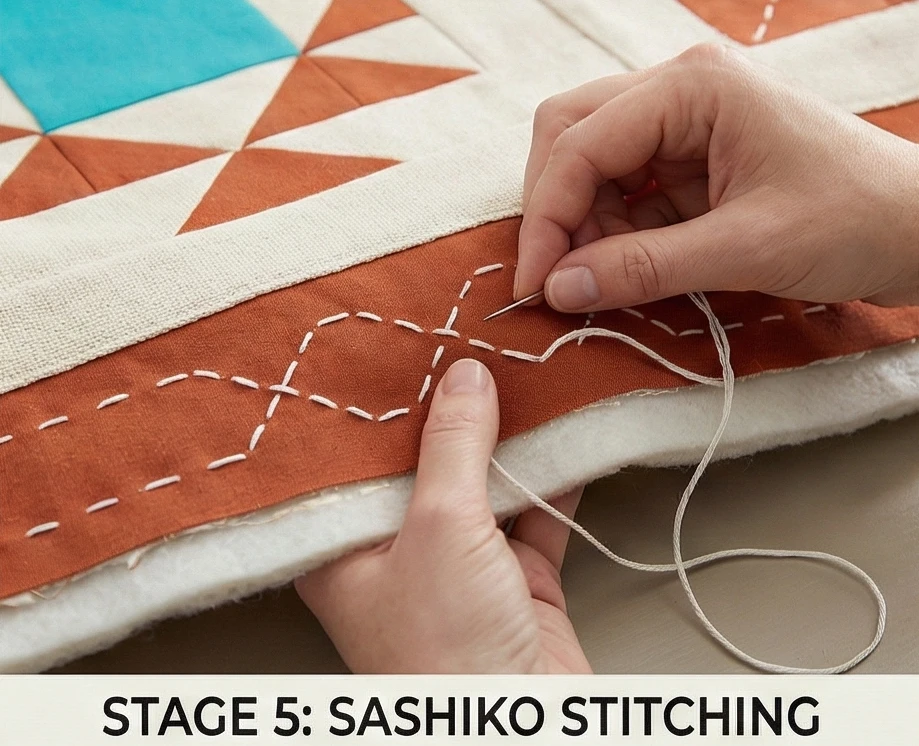
Step 6: The Fringed Ends
A clean hem is too modern. We want raw texture.
- Stay Stitch: Stitch a straight line 1 inch from the short ends of the runner to secure the layers.
- Fray: Pull the horizontal threads out of the canvas fabric at the ends until you hit the stay-stitch line. This creates a natural, self-fringe.
- Tassels: Make 4 chunky tassels from your embroidery floss (Accent colors). Hand-sew one tassel to each of the four corners of the runner, blending them into the fringe.
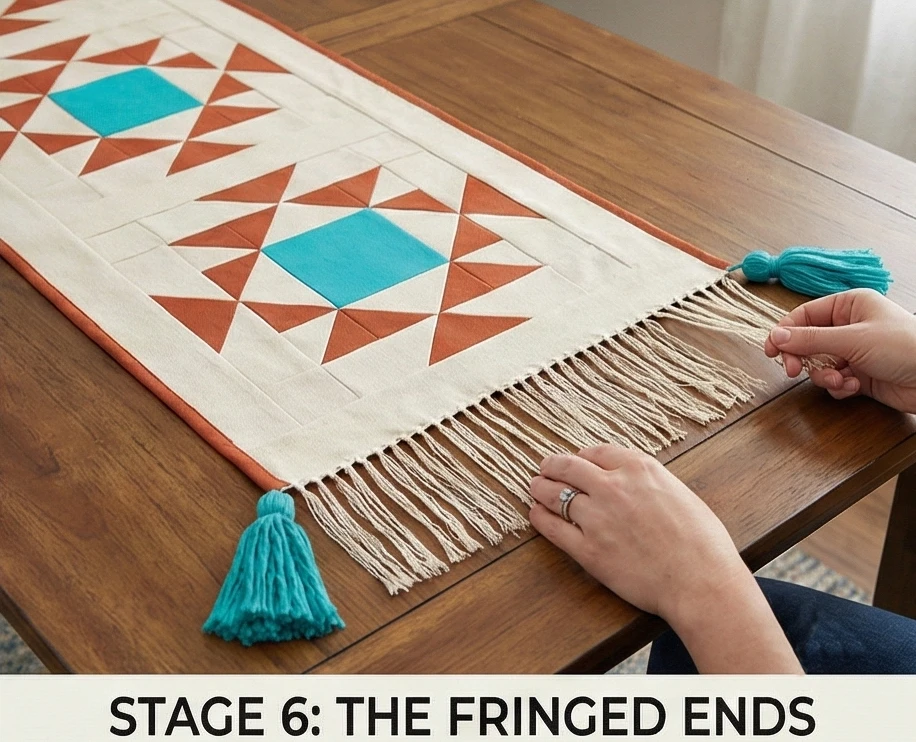
Usability Note: Canvas is durable, but it stains. Scotchgard or treat your finished runner with a fabric protector before putting it on the dining table. If using red wine or tomato sauce, spot clean immediately. The beauty of the rustic look is that it ages well—a little wear just makes it look more authentic.
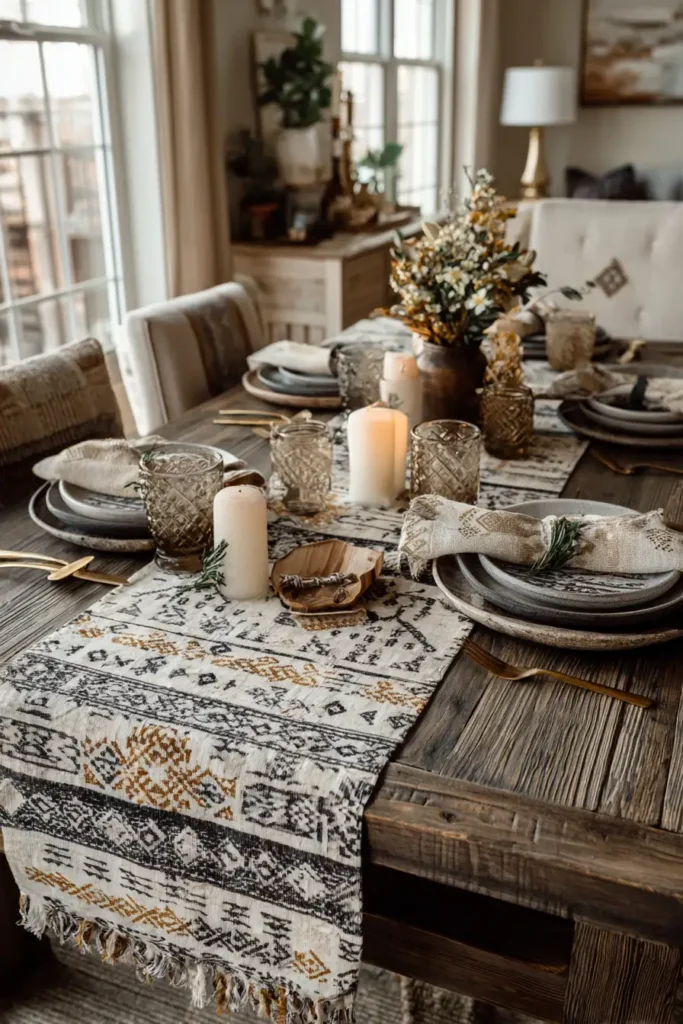
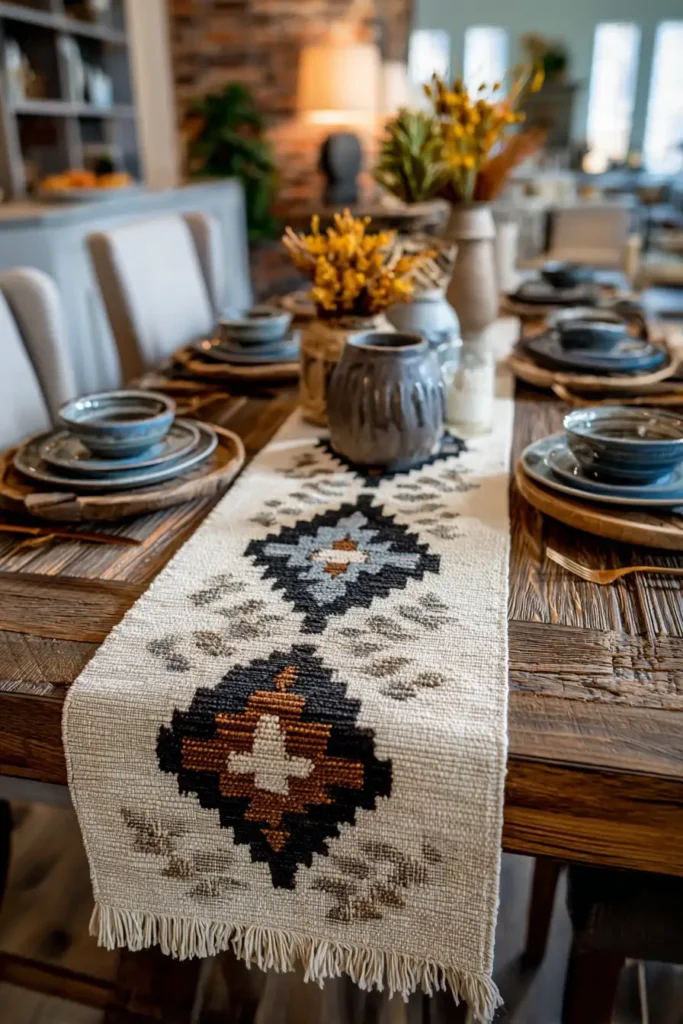
16. Patchwork Placemats and Coasters for Bohemian Tablescapes
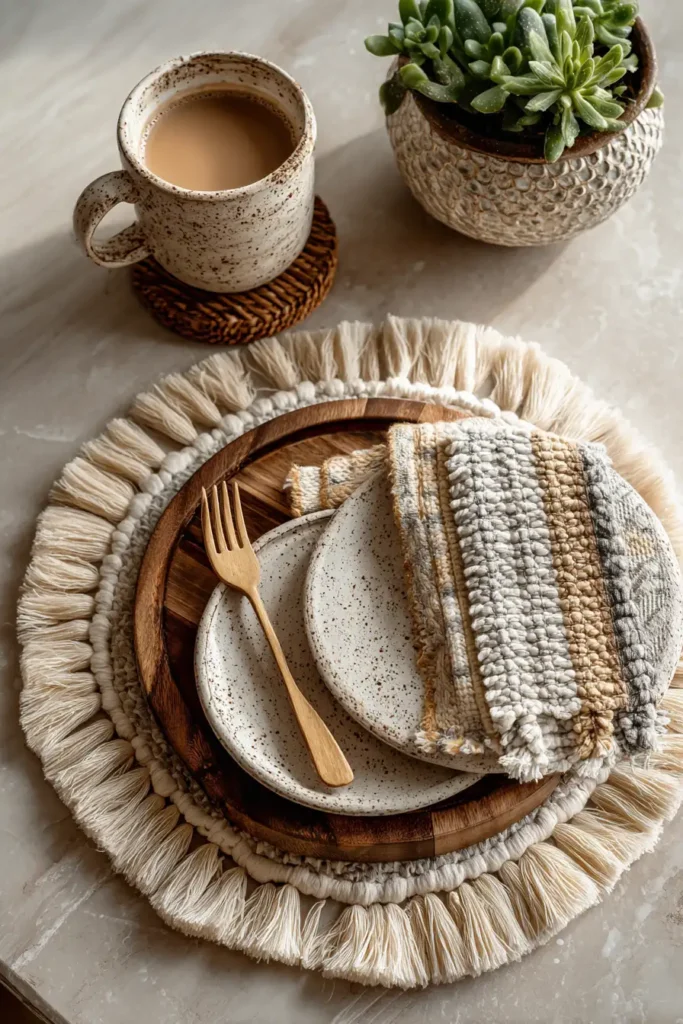

“The Souk Tile” Scrappy Mosaic Set
A true Bohemian home is a collection of stories, often represented by the smallest scraps of beloved fabrics. “The Souk Tile” set utilizes Crumb Piecing (or “Crazy Quilting”) to turn your tiniest leftovers—silks, batiks, linens, and block prints—into vibrant, mosaic-like surfaces. By unifying these chaotic scraps with a consistent Sashiko Stitch and a solid binding, you create a tablescape that looks like a collection of jewel-toned tiles found in a Moroccan marketplace.
Finished Dimensions:
- Placemat: Standard Rectangle, 12″ x 18″.
- Coaster: Round, 4.5″ Diameter.
Materials Needed:
- The Scraps: A bag of fabric remnants (nothing is too small!).
- Texture Mix: Incorporate Velvet, Linen, Silk, and Cotton for tactile variety.
- Backing: 1 yard of a solid color (e.g., Teal or Mustard) to calm the eye.
- Batting: Insul-Bright (Heat-resistant metallic fleece) AND thin cotton batting.
- Why: Keeps your table safe from hot plates and tea mugs.
- Binding: 1/2 yard of a dark solid (Navy or Charcoal) to “frame” the mosaic.
- Thread: Sashiko Thread or Perle Cotton #8 (White or Gold).
- Notions: Compass or a large mug (for tracing circles), rotary cutter.
Cultural Backstory: The technique of “Crazy Quilting” reached its peak in the Victorian era but has roots in the Japanese art of “Boro” (mending with scraps). It celebrates the philosophy of “Wabi-Sabi”—finding beauty in the imperfect, the repaired, and the discarded. In a boho home, a “crumb” placemat is a conversation starter about sustainability and creativity.
Step 1: Creating the “Made Fabric” (Crumb Piecing)
We are creating a new sheet of fabric from chaos.
- Start Small: Take two small scraps of different shapes. Sew them together along one straight edge. Press the seam open.
- Build Out: Sew a third scrap to the side of that unit. Press.
- Continue: Add pieces along the edges in a spiral or random pattern.
- The Rule: There are no rules! If a piece is angled, trim the edge straight before adding the next piece.
- Size: Continue until you have a “slab” of patchwork fabric large enough to cut your shapes (approx. 14″ x 20″ per placemat).

Step 2: Cutting the Forms
Now we impose order on the chaos.
- The Placemat: Trim your crazy patchwork slab into a perfect rectangle measuring 12.5″ x 18.5″.
- The Coaster:
- Make a smaller slab of scraps.
- Use a compass or trace a large mug to draw a 5-inch circle.
- Cut out the circle.
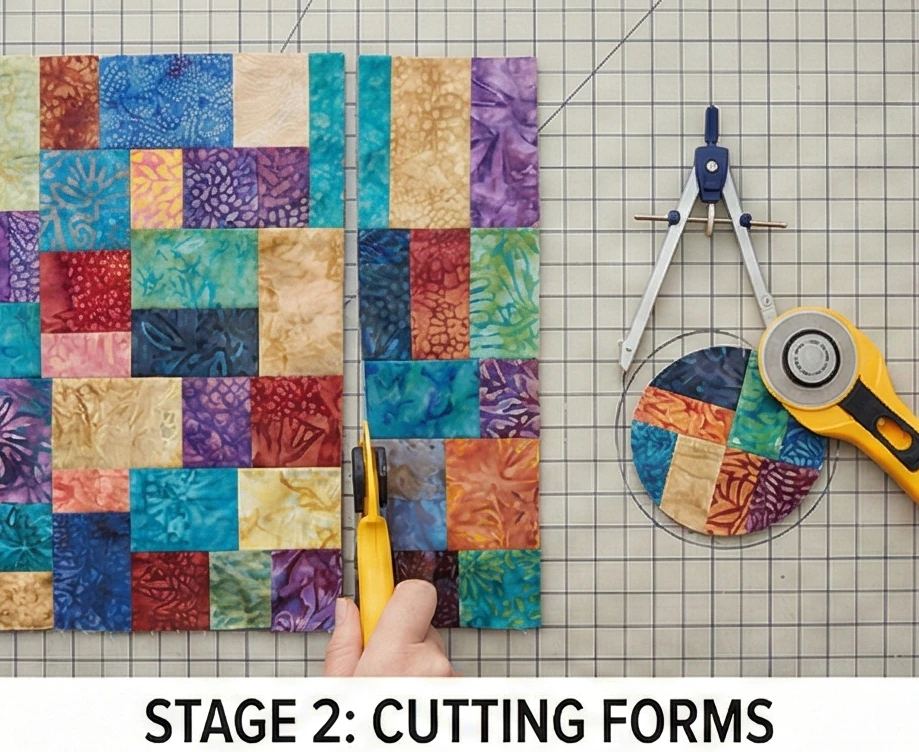
Step 3: The Thermal Sandwich
Functionality is key for table protection.
- Layer:
- Place the backing fabric face down.
- Place Insul-Bright (shiny side up).
- Place Cotton Batting on top of Insul-Bright (absorbs condensation).
- Place your Patchwork Top face up.
- Baste: Use safety pins or spray baste heavily. Small scraps create numerous seams, making the top heavy and requiring support.
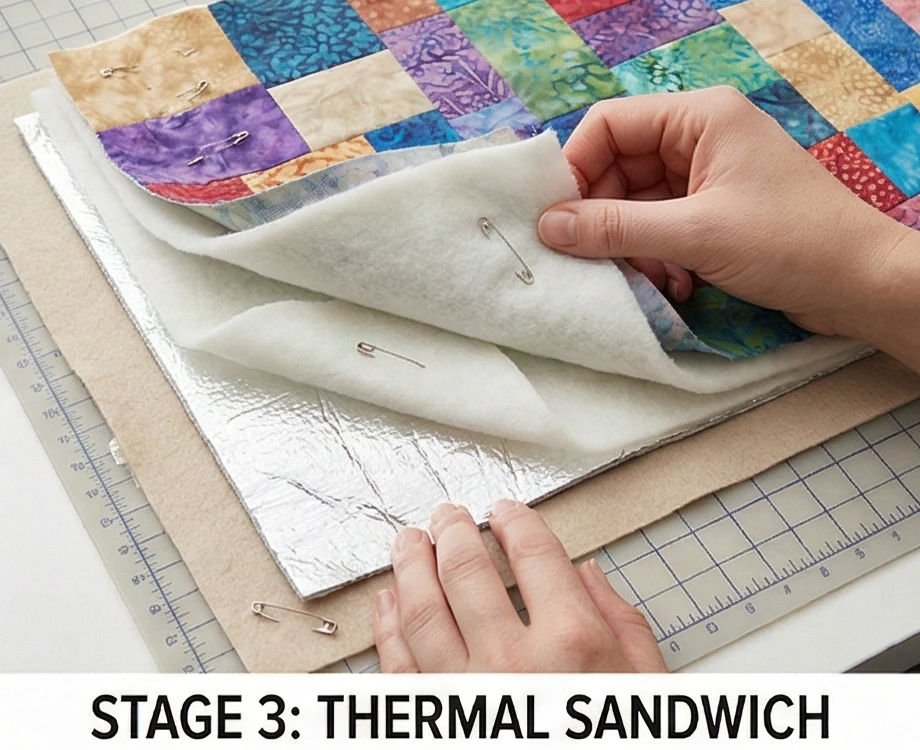
Step 4: Sashiko Unification
The stitching ties the disparate colors together.
- Thread: Load a needle with thick White or Gold Sashiko thread.
- Stitch: Quilt by hand using a simple running stitch.
- The Pattern: Ignore the seam lines of your scraps. Stitch consistent vertical lines spaced 1 inch apart across the entire surface.
- Effect: The uniform white lines visually “trap” the chaotic colors, making the design look intentional and cohesive rather than messy.
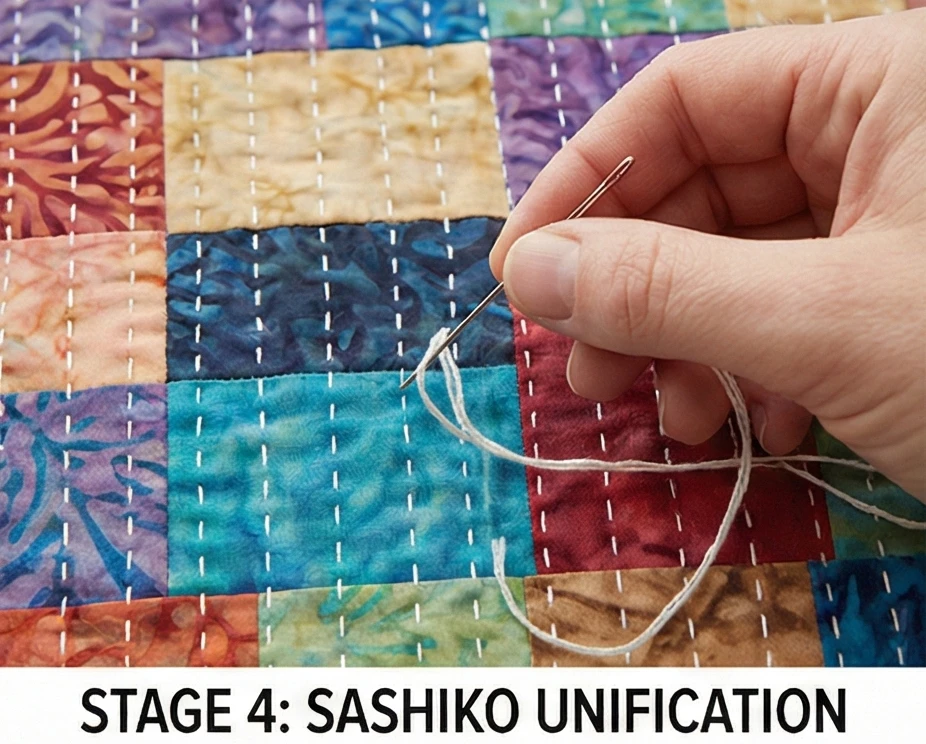
Step 5: Binding the Coasters (The Curve)
Curves can be tricky; bias binding is essential.
- Cut Bias: Cut fabric strips on a 45-degree angle (Bias), measuring 2.25 inches wide.
- Press: Fold in half lengthwise and press.
- Sew: Sew the binding to the front of the coaster, easing it gently around the curve. Do not pull tight!
- Finish: Fold over to the back and hand-stitch down for a smooth, round finish.
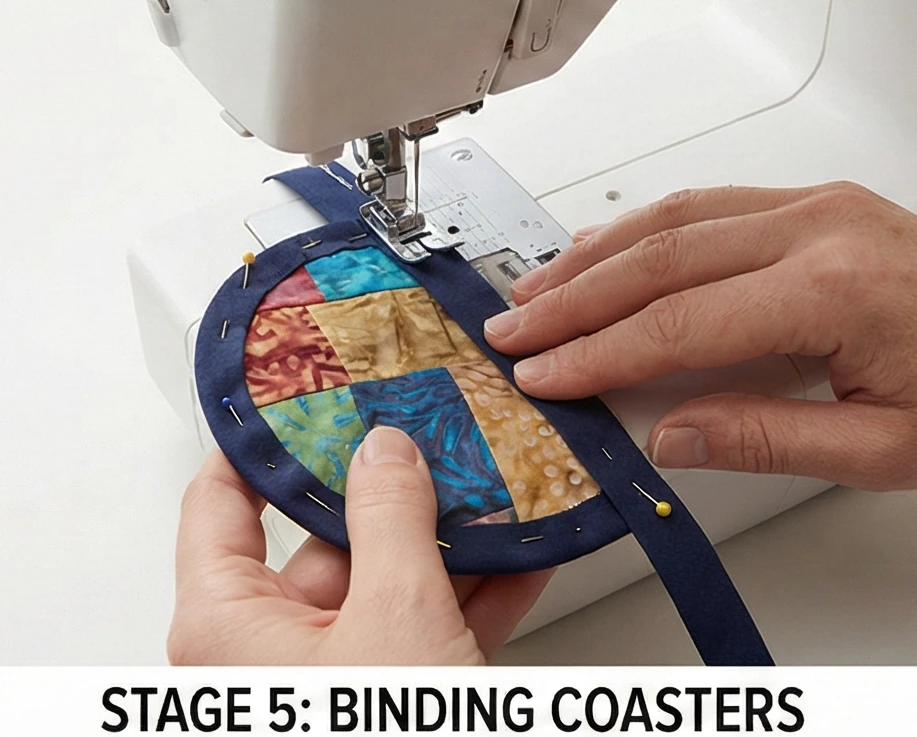
Step 6: Binding the Placemats
- Cut Straight: For the rectangular placemats, cut straight-grain binding strips (2.5 inches wide).
- Attach: Machine sew to the front, miter the corners, and hand-stitch to the back.
- Design Tip: Use a binding color that appears least in your scraps. This contrast effectively frames the “tile”.
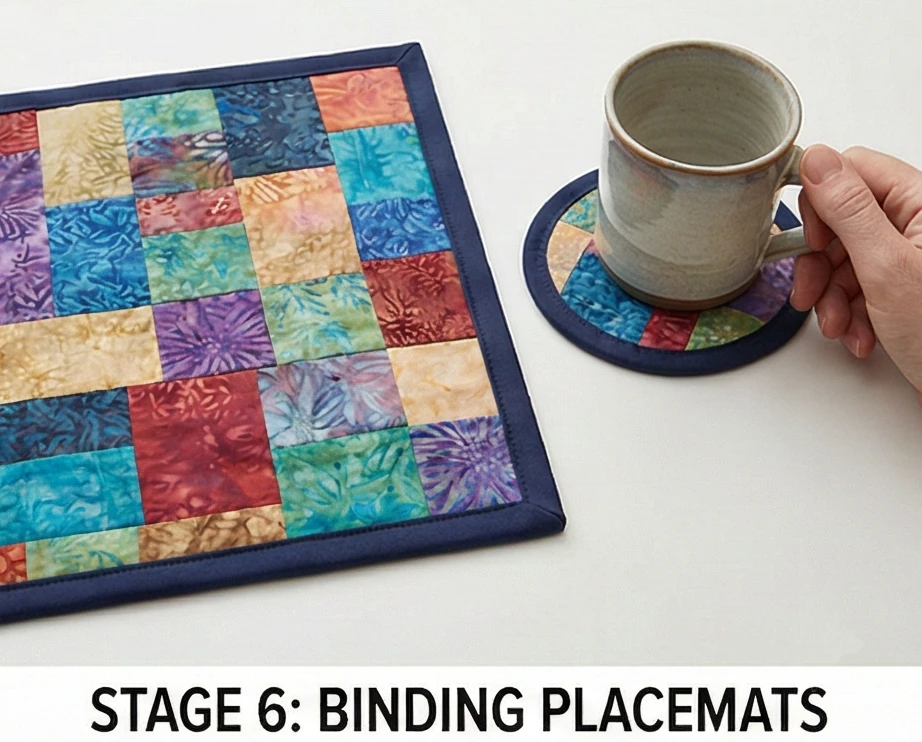
Usability Note: Because of the varying grain lines in crumb piecing, these mats can warp if washed in hot water. Wash on Cold/Gentle and lay flat to dry. Iron with plenty of steam to reshape them perfectly rectangular before putting them back on the table.
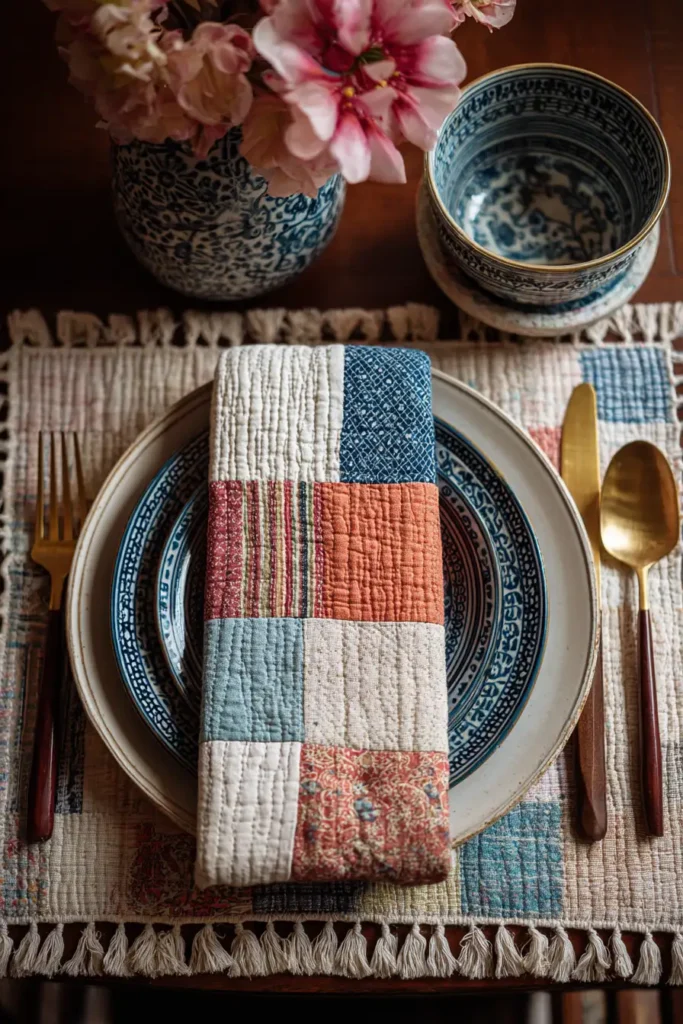
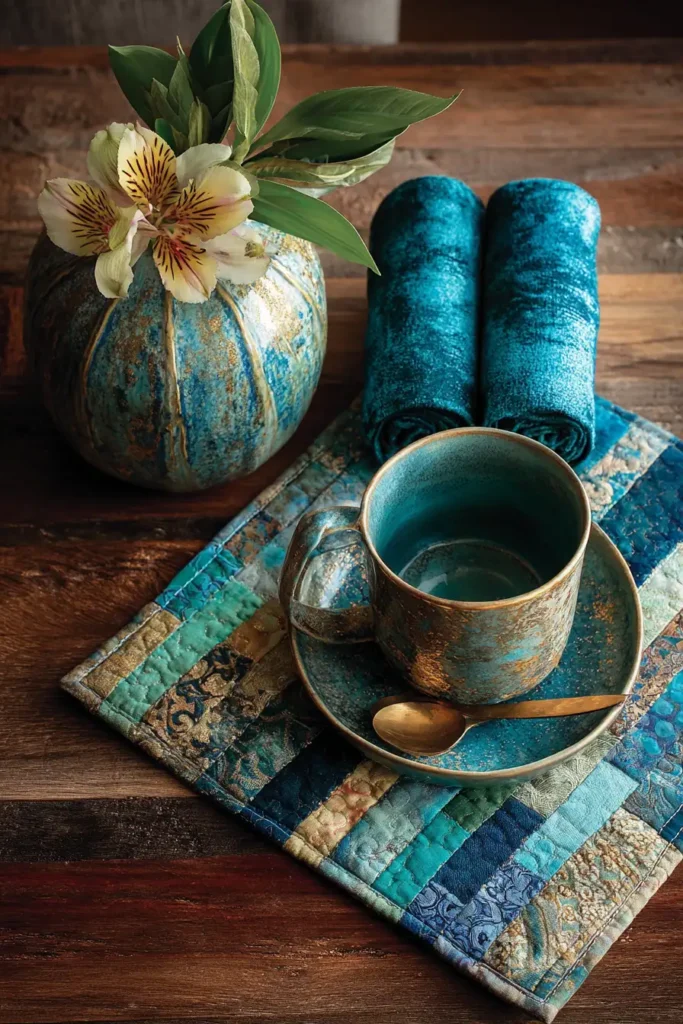
17. Sherpa-Backed Boho Lap Quilts for Ultimate Living Room Comfort
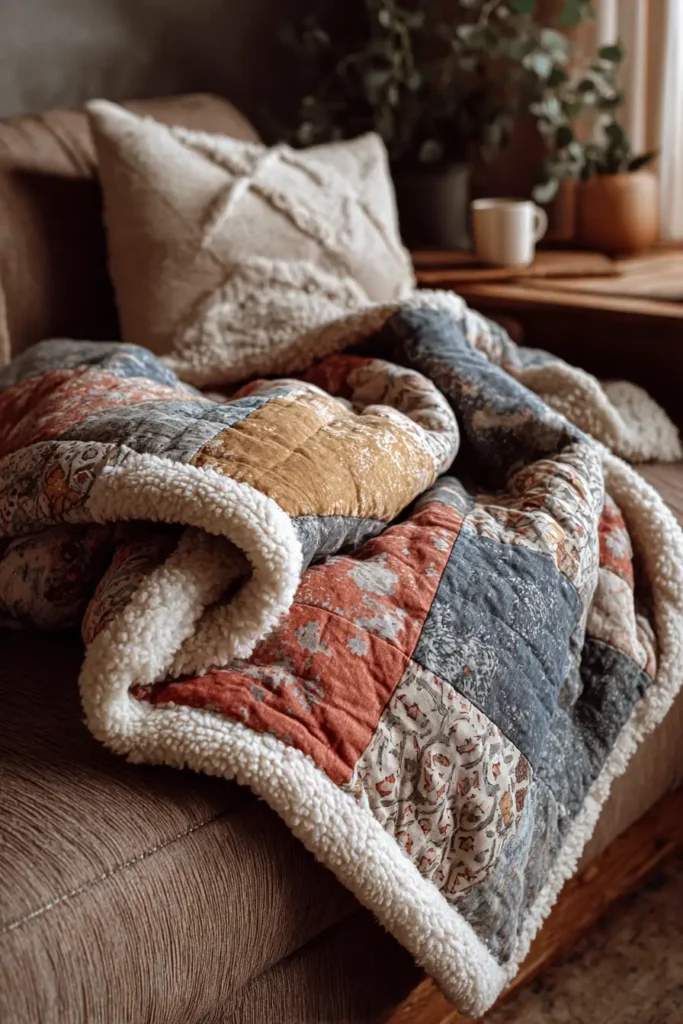
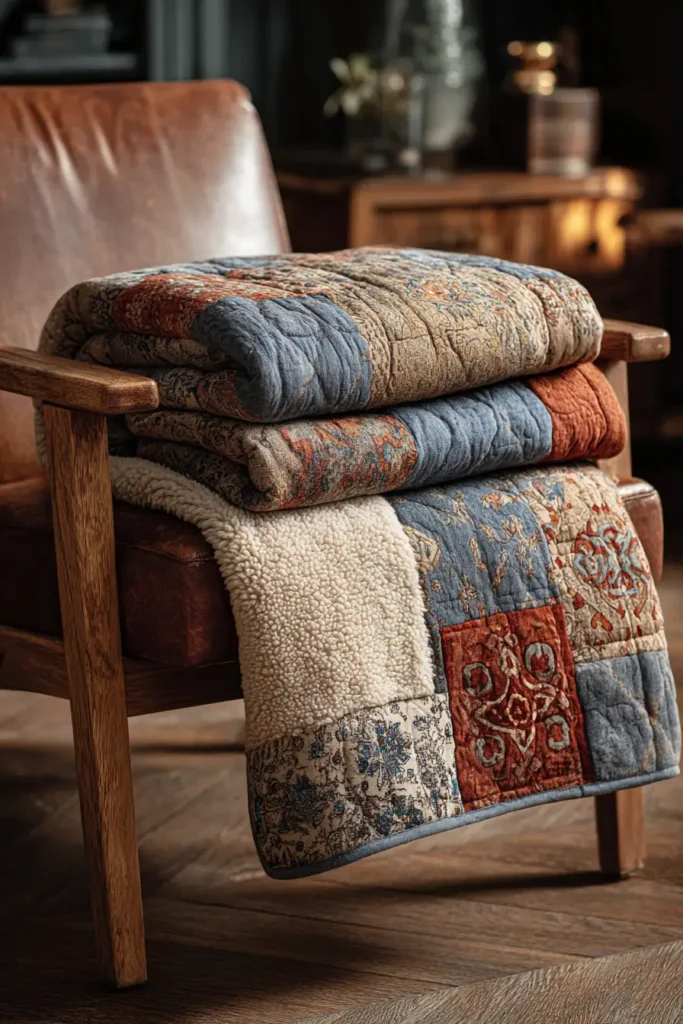
“The Mountain Nomad” Sherpa-Lined Throw
The ultimate goal of a boho sanctuary is comfort you can sink into. “The Mountain Nomad” combines the visual warmth of Plaid Flannel or Tribal Ikat with the physical warmth of a Faux Sherpa (Sheepskin) backing. Unlike traditional quilts that use batting, this “blanket-quilt” hybrid relies entirely on the sherpa layer for loft. It uses the Envelope (Pillowcase) method to avoid bulky bindings, creating a seamless, cloud-like edge that invites you to curl up with a book and tea.
Finished Dimensions: Standard Throw, 50″ x 60″.
Materials Needed:
- The Top (Visuals): 1.5 yards of Brushed Cotton Flannel, Double Gauze, or a Woven Ikat. (Choose a fabric that is soft to the touch).
- The Backing (Warmth): 1.5 yards of High-Quality Sherpa Fleece (Cream or Oatmeal color).
- Note: Buy “Bonded Sherpa” if possible—it sheds less and is easier to sew.
- Batting: None! The Sherpa provides all the warmth and puff you need.
- Ties: 1 skein of Chunky Wool Yarn or Embroidery Floss (for securing the layers).
- Notions: Walking foot (essential for thick layers), heavy-duty clips (pins get lost in the fur).
Cultural Backstory: The use of sheepskin as bedding dates back to the dawn of humanity. In the 1970s, “Shearling” coats became a fashion icon of the hippie movement, symbolizing a return to nature and rugged warmth. This quilt brings the same rugged, natural aesthetic indoors without requiring real leather or fur.
Step 1: Prep and Cut
Sherpa is stretchy and messy. Taming it is the first step.
- Wash the Top: Pre-wash and dry your flannel/cotton top to shrink it.
- Do NOT pre-wash the Sherpa (it can mat).
- Square Up: Lay the Sherpa flat on the floor (fur side up). Lay the Top fabric over it. Trim both layers to exactly 52″ x 62″ (removing selvages).
- Tip: Keep a vacuum cleaner nearby. Cutting the sherpa creates a “snowstorm” of fluff.
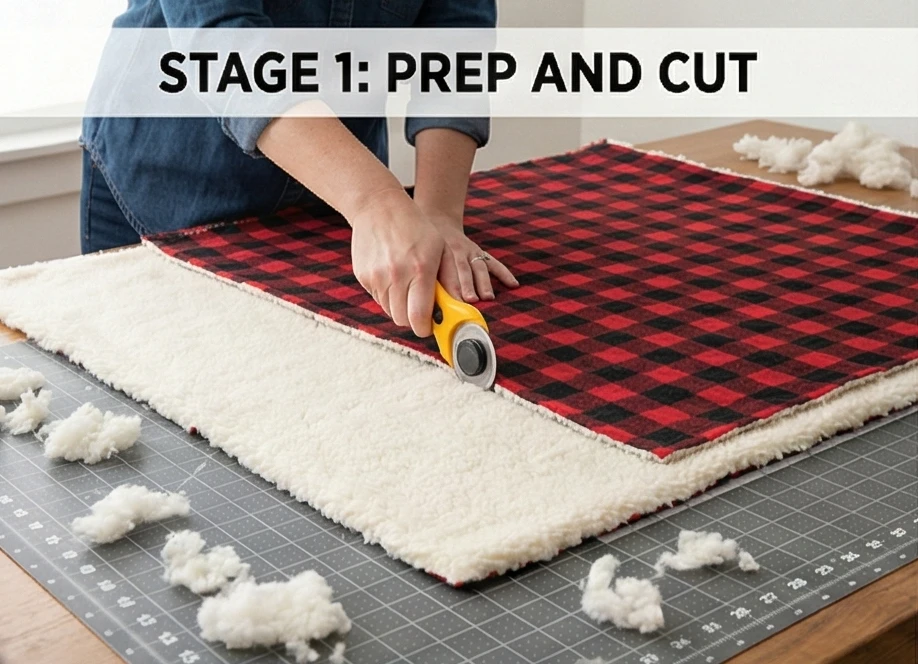
Step 2: The “Inside-Out” Sandwich
We avoid binding because the sherpa is too thick to fold over neatly.
- Layer: Place the Sherpa Right Side Up (Fur facing you).
- Top: Place the Flannel Top Right Side Down on top of the Sherpa.
- Check: Right sides should be touching.
- Clip: Use Wonder Clips or binder clips around the entire perimeter every 4 inches. Do not use pins; they will shift.
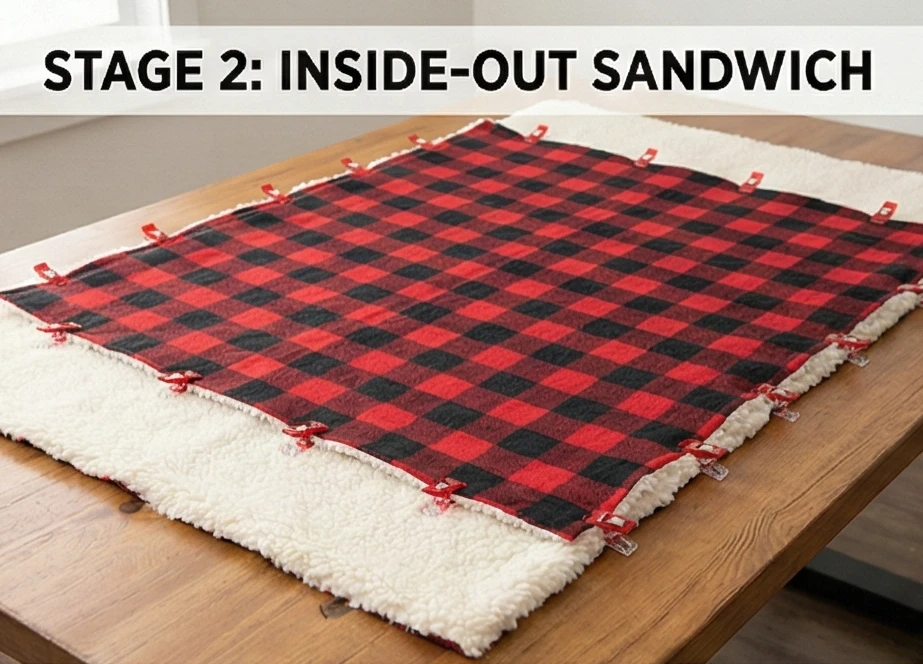
Step 3: Sewing the Envelope
- Settings: Set your stitch length to 3.5mm (longer stitches handle bulk better). Install your Walking Foot.
- Sew: Stitch around the perimeter with a 1/2 inch seam allowance.
- The Gap: Leave a 10-inch opening on one side (not a corner) to turn it right-side out.
- Reinforce: Backstitch securely at the start and end of the opening.
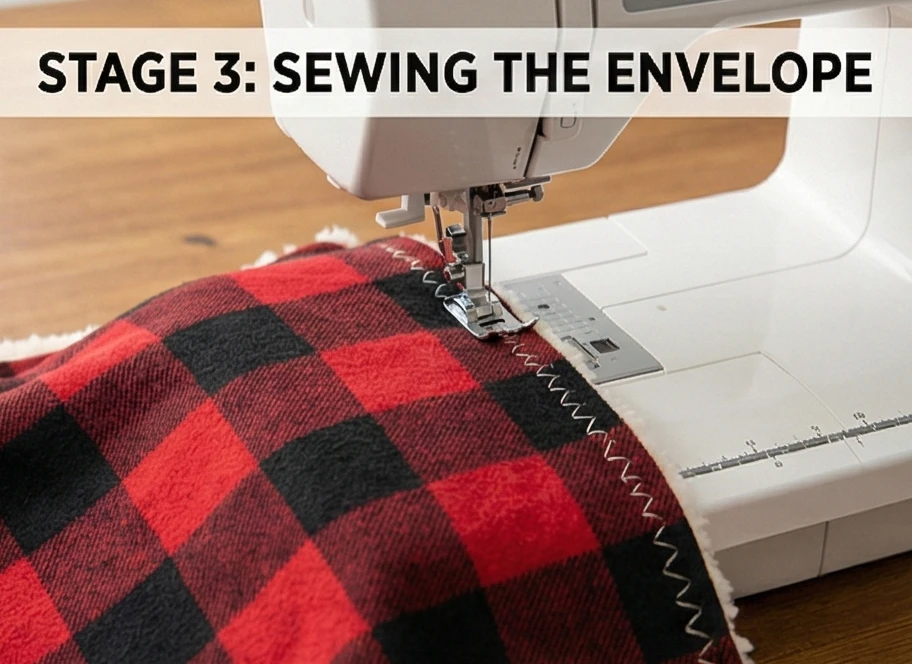
Step 4: Turn and Topstitch
The magic reveal.
- Clip Corners: Snip the four corners diagonally (be careful not to cut the stitches) to reduce bulk.
- Turn: Reach through the opening and pull the blanket right side out.
- Poke: Use a chopstick to push the corners out so they are square.
- Close: Fold the raw edges of the opening inward. Clip it shut.
- Topstitch: Sew a border line 1 inch away from the edge around the entire blanket. This closes the gap and creates a flat, flanged edge.
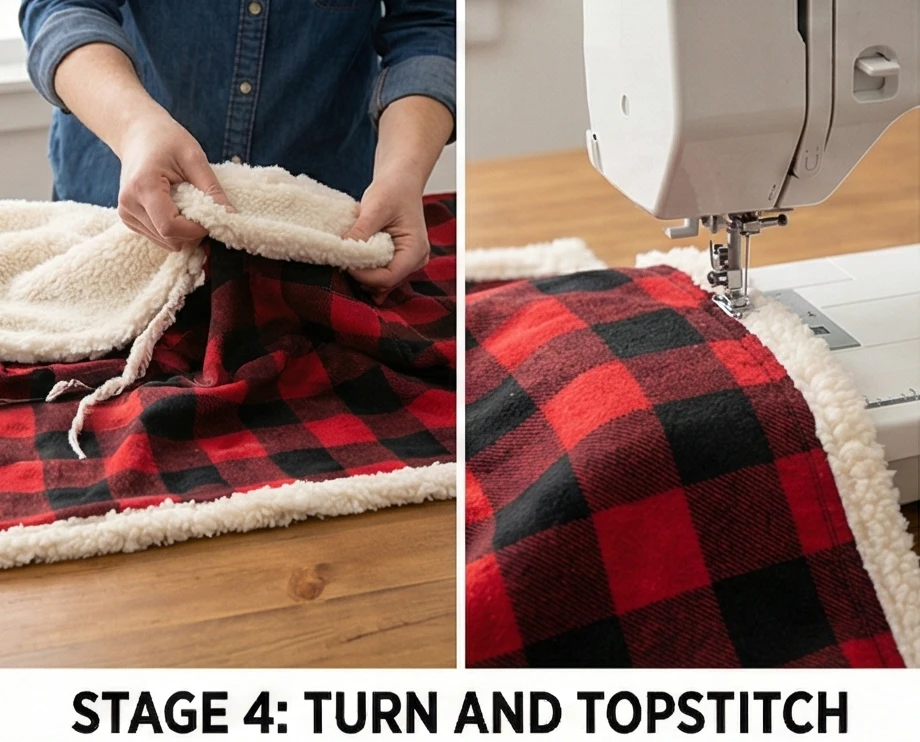
Step 5: Yarn Tying (The “Quilting”)
Machine quilting sherpa can stretch it. Tying is safer and looks more boho.
- Grid: Lay the blanket flat. Decide on a grid for your ties (e.g., every 8 inches).
- Stitch: Using a large tapestry needle and your Chunky Yarn:
- Go down through the top and return 1/4 inch.
- Knot: Tie a sturdy Square Knot. Trim the yarn tails to 1 inch.
- Visual: These little tufts of yarn on the flannel side add texture and keep the two layers from separating in the wash.
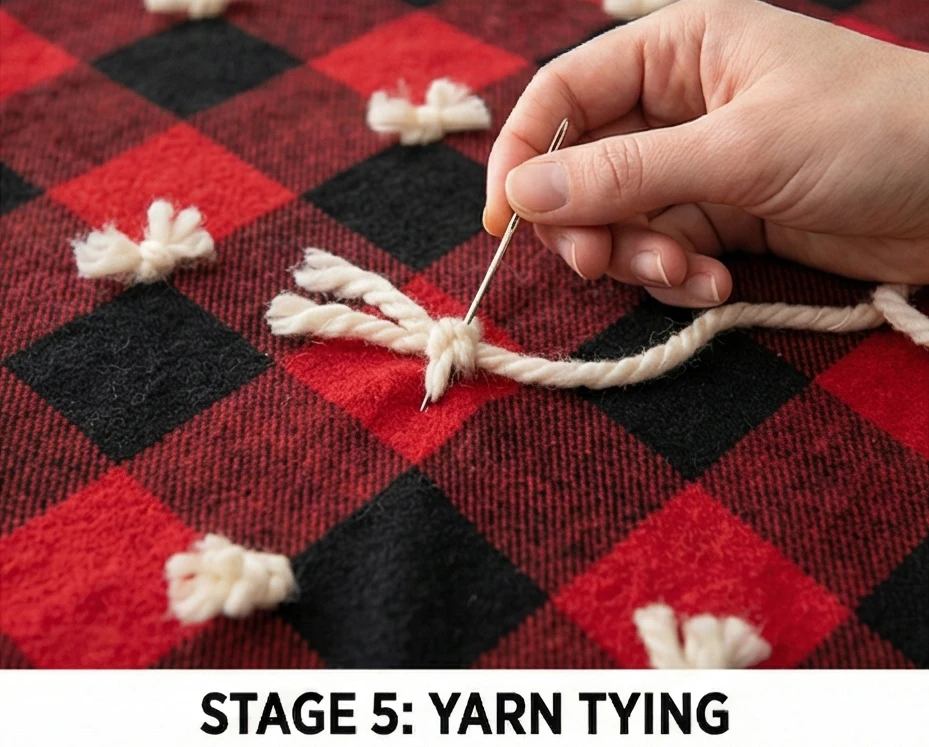
Step 6: The “Brushing” Finish
Fixing the seams.
- Inspect: Check your seams. Sometimes the sherpa fur gets caught in the thread.
- Brush: Use a clean toothbrush or a stiff comb to gently brush the seam lines on the sherpa side. This pulls the trapped fur out of the stitches, making the seam line disappear and look seamless.
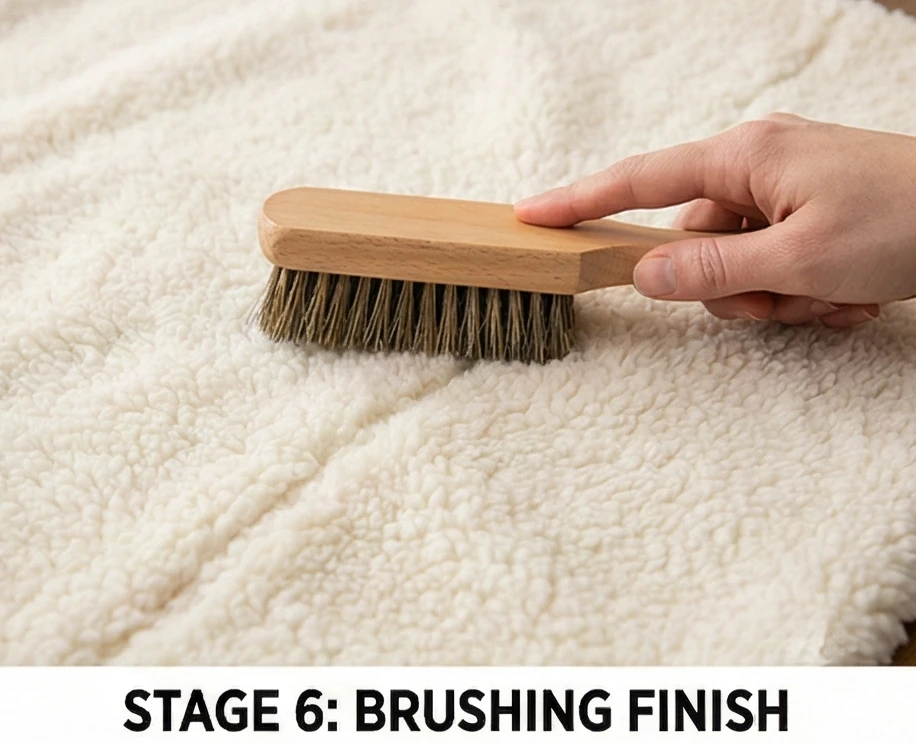
Usability Note: Sherpa is prone to attracting pet hair and wood chips. If you drop this on a rug, it will pick up everything on the rug. To clean, wash on Cold/Delicate and Hang Dry or tumble dry on Air Fluff/No Heat. Heat will melt the synthetic fibers of the sherpa and make it rough and scratchy.

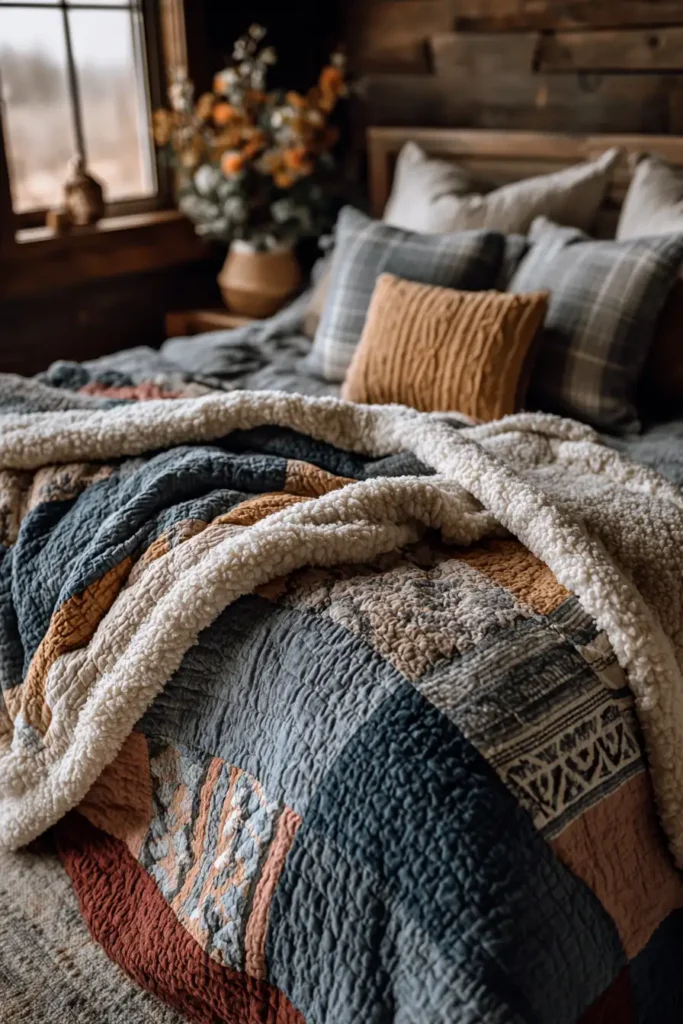
18. Mixed Media Boho Table Toppers for Artistic Dining
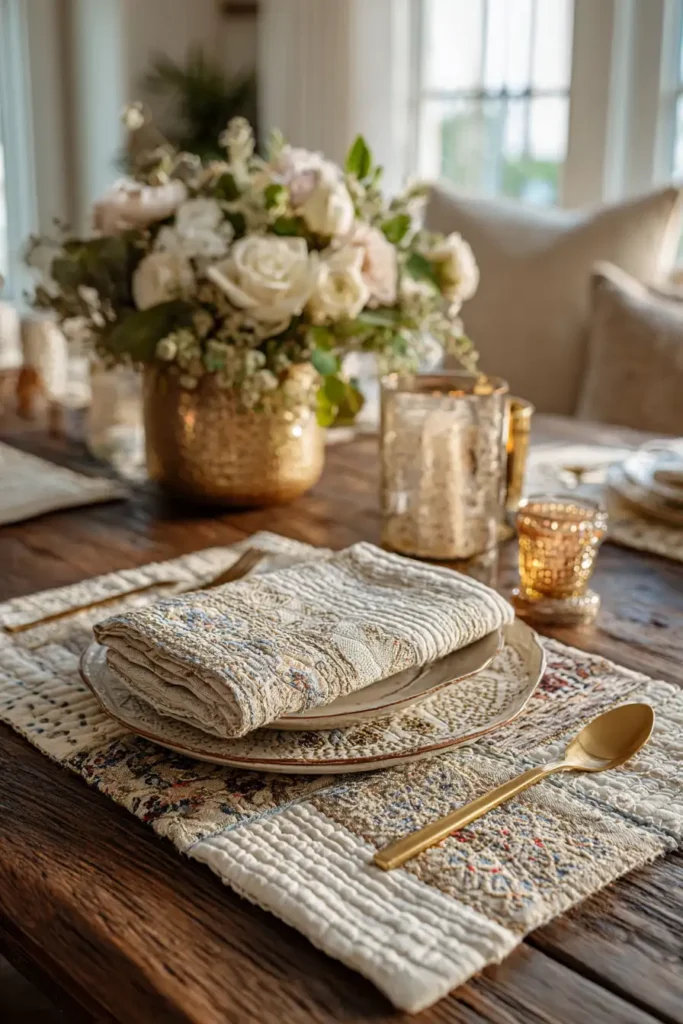
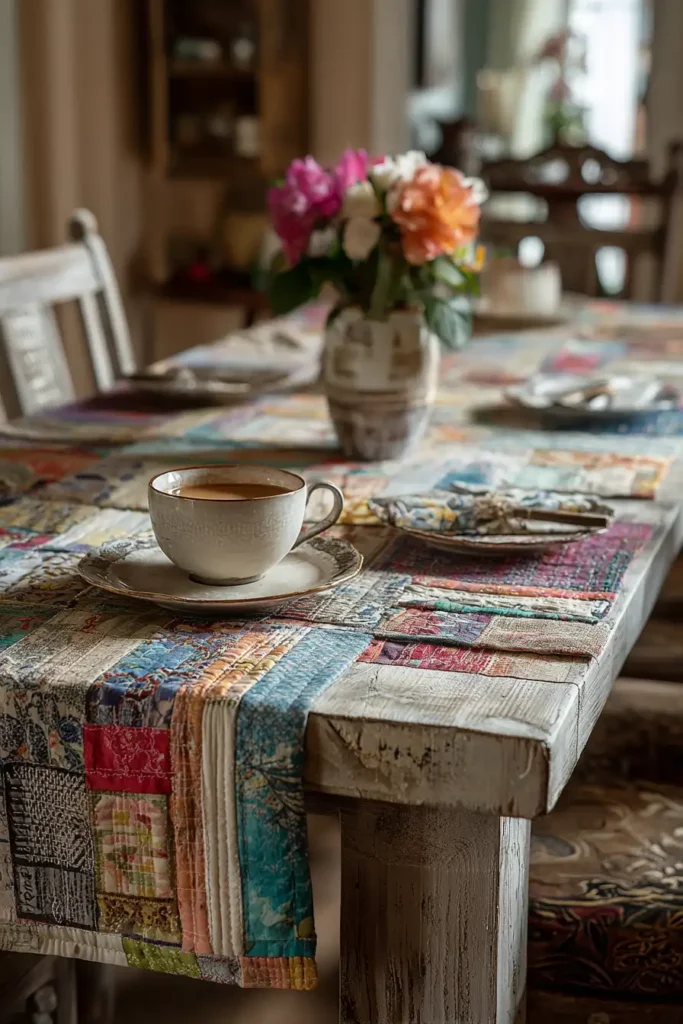
“The Artist’s Canvas” Collage Table Topper
A mixed media table topper is less about perfect points and more about layering texture, memory, and art. “The Artist’s Canvas” uses a Raw-Edge Collage technique to combine standard cottons with unconventional materials like Lace Doilies, Burlap Scraps, Vintage Handkerchiefs, and even Stenciled Paint. It treats the table not just as a surface for food, but as a gallery space. This topper is designed to be the centerpiece itself—perfect for a candlelit dinner or a lazy Sunday brunch.
Finished Dimensions: Square Table Topper, 36″ x 36″ (fits a standard round or square table).
Materials Needed:
- The Base: 1.25 yards of heavy Drop Cloth Canvas or Natural Linen.
- The Collage Elements:
- 3-4 Vintage Lace Doilies (check thrift stores).
- Scraps of Silk or Velvet (for sheen).
- Patches of Burlap or Hessian (for grit).
- Paint: Fabric Paint (Gold, Copper, or White) and a stencil brush.
- Adhesive: Fabric Glue Stick or Lite Steam-A-Seam (fusible web).
- Thread: Invisible Thread (Monofilament) or heavy contrasting Sashiko Thread.
- Backing: 1.25 yards of muslin.
Cultural Backstory: Mixed-media fiber art emerged in the 1970s feminist art movement, reclaiming “domestic” materials like lace and doilies—often dismissed as women’s busywork—and elevating them to high art. In a boho home, layering these vintage pieces honors the anonymous women who crafted them while giving them a new, modern life.
Step 1: Preparing the Canvas
We need a sturdy foundation.
- Cut Base: Cut your heavy canvas/linen into a 40″ x 40″ square.
- Prep: Wash and dry the canvas to get that crinkled, lived-in texture. Don’t iron it perfectly flat; the wrinkles add character.
- Fray Edges: Pull threads from all four sides to create a 1-inch raw fringe.
- Stay-Stitch: Sew a straight line 1 inch from the edge to prevent fraying.
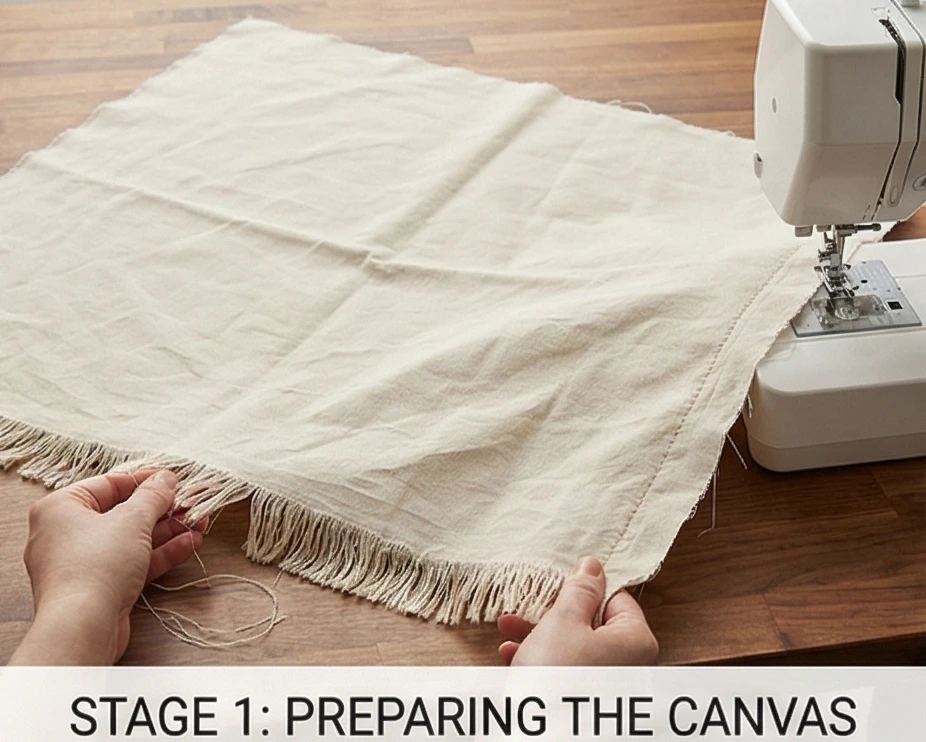
Step 2: The Paint Layer (Background Texture)
Paint adds depth that fabric alone cannot achieve.
- Stencil: Place a large stencil (mandala or geometric shape) randomly on the canvas—off-center looks best.
- Dry Brush: Lightly dab Metallic Gold or White fabric paint through the stencil.
- Technique: Keep the brush almost dry. You want a faded, “ghost” print, not a thick blob of paint.
- Dry: Let it dry completely before adding fabric.
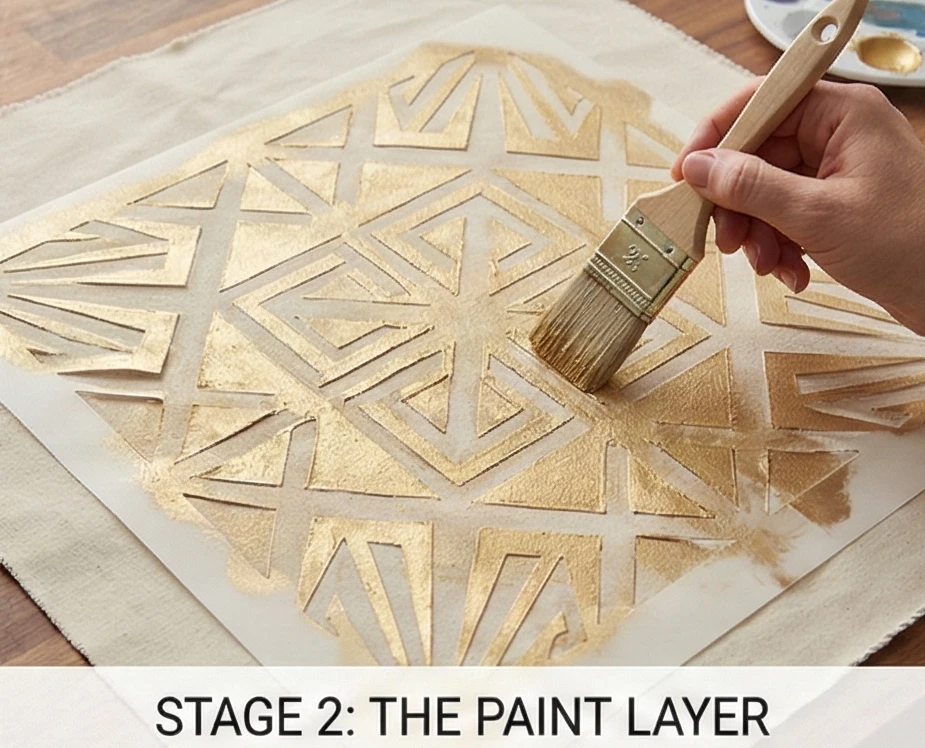
Step 3: Layering the Collage
Composition is intuitive. Trust your eye.
- Arrange:
- Place a patch of Burlap near a corner.
- Overlay a piece of Silk partially covering the burlap.
- Top it with a Lace Doily.
- Balance: Create 3 distinct clusters of collage on the topper (e.g., one large cluster, two smaller echoes). Leave some negative space so the canvas shows through.
- Secure: Use a dab of fabric glue or fusible web to tack the pieces in place so they don’t shift while sewing.
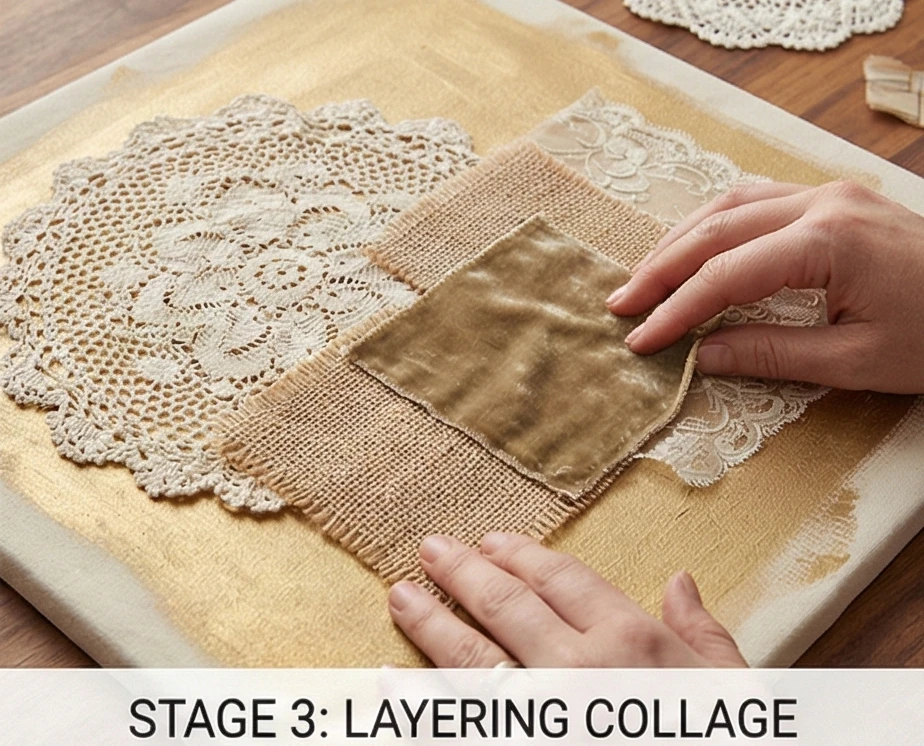
Step 4: Raw-Edge Appliqué
Embrace the fray.
- Setup: Drop the feed dogs on your sewing machine (Free Motion mode) or use a standard foot.
- Stitch: Sew around the edges of your collage pieces.
- Doilies: Stitch freely over the lace structure to hold it down.
- Fabric Scraps: Stitch roughly 1/8″ from the edge. Let the edges unravel.
- Thread Choice: Use Invisible Thread if you want the texture to shine, or Black Thread if you want a “sketched” look.
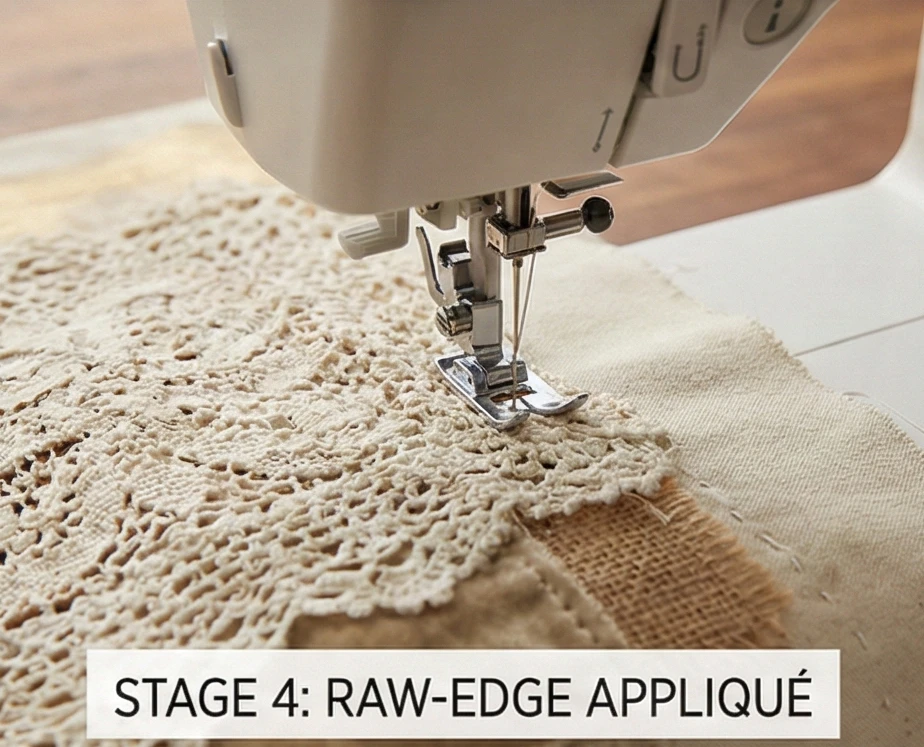
Step 5: “Kantha” Unification
Hand stitching ties the disparate elements together.
- Baste: Place the collage top over a layer of thin batting and backing. Baste well.
- Hand Stitch: Using thick Perle Cotton thread, stitch long running lines through the entire piece.
- Direction: You can stitch straight lines or follow the curves of the doilies.
- Function: This quilting secures the heavy lace and burlap to the base, ensuring they wash well.

Step 6: The “Coffee Stain” Dye (Optional Antique Finish)
If the lace looks too new and white…
- Brew: Brew a pot of strong black tea or coffee.
- Paint/Spray: Put the tea in a spray bottle. Mist the bright white doilies or the edges of the canvas.
- Set: Let it dry, then iron on high heat to set the color.
- Result: This imparts an instant “heirloom” patina to the topper, unifying the bright white lace with the natural canvas background.
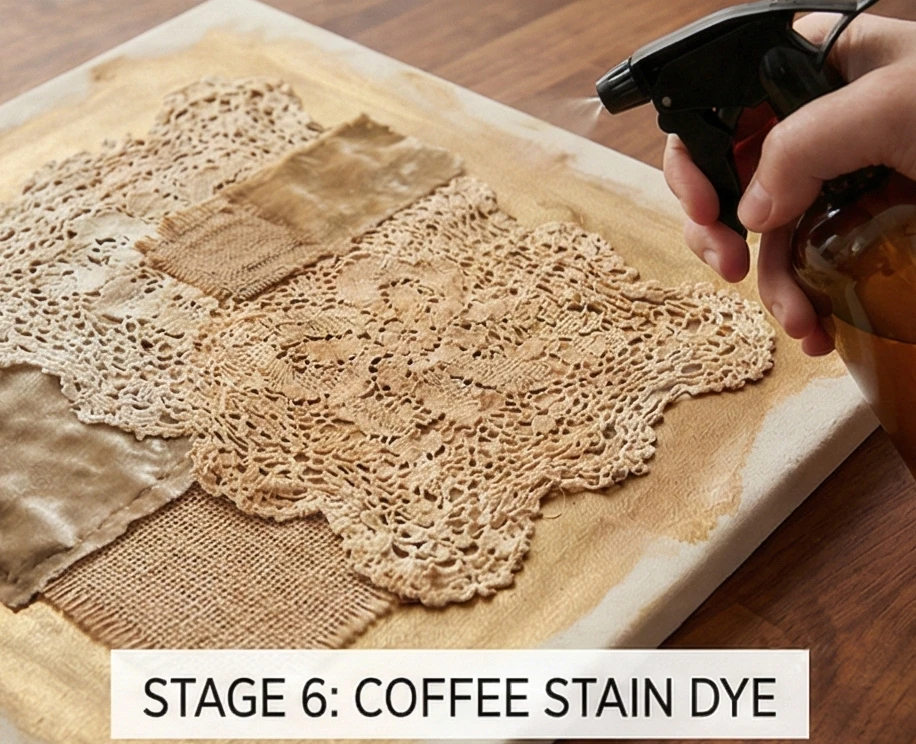
Usability Note: Mixed-media toppers are surprisingly durable, but the lace catches on forks. This topper is best used as a centerpiece base (under a bowl of fruit or candles) rather than as a dining placemat. Wash on a delicate cycle in a mesh laundry bag to protect the lace.
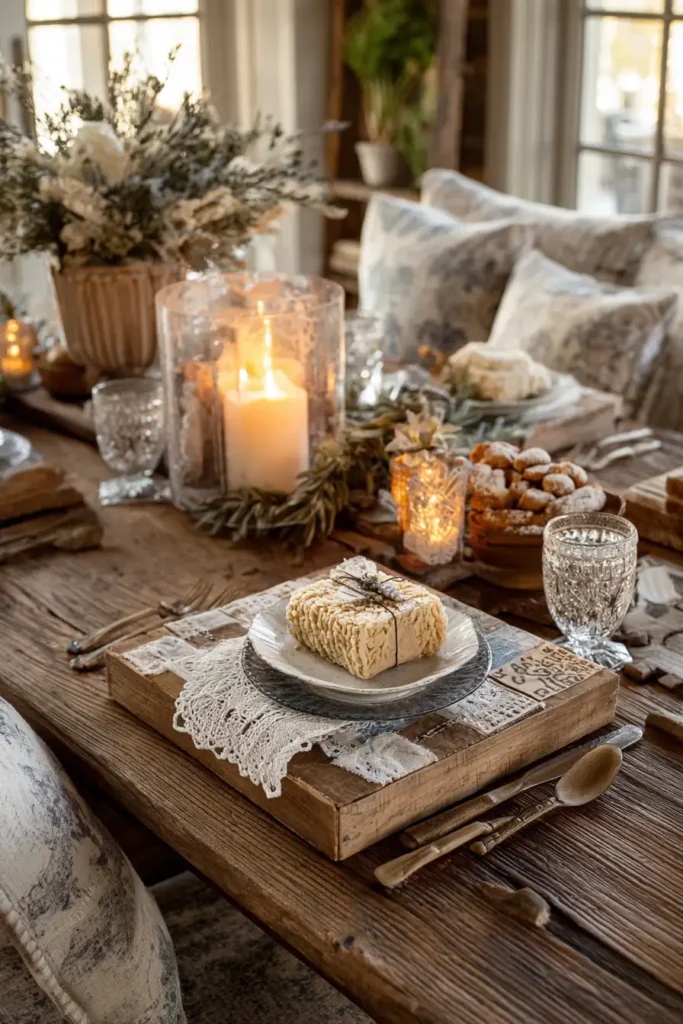
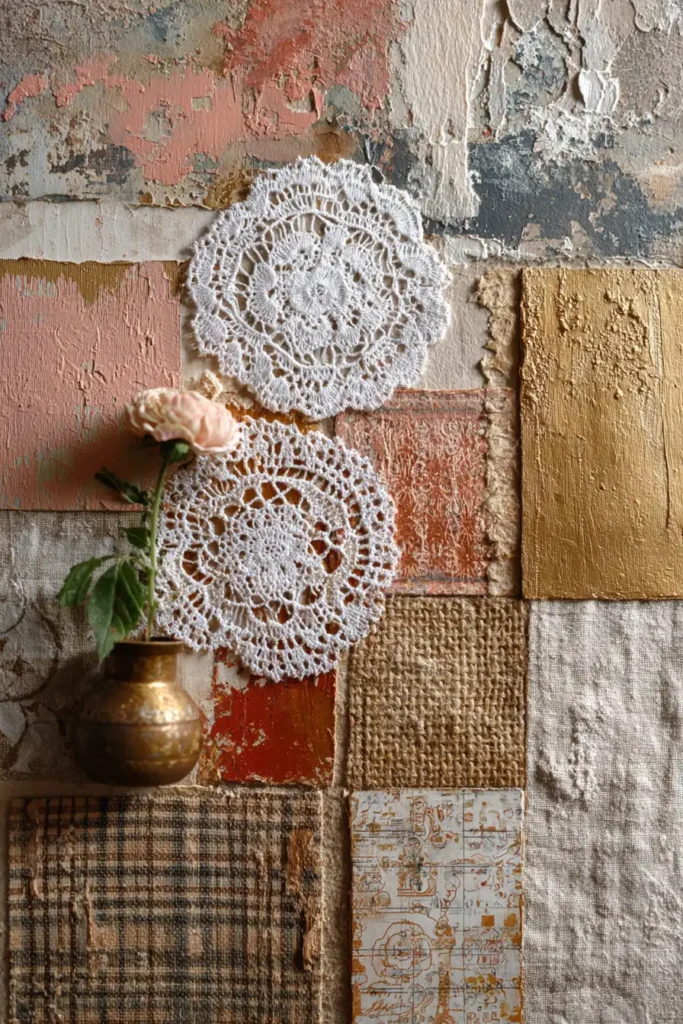
19. Celestial Sun and Moon Quilt Patterns for Mystical Wall Art
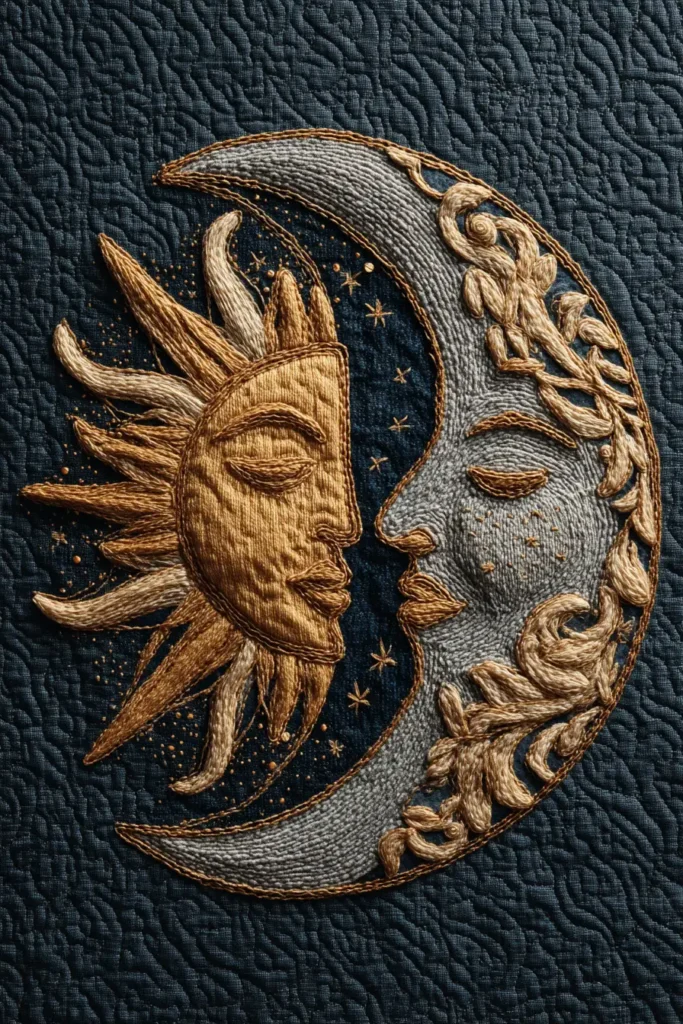
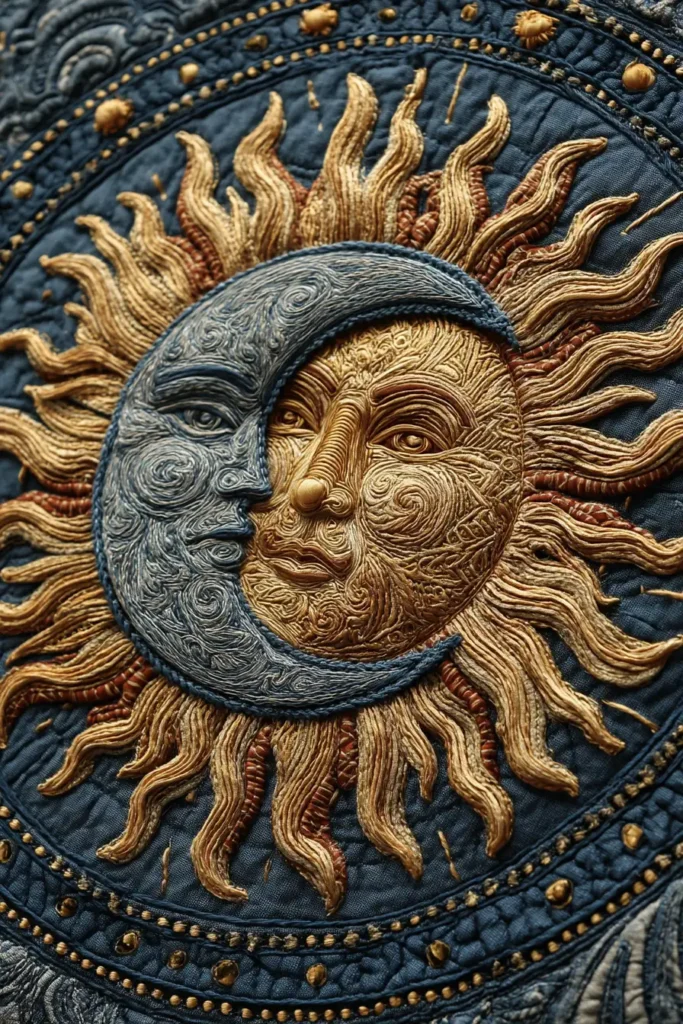
“The Cosmic Balance” Sun & Moon Medallion
In Bohemian mysticism, the Sun and Moon represent the universe’s duality—masculine and feminine, action and rest, day and night. The “The Cosmic Balance” wall hanging captures this eternal embrace in a circular medallion. Set against a deep Indigo or Midnight Blue background, the Gold Sun and Silver Moon are created using Raw-Edge Appliqué. Accented with metallic embroidery and perhaps a few seed beads, this piece turns any wall into a portal to the heavens.
Finished Dimensions: Statement Wall Hanging, 40″ x 40″.
Materials Needed:
- Fabric A (The Night Sky): 1.5 yards of Solid Navy, Black, or a subtle Star Map Print.
- Fabric B (The Sun): Scraps of Mustard, Gold Velvet, or Ochre Linen.
- Fabric C (The Moon): Scraps of Silver Grey, Pale Blue, or Pearl Cotton.
- Fusible Web: 1 yard of paper-backed adhesive (e.g., HeatnBond Lite).
- Thread: Metallic Gold and Silver thread (or high-contrast yellow/grey).
- Batting: Stiff cotton batting (Wall hangings need structure, not drape).
- Notions: Compass (or string/pencil), embroidery needle, gold beads (optional).
Cultural Backstory: The “Sun and Moon” motif became iconic in 1990s bohemian decor, but its roots trace back to medieval alchemy and Tarot. The “Eclipse” or “Embrace” image symbolizes the perfect union of opposites (Solar King and Lunar Queen), believed to bring harmony and balance to a home.
Step 1: Preparing the Sky Canvas
The background must be dark to make the celestial bodies glow.
- Cut: Cut your Navy background fabric into a 42″ x 42″ square.
- Mark Center: Fold in quarters to find the exact center point.
- Draft Circle: Using a string compass, draw a large 24-inch diameter circle in the center of the fabric. This is the boundary of your medallion.
Step 2: Drafting the Celestial Bodies
You are drawing with scissors.
- The Sun: Draw a circle (12-inch diameter) on the paper side of your Fusible Web.
- Rays: Draw wavy or triangular rays radiating out from this circle.
- The Moon: Draw a large “C” shape or a crescent that is large enough to “hug” the sun circle.
- Tip: Drawing the moon slightly larger than the sun creates a sense of protection or eclipse.
- Faces (Optional): If you want the traditional “Man in the Moon” look, sketch a profile within the crescent curve. If you prefer a modern, minimalist look, keep them as simple geometric shapes.
Step 3: Fusing the Heavens
- Iron: Iron the Fusible Web shapes onto the back of your Gold (Sun) and Silver (Moon) fabrics.
- Cut: Cut out the shapes carefully.
- Placement: Peel off the paper backing. Arrange the Sun and Moon in the center of your Navy canvas.
- Overlap: It usually looks best if the Moon slightly overlaps the Sun, or if they interlock like a Yin-Yang.
- Fuse: Press with a hot iron to bond them permanently to the background.
Step 4: Metallic “Sketch” Stitching
This brings the flat shapes to life.
- Thread Up: Load your machine with Metallic Gold thread.
- Sun Stitching: Stitch around the raw edges of the Sun shape twice—messily!
- The “Sketch” Look: Don’t try to be perfect. Go around the perimeter multiple times, letting the lines cross and wobble. This creates a vibrating, energetic look.
- Moon Stitching: Switch to Silver or Grey thread. Stitch around the Moon, adding craters or swirling lines inside the shape to mimic the lunar surface.
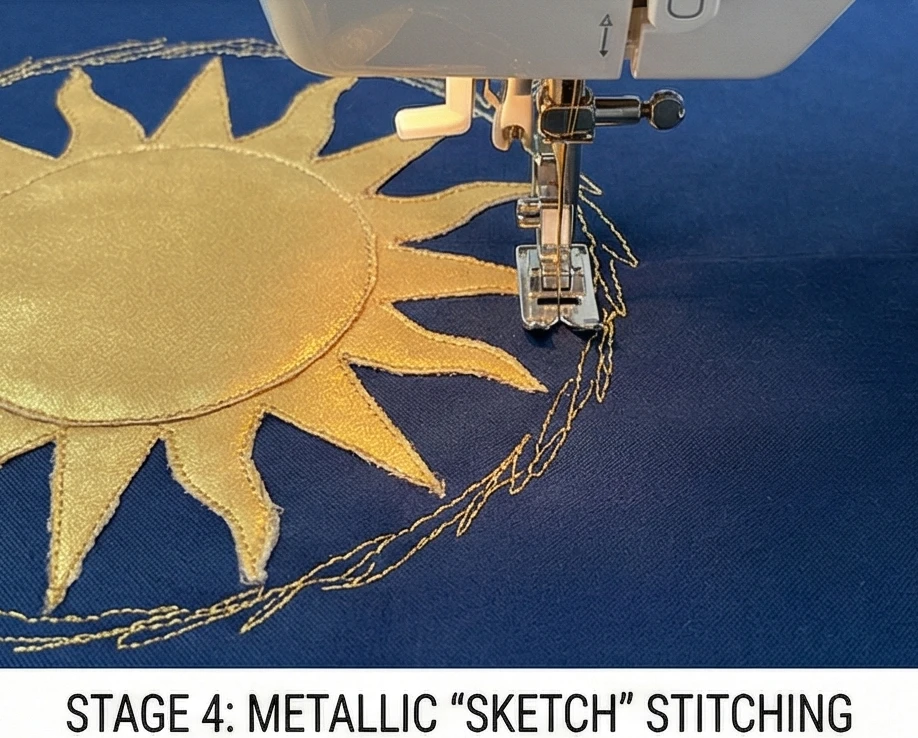
Step 5: The “Starry Field” Embellishment
Handwork adds the magic.
- Quilt Background: Using a matching Navy thread, quilt swirling wind lines or concentric circles in the negative space around the medallion.
- Embroider Stars:
- French Knots: Use white or silver embroidery floss to make French Knots scattered across the navy background.
- Beads: If desired, hand-sew tiny gold seed beads or sequins into the centers of the embroidered stars.
- Constellations: For a personal touch, stitch the constellation of your zodiac sign in a corner using straight stitches connecting the knots.
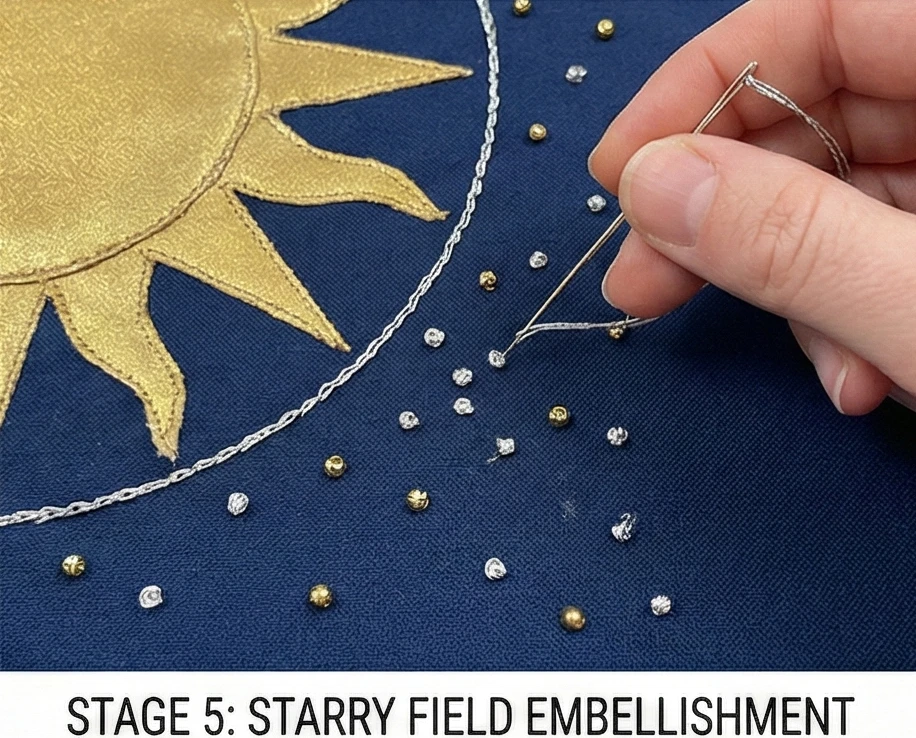
Step 6: The “Invisible” Facing Finish
Wall art should look like a canvas, not a blanket.
- Trim: Square up the quilt to 40″ x 40″.
- Facing: Instead of binding, cut 4 strips of Navy fabric (3 inches wide).
- Sew them to the front of the quilt edges (Right Sides Together).
- Flip them completely to the back.
- Hand stitch them down.
- Sleeve: Don’t forget to add a hanging sleeve (a tube of fabric) to the top back so you can insert a rod and hang it flat.
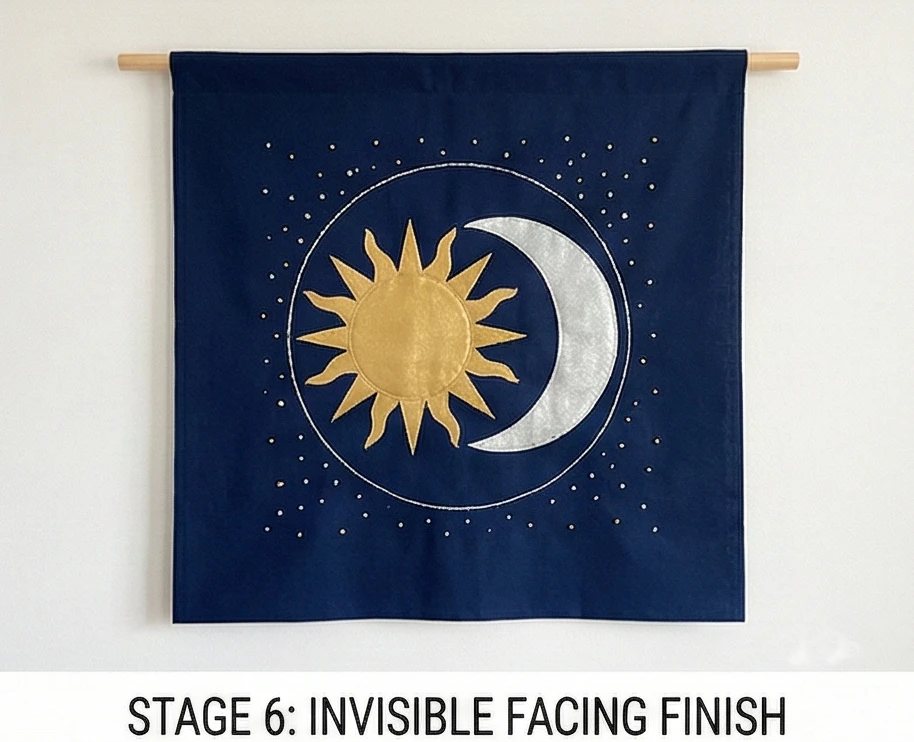
Usability Note: Metallic thread can be tricky. It often shreds or breaks in the machine. Tip: Use a “Metallic Needle” (it has a larger eye) and lower the tension on your sewing machine. If it still breaks, try feeding the thread from a stand placed farther from the machine to allow it to relax before it reaches the needle.
20. Tapestry Style Quilted Wall Hangings for Focal Points
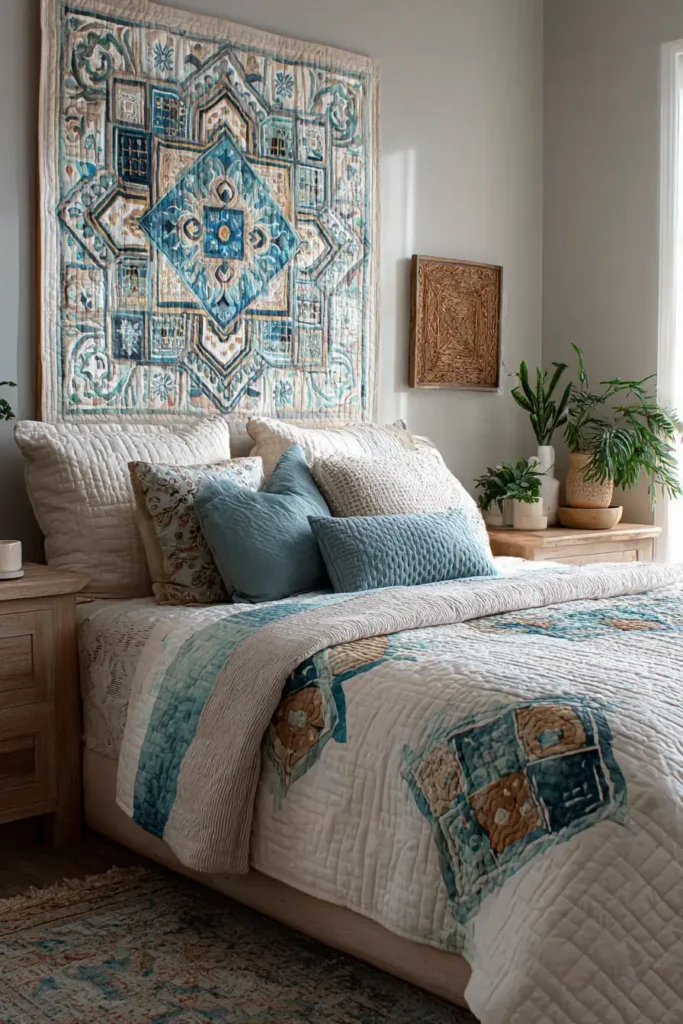
“The Loom’s Illusion” Faux-Tapestry Panel Quilt
Real woven tapestries are heavy, expensive, and difficult to clean. “The Loom’s Illusion” offers the same grand, historical aesthetic using quilting techniques. By framing a Large-Scale Fabric Panel (such as a reproduction of a Morris & Co. print, a vintage map, or a scenic toile) with borders of Velvet or Heavy Linen, and then quilting it densely to mimic the texture of warp and weft threads, you create a sophisticated focal point that softens the acoustics of a room and adds “instant history” to a blank wall.
Finished Dimensions: Large Vertical Wall Hanging, 36″ x 50″ (Size depends on your center panel).
Materials Needed:
- The Centerpiece (The “Tapestry”): 1 yard or a pre-cut panel (approx. 24″ x 42″) of a Scenic Print, Toile, or William Morris Floral.
- Tip: Look for “Decorator Weight” cotton or barkcloth for better texture.
- The Frame (Inner Border): 1/2 yard of Gold or Rust solid cotton.
- The Frame (Outer Border): 1 yard of Velvet, Corduroy, or Heavy Linen in a dark color (Navy, Forest Green, or Burgundy).
- Backing: 1.5 yards of muslin.
- Batting: Two Layers.
- Layer 1: Standard Cotton Batting.
- Layer 2: Stiff Felt or Canvas (This creates rigidity so the hanging doesn’t droop).
- Notions: A wooden dowel or decorative curtain rod, 2 tassels (optional).
Cultural Backstory: In medieval Europe, tapestries were not just art; they were insulation. They were hung on cold stone castle walls to trap heat and dampen the echo of large halls. Today, in open-concept homes with hard floors and high ceilings, a quilted tapestry serves the same functional purpose—adding warmth and acoustic softness—while acting as a dramatic visual anchor.
Step 1: Squaring the “Art”
Panels are often printed crooked. Trust the image, not the cut edge.
- Press: Iron your center panel fabric perfectly flat.
- Trim: Using a large square ruler, trim the panel so the image is perfectly centered and the corners are 90 degrees.
- Dimension Check: Let’s assume your trimmed panel is 22″ x 40″.
Step 2: The “Gold Leaf” Inner Frame
Like a painting, a mat separates the art from the heavy frame.
- Cut Strips: Cut 2-inch-wide strips of your Inner Border fabric (Gold/Rust).
- Sew Sides: Sew strips to the Left and Right sides of the panel. Press outward.
- Sew Top/Bottom: Sew strips to the Top and Bottom. Press outward.
- Result: Your panel now floats inside a thin band of color.
Step 3: The Heavy Velvet Frame
This adds the weight required to keep it hanging straight.
- Cut Strips: Cut 5-inch wide strips of your Heavy Outer Border fabric (Velvet/Linen).
- Tip: If using velvet, check the “nap” (direction of the fuzz). Make sure the nap runs down on all strips so the color looks consistent.
- Attach: Sew these wide borders to the sides, then the top and bottom.
- Walking Foot: Use a walking foot! Velvet slips against cotton. Pin excessively.
Step 4: The Double-Batting Sandwich
Wall hangings must be stiff.
- Layering:
- Place Backing face down.
- Place Stiff Felt/Canvas layer.
- Place Cotton Batting layer.
- Place the quilt top face up.
- Baste: Spray baste is best here to prevent layer shifting.
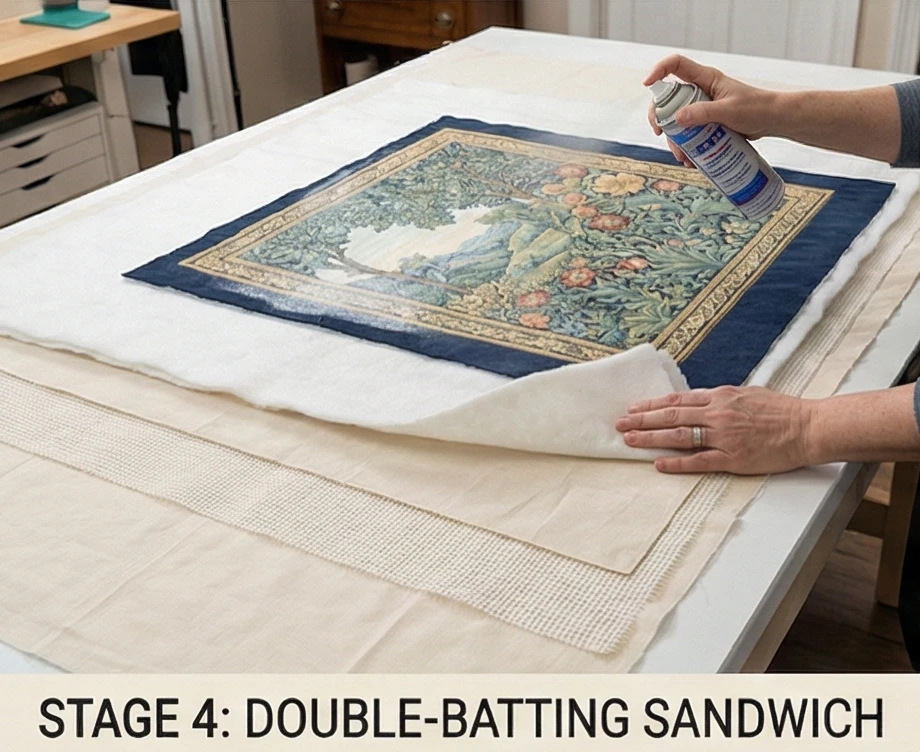
Step 5: “Thread Painting” Texture
We want to mimic the texture of a woven rug.
- The Panel: Quilt around the shapes in the print.
- Example: If it’s a floral print, stitch along the outline of the leaves and flowers. This makes the design “puff” out like embroidery.
- The Background: In the negative space of the panel, stipple or do tight vertical lines (1/4″ apart). This flattens the background and pops the main image forward.
- The Borders: Quilt a simple cross-hatch or diamond grid on the velvet border to flatten it slightly and add a “quilted leather” look.
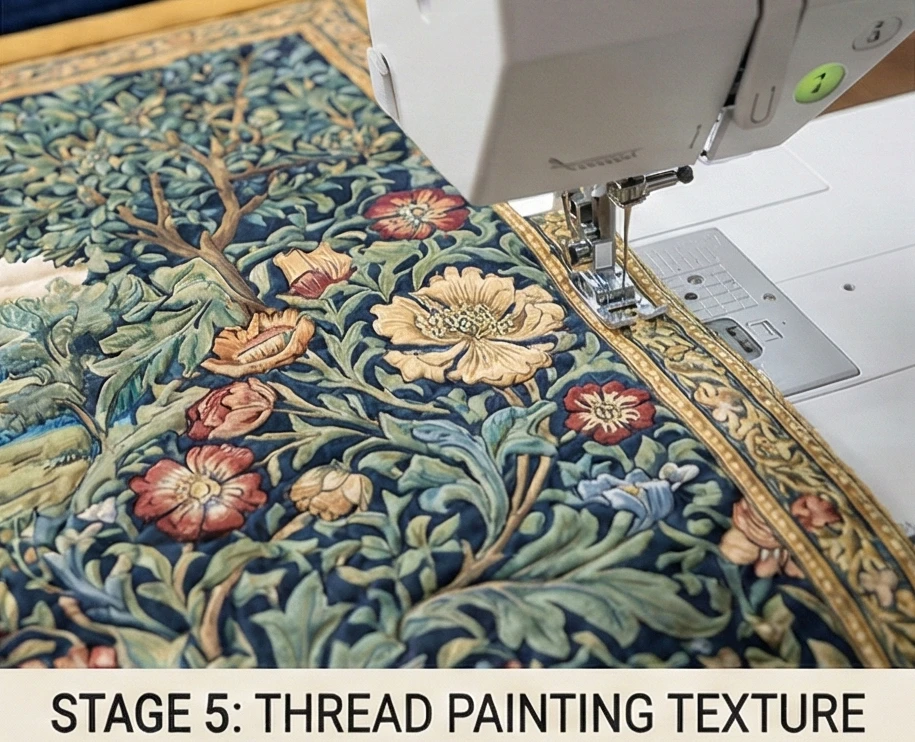
Step 6: The Hanging System & Weights
Gravity is the enemy of wall hangings.
- The Sleeve: Sew a 4-inch wide fabric tube to the top back of the quilt by hand. Leave ends open for a rod.
- The Weights: Sew small metal washers or curtain weights into the bottom corners inside the binding.
- Why: This pulls the quilt taut and prevents the corners from curling up over time.
- Finishing: Bind the edges with the same heavy fabric as the outer border.
- Adorn (Optional): Hand-sew a heavy tassel to the bottom left and right corners for that final “castle” vibe.
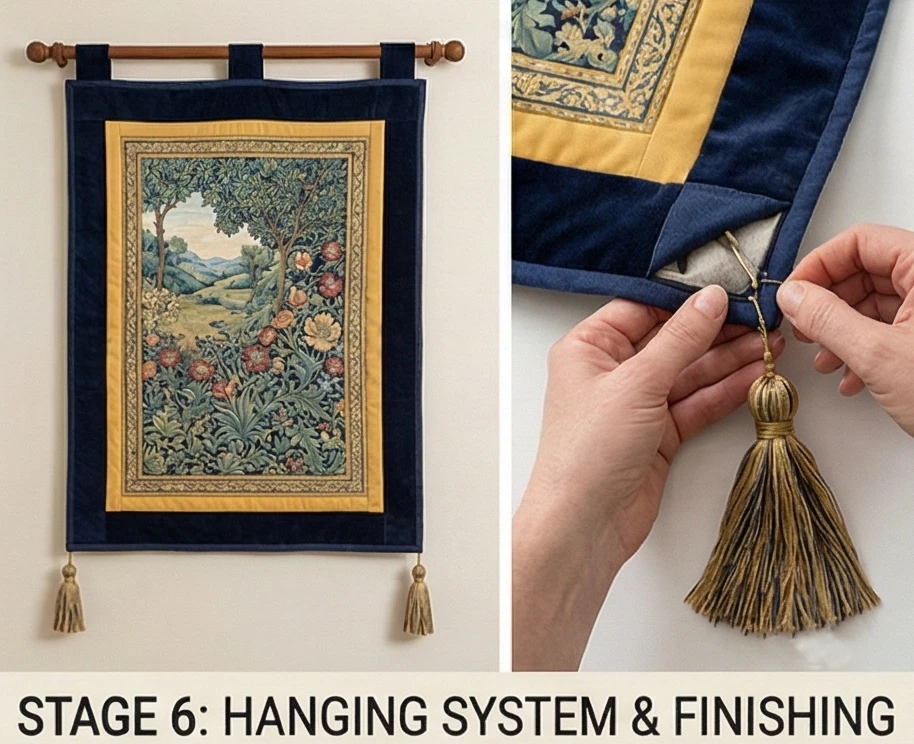
Usability Note: Avoid hanging textile art in direct sunlight. UV rays will fade cotton and rot silk within a few years. If you must hang it near a window, spray it with a UV-protectant fabric spray (such as Trek7), typically used for outdoor gear.

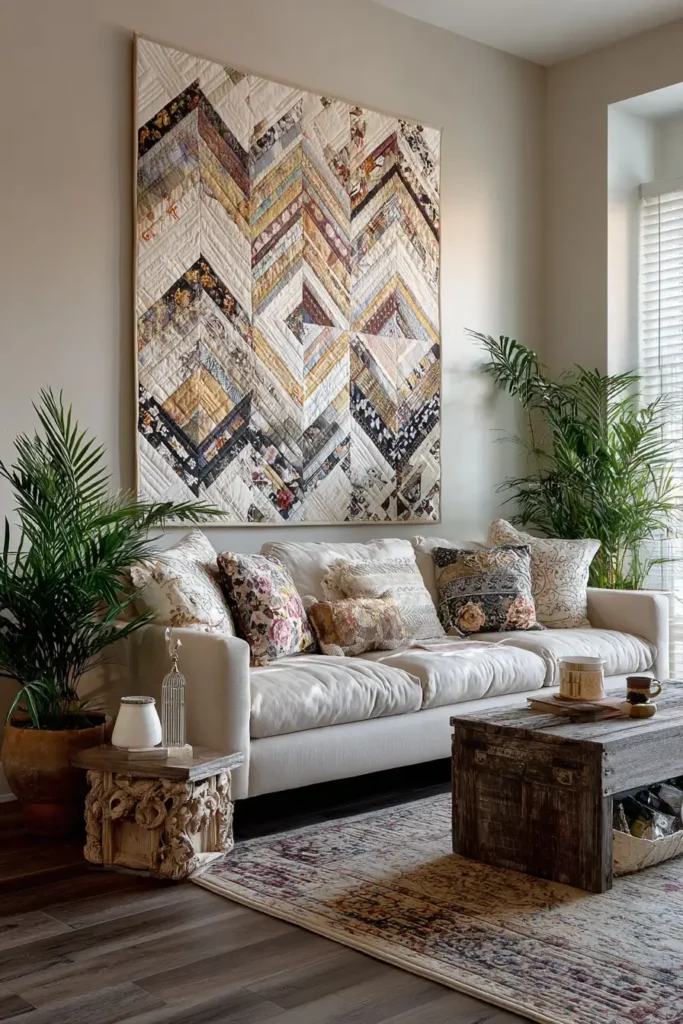
Conclusion
Integrating these Effortlessly Elegant and Cozy designs into your home allows you to cultivate a living space that reflects a free-spirited yet refined lifestyle. By choosing projects such as Modern Bohemian Patchwork or Eclectic Scrappy Bed Runners, you are moving away from mass-produced decor and embracing the warmth of handmade artistry. These quilts serve as the soulful anchors of a room, bridging the gap between high-end design and the comfort of a Sherpa-Backed Lap Quilt. They remind us that true elegance is found in the details—the sway of a tassel, the texture of a stitch, and the harmony of earth tones.
The versatility of these patterns ensures that your home remains functional while exuding style. A Geometric Boho Cushion Cover does more than accent a sofa; it provides the perfect support for an afternoon nap, just as Rustic Tribal Table Runners set the stage for memorable, lingering dinners. The inclusion of Mixed Media Table Toppers and Patchwork Placemats demonstrates that even small textiles can significantly impact a room’s ambiance. These pieces work together to create a layered, “undone” look that is actually carefully composed to maximize comfort and visual interest.
Ultimately, this collection of 20 ideas is an invitation to slow down and savor your surroundings. Whether you decide to hang a Tapestry Style Quilt as a focal point or drape a Vintage Kantha piece over your favorite armchair, you are building a Relaxed Sanctuary that shelters you from the busy world outside. Let these patterns inspire you to stitch with intention, creating items that are not only beautiful to look at but are also deeply comforting to use, ensuring your home always feels like a warm, stylish embrace.
