
20 Indigenous Quilt Patterns: Timeless Textile Art Rooted in Cultural Heritage and Honoring Tradition
Indigenous Quilts: The Category I Keep Returning To
If you have spent any time on this site, you will have noticed that indigenous textile traditions come up repeatedly – in the Lakota Star post, the Navajo patterns, the Japanese boro and sashiko guides, the Nakshi Kantha work that I grew up watching being made in Dhaka. That is not accidental. Indigenous quilts and textile arts are the category I find most compelling in all of quilting, and the reason is not aesthetic, though the aesthetics are often extraordinary. It is these patterns that carry information in a way that purely decorative textiles do not.
A Lakota Star quilt is not a star-shaped design that someone thought looked attractive. It is a ceremonial object given at births, graduations, and funerals – a material expression of honor and communal relationship. Hawaiian appliqué quilts reflect specific local flora in radially balanced designs that encode a relationship to place.
Kantha stitching from Bengal transformed worn saris into layered textiles through running stitches that were simultaneously structural and expressive. Sashiko in Japan began as a method of fabric reinforcement and evolved into one of the most precise and meditative surface-stitching traditions in the world. These are not parallel examples of the same phenomenon. They are distinct traditions that arrived at textile meaning through completely different routes – which is part of what makes studying them together so interesting.
What they share is that none of them were made in isolation or solely for decoration. The patterns were developed in relationship to ceremony, community, land, and necessity. That origin gives them a depth that is genuinely felt before it is intellectually understood — something I noticed the first time I looked carefully at a piece of Nakshi Kantha and realized I was looking at a visual language rather than a pattern.
Indigenous Quilt Patterns
Contents
- 1 Indigenous Quilt Patterns
- 2 1. Navajo-Inspired Geometric Quilt Patterns
- 3 2. Traditional Hawaiian Quilt Designs with Appliqué
- 4 3. Inuit Wall Hanging Quilt Patterns from Arctic Traditions
- 5 4. Aboriginal Australian Dot Painting Quilt Ideas
- 6 5. Maori Koru Spiral Quilt Patterns from New Zealand
- 7 6. Native American Star Quilt Patterns and Symbolism
- 8 7. Mexican Otomi Embroidery-Inspired Quilts
- 9 8. African Kente Cloth Quilt Patterns
- 10 9. Scandinavian Sami-Inspired Reindeer Quilt Designs
- 11 10. Japanese Sashiko Stitching Quilt Patterns
- 12 11. Nakshi Kantha Quilt Techniques and Patterns
- 12.1 The “Village Life” Nakshi Kantha Story Quilt
- 12.1.1 Step 1: Prepare the “Kanthar” (The Canvas)
- 12.1.2 Step 2: Draw the Central Motif (The Padma)
- 12.1.3 Step 3: Draw the Corner Motifs (The Trees of Life)
- 12.1.4 Step 4: The Storytelling Borders
- 12.1.5 Step 5: The Vorat (Filling Stitches)
- 12.1.6 Step 6: The Lahari (The Background Ripple)
- 12.1.7 Step 7: Finishing (The Par)
- 12.1 The “Village Life” Nakshi Kantha Story Quilt
- 13 12. Peruvian Textile-Inspired Andean Quilt Designs
- 14 13. Celtic Knot Quilt Patterns from Irish Heritage
- 15 14. Turkish Kilim Quilt Patterns for Bold Colors
- 16 15. Moroccan Berber Quilt-Inspired Geometric Designs
- 17 16. Maya Huipil Weaving Patterns Adapted for Quilt Blocks
- 18 17. Lakota Sioux Star Quilt Traditional Patterns
- 19 18. Hawaiian Pineapple Quilt Block Designs
- 20 19. Chinese Ethnic Minority Batik-Style Quilt Patterns
- 21 20. Filipino Weaving-Inspired Geometric Quilts
- 22 Conclusion
Approaching These Traditions Honestly
This collection draws inspiration from indigenous textile traditions across several regions and cultures — the American Southwest and Plains, the Pacific Islands, South and East Asia, West Africa, and beyond. The goal is not to replicate specific ceremonial objects or sacred designs, and it is worth being direct about the difference between inspiration and reproduction. Many of these patterns carry cultural meanings that belong to living communities. Understanding what you are drawing from – the specific geometry, the symbolic logic, the material traditions – is not a disclaimer. It is what separates thoughtful work from surface borrowing.
What these twenty patterns offer is a way to engage with those principles – balance, symbolism, resourcefulness, precision – and bring something of that grounded intentionality into contemporary quilting and contemporary homes.
These are the designs that have stayed relevant, not because they follow trends but because they were never about trends in the first place. They were about something older and more durable: the human instinct to encode meaning in cloth and to pass it forward.
See also: Lakota Star quilts · Navajo quilt patterns · Nakshi Kantha designs · Hawaiian quilt patterns · Heritage & Cultural Quilts
Recommended Supplies
“As an Amazon Associate, I earn from qualifying purchases.“

The “Canyon Echo” Serrated Diamond Quilt
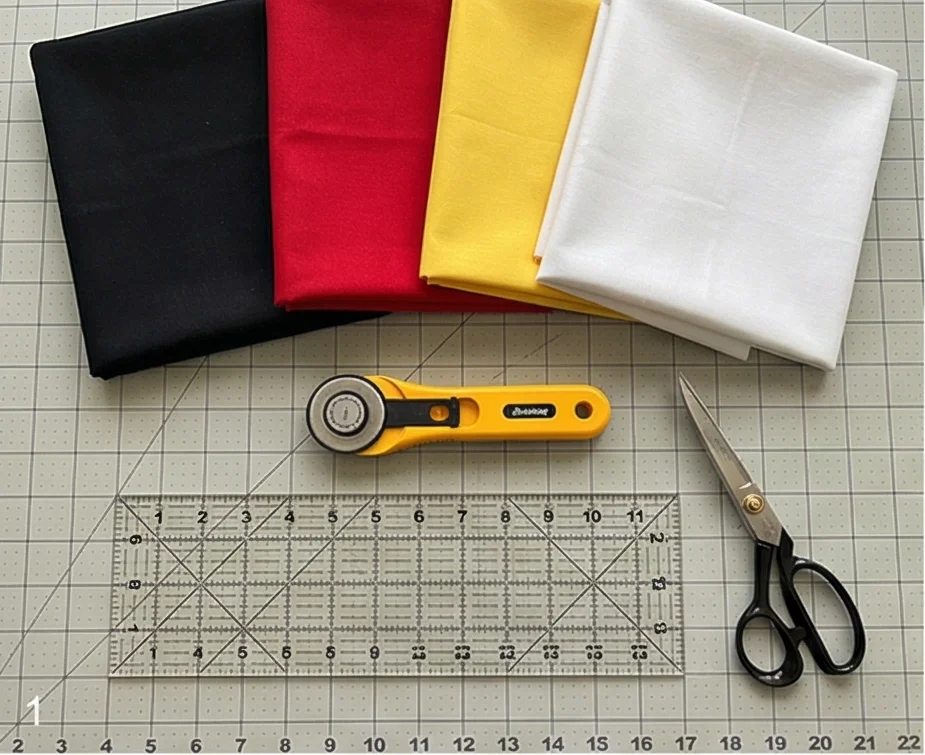
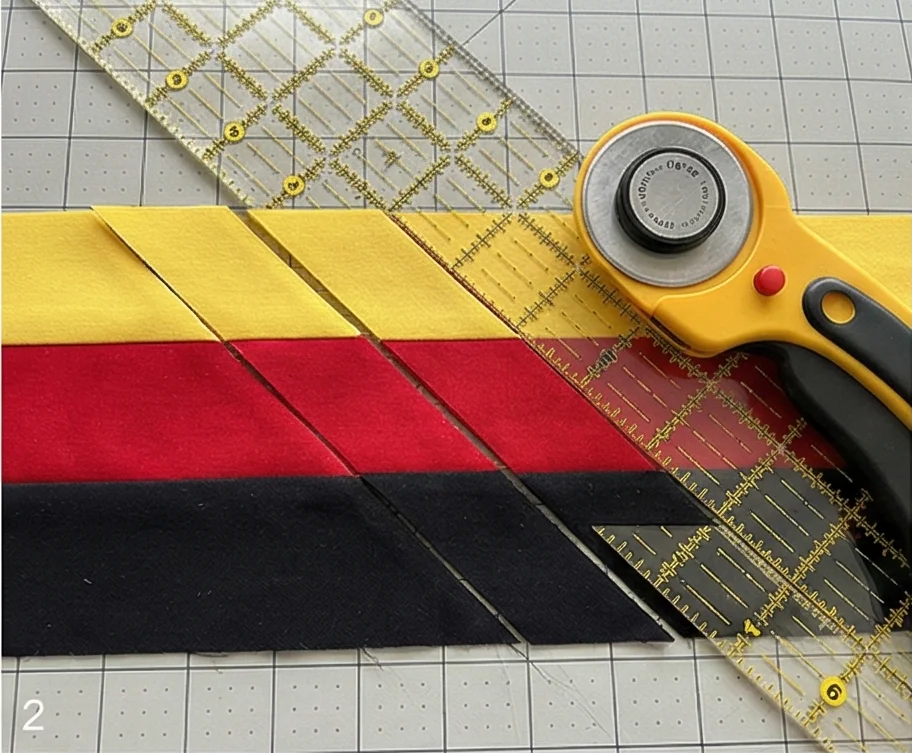
This design draws inspiration from the dazzling geometry of Diné (Navajo) weaving traditions, specifically the “Eye Dazzler” and “Ganado” styles. In weaving, the iconic “stepped” or jagged diamond shape is created by changing colors on the loom’s warp. In quilting, we recreate this bold, serrated look using Half Square Triangles (HSTs). The high contrast of Red, Black, and White (the classic Ganado colors) creates a vibrating optical effect that honors the artistry of the Southwest.
Finished Dimensions: Large Throw, approximately 60″ x 60″.
Materials Needed:
- Fabric A (Background/Black): 2.5 yards of Solid Black (represents the dark wool).
- Fabric B (Dominant/Red): 1.5 yards of Deep Red or Terra Cotta.
- Fabric C (Accent/White or Cream): 1 yard of Unbleached Muslin or Solid White.
- Backing Fabric: 4 yards.
- Batting: Throw size (64″ x 64″).
- Binding: 1/2 yard of Solid Red.
- Notions: Rotary cutter, quilting ruler, marking pencil.
Step 1: Cut the Squares (The Foundation)
This entire quilt is built from Half-Square Triangles (HSTs). We need to cut large squares first, then sew and slice them to create the triangles. We are building a 15 x 15 grid (225 blocks total).
- From Fabric A (Black): Cut 60 squares, measuring 5″ x 5″.
- From Fabric B (Red): Cut 36 squares, measuring 5″ x 5″.
- From Fabric C (White): Cut 24 squares, measuring 5″ x 5″.
- Note: This method creates 2 HSTs per square. We are cutting slightly larger (5″) to trim them down to a perfect 4.5″ (finished 4″).

Step 2: Bulk Production of HSTs
We need to mix the colors to create the “serrated” edges.
- Make Black/Red Units:
- Pair 30 Black squares with 30 Red squares.
- Draw a diagonal line on the back of the lighter square.
- Sew 1/4″ on both sides of the line. Cut on the line.
- Yield: 60 Black/Red HSTs.
- Make Black/White Units:
- Pair 24 Black squares with 24 White squares.
- Repeat the sewing process.
- Yield: 48 Black/White HSTs.
- Make Red/White Units:
- Pair 6 Red squares with 6 White squares.
- Repeat the sewing process.
- Yield: 12 Red/White HSTs.
- Solid Squares: You will also need some solid squares for the background corners. Cut the remaining Black fabric into 4.5″ squares (approx 105 squares needed).

Step 3: Trim to Perfection
The sharp points of a Navajo-style design rely on precision.
- Press all HSTs open (seams toward the darker fabric).
- Trim: Using your square ruler, trim every single HST unit to exactly 4.5″ x 4.5″. Do not skip this step, or your diamonds will look wonky.

Step 4: The “Eye Dazzler” Layout
We are creating a large central diamond radiating outward.
- Find a large floor space (Layout is 15 blocks wide x 15 blocks tall).
- Center: Place a Red/White HST in the very center.
- Radiate Out:
- Surround the center with the Red/White units to form a small central diamond.
- The next ring should be Red/Black units. Orient the Red triangles so they touch the previous red ring to make the diamond grow.
- The next ring is White/Black units. This creates the high-contrast “Lightning” effect.
- Background: Fill the four outer corners of the layout with your Solid Black squares.
- Visual Check: Step back. The edges of the diamond should look like a staircase (serrated), not a smooth line.

Step 5: Web Piecing Assembly
To keep the pattern straight, sew in a grid.
- Sew Rows: Stitch the blocks together into 15 horizontal rows.
- Pressing: Press the seams of Row 1 to the Left. Press the seams of Row 2 to the Right. Continue alternating.
- Join Rows: Pin Row 1 to Row 2. Because you alternated the pressing direction, the seams will “nest” (lock together) at every intersection, giving you perfectly sharp points on your diamonds.

Step 6: “Loom” Quilting
The quilting should respect the weaving inspiration.
- Sandwich the quilt.
- Thread: Use a thread that blends with the background (Black) or a contrasting Grey.
- Design: Do not use swirls or flowers. Traditional Navajo weaving is linear.
- Walking Foot: Stitch straight vertical lines from top to bottom, spaced about 1/2 inch apart.
- This mimics the Warp threads of a loom and adds a beautiful, vertical texture that enhances the geometric design.

Cultural Context Note: This pattern is a “Patchwork Interpretation.” While it honors the geometric aesthetic of Diné (Navajo) weavers, true Navajo rugs are woven on an upright loom using wool weft-facing techniques. When titling or gifting this quilt, it is respectful to describe it as “Southwest Style” or “Inspired by Ganado Weaving” to distinguish it from authentic indigenous textile art.
More Recommended Supplies
“As an Amazon Associate, I earn from qualifying purchases.“
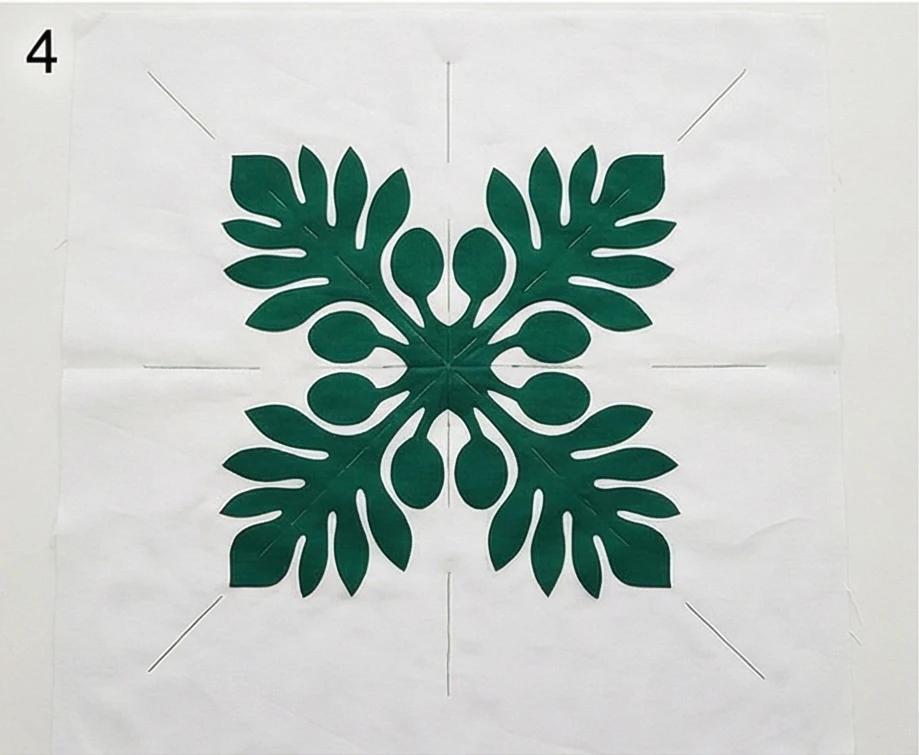
2. Traditional Hawaiian Quilt Designs with Appliqué
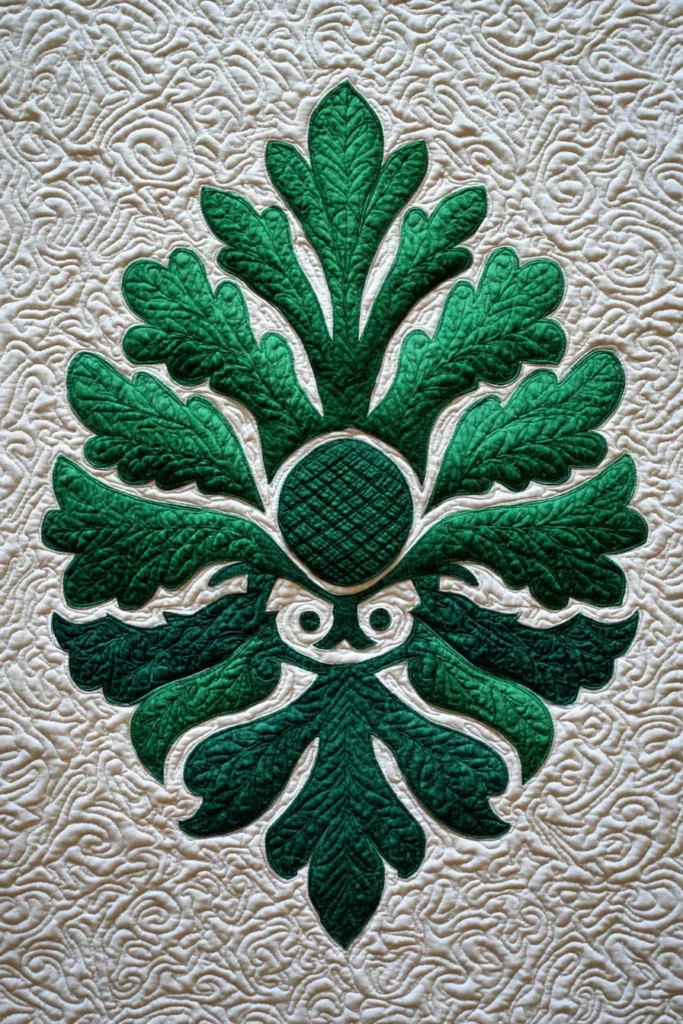

The “Ulu” (Breadfruit) Hawaiian Wall Hanging
Hawaiian quilting (Kapa Apana) is distinct from any other style in the world. It features a single, symmetrical appliqué medallion cut from one piece of fabric (like a paper snowflake) and stitched onto a solid background. The traditional “Ulu” (Breadfruit) design is often the very first pattern a quilter makes, symbolizing growth, abundance, and a fruitful life.
Finished Dimensions: Wall Hanging or Table Topper, approximately 40″ x 40″.
Materials Needed:
- Fabric A (Background): 1.25 yards of Solid White or Cream (representing the clouds/sky).
- Fabric B (Appliqué Motif): 1.25 yards of Solid Deep Green (or Red, for a royal look).
- Backing Fabric: 1.25 yards.
- Batting: Thin Cotton or Wool Batting (42″ x 42″). Polyester is rarely used; Hawaiian quilts should drape flat.
- Thread: 100% Cotton thread that matches Fabric B (for appliqué) and thread that matches Fabric A (for quilting).
- Paper: Large sheet of butcher paper or freezer paper (approx 20″ x 20″).
- Notions: Appliqué needles (Milliners size 10/11), sharp embroidery scissors, pins.
Step 1: The “Eighths” Fold (Pattern Prep)
Hawaiian designs are radially symmetrical, based on an 8-fold repeat.
- Cut your paper into a 20″ x 20″ square.
- Fold it in half (Rectangle). Fold again (Square). Fold diagonally (Triangle).
- Draw: Sketch your Ulu design on this triangle wedge.
- The “spine” of the leaf should run along the long, folded edge.
- The leaf shape and fruit should connect to the sides so the design holds together when unfolded.
- Cut: Cut out the paper design. Unfold it to reveal the full medallion. This is your master template.

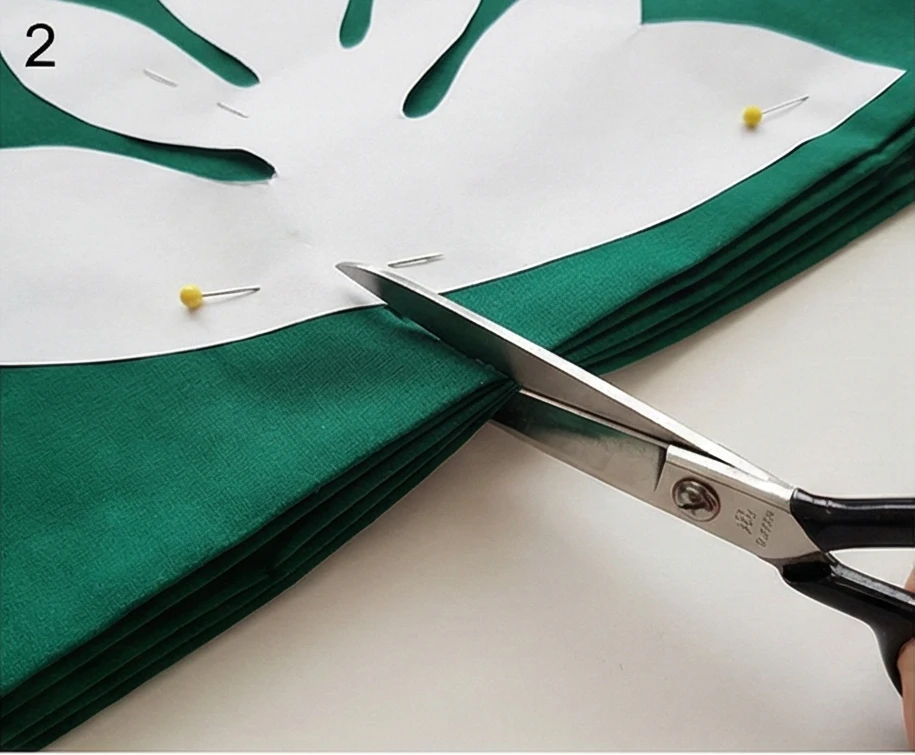
Step 2: The “Snowflake” Cut (Fabric)
This is the most nerve-wracking but magical step.
- Cut your Appliqué Fabric (Fabric B) into a 40″ x 40″ square.
- Fold the fabric exactly as you folded the paper (Half -> Quarter -> Diagonal Eighth). Press the folds sharply.
- Pin: Securely pin your paper template to the folded fabric wedge.
- Cut: Using sharp scissors, cut through all 8 fabric layers at once, following the paper edge.
- Tip: Do not shift the fabric while cutting.
- Unfold: Open up the fabric to reveal your perfectly symmetrical Breadfruit tree medallion.
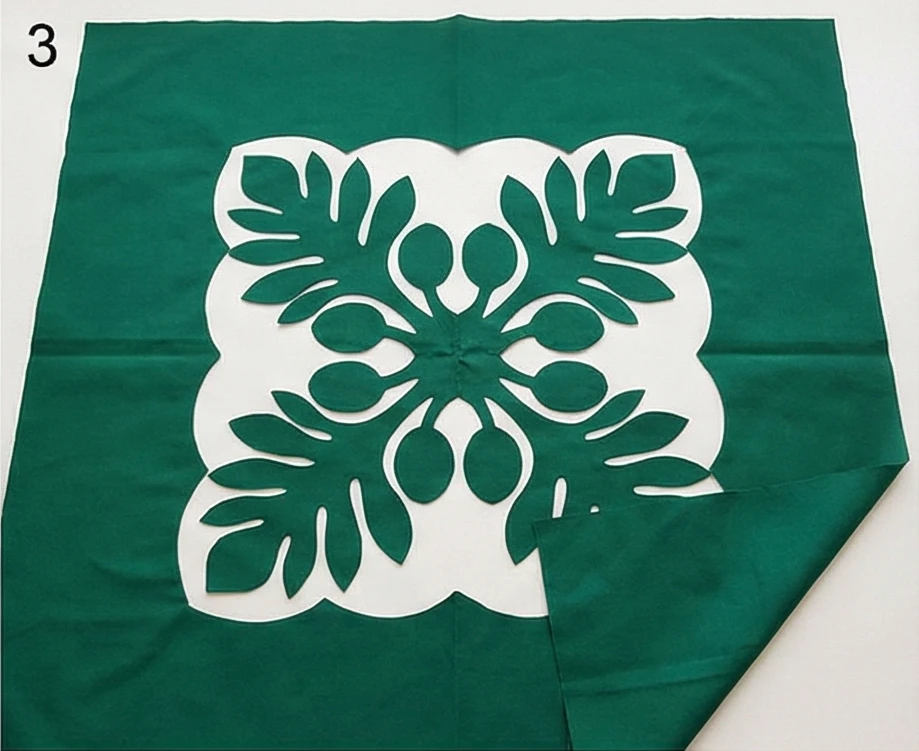
Step 3: Basting the Medallion
- Cut your Background Fabric (Fabric A) into a 40″ x 40″ square. Fold it in quarters to find the center cross-hairs.
- Align: Place your Appliqué Medallion on the Background. Match the center crease marks of both fabrics perfectly.
- Baste: You must secure the appliqué so it doesn’t shift.
- Traditional: Use long-running stitches with a contrasting thread, basting from the center out to the tips of the leaves.
- Modern: Use fabric glue dots or fusible web (if you aren’t a purist).
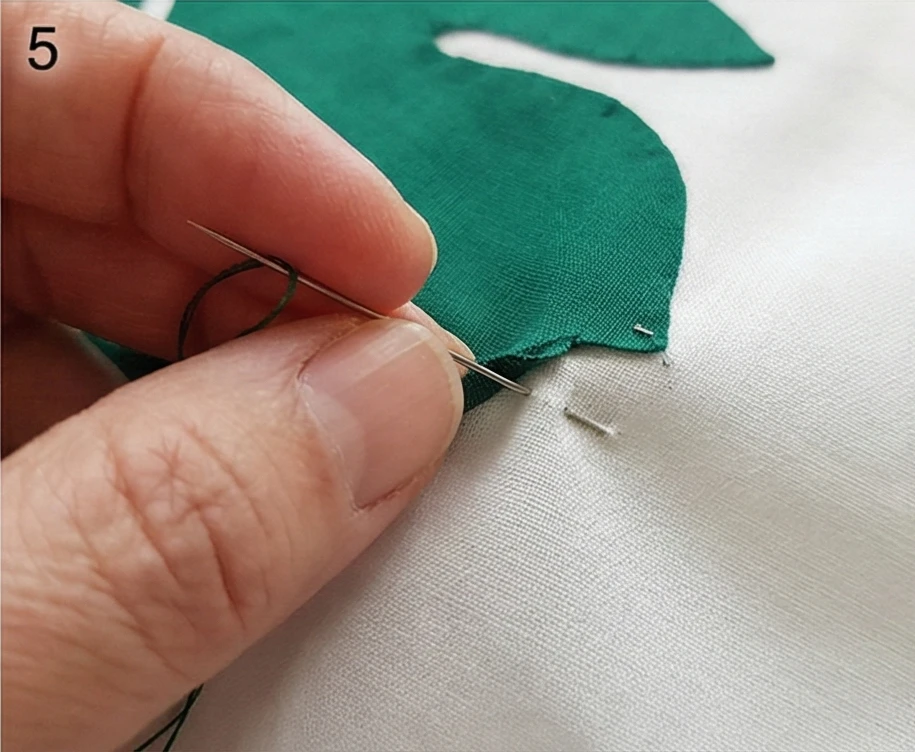
Step 4: Needle-Turn Appliqué
This is the meditative heart of Hawaiian quilting. It creates a smooth, invisible edge.
- Thread your needle with color-matched thread.
- Start at the straight edge of a leaf.
- The Sweep: Use the tip of your needle to sweep about 1/8″ of the raw edge under.
- The Stitch: Take a tiny blind stitch into the fold and down into the background.
- Inner Curves (Valleys): Clip the seam allowance slightly to turn under smoothly.
- Outer Curves (Tips): Ease the fabric under to create a smooth arc.
- Continue until the entire perimeter is stitched down.
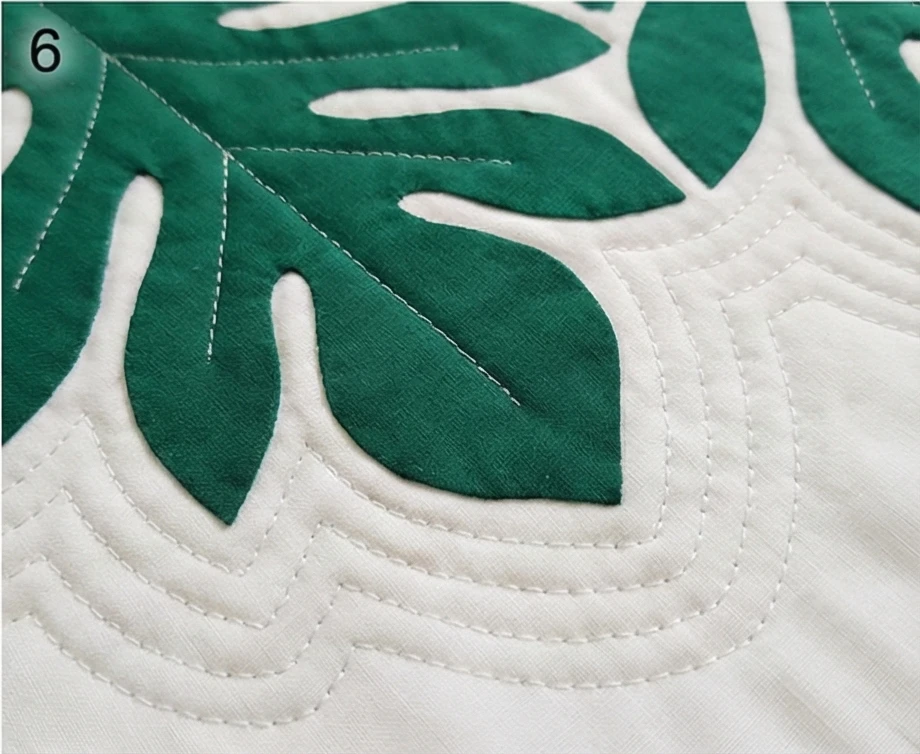
Step 5: “Echo” Quilting (Kuiki)
Hawaiian quilts do not use grids or random swirls. They use “Echo Quilting” (contour lines) that ripple out like water.
- Baste your sandwich (Backing + Batting + Top).
- Start: Begin quilting inside the appliqué motif (veins of the leaves) or right at the edge of the appliqué (“in the ditch”).
- The Echo: Using a thread that matches the background, quilt a contour line 1/2 inch to 5/8 inch from the appliqué edge all around.
- Repeat: Quilt another line 1/2 inch from the previous line.
- Continue quilting these ripples until you reach the outer binding edge. The “waves” of stitching tell the story of the ocean surrounding the islands.
Step 6: Finishing
- Trim the batting and backing square.
- Bind: Use the same color fabric as the Appliqué (Fabric B) for the binding. This creates a frame that matches the central motif.
- Alternative: Some traditions use the Background color for binding, letting the “waves” flow off the edge.
Cultural Context Note: In Hawaiian tradition, you should never sit on a quilt (unless it is specifically a floor mat). Also, patterns were historically guarded family secrets. While “Ulu” and “Pineapple” are now in the public domain, avoid copying unique family patterns without permission. It is believed the spirit of the maker is stitched into the quilt.
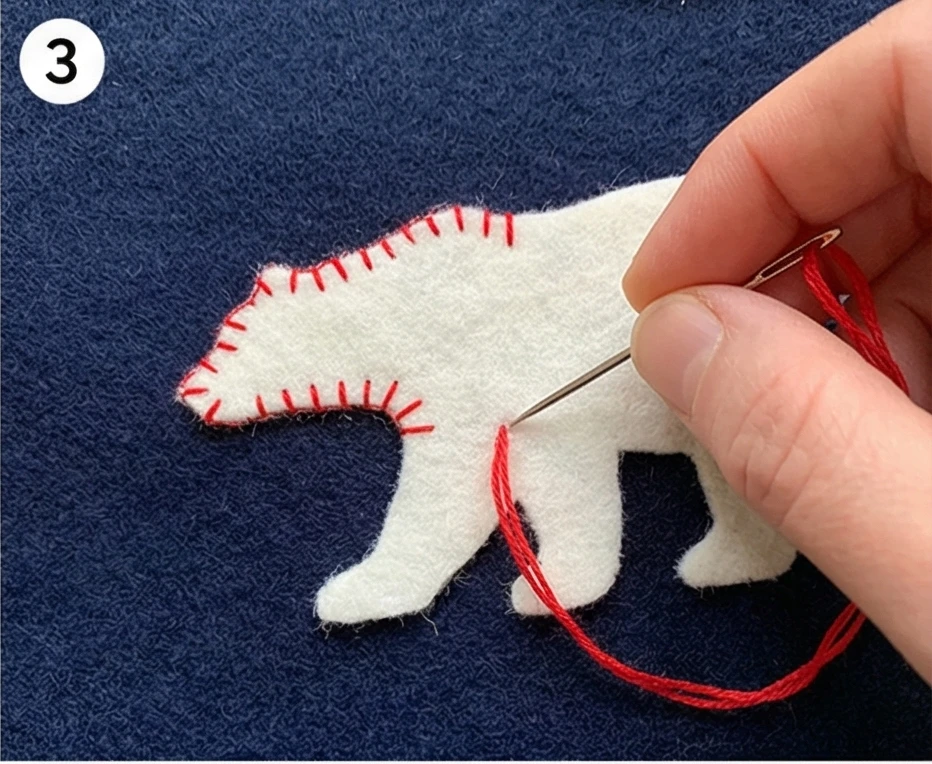
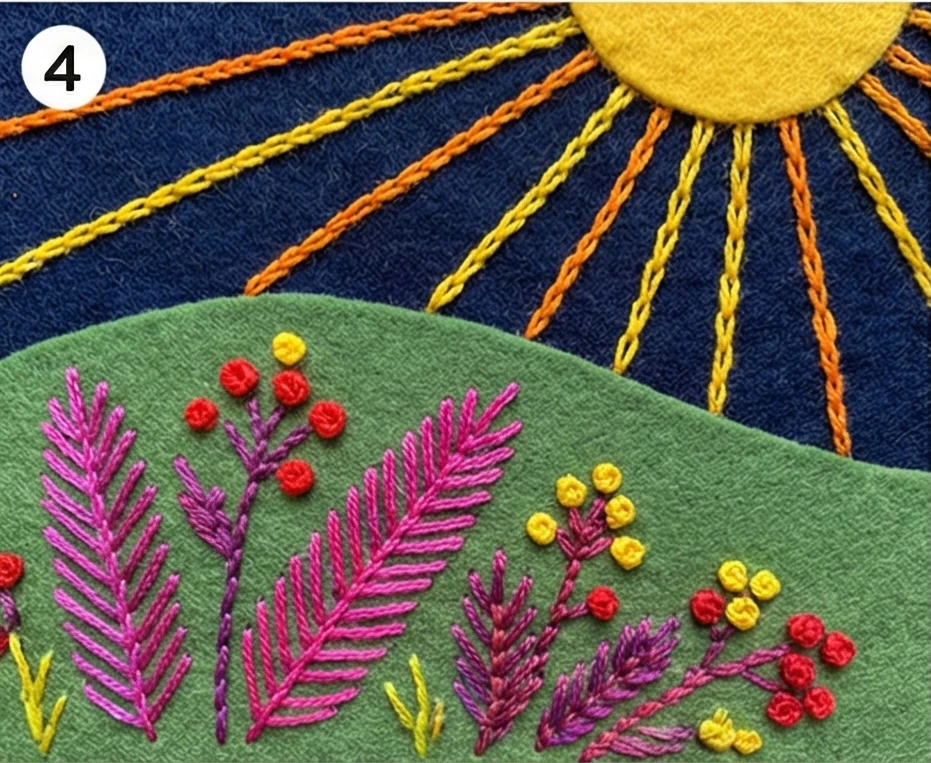
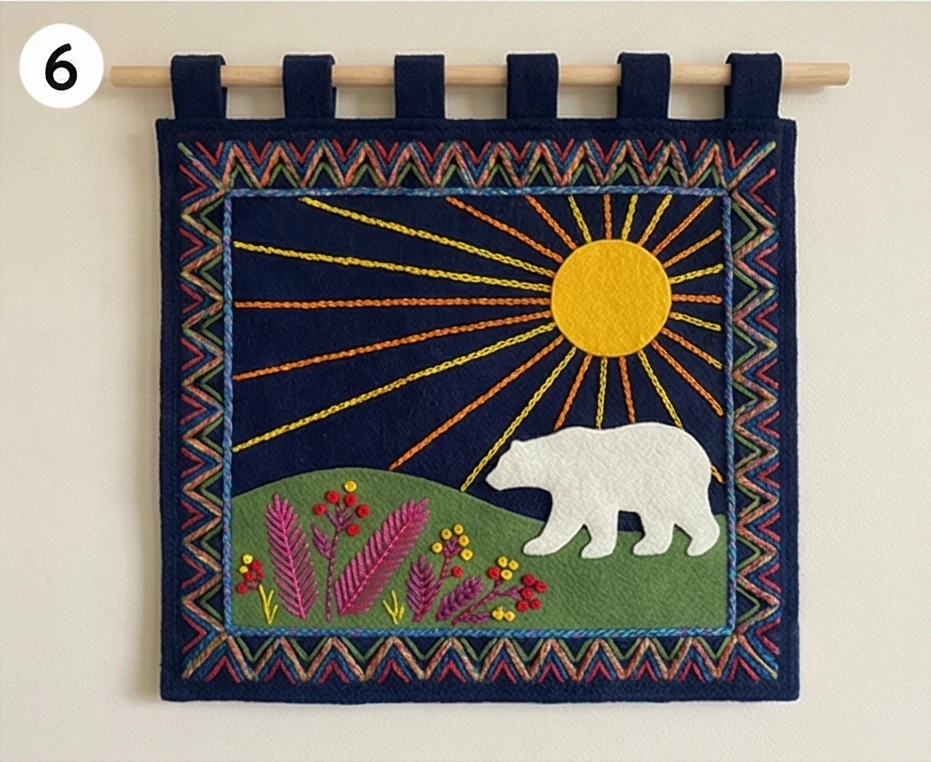
3. Inuit Wall Hanging Quilt Patterns from Arctic Traditions

The “Arctic Summer” Embroidered Wall Hanging
Inuit textile art (often called nivingjuliat) is distinct from traditional patchwork. Instead of piecing blocks together, it typically uses heavy wool “duffle” (a thick, felt-like blanket material) as a canvas. The design relies on felt appliqué and intricate embroidery to tell stories of the land, animals, and daily life. This project creates a small, framed story-cloth featuring a traditional summer scene on the tundra.
Finished Dimensions: Small Wall Hanging, approximately 18″ x 24″.
Materials Needed:
- Base Fabric (The Canvas): 3/4 yard of Wool Duffle or Heavy Wool Felt in Navy Blue or Cream (The background).
- Appliqué Fabric: Scraps of wool felt in various colors:
- White: For snow/ice or polar bears.
- Brown/Grey: For seals, caribou, or rocks.
- Green: For the tundra ground.
- Embroidery Floss: A wide variety of bright colors (Red, Yellow, Blue, Pink). Inuit embroidery is famous for its vibrant contrast against dark backgrounds.
- Backing: 3/4 yard of Cotton Calico (to hide the back of the stitches).
- Hanging Mechanism: A wooden dowel or a braid of wool yarn.
- Notions: Chenille needles (sharp with large eyes), fabric glue stick, and embroidery scissors.

Step 1: Prepare the “Canvas”
Unlike quilting, we don’t use batting. The thick wool acts as both batting and top.
- Cut: Cut your Base Wool Duffle to exactly 18″ x 24″.
- Border Prep:
- Mark a line 1.5 inches in from the edge all the way around.
- This is your “Frame.” Keep the main story inside this line. The border will be decorated separately later.

Step 2: Cut the Felt Shapes
Designs are usually cut “freehand” to capture the movement of nature, but you can first draw paper templates.
- The Landscape: Cut a curved strip of Green Felt (approx 4″ high x 18″ wide) to represent the rolling tundra hills at the bottom.
- The Sun: Cut a circle of Yellow Felt or Orange Felt for the sky.
- The Animals:
- Cut a silhouette of a Caribou or Polar Bear from White or Brown felt.
- Cut small oval shapes for rocks or seals.
- Tip: Keep shapes simple silhouettes. The detail will come from the thread.

Step 3: Layer and Tack
- Lay your Base Wool flat on a table.
- Arrange: Place the Green Tundra at the bottom. Place the Sun in the sky. Position the animals on the horizon line.
- Secure: Use a dab of Fabric Glue Stick on the back of each piece to hold it in place. Do not use pins (they distort the thick wool).

Step 4: The Appliqué Stitching
We do not turn the edges under. The raw edge of the felt is part of the aesthetic.
- Thread: Load your needle with 2 or 3 strands of embroidery floss in a contrasting color (e.g., use Red thread on a White bear).
- Stitch: Use a small Whip Stitch or Blanket Stitch around the edge of every shape.
- The stitches should be visible and rhythmic. They hold the shape down and add a decorative outline.

Step 5: Embellish with Storytelling Stitches
This is where the art comes alive. Use embroidery to fill in the details.
- Chain Stitch: Use a bright Chain Stitch to draw lines—for example, the rays of the sun, the legs of the animal, or the horizon line.
- Feather Stitch: Use Feather Stitch on the Green Tundra to represent moss, lichens, and summer flowers. Use bright pinks, purples, and yellows.
- French Knots: Add clusters of French Knots to represent berries on the bushes or eyes on the animals.
- Goal: Fill the negative space with texture.

Step 6: The “Braid” Border
A traditional finish for Inuit wall hangings involves a heavy border.
- Border Stitches: In the 1.5-inch border you marked in Step 1, stitch a repeating geometric pattern (like triangles or zig-zags) using heavy yarn or all 6 strands of floss.
- Top Loops: Cut 5 strips of wool felt measuring 1″ x 4″.
- Fold them in half to create loops.
- Sew these loops to the top edge of the hanging, spaced evenly.
- Backing:
- Place the backing fabric against the back of the wool.
- Fold the raw edges of the backing under so they are hidden between the layers.
- Hand stitch the backing to the wool around the perimeter.
- Hang: Slide a dowel or a piece of driftwood through the loops.
Cultural Context Note: Inuit wall hangings originated from the practical skills of sewing clothing from skin (kamiks, parkas). When trading posts introduced wool duffle and embroidery floss, women transferred their skin-sewing skills to these new materials to create art for sale and storytelling. Famous artists like Jessie Oonark helped define this graphic, colorful style.
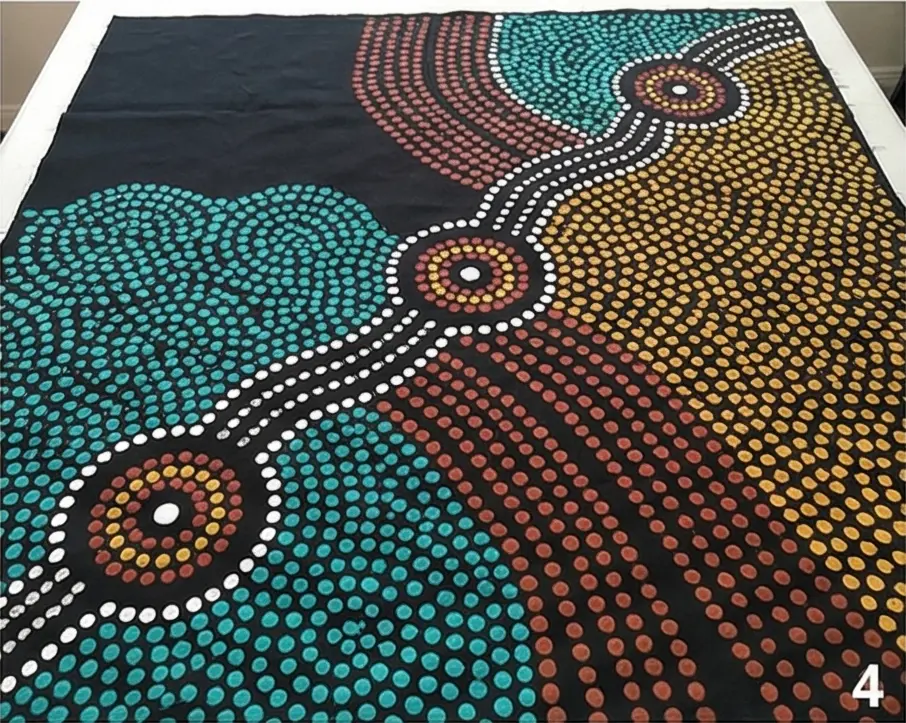
4. Aboriginal Australian Dot Painting Quilt Ideas


The “Dreamtime Tracks” Dot-Painted Wholecloth Quilt
This project honors the contemporary Indigenous Australian art movement (specifically the Papunya Tula style), which uses intricate dots to depict aerial landscapes, waterholes, and Dreamtime stories. Instead of cutting and sewing hundreds of tiny circles (appliqué), we use Wholecloth Quilting combined with Textile Paint to recreate the vibrating energy of dot painting.
Finished Dimensions: Wall Art or Throw, approximately 40″ x 50″.
Materials Needed:
- Fabric A (The Canvas): 1.5 yards of Solid Black or Earthy Red/Ochre Cotton. (Dark backgrounds make the dots pop).
- Textile Paints: High-quality fabric paints in earthy tones: Ochre Yellow, Burnt Sienna, White, and Turquoise.
- Applicators: The blunt ends of drill bits, chopsticks, or dowels (various sizes for different dots).
- Backing Fabric: 1.5 yards.
- Batting: Thin cotton batting (42″ x 52″).
- Binding: 1/2 yard of Black.
- Notions: Fabric chalk, masking tape.
Step 1: Map the “Songline” (Design Layout)
Aboriginal art is often a map. We need to define the major shapes before filling them with dots.
- Lay your Black Canvas fabric flat on a hard surface. Tape the corners down.
- The Journey Line: Use white chalk to draw a wavy line snaking diagonally across the fabric. This represents a river or a path.
- The Meeting Places: Draw 3 or 4 concentric circles (targets) at various points along the path. These represent campsites or waterholes.
- The Land: Divide the remaining background into large zones or curves.
- Tip: Do not draw detailed images. Just draw the boundary lines for the different zones.

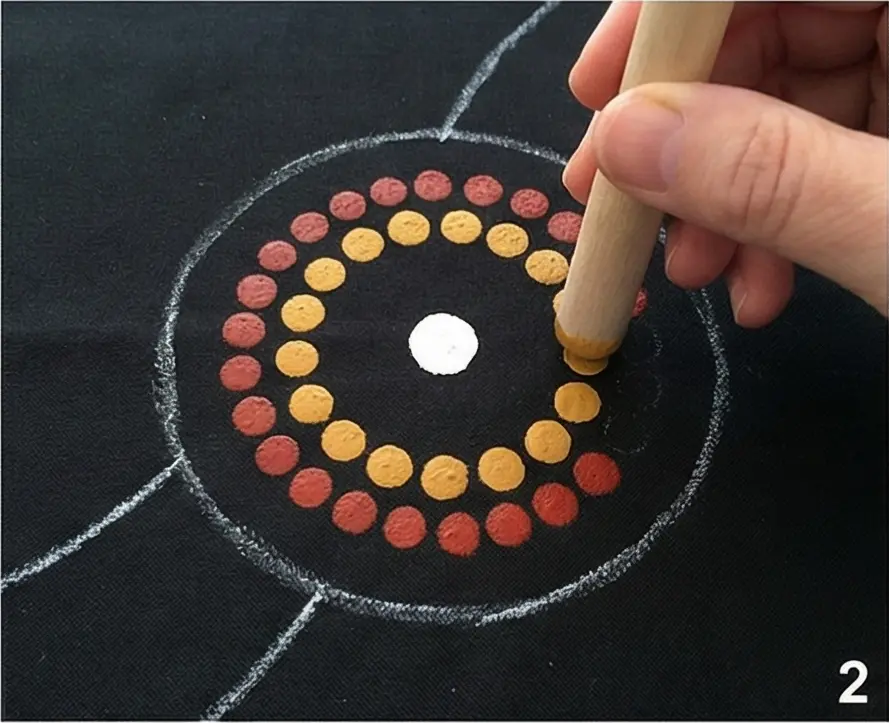
Step 2: The “Meeting Place” Concentric Circles
We start painting the focal points.
- Dip the end of a large dowel (approx 1/2 inch) into White Paint.
- Stamp a single dot in the dead center of your first circle.
- Switch to a slightly smaller tool (chopstick end). Dip it in Ochre Yellow.
- Stamp: Stamp a ring of yellow dots around the white center dot. Keep them evenly spaced.
- Expand: Switch to Red Paint. Stamp a ring of red dots around the yellow ring. *
- Continue expanding outward until the “Meeting Place” is the desired size. Repeat for all circle motifs.
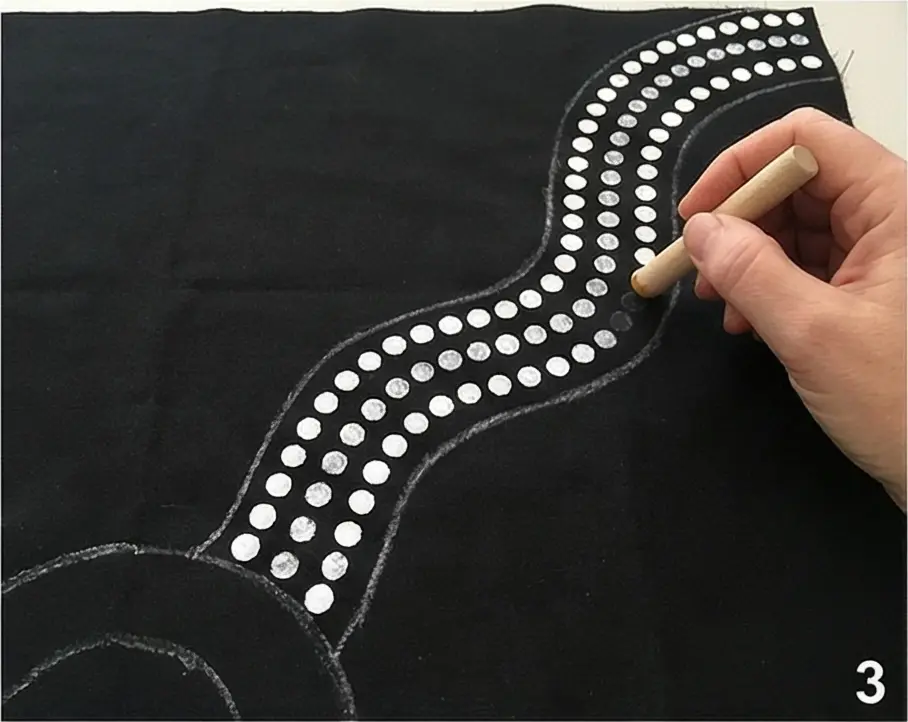
Step 3: Traveling Lines (The Path)
- Follow the wavy chalk line you drew in Step 1.
- Use White Paint and a medium tool.
- Stamp two parallel lines of dots following the curve. This creates a high-contrast path cutting through the dark background.
Step 4: Background Filling
This is the meditative part. We fill the negative space with fields of color.
- Choose a “Zone” (one of the areas separated by your lines).
- Select a color (e.g., Turquoise).
- Fill: Start stamping dots to fill the entire shape.
- Technique: You can arrange them in straight rows for a structured look, or swirl them to mimic the flow of water or the movement of sand dunes.
- Repeat for other zones using contrasting colors (Burnt Sienna, Deep Purple, etc.).
- Dry: Let the paint dry for 24 hours. Then heat-set it with a hot iron (use a pressing cloth!) to make it permanent.
Step 5: Outline Quilting
Now we add texture to match the visual rhythm.
- Sandwich your Top, Batting, and Backing. Baste carefully so you don’t crack the paint (if it’s thick).
- Thread: Use Black Thread (invisible on the background) or a thread that matches the dots.
- Stitch: Quilt between the rows of dots.
- Trace around the concentric circles.
- Follow the wavy lines of the path.
- Goal: The quilting should make the painted dots puff up slightly, adding tactile dimension to the visual texture.
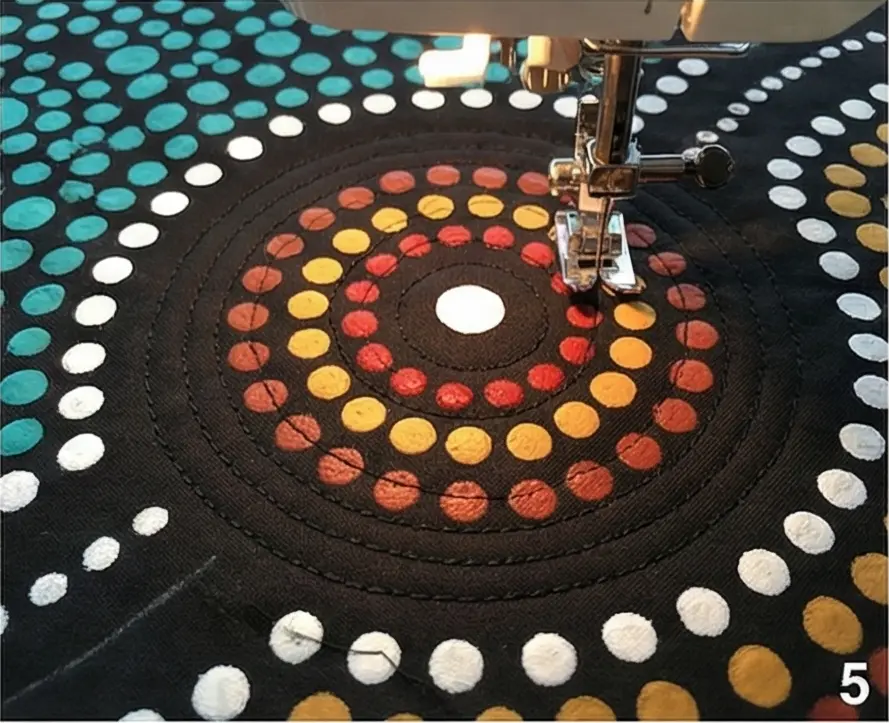
Step 6: Binding and Display
- Trim the edges square.
- Bind: Use a Solid Black Binding. A busy binding will distract from the intricate dots.
- Hanging Sleeve: Sew a sleeve on the back to hang it as a tapestry.
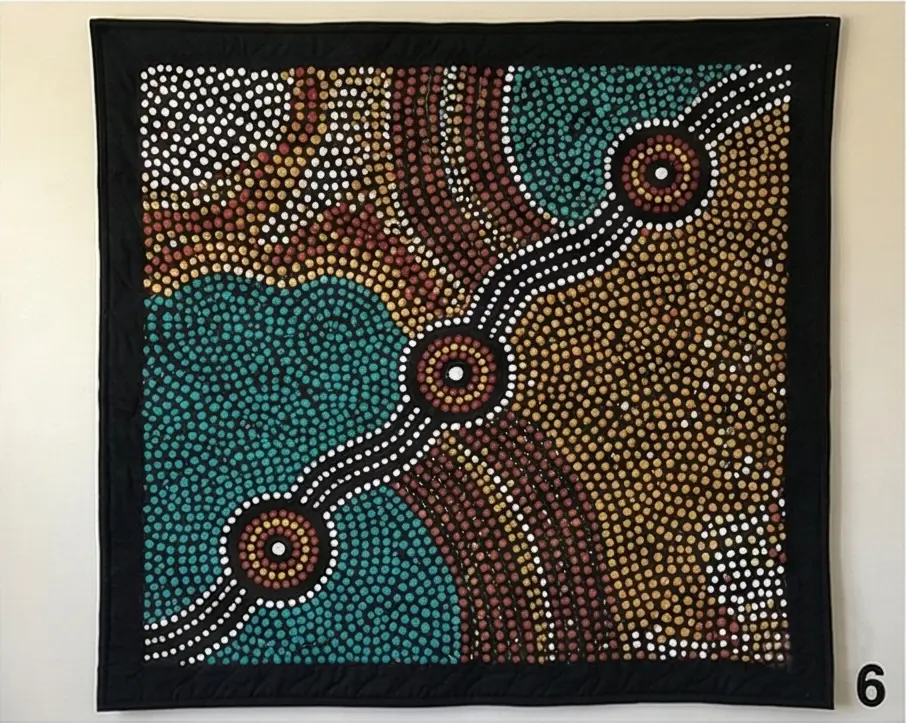
Cultural Context Note: Dot painting originated in the 1970s in Papunya Tula as a way for Aboriginal elders to obscure sacred symbols from public view while still telling their stories. It is a living, modern art form. When creating this quilt, respect the style by creating your own abstract geography rather than copying specific “Dreaming” stories or sacred totems belonging to specific clans.
5. Maori Koru Spiral Quilt Patterns from New Zealand


The “Koru Unfolding” Kowhaiwhai Runner
In Māori culture, the Koru (spiral) is based on the unfurling frond of the silver fern. It symbolizes new life, growth, strength, and peace. This runner is inspired by Kowhaiwhai—the intricate red, black, and white patterns painted on the rafters of traditional meeting houses (Wharenui). Because the designs feature complex curves, we will use Fusible Appliqué with a machine Satin Stitch to create bold, graphic lines without the struggle of needle-turning tight spirals.
Finished Dimensions: Table Runner, approximately 16″ x 60″.
Materials Needed:
- Fabric A (Background/Red): 1 yard of Deep Ochre Red (representing Te Whei Ao, the realm of coming into being).
- Fabric B (Main Koru/Black): 1 yard of Solid Black (representing Te Po, the darkness/potential).
- Fabric C (Accent/White): 1/2 yard of Solid White (representing Te Ao Marama, the world of light).
- Fusible Web: 2 yards (e.g., HeatnBond Lite or Wonder-Under).
- Backing Fabric: 1 yard.
- Batting: 18″ x 64″.
- Thread: Black machine thread (for satin stitching) and Red thread (for quilting).
- Notions: Sharp scissors, iron, tear-away stabilizer (optional).
Step 1: Create the “Pitau” Template
We need a repeating scroll pattern.
- Draft: On a piece of paper (approx 10″ x 14″), draw a large “S” shape.
- Curl: At both ends of the “S”, curl the line inward into a tight spiral (the Koru).
- Thicken: Turn this line into a shape with width (about 1.5 inches thick). It should look like a thick, scrolling vine.
- Bulbs: In the negative space of the “S” curves, draw smaller, detached teardrop shapes or smaller floating spirals.
- Trace: Trace your finalized Koru design onto the paper side of your Fusible Web. Make 4 copies.

Step 2: Prepare the Appliqué Shapes
- Fuse: Iron the Fusible Web (rough side down) onto the wrong side of your Fabric B (Black).
- Cut: Carefully cut out the 4 large Koru “S” shapes and the smaller accent bulbs.
- White Accents: If you want white outlines or inner details, trace slightly smaller versions of the spirals onto fusible web and iron them to Fabric C (White).
- Design Note: Traditional Kowhaiwhai often uses a white background with red/black positive space, or vice versa. We are using Red as the base for a warm, striking look.

Step 3: Layout and Fuse
- Background: Cut your Red Fabric into a rectangle measuring 16.5″ x 60.5″.
- Arrange: Peel the paper backing off your Black Koru shapes.
- Place the first “S” shape vertically at the left end.
- Place the second “S” shape next to it, but flipped (mirror image) or rotated 180 degrees.
- Connection: Allow the tails of the spirals to almost touch, creating a continuous flowing river of spirals down the center of the runner.
- Fuse: Once the spacing is even, press with a hot iron to permanently bond the black spirals to the red background.

Step 4: The Satin Stitch (The Outline)
In Māori carving and painting, lines are sharp and deliberate. Raw edges look too messy.
- Setup: Set your sewing machine to a Zig-Zag Stitch.
- Width: 3.0mm to 4.0mm (wide).
- Length: 0.2mm to 0.4mm (very short, almost satin).
- Stabilize: If your fabric puckers, place a sheet of Tear-Away Stabilizer underneath the red fabric.
- Stitch: Sew around the raw edges of every Black spiral using Black Thread.
- The dense stitching creates a raised, embroidered rim that defines the Koru.
- Repeat: If you added White accents, stitch around them with White thread.

Step 5: “Whakapapa” (Genealogy) Quilting
The background quilting should represent the energy surrounding the life force.
- Sandwich the Runner (Backing + Batting + Appliqué Top).
- Echo: Using Red Thread (to blend with the background), quilt echo lines around the Black Koru shapes.
- Start 1/4″ away from the satin stitch.
- Keep spiraling outward into the negative red space.
- Effect: This creates a ripple effect, making the black spirals appear to vibrate or grow.

Step 6: Binding
- Trim the runner square.
- Bind: Use Solid Black Binding to frame the artwork.
- Cultural Touch: You can add a small tassel of red wool yarn to the pointed ends of the runner (if you tapered the ends) to mimic the adornment of traditional cloaks (Korowai).

Cultural Context Note: To Māori, the Koru is not just a pretty shape; it is a text. It speaks of lineage (whakapapa) and the child’s potential. While Koru patterns are widely shared and celebrated as a symbol of New Zealand (Aotearoa), avoid copying specific, complex carvings from ancestral meeting houses, as those tell specific tribal stories. This simple repeating “Pitau” (fern) pattern is a respectful and universal celebration of nature.
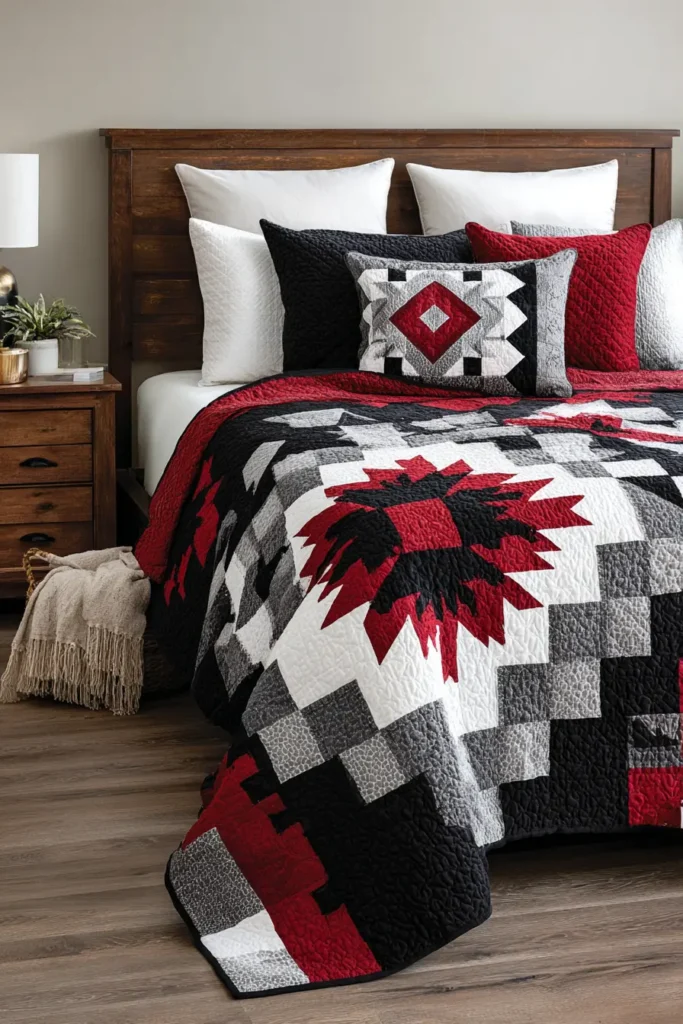
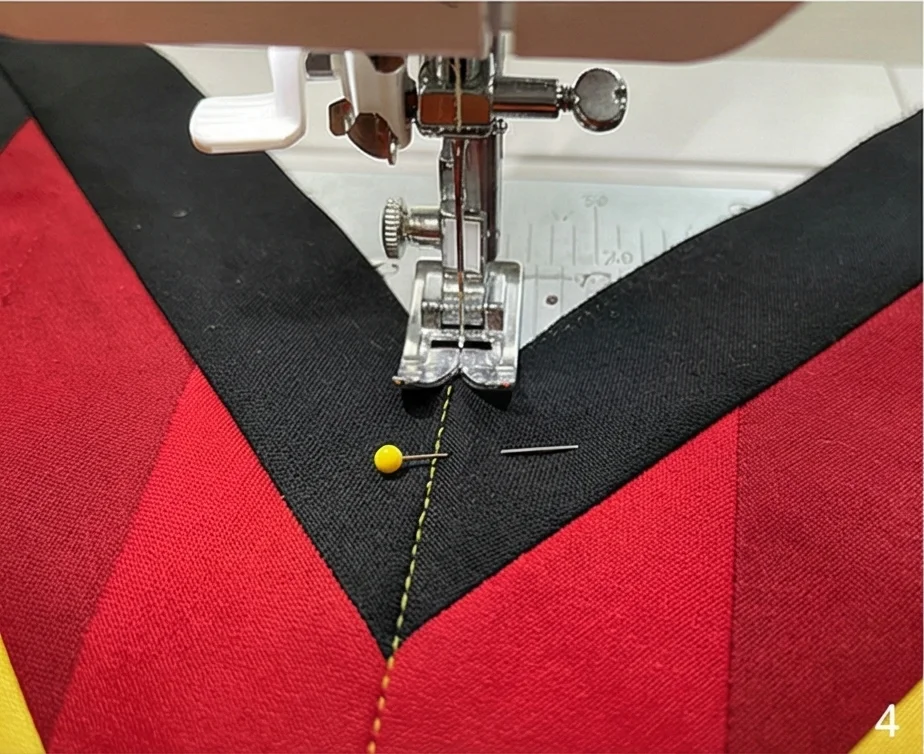
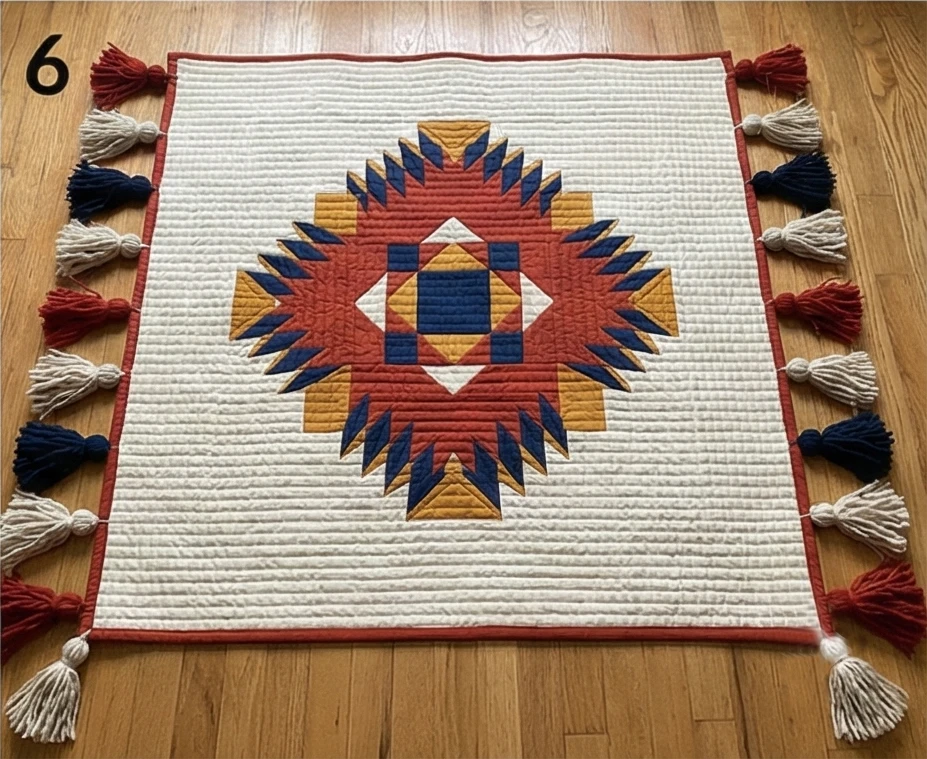
6. Native American Star Quilt Patterns and Symbolism


The “Morning Star” Lakota-Style Quilt
The Star Quilt (Wichahpi) is the most recognizable symbol in Northern Plains Native American culture, particularly among the Lakota/Sioux. It represents honor, generosity, and protection. Historically, buffalo robes with painted starburst designs were worn for warmth and ceremony. As trade cloth replaced hides, the eight-pointed Morning Star design was adapted into quilting. Today, Star Quilts are given at births, weddings, graduations, and burials (to cover the spirit on its journey).
Finished Dimensions: Large Throw or Wall Hanging, approximately 60″ x 60″.
Materials Needed:
- Fabric A (The Star Tips/Dark): 1.5 yards of Solid Black or Dark Blue.
- Fabric B (Mid-Tone): 1 yard of Red.
- Fabric C (Light/Center): 1 yard of Yellow or White.
- Fabric D (Background): 2.5 yards of Solid White or Unbleached Muslin.
- Backing Fabric: 4 yards.
- Batting: 64″ x 64″ square.
- Binding: 1/2 yard of contrasting color (e.g., Turquoise or Red).
- Notions: Rotary cutter, 6″ x 24″ ruler.
Step 1: Cutting the Diamonds (45-Degree Angle)
The entire star is built from a single shape: the 45-degree diamond. Precision cutting is non-negotiable here.
- Cut Strips: Cut the following 2.5″ strips across the width of fabric (WOF):
- Fabric A (Dark): 16 strips.
- Fabric B (Red): 12 strips.
- Fabric C (Yellow): 8 strips.
- Strip Sets: Sew the strips together into “Stratas” (panels) to speed up cutting.
- Set 1 (Center): Yellow – Red – Dark. (Make 8 of these sets).
- Set 2 (Tips): Red – Dark – Dark. (Make 8 of these sets).
- Offset: You need to offset the start of each strip by about 2 inches so when you cut at an angle, you don’t waste fabric.
- Sub-Cut Diamonds:
- Align your ruler’s 45-degree line with the straight edge of the strip set.
- Cut 2.5″ segments.
- Yield: You are creating diamond strips that already have the colors joined.
Step 2: Assembling the Eight “Blades”
The star is composed of 8 large diamond-shaped wedges (or blades).
- Take your diamond sub-cuts from Step 1.
- Arrange them to form a large diamond wedge.
- The “Yellow” diamond should be at the bottom point (the center of the star).
- The “Red” band should form a chevron above it.
- The “Dark” band should form the outer chevron.
- Sew: Stitch the diamond rows together to form one large diamond wedge.
- Pressing: Press seams open to reduce the massive bulk at the intersections.
- Repeat: Make 8 identical large diamond wedges.
Step 3: Joining the Star Center (Y-Seams)
This is the trickiest part. You cannot sew straight across.
- Pairs: Sew two wedges together to create a V-shape.
- Stop Stitching: Do not sew all the way to the center point. Stop exactly 1/4 inch from the bottom tip. Backstitch to secure. This “free” tip allows the center to lie flat.
- Make 4 pairs (V-shapes).
- Halves: Sew two V-shapes together to make a Half-Star. Again, stop 1/4 inch from the center.
- Whole: Sew the two halves together.
- Result: You now have a giant 8-pointed star lying on your table.
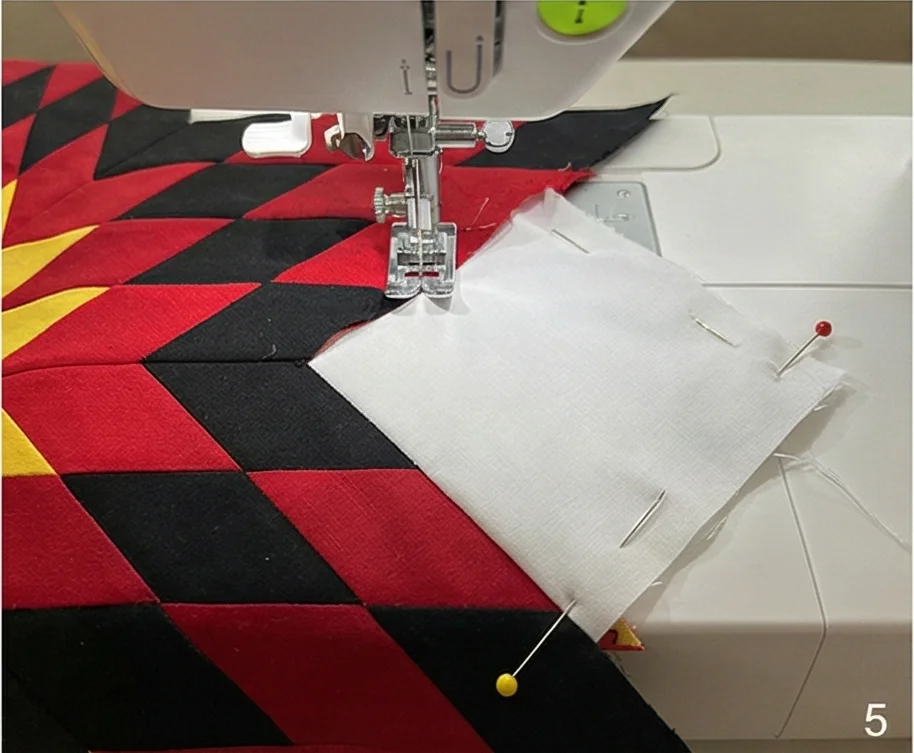
Step 4: Setting Squares and Triangles
Now we turn the star into a square quilt.
- Cut Background (Fabric D):
- Cut 4 squares measuring approx 18″ x 18″ (these are the corners).
- Cut 4 squares measuring approx. 18″ x 18″, then cut them in half diagonally (these are the side-setting triangles).
- Y-Seam Insertion:
- You must sew these squares into the “V” valleys of the star.
- Pin a Setting Square into the V.
- Sew from the outside edge toward the inner corner. Stop 1/4 inch from the V-point. Pivot/Backstitch.
- Arrange the fabric so you can sew down the other side of the V, starting 1/4 inch away from the point.
- Tip: This “inset seam” technique is essential for Lakota star quilts.
Step 5: Quilting the “Spirit Path”
The quilting design is just as important as the piecing.
- Sandwich your quilt.
- Echo Quilting: Traditional Star Quilts use echo lines.
- Start at the center star. Quilt lines 1/2 inch apart that perfectly follow the shape of the diamonds.
- Continue rippling out into the background.
- Feathers: In the large white corner squares, it is traditional to quilt Eagle Feather motifs or floral designs, representing connection to nature and the Creator.
Step 6: Binding and Gifting
- Bind: Use a contrasting color (like Turquoise) to bind the edge.
- Symbolism: If this is a gift, the colors matter.
- Red: Life, blood, earth.
- Yellow: Sun, light, East.
- Black: Night, West, wisdom.
- White: Winter, North, purity.
- Presentation: When gifting a Star Quilt, it is traditionally draped over the recipient’s shoulders, wrapping them in the community’s protection.
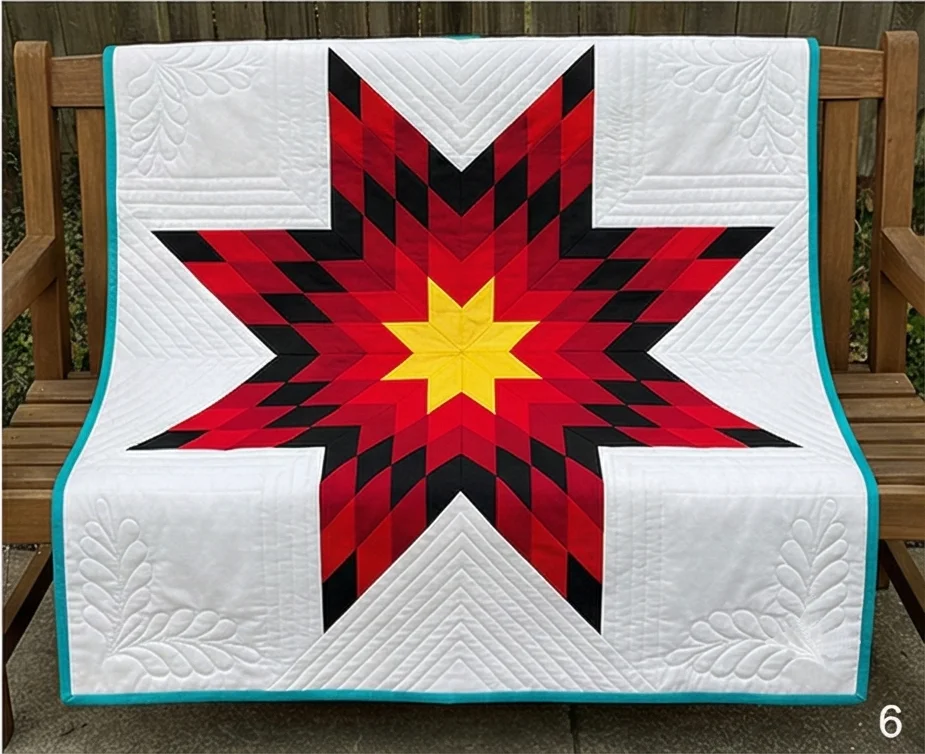
Cultural Context Note: While the “Star Quilt” technique was adapted from missionary teachings in the late 1800s, the Lakota people fully indigenized it, replacing the buffalo robe with the quilt as a central ceremonial object. Making a Star Quilt is a prayer; every stitch is a thought for the person who will receive it.
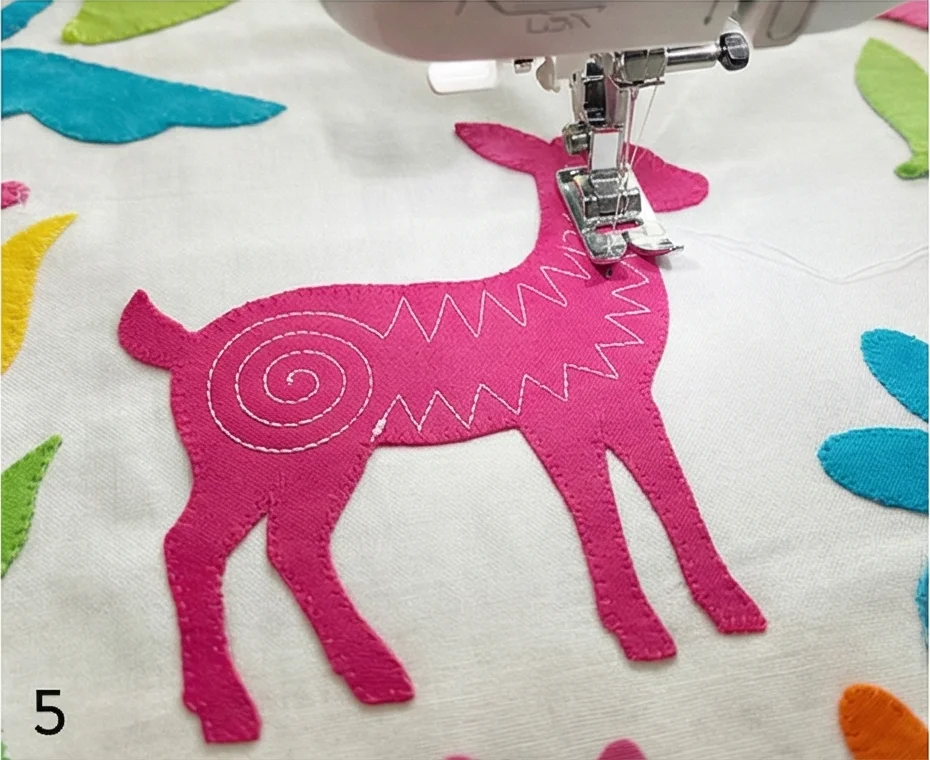
7. Mexican Otomi Embroidery-Inspired Quilts

The “Tenango Garden” Appliqué Quilt
Originating from the Otomi people of Tenango de Doria in Hidalgo, Mexico, Tenango embroidery is world-famous for its fantastical creatures and flora. Traditionally, artisans use vibrant cotton threads to create dense satin stitches on white muslin, depicting chickens, rabbits, deer, and magical flowers. To interpret this style as a quilt without spending years hand-embroidering, we use Raw Edge Appliqué with a machine Satin Stitch to mimic the texture of the original thread work.
Finished Dimensions: Wall Hanging or Colorful Throw, approximately 50″ x 60″.
Materials Needed:
- Fabric A (Background): 2 yards of Solid White or Unbleached Muslin (The traditional canvas).
- Fabric B (The Menagerie): A bundle of 10-12 Fat Quarters in distinct, saturated rainbow colors: Hot Pink, Turquoise, Sunshine Yellow, Lime Green, Bright Orange, Royal Blue.
- Fusible Web: 3 yards of lightweight fusible adhesive (e.g., HeatnBond Lite).
- Thread: You need threads that match your colored fabrics perfectly. (If you use a pink rabbit, use pink thread).
- Backing Fabric: 3 yards.
- Batting: 54″ x 64″.
- Notions: Sharp, small scissors, iron, and an open-toe embroidery foot for your machine.
Step 1: Draft the “Tenango” Silhouettes
The Otomi style is specific: animals are shown in profile, often with floral patterns inside their bodies or growing from their tails.
- Search & Sketch: Look for “Tenango symbols” for inspiration. Common motifs include:
- Roosters with elaborate tail feathers.
- Rabbits with very long ears looking backward.
- Deer with floral antlers.
- Large, multi-petaled flowers and leafy vines.
- Draw: Sketch these shapes onto standard paper. Keep the lines simple and curvy. Avoid tiny details; the silhouette is what matters.
- Scale: Make the main animals large (approx 8-10 inches tall).
Step 2: Prepare the Appliqué Shapes
- Trace: Trace your designs onto the paper side of the fusible web.
- Tip: If your animal faces a specific direction, remember that it will be reversed when you iron it. Trace the mirror image if direction matters.
- Fuse: Iron the fusible web shapes onto the wrong side of your Colored Fabrics.
- Use different colors for different creatures (e.g., a Blue Deer, a Pink Bird, an Orange Flower).
- Cut: Cut out the shapes carefully along the traced lines.
Step 3: The “Horror Vacui” Layout
Otomi art is famous for its “fear of empty space.” The canvas should be crowded with life.
- Lay your White Background fabric (50″ x 60″) on the floor.
- Peel: Remove the paper backing from your fabric shapes.
- Arrange:
- Place large animals first. Orient them in different directions (some upside down, some sideways) if you want chaotic energy, or arrange them symmetrically around a central flower for a calmer look.
- Fill the Gaps: Tuck flowers, leaves, and smaller birds into the white spaces between the large animals. The goal is to have very little white space showing, creating a lush garden effect.
- Fuse: Once you are happy with the crowded composition, iron everything down securely.
Step 4: The “Faux-Embroidery” Satin Stitch
This creates the look of hand-stitching.
- Setup: Set your sewing machine to a Zig-Zag Stitch.
- Width: 2.5mm to 3.0mm.
- Length: 0.2mm (very short, so the threads lie side-by-side like a satin bar).
- Match Thread: Thread your machine with the color that matches the shape you are sewing (Pink thread for the Pink Bird).
- Stitch: Sew around the raw edge of every shape.
- The zigzag should encase the raw edge, preventing fraying and adding a raised, thread-heavy ridge that mimics the texture of Otomi embroidery.
- Patience: This takes time. You will change thread colors often.

Step 5: Decorative Interior Lines
Otomi animals often have contrasting patterns inside them.
- If you have a large solid animal (like a deer body), don’t leave it plain.
- Switch to a White Thread (or a contrasting bright color).
- Stitch decorative lines inside the body: spirals, zig-zags, or simple straight lines to suggest ribs or feathers. This breaks up the solid blocks of color.
Step 6: Invisible Quilting
The appliqué is the star; the quilting should disappear.
- Sandwich the quilt (Backing + Batting + Top).
- Thread: Use White Thread (matching the background).
- Stitch: Quilt only in the white negative spaces.
- Micro-Stippling: Tiny meandering stitches work best to flatten the white background, making the colorful, satin-stitched animals puff out (Trapunto effect).
- Alternative: Simple outline quilting (echoing) 1/8″ away from each animal also works well.

Cultural Context Note: Authentic Tenangos are hand-embroidered by Otomi artisans and can take months to complete. This craft is a vital source of income for the Tenango de Doria community. If you love this style, consider purchasing a small, authentic, embroidered pillowcase or runner from a fair-trade source to support the original artists, while using your quilt project to celebrate their beautiful design language.
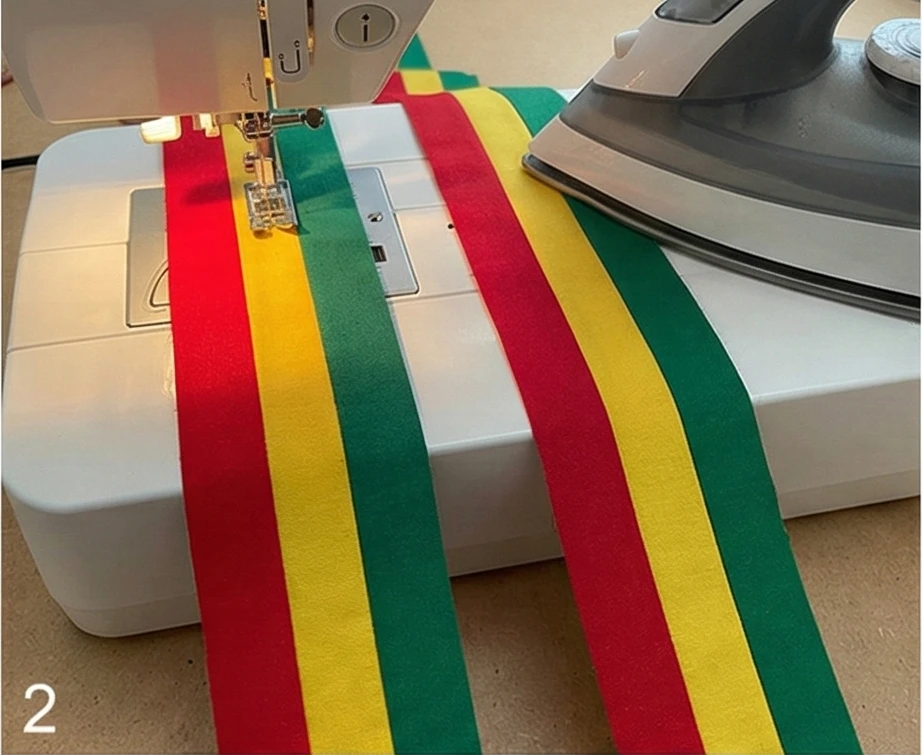
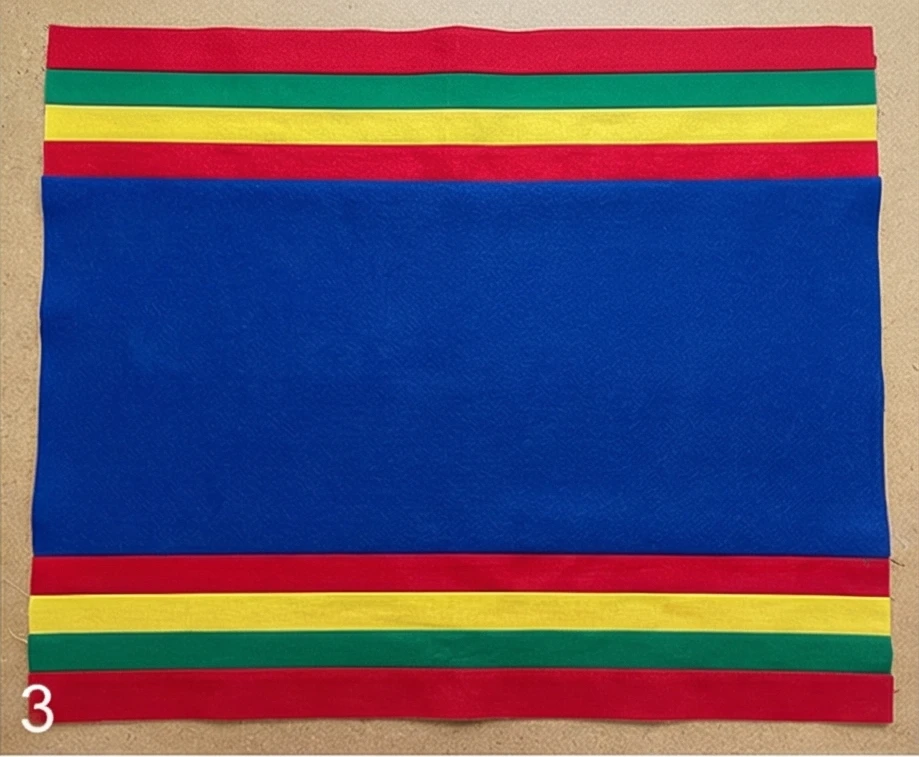
8. African Kente Cloth Quilt Patterns

The “Royal Ashanti” Kente Strip Quilt
Originating from the Ashanti and Ewe people of Ghana, Kente cloth is the “Cloth of Kings.” Traditionally, it is not woven as one wide piece of fabric. Instead, weavers create long, narrow strips (about 4 inches wide) on a strap loom, featuring complex geometric symbols and vibrant colors. These strips are then sewn together edge-to-edge to create the large robes. This quilt pattern mimics that authentic construction method by building vertical “strips” first, then joining them to create a dazzling, fractured geometric effect.
Finished Dimensions: Large Throw, approximately 54″ x 66″.
Materials Needed: To replicate the vibrant symbolic palette of Kente, you need solid cottons:
- Fabric A (Gold/Yellow): 1 yard (Symbolizes wealth and royalty).
- Fabric B (Green): 1 yard (Symbolizes growth and renewal).
- Fabric C (Red): 1 yard (Symbolizes sacrifice and passion).
- Fabric D (Black): 1.5 yards (Symbolizes maturity and spiritual energy).
- Backing Fabric: 3.5 yards.
- Batting: 60″ x 72″.
- Binding: 1/2 yard of Black.
- Notions: Rotary cutter, ruler.
Step 1: Create the “Weft” Strip Sets
Kente patterns often alternate between “solid” areas and “intricate” areas. We will make pieced blocks to represent the intricate weaving.
- Cut 2.5″ Strips: From Gold, Green, and Red, cut 10 strips each measuring 2.5″ x WOF (Width of Fabric).
- Sew Strip Set 1: Sew Green – Gold – Green.
- Press seams flat.
- Make 3 of these panels.
- Sew Strip Set 2: Sew Red – Gold – Red.
- Press seams flat.
- Make 3 of these panels.
- Sew Strip Set 3: Sew Gold – Black – Gold.
- Make 3 of these panels.
- Result: You have long ribbons of striped fabric measuring 6.5″ wide.

Step 2: Cut the Pattern Blocks
Now we chop these ribbons into square blocks.
- Take your Strip Sets to the cutting mat.
- Sub-Cut: Cut them into 6.5″ squares.
- Yield: You need roughly 50-60 mixed patterned squares.
- These squares mimic the “geometric detail” sections of a Kente strip.

Step 3: Cut the “Spacer” Blocks
Authentic Kente strips often have pauses or solid sections.
- From your Solid Black Fabric, cut 3 strips measuring 6.5″ wide.
- Sub-cut these into 6.5″ x 4.5″ rectangles.
- These smaller black rectangles will act as visual “breaths” between the bright patterns.

Step 4: Build the Vertical Columns (The Loom Strips)
We do not build this quilt in rows (left-to-right). We build it in columns (top-to-bottom) to honor the loom technique.
- Layout: Arrange a vertical column on the floor.
- Example pattern: Pattern Square (Green/Gold) — Black Spacer — Pattern Square (Red/Gold) — Pattern Square (Gold/Black) — Black Spacer.
- Variation: Make every column different! Kente is famous for “staggered” designs where the patterns don’t line up perfectly across the whole cloth.
- Length: Keep adding blocks until the column reaches 66 inches.
- Sew: Stitch the blocks together to create 9 separate vertical columns.

Step 5: The “Stitch-in-the-Ditch” Joining
In real Kente, the strips are hand-sewn together. We will join our columns.
- Arrange: Lay your 9 columns side by side.
- Check the Flow: Ensure the blocks are staggered. You don’t want a checkerboard where all the black spacers line up perfectly. Shift the columns up or down to create a “stepped” look.
- Sew: Sew Column 1 to Column 2. Then add Column 3, and so on.
- Pressing: Press the long vertical seams Open to reduce bulk.

Step 6: “Warp” Quilting
The quilting should look like the long threads of a loom.
- Sandwich the quilt.
- Thread: Use Gold Thread for a regal finish.
- Stitch: Quilt straight vertical lines from top to bottom.
- Space them 1 inch apart.
- The dense vertical lines will cross over the horizontal stripes of your blocks, creating a grid texture that looks exactly like woven cloth.

Cultural Context Note: Kente cloth is a language. The specific patterns and colors used often tell a proverb or indicate the wearer’s clan. This “patchwork” version captures the aesthetic spirit (“The Royal Ashanti”) but does not replicate a specific proverb. When choosing fabrics, remember that synthetic Kente prints exist, but building the geometric patterns yourself using solids (as described above) is a more authentic tribute to the weaver’s craft.

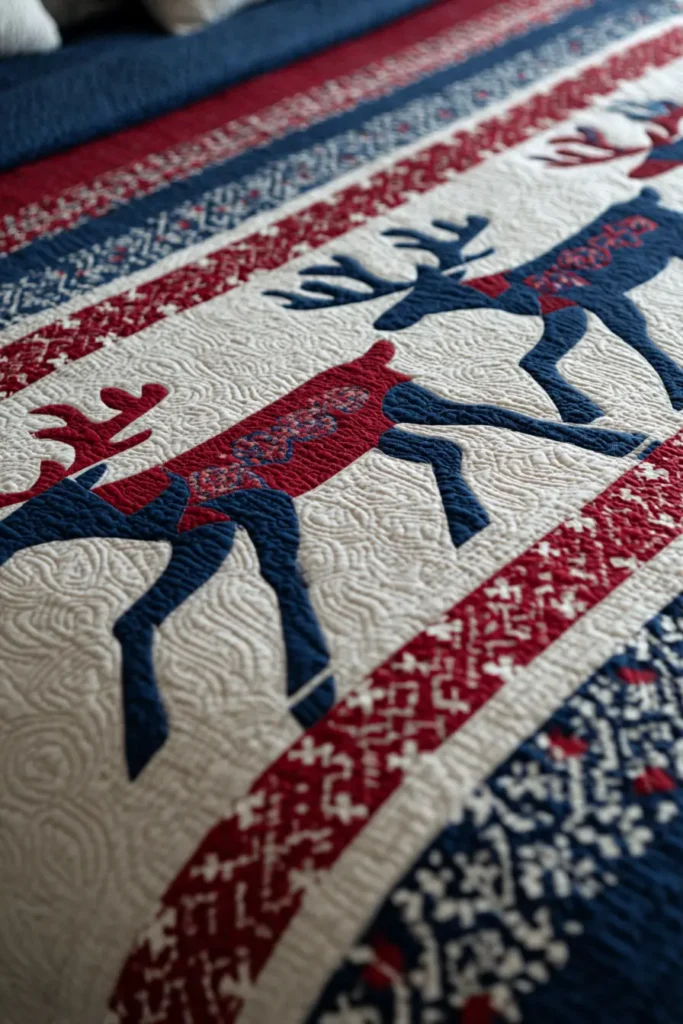
The “Sápmi Winter” Reindeer Wall Hanging
The Sámi people, indigenous to the northern regions of Norway, Sweden, Finland, and Russia (Sápmi), have a rich tradition of textile art known as Duodji. Their traditional clothing (gákti) is famous for its vibrant use of Royal Blue, Deep Red, Sunshine Yellow, and Green, often decorated with intricate woven bands and pewter wire embroidery. This quilt pattern translates those striking clothing elements into a wall hanging featuring the animal central to Sámi culture: the Reindeer.
Finished Dimensions: Wall Hanging, approximately 24″ x 36″.
Materials Needed:
- Fabric A (Background): 3/4 yard of Royal Blue or Navy Wool Felt or Flannel (mimicking the traditional wool cloth).
- Fabric B (The Reindeer): 1/4 yard of Grey or White Felt/Cotton.
- Accent Fabrics (The “Ribbons”): 1/8 yard each of Bright Red, Sunshine Yellow, and Kelly Green (Solids are best).
- Embellishment: Silver Embroidery Floss or thin Silver Cording (to simulate traditional pewter thread).
- Fusible Web: 1/2 yard.
- Backing Fabric: 1 yard.
- Batting: Thin craft batting.
- Notions: Chenille needle (for hand embroidery), rotary cutter.
Step 1: Create the “Gákti” Strip Sets
Sámi textiles are defined by rows of colorful trim. We will create these borders first.
- Cut Strips:
- Red: Cut two strips 1.5″ x WOF (Width of Fabric).
- Yellow: Cut two strips 1″ x WOF.
- Green: Cut two strips 1.5″ x WOF.
- Sew: Stitch them together lengthwise in this order: Red — Yellow — Green.
- Use a 1/4″ seam allowance.
- Press seams open to reduce bulk.
- Result: You now have a striped “ribbon” panel measuring about 3.5″ wide.
- Trim: Cut this panel into two pieces, each 24 inches long (for the top and bottom borders).

Step 2: Prepare the Background
- Cut your Royal Blue Background fabric into a rectangle measuring 24″ wide x 30″ tall.
- Attach Borders:
- Sew one “Gákti” strip set to the Top of the blue rectangle.
- Sew the second strip to the Bottom.
- Visual: The dark blue field is now framed by the vibrant colors of the Sámi flag.
Step 3: The Reindeer Silhouette
- Template: Find or draw a simple silhouette of a reindeer (specifically one with antlers).
- Fuse: Trace the shape onto the paper side of your Fusible Web.
- Iron the web onto the wrong side of your Grey Fabric (Fabric B).
- Cut out the reindeer shape.
- Position: Peel off the backing. Place the reindeer in the center of the blue field.
- Design Tip: You can place two reindeer facing each other, or a mother and calf walking across the “snow.”
- Secure: Iron the reindeer in place.
Step 4: The “Pewter” Embroidery (Couching)
Sámi artisans are famous for “Tenntrådsbroderi”—embroidery using coiled tin/pewter wire. We will mimic this metallic sparkle.
- Thread a hand needle with Silver Cording or 6 strands of grey floss.
- Couching: Lay the silver cord along the edge of the colored borders (where the Blue meets the Red).
- Using a matching thread, make tiny stitches over the silver cord every 1/4 inch to hold it in place.
- Embellish the Reindeer: Use the silver cord to outline the reindeer’s antlers, making them catch the light like ice.
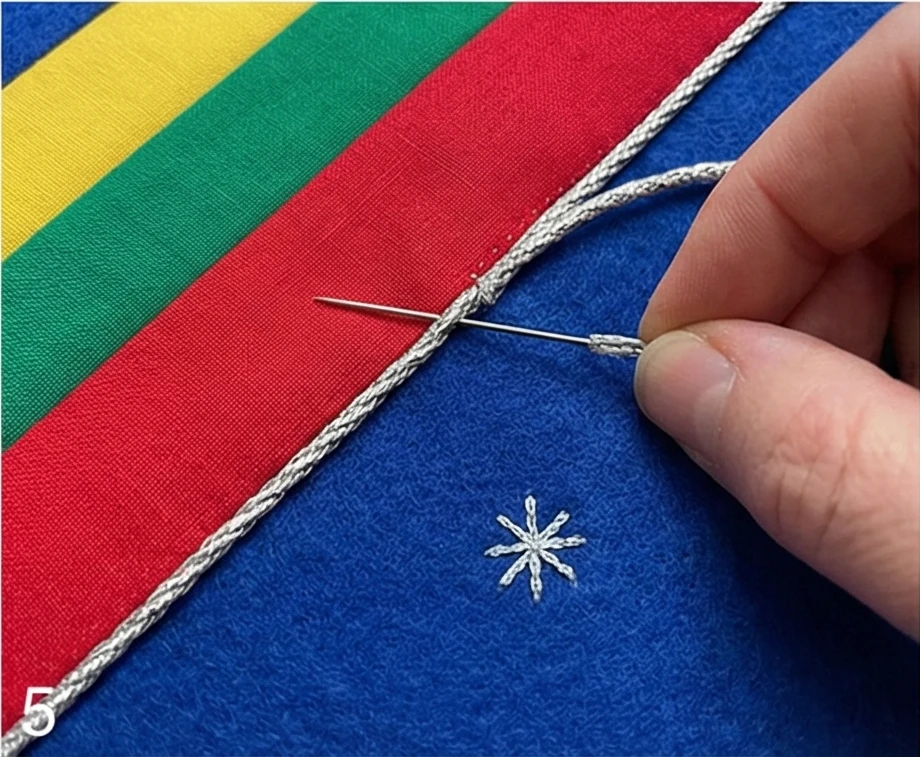
Step 5: Snowflake Details
- Using White Embroidery Floss or White Felt scraps:
- Add small stars or snowflakes in the dark blue sky above the reindeer.
- Style: Keep them geometric (8-pointed stars) rather than rounded, to match the woven Sami bands’ geometric nature.
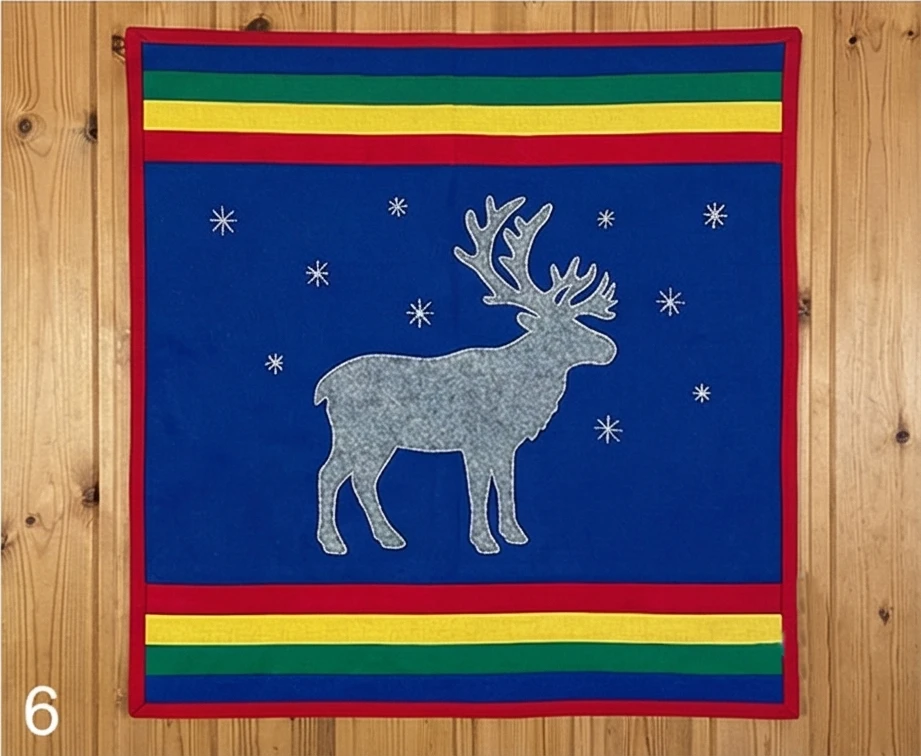
Step 6: Finishing
- Layer the quilt (Backing + Batting + Top).
- Quilt: Keep it simple. Stitch “in the ditch” along the seam lines of the colored borders. In the blue background, you can add wavy horizontal lines to represent the Aurora Borealis (Northern Lights).
- Bind: Finish with a Red Binding to seal the edges with warmth.
Cultural Context Note: The colors of the Sámi flag (Red, Blue, Green, Yellow) represent fire, water, nature, and the sun. The reindeer is not just an animal but the foundation of the traditional Sámi way of life. When creating this piece, you are celebrating the “People of the Sun and Wind.”
10. Japanese Sashiko Stitching Quilt Patterns
The “Indigo Waves” Sashiko Coasters & Placemats
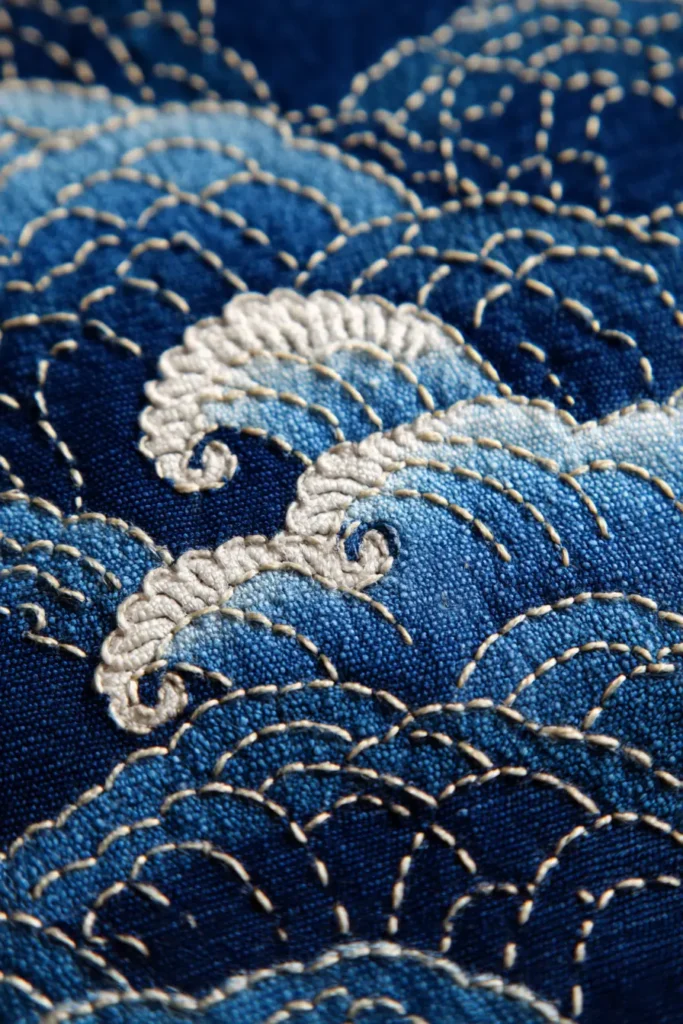
Sashiko (literally “little stabs”) is a traditional Japanese embroidery style used for reinforcement and decoration. Originally used by farmers to patch workwear (Boro), it has evolved into a refined art form featuring geometric white stitches on indigo blue fabric. This project introduces the classic Seigaiha (Blue Ocean Wave) pattern, symbolizing resilience and good fortune.
Finished Dimensions: Set of 4 Placemats (12″ x 18″) or a small Table Runner.
Materials Needed:
- Fabric A (Base): 1 yard of Indigo Blue or Navy Cotton/Linen blend. (Authentic Japanese Sarashi cotton is ideal, but Kona Navy works well).
- Thread: White Sashiko Thread (Heavyweight cotton). Substitute: Pearl Cotton Size 8 in White.
- Backing Fabric: 1 yard of Navy or a coordinating print.
- Batting: Thin Fusible Fleece (Sashiko looks best on a flat surface, not puffy batting).
- Marking Tool: White Chalk Pencil or a specialized Sashiko stencil.
- Needle: Sashiko Needle (Long, sharp, and strong).
Step 1: Prepare the “Sandwich”
Unlike patchwork, Sashiko is done on a whole piece of fabric.
- Cut: Cut your Indigo Fabric into 4 rectangles measuring 14″ x 20″ (for placemats).
- Fuse: Iron the Fusible Fleece to the wrong side of the indigo rectangles. This gives the fabric stability so it doesn’t pucker when you stitch.
- Note: Do not attach the backing fabric yet. We stitch through the top and fleece only to keep the back clean.

Step 2: Mark the Seigaiha Grid
Precision marking is 90% of Sashiko success.
- Grid: Use a ruler and white chalk to draw a 1-inch grid across the entire fabric.
- The Arcs:
- Find the intersection of two grid lines.
- Use a compass (or a 2-inch circle template/cup) to draw a semi-circle (arch) connecting the grid points.
- Move to the next intersection and repeat.
- Row 2: Start the arches halfway between the arches of Row 1 (brick-lay pattern).
- Result: You should see a pattern of overlapping “fish scales” or waves.

Step 3: The Sashiko Stitch (Running Stitch)
The rule of Sashiko: Your “grain of rice” (stitch) should be the size of a grain of rice.
- Thread: Cut a manageable length of thread (about 18 inches). Do not knot the end; leave a 2-inch tail on the back.
- Load the Needle: Insert the needle and “stack” 3 or 4 stitches onto the needle before pulling the thread through. This keeps the line straight.
- Ratio: Ideally, the visible white stitch should be 3mm, and the space between stitches should be 1-2mm (3:2 ratio).
- Corners: Ensure a stitch always lands exactly at the intersection of the waves. Do not cross threads over an empty space.

Step 4: Stitching the Waves
- Start: Stitch all the horizontal rows of waves first.
- Curving: When stitching the curve, keep the needle perpendicular to the fabric.
- Tension: Every few inches, gently tug the fabric to ensure the thread isn’t too tight (which causes puckering).
- Ends: When you finish a thread, pull it to the back and weave it under existing stitches to secure it. Do not use bulky knots if possible.

Step 5: Finishing the Edges
Once the embroidery is done, we assemble the placemat.
- Trim: Trim the embroidered block down to 12.5″ x 18.5″ to square it up.
- Backing: Place the Backing Fabric Right Sides Together with the embroidered top.
- Sew: Stitch around the perimeter with a 1/4″ seam, leaving a 4-inch gap for turning.
- Turn: Turn right side out. Poke corners. Press flat.
- Topstitch: Machine stitch 1/8″ from the edge around the entire perimeter to close the gap and frame the work.

Step 6: Boro Variation (Optional)
For a more rustic, historical look:
- Instead of a pristine indigo background, take scraps of lighter blue fabrics.
- Patch: Pin these scraps randomly onto the indigo base before marking.
- Stitch: Stitch your Sashiko pattern through the patches. The white stitches will hold the patches in place (Raw Edge Appliqué). This mimics the mended workwear of traditional Japanese fishermen and farmers.

Cultural Context Note: Sashiko was born out of necessity—to reinforce fabric and add warmth in northern Japan where cotton was scarce. The patterns often have meanings: Seigaiha (waves) for peace, Asanoha (hemp leaf) for strength and growth. It is a meditative practice that honors the concept of Mottainai (regret for waste).
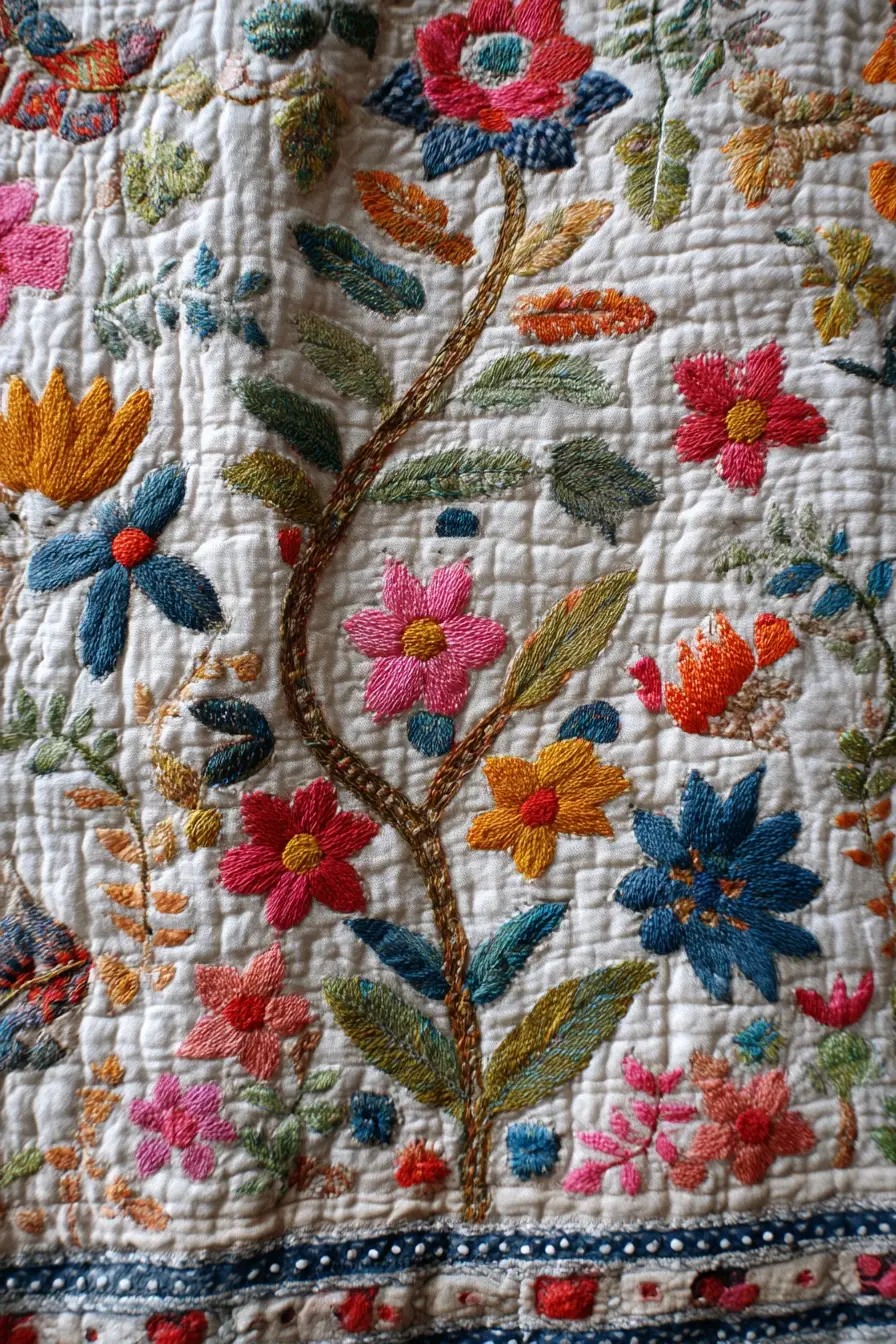
11. Nakshi Kantha Quilt Techniques and Patterns
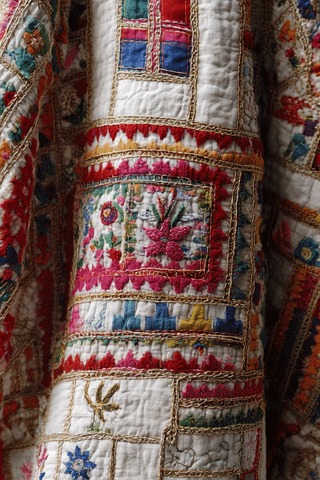
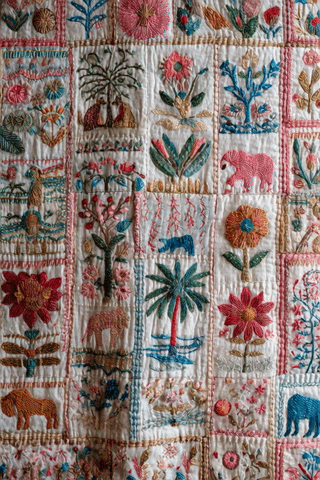
The “Village Life” Nakshi Kantha Story Quilt
Nakshi Kantha (literally “Embroidered Quilt”) is a folk art form deeply rooted in rural Bangladesh and West Bengal. Traditionally, women would repurpose old, soft saris and dhotis, layering them together and covering the entire surface with running stitches. Unlike Western quilts that focus on patchwork blocks, Nakshi Kantha is a canvas for storytelling—depicting village scenes, animals, weddings, and the central lotus (Padma) motif using colorful embroidery threads.
Finished Dimensions: Baby Quilt or Wall Hanging, approximately 36″ x 36″.
Materials Needed:
- Fabric A (Top Layer): 1.25 yards of Soft Cotton Voile or a recycled old Cotton Sari (White, Cream, or very light Red). New cotton must be washed until very soft.
- Fabric B (Inner Layers): 1.25 yards of White Cotton Muslin or old soft cotton sheets. (Traditional Kantha uses 3-5 layers of cloth instead of batting).
- Fabric C (Backing): 1.25 yards of a coordinating colored cotton (Red or Saffron).
- Thread: Embroidery Floss in vibrant colors: Red, Black, Yellow, Green, and Blue.
- Needle: Crewel Embroidery Needle (sharp with a long eye).
- Notions: Water-soluble fabric marker or tracing paper, safety pins.
Step 1: Prepare the “Kanthar” (The Canvas)
Kantha is unique because it uses layers of cloth rather than fluffy batting.
- Cut: Cut your Top, Inner, and Backing fabrics into 40″ x 40″ squares.
- Layer: Lay the Backing face down. Place the Inner layer(s) on top. Place the Top fabric face up.
- Smooth: Smooth out all wrinkles perfectly.
- Baste: Use large safety pins or long basting stitches to secure the layers together every 4-5 inches. The layers must act as one piece of fabric.
Step 2: Draw the Central Motif (The Padma)
Every Nakshi Kantha starts from the center and expands outward.
- Center Point: Find the exact center of the quilt.
- Draw: Using your water-soluble marker, draw a large 8-petaled Lotus (Padma). It should be about 10-12 inches wide.
- Symbolism: The lotus represents the seat of the divine and the unfolding of life.
- Outline: Thread your needle with Black or Dark Blue floss (2 strands). Use a Stem Stitch or Backstitch to outline the entire lotus flower.
Step 3: Draw the Corner Motifs (The Trees of Life)
- In each of the four corners, draw a Tree of Life (Kalkas or Paisley shapes) pointing inward toward the lotus.
- Outline: Stitch the outlines of these trees using Green or Red thread.
- Design Tip: Keep the shapes simple. The beauty comes from the textured filling stitches later.
Step 4: The Storytelling Borders
The space between the center and corners is for your story.
- Sketch: Draw simple figures in the empty spaces. Common motifs include:
- Fish (fertility and abundance).
- Birds/Peacocks (messengers).
- Elephants/Horses (strength).
- Palki (Bridal Palanquin).
- Outline: Stitch the outlines of these figures in contrasting bright colors.
Step 5: The Vorat (Filling Stitches)
This is the defining characteristic of Nakshi Kantha.
- Select a Motif: Choose a petal of the lotus or the body of a fish.
- Fill: Instead of coloring it in, fill the shape with rows of Running Stitches in a matching color.
- Example: For a red petal, stitch rows of red running stitches very close together until the petal looks solid and textured.
- Texture: This creates a rippled, quilted effect that makes the motif puff up slightly.
Step 6: The Lahari (The Background Ripple)
We never leave empty space in a Kantha. The background must be quilted.
- Use White or Cream thread (matching the background fabric) to create texture, not color.
- The Ripple: Start around your central Lotus. Stitch a running stitch that echoes the shape of the flower.
- Repeat: Keep stitching concentric rings outward, rippling across the whole quilt like a stone dropped in a pond.
- When you hit a motif (like a fish), stop, skip over it, and continue on the other side.
- These thousands of tiny stitches bind the layers together permanently and give the quilt its signature “crinkled” drape.
Step 7: Finishing (The Par)
- Trim the edges square (approx 36″ x 36″).
- Fold: Kantha quilts rarely use a separate binding strip. Instead, fold the Backing fabric over to the front (about 1/2 inch) to create a border.
- Stitch: Secure this folded edge with a decorative Blanket Stitch in Red or Black thread.
Cultural Context Note: Historically, Nakshi Kantha was a way to recycle precious textiles. A grandmother would sew her old, soft sari into a quilt for her grandchild, literally wrapping the baby in her history and protection. The motifs were often improvised without patterns, representing the maker’s dreams and daily reality.

12. Peruvian Textile-Inspired Andean Quilt Designs
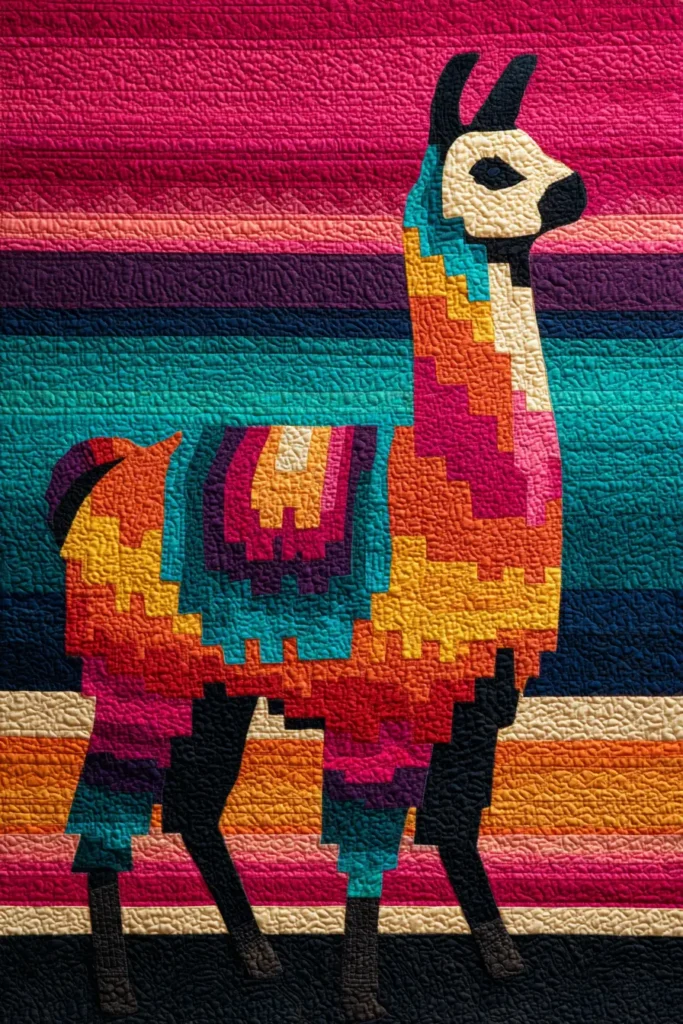
The “Andean Peaks” Llama & Stripe Quilt
Peruvian textiles, particularly those from the Andes, are renowned for their vibrant colors, intricate geometric stripes, and iconography featuring the alpaca or llama. The traditional Aguayo or Lliclla (carrying cloth) often features bold bands of neon pink, turquoise, and orange against deep black or red. This quilt captures that aesthetic by combining a pixelated “Llama” block with rich, strip-pieced borders that mimic the woven bands of a traditional backstrap loom.
Finished Dimensions: Vibrant Throw, approximately 50″ x 60″.
Materials Needed:
- Fabric A (Background): 2 yards of Solid Black (to make the colors pop like traditional weaving).
- Fabric B (Llamas): 1/2 yard of White or Cream (for the animals).
- Fabric C (The “Aguayo” Palette): 6 Fat Quarters in bright, saturated colors: Hot Pink, Teal, Orange, Purple, Lime Green, and Yellow.
- Backing Fabric: 3 yards.
- Batting: Throw size (54″ x 64″).
- Embellishment: Multi-colored yarn for making tassels (optional).
- Notions: Rotary cutter, ruler.
Step 1: Cut the Llama Parts (Pixelated Style)
We will make 9 Llama Blocks. The llama is built from simple rectangles. For ONE Llama Block (Finished size 10″ x 12″):
- Legs: Cut 2 White rectangles (2.5″ x 4.5″).
- Body: Cut 1 White rectangle (6.5″ x 4.5″).
- Neck: Cut 1 White rectangle (2.5″ x 6.5″).
- Head: Cut 1 White square (2.5″ x 2.5″) and 1 White rectangle (2.5″ x 1.5″ for the snout).
- Saddle (The Color): Cut 1 Colored Rectangle (4.5″ x 2.5″) from your bright scraps.
- Background (Black): Cut various strips to fill the space around the legs and neck (approx. 1/2 yard per block total).

Step 2: Assemble the Llama
- Leg Unit: Sew Black spacers between and around the two White leg pieces.
- Body Unit: Sew the Colored Saddle onto the back of the White Body rectangle. (This looks like the blanket they wear).
- Neck/Head Unit: Sew the head pieces to the neck piece, adding a small Black square for the eye if desired (or embroider it later).
- Join: Stack the units: Legs on bottom, Body/Saddle in middle, Neck/Head on top.
- Result: You have a cute, blocky llama silhouette on a black background. Make 9 of these.

Step 3: Create the “Woven” Divider Strips
Andean textiles are defined by stripes. We will make panels that look like the edge of a woven blanket.
- Cut Strips: From your bright Fat Quarters (Fabric C), cut distinct, narrow strips:
- Some 1.5″ wide.
- Some 2.5″ wide.
- Some 1″ wide.
- Sew Stratas: Sew long sets of these strips together.
- Example: Black – Pink – Orange – Black – Teal – Yellow – Black.
- Tip: Vary the widths. Authentic weaving uses thin pinstripes next to wide bands.
- Size: Make 4 Strip Panels that measure 10.5″ tall x 50″ wide (the width of the quilt).
Step 4: The “Chacana” (Inca Cross) Border (Optional)
If you want more geometry, add a row of Inca Crosses.
- The Chacana is a stepped cross. You can simulate this by making a 9-Patch block but leaving the corners black and using the bright colors for the central cross shape.
- Insert these blocks into one of your strip rows for extra cultural detail.
Step 5: Assembly
Layer the llamas between the stripes.
- Row 1 (Stripes): Place a Strip Panel at the top.
- Row 2 (Llamas): Sew 3 Llama blocks together side-by-side. Sew this row to the bottom of the first Strip Panel.
- Row 3 (Stripes): Add another Strip Panel.
- Row 4 (Llamas): Add another row of 3 Llamas.
- Continue: Alternate until all llamas and strip panels are used.
- Visual: The llamas look like they are walking along the mountain paths created by the striped bands.

Step 6: Finishing with “Pom-Poms”
- Quilt: Use a Walking Foot to quilt straight lines.
- In the Strip Panels, quilt straight lines to mimic warp threads.
- In the Llama blocks, outline the animals.
- Bind: Use Solid Black binding to contain the bright colors.
- Tassels: Authentic Andean blankets often have corner tassels.
- Make 4 bright, fluffy yarn tassels (using all your accent colors mixed).
- Hand-sew one to each corner of the finished quilt.
Cultural Context Note: Textiles in the Andes are a form of communication. The patterns and colors can indicate a person’s village, marital status, and social standing. The “Aguayo” cloth is a symbol of identity and survival at high altitudes. This quilt pays homage to the bold joy and utility of those daily masterpieces.
13. Celtic Knot Quilt Patterns from Irish Heritage

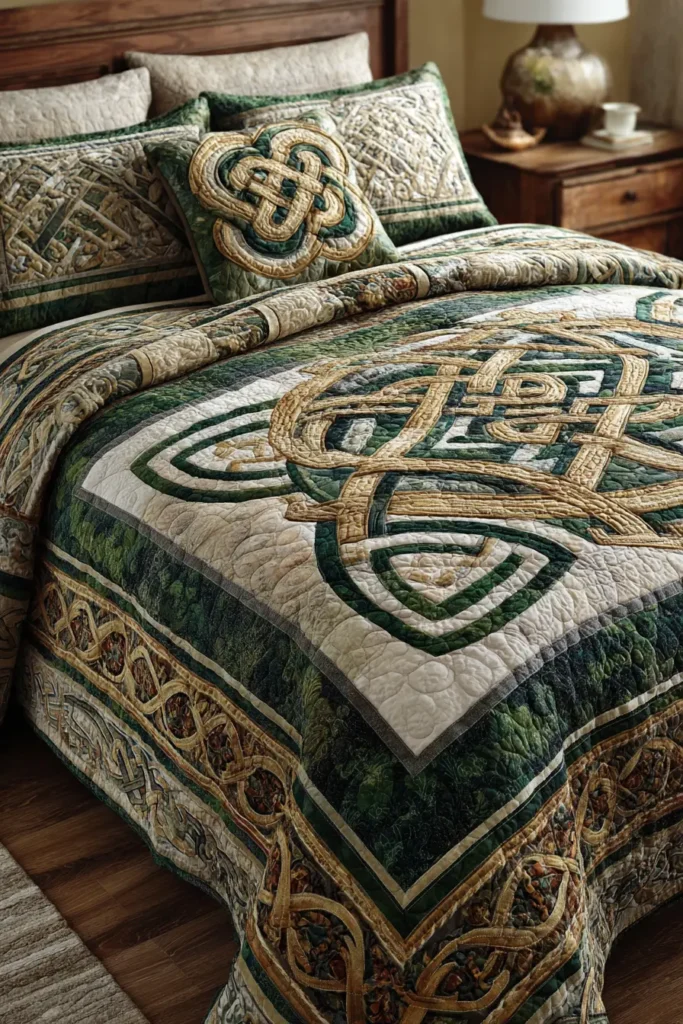
The “Emerald Trinity” Celtic Knot Wall Hanging
Celtic knotwork, famous from the Book of Kells and ancient stone carvings throughout Ireland, represents eternity, loyalty, and the interconnectedness of life. In quilting, these complex, never-ending loops are rarely pieced. Instead, they are created using Bias Tape Appliqué. This technique involves making flexible fabric tubes that can curve smoothly to form the intricate “over-under” weave that defines Celtic art.
Finished Dimensions: Wall Hanging, approximately 24″ x 24″.
Materials Needed:
- Fabric A (Background): 3/4 yard of Emerald Green or Deep Navy (Contrast is key).
- Fabric B (The Knot): 1/2 yard of Gold, Cream, or a Metallic print.
- Fusible Web: 1/4″ wide Fusible Tape (or standard HeatnBond Lite cut into strips).
- Bias Tape Maker: Size 1/4″ (6mm) or 1/2″ (12mm). (Crucial for easy folding).
- Backing Fabric: 3/4 yard.
- Batting: 26″ x 26″.
- Thread: Invisible monofilament thread OR cotton thread matching the Knot color.
- Notions: Water-soluble marking pen, cork board or foam board (for layout), pins.
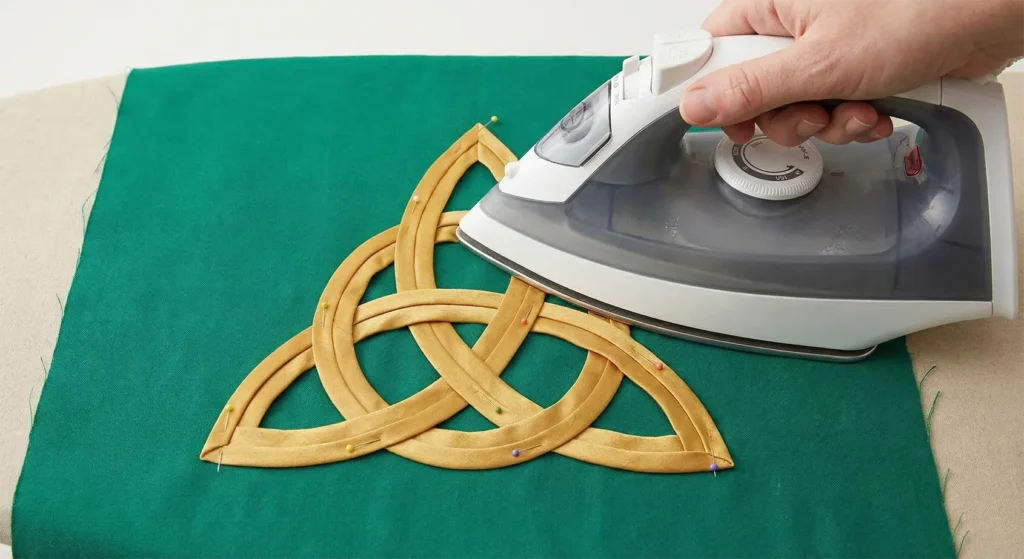
Step 1: Prepare the “Bias Tape” (The Vines)
To make the fabric curve without buckling, you must cut it on the bias (45-degree angle).
- Cut Strips: Lay your Gold Fabric (Fabric B) flat. Cut strips on the 45-degree diagonal.
- Width calculation: If using a 1/4″ bias maker, cut strips 1/2″ wide (or follow the tool’s instructions).
- You need one continuous strip about 3 yards long. Sew strips together on the diagonal to reduce seam bulk.
- Press: Feed the strip through your Bias Tape Maker. As it comes out the narrow end, press it immediately with a hot iron.
- Result: A long, neat ribbon of fabric with raw edges folded inward.
- Fuse (Optional but Recommended): Apply a thin layer of Fusible Tape to the back of this ribbon. This will let you iron it down later instead of using hundreds of pins.

Step 2: Draft the Trinity Design
- Background: Cut your Green Background fabric into a 25″ x 25″ square. Fold in quarters to find the center.
- Marking: You can print a “Triquetra” (Trinity Knot) template online, or draw it:
- Draw an equilateral triangle in the center (approx 12″ wide).
- Draw three interlocking circles (arcs) using the corners of the triangle as pivot points.
- Tip: You only need to draw a single line guide. The bias tape will sit on top of this line.

Step 3: The “Trellis” Layout
- Place your background fabric on a corkboard or firm ironing surface.
- Pinning: Start laying your Gold Bias Tape along the marked lines.
- Start at the bottom of a loop (where a seam can be hidden).
- Gently curve the tape to follow the loops. Do not pull it tight; let it ease into the curves.
- The “Over-Under” Rule: This is the most important step. As the line crosses itself, you must alternate:
- First crossing: Over.
- Second crossing: Under.
- Third crossing: Over.
- Visual Check: If you don’t weave it, it’s just a pretzel. If you weave it, it becomes a Celtic Knot.
Step 4: Secure the Appliqué
- Fusing: Once the weave is perfect, press firmly with your iron to activate the fusible tape on the back of the bias strip.
- Hiding Ends: where the two ends of the loop meet, tuck one raw edge under the other, or butt them together tightly and cover the join with a tiny scrap of gold fabric fused on top.

Step 5: Stitching the Knot
You need to secure the edges of the tape so they don’t peel up.
- Set up: Use an open-toe foot so you can see clearly.
- Stitch:
- Option A (Invisible): Use monofilament (clear) thread and a tiny Blind Hem Stitch. The stitch should bite into the gold tape, then barely nip the green background.
- Option B (Decorative): Use matching Gold thread and a straight stitch (topstitch) down both sides of the bias tape (1/8″ from the edge).
- Option C (Twin Needle): Use a Twin Needle to stitch both sides of the tape simultaneously.
Step 6: “In-Between” Quilting
Celtic knots look best when they are “trapunto” (puffy).
- Sandwich the quilt.
- Micro-Stippling: Using Green Thread, quilt very dense, tiny stipples (meandering lines) in the green background spaces inside and around the knot.
- The Pop: Do not quilt on top of the Gold knot itself.
- Effect: The intense quilting flattens the green background, making the un-quilted Gold knot pop out in 3D relief, looking like carved metal.
Cultural Context Note: While often associated with Ireland, this interlaced style (Insular Art) was shared across the British Isles. The continuous line represents eternity—no beginning and no end. In the Christian tradition, the Triquetra represents the Trinity (Father, Son, Holy Spirit); in pagan traditions, it can represent Earth, Sea, and Sky.
14. Turkish Kilim Quilt Patterns for Bold Colors

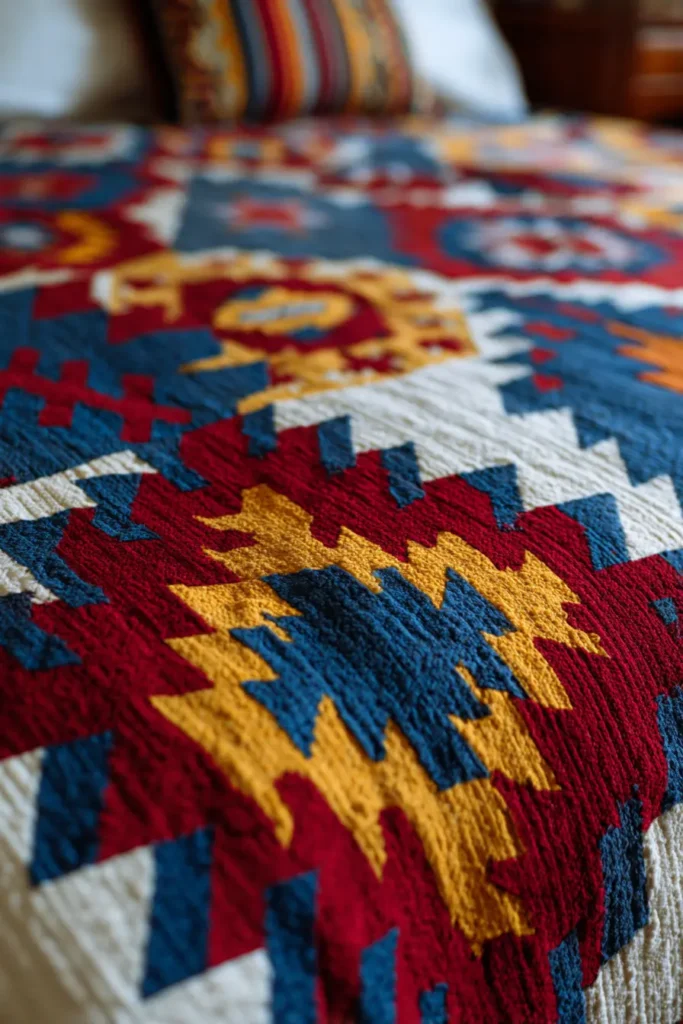
The “Anatolian Journey” Stepped Medallion Quilt
Turkish Kilims are flat-woven rugs (tapestries) produced by the nomadic tribes of Anatolia. Unlike pile rugs, they are defined by their sharp, geometric shapes created by the “slitweave” technique. The patterns are a language of symbols: the Elibelinde (hands on hips) represents fertility/motherhood, the Muska (triangle) is an amulet for protection, and the Göz (eye) wards off bad luck. This quilt mimics the “stepped” look of the weave using Flying Geese units to create a bold, radiating diamond medallion.
Finished Dimensions: Large Throw, approximately 50″ x 60″.
Materials Needed:
- Fabric A (Background/Cream): 2 yards of unbleached cotton or linen (mimicking the wool warp).
- Fabric B (Terracotta/Red): 1.5 yards (The dominant “earth” tone).
- Fabric C (Indigo/Navy): 1 yard (High contrast).
- Fabric D (Accents/Ochre & Olive): 1/2 yard each.
- Backing Fabric: 3.5 yards.
- Batting: 54″ x 64″.
- Binding: None (We will use a “Knife Edge” finish with tassels).
- Embellishment: Pre-made cotton rug fringe or heavy yarn for tassels.
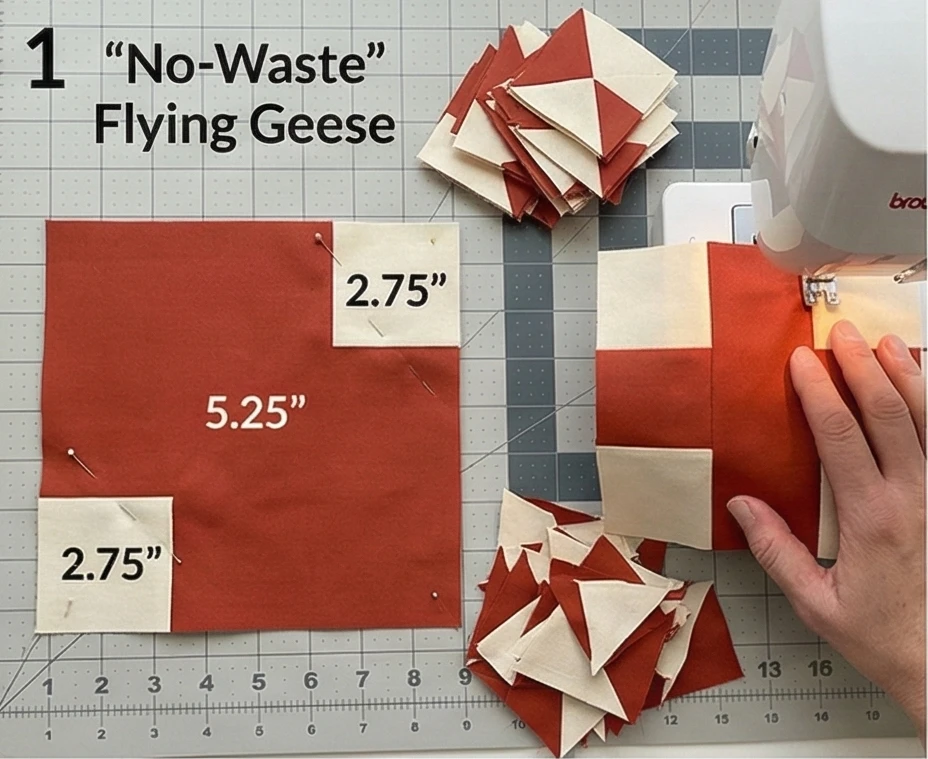
Step 1: Mass-Produce Flying Geese (The “Steps”)
Kilim patterns rely on diagonals that look like staircases. The most efficient way to quilt this is using Flying Geese units. We are making units that finish at 2″ x 4″.
- The “No-Waste” Method:
- Take one large square (5.25″) of Fabric B (Red).
- Take four small squares (2.75″) of Fabric A (Cream).
- Draw a diagonal line on the small squares. Place two on the corners of the large square. Sew 1/4″ from the line (both sides). Cut, press.
- Add the remaining two squares to the resulting heart shapes. Sew, cut, press.
- Yield: 4 Flying Geese per set.
- Quantity: You will need approximately:
- 50 Red/Cream Geese.
- 40 Navy/Cream Geese.
- 30 Ochre/Cream Geese.
Step 2: The Central Göz (Eye)
We start from the dead center.
- Cut a 4.5″ square of Navy Blue.
- Sew a Red Flying Goose to the Top and Bottom.
- Sew a Red Flying Goose to the Left and Right sides (you will need to add small 2.5″ corner squares to these side units to make the length match).
- Visual: You now have a Navy square surrounded by a Red diamond.
Step 3: The Stepped Expansion
We build the quilt in “Rounds” or concentric rings.
- Round 2 (Cream): Surround the Red diamond with background fabric strips or squares to create “negative space” before the next color.
- Round 3 (Ochre): Sew a ring of Ochre Flying Geese pointing outward from the center.
- Technique: When joining Flying Geese end-to-end, the “steps” are created. Align the point of one goose with the bottom center of the next.
- Cornerstones: At the four corners of the round, use a Half Square Triangle (HST) to turn the corner sharply.
Step 4: The Elibelinde (Hands on Hips) Motifs
In the four corners of the background field, we place a stylized female figure symbol.
- Construct 4 smaller diamond blocks using Navy and Red Geese.
- Place one in each of the four corners of the cream background field, pointing inward toward the main medallion.
- Symbolism: This arrangement protects the center.
Step 5: The “Running Water” Border
Kilims almost always have a geometric border representing flowing water or scorpion protection.
- Cut two borders measuring 6.5″ x 50″ (Sides) and two measuring 6.5″ x 50″ (Top/Bottom).
- Strip Piecing:
- Sew a strip of Red (2.5″) to a strip of Navy (2.5″).
- Cut into 2.5″ segments.
- Sew them back together offsetting them by one square to create a “Checkerboard” or “Zipper” effect.
- Attach these borders to the main quilt body.
Step 6: “Flat Weave” Quilting
Rug quilts should be dense and stiff, not puffy.
- Sandwich the quilt.
- Thread: Use a heavy-weight cotton thread (12wt or 30wt) in a neutral color.
- The Stitch: Quilt straight horizontal lines across the entire quilt, spaced 1/2 inch apart.
- This mimics the Weft-faced construction of a tapestry. It flattens the batting and gives the quilt the heavy drape of a rug.
Step 7: The Tassel Finish
A Kilim is not a Kilim without fringe.
- Knife Edge: Instead of binding, sew the Front and Back fabrics Right Sides Together (like a pillowcase), leave a gap, turn, and press. Topstitch the edge.
- Fringe:
- Hand-sew a thick Cotton Fringe trim to the short ends (Top and Bottom) only.
- Alternative: Use a crochet hook to knot lengths of yarn directly through the edge of the quilt, creating a raw, authentic fringe.
Cultural Context Note: Kilim motifs are a language. A woman weaving a rug would weave her hopes for marriage, protection from scorpions, or desire for children into the rug using these symbols. The colors were traditionally derived from roots and insects (Madder for red, Indigo for blue). This quilt honors the geometric precision and symbolic literacy of Anatolian weavers.
15. Moroccan Berber Quilt-Inspired Geometric Designs

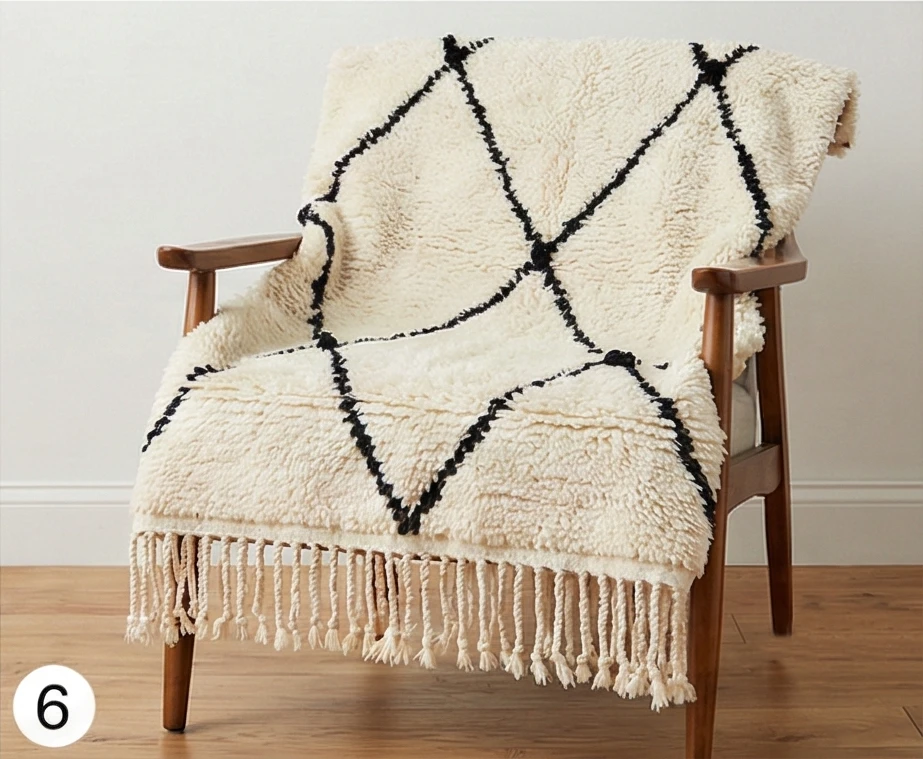
The “Atlas Snow” Beni Ourain Shag Quilt
The Beni Ourain rugs, hand-woven by the Berber tribes in the Atlas Mountains of Morocco, are icons of modernist design. Traditionally, they are thick, high-pile wool rugs featuring a creamy white background with spontaneous, charcoal-black geometric lines (diamonds or zigzags). To translate this into a quilt, we focus on texture. We use Rag Quilting or textured fabrics like chenille or flannel to mimic the plush “shag” feel, keeping the design strictly monochromatic and geometric.
Finished Dimensions: Cozy Lap Quilt, approximately 50″ x 60″.
Materials Needed:
- Fabric A (Background): 3 yards of Cream Flannel or White Chenille (Texture is crucial here; do not use standard flat cotton).
- Fabric B (The Lines): 1 yard of Charcoal Grey or Black Flannel.
- Backing Fabric: 3 yards of Flannel (for extra coziness).
- Batting: High-loft Polyester Batting (for puffiness) OR no batting if using heavy rag layers.
- Thread: Cream thread (for construction) and Black pearl cotton (for tying).
- Notions: Walking foot, rotary cutter, sharp scissors (for ragging).
Step 1: Cut the “Diamond” Strips
Beni Ourain designs are rarely perfect; the lines wander. We will use a “Slash and Insert” improv technique.
- Cut Background Panels: Cut your Cream Flannel into large irregular panels.
- Cut 3 panels approx 18″ x 60″.
- Cut Line Strips: Cut your Charcoal Flannel into narrow strips.
- Width: 1.5 inches.
- Length: Various lengths.
Step 2: The “Slash” Technique
We are going to slice our background fabric to insert the black lines.
- Take one Cream Panel (18″ x 60″).
- Slash: Using your rotary cutter, slice a diagonal line across the fabric. It doesn’t have to be straight—a little wobble looks authentic.
- Insert: Sew a Charcoal Strip between the two cut edges.
- Use a 1/4″ seam allowance.
- Press the seams open (or to the side if using flannel).
- Repeat: Make another slash in a different direction (forming a V-shape or a diamond intersection). Insert another Charcoal strip.
- Goal: Create a large, loose diamond pattern across the panels.

Step 3: Reassembling the Field
- Trim: The insertion of strips will have made your panels jagged. Trim the long edges straight again.
- Join: Sew the 3 large panels together to reform the quilt top (approx 50″ wide).
- Match-up (Optional): You can try to make the black lines meet at the seams, but in Berber rugs, lines often “miss” each other or stop abruptly. This “broken line” aesthetic is part of the charm.
Step 4: The “Faux-Shag” Tufting
To mimic the pile of a rug without weaving, we use tufting.
- Sandwich your Top, Batting, and Backing. Baste well.
- Quilting: Quilt straight lines in the Cream areas, spaced 2 inches apart. This holds the layers together.
- Tufting (The Shag):
- Cut hundreds of short strips of Cream Chenille or yarn (approx 3 inches long).
- Using a large needle, pull these strands through the quilt top at random intervals in the center of the diamonds.
- Knot them securely on the top side.
- Result: These little tufts add a 3D texture that feels like a rug under your hand.
Step 5: Tying the Intersections
To emphasize the geometric lattice.
- Thread a needle with Black Pearl Cotton or heavy embroidery floss.
- Go to every intersection where the Charcoal lines cross.
- Tie: Make a heavy “Tied Quilt” knot right at the X. Leave the tails about 1/2 inch long.
- This adds a primitive, handcrafted element that honors the tribal origin.

Step 6: The “Fringe” Binding
Berber rugs always have fringe on one end.
- Sides: Bind the two long sides (Left and Right) with standard Cream Binding.
- Ends: For the Top and Bottom:
- Sandwich a pre-made Cotton Rug Fringe between the quilt top and backing before sewing the edge shut.
- Topstitch to secure.
- Alternative: If using flannel, you can simply sew a line 1 inch from the edge and “rag” (snip) the edge to create a soft flannel fringe.
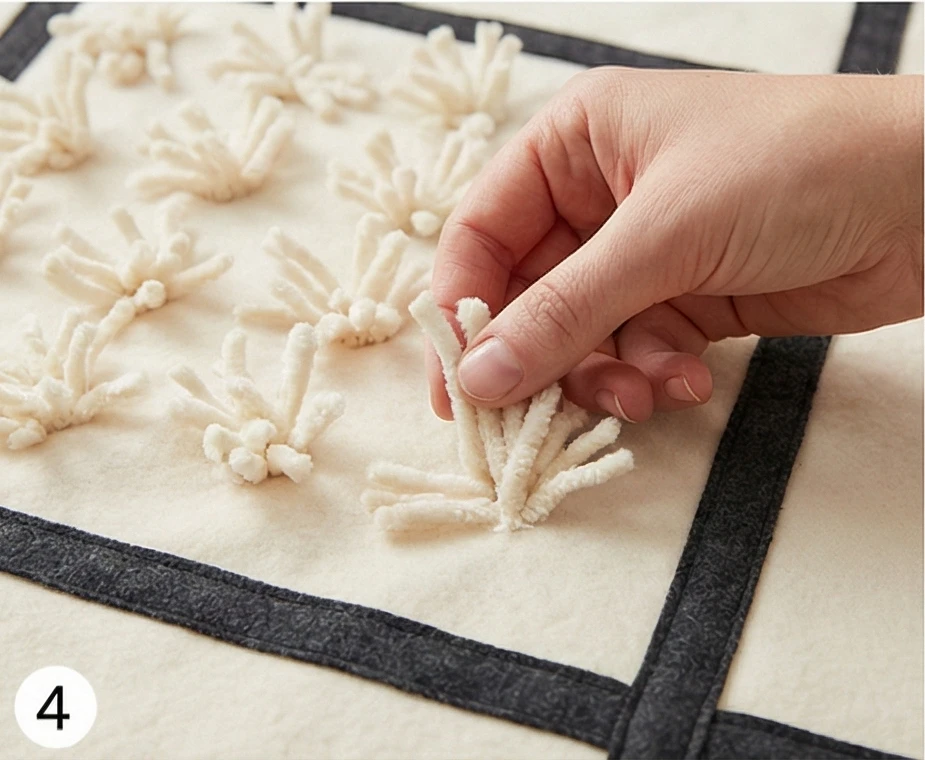
Cultural Context Note: The Beni Ourain tribes lived in the snowy peaks of the Atlas Mountains, so their textiles were strictly utilitarian—heavy blankets used for warmth, not decoration. The geometric symbols often represented tribal identity and protection against evil spirits. The spontaneity of the design (wobbly lines, asymmetry) reflects the belief that only God is perfect, and the imperfections are what give the textile its “Baraka” (spiritual power).
16. Maya Huipil Weaving Patterns Adapted for Quilt Blocks


The “Guatemalan Diamond” Huipil Block
The Huipil is the traditional woven blouse worn by Maya women in Guatemala and Mexico. Each village has its own distinctive geometric language, but a common motif is the Rombos (Diamond), representing the universe, the path of the sun, and the four cardinal directions. Authentic huipils are brocade-woven on backstrap looms. This quilt block mimics the dense brocade look using Strip Piecing and tiny Square-in-a-Square units to create a pixelated, jewel-toned diamond.
Finished Dimensions: Large Throw, approximately 50″ x 60″.
Materials Needed:
- Fabric A (Background): 2 yards of Solid Black or Indigo Blue (Traditional loom base colors).
- Fabric B (The Brocade): A “Jelly Roll” (2.5″ strips) or scraps of highly saturated solids: Magenta, Purple, Turquoise, Orange, Lime Green.
- Backing Fabric: 3 yards.
- Batting: 54″ x 64″.
- Notions: Rotary cutter, square ruler.
Step 1: Create the “Brocade” Strip Sets
Maya weaving often looks like rows of tiny, colorful pixels. We will recreate this with strip sets.
- Select Colors: Choose 3 bright colors (e.g., Pink, Orange, Turquoise).
- Sew: Sew three 1.5″ strips together lengthwise.
- Result: A striped band measuring 3.5″ wide.
- Sub-Cut: Cut this band into 3.5″ segments.
- Effect: These segments will act as the “complex woven” parts of the block.

Step 2: The Center Diamond Unit
We build the block from the inside out.
- Center: Cut a 3.5″ square of a bright focal color (e.g., Yellow).
- Framing (Round 1): Sew a Black strip (1.5″ wide) to the top and bottom. Sew Black strips to the sides.
- Snowballing: To make it a diamond:
- Cut 4 small squares of Black (1.5″).
- Place them on the corners of the Yellow center square.
- Sew diagonally across the corner squares. Trim excess. Flip open.
- Result: A yellow diamond floating in a black square.
Step 3: The “Pixel” Expansion
Now we add the brocade detail.
- Take your Brocade Segments from Step 1.
- Sew one segment to the Top of your center unit.
- Sew one segment to the Bottom.
- Sew segments to the Sides.
- Visual: You now have a cross-shaped pattern of colorful pixels surrounding the center diamond.
Step 4: Corner Backgrounds
To turn the cross back into a square block.
- Cut 4 squares of Solid Black (measuring the same size as your corner gaps, approx 3.5″).
- Sew them into the four empty corners of your cross layout.
- Press: Press seams toward the black squares.
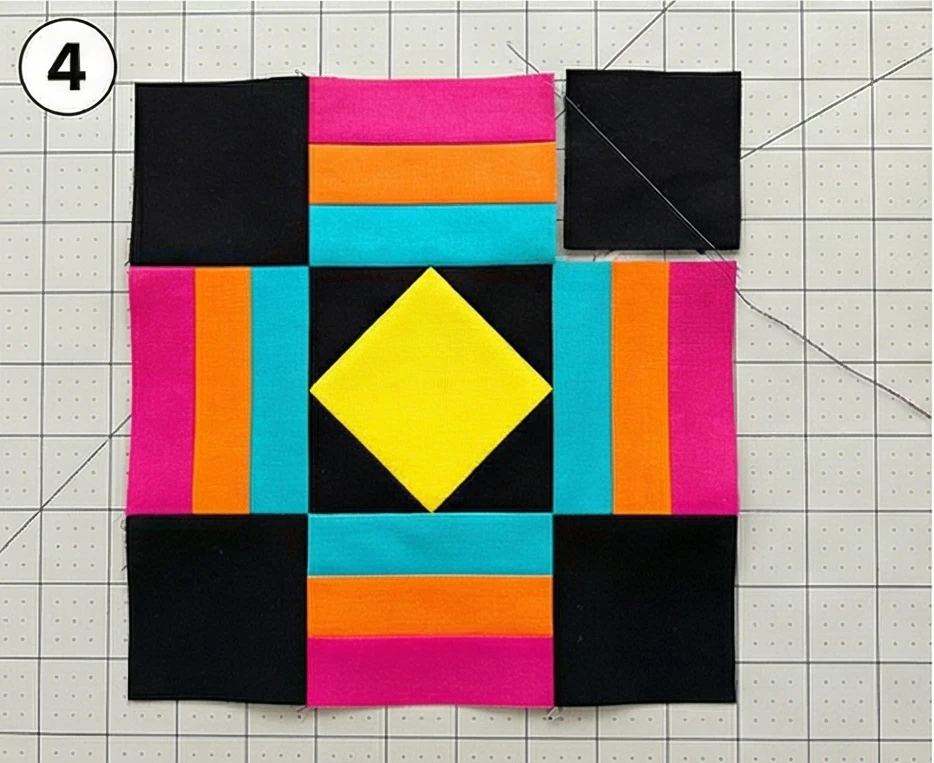
Step 5: The “Ikat” Sashing
Huipils often feature “Jaspe” (Ikat) yarns that have a blurry, variegated look.
- Sashing Fabric: Find a variegated grey/black or blue/white fabric that mimics Ikat.
- Cut: Cut sashing strips 2.5″ wide.
- Assemble: Sew your Diamond Blocks into rows, separating each block with a vertical Ikat sashing strip.
- Rows: Sew horizontal sashing strips between the rows.
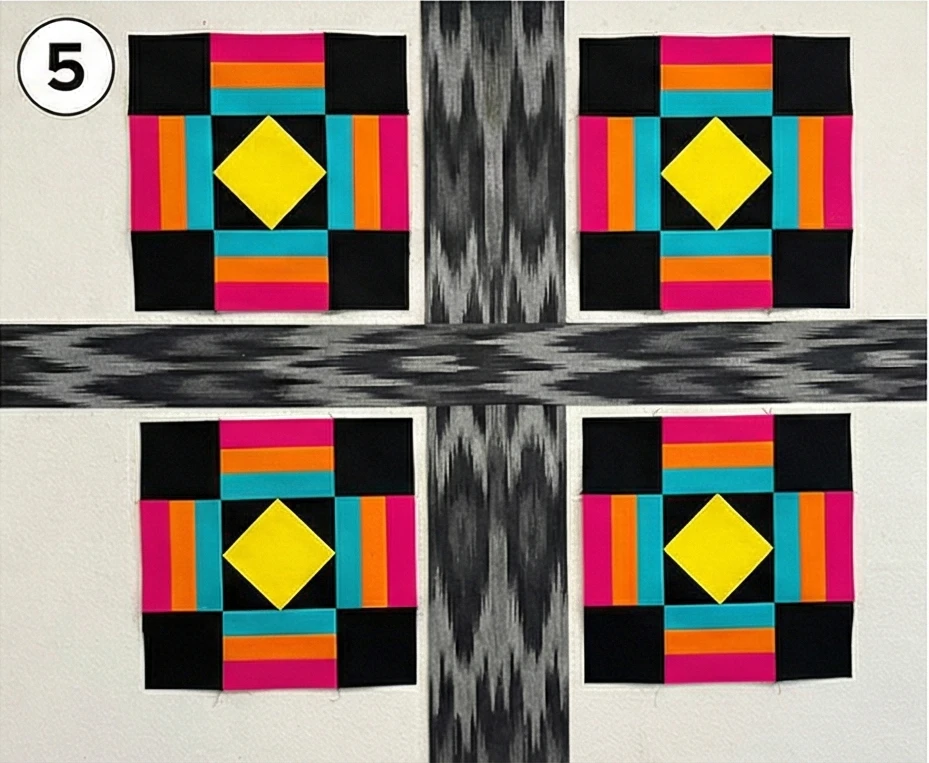
Step 6: Heavy Stitch Quilting
To mimic the stiffness of a heavy woven blouse.
- Sandwich the quilt.
- Use a heavier-weight thread (30wt or 40wt) in a contrasting color, like Fuchsia or Orange.
- Stitch: Quilt dense parallel lines across the block designs.
- The visible thread adds another layer of color, just like the supplementary weft threads in traditional brocade weaving.
Cultural Context Note: A Huipil is more than a shirt; it is a biography. The patterns can reveal a woman’s village, her marital status, and her spiritual beliefs. The “Diamond” often represents the weaving of the cosmos—Grandmother Moon weaving the fabric of time. This quilt block is a pixelated abstraction of that profound cosmology.
17. Lakota Sioux Star Quilt Traditional Patterns
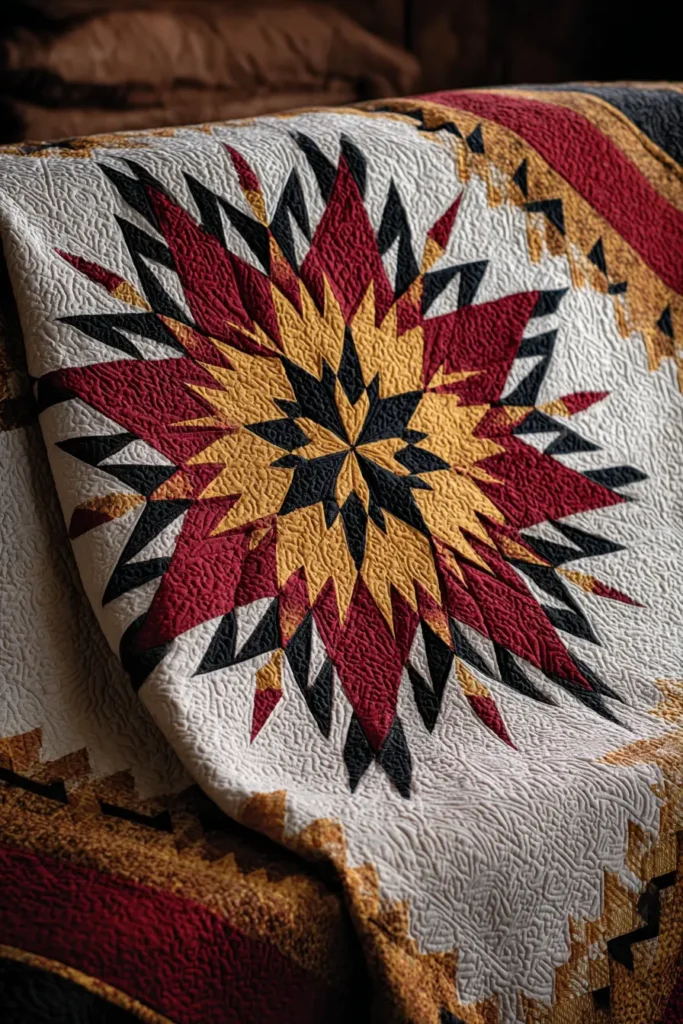

The “Wichahpi” Broken Star Quilt
While the single “Lone Star” is the most common pattern, the Broken Star is a highly prized variation in Lakota quilting, often reserved for significant giveaways, honoring ceremonies, and powwows. It uses the same 45-degree diamond structure but introduces complex color changes within the diamonds, creating concentric rings that resemble exploding light or shattering glass. It represents the complexity of the universe and the scattering of starlight.
Finished Dimensions: Queen/Ceremonial Throw, approximately 72″ x 72″.
Materials Needed:
- Fabric A (Center & Outer Points): 2 yards of Solid Black (represents the night sky).
- Fabric B (Ring 1 – Bright): 1 yard of Yellow (Sun).
- Fabric C (Ring 2 – Contrast): 1 yard of Orange or Red.
- Fabric D (Ring 3 – Light): 1 yard of White or Turquoise.
- Background Fabric: 3 yards of Solid White or Cream (for the setting squares).
- Backing: 5 yards.
- Batting: 76″ x 76″.
- Binding: 3/4 yard (Bias binding is best for the edges).
- Notions: Rotary cutter, 6″ x 24″ ruler with 45-degree markings.
Step 1: Create Complex Strip Sets
Unlike a simple star, the Broken Star requires careful color staggering. We are building the star from “strip panels.”
- Cut 2.5″ Strips of all fabrics (A, B, C, D).
- Sew Strip Set 1 (Center Diamonds):
- Sew strips in this order: A – B – C – D – C – B – A.
- Result: A wide panel with Black on both outside edges.
- Make 2 of these panels.
- Sew Strip Set 2 (Outer Rings):
- Sew strips in this order: D – C – B – A – B – C – D.
- Result: A wide panel with White/Turquoise on the outside edges.
- Make 2 of these panels.
- Press: Press all seams open to reduce bulk. This is critical for diamond intersections.
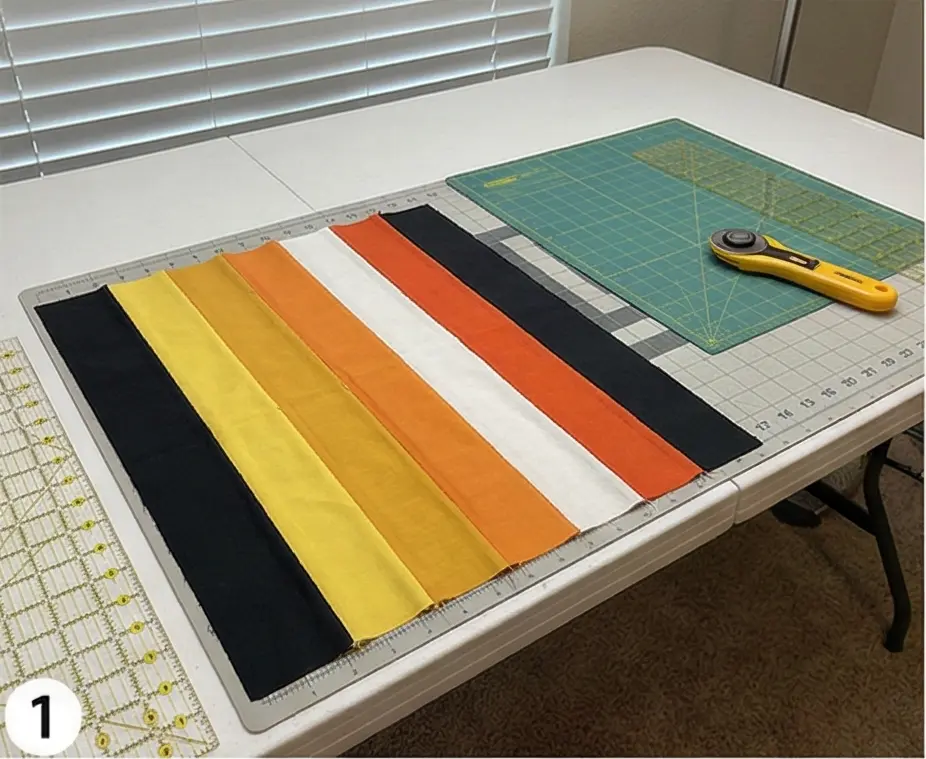
Step 2: Cutting the 45-Degree Segments
Precision cutting is the key to the Broken Star.
- Lay Strip Set 1 on your cutting mat.
- Align the 45-degree line of your ruler with the bottom edge of the strip set.
- Cut: Cut segments that are 2.5″ wide.
- You are creating angled strips of colorful diamonds.
- Repeat for Strip Set 2.
- Yield: You need enough segments to create 8 large diamonds.
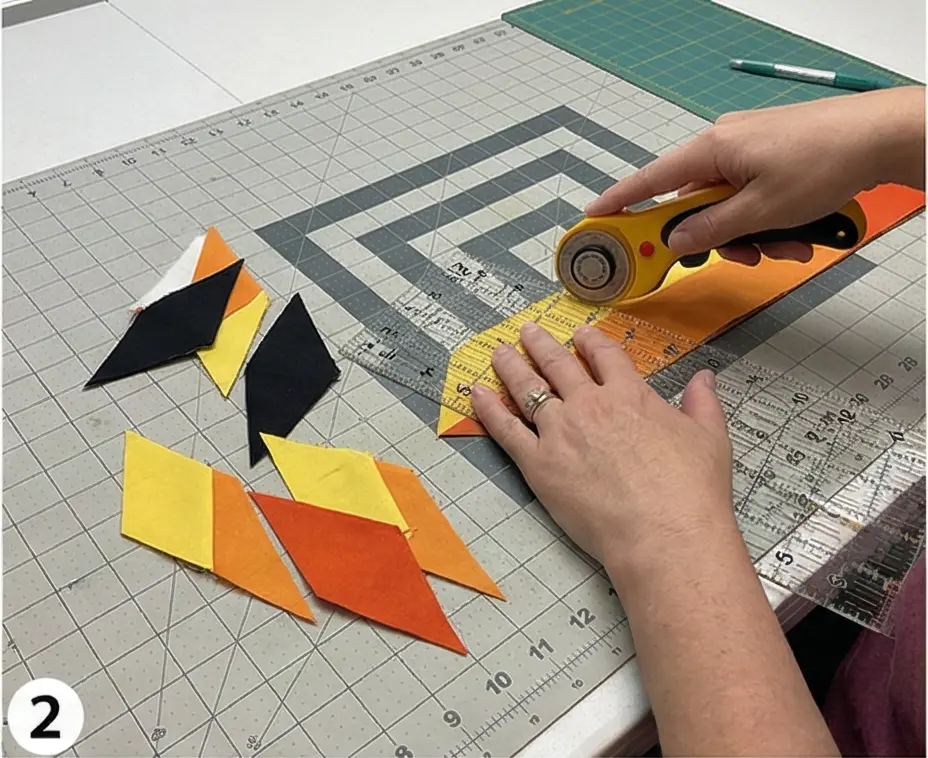
Step 3: Layout the “Shattered” Diamonds
We assemble the 8 large blades of the star from these small segments.
- Take your segments from Strip Set 1 and Strip Set 2.
- Arrange: Lay them out on a table to form a large diamond shape.
- You will stagger the strips so that the colors align diagonally.
- Visual: The Yellows should touch Yellows, Reds touch Reds, forming concentric rings that ripple outward.
- Pin and Sew: Sew the strips together to form one large diamond wedge.
- Crucial: match the intersections (corners) perfectly. Pin at every seam.
- Repeat: Build 8 identical large diamond wedges.
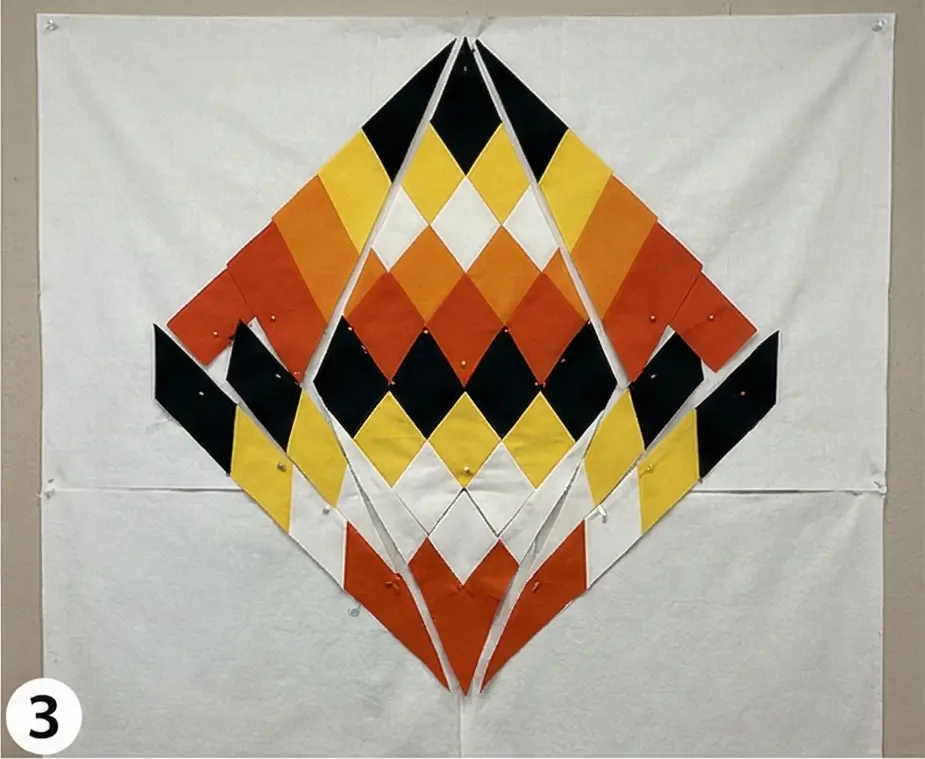
Step 4: The “Y-Seam” Assembly
Lakota star quilts are assembled into a circle first, then squared up.
- Pairs: Sew two large diamond wedges together. Stop stitching 1/4 inch before the center point.
- Make 4 pairs.
- Halves: Sew two pairs together to make a Half-Star. Stop 1/4 inch from the center.
- Center Join: Sew the two halves together.
- Tip: Because you stopped 1/4 inch short, you can spin the center seam allowance to reduce the bulk in the middle “volcano.”
- Result: A massive 8-pointed Broken Star.

Step 5: Setting Squares and Appliqué
Traditional Lakota quilts often feature eagle plumes or floral appliqué in the corners.
- Set the Star: Cut 4 large squares (approx 24″) of Background Fabric.
- Y-Seam: Sew these into the corners of the star using Y-seams (sew one side, pivot at the inner corner, sew the other side).
- Appliqué (Optional): Before quilting, apply the Eagle Plume designs to the white-background corners.
- Cut elongated tear-drop shapes from scraps of the star fabric.
- Appliqué them radiating outward from the star tips.
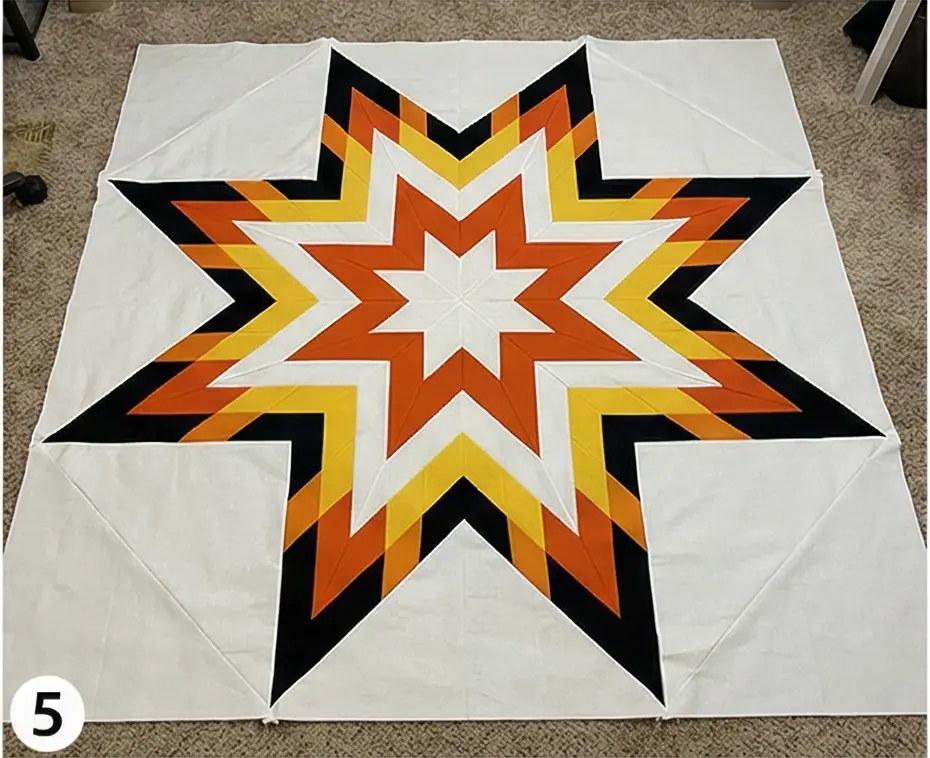
Step 6: Quilting the “Wichahpi” Spirit
- Sandwich the quilt.
- Echo Quilting: This is the hallmark of Plains quilting.
- Quilt 1/4 inch inside every single diamond seam.
- Then, the echo quilt radiates lines outward into the background fabric, mimicking ripples of water or light.
- Binding: Bind with a contrasting color (like Red) to seal the prayer within the quilt.
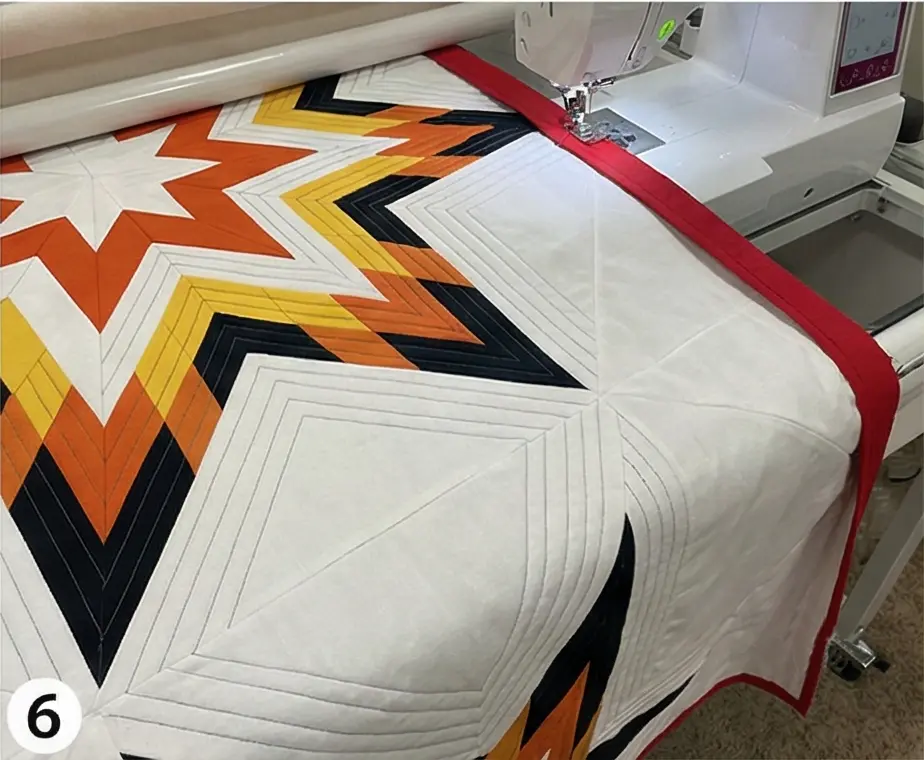
Cultural Context Note: In Lakota culture, the Star Quilt replaced the buffalo robe as a covering of honor. To receive one is a high distinction. The “Broken Star” variation is particularly potent, often interpreted as the morning star’s light breaking through the darkness, symbolizing hope and new beginnings.
18. Hawaiian Pineapple Quilt Block Designs

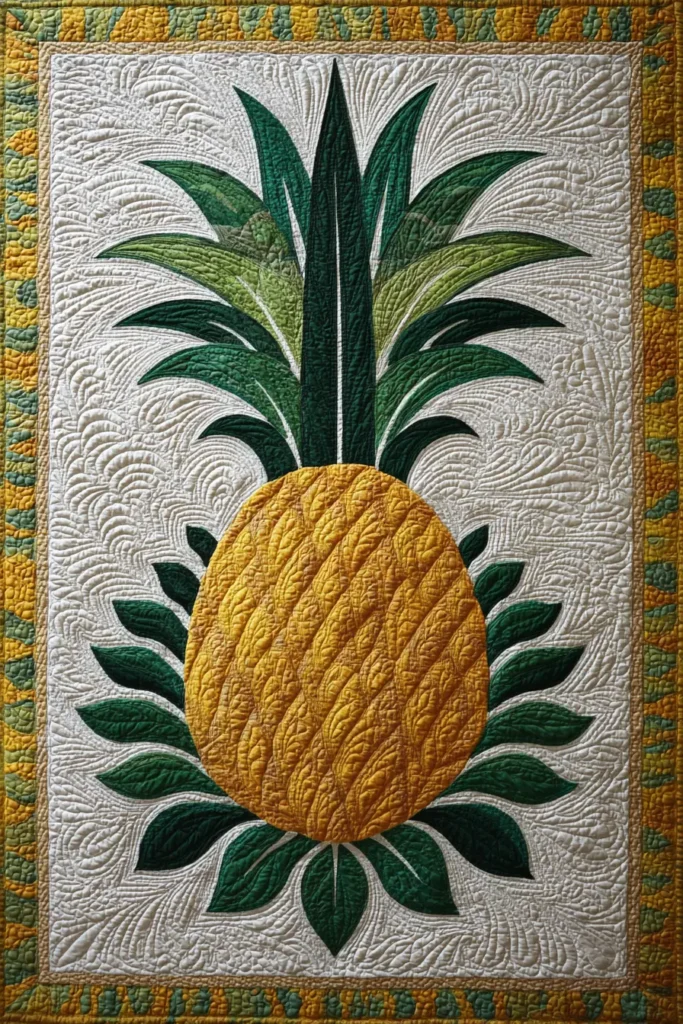
The “Hala Kahiki” (Pineapple) Hospitality Medallion
In Hawaiian culture, the pineapple (Hala Kahiki) is a universal symbol of welcome, hospitality, and friendship. While traditional Hawaiian quilts often feature botanical motifs native to the islands (like Breadfruit or Taro), the Pineapple is a beloved contemporary classic, perfect for a quilt hanging in an entryway or guest room. Like all Hawaiian quilting, this design relies on the “Eighths Fold” technique—cutting a single piece of folded fabric to create a perfectly symmetrical, kaleidoscope-like medallion.
Finished Dimensions: Large Wall Hanging or Center Medallion, approximately 30″ x 30″.
Materials Needed:
- Fabric A (Background): 1 yard of Solid White or Cream (representing the clouds/sky).
- Fabric B (Appliqué Motif): 1 yard of Solid Golden Yellow (for the fruit) or Deep Green (for the crown). Note: Authentic Hawaiian quilts typically use two solid colors.
- Backing Fabric: 1 yard.
- Batting: 34″ x 34″ (Cotton or Wool for a flat drape).
- Paper: Large sheet of Freezer Paper or butcher paper (approx 16″ x 16″).
- Notions: Appliqué needles (Milliners #10), sharp scissors, and matching thread.
Step 1: The “Eighths” Pattern Fold
The magic of Hawaiian quilting starts with paper folding, similar to making a paper snowflake.
- Cut Paper: Cut your paper into a perfect 15″ x 15″ square.
- Fold 1: Fold in half diagonally to form a triangle.
- Fold 2: Fold that triangle in half again.
- Fold 3: Fold one more time. You now have a skinny triangle wedge (1/8th of the square).
- Crease: Press the folds sharply. The long folded edge is the center spine of the design.
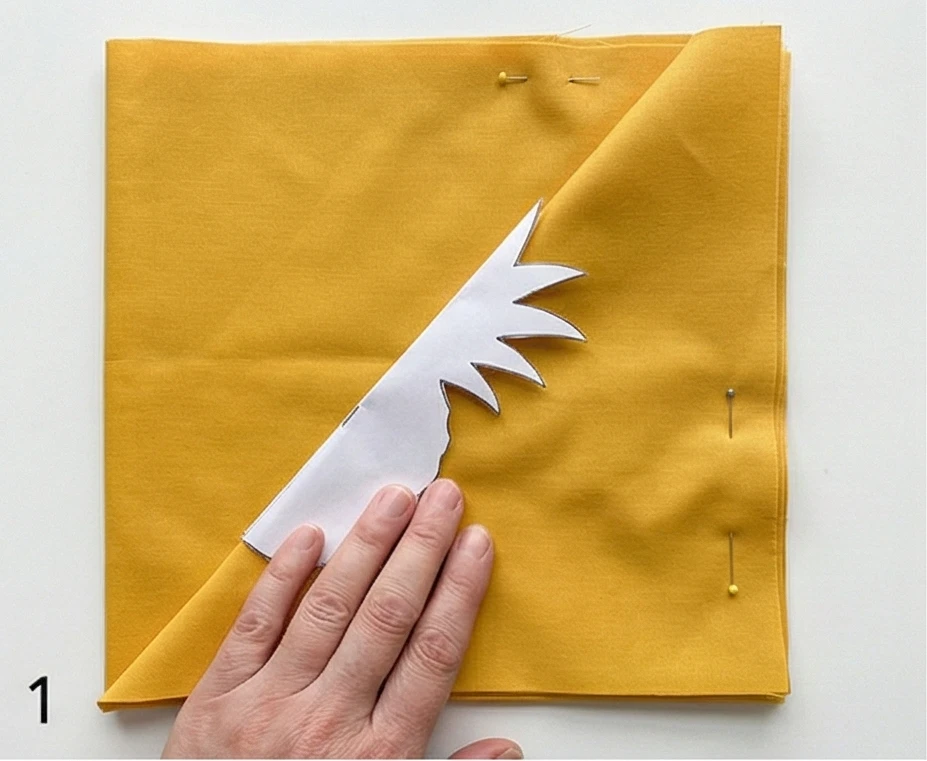
Step 2: Drafting the Pineapple Wedge
You only need to draw half of one pineapple.
- Orient: Place the wedge with the point at the bottom (this is the center of the quilt).
- Draw:
- The Crown: At the top (wide end) of the wedge, draw spiky, flowing leaves. Important: Make sure at least one leaf tip touches the side edges of the paper so the design connects when the paper is unfolded.
- The Fruit: In the middle of the wedge, draw the curve of the pineapple body. You can cut “diamonds” or “scales” into the side of the fruit shape to mimic the texture.
- The Base: At the bottom point, draw a stem or base that connects to the center point.
- Cut: Cut out your paper template. Unfold it to check the look, then refold it.
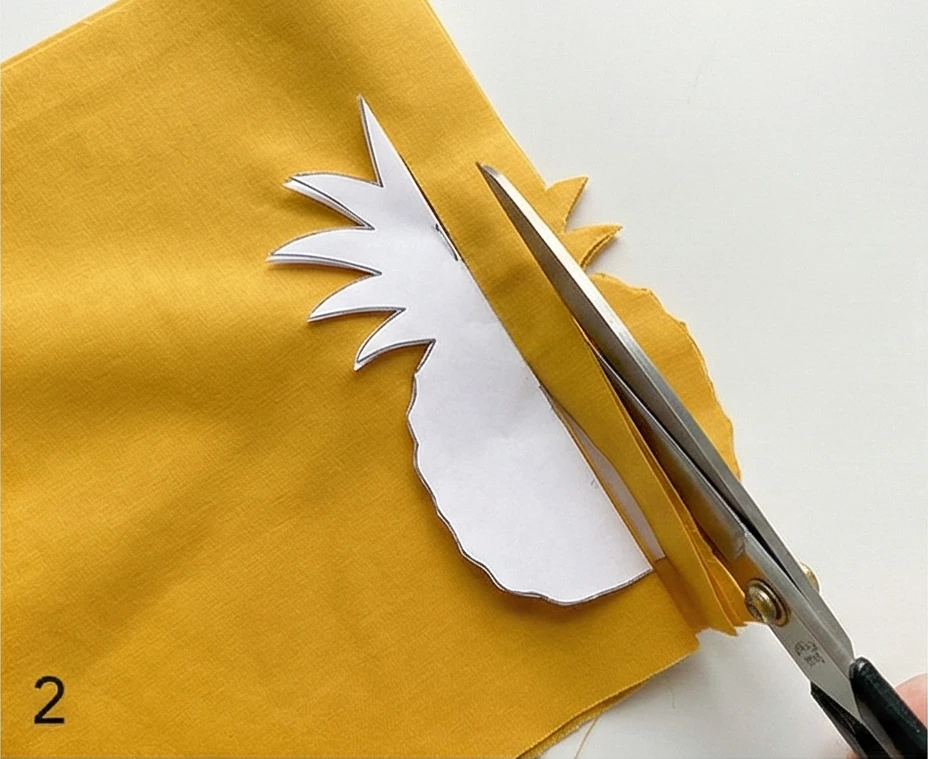
Step 3: Cutting the Fabric Medallion
Now we transfer the geometry to the fabric.
- Prepare Fabric B: Cut your Appliqué Fabric (Gold/Green) into a 30″ x 30″ square.
- Fold: Fold the fabric exactly as you folded the paper (Half -> Quarter -> Eighth). Iron the creases.
- Secure: Pin your paper template to the folded fabric wedge.
- Cut: Using very sharp scissors, cut through all 8 layers of fabric following your template.
- Tip: Take your time. Don’t lift the fabric off the table; rotate the table or your body instead.
- Unfold: Open up the fabric to reveal a ring of 4 (or 8) interlaced pineapples radiating from the center.

Step 4: Basting the Medallion
- Prepare Fabric A: Cut your Background Fabric (White) into a 30″ x 30″ square. Fold in quarters to press crease lines (crosshairs).
- Align: Lay the Appliqué Medallion on top of the Background. Match the medallion’s crease lines to the background’s crease lines.
- Baste: Use long running stitches (or fabric glue dots) to tack the medallion down. Start from the center and baste outward toward the pineapple crowns to smooth out any bubbles.
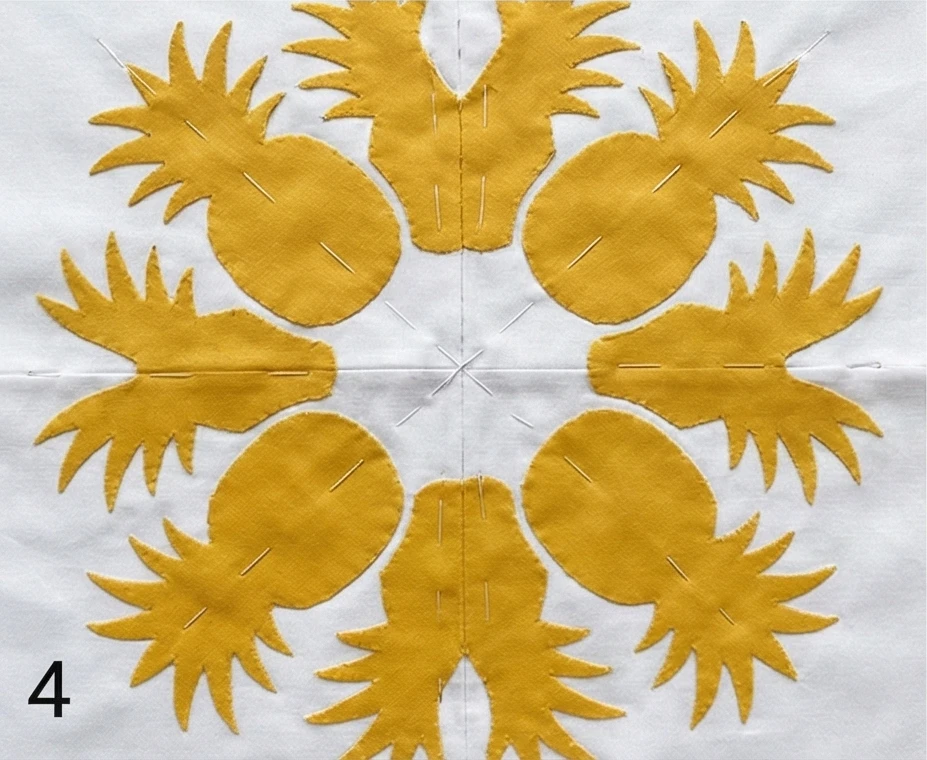
Step 5: Needle-Turn Appliqué
This creates the smooth, seamless edge that defines the style.
- Thread your needle with thread matching the Pineapple Fabric.
- The Sweep: Use the tip of your needle to sweep the raw edge of the appliqué under by about 1/8 inch.
- The Stitch: Make tiny blind stitches to secure the folded edge to the background.
- Points & Vs:
- Points (Leaf tips): Trim excess fabric at the very tip, fold the sides in to form a sharp point, and stitch.
- Valleys (Between leaves): Make a tiny snip into the “V” (don’t cut the thread!), turn under, and stitch closely to reinforce the stress point.

Step 6: Echo Quilting (Kuiki)
The quilting represents the “mana” (spirit) rippling out from the fruit.
- Sandwich your Top, Batting, and Backing.
- Thread: Switch to the thread matching the Background (White).
- Echo: Start quilting 1/2 inch away from the edge of the pineapple appliqué.
- Follow every curve and spike of the crown.
- Ripple: Quilt a second line 1/2 inch from the first. Continue filling the entire white background with these concentric ripples (like waves on a beach).
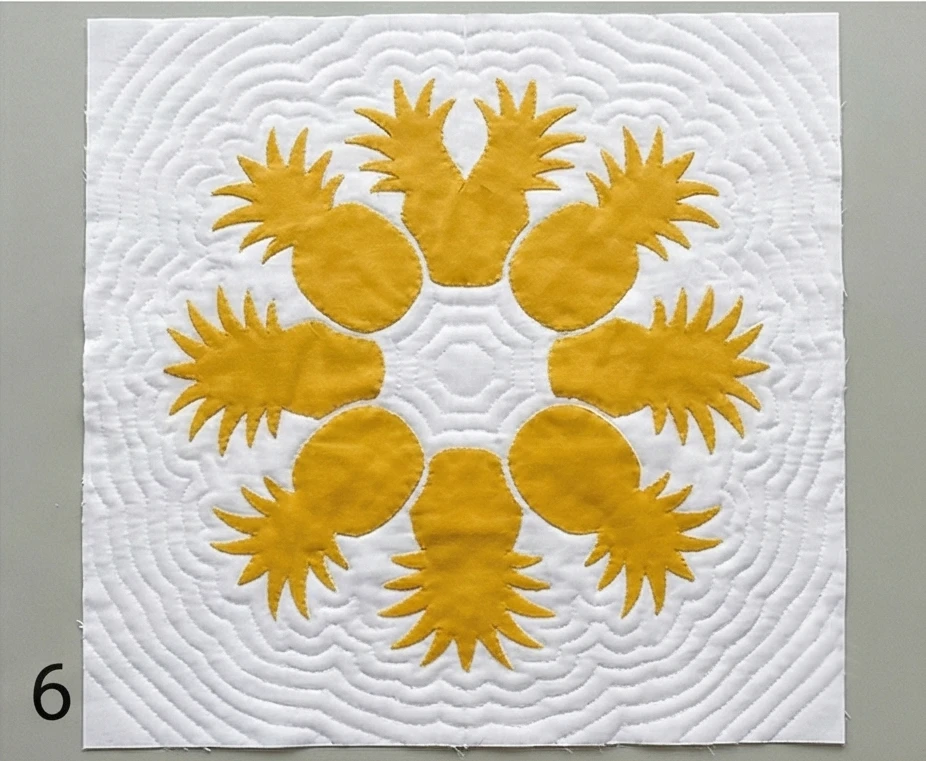
Cultural Context Note: In Hawaii, receiving a quilt is a major life event. The patterns are often named and hold stories. While the pineapple is a friendly symbol, always approach the art form with patience (“Ahonui”). Do not rush the needle-turn process; let your thoughts be good as you stitch, as it is believed feelings are sewn into the cloth.
19. Chinese Ethnic Minority Batik-Style Quilt Patterns
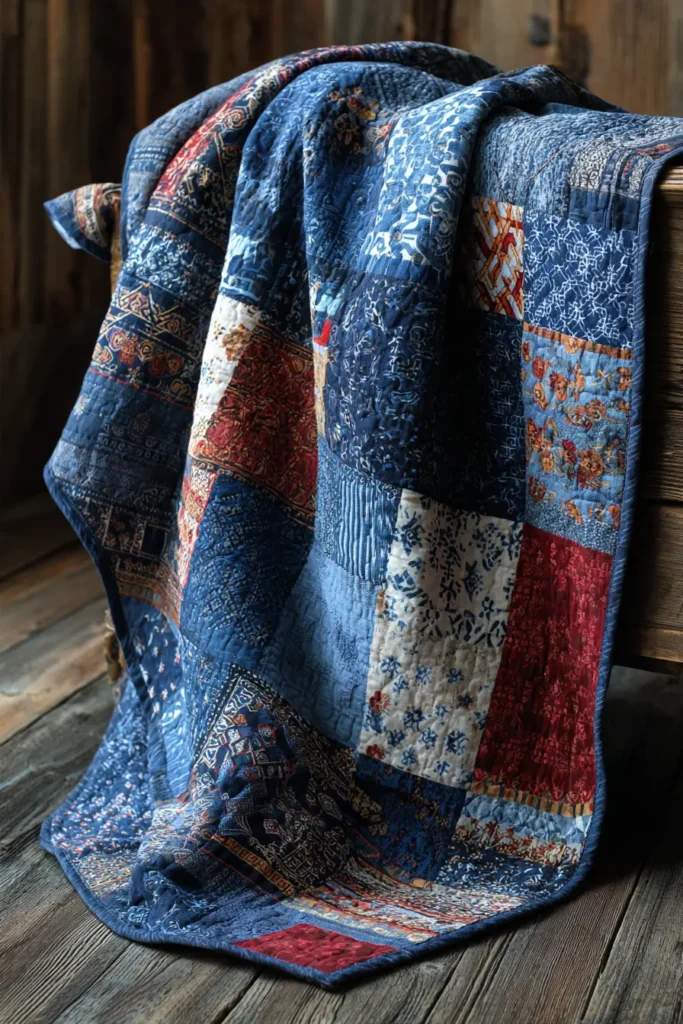

The “Miao Butterfly” Indigo Batik Quilt
The Miao people (and related Hmong groups) of southwestern China are world-renowned for their intricate batik textiles. Using beeswax and indigo dye, they create stunning blue-and-white designs featuring butterflies (their mythological mother), spirals, and geometric borders. To replicate this look without the messy hot wax, we will use White-on-Blue Appliqué and Reverse Appliqué techniques to mimic the crisp, high-contrast lines of traditional wax-resist dyeing.
Finished Dimensions: Wall Hanging or Throw, approximately 45″ x 45″.
Materials Needed:
- Fabric A (Background/Indigo): 2 yards of Deep Indigo Blue or Navy Cotton (Solid or a subtle tonal print).
- Fabric B (The Motif/White): 1 yard of White or Unbleached Muslin.
- Fusible Web: 1 yard (lightweight).
- Backing Fabric: 1.5 yards.
- Batting: 48″ x 48″ (low loft).
- Thread: White thread (for appliqué) and Navy thread (for quilting).
- Notions: Small sharp scissors, iron, and embroidery needle.
Step 1: Design the “Butterfly Mother” Motif
In the Miao legend, the Butterfly Mother laid eggs that hatched into humans and animals. This motif is central to their art.
- Drafting: On a piece of paper (approx 12″ x 12″), draw a stylized butterfly.
- Wings: Make the wings rounded. Inside the wings, draw spirals or circles (Miao art loves curves).
- Body: Keep the body simple.
- Antennae: Make them curled, like ferns.
- Trace: Trace your design onto the paper side of your Fusible Web.
- Tip: You can make 4 smaller butterflies for the corners and one large one for the center.

Step 2: Prepare the “Wax” Shapes (Appliqué)
- Fuse: Iron the fusible web shapes onto the wrong side of your White Fabric.
- Cut: Carefully cut out the butterflies.
- Detail: If you drew spirals inside the wings, cut those spiral lines out now (creating negative space) so the blue background will show through later. This mimics the fine white lines left by the wax tool (ladao).

Step 3: Construct the Central Field
- Background: Cut a 24″ x 24″ square of Indigo Fabric.
- Placement: Peel the paper backing off your White Butterfly.
- Arrange: Place the large butterfly in the exact center. You can add smaller white circles or dots around it to represent eggs or stars.
- Fuse: Iron the white shapes onto the blue background.
Step 4: The “Reverse Appliqué” Borders
Miao batik often features heavy geometric borders. We will use a “Reverse” technique here for a different texture.
- Cut Borders:
- Cut 4 strips of White Fabric: 6.5″ x 24″.
- Cut 4 strips of Indigo Fabric: 6.5″ x 24″.
- Stack: Place a Blue strip directly on top of a White strip (Right sides facing up). Baste them together around the edges.
- Mark: Draw a geometric pattern (like a zigzag or a running vine) on the Blue strip using a white chalk pencil.
- Stitch: Sew directly on your drawn lines.
- Cut to Reveal: Carefully pinch only the top layer (Blue). Snip a hole, then cut away the blue fabric inside the shape, close to your stitching line.
- Result: The White fabric underneath is revealed, creating a sunken white design surrounded by blue. This looks remarkably like the “crackle” of batik.
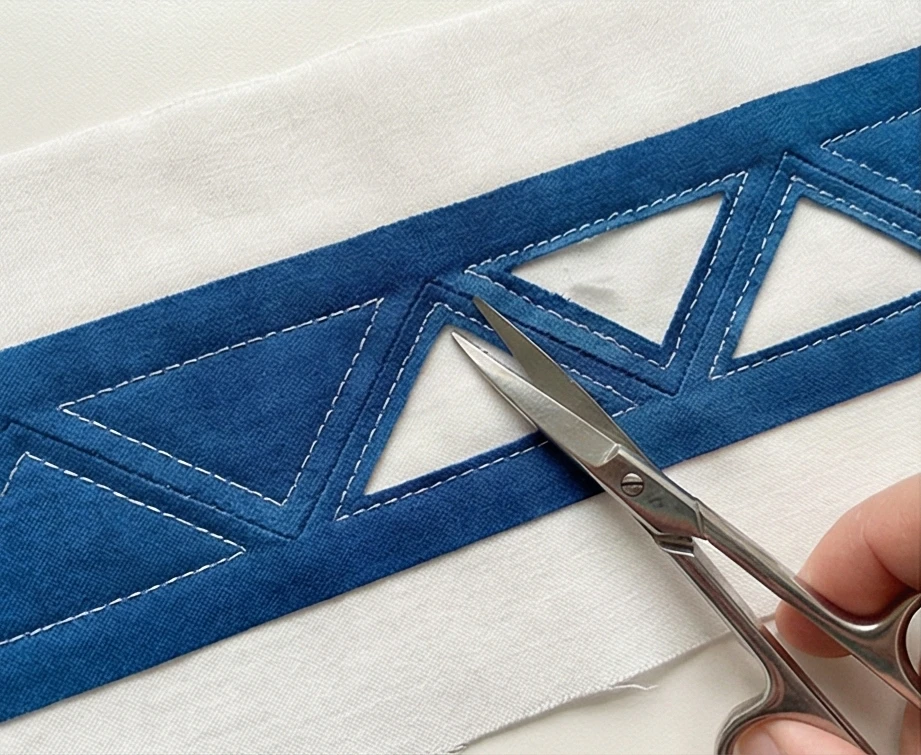
Step 5: Assembly
- Attach Borders:
- Sew the Top and Bottom border strips to the Central Indigo Square.
- Sew corner blocks (solid Blue squares, 6.5″ x 6.5″) to the ends of the remaining two border strips.
- Sew these Side borders to the quilt center.
- Visual: You now have a central butterfly medallion framed by intricate geometric borders.

Step 6: “Crackle” Quilting
Authentic batik has fine blue veins (cracks) where the wax broke during dyeing.
- Sandwich the quilt (Backing + Batting + Top).
- Thread: Use Navy Blue Thread.
- Stitch: Quilt “micro-stippling” (tiny meandering lines) all over the White Appliqué shapes.
- Effect: The blue thread wandering over the white fabric looks exactly like the characteristic “ice crackle” of real batik.
- Outline: Quilt around the edges of the butterflies and border shapes to make them pop.
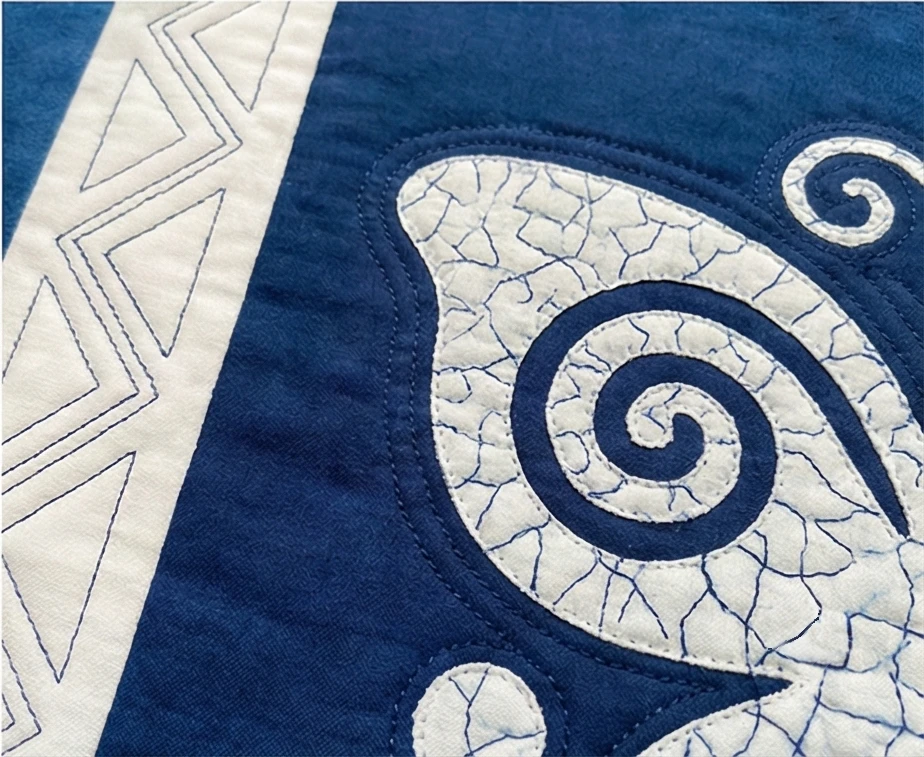
Cultural Context Note: For the Miao, batik is not just decoration; it is a way of recording history, since they traditionally lacked a written language. The patterns on a skirt or baby carrier tell the story of the tribe’s migration across rivers and mountains. The “Butterfly Mother” is a protective ancestor spirit.
20. Filipino Weaving-Inspired Geometric Quilts
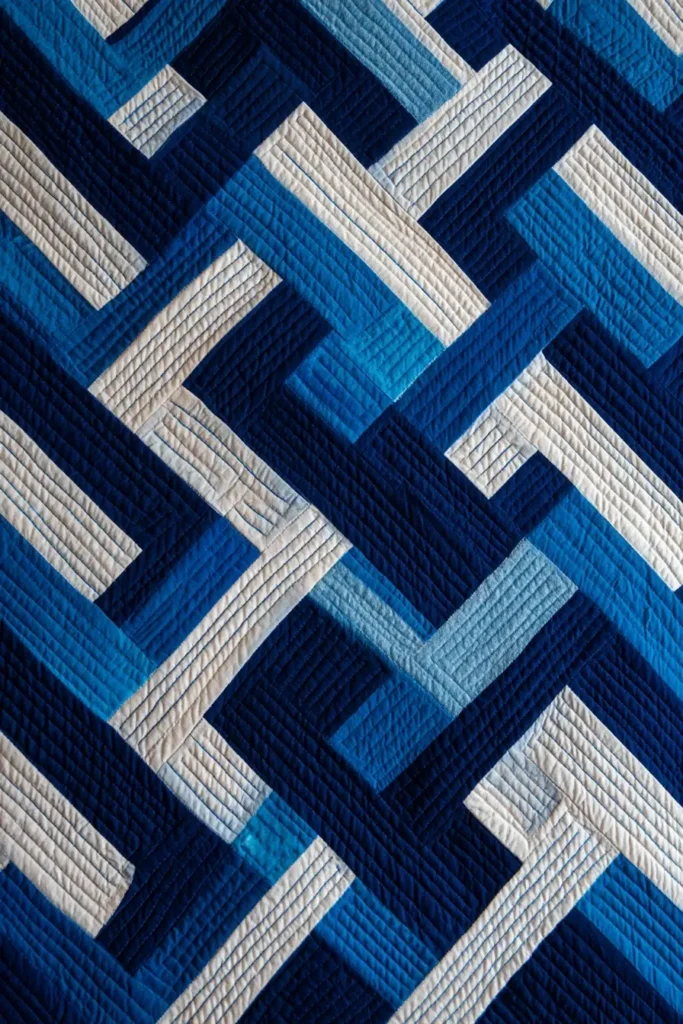
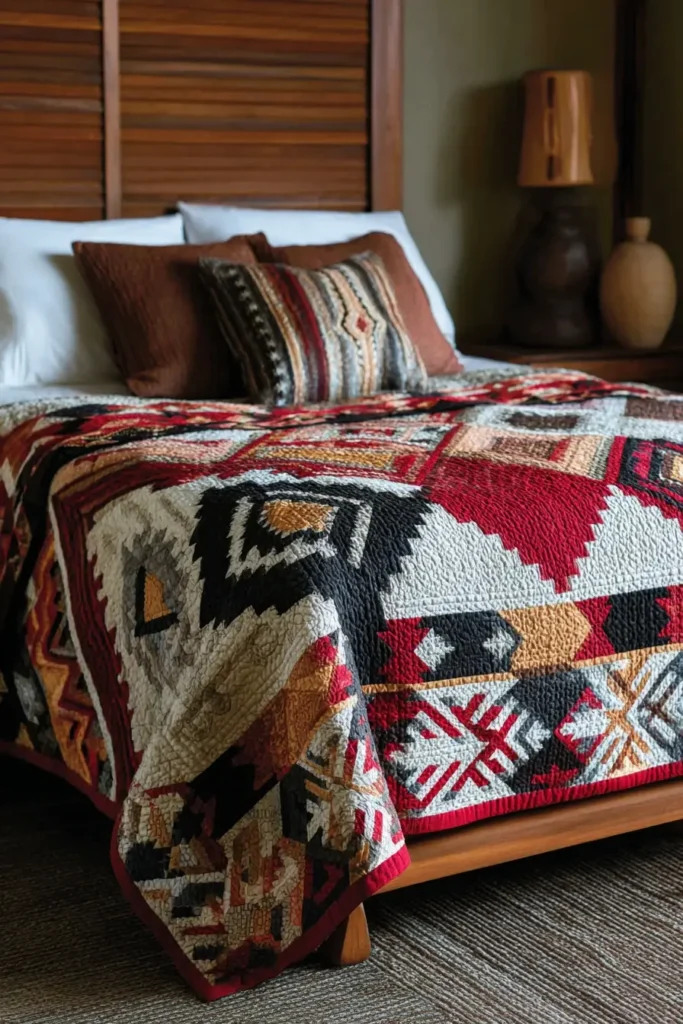
The “Kusikus” (Whirlwind) Binakol Quilt
The Inabel (or Abel Iloko) weaving tradition of the Ilocos region in the Northern Philippines is famous for its durability and intricate designs. One of the most prized patterns is Binakol, specifically the Kusikus (whirlwind) design. This Op-Art style uses geometric straight lines to create the optical illusion of curves and motion. Historically, this dizzying pattern was believed to confuse and ward off evil spirits (anito), protecting the sleeper. In quilting, we replicate this hypnotic effect using a high-contrast Log Cabin variation.
Finished Dimensions: Protective Throw, approximately 60″ x 60″.
Materials Needed:
- Fabric A (Dark/Positive): 2 yards of Navy Blue or Red (Traditional Inabel colors).
- Fabric B (Light/Negative): 2 yards of White or Cream.
- Backing Fabric: 4 yards.
- Batting: 64″ x 64″.
- Binding: 1/2 yard of Fabric A.
- Notions: Rotary cutter, square ruler (at least 10″).
Step 1: Cutting the “Logs”
The optical illusion relies on strict contrast. We are making 36 blocks (6×6 grid).
- Centers: Cut 36 squares of Fabric A (Dark) measuring 2.5″ x 2.5″.
- Dark Strips (Fabric A): Cut approximately 20 strips across the width of fabric (WOF), each 1.5″ wide.
- Light Strips (Fabric B): Cut approximately 20 strips across WOF, each 1.5″ wide.
- Note: Precision is vital. If your strips are wavy, the optical illusion won’t work.
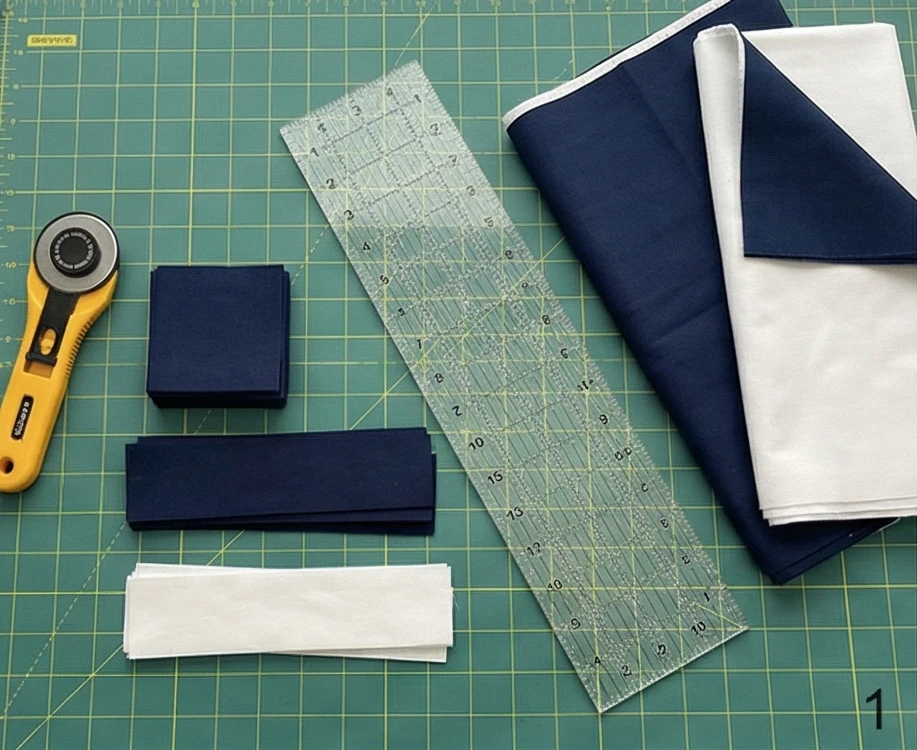
Step 2: Constructing the Block (Dark/Light Log Cabin)
We need to create blocks that are half dark and half light diagonally.
- Round 1:
- Take a Dark Center Square.
- Sew a Light Strip to the Right side. Trim.
- Sew a Light Strip to the Top. Trim.
- Sew a Dark Strip to the Left. Trim.
- Sew a Dark Strip to the Bottom. Trim.
- Round 2 & 3:
- Continue this spiral pattern: Always add Light strips to the Right and Top. Always add Dark strips to the Left and Bottom.
- Continue until the block measures 10.5″ square (unfinished).
- Visual Check: When you look at the block, if you draw a diagonal line from corner to corner, one half should look mostly white, and the other half mostly dark.

Step 3: The “Kusikus” Layout Unit (The 4-Patch)
The whirlwind appears when you group 4 blocks together.
- Take 4 completed blocks.
- Rotate them so that all the Dark Corners meet in the center.
- Block 1 (Top Left): Dark corner faces Bottom-Right.
- Block 2 (Top Right): Dark corner faces Bottom-Left.
- Block 3 (Bottom Left): Dark corner faces Top-Right.
- Block 4 (Bottom Right): Dark corner faces Top-Left.
- Visual: You should see a Dark Diamond forming in the center, surrounded by Light ripples. This is one “eye” of the whirlwind.

Step 4: Building the Grid
- Arrange your remaining blocks to form a 3 x 3 grid of these large 4-patch units (which equals a 6×6 grid of individual blocks).
- Check the Flow: Step back. The pattern should look like oscillating circles or waves. If a block is turned the wrong way, the illusion will break.
- Sew: Stitch the blocks into rows, then stitch the rows together.

Step 5: The “Loom” Border
Inabel blankets often have striped borders.
- Cut 2.5″ strips of leftover Dark and Light fabrics.
- Sew them together end-to-end to create a Piano Key border (short vertical stripes).
- Attach this border to the top and bottom of the quilt to mimic the fringe or selvedge of a woven blanket.

Step 6: Utility Quilting
Inabel fabric is utilitarian and tough. The quilting should match.
- Sandwich the quilt.
- Stitch: Do not do fancy swirls. Quilt straight diagonal lines through the centers of the blocks.
- Density: Keep lines about 1 to 2 inches apart. This reinforces the quilt’s geometric structure and makes it durable for daily use.

Cultural Context Note: In the Ilocos region, weaving is a maternal legacy. A weaver might work on a single Binakol blanket for weeks, counting threads to ensure the pattern’s rhythm is perfect. The “dizzying” nature of the design is functional—it is meant to distract malevolent spirits so they cannot locate the person sleeping beneath the blanket.
Conclusion
Exploring these 20 Indigenous Quilt Patterns offers a profound appreciation for the ingenuity and artistry found in cultures around the world. From the stark, beautiful contrast of Scandinavian Sami designs to the vibrant, life-affirming colors of Mexican Otomi embroidery, each style provides a unique window into the values and environments of its creators. These quilts are not merely decorative; they are educational tools and vessels of memory that carry the weight of ancestors. The intricacy of a Moroccan Berber design or the specific storytelling elements of an Australian Dreamtime quilt remind us that textile art has always been a fundamental way for humanity to document its existence and beliefs.
The universal language of geometry and stitchwork is evident in how disparate cultures share similar motifs yet interpret them through their own unique lenses. The connection between the specific reverse appliqué of Inuit traditions and the bold shapes of Navajo weavings highlights a shared human desire to bring order, warmth, and beauty to our surroundings. This concept of Global Fusion allows modern makers to admire and learn from these techniques, fostering a cross-cultural dialogue that respects the art’s origins while appreciating its aesthetic power in contemporary settings.
As you consider incorporating these influences into your own work or collection, you are participating in a lineage of textile appreciation and preservation. Whether you are drawn to the meditative repetition of Sashiko or the bold, protective symbolism of a Native American Star Quilt, each pattern invites you to slow down and respect the craft. We hope this guide inspires you to explore these rich traditions further, ensuring that the stories, techniques, and artistry of these indigenous communities continue to be honored, understood, and celebrated for generations to come.
