
Bold & Beautiful: 20 Red, Black, and White Quilt Ideas for Modern and Stylish Living Spaces
Red, Black, and White Quilt Ideas: The Palette That Makes a Room Come Together
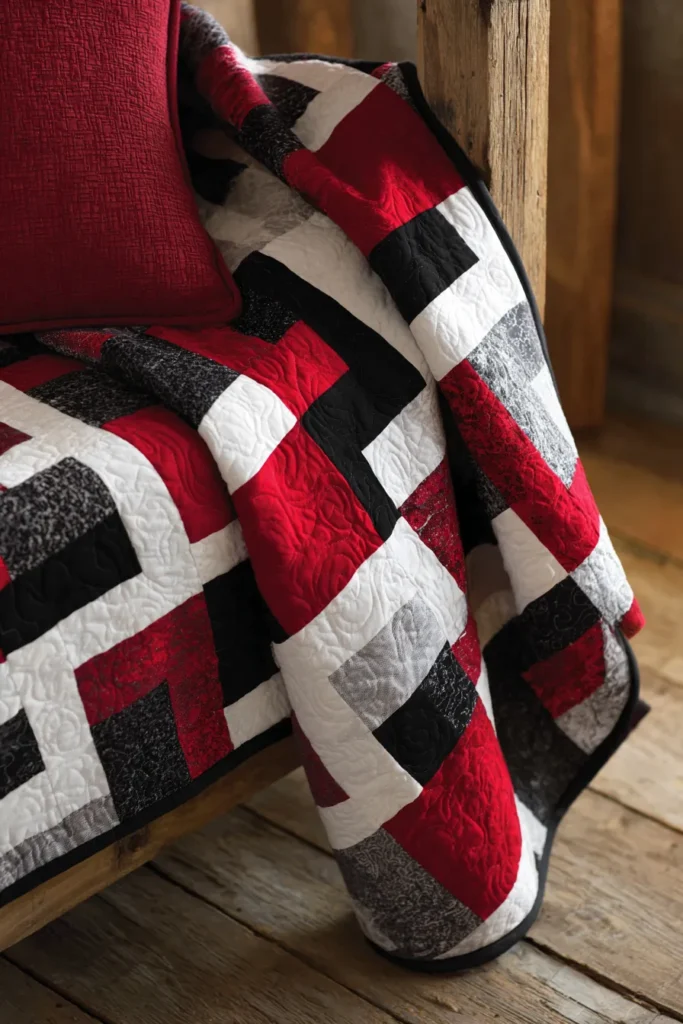
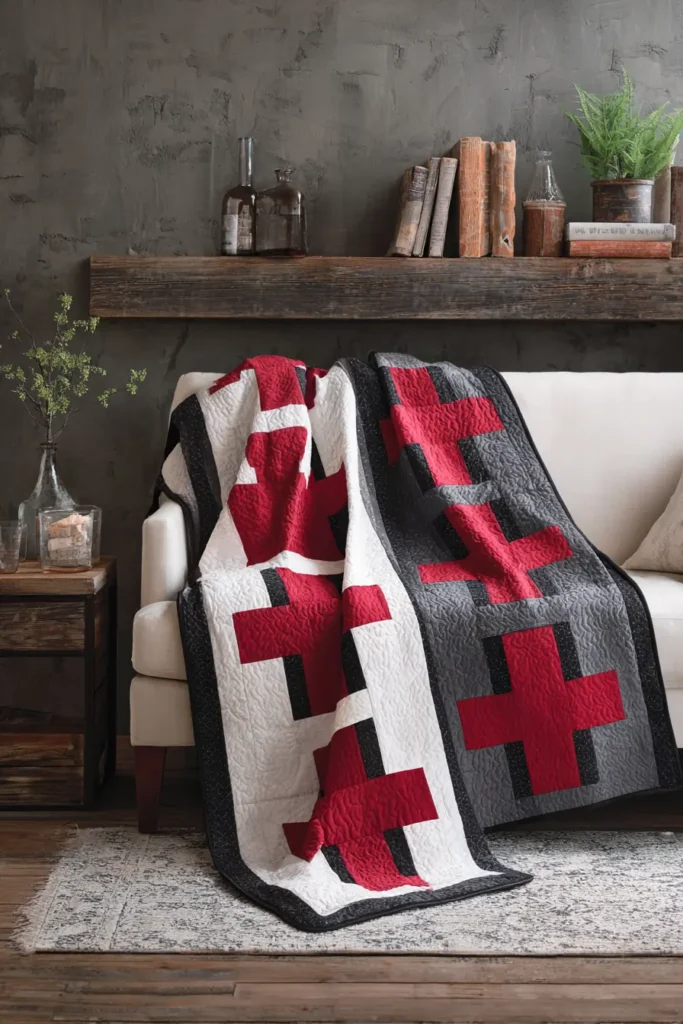
Red, Black, and White Quilt Ideas occupy a specific place in interior design — not because the combination is fashionable, but because it is structurally effective in a way that softer, more balanced palettes are not. High contrast does something to a room that graduated color cannot: it creates immediate visual hierarchy. The eye knows instantly where to look, what is background, and what is foreground. That clarity is what gives this palette its energy, and it is why a well-chosen red, black, and white quilt can change the entire dynamic of a living space without moving a single piece of furniture.
Each color has a distinct role and does it without overlap. Black grounds the room — it adds weight, definition, and the sense that the space has edges worth paying attention to. White prevents that weight from becoming oppressive — it opens the composition, separates the stronger tones, and keeps the contrast from tipping into visual aggression. Red does what neither of the others can: it adds warmth. Without red, black and white reads as cool and graphic. With it, the same palette becomes energetic and inviting. That three-way balance is harder to achieve than it looks, and when it works, it works completely.
From my experience using this palette in client living spaces, the most common mistake is distributing the three colors equally. Equal distribution flattens the contrast and removes the hierarchy that makes the palette effective. The proportion that consistently works is black as the anchor, white as the dominant field, and red as the accent — present enough to generate warmth and energy, restrained enough not to overwhelm. A red, black, and white quilt used this way on a sofa or as a throw becomes the room’s focal point, allowing everything around it to be quieter and simpler.
Red, Black, and White Quilt Ideas
Contents
- 1 Red, Black, and White Quilt Ideas
- 2 1. Red, Black, and White Patchwork Quilts for Modern Living Rooms
- 3 2. Bold Geometric Red, Black, and White Quilts for Contemporary Decor
- 4 3. Minimalist Red, Black, and White Quilts with Clean Modern Lines
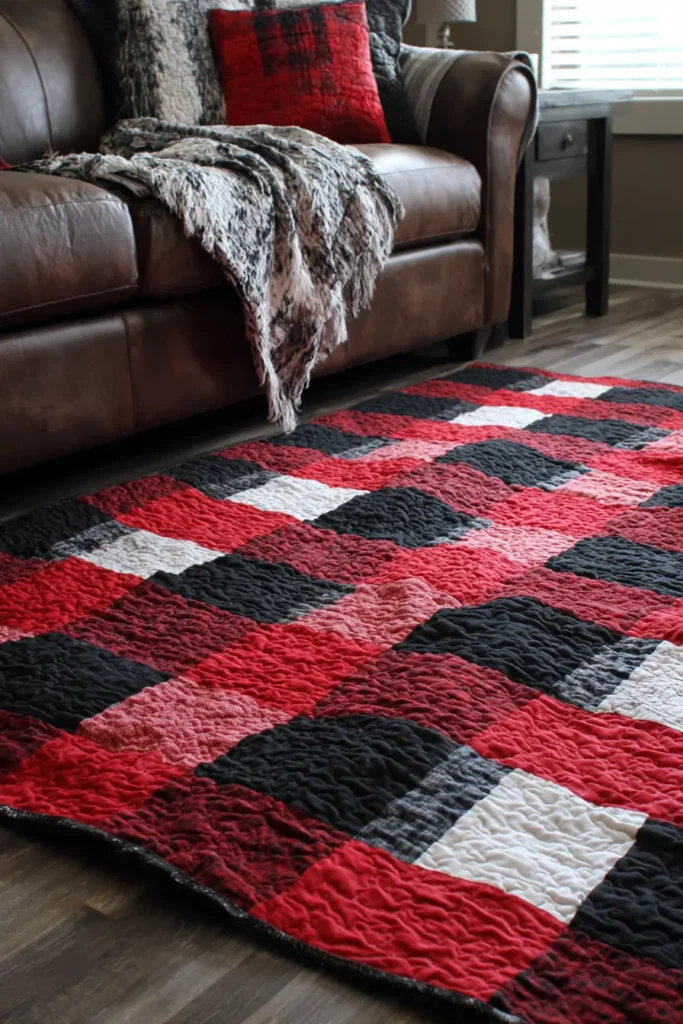
- 5 4. Buffalo Check Red, Black, and White Quilts for Cozy Yet Stylish Spaces
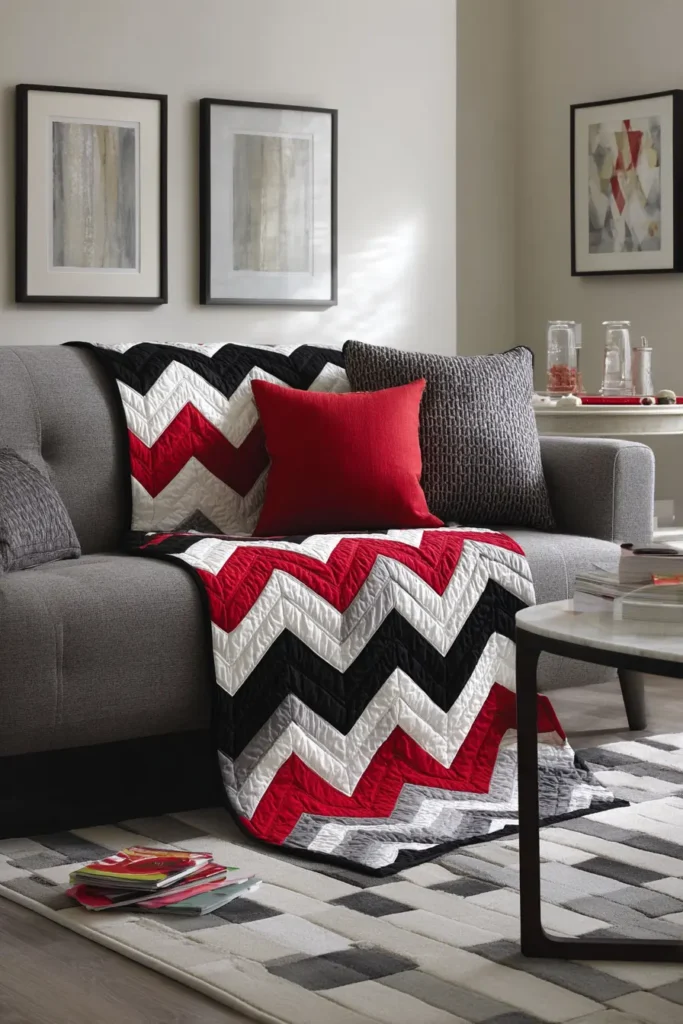
- 6 5. Statement Red, Black, and White Quilts for a Modern Sofa Throw
- 7 6. Modern Red, Black, and White Throw Quilts for Sectionals and Loveseats
- 8 7. Cozy Red, Black, and White Quilted Floor Throws and Area Quilts
- 9 8. Abstract Red, Black, and White Quilts for Artistic Living Room Statements
- 10 9. Oversized Color Block Quilts for Cozy Movie Nights
- 11 10. Scandinavian-Inspired Red, Black, and White Quilts for a Minimal Living Room
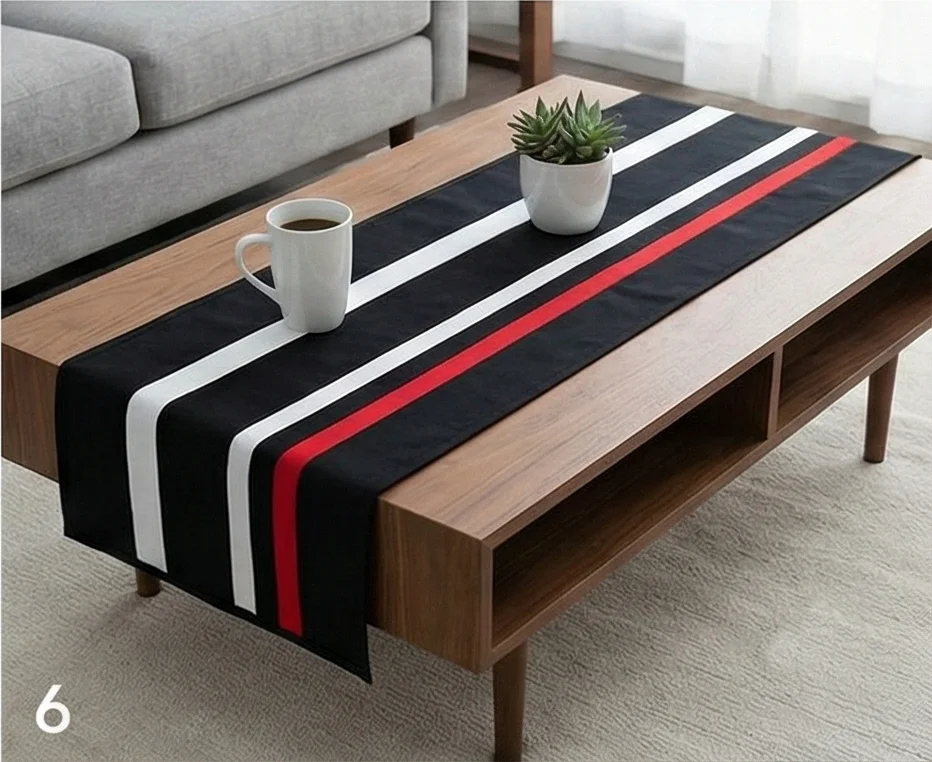
- 12 11. Sleek Striped Quilt Runners for Coffee Tables
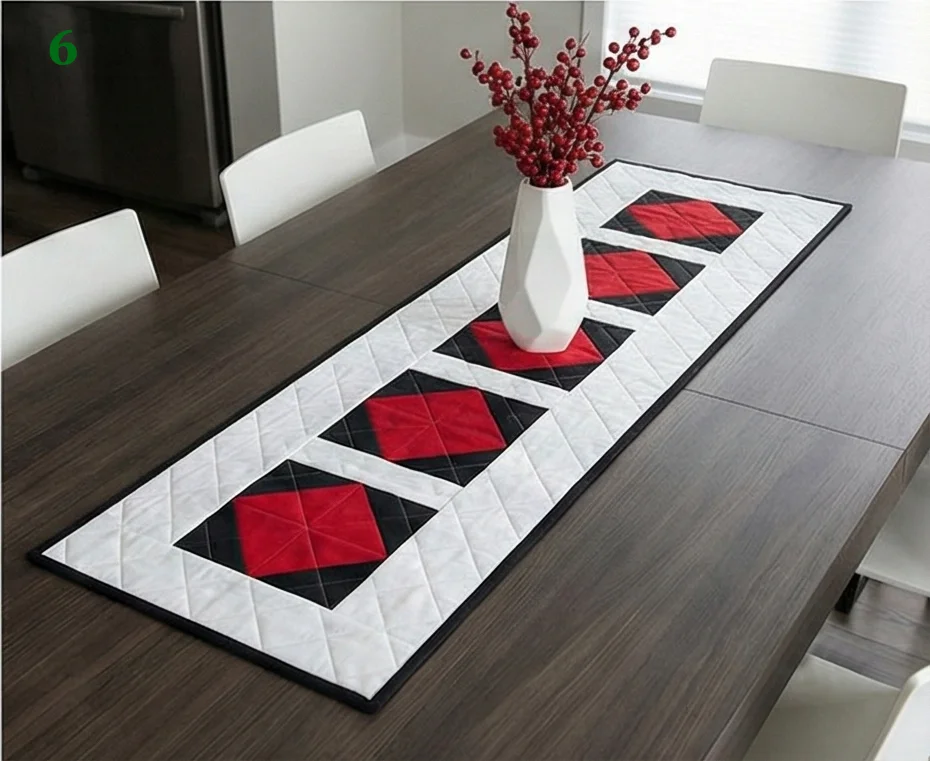
- 13 12. Chic Red, Black, and White Quilted Table Runners
- 14 13. Herringbone Red Accent Quilt for Stylish Sofas
- 15 14. Multi-Texture Modern Looking Quilts for Cushion Covers
- 16 15. Contemporary Log Cabin Quilts for Modern Floor Decor in Red, Black, and White
- 17 16. Quilted Floor Poufs and Ottomans for Flexible Seating
- 18 17. Reversible Quilt Designs for Versatile Styling
- 19 18. Houndstooth Inspired Quilt for Cozy Table Runners
- 20 19. Red, Black, and White Stripe Quilts for Sleek Modern Sofas
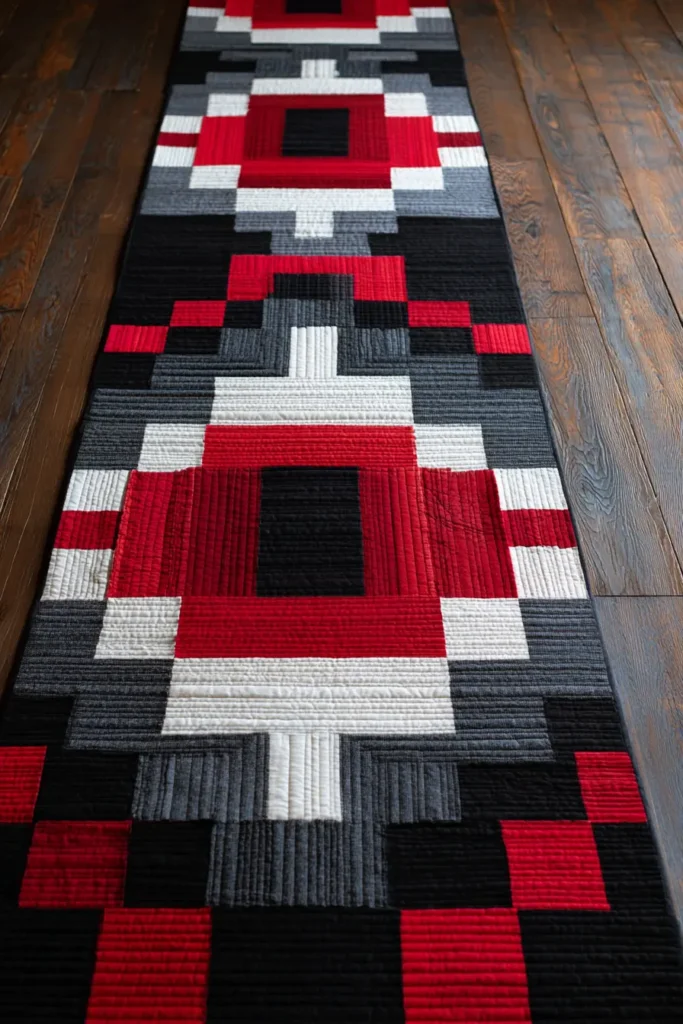
- 21 20. Durable Quilted Area Rugs in Tricolor Geometrics
- 22 Conclusion
This collection of 20 ideas covers the full range of applications in living spaces: oversized color-block quilts for sofas and reading corners, abstract wall hangings that function as textile art, reversible designs that offer two distinct looks, herringbone and geometric patterns that add architectural edge, and layered throws that work across both modern minimalist and boho-influenced interiors.
See also: Red, Black, and White quilts for bedroom · Red, Black, and White quilts for living–dining spaces · Black and White Quilt Pattern Ideas
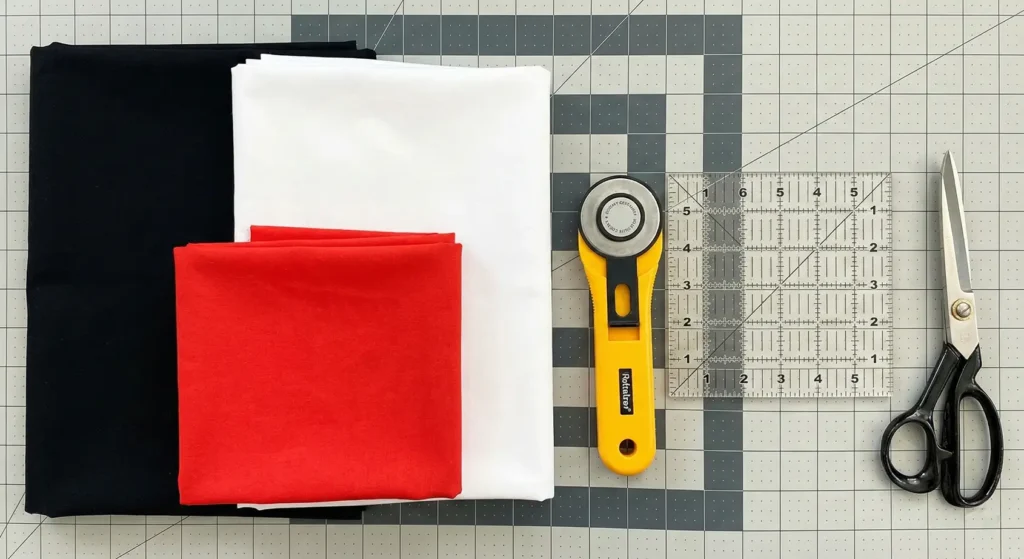
Recommended Supplies
“As an Amazon Associate, I earn from qualifying purchases.“
1. Red, Black, and White Patchwork Quilts for Modern Living Rooms
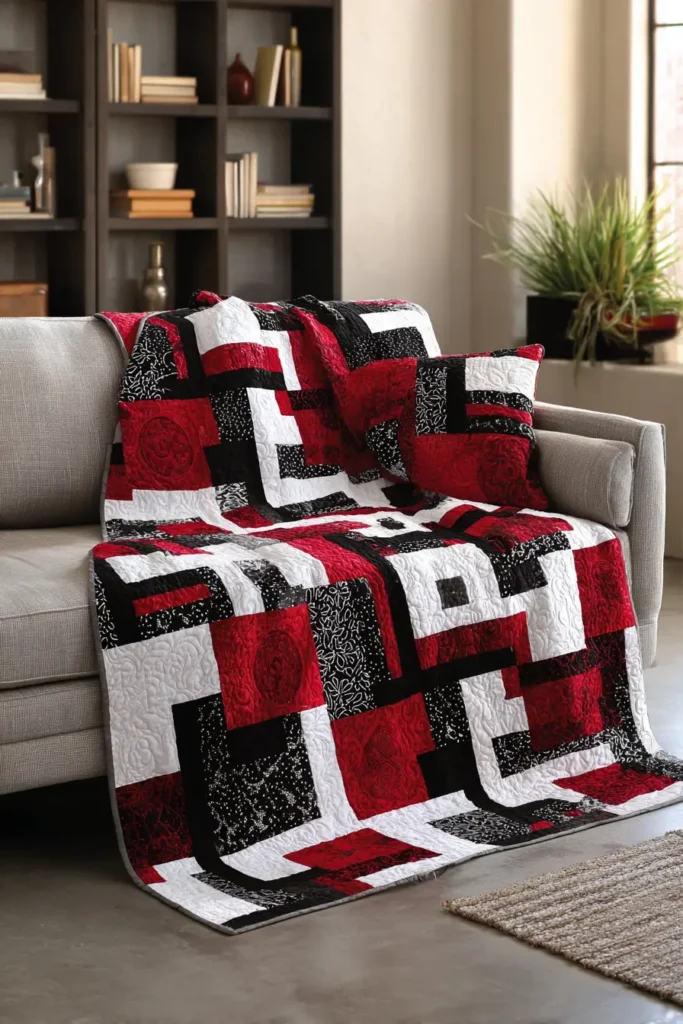
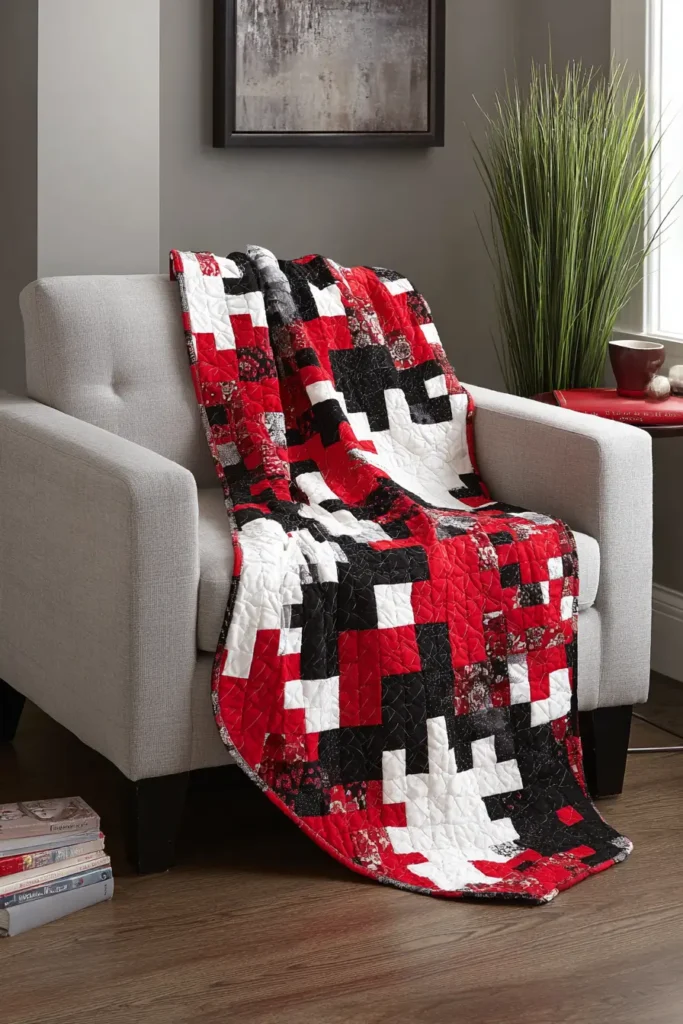
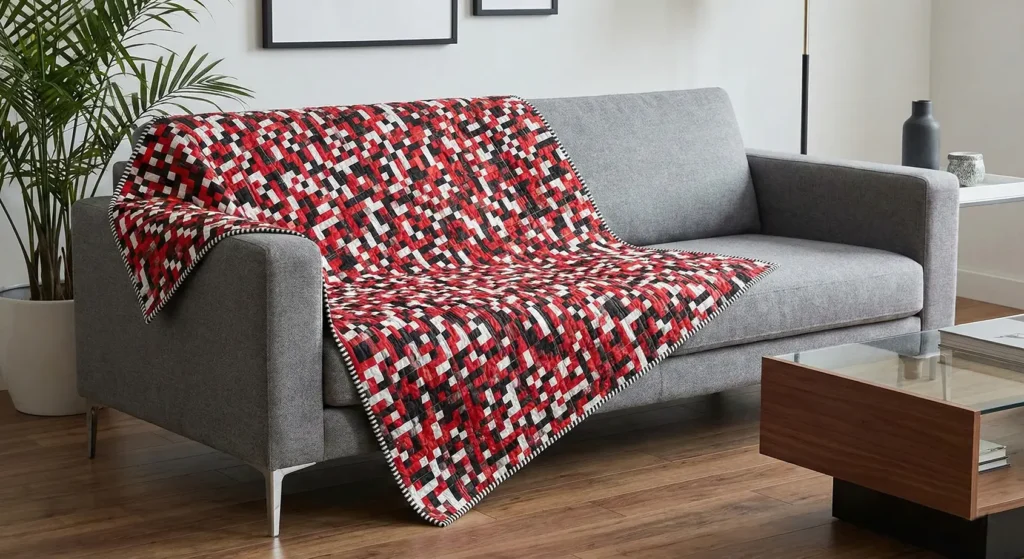
The “Urban Pixel” Disappearing Nine-Patch Throw
This pattern is a magic trick. You start by sewing a simple, traditional “Nine-Patch” block (like a Tic-Tac-Toe board). Then, you slice it into quarters and rotate the pieces. The result is a complex, scrambled “pixel” look that feels incredibly modern and energetic—perfect for draping over a grey sofa in a contemporary living room.
Finished Dimensions: Large Sofa Throw, approximately 60″ x 60″.
Materials Needed:
- Fabric A (Black): 1.5 yards of Solid Black.
- Fabric B (White): 1.5 yards of Solid White (or Low-Volume text print).
- Fabric C (Red): 1 yard of Bright Red.
- Backing Fabric: 4 yards.
- Batting: Throw Size (64″ x 64″).
- Binding: 1/2 yard of Black and White Stripe.
- Notions: Rotary cutter, 6.5″ or larger square ruler.
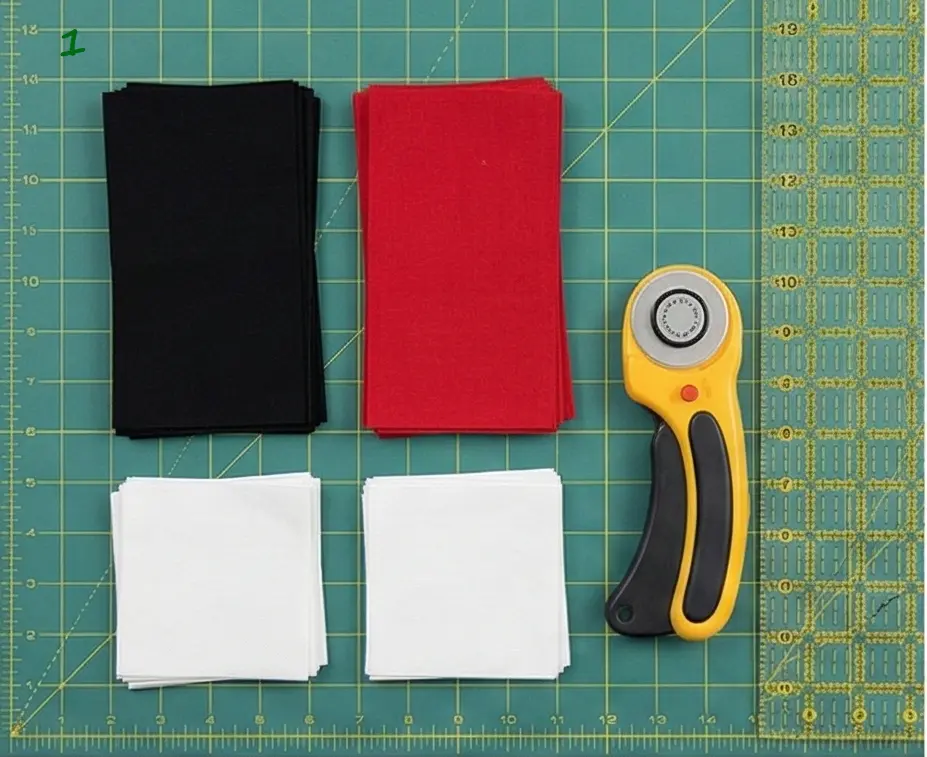
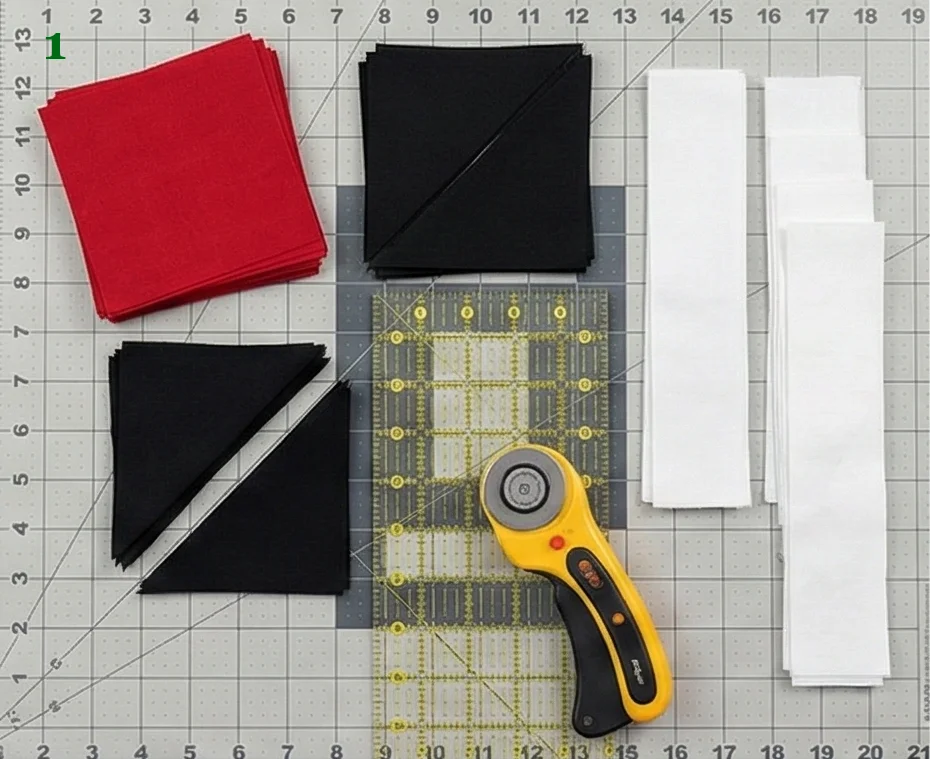
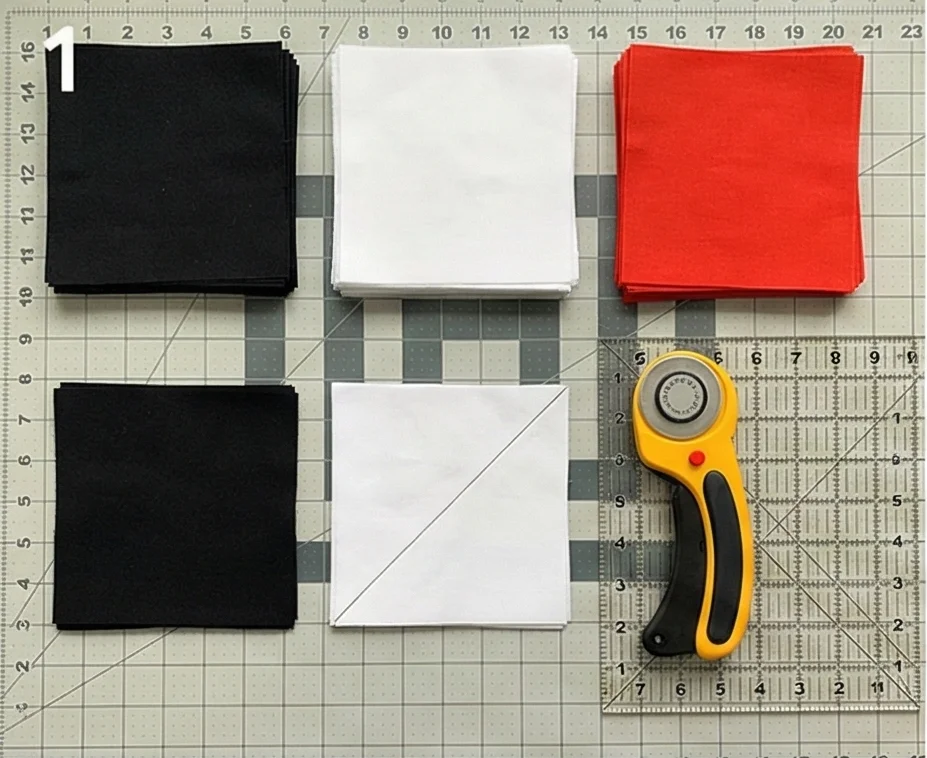
Step 1: Cut the Squares
The entire quilt is built from 5-inch squares. This is perfect for “Charm Packs” if you want to use pre-cuts.
- From Fabric A (Black): Cut 36 squares, measuring 5″ x 5″.
- From Fabric B (White): Cut 45 squares, measuring 5″ x 5″.
- From Fabric C (Red): Cut 36 squares, measuring 5″ x 5″.
- Total Squares Needed: 117 squares (we will use 108 for the blocks, extras are for safety).

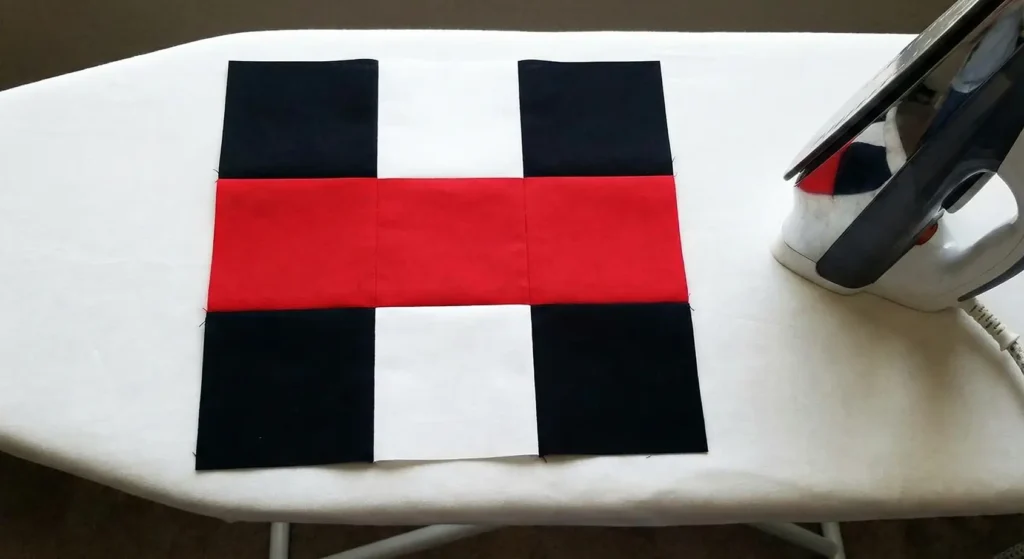
Step 2: Assemble the “Nine-Patch” Blocks
We will make 12 Big Blocks. Each block is a 3×3 grid.
- Layout: Arrange the squares in a specific order to maximize contrast:
- Row 1: Black – White – Black
- Row 2: Red – White – Red
- Row 3: Black – White – Black
- Sew: Stitch the squares into rows, then sew the rows together.
- Press: Press seams toward the darker fabrics.
- Size: The finished block should measure 14″ x 14″ (unfinished).
- Quantity: Make 12 Blocks.
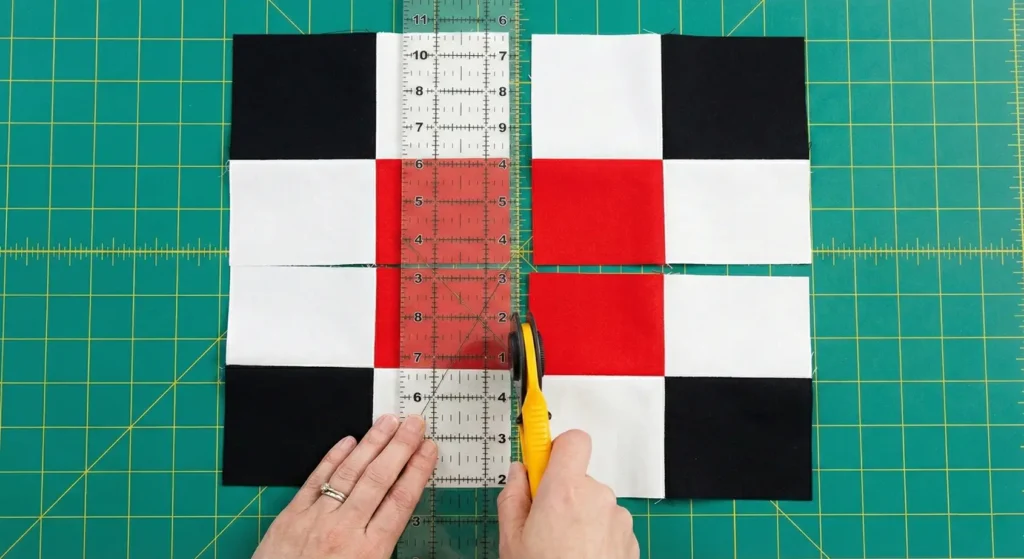
Step 3: The “Disappearing” Cut
Here is where the block transforms.
- Take one 14″ block to your cutting mat.
- Measure: Find the exact center vertical line (at 7 inches) and the exact center horizontal line (at 7 inches).
- Cut: Cut the block in half vertically, then in half horizontally.
- Result: You now have 4 smaller squares (each approx 7″ x 7″).
- Notice how the center white square has been chopped into 4 small corners!
- Repeat for all 12 blocks. You now have 48 small blocks.
Step 4: The “Scramble” Layout
- Find a floor space. Arrange the 48 small blocks in a grid of 6 blocks wide x 8 blocks tall.
- Rotate: Do not put them back together the way they were!
- Twist and turn the blocks randomly.
- Try to ensure that no two Red rectangles touch each other directly.
- The goal is a “scattered” look, where the small black squares, red bars, and white corners resemble digital noise or Tetris blocks falling.
- Visual Check: Step back. Does it look balanced? If one area is too dark, swap a block.
Step 5: Assembly
- Sew: Stitch the small blocks into horizontal rows.
- Press: Press seams open to reduce bulk at the intersections.
- Join: Sew the rows together to complete the top.

Step 6: “Grid” Quilting
- Baste the sandwich.
- Quilting: A modern patchwork demands modern quilting.
- Design: Quilt a straight Grid.
- Stitch horizontal lines 2 inches apart.
- Stitch vertical lines 2 inches apart.
- Use Grey Thread. Grey blends perfectly with black and white and looks subtle on red. The grid texture reinforces the “pixel” theme.
Pro Design Tip: The “Glossy” Red. For a living room throw, texture is key. Replace the Red cotton squares with Red Velvet or Red Corduroy. Since the pieces are small squares, the velvet is easy to sew (just use extra pins), and the luxurious texture makes the throw feel expensive and cozy.
Budget Consideration: Charm Packs. To save cutting time, buy 3 Charm Packs (pre-cut 5″ squares). Buy one “Midnight” (Blacks), one “Snow” (Whites), and one “Berry” (Reds). You can mix prints and solids for a scrappier, more eclectic look without buying full yards of fabric.
More Recommended Supplies
“As an Amazon Associate, I earn from qualifying purchases.“
2. Bold Geometric Red, Black, and White Quilts for Contemporary Decor
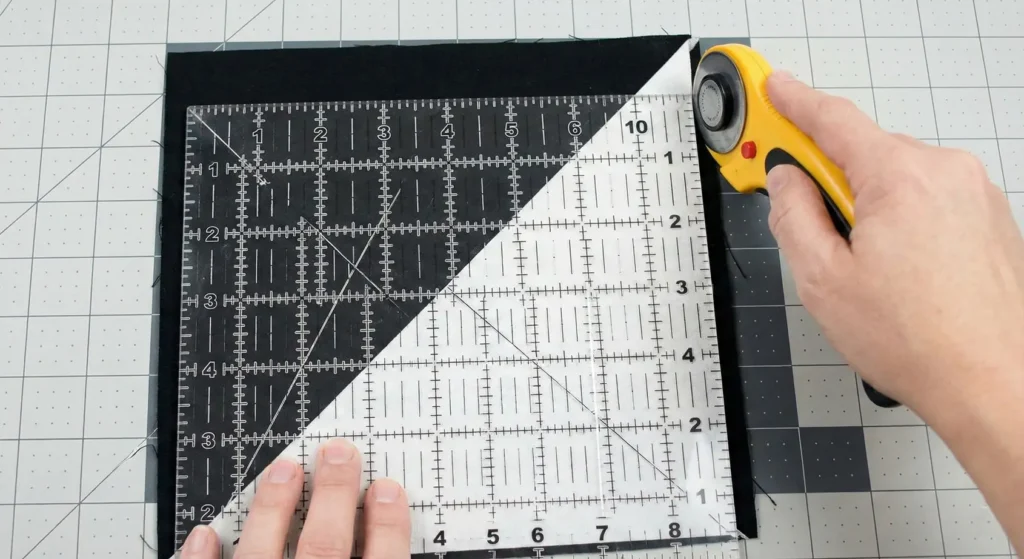
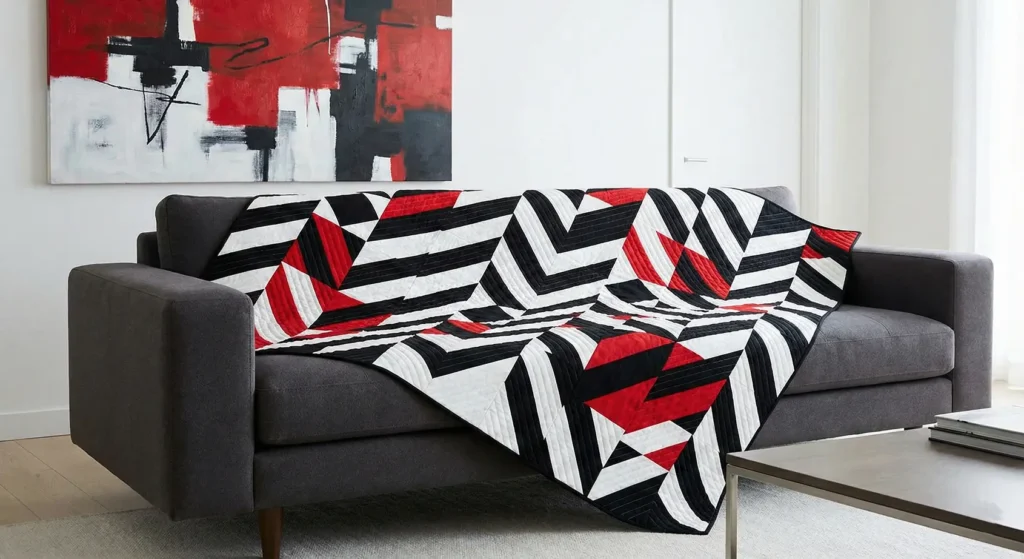
The “Shattered Chevron” Arrow Quilt
This pattern uses high-contrast Half Square Triangles (HSTs) to create large, aggressive chevron arrows that point across the quilt. By randomly flipping some of the blocks, we “shatter” the perfect zig-zag pattern, creating a glitchy, modern aesthetic that looks like abstract art. It is perfect for draping over a solid-colored sofa to add a punch of graphic energy.
Finished Dimensions: Throw Size, approximately 64″ x 72″.
Materials Needed:
- Fabric A (Black): 2.5 yards of Solid Black.
- Fabric B (White): 2.5 yards of Solid White.
- Fabric C (Red): 1 yard of Bright Poppy Red (for the accent arrows).
- Backing Fabric: 4 yards.
- Batting: Twin Size (72″ x 90″).
- Binding: 1/2 yard of Solid Black.
- Notions: Rotary cutter, 6.5″ square ruler.
Step 1: Mass Produce Large HSTs
The entire quilt is made of 8.5″ (unfinished) Half Square Triangles.
- Cut Squares:
- From Black: Cut 30 squares (9″ x 9″).
- From White: Cut 30 squares (9″ x 9″).
- From Red: Cut 6 squares (9″ x 9″).
- Note: We need contrast pairs.
- Cut 6 Black squares (9″ x 9″) to pair with Red.
- Cut 6 White squares (9″ x 9″) to pair with Red.
- Mark: Draw a diagonal line on the back of all the lighter squares (White and Red, relative to Black).
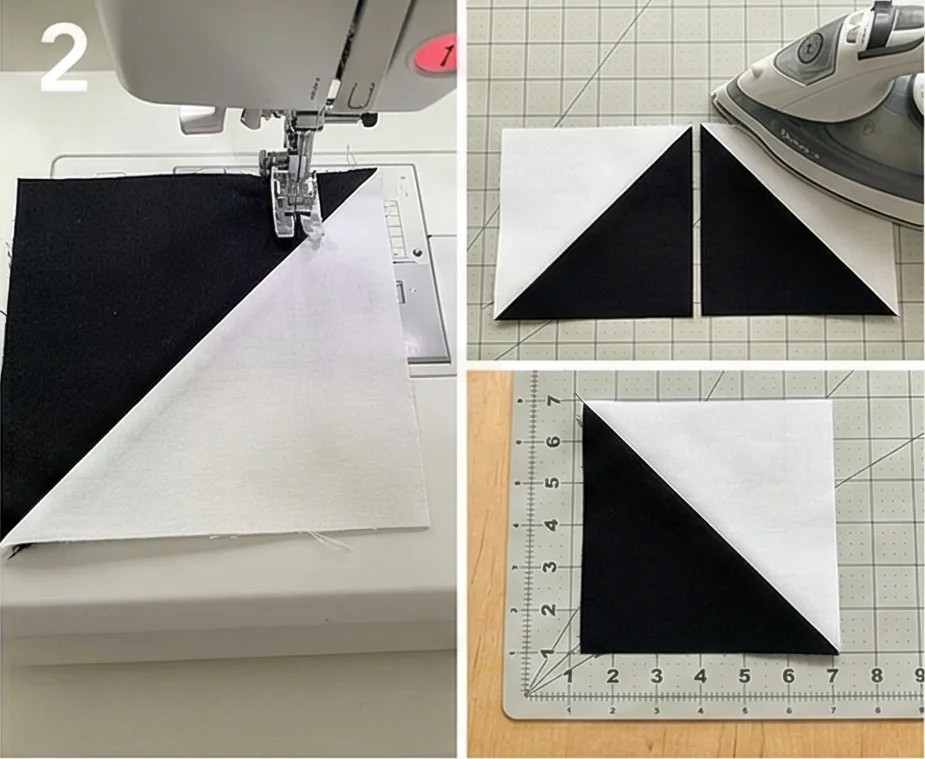
Step 2: Sew the Triangle Units
- Black/White Units: Pair 24 Black squares with 24 White squares. Sew 1/4″ on both sides of the line. Cut apart.
- Yield: 48 Black/White HSTs.
- Red/Black Units: Pair 6 Red squares with 6 Black squares. Sew, cut.
- Yield: 12 Red/Black HSTs.
- Red/White Units: Pair 6 Red squares with 6 White squares. Sew, cut.
- Yield: 12 Red/White HSTs.
- Trim: Square up all units to exactly 8.5″ x 8.5″.

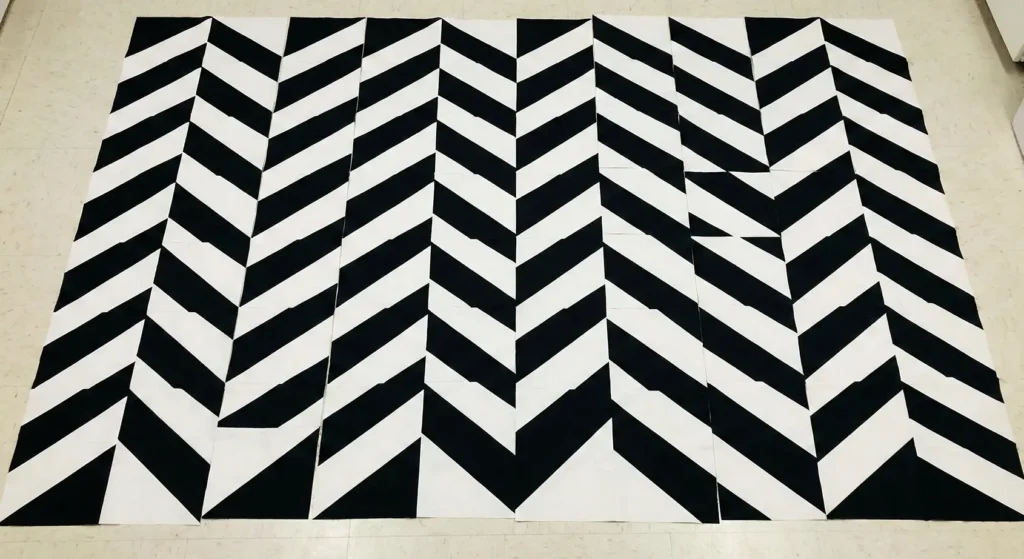
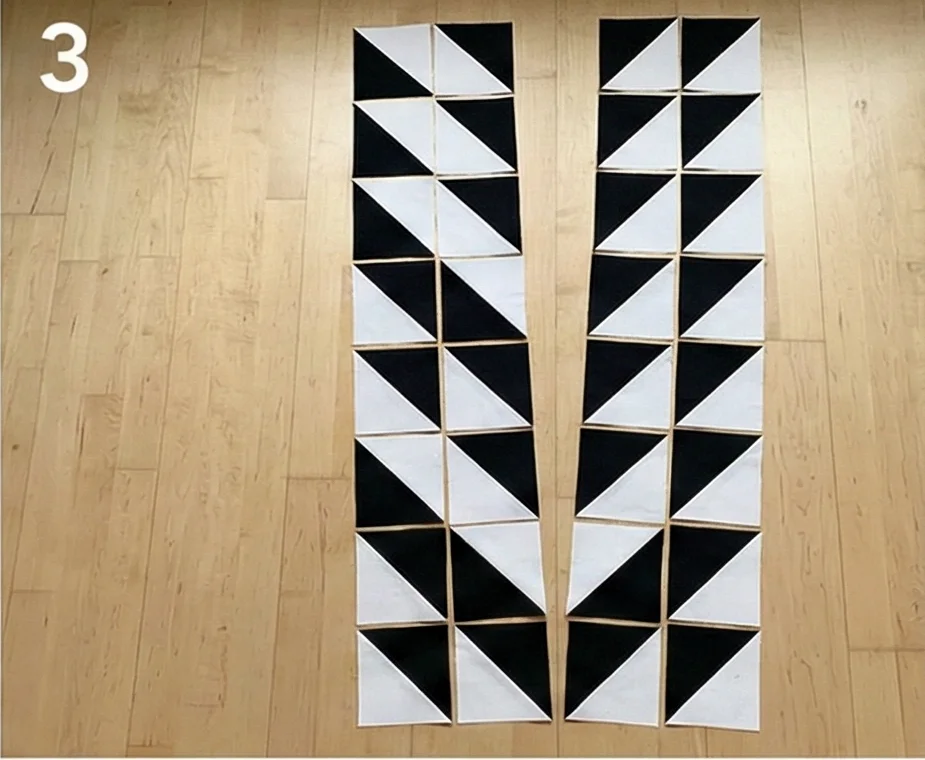
Step 3: The “Chevron” Layout (The Base)
- Find a floor space. You need a grid of 8 blocks wide x 9 blocks tall.
- Create Columns: This design works best in vertical columns.
- Column 1: Orient HSTs so the diagonal goes Bottom-Left to Top-Right ( / ).
- Column 2: Orient HSTs so the diagonal goes Top-Left to Bottom-Right ( \ ).
- Visual: When placed side-by-side, Columns 1 and 2 form a big “V” (Chevron).
- Repeat: Continue this pairing across the width (Cols 3 & 4 form a V, etc.).
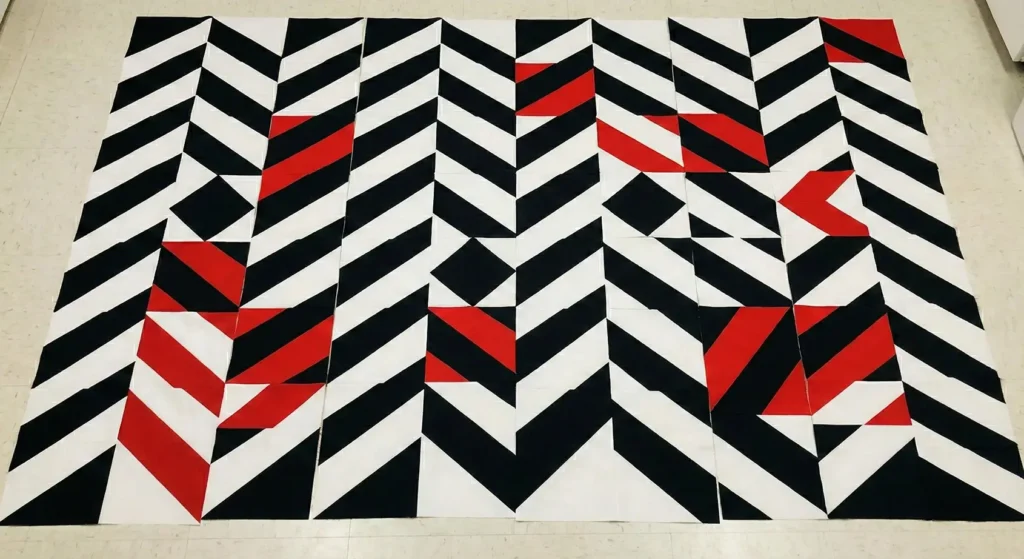
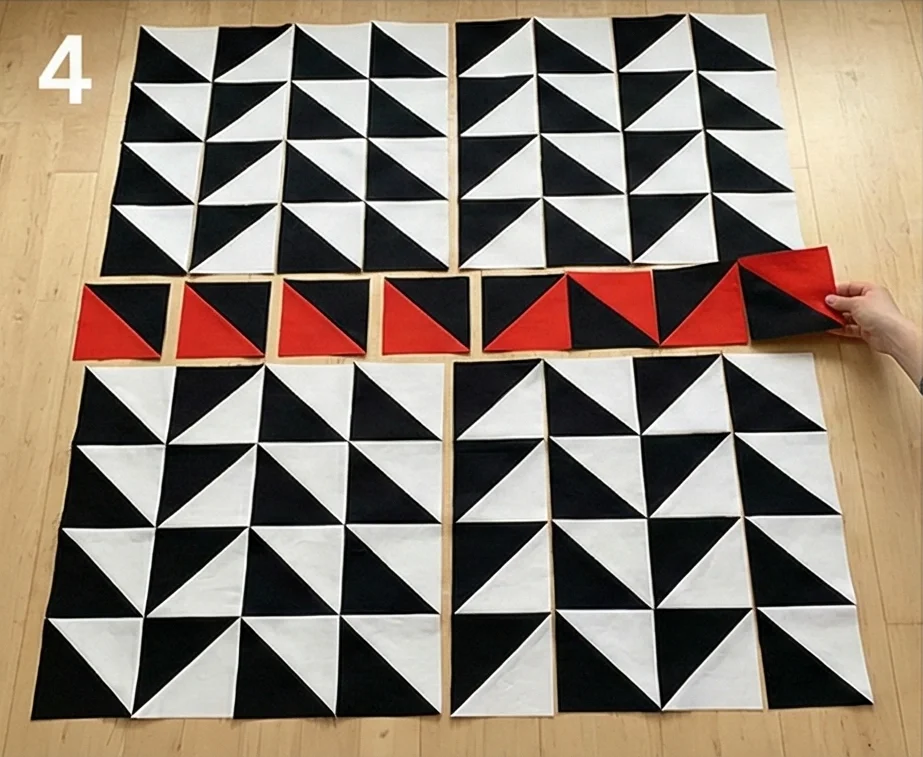
Step 4: The “Shatter” (The Glitch)
Now we disrupt the perfect pattern.
- Insert the Red: Replace random Black/White blocks with your Red/Black and Red/White blocks.
- Design Idea: Concentrate the red blocks in a single diagonal “slash” running through the quilt, or scatter them like confetti.
- Flip the Script: Take about 5 or 6 random blocks in the layout and rotate them 90 degrees.
- This breaks the “V” shape and creates sudden squares or diamonds. This “broken” geometry is what makes the quilt look contemporary rather than traditional.
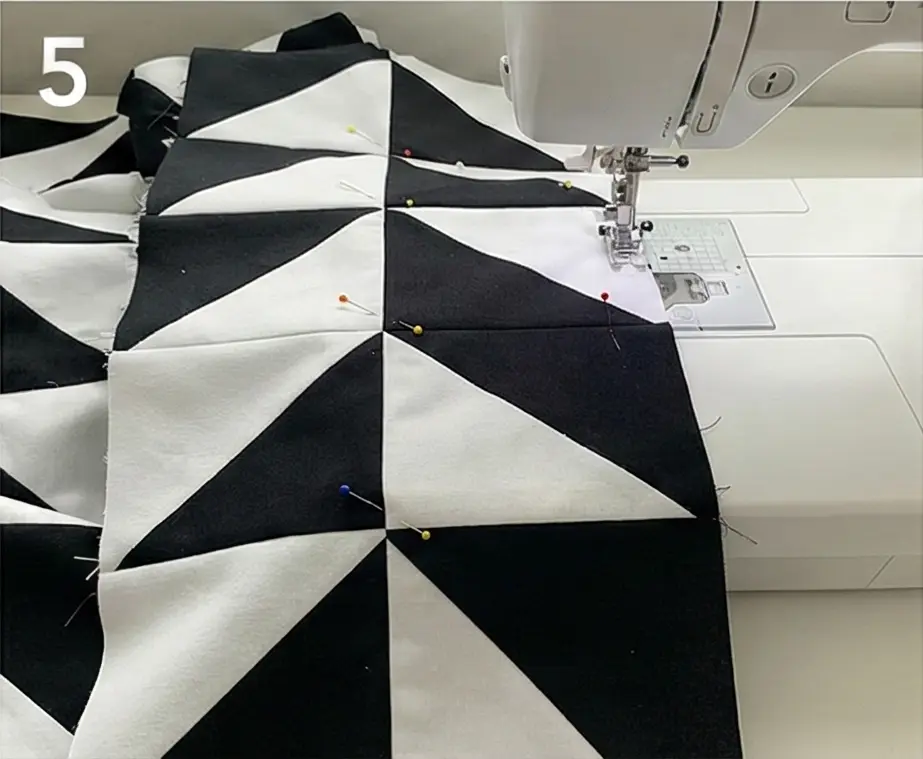
Step 5: Assembly
- Sew Columns: Sew the blocks together into vertical columns first.
- Why? It is easier to keep the chevron points aligned vertically.
- Press: Press seams open.
- Join Columns: Pin carefully at the intersections where the points match (the bottom of the “V”). Sew the columns together.
Step 6: “Echo” Quilting
- Baste the sandwich.
- Quilting: Use a Walking Foot.
- Design: Quilt straight lines that mimic the chevron “V” shape.
- Stitch 1/4″ away from the seam lines on both the black and white sides.
- Continue echoing these V-shapes out into the solid spaces.
- Thread: Use Grey Thread or White Thread—something that shows up on the black to emphasize the geometry.
Pro Design Tip: Matte vs. Shine. For a very chic, modern look, use Matte Cotton for White and Red, and Black Satin or Polished Cotton for Black. The light reflection on the black triangles adds a subtle, high-end texture that looks amazing under living room track lighting.
Budget Consideration: Flat Sheets for Backing. Since this is a Throw size (approx 64″ wide), standard 42″ fabric isn’t wide enough for the back without a seam. Buy a Twin Size Flat Sheet in solid Black or Red. It is roughly 66″ x 96″—perfect for a seamless backing with zero piecing required.
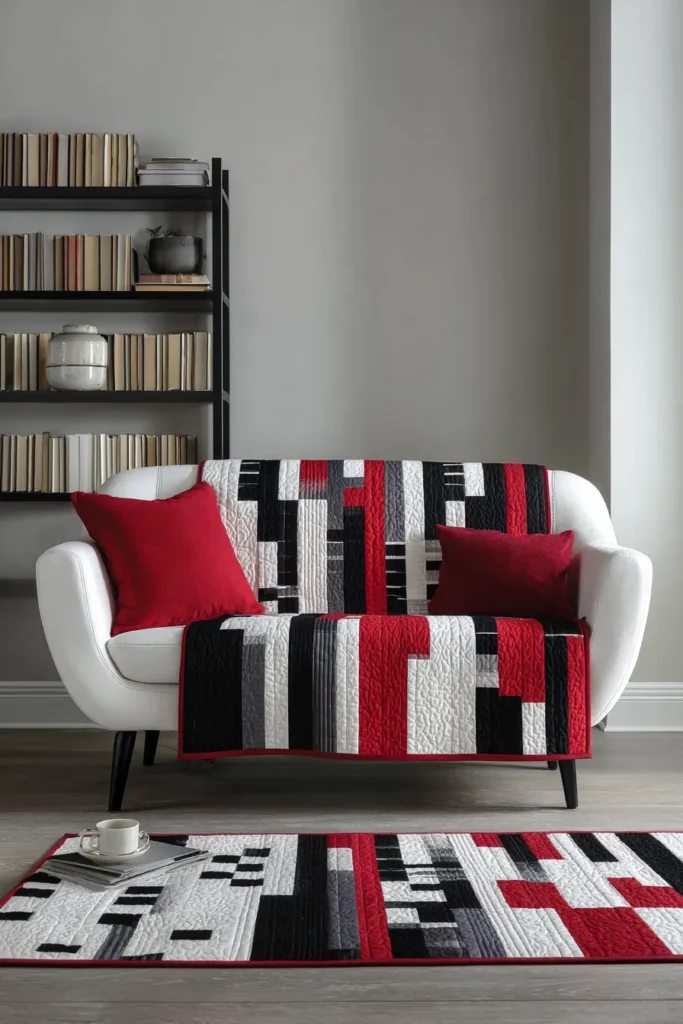
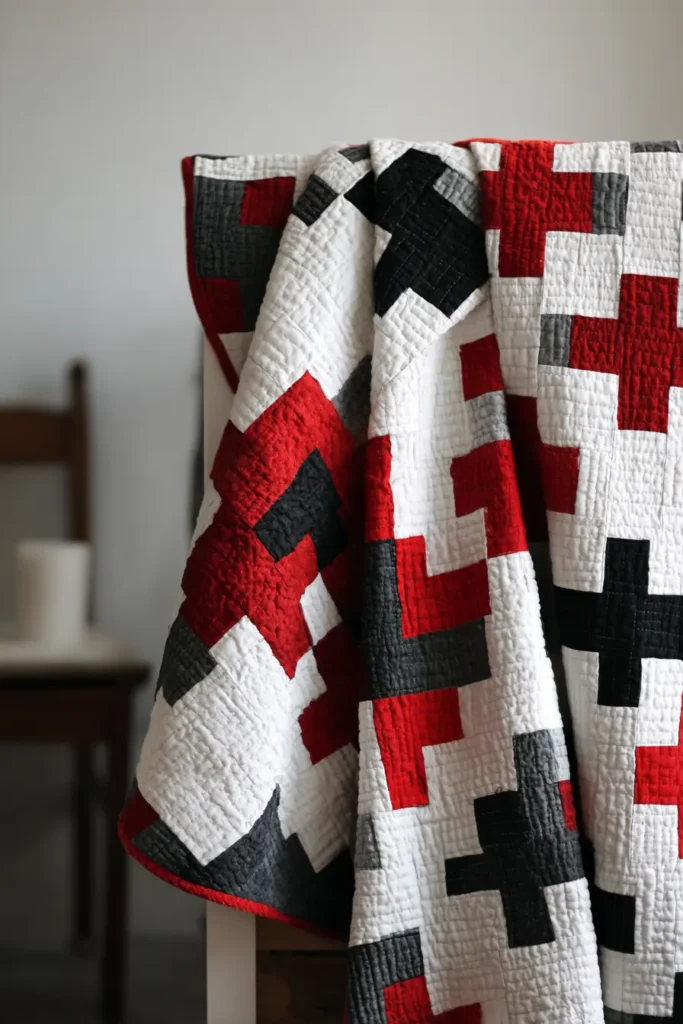
3. Minimalist Red, Black, and White Quilts with Clean Modern Lines

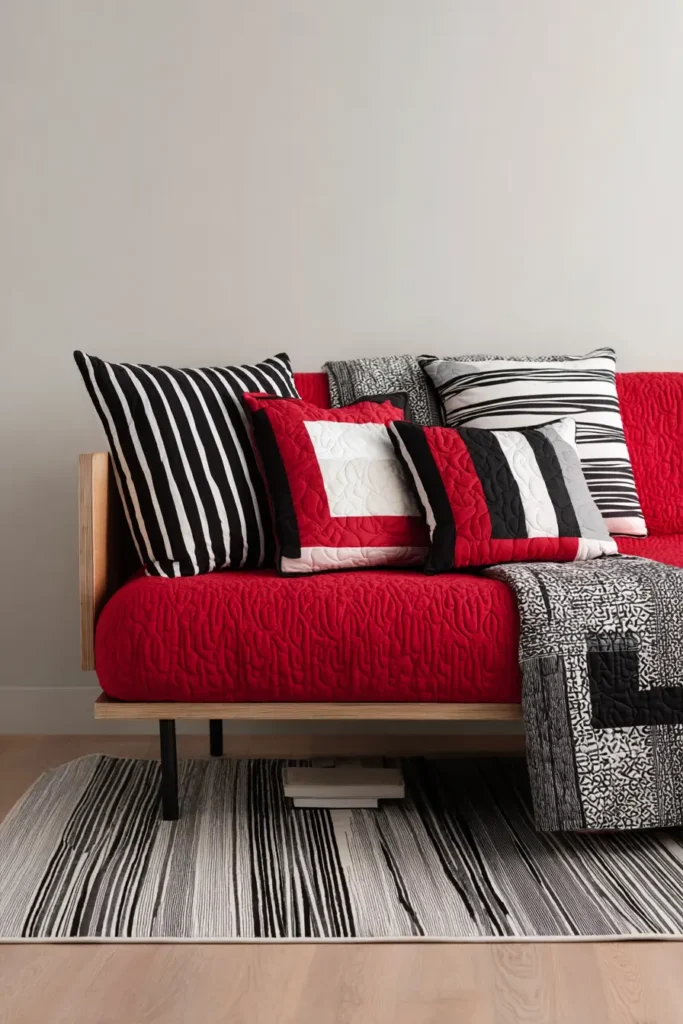
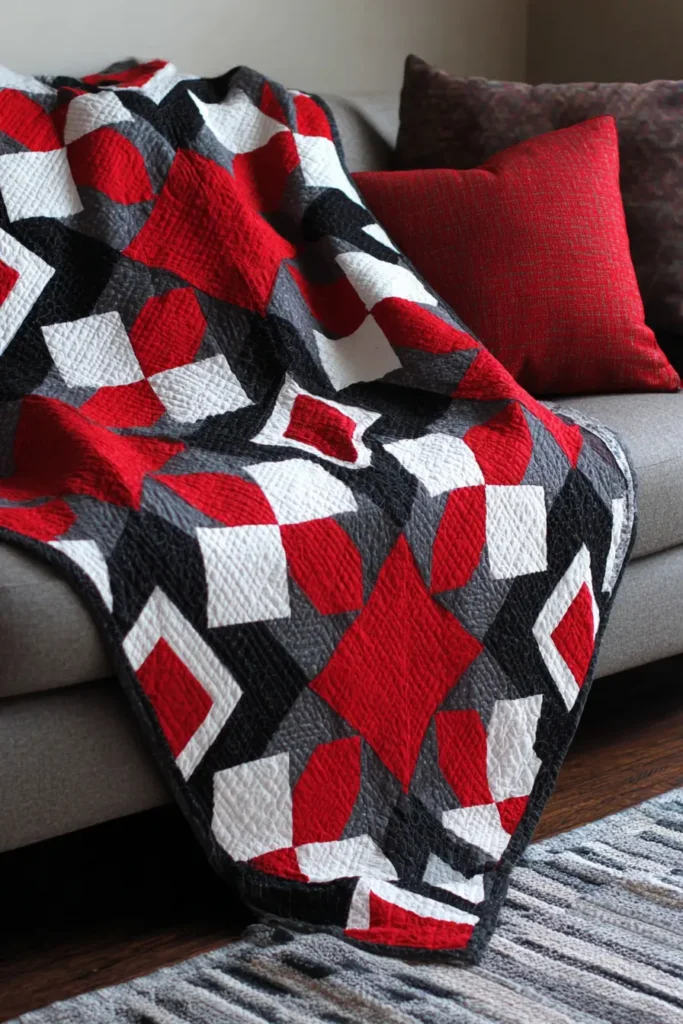
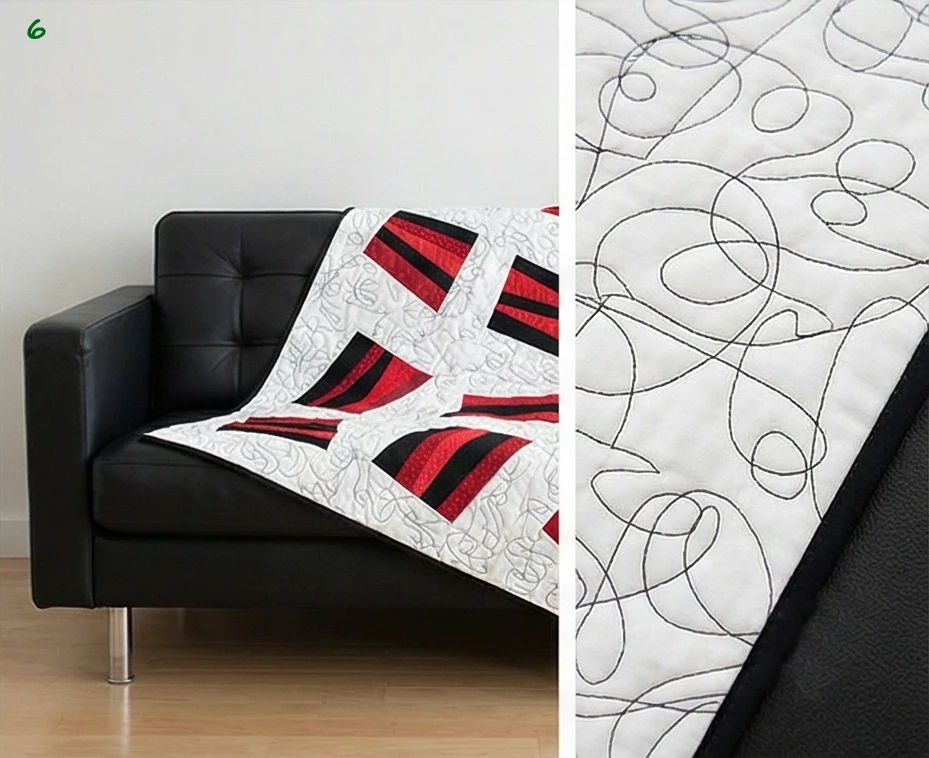
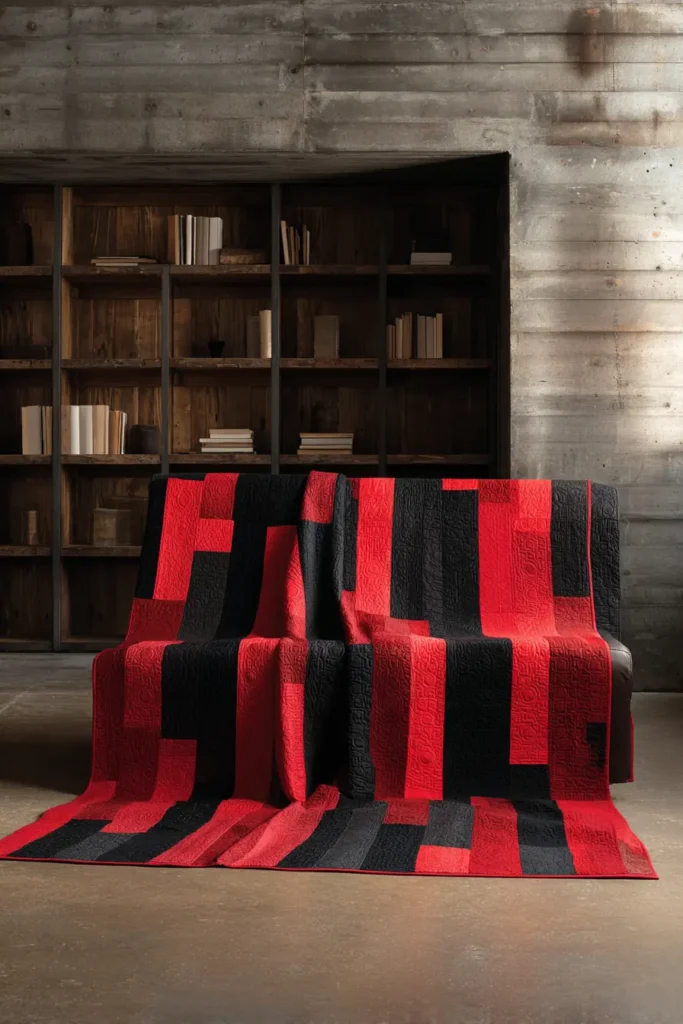
The “Bauhaus Horizon” Color Block Throw
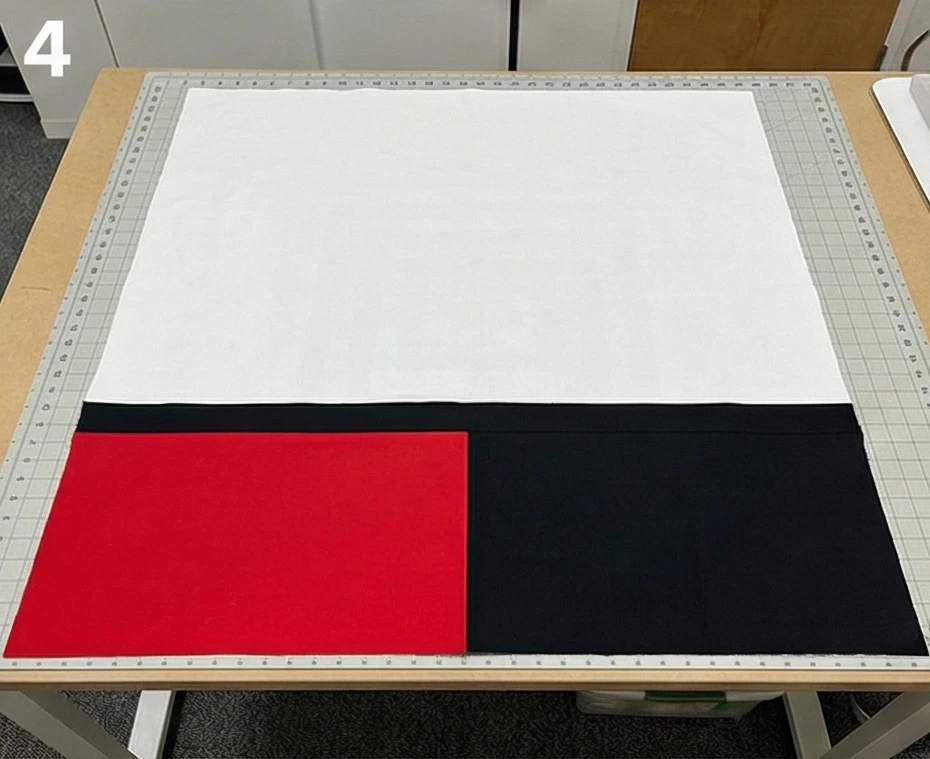
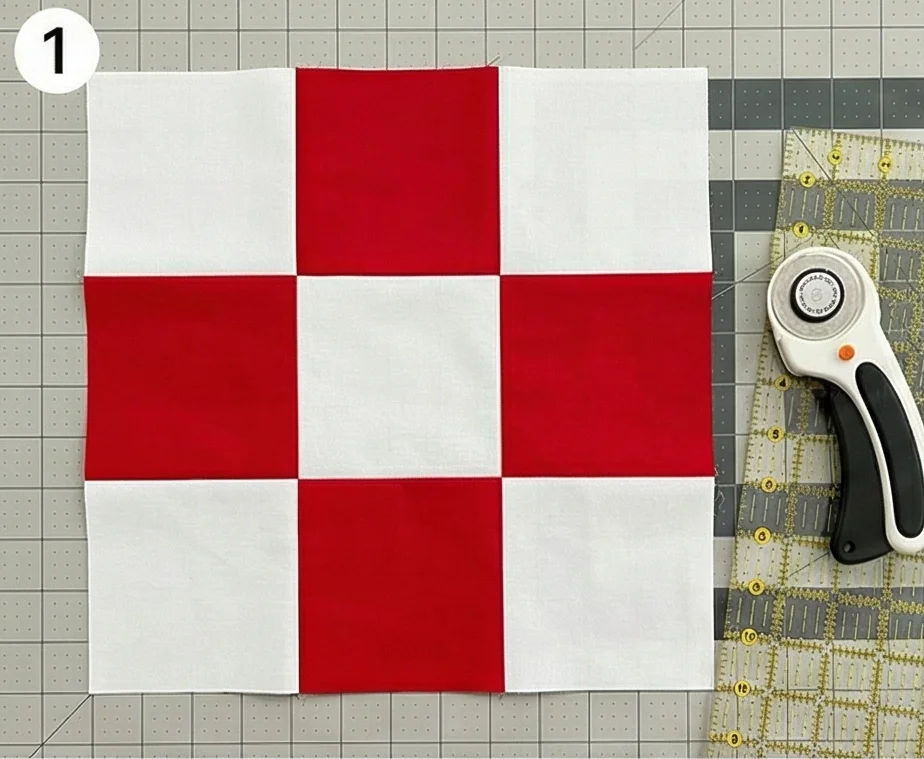
This quilt is designed specifically as a “sofa quilt.” Unlike bed quilts, sofa throws are often folded over an arm or the back of the couch. This design uses a “Color Block” layout reminiscent of a Rothko painting or Bauhaus poster. It features a large field of white (the “Sky”), a thin, sharp black dividing line, and a heavy bottom section (the “Ground”) split asymmetrically between Black and Red. It looks stunning when folded to reveal the different color zones.
Finished Dimensions: Standard Sofa Throw, approximately 60″ x 70″.
Materials Needed:
- Fabric A (The Sky/White): 2.5 yards of Solid White (Heavyweight Cotton or Denim works well here).
- Fabric B (The Ground/Black): 1.5 yards of Solid Black.
- Fabric C (The Accent/Red): 1 yard of Bright Orange-Red or Cherry Red.
- Backing Fabric: 4 yards.
- Batting: Throw Size (72″ x 90″).
- Binding: 1/2 yard of Solid Black.
- Notions: Rotary cutter, large quilting ruler (6″ x 24″).
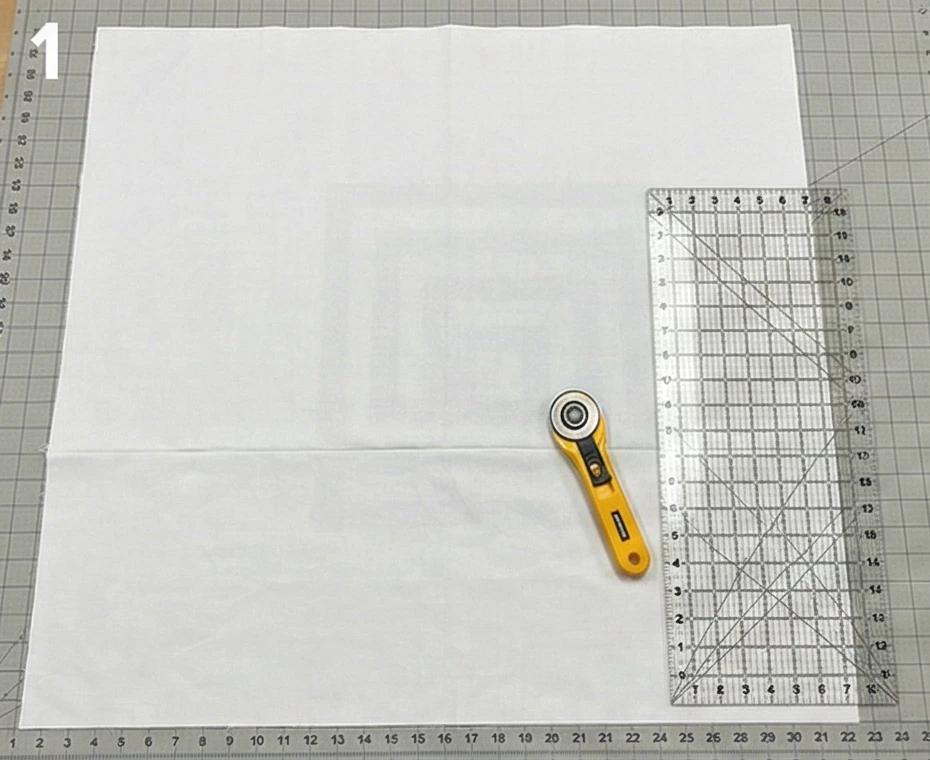
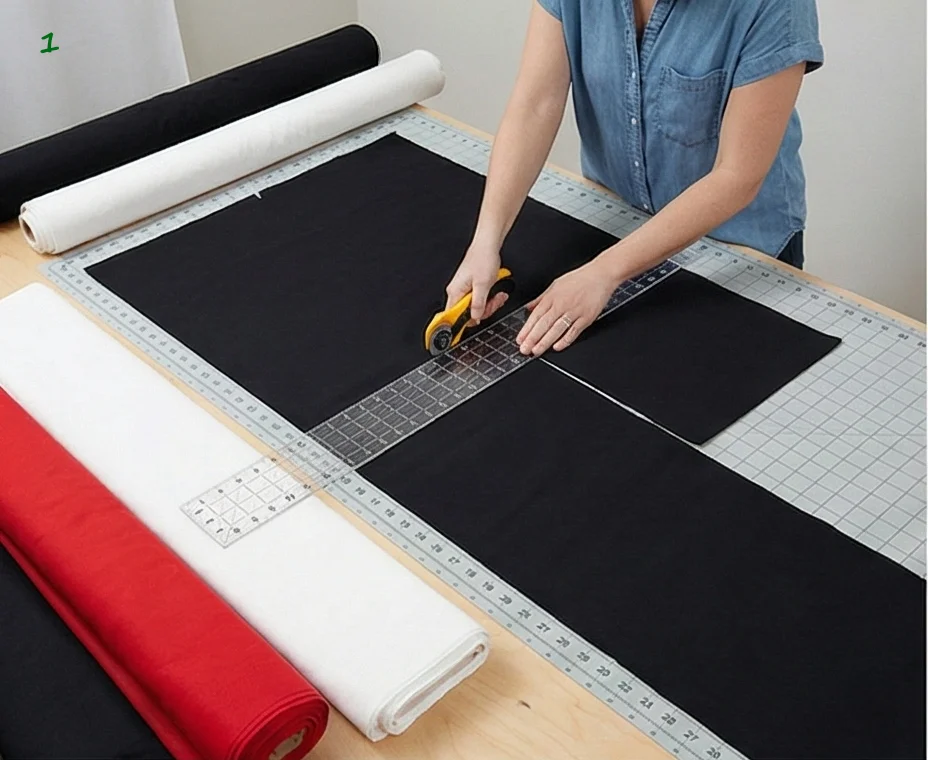
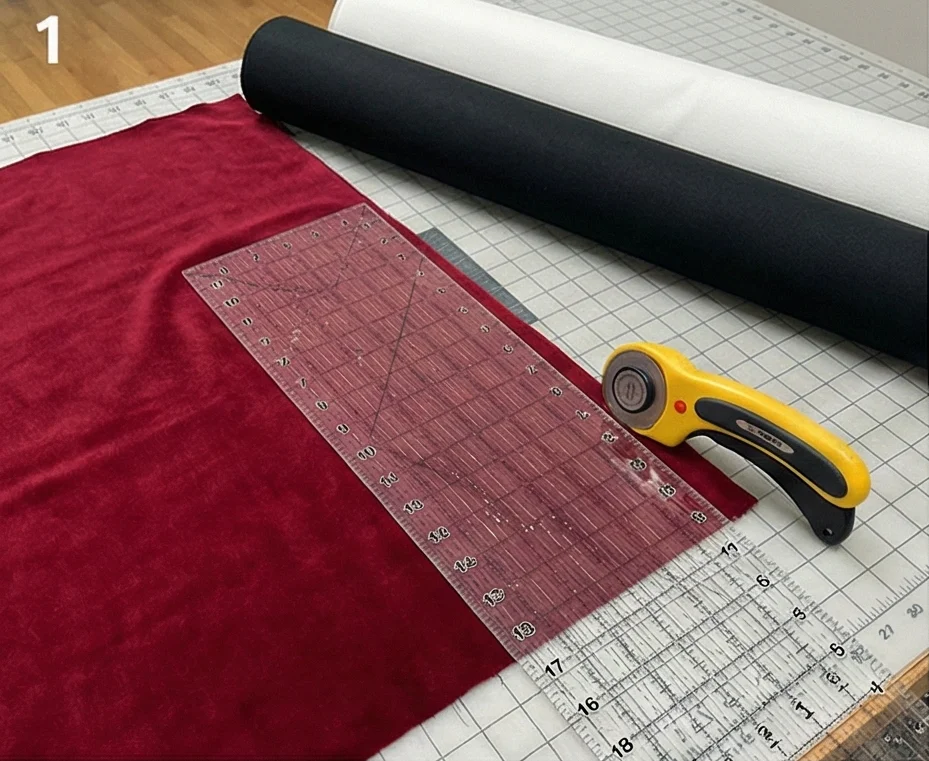
Step 1: Cut the Large “Sky” Panel
Minimalism relies on large, uninterrupted pieces of fabric. We want the top two-thirds of the quilt to be pure white.
- Cut: From Fabric A (White), cut a large rectangle measuring 40.5″ tall x 60.5″ wide.
- Note on Width: Standard fabric is only ~42″ wide. To get a 60″ width without a vertical seam showing, you may need to piece two widths of fabric together horizontally. Alternatively, treat the “40.5” dimension as the width (railroading) if your fabric allows, but usually, you will need to piece it. Make the seam horizontal so it disappears into the quilting lines later.
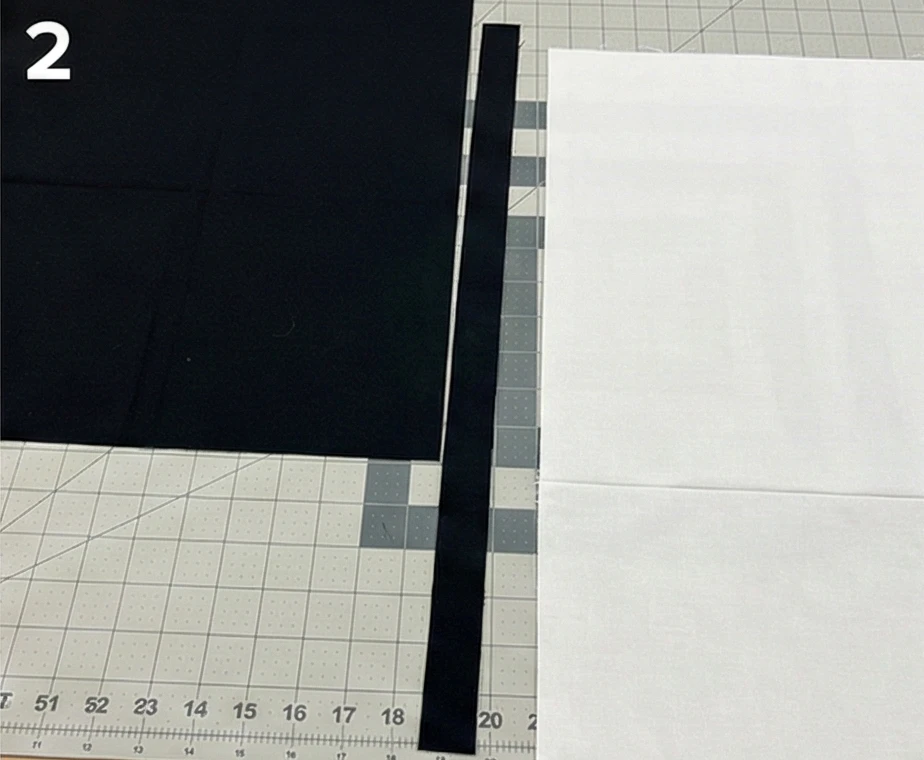
Step 2: Prepare the “Divider” Strip
This thin black line separates the light top from the heavy bottom.
- Cut: From Fabric B (Black), cut one long strip measuring 2.5″ tall x 60.5″ wide.
- Note: You will need to join two strips end-to-end to reach 60 inches. Press the joining seam open to keep it flat.
Step 3: Create the “Ground” Panels (Red and Black)
The bottom section is the visual anchor. It is not a solid block; it is split asymmetrically.
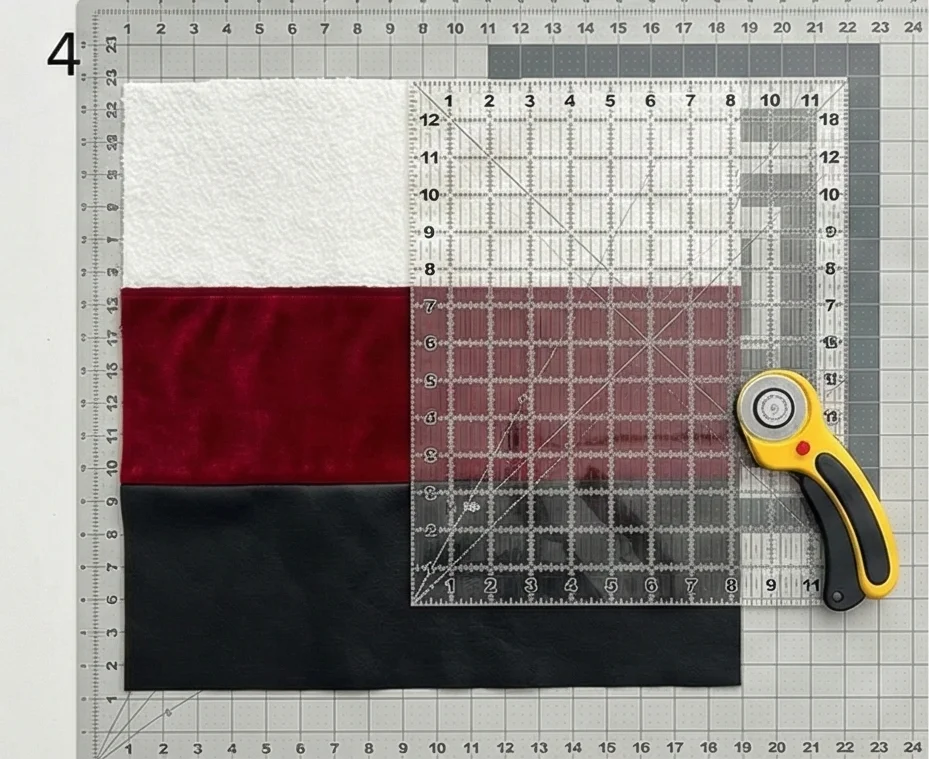
- Cut the Red Block: From Fabric C (Red), cut a rectangle measuring 18.5″ tall x 20.5″ wide.
- Cut the Black Block: From Fabric B (Black), cut a rectangle measuring 18.5″ tall x 40.5″ wide.
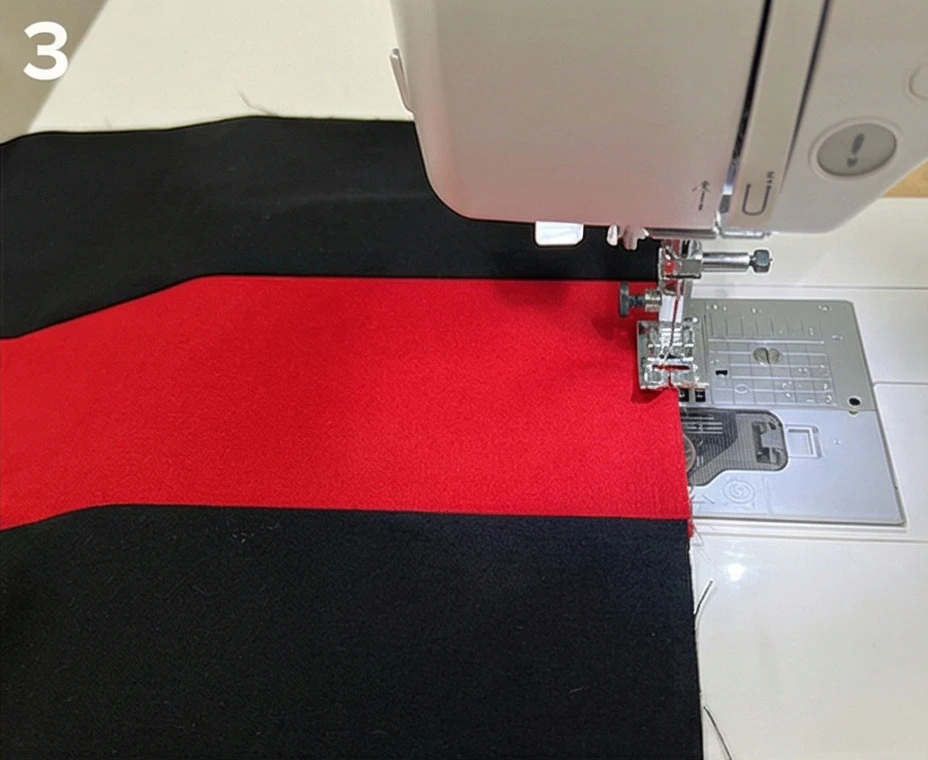
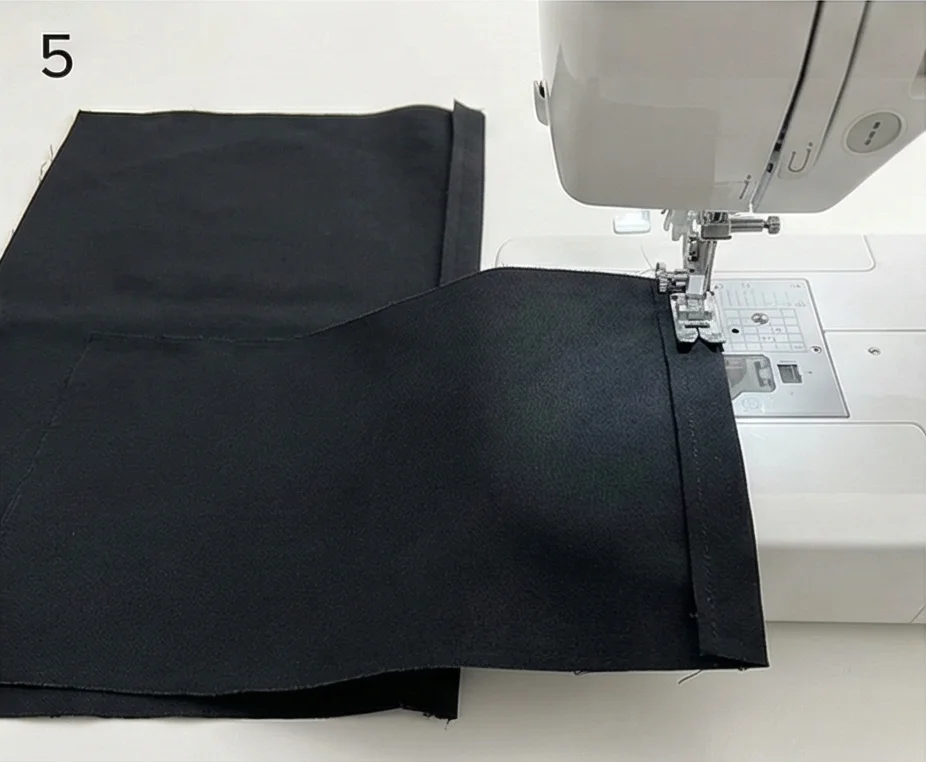
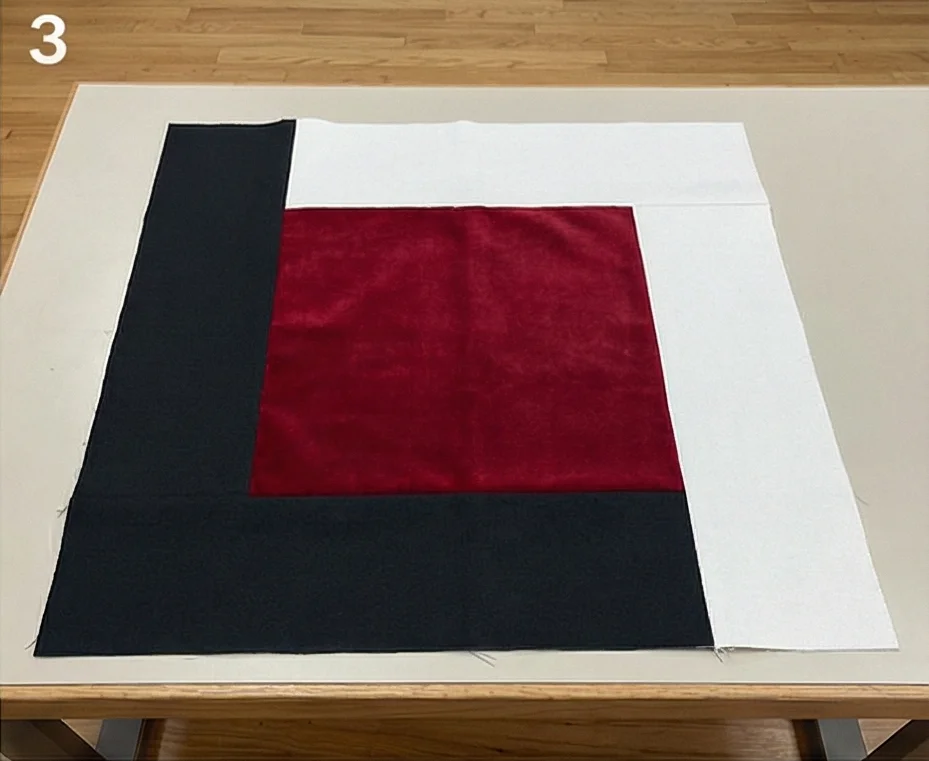
Step 4: Assemble the Bottom “Ground” Row
- Layout: Place the Red Block (20.5″ wide) to the left of the Black Block (40.5″ wide).
- Sew: Stitch them together vertically using a 1/4″ seam.
- Press: Press the seam toward the Black fabric.
- Result: You now have a bottom panel measuring 18.5″ tall x 60.5″ wide (consisting of 1/3 Red and 2/3 Black).
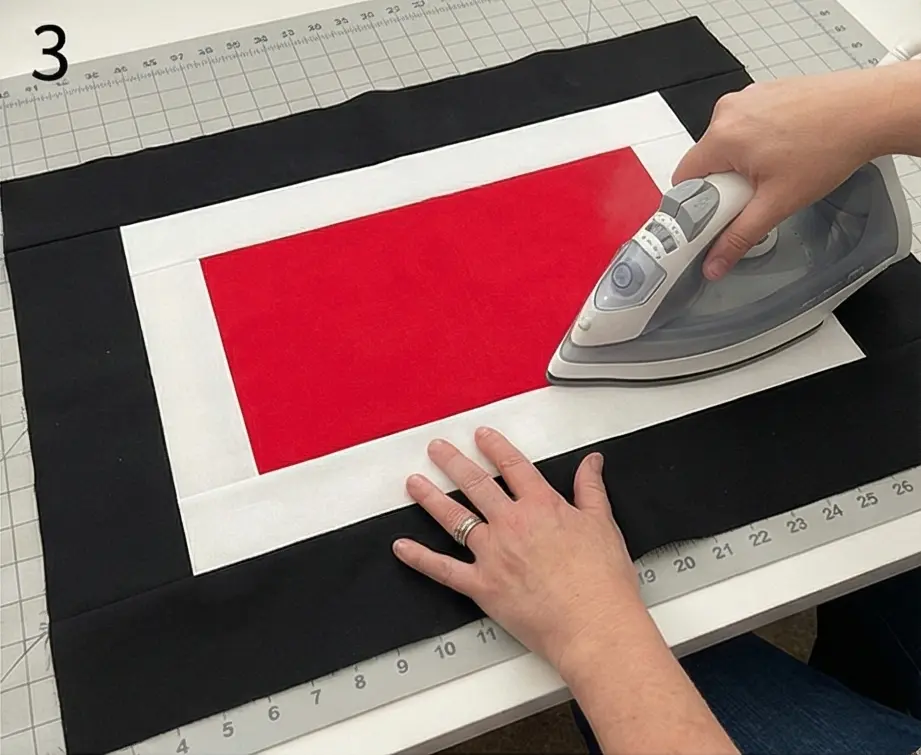
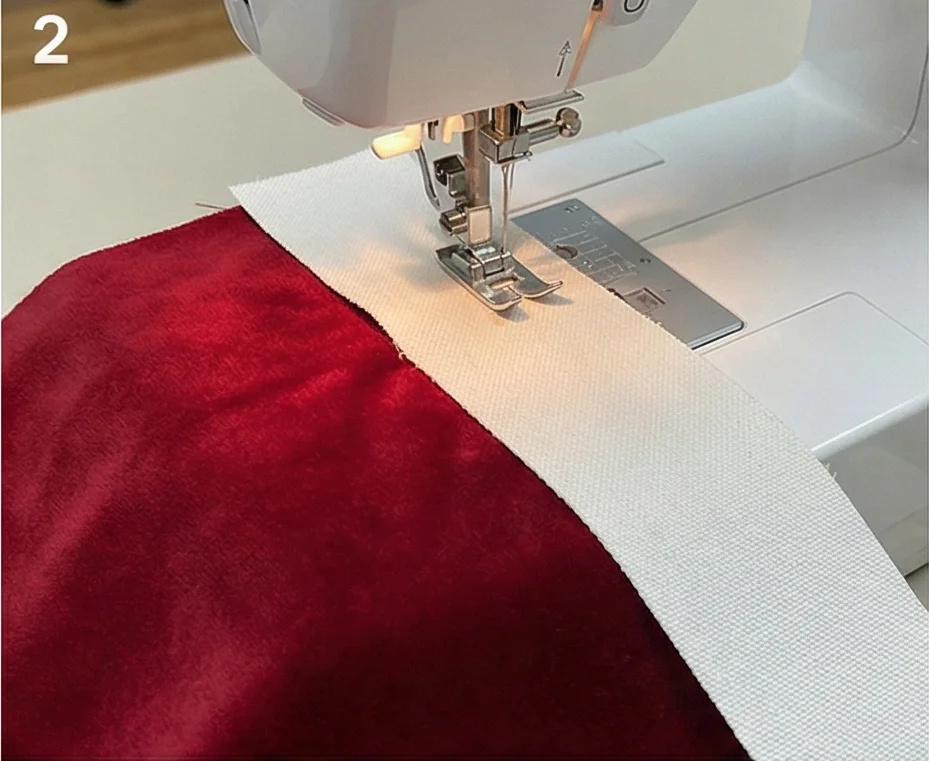
Step 5: Construct the Full Top
Now we stack the layers.
- Attach Divider: Sew the Black Divider Strip (from Step 2) to the top edge of your Ground Panel (from Step 4). Press seam toward the black strip.
- Attach Sky: Sew the large White Sky Panel (from Step 1) to the top of the Black Divider Strip.
- Press: Press the final seam toward the black strip.
- Visual: You have a large white field at the top, a thin black line, and a bold red/black block at the bottom.
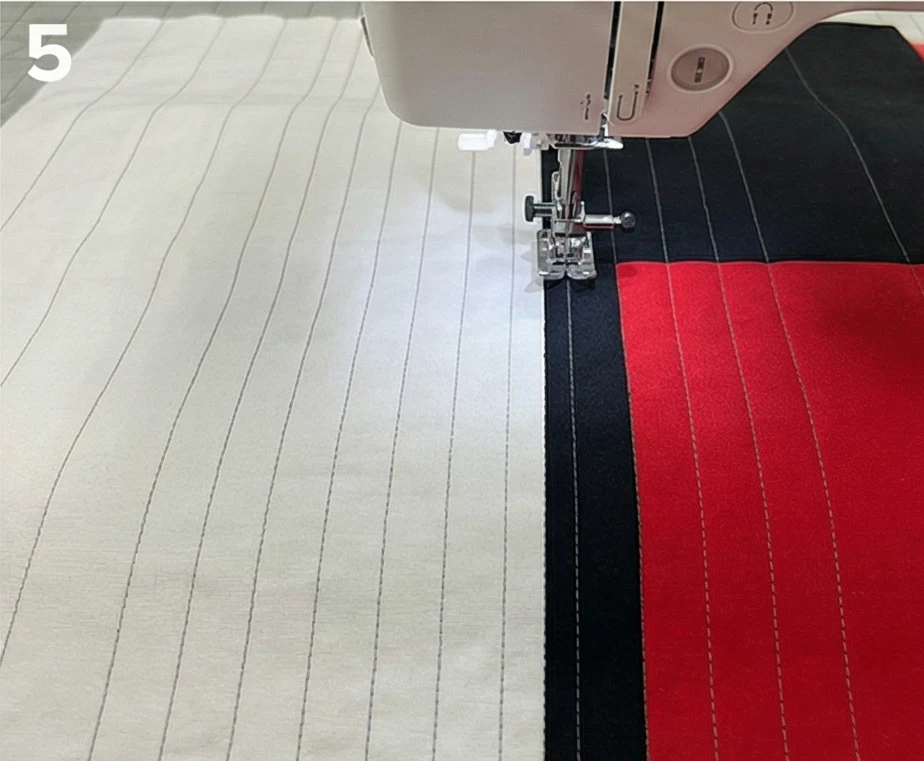
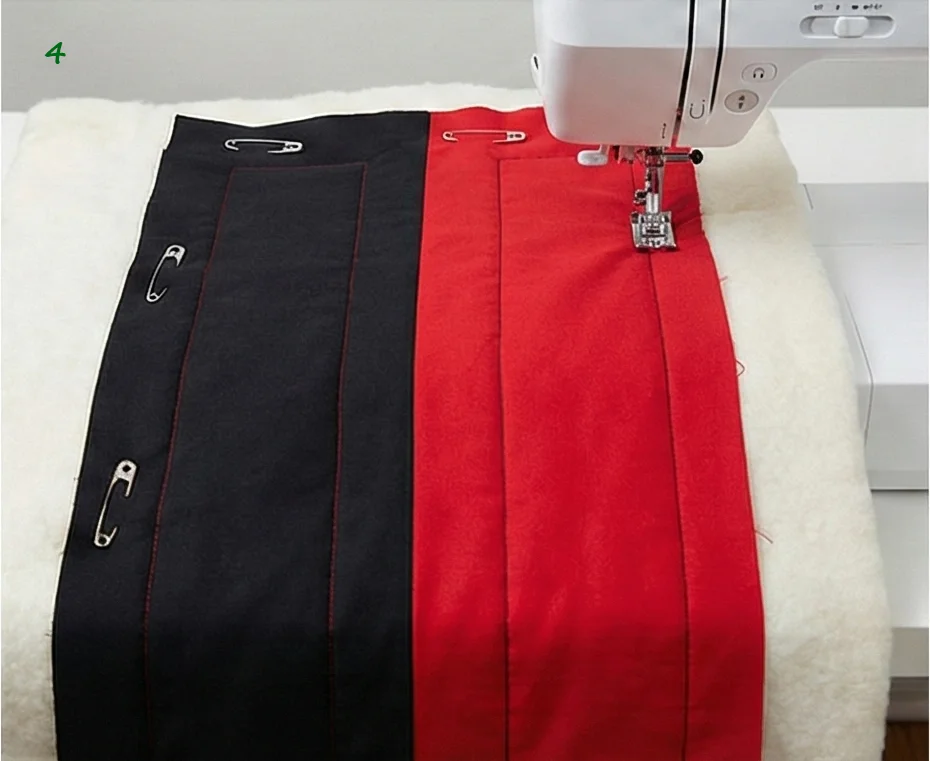
Step 6: “Perpendicular” Contrast Quilting
The quilting should enhance the blocks’ architecture.
- Baste the sandwich.
- Quilting: Use a Walking Foot.
- Design: Stitch Vertical Straight Lines (running top to bottom).
- Why Vertical? The seams of the quilt are horizontal. Quilting vertically creates a “cross-grain” texture that contrasts beautifully and helps the quilt drape more evenly over a sofa arm.
- Spacing: Stitch lines about 1 inch apart for a modern, textured look.
- Thread: Use Grey Thread throughout. It will disappear on black, look subtle on white, and add a cool-toned texture to red.

Pro Design Tip: Weighted Bottom. To keep the throw on the sofa better (and not slide off the leather upholstery), use heavier batting (like a cotton/Bamboo blend) or even a layer of flannel instead of batting. The weight makes it hug the furniture.
Budget Consideration: Canvas Drop Cloth. For the large “White Sky” panel, buy a Canvas Drop Cloth from a hardware store. Bleach it in your washer to get a soft, off-white color. The canvas is wide (no seams needed!), durable for a living room, and adds a great “upholstery” texture to the quilt.
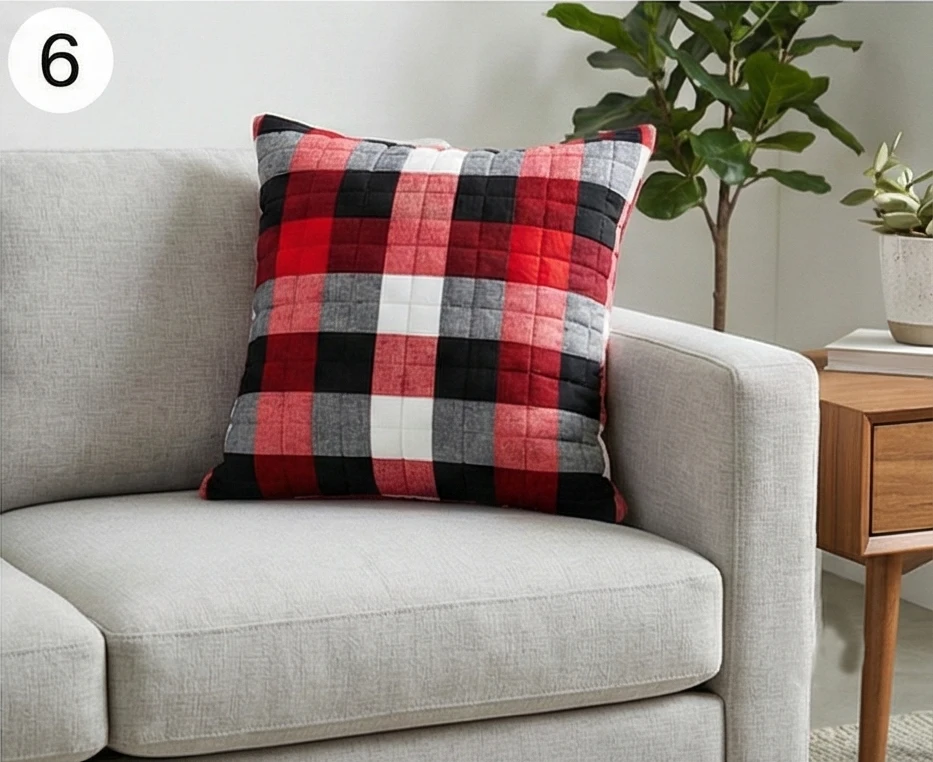
4. Buffalo Check Red, Black, and White Quilts for Cozy Yet Stylish Spaces
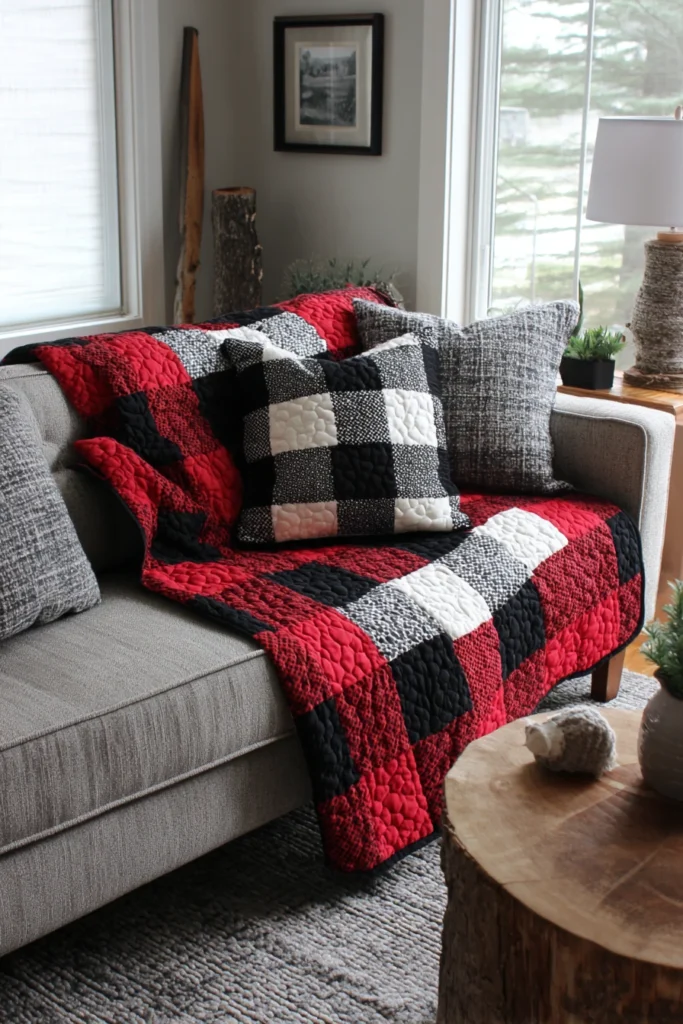
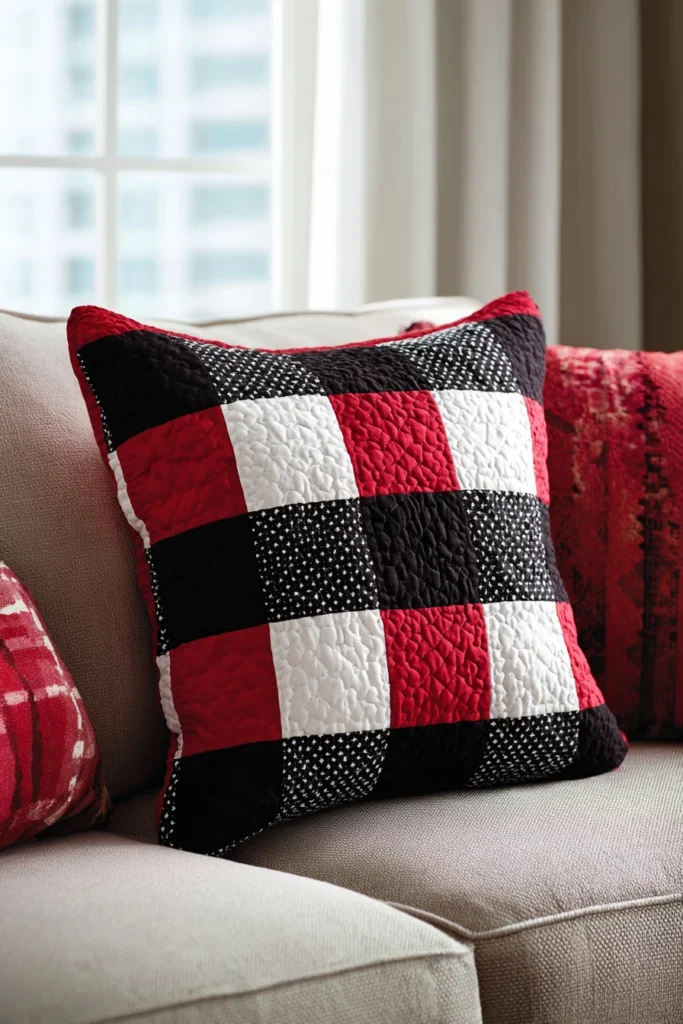
The “Lumberjack Chic” Quilted Cushion Cover
A whole quilt is great, but sometimes you just want a pop of pattern. This project shrinks the bold Buffalo Check pattern down to a size perfect for an 18-inch throw pillow. The quilted front adds structure and luxury that standard printed pillowcases lack, making your sofa look professionally styled.
Finished Dimensions: Fits an 18″ x 18″ Pillow Insert.
Materials Needed:
- Fabric A (Dark/Black): 1/4 yard (or Fat Quarter) of Solid Black.
- Fabric B (Medium/Red): 1/4 yard (or Fat Quarter) of Bright Red.
- Fabric C (Light/White): 1/4 yard (or Fat Quarter) of Solid White.
- Backing Fabric (Envelope Back): 1/2 yard of Black canvas or heavy cotton.
- Batting: A scrap piece measuring 20″ x 20″.
- Muslin/Scrap Fabric: A scrap piece measuring 20″ x 20″ (for the inside of the quilt sandwich).
- Notions: Rotary cutter, 6″ quilting ruler.
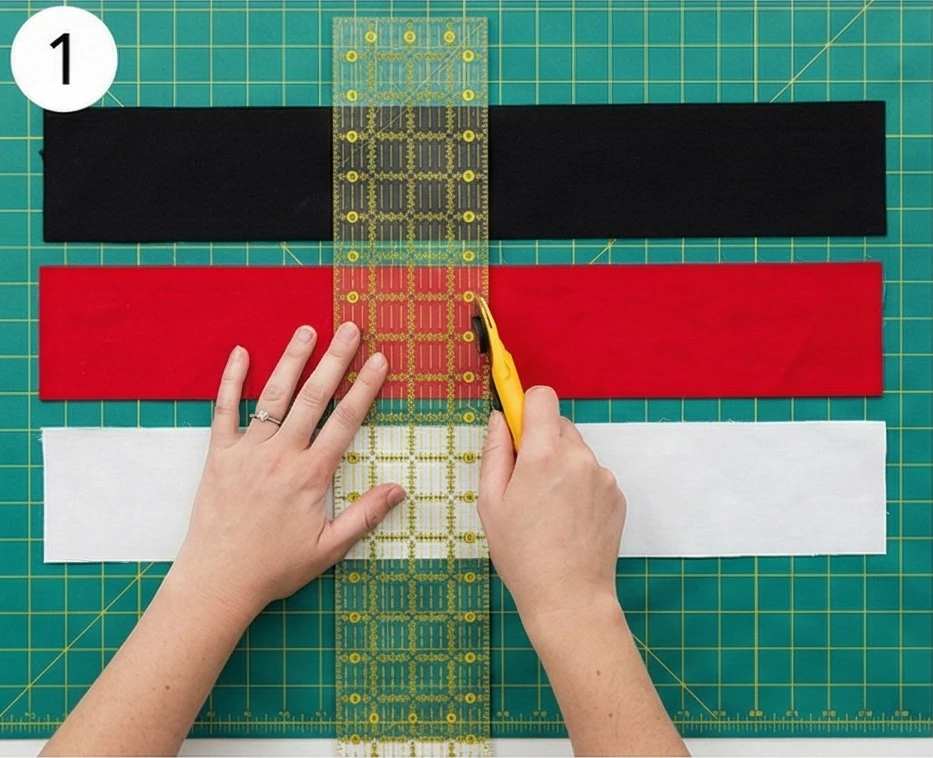
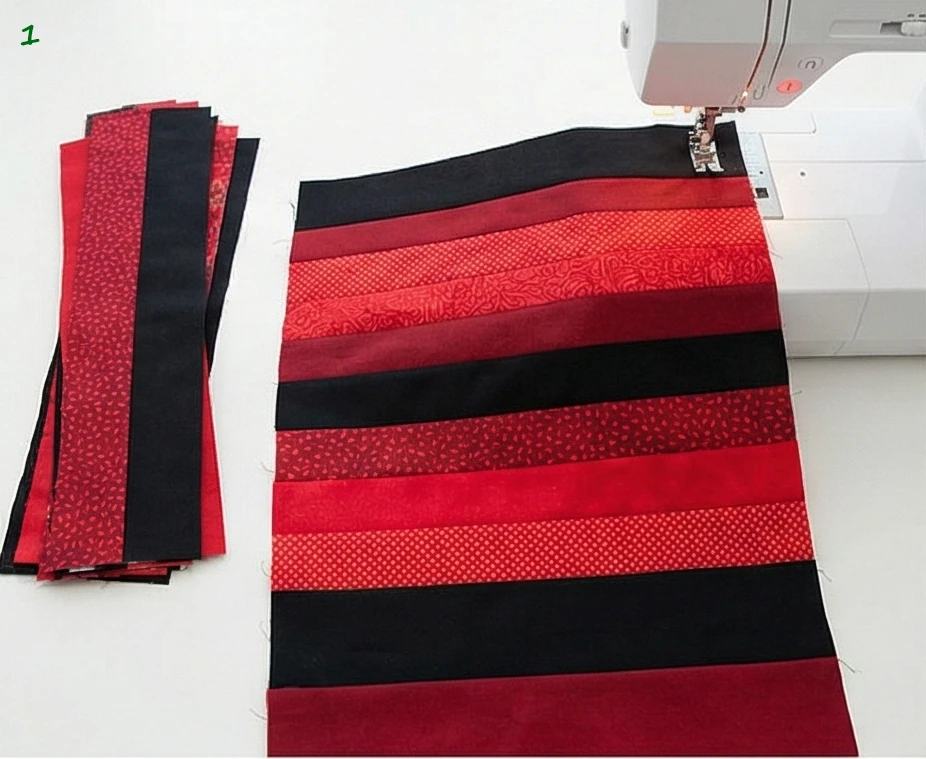
Step 1: Cut the Strips
Buffalo Check relies on strip piecing 3 specific color combinations.
- From Fabric A (Black): Cut 2 strips, measuring 2.5″ wide x 21″ long.
- From Fabric B (Red): Cut 3 strips, measuring 2.5″ wide x 21″ long.
- From Fabric C (White): Cut 1 strip, measuring 2.5″ wide x 21″ long.
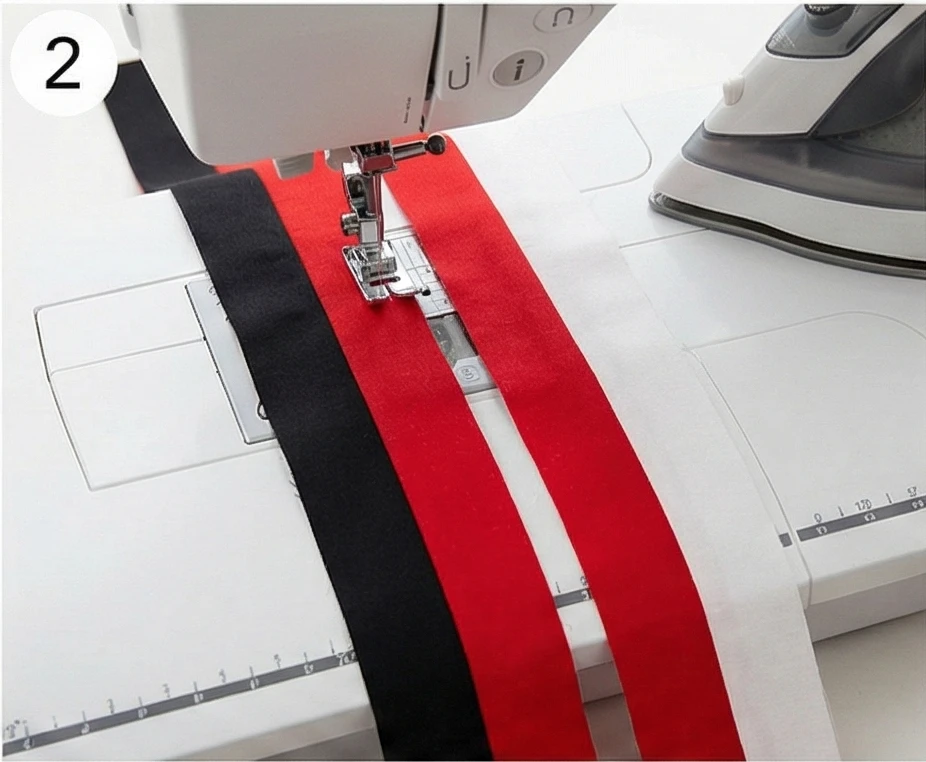
Step 2: Create the Strip Sets
We need to make two types of striped fabric.
- Strip Set 1 (Dark Row):
- Sew a Black strip to a Red strip lengthwise.
- Press seam toward the Black.
- Make 2 of these sets.
- Strip Set 2 (Light Row):
- Sew a Red strip to a White strip lengthwise.
- Press seam toward the Red.
- Make 1 of this set.
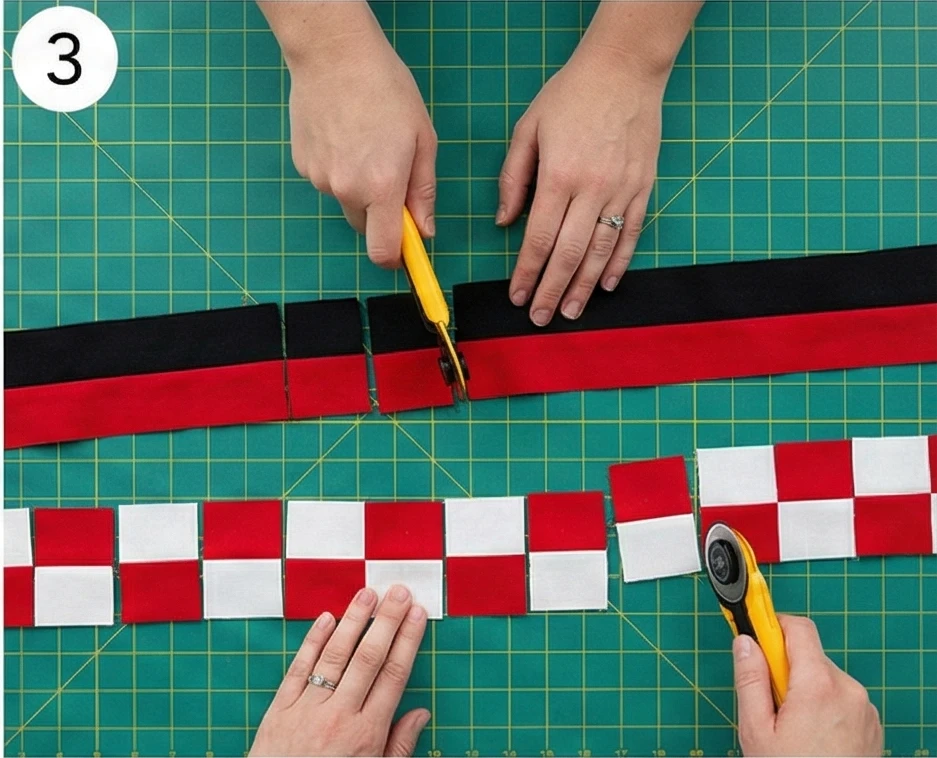
Step 3: Sub-Cut into Segments
Now chop your long striped fabric into ready-made two-patch units.
- Take your Strip Set 1 (Black/Red). Cross-cut it into segments that are 2.5″ wide.
- You need 18 segments.
- Take your Strip Set 2 (Red/White). Cross-cut it into segments that are 2.5″ wide.
- You need 9 segments.
- (Note: This creates a 9×9 grid, which is 18 inches finished).

Step 4: Assemble the Checkerboard Top
Arrange them to form the plaid pattern.
- Row Type A (Dark): Sew Black/Red units together.
- Pattern: Black – Red – Black – Red… ending with Black.
- You need 5 of these rows.
- Row Type B (Light): Sew Red/White units together.
- Pattern: Red – White – Red – White… ending with Red.
- You need 4 of these rows.
- Combine: Alternate the rows (Row A – Row B – Row A…) to build the square top.
- Press: Press seams open to reduce bulk. The top should measure 18.5″ x 18.5″.
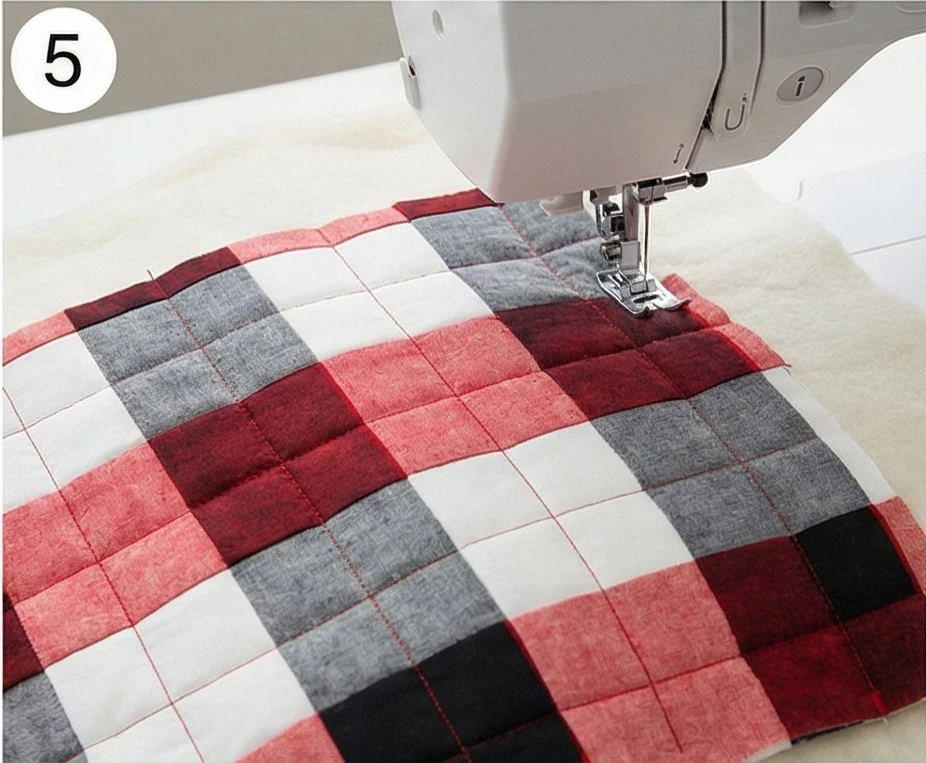
Step 5: Quilt the Front Panel
This is what makes it a “Quilted Cushion” rather than just a pillowcase.
- Make a small quilt sandwich: Muslin on the bottom, Batting in the middle, Buffalo Check on top.
- Quilt: Stitch straight lines vertically and horizontally through the center of every square. This creates a grid that puffs up the squares.
- Trim: Trim the sandwich to exactly 18.5″ x 18.5″.
Step 6: The Envelope Back Finishing
No zipper required!
- Take your Backing Fabric (1/2 yard). Cut two rectangles measuring 18.5″ wide x 13″ tall.
- Hem: On one long edge (18.5″) of each rectangle, fold the fabric under 1/2 inch, press, fold again 1/2 inch, and stitch down. This creates a nice hem.
- Layer:
- Lay the Quilted Front face up.
- Place one Backing Rectangle face down, aligning raw edges with the top of the pillow.
- Place the second Backing Rectangle face down, aligning raw edges with the bottom of the pillow. (They will overlap in the middle).
- Sew: Stitch all the way around the outer perimeter with a 1/4″ seam.
- Turn: Turn inside out through the envelope opening. Poke out corners. Insert pillow form.
Pro Design Tip: Black Velvet Backing. Use Black Velvet or Faux Fur for the envelope back panels. It adds a surprising tactile element so the pillow is “Work” on the front (plaid) and “Party” on the back (soft velvet).
Budget Consideration: Flannel Shirts. Buffalo Check is the standard pattern for flannel shirts. Go to a thrift store and buy 2 XL Men’s Flannel Shirts (one Red/Black, one White/Black). Cut the squares directly from the shirts. It saves piecing time and adds an authentic “worn-in” soft texture immediately.
5. Statement Red, Black, and White Quilts for a Modern Sofa Throw
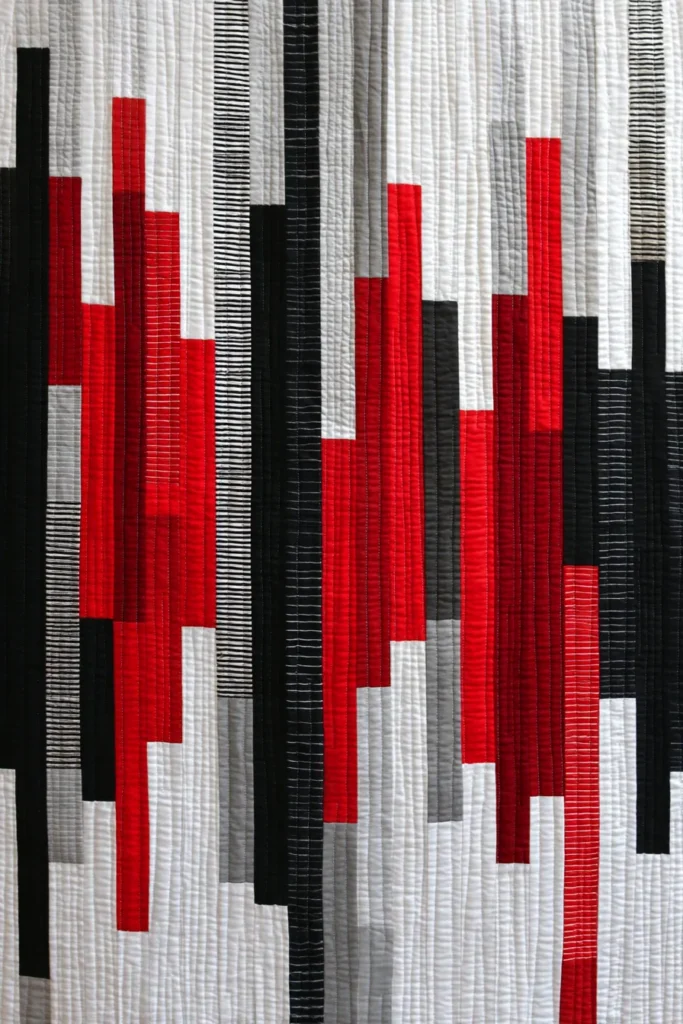
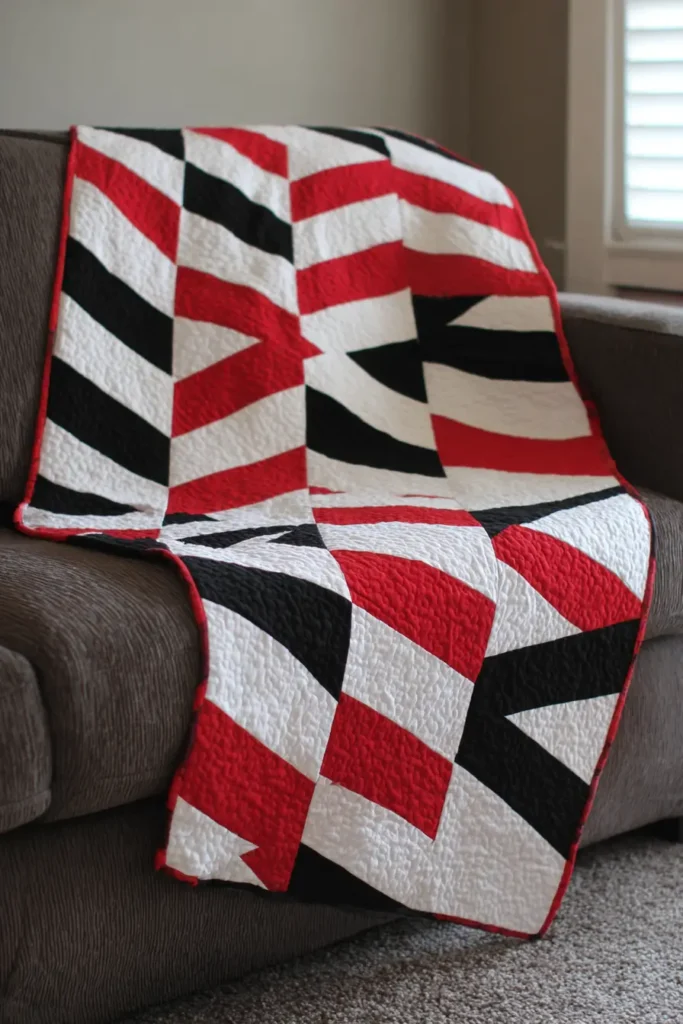
The “Red Frequency” Bar Code Quilt
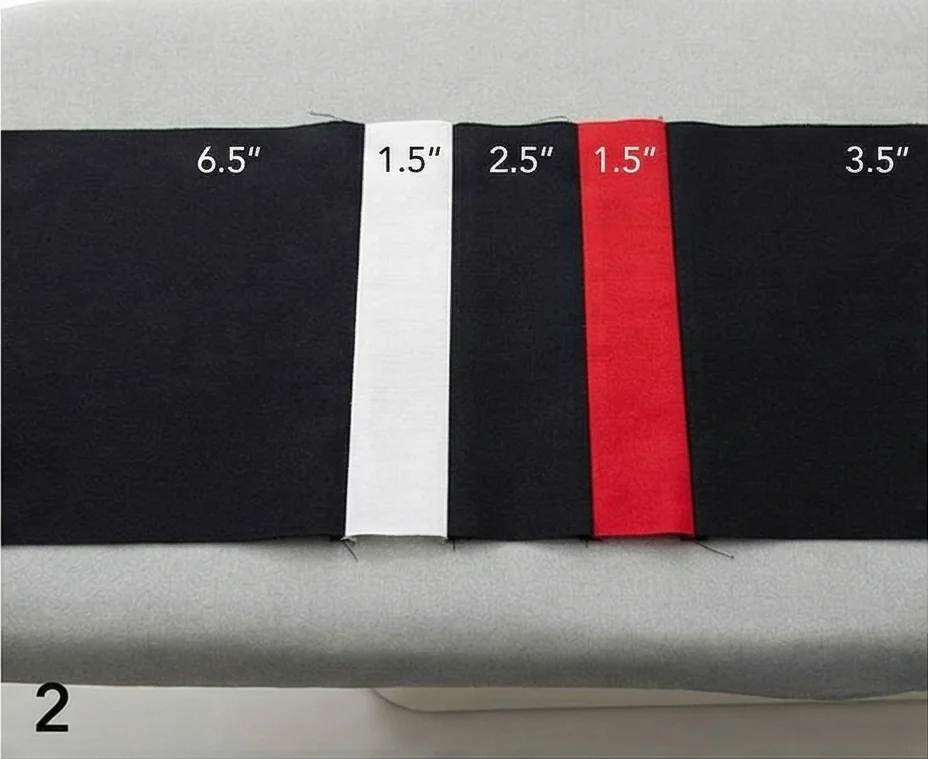
This design mimics a digital barcode or a sound-wave frequency. It uses vertical strips of varying widths in high-contrast Black and White, interrupted by sudden, sharp bursts of Red. Because the lines run vertically, it elongates the look of a sofa when draped over the back. It is modern and minimalist, using simple, straight-line sewing to create a complex visual rhythm.
Finished Dimensions: Standard Sofa Throw, approximately 55″ x 65″.
Materials Needed:
- Fabric A (Black): 2 yards of Solid Black.
- Fabric B (White): 2 yards of Solid White (or Low-Volume Grey).
- Fabric C (Red): 3/4 yard of Bright Neon Red or Cardinal Red.
- Backing Fabric: 3.5 yards.
- Batting: Throw Size (60″ x 70″).
- Binding: 1/2 yard of Solid Red.
- Notions: Rotary cutter, quilting ruler.
Step 1: Cut the “Frequency” Strips
The beauty of this quilt lies in its randomness. We need strips of different widths.
- From Black and White fabrics, cut full Width-of-Fabric (WOF) strips in the following assortments:
- 1.5″ wide strips (skinny lines).
- 2.5″ wide strips (standard bars).
- 3.5″ wide strips (thick bars).
- 5.5″ wide strips (negative space).
- From Red fabric, cut:
- 5 strips measuring 1.5″ wide (The “Spikes”).
- 2 strips measuring 2.5″ wide.
Step 2: Extend the Strips (Length Check)
Standard fabric is only 42″ long, but a sofa throw needs to be roughly 65″ long.
- Take two matching strips (e.g., two 2.5″ White strips).
- Sew them end-to-end (short side to short side).
- Press the seam open.
- Trim the total length to 65.5″.
- Repeat this for all your strips until you have a pile of 65-inch-long ribbons.
Step 3: The “Sound Wave” Layout
Do not alternate ideally (Black-White-Black). That looks like a jail cell. We want a code.
- Find a floor space. Start laying out your vertical strips side by side.
- Cluster the Darks: Group 3 or 4 Black strips of different widths together to create a heavy dark section.
- Cluster the Lights: Follow with a wide section of White strips.
- Insert the Red: Place your Red strips randomly.
- Design Tip: Don’t space them evenly. Group two thin red lines close together (a double beat), then place a single thick red line far away.
- Width Check: Keep adding strips until the total width measures approximately 55.5″.
Step 4: Vertical Assembly
- Pinning: Long vertical strips can warp or stretch. Pin every 12 inches.
- Sew: Sew the strips together from top to bottom.
- Tip: Alternate your sewing direction. Sew Strip 1 to 2 from Top-to-Bottom. Sew Strip 2 to 3 from Bottom-to-Top. This prevents the quilt from “bowing” or curving into a banana shape.
- Press: Press all seams in one direction (or open, if you prefer flatness).
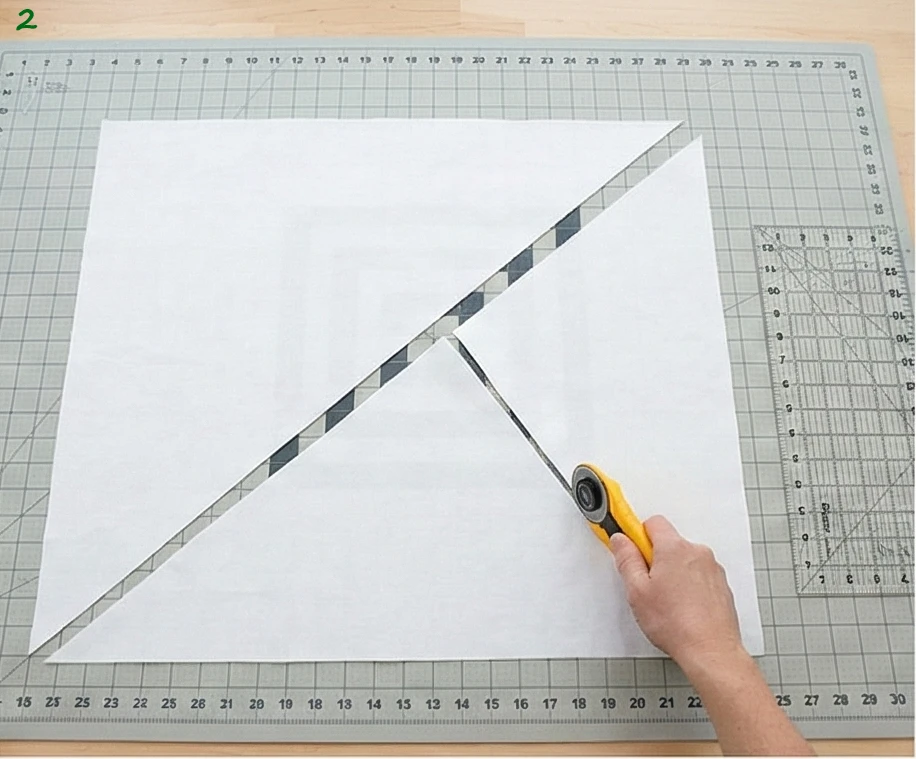
Step 5: The “Glitch” Cut (Optional but Recommended)
To make it truly “Statement” art, break the lines.
- Take your sewn quilt top.
- Make a horizontal cut across the width, about 20 inches from the bottom.
- Shift the bottom section to the right by 2 inches.
- Trim the uneven edges on the sides.
- Sew the bottom section back onto the top section.
- Result: The vertical lines are now “broken” or disjointed at the bottom, resembling a digital glitch or a fractured signal.
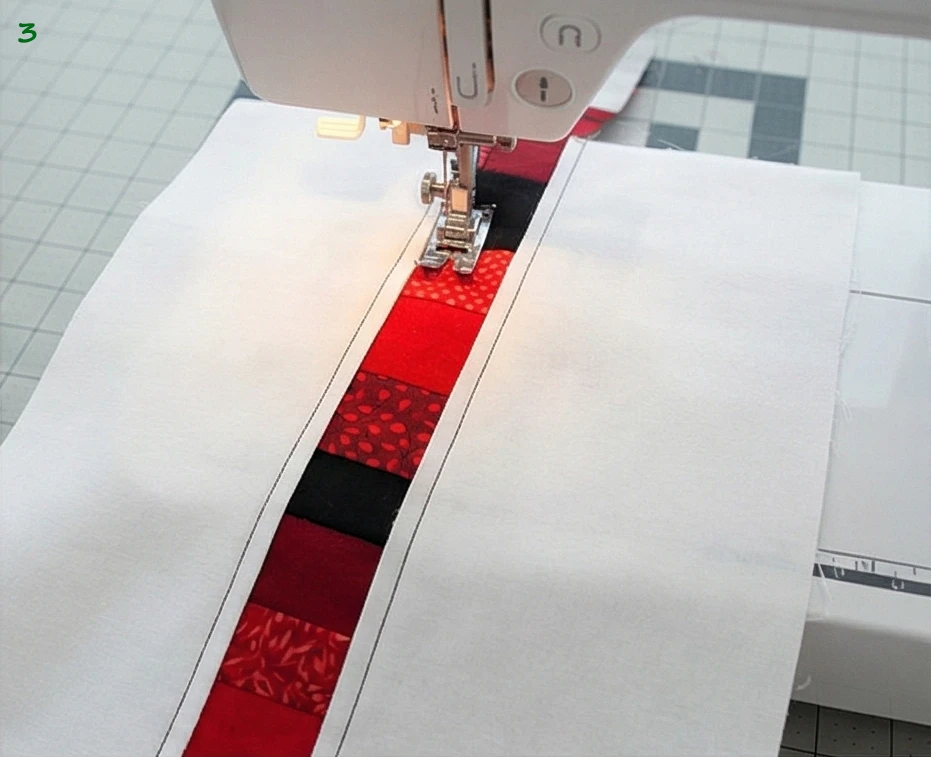
Step 6: “Echo” Quilting
- Baste the sandwich.
- Quilting: Use a Walking Foot.
- Design: Stitch straight vertical lines that mimic the piecing.
- Stitch “in the ditch” (in the seams).
- Then, stitch straight lines down the center of the wider (3.5″ and 5.5″) strips.
- Binding: Finish with the Solid Red binding. A red frame encloses the barcode’s energy and highlights the red stripes within.
Pro Design Tip: Texture Coding. Use different fabric textures to represent the other colors.
- Black: Suede or Denim.
- White: Linen.
- Red: Satin. The mix of matte, rough, and shiny surfaces makes the throw fascinating to touch when you are curled up on the sofa.
Budget Consideration: Pre-Cut Rolls. This pattern is essentially a “Jelly Roll” race but with color control. Buy a “Black and White” Jelly Roll (pre-cut 2.5″ strips). You won’t get the variance in widths (they will all be 2.5″), but it eliminates almost all cutting time and is cheaper than buying yardage of 6 different prints.
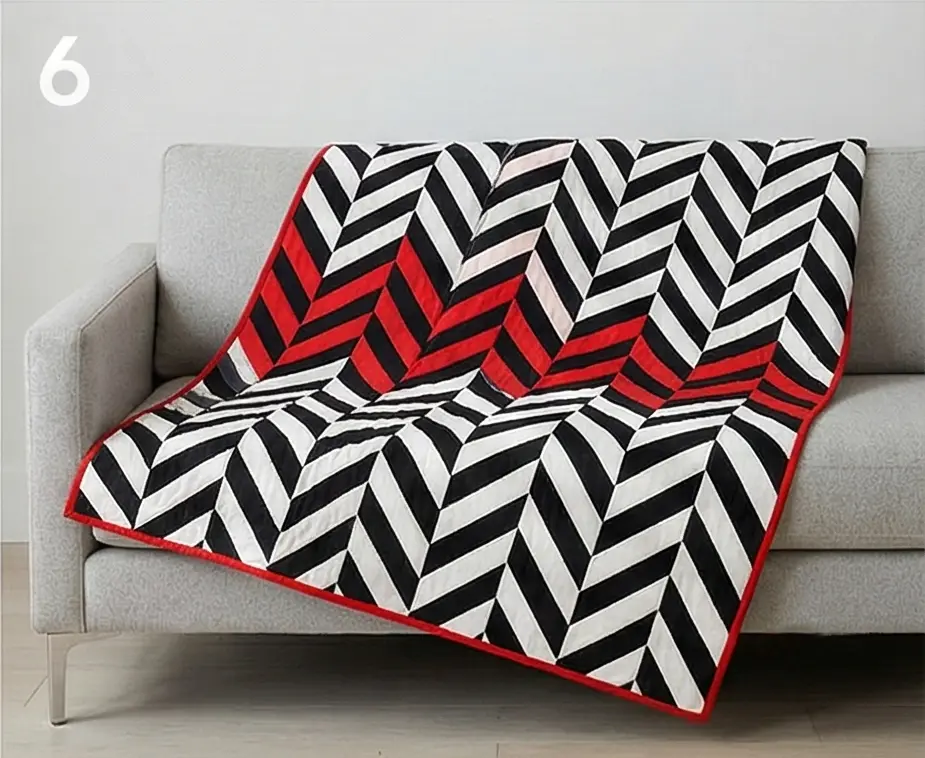
6. Modern Red, Black, and White Throw Quilts for Sectionals and Loveseats
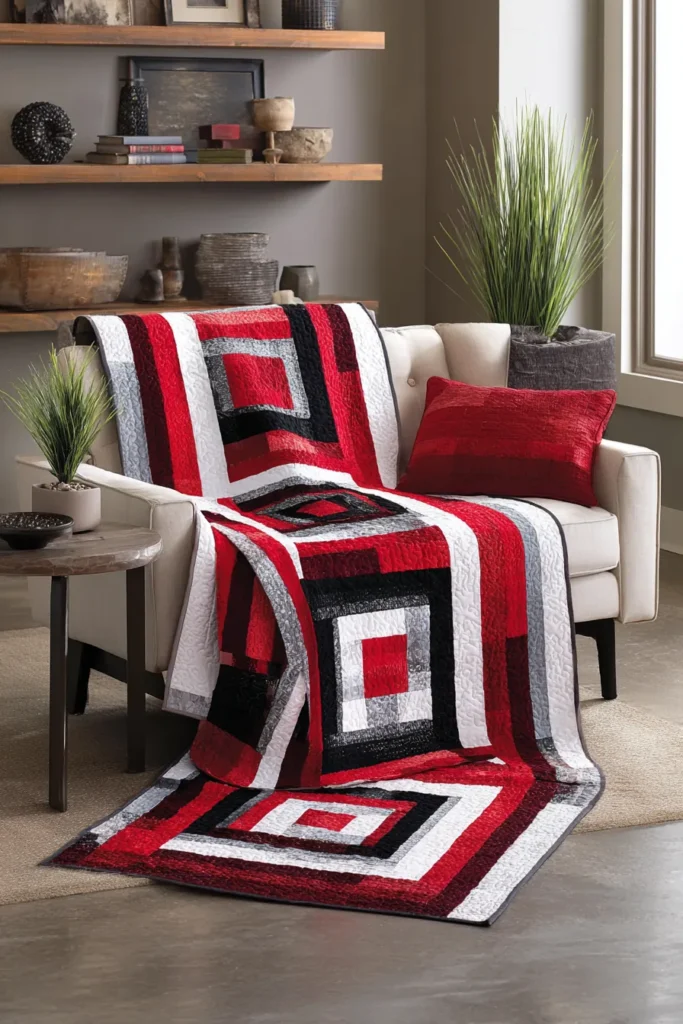
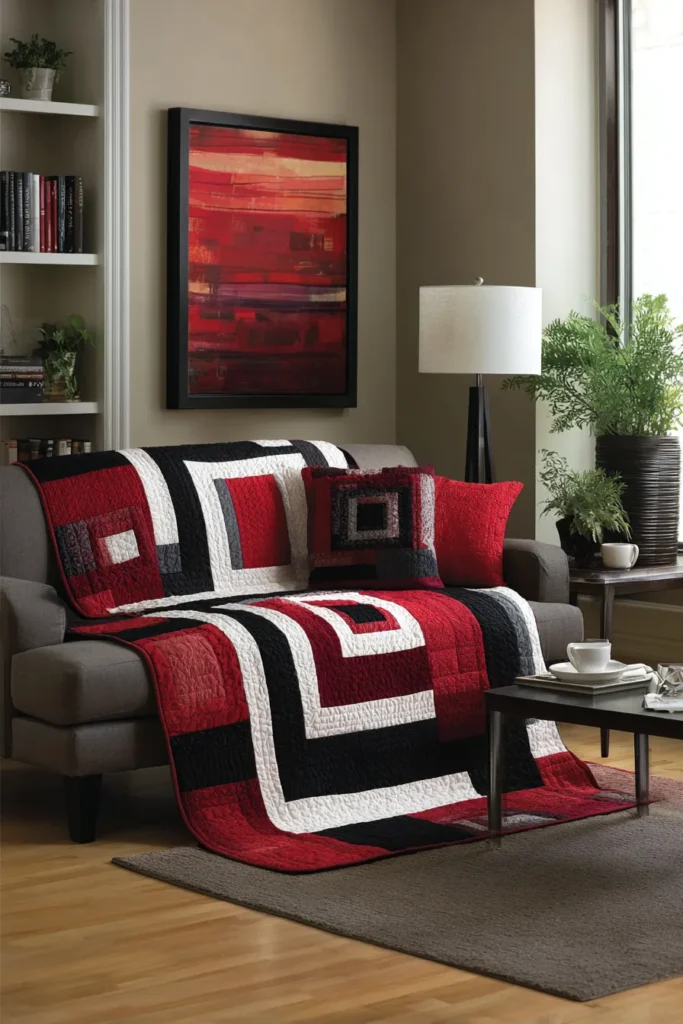
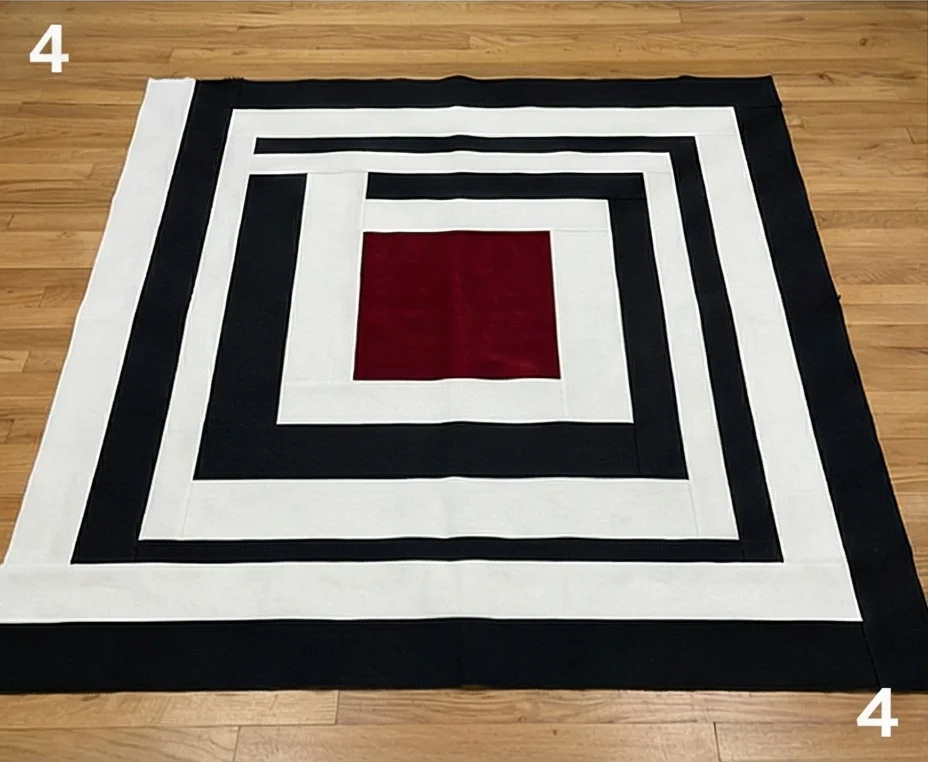
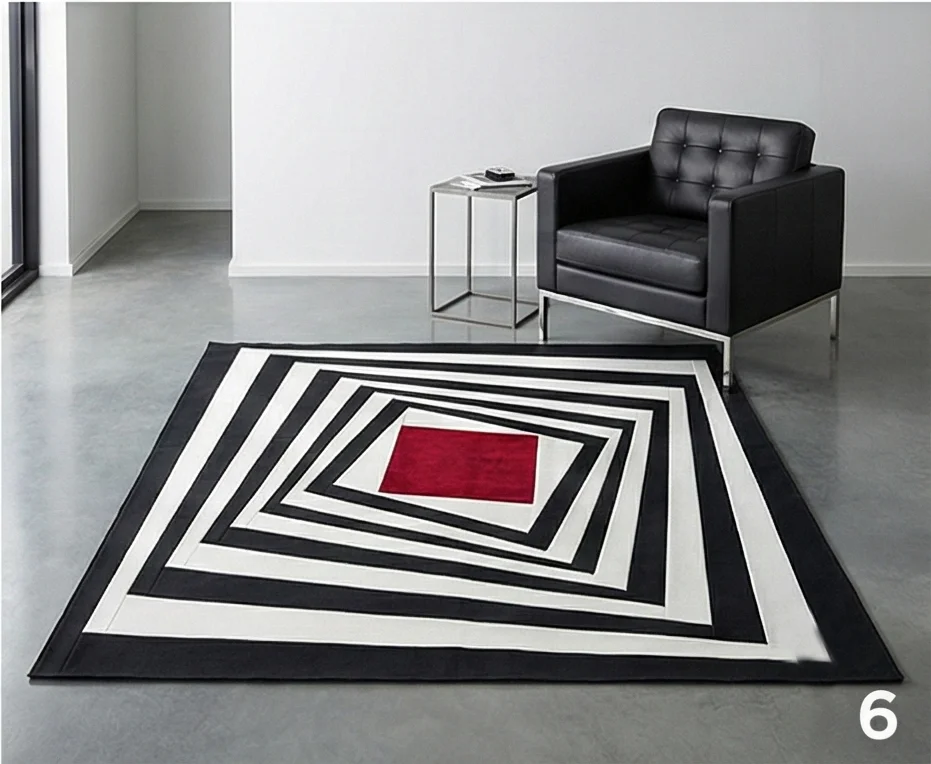
The “Rectangular Echo” Concentric Throw
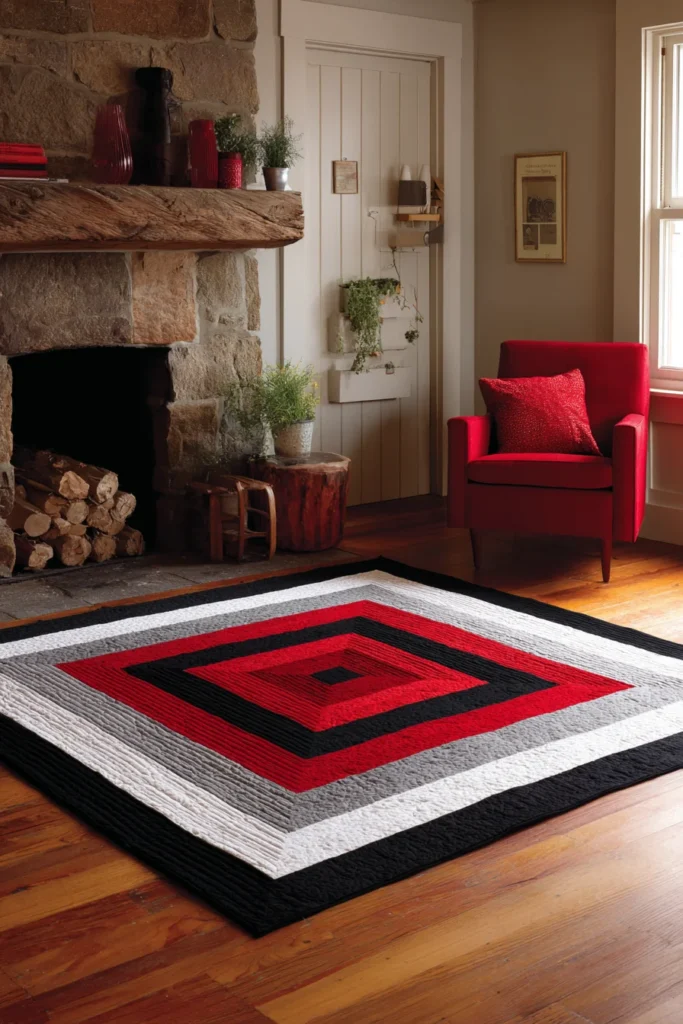
Standard quilts are usually made of many small blocks repeated over and over. This modern design creates one single, massive “Block” that radiates outward from the center. By starting with a rectangle rather than a square, the quilt maintains a long, sleek shape that is perfectly suited for draping across the back of a loveseat or the chaise of a sectional. It looks like a piece of modern art.
Finished Dimensions: Large Rectangular Throw, approximately 56″ x 68″.
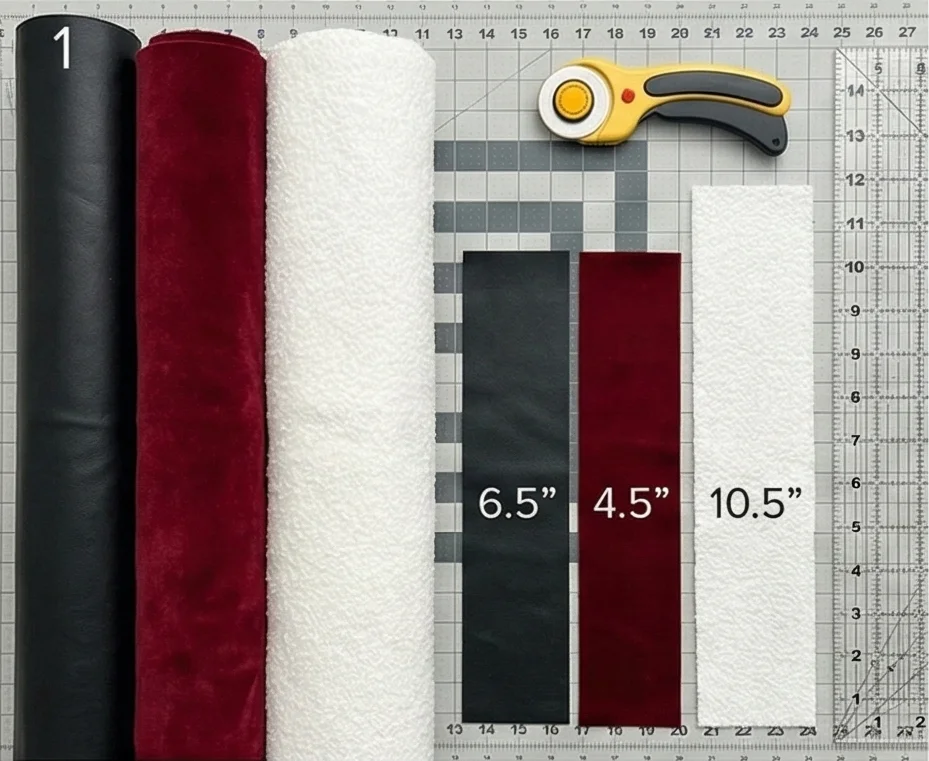
Materials Needed:
- Fabric A (Center & Accents/Red): 1 yard of Bright Red.
- Fabric B (Contrast/Black): 2 yards of Solid Black.
- Fabric C (Background/White): 2 yards of Solid White.
- Backing Fabric: 3.5 yards.
- Batting: Throw Size (60″ x 80″).
- Binding: 1/2 yard of Black and White Stripe.
- Notions: Rotary cutter, quilting ruler.
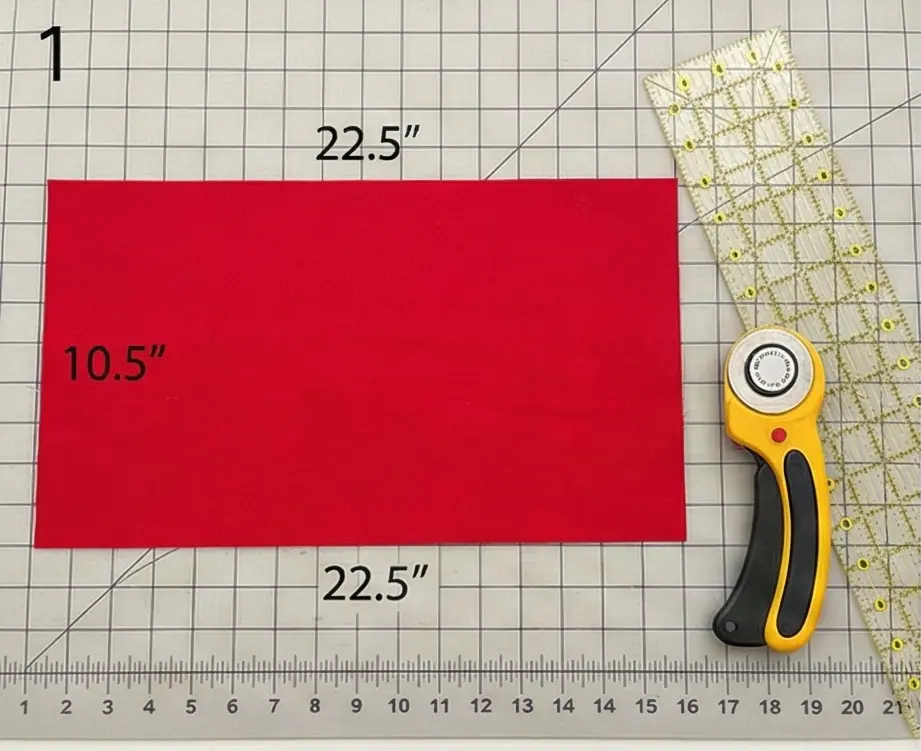
Step 1: Create the “Core” (The Center)
We start with a large rectangle so the final quilt is rectangular.
- Cut: From Fabric A (Red), cut a large rectangle measuring 10.5″ wide x 22.5″ tall.
- Note: This is your focal point. Ensure it is cut perfectly straight.

Step 2: Round 1 (The White Frame)
We build the quilt by adding “Logs” or borders around the center.
- Cut: From Fabric C (White), cut 2.5″ wide strips.
- Sides: Measure the height of your center (22.5″). Cut two white strips to this length. Sew them to the Left and Right sides. Press out.
- Top/Bottom: Measure the new width of your unit (approx 14.5″). Cut two white strips to this length. Sew them to the Top and Bottom. Press out.
- Visual: You now have a Red rectangle floating in a thin White frame.
Step 3: Round 2 (The Heavy Black Frame)
To create a modern look, we vary the width of the borders. This one will be thick.
- Cut: From Fabric B (Black), cut 4.5″ wide strips.
- Sides: Measure the height of your unit. Sew Black strips to the Left and Right.
- Top/Bottom: Measure the width. Sew Black strips to the Top and Bottom.
- Effect: The thick black border adds visual weight and drama.
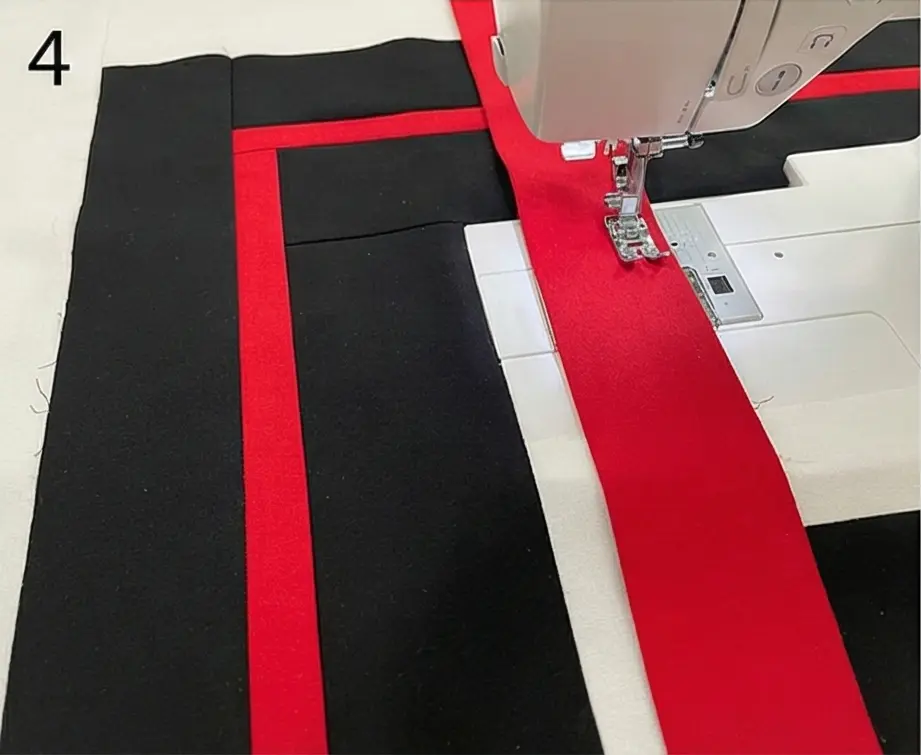
Step 4: Round 3 (The Red Pinstripe)
A thin pop of color adds sophistication.
- Cut: From Fabric A (Red), cut 1.5″ wide strips. (You will need to piece strips together end-to-end to get the length needed).
- Attach: Sew these thin strips to the Sides, then the Top/Bottom of your growing quilt top.
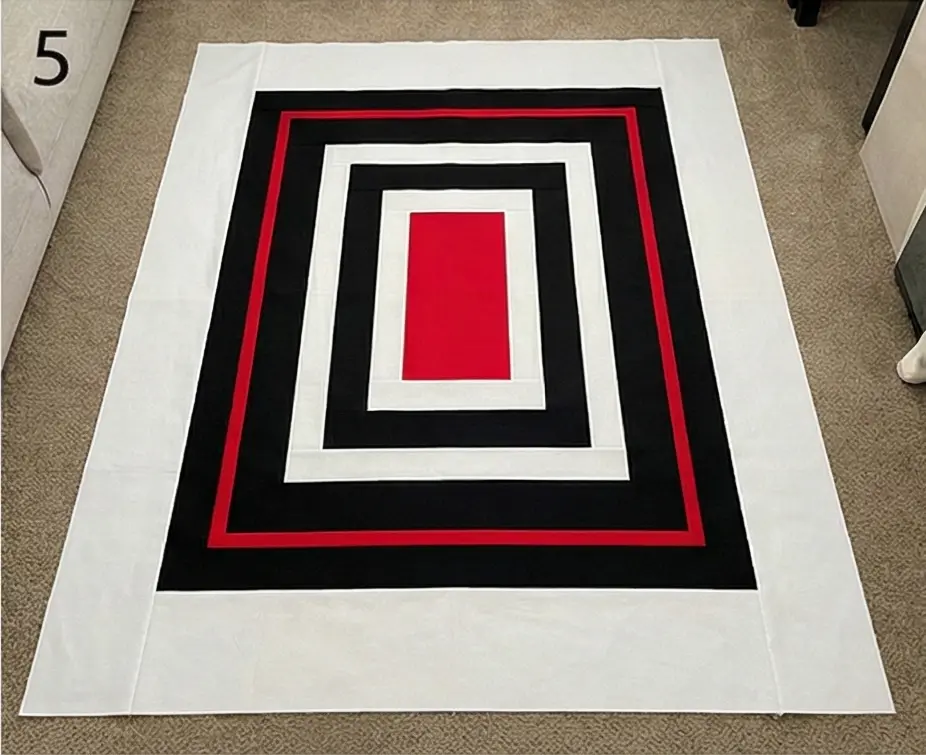
Step 5: Round 4 (The White Expanse)
We finish with a wide negative space to make the colors pop.
- Cut: From Fabric C (White), cut 6.5″ wide strips.
- Attach: Sew these wide panels to the Sides, then the Top/Bottom.
- Note on Size: At this point, your throw is roughly 40″ x 52″.
- Optional Extension: To reach the full 56″ x 68″ size, add one final 4.5″ Black Border around the very outside.
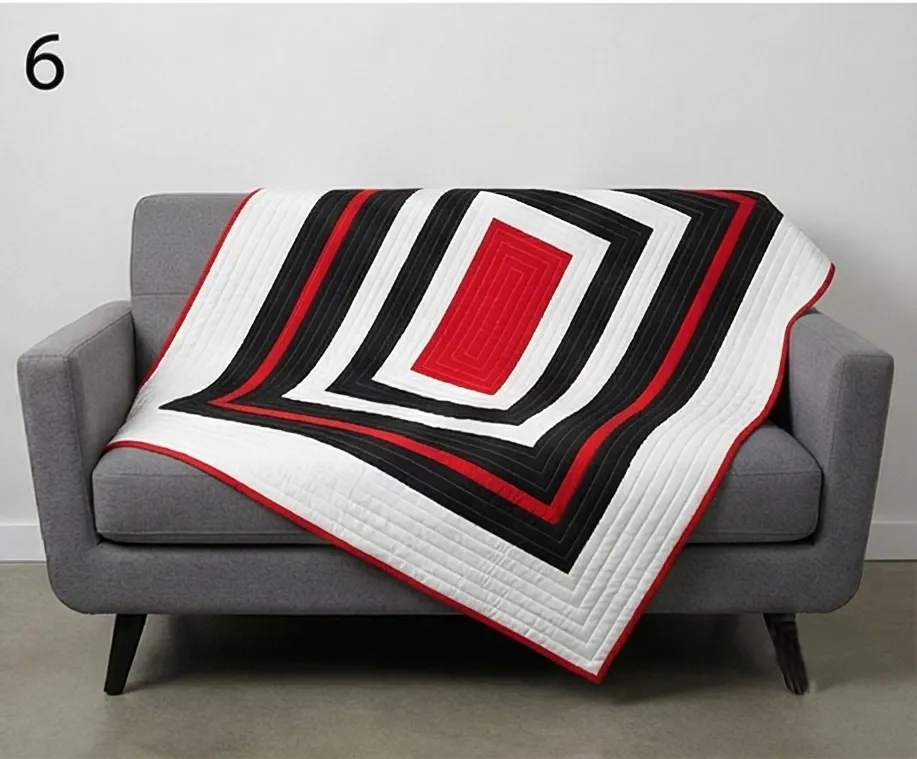
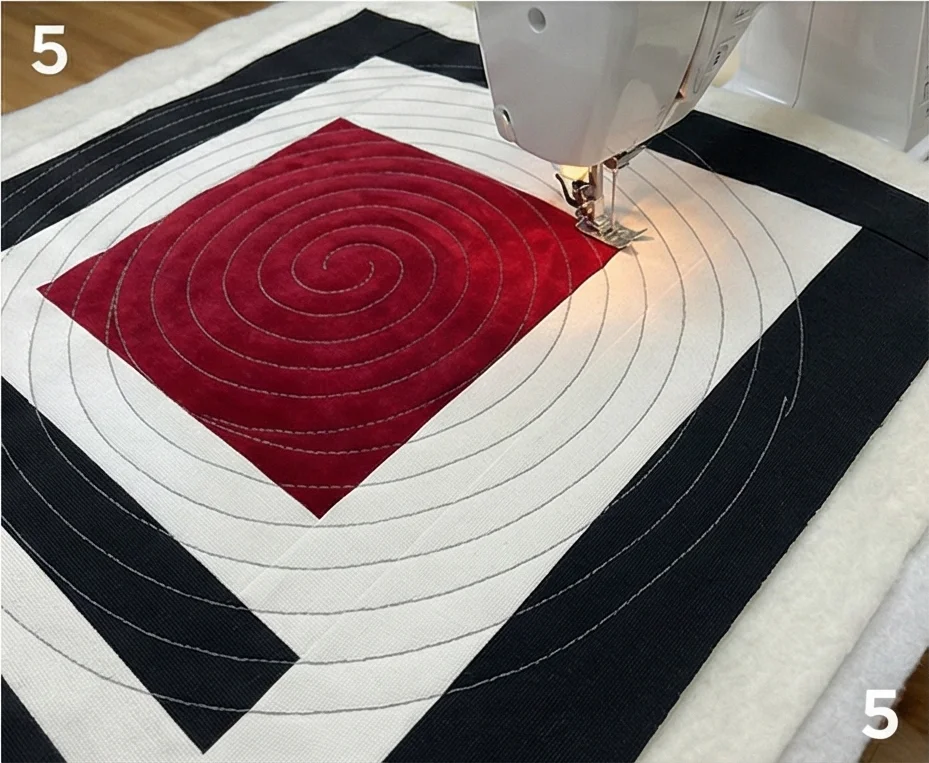
Step 6: “Echo” Quilting
- Baste the sandwich.
- Quilting: Use a Walking Foot.
- Design: Start in the very center Red rectangle.
- Stitch a rectangle about 1 inch inside the red patch.
- Stitch another rectangle 1 inch outside of that.
- Continue spiraling outward, stitching rectangular rings spaced 1.5 inches apart all the way to the edge of the quilt.
- This “rippling water” effect highlights the geometry of the throw.
Pro Design Tip: Off-Set Center. If you want the quilt to look Avant-Garde, do not center the red rectangle. When adding the borders in Step 5 (The White Expanse), add a 2.5″ strip to the Left side and an 8.5″ strip to the Right side. This shifts the focal point off-center, making it look much more dynamic when draped over furniture.
Budget Consideration: Black and White Prints. Solid black can show lint and pet hair easily on a sofa. To hide “life mess,” swap the Solid Black fabric for a Black-on-Black Geometric Print or a Black Marble Print. It reads as “Black” from a distance, but is much more forgiving of dust and hair closer up.
Master Summary of Modern Red, Black, and White Patterns
Here are the 7 Modern Patterns generated in this session, categorized by their best use case:
| Pattern Name | Best For… | Difficulty | Key Design Element |
| Urban Pixel Throw | Draping over armchairs | Beginner | Disappearing 9-Patch (Scrambled look) |
| Shattered Chevron | Adding energy to plain sofas | Intermediate | Large Arrows with “Glitch” interruptions |
| Red Thread Stripe | Minimalist/Mid-Century rooms | Beginner | Vast white space with one vertical stripe |
| Bauhaus Horizon | Folded over sofa backs | Beginner | Color Blocking (Rothko style) |
| Lumberjack Cushion | Sofa accents | Beginner | Mini Buffalo Check (Strip Piecing) |
| Red Frequency | Modern Sectionals | Beginner+ | Bar Code / Soundwave vertical lines |
| Rectangular Echo | Loveseats / Chaises | Beginner | Giant Concentric Rectangles |
7. Cozy Red, Black, and White Quilted Floor Throws and Area Quilts
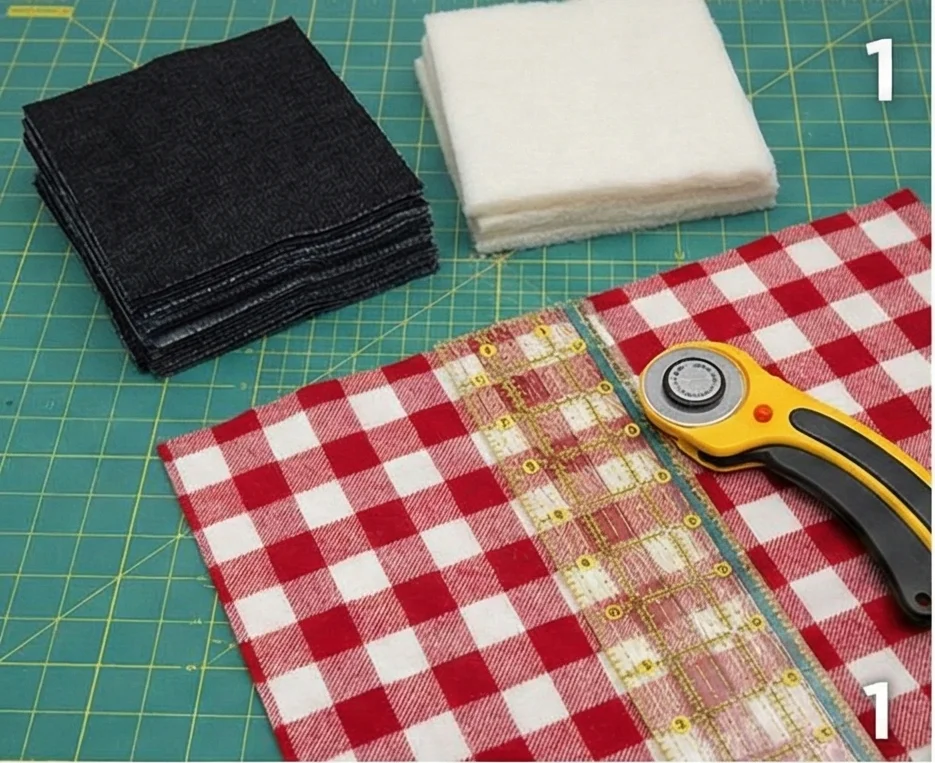
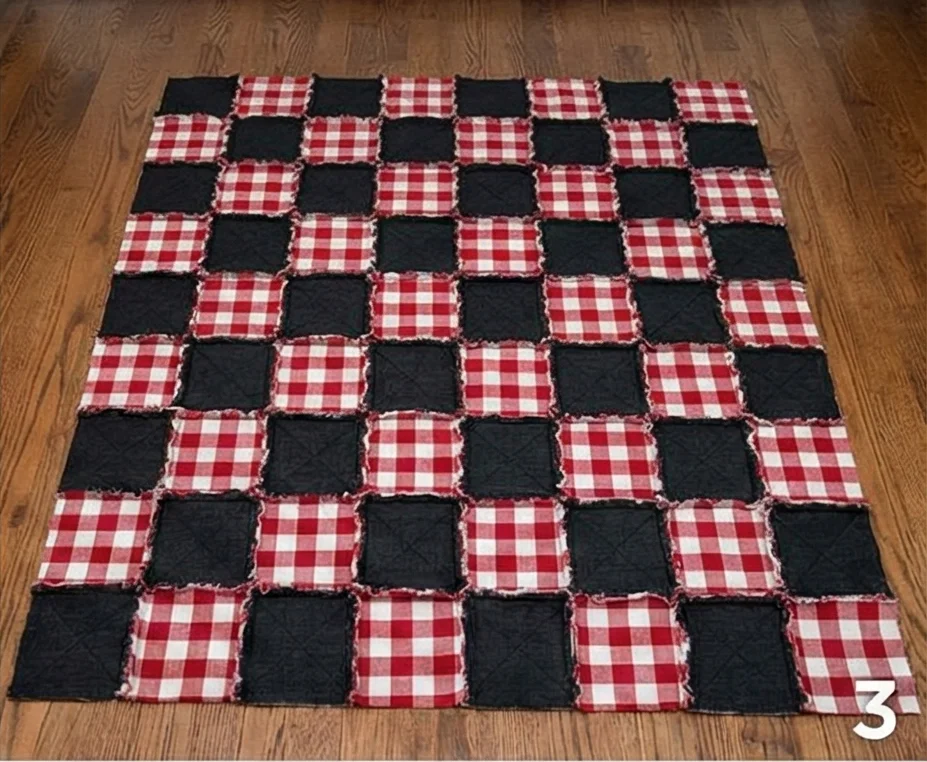
The “Urban Tundra” Heavyweight Rag Quilt
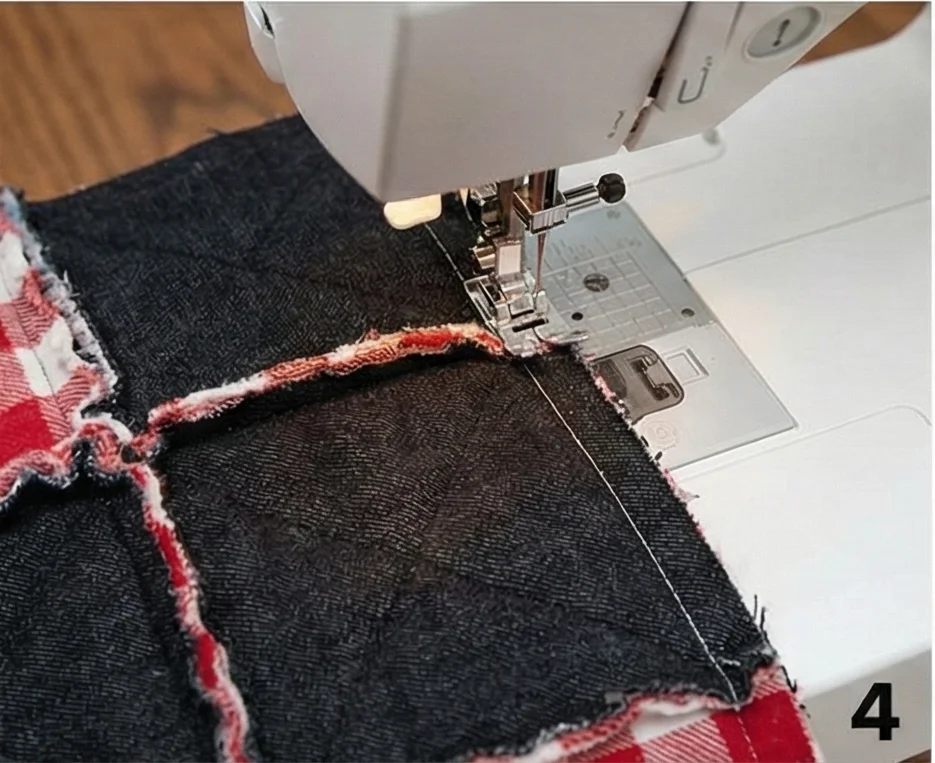
Floor quilts (or “Area Quilts”) need to be tougher, heavier, and thicker than bed quilts. This design uses the “Rag Quilt” technique, in which the seams are exposed on top and clipped to create a fuzzy, chenille-like grid. We will use heavy-duty fabrics like Black Denim and Red Flannel to create a durable, soft landing spot for movie nights or pet play.
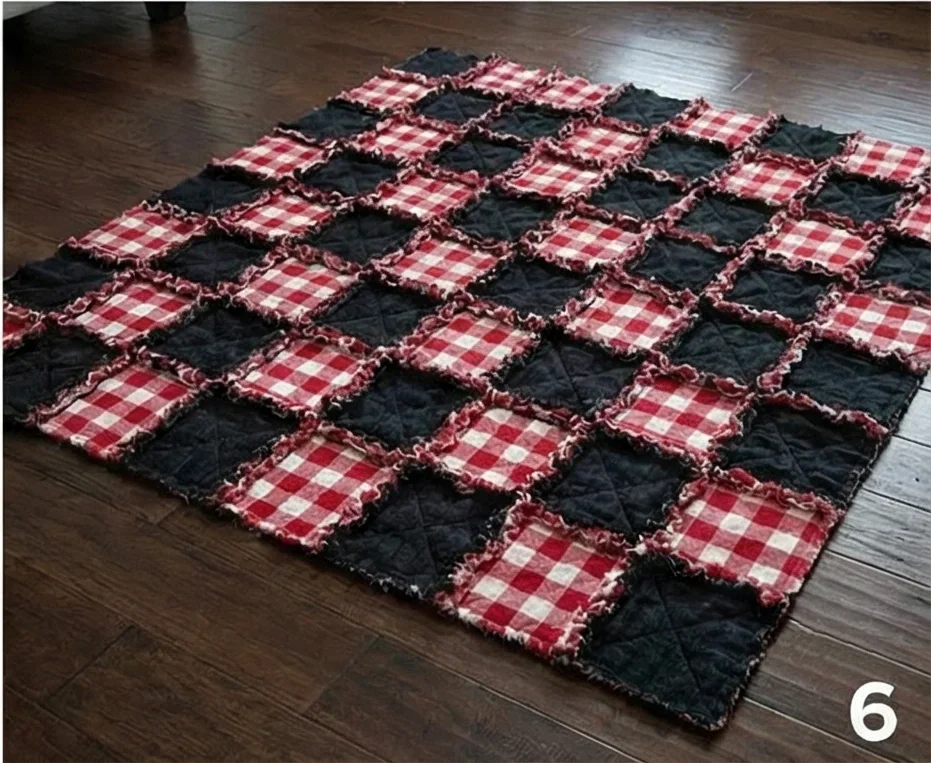
Finished Dimensions: Large Area Rug Size, approximately 60″ x 60″.
Materials Needed:
- Fabric A (Top Layer – Black): 2.5 yards of Black Denim or Canvas (for durability).
- Fabric B (Top Layer – Red/White): 2.5 yards of Red and White Buffalo Plaid Flannel (for softness).
- Backing Fabric: 5 yards of Heavy Black Cotton or Duck Cloth (This touches the floor).
- Batting: 3 yards of High-Loft Batting (or two layers of standard batting for extra cushion).
- Notions: Rotary cutter, heavy-duty sewing needle (Jeans Needle size 100/16), spring-loaded scissors (rag snips).
Step 1: Cut the Squares (The Sandwich Parts)
Unlike normal quilts, you cut the batting and backing now, not at the end.
- Top Fabrics:
- From Black Denim, cut 32 squares measuring 8.5″ x 8.5″.
- From Plaid Flannel, cut 32 squares measuring 8.5″ x 8.5″.
- Backing Fabric:
- Cut 64 squares measuring 8.5″ x 8.5″.
- Batting:
- Cut 64 squares measuring 7.5″ x 7.5″.
- Important: The batting must be 1 inch smaller than the fabric squares so it doesn’t get caught in the bulky seams.
Step 2: Make the “Mini-Sandwiches”
- Take one Backing Square (Face Down).
- Center a Batting Square on top of it.
- Place a Top Square (Face Up) over the batting.
- Note: You now have a stack: Backing -> Batting -> Top.
- Quilt the Block: Sew a simple “X” from corner to corner through the stack. This holds the batting in place.
- Repeat until you have 64 Quilted Sandwiches (32 Denim, 32 Plaid).

Step 3: Layout the Checkerboard
- Clear a floor space. Arrange the blocks in a grid of 8 blocks wide x 8 blocks tall.
- Pattern: Alternate the blocks: Denim – Plaid – Denim – Plaid.
- Visual: This creates a classic, cozy checkerboard that hides dirt (Denim) but feels soft (Flannel).
Step 4: Sew the Rows (Exposed Seams)
Here is the trick: You sew with the seam allowance sticking UP.
- Take the first two blocks in Row 1.
- Place them Wrong Sides Together (Backing touching Backing).
- Sew: Stitch with a 1/2-inch seam allowance.
- Check: The raw edges should be sticking up on the “Top” (Red/Black) side of the quilt, not the back.
- Continue joining blocks to complete all 8 rows.
Step 5: Join the Rows
- Take Row 1 and Row 2.
- Place them Wrong Sides Together.
- Nest the Seams: Open the vertical seams flat to distribute the bulk.
- Sew: Stitch the rows together with a 1/2 inch seam allowance.
- Repeat until the whole top is joined.
- Border Stitch: Sew a line 1/2 inch from the edge all around the outer perimeter of the quilt to seal the edges.
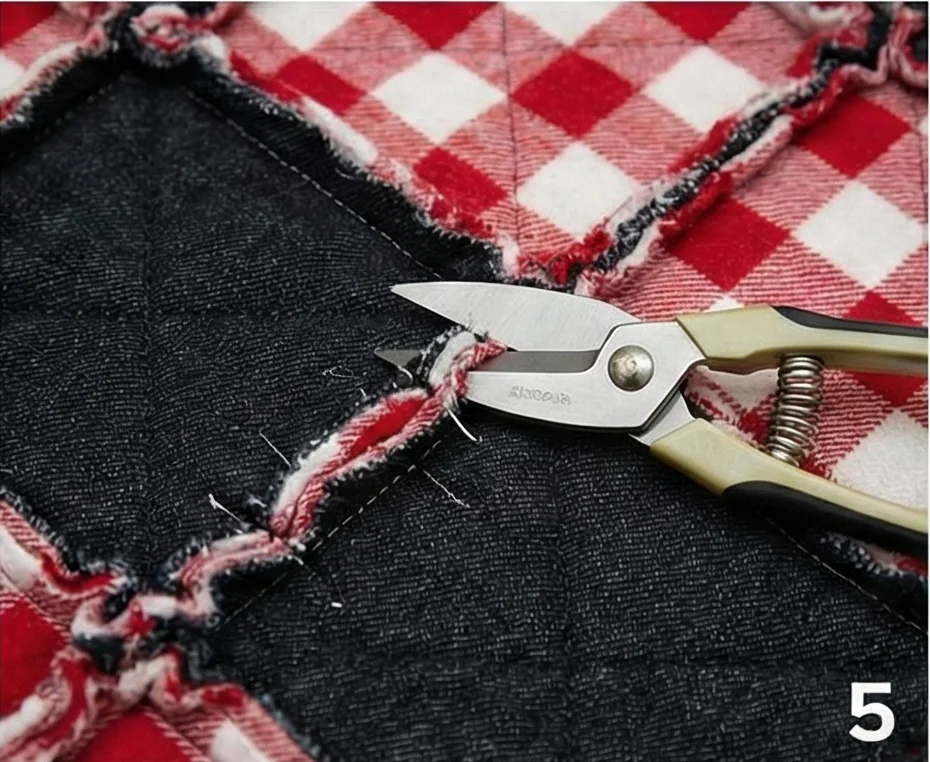
Step 6: Clip and Rag
This is the labor of love.
- Clip: Using sharp scissors or snips, make small cuts into the exposed seam allowances every 1/4 to 1/2 inch.
- Warning: Do NOT cut through the stitching thread! Stop about 1/8″ before the seam line.
- Do this for every vertical seam, horizontal seam, and the outer border.
- Wash and Dry: Throw the quilt in the washing machine (Cold cycle) and Dryer (High heat).
- The Magic: The agitation will fray the clipped edges, turning the raw denim and flannel strips into fluffy, soft “caterpillars” that outline every block. The more you wash it, the fuzzier and cozier it gets.
Pro Design Tip: Non-Slip Grip. If this is strictly for the floor, buy a jar of “Sock Stop” or liquid latex. Dab small dots on the back corners of every block. Let it dry. This creates a grippy surface so the quilt doesn’t slide around on hardwood floors when kids run and jump on it.
Budget Consideration: Upcycled Jeans. This pattern requires 2.5 yards of Black Denim. Instead, hit the thrift store for Large Men’s Black Jeans. The leg panels usually provide enough fabric for several 8.5″ squares. The worn-in denim is softer and rags beautifully compared to stiff new denim.
8. Abstract Red, Black, and White Quilts for Artistic Living Room Statements
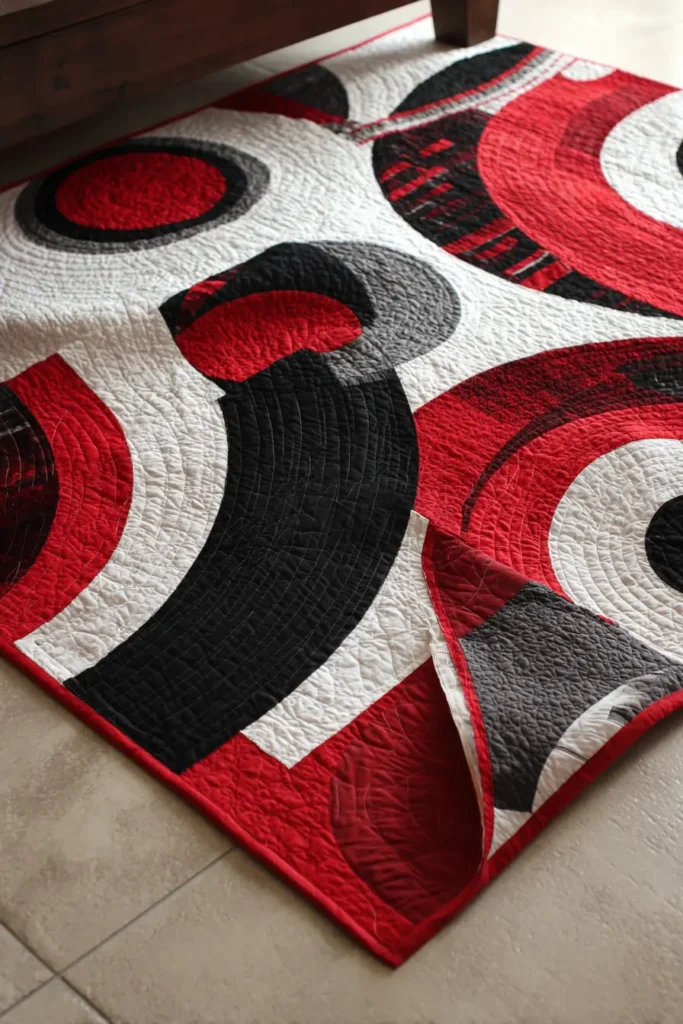
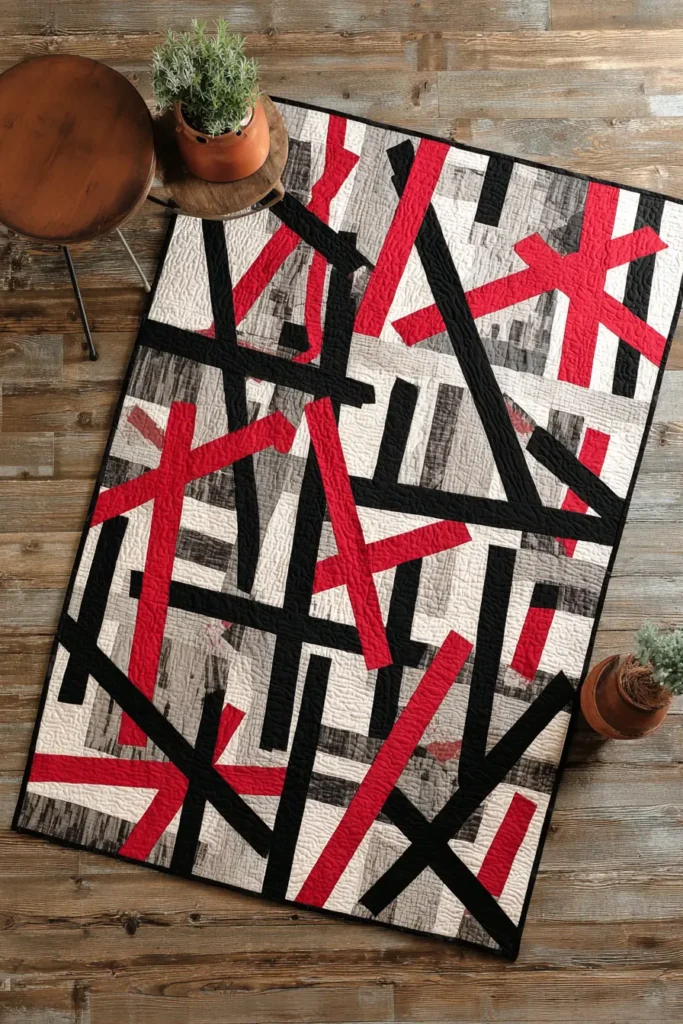
The “Fractured Canvas” Improv Slash Quilt
This quilt is designed to look like a piece of modern art hanging in a gallery. It uses a technique called “Slash and Insert” to create sharp, irregular shards of color cutting through a calm white background. It is energetic, unpredictable, and perfect for hanging on a living room wall or draping over a minimalist leather sofa.
Finished Dimensions: Large Wall Hanging or Lap Throw, approximately 50″ x 60″.
Materials Needed:
- Fabric A (Background/White): 3 yards of Solid White (or Low-Volume Text print).
- Fabric B (The Shards/Black): 1 yard of Solid Black.
- Fabric C (The Accent/Red): 1 yard of assorted Reds (Prints, Solids, Stripes).
- Backing Fabric: 3.5 yards.
- Batting: Throw Size (60″ x 70″).
- Binding: 1/2 yard of Solid Black.
- Notions: Rotary cutter with a sharp blade, large cutting mat.
Step 1: Create the “Shard” Fabric
Instead of using plain strips, we will create a custom striped fabric to act as the “filling” for our slashes.
- Cut Strips: Cut your Black and Red fabrics into strips of varying widths (1″, 2″, 3″).
- Sew: Sew these strips together lengthwise to create a “Strata” (a sheet of striped fabric).
- Press: Press seams open or to the side.
- Result: You should have a large panel of Red/Black stripes.
- Sub-Cut: Cut this striped panel into strips ranging from 1″ to 2.5″ wide. These are your “Insert Strips.”
Step 2: Prepare the Canvas Blocks
We start with large, plain blocks.
- Cut: From Fabric A (White), cut 12 large rectangles, measuring roughly 14″ x 16″.
- Note: Precision isn’t vital here because we’ll trim them down later.
Step 3: The “Slash” Technique
This is the artistic part. Be brave!
- Take one White rectangle.
- Slash: Use your rotary cutter to slice through the rectangle at a random, sharp angle. Do not cut straight down the middle—cut diagonally, off-center, or wildly.
- Separate: Pull the two white pieces apart.
Step 4: The “Insert” Technique
- Take one of your Red/Black Insert Strips (from Step 1).
- Sew: Place the strip between the two cut edges of the white rectangle.
- Sew the strip to the left piece.
- Sew the right piece to the other side of the strip.
- Press: Press the block flat.
- Repeat (Optional): If you want a block to look really shattered, slash it again in a different direction and insert another strip (maybe a plain Black one this time).
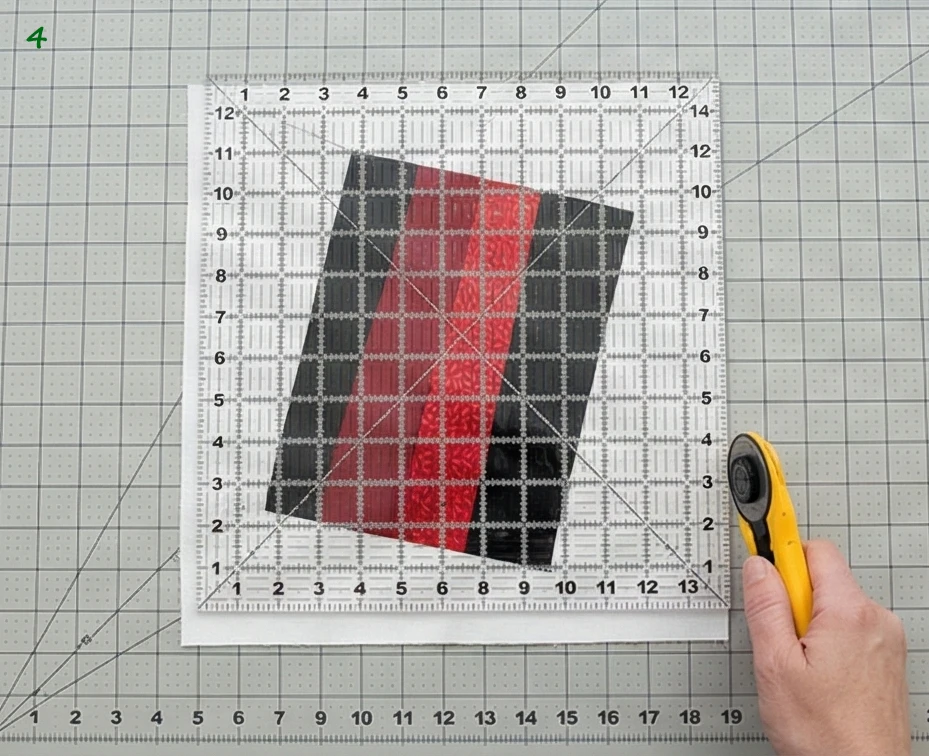
Step 5: Square Up the Blocks
Improv piecing distorts the fabric, so we must trim it back to a standard size.
- Use a large square ruler.
- Trim every finished block to exactly 12.5″ x 14.5″.
- Design Choice: As you trim, you can tilt the ruler to change the angle of the slash line one last time.
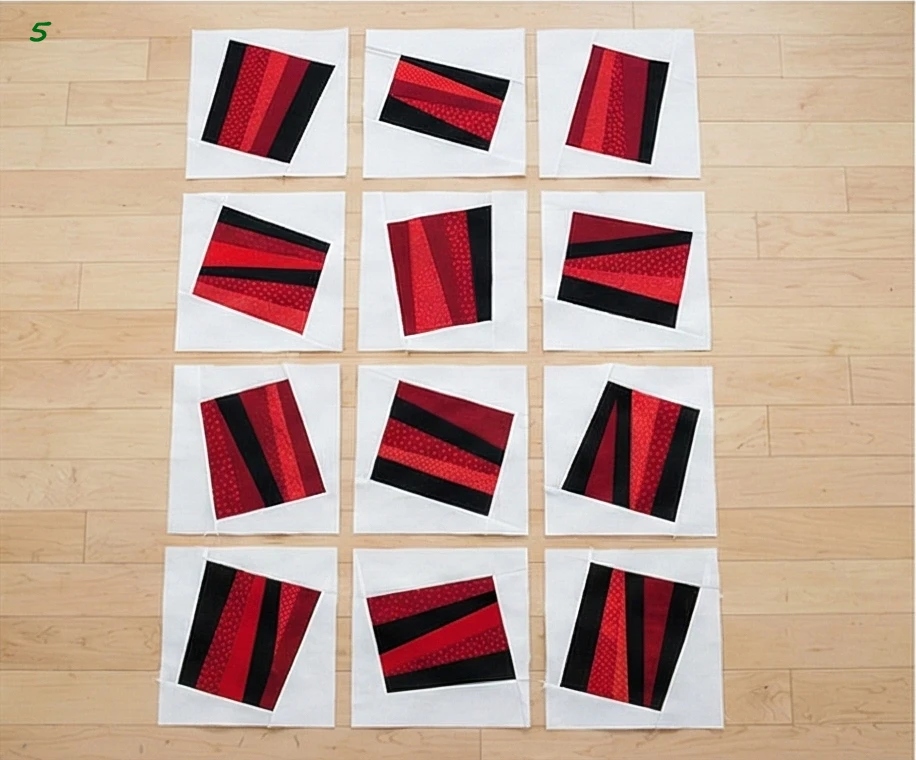
Step 6: The Abstract Layout
- Arrange the 12 blocks on the floor in a grid of 3 blocks wide x 4 blocks tall.
- Rotate: Spin the blocks so the slash lines do not match up.
- You want chaos. One line goes up, the next goes down, the next is horizontal.
- Visual: It should look like cracks in ice or a shattered window.
- Sew: Stitch the blocks into rows, then sew the rows together.
Step 7: “Graffiti” Quilting
- Baste the sandwich.
- Quilting: Treat the white space like a sketchbook.
- Thread: Use Black Thread for high contrast.
- Design: Free-motion quilt abstract shapes—loops, scribbles, jagged lightning bolts, or even messy cursive writing. The messy quilting adds to the “Street Art” vibe.
Pro Design Tip: The “Bleed” Edge. When binding the quilt, use a “Faced Binding” (invisible binding) instead of a traditional visible frame. This allows the white background and the red shards to run all the way to the edge of the quilt without stopping, making it look more like a canvas painting than a blanket.
Budget Consideration: Thrifted Dress Shirts. For the white background, use old White Dress Shirts. The slight variations in the white tones (some cool, some warm, some with subtle weaves) add depth to the background that a single bolt of Kona Cotton cannot replicate.
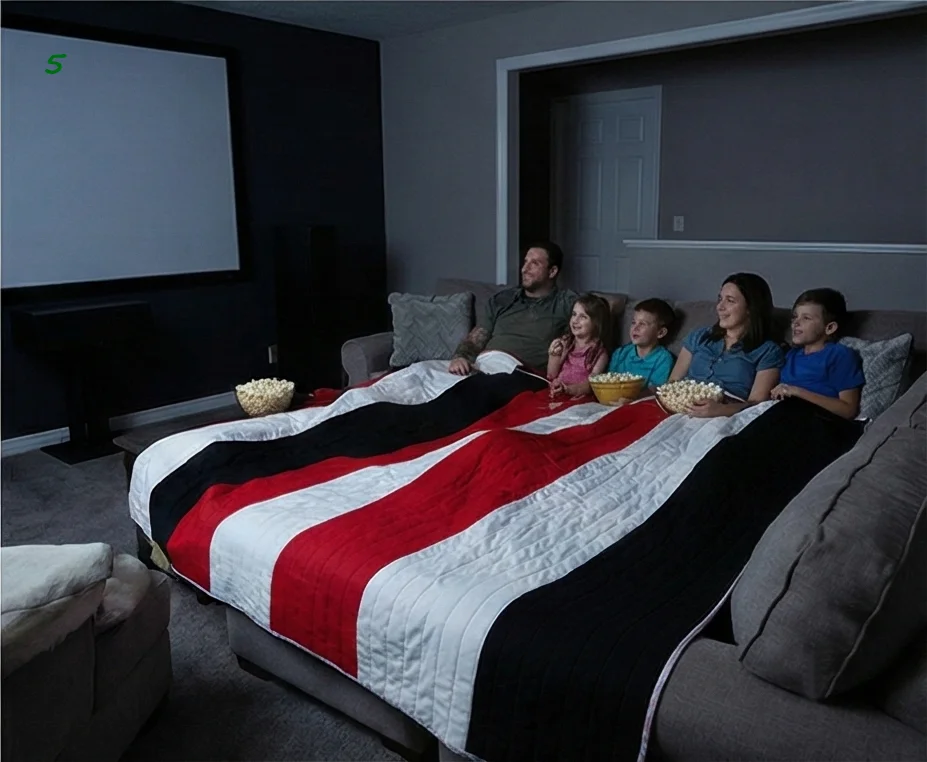
9. Oversized Color Block Quilts for Cozy Movie Nights

The “Midnight Marquee” Mega-Block Quilt
For movie nights, you don’t want a delicate, intricate patchwork. You want something massive, heavy, and graphic. This “Area Quilt” is designed to be Oversized (90″ x 90″), large enough to cover a whole family on the sofa or be spread out on the carpet as a soft island. It uses giant vertical slabs of color to create a bold, modern statement that mimics the aspect ratio of a cinema screen.
Finished Dimensions: Super Queen / King Throw, approximately 90″ x 90″.
Materials Needed:
- Fabric A (The Void/Black): 5 yards of Solid Black (Heavy Cotton, Flannel, or Denim).
- Fabric B (The Screen/White): 2 yards of Solid White (or Silver Grey).
- Fabric C (The Carpet/Red): 2 yards of Deep Velvet Red or Red Flannel.
- Backing Fabric: 8.5 yards (or use a King Size Fleece Blanket).
- Batting: King Size (100″ x 100″). Recommendation: Use “High Loft” or double-layer batting for extra floor cushioning.
- Binding: 1 yard of Solid Black.
- Notions: Rotary cutter, sewing clips (easier than pins for heavy fabric).
Step 1: Create the “Mega Panels”
To make a 90-inch quilt quickly, we work in vertical columns. Because fabric is only ~42″ wide, we will use the full width.
- Panel 1 (Black): Cut a piece of Black Fabric measuring 30.5″ wide x 90.5″ long.
- Note: You will need to sew two lengths of fabric together to reach 90.5″. Hide the seam horizontally.
- Panel 2 (The Stripe): Cut a piece of Red Fabric measuring 15.5″ wide x 90.5″ long.
- Panel 3 (The Light): Cut a piece of White Fabric measuring 10.5″ wide x 90.5″ long.
- Panel 4 (Black): Cut another piece of Black Fabric measuring 34.5″ wide x 90.5″ long.
Step 2: Assemble the Top
The design relies on asymmetry.
- Layout: Arrange the panels side-by-side on the floor:
- Left: Large Black Panel (30.5″).
- Center-Left: Red Panel (15.5″).
- Center-Right: White Panel (10.5″).
- Right: Largest Black Panel (34.5″).
- Sew: Pin the long vertical edges together.
- Sew Panel 1 to Panel 2.
- Sew Panel 2 to Panel 3.
- Sew Panel 3 to Panel 4.
- Press: Press all seams toward the Black panels to prevent color shadowing through the white.

Step 3: The “Cross Cut” (The Modern Twist)
A vertical flag looks fine, but a movie quilt needs horizontal movement.
- Take your huge 90″ x 90″ top.
- Measure: Mark a horizontal line 30 inches from the bottom.
- Cut: Slice the entire quilt in half horizontally along this line.
- Flip: Take the bottom section (the 30″ strip) and rotate it 180 degrees.
- Sew: Stitch it back onto the top section.
- Effect: The vertical stripes are now “broken.” The Red stripe on top will not align with the Red stripe on the bottom, creating a jagged, abstract glitch effect that looks very high-end.

Step 4: The “Cozy” Sandwich
For a movie quilt, weight is everything.
- Tape your Backing Fabric to the floor (face down).
- Double Batting: Lay down two layers of batting. This makes the quilt feel like a weighted blanket and provides padding if you are lying on the floor.
- Place the Quilt Top (face up).
- Baste: Spray-baste or pin-baste generously. Heavy quilts shift easily.
Step 5: “Channel” Quilting
- Design: Do not do intricate stitching. We want “Channels.”
- Stitch: Sew straight vertical lines down the length of the quilt.
- Spacing: Space the lines 3 to 4 inches apart.
- Why? Wide spacing keeps the quilt soft and drapeable. Dense quilting makes it stiff.
- Thread: Use Black Thread over the black/red areas and White Thread over the white areas (or Grey over everything).
Step 6: Wide Binding
A big quilt needs a big frame.
- Cut Black Binding strips measuring 3 inches wide (standard is 2.5″).
- Sew the binding to the front and wrap it to the back.
- The wider binding creates a bold rim that securely holds the heavy layers together.
Pro Design Tip: Fleece Backing. For the ultimate “Movie Night” experience, skip the cotton backing. Buy a King Size Plush Fleece Blanket (Red or Black). Use this as your backing. You don’t even need batting if the fleece is thick enough! It makes the quilt incredibly warm and snuggly.
Budget Consideration: Painters’ Drop Cloths. For the heavy “White” panel and backing, use Canvas Drop Cloths. They are cheap, huge (no seams!), and durable. Wash and bleach them first to soften the fabric. They give the quilt a rustic, industrial loft vibe.
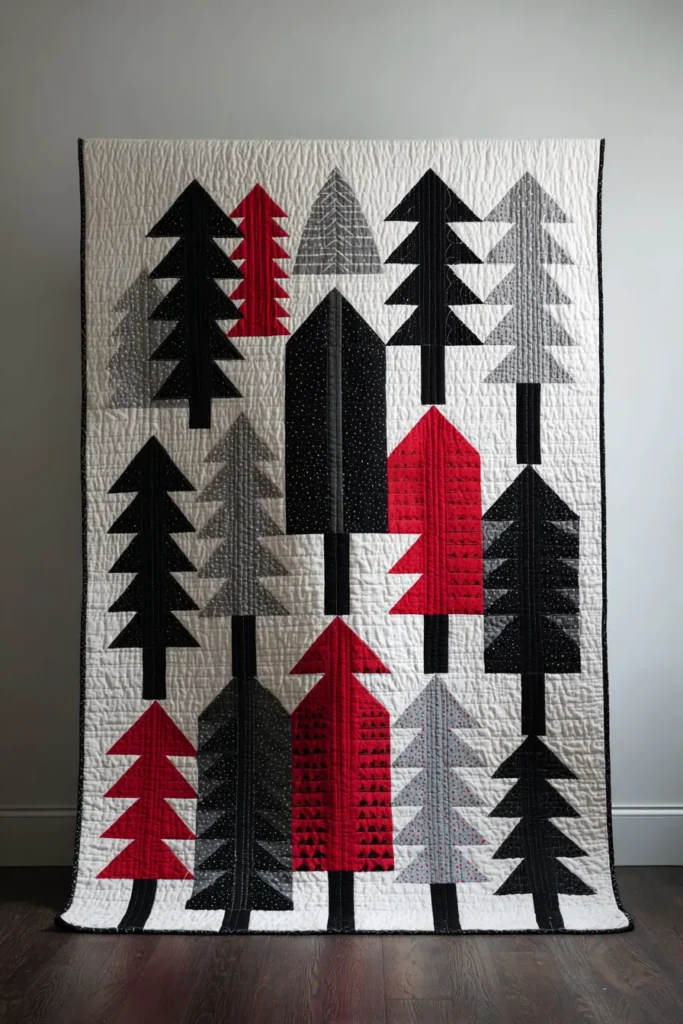
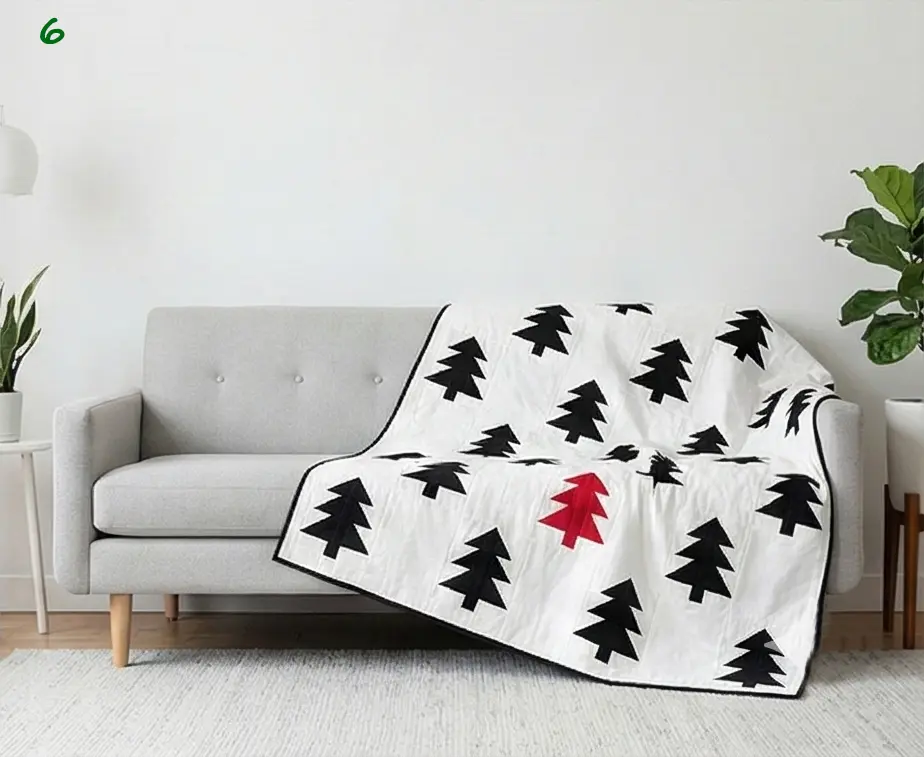
The “Scandi Forest” Floating Geese Throw
Scandinavian design is defined by functionality, clean lines, and a connection to nature. This quilt interprets the classic “Flying Geese” block as a stylized pine forest. Instead of crowding the blocks together, we “float” them in vast columns of negative white space. The result is airy, modern, and distinctly Nordic—mostly Black trees, a stark White snowy background, and a single “berry” Red tree for a pop of color.
Finished Dimensions: Large Throw, approximately 60″ x 72″.
Materials Needed:
- Fabric A (Background/White): 4 yards of Solid Bright White or unbleached Linen (for texture).
- Fabric B (Trees/Black): 1.5 yards of Solid Black or Charcoal.
- Fabric C (Accent/Red): 1 Fat Quarter (or 1/4 yard) of Deep Red.
- Backing Fabric: 4 yards.
- Batting: Throw Size (64″ x 76″).
- Binding: 1/2 yard of Black and White thin stripe.
- Notions: Rotary cutter, 6″ x 12″ quilting ruler.
Step 1: Cut the “Geese” Components
We are making a total of 40 Tree Blocks (Flying Geese). 35 Black, 5 Red.
- For the Tree Bodies (Rectangles):
- From Black Fabric: Cut 35 rectangles, measuring 4.5″ x 8.5″.
- From Red Fabric: Cut 5 rectangles, measuring 4.5″ x 8.5″.
- For the Background/Sky (Squares):
- From White Fabric: Cut 80 squares, measuring 4.5″ x 4.5″.
- For the Vertical Spacers (The Air):
- From White Fabric: Cut 40 rectangles, measuring 4.5″ x 4.5″ (These go between the trees so they don’t touch).
- For the Sashing (The Snow):
- From White Fabric: Cut 6 long strips, measuring 6.5″ wide x 72.5″ tall. (You will likely need to piece fabric lengths together to get 72.5″).
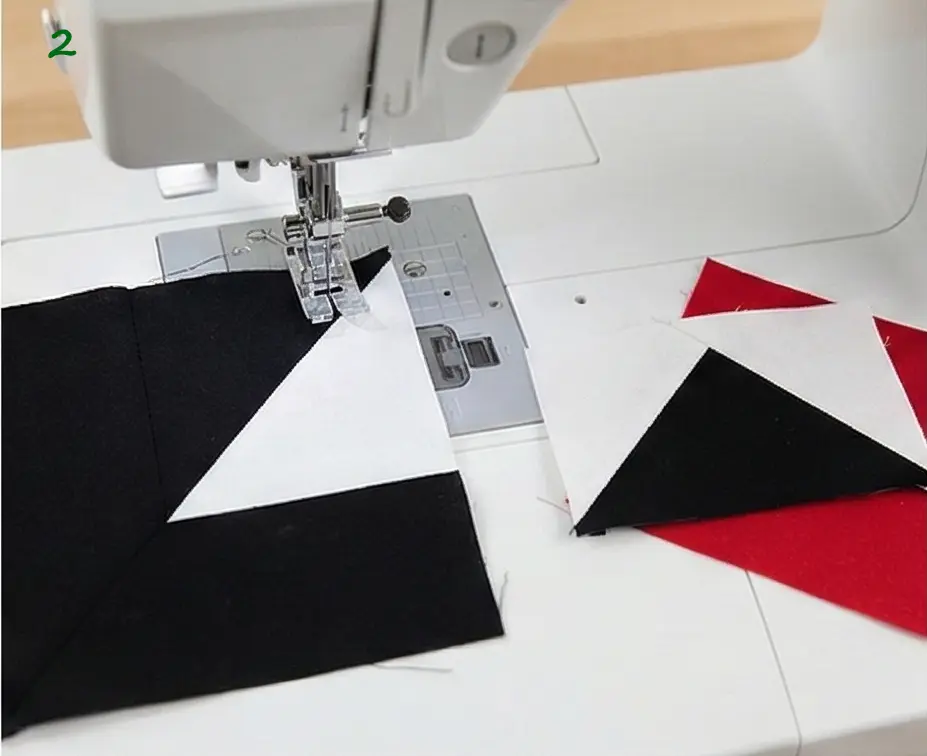
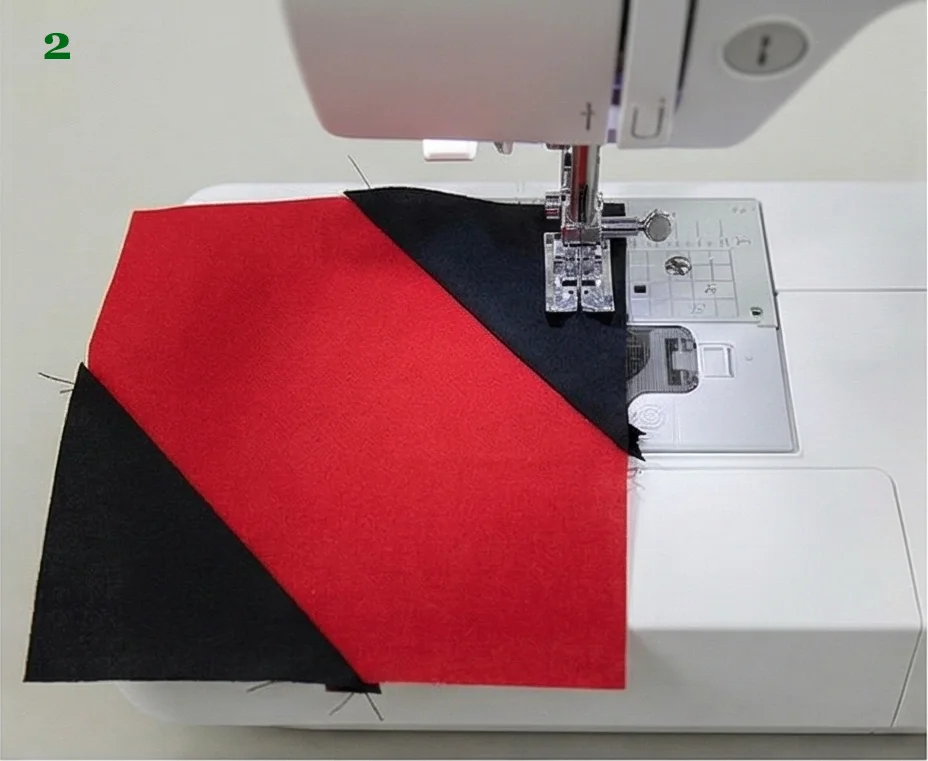
Step 2: Construct the Flying Geese
Use the “Stitch and Flip” method.
- Take one Rectangle (4.5″ x 8.5″) and one White Square (4.5″).
- Place the square on the left side of the rectangle (Right Sides Together).
- Draw a diagonal line on the back of the square. Sew exactly on the line.
- Trim the corner (1/4″ seam allowance) and press the white triangle open.
- Repeat on the right side with another White square.
- Result: A rectangular block (4.5″ x 8.5″) with a large triangle in the center.
- Repeat to make 35 Black Trees and 5 Red Trees.
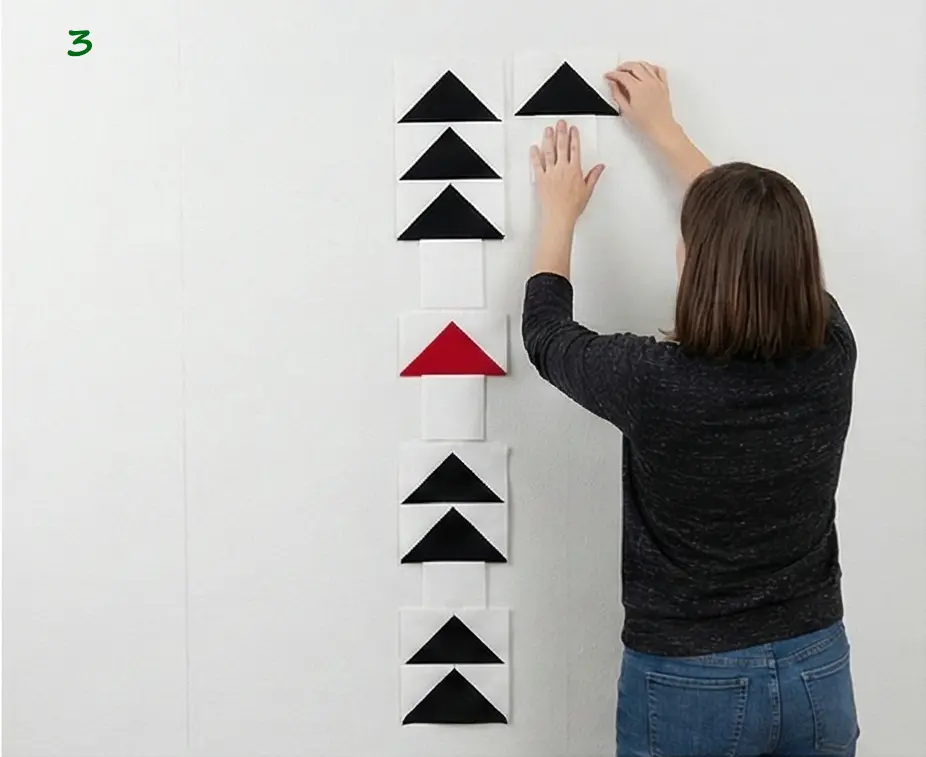
Step 3: Assemble the Forest Columns
We will build 5 vertical columns of trees.
- Layout: Arrange a column on the floor.
- Start with a White Spacer (4.5″ x 4.5″).
- Add a Tree Block (pointing UP).
- Add a White Spacer.
- Add a Tree Block.
- Repeat until you have 8 Trees in the column.
- Design: Place one Red Tree randomly in each column (e.g., Col 1 at the bottom, Col 2 at the top).
- Sew: Stitch the pieces together vertically to create a long strip measuring 8.5″ wide x approx 68.5″ tall (add extra white at top/bottom to reach 72.5″).
- Repeat to make 5 Columns.
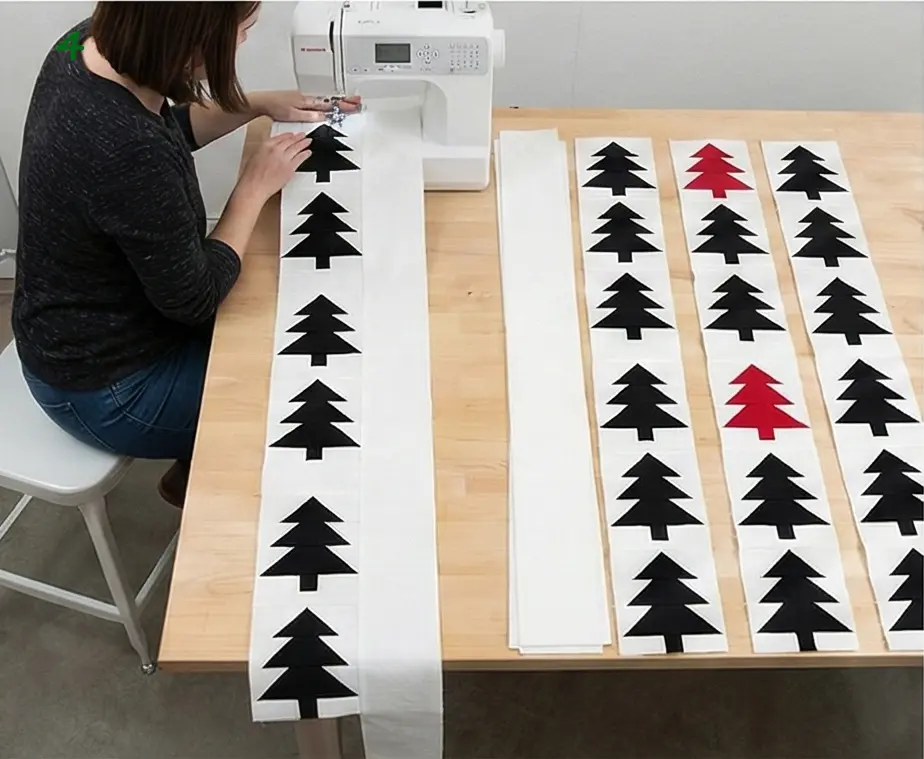
Step 4: Join with Wide Sashing
To get that Scandi minimalist look, wide white rivers must separate the tree columns.
- Layout:
- Sashing Strip (6.5″ wide).
- Tree Column 1.
- Sashing Strip.
- Tree Column 2.
- Sashing Strip.
- …Continue until all 5 columns are placed, ending with a Sashing Strip on the far right.
- Sew: Pin well (long strips stretch!) and sew the columns and sashing strips together.
Step 5: Press and Square
- Pressing: Press all seams toward the Sashing (away from the bulky goose points).
- Trim: The top and bottom edges may be jagged due to assembly. Use a large ruler to trim the entire quilt top to a clean, straight rectangle (approx 60″ x 72″).
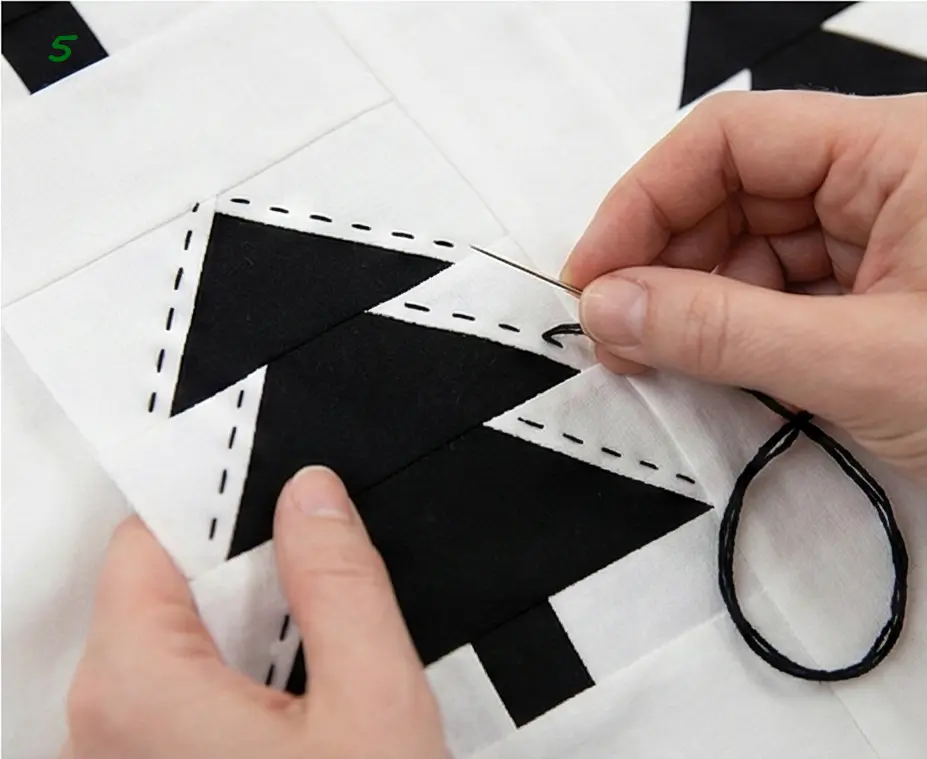
Step 6: “Big Stitch” Hand Quilting
Machine quilting looks too industrial for Hygge. Use visible hand stitching.
- Baste the sandwich.
- Thread: Use Black Perle Cotton (Size 8) or thick embroidery floss.
- Stitch: Sew a simple running stitch (large dashes) by hand.
- Stitch a straight vertical line 1/4″ away from the points of the trees.
- In the wide white sashing, stitch large “X”s or simple snowflakes spaced far apart.
- The visible, chunky thread adds texture and emphasizes the handmade quality essential to Scandinavian design.
Pro Design Tip: Linen Texture. The key to Scandinavian luxury is texture, not just pattern. Swap the standard White Cotton for Essex Linen (a cotton/linen blend). The slight nubby texture of the linen against the smooth black cotton trees elevates the quilt from “craft project” to “boutique home decor.”
Budget Consideration: Drop Cloth Sashing. Because this quilt uses so much white sashing, buying yards of linen is pricey. Use Canvas Drop Cloths (bleached white) for the sashing strips. The canvas weave looks exactly like heavy linen but costs a fraction of the price and is durable enough for living room use.
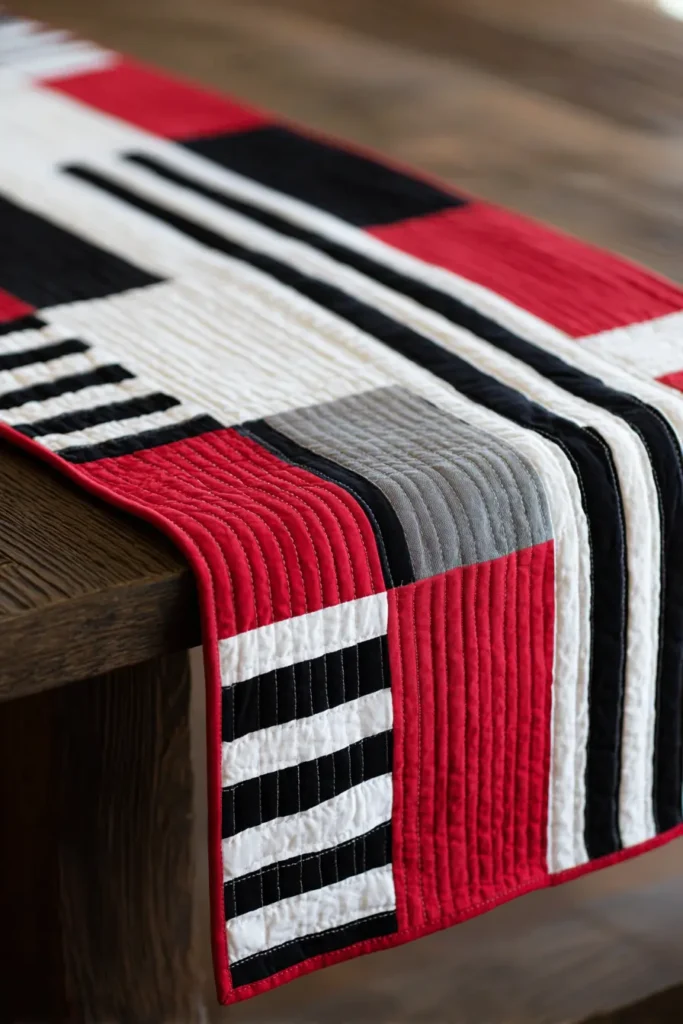
11. Sleek Striped Quilt Runners for Coffee Tables
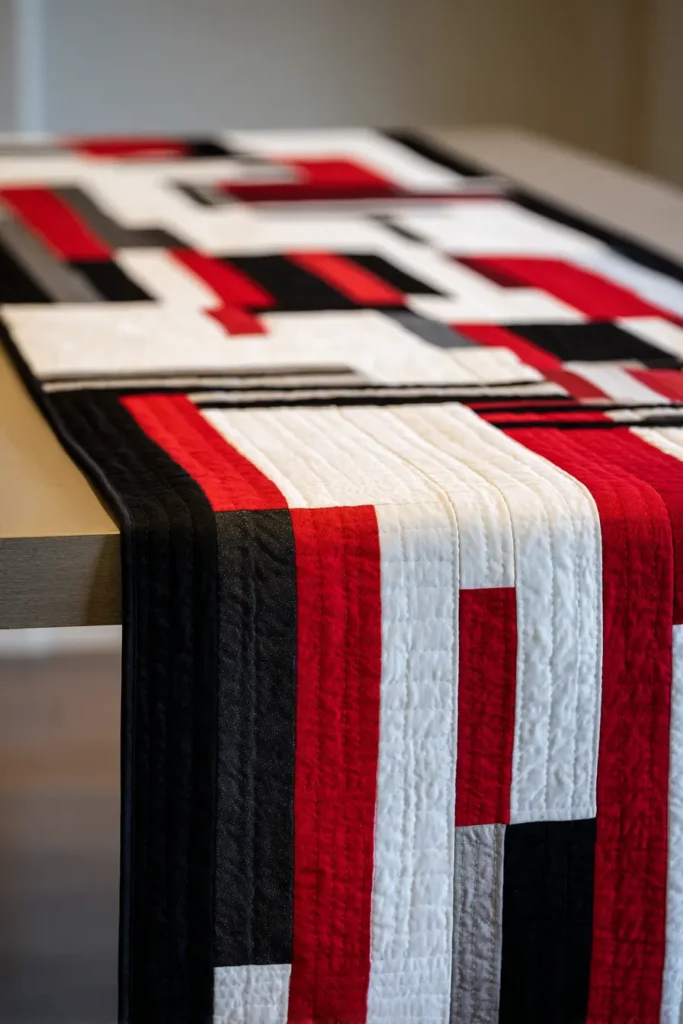
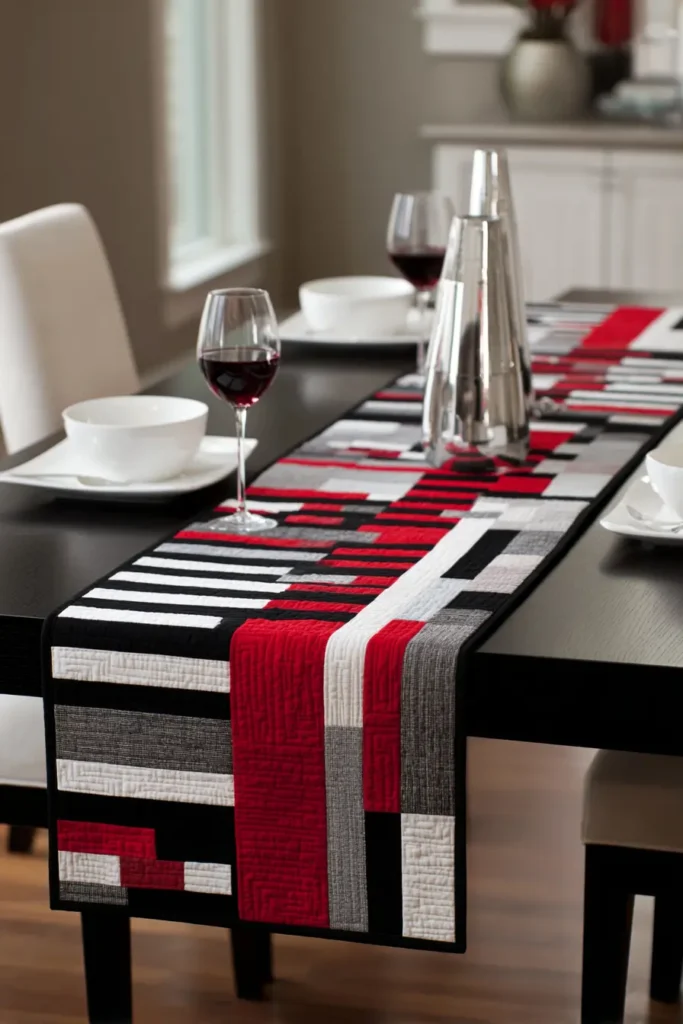
The “Modern Highway” Asymmetrical Runner
For a coffee table runner, the primary goal is “sleekness.” You want a design that is flat and stable (so wine glasses and coffee mugs don’t wobble) but visually elongates the table. This design uses long, horizontal “racing stripes” of varying widths. The asymmetry—placing the color stripes off to one side rather than dead center—gives it a contemporary, architectural look.
Finished Dimensions: Approximately 14″ x 42″ (Adjustable length).
Materials Needed:
- Fabric A (Black): 1/2 yard of Solid Black.
- Fabric B (White): 1/8 yard (or scrap) of Solid White.
- Fabric C (Red): 1/8 yard (or scrap) of Bright Red.
- Backing Fabric: 1/2 yard (or a 16″ x 45″ scrap).
- Batting: Fusible Fleece (Recommended) or very thin cotton batting. Note: Do not use high-loft batting; you want a flat surface for coasters and cups.
- Binding: 1/4 yard of Solid Black.
- Notions: Rotary cutter, 24″ quilting ruler.
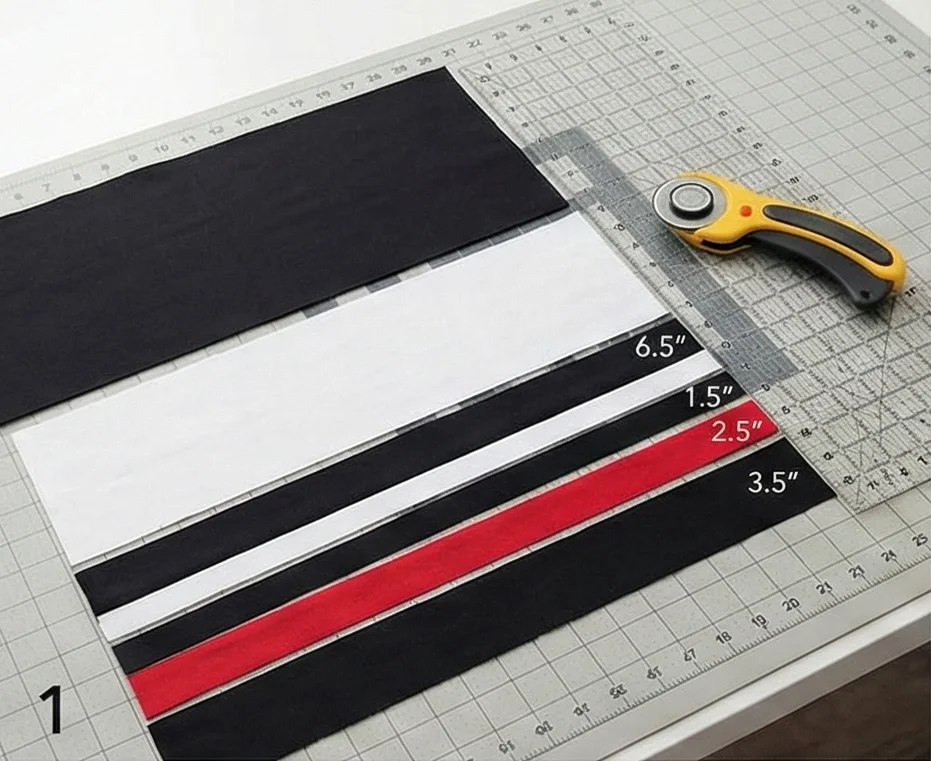
Step 1: Cut the Lengthwise Strips
We are creating the runner from 5 long strips sewn side by side. We will use the full Width of Fabric (WOF), which is typically 42-44 inches.
- From Fabric A (Black):
- Cut one strip 6.5″ wide x WOF. (This is the wide “negative space” side).
- Cut one strip 2.5″ wide x WOF. (The spacer).
- Cut one strip 3.5″ wide x WOF. (The other edge).
- From Fabric B (White):
- Cut one strip 1.5″ wide x WOF. (The pinstripe).
- From Fabric C (Red):
- Cut one strip 1.5″ wide x WOF. (The accent stripe).
Step 2: Arrange the Asymmetry
Do not place the colors in the middle. Off-center is more modern.
- Lay the strips out on your ironing board or table in this order:
- Strip 1: 6.5″ Black (Wide Side).
- Strip 2: 1.5″ White (Pinstripe).
- Strip 3: 2.5″ Black (Spacer).
- Strip 4: 1.5″ Red (Accent).
- Strip 5: 3.5″ Black (Narrow Side).
Step 3: Sew the Strips
- Sew: Stitch the strips together lengthwise using a precise 1/4″ seam allowance.
- Tip: Keep your fabric feeding straight. Wavy seams will make the runner bow.
- Pressing: This is the most important step for a table runner. Press all seams open.
- Why? Pressing open reduces the “bump” at the seam, ensuring your coffee mugs sit perfectly flat on the table surface.
Step 4: Stabilize (The “Flat” Sandwich)
- Cut your Backing Fabric and Fusible Fleece to be slightly larger than your striped top (approx 16″ x 45″).
- Fuse: Iron the Fusible Fleece onto the wrong side of the runner top (or the backing, depending on manufacturer instructions).
- Why Fleece? Fusible fleece is stiff and flat. It gives the runner structure like a placemat, rather than the puffiness of a quilt.
- Layer: Place Backing (face down) and the Fused Top (face up). Baste with a few pins or spray baste.
Step 5: “In the Ditch” Quilting
Keep the design minimal so it doesn’t distract from the stripes.
- Stitch: Sew straight lines directly in the seam lines (“in the ditch”).
- Stitch between the Black and White strips.
- Stitch between the Black and Red strips.
- Optional Echo: If you want more detail, sew one straight line of Black Thread down the center of the wide black panels to keep them flat.
Step 6: Trim and Bind
- Square Up: Take your large ruler. Trim the short ends of the runner so they are perfectly square, and the total length is clean (usually trimming off the fabric selvages results in a ~41″ or 42″ runner).
- Bind: Attach the Solid Black binding around the perimeter.
- Tip: For a sleek finish, use a “Single Fold” binding (less bulk) or simply face the runner (sew front to back and turn inside out) for a binding-free edge.
Pro Design Tip: The “Waterfall” Edge. If your coffee table is shorter than 40 inches, let the runner drape over the ends. To make this look intentional, add small Steel Washers or drapery weights into the corners of the binding at the short ends. The weight will pull the runner taut and straight down the side of the table for a sharp, tailored look.
Budget Consideration: Ribbon Hack. If you struggle to cut perfect 1.5″ strips for the accents, simply buy 1-inch Grosgrain Ribbon in Red and White. Sew the Black fabric panels directly onto the sides of the ribbon. It’s faster, the edges are perfectly straight, and the ribbon adds a nice matte texture contrast.
12. Chic Red, Black, and White Quilted Table Runners
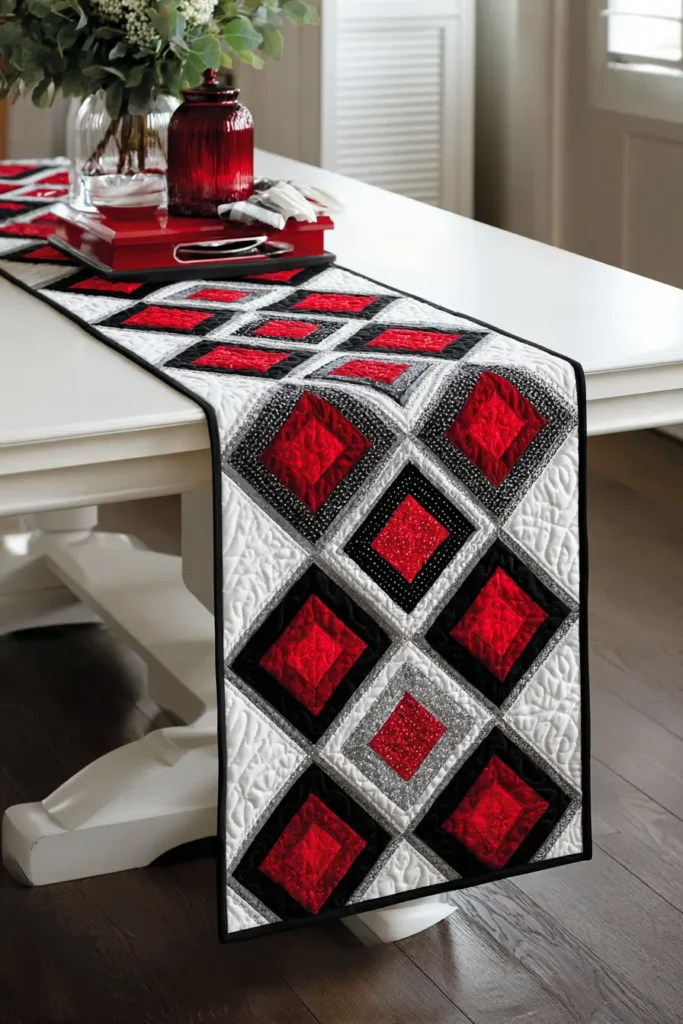
The “Diamond Solitaire” Geometric Runner
Nothing says “chic dining” like diamonds. This pattern uses the classic “Square-in-a-Square” block (also known as the Economy Block) to create a row of sparkling Red gems framed in Black, floating on a clean White background. It is elegant enough for a dinner party but graphic enough for a modern loft.
Finished Dimensions: Dining Table Runner, approximately 14″ x 54″.
Materials Needed:
- Fabric A (The Gems/Red): 1/4 yard (or 5 Fat Eighths) of assorted Red prints or solids.
- Fabric B (The Frames/Black): 1/2 yard of Solid Black.
- Fabric C (Background/White): 1/2 yard of Solid White.
- Backing Fabric: 1/2 yard (approx 18″ x 60″).
- Batting: Thin Cotton Batting or Fusible Fleece (16″ x 60″).
- Binding: 1/4 yard of Solid Black.
- Notions: Rotary cutter, 6.5″ square ruler.
Step 1: Cut the Center Squares and Corners
We are making 5 Diamond Blocks. Each block starts with a center square and adds triangles to the corners.
- From Fabric A (Red): Cut 5 squares, measuring 4.5″ x 4.5″.
- Design Tip: Use a different red print for each square (scrappy) or the same solid red for a uniform look.
- From Fabric B (Black): Cut 10 squares, measuring 4″ x 4″.
- Cut each of these squares in half diagonally (corner to corner) to create 20 triangles.
- From Fabric C (White):
- Cut 2 strips measuring 2.5″ x width of fabric (for the border).
- Cut 4 strips measuring 2.5″ x 8.5″ (for the sashing/spacers).
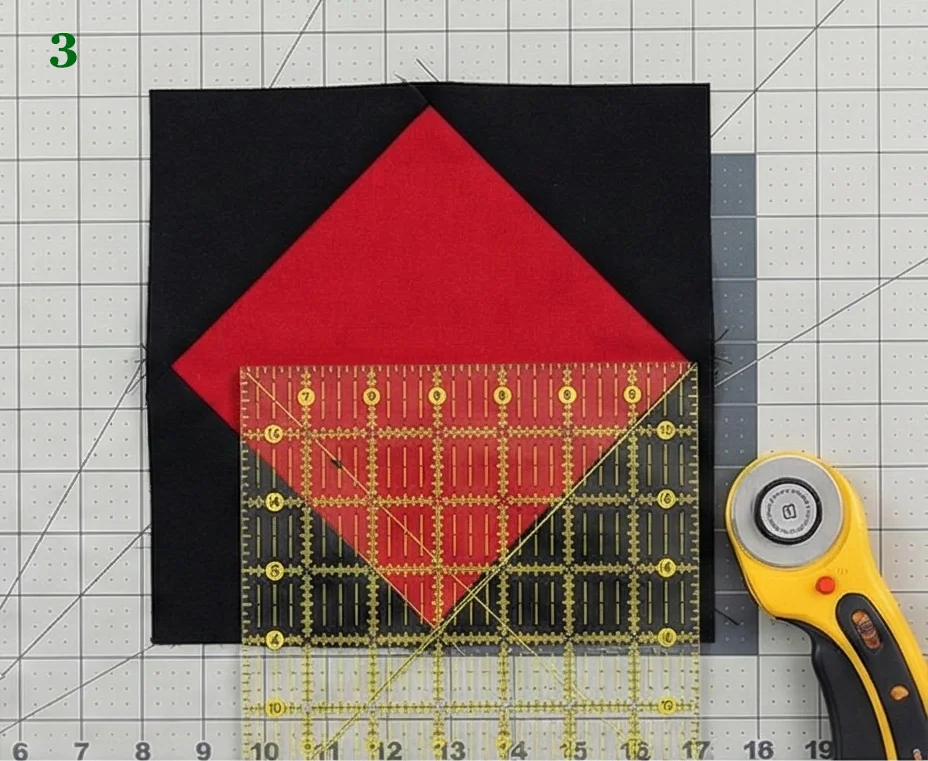
Step 2: Build the Diamond Blocks
This turns a square into a diamond set on a point.
- Take one Red Square (4.5″).
- Take two Black Triangles.
- Sew: Stitch the long side of the triangles to opposite sides of the red square. Press seams outward toward the black.
- Repeat: Sew two more Black Triangles to the remaining two sides of the red square. Press outward.
- Trim: You now have a square block with a red diamond in the center. Use your ruler to trim this block to exactly 8.5″ x 8.5″.
- Note: Be careful to leave a 1/4″ seam allowance past the points of the red diamond so you don’t chop off the points!
- Repeat to make 5 Diamond Blocks.
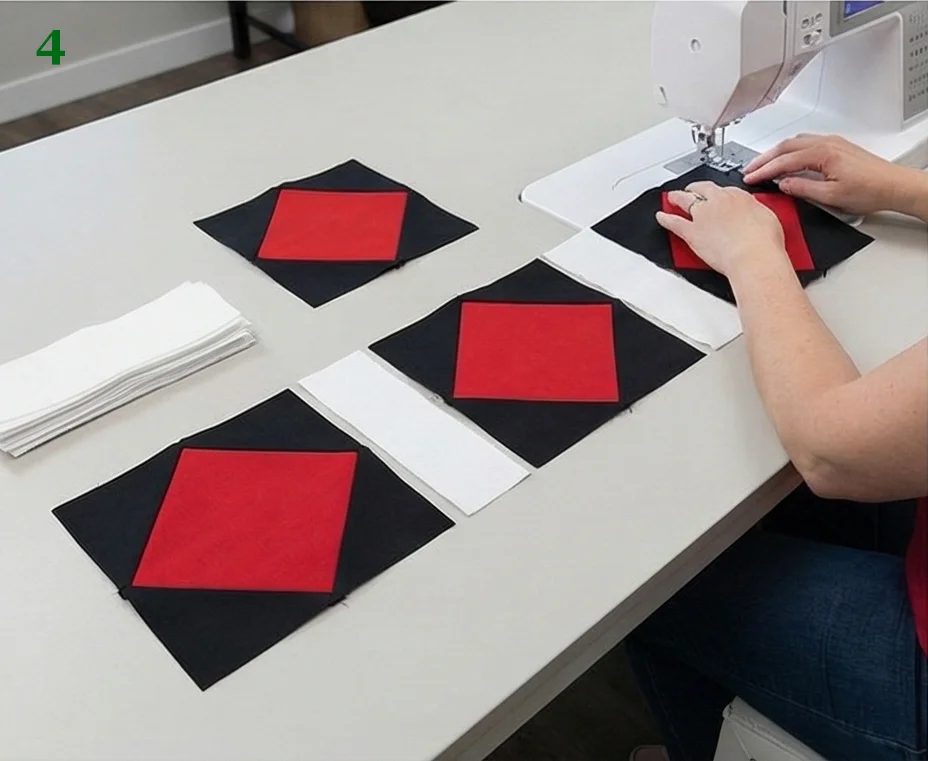
Step 3: Arrange the Row
- Lay the blocks out on your table.
- Place a White Sashing Strip (2.5″ x 8.5″) between each block.
- Layout: Block – Sashing – Block – Sashing – Block – Sashing – Block – Sashing – Block.
- Visual: The black frames should touch the white sashing, isolating each diamond “gem.”
Step 4: Sew the Center Strip
- Sew: Stitch the blocks and sashing strips together in a long row.
- Press: Press seams toward the Black fabric (away from the white sashing) to prevent shadowing.
- Result: You have a long strip measuring 8.5″ wide x approx 52″ long.
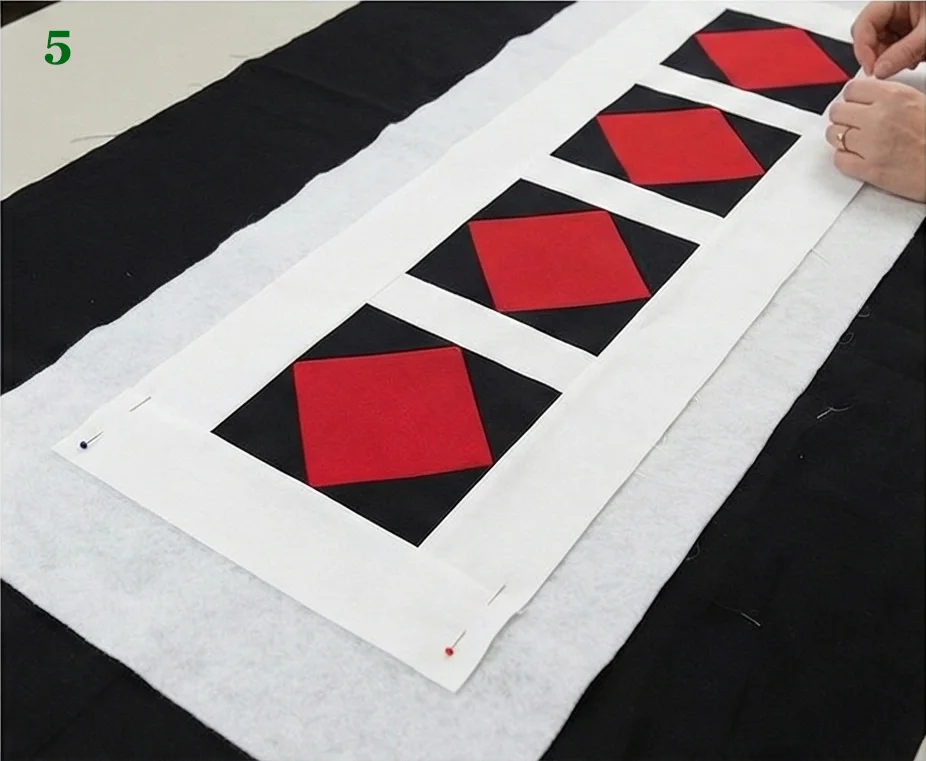
Step 5: Add the Long Borders
The borders widen the runner to a substantial dining size.
- Take your long White Border Strips (2.5″ wide).
- Sew: Stitch one strip to the Top of the runner row. Stitch the other to the Bottom.
- Trim: Trim the excess length from the ends.
- Final Top Size: Approximately 12.5″ x 52″. (If you want it wider, add a final 1.5″ Black border around the whole thing).
Step 6: “Cross-Hatch” Quilting
- Fuse your Fleece to the backing or baste your thin batting sandwich.
- Quilting: Diamond shapes look best with diagonal quilting.
- Design: Quilt a grid of diagonal lines spaced 1 inch apart.
- Effect: The lines will cut through the squares, creating smaller diamonds that reinforce the geometric theme.
- Thread: Use Grey Thread or Invisible Thread so it doesn’t compete with the high-contrast fabrics.
Pro Design Tip: Black Velvet Centers. For a glamorous holiday runner, use Red Satin for the centers and Black Velvet for the triangles. The mix of sheen and matte black absorbs the light beautifully, making it look like formal evening wear for your table.
Budget Consideration: Placemat Scraps. If 54 inches is too long for your table, just make 3 Blocks and turn them into individual placemats instead of a runner. Add wider borders (3.5″) to bring them to placemat size (approx 12″ x 18″).
13. Herringbone Red Accent Quilt for Stylish Sofas
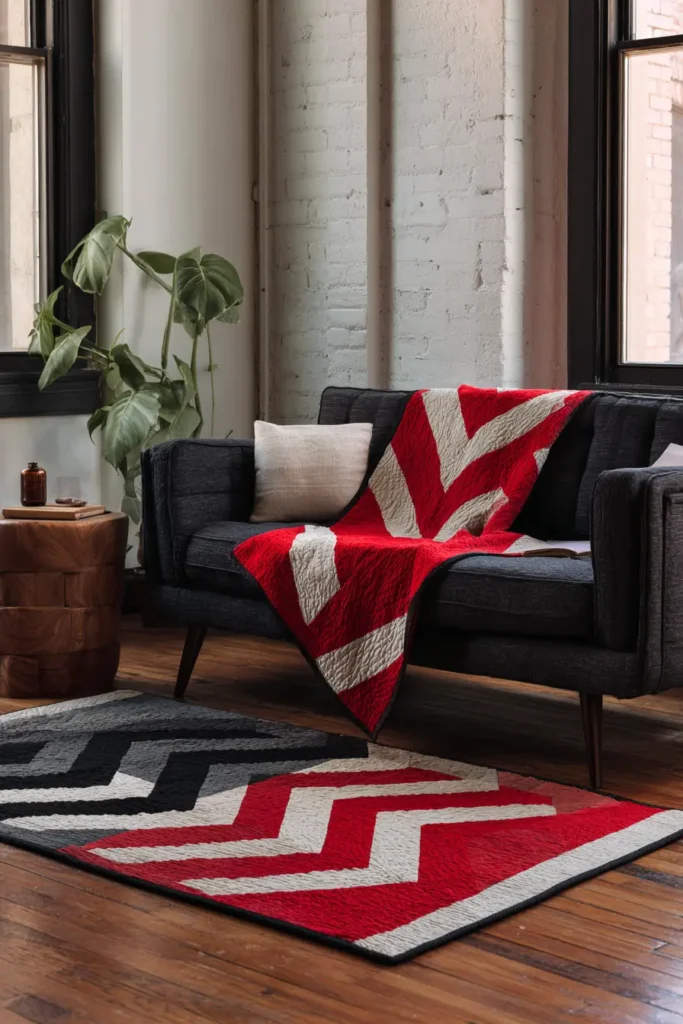
The “Red Pulse” Modern Herringbone Throw
Traditional herringbone requires tricky partial seams or bias edges. This modern version “cheats” by using Half Square Triangles (HSTs) to create the exact same visual effect without the headache. The result is a striking field of Black and White zig-zags, interrupted by a single, electric “heartbeat” line of Red running horizontally across the sofa.
Finished Dimensions: Large Throw, approximately 56″ x 72″.
Materials Needed:
- Fabric A (Black): 2.5 yards of Solid Black.
- Fabric B (White): 2.5 yards of Solid White.
- Fabric C (Accent/Red): 1/2 yard of Bright Poppy Red.
- Backing Fabric: 4 yards.
- Batting: Throw Size (60″ x 80″).
- Binding: 1/2 yard of Solid Red (to match the pulse).
- Notions: Rotary cutter, 8.5″ or larger square ruler.
Step 1: Cut the Squares (The Base Units)
We are using large squares to make this come together fast. We need a total of 63 large squares to create 126 triangles.
- From Fabric A (Black): Cut 32 squares, measuring 9″ x 9″.
- From Fabric B (White): Cut 28 squares, measuring 9″ x 9″.
- From Fabric C (Red): Cut 4 squares, measuring 9″ x 9″.
Step 2: Create the Half Square Triangles (HSTs)
This transforms our squares into the building blocks of the herringbone.
- Pair Up:
- Pair 28 Black squares with 28 White squares.
- Pair 4 Black squares with 4 Red squares.
- Mark & Sew: Draw a diagonal line on the back of the lighter square. Stitch 1/4″ away from the line on both sides.
- Cut: Cut directly on the drawn line.
- Press & Trim: Press seams toward the dark side. Trim all HST units to exactly 8.5″ x 8.5″.
- Yield: 56 Black/White HSTs and 8 Black/Red HSTs.
Step 3: The “Herringbone” Column Layout
The trick to herringbone is vertical columns.
- Find a large floor space. You will build 7 Columns. Each column has 9 blocks.
- Column 1: Place all Black/White HSTs. Orient them so the diagonal goes from Top-Left to Bottom-Right ( \ ).
- Column 2: Place all Black/White HSTs. Orient them so the diagonal goes from Bottom-Left to Top-Right ( / ).
- Visual: When placed side-by-side, Columns 1 and 2 form a “V” shape.
- Repeat: Continue alternating the angle for Columns 3, 4, 5, 6, and 7.
Step 4: Insert the “Red Pulse”
Now we disrupt the pattern to add the stylish accent.
- Decide where you want your “Pulse.” (Usually 1/3 of the way down looks best on a sofa).
- Swap: Remove one row of Black/White blocks going across the width of the quilt (Rows 3 or 4 are good spots).
- Replace: Insert your 8 Black/Red HSTs in that row.
- Important: Make sure you maintain the correct angle orientation so the Red blocks still form the “V” shape with the black blocks next to them.
Step 5: Vertical Assembly
- Sew Columns: Sew the blocks together into their vertical columns first.
- Press: Press the seams of Column 1 Down. Press the seams of Column 2 Up. Alternate across the quilt.
- Why? This allows the seams to “nest” (lock together) when you join the columns, giving you sharp points.
- Join: Pin the long columns together. Match the intersection points carefully. Sew the columns together.
Step 6: “Zig-Zag” Quilting
- Baste the sandwich.
- Quilting: Use a Walking Foot.
- Design: Do not stitch “in the ditch.” Instead, stitch a straight line 1/2 inch away from the zig-zag seam lines on the white side. Then stitch another line 1/2 inch away on the black side.
- Accent: Switch to Red Thread just for the red pulse row to make it glow.
Pro Design Tip: Gradient Herringbone. Instead of solid Black, use 4 different shades of Grey/Black prints. Randomize them in the “Black” spots. This creates a shimmering, textured effect like a tweed suit, which looks very sophisticated on a leather couch.
Budget Consideration: Flat Sheet Backing. Since the width is approx 56″, standard quilting cotton (42″ wide) requires a seam on the back. Buy a Full Size Black Flat Sheet for the backing. It’s seamless, usually cheaper than yardage, and feels smooth against the skin.
14. Multi-Texture Modern Looking Quilts for Cushion Covers
The “Tactile Horizon” Mixed-Media Cushion Series
Modern design isn’t just about color; it’s about touch. This project moves beyond standard quilting cotton to combine three distinct textures: sleek Faux Leather, nubby Bouclé (or Sherpa), and luxurious Velvet. The design is a simple asymmetrical stripe pattern that lets the fabrics do the talking.
Finished Dimensions: Instructions are for a standard 18″ x 18″ cushion, with notes for resizing.
Materials Needed (for one 18″ cover):
- Texture A (The Sleek/Black): 1/4 yard of Black Faux Leather (or Vinyl/coated cotton).
- Texture B (The Soft/White): 1/4 yard of White Bouclé or Sherpa Fleece.
- Texture C (The Luxe/Red): 1/8 yard of Deep Red Velvet or Corduroy.
- Stabilizer: 20″ x 20″ piece of Muslin or scrap cotton (foundation layer).
- Backing Fabric: 1/2 yard of sturdy Black Cotton Canvas.
- Notions: Rotary cutter, Sewing Clips (essential—pins leave holes in leather!), Walking Foot (highly recommended for thick layers), Denim/Leather Needle (Size 100/16).
Step 1: Calculate and Cut the Strips
We are building a striped panel. For an 18″ pillow, we need a roughly 19″ square top to allow for shrinkage during quilting.
For an 18×18 Pillow:
- Black Leather: Cut one strip 6.5″ tall x 20″ wide.
- Red Velvet: Cut one strip 4.5″ tall x 20″ wide.
- White Bouclé: Cut one strip 10.5″ tall x 20″ wide.
- Sizing Note:
- For a 20×20 Pillow: Add 1 inch to the height of each strip.
- For a 16×16 Lumbar: Subtract 1 inch from the height of each strip.
Step 2: The “Clip and Stitch” Assembly
Sewing mixed materials requires care. Leather sticks, and velvet slides.
- Set Up: Install a fresh heavy-duty needle. Set stitch length to 3.0mm (longer stitches prevent perforating the leather too much). Attach your Walking Foot.
- Join Bottom: Place the Black Leather and Red Velvet Right Sides Together.
- Tip: Use Clips (Wonder Clips) to hold them. Do not use pins on the leather.
- Sew slowly with a 1/2″ seam allowance.
- Join Top: Place the Red Velvet and White Bouclé Right Sides Together. Clip and sew.
- Finger Press: Do not iron the leather! Finger-press the seams open or toward the softer fabric. If you must iron the velvet, do it from the back on low heat.
Step 3: Foundation Quilting
Because these fabrics are stretchy and heavy, we need to stabilize them on a non-stretchy base.
- Lay your Muslin/Scrap Cotton square (20″ x 20″) on the table.
- Place your striped Top Panel directly on top (Right Side Up).
- Baste: Use spray baste or safety pins (only in the fabric sections, not the leather) to secure the top to the muslin.
- Quilt: Stitch “in the ditch” (directly in the seam lines) between the stripes. This anchors the heavy fabrics to the stable muslin without ruining the leather’s look.

Step 4: Trim to Size
- Place the quilted panel on your cutting mat.
- Measure: We want the final front panel to be the exact size of the insert for a plump fit (or 0.5″ larger for a loose fit). Let’s aim for 18.5″ x 18.5″ (includes seam allowance).
- Cut: Trim the edges clean using your rotary ruler. Ensure the stripes remain straight horizontally.
Step 5: The “Envelope” Backing
A heavy-textured pillow is hard to zip. An envelope back is easier and durable.
- From your Black Canvas, cut two rectangles measuring 18.5″ wide x 13″ tall.
- Hem: On one long edge (18.5″) of each rectangle, fold under 1/2 inch, press, fold again, and stitch.
- Layer:
- Lay your Textured Front Panel Face Up.
- Place Backing Panel 1 Face Down, aligned with the top edge.
- Place Backing Panel 2 Face Down, aligned with the bottom edge (they will overlap in the center).
- Sew: Clip the perimeter (heavy fabrics are thick!). Sew all the way around with a 1/2″ seam allowance. Backstitch over the envelope-opening points for added strength.
Step 6: Turn and Finish
- Trim Corners: Clip the corners diagonally to reduce bulk.
- Turn: Turn the cover right side out through the envelope opening.
- Poke: Use a chopstick or point turner to push the thick corners out.
- Stuff: Insert your 18″ pillow form.
- Result: You have a sleek leather bottom, a luxe velvet stripe, and a soft fuzzy top. It creates a high-end “hotel chic” look for a fraction of the price.

Pro Design Tip: The “Gold” Zipper. If you are an advanced sewer and want to skip the envelope back, install an exposed Gold Metal Zipper right between the Red Velvet and White Bouclé strips on the front. It adds a metallic industrial edge that looks incredible with the black leather.
Budget Consideration: Thrifted Textures.
- Leather: Use an old black handbag or faux leather skirt.
- Bouclé: Use an old teddy-bear coat or a bath mat (seriously!).
- Velvet: Use a holiday dress or curtain scrap. Since the pieces are small strips, you rarely need to buy yardage.
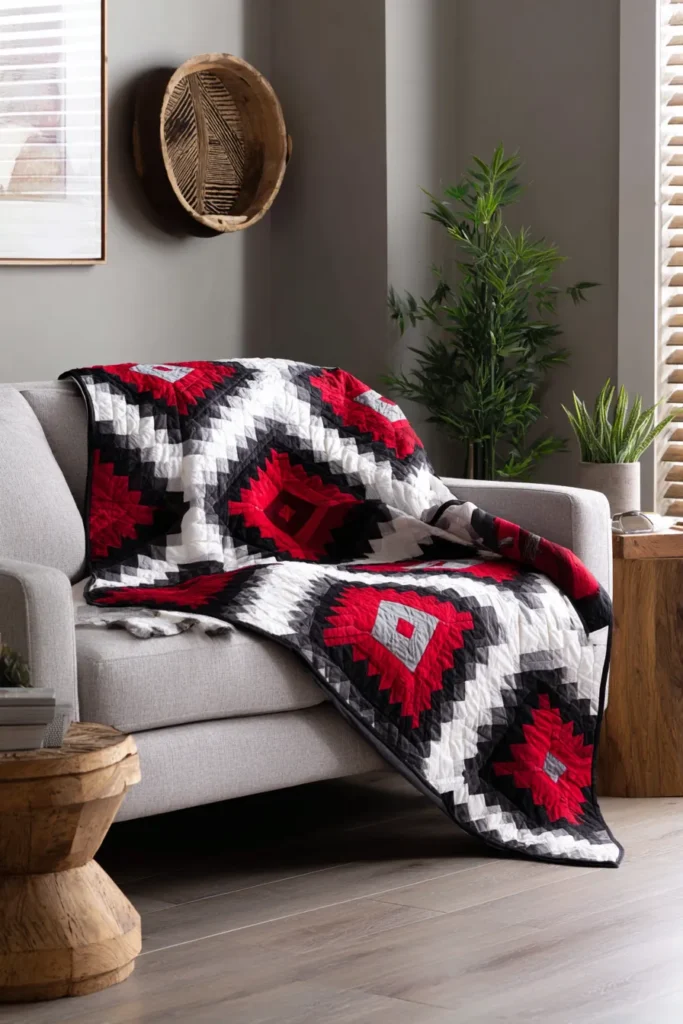
15. Contemporary Log Cabin Quilts for Modern Floor Decor in Red, Black, and White
The “Infinity Square” Giant Log Cabin Rug
Standard quilts use many small blocks. For a floor rug, we invert that logic: The entire rug is one single, massive Log Cabin block. By using extra-wide strips of heavy-duty fabric (like canvas or denim), this quilt creates a hypnotic “tunnel” effect that anchors the room. The contrast between the light and dark sides of the square adds depth, making the floor look like it drops into a stylish void.
Finished Dimensions: Large Area Rug, approximately 60″ x 60″.
Materials Needed:
- Fabric A (Light/White): 2 yards of White Denim, Canvas, or Twill.
- Fabric B (Dark/Black): 2 yards of Black Denim, Canvas, or Twill.
- Fabric C (Center/Red): 1/2 yard of Red Velvet or Heavy Cotton (for a plush center).
- Backing Fabric: 3.5 yards of Heavy Duck Cloth or Upholstery Fabric (needs to be tough).
- Batting: 2 layers of Cotton Batting (for stiffness) or one layer of stiff “Rug Time” interfacing.
- Binding: 3/4 yard of Solid Black (Wide bias tape).
- Notions: Rotary cutter, heavy-duty needle (Size 100/16).
Step 1: Cut the Center and Strips
Since this is a floor rug, we use wide strips to create visual weight.
- The Heart (Red): Cut one square measuring 10.5″ x 10.5″. This is the “hearth” of the cabin.
- The Logs (Black & White): Cut all your remaining Black and White fabric into 5.5″ wide strips.
- Tip: You will need to sew strips together end-to-end to make them long enough for the outer rounds. Press seams open to reduce lumps underfoot.
Step 2: Round 1 (The First Layer)
Log Cabin logic: Add logs in a clockwise spiral. We will keep Light on two sides and Dark on the other two.
- Log 1 (White): Sew a white strip to the Top of the Red square. Trim to fit. Press seam away from center.
- Log 2 (White): Sew a white strip to the Right side. Trim to fit.
- Log 3 (Black): Sew a black strip to the Bottom. Trim to fit.
- Log 4 (Black): Sew a black strip to the Left. Trim to fit.
- Result: The Red center is now offset, surrounded by a round of contrast.
Step 3: Round 2 (Expanding the Square)
Repeat the exact same sequence.
- Sew White to the Top.
- Sew White to the Right.
- Sew Black to the Bottom.
- Sew Black to the Left.
- Visual: You will see the “White Quadrant” growing in one corner and the “Black Quadrant” growing in the opposite corner.
Step 4: Continue Until Giant
Keep building rounds.
- Continue this Light/Light/Dark/Dark spiral for roughly 5 or 6 Rounds.
- Measure: Stop when the rug reaches approximately 60 inches square (or however large your floor space allows).
- Square Up: Because you are adding long strips, the rug might get slightly wonky. Use a large carpenter’s square or ruler to trim the outer edges perfectly straight.
Step 5: Heavy-Duty Layering
Floor quilts shouldn’t be floppy.
- Tape your Backing Fabric to the floor (face down).
- Layer your Double Batting (or stiff interfacing).
- Place your Giant Log Cabin Top (face up).
- Baste: Use Curved Safety Pins every 4 inches. You do not want this shifting underfoot while sewing.
Step 6: “Spiral” Quilting
Use the quilting to reinforce the seam strength.
- Thread: Use a heavy-weight thread (like 30wt or 12wt) in Grey or Black.
- Stitch: Start in the center Red square.
- Quilt a continuous square spiral outward.
- Stitch “in the ditch” (in the seam lines) between every log.
- Then, stitch a second line down the center of every 5.5″ log.
- This ensures the wide strips don’t bubble up when walked on.
Pro Design Tip: Non-Slip Corners. Once the binding is on, flip the rug over. Apply Silicone Caulk or dedicated Rug Grip Paint in squiggly lines on the back of the quilt, focusing on the four corners and the center. Let it cure for 24 hours. This turns your quilt into a safe, non-slip area rug.
Budget Consideration: Drop Cloths & Blackout Curtains.
- White: Use a bleached Painter’s Drop Cloth.
- Black: Buy heavy “Blackout Curtains” from a discount store. The fabric is thick, light-blocking (dense weave), and often cheaper than buying yards of black canvas.
16. Quilted Floor Poufs and Ottomans for Flexible Seating
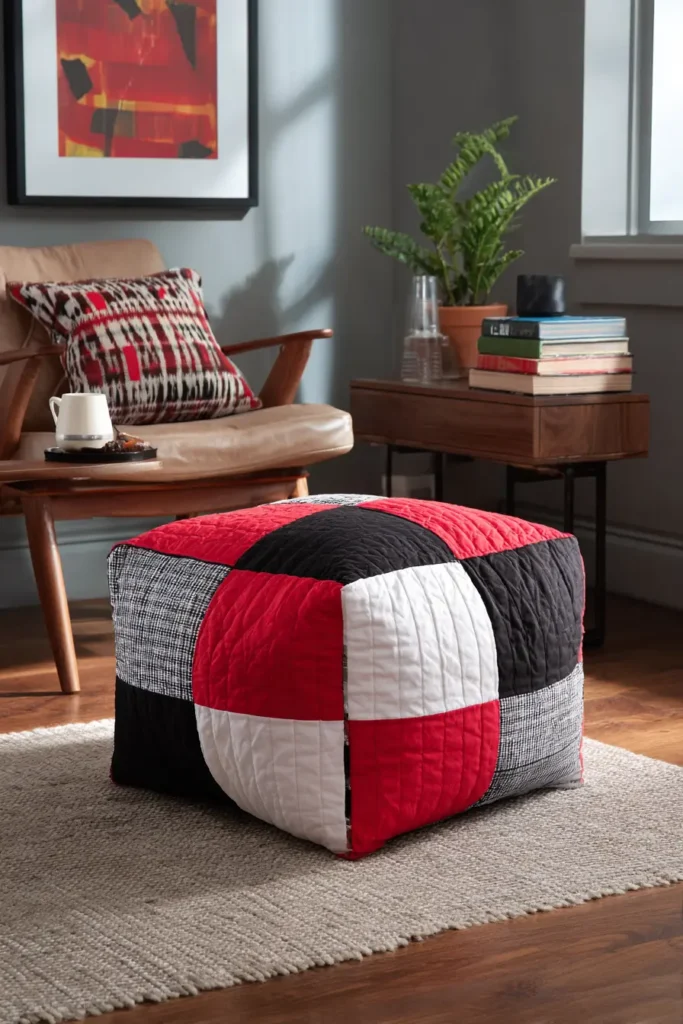
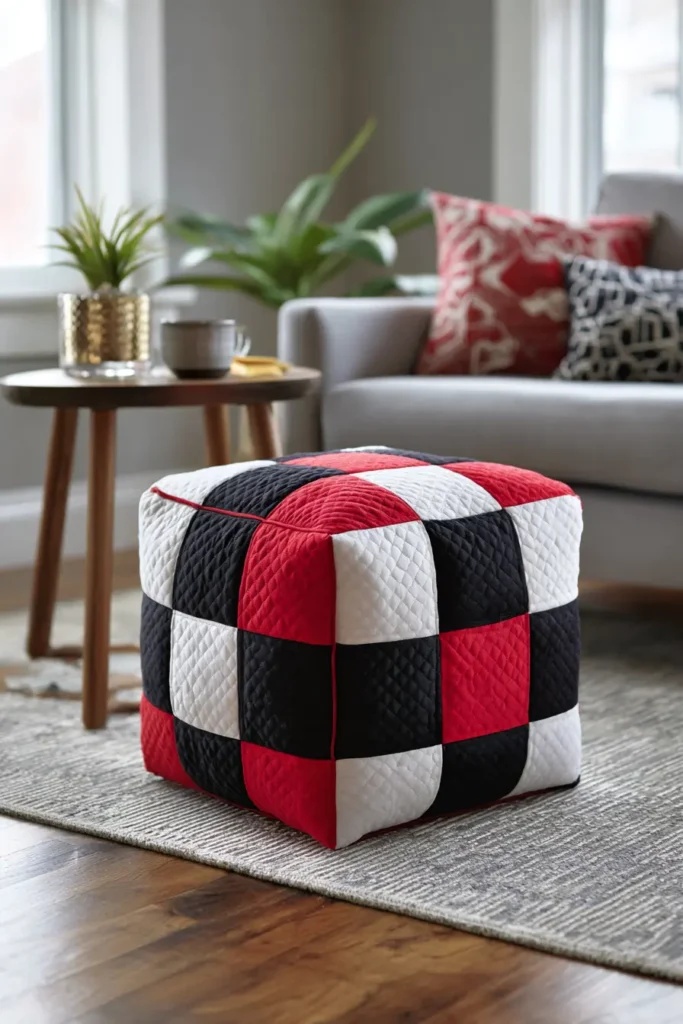
The “Mod Cube” Patchwork Floor Pouf
Floor poufs are the ultimate flexible seating for modern living rooms. This project creates a structured, 18-inch cube that serves as a footrest, extra seat, or even a side table. The design features high-contrast patchwork sides that look like modern art, using heavy quilting to keep the cube perfectly square and sturdy.
Finished Dimensions: 18″ x 18″ x 18″ Cube.
Materials Needed:
- Fabric A (Black): 1 yard of Heavy Canvas or Denim.
- Fabric B (White): 1 yard of Heavy Canvas or Duck Cloth.
- Fabric C (Red): 1/2 yard of Upholstery Weight Fabric.
- Stabilizer: 1.5 yards of Fusible Foam Stabilizer (like Annie’s Soft and Stable or Pellon Flex-Foam). Note: Regular batting is too floppy; foam gives the pouf its rigid shape.
- Muslin/Scrap Fabric: 1.5 yards (for the interior lining of the quilt sandwich).
- Closure: One 22-inch (or longer) heavy-duty zipper.
- Filling: 2 bags of Bean Bag Filler (Polystyrene beads) or shredded memory foam.
- Notions: Rotary cutter, heavy-duty needle (Size 100/16).
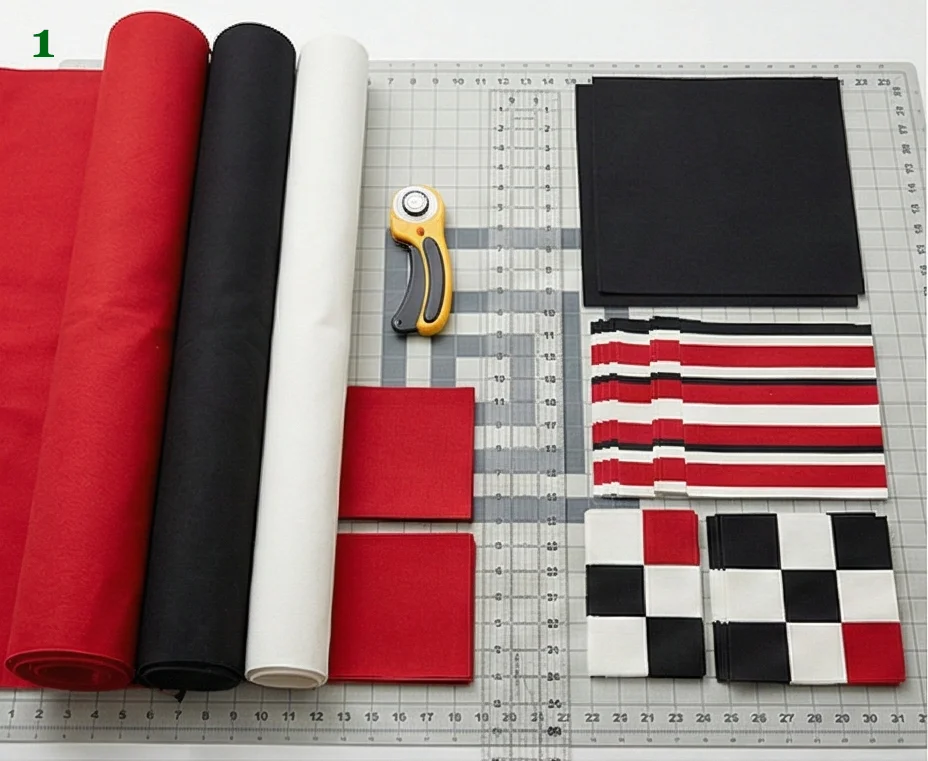
Step 1: Create the Panel Designs
A cube has 6 sides. To make it “Bold & Beautiful,” we will mix solid sides with patchwork sides.
- Top & Bottom (The Solids):
- From Black Fabric, cut 2 squares measuring 19″ x 19″.
- Side Panels 1 & 2 (The Stripes):
- Cut strips of Red, White, and Black (varying widths like 2.5″, 4.5″).
- Sew them together to make two striped panels. Trim them to 19″ x 19″.
- Side Panels 3 & 4 (The Checkerboard):
- Sew four large squares (9.5″ each) together (Black/White/White/Red) to make a 4-patch.
- Trim to 19″ x 19″.
- Result: You now have 6 raw panels, all 19″ square.
Step 2: Make the Foam Sandwiches
This step creates the “structural walls” of the pouf.
- Cut 6 squares of Muslin (19″ x 19″).
- Cut 6 squares of Fusible Foam (18″ x 18″). Note: The foam is smaller to keep bulk out of the seams.
- Fuse: Center the Foam on the back of your Exterior Panels. Iron to fuse.
- Layer: Place the Muslin on the back of the foam.
- Baste: Stitch around the very edge (1/8″) to hold the sandwich together.
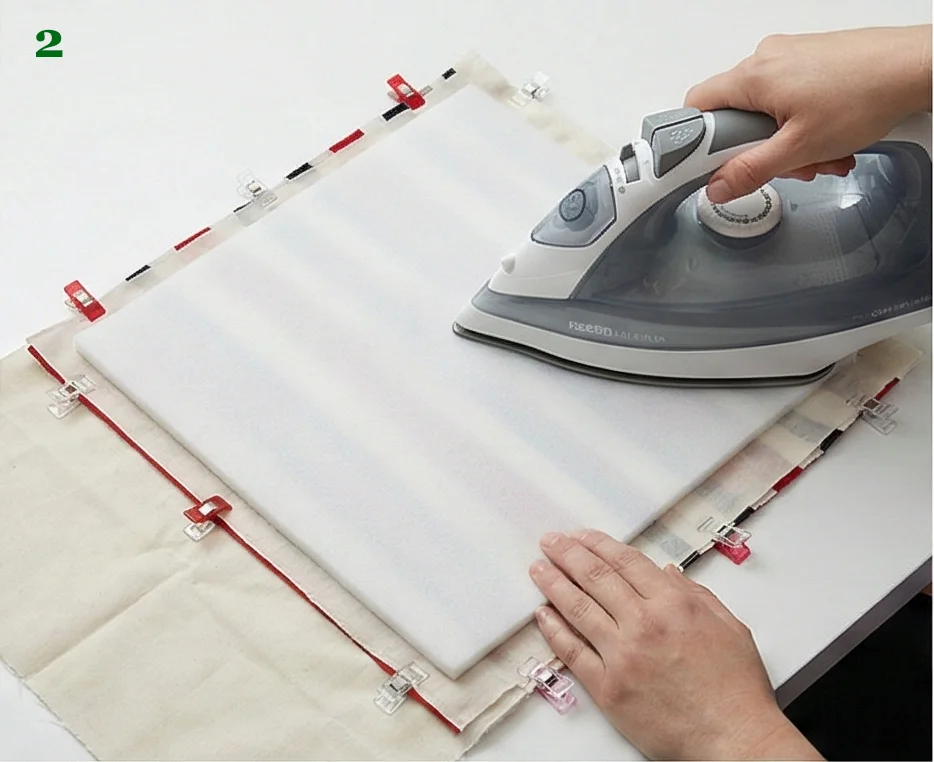
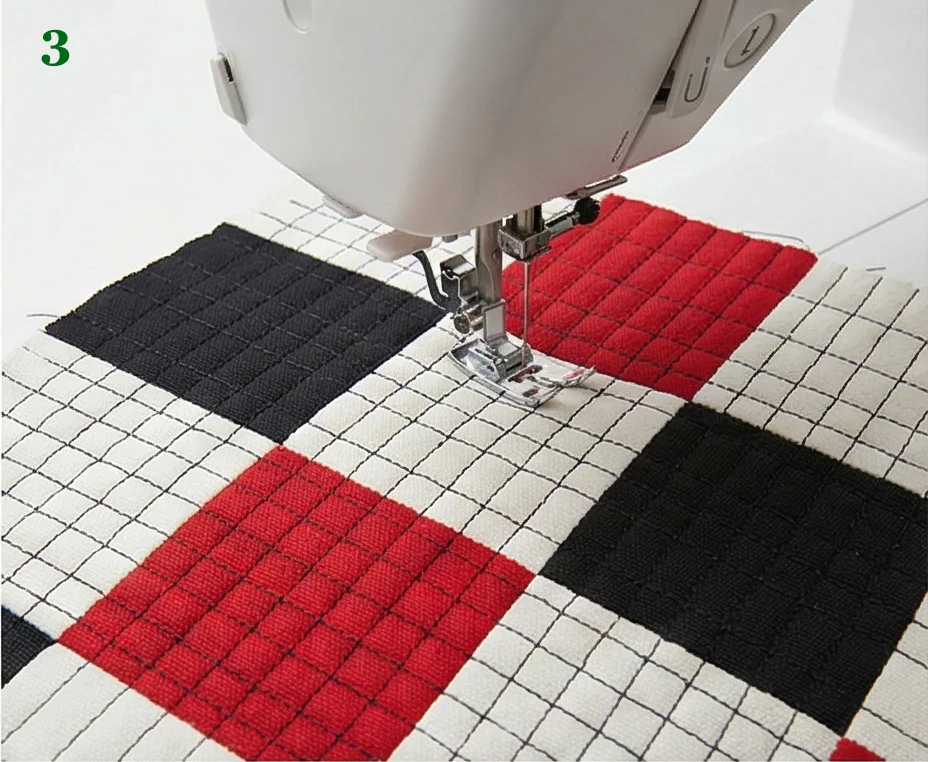
Step 3: Quilt for Structure
Quilting compresses the foam and makes it rigid.
- Grid Quilting: On all 6 panels, stitch a dense grid or straight lines spaced 1 inch apart.
- Thread: Use Black Thread for a graphic look.
- The dense quilting turns the fabric/foam sandwich into a stiff, board-like material that will hold the cube shape perfectly.
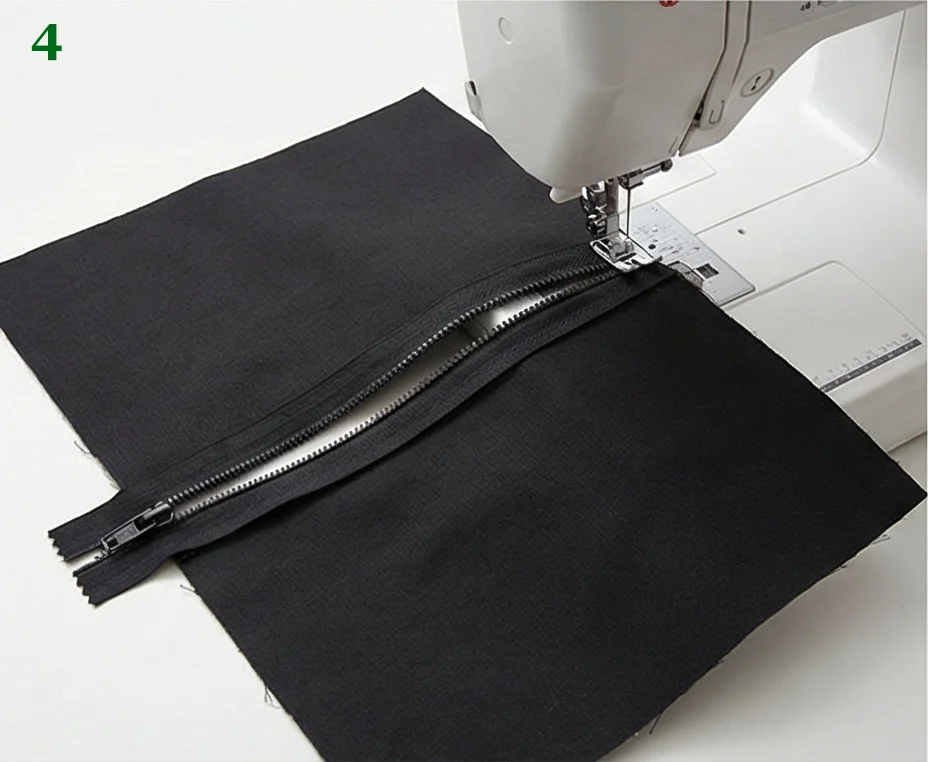
Step 4: Install the Zipper (Bottom Panel)
You need a way to get the filling in!
- Take your Black Bottom Panel. Cut it in half right down the middle.
- Sew the Zipper between the two halves.
- Open the zipper halfway (Important! Or you can’t turn it right side out later).
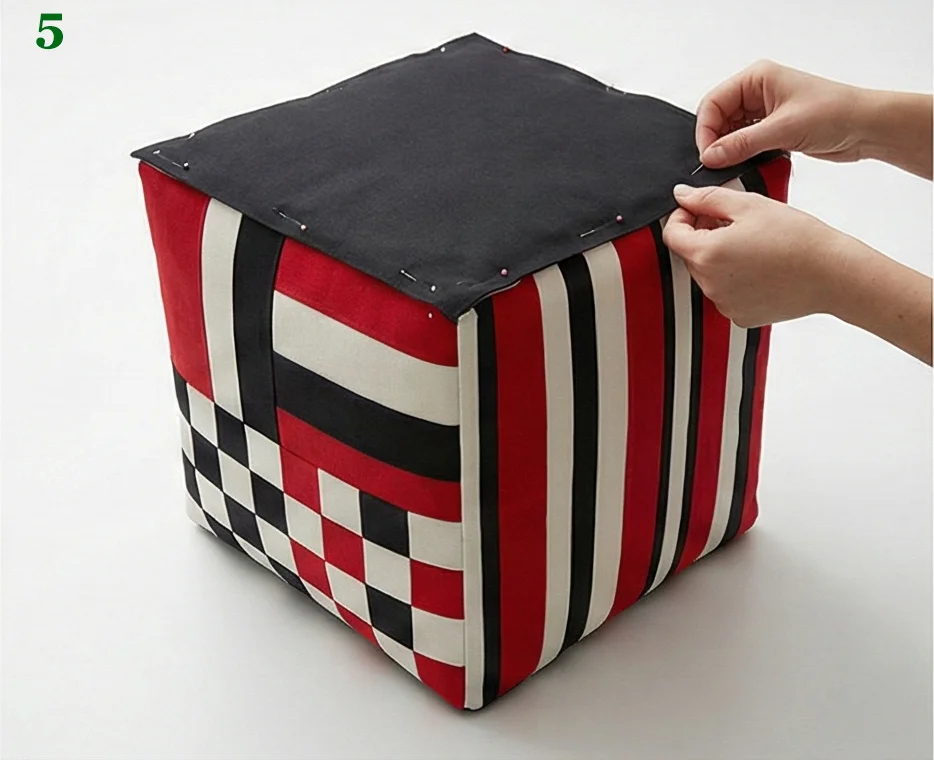
Step 5: Assemble the Cube
Think of this like building a box.
- The Walls: Sew the 4 Side Panels together in a line (Side 1 to Side 2 to Side 3 to Side 4).
- Use a 1/2″ seam allowance.
- Join Side 4 to Side 1 to close the loop (creating a square tube).
- The Top: Pin the Top Panel to the top edge of the tube. Sew all 4 sides, pivoting at the corners.
- The Bottom: Pin the Bottom Panel (with the zipper) to the bottom edge of the tube. Sew all 4 sides.
Step 6: Stuff and Shape
- Turn: Turn the cube right side out through the zipper. Use a chopstick to poke the corners out sharply.
- Fill:
- Tip: Do not pour beans directly in! They spill everywhere. Make a simple inner bag from an old sheet, fill it with beans, and stuff it into your quilted cube.
- Zip: Close the zipper. The foam walls will stand up straight, creating a perfect, modern block of seating.
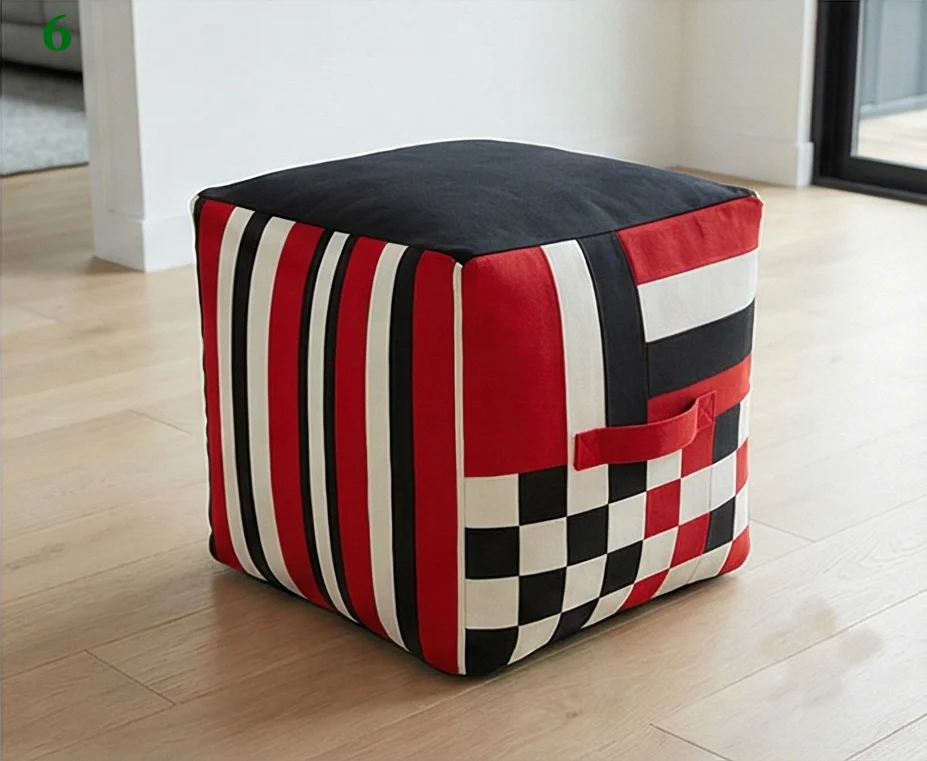
Pro Design Tip: The Handle. Before assembling the cube (Step 5), sew a sturdy Webbing Handle or a strap made from the Red Fabric onto one of the side panels. This makes it easy to drag the pouf around the living room for movie nights or game nights.
Budget Consideration: Eco-Stuffing. Bean bag beads flatten over time and are made of plastic. Instead, stuff your pouf with Old Textiles. Use old towels, sheets, t-shirts, and fabric scraps. It makes the pouf much heavier (solid like a rock), completely free to fill, and keeps textile waste out of landfills.
17. Reversible Quilt Designs for Versatile Styling
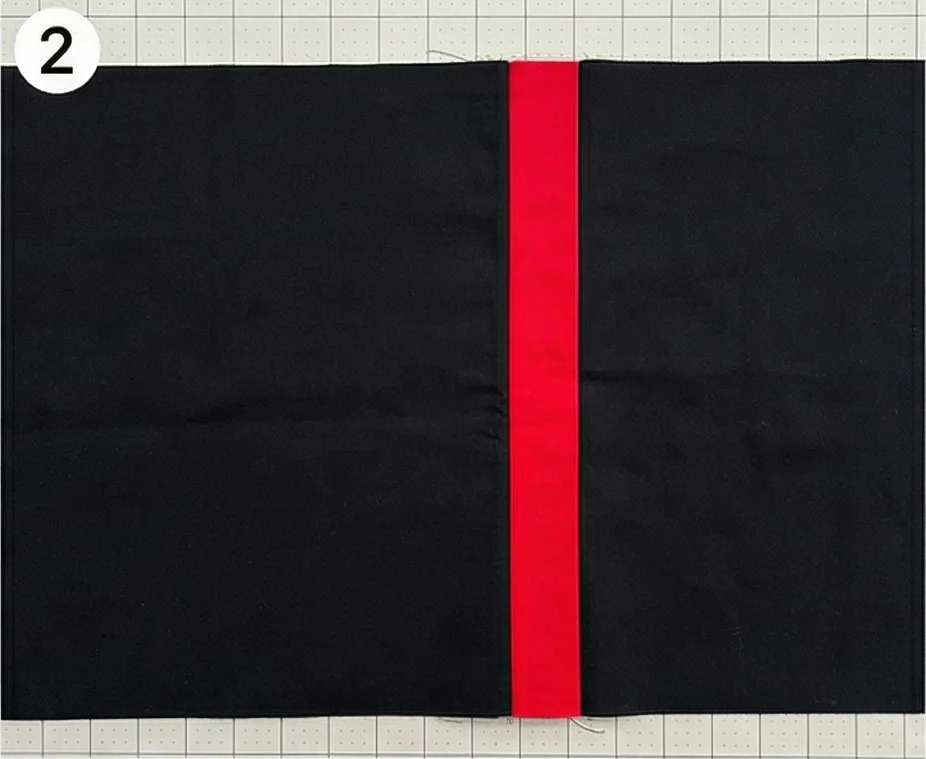
The “Day & Night” Dual-Personality Throw
Why settle for one look when you can have two? This reversible quilt is designed to instantly change the mood of your living room. Side A (The “Day” Side) features a high-energy “Swiss Cross” pattern in Red and White. Side B (The “Night” Side) is a sleek, moody “Piano Key” design using mostly Black with thin vertical lines. It allows you to flip the quilt from “Bright & Scandi” to “Dark & Moody” in seconds.
Finished Dimensions: Standard Throw, approximately 60″ x 60″.
Materials Needed:
- Fabric A (Side A Background/White): 2.5 yards of Solid White.
- Fabric B (Side A Crosses/Red): 1 yard of Bright Red.
- Fabric C (Side B Main/Black): 3 yards of Solid Black.
- Fabric D (Side B Accents): Scraps of the Red and White from above.
- Batting: Throw Size (64″ x 64″).
- Binding: 1/2 yard of Black and White Stripe (frames both sides perfectly).
- Notions: Rotary cutter, quilting ruler.
Step 1: Cut Side A (The Swiss Crosses)
We are making 25 Cross Blocks (5 rows of 5).
- From Fabric B (Red): Cut 50 rectangles, measuring 2.5″ x 6.5″.
- Also cut 25 squares, measuring 2.5″ x 2.5″.
- From Fabric A (White): Cut 100 squares, measuring 4.5″ x 4.5″.
- Note: This “floating cross” method is the easiest way to get crisp crosses without complex seams.
Step 2: Assemble Side A Blocks
- Layout One Block:
- Row 1: White Square (4.5″) — Red Rectangle (2.5″ wide, vertical) — White Square (4.5″).
- Row 2: Red Rectangle (6.5″ wide, horizontal) … Wait, this math is tricky for beginners. Let’s switch to the standard 5-square method.
- Correction/Simpler Method: A cross is just 5 squares.
- New Cut List: Cut 125 Red Squares (4.5″) and 200 White Squares (4.5″).
- Row 1: White – Red – White.
- Row 2: Red – Red – Red.
- Row 3: White – Red – White.
- Sew these into a 9-patch block.
- Sew: Stitch the 9 squares together. The block will measure 12.5″ x 12.5″.
- Make 25 Blocks.
- Join: Sew them into a 5×5 grid. Side A is done!
Step 3: Create Side B (The Piano Keys)
The back needs to be pieced, not just a plain sheet, to qualify as “Reversible.”
- The Concept: Large panels of Black interrupted by thin vertical strips of Red and White.
- Cut: From Fabric C (Black), cut 4 large panels measuring 15.5″ wide x 60.5″ tall.
- Cut Accents: From your Red and White scraps, cut long 1.5″ strips. Sew them end-to-end to reach 60″ in length.
- Assembly:
- Sew: Black Panel — Red Strip — Black Panel — White Strip — Black Panel — Red Strip — Black Panel.
- Result: A dark, sleek surface with thin pinstripes.
Step 4: The Reversible Baste
Basting is critical here because you need both sides to be centered.
- Tape Side B (Black) face down on the floor. Stretch it taut.
- Layer the Batting.
- Center Side A (Crosses) face up on top.
- Check: Feel with your fingers to ensure the seams of Side B (the pinstripes) aren’t warping under the weight of Side A.
- Pin Baste: Use safety pins every 3-4 inches. Spray baste is risky for reversible quilts as it can sometimes shift large pieced backings.
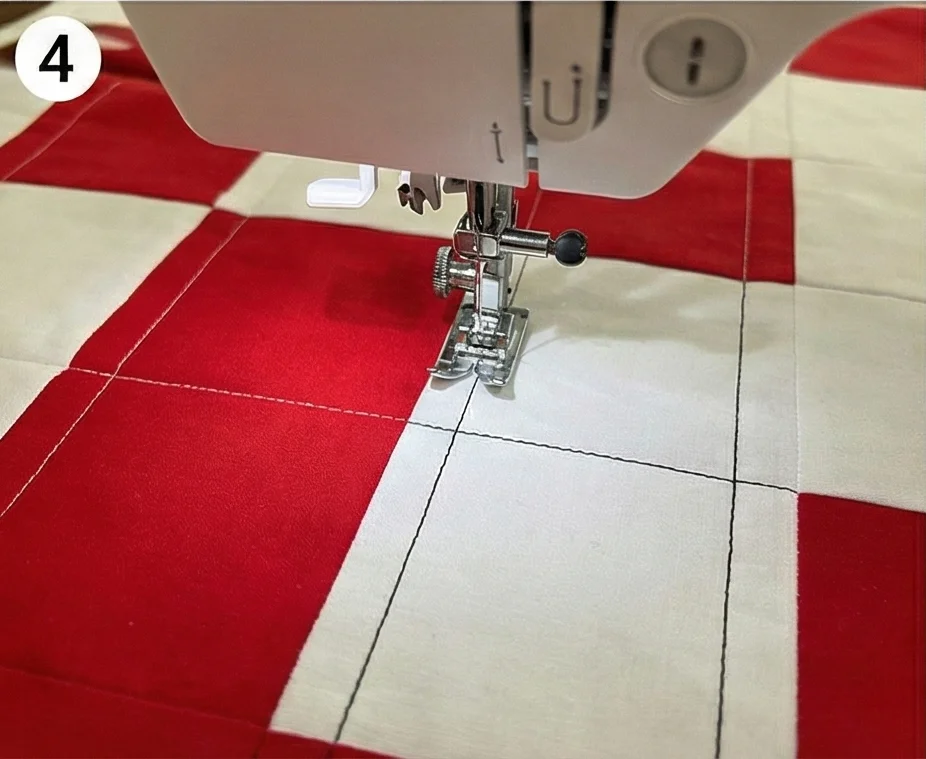
Step 5: “Shadow” Quilting
You need a quilting pattern that looks good on squares (Side A) AND stripes (Side B).
- The Solution: A simple 2-inch Grid.
- Thread Color: This is the challenge.
- Top Thread: White (blends with Side A).
- Bobbin Thread: Black (blends with Side B).
- Tension Check: Test on a scrap first! If your tension is off, you will see white dots on the black side or black dots on the white side.
- Quilt: Stitch straight vertical and horizontal lines across the quilt. The grid reinforces the geometry of the crosses on the front and adds a modern texture to the black stripes on the back.
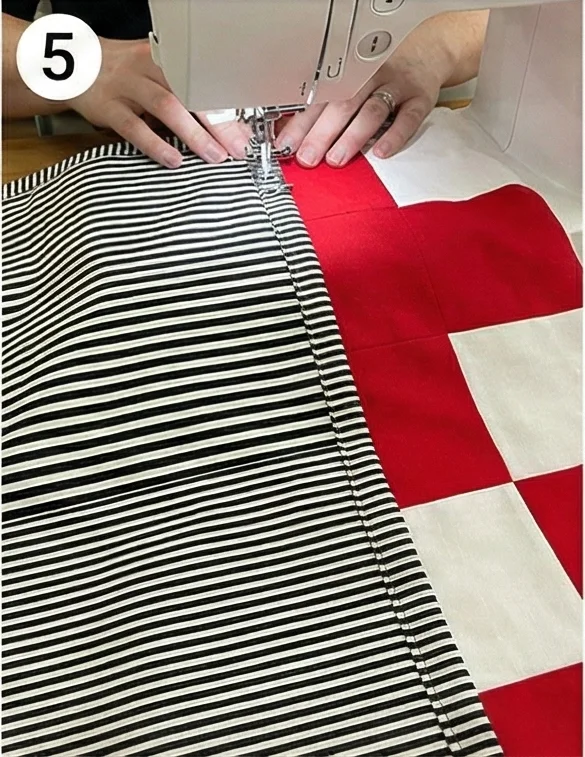
Step 6: The Contrast Binding
- Use the Black and White Striped fabric.
- Cut 2.5″ strips and prepare your binding.
- Attach: Sew it to Side A first, then fold it over to Side B. Hand-stitch or machine-stitch it down.
- Effect: The striped rim serves as a neutral frame, tying the red/white front and the black/red back together visually.
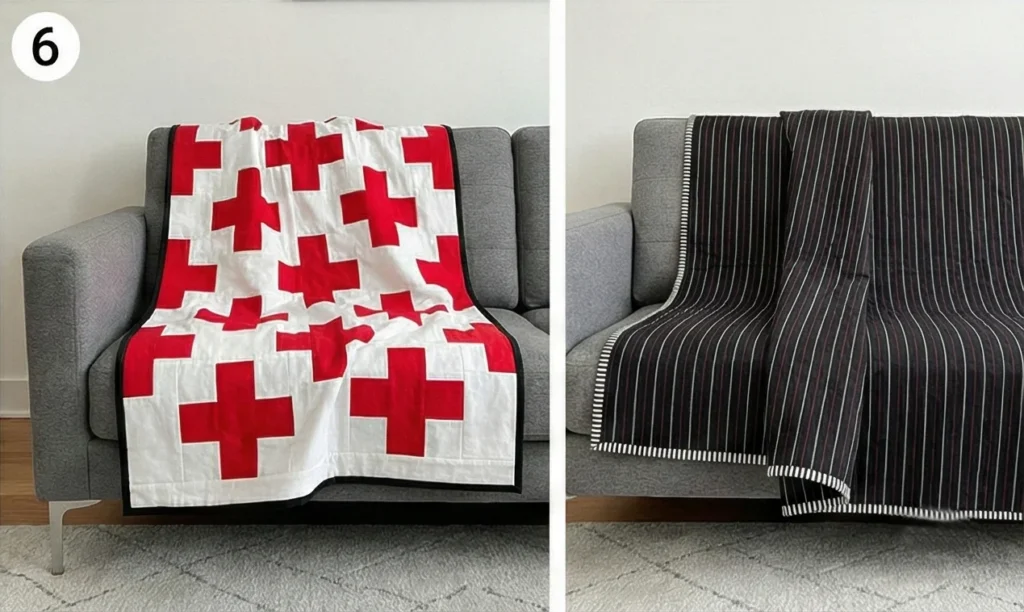
Pro Design Tip: The “Label” Hack. On a reversible quilt, you don’t want a dedicated label patch ruining the design on one side. Instead, incorporate your label into the binding. Write your name and date on a piece of Twill Tape, then sew it into the binding seam so it folds out subtly, like a clothing tag.
Budget Consideration: Use Leftovers. “Side B” is the perfect place to use up all the weird strip cuttings left over from “Side A.” If you have 20 extra red squares, sew them into a single long strip and insert that into the black backing. It saves money on backing fabric and reduces waste.
18. Houndstooth Inspired Quilt for Cozy Table Runners
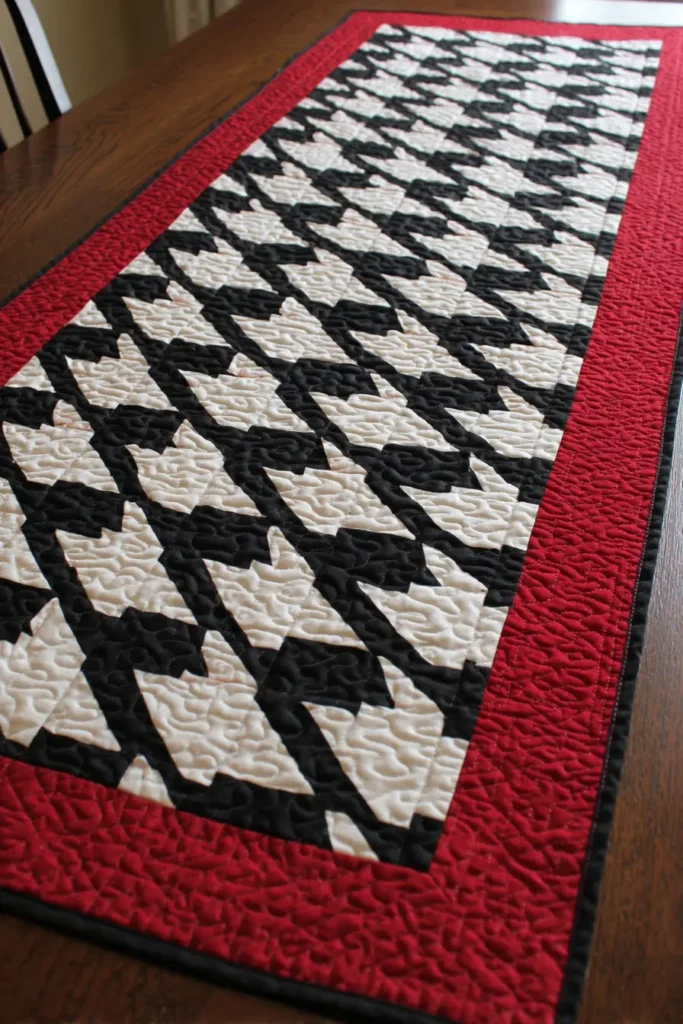
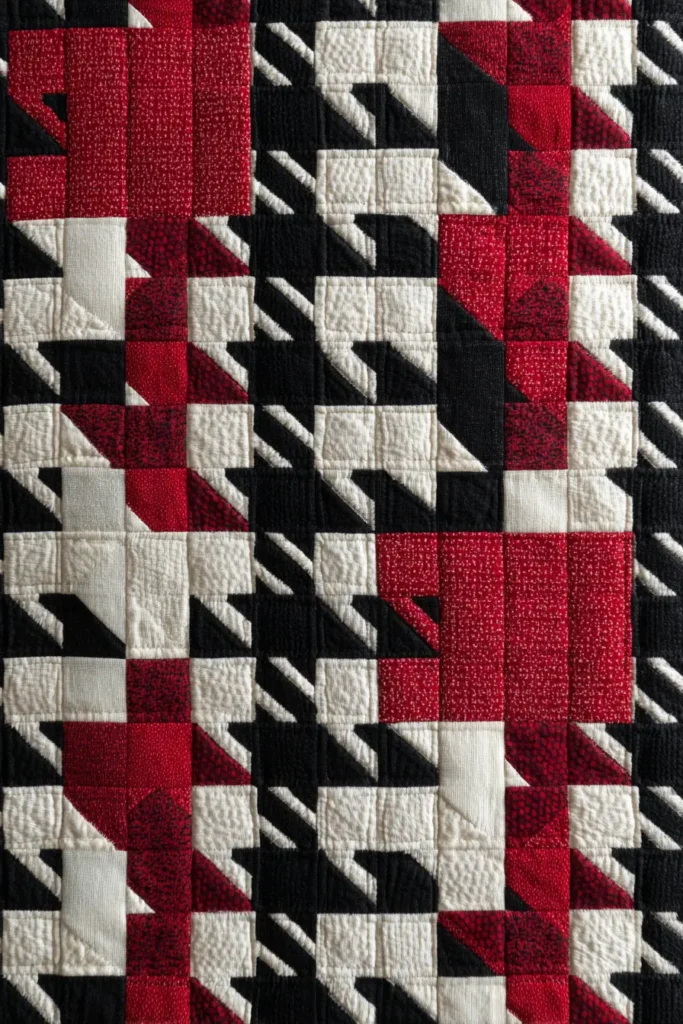
The “Puppy Tooth” Modern Table Runner
Classic Houndstooth is a weaving pattern, but quilters can replicate that iconic jagged look using simple squares and triangles. This runner uses a high-contrast Black and White center to create the optical illusion of the “tooth,” framed by a bold Red border that makes it pop on any dining table. It looks complex and expensive, but it’s essentially just a 4-patch block!
Finished Dimensions: Dining Table Runner, approximately 16″ x 60″.
Materials Needed:
- Fabric A (Black): 3/4 yard of Solid Black.
- Fabric B (White): 3/4 yard of Solid White.
- Fabric C (Border/Red): 1/2 yard of Deep Red or Cherry Red.
- Backing Fabric: 1 yard.
- Batting: Thin Cotton Batting or Fusible Fleece (18″ x 64″).
- Binding: 1/4 yard of Solid Black.
- Notions: Rotary cutter, 4.5″ square ruler (or larger).
Step 1: Cut the Components
The houndstooth block is built from solid squares and Half Square Triangles (HSTs).
- From Fabric A (Black):
- Cut 3 strips measuring 2.5″ wide. Sub-cut into 48 squares (2.5″ x 2.5″).
- Cut 2 strips measuring 3″ wide (for HSTs). Sub-cut into 24 squares (3″ x 3″).
- From Fabric B (White):
- Cut 3 strips measuring 2.5″ wide. Sub-cut into 48 squares (2.5″ x 2.5″).
- Cut 2 strips measuring 3″ wide (for HSTs). Sub-cut into 24 squares (3″ x 3″).
- From Fabric C (Red):
- Cut 3 strips measuring 2.5″ wide x WOF (Width of Fabric) for the border.

Step 2: Create the HSTs
We need 48 Half Square Triangles.
- Take your larger 3″ Black and 3″ White squares.
- Place a Black and White square Right Sides Together.
- Draw a diagonal line on the back of the White square.
- Sew 1/4″ away from the line on both sides.
- Cut on the drawn line. Press seams toward the Black.
- Trim: Square up these units to exactly 2.5″ x 2.5″.
- Yield: You now have 48 Black/White HSTs.
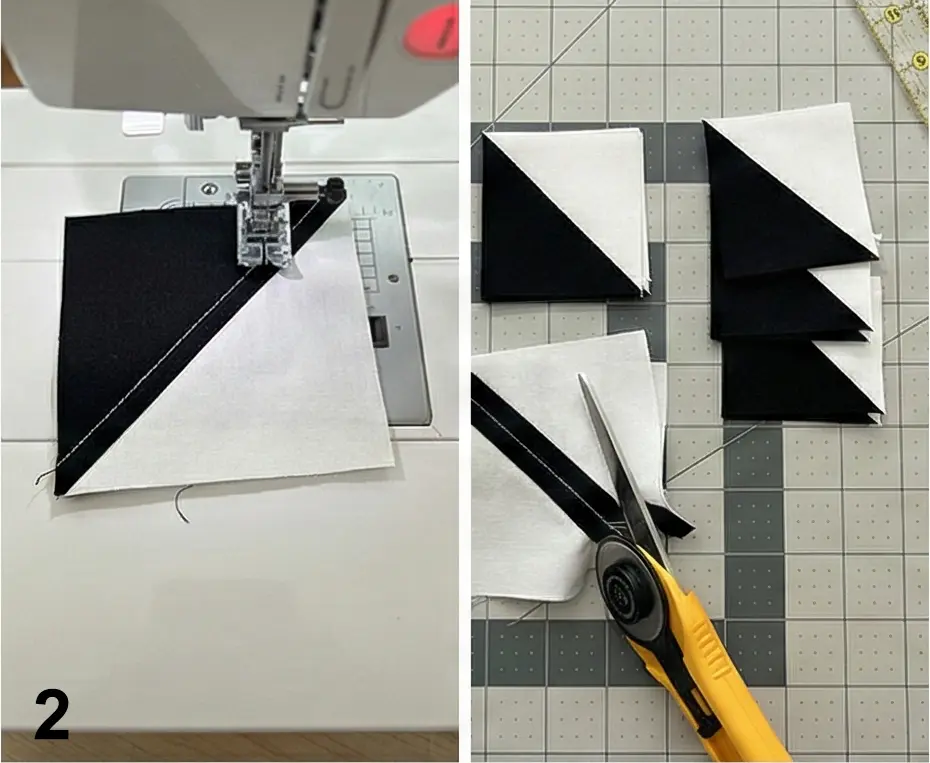
Step 3: Assemble the “Tooth” Block
Each block is a 4-patch grid. Pay attention to orientation!
- Lay out 4 pieces in a 2×2 grid:
- Top Left: Solid White Square.
- Top Right: HST (Orient so the Black triangle is in the bottom-right corner).
- Bottom Left: HST (Orient so the Black triangle is in the bottom-right corner).
- Bottom Right: Solid Black Square.
- Check: The Black triangles should touch the Solid Black square, creating a larger black shape that looks like a jagged arrow.
- Sew: Stitch into rows, then sew rows together.
- Size: The block should measure 4.5″ x 4.5″.
- Quantity: Make 24 Blocks.
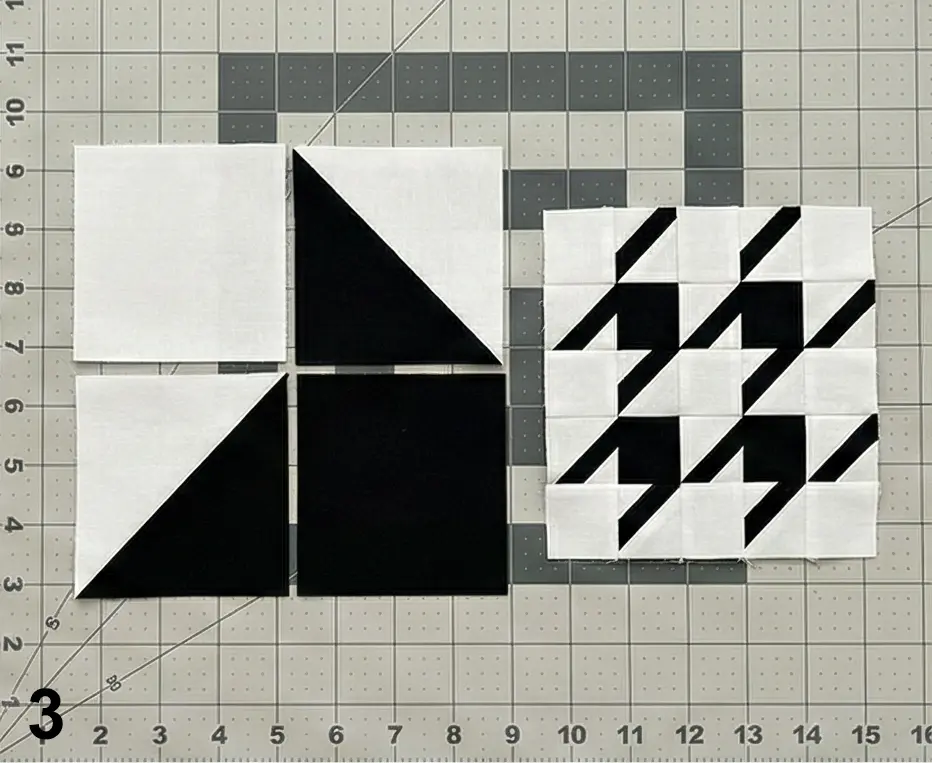
Step 4: Assemble the Runner Center
- Arrangement is simple: 2 Blocks Wide x 12 Blocks Long.
- Orientation: Lay the blocks out so they all face the same direction. The “Teeth” should all point diagonally.
- Sew: Stitch the blocks into pairs (rows of 2). Then sew the 12 pairs together to form the long runner.
- Press: Press seams open to keep the runner flat.
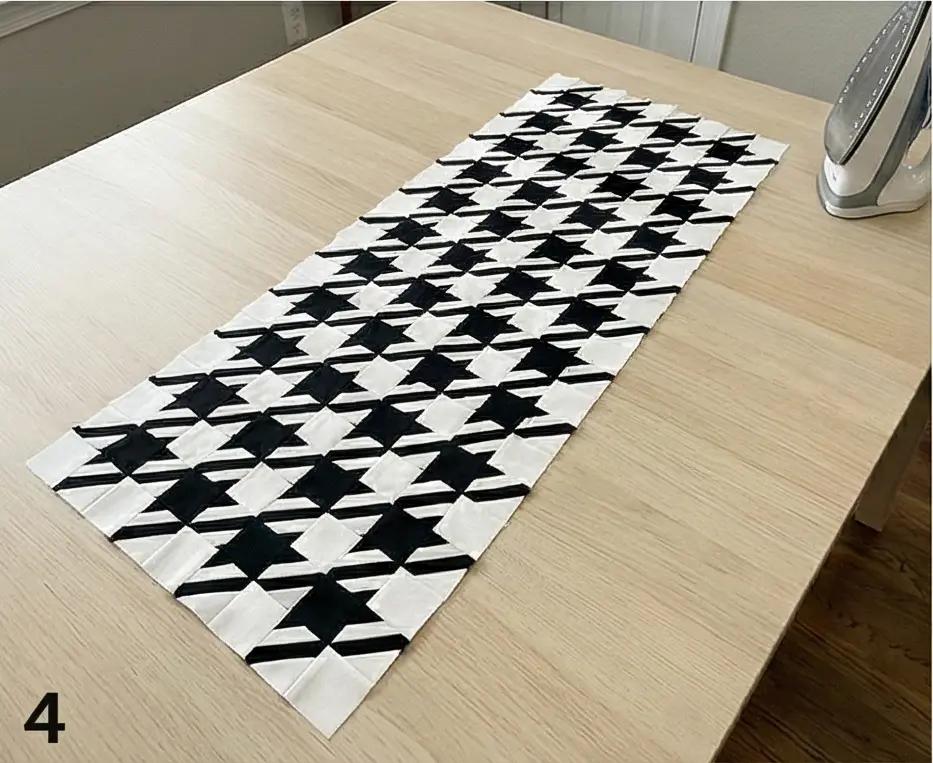
Step 5: Add the Red Frame
The jagged black and white needs a container.
- Sew your Red strips together end-to-end to create long borders.
- Sides: Measure the length of your runner (approx 48.5″). Cut two Red strips to this length. Sew to the Long Sides.
- Ends: Measure the width (approx 12.5″). Cut two Red strips to this length. Sew to the Short Ends.
- Result: The runner is now approx 16.5″ x 52.5″.
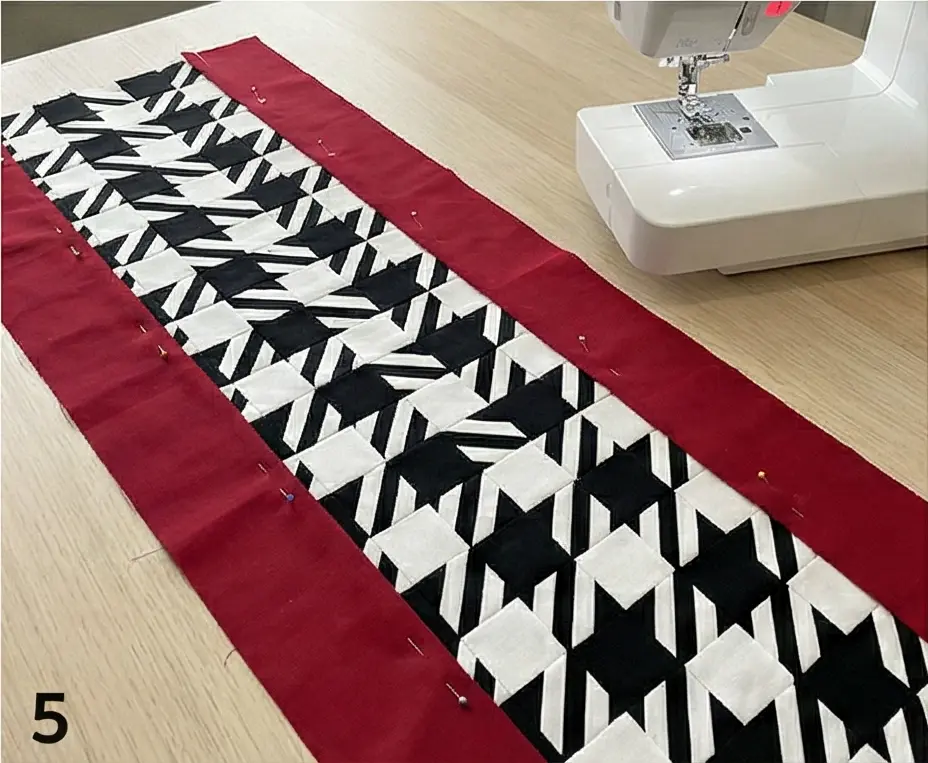
Step 6: “Diagonal” Quilting
- Fuse your fleece or baste your sandwich.
- Quilting: Follow the lines of the pattern.
- Design: Quilt straight diagonal lines through the center of the HSTs.
- Stitch parallel lines about 1 inch apart.
- This diagonal texture reinforces the “weaving” look of real houndstooth fabric.
- Bind: Finish with Solid Black binding for a clean edge.
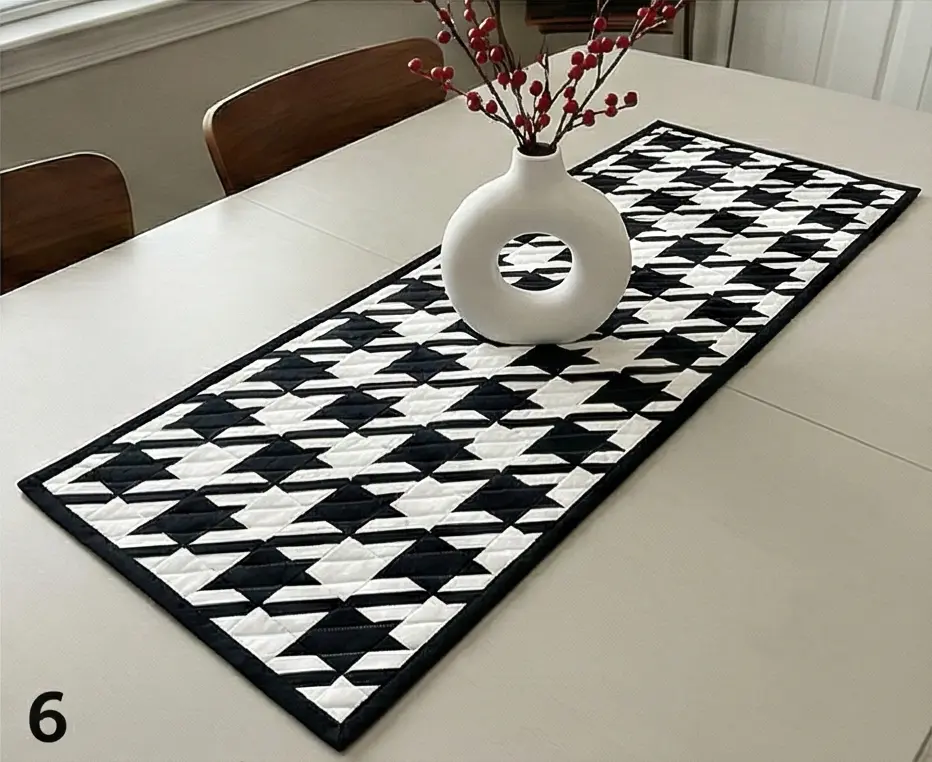
Pro Design Tip: Gradient Houndstooth. Instead of just solid Black, use a mix of Charcoal, Black, and Midnight Blue squares for the dark parts of the pattern. Arrange them randomly. It gives the runner a shimmering, tailored suit appearance rather than a flat graphic look.
Budget Consideration: Suit Upcycling. Houndstooth is a menswear staple. Visit a thrift store and buy Men’s Wool Suit Trousers in Black and Grey. Cut your squares from the wool fabric. The texture is incredible for a winter table runner, and wool naturally repels water spills!
19. Red, Black, and White Stripe Quilts for Sleek Modern Sofas
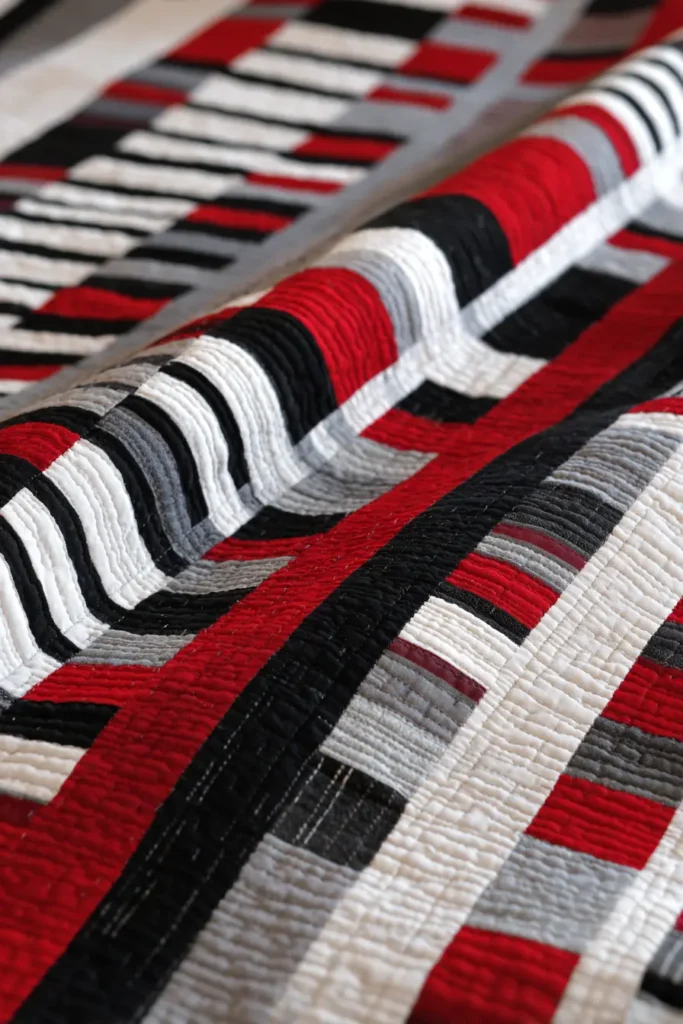

The “Morse Code” Message Quilt
Standard horizontal stripes can look a bit like a prison uniform or a referee shirt. To make stripes “Modern,” we break them up. This design uses horizontal rows of Black and White, with small squares of Red and White randomly inserted into the black rows (and vice versa). It creates a “Dash-Dot-Dash” visual that looks like a secret message encoded in the fabric. It is sleek, linear, and keeps the eye moving.
Finished Dimensions: Sofa Throw, approximately 55″ x 65″.
Materials Needed:
- Fabric A (Black): 2 yards of Solid Black.
- Fabric B (White): 2 yards of Solid White.
- Fabric C (Red): 1/2 yard of Bright Red (or scraps).
- Backing Fabric: 3.5 yards.
- Batting: Throw Size (60″ x 70″).
- Binding: 1/2 yard of Solid Red (to frame the code).
- Notions: Rotary cutter, quilting ruler.
Step 1: Cut the Strip Components
We are building this row by row. We need varied lengths to create the “code.”
- Cut Full Strips:
- From Black: Cut 12 strips, measuring 4.5″ wide x Width of Fabric (WOF).
- From White: Cut 12 strips, measuring 4.5″ wide x WOF.
- Cut the “Dots” (The Code Breakers):
- From Red: Cut 3 strips (4.5″ wide). Sub-cut them into random small rectangles (4.5″ x 2.5″, 4.5″ x 4.5″, 4.5″ x 6.5″).
- From Black & White (scraps): Cut a few small rectangles (4.5″ x 3.5″) to use as spacers.
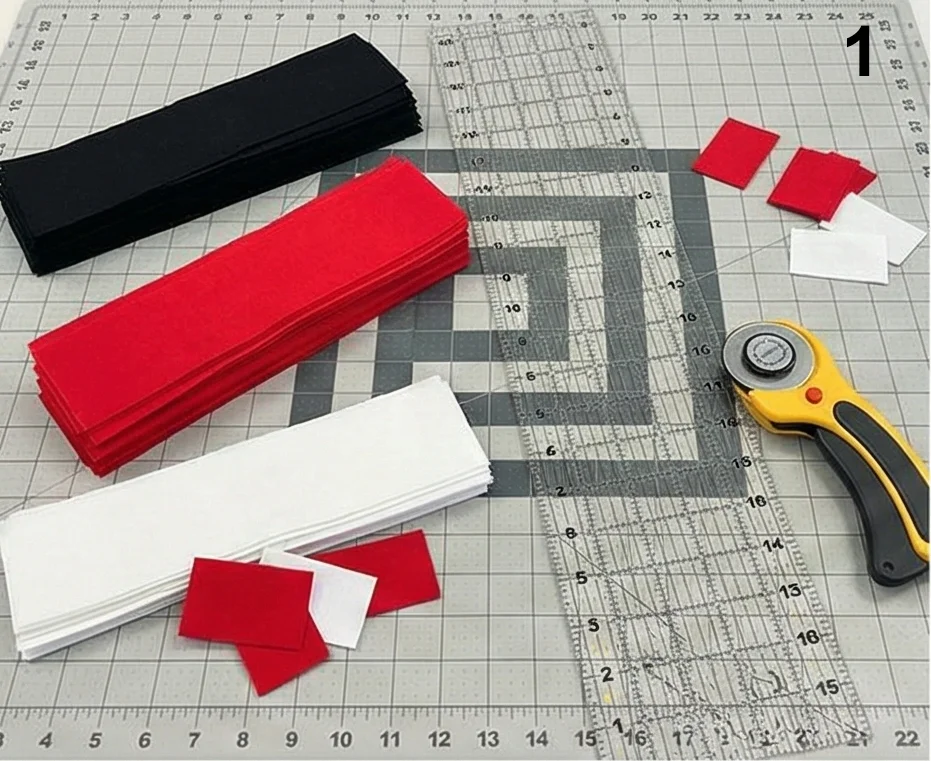
Step 2: Create the “Message” Rows
We will make roughly 15 horizontal rows. Some will be solid, some will be coded.
- Solid Rows: Keep about 5 strips (some Black, some White) purely solid. Just sew two WOF strips end-to-end and trim to 55.5″ long.
- Coded Rows: Take a long Black strip.
- Slice: Cut it randomly in 2 or 3 places.
- Insert: Sew a Red Rectangle or a White Rectangle into the gap you just cut.
- Re-join: Sew the strip back together.
- Reverse: Do the same for a White strip (insert Red or Black rectangles).
- Goal: You want about 10 “Coded” rows that are 55.5″ long, featuring random pops of color.
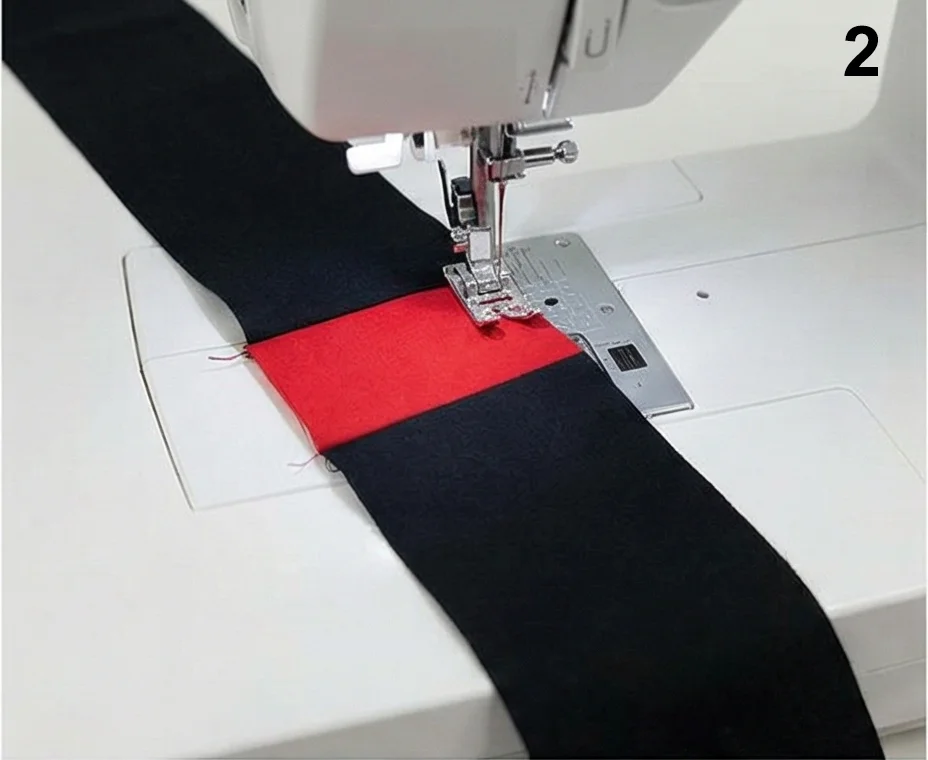
Step 3: The Layout
- Find a floor space. Arrange your 15 rows horizontally.
- Randomize:
- Don’t just alternate Black/White/Black/White. That’s too predictable.
- Try: Black (Solid) — Black (Coded) — White (Coded) — Black (Coded) — White (Solid) — Red (Wait, do we have a red row? No, just accents).
- Design Tip: Group the darker rows at the bottom and the lighter rows at the top for a “gradient” effect.
- Check: Ensure the little “Red Dots” are scattered and don’t bunch up in one area.
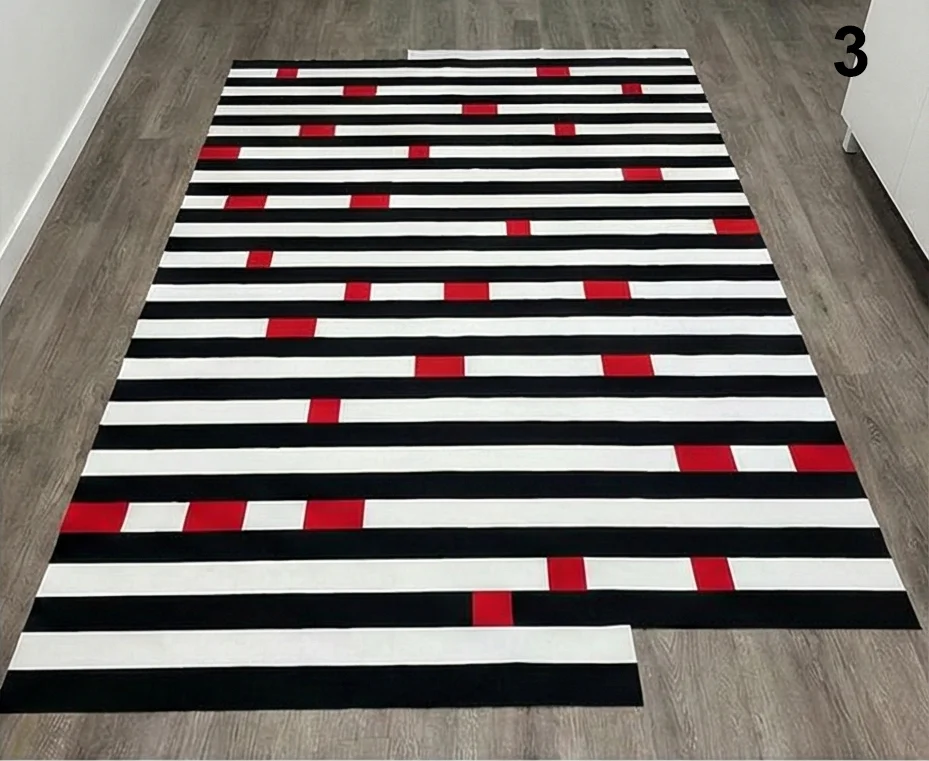
Step 4: Row Assembly
- Pin: Long horizontal strips can bow or stretch. Pin the rows together every 10 inches.
- Sew: Stitch the rows together using a 1/4″ seam allowance.
- Press: Press all horizontal seams in one direction (e.g., downwards). This makes the quilt stronger.
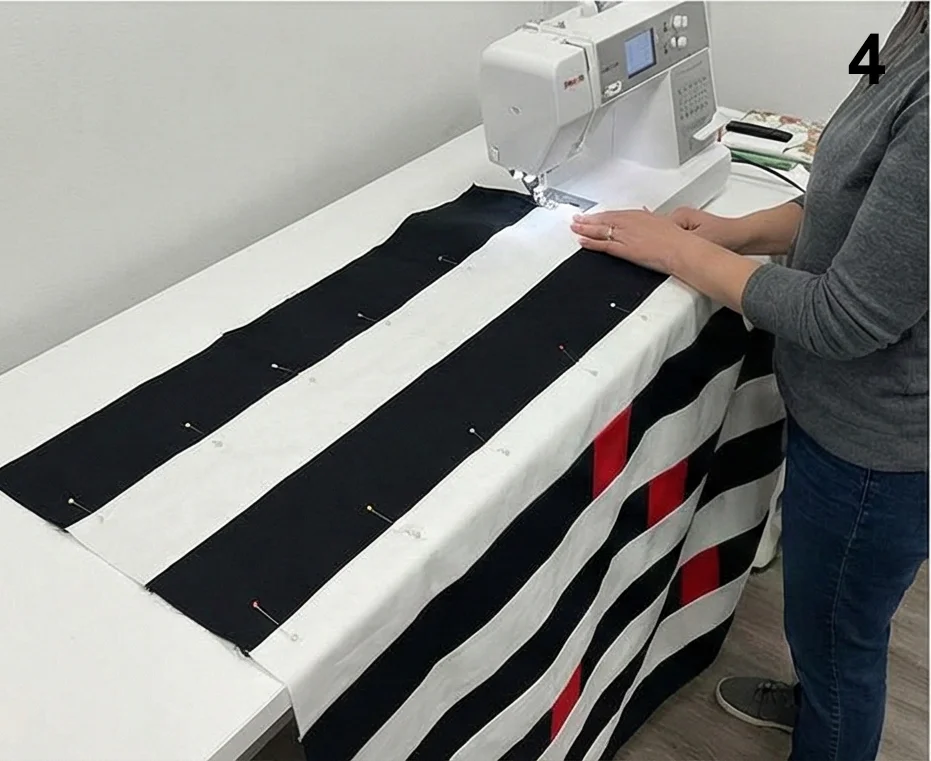
Step 5: “Transmission Line” Quilting
- Baste the sandwich.
- Quilting: A linear design needs linear quilting.
- Design: Stitch straight horizontal lines running parallel to the seams.
- Stitch “in the ditch” (in the seam lines).
- Then, stitch a straight line through the center of every row.
- Effect: This simple quilting emphasizes the horizontal flow and makes the throw drape beautifully over the arm of a sofa.
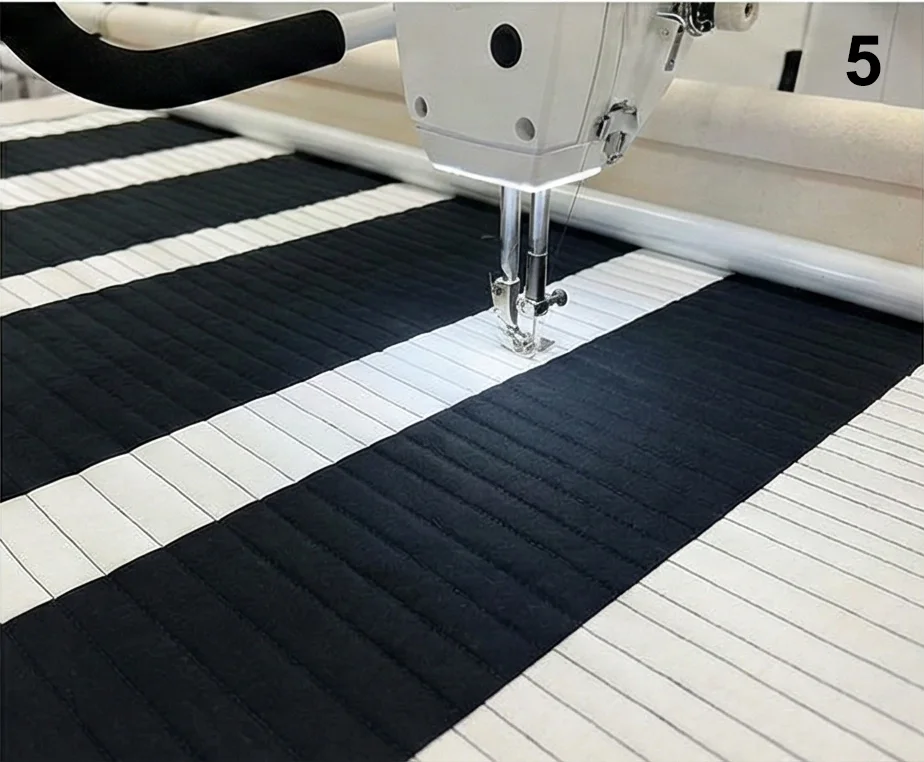
Step 6: The “Red Alert” Binding
- Use the Solid Red fabric.
- Prepare standard 2.5″ binding strips.
- Attach: The bright red frame contains the “data stream” of the quilt, making the random red blocks inside pop out visually.
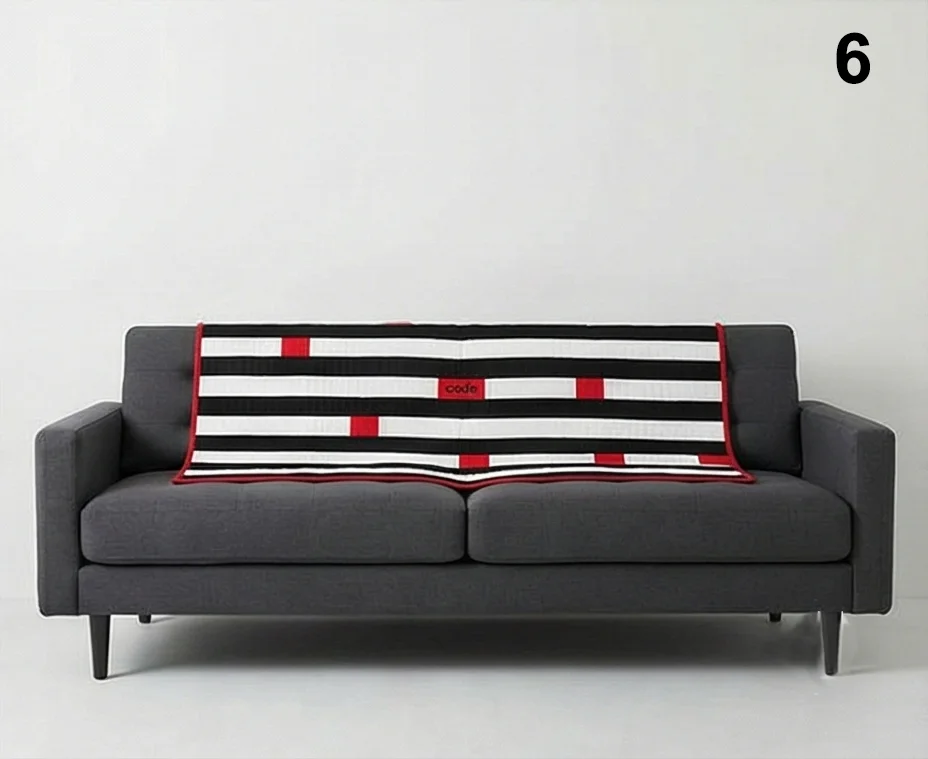
Pro Design Tip: Actual Morse Code. If you want to be a true geek about it (in a stylish way), actually encode a word!
- Let a 2.5″ wide block = Dot.
- Let a 6.5″ wide block = Dash.
- Use the Black/White contrast to spell out “LOVE,” “HOME,” or your family name in the stripes. Only you will know it’s there!
Budget Consideration: Jelly Rolls. If you want thinner stripes (2.5″ wide instead of 4.5″), buy a Black Jelly Roll and a White Jelly Roll. Use the pre-cut strips to build your rows. It creates a busier, more vibrating texture while saving hours of cutting time.
20. Durable Quilted Area Rugs in Tricolor Geometrics
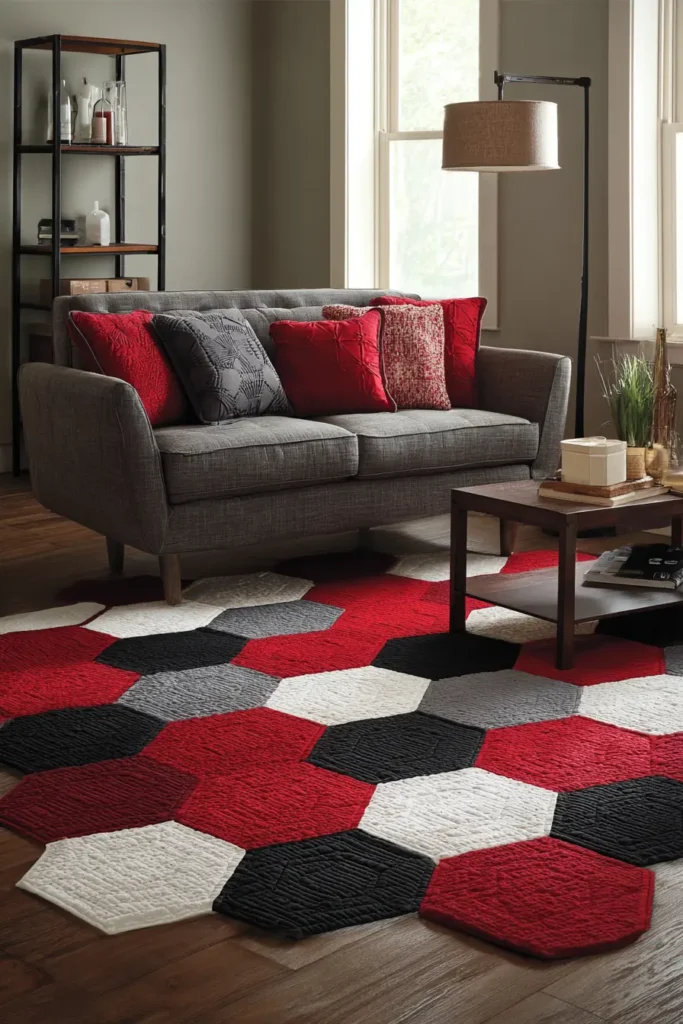
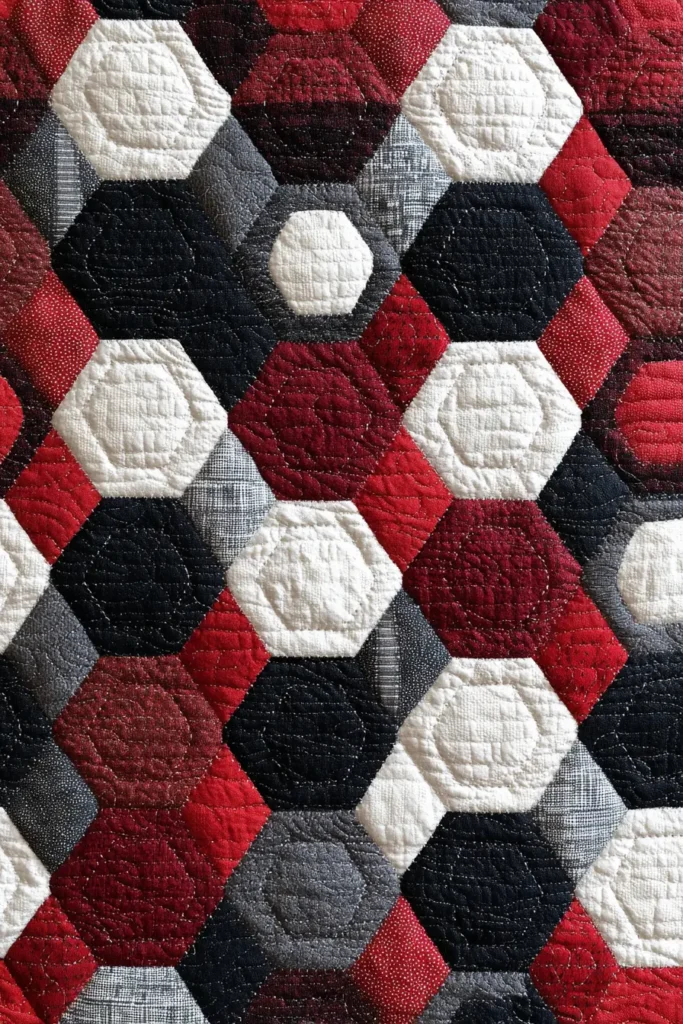
The “Honeycomb Hard-Wear” Hexagon Floor Rug
Floor rugs take a beating, so delicate quilting cotton won’t cut it here. This design uses the classic Hexagon shape to mimic the look of trendy honeycomb floor tiles. Using Heavyweight Canvas or Denim, we create a rugged, flat-lying rug that forms a stunning red, black, and white focal point in the center of a room.
Finished Dimensions: Small Area Rug, approximately 45″ x 55″.
Materials Needed:
- Fabric A (Black): 1.5 yards of Black Duck Cloth or Heavy Canvas.
- Fabric B (White): 1.5 yards of White Duck Cloth or Heavy Canvas.
- Fabric C (Red): 1 yard of Red Denim or Canvas.
- Backing Fabric: 2 yards of Rubberized Non-Slip Fabric (or heavy Drop Cloth).
- Batting: Fusible Fleece (Stiff) or “Rug Interfacing.” Do not use puffy poly-fill batting; it makes the rug a tripping hazard.
- Binding: 3/4 yard of Wide Black Bias Tape.
- Notions: Rotary cutter, 60-degree triangle ruler (or a cardstock template), Jeans Needle (Size 100/16).
Step 1: The “Half-Hexie” Hack (Cutting)
Sewing full hexagons requires difficult Y-seams. We will “cheat” by cutting Half-Hexagons (trapezoids), which sew together in straight rows.
- Make a Template: Cut a piece of cardstock into a trapezoid.
- Bottom Width: 10 inches.
- Top Width: 5 inches.
- Height: 4.5 inches.
- Cut Strips: Cut your fabric into strips that are 4.5″ tall.
- Cut Shapes: Place your template on the strips and cut.
- Flip the template upside down after every cut to minimize waste.
- Cut 30 Black, 30 White, and 15 Red half-hexagons.
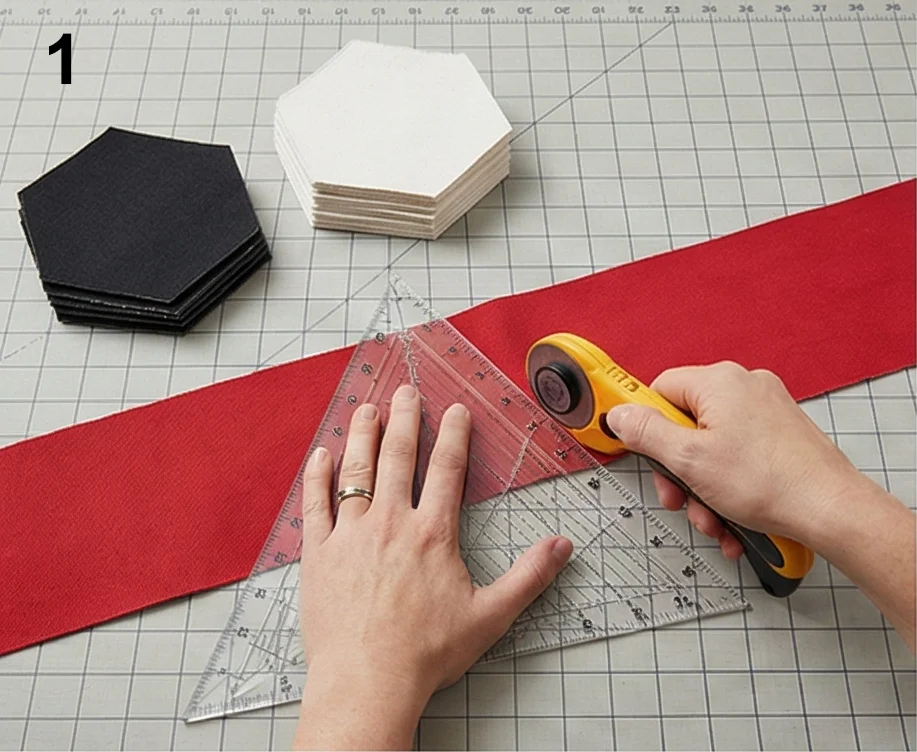
Step 2: The Layout
- Clear a large floor space.
- Arrange Row 1: Lay out the shapes side-by-side, alternating the orientation (Wide base down, Narrow base down, Wide base down…).
- Arrange Row 2: Place this row below the first.
- Crucial: Arrange it so that when a “Wide Base” from Row 1 meets a “Wide Base” from Row 2, they form a Full Hexagon.
- Pattern: Scatter the Red hexagons randomly among the Black and White to create a “confetti” or “mosaic” look. Avoid big clumps of one color.
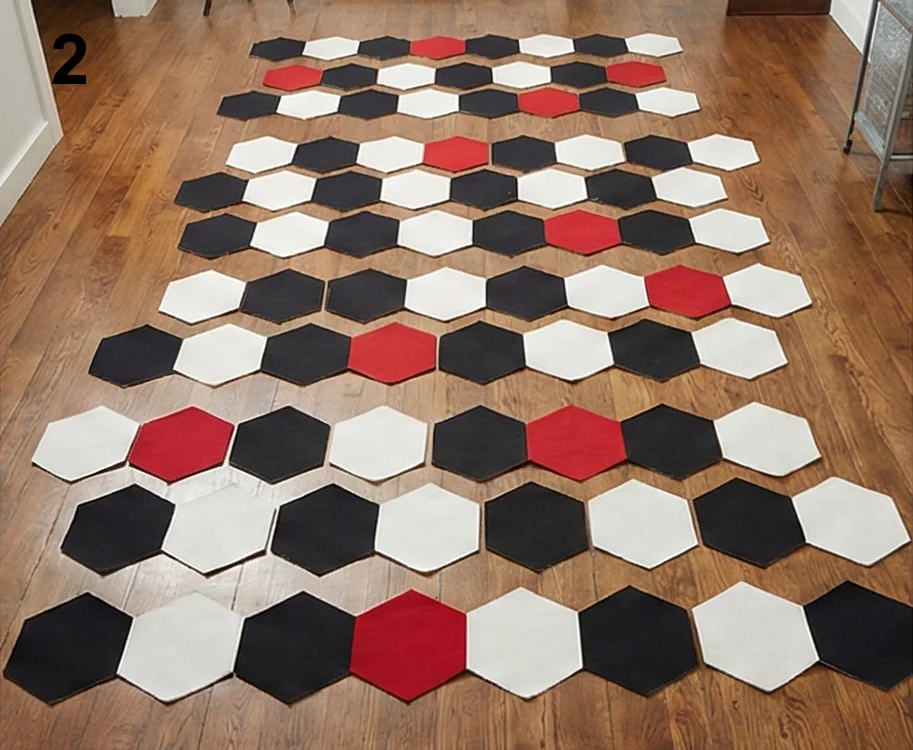
Step 3: Sew the Rows
- Stitch: Sew the pieces of Row 1 together end-to-end.
- Use a 1/4″ seam allowance.
- Tip: Because we are using canvas, go slow over the bulky seams.
- Press: Press every vertical seam Open. This is vital for a floor rug; if you press to the side, the ridge will be too high and uncomfortable underfoot.
- Repeat for all rows.
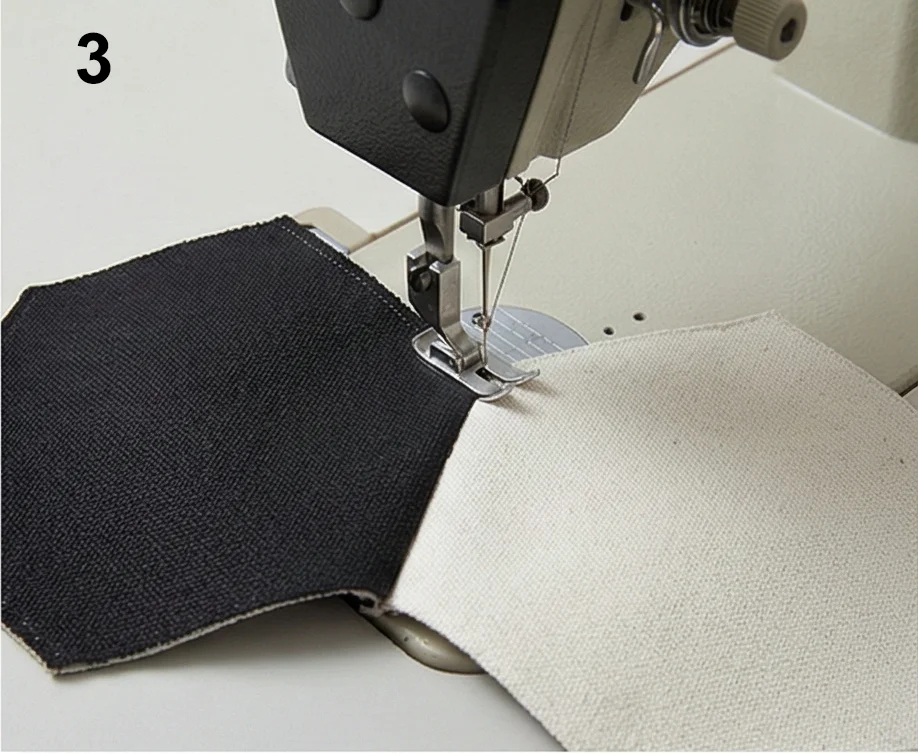
Step 4: Join the Rows (Completing the Hexagons)
- Place Row 1 and Row 2 Right Sides Together.
- Pin: Match the intersection points carefully. The points where the half-hexagons meet must align perfectly to make the full hexagon shape look seamless.
- Sew: Stitch the long horizontal seam.
- Press: Press the long horizontal seam Open.
- Continue joining all rows until the top is complete.
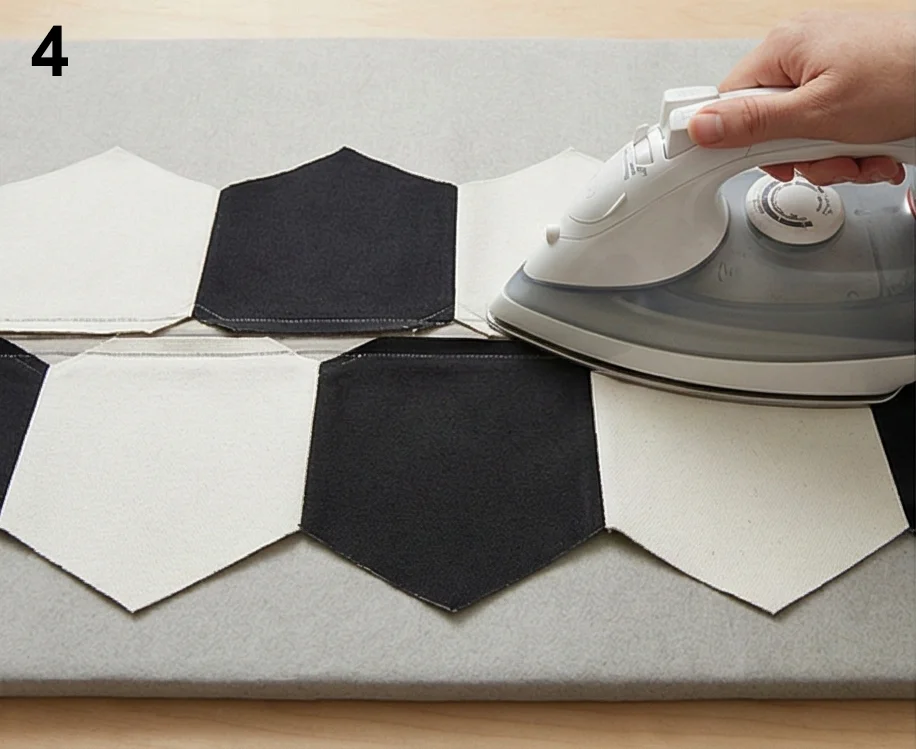
Step 5: Trim the Edges
- Because of the hexagon shape, the left and right edges of your rug will be zigzagged.
- Decision:
- Option A: Leave it zigzagged for a funky geometric edge (harder to bind).
- Option B: Use a long ruler and rotary cutter to slice the sides straight, creating a rectangular rug. (Recommended for beginners).
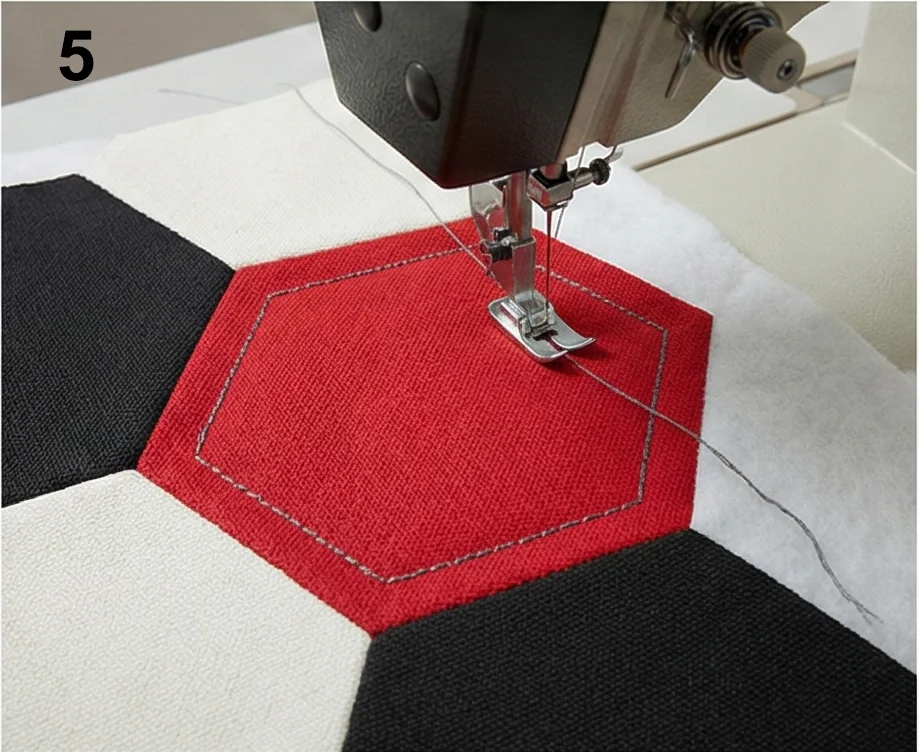
Step 6: The Stiff Sandwich
- Lay your Backing Fabric face down.
- Fuse your Fusible Fleece to the back of your Rug Top.
- Place the Rug Top (with fleece attached) onto the Backing.
- Spray Baste: Use heavy-duty Spray Adhesive. Safety pins will bend in the canvas, and straight pins will prick your feet later if you miss one!
Step 7: “Grout Line” Quilting
- Thread: Use thick Topstitching Thread in Grey (hides dirt).
- Stitch: Echo the hexagon shapes.
- Stitch 1/4″ inside the seam line of every single hexagon.
- This strengthens the seams and makes the shapes look like tiles set in grout.
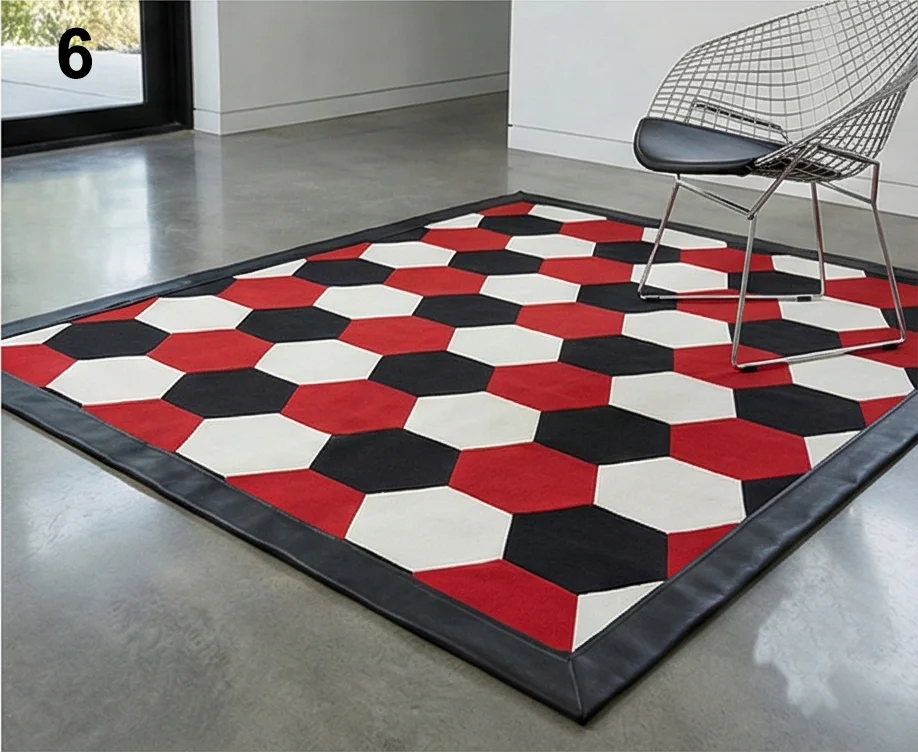
Pro Design Tip: Faux-Leather Binding. Instead of fabric binding, use wide strips of Black Faux Leather to bind the edges. It is incredibly durable against vacuum cleaners and shoes, and it gives the rug a very high-end, masculine finish.
Budget Consideration: Yoga Mat Core. If you want the rug to be squishy but flat (like an anti-fatigue kitchen mat), sandwich a cheap, thin Yoga Mat inside instead of batting. You can sew through it (slowly!), and it provides the best cushion-to-flatness ratio for floor use.
Conclusion
Integrating these 20 Bold Red, Black, and White Quilt Ideas into your living space is about more than just adding warmth; it is about curating an environment that feels dynamic and intentionally designed. As we have explored, the applications are endless, ranging from the subtle elegance of a Houndstooth-Inspired Table Runner to the dramatic flair of Contemporary Log Cabin Floor Decor. This specific color palette acts as a unifying thread, allowing you to mix various patterns—like stripes, checks, and geometrics—without the room feeling cluttered or chaotic. The red provides the heartbeat, the black creates depth, and the white offers breathing room, resulting in a balanced, stylish harmony.
The beauty of these quilting projects lies in their dual nature as both functional comfort objects and sophisticated decor elements. A Minimalist Quilt with Clean Lines can make a stark modern sofa feel welcoming, while Quilted Floor Throws invite casual gathering and relaxation. By incorporating items like Reversible Designs or Layered Textures, you gain the flexibility to change your room’s mood with a simple flip of a fabric. These pieces prove that modern decor does not have to be cold; it can be soft, tactile, and incredibly cozy while still maintaining a sharp, fashionable edge.
Ultimately, choosing to decorate with red, black, and white is a celebration of bold contrast and timeless style. Whether you are draping a Sleek Striped Quilt over your loveseat or placing a Tricolor Geometric Rug under your coffee table, you are making a statement that your home is a place of energy and comfort. We hope this guide has inspired you to experiment with these powerful colors and patterns. So, embrace the drama, play with the geometry, and enjoy the transformative power of a well-placed quilt in your stylish modern living space.
