
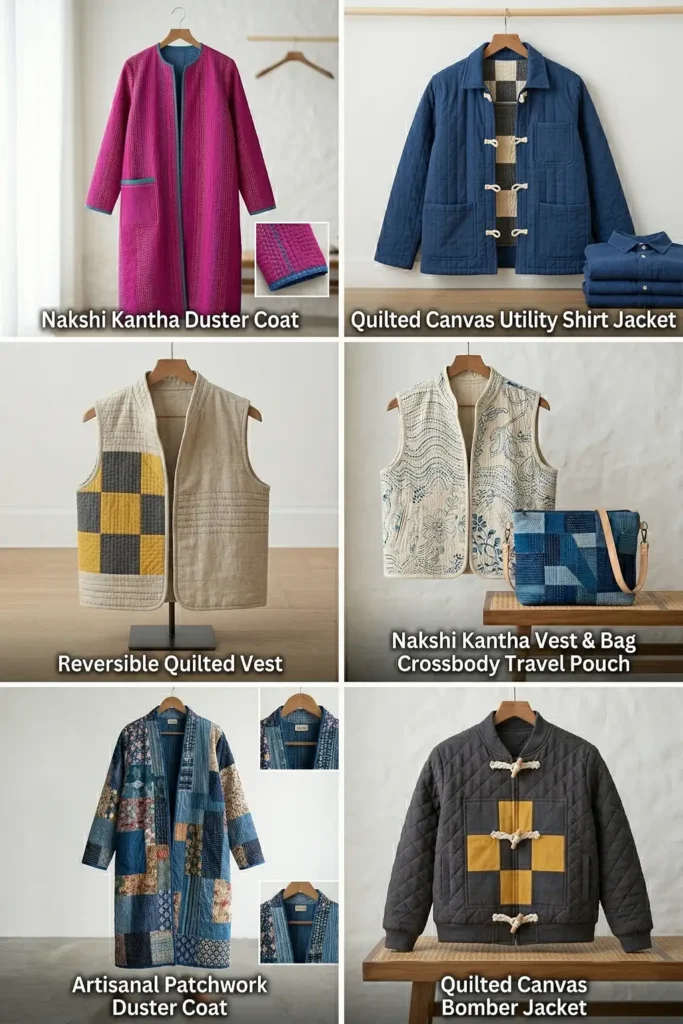
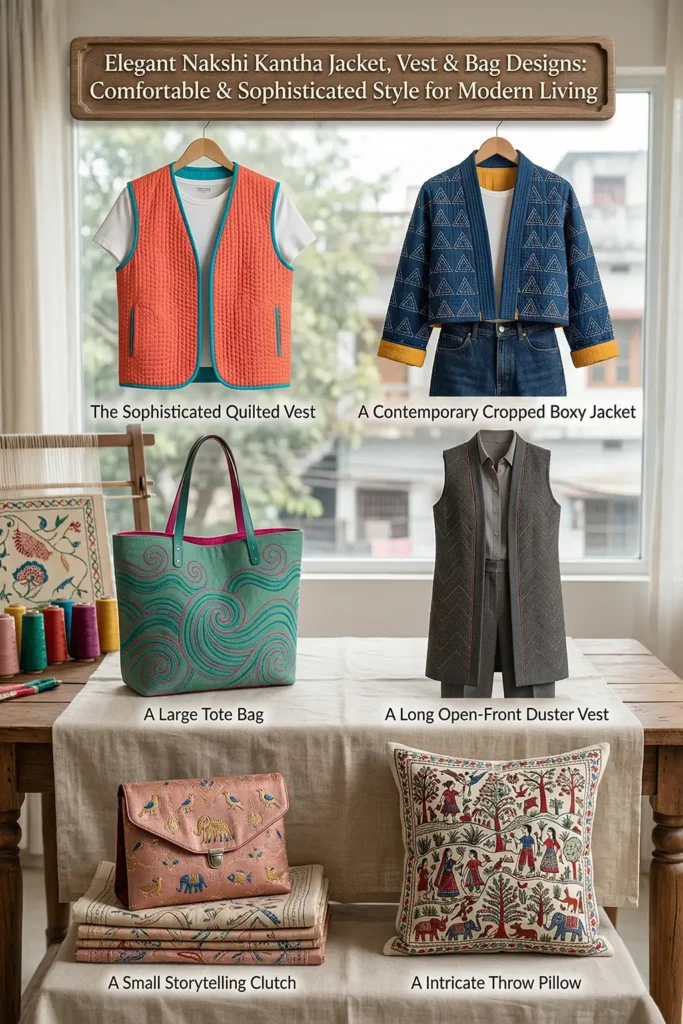
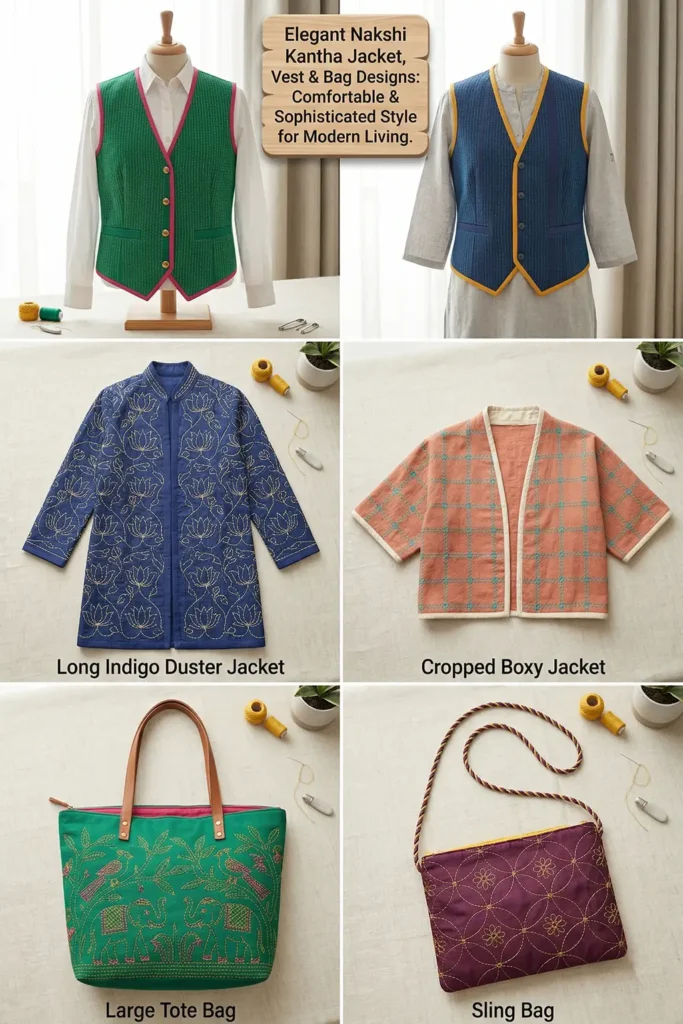
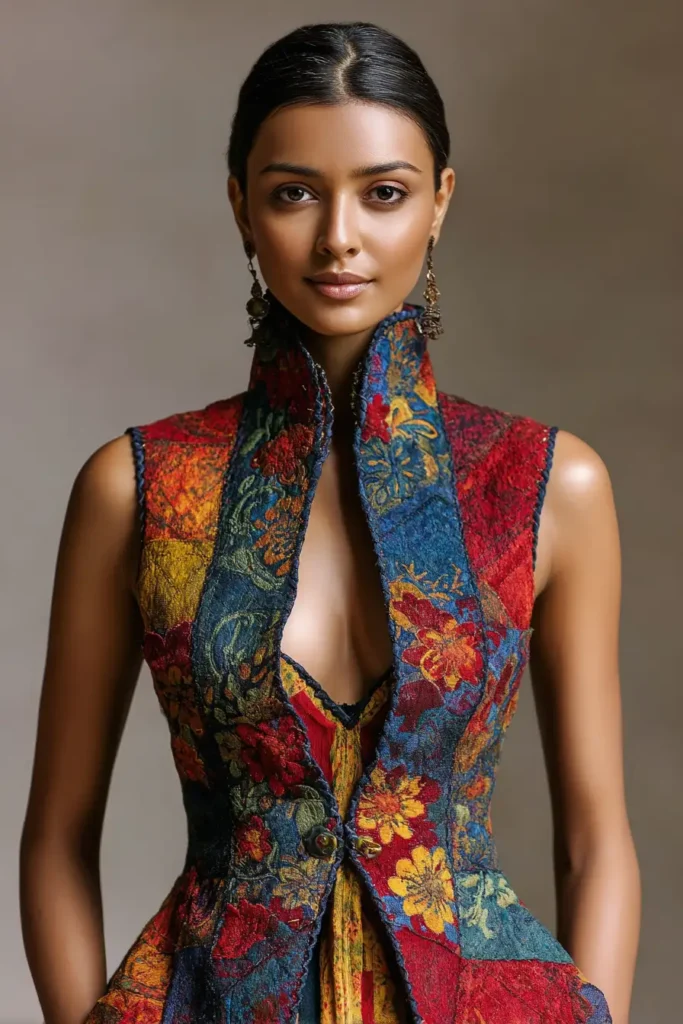
15 Elegant Nakshi Kantha Accessories – Jacket, Vest & Bag Designs – Comfortable & Sophisticated Style for Modern Living
Nakshi Kantha Beyond the Quilt
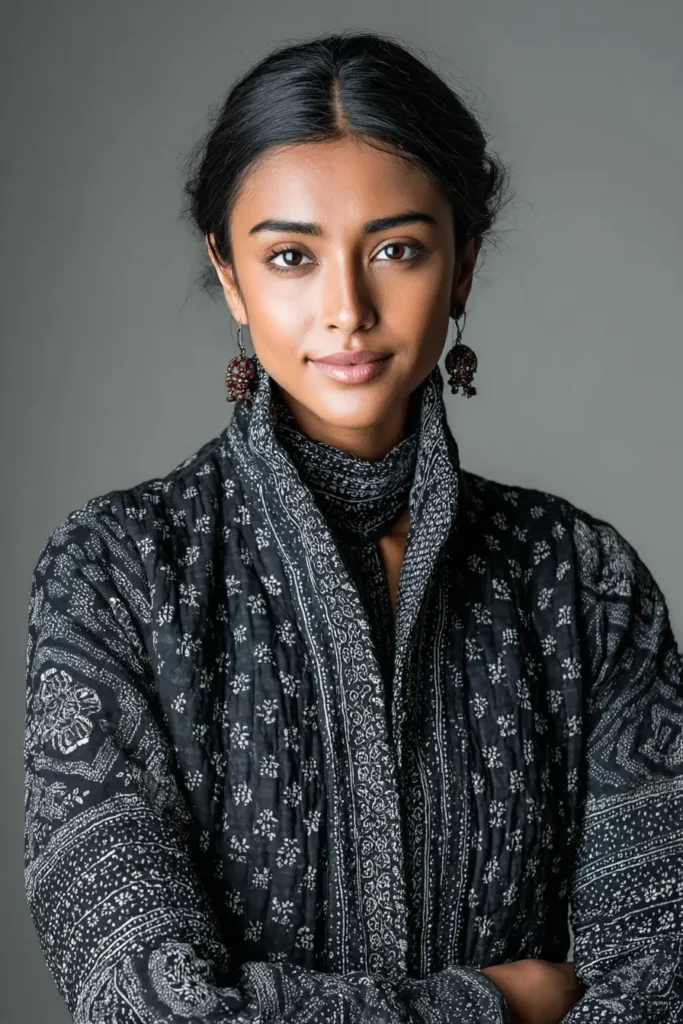
I grew up around Nakshi Kantha. It was always present – quilts folded in cupboards, soft layers used every day, the particular texture of the running stitch under your fingers before you are old enough to know what it is called. What I remember most is not the visual pattern but the physical quality of the cloth: the way the stitching created a slight ripple across the surface, the weight of layered fabric, the sense that each piece had been made by someone with something specific in mind.
Seeing Kantha move into jackets, vests, and bags feels like a continuation of that logic rather than a departure from it. The craft was always about making something practical and personal from available materials. Extending it into wearable and functional accessories is not a reinvention – it is the same instinct applied to a different form.
What Nakshi Kantha Actually Is
For those less familiar: Nakshi Kantha is a centuries-old Bengali textile tradition built on layering repurposed fabrics – typically old saris – and stitching them together with a running stitch that simultaneously reinforces the cloth and decorates its surface. The motifs are drawn from everyday life, nature, memory, and local visual culture. No two pieces are identical, because no two makers bring the same set of references to the work. Traditionally, these were quilts made at home, used daily, and passed down from generation to generation. The craft was practical before it was artistic, which is part of why it has lasted.
What is happening now is that the same construction logic – layered fabric, hand stitching, natural materials – is being applied to a wider range of objects. Jackets, vests, tote bags, shoppers. The aesthetic is the same. The function has changed.
Nakshi Kantha Accessories
Contents
- 1 Nakshi Kantha Accessories
- 2 1. Longline Nakshi Kantha Quilted Jackets for Effortless Elegance
- 3 2. Contemporary Cropped Nakshi Kantha Jackets for Modern Wardrobes
- 3.1 A Guide to Making Contemporary Cropped Nakshi Kantha Jackets for Modern Wardrobes
- 3.2 Measurements & Materials Needed
- 3.3 Step-by-Step Guide: The Cropped Kantha Jacket
- 3.3.1 Step 1: Drafting and Cutting the Vibrant Canvas
- 3.3.2 Step 2: Basting the Breathable Layers
- 3.3.3 Step 3: The Vibrant Kantha Stitching
- 3.3.4 Step 4: Squaring Up the Hand-Stitched Panels
- 3.3.5 Step 5: Assembly Section (Constructing the Cropped Silhouette)
- 3.3.6 Step 6: Tailored Binding and Finishing
- 4 3. Reversible Nakshi Kantha Quilted Jackets for Versatile Styling
- 4.1 A Guide to Making Reversible Nakshi Kantha Quilted Jackets for Versatile Styling
- 4.2 Measurements & Materials Needed
- 4.3 Step-by-Step Guide: The Reversible Kantha Jacket
- 4.3.1 Step 1: Precision Cutting for a Reversible Canvas
- 4.3.2 Step 2: Basting the Dual-Faced Layers
- 4.3.3 Step 3: The Rhythmic Kantha Stitching
- 4.3.4 Step 4: Squaring Up the Hand-Stitched Panels
- 4.3.5 Step 5: Assembly Section (Constructing the Reversible Silhouette)
- 4.3.6 Step 6: Tailored Binding and Reversible Pocket Placement
- 5 4. Luxurious Silk Nakshi Kantha Winter Jackets for Cozy Warmth
- 5.1 A Guide to Making Luxurious Silk Nakshi Kantha Winter Jackets for Cozy Warmth
- 5.2 Measurements & Materials Needed
- 5.3 Step-by-Step Guide: The Silk Winter Kantha Jacket
- 5.3.1 Step 1: Drafting and Cutting the Vibrant Winter Canvas
- 5.3.2 Step 2: Basting the Slippery Layers
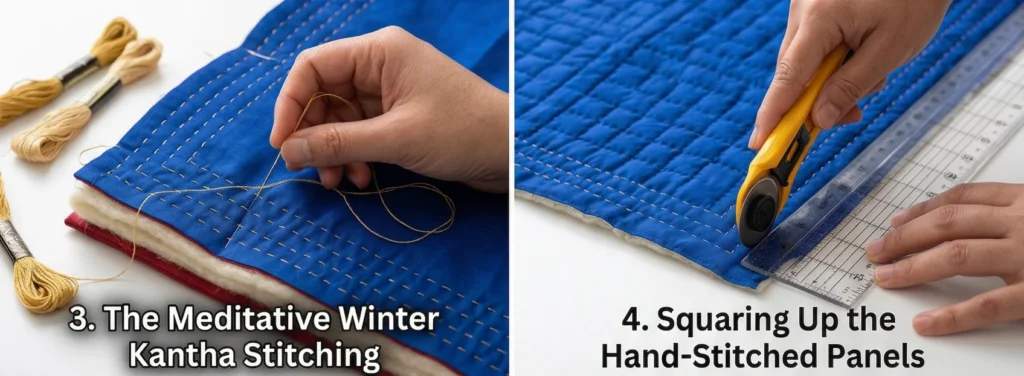
- 5.3.3 Step 3: The Meditative Winter Kantha Stitching
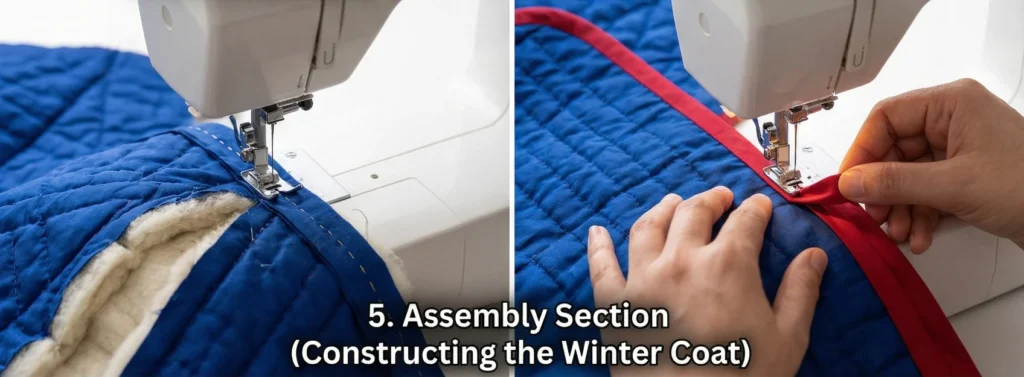
- 5.3.4 Step 4: Squaring Up the Hand-Stitched Panels
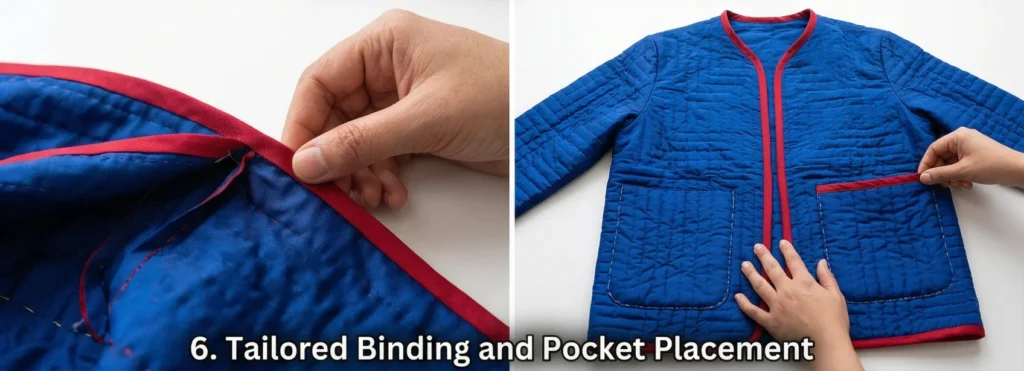
- 5.3.5 Step 5: Assembly Section (Constructing the Winter Coat)
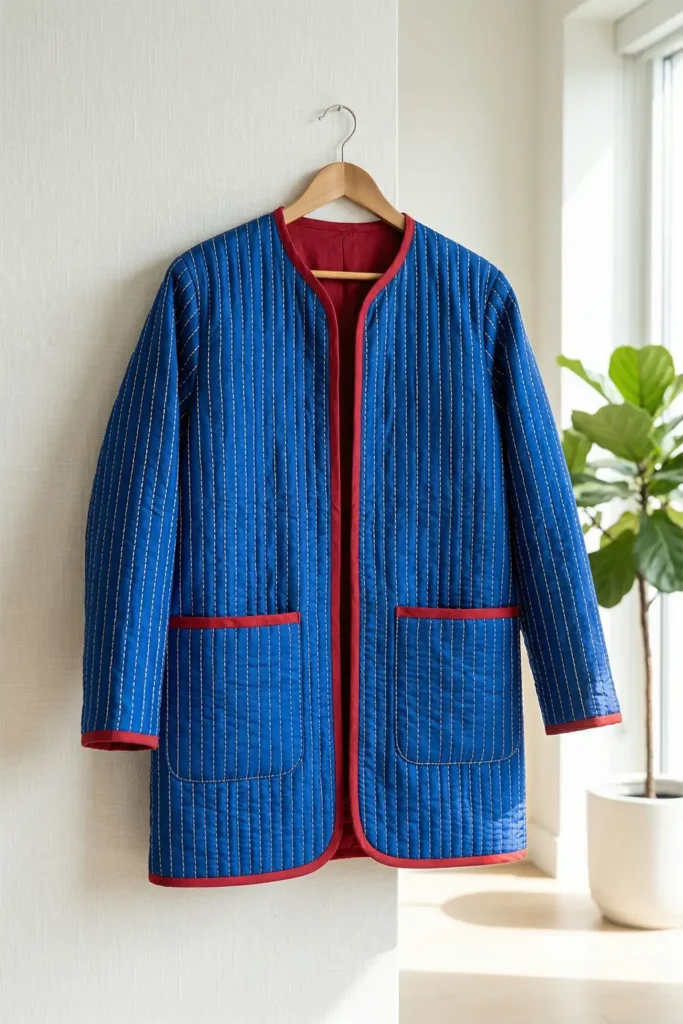
- 5.3.6 Step 6: Tailored Binding and Pocket Placement
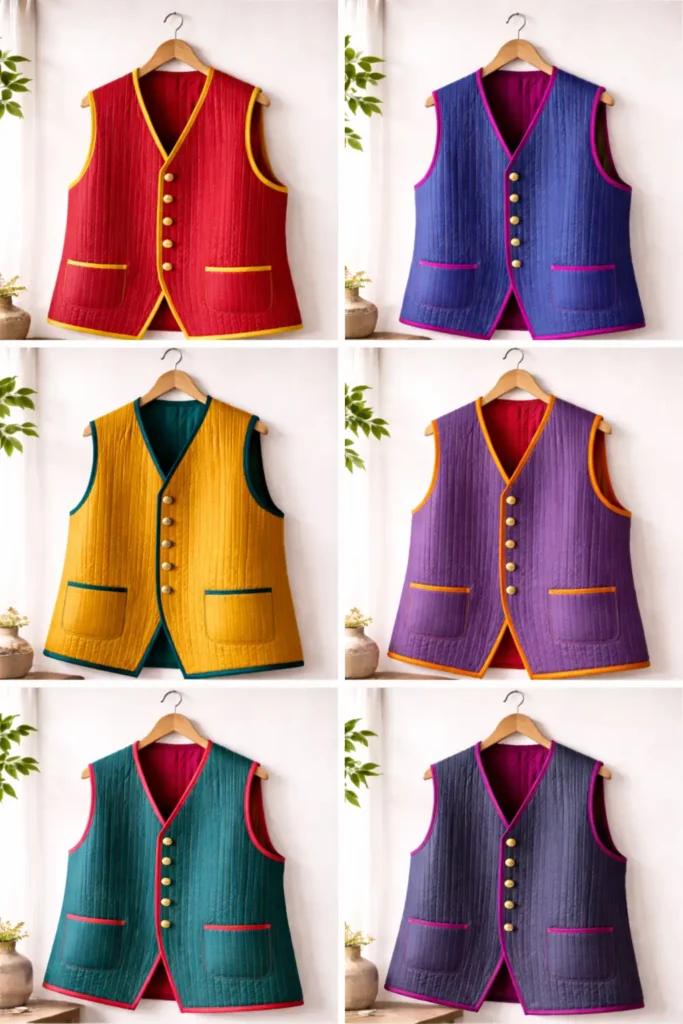
- 6 5. Sophisticated Nakshi Kantha Quilted Vests for Layered Sophistication
- 6.1 A Guide to Making Sophisticated Nakshi Kantha Quilted Vests for Layered Sophistication
- 6.2 Measurements & Materials Needed
- 6.3 Step-by-Step Guide: The Vibrant Kantha Vest
- 6.3.1 Step 1: Drafting and Cutting the Colorful Canvas
- 6.3.2 Step 2: Basting the Breathable Core
- 6.3.3 Step 3: The Meditative Kantha Stitching
- 6.3.4 Step 4: Shaping the Armholes and Neckline
- 6.3.5 Step 5: Assembly Section (Constructing the Waistcoat)
- 6.3.6 Step 6: Tailored Binding and Finishing
- 6.3.7 Comfort and Practical Care
- 6.3.8 Elegance That Lasts
- 7 6. Elegant Tailored Nakshi Kantha Waistcoats for Polished Outfits
- 7.1 A Guide to Making Elegant Tailored Nakshi Kantha Waistcoats for Polished Outfits
- 7.2 Measurements & Materials Needed
- 7.3 Step-by-Step Guide: The Tailored Kantha Waistcoat
- 7.3.1 Step 1: Drafting and Cutting the Formal Canvas
- 7.3.2 Step 2: Basting the Structured Layers
- 7.3.3 Step 3: The Vibrant, Formal Kantha Stitching
- 7.3.4 Step 4: Shaping the V-Neck, Armholes, and Darts
- 7.3.5 Step 5: Assembly Section (Constructing the Formal Waistcoat)
- 7.3.6 Step 6: Tailored Binding, Buttonholes, and Finishing
- 7.3.7 Usability Note
- 7.3.8 Comfort and Practical Care
- 7.3.9 Elegance That Lasts
- 8 7. Hand-Embroidered Nakshi Kantha Tunic Tops for Everyday Grace
- 8.1 A Guide to Making Hand-Embroidered Nakshi Kantha Tunic Tops for Everyday Grace
- 8.2 Measurements & Materials Needed
- 8.3 Step-by-Step Guide: The Vibrant Kantha Tunic
- 8.3.1 Step 1: Drafting and Cutting the Flowing Canvas
- 8.3.2 Step 2: Basting the Breathable Tunic Layers
- 8.3.3 Step 3: The Rhythmic, Meditative Kantha Stitching
- 8.3.4 Step 4: Shaping the Split V-Neck and Armholes
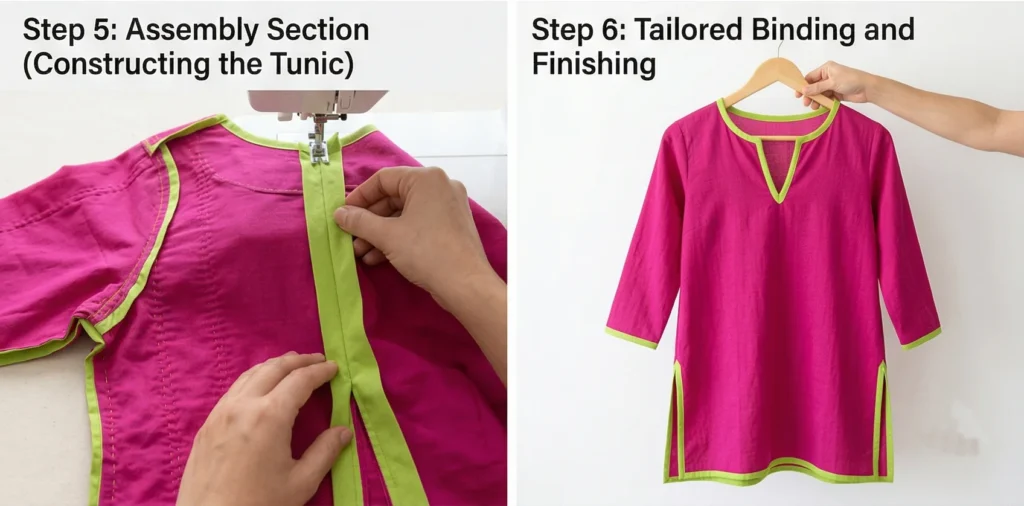
- 8.3.5 Step 5: Assembly Section (Constructing the Tunic)
- 8.3.6 Step 6: Tailored Binding and Finishing
- 8.3.7 Usability Note
- 8.3.8 Comfort and Practical Care
- 8.3.9 Elegance That Lasts
- 9 8. Artisan-Crafted Nakshi Kantha Peplum Tops for a Feminine Silhouette
- 9.1 A Guide to Making Artisan-Crafted Nakshi Kantha Peplum Tops for a Feminine Silhouette
- 9.2 Measurements & Materials Needed
- 9.3 Step-by-Step Guide: The Vibrant Kantha Peplum
- 9.3.1 Step 1: Drafting the Bodice and Peplum Canvas
- 9.3.2 Step 2: Basting the Vibrant Layers
- 9.3.3 Step 3: The Meditative Hot Pink Stitching
- 9.3.4 Step 4: Shaping the Bodice and Gathering the Flare
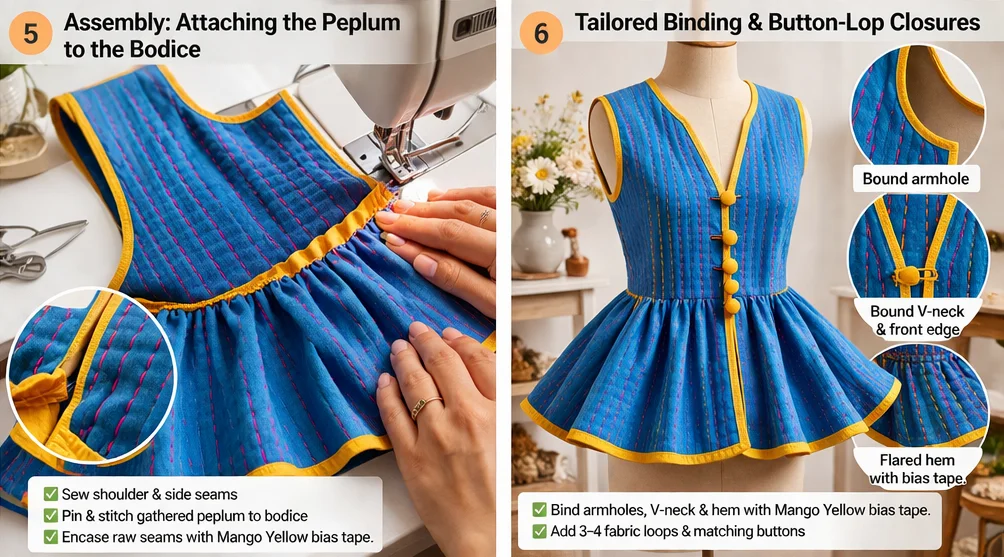
- 9.3.5 Step 5: Assembly Section (Constructing the Silhouette)
- 9.3.6 Step 6: Tailored Binding and Closures
- 9.3.7 Usability Note
- 9.3.8 Comfort and Practical Care
- 9.3.9 Elegance That Lasts
- 10 9. Classic Button-Down Nakshi Kantha Shirts with Lotus Motif Embroidery
- 10.1 A Guide to Making Classic Button-Down Nakshi Kantha Shirts with Lotus Motif Embroidery
- 10.2 Measurements & Materials Needed
- 10.3 Step-by-Step Guide: The Vibrant Kantha Lotus Shirt
- 10.3.1 Step 1: Drafting and Cutting the Tailored Canvas
- 10.3.2 Step 2: Basting the Breathable Shirting Layers
- 10.3.3 Step 3: Embroidering the Focal Lotus Motif
- 10.3.4 Step 4: The Meditative Kantha Stitching
- 10.3.5 Step 5: Shaping the Collar, Armholes, and Placket
- 10.3.6 Step 6: Assembly Section (Constructing the Shirt)
- 10.3.7 Step 7: Attaching the Collar, Cuffs, and Buttons
- 10.3.8 Usability Note
- 10.3.9 Comfort and Practical Care
- 10.3.10 Elegance That Lasts
- 11 10. Stylish Oversized Nakshi Kantha Shirts for Ultimate Comfort
- 11.1 A Guide to Making Stylish Oversized Nakshi Kantha Shirts for Ultimate Comfort
- 11.2 Measurements & Materials Needed
- 11.3 Step-by-Step Guide: The Oversized Kantha Shirt
- 11.3.1 Step 1: Drafting and Cutting the Oversized Canvas
- 11.3.2 Step 2: Basting the Breathable Layers
- 11.3.3 Step 3: The Rhythmic, Meditative Kantha Stitching
- 11.3.4 Step 4: Shaping the Drop-Shoulders and Neckline
- 11.3.5 Step 5: Assembly Section (Constructing the Oversized Shirt)
- 11.3.6 Step 6: Tailored Binding, Plackets, and Buttons
- 11.3.7 Usability Note
- 11.3.8 Comfort and Practical Care
- 11.3.9 Elegance That Lasts
- 12 11. Oversized Nakshi Kantha Tote Bags for Stylish Everyday Carry
- 12.1 A Guide to Making Oversized Nakshi Kantha Tote Bags for Stylish Everyday Carry
- 12.2 Measurements & Materials Needed
- 12.3 Step-by-Step Guide: The Vibrant Kantha Tote
- 12.3.1 Step 1: Drafting and Cutting the Heavy-Duty Canvas
- 12.3.2 Step 2: Basting the Structural Bag Layers
- 12.3.3 Step 3: The Rhythmic, Architectural Kantha Stitching
- 12.3.4 Step 4: Crafting the Quilted Comfort Straps
- 12.3.5 Step 5: Assembly Section (Constructing the Tote)
- 12.3.6 Step 6: Tailored Binding and Strap Attachment
- 12.3.7 Usability Note
- 12.3.8 Comfort and Practical Care
- 12.3.9 Elegance That Lasts
- 13 12. Eco-Friendly Patchwork Nakshi Kantha Shopper Bags for Sustainable Living
- 13.1 A Guide to Making Eco-Friendly Patchwork Nakshi Kantha Shopper Bags for Sustainable Living
- 13.2 Measurements & Materials Needed
- 13.3 Step-by-Step Guide: The Vibrant Patchwork Shopper
- 13.3.1 Step 1: Sorting and Cutting the Vibrant Scraps
- 13.3.2 Step 2: Piecing the Eco-Friendly Canvas
- 13.3.3 Step 3: Basting the Shopper Layers
- 13.3.4 Step 4: The Rhythmic, Unifying Kantha Stitching
- 13.3.5 Step 5: Assembly Section (Constructing the Bag Body & Boxed Corners)
- 13.3.6 Step 6: Creating the Comfort Straps and Final Binding
- 13.3.7 Usability Note
- 13.3.8 Comfort and Practical Care
- 13.3.9 Elegance That Lasts
- 14 13. Leather Accent Nakshi Kantha Tote Bags for Elevated Sophistication
- 14.1 A Guide to Making Leather Accent Nakshi Kantha Tote Bags for Elevated Sophistication
- 14.2 Measurements & Materials Needed
- 14.3 Step-by-Step Guide: The Leather Accent Kantha Tote
- 14.3.1 Step 1: Drafting and Cutting the Vibrant Canvas & Leather
- 14.3.2 Step 2: Basting the Upper Bag Layers
- 14.3.3 Step 3: The Rhythmic, Architectural Kantha Stitching
- 14.3.4 Step 4: Prepping and Attaching the Leather Base
- 14.3.5 Step 5: Assembly Section (Constructing the Tote)
- 14.3.6 Step 6: Leather Handles and Final Binding
- 14.3.7 Usability Note
- 14.3.8 Comfort and Practical Care
- 14.3.9 Elegance That Lasts
- 15 14. Spacious Nakshi Kantha Quilted Laundry Bags for Stylish Home Organization
- 15.1 A Guide to Making Spacious Nakshi Kantha Quilted Laundry Bags for Stylish Home Organization
- 15.2 Measurements & Materials Needed
- 15.3 Step-by-Step Guide: The Vibrant Kantha Laundry Bag
- 15.3.1 Step 1: Precision Cutting the Massive Canvas
- 15.3.2 Step 2: Basting the Heavy-Duty Layers
- 15.3.3 Step 3: The Architectural Kantha Stitching
- 15.3.4 Step 4: Assembly Section (Constructing the 3D Cylinder)
- 15.3.5 Step 5: Enclosing the Internal Seams
- 15.3.6 Step 6: Creating the Casing and Rope Drawstring
- 15.3.7 Usability Note
- 15.3.8 Comfort and Practical Care
- 15.3.9 Elegance That Lasts
- 16 15. Hanging Reversible Kantha Stitch Laundry Hampers for Closet Organization
- 16.1 A Guide to Making Hanging Reversible Kantha Stitch Laundry Hampers for Closet Organization
- 16.2 Measurements & Materials Needed
- 16.3 Step-by-Step Guide: The Reversible Hanging Hamper
- 16.3.1 Step 1: Precision Cutting for a Reversible Canvas
- 16.3.2 Step 2: Basting the Dual-Faced Layers
- 16.3.3 Step 3: The Rhythmic, Architectural Kantha Stitching
- 16.3.4 Step 4: Crafting the Reversible Hanging Loops
- 16.3.5 Step 5: Assembly Section (Constructing the Reversible Cylinder)
- 16.3.6 Step 6: Boxing the Base and Final Binding
- 16.3.7 Usability Note
- 16.3.8 Comfort and Practical Care
- 16.3.9 Elegance That Lasts
- 17 Conclusion
Why the Transition Works
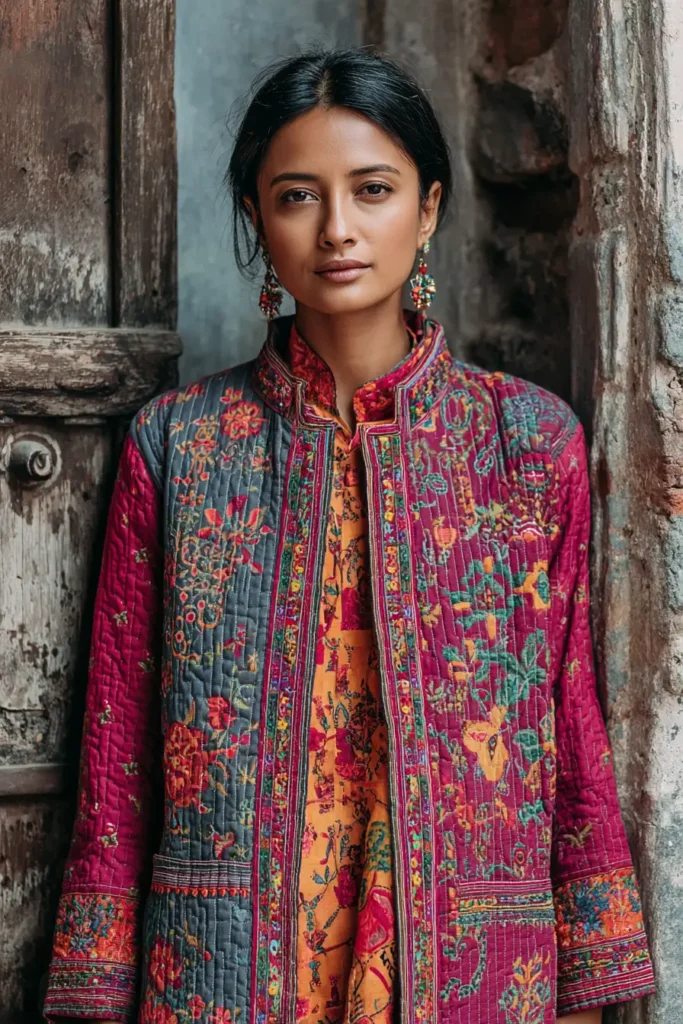
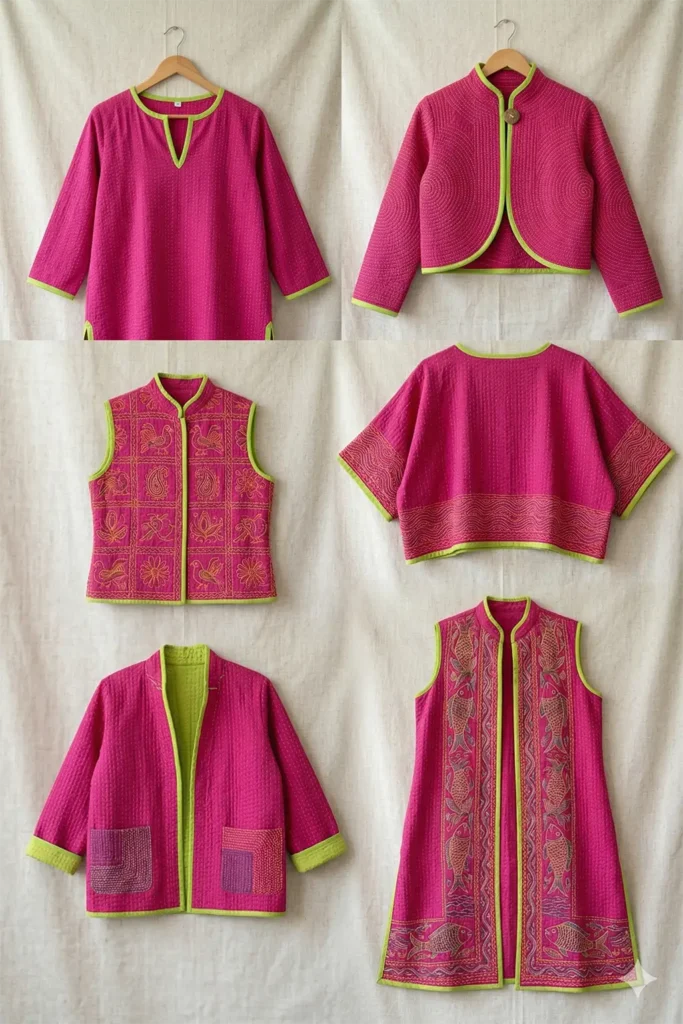
A Kantha jacket offers something genuinely difficult to find in contemporary clothing: warmth without bulk, and a texture that improves rather than degrades with regular use. The layered construction breathes well, which makes these pieces more seasonally versatile than their weight suggests. Reversible designs – and many are – give you two distinct looks from the same piece of careful handwork. That practicality feels consistent with the tradition’s origins.
Vests and waistcoats bring a slightly more structured silhouette while keeping the softness and surface texture that defines Kantha. They layer well over simple clothing in a way that adds character without effort – which is, I think, the best thing any textile piece can do.
Bags are probably the most immediate entry point for people new to Kantha accessories. A quilted tote or shopper is lightweight, durable, and carries the handmade quality that is genuinely hard to find in mass-produced alternatives. These pieces tend to age well – the stitching holds, the fabric softens in the right ways, and the object becomes more personal rather than less over time.
These are not decorative objects that happen to be functional. They are functional objects that carry cultural depth – a combination that is increasingly rare.
See also: Nakshi Kantha quilt designs · Quilted tote bag patterns · Heritage & Cultural Quilts
Recommended Supplies
“As an Amazon Associate, I earn from qualifying purchases.“
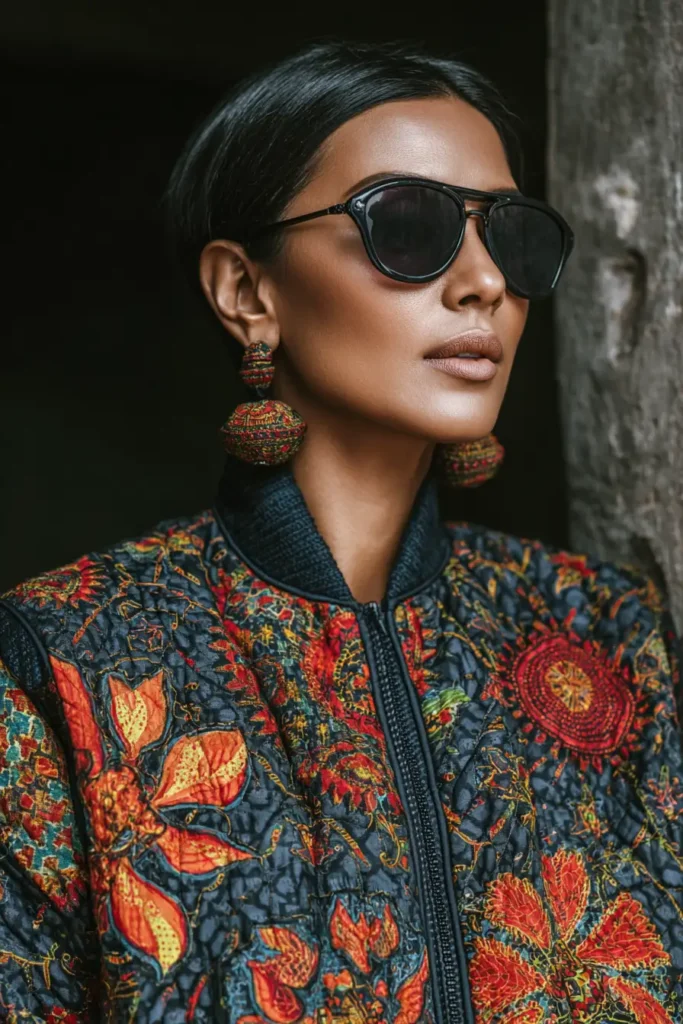
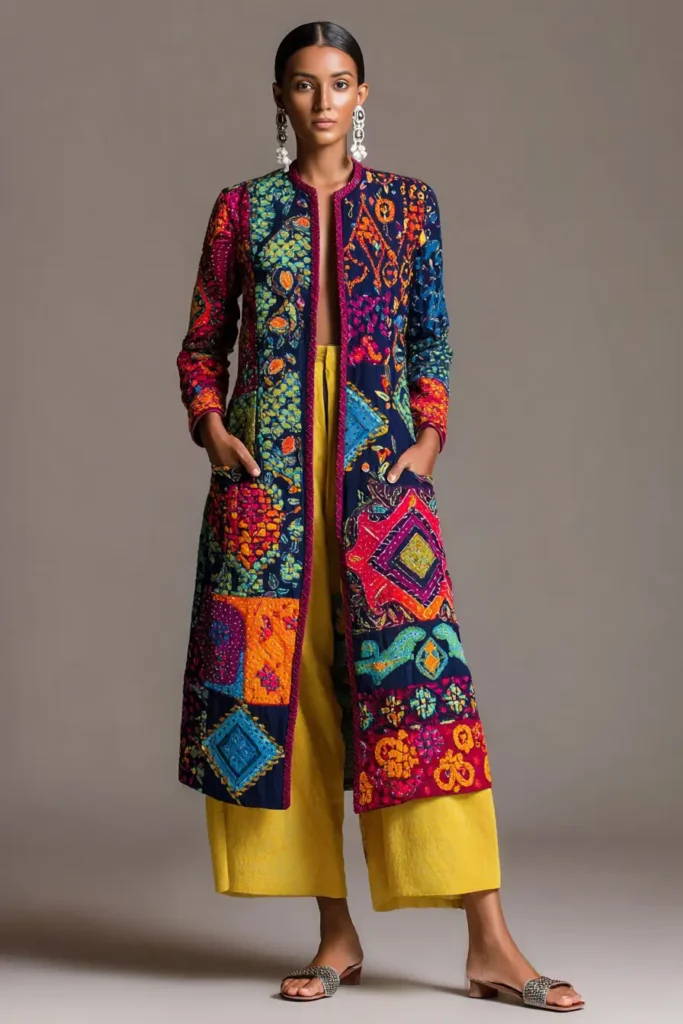
1. Longline Nakshi Kantha Quilted Jackets for Effortless Elegance
A Guide to Making Longline Nakshi Kantha Quilted Jackets for Effortless Elegance
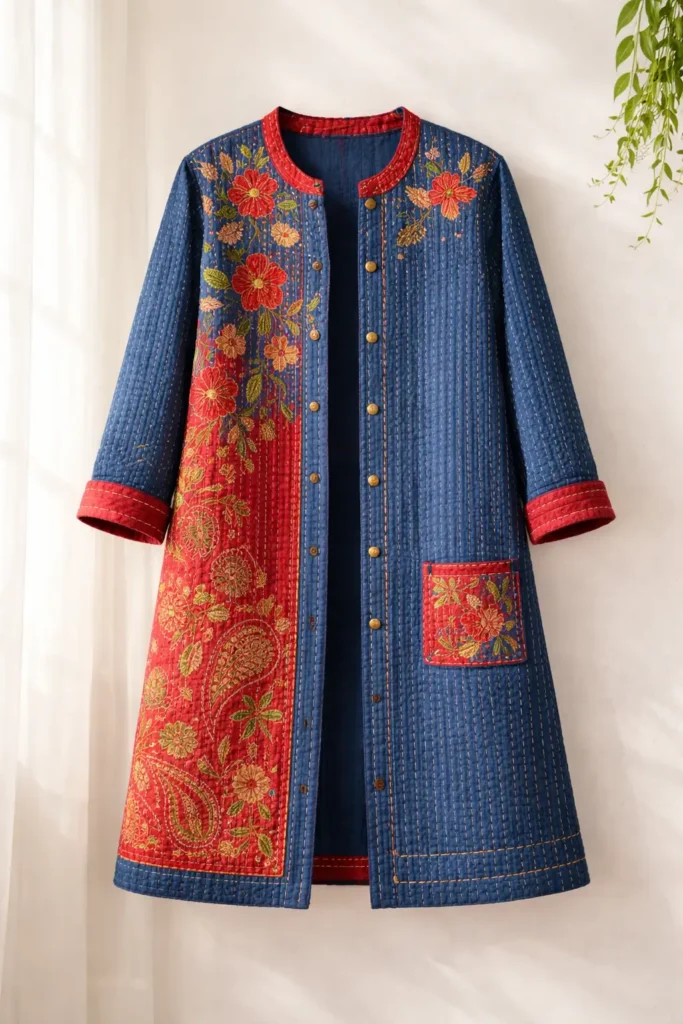
When curating the perfect aesthetic for a stylish life—creating a truly comfy dwelling that extends beyond the living room—the textiles we wear are just as important as those we drape over our sofas. The Longline Nakshi Kantha Quilted Jacket takes the breathtaking, centuries-old Bengali tradition of hand-stitched quilts and transforms it into a vibrant, wearable masterpiece. By utilizing layers of soft, breathable cotton united by dense, rhythmic running stitches, this jacket offers an elegant, sweeping silhouette that feels as comforting as a lightweight blanket but looks impeccably chic in a bold, modern palette.
The Heritage of Nakshi Kantha (And Why I Curated This Guide)
I formulated this specific pattern guide to celebrate one of the most sustainable and historically rich textile arts in the world, rooted deeply in the vibrant heritage of Bengal. Nakshi Kantha was traditionally born from necessity and love: women would layer old, softened, brightly colored saris and dhotis, stitching them together with intricate embroidery to create warm, storytelling blankets for their families.
I designed this guide to help bring that profound cultural artisanship into a modern wardrobe, specifically highlighting the brilliant, saturated colors characteristic of regional textiles. Instead of muted neutrals, this piece demands to be seen. The longline, duster-style silhouette honors the fluid drape of traditional garments, while the dense Kantha stitching provides incredible modern texture. It is a celebration of history, color, and absolute comfort.
Focus on Usability, Comfort, and Elegance
- Usability: Unlike standard winter coats that require dry cleaning, a Kantha jacket is highly washable and designed for daily, multi-season wear. The longline cut (hitting just below the knee) offers excellent coverage while remaining lightweight enough to layer. Deep, integrated patch pockets provide essential everyday utility.
- Comfort: True Kantha does not use stiff, synthetic batting. The comfort comes from stacking three layers of premium, pre-washed cotton. The dense hand-stitching compresses the layers, creating a rippled, ultra-soft textile that molds to your body and breathes flawlessly.
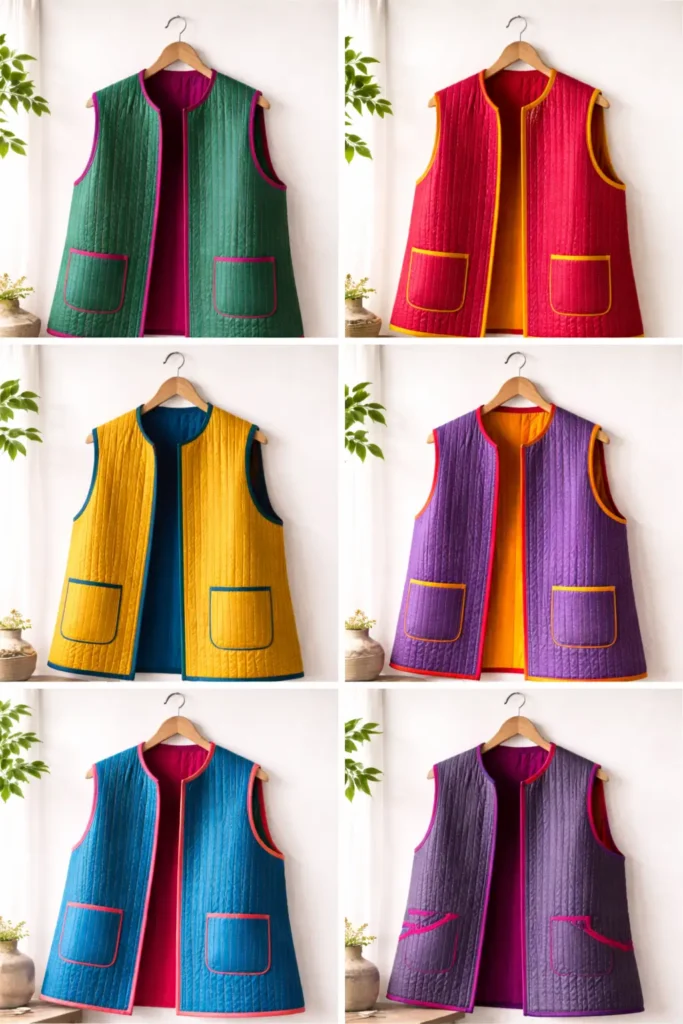
- Elegance: To elevate this garment, we lean into a highly saturated, vibrant color palette. Imagine a base of striking Magenta or rich Peacock Blue, paired with a brilliant Emerald Green lining that flashes when you walk. Stitched entirely with a high-contrast thread like Marigold Yellow, the intricate geometry of the needlework takes center stage, creating an aura of bold, bespoke elegance.
Measurements & Materials Needed
Finished Jacket Size: One-Size-Fits-Most (Modern Longline/Relaxed Fit). Approx. 42″ length from shoulder to hem. Finished Style: A sweeping, collarless duster coat featuring edge-to-edge vibrant Kantha hand-stitching.
Materials Needed:
- Fabric for the Outer Shell, Core, and Lining: 9 yards total of premium, lightweight 100% cotton voile or upcycled cotton saris.
- Outer Shell: 3 yards of a vibrant solid (e.g., Bright Magenta).
- Lining: 3 yards of a highly contrasting solid (e.g., Emerald Green).
- Core (Middle Layer): 3 yards of scrap cotton or white muslin.
- Thread: * 50-weight cotton thread for the machine-pieced internal seams.
- 6 to 8 skeins of Pearl Cotton (Size 8) or traditional embroidery floss in a brilliant accent color (e.g., Marigold Yellow) for the visible hand-stitching.
- Binding: 6 yards of 1/2-inch double-fold bias tape (matching your outer shell or lining) to finish the raw edges and internal seams.
- Tools: A sharp rotary cutter, a large acrylic ruler, fabric shears, curved safety pins for basting, and a high-quality embroidery needle.
Step-by-Step Guide: The Vibrant Longline Kantha Jacket
Step 1: Drafting and Cutting the Colorful Canvas
Because we are hand-quilting the fabric, you must cut the panels slightly larger than your final measurements to allow for shrinkage and draw-in as the fabric is heavily stitched. Cut 3 identical layers (Outer Magenta, Core Muslin, and Lining Emerald) for each of the following pieces:
- One Back Panel: 28″ wide x 44″ tall.
- Two Front Panels: 14″ wide x 44″ tall each.
- Two Sleeves: 22″ wide x 20″ long each.
- Two Pockets: 9″ x 10″ rectangles.
Step 2: Basting the Soft Layers
For every garment piece, stack your three layers: Emerald Lining (face down), Muslin Core (middle), and Magenta Outer Shell (face up). Smooth them out meticulously on a large, flat surface. Pin the layers together densely with curved safety pins, spacing them every 3 to 4 inches. Because there is no sticky batting, heavy basting is critical to prevent these slippery, lightweight cottons from shifting.
Step 3: The Meditative Kantha Stitching
This is the heart of the project. Thread your embroidery needle with a long length of your Marigold Yellow Pearl Cotton. Instead of a machine, you will use a simple, rhythmic running stitch. For a contemporary, elegant look that highlights the vibrant fabric, stitch perfectly straight vertical lines from the top of the panels to the bottom, spacing them exactly 1/4-inch to 1/2-inch apart. Work your needle through all three layers, picking up multiple small stitches before pulling the thread through. This yields an incredibly rich, rippled texture, with the yellow thread popping brilliantly against the magenta background. Quilt all your panels (Back, Fronts, Sleeves, and Pockets).
Step 4: Squaring Up the Hand-Stitched Panels
Once the hand-quilting is complete, the fabric will have shrunk slightly, and the edges may be uneven. Take your vividly quilted panels back to your cutting mat. Use your acrylic ruler and rotary cutter to square up all the edges perfectly, trimming away any frayed threads or uneven layers before assembly.
Step 5: Assembly Section (Constructing the Duster)
To maintain the elegant drape, we will use bias-bound internal seams.
- Shoulders: Place the Front Panels right sides together with the Back Panel at the top shoulder edges. Machine-sew a 1/2-inch seam.
- Sleeves: Open the jacket flat. Pin the top center of a quilted sleeve to the shoulder seam, right sides together. Ease the sleeve into the armhole and sew with a 1/2-inch seam. Repeat for the other side.
- Side Seams: Fold the jacket right sides together. Pin from the bottom hem of the jacket, up the side, through the armpit, and down to the wrist of the sleeve. Sew this continuous seam on both sides.
- Internal Polish: Encase all of these raw internal seam allowances inside your double-fold bias tape and topstitch them down. This ensures the bright Emerald inside the jacket looks as beautiful and boutique-quality as the outside.
Step 6: Tailored Binding and Pocket Placement
- Pockets: Bind the top edge of your two pockets with bias tape. Position them on the front panels (typically about 20 inches down from the shoulder seam). Pin securely and topstitch the sides and bottom to anchor them to the jacket.
- The Final Frame: Take a continuous strip of your bias tape and machine-sew it around the entire raw outer perimeter of the jacket (up the front edge, around the back of the neck, down the other front edge, and across the sweeping bottom hem). Finish the raw edges of the sleeve cuffs in the exact same manner.
Usability Note: The true magic of a Kantha garment is that its colors soften and its texture deepens beautifully with age and wear. To care for this heirloom piece, machine wash on a delicate, cold cycle with a mild, color-safe detergent to protect the bright dyes. Hang it immediately on a broad-shouldered wooden hanger to air dry, preserving the structural integrity of the longline silhouette.
More Recommended Supplies
“As an Amazon Associate, I earn from qualifying purchases.“
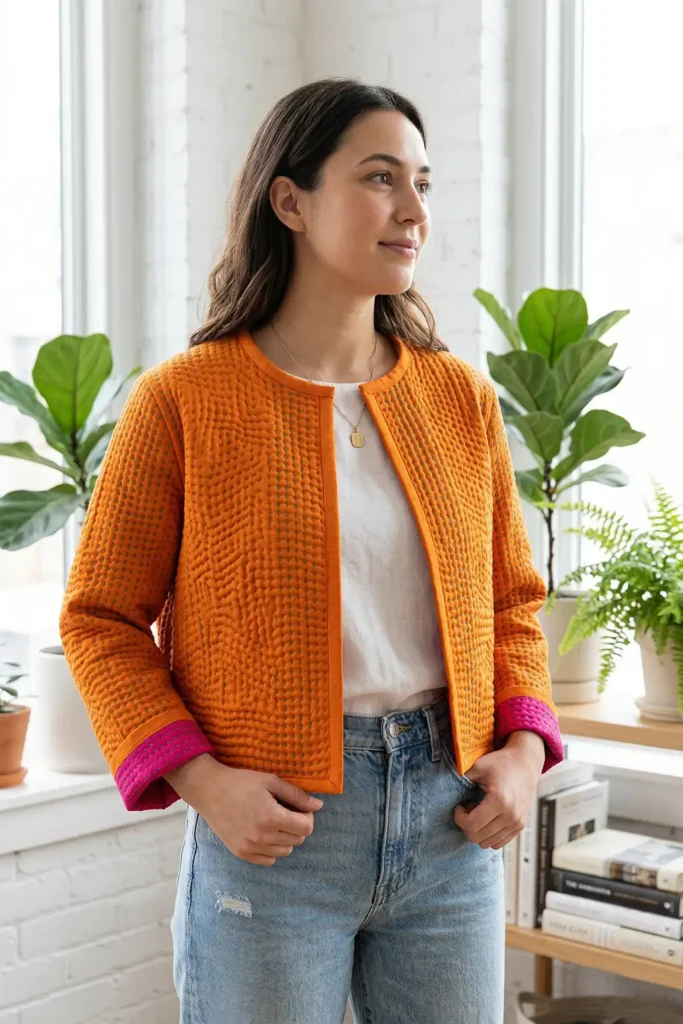
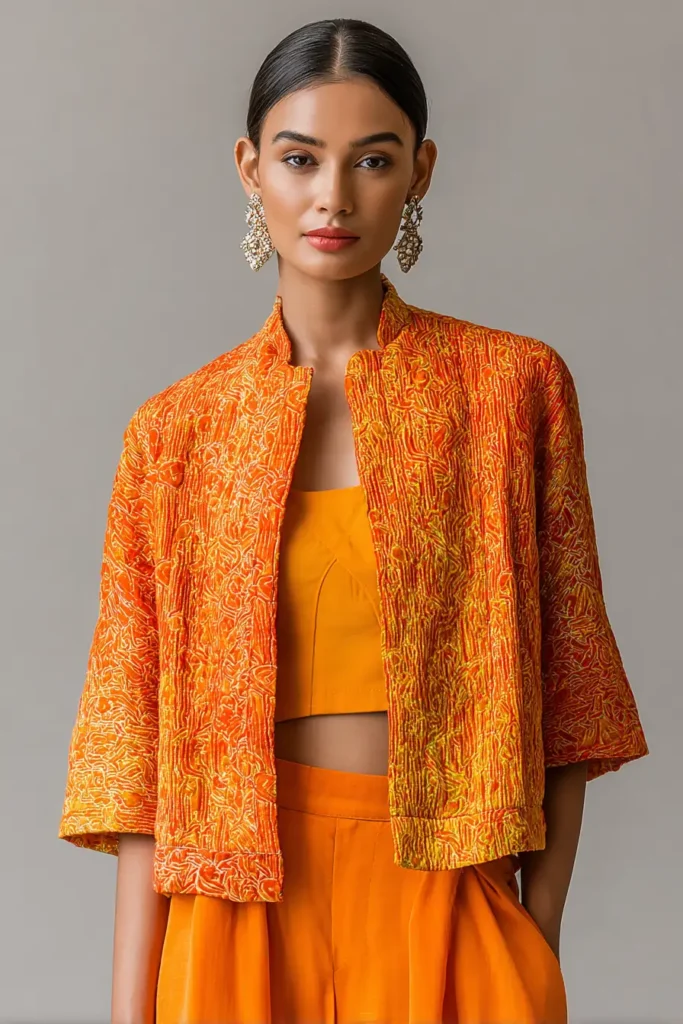
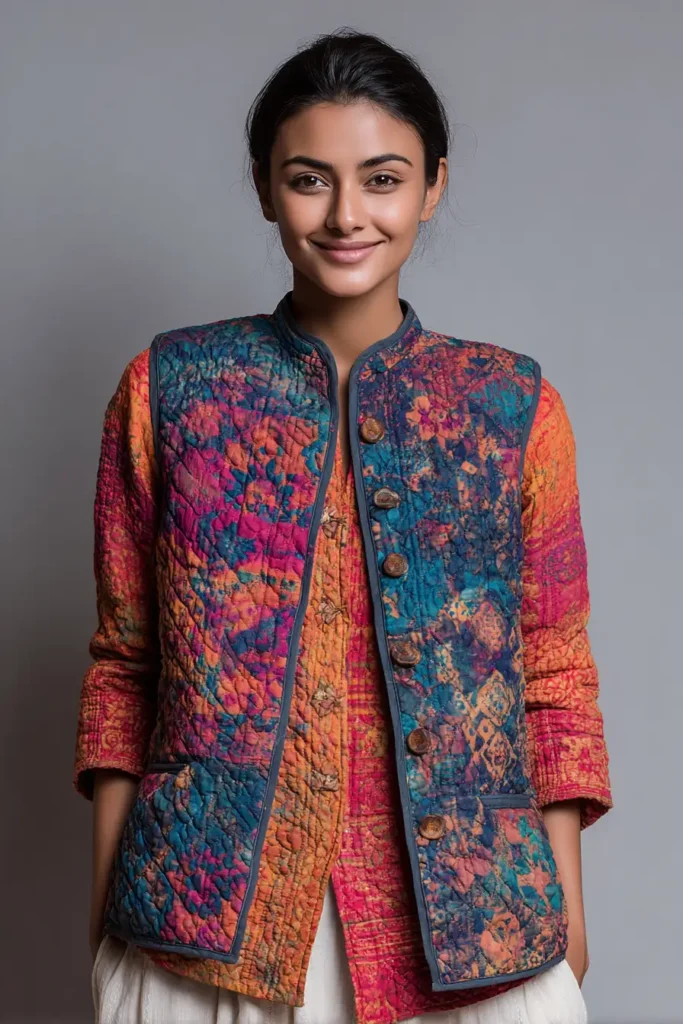
2. Contemporary Cropped Nakshi Kantha Jackets for Modern Wardrobes


A Guide to Making Contemporary Cropped Nakshi Kantha Jackets for Modern Wardrobes
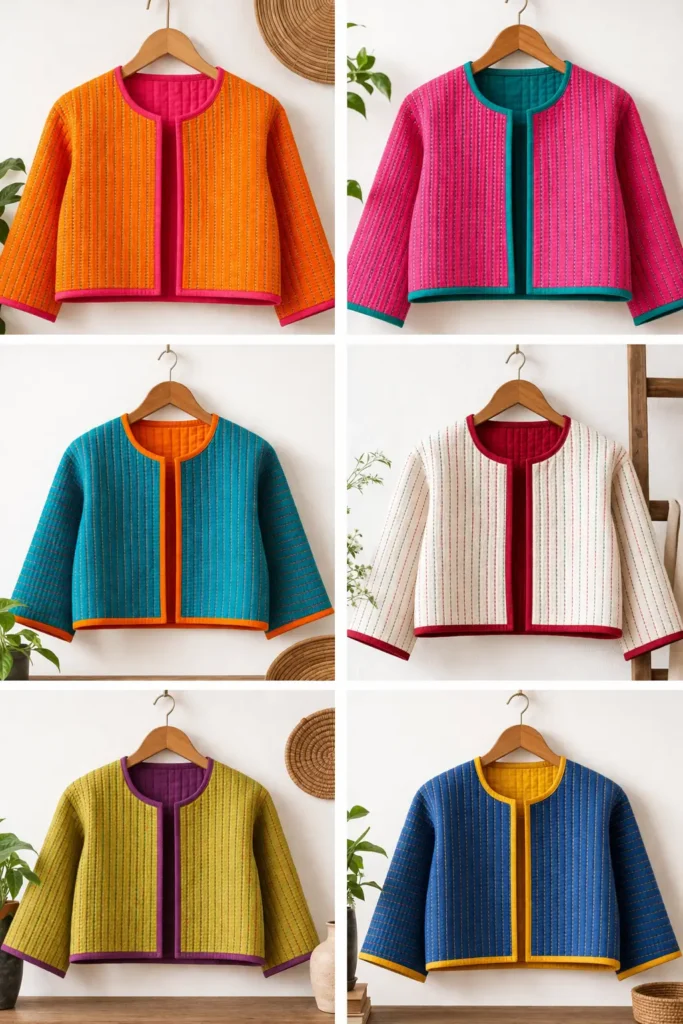
While long duster coats offer sweeping drama, the modern wardrobe often demands something slightly more versatile and energetic. The Contemporary Cropped Nakshi Kantha Jacket delivers exactly that. By lifting the hemline to a chic, boxy crop, this garment transforms traditional Bengali needlework into a highly wearable, everyday statement piece. It pairs flawlessly with high-waisted denim, structured trousers, or flowing summer dresses, offering an irresistible pop of rich, tactile color.
The Heritage of Nakshi Kantha (And Why I Made It)
Curating this specific pattern for comfydwell.com was a joyful exploration of balancing deep-rooted heritage with modern fashion. Strolling through the vibrant textile markets of Dhaka, you are instantly surrounded by the breathtaking colors and artistry of traditional Nakshi Kantha. Historically, Bengali women ingeniously upcycled soft, worn saris into beautiful, storytelling quilts using rhythmic running stitches.
I designed this cropped jacket to capture that exact historical magic but reimagined it for a fast-paced, contemporary lifestyle. Often, heavily quilted garments can feel restrictive or bulky. By cropping the silhouette and using brilliant, saturated colors, the jacket becomes a lightweight, architectural accent rather than a heavy winter coat. It is a vibrant ode to local textile traditions, engineered for the modern eye.
Focus on Usability, Comfort, and Elegance
- Usability: A cropped jacket is inherently practical. It provides warmth across the shoulders and chest without interfering with your stride or adding bulk around the hips. It transitions effortlessly from a crisp spring morning to an air-conditioned office.
- Comfort: By layering three pieces of pure, pre-washed cotton, the jacket achieves a soft, cloud-like loft without the stiffness of synthetic batting. The dense hand-stitching compresses the cotton into a pliable fabric that moves beautifully with your body.
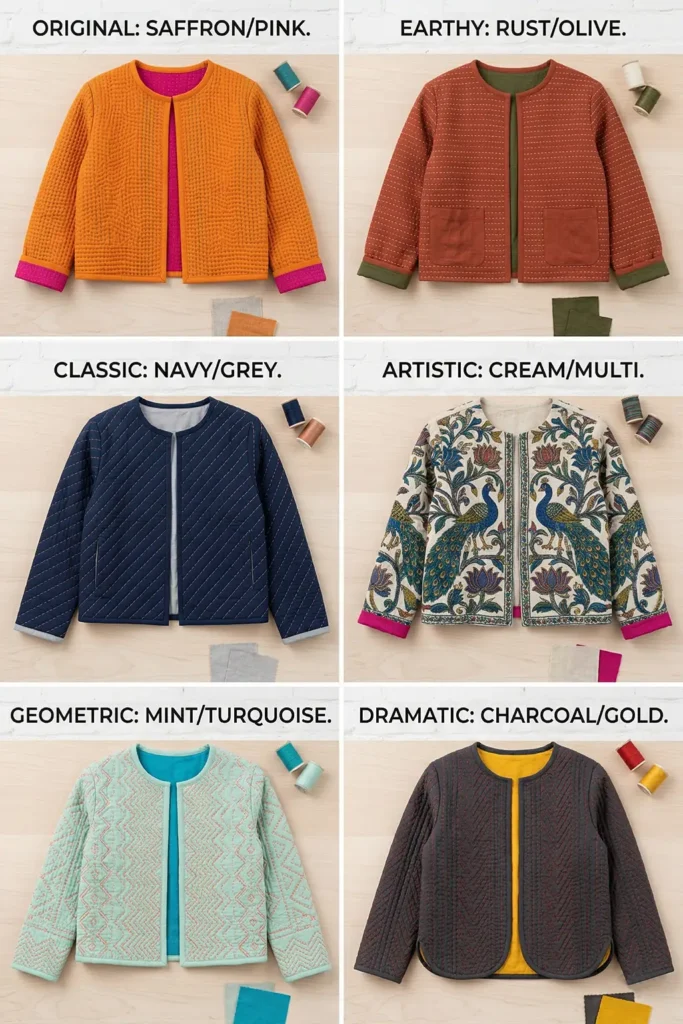
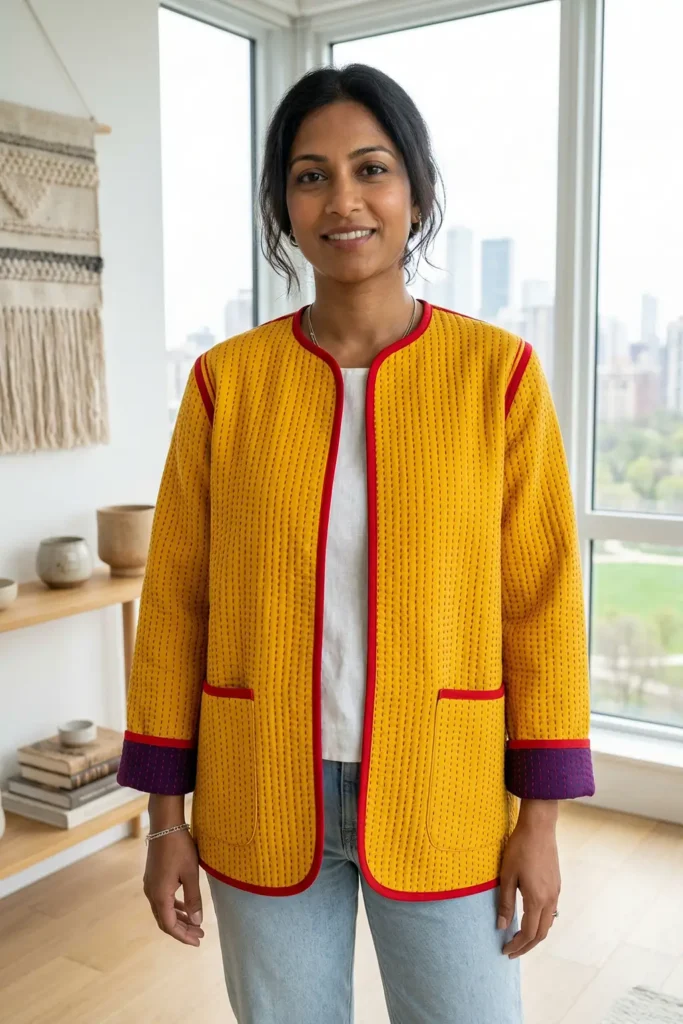
- Elegance: To maximize the contemporary impact, this design uses an explosively vibrant color palette. Imagine a brilliant Saffron Orange outer shell lined with a shocking Rani Pink, all stitched together with a striking Teal thread. The cropped, geometric lines keep the loud colors looking highly intentional and elegantly tailored.
Measurements & Materials Needed
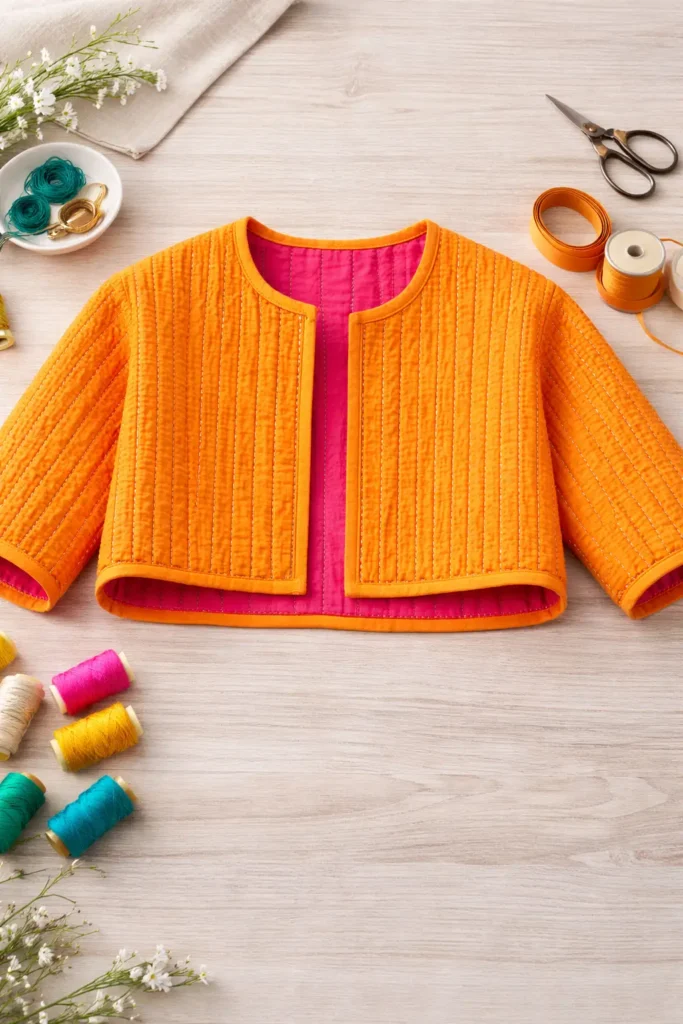
Finished Jacket Size: One-Size-Fits-Most (Modern Boxy/Cropped Fit). Approx. 20″ length from shoulder to hem. Finished Style: A collarless, open-front, cropped jacket with edge-to-edge vibrant Kantha stitching.
Materials Needed:
- Fabric for the Outer Shell, Core, and Lining: 6 yards total of premium, lightweight 100% cotton voile or soft linen.
- Outer Shell: 2 yards of a vibrant solid (e.g., Saffron Orange).
- Lining: 2 yards of a contrasting solid (e.g., Rani Pink).
- Core (Middle Layer): 2 yards of scrap cotton or unbleached muslin.
- Thread: * 50-weight cotton thread for machine-pieced internal seams.
- 5 to 6 skeins of Pearl Cotton (Size 8) or thick embroidery floss in an accent color (e.g., Teal) for the visible hand-stitching.
- Binding: 4 yards of 1/2-inch double-fold bias tape (matching your outer shell) to frame the jacket.
- Tools: A rotary cutter, a 6″ x 24″ acrylic ruler, fabric shears, curved safety pins, and a high-quality embroidery needle.
Step-by-Step Guide: The Cropped Kantha Jacket
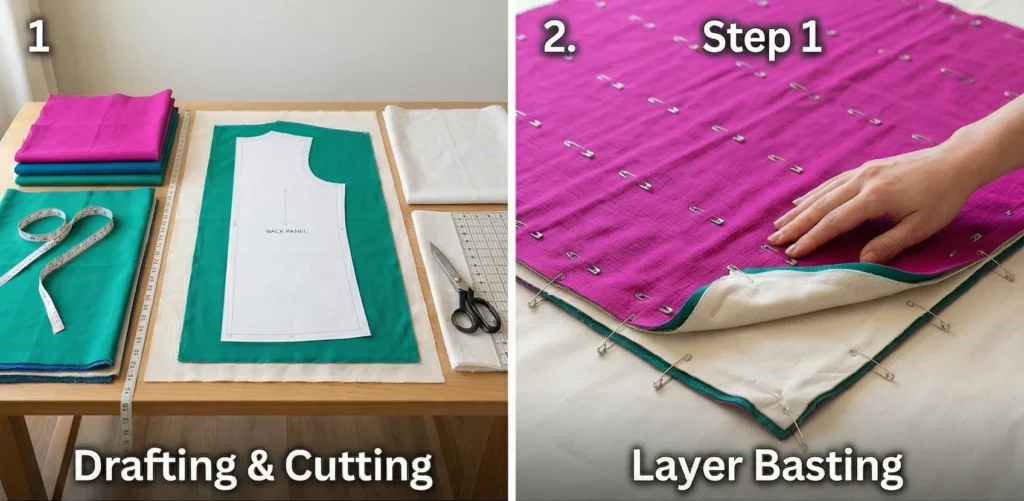
Step 1: Drafting and Cutting the Vibrant Canvas
Because hand-stitching slightly shrinks the fabric, cut your panels a bit larger than the final desired dimensions. Cut 3 identical layers (Outer Saffron, Core Muslin, and Lining Pink) for each of the following pieces:
- One Back Panel: 28″ wide x 22″ tall.
- Two Front Panels: 14″ wide x 22″ tall each.
- Two Sleeves: 22″ wide x 18″ long each (a slightly cropped bracelet-length sleeve pairs beautifully with a cropped hem).
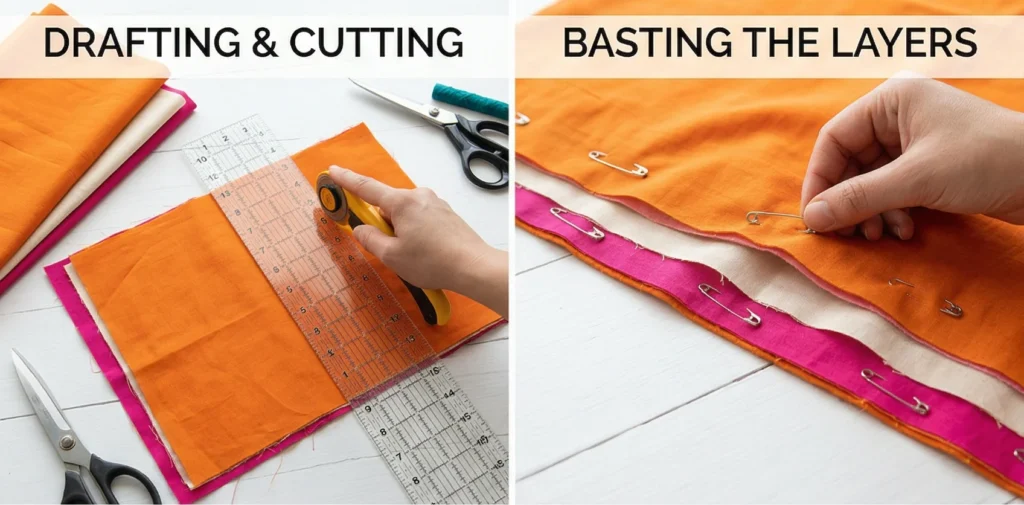
Step 2: Basting the Breathable Layers
For every garment piece, meticulously stack your three layers on a flat surface: Pink Lining (face down), Muslin Core (middle), and Saffron Outer (face up). Smooth out any wrinkles. Pin the layers together securely with your curved safety pins, placing a pin every 3 inches to prevent these lightweight cottons from shifting during quilting.
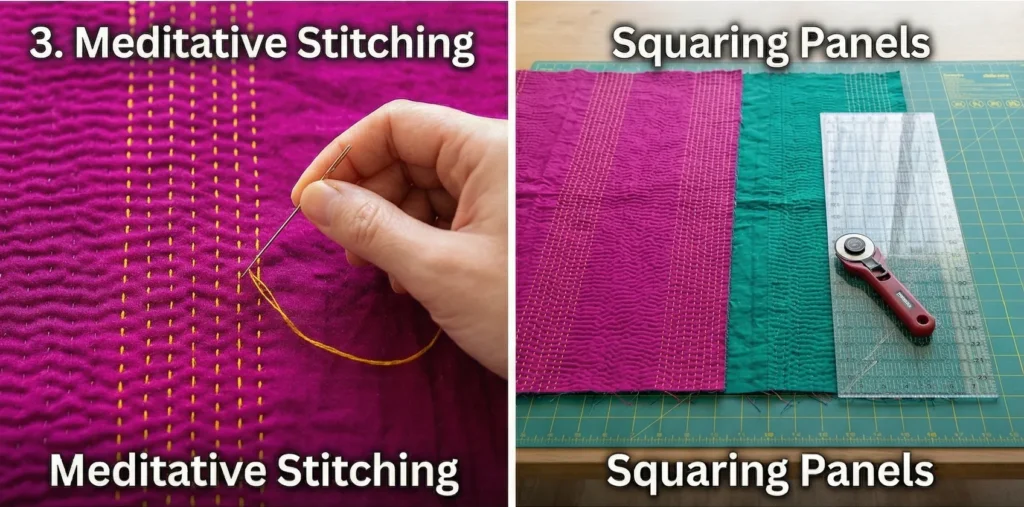
Step 3: The Vibrant Kantha Stitching
Thread your embroidery needle with a long length of the Teal Pearl Cotton. You will use a rhythmic, traditional running stitch. To highlight the jacket’s cropped, boxy nature, stitch perfectly straight vertical lines from the top of the panels to the bottom, spacing them 1/4-inch apart. Work your needle through all three layers. The high-contrast Teal thread will create an incredible, rippled geometric texture against the Saffron background. Quilt all your panels completely.
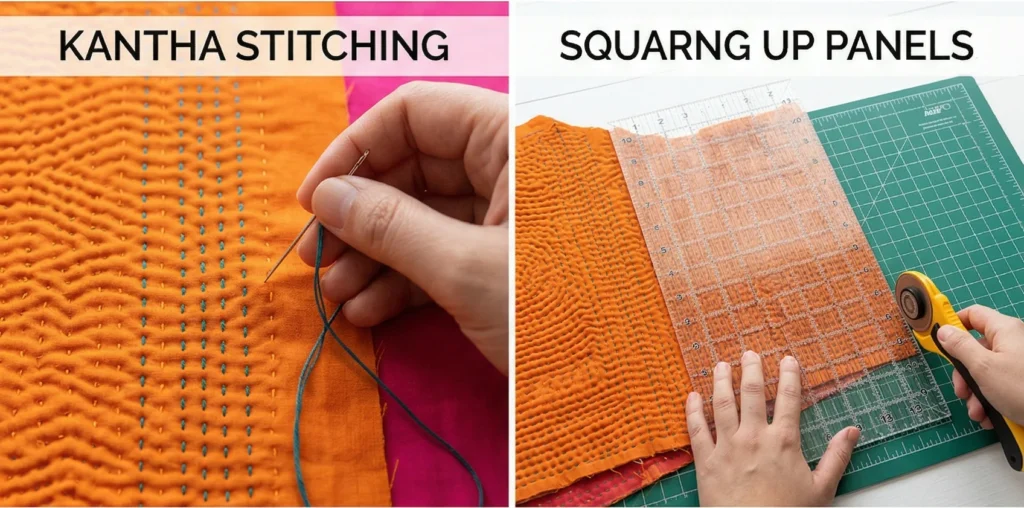
Step 4: Squaring Up the Hand-Stitched Panels
After the heavy hand-quilting is finished, take the panels to your cutting mat. Use your acrylic ruler and rotary cutter to precisely square up all the edges. Trimming the pieces guarantees the architectural, boxy fit will drape perfectly once assembled.
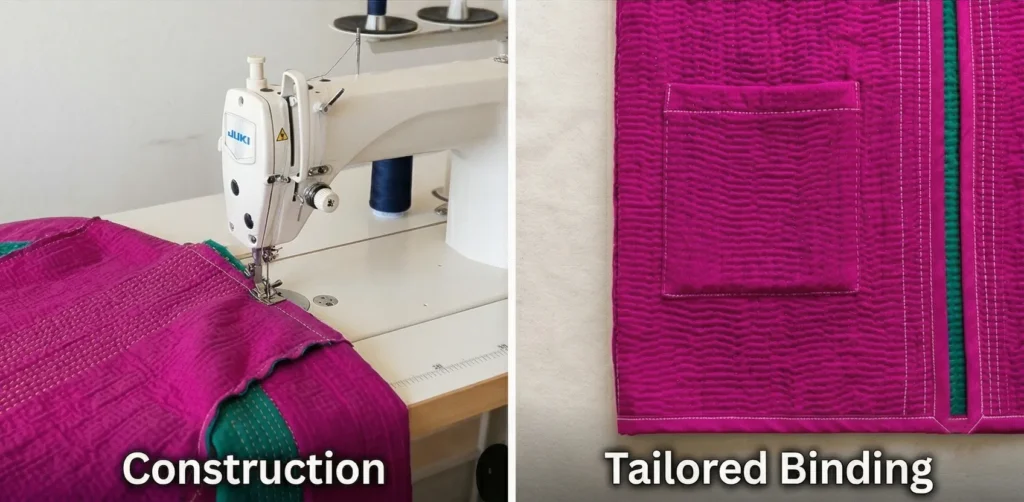
Step 5: Assembly Section (Constructing the Cropped Silhouette)
To keep the jacket unlined and fluid, use flat-felled or bias-bound internal seams.
- Shoulders: Place the Front Panels right sides together with the Back Panel at the shoulders. Machine-sew a 1/2-inch seam.
- Sleeves: Open the joined panels flat. Pin the top center of a quilted sleeve to the shoulder seam, right sides together. Ease the sleeve into the armhole and sew. Repeat for the other side.
- Side Seams: Fold the jacket right sides together. Pin from the cropped bottom hem, up the side, through the armpit, and down to the sleeve cuff. Sew this continuous seam on both sides.
- Internal Polish: Encase all raw internal seam allowances inside a strip of bias tape and topstitch them down. This ensures the bright Pink interior is flawless.

Step 6: Tailored Binding and Finishing
Take a continuous strip of your bias tape and machine-sew it tightly around the entire raw outer perimeter of the jacket (up the front edge, around the back of the neck, down the other front edge, and straight across the cropped bottom hem). Finish the raw edges of the bracelet-length sleeves in the exact same manner to create a pristine, framed edge.
Usability Note: The densely stitched Kantha cotton is incredibly durable and softens beautifully with wear. Machine wash your cropped jacket on a delicate, cold cycle with a color-safe detergent to protect the vibrant Saffron and Pink dyes. Lay it flat to air-dry, maintaining the crisp, boxy architecture of the modern cut.

3. Reversible Nakshi Kantha Quilted Jackets for Versatile Styling
A Guide to Making Reversible Nakshi Kantha Quilted Jackets for Versatile Styling
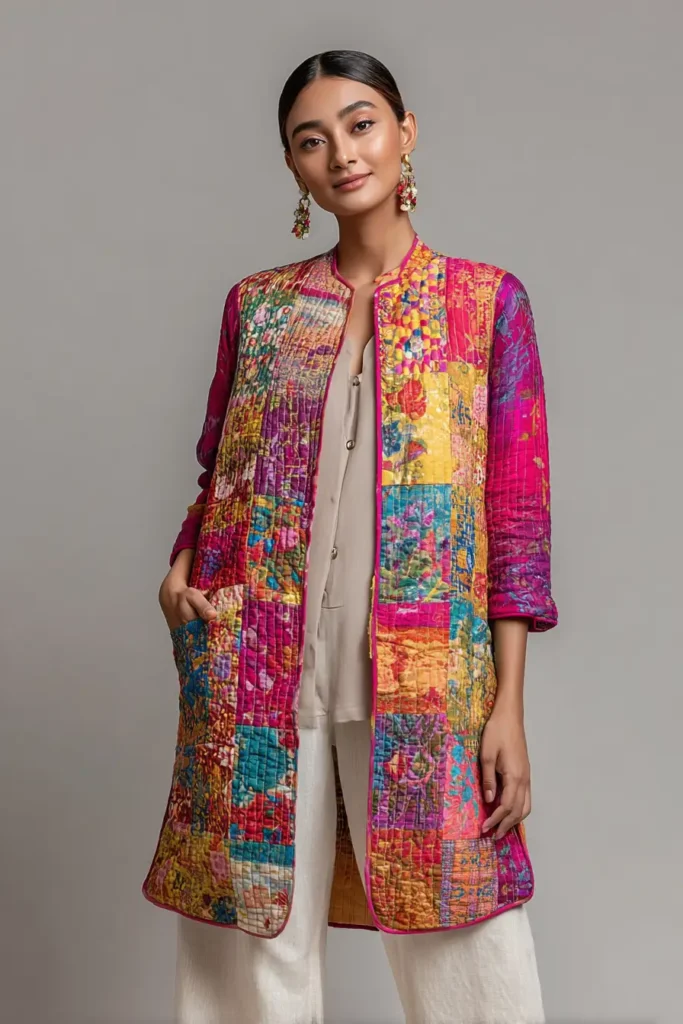
In the world of modern fashion, versatility is the ultimate luxury. A garment that can seamlessly transition from a bold daytime statement to a moody evening aesthetic is incredibly valuable. The Reversible Nakshi Kantha Quilted Jacket achieves exactly this. By mastering the art of completely finished, hidden seams and utilizing the traditional, double-sided beauty of Bengali running stitches, this jacket gives you two entirely different, vibrant wardrobes in a single, impeccably tailored piece.
The Heritage of Nakshi Kantha (And Why I Made It)
Curating this specific pattern for comfydwell.com was a deeply inspiring process, drawing directly from the incredible textile heritage of Bangladesh. Historically, the magic of authentic Nakshi Kantha is that it is inherently beautiful on both sides. Because Bengali women layered old, colorful saris and stitched entirely through the stack, the back of the quilt was often just as striking as the front.
I designed this modern jacket to honor that two-sided historical ingenuity. Often, contemporary lined jackets hide the structural stitching inside. By making the garment fully reversible, we expose and celebrate the hand-stitched architecture from every angle. It is a vibrant, wearable tribute to local artistry, engineered to offer ultimate flexibility for a modern, sophisticated lifestyle.
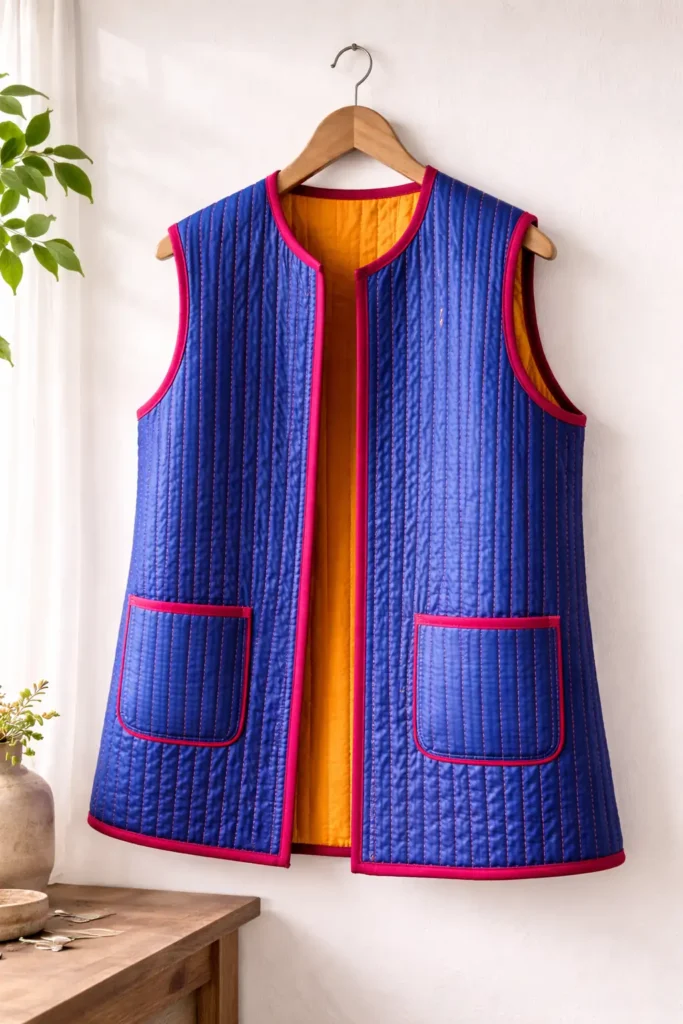
Focus on Usability, Comfort, and Elegance
- Usability: A reversible garment is a travel essential. Packing one jacket that offers two distinct, vibrant colorways saves luggage space while maximizing your outfit options. Patch pockets placed on both sides ensure you never lose functionality, regardless of which color you are wearing outward.
- Comfort: Layering three tiers of pre-washed, breathable cotton creates a textile that feels like a soft, comforting embrace. The absence of stiff synthetic interfacing or heavy batting allows the jacket to drape fluidly, molding to the wearer’s shape over time.
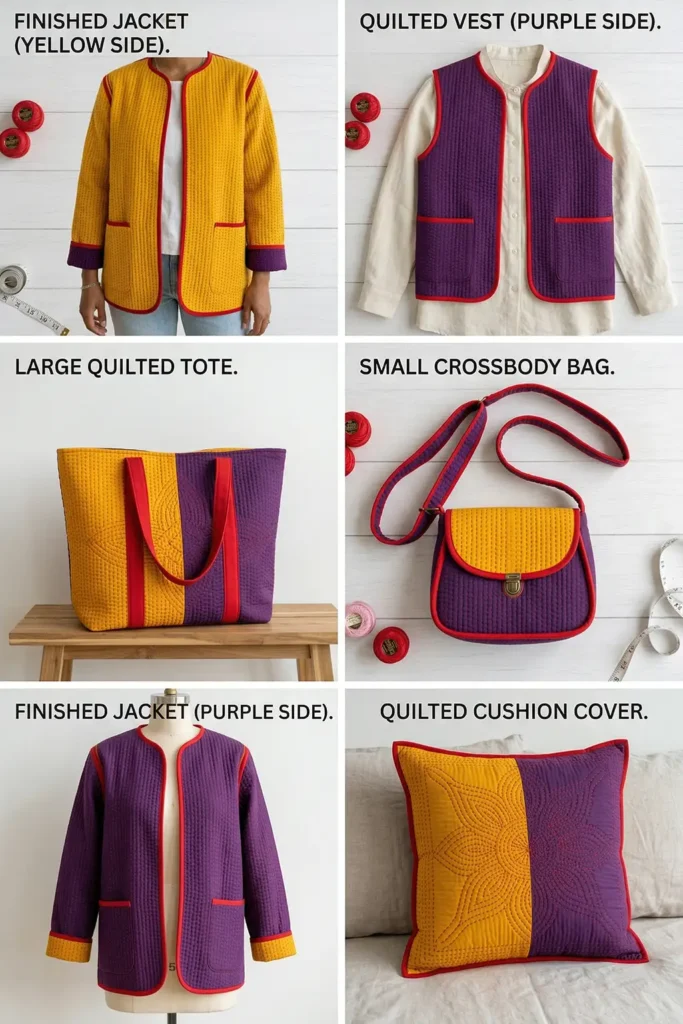
- Elegance: To make both sides pop, we will use a stunning, highly saturated two-tone palette. Imagine Side A in a radiant Turmeric Yellow, and Side B in a deep, jewel-toned Amethyst Purple. When stitched and bound entirely with a brilliant Ruby Red thread and bias tape, the jacket exudes an upscale, artistic elegance that turns heads in any room.
Measurements & Materials Needed
Finished Jacket Size: One-Size-Fits-Most (Modern Hip-Length/Relaxed Fit). Approx. 28″ length from shoulder to hem. Finished Style: A collarless, reversible jacket featuring edge-to-edge vibrant Kantha stitching and reversible patch pockets.
Materials Needed:
- Fabric for the Dual-Faced Shells and Core: 7.5 yards total of premium, lightweight 100% cotton voile or soft linen.
- Side A (e.g., Turmeric Yellow): 2.5 yards.
- Side B (e.g., Amethyst Purple): 2.5 yards.
- Core (Middle Layer): 2.5 yards of lightweight unbleached muslin.
- Thread: * 50-weight cotton thread for machine piecing.
- 6 to 8 skeins of Pearl Cotton (Size 8) or thick embroidery floss in an accent color (e.g., Ruby Red) for the visible hand-stitching.
- Binding: 7 yards of 1/2-inch double-fold bias tape in your accent color (Ruby Red) to finish the edges and bind the internal seams.
- Tools: A rotary cutter, a 6″ x 24″ acrylic ruler, fabric shears, curved safety pins, and a high-quality embroidery needle.
Step-by-Step Guide: The Reversible Kantha Jacket
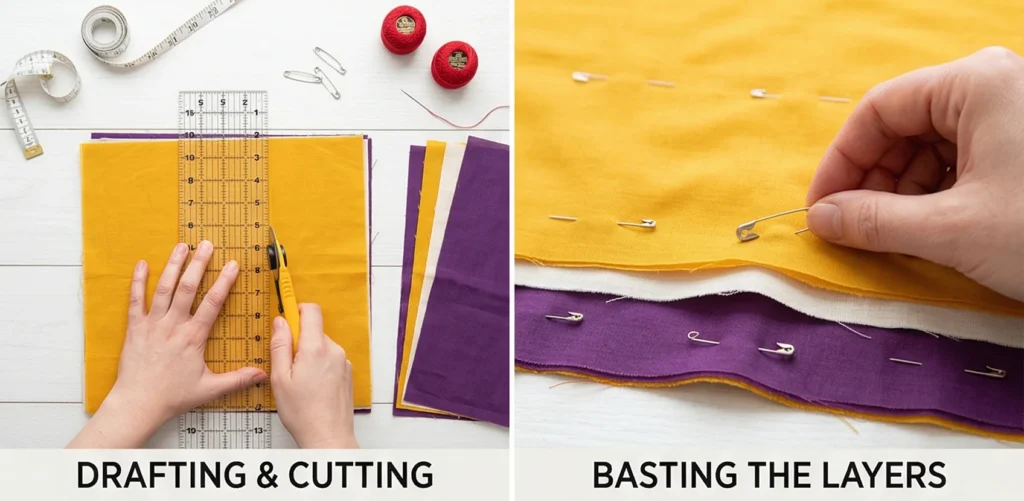
Step 1: Precision Cutting for a Reversible Canvas
Because the heavy hand-stitching will slightly draw the fabric in, cut your panels larger than the final dimensions. Cut 3 identical layers (Turmeric, Muslin, and Amethyst) for each of the following:
- One Back Panel: 28″ wide x 30″ tall.
- Two Front Panels: 14″ wide x 30″ tall each.
- Two Sleeves: 22″ wide x 22″ long each.
- Four Pockets (Two for each side): 8″ x 9″ rectangles.
Step 2: Basting the Dual-Faced Layers
For every single garment piece, meticulously stack your three layers: Amethyst Purple (face down), Muslin Core (middle), and Turmeric Yellow (face up). Smooth out all wrinkles. Pin the layers together intensely using curved safety pins, placing a pin every 3 inches. Because both sides will be visible when worn, the fabric must be perfectly smooth on both the top and the bottom.
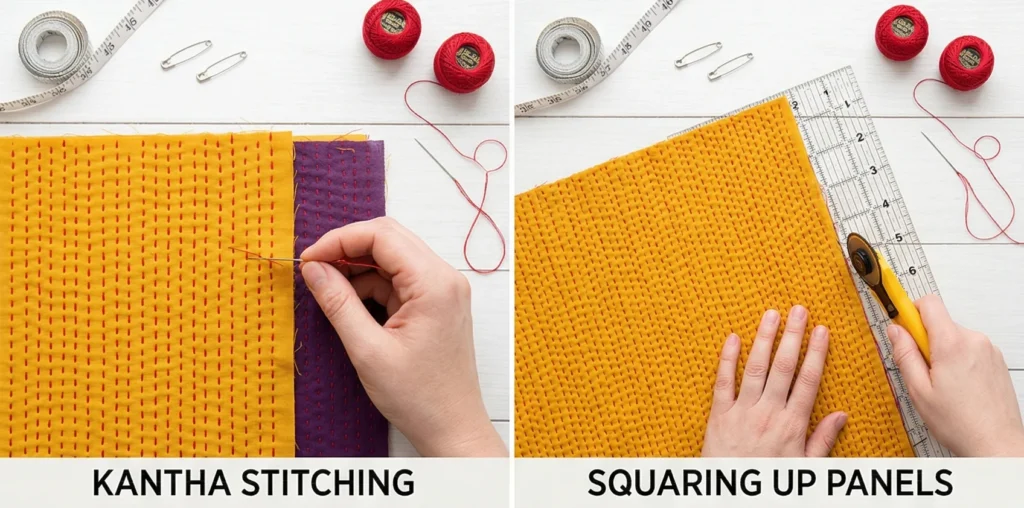
Step 3: The Rhythmic Kantha Stitching
Thread your embroidery needle with the brilliant Ruby Red Pearl Cotton. Using a rhythmic running stitch, quilt straight vertical lines from the top of the panels to the bottom, spacing them 1/4-inch apart. Push your needle straight through all three layers so the red dashed lines show up vibrantly against both the Yellow and the Purple fabrics. Quilt all your body panels, sleeves, and pockets.
Step 4: Squaring Up the Hand-Stitched Panels
Take the heavily quilted panels back to your cutting mat. Use your acrylic ruler and rotary cutter to precisely square up all the edges. Clean, 90-degree edges are absolutely crucial for sewing reversible seams that lay flat.
Step 5: Assembly Section (Constructing the Reversible Silhouette)
To make a jacket truly reversible, there can be no raw seam allowances visible on either side. We will use bound seams.
- Shoulders: Place the Front Panels and Back Panel together (Yellow sides touching). Machine-sew a 1/2-inch seam.
- Bind the Seam: Trim the seam allowance down to 1/4-inch. Encase this raw edge completely in your Ruby Red bias tape and topstitch it down. When you flip the jacket to the Purple side, this bound seam will look like a deliberate, stylish red racing stripe across the shoulder.
- Sleeves & Sides: Repeat this exact process for attaching the sleeves into the armholes, and for sewing the long side/underarm seams. Sew the seams, trim them, and bind them with the red tape.

Step 6: Tailored Binding and Reversible Pocket Placement
- Pockets: Bind the top edges of all four pockets with the Ruby Red bias tape. Pin two Yellow pockets to the Yellow front panels, and two Purple pockets to the Purple front panels. Topstitch them securely into place.
- The Final Frame: Take a continuous strip of your Ruby Red bias tape and machine-sew it tightly around the entire raw outer perimeter of the jacket (up the front edge, around the back of the neck, down the other front edge, and across the bottom hem). Bind the raw edges of the sleeve cuffs in the exact same manner.
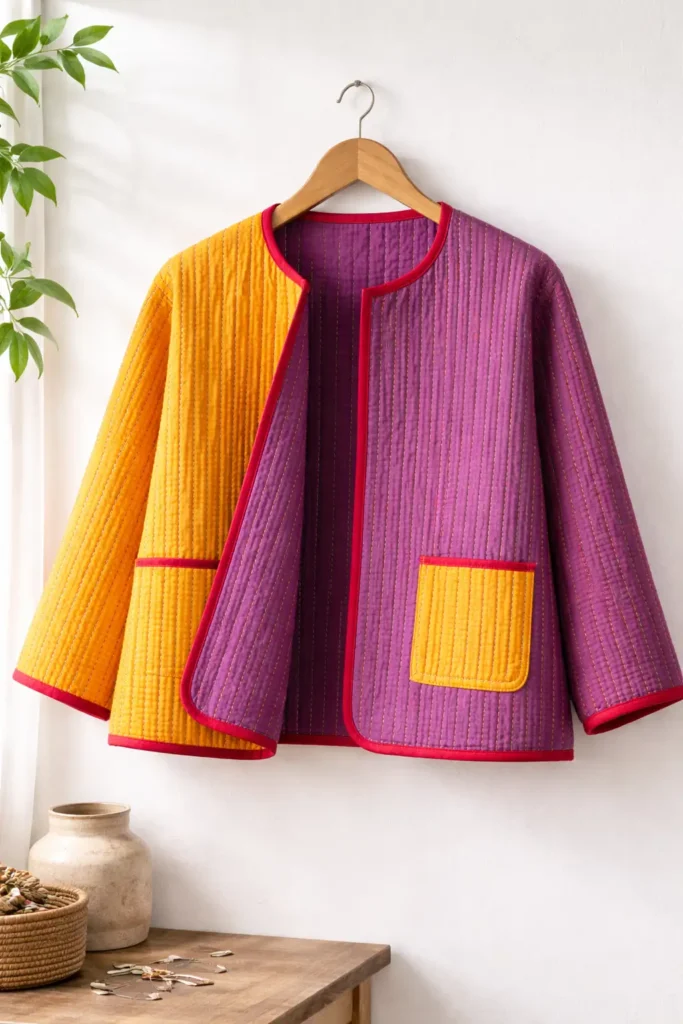
Usability Note: You now have a flawless, two-in-one garment. Wear the Turmeric Yellow side outward for a bright, energetic daytime look, or flip it to the Amethyst Purple side for a deep, sophisticated evening ensemble. Wash this jacket on a cold, delicate cycle to preserve the brilliant dyes, and air dry flat or on a sturdy hanger to maintain its impeccable, reversible tailoring.
4. Luxurious Silk Nakshi Kantha Winter Jackets for Cozy Warmth
A Guide to Making Luxurious Silk Nakshi Kantha Winter Jackets for Cozy Warmth
When the temperature drops, the transition to winter wear often means sacrificing vibrant style for bulky, drab functionality. The Luxurious Silk Nakshi Kantha Winter Jacket shatters that compromise entirely. By elevating the traditional Bengali running stitch with the unparalleled radiance of pure silk and the hidden insulation of natural wool, this jacket offers a breathtaking pop of color to combat winter grayness. It is a true statement piece that envelops you in sophisticated, deeply insulating warmth.
The Heritage of the Silk Kantha (And Why I Made It)
Curating this specific pattern for comfydwell.com came from a very personal moment of winter necessity. Recently, I spent weeks shivering at my desk in Bangladesh, meticulously reviewing over 145 SA documents and porchas related to my grandfather’s inherited land across various Mouzas. Sitting still for hours analyzing those old property records required a garment that provided intense, insulating warmth, but I still wanted to feel elegantly dressed.
Historically, while everyday Nakshi Kantha was made from soft cottons, wealthy families occasionally commissioned kantha work on exquisite Rajshahi silks for special ceremonies. I designed this modern winter jacket to resurrect that luxurious tradition. I wanted to create a guide that proves heavy winter gear doesn’t have to be synthetic or restrictive. By combining the vivid, reflective surface of silk with the architectural texture of hand-stitching, this jacket becomes a wearable masterpiece engineered for extreme coziness.
Focus on Usability, Comfort, and Elegance
- Usability: Why and how this design idea is useful to the reader: Incorporating a layer of natural wool batting between the silk and cotton lining makes this jacket exceptionally useful for freezing temperatures. Wool naturally regulates body heat and wicks moisture away, so you stay incredibly warm outdoors without overheating when you step into a heated room.
- Comfort: Why and how this design idea is useful to the reader: Silk is notoriously frictionless. We line the inside of the jacket with a soft, breathable cotton voile rather than a slippery synthetic lining. This design choice is useful because it ensures the jacket stays securely on your shoulders and feels incredibly soft and grounding against your skin, rather than sliding around uncomfortably.
- Elegance: Why and how this design idea is useful to the reader: To counteract the dreary winter landscape, this design utilizes an explosively vibrant, jewel-toned color palette. This is useful for the reader because a brilliant Sapphire Blue outer shell, stitched entirely with gleaming Metallic Gold or bright Fuchsia thread, instantly elevates any basic winter outfit (like simple jeans and a turtleneck) into an upscale, editorial look.
Measurements & Materials Needed
Finished Jacket Size: One-Size-Fits-Most (Modern Winter/Relaxed Fit to accommodate sweaters). Approx. 32″ length from shoulder to mid-thigh. Finished Style: A structured, collarless winter coat featuring dense, vibrant hand-stitching and deep, functional pockets.
Materials Needed:
- Fabric for the Outer Shell: 3.5 yards of premium, vibrant pure silk or silk-blend (e.g., Brilliant Sapphire Blue).
- Lining Fabric: 3.5 yards of a highly contrasting, breathable 100% cotton voile (e.g., Rich Ruby Red).
- Insulation (Core Layer): 3.5 yards of mid-loft 100% wool apparel batting. (Do not use polyester batting; wool provides the highest warmth-to-weight ratio).
- Thread: * 50-weight cotton thread for machine-pieced internal seams.
- 6 to 8 skeins of Pearl Cotton (Size 8) or thick embroidery floss in a striking accent color (e.g., Metallic Gold or Bright Fuchsia) for the visible hand-stitching.
- Binding: 5 yards of 1/2-inch double-fold bias tape (matching your Ruby Red lining) to finish the raw edges and internal seams.
- Tools: A sharp rotary cutter, a 6″ x 24″ acrylic ruler, fine glass-head pins, curved safety pins, and a sharp, fine-gauge embroidery needle (essential to avoid punching large holes in the delicate silk).
Step-by-Step Guide: The Silk Winter Kantha Jacket
Step 1: Drafting and Cutting the Vibrant Winter Canvas
Because wool batting is thicker than the cotton used in summer kanthas, the fabric will draw in significantly as you hand-quilt it. Cut your 3 identical layers (Sapphire Silk, Wool Batting, and Ruby Cotton) generously for each of the following pieces:
- One Back Panel: 30″ wide x 36″ tall.
- Two Front Panels: 15″ wide x 36″ tall each.
- Two Sleeves: 23″ wide x 22″ long each.
- Two Pockets: 10″ x 10″ rectangles (winter pockets need to be large enough to hold gloved hands!).
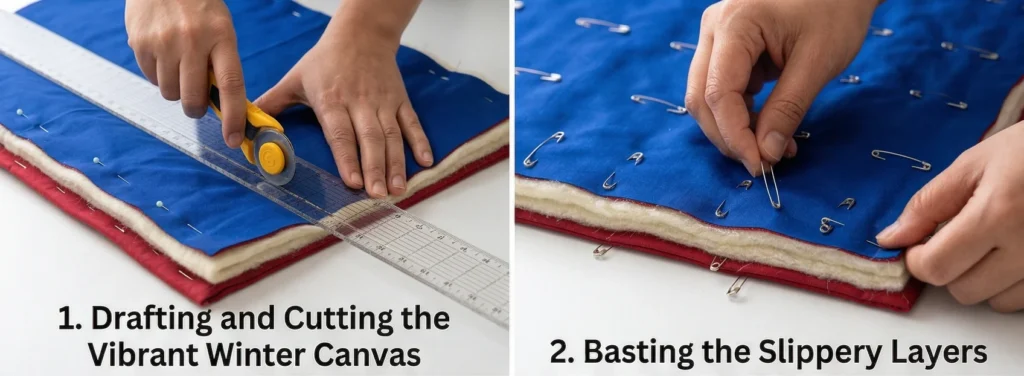
Step 2: Basting the Slippery Layers
Silk requires extreme patience. For every garment piece, meticulously stack your three layers: Ruby Cotton Lining (face down), Wool Batting (middle), and Sapphire Silk Outer (face up). Smooth out all wrinkles. Pin the layers together intensely using your curved safety pins, placing a pin every 2 to 3 inches. Silk shifts incredibly easily, so heavy basting is your best defense against puckering.
Step 3: The Meditative Winter Kantha Stitching
Thread your fine embroidery needle with a long length of the Gold or Fuchsia Pearl Cotton. Using a rhythmic running stitch, quilt straight vertical lines from the top of the panels to the bottom, spacing them 1/2-inch apart. Push your needle straight through the silk, the dense wool, and the cotton lining. The contrast between the bright thread and the Sapphire silk will create an incredible, luminescent texture, while the stitches compress the wool, locking in the garment’s insulating properties. Quilt all your body panels, sleeves, and pockets.
Step 4: Squaring Up the Hand-Stitched Panels
Take the densely quilted, heavy panels back to your cutting mat. Use your acrylic ruler and rotary cutter to precisely square up all the edges. Trimming the pieces ensures the jacket will have a clean, tailored drape rather than looking like a bulky duvet.
Step 5: Assembly Section (Constructing the Winter Coat)
To keep the heavy winter jacket looking flawless on the inside, we will use bound seams.
- Shoulders: Place the Front Panels and Back Panel right sides together (Silk sides touching) at the shoulders. Machine-sew a 1/2-inch seam.
- Sleeves: Open the joined panels flat. Pin the top center of a quilted sleeve to the shoulder seam, right sides together. Ease the sleeve into the armhole and sew with a 1/2-inch seam. Repeat for the other side.
- Side Seams: Fold the jacket right sides together. Pin from the bottom hem, up the side, through the armpit, and down to the sleeve cuff. Sew this continuous seam on both sides.
- Internal Polish: Trim the bulky wool seam allowances down to 1/4-inch. Encase all these raw internal edges in your Ruby Red bias tape, then topstitch them down.
Step 6: Tailored Binding and Pocket Placement
- Pockets: Bind the top edges of your two oversized pockets with the Ruby Red bias tape. Position them on the front Sapphire panels at a comfortable height for your hands. Topstitch the sides and bottom securely into place.
- The Final Frame: Take a continuous strip of your Ruby Red bias tape and machine-sew it tightly around the entire raw outer perimeter of the jacket (up the front edge, around the back of the neck, down the other front edge, and straight across the bottom hem). Bind the raw edges of the sleeve cuffs in the exact same manner. This provides a stunning red contrast border against the blue silk.

Usability Note: Silk and wool are luxurious, natural fibers that require gentle care. This design idea is highly useful to the reader because it eliminates the need for harsh dry-cleaning chemicals; you can gently hand-wash this jacket in the bathtub with a mild, wool-safe detergent and cold water. Roll it in a dry towel to press out excess water, then lay it completely flat to air dry. This ensures the wool batting doesn’t stretch and the vibrant silk maintains its flawless, geometric architecture for many winters to come.
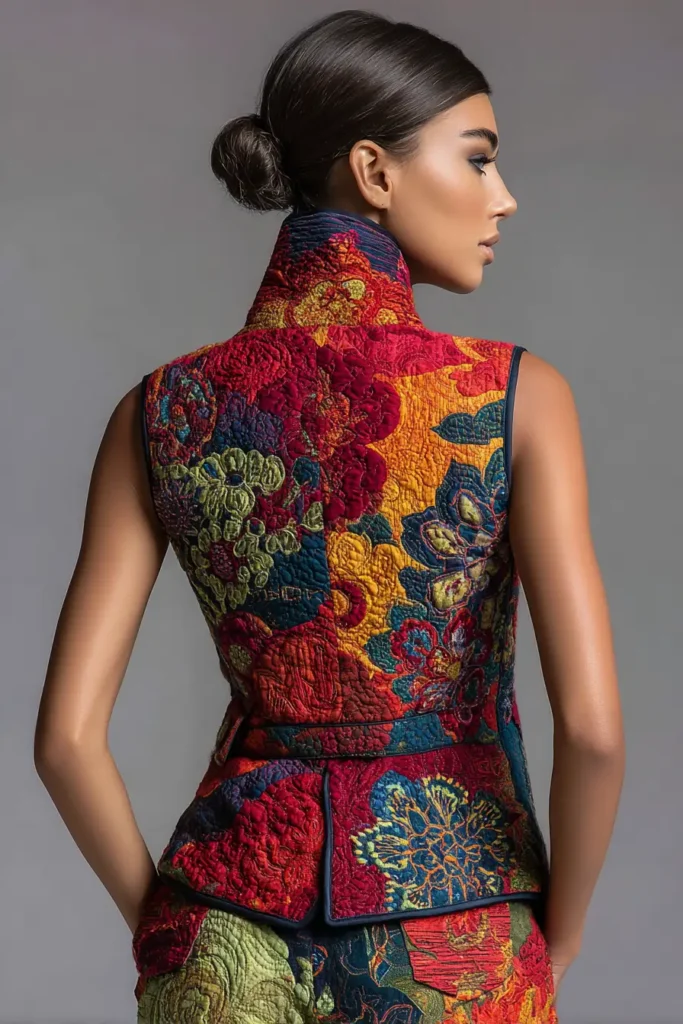
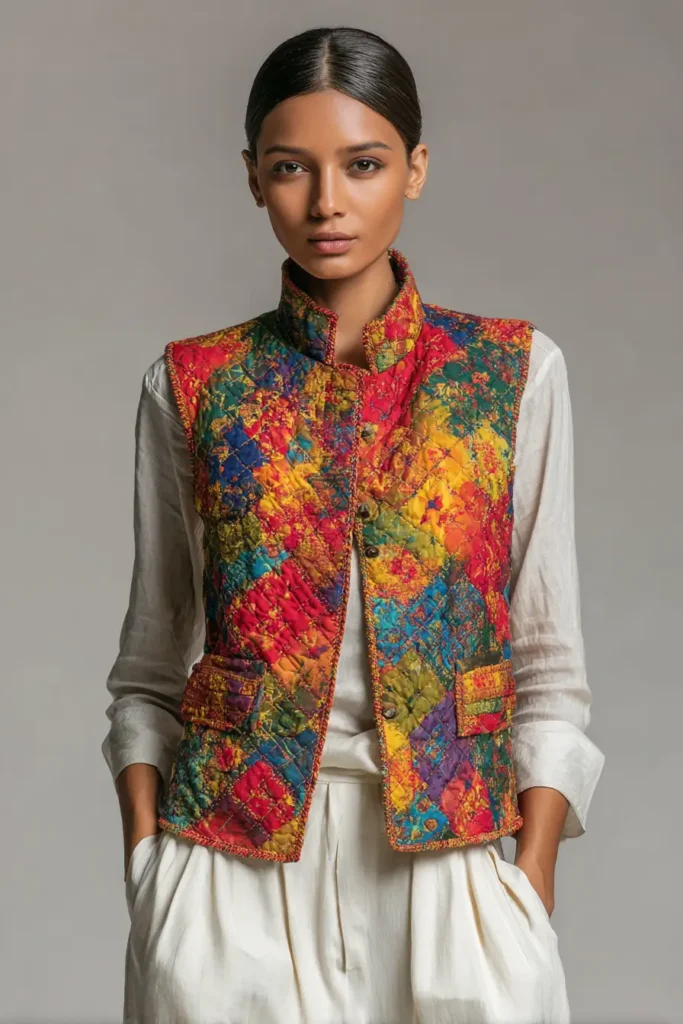
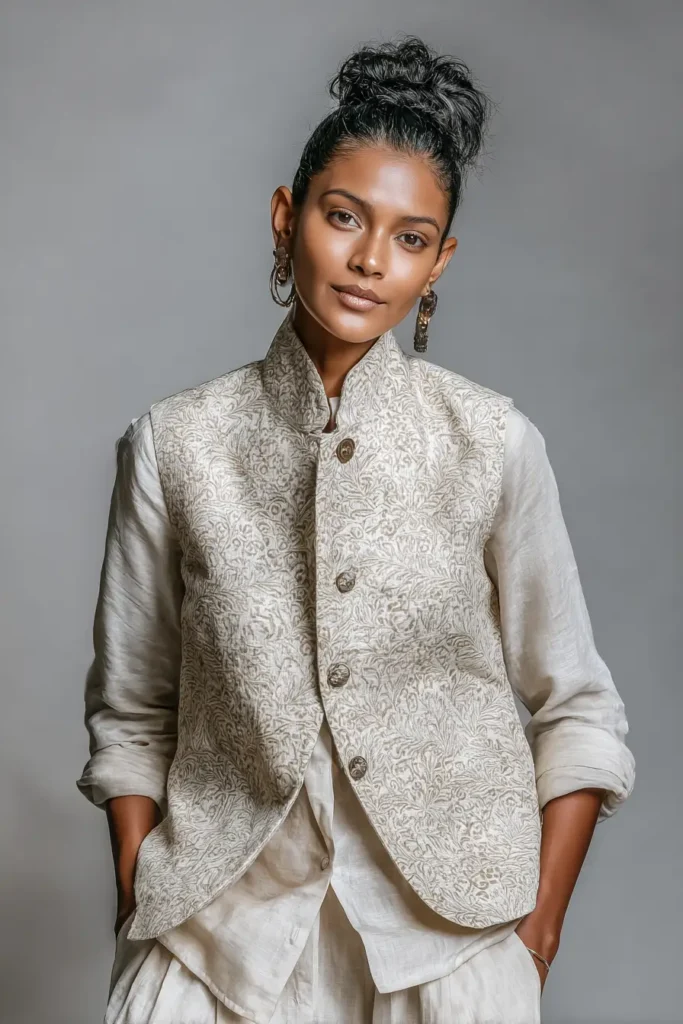
5. Sophisticated Nakshi Kantha Quilted Vests for Layered Sophistication
A Guide to Making Sophisticated Nakshi Kantha Quilted Vests for Layered Sophistication
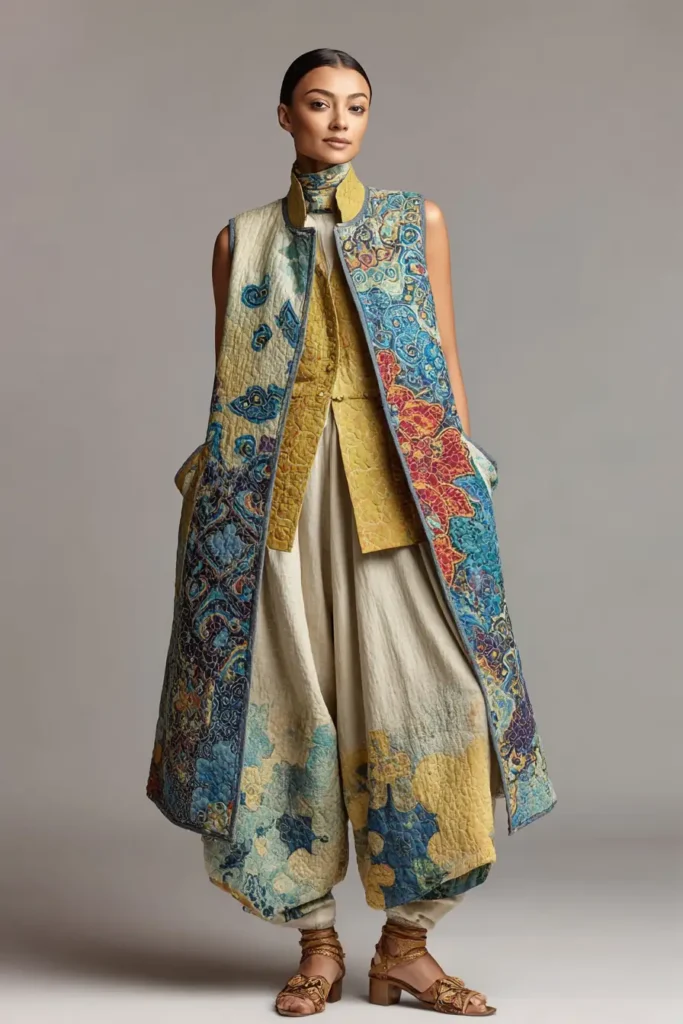
While jackets and duster coats offer sweeping coverage, true wardrobe versatility relies on the art of layering. The Sophisticated Nakshi Kantha Quilted Vest is the ultimate transitional garment. By stripping away the sleeves and focusing entirely on tailoring the torso, this design transforms the historic Bengali running stitch into a sleek, modern, and highly functional layering piece. It delivers the vibrant, textural beauty of traditional Kantha while offering unmatched mobility and temperature control.
The Heritage of the Quilted Vest (And Why I Made It)
Curating this specific pattern for comfydwell.com was inspired by a recent trip to Canada to visit my brother and sister. Moving constantly between the crisp, biting outdoor air and the heavily heated indoors, I quickly realized the immense value of a garment that provides targeted core warmth without the restrictive bulk of full sleeves.
Historically, Kantha was engineered to wrap the entire body in warmth. I designed this vest to adapt that ancient textile wisdom for the modern, on-the-go lifestyle. By framing the vest with crisp, geometric lines and rendering it in explosively vibrant colors, the humble quilted waistcoat is elevated into a sophisticated, high-fashion statement. It allows you to carry a piece of rich, handcrafted heritage, whether you are running errands or attending a gallery opening.
Focus on Usability, Comfort, and Elegance
- Usability: Why and how this design idea is useful to the reader: The sleeveless, open-front design allows for total arm mobility and effortless layering over chunky knit sweaters or button-down shirts. This makes it a highly versatile transitional piece that instantly adapts your existing wardrobe to unpredictable weather.
- Comfort: Why and how this design idea is useful to the reader: By utilizing three stacked layers of breathable cotton voile instead of dense synthetic batting, this vest provides essential core warmth that naturally regulates your body temperature. This prevents you from overheating when moving from the chilly outdoors to a warm room.
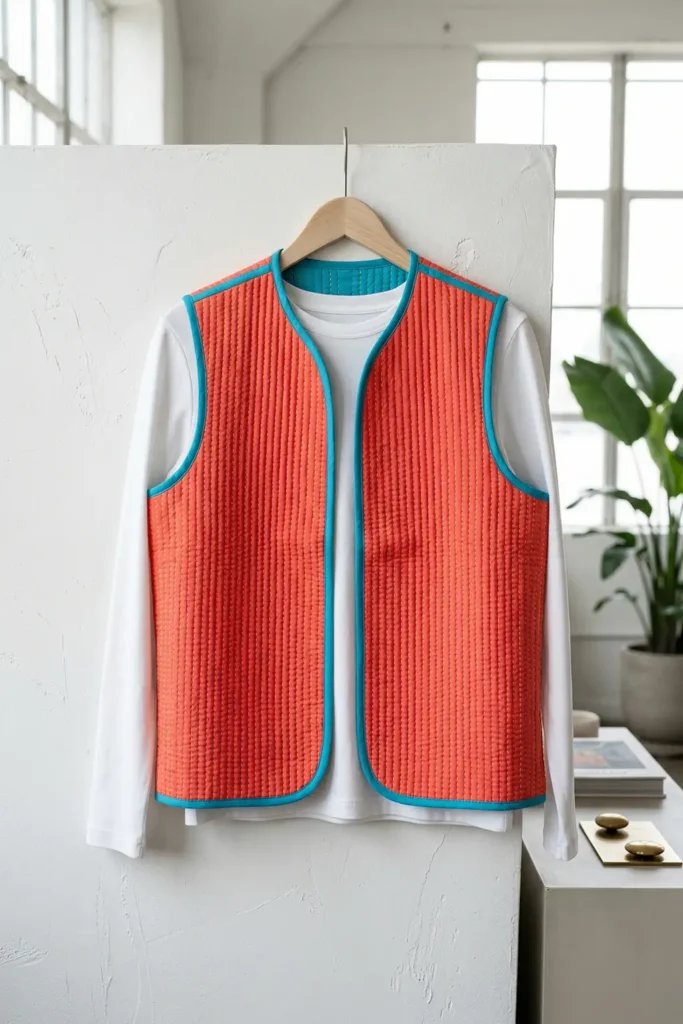
- Elegance: Why and how this design idea is useful to the reader: Using a vibrant, highly saturated color palette—like a brilliant Coral outer shell paired with a vivid Turquoise lining and stitched with Lemon Yellow thread—instantly elevates a basic, neutral outfit (like jeans and a white tee) into a deliberate, bespoke fashion statement.
Measurements & Materials Needed
Finished Vest Size: One-Size-Fits-Most (Modern Tailored Fit). Approx. 24″ length from shoulder to hem. Finished Style: A structured, open-front sleeveless vest featuring vibrant Kantha stitching and bound edges.
Materials Needed:
- Fabric for the Outer Shell, Core, and Lining: 4.5 yards total of premium, lightweight 100% cotton voile or soft linen.
- Outer Shell: 1.5 yards of a vibrant solid (e.g., Brilliant Coral).
- Lining: 1.5 yards of a highly contrasting solid (e.g., Vivid Turquoise).
- Core (Middle Layer): 1.5 yards of unbleached muslin or scrap cotton.
- Thread: * 50-weight cotton thread for the machine-pieced internal shoulder and side seams.
- 4 to 5 skeins of Pearl Cotton (Size 8) or thick embroidery floss in a striking accent color (e.g., Lemon Yellow) for the visible hand-stitching.
- Binding: 5 yards of 1/2-inch double-fold bias tape (matching your Turquoise lining) to finish the armholes, front edges, and hem.
- Tools: A sharp rotary cutter, a 6″ x 24″ acrylic ruler, fabric shears, curved safety pins, and a high-quality embroidery needle.
Step-by-Step Guide: The Vibrant Kantha Vest
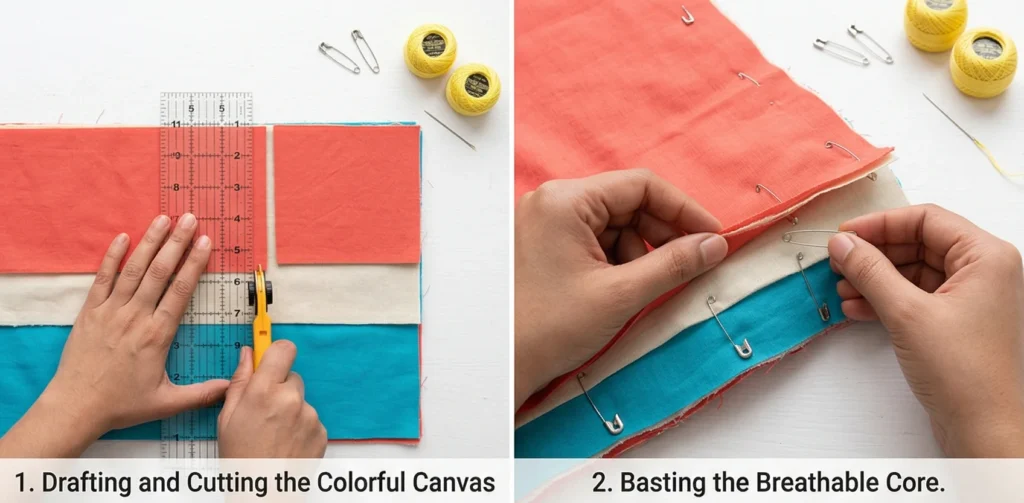
Step 1: Drafting and Cutting the Colorful Canvas
Because the hand-stitching will pull the fabric inward, cut your panels generously. Cut 3 identical layers (Coral Outer, Muslin Core, and Turquoise Lining) for each of the following pieces:
- One Back Panel: 24″ wide x 26″ tall.
- Two Front Panels: 12″ wide x 26″ tall each. (Note: Because this is a vest, no sleeves are required, making this a wonderfully fast project!)
Step 2: Basting the Breathable Core
Meticulously stack your three layers for each panel: Turquoise Lining (face down), Muslin Core (middle), and Coral Outer Shell (face up). Smooth the fabrics perfectly flat. Pin the layers together densely using your curved safety pins, placing a pin every 3 inches. Tight basting is absolutely crucial to keeping these lightweight, vibrant cottons perfectly aligned during hand-sewing.
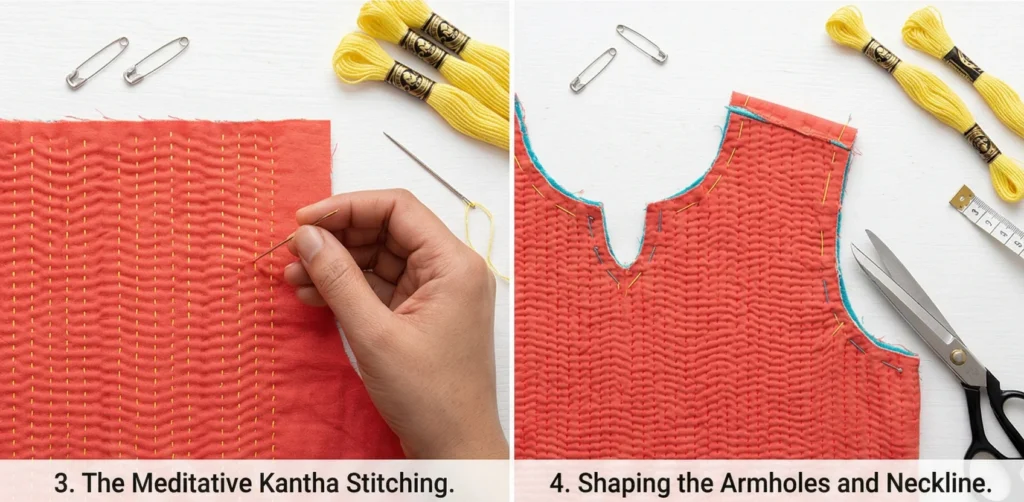
Step 3: The Meditative Kantha Stitching
Thread your embroidery needle with a long length of the Lemon Yellow Pearl Cotton. Using a traditional, rhythmic running stitch, quilt perfectly straight vertical lines running from the top of the panels to the bottom, spacing them exactly 1/4-inch apart. Push your needle through all three layers. The Lemon Yellow thread popping against the Brilliant Coral creates a stunning, rippled geometric texture. Quilt the entire expanse of the Back and Front panels.
Step 4: Shaping the Armholes and Neckline
Once the hand-quilting is finished, take the panels to your cutting mat.
- Square Up: Trim the outer edges to make the panels perfectly rectangular.
- Armholes: On the outer edges of the Front Panels and the corresponding edges of the Back Panel, use fabric shears to cut a gentle, scooped curve for the armholes (measuring about 9 inches deep from the top shoulder edge).
- Neckline: On the inner top edges of the Front Panels, cut a subtle downward curve to create a comfortable, flattering front neckline.
Step 5: Assembly Section (Constructing the Waistcoat)
To keep the vest unlined and sleek, we will utilize bound internal seams.
- Shoulders: Place the Front Panels right sides together with the Back Panel at the top shoulder seams. Machine-sew a 1/2-inch seam.
- Side Seams: Pin the sides of the vest from the bottom of the armhole curve straight down to the bottom hem, right sides together. Sew a 1/2-inch seam on both sides.
- Internal Polish: Trim these raw internal seam allowances (shoulders and sides) down to 1/4-inch. Encase them entirely in your Turquoise bias tape, then topstitch them down to ensure the interior is just as vibrant and flawless as the exterior.
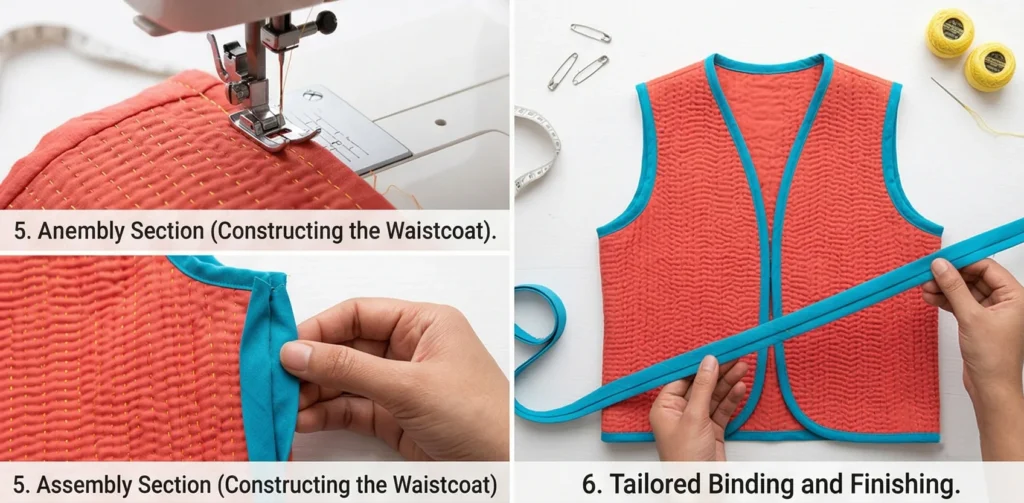
Step 6: Tailored Binding and Finishing
The secret to a high-end vest is how the raw edges are framed.
- Bind the Armholes: Take a strip of your Turquoise bias tape and carefully sew it around the curved raw edge of each armhole, encasing the layers perfectly.
- The Final Frame: Take a long, continuous strip of the Turquoise bias tape and machine-sew it tightly around the entire raw outer perimeter of the vest (up the front edge, around the back of the neck, down the other front edge, and straight across the bottom hem). This contrasting border sharpens the silhouette and completes the sophisticated garment.
Usability Note: The sleeveless architecture of this vest makes it a highly adaptable, everyday staple that effortlessly transitions between seasons. To care for this vibrant, handcrafted piece, machine wash it on a delicate, cold cycle with a color-safe detergent to preserve the brilliant Coral and Turquoise dyes. Hang it on a sturdy wooden hanger to air dry. This simple care routine bypasses the need for harsh dry-cleaning chemicals and ensures the dense Kantha stitching retains its stunning, rippled texture and tailored fit for years of stylish layering.
Comfort and Practical Care
The dense, hand-stitched layers of breathable cotton voile offer unparalleled core warmth without the restrictive, sweaty feel of synthetic down or polyester linings. This natural composition ensures the vest breathes with you, keeping your temperature perfectly regulated whether you are navigating a breezy outdoor market or sitting in a heated cafe. To maintain this exquisite, lived-in comfort, avoid harsh dry-cleaning chemicals. Simply machine-wash the vest on a delicate, cold cycle with a color-safe detergent. Reshape it gently while damp and hang it on a broad-shouldered wooden hanger to air dry. This highly practical routine protects the vibrant threads and allows the cotton to naturally soften, enhancing the vest’s cloud-like texture with every single wash.
Elegance That Lasts
The true luxury of a Nakshi Kantha garment is that it is the absolute antithesis of fast fashion: a wearable, enduring heirloom. The meticulous, dense running stitches do much more than create a stunning visual rhythm—they structurally bind the fabric layers together with incredible strength, preventing the cotton from tearing or stretching out of shape over time. By utilizing high-quality, colorfast pearl cotton threads and completely encasing all internal raw edges with bias tape, the vest is engineered to withstand daily, active wear without fraying. As the fabric ages, the vibrant Coral and Turquoise dyes will settle into a beautiful, nuanced patina, ensuring your vest remains a chic, highly sophisticated wardrobe staple for decades.
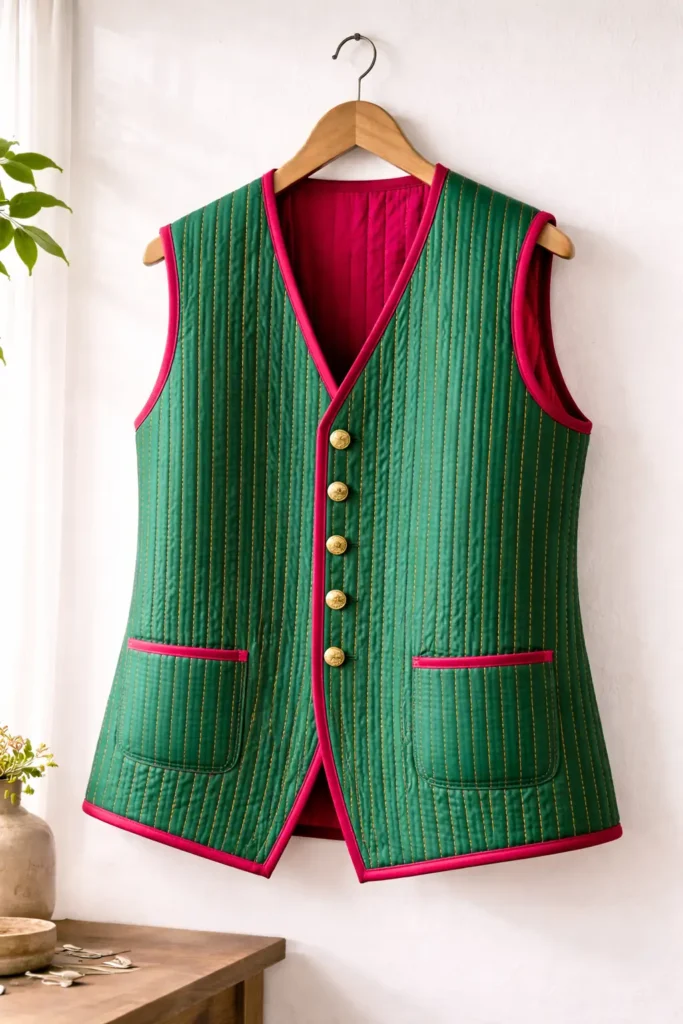
6. Elegant Tailored Nakshi Kantha Waistcoats for Polished Outfits
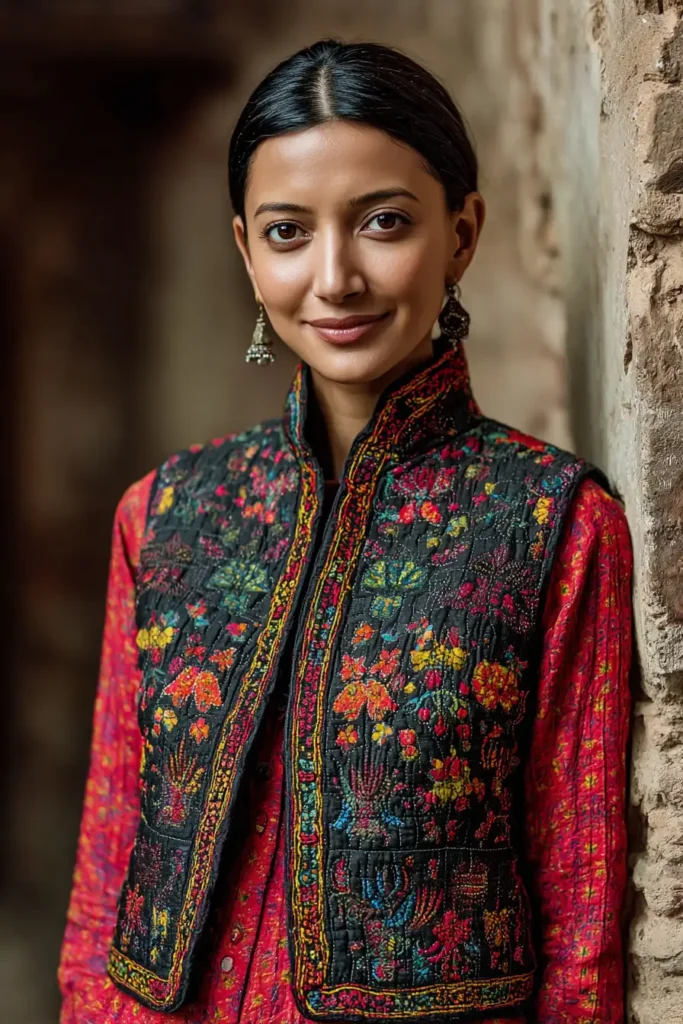
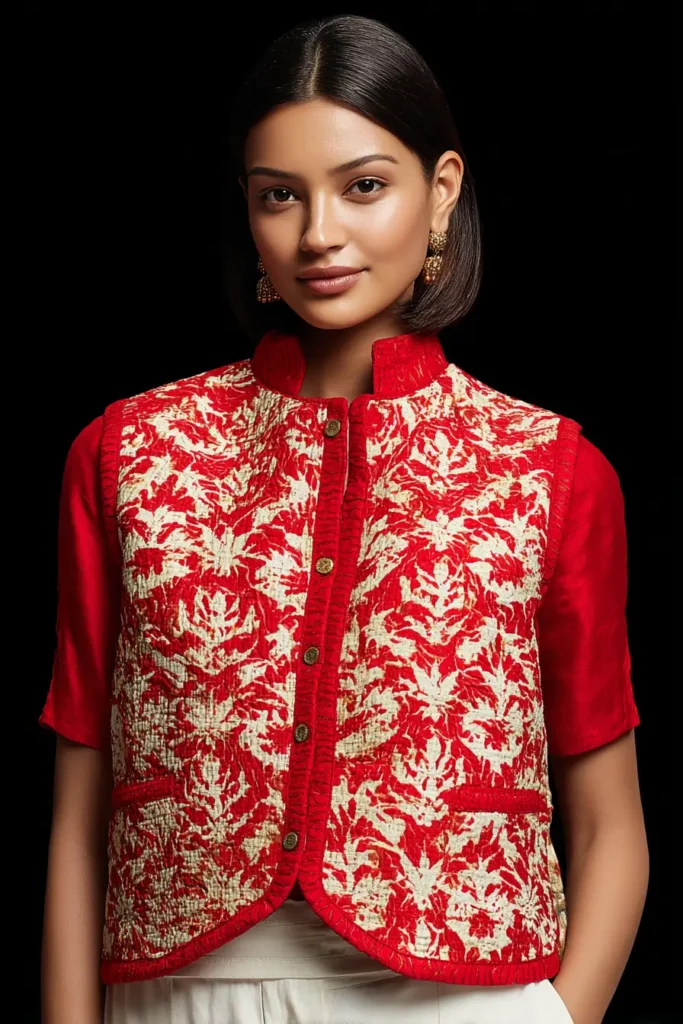
A Guide to Making Elegant Tailored Nakshi Kantha Waistcoats for Polished Outfits
While relaxed, open-front vests are perfect for casual layering, formal occasions demand a sharper silhouette. The Elegant Tailored Nakshi Kantha Waistcoat bridges the gap between traditional heritage and high-end formalwear. By applying the rich, textural beauty of Bengali hand-stitching to the strict, structured lines of a classic waistcoat (complete with darts and a buttoned front), this garment transforms a standard suit or a crisp button-down shirt into an incredibly polished, bespoke ensemble.
The Heritage of the Tailored Kantha (And Why I Made It)
Curating this specific pattern for comfydwell.com was driven by a desire to see traditional textile arts represented in formal settings. Historically, Nakshi Kantha was a domestic craft, meant for the privacy and warmth of the home. However, as Bangladesh’s rich culture continues to influence global fashion, we are seeing these intricate running stitches make their way into upscale, celebratory attire.
I designed this tailored waistcoat to showcase how a craft born from upcycled saris can be engineered for a modern, polished event—like an upscale dinner in Dhaka or a vibrant cultural wedding. By combining the rigid, mathematical tailoring of a classic vest with the organic, rhythmic texture of hand-stitched Kantha, I wanted to create a statement piece. Using explosively vibrant colors ensures the waistcoat doesn’t just blend in under a blazer; it becomes the outfit’s undisputed focal point.
Measurements & Materials Needed
Finished Waistcoat Size: Men’s/Women’s Tailored Fit (Approx. 38″ chest, 23″ length). Note: Waistcoats require precise tailoring; adjust these base measurements to your exact measurements. Finished Style: A structured, V-neck button-down waistcoat with darted shaping and vibrant, edge-to-edge Kantha stitching.
Materials Needed:
- Fabric for the Outer Shell, Core, and Lining: 4.5 yards total of premium, structured cotton canvas or raw silk.
- Outer Shell: 1.5 yards of a vibrant jewel tone (e.g., Brilliant Emerald Green).
- Lining: 1.5 yards of a contrasting, flashy solid (e.g., Shocking Rani Pink).
- Core (Middle Layer): 1.5 yards of medium-weight unbleached muslin to give the waistcoat its rigid, formal structure.
- Thread: * 50-weight cotton thread for machine piecing and darts.
- 4 to 5 skeins of Pearl Cotton (Size 8) in a striking accent color (e.g., Bright Mustard Yellow) for the visible hand-stitching.
- Binding: 5 yards of 1/2-inch double-fold bias tape matching your Rani Pink lining.
- Hardware: 5 high-quality buttons (e.g., polished brass or fabric-covered buttons in Mustard Yellow).
- Tools: A sharp rotary cutter, a 6″ x 24″ acrylic ruler, fabric shears, curved safety pins, tailor’s chalk, and a high-quality embroidery needle.
Step-by-Step Guide: The Tailored Kantha Waistcoat
Step 1: Drafting and Cutting the Formal Canvas
Because a waistcoat requires a tailored fit, we will cut standard rectangular panels first, quilt them, and then cut the precise armholes and necklines. Cut 3 identical layers (Emerald Outer, Muslin Core, and Pink Lining) for each of the following:
- One Back Panel: 22″ wide x 26″ tall.
- Two Front Panels: 12″ wide x 26″ tall each.
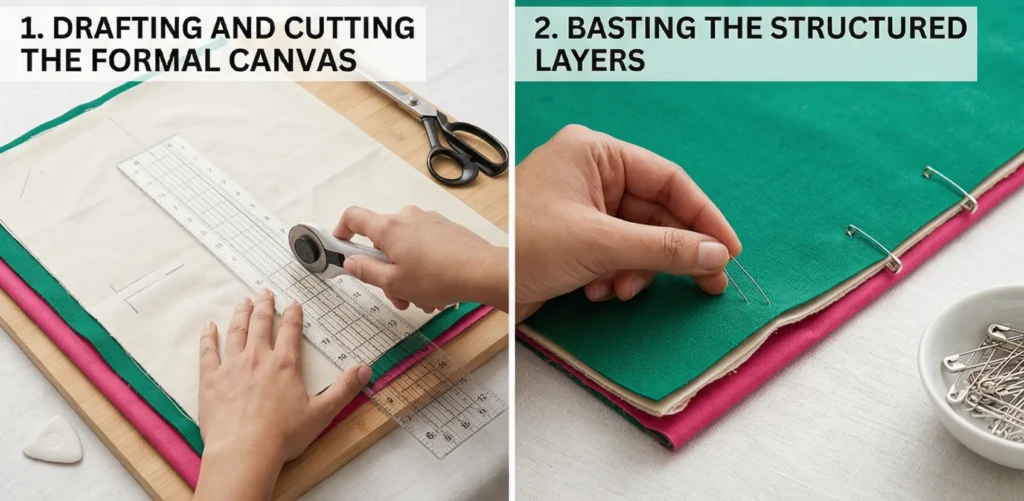
Step 2: Basting the Structured Layers
Meticulously stack your three layers for each panel: Rani Pink Lining (face down), Muslin Core (middle), and Emerald Green Outer Shell (face up). Smooth the fabrics perfectly flat. Because this garment requires formal rigidity, pin the layers together very densely using your curved safety pins (a pin every 2 inches).
Step 3: The Vibrant, Formal Kantha Stitching
Thread your embroidery needle with the Mustard Yellow Pearl Cotton. Using a highly consistent running stitch, quilt perfectly straight vertical lines running from the top of the panels to the bottom, spacing them exactly 1/4-inch apart. Push your needle through all three layers. The strict, vertical lines of the Mustard thread popping against the Emerald background will naturally elongate the torso, adding to the garment’s formal, tailored illusion. Quilt the entire Back and both Front panels.
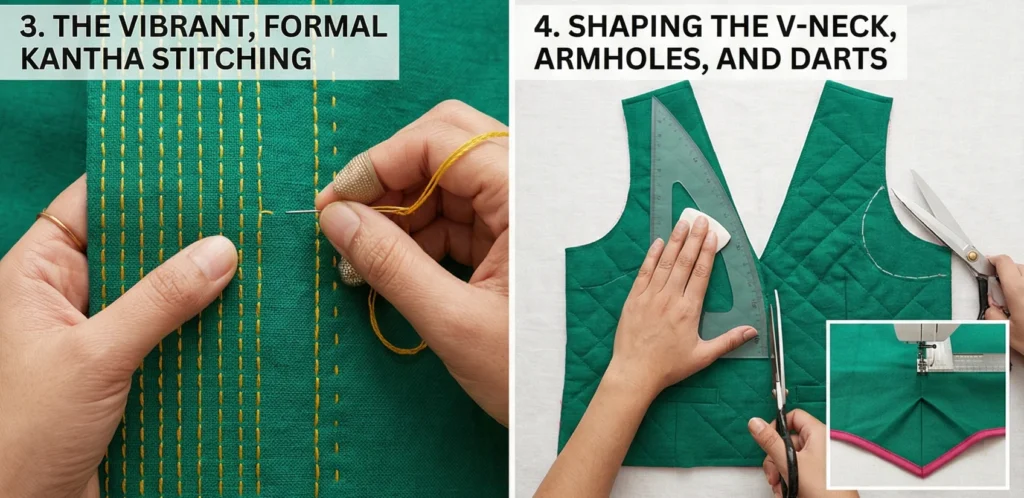
Step 4: Shaping the V-Neck, Armholes, and Darts
Once the heavy hand-quilting is complete, take your panels to your cutting mat. Use tailor’s chalk and a waistcoat template (or a well-fitting vest you already own) to draw your tailored lines.
- Armholes: Cut deep, scooped armholes into the outer edges of the Front panels and the corresponding Back panel.
- The V-Neck: Cut a sharp, plunging V-neck line into the inner edges of the two Front panels.
- The Bottom Hem: Cut the classic pointed waistcoat tips at the bottom of the Front panels.
- Tailoring Darts: To achieve a polished, body-skimming fit, fold the bottom center of each Front panel right-sides together and sew a vertical dart (about 6 inches long, tapering at the top). Press the darts flat. Repeat on the Back panel.
Step 5: Assembly Section (Constructing the Formal Waistcoat)
We will use bound internal seams to keep the interior sleek and unlined.
- Shoulders: Place the Front Panels right sides together with the Back Panel at the narrow top shoulder seams. Machine-sew a 1/2-inch seam.
- Side Seams: Pin the sides of the vest from the bottom of the armhole curve straight down to the bottom hem, right sides together. Sew a 1/2-inch seam on both sides.
- Internal Polish: Trim these raw internal seam allowances down to 1/4-inch. Encase them entirely in your Rani Pink bias tape, then topstitch them down.

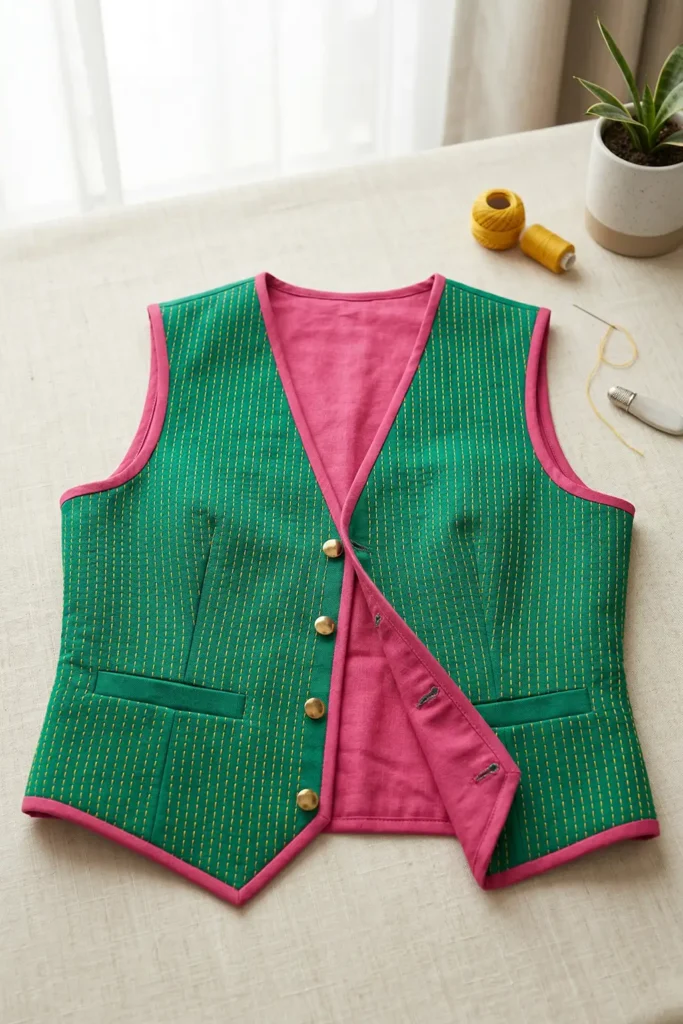
Step 6: Tailored Binding, Buttonholes, and Finishing
- Bind the Edges: Take your Rani Pink bias tape and carefully sew it around the curved raw edges of both armholes. Next, take a long, continuous strip and bind the entire outer perimeter of the waistcoat (up the front edges, around the V-neck, around the back of the neck, and across the pointed bottom hem).
- Buttonholes: On the right Front panel, carefully measure and mark 5 evenly spaced buttonholes. Use your sewing machine’s buttonhole foot to stitch them securely, and slice them open with a seam ripper.
- Buttons: Sew your polished brass or Mustard Yellow buttons onto the left Front panel, perfectly aligned with the buttonholes.
Usability Note
The structured, tailored architecture of this waistcoat makes it an incredibly versatile piece of formalwear. It can be worn fully buttoned over a crisp, white dress shirt for a highly polished, culturally rich formal look, or worn unbuttoned over a simple black turtleneck for a sharp, sophisticated evening aesthetic. The lack of bulky sleeves allows it to slide effortlessly under a tailored suit jacket, offering a brilliant flash of Emerald Green and Rani Pink whenever the jacket falls open.
Comfort and Practical Care
Despite its formal appearance, the waistcoat is exceptionally comfortable. By replacing the stiff, synthetic interfacings found in traditional suiting with densely stitched layers of breathable muslin and cotton canvas, the garment naturally regulates your core temperature and molds to your specific body shape over time. To maintain its crisp, tailored lines and vibrant dyes, spot clean when possible. When a full wash is necessary, gently hand-wash in cold water with a mild, color-safe detergent. Lay it completely flat on a towel to air-dry, then finish with a warm iron to restore the pristine points of the collar and hem.
Elegance That Lasts
The elegance of this piece lies in its meticulous construction. The dense Kantha stitching serves a dual role: it provides a stunning, vibrant visual texture and physically anchors the three layers of fabric together with incredible strength. This prevents the structured cotton from warping, stretching, or losing its tailored silhouette even after years of wear. By binding all the raw edges with double-fold bias tape, the waistcoat is engineered to resist fraying, ensuring this vibrant, bespoke garment remains a polished cornerstone of your formal wardrobe for decades.
7. Hand-Embroidered Nakshi Kantha Tunic Tops for Everyday Grace
A Guide to Making Hand-Embroidered Nakshi Kantha Tunic Tops for Everyday Grace
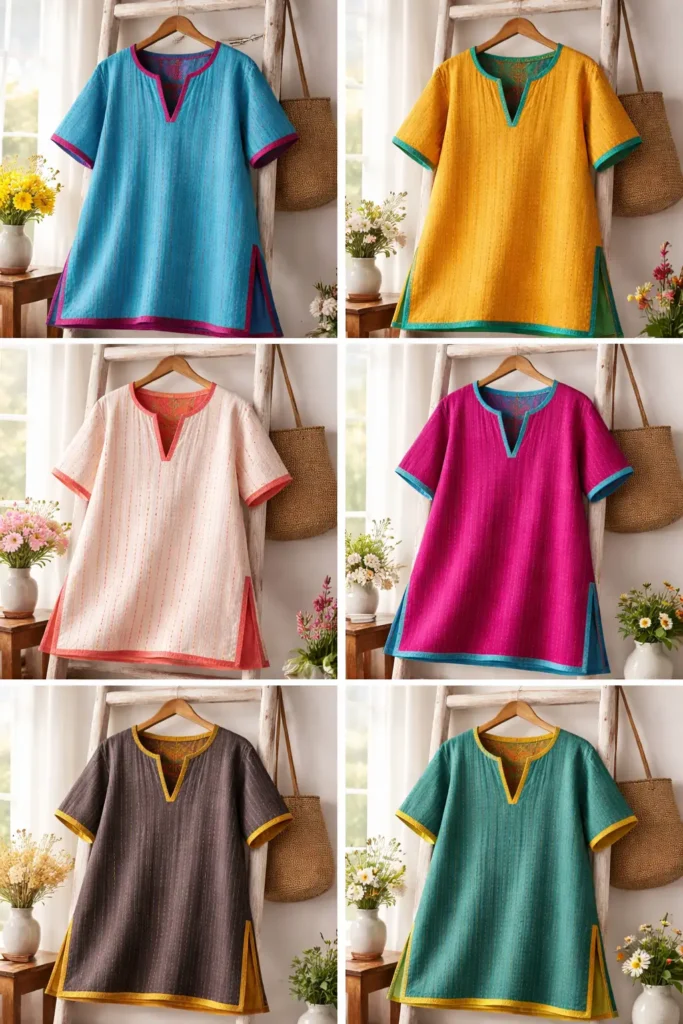
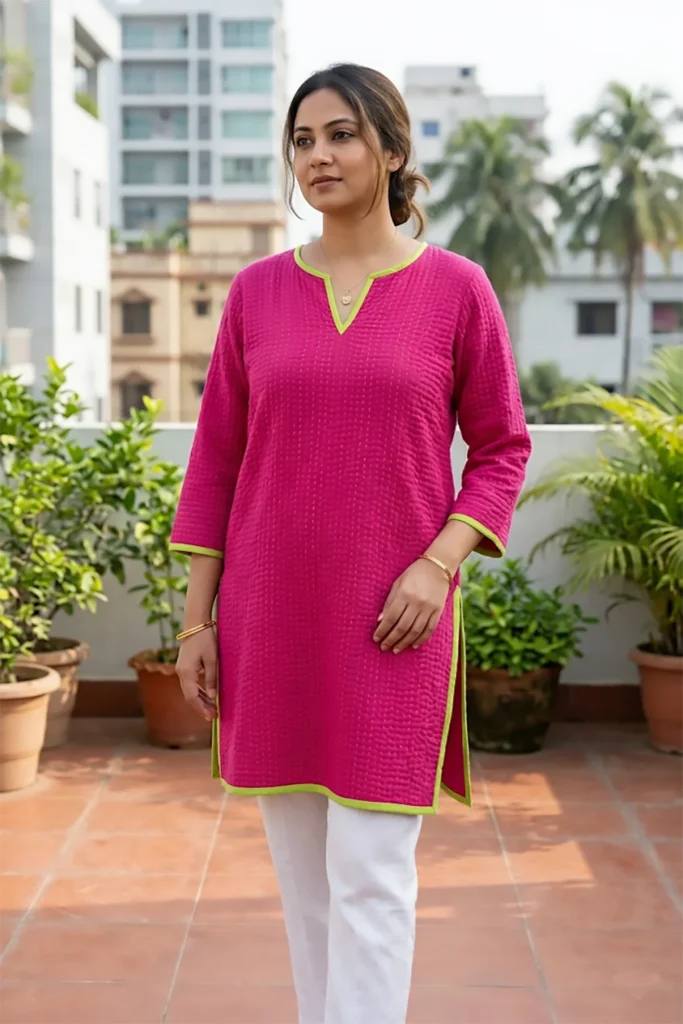
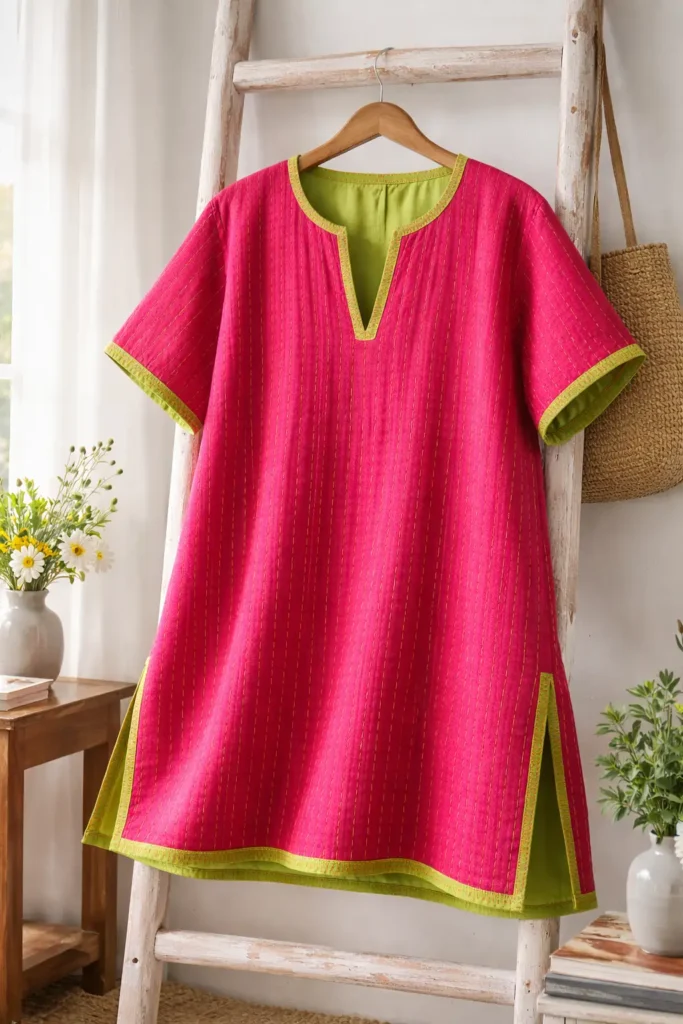
While structured coats and tailored waistcoats offer incredible architectural presence, everyday life often calls for garments that are a bit more fluid and forgiving. The Hand-Embroidered Nakshi Kantha Tunic Top perfectly answers this call. By applying the breathtaking, rhythmic running stitches of Bengali heritage to a relaxed, flowing tunic silhouette, you create a garment that moves effortlessly with you. Rendered in explosively vibrant colors, this top brings the intricate beauty of traditional textile art into your daily, casual wardrobe without sacrificing a single degree of comfort.
The Heritage of the Tunic (And Why I Made It)
Curating this specific pattern for comfydwell.com was an exercise in bridging historic artistry with modern, multi-generational appeal. Historically, Nakshi Kantha was widely used to create soft, breathable garments and wraps that withstand the heat and humidity of the Bengal region. The running stitches provided texture and durability to lightweight, upcycled cottons.
I designed this modern tunic to capture that exact breezy functionality, but I elevated the palette to make it a striking fashion statement. I wanted to create a piece that effortlessly spans generations—a garment comfortable enough to wear while working from home or running weekend errands, yet so inherently stylish that my teenage daughter (who is currently busy navigating grade 10) constantly tries to “borrow” it from my closet. By fusing a timeless silhouette with brilliant, saturated hues, the humble tunic becomes a piece of everyday grace.
Focus on Usability, Comfort, and Elegance
- Usability: Why and how this design idea is useful to the reader: The tunic features a longer hemline (hitting mid-thigh) with deep, reinforced side slits. This design is highly useful because it provides elegant, comfortable coverage when paired with fitted leggings or skinny jeans, while the side slits ensure complete freedom of movement when walking or sitting.
- Comfort: Why and how this design idea is useful to the reader: By utilizing three thin layers of premium cotton voile and omitting any stiff batting, the tunic remains incredibly lightweight. This is useful to the reader because the breathable layers naturally wick away moisture, keeping you cool in the summer while providing just enough weight to drape beautifully rather than clinging to the body.
- Elegance: Why and how this design idea is useful to the reader: This design embraces a daring, high-contrast color palette. Pairing a vivid Fuchsia outer shell with a striking Lime Green lining—and stitching it entirely with bright Tangerine thread—is highly useful because it instantly injects high-end, bespoke runway energy into an otherwise casual, everyday outfit.
Measurements & Materials Needed
Finished Tunic Size: One-Size-Fits-Most (Modern Relaxed/Flowing Fit). Approx. 34″ length from shoulder to hem. Finished Style: A flowing, short-sleeved (or 3/4 sleeve) tunic with a split V-neck, deep side slits, and edge-to-edge vibrant Kantha stitching.
Materials Needed:
- Fabric for the Outer Shell, Core, and Lining: 6 yards total of premium, lightweight 100% cotton voile or soft double gauze.
- Outer Shell: 2 yards of a vibrant solid (e.g., Vivid Fuchsia).
- Lining: 2 yards of a flashy, contrasting solid (e.g., Lime Green).
- Core (Middle Layer): 2 yards of unbleached muslin.
- Thread: * 50-weight cotton thread for machine piecing.
- 5 to 6 skeins of Pearl Cotton (Size 8) in a striking accent color (e.g., Bright Tangerine) for the visible hand-stitching.
- Binding: 4 yards of 1/2-inch double-fold bias tape matching your Lime Green lining.
- Tools: A rotary cutter, a 6″ x 24″ acrylic ruler, fabric shears, curved safety pins, and a high-quality embroidery needle.
Step-by-Step Guide: The Vibrant Kantha Tunic
Step 1: Drafting and Cutting the Flowing Canvas
Cut your 3 identical layers (Fuchsia Outer, Muslin Core, and Lime Lining) generously for each of the following pieces, allowing room for the fabric to draw in during hand-stitching:
- One Back Panel: 28″ wide x 36″ tall.
- One Front Panel: 28″ wide x 36″ tall.
- Two Sleeves: 20″ wide x 16″ long each (for a breezy, elbow-length drape).
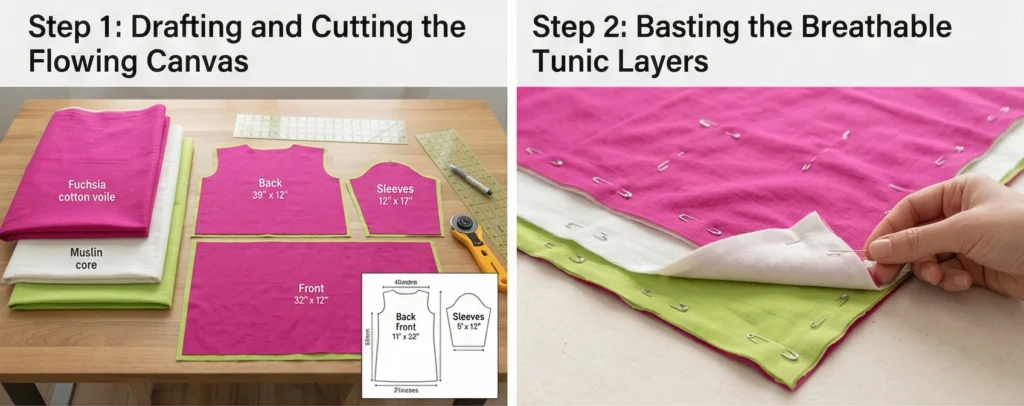
Step 2: Basting the Breathable Tunic Layers
Meticulously stack your three layers for each panel: Lime Lining (face down), Muslin Core (middle), and Fuchsia Outer Shell (face up). Smooth the fabrics perfectly flat on a large table. Pin the layers together densely using your curved safety pins, placing a pin every 3 inches. Lightweight voile shifts easily, so thorough basting is the secret to a pucker-free garment.
Step 3: The Rhythmic, Meditative Kantha Stitching
Thread your embroidery needle with a long length of the Tangerine Pearl Cotton. Using a highly consistent running stitch, quilt straight vertical lines running from the top of the panels to the bottom, spacing them exactly 1/2-inch apart. Push your needle through all three layers. The bright Tangerine thread will create an incredible, rippled geometric texture against the Fuchsia background, making the fabric look and feel luxuriously bespoke. Quilt the Back, Front, and Sleeve panels completely.

Step 4: Shaping the Split V-Neck and Armholes
Once the panels are heavily quilted, take them to your cutting mat.
- Armholes: Cut scooped armholes into the outer top edges of the Front and Back panels.
- The Neckline: On the top center of the Front panel, cut a shallow scoop neck. Then, cut a straight, 5-inch vertical slit down from the center of that scoop. This creates a highly flattering, relaxed split V-neck that beautifully frames the face. Cut a matching, shallow scoop on the Back panel neckline.
Step 5: Assembly Section (Constructing the Tunic)
We will use enclosed, flat-felled, or bias-bound seams to ensure the inside is perfectly smooth against the skin.
- Shoulders: Place the Front and Back panels right sides together at the shoulders. Machine-sew a 1/2-inch seam.
- Sleeves: Open the tunic flat. Pin the top center of a quilted sleeve to the shoulder seam, right sides together. Ease the sleeve into the armhole and sew. Repeat for the other side.
- Side Seams and Slits: Fold the tunic right sides together. Pin from the bottom of the sleeve cuff, through the armpit, and down the side of the body. Stop sewing exactly 10 inches from the bottom hem. Leave this 10-inch section completely open to create the flowing side slits.
- Internal Polish: Encase all raw internal seam allowances inside your Lime Green bias tape and topstitch them down.
Step 6: Tailored Binding and Finishing
- Bind the Neckline: Take your Lime Green bias tape and carefully sew it around the entire raw edge of the split V-neck and the back collar. Miter the sharp inner corner of the “V” so it lies perfectly flat.
- Bind the Slits and Hem: Use your bias tape to bind the raw edges of the open side slits, sewing a continuous ‘U’ shape up one side of the slit and down the other. Finally, bind the bottom front and back hems to complete the vibrant, framed edge.
Usability Note
The relaxed, boxy architecture of this tunic makes it an incredibly adaptable wardrobe staple. Whether you are throwing it over a swimsuit for a chic resort look or pairing it with tailored trousers and statement jewelry for a creative office environment, the tunic delivers effortless polish. The split V-neck is designed to slip easily over the head, eliminating the need for fussy zippers or buttons.
Comfort and Practical Care
Because this garment sits directly against the body, 100% natural cotton ensures ultimate sensory comfort. The dense Kantha stitching compresses the three layers into a single, pliable textile that softens dramatically with wear. To care for this vibrant top, skip the dry cleaner. Machine wash it on a cold, delicate cycle with a color-safe detergent to protect the bright Fuchsia and Lime dyes. Hang it on a sturdy wooden hanger to air dry, which helps maintain the beautiful, sweeping drape of the tunic’s hem.
Elegance That Lasts
The elegance of this tunic is engineered into its very structure. The Tangerine running stitches do more than catch the eye—they physically bind the delicate cotton voile to the sturdy muslin core, preventing the lightweight fabric from tearing or losing its shape over years of active wear. By binding all the hems and the high-stress side slits with double-fold bias tape, the garment is meticulously finished to resist fraying. As you wear and wash it, the saturated colors will settle into a gorgeous, slightly distressed patina, ensuring this top remains a vibrant, heirloom-quality favorite in your closet.


8. Artisan-Crafted Nakshi Kantha Peplum Tops for a Feminine Silhouette

A Guide to Making Artisan-Crafted Nakshi Kantha Peplum Tops for a Feminine Silhouette
While straight-cut tunics and boxy jackets offer a relaxed, architectural drape, some occasions call for a silhouette that specifically celebrates and accentuates the waist. The Artisan-Crafted Nakshi Kantha Peplum Top masterfully achieves this balance. By applying the breathtaking, dense running stitches of traditional Bengali needlework to a structured bodice that flares into a dramatic, playful peplum hem, you create a garment that is unabashedly feminine. Rendered in explosively vibrant colors, this top brings the intricate beauty of historic textile art into a highly tailored, modern aesthetic.
The Heritage of the Peplum (And Why I Made It)
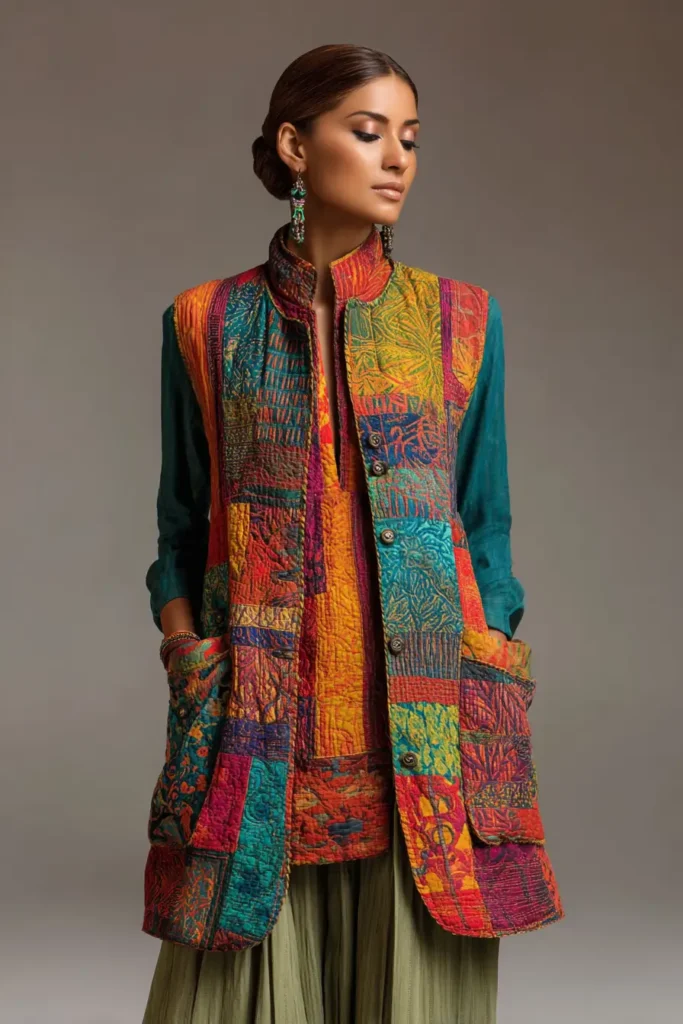
Curating this specific pattern for the comfydwell.com community was an exercise in blending structural tailoring with organic artistry. Historically, Nakshi Kantha was prized for its ability to create a thick, pliable textile out of upcycled, worn cottons. The resulting fabric had incredible body and structure, making it ideal for holding a flared shape.
I designed this modern peplum top to harness that exact structural memory. Traditional garments in the Bengal region often focus on sweeping, continuous drapes. By introducing a sharp waistline and a gathered flare, we disrupt that tradition in the most elegant way possible. I wanted to engineer a garment that feels empowering to wear—something that nips in neatly at the natural waist before flaring out to forgive the hips, offering a universally flattering silhouette. It is a vibrant, wearable celebration of curves, color, and cultural heritage.
Focus on Usability, Comfort, and Elegance
- Usability: The peplum hem is a styling powerhouse. It pairs flawlessly with sleek, fitted bottoms—like a tailored pencil skirt for an office environment or high-waisted skinny jeans for a weekend brunch. The button-loop or tie-front closure makes dressing easy without the fuss of hidden zippers.
- Comfort: By layering three pieces of pure, pre-washed cotton voile, the top achieves a soft, cloud-like loft. The absence of stiff, synthetic interfacing means the fitted bodice remains completely breathable and molds to your specific shape as the cotton softens with your body heat.
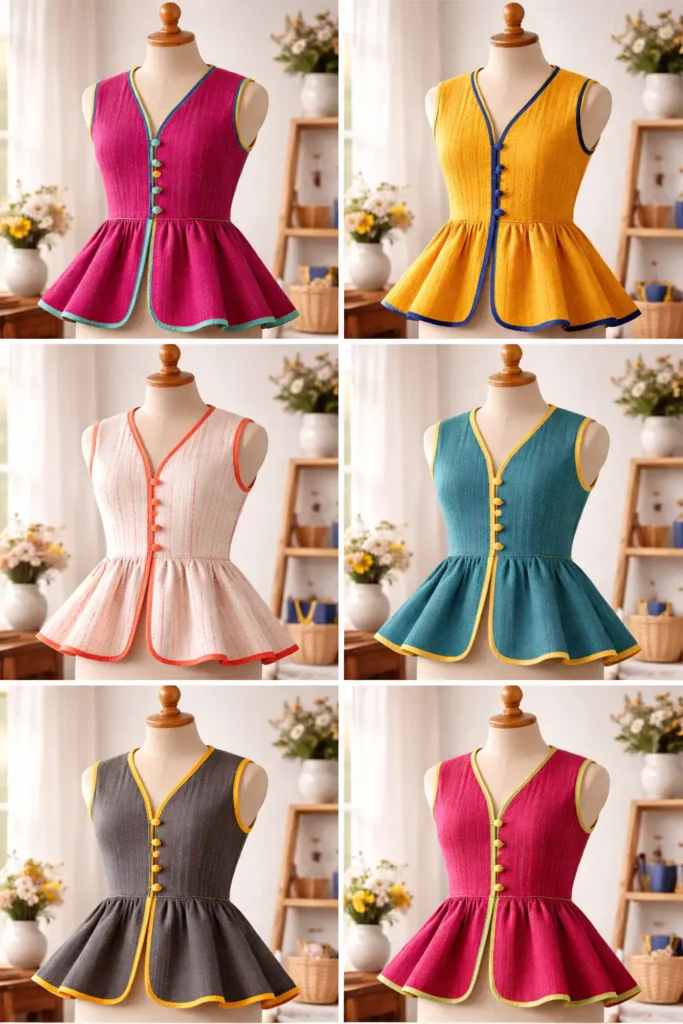
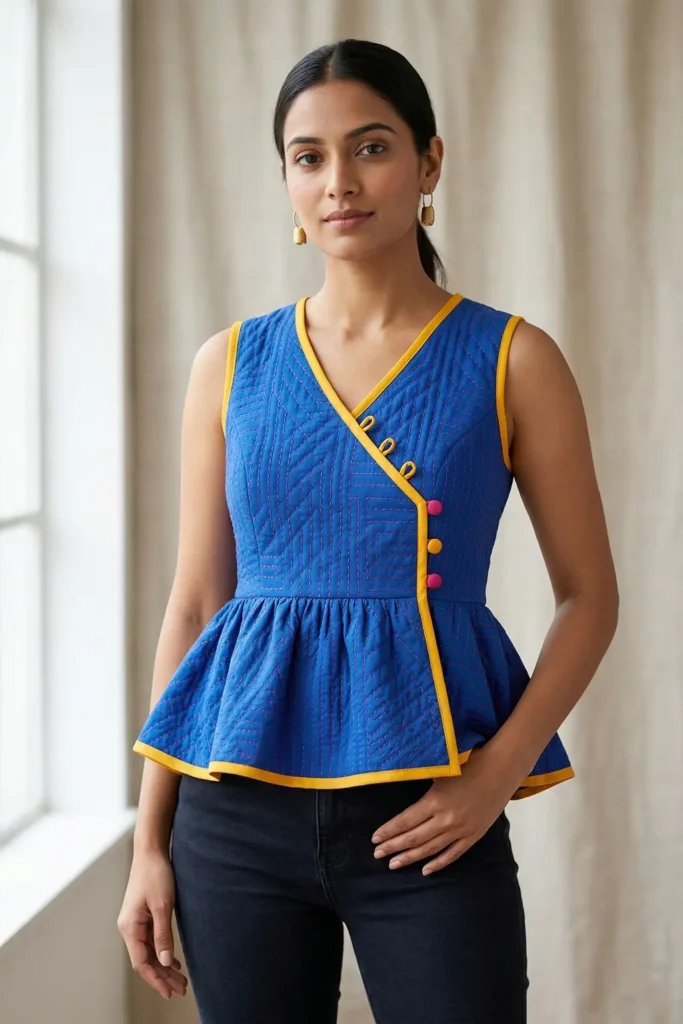
- Elegance: To maximize the visual impact of the tailored cut, this design utilizes a strikingly bold color palette. Imagine a brilliant Electric Blue outer shell lined with a saturated Mango Yellow, all stitched together with a shocking Hot Pink thread. The crisp, geometric lines of the tailoring keep the loud, joyful colors looking intentional and exquisitely bespoke.
Measurements & Materials Needed
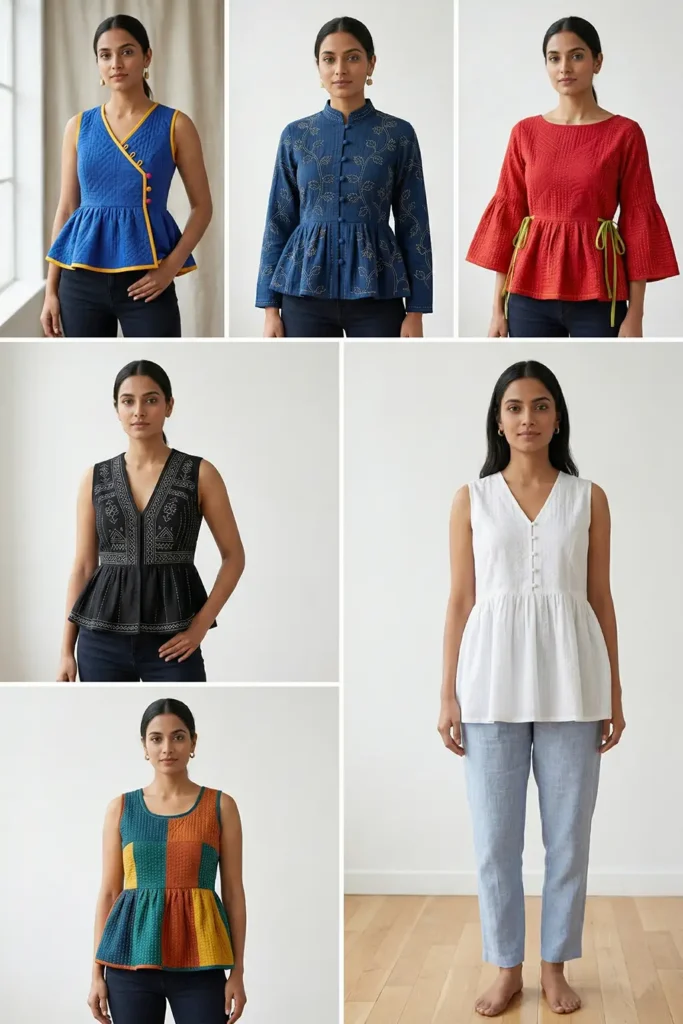
Finished Top Size: One-Size-Fits-Most (Modern Tailored Bodice with a Flared Peplum). Approx. 24″ length from shoulder to hem. Finished Style: A sleeveless (or cap-sleeve) top featuring a fitted, V-neck bodice and a dramatically gathered peplum skirt, adorned with vibrant Kantha stitching.
Materials Needed:
- Fabric for the Outer Shell, Core, and Lining: 5.5 yards total of premium, lightweight 100% cotton voile or soft double gauze.
- Outer Shell: 2 yards of a vibrant solid (e.g., Electric Blue).
- Lining: 2 yards of a flashy, contrasting solid (e.g., Mango Yellow).
- Core (Middle Layer): 1.5 yards of unbleached muslin.
- Thread: * 50-weight cotton thread for machine piecing and gathering.
- 5 to 6 skeins of Pearl Cotton (Size 8) in a striking accent color (e.g., Hot Pink) for the visible hand-stitching.
- Binding: 5 yards of 1/2-inch double-fold bias tape matching your Mango Yellow lining.
- Tools: A rotary cutter, a 6″ x 24″ acrylic ruler, fabric shears, curved safety pins, tailor’s chalk, and a high-quality embroidery needle.
Step-by-Step Guide: The Vibrant Kantha Peplum
Step 1: Drafting the Bodice and Peplum Canvas
Because we need structured tailoring, we will quilt rectangular panels first and cut the specific shapes afterward. Cut 3 identical layers (Electric Blue, Muslin, Mango Yellow) for each of the following:
- One Back Bodice Panel: 24″ wide x 18″ tall.
- Two Front Bodice Panels: 12″ wide x 18″ tall each.
- The Peplum Skirt Panels: Cut two long rectangles, each measuring 40″ wide x 10″ tall (this extra width will create the dramatic gathered flare).
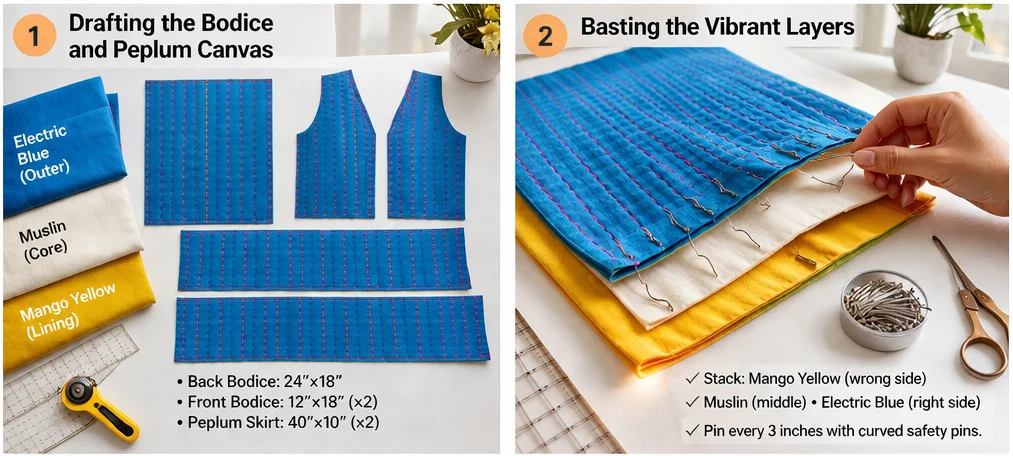
Step 2: Basting the Vibrant Layers
Meticulously stack your three layers for each panel: Mango Yellow Lining (face down), Muslin Core (middle), and Electric Blue Outer (face up). Smooth the fabrics perfectly flat. Pin the layers together densely with curved safety pins, spacing each pin every 3 inches. Tight basting is absolutely critical here, as the peplum will require rigorous gathering and cannot afford to slip out of alignment.
Step 3: The Meditative Hot Pink Stitching
Thread your embroidery needle with a long length of the Hot Pink Pearl Cotton. Using a highly consistent running stitch, quilt straight vertical lines from the top of the bodice panels to the bottom, spacing them exactly 1/4-inch apart. For the long Peplum Skirt panels, stitch the lines vertically as well. The high-contrast Hot Pink thread popping against the Electric Blue creates a stunning, rippled geometric texture that catches the light beautifully. Quilt all your panels completely.
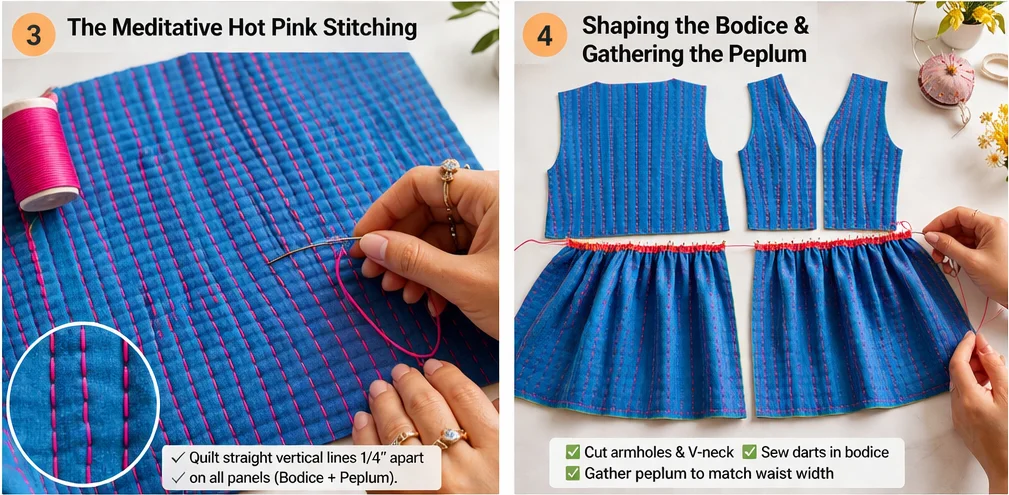
Step 4: Shaping the Bodice and Gathering the Flare
Once quilted, take the panels to your cutting mat.
- The Bodice: Use tailor’s chalk to mark and cut scooped armholes and a flattering V-neckline into the Front and back bodice panels. To ensure the bodice hugs the waist, sew two vertical darts into the bottom edge of the Back panel, and one vertical dart into the bottom edge of each Front panel. Press the darts flat.
- The Peplum: Run two rows of long, machine basting stitches along the top raw edge of your two long Peplum Skirt panels. Gently pull the bobbin threads to gather the fabric until the width of the gathered skirts perfectly matches the bottom waistline width of your assembled bodice panels.
Step 5: Assembly Section (Constructing the Silhouette)
We will use enclosed, bound seams to keep the interior flawlessly smooth.
- Bodice Shoulders & Sides: Place the Front bodice panels right sides together with the Back panel at the shoulders, and machine-sew a 1/2-inch seam. Pin the side seams under the armholes and sew.
- Attaching the Peplum: Pin the gathered top edge of the Peplum skirt to the bottom raw edge of your assembled Bodice, right-sides together. Carefully machine-sew this waistline seam, taking your time to ensure the gathers remain even and voluminous.
- Internal Polish: Trim all raw internal seam allowances (shoulders, sides, and the bulky gathered waistline) down to 1/4-inch. Encase them entirely in your Mango Yellow bias tape, then topstitch them down.
Step 6: Tailored Binding and Closures
- Bind the Edges: Take your Mango Yellow bias tape and meticulously sew it around the curved raw edges of both armholes. Next, bind the entire outer perimeter of the top (up the front bodice edges, around the V-neck, down the other side, and across the sweeping, flared bottom hem).
- Closures: For a modern, delicate finish, sew three to four small fabric loops along the right side of the bodice V-neck. Attach matching Mango Yellow or Hot Pink fabric-covered buttons to the left side to create a secure, elegant closure.

Usability Note
The structured waist and flared hem of the peplum top make it an incredibly forgiving and versatile garment. It effortlessly defines the narrowest part of the torso while the gathered skirt allows for complete ease of movement across the hips and stomach. This design is highly practical for long days at the office or festive evening dinners, ensuring you look impeccably tailored without ever feeling constricted by tight fabrics.
Comfort and Practical Care
Because this tailored top sits closer to the body than a relaxed tunic, 100% natural, breathable cotton voile is essential for all-day comfort. The dense Kantha stitching compresses the layers, giving the peplum enough architectural rigidity to flare out beautifully on its own without the need for stiff, itchy tulle or crinoline. To care for this vibrant piece, machine wash it on a delicate, cold cycle with a color-safe detergent to protect the Electric Blue and Mango Yellow dyes. Hang it on a well-shaped wooden hanger to air dry, ensuring the bodice darts and gathered waistline maintain their crisp, tailored geometry.
Elegance That Lasts
The true elegance of this peplum top lies in the marriage of intensive hand-craftsmanship and precise garment engineering. The Hot Pink running stitches physically bind the delicate cotton to the sturdy muslin core, preventing the fitted bodice from warping or stretching out of shape across the bust or waist. By binding the heavy, gathered waistline seam and all outer hems with double-fold bias tape, the garment is meticulously finished to resist fraying under stress. As you wear it, the saturated colors will settle into a gorgeous, slightly antiqued patina, ensuring this top remains a vibrant, structurally flawless centerpiece of your wardrobe for years to come.
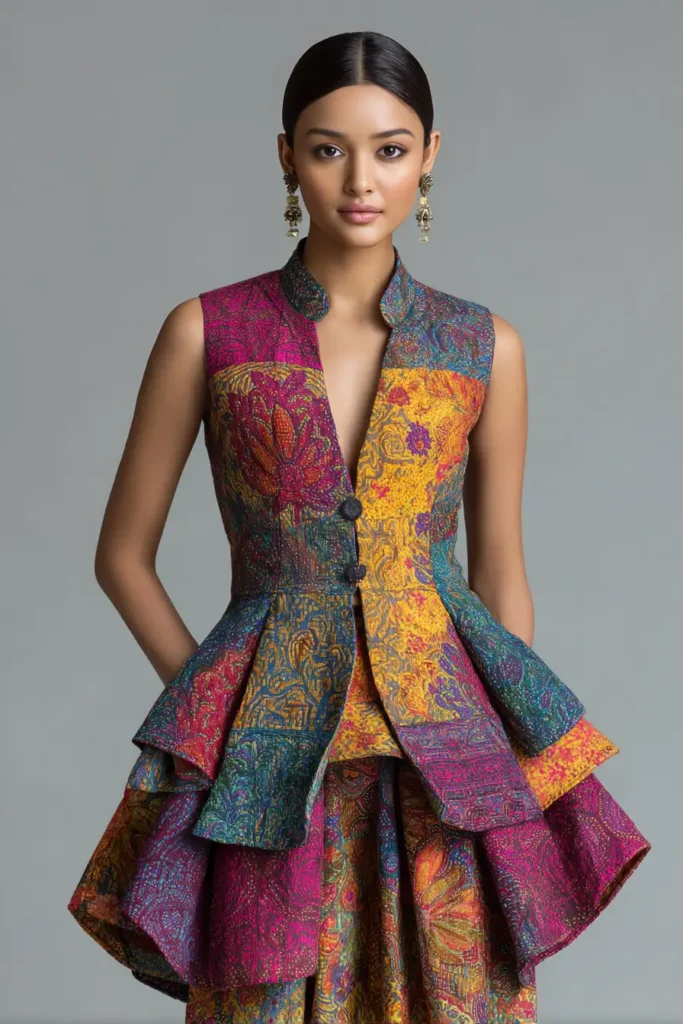
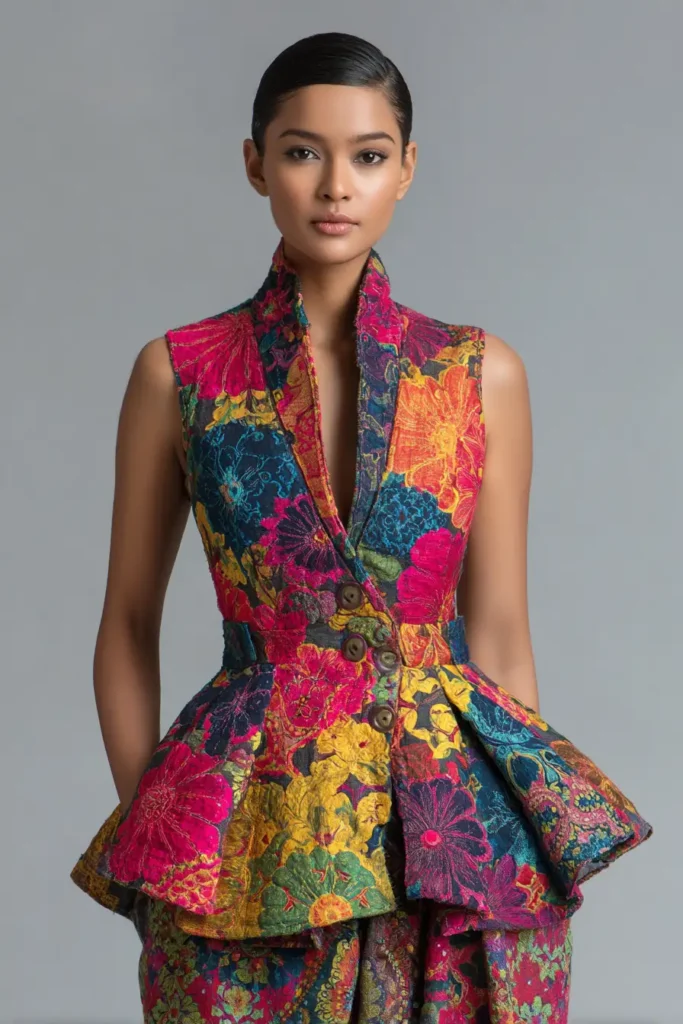
9. Classic Button-Down Nakshi Kantha Shirts with Lotus Motif Embroidery
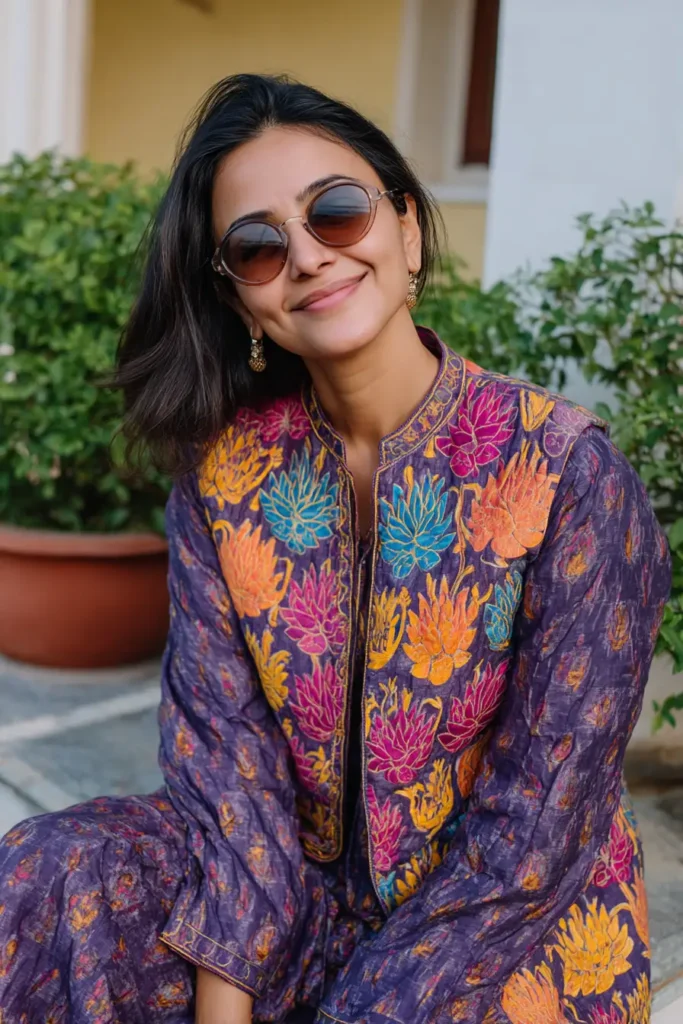
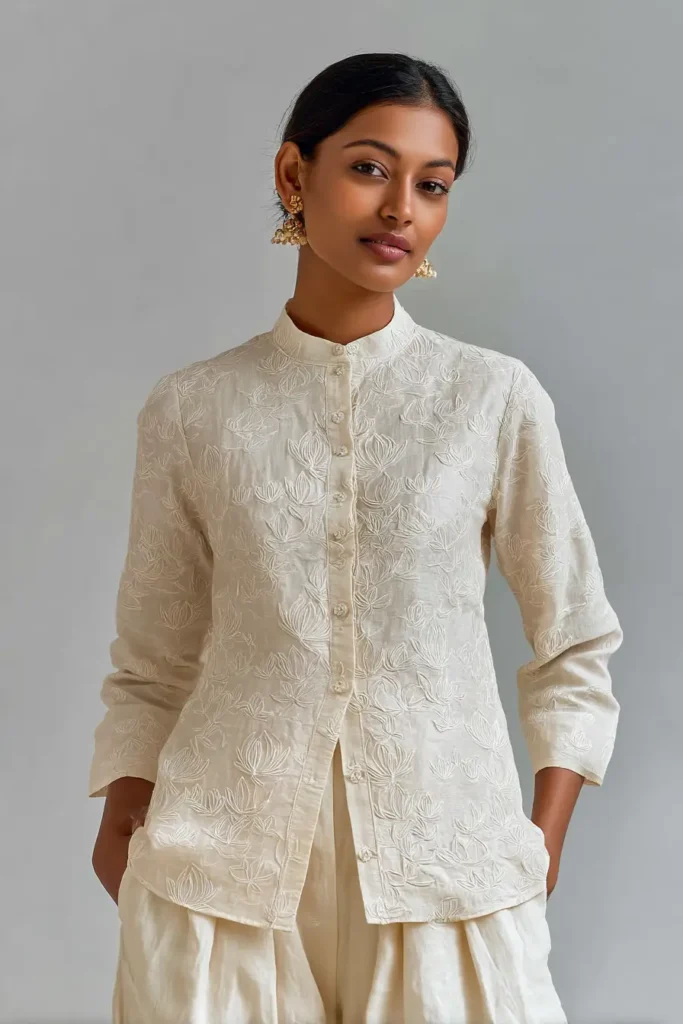
A Guide to Making Classic Button-Down Nakshi Kantha Shirts with Lotus Motif Embroidery
While outerwear makes a stunning first impression, the foundation of any sophisticated wardrobe lies in the tailored shirt. The Classic Button-Down Nakshi Kantha Shirt with Lotus Motif Embroidery reinvents a global closet staple by infusing it with the profound Bengali artistry of Nakshi Kantha. By combining the crisp, collared architecture of a traditional button-down with the dense, textural running stitches of Kantha and the striking beauty of an embroidered lotus, this garment transforms everyday shirting into a vibrant, breathable masterpiece.
The Heritage of the Lotus Motif (And Why I Made It)
Curating this specific pattern for comfydwell.com was deeply inspired by the rich symbolism embedded in traditional Bengali textiles. In historical Nakshi Kantha, the lotus (or Padma) is one of the most revered and frequently stitched motifs. It symbolizes purity, resilience, and rebirth, as the lotus beautifully rises pristine from muddy waters.
I designed this modern button-down to bring that powerful, historic motif directly into a contemporary, active lifestyle. While traditional Kantha often features edge-to-edge chaotic stitching, I wanted to engineer a garment with a highly deliberate, focal placement of the embroidery. By positioning a brilliant, blooming lotus on the back panel and balancing it with sharp, tailored lines and explosively vibrant colors, this shirt becomes a wearable canvas that proudly celebrates cultural heritage while fitting perfectly into a modern office or a chic weekend outing.
Focus on Usability, Comfort, and Elegance
- Usability: Why and how this design idea is useful to the reader: The classic button-down front and structured collar provide incredible versatility. This design is highly useful because it allows the shirt to be worn fully buttoned for a sharp, professional look, or worn open as a lightweight, vibrant overshirt over a simple camisole, effortlessly doubling the garment’s functionality in your wardrobe.
- Comfort: Why and how this design idea is useful to the reader: Utilizing three layers of premium cotton voile—without stiff interfacing—creates a fabric that is incredibly breathable. This is useful to the reader because it wicks moisture away and naturally regulates temperature, keeping you cool and comfortable even during humid summer afternoons or stuffy commutes.
- Elegance: Why and how this design idea is useful to the reader: This pattern utilizes a striking, saturated palette—such as a deep, vivid Teal outer shell paired with a bright Magenta lining. This high-contrast color choice, combined with a gleaming Gold embroidered lotus, is highly useful because it instantly injects bespoke, high-end runway energy into your daily attire, elevating a simple pair of jeans or trousers into a deliberate fashion statement.
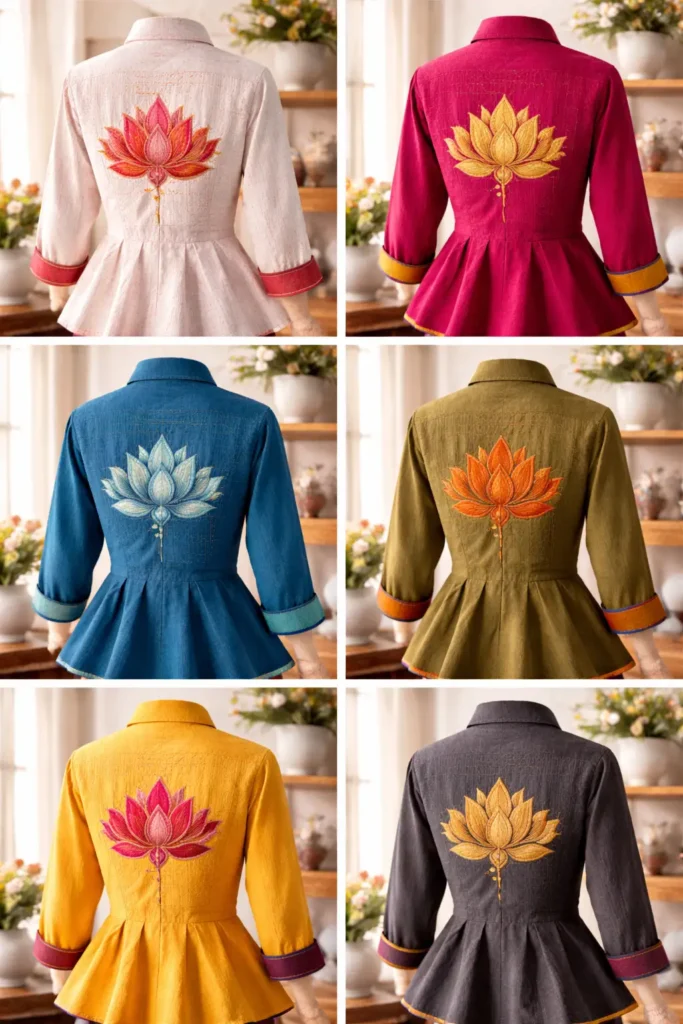
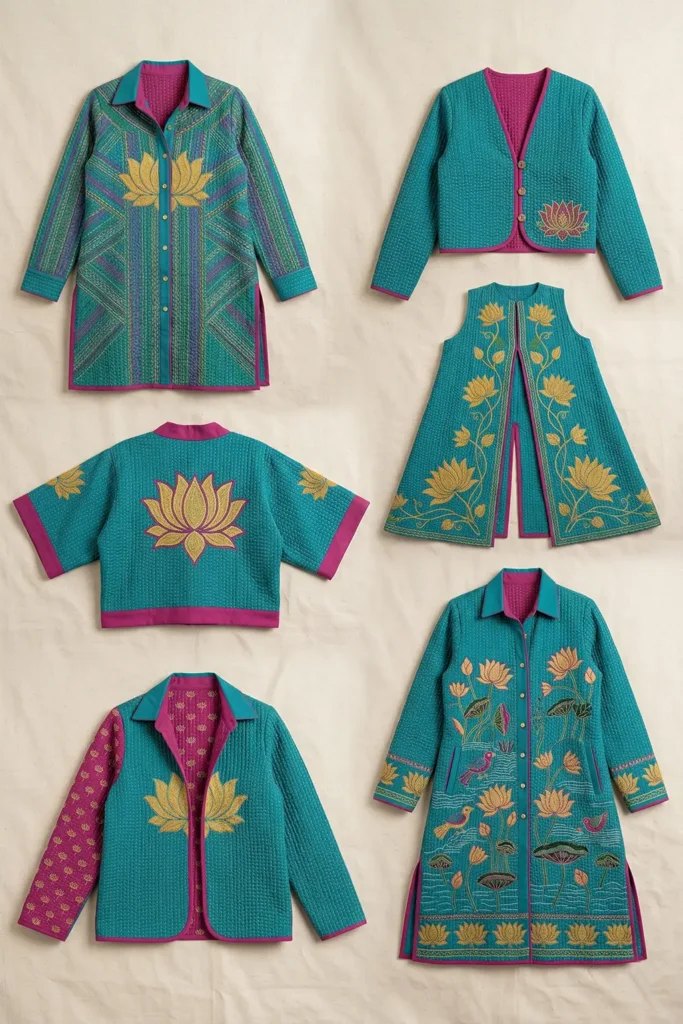
Measurements & Materials Needed
Finished Shirt Size: One-Size-Fits-Most (Modern Relaxed Shirting Fit). Approx. 28″ length from shoulder to hem. Finished Style: A structured, long-sleeve button-down shirt with a classic collar, cuffs, and a large central lotus motif on the back.
Materials Needed:
- Fabric for the Outer Shell, Core, and Lining: 6.5 yards total of premium, lightweight 100% cotton voile or soft double gauze.
- Outer Shell: 2.5 yards of a vibrant solid (e.g., Vivid Teal).
- Lining: 2.5 yards of a flashy, contrasting solid (e.g., Bright Magenta).
- Core (Middle Layer): 1.5 yards of unbleached muslin.
- Thread: * 50-weight cotton thread for machine piecing and buttonholes.
- 5 to 6 skeins of Pearl Cotton (Size 8) in an accent color (e.g., Gleaming Gold) for the Kantha stitching and the lotus motif.
- Binding: 5 yards of 1/2-inch double-fold bias tape matching your Magenta lining.
- Hardware: 7 to 9 high-quality shirt buttons (e.g., polished brass or mother-of-pearl).
- Tools: A rotary cutter, a 6″ x 24″ acrylic ruler, fabric shears, curved safety pins, tailor’s chalk, an embroidery hoop, and a high-quality embroidery needle.
Step-by-Step Guide: The Vibrant Kantha Lotus Shirt
Step 1: Drafting and Cutting the Tailored Canvas
Because the heavy stitching will slightly shrink the fabric, cut your panels generously. Cut 3 identical layers (Teal Outer, Muslin Core, and Magenta Lining) for each of the following pieces:
- One Back Panel: 26″ wide x 30″ tall.
- Two Front Panels: 13″ wide x 30″ tall each.
- Two Sleeves: 22″ wide x 24″ long each.
- Collar & Cuffs: Cut the collar and cuff pieces only from your Teal and Magenta fabrics (no muslin core needed here to keep them crisp and thin).
Step 2: Basting the Breathable Shirting Layers
Meticulously stack your three layers for each body and sleeve panel: Magenta Lining (face down), Muslin Core (middle), and Teal Outer Shell (face up). Smooth the fabrics perfectly flat. Pin the layers together densely using your curved safety pins, placing a pin every 3 inches.
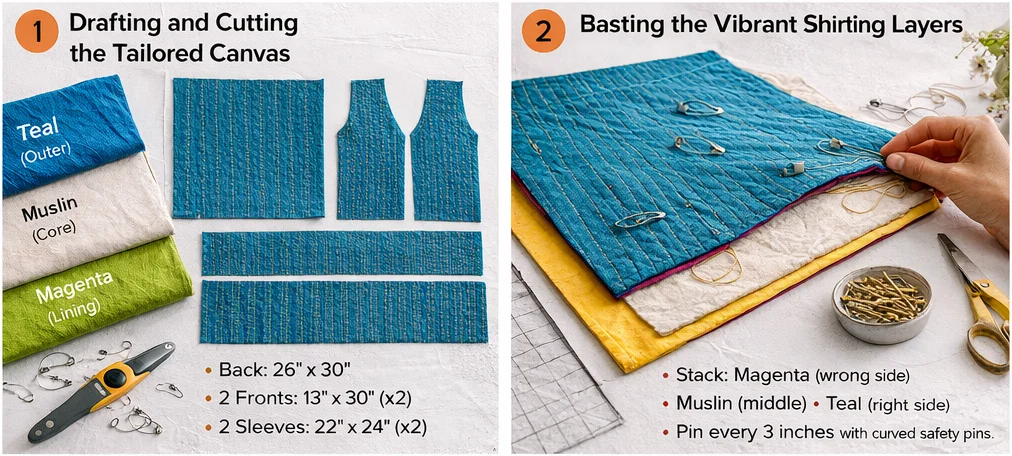
Step 3: Embroidering the Focal Lotus Motif
Before doing the overall Kantha quilting, focus on the artistry.
- Center your embroidery hoop on the upper-middle section of the Teal Back panel.
- Use tailor’s chalk to lightly sketch a large, blooming lotus flower (approx. 8 inches wide).
- Thread your needle with the Gleaming Gold Pearl Cotton. Use traditional embroidery stitches—such as the satin stitch for the petals and the stem stitch for the outlines—to densely fill in the lotus. The brilliant Gold thread will pop spectacularly against the Teal background.
Step 4: The Meditative Kantha Stitching
Once the lotus is complete, surround it with texture. Thread your needle with the Gold Pearl Cotton. Quilt straight vertical lines from the top of the panels to the bottom, spacing them exactly 1/4-inch apart. When you reach the lotus on the Back panel, simply stop your running stitch at the edge of the embroidery and resume it on the other side, allowing the lotus to float beautifully within the dense vertical grid. Quilt the Front and Sleeve panels entirely.
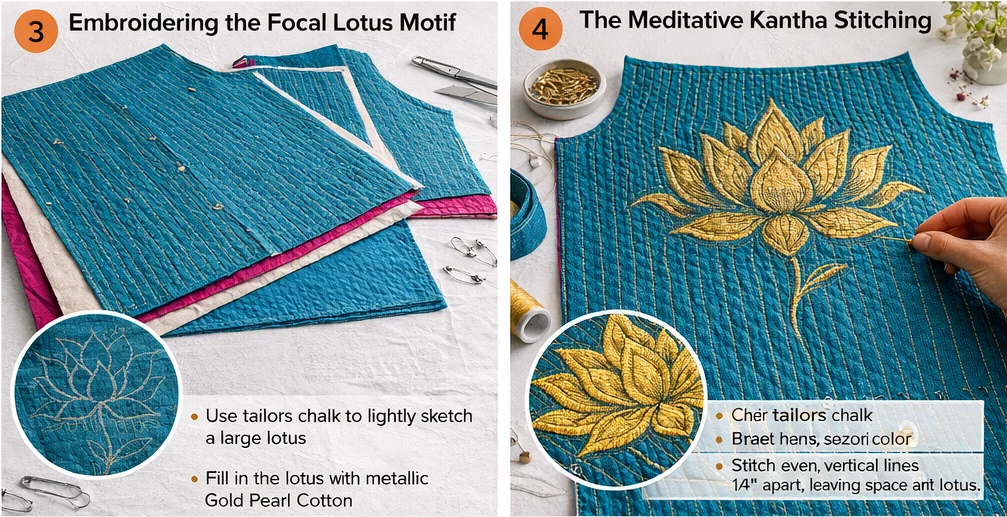
Step 5: Shaping the Collar, Armholes, and Placket
Take the quilted panels to your cutting mat.
- Armholes & Neckline: Cut scooped armholes into the outer edges of the Front and Back panels. Cut a curved neckline into the top of the panels to accommodate the collar.
- The Button Placket: Fold the inner, straight edge of both Front panels back by 1.5 inches to create a reinforced button placket. Topstitch this fold down.
Step 6: Assembly Section (Constructing the Shirt)
We will use enclosed, flat-felled, or bias-bound seams to ensure the interior is as flawless as the exterior.
- Shoulders: Place the Front and Back panels right sides together at the shoulders. Machine-sew a 1/2-inch seam.
- Sleeves: Pin the top center of a quilted sleeve to the shoulder seam, right sides together. Ease the sleeve into the armhole and sew. Repeat for the other side.
- Side Seams: Pin the shirt from the bottom of the sleeve cuff, through the armpit, and down the side of the body. Sew this continuous seam on both sides.
- Internal Polish: Encase all raw internal seam allowances inside your Magenta bias tape and topstitch them down.
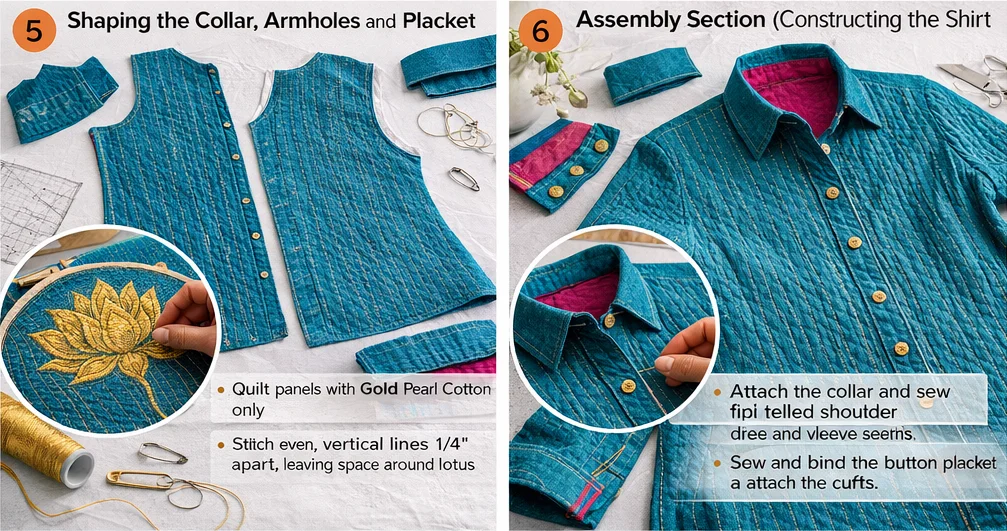
Step 7: Attaching the Collar, Cuffs, and Buttons
- Collar & Cuffs: Sew your un-quilted Teal and Magenta collar pieces together, turn them right-side out, and press them crisply. Attach the collar to the shirt’s neckline. Repeat this process to attach the cuffs to the sleeves.
- Buttonholes: Mark 7 evenly spaced buttonholes down the right Front placket. Sew them using your machine’s buttonhole function and cut them open carefully. Add buttonholes to the cuffs.
- Buttons: Sew your polished brass buttons onto the left Front placket and the cuffs, ensuring they align perfectly. Finish the bottom hem by binding it with your Magenta bias tape.
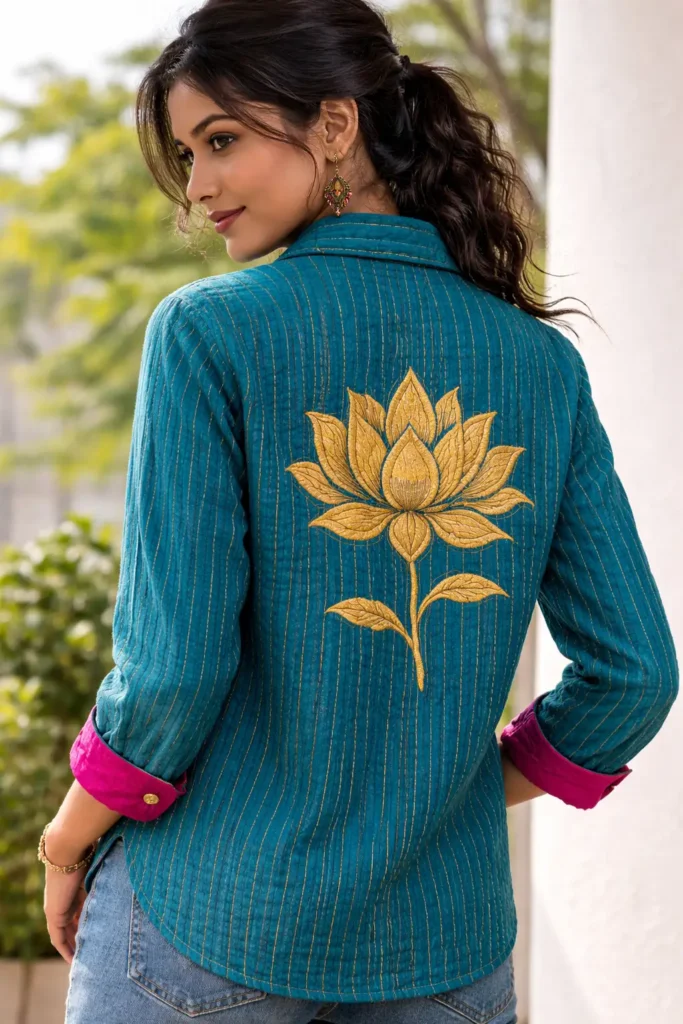
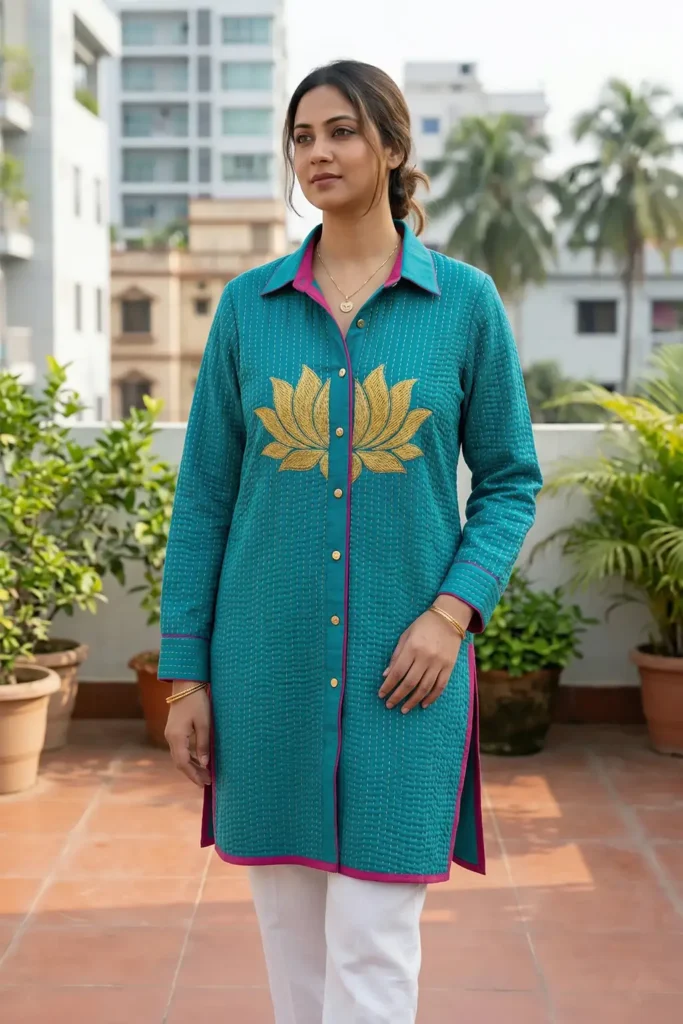
Usability Note
Why and how this design idea is useful to the reader: The classic button-down architecture ensures this vibrant piece seamlessly integrates into a modern lifestyle. It is highly useful because the structured cuffs can be neatly rolled up for a relaxed, creative-studio aesthetic, while the crisp collar perfectly frames delicate necklaces or bold, chunky jewelry. It bridges the gap between formal tailoring and artisanal expression.
Comfort and Practical Care
Why and how this design idea is useful to the reader: The dense, hand-stitched layers of breathable cotton voile offer unparalleled comfort without the restrictive, sweaty feel of synthetic shirting. This natural composition ensures the shirt breathes with you. This is useful to the reader because maintaining this exquisite comfort is incredibly simple: avoid harsh dry-cleaning chemicals and machine-wash the shirt on a delicate, cold cycle with a color-safe detergent. Hang it on a broad-shouldered wooden hanger to air dry. This practical routine protects the vibrant Teal and Gold threads and allows the cotton to naturally soften with every wash.
Elegance That Lasts
Why and how this design idea is useful to the reader: The true luxury of a Kantha garment is its enduring construction. The meticulous running stitches do much more than create a stunning visual rhythm—they structurally bind the fabric layers together, preventing the cotton from tearing or stretching out of shape. This is useful to the reader because, by utilizing high-quality, colorfast pearl cotton threads and encasing all internal raw edges with bias tape, the shirt is engineered to withstand daily, active wear without fraying. As the fabric ages, the vibrant dyes will settle into a beautiful, nuanced patina, ensuring your Lotus shirt remains a chic, highly sophisticated wardrobe staple for decades.
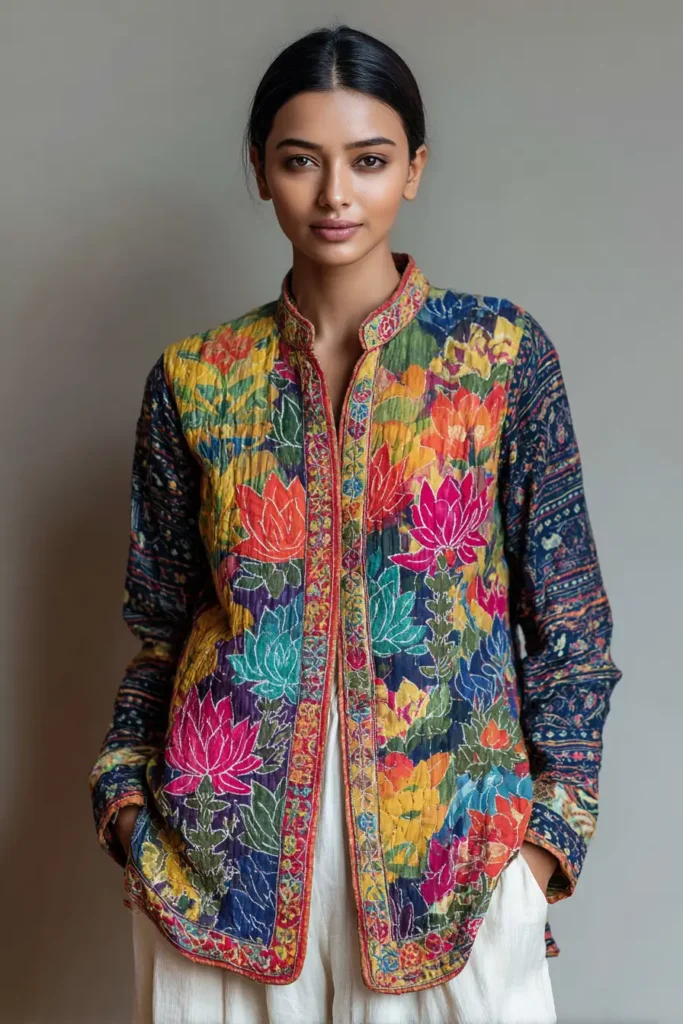
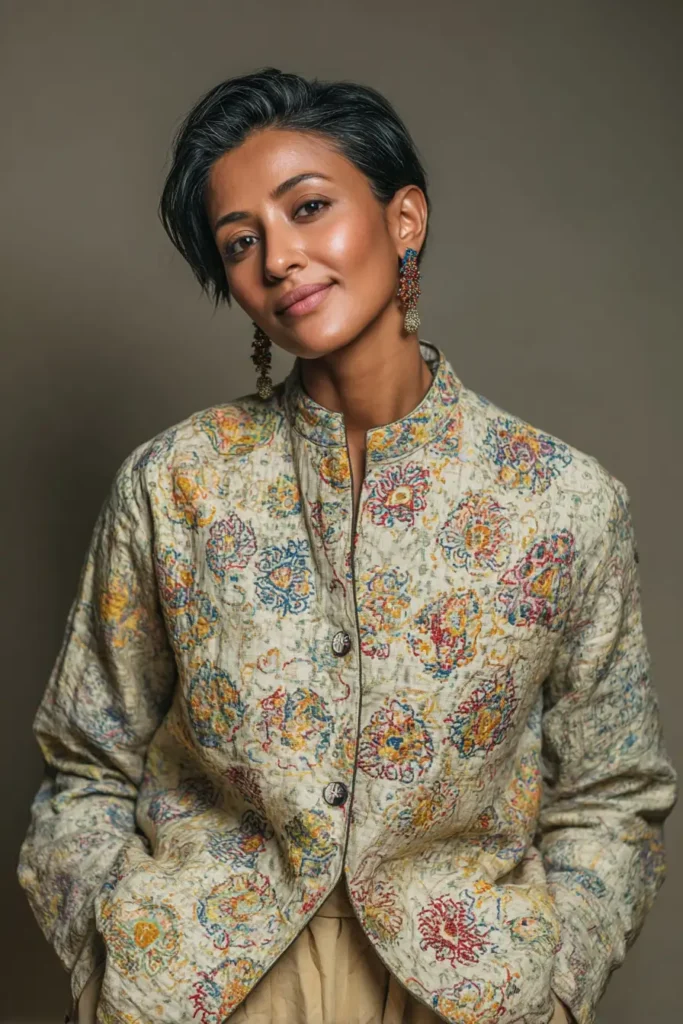
10. Stylish Oversized Nakshi Kantha Shirts for Ultimate Comfort
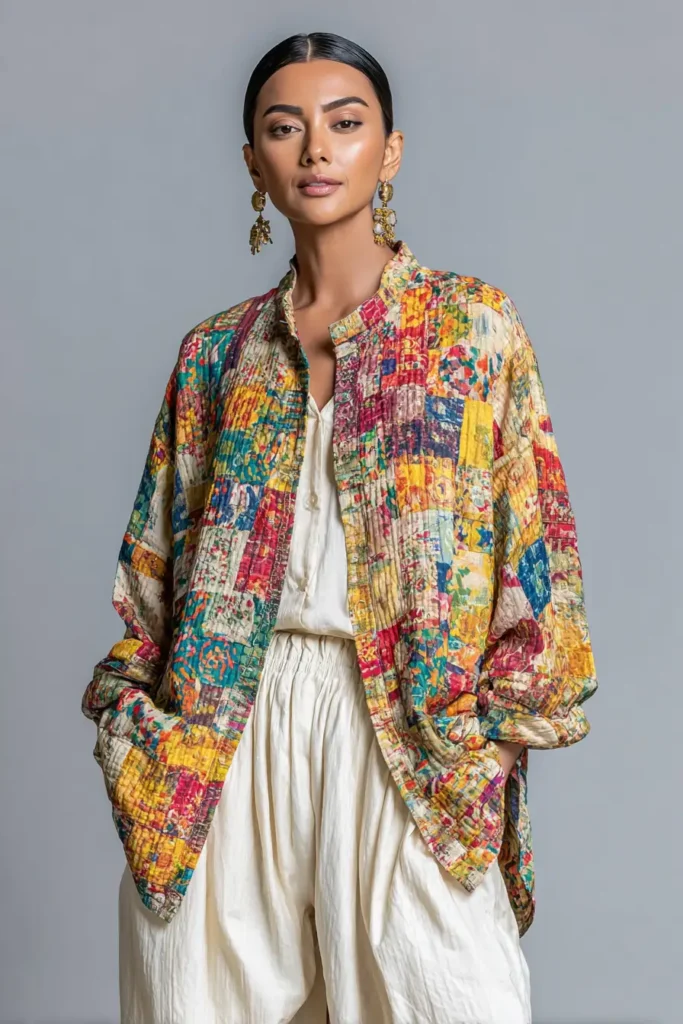
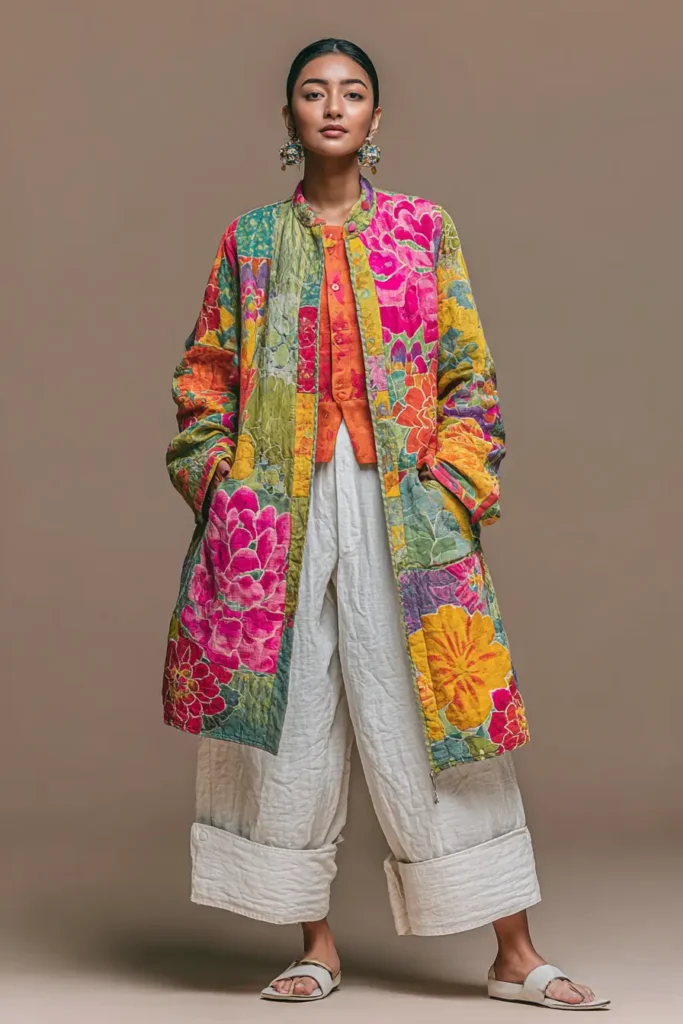
A Guide to Making Stylish Oversized Nakshi Kantha Shirts for Ultimate Comfort
The modern wardrobe is experiencing a massive shift toward garments that refuse to compromise between high fashion and physical ease. The Stylish Oversized Nakshi Kantha Shirt is the absolute pinnacle of this movement. By taking the crisp, collared structure of traditional shirting and expanding its proportions to a relaxed, flowing scale, this garment becomes a sanctuary of comfort. When rendered in deeply vibrant colors and textured entirely with the historic Bengali running stitch, it transforms an oversized basic into an artisanal, show-stopping centerpiece.
The Heritage of the Oversized Canvas (And Why I Made It)
Curating this specific pattern for comfydwell.com was born out of pure, everyday necessity. Balancing the daily operations of running a small resort with an attached children’s park means I am constantly on my feet, transitioning between managing staff, greeting guests, and handling behind-the-scenes logistics. I needed a garment that offered the unrestricted, breathable comfort of loungewear but maintained a highly polished, culturally rich aesthetic.
Historically, Nakshi Kantha was designed to wrap the wearer in soft, upcycled comfort. I wanted to apply that historical softness to a modern, dramatic silhouette. Additionally, as my website has recently seen a massive surge in traffic, specifically from Pinterest, I knew I had to engineer a piece that was explosively visual. By ditching muted tones for a breathtaking, highly saturated palette, this oversized shirt serves as a vibrant, wearable canvas that looks just as incredible on a screen as it feels in real life.
Focus on Usability, Comfort, and Elegance
- Usability: Why and how this design idea is useful to the reader: The oversized, drop-shoulder architecture is highly useful because it completely eliminates tight armholes and restrictive waistlines. It allows effortless layering over turtlenecks in winter or simple tank tops in summer, making it a true four-season garment.
- Comfort: Why and how this design idea is useful to the reader: By layering three tiers of lightweight, pre-washed cotton voile, the fabric achieves a magnificent loft without the sweaty weight of synthetic materials. This design choice is useful because it naturally regulates your body temperature, ensuring you stay incredibly comfortable whether you are lounging indoors or running errands outside.
- Elegance: Why and how this design idea is useful to the reader: To elevate the relaxed fit into high fashion, we utilize a strikingly bold color palette. This is useful to the reader because pairing a deep, rich Indigo Blue outer shell with a shocking Saffron Orange lining—and stitching it with a brilliant Emerald Green thread—instantly makes the oversized silhouette look like a deliberate, upscale fashion statement rather than a garment that is simply too big.
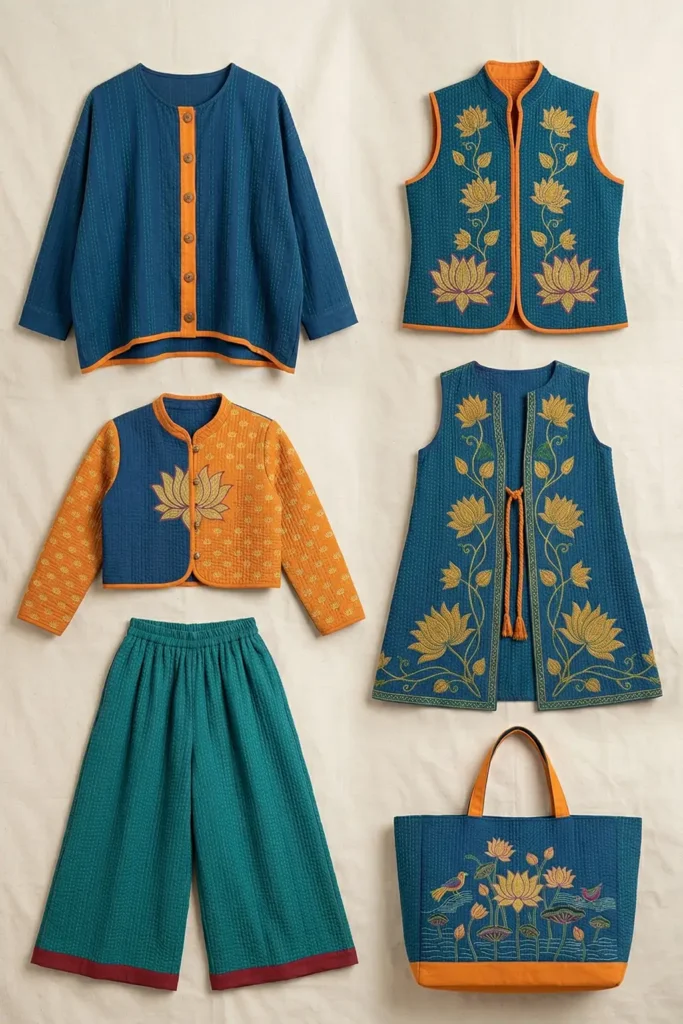
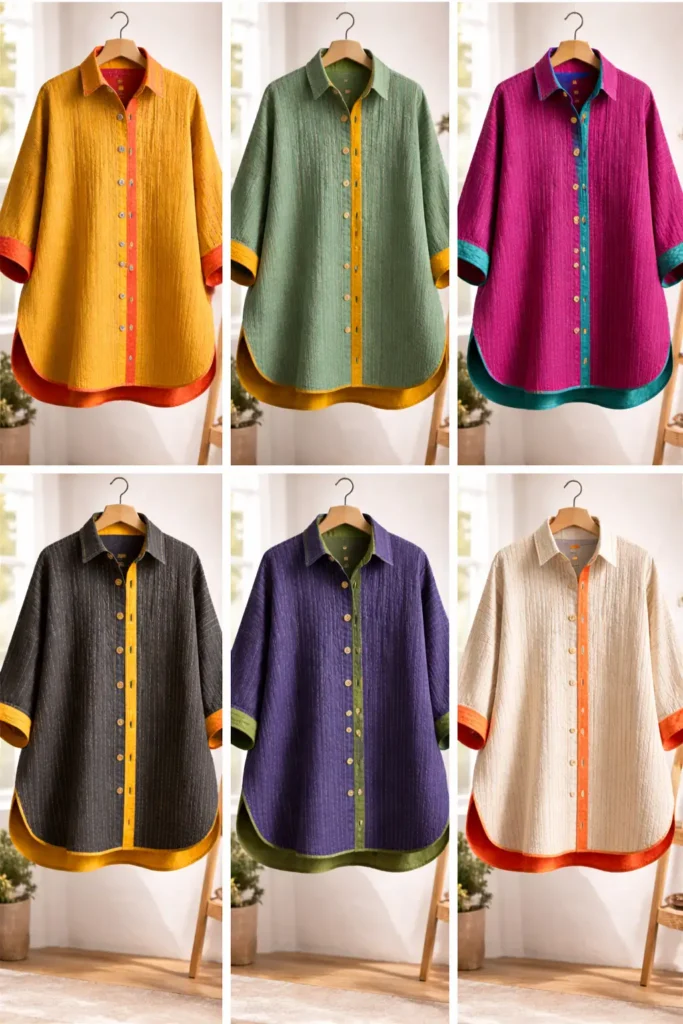
Measurements & Materials Needed
Finished Shirt Size: One-Size-Fits-Most (Modern Oversized/Drop-Shoulder Fit). Approx. 32″ length from shoulder to hem, with extra width through the torso. Finished Style: A dramatic, flowing button-down shirt with wide sleeves, a relaxed collar, and edge-to-edge vibrant Kantha stitching.
Materials Needed:
- Fabric for the Outer Shell, Core, and Lining: 7.5 yards total of premium, lightweight 100% cotton voile or soft double gauze.
- Outer Shell: 3 yards of a vibrant solid (e.g., Deep Indigo Blue).
- Lining: 3 yards of a flashy, contrasting solid (e.g., Saffron Orange).
- Core (Middle Layer): 1.5 yards of unbleached muslin.
- Thread: * 50-weight cotton thread for machine piecing and buttonholes.
- 6 to 7 skeins of Pearl Cotton (Size 8) in a striking accent color (e.g., Brilliant Emerald Green) for the visible hand-stitching.
- Binding: 5 yards of 1/2-inch double-fold bias tape matching your Saffron Orange lining.
- Hardware: 6 large, statement buttons (e.g., oversized wooden or polished resin buttons).
- Tools: A rotary cutter, a 6″ x 24″ acrylic ruler, fabric shears, curved safety pins, and a high-quality embroidery needle.
Step-by-Step Guide: The Oversized Kantha Shirt
Step 1: Drafting and Cutting the Oversized Canvas
Because hand-stitching slightly shrinks the fabric, and we want a dramatic, flowing fit, cut your panels very generously. Cut 3 identical layers (Indigo Outer, Muslin Core, and Saffron Lining) for each of the following pieces:
- One Back Panel: 32″ wide x 34″ tall.
- Two Front Panels: 17″ wide x 34″ tall each.
- Two Sleeves: 24″ wide x 22″ long each (cut wide for a relaxed, bell-like drape).
- Collar & Button Plackets: Cut the collar and placket strips only from your Indigo and Saffron fabrics to keep them crisp.
Step 2: Basting the Breathable Layers
Meticulously stack your three layers for each body and sleeve panel: Saffron Lining (face down), Muslin Core (middle), and Indigo Outer Shell (face up). Smooth the fabrics perfectly flat on a large table. Pin the layers together densely using your curved safety pins, placing a pin every 3 inches to prevent these wide panels from shifting.
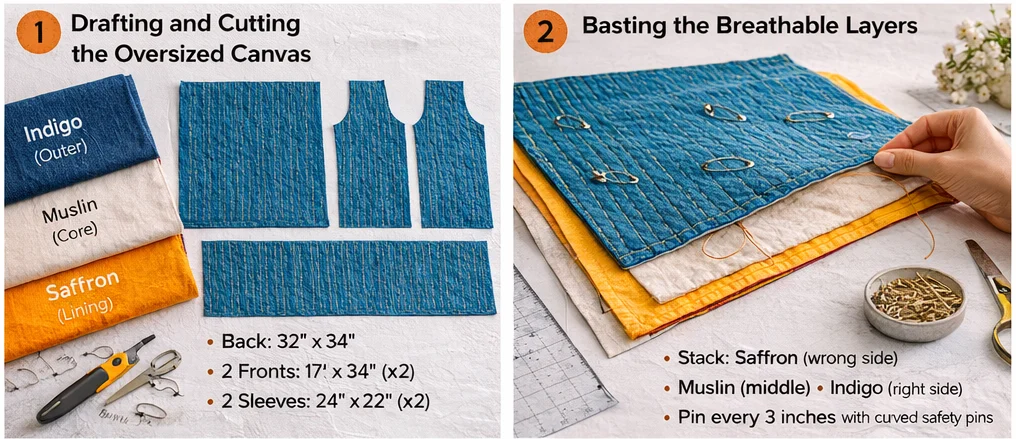
Step 3: The Rhythmic, Meditative Kantha Stitching
Thread your embroidery needle with the Emerald Green Pearl Cotton. Using a highly consistent running stitch, quilt straight vertical lines from the top of the panels to the bottom, spacing them exactly 1/2-inch apart. The Emerald Green thread popping against the Deep Indigo background creates a mesmerizing, rippled texture that gives the oversized garment necessary architectural weight. Quilt the entire expanse of the Back, Front, and Sleeve panels.
Step 4: Shaping the Drop-Shoulders and Neckline
Once quilted, take the massive panels to your cutting mat.
- The Drop Shoulder: Because this is an oversized fit, do not cut deep armholes. The shoulder seam will drop off the edge of your natural shoulder. Simply cut a very shallow, 2-inch inward curve at the top outer edges of the Front and Back panels.
- The Neckline: Cut a gentle scoop at the top inner edges of the Front panels and the top center of the Back panel to accommodate the collar.
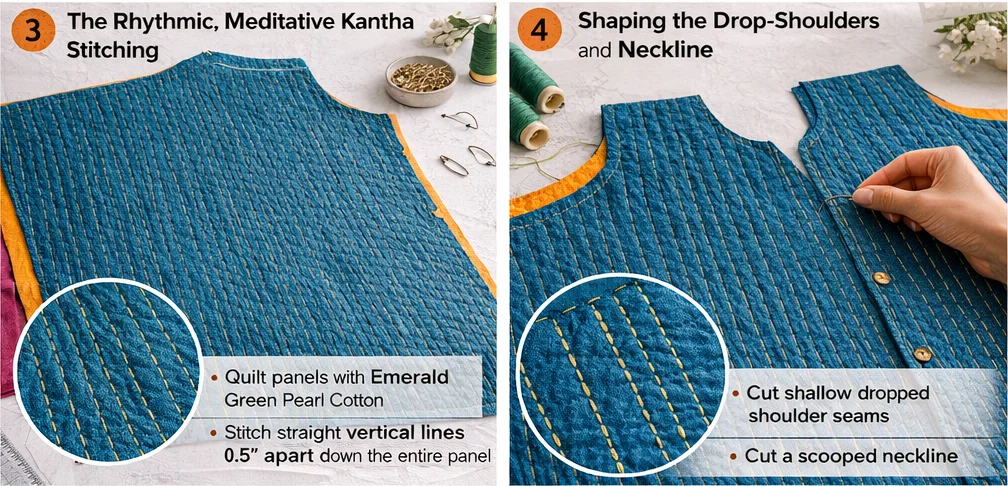
Step 5: Assembly Section (Constructing the Oversized Shirt)
We will use enclosed, flat-felled, or bias-bound seams to ensure the interior is perfectly smooth.
- Shoulders: Place the Front and Back panels right sides together at the wide shoulder seams. Machine-sew a 1/2-inch seam.
- Sleeves: Open the shirt flat. Pin the wide top edge of a quilted sleeve to the shallow armhole, right-sides together. Sew the sleeve into place. Repeat for the other side.
- Side Seams: Fold the shirt right sides together. Pin from the bottom of the wide sleeve cuff, through the underarm, and down the long side of the body. Sew this continuous seam on both sides.
- Internal Polish: Encase all raw internal seam allowances inside your Saffron Orange bias tape and topstitch them down.

Step 6: Tailored Binding, Plackets, and Buttons
- Plackets & Collar: Sew your Saffron/Indigo button placket strips to the raw inner edges of the Front panels. Sew your collar pieces together, turn right-side out, and attach the collar to the neckline.
- Bind the Hems: Use your Saffron bias tape to cleanly bind the raw edges of the oversized sleeve cuffs and the sweeping bottom hem.
- Closures: Mark 6 evenly spaced buttonholes down the right Front placket. Sew them on your machine, then cut them open. Sew your oversized statement buttons onto the left Front placket to complete the vibrant look.
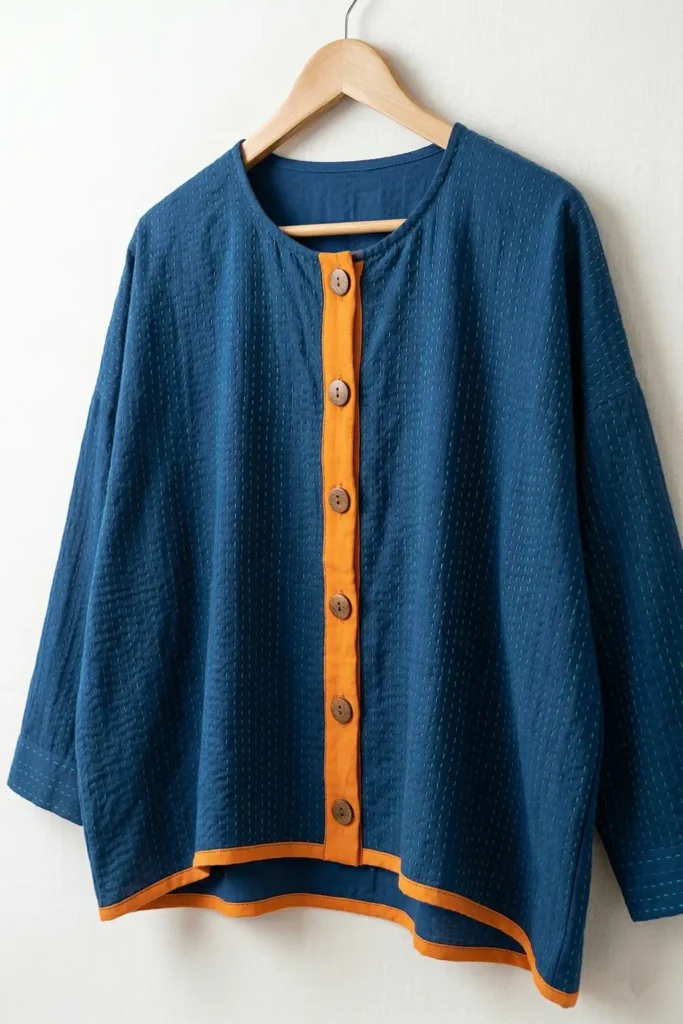

Usability Note
Why and how this design idea is useful to the reader: The shirt’s relaxed, flowing architecture ensures it fits seamlessly into a demanding, active lifestyle. It is highly useful because it can be thrown over leggings for a chic, comfortable travel outfit, or belted at the waist to create a stunning, structured tunic for an evening out. The oversized pockets (if added) provide crucial utility for carrying essentials without needing a purse.
Comfort and Practical Care
Why and how this design idea is useful to the reader: The use of pure, breathable cotton voile means this massive garment never feels heavy or suffocating. This is useful to the reader because caring for it is blissfully simple: avoid the dry cleaner entirely. Machine wash the shirt on a delicate, cold cycle with a color-safe detergent to protect the brilliant Indigo and Saffron dyes. Give it a firm shake while damp, and hang it on a sturdy wooden hanger to air dry. This allows the cotton to naturally soften and crinkle, enhancing the artisanal Kantha texture.
Elegance That Lasts
Why and how this design idea is useful to the reader: An oversized garment can quickly look sloppy if not properly constructed, but the dense Kantha stitching provides permanent structural integrity. This is useful to the reader because the Emerald Green running stitches physically anchor the delicate cotton to the muslin core, preventing the wide shoulders and flowing sleeves from stretching out of shape. Finished with fully bound internal seams, this shirt is engineered to endure heavy, daily wear while remaining a polished, vibrant heirloom in your closet for decades.
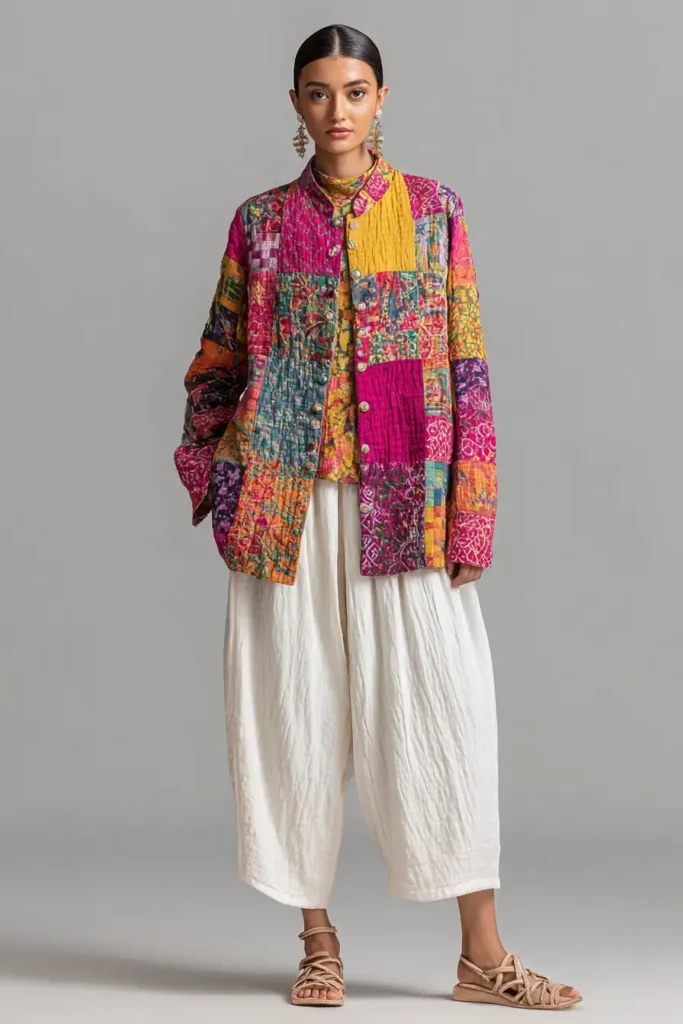
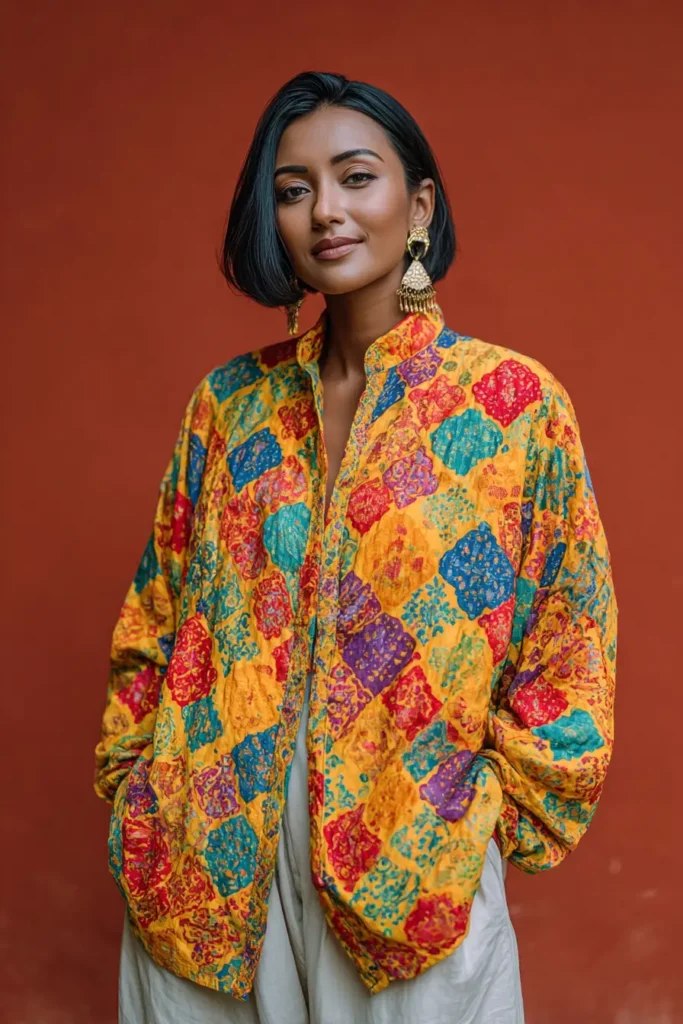
11. Oversized Nakshi Kantha Tote Bags for Stylish Everyday Carry
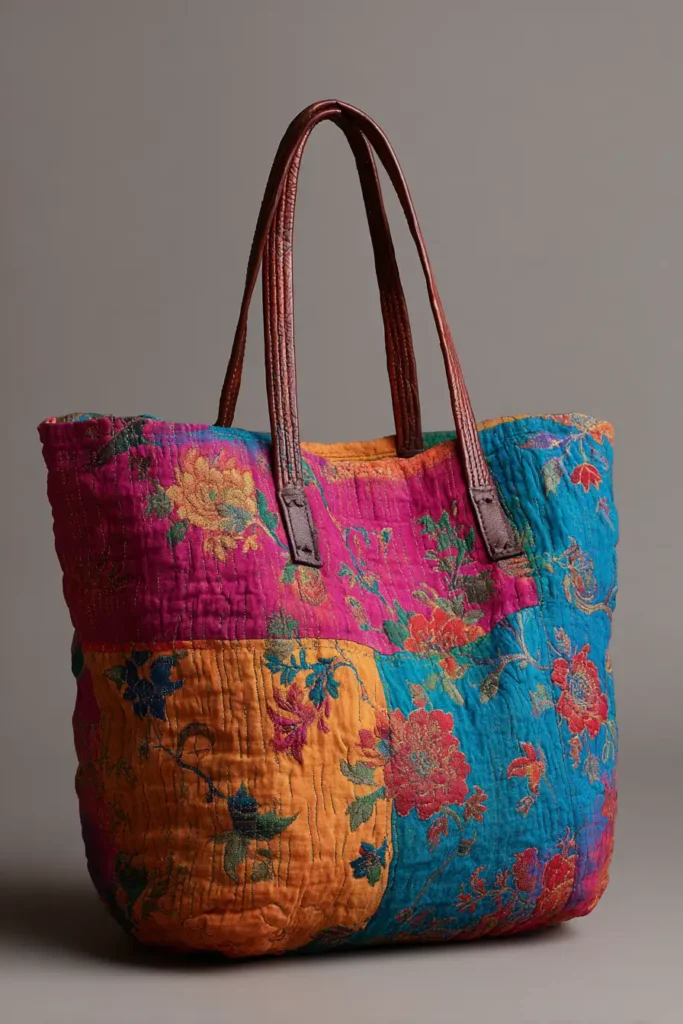
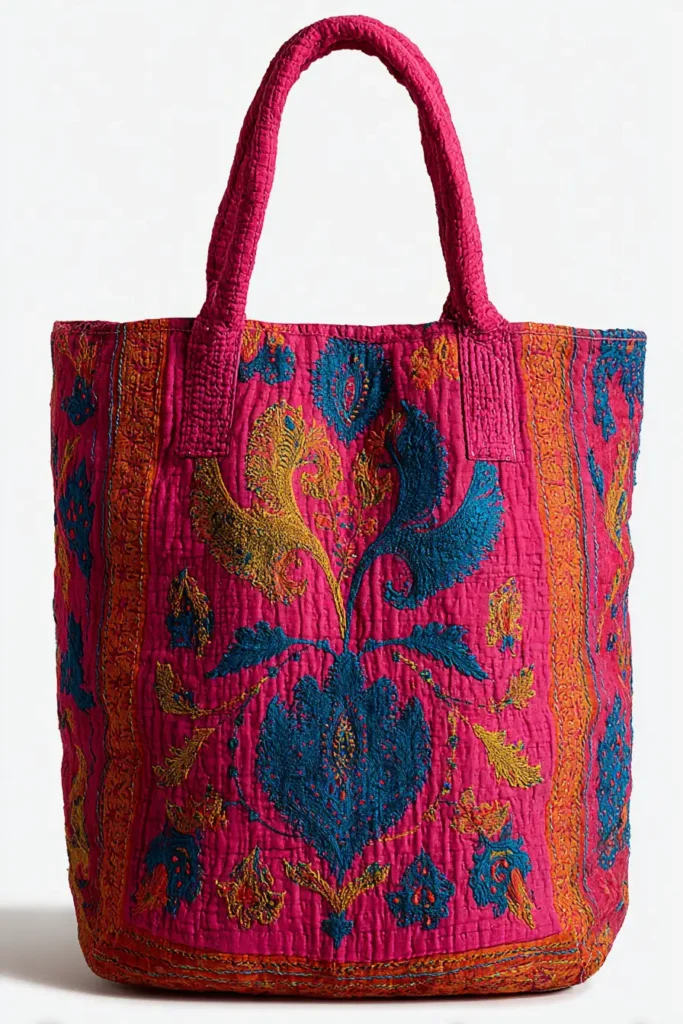
A Guide to Making Oversized Nakshi Kantha Tote Bags for Stylish Everyday Carry
While clothing defines your personal style, the bag you carry dictates how you navigate your day. Standard canvas totes are practical but often lack aesthetic polish, while designer leather bags can be heavy and difficult to clean. The Oversized Nakshi Kantha Tote Bag is the perfect convergence of high-end artisanship and rugged daily utility. By executing a massive, carry-all silhouette using the dense, architectural running stitches of Bengali heritage, you create a vibrant, lightweight companion that holds everything you need while looking like a piece of bespoke art.
The Heritage of the Kantha Bundle (And Why I Made It)
Curating this specific pattern for comfydwell.com was born from the practical reality of managing a bustling, multi-faceted daily routine. Navigating the logistics of a busy property—like running a resort with an attached children’s park—requires carrying clipboards, tablets, water bottles, and a myriad of sudden necessities all at once. I needed a bag that was practically bottomless, but I refused to carry a drab, utilitarian sack.
Historically, the word kantha itself is deeply tied to the concept of a bundle or a wrap used to carry precious belongings. I designed this modern tote to honor that original, highly functional purpose. By scaling up the size and reinforcing the core, it becomes the ultimate everyday carry. To make it a true fashion statement, I abandoned muted tones entirely. Rendered in explosively vibrant colors, this oversized tote ensures that even on your most chaotic, chore-heavy days, you carry a piece of striking, cultural elegance over your shoulder.
Focus on Usability, Comfort, and Elegance
- Usability: The oversized, wide-mouth design lets you easily drop in a laptop, groceries, or a change of clothes without struggling with tight zippers. A wide, flat boxed bottom ensures the bag stands upright when you set it down on a desk or a café floor.
- Comfort: Heavy loads usually mean straps that painfully dig into your shoulders. By heavily quilting wide, padded straps with multiple layers of soft cotton, the bag’s weight is evenly distributed, making it incredibly comfortable to carry all day.
- Elegance: To elevate this from a simple tote to a high-fashion accessory, we use an unapologetically bold color palette. Imagine a striking Peacock Blue outer shell lined with an electrifying Citrus Orange, all stitched with a gleaming Marigold Yellow thread. The dense, linear stitching provides a highly textured, matte finish that looks incredibly expensive.
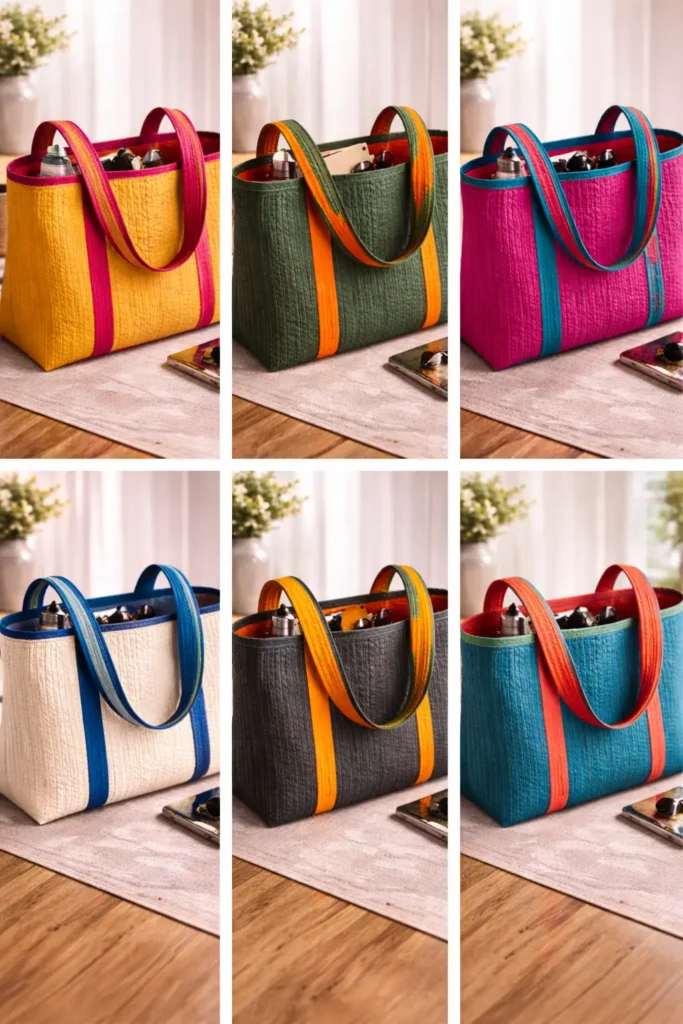
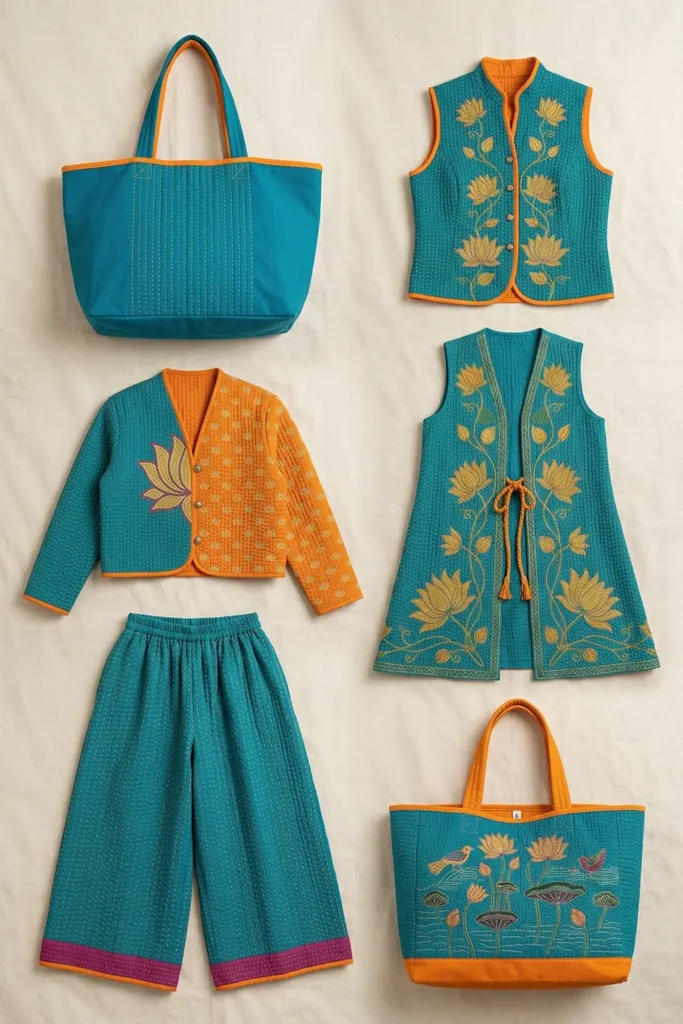
Measurements & Materials Needed
Finished Bag Size: Generous Oversized Tote (Approx. 20″ wide x 16″ tall, with a 6″ deep flat base). Finished Style: A highly structured, open-top tote bag with wide shoulder straps, deep internal pockets, and vibrant, edge-to-edge Kantha stitching.
Materials Needed:
- Fabric for the Outer Shell and Lining: 3 yards total of premium, medium-weight 100% cotton canvas or heavy linen (lightweight voile is too delicate for a heavy-duty bag).
- Outer Shell: 1.5 yards of a vibrant solid (e.g., Peacock Blue).
- Lining: 1.5 yards of a flashy, contrasting solid (e.g., Citrus Orange).
- Core Stabilizer: 1.5 yards of heavy unbleached cotton canvas or cotton batting to give the bag rigid structure.
- Thread: * Heavy-duty 50-weight cotton thread for machine piecing the seams.
- 4 to 5 skeins of Pearl Cotton (Size 8) in a striking accent color (e.g., Marigold Yellow) for the visible hand-stitching.
- Binding: 2 yards of 1/2-inch double-fold bias tape matching your Citrus Orange lining to frame the top edge.
- Tools: A sharp rotary cutter, a 6″ x 24″ acrylic ruler, heavy-duty sewing machine needles (Size 90/14), curved safety pins, and a sturdy embroidery needle.
Step-by-Step Guide: The Vibrant Kantha Tote
Step 1: Drafting and Cutting the Heavy-Duty Canvas
Cut 3 identical layers (Peacock Outer, Canvas Core, and Citrus Lining) for each of the following pieces:
- The Main Bag Body: Cut two large rectangles measuring 24″ wide by 20″ tall.
- The Comfort Straps: Cut two long strips, each measuring 5″ wide x 30″ tall.
- Internal Pockets: Cut two pieces only from the Citrus Orange lining, measuring 10″ x 8″ each.
Step 2: Basting the Structural Bag Layers
Meticulously stack your three layers for the main body panels: Citrus Lining (face down), heavy Canvas Core (middle), and Peacock Outer (face up). Smooth the fabrics perfectly flat. Pin the layers together densely using your curved safety pins, placing a pin every 2 inches. Because the bag will carry heavy items, the layers must be perfectly locked together.
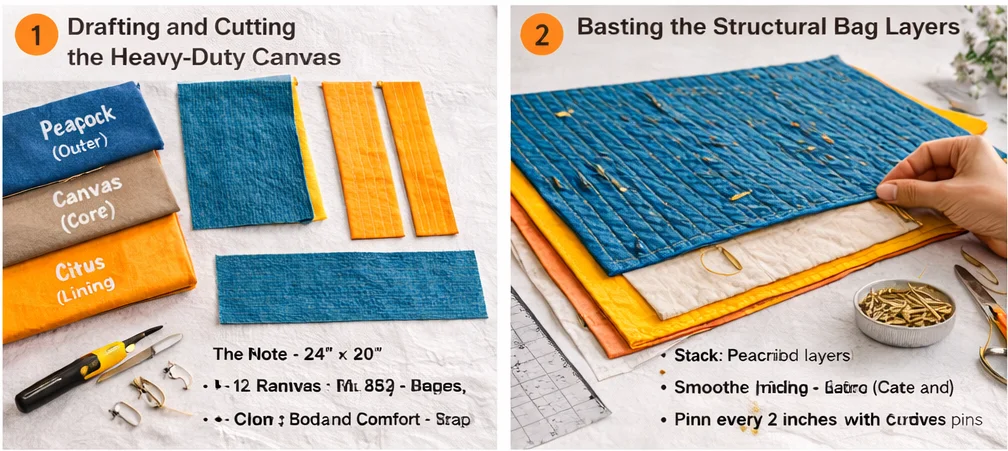
Step 3: The Rhythmic, Architectural Kantha Stitching
Thread your embroidery needle with the Marigold Yellow Pearl Cotton. Using a highly consistent, tight running stitch, quilt straight vertical lines from the top of the body panels to the bottom, spacing them exactly 1/4-inch apart. Push your needle through the thick canvas core. This dense stitching is not just decorative; it compresses the heavy fabrics into a stiff, architectural board that will allow the finished bag to stand up on its own. Quilt both main body panels.
Step 4: Crafting the Quilted Comfort Straps
Take your 5″ x 30″ strap pieces. Fold the long outer edges inward by 1/2 inch, then fold the entire strap in half lengthwise so it measures 2 inches wide, enclosing all raw edges. Pin securely. Using your Marigold thread, hand-quilt 4 or 5 long, continuous running stitches down the entire length of the straps. This gives them a beautiful, ridged texture and ensures they are incredibly strong and padded for your shoulders.

Step 5: Assembly Section (Constructing the Tote)
We will use enclosed French or bound seams to ensure the inside of the bag is pristine and will not fray.
- Internal Pockets: Hem the top edge of your Citrus pocket pieces. Topstitch them directly onto the Citrus lining side of your quilted body panels.
- Sewing the Body: Place your two massive quilted body panels right sides together (Peacock sides touching). Using your sewing machine and a heavy-duty needle, sew down the left side, across the bottom, and up the right side with a 1/2-inch seam allowance. Leave the top open.
- Boxing the Corners: To create the flat base, pull the front and back fabrics apart at one of the bottom corners, flattening it into a triangle so the side seam aligns with the bottom seam. Measure exactly 3 inches down from the point, draw a 6-inch straight line across the triangle, and sew directly on this line. Trim off the excess triangle and bind the raw edge with bias tape. Repeat on the other bottom corner.
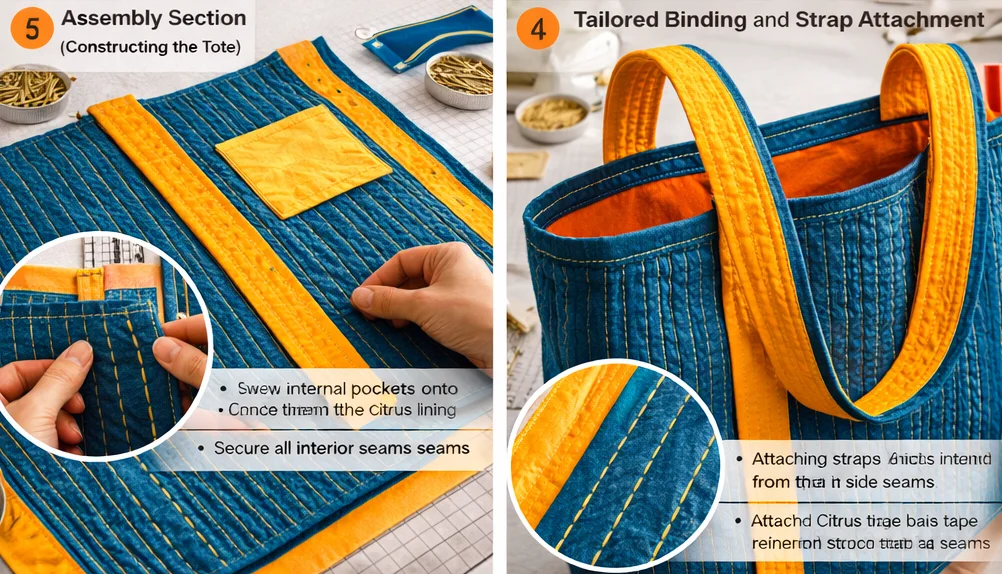
Step 6: Tailored Binding and Strap Attachment
- Attach the Straps: Measure 6 inches inward from the side seams on the front panel. Pin the raw ends of one strap to the top raw edge of the bag (ensure the strap isn’t twisted). Machine-baste the strap in place. Repeat for the back panel.
- Bind the Top Rim: Turn the bag right-side out. Take your Citrus Orange bias tape and meticulously sew it around the entire raw top rim of the bag, catching the straps in the seam.
- Reinforce: Fold the straps upward, so they extend over the bound rim. Sew a strong box-and-X stitch through the strap and the bag body, just below the binding, to ensure the straps can carry the heaviest loads.

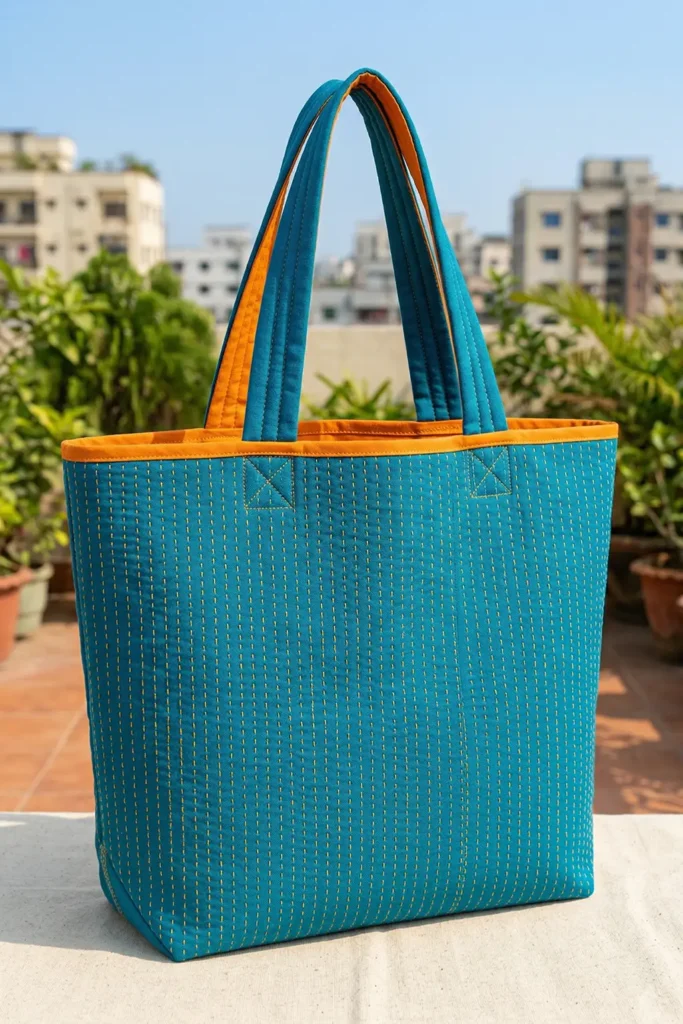
Usability Note
The massive capacity and structured base of this tote make it a highly adaptable daily companion. It is exceptionally useful because it transitions flawlessly from a professional carry-all for laptops and design portfolios to a chic, resilient weekender bag for quick getaways. The deep, brightly colored Citrus Orange interior ensures that small items, like keys or phones, never get lost in dark shadows at the bottom of the bag.
Comfort and Practical Care
By replacing standard, rigid leather straps with thick, hand-quilted cotton, the bag naturally conforms to the slope of your shoulder, preventing the painful digging that can occur with heavy loads. The 100% cotton canvas construction means maintaining the bag’s vibrant elegance is completely hassle-free. When the bag inevitably gets dirty from daily life, empty the pockets, machine wash on a cold, heavy-duty cycle with a color-safe detergent, and air dry it standing upright. A quick press with a hot iron will instantly restore its crisp, architectural shape.
Elegance That Lasts
The elegance of this tote lies in its rugged, handcrafted resilience. The dense Kantha stitching physically anchors the vivid Peacock Blue outer shell to the heavy canvas core, creating a composite material that resists puncturing, stretching, or tearing. By boxing the corners and completely binding the internal seams, the bag is meticulously engineered to carry weight without fraying. As you use it day after day, the Marigold Yellow stitches will slightly embed into the softening canvas, giving the vibrant tote a rich, artisanal patina that only deepens with time.
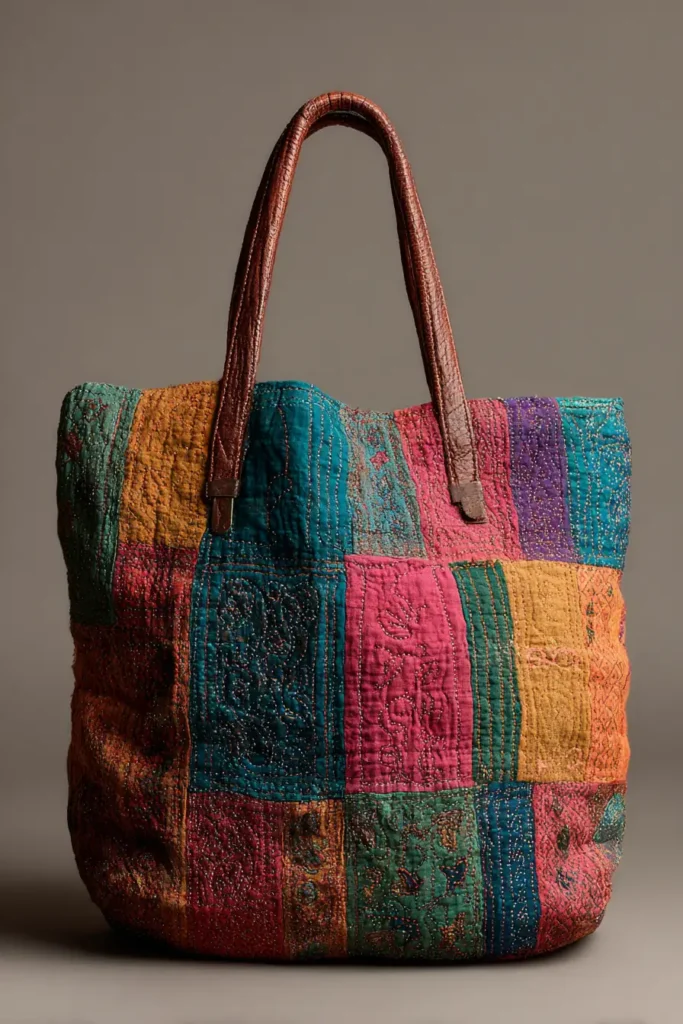
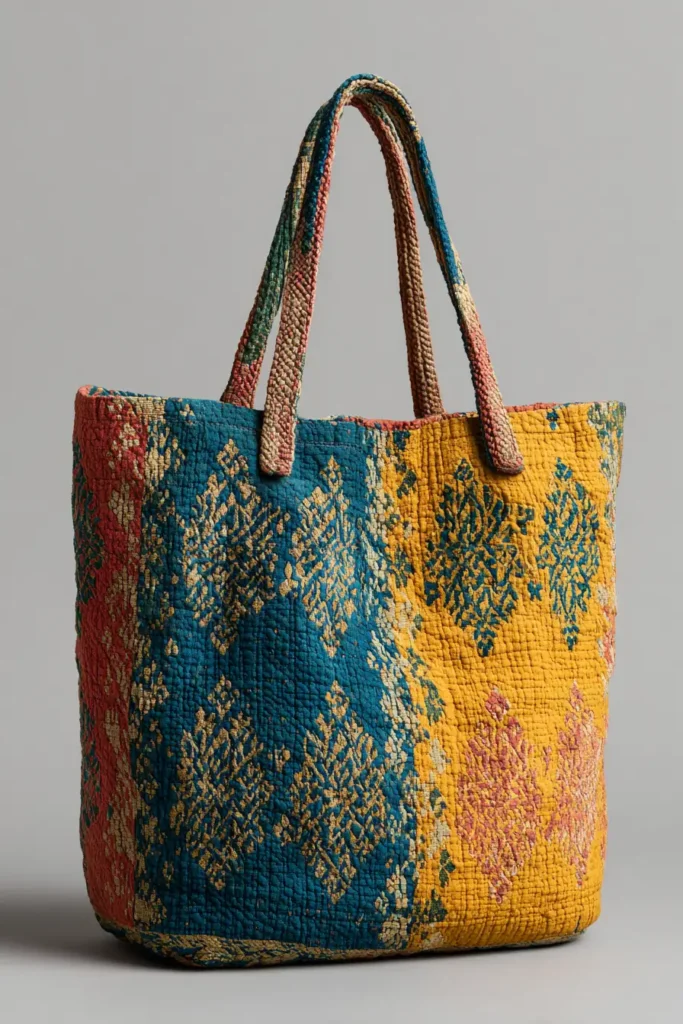
12. Eco-Friendly Patchwork Nakshi Kantha Shopper Bags for Sustainable Living
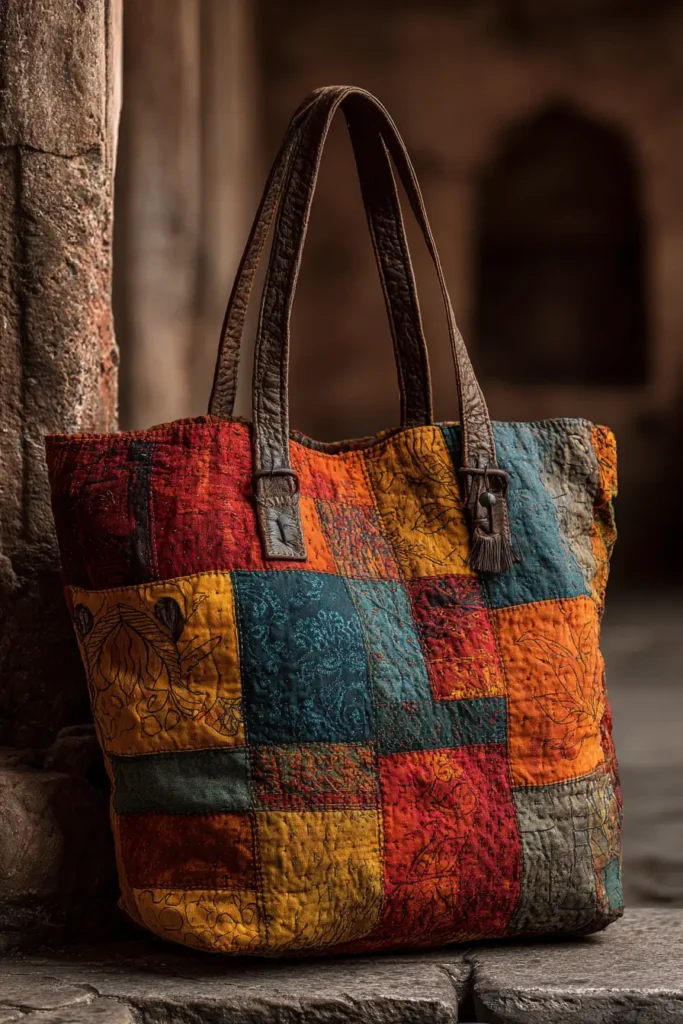
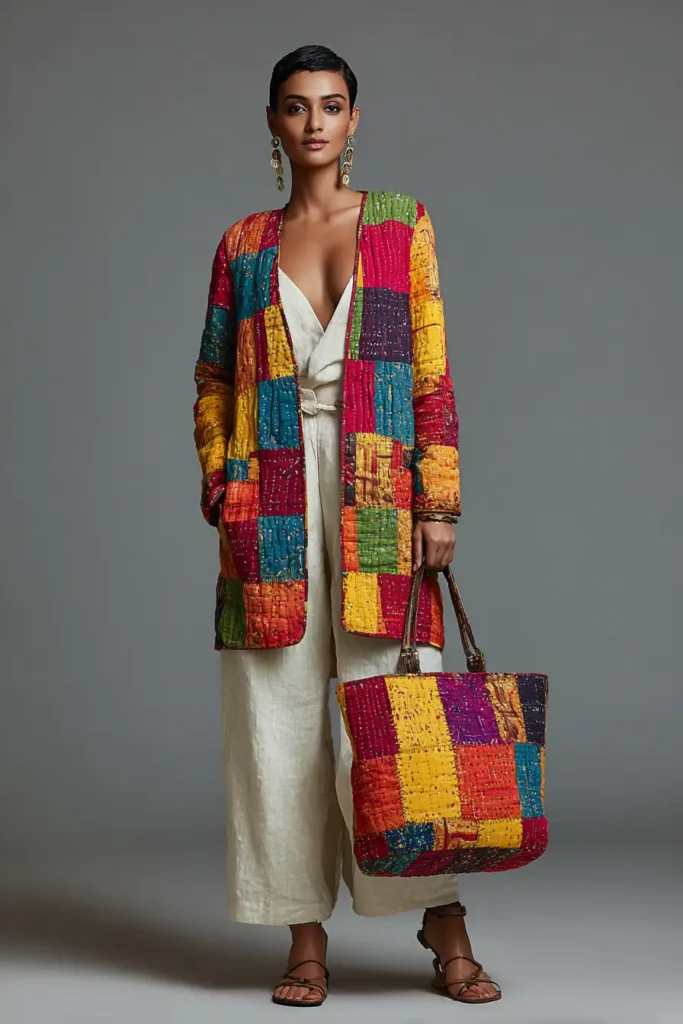
A Guide to Making Eco-Friendly Patchwork Nakshi Kantha Shopper Bags for Sustainable Living
As we become more conscious of our environmental footprint, the desire for sustainable living has beautifully intersected with the world of fashion and home design. The Eco-Friendly Patchwork Nakshi Kantha Shopper Bag is the ultimate expression of this movement. By returning to the absolute roots of traditional Bengali needlework—which was fundamentally about upcycling and zero-waste—and combining it with a brilliant, explosive color palette, you can create a daily shopper that is both incredibly functional and breathtakingly stylish.
The Heritage of Upcycling (And Why I Made It)
Curating this specific pattern for comfydwell.com was deeply personal and rooted in the craft’s very origins. Historically, Nakshi Kantha was the original sustainable textile art. Women in Bangladesh did not buy new fabric for their quilts; they meticulously saved old, softened cotton saris and pieced them together, giving them a second, beautiful life.
I designed this modern patchwork shopper to resurrect that resourceful spirit for today’s eco-conscious lifestyle. Managing a busy property with a resort and children’s park makes you hyper-aware of daily waste, especially single-use plastics. I wanted to engineer a reusable bag that people would want to carry everywhere. Knowing that our website’s audience often arrives via highly visual Pinterest boards, I abandoned drab, “earthy” eco-tones in favor of unapologetically vibrant, jewel-toned patchwork. It honors the heritage of passing down resources—much like inheriting historic property documents from a grandfather—by ensuring nothing of value is ever wasted.
Focus on Usability, Comfort, and Elegance
- Usability: Why and how this design idea is useful to the reader: Utilizing a patchwork method allows you to use up small fabric scraps leftover from other quilting or garment projects. This is highly useful because it makes the project virtually cost-free, completely eliminates textile waste, and results in a highly durable, structured bag perfect for heavy farmers’ market hauls or daily errands.
- Comfort: Why and how this design idea is useful to the reader: This design features wide, deeply quilted handles rather than thin nylon webbing or stiff leather. This design choice is useful because the densely stitched cotton naturally cushions your shoulders and hands, preventing the straps from digging into your skin even when the shopper is loaded with heavy groceries.
- Elegance: Why and how this design idea is useful to the reader: The pattern relies on high-contrast, vibrant color blocking. Combining scraps of Ruby Red, Turmeric Yellow, and Emerald Green, all united by a cohesive Royal Blue Kantha stitch, is highly useful because it elevates a simple grocery tote into a deliberate, bespoke fashion accessory that adds a massive pop of joy to a casual outfit.
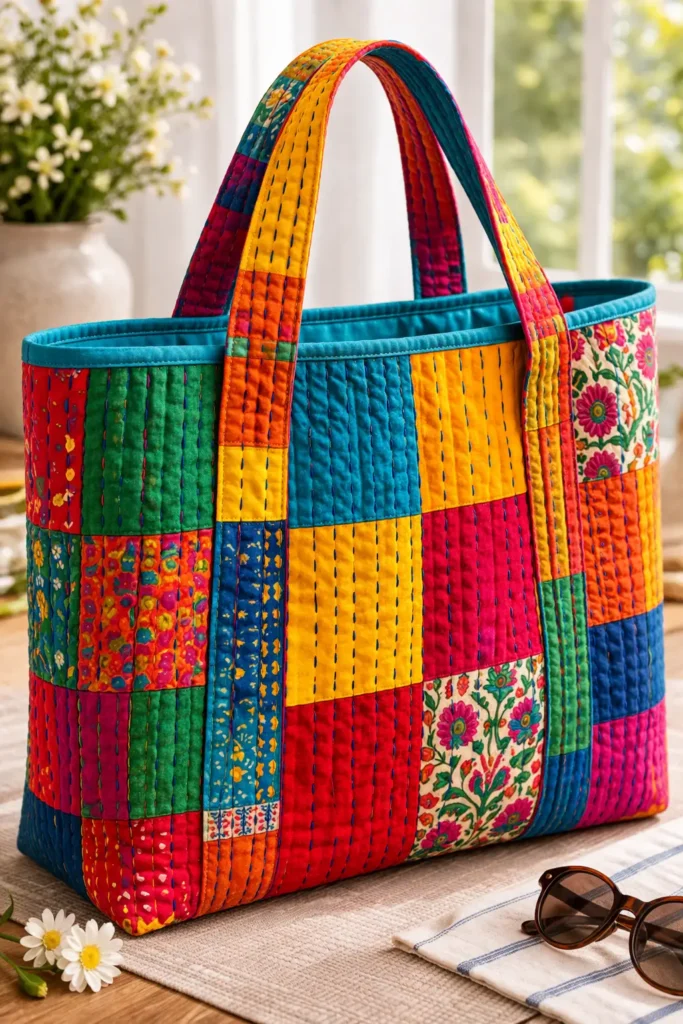
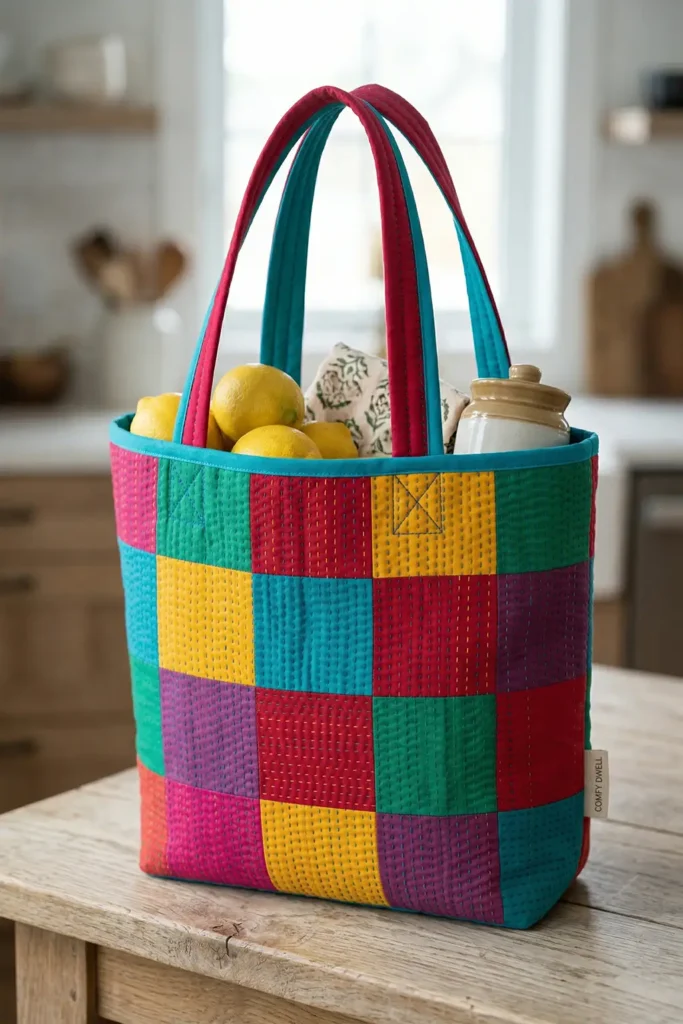
Measurements & Materials Needed
Finished Bag Size: Generous Daily Shopper (Approx. 18″ wide x 15″ tall, with a 5″ deep flat base). Finished Style: A vibrant, geometrically pieced patchwork tote with edge-to-edge Kantha stitching and comfortable, reinforced straps.
Materials Needed:
- Fabric for the Patchwork Outer Shell: Approximately 1 to 1.5 yards total of various vibrant 100% cotton scraps (e.g., solid jewel tones or bright block prints).
- Lining Fabric: 1 yard of a solid, bright cotton (e.g., Vivid Turquoise) to make finding items inside easy.
- Core Stabilizer: 1 yard of unbleached muslin or scrap cotton canvas.
- Thread: * 50-weight cotton thread for machine piecing the patchwork and seams.
- 4 to 5 skeins of Pearl Cotton (Size 8) in a striking, unifying color (e.g., Royal Blue) for the Kantha stitching.
- Binding: 2 yards of 1/2-inch double-fold bias tape matching your lining.
- Tools: A rotary cutter, a 6″ x 24″ acrylic ruler, curved safety pins, and a high-quality embroidery needle.
Step-by-Step Guide: The Vibrant Patchwork Shopper
Step 1: Sorting and Cutting the Vibrant Scraps
Gather your vibrant fabric scraps. Using your rotary cutter and acrylic ruler, cut them into uniform squares or rectangles. For a modern, geometric look, cut squares measuring 4.5″ x 4.5″ and rectangles measuring 4.5″ x 8.5″. You will need enough pieced fabric to create two large outer panels.
Step 2: Piecing the Eco-Friendly Canvas
Lay out your cut scraps on a table, playing with the color arrangement until the vibrant hues feel balanced (e.g., ensuring that no two red squares touch). Sew the pieces together using a strict 1/4-inch seam allowance. Press all seams completely flat and open to reduce bulk. You need to create two pieced panels that measure at least 20″ wide x 18″ tall. Also, piece together scraps to create two strap panels measuring 5″ wide x 28″ long.
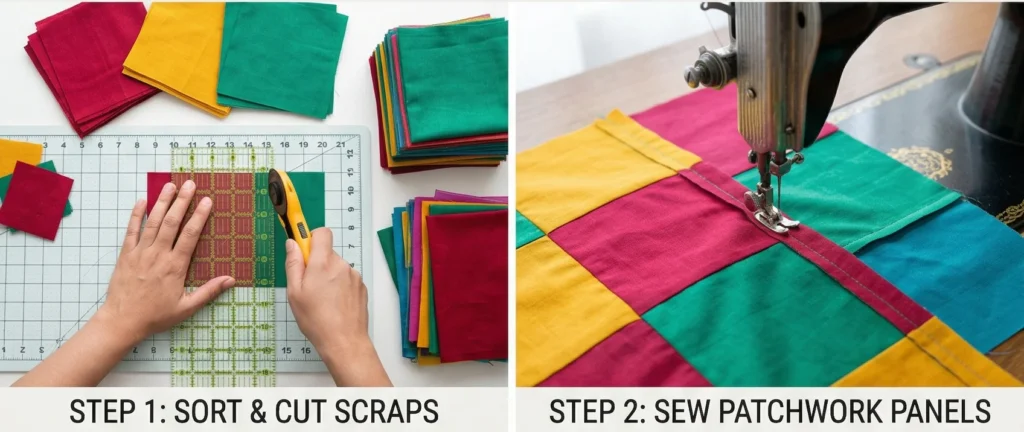
Step 3: Basting the Shopper Layers
Cut your Muslin Core and Turquoise Lining to match your two 20″ x 18″ pieced outer panels. Meticulously stack the three layers for both the front and back of the bag: Turquoise Lining (face down), Muslin Core (middle), and Patchwork Outer (face up). Pin the layers together densely with curved safety pins, spacing each pin every 3 inches to prevent the patchwork intersections from shifting.
Step 4: The Rhythmic, Unifying Kantha Stitching
Thread your embroidery needle with the Royal Blue Pearl Cotton. Using a consistent running stitch, quilt straight vertical lines from the top of the panels to the bottom, spacing them 1/4-inch apart. Push your needle through all three layers. The continuous Royal Blue thread running across the chaotic, vibrant patchwork creates incredible visual cohesion and physical structure. Quilt both main body panels and both strap panels.
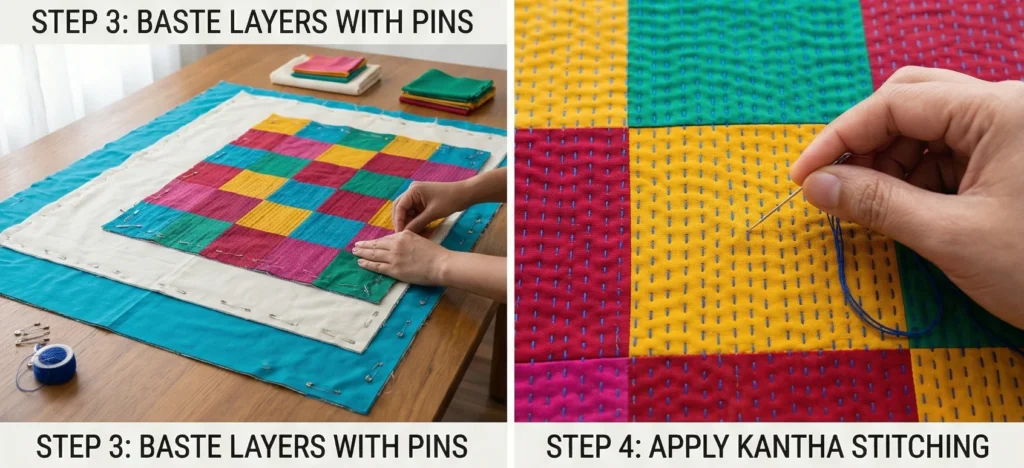
Step 5: Assembly Section (Constructing the Bag Body & Boxed Corners)
We will use enclosed seams to ensure the inside is perfectly neat.
- Squaring Up: Trim your quilted front and back panels to measure exactly 19″ wide by 17″ tall.
- Sewing the Body: Place the two panels right sides together (patchwork sides touching). Machine-sew down the left side, across the bottom, and up the right side with a 1/2-inch seam. Encase these three raw internal seams in your bias tape.
- Boxing the Corners: Pull the front and back fabrics apart at a bottom corner, flattening it into a triangle so the side seam aligns perfectly with the bottom seam. Measure 2.5 inches down from the point, draw a 5-inch line across, and sew directly along it. Trim the excess triangle and bind the raw edge. Repeat on the other corner. This gives the shopper its deep, 5-inch flat base.
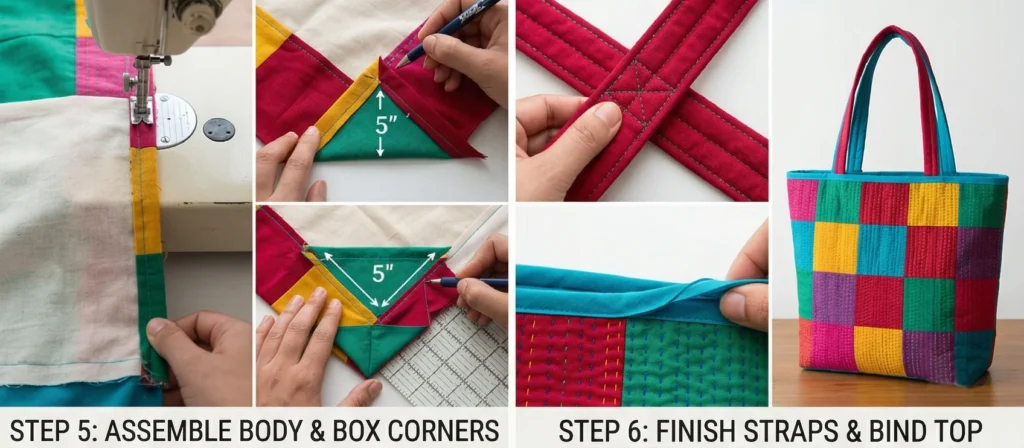
Step 6: Creating the Comfort Straps and Final Binding
- Finish the Straps: Take your quilted 5″ x 28″ strap panels. Fold the long raw edges inward by 1/2 inch, then fold the strap in half lengthwise and topstitch down the edge. You now have two heavily padded, 2-inch-wide handles.
- Attach the Straps: Pin the raw ends of the straps to the top raw edge of the bag (about 5 inches inward from the side seams). Machine-baste them in place.
- Bind the Top Rim: Turn the bag right-side out. Use your Turquoise bias tape to meticulously bind the entire top rim of the bag, catching the straps in the seam. Fold the straps upward and sew a secure box-and-X stitch to permanently anchor them for heavy lifting.

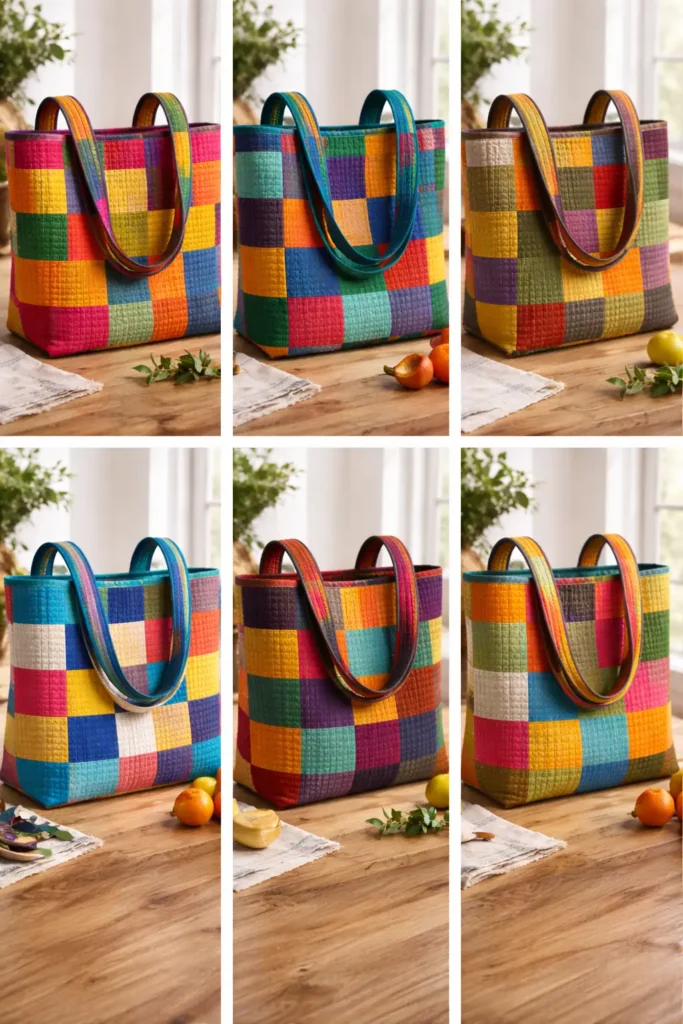
Usability Note
Why and how this design idea is useful to the reader: The wide-mouth, flat-bottom design of this shopper ensures it stands open on its own, making it incredibly easy to pack at a supermarket checkout or load with towels for an afternoon at the park. This design is highly useful because it completely replaces the need for flimsy, environmentally damaging plastic bags while offering significantly more carrying capacity and structural support than a standard, unlined canvas tote.
Comfort and Practical Care
Why and how this design idea is useful to the reader: By utilizing multiple layers of breathable, upcycled cotton, the bag remains incredibly lightweight when empty, yet the dense quilting prevents the fabric from tearing when fully loaded. This is useful to the reader because it ensures long-term hygiene and comfort: when the bag gets dirty from produce or daily life, simply machine-wash it on a cold, delicate cycle with a color-safe detergent and let it air-dry. It will emerge perfectly clean, smelling fresh, and feeling even softer.
Elegance That Lasts
Why and how this design idea is useful to the reader: The true elegance of this eco-friendly bag lies in its brilliant fusion of chaotic patchwork and rigorous, unifying hand-embroidery. The Royal Blue Kantha stitches physically anchor the myriad of vibrant scraps to the core lining, guaranteeing that the patchwork seams will not split or fray under heavy weight. This is useful to the reader because it means the bag is engineered to be a permanent, heirloom-quality staple in your daily routine. As it ages, the vivid colors will settle into a stunning, distressed patina, beautifully showcasing your commitment to both high fashion and sustainable living.
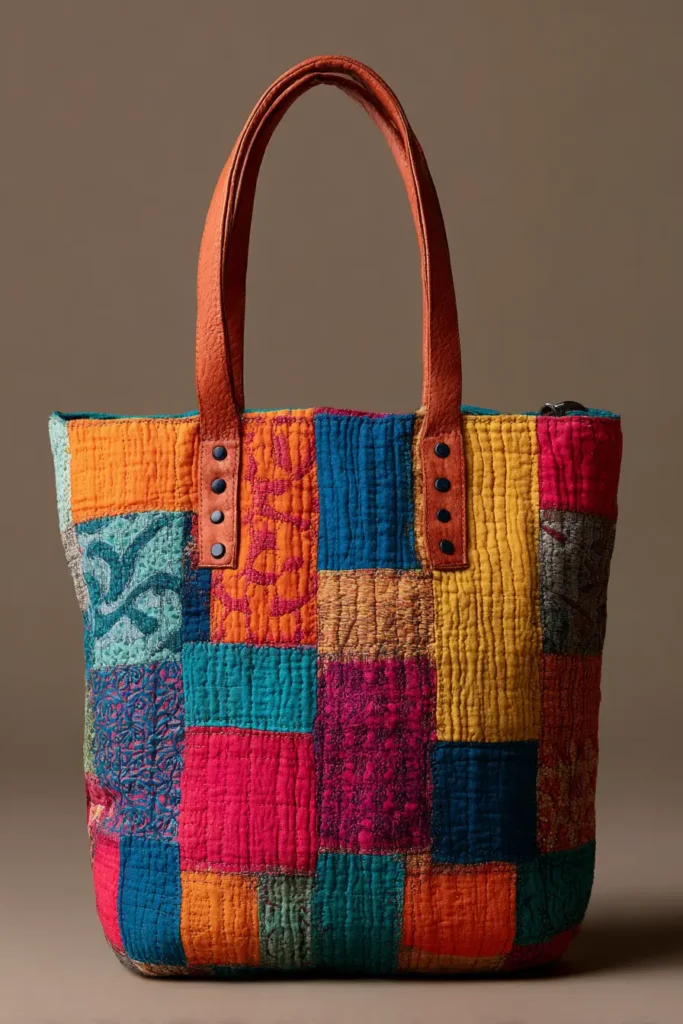
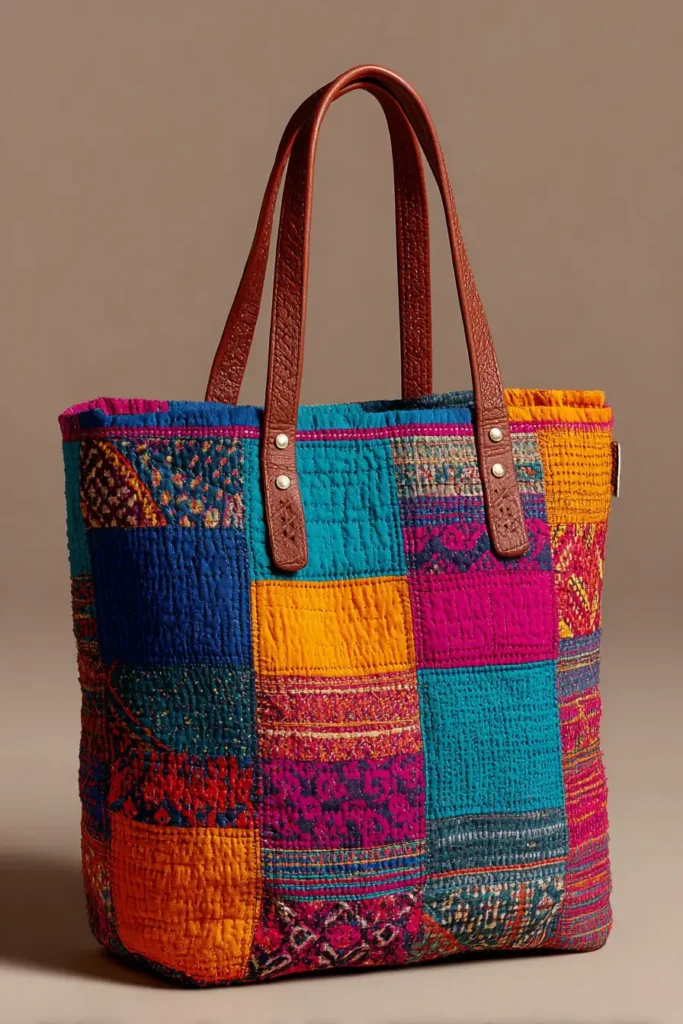
13. Leather Accent Nakshi Kantha Tote Bags for Elevated Sophistication
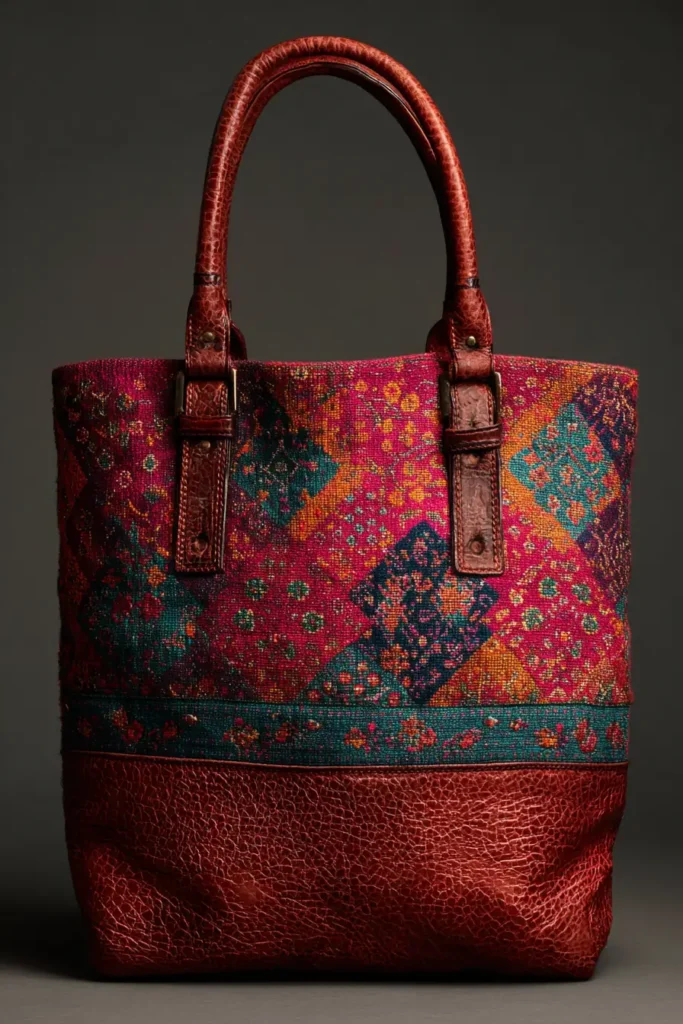

A Guide to Making Leather Accent Nakshi Kantha Tote Bags for Elevated Sophistication
While an all-cotton Kantha bag is beautifully soft and lightweight, sometimes our modern routines demand an accessory with a bit more structural gravitas. The Leather Accent Nakshi Kantha Tote Bag is a masterclass in contrasting textures. By pairing the dense, rhythmic, and incredibly vibrant hand-stitched cotton of Bengali heritage with the sleek, architectural durability of rich leather, you create a hybrid masterpiece. It is a bag that honors traditional artisanship while commanding the presence of a high-end, contemporary designer piece.
The Heritage of the Mixed-Material Carrier (And Why I Made It)
Curating this specific pattern for comfydwell.com was born out of a desire to merge the aesthetic warmth of traditional textiles with the rugged demands of a busy professional life. Historically, Nakshi Kantha was prized for its softness, but wrapping and carrying heavy items sometimes required leather reinforcement at the base or handles.
I designed this modern tote to celebrate that exact juxtaposition. When managing a bustling property or traveling, you need a bag that can be set down on various surfaces without the fear of ruining delicate hand-embroidery. I wanted to engineer a bag with a “tough” bottom and a “soft” top. Knowing that our aesthetic thrives on joy, I paired a rich, cognac-colored leather with explosively vibrant cottons. The result is a bag that feels incredibly grounding to carry, yet visually pops with unapologetic color.
Focus on Usability, Comfort, and Elegance
- Usability: The addition of a structured leather base (or high-quality vegan leather) ensures the bag stands completely upright when set down, making it highly useful for sliding in laptops, files, or daily essentials without the bag collapsing.
- Comfort: While the base and straps are made of tough leather, the bag’s body is densely quilted cotton. This design choice is useful because the bag rests softly against your hip or side as you walk, avoiding the rigid, bruising feel of a fully stiff leather briefcase.
- Elegance: This design thrives on brilliant contrast. Combining a Vivid Magenta outer shell, a Bright Turquoise lining stitched with Gleaming Gold thread, and anchoring it all with rich, tan leather is highly useful for elevating a wardrobe. It bridges the gap between artisanal bohemian and upscale urban chic.
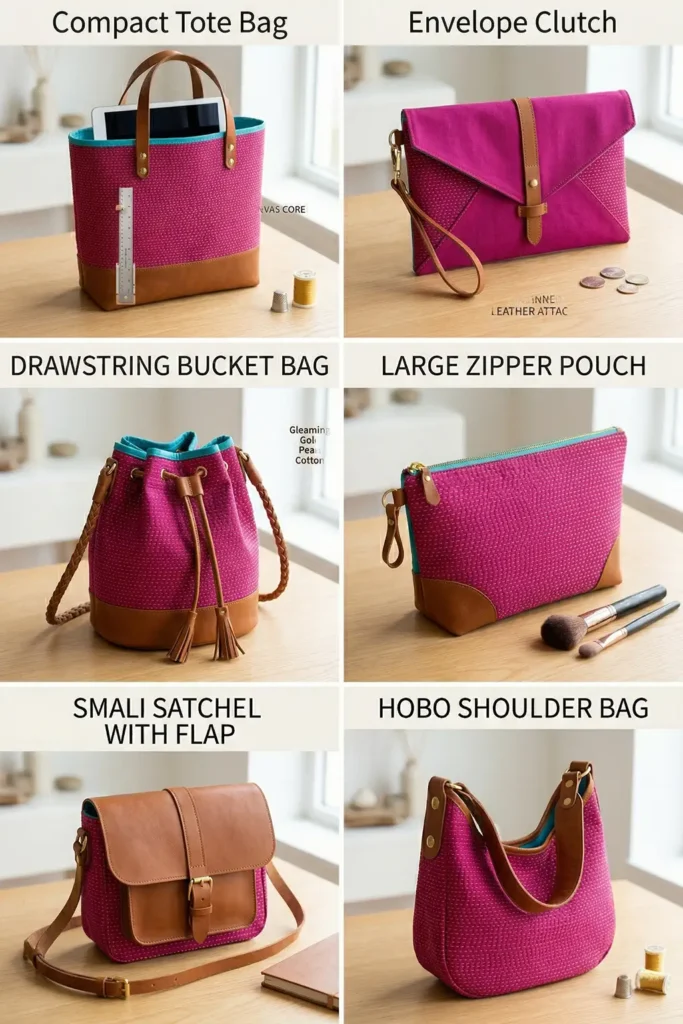
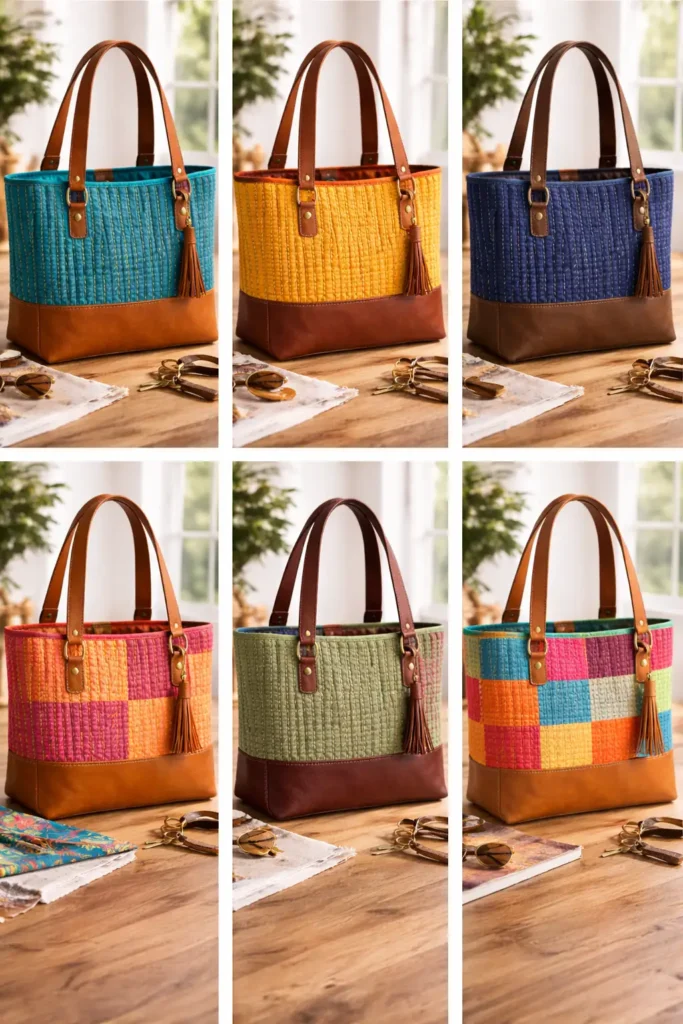
Measurements & Materials Needed
Finished Bag Size: Sophisticated Daily Tote (Approx. 16″ wide x 14″ tall, with a 5″ deep leather base). Finished Style: A structured, mixed-material tote with an open top, riveted leather handles, and edge-to-edge vibrant Kantha stitching on the upper body.
Materials Needed:
- Fabric for the Upper Shell and Lining: 1.5 yards total of premium, medium-weight 100% cotton canvas or heavy linen.
- Upper Outer Shell: 3/4 yard of a vibrant solid (e.g., Vivid Magenta).
- Lining: 3/4 yard of a flashy, contrasting solid (e.g., Bright Turquoise).
- Core Stabilizer: 3/4 yard of heavy, unbleached cotton canvas.
- Leather Accents: * Base: One piece of medium-weight leather measuring 17″ x 10″ (in Cognac or Rich Tan).
- Straps: Two pre-cut leather tote straps (approx. 1″ wide x 28″ long).
- Thread & Hardware: * Heavy-duty 50-weight cotton thread for machine piecing.
- 4 skeins of Pearl Cotton (Size 8) in a striking accent color (e.g., Gleaming Gold) for the Kantha stitching.
- 8 metal rivets (brass or antique gold) and a rivet setter for attaching the handles.
- Binding: 1.5 yards of 1/2-inch double-fold bias tape matching your Turquoise lining.
- Tools: Leather punch, heavy-duty leather machine needles, rotary cutter, acrylic ruler, curved safety pins, and a sharp embroidery needle.
Step-by-Step Guide: The Leather Accent Kantha Tote
Step 1: Drafting and Cutting the Vibrant Canvas & Leather
Because this is a mixed-media bag, precision is critical.
- The Quilted Upper Body: Cut your Vivid Magenta outer, Canvas core, and Bright Turquoise lining. You need 3 layers of each for the front and back panels, measuring 17″ wide x 12″ tall.
- The Leather Base: Your leather piece should already be cut to 17″ wide x 10″ tall.
- The Lower Lining: Cut one piece of Bright Turquoise lining for the inside bottom measuring 17″ wide x 10″ tall.
Step 2: Basting the Upper Bag Layers
Meticulously stack the three layers for your two upper body panels: Turquoise Lining (face down), Canvas Core (middle), and Magenta Outer Shell (face up). Smooth the fabrics perfectly flat. Pin the layers densely using curved safety pins. Leave the bottom 1 inch of the panels unpinned, as this is where the leather will attach later.
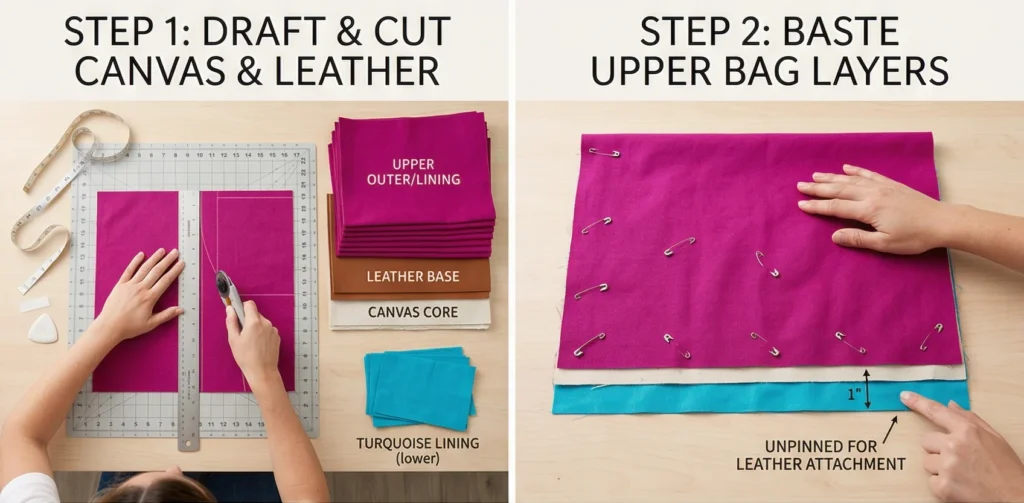
Step 3: The Rhythmic, Architectural Kantha Stitching
Thread your embroidery needle with the Gleaming Gold Pearl Cotton. Using a tight, consistent running stitch, quilt straight vertical lines from the top of the Magenta panels down to the bottom, spacing them exactly 1/4-inch apart. The heavy gold stitching compresses the canvas into a stiff, textured board. Quilt both the front and back upper panels completely, stopping about 1 inch from the bottom edge.
Step 4: Prepping and Attaching the Leather Base
Leather cannot be pinned, as pins leave permanent holes. Use sewing clips.
- Switch your sewing machine to a heavy-duty leather needle and lengthen your stitch size.
- Take one quilted upper panel and lay it right sides together with the top edge of your leather base piece. Clip securely. Machine-sew a 1/2-inch seam.
- Open the seam, fold the seam allowance flat against the leather, and topstitch it down on the right side of the leather for a highly professional finish.
- Repeat this process to attach the other side of the leather base to the second quilted upper panel. You now have one massive, continuous panel (Upper Front + Leather Base + Upper Back).
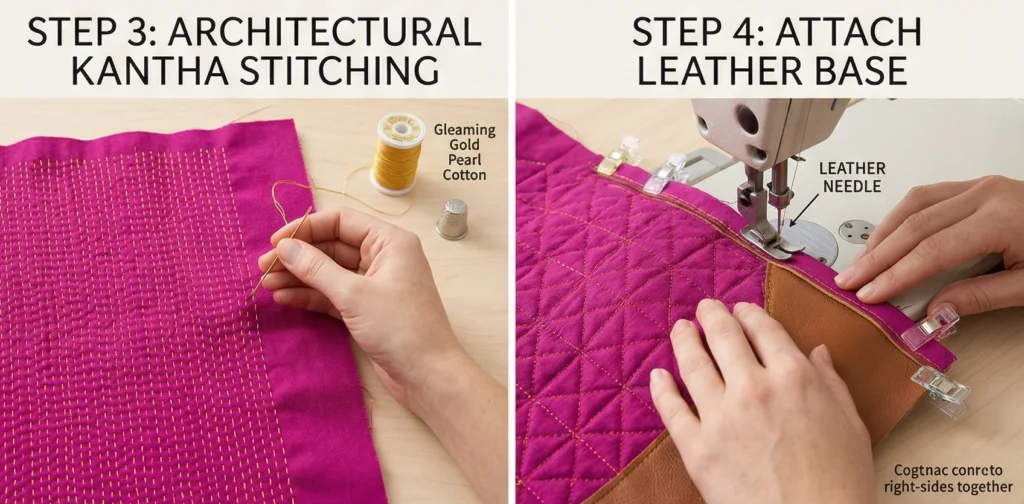
Step 5: Assembly Section (Constructing the Tote)
We will use enclosed seams to ensure the inside is pristine.
- The Lining Base: Take your 17″ x 10″ lower lining piece and sew it to the bottom edges of the quilted lining panels, mirroring what you did with the leather outside.
- Sewing the Body: Fold the entire massive panel in half, right-sides together (Magenta touching Magenta, Leather touching Leather). Clip the sides. Machine-sew down both sides with a 1/2-inch seam. Encase these raw side seams in your bias tape.
- Boxing the Leather Corners: Pull the front and back fabrics apart at a bottom leather corner, flattening it into a triangle so the side seam aligns perfectly with the bottom center of the leather. Measure 2.5 inches down from the point, draw a 5-inch line across the leather, and sew directly on this line. Carefully trim the excess leather triangle and bind the raw edge. Repeat on the other corner to create the deep, flat base.

Step 6: Leather Handles and Final Binding
- Bind the Top Rim: Turn the bag right-side out. The leather base will easily pop into its flat shape. Use your Bright Turquoise bias tape to meticulously bind the entire raw top rim of the bag.
- Attach the Leather Straps: Measure 5 inches inward from the side seams on the front panel. Position the ends of your leather straps just below the bound rim. Use your leather punch to create two holes through the strap and the quilted bag body. Insert your metal rivets and set them permanently with a hammer or rivet setter. Repeat for the back panel.
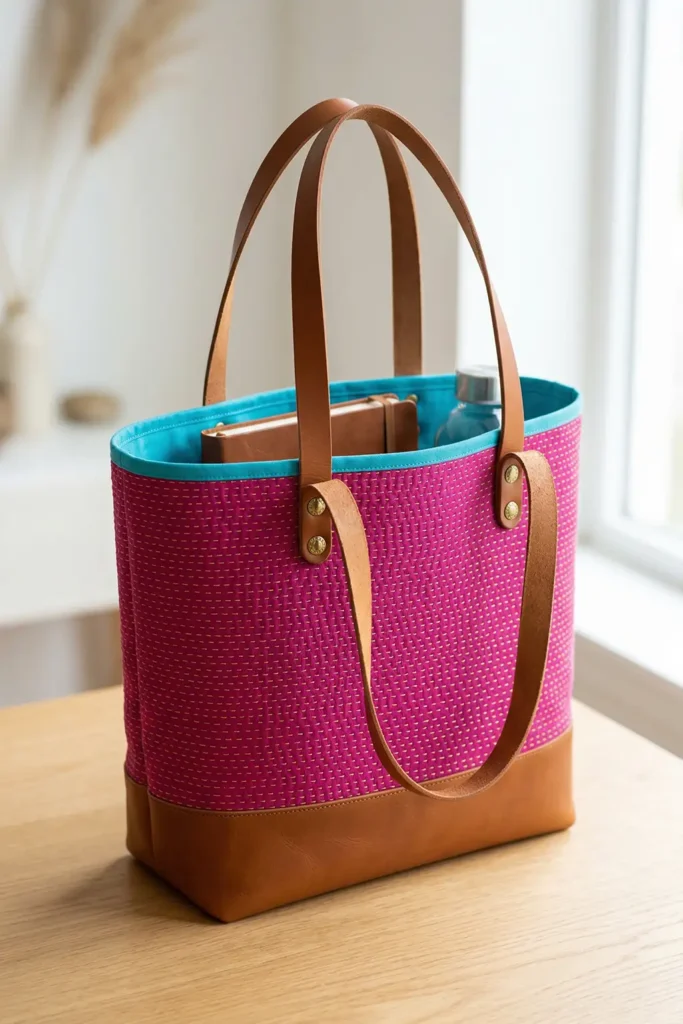
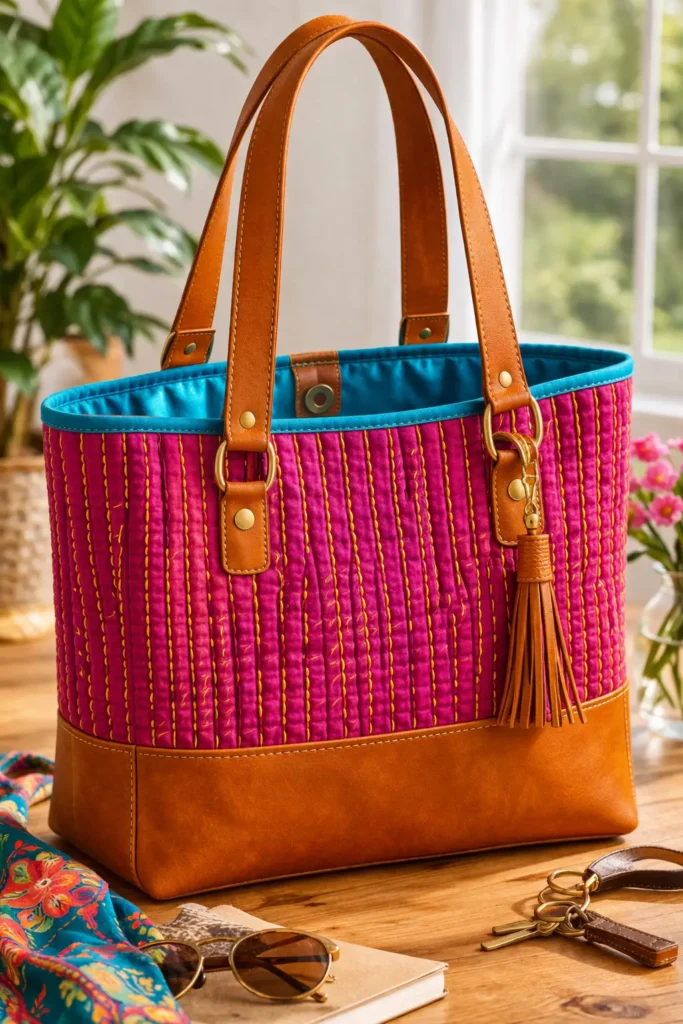
Usability Note
The robust leather base of this tote dramatically enhances its functionality. It is highly useful because you can confidently set the bag down on a subway floor, a damp café patio, or a grassy park bench without worrying about moisture seeping into the cotton or ruining your vibrant Kantha stitching. The open-top design, paired with the structural rigidity of the canvas core, allows for effortless, one-handed access to your belongings.
Comfort and Practical Care
Because this bag is made of genuine or high-quality faux leather, it cannot be washed in the washing machine. This design choice requires a slightly different care routine: to clean the vibrant Magenta cotton upper, use a gentle spot-cleaning method with a damp cloth and mild detergent. The leather base can be wiped clean with a soft cloth and occasionally treated with leather conditioner to maintain its supple luster. The comfortable, wide leather straps will naturally soften and mold to the exact slope of your shoulder over time, making the bag feel increasingly bespoke.
Elegance That Lasts
The elegance of this mixed-material tote lies in the durability of its components, both physical and visual. The dense Gold Kantha stitches physically anchor the cotton canvas, preventing the upper bag from sagging or warping, while the heavy-duty rivets ensure the straps will never tear free, even when the bag is loaded with heavy electronics or books. As you carry this tote through your daily life, the leather will develop a rich, deep patina that beautifully complements the vibrant, handcrafted cotton, ensuring this accessory remains a sophisticated, statement-making cornerstone of your wardrobe for decades.

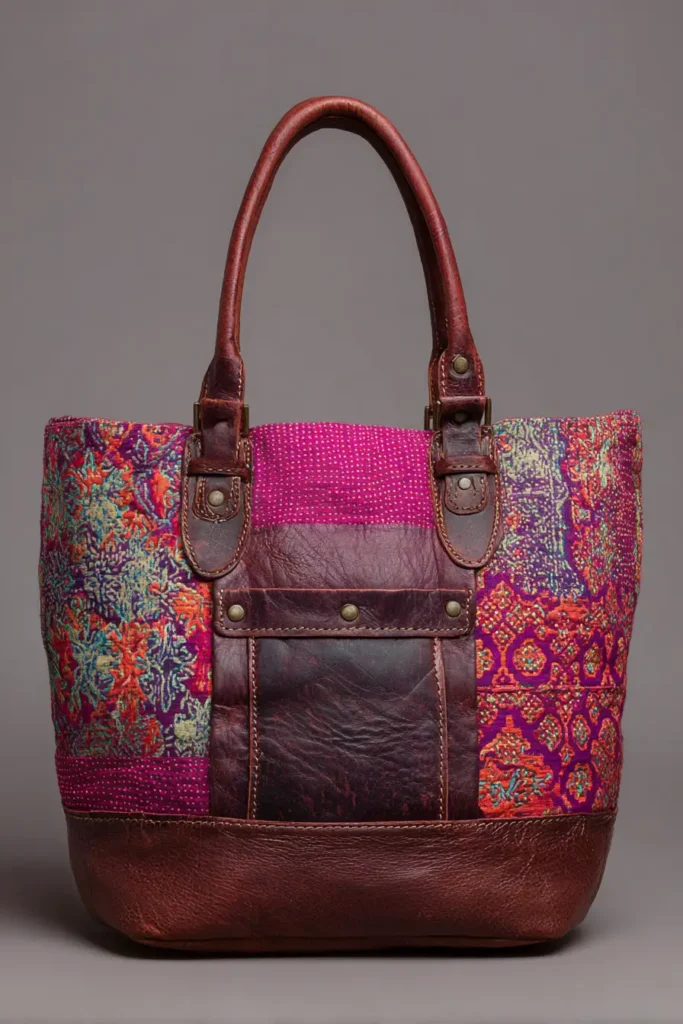
14. Spacious Nakshi Kantha Quilted Laundry Bags for Stylish Home Organization
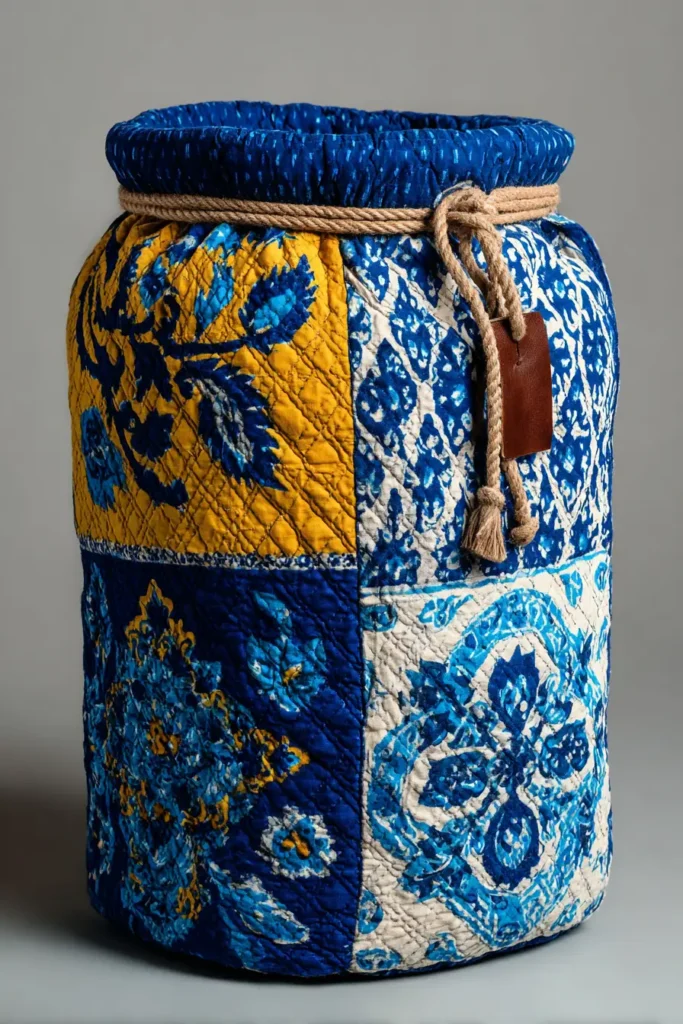
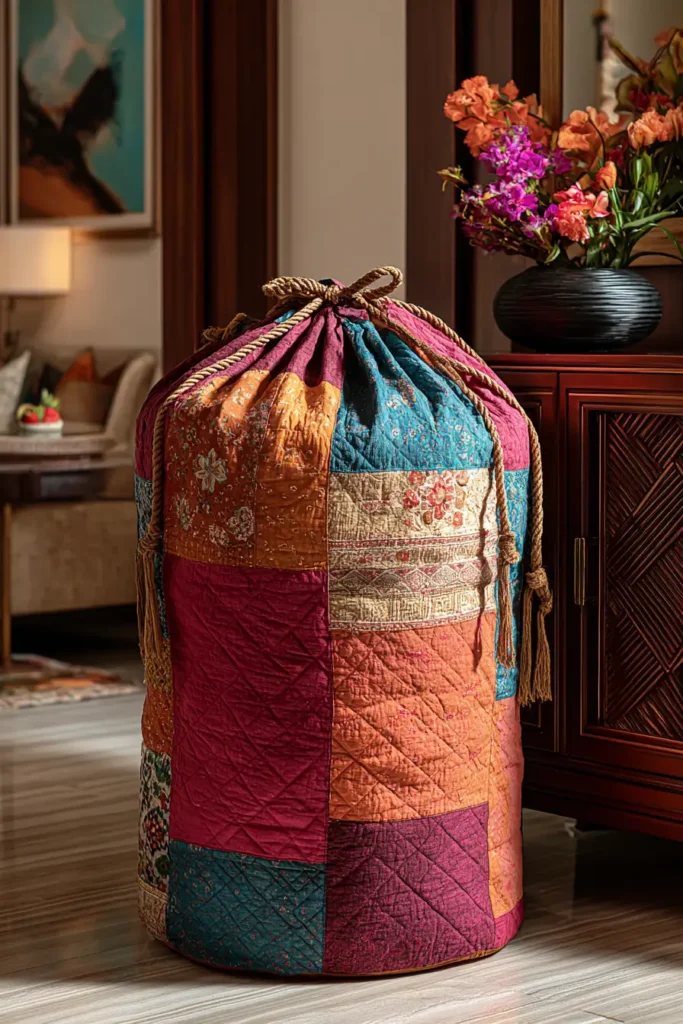
A Guide to Making Spacious Nakshi Kantha Quilted Laundry Bags for Stylish Home Organization
When we think of interior design, we often focus on the public-facing spaces—the living room, the dining table, the entryway. Yet, true elegance extends into the functional, hidden corners of our daily lives. The Spacious Nakshi Kantha Quilted Laundry Bag completely reimagines a mundane household necessity. By taking the breathtaking, centuries-old Bengali tradition of hand-stitched quilts and applying it to a heavy-duty, freestanding cylinder, you transform an everyday chore into a moment of vibrant, tactile beauty.
The Heritage of the Kantha Bundle (And Why I Made It)
Curating this specific pattern was born directly from the practical realities of managing a bustling resort and its attached children’s park. When you are constantly turning over guest rooms, handling endless streams of linens, and keeping a large property pristine, laundry becomes a highly visible part of daily operations. Standard plastic hampers or flimsy nylon sacks severely disrupt the carefully curated, welcoming aesthetic of a beautiful space.
Historically, the word kantha refers to a bundle or wrap used to protect and carry precious belongings. I designed this modern laundry bag to honor that functional origin while engineering it for massive capacity. I wanted a piece that could stand upright on its own, handle heavy loads of towels, and look like a deliberate piece of boutique decor. To achieve this, I bypassed muted tones in favor of an explosively vibrant color palette. It proves that even the most utilitarian items in our homes can be celebrations of cultural artistry.
Focus on Usability, Comfort, and Elegance
- Usability: The bag features a wide, structured circular base that allows it to stand completely open and upright on its own, making it effortless to toss in garments from across the room. A thick cotton rope drawstring allows you to cinch it closed and drag or carry it easily to the washing machine.
- Comfort: Visual comfort is a crucial element of an elegant space, and a beautifully structured fabric bag significantly reduces visual clutter. Furthermore, the 100% cotton construction is highly breathable, preventing damp towels or workout clothes from trapping musty odors the way synthetic plastic bins do.
- Elegance: To elevate this from a simple sack to a high-fashion home accessory, we use an unapologetically bold, jewel-toned color palette. Imagine a deep Amethyst Purple outer shell lined with a shocking Coral Pink, all intricately stitched with a gleaming Teal thread. The heavy machine and hand-quilting add a stunning, tactile bas-relief texture to the sturdy fabric.

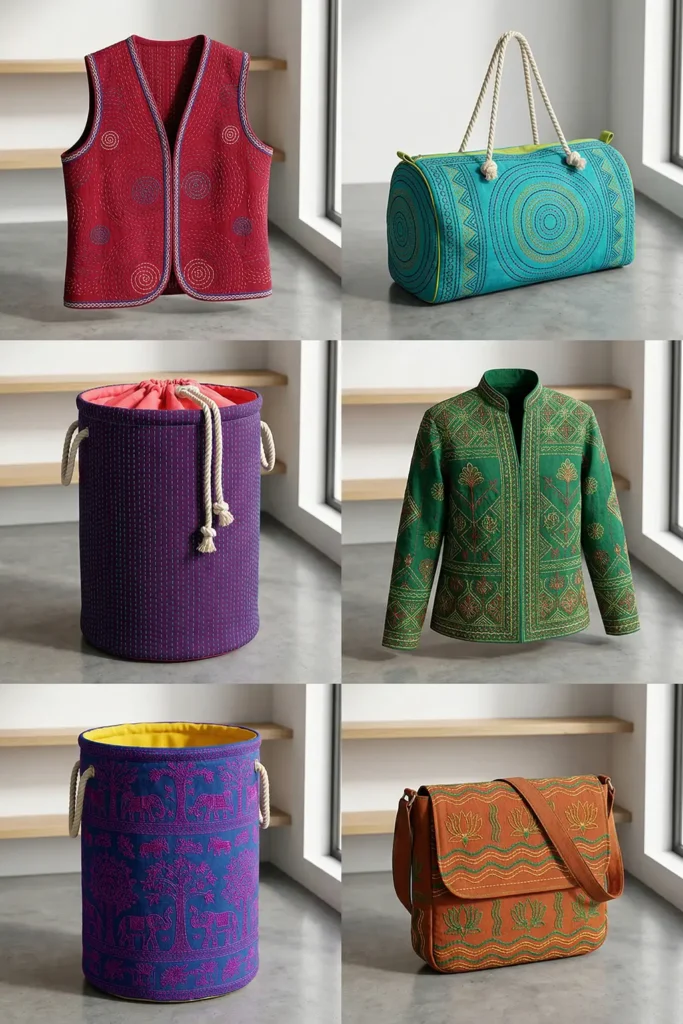
Measurements & Materials Needed
Finished Bag Size: Massive Freestanding Cylinder (approx. 18″ diameter base x 26″ tall). Finished Style: A highly structured, vibrant laundry sack with a cinched rope closure and edge-to-edge Kantha stitching.
Materials Needed:
- Fabric for the Outer Shell and Lining: 3.5 yards total of premium, medium-weight 100% cotton or linen.
- Outer Shell: 1.75 yards of a vibrant solid (e.g., Deep Amethyst Purple).
- Lining: 1.75 yards of a flashy, contrasting solid (e.g., Shocking Coral Pink).
- Core Stabilizer: 1.75 yards of heavy, unbleached cotton canvas (this hidden middle layer is crucial for keeping the bag upright).
- Thread: * Heavy-duty 50-weight cotton thread for machine piecing the thick seams.
- 5 to 6 skeins of Pearl Cotton (Size 8) in a striking accent color (e.g., Gleaming Teal) for the visible hand-stitching.
- Binding & Hardware: 3 yards of 1/2-inch double-fold bias tape matching your Coral Pink lining, and 3 yards of thick (1/2-inch) natural cotton twisted rope.
- Tools: A sharp rotary cutter, a 6″ x 24″ acrylic ruler, heavy-duty sewing machine needles (Size 90/14), curved safety pins, and a sturdy embroidery needle.
Step-by-Step Guide: The Vibrant Kantha Laundry Bag
Step 1: Precision Cutting the Massive Canvas
Working with three heavy layers requires precision. Cut your identical layers (Amethyst Outer, Canvas Core, Coral Lining) for the two main components:
- The Main Cylinder Body: Cut one massive rectangle measuring 58″ wide x 29″ tall from all three fabrics.
- The Circular Base: Cut a circle with a 19″ diameter from all three fabrics. (You can make a template by tying a 9.5-inch string to a pencil and drawing a circle on paper).
Step 2: Basting the Heavy-Duty Layers
Meticulously stack your three layers for both the main body and the circular base: Coral Lining (face down), Heavy Canvas Core (middle), and Amethyst Outer (face up). Smooth the fabrics perfectly flat on a large table or clean floor. Pin the layers together densely using your curved safety pins, placing a pin every 3 inches. The canvas core is stiff, so heavy basting helps prevent the cotton from pucking during quilting.

Step 3: The Architectural Kantha Stitching
Thread your embroidery needle with the Gleaming Teal Pearl Cotton. To ensure the bag stands rigidly upright, you must stitch straight, vertical lines from the top of the 58″ wide panel to the bottom. Space these running stitches exactly 1/2-inch apart. Push your needle through the thick canvas core. This dense, vertical Kantha stitching compresses the heavy fabrics into a stiff, architectural board. Quilt the massive rectangular panel and the circular base completely.
Step 4: Assembly Section (Constructing the 3D Cylinder)
Because the quilted fabric is now very thick, use heavy-duty clips instead of pins.
- From the Tube: Fold your massive quilted rectangular panel in half, right sides together (Amethyst sides touching), aligning the two short 29″ edges. Clip securely. Using your sewing machine and a heavy-duty needle, sew this side seam with a 1/2-inch allowance. Press the bulky seam open.
- Attach the Quilted Base: Clip your quilted circular base right sides together to the bottom raw edge of your heavy cylinder. Carefully ease the straight edge of the tube along the circle’s curve. Machine-sew around the entire perimeter with a 1/2-inch seam.
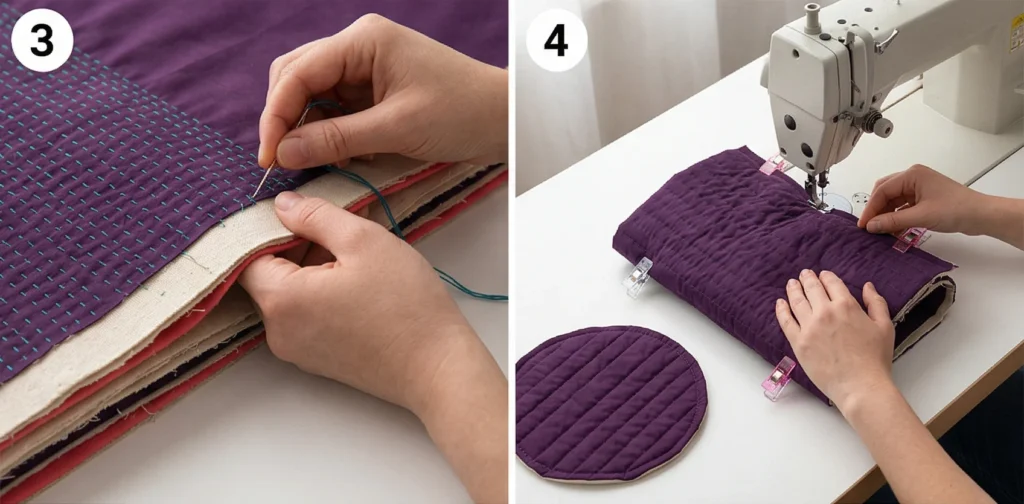
Step 5: Enclosing the Internal Seams
To ensure the inside of the laundry bag is snag-free and pristine, you must bind the raw edges. Take your Coral Pink bias tape and machine-sew it completely over the raw circular bottom seam and the long vertical side seam inside the bag. This encases the heavy canvas edges and provides a flawless finish.
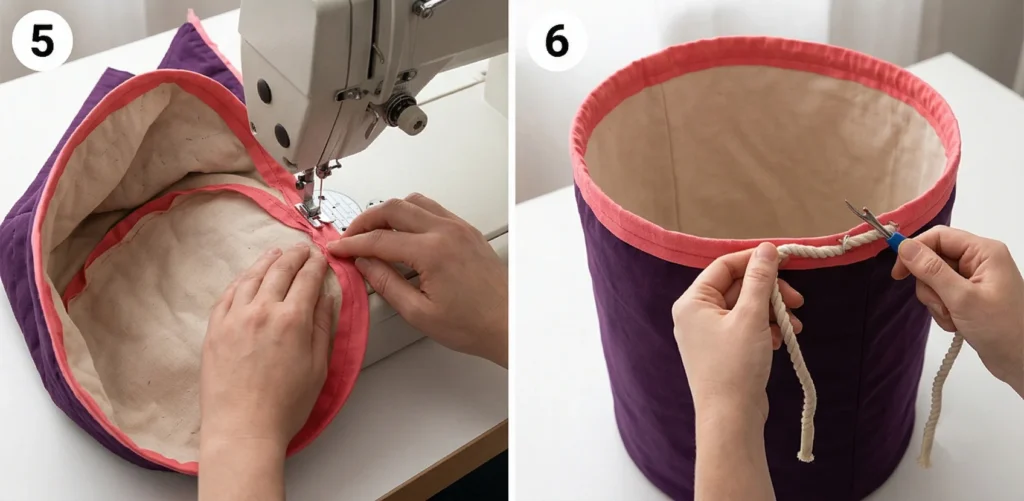
Step 6: Creating the Casing and Rope Drawstring
- Bind the Top Rim: Turn the massive bag right-side out. Meticulously sew your Coral Pink bias tape around the entire raw top rim of the bag to finish the edge.
- Sew the Casing: Fold the top-bound edge of the bag inward (toward the lining) by exactly 2 inches. Pin it in place around the entire rim. Topstitch the bottom edge of this fold down to create a hollow channel (casing) around the top of the bag.
- Insert the Rope: Use a seam ripper to carefully open a few stitches on the outer Amethyst side seam, specifically within that 2-inch casing channel. Wrap a piece of tape around the end of your thick cotton rope, thread it completely through the casing, and out the same hole. Tie the rope ends into large, handsome knots.
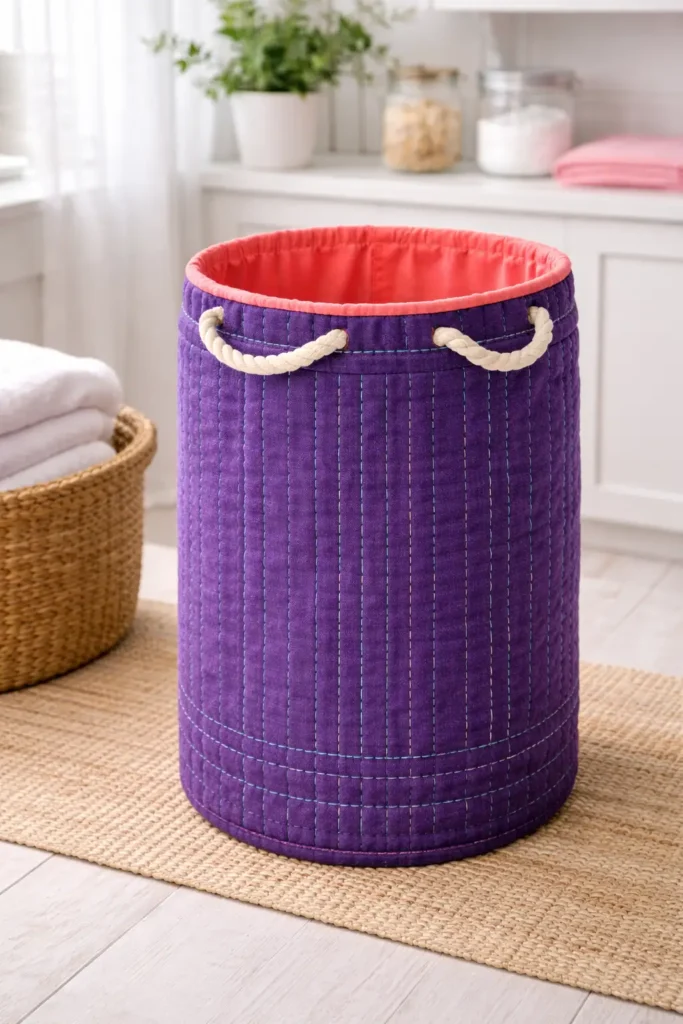
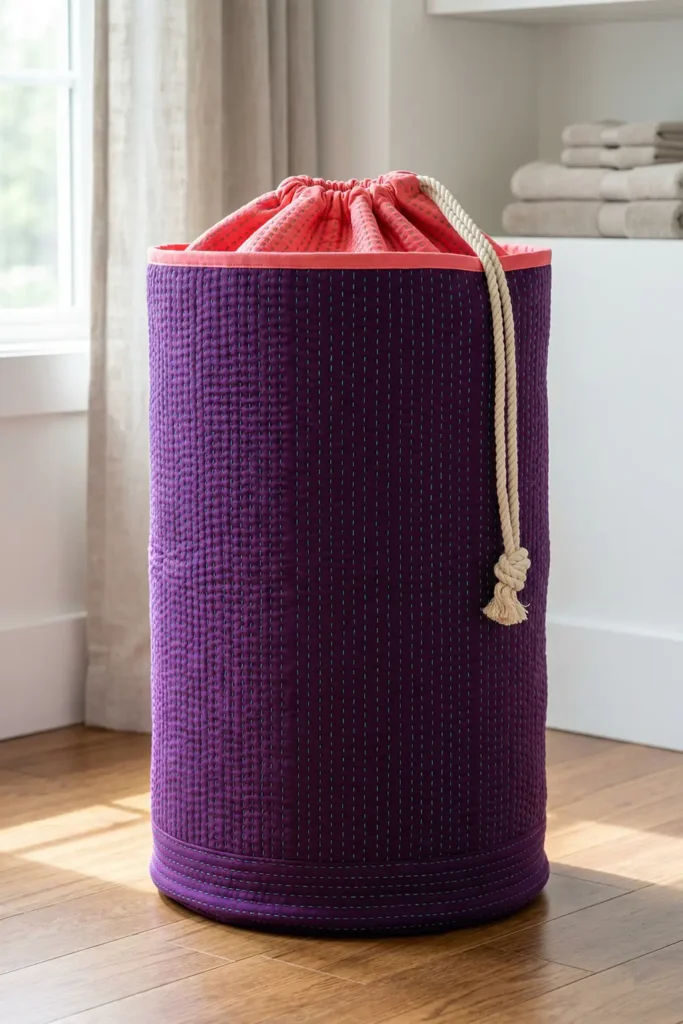
Usability Note
The structured, freestanding nature of this laundry bag makes it an incredibly functional addition to a bedroom, bathroom, or closet. Its massive capacity easily holds a week’s worth of linens or clothing. The thick rope closure lets you cinch the top and throw the entire bag over your shoulder, making the journey to the laundry room effortless and stylish.
Comfort and Practical Care
By avoiding rigid wicker or cracking plastic, this soft-sided fabric bag protects your delicate garments from snags and scratches. The 100% natural cotton and canvas construction ensures airflow, keeping your laundry fresh. To care for this vibrant piece, simply remove the heavy cotton rope, machine wash the entire bag on a heavy-duty, cold cycle with a color-safe detergent, and allow it to air dry standing upright. A quick pass with a hot steam iron will instantly restore its crisp, cylindrical shape.
Elegance That Lasts
The true luxury of this Nakshi Kantha home accessory lies in its physical resilience. The dense Teal running stitches physically anchor the vivid Amethyst cotton to the heavy canvas core, creating a composite material that resists collapsing, puncturing, or stretching out of shape over time. By fully binding all internal seams, the bag is meticulously engineered to carry immense weight without fraying. As it ages through daily use, the vibrant dyes and textured threads will settle into a stunning, artisanal patina, ensuring your practical storage remains a sophisticated design feature for years to come.
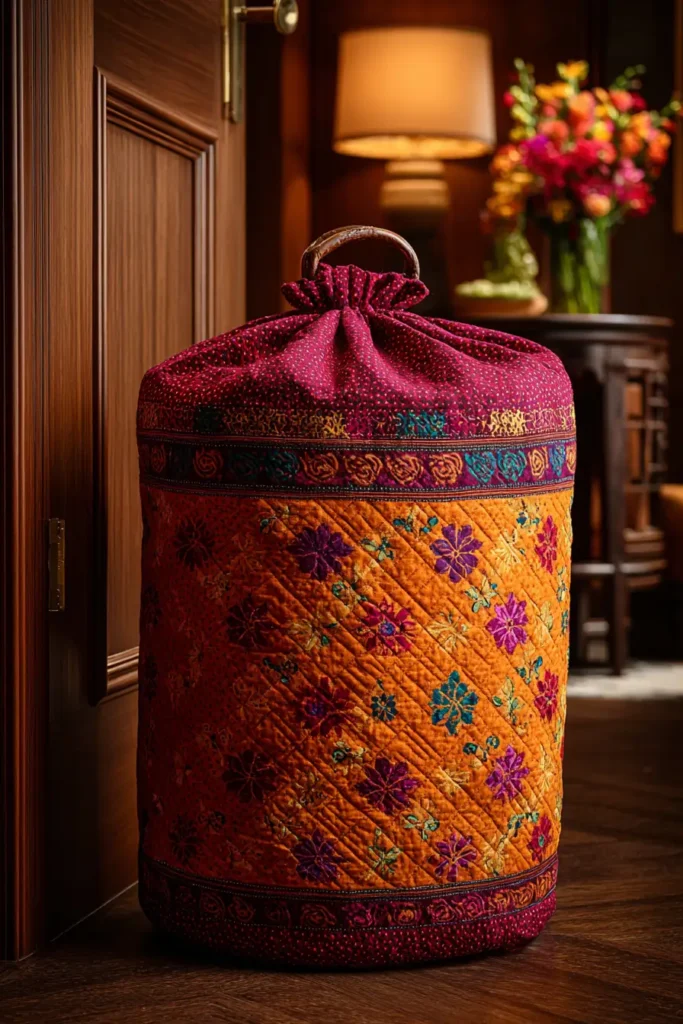
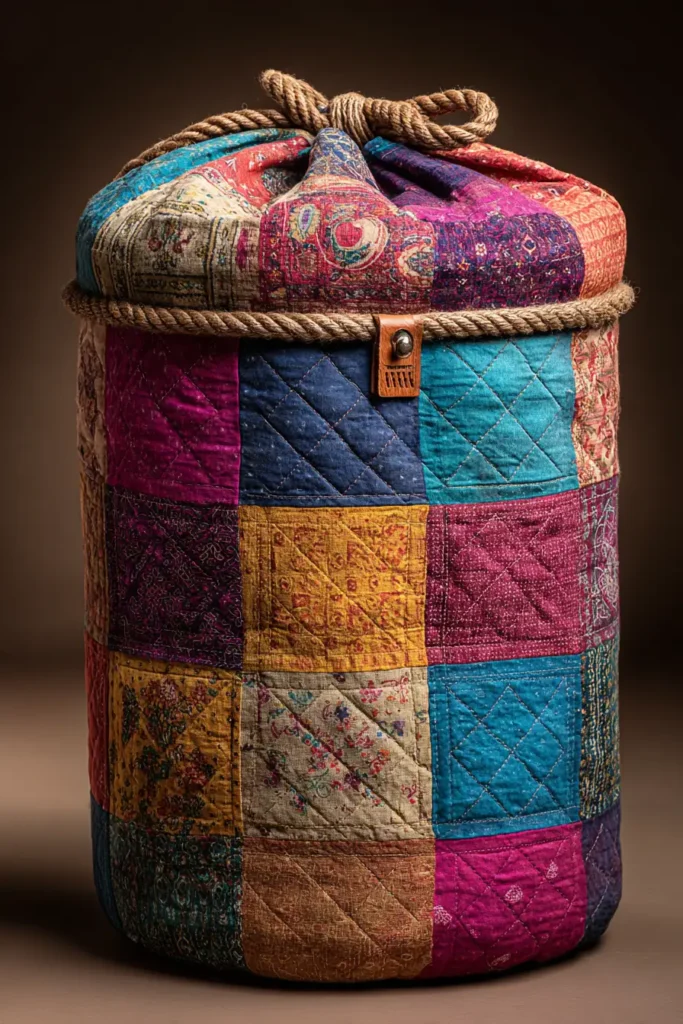
15. Hanging Reversible Kantha Stitch Laundry Hampers for Closet Organization
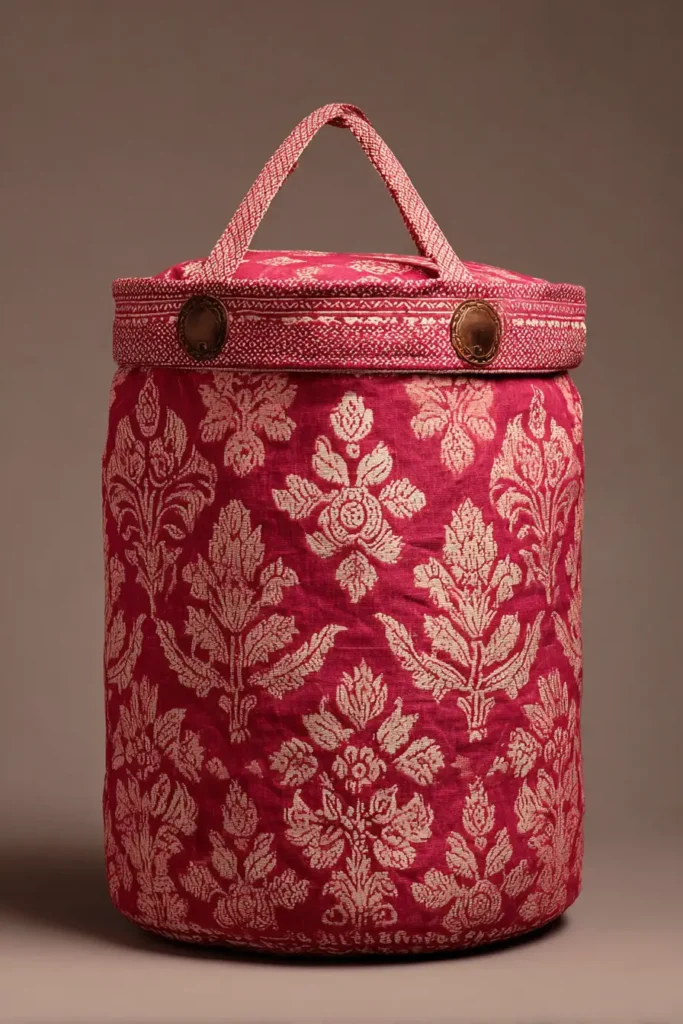
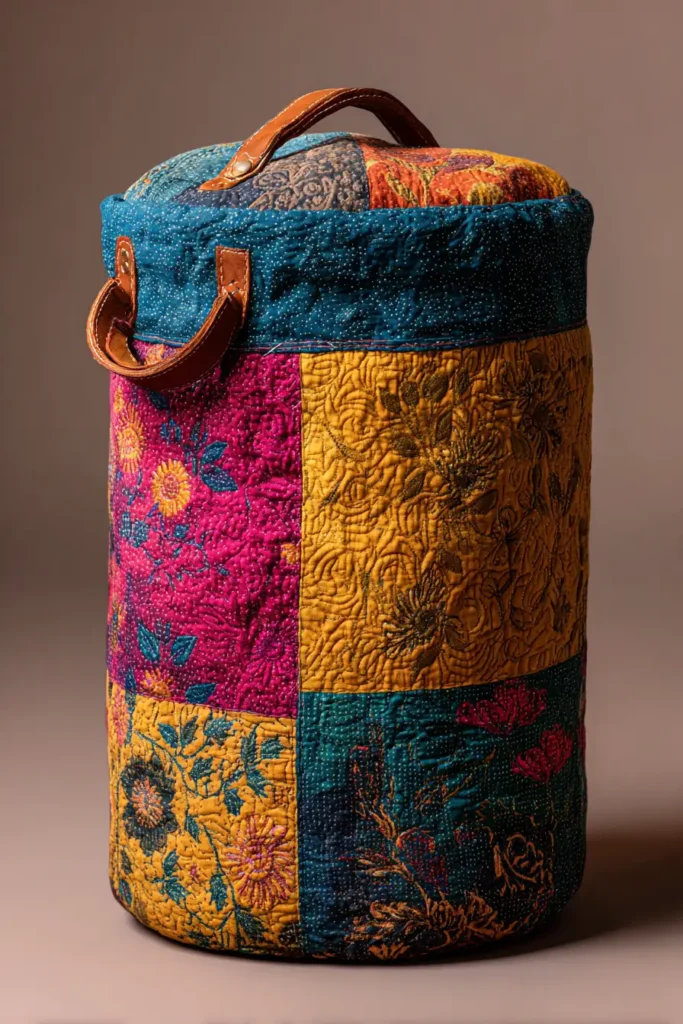
A Guide to Making Hanging Reversible Kantha Stitch Laundry Hampers for Closet Organization
Floor space is a premium commodity in any thoughtfully designed space. Whether optimizing a compact urban closet or outfitting luxury guest suites at a boutique resort, a bulky plastic hamper immediately disrupts the tranquility of the room. The Hanging Reversible Nakshi Kantha Laundry Hamper is a brilliant, space-saving alternative that elevates home organization into an art form. By suspending a beautifully quilted, structured bag from a sturdy closet rod or wall hook, you reclaim your floor space while introducing a piece of sleek, highly functional textile art into your daily routine.
The Heritage of the Hanging Canvas (And Why I Made It)
Curating this specific pattern for the digital encyclopedia of home design was driven by a need to solve a universal storage problem with exquisite cultural flair. Historically, hanging laundry sacks or bundles were purely utilitarian—often used in cramped quarters where floor space simply didn’t exist.
I designed this modern, hanging hamper to elevate that rugged utility into high-end residential design. By applying the dense, rhythmic running stitches of traditional Bengali Nakshi Kantha to a rigid, reversible canvas structure, the hamper transcends its chore-based purpose. I engineered it to be fully reversible because versatility is the hallmark of modern luxury. Rendered in explosively vibrant colors, it proves that even the most mundane household items can reflect impeccable, bespoke taste.
Focus on Usability, Comfort, and Elegance
- Usability: Why and how this design idea is useful to the reader: Suspended via heavy-duty fabric loops, this hamper hangs conveniently out of the way. Because it is fully reversible, you essentially get two distinct room accessories in one. You can flip it inside out whenever you want to instantly change the aesthetic energy of your closet.
- Comfort: Why and how this design idea is useful to the reader: Visual comfort is achieved by lifting clutter off the floor, instantly making the room feel larger and more serene. The quilted cotton structure dampens the sound of dropped items (unlike plastic bins) and protects your delicate clothing from snagging.
- Elegance: Why and how this design idea is useful to the reader: To ensure this looks like a boutique accessory rather than a bulky storage bin, we use an unapologetically bold, dual-toned color palette. Pairing a brilliant Ruby Red on one side with a deep Sapphire Blue on the other—and stitching it entirely with a Gleaming Gold thread—makes a dramatic, highly tailored fashion statement inside your closet.
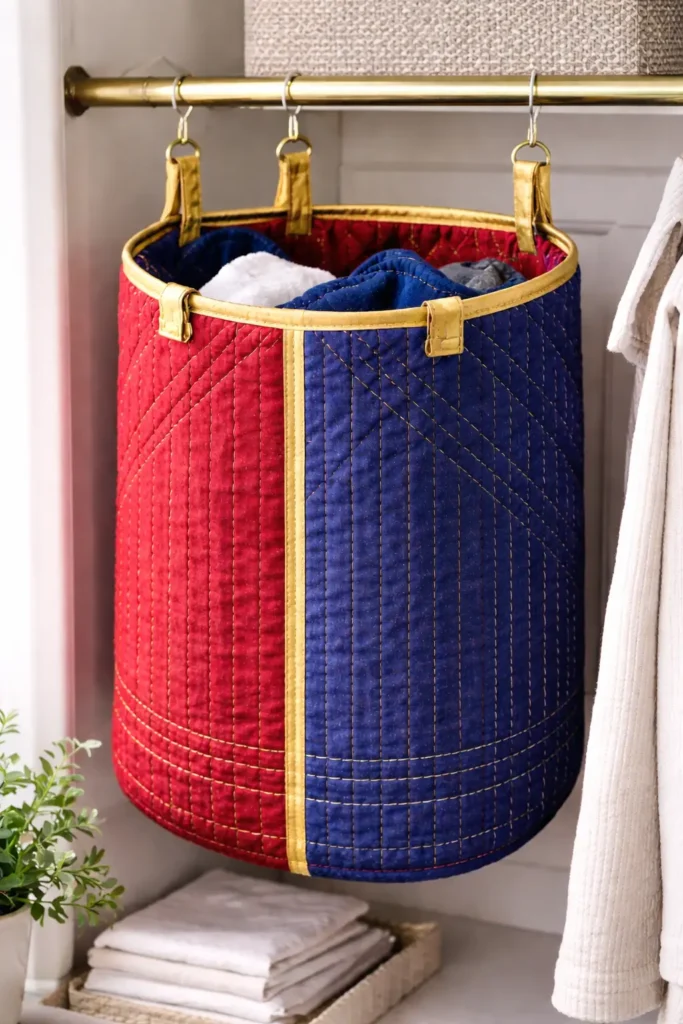
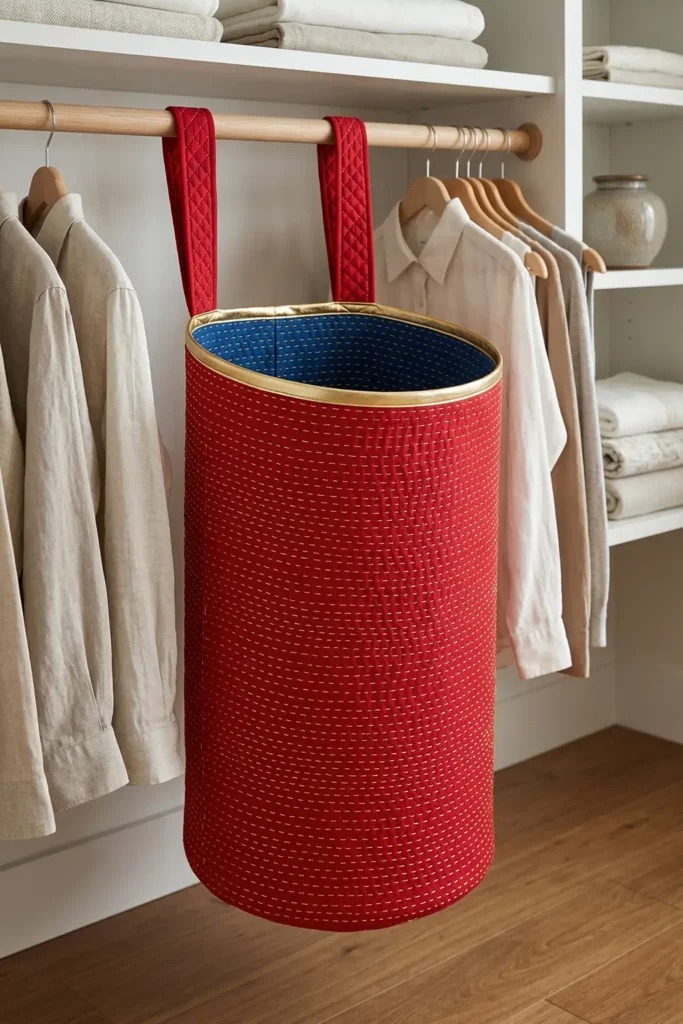
Measurements & Materials Needed
Finished Hamper Size: Sleek Hanging Cylinder (approx. 18″ wide x 28″ tall, with a 6″ boxed base). Finished Style: A highly structured, fully reversible hanging laundry bag with sturdy suspension loops and edge-to-edge vibrant Kantha stitching.
Materials Needed:
- Fabric for the Dual-Faced Shells: 2 yards total of premium, medium-weight 100% cotton canvas or heavy linen (lightweight voile will not support heavy laundry).
- Side A: 1 yard of a vibrant solid (e.g., Brilliant Ruby Red).
- Side B: 1 yard of a highly contrasting solid (e.g., Deep Sapphire Blue).
- Core Stabilizer: 1 yard of heavy-duty cotton batting to give the hamper structure and sound-dampening loft.
- Thread: * Heavy-duty 50-weight cotton thread for machine piecing the thick seams.
- 4 to 5 skeins of Pearl Cotton (Size 8) in a striking accent color (e.g., Gleaming Gold) for the visible hand-stitching.
- Binding: 3 yards of 1/2-inch double-fold bias tape in a unifying color (e.g., Metallic Gold or Ruby Red).
- Tools: A sharp rotary cutter, a 6″ x 24″ acrylic ruler, heavy-duty sewing machine needles (Size 90/14), curved safety pins, heavy-duty sewing clips, and a sturdy embroidery needle.
Step-by-Step Guide: The Reversible Hanging Hamper
Step 1: Precision Cutting for a Reversible Canvas
Because this hamper must look flawless on both the inside and the outside, precision is key. Cut 1 identical layer of Ruby Red, Cotton Batting, and Sapphire Blue for the following pieces:
- The Main Body Panel: Cut a single massive rectangle measuring 37″ wide by 30″ tall.
- The Hanging Loops: Cut three strips measuring 4″ wide x 10″ long.
Step 2: Basting the Dual-Faced Layers
Meticulously stack your three layers for the main body panel: Sapphire Blue (face down), Cotton Batting (middle), and Ruby Red (face up). Smooth the heavy fabrics perfectly flat on a large table. Pin the layers together densely using your curved safety pins, placing a pin every 3 inches. Because both sides will be visible when hanging, the fabric must be perfectly smooth on both the top and the bottom.
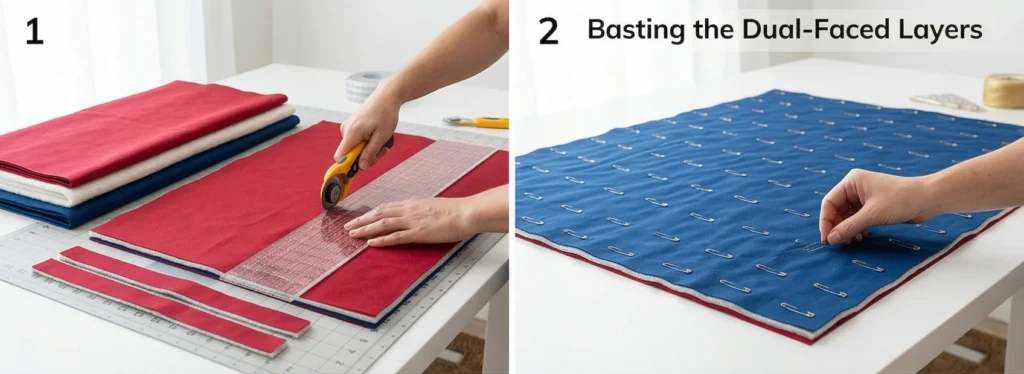
Step 3: The Rhythmic, Architectural Kantha Stitching
Thread your embroidery needle with the Gleaming Gold Pearl Cotton. Using a highly consistent running stitch, quilt straight vertical lines from the top of the massive panel to the bottom, spacing them exactly 1/2-inch apart. Push your needle straight through all three thick layers. The vibrant Gold thread popping against both the Red and the Blue creates a stunning, rippled geometric texture that structurally locks the heavy canvas together. Quilt the main body panel and the loop strips completely.
Step 4: Crafting the Reversible Hanging Loops
Take your three 4″ x 10″ quilted loop strips. Bind both long raw edges of each strip with your bias tape. Fold each strip in half to form a loop (so each measures 5 inches). Baste the raw ends together. These thick, quilted loops will effortlessly support the weight of a full laundry load without tearing.
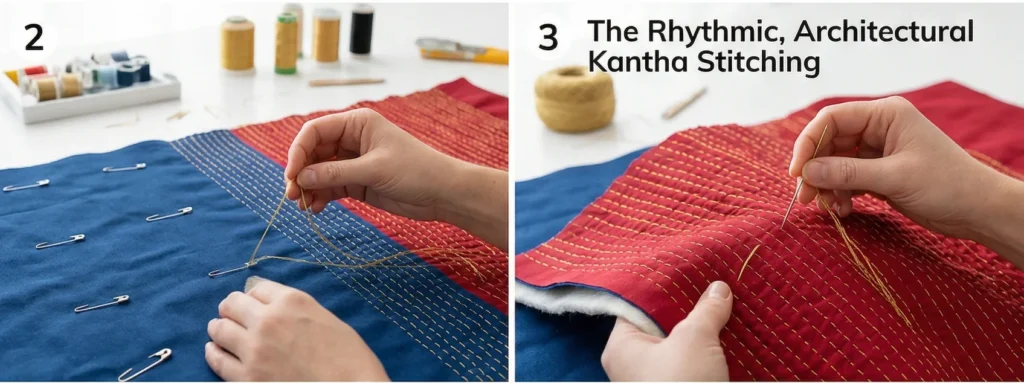
Step 5: Assembly Section (Constructing the Reversible Cylinder)
To make a bag truly reversible, there can be no raw seam allowances visible on either side. We will use bound seams.
- Form the Tube: Fold your massive quilted rectangular panel in half, bringing the two 30″ tall edges together. Decide which color will be on the “inside” for the sewing process (e.g., Red touching Red). Clip securely. Machine-sew this side seam with a 1/2-inch allowance.
- Sew the Bottom: Sew straight across the bottom 18″ wide edge with a 1/2-inch seam allowance.
- Internal Polish: Trim these raw seam allowances (side and bottom) down to 1/4-inch. Encase them entirely inside your bias tape and topstitch them down. When you flip the hamper to the other side, this bound seam will look like a deliberate, stylish racing stripe.
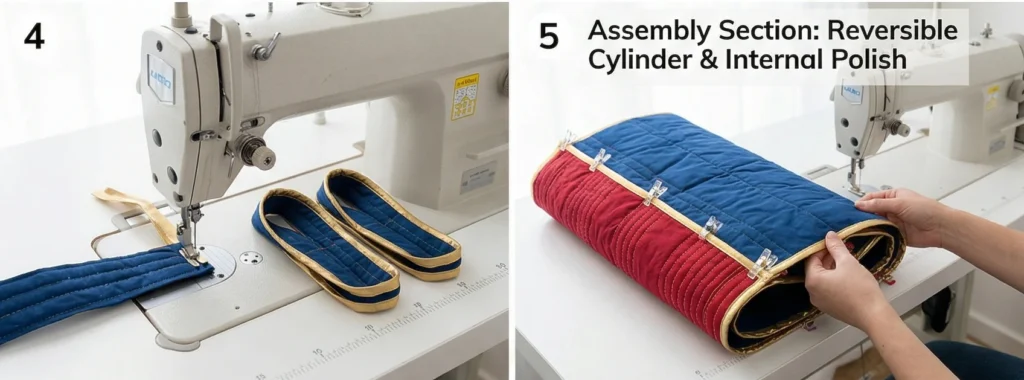
Step 6: Boxing the Base and Final Binding
- Box the Corners: To create the flat base, pull the front and back fabrics apart at one of the bottom corners, flattening it into a triangle so the side seam aligns perfectly with the bottom seam. Measure exactly 3 inches down from the point, draw a 6-inch straight line across the triangle, and sew directly on this line. Trim off the excess triangle and bind the raw edge with bias tape. Repeat on the other bottom corner.
- Attach Loops & Bind the Rim: Turn the hamper so that your preferred starting color faces out. Space your three hanging loops evenly along the top raw edge of the back panel. Clip them in place. Finally, use your bias tape to meticulously bind the entire top rim of the hamper, permanently catching and enclosing the raw ends of the hanging loops in the seam.
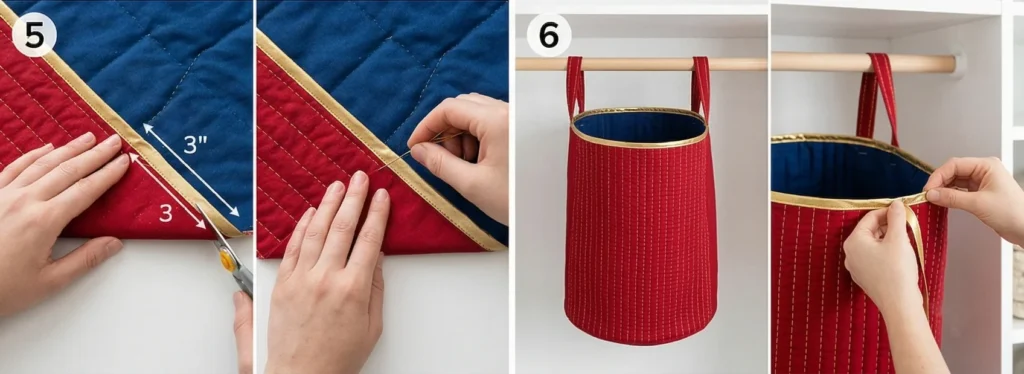

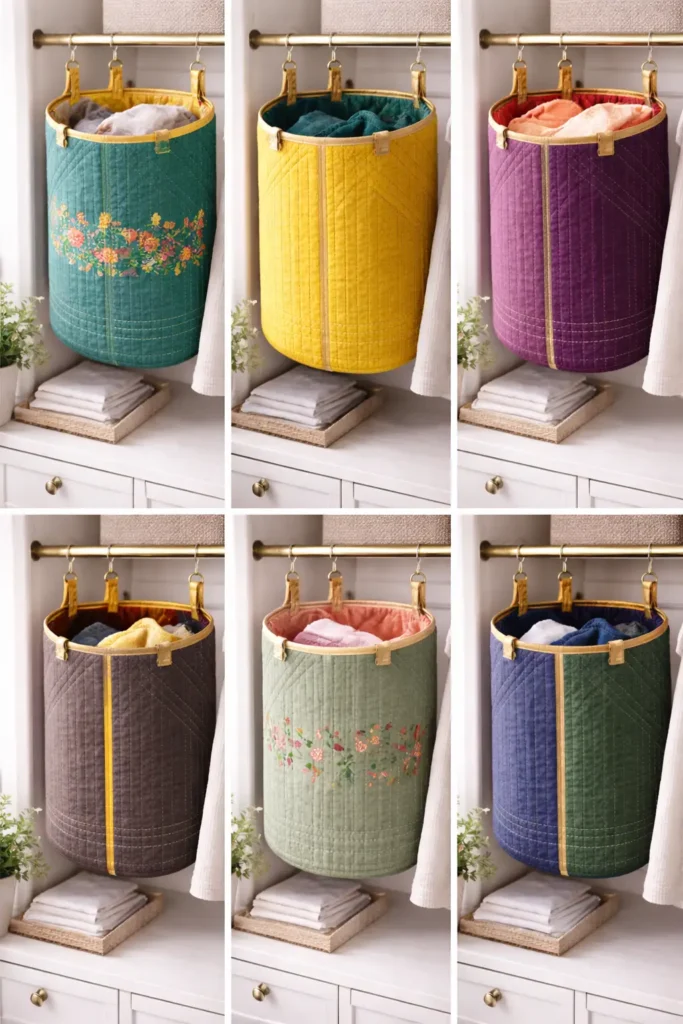
Usability Note
The suspended, reversible architecture of this hamper makes it a highly adaptable, everyday organizational staple. It is exceptionally useful because it completely clears the floor for easy vacuuming and sweeping. When guests arrive or seasons change, simply unhook the hamper, flip it inside out, and instantly refresh the closet’s color palette. The wide-open top makes daily use effortless.
Comfort and Practical Care
By replacing rigid plastic baskets with thick, hand-quilted cotton canvas, this hamper naturally dampens the clatter of buttons and zippers while protecting your wardrobe from snags. The breathable cotton construction guarantees excellent airflow, preventing musty odors from accumulating. To care for this vibrant piece, simply unhook it from the closet rod, machine wash it on a heavy-duty, cold cycle with a color-safe detergent to preserve the brilliant Red and Blue dyes, and hang it back up to air dry.
Elegance That Lasts
The true luxury of a Nakshi Kantha home accessory lies in its enduring, handcrafted resilience. The dense Gold running stitches play a vital structural role: they physically anchor the vivid canvas to the dense batting, creating a composite material that resists collapse, stretching, or tearing, even when loaded with heavy, damp towels. By binding all high-stress internal seams and the top rim, the hamper is meticulously engineered to carry heavy loads without ever fraying. As it ages, the saturated colors will settle into a gorgeous, slightly distressed patina, ensuring your closet organization remains a vibrant, sophisticated focal point for decades.
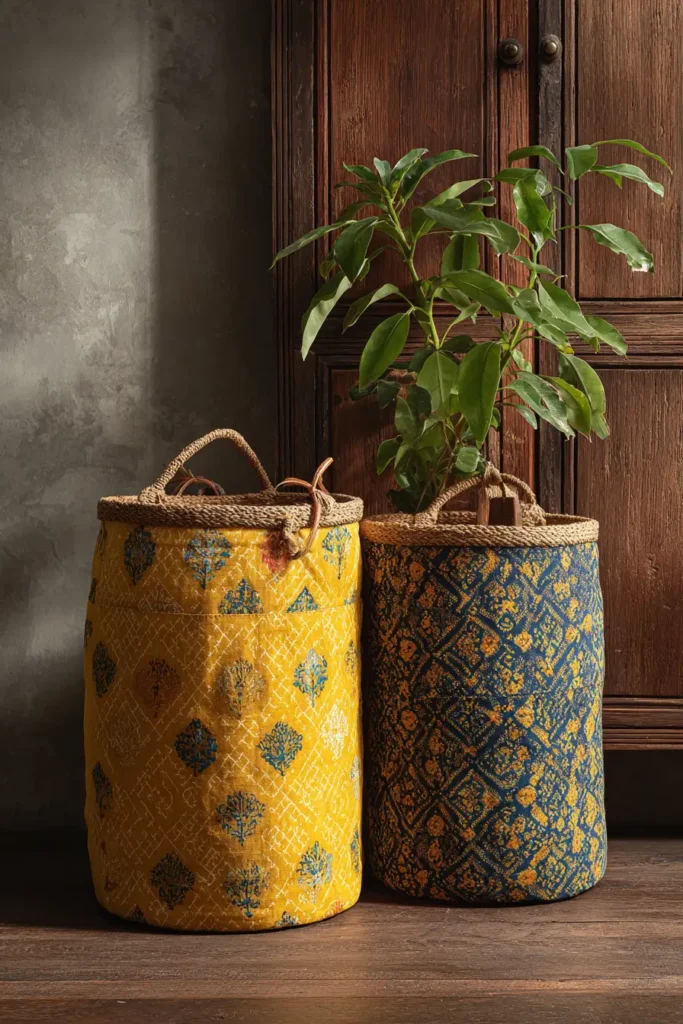
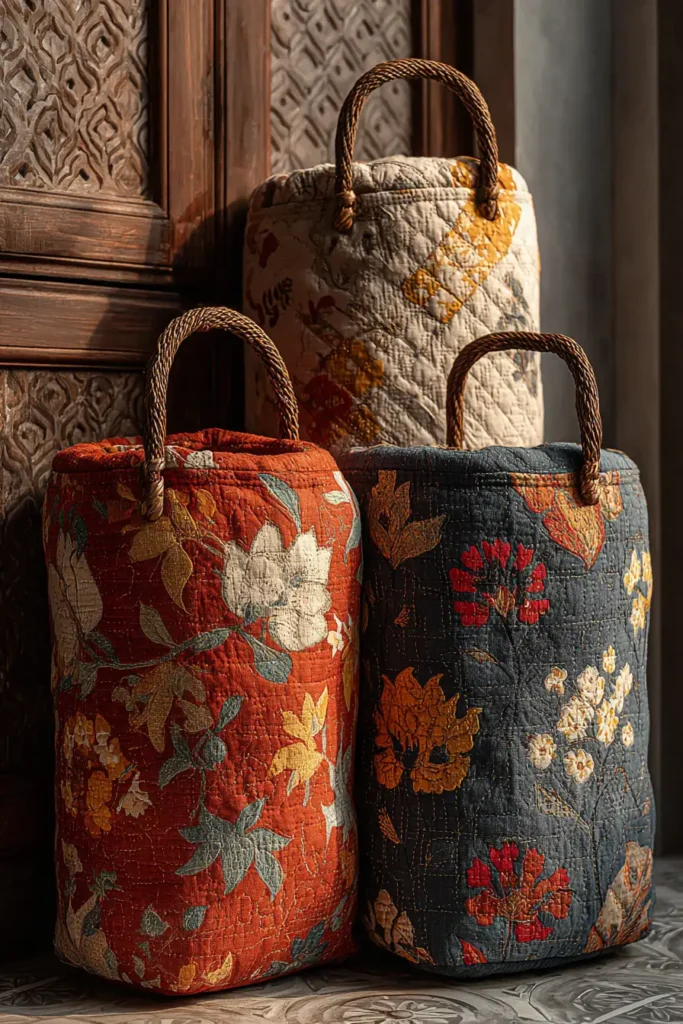
Conclusion
Integrating these 15 beautiful designs into your life ensures your wardrobe and daily routines are filled with artistic depth and unparalleled warmth. From the tailored elegance of a Kantha waistcoat to the casual chic of an oversized shopper bag, this collection highlights the incredible versatility of traditional Bengali stitching reimagined for modern-day wear. But beyond their undeniable visual appeal, why use Nakshi Kantha for your everyday accessories? The answer lies in its profound connection to sustainable craftsmanship and enduring heritage.
Choosing Nakshi Kantha for accessories is a conscious step toward embracing eco-friendly, slow fashion. Each jacket, vest, and bag is a testament to an artisan’s remarkable skill, transforming repurposed, vintage cottons and silks into highly durable, deeply personal works of art. By wearing a hand-embroidered tunic top or carrying a patchwork Kantha tote, you are actively preserving a rich cultural legacy while significantly reducing textile waste. This upcycled nature ensures that no two pieces are ever exactly alike, giving you a completely unique accessory that carries its own history, personality, and charm.
Furthermore, Nakshi Kantha accessories offer an unmatched level of tactile comfort and structural integrity that traditional flat fabrics simply cannot provide. The layered, quilted nature of the material creates a breathable yet cozy structure, making lightweight vests and luxurious winter jackets perfect for year-round styling. The intricate running stitches add a unique textural dimension that actually reinforces the fabric, providing incredible durability for heavy-use items like spacious laundry hampers and everyday tote bags. Ultimately, these exquisite accessories provide the perfect balance of chic modern style and vintage warmth, ensuring you step out and live beautifully, wrapped in elegant, cozy comfort.
