
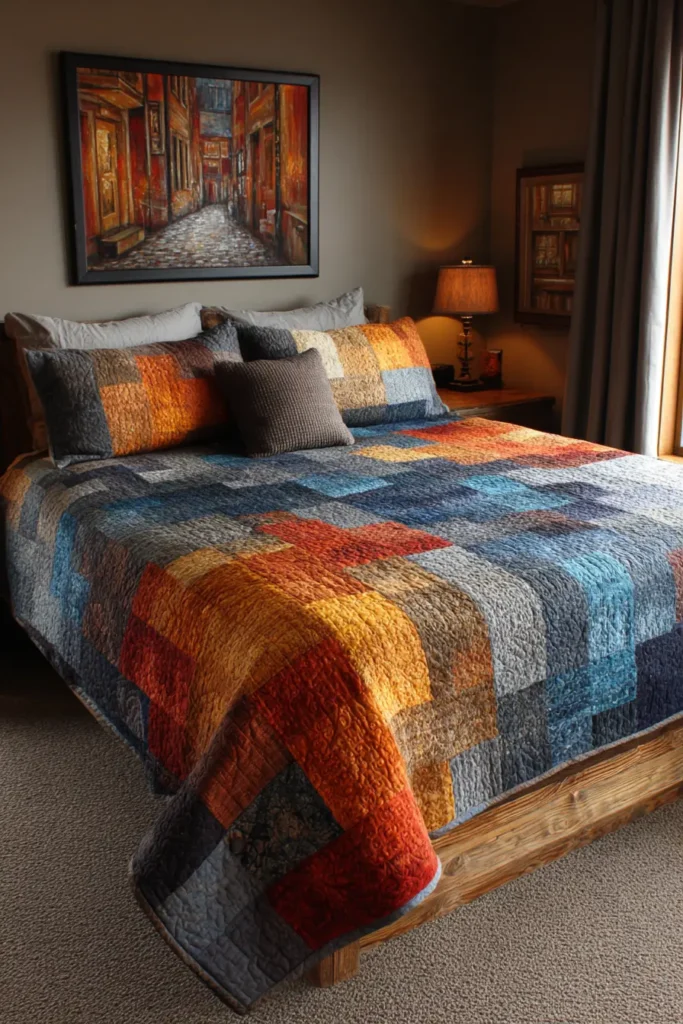
20 Modern Nine Patch Quilt Pattern Ideas: Timeless Style and Cozy Comfort for an Elegant Home
The Nine Patch: The Simplest Block That Does the Most
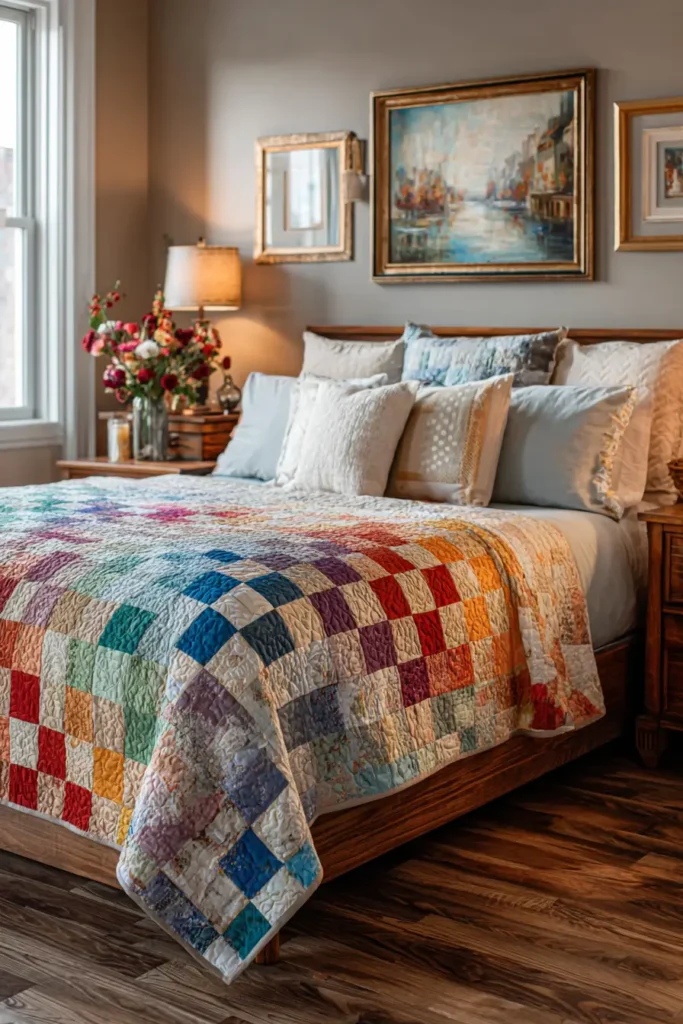
The Nine Patch is the oldest trick in quilting and still one of the best. Dating to the early 19th century, it was the first block taught to most young quilters for practical reasons: nine equal squares in a 3×3 grid, alternating light and dark, make efficient use of scraps, and teach the fundamentals of accurate piecing without demanding complex construction. Pioneer and Civil War-era quilters used it to turn small remnants into durable, useful items. That instinct – building something lasting from the simplest available parts – is not dated. It still makes sense.
What distinguishes the Nine Patch from other classics is what it does not do. The Log Cabin tells a story through its construction – the symbolic red center, the light-and-dark division of each block. The Irish Chain creates its effect through the relationship between alternating blocks across the whole quilt surface. The Nine Patch does neither. It creates structure, and then it gets out of the way. The design work lives entirely in what you bring to it: color placement, block rotation, fabric choice, and setting. The pattern itself is neutral – and that neutrality is its greatest strength.
I have always appreciated the Nine Patch for exactly this reason. It does not announce itself. You can live with a Nine Patch quilt for years and keep finding things in it – the way a particular color combination reads differently in morning light than in lamplight, the way rotating alternate blocks shifts the whole visual rhythm of the surface. It rewards attention without demanding it, which is a quality very few quilt patterns manage.
Modern Nine Patch Quilt Pattern Ideas for the Home
Contents
- 1 Modern Nine Patch Quilt Pattern Ideas for the Home
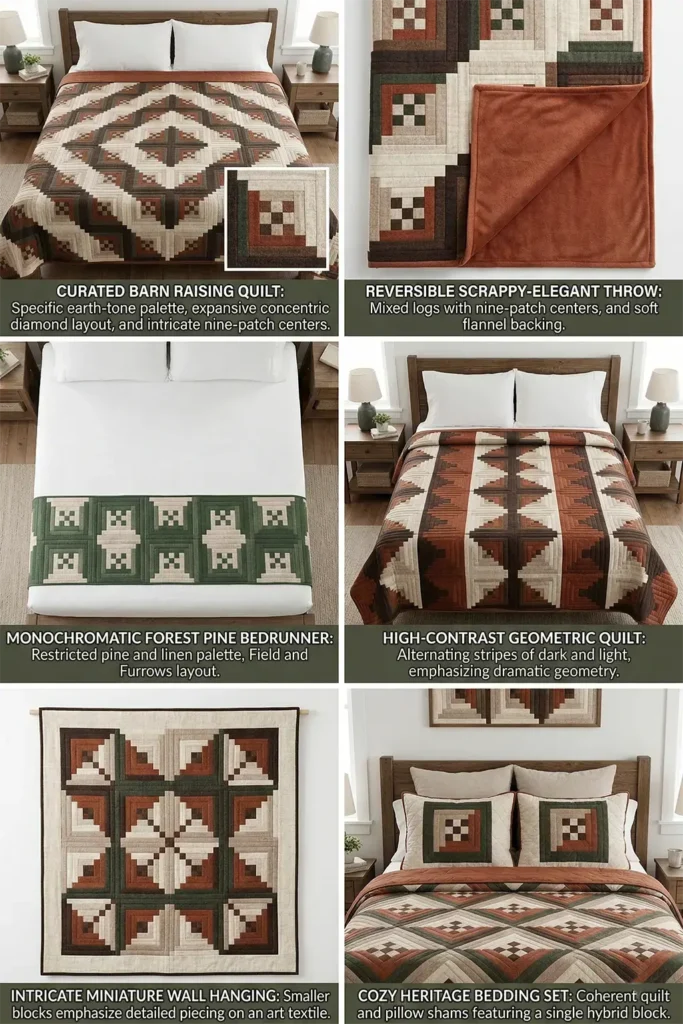
- 2 1. Disappearing Nine Patch Quilt Patterns for Elegant Master Bedrooms
- 3 2. Cozy Rag Quilt Style Nine Patch Bed Covers for Ultimate Winter Warmth
- 4 3. Sophisticated Nine Patch Bed Sheets with Subtle Geometric Accents
- 5 4. Traditional Log Cabin and Nine Patch Hybrid Quilts for Rustic Bedroom Charm
- 6 5. Modern Jelly Roll Strip Pieced Nine Patch Bedspreads for Quick Elegance
- 7 6. Elegant Star Pattern Intersected Nine Patch Bed Runners
- 8 7. Japanese Sashiko Inspired Nine Patch Pillow Covers for a Zen Aesthetic
- 9 8. Split Nine Patch Bed Quilts for Contemporary Style and Comfort
- 9.1 Split Nine Patch Bed Quilts for Contemporary Style and Comfort
- 9.2 Measurements & Materials Needed
- 9.3 Step-by-Step Guide: The Split Nine Patch
- 9.3.1 Step 1: Preparation and Precision Cutting
- 9.3.2 Step 2: Crafting the Half-Square Triangles (HSTs)
- 9.3.3 Step 3: Trimming the HSTs for Absolute Precision
- 9.3.4 Step 4: Assembling the Split Nine Patch Block
- 9.3.5 Step 5: Assembly Section (Building the Contemporary Chevron)
- 9.3.6 Step 6: Basting, Quilting, and Binding
- 10 9. Soft Pastel Nine Patch Throw Blankets for a Cozy Bed Layering
- 11 10. Double Nine Patch Designs for Luxurious, Cozy Bed Covers
- 11.1 Measurements & Materials Needed
- 11.2 Step-by-Step Guide: The Double Nine Patch
- 11.2.1 Step 1: Strip-Piecing the Miniature Blocks
- 11.2.2 Step 2: Sub-Cutting the Strip Sets
- 11.2.3 Step 3: Assembling the Miniature Nine Patches
- 11.2.4 Step 4: Laying out the Main Double Nine Patch Block
- 11.2.5 Step 5: Assembling the Master Block
- 11.2.6 Step 6: Assembly Section (Building the Lattice Bed Cover)
- 11.2.7 Step 7: Basting, Quilting, and Binding
- 12 11. Heavyweight Nine Patch Floor Pillows for Casual Living Room Seating
- 12.1 Measurements & Materials Needed
- 12.2 Step-by-Step Guide: The Heavyweight Floor Pillow
- 12.2.1 Step 1: Preparation and Heavyweight Cutting
- 12.2.2 Step 2: Assembling the Giant Nine-Patch Top
- 12.2.3 Step 3: Basting the Quilted Front Panel
- 12.2.4 Step 4: Heavy-Duty Quilting for Upholstery
- 12.2.5 Step 5: Assembly Section (Constructing the Zippered Pillow)
- 12.2.6 Step 6: Finishing the Structural Seams
- 13 12. Bold Color Block Nine Patch Cushion Covers for Living Room Accents
- 14 13. Decorative Nine Patch Cushion Covers to Brighten Up Your Loveseat
- 15 14. Modern Farmhouse Nine Patch Couch Covers for Everyday Elegance
- 16 15. Contemporary Nine Patch Table Runners to Elevate Your Dining Experience
- 16.1 A Guide to Making Contemporary Nine Patch Table Runners to Elevate Your Dining Experience
- 16.2 Measurements & Materials Needed
- 16.3 Step-by-Step Guide: The Contemporary Table Runner
- 16.3.1 Step 1: Precision Cutting and Sorting
- 16.3.2 Step 2: Assembling the Nine-Patch Blocks
- 16.3.3 Step 3: Pressing for a Flawlessly Flat Surface
- 16.3.4 Step 4: Assembly Section (Building the Floating Layout)
- 16.3.5 Step 5: Basting the Heat-Protective Layers
- 16.3.6 Step 6: Structural Quilting and Binding
- 17 16. Hand-Stitched Nine Patch Couch Throws Featuring Hawaiian Appliqué Accents
- 17.1 A Guide to Making Hand-Stitched Nine Patch Couch Throws Featuring Hawaiian Appliqué Accents
- 17.2 Measurements & Materials Needed
- 17.3 Step-by-Step Guide: The Hawaiian Appliqué Nine Patch
- 17.3.1 Step 1: Cutting the Hawaiian Appliqué Motif
- 17.3.2 Step 2: Basting the Botanical Medallions
- 17.3.3 Step 3: Needle-Turn Hand Appliqué
- 17.3.4 Step 4: Assembling the Oversized Nine-Patches
- 17.3.5 Step 5: Assembly Section (Building the Intersected Throw)
- 17.3.6 Step 6: Traditional Echo Hand-Quilting and Binding
- 18 17. Layered Nine Patch Table Toppers Inspired by Indigenous Design Elements
- 18.1 A Guide to Making Layered Nine Patch Table Toppers Inspired by Indigenous Design Elements
- 18.2 Measurements & Materials Needed
- 18.3 Step-by-Step Guide: The Indigenous-Inspired Table Topper
- 18.3.1 Step 1: Precision Cutting and Textural Sorting
- 18.3.2 Step 2: Assembling the Stepped Nine-Patches
- 18.3.3 Step 3: Pressing for Absolute Tabletop Flatness
- 18.3.4 Step 4: Assembly Section (Building the Master Grid)
- 18.3.5 Step 5: Layering and Basting the Centerpiece
- 18.3.6 Step 6: Quilting the Woven Texture and Binding
- 19 18. Durable Canvas Nine Patch Laundry Bags for Stylish Closet Storage
- 20 A Guide to Making Durable Canvas Nine Patch Laundry Bags for Stylish Closet Storage
- 21 19. Reversible Nine Patch Quilted Laundry Baskets for Bedroom Organization
- 22 A Guide to Making Reversible Nine Patch Quilted Laundry Baskets for Bedroom Organization
- 23 20. Stylish Modern Nine Patch Laundry Bag Patterns for Functional Decor
- 24 A Guide to Making a Stylish Quilted Laundry Bag
- 25 Conclusion
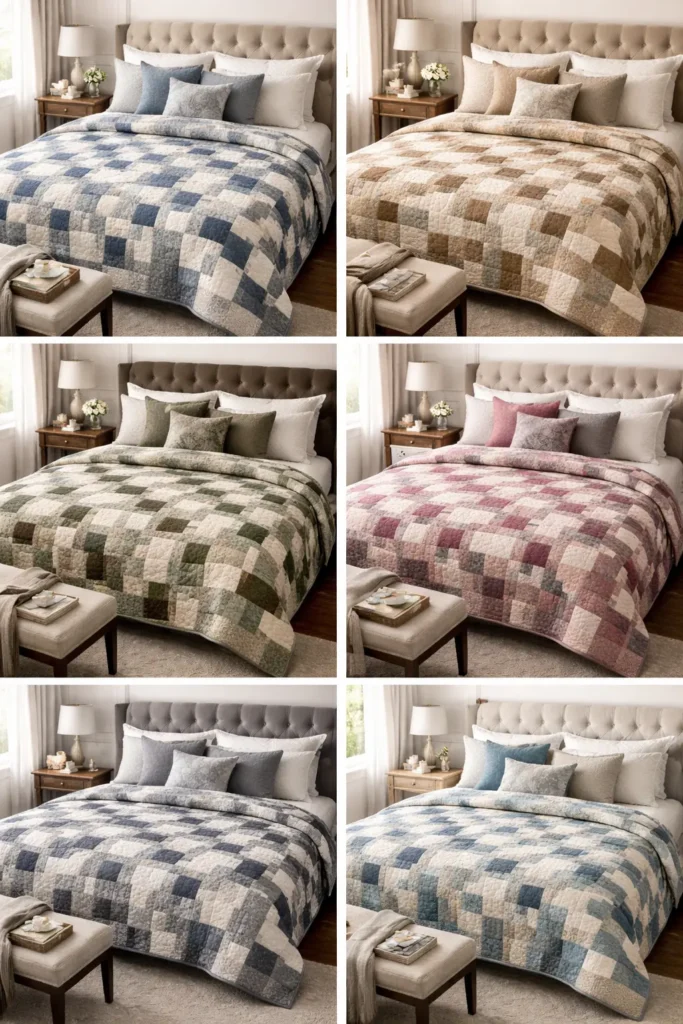
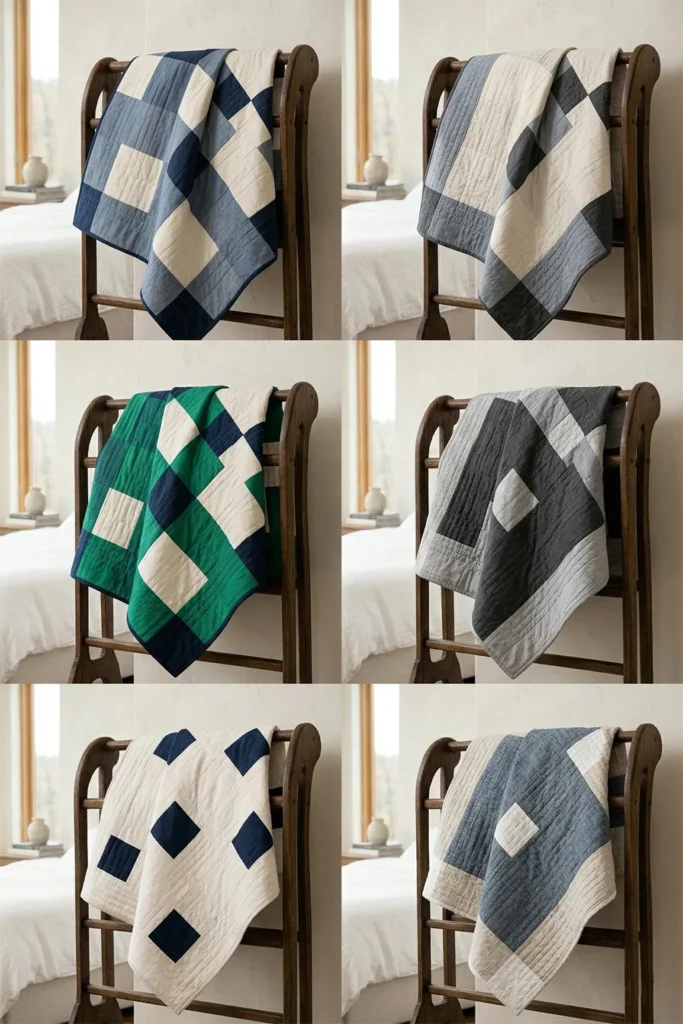
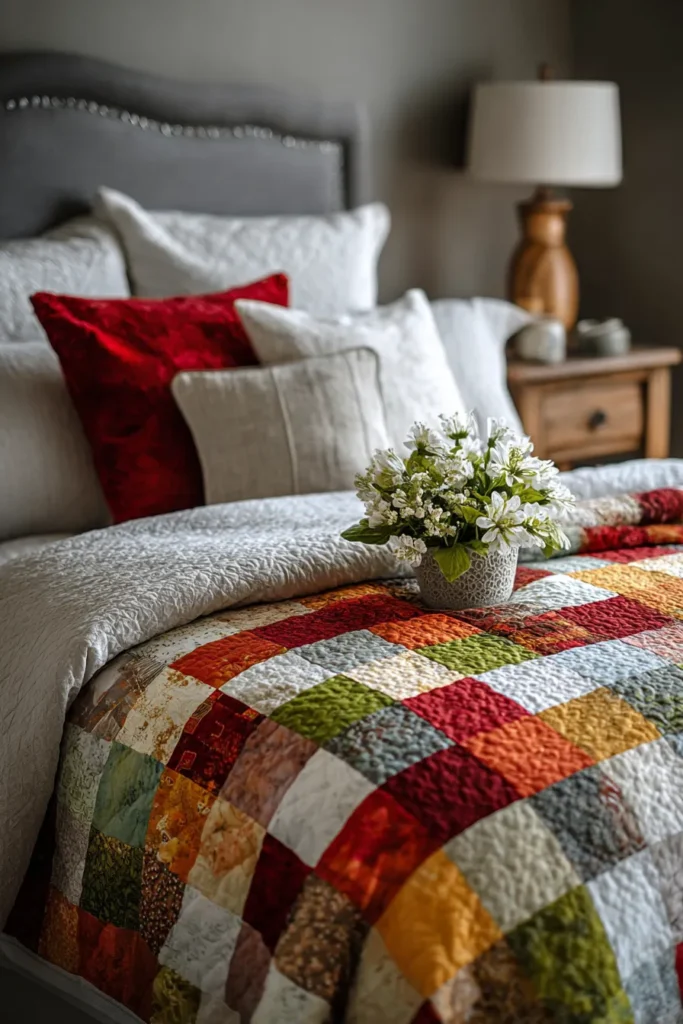
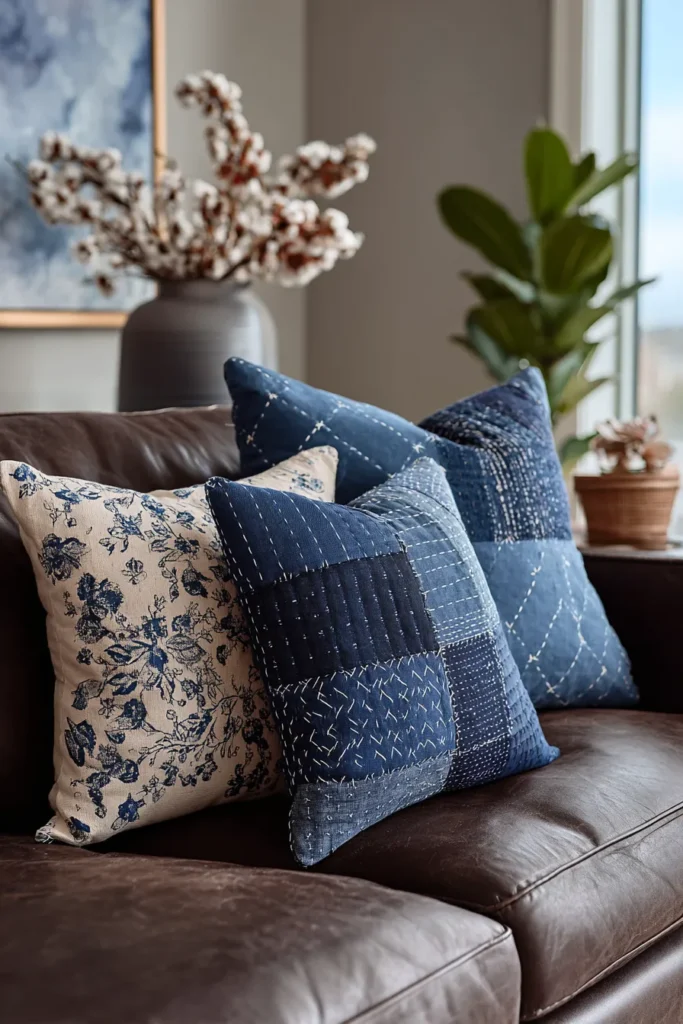
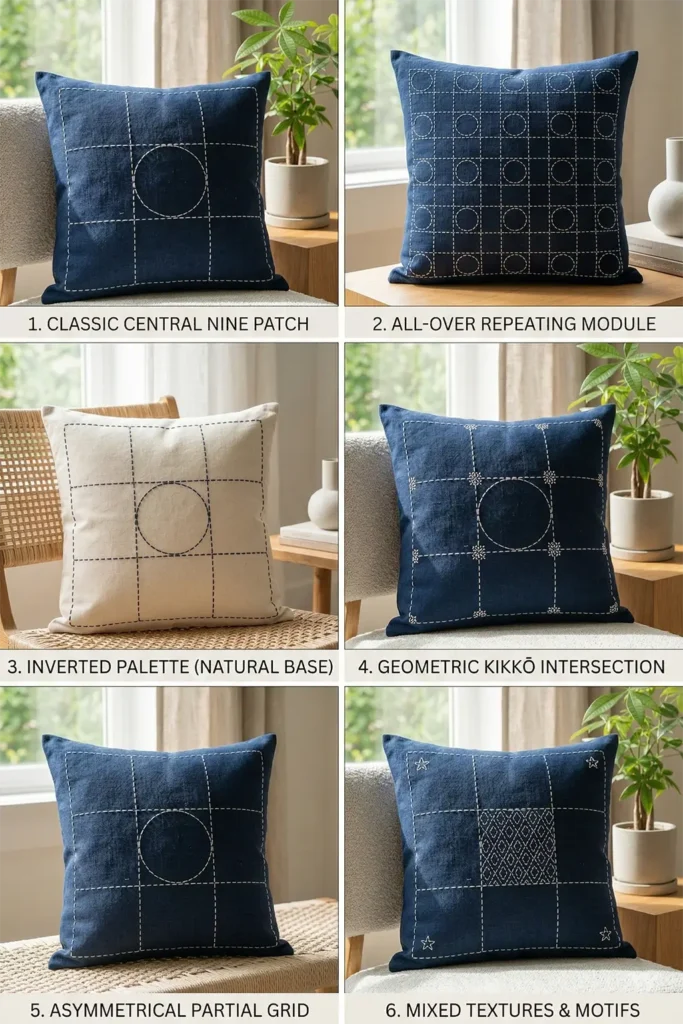
This collection focuses on what happens when that foundational grid is pushed in unexpected directions. The Disappearing Nine Patch – where blocks are cut and rearranged after initial piecing – produces movement and complexity that bears almost no resemblance to its simple origin. Sashiko-inspired Nine Patch pillow covers bring Japanese surface stitching into a Western block structure, creating a quiet, textural detail that works in both traditional and contemporary rooms. Star-intersected bed runners add a more structured, decorative edge. Rag-style Nine Patch quilts go the opposite direction entirely – frayed seams, heavy texture, the kind of warmth that suits a cold bedroom in January.
The pattern moves beyond bedding more naturally than almost any other classic block. A Nine Patch sofa throw anchors a living room without competing with it. Quilted cushion covers in a two-tone Nine Patch add color and structure in a more subtle register. Table runners, storage pieces, laundry bags – the grid translates into all of them without losing coherence.
Whether you are working with a coordinated jelly roll bundle or a pile of fabric scraps with no obvious relationship to each other, the Nine Patch accommodates both with equal grace.
At its core, this is a pattern about balance – between simplicity and variation, tradition and reinvention. It does not try hard. It holds everything together. In a home, that kind of quiet reliability is worth more than it looks.
See also: Log Cabin quilts · Irish Chain quilts · Other Classic Quilt Patterns
Recommended Supplies
“As an Amazon Associate, I earn from qualifying purchases.“
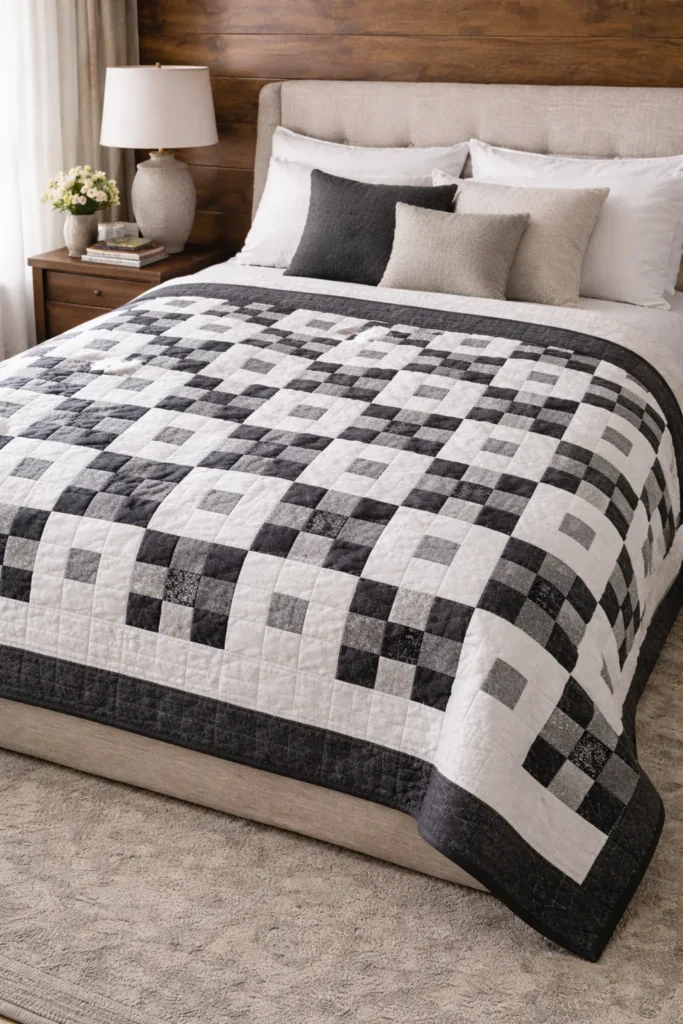
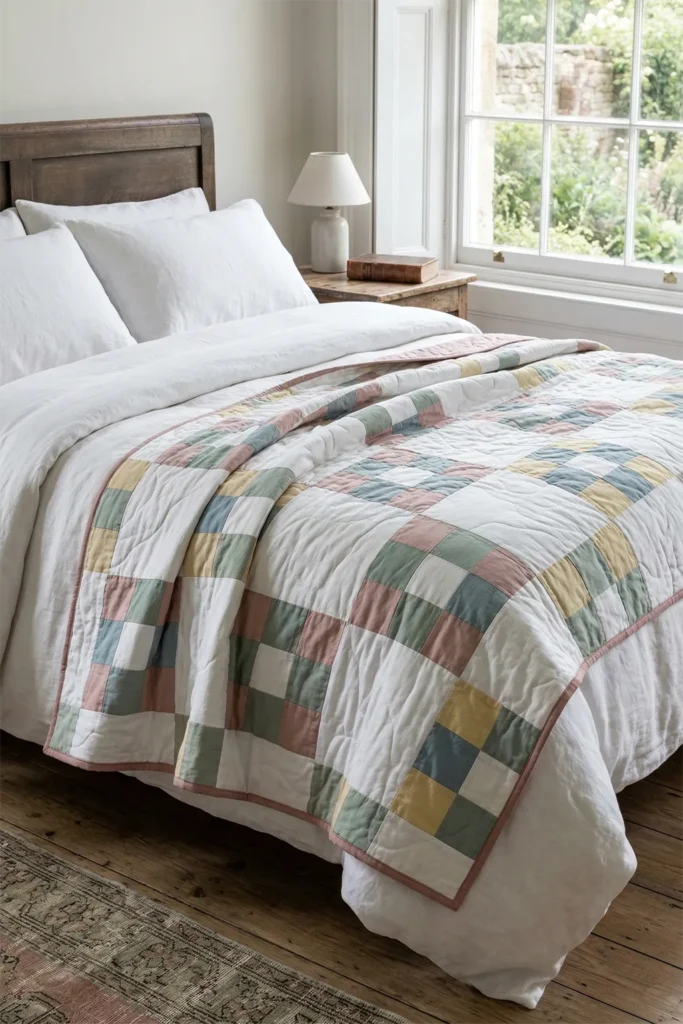
1. Disappearing Nine Patch Quilt Patterns for Elegant Master Bedrooms
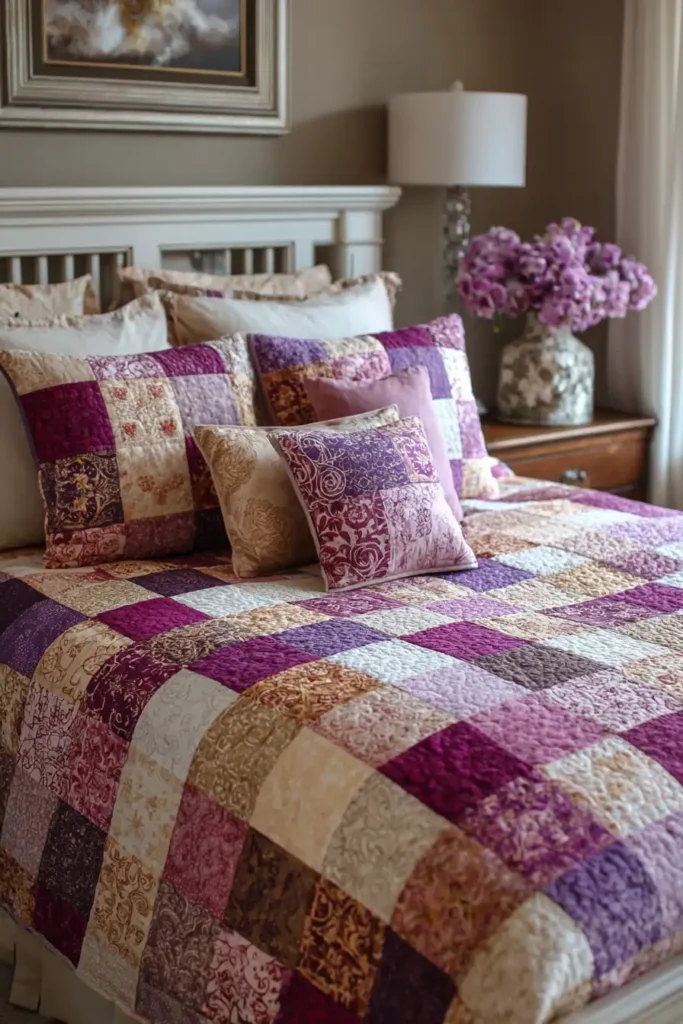
Disappearing Nine Patch Quilt Patterns for Elegant Master Bedrooms
The master bedroom should be a sanctuary—a place of serenity, comfort, and sophisticated design. The Disappearing Nine Patch (DNP) is the perfect quilt pattern to achieve this. It offers a stunning optical illusion: it looks like an incredibly complex, intricately pieced heirloom, but it is actually built from a basic, beginner-friendly block.
The Magic of the Pattern
The Disappearing Nine Patch is a marvel of geometric design. Historically, the traditional Nine Patch was born out of utility and scrap-saving. The “Disappearing” variation is a modern twist that takes that humble, utilitarian block, slices it exactly in half both vertically and horizontally, and rearranges the pieces. This simple cut creates a highly sophisticated grid of large squares, narrow sashing, and tiny cornerstones. This specific layout uses a monochromatic or low-volume color palette to elevate the pattern from “country craft” to “modern luxury.”
Focus on Usability, Comfort, and Elegance
- Usability: By starting with pre-cut 5-inch squares (charm packs), you skip hours of tedious cutting. The pattern comes together quickly but looks painstakingly detailed.
- Comfort: For a master bedroom, drape and weight are everything. Use premium, high-thread-count quilting cottons for the top, and consider a silk-blend or bamboo batting. These natural fibers breathe beautifully, providing warmth in winter and cool comfort in summer.
- Elegance: To achieve a polished, high-end look, avoid overly busy, contrasting novelty prints. Instead, choose a curated palette of low-volume neutrals (creams, soft greys, taupes) paired with one deep anchor color (like navy, charcoal, or emerald).
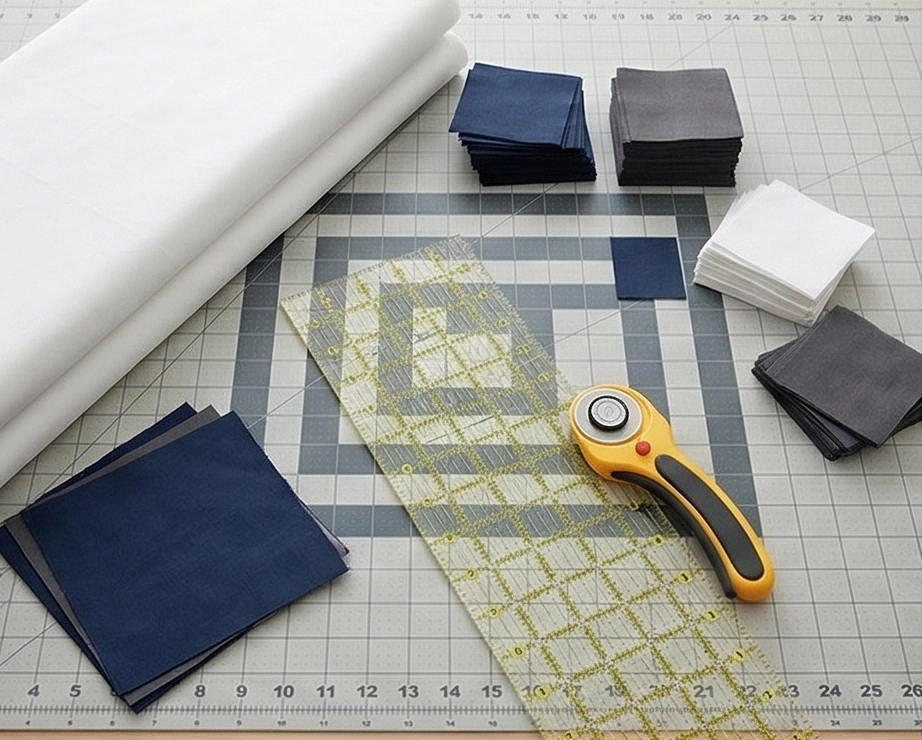
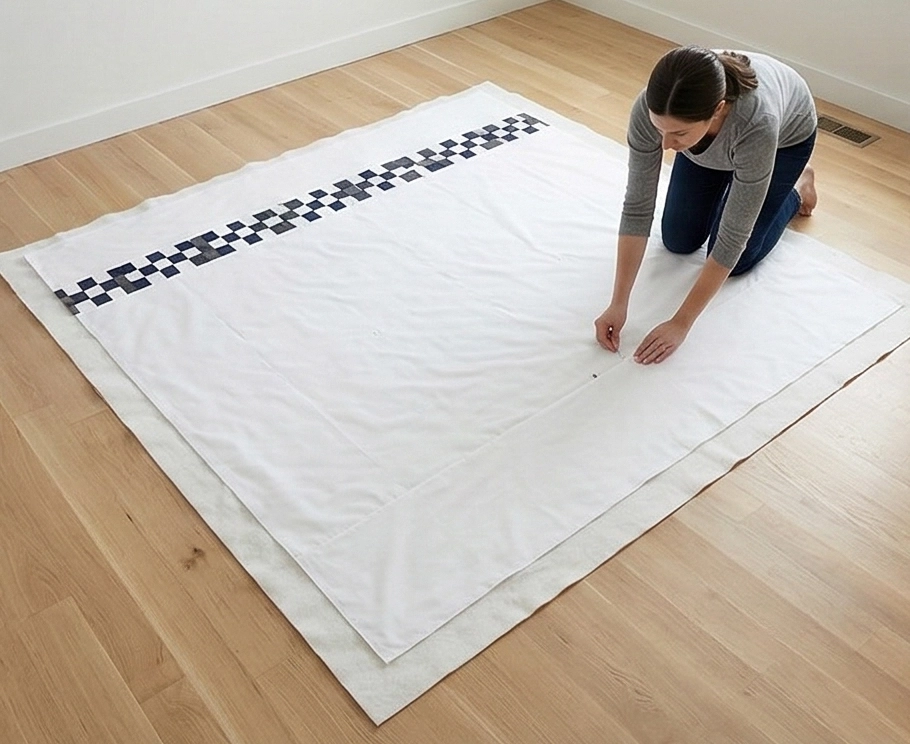
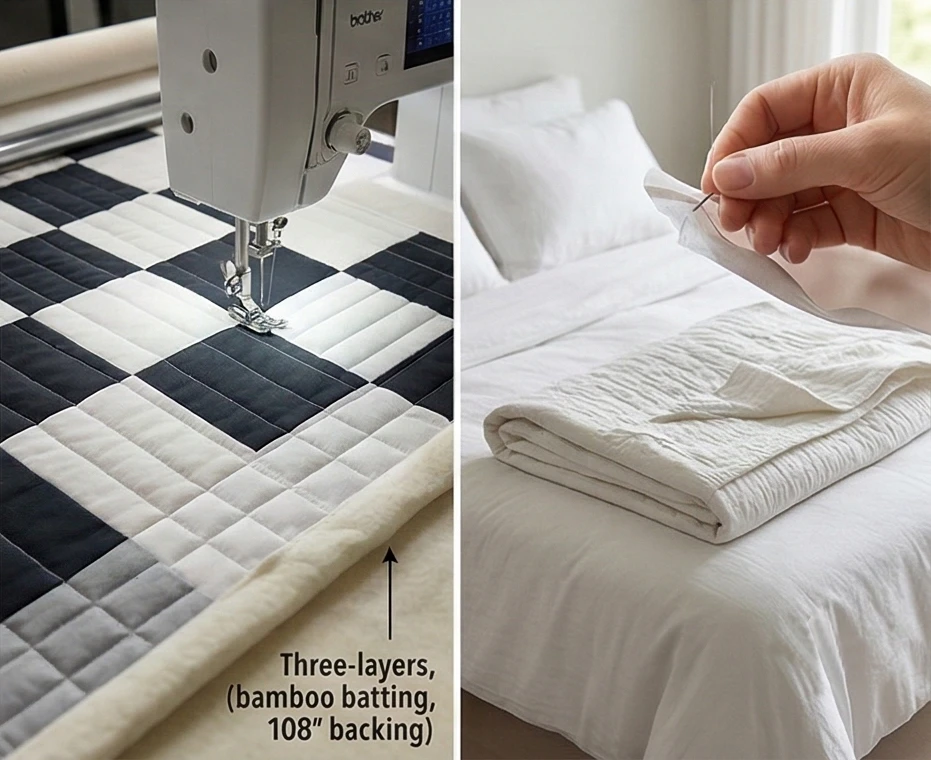
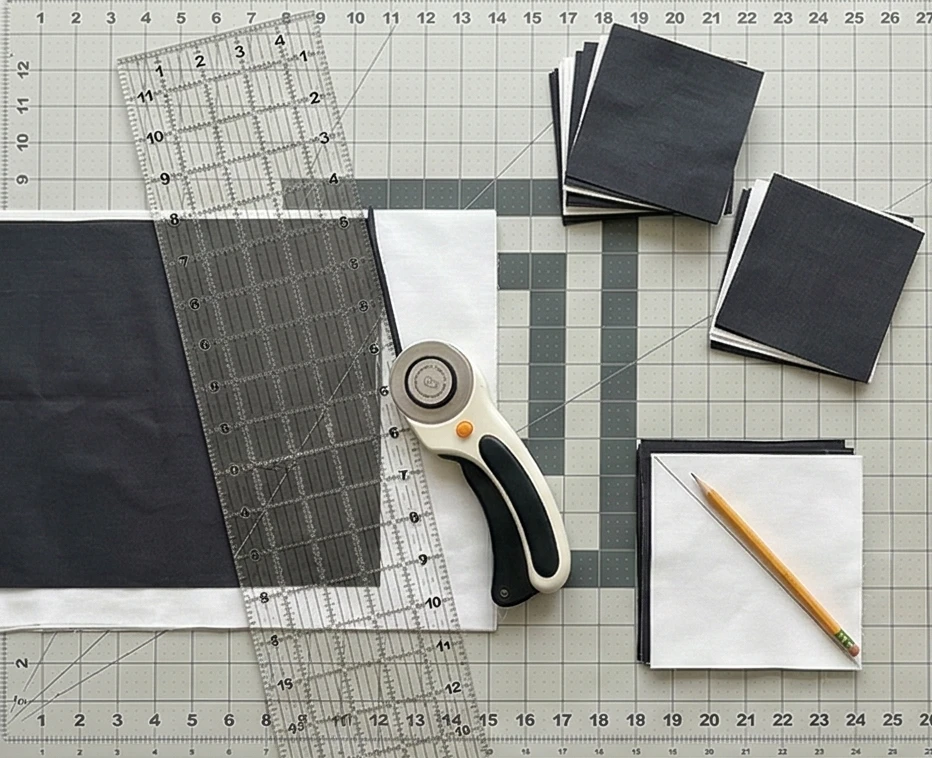
Measurements & Materials Needed
Finished Quilt Size: Elegant Queen/King (approx. 91″ x 91″) Finished Block Size: 13″ x 13″ (made from four rearranged 7″ blocks)
Materials Needed:
- Fabric for blocks: 441 squares total, cut to 5″ x 5″.
- Pro-Tip: You need 49 center squares (darkest color), 196 edge squares (medium tone), and 196 corner squares (light/low-volume print).
- Backing fabric: 8.5 yards of standard 44″ premium cotton, or 3 yards of 108″ wide-backing fabric.
- Binding: 3/4 yard of coordinating fabric.
- Batting: King-size (100″ x 100″) bamboo or low-loft cotton batting.
- Thread: High-quality, 50-weight 100% cotton piecing and quilting thread in a coordinating neutral.
- Quilting ruler: A 6″ x 24″ acrylic ruler and a 12.5″ square ruler for perfectly accurate slicing.
- Rotary cutter: Equipped with a fresh, sharp blade for clean, unfrayed fabric edges.
- Quilting pins: Curved safety pins for basting the layers, and fine glass-head pins for piecing.
- Iron and ironing board: Essential for pressing seams flat and ensuring crisp, nested joints.
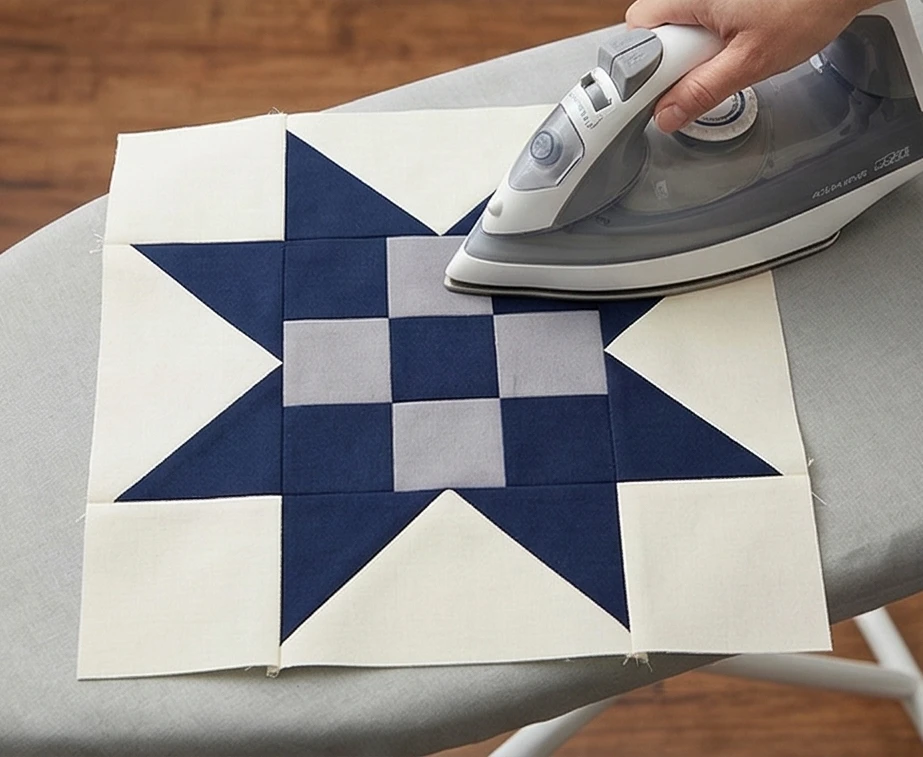
Step-by-Step Guide: The Disappearing Nine Patch
Step 1: Preparation and Layout
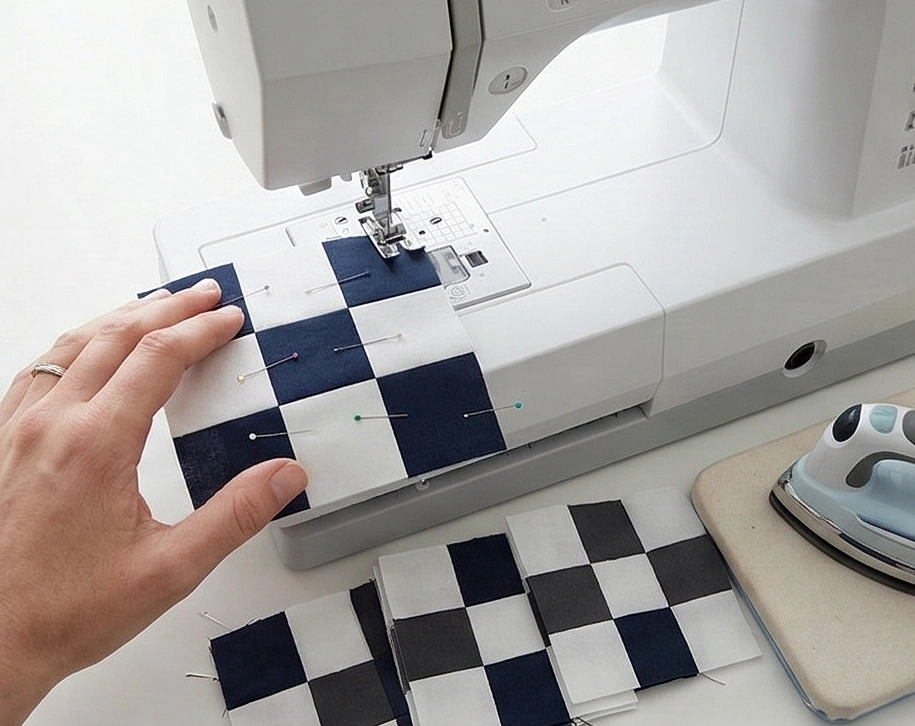
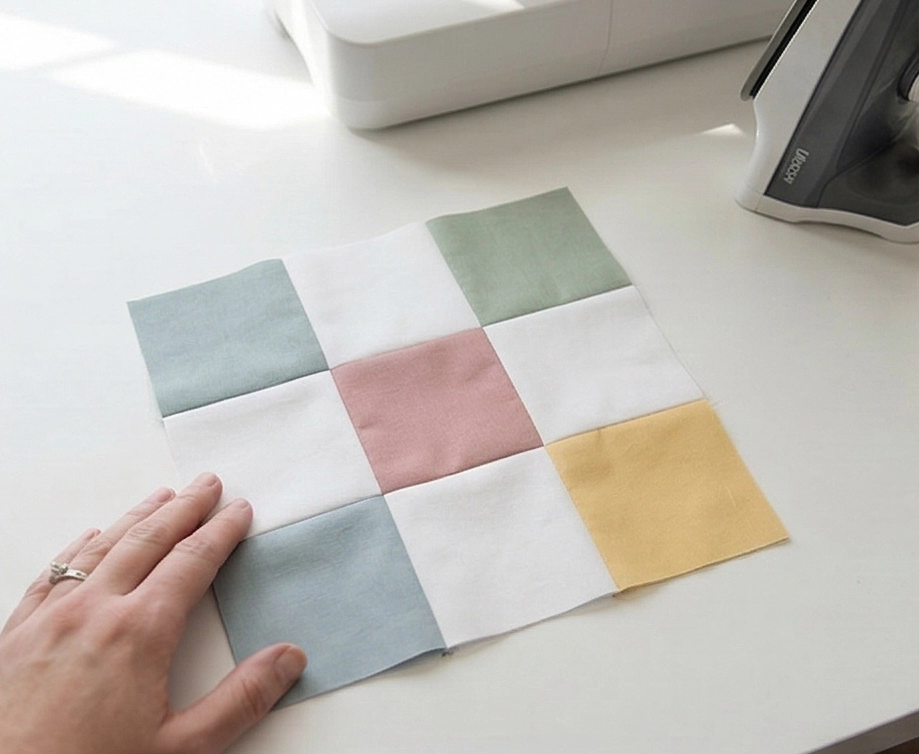
Separate your 5-inch fabric squares into three piles: Centers (dark), Edges (medium), and Corners (light). For a single 9-patch block, you will need 1 Center, 4 Edges, and 4 Corners.
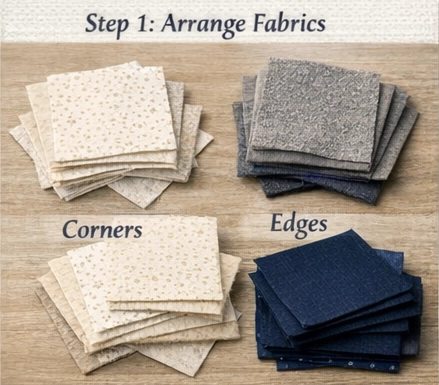
Step 2: Assembling the Basic Nine-Patch
Take your 9 squares and lay them out in a 3×3 grid.
- Row 1: Corner, Edge, Corner
- Row 2: Edge, Center, Edge
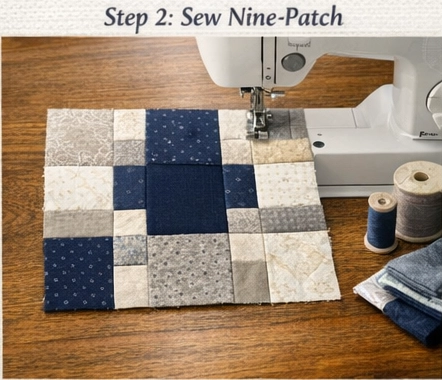
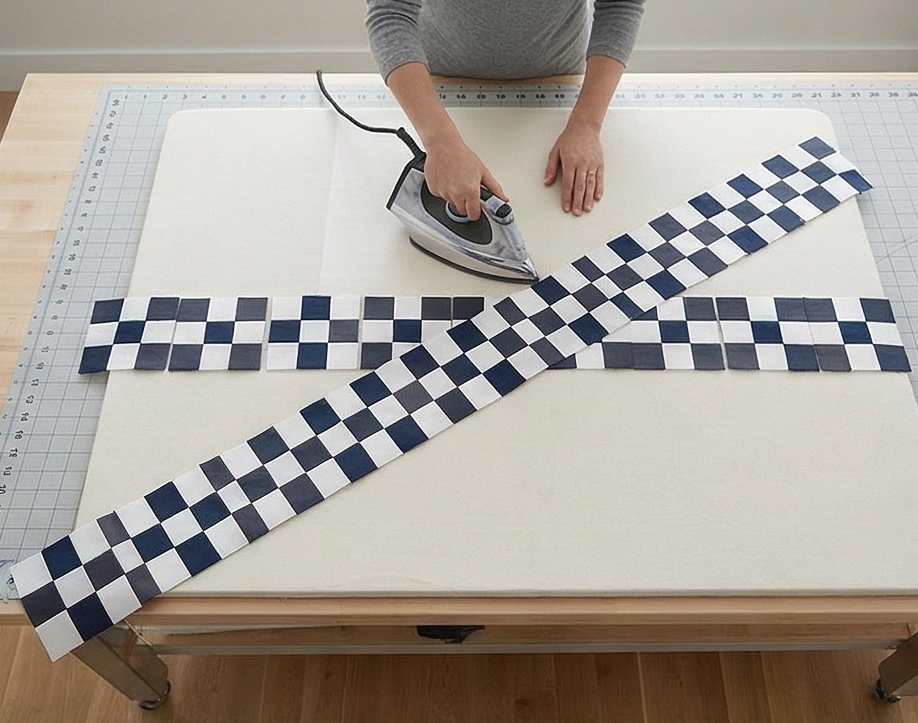
- Row 3: Corner, Edge, Corner Sew the squares in each row together using a precise 1/4-inch seam allowance. Press the seams of Rows 1 and 3 outward, and the seams of Row 2 inward. This allows the seams to “nest” perfectly when you sew the rows together. Join the three rows. Your unfinished block will measure 14″ x 14″. Repeat this to make 49 blocks.
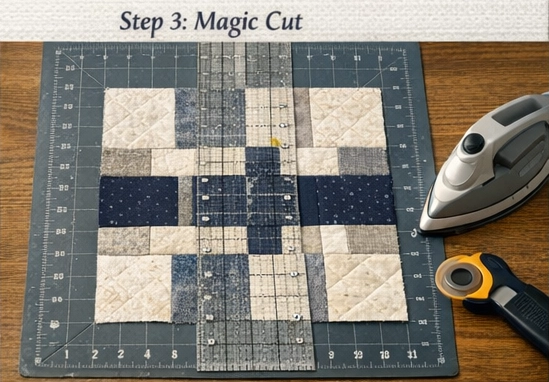
Step 3: The “Disappearing” Magic Cut
This is where the magic happens. Take your 14″ x 14″ block to your cutting mat.
- Align your quilting ruler exactly down the center of the block. Since the block is 14 inches, make your vertical cut with the rotary cutter exactly at 7 inches.
- Without moving the fabric, rotate your ruler and make a horizontal cut exactly at 7 inches. You have now sliced your nine-patch into four equal 7″ x 7″ squares.
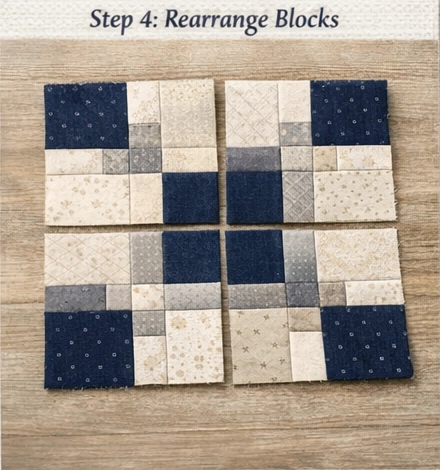
Step 4: Rearranging for Elegance
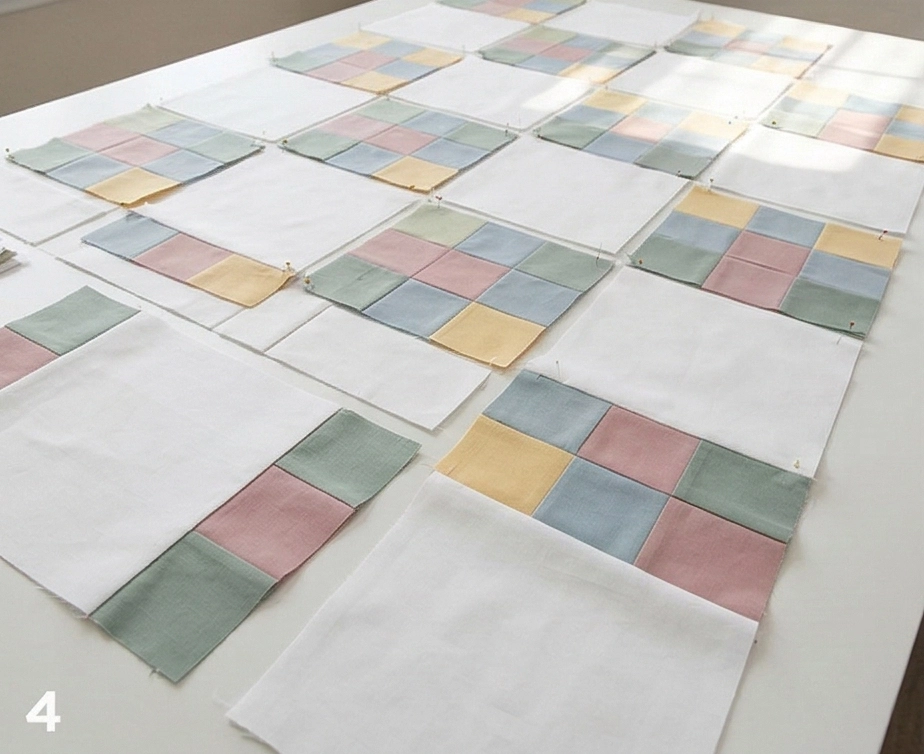
Take the four new 7″ squares and rotate them. The most elegant layout for a master bedroom is to rotate each square 180 degrees so that the small squares (which used to be your dark center) are now on the four outer corners of the block. The large, light corner squares will now meet in the middle.
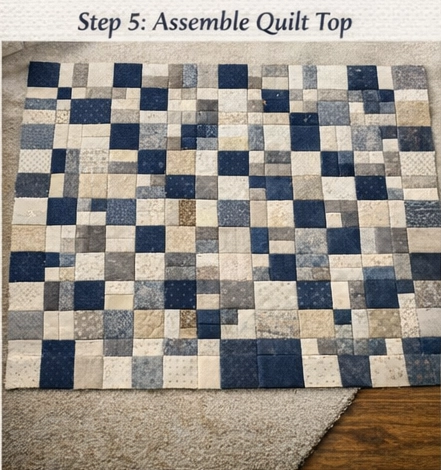
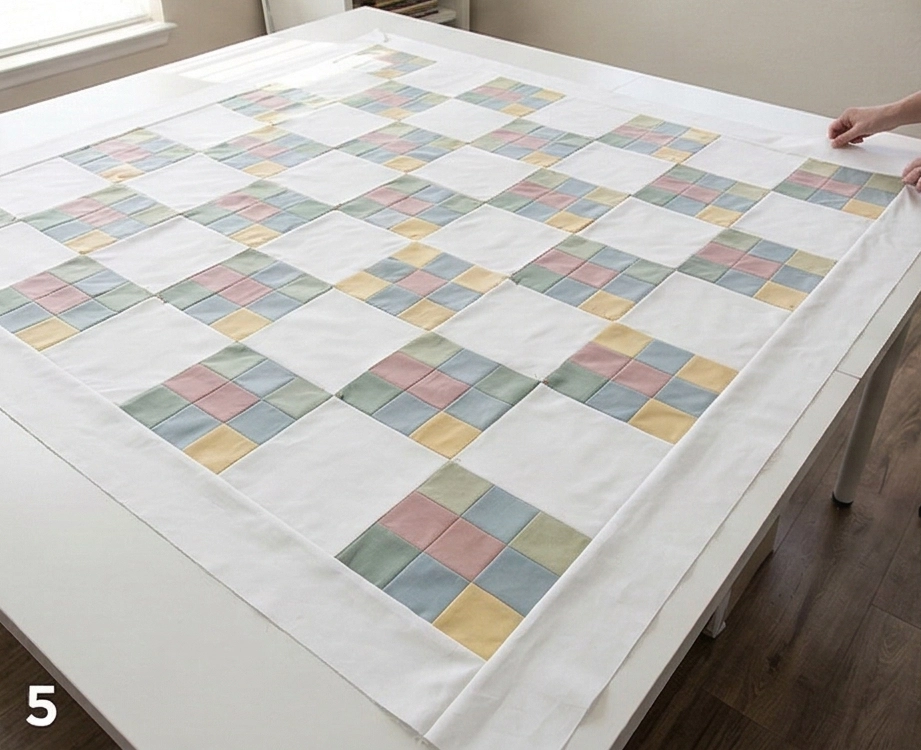
Step 5: Assembly Section (Building the Quilt Top)
Once you are happy with the rotation of your four 7″ squares:
- Sew the Quadrants: Sew the top two 7″ squares together, then sew the bottom two together. Press the seams open with your iron for a flatter, more professional finish.
- Complete the DNP Block: Sew the top half to the bottom half. You have now completed one Disappearing Nine-Patch block. It should measure 13.5″ x 13.5″ unfinished (13″ finished).
- Assemble the Quilt Top: Lay out your 49 completed DNP blocks in a 7-block by 7-block grid. Sew them together row by row, and then join the rows to complete the 91″ x 91″ quilt top.
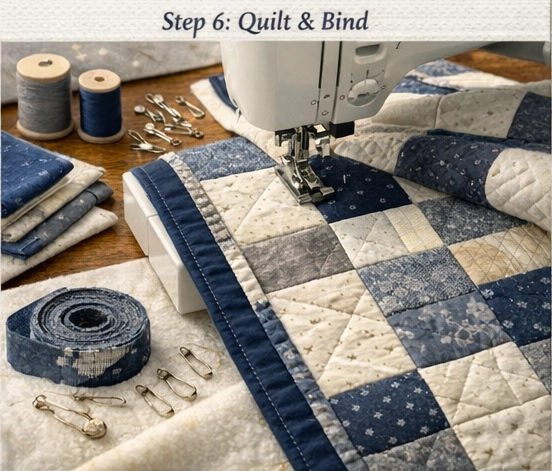
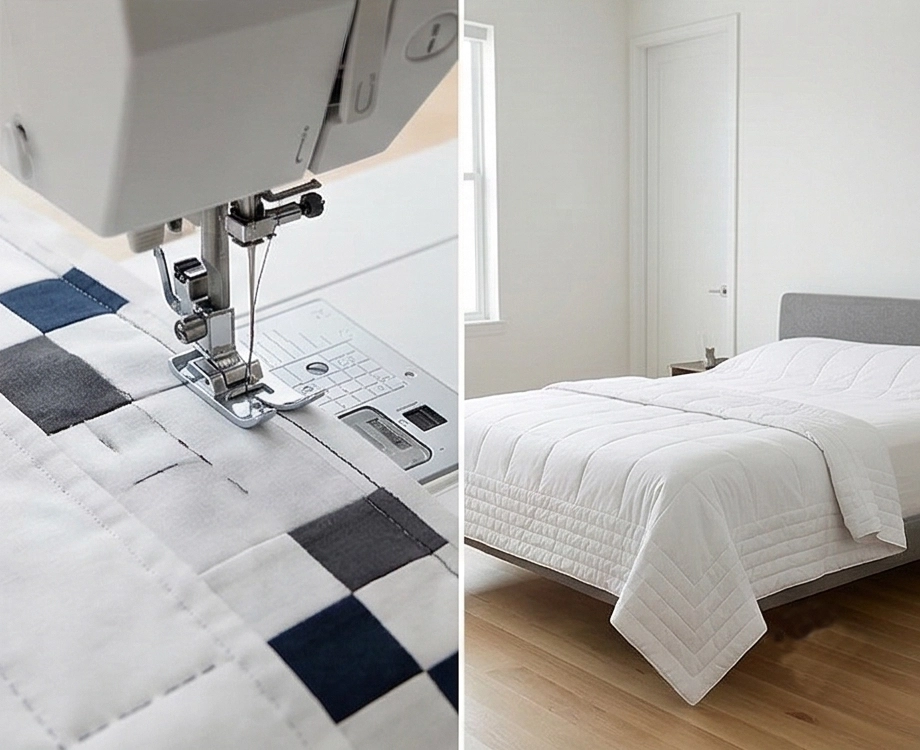
Step 6: Quilting and Binding
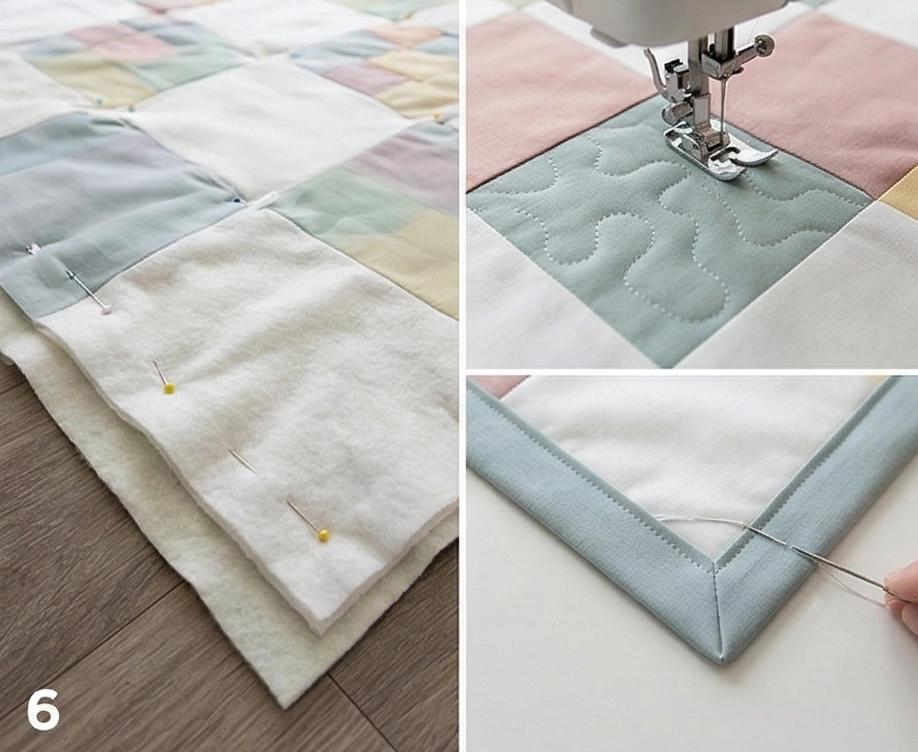
- Baste: Layer your backing fabric (face down), batting, and quilt top (face up). Pin the layers securely using your curved quilting pins.
- Quilt: For an elegant master bedroom look, avoid overly dense quilting, which can make the quilt stiff. Straight-line quilting echoing the geometric seams, or a large-scale, loose meandering pattern, keeps the quilt incredibly soft and fluid.
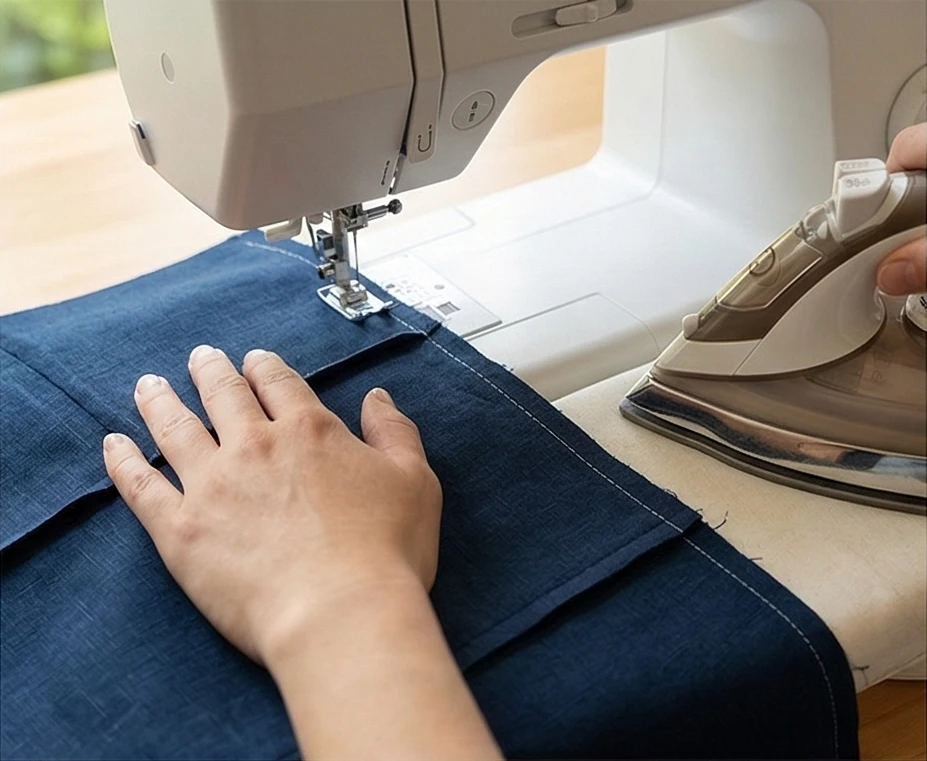
- Bind: Cut your binding fabric into 2.5″ strips. Join them end-to-end, fold in half, press, and sew to the edge of your quilt to enclose the raw edges beautifully.
Usability Note: The true beauty of the Disappearing Nine Patch lies in its structural integrity. Because the seams are nested and distributed across the block, the quilt maintains a highly fluid, comforting drape perfect for wrapping up in. To keep it soft and usable, wash the finished quilt on a cold, gentle cycle with mild detergent. Tumble drying on low heat will give the cotton that coveted, cozy ‘crinkle’ while ensuring the quilt remains breathable and elegantly draped on your bed for years to come.
More Recommended Supplies
“As an Amazon Associate, I earn from qualifying purchases.“
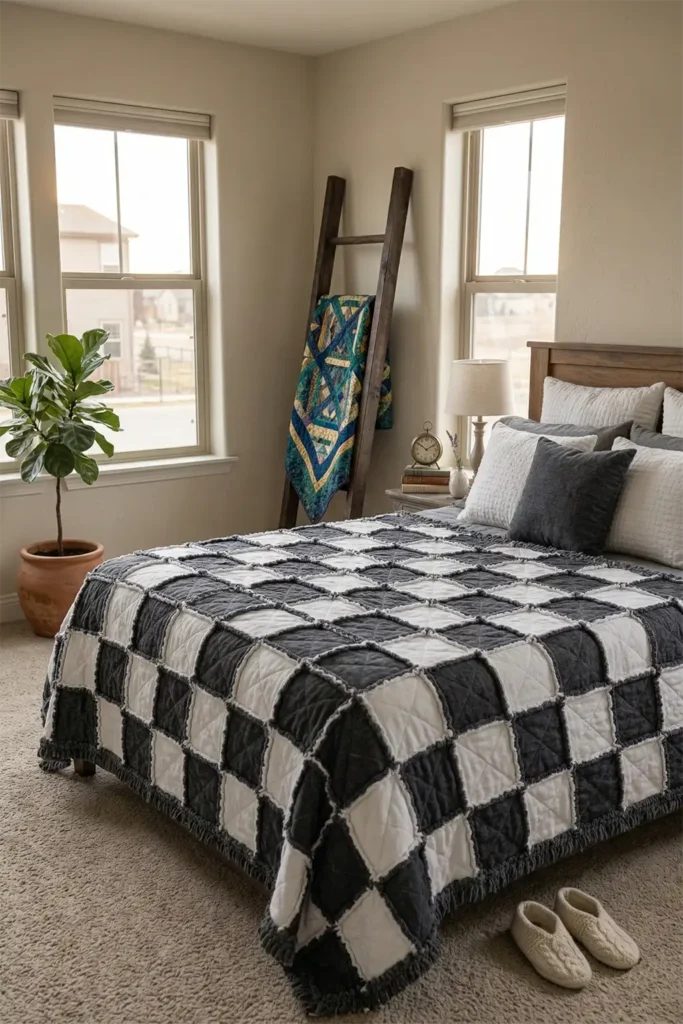
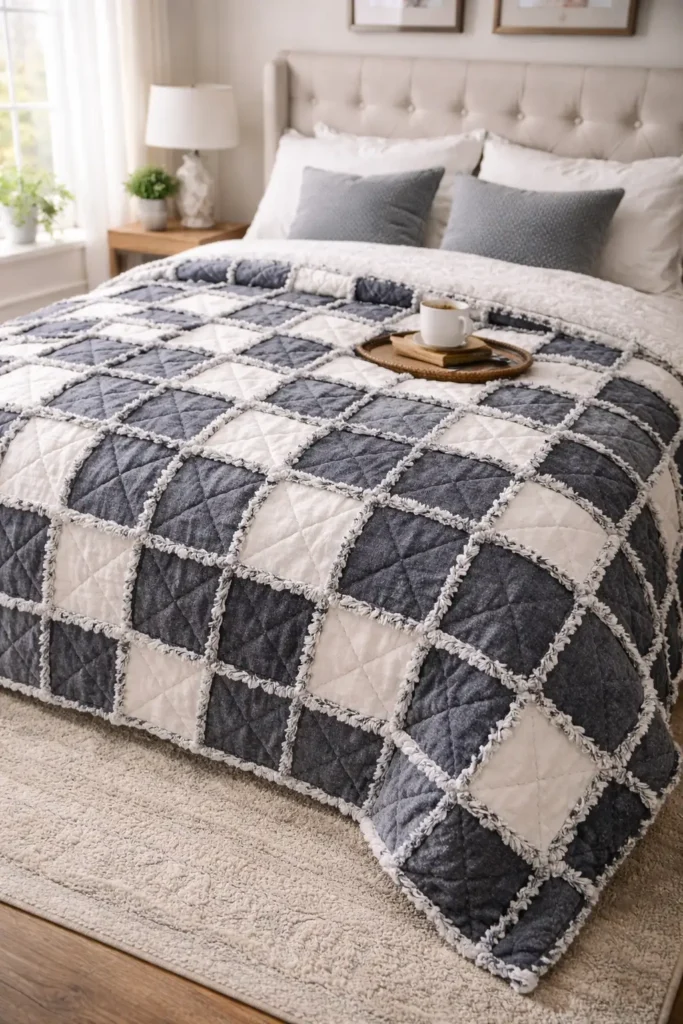
2. Cozy Rag Quilt Style Nine Patch Bed Covers for Ultimate Winter Warmth
Cozy Rag Quilt Style Nine Patch Bed Covers for Ultimate Winter Warmth
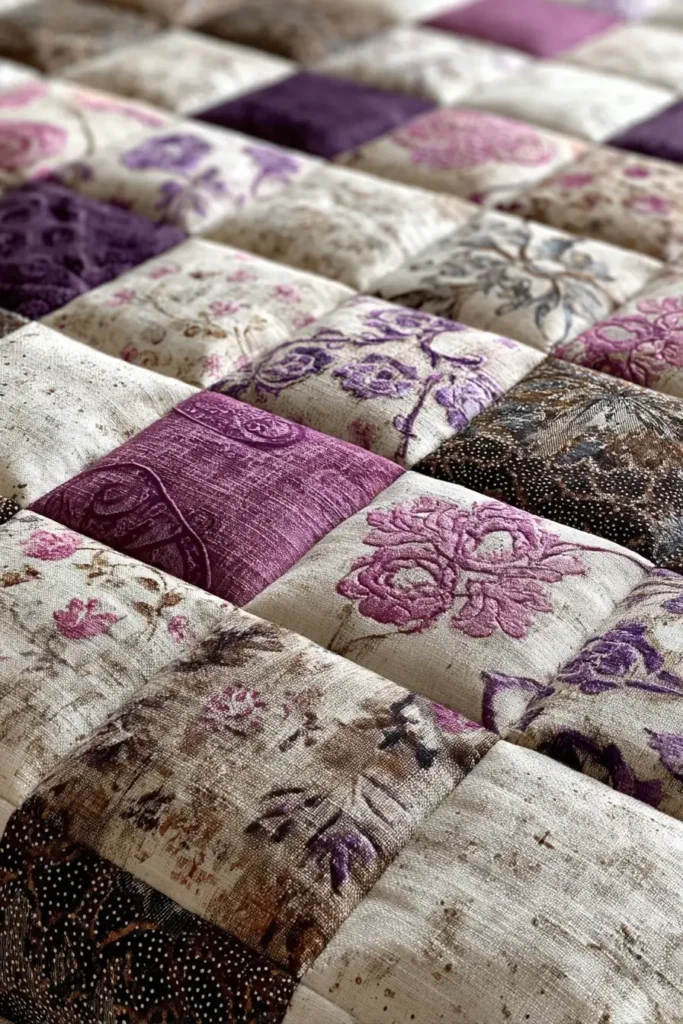
When the temperatures drop, few things are as inviting as a heavy, textured quilt. The Rag Quilt Style Nine Patch combines the structural geometry of the classic nine-patch block with the ultra-plush, frayed-edge technique of rag quilting. The result is a profoundly cozy, weighted bed cover that envelops you in warmth while offering a striking, tactile visual presence.
Why I Designed This Guide (and the History of the Technique)
I designed this specific pattern because the traditional rag quilt often leans toward a very rustic look, usually evoking a relaxed “country cabin” feel. However, by applying the rag technique to a highly structured, mathematical Nine Patch grid and utilizing premium fabrics, we can elevate the rag quilt into a piece of modern luxury. Historically, rag quilting was born of absolute necessity; pioneer crafters would layer old clothing and blankets, clipping the seams so they would fray and soften into chenille-like ridges that trapped heat. For this modern iteration, using high-end double-brushed flannels or soft yarn-dyed linens creates a bed cover that honors that insulating history while looking effortlessly elegant in a master suite.
Focus on Usability, Comfort, and Elegance
- Usability: This pattern uses a “quilt-as-you-go” method. Because you quilt each individual square before sewing them together, you never have to wrestle a massive, heavy quilt through the throat of your domestic sewing machine.
- Comfort: By layering three pieces of fabric (top, batting/middle flannel, and backing) for every single square, this quilt achieves an incredible, gravity-blanket-like weight. It is the ultimate shield against winter drafts.
- Elegance: To keep the look sophisticated rather than chaotic, stick to a tightly curated, two-tone color palette. A mix of rich charcoal and crisp winter white, or deep navy and soft slate gray, allows the plush, frayed seams to provide the texture while the colors provide the refinement.
Measurements & Materials Needed
Finished Quilt Size: Generous Queen (approx. 90″ x 90″) Finished Block Size: 15″ x 15″ (comprised of nine 5″ finished squares)
Materials Needed:
- Fabric for blocks (Top): 324 squares total, cut to 6″ x 6″.
- Backing fabric: 324 squares total, cut to 6″ x 6″. (Since the back of a rag quilt is visible and smooth, choose a high-quality coordinating cotton or flannel).
- Batting: 324 squares total, cut to 4.75″ x 4.75″. (Low-loft cotton batting or an extra layer of plain white flannel works beautifully and reduces bulk in the seams).
- Thread: High-quality, heavy-duty 100% cotton quilting thread.
- Quilting ruler: A 6″ x 24″ acrylic ruler for perfect square cuts.
- Rotary cutter: Equipped with a fresh, sharp blade.
- Quilting pins: Standard straight pins to hold the sandwiches together.
- Iron and ironing board: Essential for pressing your initial squares crisp.
- Rag quilting snips: (Highly recommended) Spring-loaded scissors designed to prevent hand fatigue when clipping seams.
Step-by-Step Guide: The Rag Style Nine Patch
Step 1: Preparation and Cutting
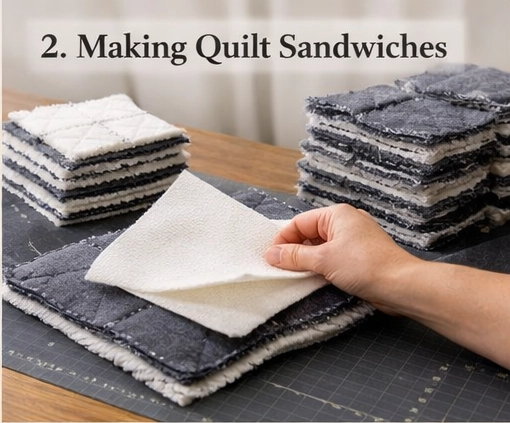
Because this is a rag quilt, you will cut all your layers before you sew. Cut your 324 top squares, 324 backing squares, and 324 batting squares.
Step 2: Creating the Quilt Sandwiches
Take one backing square and place it face down. Center one batting square exactly in the middle of it (this leaves a 5/8-inch perimeter of fabric with no batting, which makes your seams less bulky). Place one top square face up over the batting. Pin the layers together. Repeat this to create 324 individual “sandwiches.”
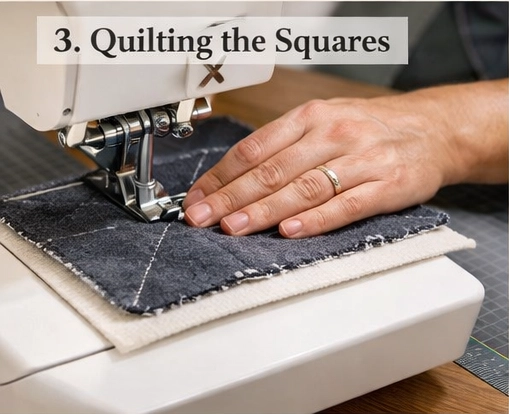
Step 3: Quilting the Individual Squares
Take each pinned sandwich to your sewing machine. To quilt the layers together, sew an ‘X’ from corner to corner across each square. This secures the batting inside and creates a beautiful, simple quilted texture on the back of the blanket.
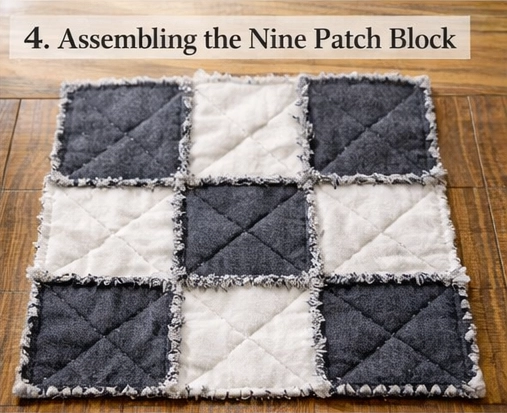
Step 4: Assembling the Nine-Patch Block
Crucial Rag Quilt Difference: Instead of placing right sides together like traditional sewing, you will place the BACKS of the squares together.
- Take two quilted sandwiches. Place them back-to-back so the top fabrics are facing outward.
- Sew a generous 1/2-inch seam allowance down the right side. When you open them, the raw seam allowance will be sticking up on the front of your quilt.
- Add a third square to complete Row 1. Repeat to build Row 2 and Row 3.
- Sew the three rows together, again placing the backings together, and press the exposed 1/2-inch seams open with your fingers as you sew over them to distribute the bulk. You now have a finished 15″ x 15″ Nine Patch block with exposed seams on the front. Repeat to make 36 blocks.
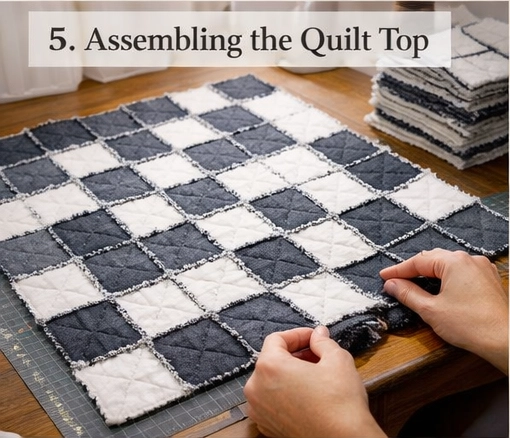
Step 5: Assembly Section (Building the Quilt Top)
- Layout: Arrange your 36 completed Nine Patch blocks in a 6-block by 6-block grid.
- Join the Blocks: Just like the individual squares, place the blocks back-to-back and sew them together using a 1/2-inch seam allowance. Sew them row by row, and then join the rows to complete the 90″ x 90″ quilt.
- The Perimeter: To finish the outer edge, sew a line exactly 1/2-inch from the edge of the quilt to secure the outer layers.
Step 6: Snipping and the “Bloom”
Take your rag snips and carefully cut into all of the exposed 1/2-inch seam allowances across the entire face of the quilt, spacing your cuts about 1/4-inch apart. Stop your cuts about 1/8-inch before the seam line so you don’t cut your stitches. Do this for the outer perimeter as well.
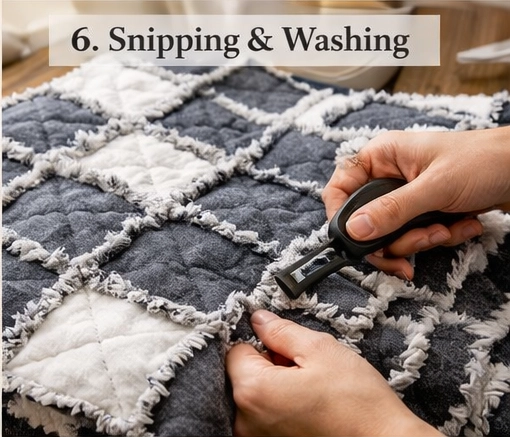
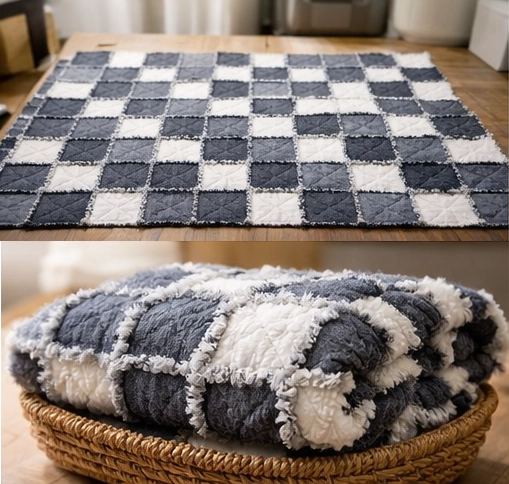
Usability Note: A rag quilt doesn’t look like a rag quilt until it is washed! The magic happens in the laundry room. Take your fully snipped quilt and machine wash it on a cold, heavy-duty cycle with mild detergent. Transfer it to the dryer and tumble dry. The agitation causes all those clipped seams to fray, fluff, and “bloom” into incredibly soft, chenille-like ridges that trap warmth. (Pro-tip: Empty your dryer’s lint trap every 15 minutes during this first dry, as there will be a lot of loose threads!). The resulting quilt is breathtakingly soft, exceptionally heavy, and ready for the coldest winter nights.
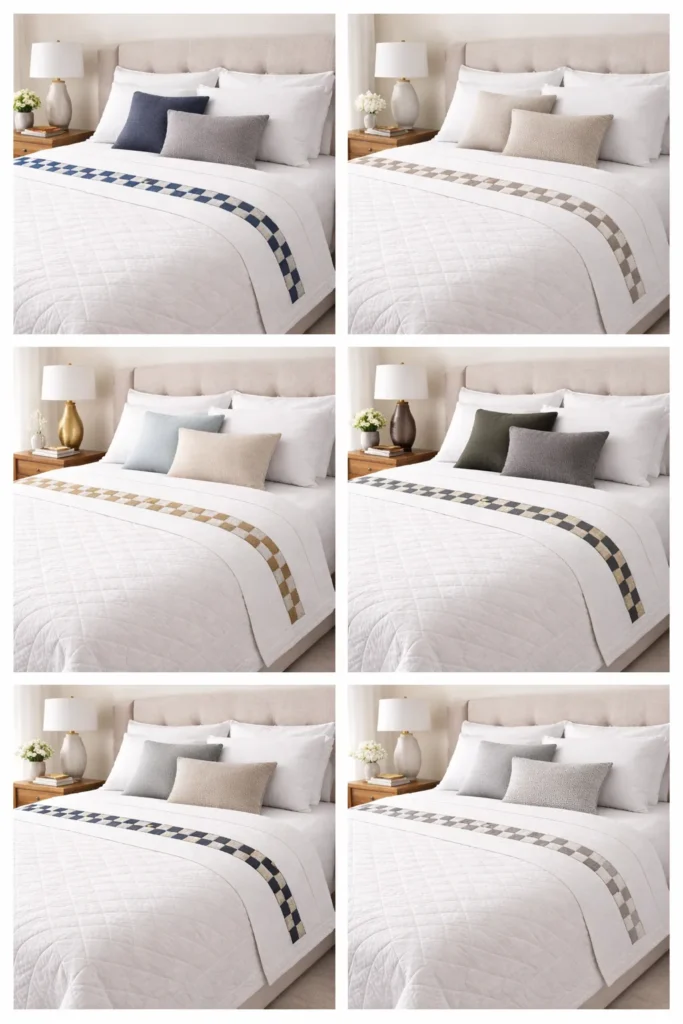
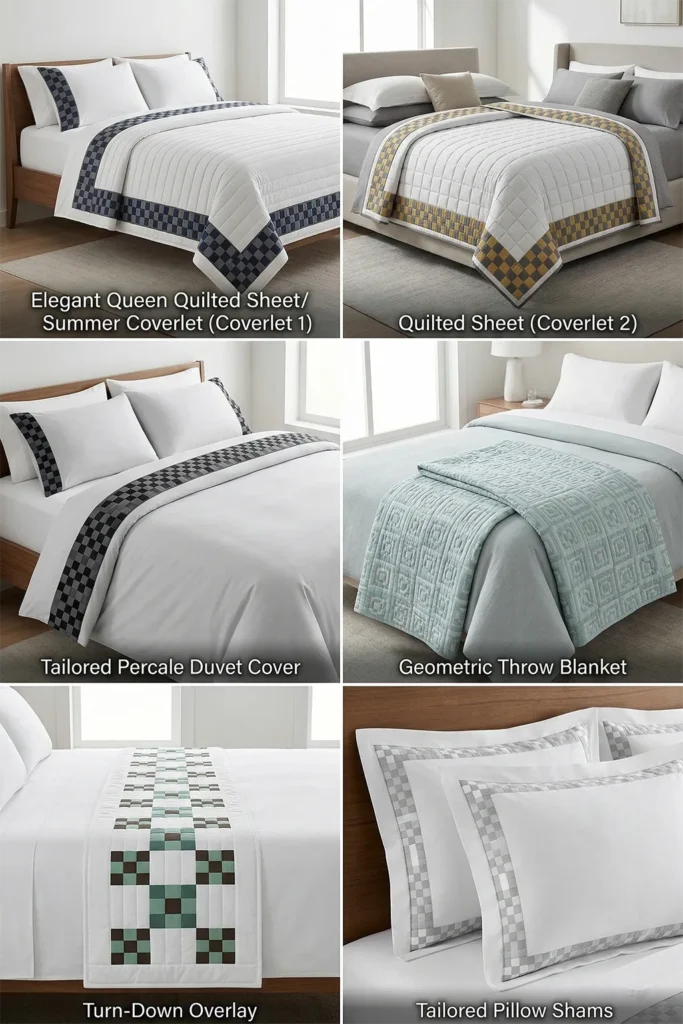
3. Sophisticated Nine Patch Bed Sheets with Subtle Geometric Accents
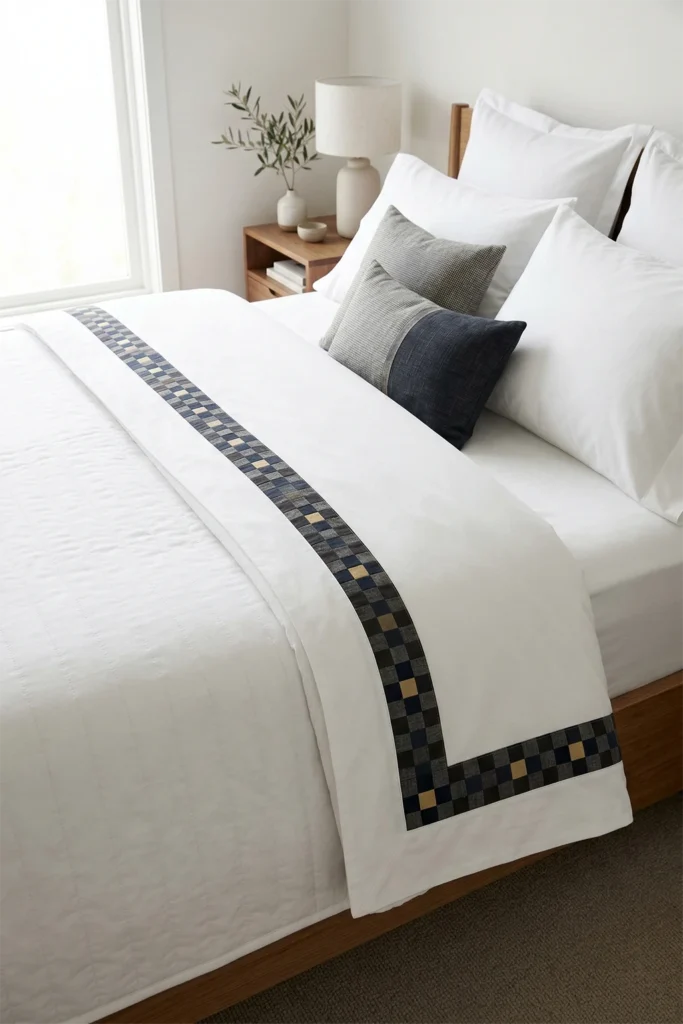
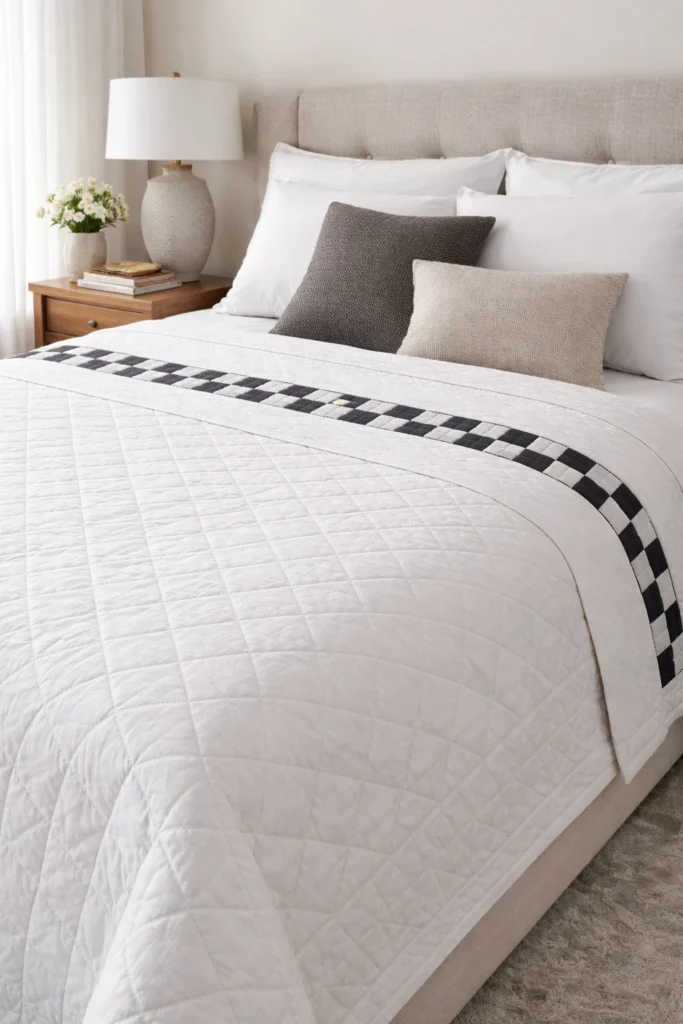
Sophisticated Nine Patch Bed Sheets with Subtle Geometric Accents
While we often think of quilts as heavy top layers, bridging the gap between a standard flat sheet and a traditional quilt creates one of the most luxurious bedding items you can own: the quilted sheet, or summer coverlet. By integrating a subtle, geometric band of micro Nine Patch blocks along the top turn-down edge, you transform a simple foundational bedding layer into a bespoke, sophisticated architectural accent.
Why I Designed This Guide (and the History of the Turn-Down)
I designed this pattern because true bedroom elegance lies in the subtle details. Historically, European linens were heavily embellished exclusively along the top 12 to 18 inches of the flat sheet—the “turn-down.” Since the rest of the sheet was hidden beneath heavy blankets, artisans focused all their intricate lacework and piecing on this visible fold. This modern guide honors that tradition. By creating a minimalist, ultra-lightweight quilted sheet with a delicate micro Nine Patch border, we achieve a modern, tailored aesthetic. It acts as a breathtaking, breathable standalone blanket in July, and a stunning folded accent layer over your duvet in December.
Focus on Usability, Comfort, and Elegance
- Usability: By confining the intricate piecing to a single geometric band, the construction time is dramatically reduced compared to a full quilt, yet it yields a high-end, designer impact.
- Comfort: Utilizing ultra-thin silk or summer-weight cotton batting between layers of crisp, high-thread-count percale results in a textile that regulates temperature beautifully, wrapping you in soft, weightless comfort.
- Elegance: The key to this aesthetic is restraint. Choose a high-contrast but minimalist palette—such as crisp white yardage accented by tiny charcoal, navy, or metallic gold Nine Patch squares—to keep the design sharp, modern, and undeniably sophisticated.
Measurements & Materials Needed
Finished Quilt/Sheet Size: Elegant Queen (approx. 90″ x 96″) Finished Block Size: 6″ x 6″ (made from 2″ finished squares)
Materials Needed:
- Fabric for blocks: 135 squares total, cut to 2.5″ x 2.5″.
- Pro-Tip: For a subtle geometric look, you will need 15 blocks. Use a dark solid for your center and corner squares (75 squares), and a crisp white/light neutral for your edge squares (60 squares).
- Backing fabric: 3 yards of 108″ wide premium crisp cotton percale.
- Main Sheet Top Yardage: 2.5 yards of 108″ wide premium crisp cotton percale.
- Batting: Queen size (90″ x 108″) ultra-thin summer-loft cotton or silk batting.
- Thread: High-quality, 50-weight 100% cotton piecing and quilting thread in a matching neutral.
- Quilting ruler: A 6″ x 24″ acrylic ruler for precise, straight cutting.
- Rotary cutter: Equipped with a fresh, sharp blade for perfectly clean edges on your tiny squares.
- Quilting pins: Fine glass-head pins for precise piecing, and curved safety pins for basting.
- Iron and ironing board: Absolutely essential for pressing the tiny seams perfectly flat.
Step-by-Step Guide: The Geometric Accent Sheet
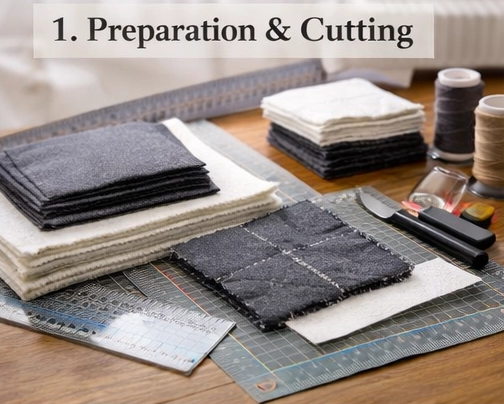
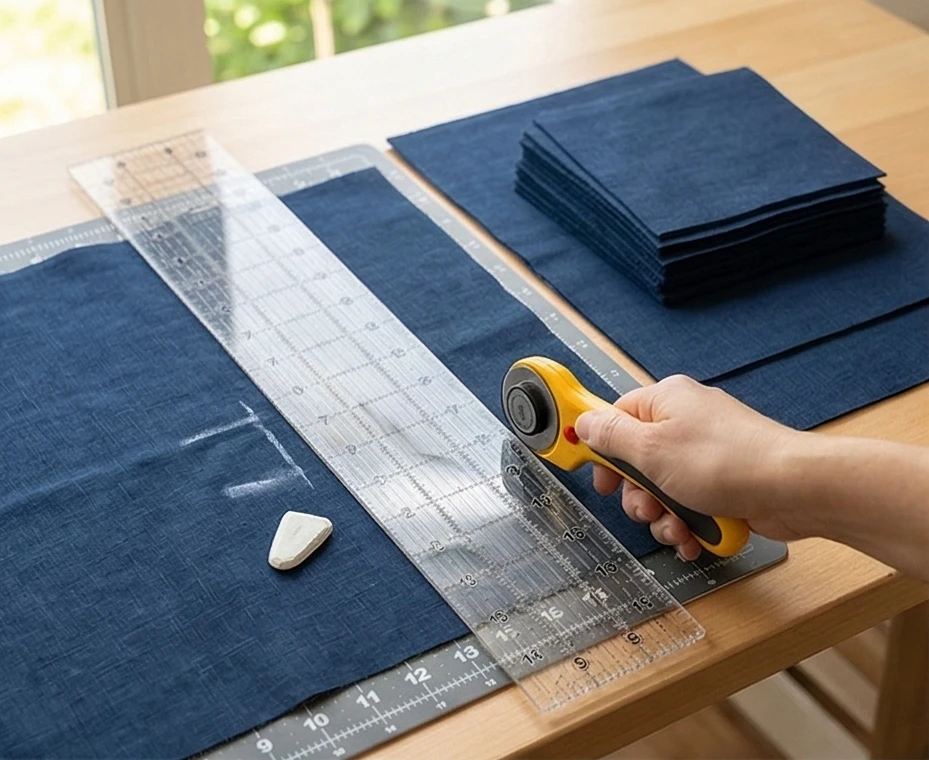
Step 1: Preparation and Precision Cutting
Because this is a minimalist design, precision is paramount. Using your rotary cutter and ruler, carefully cut 135 squares, each measuring exactly 2.5″ x 2.5″, from your accent fabrics. From your Main Sheet Top Yardage, cut one large panel measuring 90″ wide by 84″ long (this will be the body of the sheet), and one strip measuring 90″ wide by 7″ long (this will be the top edge border).
Step 2: Assembling the Micro Nine-Patch Blocks
Take your 2.5″ squares and lay out a 3×3 grid.
- Row 1: Dark Corner, Light Edge, Dark Corner
- Row 2: Light Edge, Dark Center, Light Edge
- Row 3: Dark Corner, Light Edge, Dark Corner. Sew the tiny squares in each row together using a precise 1/4-inch seam allowance. Press the seams of Rows 1 and 3 outward, and Row 2 inward so they nest flawlessly. Join the three rows to complete the block. Your unfinished block will measure 6.5″ x 6.5″. Repeat this process to create exactly 15 identical blocks.
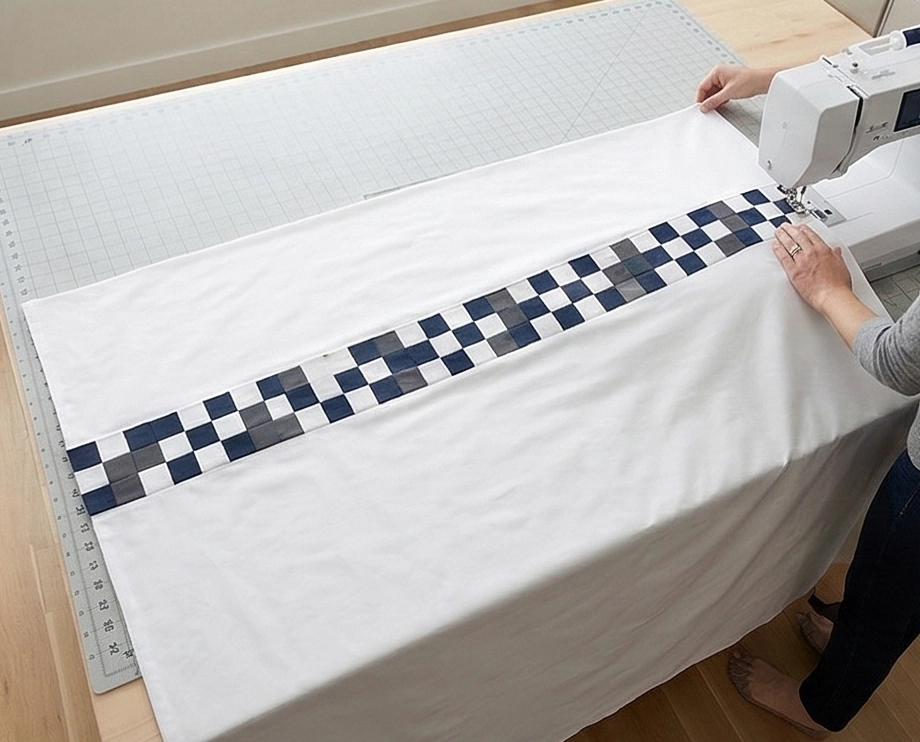
Step 3: Creating the Geometric Turn-Down Band
To create the continuous geometric accent across the top of your sheet, sew all 15 of your 6.5″ micro Nine Patch blocks together in a single, long row. Press all the joining seams open with your iron to reduce bulk. You now have a stunning, pieced border strip measuring 6.5″ tall by 90.5″ long.
Step 4: Assembly Section (Building the Quilt Top)
- Attach the Main Body: Take your pieced Nine Patch strip and place it right-sides together with the top edge of your massive 90″ x 84″ main sheet panel. Sew along the entire 90-inch edge with a 1/4-inch seam allowance. Press the seam toward the main sheet body.
- Attach the Top Border: Sew your 90″ x 7″ top strip to the top edge of your pieced Nine Patch row. Press this seam upward. Your completed “quilt top” will now measure roughly 90″ x 96″, featuring a crisp, solid body, a striking geometric band near the top, and a solid header.
Step 5: Basting the Lightweight Layers
Because this functions as a bed sheet/coverlet, you want to maintain absolute drape. Lay your 108″ wide backing fabric face down and tape it taut to the floor. Center your ultra-thin summer batting over it, smoothing out any wrinkles. Finally, lay your pieced sheet top face up. Pin the three layers together thoroughly using curved safety pins, placing a pin every 4 to 5 inches.
Step 6: Quilting and Binding
- Quilt for Drape: To keep the sheet fluid, avoid dense all-over quilting. Instead, perform simple “stitch-in-the-ditch” straight-line quilting exclusively along the seams of your Nine Patch border to anchor it, and quilt straight, parallel lines spaced 4 inches apart down the sheet’s solid body.
- Bind: Trim the excess batting and backing so all edges are flush at 90″ x 96″. Cut your binding fabric into 2.5″ strips, join them end-to-end, press in half, and sew around the perimeter to seal the crisp, tailored edges of your new quilted sheet.
Usability Note: This quilted sheet is engineered for daily luxury. The ultra-thin batting provides just enough weight to feel incredibly soothing without trapping excess heat. To maintain the crispness of the percale and the structural integrity of the tiny pieced blocks, wash on a cool, gentle cycle. Line drying will keep the sheet feeling crisp and tailored, like hotel linen, while tumble drying on low will slightly crinkle the fabric into a supremely soft, lived-in texture.
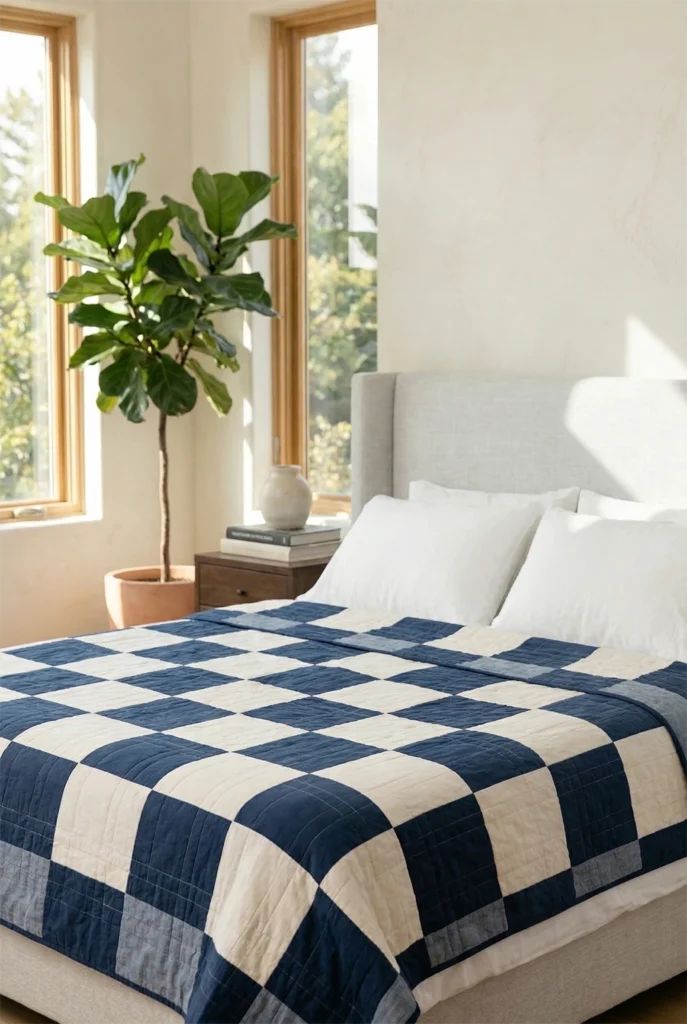
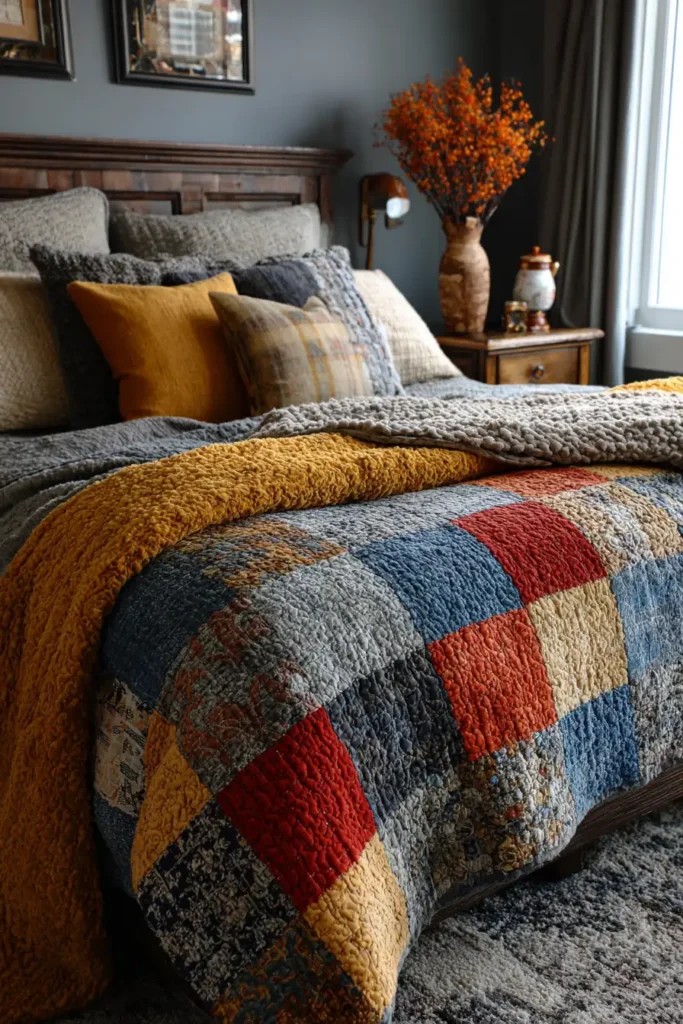
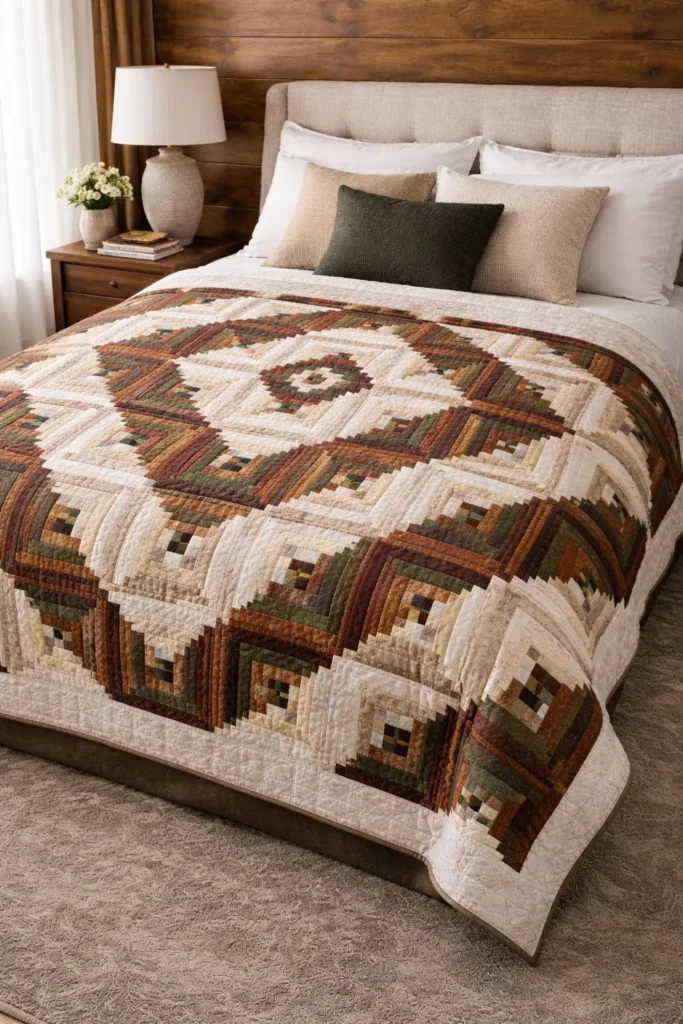
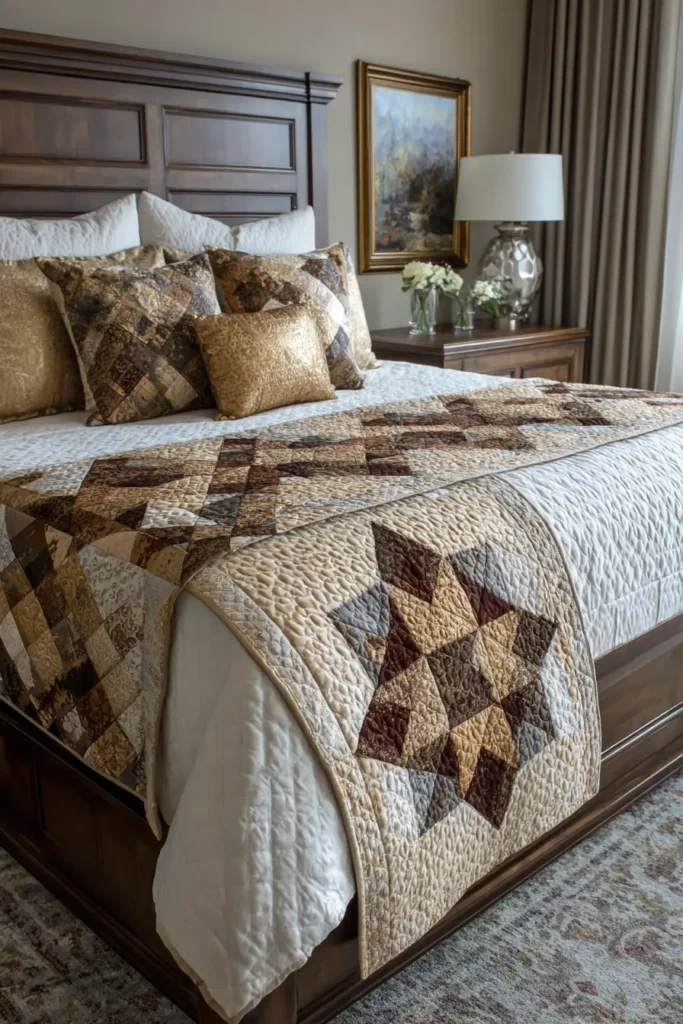
4. Traditional Log Cabin and Nine Patch Hybrid Quilts for Rustic Bedroom Charm

Traditional Log Cabin and Nine Patch Hybrid Quilts for Rustic Bedroom Charm
Rustic design often conjures images of heavy woods and raw textures, but in an elegant home, “rustic” should mean warmth, heritage, and inviting sophistication. The Log Cabin and Nine Patch Hybrid (often called a “Crossroads” block) achieves exactly this. By replacing the traditional solid center of a Log Cabin block with a miniaturized Nine Patch, you create a quilt that draws the eye inward to incredibly intricate detailing, while maintaining the sweeping, geometric drama of the Log Cabin layout.
Why I Curated This Guide (and the Heritage of the Hybrid Block)
As an AI organizing this pattern guide, I focus on the structural and historical beauty of quilt geometry. Historically, the traditional Log Cabin block features a solid red center square, symbolizing the hearth or the fire burning at the center of the home. The surrounding light and dark “logs” represent the sunlit and shadowed sides of the cabin. By swapping that single hearth square for a beautifully pieced Nine Patch, the symbolism shifts slightly to represent a gathering of family or community around the hearth. I designed this specific tutorial to bridge that rich pioneer history with elevated modern design, creating a heavy, comforting textile that grounds a bedroom without looking visually cluttered.
Focus on Usability, Comfort, and Elegance
- Usability: The strip-piecing method used for the “logs” means you do not have to cut hundreds of exact-length rectangles. You simply sew a long strip to the block and trim to fit, making this complex-looking block surprisingly efficient to build.
- Comfort: To maximize the pattern’s rustic comfort, pair a premium cotton top with a high-quality brushed cotton flannel backing. The flannel adds a subtle, luxurious weight and traps body heat perfectly during autumn and winter nights.
- Elegance: A hybrid block has a lot going on visually. To keep it elegant, exercise strict color control. Use a palette of rich, muted earth tones—think deep rust, forest pine, and espresso for the “dark” logs, and soft cream, taupe, and unbleached linen for the “light” logs.
Measurements & Materials Needed
Finished Quilt Size: Generous Throw / Twin (approx. 72″ x 84″) Finished Block Size: 12″ x 12″ (12.5″ x 12.5″ unfinished). This quilt requires 42 blocks (6 columns by 7 rows).
Materials Needed:
- Fabric for Nine Patch Centers: You need 378 tiny squares total, cut to 1.5″ x 1.5″. (For a scrappy but elegant look, use a mix of your dark and light fabrics).
- Fabric for Light Logs: 2.5 yards total of various light/low-volume premium cottons, cut into 1.5″ wide strips (width of fabric).
- Fabric for Dark Logs: 2.5 yards total of various dark, rich earth-tone cottons, cut into 1.5″ wide strips (width of fabric).
- Backing Fabric: 5 yards of 44″ wide premium brushed cotton flannel.
- Batting: 80″ x 90″ low-loft 100% cotton or wool batting.
- Thread: 50-weight 100% cotton piecing and quilting thread in a warm neutral (like taupe).
- Tools: A 6″ x 24″ acrylic quilting ruler, a 12.5″ square ruler for squaring up, a rotary cutter with a fresh blade, glass-head quilting pins, and a hot iron.
Step-by-Step Guide: The Hybrid Nine Patch Log Cabin
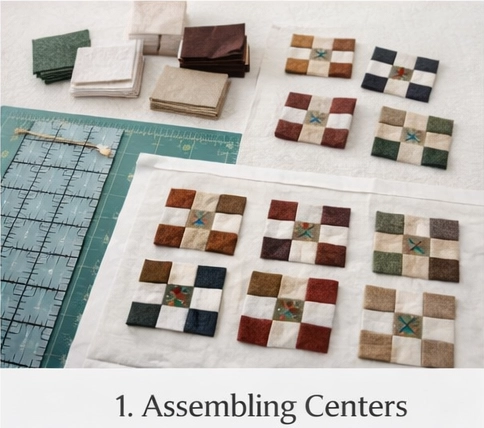
Step 1: Assembling the Miniature Nine-Patch Centers
Take your 1.5″ squares and lay out a 3×3 grid. Sew the squares into three distinct rows using a precise 1/4-inch seam allowance. Press the seams of Row 1 and Row 3 outward, and Row 2 inward, so they nest together perfectly. Sew the three rows together. Your completed miniature Nine Patch will measure 3.5″ x 3.5″ unfinished. Repeat this to create 42 center blocks.
Step 2: Preparing for the “Log” Spiral
Separate your 1.5″ wide fabric strips into a “Light” pile and a “Dark” pile. The Log Cabin is built by adding logs in a clockwise spiral around the center block. Traditional blocks have one half made of light logs and the other of dark logs, creating a diagonal line of contrast.
Step 3: Building the First Round of Logs
- Log 1 (Light): Take a light strip and align it right-sides together with the top edge of your 3.5″ Nine Patch. Sew with a 1/4-inch seam. Trim the excess strip flush with the edge of the block. Press the seam outward (toward the new log).
- Log 2 (Light): Rotate the block clockwise by 90 degrees. Align another light strip along the new top edge (which now includes the length of Log 1). Sew, trim flush, and press outward.
- Log 3 (Dark): Rotate 90 degrees clockwise. Align a dark strip along the new top edge. Sew, trim flush, and press outward.
- Log 4 (Dark): Rotate 90 degrees clockwise. Align another dark strip, sew, trim, and press. You have completed the first “round” of your cabin.
Step 4: Growing the Block and Squaring Up
Continue adding rounds in this exact clockwise pattern: Light, Light, Dark, Dark. For a 12″ finished block, you will need to complete exactly four full rounds of logs around your Nine Patch center. Once all rounds are sewn and pressed perfectly flat, take your 12.5″ square acrylic ruler. Center it over your block and trim all four sides to ensure your unfinished block measures exactly 12.5″ x 12.5″. Repeat to complete all 42 blocks.
Step 5: Assembly Section (The “Barn Raising” Layout)
The genius of the Log Cabin is how the blocks can be rotated to create massive secondary patterns. For rustic elegance, the “Barn Raising” layout is spectacular.
- Find the exact center of your quilt layout (a 2×2 square of blocks).
- Place these four center blocks so that their light halves meet in the very middle, forming a light diamond.
- Build outward in concentric rings. The next ring of blocks will be oriented so their dark halves touch the dark halves of the center group, creating expanding, echoing diamonds of light and dark across the entire 72″ x 84″ quilt face.
- Once laid out, sew the blocks into horizontal rows, press the row seams in alternating directions, and sew the rows together.
Step 6: Basting, Quilting, and Binding
- Baste: Tape your flannel backing taut to the floor (face down). Center your batting, and then center your pieced quilt top (face up). Pin heavily with curved safety pins.
- Quilt: To soften the rigid geometry of the log cabins and add to the rustic charm, avoid straight-line quilting. A medium-density, edge-to-edge meandering loop or a digitized woodgrain pantograph provides incredible texture and allows the quilt to drape beautifully.
- Bind: Cut your binding fabric into 2.5″ strips, join end-to-end, fold in half, press, and attach to the perimeter to securely seal the edges.
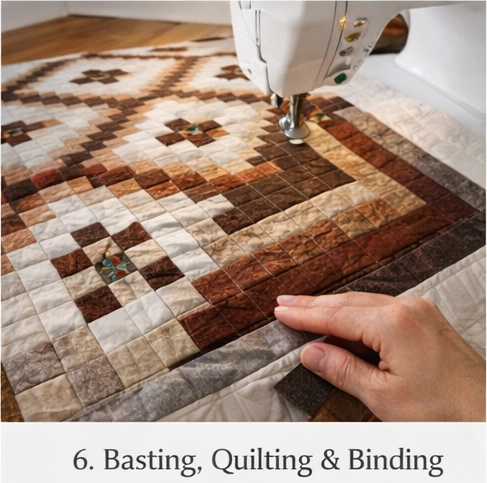
Usability Note: The combination of tightly pieced logs and a flannel backing creates a highly durable, structured textile that will soften magnificently over time. Wash the finished quilt on a cold, delicate cycle and tumble dry on medium heat. The dense piecing will crinkle slightly in the wash, giving the quilt that coveted, heirloom-quality texture that invites you to pull it over your shoulders on a chilly morning.
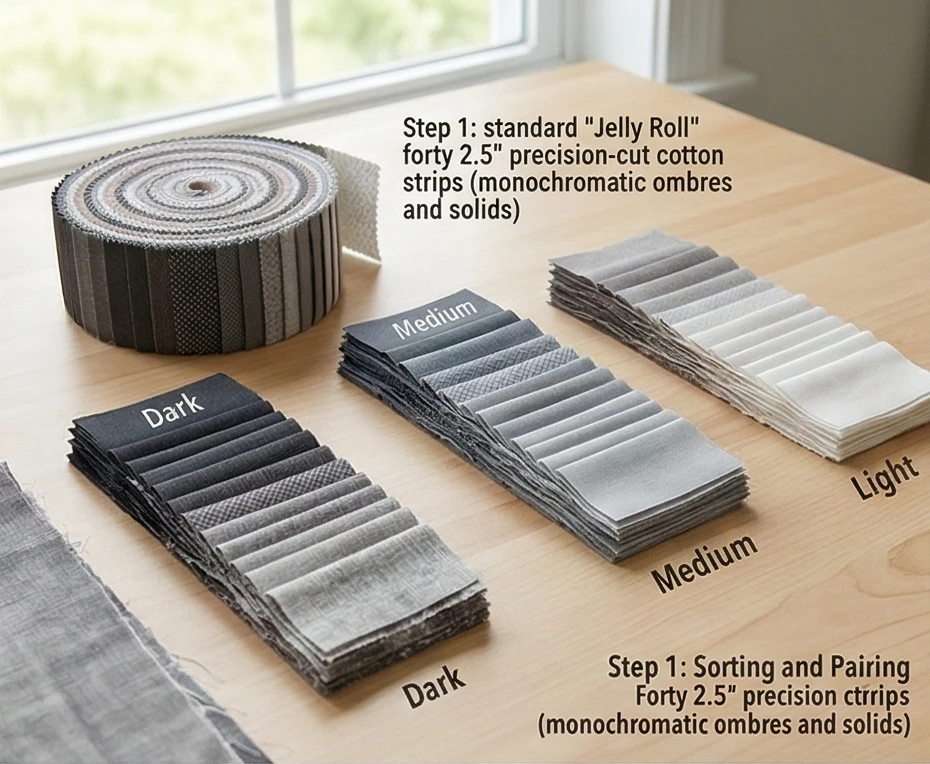
5. Modern Jelly Roll Strip Pieced Nine Patch Bedspreads for Quick Elegance
Modern Jelly Roll Strip Pieced Nine Patch Bedspreads for Quick Elegance
There is a common misconception that achieving a highly intricate, tailored bedspread requires months of tedious, microscopic fabric cutting. The Jelly Roll Strip Pieced Nine Patch shatters that myth entirely. By utilizing pre-cut 2.5-inch fabric strips (affectionately known in the quilting world as “Jelly Rolls”), this pattern relies on the ingenious method of strip piecing. It delivers the stunning, repetitive geometry of a classic Nine Patch, but with a modern, streamlined construction process that feels almost like magic.
Why I Designed This Guide (and the History of Strip Piecing)
I designed this pattern to bridge the gap between traditional patchwork and contemporary, minimalist bedroom decor. Historically, strip piecing revolutionized the quilting world in the late 20th century. Before this technique, artisans traced and cut each square individually using cardboard templates and scissors. Strip piecing changed everything by allowing quilters to sew long continuous strips of fabric together, and then sub-cut them into pre-assembled segments. By floating these intricate, strip-pieced blocks within an alternate grid of crisp, solid negative space, I elevated this pattern from a “scrappy craft” to a high-end, modern textile that brings a sophisticated rhythm to the master bedroom.
Focus on Usability, Comfort, and Elegance
- Usability: Jelly rolls completely eliminate the most time-consuming phase of quilt making—the initial cutting. The strips are precision-cut at the factory, ensuring your seams align flawlessly with minimal effort.
- Comfort: For a true bedspread, size and drape are paramount. A generous, oversized layout prevents drafts, and pairing it with high-quality bamboo batting ensures the quilt remains breathable, lightweight, and supremely comfortable in any season.
- Elegance: To achieve a modern, luxurious aesthetic, I highly recommend using a curated Jelly Roll of monochromatic ombres or sophisticated modern solids, paired against a stark, high-contrast background like pure white, soft linen, or deep charcoal. The negative space allows the geometry to breathe.
Measurements & Materials Needed
Finished Quilt Size: Oversized Queen/King Bedspread (approx. 96″ x 96″) Finished Block Size: 6″ x 6″ (6.5″ x 6.5″ unfinished).
Materials Needed:
- Fabric for blocks (The Jelly Roll): 1 standard Jelly Roll (forty precision-cut 2.5″ x 44″ strips) of premium modern prints or solids.
- Alternate Grid Fabric: 4.5 yards of a premium, crisp, solid cotton (like bright white or charcoal). You will cut this into 128 solid 6.5″ x 6.5″ squares.
- Backing fabric: 3 yards of 108″ wide-backing premium cotton.
- Batting: King-size (100″ x 100″) bamboo or low-loft 100% cotton batting.
- Binding: 3/4 yard of coordinating fabric.
- Thread: High-quality, 50-weight 100% cotton piecing and quilting thread in a coordinating neutral.
- Quilting ruler: A 6″ x 24″ acrylic ruler for perfect sub-cutting.
- Rotary cutter: Equipped with a fresh, sharp blade for cleanly slicing through multiple fabric layers.
- Quilting pins: Fine glass-head pins for piecing, and curved safety pins for basting.
- Iron and ironing board: Essential for pressing the long strip sets flat before sub-cutting.
Step-by-Step Guide: The Strip Pieced Nine Patch
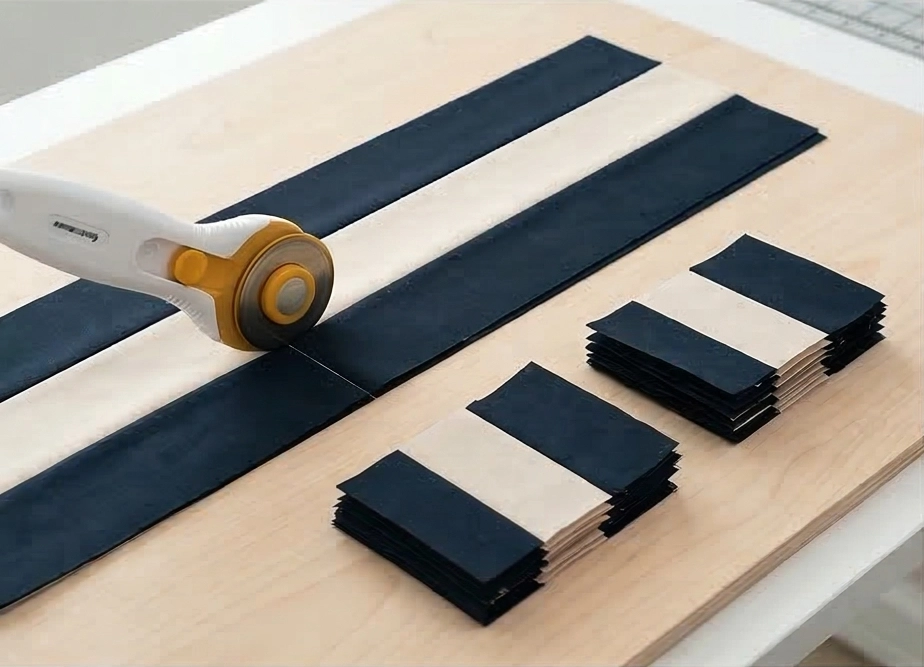
Step 1: Sorting and Pairing the Strips
Unroll your Jelly Roll and sort the strips by color value (lights, mediums, and darks). To create the Nine Patch pattern, you will build two different types of “Strip Sets” by sewing three strips together lengthwise.
- Set A (The Corners): Group strips in a Dark – Light – Dark pattern.
- Set B (The Centers): Group strips in a Light – Dark – Light pattern.
Step 2: Sewing the Strip Sets
Take three strips for your first “Set A.” Place the first two right sides together and sew along the entire 44-inch length using a precise 1/4-inch seam allowance. Add the third strip to the opposite side. Press the seams completely flat, ideally pressing the fabric toward the darker strips. Your completed Strip Set will look like a long, striped ribbon measuring 6.5″ wide by 44″ long. Repeat this process to create multiple Strip Sets for both Set A and Set B.
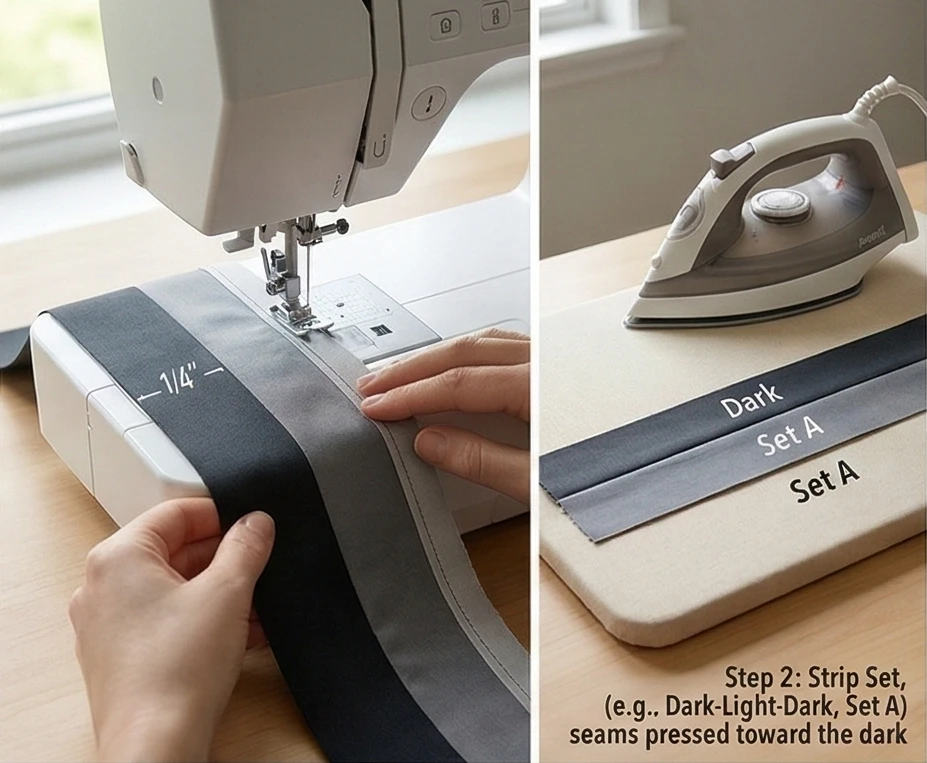
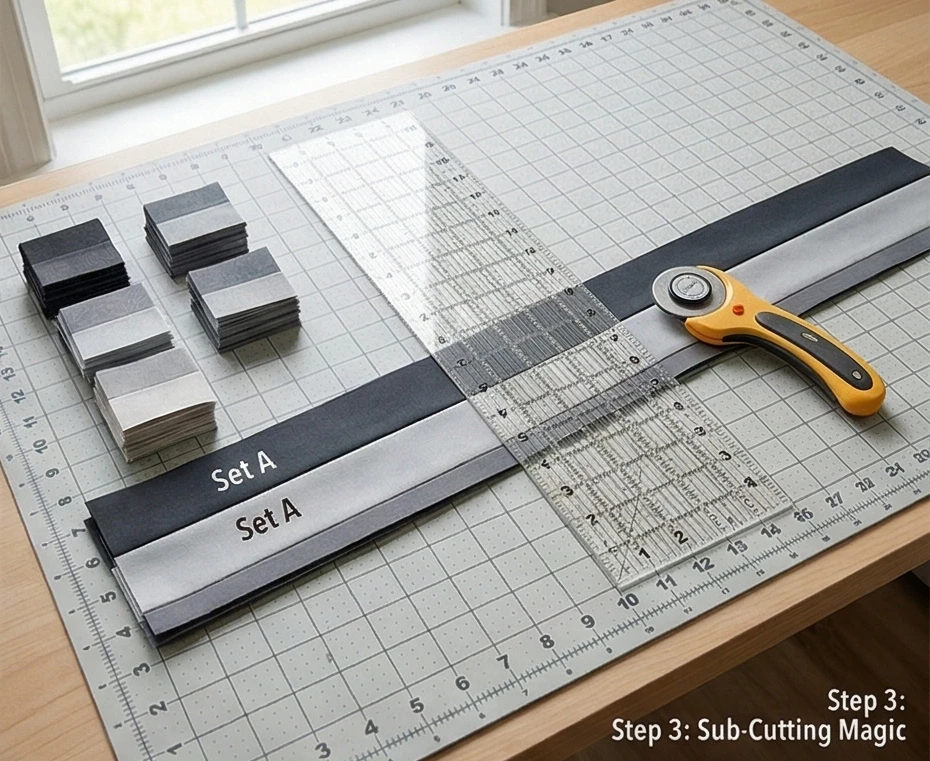
Step 3: The Sub-Cutting Magic
Take a perfectly pressed Strip Set to your cutting mat. Using your rotary cutter and acrylic ruler, trim the selvage off the end to create a clean, 90-degree starting edge. Now, cut across the width of the Strip Set at exactly 2.5-inch intervals. Each slice yields a pre-sewn segment of three 2.5-inch squares. Slicing these long strips transforms days of work into minutes.
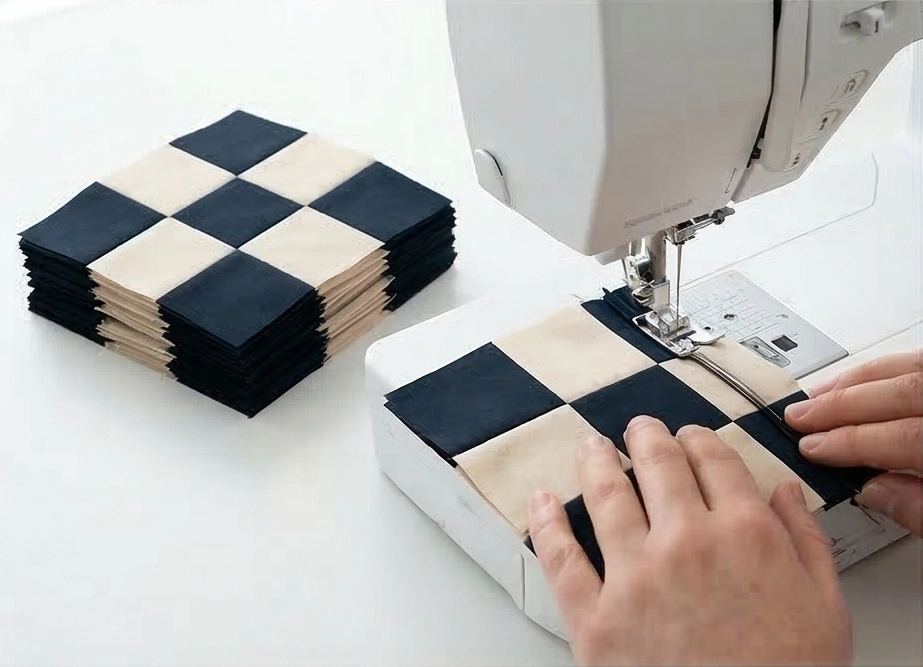
Step 4: Assembling the Nine Patch Block
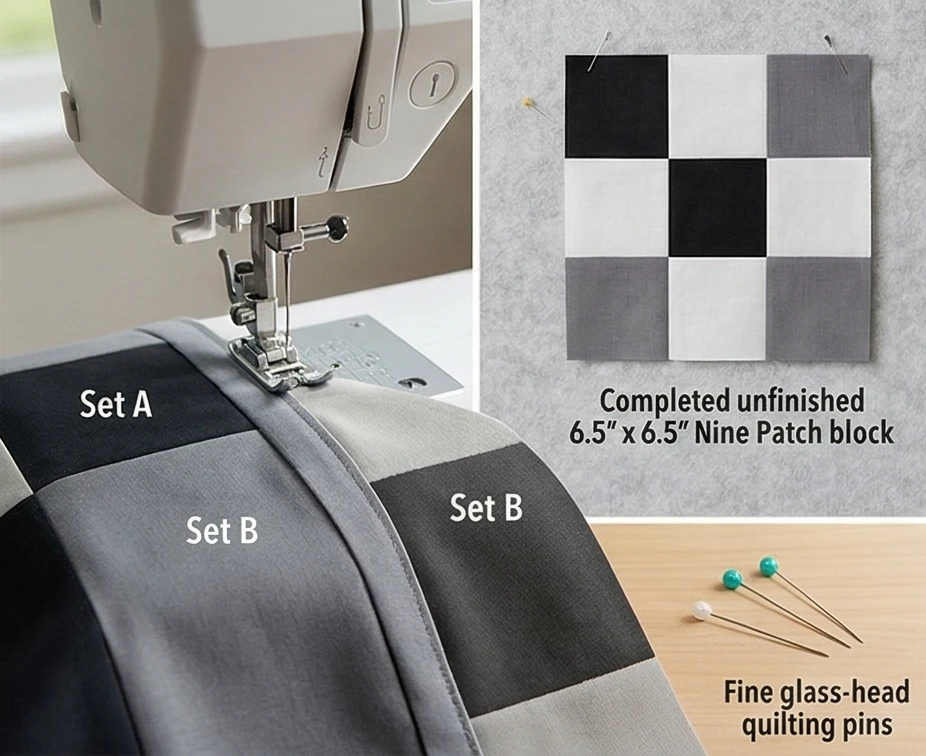
To build a single Nine Patch block, you need two segments cut from Set A and one segment cut from Set B. Lay them out in a square: Set A on top, Set B in the middle, and Set A on the bottom. Because you pressed your seams toward the dark fabrics in Step 2, the seams of these segments will naturally “lock” or “nest” together. Pin them securely and sew them together. Your unfinished Nine Patch block will measure exactly 6.5″ x 6.5″. Repeat to create 128 Nine Patch blocks.
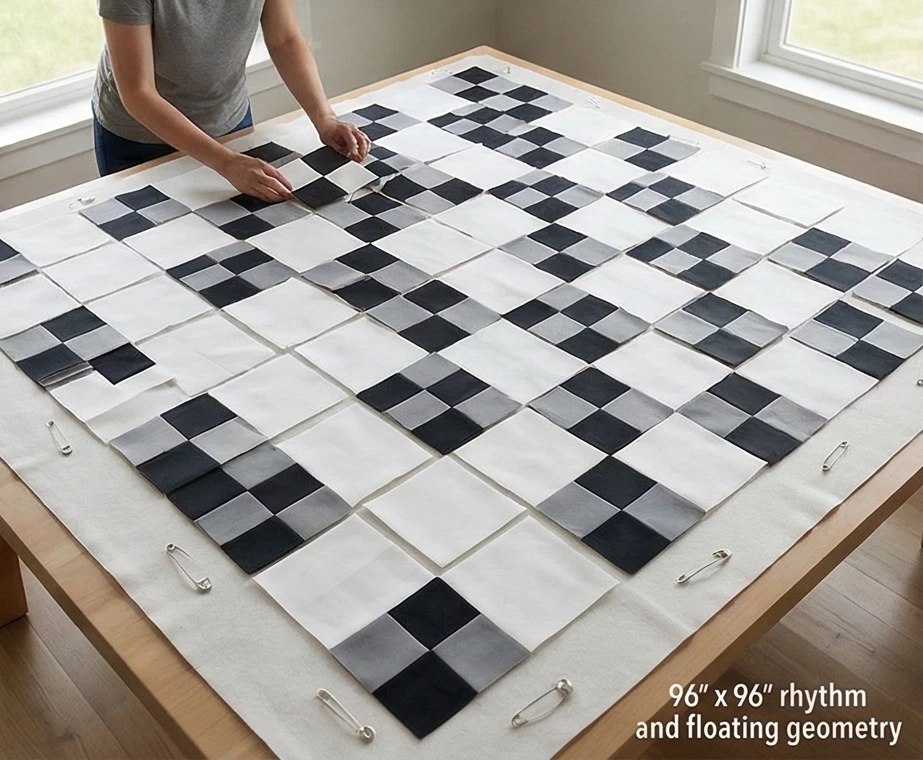
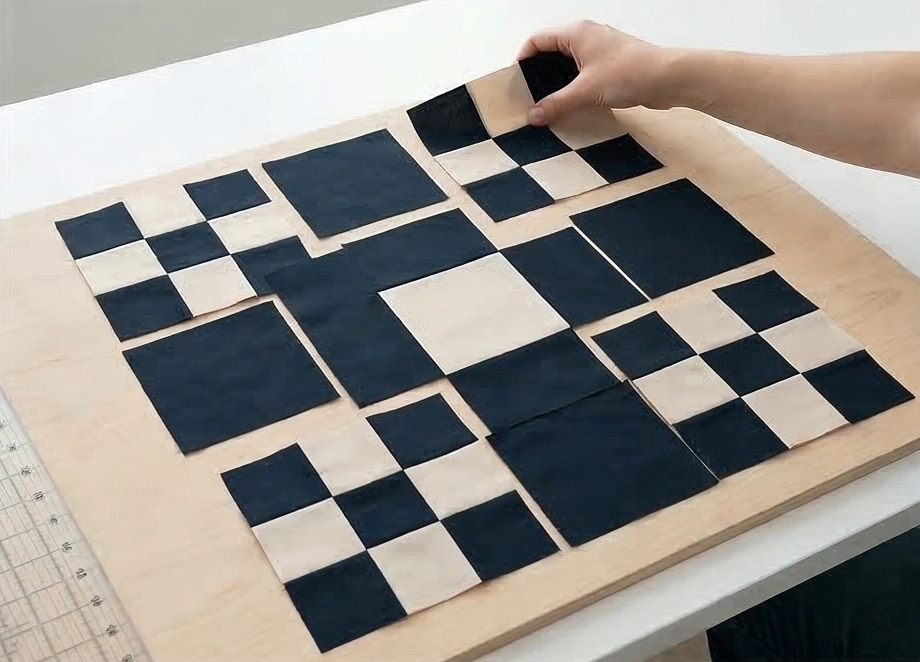
Step 5: Assembly Section (Building the Checkerboard Quilt Top)
To create the modern, floating elegance of this bedspread, we use an alternate grid layout.
- Row 1: Sew a Nine Patch block, then a solid 6.5″ background square, then a Nine Patch, and so on, until the row has 16 blocks total.
- Row 2: Start with a solid 6.5″ background square, then a Nine Patch, alternating to complete 16 blocks.
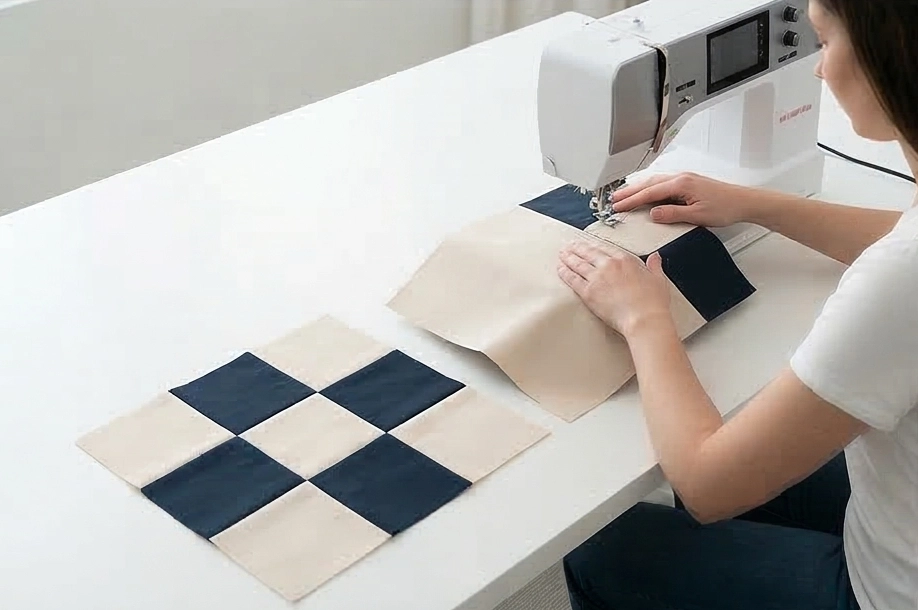
- Join the Rows: Build 16 rows total, alternating Row 1 and Row 2 to create a massive checkerboard pattern. Sew the horizontal rows together, pinning at every seam intersection to ensure sharp, perfect corners. The quilt top will finish at a stunning 96″ x 96″.
Step 6: Basting, Quilting, and Binding
- Baste: Tape your 108″ wide backing fabric face down and taut on the floor. Center your bamboo batting over it, and lay your pieced quilt top face up. Pin the three layers together thoroughly using curved safety pins.
- Quilt: To complement the modern, geometric aesthetic, I recommend straight-line quilting. Stitching long, continuous parallel lines vertically and horizontally across the quilt creates a sophisticated “grid” texture that looks impeccably tailored on a bed.
- Bind: Cut your binding fabric into 2.5″ strips, join them end-to-end, fold in half, press, and sew to the perimeter of your quilt to enclose the raw edges with a crisp finish.
Usability Note: The alternate grid layout using solid squares is not just an aesthetic choice; it dramatically reduces the overall weight and stiffness of the pieced seams. This ensures the oversized bedspread maintains a remarkably fluid, comforting drape. Wash on a cool, gentle cycle with mild detergent, and tumble dry on low to allow the bamboo batting to slightly shrink and pull the fabric into a luxuriously soft, crinkled texture that resists deep wrinkling between washes.

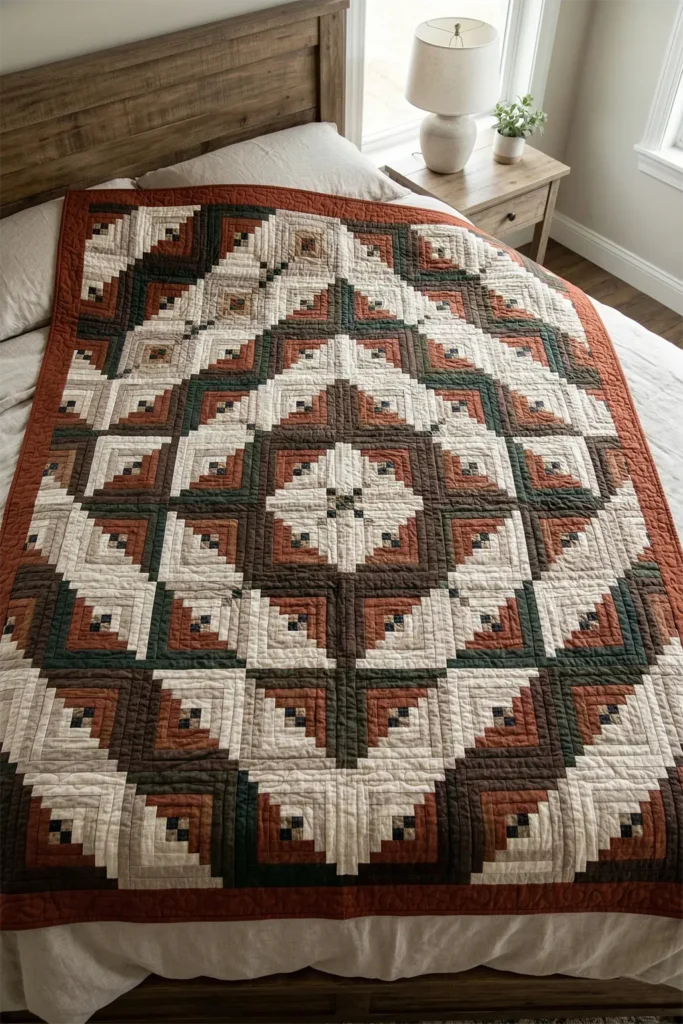
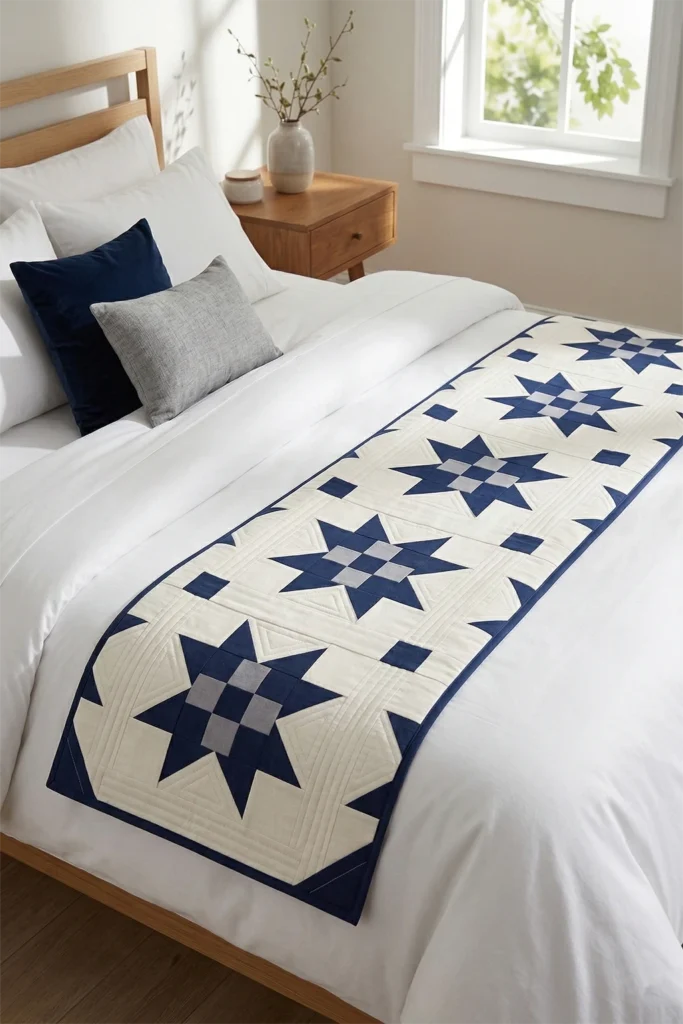
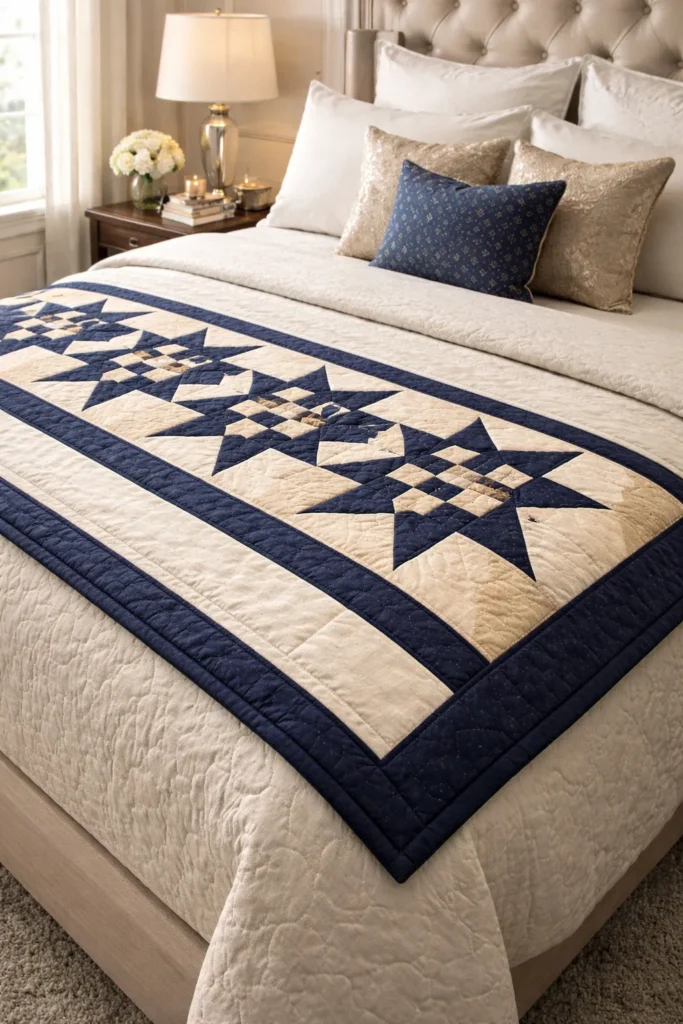
6. Elegant Star Pattern Intersected Nine Patch Bed Runners
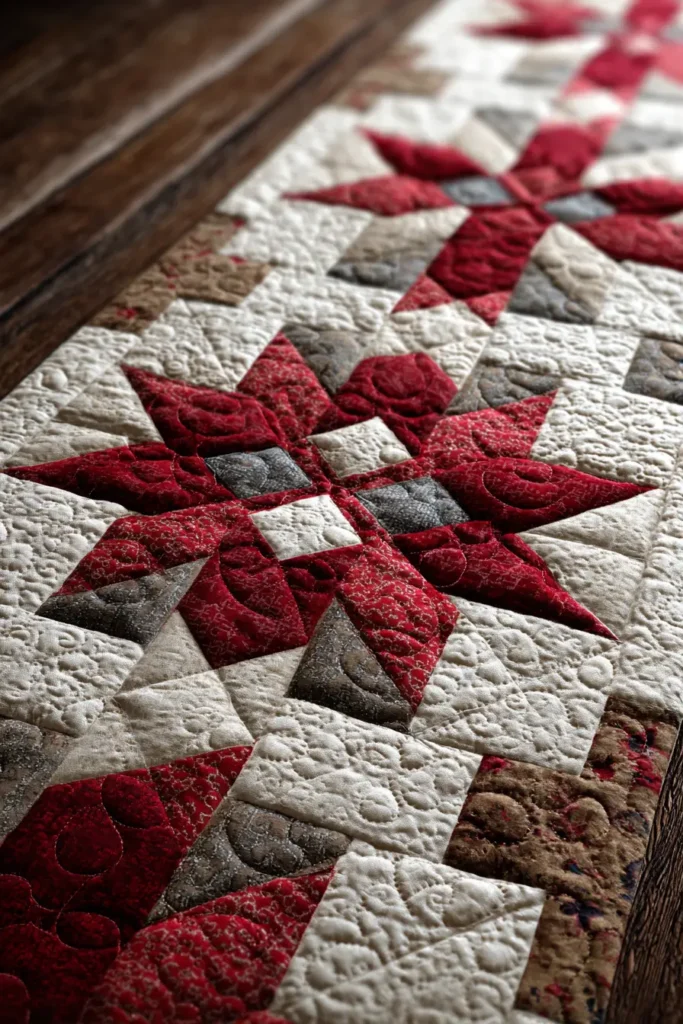
Elegant Star Pattern Intersected Nine Patch Bed Runners
A fully quilted bedspread is a magnificent undertaking, but sometimes a room calls for a more targeted touch of luxury. The Star Pattern Intersected Nine Patch Bed Runner is the ultimate designer secret for elevating a master suite. By placing a traditional Nine Patch block directly into the center of a classic Sawtooth Star, you create a complex, dazzling intersection of geometry. Draped across the foot of the bed, this runner adds a bespoke, five-star hotel aesthetic and an extra layer of targeted warmth exactly where you need it.
Why I Designed This Guide (and the Heritage of the Intersecting Block)
I designed this specific pattern because a bed runner offers high visual impact with a fraction of the time commitment of a full-scale quilt. It is the perfect canvas for intricate, show-stopping blocks. Historically, the Sawtooth Star dates back to the mid-1800s and was often used in pioneer quilts as a symbol of the North Star—representing guidance, safe travels, and destination. The Nine Patch, conversely, is the ultimate symbol of the hearth and domestic life. By intersecting them—placing the home directly in the center of the guiding star—this pattern weaves a beautiful, subtle narrative of “finding your way home.” Wrapping this rich history in a sleek, modern color palette results in unparalleled elegance.
Focus on Usability, Comfort, and Elegance
- Usability: A bed runner is highly manageable to machine-quilt on a standard domestic sewing machine, making this an accessible project that finishes beautifully without frustration.
- Comfort: Placed at the foot of the bed, it provides a crucial layer of extra warmth for your feet on chilly winter nights without overheating you under the main duvet.
- Elegance: To achieve maximum sophistication, skip the loud novelty prints. Opt for a shimmering palette of metallic champagne, deep midnight navy, and crisp ivory. Framing the intricately pieced stars with wide, solid borders gives the eye a place to rest and frames the runner like a piece of fine art.
Measurements & Materials Needed
Finished Runner Size: Elegant Queen/King (approx. 24″ x 84″) Finished Block Size: 12″ x 12″ (12.5″ x 12.5″ unfinished). This runner requires exactly 6 blocks.
Materials Needed:
- Fabric for blocks: * For Nine Patch Centers: 54 squares cut to 2.5″ x 2.5″ (mixed darks and mediums).
- For Star Points: 24 rectangles cut to 3.5″ x 6.5″ (background ivory) and 48 squares cut to 3.5″ x 3.5″ (star color, e.g., navy).
- For Block Corners: 24 squares cut to 3.5″ x 3.5″ (background ivory).
- For Borders: 1.5 yards of solid border fabric.
- Backing fabric: 2.5 yards of premium 44″ cotton, seamed to fit, or a single length of wide-backing fabric.
- Batting: 30″ x 90″ low-loft 100% cotton or silk-blend batting.
- Thread: High-quality, 50-weight 100% cotton piecing and quilting thread in a coordinating neutral.
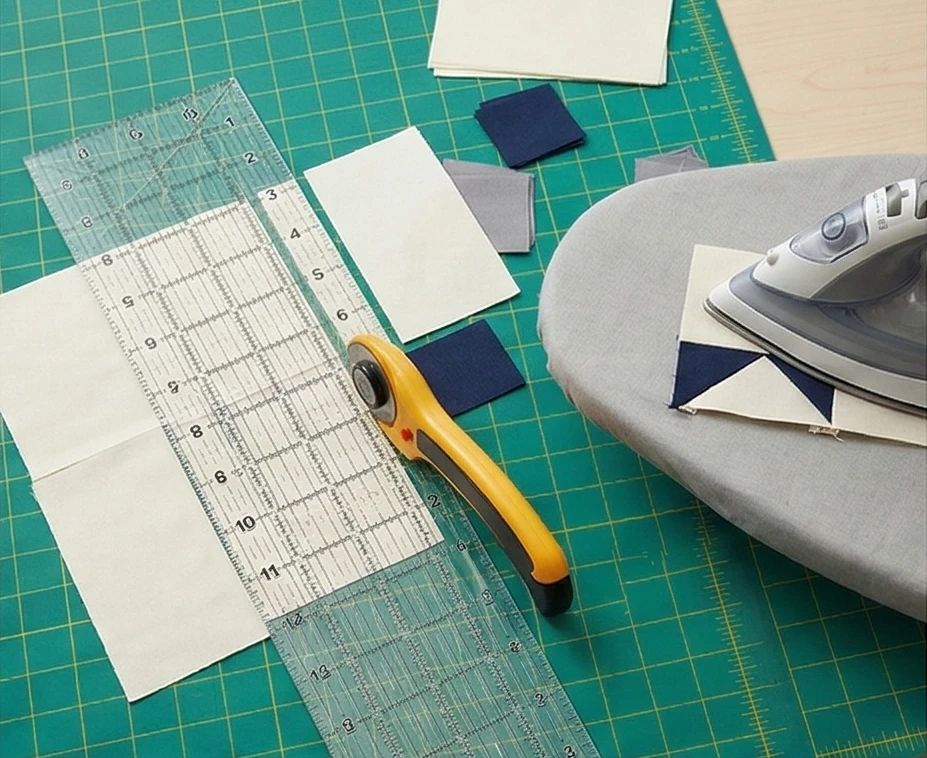
- Quilting ruler: A 6″ x 24″ acrylic ruler for precise, straight cutting and squaring up.
- Rotary cutter: Equipped with a fresh, sharp blade to ensure the star points are cut perfectly crisp.
- Quilting pins: Fine glass-head pins for precise piecing, and curved safety pins for basting the layers.
- Iron and ironing board: Absolutely essential for pressing seams flat and ensuring the intersecting points remain sharp.
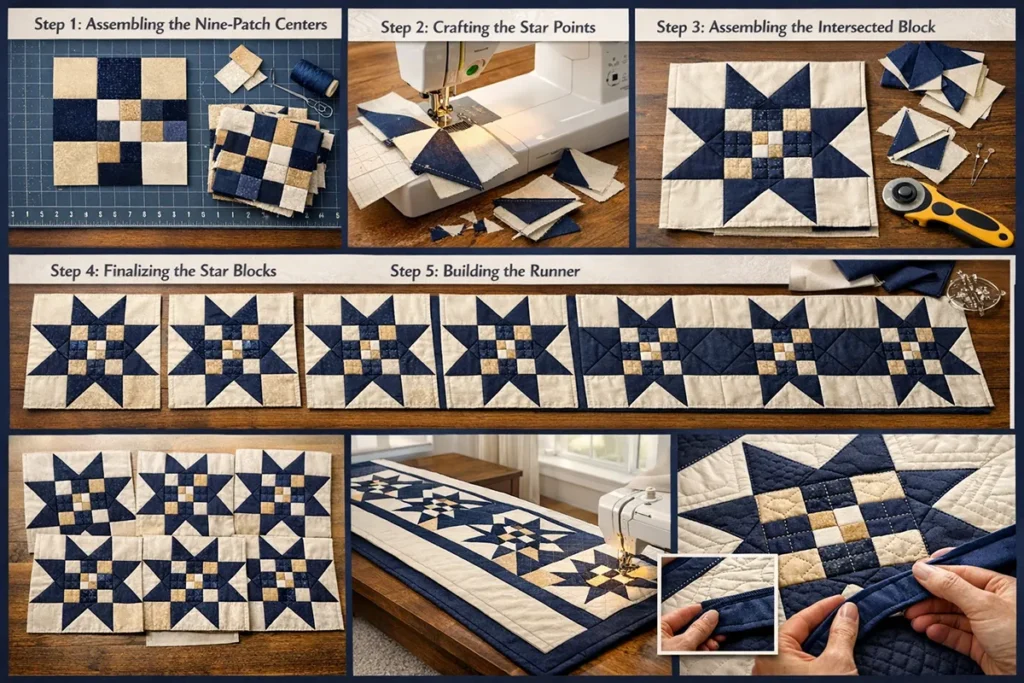
Step-by-Step Guide: The Star Intersected Nine Patch
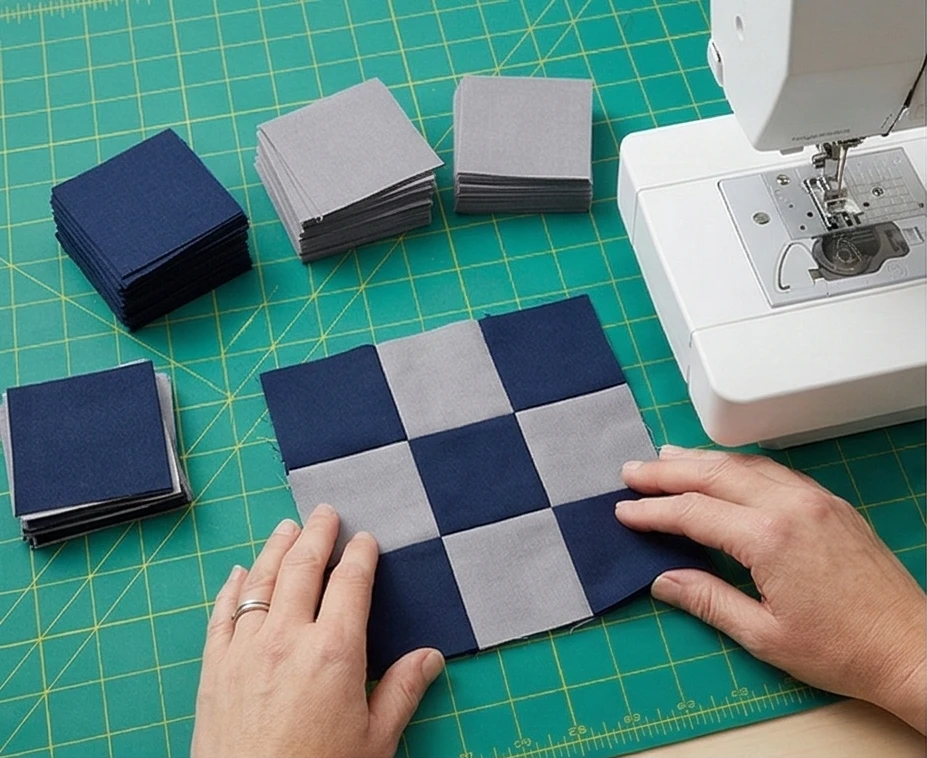
Step 1: Assembling the Nine-Patch Centers
Take your 2.5″ squares and lay out six separate 3×3 grids. Sew the squares in each row together using a precise 1/4-inch seam allowance. Press the seams of Rows 1 and 3 outward, and Row 2 inward so they nest perfectly. Join the three rows to complete the center block. Your unfinished Nine Patch centers will measure 6.5″ x 6.5″.
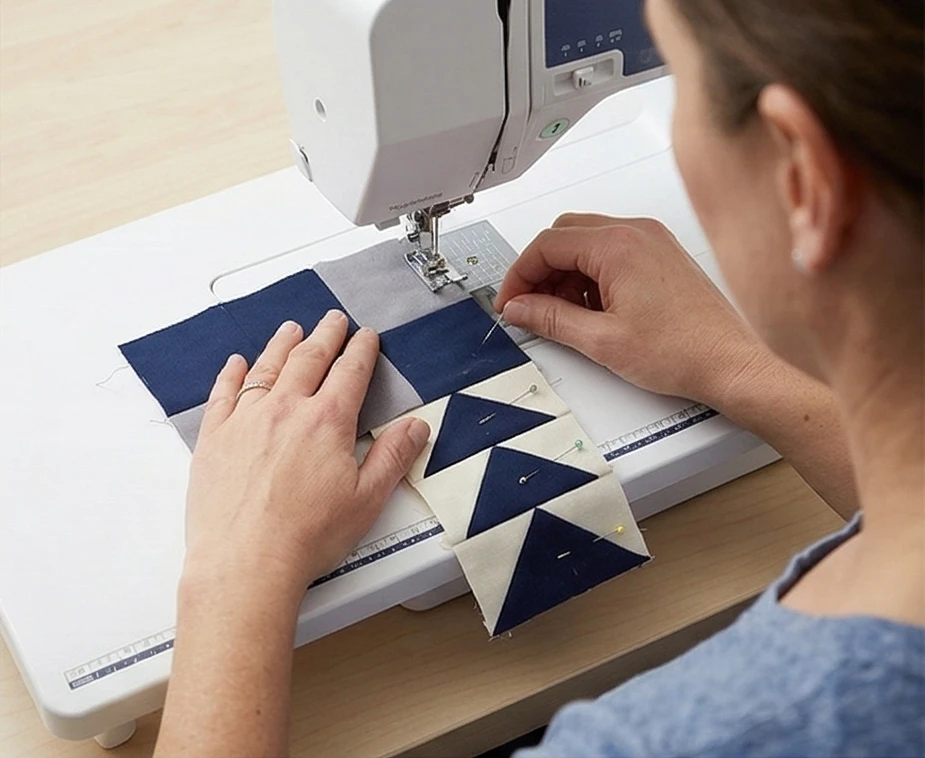
Step 2: Crafting the Star Points (Flying Geese)
We will use the “stitch and flip” method for the star points. Take one 3.5″ x 6.5″ background rectangle and place a 3.5″ colored star square face down on the right side. Draw a diagonal line from corner to corner on the back of the small square. Sew directly on that line. Trim the excess fabric 1/4-inch away from the seam and press the colored triangle open. Repeat this on the left side of the rectangle to form a “V” shape. Make 24 of these Flying Geese units. They should measure 3.5″ x 6.5″ unfinished.
Step 3: Assembling the Intersected Block
Now, treat the Nine Patch like the center of a traditional nine-grid block.
- Top Row: Sew a 3.5″ background square to each side of a Flying Geese unit (pointing upward).
- Middle Row: Sew a Flying Geese unit (pointing left) to the left side of your Nine Patch center, and another (pointing right) to the right side.
- Bottom Row: Sew a 3.5″ background square to each side of a Flying Geese unit (pointing downward). Press your seams away from the bulky Flying Geese units.
Step 4: Finalizing the Star Blocks
Sew the Top Row to the Middle Row, and then add the Bottom Row. Pin carefully where the seams intersect to ensure your star points meet the corners of your Nine Patch flawlessly. Press the final block flat. Your stunning Intersected Star block will measure 12.5″ x 12.5″ unfinished. Repeat to complete all 6 blocks.
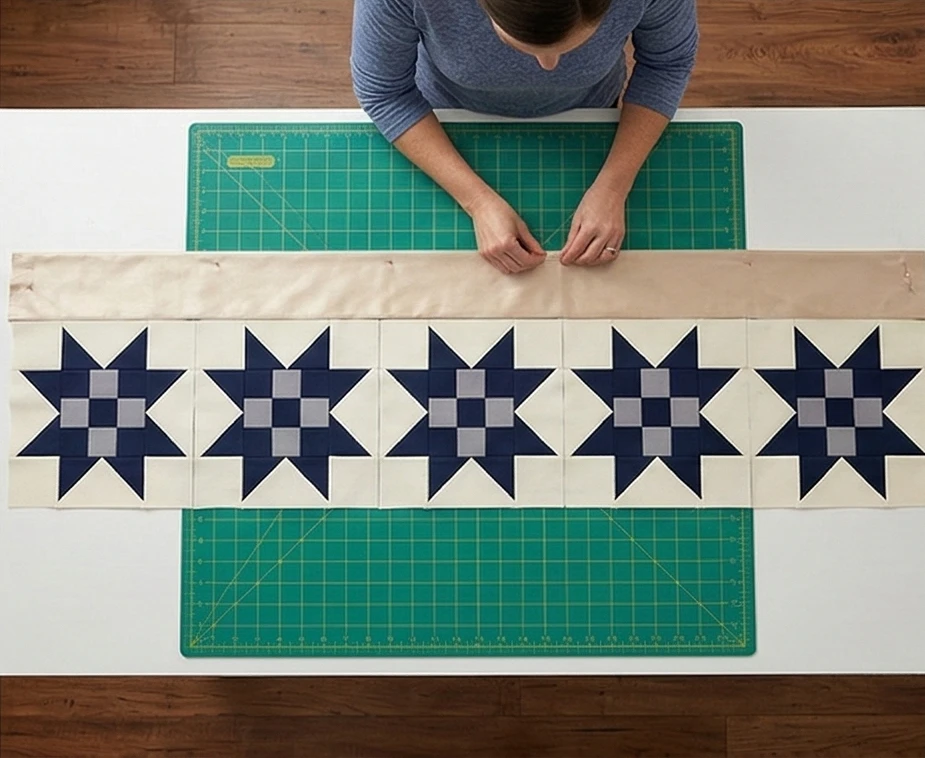
Step 5: Assembly Section (Building the Runner)
- The Core Row: Sew all 6 of your star blocks together in a single, horizontal row. Press the joining seams open to reduce bulk. The row will measure 12.5″ x 72.5″.
- The Framing Borders: Cut two strips measuring 6.5″ x 72.5″ from your border fabric. Sew these to the top and bottom of your star row.
- The End Borders: Cut two strips measuring 24.5″ x 6.5″ and sew them to the runner’s short left and right ends. The borders brilliantly frame the complex stars, bringing the runner to its final unfinished size of 24.5″ x 84.5″.
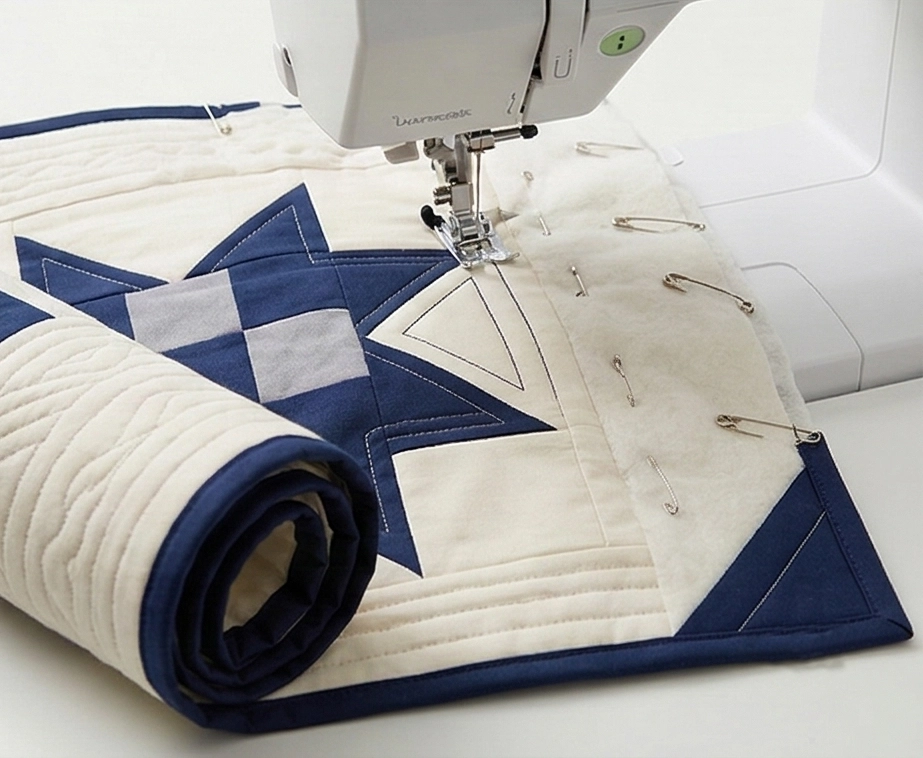
Step 6: Basting, Quilting, and Binding
- Baste: Tape your backing fabric face down on a flat surface. Layer the cotton batting on top, followed by the pieced runner top (face up). Pin heavily with curved safety pins.
- Quilt: To emphasize the elegance of this design, perform “echo quilting.” Stitch continuous lines exactly 1/4-inch inside and outside the perimeter of the majestic stars. This presses the background down, making the intricate Nine Patch stars puff up beautifully in bas-relief.
- Bind: Cut your binding fabric into 2.5″ strips, join them end-to-end, press in half, and sew tightly around the perimeter. Miter the corners for a crisp, professional, tailored finish.
Usability Note: A bed runner experiences different wear than a full quilt, often being folded, pulled, or sat upon at the edge of the bed. The dense echo quilting around the stars locks the layers together securely, ensuring the batting will never shift or bunch. To keep the runner looking pristine and the colors vibrant, spot-clean when necessary, and machine-wash on a cold, delicate cycle only once or twice a year. Lay flat to dry, then press lightly with a warm iron to restore its crisp, luxurious drape.
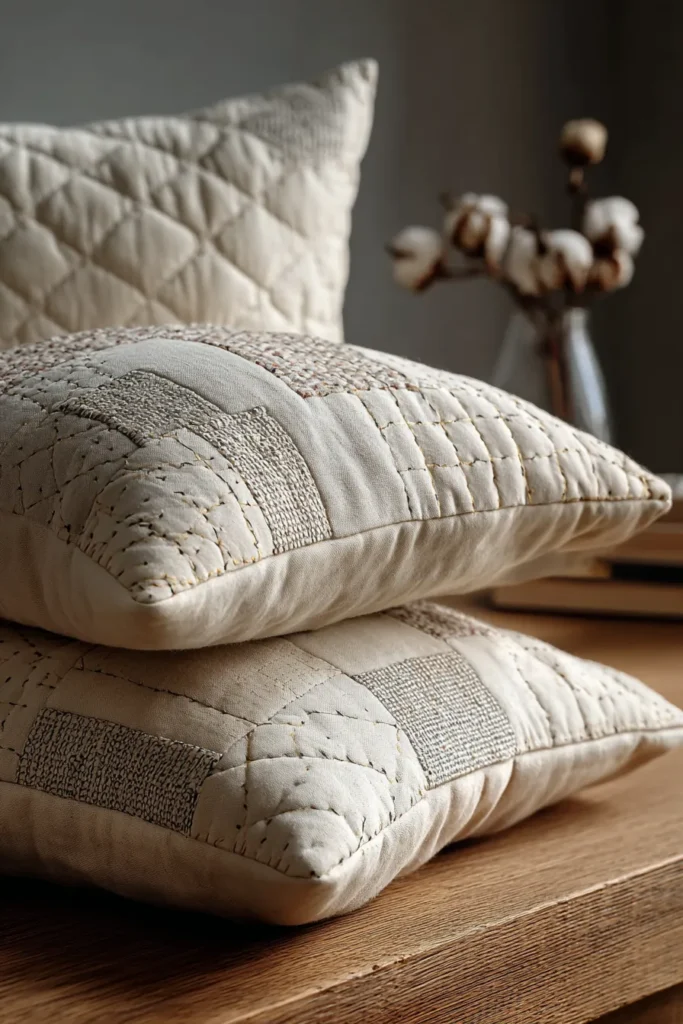
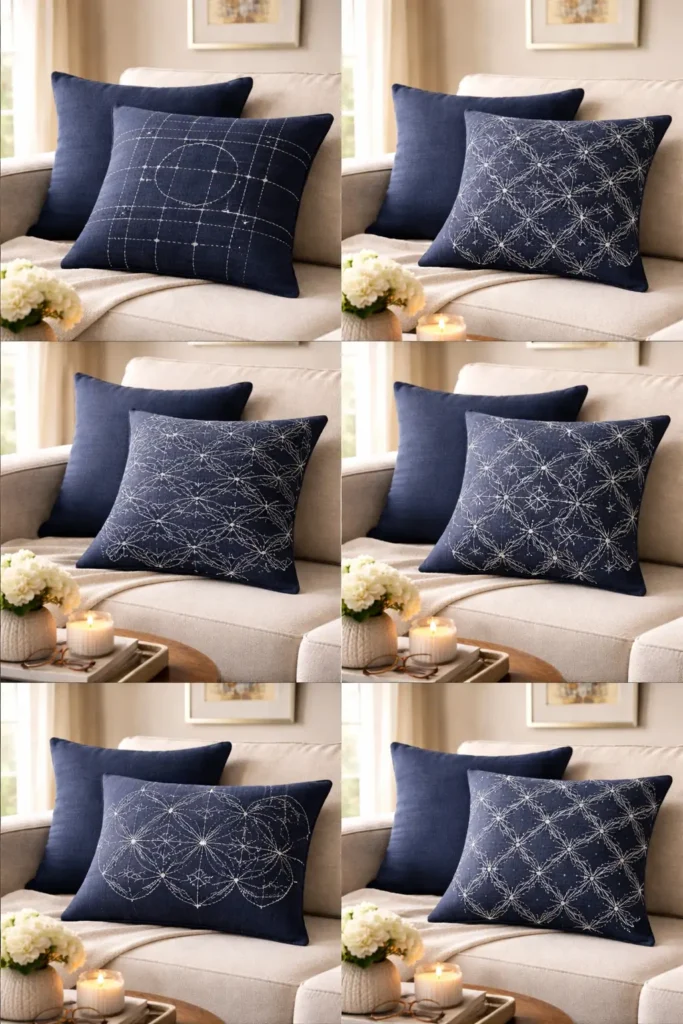
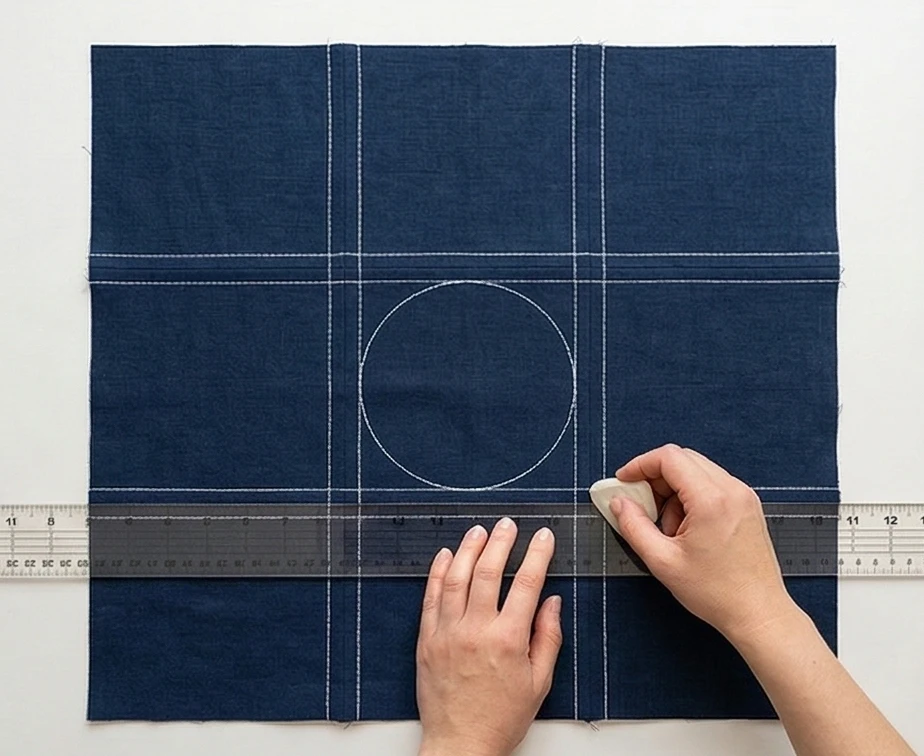
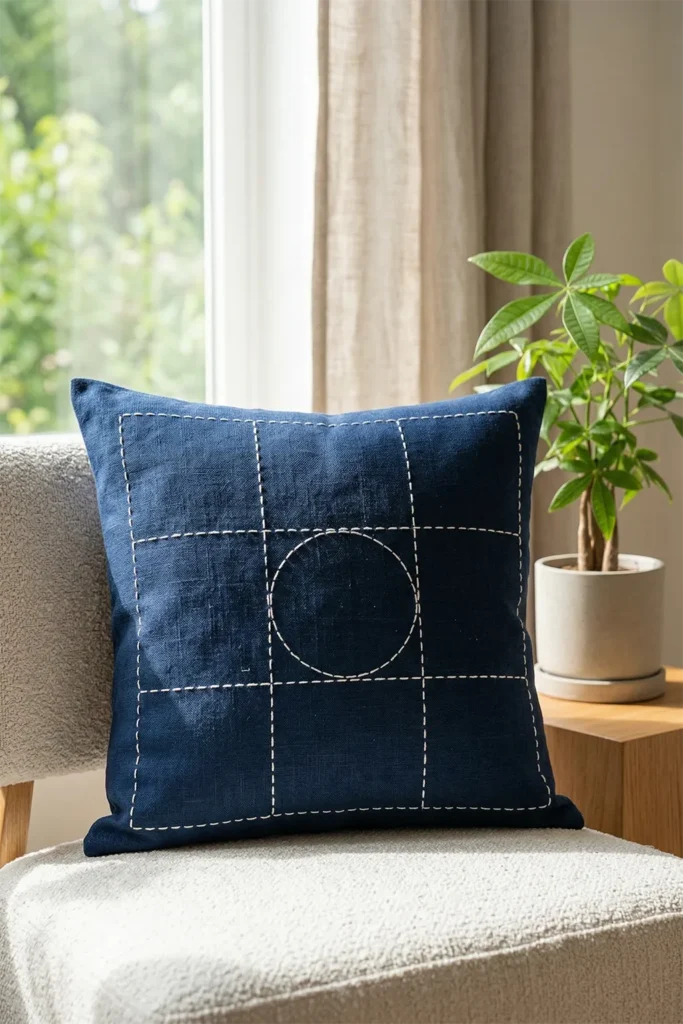
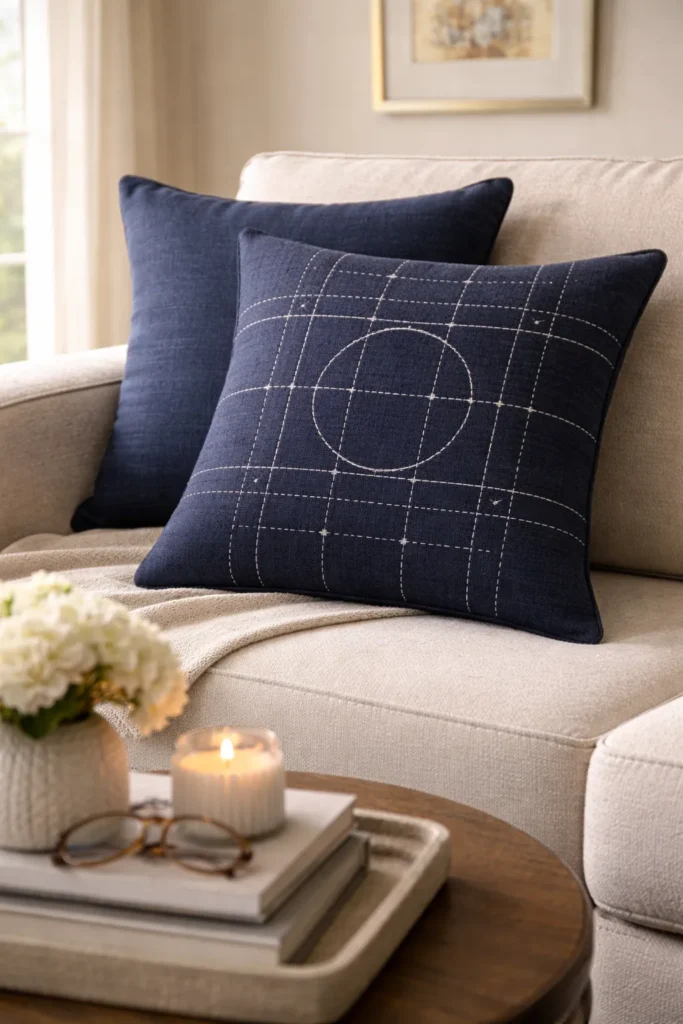
7. Japanese Sashiko Inspired Nine Patch Pillow Covers for a Zen Aesthetic
Japanese Sashiko Inspired Nine Patch Pillow Covers for a Zen Aesthetic
Bringing elegance into a home often means stripping away the excess and focusing entirely on texture, quality, and intention. The Japanese Sashiko Inspired Nine Patch pillow cover represents the pinnacle of minimalist design. By taking the classic Western Nine Patch grid and rendering it entirely in deep, solid indigo, it transforms the block into a stark, beautiful canvas for the striking white geometry of traditional Japanese Sashiko stitching.
Why I Curated This Guide (and the History of Sashiko)
I designed this specific pattern to explore the beautiful intersection of two distinct, historically utilitarian textile traditions. The Nine Patch was the staple of American pioneer practicality, while Sashiko (meaning “little stabs”) originated in the Edo period of Japan as a way for working-class families to mend, reinforce, and warm worn clothing. Because thread was scarce, the stitching patterns were mathematically precise and profoundly beautiful. By fusing the structural grid of the Nine Patch with the striking white-on-indigo “little stabs” of Sashiko, this pattern honors a shared global history of resilience while delivering a textile that feels incredibly grounded, modern, and Zen.
Focus on Usability, Comfort, and Elegance
- Usability: An envelope-closure pillow cover is the most functional decor item you can make. It allows you to easily remove the cover for washing or to swap out seasonal textiles without needing to store bulky, filled pillows.
- Comfort: Sashiko is highly tactile. Using a heavyweight, yarn-dyed linen-cotton blend for the fabric and thick, twisted Pearl cotton for the stitching creates a deeply textured, raised surface that is incredibly soothing to trace with your fingers.
- Elegance: A Zen aesthetic relies on deep contrast and impeccable neatness. The stark visual of heavy, matte white thread sinking into dark, moody indigo blue creates an atmosphere of serene, uncluttered sophistication in any living room or bedroom.
Measurements & Materials Needed
Finished Pillow Size: Elegant Throw Cushion (18″ x 18″) Finished Block Size: 18″ x 18″ (made from nine 6″ finished squares)
Materials Needed:
- Fabric for blocks: 9 squares total, cut to 6.5″ x 6.5″ from a premium, dark Indigo or Navy linen-cotton blend.
- Backing fabric (Envelope Back): Two rectangles cut to 18.5″ x 13″ from the same Indigo linen-cotton blend.
- Batting/Interfacing: One 20″ x 20″ square of lightweight muslin or ultra-thin cotton batting. (This sits behind the pillow front to anchor the heavy Sashiko thread, preventing the stitches from pulling the linen out of shape).
- Thread for Piecing: Standard 50-weight 100% cotton thread in matching dark indigo.
- Thread for Sashiko: High-quality, heavyweight white Sashiko thread, or Size 8 White Pearl Cotton.
- Quilting ruler: A 6″ x 24″ acrylic ruler for perfect square cuts and drafting your stitch lines.
- Rotary cutter: Equipped with a sharp blade for clean fabric edges.
- Quilting pins: Fine glass-head pins for piecing.
- Iron and ironing board: Essential for pressing the grid flat before hand-stitching.
- Additional Tools: A water-soluble fabric marking pen (or white tailor’s chalk) and a specialized Sashiko needle (which has a long shaft and a large eye for the thick thread).
Step-by-Step Guide: The Sashiko Nine Patch
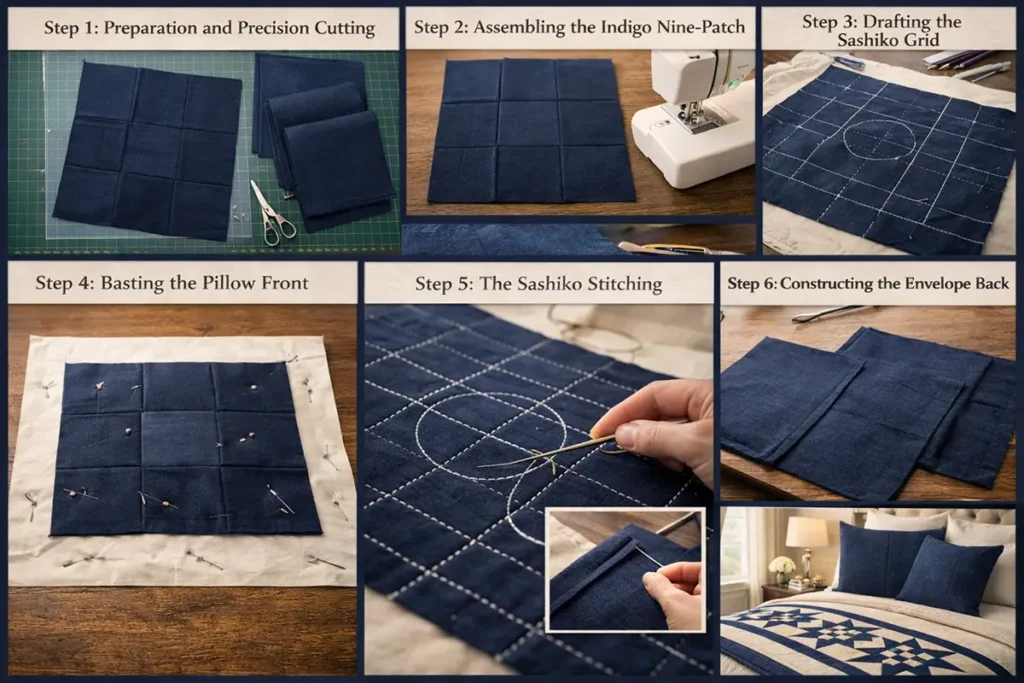
Step 1: Preparation and Precision Cutting
Using your rotary cutter and acrylic ruler, carefully cut your dark indigo linen into nine 6.5″ x 6.5″ squares. For the envelope backing, cut your two 18.5″ x 13″ rectangles and set them aside.
Step 2: Assembling the Indigo Nine-Patch
Take your 9 squares and lay them out in a 3×3 grid. Because they are all the same color, this step creates the subtle, architectural foundation of the pillow.
- Sew the squares in each row together using a precise 1/4-inch seam allowance.
- Press the seams of Rows 1 and 3 to the left, and the seams of Row 2 to the right.
- Join the three rows together, allowing the alternating seams to nest perfectly. Your unfinished, solid indigo Nine Patch front will measure exactly 18.5″ x 18.5″.
Step 3: Drafting the Sashiko Grid
Lay your pieced 18.5″ block face-up on a flat surface. Using your ruler and white tailor’s chalk, draft your Sashiko pattern. For a modern, minimalist look, use the seam lines of your Nine Patch as your anchor. Draw continuous straight lines exactly 1/4-inch on either side of every seam line (creating a grid). For an added touch of Zen geometry, draw a single, large circle right in the center block.
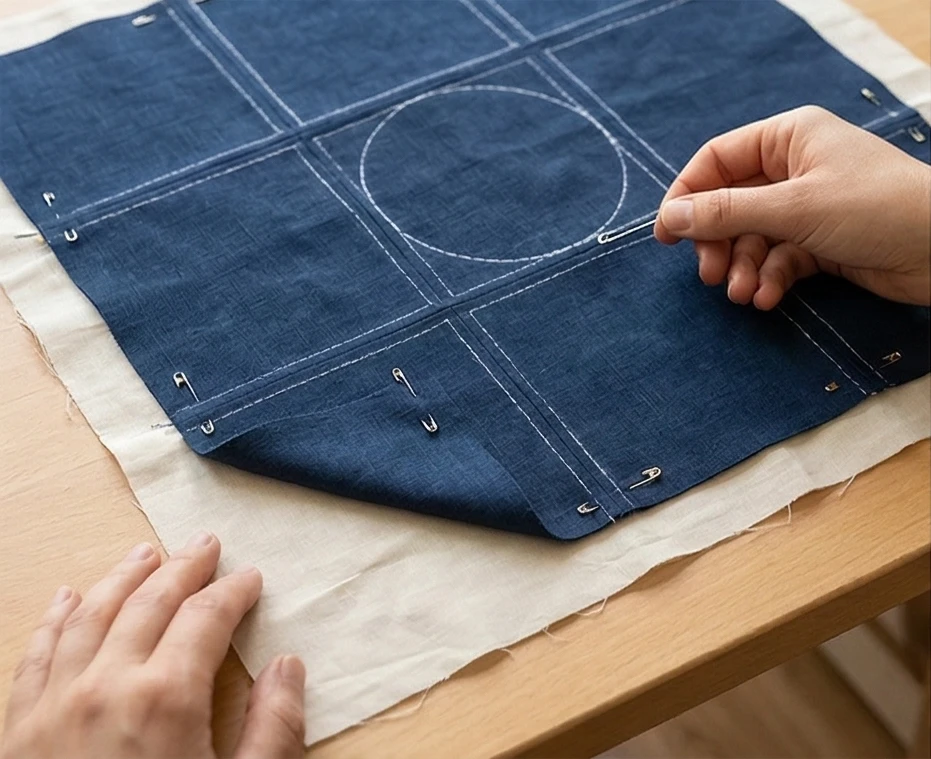
Step 4: Basting the Pillow Front
Place your 20″ x 20″ square of muslin or thin batting flat on the table. Center your chalk-marked indigo Nine Patch directly on top of it, face up. Pin the two layers together using safety pins. Do not add a backing layer to this sandwich; you need access to the back of the muslin to knot your heavy thread.
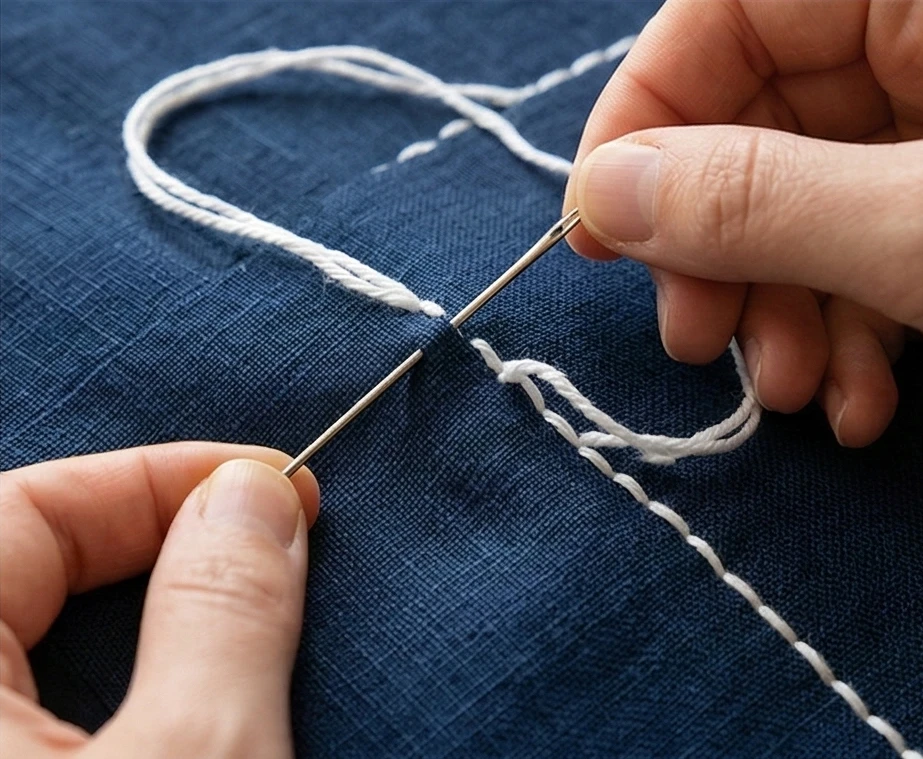
Step 5: The Sashiko Stitching (The “Little Stabs”)
Thread your long Sashiko needle with the heavy white thread.
- Starting from the back (the muslin side), bring your needle up to the front on one of your chalk lines.
- The key to Sashiko is the “running stitch.” Load multiple stitches onto the long needle before pulling the thread through.
- Ensure your stitches are perfectly uniform. Traditionally, the stitch on the surface of the fabric is slightly longer than the space between the stitches (a 3:2 ratio).
- Follow your chalked grid lines and the center circle, pulling the thread taut enough to lay flat, but not so tight that the linen puckers.
Step 6: Assembly Section (Constructing the Envelope Back)
- Hem the Backing: Take your two 18.5″ x 13″ backing rectangles. On one 18.5″ edge of each rectangle, fold the fabric down 1/2 inch, press, fold another 1/2 inch, press, and topstitch to create a clean, finished hem.
- Layer the Pillow: Lay your beautifully stitched 18.5″ x 18.5″ Sashiko front panel face up. Place the two backing rectangles face down on top of it, ensuring the hemmed edges overlap in the center by several inches to create the envelope opening. Pin the entire outer perimeter.
- Sew and Turn: Sew around the entire 18.5″ perimeter with a 1/4-inch seam allowance. Clip the four corners diagonally to reduce bulk, turn the cover right-side out through the envelope opening, and use a chopstick to push the corners out crisply. Insert an 18″ x 18″ plush pillow form.

Usability Note: The heavy Pearl cotton or Sashiko thread is incredibly durable, but it can catch on sharp objects, such as jewelry. To clean this elegant cover, remove the pillow insert and hand-wash or machine-wash on a delicate, cold water cycle. Lay it completely flat to air dry. Iron the cover gently from the back (inside the envelope) on a medium heat setting to restore the crispness of the linen without flattening the beautiful raised texture of your Sashiko stitches.
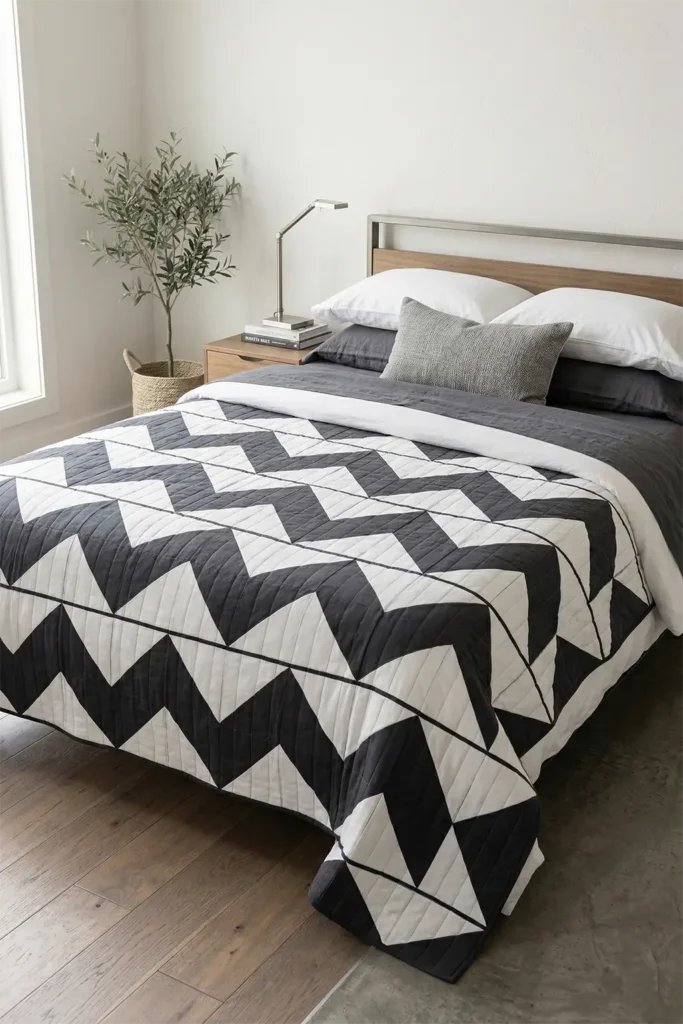
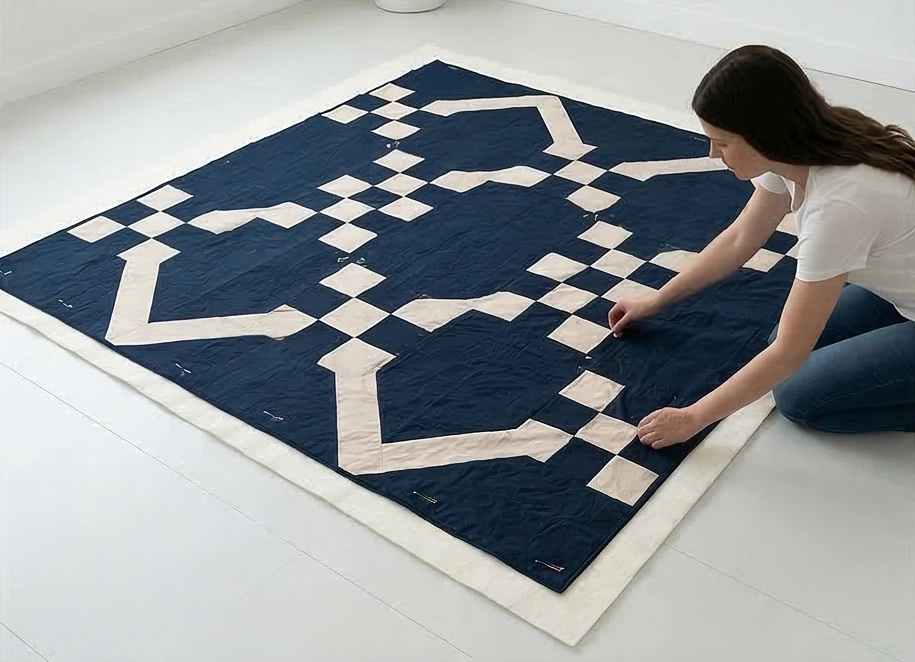
8. Split Nine Patch Bed Quilts for Contemporary Style and Comfort
Split Nine Patch Bed Quilts for Contemporary Style and Comfort
If you love the mathematical precision of traditional quilting but crave a layout that feels dynamic and modern, the Split Nine Patch is an absolute revelation. By replacing just three solid squares in a standard Nine Patch block with Half-Square Triangles (HSTs), you effectively “split” the block diagonally. When multiple blocks are sewn together, this simple geometric shift creates breathtaking, sweeping secondary patterns—like chevrons, zigzags, or cascading diamonds—that bring unparalleled contemporary movement to a bedroom.
Why I Designed This Guide (and the History of the Split Block)
I designed this specific pattern because it is the ultimate “trick of the eye” in textile art. Historically, the traditional Nine Patch was rooted in absolute stillness; it was a static, dependable grid that represented the stability of the home. Quilters later began introducing the Half-Square Triangle—a shape born out of the need to piece irregular fabric scraps together—to add movement without losing that reliable nine-grid structure. By strictly controlling the placement of color in this split variation, we take a historically scrappy, utilitarian technique and transform it into a sleek optical illusion. I curated this guide to give you a striking, modern centerpiece that feels sophisticated, intentional, and entirely bespoke.
Focus on Usability, Comfort, and Elegance
- Usability: We use the “two-at-a-time” method to create Half-Square Triangles. This ensures you aren’t dealing with stretchy bias edges until the square is safely sewn, making the construction fast, accurate, and incredibly user-friendly.
- Comfort: Contemporary style shouldn’t mean stiff or uninviting. By utilizing high-thread-count premium quilting cottons and a mid-weight 100% cotton batting, this quilt achieves a wonderful, breathable drape that provides comforting weight without trapping excess heat.
- Elegance: Contemporary elegance relies on high contrast and clean lines. Choose a strict two-color palette—such as deep charcoal and stark white, or rich emerald green and soft linen. This minimalist approach allows the dynamic zigzag geometry to take center stage, beautifully anchoring your bedroom’s aesthetic.

Measurements & Materials Needed
Finished Quilt Size: Large Throw / Double (approx. 72″ x 84″) Finished Block Size: 12″ x 12″ (12.5″ x 12.5″ unfinished). This quilt requires 42 blocks (arranged in 6 columns and 7 rows).
Materials Needed:
- Fabric for blocks: * Dark Fabric (e.g., Charcoal): 2.5 yards. You will cut 126 squares at 4.5″ x 4.5″, and 63 squares at 5″ x 5″.
- Light Fabric (e.g., White): 2.5 yards. You will cut 126 squares at 4.5″ x 4.5″, and 63 squares at 5″ x 5″.
- Backing fabric: 5 yards of standard 44″ premium cotton, or 2.5 yards of 108″ wide-backing fabric.
- Binding: 5/8 yard of coordinating dark fabric.
- Batting: 80″ x 90″ mid-loft 100% cotton batting.
- Thread: High-quality, 50-weight 100% cotton piecing and quilting thread in a coordinating neutral.
- Quilting ruler: A 6″ x 24″ acrylic ruler and a small 6.5″ square ruler for perfectly squaring up your triangles.
- Rotary cutter: Equipped with a fresh, sharp blade for flawless cuts.
- Quilting pins: Fine glass-head pins for piecing, and curved safety pins for basting.
- Iron and ironing board: Essential for pressing seams flat and setting your crisp geometric lines.
Step-by-Step Guide: The Split Nine Patch
Step 1: Preparation and Precision Cutting
Begin by cutting your fabrics according to the material list. Keep your 4.5″ solid squares separated by color. Take your 63 Light 5″ squares and use a pencil and ruler to draw a single diagonal line from corner to corner on the back (wrong side) of each one.
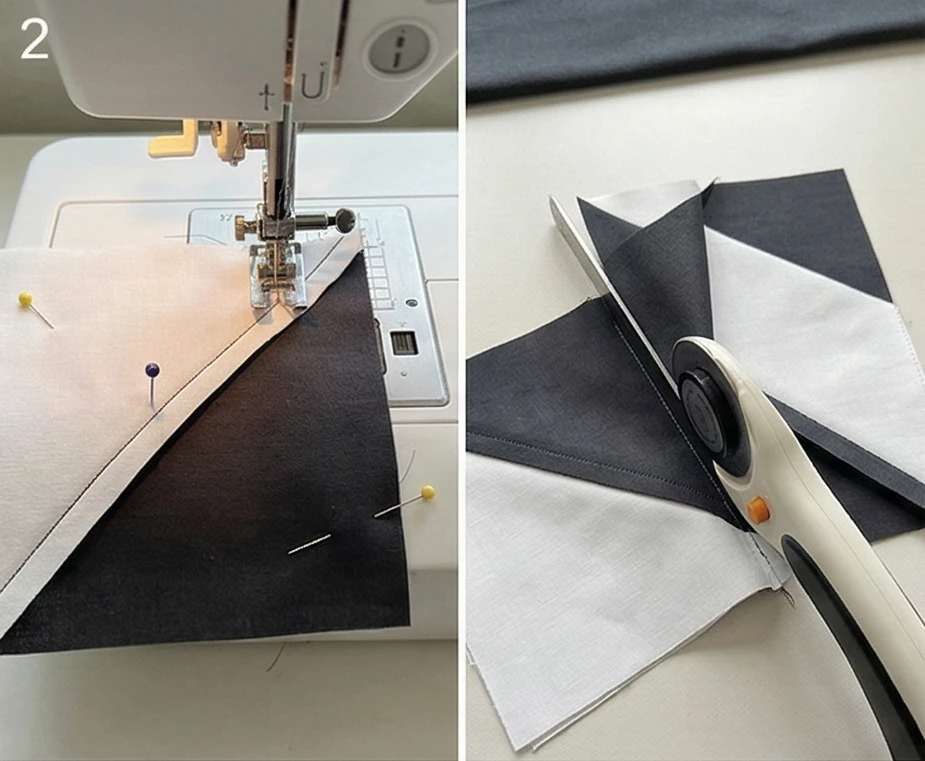
Step 2: Crafting the Half-Square Triangles (HSTs)
Pair each 5″ Light square with a 5″ Dark square, placing them right sides together. Pin them securely. Take them to your sewing machine and stitch exactly 1/4-inch away from the drawn line on BOTH sides. Once sewn, use your rotary cutter to slice directly down the drawn pencil line, separating the piece into two triangles. Press the pieces open (pressing the seam toward the dark fabric). You now have two beautiful two-toned squares! Repeat this process with all 63 pairs to yield exactly 126 HSTs.
Step 3: Trimming the HSTs for Absolute Precision
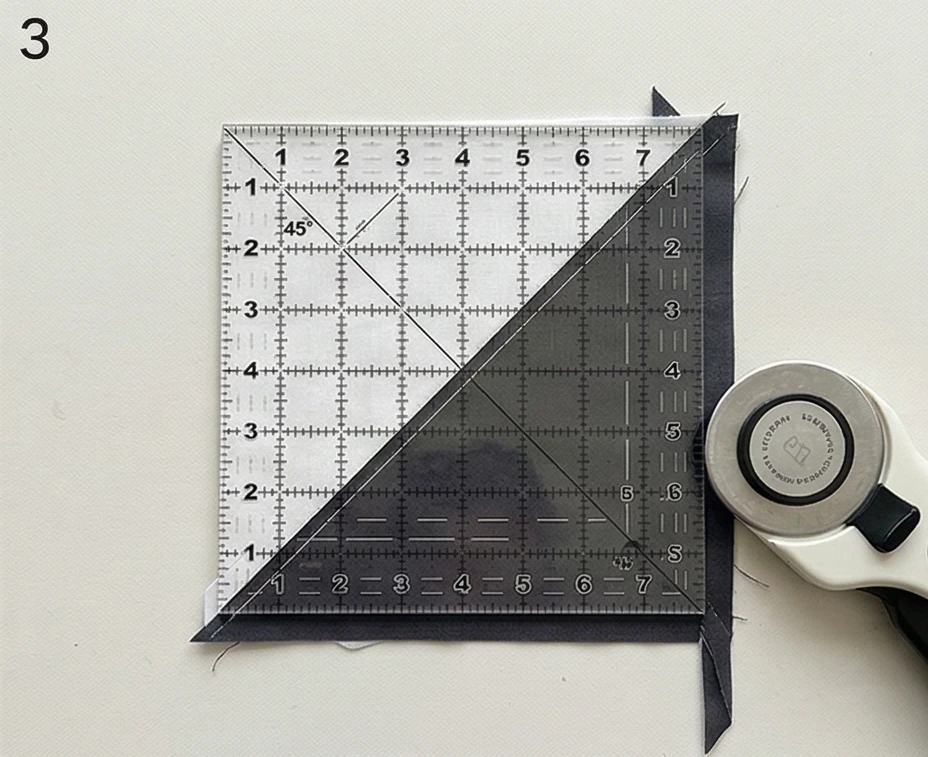
Because we made the HSTs slightly oversized (starting with 5″ squares), you now have room to trim them to perfection. Take your 6.5″ square acrylic ruler and align the 45-degree diagonal line on the ruler directly over the diagonal seam of your HST. Trim the edges so the block measures exactly 4.5″ x 4.5″. This step is the secret to a quilt with sharp, professional points.
Step 4: Assembling the Split Nine Patch Block
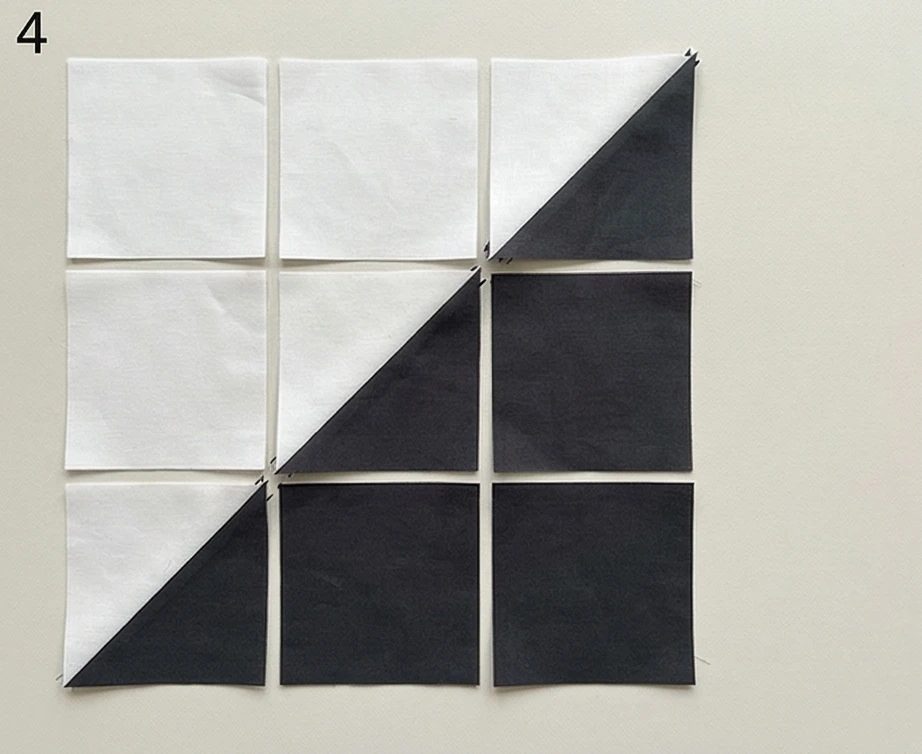
Lay out your 9 units (3 Light solids, 3 Dark solids, 3 HSTs) in a 3×3 grid to form the diagonal split:
- Row 1: Light Solid, Light Solid, HST (oriented with the Light half on the top-left, Dark half on the bottom-right).
- Row 2: Light Solid, HST (same orientation), Dark Solid.
- Row 3: HST (same orientation), Dark Solid, Dark Solid. Sew the units in each row together using a precise 1/4-inch seam allowance. Press Row 1 and 3 seams to the left, and Row 2 seams to the right. Join the three rows together, nesting the seams. Your unfinished block will measure exactly 12.5″ x 12.5″. Repeat to create all 42 identical blocks.
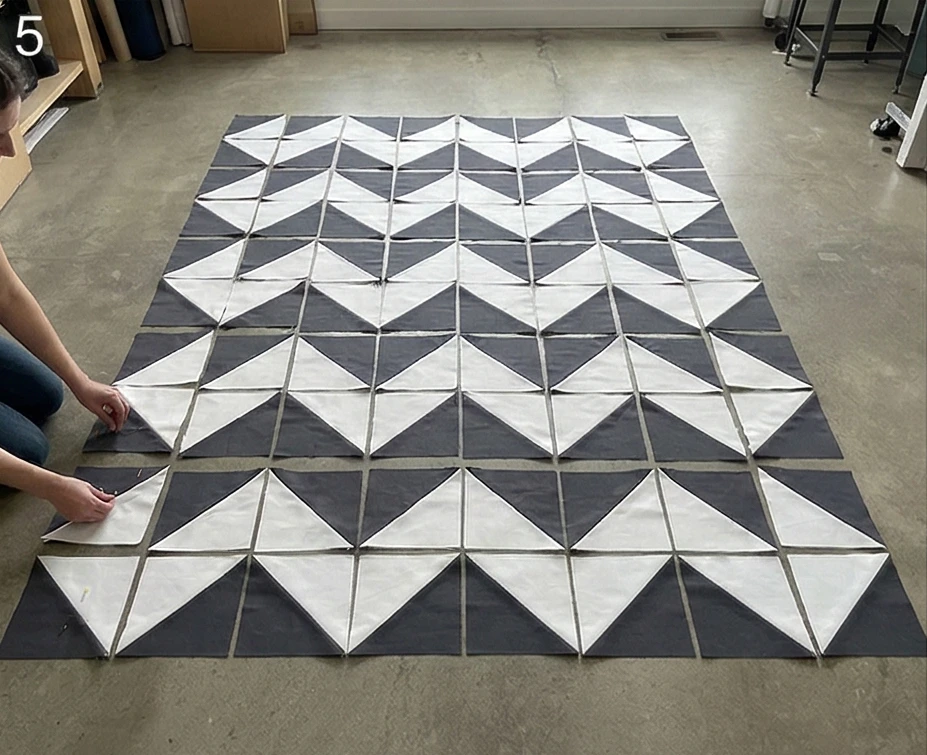
Step 5: Assembly Section (Building the Contemporary Chevron)
This is where the optical illusion comes to life.
- The Layout: Find a large floor space. Instead of laying all the blocks facing the same direction, you will rotate them to create a zigzag pattern.
- Row 1: Place the first block in its original orientation. Place the second block rotated clockwise by 90 degrees. Place the third block in the original orientation, and so on. This alternating rotation forces the dark and light diagonal halves to meet, forming a striking, continuous “mountain and valley” chevron wave across the width of the quilt.
- Join the Blocks: Once you are thrilled with the layout, sew the 6 blocks of each row together. Then, carefully pin and sew the 7 horizontal rows together, ensuring the diagonal points meet crisply at the intersections.
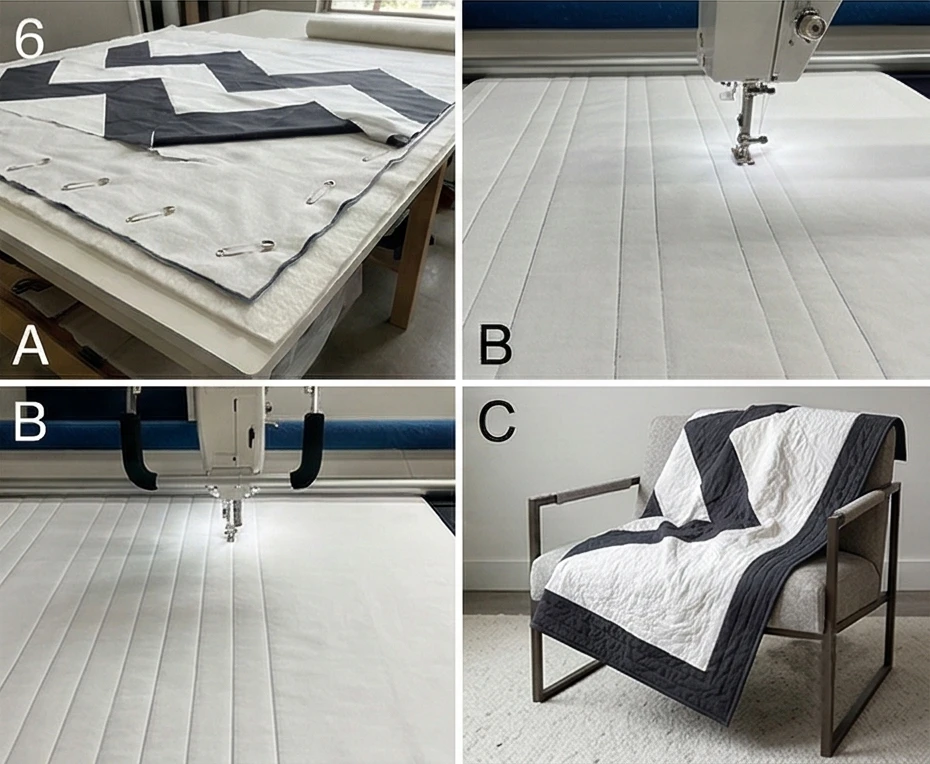
Step 6: Basting, Quilting, and Binding
- Baste: Lay your backing fabric face down and tape the edges taut. Center your cotton batting over it, and place your pieced chevron top face up. Secure the three layers tightly with your curved quilting pins.
- Quilt: To enhance the contemporary aesthetic, quilt straight, parallel lines running vertically from the top to the bottom, spaced about 2 inches apart. This sleek, vertical texture beautifully contrasts the sharp, diagonal angles of the piecing.
- Bind: Cut your binding fabric into 2.5″ strips. Join them end-to-end, fold in half, press, and sew around the perimeter of the quilt, mitering the corners for a sharp, tailored frame.
Usability Note: The Split Nine Patch owes its beautiful drape to the way its seams are distributed. The mix of solid squares and halved squares creates a balanced weight across the quilt, ensuring it conforms comfortably to the body. To keep the geometric lines sharp and the cotton incredibly soft, machine wash the finished quilt on a cold, delicate cycle. Tumble drying on medium heat will yield that classic, cozy crinkle, instantly transforming your crisp contemporary design into an inviting, touchable heirloom.

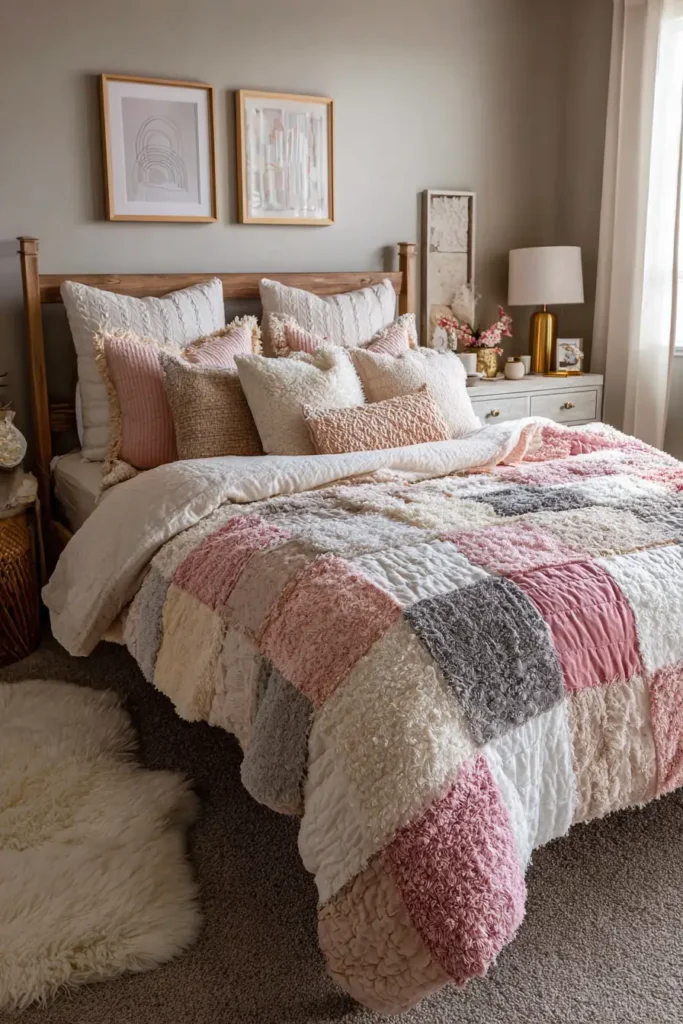
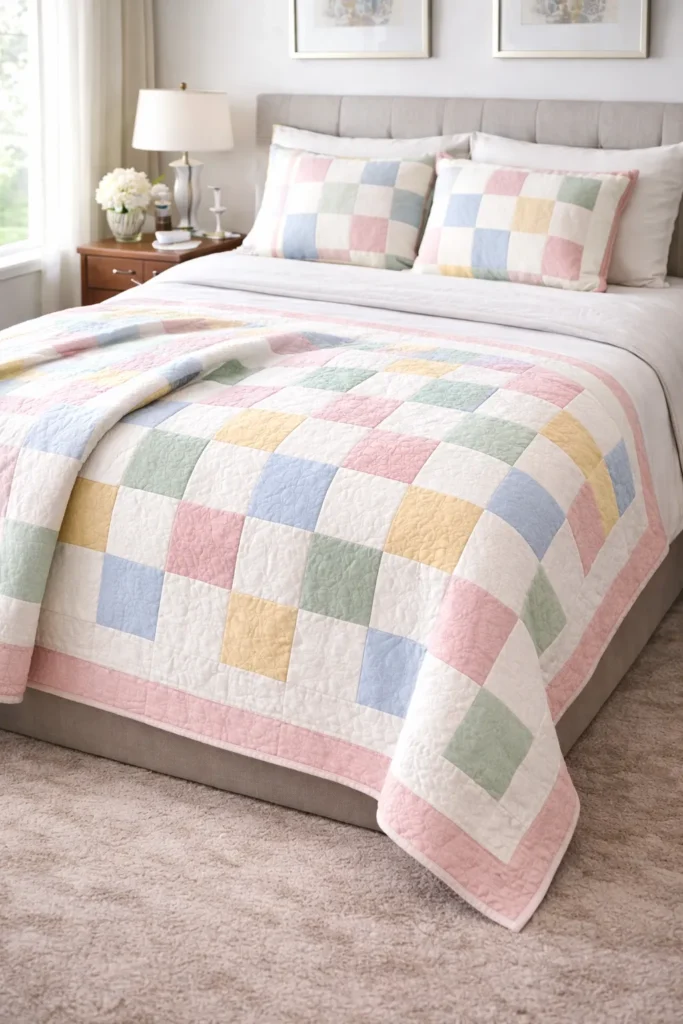
9. Soft Pastel Nine Patch Throw Blankets for a Cozy Bed Layering
Soft Pastel Nine Patch Throw Blankets for a Cozy Bed Layering
A masterfully styled bed is all about the art of layering. While a heavy duvet provides the foundation, a beautifully draped throw blanket at the foot of the bed introduces texture, color, and an inviting sense of warmth. The Soft Pastel Nine Patch Throw is designed to be that perfect, approachable layer. By utilizing a whisper-soft color palette and a classic alternating nine-patch checkerboard layout, this blanket brings a breath of fresh air and delicate visual interest to a sophisticated bedroom.
Why I Designed This Guide (and the History of Pastel Quilts)
I designed this pattern to capture a sense of deep, restorative calm. Historically, pastel quilts had a massive surge in popularity during the 1920s and 1930s. During those difficult decades, crafters turned to “feed sack” cottons dyed in cheerful, soft hues—mint greens, powdery blues, butter yellows, and blush pinks—to intentionally bring light, hope, and softness into their homes. I curated this guide to honor that beautiful heritage, translating those soothing Depression-era hues into a modern, elegant context. By alternating intricate nine-patch blocks with large, crisp white negative-space squares, the pastel tones are elevated from “vintage craft” to “contemporary luxury.”
Focus on Usability, Comfort, and Elegance
- Usability: A throw-sized blanket is the most versatile textile in your home. It is small enough to wash easily, light enough to carry from the bedroom to a reading chair, and simple enough to piece together over a single weekend.
- Comfort: For an ultra-cozy layering piece, softness is non-negotiable. I recommend using high-quality, lightweight cotton lawns or premium broadcloths. When paired with a 100% bamboo batting, the throw becomes incredibly supple, draping over the body like a gentle cloud.
- Elegance: The secret to elegant pastels is muting the saturation. Avoid overly bright “baby” colors. Instead, choose sophisticated, dusty tones: sage instead of lime, dusty rose instead of hot pink, and French blue instead of cyan. Grounding them with pure white creates a crisp, tailored aesthetic.

Measurements & Materials Needed
Finished Quilt Size: Standard Throw (approx. 60″ x 72″) Finished Block Size: 9″ x 9″ (9.5″ x 9.5″ unfinished). This throw requires 42 blocks total (21 Nine Patches and 21 solid background blocks), arranged in 6 columns and 7 rows, plus a border.
Materials Needed:
- Fabric for blocks: * Pastel Cottons: 105 squares total, cut to 3.5″ x 3.5″ (a mix of dusty rose, sage, powder blue, etc.).
- White/Background Cotton: 84 squares cut to 3.5″ x 3.5″ (for the nine-patch centers), AND 21 large squares cut to 9.5″ x 9.5″ (for the alternate solid blocks).
- Border Fabric: 1 yard of background white or your favorite pastel, cut into six 3.5″ x width-of-fabric strips.
- Backing fabric: 4 yards of standard 44″ premium cotton, or 2 yards of 108″ wide-backing fabric.
- Batting: 72″ x 80″ low-loft bamboo or 100% cotton batting.
- Binding: 1/2 yard of a coordinating pastel fabric.
- Thread: High-quality, 50-weight 100% cotton piecing and quilting thread in soft white.
- Quilting ruler: A 6″ x 24″ acrylic ruler and a 9.5″ square ruler for perfectly squaring up blocks.
- Rotary cutter: Equipped with a fresh, sharp blade to ensure clean edges on all your squares.
- Quilting pins: Fine glass-head pins for precise piecing, and curved safety pins for basting.
- Iron and ironing board: Essential for pressing seams flat and achieving perfectly nested joints.
Step-by-Step Guide: The Soft Pastel Nine Patch
Step 1: Preparation and Precision Cutting
Begin by cutting your fabrics according to the material list. Keep your 3.5″ pastel squares mixed together in one pile to ensure a delightfully random, “scrappy” distribution of color, and keep your 3.5″ white squares in another. Set your large 9.5″ solid background squares aside for the assembly phase.
Step 2: Assembling the Pastel Nine-Patch
Take five 3.5″ pastel squares and four 3.5″ white squares. Lay them out in a 3×3 grid, placing the pastels in the corners and the exact center, forming an ‘X’ shape.
- Row 1: Pastel, White, Pastel
- Row 2: White, Pastel, White
- Row 3: Pastel, White, Pastel Sew the squares in each row together using a precise 1/4-inch seam allowance.
Step 3: Pressing and Completing the Blocks
To ensure your blocks sit perfectly flat, press the seams of Rows 1 and 3 outward (toward the pastel squares), and the seams of Row 2 inward (toward the center pastel square). This opposing pressing allows the seams to “nest” smoothly without creating bulky lumps. Sew the three rows together. Your unfinished Nine Patch block will measure exactly 9.5″ x 9.5″. Repeat this process to create all 21 Pastel Nine Patch blocks.
Step 4: Assembly Section (The Airy Checkerboard Layout)
We will use an alternating grid layout to give the pastel colors room to breathe.
- Row 1: Sew a pieced Nine Patch block to a solid 9.5″ white block. Alternate until you have 6 blocks in the row (ending with a solid block). Press all seams toward the solid white blocks to reduce bulk.
- Row 2: Start with a solid 9.5″ white block, then a pieced Nine Patch, alternating to complete 6 blocks (ending with a Nine Patch).
- Join the Rows: Build 7 rows total, alternating the starting block of each row to create a checkerboard pattern. Pin carefully at the intersections and sew the rows together.
Step 5: Attaching the Border
To frame the soft pastels, we will add a 3-inch finished border.
- Take your 3.5″ border strips and sew them end-to-end to create one long strip.
- Measure vertically through the center of your quilt top. Cut two border strips to this exact measurement and sew them to the left and right sides of the quilt. Press outward.
- Measure horizontally through the center of the quilt (including the newly attached side borders). Cut two strips to this measurement and sew them to the top and bottom. Press outward.
Step 6: Basting, Quilting, and Binding
- Baste: Tape your backing fabric taut to the floor, face down. Layer the bamboo batting on top, followed by your beautifully pieced throw top (face up). Pin heavily with curved safety pins.
- Quilt: To maintain the soft, romantic feel of the pastels, avoid rigid geometric quilting. Instead, opt for a gentle, meandering stipple or an undulating wave pattern across the entire surface. This organic quilting mimics the softness of the colors and keeps the blanket incredibly pliable.
- Bind: Cut your binding fabric into 2.5″ strips. Join them end-to-end, fold in half, press crisp, and sew tightly around the perimeter, mitering the corners for a flawless finish.
Usability Note: This throw blanket thrives on use and love. The combination of lightweight cottons and bamboo batting creates a textile that breathes exceptionally well, making it the perfect layer to pull over your shoulders while reading in bed or watching the morning light. Wash the finished throw on a cold, gentle cycle with a mild, color-safe detergent. Tumble drying on low heat will softly crinkle the fabric, beautifully enhancing the cozy, vintage-inspired charm of the Depression-era pastels while keeping the drape completely fluid.
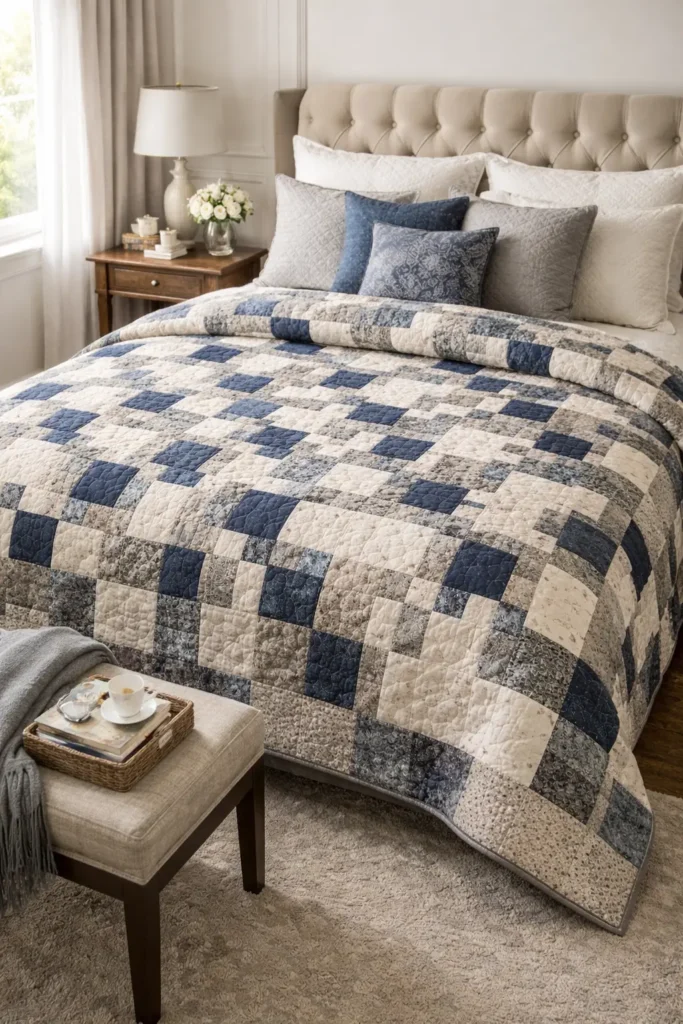
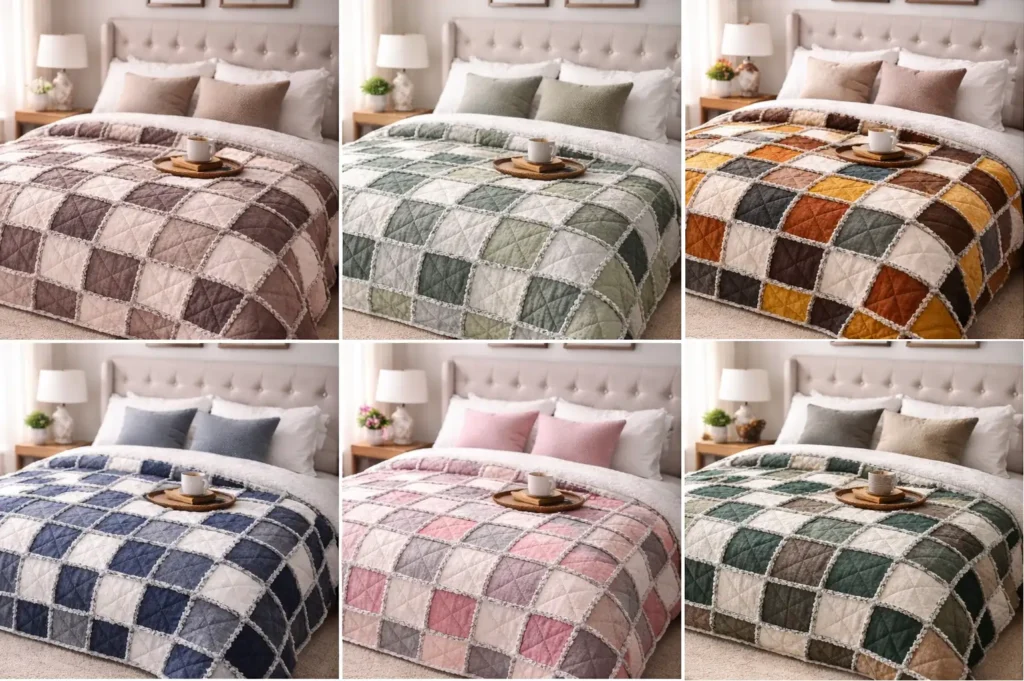
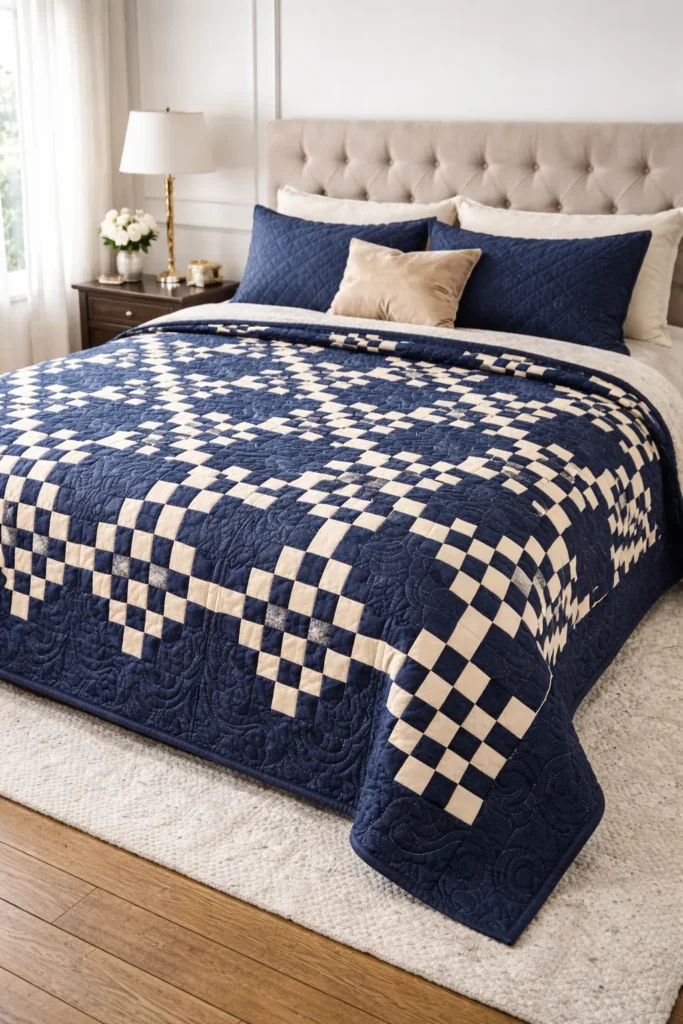
10. Double Nine Patch Designs for Luxurious, Cozy Bed Covers
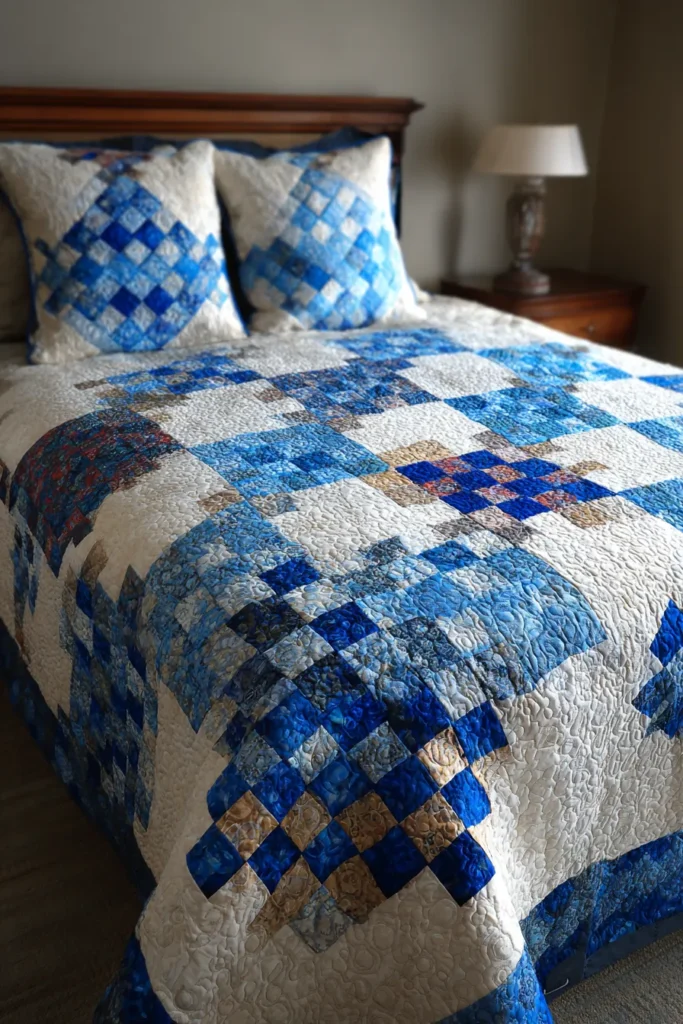
For those who view their bed as the ultimate sanctuary of luxury, a standard quilt pattern may not be enough. The Double Nine Patch is a breathtaking geometric design masterpiece that delivers an unparalleled sense of grandeur. By replacing the four corner squares of a traditional Nine Patch block with miniature, fully pieced Nine Patches, the design creates an intricate, interlocking lattice effect across the entire bed surface. It is a show-stopping textile that demands attention while providing incredible, weighted warmth.
Why I Curated This Guide (and the Heritage of the Masterwork Block)
I designed this pattern because the Double Nine Patch represents the pinnacle of traditional patchwork skill and deserves a place in contemporary, elegant homes. Historically, in the mid-to-late 19th century, a standard Nine Patch was an everyday utility quilt, but a Double Nine Patch was often reserved as a “masterwork” or a dowry quilt. It was a canvas where a crafter could show off their absolute precision. By curating this guide with a sleek, two-tone color palette rather than a chaotic mix of scraps, we honor that historic precision while elevating the pattern into a sophisticated, tapestry-like bed cover fit for a modern luxury suite.
Focus on Usability, Comfort, and Elegance
- Usability: While it looks overwhelmingly complex, we will rely heavily on the brilliant “strip-piecing” method for the miniature corner blocks. This technique shaves dozens of hours off the construction time, making a masterwork quilt surprisingly approachable.
- Comfort: Because of the sheer volume of seams in the miniature blocks, this quilt naturally gains a wonderful, dense weight. When paired with a plush wool or high-quality bamboo batting, it acts almost like a subtle weighted blanket, offering profound, anxiety-reducing comfort and superior winter insulation.
- Elegance: To achieve maximum luxury, strict color discipline is required. I recommend a deeply saturated jewel tone—like Midnight Sapphire, Emerald, or deep Plum—paired with a shimmering Champagne or crisp Ivory. Using a subtle sateen cotton will give the geometric lattice a gorgeous, high-end sheen under bedroom lighting.
Measurements & Materials Needed
Finished Quilt Size: Luxurious King Bed Cover (approx. 90″ x 90″) Finished Block Size: 15″ x 15″ (15.5″ x 15.5″ unfinished). This quilt requires exactly 36 blocks (arranged in 6 columns and 6 rows).
Materials Needed:
- Fabric for blocks: * Dark Fabric (e.g., Midnight Sapphire): 4.5 yards. You will cut 180 solid squares at 5.5″ x 5.5″, plus multiple 2.5″ x 44″ strips for piecing.
- Light Fabric (e.g., Champagne): 4.5 yards. You will cut 36 solid squares at 5.5″ x 5.5″, plus multiple 2.5″ x 44″ strips for piecing.
- Backing fabric: 3 yards of 108″ wide-backing premium cotton or sateen.
- Binding: 3/4 yard of matching Dark Fabric.
- Batting: 100″ x 100″ high-quality wool or bamboo batting.
- Thread: High-quality, 50-weight 100% cotton piecing and quilting thread in a coordinating dark shade.
- Quilting ruler: A 6″ x 24″ acrylic ruler for stripping and sub-cutting, and a 5.5″ square ruler for checking blocks.
- Rotary cutter: Equipped with a brand-new blade to ensure perfectly straight strips.
- Quilting pins: Fine glass-head pins for meticulous piecing.
- Iron and ironing board: Essential for pressing the intricate seams flat.
Step-by-Step Guide: The Double Nine Patch
Step 1: Strip-Piecing the Miniature Blocks
Instead of cutting hundreds of tiny 2.5″ squares, we will build strip sets.
- Strip Set A (The Corners): Sew three 2.5″ wide strips together lengthwise in a Dark – Light – Dark configuration. Press the seams toward the dark fabric. Make several of these sets.
- Strip Set B (The Centers): Sew three 2.5″ wide strips together lengthwise in a Light – Dark – Light configuration. Press the seams toward the dark fabric. Make several of these sets.
Step 2: Sub-Cutting the Strip Sets
Take your perfectly pressed Strip Sets to your cutting mat. Trim the edge clean, and then use your rotary cutter to slice across the width of the strips at exactly 2.5-inch intervals. Each slice gives you a pre-sewn segment of three squares. You will need 288 segments from Set A and 144 segments from Set B.
Step 3: Assembling the Miniature Nine Patches
To build one miniature Nine Patch (which will become the corner of your main block), take two Set A segments and one Set B segment. Lay them out: Set A on top, Set B in the middle, Set A on the bottom. Because you pressed the seams toward the dark fabric, the seams will naturally interlock or “nest.” Pin and sew the three rows together. Your miniature Nine Patch will measure exactly 5.5″ x 5.5″ unfinished. Repeat this to create 144 miniature blocks.
Step 4: Laying out the Main Double Nine Patch Block
Now, it is time to build the master 15-inch block. Treat your newly made miniature blocks just like solid corner squares.
- Row 1: Miniature Nine Patch, Solid Dark 5.5″ Square, Miniature Nine Patch.
- Row 2: Solid Dark 5.5″ Square, Solid Light 5.5″ Square (Center), Solid Dark 5.5″ Square.
- Row 3: Miniature Nine Patch, Solid Dark 5.5″ Square, Miniature Nine Patch.
Step 5: Assembling the Master Block
Sew the units in each row together using a precise 1/4-inch seam allowance. Press the seams of Rows 1 and 3 toward the solid dark squares, and press the seams of Row 2 outward toward the solid dark squares. Join the three rows together. Your magnificent Double Nine Patch block will measure exactly 15.5″ x 15.5″ unfinished. Repeat to build all 36 master blocks.
Step 6: Assembly Section (Building the Lattice Bed Cover)
When these blocks are sewn side-by-side, the solid dark squares merge to form a bold, striking plus-sign grid, while the miniature blocks create a dizzying, beautiful diagonal lattice.
- Lay out your 36 blocks in a 6×6 grid.
- Sew the blocks into 6 horizontal rows. Pin heavily at every intersection where a miniature block meets a solid block to keep the geometric lattice razor-sharp.
- Press the row seams in alternating directions, then sew the 6 rows together to complete the stunning 90″ x 90″ quilt top.

Step 7: Basting, Quilting, and Binding
- Baste: Secure your 108″ backing fabric taut to the floor, face down. Layer your wool or bamboo batting, followed by your heavy pieced top (face up). Baste thoroughly with curved safety pins.
- Quilt: To complement the extreme geometry of this quilt, a continuous, edge-to-edge digitized pantograph (such as interlocking overlapping circles or a sweeping teardrop pattern) provides a brilliant, softening contrast to the rigid squares.
- Bind: Cut your binding fabric into 2.5″ strips. Join end-to-end, press in half, and sew tightly around the perimeter, mitering the corners for a crisp, tailored frame.
Usability Note: The sheer volume of nested seams in a Double Nine Patch creates a structurally robust, heavy bed cover that feels incredibly luxurious over the body. To maintain the crispness of the intricate lattice piecing, wash this heirloom-quality quilt sparingly on a cold, delicate cycle with a color-safe detergent. Tumble drying on low will slightly shrink the batting, resulting in a deep, highly textured, antique-style crinkle that makes the majestic geometric pattern pop even more.
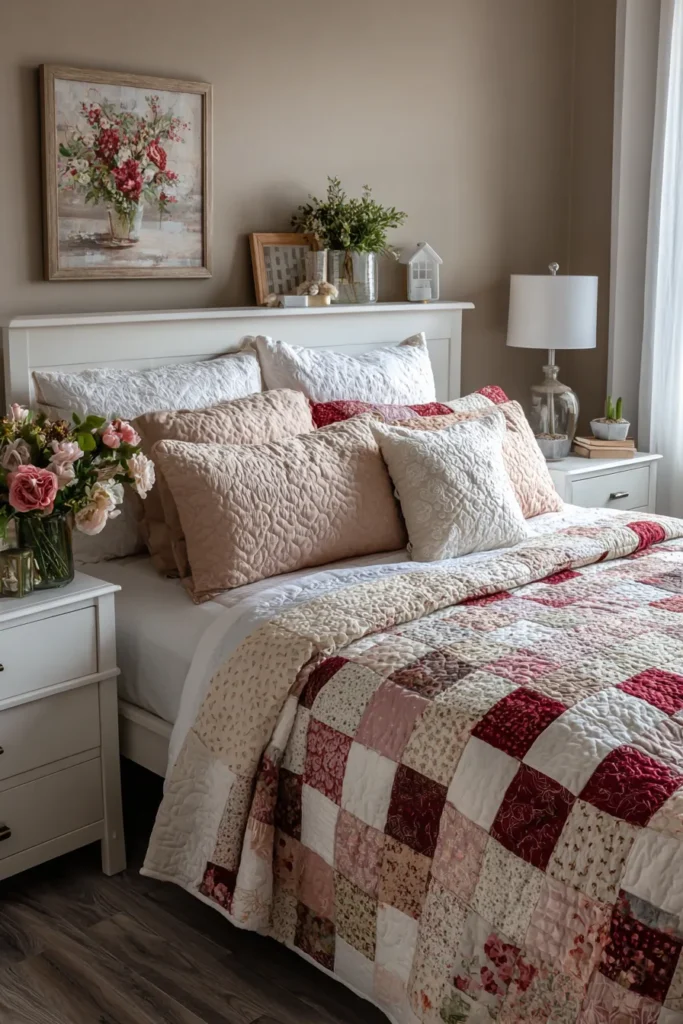
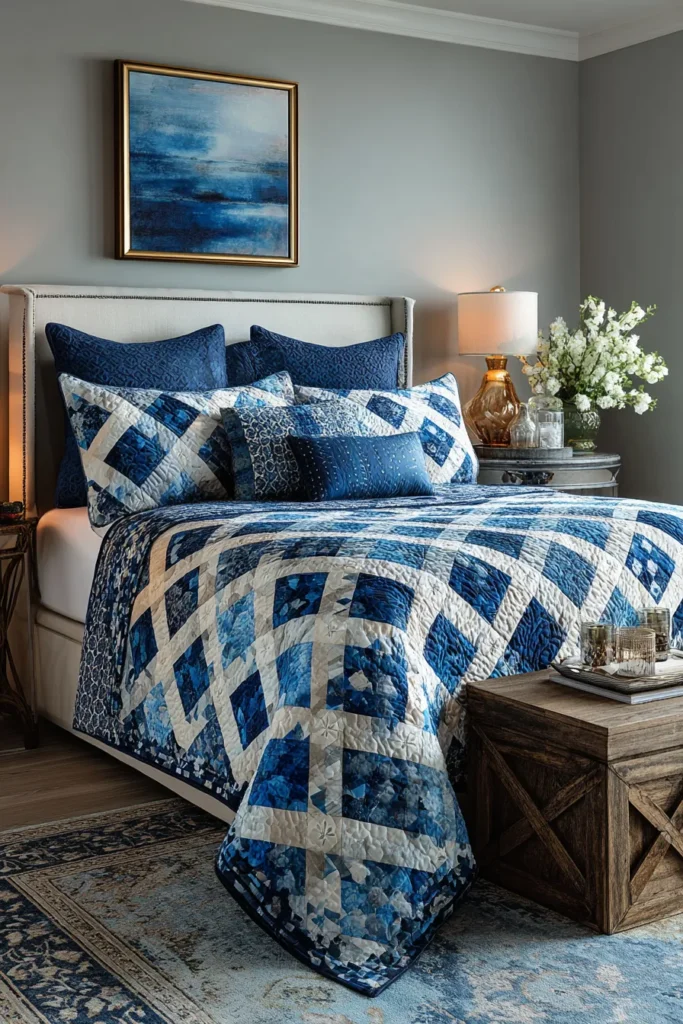
11. Heavyweight Nine Patch Floor Pillows for Casual Living Room Seating
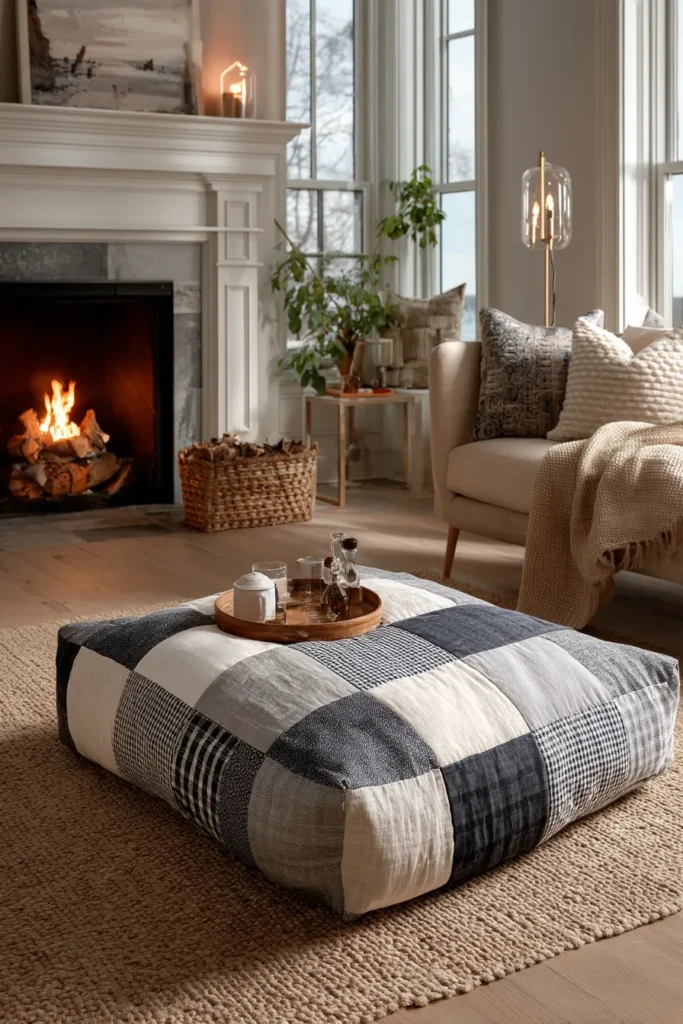
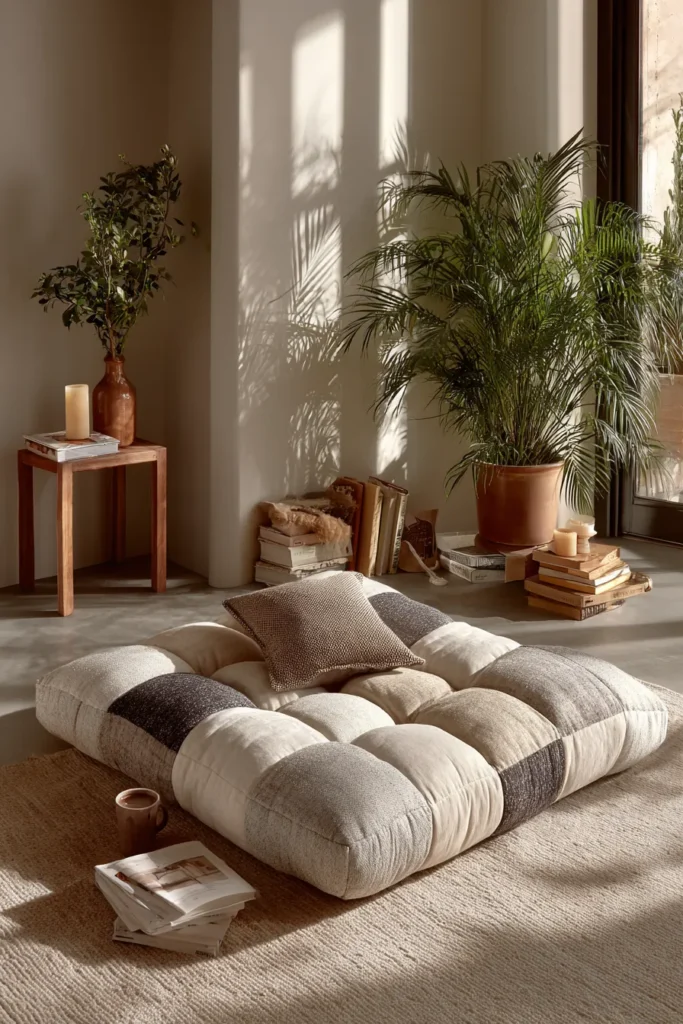
An elegantly styled living room doesn’t have to be rigid or formal. As modern homes embrace open floor plans and flexible gathering spaces, floor seating has become a chic, highly sought-after design element. The Heavyweight Nine Patch Floor Pillow bridges the gap between traditional quilt block geometry and durable, functional upholstery. By scaling up a single Nine Patch block to massive proportions and utilizing heavy-duty textiles, you create a striking, architectural cushion that invites guests to lounge comfortably by the coffee table or the fireplace.
Why I Designed This Guide (and the Heritage of Floor Cushions)
I designed this pattern because I love taking traditional, delicate bed quilt motifs and re-engineering them for everyday life. Historically, floor cushions have deep roots in global design—from the Arabic Majlis to the Japanese Zabuton—serving as the primary, most hospitable seating in a home. In Western quilting traditions, however, pieced blocks were rarely subjected to the friction of floor use. By utilizing heavyweight linen-cotton blends or durable duck canvas instead of delicate quilting cottons, this guide honors the welcoming heritage of floor seating while transforming the humble Nine Patch into a luxurious, modern statement piece capable of withstanding real life.
Focus on Usability, Comfort, and Elegance
- Usability: Floor pillows take the full weight of the human body. This pattern incorporates a quilted front panel with a hidden muslin backing, which acts as a structural anchor to prevent the pieced seams from splitting under pressure.
- Comfort: To ensure the cushion is deeply supportive rather than flat and flimsy, this cover is engineered to hold a firm, overstuffed 38-inch insert. The quilted top layer adds a plush, padded barrier between you and the floor.
- Elegance: To keep a massive floor pillow looking sophisticated rather than like a dorm room beanbag, scale and color are crucial. A single, oversized Nine Patch in a high-contrast, neutral palette (like rich Cognac leather-toned canvas alternating with heavy Oatmeal linen) provides clean, architectural lines that elevate the entire room.
Measurements & Materials Needed
Finished Pillow Size: Oversized Square Floor Cushion (approx. 36″ x 36″) Finished Block Size: The entire pillow front is one giant 36″ x 36″ Nine Patch block (made from nine 12″ finished squares).
Materials Needed:
- Fabric for blocks (Top): Heavyweight linen, canvas, or denim.
- You will need 5 squares cut to 12.5″ x 12.5″ in your Dark/Accent color.
- You will need 4 squares cut to 12.5″ x 12.5″ in your Light/Neutral color.
- Backing fabric: 1.5 yards of 44″ heavyweight fabric (like canvas or denim) for the zippered pillow back, plus a 38″ x 38″ square of cheap muslin to line the quilted front.
- Batting: 38″ x 38″ square of medium-loft to high-loft polyester or dense cotton batting.
- Thread: Heavy-duty, upholstery-weight 100% cotton or polyester thread for piecing and quilting.
- Quilting ruler: A 6″ x 24″ acrylic ruler and a 12.5″ square ruler for perfect, massive squares.
- Rotary cutter: Equipped with a fresh, sharp blade (crucial for cutting cleanly through heavyweight fabrics).
- Quilting pins: Heavy-duty glass-head pins and large, curved safety pins for basting.
- Iron and ironing board: Essential for pressing the thick, bulky seams as flat as possible.
- Additional Notions: One heavy-duty 30-inch upholstery zipper, and a firm 38″ x 38″ floor pillow insert.
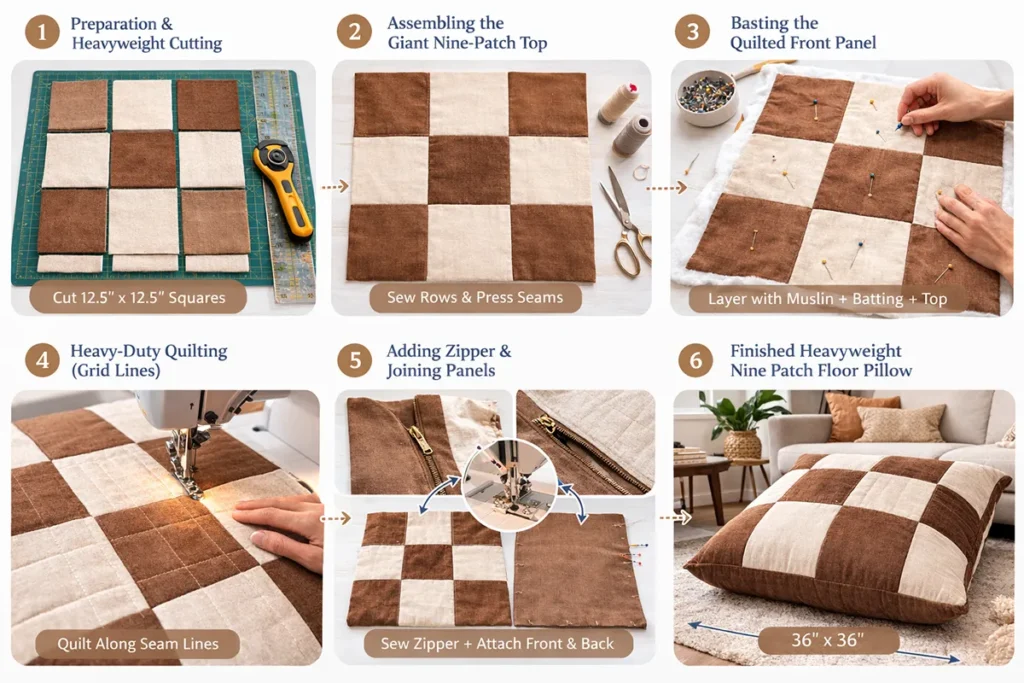
Step-by-Step Guide: The Heavyweight Floor Pillow
Step 1: Preparation and Heavyweight Cutting
Because we are working with upholstery-weight fabrics, precision is vital to avoid warped seams. Using your rotary cutter and acrylic ruler, cut your 12.5″ x 12.5″ squares from your heavy fabric. For the zippered backing, cut your 1.5 yards of backing fabric into two rectangles measuring 37″ x 19″.
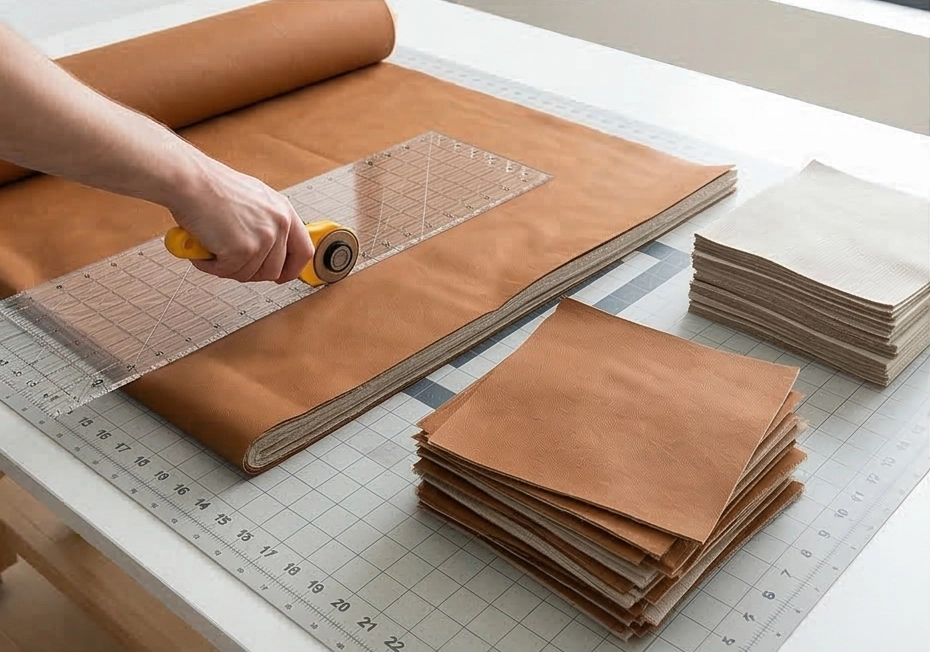
Step 2: Assembling the Giant Nine-Patch Top
Lay your 9 massive squares out in a 3×3 grid, alternating the colors.
- Row 1: Dark, Light, Dark
- Row 2: Light, Dark, Light
- Row 3: Dark, Light, Dark. Sew the squares in each row together using a heavy-duty needle and a precise 1/4-inch seam allowance. Press the seams of Rows 1 and 3 outward, and Row 2 inward so they nest. Because the fabric is thick, use plenty of steam and pressure from your iron. Join the three rows to complete your 36.5″ x 36.5″ unfinished pillow front.
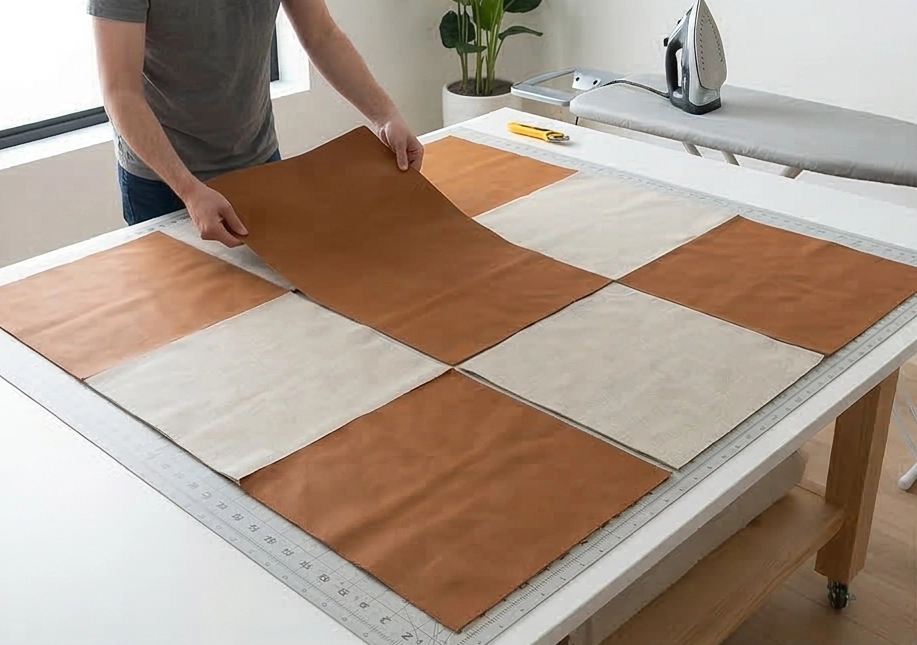
Step 3: Basting the Quilted Front Panel
To give the pillow top its durability, we must quilt it. Lay your 38″ x 38″ piece of scrap muslin face down on the floor. Center your batting on top of it, and then place your pieced Nine Patch canvas top face up. Pin heavily through all three layers with large, curved safety pins.
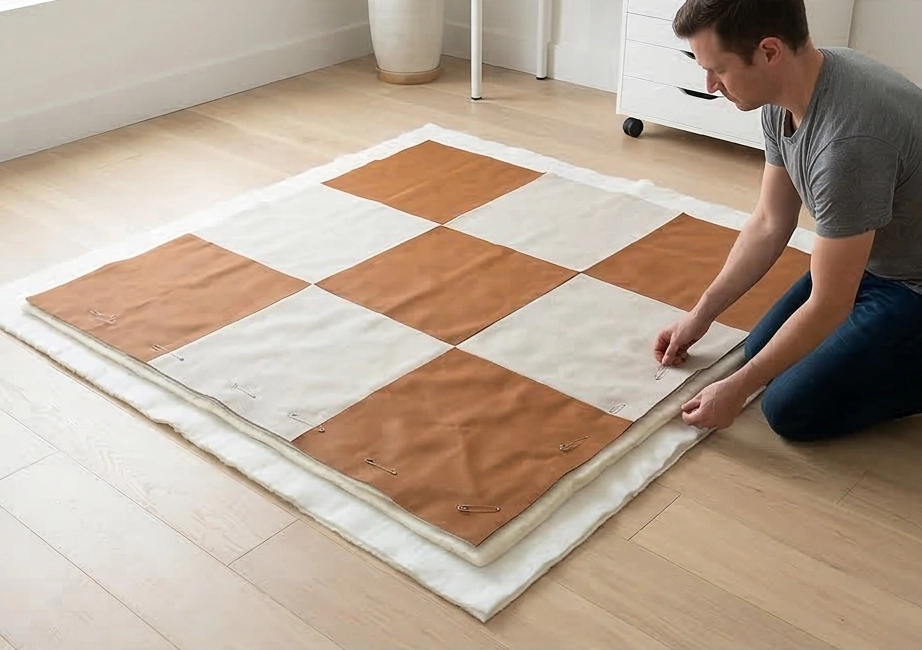
Step 4: Heavy-Duty Quilting for Upholstery
Take the basted sandwich to your machine. For a floor cushion, the quilting needs to be structural. Quilt straight lines exactly 1/4-inch on both sides of every seam line (stitching “in the ditch” is not recommended for heavy wear, as the thread can easily snap). This grid quilting anchors the thick canvas permanently to the batting and muslin, creating a heavily reinforced, friction-resistant surface. Once quilted, trim the edges flush to exactly 36.5″ x 36.5″.
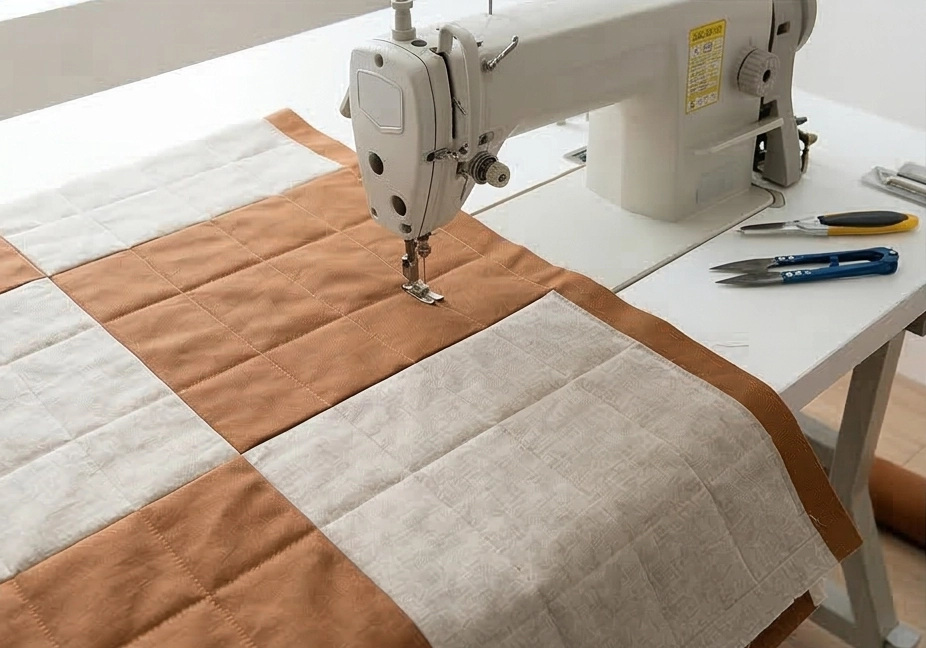
Step 5: Assembly Section (Constructing the Zippered Pillow)
- Install the Zipper: Take your two 37″ x 19″ backing rectangles. Place them right sides together along the 37-inch edge. Baste the center 30 inches, and sew the ends securely. Press the seam open and install your 30-inch heavy-duty zipper face down over the basted seam. Topstitch around the zipper, then use a seam ripper to open the basted stitches, revealing your functional zipper. Unzip it halfway.
- Attach the Front and Back: Lay your heavily quilted Nine Patch front right-side up. Place your zippered backing panel right-side down on top of it. Pin the outer perimeter securely with heavy-duty pins or sewing clips.
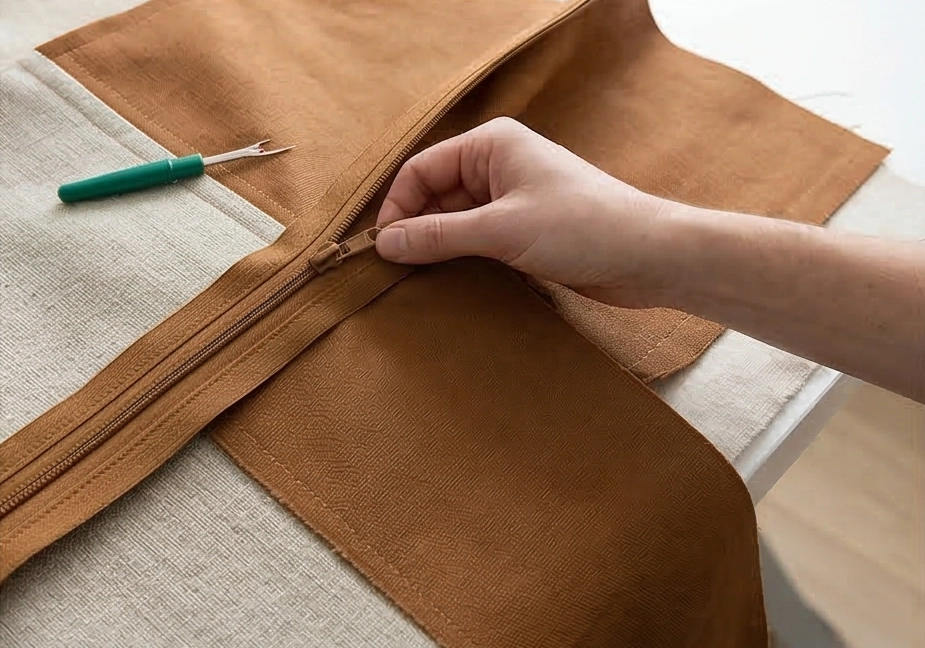
Step 6: Finishing the Structural Seams
Sew around the entire 36.5″ x 36.5″ perimeter with a robust 1/2-inch seam allowance. Because this pillow will be thrown on the floor and sat upon, I highly recommend sewing around the perimeter a second time, directly over your first stitch line, to double-reinforce the seam. Clip the four corners diagonally to reduce extreme bulk, turn the heavy cover right-side out through the open zipper, and wrestle your firm 38×38 insert inside.

Usability Note: Canvas and heavy linen blends are exceptionally resilient and naturally repel light dirt, making them ideal for use on floors. The hidden muslin backing inside the quilted top ensures that the tension from sitting is distributed throughout the textile, not just along the pieced seams. To clean, simply unzip and remove the heavy cover. Machine wash on a cold, heavy-duty cycle with mild detergent, and air dry flat to maintain the crisp, architectural shape of the giant Nine Patch grid without shrinking the canvas.
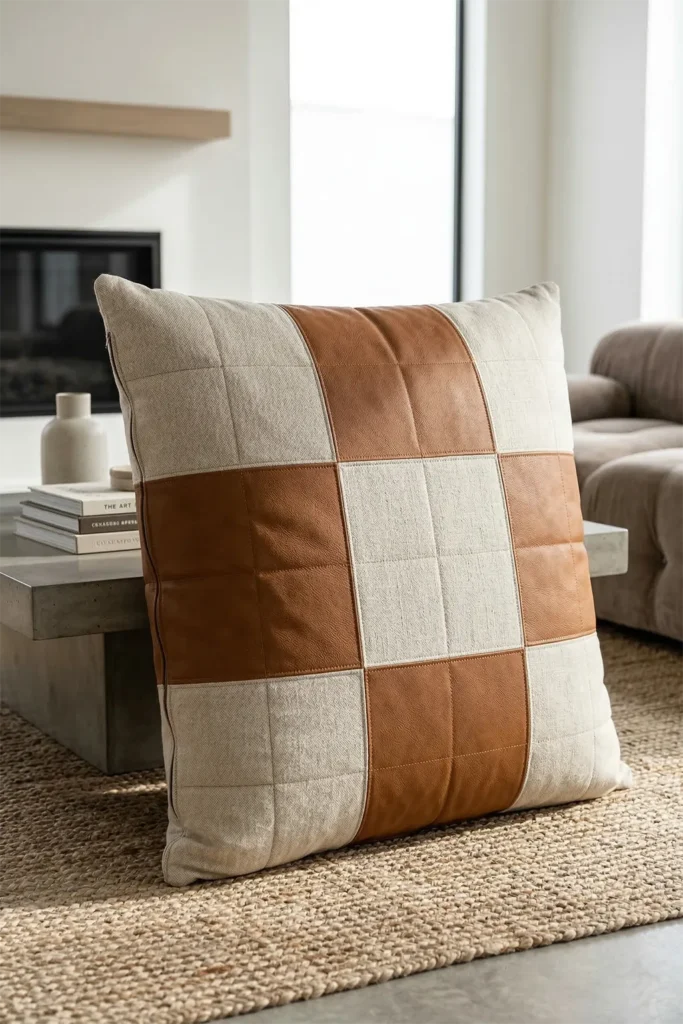
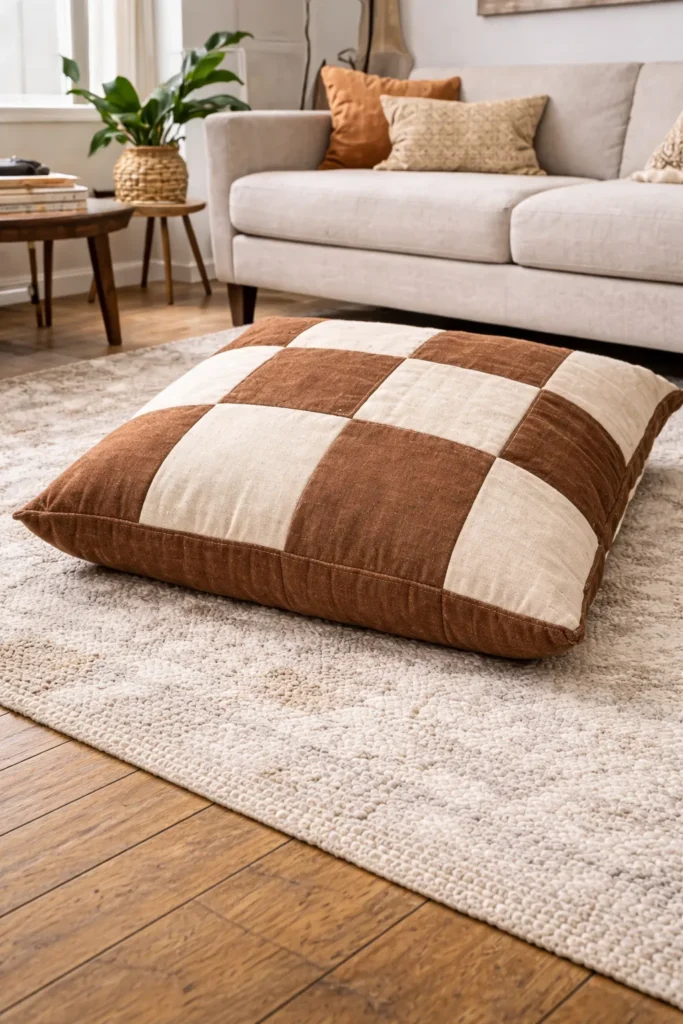
12. Bold Color Block Nine Patch Cushion Covers for Living Room Accents

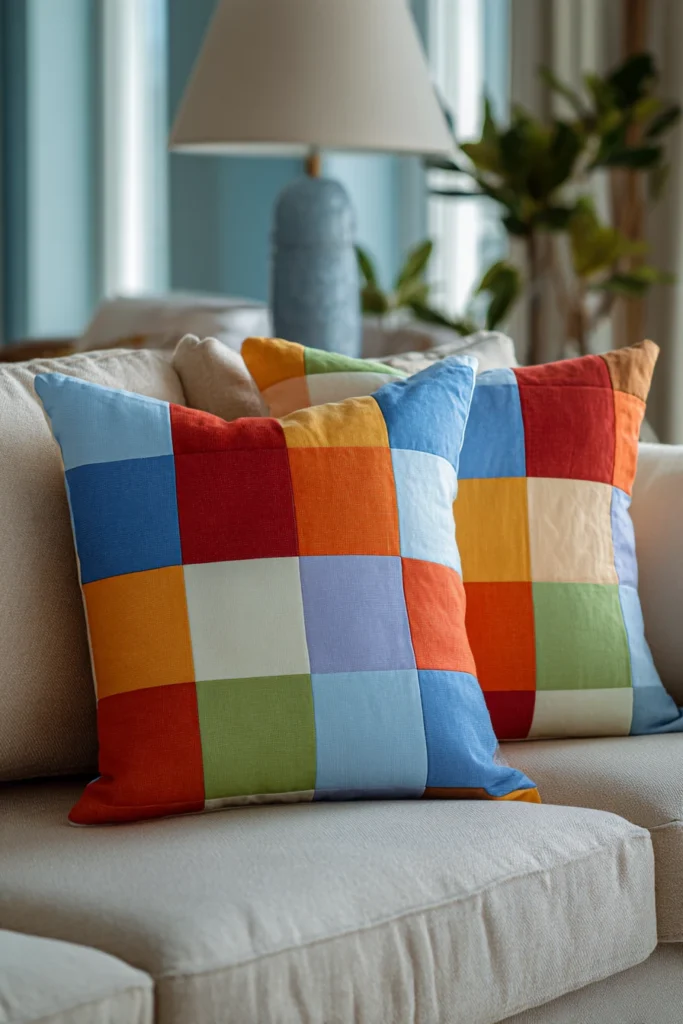
Sometimes, an elegant living room just needs a sudden, intentional punch of vibrancy to bring the space to life. The Bold Color Block Nine Patch Cushion Cover uses the traditional nine-grid structure not as a scrappy patchwork, but as a canvas for striking, contemporary color blocking. By drastically sizing up the individual squares and using deeply saturated, solid hues, you transform a classic quilt block into a piece of modern, graphic art that commands attention on any sofa or armchair.
Why I Designed This Guide (and the Heritage of Color Blocking)
I designed this pattern because I love the intersection of traditional heritage and mid-century modern art. Historically, the Nine Patch was a thrifty way to use up tiny, mismatched floral scraps. However, by the mid-20th century, the Bauhaus movement and modern art introduced the world to “color blocking”—the pairing of bold, contrasting solid colors in sharp geometric grids. By stripping away the busy prints and applying this modern color theory to the humble Nine Patch, I curated a guide that honors the geometry of traditional quilting while delivering a highly sophisticated, designer-quality accent piece for the contemporary home.
Focus on Usability, Comfort, and Elegance
- Usability: An envelope-back pillow cover is incredibly functional. It requires no zippers or buttons, making the sewing process fast and the finished cover wonderfully easy to remove for seasonal swapping or laundering.
- Comfort: Adding a layer of cotton batting behind the pieced front gives the cushion a beautiful, structured plushness. It prevents the pillow insert from looking lumpy and feels incredibly soft to lean against during a movie night.
- Elegance: The key to elegant color blocking is selecting a tight palette of three sophisticated, highly saturated solids. Think deep Ochre, rich Navy, and a grounding crisp White, or perhaps Terracotta, Sage green, and Oatmeal. This deliberate, high-contrast pairing ensures the pillow acts as a striking focal point rather than an afterthought.
Measurements & Materials Needed
Finished Pillow Size: Standard Throw Cushion (18″ x 18″) Finished Block Size: 18″ x 18″ (made from nine 6″ finished squares).
Materials Needed:
- Fabric for blocks: 9 squares total, cut to 6.5″ x 6.5″ from premium solid cottons.
- Pro-Tip: For a striking color-blocked look, cut 5 squares of Color A (e.g., Navy), and 4 squares of Color B (e.g., Ochre).
- Backing fabric: 1/2 yard of coordinating premium solid cotton (you will cut two rectangles measuring 18.5″ x 13″ for the envelope back), plus one 20″ x 20″ square of cheap scrap muslin to line the quilted front.
- Batting: One 20″ x 20″ square of low-loft 100% cotton batting.
- Thread: High-quality, 50-weight 100% cotton piecing and quilting thread in a coordinating neutral.
- Quilting ruler: A 6″ x 24″ acrylic ruler for perfectly square, razor-sharp cuts.
- Rotary cutter: Equipped with a fresh, sharp blade to ensure perfectly clean edges on your solids.
- Quilting pins: Fine glass-head pins for precise piecing, and curved safety pins for basting the layers.
- Iron and ironing board: Absolutely essential for pressing the seams perfectly flat, which is critical for crisp color blocking.
- Additional Notions: An 18″ x 18″ plush pillow insert (or a 20″ x 20″ insert if you prefer an overstuffed, very firm look).
Step-by-Step Guide: The Color Block Nine Patch
Step 1: Preparation and Bold Cutting
Using your rotary cutter and acrylic ruler, meticulously cut your solid fabrics into nine 6.5″ x 6.5″ squares. Solid fabrics show uneven cuts much more clearly than busy prints, so precision here is paramount to maintaining a modern aesthetic. Cut your two 18.5″ x 13″ backing rectangles and set them aside.
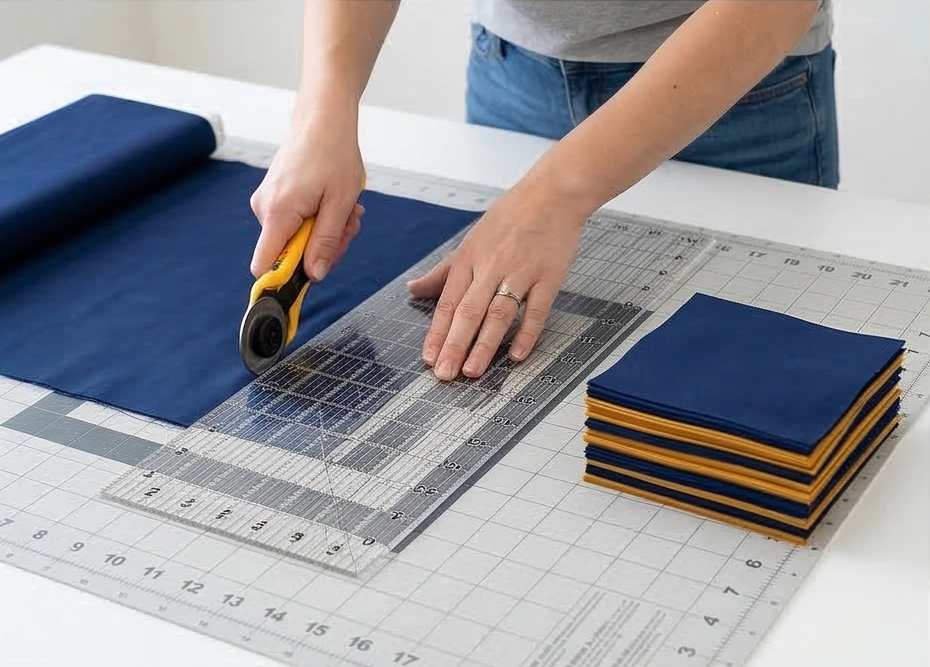
Step 2: Assembling the Bold Grid
Lay your 9 large squares out in a 3×3 grid on your table, alternating your two bold colors to create a high-contrast checkerboard effect.
- Row 1: Color A, Color B, Color A
- Row 2: Color B, Color A, Color B
- Row 3: Color A, Color B, Color A. Sew the squares in each row together using a precise 1/4-inch seam allowance.
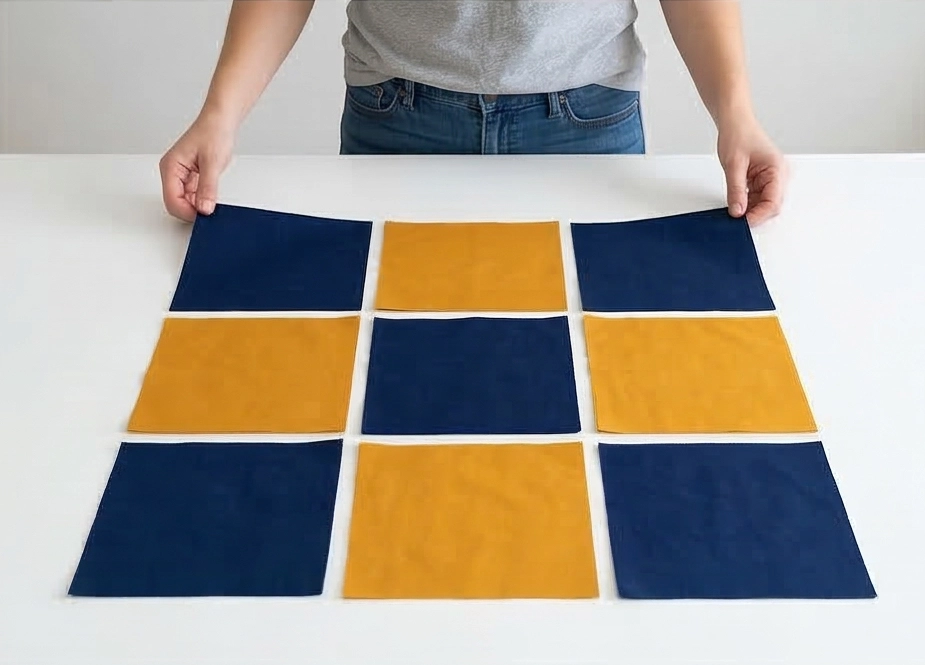
Step 3: Pressing for Crisp Intersections
With solid fabrics, bulky seams can distort the block’s clean lines. Press the seams of Rows 1 and 3 in one direction (e.g., to the left), and the seams of Row 2 in the opposite direction (to the right). When you pin the three rows together, these opposing seams will physically lock or “nest” together. Sew the three rows together. Your bold, unfinished pillow front will measure exactly 18.5″ x 18.5″.
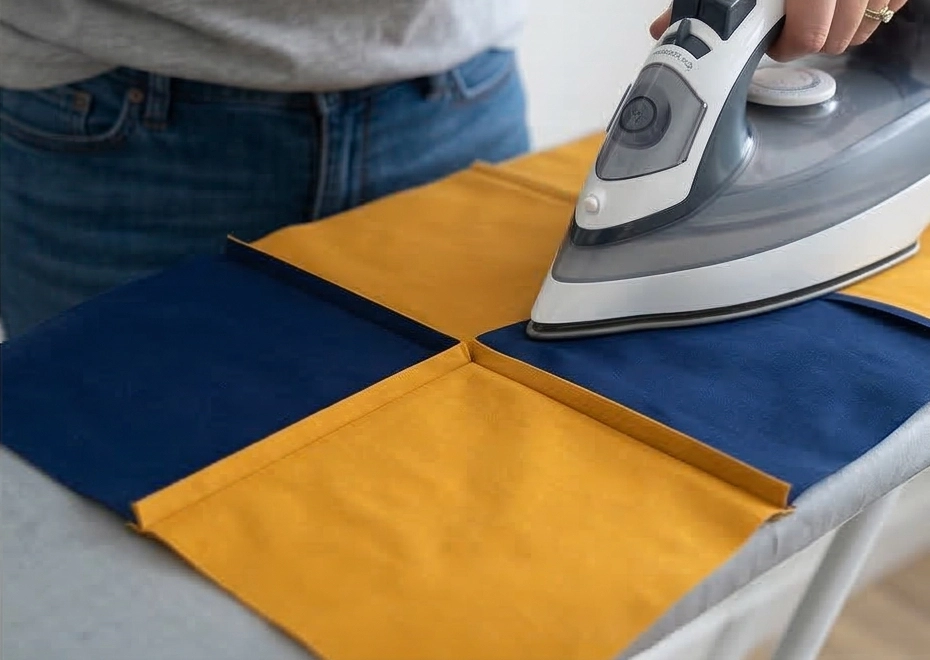
Step 4: Basting the Quilted Front
Lay your 20″ x 20″ piece of scrap muslin face down on your workspace. Center your cotton batting on top, then place your stunning Color Block Nine Patch face up. Pin through all three layers with your curved safety pins, placing a pin in the center of every square.
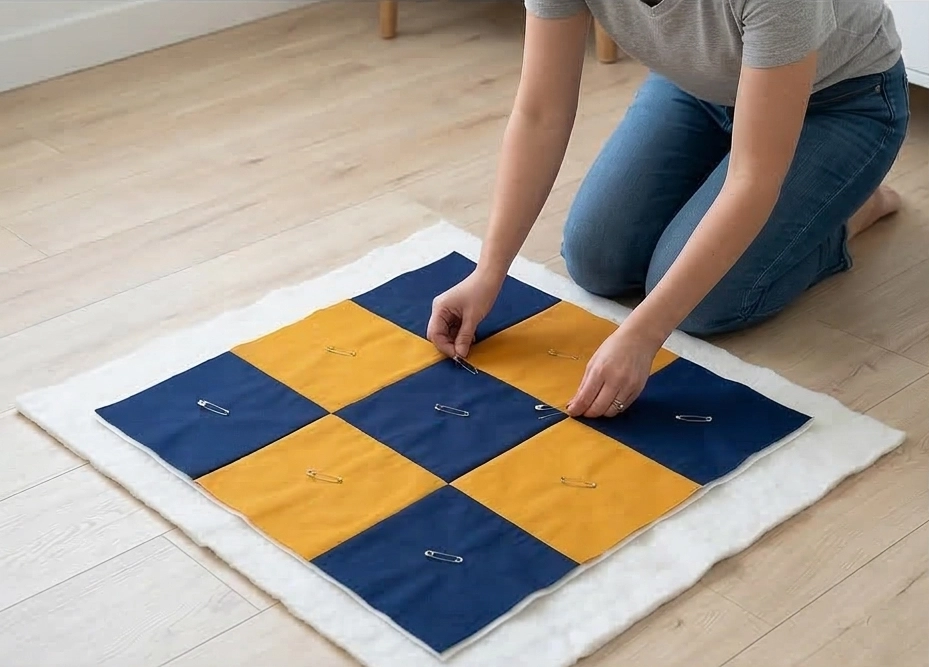
Step 5: Modern Quilting for Structure
Take the basted sandwich to your sewing machine. To enhance the contemporary, graphic nature of the color blocking, use straight-line quilting. Stitch continuous lines exactly 1/4-inch on both sides of every seam line. This grid quilting anchors the layers together, giving the bold squares a slightly puffed, highly tailored 3D texture. Trim the edges flush so the quilted panel measures exactly 18.5″ x 18.5″.
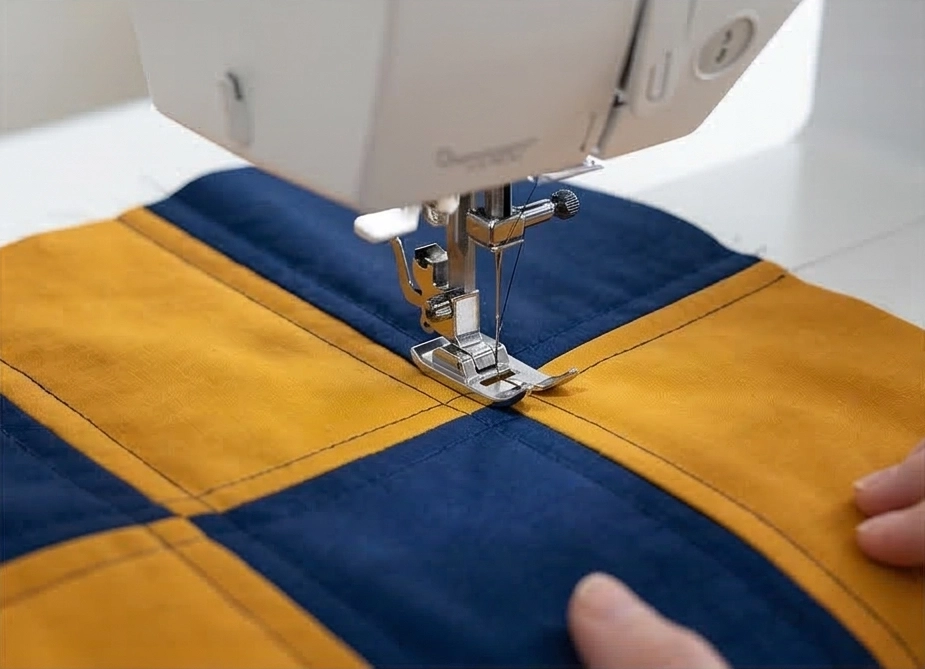
Step 6: Assembly Section (Constructing the Envelope Back)
- Prepare the Backing Panels: Take your two 18.5″ x 13″ backing rectangles. On one long 18.5-inch edge of each rectangle, fold the fabric down 1/2 inch, press with your iron, fold another 1/2 inch, press again, and topstitch to create a clean, finished hem.
- Layer for Assembly: Lay your beautifully quilted Color Block front panel right-side up. Place the two backing rectangles right-side down on top of it, aligning the raw outer edges. The hemmed edges will overlap in the middle by a few inches, creating the envelope opening. Pin the entire outer perimeter securely.
- Sew and Finish: Sew around the entire 18.5″ x 18.5″ perimeter with a 1/4-inch seam allowance. Clip the four corners diagonally (being careful not to cut your stitches) to reduce bulk. Turn the cover right-side out through the envelope opening, use a blunt tool to push the corners out crisp and square, and insert your pillow form.
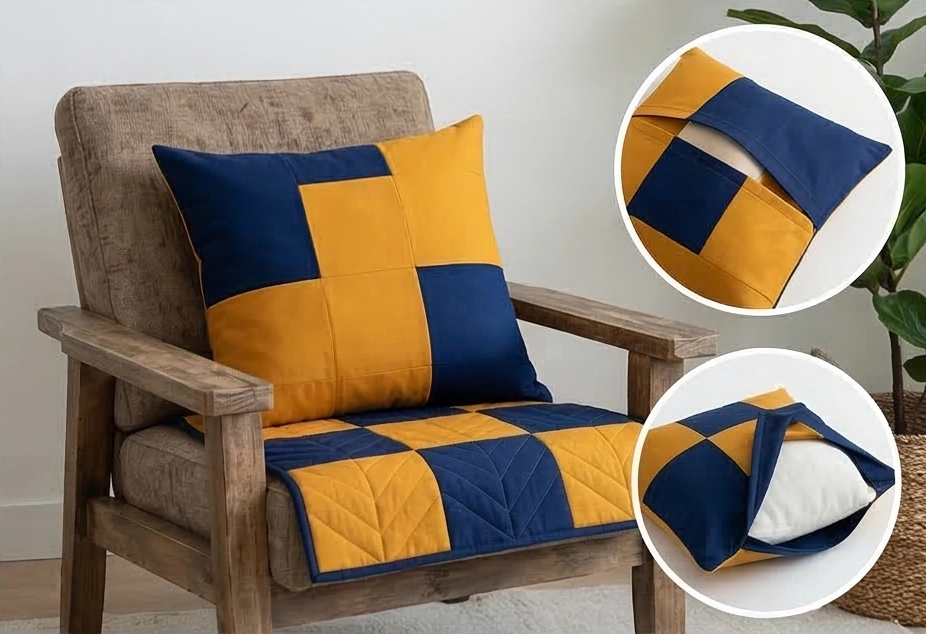
Usability Note: The quilted front of this cushion cover provides excellent durability and prevents the fabric from wrinkling heavily with daily use. Because bold, saturated solids can occasionally bleed during the first wash, I highly recommend adding a color-catcher sheet to the wash when you launder them. Wash on a cold, delicate cycle, and lay flat to dry. A quick press with a hot iron will instantly restore its crisp, museum-quality geometry.
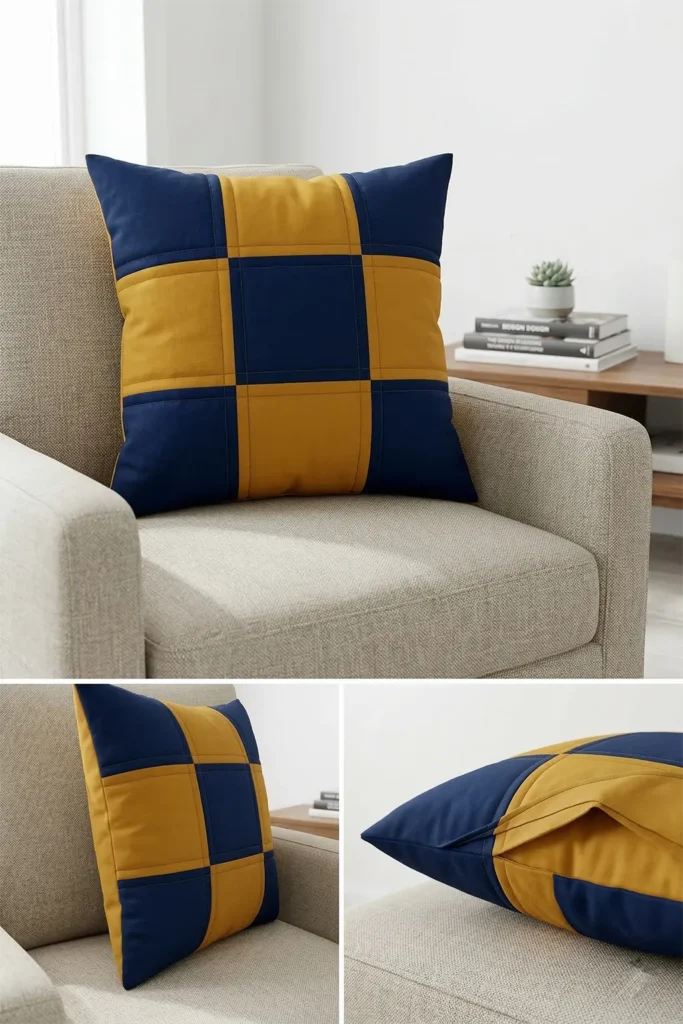
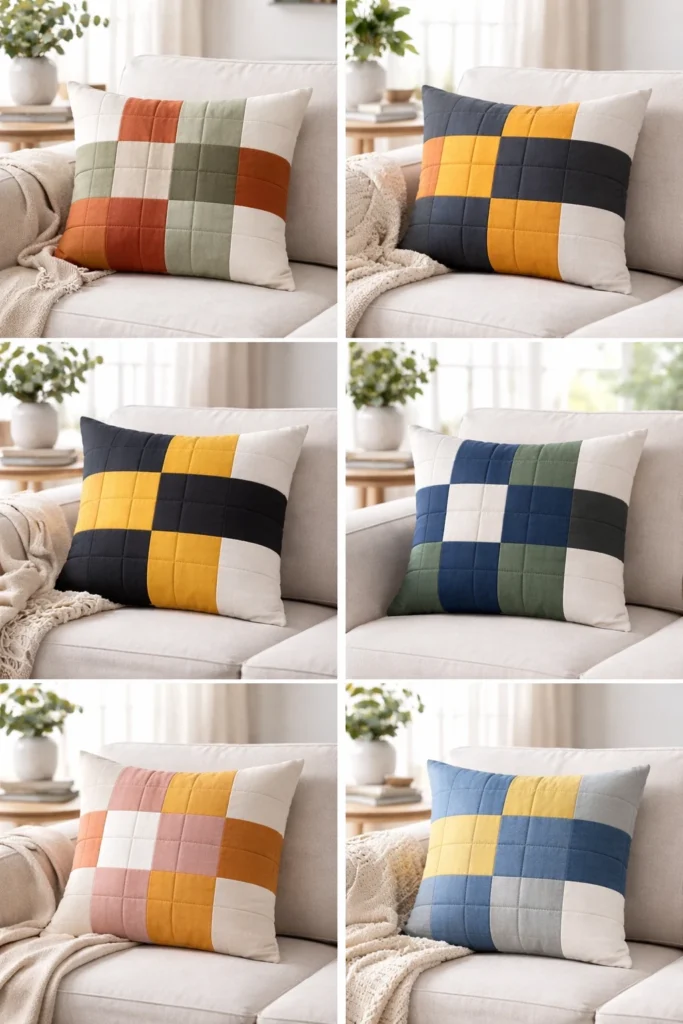
13. Decorative Nine Patch Cushion Covers to Brighten Up Your Loveseat
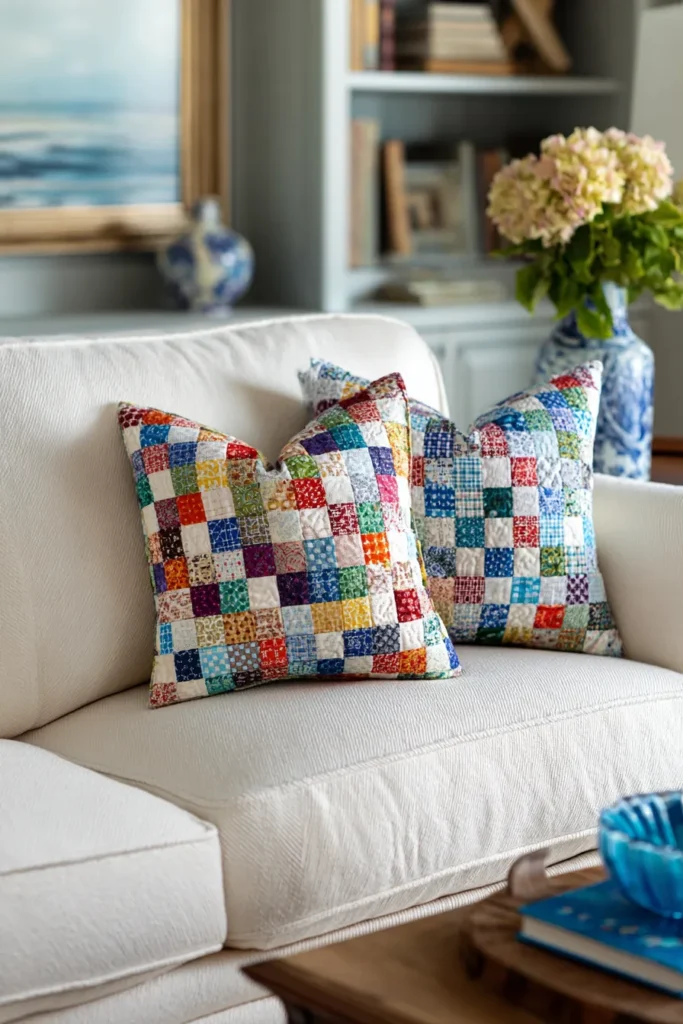
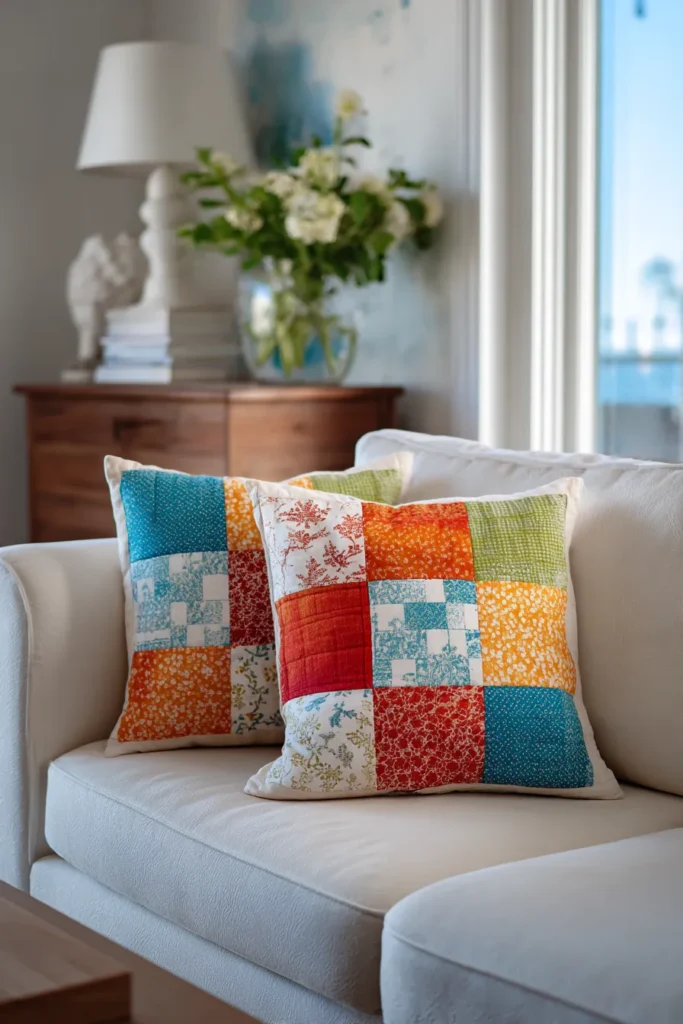
A Guide to Making Miniature Nine Patch Accent Cushions
A loveseat is an inherently intimate piece of furniture, designed for close conversation and relaxed lounging. Because of its smaller scale, it requires decor that is impactful but not overwhelming. This miniature framed Nine Patch cushion cover is the perfect solution. By shrinking the traditional pattern to a tiny scale and grouping four of them within a crisp, solid border, you create a vibrant, jewel-like accent piece that brightens the room without dominating the sofa.
The Heritage of the Miniature Block
Smaller seating arrangements require a delicate balance of scale and visual weight. Historically, miniature piecing was the ultimate test of a quilter’s precision, often used in “crib quilts” or tailored home goods to showcase refined craftsmanship. This guide marries that historic, intricate geometry with the demands of a warm, humid climate. For elegant lounging in tropical or summer weather, heavy velvets and thick wools simply won’t do. By executing this miniature patchwork entirely in lightweight, highly breathable premium cottons, the cushion remains cool to the touch and wonderfully comfortable year-round.
Focus on Usability, Comfort, and Elegance
- Usability: The structured border acts as a built-in frame, making the pieced center look like a deliberate work of art rather than a leftover scrap project. The envelope backing ensures it is effortless to remove and launder.
- Comfort: Utilizing crisp, high-thread-count cotton voile or lightweight percale ensures the cushion cover remains breathable and soft against the skin, preventing that sticky, overheated feeling during a warm afternoon nap.
- Elegance: To brighten the loveseat, choose a curated “spark” palette. Pair deeply saturated jewel tones or bright, cheerful citrus hues (like tangerine, turquoise, and magenta) with a stark, blinding white background and border. This makes the colors pop with a fresh, contemporary elegance.
Measurements & Materials Needed
Finished Pillow Size: Intimate Loveseat Cushion (16″ x 16″) Finished Block Size: The pieced center measures 12″ x 12″, surrounded by a 2″ finished framing border.
Materials Needed:
- Fabric for blocks (The Miniatures): 36 squares total, cut to 2.5″ x 2.5″.
- Pro-Tip: You need 18 bright/colored squares and 18 crisp white squares to create four alternating nine-patch blocks.
- Border Fabric: Crisp white premium cotton. Cut two strips at 2.5″ x 12.5″ (for the sides), and two strips at 2.5″ x 16.5″ (for the top and bottom).
- Backing fabric (Envelope Back): Two rectangles cut to 16.5″ x 11.5″ from your solid white or a coordinating bright fabric.
- Lining & Batting: One 18″ x 18″ square of lightweight summer cotton batting, and one 18″ x 18″ square of inexpensive muslin (to sit behind the batting).
- Thread: High-quality, 50-weight 100% cotton piecing and quilting thread in crisp white.
- Quilting ruler: A 6″ x 24″ acrylic ruler for precise strip cutting.
- Rotary cutter: Equipped with a fresh blade for flawless, unfrayed edges.
- Quilting pins: Fine glass-head pins for meticulous piecing.
- Iron and ironing board: Absolutely essential for pressing the tiny 1/4-inch seams completely flat.
- Additional Notions: A plush 16″ x 16″ pillow insert.
Step-by-Step Guide: The Framed Miniature Nine Patch
Step 1: Precision Cutting and Sorting
Take your rotary cutter and carefully cut your 36 tiny 2.5″ squares. Separate them into four piles of 9 squares each. For the highest visual impact, arrange two piles with colored corners/centers (5 colors, 4 white) and the other two with white corners/centers (5 white, 4 colors).
Step 2: Assembling the Miniature Blocks
Take your first pile of 9 squares and lay them out in a 3×3 grid.
- Sew the squares in each of the three rows together using a precise 1/4-inch seam allowance.
- Press the seams of Rows 1 and 3 outward, and Row 2 inward.
- Join the three rows together, ensuring the tiny seams nest perfectly to create sharp, crisp corners. Your unfinished miniature block will measure exactly 6.5″ x 6.5″. Repeat this process to build all four blocks.
Step 3: Joining the Central Grid
Lay your four completed 6.5″ blocks out in a 2×2 grid, alternating the color-heavy and white-heavy blocks to create a dynamic checkerboard effect. Sew the top two blocks together, and then sew the bottom two blocks together. Press these seams open. Finally, sew the top half to the bottom half. Your stunning, intricately pieced center will now measure 12.5″ x 12.5″ unfinished.
Step 4: Framing with the Border
To elevate this from a quilt block to a tailored cushion, we add the frame.
- Take your two 2.5″ x 12.5″ white border strips. Sew them to the left and right sides of your pieced center. Press the seams outward toward the border.
- Take your two 2.5″ x 16.5″ white border strips. Sew them to the top and bottom of the unit. Press the seams outward. Your framed cushion front is now complete and should measure exactly 16.5″ x 16.5″.
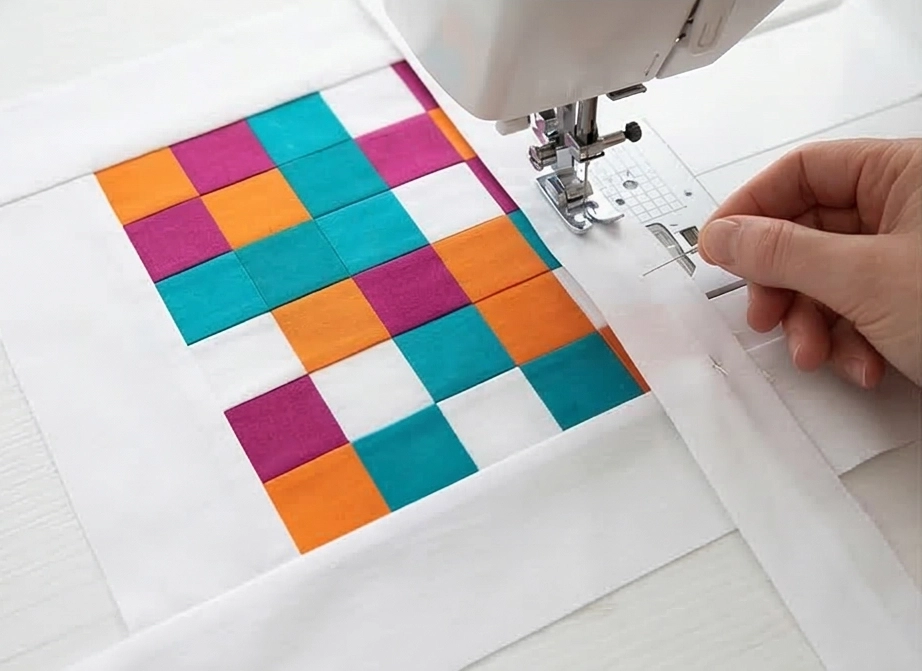
Step 5: Basting and Quilted Texture
Lay your 18″ scrap muslin face down, center the lightweight cotton batting on top, and place your pieced cushion front face up. Pin the three layers together. Take this to your sewing machine and perform a simple “stitch-in-the-ditch” straight line along the inner and outer edges of your solid white border. Then, sew diagonal straight lines through the center of the nine-patch grid. This minimalist quilting provides structural durability and gives the pieced cotton a beautifully subtle, padded dimension. Trim the edges flush to 16.5″ x 16.5″.
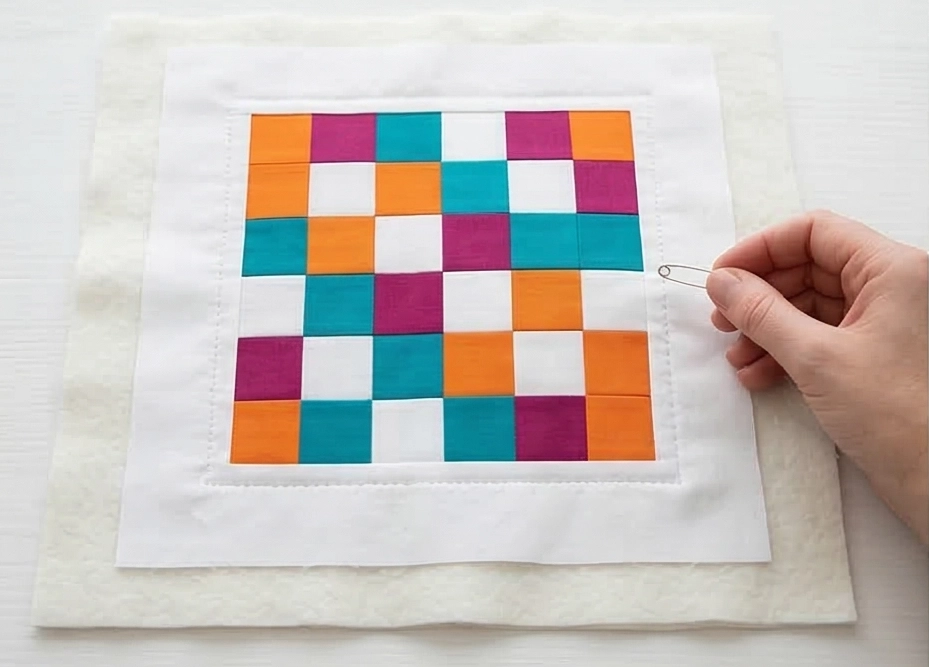
Step 6: Assembly Section (Constructing the Envelope Back)
- Hem the Panels: Take your two 16.5″ x 11.5″ backing rectangles. On one long 16.5-inch edge of each, fold the fabric down 1/2 inch, press, fold another 1/2 inch, press, and topstitch to create a clean hem.
- Layer: Lay your quilted front panel right-side up. Place the two backing rectangles right-side down on top, aligning the raw outer edges so the hemmed edges overlap in the center. Pin heavily around the perimeter.
- Finish: Sew around the entire 16.5″ x 16.5″ perimeter with a 1/4-inch seam allowance. Clip the corners diagonally to reduce bulk, turn right-side out through the envelope opening, and push the corners out sharply before adding your pillow insert.
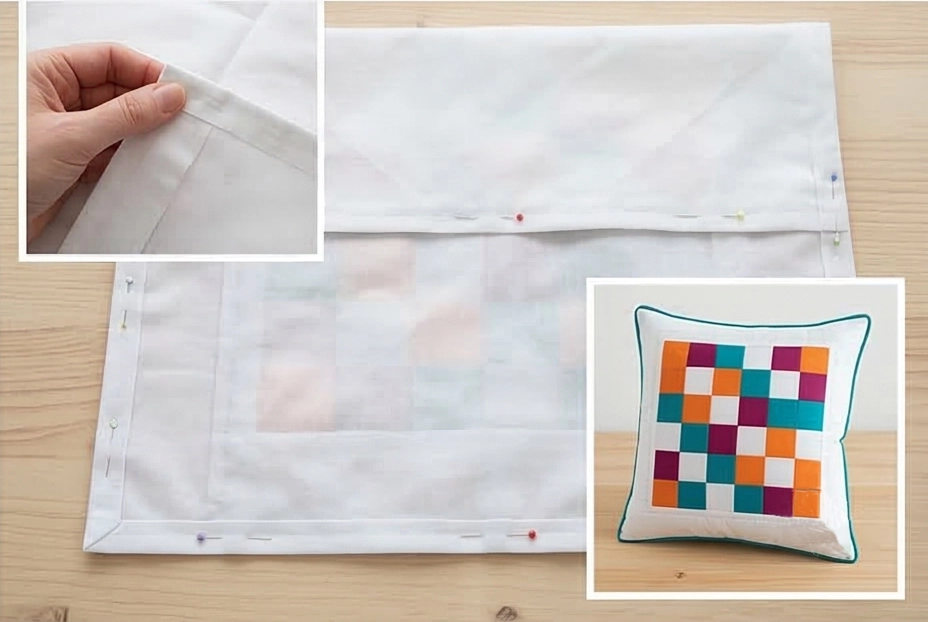
Usability Note: The lightweight cottons and summer-loft batting make this cushion exceptionally easy to care for. Machine wash the cover on a cool, gentle cycle with mild detergent. Because it is highly breathable, it will air-dry beautifully on a flat surface in warm weather, maintaining its crisp, vibrant appearance and fresh, cooling touch.

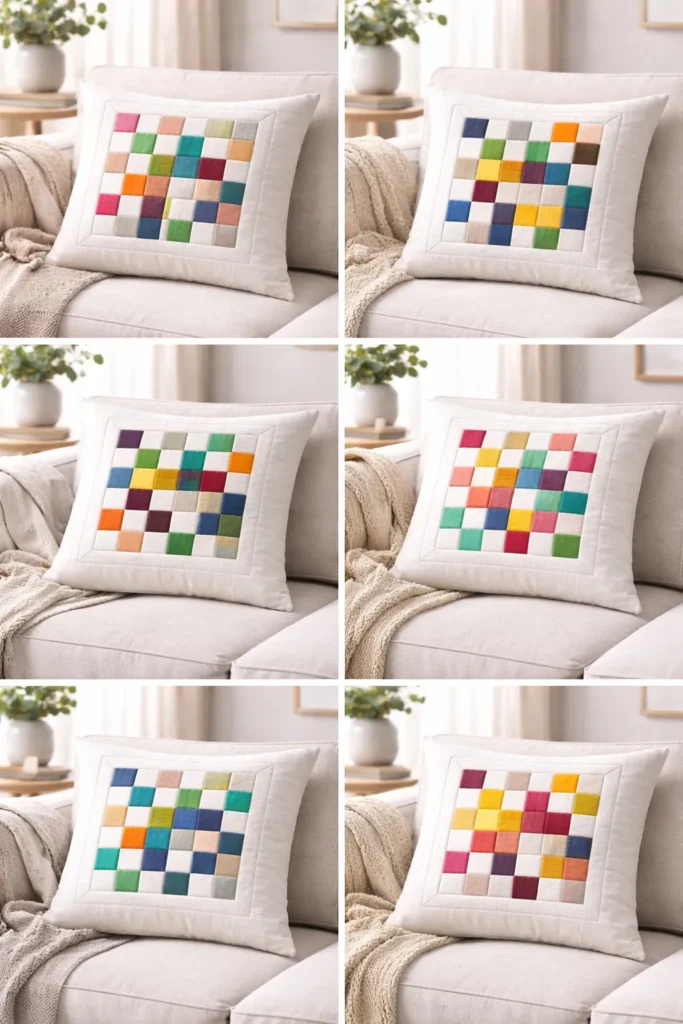
14. Modern Farmhouse Nine Patch Couch Covers for Everyday Elegance
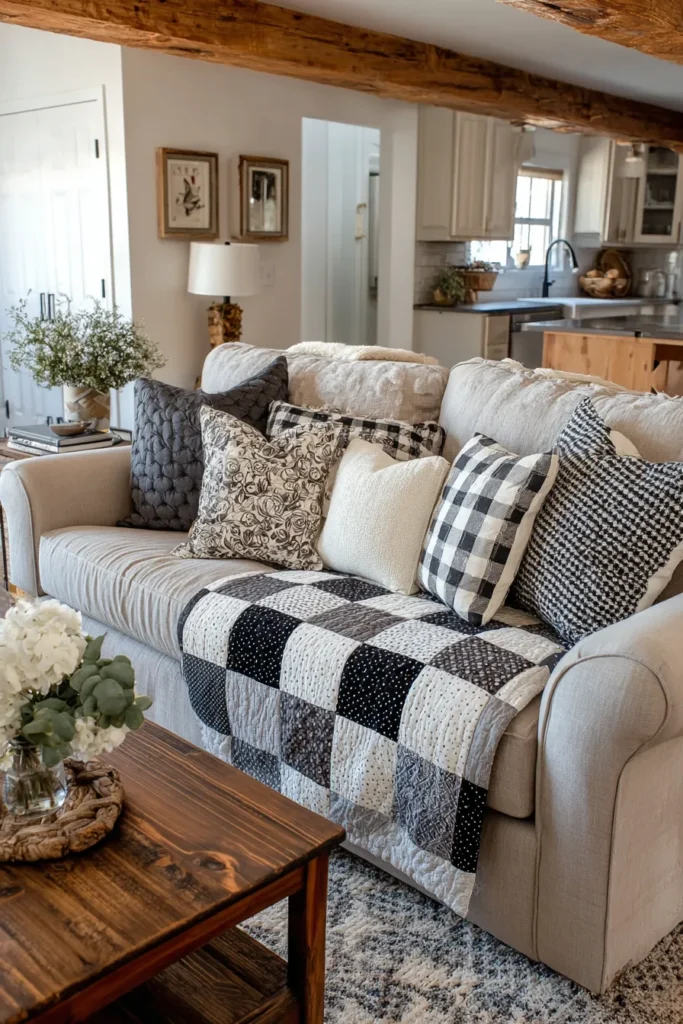
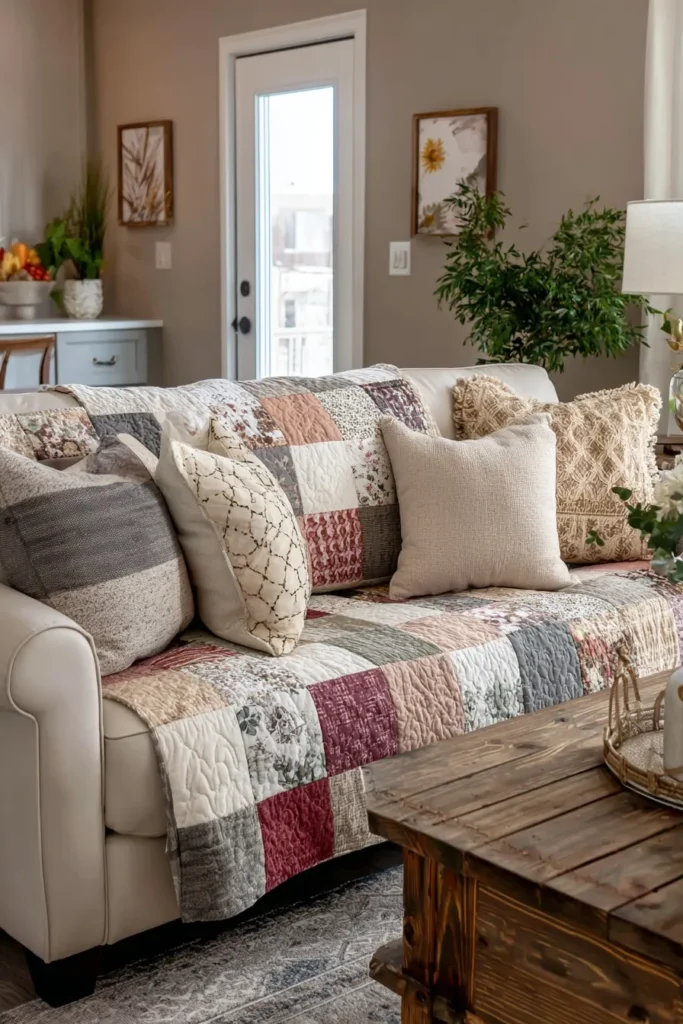
A Guide to Making Modern Farmhouse Nine Patch Couch Covers
The living room sofa is the heart of the home, enduring daily naps, movie marathons, and family gatherings. While practical, traditional slipcovers can often look sloppy or purely utilitarian. This Modern Farmhouse Nine Patch couch cover offers a beautiful alternative. By scaling up the classic Nine Patch block to an oversized proportion and utilizing a chic, neutral palette, you create a heavy, tailored quilt that intentionally drapes over your sofa. It protects your upholstery while adding a breathtaking layer of modern farmhouse elegance to the room.
The Heritage of the Utility Quilt
I designed this specific pattern because the modern farmhouse aesthetic is deeply rooted in the concept of elevated practicality. Historically, pioneer women would throw their heaviest utility quilts over worn furniture to extend its life and hide frayed upholstery. I wanted to take that frugal, historical practice and turn it into a deliberate, high-end design choice. By utilizing classic farmhouse textiles—like charcoal ticking stripes and soft, unbleached cottons—in a rigidly scaled geometric grid, we bridge the gap between historic utility and contemporary luxury.
Focus on Usability, Comfort, and Elegance
- Usability: Using oversized blocks means this large-scale cover comes together much faster than a traditional bed quilt. It is specifically designed to be thrown in the washing machine the moment a spill occurs.
- Comfort: For a couch cover, grip and texture are essential. Pairing a soft, linen-cotton blend top with a brushed flannel backing ensures the cover feels incredibly cozy against the skin while providing enough “grip” to prevent it from constantly sliding off leather or microfiber sofas.
- Elegance: The modern farmhouse look relies on a restrained, earthy palette. Stick to crisp creams, soft greiges, faded charcoals, and classic ticking stripes. This keeps the large geometric pattern looking sophisticated and tailored rather than busy or chaotic.
Measurements & Materials Needed
Finished Quilt Size: Generous Sofa Throw (approx. 72″ x 90″) – Sized to drape completely over the seat cushions and up over the back of a standard three-seater sofa. Finished Block Size: 18″ x 18″ (made from nine 6″ finished squares). This cover requires 20 blocks total (arranged in 4 columns and 5 rows).
Materials Needed:
- Fabric for blocks: 180 squares total, cut to 6.5″ x 6.5″.
- Pro-Tip: For a true farmhouse look, cut 90 squares from a creamy unbleached cotton (Lights), and 90 squares from a mix of charcoal solids and ticking stripes (Darks).
- Backing fabric: 5 yards of 44″ premium brushed cotton flannel (for extra grip against the sofa fabric), or 2.5 yards of 108″ wide-backing cotton.
- Batting: 80″ x 90″ low-loft 100% cotton batting (cotton provides a denser, heavier drape than polyester, making it ideal for upholstery protection).
- Binding: 5/8 yard of coordinating ticking stripe fabric.
- Thread: High-quality, 50-weight 100% cotton piecing and quilting thread in soft cream.
- Quilting ruler: A 6″ x 24″ acrylic ruler for precise strip cutting and sub-cutting.
- Rotary cutter: Equipped with a fresh, sharp blade to ensure clean cuts through the thicker linen-cotton blends.
- Quilting pins: Fine glass-head pins for piecing, and heavy-duty curved safety pins for basting.
- Iron and ironing board: Absolutely essential for pressing the thick seams completely flat.
Step-by-Step Guide: The Modern Farmhouse Couch Cover
Step 1: Precision Cutting and Sorting
Using your rotary cutter and acrylic ruler, cut your fabrics into 180 squares measuring exactly 6.5″ x 6.5″. Separate them into two piles: your Light neutrals and your Dark/Striped fabrics.
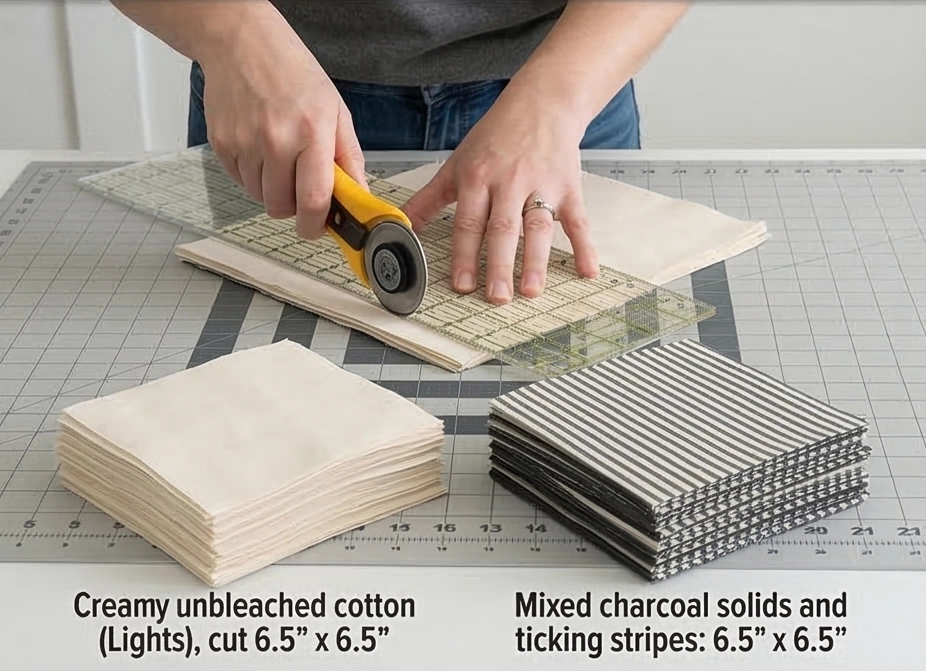
Step 2: Assembling the Oversized Nine-Patch
To create a balanced checkerboard effect across the whole couch, you will make two different variations of the block.
- Block A (Make 10): Lay out a 3×3 grid with Darks in the four corners and the center. (Requires 5 Darks, 4 Lights).
- Block B (Make 10): Lay out a 3×3 grid with Lights in the four corners and the center. (Requires 5 Lights, 4 Darks). Sew the squares in each row together using a precise 1/4-inch seam allowance.
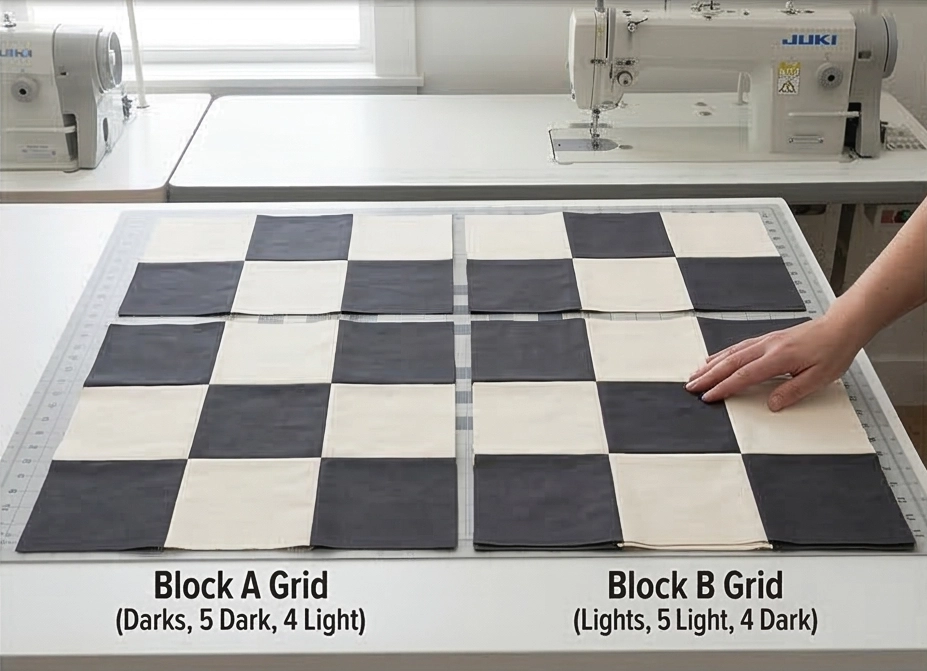
Step 3: Pressing for a Flat Seating Surface
Because people will be sitting on this quilt, preventing bulky seam lumps is critical. For Block A, press the row seams toward the Dark squares. For Block B, press the row seams toward the Light squares. Join the three rows of each block together. The opposing seams will lock together smoothly, ensuring a completely flat block that measures exactly 18.5″ x 18.5″ unfinished.
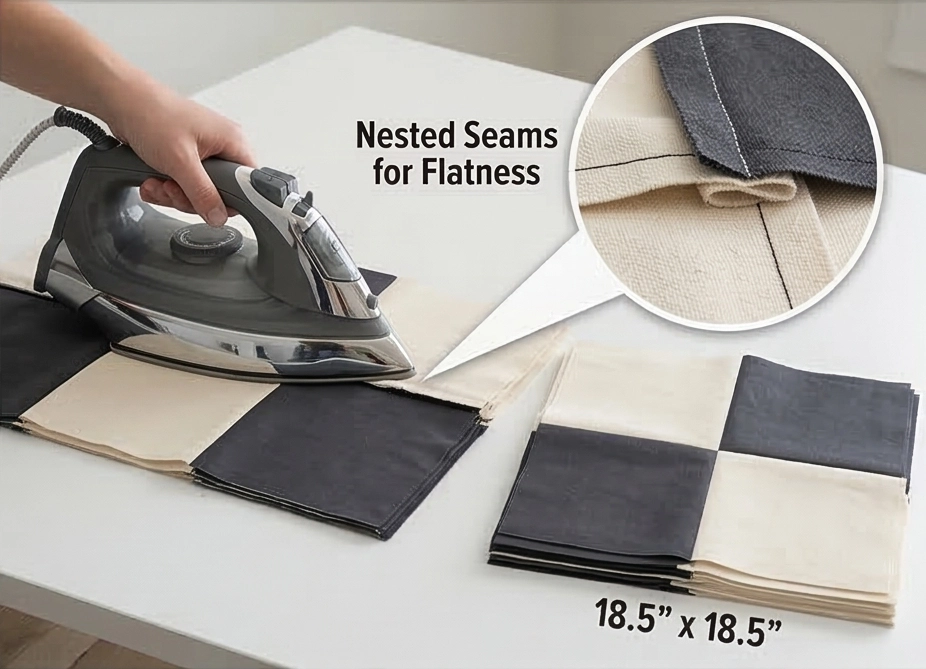
Step 4: Assembly Section (Building the Cover)
- Row 1: Sew a Block A to a Block B. Add another Block A, and finish with a Block B to create a row of 4 blocks.
- Row 2: Start with Block B, then Block A, alternating to complete the row of 4 blocks.
- Join the Rows: Build 5 horizontal rows in total, alternating the starting blocks to continue the massive checkerboard pattern. Pin carefully at the seam intersections and sew the 5 rows together. Your heavy, beautifully pieced top will now measure 72.5″ x 90.5″.
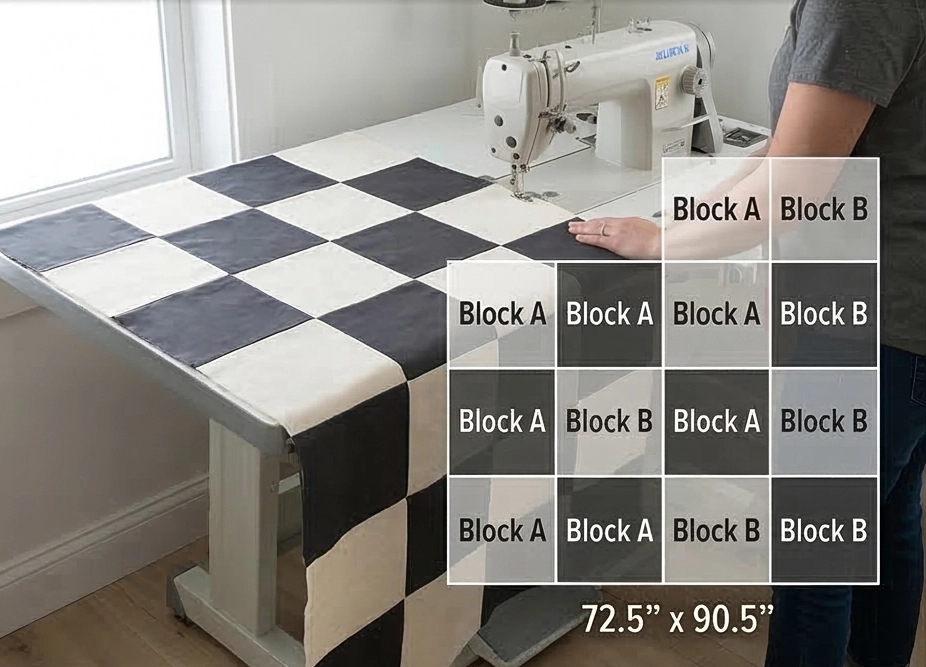
Step 5: Basting the Heavyweight Layers
Tape your flannel backing fabric face down and taut on the floor. Center your cotton batting over it, and lay your pieced farmhouse top face up. Because this cover will endure a lot of friction from sitting and shifting, pin the three layers together very densely with your curved safety pins—place one pin in almost every square.
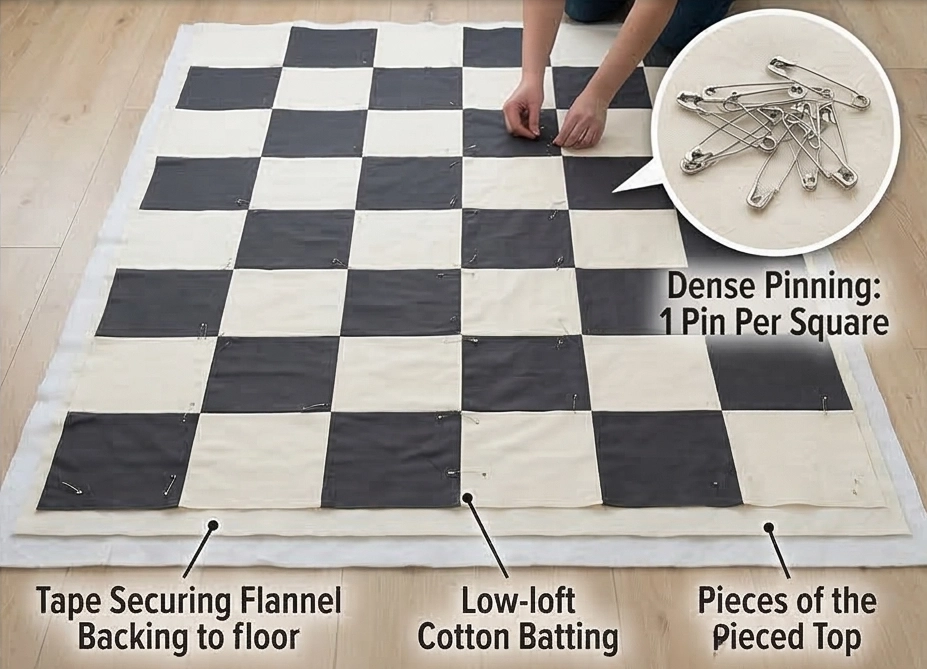
Step 6: Structural Quilting and Binding
- Quilt: To ensure the cover holds its shape beautifully over the sofa cushions, it requires structural quilting. Stitch straight lines exactly 1/4-inch on both sides of every major seam line (both horizontally and vertically). This creates a heavy, durable grid that anchors the fabric to the batting so it will never warp or stretch out of shape when sat upon.
- Bind: Cut your binding fabric into 2.5″ strips. Join them end-to-end, fold in half, press, and sew tightly around the entire perimeter of the cover, mitering the corners for a durable, tailored edge.
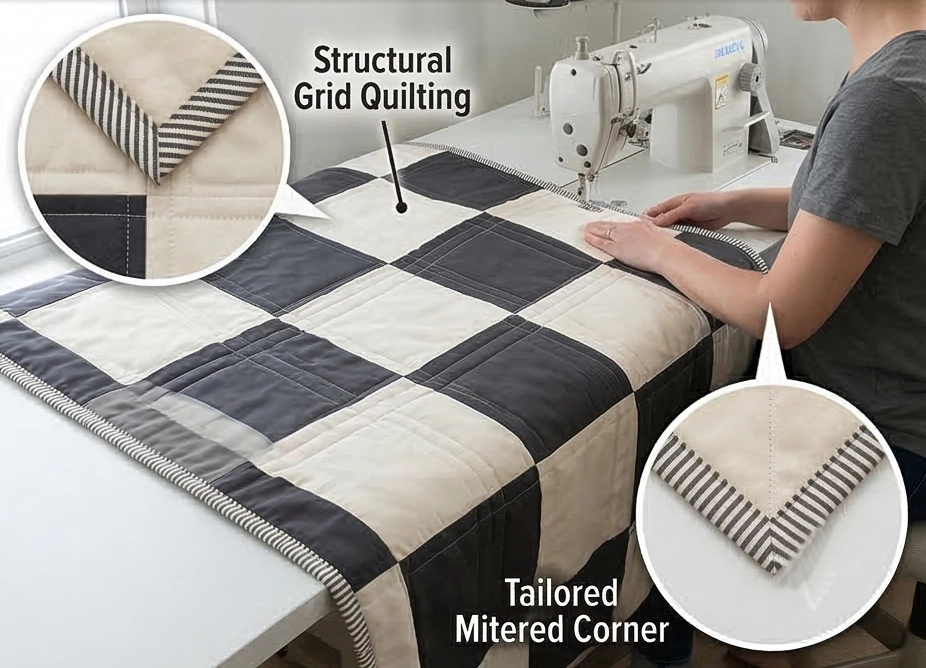
Usability Note: This couch cover is engineered for real life. The flannel backing provides natural friction, helping the quilt stay anchored to your sofa cushions rather than sliding down the backrest. To care for it, machine wash on a cold, normal cycle with a mild detergent whenever it needs a refresh. Tumble drying on medium heat will beautifully crinkle the cotton batting, enhancing that soft, lived-in, vintage farmhouse texture while keeping your actual sofa in pristine condition.
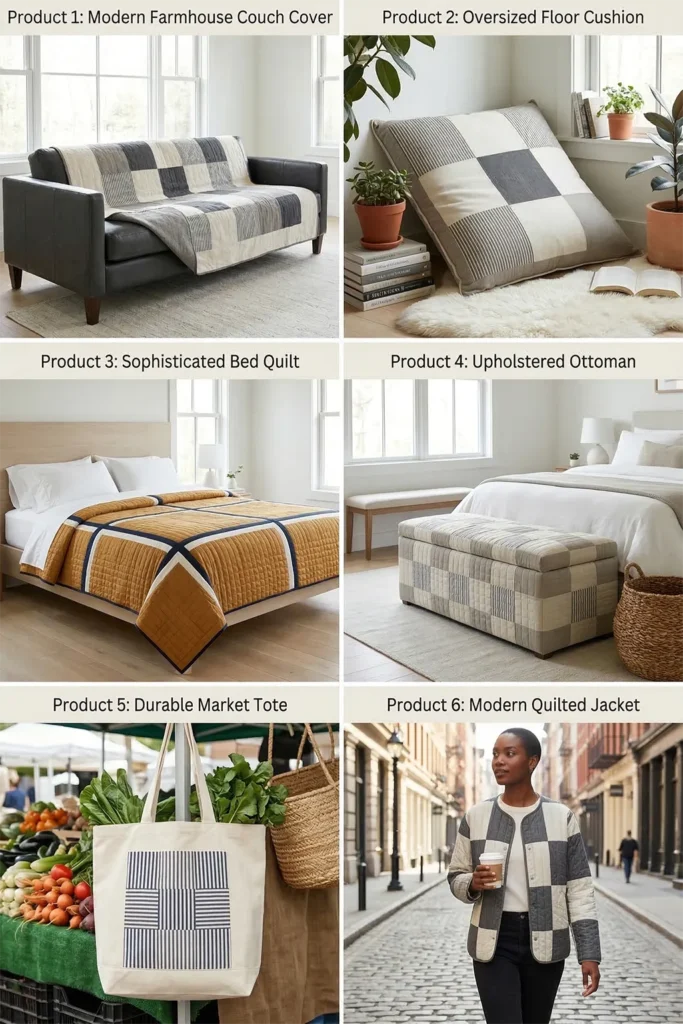
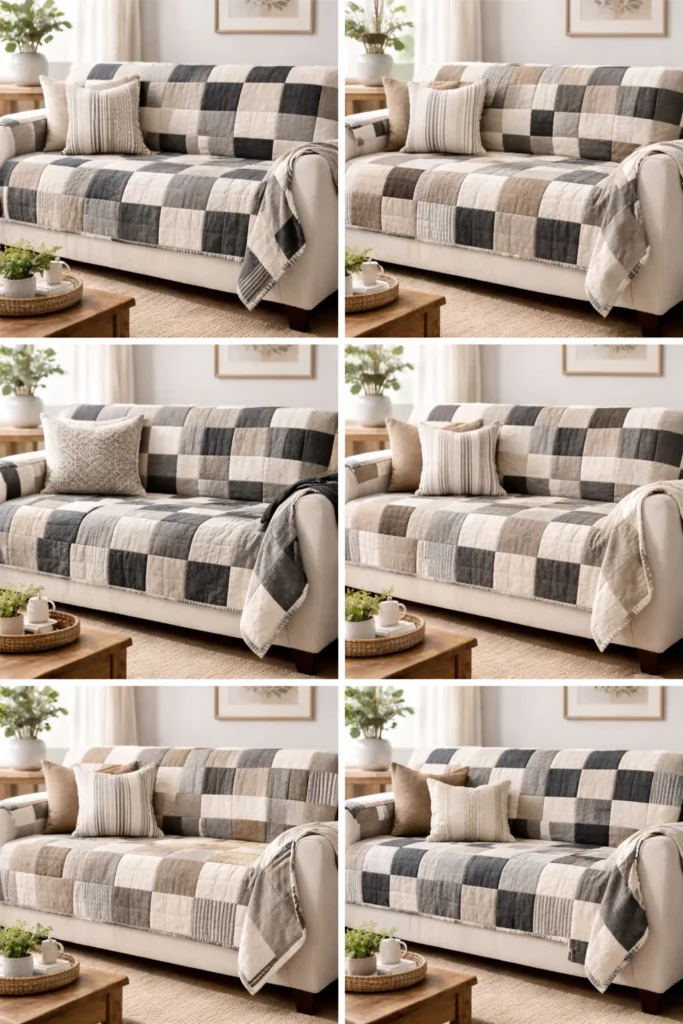
15. Contemporary Nine Patch Table Runners to Elevate Your Dining Experience
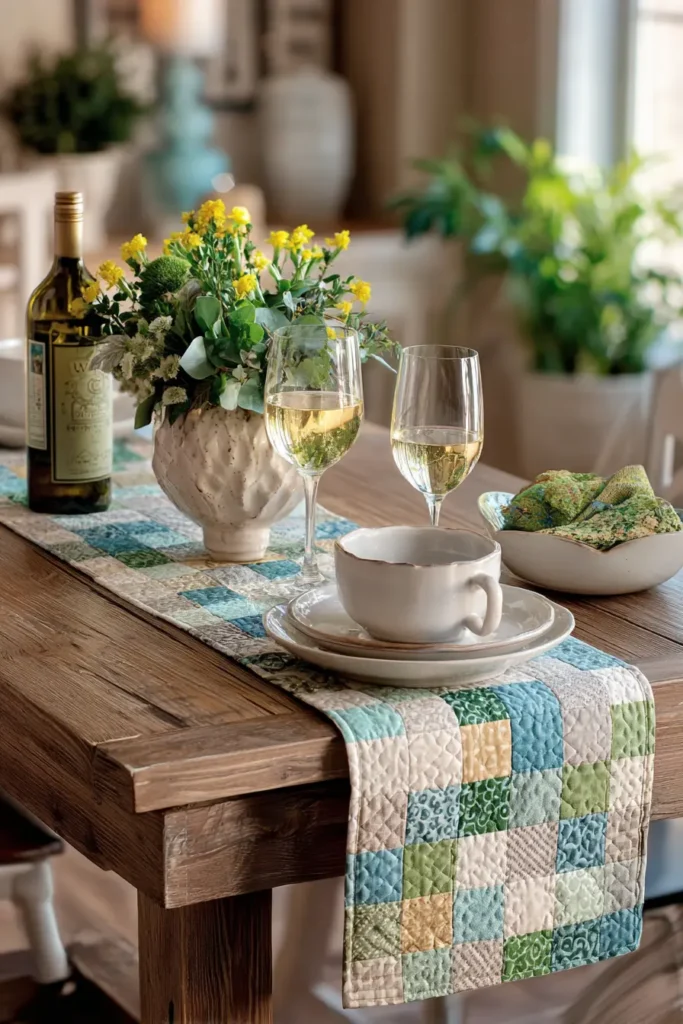
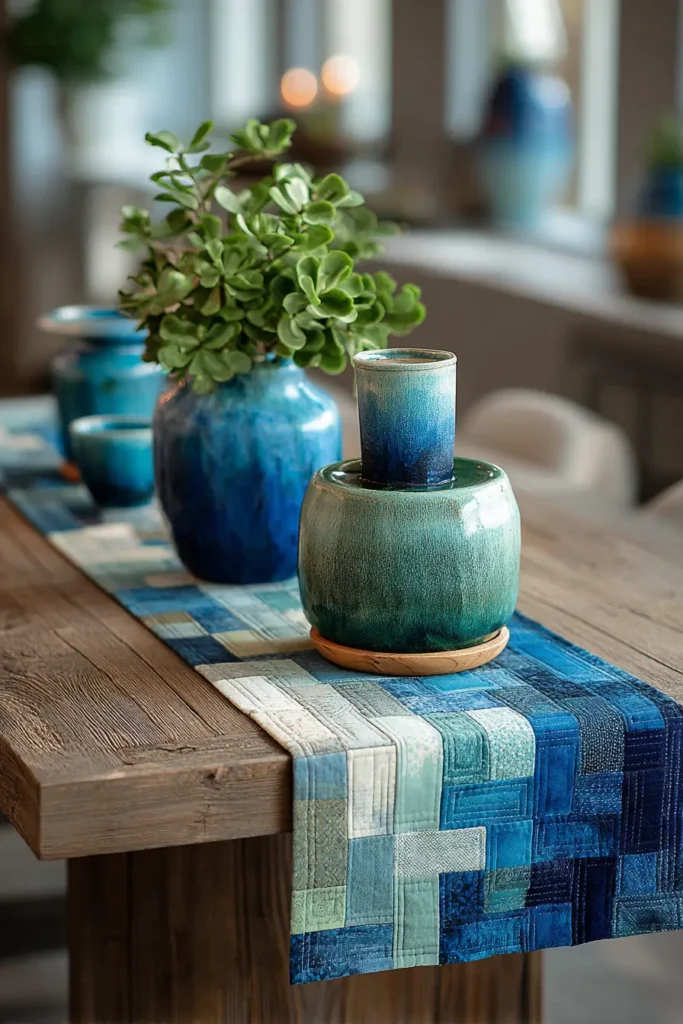
A Guide to Making Contemporary Nine Patch Table Runners to Elevate Your Dining Experience
A dining table is the gathering point of the home, a place where meals and memories are shared. However, a large expanse of bare wood or glass can feel austere, while a full tablecloth can sometimes feel overly traditional or fussy. The Contemporary Nine Patch Table Runner provides the perfect architectural balance. By arranging precise, miniaturized Nine Patch blocks in a sleek, linear sequence flanked by crisp negative space, this runner anchors your centerpieces and protects your table while infusing the room with modern, tailored elegance.
The Heritage of the Linear Runner
I designed this specific pattern to rethink how geometric quilt blocks interact with negative space. Historically, the Nine Patch was used in dense, repetitive grids to maximize warmth on a bed. Table runners, conversely, originated in the Middle Ages as long, narrow cloths used primarily to catch spills and protect expensive wooden banqueting tables. By merging these two concepts, we isolate the beautiful geometry of the Nine Patch, treating each block like a framed piece of modern art floating down the center of the table. I curated this design with a minimalist, high-contrast palette to ensure it feels distinctly contemporary and sophisticated.
Focus on Usability, Comfort, and Elegance
- Usability: A table runner is incredibly practical. It provides a dedicated “runway” for serving dishes, protecting the table surface from scuffs and scratches, while being small enough to easily toss into the washing machine after a dinner party.
- Comfort: Textiles in a dining room do more than look pretty; they provide acoustic comfort. The quilted layers absorb the harsh clatter of silverware and glassware, creating a softer, more intimate acoustic environment for conversation.
- Elegance: Contemporary elegance relies on crisp lines and sophisticated textures. Use a textured, solid background like slate-grey crossweave or crisp white linen, and piece the Nine Patches using a bold accent color—such as deep ochre, emerald, or stark black—to create a stunning, high-end focal point.
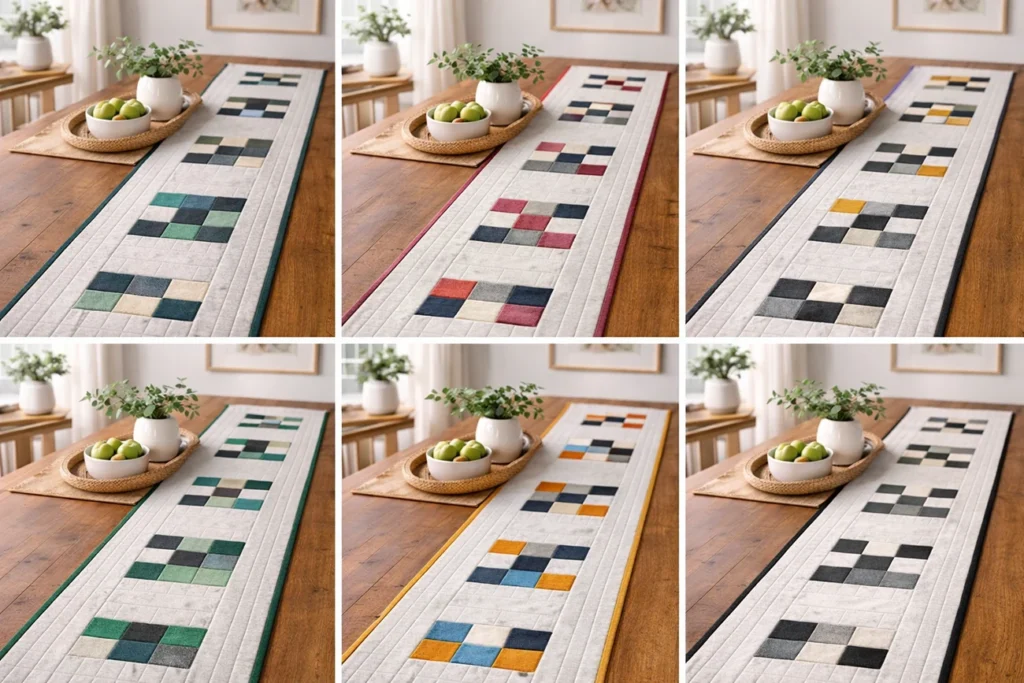
Measurements & Materials Needed
Finished Runner Size: Contemporary Long Runner (approx. 14″ x 72″) – Perfect for a standard 6-to-8 seat dining table. Finished Block Size: The runner features five 6″ x 6″ Nine Patch blocks interspersed with solid background sashing.
Materials Needed:
- Fabric for blocks (The Nine Patches): 45 tiny squares total, cut to 2.5″ x 2.5″.
- Pro-Tip: For a striking modern look, cut 25 squares in your bold Accent Color, and 20 squares in your Background Color.
- Background & Border Fabric: 1.5 yards of premium solid cotton or linen-cotton blend. You will need to cut:
- Four 6.5″ x 8.5″ rectangles (for the sashing between the blocks).
- Two 4.5″ x 6.5″ rectangles (for the end caps).
- Two 4.5″ x 72.5″ long strips (for the top and bottom borders).
- Backing fabric: 1.5 yards of standard 44″ premium cotton.
- Batting: 20″ x 80″ low-loft 100% cotton batting. (Do not use polyester batting for table linens, as it can melt or warp under hot serving dishes).
- Binding: 1/2 yard of coordinating Accent Color fabric.
- Thread: High-quality, 50-weight 100% cotton piecing and quilting thread.
- Quilting ruler: A 6″ x 24″ acrylic ruler for perfectly straight border cuts.
- Rotary cutter: Equipped with a fresh blade to ensure flawless edges on the tiny squares.
- Quilting pins: Fine glass-head pins for meticulous piecing.
- Iron and ironing board: Absolutely essential for pressing the seams entirely flat so glassware sits level.
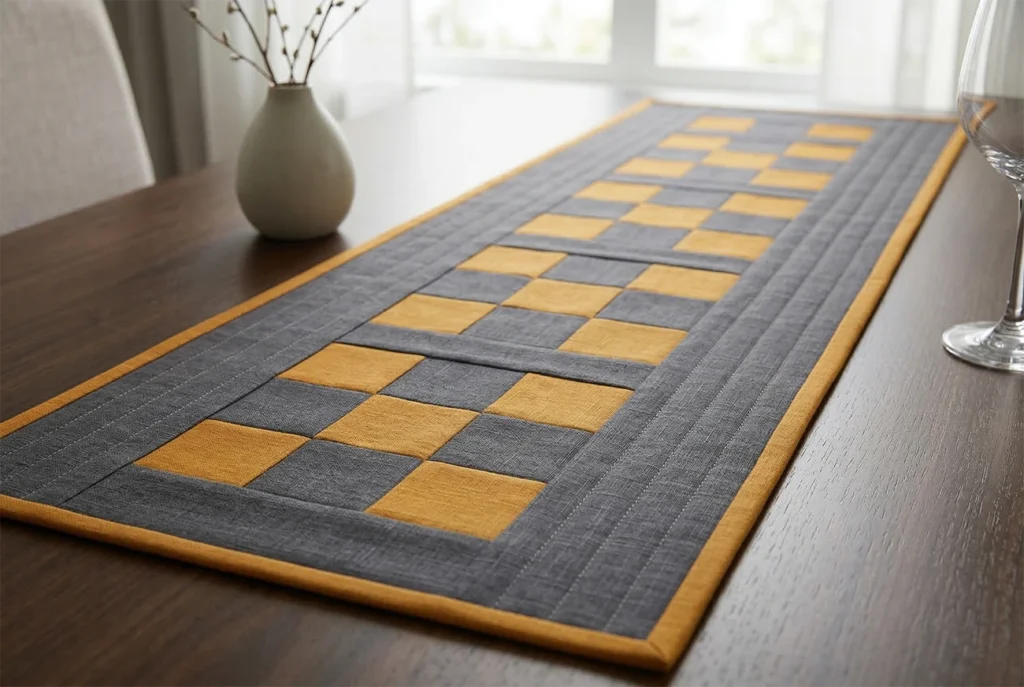
Step-by-Step Guide: The Contemporary Table Runner
Step 1: Precision Cutting and Sorting
Take your rotary cutter and carefully cut all your pieces according to the materials list. Separate your 2.5″ squares into five distinct piles, with each pile containing 5 Accent squares and 4 Background squares.
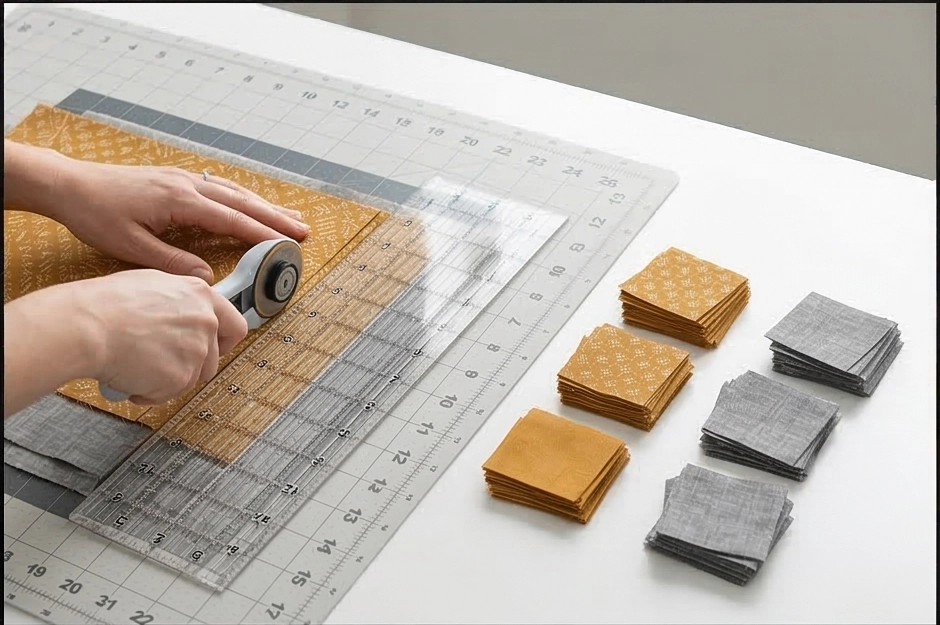
Step 2: Assembling the Nine-Patch Blocks
Take your first pile of 9 squares and lay them out in a 3×3 grid, placing the Accent color in the four corners and the exact center to create an ‘X’ pattern.
- Row 1: Accent, Background, Accent
- Row 2: Background, Accent, Background
- Row 3: Accent, Background, Accent Sew the squares in each row together using a precise 1/4-inch seam allowance.
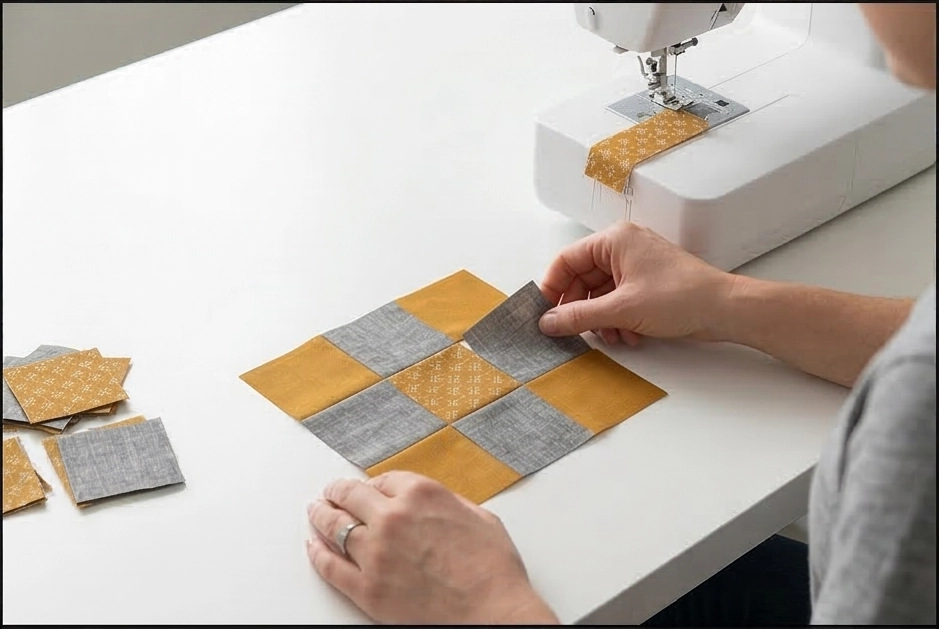
Step 3: Pressing for a Flawlessly Flat Surface
When making table linens, minimizing seam bulk is critical to prevent wine glasses and plates from tipping over. Press the seams of Rows 1 and 3 outward (toward the outer Accent squares), and press the seams of Row 2 inward (toward the center Accent square). Join the three rows together, ensuring the seams nest perfectly. Your unfinished block will measure exactly 6.5″ x 6.5″. Repeat to build all 5 blocks.
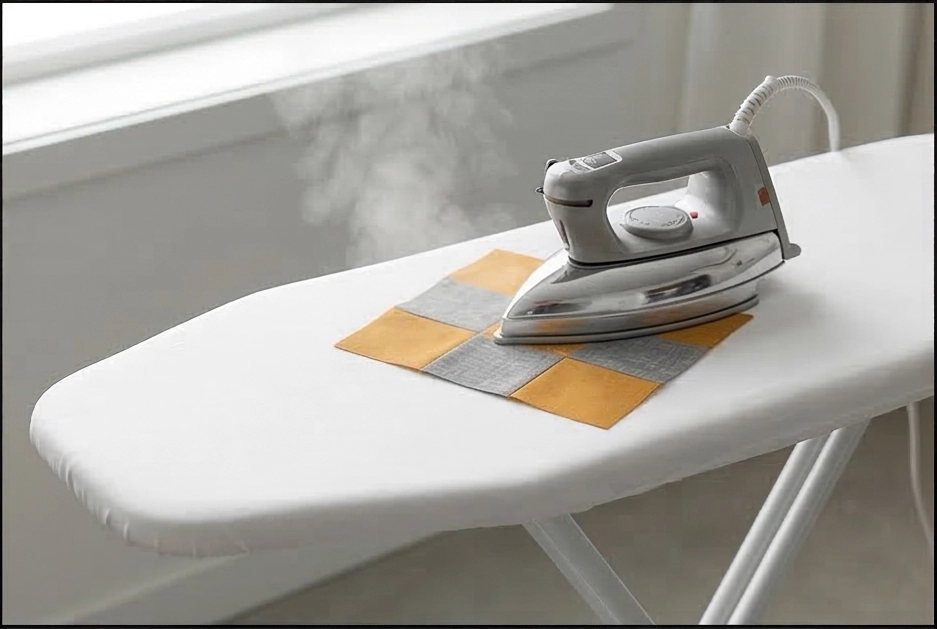
Step 4: Assembly Section (Building the Floating Layout)
To create the contemporary “floating” effect, we will alternate the blocks with negative space.
- The Center Row: Sew a 6.5″ x 8.5″ Background sashing rectangle between each of the five Nine Patch blocks. Add a 4.5″ x 6.5″ Background end cap to the far-left and far-right sides. Press all these seams open to keep the runner perfectly flat. You now have a single, long, pieced strip measuring 6.5″ x 72.5″.
- The Long Borders: Take your two 4.5″ x 72.5″ Background strips. Sew one to the top edge of your pieced center strip, and the other to the bottom edge. Press the seams outward. Your stunning, minimalist runner top is now fully assembled and measures 14.5″ x 72.5″.
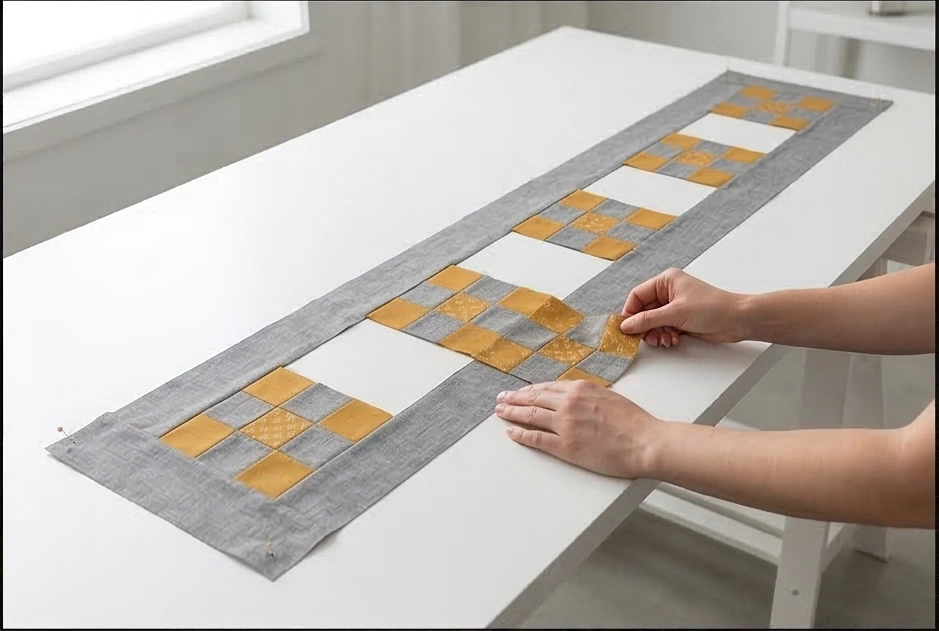
Step 5: Basting the Heat-Protective Layers
Tape your backing fabric taut to a large table or the floor, face down. Center your 100% cotton batting over it, and lay your pieced runner top face up. Because this is a long, narrow piece, pin the three layers together frequently (about every 4 inches) using your curved safety pins to prevent the fabric from shifting out of square.
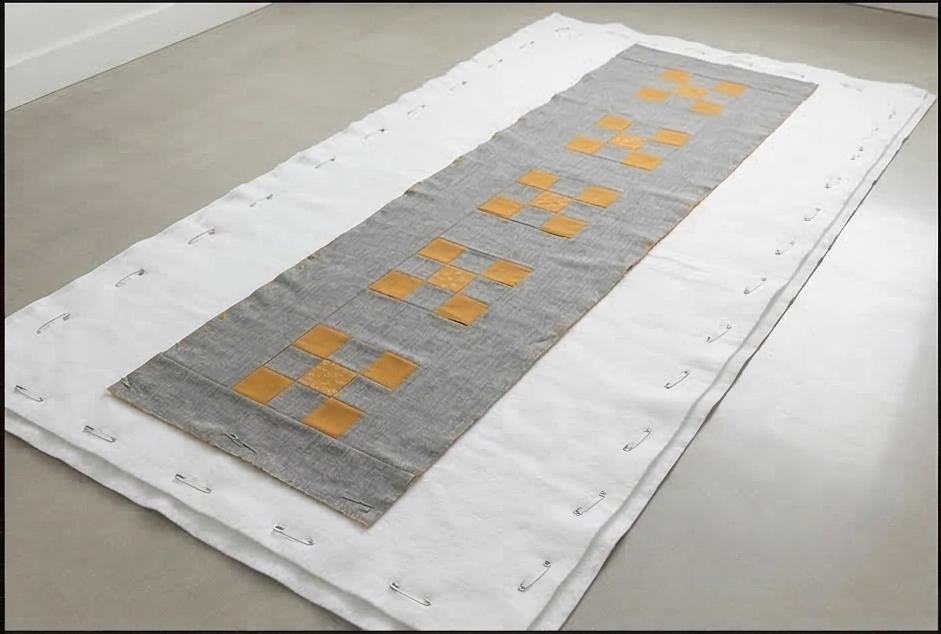
Step 6: Structural Quilting and Binding
- Quilt: To complement the contemporary aesthetic, opt for sleek, straight-line quilting. Stitch continuous lines spanning the entire 72-inch length of the runner, spacing them exactly 1 inch apart. This dense, linear texture not only looks incredibly modern but also firmly anchors the heat-protective cotton batting, creating a sturdy, trivet-like surface for warm dishes.
- Bind: Cut your binding fabric into 2.5″ strips. Join them end-to-end, fold in half, press, and sew tightly around the perimeter, mitering the four corners for a crisp, professional, tailored frame.
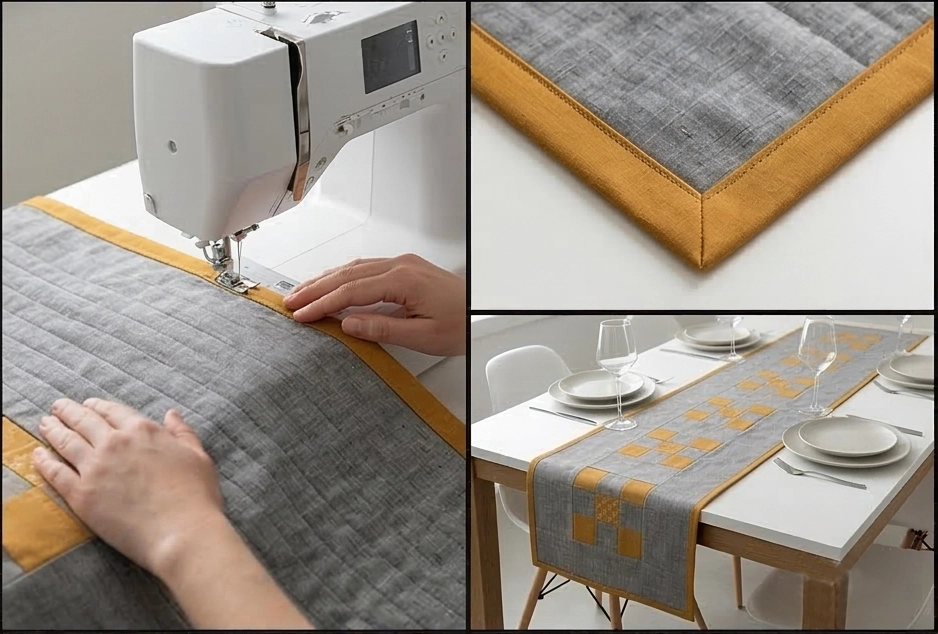
Usability Note: This table runner is engineered for both beauty and rigorous use in the dining room. The 100% cotton batting acts as a natural thermal barrier, protecting your wood finishes from warm (not boiling) serving bowls. Because dining linens inevitably encounter spills, simply machine wash on a cold, normal cycle with a stain-removing detergent. To maintain crisp, contemporary lines and keep the edges from curling, lay the runner completely flat to air-dry, then press it firmly with a hot iron before returning it to the center of your table.
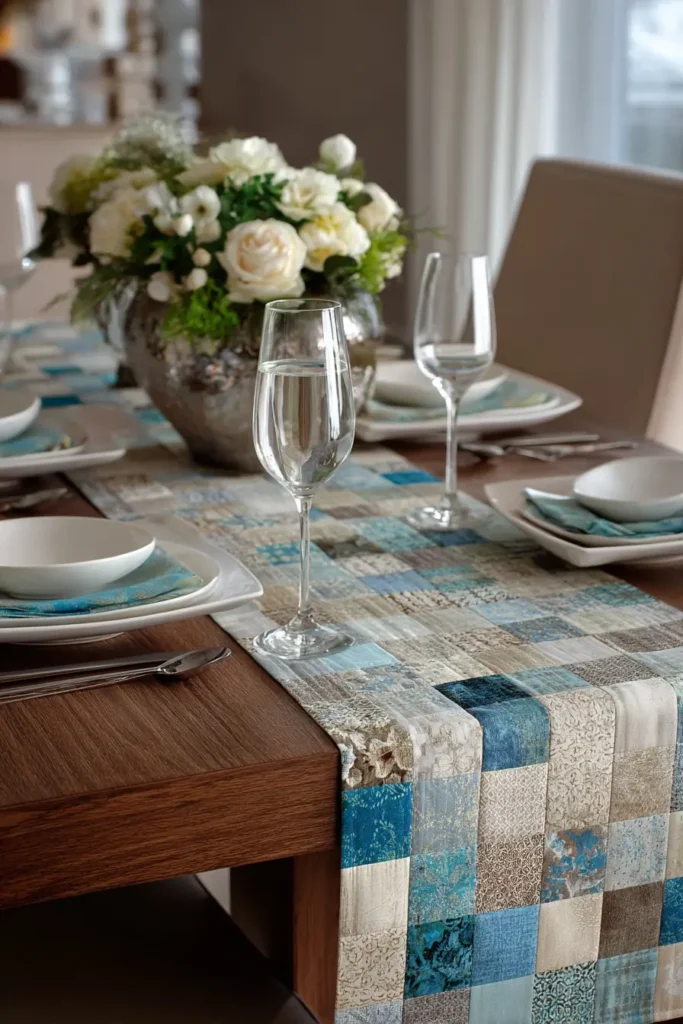

16. Hand-Stitched Nine Patch Couch Throws Featuring Hawaiian Appliqué Accents
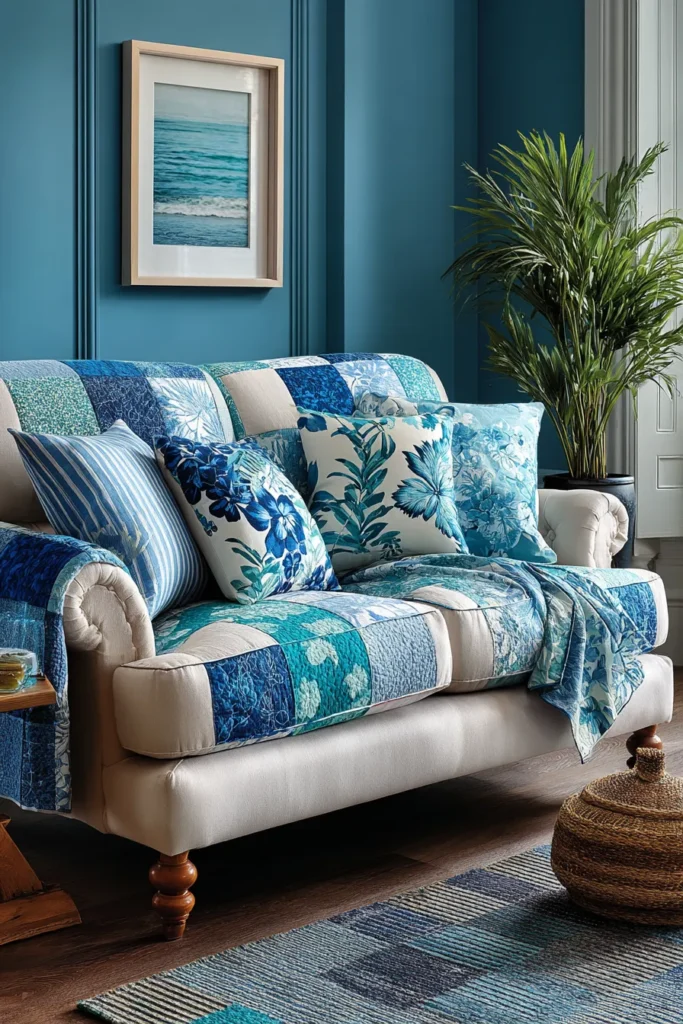
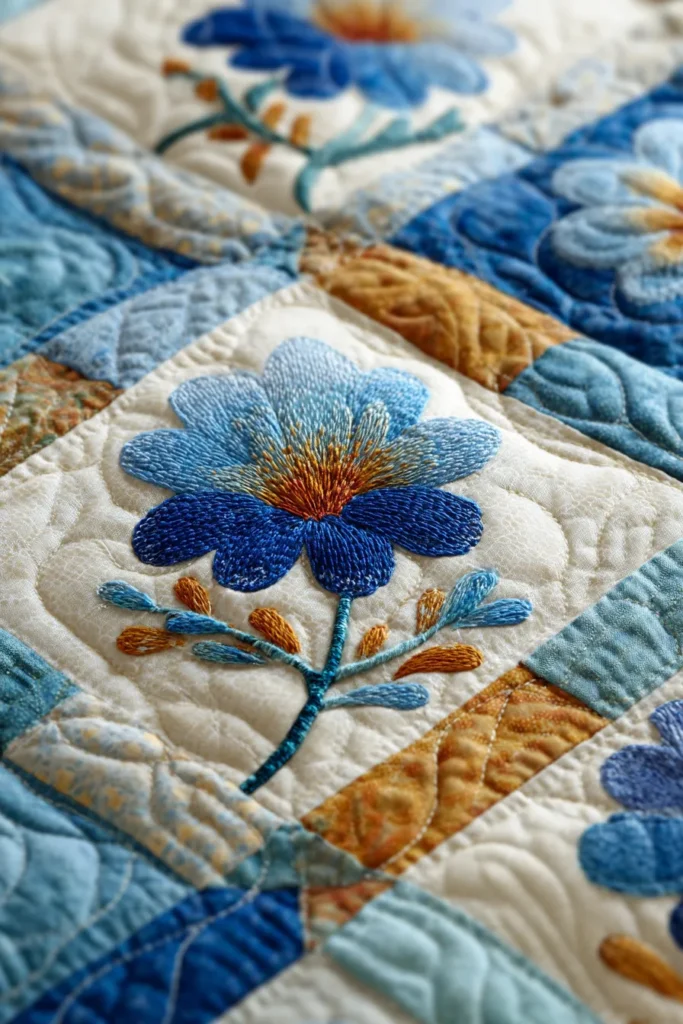
A Guide to Making Hand-Stitched Nine Patch Couch Throws Featuring Hawaiian Appliqué Accents
A beautifully draped couch throw is the quintessential element of a welcoming living room. However, combining the rigid, mathematical structure of classic patchwork with the fluid, organic grace of botanical art creates a textile that transcends basic comfort and becomes a true conversational masterpiece. This Hawaiian Appliqué Intersected Nine Patch throw blends these two distinct worlds, framing striking, symmetrical island botanicals within the reliable geometry of oversized Nine Patch blocks.
The Heritage of the Hybrid Block (And Why I Curated This Design)
I designed this specific pattern to celebrate a fascinating intersection of textile history. In the 1820s, missionaries arrived in the Hawaiian Islands and introduced traditional New England patchwork (such as the Nine Patch) to native women. However, the Hawaiian artisans quickly adapted the craft to reflect their own culture and lush surroundings. They discarded the tiny, rigid scraps in favor of cutting large, symmetrical botanical designs from solid fabrics—much like folding and cutting a paper snowflake—and appliquéd them onto pristine white backgrounds.
I curated this guide to bring that incredible history into the modern, elegant home. By alternating traditional oversized Nine Patch blocks with stunning hand-stitched Hawaiian appliqué blocks (such as the Monstera leaf or the traditional Breadfruit motif), we create a dynamic tension between straight lines and sweeping curves.
Focus on Usability, Comfort, and Elegance
- Usability: The appliqué technique allows for highly portable hand-sewing. You can baste the botanical motifs to your background fabric and comfortably stitch them by hand while relaxing on the sofa, making the construction process incredibly restorative.
- Comfort: Hand-stitching and hand-quilting result in a significantly softer, more pliable drape than dense machine quilting. Paired with a breathable bamboo batting, this throw molds perfectly over your shoulders without feeling stiff or heavy.
- Elegance: To keep the island motif sophisticated rather than kitschy, restraint is vital. I recommend a strict, two-tone palette—such as a deep, saturated Forest Green or Ocean Navy against crisp, optic White. This high-contrast minimalism elevates the throw into a piece of modern, bespoke textile art.
Measurements & Materials Needed
Finished Quilt Size: Large Couch Throw (approx. 54″ x 54″) Finished Block Size: 18″ x 18″ (18.5″ x 18.5″ unfinished). The throw requires 9 blocks total (arranged in a 3×3 grid): 5 Nine Patch blocks and 4 Appliqué blocks.
Materials Needed:
- Fabric for Nine Patch Blocks: * 25 squares of your Dark/Botanical color, cut to 6.5″ x 6.5″.
- 20 squares of your Crisp White background, cut to 6.5″ x 6.5″.
- Fabric for Appliqué Blocks: * 4 squares of Crisp White background, cut to 18.5″ x 18.5″.
- 4 squares of your Dark/Botanical color, cut to 16″ x 16″ (to be folded and cut into your motifs).
- Backing fabric: 3.5 yards of standard 44″ premium cotton, or 2 yards of 108″ wide-backing.
- Batting: 60″ x 60″ low-loft 100% bamboo batting for maximum drape.
- Binding: 1/2 yard of your Dark/Botanical color.
- Thread: 50-weight 100% cotton thread for piecing, fine silk thread for the invisible appliqué stitching, and heavy quilting thread for the hand-quilting.
- Tools: A 6″ x 24″ acrylic ruler, sharp fabric shears, fine appliqué “sharps” needles, and glass-head pins.
Step-by-Step Guide: The Hawaiian Appliqué Nine Patch
Step 1: Cutting the Hawaiian Appliqué Motif
Take one of your 16″ x 16″ Dark solid squares. Fold it in half diagonally, then in half diagonally again, and once more (like folding a paper snowflake). Using sharp fabric shears, cut out a sweeping botanical shape—such as a half-leaf with scalloped edges—along the folded triangle. When you unfold the fabric, you will have a perfectly symmetrical, stunning botanical medallion. Repeat this to create four identical motifs.
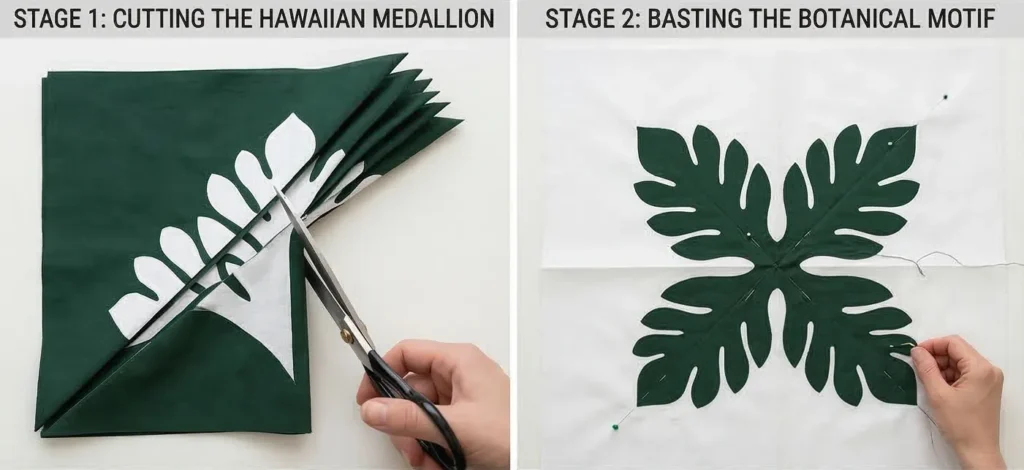
Step 2: Basting the Botanical Medallions
Take one of your 18.5″ x 18.5″ White background squares and fold it in quarters, then lightly crease the exact center. Center your unfolded, symmetrical botanical motif over the creases. Pin heavily, or use a simple basting stitch to temporarily anchor the motif flat against the white background.
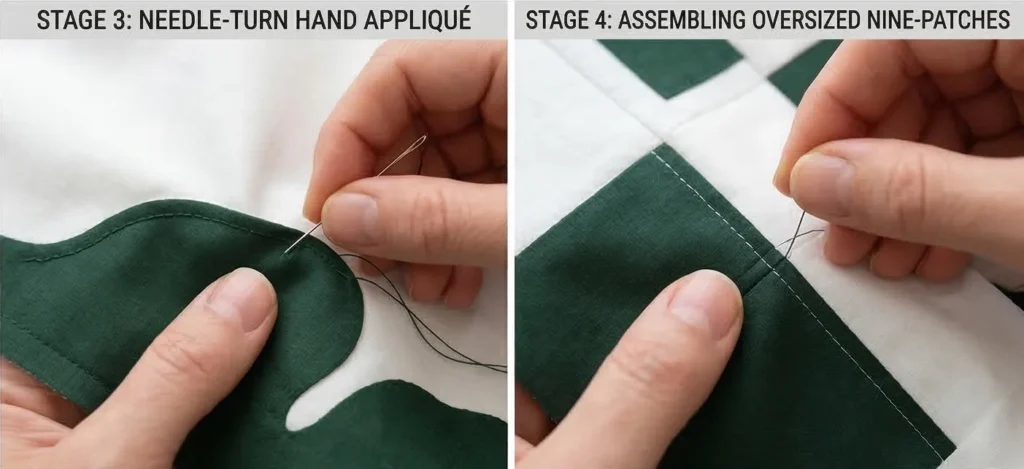
Step 3: Needle-Turn Hand Appliqué
Thread your fine appliqué needle with matching silk thread (silk sinks invisibly into the cotton). Using the traditional “needle-turn” method, sweep the tip of your needle under the raw edge of the motif by a scant 1/8 inch. Secure the folded edge to the background fabric with tiny, hidden slip stitches. Slowly work your way around the entire perimeter of the botanical design. The result is a smooth, raised, flawlessly finished organic shape. Complete all 4 appliqué blocks.
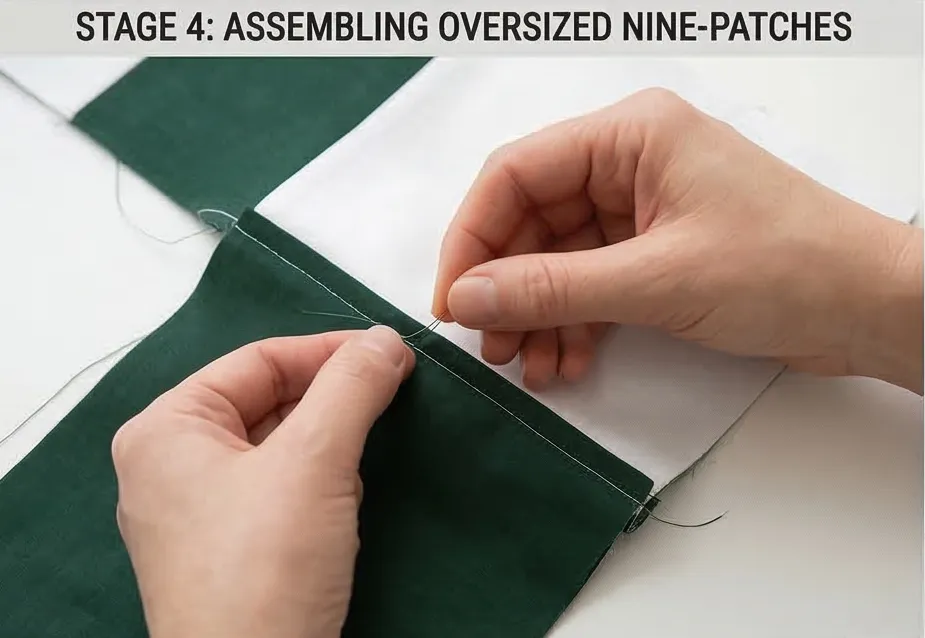
Step 4: Assembling the Oversized Nine-Patches
For the remaining 5 blocks, you will construct oversized Nine Patches.
- Lay out a 3×3 grid of your 6.5″ squares, placing the Dark squares in the four corners and the center.
- Sew the squares in each row together using a precise 1/4-inch seam allowance.
- Press the seams of Rows 1 and 3 outward, and the seam of Row 2 inward, so the seams nest perfectly.
- Join the three rows together. The finished oversized block will measure exactly 18.5″ x 18.5″ unfinished. Repeat to build all 5 Nine Patch blocks.
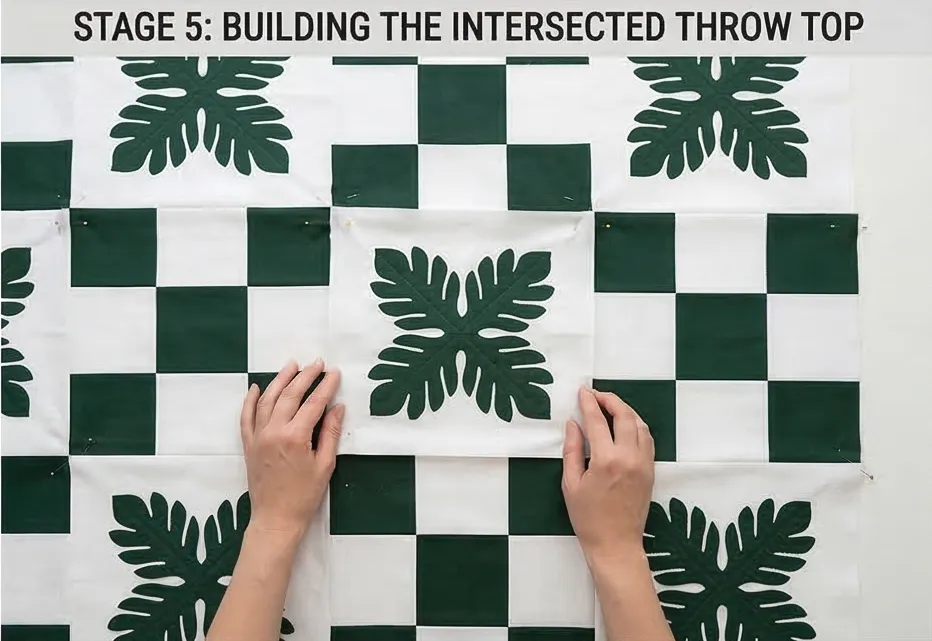
Step 5: Assembly Section (Building the Intersected Throw)
You now have 5 geometric Nine Patch blocks and 4 organic Appliqué blocks.
- Row 1: Nine Patch, Appliqué, Nine Patch.
- Row 2: Appliqué, Nine Patch, Appliqué.
- Row 3: Nine Patch, Appliqué, Nine Patch. Sew the blocks in each row together, pressing the seams toward the Appliqué blocks to reduce bulk. Then, sew the three rows together, pinning carefully at the intersections. Your completed hybrid top will measure exactly 54.5″ x 54.5″.
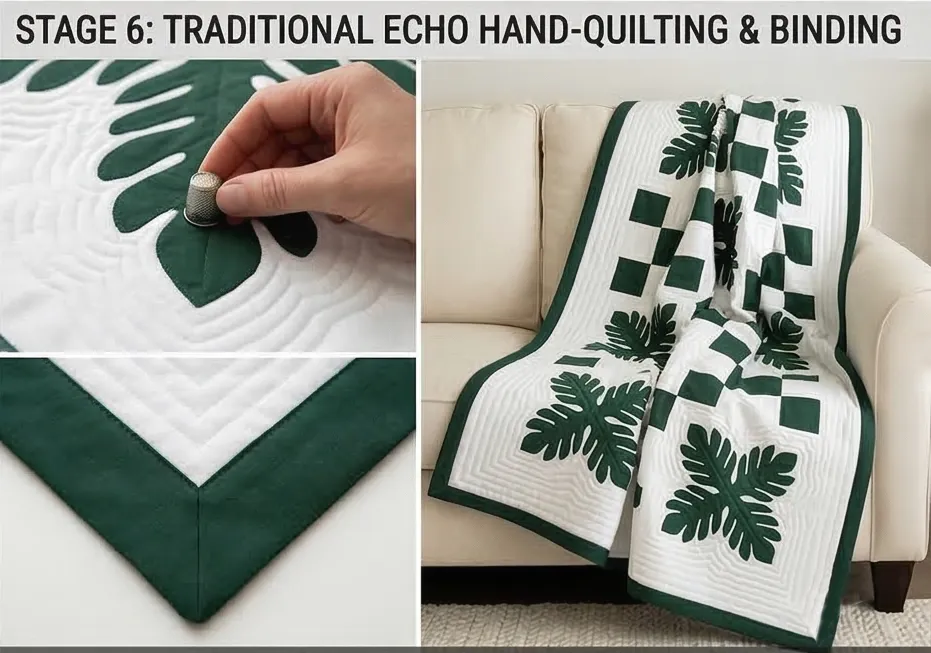
Step 6: Traditional Echo Hand-Quilting and Binding
- Baste: Tape your backing fabric face down, layer your bamboo batting, and place your pieced top face up. Pin heavily.
- Quilt: To truly honor the Hawaiian tradition, use the “echo quilting” technique. Thread a needle with heavy quilting thread and hand-stitch continuous outlines that radiate 1/2-inch outward from your appliquéd botanical shapes, rippling into the white negative space like waves on water. For the Nine Patch blocks, quilt simple diagonal grids. This mix of curved and straight hand-quilting creates unparalleled texture.
- Bind: Cut your binding fabric into 2.5″ strips. Join them end-to-end, fold in half, press, and machine-sew tightly around the perimeter, mitering the corners for a crisp frame.
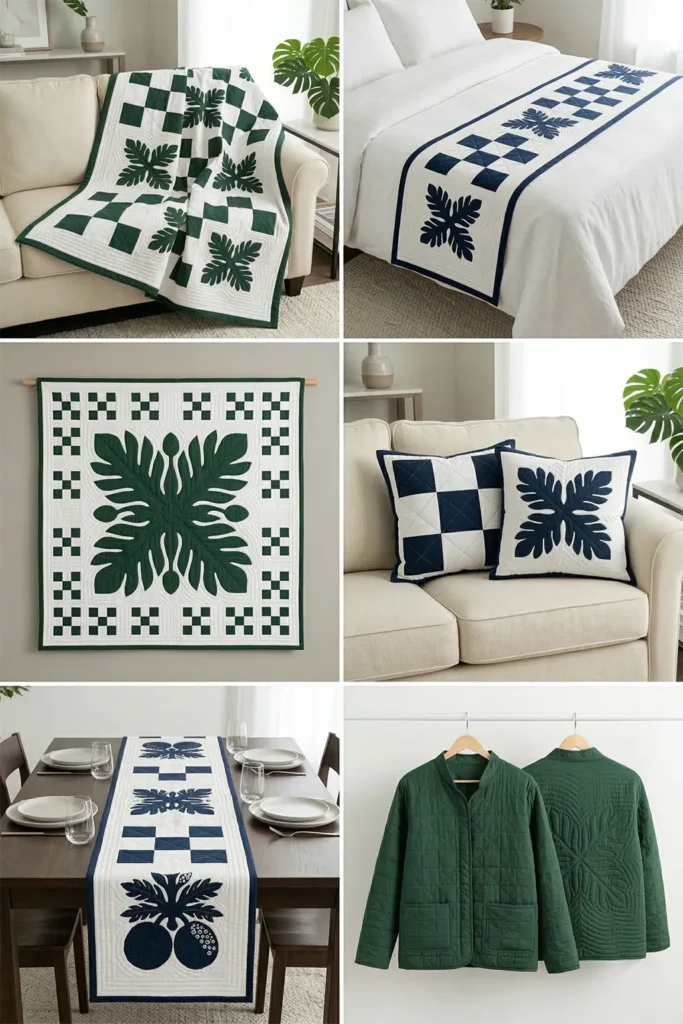
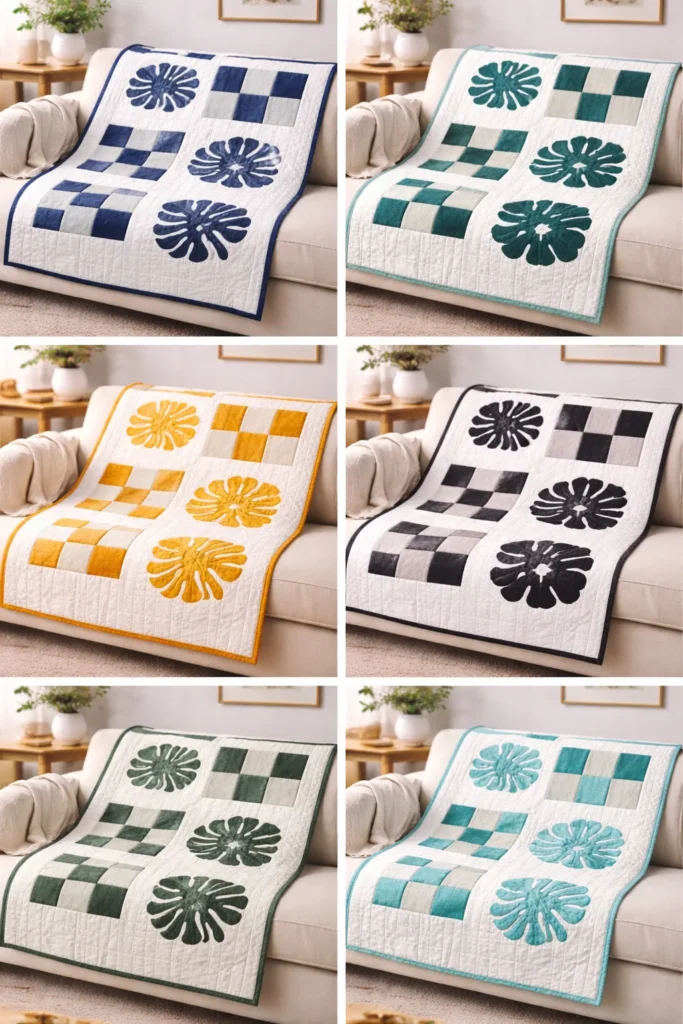
Usability Note: Hand-appliquéd and hand-quilted textiles are surprisingly resilient but require gentle care to preserve the delicate silk stitches. Machine wash this beautiful throw on a cold, delicate cycle inside a large mesh laundry bag. Air drying flat is highly recommended to protect the integrity of the needle-turn edges and to ensure the bamboo batting maintains its famously luxurious, fluid drape across your sofa.
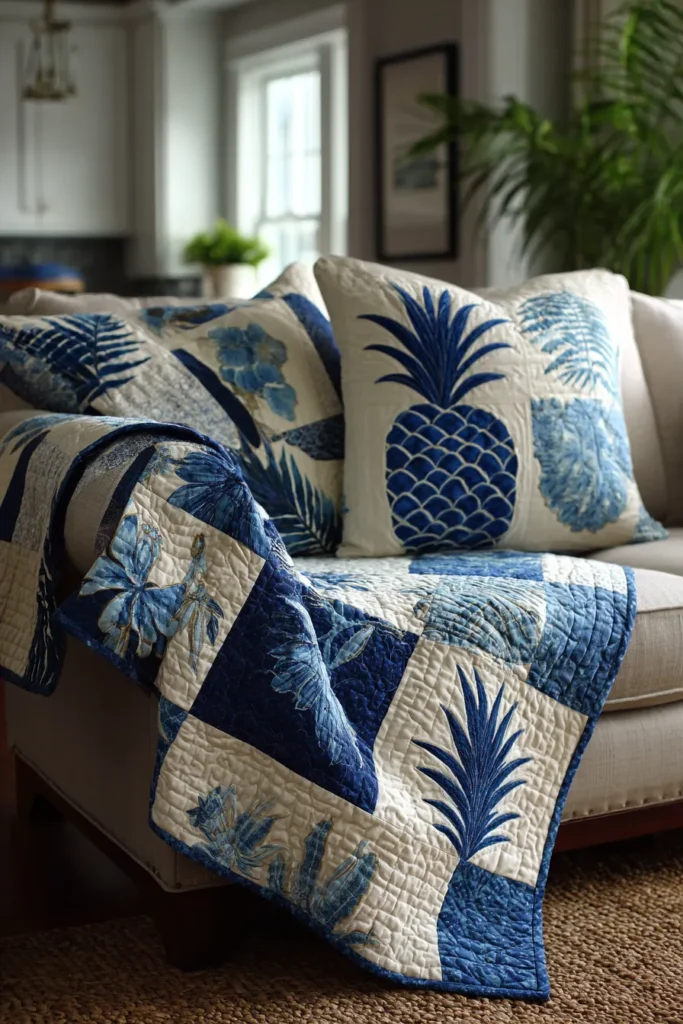
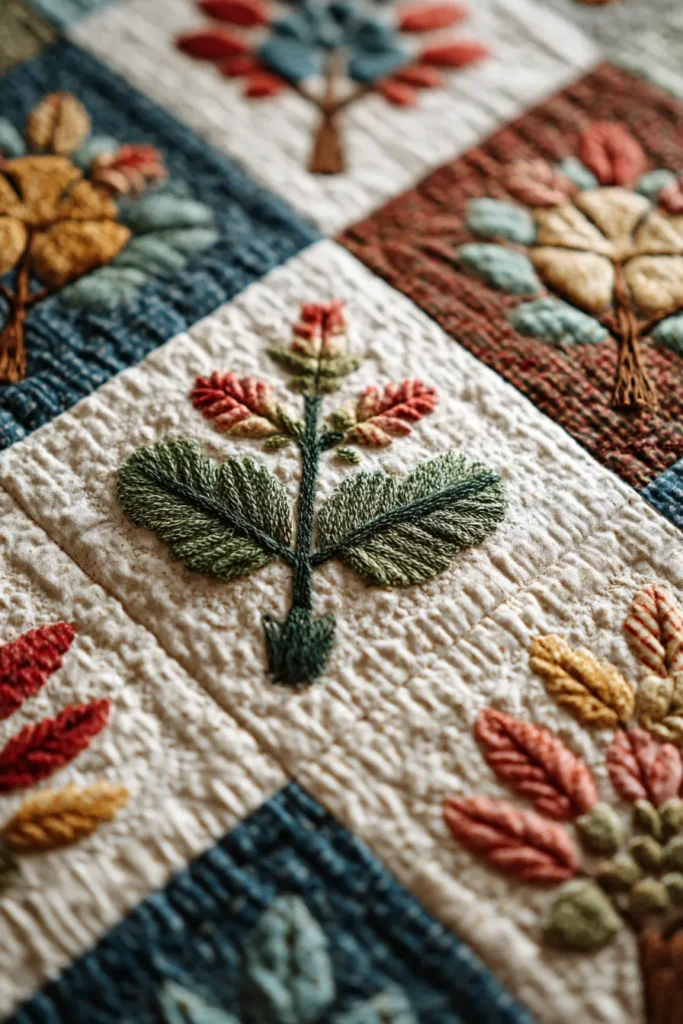
17. Layered Nine Patch Table Toppers Inspired by Indigenous Design Elements
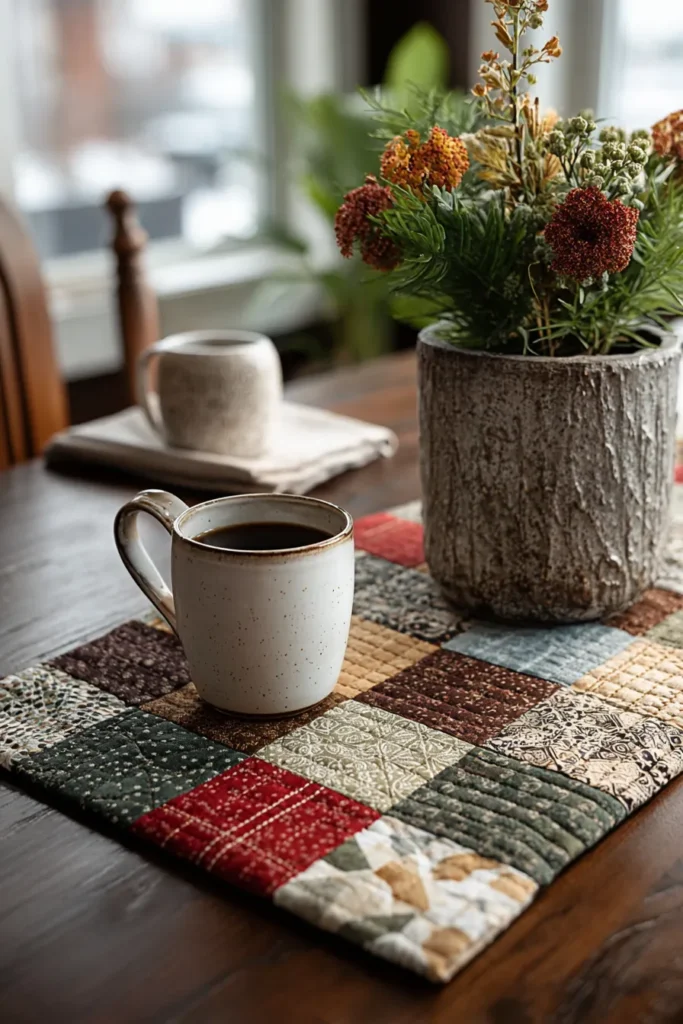
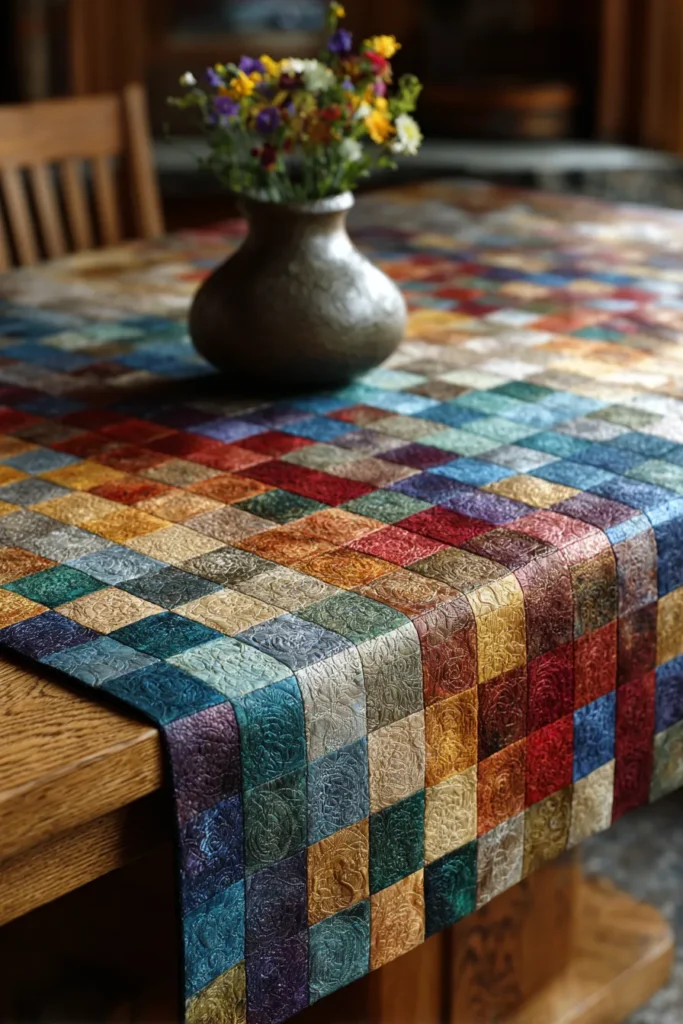
A Guide to Making Layered Nine Patch Table Toppers Inspired by Indigenous Design Elements
A dining table or a large coffee table often needs a central grounding element to tie a room together. The Layered Nine Patch Table Topper serves this exact purpose, acting as a stunning textile foundation for centerpieces, candles, or serving dishes. By infusing the traditional Western Nine Patch block with the striking, stepped geometry inspired by indigenous textile arts, this table topper transforms from a simple protective layer into a profound piece of cultural craftsmanship.
The Heritage of the Geometric Motif
I curated this specific design to celebrate the breathtaking precision of indigenous backstrap weaving, particularly drawing inspiration from the intricate, geometric alam patterns crafted by the indigenous communities of the Chittagong Hill Tracts. In these rich weaving traditions, stepped diamonds, bold cross-hatches, and repeating grids symbolize mountains, rivers, and community ties. The Nine Patch block is the perfect structural vehicle to honor these motifs. By using a deeply earthy palette—think rich madder red, raw indigo, and unbleached cotton—we can replicate the look of traditional woven textiles, bringing an incredibly grounded, organic elegance to your dining space.
Focus on Usability, Comfort, and Elegance
- Usability: A layered square table topper sits beautifully in the center of a round, square, or long rectangular table. It protects the wood from scratching while being effortlessly easy to toss into the wash after a gathering.
- Comfort: Textiles inherently soften a room. A padded, quilted table topper provides acoustic comfort by absorbing the clatter of plates and silverware, creating a warmer, more intimate dining atmosphere.
- Elegance: To achieve a refined, indigenous-inspired aesthetic, focus heavily on texture. Incorporate raw, slubby linen-cotton blends or yarn-dyed wovens instead of flat quilting cottons. The combination of tactile fabrics and sharp, meaningful geometry creates an atmosphere of sophisticated, worldly elegance.
Measurements & Materials Needed
Finished Topper Size: Elegant Square Centerpiece (approx. 27″ x 27″) Finished Block Size: 9″ x 9″ (9.5″ x 9.5″ unfinished). The topper requires 9 blocks total (5 Nine Patch blocks and 4 solid background blocks).
Materials Needed:
- Fabric for blocks: * Indigenous Accent Colors (e.g., Madder Red & Indigo): 45 squares total, cut to 3.5″ x 3.5″. (For a dynamic, woven look, use 25 Red squares and 20 Indigo squares).
- Unbleached Cotton/Linen (Background): Cut four large solid squares measuring 9.5″ x 9.5″.
- Backing fabric: 1 yard of 44″ premium cotton or linen blend.
- Batting: 30″ x 30″ low-loft 100% cotton batting. (Cotton is mandatory for table linens; polyester will melt or warp under warm serving dishes).
- Binding: 1/4 yard of matching Indigo or Red fabric.
- Thread: High-quality, 50-weight 100% cotton piecing thread, plus a heavier Sashiko or Pearl cotton thread for decorative hand-quilting.
- Quilting ruler: A 6″ x 24″ acrylic ruler for perfect, clean cuts.
- Rotary cutter: Equipped with a fresh blade to prevent fraying on looser linen weaves.
- Quilting pins: Fine glass-head pins for piecing, and curved safety pins for basting.
- Iron and ironing board: Essential for pressing seams completely flat to ensure glasses don’t tip.
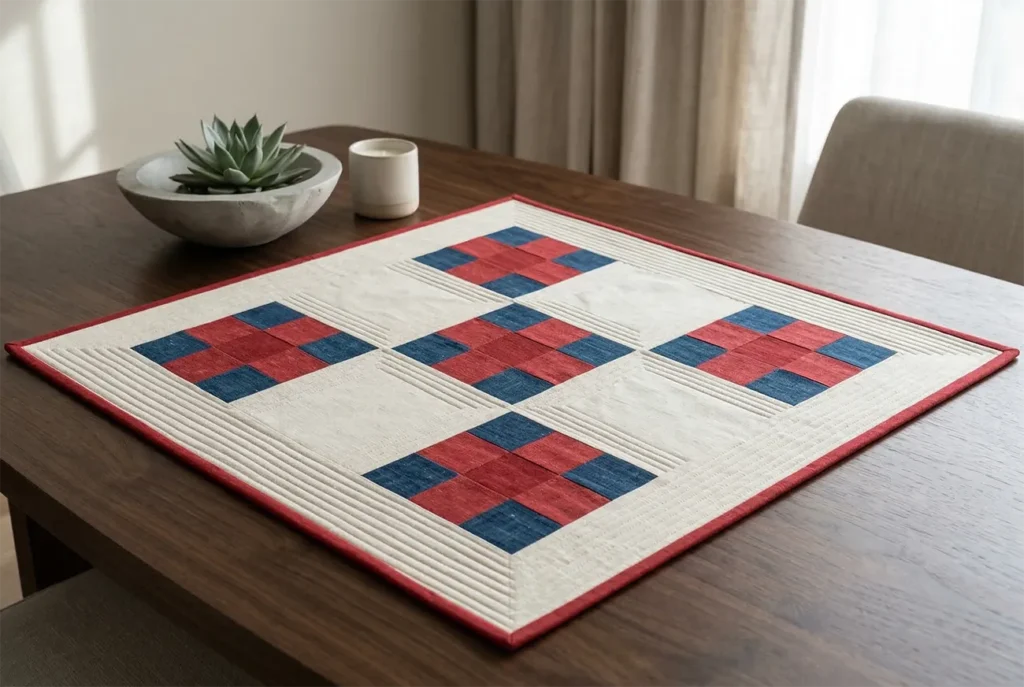
Step-by-Step Guide: The Indigenous-Inspired Table Topper
Step 1: Precision Cutting and Textural Sorting
Using your rotary cutter, carefully cut your 3.5″ x 3.5″ squares from your textured accent fabrics. Separate them into your five block piles. To mimic the stepped diamonds of traditional backstrap weaving, lay out your 3×3 grids so the colors create a distinct cross or ‘X’ pattern in each block (e.g., Red in the corners and center, Indigo on the four edges).
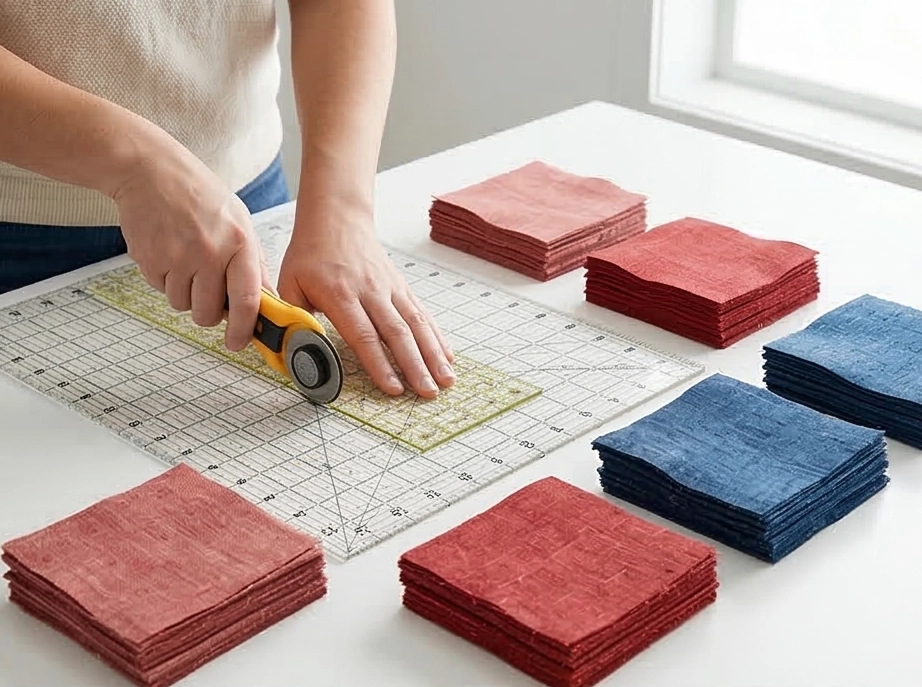
Step 2: Assembling the Stepped Nine-Patches
Take your first pile of 9 squares and lay them out.
- Row 1: Red, Indigo, Red
- Row 2: Indigo, Red, Indigo
- Row 3: Red, Indigo, Red Sew the squares in each row together using a precise 1/4-inch seam allowance.

Step 3: Pressing for Absolute Tabletop Flatness
With table linens, seam management is critical. Press the seams of Rows 1 and 3 outward, and press the seams of Row 2 inward. Join the three rows together, ensuring the tiny seams nest perfectly together. This opposing tension prevents bulky lumps that could unbalance your dinnerware. Your unfinished Nine Patch block will measure exactly 9.5″ x 9.5″. Repeat to build all 5 blocks.
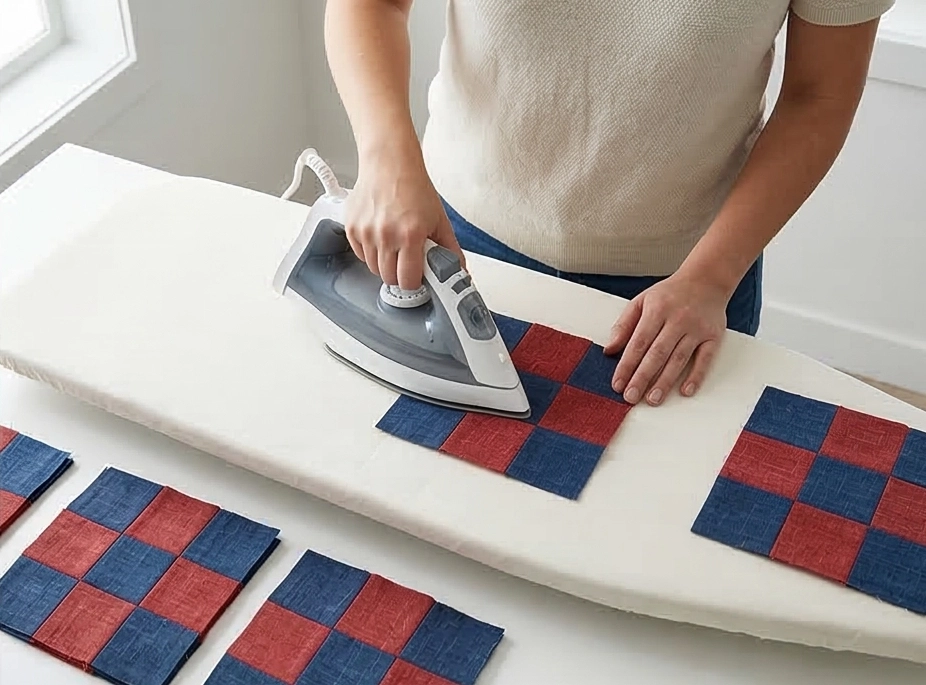
Step 4: Assembly Section (Building the Master Grid)
We will now alternate the intricately pieced Nine Patches with the quiet negative space of your solid, unbleached squares to create a floating, geometric tapestry.
- Row 1: Sew a Nine Patch block to a solid 9.5″ Background block, followed by another Nine Patch. Press seams toward the solid block.
- Row 2: Sew a solid 9.5″ Background block to a Nine Patch block, followed by another solid Background block. Press seams toward the solid blocks.
- Row 3: Repeat the layout of Row 1 (Nine Patch, Solid, Nine Patch). Join the three rows together, pinning carefully at the major intersections. Your stunning centerpiece top is now assembled and measures 27.5″ x 27.5″.
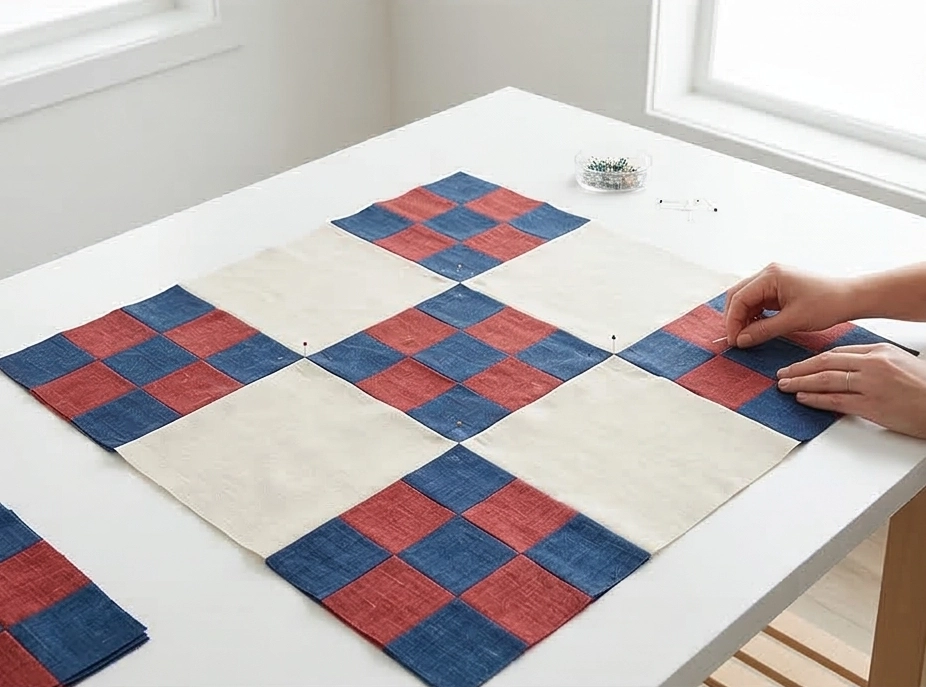
Step 5: Layering and Basting the Centerpiece
Tape your backing fabric taut to a flat table, face down. Center your 100% cotton batting over it, and lay your pieced topper face up. Pin the three layers together thoroughly using your curved safety pins.
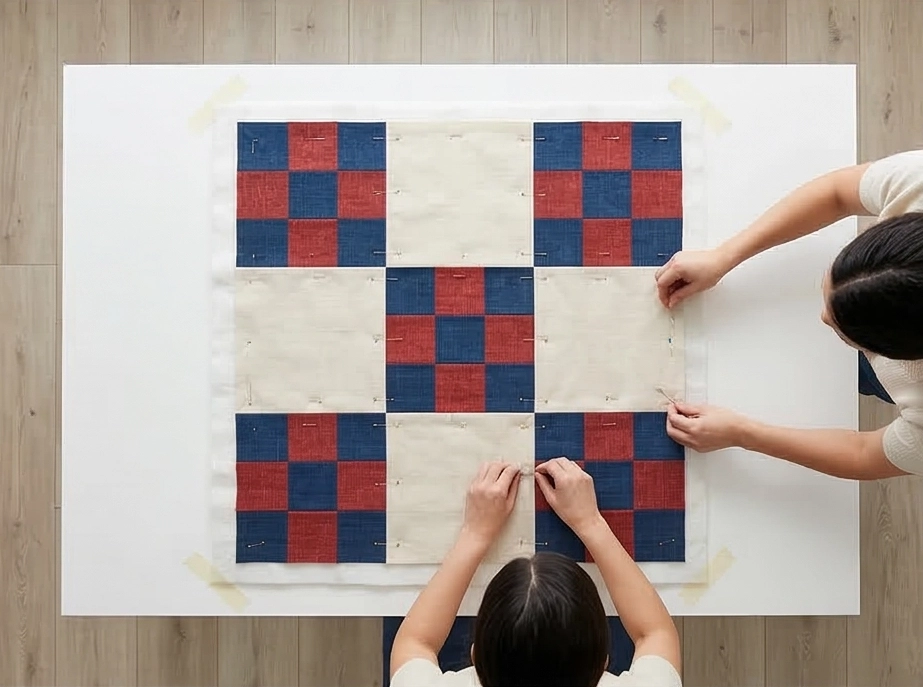
Step 6: Quilting the Woven Texture and Binding
- Quilt: To truly emulate the look of indigenous weaving, utilize straight-line echo quilting. Using your heavier decorative thread, stitch continuous, parallel straight lines that echo the geometric steps of your Nine Patch blocks, extending out into the solid background squares. This dense, linear texture acts as structural armor, flattening the batting to create a highly protective, trivet-like surface.
- Bind: Cut your binding fabric into 2.5″ strips. Join them end-to-end, fold in half, press crisp, and machine-sew tightly around the perimeter, mitering the four corners for a flawless, tailored frame.

Usability Note: This table topper is engineered for both striking visual impact and rigorous daily use. The 100% cotton batting provides an excellent thermal barrier for warm dishes. Should the raw, earthy fabrics encounter a spill, spot treat immediately and machine wash on a cold, delicate cycle. Lay the topper perfectly flat on a towel to air dry, and press it firmly from the back with a hot iron to restore its crisp, geometric architecture before placing it back in the center of your table.
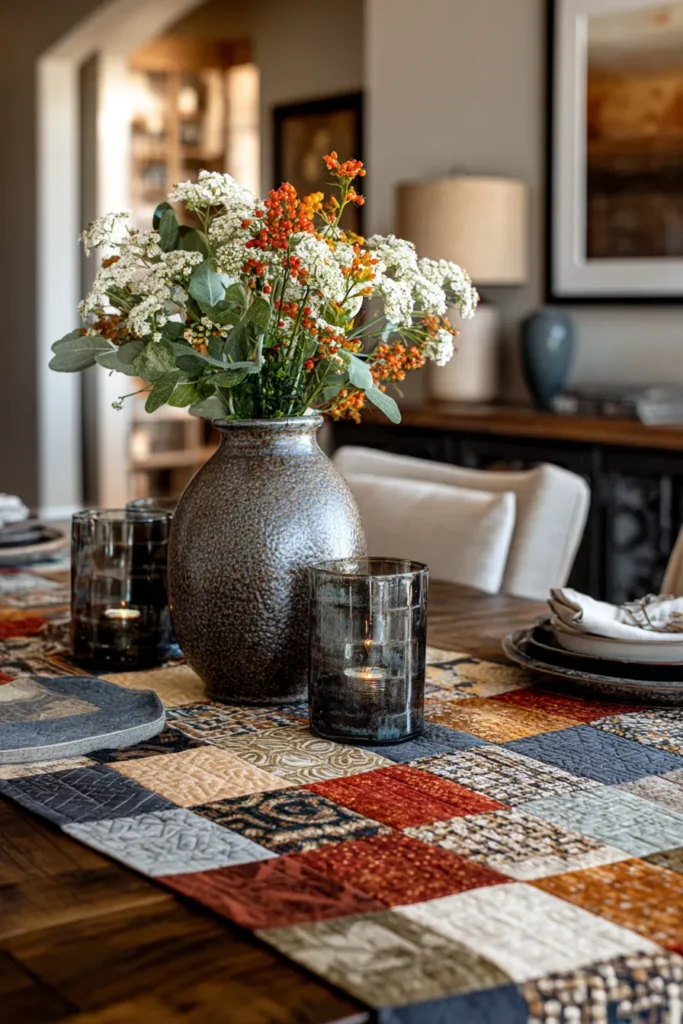
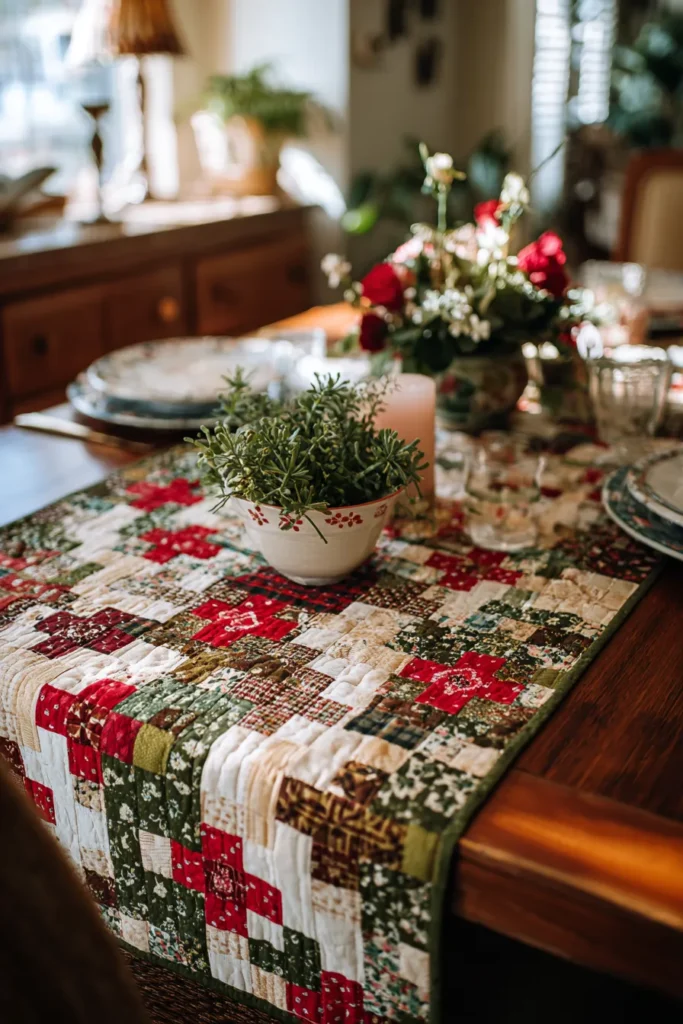
18. Durable Canvas Nine Patch Laundry Bags for Stylish Closet Storage
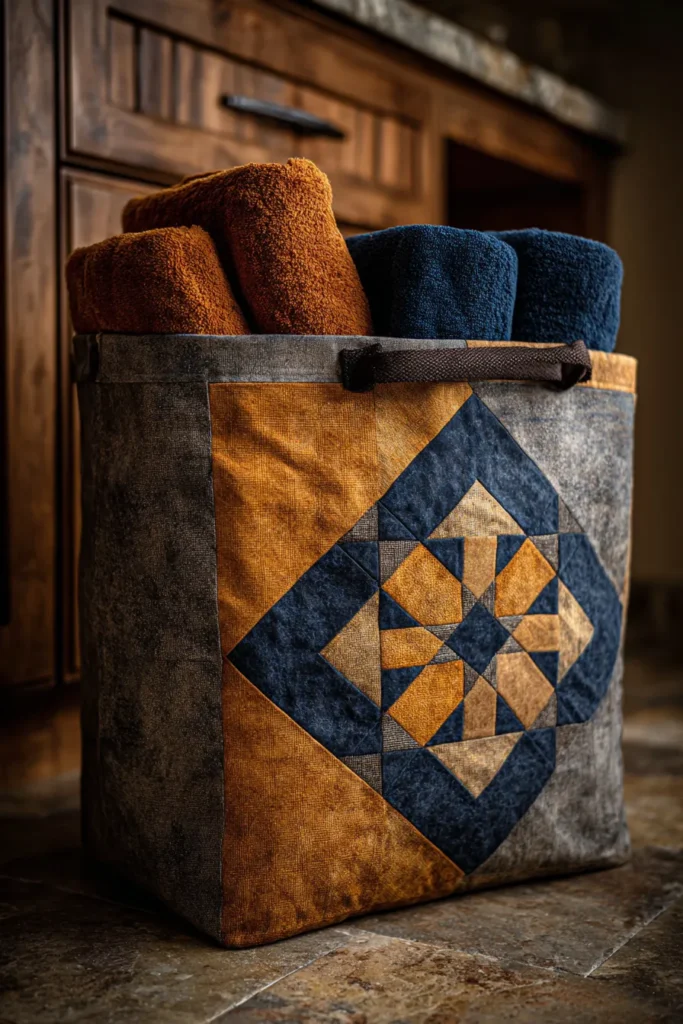
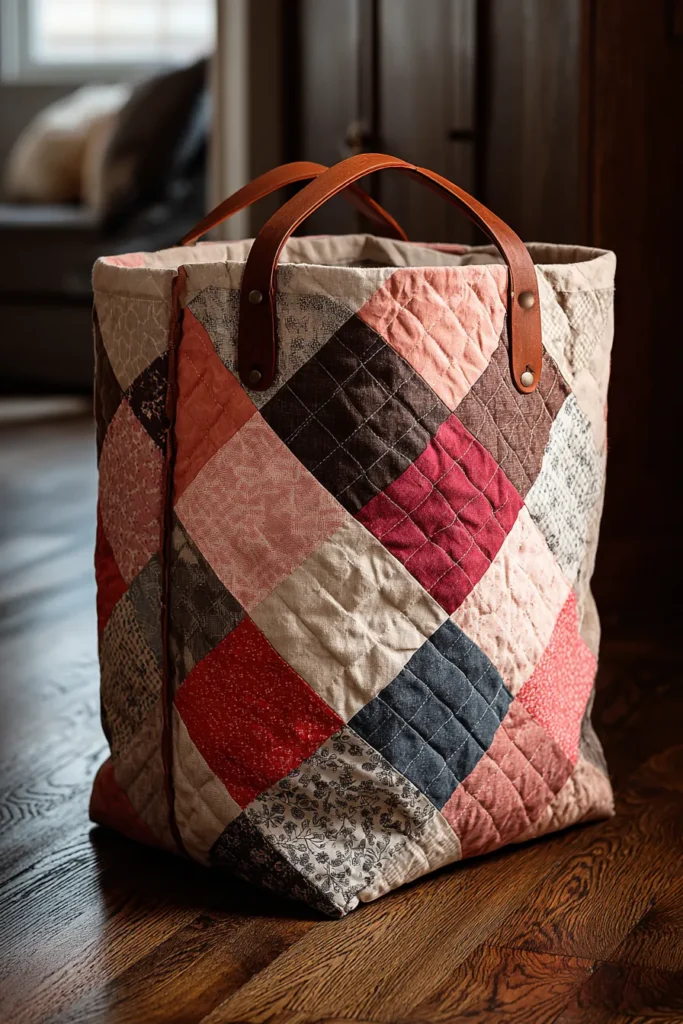
A Guide to Making Durable Canvas Nine Patch Laundry Bags for Stylish Closet Storage
Closet storage is often the most overlooked aspect of home design. We invest in beautiful bedroom furniture, only to hide flimsy nylon hampers or cracking plastic laundry baskets behind closed doors. This Durable Canvas Nine Patch Laundry Bag changes that narrative entirely. By taking the classic geometry of a traditional quilt block and scaling it up in rugged, heavy-duty textiles, you create a functional storage piece that looks like a deliberate, high-end design choice.
The Heritage of the Utilitarian Canvas Sack
I designed this specific pattern to bridge the gap between rugged maritime utility and refined domestic craft. Historically, canvas sacks—often referred to as sea bags or duffels—were the ultimate utilitarian storage for sailors and soldiers. They were nearly indestructible but visually plain. On the other hand, the Nine Patch block is the ultimate symbol of the home and hearth. By fusing the two, we honor the incredible durability of historic canvas while the crisp, geometric patchwork elevates the bag into a piece of stylish, modern home decor.
Focus on Usability, Comfort, and Elegance
- Usability: This bag utilizes “French seams” on the interior. Because canvas can fray heavily in the washing machine, a French seam completely encloses the raw edges, ensuring this laundry bag can survive decades of heavy use and hot water washes without unraveling.
- Comfort: Visual comfort is a crucial element of an elegant home. A structured, beautiful laundry bag reduces visual clutter in the closet. Furthermore, 100% cotton canvas is highly breathable, preventing damp towels or workout clothes from trapping moisture and odors the way synthetic bags do.
- Elegance: To keep this piece looking like a luxury home accessory, lean into a minimalist, two-tone color palette. Pair a rugged, unbleached natural canvas with a deep, saturated solid—like Charcoal, Navy, or Olive Green. Finishing the bag with a thick, natural cotton rope drawstring adds a touch of bespoke, nautical elegance.
Measurements & Materials Needed
Finished Bag Size: Generous Laundry Sack (approx. 20″ wide x 28″ tall) Finished Block Size: The front features a bold 15″ x 15″ Nine Patch block (made from nine 5″ finished squares), surrounded by solid framing borders.
Materials Needed:
- Fabric for the Nine Patch: Heavyweight cotton duck canvas or denim.
- Dark/Accent Canvas: 5 squares cut to 5.5″ x 5.5″.
- Light/Natural Canvas: 4 squares cut to 5.5″ x 5.5″.
- Framing & Backing Canvas: 1.5 yards of your Light/Natural Canvas. You will cut:
- Two side borders: 3.5″ x 15.5″.
- One bottom border: 4.5″ x 21.5″.
- One top border (incorporates the casing): 11.5″ x 21.5″.
- One large solid back panel: 21.5″ x 30.5″.
- Thread: Heavy-duty polyester or upholstery thread (standard cotton thread may snap under the weight of heavy canvas).
- Hardware: 2 yards of thick (1/2-inch or 3/4-inch) natural cotton twisted rope.
- Quilting ruler: A 6″ x 24″ acrylic ruler for perfect, clean cuts.
- Rotary cutter: Equipped with a fresh blade to cleanly slice through thick canvas.
- Heavy-Duty Needles: Size 90/14 or 100/16 sewing machine needles.
- Iron and ironing board: Essential for pressing the bulky canvas seams.
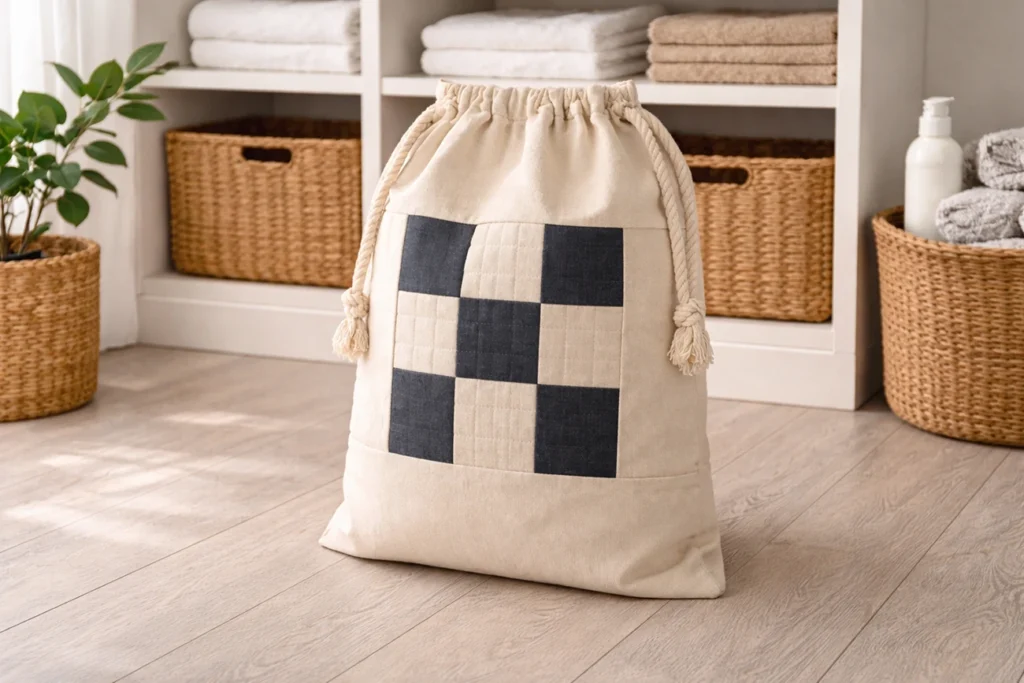
Step-by-Step Guide: The Canvas Nine Patch Laundry Bag
Step 1: Precision Cutting the Heavy Canvas
Working with heavy-duty textiles requires patience. Using your rotary cutter and ruler, press firmly to cut your 5.5″ squares and your framing borders. Separate your squares into a pile of 5 Accents and 4 Naturals.
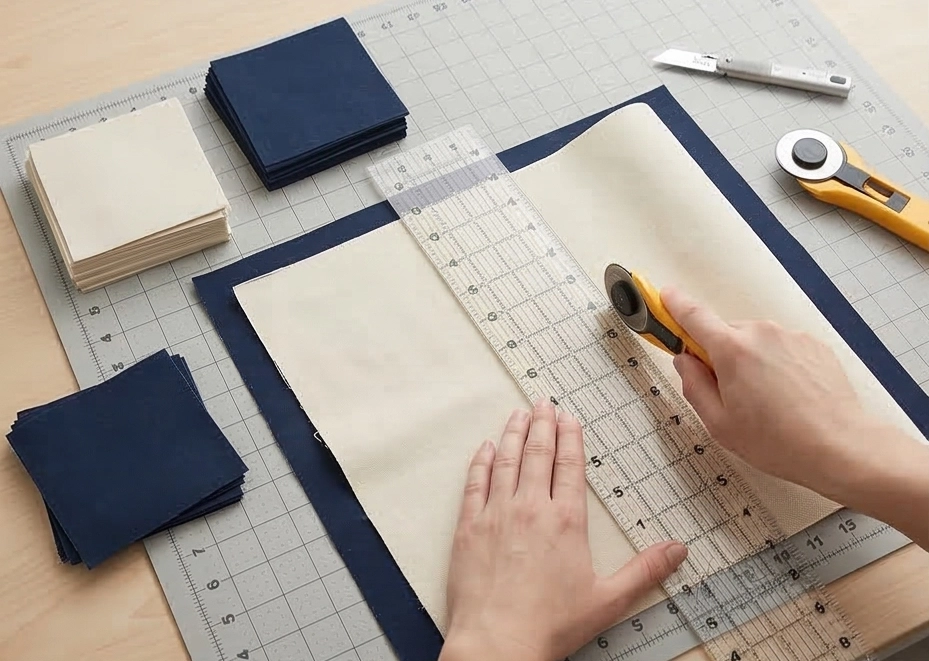
Step 2: Assembling the Bold Canvas Block
Lay out a 3×3 grid, placing your Dark/Accent canvas in the four corners and the exact center to create an ‘X’ pattern.
- Sew the squares in each row together using a precise 1/4-inch seam allowance.
- Press the seams of Rows 1 and 3 outward, and Row 2 inward. Since canvas is thick, use high heat and steam to force the seams flat.
- Join the three rows together, nesting the seams. Your massive, heavy-duty Nine Patch block will measure exactly 15.5″ x 15.5″ unfinished.
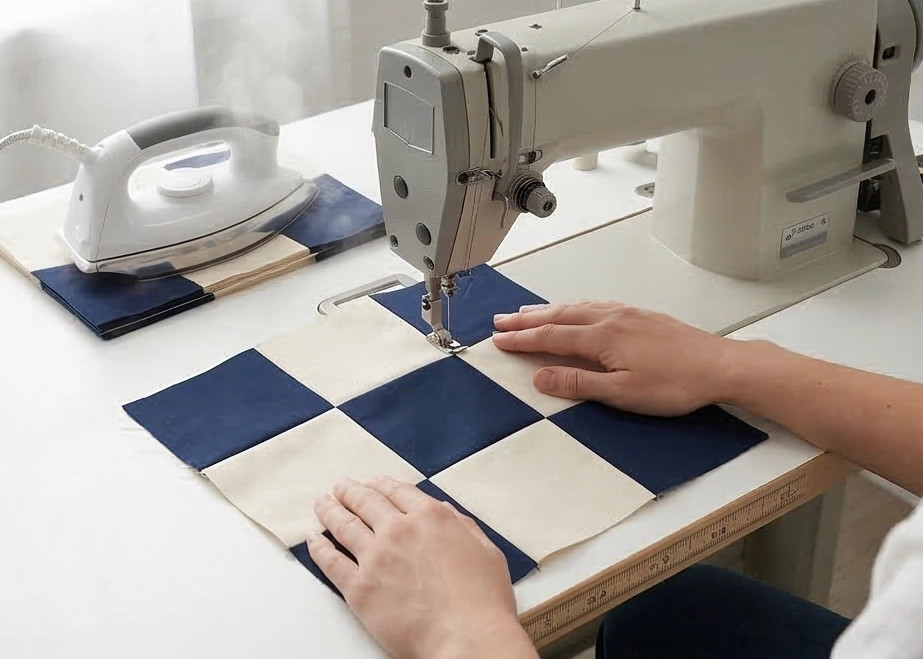
Step 3: Framing the Front Panel
To turn the block into the front of a laundry bag, we must frame it to match the size of the back panel.
- Sew the two 3.5″ x 15.5″ side borders to the left and right of the Nine Patch. Press seams outward.
- Sew the 4.5″ x 21.5″ bottom border to the bottom edge. Press outward.
- Sew the large 11.5″ x 21.5″ top border to the top edge. Press outward. Your pieced front panel is now complete and should measure exactly 21.5″ x 30.5″, matching your solid back panel.

Step 4: Assembly Section (Constructing with French Seams)
Because this bag will hold heavy loads and be machine-washed, we will use French seams to hide all raw edges.
- Wrong Sides Together: Place your pieced front panel and solid back panel wrong sides together (the beautiful sides are facing out).
- Sew along the left side, bottom edge, and right side using a scant 1/4-inch seam allowance. Leave the top edge completely open.
- Trim the seam allowance down to a tiny 1/8-inch, clipping the two bottom corners diagonally to reduce bulk.
- Right Sides Together: Turn the bag inside out and use a blunt tool to push the corners out. Now, the beautiful sides are facing inward. Press the edges flat.
- Sew along the left side, bottom edge, and right side again, this time using a 3/8-inch seam allowance. This second seam completely traps the raw edges inside the fabric, creating a bulletproof, fray-free interior.
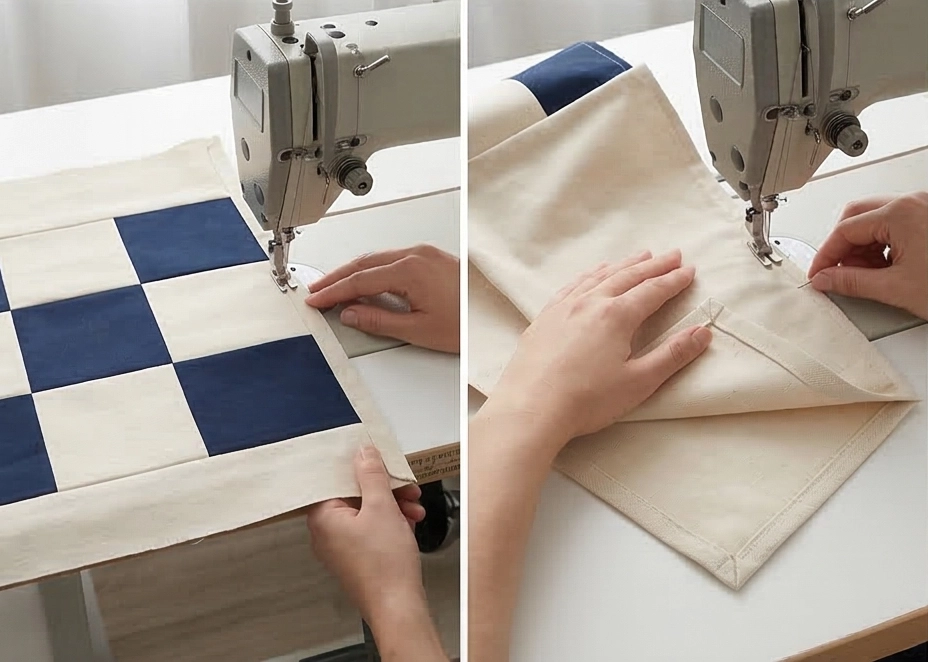
Step 5: Creating the Drawstring Casing
Turn the bag right-side out again. To create the casing for your rope:
- Fold the top raw edge of the bag down by 1/2-inch and press well.
- Fold it down again by 2 inches and press thoroughly. Pin this fold securely.
- Before sewing the casing shut, use a seam ripper to carefully open the outer side seam on the left and right sides of the bag, just within that 2-inch folded section. This creates the two buttonhole-like openings for your rope to exit.
- Topstitch along the bottom folded edge of the casing, securing it around the entire opening of the bag.
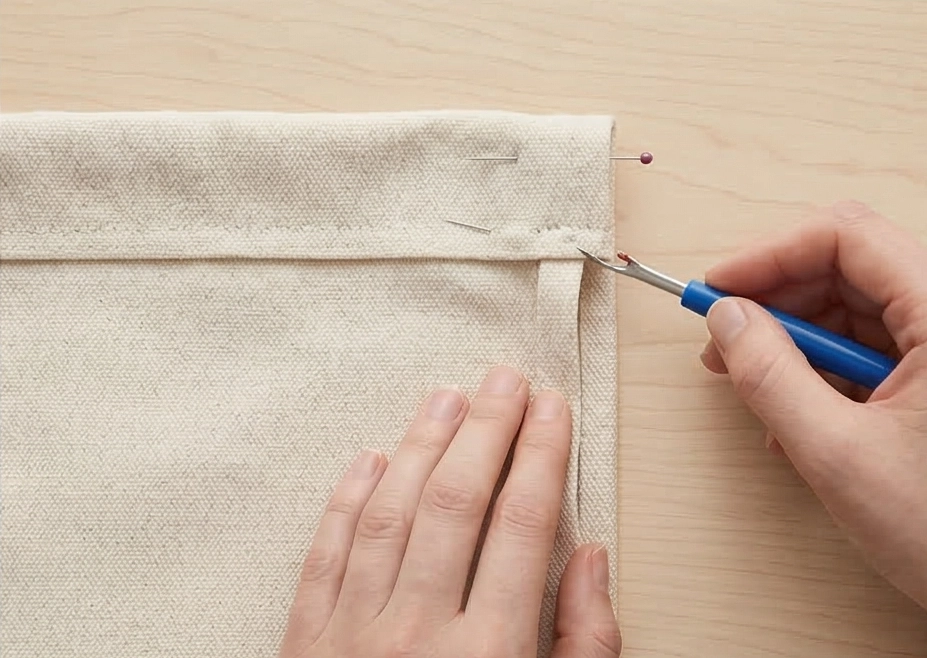
Step 6: Threading the Rope and Finishing
Take your heavy cotton rope and wrap a piece of tape tightly around one end to prevent fraying and serve as a “needle.” Feed the rope into the left opening of your casing, working it all the way around the top of the bag until it emerges back out the same side. Tie the two ends of the rope into large, handsome knots to prevent them from slipping back inside the casing.
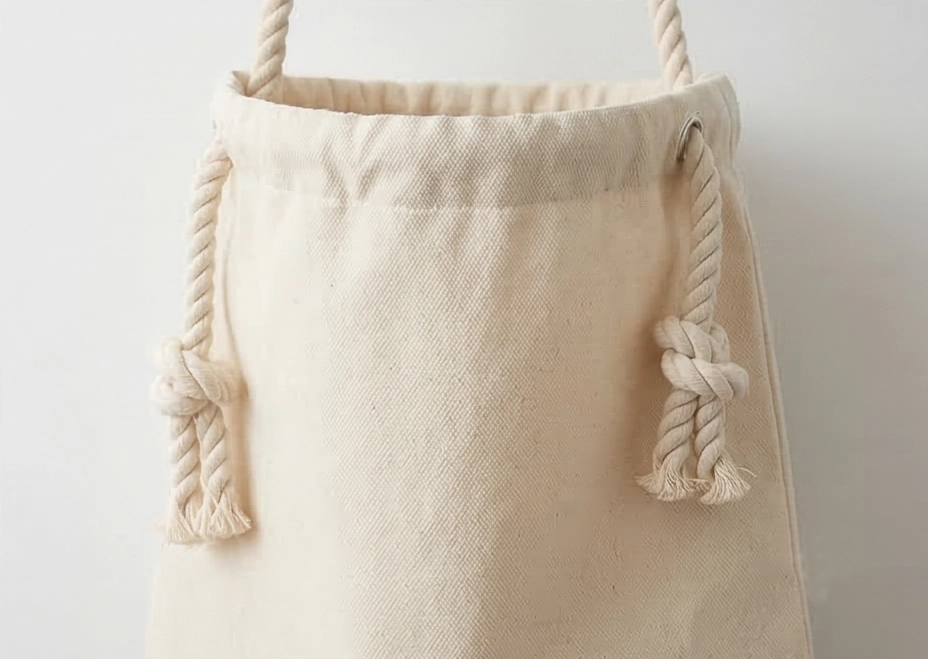
Usability Note: Canvas will naturally soften and distress beautifully over time, much like a favorite pair of jeans. When the laundry bag needs cleaning, simply remove the rope, toss the bag into the washing machine on a heavy-duty cold cycle, and air dry. A quick press with a hot iron will restore its crisp, architectural shape before you hang it back in your closet.
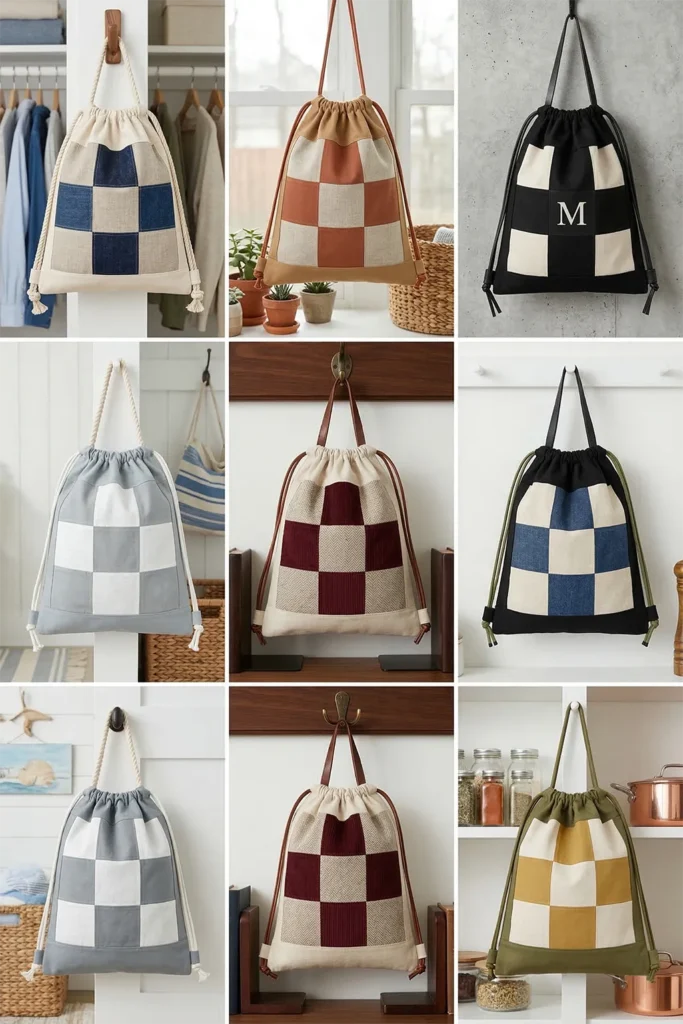
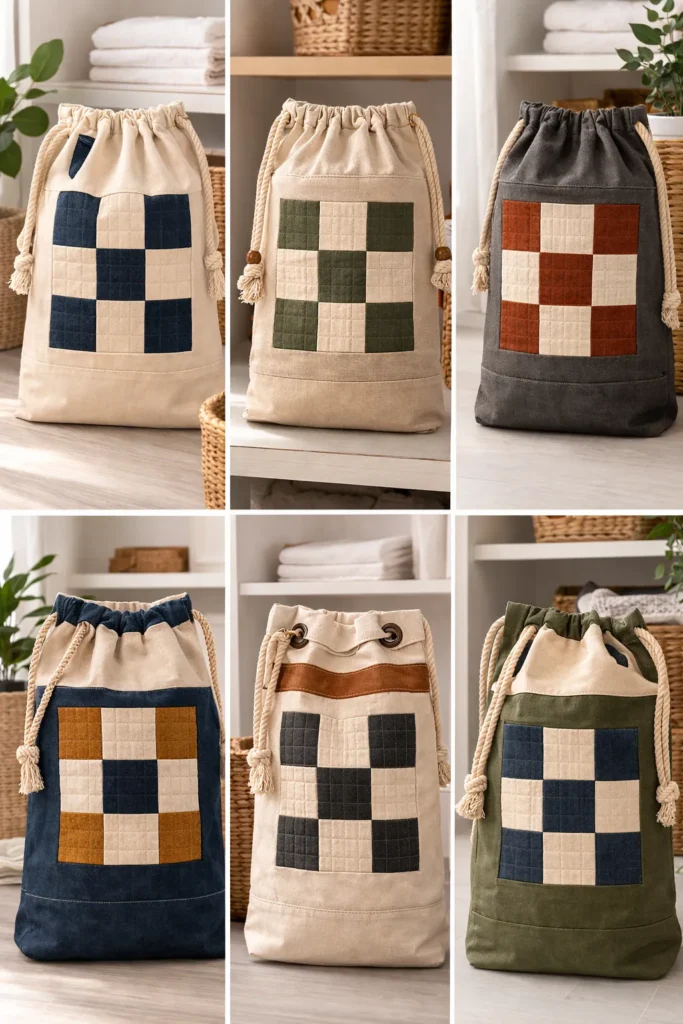
19. Reversible Nine Patch Quilted Laundry Baskets for Bedroom Organization
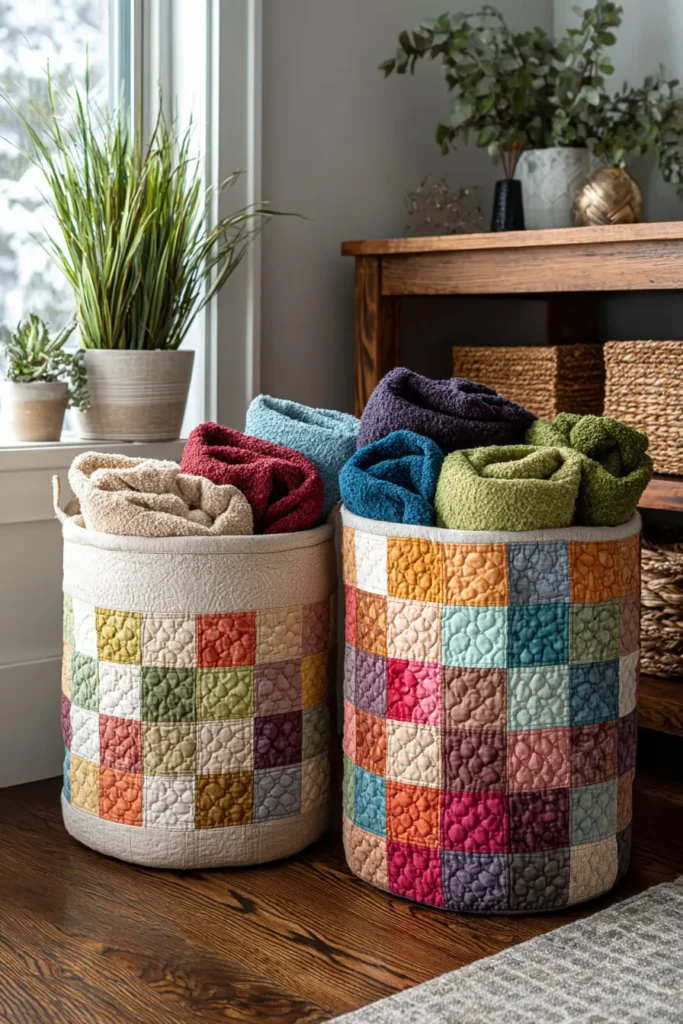
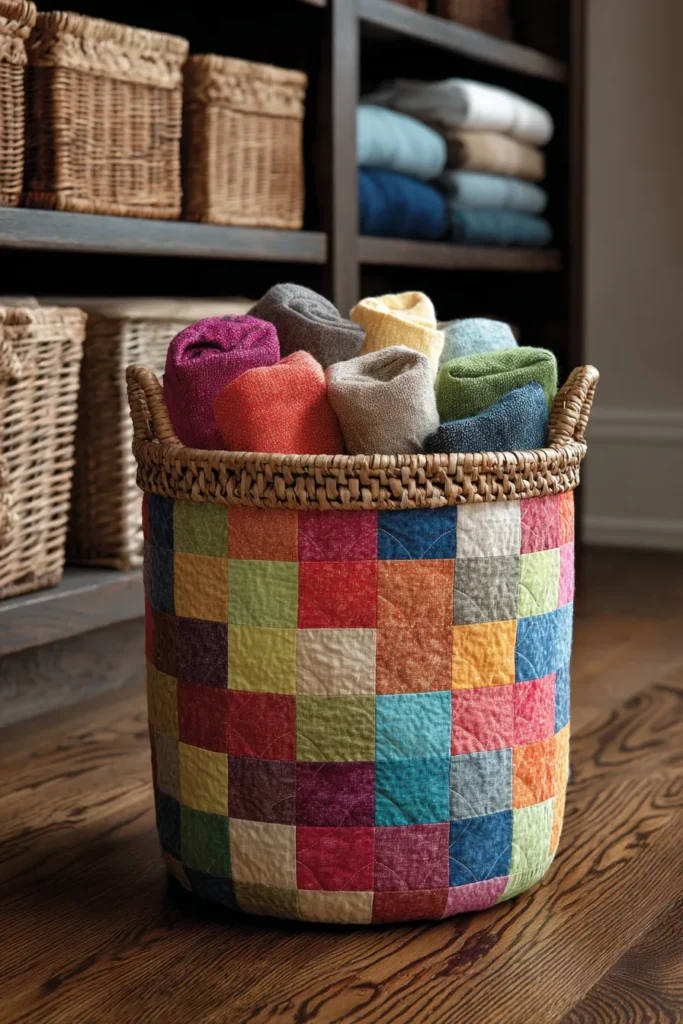
A Guide to Making Reversible Nine Patch Quilted Laundry Baskets for Bedroom Organization
A bedroom should be a sanctuary of rest, which means keeping everyday clutter—like laundry—beautifully out of sight. A standard plastic hamper disrupts the tranquility of an elegant bedroom, but the Reversible Nine Patch Quilted Laundry Basket solves this dilemma. By utilizing the classic geometry of the Nine Patch block and pairing it with a rigid, structured foam stabilizer, we can create a freestanding, sculptural textile bin. The fact that it is completely reversible means you essentially get two bespoke room accessories in one.
The Heritage of the Structural Textile
I curated this specific design because I love the challenge of turning flat, traditional quilt blocks into three-dimensional, functional architecture. Historically, quilters created soft fabric baskets to store scraps or knitting supplies, but they lacked the rigidity needed to hold heavy laundry. Modern sewing technology—specifically, structural foam interfacing—allows us to take the historic, comforting Nine Patch grid and build a basket that stands perfectly upright on its own, even when completely empty. I designed this pattern to give you a functional storage solution that looks like a high-end, custom piece of soft furnishing.
Focus on Usability, Comfort, and Elegance
- Usability: It is fully reversible! One side features a bold, pieced Nine Patch grid for a striking geometric look, and the inside features a crisp, solid color that you can flip outward whenever you want a more minimalist aesthetic.
- Comfort: Fabric baskets naturally dampen sound (unlike plastic bins that clatter when items are tossed in) and protect delicate clothing from snagging on the rough edges of wicker or rattan hampers.
- Elegance: With a sophisticated palette—soft sage green alternating with brushed oatmeal linen—and a cleanly bound top edge, the basket looks impeccably tailored. It elevates laundry storage from a chore to a deliberate design moment.
Measurements & Materials Needed
Finished Basket Size: Generous Cylinder Basket (approx. 15″ diameter x 20″ tall) Finished Block Style: A continuous, alternating checkerboard grid of 5″ finished squares wrapping around the cylinder.
Materials Needed:
- Fabric for the Nine Patch Exterior: 2 yards total of premium cotton or linen blend.
- Pro-Tip: Cut 20 squares at 5.5″ x 5.5″ in your Accent Color, and 20 squares at 5.5″ x 5.5″ in your Background Color (40 squares total for the body).
- Cut one 16″ x 16″ square of your Background Color for the exterior circular base.
- Reversible Interior Fabric: 1.5 yards of a solid, coordinating premium cotton. (You will cut one 50.5″ x 20.5″ rectangle for the inner body, and one 16″ x 16″ square for the inner base).
- Stabilizer: 1.5 yards of double-sided fusible structural foam (such as Pellon Flex-Foam or ByAnnie’s Soft and Stable).
- Binding: 1/4 yard of coordinating fabric to finish the top rim.
- Thread: Heavy-duty 50-weight 100% cotton thread.
- Tools: A walking foot for your sewing machine (crucial for sewing through the thick foam), a rotary cutter, a 6″ x 24″ acrylic ruler, a fabric marking pen, and heavy-duty sewing clips (pins will distort the foam).
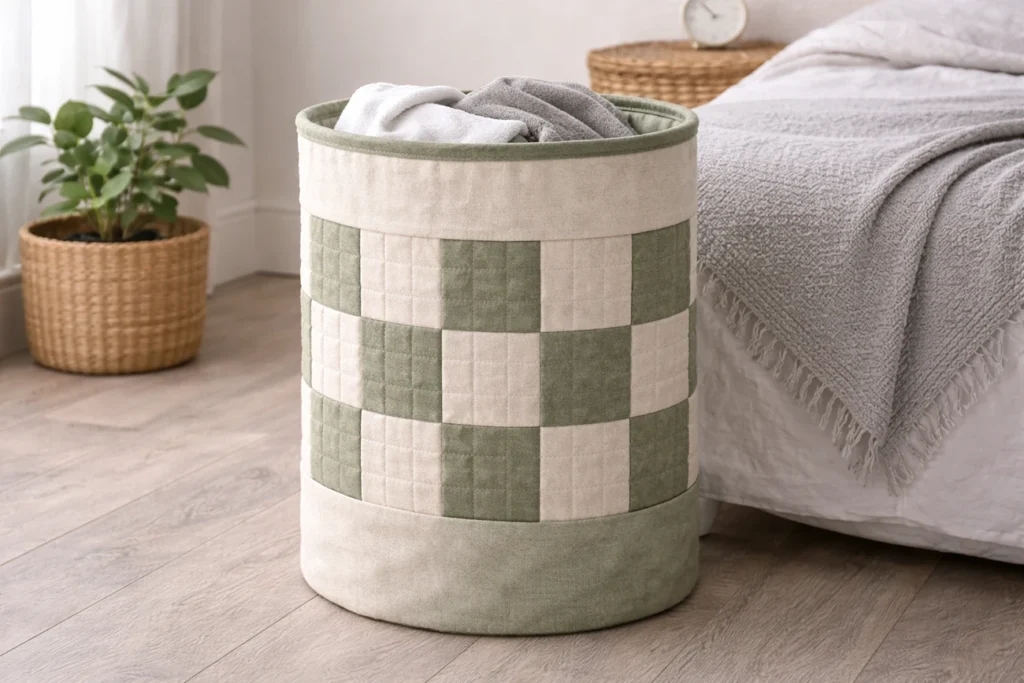
Step-by-Step Guide: The Reversible Quilted Basket
Step 1: Precision Cutting for the Grid
Using your rotary cutter and acrylic ruler, cut your 40 squares (5.5″ x 5.5″) to form the exterior body. To create the circular base, take your 16″ x 16″ exterior fabric square, fold it in quarters, and use a ruler and marking pen to measure 7.5 inches from the folded point. Connect the marks to form a curve, then cut to yield a perfect 15-inch circle. Repeat this to cut your foam base and your interior solid fabric base.
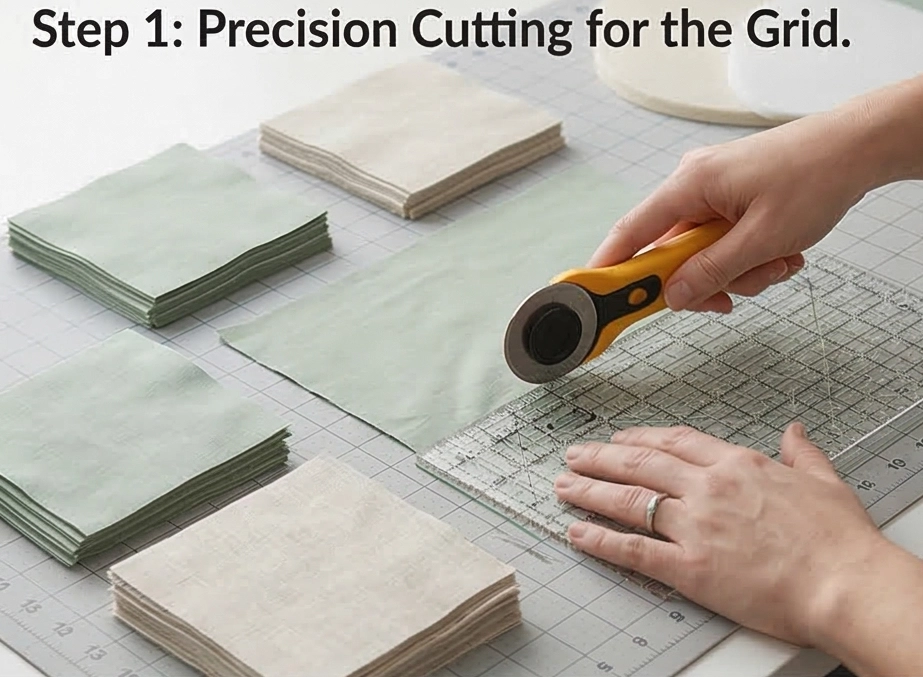
Step 2: Assembling the Continuous Nine Patch Body
To create the basket’s walls, you will piece together a massive, continuous checkerboard grid.
- Build the Rows: Lay out a row of 10 squares, alternating your Accent and Background colors. Sew them together with a precise 1/4-inch seam allowance. Make 4 rows in total.
- Press and Join: Press the seams of Rows 1 and 3 to the left, and Rows 2 and 4 to the right. Sew the 4 rows together, ensuring the alternating seams nest flawlessly. Your completed exterior wall panel should measure exactly 50.5″ wide by 20.5″ tall, unfinished.
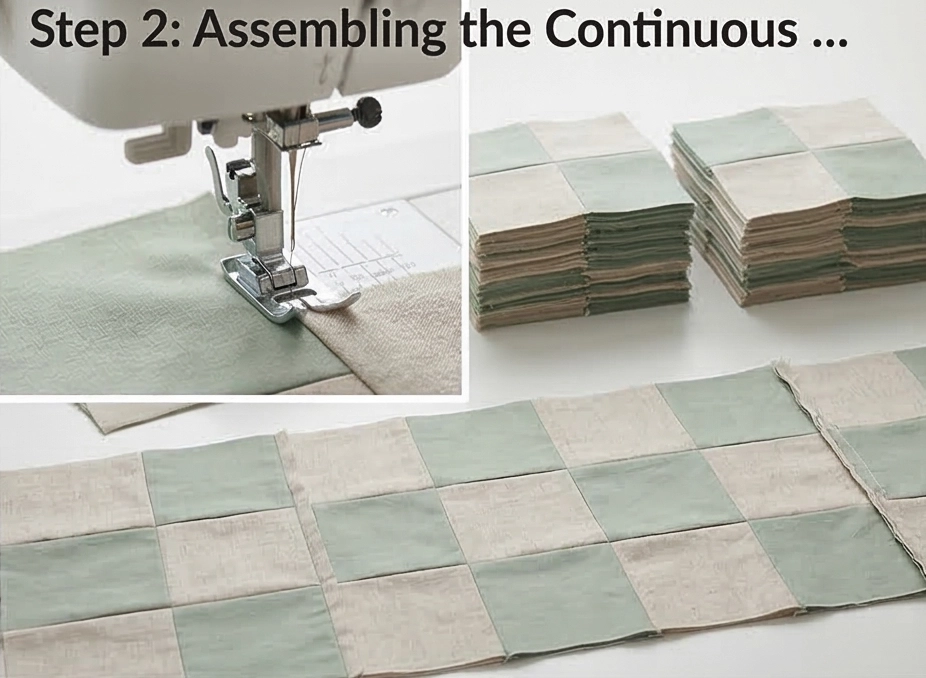
Step 3: Fusing the Structural Foam
Cut a piece of your fusible foam stabilizer to exactly 50.5″ x 20.5″. Lay the foam flat on your ironing board, and place your pieced Nine Patch panel right-side up on top of it. Follow the manufacturer’s instructions for the foam, then use a hot iron to permanently fuse the fabric to the stabilizer. Repeat this process to fuse your exterior 15-inch fabric circle to your foam base circle.
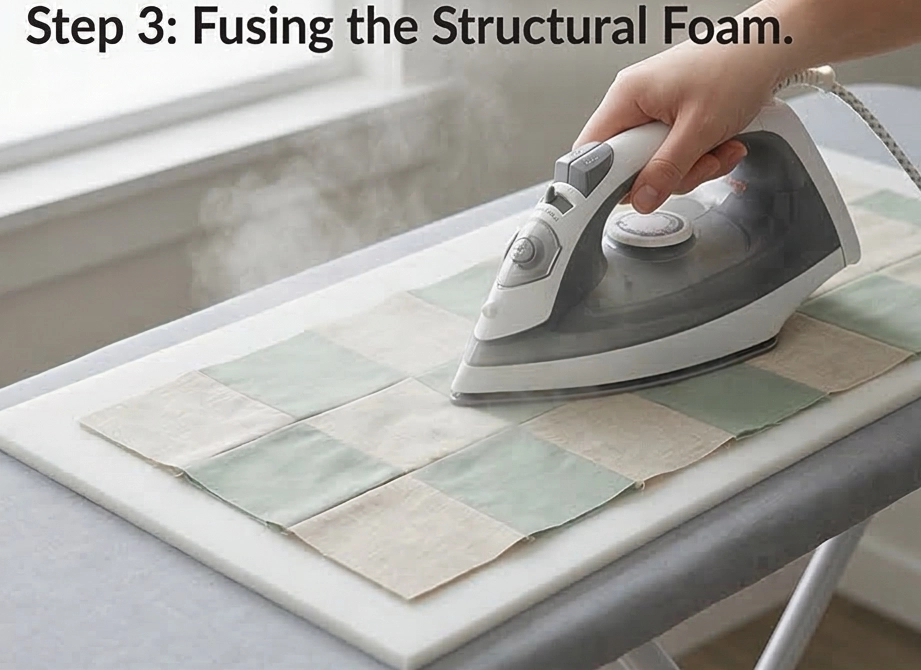
Step 4: Quilting for Rigidity
Attach the walking foot to your sewing machine. To ensure the basket stands rigidly upright, you must quilt the foam. Stitch straight lines exactly 1/4-inch on both sides of all the vertical and horizontal seams of your Nine Patch grid. This structural grid-quilting compresses the foam and locks the geometric shape in place. Quilt a simple crosshatch pattern into your circular base as well.
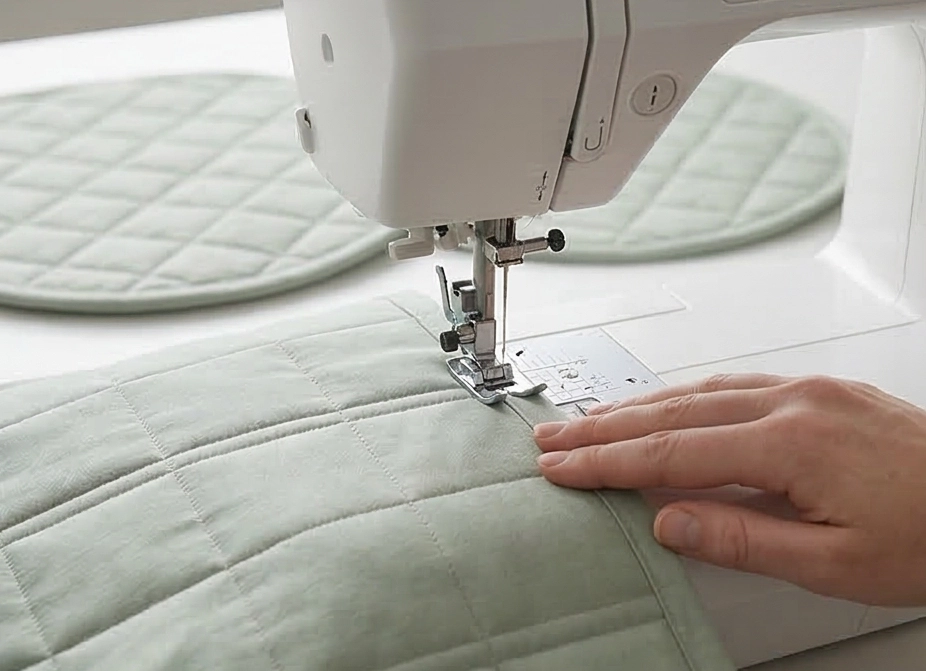
Step 5: Assembly Section (Constructing the 3D Cylinder)
- From the Tube: Fold your quilted exterior panel in half, right sides together, aligning the two short 20.5″ ends. Clip securely and sew together with a 1/4-inch seam allowance to form a large cylinder. Press this bulky seam open.
- Attach the Base: Carefully pin or clip your quilted circular base to the bottom edge of your cylinder, right sides together. Ease the straight edge of the tube along the curve of the circle, clipping it slightly if necessary. Sew around the entire perimeter with a 1/4-inch seam.
- Build the Lining: Repeat this exact assembly process (forming a tube and attaching the base) using your solid interior fabric, but without any foam stabilizer.
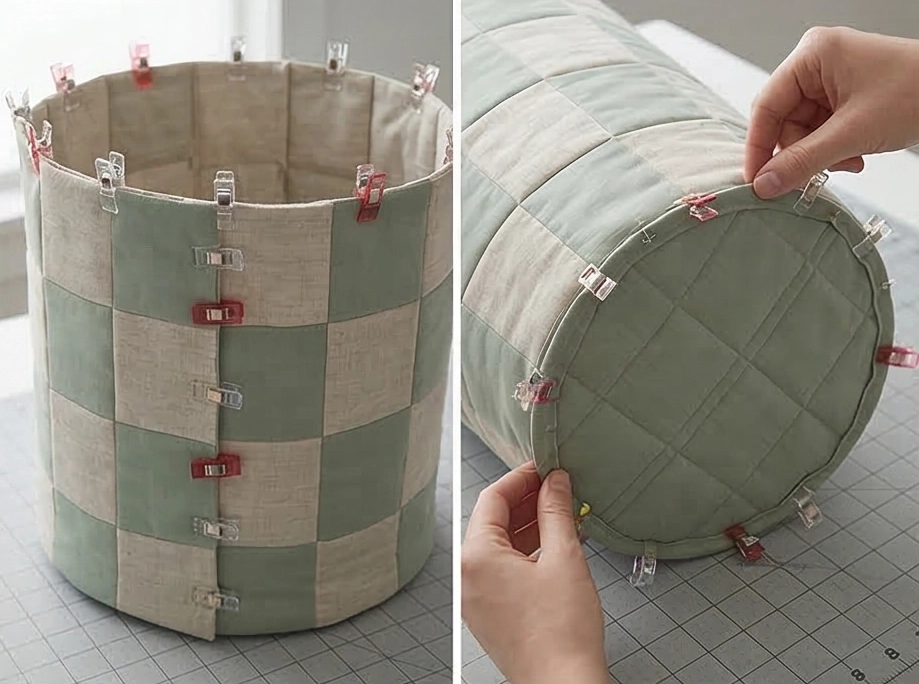
Step 6: Layering, Reversing, and Binding
- Nest the Baskets: Turn your heavy, quilted exterior basket right-side out. Leave your thin interior lining basket wrong-side out. Drop the lining directly inside the exterior basket so that the wrong sides are touching. Smooth the lining out so it sits flush against the foam walls.
- Baste the Rim: Clip the top raw edges of the exterior and the lining together all the way around the rim. Baste them together with a 1/8-inch seam to hold the layers in place.
- Bind: Cut your binding fabric into 2.5″ strips. Join them end-to-end and press in half. Align the raw edge of the binding with the raw edge of the basket’s exterior rim, sew it around the circumference, fold it over the top to the inside of the basket, and topstitch it down. This encloses the raw edges beautifully, leaving you with a flawless, reversible, freestanding textile basket.
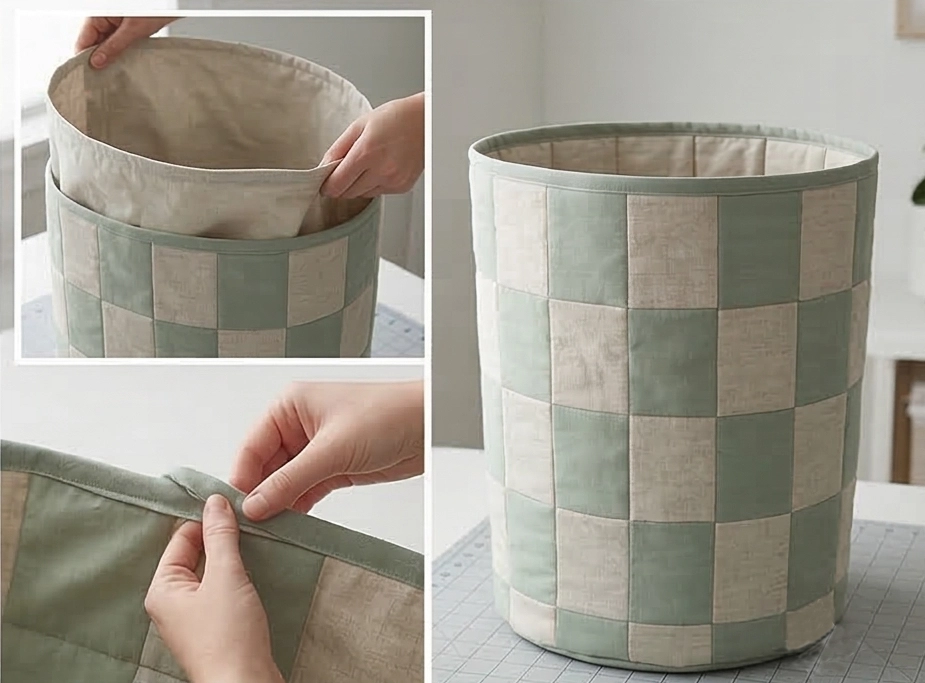
Usability Note: The double-sided foam stabilizer is incredibly resilient and will bounce back if crushed. Because of the foam, it is highly recommended to spot-clean this basket or hand-wash it gently in the bathtub with cold water and mild detergent. Rinse thoroughly and allow it to air dry standing up to ensure the geometric grid and the cylindrical structure remain perfectly tailored and pristine.
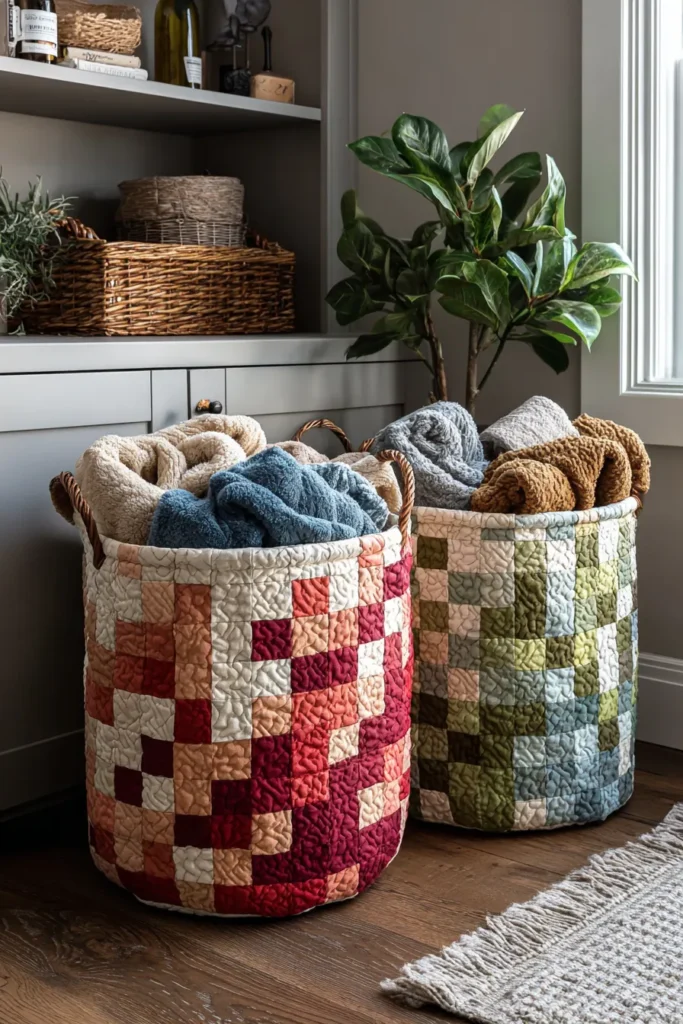
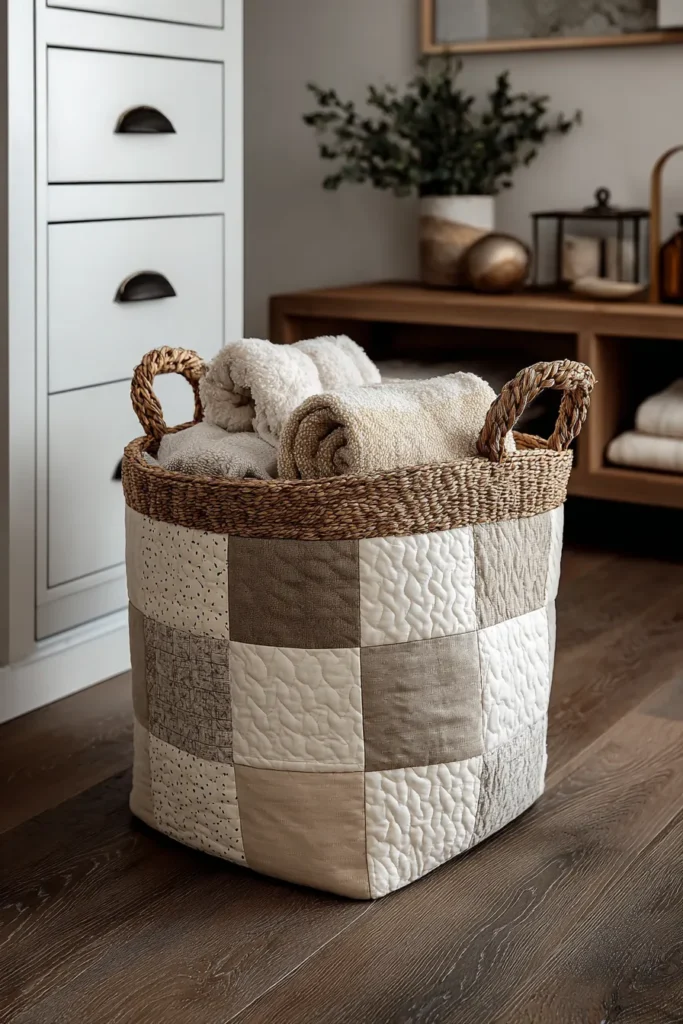
20. Stylish Modern Nine Patch Laundry Bag Patterns for Functional Decor
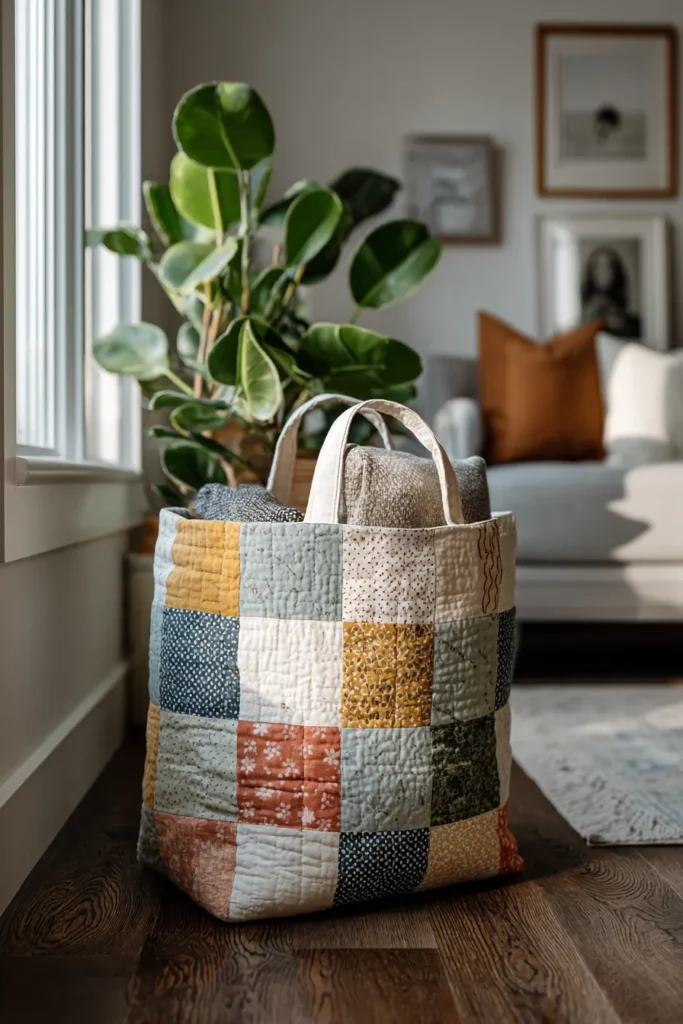
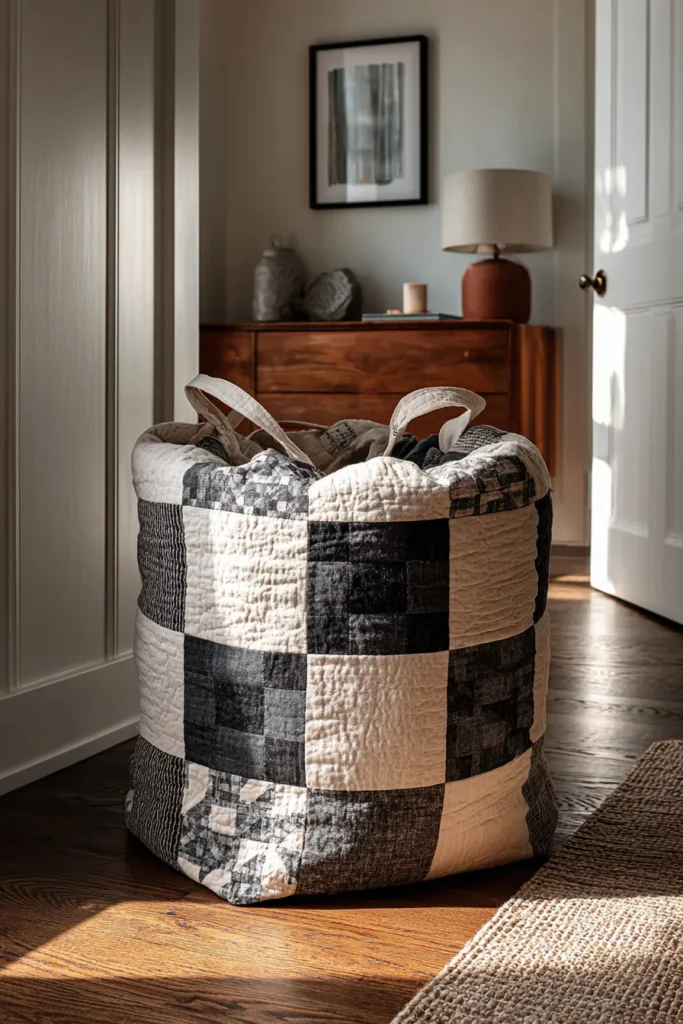
A Guide to Making a Stylish Quilted Laundry Bag
A well-designed home carries its elegance into every corner, including the laundry room and the bedroom closet. Too often, laundry is relegated to purely utilitarian, uninspiring plastic bins or flimsy mesh sacks that we rush to hide when guests arrive. This quilted laundry bag transforms that daily chore. By integrating a crisp, oversized Nine Patch block into the body of a fully lined, beautifully structured fabric sack, you create a piece of functional decor that you’ll actually want to leave out on display.
The Heritage of the Quilted Wash Bag
I curated this specific pattern to elevate a historically humble item. In the early 20th century, a “wash bag” was typically just a rough, unbleached muslin sack used to transport linens to the washhouse. It was pure utility. By applying the iconic Nine Patch—a pattern historically reserved for comforting bed quilts—directly to the laundry bag, we cross the boundary between practical storage and textile art. The structured quilting not only honors that heritage but also gives the modern bag the durability it needs to handle heavy loads without losing its beautiful shape.
Focus on Usability, Comfort, and Elegance
- Usability: A drawstring closure makes it easy to cinch and carry down the hall, while the “boxed” gusseted bottom allows the bag to stand upright on the closet floor while you fill it.
- Comfort: Unlike rigid plastic hampers that can scuff walls or clatter in the night, a quilted fabric bag is silent, soft to the touch, and visually comforting. The cotton layers also breathe, helping prevent garments from becoming musty in a closed space.
- Elegance: To maintain a stylish, modern aesthetic, choose a monochromatic palette. A mix of crisp optic white and deep charcoal gray, quilted with stark geometric lines, ensures the bag looks like a high-end boutique accessory rather than a craft project.
Measurements & Materials Needed
Finished Bag Size: Large Freestanding Sack (approx. 18″ wide x 24″ tall with a 6″ deep flat base) Finished Block Size: The front features a prominent 12″ x 12″ Nine Patch (made from nine 4″ finished squares) seamlessly framed by the bag’s body.
Materials Needed:
- Fabric for the Nine Patch: Premium quilting cotton or medium-weight linen.
- 5 squares of an Accent Color (e.g., Charcoal), cut to 4.5″ x 4.5″.
- 4 squares of a Background Color (e.g., White), cut to 4.5″ x 4.5″.
- Framing & Back Panel Fabric: 1.5 yards of your Background Color. You will cut:
- Two side borders: 3.5″ x 12.5″.
- One bottom border: 18.5″ x 6.5″.
- One top border: 18.5″ x 8.5″.
- One solid back panel: 18.5″ x 26.5″.
- Lining Fabric: 1 yard of a coordinating solid fabric. Cut two panels measuring 18.5″ x 26.5″.
- Batting: 1 yard of low-loft 100% cotton batting to provide that beautiful, plush quilted texture.
- Hardware: 2 yards of 1/2-inch natural cotton twisted rope for the drawstring.
- Thread: 50-weight 100% cotton piecing and quilting thread.
- Tools: Rotary cutter, 6″ x 24″ acrylic ruler, sewing machine, and curved safety pins for basting.
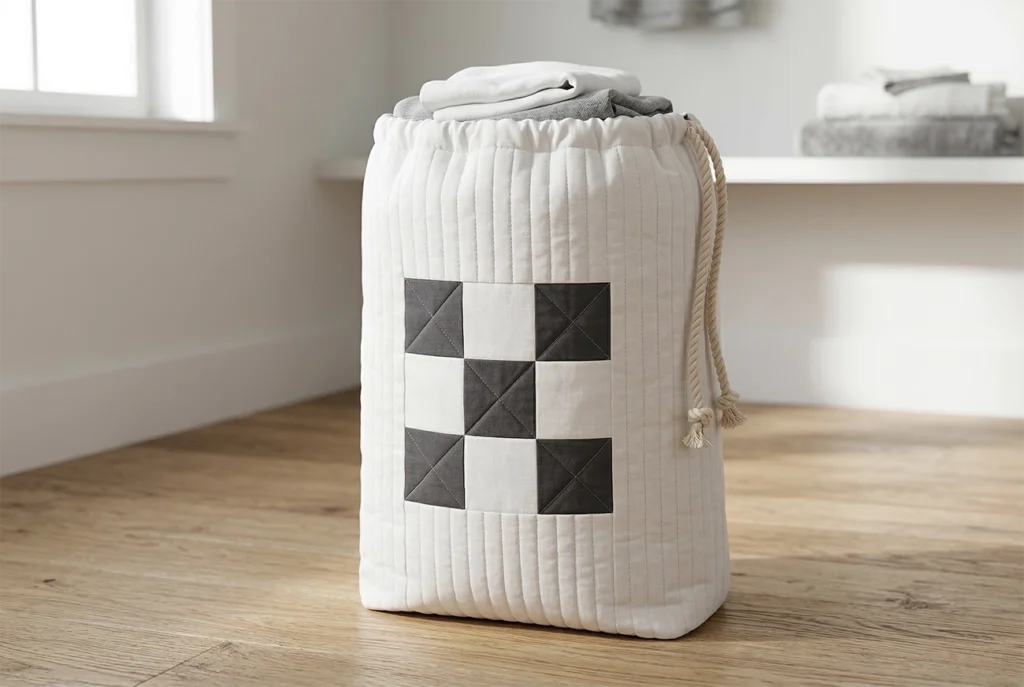
Step-by-Step Guide: The Quilted Nine Patch Laundry Bag
Step 1: Precision Cutting for the Grid
Using your rotary cutter and acrylic ruler, cut your 4.5″ squares and all your border pieces exactly to the measurements listed above. Keeping the cuts perfectly square is the secret to a professional-looking finished bag.
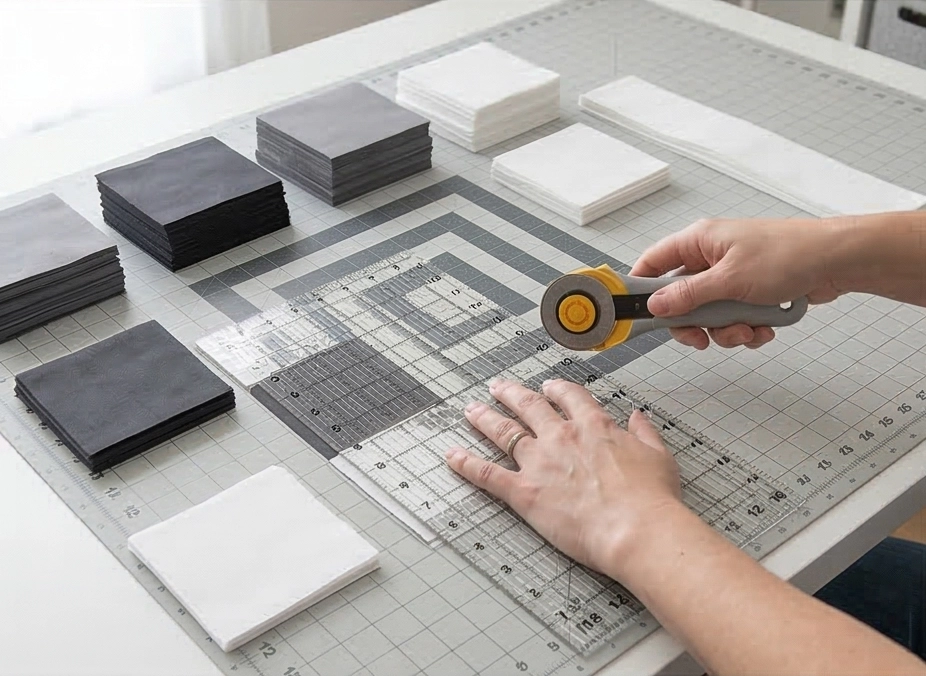
Step 2: Assembling the Nine-Patch Focal Point
Lay out your nine 4.5″ squares in a 3×3 grid, placing your Accent Color in the four corners and the center to form an ‘X’.
- Sew the squares in each horizontal row together using a precise 1/4-inch seam allowance.
- Press the seams of the top and bottom rows outward, and the middle row inward.
- Join the three rows together, ensuring the seams are tightly locked. Your finished focal block will measure exactly 12.5″ x 12.5″ unfinished.
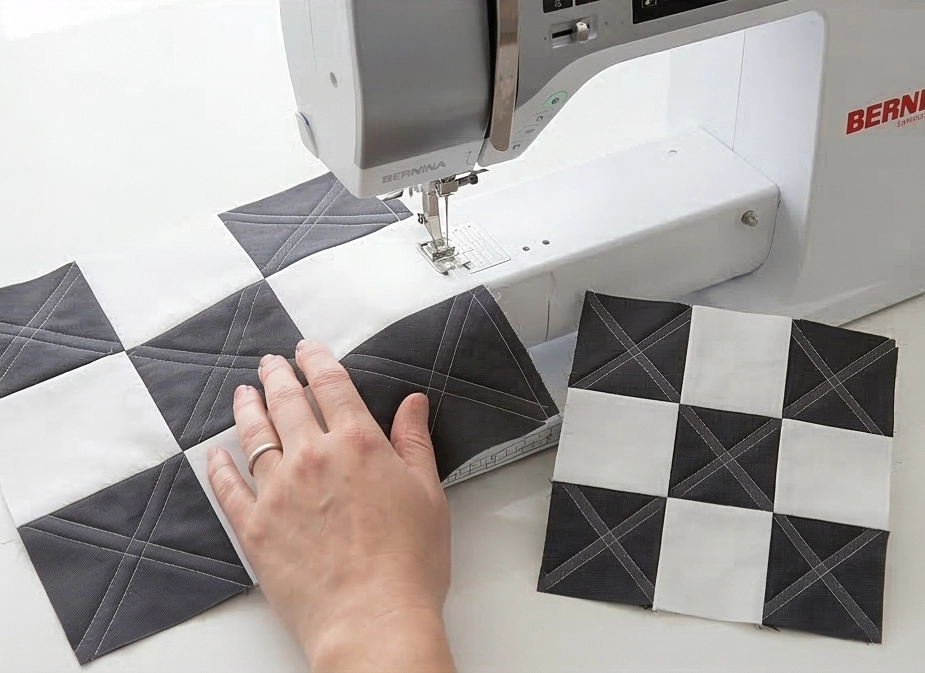
Step 3: Framing the Front Panel
To make the front panel the same size as your solid back panel, you must build the frame around the Nine Patch.
- Sew the two 3.5″ x 12.5″ side borders to the left and right sides of your block. Press the seams outward.
- Sew the 18.5″ x 6.5″ bottom border to the lower edge. Press outward.
- Sew the 18.5″ x 8.5″ top border to the top edge. Press outward. Your pieced front panel should now measure 18.5″ wide by 26.5″ tall.
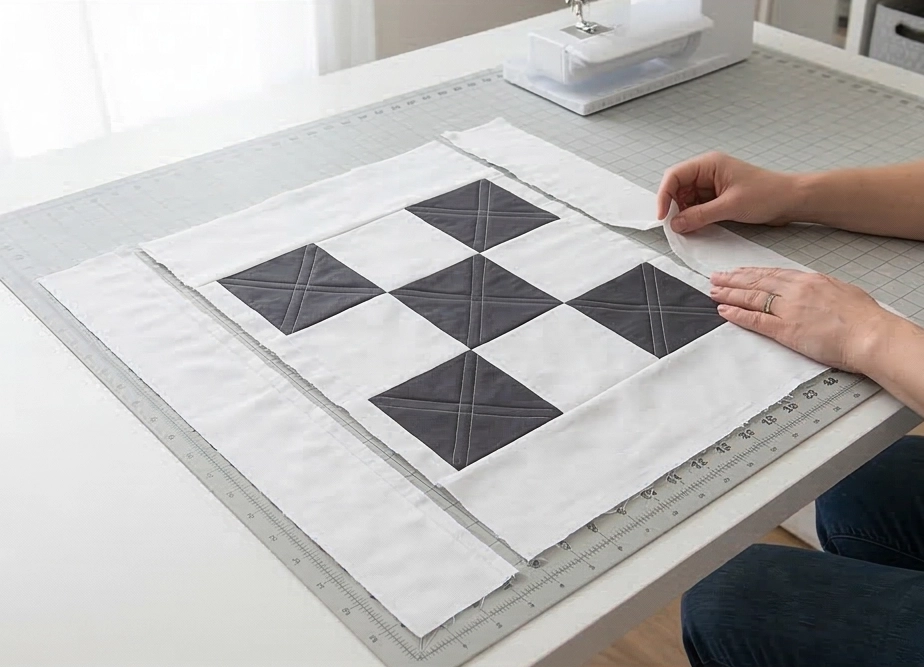
Step 4: Basting and Structural Quilting
Cut two pieces of cotton batting slightly larger than your front and back panels. Baste the pieced front panel to one piece of batting, and the solid back panel to the other. Take them to your machine and quilt them. For a stylish, modern look, stitch straight, vertical lines spaced exactly 1.5 inches apart from the top of the panels to the bottom. This dense, vertical quilting gives the fabric the rigidity it needs to stand up as a bag.
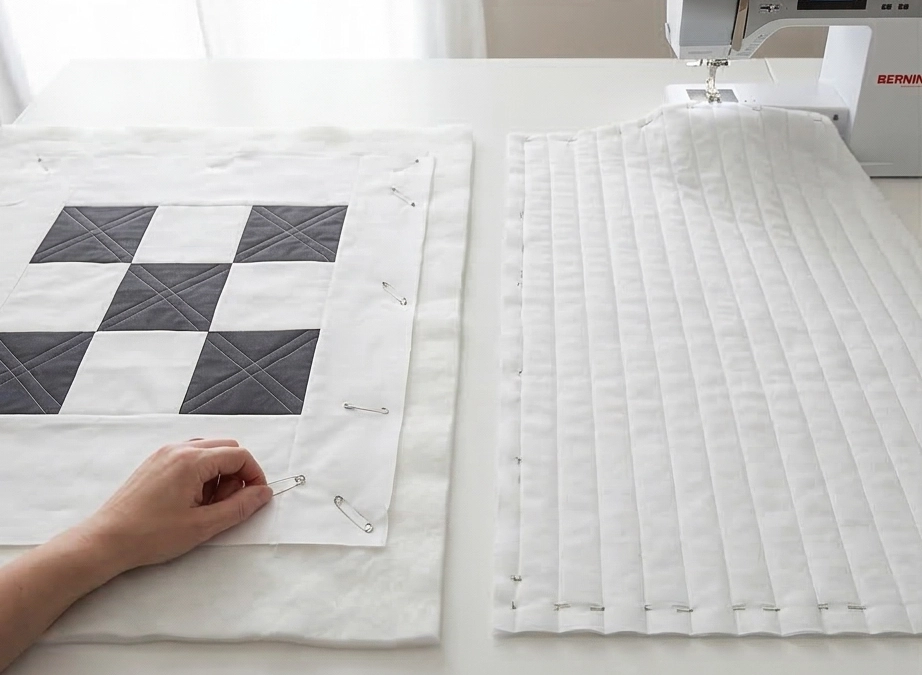
Step 5: Assembly Section (Boxing the Base)
- Sew the Outer Bag: Place your quilted front and back panels right sides together. Sew along the left side, the bottom edge, and the right side with a 1/4-inch seam allowance. Leave the top open.
- Box the Corners: To create the flat base so the bag can stand, pull the front and back fabrics apart at one of the bottom corners, flattening it into a triangle so the side seam aligns perfectly with the bottom seam. Measure exactly 3 inches down from the point of the triangle, then draw a straight line across (it should be 6 inches long). Sew directly on this line, then trim off the excess triangle. Repeat on the other bottom corner.
- Sew the Lining: Repeat this exact process (sewing the sides/bottom and boxing the corners) with your two lining panels.
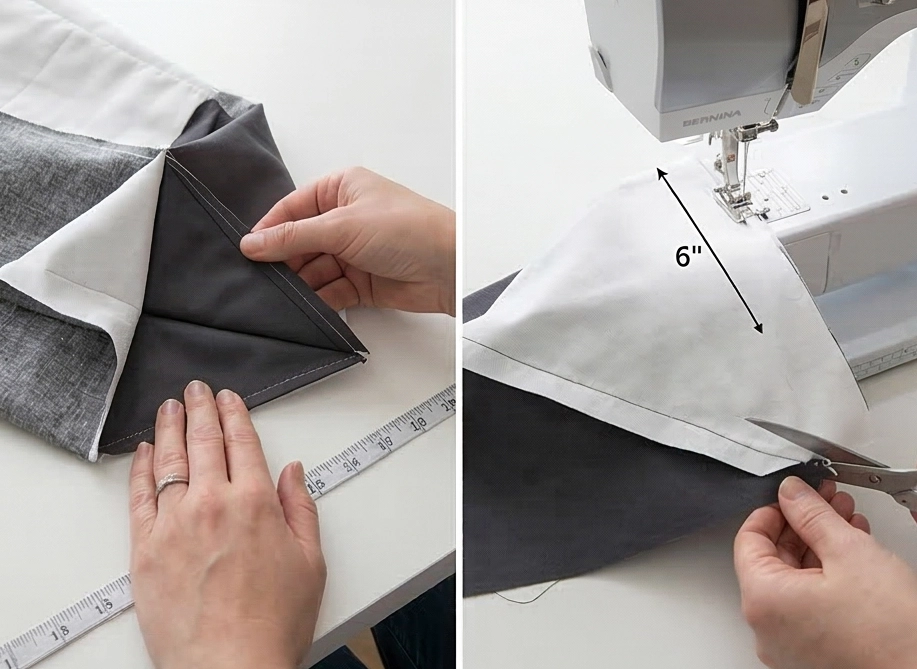
Step 6: Attaching the Lining and Creating the Casing
- Leave the outer quilted bag inside out. Turn the lining right-side out. Insert the lining inside the outer bag so their right sides are touching.
- Pin the top raw edges together all the way around the rim. Sew around the top edge, leaving a 4-inch gap for turning.
- Pull the entire bag right-side out through that gap. Push the lining down neatly into the bag and press the top rim flat.
- Topstitch completely around the top rim (which closes the turning gap). Then, stitch another line exactly 1.5 inches below the top rim to create the casing channel.
- Use a seam ripper to carefully open a few stitches on the outer side seam only between those two topstitched lines. Thread your cotton rope through this opening, around the entire bag, and out the same hole. Knot the ends securely.
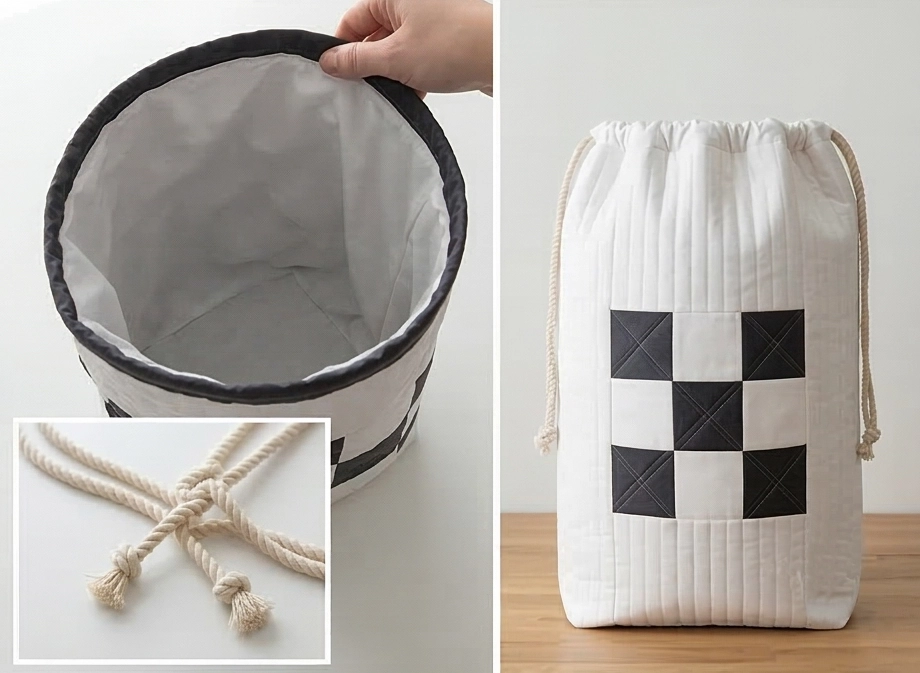
Usability Note: The cotton batting gives this bag a beautiful, protective structure that won’t easily collapse when empty. Because laundry bags absorb odors over time, this entirely cotton construction is a major advantage—simply remove the cotton rope, wash the bag on a warm, normal cycle, and tumble dry on low to refresh it completely.
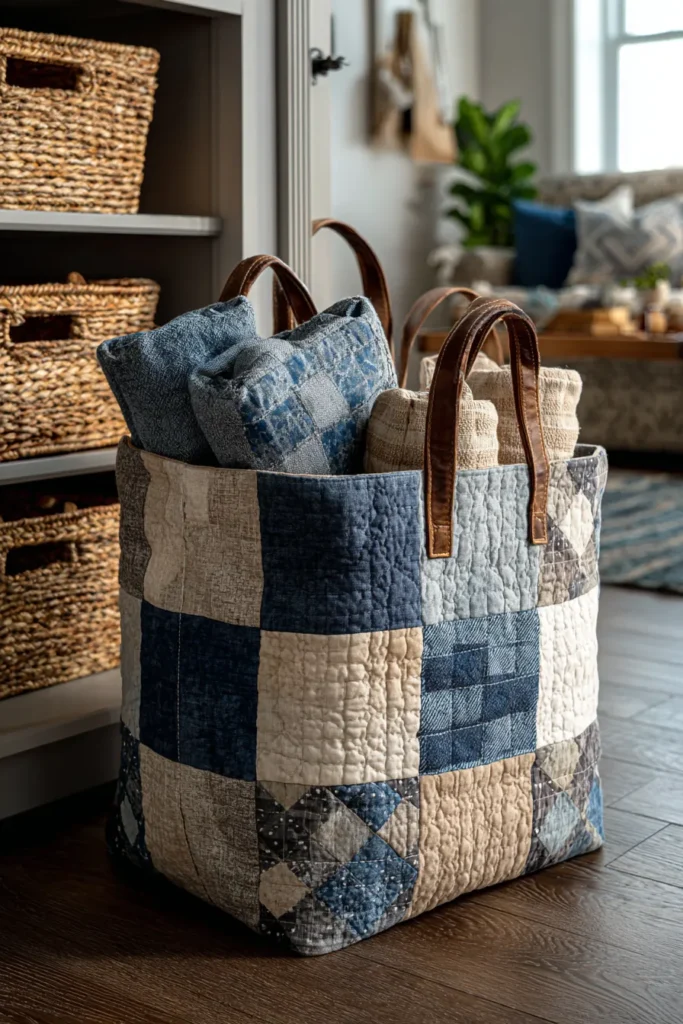

Conclusion
By embracing Nine Patch Quilt Pattern Ideas, you bring timeless artistry into every corner of your home. From the comfort of your bedroom to the elegance of your living room, this classic design provides endless opportunities for creativity and personalization.
Each pattern, whether it’s a Split Nine Patch Bed Quilt for contemporary style or a Heavyweight Nine Patch Floor Pillow for casual seating, enhances the warmth and charm of your home. Not only do these quilts offer comfort, but they also transform practical items like laundry bags and table runners into beautiful works of art. With such a rich history and a wide variety of styles, Nine Patch quilts are an enduring way to make your living spaces feel both cozy and elegant.
