
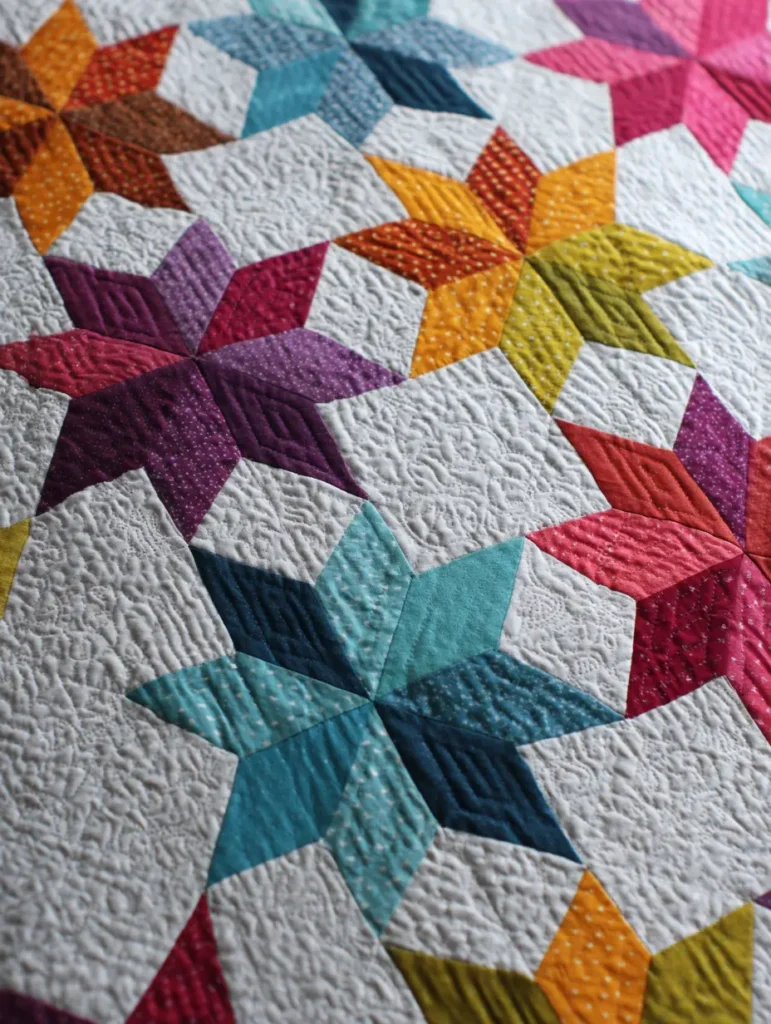
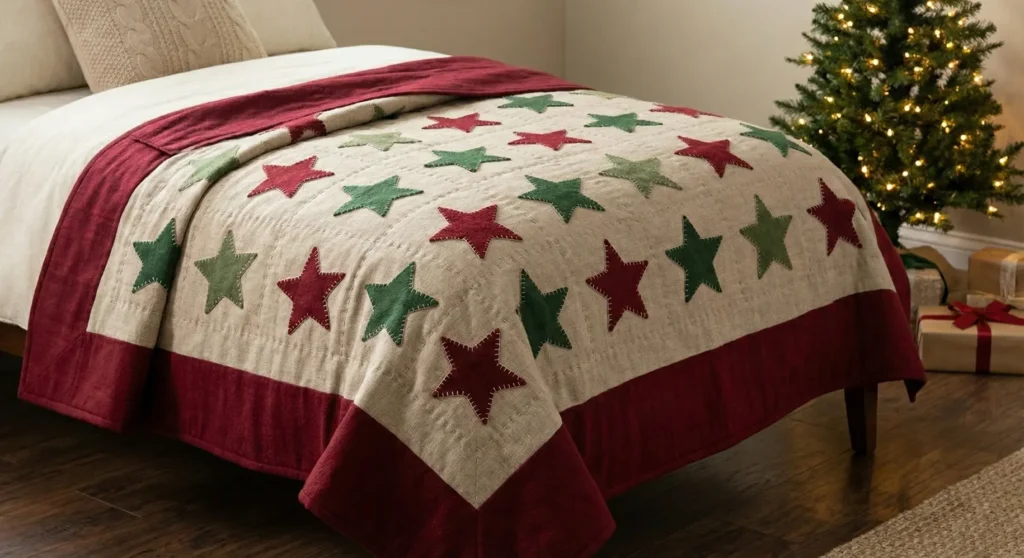
20 Christmas Star Quilting Pattern Ideas for Holiday Bedrooms
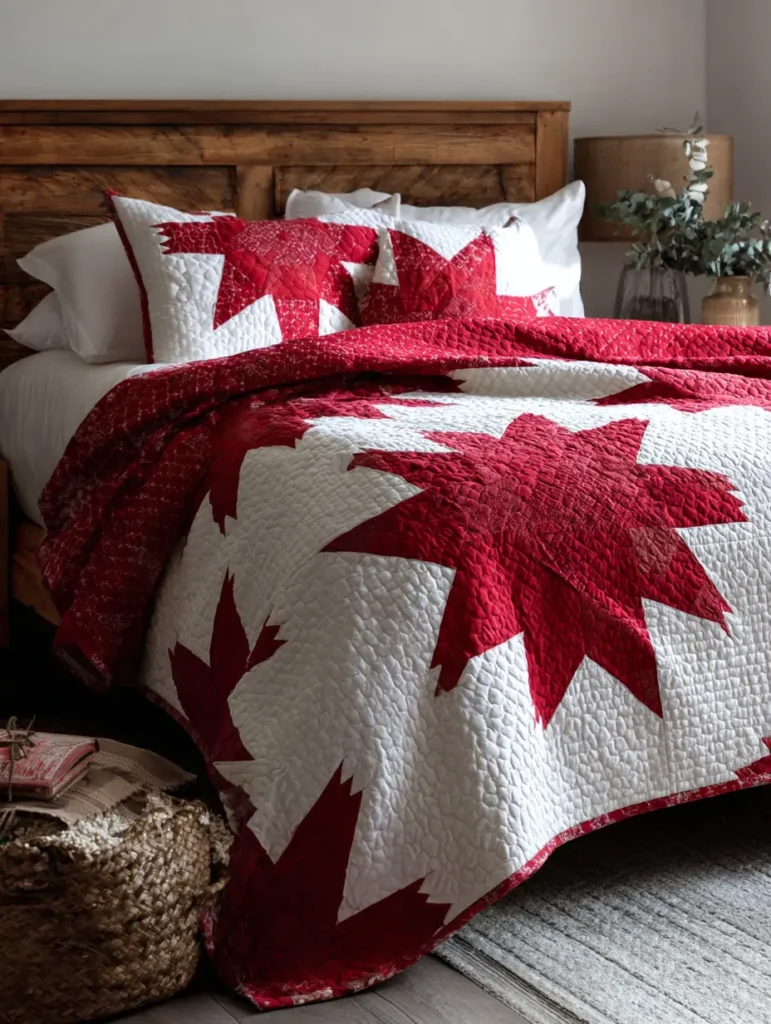
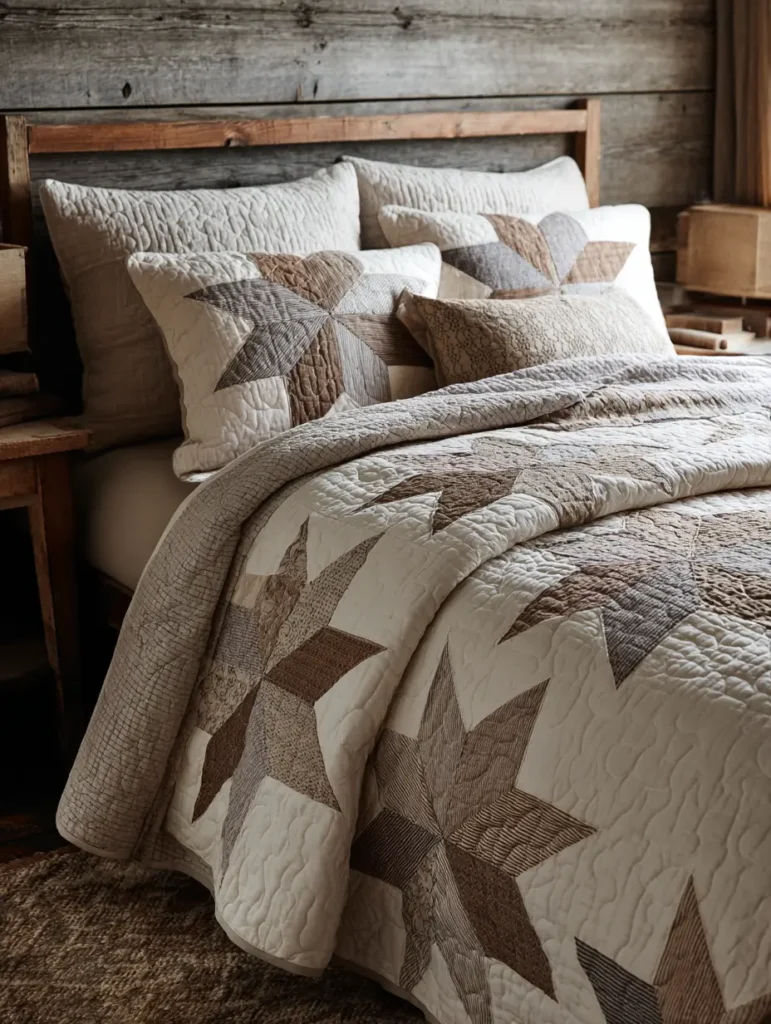
Christmas Star Quilts: The Piece That Makes a Bedroom Feel Like the Holidays
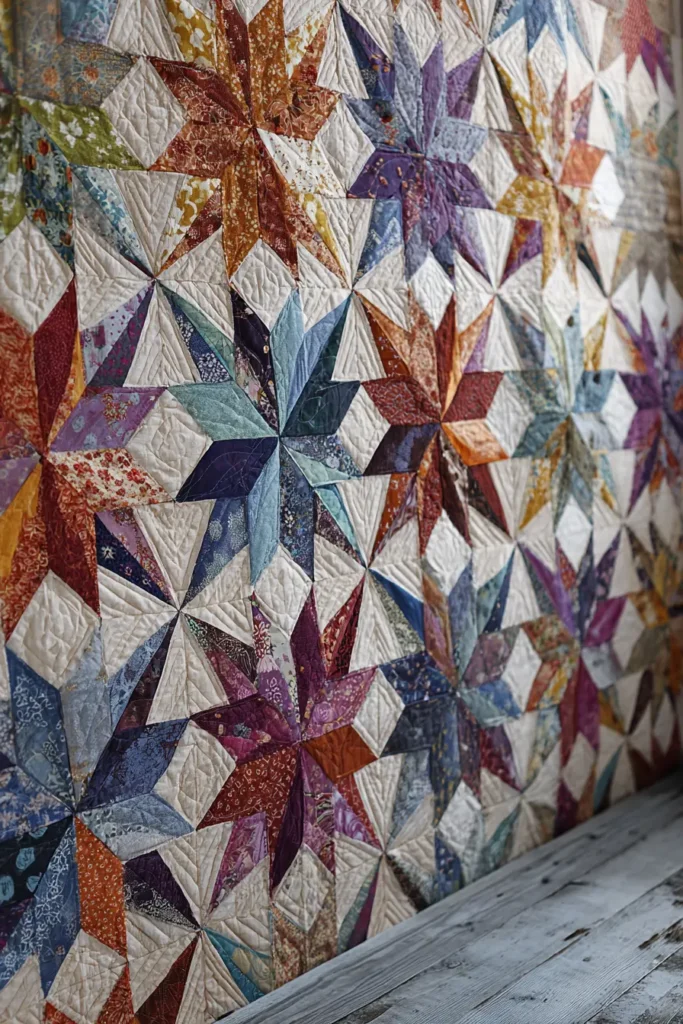
There is a specific quality to a well-decorated Christmas bedroom that sets it apart from the rest of the house. The living room gets the tree, the mantel, and the visible effort. The bedroom is quieter – and that quietness is where the details matter most. A Christmas star quilt does something a wreath or a string of lights cannot: it changes the fundamental texture and weight of the room, which is what makes a space feel genuinely seasonal rather than just decorated.
I have always thought star patterns belong to winter in a particular way. The connection to the night sky is part of it – stars as navigation, as light in darkness, as the thing you look for when everything else is obscured. That symbolism does not feel forced during the holiday season. It feels accurate. A star quilt on a bed in December is doing exactly what star patterns have always done: providing warmth and a fixed point to orient toward.
Why Star Patterns Work at Christmas
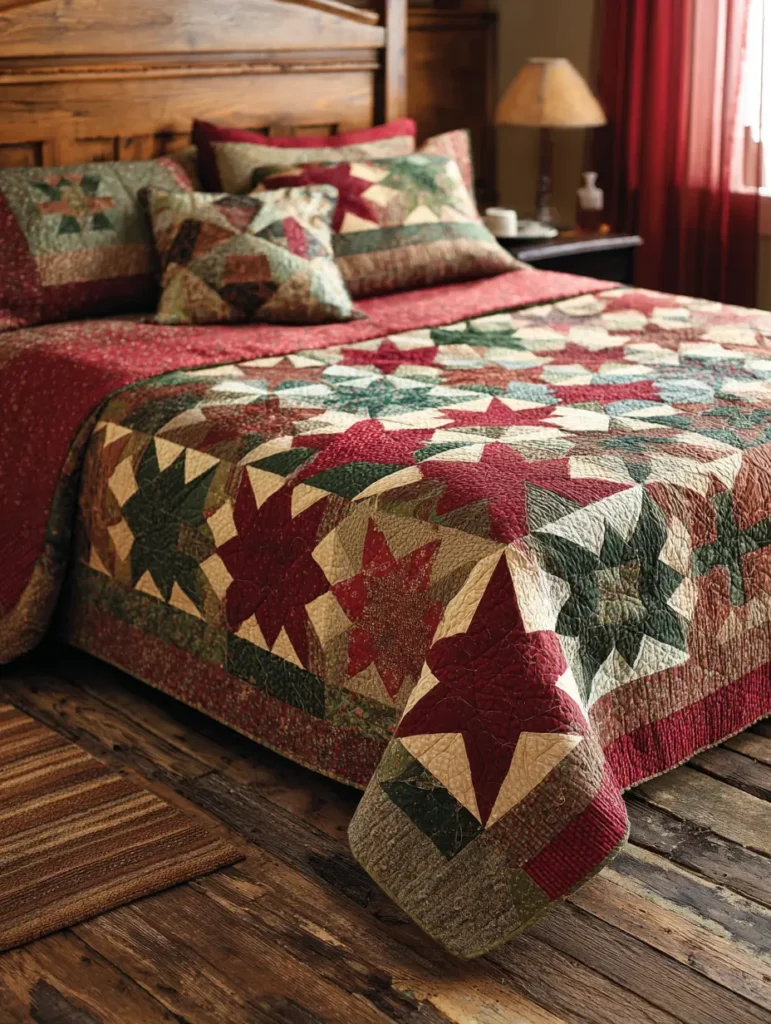
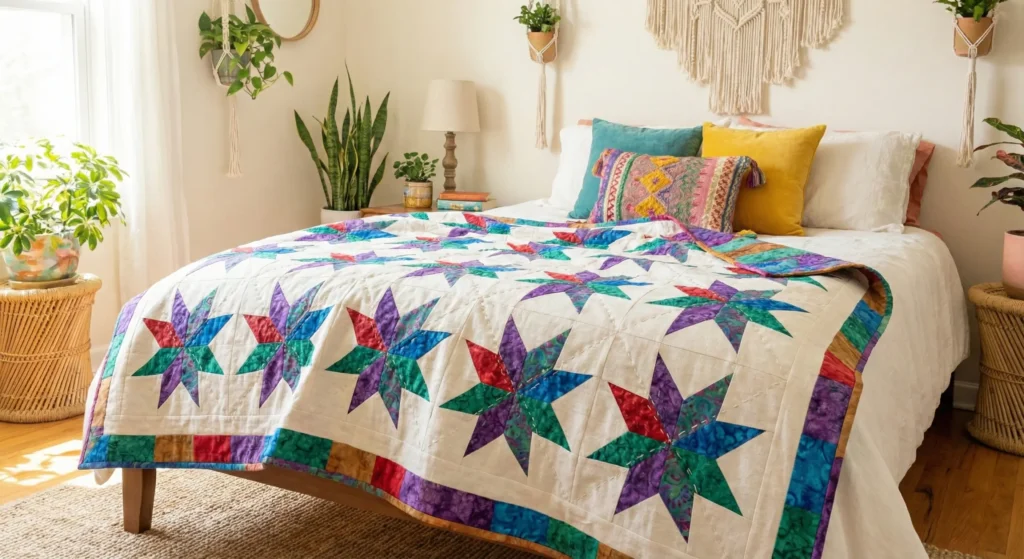
The practical versatility of star quilts at Christmas is as important as the symbolism. A classic red-and-white Ohio Star or Lone Star quilt delivers immediate festive impact – the palette alone carries the season. Softer interpretations, in cream and grey or Scandinavian-inspired neutrals, create a quieter register that suits bedrooms where you want the holiday feeling without the visual noise. Farmhouse-style stars in flannel or brushed cotton feel relaxed and lived-in. Clean geometric stars in high-contrast solids look sharp and contemporary. The same underlying pattern structure accommodates all of these, which is why star quilts have appeared in seasonal quilting traditions for as long as seasonal quilting traditions have existed.
What I have noticed in practice is that a single well-chosen star quilt does not need much support. The geometry – those radiating points moving outward from a strong center – naturally draws the eye and gives the room a sense of order and warmth. You can simplify everything else around it, and the bedroom still feels intentional.
Christmas Star Quilting Pattern Ideas
Contents
- 1 Christmas Star Quilting Pattern Ideas
- 2 1. Classic Red and White Christmas Star Quilt Patterns
- 3 2. Modern Geometric Christmas Star Quilt for Contemporary Bedrooms
- 4 3. Rustic Farmhouse Star Quilt Designs with Warm Neutrals
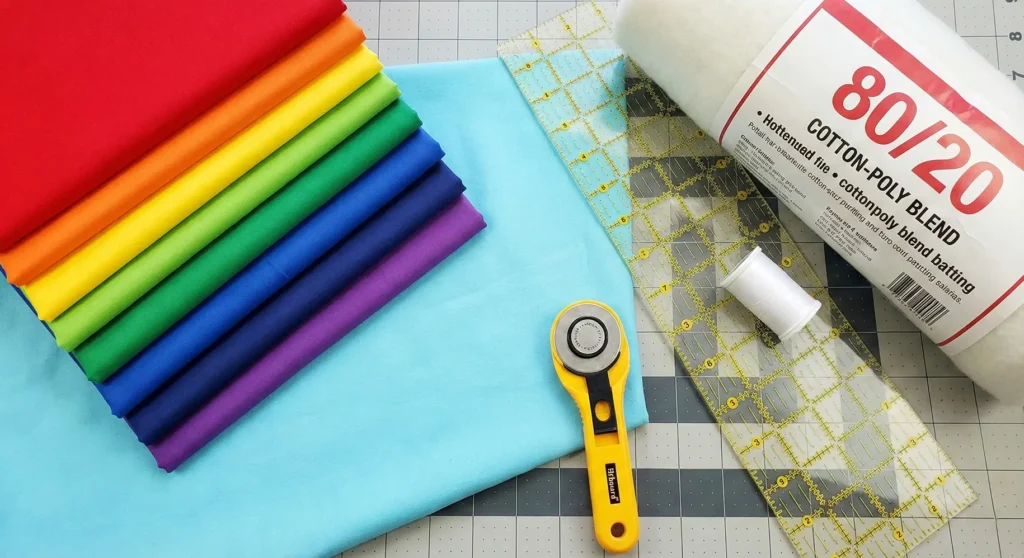
- 5 4. Charming Colorful Rainbow Holiday Star Quilt for Kids
- 6 5. Holiday Log Cabin Star Quilt with Festive Colors
- 7 6. Patchwork Starburst Quilts for Festive Winter Bedrooms
- 8 7. Festive Star Quilted Bed Runners for Quick Decor
- 9 8. Traditional Folk Art Christmas Star Ideas
- 10 9. Mixed Fabric and Texture Star Quilt Combinations
- 11 10. Soft Pastel Christmas Star Quilts for a Gentle Winter Look
- 12 11. Quilted Star Throws for Layered Christmas Bedding
- 13 12. Miniature Star Quilt Blocks for a Festive Accent Pillow
- 14 13. Classic Ohio Star Block Design in Red and Green Fabrics
- 15 14. Luxury Velvet-Accented Holiday Star Design
- 16 15. Starry Night-Inspired Christmas Quilt Themes
- 17 16. Scandinavian Star Quilt Pattern in Minimalist Holiday Colors
- 18 17. Patriotic Christmas Star Quilt in Red, White, and Blue
- 19 18. Cozy Buffalo Plaid and Star Patchwork Bedding
- 20 19. Bohemian Whimsical Star Quilt Designs
- 21 20. Easy DIY Eight-Point Star Quilt Tutorial
- 22 Conclusion
What This Collection Covers
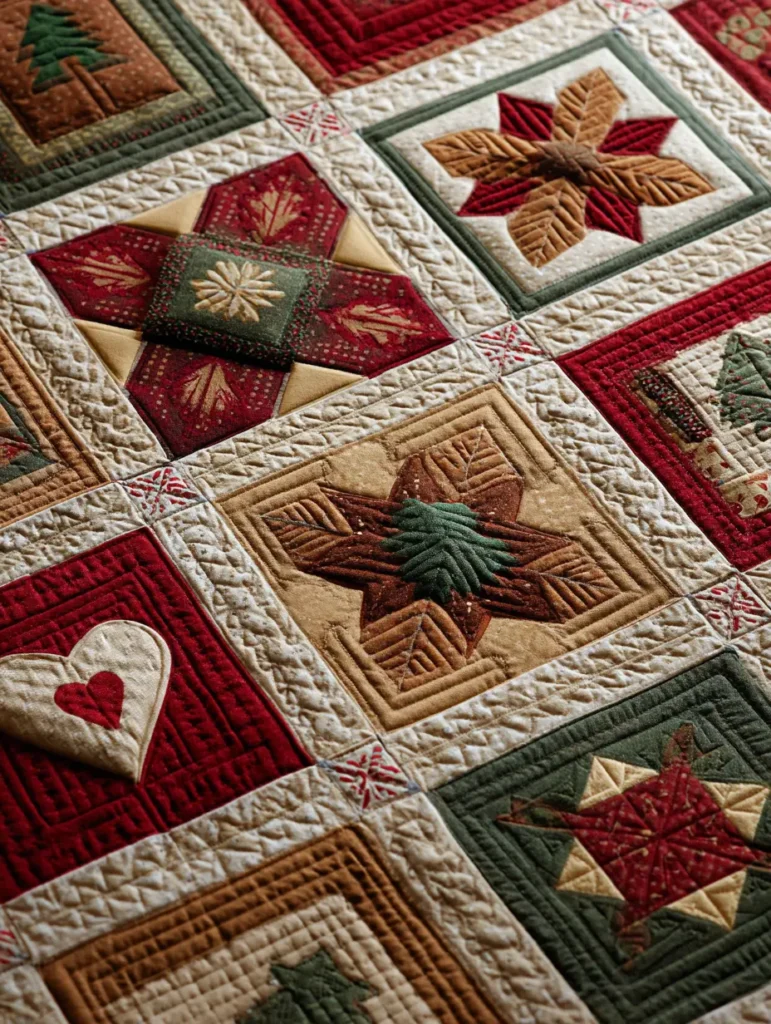
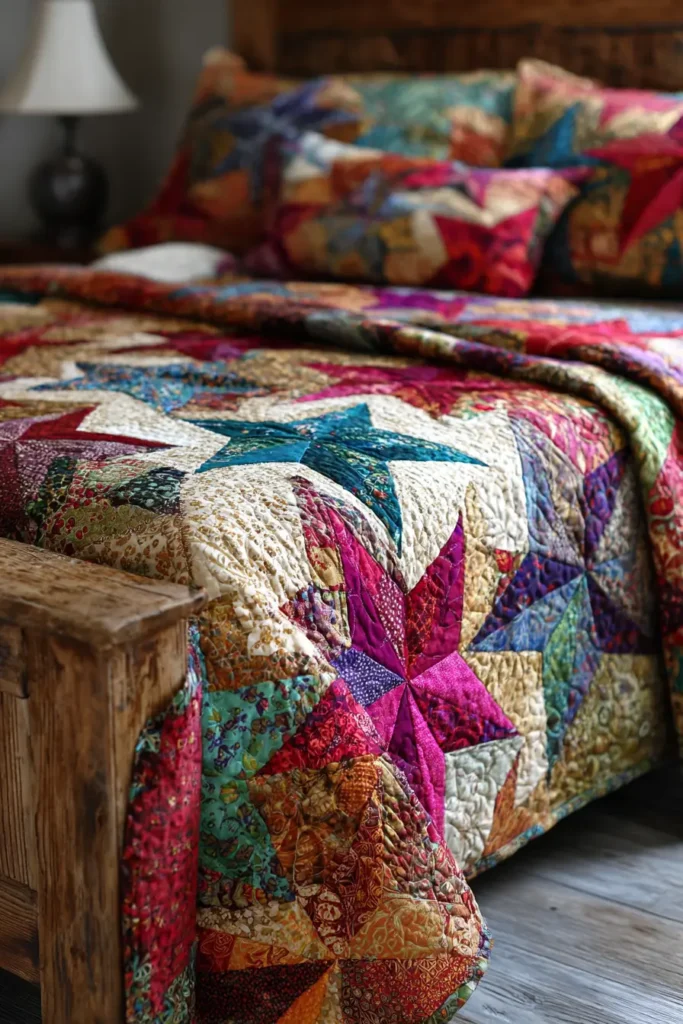
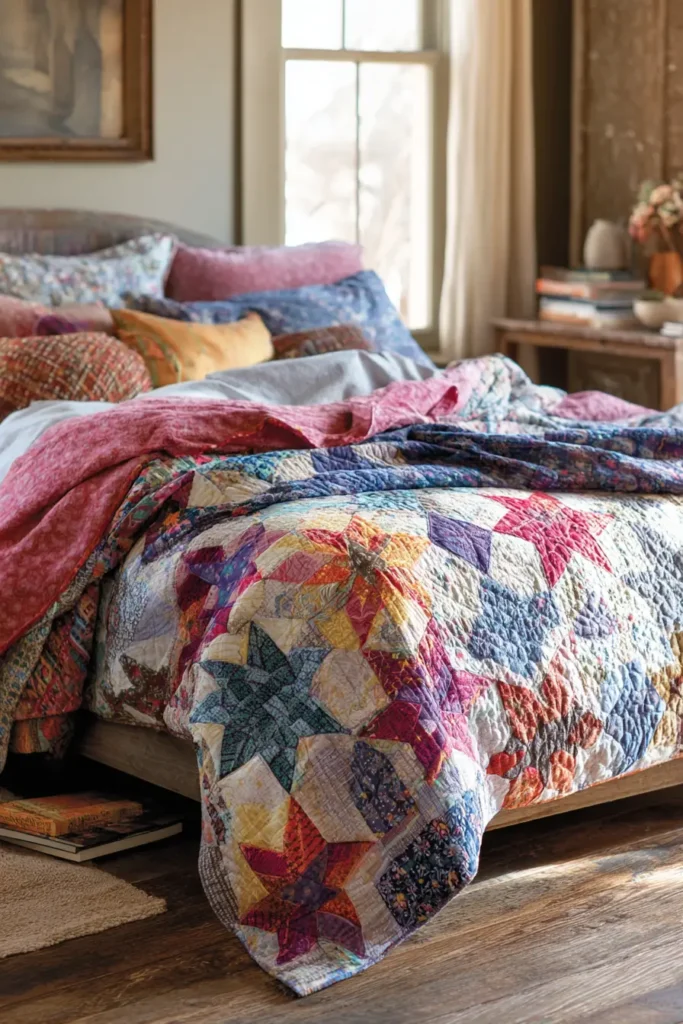
These 20 patterns range from statement bed quilts that anchor the whole room to smaller seasonal accents – bed runners, layered throws, quilted pillow covers – that add holiday detail without requiring a complete textile overhaul. Fabric and texture variations throughout: traditional cotton, flannel for warmth, subtle metallic accents that catch lamplight in the way that feels right for December evenings.
Some designs are purely seasonal – pieces you bring out in November and fold away in January, gradually becoming part of the year’s rhythm rather than a decorating decision. Others are designed to carry beyond the holidays, the star geometry remaining relevant in January and February when everything overtly Christmas has been put away.
Both kinds are worth making. The ones that last the longest, in my experience, are the ones that were made carefully enough to deserve being brought back out next year.
See also: Star quilt patterns · Lakota Star quilts · 15 Cozy Winter Quilt Designs · Scandinavian quilt patterns
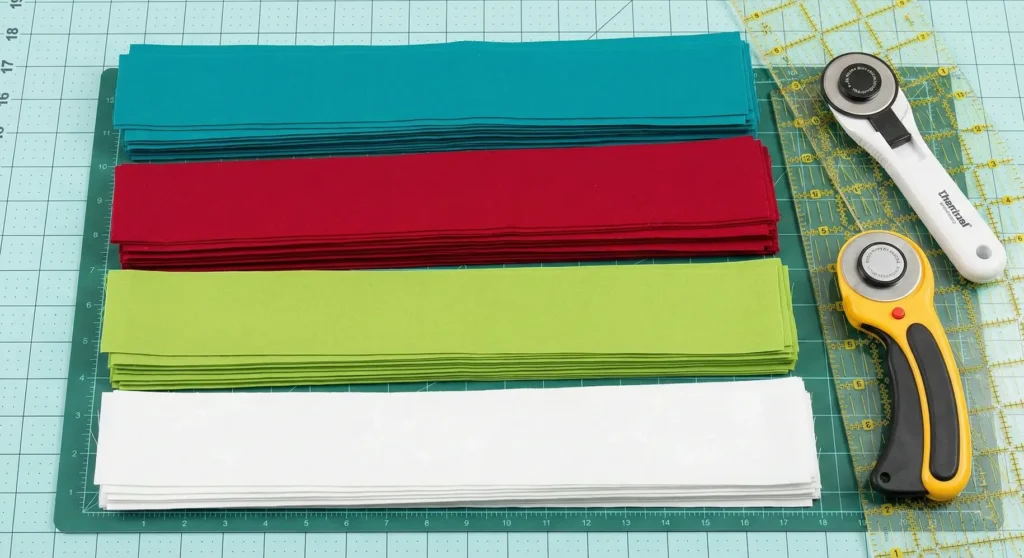
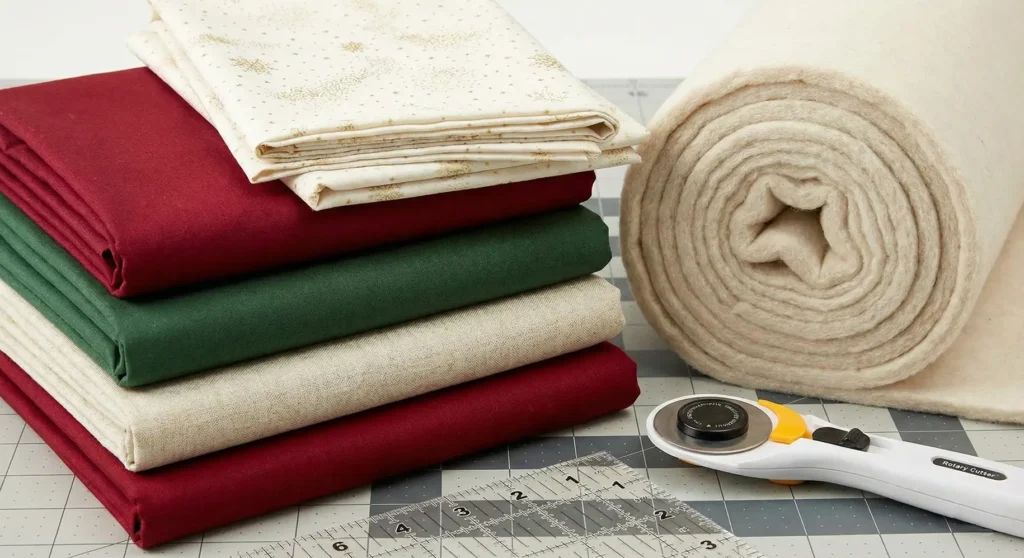
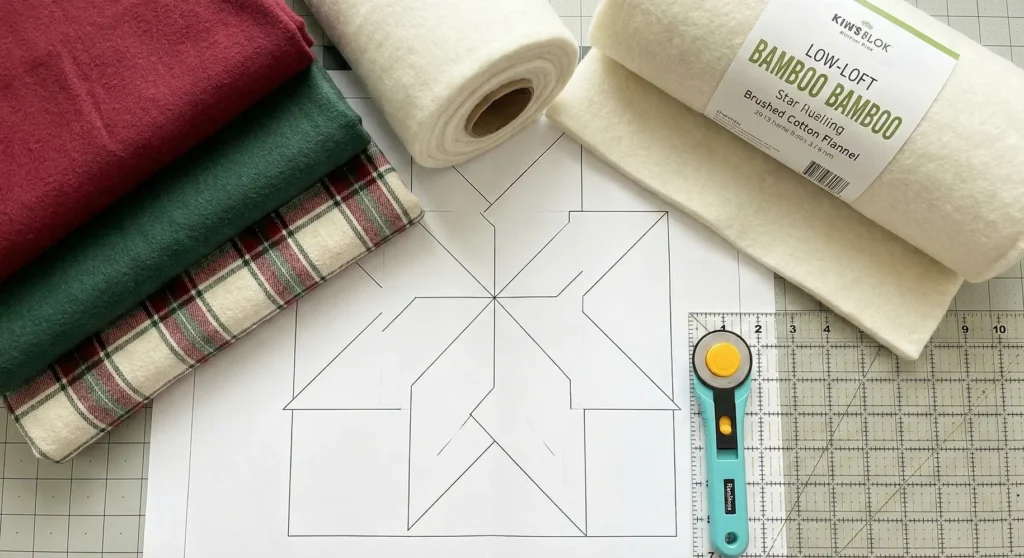
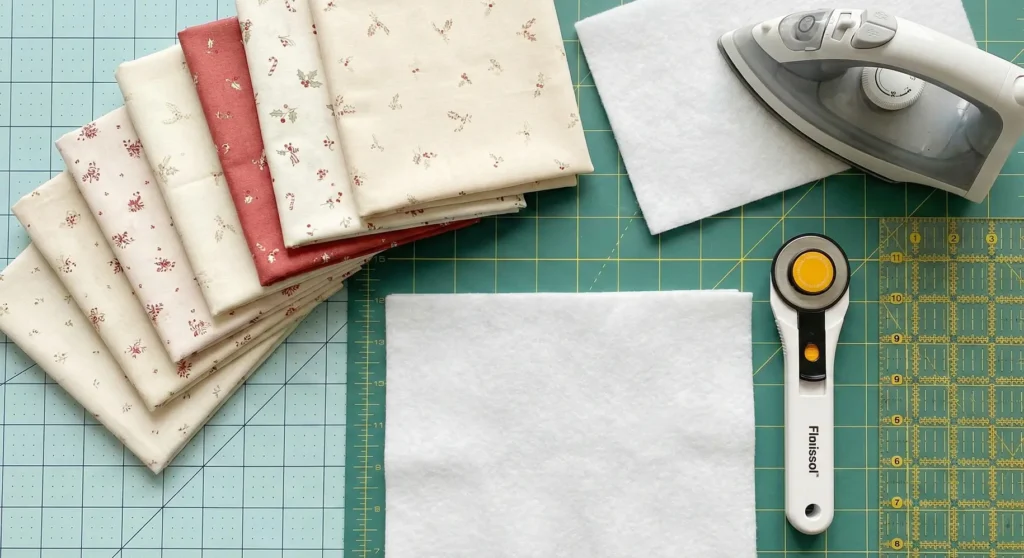
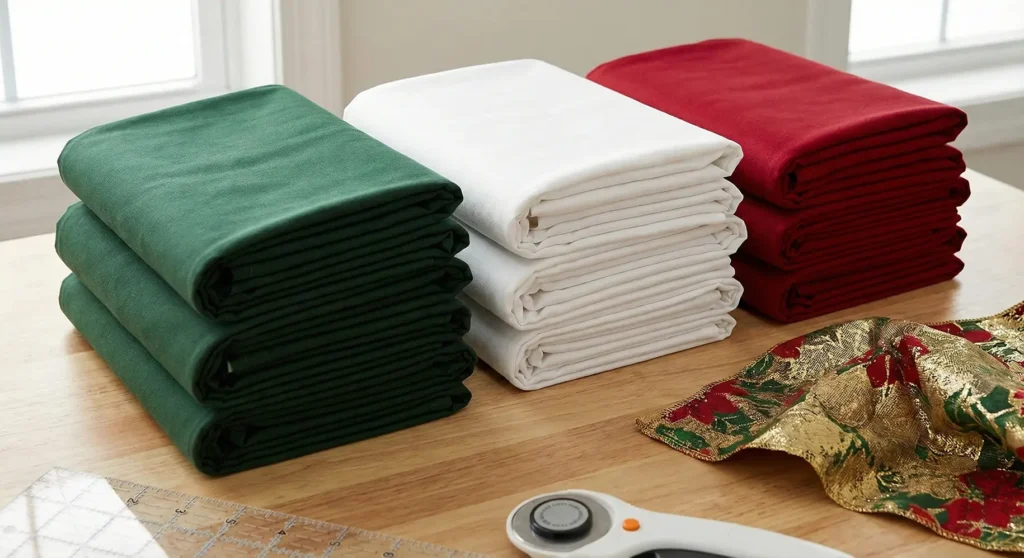
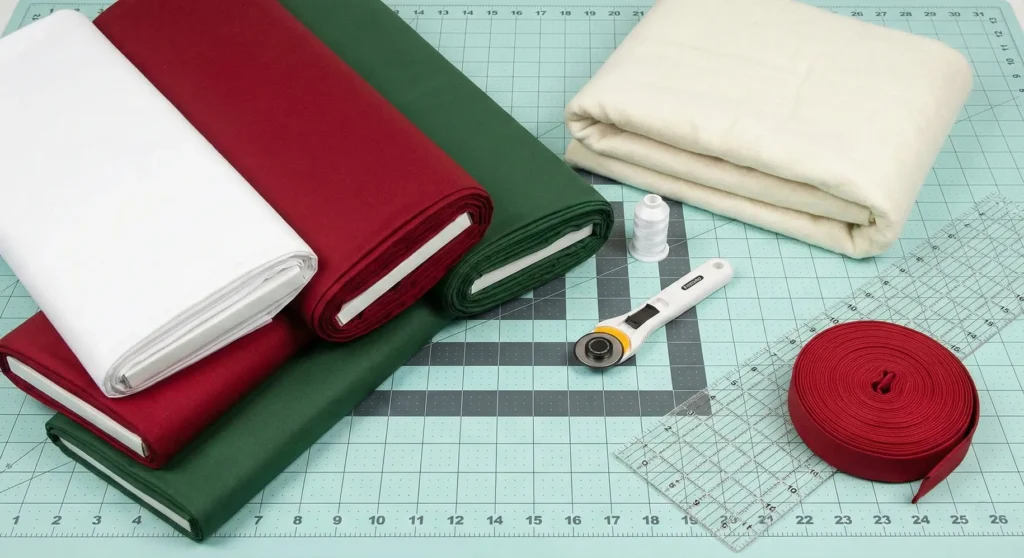
Recommended Supplies
“As an Amazon Associate, I earn from qualifying purchases.“
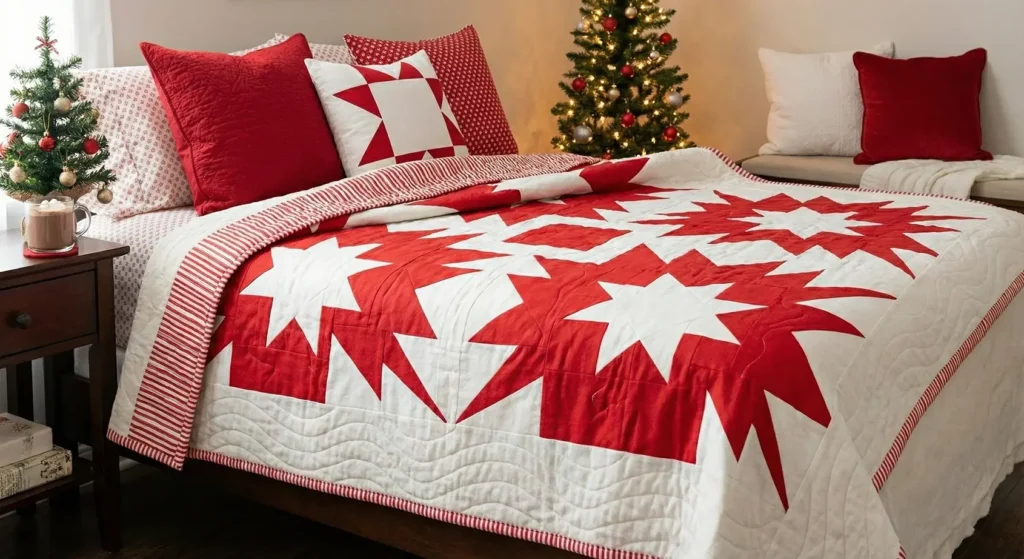
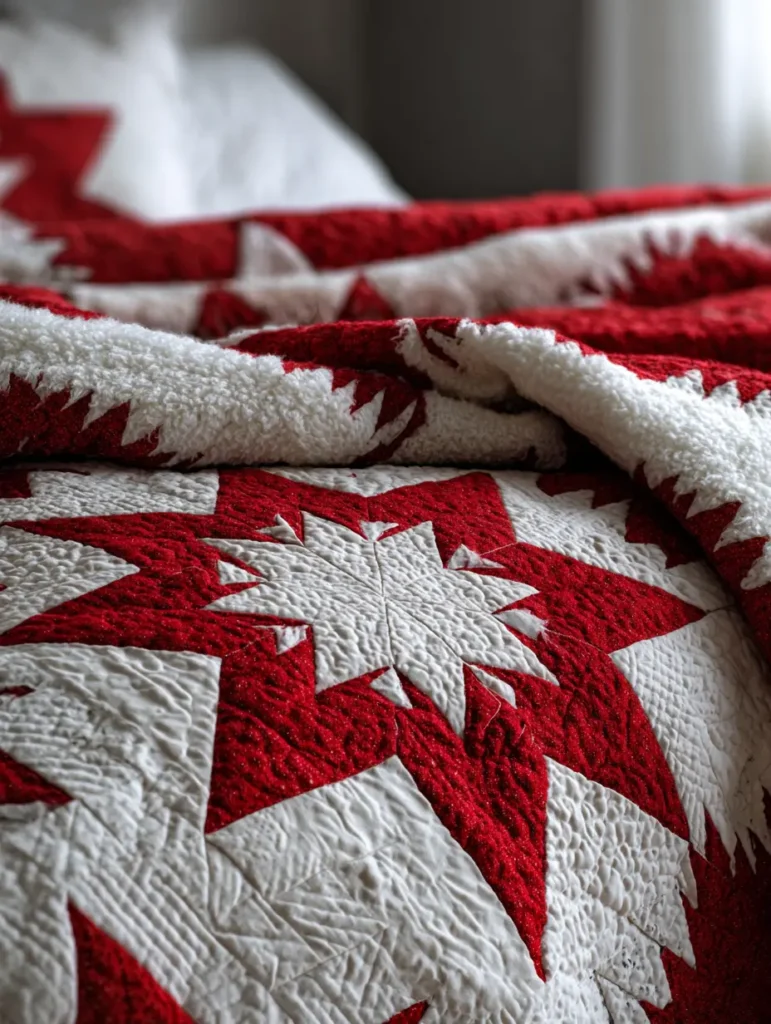
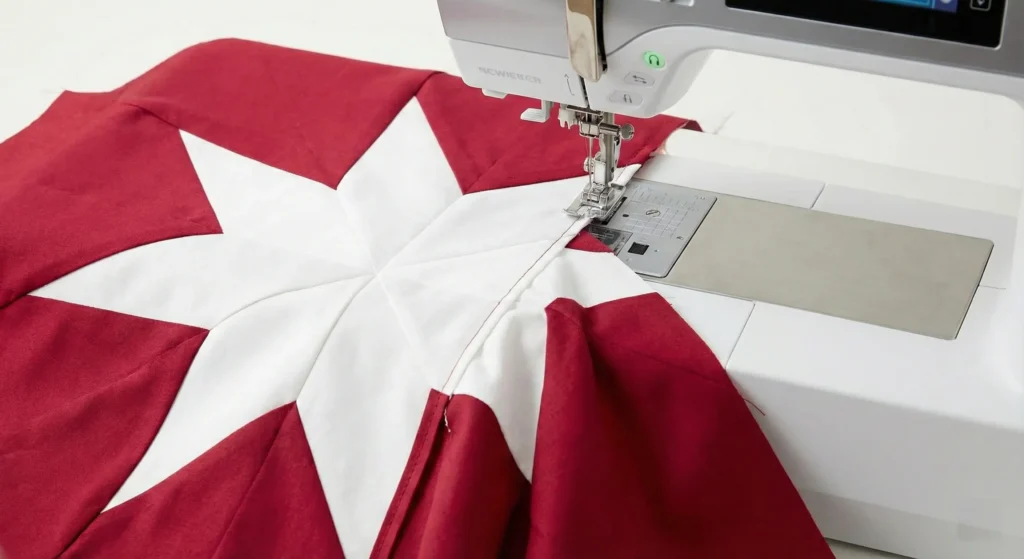
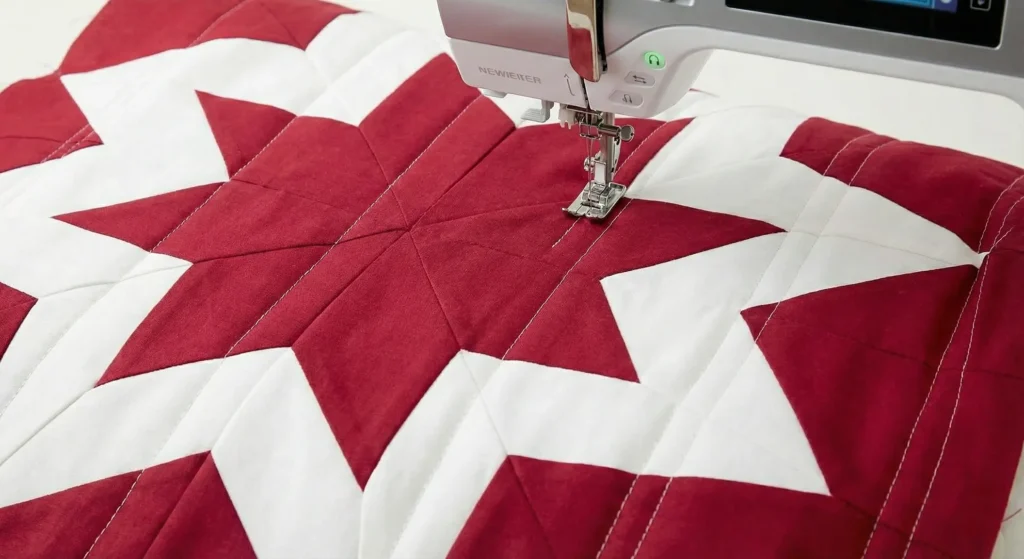
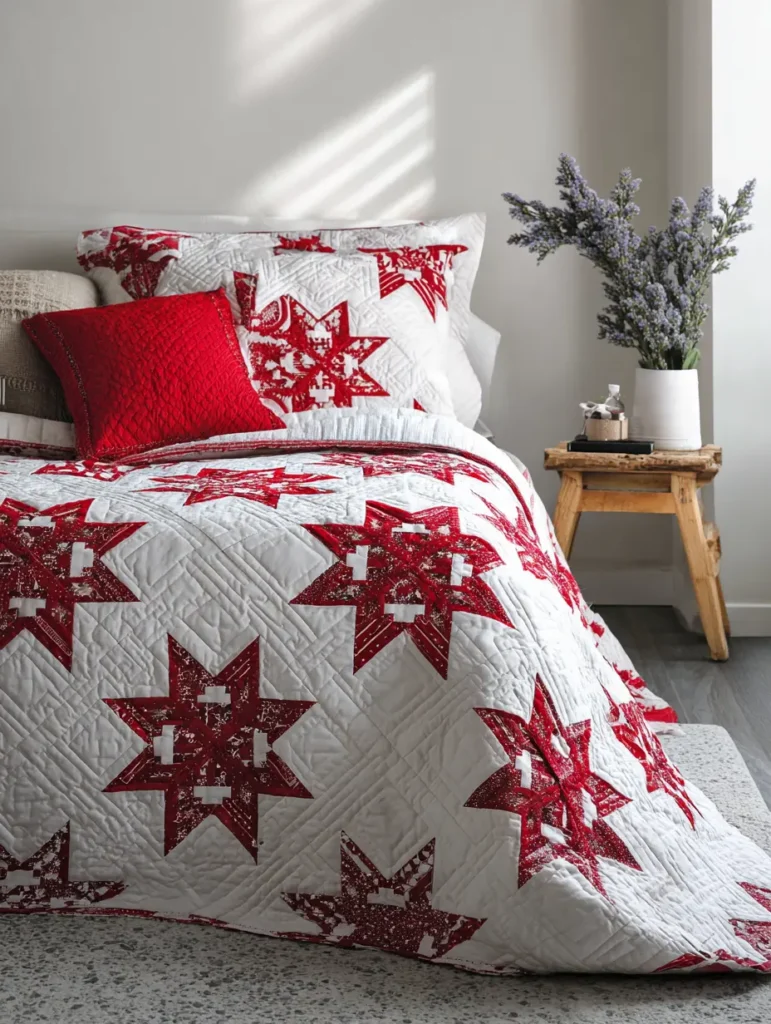
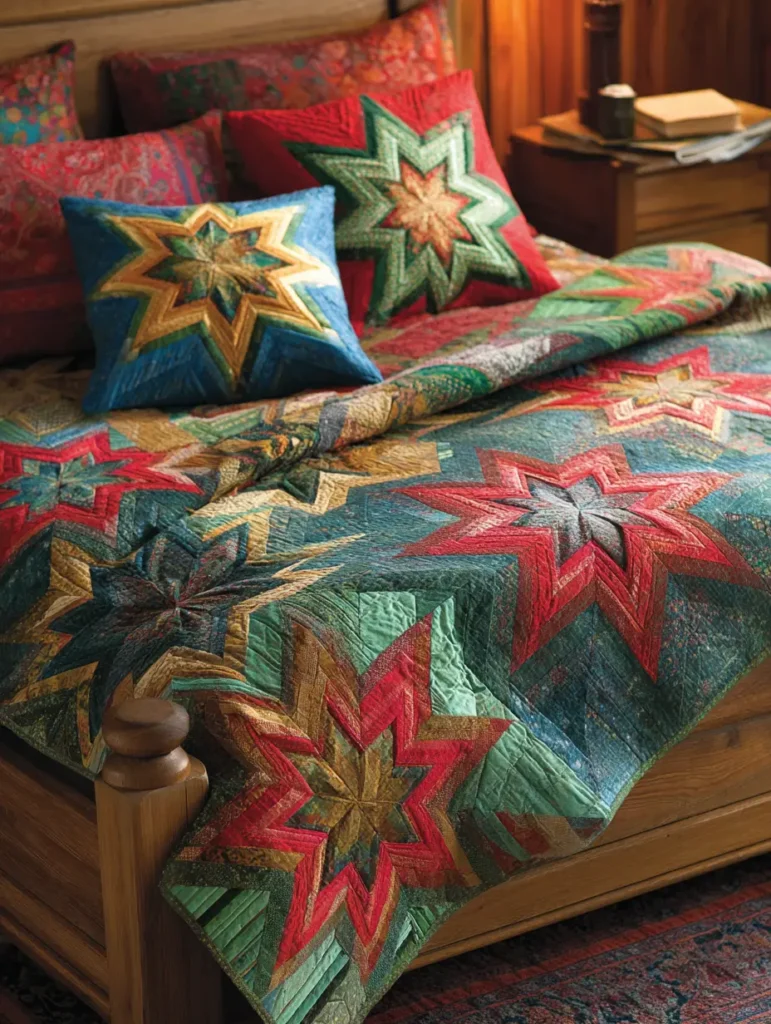
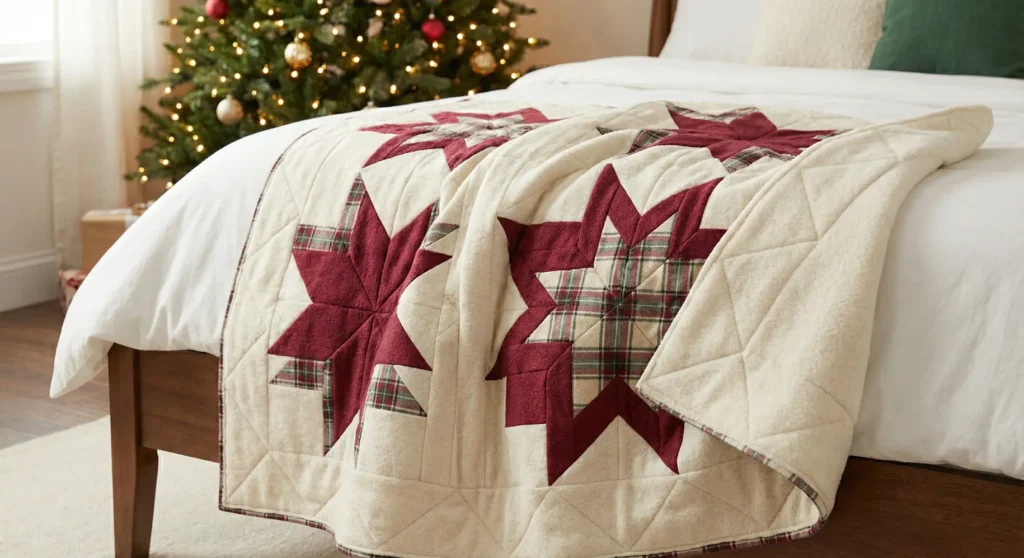
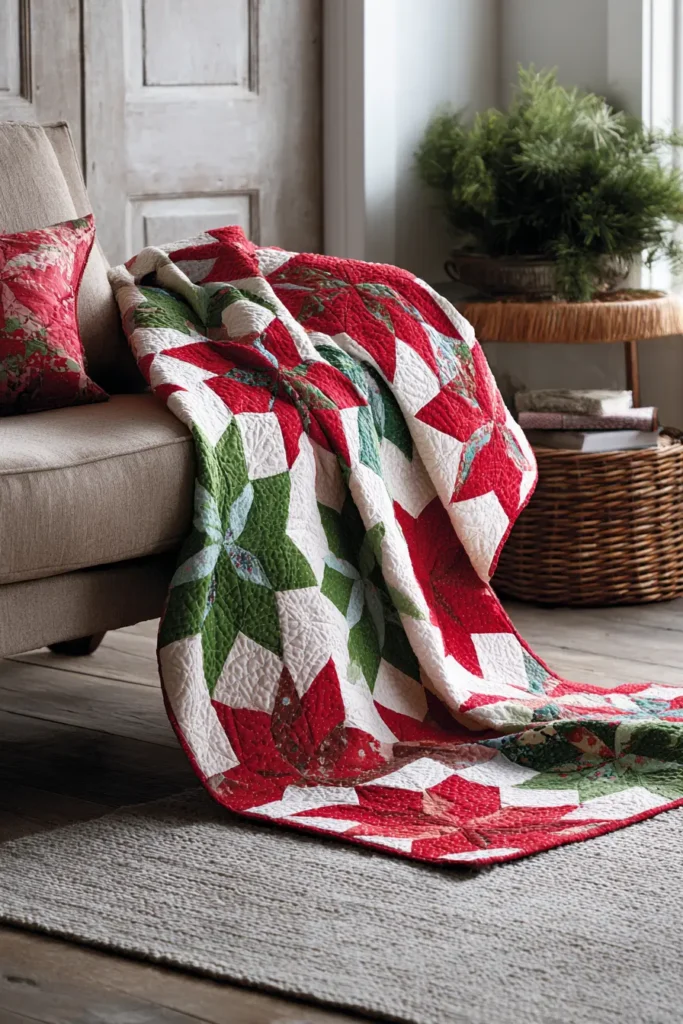
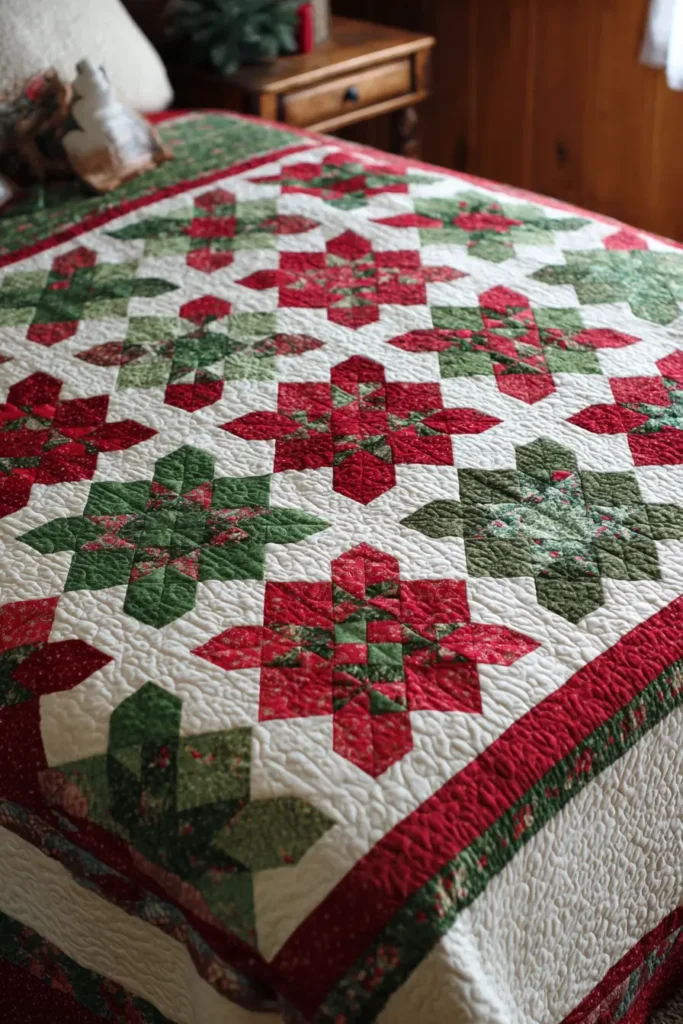
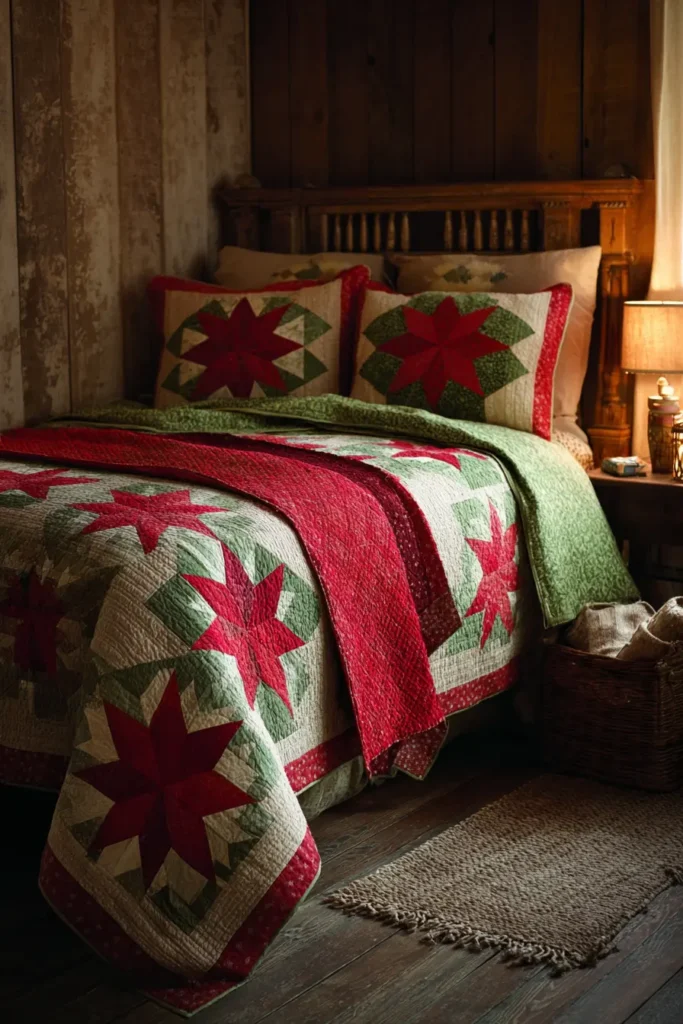
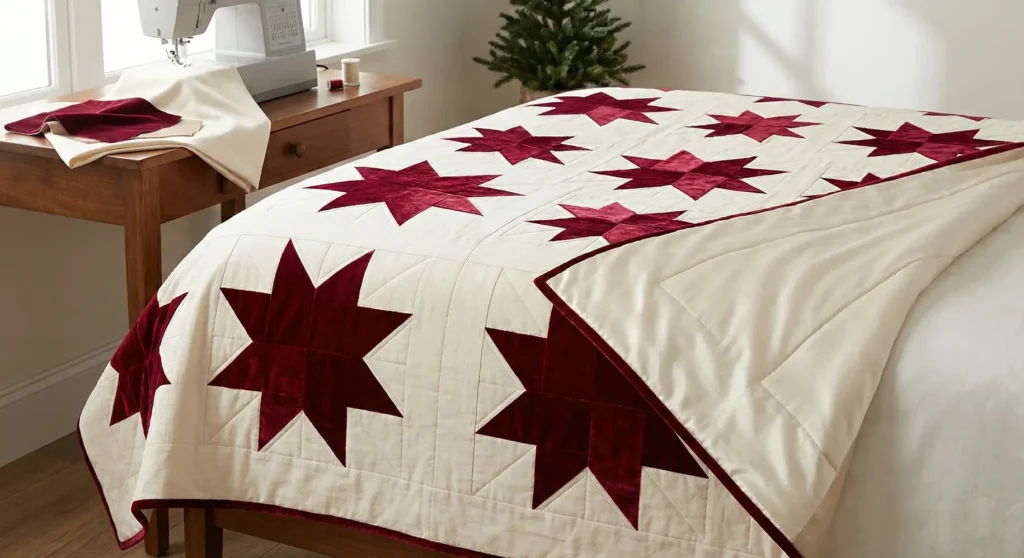
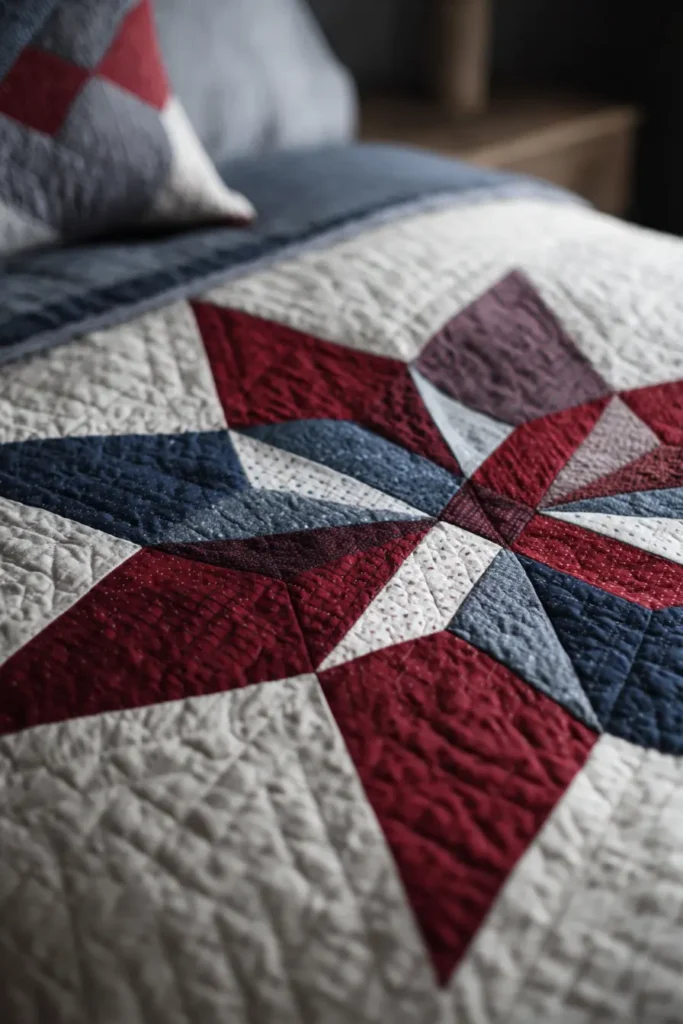
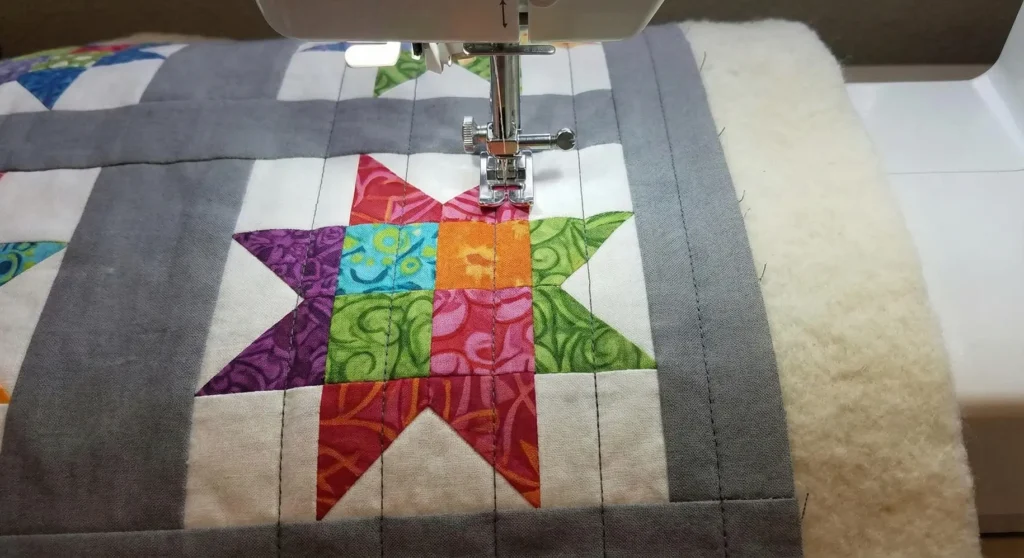
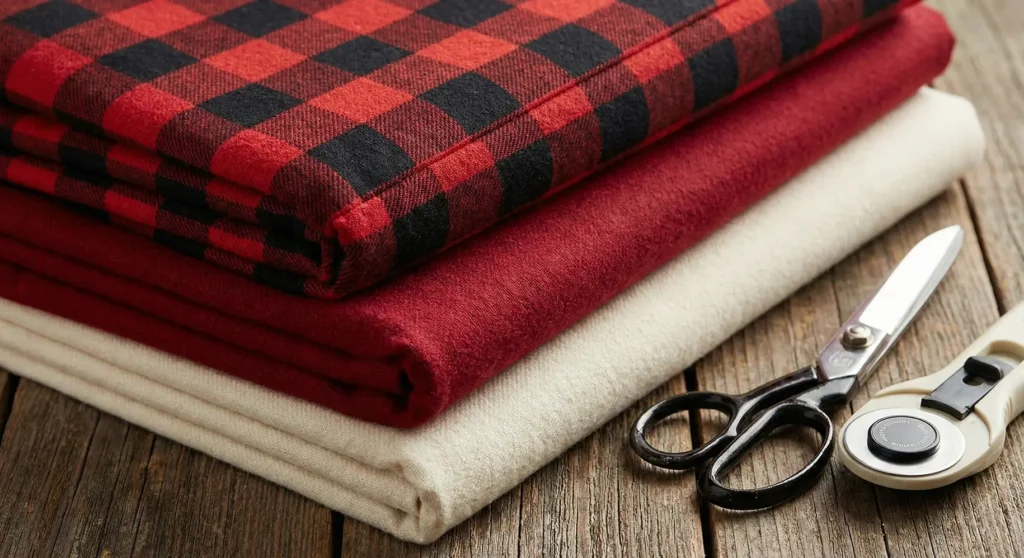
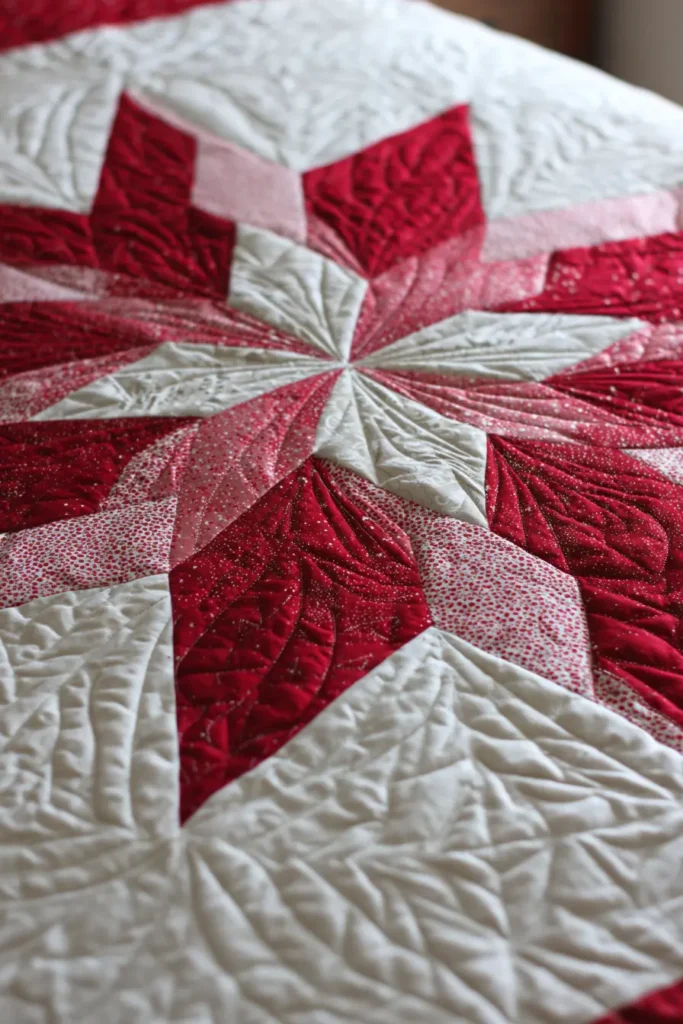
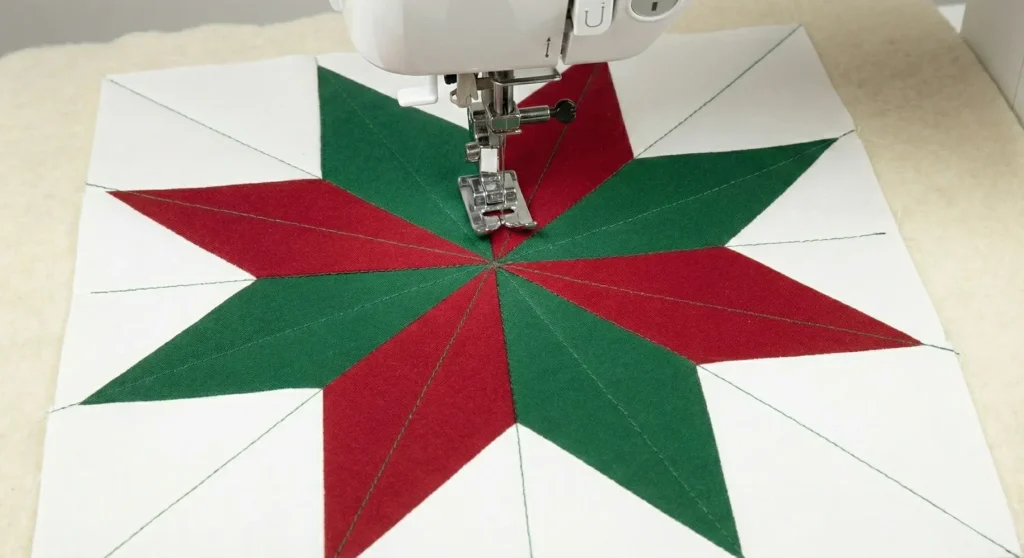
1. Classic Red and White Christmas Star Quilt Patterns
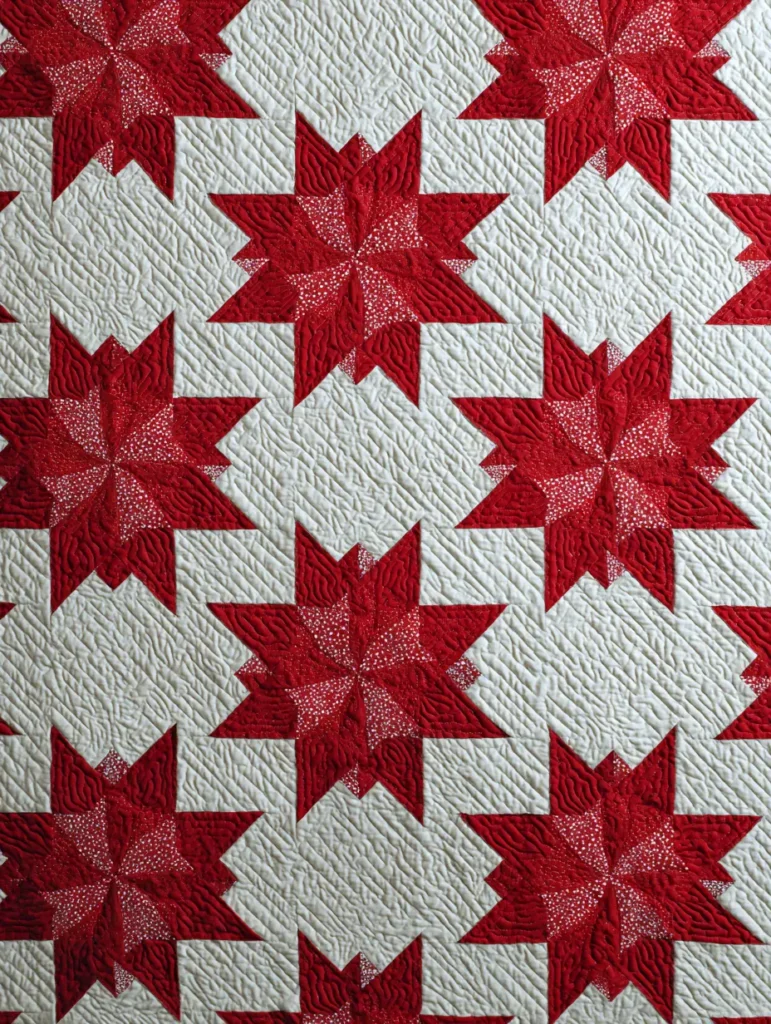
Create a timeless holiday masterpiece that combines visual cheer with physical warmth by using a high-contrast palette of crimson and snow-white. This guide focuses on constructing a quilt that feels substantial yet breathable, ensuring deep, restful sleep during the winter months.
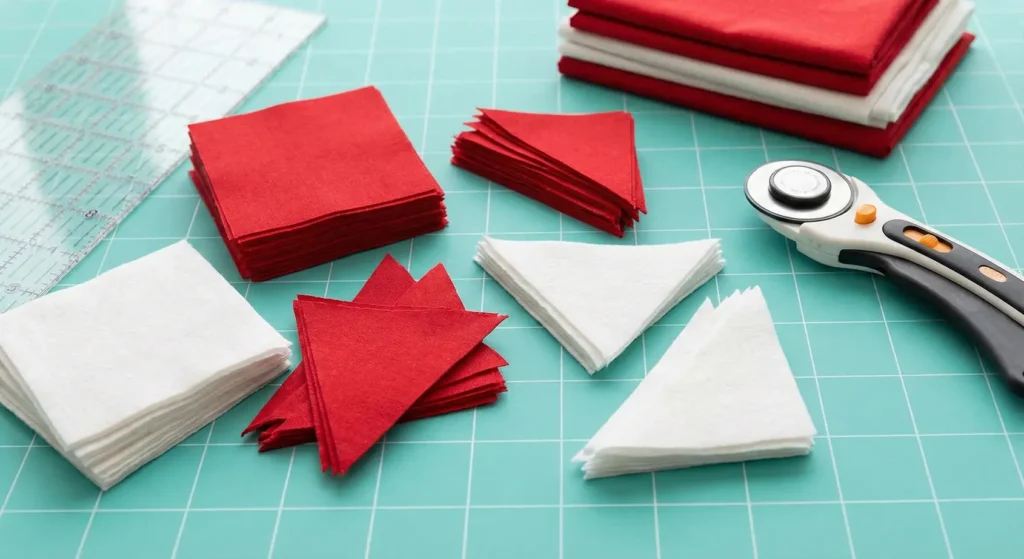
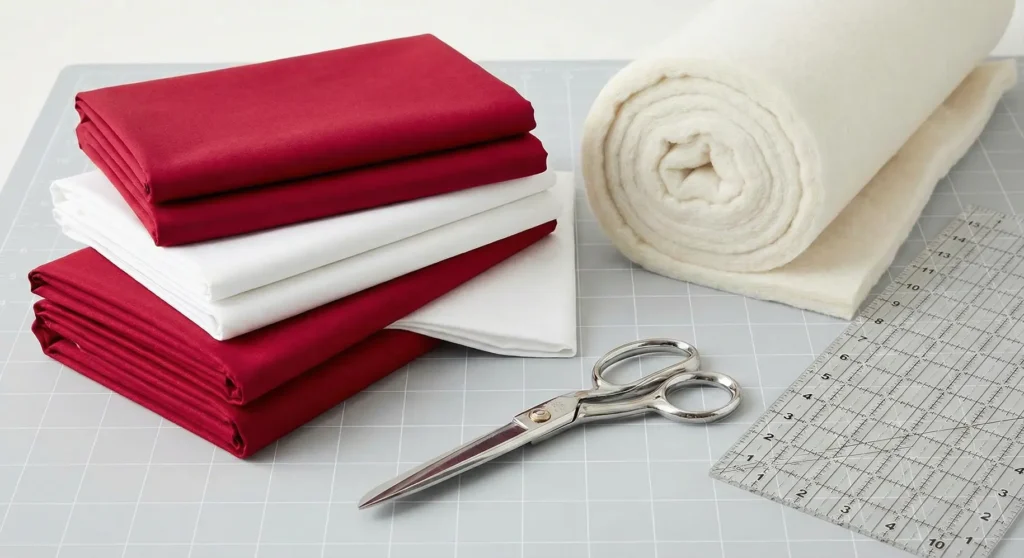
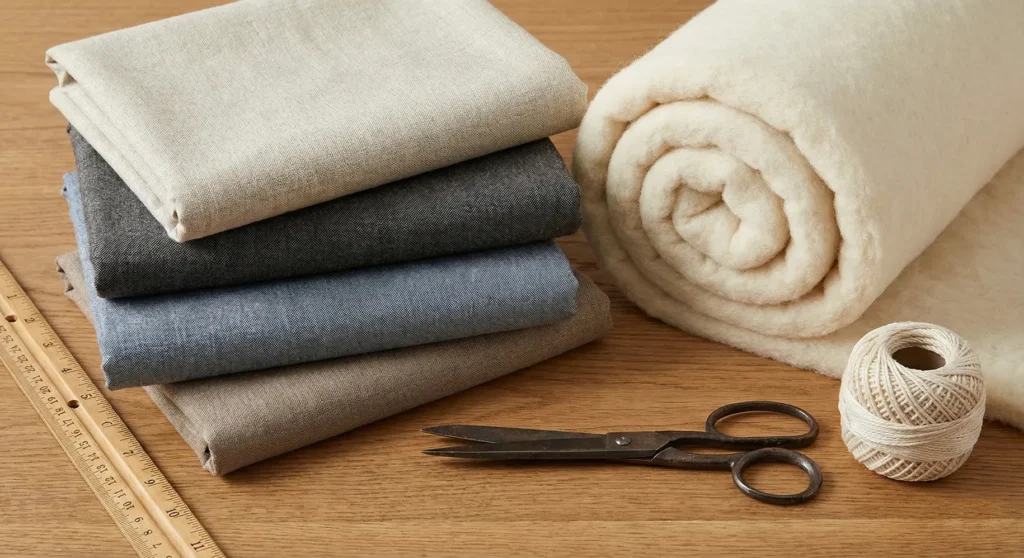
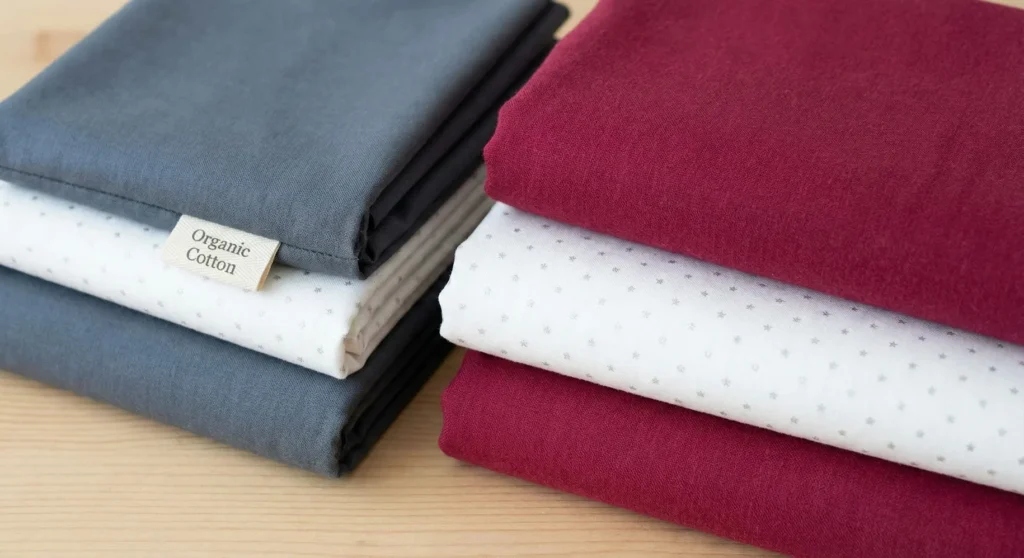
Step 1: Select Soft Fabrics
Choose a high-quality quilting cotton for the red stars and a brushed cotton or flannel for the white background. This combination adds a layer of tactile softness against the skin and improves heat retention compared to standard cottons.
Step 2: Cut and Piece the Blocks
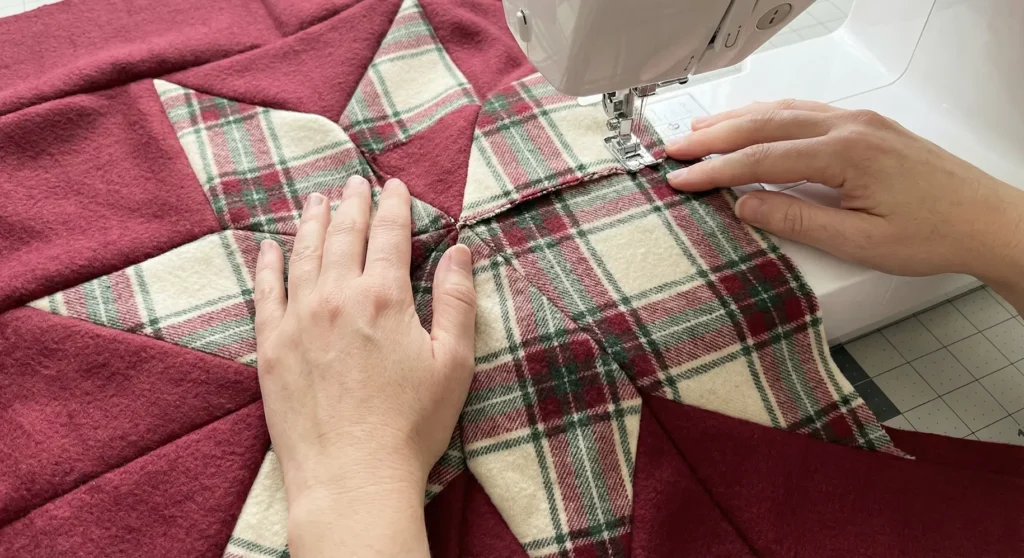
Cut your fabric into large squares and triangles to form simple Sawtooth Star blocks, which require fewer seams than complex patterns. Fewer seams result in a more flexible drape, allowing the quilt to wrap comfortably around the body without stiffness.
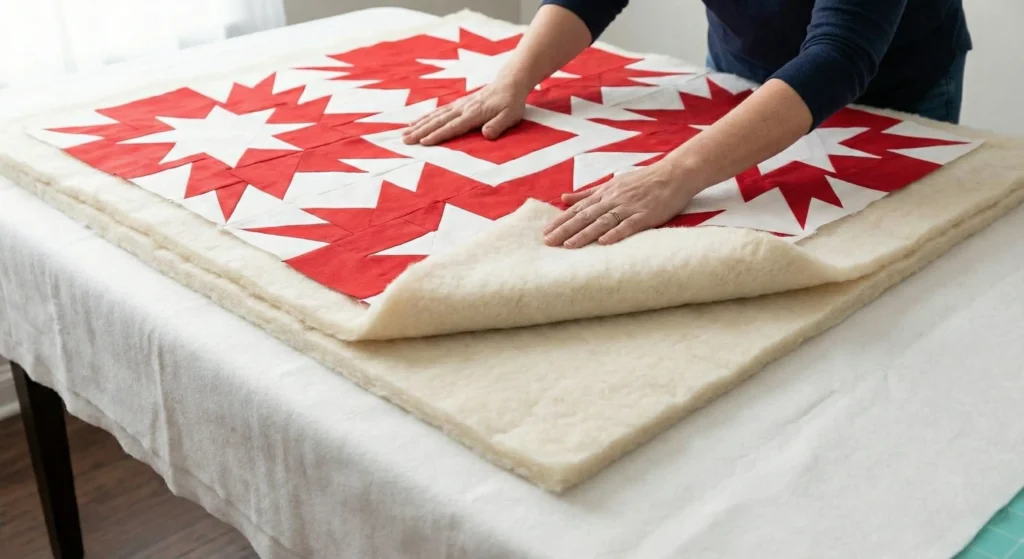
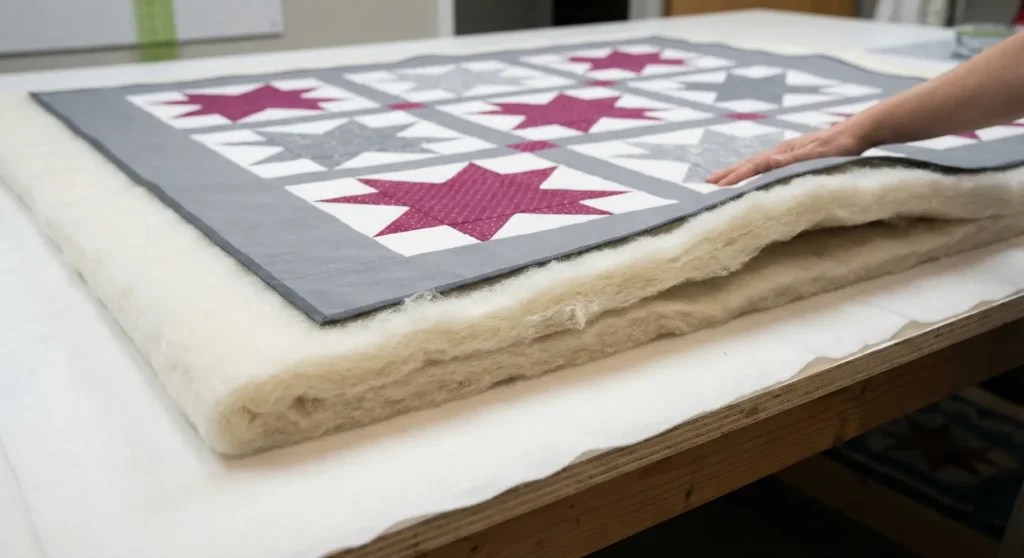
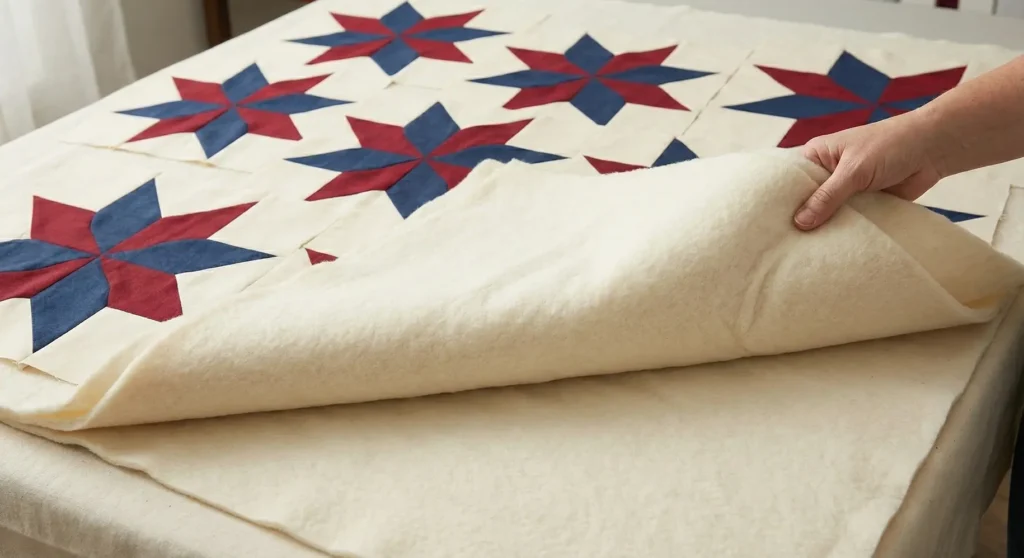
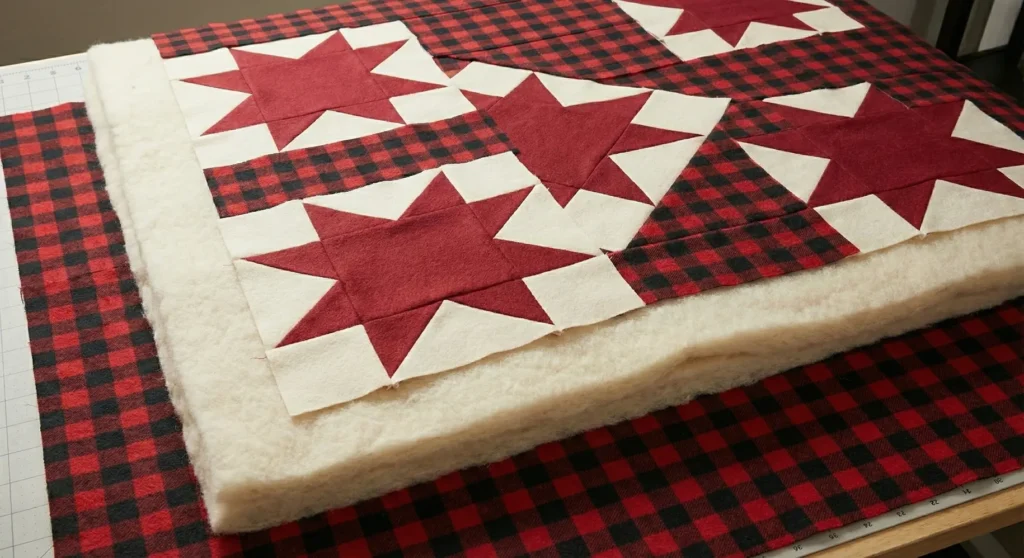
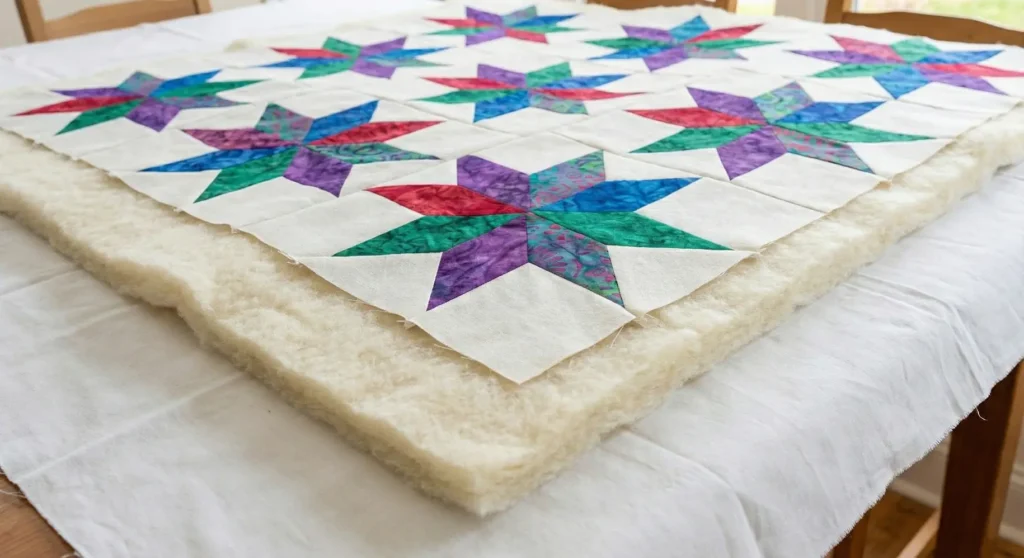
Step 3: Layer with Lofty Batting
Sandwich your quilt top and backing with a medium- to high-loft wool or cotton batting. Wool batting is particularly excellent for regulating body temperature, keeping you warm without overheating, and providing a plush, cloud-like feel.
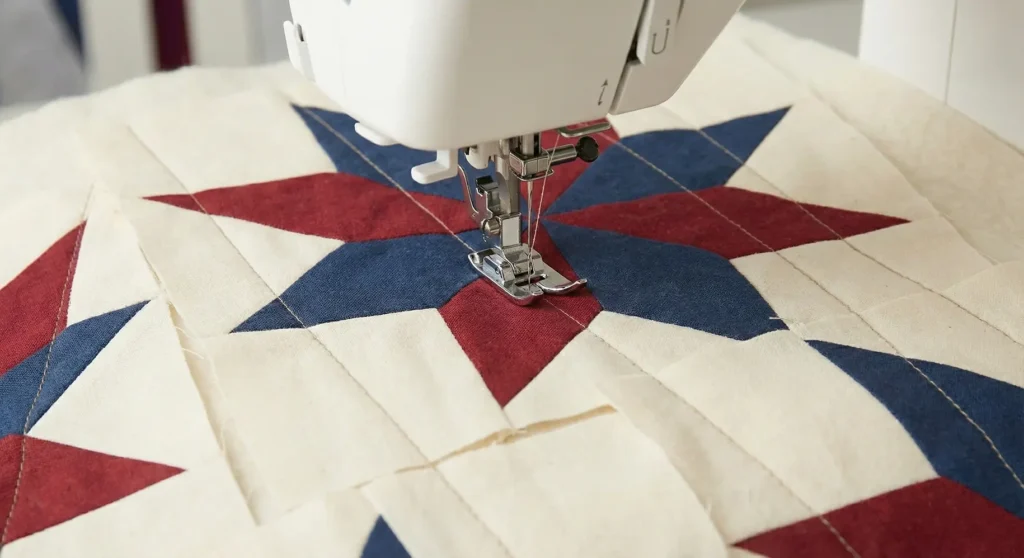
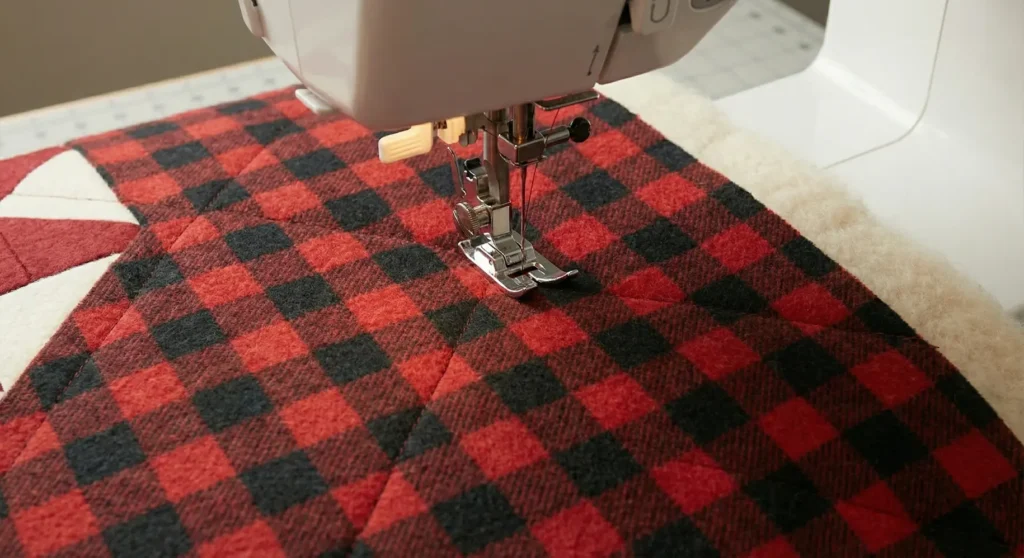
Step 4: Quilt with Open Spacing
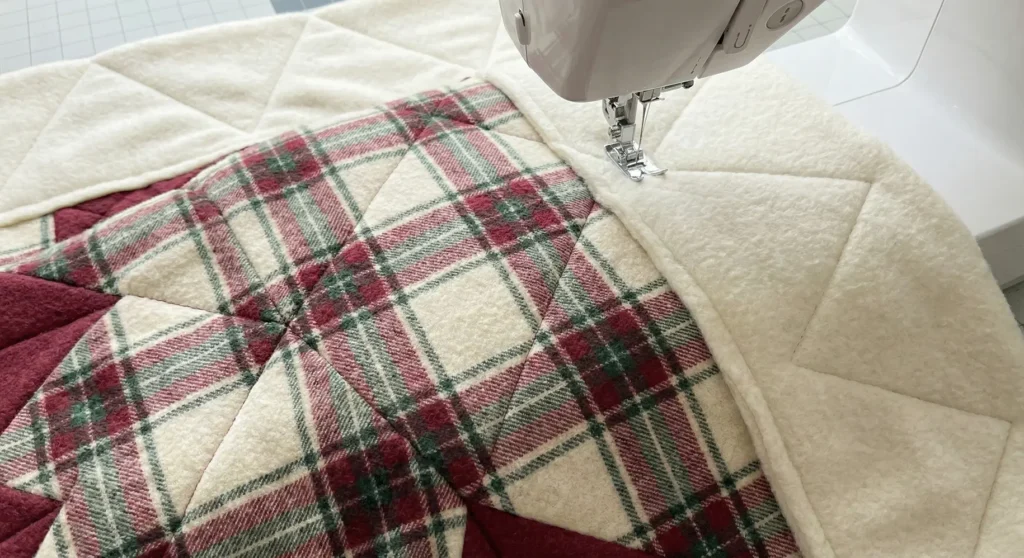
Stitch the layers together using a simple grid or wavy-line pattern with wide spacing between lines. Dense stitching can make a quilt stiff, so leaving 2-3 inches between quilt lines ensures the batting remains fluffy and the blanket stays soft and pliable.
Step 5: Bind with Bias Tape
Finish the raw edges using a double-fold bias binding, preferably in a striped red fabric for a festive touch. Bias binding stretches slightly, creating a durable edge that feels smooth to the touch rather than rigid or scratchy.
Pro Design Tip
Pre-wash all your red fabrics with a color catcher sheet before cutting to prevent the dye from bleeding onto the white. This process also preshrinks the cotton, giving the finished quilt a crinkled, vintage texture that feels instantly lived-in and soft.
Budget Consideration
To save money on backing fabric, look for high-quality, 100% cotton flat sheets in the “white sales” section of department stores. A twin or full-size sheet is often cheaper than buying yards of wide backing fabric and provides a seamless, smooth surface against your skin.
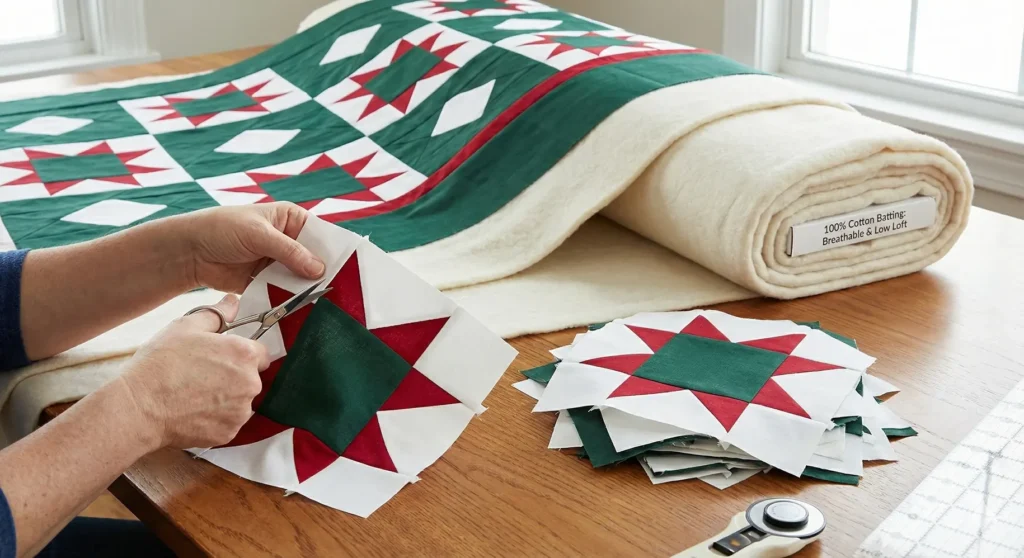
More Recommended Supplies
“As an Amazon Associate, I earn from qualifying purchases.“
2. Modern Geometric Christmas Star Quilt for Contemporary Bedrooms
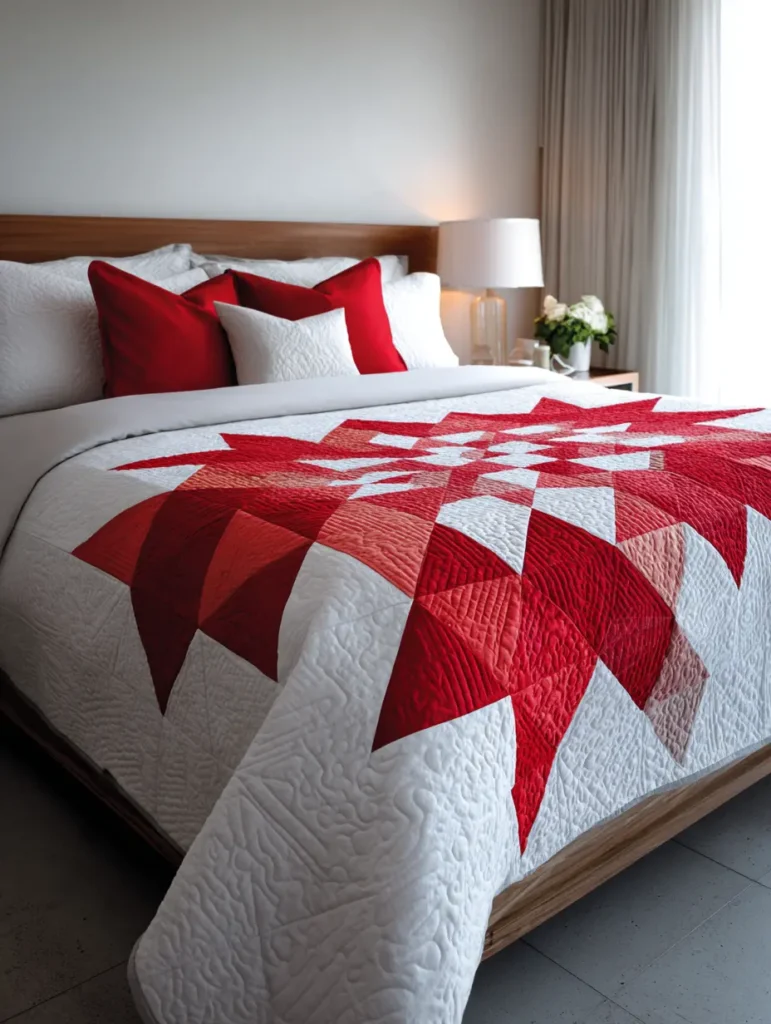

Reimagine the traditional holiday palette with a bold, modern geometric layout that prioritizes clean lines and physical comfort. By using high-quality solids and negative space, you create a visually striking bedspread that feels lightweight and silky, perfect for a restful night’s sleep without the visual clutter of busy prints.
Step 1: Select Premium Solids.
Choose high-thread-count cotton sateen in solid crimson and pure white for a finish that feels cool and luxurious against the skin. Unlike rougher printed cottons, sateen has a subtle sheen and a softer hand, ensuring the quilt feels inviting the moment you climb into bed.
Step 2: Construct Large-Scale Blocks.
Cut oversized triangles to create massive 18 or 24-inch “Sawtooth Star” blocks, which significantly reduces the number of bulky seams. Fewer seams mean the fabric remains flexible and fluid, allowing the quilt to drape softly over your body rather than feeling stiff or board-like.
Step 3: Layer with Bamboo Batting.
Baste your top and backing with a bamboo-cotton blend batting, which offers a heavier, more comforting drape than polyester while remaining breathable. This natural fiber regulates temperature excellently, keeping you warm without the stuffy, sweaty feeling of synthetic fillers.
Step 4: Quilt with Straight Lines.
Use a walking foot to quilt simple, parallel straight lines spaced 2-3 inches apart across the entire surface. This modern, minimal stitching style keeps the batting lofty and plush, ensuring the quilt retains a cloud-like softness instead of becoming dense and rigid.
Step 5: Finish with a Soft Binding.
Bind the edges with the same soft sateen fabric, ensuring the binding is filled with batting to create a plump, rounded edge. A substantial, well-stuffed edge provides a comforting tactile finish that feels cozy when tucked under your chin.
Pro Design Tip:
Use a flannel backing in a solid white color instead of standard cotton. The flannel gently grips the top sheet to prevent the quilt from sliding off the bed at night, and the brushed texture adds a hidden layer of fuzzy warmth that makes the bed feel instantly safer and more secure.

Budget Consideration:
A modern geometric design relies on negative space (large areas of white background). Since solid white cotton is generally the cheapest quilting fabric available, this style is incredibly cost-effective, allowing you to create a significant, king-sized impact for a fraction of the cost of a pattern-heavy quilt.
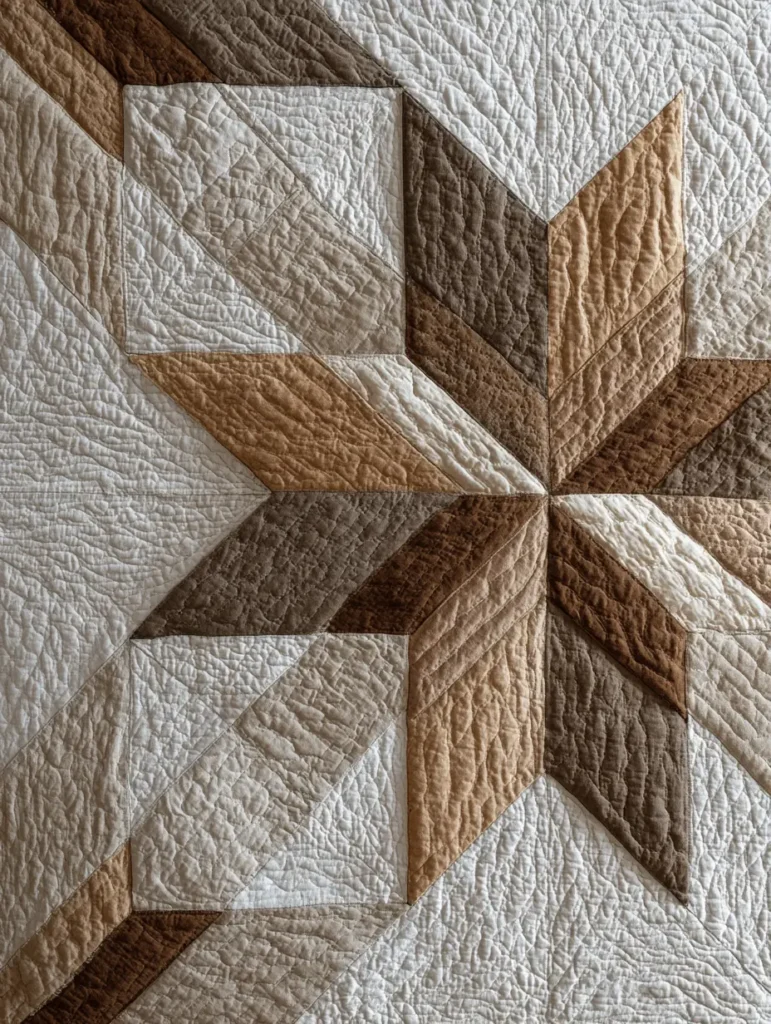
3. Rustic Farmhouse Star Quilt Designs with Warm Neutrals
Merge the sharp, clean lines of modern geometry with the soulful, tactile nature of rustic farmhouse design. This approach utilizes earthy tones and textured fabrics to create a bed covering that is visually grounding and physically substantial, offering a heavy, comforting embrace on cold winter nights.
Step 1: Choose Textured Neutrals.
Select linen-blend or chambray fabrics in shades of oatmeal, charcoal, and warm taupe. These natural fibers breathe exceptionally well and soften significantly with every wash, resulting in a quilt that feels delightfully broken-in and gentle against the skin.
Step 2: Cut Large Diamonds.
Cut large diamond shapes to construct a massive, singular “Barn Star” or “Lone Star” that spans the entire width of the quilt. Utilizing oversized geometric pieces minimizes the number of stiff seams, allowing the heavy fabric to drape fluidly over your body rather than standing rigid.
Step 3: Layer with Wool Batting.
Sandwich your layers using a high-loft wool batting instead of standard polyester. Wool provides superior temperature regulation and a luxurious, heavyweight fabric that helps induce sleep by making the sleeper feel securely “tucked in.”
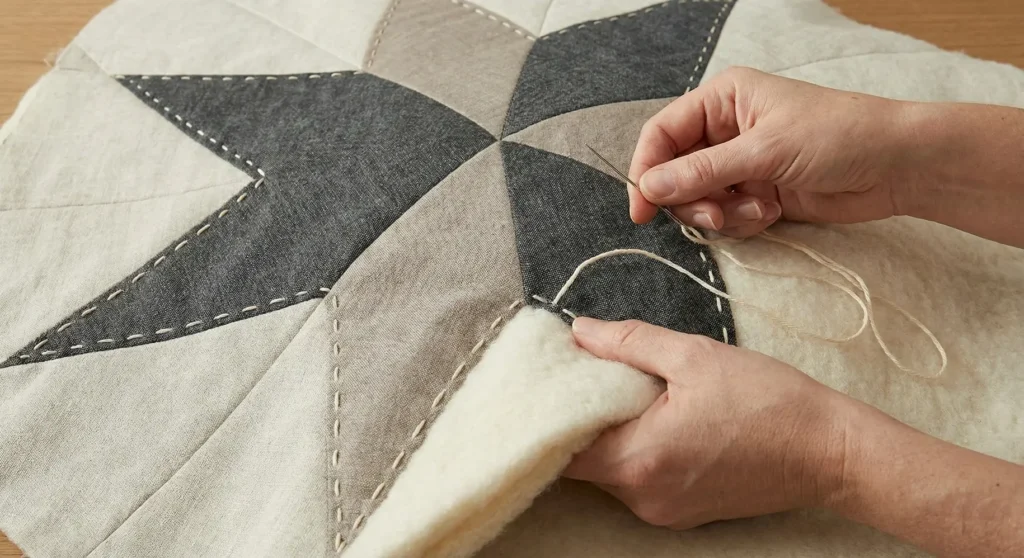
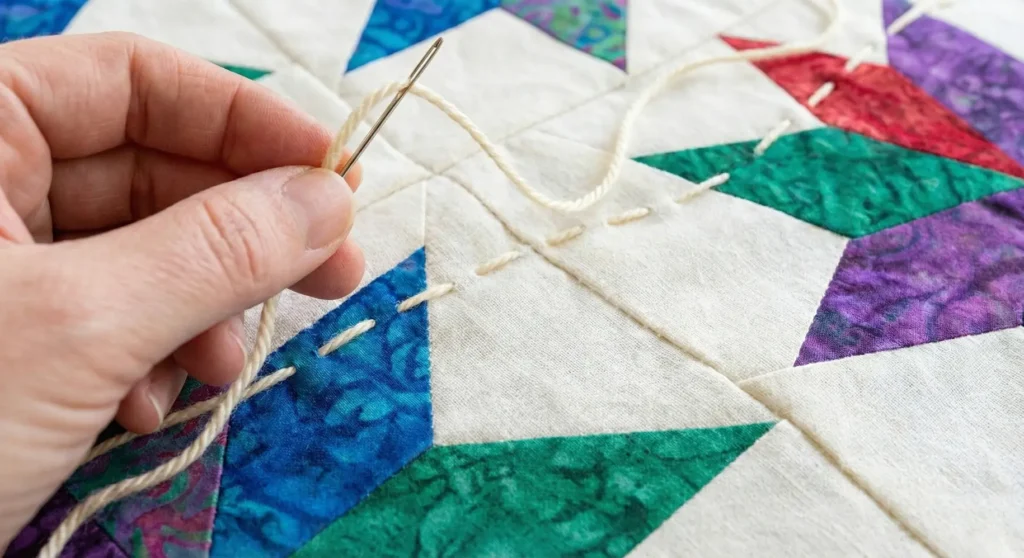
Step 4: Big-Stitch Hand Quilt.
Use a thick pearl cotton thread to hand-quilt large stitches around the geometric outlines. This manual technique keeps the tension loose, preserving the air pockets within the batting for maximum loft and warmth retention.
Step 5: Bind with Soft Chambray.
Finish the edges with a bias-cut binding made from soft, washed chambray or flannel. The bias cut allows the edge to stretch and curve slightly, ensuring the quilt borders feel smooth and pliable when pulled up under your chin.
Pro Design Tip:
Incorporate velvet accents into the star center. Use a matte velvet in a matching neutral tone for the central star points to add a surprising element of plush softness that your hand naturally seeks out while resting.
Budget Consideration:
For the neutral background, use unbleached muslin or even high-quality painters’ drop cloth canvas (washed and bleached). These materials are incredibly durable, offer a beautiful rustic texture, and cost pennies compared to designer quilting cottons.
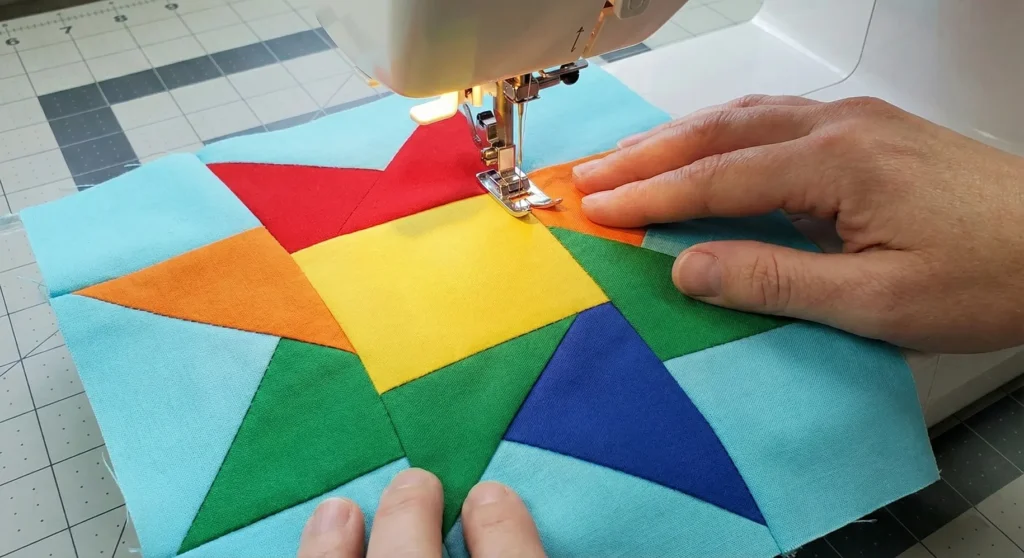
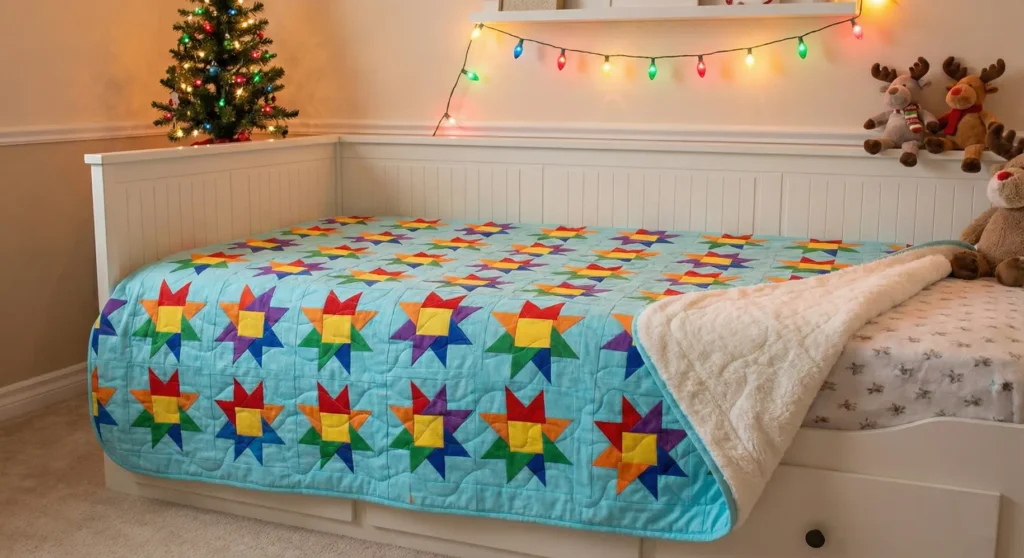
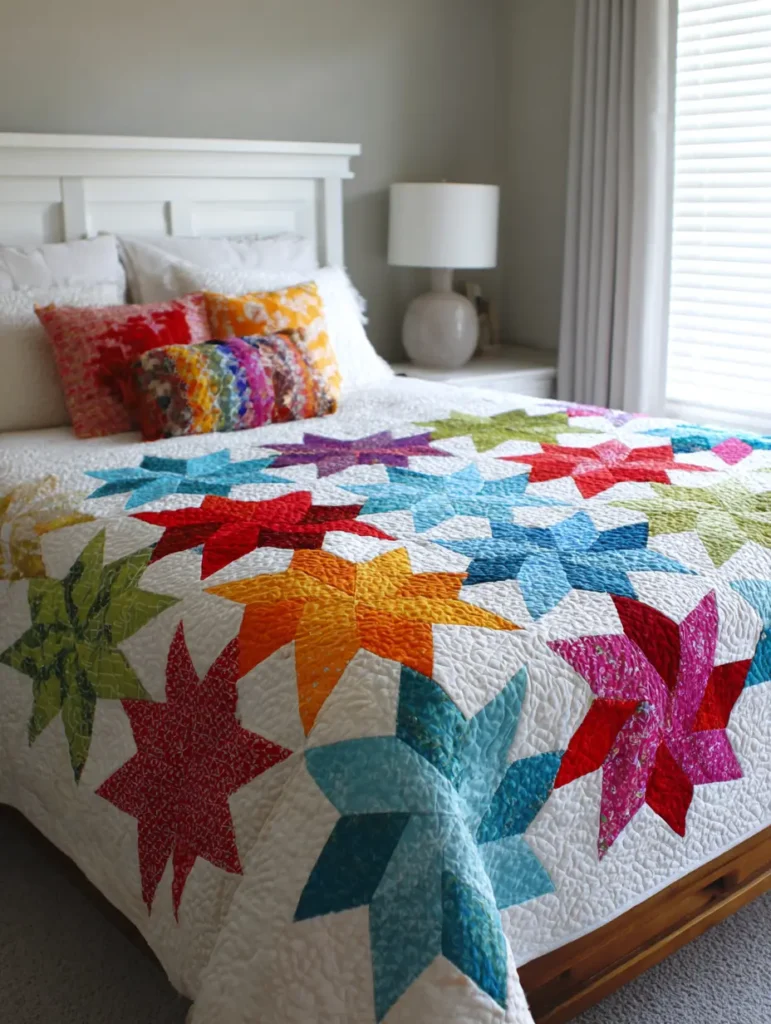
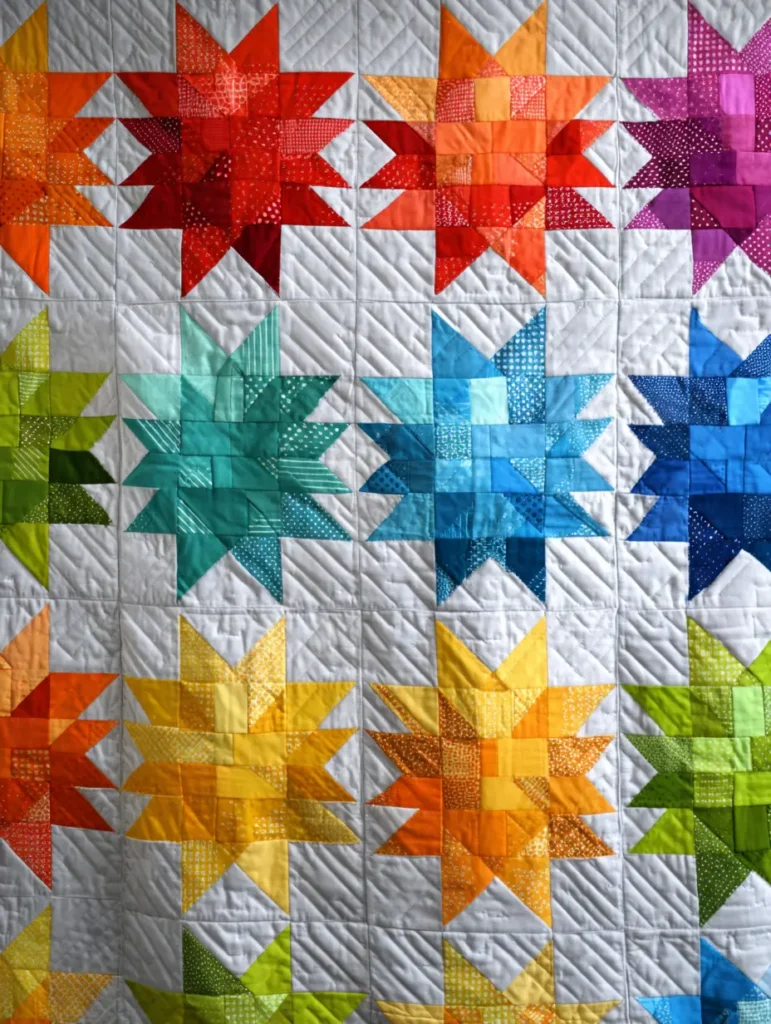
4. Charming Colorful Rainbow Holiday Star Quilt for Kids

Inject vibrant energy into a child’s room with a modern rainbow star design that stimulates the imagination while providing a soft haven for sleep. By using a spectrum of solids against a calming background, you create a playful focal point that doesn’t sacrifice physical comfort for style.
Step 1: Select High-Quality Solids.
Pick a spectrum of Kona cottons or high-thread-count solids for the stars to ensure the fabric feels smooth and cool against sensitive skin. Avoiding rough glitters or stiff metallic prints ensures the quilt remains a snuggly companion rather than just a decorative object.
Step 2: Create “Wonky Star” Blocks.
Cut center squares and surround them with impromptu, angled points to create “wonky” stars that look dynamic and modern. This improvisational piecing technique reduces the stress of perfectionism and creates a flexible block structure that drapes effortlessly over a sleeping child.
Step 3: Layer with Washable Cotton Batting.
Use a durable 80/20 cotton-poly blend batting that can withstand frequent washing without clumping. This blend offers the perfect balance of warmth and breathability, ensuring the child stays toasty without overheating during the night.
Step 4: Quilt with Wavy Lines.
Use a walking foot to sew gentle, organic wavy lines across the quilt from edge to edge. These curved lines break up the rigidity of the geometric stars and keep the quilt feeling pliable and “hug-like” rather than stiff.

Step 5: Bind with Rounded Corners.
Bias binds the edges and considers rounding the four corners of the quilt slightly. Rounded corners eliminate sharp, stiff points, creating a softer silhouette that is more comfortable to wrap up in during storytime.
Pro Design Tip:
Swap the standard cotton backing for Minky or Cuddle fabric in a coordinating color. This plush, velvety material adds tactile sensory input to help soothe children and provides an extra layer of warmth, making the quilt irresistible to snuggle.
Budget Consideration:
This project is perfect for “Jelly Rolls” or scraps. You only need small amounts of many colors, so you can easily use leftover strips from previous projects to create the rainbow effect without buying yardage of every single color.
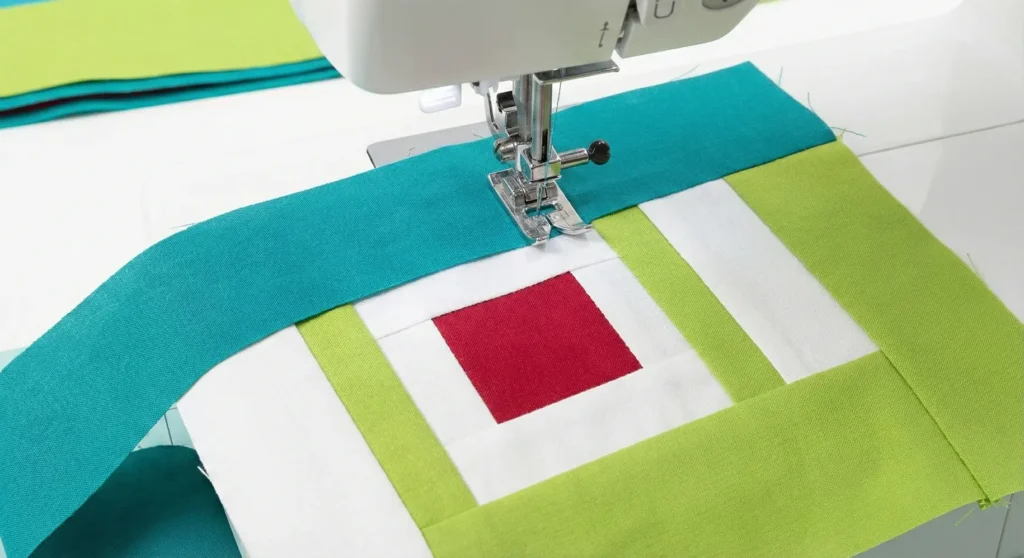
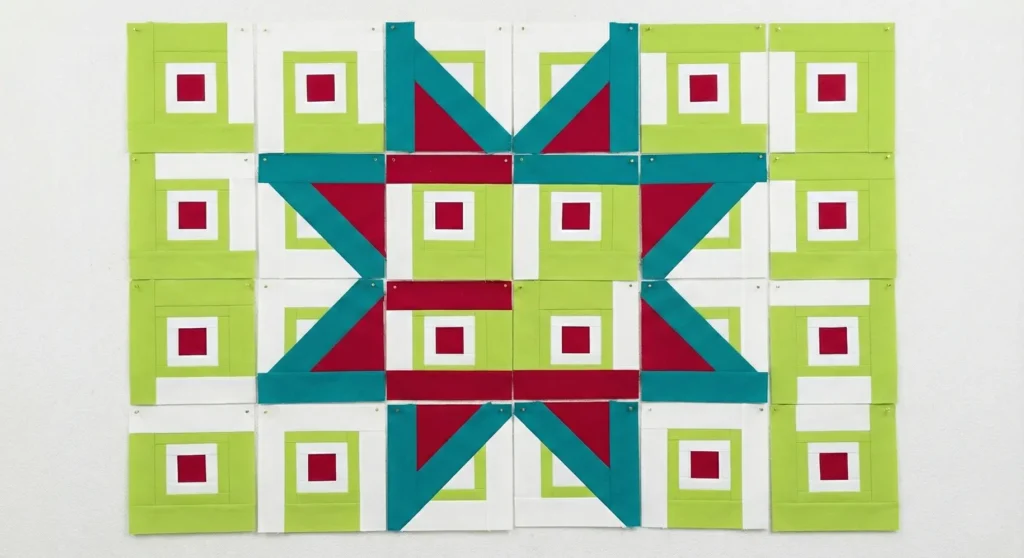
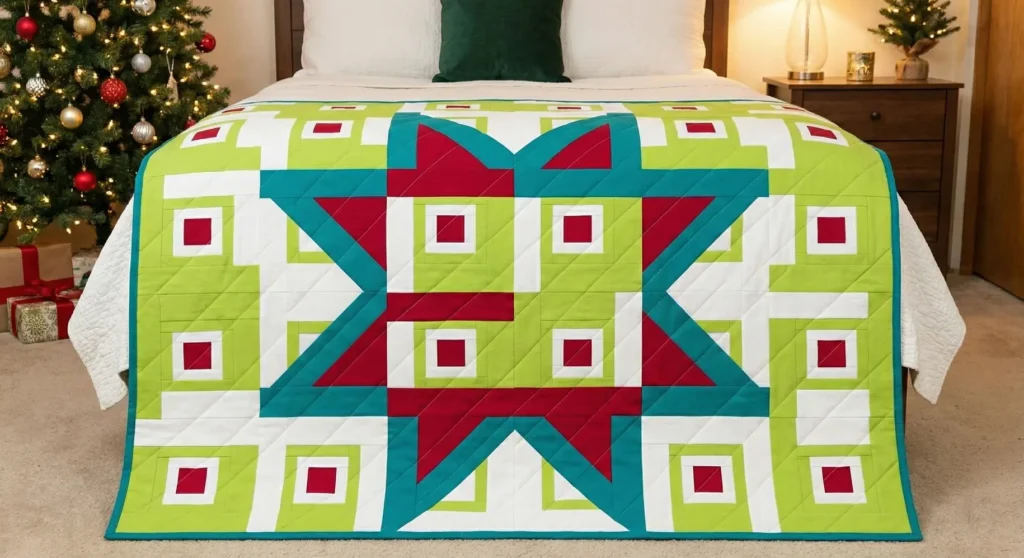
5. Holiday Log Cabin Star Quilt with Festive Colors
Revitalize a traditional pattern by arranging log cabin blocks to form massive, modern geometric stars using a palette of contemporary holiday brights like teal, cherry, and lime. This construction method creates a quilt with substantial weight and texture, offering a “weighted blanket” effect that promotes deep relaxation and security.
Step 1: Select Smooth Solids.
Choose premium, high-thread-count cottons in contrasting light and dark festive values for a finish that feels cool and silky against the skin. Using high-quality solids eliminates the roughness sometimes found in cheaper novelty prints, ensuring the quilt is soft enough for sensitive sleepers.
Step 2: Strip the Pieces from the Blocks.
Cut 2.5-inch wide strips and sew them sequentially around a center square, pressing seams open to reduce bulk. Pressing the seams flat prevents the creation of stiff, lumpy ridges, ensuring the final quilt top remains flexible and comfortable to lie on or under.
Step 3: Arrange for Visual Calm.
Layout the blocks so the light and dark values form large, expanding stars rather than a chaotic, scrappy look. This organized geometric repetition creates a restful visual anchor in the bedroom, contributing to a sense of order and tranquility essential for winding down at night.
Step 4: Layer with Natural Batting.
Baste the quilt with a 100% natural cotton batting, which offers a heavier drape than polyester. The natural fibers breathe effectively to regulate body heat, preventing the “sweaty” feeling of synthetic fillers and keeping you at a perfect sleeping temperature.
Step 5: Quilt with Diagonal Lines.
Machine quilt straight diagonal lines that follow the angles of the star points, spacing them 3 to 4 inches apart. This wider quilting density preserves the air pockets within the batting, keeping the quilt fluffy and pliable so it molds gently to your body.
Pro Design Tip:
Use brushed flannel for the center square of every log cabin block. This tiny detail creates a hidden textural surprise, offering a spot of fuzzy softness that feels delightful when you run your hand across the quilt surface in the dark.
Budget Consideration:
This pattern is the ultimate scrap-buster. You can cut your own strips from leftover holiday fabrics or old clothing (like plaid shirts) to create a memory quilt that costs almost nothing but carries immense sentimental warmth.

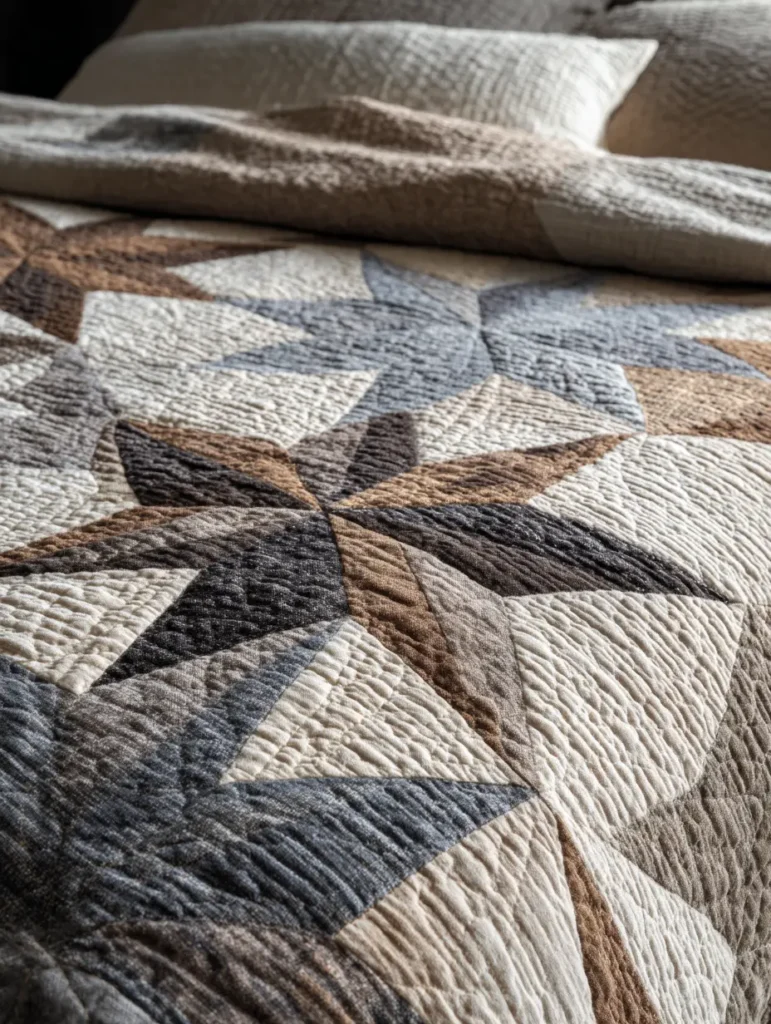
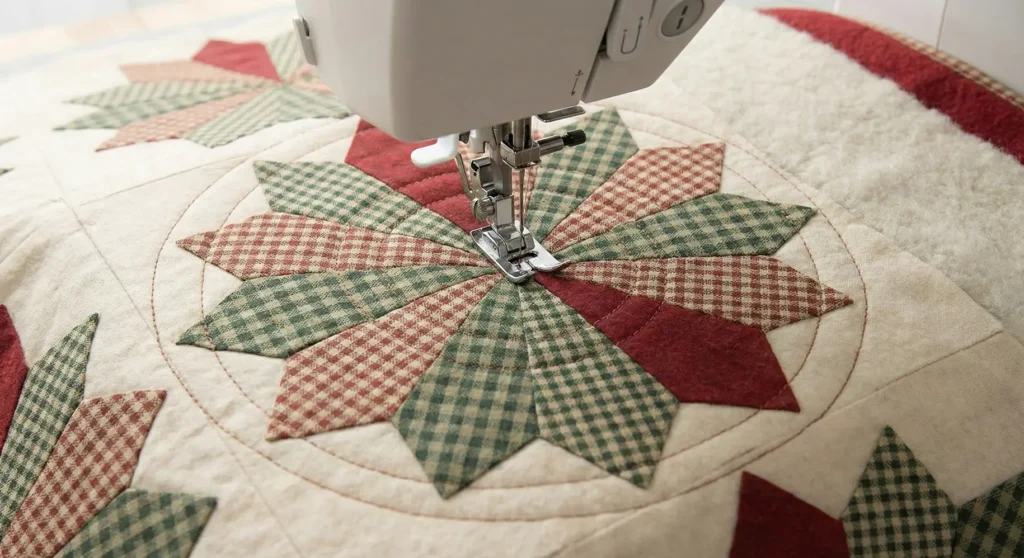
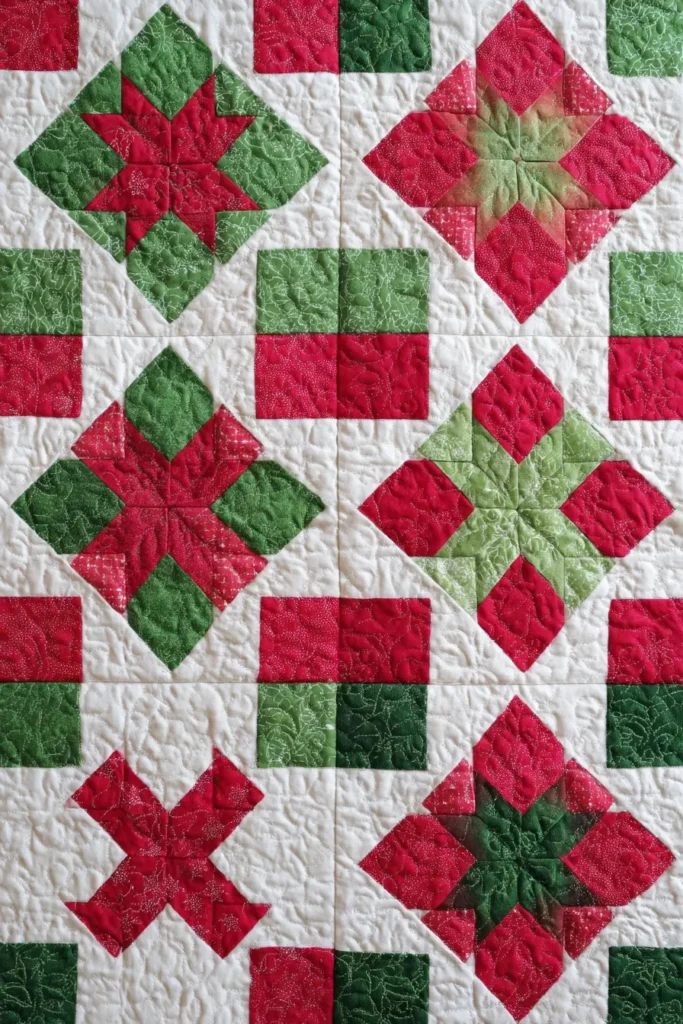
6. Patchwork Starburst Quilts for Festive Winter Bedrooms

Create a dynamic, radiating starburst effect using a sophisticated, slightly subdued holiday palette to bring a sense of elegant warmth and movement to a contemporary bedroom. The circular geometry of a starburst, combined with a comforting loft, makes this quilt an ideal centerpiece for cozy winter sleeping.
Step 1: Choose Softer Prints.
Select quilting cottons in non-traditional holiday prints, like small ginghams or subtle checks, rather than loud, busy motifs. Avoiding large, chaotic patterns significantly reduces visual noise, creating a calmer, more restful environment that helps the mind unwind for sleep.
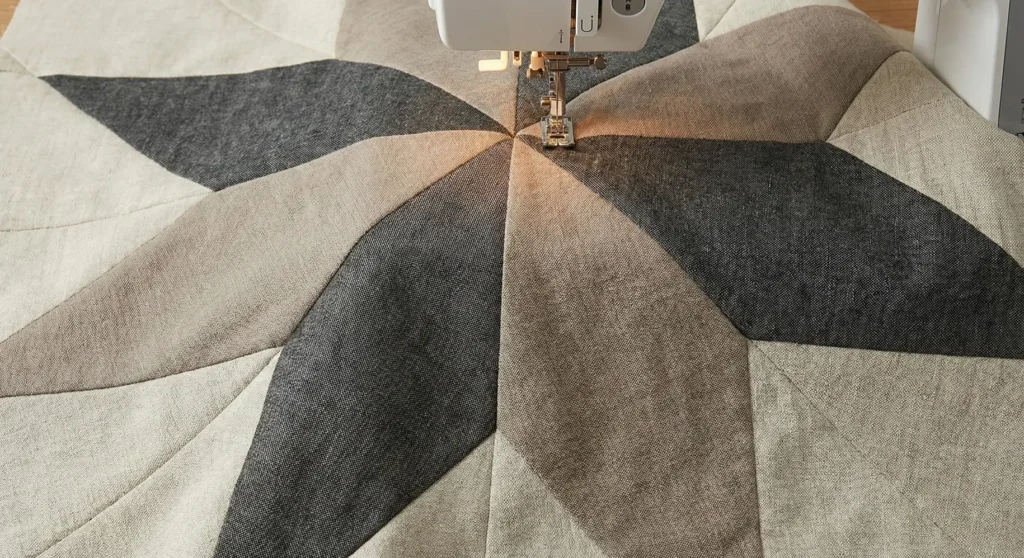
Step 2: Piece the Foundation.
Use foundation paper piecing to join the wedge shapes around a central point, ensuring sharp precision for the geometric design. This technique results in perfectly flat seams that lie smoothly against the body, eliminating the uncomfortable, bulky ridges often found in traditional patchwork.

Step 3: Layer with Wool-Blend Batting.
Sandwich your layers with a wool-and-polyester blend batting, which is resilient and highly insulating. This blend gives the quilt a substantial, dense texture that provides comforting weight and warmth without the heavy, stifling feeling of purely synthetic fillers.

Step 4: Echo Quilt the Stars.
Quilt concentric rings that “echo” the shape of the starburst, radiating outwards into the background fabric. This quilting style secures the batting effectively while maintaining flexibility, ensuring the quilt wraps softly around your shoulders rather than remaining stiff.
Step 5: Back with Flannel.
Use a coordinating, high-quality flannel for the quilt backing instead of standard cotton. The flannel’s brushed texture adds a hidden layer of velvety softness against the skin and helps the quilt grip the top sheet, preventing it from sliding off the bed.
Pro Design Tip:
Include one section of cotton velvet in the star center for a luxurious touch, but avoid plush polyester velvet. Polyester velvet can melt under a hot iron during construction and traps body heat too aggressively, leading to a “sweaty” rather than cozy sleeping experience.

Budget Consideration:
Since the starburst requires many small wedges, this pattern is ideal for using scraps or small bundles of “fat quarters” from your stash. This minimizes the need to purchase large amounts of new fabric, making the project cost-effective while still yielding a high-impact design.
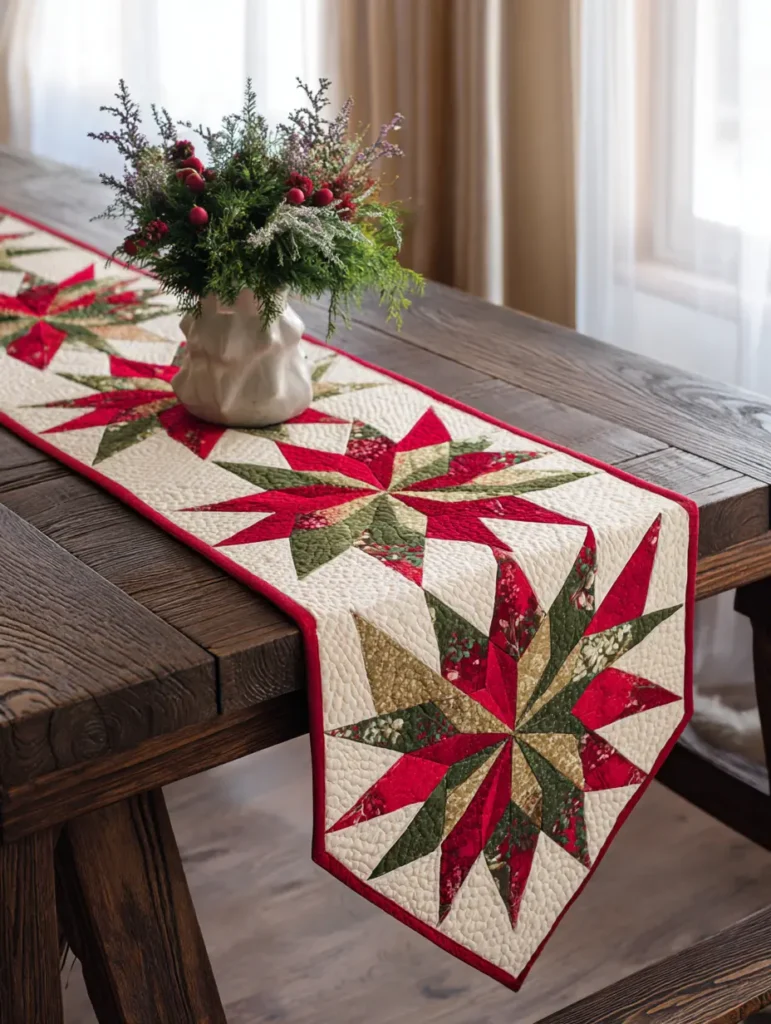
7. Festive Star Quilted Bed Runners for Quick Decor
Add a targeted layer of warmth and a splash of holiday style to the foot of the bed with a modern, geometric star runner. This smaller project allows you to introduce bold design without committing to a full-size quilt, creating a cozy “weight” at the bottom of the bed that helps keep feet toasty warm.
Step 1: Select Tactile Fabrics.
Choose soft cotton sateen or linen blends for the star blocks to ensure a smooth, inviting finish. Avoid stiff metallic prints or heavy glitter fabrics, as these can feel scratchy against bare legs and disrupt the physical comfort of your sleeping space.
Step 2: Assemble a Linear Layout.
Sew a single, long row of large-scale geometric stars, creating a sleek horizontal strip that complements modern decor. This simple, linear construction minimizes bulky seam intersections, ensuring the runner lies flat and smooth across the duvet rather than bunching up.
Step 3: Layer with Bamboo Batting.
Baste the runner with a bamboo-cotton blend batting, which offers a lush, heavy drape that hugs the bed’s curves. The weight of this natural batting helps the runner stay in place while providing an extra zone of breathable insulation for cold toes.
Step 4: Quilt with Horizontal Lines.
Quilt simple straight lines running the length of the runner to emphasize the modern horizontal flow. This minimal stitching keeps the batting lofty and soft, avoiding the stiff, board-like texture that can result from dense, intricate quilting.
Step 5: Back with Heavy Flannel.
Finish the runner by backing it with a heavy, brushed flannel or plush fleece fabric. This grippy texture prevents the runner from sliding off the bed at night and adds a hidden layer of fuzzy warmth, making the bed feel extra snug.
Pro Design Tip:
Ensure the runner is long enough to drape 10-12 inches over each side of the mattress. This extra length adds visual elegance and provides necessary weight to anchor the runner, preventing it from shifting or tangling in your feet while you sleep.
Budget Consideration:
A bed runner is significantly smaller than a whole quilt, requiring only about one-third of the fabric and batting. This makes it the perfect project for using up “orphan blocks” (leftover blocks from previous quilts) or expensive designer fabrics that would be too costly to use for a king-sized spread.
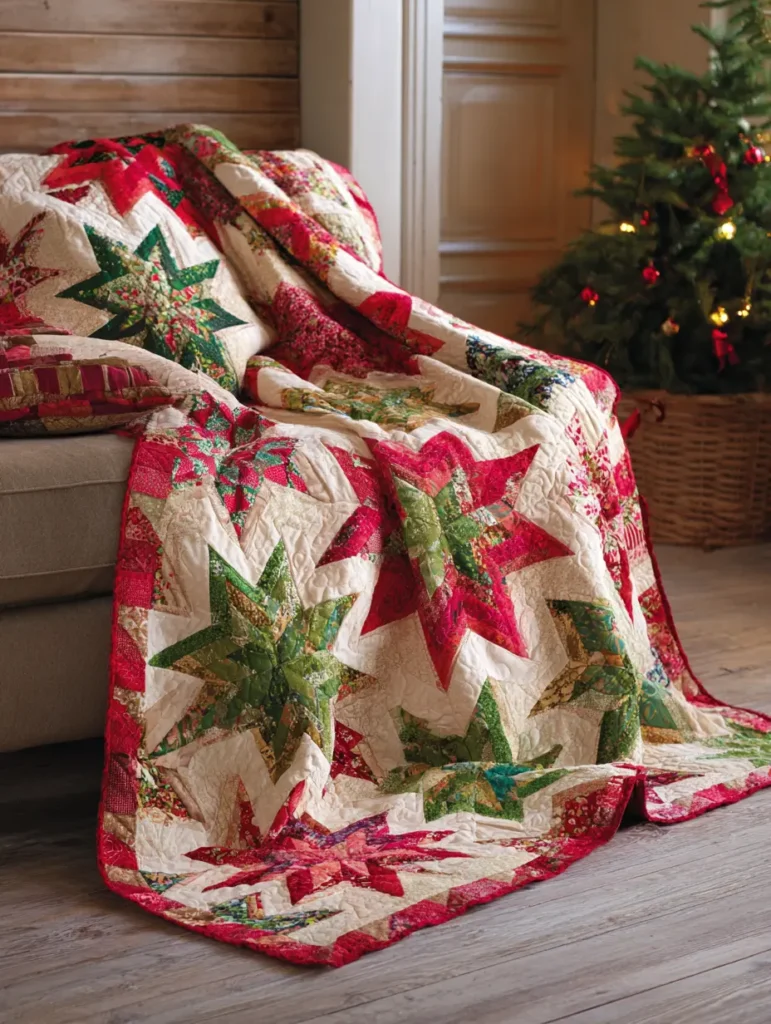
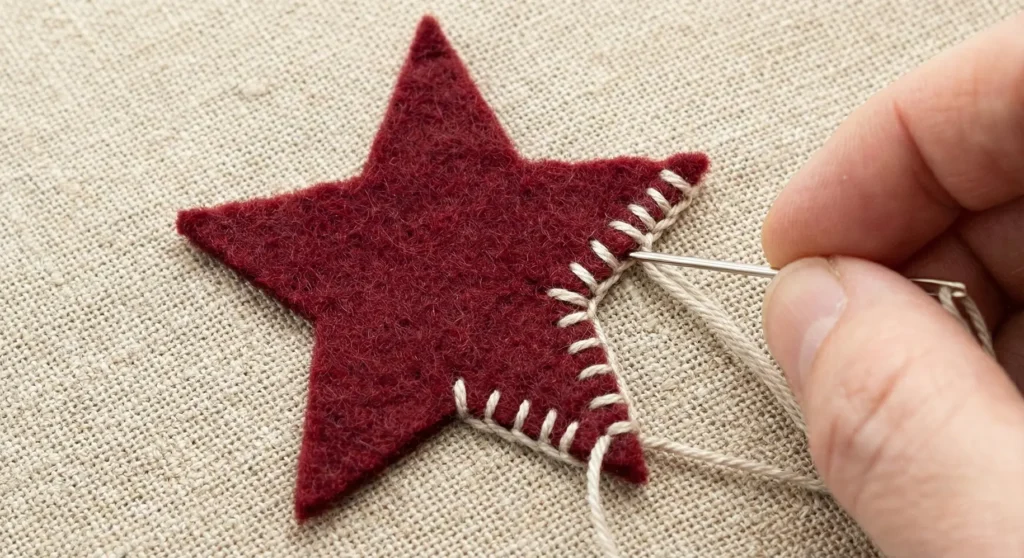
8. Traditional Folk Art Christmas Star Ideas
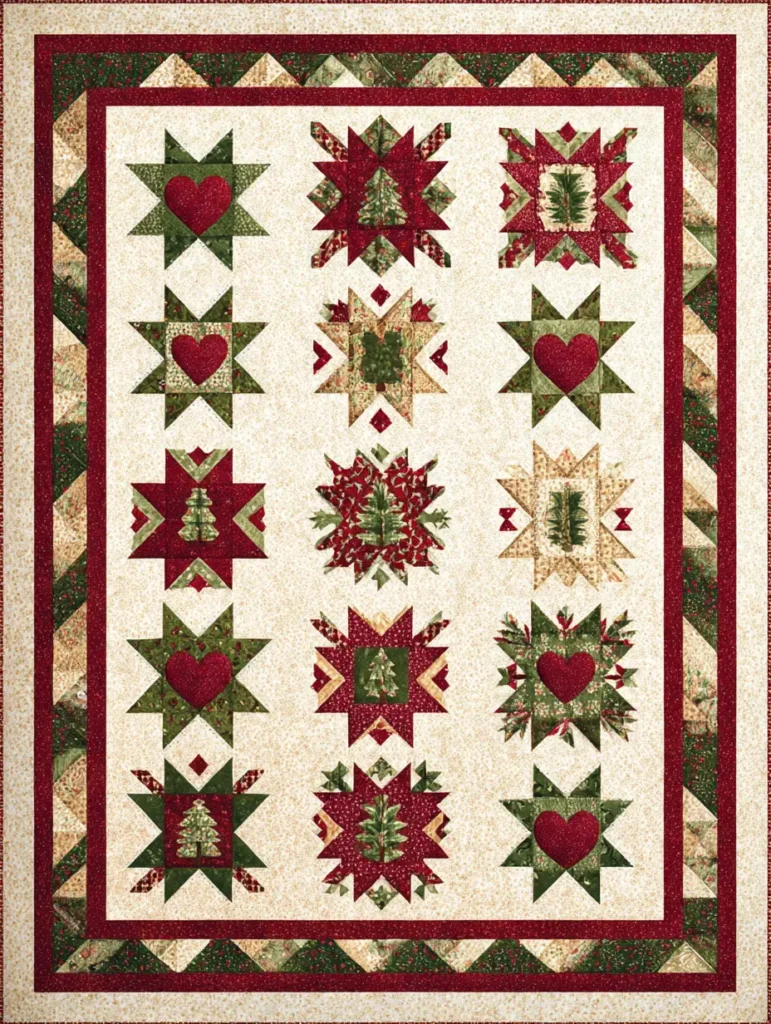
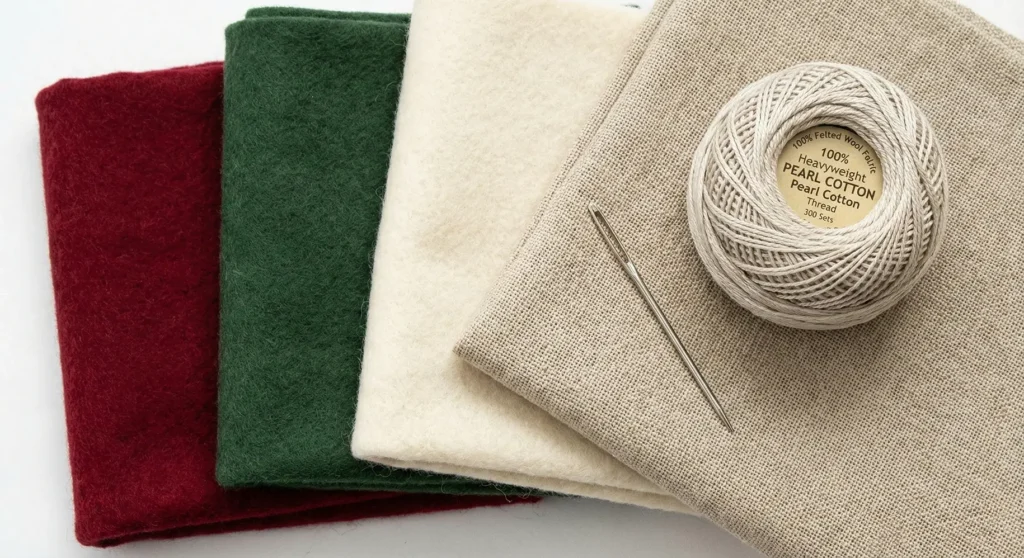
Blend the charm of old-world folk art with modern comfort by using wool or felt appliqué to create tactile, dimensional stars on a cotton background. This mixed-media approach adds significant physical warmth and visual depth, creating a bed cover that feels substantial and rich, like a heritage heirloom.
Step 1: Choose Felted Wool.
Select 100% felted wool for your star shapes rather than stiff craft felt. Avoid synthetic acrylic felt, which can pill easily and feels scratchy against the skin; genuine wool is naturally breathable, soft, and retains heat efficiently for a cozy night’s sleep.
Step 2: Applique for Softness.
Fuse the wool stars onto the background using a lightweight fusible web, then secure them with a soft blanket stitch. Using a lightweight web prevents the applique from becoming stiff and “board-like,” ensuring the quilt remains pliable and drapes gently over the body.
Step 3: Layer with Cotton Batting.
Pair the heavy wool top with a standard low-loft cotton batting. Since the wool itself provides significant insulation, a lighter batting prevents the quilt from becoming uncomfortably heavy or hot, maintaining a balanced sleeping temperature.
Step 4: Big Stitch Hand Quilt.
Use a heavyweight pearl cotton thread to hand quilt around the stars with large, visible stitches. This technique leaves the layers relatively loose and fluffy, enhancing the quilt’s loft and creating a handcrafted texture that is soothing to touch.
Step 5: Bind with Brushed Cotton.
Finish the edges with a soft, brushed cotton or flannel binding in a deep, folk-art red or green. This fuzzy edge provides a comforting finish that feels warm against the face when the quilt is pulled up tight.
Pro Design Tip:
When choosing background fabrics, opt for woven cottons (like homespun) rather than printed cottons. Avoid stiff, glazed chintz fabrics, as they are noisy when moved and feel cold to the touch, whereas woven homespun gets softer and quieter with every wash.
Budget Consideration:
This style is perfect for upcycling. You can shrink old 100% wool sweaters in the wash (felting them) and cut your star shapes from the dense, felted material, creating luxuriously soft and free applique pieces.
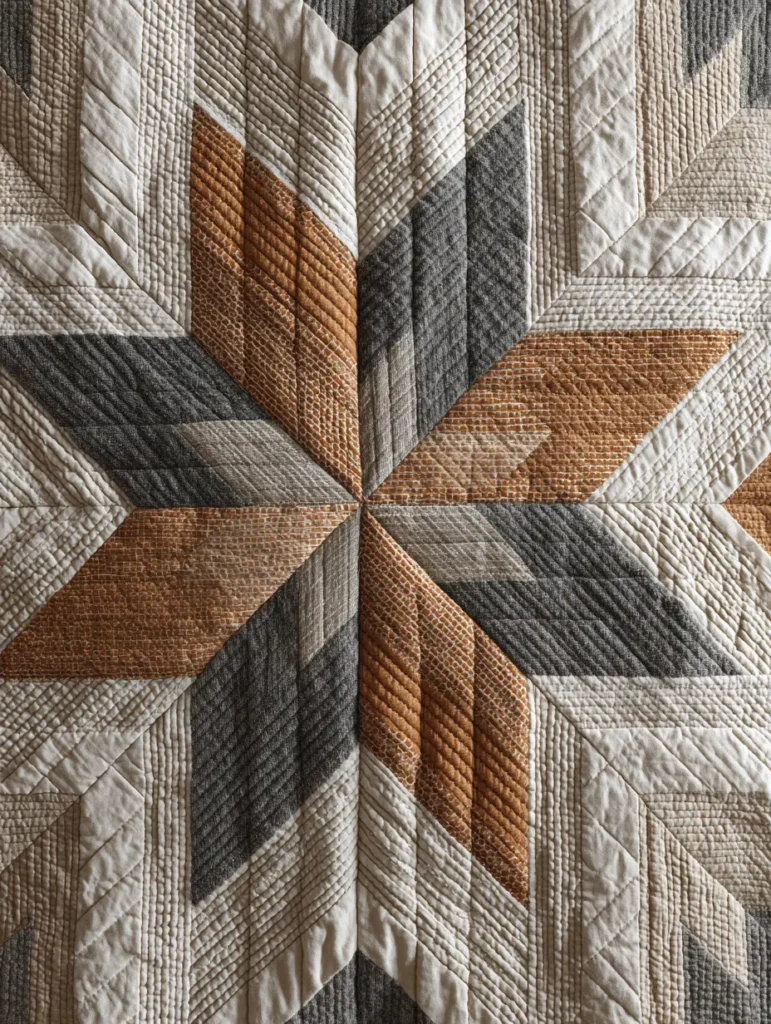
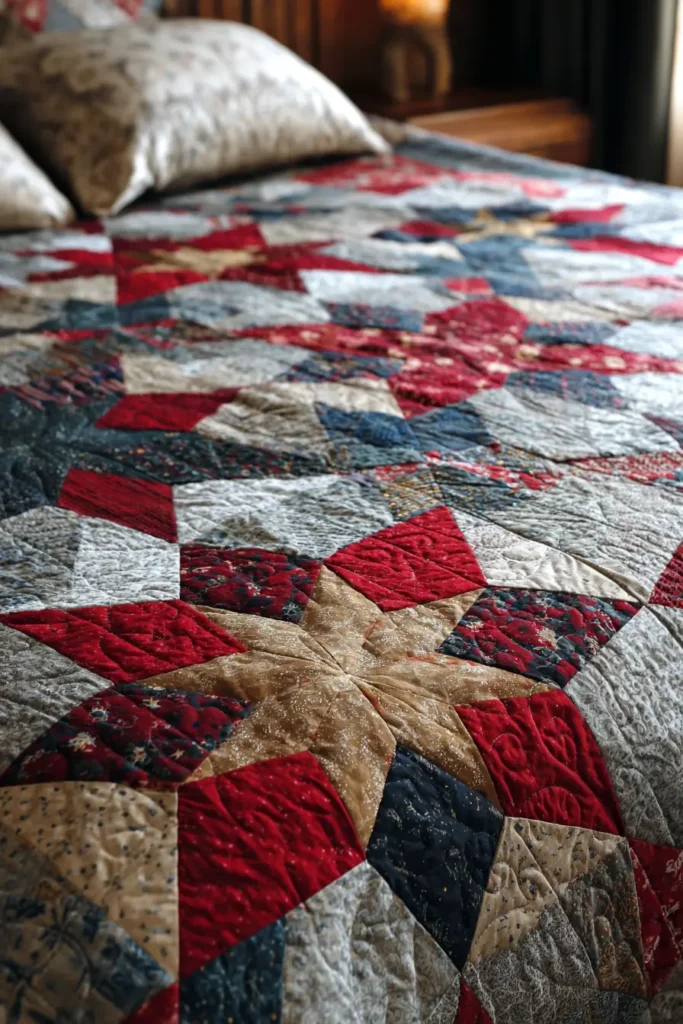
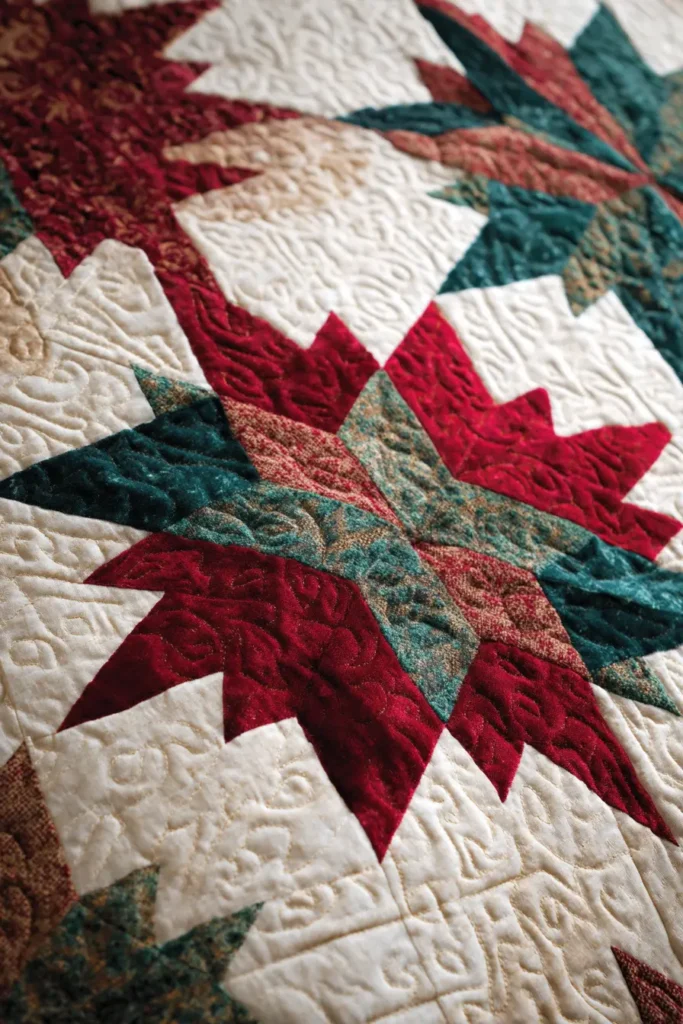
9. Mixed Fabric and Texture Star Quilt Combinations

Elevate a standard geometric design by incorporating a variety of tactile surfaces, creating a sensory-rich quilt that is as soothing to touch as it is visually interesting. By carefully balancing linens, velvets, and cottons, you build a bed cover with substantial weight and warmth, mimicking the comforting feel of a weighted blanket.
Step 1: Curate Tactile Fabrics.
Select a mix of soft linen, brushed cotton, and cotton velvet to create depth. Avoid rough materials like burlap, upholstery-weight weaves, or stiff metallics, as these are scratchy against bare skin and will make the quilt feel abrasive rather than inviting.
Step 2: Stabilize for Smooth Seams.
When piecing lightweight cottons to heavier velvets, apply a lightweight fusible interfacing to the lighter fabric to prevent puckering or stretching. This ensures the seams remain flat and smooth, eliminating bulky ridges that could be uncomfortable to lie on.
Step 3: Layer with Wool Batting.
Sandwich the top with a resilient medium-loft wool batting that can support the heavier fabrics without collapsing. Wool provides a springy, breathable warmth that keeps you insulated without trapping moisture, preventing the clammy feeling often associated with heavy synthetic blankets.
Step 4: Quilt with Minimal Density.
Use a “stitch-in-the-ditch” technique or widely spaced straight lines to accommodate varying fabric thicknesses without crushing the velvet pile. Dense quilting can make mixed-texture quilts feel stiff and board-like, so minimal stitching ensures the blanket remains pliable and molds gently to the body.
Step 5: Bind with Sateen.
Finish the edges with a smooth cotton sateen or silk-cotton blend binding. This silky, cool texture provides a soothing contrast to the nubby linens or warm velvets, feeling delightful against the face when the quilt is pulled up at night.
Pro Design Tip:
Place the heaviest textured fabrics (like velvet or corduroy) toward the center of the mattress rather than at the very top edge. This keeps the area near your face smooth and breathable, preventing heavier textures from tickling your nose or feeling too warm against your chin while you sleep.
Budget Consideration:
This style is perfect for upcycling worn clothing, such as old flannel shirts or soft corduroy pants. These fabrics are already washed and broken in, offering a level of softness that new fabric can’t match, all for zero cost.
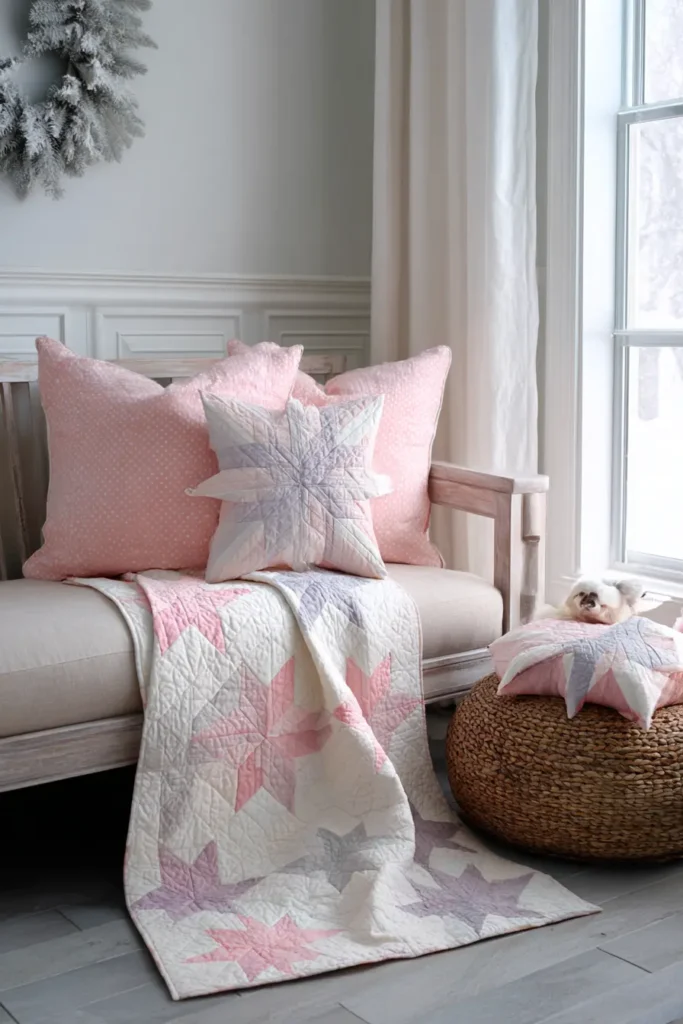
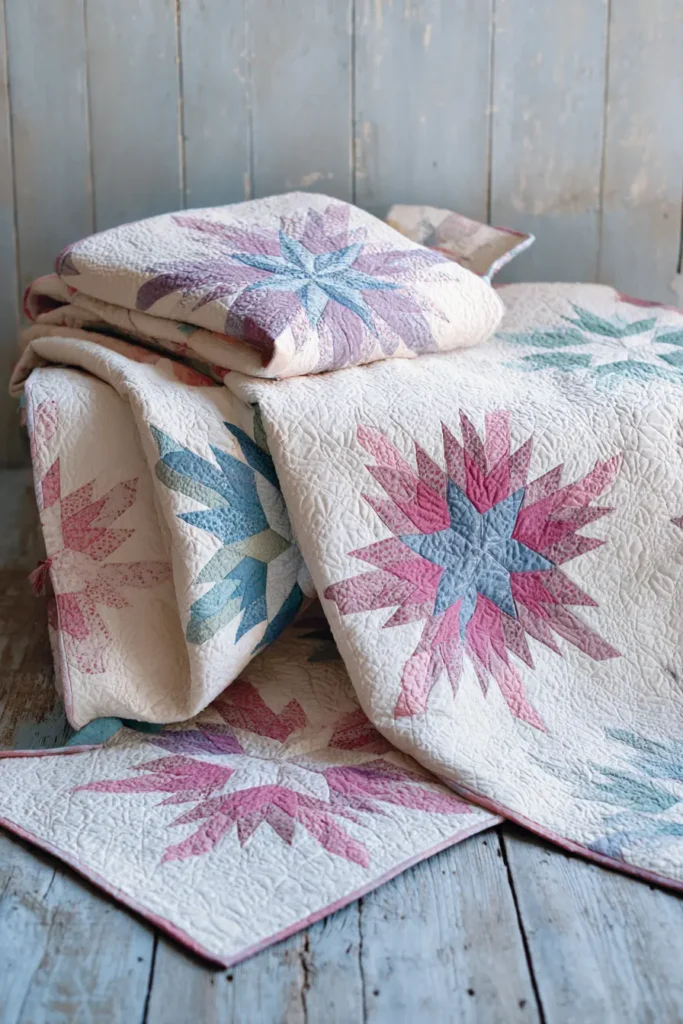
10. Soft Pastel Christmas Star Quilts for a Gentle Winter Look
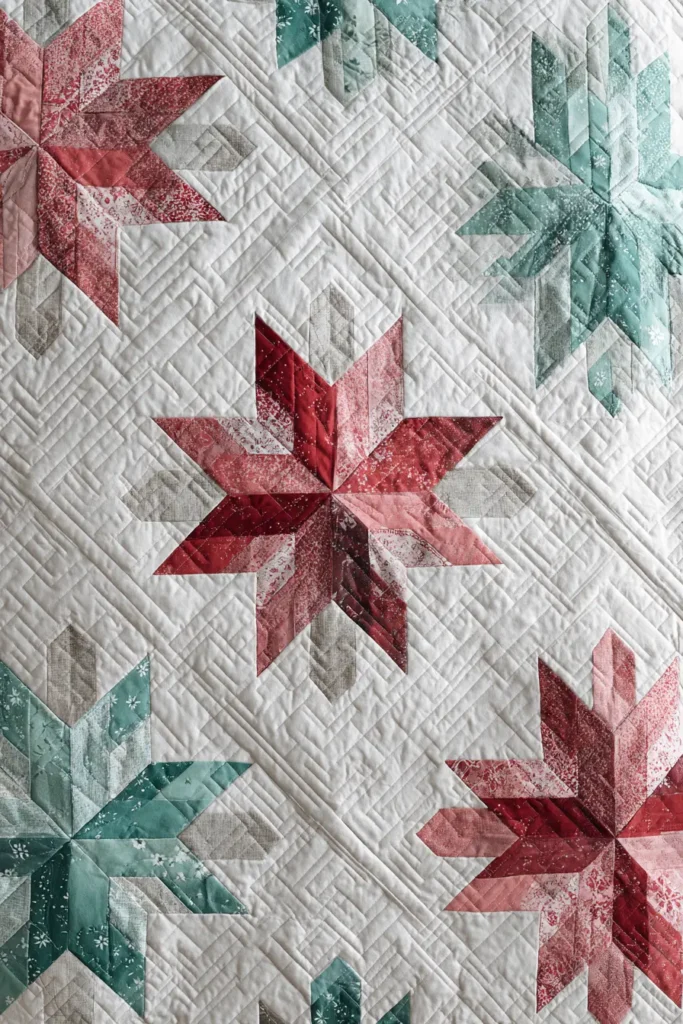
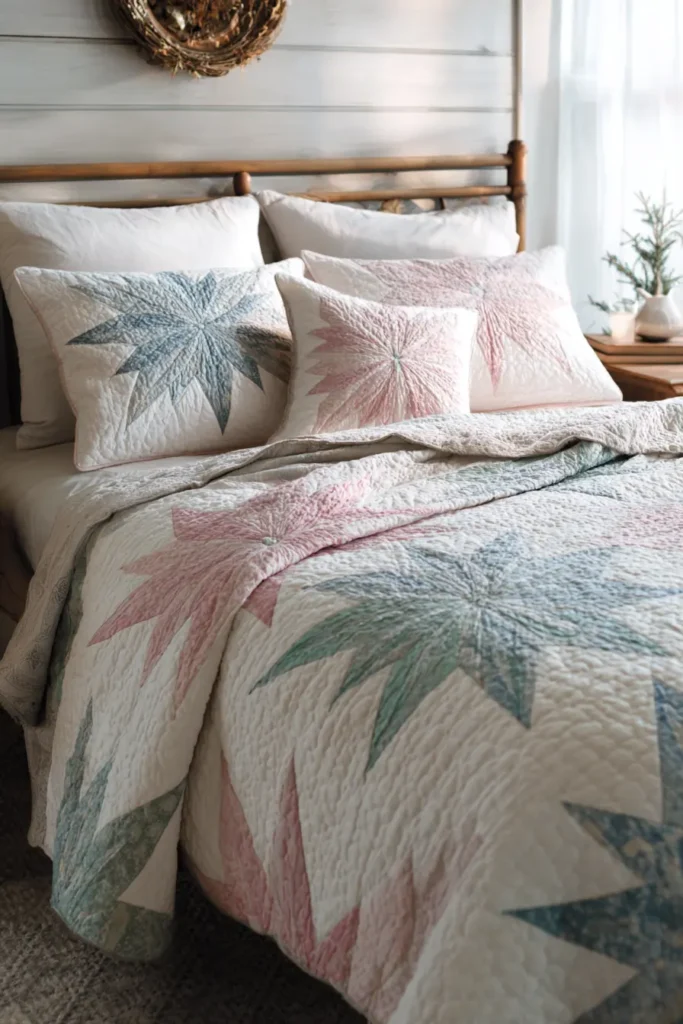
Depart from traditional dark holiday colors and create a serene sleeping sanctuary with a palette of icy blues, blush pinks, and mint greens. This “winter wonderland” aesthetic uses light-reflecting fabrics to make the bedroom feel airy and calm, promoting relaxation and peaceful sleep during the hectic holiday season.
Step 1: Select Fine Cottons.
Choose cotton lawn or high-thread-count voile for your pastel fabrics rather than standard quilting-weight cotton. Avoid stiff, low-thread-count calicos, which can feel rough and scratchy; lawn is incredibly silky and lightweight, creating a quilt that feels like a soft sheet against the skin.

Step 2: Use Negative Space.
Design your quilt with smaller pastel stars floating on an extensive, white background to maintain an airy, uncluttered look. This generous use of negative space eliminates heavy, bulky seam intersections, ensuring the quilt top remains fluid and flexible for maximum comfort.
Step 3: Layer with Bamboo-Silk Batting.
Baste with a bamboo-silk blend batting, which offers incredible drape and temperature regulation. This luxurious blend is thinner than wool but warmer than cotton, draping over the body like water for a truly comforting, non-restrictive sleep experience.
Step 4: Quilt with Cloud Shapes.
Use a free-motion quilting technique to stitch soft, swirling cloud or wind shapes across the surface. These gentle curves break up the geometric stars’ straight lines and keep the quilt’s texture smooth and pliable, preventing the stiffness that comes from rigid straight-line stitching.
Step 5: Bind with Bias Tape.
Finish the edges with a soft, pastel bias binding that matches the background fabric for a seamless look. The bias cut ensures the edges are durable yet soft, curving gently around your body without creating a hard, rigid border.
Pro Design Tip:
When selecting pastel fabrics, avoid “shot cottons” if you are a beginner. While beautiful, shot cottons fray easily and can distort during piecing, leading to lumpy seams that detract from the smooth, comforting finish you want for a bed quilt.
Budget Consideration:
Pastel quilts often use a lot of white background. Use vintage white sheets (100% cotton) from thrift stores for the background fabric. They are already washed, soft, extremely cheap, and often higher quality than new bolt fabric.
11. Quilted Star Throws for Layered Christmas Bedding
Design a smaller, versatile throw to drape at the foot of the bed, adding a pop of geometric holiday cheer without the bulk of a full-size comforter. This lighter layer is designed to be ultra-flexible and soft, perfect for pulling up for an afternoon nap or wrapping around your shoulders while reading in bed.
Step 1: Select Soft Brushed Cottons.
Choose flannel or brushed cotton for the quilt top to ensure immediate warmth upon contact. Avoid heavy upholstery-weight fabrics or stiff canvas, as these materials are designed for durability rather than drape and will make the throw feel rigid and uncomfortable against the body.
Step 2: Piece Large-Scale Stars.
Construct the top using oversized geometric star blocks (12 inches or larger) to minimize seam bulk. Fewer seams allow the fabric to remain fluid and pliable, ensuring the throw settles softly over your legs rather than standing up stiffly.
Step 3: Layer with Bamboo Batting.
Baste with a low-loft bamboo batting, which provides a silky, heavy drape that conforms perfectly to the body. Bamboo is naturally breathable and moisture-wicking, preventing the “stuffy” heat often associated with polyester throws.
Step 4: Quilt with Sparse Geometry.
Quilt large grid lines or diamonds spaced 3 to 4 inches apart across the surface. This loose quilting density keeps the batting fluffy and the quilt floppy, maximizing the “snuggle factor” compared to stiff, densely stitched blankets.
Step 5: Back with Luxe Fleece.
Skip the cotton backing and use a high-quality plush fleece or minky fabric. This adds significant weight and an incredibly soft texture against the skin, turning a decorative accent into the most comfortable blanket in the room.
Pro Design Tip:
When quilting a throw meant for skin contact, avoid using “invisible” monofilament thread. While it hides stitches well, it often feels scratchy like fishing line; instead, use a high-quality 50wt cotton thread that softens with the fabric and feels gentle to the touch.
Budget Consideration:
If you choose a high-quality fleece or minky backing, you can skip the batting entirely. The fleece provides sufficient warmth and weight on its own, saving you the cost of batting and making the construction process faster and cheaper.
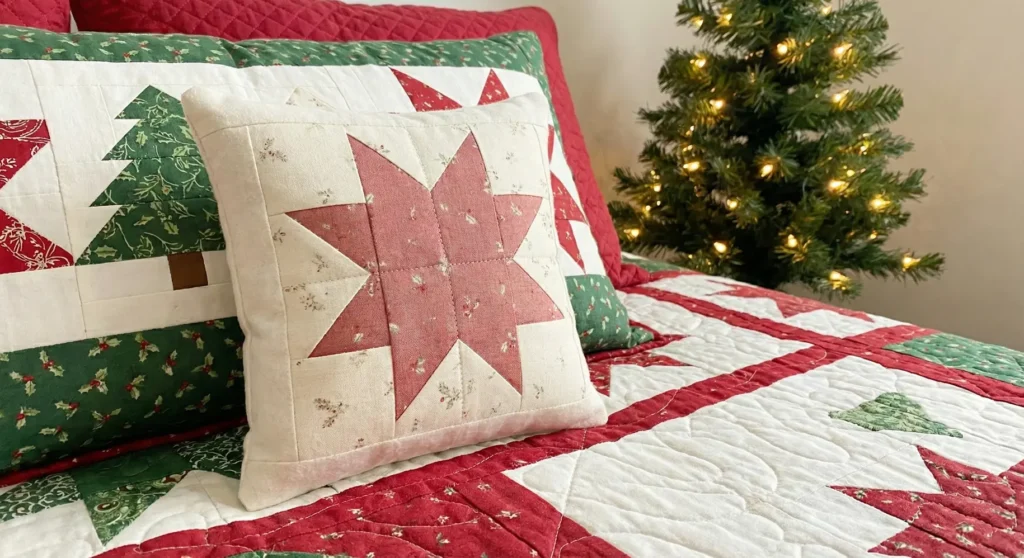
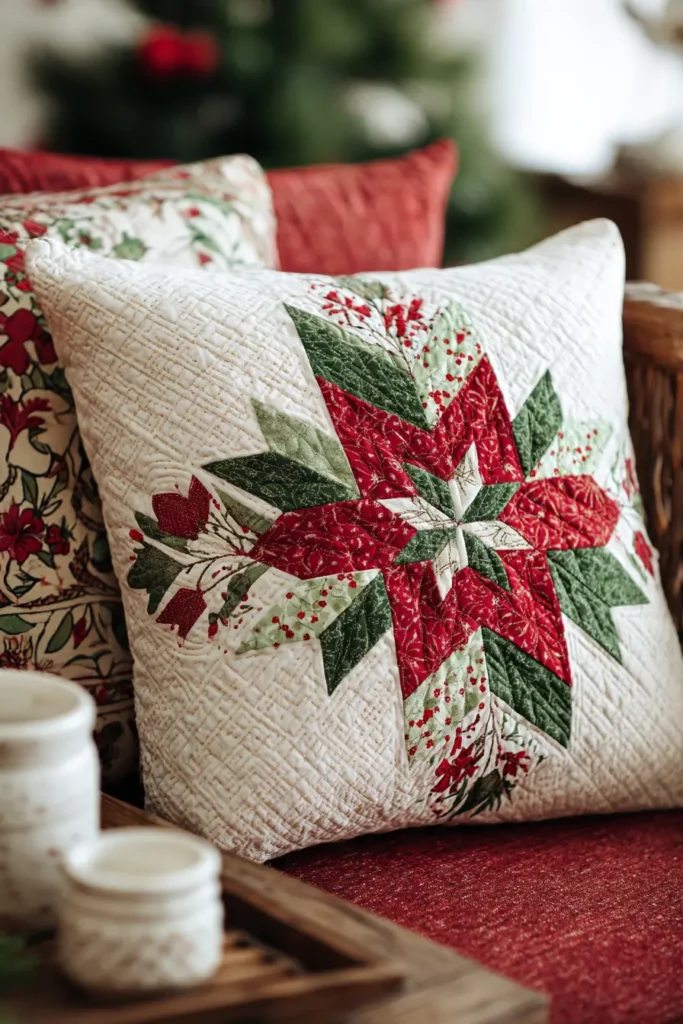
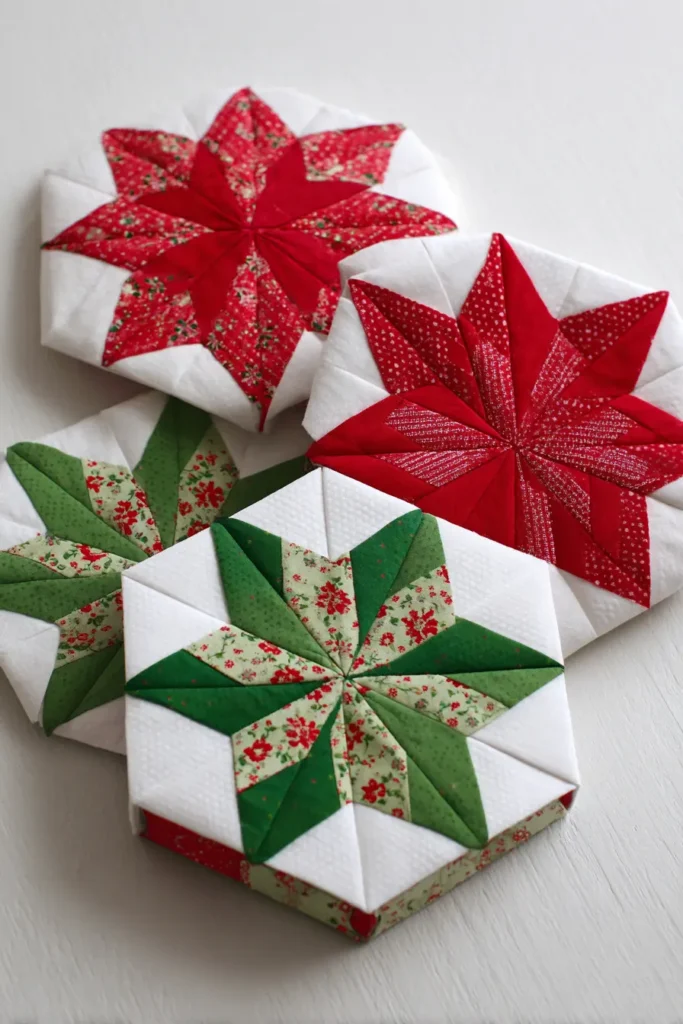
12. Miniature Star Quilt Blocks for a Festive Accent Pillow
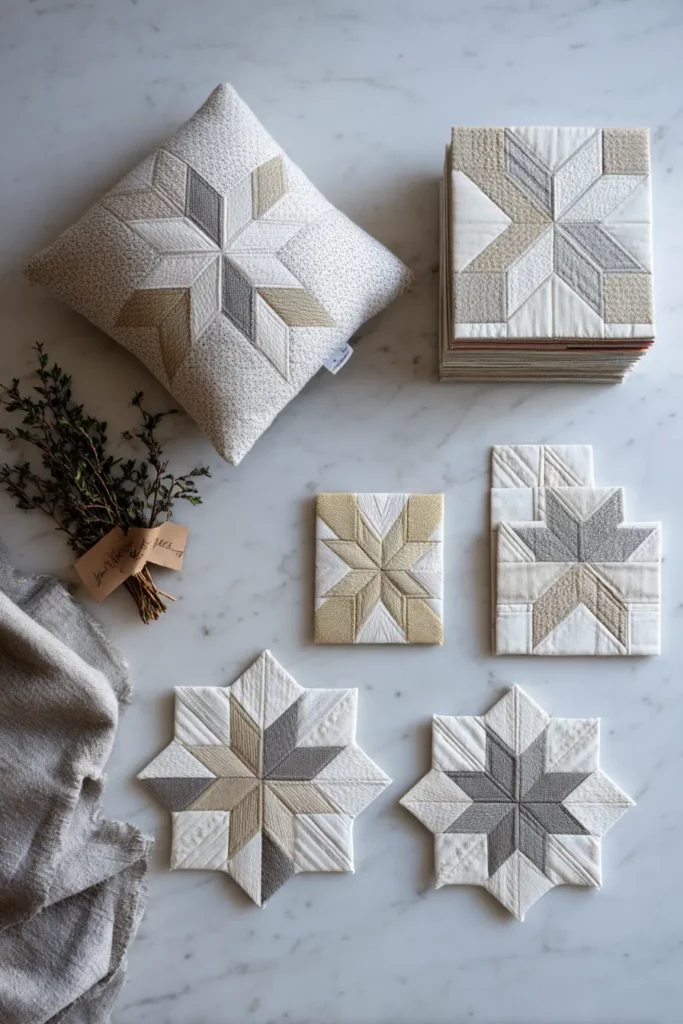
Add a functional pop of holiday cheer to your bed by turning intricate miniature star blocks into a plush accent pillow. Unlike stiff decorative throw pillows that must be removed before sleep, this quilted sham features soft surfaces and a flat construction, making it a comfortable headrest for reading or napping.
Step 1: Choose Softer Prints.
Select high-thread-count quilting cottons in calming, low-volume prints or solids rather than stiff, heavy canvas or metallic fabrics. Avoid rough glitter-coated fabrics, as these act like sandpaper against delicate facial skin, making the pillow purely decorative rather than functional and cozy.
Step 2: Press Seams Open.
Construct your miniature blocks (3 to 6 inches) carefully, pressing every seam allowance open rather than to the side. This technique distributes the bulk of the fabric intersections evenly, eliminating hard, lumpy ridges that would otherwise be uncomfortable to lie your head on.
Step 3: Fuse to Fleece.
Iron the completed quilt block top to a layer of fusible fleece or flannel instead of using traditional heavy batting. This adds a layer of padded softness that hides the internal seam allowances so you don’t feel them, while keeping the pillow top flexible and yielding.
Step 4: Quilt Sparingly.
Stitch simple “in the ditch” lines or a minimal grid to secure the layers without over-stiffening the fabric. Dense, heavy quilting on a small surface area can turn a pillow sham into a rigid board, so less stitching keeps it squishy and inviting.
Step 5: Sew an Envelope Backing.
Finish the pillow with a simple envelope closure using soft cotton fabric that overlaps generously in the back. This eliminates the need for hard zippers or buttons, ensuring there is no hardware to poke you if you flip the pillow over during the night.
Pro Design Tip:
When designing the layout, avoid placing embellishments like beads, sequins, or large buttons on the pillow face. While festive, these hard elements are uncomfortable to rest a cheek against and can snag hair, ruining the bed’s cozy, relaxing feel.
Budget Consideration:
This is the ideal project for using “Orphan Blocks”—the extra or slightly imperfect blocks left over from larger quilt projects. Using a single leftover block to make a pillow costs nothing and prevents beautiful fabric and effort from going to waste.
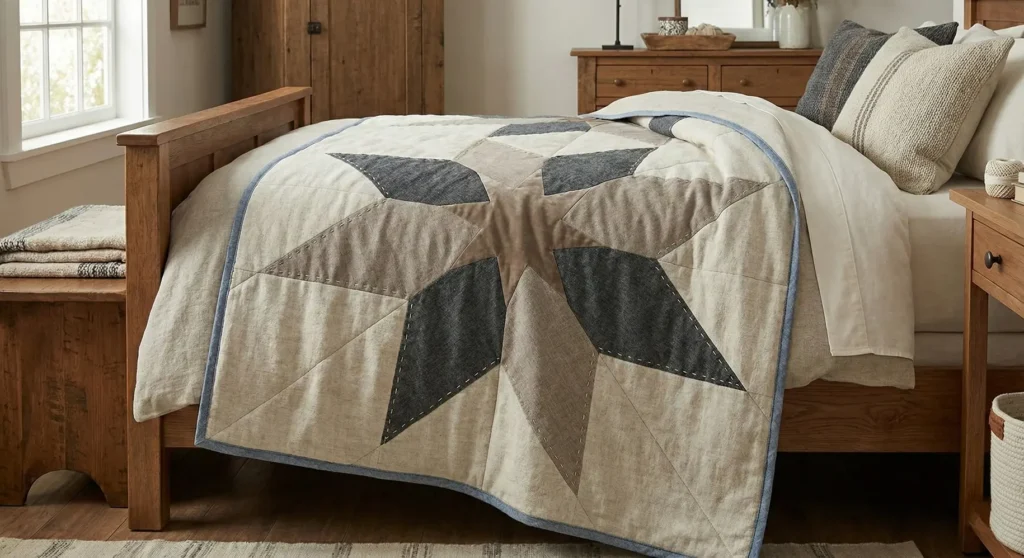
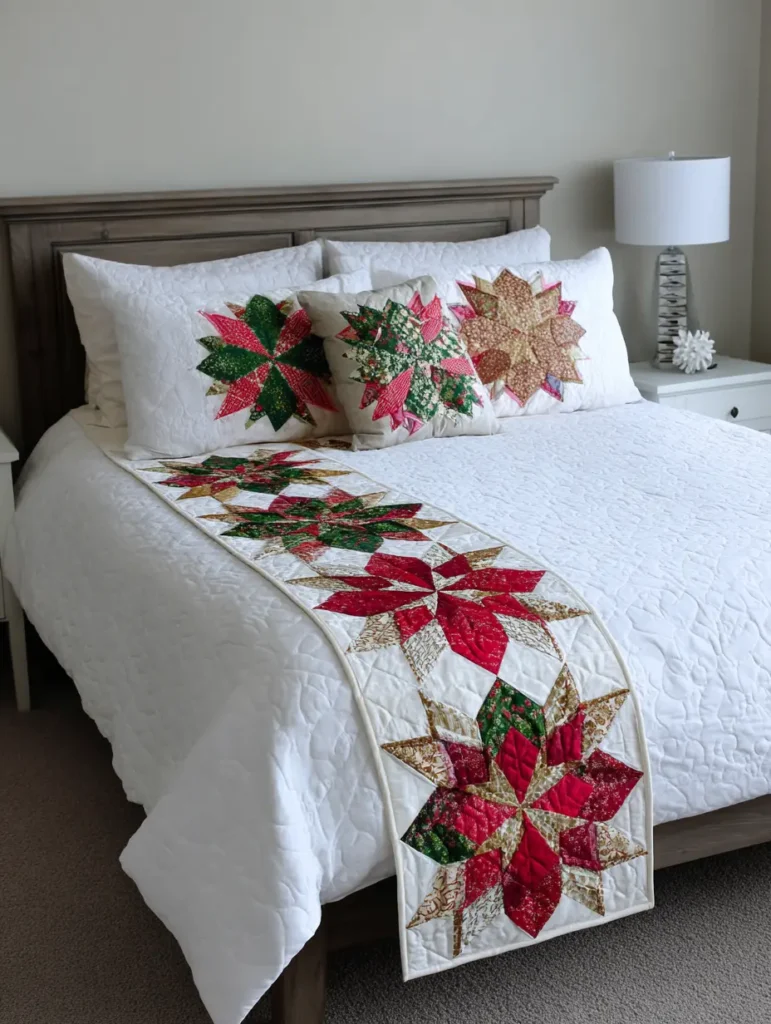
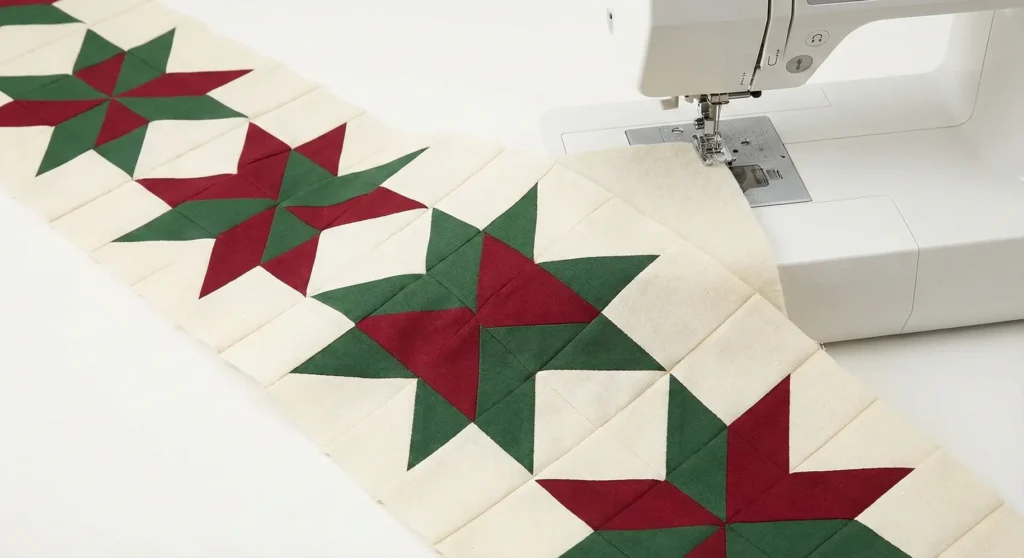
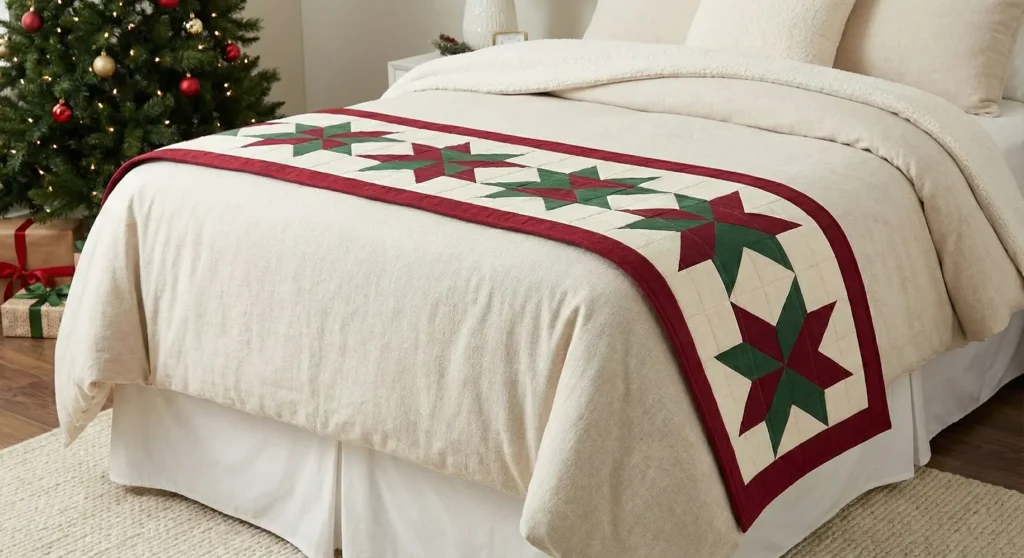
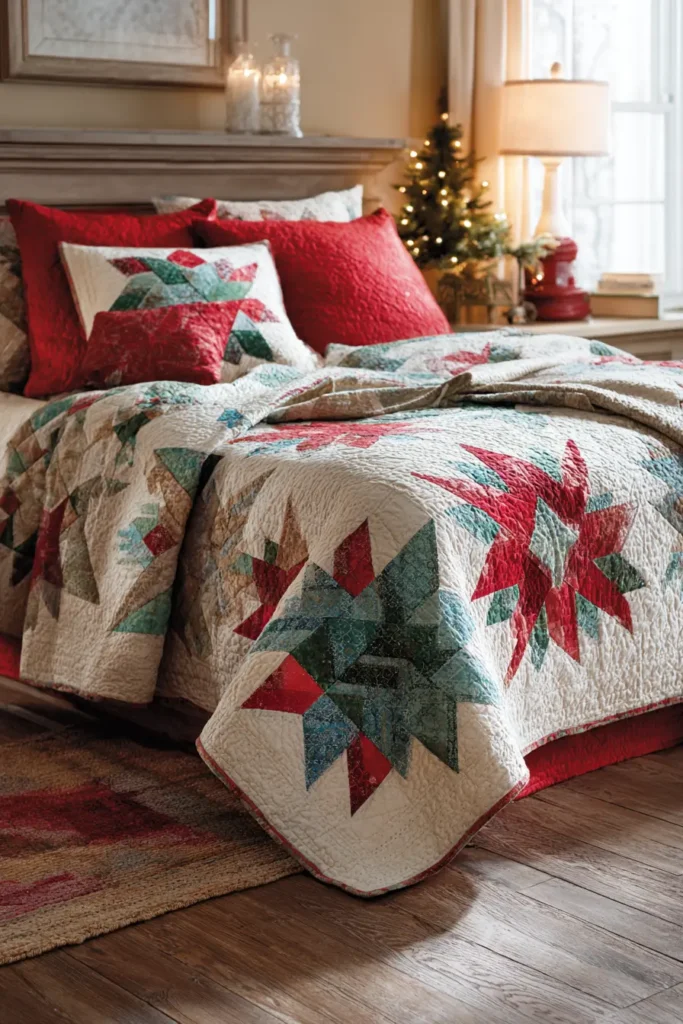
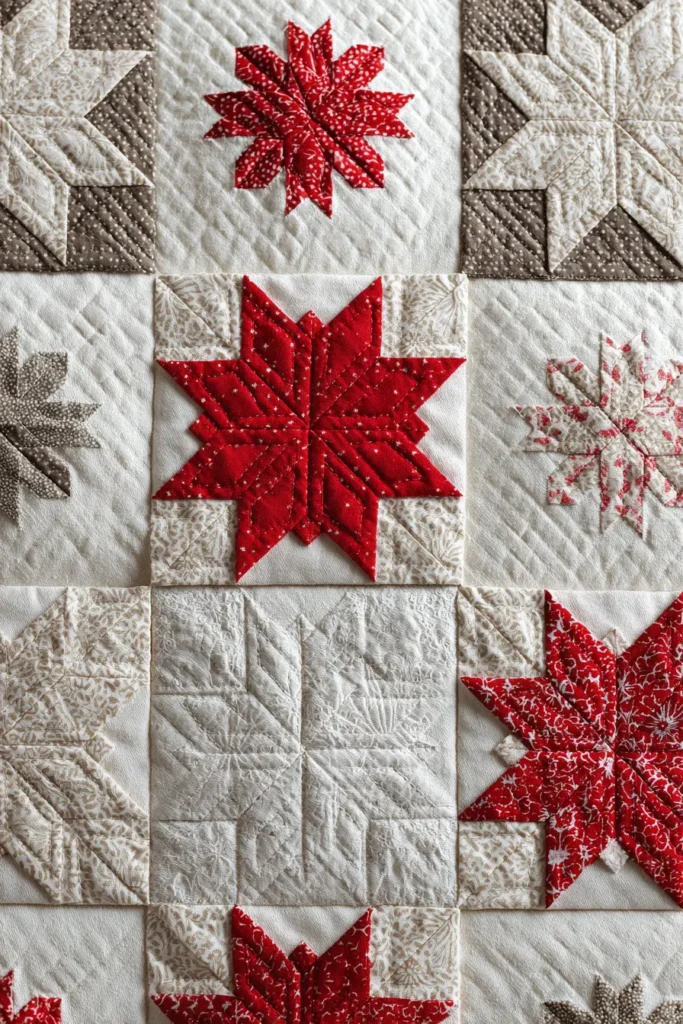
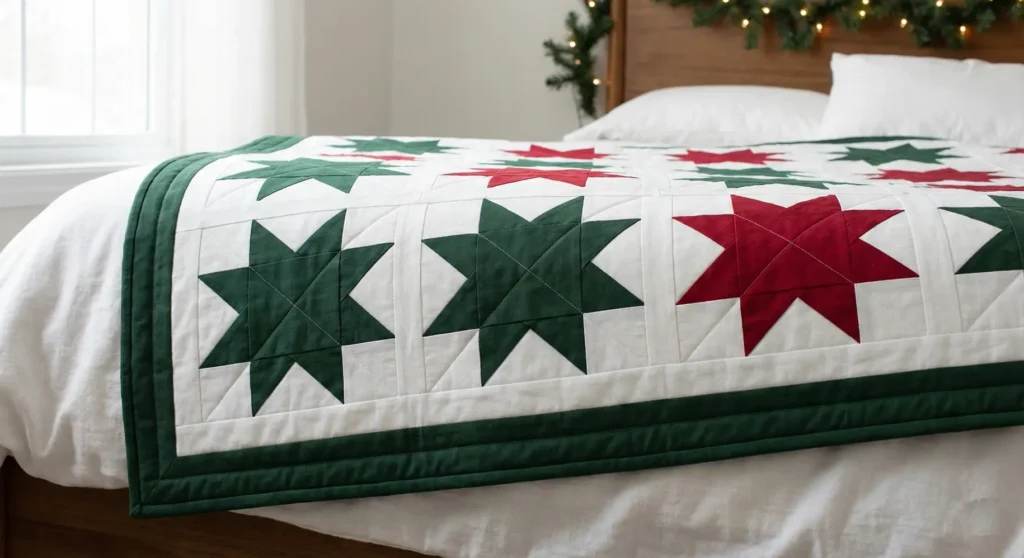
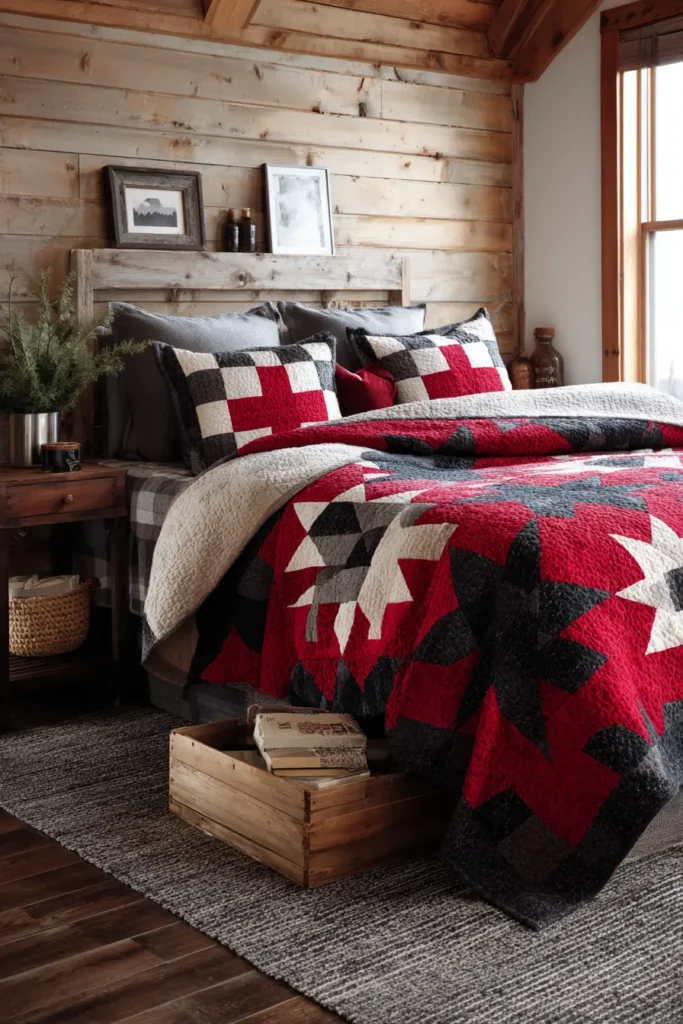
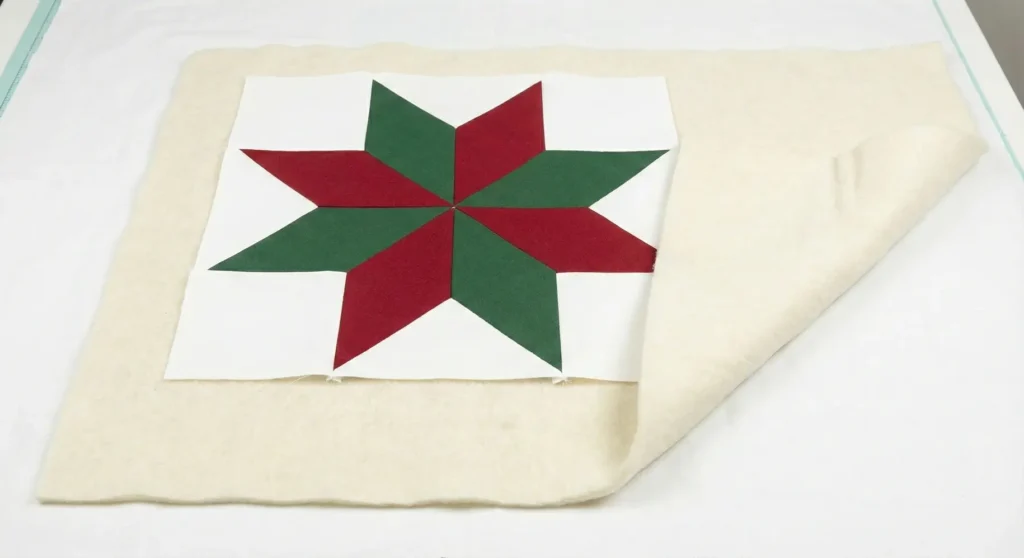
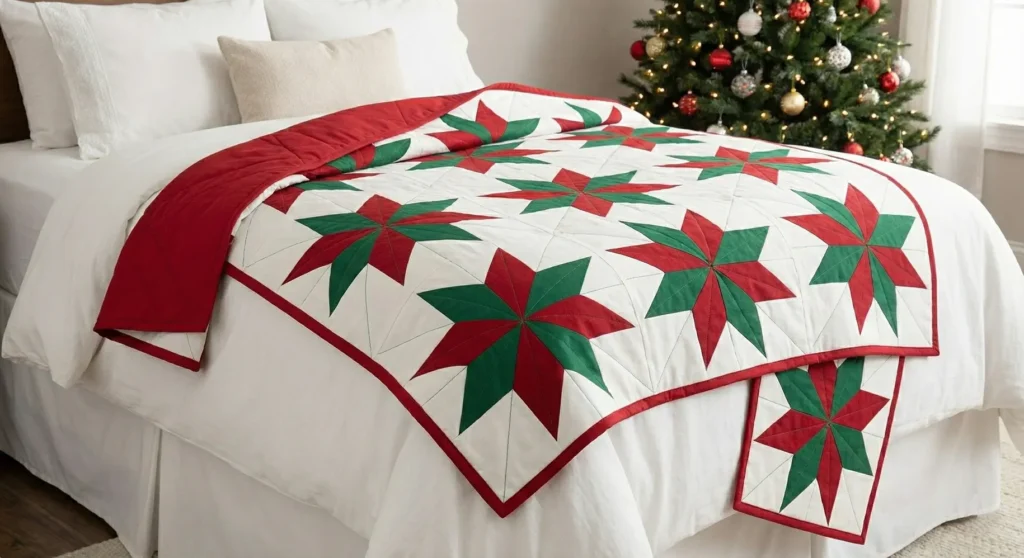
13. Classic Ohio Star Block Design in Red and Green Fabrics
Update this traditional block with a modern layout by using solid fabrics in deep forest green and cherry red against a crisp white background. This high-contrast geometric design creates a visually clean aesthetic that fits contemporary bedrooms while maintaining the festive spirit. Constructed with care, these blocks lie flat and smooth, offering a sleek yet substantial layer of warmth for winter nights.
Step 1: Select Premium Solids.
Choose high-quality, solid-color cottons rather than stiff holiday prints with metallic gold overlays. Avoid fabrics with heavy metallic ink, as the paint sits on top of the fiber and feels scratchy against the skin, whereas solids get softer with every wash.
Step 2: Trim Excess Bulk.
Construct the hourglass units of the Ohio Star carefully, ensuring you trim off the “dog ears” (excess triangle points) before sewing the rows together. Removing this hidden excess fabric reduces bulk at the seam intersections, creating a perfectly flat quilt top without uncomfortable lumpy knots.
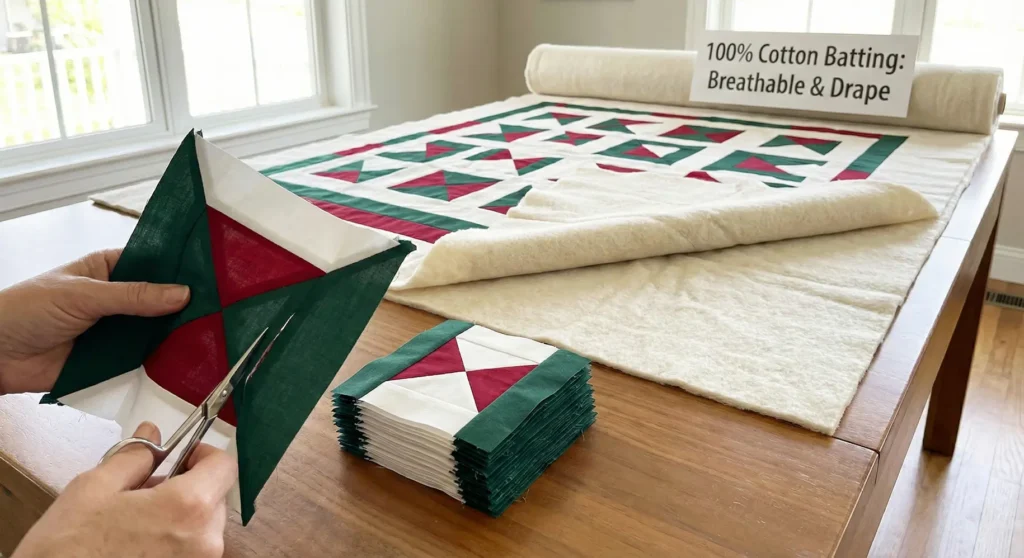
Step 3: Layer for Breathability.
Use a 100% cotton batting with a low loft for this geometric design. Cotton batting breathes exceptionally well, preventing you from overheating under the quilt, and it drapes heavily and securely around the body for a “tucked-in” feeling.
Step 4: Quilt with Straight Grids.
Stitch a simple diagonal grid pattern that crosses through the center of the stars. This geometric quilting reinforces the modern look and secures the seams without making the quilt stiff, keeping the fabric flexible enough to mold comfortably to your sleeping form.
Step 5: Bind with Double-Fold Fabric.
Finish the edges with a durable double-fold binding in the darker green shade to frame the design. A double-fold binding provides a thick, cushioned edge that feels substantial and soft when pulled up under your chin on a cold night.
Pro Design Tip:
When pressing the seams for the Ohio Star, avoid pressing all seams to the side. Instead, press the center block seams open to distribute the thread bulk evenly, ensuring the center of the star remains flat and comfortable to lie on.
Budget Consideration:
Red and green solids are standard year-round staples. Buy them during non-holiday sales or use basic solid yardage, which is significantly cheaper than buying specialized “Christmas” fabric collections.
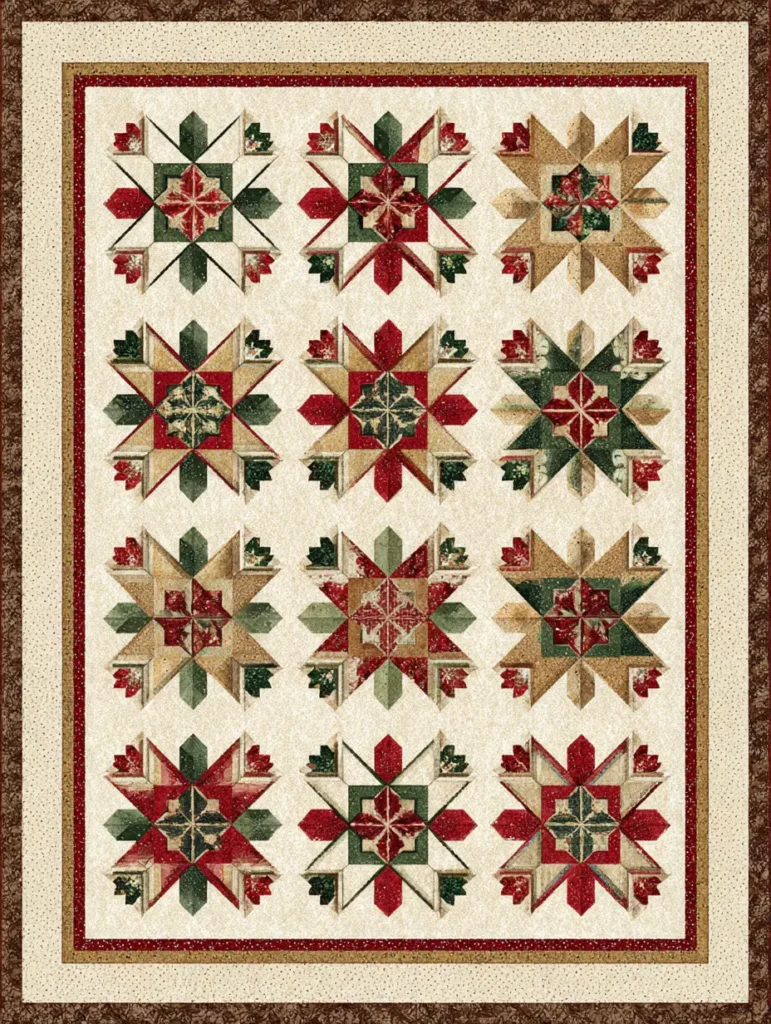
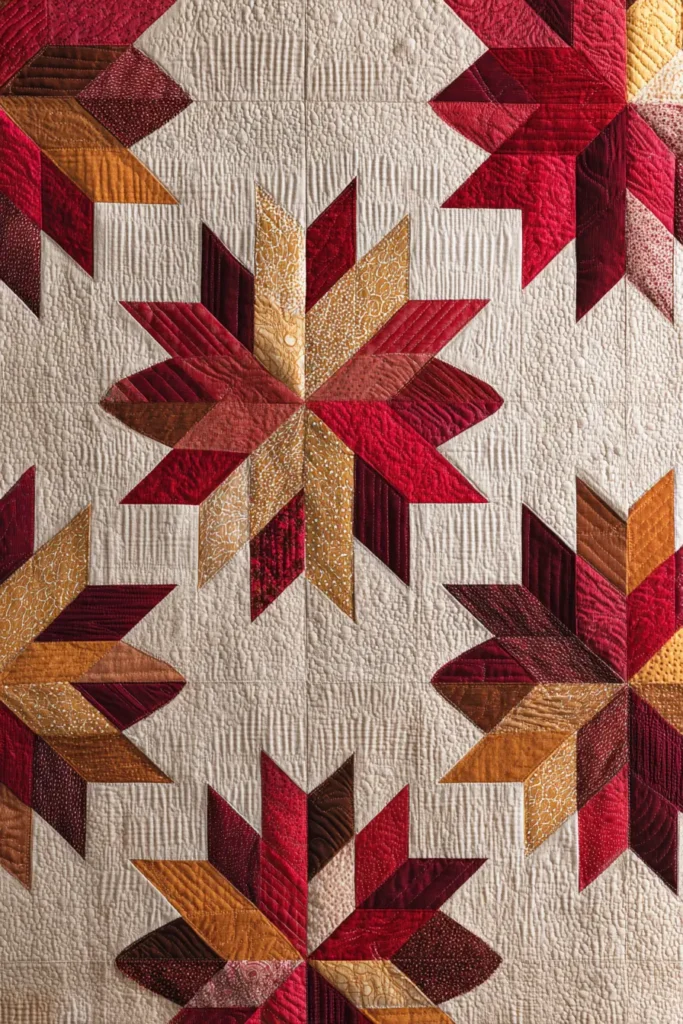
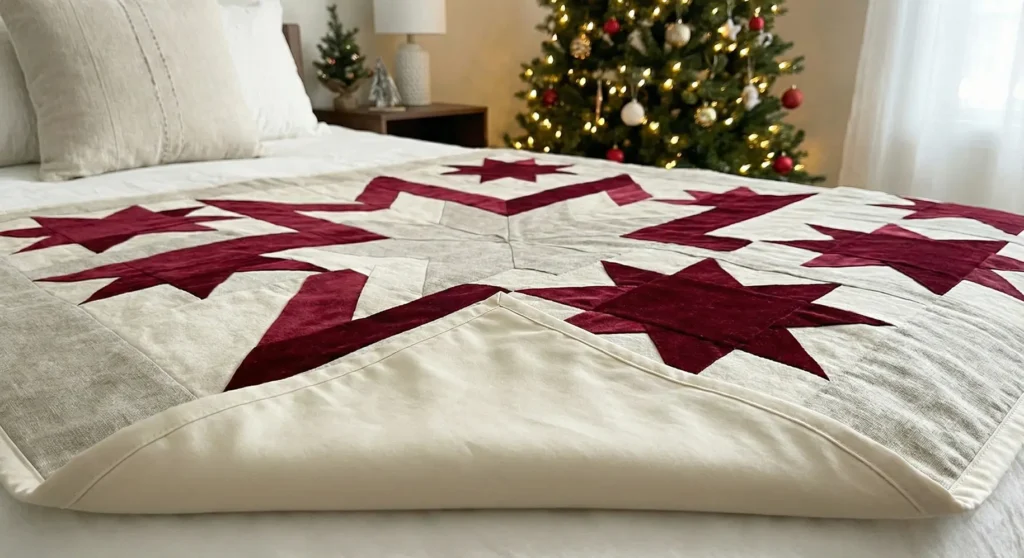
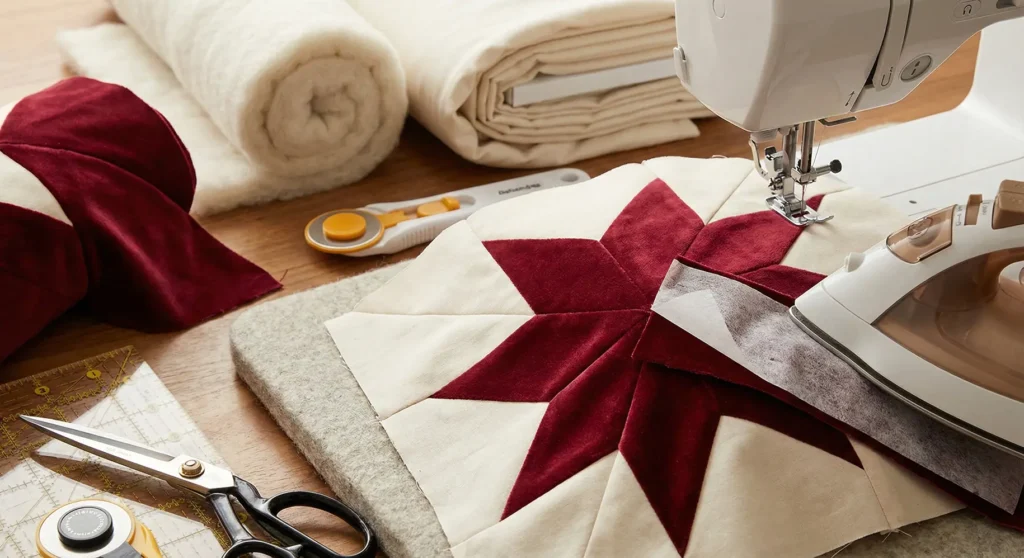
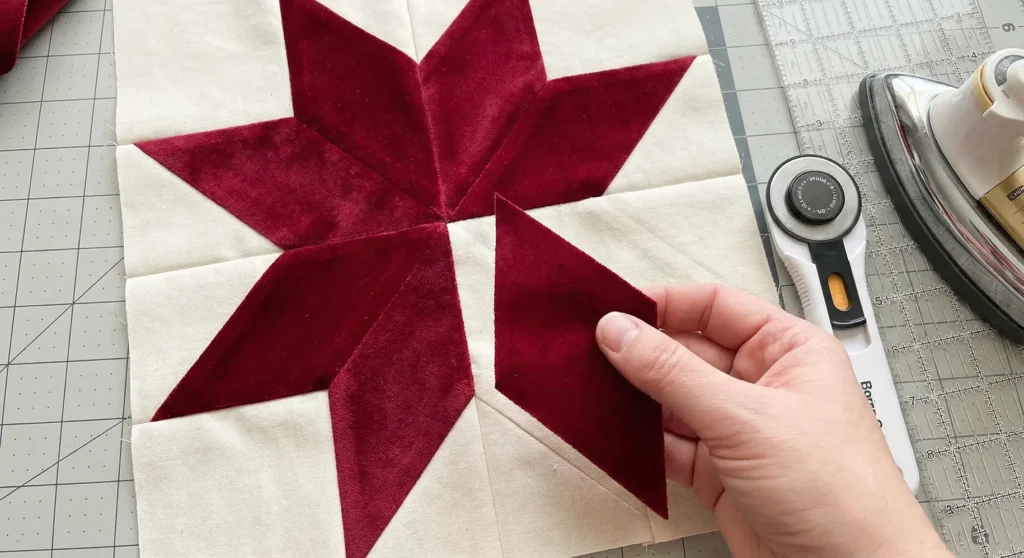
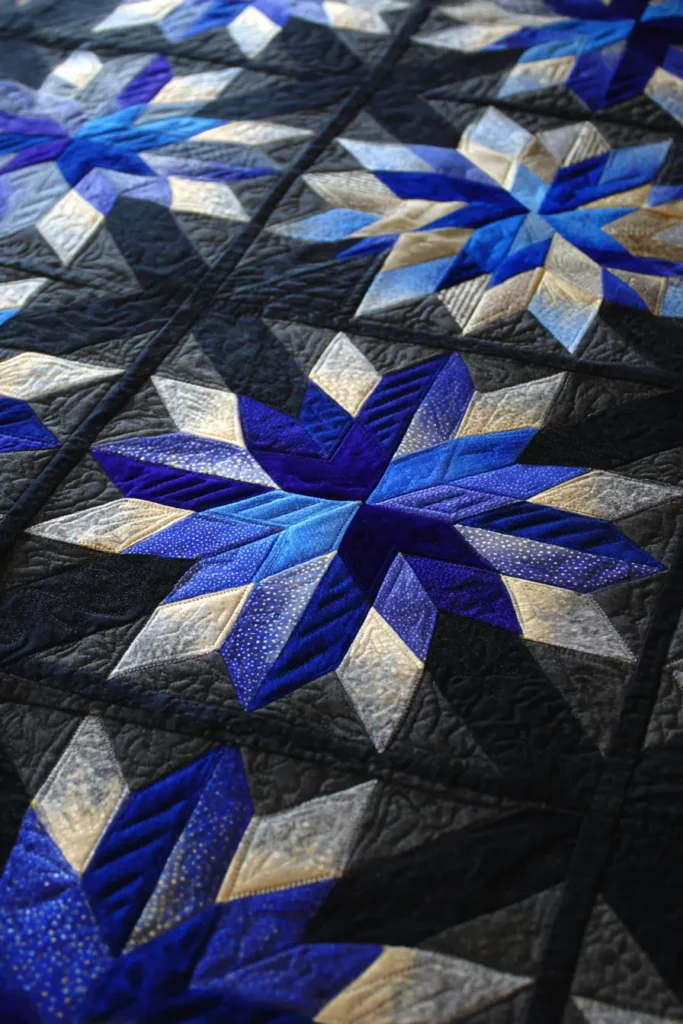
14. Luxury Velvet-Accented Holiday Star Design

When we think of holiday decor for the bedroom, we often picture cozy flannels and traditional prints. But this year, why not infuse a touch of true opulence into your winter sanctuary?
If you are looking for a project that bridges the gap between modern design and festive warmth, it’s time to introduce texture. By incorporating rich velvet into geometric star blocks, you create a quilt with significant visual depth. It’s a tactile quality that begs to be touched.
More than just a visual statement, this combination of materials results in a quilt with a heavy, comforting weight—perfect for a deep winter sleep.
Here is how to construct this luxurious, modern heirloom, ensuring it is as comfortable as it is beautiful.
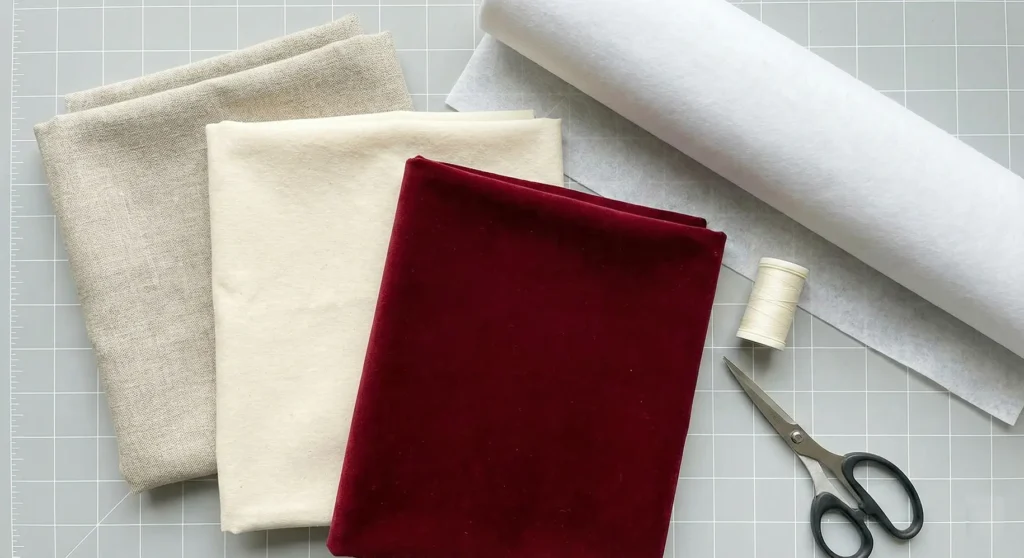
Part 1: Mastering the Materials
Working with mixed textures requires careful selection and preparation to ensure your finished quilt not only looks good but also feels incredible to sleep under.
Select “Breathable” Luxury
Velvet looks lush, but the fiber content matters immensely for a bed quilt. You must choose high-quality cotton velvet for your star points. Avoid plush polyester velvets at all costs, as they trap body heat and can melt under a hot iron. Cotton velvet breathes and handles pressing much better.
The Secret to Precision: Stabilize First
Velvet is slippery and slightly stretchy. The secret to crisp geometric shapes is stabilization. Before you cut a single star point, iron a lightweight fusible interfacing to the back of your velvet yardage. This stabilizes the fabric, preventing it from shifting during cutting and sewing, resulting in seams that lie flat and smooth.
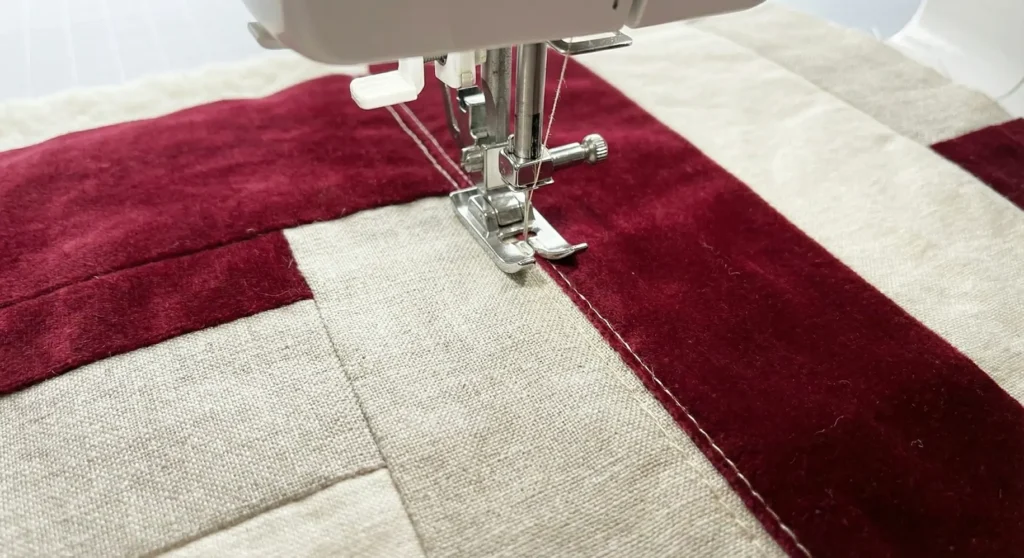
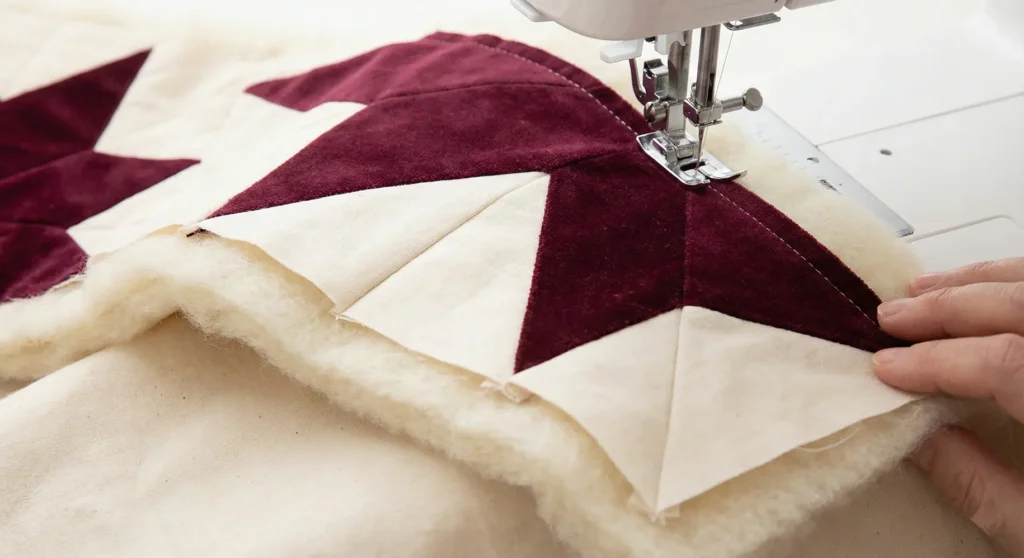
Part 2: Construction Essentials
Sewing with thick pile fabrics requires the right tools to keep things moving smoothly.
Pro Tip: The Walking Foot is Mandatory
When piecing velvet to standard quilting cotton, you are dealing with different thicknesses and drag coefficients. If you use a standard presser foot, the top layer (velvet) will likely push forward, causing puckering.
Install a walking foot (also called an even-feed foot) on your sewing machine. The dual feed dogs work in tandem to move both the thick, slippery top layer and the bottom layer evenly through the machine, ensuring perfect points and a flat surface.
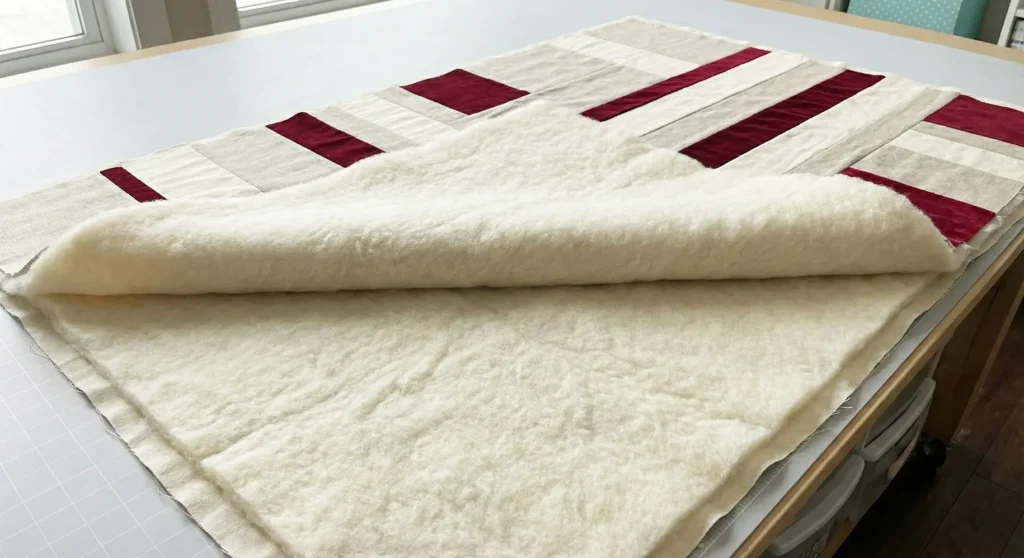
Part 3: Creating the “Weighted Blanket” Feel
A luxury winter quilt should feel substantial. The interior structure is just as important as the opulent top.
The Wool Advantage
For this design, bypass standard cotton batting and choose a resilient, medium-loft wool batting.
Wool is the perfect partner for velvet. It has a natural springiness that supports the heavier weight of the velvet top without collapsing and looking flat. Wool provides exceptional, breathable warmth, creating that substantial, comforting, “weighted blanket” feel that is incredibly soothing on cold nights.
Part 4: The Finishing Touches
How you finish the quilt determines how soft it remains.
Back it with Silkiness
Your quilt top is textured and rich; your backing should be calm and smooth. Finish the quilt with a high-thread-count cotton sateen backing. The silky finish of sateen feels luxurious against the skin and prevents friction against pajamas, allowing you to move freely under the heavy quilt.
Quilt with Minimal Density
When quilting a velvet project, “less is more.” Dense, intricate quilting patterns will crush the velvet pile you worked so hard to preserve, stiffening the quilt and ruining the soft texture.
Instead, use a “stitch-in-the-ditch” technique along the seam lines, or use widely spaced straight lines across the quilt. This minimal approach secures the heavy layers effectively while ensuring the quilt remains pliable, soft, and drapeable.
Strategic Opulence: A Budget Consideration
Velvet is expensive, but a little goes a long way. You don’t need yards of it to make an impact.
Consider using standard quilting cotton for the background and the star points, and reserve the luxurious velvet solely for the center square of each star. You can often buy velvet remnants or “fat quarters” that are perfect for this application, giving you the luxurious look and feel for a fraction of the cost of yardage.

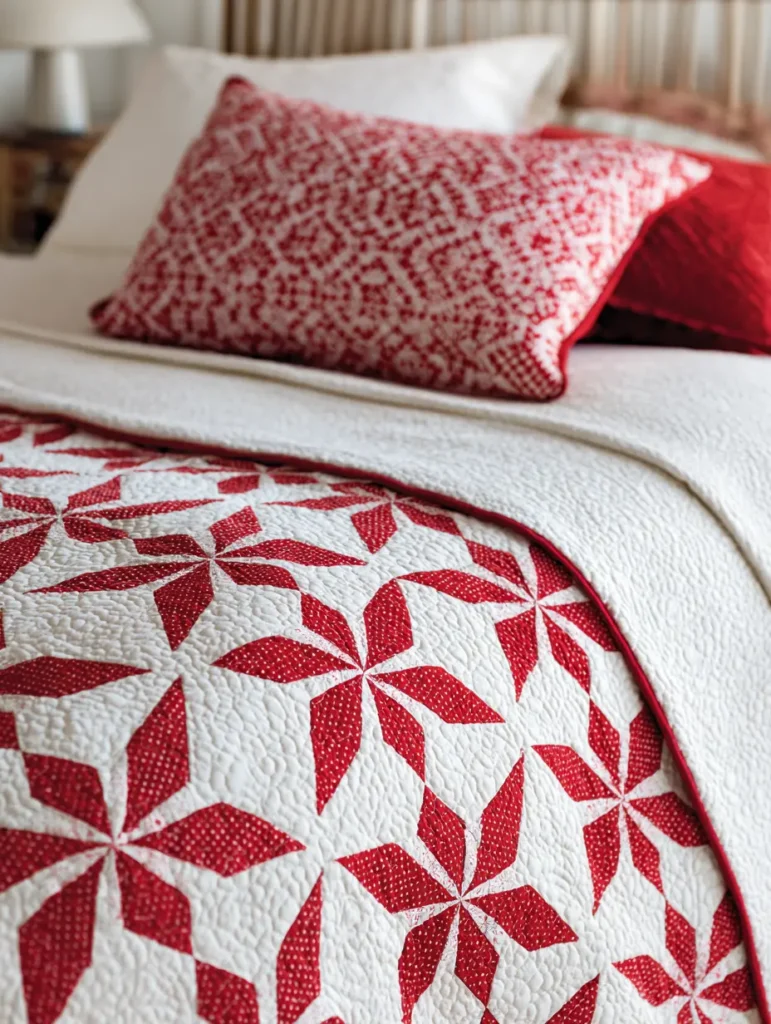
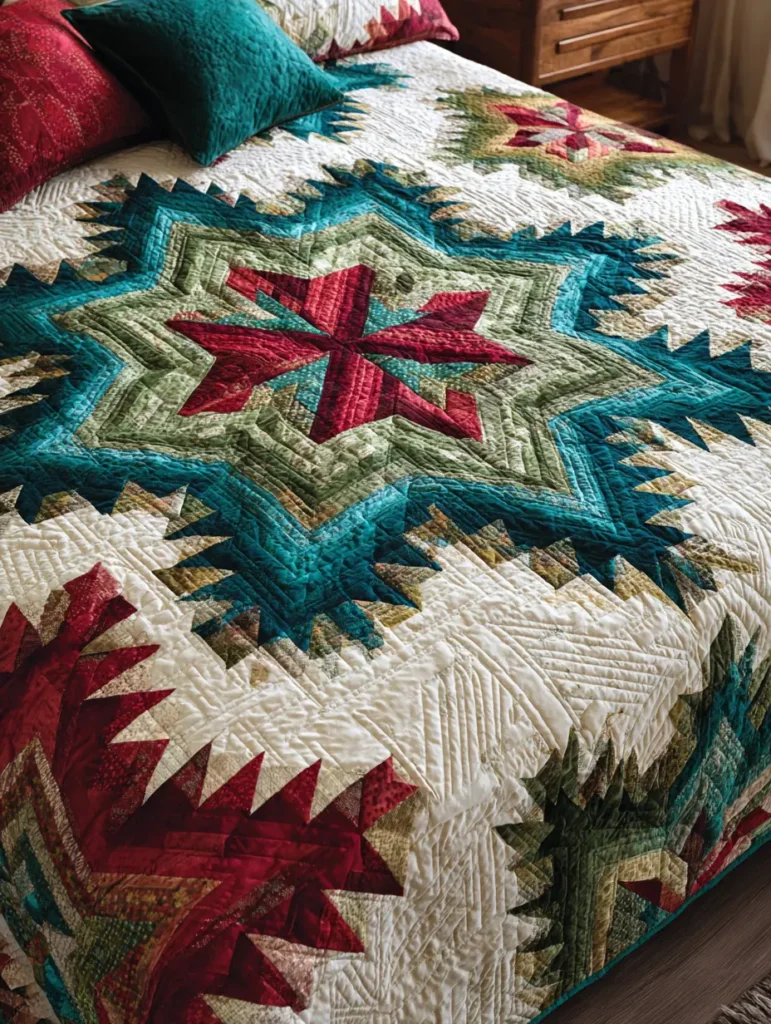
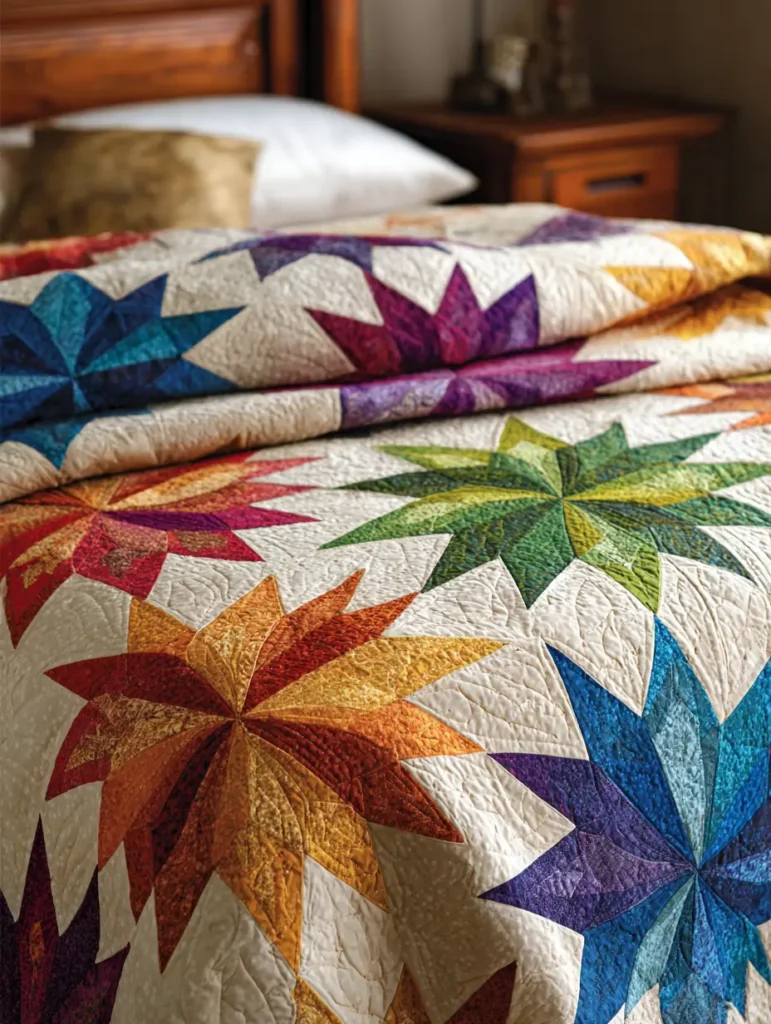
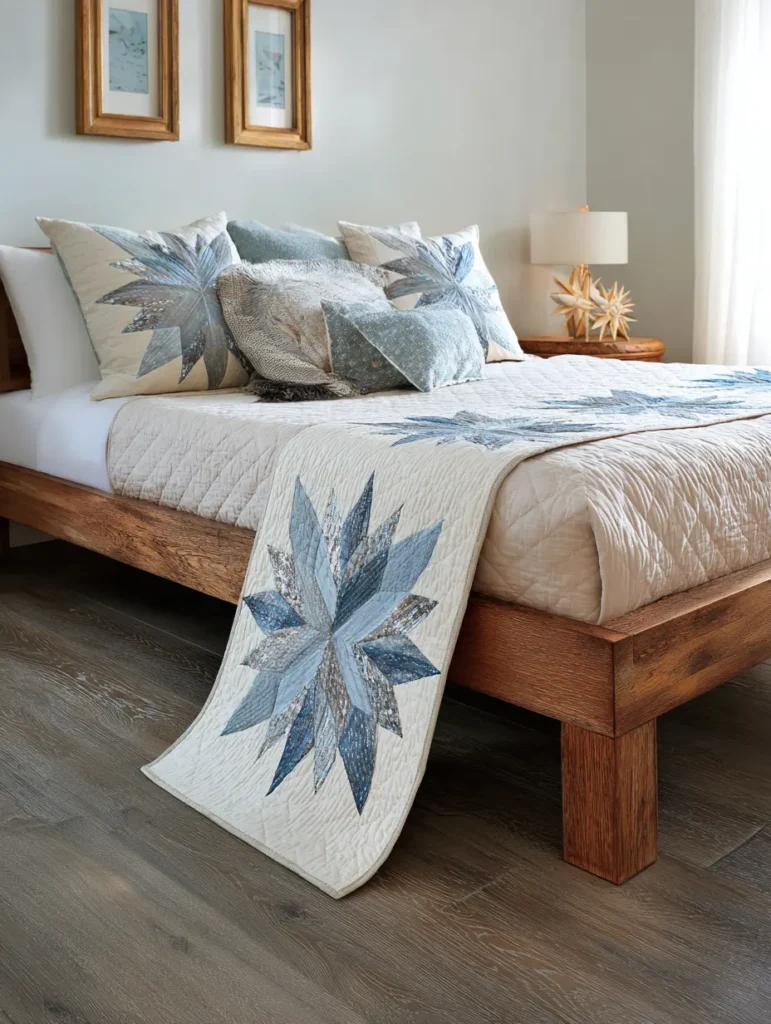
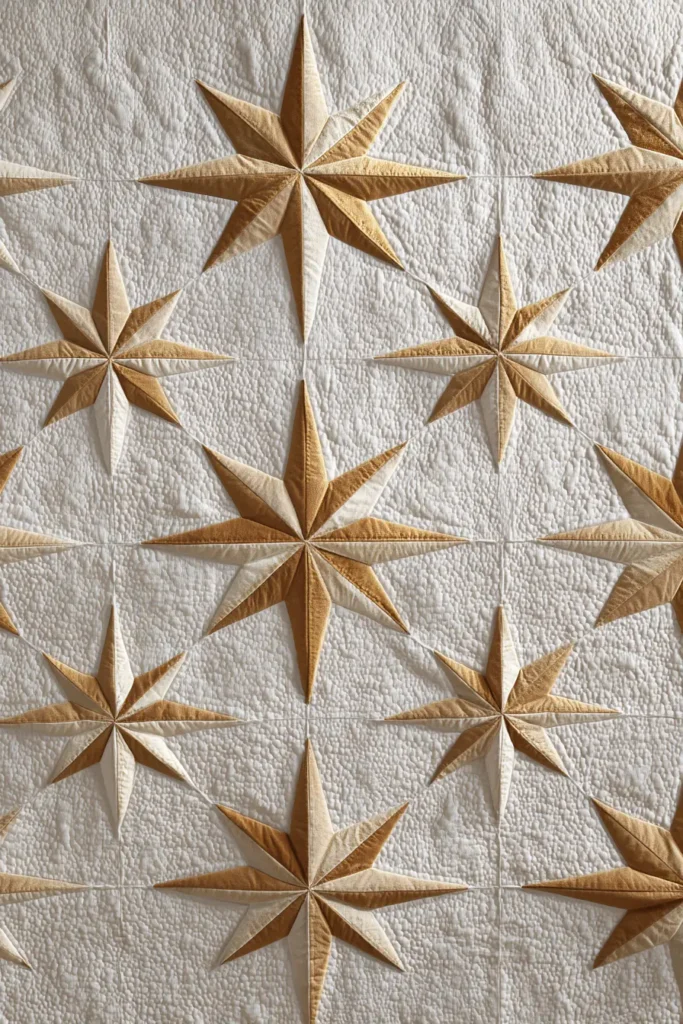
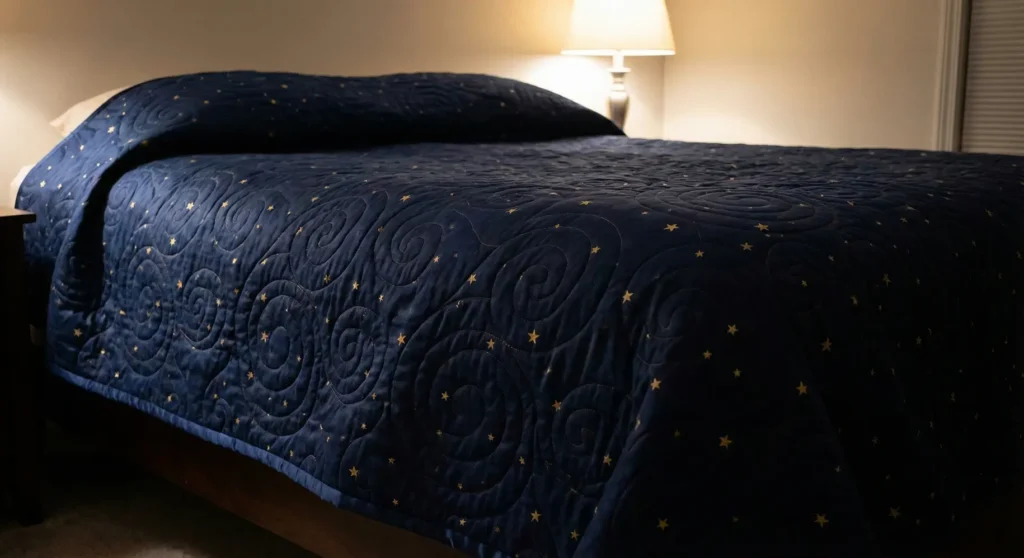
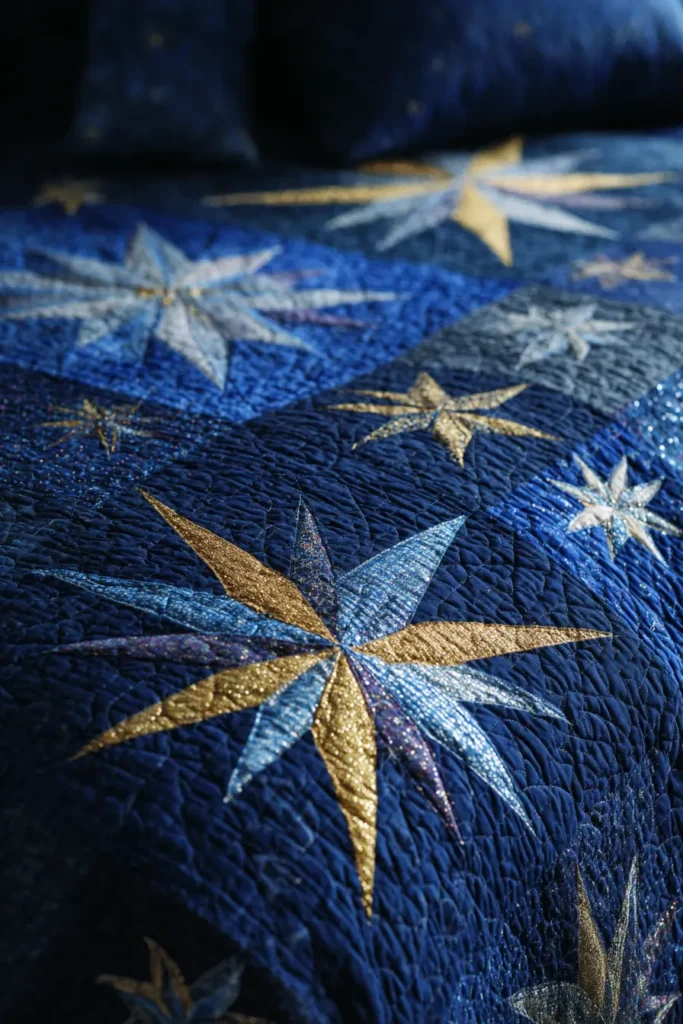
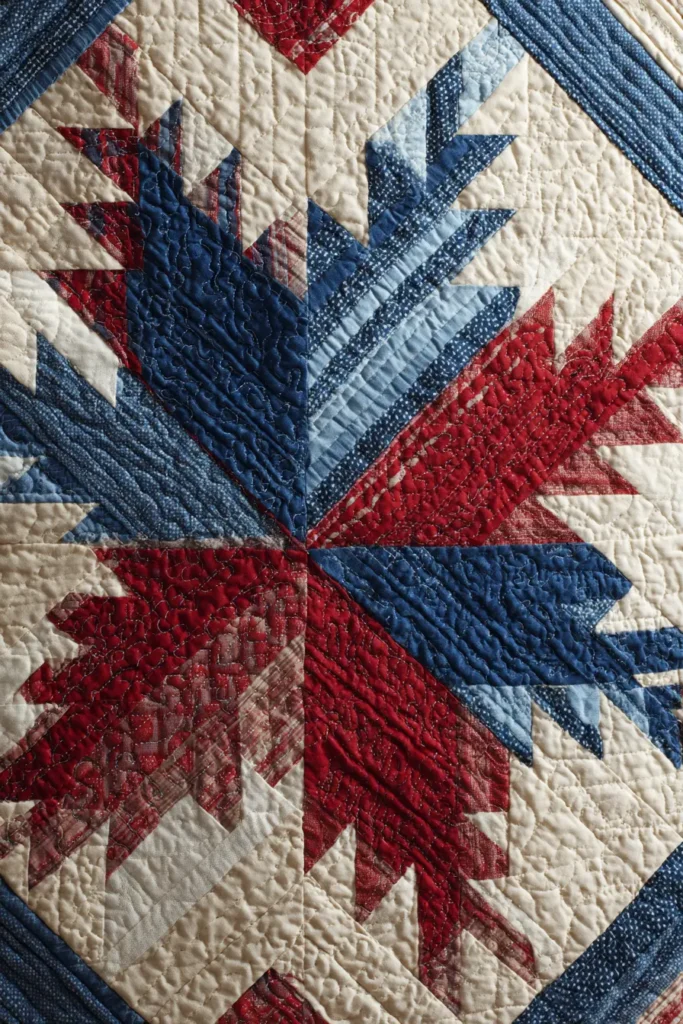
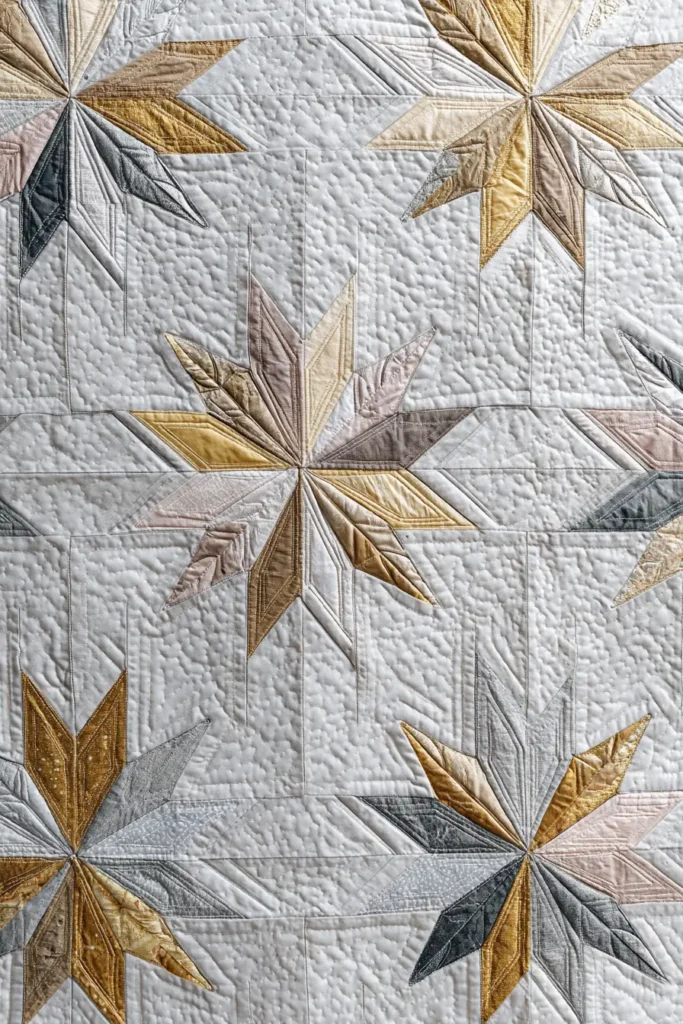
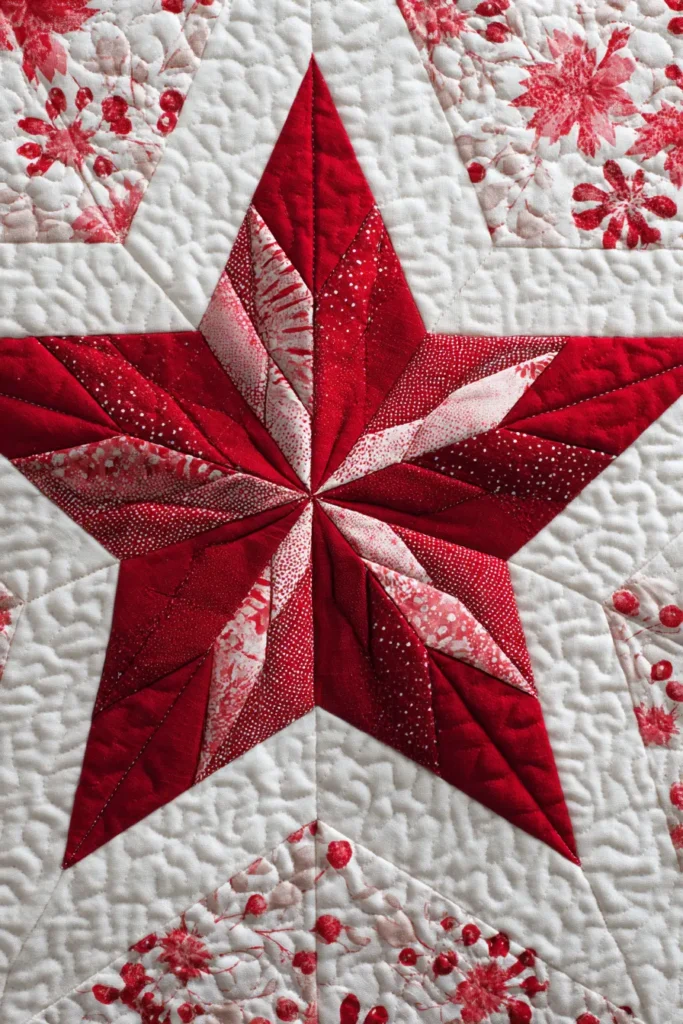
15. Starry Night-Inspired Christmas Quilt Themes
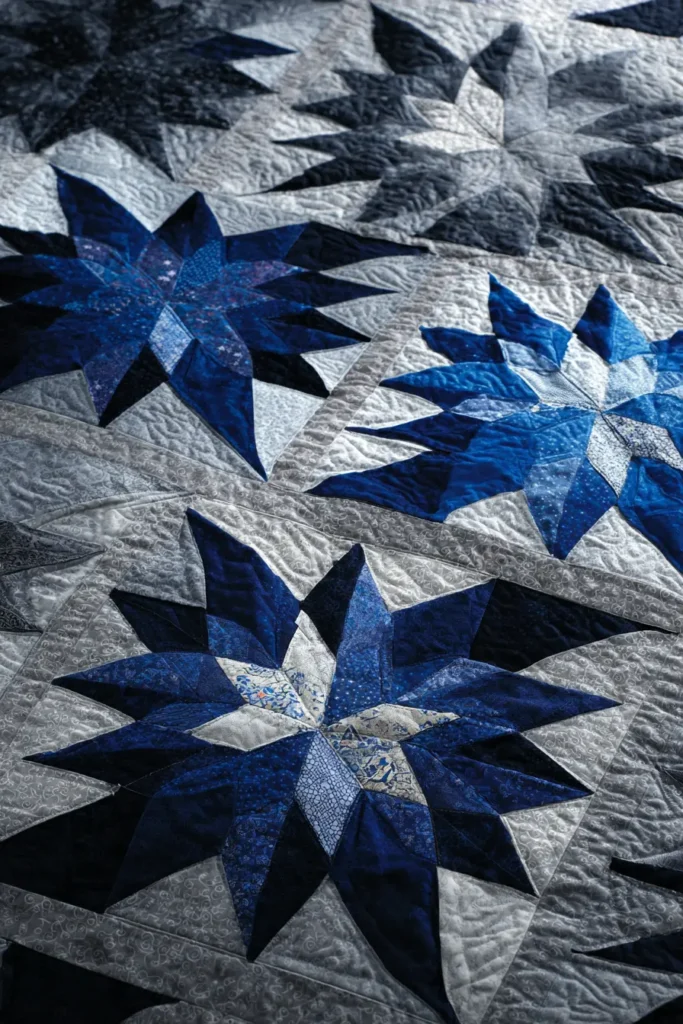
Capture the silent peace of a midwinter night by using a palette of deep indigo, midnight blue, and shimmering gold to create a sophisticated, calming atmosphere perfect for sleep. This design utilizes negative space and rich, dark tones to reduce visual stimulation, creating a tranquil environment that encourages deep relaxation during the bustling holiday season.
Step 1: Select Smooth Sateens.
Choose cotton sateen in deep navy or midnight blue for the background to create a silky, cool surface that mimics the night sky. Avoid fabrics with rough glitter or heavy metallic paint overlays, as these add an abrasive texture that can scratch the skin and disrupt a peaceful night’s rest.

Step 2: Piece Scatter Stars.
Construct small, variable-sized star blocks and arrange them irregularly across the dark background to mimic a natural constellation. Pressing the seams open on these smaller blocks is crucial to prevent complex, lumpy intersections, ensuring the quilt remains smooth and comfortable to lie on.
Step 3: Layer with Wool Batting.
Use high-quality wool batting for a lofty, breathable warmth that regulates body temperature throughout the night. Wool’s natural resilience creates a plush, cloud-like feel that enhances the sensation of sleeping under a heavy, protective sky.

Step 4: Quilt with Swirls.
Use free-motion quilting to stitch large, open swirls or “wind” patterns across the negative space. These gentle curves break up the fabric’s straight grain, keeping the quilt top flexible and soft so it drapes effortlessly over the body.

Step 5: Bind with Silk-Blend Fabric.
Finish the edges with a matching dark blue silk-cotton blend binding. This ultra-smooth edge feels luxurious and cool against the face, adding a final touch of sensory comfort to the blanket.
Pro Design Tip:
While adding sparkle is tempting, avoid using “glow-in-the-dark” thread for the quilting. These threads are often made of stiff, synthetic nylon that feels like fishing line against the skin, making the quilt uncomfortable to snuggle with.
Budget Consideration:
Deeply colored quilt backings can be expensive. Use a high-quality navy blue flat sheet (specifically high-thread-count cotton) as the backing; it provides a seamless, smooth finish that is often softer and cheaper than wide quilting fabric.

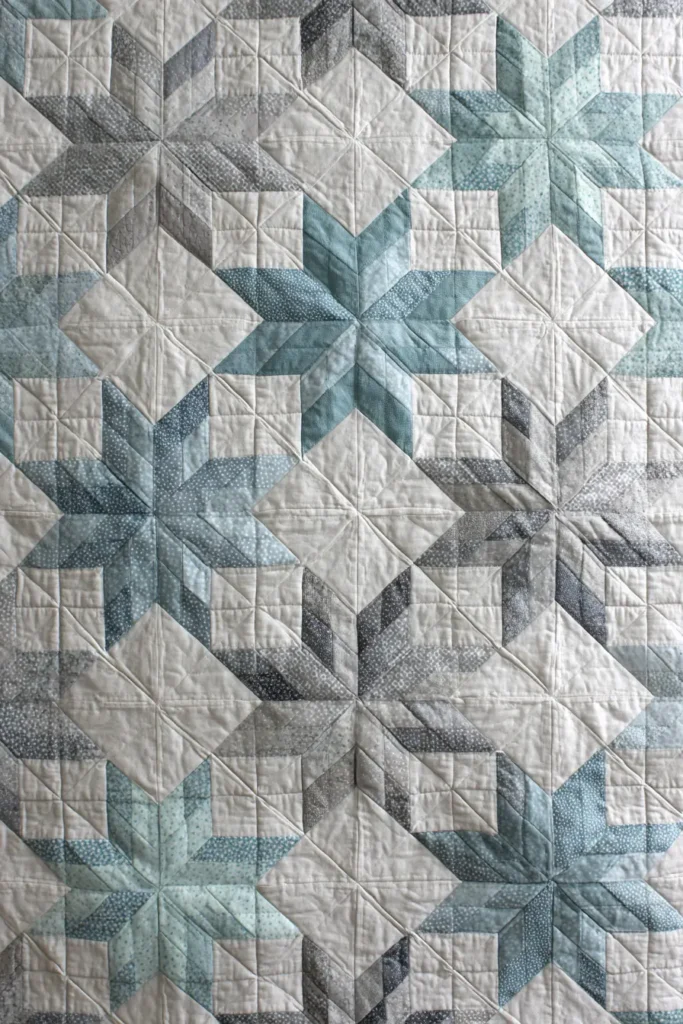
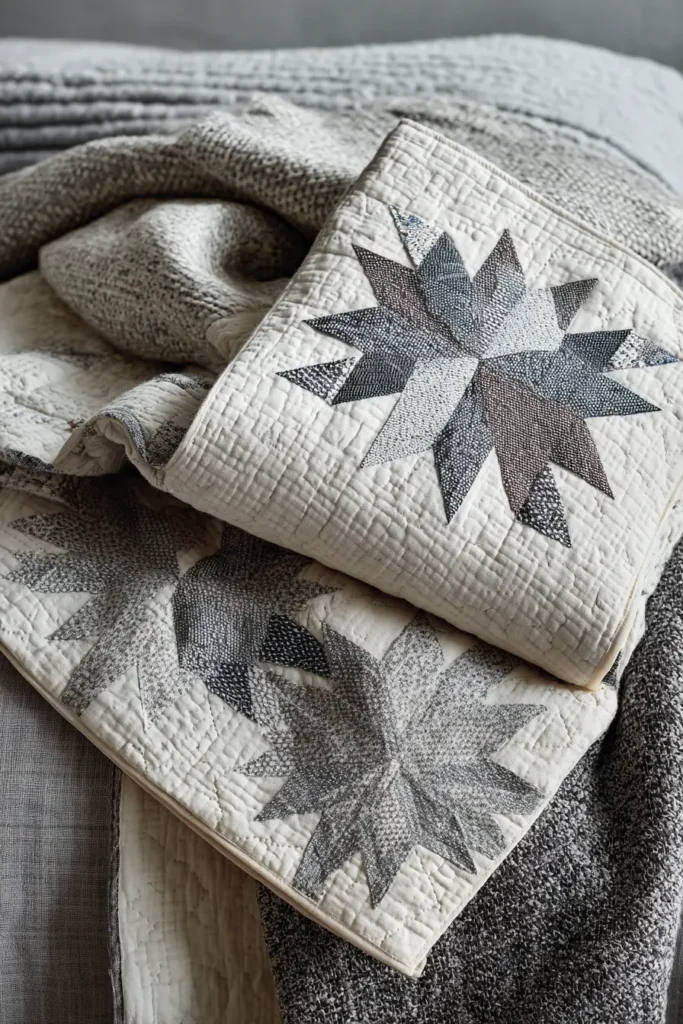
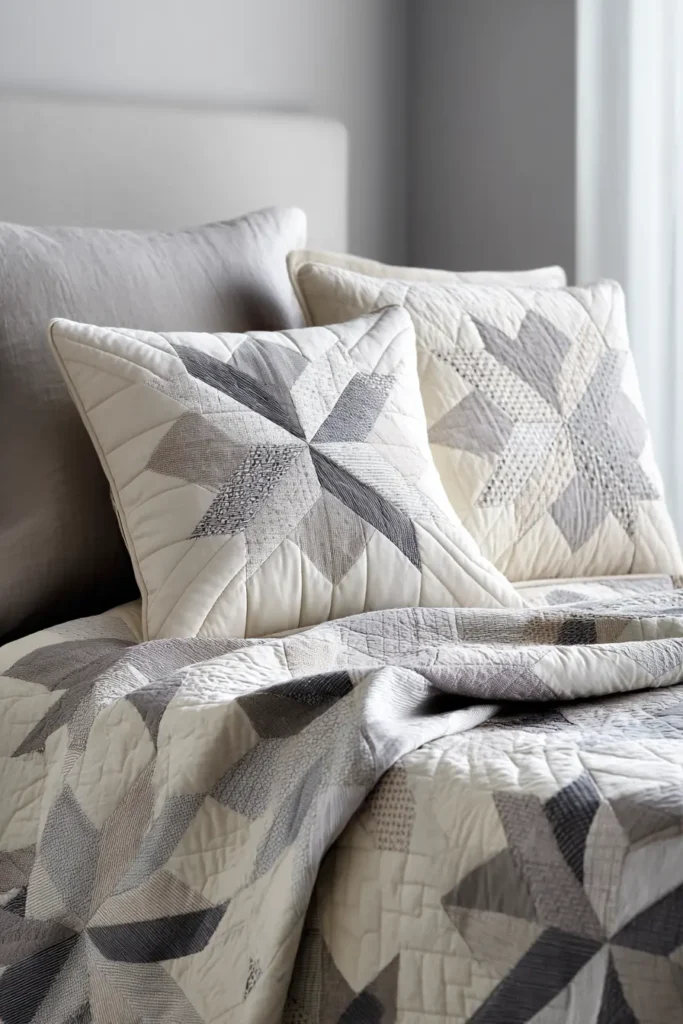
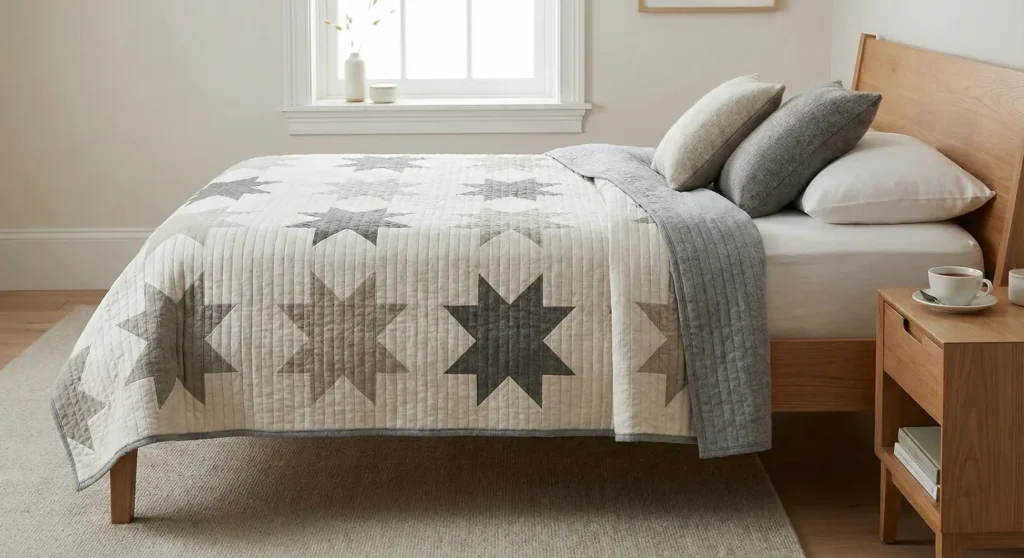
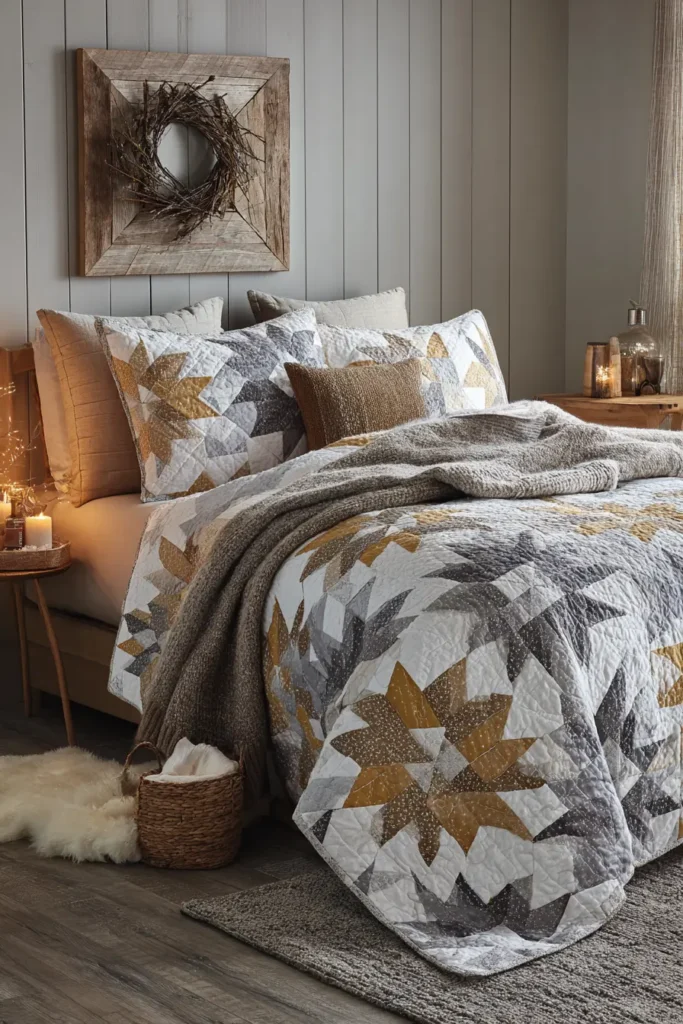
Embrace the concept of “Hygge” by combining clean, Nordic geometry with soft textures and a muted palette of slate grey, winter white, and deep berry. This design focuses on simplicity and physical warmth, creating a calm, uncluttered visual space that encourages deep relaxation and peaceful sleep.
Step 1: Choose Softer Prints.
Select high-quality solids or low-volume prints in muted tones rather than loud, busy holiday patterns. These less busy fabrics reduce visual noise, creating a serene environment that helps the mind unwind and prepares the body for rest.
Step 2: Construct Nordic Stars.
Assemble large-scale star blocks using Half-Square Triangles to create sharp, clean points with minimal fuss. Pressing the seams open during construction is essential to eliminate bulky ridges, ensuring the quilt top remains flat and smooth against your body.
Step 3: Layer with Wool Batting.
Sandwich the layers with a high-loft wool batting, which is traditional for Nordic climates. Wool provides superior breathability and a luxurious, heavy drape that mimics a warm hug, keeping you cozy without overheating.
Step 4: Quilt with Vertical Lines.
Machine quilt simple, straight vertical lines spaced 2 to 3 inches apart across the entire quilt. This minimal stitching style keeps the batting airy and the quilt flexible, avoiding the stiffness that comes from dense, intricate quilting designs.
Step 5: Bind with Flannel.
Finish the edges with a soft grey flannel binding. The brushed texture of the flannel provides a gentle, warm finish that feels soothing against the skin when pulled up near your face on cold nights.
Pro Design Tip:
Use woven brushed cotton for the background fabric to add texture, but avoid stiff linen-canvas blends. While canvas blends look rustic and durable, they feel rough and abrasive against sensitive skin, whereas brushed cotton offers the same matte aesthetic with a much softer, sleep-friendly hand.
Budget Consideration:
A minimalist design relies heavily on the background fabric. Use wide-back fabric (108-inch width) for the white sections; buying one large cut is often cheaper per inch than buying multiple yards of standard 44-inch fabric and requires no piecing for the back.
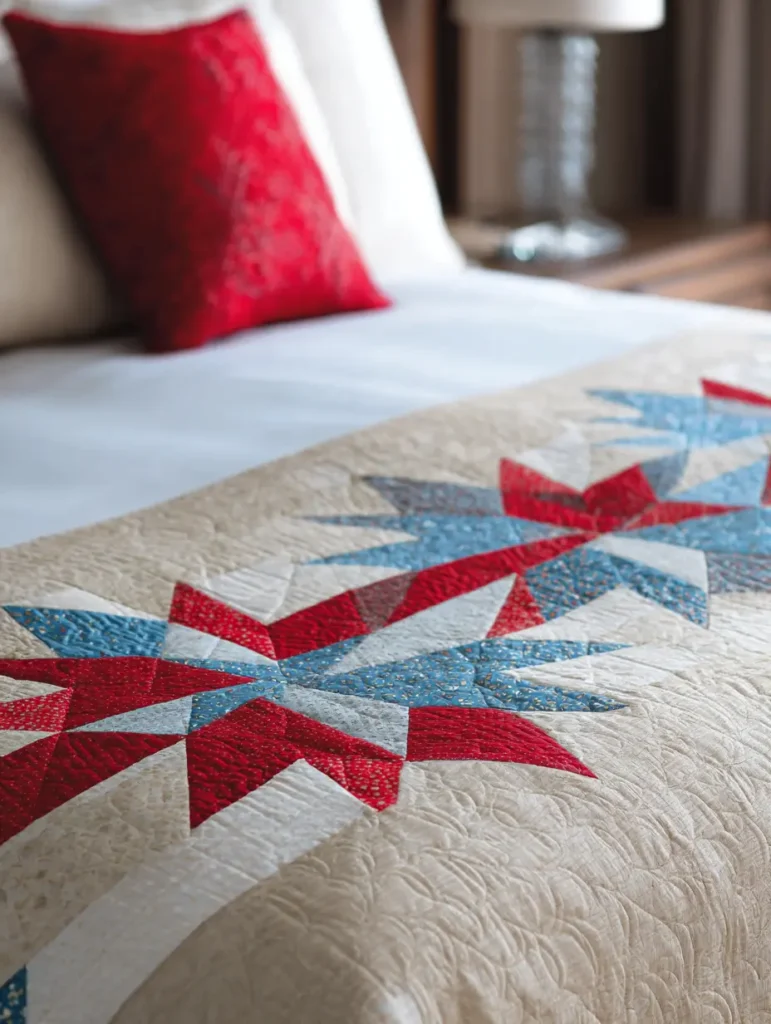
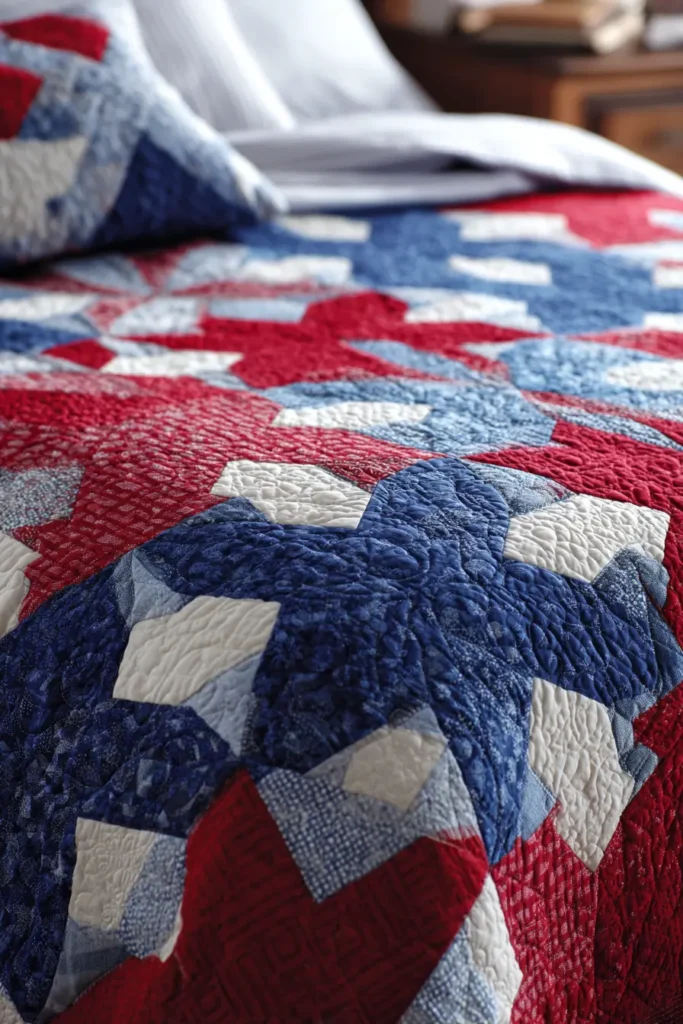
17. Patriotic Christmas Star Quilt in Red, White, and Blue


Merge national pride with holiday warmth by shifting the palette to deep cranberry, midnight navy, and antique cream for a sophisticated, heritage look. This design moves away from the harsh brightness of a summer flag, utilizing softer, woven textures to create a bed covering that feels like a warm, protective embrace during the cold winter months.
Step 1: Select Heritage Fabrics.
Choose soft chambrays, woven plaids, or brushed cottons in deep reds and blues. Avoid stiff, glazed flag-print fabrics or heavy canvas, as the thick dye and tight weave make these materials rigid and unbreathable, whereas woven fabrics breathe well and drape softly over the body.
Step 2: Construct Liberated Stars.
Piece large, modern stars using an improvisational technique that allows for slightly irregular points. Using larger fabric cuts reduces the number of dense, bulky seam intersections, ensuring the quilt top remains flexible and comfortable to lie under.
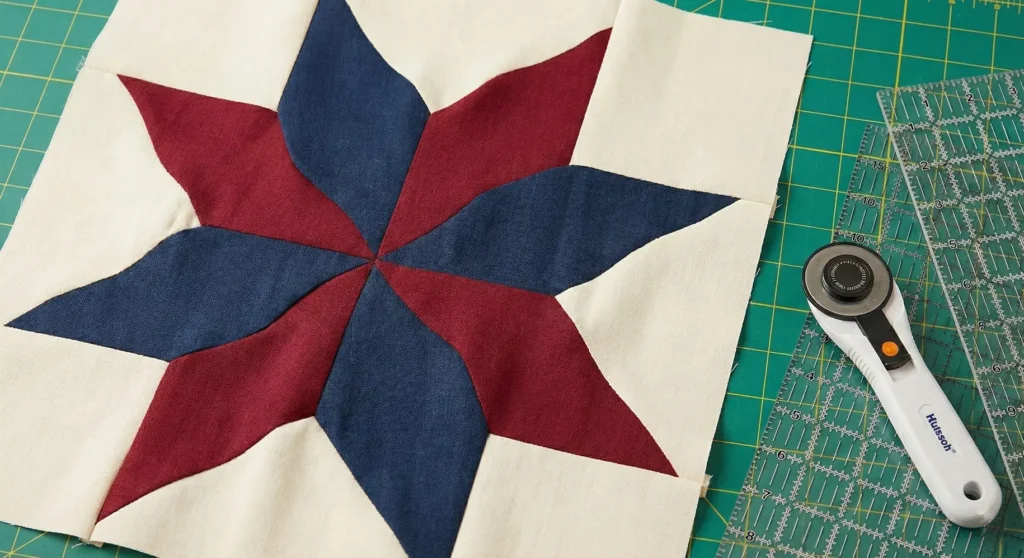
Step 3: Layer with Bamboo Batting.
Sandwich the layers with bamboo-cotton blend batting, which offers a heavy, luxurious drape similar to that of a weighted blanket. This natural fiber blend regulates body heat efficiently, keeping you toasty without the sweaty, trapped-heat feeling of synthetic polyester.
Step 4: Quilt with Straight Lines.
Use a walking foot to quilt simple straight lines across the width of the quilt, spaced about 2 to 3 inches apart. This moderate density secures the batting while keeping the quilt lofty and pliable, avoiding the stiffness that results from dense, intricate stitching.
Finish the edges with a binding made from high-quality navy flannel. The brushed surface creates a velvety, soft frame for the quilt that feels incredibly soothing against your hands or face when pulling the covers up at night.
Pro Design Tip:
Incorporate wool accents for the star centers, but avoid using heavy denim. While denim fits the color scheme, it is heavy and stiff, and it takes forever to dry, making the quilt feel like a heavy tarp rather than a cozy blanket.
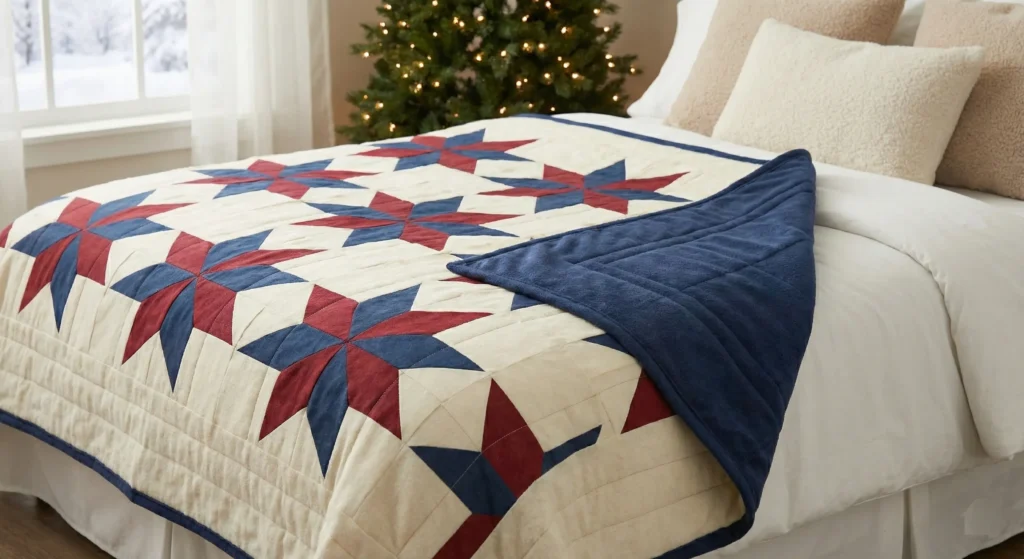
Budget Consideration:
This style is perfect for upcycling old plaid flannel shirts. The red and blue checks from worn-in shirts are already incredibly soft and free, adding instant “lived-in” comfort to your quilt for zero cost.
18. Cozy Buffalo Plaid and Star Patchwork Bedding
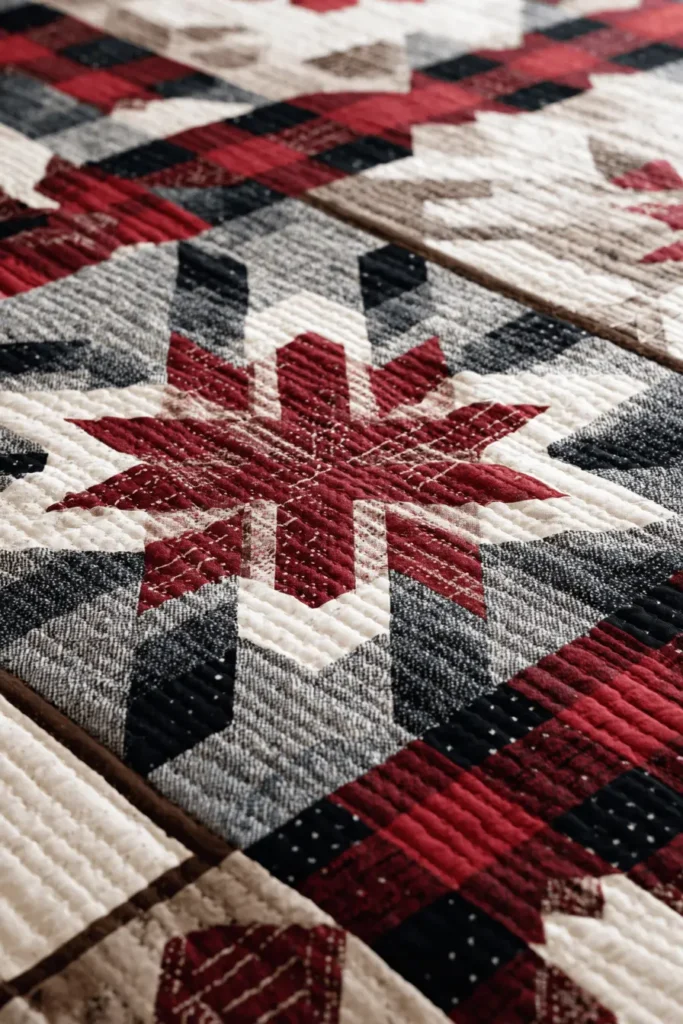
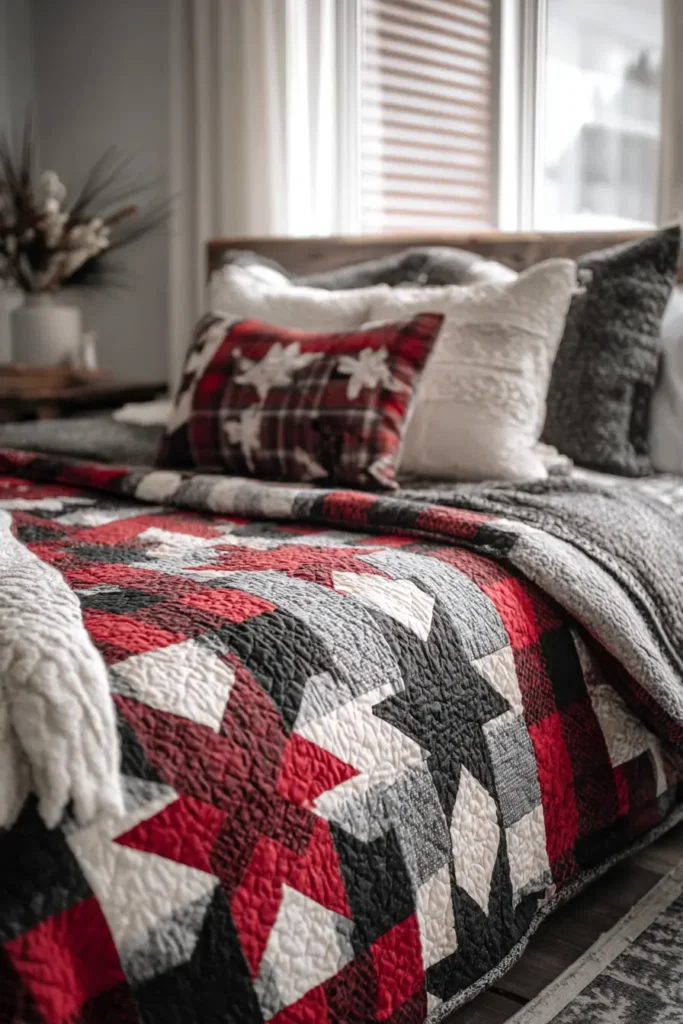
Combine the rustic charm of lumberjack plaid with modern geometric stars to create a bed cover that is rugged, warm, and inviting. This design relies on the inherent softness of flannel fabrics to create a “winter cabin” atmosphere, offering a heavy, comforting weight that helps you fall asleep faster on cold nights.
Step 1: Select Woven Flannels.
Choose yarn-dyed woven flannels (where the threads themselves are colored) rather than stiff printed cottons. Avoid “printed” flannels, where the pattern is stamped on top with ink; these often feel stiff and scratchy against the skin, whereas woven flannels are breathable and get softer with every wash.
Step 2: Piece Large Blocks.
Cut oversized squares and triangles to integrate the stars into the plaid grid layout. Using larger pieces minimizes the bulk of the thick flannel seams, ensuring the quilt remains flexible and drapes heavily over the body rather than standing up stiffly.

Step 3: Layer with Wool Batting.
Sandwich the heavy flannel top with a high-loft wool batting. This combination creates maximum insulation and breathability, regulating your body temperature perfectly so you stay warm without waking up in a sweat.
Step 4: Quilt with Diagonal Crosshatch.
Stitch simple diagonal lines that follow the plaid pattern’s grid, spacing them widely (3 to 4 inches). This minimal quilting sinks into the deep pile of the flannel, securing the layers while keeping the blanket fluffy and pliable.
Step 5: Bind with Bias Flannel.
Finish the edges with a binding made from the same soft flannel cut on the bias. The bias cut allows the thick fabric to stretch smoothly around the corners, creating a smooth, rounded edge that is comforting to hold.
Pro Design Tip:
You can mix in cotton velvet for the star centers to add luxury, but avoid using minky or plush fleece for the patchwork blocks. Minky stretches significantly more than flannel, leading to warped, puckered seams that create lumpy ridges in the quilt top, which can be uncomfortable to lie on.

Budget Consideration:
Buffalo plaid is a typical pattern in clothing. Visit thrift stores for XXL flannel shirts in matching colors; you can harvest large amounts of pre-softened, high-quality fabric from the backs of these shirts for a fraction of the price of bolt fabric.
19. Bohemian Whimsical Star Quilt Designs
Infuse your bedroom with a relaxed, artistic vibe by mixing eclectic patterns and rich, saturated colors in a free-spirited star layout. This style prioritizes comfort through soft, washed textures and loose construction, creating a bed cover that feels like a well-loved heirloom rather than a stiff display piece.
Step 1: Curate Soft Textures.
Gather a mix of soft cotton voiles, washed linens, and lightweight batiks in jewel tones. Avoid heavy upholstery fabrics or stiff canvas prints, as they lack the fluid drape needed for a cozy, wrap-around quilt and can feel rough against bare arms.
Step 2: Improvise the Stars.
Use an “improv piecing” technique to create wonky, uneven stars without measuring perfectly. This relaxed method prevents the tension issues common in rigid geometric patterns, resulting in a flexible quilt top that molds gently to your body.
Step 3: Layer with Bamboo Batting.
Baste the quilt with a bamboo or bamboo-silk blend batting. This natural fiber offers incredible drape and breathability, ensuring the quilt feels heavy and comforting without trapping excess heat during the night.
Step 4: Big Stitch Hand Quilt.
Use thick pearl cotton thread to hand quilt large, organic shapes or lines across the surface. The large stitches leave the batting lofty and the layers loose, enhancing the “squish factor” and making the quilt significantly softer than machine-stitched alternatives.
Step 5: Bind with Scrappy Fabrics.
Finish the edges with a “scrappy binding” made from leftover strips of your softest fabrics sewn together. This creates a visually playful edge that feels broken-in and smooth to the touch, eliminating the rigid frame of a standard single-fabric binding.
Pro Design Tip:
Incorporate a few pieces of washed silk or cotton lawn into the stars for a touch of luxury. However, avoid using rayon challis for patchwork; while soft, it is incredibly slippery and unstable, leading to distorted blocks and lumpy seams that can ruin the quilt’s smooth feel.
Budget Consideration:
This style thrives on variety, making it perfect for trading scraps with friends. You don’t need to buy yards of new fabric; a collection of small, mismatched scraps creates the best bohemian look for zero cost.

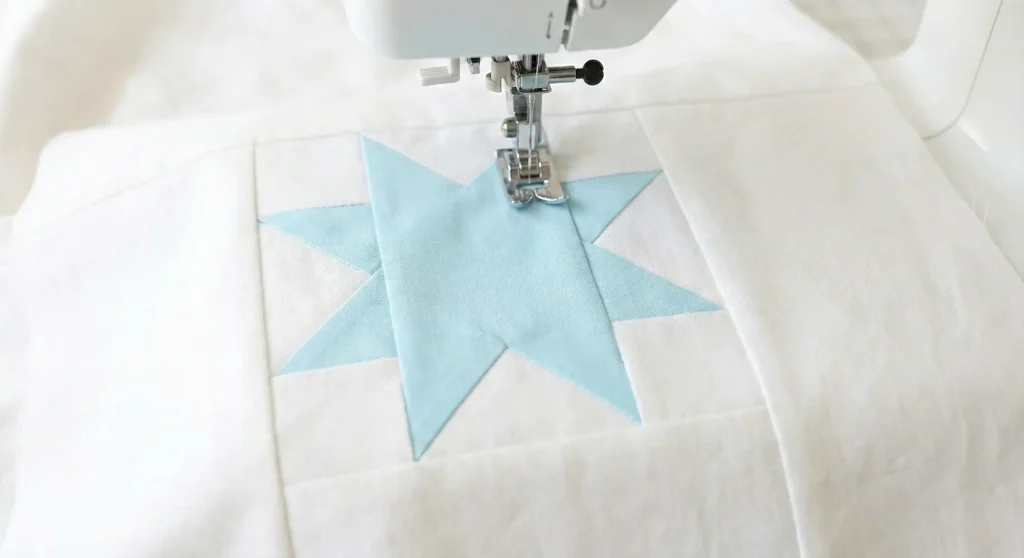
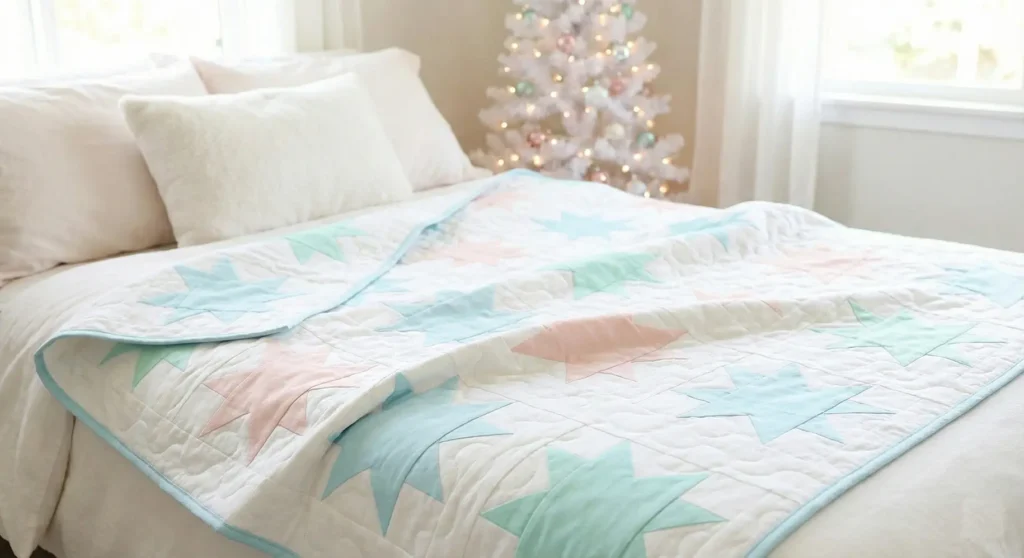
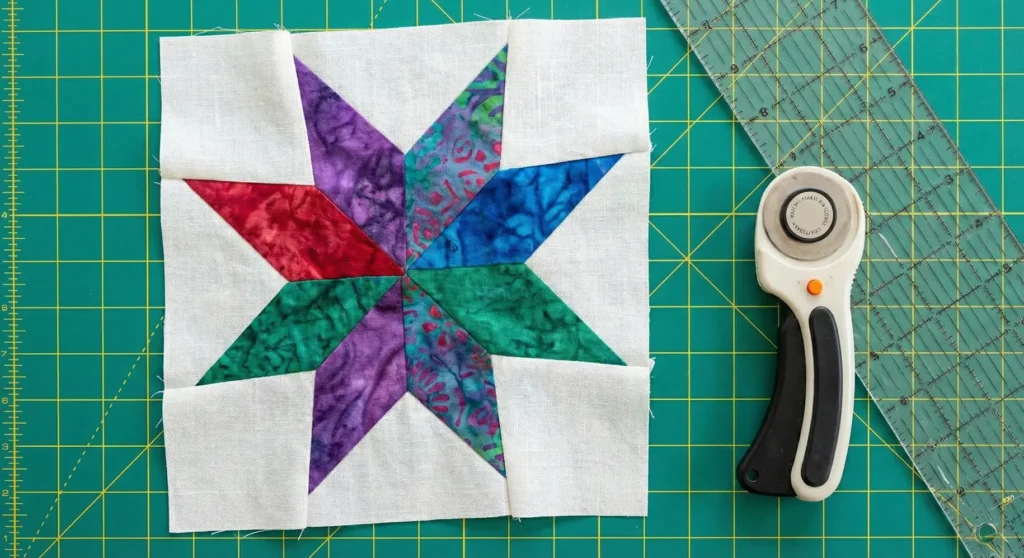
20. Easy DIY Eight-Point Star Quilt Tutorial
Simplify the complex look of a classic LeMoyne or Eight-Point star using modern piecing tricks to create a stunning, flat-lying focal point for your bed. By managing seam bulk effectively, you ensure this geometric centerpiece remains smooth and soft against the body, rather than creating a complex, uncomfortable knot in the middle of the quilt.
Step 1: Select Smooth Solids.
Choose high-thread-count solid cottons or silky cotton lawn for the star points to ensure a premium, soft feel. Avoid fabrics with heavy metallic glitter or stiff screen-printed motifs, as these add rigid texture that can feel scratchy and uncomfortable when the quilt is pulled up near your face.
Step 2: Spin the Center Seams.
As you join the eight diamond or triangle points in the center, “spin” or fan the seam allowances open on the back rather than pressing them all to one side. This crucial technique completely flattens the center intersection, eliminating the complex, lumpy “volcano” of fabric that is annoying to lie on.

Step 3: Layer with Bamboo Blend Batting.
Sandwich the top with a bamboo-cotton blend batting, which offers a luxurious, heavy drape that hugs the bed corners. This natural fiber blend is cooler and more breathable than polyester, ensuring you stay comfortably warm without overheating during the night.
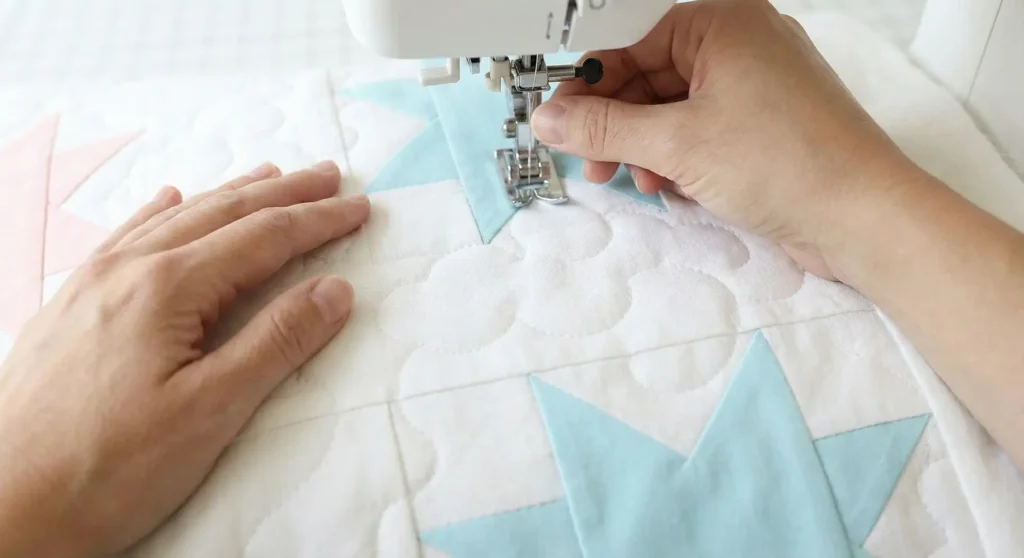
Step 4: Quilt with Radiating Lines.
Use a walking foot to quilt straight lines that radiate outward from the center of the star, extending to the edges of the block. Spacing these lines 2-3 inches apart keeps the batting fluffy and the quilt flexible, avoiding the stiffness that comes from dense, intricate stitching.
Step 5: Bind with Soft Cotton Sateen. Finish the edges with a smooth cotton sateen binding in a contrasting color. The slight sheen and smooth texture of sateen provide a comforting, cool touch against your hands, adding a final note of luxury to the quilt’s perimeter.
Pro Design Tip:
When piecing angled stars, avoid heavily spraying starch on the final block. While starch helps with cutting, leaving too much residue in the finished quilt can attract silverfish and make the fabric feel stiff and paper-like; instead, use a dry iron or steam to press blocks flat for maximum softness.
Budget Consideration:
This pattern looks impressive, but it is actually very economical with fabric. You can make a significant impact by using solid white sheeting for the background squares and just small amounts of colored yardage (or even large scraps) for the star points.
Conclusion
Selecting or creating a Christmas star quilt is a beautiful way to enhance the ambiance of your holiday home, resulting in a piece that offers comfort and beauty season after season. The ideas presented, from a Cozy Buffalo Plaid and Star Patchwork design to a Luxury Velvet-Accented Holiday Star creation, demonstrate that this classic motif can be adapted to any style, from the playful Charming Colorful Rainbow Holiday Star Quilt for Kids to the sophisticated Starry Night-Inspired Christmas Quilt Themes. Each pattern holds the potential to become the cherished centerpiece of your bedroom’s winter transformation.
As you contemplate these 20 Christmas Star Quilting Pattern Ideas, remember that the true magic lies in how the finished piece makes you feel—wrapped in a tapestry of holiday tradition and personal craftsmanship. Whether you are drawn to the structured beauty of a Traditional Folk Art Christmas Star or the gentle whisper of a Soft Pastel Christmas Star Quilt, your choice will cast a warm, festive glow over your holiday nights. So, embrace the creative journey, mix elements from a Patchwork Starburst and a Holiday Log Cabin Star design, and craft a bedroom sanctuary that celebrates the guiding light of the season with every stitch.
