
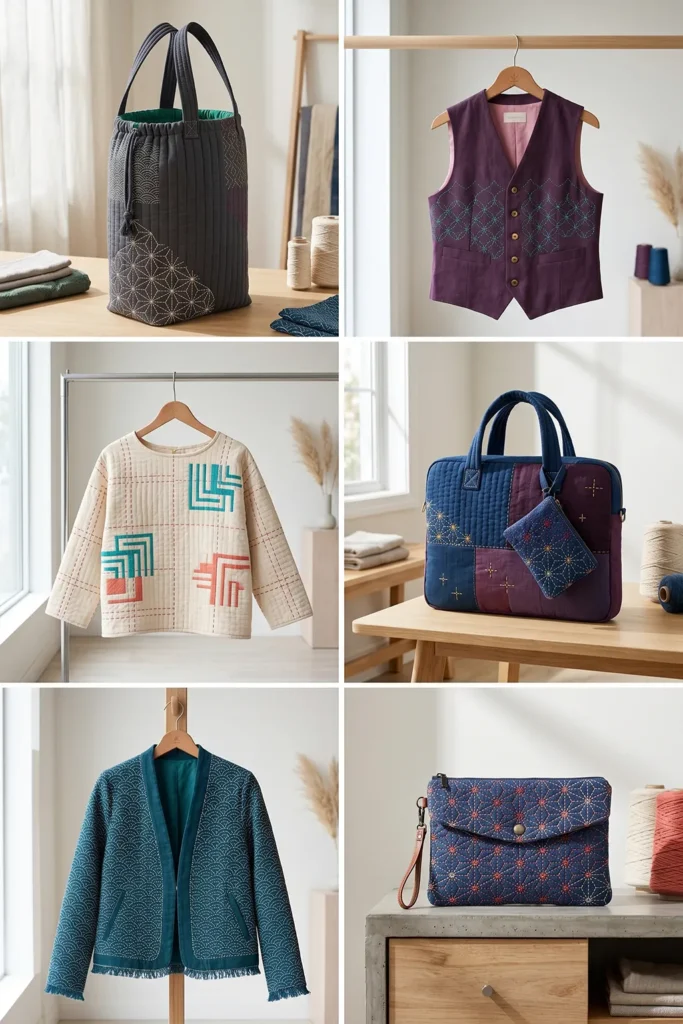
Japanese Quilted Bag Ideas: 7 Elegant Totes & Laundry Hampers for Modern Living
Japanese Quilted Bags: When Textile Heritage Becomes Something You Carry Every Day
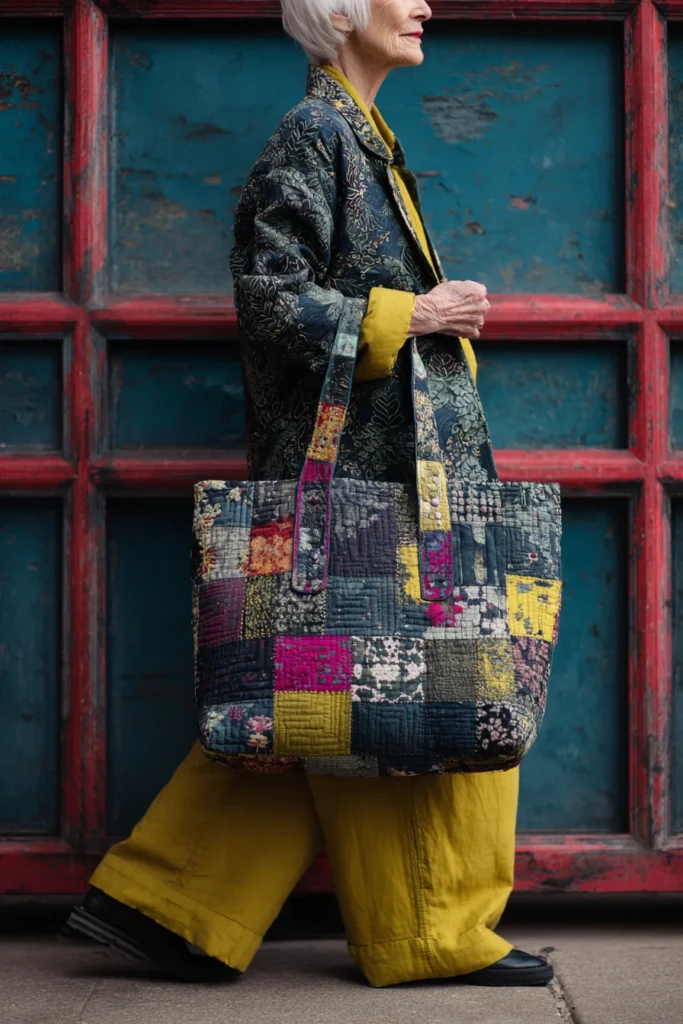
There is a particular satisfaction in an object that is both well-made and genuinely useful – something that does not ask you to choose between craft and function. Japanese quilted bags sit exactly at that intersection, and the reason goes deeper than aesthetics.
The textile traditions behind these bags – sashiko, boro, indigo dyeing, geometric patchwork – were never decorative in origin. Sashiko stitching reinforced worn fabric, extending its working life. Boro transformed scraps and remnants into layered cloth through patient, deliberate needlework. The komebukuro, a small drawstring bag traditionally used to carry rice, applied the same careful construction logic to everyday carrying objects. These were not craft projects. They were practical responses to scarcity, made with enough skill and intention that they became beautiful in the process.
What happens when you make a bag from quilted fabric rooted in those traditions is that the object carries that history with it. The texture is different from a standard tote – softer, more structured, with a surface that responds to light differently at different angles. The construction is more durable than a single-layer fabric. And the visual language—whether sashiko geometric stitching, boro-style patchwork, or deep indigo dyeing—connects the finished bag to a craft lineage that is genuinely worth understanding rather than just borrowing its look.
I find these pieces compelling for the same reason I am drawn to Nakshi Kantha accessories: the making process and the finished object are in an honest relationship with each other. You can see how it was constructed. The stitching is visible, the fabric choices are deliberate, and the bag improves with use rather than wearing out in the anonymous way mass-produced accessories do.
Japanese Quilted Bag Ideas
Contents
- 1 Japanese Quilted Bag Ideas
- 2 1. Elegant Sashiko Stitched Japanese Quilt Tote Bags for Everyday Carry
- 2.1 A Guide to Making Elegant Sashiko Stitched Japanese Quilt Tote Bags for Everyday Carry
- 2.2 Why This Idea Is Worth Making
- 2.3 Materials Needed
- 2.4 Step-by-Step Guide
- 2.4.1 Step 1: Choose a Vibrant Fabric Palette
- 2.4.2 Step 2: Cut the Bag Pieces
- 2.4.3 Step 3: Mark the Sashiko Design
- 2.4.4 Step 4: Layer the Quilt Panels
- 2.4.5 Step 5: Stitch the Sashiko Pattern
- 2.4.6 Step 6: Quilt the Bag Panels
- 2.4.7 Step 7: Make the Handles
- 2.4.8 Step 8: Sew the Exterior Bag
- 2.4.9 Step 9: Sew the Lining
- 2.4.10 Step 10: Attach the Handles
- 2.5 Assembly Section
- 2.6 Final Styling Idea
- 3 2. Sophisticated Indigo Dyed Quilted Tote Bags for Chic Everyday Errands
- 3.1 A Guide to Making Sophisticated Indigo Dyed Quilted Tote Bags for Chic Everyday Errands
- 3.2 Why This Idea Is Worth Making
- 3.3 Materials Needed
- 3.4 Step-by-Step Guide
- 3.4.1 Step 1: Choose the Indigo Fabric
- 3.4.2 Step 2: Cut the Tote Pieces
- 3.4.3 Step 3: Layer the Quilted Panels
- 3.4.4 Step 4: Mark the Quilting Lines
- 3.4.5 Step 5: Quilt the Exterior Panels
- 3.4.6 Step 6: Add a Decorative Indigo Patch
- 3.4.7 Step 7: Make the Handles
- 3.4.8 Step 8: Create the Optional Pocket
- 3.4.9 Step 9: Sew the Exterior Bag
- 3.4.10 Step 10: Sew the Lining
- 3.5 Assembly Section
- 3.6 Final Styling Idea
- 4 3. Eco-Friendly Boro Patchwork Japanese Quilted Shopper Bags for Sustainable Living
- 4.1 A Guide to Making Eco-Friendly Boro Patchwork Japanese Quilted Shopper Bags for Sustainable Living
- 4.2 Why This Idea Is Worth Making
- 4.3 Measurements & Materials Needed
- 4.4 Step-by-Step Guide
- 4.4.1 Step 1: Gather Recycled and Scrap Fabrics
- 4.4.2 Step 2: Create the Patchwork Panels
- 4.4.3 Step 3: Pin and Press the Patchwork
- 4.4.4 Step 4: Stitch the Patches Down
- 4.4.5 Step 5: Add Batting for Quilted Strength
- 4.4.6 Step 6: Quilt Across the Patchwork
- 4.4.7 Step 7: Make the Handles
- 4.4.8 Step 8: Add an Optional Inner Pocket
- 4.4.9 Step 9: Sew the Exterior Bag
- 4.4.10 Step 10: Sew the Lining
- 4.5 Assembly Section
- 4.6 Final Styling Idea
- 5 4. Minimalist Geometric Japanese Quilt Market Totes for Effortless Style
- 5.1 A Guide to Making Minimalist Geometric Japanese Quilt Market Totes for Effortless Style
- 5.2 Why This Idea Is Worth Making
- 5.3 Materials Needed
- 5.4 Step-by-Step Guide
- 5.4.1 Step 1: Choose a Minimalist Color Story
- 5.4.2 Step 2: Cut the Main Tote Panels
- 5.4.3 Step 3: Cut the Geometric Quilt Shapes
- 5.4.4 Step 4: Arrange the Geometric Design
- 5.4.5 Step 5: Stitch the Shapes in Place
- 5.4.6 Step 6: Layer the Quilt Panels
- 5.4.7 Step 7: Quilt the Panels
- 5.4.8 Step 8: Make the Handles
- 5.4.9 Step 9: Sew the Exterior Tote
- 5.4.10 Step 10: Sew the Lining
- 5.5 Assembly Section
- 5.6 Final Styling Idea
- 6 5. Padded Sashiko Quilted Laptop Bags for Elegant and Secure Tech Protection
- 6.1 A Guide to Making Padded Sashiko Quilted Laptop Bags for Elegant and Secure Tech Protection
- 6.2 Why This Idea Is Worth Making
- 6.3 Suggested Finished Size
- 6.4 Materials Needed
- 6.5 Step-by-Step Guide
- 6.5.1 Step 1: Measure Your Laptop
- 6.5.2 Step 2: Choose a Vibrant Japanese-Inspired Palette
- 6.5.3 Step 3: Cut the Main Bag Pieces
- 6.5.4 Step 4: Mark the Sashiko Pattern
- 6.5.5 Step 5: Layer and Quilt the Exterior Panels
- 6.5.6 Step 6: Add Foam Padding
- 6.5.7 Step 7: Make the Closure Flap
- 6.5.8 Step 8: Add the Closure
- 6.5.9 Step 9: Sew the Exterior Bag
- 6.5.10 Step 10: Sew the Lining
- 6.6 Assembly Section
- 6.7 Final Styling Idea
- 7 6. Spacious Japanese Quilted Laundry Bags for Chic Home Organization
- 7.1 A Guide to Making Spacious Japanese Quilted Laundry Bags for Chic Home Organization
- 7.2 Why This Idea Is Worth Making
- 7.3 Suggested Finished Size
- 7.4 Materials Needed
- 7.5 Step-by-Step Guide
- 7.5.1 Step 1: Choose a Bold Japanese-Inspired Color Palette
- 7.5.2 Step 2: Cut the Main Laundry Bag Pieces
- 7.5.3 Step 3: Layer the Quilted Exterior Panels
- 7.5.4 Step 4: Mark the Quilting Design
- 7.5.5 Step 5: Quilt the Exterior Panels
- 7.5.6 Step 6: Add Sashiko or Geometric Details
- 7.5.7 Step 7: Make the Handles
- 7.5.8 Step 8: Sew the Exterior Bag
- 7.5.9 Step 9: Sew the Lining
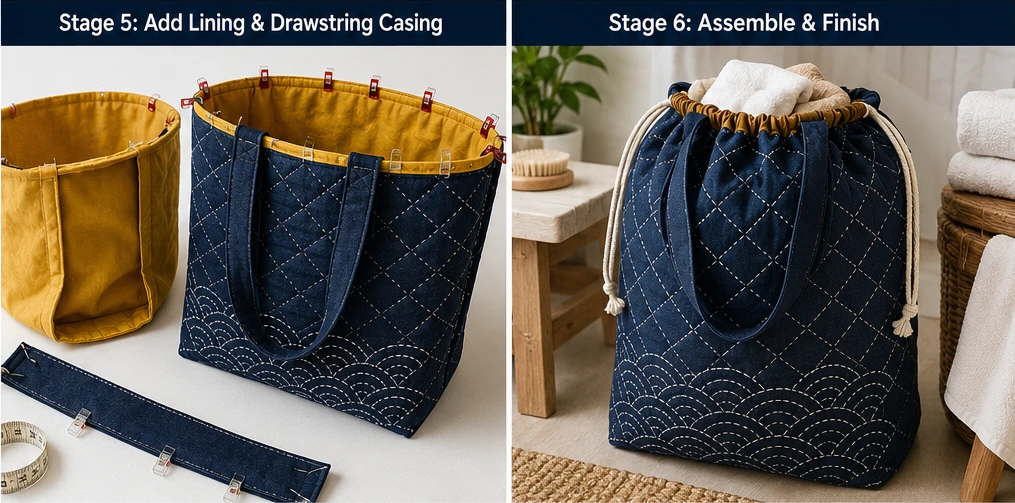
- 7.5.10 Step 10: Make the Drawstring Casing
- 7.6 Assembly Section
- 7.7 Final Styling Idea
- 8 7. Foldable Japanese Quilted Laundry Hampers for Stylish Small Spaces
- 8.1 A Guide to Making Foldable Japanese Quilted Laundry Hampers for Stylish Small Spaces
- 8.2 Why This Idea Is Worth Making
- 8.3 Suggested Finished Size
- 8.4 Materials Needed
- 8.5 Step-by-Step Guide
- 8.5.1 Step 1: Choose a Small-Space Friendly Color Palette
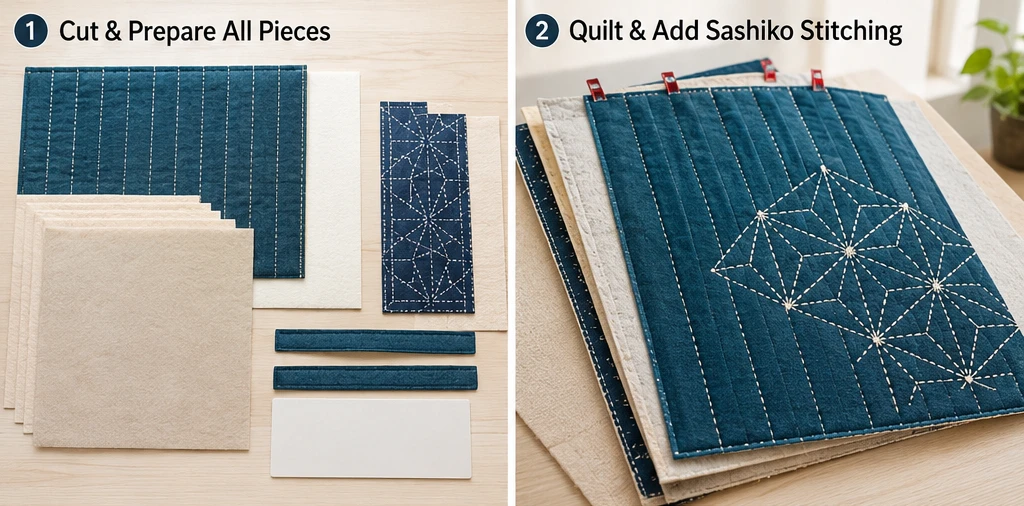
- 8.5.2 Step 2: Cut the Hamper Panels
- 8.5.3 Step 3: Layer and Quilt the Main Panels
- 8.5.4 Step 4: Add Japanese-Inspired Stitching
- 8.5.5 Step 5: Add Flexible Stabilizer Panels
- 8.5.6 Step 6: Make the Handles
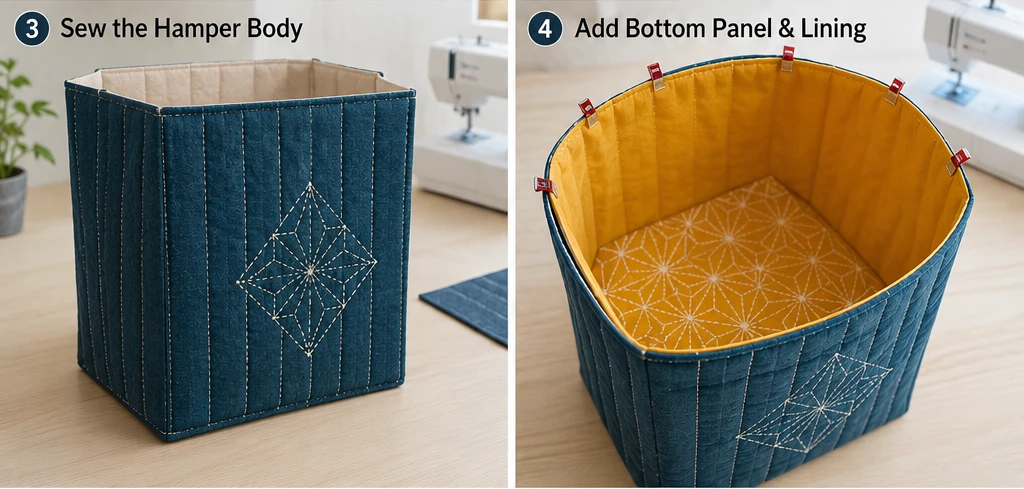
- 8.5.7 Step 7: Sew the Hamper Body
- 8.5.8 Step 8: Attach the Bottom Panel
- 8.5.9 Step 9: Sew the Lining
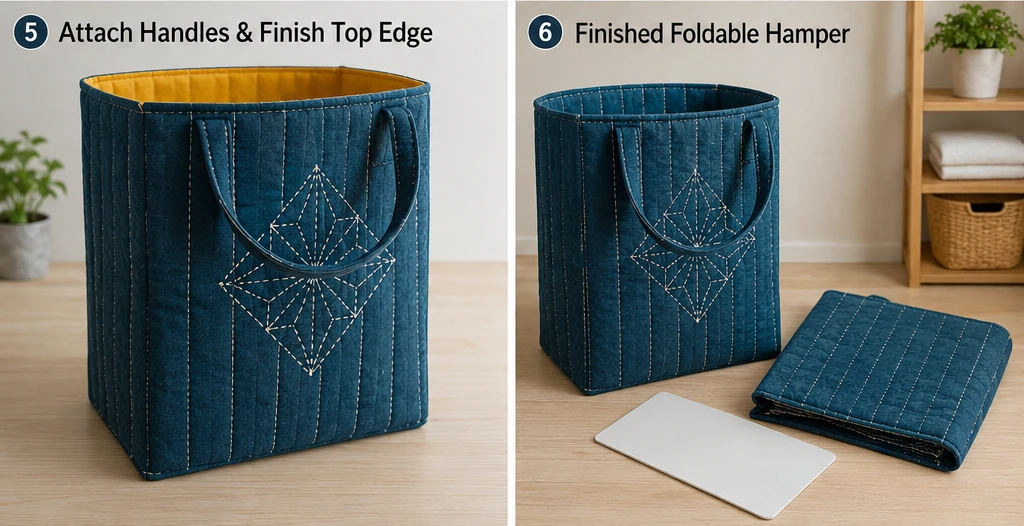
- 8.5.10 Step 10: Add the Handles to the Exterior
- 8.6 Assembly Section
- 8.7 Final Styling Idea
- 9 CONCLUSION
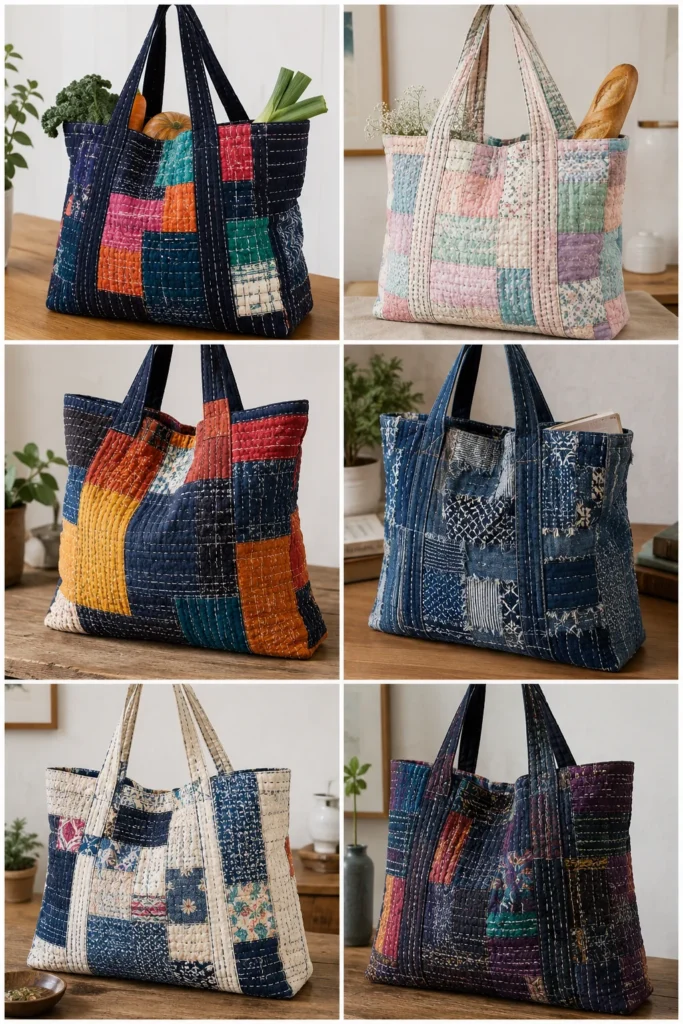
This collection of seven ideas – totes, laptop bags, and laundry hampers – spans from everyday market carriers to home organization pieces. Seven rather than twenty because Japanese quilted bag design rewards depth over volume: each construction approach here does something distinct, and understanding why is more useful than scrolling through variations on the same concept.
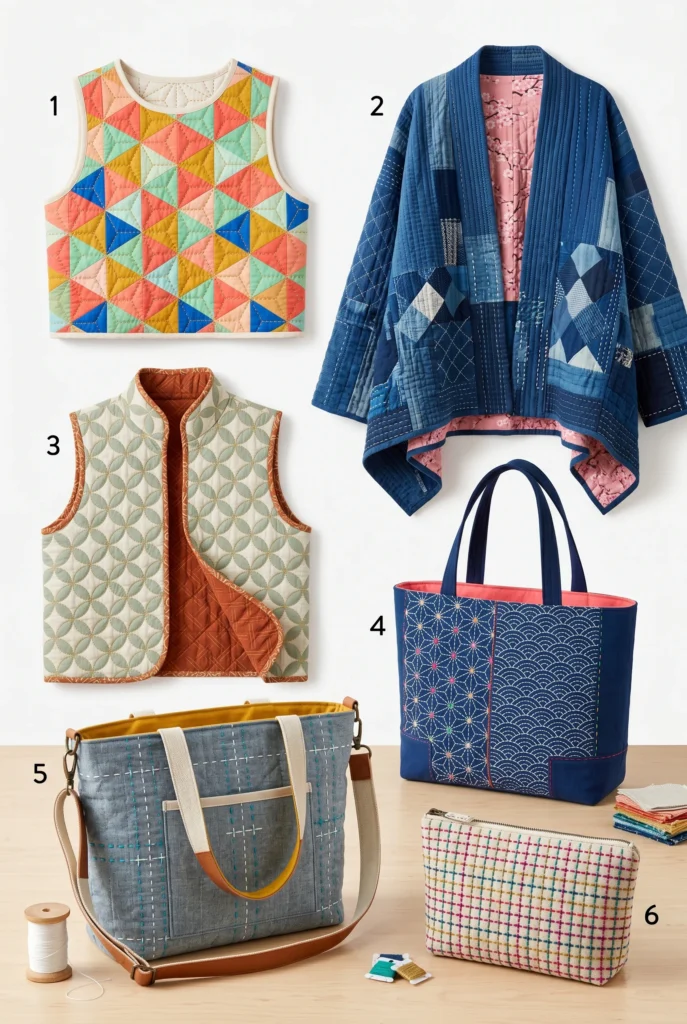
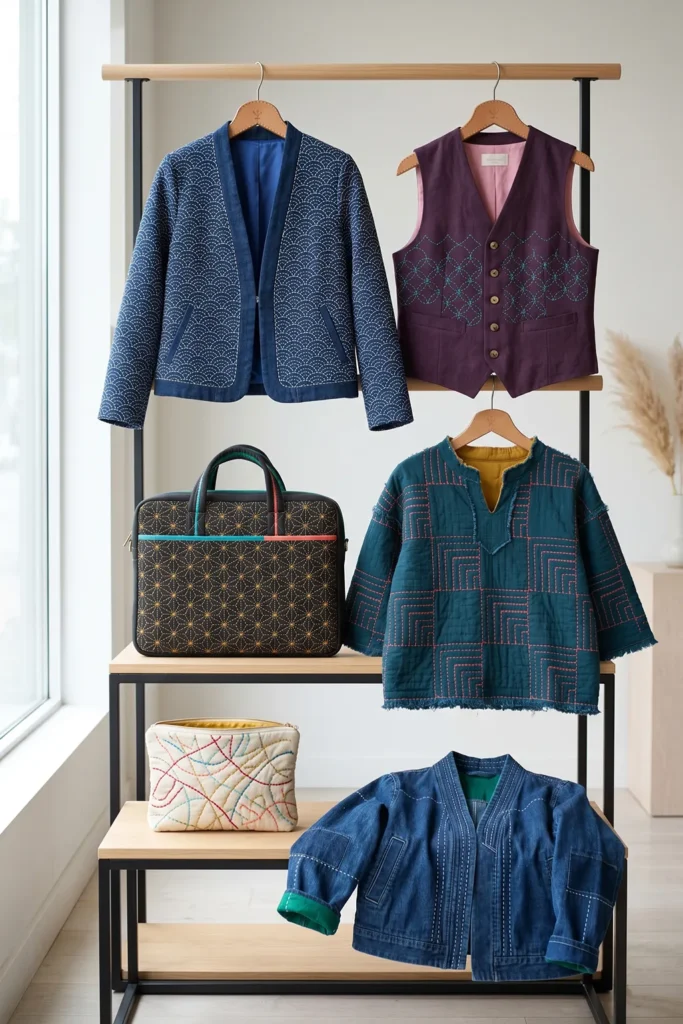
See also: Nakshi Kantha accessories · Japanese quilt patterns · Quilted tote bag patterns · Japanese Quilt Jackets, Vests & Tops
Recommended Supplies
“As an Amazon Associate, I earn from qualifying purchases.“
1. Elegant Sashiko Stitched Japanese Quilt Tote Bags for Everyday Carry
A Guide to Making Elegant Sashiko Stitched Japanese Quilt Tote Bags for Everyday Carry
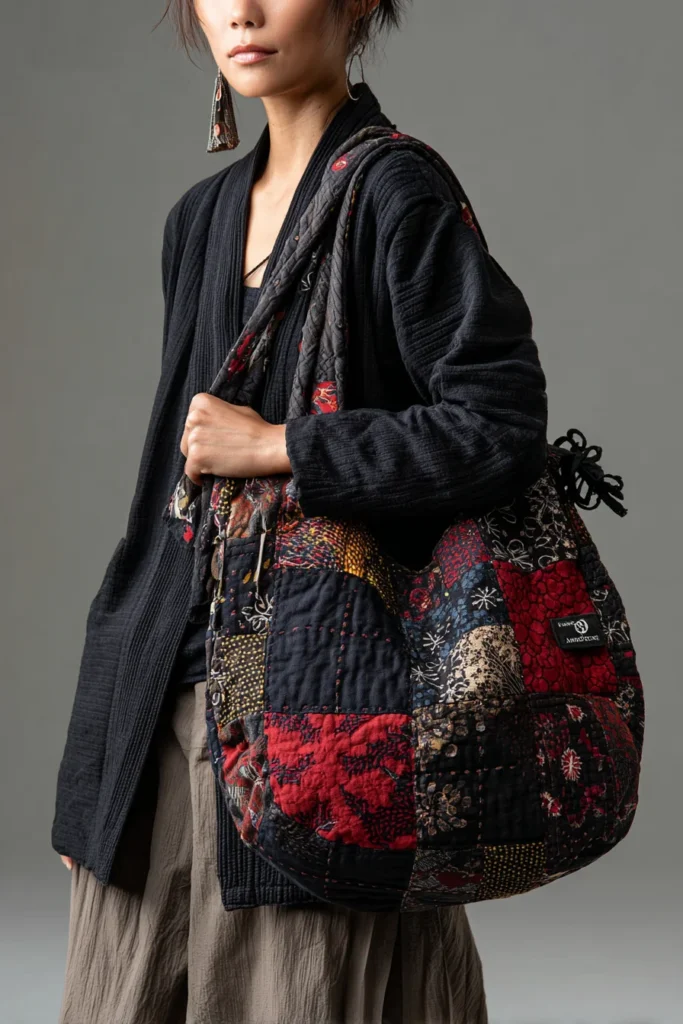
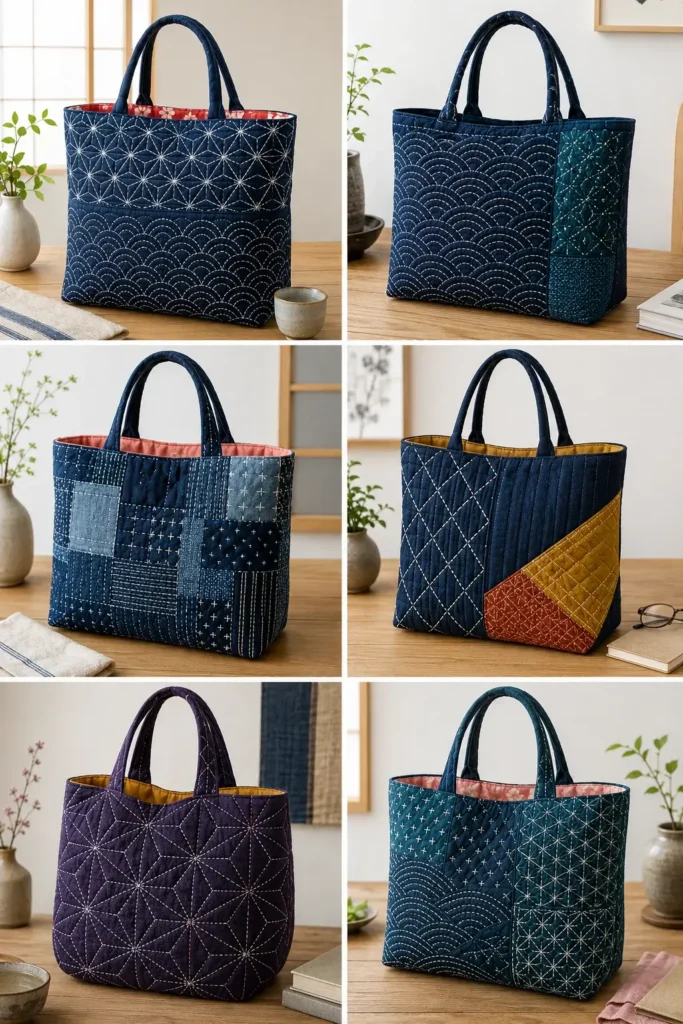
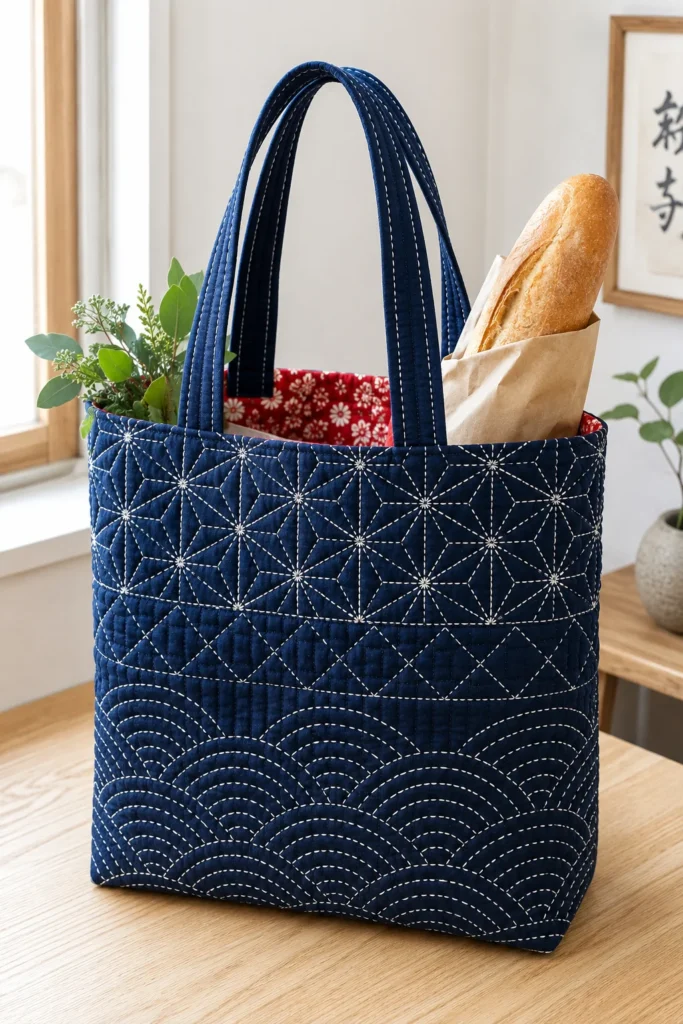
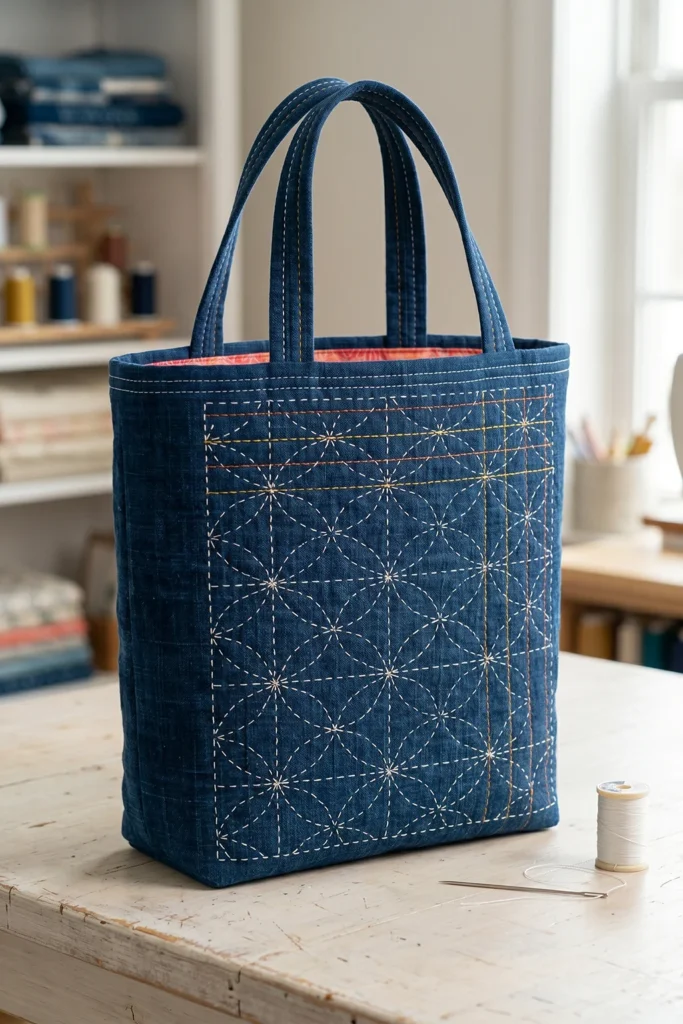
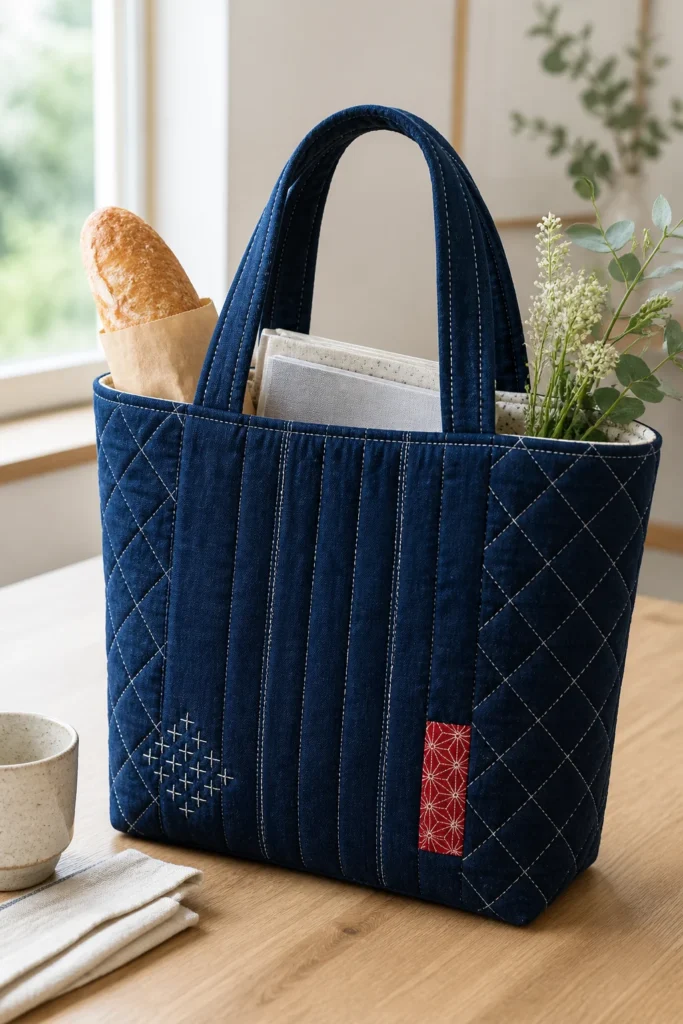
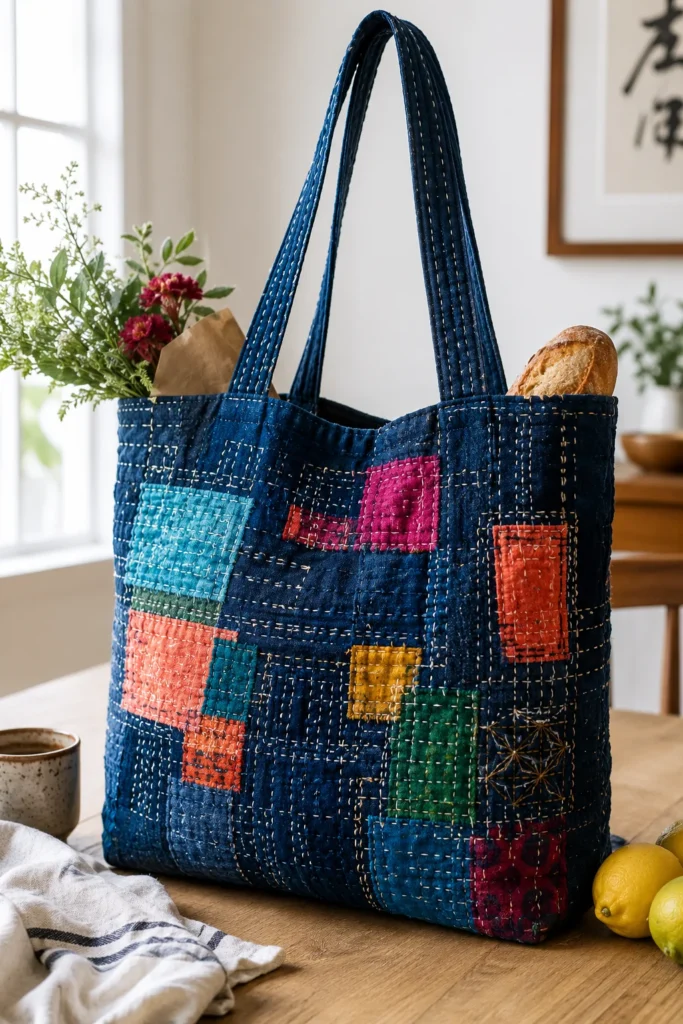
An Elegant Sashiko Stitched Japanese Quilt Tote Bag is a beautifully practical everyday bag inspired by traditional Japanese hand-stitching. Sashiko, meaning “little stabs,” began as a way to reinforce and repair fabric, but today it is loved for its clean geometric patterns and timeless elegance. I came up with this idea because it combines usefulness with artistry—a tote bag that can carry books, groceries, craft supplies, or daily essentials while still looking refined and handmade.
For a vibrant look, choose rich indigo blue as the base, then add white sashiko stitching with accents of cherry blossom pink, mustard yellow, emerald green, or burnt orange. This mix keeps the bag rooted in Japanese textile tradition while making it feel fresh, modern, and stylish.
Why This Idea Is Worth Making
This idea is worth making because it turns a simple tote bag into a durable, elegant, and meaningful accessory. The quilting adds softness and structure, while the sashiko stitching gives the bag character, texture, and a handcrafted story. It is also a great beginner-friendly quilt project because the shape is simple, the measurements are manageable, and the finished piece is useful every day.
Materials Needed
- 2 exterior fabric pieces: 16 inches wide × 18 inches tall
- 2 lining fabric pieces: 16 inches wide × 18 inches tall
- 2 batting pieces: 16 inches wide × 18 inches tall
- 2 handle strips: 4 inches wide × 24 inches long
- Sashiko thread or thick embroidery thread
- Sashiko needle or embroidery needle
- Fabric marker or chalk
- Ruler
- Pins or clips
- Sewing machine
- Scissors or rotary cutter
- Iron
Step-by-Step Guide
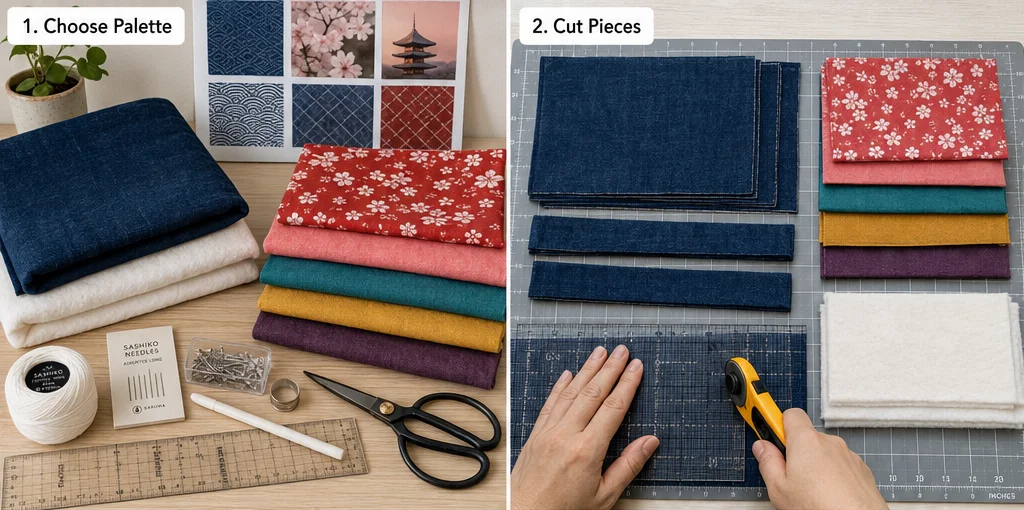
Step 1: Choose a Vibrant Fabric Palette
Select a bold Japanese-inspired color combination. A classic choice is indigo blue cotton with white sashiko thread, but you can make it more vibrant by adding lining fabric in red, teal, golden yellow, plum purple, or coral pink. For elegance, use solid or subtly textured fabric for the outside and a brighter patterned fabric for the lining.
Step 2: Cut the Bag Pieces
Cut two exterior fabric panels, two lining panels, and two batting panels, each measuring 16 × 18 inches. This creates a medium everyday tote that is roomy enough for errands, notebooks, small groceries, or craft materials. For a larger tote, increase the size to 18 × 20 inches.
Step 3: Mark the Sashiko Design
On the right side of each exterior fabric panel, lightly mark your sashiko pattern using chalk or a washable fabric marker. Popular elegant patterns include waves, diamonds, hemp leaves, crosses, or simple running-stitch grids. Keep the design about 1 inch away from the edges so it does not disappear into the seams.
Step 4: Layer the Quilt Panels
Place one batting piece behind each exterior fabric piece. Smooth the layers flat and pin or baste them together. This creates the quilted base for your tote. The batting gives the bag a soft, padded feel and helps the sashiko stitches stand out beautifully.
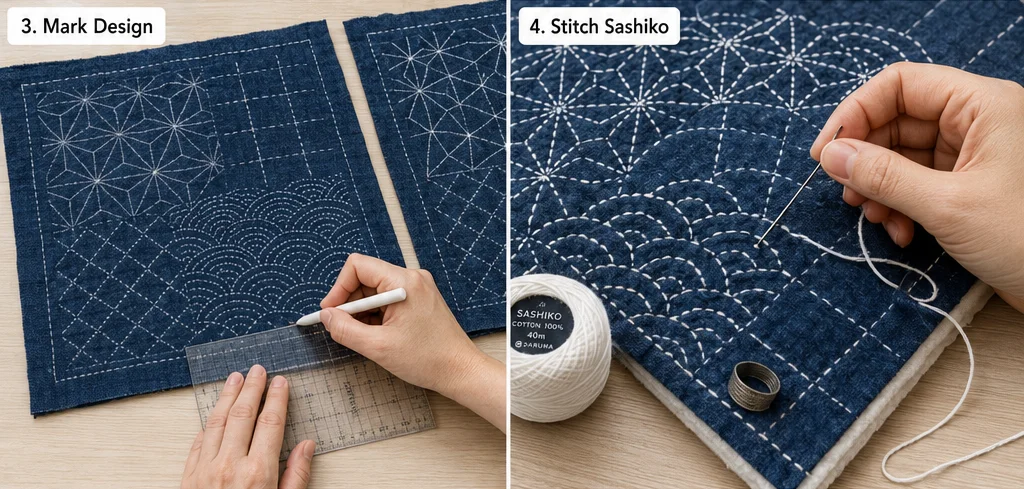
Step 5: Stitch the Sashiko Pattern
Use sashiko thread and a long needle to sew small, even running stitches along the marked design. Traditional sashiko uses simple repeated stitches, so do not worry about making it overly complicated. Use white thread for a classic look, or try turquoise, gold, pink, or orange thread for a more vibrant modern style.
Step 6: Quilt the Bag Panels
After the sashiko design is complete, add extra quilting lines if desired. You can stitch straight vertical lines every 1½ inches, diagonal lines for a diamond effect, or echo quilting around the sashiko pattern. This strengthens the bag and gives it a polished, handmade finish.
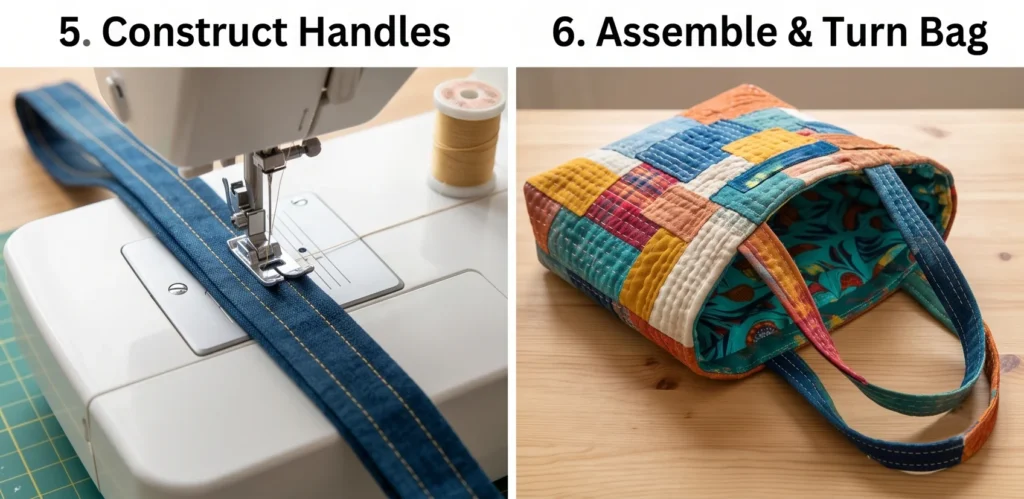
Step 7: Make the Handles
Fold each 4 × 24-inch handle strip in half lengthwise and press. Open it, fold both long edges toward the center crease, then fold again and press. Stitch along both long edges. For extra strength, add batting inside the handles or use canvas fabric.
Step 8: Sew the Exterior Bag
Place the two quilted exterior panels right sides together. Sew along the sides and bottom using a ½ inch seam allowance. Leave the top open. For a flat-bottom tote, box the bottom corners by measuring 2 inches from each corner, sewing across, and trimming the excess.
Step 9: Sew the Lining
Place the two lining pieces right sides together. Sew the sides and bottom with a ½ inch seam allowance, but leave a 4 inch opening at the bottom for turning the bag later. Box the lining corners the same way as the exterior.
Step 10: Attach the Handles
Turn the exterior bag right side out. Pin each handle to the top edge of the bag, placing the ends about 4 inches apart from the center on each side. Make sure the handles are not twisted. Baste them in place using a short stitch.
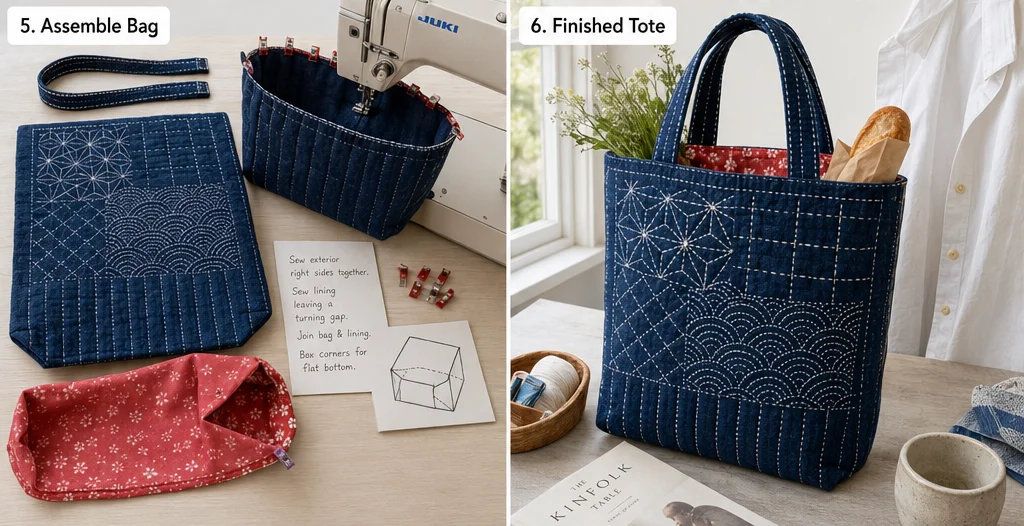
Assembly Section
Place the exterior bag inside the lining so the right sides are facing each other. Match the side seams and top raw edges. Sew all the way around the top opening using a ½ inch seam allowance. Pull the bag’s right side out through the opening in the lining, then stitch the lining opening closed. Push the lining inside the tote, press the top edge neatly, and topstitch around the opening for a clean, professional finish.
Final Styling Idea
For a bold and elegant finish, pair an indigo sashiko tote with a white linen shirt, wide-leg trousers, or a simple quilted jacket. Add a lining in vibrant red, golden yellow, or sakura pink for a surprise pop of color inside the bag. The result is a stylish everyday tote that feels artistic, durable, and deeply inspired by Japanese quilting tradition.

More Recommended Supplies
“As an Amazon Associate, I earn from qualifying purchases.“
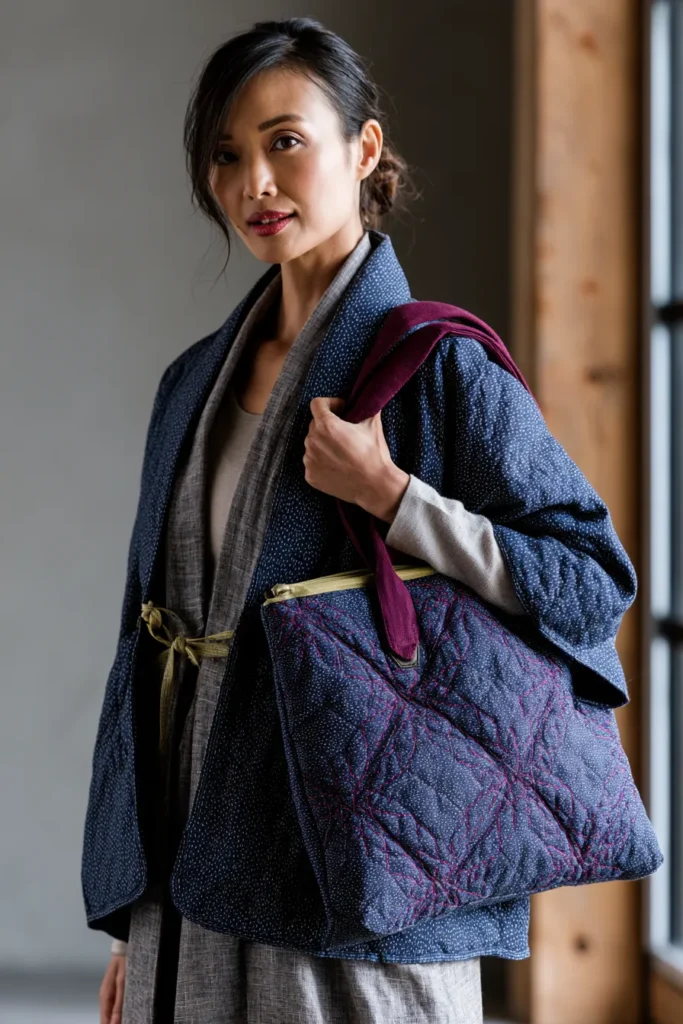
2. Sophisticated Indigo Dyed Quilted Tote Bags for Chic Everyday Errands
A Guide to Making Sophisticated Indigo Dyed Quilted Tote Bags for Chic Everyday Errands
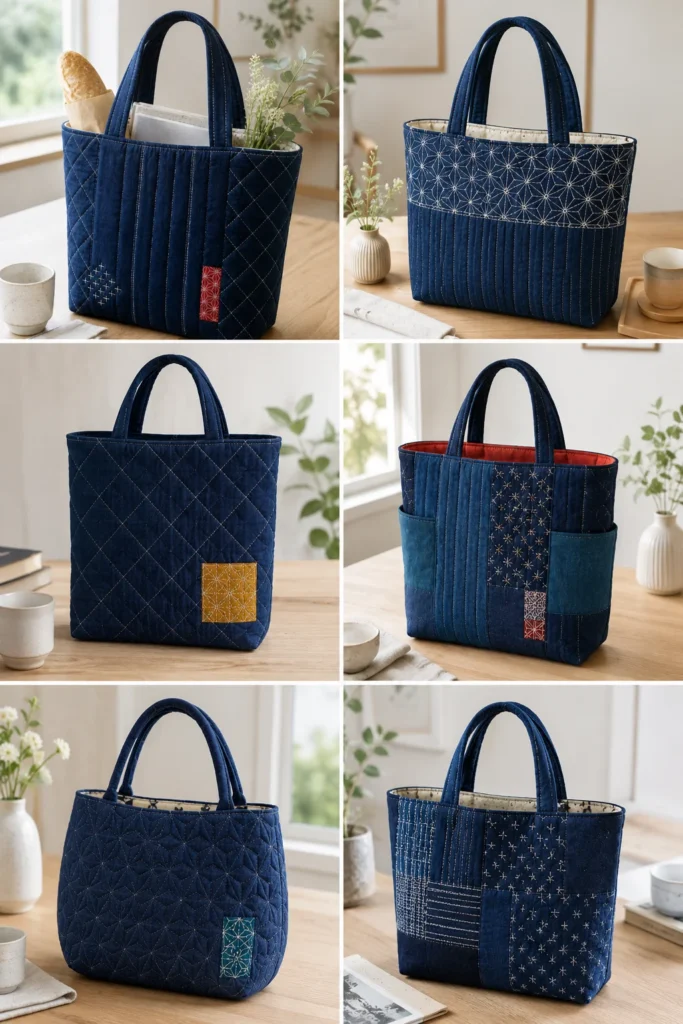
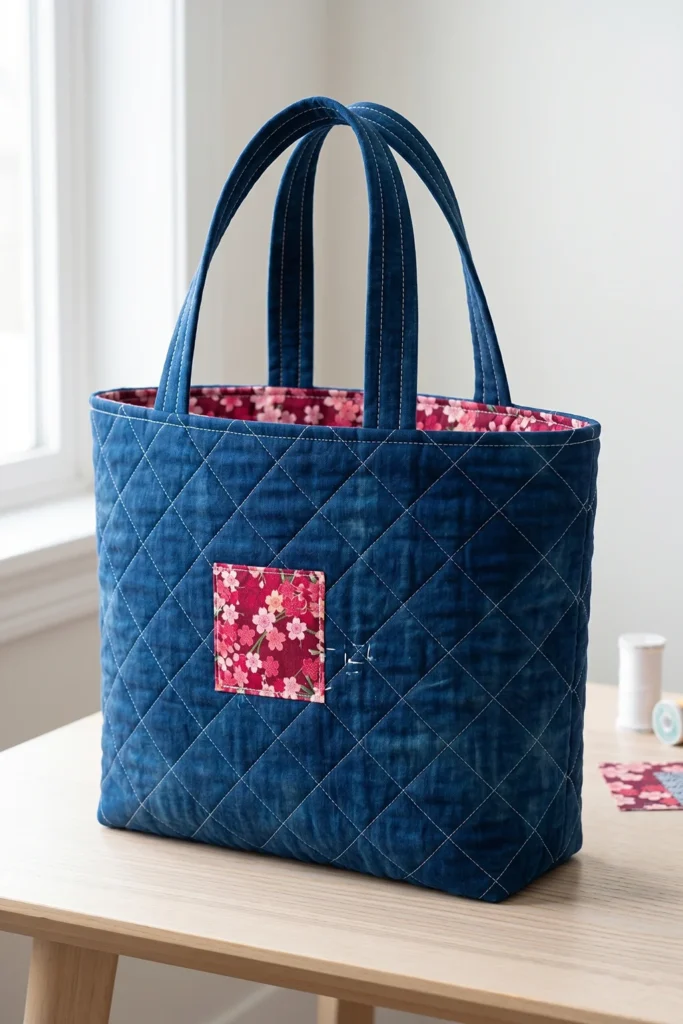
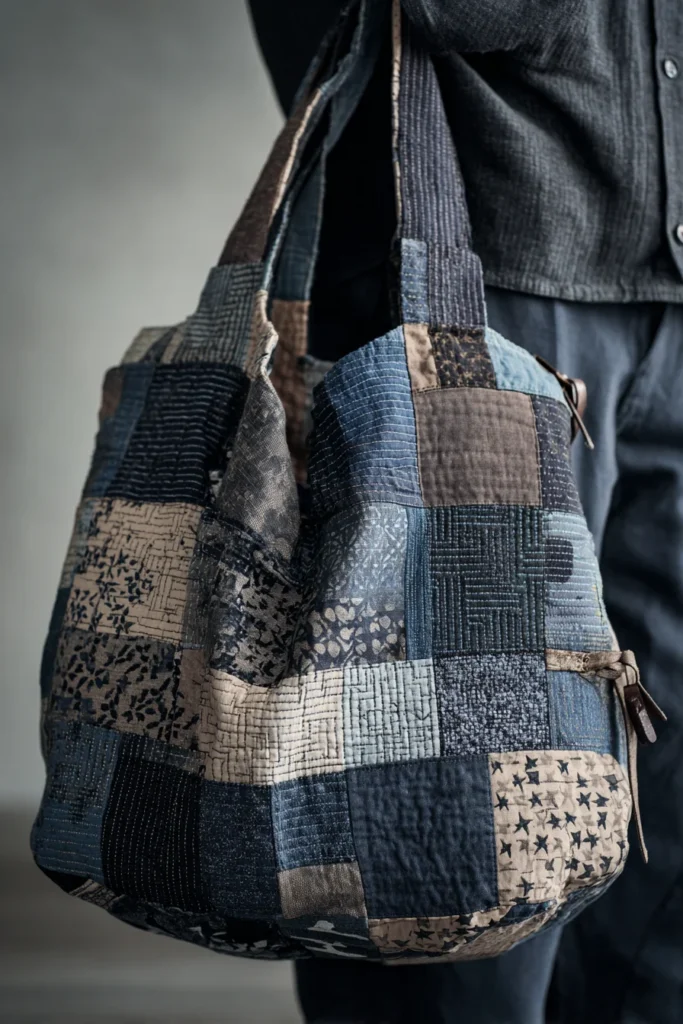
A Sophisticated Indigo Dyed Quilted Tote Bag is a stylish everyday carryall inspired by Japanese indigo textiles, soft quilting, and elegant handmade details. Indigo dye has a long history in Japanese fabric traditions, especially in workwear, boro textiles, and sashiko stitching. I came up with this idea because an errand bag should feel practical, but it can also look polished, artistic, and beautifully unique.
For a vibrant version, use deep indigo blue as the main color and pair it with accents of crimson red, marigold yellow, jade green, orchid purple, or bright white stitching. The rich blue base keeps the tote sophisticated, while the colorful details make it fresh and eye-catching.
Why This Idea Is Worth Making
This idea is worth making because it creates a durable, reusable, and elegant tote bag that can replace plain shopping bags while adding style to everyday errands. The quilted structure makes it stronger and softer, the indigo color beautifully hides light wear, and the handmade details give it a refined, Japanese-inspired look.

Materials Needed
- 2 exterior indigo fabric pieces: 17 inches wide × 19 inches tall
- 2 lining fabric pieces: 17 inches wide × 19 inches tall
- 2 cotton batting pieces: 17 inches wide × 19 inches tall
- 2 handle strips: 4 inches wide × 26 inches long
- 1 optional inside pocket piece: 9 inches wide × 7 inches tall
- White, gold, red, or teal quilting thread
- Fabric marker or chalk
- Pins or sewing clips
- Sewing machine
- Iron
- Scissors or rotary cutter
- Ruler or measuring tape
Step-by-Step Guide
Step 1: Choose the Indigo Fabric
Select a rich, indigo-dyed cotton, denim-weight cotton, or linen-cotton blend for the outside of the tote. For a traditional look, choose deep blue fabric with subtle variations. For a more vibrant style, use indigo fabric with small accents of red, yellow, turquoise, or white Japanese-inspired prints.
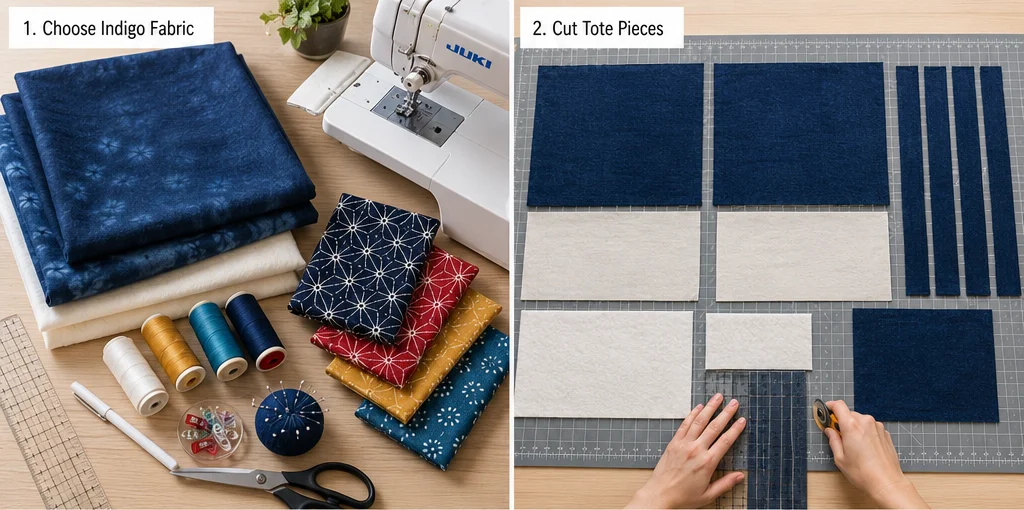
Step 2: Cut the Tote Pieces
Cut two exterior fabric pieces, two lining pieces, and two batting pieces, each measuring 17 × 19 inches. This size makes a roomy tote for groceries, books, craft supplies, or everyday errands. For a smaller city tote, cut the panels to 15 × 17 inches instead.
Step 3: Layer the Quilted Panels
Place one batting piece behind each indigo exterior panel. Smooth the layers carefully so there are no wrinkles. Pin or baste the layers together. This creates the padded quilt base and helps the tote hold its shape.
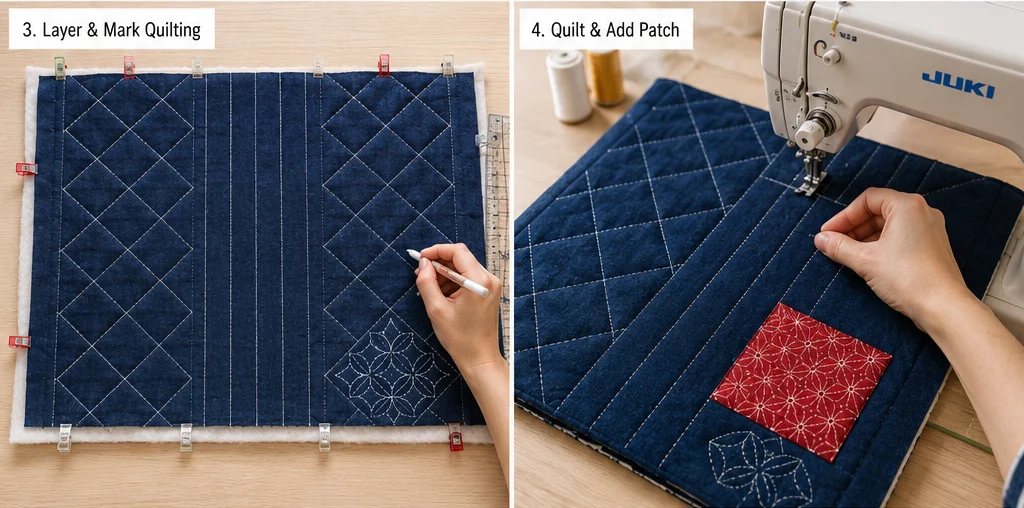
Step 4: Mark the Quilting Lines
Use chalk to mark simple quilting lines on the indigo fabric. For a sophisticated look, try diagonal lines spaced 1½ inches apart, a diamond grid, or clean vertical channels. You can also add a small sashiko-inspired motif near the lower corner for an elegant handmade detail.
Step 5: Quilt the Exterior Panels
Stitch along the marked lines using white, gold, or bright teal thread. White thread gives a classic Japanese indigo look, while gold or coral thread adds a vibrant modern twist. Keep the stitches even and slow, so the quilting looks polished.
Step 6: Add a Decorative Indigo Patch
Cut a small patch of contrasting fabric, about 4 × 4 inches or 5 × 5 inches. Choose a bold print in crimson, mustard, emerald, or sakura pink. Stitch it onto one exterior panel before assembling the bag. This creates a subtle boro-inspired detail without making the design look too busy.
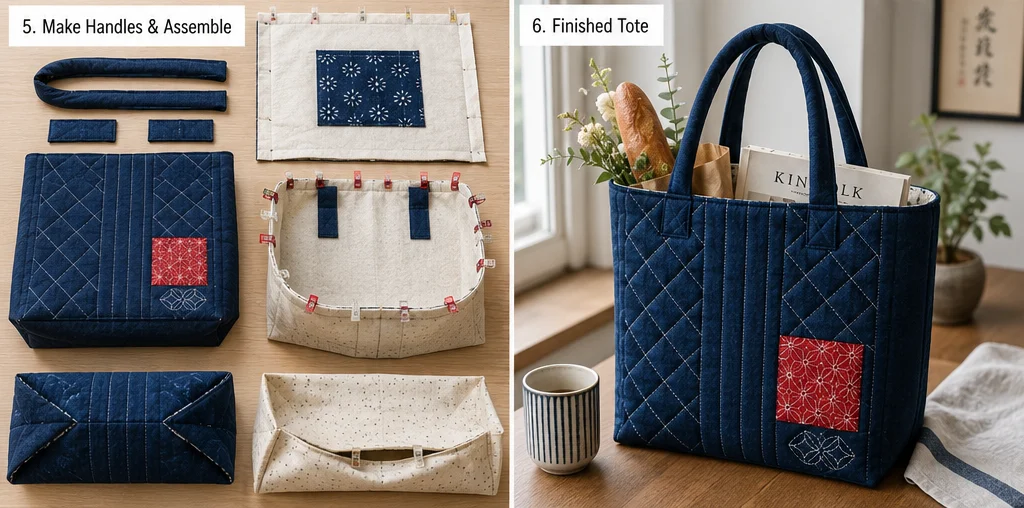
Step 7: Make the Handles
Fold each 4 × 26 inch handle strip in half lengthwise and press. Open it, fold both long edges toward the center crease, then fold again. Press well and stitch along both long edges. For stronger handles, add a thin strip of batting inside before sewing.
Step 8: Create the Optional Pocket
Fold the 9 × 7 inch pocket piece in half with right sides together, sew around the edges, and leave a small opening for turning. Turn it right side out, press flat, and stitch it onto one lining piece. Place it about 5 inches below the top edge so it can hold keys, cards, or a phone.
Step 9: Sew the Exterior Bag
Place the two quilted exterior panels right sides together. Sew along both sides and the bottom using a ½ inch seam allowance. Leave the top open. To create a flat base, box each bottom corner by measuring 2 inches from the tip, sewing across the corner, and trimming away the excess fabric.
Step 10: Sew the Lining
Place the lining pieces right sides together. Sew the sides and bottom using a ½ inch seam allowance, but leave a 4 inch opening at the bottom. Box the lining corners the same way as the exterior so both layers fit neatly together.
Assembly Section
Turn the quilted exterior bag right side out and keep the lining wrong side out. Pin the handles to the top edge of the exterior bag, placing each handle end about 4 inches from the side seam. Baste the handles in place.
Place the exterior bag inside the lining so the right sides are facing. Match the side seams and top raw edges. Sew around the entire top opening with a ½ inch seam allowance. Pull the bag through the opening in the lining, then sew the lining opening closed. Push the lining inside the bag, press the top edge, and topstitch around the opening for a crisp, finished look.
Final Styling Idea
For chic everyday errands, style this indigo quilted tote with a cream linen shirt, wide-leg jeans, simple sandals, or a relaxed quilted jacket. Use a lining in bright marigold yellow, cherry red, jade green, or soft pink for a colorful surprise inside. The finished tote feels practical, elegant, and vibrant while still honoring the calm beauty of Japanese indigo textiles.

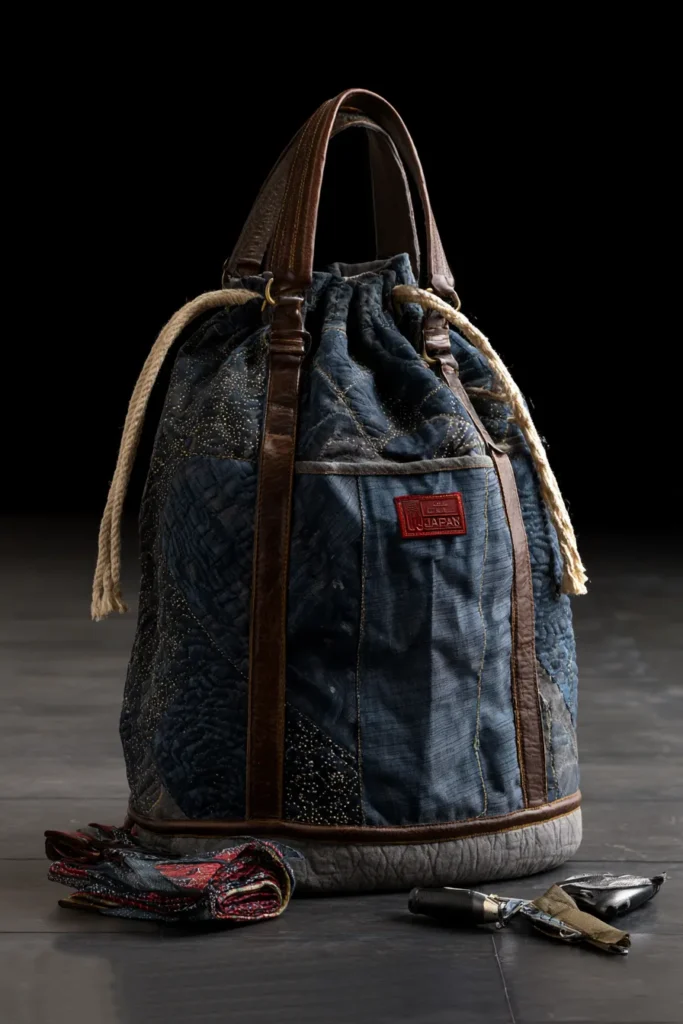
3. Eco-Friendly Boro Patchwork Japanese Quilted Shopper Bags for Sustainable Living
A Guide to Making Eco-Friendly Boro Patchwork Japanese Quilted Shopper Bags for Sustainable Living
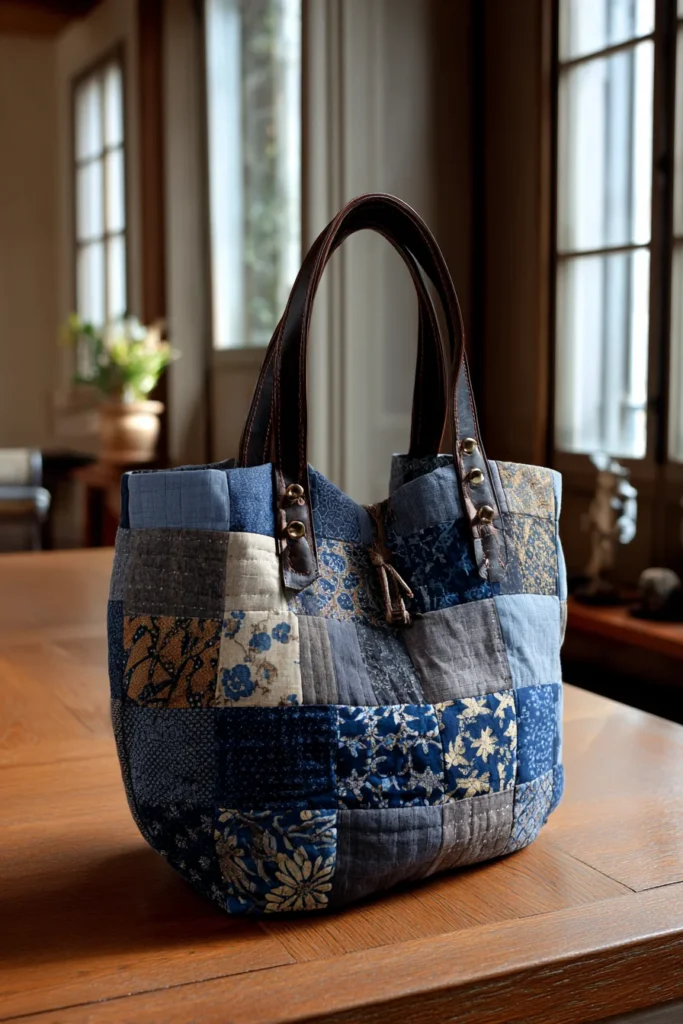
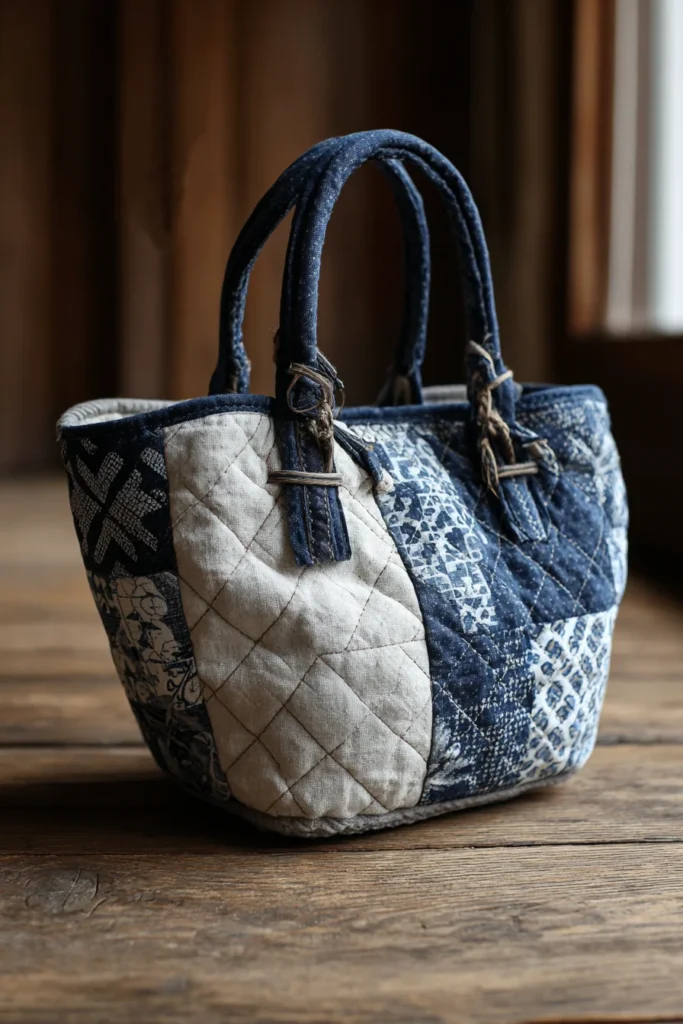
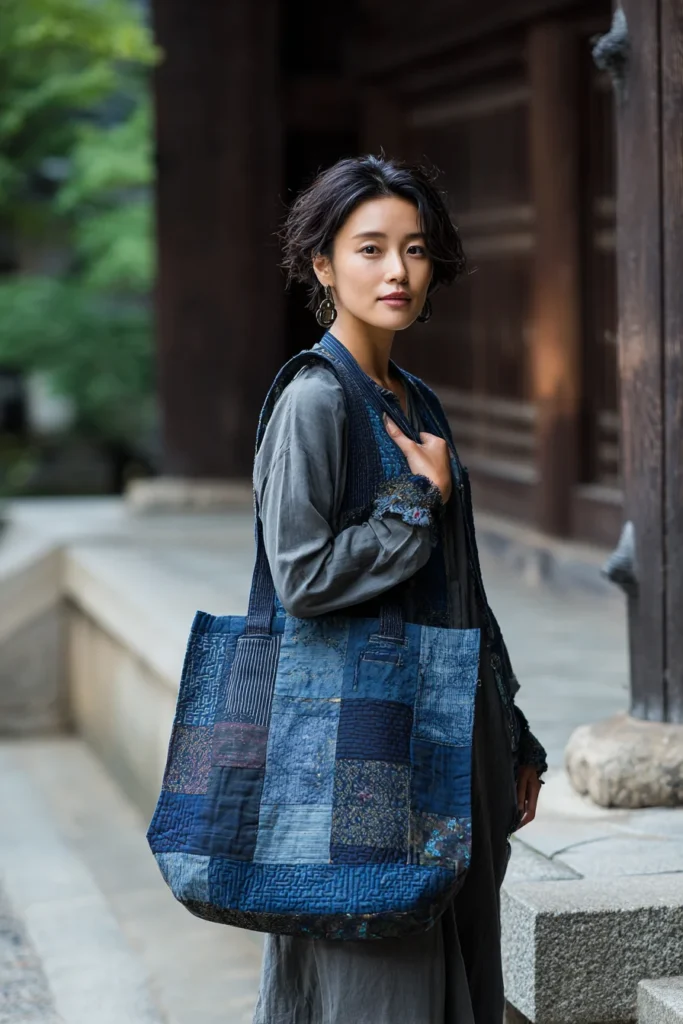
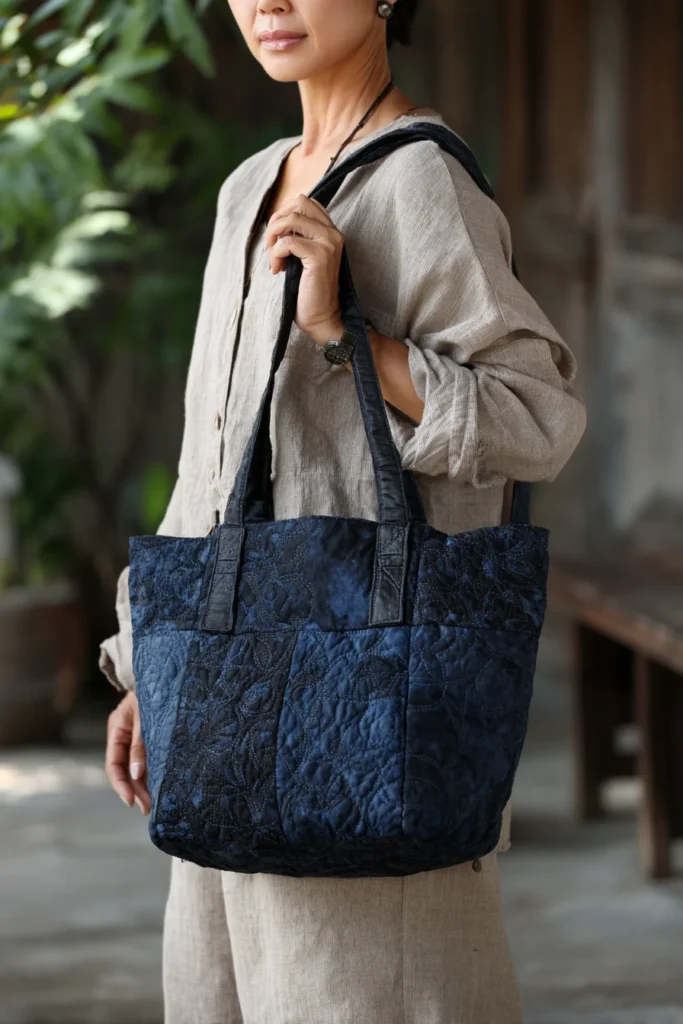
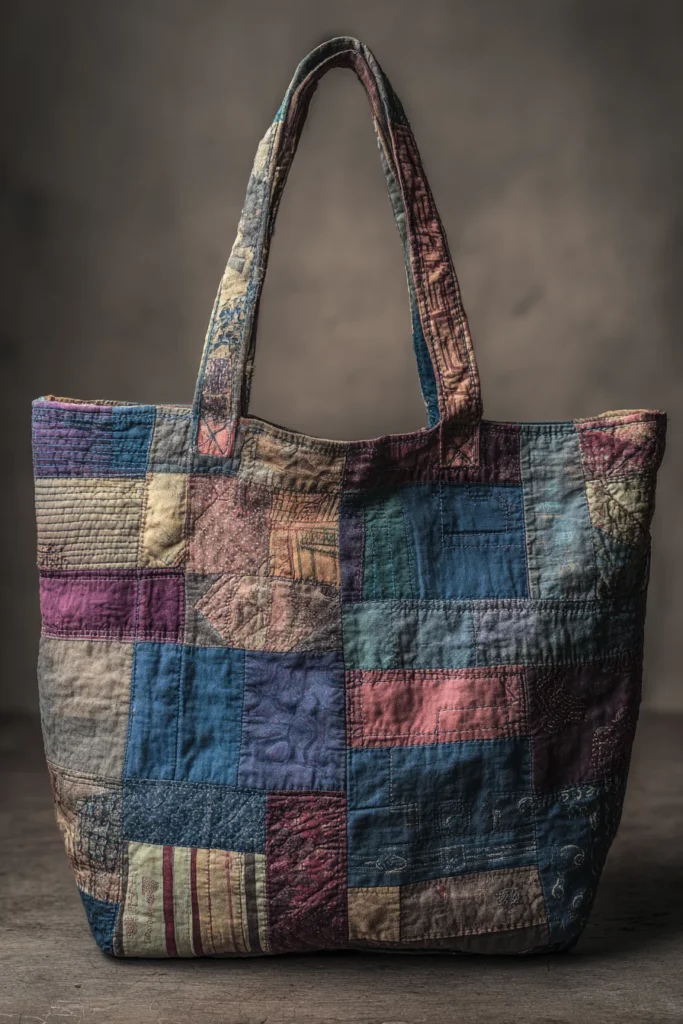
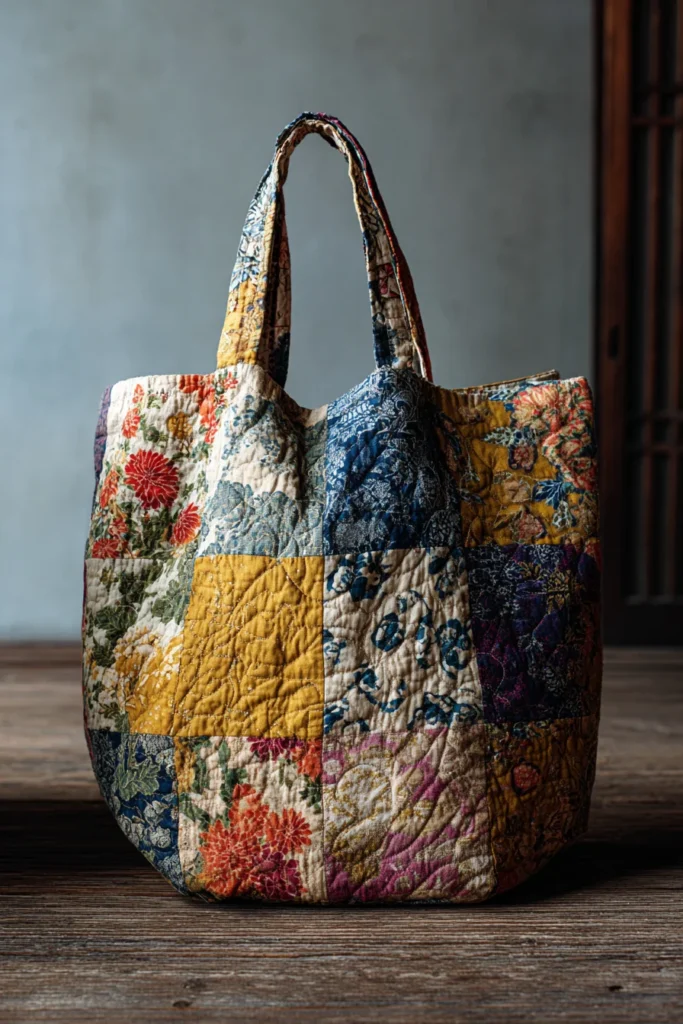
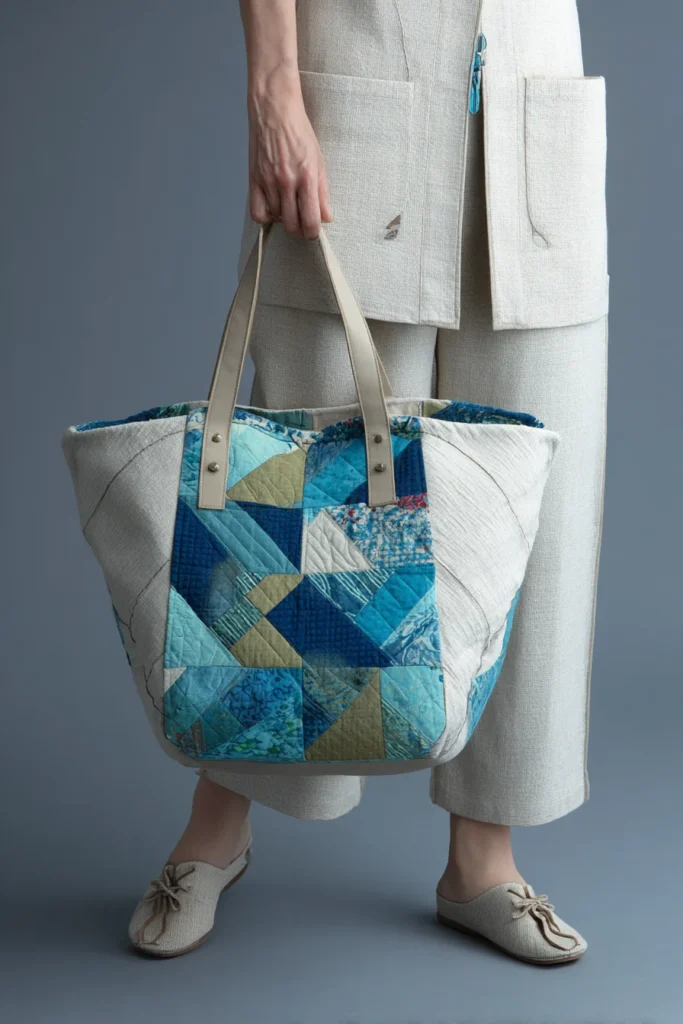
An Eco-Friendly Boro Patchwork Japanese Quilted Shopper Bag is a reusable fabric shopping bag inspired by the Japanese tradition of boro, in which fabric scraps are repaired, layered, and stitched together to extend their life. Boro textiles are loved today for celebrating imperfection, sustainability, and handmade beauty. I came up with this idea because it turns leftover fabric pieces into something useful, colorful, and elegant for everyday shopping.
For a vibrant version, combine indigo blue, rust orange, turmeric yellow, deep teal, cherry red, plum purple, and cream cotton. The patchwork gives the shopper bag a lively, artistic look, while the quilting adds strength and softness, making it perfect for groceries, market trips, books, or casual errands.
Why This Idea Is Worth Making
This idea is worth making because it helps reduce waste while creating a beautiful, durable, and practical bag. Instead of throwing away fabric scraps, old shirts, denim pieces, or leftover quilt cotton, you can turn them into a stylish Japanese-inspired shopper. Each patch tells a small story, so no two bags will ever look exactly the same.
Focus on Usability, Comfort, and Elegance
- Usability: If you are wondering why this idea is worth making, it is because a Boro-style shopper is the ultimate, indestructible utility bag. The multi-layered patchwork and dense quilting mean the fabric can support the sharp corners of boxed goods and the heavy weight of fresh produce without tearing or stretching out of shape.
- Comfort: Grocery runs can be exhausting, and thin bag handles quickly become painful. By utilizing wide, deeply quilted straps, this shopper distributes heavy loads evenly across the shoulder, ensuring a comfortable carry from the market back to your kitchen.
- Elegance: Boro’s elegance lies in its curated chaos. The highly textured, overlapping raw edges of the Emerald, Amethyst, and Coral scraps are unified by strict, geometric quilting lines. This tension between organic patchwork and rigid stitching elevates the shopper from a simple reusable bag to a bespoke piece of bohemian luxury.

Measurements & Materials Needed
- Assorted fabric scraps in vibrant colors: at least 20–30 pieces, various sizes
- 2 backing fabric pieces: 18 inches wide × 20 inches tall
- 2 lining fabric pieces: 18 inches wide × 20 inches tall
- 2 batting pieces: 18 inches wide × 20 inches tall
- 2 handle strips: 4 inches wide × 28 inches long
- Optional pocket piece: 10 inches wide × 8 inches tall
- Sashiko thread, embroidery thread, or strong cotton thread
- Sewing machine
- Needle for hand stitching
- Fabric marker or chalk
- Pins or clips
- Iron
- Scissors or rotary cutter
- Ruler
Step-by-Step Guide
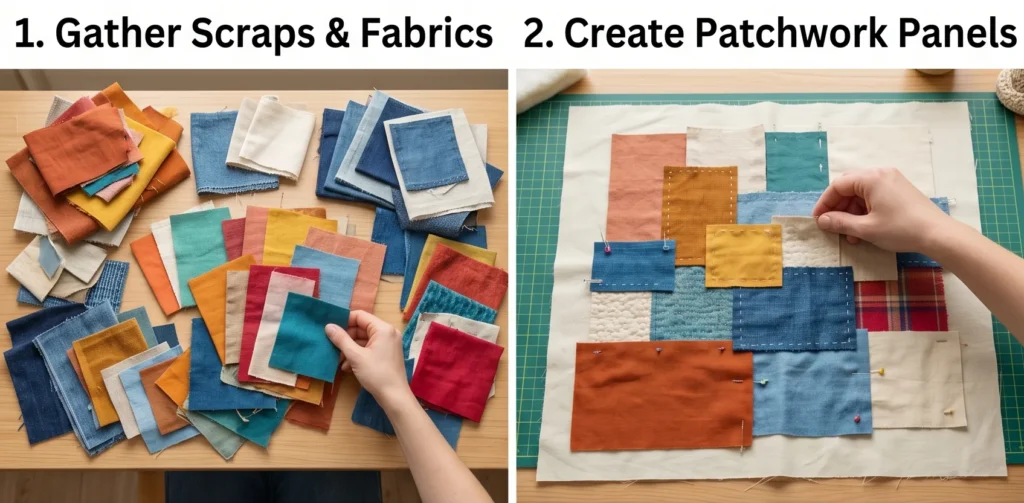
Step 1: Gather Recycled and Scrap Fabrics
Collect leftover cotton, linen, denim, canvas, old shirts, or worn fabric pieces. Choose fabrics that are still strong enough to sew. For a Japanese boro-inspired look, mix indigo, navy, cream, and white, then add vibrant patches of red, yellow, teal, orange, or purple for a modern, stylish finish.
Step 2: Create the Patchwork Panels
Lay one 18 × 20 inch backing fabric piece flat. Arrange fabric scraps over it until the surface is covered. Overlap the edges slightly by about ¼ inch to avoid gaps. Repeat for the second backing piece. Keep larger patches near the bottom for strength and smaller, colorful pieces near the top for detail.
Step 3: Pin and Press the Patchwork
Once you like the layout, pin or clip each patch in place. Press the fabric gently with an iron to flatten the layers. Do not worry if the patches look irregular. Boro patchwork is beautiful because it feels handmade, natural, and imperfect.
Step 4: Stitch the Patches Down
Sew around the edges of each patch using a straight stitch, zigzag stitch, or visible hand stitch. For a traditional feel, use sashiko-style running stitches with white or cream thread. For a vibrant modern look, try stitching with gold, coral, turquoise, or red thread.
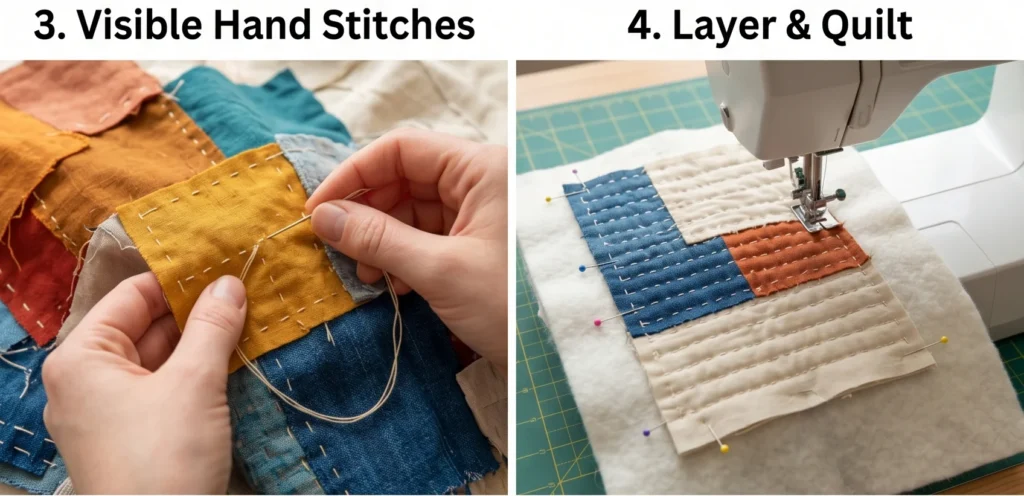
Step 5: Add Batting for Quilted Strength
Place one batting piece behind each finished patchwork panel. Pin the layers together. The batting helps the shopper bag feel padded, structured, and sturdy enough for everyday use. It also gives the patchwork a richer quilted texture.
Step 6: Quilt Across the Patchwork
Quilt the panels using simple horizontal, vertical, or diagonal lines spaced about 1½ inches apart. You can also follow the shapes of the patches with echo quilting. This step strengthens the bag and keeps the layers secure, especially when carrying groceries or heavier items.
Step 7: Make the Handles
Take the two 4 × 28 inch handle strips. Fold each strip in half lengthwise and press. Open the strip, fold both long edges toward the center crease, then fold again. Press flat and stitch along both long sides. For extra durability, insert a thin strip of batting or canvas before sewing.
Step 8: Add an Optional Inner Pocket
Fold the 10 × 8-inch pocket piece in half, right sides together. Sew around the edges, leaving a small opening. Turn it right side out, press flat, and stitch it onto one lining panel about 5 inches below the top edge. This pocket is useful for keys, coupons, cards, or a small phone.
Step 9: Sew the Exterior Bag
Place the two quilted patchwork panels right sides together. Sew along the sides and bottom using a ½ inch seam allowance. Leave the top open. For a roomy shopper base, box the bottom corners by measuring 2½ inches from each corner tip, sewing across the line, and trimming away the excess fabric.
Step 10: Sew the Lining
Place the lining pieces right sides together. Sew along the sides and bottom using a ½ inch seam allowance, but leave a 4–5 inch opening at the bottom for turning. Box the lining corners the same way as the exterior, so the inside fits smoothly.
Assembly Section
Turn the quilted patchwork exterior right side out. Keep the lining wrong side out. Pin the handles to the top edge of the exterior bag, placing each handle end about 4 inches from the side seam. Baste the handles in place to keep them secure.
Slide the exterior bag inside the lining so the right sides are facing each other. Match the side seams and top edges. Sew around the top opening with a ½ inch seam allowance. Pull the bag through the opening in the lining, then stitch the lining opening closed. Push the lining inside the shopper bag, press the top edge, and topstitch around the opening for a strong, neat finish.
Final Styling Idea
For a bright, sustainable look, pair this boro patchwork shopper with casual linen outfits, denim, relaxed cotton dresses, or a simple quilted jacket. Use a lining in sunny yellow, sakura pink, jade green, or bright coral for a cheerful surprise inside. The finished bag is practical, eco-friendly, colorful, and full of handmade charm—perfect for sustainable living with Japanese-inspired elegance.
4. Minimalist Geometric Japanese Quilt Market Totes for Effortless Style
A Guide to Making Minimalist Geometric Japanese Quilt Market Totes for Effortless Style
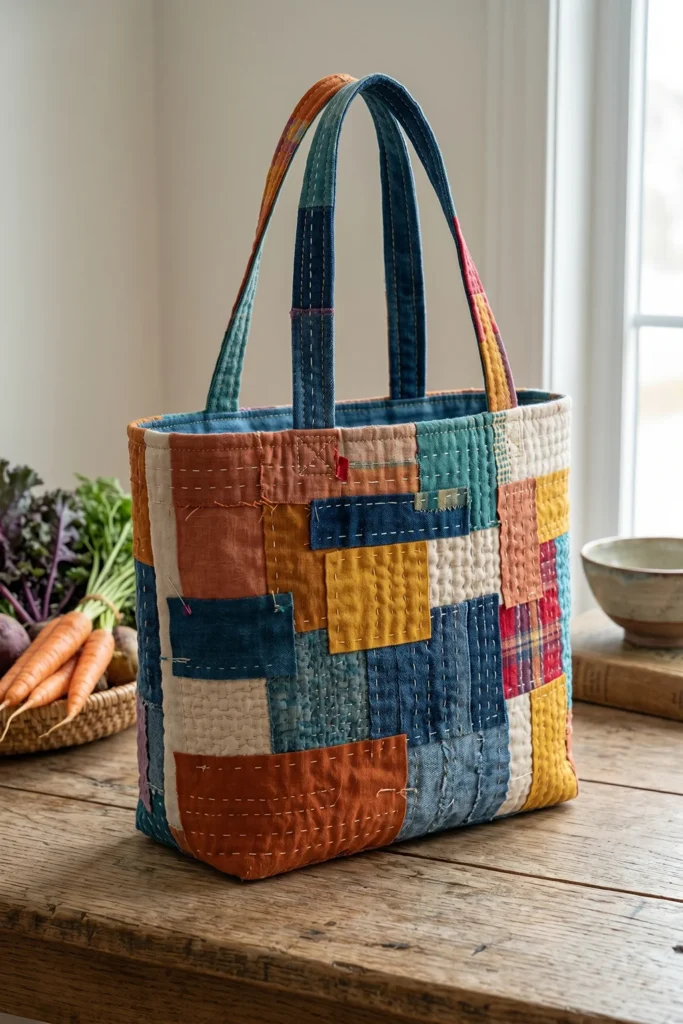
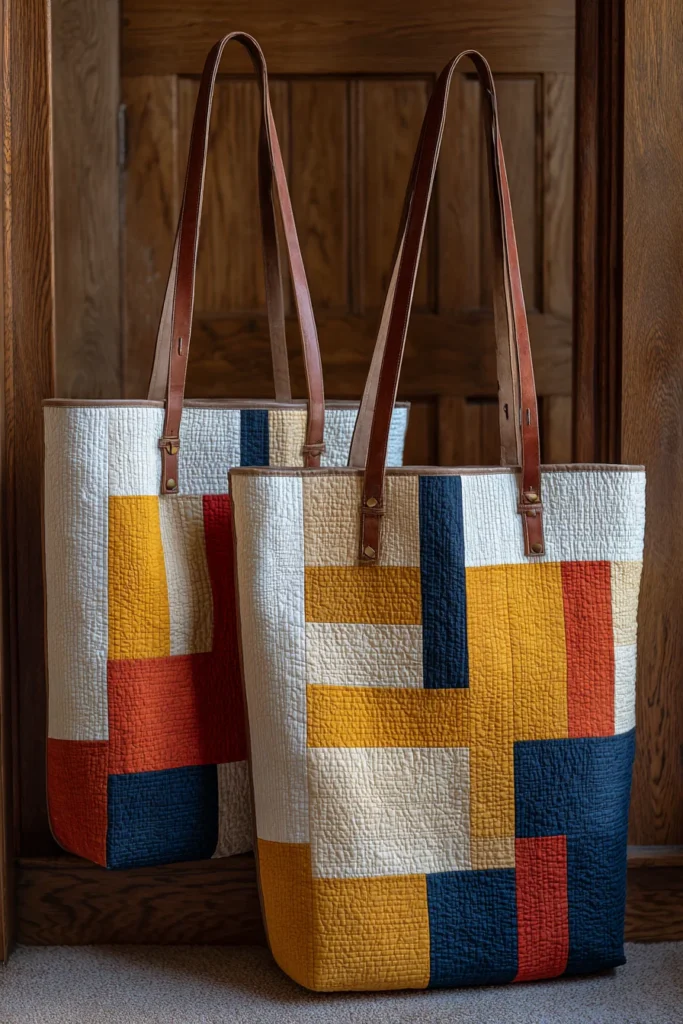
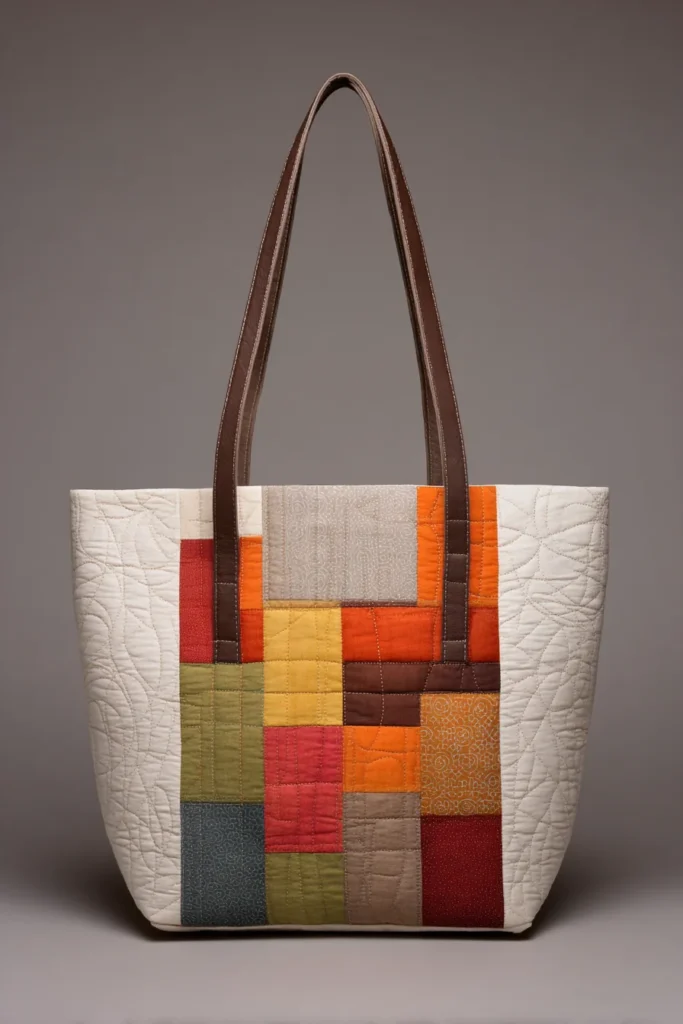
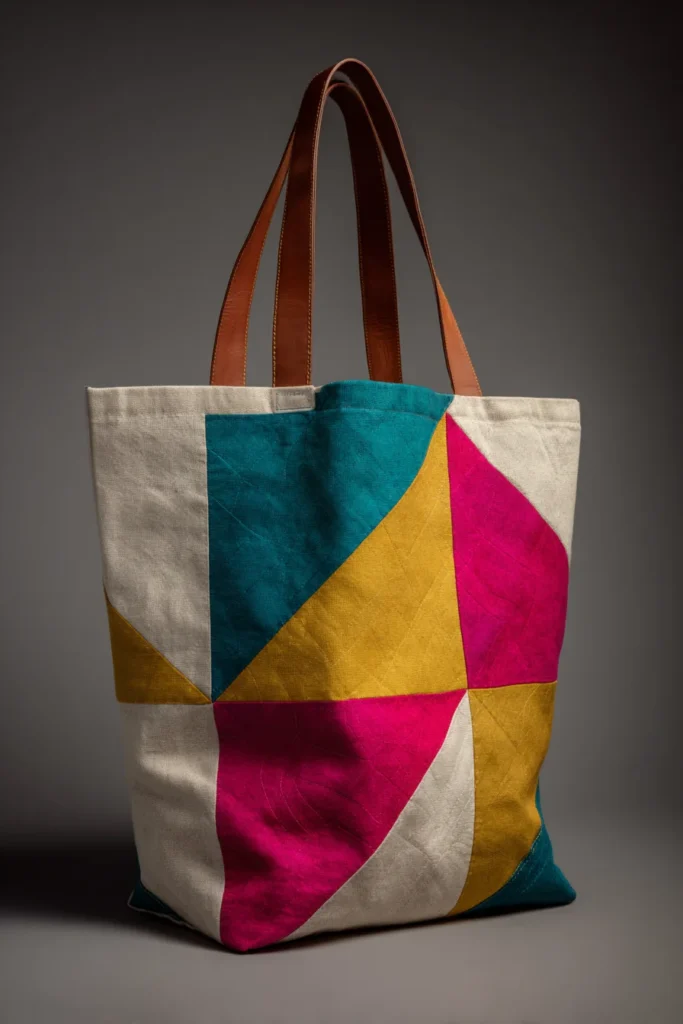
A Minimalist Geometric Japanese Quilt Market Tote is a clean, modern reusable bag inspired by Japanese design principles, simple quilt blocks, and elegant geometric patterns. This style focuses on balance, negative space, neat lines, and practical beauty. I came up with this idea because market totes are often used, so they should be strong and useful, yet stylish enough to carry with confidence.
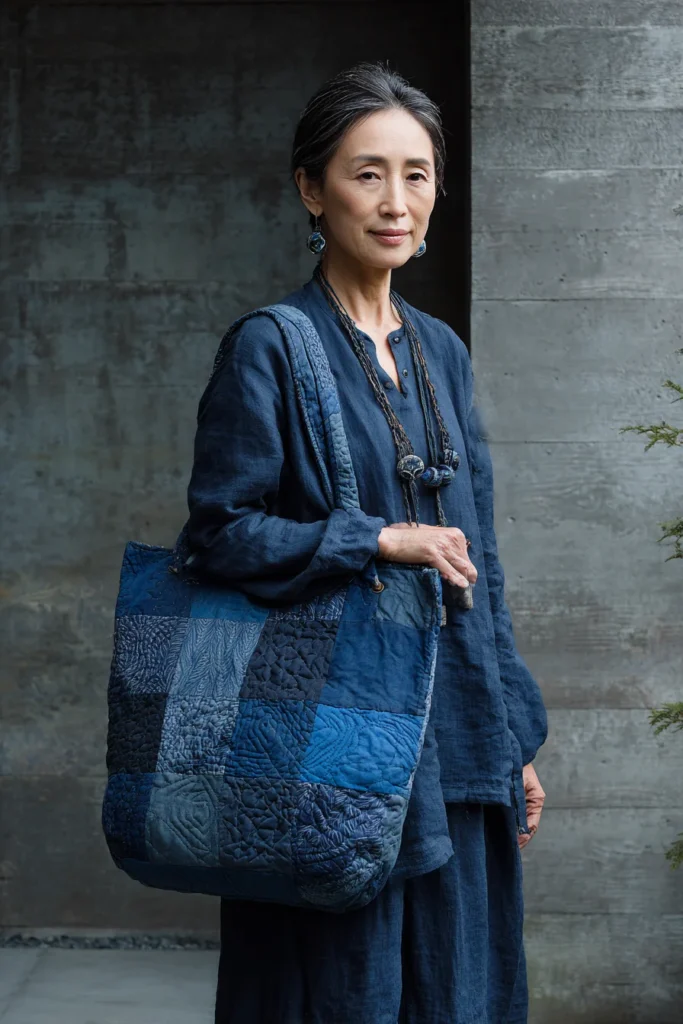
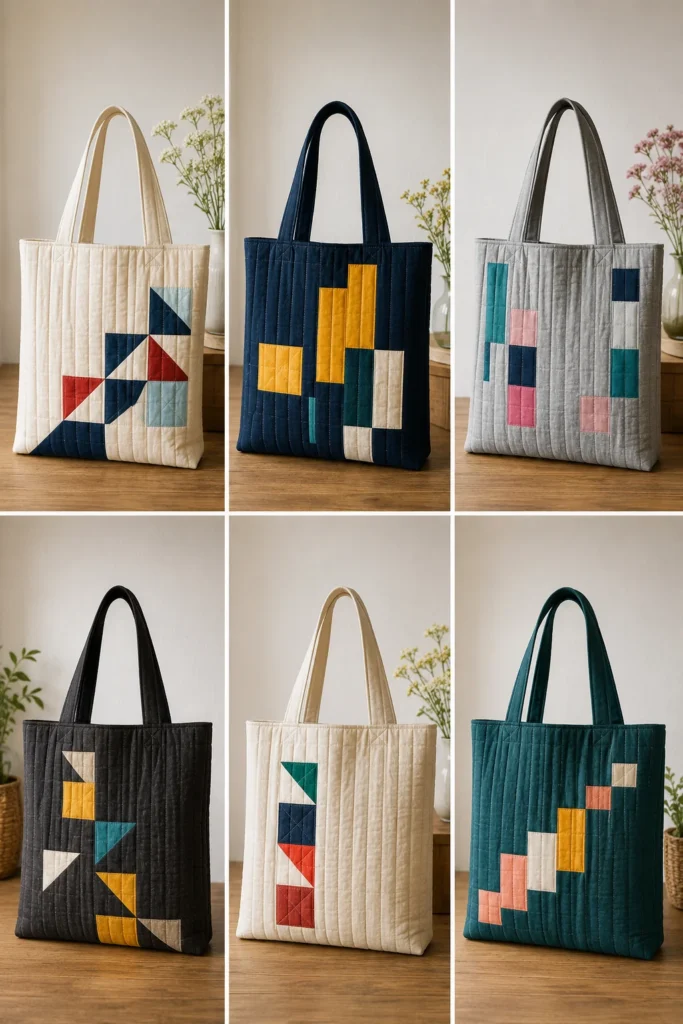
For vibrant colors, use a calm base like cream, charcoal, navy, or indigo, then add geometric accents in sakura pink, jade green, golden yellow, vermilion red, cobalt blue, or bright turquoise. The result feels minimalist, but not plain—simple shapes create a polished Japanese-inspired look with just enough color to stand out.
Why This Idea Is Worth Making
This idea is worth making because it is practical, beginner-friendly, and stylish without being overly complicated. The geometric quilt design adds structure and visual interest, while the clean layout makes it easy to pair with everyday outfits. It is perfect for farmers’ markets, bookshops, craft supplies, light groceries, or casual weekend errands.
Materials Needed
- 2 exterior background fabric pieces: 18 inches wide × 20 inches tall
- Assorted geometric accent fabrics: squares, triangles, strips, or rectangles
- 2 cotton batting pieces: 18 inches wide × 20 inches tall
- 2 lining fabric pieces: 18 inches wide × 20 inches tall
- 2 handle strips: 4 inches wide × 28 inches long
- Optional pocket piece: 10 inches wide × 8 inches tall
- Quilting thread in white, gold, navy, or a vibrant accent color
- Fabric marker or chalk
- Pins or clips
- Sewing machine
- Iron
- Scissors or rotary cutter
- Ruler or quilting ruler
Step-by-Step Guide
Step 1: Choose a Minimalist Color Story
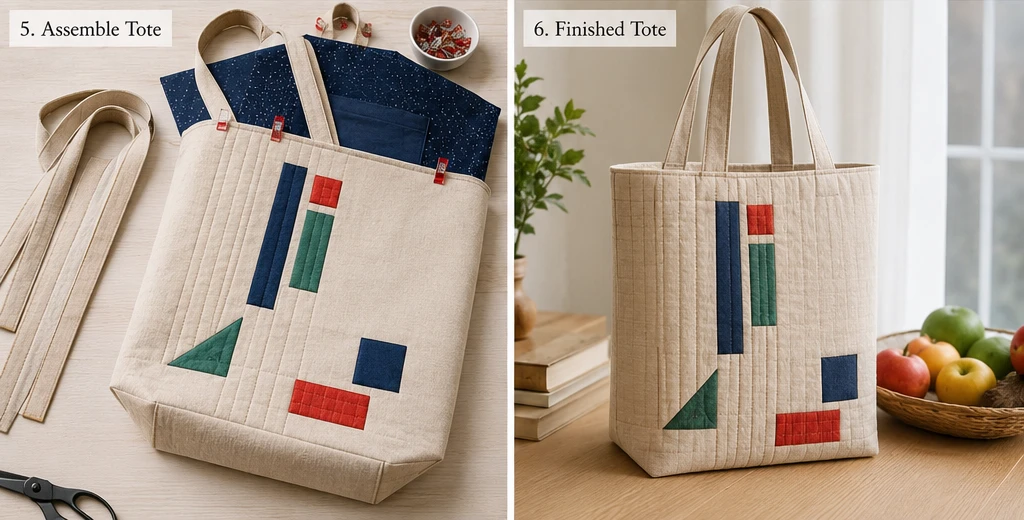
Pick one simple background color and two or three bright accent colors. A beautiful combination is a cream background with indigo, jade green, and vermilion red accents. Another elegant option is a charcoal background with golden yellow, turquoise, and sakura pink geometric pieces.
Step 2: Cut the Main Tote Panels
Cut two background fabric pieces measuring 18 × 20 inches. These will become the front and back of the market tote. This size creates a roomy bag for market produce, folded fabric, books, or daily essentials.
Step 3: Cut the Geometric Quilt Shapes
Cut simple accent pieces such as:
- 6 squares: 3 × 3 inches
- 4 rectangles: 2½ × 6 inches
- 4 strips: 1½ × 12 inches
- 6 triangles cut from 4 × 4 inch squares
Use only a few shapes to keep the design clean and minimalist.

Step 4: Arrange the Geometric Design
Lay the accent shapes on each exterior panel before sewing. Try an off-center design, a vertical column, a simple checker layout, or a few floating triangles near the lower corner. Leave open background space so the tote feels calm, balanced, and elegant.
Step 5: Stitch the Shapes in Place
Pin the geometric fabric pieces onto the exterior panels. Sew around each shape using a straight stitch about ⅛ inch from the edge. For extra detail, add a second stitch line in a contrasting thread like white, gold, red, or turquoise.
Step 6: Layer the Quilt Panels
Place one batting piece behind each decorated exterior panel. Smooth the fabric flat and pin the layers together. This gives the tote a soft quilted feel and helps the bag hold its shape.
Step 7: Quilt the Panels
Quilt the panels with simple straight lines spaced 1½ inches apart. Vertical quilting creates a sleek, modern look, while diagonal quilting adds subtle movement. You can also stitch around each geometric shape to make the colors pop.
Step 8: Make the Handles
Fold each 4 × 28 inch handle strip in half lengthwise and press. Open it, fold both long edges toward the center crease, then fold again. Press and stitch along both long sides. For stronger market handles, add a thin piece of batting or canvas inside.
Step 9: Sew the Exterior Tote
Place the two quilted exterior panels right sides together. Sew down both sides and across the bottom using a ½ inch seam allowance. Leave the top open. Box the bottom corners by measuring 2½ inches from each corner tip, sewing across the line, and trimming the excess. This creates a wider base for market items.
Step 10: Sew the Lining
Place the two lining pieces right sides together. Sew the sides and bottom using a ½ inch seam allowance, leaving a 4–5-inch opening at the bottom for turning. Box the lining corners the same way as the exterior bag.


Assembly Section
Turn the quilted exterior bag right side out. Keep the lining wrong side out. Pin the handles to the top raw edge of the exterior bag, placing each handle end about 4 inches from the side seam. Baste the handles in place.
Slide the exterior tote inside the lining so the right sides face each other. Match the side seams and top edges carefully. Sew around the top opening with a ½-inch seam allowance. Pull the bag through the opening in the lining, then stitch the opening closed. Push the lining inside the tote, press the top edge flat, and topstitch around the opening for a crisp, professional finish.
Final Styling Idea
For effortless style, pair this geometric quilt market tote with a white linen shirt, cropped trousers, sandals, or a relaxed indigo jacket. A lining in bright yellow, sakura pink, emerald green, or coral orange adds a joyful hidden detail. The finished tote is clean, colorful, practical, and elegant—perfect for modern living with a subtle Japanese quilt-inspired touch.
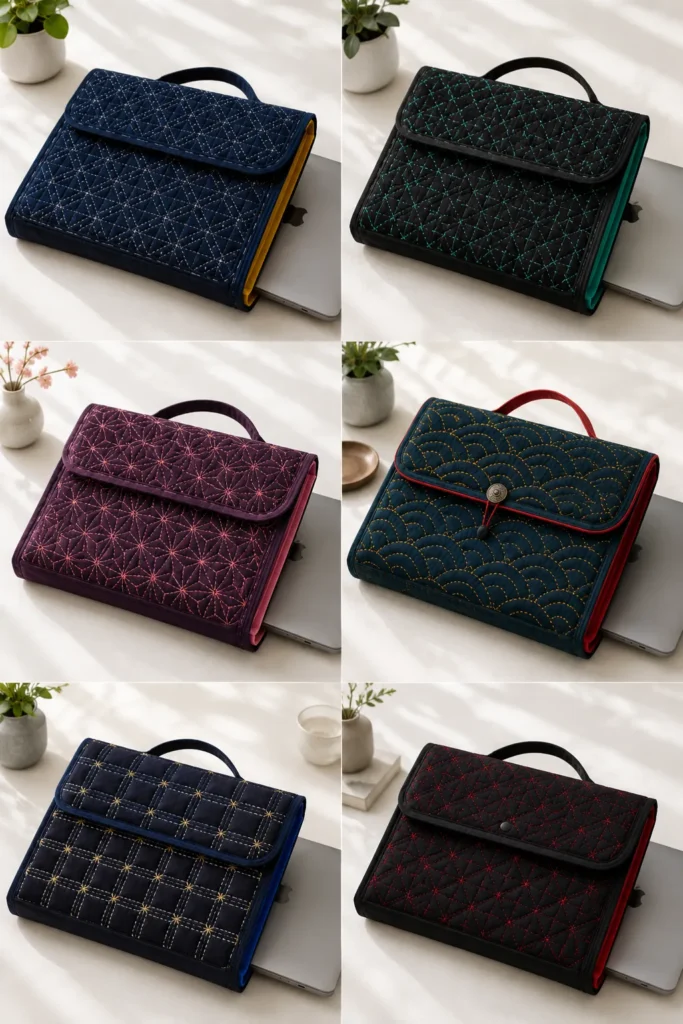
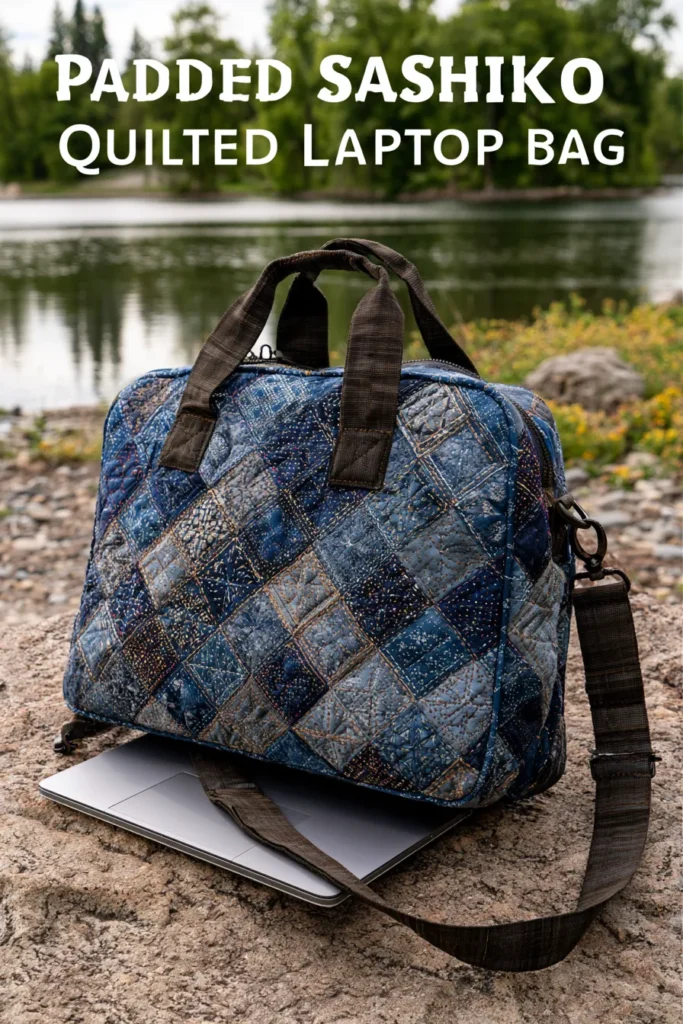
5. Padded Sashiko Quilted Laptop Bags for Elegant and Secure Tech Protection
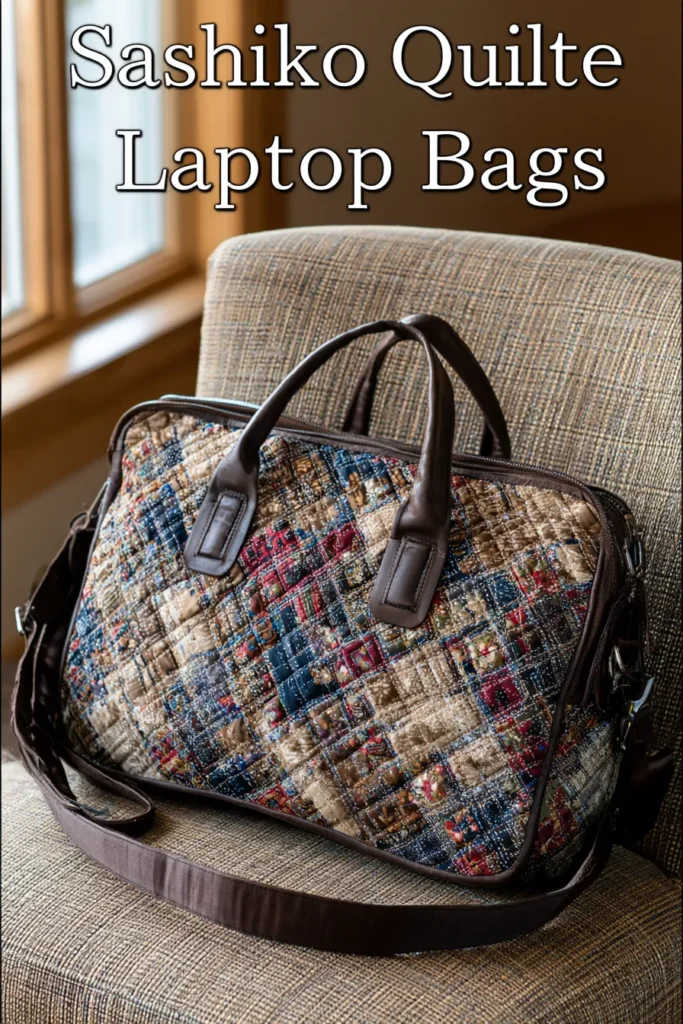
A Guide to Making Padded Sashiko Quilted Laptop Bags for Elegant and Secure Tech Protection
A Padded Sashiko Quilted Laptop Bag is a soft, protective tech carrier inspired by traditional Japanese sashiko stitching and modern quilted bag design. Sashiko was originally used to reinforce fabric, making it a perfect inspiration for a laptop bag, as its stitching adds both beauty and strength. I came up with this idea because laptop bags often look plain or overly corporate, while this version feels elegant, handmade, colorful, and personal.
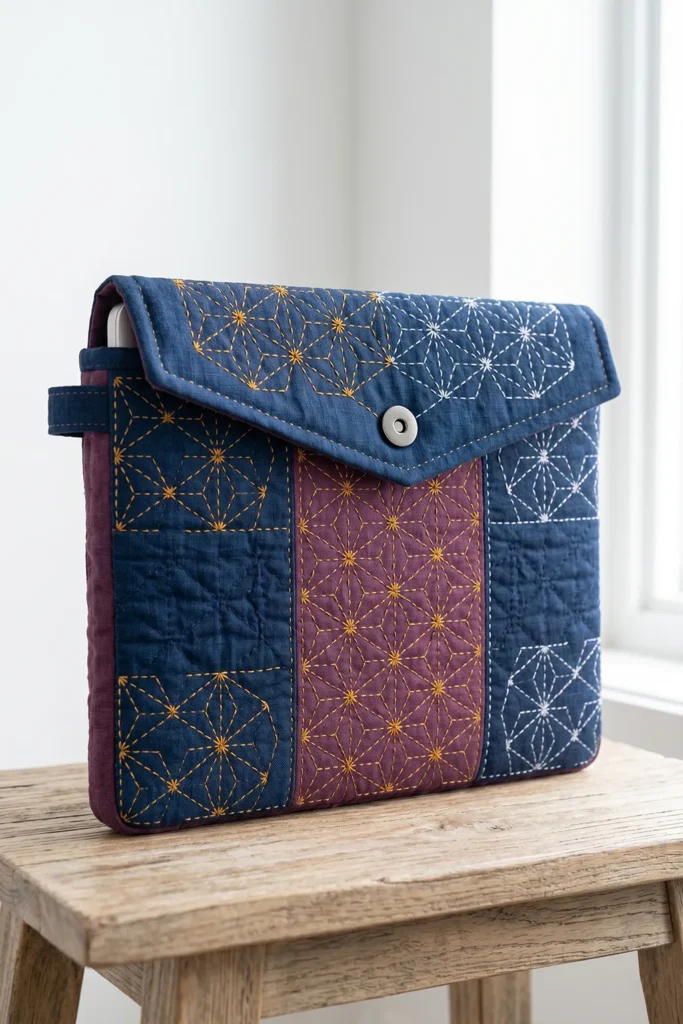
For vibrant colors, use a deep indigo blue, charcoal black, or plum purple exterior with bold sashiko stitching in white, gold, turquoise, coral, or cherry red. Add a bright lining in sakura pink, emerald green, mustard yellow, or cobalt blue so the inside feels just as stylish as the outside.
Why This Idea Is Worth Making
Curating the visual galleries for comfydwell.com is a process deeply intertwined with daily life. It is always important to emphasize that the textiles, patterns, and images featured on the site are intended as digital design concepts and creative inspirations rather than physical retail products. I conceptualized this specific digital aesthetic to solve a very real, personal challenge.
Moving constantly between focused indoor sessions—writing Python scripts and building data pipelines for AI agents—and stepping outside to oversee the lively resort and children’s park, my laptop is always under my arm. I needed a design that offered heavy-duty shock absorption but looked like a high-end, bespoke accessory. Historically, Sashiko stitching was used to reinforce fabric to the point of near-indestructibility. To bring this ancient utility into the digital age, I paired a deeply saturated Deep Sapphire canvas with high-contrast, Electric Magenta Sashiko thread, revealing a hidden lining of Luminous Lime. This creates a protective tech sleeve that feels both mathematically precise and unapologetically vibrant.
Suggested Finished Size
This guide fits a standard 13-inch laptop.
- Finished bag size: about 15 inches wide × 11 inches tall
- For a 14-inch laptop, cut pieces about 16 × 12 inches
- For a 15-inch laptop, cut pieces about 17 × 13 inches
Always measure your laptop first and add at least 1½ inches to the width and height for padding and seam allowance.
Materials Needed
- 2 exterior fabric pieces: 16 inches wide × 12 inches tall
- 2 lining fabric pieces: 16 inches wide × 12 inches tall
- 2 cotton batting pieces: 16 inches wide × 12 inches tall
- 2 foam stabilizer pieces: 15 inches wide × 11 inches tall
- 1 flap exterior piece: 16 inches wide × 5 inches tall
- 1 flap lining piece: 16 inches wide × 5 inches tall
- 1 flap batting piece: 16 inches wide × 5 inches tall
- Optional handle strip: 4 inches wide × 18 inches long
- Sashiko thread or thick embroidery thread
- Magnetic snap, button, or Velcro closure
- Sewing machine
- Hand-sewing needle
- Fabric marker or chalk
- Pins or clips
- Iron
- Scissors or rotary cutter
- Ruler
Step-by-Step Guide
Step 1: Measure Your Laptop
Measure the width, height, and thickness of your laptop. For a snug but padded fit, add about 1½ inches to the width and height. For example, if your laptop is about 13 × 9 inches, cut your main fabric pieces to 16 × 12 inches so there is enough room for padding, seams, and easy sliding.
Step 2: Choose a Vibrant Japanese-Inspired Palette
Choose a strong outer fabric such as cotton canvas, linen-cotton, denim, or heavy quilting cotton. A classic choice is indigo blue with white sashiko stitching, but you can make it more modern with plum purple and gold thread, charcoal with turquoise stitching, or deep teal with coral accents.
Step 3: Cut the Main Bag Pieces
Cut two exterior pieces, two lining pieces, and two batting pieces to 16 × 12 inches. Cut two foam stabilizer pieces slightly smaller at 15 × 11 inches so they fit inside the seams without making the edges bulky.

Step 4: Mark the Sashiko Pattern
On the right side of each exterior piece, use chalk to mark a sashiko-inspired pattern. Good options include simple running-stitch grids, waves, diamonds, hemp-leaf designs, or repeating crosses. Keep the pattern at least 1 inch away from all edges so the stitches do not get hidden in the seams.
Step 5: Layer and Quilt the Exterior Panels
Place batting behind each exterior fabric piece. Pin the layers together, then stitch along your marked sashiko lines by hand or machine. Use white thread for a traditional look, or try gold, cherry red, turquoise, or bright coral for a vibrant modern style.
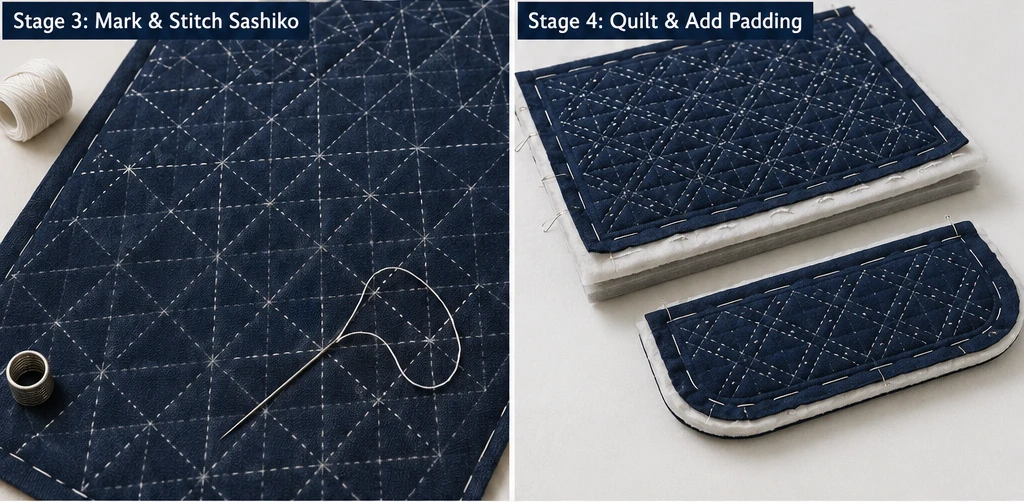
Step 6: Add Foam Padding
Place one foam stabilizer piece behind each quilted exterior panel. Baste around the edges with a ¼ inch seam allowance to hold the foam in place. This provides the laptop bag with more protection and helps it maintain a clean rectangular shape.
Step 7: Make the Closure Flap
Layer the flap exterior, batting, and flap lining pieces. Sew around the sides and the lower edge using a ½-inch seam allowance, leaving the top open. Turn the flap right side out, press it flat, and topstitch around the finished edges. Add sashiko stitching or one bold geometric quilt line to match the bag.
Step 8: Add the Closure
Attach one side of a magnetic snap, button, or Velcro closure to the flap. Place the matching closure piece on the front exterior panel about 3 inches below the top edge. Test the placement before sewing so the flap closes neatly over the laptop.
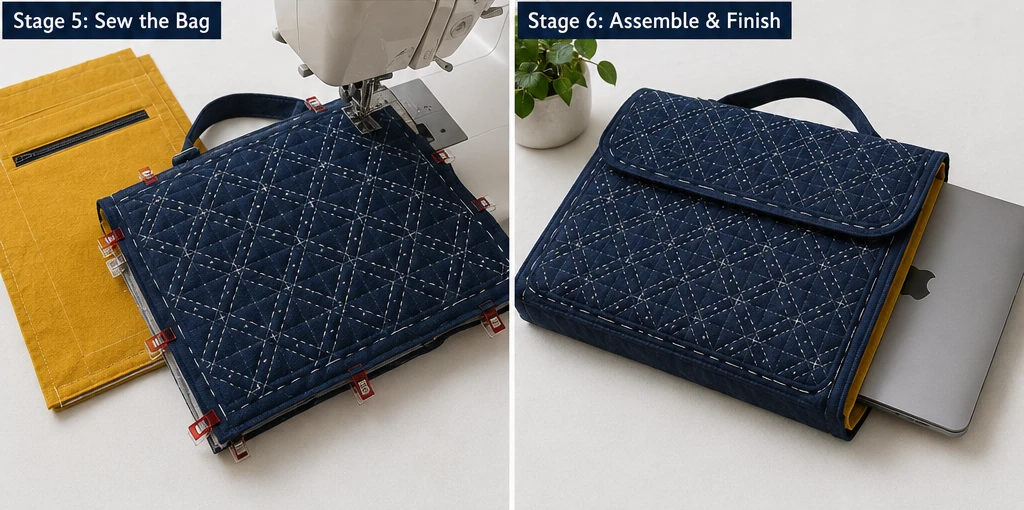
Step 9: Sew the Exterior Bag
Place the two quilted exterior panels right sides together. Sew along both sides and the bottom using a ½ inch seam allowance. Leave the top open. Because this is a laptop bag, keep the corners mostly square, or box the bottom only ½ inch to 1 inch if your laptop is thicker.
Step 10: Sew the Lining
Place the two lining pieces right sides together. Sew along both sides and the bottom using a ½-inch seam allowance, leaving a 4-inch opening at the bottom for turning. This opening will let you pull the finished laptop bag right side out later.
Assembly Section
Turn the quilted exterior bag right side out and keep the lining wrong side out. Pin the flap to the back top edge of the exterior bag, with the outer side of the flap facing the outer side of the bag. Baste it in place with a ¼-inch seam allowance.
If you want a small carry handle, fold the 4 × 18-inch handle strip like bias tape, stitch along both long edges, and baste it to the top center of the back panel under the flap. Then place the exterior bag inside the lining so the right sides are facing each other. Match the side seams and top edges, then sew around the top opening with a ½-inch seam allowance.
Pull the bag through the opening in the lining. Sew the lining opening closed, push the lining inside the bag, press the top edge carefully, and topstitch around the opening. Close the flap and check that the laptop slides in smoothly and securely.
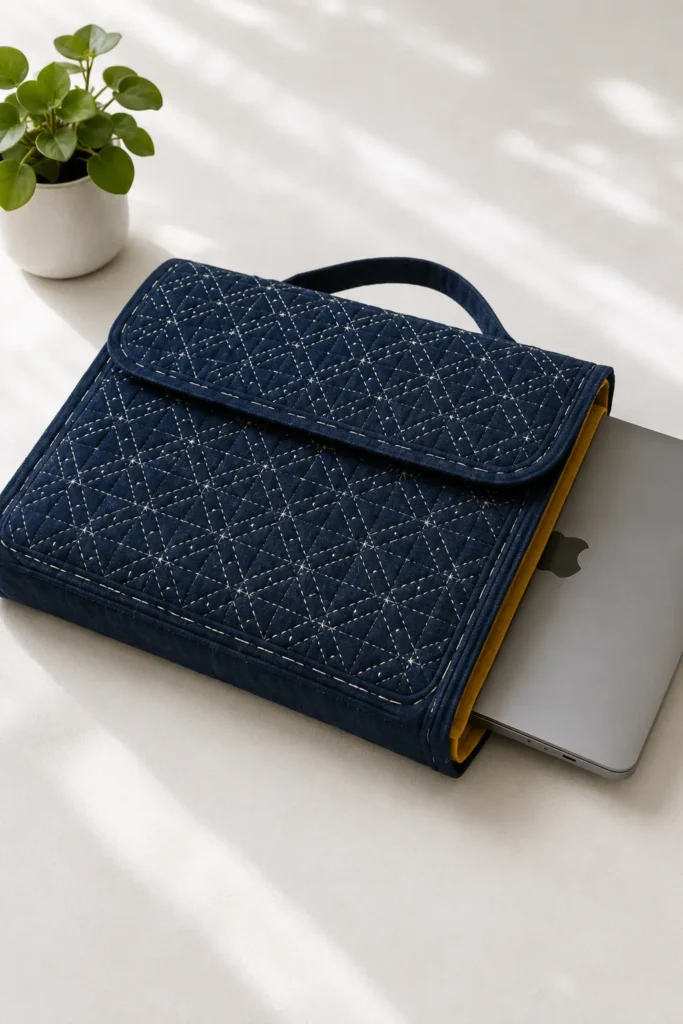
Final Styling Idea
For an elegant work or travel look, make the laptop bag in indigo blue with bright white sashiko stitching and a golden yellow lining. For a bolder style, try plum purple fabric with coral stitching or deep teal with turquoise and red geometric accents. The finished bag protects your laptop while looking handcrafted, stylish, and beautifully inspired by Japanese quilting traditions.
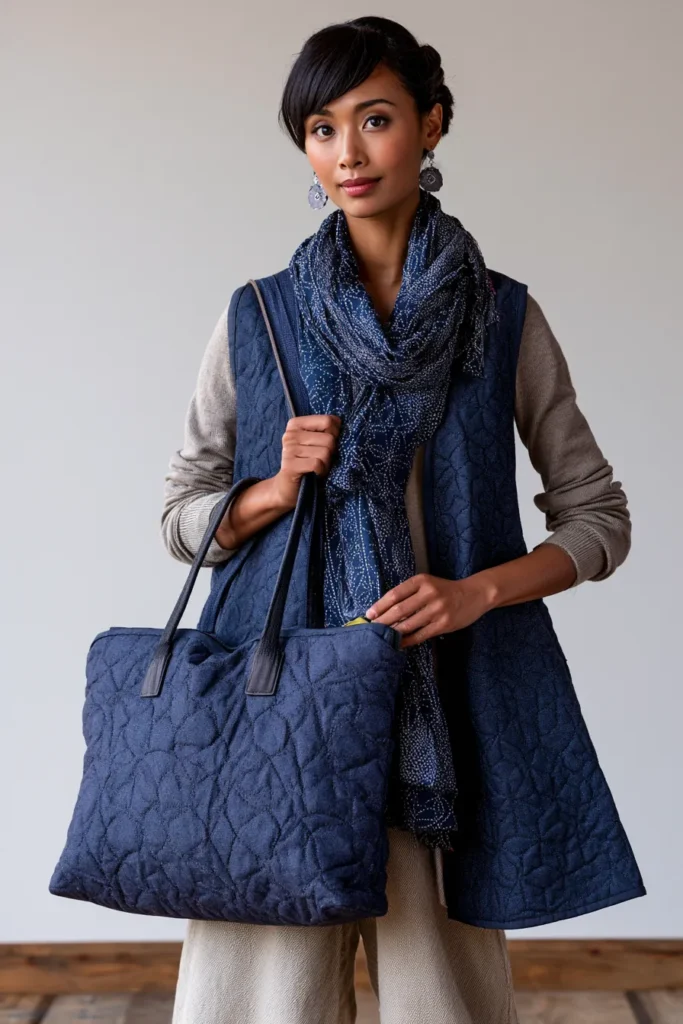
6. Spacious Japanese Quilted Laundry Bags for Chic Home Organization
A Guide to Making Spacious Japanese Quilted Laundry Bags for Chic Home Organization
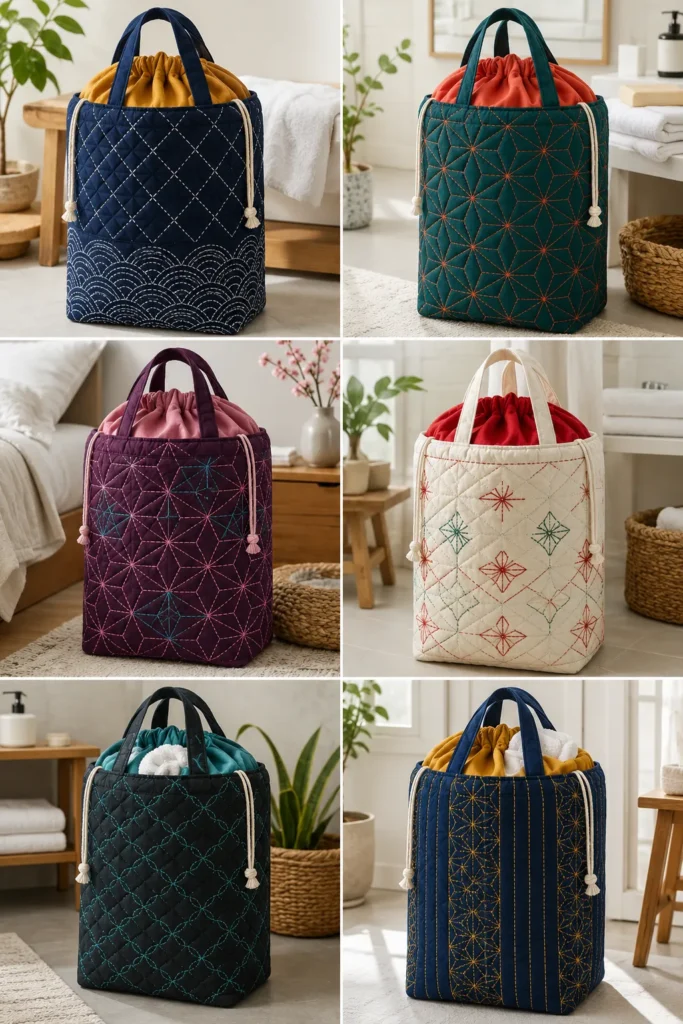
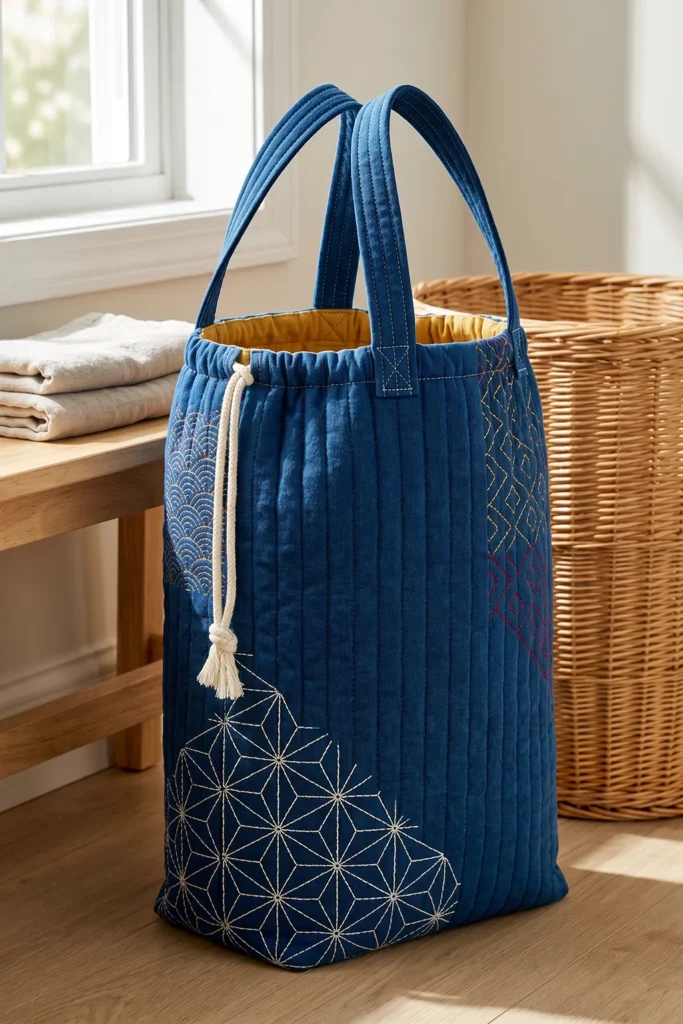
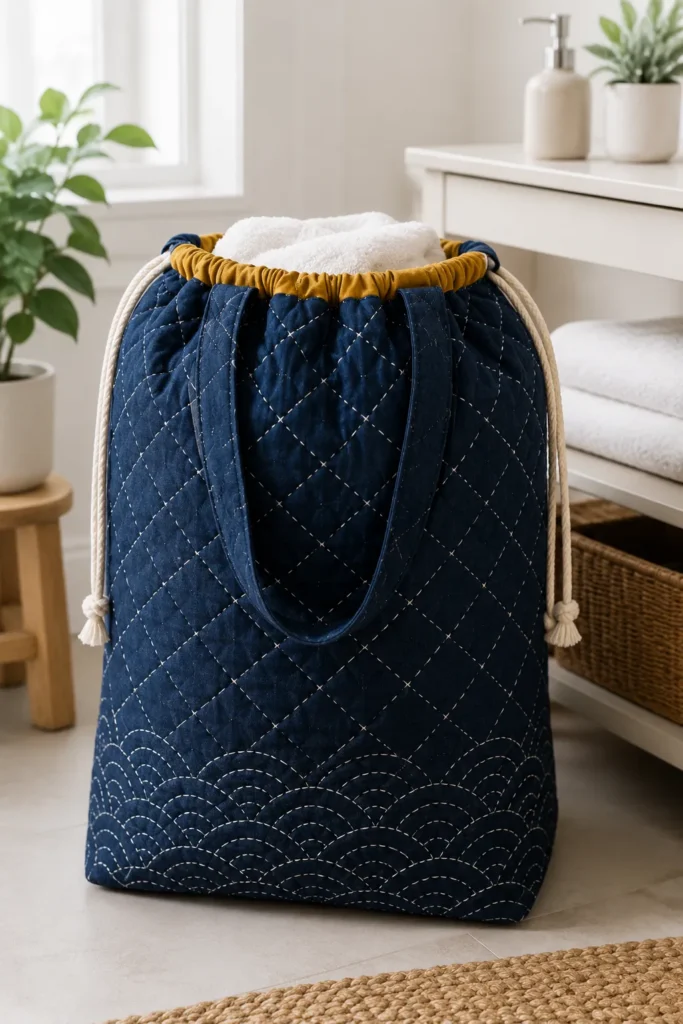
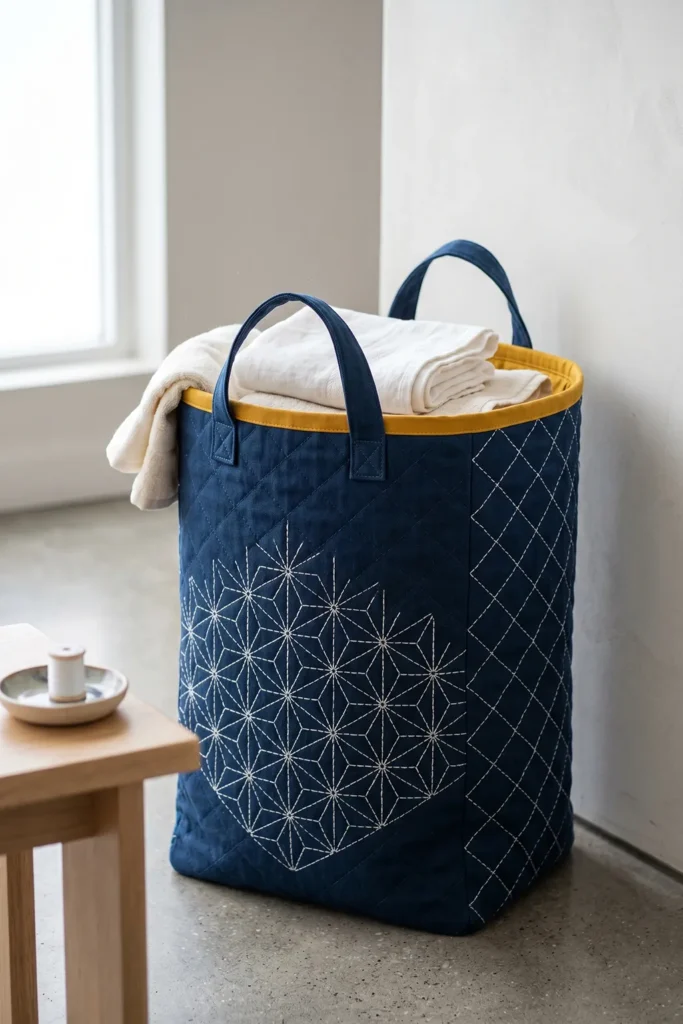
A Spacious Japanese Quilted Laundry Bag is a soft, roomy fabric bag that holds laundry while adding beauty and order to your home. Inspired by Japanese quilting, sashiko stitching, indigo textiles, and practical storage design, this project turns an everyday household item into something elegant and decorative. I came up with this idea because laundry storage doesn’t have to look plain or hidden away—it can be functional, colorful, and stylish enough to display in a bedroom, bathroom, laundry room, or dorm space.
For vibrant colors, use a rich base such as indigo blue, charcoal gray, deep teal, plum purple, or warm cream, then add accents of sakura pink, golden yellow, emerald green, vermilion red, or bright turquoise. The quilted texture gives the laundry bag body and softness, while Japanese-inspired stitching adds a handmade, refined look.
Why This Idea Is Worth Making
This idea is worth making because it combines practical storage with elegant home décor. A quilted laundry bag is lightweight, washable, easier to move than a hard basket, and much prettier than a basic plastic hamper. The larger size makes it useful for family laundry, towels, bedding, or seasonal clothing, while the colorful Japanese-inspired details make it feel like a thoughtful handmade piece rather than simple storage.
Suggested Finished Size
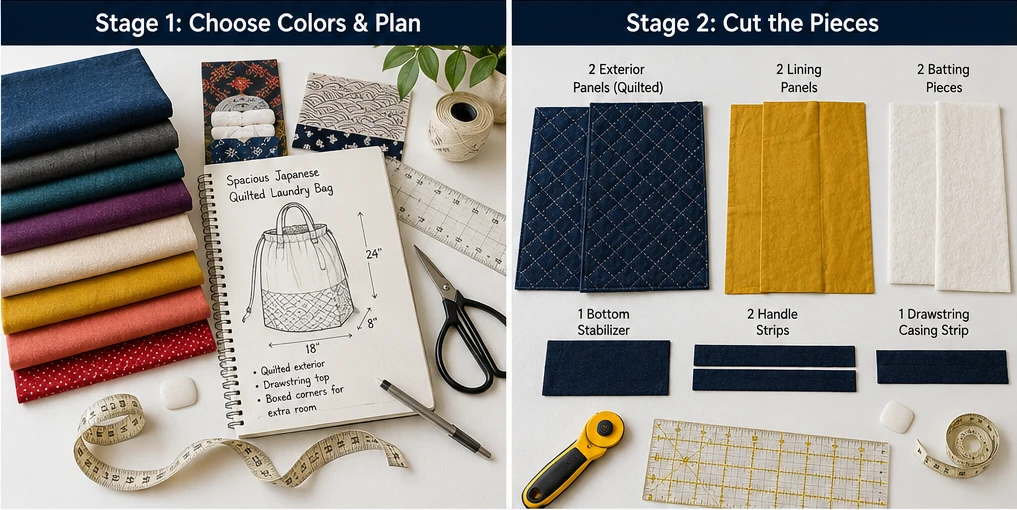
A good finished size for a spacious laundry bag is about 18 inches wide × 24 inches tall × 8 inches deep.
For a smaller laundry bag, use 16 × 20-inch panels.
For a larger family-size version, use 20 × 28-inch panels and a 10-inch boxed base.
Materials Needed
- 2 exterior fabric pieces: 20 inches wide × 26 inches tall
- 2 lining fabric pieces: 20 inches wide × 26 inches tall
- 2 cotton batting pieces: 20 inches wide × 26 inches tall
- 1 bottom stabilizer piece: 8 inches × 18 inches
- 2 handle strips: 5 inches wide × 24 inches long
- 1 drawstring casing strip: 4 inches wide × 40 inches long
- 1 cotton cord or drawstring: 48–54 inches long
- Sashiko thread, embroidery thread, or strong quilting thread
- Fabric marker or chalk
- Pins or sewing clips
- Sewing machine
- Iron
- Scissors or rotary cutter
- Ruler or measuring tape
Step-by-Step Guide
Step 1: Choose a Bold Japanese-Inspired Color Palette
Start with a strong base fabric such as indigo cotton canvas, deep teal linen, or charcoal quilting cotton. For a classic Japanese look, use indigo with white stitching. For a more vibrant version, add a lining in mustard yellow, cherry red, jade green, coral pink, or cobalt blue.
Step 2: Cut the Main Laundry Bag Pieces
Cut two exterior fabric pieces, two lining pieces, and two batting pieces to 20 × 26 inches. This creates a tall, roomy laundry bag that can hold clothing, towels, or light bedding. Keep the fabric pieces neatly squared so the finished bag stands more evenly.
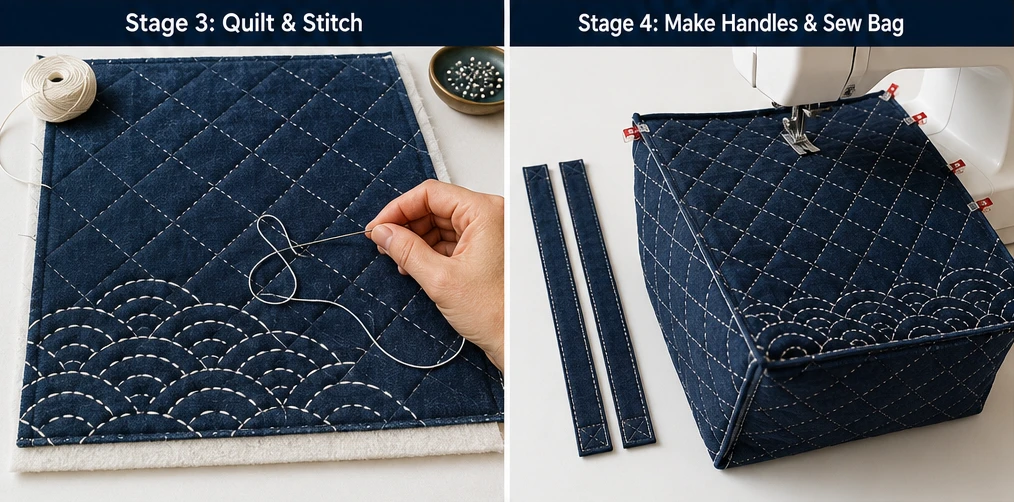
Step 3: Layer the Quilted Exterior Panels
Place one batting piece behind each exterior fabric piece. Smooth the layers flat and pin them securely. This padded layer gives the laundry bag structure, softness, and a cozy quilted finish.
Step 4: Mark the Quilting Design
Use chalk to mark simple quilting lines on the exterior panels. Try vertical lines spaced 2 inches apart, diagonal diamonds, or a sashiko-inspired wave design. For a clean, modern look, keep the quilting simple. For a more decorative look, add a border motif near the top edge.
Step 5: Quilt the Exterior Panels
Stitch along the marked lines using strong thread. Use white thread for a traditional indigo look, or choose gold, turquoise, coral, red, or emerald green for a lively modern style. Quilting helps stabilize the fabric and makes the bag stronger for repeated use.
Step 6: Add Sashiko or Geometric Details
Add hand-stitched sashiko accents to one front panel. Good designs include waves, diamonds, crosses, hemp leaf shapes, or simple running stitch grids. Place the design in the lower corner or across the center panel for a balanced decorative effect.
Step 7: Make the Handles
Fold each 5 × 24-inch handle strip in half lengthwise and press. Open it, fold both long edges toward the center, then fold again. Press flat and stitch down both long sides. For extra strength, insert a narrow strip of batting or canvas before stitching.
Step 8: Sew the Exterior Bag
Place the quilted exterior panels right sides together. Sew down both sides and across the bottom using a ½ inch seam allowance. Leave the top open. To create a wide base, box the bottom corners by measuring 4 inches from each corner tip, sewing across, and trimming the excess fabric.
Step 9: Sew the Lining
Place the lining pieces right sides together. Sew the sides and bottom with a ½ inch seam allowance, leaving a 5-inch opening at the bottom for turning. Box the lining corners the same way as the exterior, so it fits smoothly inside.
Step 10: Make the Drawstring Casing
Fold the short ends of the 4 × 40-inch casing strip under by ½ inch and stitch them down. Fold the strip in half lengthwise, wrong sides together, and press. This creates a long casing band for the drawstring at the top of the laundry bag.
Assembly Section
Turn the quilted exterior bag right side out. Pin the handles to the top edge, placing each handle end about 5 inches from the side seams. Baste them in place with a ¼ inch seam allowance.
Place the exterior bag inside the lining with the right sides facing. Match the side seams and top edges. Insert the folded drawstring casing between the exterior and lining layers, aligning the raw edges at the top and leaving the finished casing openings near one side seam. Sew all the way around the top using a ½ inch seam allowance.
Pull the bag right side out through the opening in the lining. Stitch the lining opening closed, push the lining into the bag, and press the top edge neatly. Thread the cotton cord through the casing using a safety pin, then tie the cord ends together. For extra structure, slide the 8 × 18 inch stabilizer piece into the bottom of the bag between the lining and exterior, or place it inside as a removable base.
Final Styling Idea
For chic home organization, make the laundry bag with an indigo quilted exterior, white sashiko stitching, and a bright golden yellow lining. For a more playful home style, try deep teal with coral stitching, plum purple with turquoise details, or cream fabric with red and emerald geometric accents. Place it beside a wooden bench, linen closet, bathroom shelf, or bedroom corner for laundry storage that feels elegant, handmade, and beautifully organized.
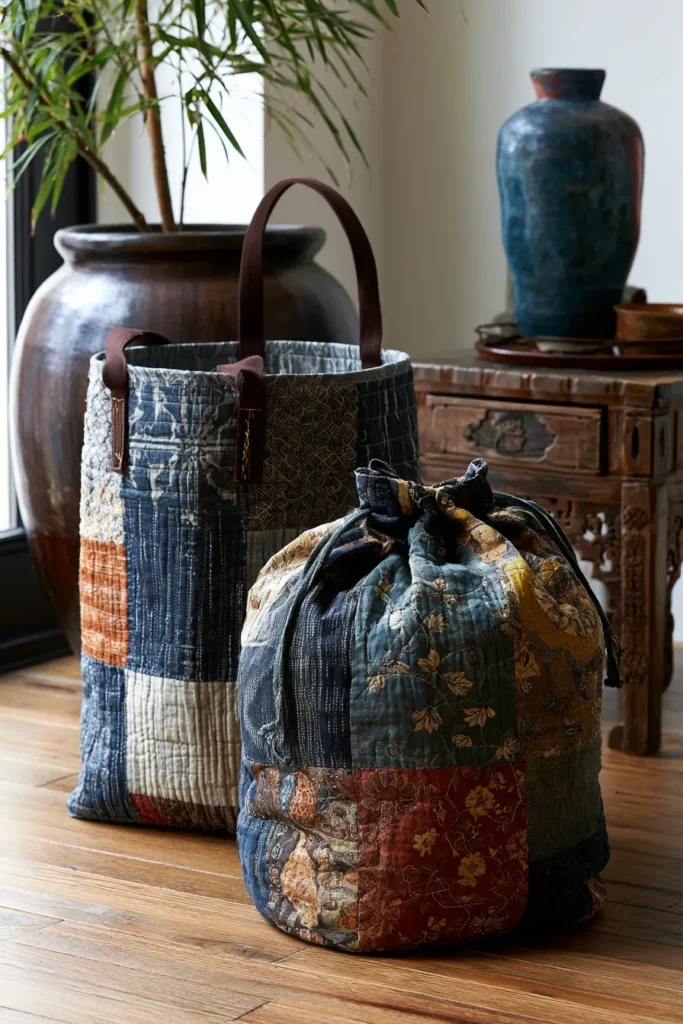
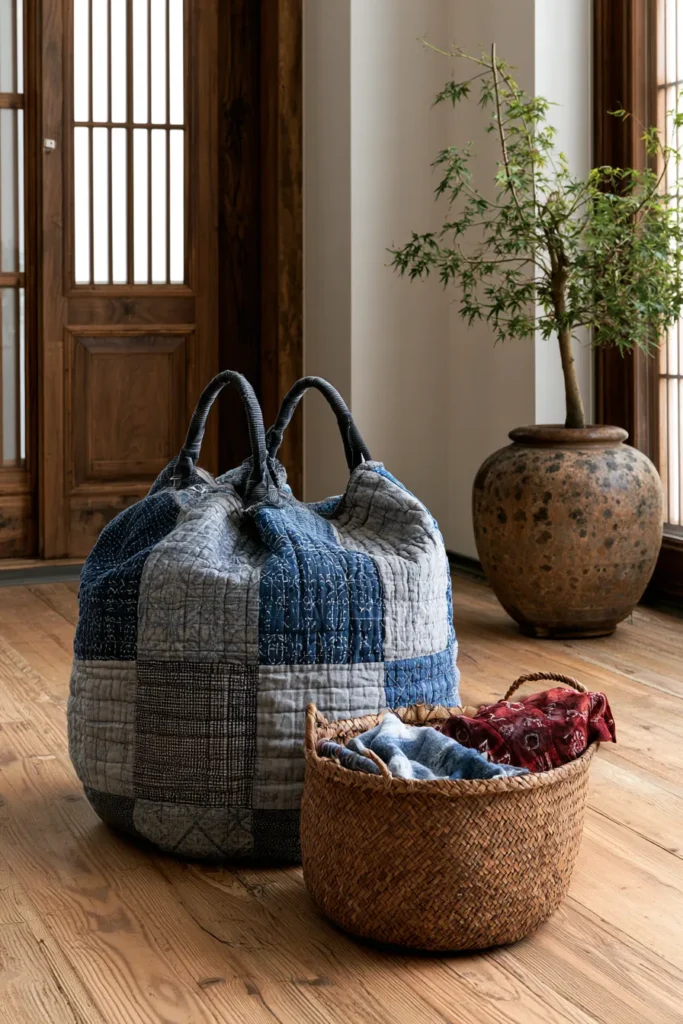
7. Foldable Japanese Quilted Laundry Hampers for Stylish Small Spaces
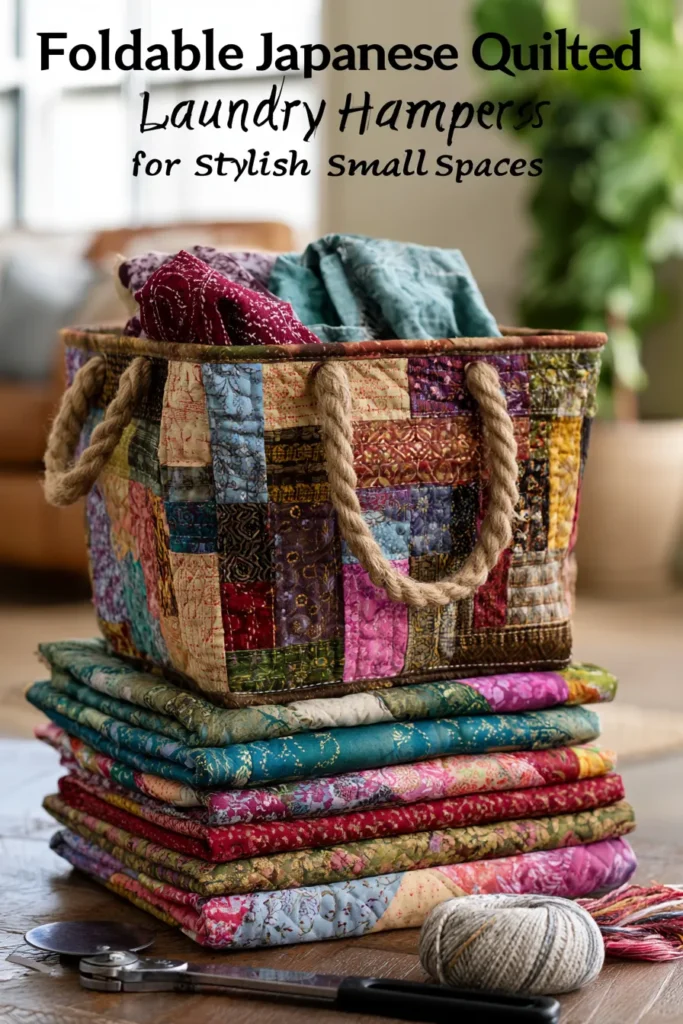
A Guide to Making Foldable Japanese Quilted Laundry Hampers for Stylish Small Spaces
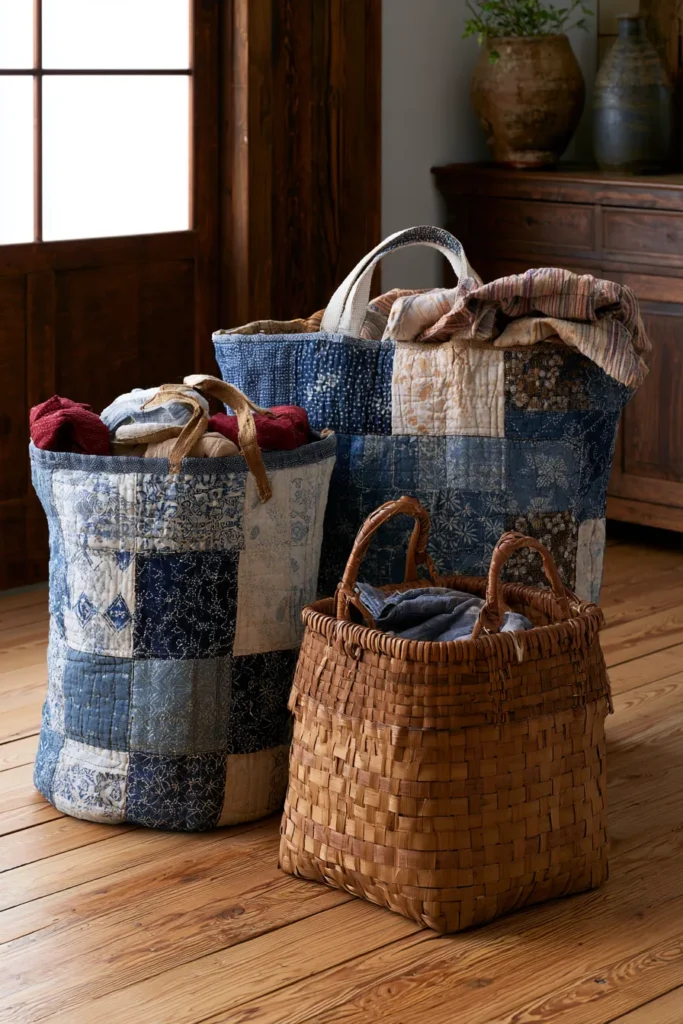
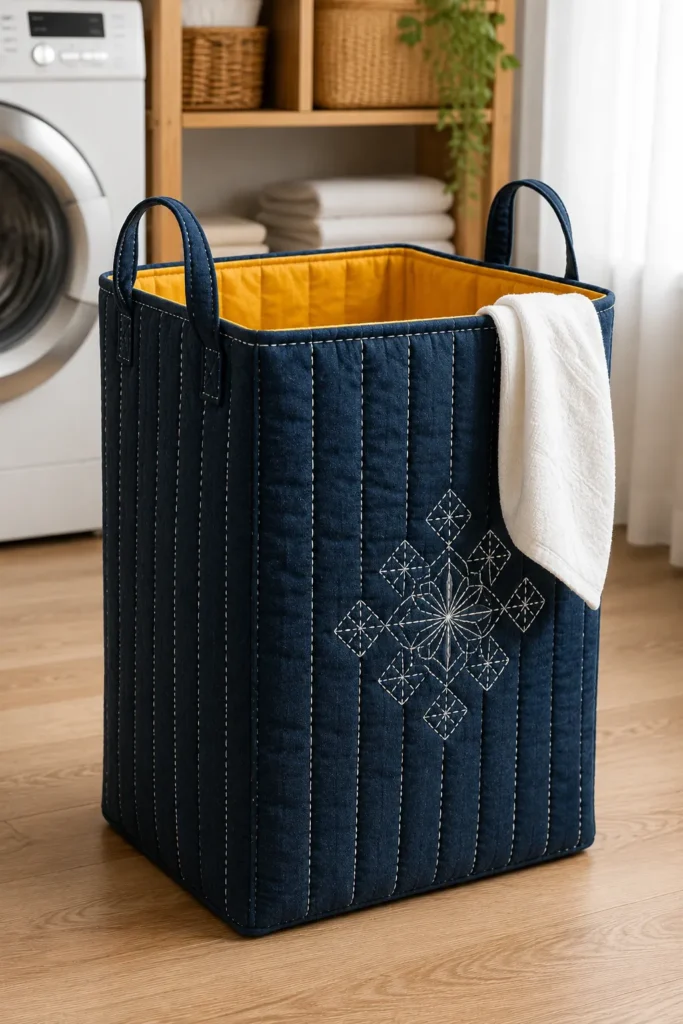
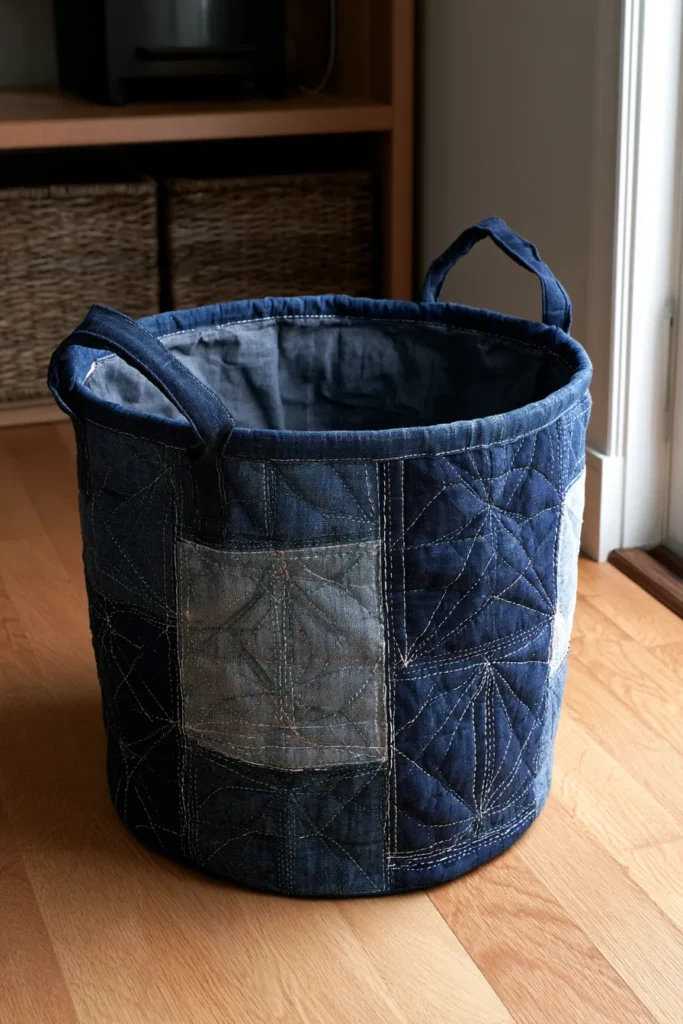
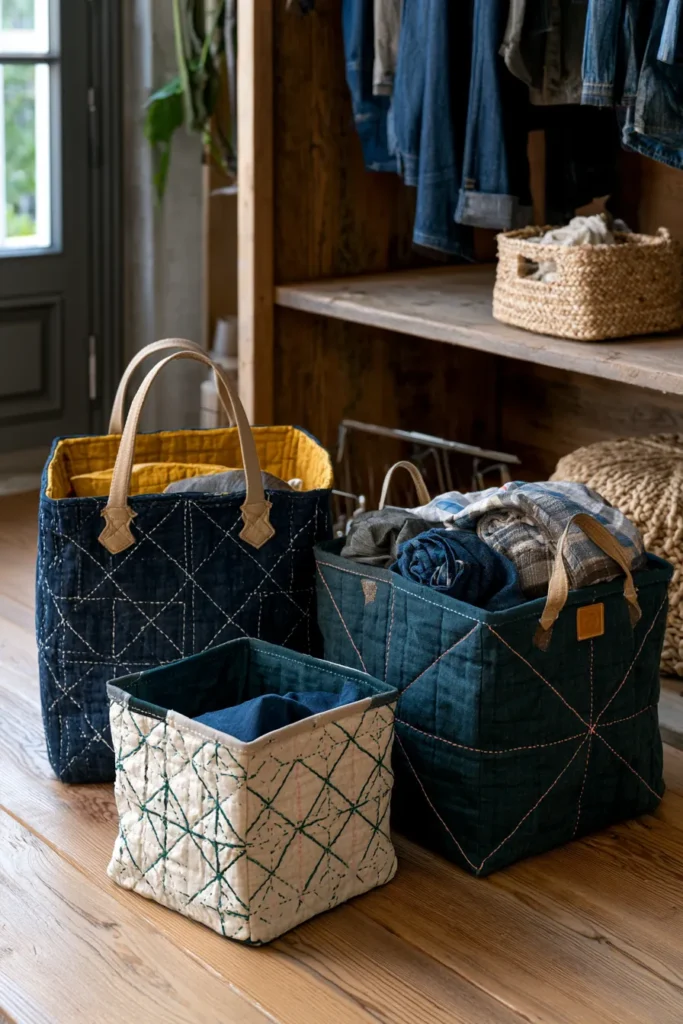
A Foldable Japanese Quilted Laundry Hamper is a soft, collapsible storage basket designed for laundry, towels, linens, or everyday clutter. Inspired by Japanese quilting, sashiko stitching, boro patchwork, and practical small-space living, this hamper offers elegant storage that folds flat when not in use. I came up with this idea because small homes, apartments, dorm rooms, and shared laundry spaces need storage that is beautiful, lightweight, and easy to tuck away.
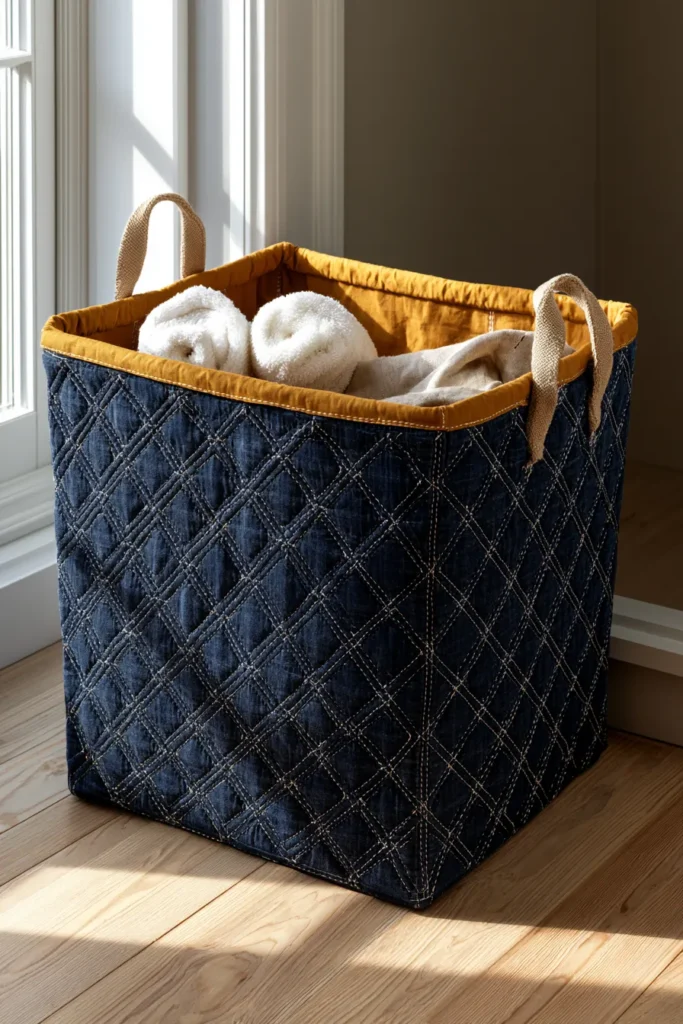
For vibrant colors, use an indigo blue, deep teal, charcoal, or warm cream exterior with bold accents in sakura pink, golden yellow, vermillion red, emerald green, cobalt blue, or bright turquoise. The quilted body adds softness and structure, while the foldable design makes it practical for modern living.
Why This Idea Is Worth Making
This idea is worth making because it solves a real home organization problem in a stylish, handmade way. Many laundry hampers are bulky, plastic, or difficult to store, but this quilted version is lightweight, washable, and collapsible. It works beautifully in bedrooms, bathrooms, closets, laundry corners, RVs, dorms, or small apartments where every inch of space matters.

Suggested Finished Size
A practical finished size is about 16 inches wide × 20 inches tall × 10 inches deep.
For a smaller apartment hamper, use 14 × 18 × 8 inches.
For a larger family hamper, use 18 × 24 × 12 inches.
Materials Needed
- 2 exterior fabric pieces: 18 inches wide × 22 inches tall
- 2 lining fabric pieces: 18 inches wide × 22 inches tall
- 2 cotton batting pieces: 18 inches wide × 22 inches tall
- 2 side gusset exterior pieces: 12 inches wide × 22 inches tall
- 2 side gusset lining pieces: 12 inches wide × 22 inches tall
- 2 side gusset batting pieces: 12 inches wide × 22 inches tall
- 1 bottom exterior piece: 18 inches × 10 inches
- 1 bottom lining piece: 18 inches × 10 inches
- 1 bottom batting piece: 18 inches × 10 inches
- 2 handle strips: 5 inches wide × 18 inches long
- 4 flexible stabilizer panels: 15 inches × 18 inches or heavy interfacing
- 1 removable bottom insert: 17 inches × 9 inches
- Sashiko thread, embroidery thread, or strong quilting thread
- Sewing machine
- Fabric marker or chalk
- Pins or clips
- Iron
- Scissors or rotary cutter
- Ruler
Step-by-Step Guide
Step 1: Choose a Small-Space Friendly Color Palette
Select a main fabric that looks clean and elegant in the home. Indigo with white stitching feels classic, cream with red and gold accents feels bright, and deep teal with coral and turquoise details feels modern. Choose a bold lining color like sakura pink, mustard yellow, jade green, or cobalt blue for a cheerful inside finish.
Step 2: Cut the Hamper Panels
Cut the front and back pieces to 18 × 22 inches, the side gusset pieces to 12 × 22 inches, and the bottom pieces to 18 × 10 inches. Cut matching batting and lining pieces for each section. These measurements create a tall rectangular hamper that holds laundry while still fitting neatly in small spaces.
Step 3: Layer and Quilt the Main Panels
Place batting behind each exterior piece: front, back, sides, and bottom. Pin the layers together. Quilt each panel with simple vertical lines spaced 2 inches apart, diagonal diamonds, or large sashiko-style waves. Use white, gold, turquoise, coral, or red thread for vibrant contrast.
Step 4: Add Japanese-Inspired Stitching
On the front panel, mark a simple sashiko motif such as diamonds, waves, crosses, or hemp leaf shapes. Stitch the design by hand or machine. Keep the motif centered or place it in one lower corner for a clean, elegant look. This gives the hamper a handmade story without making it feel too busy.
Step 5: Add Flexible Stabilizer Panels
Place a flexible stabilizer or heavy interfacing behind the quilted front, back, and side panels. Keep each stabilizer about 1 inch smaller than the fabric panel so it does not get caught heavily in the seams. These inserts help the hamper stand upright but still allow it to fold when empty.
Step 6: Make the Handles
Fold each 5 × 18 inch handle strip in half lengthwise and press. Open it, fold both long edges toward the center, then fold again. Stitch along both long sides. For a stronger grip, add a narrow strip of batting inside each handle before sewing.
Step 7: Sew the Hamper Body
Place the quilted front panel right sides together with one side of the gusset panel. Sew using a ½ inch seam allowance. Attach the back panel to the same side gusset, then add the second side gusset to form a rectangular tube. Keep the seams neat and press them open where possible.
Step 8: Attach the Bottom Panel
Pin the quilted bottom panel to the lower edge of the rectangular hamper body, matching corners carefully. Sew around all four sides with a ½-inch seam allowance. Clip the corners slightly so the base turns cleanly. This creates the outer hamper shell.
Step 9: Sew the Lining
Repeat the same process with the lining pieces. Sew the front, back, side gussets, and bottom lining together, but leave a 5 inch opening along one lower side seam for turning. The lining makes the inside neat and helps protect clothing from raw seams.
Step 10: Add the Handles to the Exterior
Turn the exterior hamper right side out. Pin one handle to the front top edge and one handle to the back top edge. Place each handle end about 5 inches apart, centered on the panel. Baste the handles in place with a ¼ inch seam allowance.
Assembly Section
Place the quilted exterior hamper inside the lining with right sides facing. Match the top edges and side seams carefully. Sew all the way around the top opening using a ½ inch seam allowance, making sure the handles are tucked between the exterior and lining layers.
Pull the hamper’s right side out through the opening in the lining. Stitch the lining opening closed, then push the lining inside the hamper. Press the top edge neatly and topstitch around the opening for a strong, finished rim. Slide the 17 × 9 inch removable bottom insert into the base to help the hamper stand when full. To fold it flat, remove the bottom insert and press the sides inward.
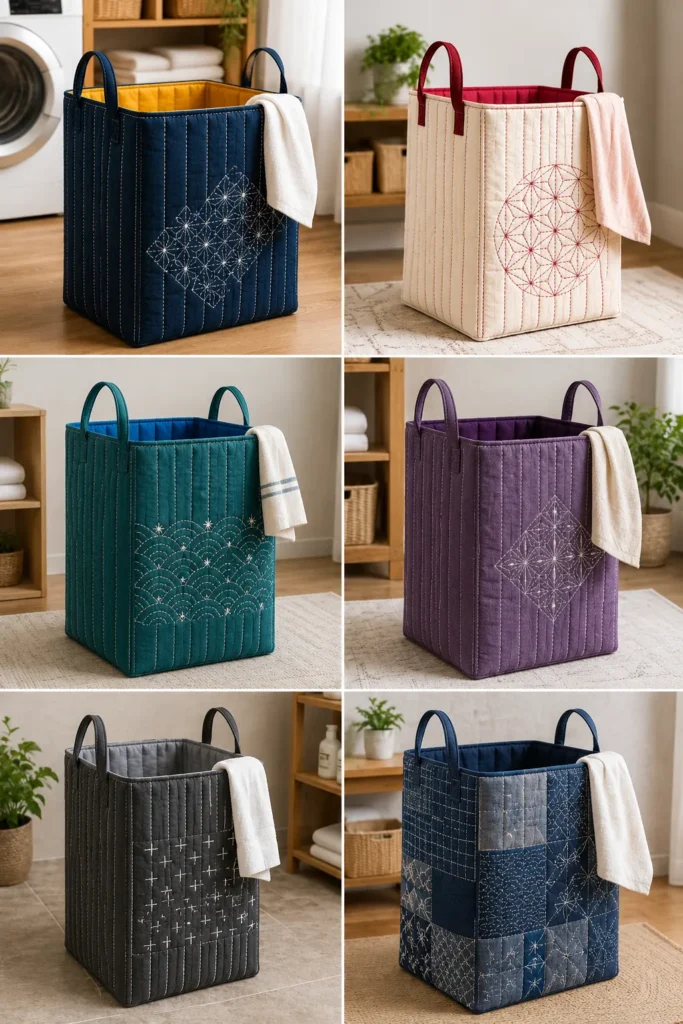
Final Styling Idea
For a vibrant small-space look, make the hamper with an indigo quilted exterior, white sashiko stitching, and a golden yellow lining. For a softer room style, try cream fabric with sakura pink and emerald green geometric quilting. For a bold modern finish, use deep teal with coral stitching and cobalt blue lining. Place it beside a closet, under a bathroom shelf, near a laundry nook, or in a dorm corner for stylish storage that folds away when not needed.
CONCLUSION
A well-made quilted bag becomes part of daily routine in a specific way – present enough to notice, understated enough not to demand attention. These seven designs share that quality: practical in use, considered in construction, and connected to a textile tradition worth carrying forward. Whether you are drawn to the geometric precision of sashiko stitching, the layered character of boro patchwork, or the quiet depth of indigo-dyed fabric, the goal is the same – an object useful enough to reach for every day and made carefully enough to last.
