
5 Stylish Cat Quilt Pattern Ideas: Cozy Design Concepts for Elegant Spaces
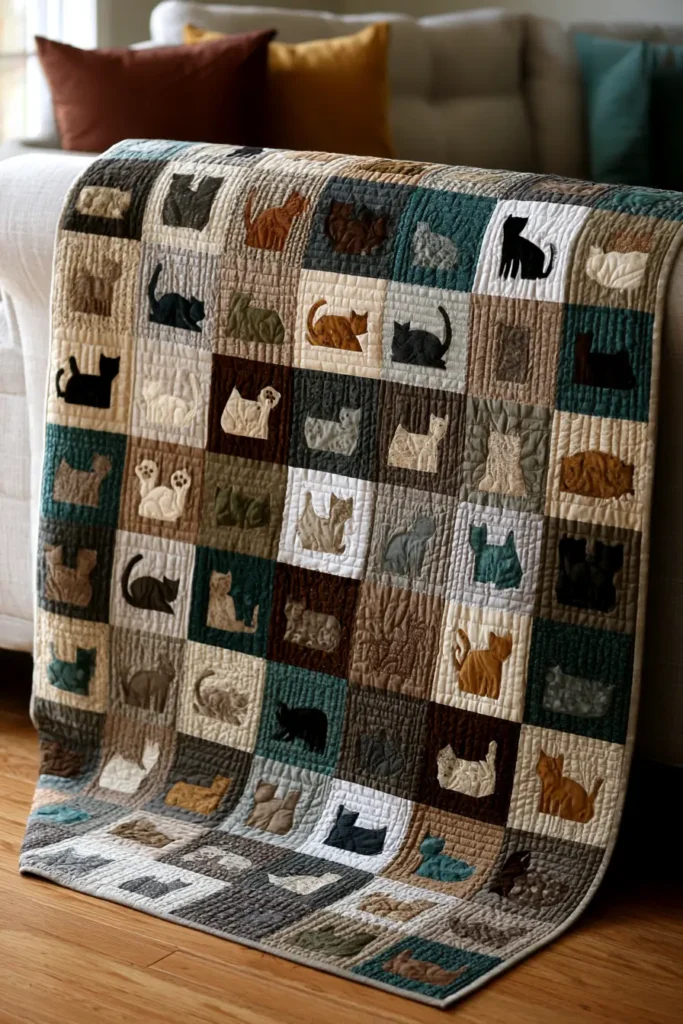
Cat Quilt Pattern Ideas have a longer history than most people assume — and a more respectable one. Cat motifs in American quilting date to at least the mid-19th century, appearing in crib quilts and friendship quilts from the 1850s onward. The earliest documented examples were often appliquéd rather than pieced, with simple silhouettes that served both decorative and symbolic purposes — cats as guardians of the home, as companions, as the particular presence that a domestic space either has or noticeably lacks. The theme has never entirely disappeared from quilting traditions, which is its own kind of endorsement.
Cat Quilt Pattern Ideas: A Feline Theme That Earns Its Place in a Serious Room
Contents
- 1 Cat Quilt Pattern Ideas: A Feline Theme That Earns Its Place in a Serious Room
- 2 What Makes a Cat Quilt Work in an Adult Space
- 3 1. Elegant Minimalist Cat Silhouette Quilt Patterns for Chic Modern Spaces
- 3.1 Why I Made It
- 3.2 Why This Idea Is Worth Making
- 3.3 Materials Needed
- 3.4 Finished Size
- 3.5 Cat Silhouette Template Measurements
- 3.6 Step-by-Step Guide
- 3.6.1 Step 1: Choose the Modern Color Palette
- 3.6.2 Step 2: Cut the Background Blocks
- 3.6.3 Step 3: Create the Cat Silhouette Templates
- 3.6.4 Step 4: Prepare the Appliqué Fabric
- 3.6.5 Step 5: Place the Cat Silhouettes
- 3.6.6 Step 6: Fuse and Stitch the Cats
- 3.6.7 Step 7: Add Accent Shapes
- 3.6.8 Step 8: Arrange the Quilt Blocks
- 3.6.9 Step 9: Sew the Quilt Top Together
- 3.6.10 Step 10: Layer, Quilt, and Bind
- 3.7 Assembly Section
- 3.8 Vibrant Color Combination Ideas
- 3.9 Styling Tip
- 4 2. Sophisticated Neutral Tone Cat Quilt Ideas for Calm, Cozy Interiors
- 5 Why I Made It
- 6 Why This Idea Is Worth Making
- 7 Materials Needed
- 8 Finished Size and Block Plan
- 9 Step-by-Step Guide
- 9.1 Step 1: Choose a Sophisticated Neutral Palette
- 9.2 Step 2: Cut the Background Blocks
- 9.3 Step 3: Create the Cat Silhouette Templates
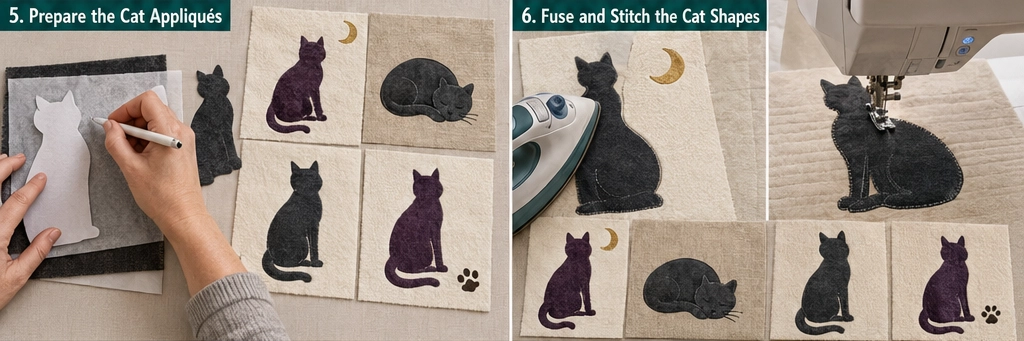
- 9.4 Step 4: Prepare the Cat Appliqués
- 9.5 Step 5: Place and Fuse the Cat Shapes
- 9.6 Step 6: Stitch Around the Cat Appliqués
- 9.7 Step 7: Make Accent Blocks
- 9.8 Step 8: Arrange the Quilt Layout
- 9.9 Step 9: Sew the Blocks Together
- 9.10 Step 10: Layer and Baste the Quilt
- 9.11 Step 11: Quilt the Layers
- 9.12 Step 12: Bind the Quilt
- 10 Assembly Section
- 11 Sophisticated Color Combination Ideas
- 12 Styling Tip
- 13 3. Vintage-Inspired Patchwork Cat Quilt Concepts for Relaxed Everyday Charm
- 14 Why I Made It
- 15 Why This Idea Is Worth Making
- 16 Materials Needed
- 17 Finished Size and Block Plan
- 18 Step-by-Step Guide
- 18.1 Step 1: Choose Vintage-Inspired Fabrics
- 18.2 Step 2: Cut Patchwork Squares
- 18.3 Step 3: Create Cat Appliqué Shapes
- 18.4 Step 4: Make the Cat Blocks
- 18.5 Step 5: Stitch Around the Cat Shapes
- 18.6 Step 6: Make Accent Blocks
- 18.7 Step 7: Arrange the Quilt Layout
- 18.8 Step 8: Sew Blocks into Rows
- 18.9 Step 9: Join the Rows
- 18.10 Step 10: Layer the Quilt
- 18.11 Step 11: Quilt the Layers
- 18.12 Step 12: Bind the Quilt
- 19 Assembly Section
- 20 Vintage Color Combination Ideas
- 21 Styling Tip
- 22 4. Stylish Geometric Feline Quilt Designs for Artistic Home Accents
- 23 Why I Made It
- 24 Why This Idea Is Worth Making
- 25 Materials Needed
- 26 Finished Size and Block Plan
- 27 Step-by-Step Guide
- 27.1 Step 1: Choose a Bold Geometric Palette
- 27.2 Step 2: Cut the Base Blocks
- 27.3 Step 3: Make Simple Geometric Cat-Face Pieces
- 27.4 Step 4: Piece the Cat-Face Blocks
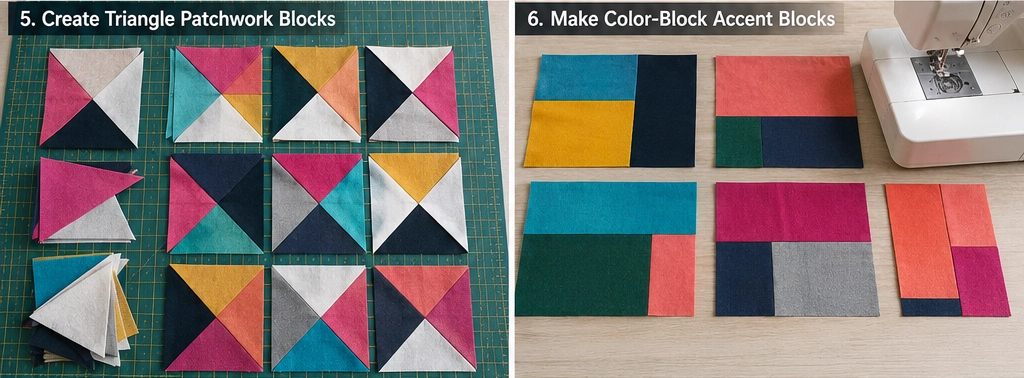
- 27.5 Step 5: Create Triangle Patchwork Blocks
- 27.6 Step 6: Make Color-Block Accent Blocks
- 27.7 Step 7: Arrange the Quilt Layout
- 27.8 Step 8: Sew Blocks into Rows
- 27.9 Step 9: Join the Rows
- 27.10 Step 10: Layer and Baste
- 27.11 Step 11: Quilt with Modern Lines
- 27.12 Step 12: Bind the Quilt
- 28 Assembly Section
- 29 Vibrant Color Combination Ideas
- 30 Styling Tip
- 31 5. Luxury-Inspired Mixed-Texture Cat Quilts for Cozy Sofa Throws
- 32 Why I Made It
- 33 Why This Idea Is Worth Making
- 34 Finished Size
- 35 Materials Needed
- 36 Cutting Measurements
- 37 Step-by-Step Guide
- 37.1 Step 1: Choose a Rich, Vibrant Palette
- 37.2 Step 2: Choose Beginner-Friendly Textures
- 37.3 Step 3: Cut the Blocks
- 37.4 Step 4: Make the Cat Silhouette Templates
- 37.5 Step 5: Prepare the Cat Appliqués
- 37.6 Step 6: Fuse and Stitch the Cat Shapes
- 37.7 Step 7: Add Small Luxury Accents
- 37.8 Step 8: Arrange the Quilt Layout
- 37.9 Step 9: Sew the Blocks into Rows
- 37.10 Step 10: Join the Rows
- 37.11 Step 11: Layer and Quilt
- 37.12 Step 12: Bind the Quilt
- 38 Assembly at a Glance
- 39 Vibrant Luxury Color Combinations
- 40 Beginner-Friendly Texture Tips
- 41 Styling Tip
- 42 CONCLUSION
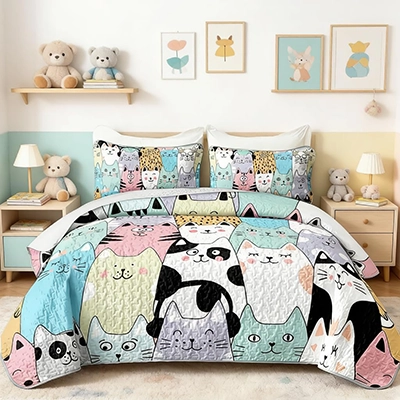
What has changed is the design sophistication available within the category. For most of the 20th century, cat quilts meant nursery quilts: bright colors, cartoon proportions, the kind of unambiguous whimsy that belongs in a child’s room and nowhere else. That version still exists and still sells, but it is no longer the whole story.
The current wave of cat-themed quilting — visible in quilting communities, on Pinterest, across independent makers’ shops — is doing something more considered: geometric cat silhouettes in high-contrast neutrals, minimalist outline quilting on whole-cloth backgrounds, vintage patchwork incorporating subtle feline motifs that reward close attention rather than announcing themselves immediately. These are quilts that happen to feature cats rather than quilts that are entirely about cats, and the distinction matters for anyone trying to incorporate the theme into a room they take seriously.
I will admit a personal position here: I find cat quilts genuinely interesting as a design challenge precisely because the brief is harder than it looks. A quilt that reads as sophisticated while featuring an animal motif has to work harder than one using abstract geometry or a heritage pattern. The cat has to earn its place in the design rather than simply being the design. The five patterns in this collection are chosen because they pass that test — each one uses feline themes in a way that adds character and warmth to a room without reducing the room to a theme.
What Makes a Cat Quilt Work in an Adult Space
The difference between a cat quilt that works in a considered interior and one that does not comes down to how the motif is used. Silhouette and abstraction over literal representation. Scale chosen for the room, not the pattern. A palette that belongs to the room’s existing logic rather than being imported from a cat-themed color story. These five ideas are built on those principles.
See also: Baby quilt patterns · Boho quilt patterns · Themed & Specialty Quilts
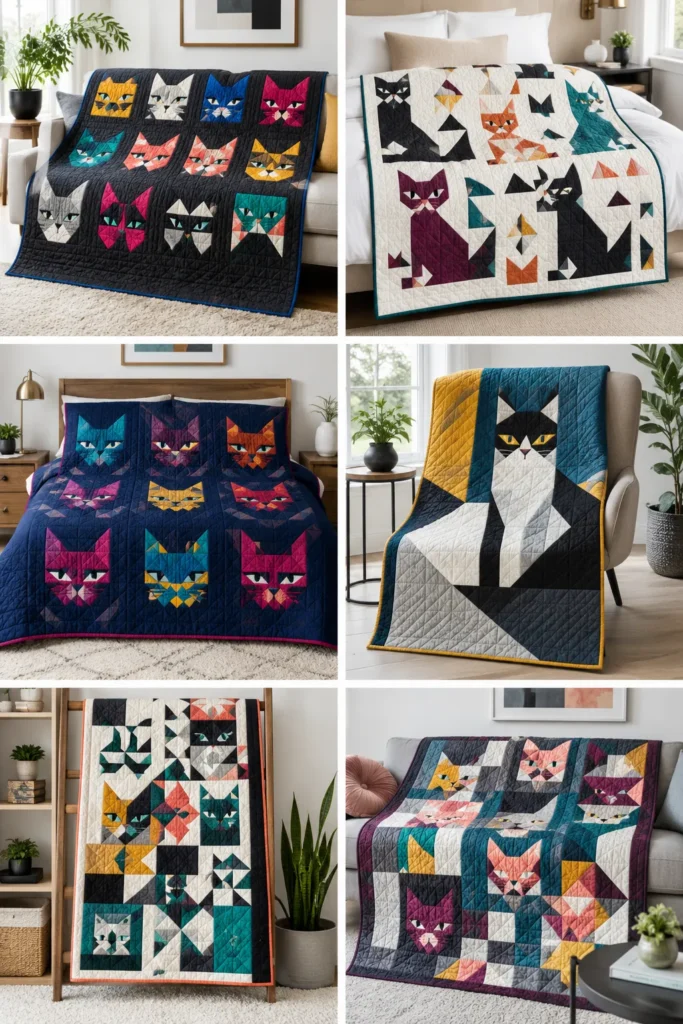
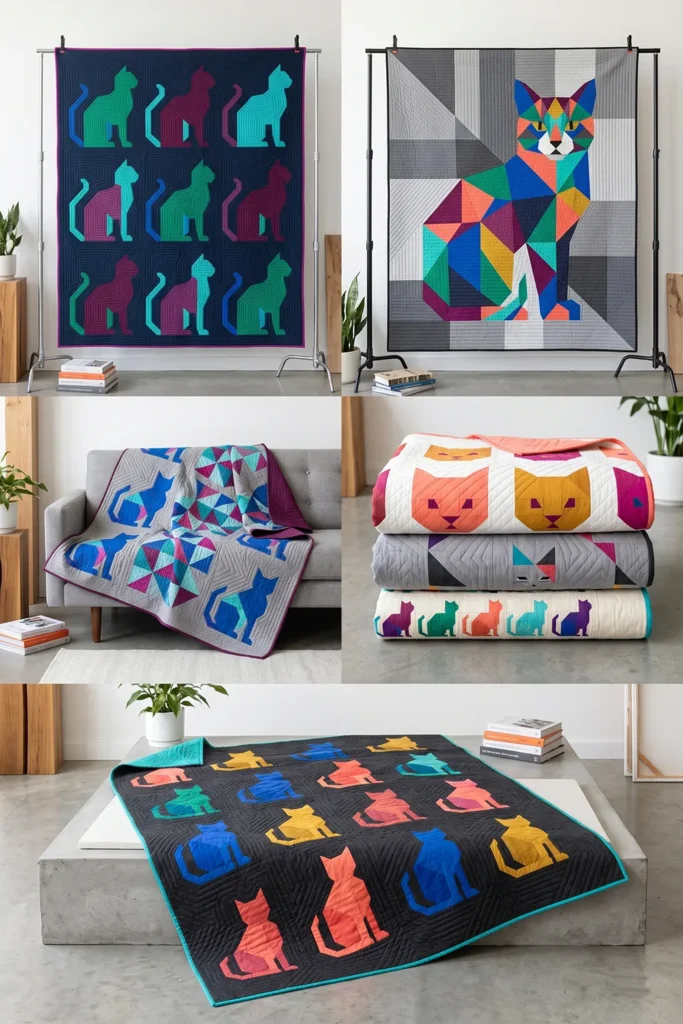
Recommended Ready-Made Cat Quilts
“As an Amazon Associate, I earn from qualifying purchases.“
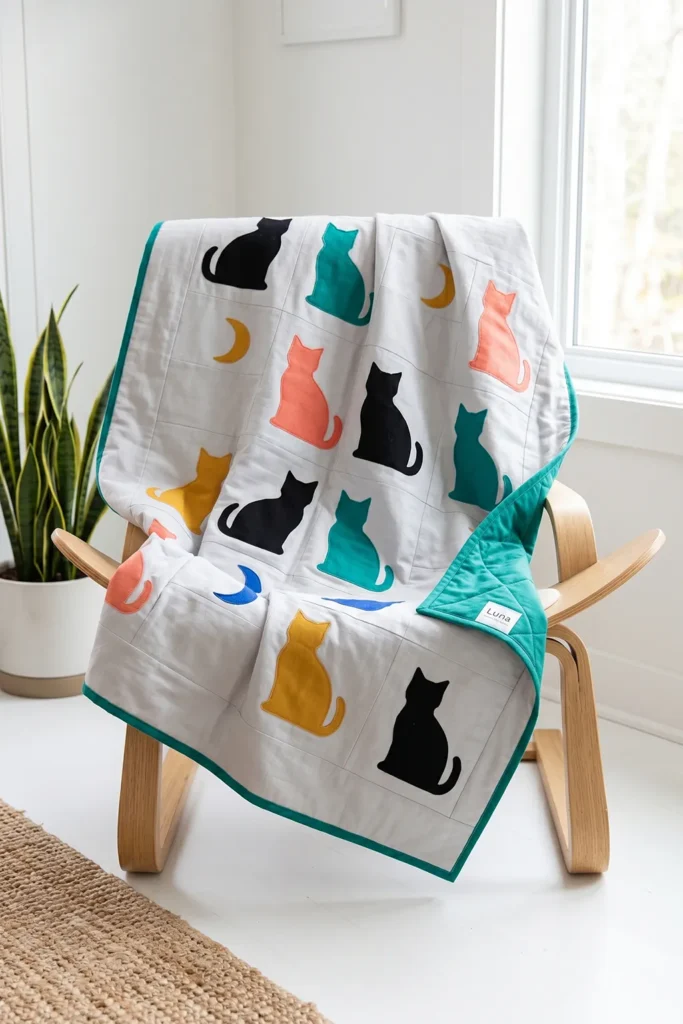
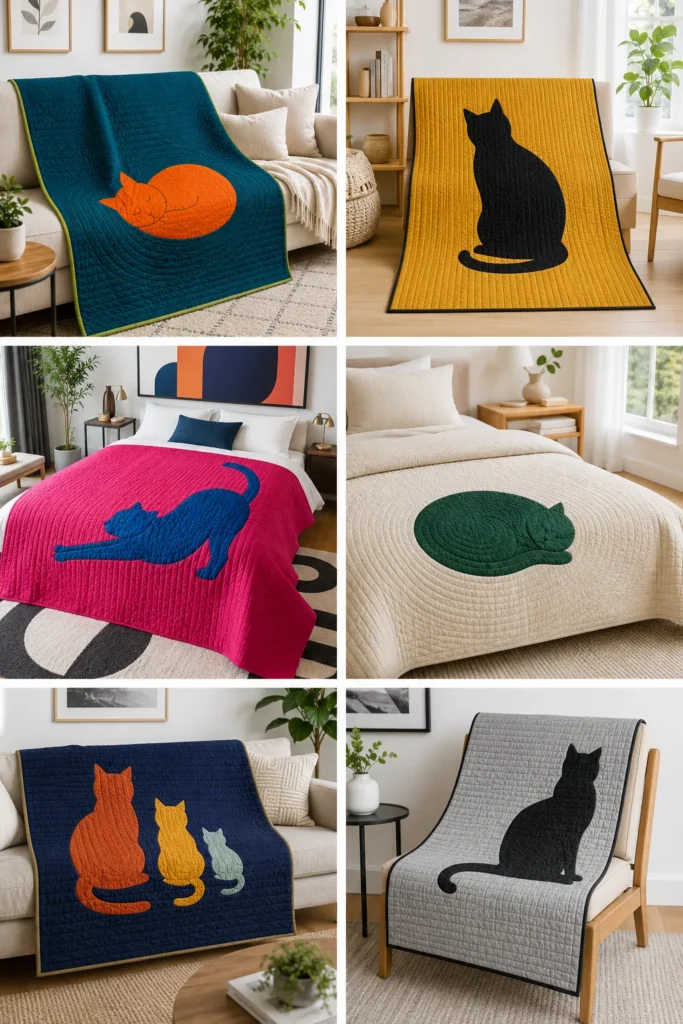
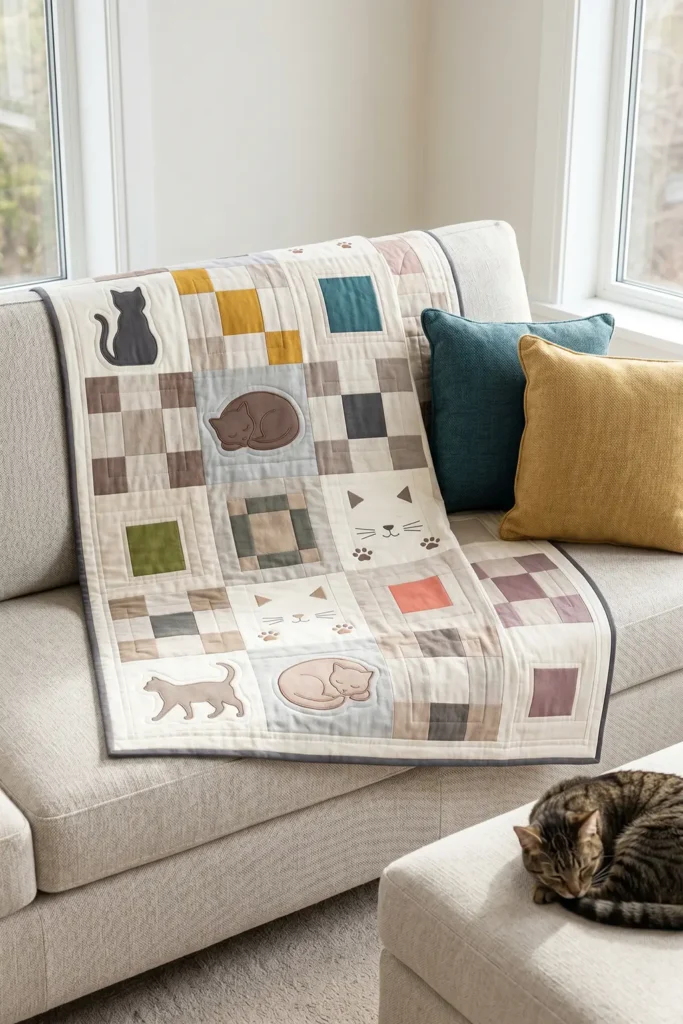
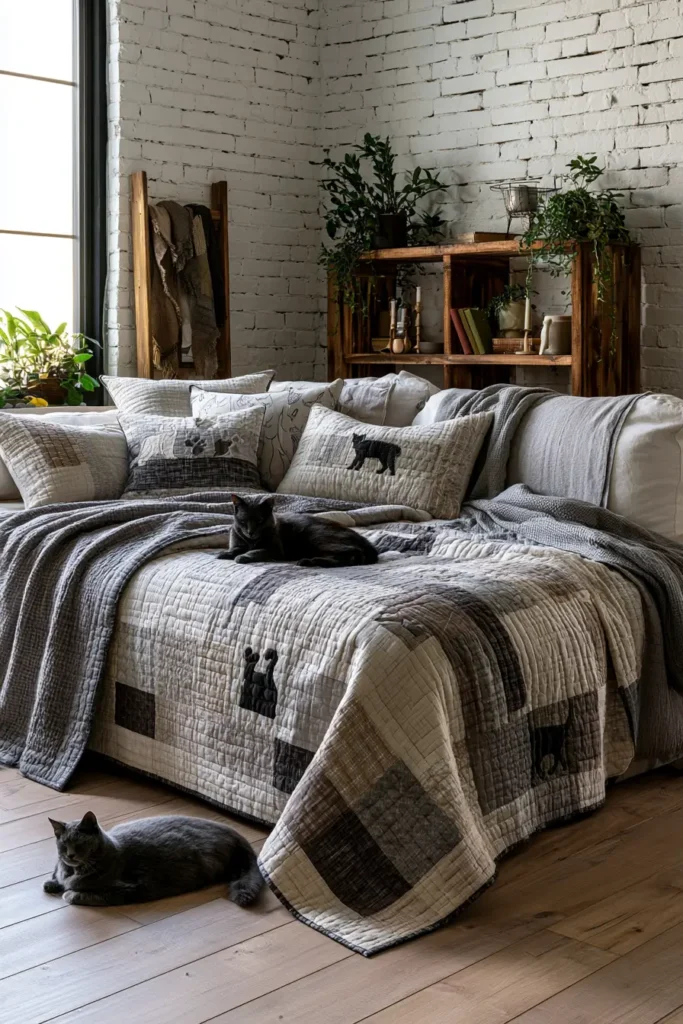
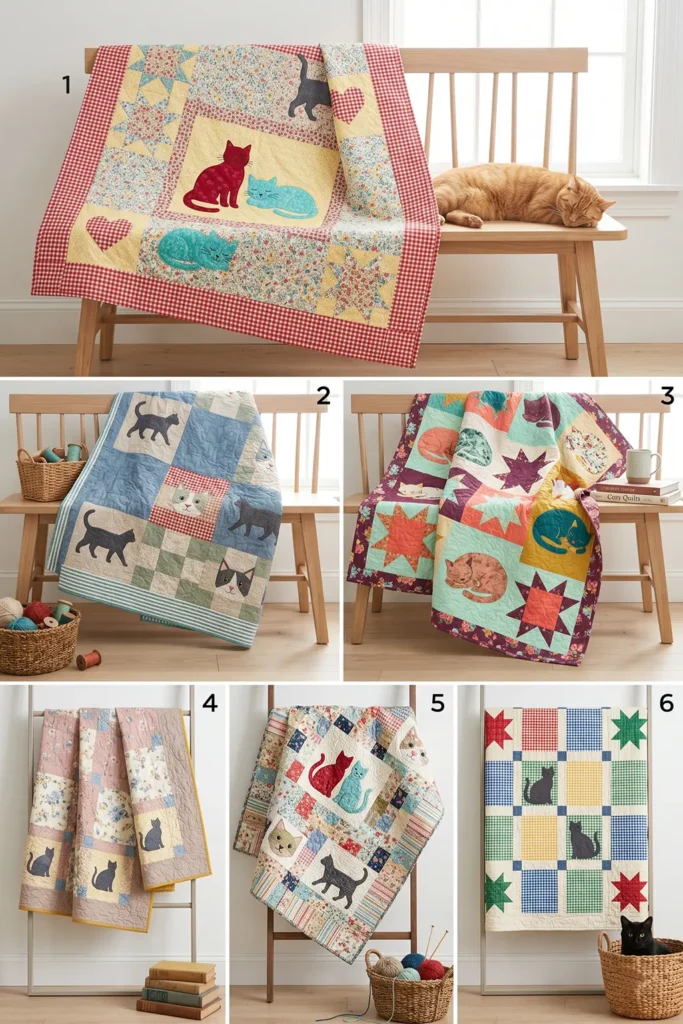
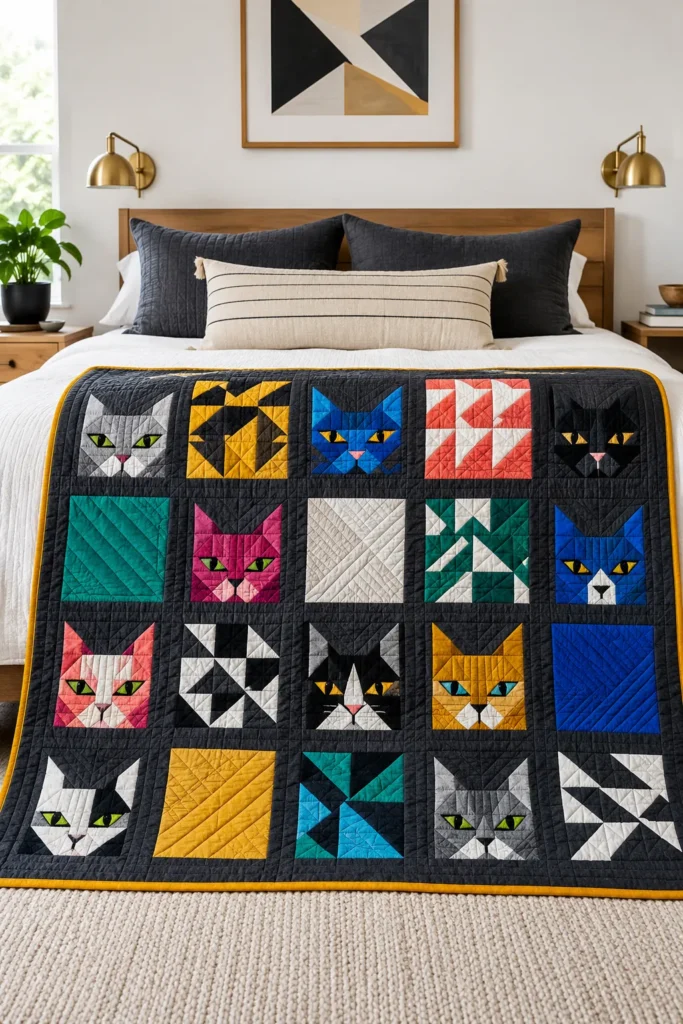
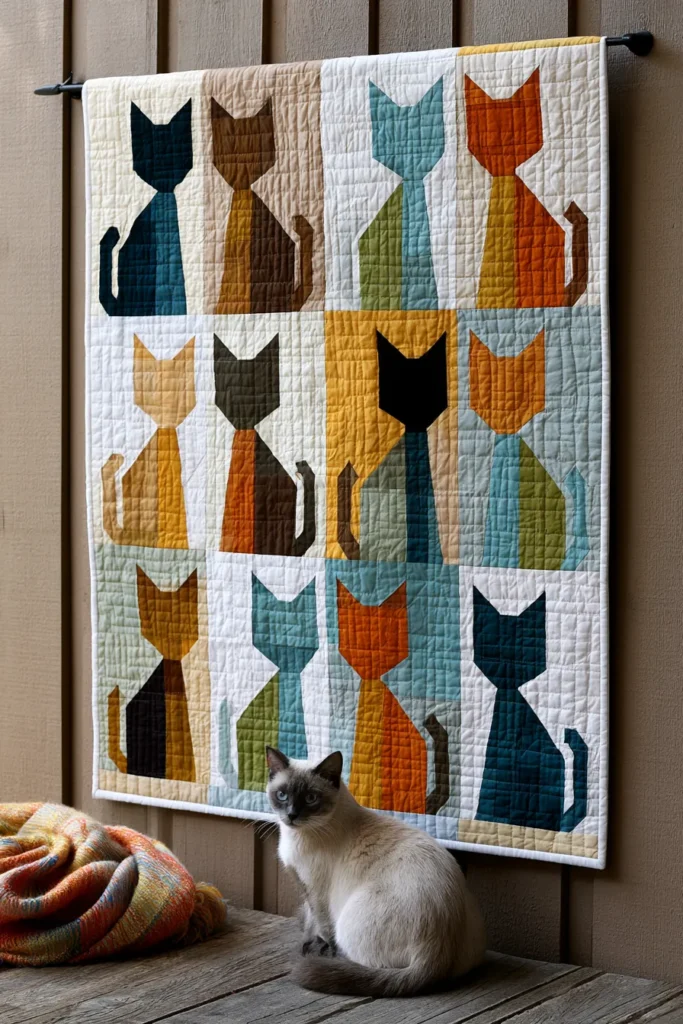
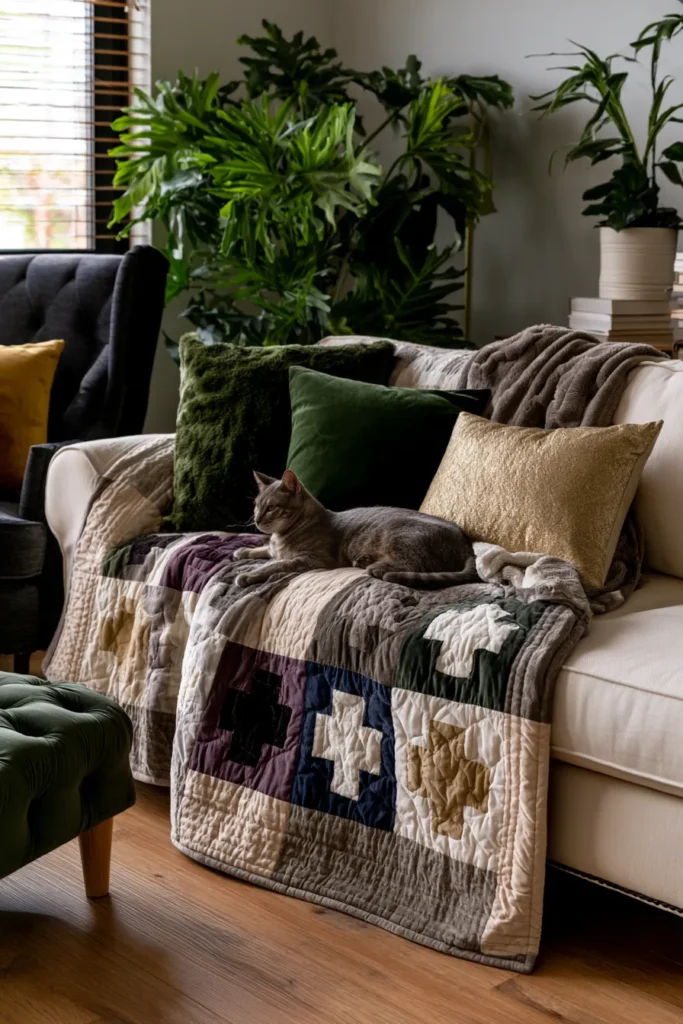
1. Elegant Minimalist Cat Silhouette Quilt Patterns for Chic Modern Spaces
An elegant minimalist cat silhouette quilt is a stylish way to bring personality, warmth, and modern charm into a room without making the décor feel too busy. This design uses clean cat shapes, bold negative space, and vibrant accent colors to create a quilt that feels both artistic and cozy.
For a chic modern look, use a crisp background such as white, ivory, charcoal, or soft gray, then add cat silhouettes in striking shades like midnight black, teal, cobalt blue, coral, mustard yellow, emerald green, and deep plum. The result is playful but polished.
Why I Made It
I made this quilt because I wanted a cat-themed design that felt sophisticated enough for a modern bedroom, studio, or reading nook. Many cat quilts are cute and whimsical, but this version keeps the shapes simple and elegant, almost like framed wall art.
The backstory behind this idea is that cat silhouettes have been used in art and décor for generations because they are instantly recognizable. A curved tail, pointed ears, and a graceful sitting pose can tell the whole story without needing extra detail. That makes the silhouette perfect for minimalist quilting.
Why This Idea Is Worth Making
This idea is worth pursuing because it combines cozy, handmade comfort with sleek, modern design. It is ideal for cat lovers who want something stylish rather than overly novelty-themed. The quilt can be used on a bed, draped over a chair, displayed on a quilt ladder, or given as a gift to someone who loves cats and elegant home décor.
Recommended Supplies
“As an Amazon Associate, I earn from qualifying purchases.“
Materials Needed
For a throw-size cat silhouette quilt, approximately 48 x 60 inches, gather:
- Background fabric: 3 yards, such as white, cream, soft gray, or charcoal cotton
- Cat silhouette fabrics: 1½ to 2 yards total in vibrant colors or black
- Backing fabric: 3 yards
- Batting: 3 yards or one throw-size batting piece
- Fusible web: 1 to 2 yards for appliqué silhouettes
- Thread: matching or contrasting thread
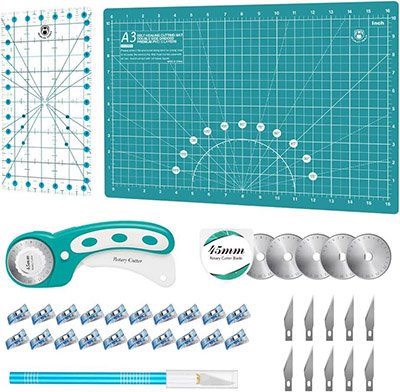
- Rotary cutter and cutting mat
- Quilting ruler
- Sewing machine
- Iron
- Pins or clips
- Fabric scissors
Suggested vibrant palette: black silhouettes with teal, coral, mustard, emerald, cobalt, and plum accent blocks.
Finished Size
This guide makes a throw quilt that finishes at approximately 48 x 60 inches.
Suggested layout:
- 12 quilt blocks
- Each finished block: 12 x 15 inches
- Layout: 3 blocks across by 4 blocks down
Cut each background block at 12½ x 15½ inches to allow for a ¼-inch seam allowance.
Cat Silhouette Template Measurements
For each cat appliqué, use a simple sitting cat shape:
- Cat body height: 9 to 10 inches
- Cat body width: 5 to 6 inches
- Ear height: 1 to 1½ inches
- Tail curve length: about 7 to 8 inches
- Optional moon or circle accent: 3 to 4 inches wide
You can draw the cat freehand on paper first or trace a simple silhouette. Keep the shape smooth and bold so it is easy to cut and stitch.
Step-by-Step Guide
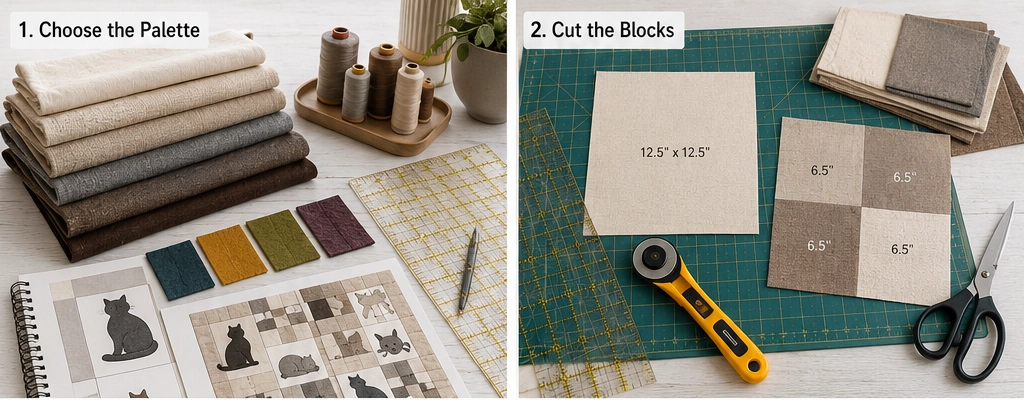
Step 1: Choose the Modern Color Palette
Pick one calm background color and several vibrant silhouette or accent colors. A beautiful modern combination is soft white background, black cat silhouettes, teal accent moons, coral corner blocks, mustard binding, and emerald backing.
For a dramatic version, use a charcoal background with ivory, cobalt, plum, and gold cat silhouettes.
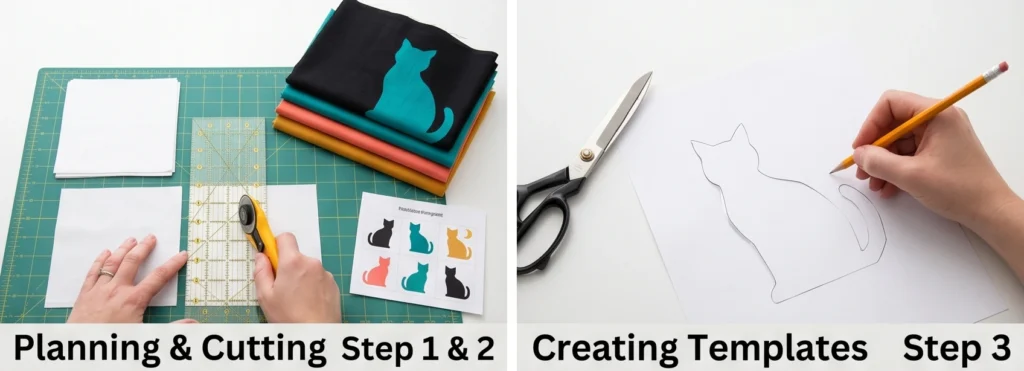
Step 2: Cut the Background Blocks
Cut 12 background rectangles, each measuring 12½ x 15½ inches. These will become the main quilt blocks.
For a more spacious minimalist look, keep most blocks plain and add cat silhouettes to only 6 or 8 of the 12 blocks.
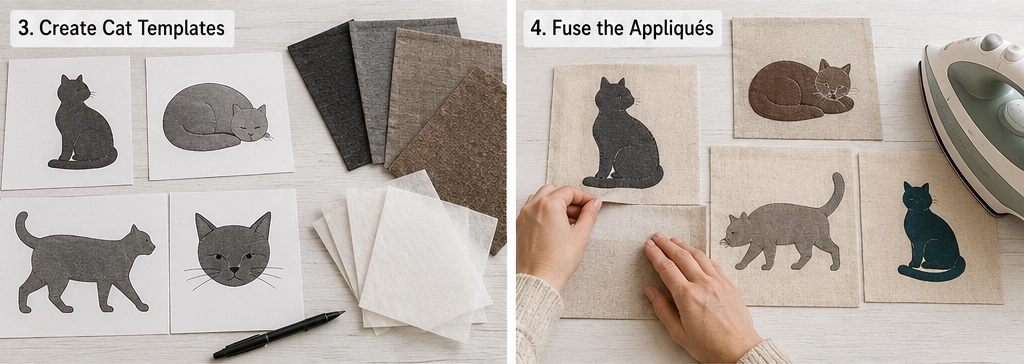
Step 3: Create the Cat Silhouette Templates
Draw a simple sitting cat silhouette on paper. Aim for a shape around 9½ inches tall by 5½ inches wide. Include pointed ears, a curved back, and a curled or upright tail.
Cut out the paper template. If you want variety, make 2 or 3 cat poses: a sitting cat, a stretching cat, and a curled sleeping cat.
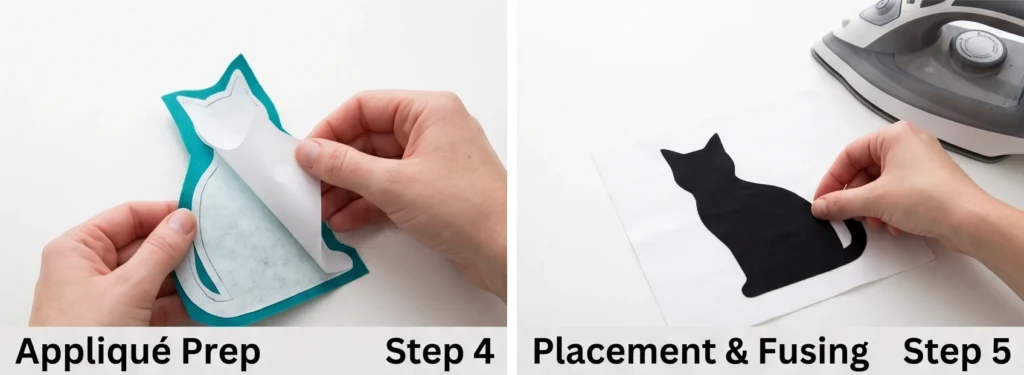
Step 4: Prepare the Appliqué Fabric
Fuse the webbing to the wrong side of your cat silhouette fabric, following the package instructions. Trace the cat template onto the paper side of the fusible web, then cut out each cat shape.
Make 6 to 12 cat silhouettes, depending on how full you want the quilt to look.
Step 5: Place the Cat Silhouettes
Peel the paper backing from each cat shape. Position one cat on each selected background block.
For a chic layout, place some cats centered, some near the lower corner, and some facing opposite directions. Leave at least 1½ inches from the block edge so the cat shape does not get caught in the seam allowance.
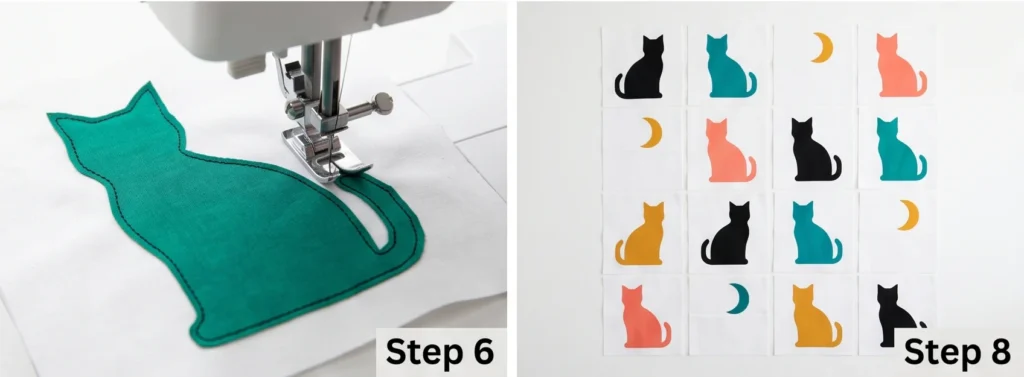
Step 6: Fuse and Stitch the Cats
Press each cat silhouette onto the background block with an iron. Then stitch around the edge of each cat using a narrow zigzag, blanket stitch, or straight stitch.
Use black thread for a crisp graphic look, or use contrasting thread like teal, gold, coral, or plum for a more artistic finish.
Step 7: Add Accent Shapes
Cut optional accent circles, stars, or small squares from vibrant fabric. A 3½-inch moon circle above a cat silhouette looks elegant and modern.
Fuse and stitch these accents the same way as the cat shapes. Keep the accents minimal so the quilt stays sleek.
Step 8: Arrange the Quilt Blocks
Lay the 12 blocks in a 3 x 4 layout. Balance plain blocks with cat blocks to give the design breathing room. Spread vibrant colors evenly across the quilt.
A strong layout idea:
- Row 1: cat block, plain block, cat block
- Row 2: accent block, cat block, plain block
- Row 3: plain block, cat block, accent block
- Row 4: cat block, plain block, cat block
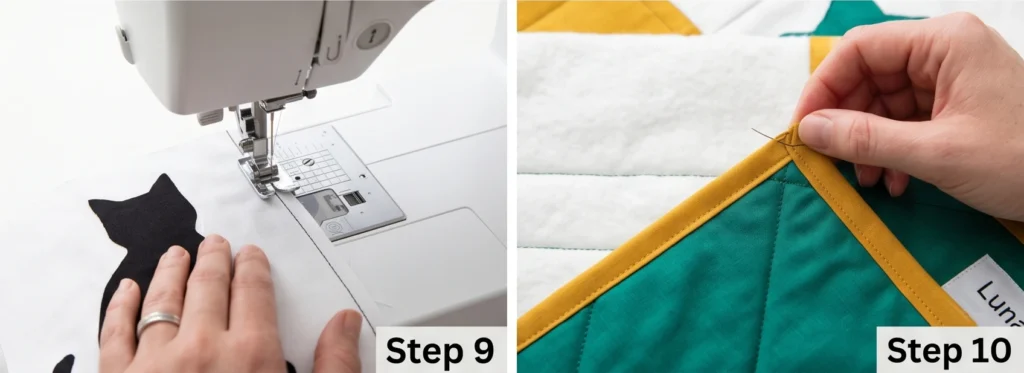
Step 9: Sew the Quilt Top Together
Sew the blocks together in rows using a ¼-inch seam allowance. Press seams to one side or open, depending on your preference. Then sew the rows together to complete the quilt top.
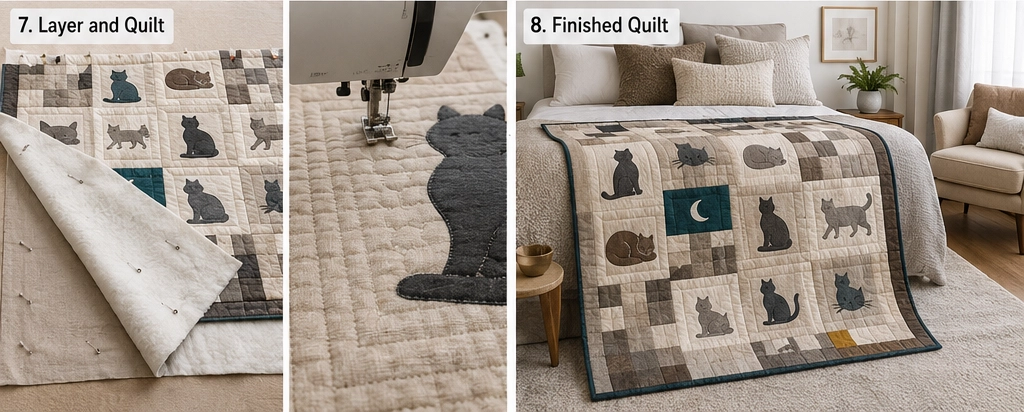
Step 10: Layer, Quilt, and Bind
Layer the backing fabric wrong side up, batting in the middle, and quilt top right side up. Baste with pins or spray.
Quilt simple straight lines, diagonal lines, or gentle echo quilting around each cat silhouette. Finish with binding strips cut 2½ inches wide.
Assembly Section
Assemble the minimalist cat silhouette quilt in this order:
- Cut 12 background blocks at 12½ x 15½ inches.
- Make cat templates around 9 to 10 inches tall.
- Fuse webbing to the wrong side of silhouette fabrics.
- Cut and place cat shapes on selected blocks.
- Stitch around each appliqué cat.
- Add optional accent moons or stars.
- Arrange blocks in a 3 x 4 layout.
- Sew blocks into rows with a ¼-inch seam allowance.
- Join rows to complete the quilt top.
- Layer with batting and backing.
- Quilt around the silhouettes or in clean, straight lines.
- Bind the quilt with 2½-inch binding strips.
Vibrant Color Combination Ideas
For a crisp gallery-style quilt, use a white background, black cats, teal moons, and mustard binding.
For a bold modern apartment look, use charcoal background, cobalt cats, coral accents, and emerald backing.
For a playful yet elegant cat-lover quilt, use a cream background, black cats, plum stars, berry-pink accents, and gold binding.
For a softer, chic bedroom quilt, use a pale gray background, navy cats, blush moons, lavender accents, and ivory binding.
Styling Tip
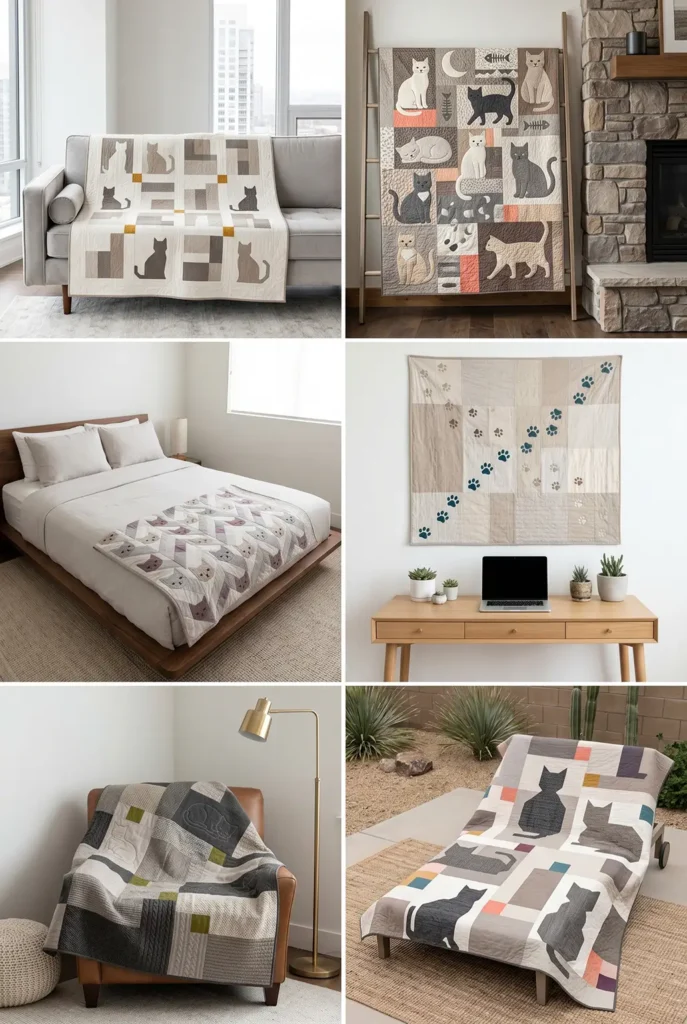
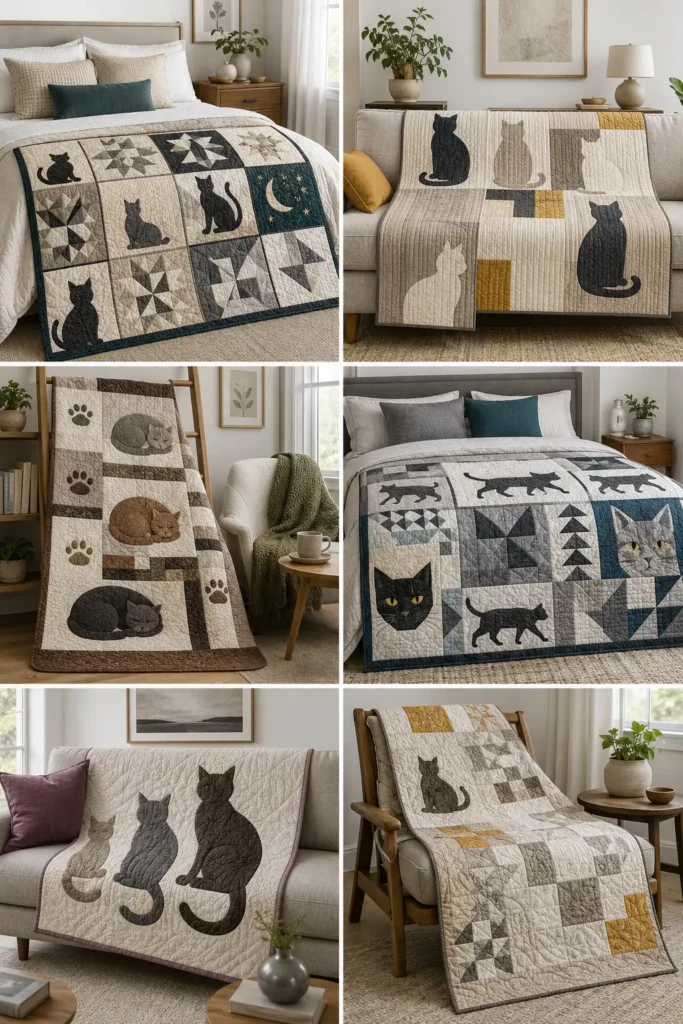
Drape the finished cat silhouette quilt over a modern accent chair, fold it at the foot of a bed, or hang it as soft textile art above a reading nook. Pair it with solid pillows in teal, mustard, coral, emerald, or plum so the quilt feels vibrant, intentional, and stylish.
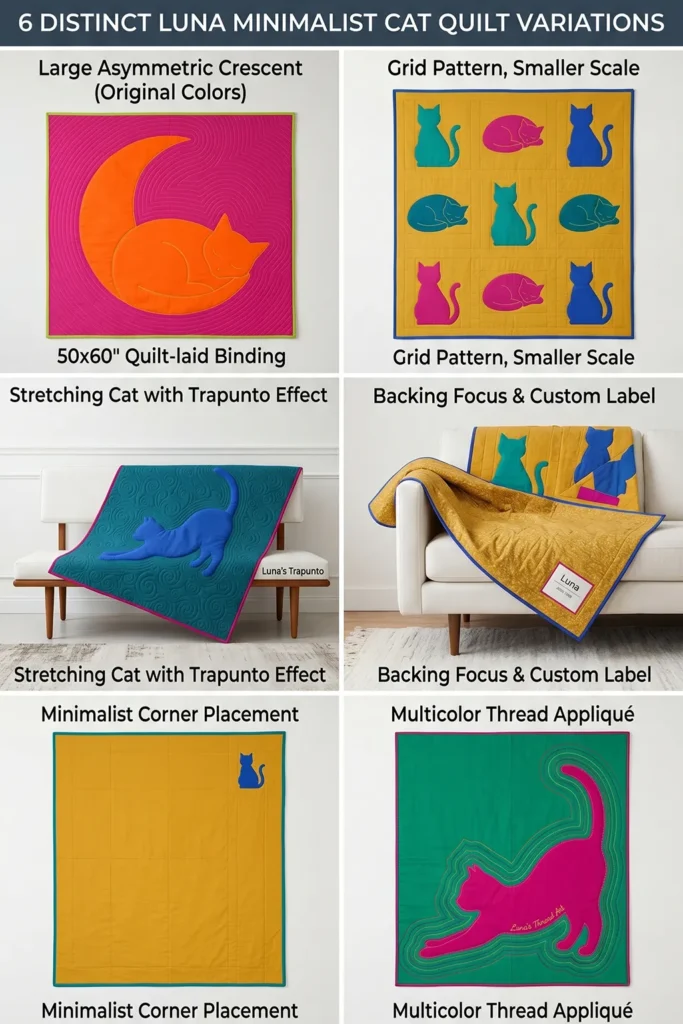
Other Design Inspirations – Digitally Modified
More Recommended Supplies
“As an Amazon Associate, I earn from qualifying purchases.“
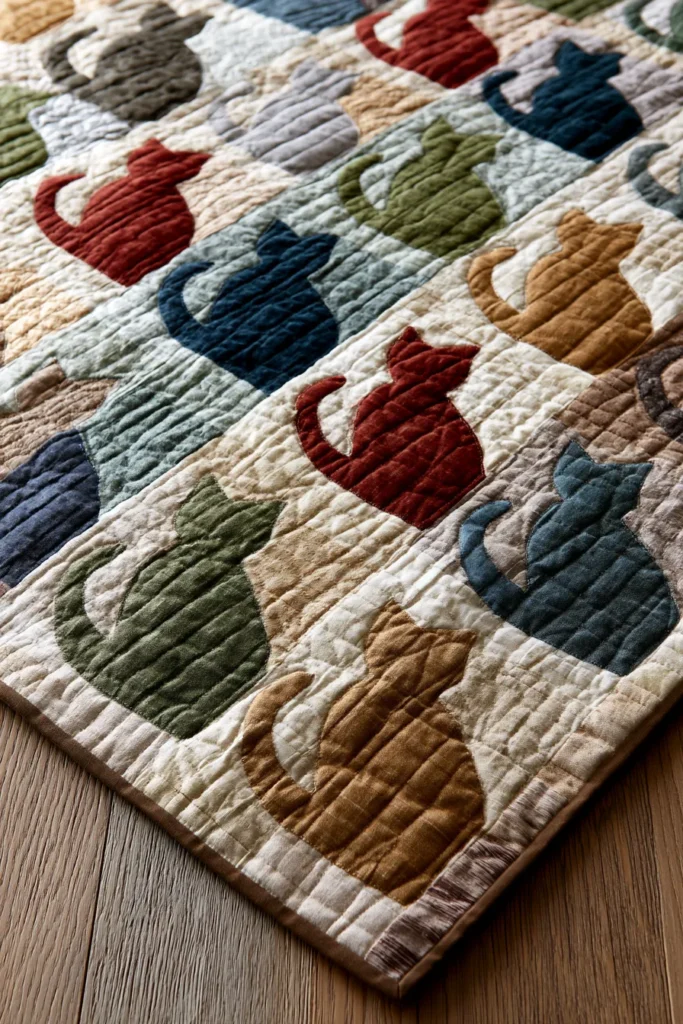
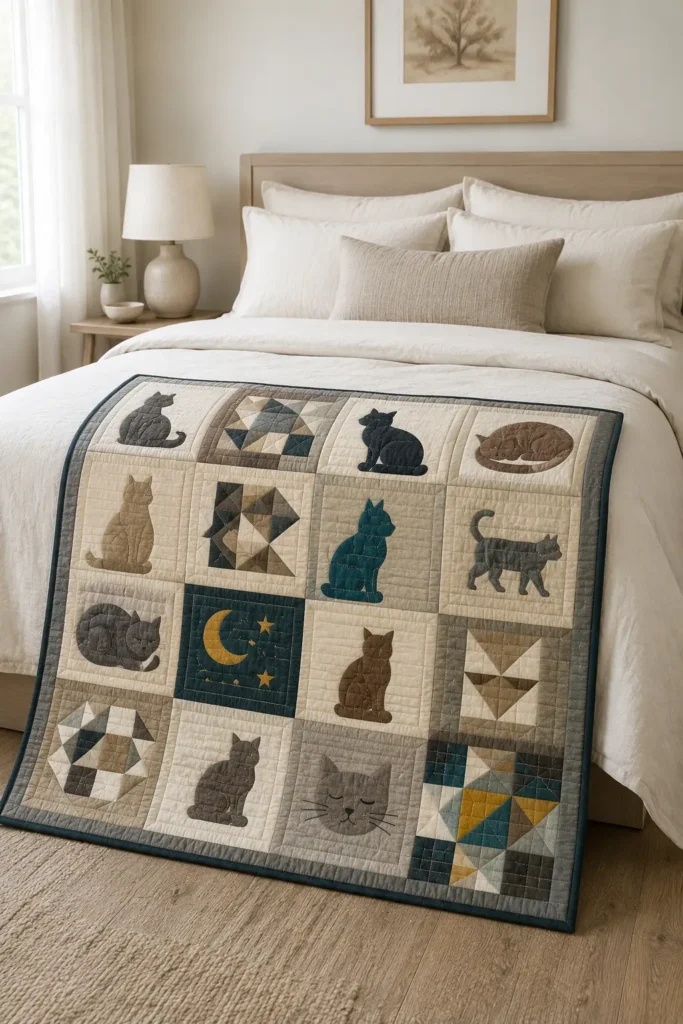
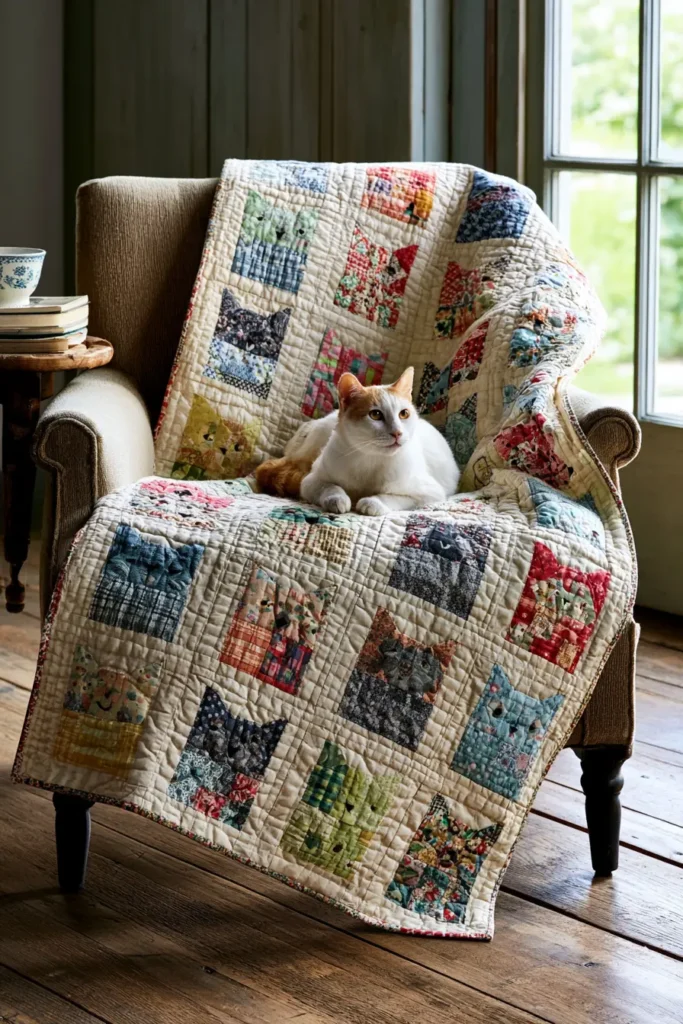
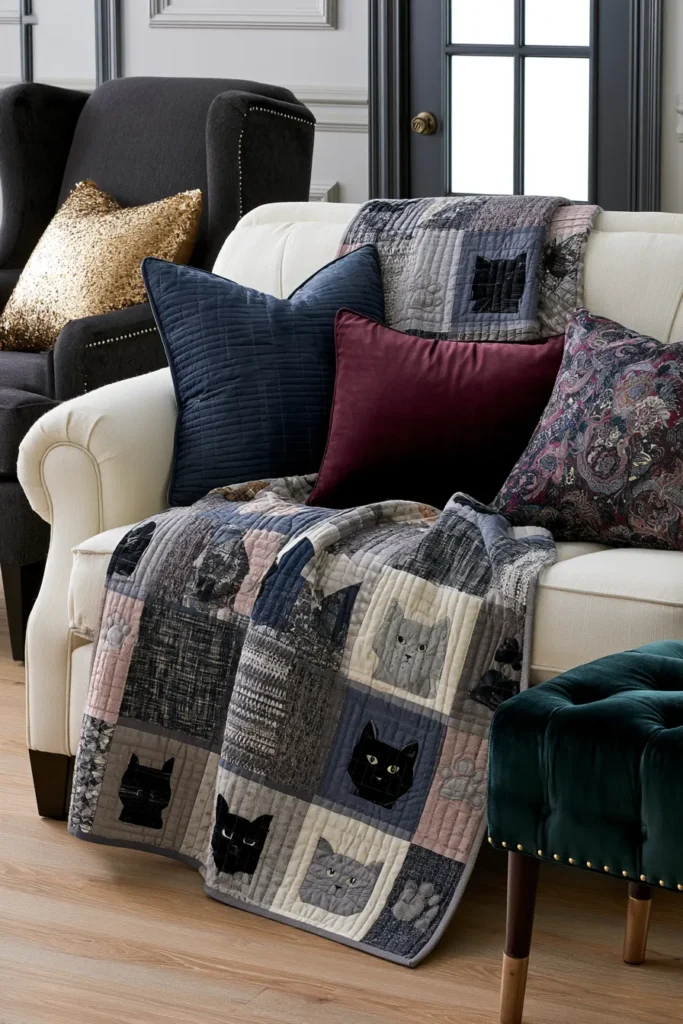
2. Sophisticated Neutral Tone Cat Quilt Ideas for Calm, Cozy Interiors
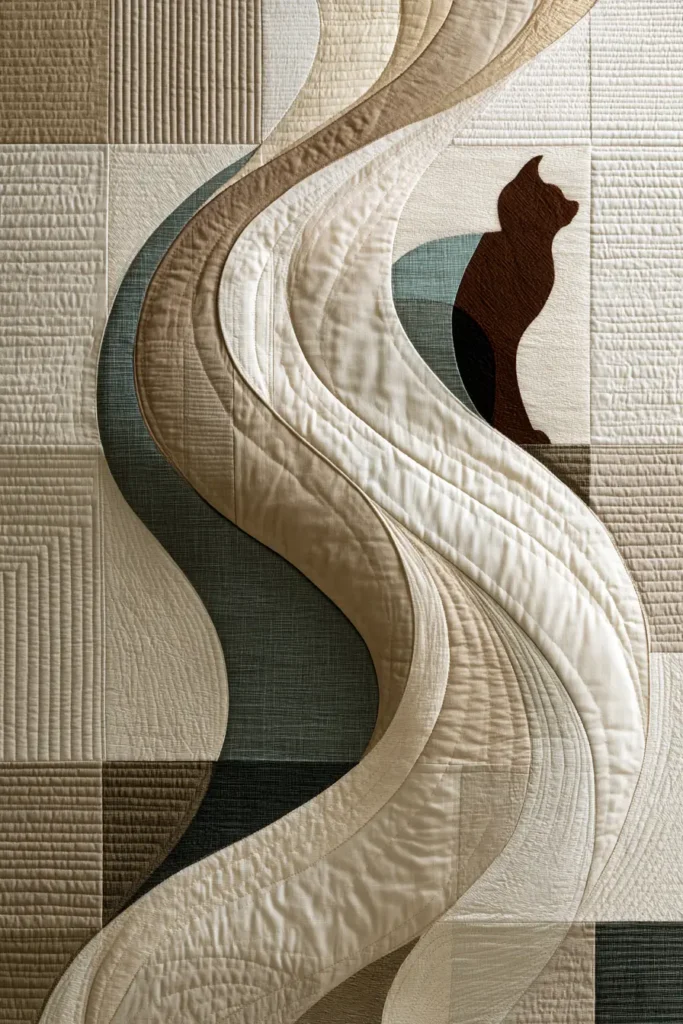
A sophisticated neutral tone cat quilt is perfect for anyone who loves cats but wants a calm, elegant design that blends beautifully with modern home décor. Instead of bright novelty prints, this quilt uses soft, layered neutrals like ivory, oatmeal, warm beige, taupe, greige, charcoal, cocoa brown, sand, and misty gray. To keep the design from feeling flat, add small pops of vibrant color such as deep teal, muted coral, mustard gold, olive green, or dusty plum.
The cat shapes can be subtle and stylish: simple silhouettes, sleeping cat outlines, tiny paw-print accents, or minimalist cat-face blocks. The finished quilt feels cozy, personal, and refined.
Why I Made It
I made this quilt because I wanted a cat-themed project that looked grown-up and peaceful enough for a bedroom, reading corner, or neutral living room. Cat quilts can sometimes look very playful, but this version keeps the theme soft and sophisticated.
The backstory behind this idea is that cats naturally fit calm interiors. Their graceful shapes, curled sleeping poses, and quiet presence work beautifully with soft fabrics and gentle colors. A neutral cat quilt captures that peaceful feeling without overwhelming the room.
Why This Idea Is Worth Making
This idea is worth making because it gives you a meaningful cat-inspired quilt that still looks elegant and timeless. It is cozy enough for everyday use, subtle enough for refined décor, and personal enough to feel special. It also makes a thoughtful gift for a cat lover who prefers understated, stylish home accents.
Materials Needed
For a throw-size cat quilt, approximately 48 x 60 inches, gather:
- Neutral background fabrics: 2½ to 3 yards total
- Cat appliqué or cat block fabrics: 1 to 1½ yards total
- Accent fabrics: ½ yard total in teal, mustard, coral, olive, or plum
- Backing fabric: 3 yards
- Batting: 3 yards or one throw-size batting piece
- Fusible web for appliqué: 1 yard
- Thread: ivory, taupe, gray, charcoal, or coordinating colors
- Rotary cutter and cutting mat
- Quilting ruler
- Pins or clips
- Sewing machine
- Iron
- Fabric scissors
Finished Size and Block Plan
This guide makes a throw quilt that finishes at about 48 x 60 inches.
Use:
- 20 blocks total
- Each finished block: 12 x 12 inches
- Layout: 4 blocks across by 5 blocks down
- Cut each block at 12½ x 12½ inches to allow for a ¼-inch seam allowance
Suggested block mix:
- 8 cat silhouette blocks
- 4 simple accent blocks
- 8 neutral patchwork blocks
Step-by-Step Guide
Step 1: Choose a Sophisticated Neutral Palette
Start with 4 or 5 calm, neutral fabrics. A beautiful palette could include ivory, oatmeal, taupe, greige, charcoal, and soft cocoa. Then choose one or two restrained accent colors, such as deep teal and mustard gold, to keep the quilt lively without losing its calm look.
Step 2: Cut the Background Blocks
Cut 20 background or patchwork base blocks measuring 12½ x 12½ inches. If you want more texture, make some blocks from smaller neutral squares.
For simple patchwork blocks, cut four 6½ x 6½-inch squares and sew them together to create one 12½ x 12½-inch unfinished block.
Step 3: Create the Cat Silhouette Templates
Draw or print simple cat shapes for appliqué. Good neutral-style shapes include:
- Sitting cat: about 8½ inches tall by 5 inches wide
- Curled sleeping cat: about 7 inches wide by 4 inches tall
- Walking cat: about 8 inches wide by 5 inches tall
- Minimal cat face: about 6 inches wide by 5 inches tall
Keep the shapes clean and simple so they look elegant rather than busy.
Step 4: Prepare the Cat Appliqués
Iron fusible web onto the wrong side of your cat fabrics. Trace the cat templates onto the paper backing, then cut out the shapes.
Use fabrics like charcoal, cocoa brown, warm gray, black, cream, or taupe for the cats. For a gentle pop, make one or two cats in deep teal or dusty plum.
Step 5: Place and Fuse the Cat Shapes
Position each cat on a 12½ x 12½-inch background block. Leave at least 1½ inches around the edges so the appliqué does not disappear into the seam allowance.
Place some cats centered, some sitting at the lower corner, and some facing opposite directions. This gives the quilt a natural, relaxed rhythm.
Step 6: Stitch Around the Cat Appliqués
Sew around each cat shape using a narrow zigzag stitch, blanket stitch, or straight stitch. Match the thread for a subtle look, or use charcoal thread for a clean outline.
For extra detail, add simple stitched whiskers or a tiny triangle nose on cat-face blocks.
Step 7: Make Accent Blocks
Create 4 accent blocks using muted but vibrant colors. For example, sew together four 6½ x 6½-inch squares in mustard, teal, ivory, and taupe to make a 12½ x 12½-inch block.
You can also add small appliqué shapes like moons, stars, fish bones, or paw prints. Keep them minimal so the design stays sophisticated.
Step 8: Arrange the Quilt Layout
Lay out the blocks in a 4 x 5 grid. Balance darker cat blocks across the quilt so that neither side feels too heavy. Place accent blocks in different areas to guide the eye around the quilt.
A simple layout idea:
- Row 1: cat block, neutral patchwork, accent block, cat block
- Row 2: neutral block, cat block, neutral block, patchwork block
- Row 3: accent block, neutral block, cat block, neutral block
- Row 4: patchwork block, cat block, accent block, neutral block
- Row 5: cat block, neutral block, patchwork block, cat block

Step 9: Sew the Blocks Together
Sew each row together using a ¼-inch seam allowance. Press seams in alternating directions from row to row so the seams nest neatly.
Then sew the rows together to complete the quilt top. Press the quilt top flat before layering.
Step 10: Layer and Baste the Quilt
Place the backing fabric wrong side up, batting in the middle, and quilt top right side up. Smooth out wrinkles and baste with safety pins or spray.
The backing can be solid ivory flannel, taupe cotton, charcoal gray, or a subtle neutral print.
Step 11: Quilt the Layers
Quilt simple straight lines, gentle diagonal lines, or echo quilting around each cat shape. For a cozy modern look, quilt lines about 2 to 3 inches apart.
Avoid overly dense quilting if you want a softer drape.
Step 12: Bind the Quilt
Trim the quilt edges square. Cut binding strips 2½ inches wide, join them end to end, and sew them around the quilt. A charcoal, cocoa, teal, or mustard binding gives the neutral quilt a polished frame.
Assembly Section
Assemble the sophisticated neutral cat quilt in this order:
- Choose neutral fabrics and 1 or 2 muted vibrant accent colors.
- Cut 20 blocks at 12½ x 12½ inches.
- Prepare cat templates between 4 and 8½ inches, depending on the pose.
- Fuse cat appliqués to selected blocks.
- Stitch around each cat shape.
- Make 4 accent blocks using 6½-inch squares.
- Arrange blocks in a 4 x 5 layout.
- Sew blocks into rows with a ¼-inch seam allowance.
- Join rows to complete the quilt top.
- Layer backing, batting, and quilt top.
- Quilt with clean lines or echo stitching.
- Bind with 2½-inch strips.
Sophisticated Color Combination Ideas
For a calm, warm-neutral quilt, use ivory, oatmeal, beige, cocoa, taupe, and mustard gold.
For a modern cool-neutral quilt, use soft gray, charcoal, white, slate, deep teal, and silver beige.
For a cozy reading-nook quilt, use cream, greige, warm brown, olive green, dusty coral, and charcoal.
For a chic bedroom quilt, use ivory, pale taupe, cocoa, blush beige, plum, and warm gray.
Styling Tip
Fold the finished quilt at the foot of a bed, drape it over a linen sofa, or place it on a quilt ladder beside a cozy reading chair. Add pillows in teal, mustard, cocoa, olive, or plum to bring out the subtle accent colors while keeping the room calm and elegant.
Other Design Inspirations – Digitally Modified
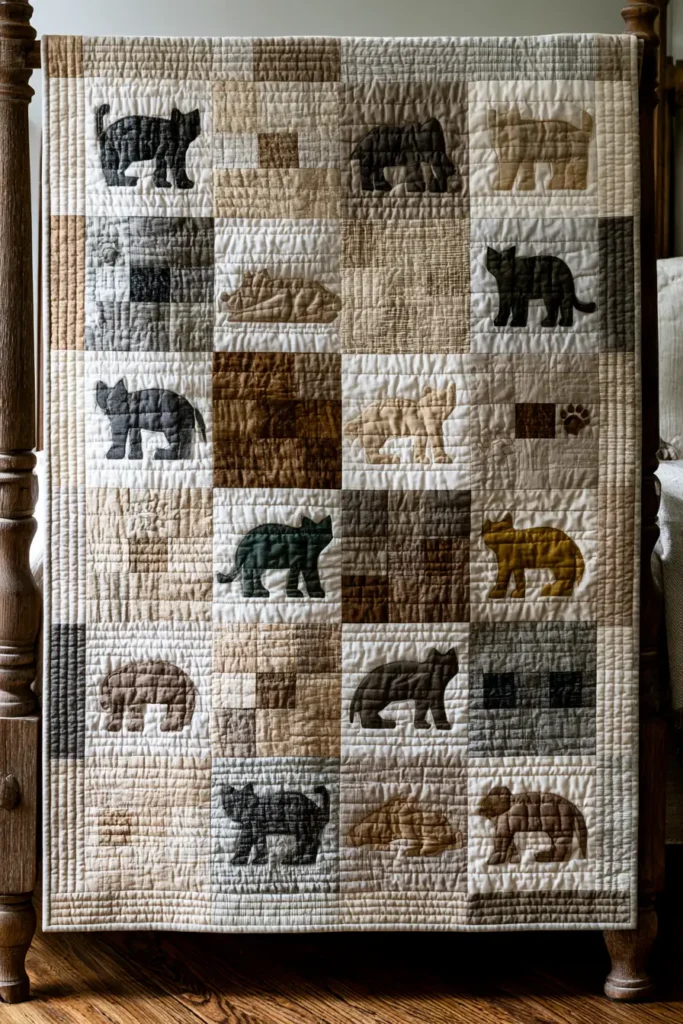
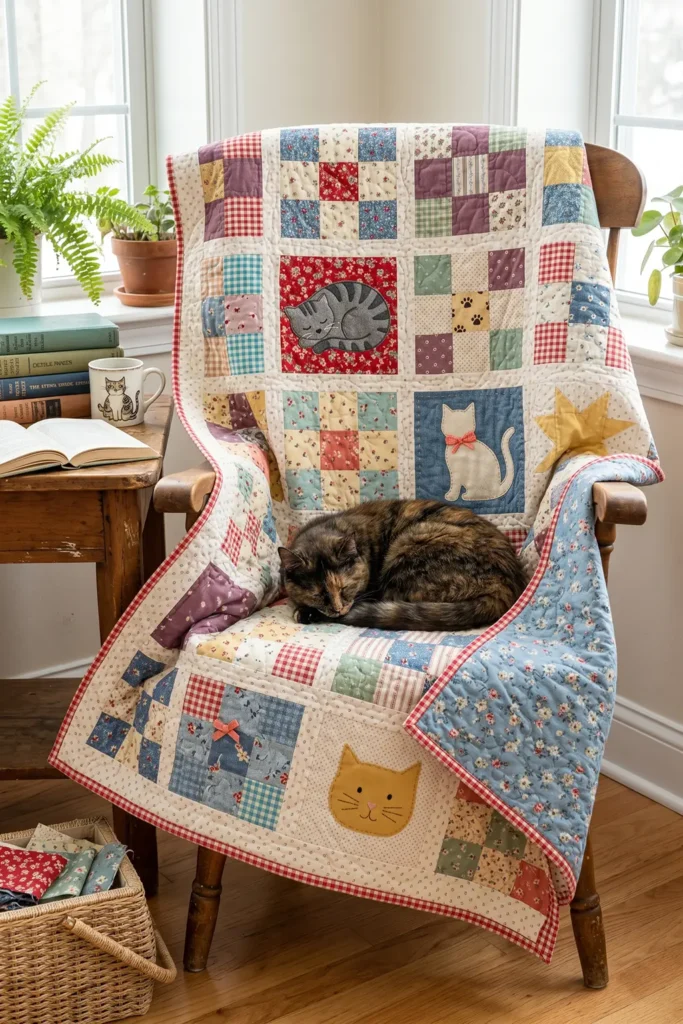
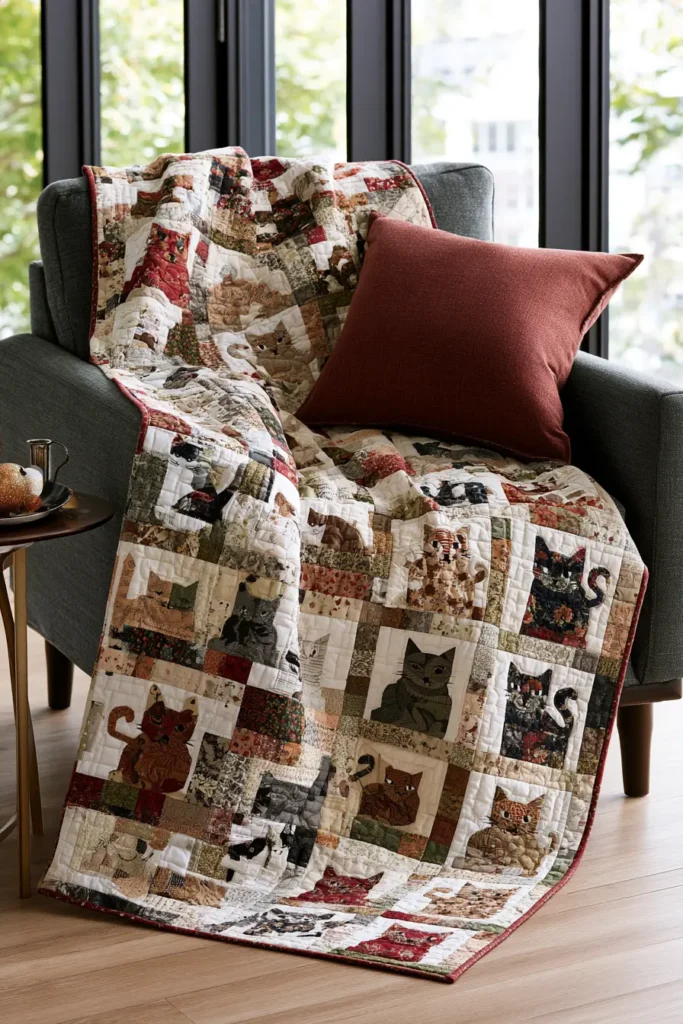
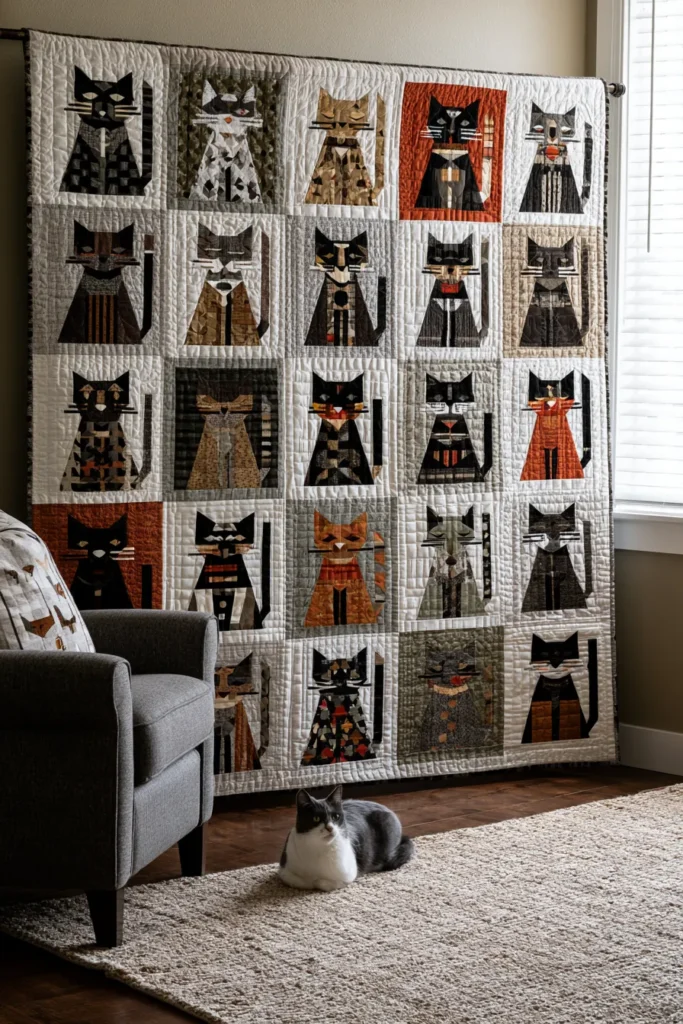
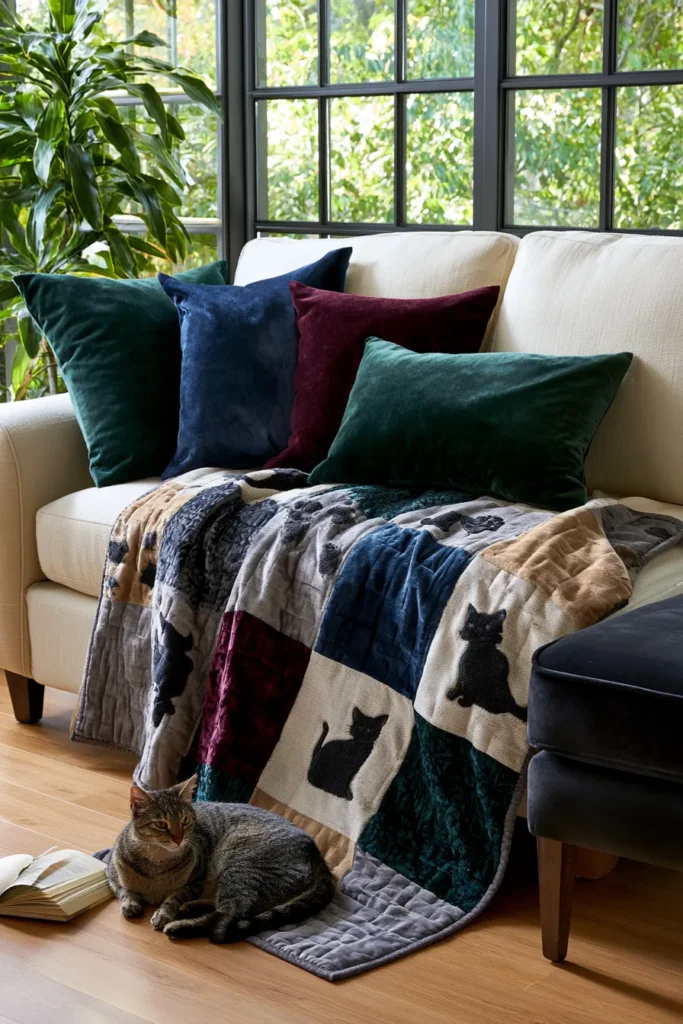
3. Vintage-Inspired Patchwork Cat Quilt Concepts for Relaxed Everyday Charm
A vintage-inspired patchwork cat quilt is a cozy, nostalgic project that brings together classic quilting, playful cat motifs, and relaxed everyday comfort. This design feels like something you might find folded in a sunny window seat, draped over a reading chair, or layered at the foot of a bed where a real cat would immediately claim it.
Use soft vintage-style prints such as tiny florals, gingham, calico, dots, stripes, and faded patchwork fabrics. To keep the quilt lively, mix gentle old-fashioned tones with vibrant accents like cherry red, turquoise, butter yellow, apple green, coral pink, denim blue, plum, and warm cream.
Why I Made It
I made this quilt because I wanted a cat quilt that felt warm, familiar, and full of personality. Vintage patchwork has a beautiful way of telling a story through fabric: a floral scrap from one project, a gingham square from another, or a favorite print saved for years.
The cat theme fits naturally with this style because cats have always been part of cozy homes, sewing rooms, and quiet afternoon spaces. A curled cat block, a tiny paw-print accent, or a simple cat-face patch adds charm without overpowering the quilt.
Why This Idea Is Worth Making
This idea is worth making because it turns small fabric pieces into a meaningful, practical quilt with character. It is perfect for using scraps, old-fashioned prints, or sentimental fabrics, and the finished quilt feels relaxed enough for daily use. It is also a wonderful gift for a cat lover who enjoys handmade, vintage-style home décor.

Materials Needed
For a throw-size quilt, approximately 48 x 60 inches, gather:
- Assorted vintage-style cotton fabrics: 3 yards total
- Cat appliqué fabric: ¾ to 1 yard
- Backing fabric: 3 yards
- Batting: 3 yards or one throw-size batting piece
- Fusible web for cat appliqués: 1 yard
- Thread: cream, tan, gray, black, or coordinating colors
- Rotary cutter and cutting mat
- Quilting ruler
- Pins or clips
- Sewing machine
- Iron
- Fabric scissors
- Optional buttons or embroidery floss for details
Finished Size and Block Plan
This guide makes a throw quilt that finishes at about 48 x 60 inches.
Use:
- 20 finished blocks
- Each finished block: 12 x 12 inches
- Layout: 4 blocks across by 5 blocks down
- Cut or piece each unfinished block to 12½ x 12½ inches to allow for a ¼-inch seam allowance
Suggested block mix:
- 8 patchwork cat blocks
- 8 simple vintage patchwork blocks
- 4 accent blocks with stars, hearts, paw prints, or small fabric scraps
Step-by-Step Guide
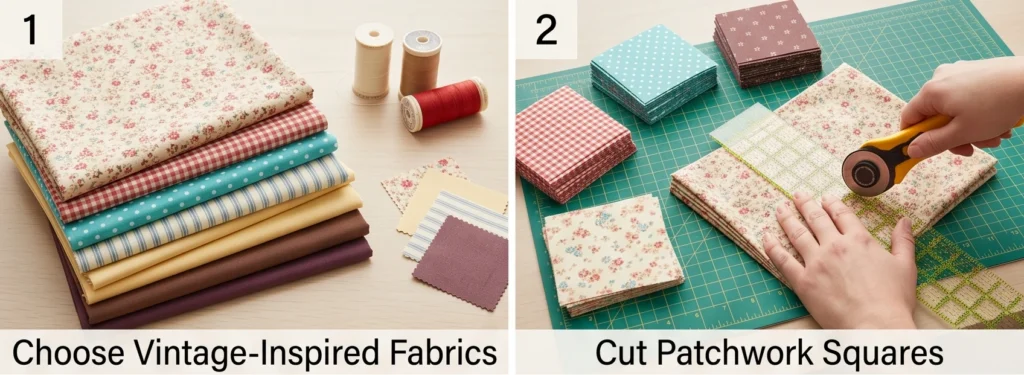
Step 1: Choose Vintage-Inspired Fabrics
Select fabrics that feel collected over time. Combine tiny florals, gingham, faded stripes, polka dots, calico prints, and small-scale plaids. Add vibrant accents like turquoise, cherry red, coral, mustard yellow, apple green, and plum so the quilt feels cheerful instead of muted.
A lovely palette is cream, rose pink, denim blue, red gingham, butter yellow, turquoise, sage green, and cocoa brown.
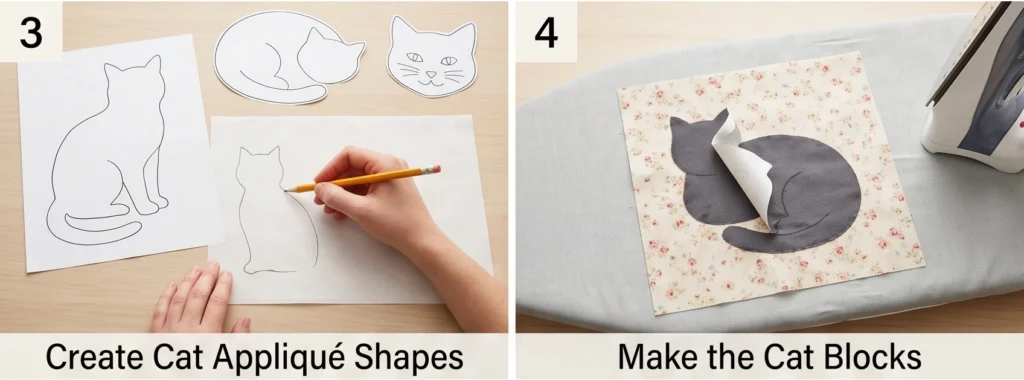
Step 2: Cut Patchwork Squares
For each patchwork block, cut smaller squares and rectangles. A simple option is to make four-patch blocks:
- Cut 4 squares measuring 6½ x 6½ inches for each 12½-inch unfinished block.
For a more scrappy vintage look, make nine-patch blocks:
- Cut 9 squares measuring 4½ x 4½ inches for each block.
- Sew them together into a 12½ x 12½-inch unfinished block.
Make at least 8 simple patchwork blocks.
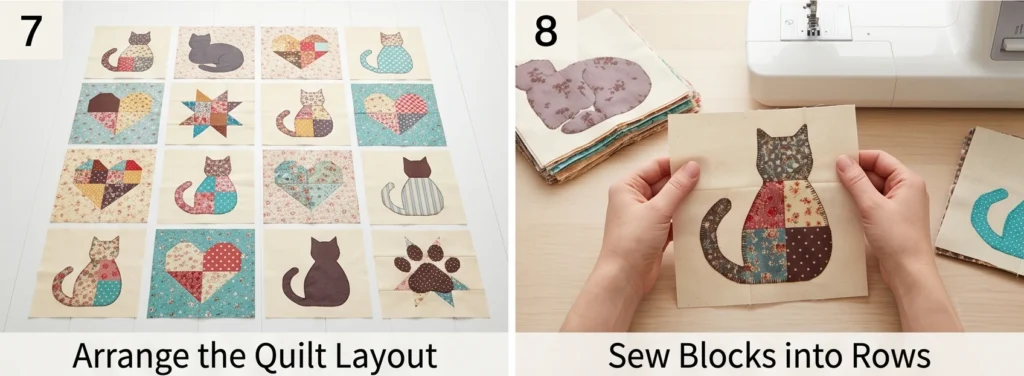
Step 3: Create Cat Appliqué Shapes
Draw or trace simple cat shapes onto paper. Good vintage-style options include:
- Sitting cat: 8 inches tall by 5 inches wide
- Curled sleeping cat: 7 inches wide by 4 inches tall
- Cat face: 6 inches wide by 5 inches tall
- Walking cat: 8 inches wide by 4½ inches tall
Keep the shapes simple so they are easy to stitch and still look charming.
Step 4: Make the Cat Blocks
Create 8 background blocks measuring 12½ x 12½ inches. These can be solid cream, light floral, gingham, or soft patchwork.
Fuse webbing to the wrong side of the cat fabric, trace the cat shapes, cut them out, and place one cat on each background block. Leave at least 1½ inches around the edges for seam allowance and visual breathing room.
Step 5: Stitch Around the Cat Shapes
Iron each cat appliqué in place, then stitch around the edges using a narrow zigzag, blanket stitch, or straight stitch.
For a vintage handmade look, use cream or dark brown thread. You can add embroidered whiskers, a tiny stitched nose, or a small fabric bow, but keep embellishments washable if the quilt will be used often.
Step 6: Make Accent Blocks
Make 4 accent blocks using leftover scraps. Try one of these ideas:
- A scrappy heart block
- A small star block
- A paw-print appliqué block
- A four-patch block with one cat-print square
- A checkerboard block using 3½-inch squares
Each accent block should finish unfinished at 12½ x 12½ inches.

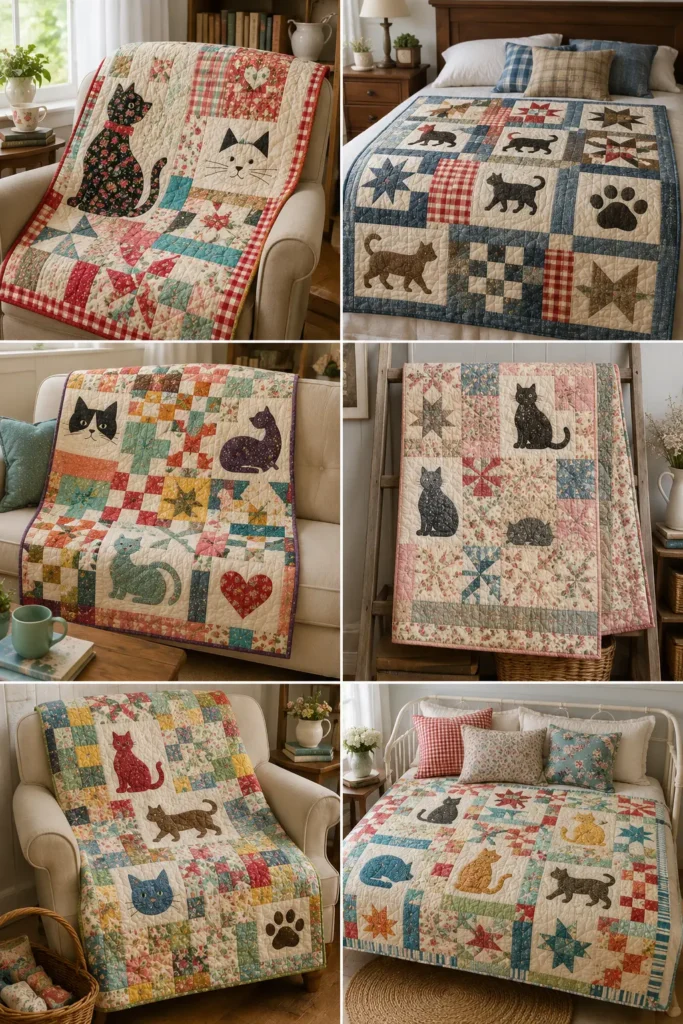
Step 7: Arrange the Quilt Layout
Lay out all 20 blocks in a 4 x 5 grid. Spread cat blocks evenly so the quilt feels balanced. Place bright colors like turquoise, red, yellow, and coral in different areas of the quilt to guide the eye.
A balanced layout idea:
- Row 1: patchwork block, cat block, accent block, patchwork block
- Row 2: cat block, patchwork block, cat block, accent block
- Row 3: patchwork block, accent block, patchwork block, cat block
- Row 4: cat block, patchwork block, cat block, patchwork block
- Row 5: accent block, cat block, patchwork block, cat block
Step 8: Sew Blocks into Rows
Sew the blocks together row by row using a ¼-inch seam allowance. Press seams in alternating directions for each row so the seams nest together neatly.
Step 9: Join the Rows
Sew the rows together to complete the quilt top. Pin at each seam intersection to keep the patchwork aligned. Press the finished quilt top carefully.
Step 10: Layer the Quilt
Place backing fabric wrong side up, batting in the middle, and quilt top right side up. Smooth everything flat and baste with safety pins or spray.
For a vintage finish, choose a backing fabric in cream floral, faded blue, red gingham, or soft yellow calico.
Step 11: Quilt the Layers
Quilt simple straight lines, diagonal lines, or gentle loops. You can also echo quilt around the cat appliqués to make them stand out. For a relaxed everyday quilt, quilt lines about 2 to 3 inches apart.
Step 12: Bind the Quilt
Trim the quilt edges square. Cut binding strips 2½ inches wide. A red gingham, turquoise stripe, plum floral, or mustard yellow binding gives the quilt a cheerful vintage frame.
Assembly Section
Assemble the vintage-inspired patchwork cat quilt in this order:
- Choose vintage-style fabrics with vibrant accent colors.
- Make 8 simple patchwork blocks at 12½ x 12½ inches.
- Prepare 8 cat appliqué blocks at 12½ x 12½ inches.
- Create 4 accent blocks using scraps or small appliqués.
- Stitch around all cat appliqués.
- Arrange the 20 blocks in a 4 x 5 layout.
- Sew blocks into rows using a ¼-inch seam allowance.
- Join rows to complete the quilt top.
- Layer backing, batting, and quilt top.
- Quilt with straight lines, loops, or echo stitching.
- Trim and bind with 2½-inch binding strips.
Vintage Color Combination Ideas
For a cheerful cottage quilt, use cream, cherry red, turquoise, butter yellow, and soft pink.
For a cozy farmhouse-vintage quilt, use denim blue, red gingham, oatmeal, sage green, cocoa, and ivory.
For a playful retro cat quilt, use coral, mint green, plum, mustard yellow, teal, and warm white.
For a softer heirloom-inspired quilt, use dusty rose, faded blue, cream floral, pale yellow, taupe, and charcoal cat silhouettes.
Styling Tip
Fold the finished quilt over a reading chair, place it at the foot of a guest bed, or keep it in a basket beside the sofa. Pair it with vintage books, a ceramic mug, woven baskets, and pillows in turquoise, red, mustard, coral, or denim blue for a cozy everyday space with relaxed charm.
Other Design Inspirations – Digitally Modified

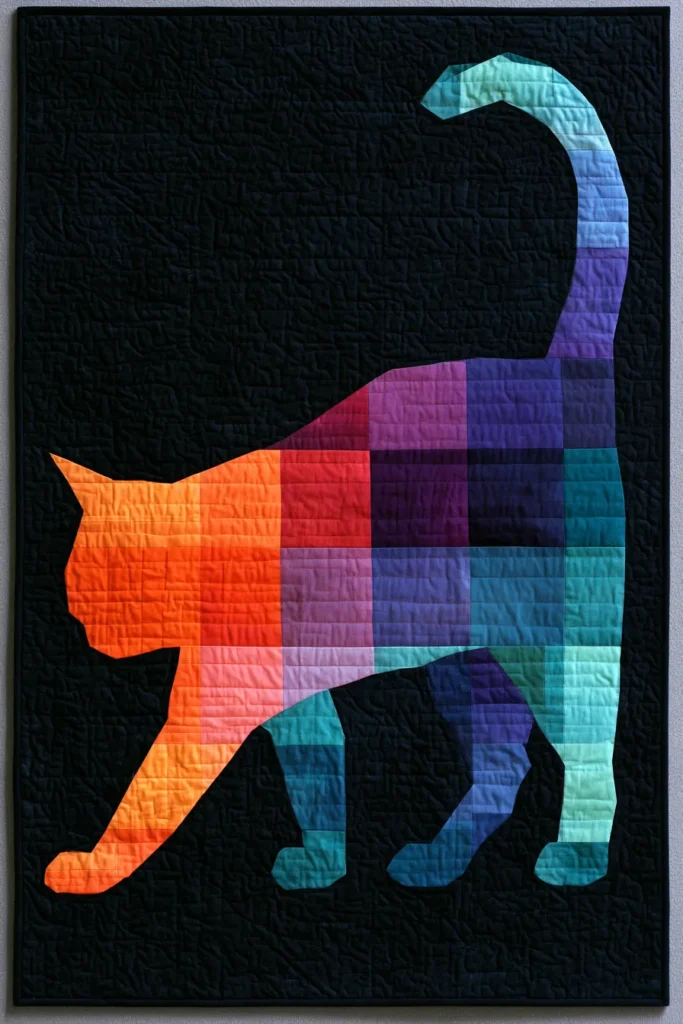
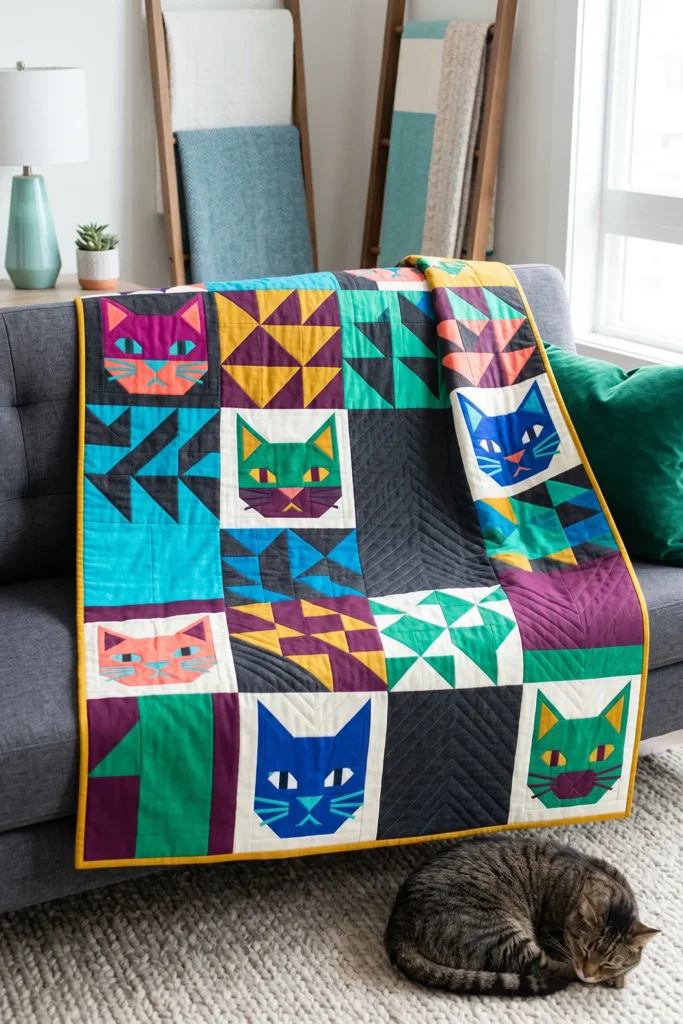
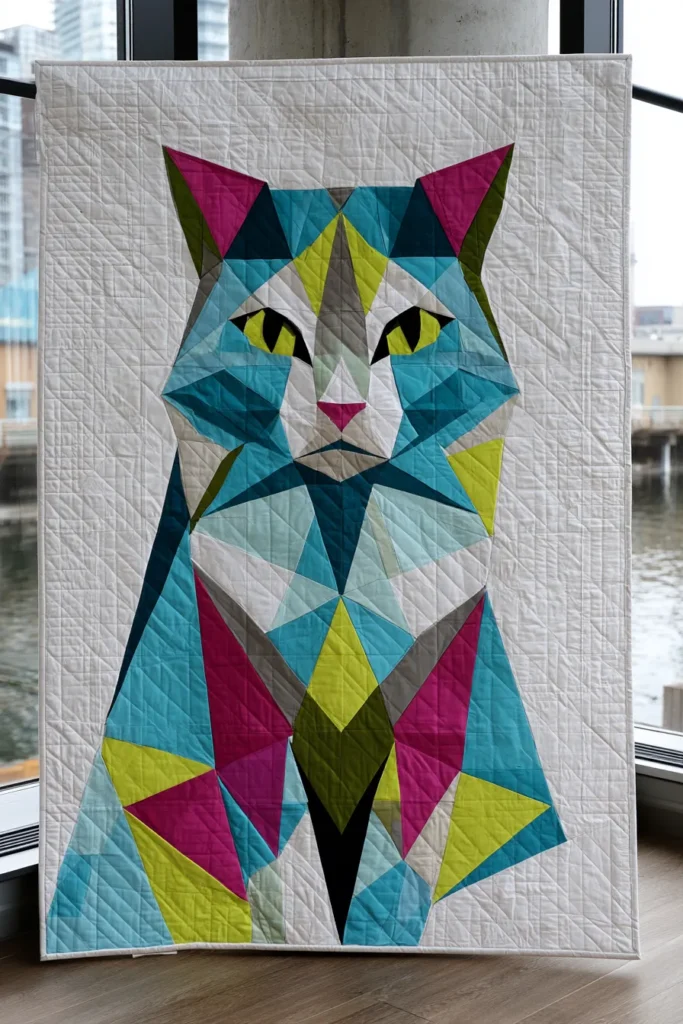
4. Stylish Geometric Feline Quilt Designs for Artistic Home Accents
A stylish geometric feline quilt turns a simple cat theme into a bold, modern art piece. Instead of using realistic cat shapes, this design breaks the feline form into triangles, diamonds, rectangles, and color-blocked sections. The result feels artistic, graphic, and perfect for chic home accents.
Use vibrant colors such as cobalt blue, coral, emerald green, mustard yellow, magenta, turquoise, deep plum, crisp white, and charcoal black. These shades make the cat design pop while keeping the quilt fresh and contemporary.
Why I Made It
I made this quilt because I wanted a cat-inspired design that felt more like modern textile art than a traditional novelty quilt. Cats already have strong, recognizable shapes: pointed ears, curved backs, long tails, and almond-like eyes. By simplifying those features into geometric pieces, the quilt becomes stylish enough for a living room, studio, reading nook, or creative bedroom.
The backstory of this idea is that geometric quilts have long been loved for creating movement and rhythm from simple shapes. When those shapes are arranged into a feline form, the quilt feels both playful and sophisticated.
Why This Idea Is Worth Making
This idea is worth making because it gives cat lovers a quilt that looks artistic, modern, and personal. It is a cozy, handmade piece, but it can also function as a bold decorative accent. The design is flexible too: you can make one large geometric cat as a statement panel, or create smaller feline blocks repeated across the quilt.
Materials Needed
For a throw-size quilt measuring approximately 48 x 60 inches, gather:
- Background fabric: 2½ to 3 yards in white, ivory, gray, navy, or charcoal
- Geometric cat fabrics: 2 yards total in vibrant solids or small prints
- Accent fabric: ½ yard for eyes, ears, moon shapes, or borders
- Backing fabric: 3 yards
- Batting: 3 yards or one throw-size batting piece
- Thread: neutral or coordinating colors
- Rotary cutter and cutting mat
- Quilting ruler
- Pins or clips
- Sewing machine
- Iron
- Fabric scissors
- Optional fusible web for appliqué details
Finished Size and Block Plan
This guide makes a throw quilt about 48 x 60 inches.
Use:
- 20 blocks total
- Each finished block: 12 x 12 inches
- Layout: 4 blocks across by 5 blocks down
- Cut each unfinished block to 12½ x 12½ inches to allow for a ¼-inch seam allowance
Suggested block mix:
- 8 geometric cat-face blocks
- 6 triangle patchwork blocks
- 4 solid color-block accent blocks
- 2 plain background blocks for visual rest
Step-by-Step Guide
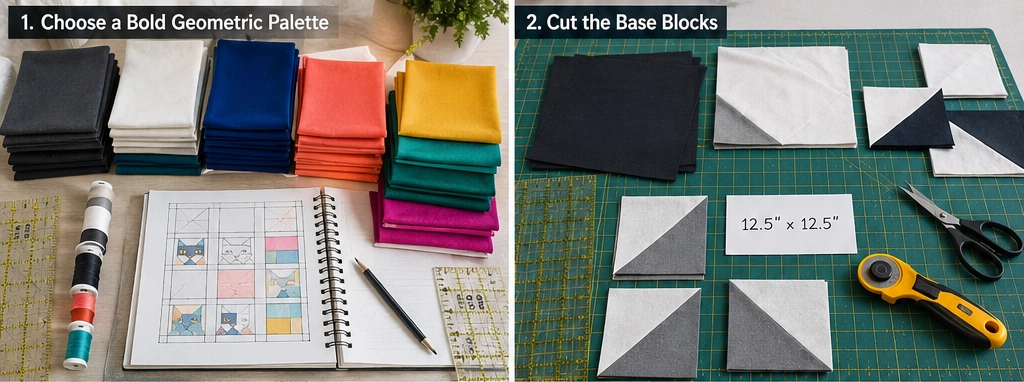
Step 1: Choose a Bold Geometric Palette
Pick a strong background and 5 to 7 vibrant colors. A striking combination is charcoal background with cobalt, coral, mustard, emerald, turquoise, magenta, and white.
For a lighter modern look, use a white or ivory background with black, teal, orange, plum, and yellow cat shapes.
Step 2: Cut the Base Blocks
Cut 20 background squares measuring 12½ x 12½ inches. Some will become cat-face blocks, while others will become patchwork or accent blocks.
If you want a dramatic design, keep the background consistent. If you want a more playful art-quilt look, use several background shades such as white, light gray, charcoal, and navy.
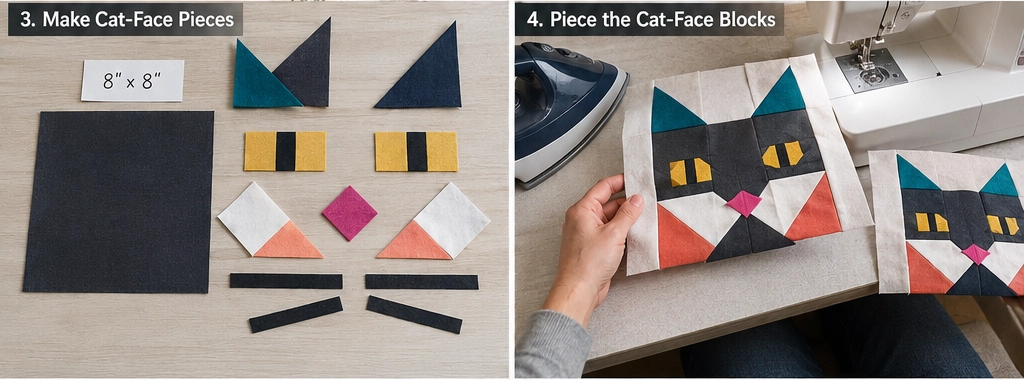
Step 3: Make Simple Geometric Cat-Face Pieces
For each cat-face block, cut the following pieces:
- Face base: one 8 x 8-inch square
- Ears: two 3½ x 3½-inch squares, cut diagonally into triangles
- Cheeks or muzzle: two 3 x 3-inch squares
- Nose: one 1½ x 1½-inch triangle or diamond
- Eyes: two 1 x 2-inch rectangles or appliqué ovals
- Background side strips: two 2½ x 8-inch rectangles
- Background top strip: one 12½ x 2½-inch rectangle
Use bold colors for the face pieces, such as cobalt, coral, mustard, emerald, or plum.
Step 4: Piece the Cat-Face Blocks
Sew the ear triangles to the top corners of the face square or appliqué them onto the background block. Add the side background strips as needed so the block measures 12½ x 12½ inches.
Place the eyes, nose, and muzzle pieces on the face. These small details can be appliquéd with fusible web or stitched with a narrow zigzag stitch.
Step 5: Create Triangle Patchwork Blocks
Make 6 triangle patchwork blocks to support the geometric theme. Cut 6½ x 6½-inch squares from two contrasting fabrics, draw a diagonal line, sew ¼ inch on each side of the line, cut apart, and press open to make half-square triangles.
Combine four half-square triangles into one 12½ x 12½-inch unfinished block.
Step 6: Make Color-Block Accent Blocks
Make 4 accent blocks by sewing together bold-colored rectangles. For one block, cut:
- Two rectangles at 6½ x 12½ inches
- Or four rectangles at 3½ x 12½ inches
Use colors like turquoise, mustard, coral, emerald, and magenta to create a gallery-style modern look.
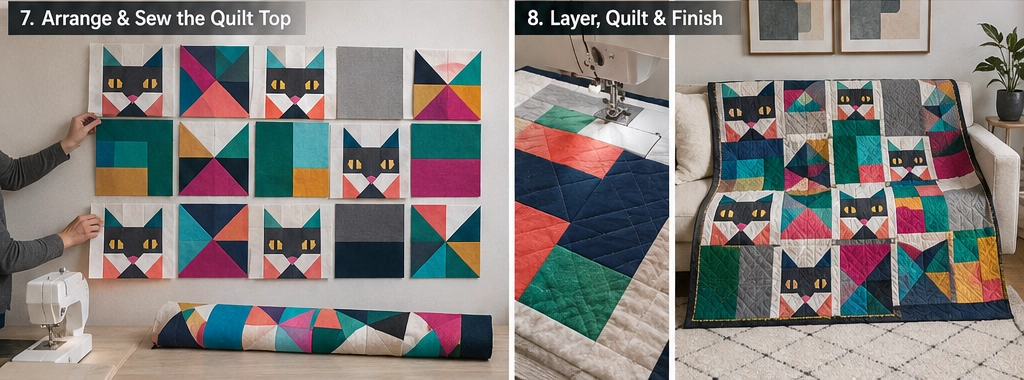
Step 7: Arrange the Quilt Layout
Lay the blocks in a 4 x 5 grid. Spread the cat-face blocks evenly across the quilt. Place triangle blocks and color-block accents between them to create a balanced, energetic design.
A good layout idea:
- Row 1: cat face, triangle block, accent block, cat face
- Row 2: plain block, cat face, triangle block, accent block
- Row 3: triangle block, accent block, cat face, triangle block
- Row 4: cat face, plain block, accent block, cat face
- Row 5: triangle block, cat face, triangle block, cat face
Step 8: Sew Blocks into Rows
Sew the blocks together row by row using a ¼-inch seam allowance. Press seams in alternating directions from row to row so they nest neatly when joined.
Step 9: Join the Rows
Sew the rows together to complete the quilt top. Pin at seam intersections so the geometric shapes line up cleanly. Press the quilt top flat.
Step 10: Layer and Baste
Place the backing fabric wrong side up, batting in the middle, and quilt top right side up. Smooth the layers carefully and baste with safety pins or spray.
A solid backing in charcoal, teal, navy, or bright coral gives the quilt a polished finish.
Step 11: Quilt with Modern Lines
Quilt straight lines, diagonal lines, or angular zigzags to match the geometric theme. Space quilting lines about 2 to 3 inches apart for a soft throw, or closer together for a more structured wall-art effect.
Step 12: Bind the Quilt
Trim the edges square. Cut binding strips 2½ inches wide and join them end to end. Bind the quilt in a bold color such as mustard yellow, black, turquoise, or coral to frame the design.
Assembly Section
Assemble the geometric feline quilt in this order:
- Cut 20 base blocks at 12½ x 12½ inches.
- Make 8 geometric cat-face blocks using squares, triangles, and appliqué details.
- Make 6 half-square triangle patchwork blocks.
- Make 4 bold color-block accent blocks.
- Keep 2 plain background blocks for balance.
- Arrange everything in a 4 x 5 layout.
- Sew blocks into rows with a ¼-inch seam allowance.
- Join rows to complete the quilt top.
- Layer with batting and backing.
- Quilt with straight, diagonal, or angular lines.
- Bind with 2½-inch strips.
Vibrant Color Combination Ideas
For a bold modern art quilt, use charcoal, cobalt blue, coral, mustard yellow, emerald, and white.
For a playful studio quilt, use turquoise, magenta, orange, lime green, black, and cream.
For a chic living room accent, use navy, ivory, teal, plum, gold, and blush coral.
For a bright cat-lover gift, use white, black, rainbow brights, hot pink, yellow, and aqua.
Styling Tip
Display the finished geometric feline quilt over a modern sofa, on a quilt ladder, or across the foot of a bed. Pair it with solid pillows in coral, teal, mustard, cobalt, or emerald so the quilt feels like intentional textile art rather than just a cozy blanket.
Other Design Inspirations – Digitally Modified
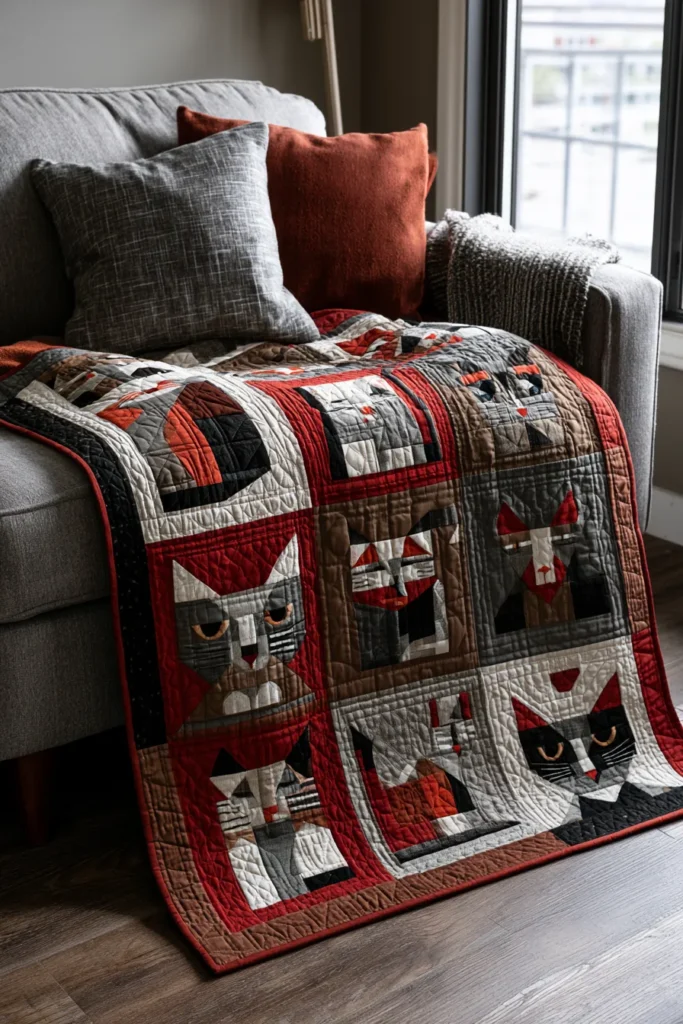
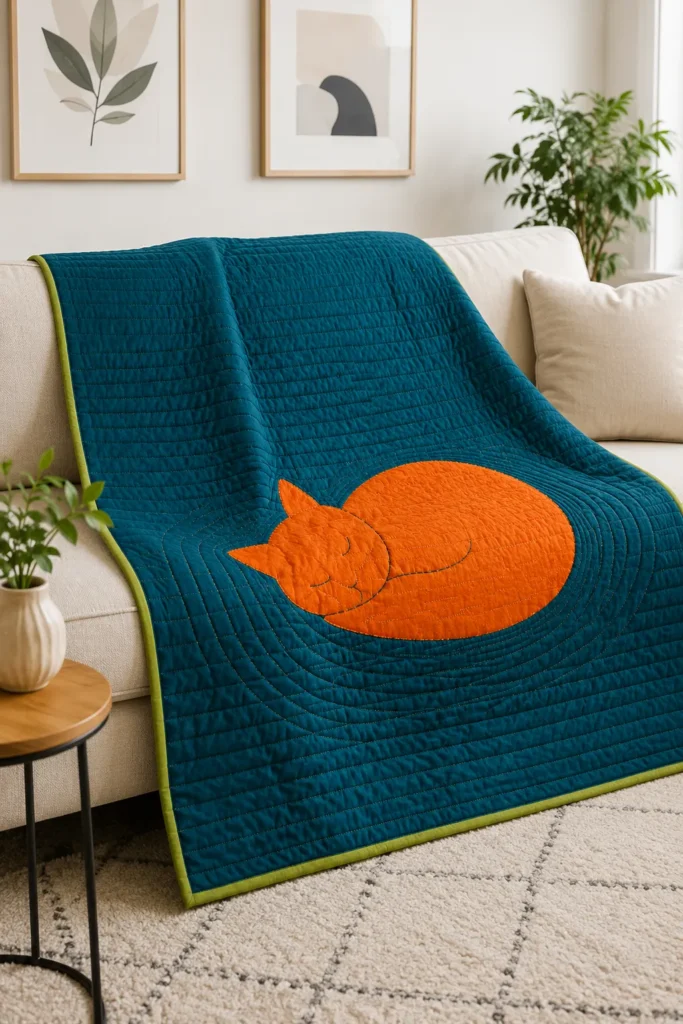
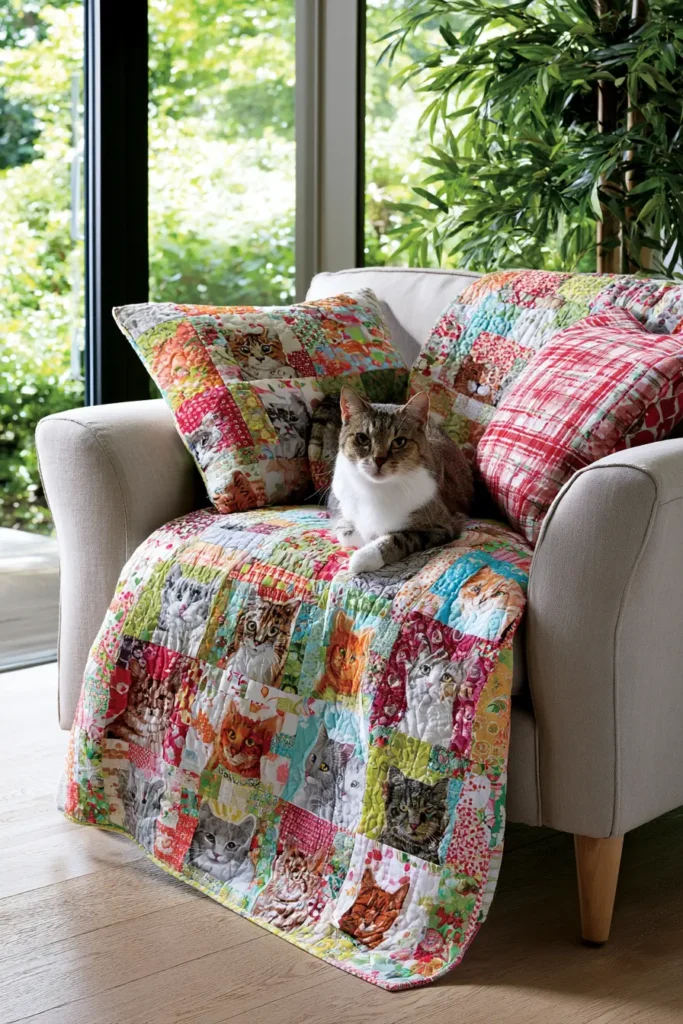
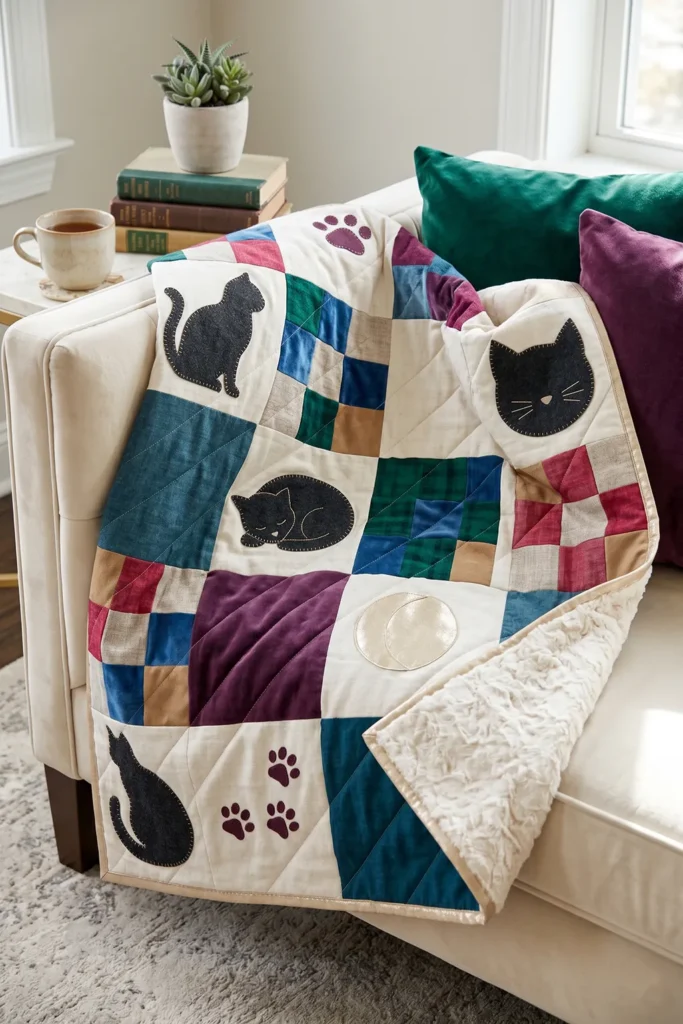
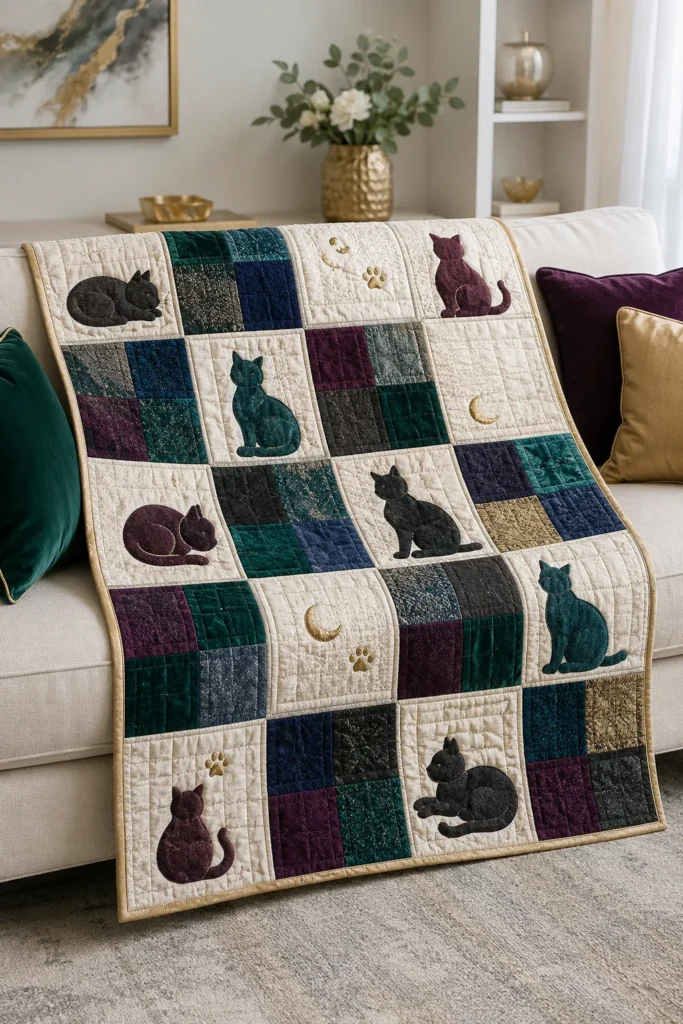
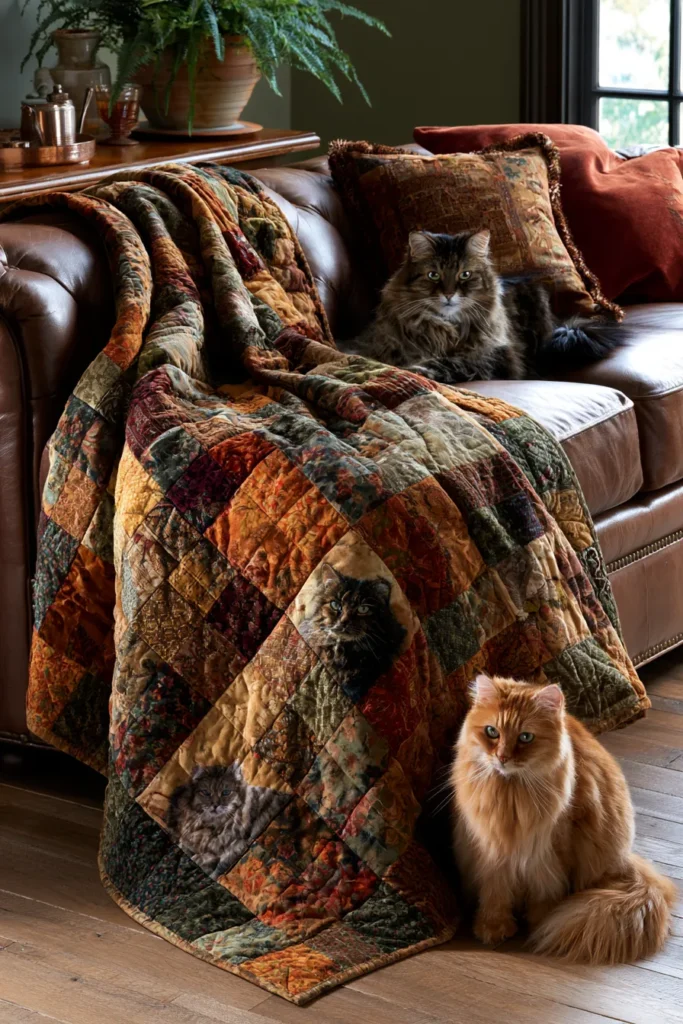
5. Luxury-Inspired Mixed-Texture Cat Quilts for Cozy Sofa Throws
A luxury-inspired mixed-texture cat quilt is a cozy sofa throw that feels rich, stylish, and personal. Instead of relying only on printed cotton, this design combines soft quilting cotton, flannel, faux suede, velvet-look cotton, brushed chambray, linen-look fabric, and plush minky-style accents. The cat motif stays elegant through simple silhouettes, cat-face blocks, and paw or moon accents.
For a vibrant luxury palette, try emerald green, sapphire blue, plum purple, ruby red, blush pink, champagne gold, ivory, charcoal, and deep teal. These colors make the quilt feel decorative enough for a beautiful living room while still being soft enough for everyday snuggling.
Why I Made It
I made this quilt because I wanted a sofa throw that felt special, not just practical. My inspiration was the way cats naturally choose the softest, warmest spot in the room. A cat quilt made with mixed textures feels like it was designed for that exact moment: a quiet evening, a cup of tea, a favorite sofa, and a blanket that looks as good as it feels.
The interesting thing about texture in quilting is that it can change the mood of the whole piece. Cotton keeps the quilt stable, flannel adds warmth, linen-look fabric adds relaxed elegance, and velvet or minky-style accents add that touch of luxury.
Why This Idea Is Worth Making
This idea is worth making because it turns a cat-themed quilt into a sophisticated home accent. It is cozy, stylish, and gift-worthy, but still beginner-friendly if you keep the block shapes simple. The mix of fabrics adds richness without requiring complicated piecing, and the cat silhouettes make the quilt personal without looking overly novelty-themed.
Finished Size
This guide makes a sofa throw measuring approximately 48 x 60 inches.
Use:
- 20 blocks total
- Each finished block: 12 x 12 inches
- Layout: 4 blocks across by 5 blocks down
- Cut each block at 12½ x 12½ inches before sewing
Materials Needed
For one sofa throw, gather:
- Background quilting cotton or linen-look cotton: 2 yards
- Mixed-texture accent fabrics: 1½ to 2 yards total
Suggested textures: flannel, faux suede, brushed cotton, velvet-look cotton, or soft chambray - Cat silhouette fabric: ¾ yard, such as charcoal, black, deep plum, navy, or emerald
- Backing fabric: 3 yards, preferably soft flannel or cotton
- Batting: one piece at least 54 x 66 inches
- Fusible web: 1 yard for appliqué cat shapes
- Binding fabric: ½ yard
- Thread: ivory, charcoal, gold, or coordinating colors
- Rotary cutter, cutting mat, and quilting ruler
- Pins or sewing clips
- Iron
- Sewing machine
- Fabric scissors
Beginner tip: If you are new to quilting, use mostly quilting cotton and flannel. Save slippery or stretchy fabrics like minky for small accents or the backing only.
Cutting Measurements
Cut the following pieces:
Background Blocks
- Cut 12 squares at 12½ x 12½ inches
Mixed-Texture Patchwork Blocks
For 4 patchwork blocks, cut:
- 16 squares at 6½ x 6½ inches
Each patchwork block uses 4 squares sewn into a simple four-patch.
Cat Appliqué Blocks
For 8 cat blocks, cut:
- 8 background squares at 12½ x 12½ inches
- 8 cat silhouettes about 8 to 9 inches tall by 5 to 6 inches wide
Optional Accent Shapes
Cut from velvet-look cotton, gold fabric, or jewel-tone scraps:
- 4 moon circles at 3½ inches wide
- 8 small paw-print circles at 1 to 1½ inches wide
- 4 accent squares at 3½ x 3½ inches
Binding
- Cut 6 strips at 2½ inches x width of fabric
Step-by-Step Guide
Step 1: Choose a Rich, Vibrant Palette
Start with one elegant neutral and three or four jewel tones. A beautiful luxury sofa palette is ivory background, charcoal cat silhouettes, emerald flannel, sapphire cotton, plum velvet-look accents, and champagne gold binding.
For a warmer version, use ruby red, blush pink, cocoa brown, gold, and cream. For a dramatic modern look, use deep teal, black, emerald, plum, and ivory.
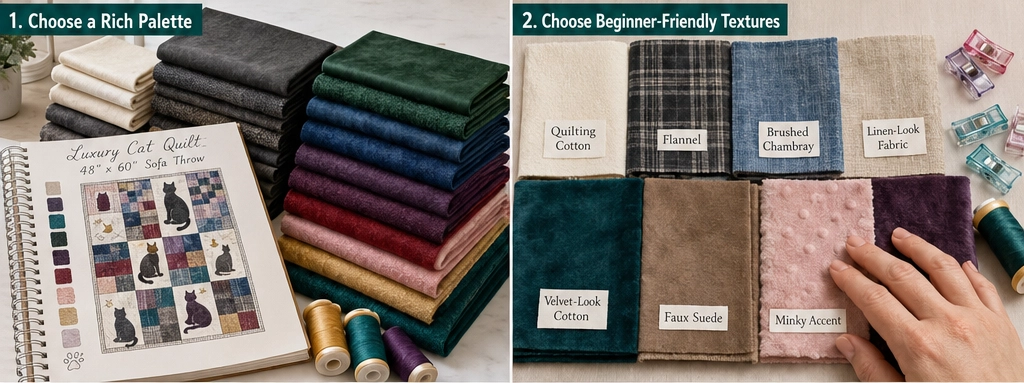
Step 2: Choose Beginner-Friendly Textures
Pick fabrics that feel different but are still easy to sew. Good beginner choices include quilting cotton, flannel, brushed cotton, chambray, and linen-look cotton.
Avoid using too many thick or slippery fabrics in one quilt. If you want a luxury feel, use textured fabrics as accents rather than every block. This keeps the quilt easier to piece and helps it lie flat.
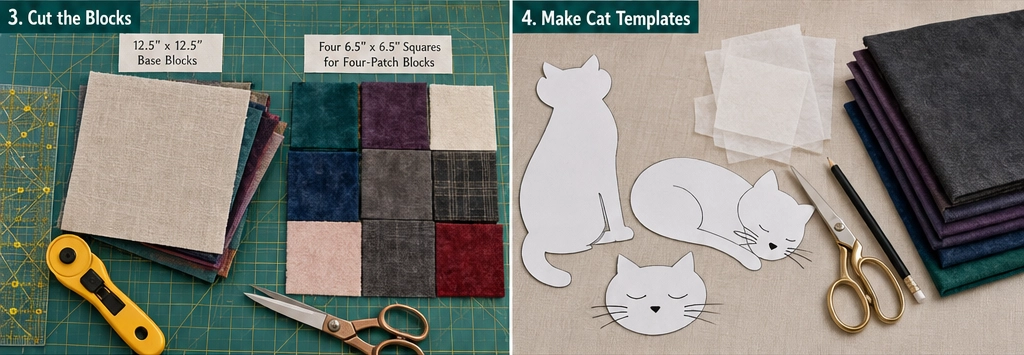
Step 3: Cut the Blocks
Cut all blocks to 12½ x 12½ inches before sewing. This includes plain background blocks, appliqué backgrounds, and patchwork blocks.
For the four-patch blocks, sew four 6½ x 6½-inch squares together with a ¼-inch seam allowance. Each finished four-patch should measure 12½ x 12½ inches before joining the quilt top.
Step 4: Make the Cat Silhouette Templates
Draw a simple sitting cat or curled sleeping cat on paper. Keep the shape bold and smooth so it is easy to cut and stitch.
Good beginner template sizes:
- Sitting cat: 8½ inches tall x 5½ inches wide
- Curled cat: 8 inches wide x 4½ inches tall
- Cat face: 6 inches wide x 5 inches tall
Simple shapes look more elegant and are much easier to appliqué neatly.
Step 5: Prepare the Cat Appliqués
Iron the fusible web to the wrong side of the cat fabric. Trace the cat template onto the paper side, then cut out each cat shape.
Peel off the backing and place one cat on each appliqué block. Keep the cat at least 1½ inches away from the block edges so it does not get caught in the seam allowance.
Step 6: Fuse and Stitch the Cat Shapes
Press each cat silhouette in place according to the fusible web instructions. Then stitch around the edges using a narrow zigzag, blanket, or simple straight stitch.
Use matching thread for a clean, luxury look, or use metallic gold, teal, plum, or charcoal thread for a subtle decorative outline.
Step 7: Add Small Luxury Accents
Add a few simple accent shapes, such as a moon above a cat, a tiny paw print in a corner, or a champagne-gold square inside a patchwork block.
Keep these accents minimal. The goal is elegant, not cluttered. A small gold moon on an ivory block or a plum paw print beside a charcoal cat can make the quilt feel custom and high-end.
Step 8: Arrange the Quilt Layout
Lay out the 20 blocks in a 4 x 5 grid. Spread the cat blocks evenly and place textured patchwork blocks where the quilt needs color and movement.
A balanced layout could be:
- Row 1: cat block, patchwork block, plain block, cat block
- Row 2: textured block, cat block, accent block, plain block
- Row 3: cat block, plain block, patchwork block, cat block
- Row 4: accent block, textured block, cat block, patchwork block
- Row 5: plain block, cat block, textured block, cat block
Take a photo before sewing so you can remember the layout.
Step 9: Sew the Blocks into Rows
Sew the blocks together row by row using a ¼-inch seam allowance. Press seams gently. For thicker fabrics, press seams open to reduce bulk. For cotton blocks, pressing to one side is fine.
Use pins or clips at every seam intersection so the blocks line up neatly.
Step 10: Join the Rows
Sew the five rows together to complete the quilt top. Press carefully from the back. Do not drag the iron over textured fabrics; lift and press instead.
The quilt top should measure approximately 48½ x 60½ inches before quilting.
Step 11: Layer and Quilt
Place the backing fabric wrong side up, batting in the middle, and quilt top right side up. Baste with safety pins or spray.
For quilting, use simple straight lines, diagonal lines, or gentle echo quilting around the cats. Space quilting lines about 2 to 3 inches apart for a soft sofa throw. Avoid dense quilting if you want the quilt to stay plush and drapey.
Step 12: Bind the Quilt
Trim the edges square. Sew the 2½-inch binding strips together end to end, press in half lengthwise, and attach around the quilt.
A binding in champagne gold, deep teal, charcoal, ruby, or plum gives the quilt a polished designer-style finish.
Assembly at a Glance
- Choose a rich jewel-tone palette with beginner-friendly textures.
- Cut all base blocks to 12½ x 12½ inches.
- Make simple four-patch blocks from 6½-inch squares.
- Create cat templates about 8 to 9 inches tall.
- Fuse cat silhouettes onto selected blocks.
- Stitch around each cat appliqué.
- Add small moon, paw, or gold accent shapes.
- Arrange the blocks in a 4 x 5 layout.
- Sew blocks into rows using a ¼-inch seam allowance.
- Join rows to finish the quilt top.
- Layer with batting and backing.
- Quilt with simple lines and bind with 2½-inch strips.
Vibrant Luxury Color Combinations
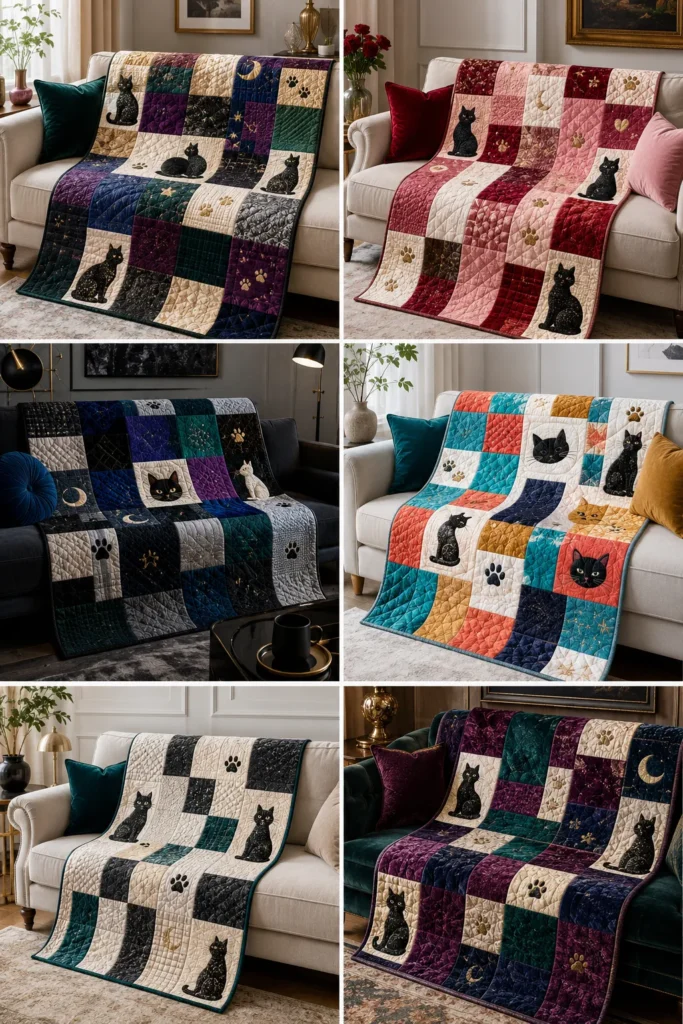
For a jewel-box sofa throw, use emerald, sapphire, plum, ivory, charcoal, and champagne gold.
For a romantic luxury quilt, use ruby red, blush pink, cream, cocoa, dusty rose, and gold.
For a moody modern cat quilt, use deep teal, black, cobalt blue, plum, silver gray, and ivory.
For a bright, elegant accent, use coral, turquoise, mustard yellow, emerald, white, and navy.
Beginner-Friendly Texture Tips
Use flannel beside quilting cotton for softness without too much difficulty. Use velvet-look or faux-suede fabrics only in larger, simple pieces, not tiny triangles. If using minky as backing, baste very well because it can shift while sewing.
Choose one “star texture” and let the rest of the fabrics support it. For example, use mostly cotton and flannel, then add just a few plum velvet-look accent blocks.
Styling Tip
Drape the finished mixed-texture cat quilt over a cream sofa, charcoal armchair, or velvet bench. Add pillows in emerald, sapphire, plum, gold, or ruby to echo the quilt colors. The result is cozy, elegant, and personal—the kind of throw that looks styled but still invites someone to curl up under it.
Other Design Inspirations – Digitally Modified
CONCLUSION
A cat quilt that works in a serious room is one where the cat earns its place rather than dominates the space. The five ideas here are chosen because they use feline themes as design elements rather than as the entire design, which is the distinction that separates a quilt you display in a bedroom you care about from one that ends up in the spare room.
Animal motifs in quilting have a genuine historical tradition and a current creative revival, producing some sophisticated work. These patterns sit within that revival rather than the novelty-gift end of the category. Make one for a room you actually use, wash it, live with it, and see whether the cat earns its place.
