
7 Chic Jelly Roll Quilt Tote Bag Ideas: Elegant Design Concepts and Creative Inspirations
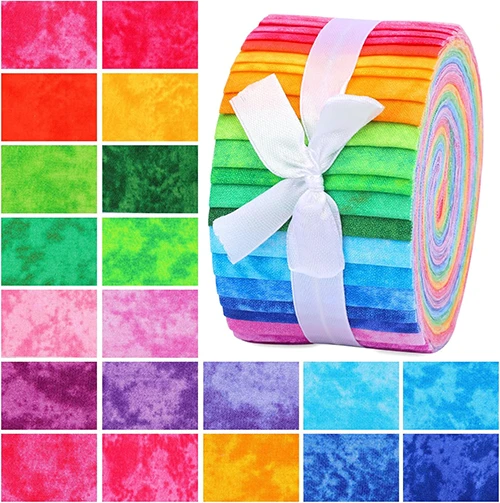
Jelly Roll Quilt Tote Bag Ideas apply one of quilting’s most efficient construction methods to an object most quilters have never considered making from jelly roll strips — and the result makes immediate sense once you see it. The pre-cut 2.5-inch strips that make jelly roll quilts fast and color-coordinated do the same work in a bag: they eliminate the most time-consuming preparation steps, ensure color harmony throughout the finished piece, and produce the characteristic linear pattern that gives jelly roll construction its visual identity. The technique translates from quilt to bag without losing anything that makes it appealing in the first place.
What jelly roll bags do differently from standard quilted totes is worth being specific about. A conventional quilted tote is typically made from a single quilted panel — one fabric on top, batting, backing — with the quilting pattern providing surface texture. A jelly roll tote is structurally different: the strip-pieced top is itself the design, with the color progressions and linear geometry built into the fabric rather than applied afterward through stitching. The visual effect is more dynamic and directional than standard quilted fabric — the eye follows the strips, creating movement across the bag’s surface in a way that a simple quilted grid does not.
The practical advantages compound the aesthetic ones. Jelly roll strips are pre-cut to a consistent width, so the strip seams align accurately across the bag without the precision cutting that makes other pieced-bag designs demanding. The multiple fabric layers created by strip piecing and batting produce a bag with natural structure — enough rigidity to hold its shape when carried, enough flexibility to fold flat for storage. And because jelly rolls are sold as coordinated bundles, the color question is largely answered before you cut anything.
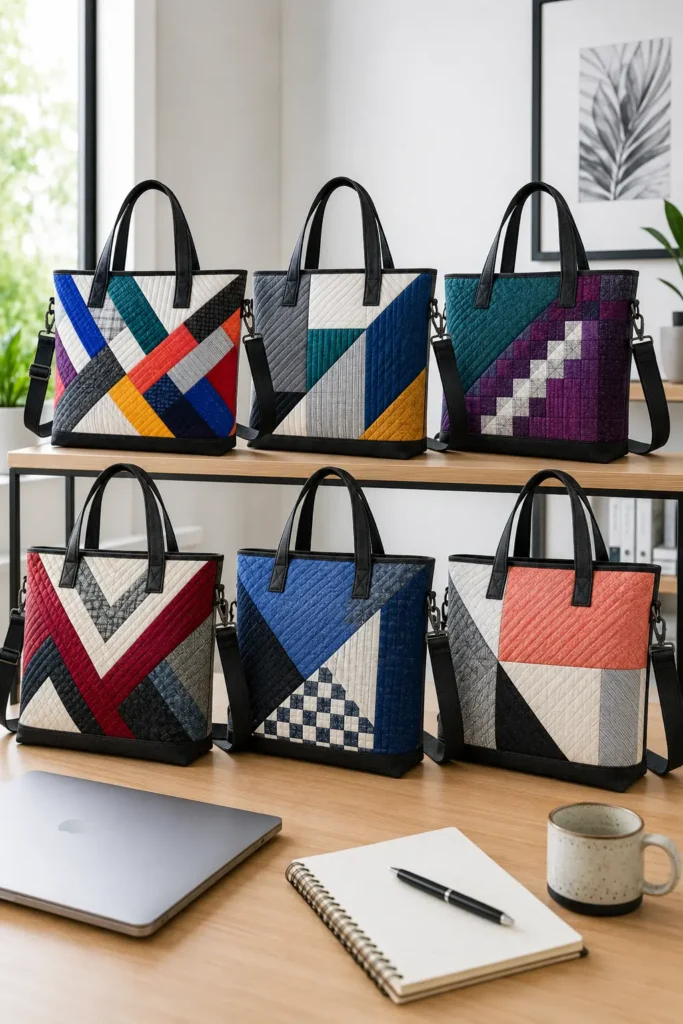
I find jelly roll bag construction particularly satisfying for the same reason I find jelly roll quilts satisfying: the pace. Once the strips are sewn into panels, the construction moves quickly, and the finished object looks more considered than the making time suggests. These seven ideas are chosen because they show the range of what strip-pieced construction can produce — from everyday market totes to structured laptop bags to home organization pieces that carry the same visual logic off the person and into the room.
Some of the Best Jelly Roll Fabrics for These Quilt Patterns

Jelly Roll Quilt Tote Bag
Contents
- 1 Jelly Roll Quilt Tote Bag
- 2 1. Elegant Neutral Jelly Roll Quilt Tote Bags for Minimalist Everyday Carry
- 2.1 Why I Made It
- 2.2 Why This Idea Is Worth Making
- 2.3 Finished Size
- 2.4 Materials Needed
- 2.5 Elegant Neutral Palette
- 2.6 Cutting Measurements
- 2.7 Step-by-Step Guide
- 2.7.1 Step 1: Choose and Arrange the Jelly Roll Strips
- 2.7.2 Step 2: Piece the Front and Back Panels
- 2.7.3 Step 3: Add Batting or Fusible Fleece
- 2.7.4 Step 4: Quilt the Tote Panels
- 2.7.5 Step 5: Make the Handles
- 2.7.6 Step 6: Add the Optional Inner Pocket
- 2.7.7 Step 7: Attach the Handles to the Outer Panels
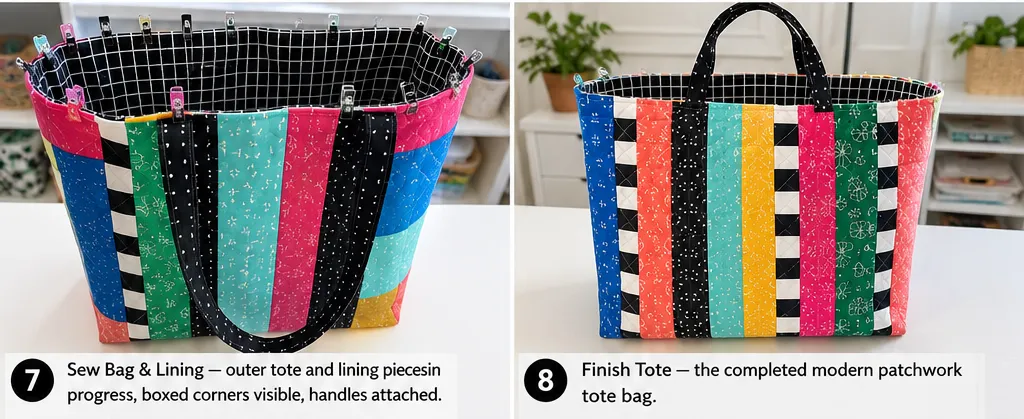
- 2.7.8 Step 8: Sew the Outer Bag
- 2.7.9 Step 9: Box the Bottom Corners
- 2.7.10 Step 10: Sew the Lining
- 2.7.11 Step 11: Join the Bag and Lining
- 2.7.12 Step 12: Turn and Finish
- 2.8 Assembly at a Glance
- 2.9 Minimalist Color Combination Ideas
- 2.10 Beginner Tips for Success
- 2.11 Styling Tip
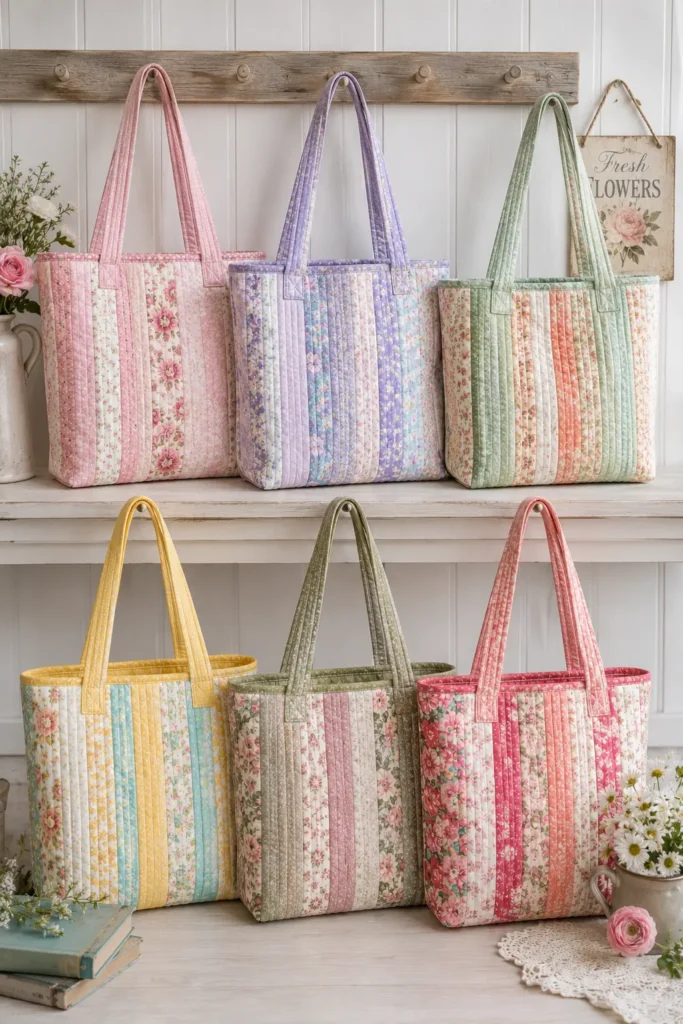
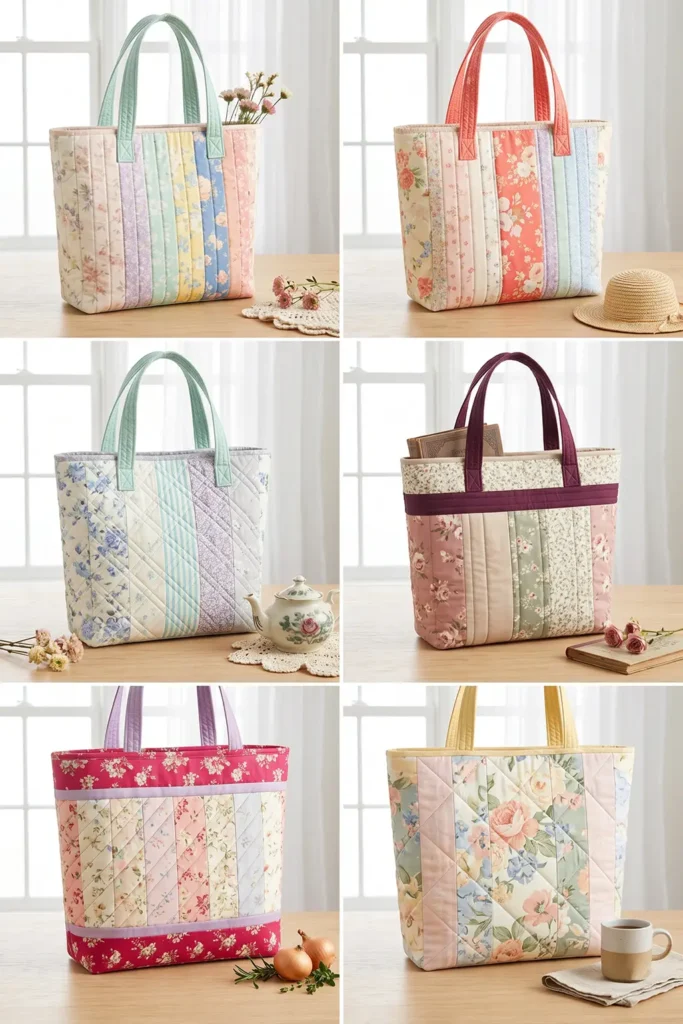
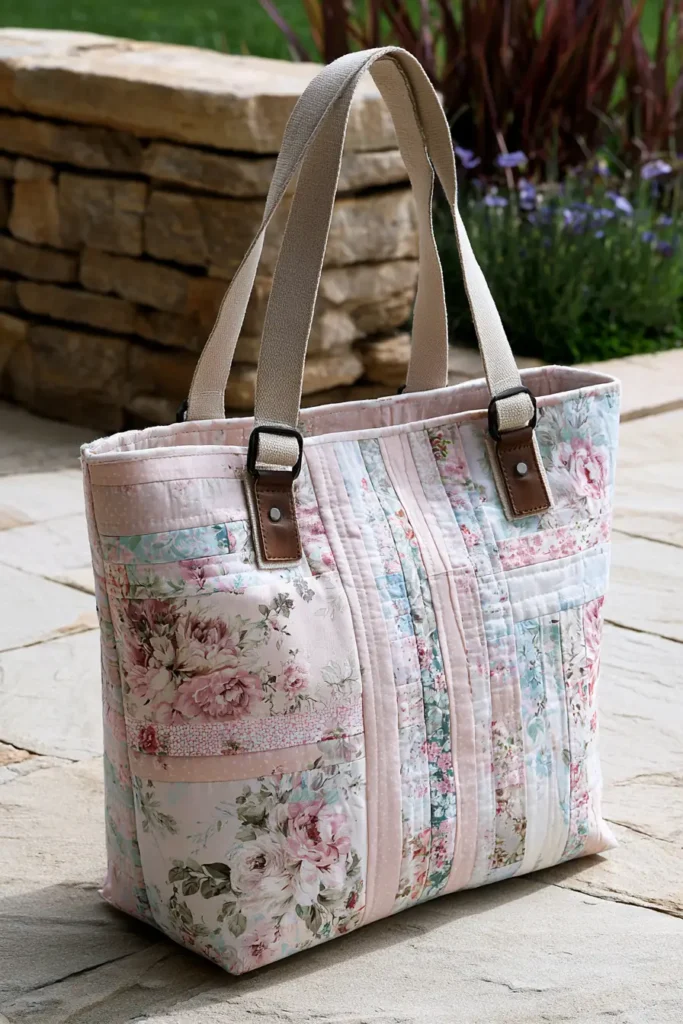
- 3 2. Soft Pastel Floral Jelly Roll Tote Bag for Feminine Weekend Outings
- 3.1 Why I Made It
- 3.2 Why This Idea Is Worth Making
- 3.3 Finished Size
- 3.4 Materials Needed
- 3.5 Soft Pastel Floral Palette
- 3.6 Cutting Measurements
- 3.7 Step-by-Step Guide
- 3.7.1 Step 1: Choose and Arrange the Pastel Floral Strips
- 3.7.2 Step 2: Piece the Front and Back Panels
- 3.7.3 Step 3: Add Batting or Fusible Fleece
- 3.7.4 Step 4: Quilt the Tote Panels
- 3.7.5 Step 5: Make the Handles
- 3.7.6 Step 6: Make the Optional Inner Pocket
- 3.7.7 Step 7: Attach the Handles
- 3.7.8 Step 8: Sew the Outer Bag
- 3.7.9 Step 9: Box the Bottom Corners
- 3.7.10 Step 10: Sew the Lining
- 3.7.11 Step 11: Join the Lining and Outer Bag
- 3.7.12 Step 12: Turn, Press, and Topstitch
- 3.8 Assembly at a Glance
- 3.9 Pastel Floral Color Combination Ideas
- 3.10 Beginner Tips for Success
- 3.11 Styling Tip
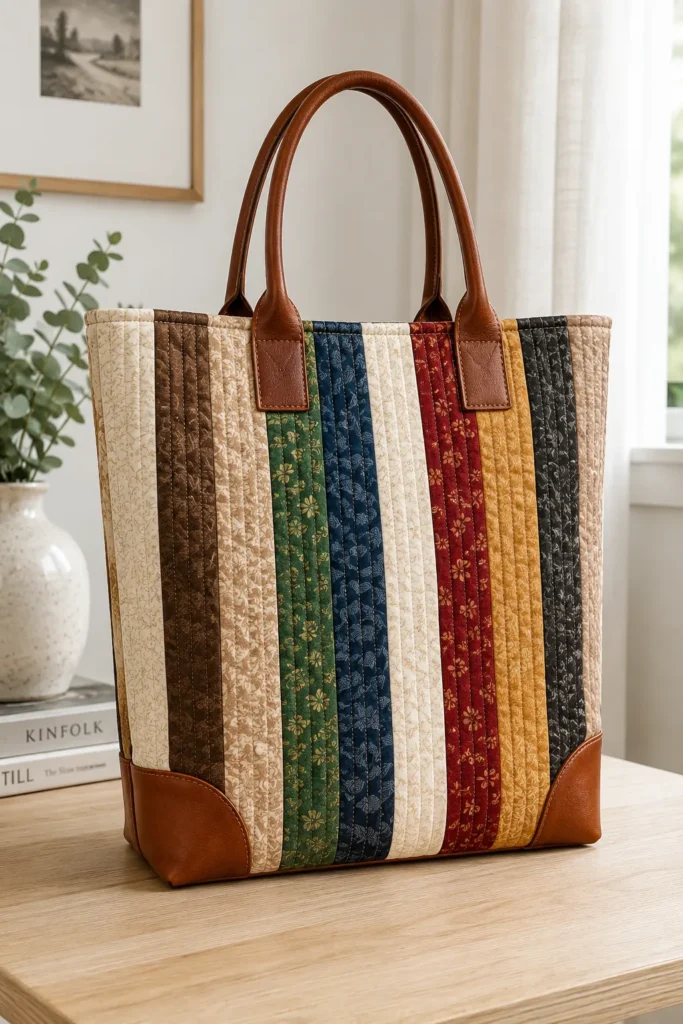
- 4 3. Sophisticated Leather-Accent Jelly Roll Quilt Tote Bags for Elevated Style
- 4.1 Why I Made It
- 4.2 Why This Idea Is Worth Making
- 4.3 Finished Size
- 4.4 Materials Needed
- 4.5 Sophisticated Color Palette
- 4.6 Cutting Measurements
- 4.7 Step-by-Step Guide
- 4.7.1 Step 1: Choose and Arrange the Jelly Roll Strips
- 4.7.2 Step 2: Piece the Front and Back Panels
- 4.7.3 Step 3: Add Fusible Fleece or Foam Stabilizer
- 4.7.4 Step 4: Quilt the Tote Panels
- 4.7.5 Step 5: Prepare the Leather Handle Tabs
- 4.7.6 Step 6: Attach the Handles to the Outer Panels
- 4.7.7 Step 7: Add Optional Leather Corner Patches
- 4.7.8 Step 8: Make the Optional Inner Pocket
- 4.7.9 Step 9: Sew the Outer Bag
- 4.7.10 Step 10: Box the Bottom Corners
- 4.7.11 Step 11: Sew the Lining
- 4.7.12 Step 12: Join the Lining and Outer Bag
- 4.7.13 Step 13: Turn, Press, and Topstitch
- 4.8 Assembly at a Glance
- 4.9 Sophisticated Color Combination Ideas
- 4.10 Beginner Tips for Success
- 4.11 Styling Tip
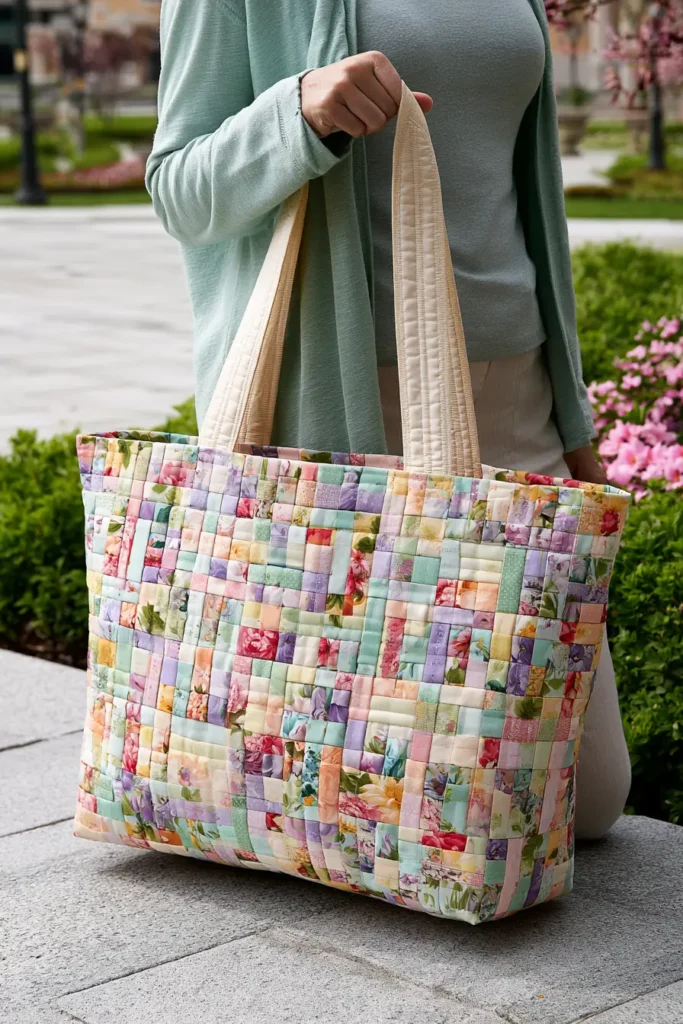
- 5 4. Modern Jelly Roll Patchwork Tote Bag Designs for Creative Fashion
- 5.1 Why I Made It
- 5.2 Why This Idea Is Worth Making
- 5.3 Finished Size
- 5.4 Materials Needed
- 5.5 Vibrant Modern Patchwork Palette
- 5.6 Cutting Measurements
- 5.7 Step-by-Step Guide
- 5.7.1 Step 1: Choose a Bold Jelly Roll Layout
- 5.7.2 Step 2: Piece the Front and Back Panels
- 5.7.3 Step 3: Add Optional Patchwork Accent Squares
- 5.7.4 Step 4: Add Batting or Fusible Fleece
- 5.7.5 Step 5: Quilt the Panels
- 5.7.6 Step 6: Make the Handles
- 5.7.7 Step 7: Add the Optional Inner Pocket
- 5.7.8 Step 8: Attach the Handles
- 5.7.9 Step 9: Sew the Outer Bag
- 5.7.10 Step 10: Box the Bottom Corners
- 5.7.11 Step 11: Sew the Lining
- 5.7.12 Step 12: Join the Lining and Outer Bag
- 5.7.13 Step 13: Turn, Press, and Topstitch
- 5.8 Assembly at a Glance
- 5.9 Modern Color Combination Ideas
- 5.10 Beginner Tips for Success
- 5.11 Styling Tip
- 6 5. Chic Padded Jelly Roll Quilted Laptop Bags for Stylish Professionals
- 6.1 Why I Made It
- 6.2 Why This Idea Is Worth Making
- 6.3 Finished Size
- 6.4 Materials Needed
- 6.5 Stylish Professional Color Palette
- 6.6 Cutting Measurements
- 6.7 Step-by-Step Guide
- 6.7.1 Step 1: Measure Your Laptop First
- 6.7.2 Step 2: Choose and Arrange the Jelly Roll Strips
- 6.7.3 Step 3: Piece the Front and Back Panels
- 6.7.4 Step 4: Add Fleece and Foam Padding
- 6.7.5 Step 5: Quilt the Laptop Panels
- 6.7.6 Step 6: Make the Optional Flap Closure
- 6.7.7 Step 7: Make the Handles
- 6.7.8 Step 8: Add the Inner Pocket
- 6.7.9 Step 9: Attach Handles and Flap to the Outer Panels
- 6.7.10 Step 10: Sew the Outer Bag
- 6.7.11 Step 11: Box the Bottom Corners
- 6.7.12 Step 12: Sew the Lining
- 6.7.13 Step 13: Join the Lining and Outer Bag
- 6.7.14 Step 14: Turn, Press, and Topstitch
- 6.8 Assembly at a Glance
- 6.9 Professional Color Combination Ideas
- 6.10 Beginner Tips for Success
- 6.11 Styling Tip
- 7 6. Convertible Geometric Jelly Roll Laptop Totes for Creative Remote Work
- 7.1 Why I Made It
- 7.2 Why This Idea Is Worth Making
- 7.3 Finished Size
- 7.4 Materials Needed
- 7.5 Vibrant Geometric Palette
- 7.6 Cutting Measurements
- 7.7 Step-by-Step Guide
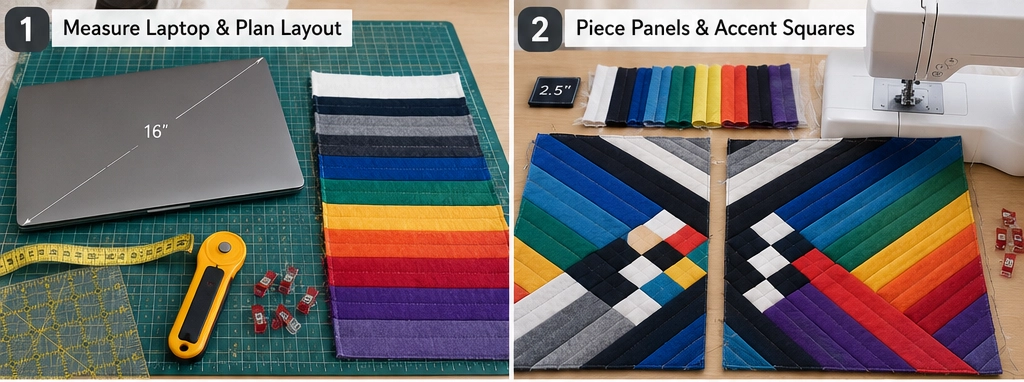
- 7.7.1 Step 1: Measure Your Laptop and Plan the Ease
- 7.7.2 Step 2: Choose a Geometric Jelly Roll Layout
- 7.7.3 Step 3: Piece the Front and Back Panels
- 7.7.4 Step 4: Add Geometric Accent Squares
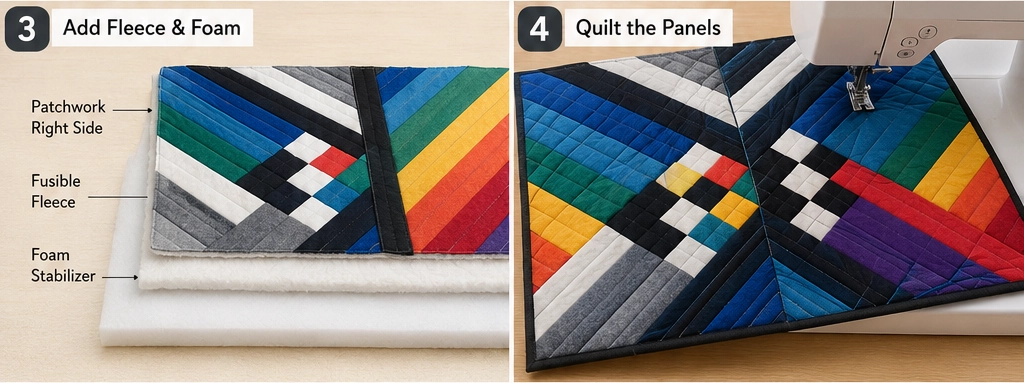
- 7.7.5 Step 5: Add Fleece and Foam Padding
- 7.7.6 Step 6: Quilt the Laptop Panels
- 7.7.7 Step 7: Make the Tote Handles
- 7.7.8 Step 8: Make the Side Strap Tabs
- 7.7.9 Step 9: Make the Optional Crossbody Strap
- 7.7.10 Step 10: Add the Optional Inner Pocket
- 7.7.11 Step 11: Attach the Handles
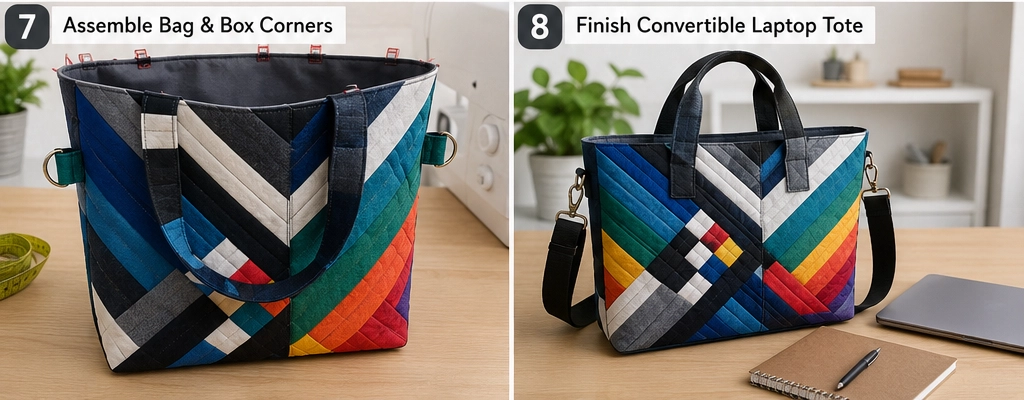
- 7.7.12 Step 12: Sew the Outer Bag
- 7.7.13 Step 13: Box the Bottom Corners
- 7.7.14 Step 14: Sew the Lining
- 7.7.15 Step 15: Join the Lining and Outer Bag
- 7.7.16 Step 16: Turn, Press, and Topstitch
- 7.8 Assembly at a Glance
- 7.9 Geometric Color Combination Ideas
- 7.10 Beginner Tips for Success
- 7.11 Styling Tip
- 8 7. Stylish Foldable Jelly Roll Quilted Laundry Hampers for Chic Home Organization
- 8.1 Why I Made It
- 8.2 Why This Idea Is Worth Making
- 8.3 Finished Size
- 8.4 Materials Needed
- 8.5 Vibrant Home Organization Palette
- 8.6 Cutting Measurements
- 8.7 Step-by-Step Guide
- 8.7.1 Step 1: Choose the Jelly Roll Strip Layout
- 8.7.2 Step 2: Piece the Front and Back Panels
- 8.7.3 Step 3: Piece the Side Panels
- 8.7.4 Step 4: Piece the Bottom Panel
- 8.7.5 Step 5: Add Fleece and Foam Stabilizer
- 8.7.6 Step 6: Quilt Each Panel
- 8.7.7 Step 7: Make the Handles
- 8.7.8 Step 8: Attach the Handles
- 8.7.9 Step 9: Sew the Outer Hamper Sides
- 8.7.10 Step 10: Attach the Bottom Panel
- 8.7.11 Step 11: Sew the Lining
- 8.7.12 Step 12: Join the Outer Hamper and Lining
- 8.7.13 Step 13: Turn and Topstitch
- 8.7.14 Step 14: Add a Binding or a Removable Base Insert
- 8.8 Assembly at a Glance
- 8.9 Chic Color Combination Ideas
- 8.10 Beginner Tips for Success
- 8.11 Styling Tip
- 9 CONCLUSION
What This Collection Covers
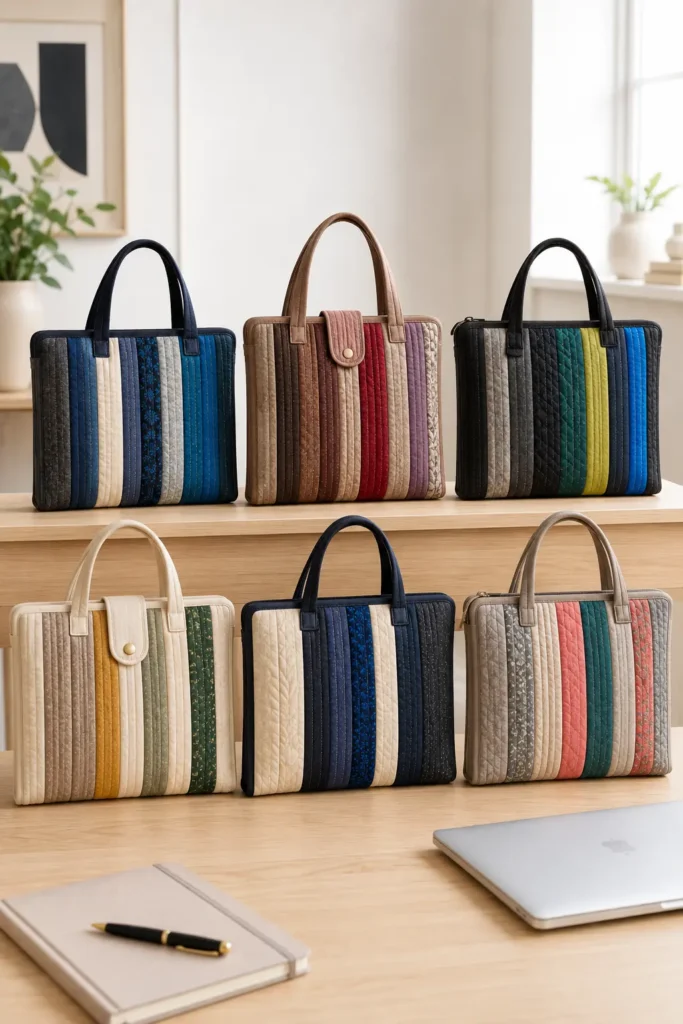
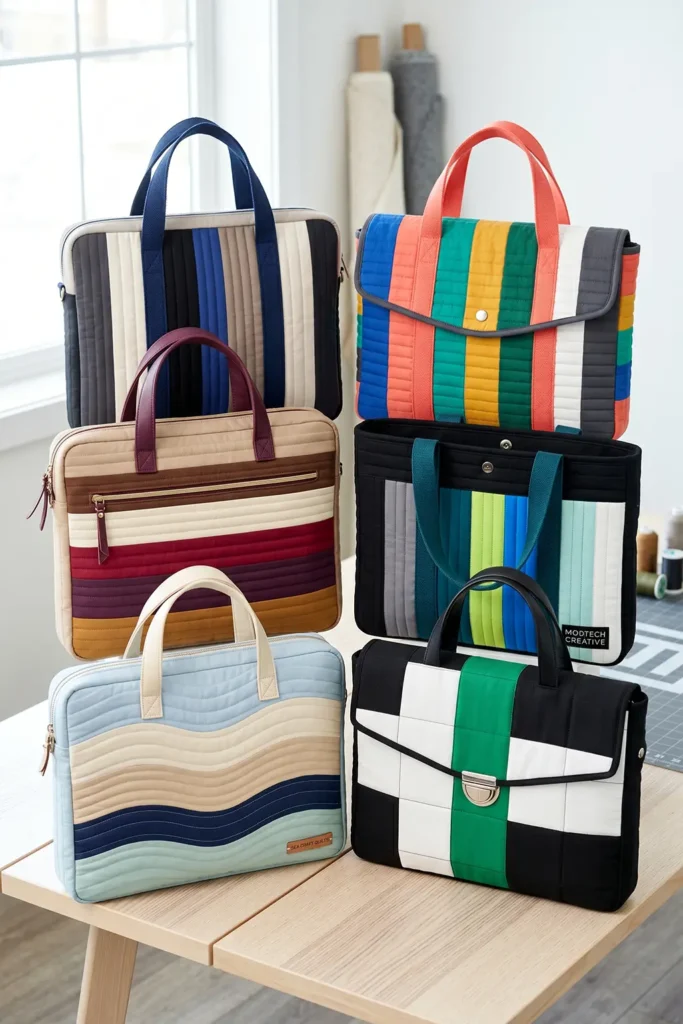
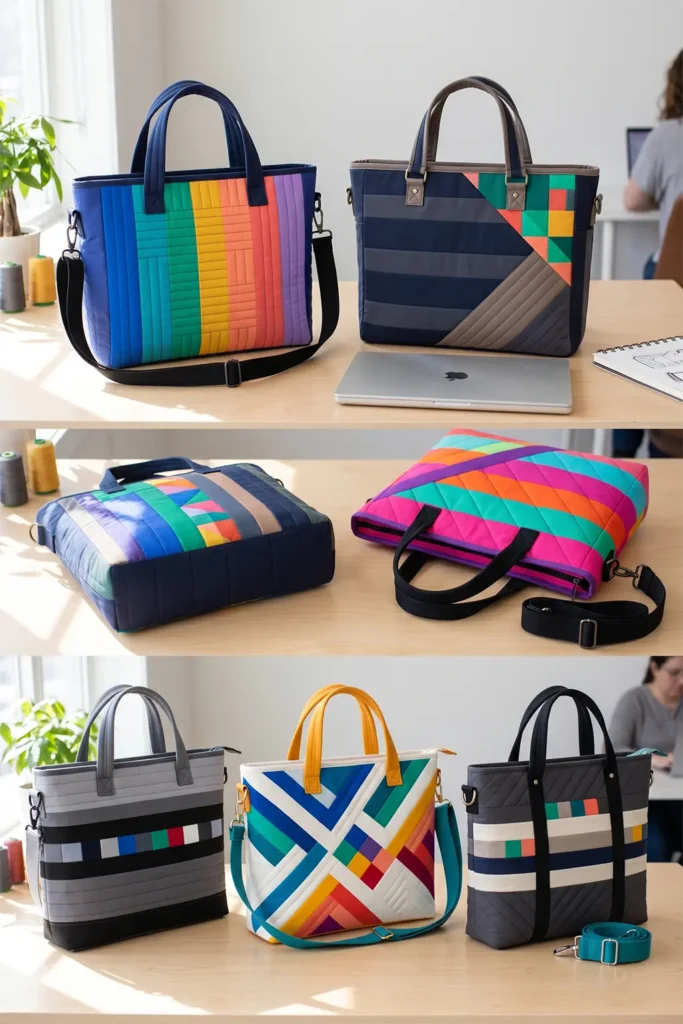
Seven ideas across the practical spectrum: everyday shoulder totes, oversized market shoppers, padded laptop bags for professional use, convertible designs that adapt between uses, and a quilted laundry hamper that brings strip-pieced geometry into home organization. Each one is described as a complete design concept rather than a pattern variation.
See also: 20 Jelly Roll Quilt Pattern Ideas · Quilted tote bag patterns · Japanese quilted bag ideas · Boho Quilt Tote Bag Ideas
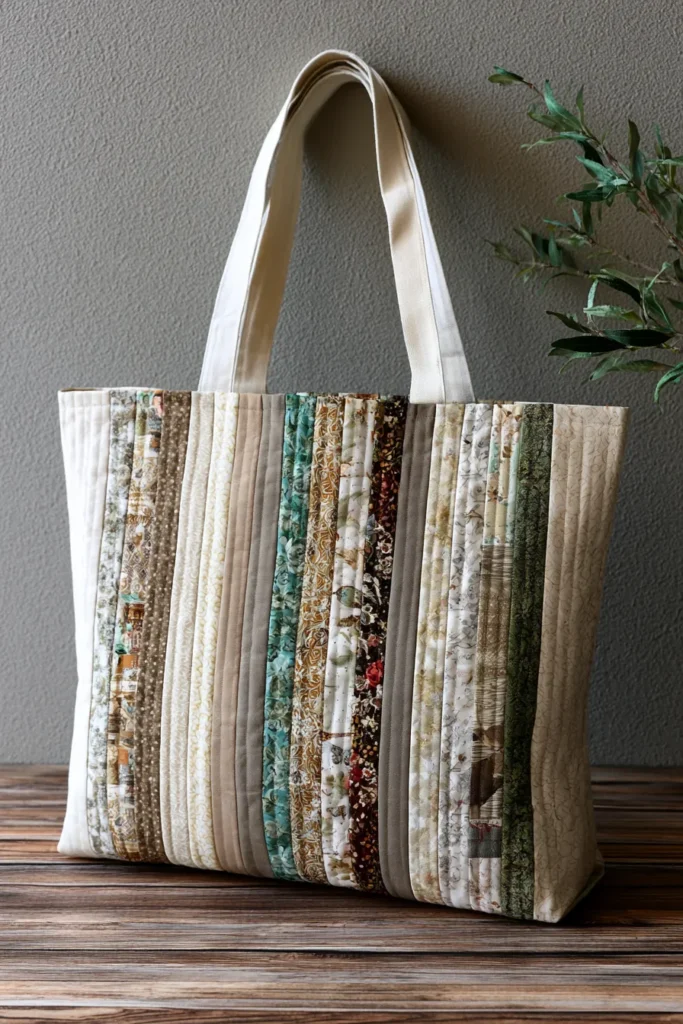
1. Elegant Neutral Jelly Roll Quilt Tote Bags for Minimalist Everyday Carry
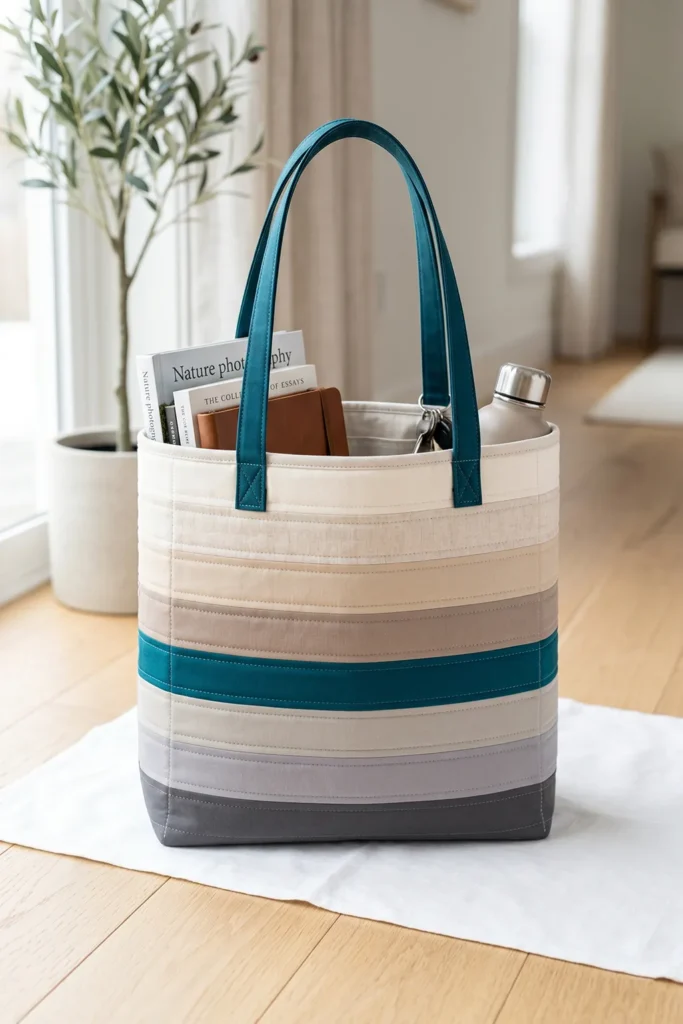
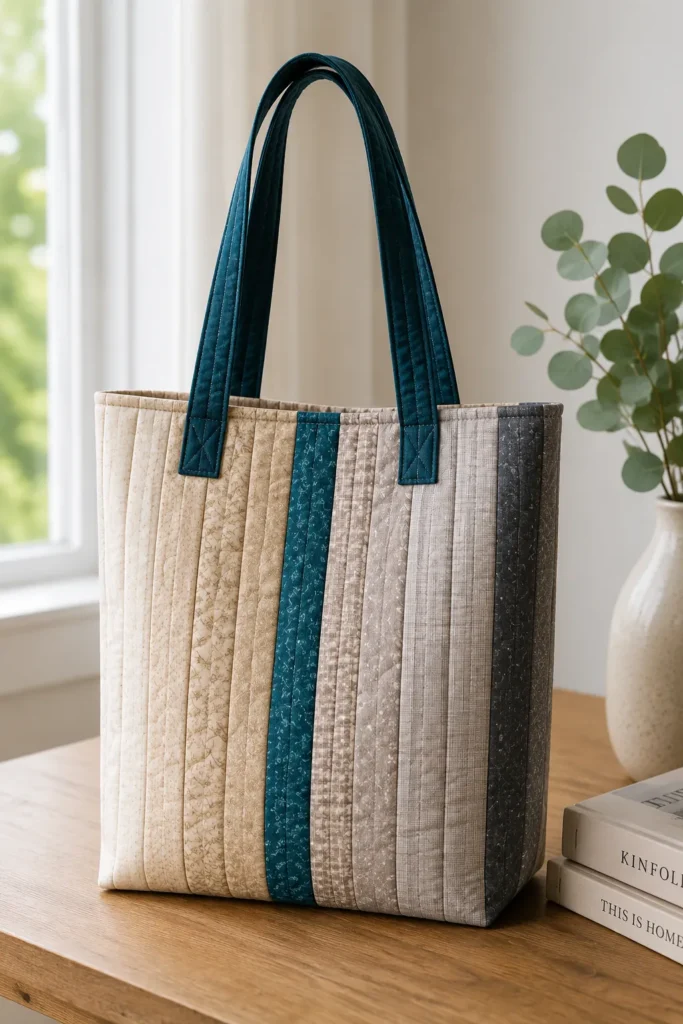
An elegant neutral jelly roll quilt tote bag is a beautiful way to turn simple fabric strips into a polished everyday accessory. Jelly roll strips are usually 2½ inches wide, which makes them perfect for beginner-friendly strip piecing. By sewing the strips together into quilted panels, you can create a soft but sturdy tote that feels handmade, stylish, and useful.
For a minimalist everyday carry look, choose calming neutrals such as ivory, oatmeal, beige, taupe, warm gray, charcoal, sand, linen, and soft cocoa. To keep the bag from feeling too plain, add one vibrant accent color like deep teal, emerald green, saffron yellow, ruby red, cobalt blue, or plum.
Why I Made It
I made this tote because I wanted a practical bag that still felt elegant enough to carry every day. A quilted tote has the softness of a handmade project, but the structure of a useful carryall. It is perfect for books, small groceries, sewing supplies, work notebooks, or a weekend outing.
The backstory behind this idea is that jelly rolls are one of the easiest precuts for beginners because the strips are already cut to a consistent width. Instead of worrying about lots of tiny pieces, you can focus on color order, straight seams, and simple quilting. A neutral jelly roll tote feels especially timeless because it works with almost any outfit or home style.
Why This Idea Is Worth Making
This idea is worth making because it is practical, beginner-friendly, and stylish. You get the satisfaction of making a quilted project without committing to a full-size quilt. The neutral palette makes the tote easy to use every day, while the quilted texture and optional vibrant accent strip make it feel personal and handmade.
Finished Size
This guide makes one everyday quilted tote measuring approximately:
- Finished width: 15 inches
- Finished height: 16 inches
- Boxed bottom depth: 4 inches
- Handle drop: about 10 inches
This size is roomy enough for daily errands, a small laptop or tablet, a book, a wallet, keys, and a light sweater.
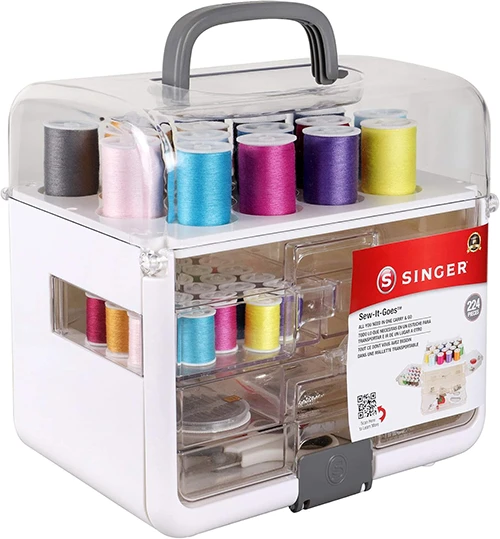
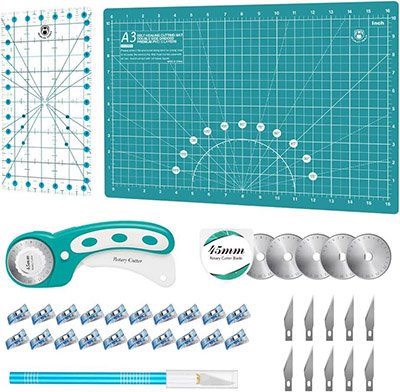
Helpful Sewing Kits for New Quilters

Materials Needed
For one tote bag, gather:
- 8 to 10 jelly roll strips: 2½ inches x width of fabric
- Lining fabric: ½ yard
- Batting or fusible fleece: ½ yard
- Handle fabric: ¼ yard, or 2 extra jelly roll strips
- Optional accent strip: 1 jelly roll strip in teal, saffron, emerald, plum, or ruby
- Thread: ivory, beige, gray, charcoal, or matching neutral
- Rotary cutter and cutting mat
- Quilting ruler
- Pins or sewing clips
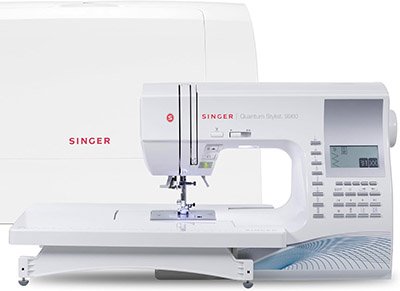
- Sewing machine
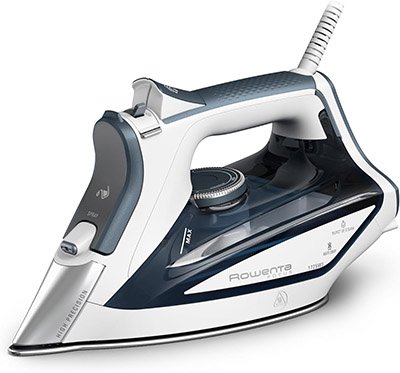
- Iron and ironing board
For a sturdier tote, use fusible fleece instead of regular batting. For a softer quilted look, use cotton batting.
Elegant Neutral Palette
A polished minimalist palette could include:
- Ivory
- Linen beige
- Oatmeal
- Sand
- Warm taupe
- Greige
- Soft gray
- Charcoal
- Accent: deep teal, saffron, emerald, plum, or ruby
The accent color should appear only once or twice so the tote stays elegant and understated.
Cutting Measurements
From jelly roll strips, cut:
- For front panel: 8 strips measuring 2½ x 17 inches
- For back panel: 8 strips measuring 2½ x 17 inches
From batting or fusible fleece, cut:
- 2 pieces measuring 17 x 18 inches
From lining fabric, cut:
- 2 pieces measuring 17 x 18 inches
For handles, cut:
- 2 strips measuring 4 x 24 inches
For optional inner pocket, cut:
- 1 rectangle measuring 8 x 10 inches
Seam allowance: Use ¼ inch for piecing the jelly roll strips and ½ inch for tote bag construction unless noted.
Step-by-Step Guide
Step 1: Choose and Arrange the Jelly Roll Strips
Select 8 strips for the front and 8 strips for the back. Arrange them from light to dark for a soft ombré effect, or alternate warm and cool neutrals for a modern minimalist look.
A beautiful front panel order is ivory, oatmeal, beige, taupe, broad teal accent, greige, soft gray, and charcoal. For the back, repeat the same order or reverse it for a subtle designer touch.
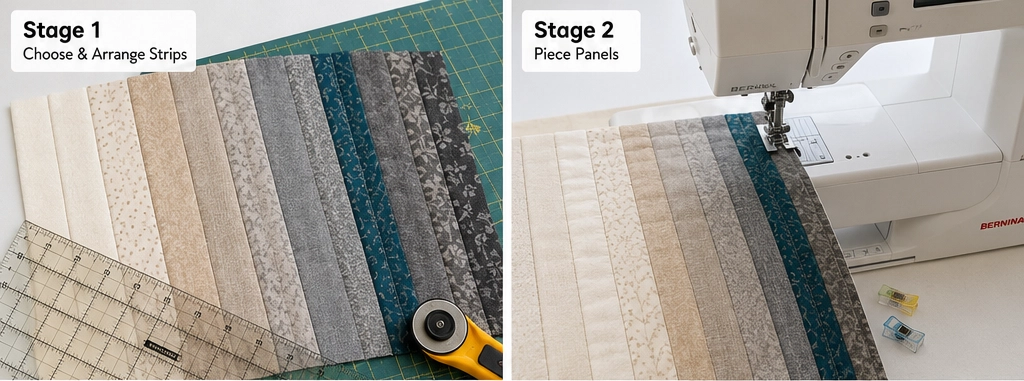
Step 2: Piece the Front and Back Panels
Sew the 8 front strips together lengthwise using a ¼-inch seam allowance. Press seams to one side or open.
Repeat with the 8 back strips.
Each panel should measure about 16½ x 17 inches after piecing. Trim both panels to 16 x 17 inches so they match neatly.
Step 3: Add Batting or Fusible Fleece
Place each pieced panel on top of a batting piece, or fuse the fleece to the wrong side according to the manufacturer’s directions.
Trim the batting or fleece so it matches the panel size exactly. This gives the tote body softness, structure, and a quilted feel.
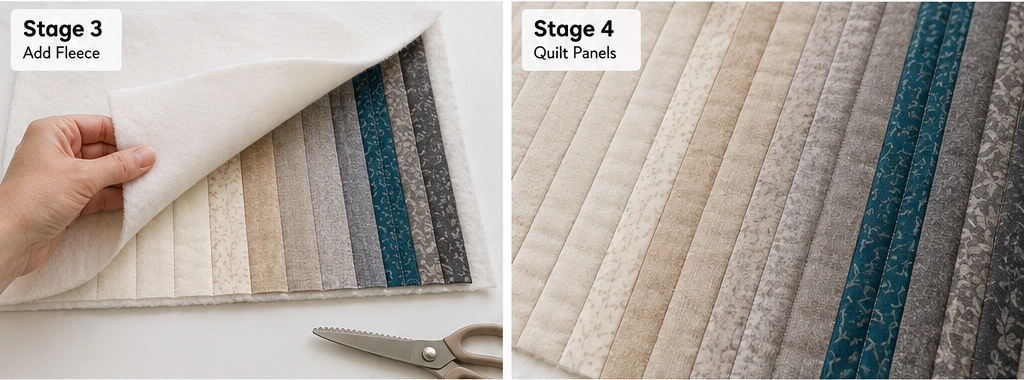
Step 4: Quilt the Tote Panels
Quilt each panel with simple straight lines. A beginner-friendly option is to stitch ¼ inch away from each seam on both sides. This creates a clean channel-quilted effect.
You can also quilt diagonal lines spaced 1½ to 2 inches apart for a modern look. Keep the quilting simple so the neutral strip design remains the focus.
Step 5: Make the Handles
Fold each 4 x 24-inch handle strip in half lengthwise and press. Open it, then fold each long edge toward the center crease and press again. Fold in half once more and stitch along both long edges.
Each finished handle will be about 1 inch wide by 24 inches long.
For a more vibrant detail, make the handles in deep teal, saffron, emerald, plum, or ruby.
Step 6: Add the Optional Inner Pocket
Fold the 8 x 10-inch pocket rectangle in half, right sides together, so it measures 8 x 5 inches. Sew around the edges, leaving a small opening for turning.
Turn right side out, press, and topstitch along the folded top edge. Place the pocket on one lining piece, about 4 inches down from the top edge, and stitch around the sides and bottom.
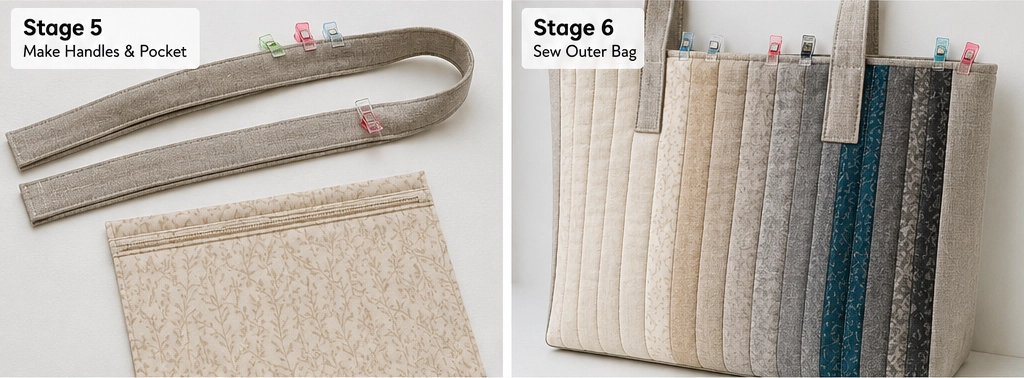
Step 7: Attach the Handles to the Outer Panels
Place one quilted panel right side up. Measure 4 inches in from each side along the top edge and mark the handle placement.
Pin one handle to the top edge with raw handle ends aligned to the raw edge of the bag. Make sure the handle is not twisted. Repeat for the second panel.
Baste handles in place with a ¼-inch seam allowance.
Step 8: Sew the Outer Bag
Place the front and back quilted panels right sides together. Sew down both sides and across the bottom using a ½-inch seam allowance. Leave the top open.
Backstitch at the beginning and end for strength.
Step 9: Box the Bottom Corners
To create a flat tote bottom, pinch one bottom corner so the side seam and bottom seam line up. Measure 2 inches from the corner point and draw a line across.
Sew along the line and trim the corner to ½ inch beyond the stitching. Repeat on the other corner.
This creates a tote depth of about 4 inches.
Step 10: Sew the Lining
Place the two lining pieces right sides together. Sew the sides and bottom with a ½-inch seam allowance, but leave a 4-inch opening in the bottom for turning.
Box the lining corners the same way as the outer bag, measuring 2 inches from each corner point.
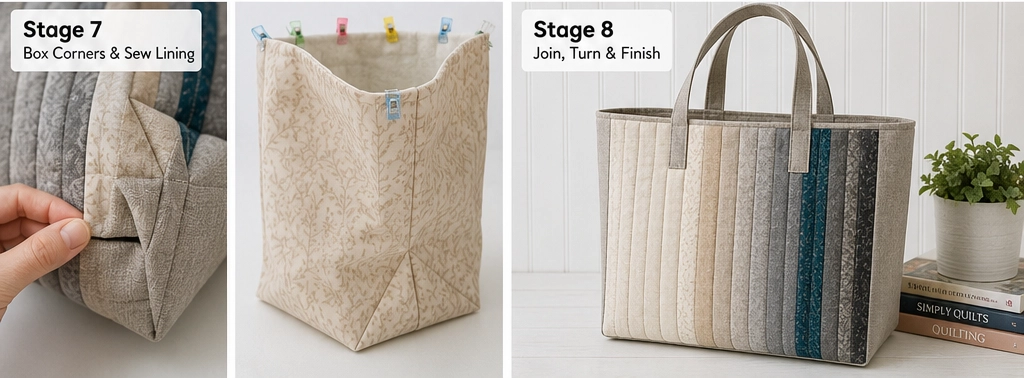
Step 11: Join the Bag and Lining
Turn the outer bag right side out. Keep the lining wrong side out.
Place the outer bag inside the lining so right sides are together. Match the side seams and top raw edges. Pin or clip around the top.
Sew around the top edge with a ½-inch seam allowance, securing the handles between the layers.
Step 12: Turn and Finish
Pull the bag right side out through the opening in the lining. Push the lining into the bag and press the top edge carefully.
Topstitch around the top edge about ⅛ inch from the edge, then again at ¼ inch for extra strength. Sew the lining opening closed by machine or hand.
Assembly at a Glance
- Choose neutral jelly roll strips and one optional vibrant accent.
- Cut front and back strips to 2½ x 17 inches.
- Piece 8 strips for the front and 8 strips for the back.
- Trim panels to 16 x 17 inches.
- Add batting or fusible fleece.
- Quilt both panels with straight lines.
- Make two 4 x 24-inch handles.
- Add an optional 8 x 10-inch inner pocket.
- Sew the outer bag sides and bottom.
- Box the bottom corners at 2 inches.
- Sew and box the lining.
- Join lining and outer bag, turn, topstitch, and finish.
Minimalist Color Combination Ideas
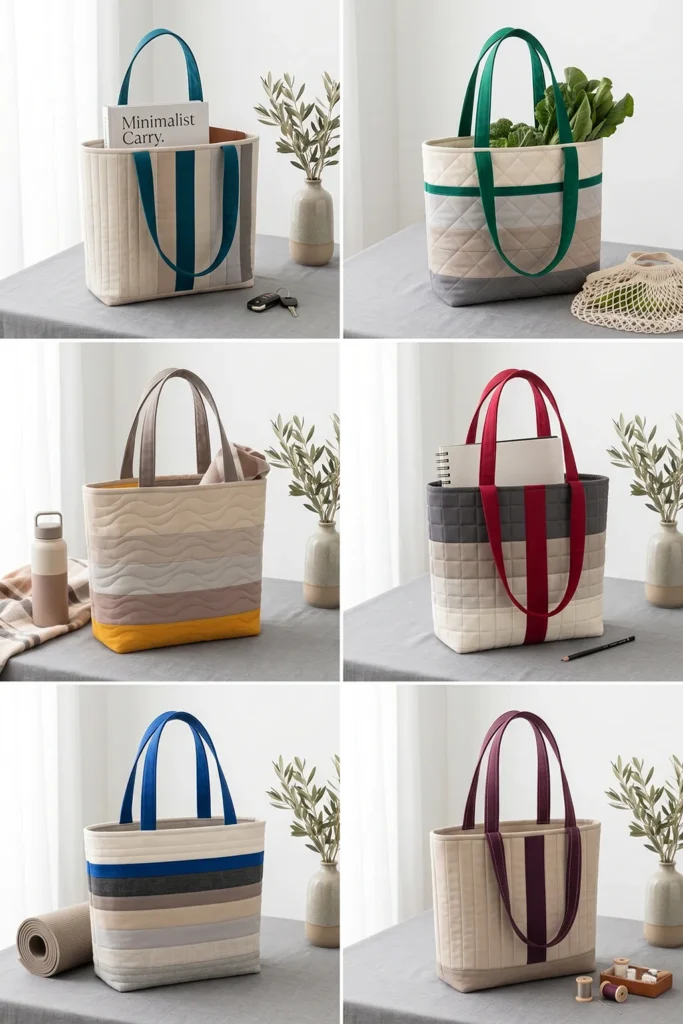
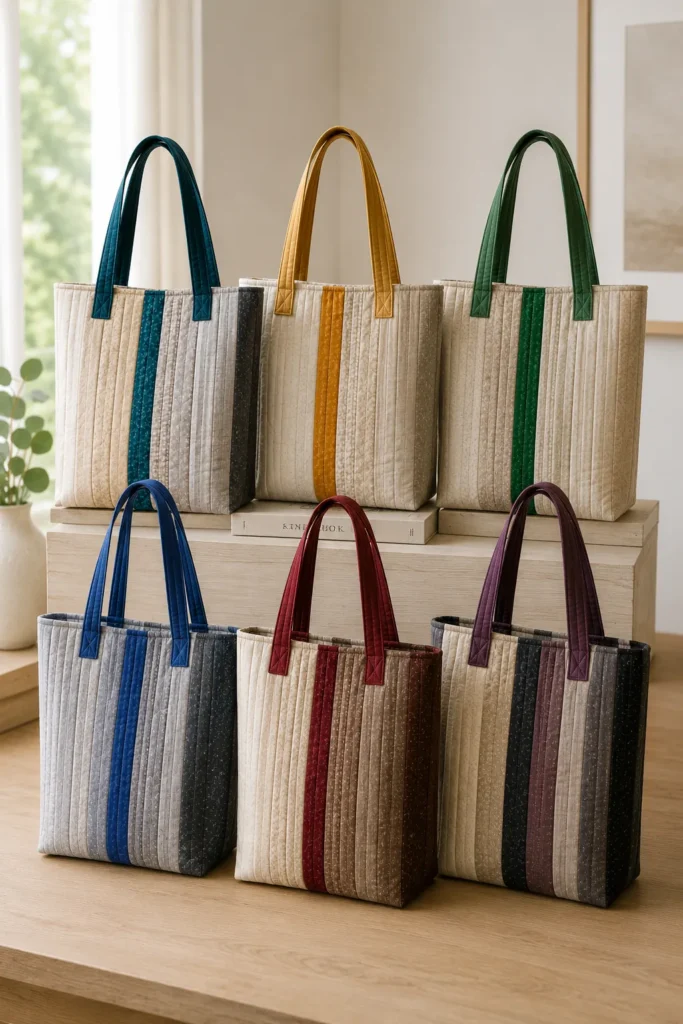
For a warm-neutral tote, use ivory, oatmeal, beige, taupe, cocoa, and cream, with a saffron-yellow accent.
For a cool modern tote, use white, pale gray, slate, charcoal, and black with a cobalt blue accent.
For an earthy everyday tote, use linen, sand, olive beige, warm gray, cocoa, and ivory with an emerald green accent.
For a chic city-style tote, use cream, greige, charcoal, black, and taupe with a deep plum accent.
Beginner Tips for Success
Use fusible fleece if you want the tote to stand up more firmly. Use cotton batting for a softer, more quilt-like feel.
Press after every seam. Neat pressing makes the strip-pieced panels look polished and professional.
Use clips instead of pins when sewing thick quilted layers. Clips help hold the fabric without distortion.
Keep the accent color limited. One bold strip, bright handle, or colorful pocket lining is enough to make the neutral tote feel stylish.
Reinforce the handles with extra stitching at the top edge. Tote bags carry weight, so strong handles matter.
Styling Tip
Carry the finished tote with linen outfits, denim, black basics, or soft neutral layers. The quilted texture gives it a handmade charm, while the minimalist palette keeps it elegant. A small flash of teal, saffron, emerald, ruby, or plum makes the tote feel modern without overpowering its everyday simplicity.
Other Design Inspirations – Digitally Modified
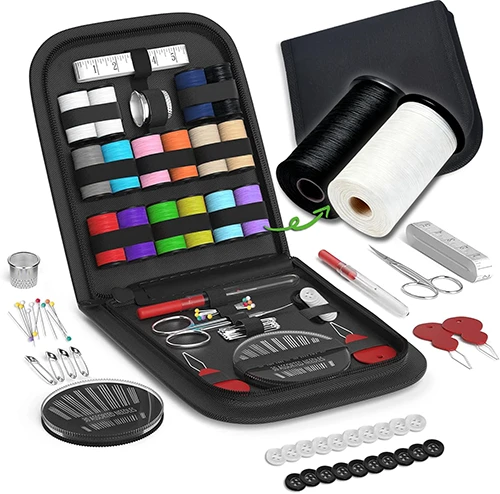
Tools for Cutting, Pressing, and Sewing
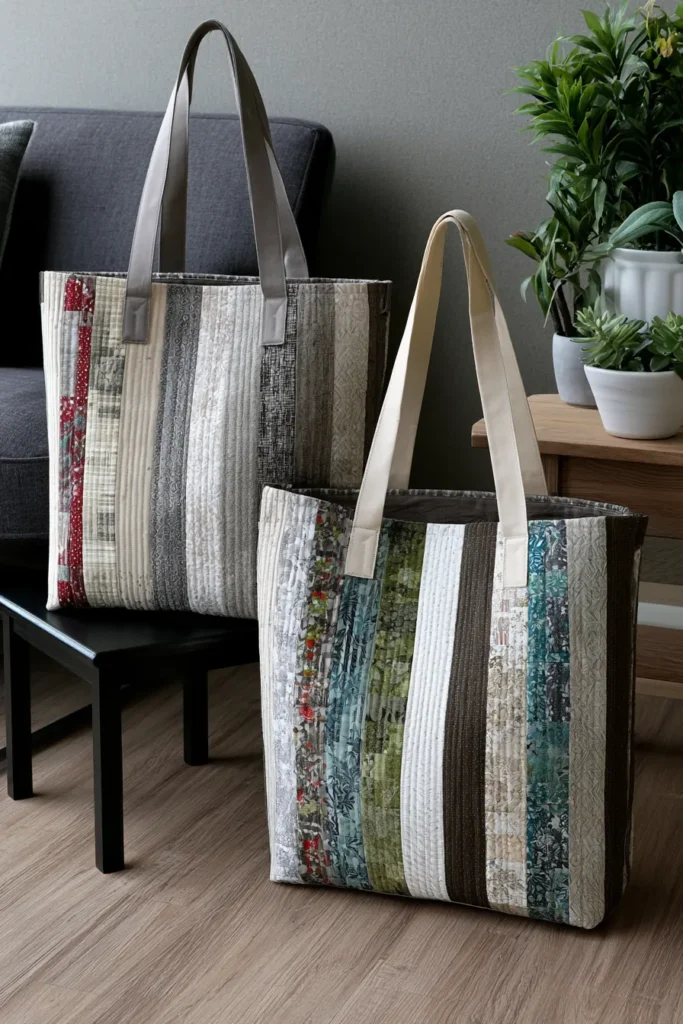
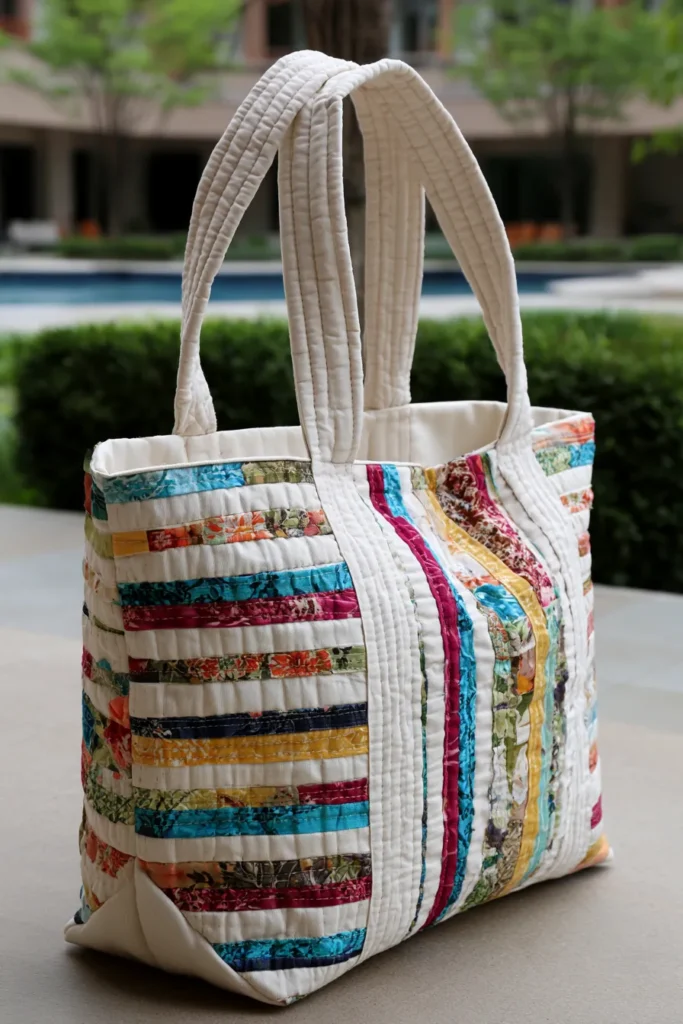
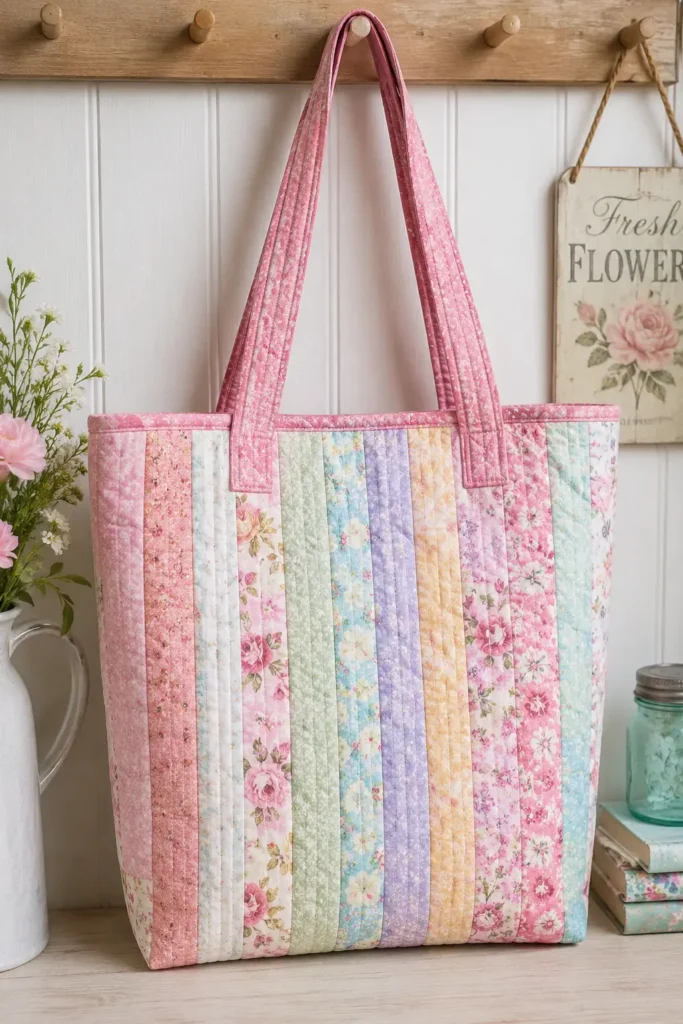
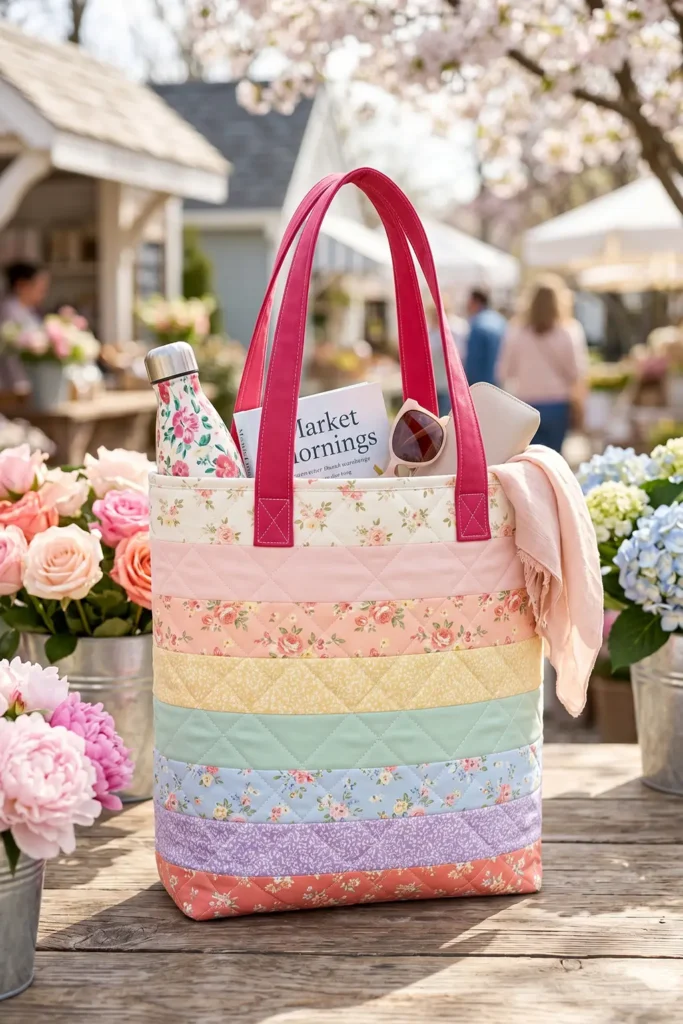
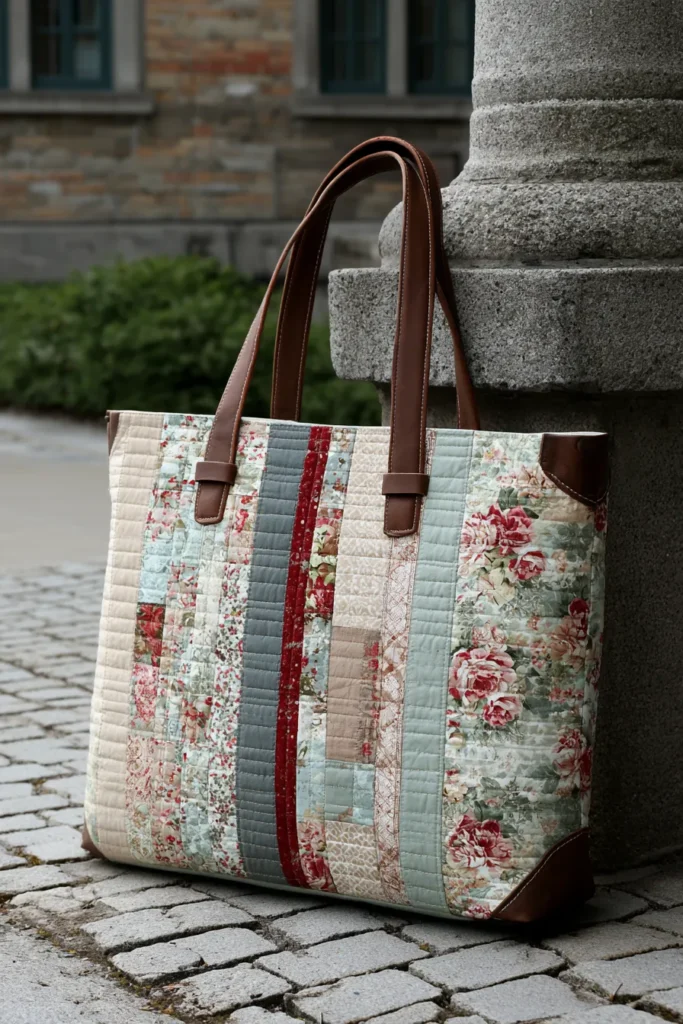
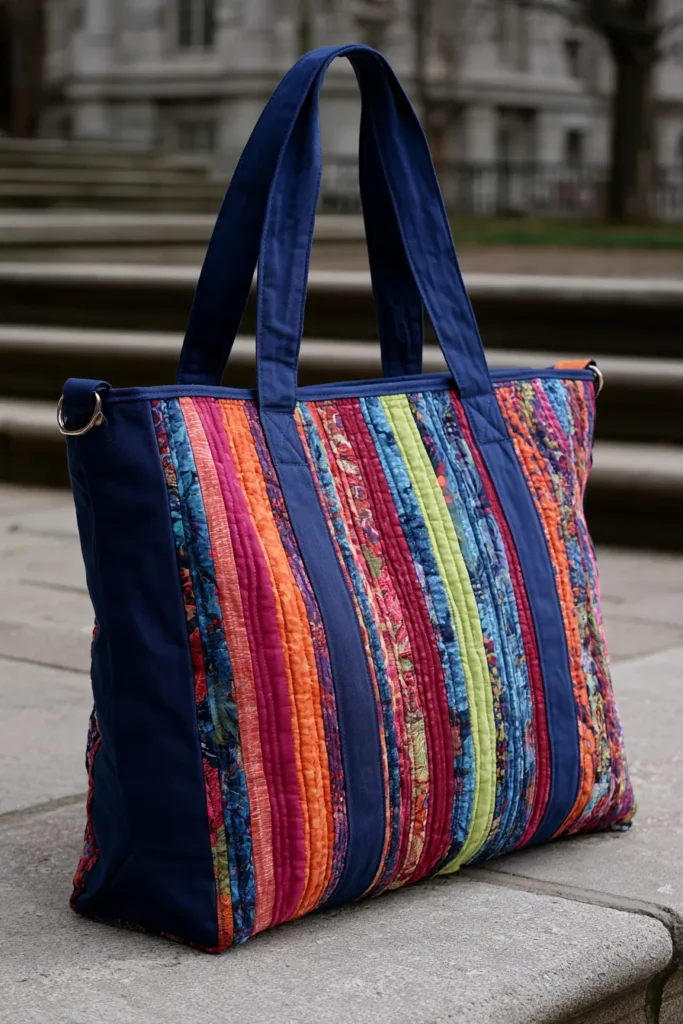
2. Soft Pastel Floral Jelly Roll Tote Bag for Feminine Weekend Outings
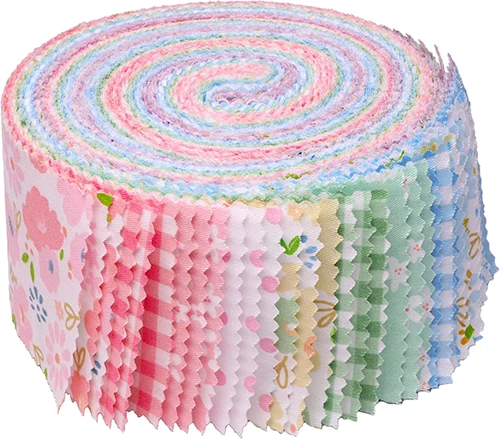
A soft pastel floral jelly roll tote bag is a pretty, practical project for weekend outings, brunch dates, market mornings, library trips, or casual strolls through town. Jelly roll strips are usually 2½ inches wide, which makes them easy to sew into charming quilted panels without cutting dozens of tiny pieces.
This design uses gentle, feminine colors like blush pink, lavender, mint green, butter yellow, powder blue, peach, ivory, and soft rose, with a few brighter accents such as coral, raspberry, aqua, or fresh green to keep the bag lively. The finished tote feels romantic and handmade, but still sturdy enough for everyday use.
Why I Made It
I made this tote because I wanted a weekend bag that felt softer and prettier than a plain canvas tote. I imagined something I could carry to a flower market, a craft fair, a café, or a relaxed afternoon with friends. A pastel floral jelly roll is perfect for that feeling because the colors already look collected and coordinated.
The backstory behind this idea is simple: jelly roll strips make quilting feel approachable. Since the strips are already cut, you can focus on arranging the colors and enjoying the sewing. Floral prints also have a timeless charm, especially when paired with quilted texture and soft pastel tones.
Why This Idea Is Worth Making
This idea is worth making because it gives you a beautiful quilted accessory without the time commitment of a full-size quilt. It is beginner-friendly, useful, and easy to personalize. The quilted panels make the tote feel special, while the pastel floral colors add a feminine touch that works beautifully for spring, summer, and cheerful weekend outfits.
Finished Size
This guide makes one quilted tote bag measuring approximately:
- Finished width: 15 inches
- Finished height: 16 inches
- Boxed bottom depth: 4 inches
- Handle drop: about 10 inches
This size is roomy enough for a wallet, sunglasses, a small book, a water bottle, a scarf, a notebook, and a few weekend essentials.
Materials Needed
For one pastel floral tote, gather:
- 8 to 10 jelly roll strips: 2½ inches x width of fabric
- Lining fabric: ½ yard
- Batting or fusible fleece: ½ yard
- Handle fabric: ¼ yard, or 2 extra jelly roll strips
- Optional pocket fabric: ¼ yard
- Thread: ivory, blush, lavender, or pale gray
- Rotary cutter and cutting mat
- Quilting ruler
- Pins or sewing clips
- Sewing machine
- Iron and ironing board
For a sturdier tote, use fusible fleece. For a softer quilted look, use cotton batting.
Batting, Measuring, Marking, and Clipping Supplies for Quilts
“As an Amazon Associate, I earn from qualifying purchases.“


Soft Pastel Floral Palette
A pretty weekend palette could include:
- Ivory floral
- Blush pink
- Peach rose
- Butter yellow
- Mint green
- Powder blue
- Lavender
- Soft coral
- Raspberry accent
- Fresh green accent
For a more elegant finish, keep most of the bag in pastel tones and use brighter colors only on one strip, the pocket lining, or the handles.
Cutting Measurements
From jelly roll strips, cut:
- Front panel: 8 strips measuring 2½ x 17 inches
- Back panel: 8 strips measuring 2½ x 17 inches
From batting or fusible fleece, cut:
- 2 pieces measuring 17 x 18 inches
From lining fabric, cut:
- 2 pieces measuring 17 x 18 inches
For handles, cut:
- 2 strips measuring 4 x 24 inches
For an optional inner pocket, cut:
- 1 rectangle measuring 8 x 10 inches
Use a ¼-inch seam allowance for piecing the jelly roll strips and a ½-inch seam allowance for tote construction.
Step-by-Step Guide
Step 1: Choose and Arrange the Pastel Floral Strips
Pick 8 jelly roll strips for the front and 8 for the back. Arrange them in a soft color flow, such as ivory, blush, peach, yellow, mint, blue, lavender, and coral.
For a feminine weekend look, place the floral prints near the center and pair them with solids or small prints. This makes the tote look balanced instead of too busy.
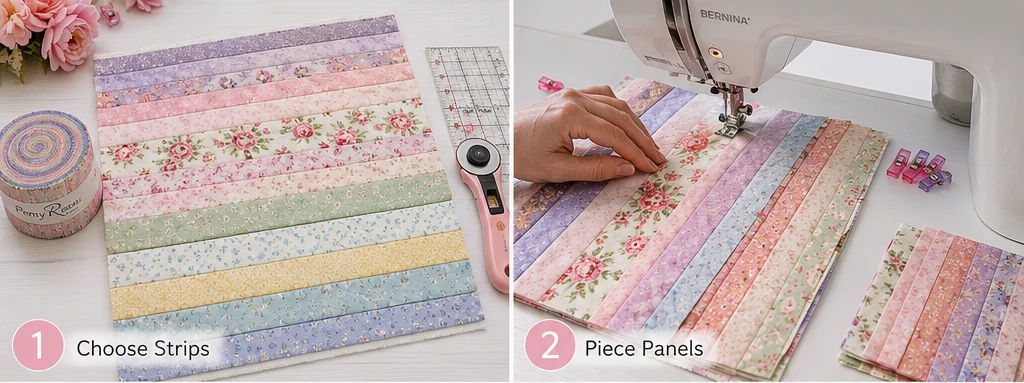
Step 2: Piece the Front and Back Panels
Sew the 8 front strips together lengthwise using a ¼-inch seam allowance. Press the seams to one side or open.
Repeat with the 8 back strips.
Each pieced panel should measure about 16½ x 17 inches. Trim both panels to 16 x 17 inches so they match neatly.
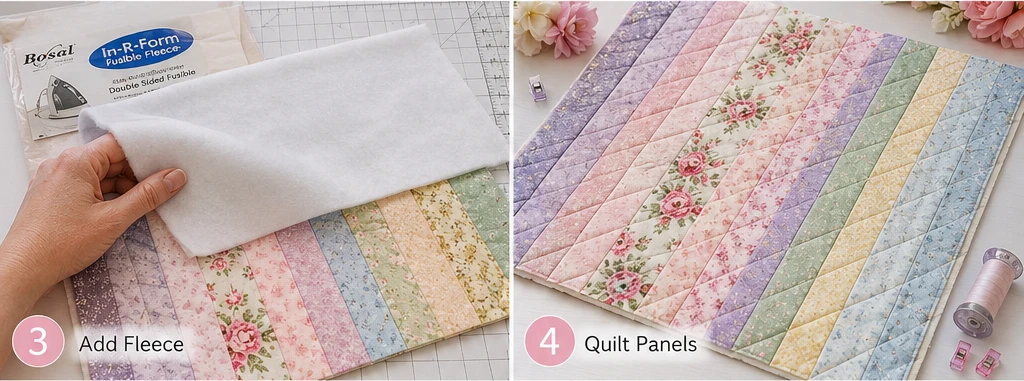
Step 3: Add Batting or Fusible Fleece
Place each pieced panel on a piece of batting, or fuse fleece to the wrong side of each panel according to the manufacturer’s instructions.
Trim the batting or fleece to match the tote panels exactly. This gives the bag body, softness, and a quilted texture.
Step 4: Quilt the Tote Panels
Quilt each panel with simple straight lines. A beginner-friendly option is to stitch ¼ inch away from each strip seam.
For a more delicate look, quilt diagonal lines spaced 1½ to 2 inches apart. Use ivory or pale blush thread so the quilting blends softly with the floral fabrics.
Step 5: Make the Handles
Fold each 4 x 24-inch handle strip in half lengthwise and press. Open it, fold both long edges toward the center crease, and press again. Fold in half once more and stitch along both long edges.
Each finished handle should measure about 1 inch wide by 24 inches long.
For a pretty accent, make the handles in coral, lavender, raspberry, mint, or powder blue.
Step 6: Make the Optional Inner Pocket
Fold the 8 x 10-inch pocket rectangle in half, right sides together, so it measures 8 x 5 inches. Sew around the edges, leaving a small opening for turning.
Turn it right side out, press, and topstitch along the folded top edge. Place the pocket on one lining piece about 4 inches down from the top edge, then stitch around the sides and bottom.

Step 7: Attach the Handles
Place one quilted outer panel right side up. Measure 4 inches in from each side along the top edge and mark the handle placement.
Pin or clip the handle ends to the top edge with raw edges aligned. Make sure the handle is not twisted. Repeat on the second outer panel.
Baste the handles in place using a ¼-inch seam allowance.
Step 8: Sew the Outer Bag
Place the two quilted outer panels right sides together. Sew down both sides and across the bottom using a ½-inch seam allowance. Leave the top open.
Backstitch at the beginning and end so the seams stay strong.
Step 9: Box the Bottom Corners
Pinch one bottom corner so the side seam and bottom seam line up. Measure 2 inches from the corner point and draw a line across.
Sew along the line, then trim the corner to ½ inch beyond the stitching. Repeat on the other corner.
This creates a flat bottom with about 4 inches of depth, making the tote easier to set down and fill.
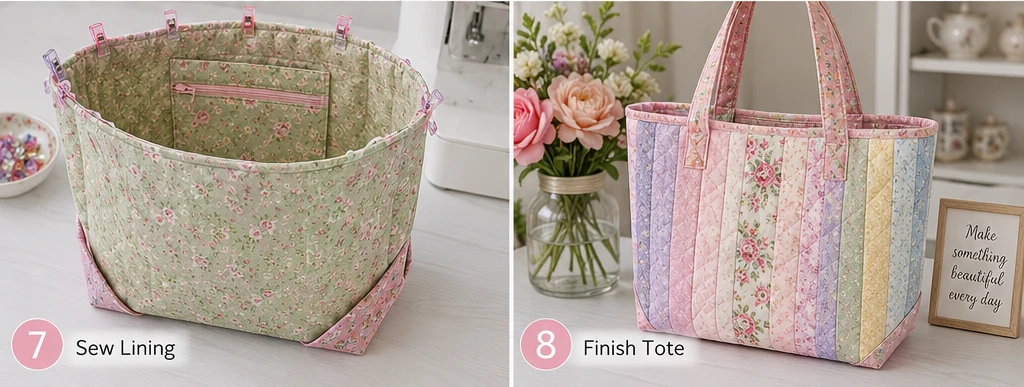
Step 10: Sew the Lining
Place the two lining pieces right sides together. Sew down both sides and across the bottom with a ½-inch seam allowance, leaving a 4-inch opening in the bottom for turning.
Box the lining corners the same way as the outer bag, measuring 2 inches from each corner point.
Step 11: Join the Lining and Outer Bag
Turn the outer bag right side out. Keep the lining wrong side out.
Place the outer bag inside the lining so right sides are together. Match the side seams and top edges. Pin or clip around the top.
Sew around the top edge with a ½-inch seam allowance, catching the handles securely between the layers.
Step 12: Turn, Press, and Topstitch
Pull the bag right side out through the opening in the lining. Push the lining into the bag and press the top edge.
Topstitch around the top edge about ⅛ inch from the edge, then stitch again at ¼ inch for extra strength. Close the lining opening by machine or hand.
Assembly at a Glance
- Choose pastel floral jelly roll strips with one or two vibrant accents.
- Cut front and back strips to 2½ x 17 inches.
- Piece 8 strips for the front and 8 strips for the back.
- Trim both panels to 16 x 17 inches.
- Add batting or fusible fleece.
- Quilt the panels with straight or diagonal lines.
- Make two 4 x 24-inch handles.
- Add an optional 8 x 10-inch inner pocket.
- Sew the outer bag sides and bottom.
- Box the bottom corners at 2 inches.
- Sew and box the lining.
- Join the lining and outer bag, turn, press, and topstitch.
Pastel Floral Color Combination Ideas
For a romantic spring tote, use blush pink, ivory floral, peach, butter yellow, and mint green.
For a soft cottage-style tote, use lavender, powder blue, cream, pale rose, and fresh green.
For a cheerful weekend tote, use coral, aqua, raspberry, lemon yellow, white, and soft pink.
For an elegant, feminine tote, use dusty rose, champagne, sage green, ivory, and plum accents.
Beginner Tips for Success
Use fusible fleece if you want the tote to stand up more firmly. It is easier to manage than lose batting for a beginner bag project.
Press after every seam. Smooth pressing makes jelly roll panels look neat and professional.
Use clips when sewing thick quilted layers. They hold the layers without bending or shifting them.
Keep the floral prints balanced. If one fabric is very bold, place it near softer solids or tiny prints.
Reinforce the handles with extra stitching. Weekend totes often carry books, water bottles, or small purchases, so strong handles matter.
Styling Tip
Carry the finished pastel floral tote with a linen dress, denim jacket, soft cardigan, or simple weekend outfit. The quilted texture gives it a handmade charm, while the pastel florals make it feel sweet, feminine, and cheerful. A bright handle or accent strip in coral, raspberry, aqua, or fresh green adds just enough color to make the tote feel fresh and memorable.
Other Design Inspirations – Digitally Modified
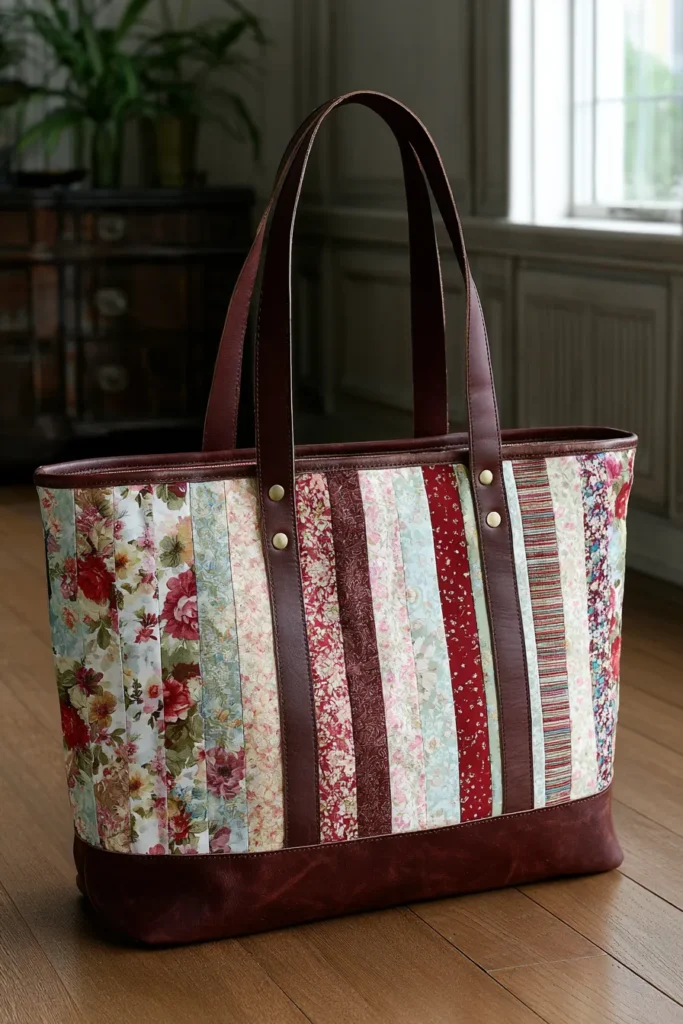
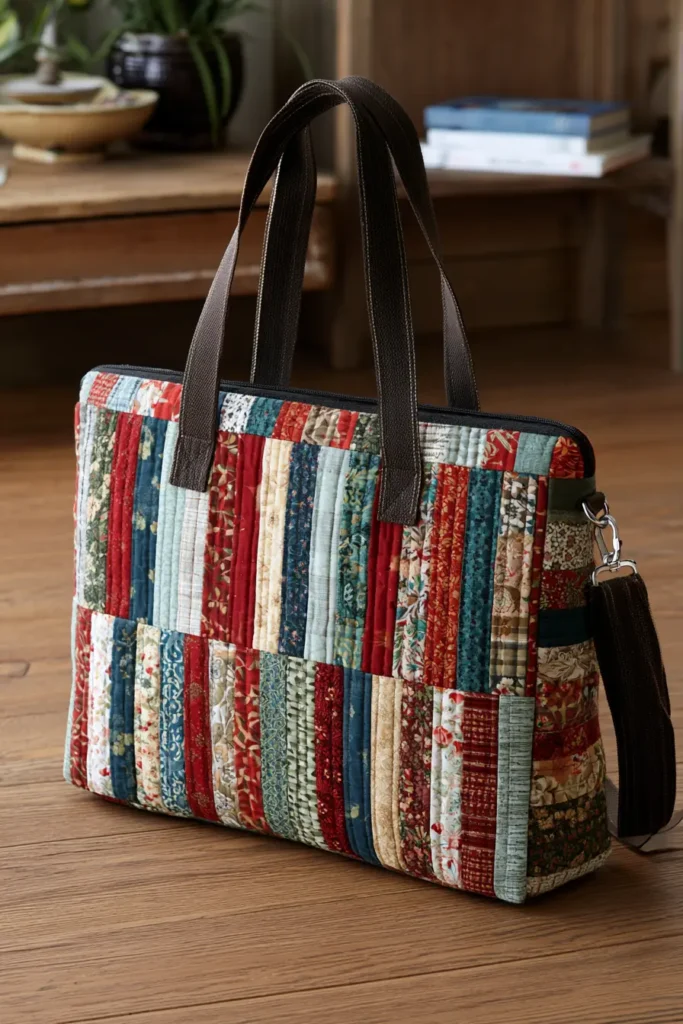
3. Sophisticated Leather-Accent Jelly Roll Quilt Tote Bags for Elevated Style
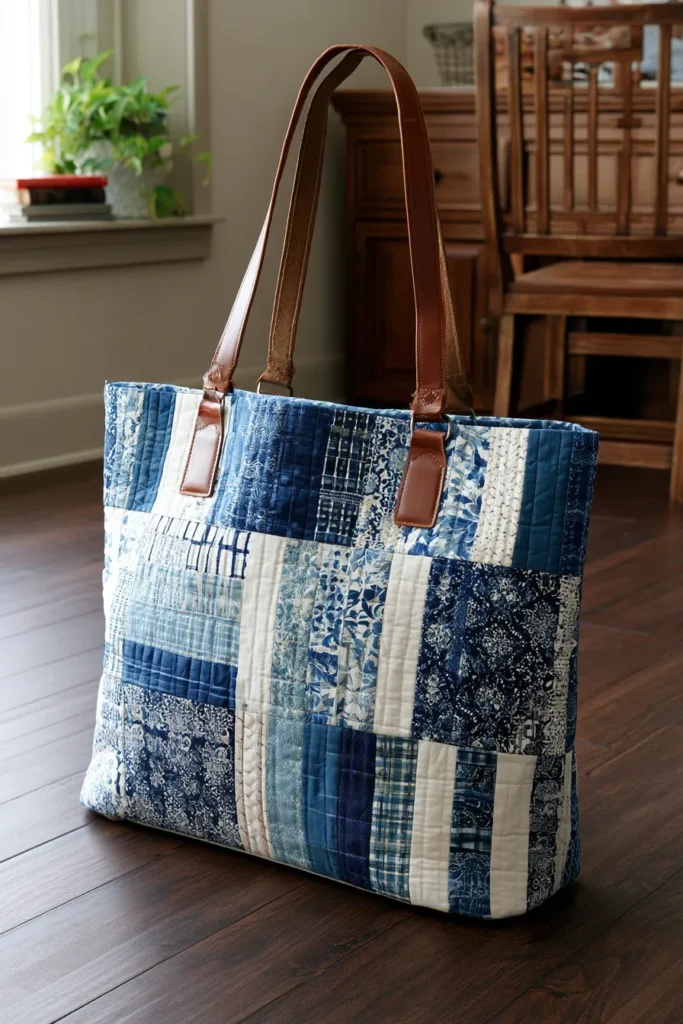
A sophisticated leather-accent jelly roll quilt tote bag blends soft patchwork charm with polished, boutique-style details. The quilted jelly roll panels give the bag color, texture, and handmade personality, while leather or faux-leather handles, tabs, and corner accents make it feel elevated enough for everyday errands, workdays, creative meetings, or stylish weekend outings.
For a vibrant but refined look, pair elegant neutrals like ivory, taupe, charcoal, sand, warm gray, and cocoa with rich accent colors such as emerald green, sapphire blue, ruby red, deep plum, teal, mustard gold, or coral. The leather accents ground the color palette and give the tote a chic, modern finish.
Why I Made It
I made this tote because I wanted a quilted bag that felt grown-up and polished, not overly casual. Jelly roll strips are playful and easy to sew, but when you add leather handles or faux-leather trim, the whole project instantly feels more sophisticated.
The backstory behind this design is inspired by classic market totes and structured leather handbags. I loved the idea of combining those tailored details with the softness of a quilted panel. The result is a bag that feels handmade, practical, and elegant all at once.
Why This Idea Is Worth Making
This idea is worth making because it gives you a useful everyday tote with a boutique-style look. It is easier than making a full quilt, but you still get to enjoy strip piecing, quilting, color arranging, and finishing details. The leather accents add durability and style, making the tote feel special enough to carry often or give as a thoughtful handmade gift.

Finished Size
This guide makes one structured quilted tote measuring approximately:
- Finished width: 15 inches
- Finished height: 16 inches
- Boxed bottom depth: 4 inches
- Handle drop: about 10 to 11 inches
This size works well for a tablet, notebook, wallet, keys, small cosmetic pouch, sunglasses, and a few daily essentials.
Materials Needed
For one leather-accent jelly roll tote, gather:
- 8 to 10 jelly roll strips: 2½ inches x width of fabric
- Lining fabric: ½ yard
- Fusible fleece or foam stabilizer: ½ yard
- Leather or faux-leather handles: two handles, each about 24 to 26 inches long
- Leather or faux-leather accent tabs: 4 pieces measuring 1½ x 3 inches
- Optional leather corner patches: 4 pieces measuring 3 x 3 inches
- Optional inner pocket fabric: ¼ yard
- Heavy-duty needle: size 90/14 or 100/16
- Thread: polyester thread in beige, charcoal, brown, gold, or black
- Rotary cutter and cutting mat
- Quilting ruler
- Pins or sewing clips
- Sewing machine
- Iron and ironing board
- Leather punch or awl, optional
- Rivets, optional
Beginner tip: Faux leather is often easier to work with and more affordable than real leather. Use clips instead of pins on leather or faux leather, as pinholes can remain visible.
Sophisticated Color Palette
A polished tote palette could include:
- Ivory
- Sand beige
- Warm taupe
- Cocoa brown
- Charcoal
- Deep teal
- Emerald green
- Mustard gold
- Ruby red
- Sapphire blue
For leather accents, choose cognac brown, espresso, black, cream, metallic bronze, or deep burgundy.
Cutting Measurements
From jelly roll strips, cut:
- Front panel: 8 strips measuring 2½ x 17 inches
- Back panel: 8 strips measuring 2½ x 17 inches
From fusible fleece or foam stabilizer, cut:
- 2 pieces measuring 17 x 18 inches
From lining fabric, cut:
- 2 pieces measuring 17 x 18 inches
For an optional inner pocket, cut:
- 1 rectangle measuring 8 x 10 inches
For leather or faux-leather accents, cut:
- 4 handle tabs measuring 1½ x 3 inches
- Optional: 4 corner patches measuring 3 x 3 inches
Use a ¼-inch seam allowance for piecing the jelly roll strips and a ½-inch seam allowance for tote construction.
Step-by-Step Guide
Step 1: Choose and Arrange the Jelly Roll Strips
Select 8 jelly roll strips for the front panel and 8 for the back panel. For an elevated look, mix neutrals with a few rich accent colors.
A beautiful order is ivory, taupe, cocoa, emerald, mustard gold, charcoal, sapphire, and ruby. Repeat the same order on the back panel, or reverse it for a subtle designer effect.
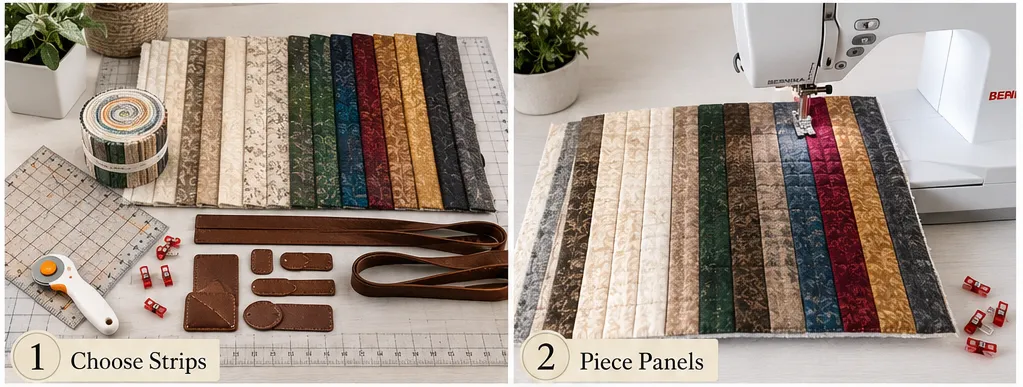
Step 2: Piece the Front and Back Panels
Sew the 8 front strips together lengthwise using a ¼-inch seam allowance. Press the seams open or to one side.
Repeat with the 8 back strips.
Each panel should measure about 16½ x 17 inches after piecing. Trim both panels to 16 x 17 inches so the bag pieces match neatly.
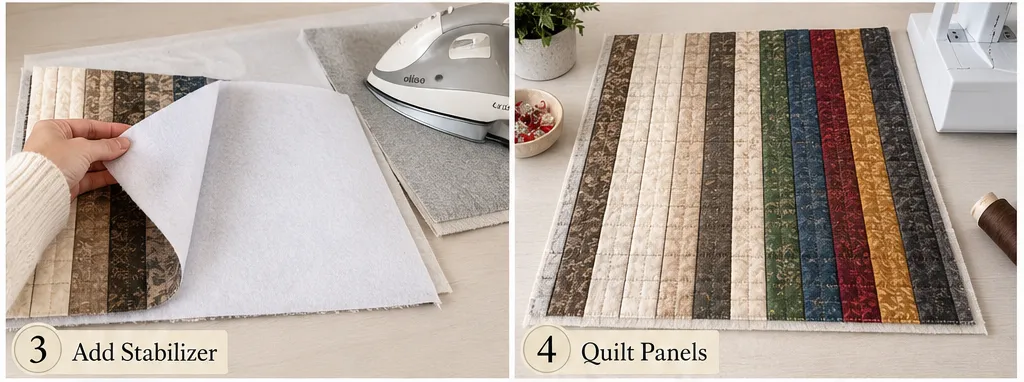
Step 3: Add Fusible Fleece or Foam Stabilizer
Fuse the fleece or stabilizer to the wrong side of each quilted panel according to the manufacturer’s instructions.
For a softer tote, use fusible fleece. For a more structured handbag-style tote, use a foam stabilizer. Trim the stabilizer so it matches each panel exactly.
Step 4: Quilt the Tote Panels
Quilt each panel with simple straight lines. Stitch ¼ inch away from each jelly roll seam for a clean channel-quilted look.
For a modern elevated finish, you can also quilt vertical lines spaced 1½ inches apart. Use thread in charcoal, tan, gold, or ivory, depending on the look you want.
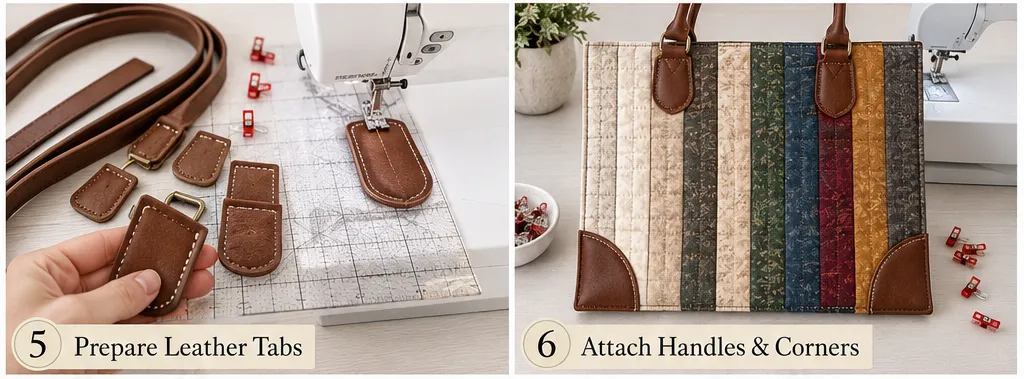
Step 5: Prepare the Leather Handle Tabs
Cut 4 leather or faux-leather tabs measuring 1½ x 3 inches. Fold each tab in half around the end of a handle; if using separate handles, use the tabs as decorative anchor patches.
If the leather is thick, do not fold it. Instead, place the flat tab over the handle end and stitch or rivet it to the bag.
Beginner tip: Test-stitch on a scrap first. Use a longer stitch length, about 3.0 to 3.5 mm, so the leather does not perforate too much.
Step 6: Attach the Handles to the Outer Panels
Place one quilted panel right side up. Measure 4 inches in from each side along the top edge and mark the handle placement.
Position the leather tabs and handles at the marks. The handle ends should extend about 1 inch below the top edge for strength.
Stitch a small rectangle or box shape around each tab. For extra strength, add an X through the rectangle. Repeat for the second panel.
If using rivets, punch holes first and attach rivets after stitching or instead of stitching, depending on your preference.
Step 7: Add Optional Leather Corner Patches
Place one 3 x 3-inch leather or faux-leather square on each lower corner of the outer panels. You can leave them square or trim one edge into a gentle curve.
Stitch around the edges with a longer stitch length. These corner patches add style and protect the bottom corners from wear.
Step 8: Make the Optional Inner Pocket
Fold the 8 x 10-inch pocket rectangle in half, right sides together, so it measures 8 x 5 inches. Sew around the edges, leaving a small opening for turning.
Turn right side out, press, and topstitch along the folded top edge. Place the pocket on one lining piece about 4 inches down from the top edge. Stitch around the sides and bottom.
Step 9: Sew the Outer Bag
Place the two quilted outer panels right sides together. Sew down both sides and across the bottom using a ½-inch seam allowance. Leave the top open.
Backstitch at the beginning and end. If you added leather corner patches, sew slowly through the thicker areas.
Step 10: Box the Bottom Corners
Pinch one bottom corner so the side seam and bottom seam line up. Measure 2 inches from the corner point and draw a straight line across.
Sew along the line, then trim the corner to ½ inch beyond the stitching. Repeat on the other corner.
This creates a flat bottom with approximately 4 inches of depth.
Step 11: Sew the Lining
Place the two lining pieces right sides together. Sew down both sides and across the bottom using a ½-inch seam allowance, leaving a 4-inch opening in the bottom for turning.
Box the lining corners the same way as the outer bag, measuring 2 inches from each corner point.
Step 12: Join the Lining and Outer Bag
Turn the outer bag right side out. Keep the lining wrong side out.
Place the outer bag inside the lining so the right sides are together. Match the side seams and top raw edges. Pin or clip around the top.
Sew around the top edge with a ½-inch seam allowance. Go slowly where the handle tabs or thicker areas meet the top seam.
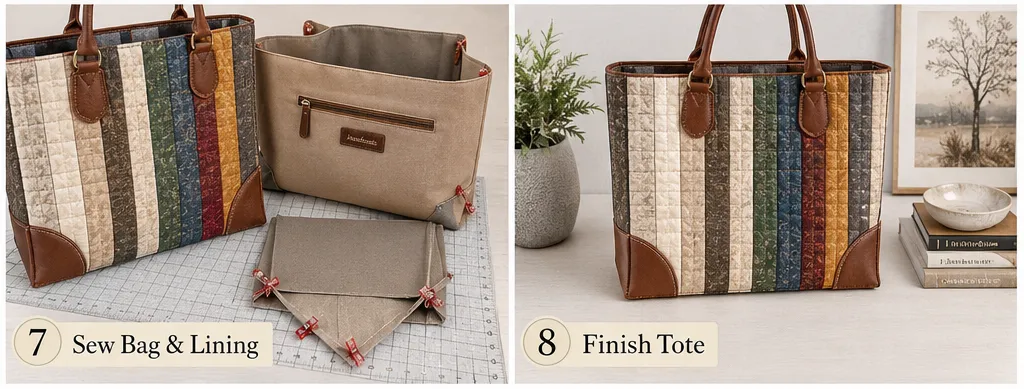
Step 13: Turn, Press, and Topstitch
Pull the bag’s right side out through the opening in the lining. Push the lining into the bag and smooth the top edge.
Press carefully from the fabric side only. Avoid placing a hot iron directly on faux leather.
Topstitch around the top edge about ⅛ inch from the edge, then stitch again at ¼ inch for extra strength. Close the lining opening by machine or hand.
Assembly at a Glance
- Choose jelly roll strips in neutrals and rich accent colors.
- Cut front and back strips to 2½ x 17 inches.
- Piece 8 strips for the front and 8 strips for the back.
- Trim both panels to 16 x 17 inches.
- Add fusible fleece or foam stabilizer.
- Quilt the panels with straight lines.
- Prepare leather or faux-leather handle tabs.
- Attach handles about 4 inches in from each side.
- Add optional leather corner patches.
- Sew the outer bag sides and bottom.
- Box the bottom corners at 2 inches.
- Sew and box the lining.
- Join lining and outer bag, turn, topstitch, and finish.
Sophisticated Color Combination Ideas

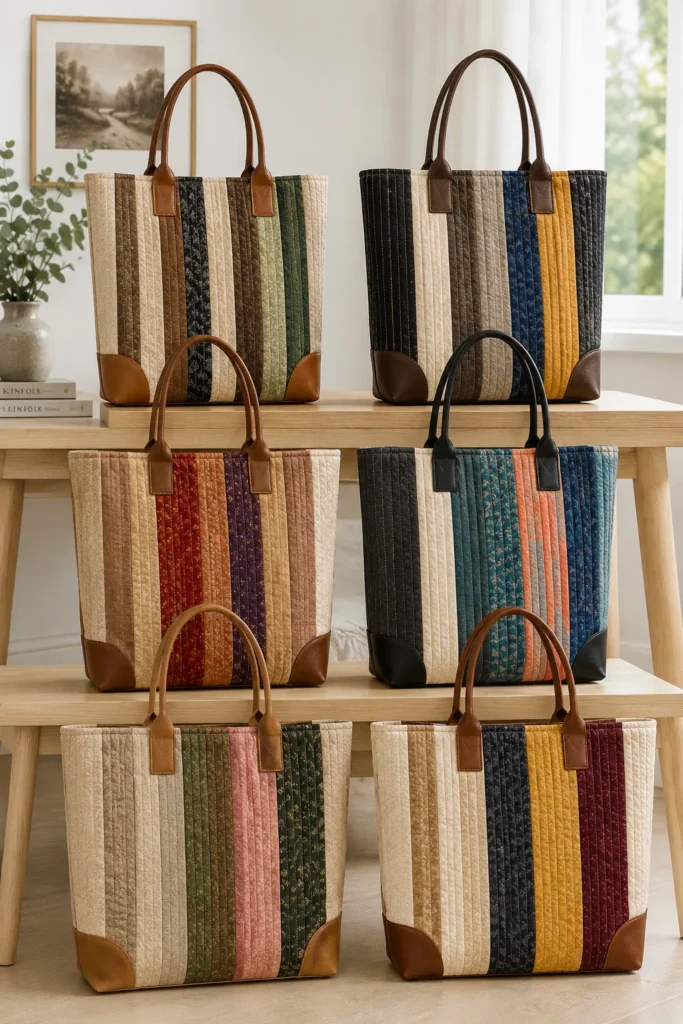
For a classic, elevated tote, use ivory, taupe, cocoa, charcoal, and cognac leather with an emerald-green accent.
For a city-style tote, use black, cream, gray, sapphire blue, and espresso leather with mustard gold stitching.
For a warm luxury tote, use sand, caramel, ruby red, plum, and bronze leather.
For a bold modern tote, use charcoal, ivory, teal, cobalt blue, coral, and black leather.
Beginner Tips for Success
Use faux leather for your first version. It is easier to cut, usually thinner, and more forgiving than heavy real leather.
Use clips instead of pins on leather or faux leather to avoid permanent holes.
Lengthen your stitch when sewing leather accents. A 3.0 to 3.5 mm stitch length works well for most faux leather.
Do not iron directly on faux leather. Press nearby fabric areas carefully, and use a pressing cloth if needed.
Keep the bag shape simple. The leather accents already add enough sophistication, so the tote does not need complicated pockets or hardware.
Reinforce the handle tabs. Handles carry the weight of the bag, so stitch securely or use rivets for extra strength.
Styling Tip
Carry the finished leather-accented jelly roll tote with a tailored coat, a linen outfit, a denim jacket, or a simple black dress. The quilted strips bring softness and handmade charm, while the leather details give the bag a polished, elevated finish. A flash of emerald, ruby, teal, sapphire, mustard, or plum keeps the design vibrant and memorable.
Other Design Inspirations – Digitally Modified
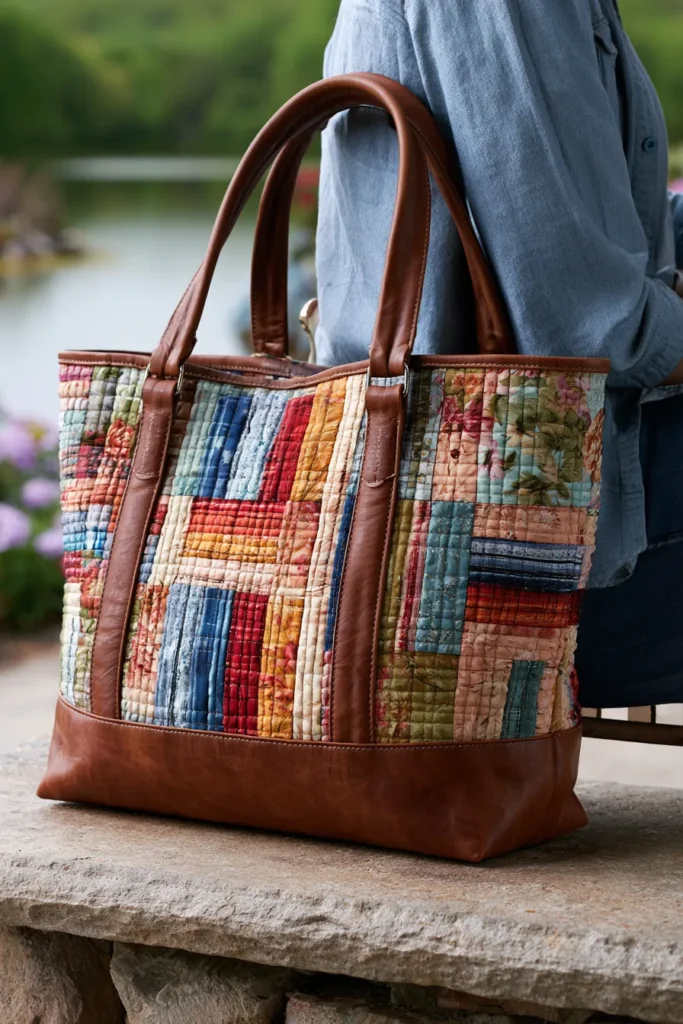
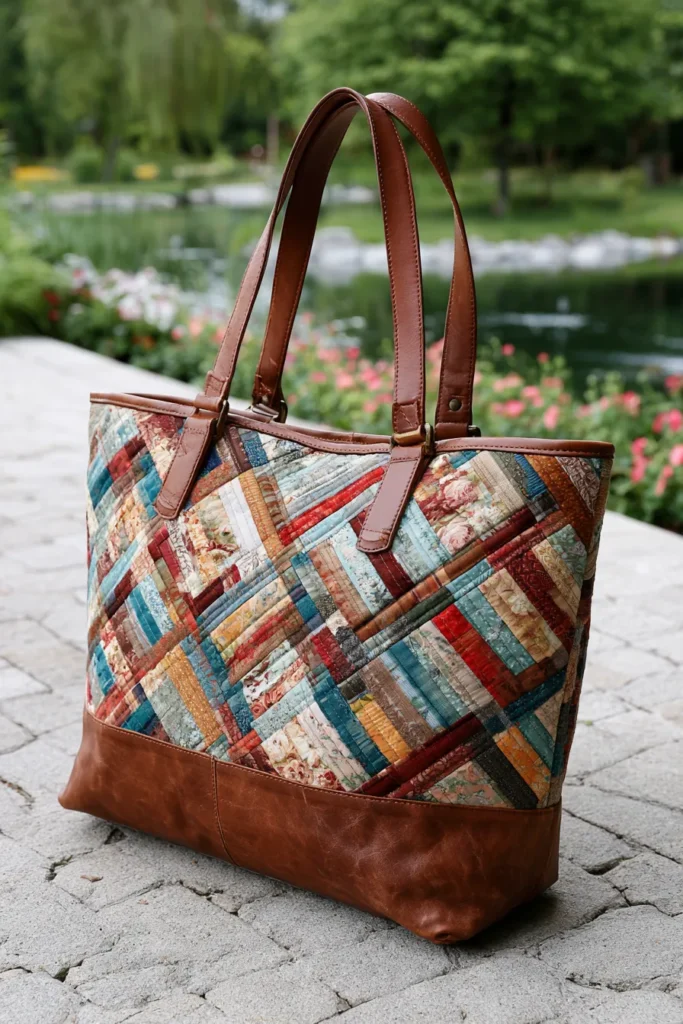
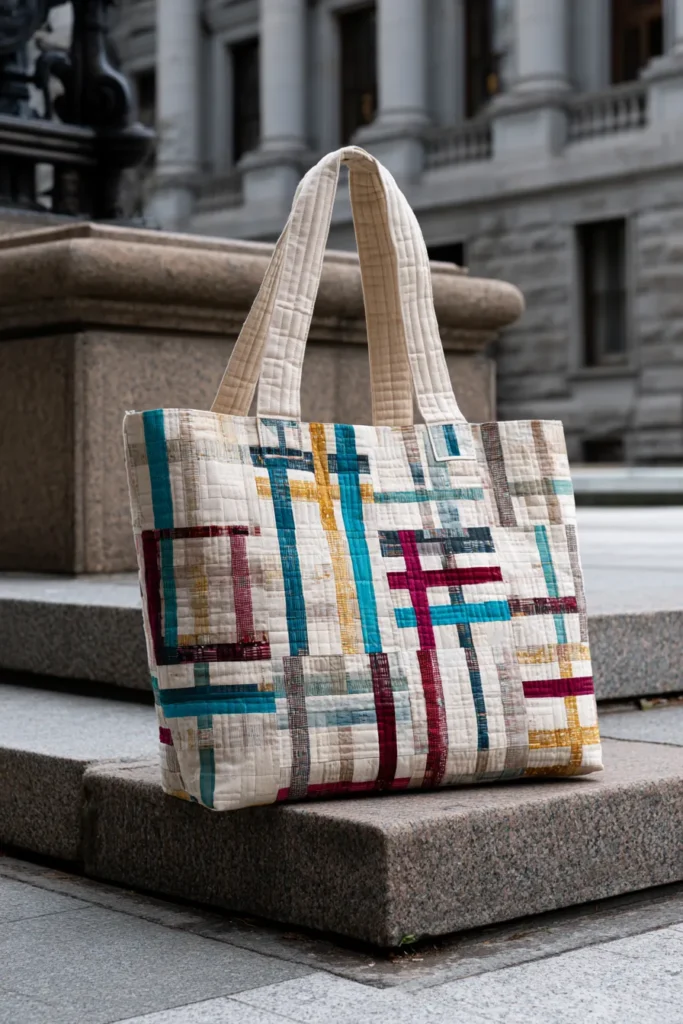
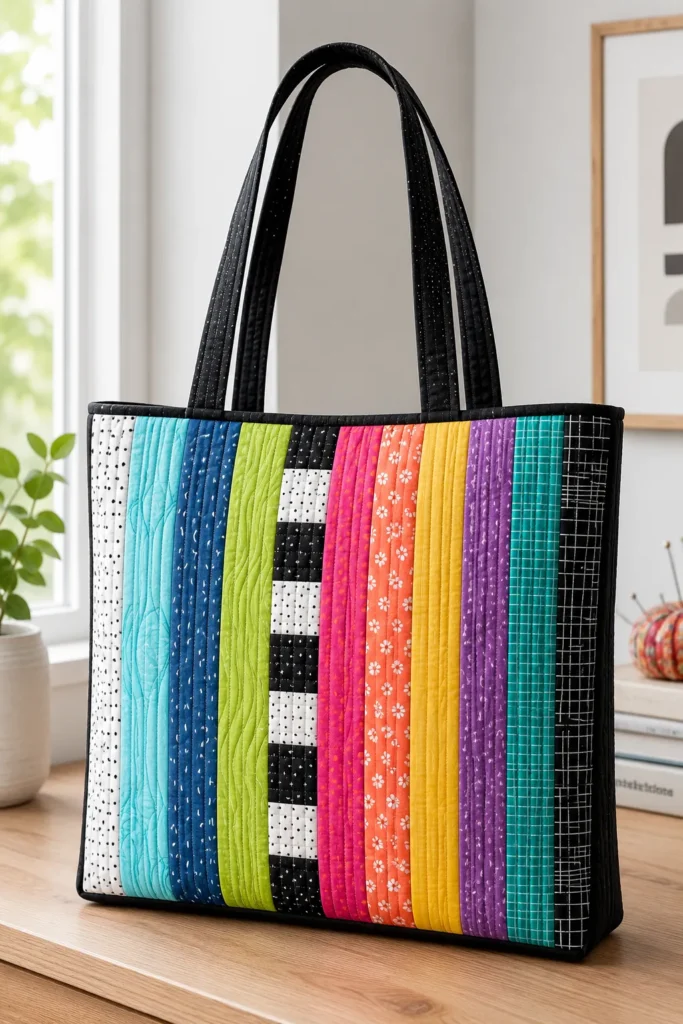
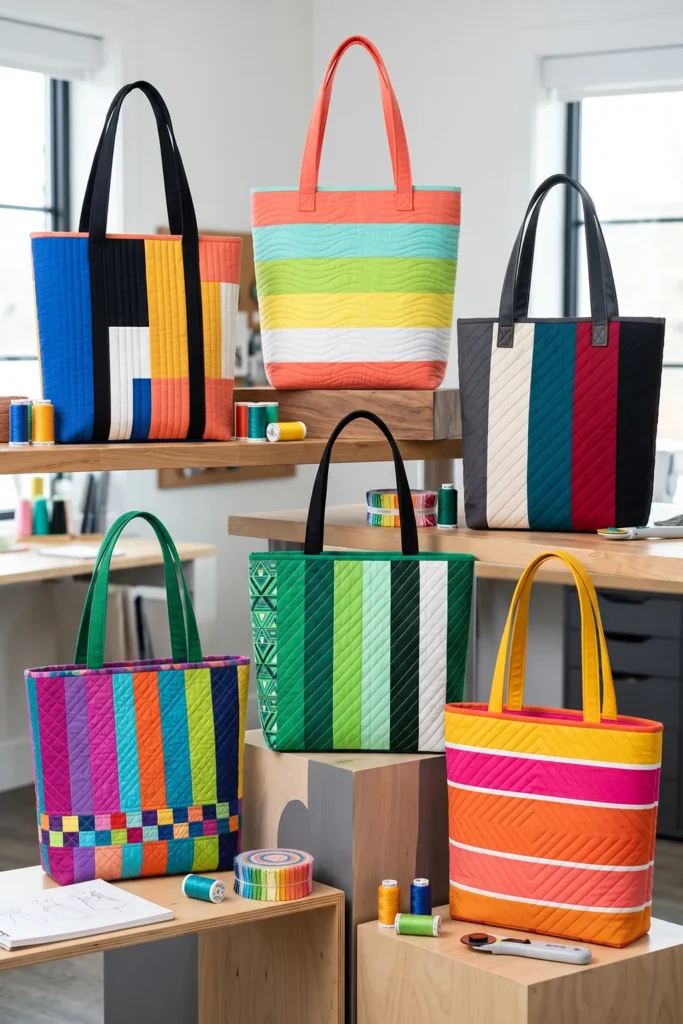
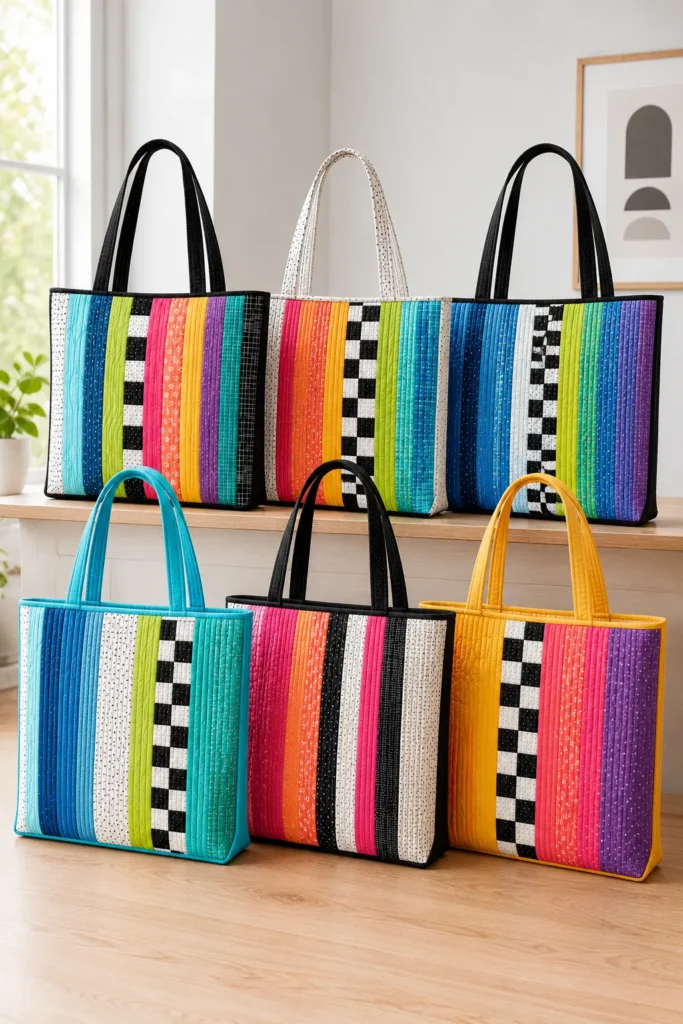
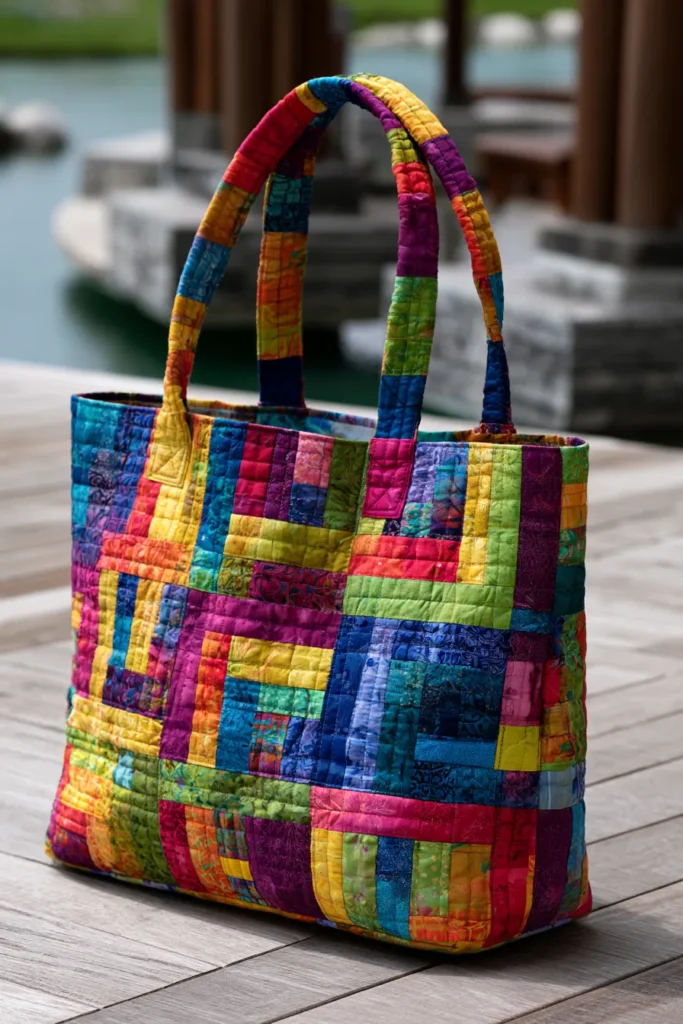
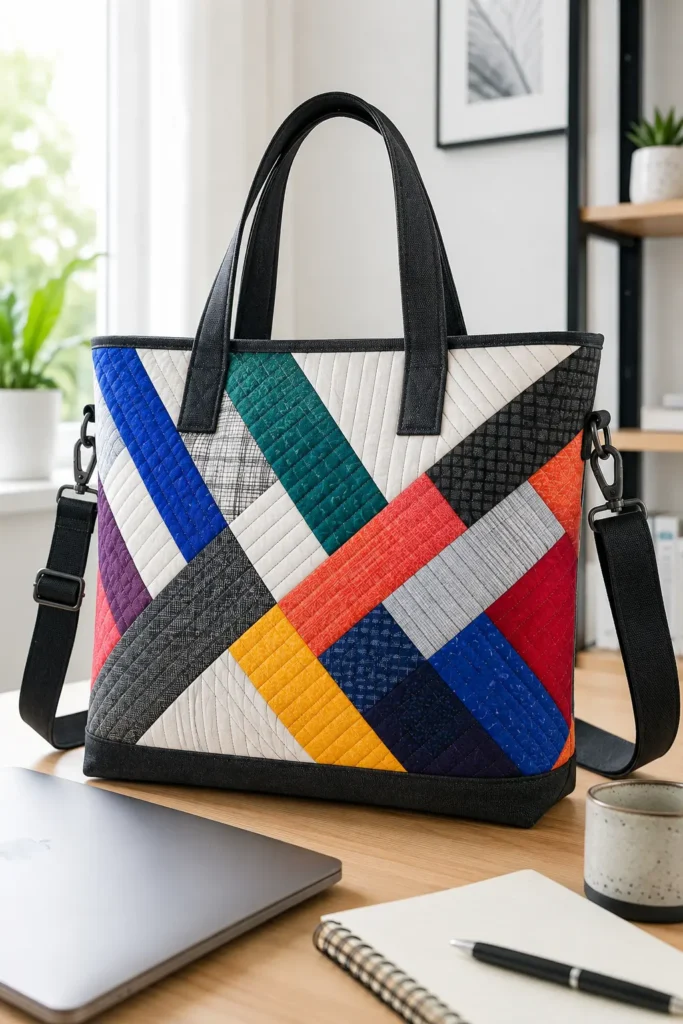
4. Modern Jelly Roll Patchwork Tote Bag Designs for Creative Fashion
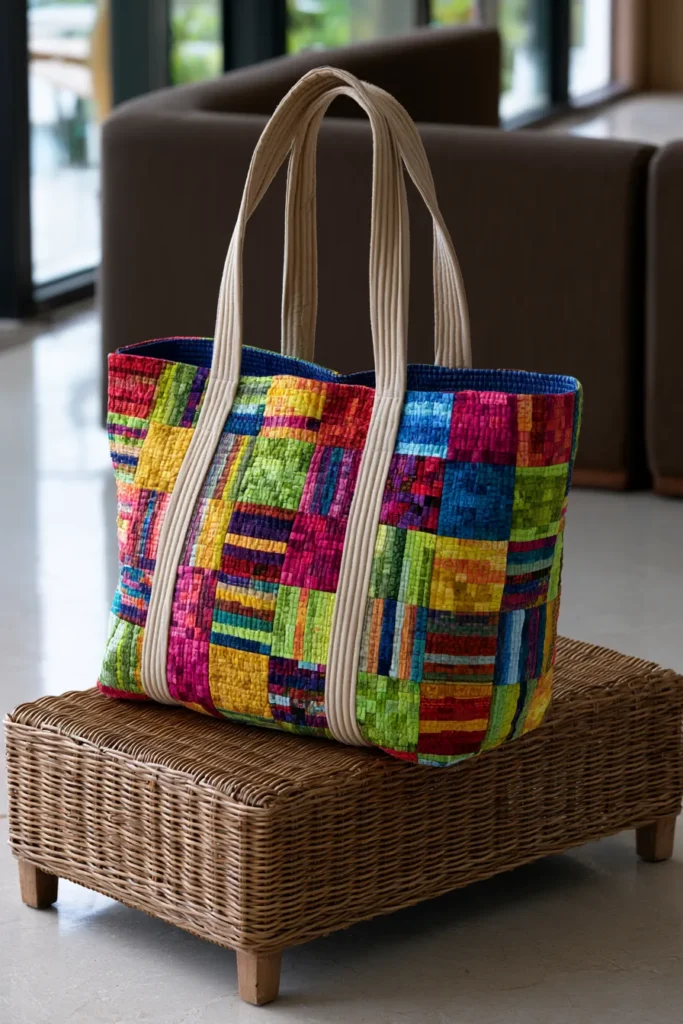
A modern jelly roll patchwork tote bag is a bright, stylish way to turn simple fabric strips into a wearable quilted accessory. Instead of making a full-size quilt, this project lets you enjoy color arranging, strip piecing, quilting, and bag construction in a smaller, beginner-friendly format.
For a creative fashion look, use vibrant colors such as cobalt blue, coral, lime green, hot pink, saffron yellow, turquoise, emerald, violet, black, and crisp white. The finished tote feels artistic and useful, perfect for carrying sketchbooks, fabric, books, market finds, or daily essentials.
Why I Made It
I made this tote because I wanted a bag that felt like a small piece of modern quilt art I could actually carry. Jelly roll strips make that easy because they are already cut to a consistent 2½-inch width, so the patchwork comes together quickly.
The backstory behind this idea is that quilted bags have always been a clever way to use leftover strips and favorite fabric collections. A jelly roll tote takes that tradition and gives it a fresh fashion twist. With bold color blocking and simple quilting, it becomes more than a practical bag—it becomes part of the outfit.
Why This Idea Is Worth Making
This idea is worth making because it is colorful, useful, and beginner-friendly. You get the creative satisfaction of making patchwork without committing to a large quilt. The tote is also easy to personalize with different color stories, handle fabrics, pockets, quilting lines, and lining prints.
It is especially worth making if you love unique accessories. No two jelly roll totes look exactly alike, and the vibrant patchwork makes even a simple outfit feel more expressive.

Finished Size
This guide makes one modern quilted tote measuring approximately:
- Finished width: 15 inches
- Finished height: 16 inches
- Boxed bottom depth: 4 inches
- Handle drop: about 10 inches
This is a comfortable everyday size for a wallet, phone, notebook, water bottle, sunglasses, keys, small craft project, or folded scarf.
Materials Needed
For one patchwork tote, gather:
- 10 to 12 jelly roll strips: 2½ inches x width of fabric
- Lining fabric: ½ yard
- Batting or fusible fleece: ½ yard
- Handle fabric: ¼ yard, or 2 extra jelly roll strips
- Optional pocket fabric: ¼ yard
- Thread: white, black, gray, teal, coral, or coordinating color
- Rotary cutter and cutting mat
- Quilting ruler
- Pins or sewing clips
- Sewing machine
- Iron and ironing board
For a crisp, structured tote, use fusible fleece. For a softer quilted tote, use cotton batting.
Vibrant Modern Patchwork Palette
A bold fashion-forward palette could include:
- Crisp white
- Black
- Cobalt blue
- Turquoise
- Emerald green
- Lime green
- Saffron yellow
- Coral
- Hot pink
- Violet
For a more polished modern look, balance bright colors with black, white, gray, or navy.
Cutting Measurements
From jelly roll strips, cut:
- Front panel strips: 8 strips measuring 2½ x 17 inches
- Back panel strips: 8 strips measuring 2½ x 17 inches
- Optional patchwork accent pieces: 8 squares measuring 2½ x 2½ inches
From batting or fusible fleece, cut:
- 2 pieces measuring 17 x 18 inches
From lining fabric, cut:
- 2 pieces measuring 17 x 18 inches
For handles, cut:
- 2 strips measuring 4 x 24 inches
For an optional inner pocket, cut:
- 1 rectangle measuring 8 x 10 inches
Use a ¼-inch seam allowance for piecing and a ½-inch seam allowance for tote construction.
Step-by-Step Guide
Step 1: Choose a Bold Jelly Roll Layout
Select 8 jelly roll strips for the front and 8 for the back. For a modern fashion look, arrange the strips in a strong rhythm: light, dark, bright, light, dark, bright.
A striking order is white, cobalt, coral, black, turquoise, saffron, hot pink, and emerald. For the back panel, reverse the order or swap in violet, lime, or navy for variety.
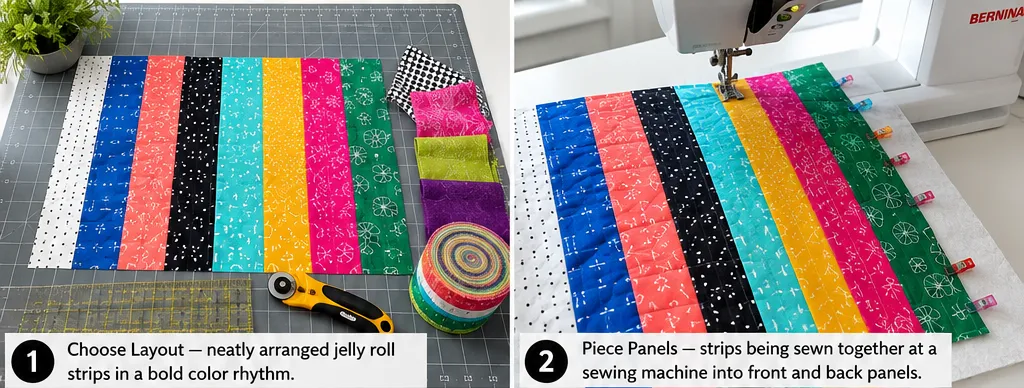
Step 2: Piece the Front and Back Panels
Sew the 8 front strips together lengthwise using a ¼-inch seam allowance. Press seams to one side or open.
Repeat with the 8 back strips.
Each pieced panel should measure about 16½ x 17 inches. Trim both panels to 16 x 17 inches so the front and back match.
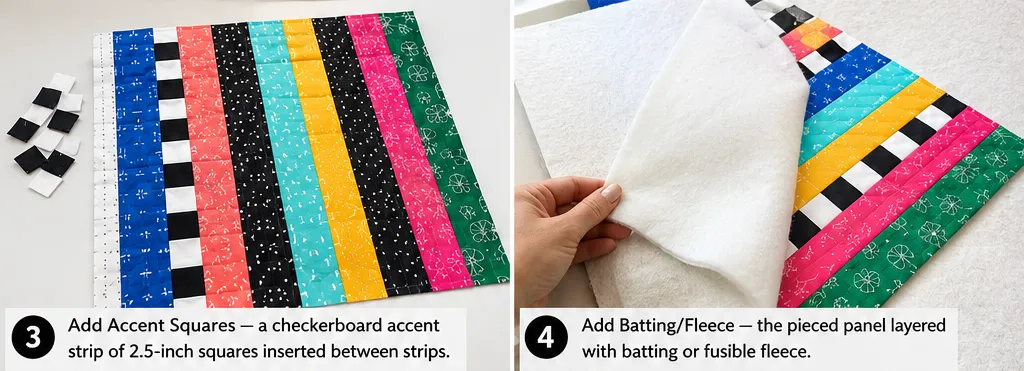
Step 3: Add Optional Patchwork Accent Squares
For a more creative patchwork effect, replace one strip section with small squares.
Sew 2½ x 2½-inch squares together into a short accent row, then insert that row between two jelly roll strips. This creates a playful checkerboard detail without making the whole bag complicated.
Keep the accent row near the lower third or center of the tote so it looks intentional.
Step 4: Add Batting or Fusible Fleece
Place each pieced panel on batting, or fuse fleece to the wrong side of each panel.
Trim the batting or fleece to match the panel exactly. This gives the tote body softness and structure.
If using cotton batting, pin or baste it well before quilting.
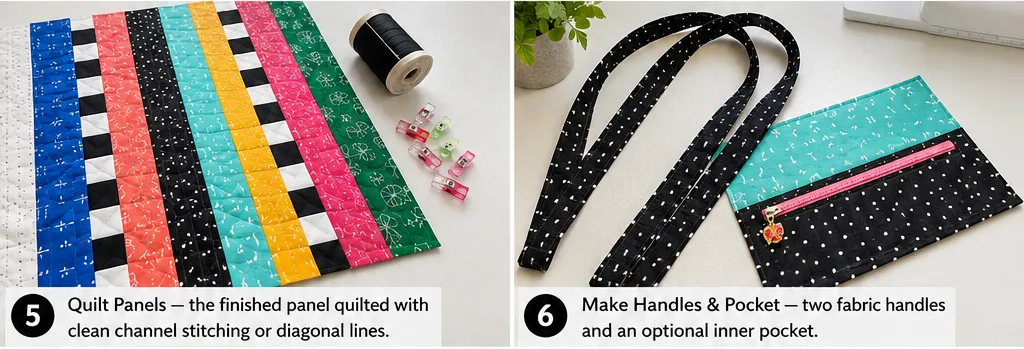
Step 5: Quilt the Panels
Quilt each panel with simple straight lines. Stitch ¼ inch away from each strip seam for a clean channel-quilted look.
For a more modern style, quilt diagonal lines spaced 1½ to 2 inches apart. You can also use black thread on bright fabrics for graphic contrast, or white thread for a cleaner finish.
Step 6: Make the Handles
Fold each 4 x 24-inch handle strip in half lengthwise and press. Open it, fold both long edges toward the center crease, and press again. Fold in half once more and stitch along both long edges.
Each handle should finish at about 1 inch wide by 24 inches long.
For a fashion-forward detail, make the handles in black, hot pink, cobalt, emerald, or saffron yellow.
Step 7: Add the Optional Inner Pocket
Fold the 8 x 10-inch pocket rectangle in half, right sides together, so it measures 8 x 5 inches. Sew around the edges, leaving a small opening for turning.
Turn right side out, press, and topstitch the folded top edge. Place the pocket on one lining piece about 4 inches down from the top edge, then stitch around the sides and bottom.
Step 8: Attach the Handles
Place one quilted outer panel right side up. Measure 4 inches in from each side along the top edge and mark the handle placement.
Pin or clip the handle ends to the top edge with raw edges aligned. Make sure the handle is not twisted. Repeat for the second outer panel.
Baste the handles in place using a ¼-inch seam allowance.
Step 9: Sew the Outer Bag
Place the two quilted panels right sides together. Sew down both sides and across the bottom using a ½-inch seam allowance. Leave the top open.
Backstitch at the beginning and end for strength.
Step 10: Box the Bottom Corners
Pinch one bottom corner so the side seam and bottom seam line up. Measure 2 inches from the corner point and draw a line across.
Sew along the line, then trim the corner to ½ inch beyond the stitching. Repeat on the second corner.
This creates a flat bottom with about 4 inches of depth.
Step 11: Sew the Lining
Place the two lining pieces right sides together. Sew down both sides and across the bottom using a ½-inch seam allowance, leaving a 4-inch opening in the bottom for turning.
Box the lining corners the same way as the outer bag, measuring 2 inches from each corner point.
Step 12: Join the Lining and Outer Bag
Turn the outer bag right side out. Keep the lining wrong side out.
Place the outer bag inside the lining so the right sides are together. Match the side seams and top raw edges. Pin or clip around the top.
Sew around the top edge with a ½-inch seam allowance, ensuring the handles are securely caught between the layers.
Step 13: Turn, Press, and Topstitch
Pull the bag right side out through the opening in the lining. Push the lining into the tote and press the top edge.
Topstitch around the top edge about ⅛ inch from the edge, then stitch again at ¼ inch for extra strength. Close the lining opening by machine or hand.
Assembly at a Glance
- Choose 10 to 12 vibrant jelly roll strips.
- Cut front and back strips to 2½ x 17 inches.
- Piece 8 strips for the front and 8 for the back.
- Add optional 2½-inch patchwork squares for a checkerboard accent.
- Trim both panels to 16 x 17 inches.
- Add batting or fusible fleece.
- Quilt both panels with straight or diagonal lines.
- Make two 4 x 24-inch handles.
- Add an optional 8 x 10-inch inner pocket.
- Sew the outer bag sides and bottom.
- Box the corners at 2 inches.
- Sew and box the lining.
- Join the lining and outer bag, turn, topstitch, and finish.
Modern Color Combination Ideas
For an art-school tote, use black, white, cobalt blue, hot pink, saffron yellow, and emerald green.
For a bright summer tote, use coral, aqua, lime green, lemon yellow, turquoise, and white.
For a chic city tote, use charcoal, ivory, cobalt, ruby, teal, and black.
For a playful, creative tote, use magenta, violet, orange, turquoise, lime, and navy.
Beginner Tips for Success
Use fusible fleece if you want the tote to hold its shape. It makes the panels easier to handle and gives the bag a more polished finish.
Press every seam before quilting. Good pressing makes strip-pieced panels look cleaner and more professional.
Use clips when sewing bulky quilted layers. They hold better than pins and are easier to remove while sewing.
Keep the patchwork accent simple. One checkerboard strip or one bold color block is enough to make the tote look creative.
Reinforce the handles with extra stitching. A tote bag needs strong handles, especially if you carry books, supplies, or groceries.
Styling Tip
Carry the finished tote with a monochrome outfit, denim jacket, linen dress, or simple black basics. The bold jelly roll patchwork becomes the statement piece. Add a matching key fob, scarf, tie, or zipper pouch in cobalt, coral, emerald, hot pink, or saffron for a coordinated, creative fashion look.
Other Design Inspirations – Digitally Modified

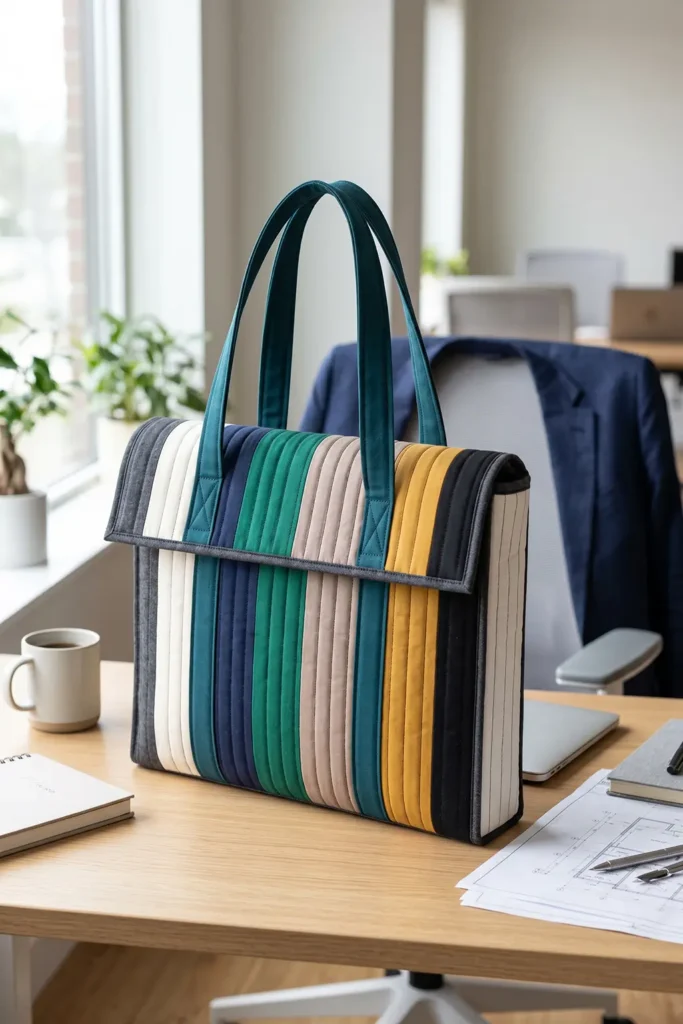
5. Chic Padded Jelly Roll Quilted Laptop Bags for Stylish Professionals
A chic padded jelly roll quilted laptop bag is a beautiful way to combine handmade creativity with everyday professional function. Instead of carrying a plain laptop sleeve, this design turns simple 2½-inch jelly roll strips into a structured, softly padded bag with room for a laptop, charger, notebook, and small work essentials.
For a stylish professional look, choose polished neutrals such as ivory, charcoal, taupe, navy, sand, warm gray, and black, then add vibrant accents like emerald green, sapphire blue, ruby red, deep teal, plum, mustard gold, coral, or cobalt blue. The quilted texture keeps the bag soft and personal, while the clean shape makes it office-friendly and modern.
Why I Made It
I made this laptop bag because I wanted something more personal than a basic store-bought case, yet polished enough to carry to a meeting, café, studio, or coworking space. A quilted laptop bag feels warm and handmade, yet it can look very professional when the color palette is intentional.
The backstory behind this idea is that quilted bags have always been a practical way to use beautiful fabric scraps, but jelly roll strips make the process even easier. Since the strips are already evenly cut, beginners can focus on layout, quilting, padding, and structure rather than complicated patchwork.
Why This Idea Is Worth Making
This idea is worth making because it gives you a useful, stylish project that protects your laptop while showing off your creativity. It is smaller than a full quilt, so it feels manageable, yet it still teaches important quilting skills such as strip piecing, layering, quilting, lining, and finishing. It also makes a thoughtful, handmade gift for students, remote workers, designers, teachers, writers, or anyone who often carries a laptop.
Finished Size
This guide makes a padded laptop bag designed to fit many 13-inch laptops.
Finished approximate size:
- Width: 15 inches
- Height: 11½ inches
- Depth: 2½ inches
- Handle drop: 7 to 8 inches
For a larger laptop, increase the outer and lining pieces by 1 to 2 inches in width and height. Always measure your laptop first and add at least 1½ inches of ease in width and height.
Materials Needed
For one padded laptop bag, gather:
- 10 to 12 jelly roll strips: 2½ inches x width of fabric
- Lining fabric: ¾ yard
- Fusible fleece: ½ yard
- Foam stabilizer: ½ yard for extra laptop protection
- Handle fabric: ¼ yard, or 2 extra jelly roll strips
- Optional zipper: 16-inch zipper
- Optional inner pocket fabric: ¼ yard
- Optional hook-and-loop tape or magnetic snap
- Thread: charcoal, navy, ivory, gold, teal, or coordinating color
- Rotary cutter and cutting mat
- Quilting ruler
- Pins or sewing clips
- Sewing machine
- Iron and ironing board
Beginner tip: For the easiest version, skip the zipper and use a simple flap or magnetic snap closure. For the most protective version, use both fusible fleece and foam stabilizer.
Stylish Professional Color Palette
A polished laptop-bag palette could include:
- Ivory
- Warm taupe
- Sand beige
- Charcoal
- Navy
- Black
- Deep teal
- Emerald green
- Mustard gold
- Sapphire blue
For a more creative professional style, add coral, ruby, cobalt, plum, or magenta in one or two accent strips.
Cutting Measurements
From jelly roll strips, cut:
- Front panel: 7 strips measuring 2½ x 16 inches
- Back panel: 7 strips measuring 2½ x 16 inches
- Optional flap panel: 5 strips measuring 2½ x 16 inches
From fusible fleece, cut:
- Front fleece: 1 piece measuring 16 x 13 inches
- Back fleece: 1 piece measuring 16 x 13 inches
- Optional flap fleece: 1 piece measuring 16 x 9 inches
From the foam stabilizer, cut:
- Front foam: 1 piece measuring 15½ x 12½ inches
- Back foam: 1 piece measuring 15½ x 12½ inches
From lining fabric, cut:
- Front lining: 1 piece measuring 16 x 13 inches
- Back lining: 1 piece measuring 16 x 13 inches
- Optional flap lining: 1 piece measuring 16 x 9 inches
For handles, cut:
- 2 strips measuring 4 x 20 inches
For an optional inner pocket, cut:
- 1 rectangle measuring 9 x 10 inches
Use a ¼-inch seam allowance for piecing jelly roll strips and a ½-inch seam allowance for bag construction.
Step-by-Step Guide
Step 1: Measure Your Laptop First
Measure the width, height, and thickness of your laptop. The sample size is designed for many 13-inch laptops, but laptop dimensions can vary by brand and model.
Add at least 1½ inches to the width and height so the laptop slides in easily. Add more room if you use a thick foam stabilizer or want to carry a notebook, too.
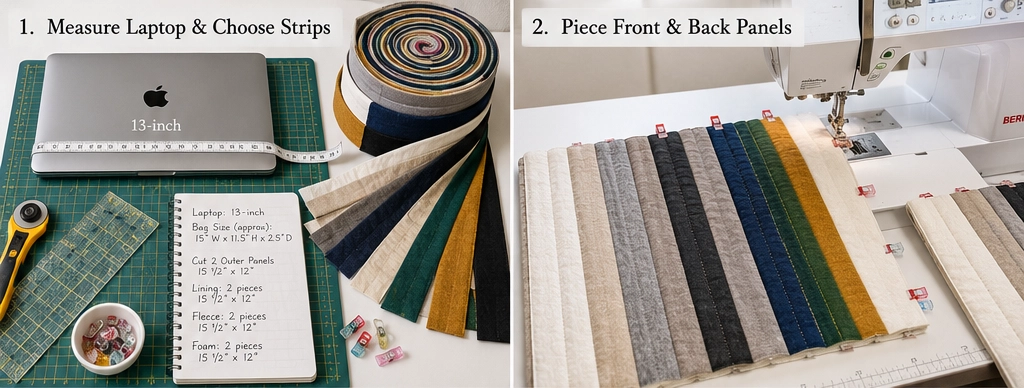
Step 2: Choose and Arrange the Jelly Roll Strips
Choose 7 strips for the front and 7 strips for the back. For a professional look, balance neutral strips with one or two vibrant accents.
A sleek arrangement is charcoal, ivory, navy, emerald, taupe, mustard gold, and black. For the back, repeat the order or reverse it for a subtle design detail.
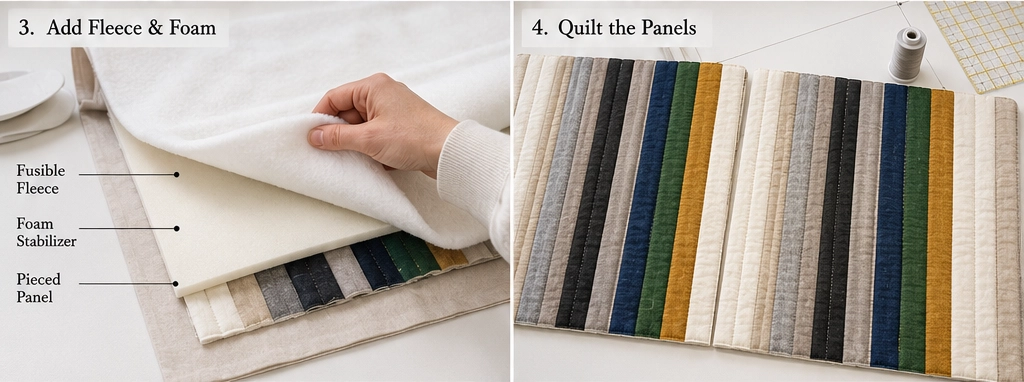
Step 3: Piece the Front and Back Panels
Sew the 7 front strips together lengthwise using a ¼-inch seam allowance. Press seams open or to one side.
Repeat for the back panel.
Each panel should measure about 14½ x 16 inches after piecing. Trim each panel to 16 x 13 inches, choosing the nicest part of the strip layout.
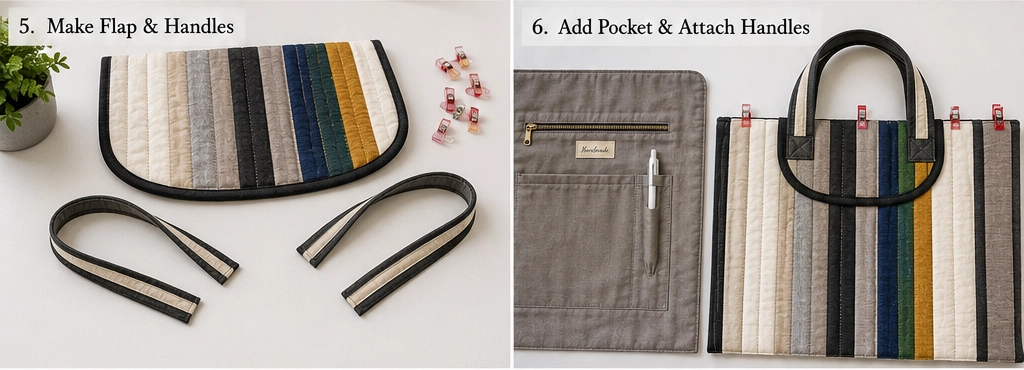
Step 4: Add Fleece and Foam Padding
Fuse the fleece to the wrong side of each quilted panel according to the manufacturer’s instructions.
Place the foam stabilizer behind the fleece-backed panel. The foam should be slightly smaller than the panel to reduce bulk in the seams.
This double layer gives the laptop bag a soft, padded feel and helps protect your device.
Step 5: Quilt the Laptop Panels
Quilt the front and back panels with straight lines. Stitch ¼ inch away from each strip seam for a clean, professional channel-quilted effect.
You can also quilt vertical lines spaced 1 inch apart for extra structure. Use thread that blends with the fabric for a polished look, or use gold, teal, or coral thread for a decorative accent.
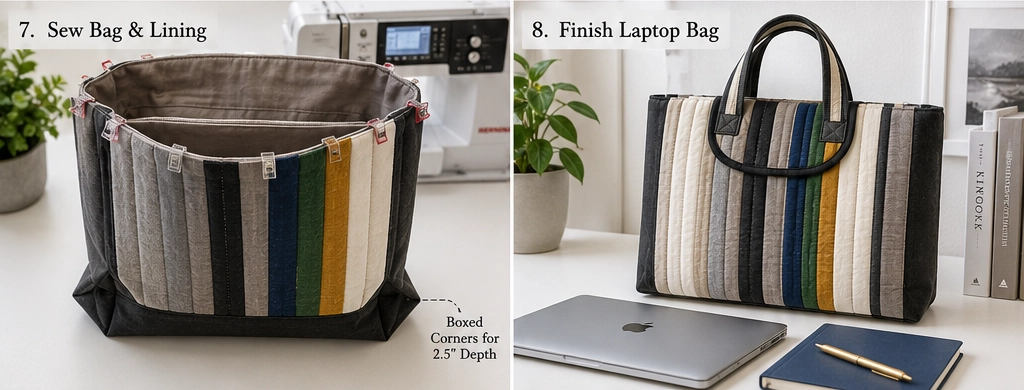
Step 6: Make the Optional Flap Closure
If adding a flap, sew 5 jelly roll strips together and trim the panel to 16 x 9 inches. Add fusible fleece to the wrong side, then quilt it with simple straight lines.
Place the flap panel and flap lining right sides together. Sew around the sides and bottom using a ½-inch seam allowance, leaving the top open. Turn right side out, press, and topstitch around the finished edges.
Add hook-and-loop tape or a magnetic snap if desired.
Step 7: Make the Handles
Fold each 4 x 20-inch handle strip in half lengthwise and press. Open it, fold both long edges toward the center crease, and press again. Fold in half once more and stitch along both long edges.
Each handle should be about 1 inch wide by 20 inches long.
For a stylish accent, make handles in deep teal, black, mustard gold, sapphire, plum, or ruby.
Step 8: Add the Inner Pocket
Fold the 9 x 10-inch pocket rectangle in half, right sides together, so it measures 9 x 5 inches. Sew around the edges, leaving a small opening for turning.
Turn right side out, press, and topstitch the folded top edge. Place the pocket on one lining piece about 3 inches down from the top edge. Stitch around the sides and bottom.
This pocket is useful for a charger cord, a pen, a mouse, or a small notebook.
Step 9: Attach Handles and Flap to the Outer Panels
Place the front outer panel right side up. Measure 4 inches in from each side along the top edge and mark handle placement. Pin or clip the handle ends to the top edge, with the raw edges aligned.
Repeat on the back panel.
If using a flap, center it on the back panel with raw edges aligned at the top. Baste handles and flap in place with a ¼-inch seam allowance.
Step 10: Sew the Outer Bag
Place the front and back outer panels right sides together. Sew down both sides and across the bottom using a ½-inch seam allowance. Leave the top open.
Backstitch at the beginning and end. Sew slowly because the fleece and foam make the layers thicker.
Step 11: Box the Bottom Corners
To create depth, pinch one bottom corner so the side seam and bottom seam line up. Measure 1¼ inches from the corner point and draw a line across.
Sew along the line, then trim the corner to ½ inch beyond the stitching. Repeat on the other corner.
This creates a finished depth of about 2½ inches, enough for a laptop plus a slim notebook.
Step 12: Sew the Lining
Place the lining pieces right sides together. Sew down both sides and across the bottom using a ½-inch seam allowance, leaving a 4-inch opening in the bottom for turning.
Box the lining corners the same way as the outer bag, measuring 1¼ inches from each corner point.
Step 13: Join the Lining and Outer Bag
Turn the outer bag right side out. Keep the lining wrong side out.
Place the outer bag inside the lining so right sides are together. Match the side seams and top raw edges. Pin or clip around the top.
Sew around the top edge with a ½-inch seam allowance, making sure the handles and optional flap are securely caught in the seam.
Step 14: Turn, Press, and Topstitch
Pull the bag’s right side out through the opening in the lining. Push the lining into the bag and smooth the top edge.
Topstitch around the top edge about ⅛ inch from the edge, then again at ¼ inch for strength. Close the lining opening by machine or hand.
If using a flap, add the matching hook-and-loop tape or snap placement to the front of the bag.
Assembly at a Glance
- Measure your laptop and adjust dimensions if needed.
- Choose 10 to 12 jelly roll strips in professional colors.
- Cut front and back strips to 2½ x 16 inches.
- Piece 7 strips for the front and 7 for the back.
- Trim panels to 16 x 13 inches.
- Add fusible fleece and foam stabilizer.
- Quilt the panels with straight lines.
- Make two 4 x 20-inch handles.
- Add an optional flap and inner pocket.
- Attach handles and flap to the outer panels.
- Sew the outer bag and box corners at 1¼ inches.
- Sew and box the lining.
- Join lining and outer bag, turn, topstitch, and finish.
Professional Color Combination Ideas
For a sleek office bag, use charcoal, ivory, black, navy, and taupe, with a sapphire-blue accent.
For a creative studio bag, use cobalt, coral, emerald, mustard, white, and charcoal.
For a warm, polished bag, use sand, cocoa, cream, ruby, plum, and bronze-gold.
For a modern tech-friendly look, use black, gray, deep teal, lime green, electric blue, and white.
Beginner Tips for Success
Measure your laptop before cutting. A small laptop bag can become too tight if you forget to allow room for padding.
Use fusible fleece plus foam stabilizer for protection. Keep the foam slightly smaller than the panel so the seams are easier to sew.
Use a walking foot if you have one. It helps feed quilted layers evenly.
Use clips instead of pins when sewing bulky layers. Clips are easier to handle and do not distort thick edges.
Keep the quilting simple. Straight lines look professional and are easier to sew on padded panels.
Reinforce the handles with extra topstitching. Laptop bags carry weight, so handle strength is important.
Styling Tip
Carry the finished laptop bag with a blazer, a linen shirt, a tailored coat, or a simple denim outfit. The quilted jelly roll panels add creative personality, while the structured padding keeps it polished for professional settings. A flash of emerald, sapphire, coral, ruby, teal, mustard, or plum makes the bag feel modern, stylish, and memorable.
Other Design Inspirations – Digitally Modified
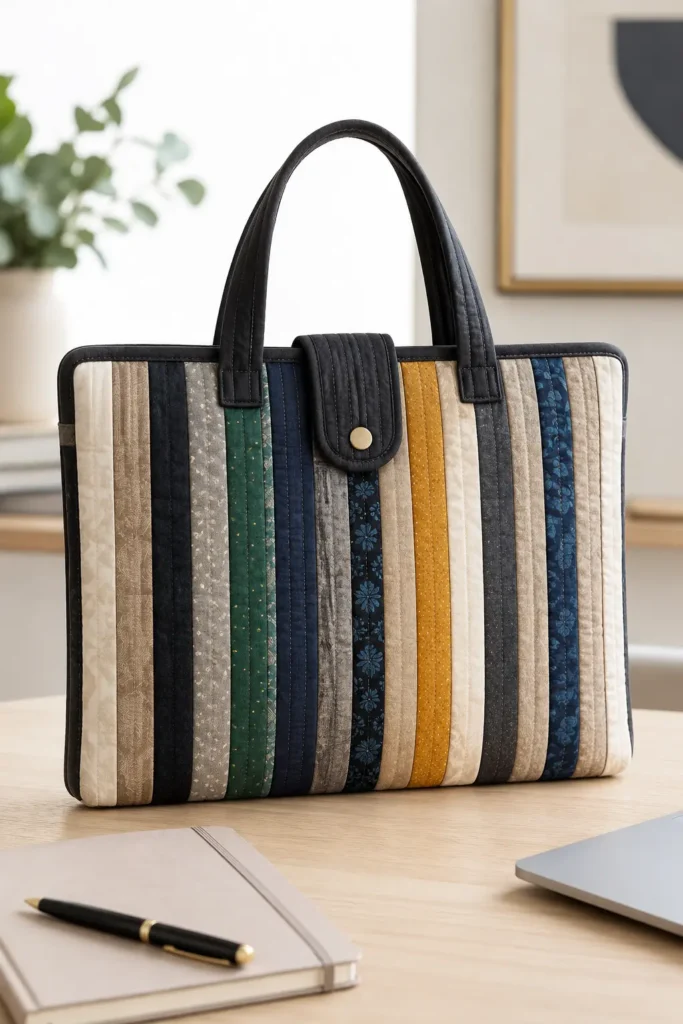
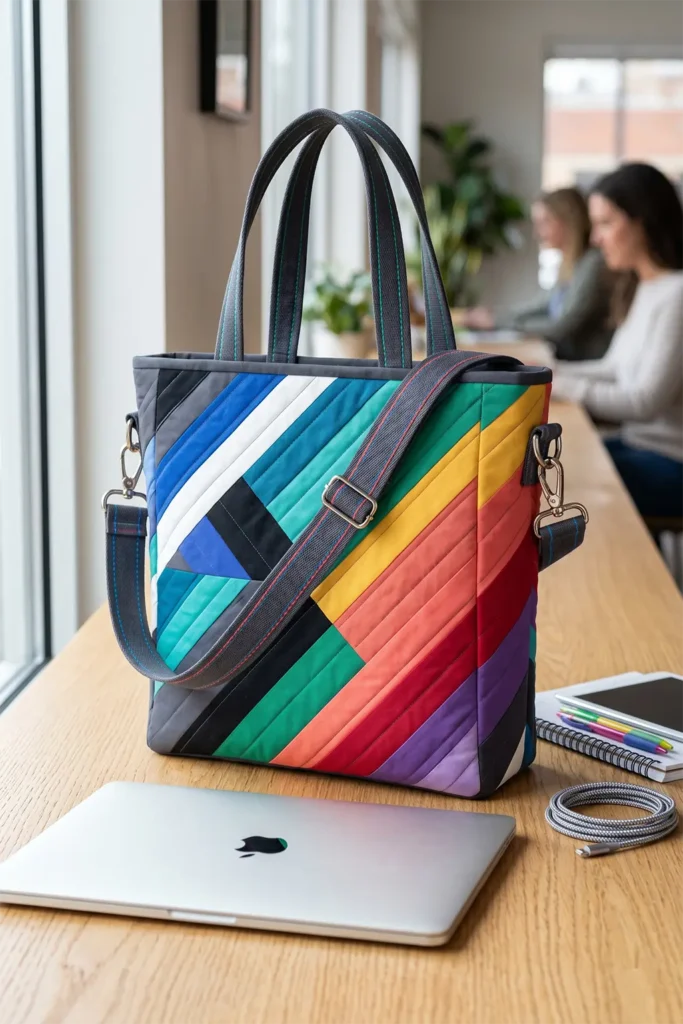
6. Convertible Geometric Jelly Roll Laptop Totes for Creative Remote Work
A convertible geometric jelly roll laptop tote is a stylish and practical project for creative remote work. It combines the softness of quilted patchwork with the function of a work bag, giving you space for a 16-inch laptop, charger, notebook, tablet, pens, and everyday essentials.
The convertible feature makes it especially useful: you can carry it by the handles like a tote or add a detachable crossbody strap for hands-free commuting, café work sessions, conferences, or creative studio days. Jelly roll strips are usually 2½ inches wide, which makes them perfect for building bold geometric panels without complicated cutting.
For a vibrant professional look, use colors like cobalt blue, teal, emerald green, saffron yellow, coral, ruby red, violet, charcoal, black, and crisp white. The geometric patchwork keeps the bag modern, while the padding makes it practical for daily laptop carry.
Why I Made It
I made this bag because I wanted a laptop tote that felt creative but still polished enough for work. Many laptop bags are plain and practical, while many quilted bags are soft but not structured enough for a computer. This design brings both worlds together: a padded laptop tote with handmade color, geometric energy, and professional structure.
The backstory behind this idea comes from the rise of remote work and flexible creative schedules. A laptop bag now needs to move from the home office to the coffee shop to the coworking desk without looking bulky or dull. A jelly roll quilted tote makes that routine feel more personal, colorful, and inspiring.
Why This Idea Is Worth Making
This idea is worth making because it gives you a functional work bag that reflects your creative style. It teaches useful beginner-friendly skills like strip piecing, simple geometric patchwork, quilting padded panels, making handles, adding lining, and attaching strap hardware. It is also more customizable than a store-bought laptop bag, so you can match it to your wardrobe, brand colors, or workspace aesthetic.
Finished Size
This guide makes a padded convertible laptop tote designed to fit many 16-inch laptops.
Approximate finished size:
- Width: 17 inches
- Height: 13 inches
- Depth: 3 inches
- Handle drop: 8 inches
- Optional crossbody strap length: 42 to 52 inches, adjustable
Before cutting, measure your laptop. Add at least 1½ to 2 inches to the laptop width and height so the device slides in easily with padding.
Materials Needed
For one convertible laptop tote, gather:
- 12 to 14 jelly roll strips: 2½ inches x width of fabric
- Lining fabric: 1 yard
- Fusible fleece: ¾ yard
- Foam stabilizer: ¾ yard
- Handle fabric: ¼ yard, or 2 extra jelly roll strips
- Optional contrast fabric for strap tabs: ¼ yard
- Two D-rings: 1-inch or 1¼-inch size
- Two swivel hooks: matching D-ring size
- One strap slider: optional, for an adjustable crossbody strap
- Optional zipper: 18-inch zipper
- Optional inner pocket fabric: ¼ yard
- Thread: charcoal, ivory, teal, cobalt, coral, or coordinating color
- Rotary cutter and cutting mat
- Quilting ruler
- Pins or sewing clips
- Sewing machine
- Iron and ironing board
For the best laptop protection, use both fusible fleece and foam stabilizer. The fleece gives softness, while the foam gives structure.
Vibrant Geometric Palette
A bold remote-work palette could include:
- Crisp white
- Charcoal
- Black
- Cobalt blue
- Teal
- Emerald green
- Saffron yellow
- Coral
- Ruby red
- Violet
For a more polished professional version, use mostly navy, charcoal, ivory, taupe, and black, then add small geometric accents in cobalt, emerald, saffron, or coral.
Cutting Measurements
From jelly roll strips, cut:
- Front panel strips: 8 strips measuring 2½ x 18 inches
- Back panel strips: 8 strips measuring 2½ x 18 inches
- Geometric accent squares: 12 squares measuring 2½ x 2½ inches
- Optional diagonal accent strips: 4 strips measuring 2½ x 10 inches
From fusible fleece, cut:
- Front fleece: 1 piece measuring 18 x 15 inches
- Back fleece: 1 piece measuring 18 x 15 inches
From the foam stabilizer, cut:
- Front foam: 1 piece measuring 17½ x 14½ inches
- Back foam: 1 piece measuring 17½ x 14½ inches
From lining fabric, cut:
- Front lining: 1 piece measuring 18 x 15 inches
- Back lining: 1 piece measuring 18 x 15 inches
For handles, cut:
- 2 strips measuring 4 x 22 inches
For side strap tabs, cut:
- 2 strips measuring 4 x 4 inches
For an optional crossbody strap, cut:
- 1 strip measuring 4 x 54 inches, or piece multiple strips together to reach length
For an optional inner pocket, cut:
- 1 rectangle measuring 10 x 12 inches
Use a ¼-inch seam allowance for patchwork piecing and a ½-inch seam allowance for bag construction.
Step-by-Step Guide
Step 1: Measure Your Laptop and Plan the Ease
Measure your laptop width, height, and thickness before cutting. This sample tote is designed for many 16-inch laptops, but laptop dimensions vary.
Add at least 1½ to 2 inches of ease to the width and height. This extra space allows room for foam padding, seams, and easy sliding. If your laptop has a thick protective case, add another ½ inch.
Step 2: Choose a Geometric Jelly Roll Layout
Choose 8 jelly roll strips for the front and 8 for the back. For a modern geometric look, alternate light, dark, and bright colors.
A strong layout is white, cobalt, charcoal, saffron, teal, black, coral, and emerald. For the back panel, reverse the order or replace one strip with violet or ruby for variety.
Step 3: Piece the Front and Back Panels
Sew the 8 front strips together lengthwise using a ¼-inch seam allowance. Press seams open or to one side.
Repeat for the back panel.
Each panel should measure about 16½ x 18 inches after piecing. Trim each panel to 18 x 15 inches, choosing the most balanced part of the strip layout.
Step 4: Add Geometric Accent Squares
For a creative geometric detail, insert a short checkerboard section into one panel.
Sew 2½ x 2½-inch squares into a row, then place that row between two jelly roll strips before completing the panel. You can also place accent squares near one of the lower corners for an asymmetrical, modern look.
Keep the accents bold but simple. A small group of cobalt, coral, saffron, and black squares can make the tote look intentionally designed without making it difficult.
Step 5: Add Fleece and Foam Padding
Fuse the fleece to the wrong side of each outer panel according to the manufacturer’s instructions.
Place the foam stabilizer behind each fleece-backed panel. The foam is cut slightly smaller to reduce seam bulk. Baste the foam around the edges with a long stitch or clips before quilting.
This padded structure helps protect the laptop while keeping the bag upright.
Step 6: Quilt the Laptop Panels
Quilt each panel with simple straight lines. Stitch ¼ inch away from each jelly roll seam for a clean channel-quilted effect.
For a more geometric style, add diagonal quilting lines spaced 1½ to 2 inches apart. Use thread in charcoal, teal, cobalt, coral, or ivory, depending on whether you want contrast or subtle texture.
Step 7: Make the Tote Handles
Fold each 4 x 22-inch handle strip in half lengthwise and press. Open it, fold both long edges toward the center crease, press again, then fold in half once more.
Stitch along both long edges. Each handle should be about 1 inch wide by 22 inches long.
For a polished look, use black, charcoal, navy, teal, or saffron for the handles.

Step 8: Make the Side Strap Tabs
Fold each 4 x 4-inch tab strip the same way as the handles, folding the raw edges toward the center and stitching along both long edges.
Thread each tab through a D-ring and fold it in half. Baste one tab to each side edge of the outer bag, about 2 inches below the top edge, with the D-ring facing inward toward the bag center.
These tabs allow you to clip on a removable crossbody strap.
Step 9: Make the Optional Crossbody Strap
Fold the 4 x 54-inch strap strip the same way as the handles and stitch along both long edges.
For an adjustable strap, thread it through a slider and swivel hooks. For a simpler beginner version, attach one swivel hook to each end and make the strap a fixed length.
A finished strap around 42 to 52 inches works well for most adults, depending on preferred carry height.
Step 10: Add the Optional Inner Pocket
Fold the 10 x 12-inch pocket rectangle in half, right sides together, so it measures 10 x 6 inches. Sew around the edges, leaving a small opening for turning.
Turn right side out, press, and topstitch the folded top edge. Place it on one lining piece about 3 inches down from the top edge. Stitch around the sides and bottom.
For extra function, sew one vertical line down the pocket to divide it into two sections for a charger cord and pen.
Step 11: Attach the Handles
Place one quilted outer panel right side up. Measure 4½ inches in from each side along the top edge and mark handle placement.
Pin or clip the handle ends to the top edge with raw edges aligned. Baste with a ¼-inch seam allowance. Repeat on the second outer panel.
Make sure the handles are not twisted before sewing.
Step 12: Sew the Outer Bag
Place the two outer panels right sides together. Sew down both sides and across the bottom using a ½-inch seam allowance. Leave the top open.
Backstitch at the beginning and end. Sew slowly over thicker areas where the foam, fleece, and strap tabs overlap.
Step 13: Box the Bottom Corners
Pinch one bottom corner so the side seam and bottom seam line up. Measure 1½ inches from the corner point and draw a line across.
Sew along the line, then trim the corner to ½ inch beyond the stitching. Repeat on the other corner.
This creates a finished depth of about 3 inches, which is useful for a laptop plus a slim notebook or charger pouch.
Step 14: Sew the Lining
Place the two lining pieces right sides together. Sew down both sides and across the bottom with a ½-inch seam allowance, leaving a 5-inch opening in the bottom for turning.
Box the lining corners the same way as the outer bag, measuring 1½ inches from each corner point.
Step 15: Join the Lining and Outer Bag
Turn the outer bag right side out. Keep the lining wrong side out.
Place the outer bag inside the lining so right sides are together. Match side seams and top raw edges. Pin or clip around the top.
Sew around the top edge with a ½-inch seam allowance, ensuring the handles are securely caught in the seam.
Step 16: Turn, Press, and Topstitch
Pull the bag’s right side out through the opening in the lining. Push the lining into the bag and smooth the top edge.
Topstitch around the top edge about ⅛ inch from the edge, then again at ¼ inch for strength. Close the lining opening by machine or hand.
Clip the crossbody strap onto the D-rings and test the bag with your laptop inside.
Assembly at a Glance
- Measure your 16-inch laptop and add ease.
- Choose 12 to 14 jelly roll strips in bold geometric colors.
- Cut front and back strips to 2½ x 18 inches.
- Piece 8 strips for the front and 8 for the back.
- Add optional 2½-inch geometric accent squares.
- Trim outer panels to 18 x 15 inches.
- Add fusible fleece and foam stabilizer.
- Quilt the padded panels with straight or diagonal lines.
- Make two 4 x 22-inch handles.
- Make side tabs and add D-rings.
- Make an optional detachable crossbody strap.
- Add an optional inner pocket.
- Sew the outer bag and box corners at 1½ inches.
- Sew and box the lining.
- Join lining and outer bag, turn, topstitch, and finish.
Geometric Color Combination Ideas
For a creative studio tote, use white, black, cobalt, coral, saffron, teal, and emerald.
For a polished remote-work tote, use charcoal, navy, ivory, taupe, deep teal, and mustard gold.
For a bold design-school look, use hot pink, orange, turquoise, lime green, violet, and black.
For a modern professional style, use gray, black, cobalt blue, emerald green, ruby red, and crisp white.
Beginner Tips for Success
Measure first and cut second. A padded laptop tote needs extra room for the computer, foam, and seams.
Use foam stabilizer for structure. It helps the tote stand upright and gives the laptop more protection.
Keep the geometric accents simple. A small checkerboard row, color block, or diagonal quilting line is enough to create a modern look.
Use clips instead of pins when sewing thick padded layers. Clips hold bulky edges more securely.
Use a walking foot if available. It helps feed the foam, fleece, and quilted fabric evenly.
Reinforce handles and D-ring tabs with extra stitching. Laptop bags carry weight, so these areas need to be strong.
Styling Tip
Carry the finished convertible laptop tote with a blazer, denim jacket, oversized cardigan, linen trousers, or a simple black outfit. The bold jelly roll geometry adds creative energy, while the padded structure keeps it practical for remote work. A detachable strap in black, teal, saffron, cobalt, or coral makes the bag even more versatile for busy workdays.
Other Design Inspirations – Digitally Modified
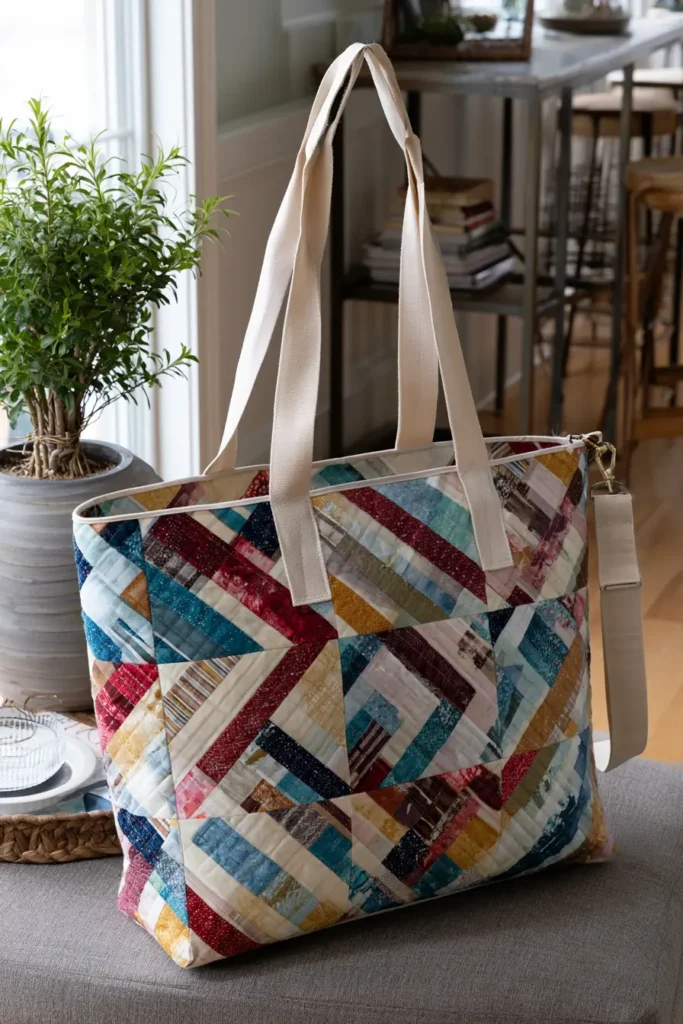
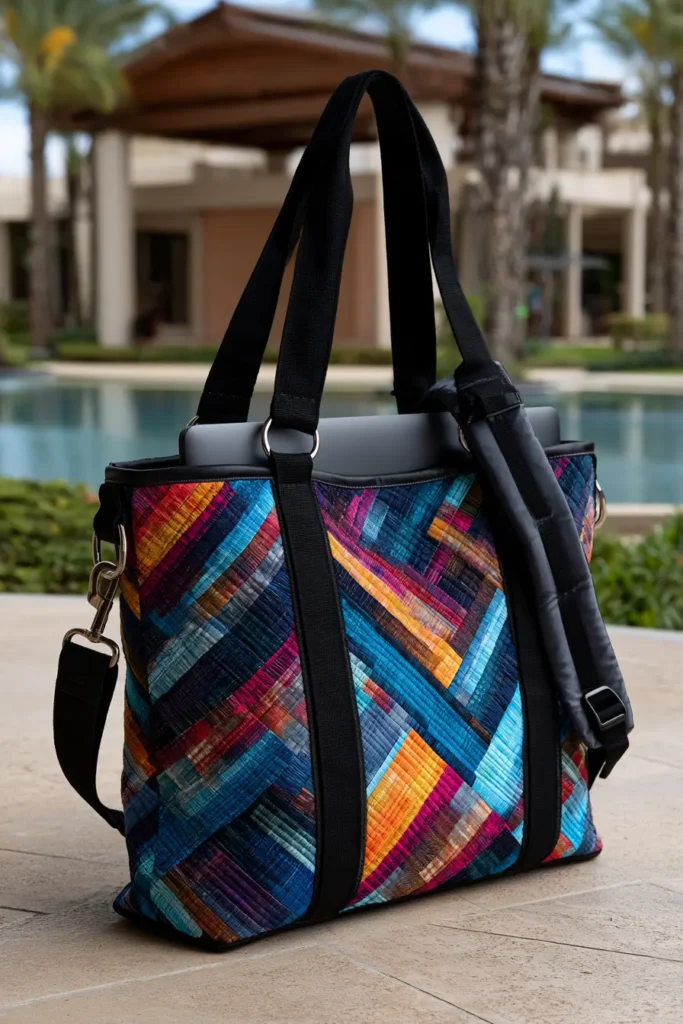
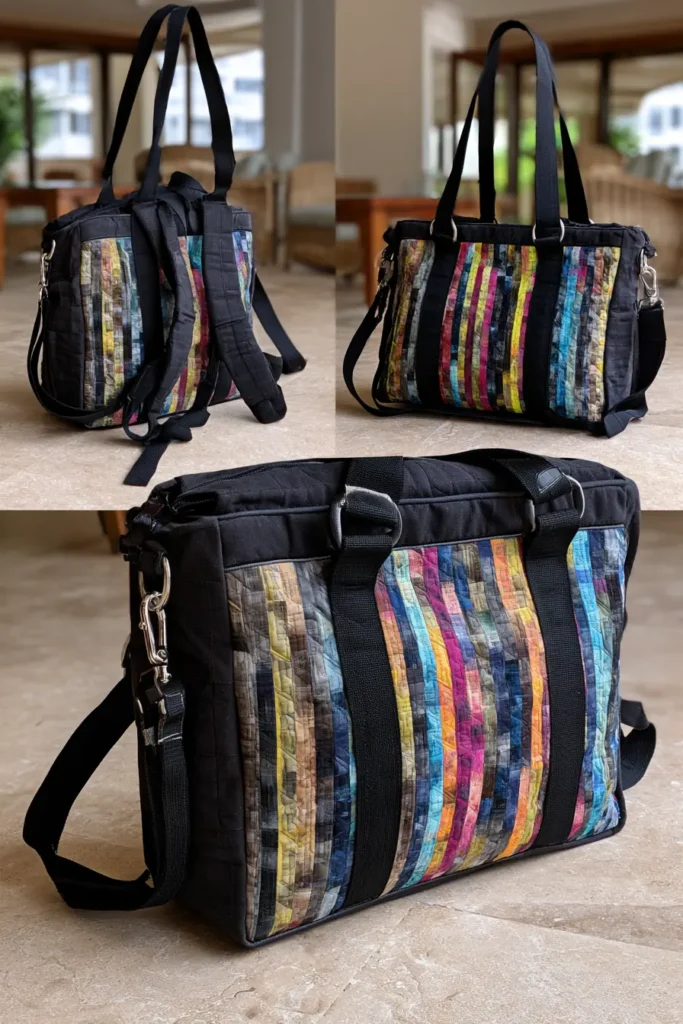
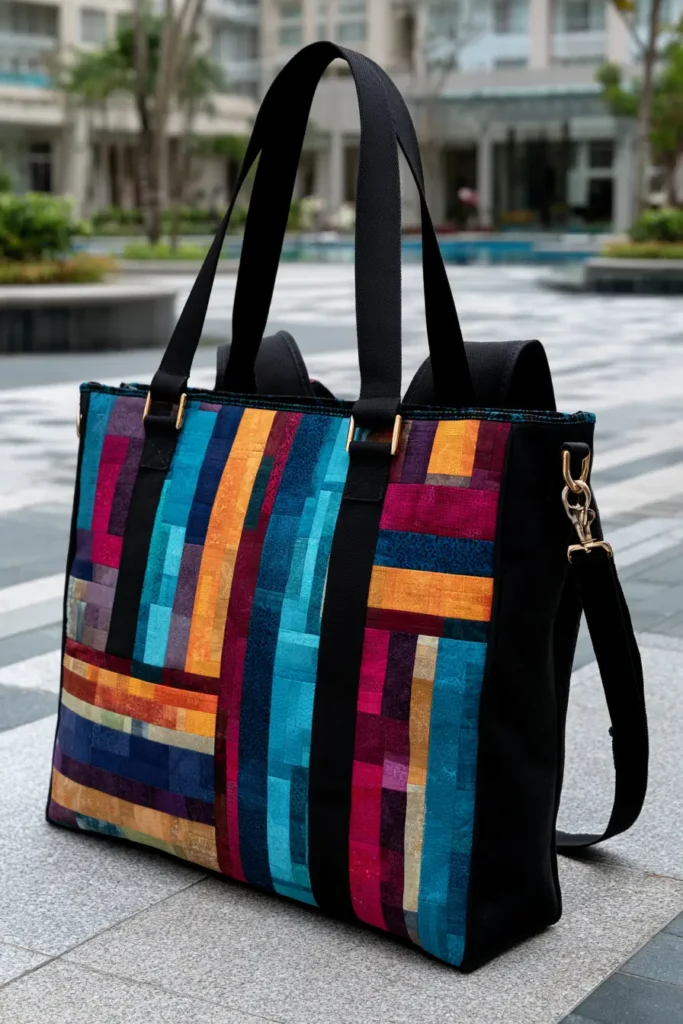
7. Stylish Foldable Jelly Roll Quilted Laundry Hampers for Chic Home Organization
A stylish foldable jelly roll quilted laundry hamper is a creative way to bring color, softness, and handmade charm into everyday home organization. Instead of using a plain plastic basket or bulky store-bought hamper, this design turns 2½-inch jelly roll strips into quilted fabric panels that are sturdy enough to stand open but flexible enough to fold flat when not in use.
For a chic home look, choose a vibrant but coordinated palette such as teal, coral, saffron yellow, emerald green, cobalt blue, plum, blush pink, ivory, charcoal, and warm taupe. The quilted texture makes the hamper feel cozy and decorative, while the foldable shape keeps it practical for bedrooms, laundry rooms, nurseries, dorms, and craft spaces.
Why I Made It
I made this hamper because I wanted laundry storage that looked pretty enough to leave out in the room. Most hampers are useful but not especially decorative, and I loved the idea of making one that felt like a soft quilted home accent.
The backstory behind this design comes from the practical side of quilting. Quilted fabric is not only beautiful; it can also add structure, padding, and durability. By pairing jelly roll strips with fusible fleece or foam stabilizer, you can create a lightweight hamper that folds down easily but still holds its shape when filled with clothes, towels, or fabric scraps.
Why This Idea Is Worth Making
This idea is worth making because it turns a basic household item into something colorful, useful, and handmade. It is a great beginner-friendly project if you want to practice strip piecing, quilting, lining, boxed corners, and handle making without committing to a full-size quilt. It also makes a thoughtful gift for a new apartment, dorm room, nursery, sewing room, or laundry area.
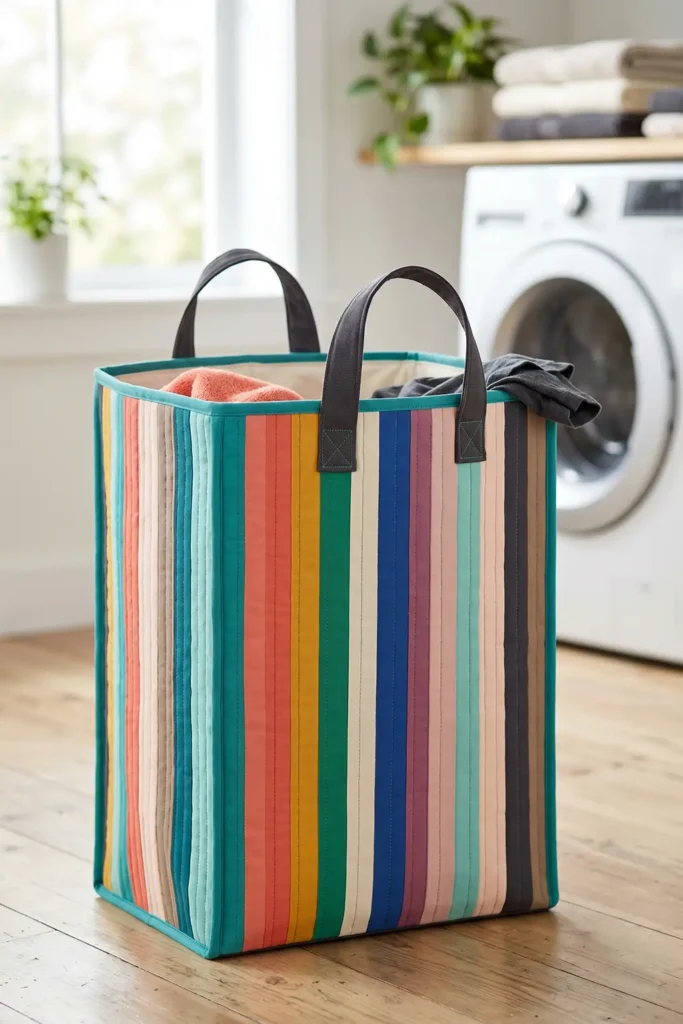
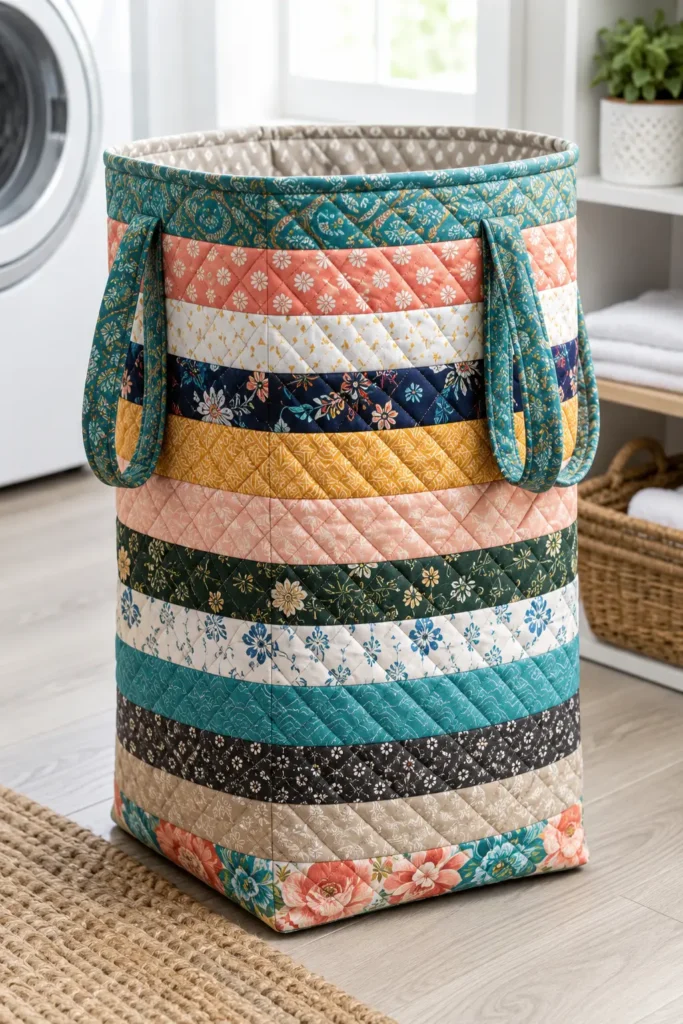
Finished Size
This guide makes one medium foldable quilted laundry hamper measuring approximately:
- Width: 16 inches
- Height: 20 inches
- Depth: 12 inches
- Folded thickness: about 2 to 3 inches, depending on stabilizer
This size works well for a bedroom hamper, a children’s laundry basket, a towel holder, a fabric-scrap bin, or a closet organizer.
Materials Needed
For one foldable quilted hamper, gather:
- 18 to 22 jelly roll strips: 2½ inches x width of fabric
- Lining fabric: 1½ yards
- Fusible fleece: 1½ yards
- Flexible foam stabilizer: 1 yard, optional but helpful
- Handle fabric: ¼ yard, or 2 extra jelly roll strips
- Binding fabric: ½ yard
- Optional plastic canvas or thin removable base insert: one piece about 11½ x 15½ inches
- Thread: ivory, charcoal, teal, coral, or coordinating color
- Rotary cutter and cutting mat
- Quilting ruler
- Pins or sewing clips
- Sewing machine
- Iron and ironing board
Beginner tip: For a softer foldable hamper, use fusible fleece only. For a hamper that stands more firmly, use fusible fleece plus a flexible foam stabilizer.
Vibrant Home Organization Palette
A cheerful but stylish palette could include:
- Ivory
- Warm taupe
- Charcoal
- Teal
- Cobalt blue
- Emerald green
- Saffron yellow
- Coral
- Blush pink
- Deep plum
For a calmer room, use mostly neutrals and add bright strips as accents. For a laundry room or kids’ room, use more saturated color for a playful storage piece.
Cutting Measurements
From jelly roll strips, cut:
- Front panel strips: 9 strips measuring 2½ x 18 inches
- Back panel strips: 9 strips measuring 2½ x 18 inches
- Side panel strips: 9 strips measuring 2½ x 14 inches, cut twice
- Bottom panel strips: 6 strips measuring 2½ x 18 inches
From fusible fleece, cut:
- Front fleece: 1 piece measuring 18 x 22 inches
- Back fleece: 1 piece measuring 18 x 22 inches
- Side fleece: 2 pieces measuring 14 x 22 inches
- Bottom fleece: 1 piece measuring 18 x 14 inches
From flexible foam stabilizer, optional, cut:
- Front foam: 1 piece measuring 17½ x 21½ inches
- Back foam: 1 piece measuring 17½ x 21½ inches
- Side foam: 2 pieces measuring 13½ x 21½ inches
- Bottom foam: 1 piece measuring 17½ x 13½ inches
From lining fabric, cut:
- Front lining: 1 piece measuring 18 x 22 inches
- Back lining: 1 piece measuring 18 x 22 inches
- Side lining: 2 pieces measuring 14 x 22 inches
- Bottom lining: 1 piece measuring 18 x 14 inches
For handles, cut:
- 2 strips measuring 4 x 18 inches
For binding, cut:
- 5 strips measuring 2½ inches x width of fabric
Use a ¼-inch seam allowance for piecing the jelly roll strips and a ½-inch seam allowance for hamper construction.
Step-by-Step Guide
Step 1: Choose the Jelly Roll Strip Layout
Choose strips that coordinate with the room where the hamper will live. For a stylish laundry room, try ivory, teal, cobalt, saffron, coral, charcoal, emerald, blush, and plum.
Arrange the strips in a repeating order for all four sides, or make the front more colorful and keep the sides calmer. A good beginner layout is light, bright, dark, light, bright, dark.
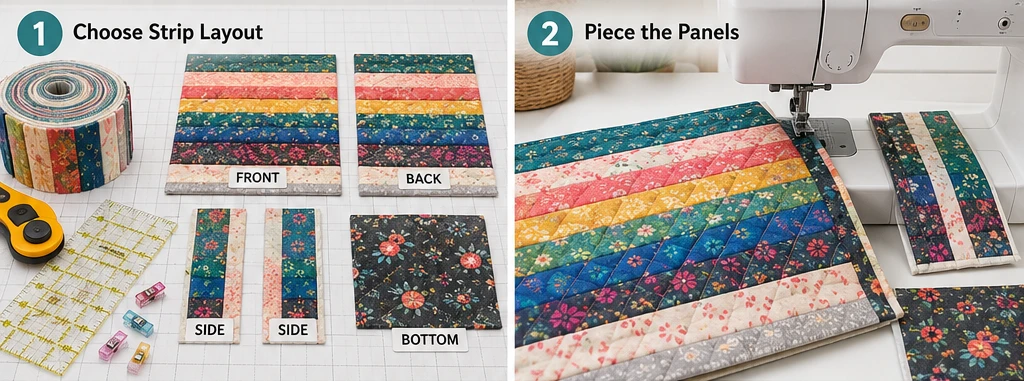
Step 2: Piece the Front and Back Panels
Sew 9 strips measuring 2½ x 18 inches together lengthwise using a ¼-inch seam allowance. This creates the front panel.
Repeat with another 9 strips for the back panel.
Press the seams open or to one side. Trim each finished panel to 18 x 22 inches.
Step 3: Piece the Side Panels
Sew 9 strips measuring 2½ x 14 inches together for one side panel.
Repeat for the second side panel.
Trim each side panel to 14 x 22 inches. The narrower side panels create the hamper depth.
Step 4: Piece the Bottom Panel
Sew 6 strips, each measuring 2½ x 18 inches, together to make the bottom panel.
Trim the bottom panel to 18 x 14 inches.
For extra strength, use darker or busier fabrics on the bottom because this part gets the most wear.
Step 5: Add Fleece and Foam Stabilizer
Fuse the fleece to the wrong side of each quilted outer panel according to the manufacturer’s instructions.
If using a foam stabilizer, place it behind each fleece-backed panel and baste around the edges with a long stitch. The foam pieces are slightly smaller to reduce bulk in the seams.
This gives the hamper body and helps it stand open while still allowing it to fold flat.
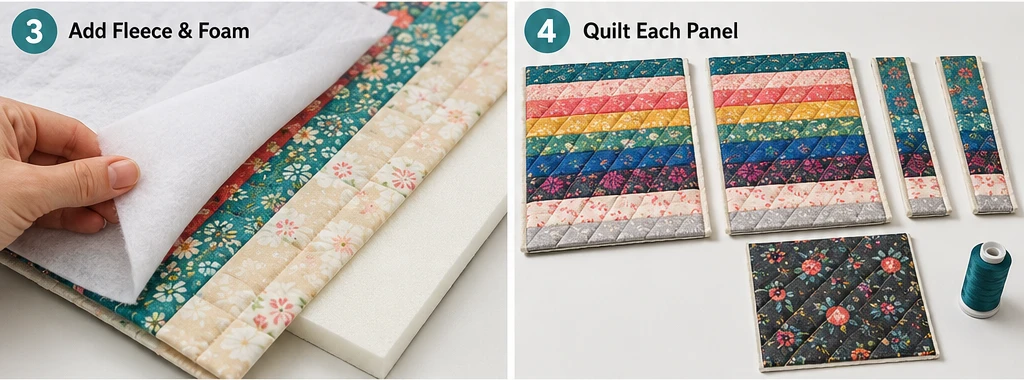
Step 6: Quilt Each Panel
Quilt each panel with simple straight lines. Stitch ¼ inch away from each jelly roll seam for a clean channel-quilted look.
For a more modern design, quilt diagonal lines spaced 2 inches apart. Use thread in teal, coral, gold, charcoal, or ivory depending on whether you want contrast or subtle texture.
Step 7: Make the Handles
Fold each 4 x 18-inch handle strip in half lengthwise and press. Open it, fold both long edges toward the center crease, press again, then fold in half once more.
Stitch along both long edges. Each handle should finish about 1 inch wide by 18 inches long.
For easy carrying, use strong quilting cotton, canvas, or reinforced jelly roll strips.
Step 8: Attach the Handles
Place one handle on the front panel, centered near the top edge. Position the handle ends about 5 inches apart and about 3 inches down from the top edge.
Stitch each handle end in a rectangle with an X through it for strength.
Repeat with the second handle on the back panel.
Step 9: Sew the Outer Hamper Sides
Place the front panel and one side panel right sides together. Sew along the side edge with a ½-inch seam allowance.
Add the back panel, then the second side panel, until the four side pieces form a tube. Leave the top and bottom open.
Press seams carefully from the fabric side. Use clips if the layers are bulky.
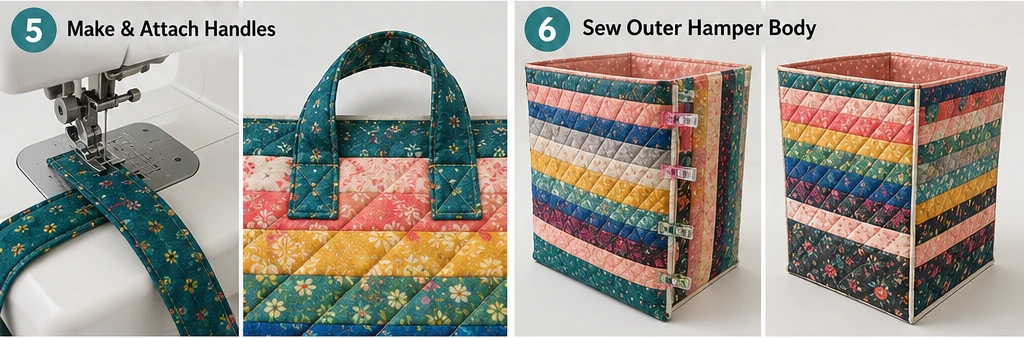
Step 10: Attach the Bottom Panel
With the hamper body still wrong side out, pin or clip the bottom panel to the lower edge of the side tube, matching corners.
Sew around all four sides using a ½-inch seam allowance. Pivot carefully at each corner.
This creates the box shape of the hamper.
Step 11: Sew the Lining
Sew the lining pieces together in the same order: front, side, back, side, then bottom. Use a ½-inch seam allowance.
Leave a 5-inch opening along one lower side seam or bottom seam for turning later.
Do not add foam to the lining. Keeping the lining lighter helps the hamper fold more easily.
Step 12: Join the Outer Hamper and Lining
Turn the outer hamper right side out. Keep the lining wrong side out.
Place the outer hamper inside the lining so the right sides are together. Match the top raw edges and side seams. Clip around the top edge.
Sew around the entire top edge using a ½-inch seam allowance.
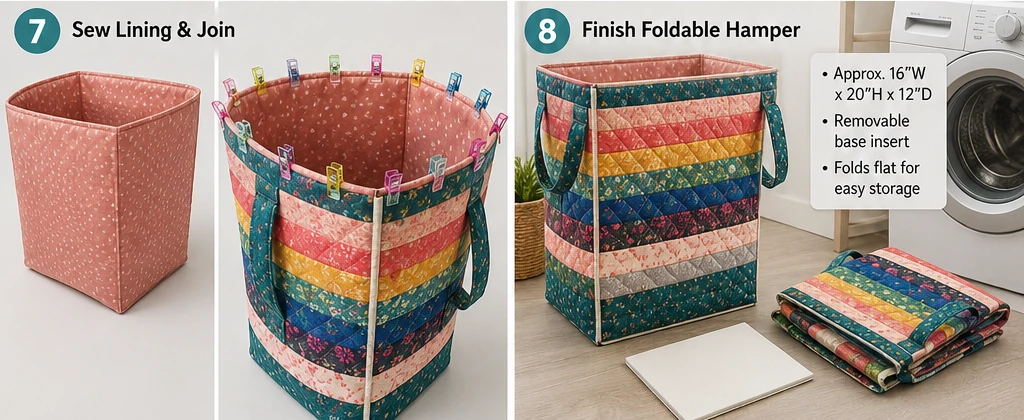
Step 13: Turn and Topstitch
Pull the hamper’s right side out through the opening in the lining. Push the lining inside the hamper and smooth the top edge.
Topstitch around the top edge about ⅛ inch from the edge, then again at ¼ inch for extra strength.
Close the lining opening by machine or hand.
Step 14: Add a Binding or a Removable Base Insert
For a cleaner finish, sew binding around the top edge for extra structure and color.
For a firmer bottom, slide a thin, removable base insert into the hamper. Cut plastic canvas, stiff felt, or thin covered cardboard to about 11½ x 15½ inches so it fits inside the boxed base.
Remove the insert before washing.
Assembly at a Glance
- Choose 18 to 22 vibrant jelly roll strips.
- Cut strips for front, back, side, and bottom panels.
- Piece the front and back panels to 18 x 22 inches.
- Piece the side panels to 14 x 22 inches.
- Piece the bottom panel to 18 x 14 inches.
- Add fusible fleece and optional foam stabilizer.
- Quilt each panel with straight or diagonal lines.
- Make two 4 x 18-inch handles.
- Attach handles to the front and back panels.
- Sew the four outer side panels into a tube.
- Attach the bottom panel.
- Sew the lining the same way.
- Join lining and outer hamper at the top edge.
- Turn, topstitch, and add an optional removable base insert.
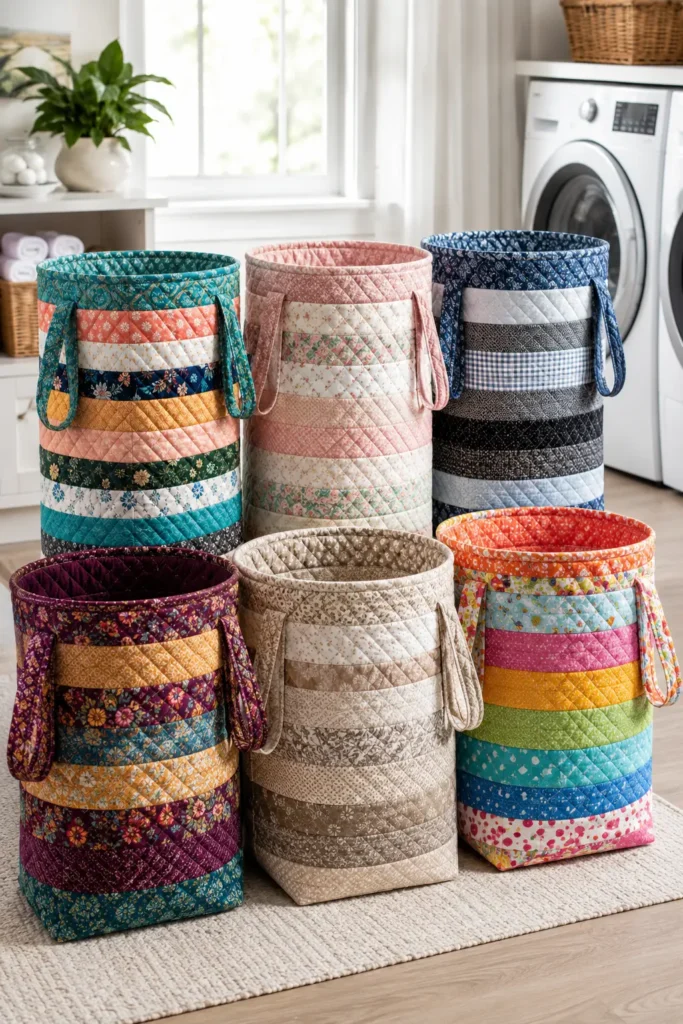
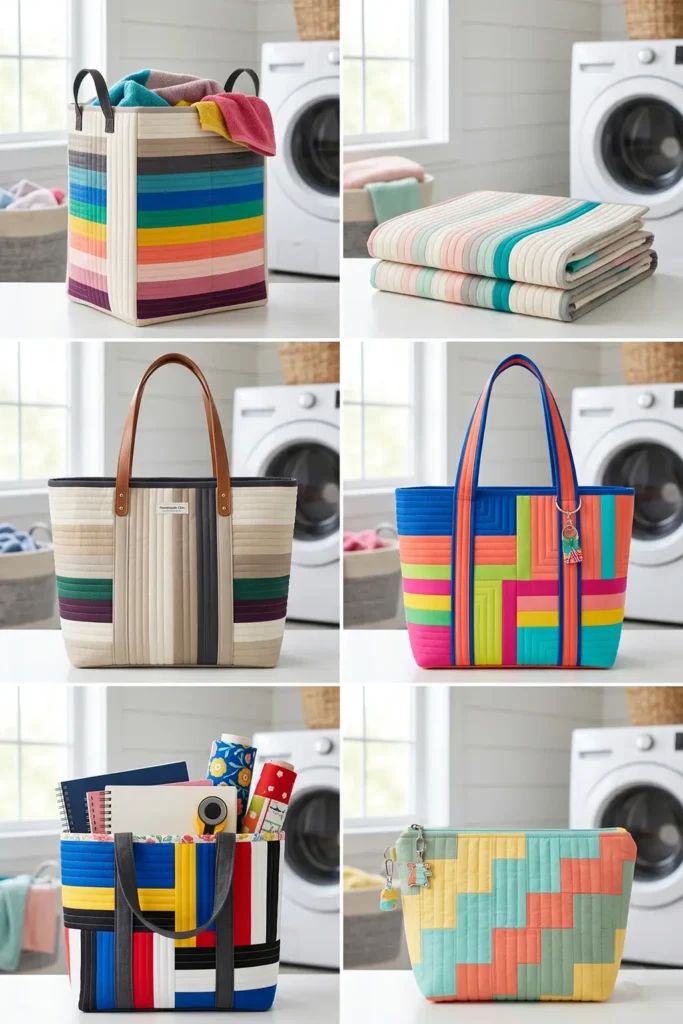
Chic Color Combination Ideas
For a bright laundry room hamper, use teal, coral, saffron, white, emerald, cobalt, and charcoal.
For a soft bedroom hamper, use blush, ivory, lavender, mint, peach, and warm gray.
For a modern closet organizer, use black, white, cobalt, lime, hot pink, and silver gray.
For a cozy nursery hamper, use butter yellow, aqua, coral, sage green, cream, and raspberry.
For a sophisticated sewing-room bin, use plum, teal, mustard gold, ruby, navy, and ivory.
Beginner Tips for Success
Use fusible fleece for a foldable hamper and foam stabilizer for a sturdier hamper. Combining both gives the best balance of softness and structure.
Keep quilting simple. Straight lines are strong, beginner-friendly, and help the panels keep their shape.
Use clips instead of pins when sewing thick quilted panels. Clips hold the layers more securely.
Reinforce the handles well. Laundry can get heavy, so stitch a rectangle with an X through each handle end.
Use a removable base insert instead of sewing cardboard or plastic in. This makes the hamper easier to wash and fold.
Wash gently and air dry if you use a foam stabilizer. High heat can affect some stabilizers.
Styling Tip
Place the finished jelly roll quilted laundry hamper beside a dresser, inside a closet, in a laundry corner, or near a nursery changing table. Choose accent strips that echo nearby décor, such as coral towels, teal storage bins, saffron pillows, emerald plants, or plum curtains. The hamper will keep laundry organized while adding a cheerful quilted touch to the room.
Other Design Inspirations – Digitally Modified

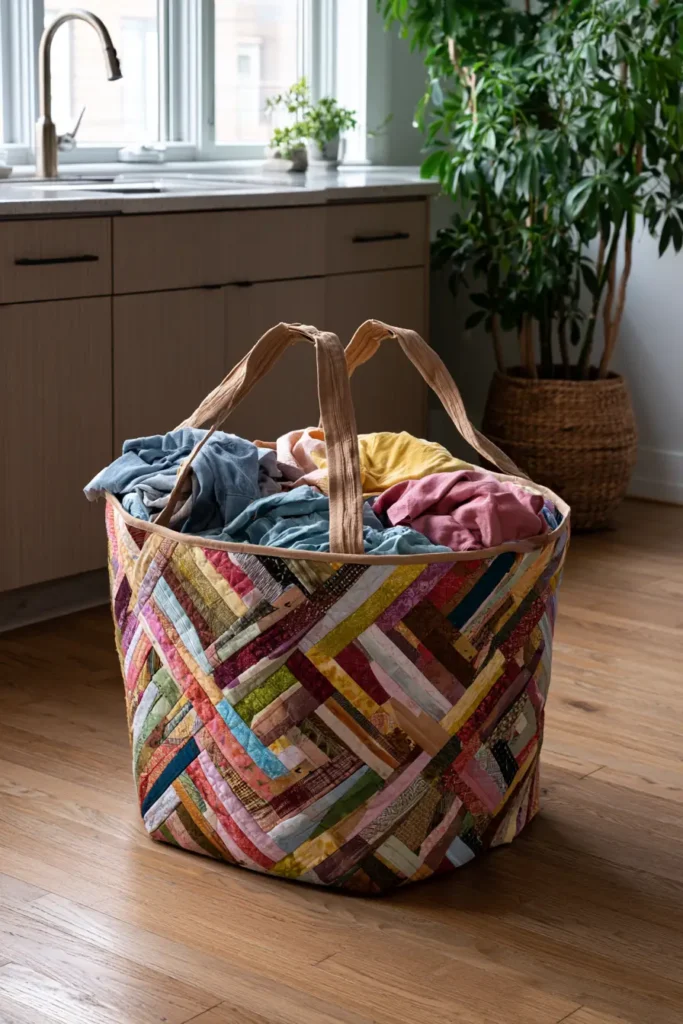
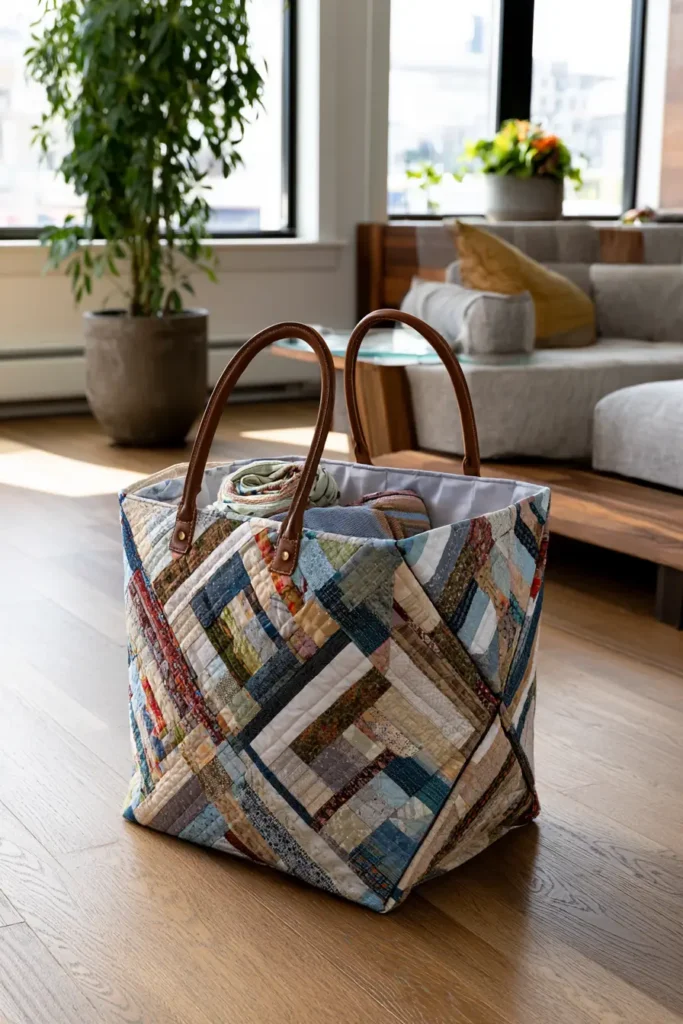
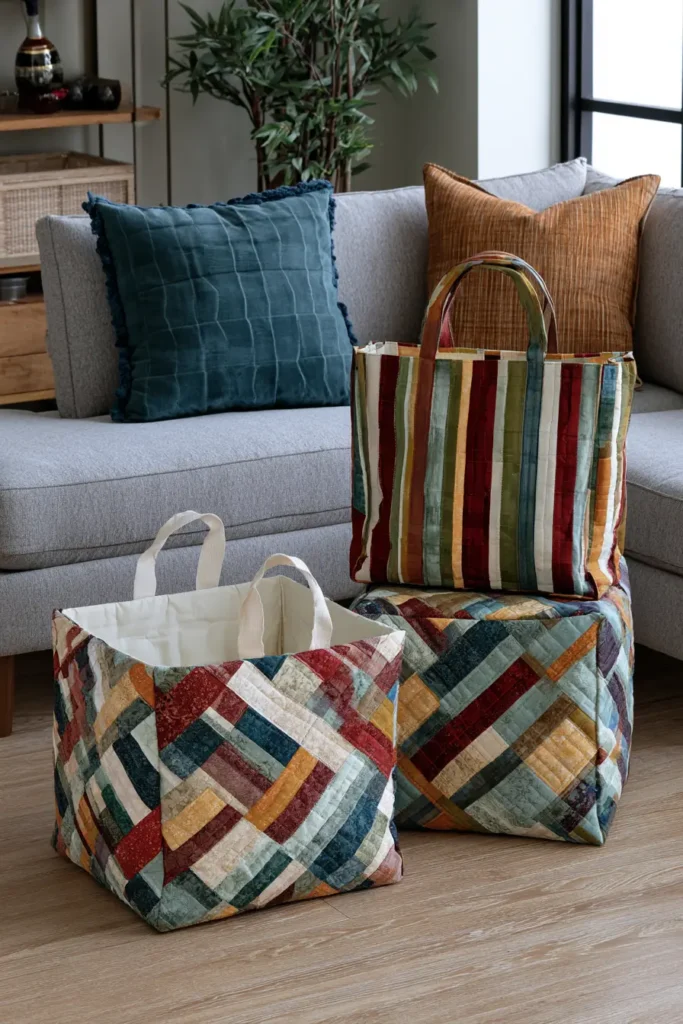
CONCLUSION
A jelly roll tote bag is one of those projects where the method and the result are in honest proportion — the construction logic is clear, the preparation is genuinely reduced by the pre-cut strips, and the finished bag looks like the effort was greater than it was. That is not a criticism. It is the particular appeal of jelly roll construction applied to a functional object: you make something that works well, looks considered, and carries the visual identity of a technique with genuine quilting heritage. These seven ideas are starting points. Strip a panel, assess the color progression, and build the bag around what the fabric is doing. The strips will tell you what the bag wants to be.
