
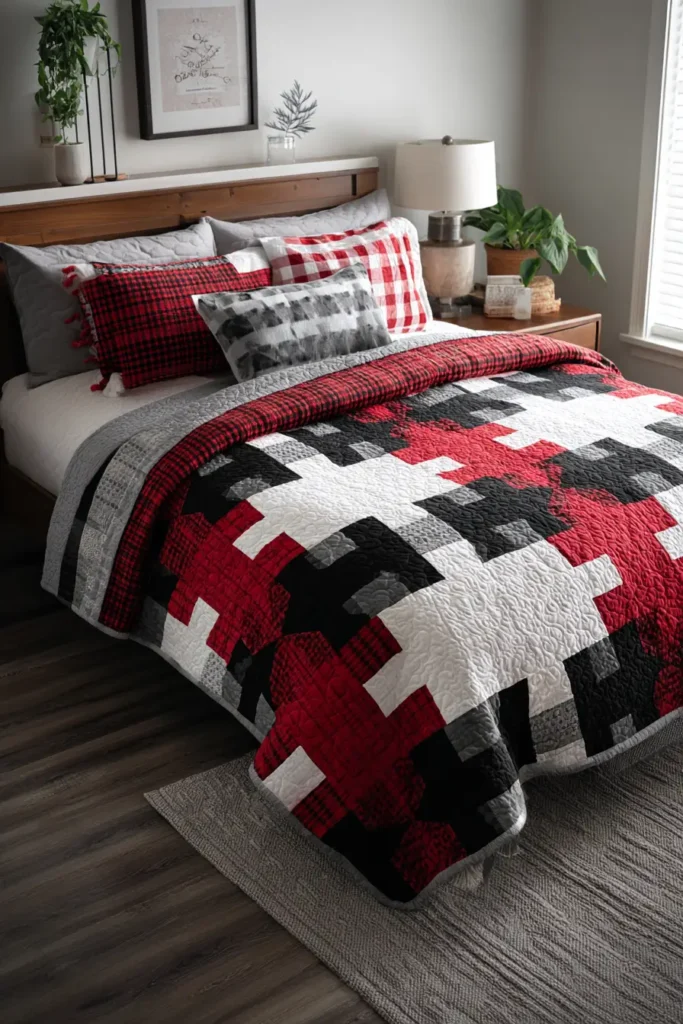
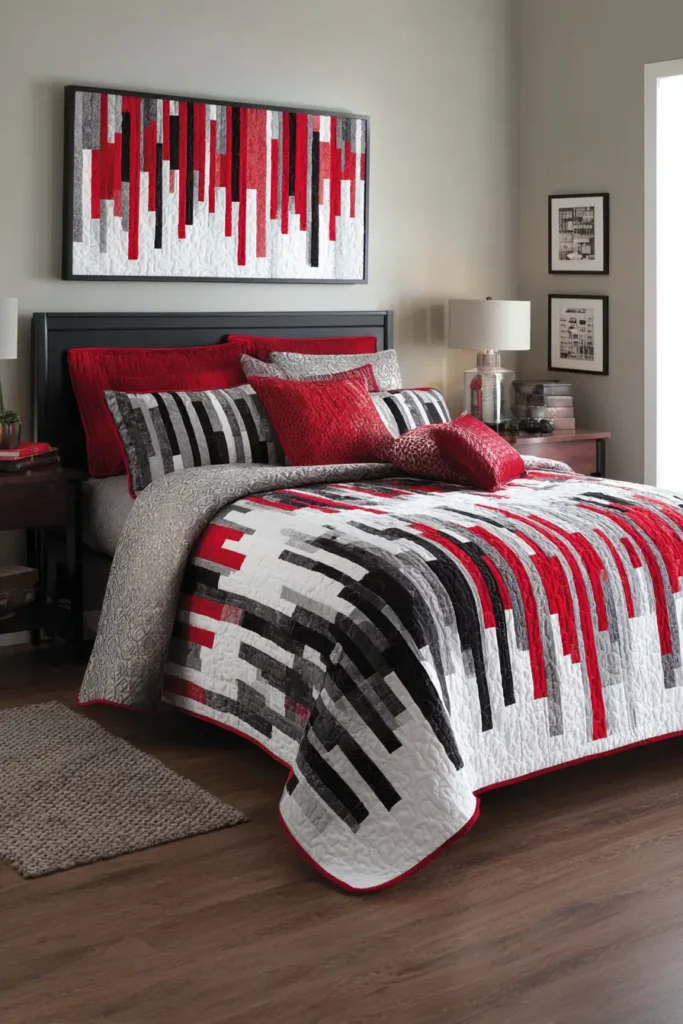
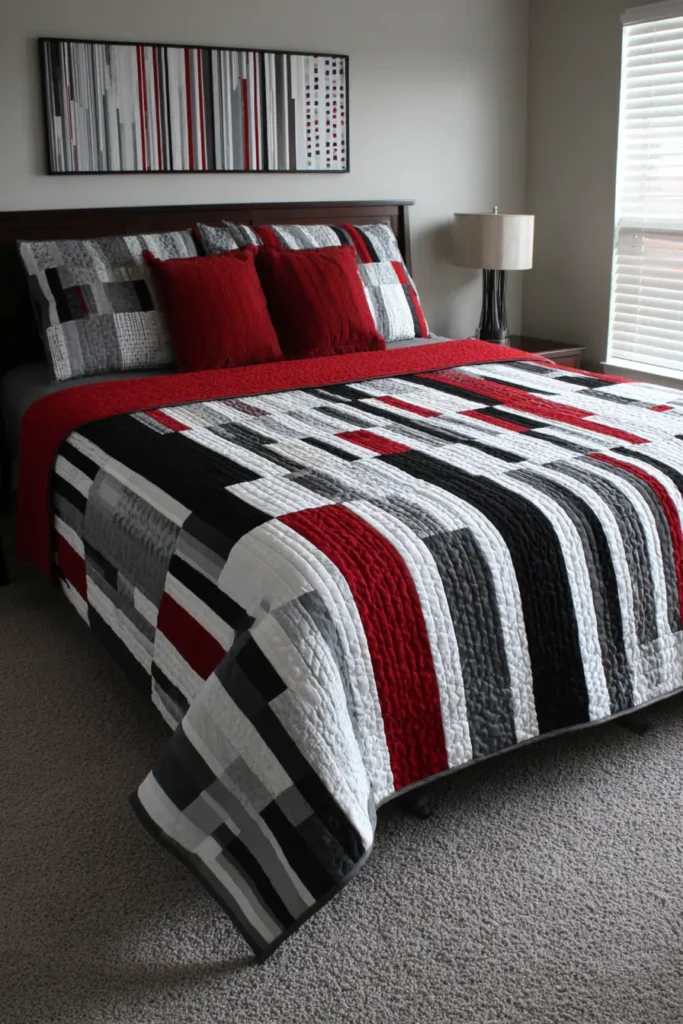
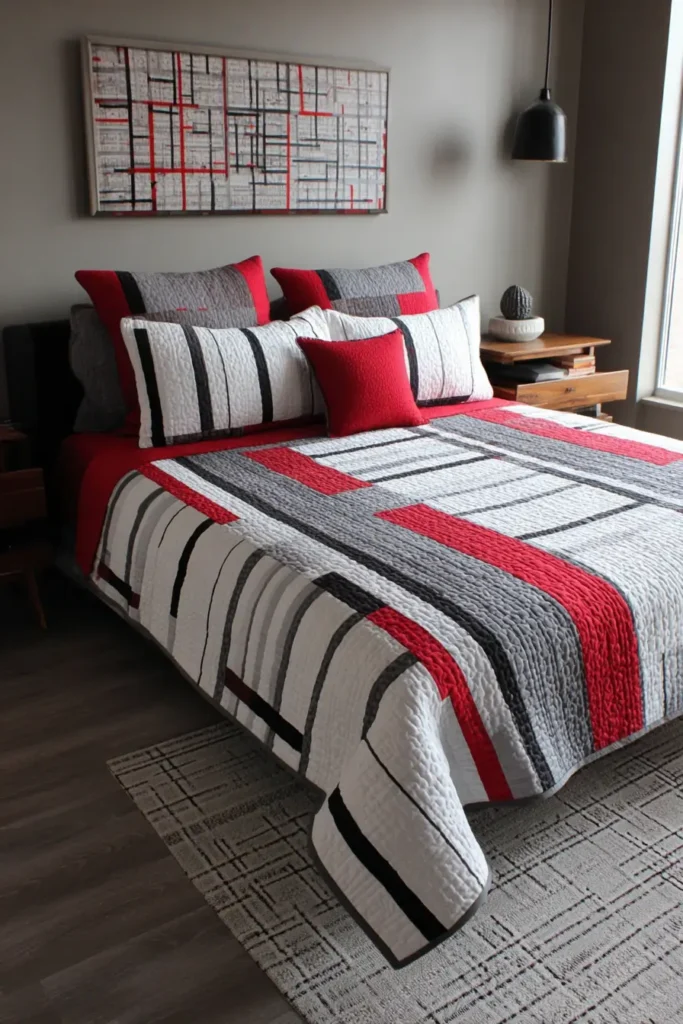
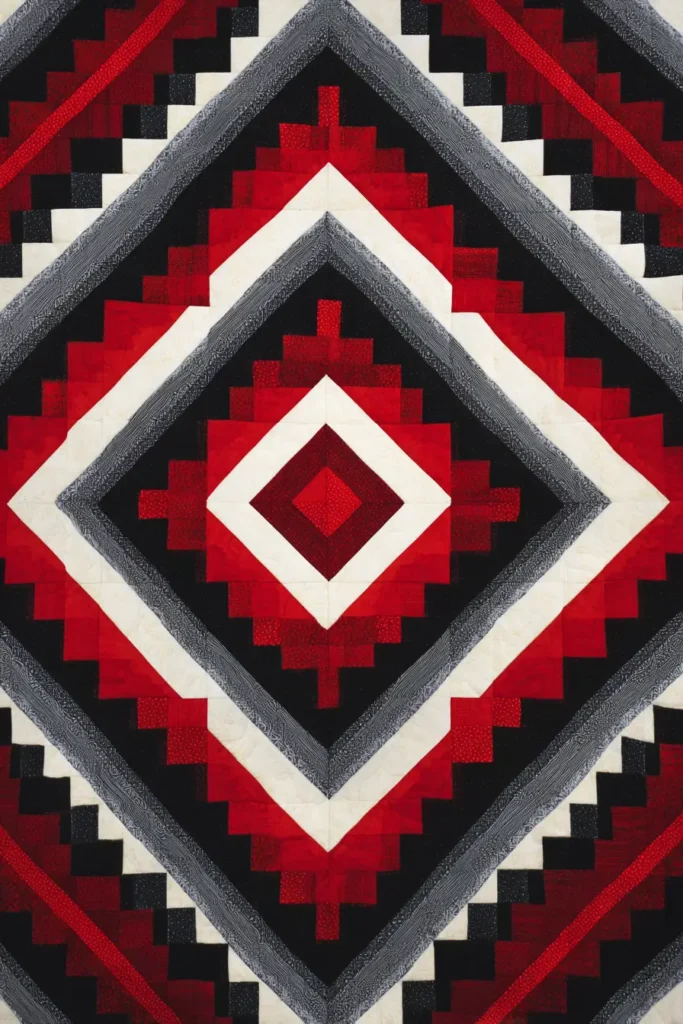
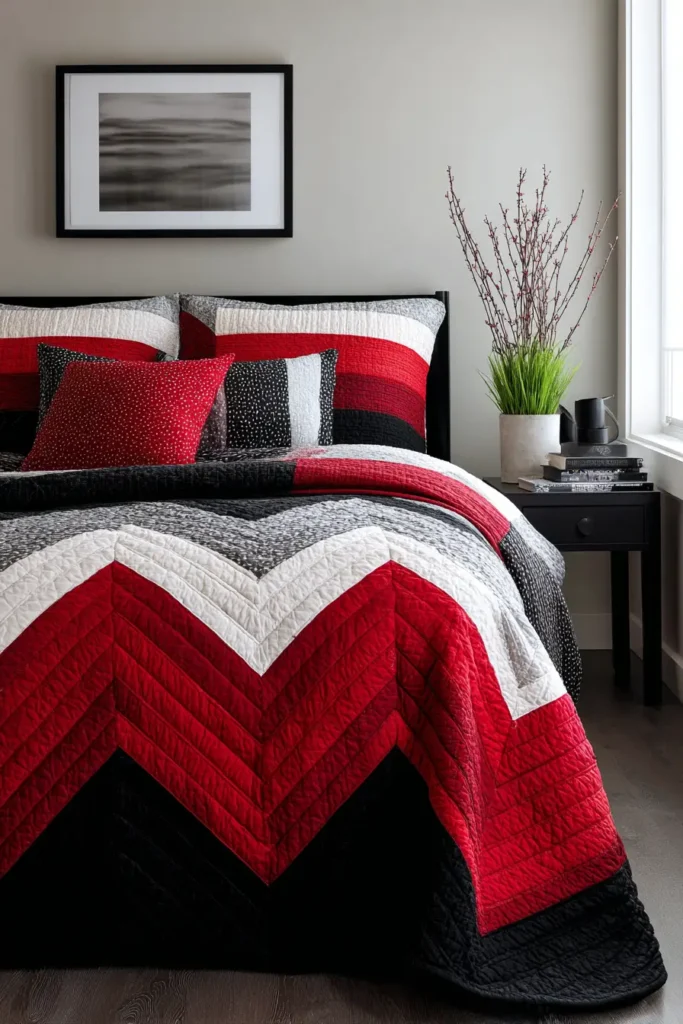
20 Bold Red, Black, and White Quilt Patterns for a Dramatic and Cozy Bedroom
Red, Black, and White: How to Make a Bold Palette Actually Work
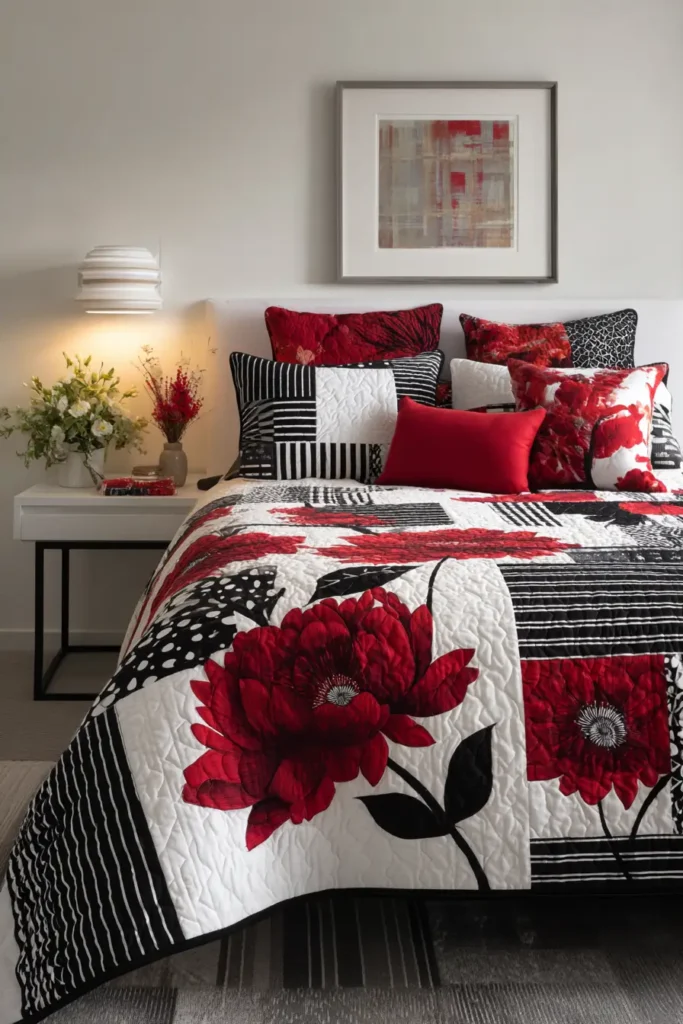
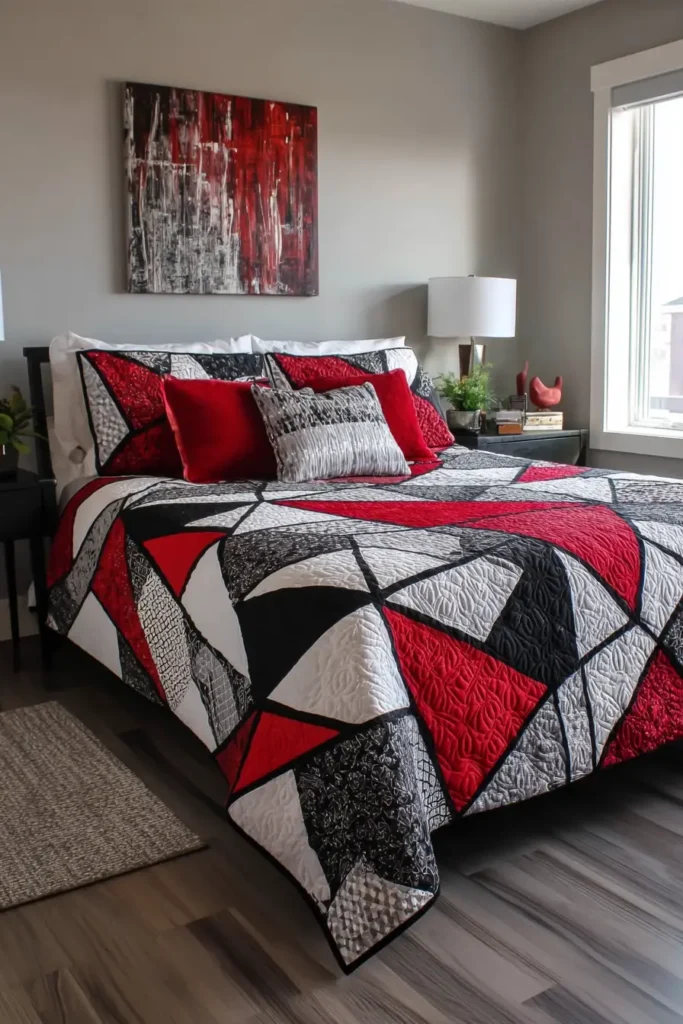
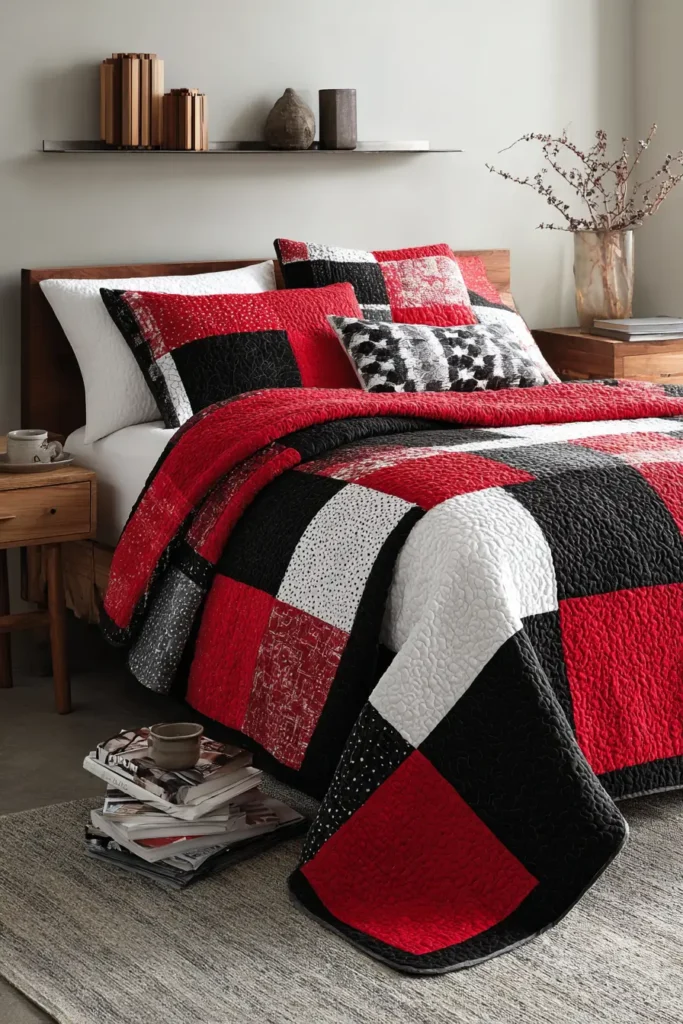
Red, black, and white are one of the few color combinations that make a decision the moment they enter a room. There is no ambiguity in it, no softness, no hedging. It commits — which is exactly why it works so well in a bedroom, and exactly why it goes wrong when the balance is off.
The balance is everything with this palette. Too much red and the room feels urgent, almost aggressive – the opposite of what a bedroom should do. Too much black and it becomes heavy, the space contracting around you. White does the work of keeping both in check: it opens the room, separates the stronger colors, and prevents the contrast from tipping into visual noise. When all three are proportioned correctly, the result is something that feels bold and cohesive at the same time – a combination that is genuinely difficult to achieve with most color palettes.
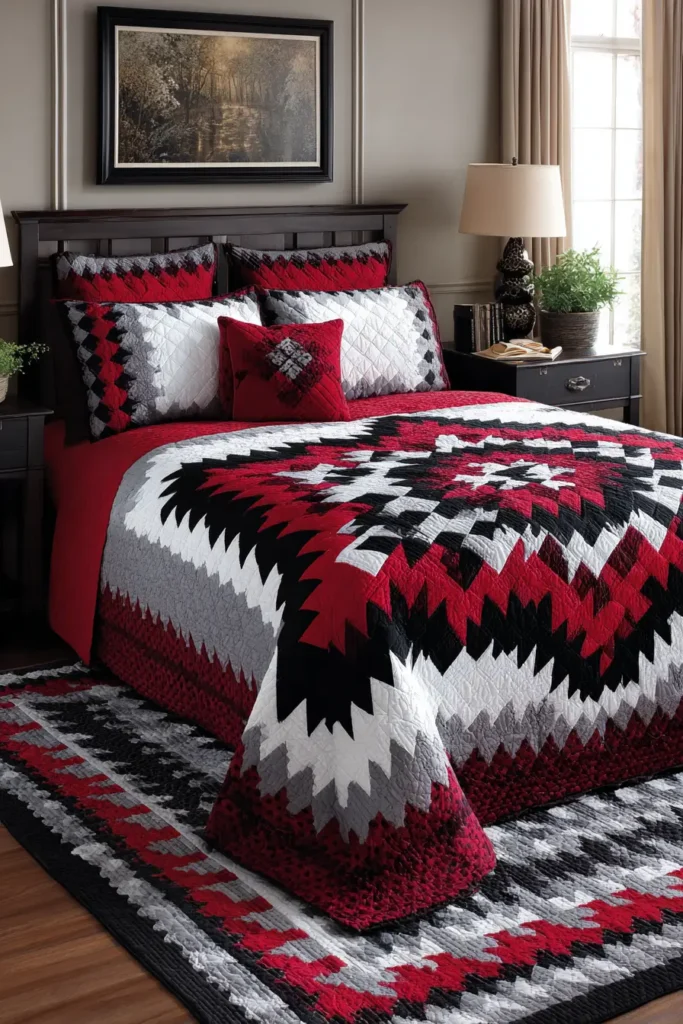
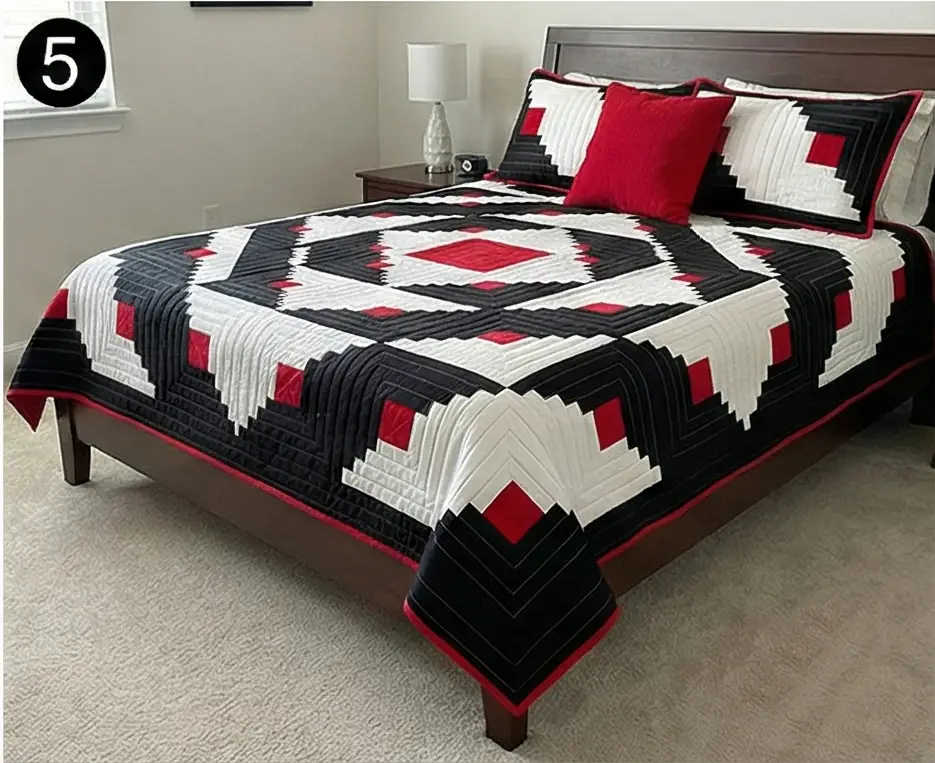
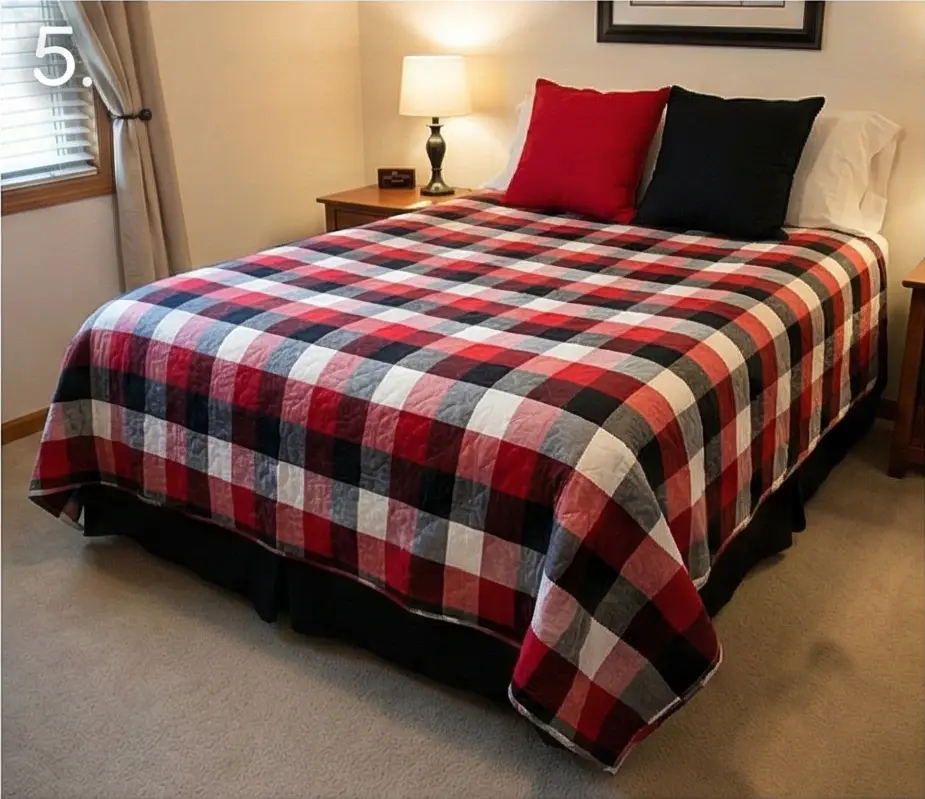
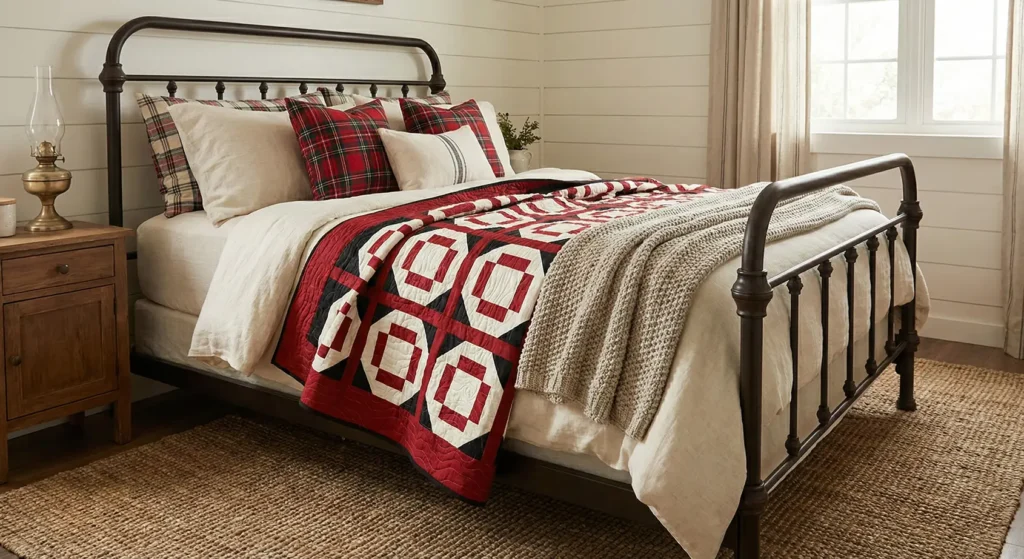
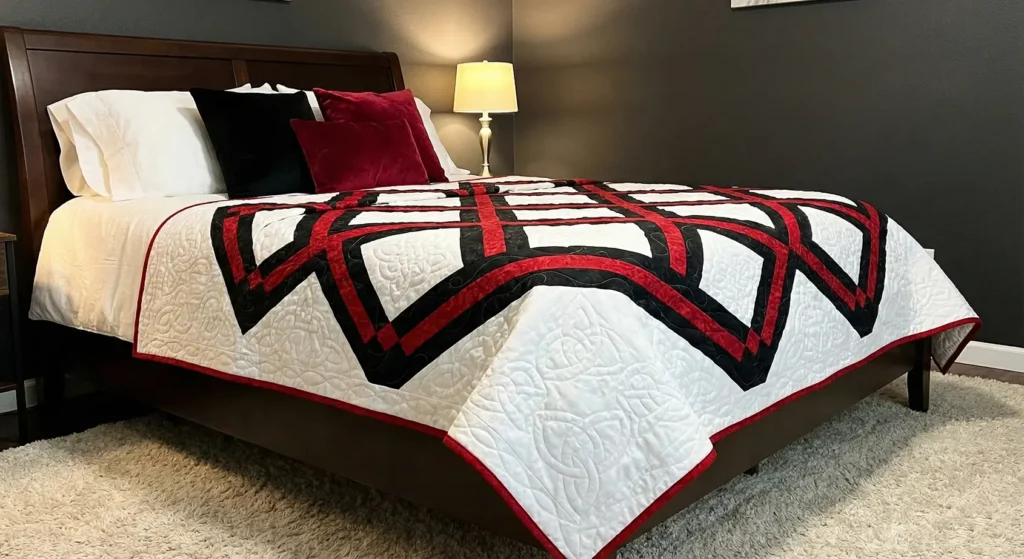
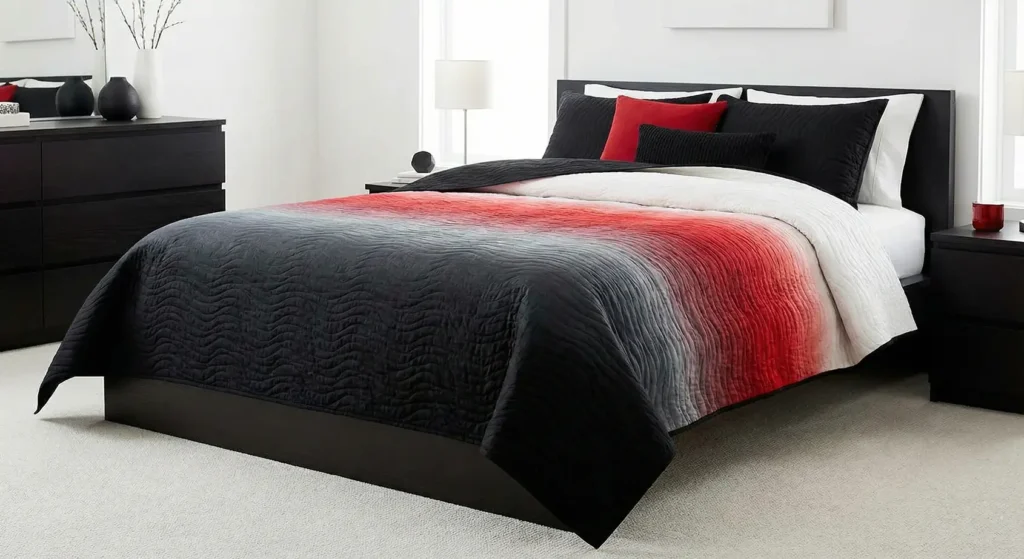
I have seen this work in rooms where every other attempt to add character had fallen flat. A well-chosen red, black, and white quilt on the bed changed the entire dynamic – suddenly the room had a center of gravity, and everything else organized itself around it. That is what a strong palette does when it is used with intention rather than caution.
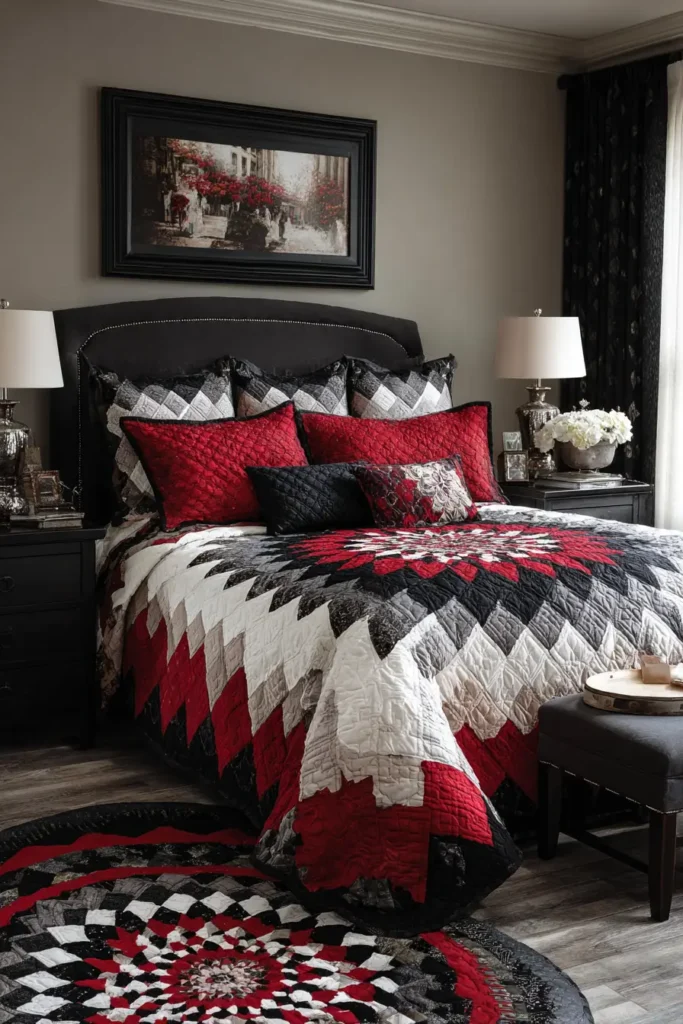
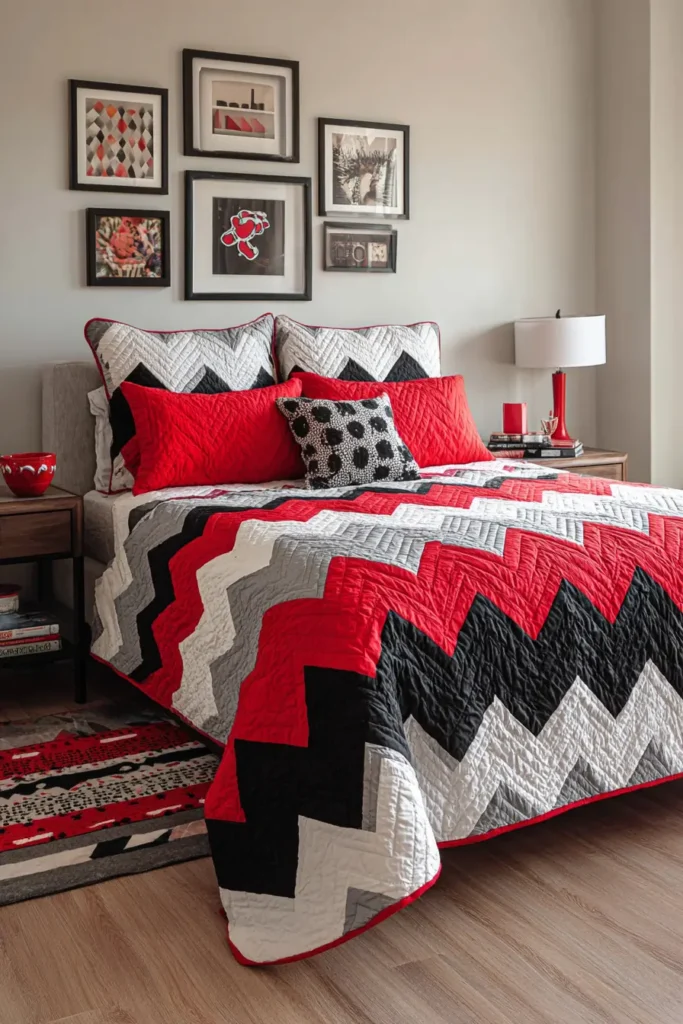
Why the Bedroom Is the Right Place for This
A bedroom is one of the few rooms where a dramatic focal point actually improves how the space feels to live in. In a living room, a bold palette has to negotiate with more competing elements – furniture, art, traffic, and function. In a bedroom, the bed is already the dominant object. A quilt that commits fully to a strong palette does not fight the room; it defines it. Black brings depth and structure. White keeps the space from closing in. Red adds warmth, preventing the high contrast from feeling cold or clinical.
The patterns in this collection show how differently the same palette behaves depending on construction. Pinwheel designs introduce rotation and movement – the eye travels across the surface rather than settling. Buffalo check and Irish Chain patterns ground the palette in familiarity, making the boldness feel approachable rather than confrontational. Geometric layouts and asymmetric block arrangements give the same colors a sharper, more architectural edge – better suited to rooms with clean lines and contemporary furniture.
Red, Black, and White Quilt
Contents
- 1 Red, Black, and White Quilt
- 2 1. Classic Red, Black, and White Patchwork Quilts for Cozy Bedrooms
- 3 2. Bold Red, Black, and White Stripe Quilts for Modern Beds
- 4 3. Elegant Red, Black, and White Quilted Bedspreads for Master Bedrooms
- 5 4. Dynamic Pinwheel Patterns for Guest Bedrooms
- 6 5. Bold Red, Black, and White Patchwork Quilt for Master Bedrooms
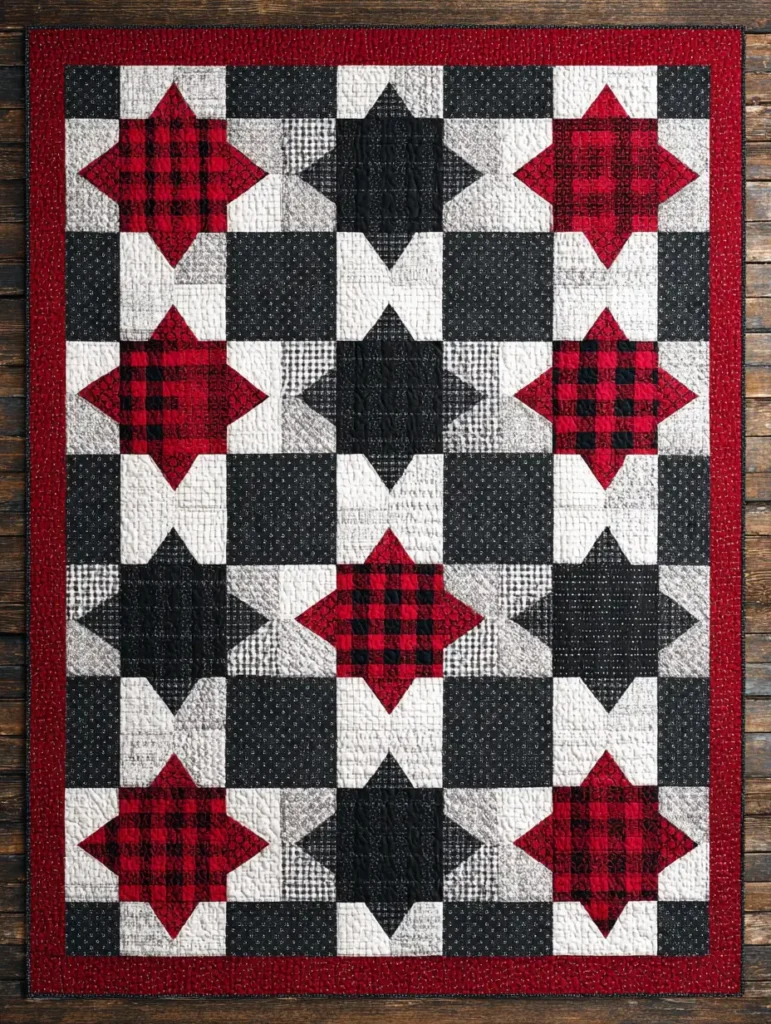
- 7 6. Bold Buffalo Check Red, Black, and White Bed Quilts – Plaid Bedspreads
- 8 7. Monochrome Floral Accent Quilts with Red Highlights
- 9 8. Modern Geometric Red, Black, and White Quilt Designs for a Modern Bedroom Statement
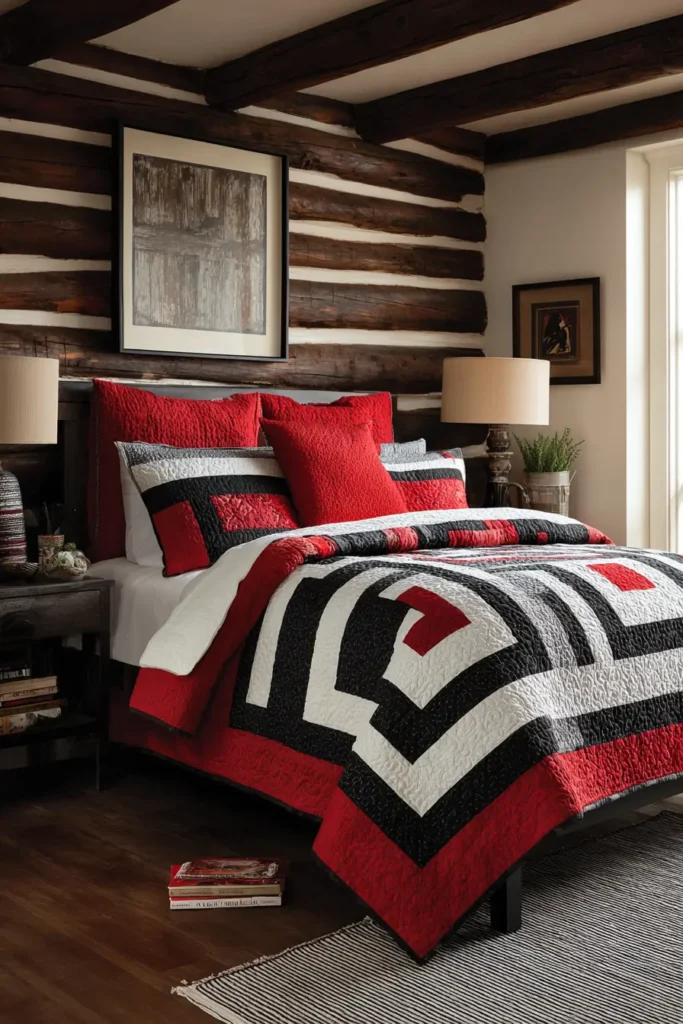
- 10 9. Rustic Farmhouse Red, Black, and White Quilt Designs
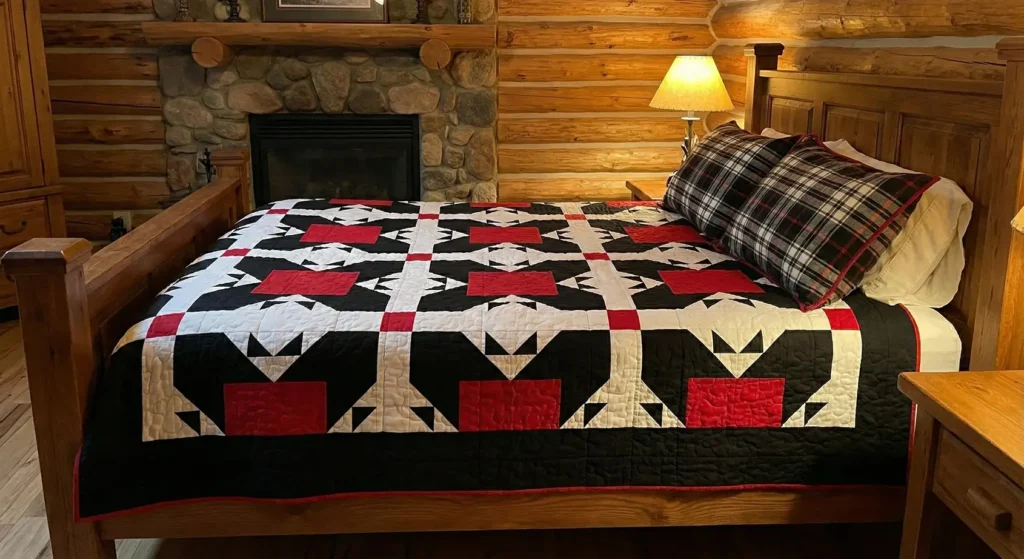
- 11 10. Rustic Bear Paw Blocks in Red, Black, and White
- 12 11. Elegant Irish Chain Quilts with Red Accents
- 13 12. Layered Red, Black, and White Quilts for Cozy Statement Bedrooms
- 14 13. Romantic Red Heart Patchwork for Cozy Bedrooms
- 15 14. Dramatic Ombre Red, Black, and White Quilt Patterns
- 16 15. Red, Black, and White Sophisticated Log Cabin Quilt Patterns
- 17 16. Contemporary Herringbone Quilt Patterns in Red, Black, and White
- 18 17. Scandinavian-Inspired Red, Black, and White Bedroom Quilts
- 19 18. Mosaic Tile Inspired Red, Black, and White Quilts
- 20 19. Minimalist Red, Black, and White Quilts with Clean Lines
- 21 20. Artistic Abstract Red, Black, and White Quilt Designs
- 22 Conclusion
Making It Liveable
The risk with a high-contrast palette is that it looks striking in a photograph and exhausting to sleep in. The solution is texture. Layered quilts, subtle quilting stitches across the surface, mixed fabric weights – these soften the visual contrast without reducing it. The design reads as bold from the doorway and comfortable up close, which is the balance a bedroom specifically requires.
Done right, this palette needs little else around it. Strong pattern, honest materials, correct proportions. The bed becomes the room’s natural focal point – and the rest follows.
See also: Red, Black, and White quilts for living–dining spaces · Black and White quilt patterns · Contemporary quilts
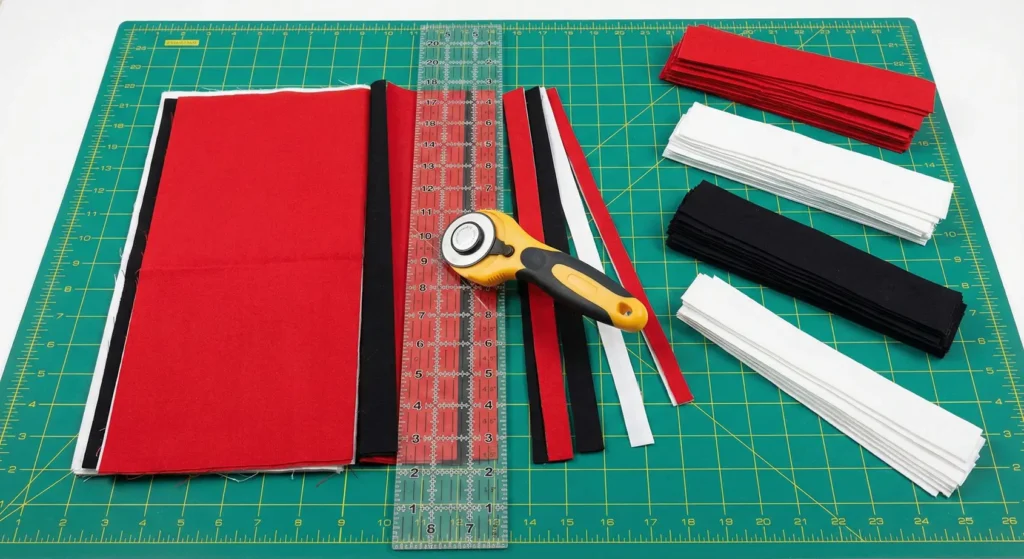
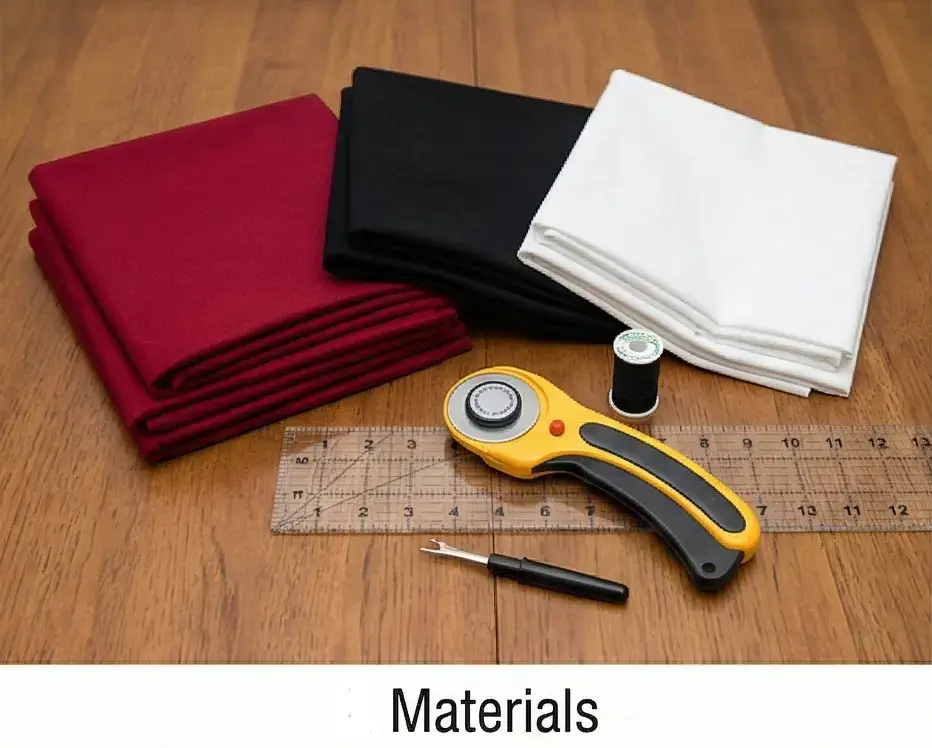
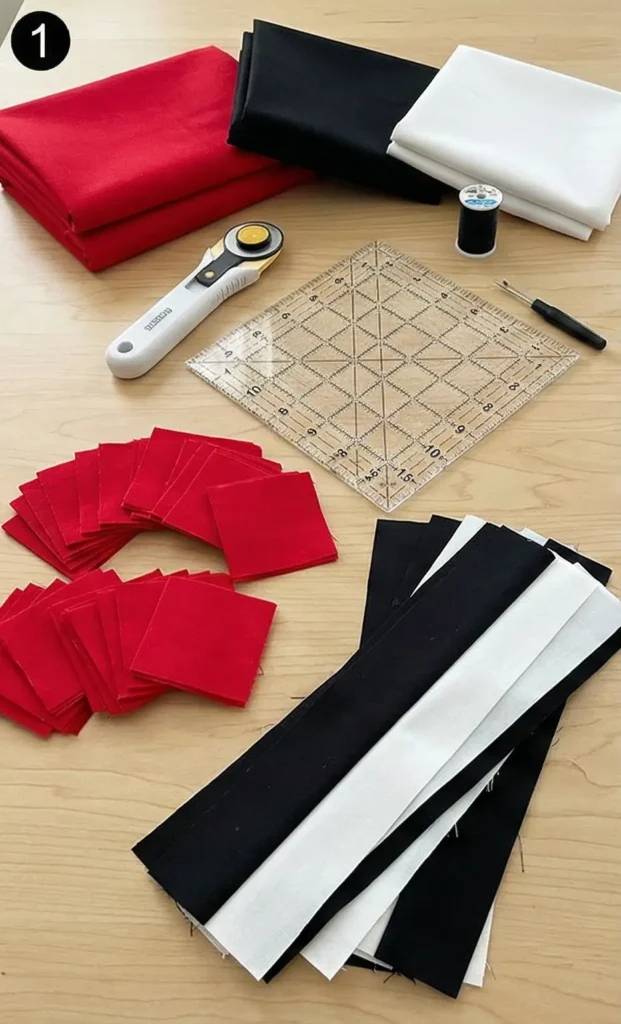
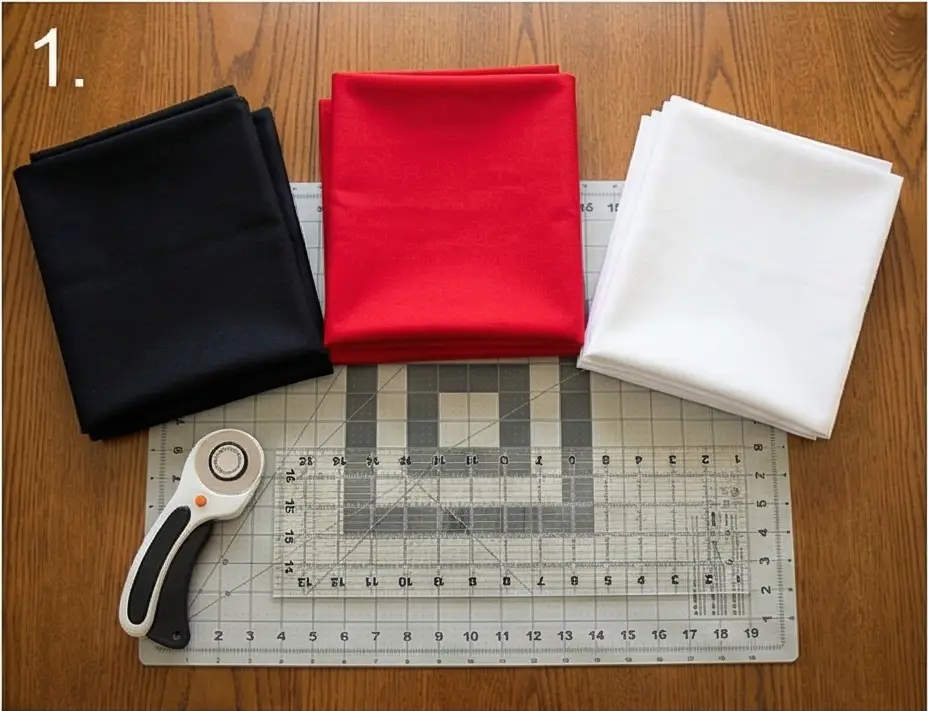
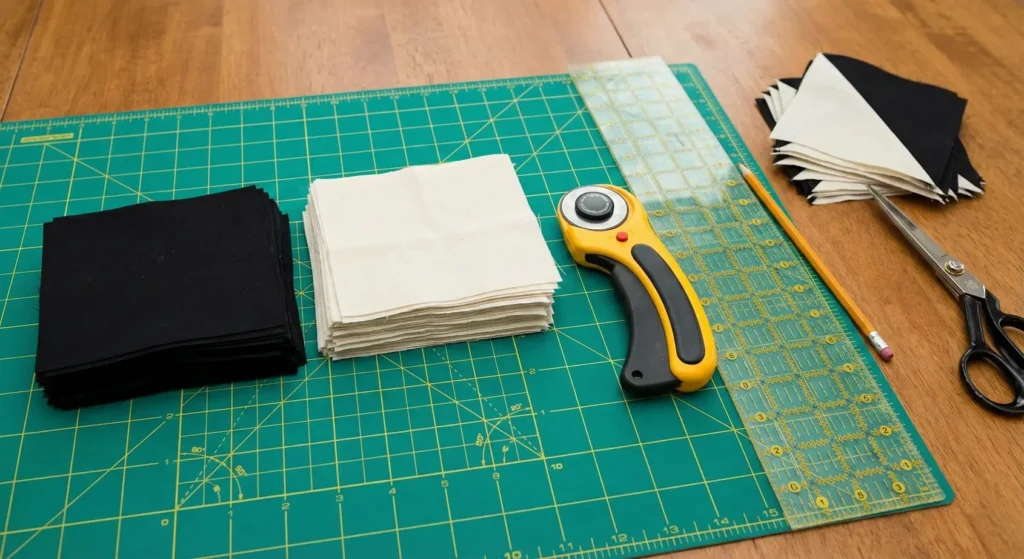
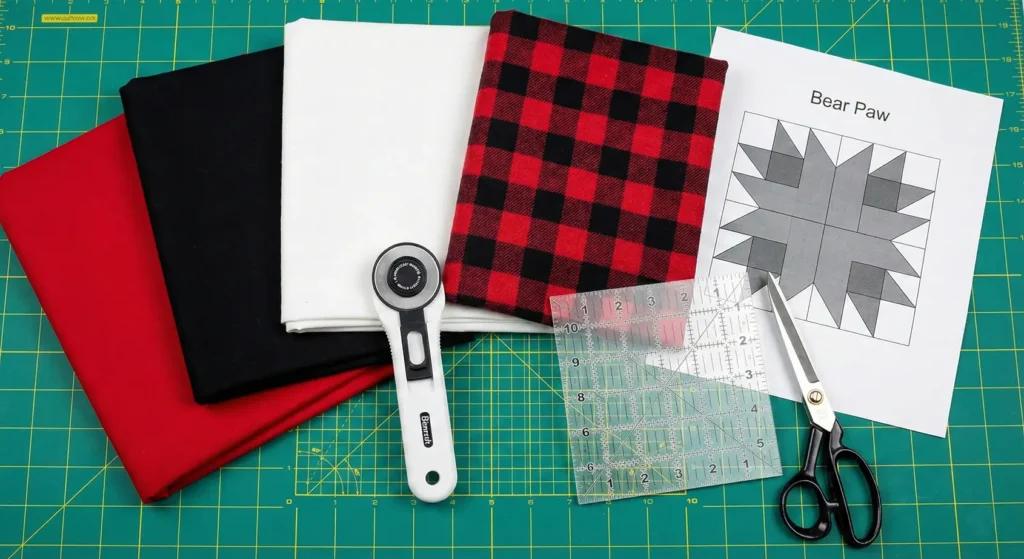
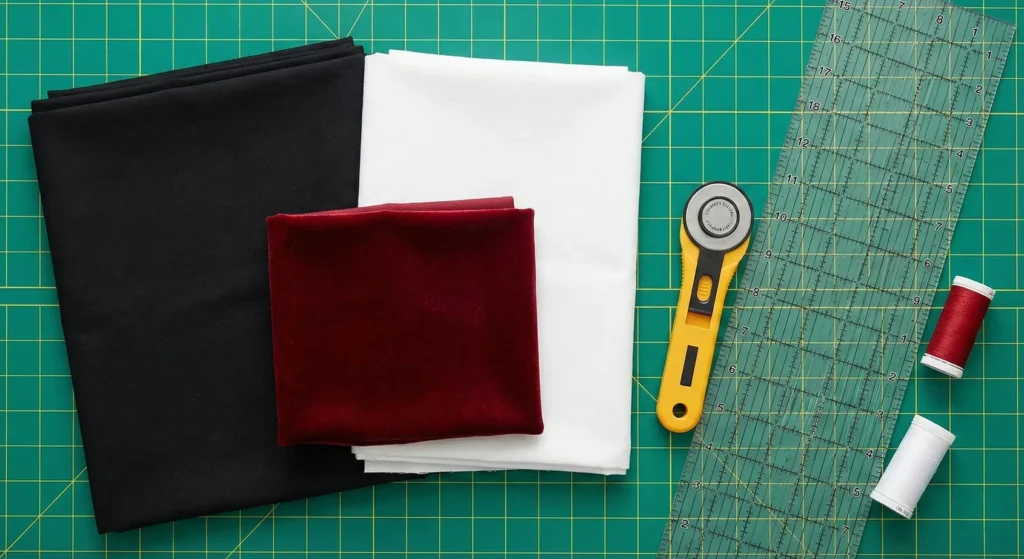
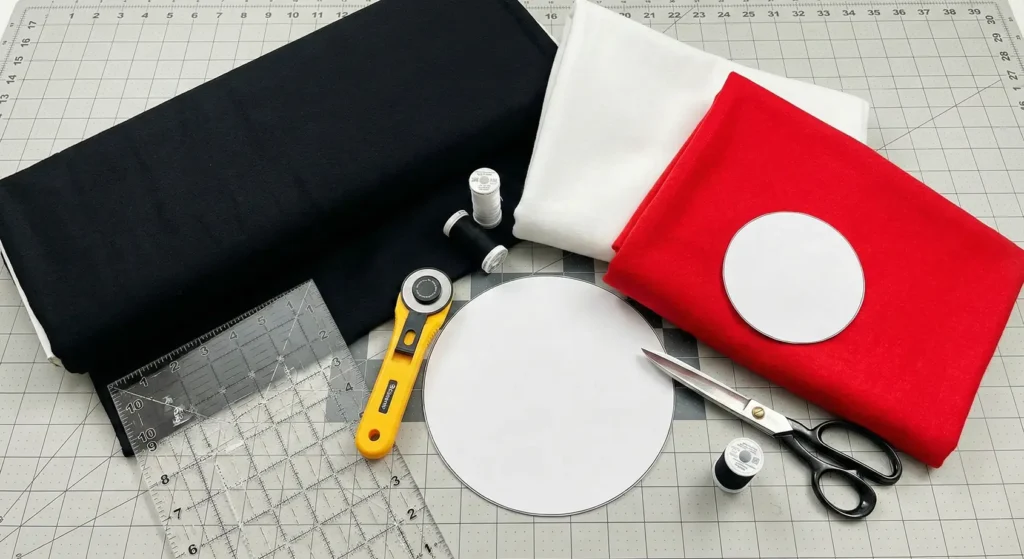
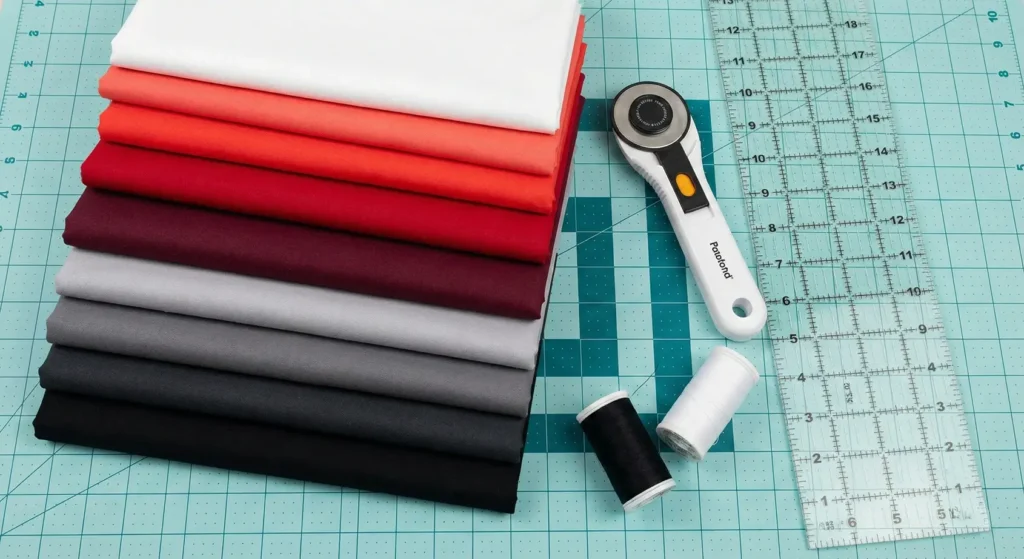
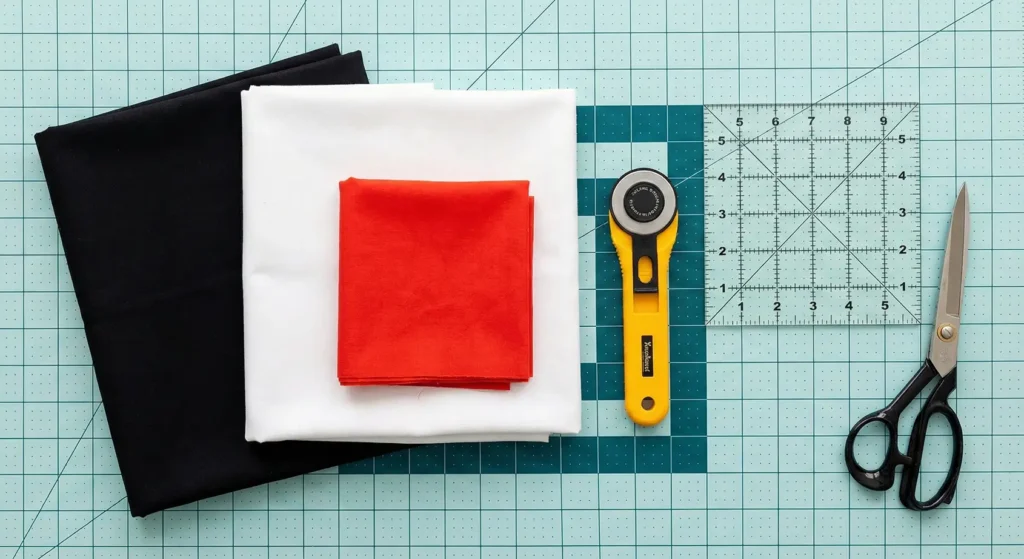
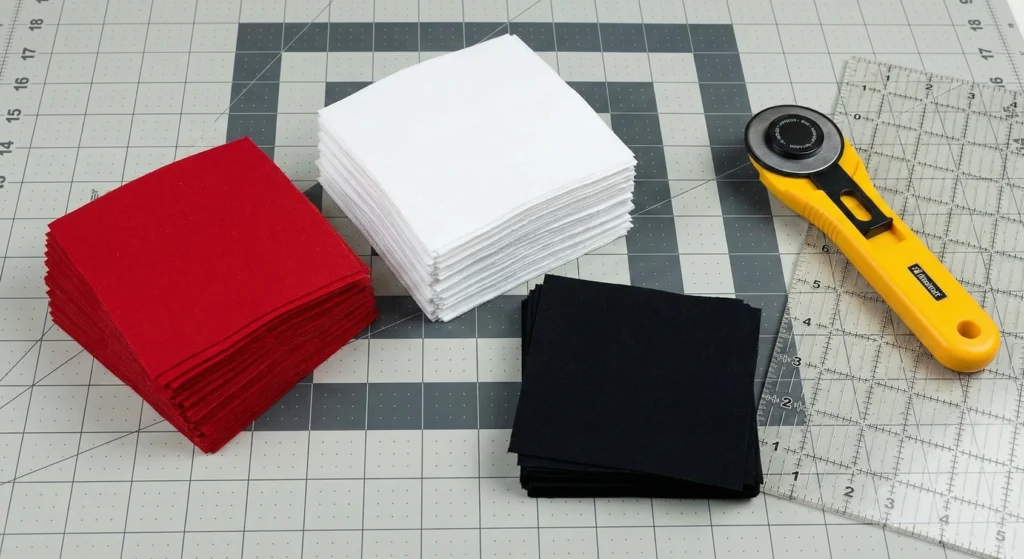
Recommended Supplies
“As an Amazon Associate, I earn from qualifying purchases.“
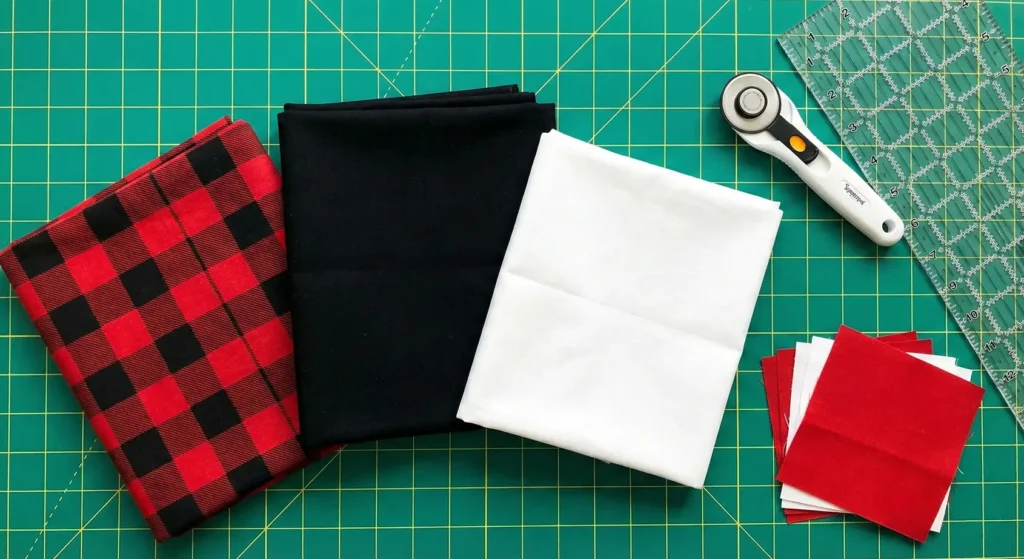
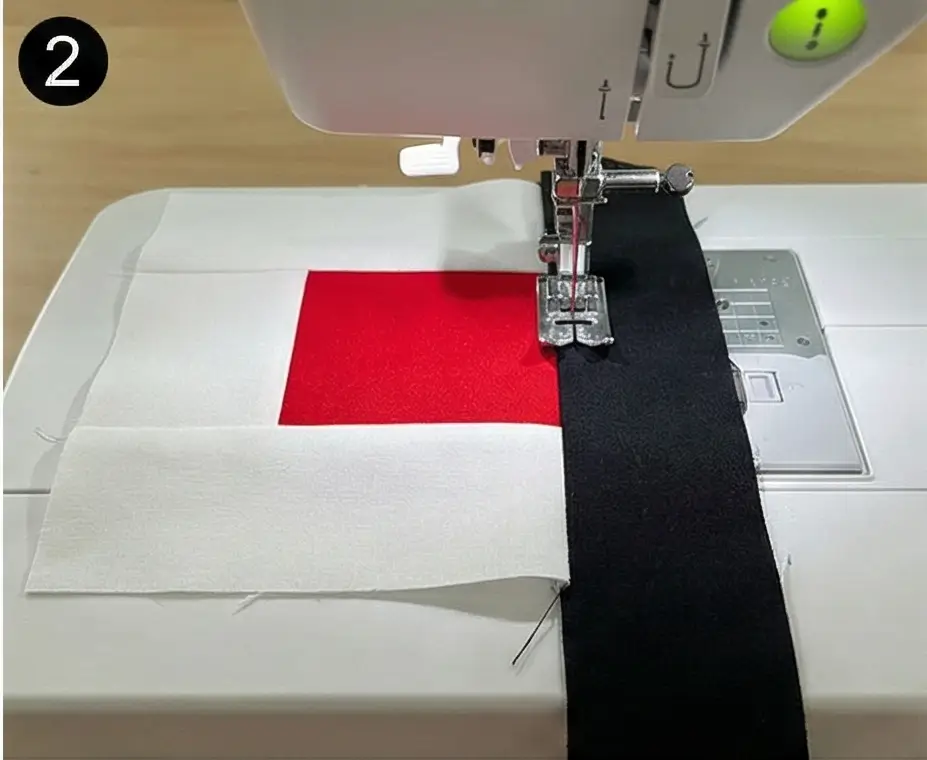
1. Classic Red, Black, and White Patchwork Quilts for Cozy Bedrooms

The “Lumberjack Star” Quilt
This pattern uses the classic “Ohio Star” block to create a rugged, cozy aesthetic. By mixing Buffalo Plaid reds, solid blacks, and crisp whites, you get a quilt that feels like a warm winter cabin. The sharp points of the stars add a dramatic flair against the simple patchwork background.
Finished Dimensions: Queen Size, approximately 84″ x 84″.
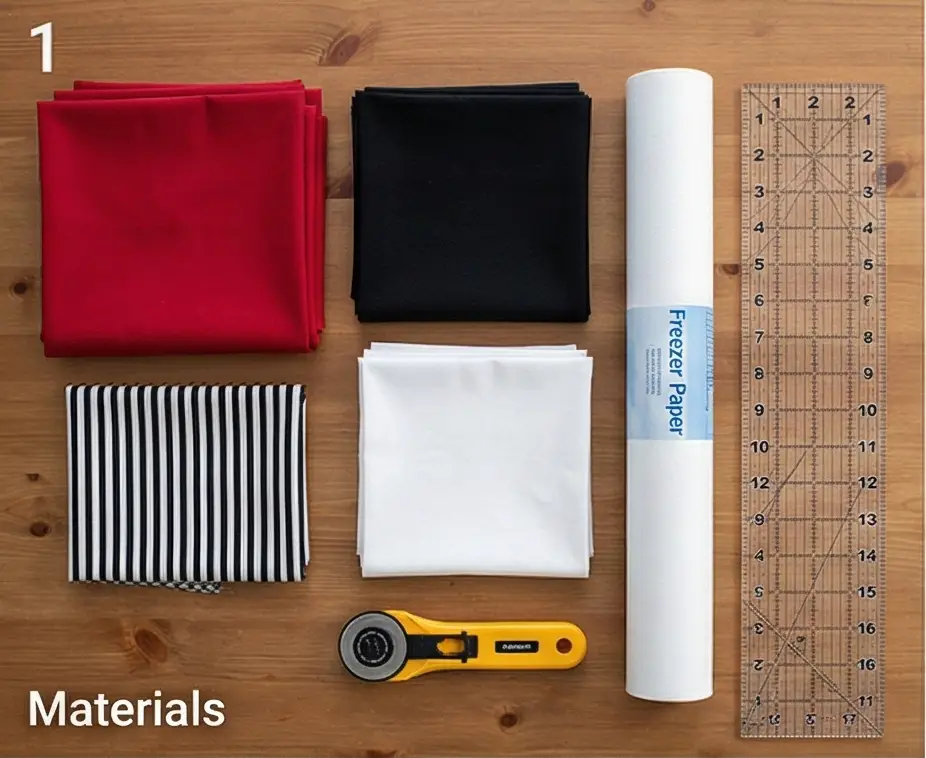
Materials Needed:
- Fabric A (Red/Plaid): 2.5 yards of Red Buffalo Check or Solid Deep Red.
- Fabric B (Black): 2.5 yards of Solid Black.
- Fabric C (White/Background): 3.5 yards of Solid White or Low-Volume Cream.
- Backing Fabric: 7.5 yards.
- Batting: Queen Size (90″ x 90″).
- Binding: 3/4 yard of Solid Black.
- Notions: Rotary cutter, 6.5″ square ruler, neutral thread.
Step 1: Cutting the Components
We will make 16 Large Ohio Star Blocks (16″ finished) and use plain squares for the alternate blocks.
- From Fabric A (Red): Cut 64 squares measuring 5.25″ x 5.25″ (for Quarter Square Triangles).
- From Fabric B (Black): Cut 16 squares measuring 5.25″ x 5.25″ (Center Squares).
- From Fabric C (White):
- Cut 64 squares measuring 5.25″ x 5.25″ (for Quarter Square Triangles).
- Cut 64 squares measuring 4.5″ x 4.5″ (Corner Squares).
- Cut 9 squares measuring 16.5″ x 16.5″ (Alternate Plain Blocks).
Step 2: Construct Quarter Square Triangles (QSTs)
The Ohio Star points are made from hourglass blocks (QSTs).
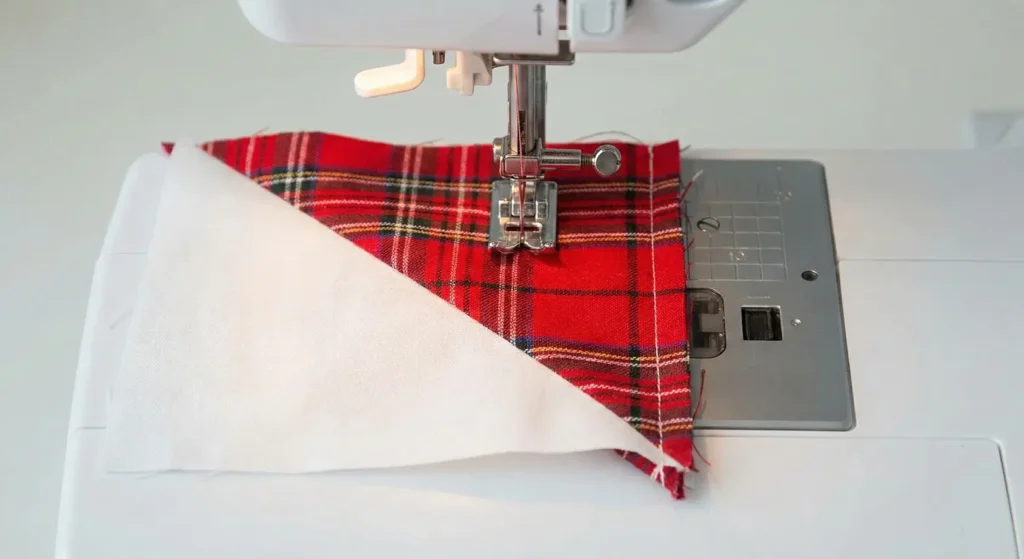
- Make HSTs first: Pair a 5.25″ Red square with a 5.25″ White square. Sew diagonally, cut, and press. (Yields 2 Red/White Half Square Triangles).
- Make QSTs: Take two Red/White HSTs. Place them Right Sides Together with opposite colors touching (Red touching White).
- Draw a diagonal line perpendicular to the seam. Sew 1/4″ on both sides. Cut and press.
- Trim: Trim these “Hourglass” units to exactly 4.5″ x 4.5″. You need 64 units.
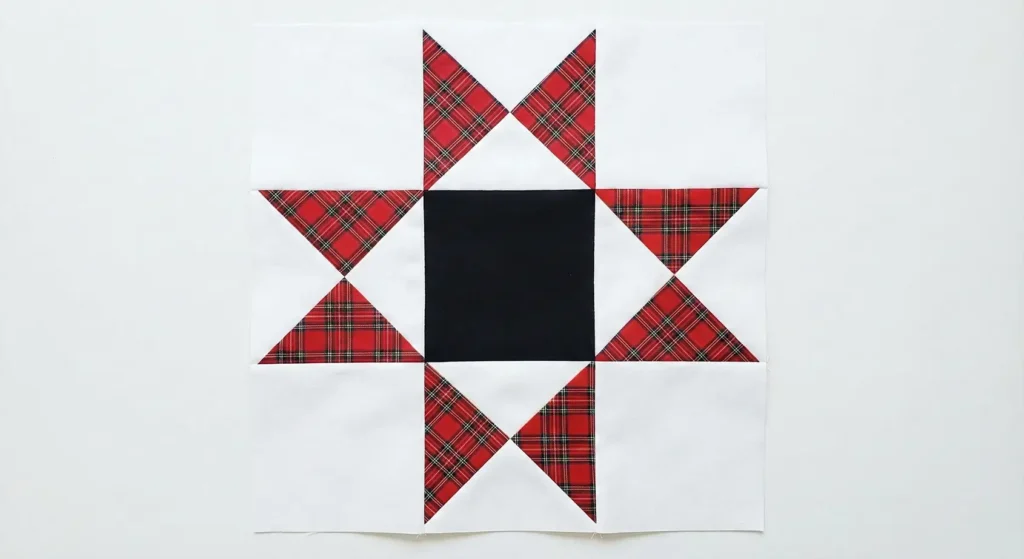
Step 3: Assemble the Ohio Star Block
- Lay out a 3×3 grid:
- Row 1: White Square – Hourglass (Red point out) – White Square.
- Row 2: Hourglass (Red point out) – Black Center Square – Hourglass (Red point out).
- Row 3: White Square – Hourglass (Red point out) – White Square.
- Sew the units into rows.
- Sew the rows together.
- The finished block should measure 16.5″ x 16.5″. Make 16 Blocks.
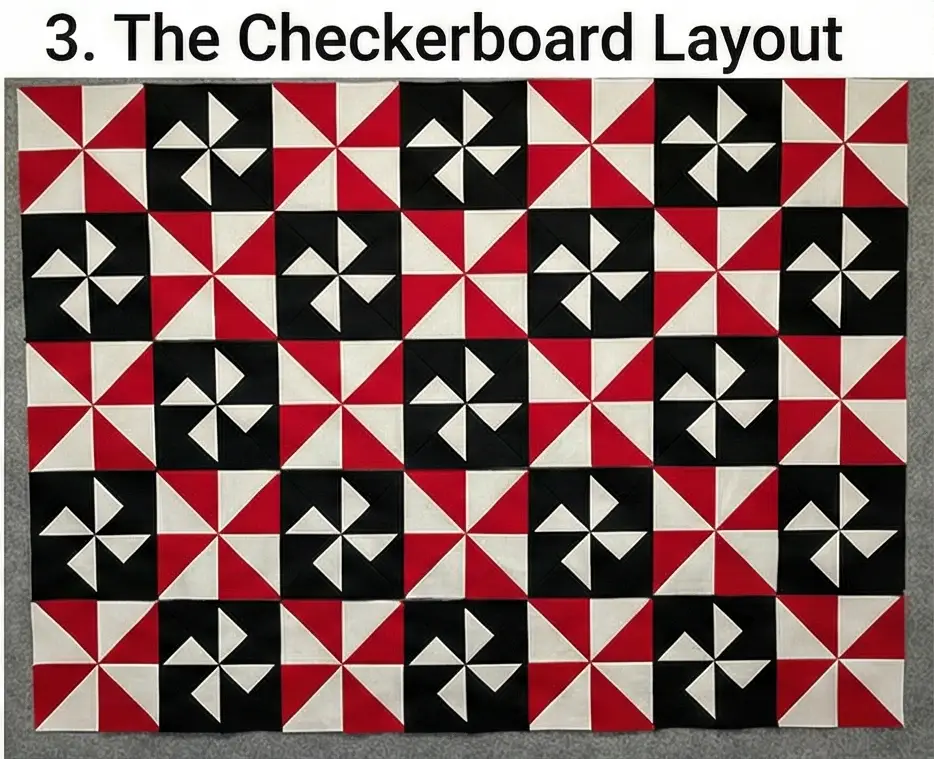
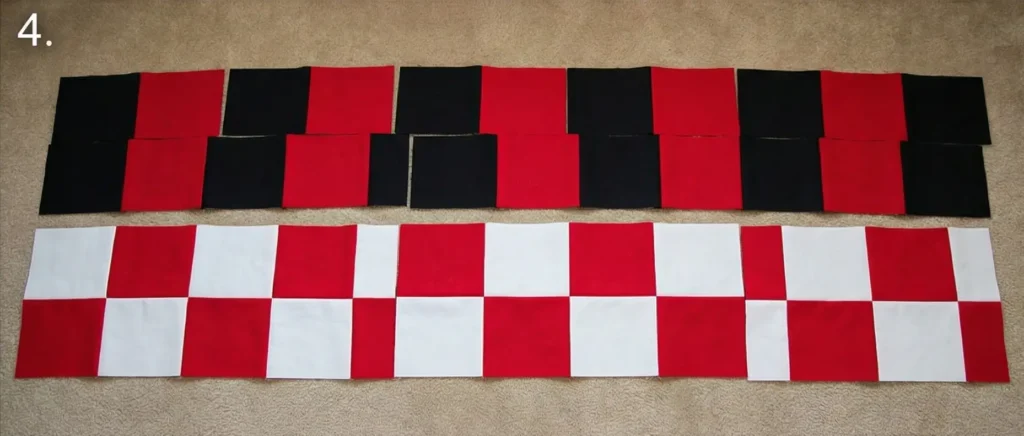
Step 4: The Checkerboard Layout
- Find a large floor space. Lay out a grid of 5 blocks wide x 5 blocks tall.
- Alternate: Start with an Ohio Star Block, then a Plain White (16.5″) square.
- Row 1: Star – Plain – Star – Plain – Star.
- Row 2: Plain – Star – Plain – Star – Plain.
- This alternating layout (“On Point” look without the math) gives the eyes a place to rest and makes the red stars pop dramatically.

Step 5: Join the Rows
- Sew the blocks into horizontal rows.
- Press seams toward the Plain Squares (this reduces bulk because the Star blocks have many seams).
- Sew the 5 rows together to complete the top.
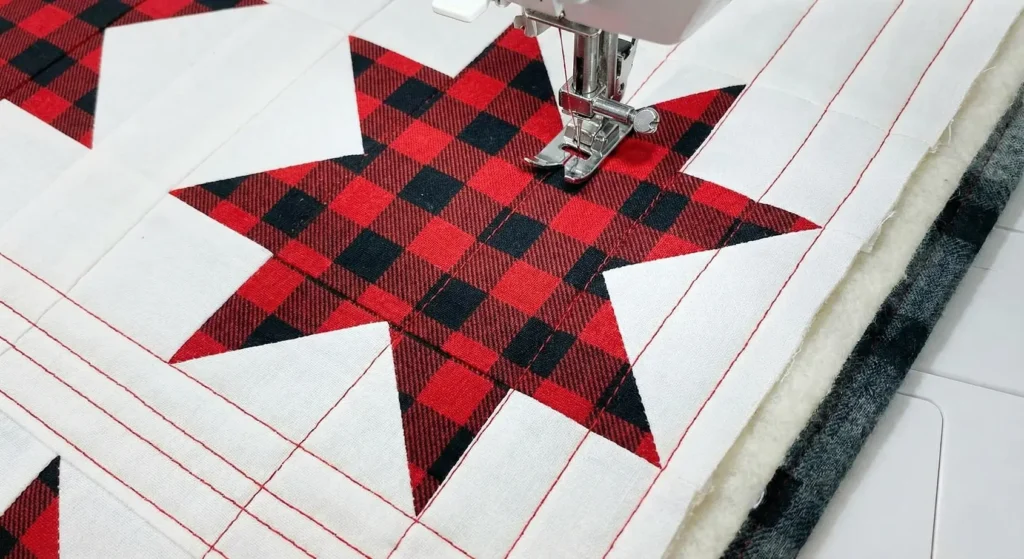
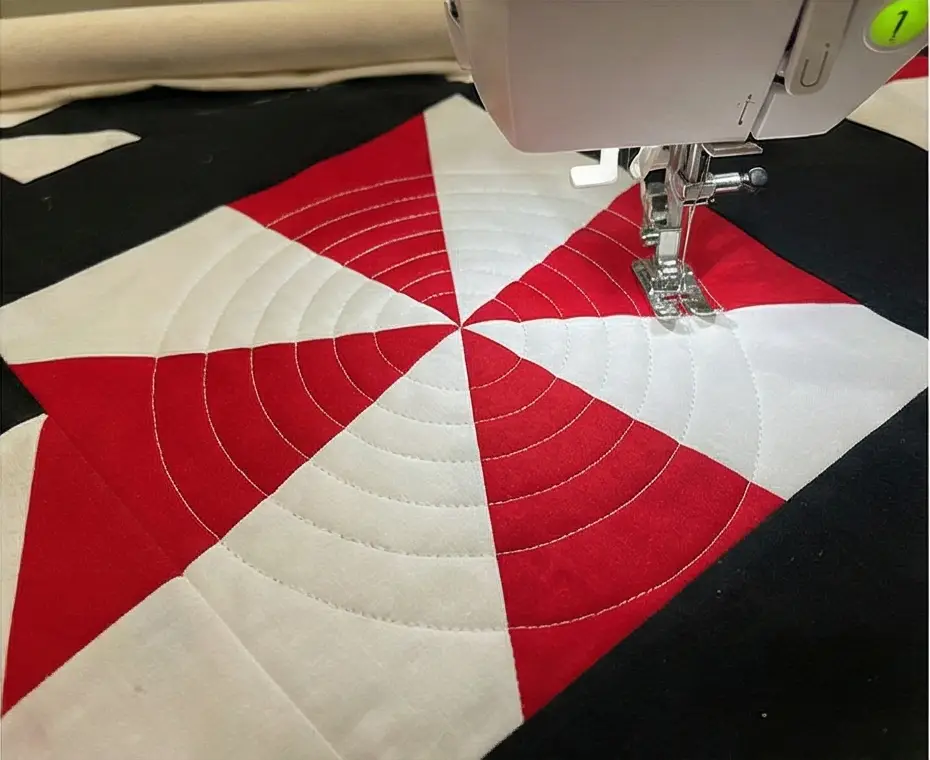
Step 6: “Echo” Quilting
- Baste the sandwich.
- Quilting: Use Red Thread for a bold statement or White Thread for subtlety.
- Quilt diagonal lines that pass through the center of the stars.
- Echo these lines 1 inch apart. The cross-hatching effect reinforces the geometry of the stars and secures the large plain blocks.
Pro Design Tip: Mix Your Reds. Don’t stick to just one red fabric. Use a “Scrappy” approach for the red parts of the stars. Mix Cranberry, Cherry, Brick, and Maroon fabrics. As long as they all read as “Red” and contrast with the Black/White, the variety adds incredible depth and richness to the quilt.
Budget Consideration: Flannel Shirts. This pattern screams “Cabin Core.” Go to the thrift store and buy 4-5 XL Red and Black Plaid Flannel Shirts. Cut your red/plaid pieces from these shirts. The worn-in flannel is softer than new fabric and adds authentic rustic charm for a fraction of the cost.
More Recommended Supplies
“As an Amazon Associate, I earn from qualifying purchases.“
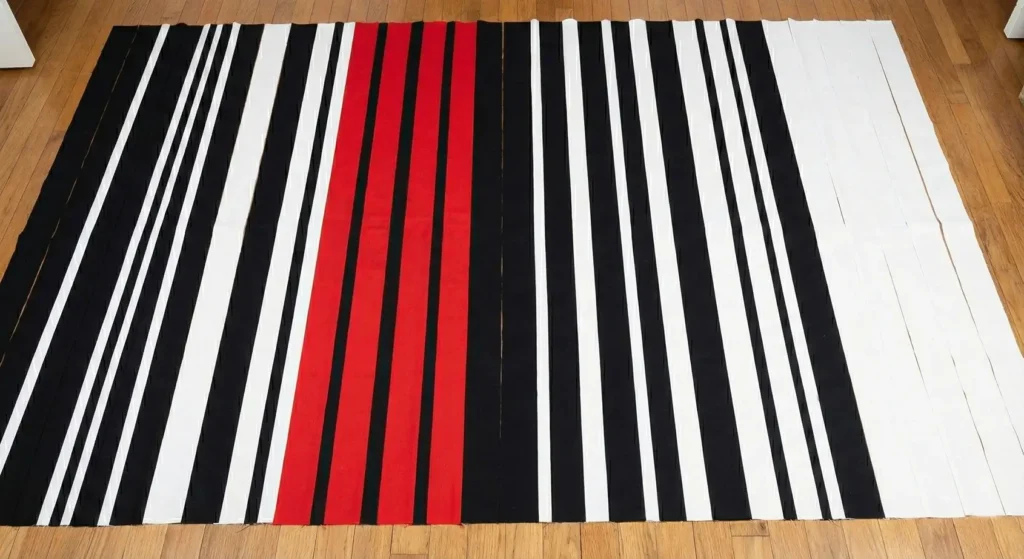
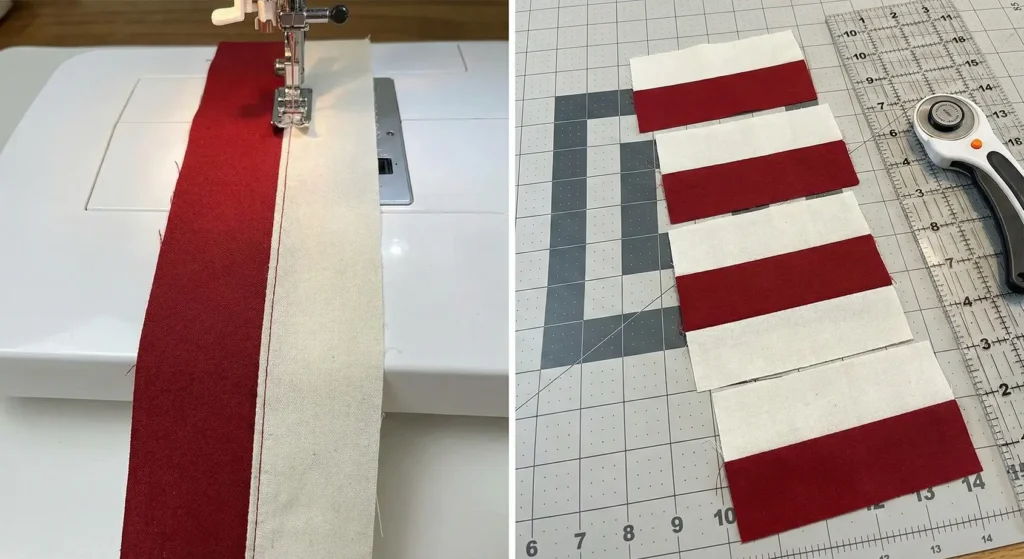
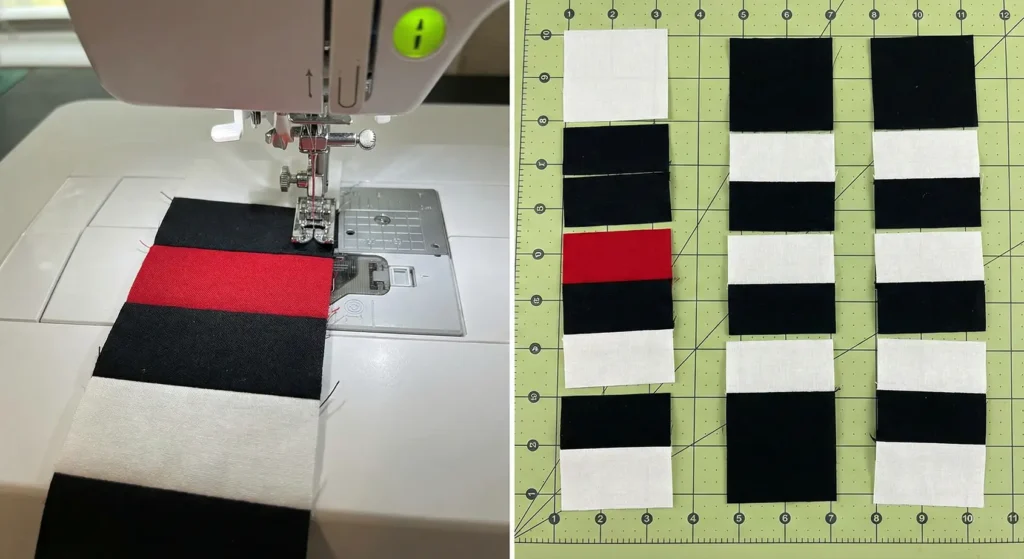
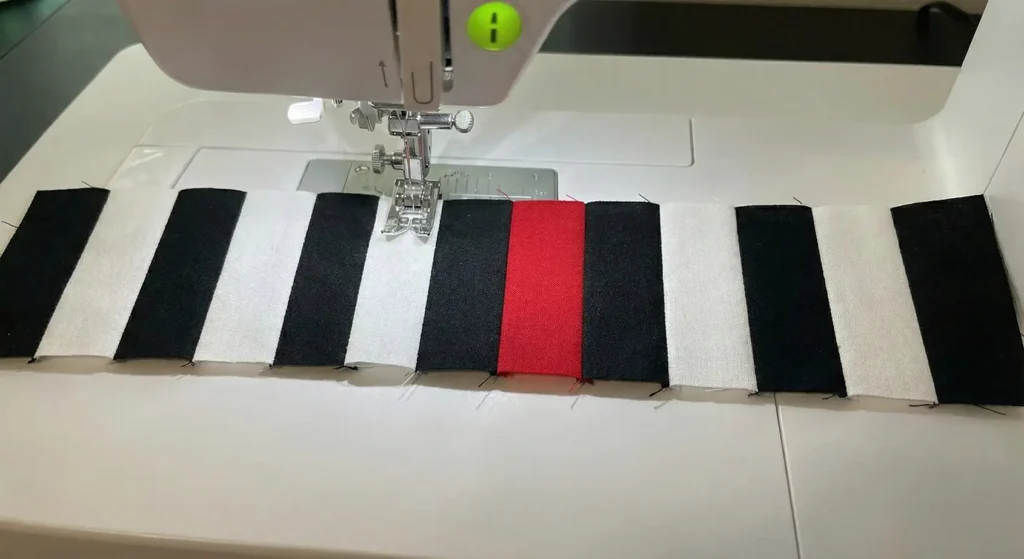
2. Bold Red, Black, and White Stripe Quilts for Modern Beds
The “Red Line” Barcode Quilt
This design takes the minimalist “barcode” concept—vertical strips of varying widths—and injects it with adrenaline. The layout uses primarily Black and White for high contrast, but features deliberate, bold “interruptions” of bright Fire Engine Red. The result looks like a modern abstract painting or a city subway map. It elongates the bed’s look and creates a powerful focal point in a modern room.
Finished Dimensions: Queen Size, approximately 90″ x 96″.
Materials Needed:
- Fabric A (Red): 2 yards of Solid Bright Red (Kona Poppy or Cardinal).
- Fabric B (Black): 3 yards of Solid Black (or Charcoal for a softer look).
- Fabric C (White): 3 yards of Solid White (or light Grey).
- Backing Fabric: 8.5 yards.
- Batting: Queen/King Size (100″ x 100″).
- Binding: 3/4 yard of Solid Red (for a spicy finish).
- Notions: Rotary cutter, 24″ quilting ruler, walking foot (essential for long seams).
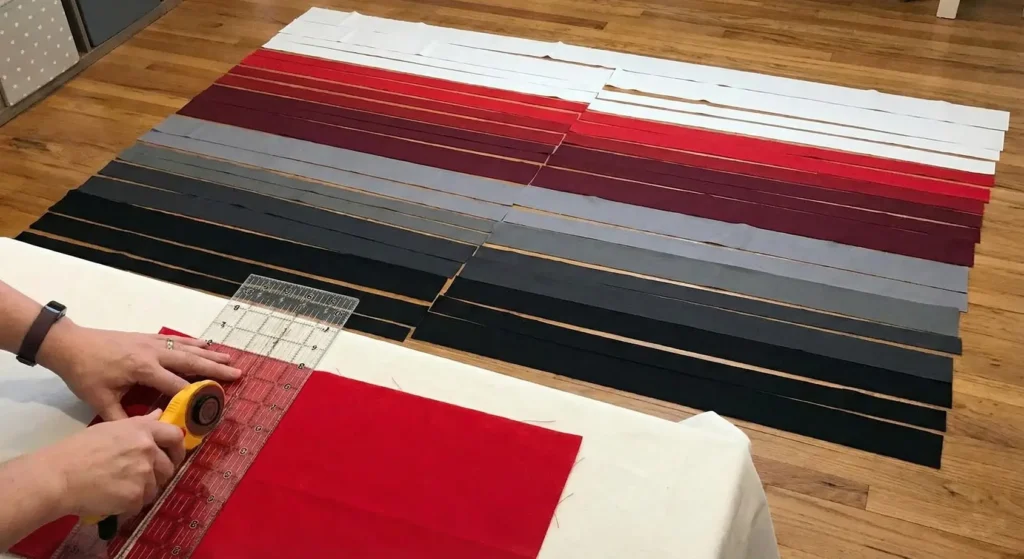
Step 1: Cut Varied Width Strips
To create the “random” barcode look, you need a variety of strip widths. Cut Width of Fabric (WOF) strips from all colors.
- From Red: Cut 8 strips @ 2.5″, 4 strips @ 4.5″.
- From Black: Cut 12 strips @ 1.5″, 10 strips @ 3.5″, 5 strips @ 6.5″.
- From White: Cut 12 strips @ 2.5″, 10 strips @ 4.5″, 5 strips @ 8.5″.
- Note: The wider white strips add “negative space” to let the quilt breathe.
Step 2: Extend the Strip Length
Standard fabric is ~42″ wide, but a bed quilt needs to be ~96″ long. You must join strips.
- Take two matching strips (e.g., two 2.5″ Red strips).
- Sew: Sew them together end-to-end using a diagonal seam (to reduce bulk) or a straight seam.
- Add a Third: Since 42 + 42 = 84″ (too short), cut a third strip in half and add it to the length.
- Trim: Trim all your long strips to exactly 96.5 inches.
- Repeat for all color strips until you have a pile of very long ribbons.

Step 3: The Asymmetrical Layout
Do not make a repeating pattern (A-B-C-A-B-C). Randomness is key.
- Find a large floor space.
- Zone 1 (Left Side): Start with mostly Black and White strips of varying widths.
- Zone 2 (The “Red Line”): About 1/3 of the way into the quilt, cluster 3-4 Red strips together, separated by very thin Black strips (1.5″). This creates a heavy vertical “stripe of power.”
- Zone 3 (Center): Return to a mix of Black and White, but scatter in a single Red strip here and there.
- Zone 4 (Right Side): End with wide White blocks to fade the pattern out.
- Check: Ensure the total width of your laid-out strips is roughly 90 inches.
Step 4: Sew the “Long Haul” Seams
Sewing 96-inch seams can cause bowing/warping.
- Pin: Pin your first two strips together at 12-inch intervals.
- Sew: Stitch from Top to Bottom.
- Flip: For the next strip, sew from Bottom to Top.
- Alternate: changing direction with every strip prevents the quilt from curving into a banana shape.
- Pressing: Press all seams toward the darker fabric (Black or Red).
Step 5: Square Up the Top
- Lay the massive top flat.
- Even with careful measuring, the top and bottom edges will be jagged.
- Use a large square ruler to trim the top and bottom edges perfectly straight, removing the uneven ends of the strips.

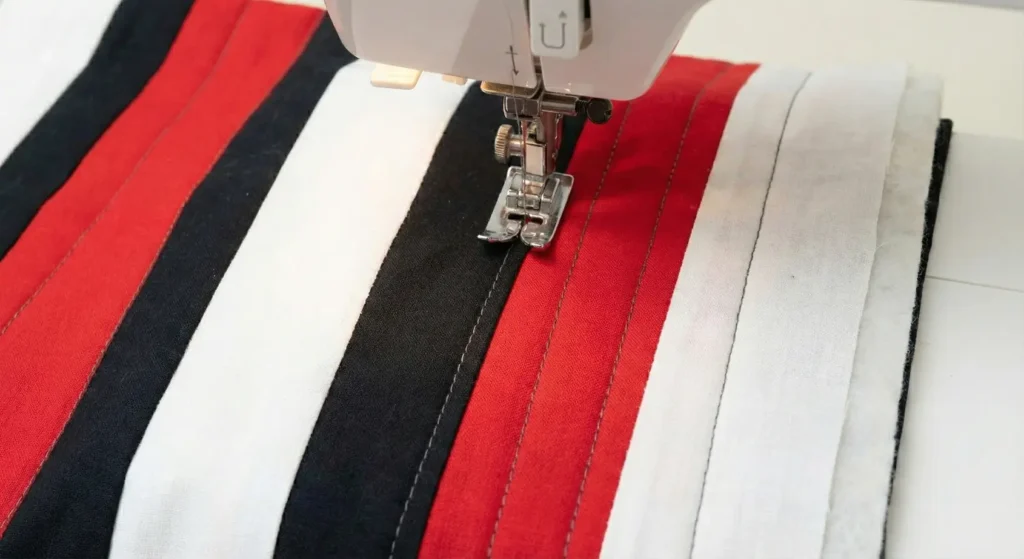
Step 6: “Matchstick” or “Channel” Quilting
- Baste the sandwich.
- Quilting: Use a walking foot.
- Channel Quilting: Stitch straight vertical lines parallel to the seams.
- Spacing: Stitch lines about 1 inch apart (or closer for a stiffer, more modern coverlet feel).
- Thread Color: Use Grey Thread. It blends well with both the black and white and looks intentional on the red.
Pro Design Tip: The “Texture” Swap. To make the red really stand out, change the texture of just the red fabric. Use a Red Velvet or Red Corduroy for the red strips, while keeping the black and white as standard cotton. The velvet will catch the light and add a luxurious, tactile element to the bold color.
Budget Consideration: Flat Sheets as Fabric. Since this pattern requires long, continuous lengths of fabric, buying King Size Flat Sheets (one Black, one White, one Red) is often cheaper than yardage. A King sheet gives you ~100 inches of continuous length, meaning you can skip “Step 2” (joining strips) entirely!

3. Elegant Red, Black, and White Quilted Bedspreads for Master Bedrooms
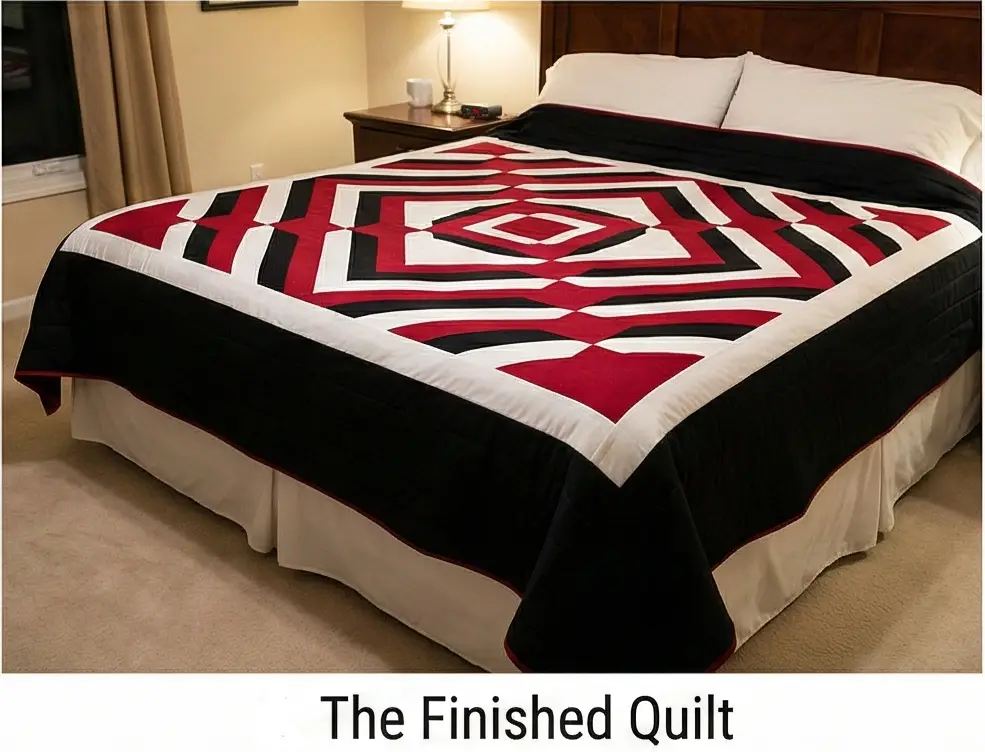
The “Royal Diamond” Trip Around the World Quilt
For a master bedroom, you want grandeur. The “Trip Around the World” pattern is one of the most elegant designs in quilting history. It creates a massive, pulsating diamond that radiates from the center of the bed to the floor. In Black, White, and Deep Red, it looks less like a quilt and more like a royal tapestry. While it looks incredibly complex, it is actually made using a clever “tube” technique that saves hours of sewing.
Finished Dimensions: Queen/King Bedspread, approximately 96″ x 108″ (Generous drape).
Materials Needed:
- Fabric A (Red): 3 yards of Deep Crimson or Burgundy (for richness).
- Fabric B (Black): 3 yards of Jet Black.
- Fabric C (White): 3 yards of Crisp White or Silver Grey.
- Backing Fabric: 9 yards.
- Batting: King Size (120″ x 120″).
- Binding: 1 yard of Solid Black.
- Notions: Rotary cutter, 6.5″ x 24″ ruler, seam ripper (essential for this technique).
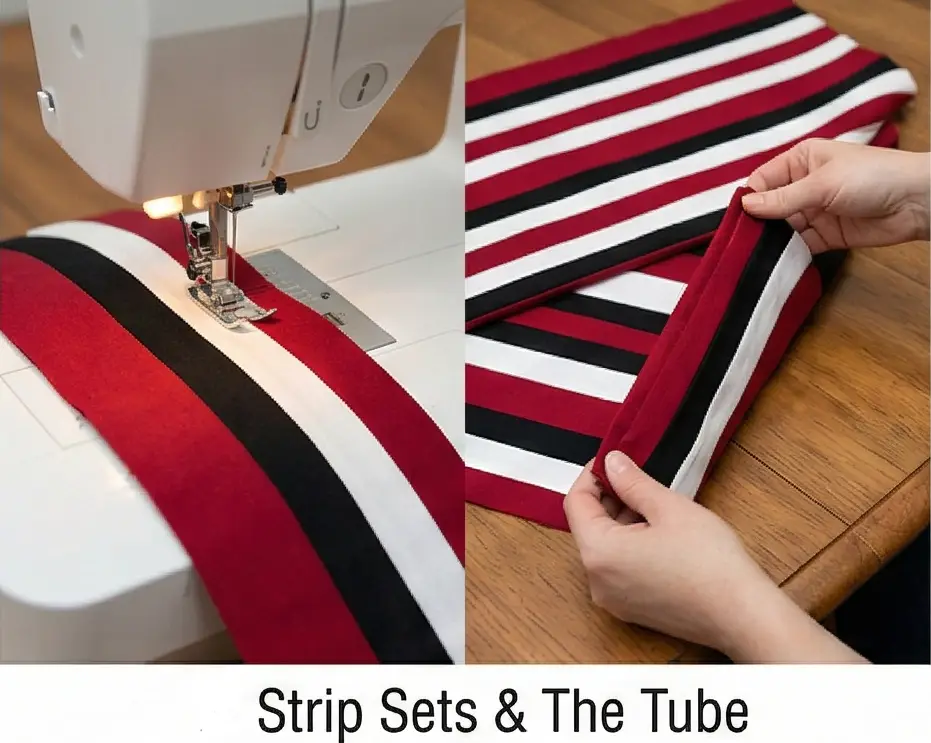
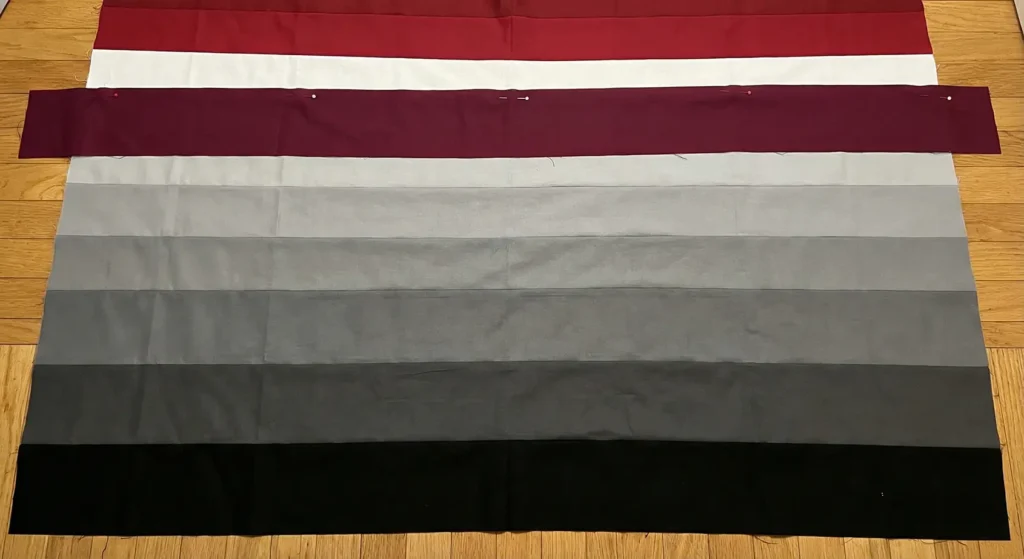
Step 1: Create the Strip Sets
The secret to this pattern is sewing long strips rather than individual squares.
- Cut all your fabrics into 2.5″ wide strips x WOF (Width of Fabric). You need about 84 strips total.
- Divide them into 6 sets of 14 strips.
- Arrange: Lay out 14 strips in a pleasing gradient sequence (e.g., Black-Black-Red-Red-White-White-Red-Red-Black-Black…).
- Sew: Sew these 14 strips together lengthwise to create a massive striped “fabric sheet.”
- Press all seams in one direction.
- Repeat to make 6 identical strip sets.
Step 2: Make the “Tube”
- Take one strip set. Fold it lengthwise, bringing the top strip down to meet the bottom strip.
- Sew: Sew the top strip to the bottom strip (Right Sides Together).
- Result: You now have a giant tube of fabric stripes.
- Repeat for all 6 strip sets.
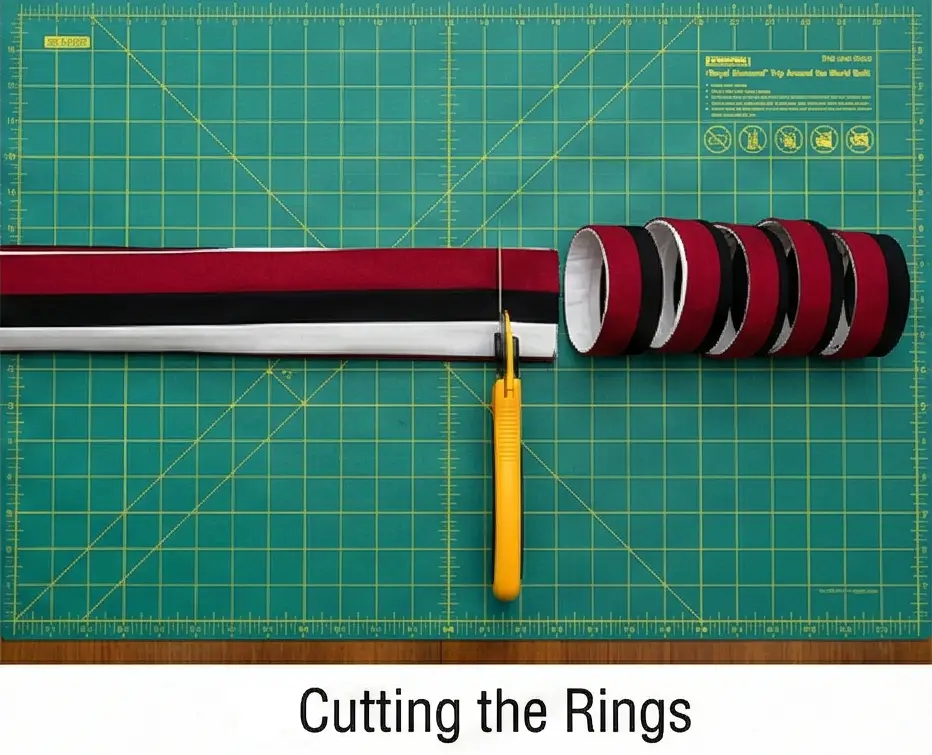
Step 3: Cut the Rings
- Lay the tube flat on your cutting mat (be careful not to cut the layer underneath crookedly).
- Cut: Cross-cut the tube into loops that are 2.5″ wide.
- Since you used 2.5″ strips, you are now creating loops of 2.5″ squares.
- Cut the entire tube into these loops.
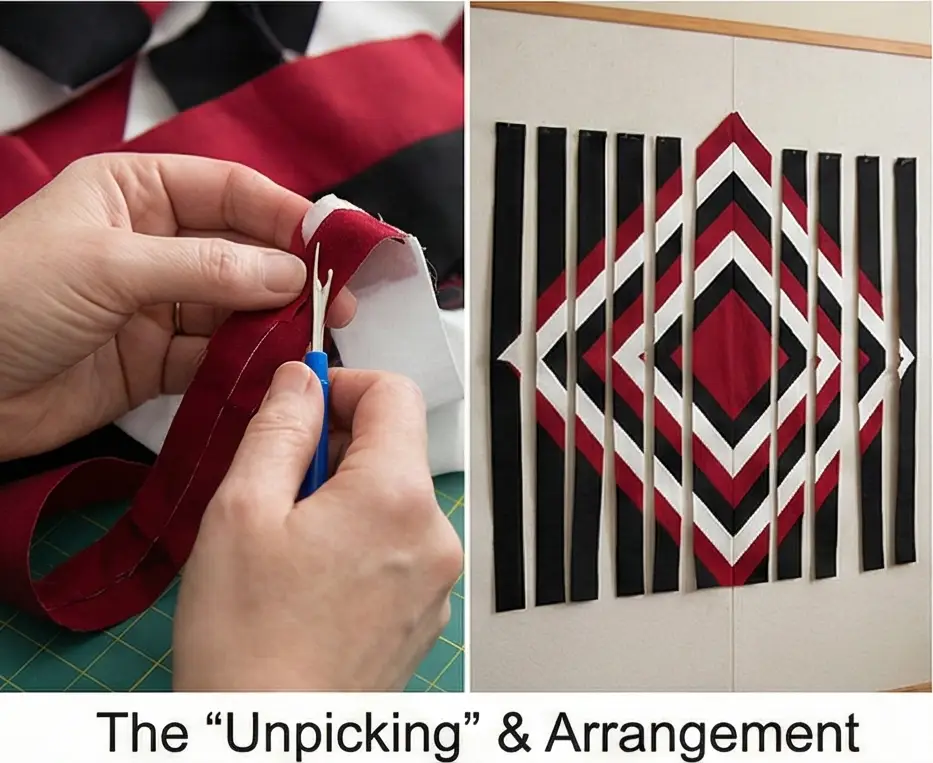
Step 4: The “Unpicking” (Creating the Pattern)
This is the magic step. By unpicking just ONE seam in each loop at a different spot, you shift the colors.
- Row 1 (Center): Take a loop. Unpick the seam between two Red squares. Lay it flat. (This puts Red at the ends).
- Row 2: Take a loop. Unpick the seam between the next color down (e.g., Red and White). Lay it next to Row 1.
- Row 3: Unpick the seam at the next color.
- Continue: Keep shifting the “opening” point by one square for each row.
- Visual: As you lay the strips side-by-side, you will see the colored squares stepping up and down diagonally, forming the diamond shape.
Step 5: Assembly
- Arrange your strips until you have a full diamond that expands from the center to the corners.
- Pin: Nest the seams (they should lock together perfectly because you pressed them all the same way).
- Sew the long vertical rows together.
- Press seams open to reduce the bulk at the many intersections.
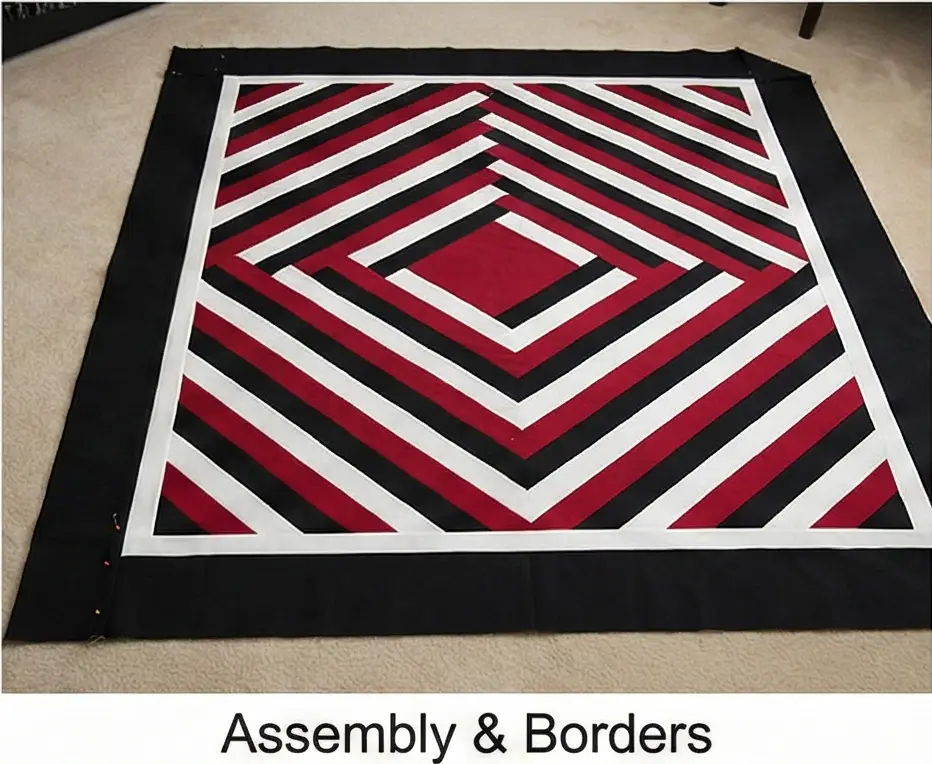
Step 6: Add “Master Suite” Borders
A bedspread needs to hang over the sides of the mattress. We add wide borders to achieve the final size and frame the diamond.
- Inner Border: Cut 2.5″ wide strips of Solid White. Sew to all four sides. This acts as a “mat” for the picture.
- Outer Border: Cut 6.5″ wide strips of Solid Black. Sew to all four sides.
- This wide black frame grounds the quilt and looks very sophisticated when draped over the edge of the bed.
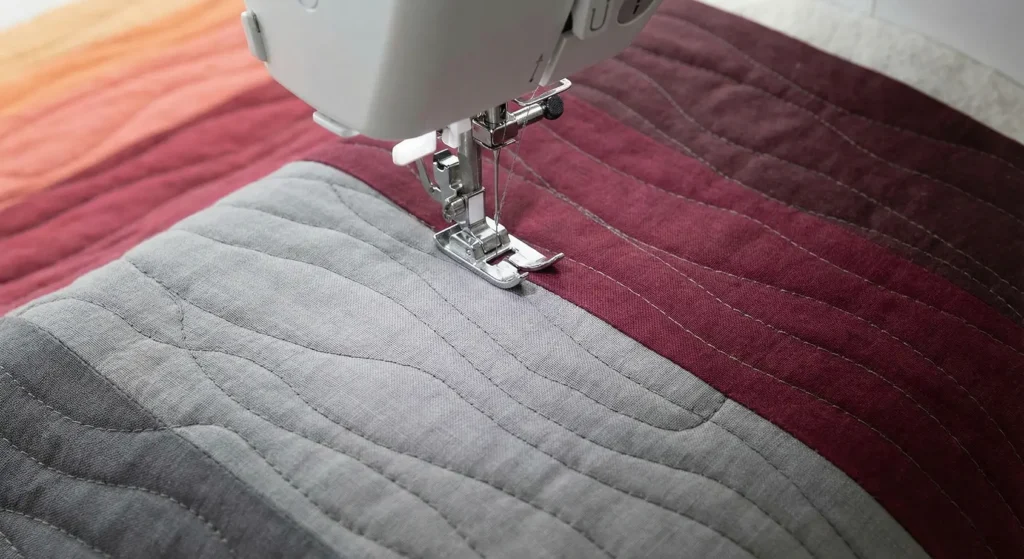
Step 7: Custom Quilting
- Baste the sandwich.
- Design: Enhance the diamond.
- Stitch “in the ditch” (in the seams) along the diagonal lines of the color blocks.
- In the wide Black Border, use a contrasting thread (like Dark Red or Silver) to quilt a Cable or Feather design. This traditional border quilting adds that expensive “heirloom” texture.
Pro Design Tip: Use Sateen Fabric. For a master bedroom, standard quilting cotton can look a bit “crafty.” Use Cotton Sateen for your solids. Sateen has a subtle sheen that catches the bedroom lighting, making the Deep Red look like ruby and the Black look like obsidian.
Budget Consideration: Flat Sheet Backing. Backing a King-size quilt requires expensive wide-back fabric ($20+/yard). Instead, buy a high-quality King Size Flat Sheet (300+ thread count) in solid black or dark grey. It is seamless, smooth against the skin, and costs significantly less than 9 yards of fabric.
4. Dynamic Pinwheel Patterns for Guest Bedrooms
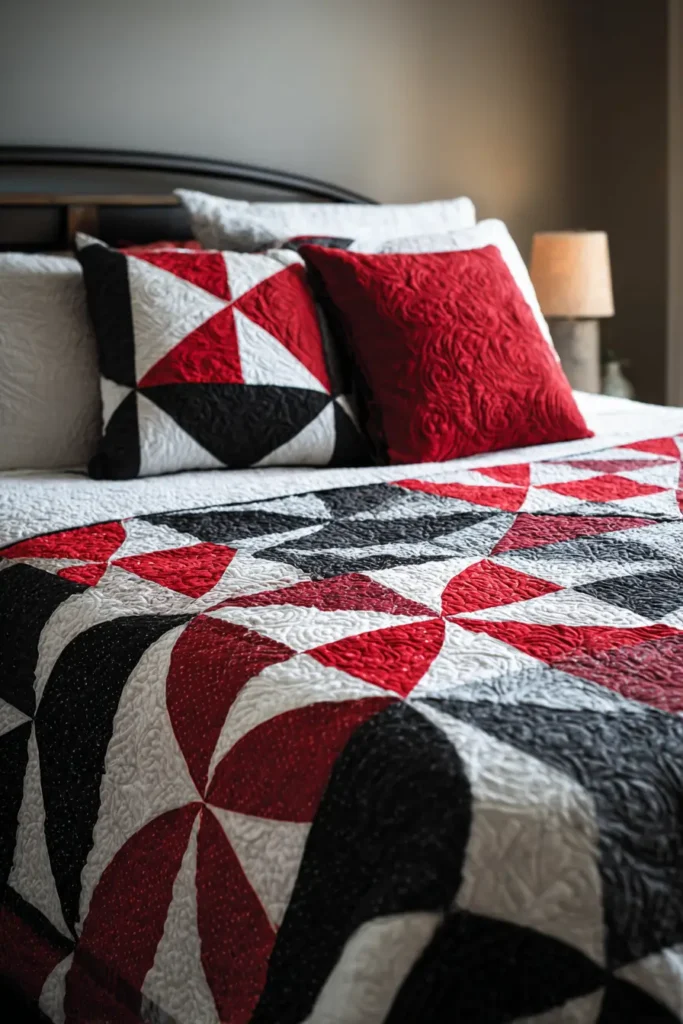
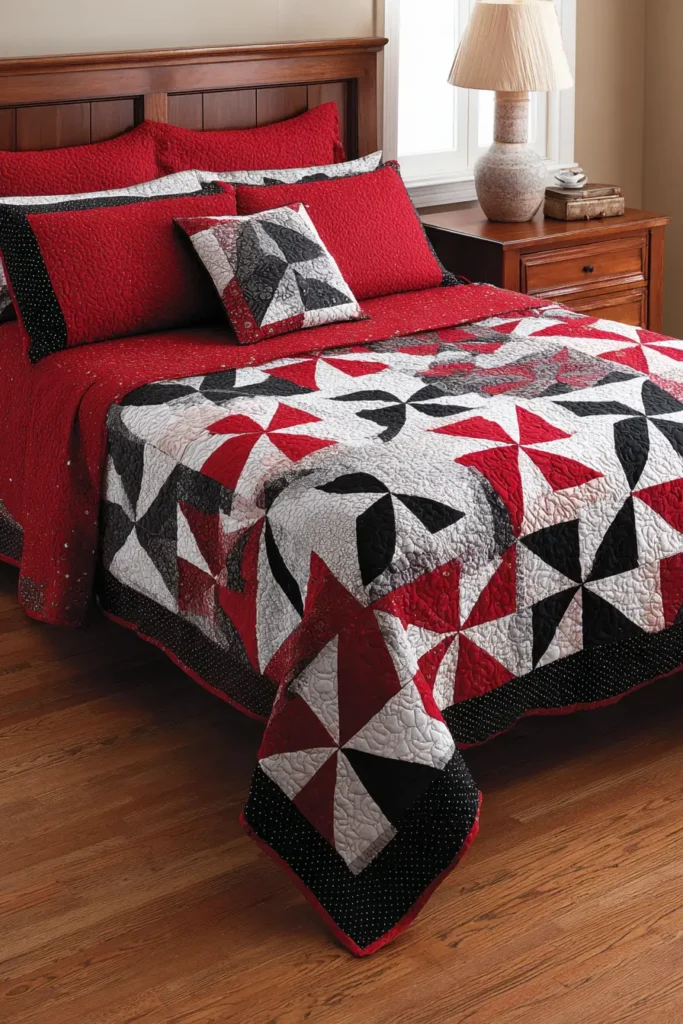
The “Cyclone” Positive/Negative Pinwheel Quilt
Pinwheels naturally suggest movement, making a room feel energetic and welcoming. To make this “Dynamic” for a guest room, we play with positive and negative space. Half the blocks feature Red Pinwheels on White, and the other half feature White Pinwheels on Black. When placed together, the high contrast makes the entire quilt look like it is spinning.
Finished Dimensions: Full/Queen Size, approximately 80″ x 80″.
Materials Needed:
- Fabric A (Red): 2 yards of Bright Red.
- Fabric B (Black): 3 yards of Solid Black.
- Fabric C (White): 3 yards of Solid White.
- Backing Fabric: 5 yards.
- Batting: Queen Size (90″ x 90″).
- Binding: 3/4 yard of Red and White Stripe.
- Notions: Rotary cutter, 6.5″ square ruler.
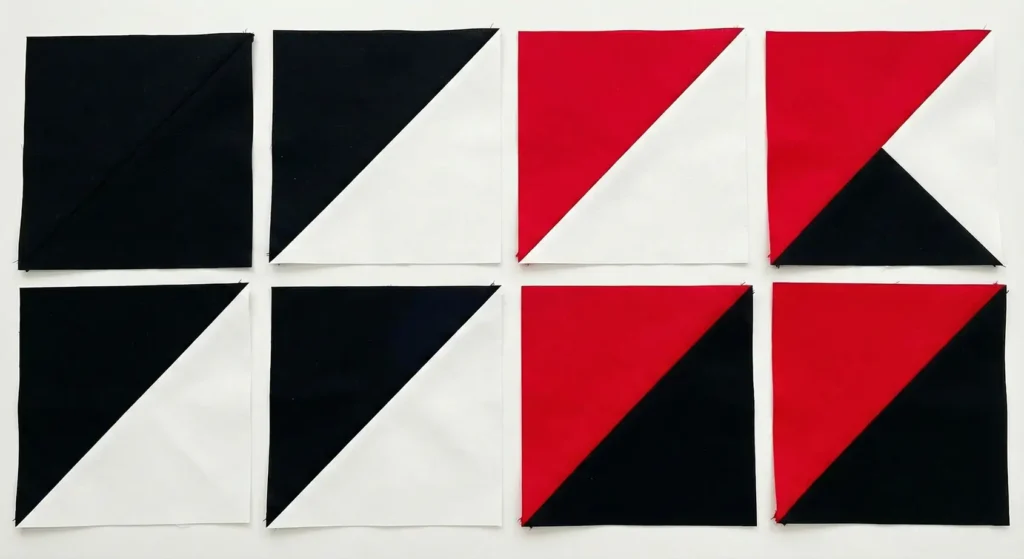
Step 1: Mass Produce Half Square Triangles (HSTs)
The entire quilt is made of 4.5″ (unfinished) HST units. You need two types of pairings:
- Red/White Pairing:
- Cut 40 Red squares (5″ x 5″).
- Cut 40 White squares (5″ x 5″).
- Pair them, draw a diagonal line, sew 1/4″ on both sides, cut, and press toward Red.
- Yield: 80 Red/White HSTs. Trim to 4.5″ x 4.5″.
- White/Black Pairing:
- Cut 40 White squares (5″ x 5″).
- Cut 40 Black squares (5″ x 5″).
- Pair them, sew, cut, and press toward Black.
- Yield: 80 White/Black HSTs. Trim to 4.5″ x 4.5″.

Step 2: Cut Solid Squares (The Backgrounds)
Pinwheels need solid squares to define the “blades.”
- From White Fabric: Cut 80 squares, measuring 4.5″ x 4.5″.
- From Black Fabric: Cut 80 squares, measuring 4.5″ x 4.5″.
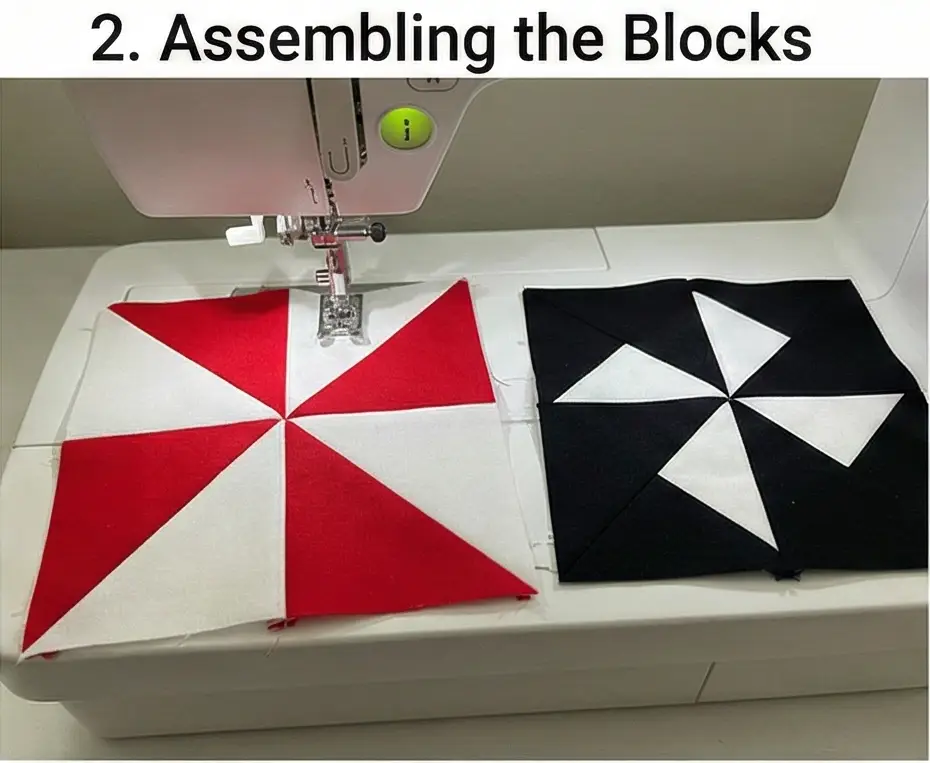
Step 3: Assemble Block Type A (Red on White)
This block looks like a Red Pinwheel spinning in a White field.
- Components: You need 4 Red/White HSTs and 4 Solid White squares.
- Layout (3 rows of 3? No, Pinwheels are usually 2×2 or 4×4. Let’s do a large 4-patch style Pinwheel):
- Actually, a classic large pinwheel block is a 4-Patch grid.
- Top Left: Red/White HST (Red triangle points toward center).
- Top Right: Red/White HST (Red triangle points toward center).
- Bottom Left: Red/White HST (Red triangle points toward center).
- Bottom Right: Red/White HST (Red triangle points toward center).
- Wait, that makes a “Broken Dishes” block. A Pinwheel must rotate.
- Correct Rotation:
- Top Left: HST (Red points Down-Right).
- Top Right: HST (Red points Down-Left).
- Bottom Left: HST (Red points Up-Right).
- Bottom Right: HST (Red points Up-Left).
- Actually, for a 12″ block using 4.5″ units, we need 16 units per block (4×4 grid) OR we just make smaller blocks. Let’s make 40 Small Blocks (8″ finished size).
- Layout:
- Top Left: Red/White HST (Red touches center).
- Top Right: Red/White HST (Red touches center).
- Bottom Right: Red/White HST (Red touches center).
- Bottom Left: Red/White HST (Red touches center).
- Correction for “Spin”: Make sure the Red triangles chase each other clockwise.
- Sew the 4 units together. Make 20 Red-on-White Blocks.
Step 4: Assemble Block Type B (White on Black)
This block looks like a White Pinwheel spinning in a Black field.
- Components: 4 White/Black HSTs (and no solid squares needed if doing pure pinwheels).
- Layout: Arrange 4 White/Black HSTs so the White triangles form the pinwheel and the Black triangles form the corners.
- Sew the 4 units together. Make 20 White-on-Black Blocks.
Step 5: The “Checkerboard” Assembly
- Lay out the blocks in a grid of 5 blocks wide x 8 blocks tall.
- Alternate: Block A – Block B – Block A – Block B…
- Twist: Ensure all Red pinwheels spin Clockwise, and all White pinwheels spin Counter-Clockwise. This subtle detail creates a dizzying, dynamic visual effect, making the pattern feel alive.
- Sew blocks into rows. Press seams open.
- Sew rows together.
Step 6: “Cyclone” Swirl Quilting
- Baste the quilt.
- Quilting: Do not stitch in the ditch! Use a Round Spiral or Large Swirls.
- Start with large swirls in the center of the pinwheels, then spiral out.
- The curved quilting lines soften the sharp points of the triangles and enhance the feeling of rotation.
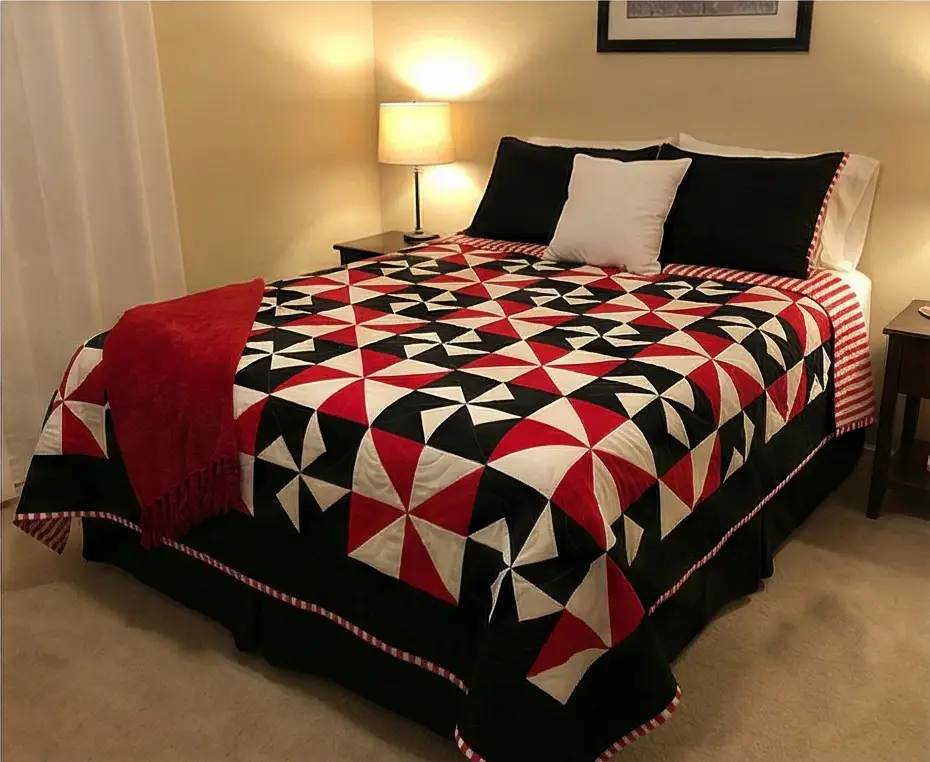
Pro Design Tip: The “Guest Ready” Sashing. To make the quilt larger and less busy for a restful guest room, add 2-inch Sashing strips between the blocks. Use Grey fabric for the sashing. Grey calms the high-contrast vibration between the Red/White and Black/White blocks, making the quilt easier on the eyes.
Budget Consideration: Pre-Cut Charm Packs. This pattern uses standard squares. You can buy “Charm Packs” (pre-cut 5″ squares) in Red, Black, and White. This saves hours of cutting time and ensures your squares are perfectly accurate, often for a comparable price to yardage.
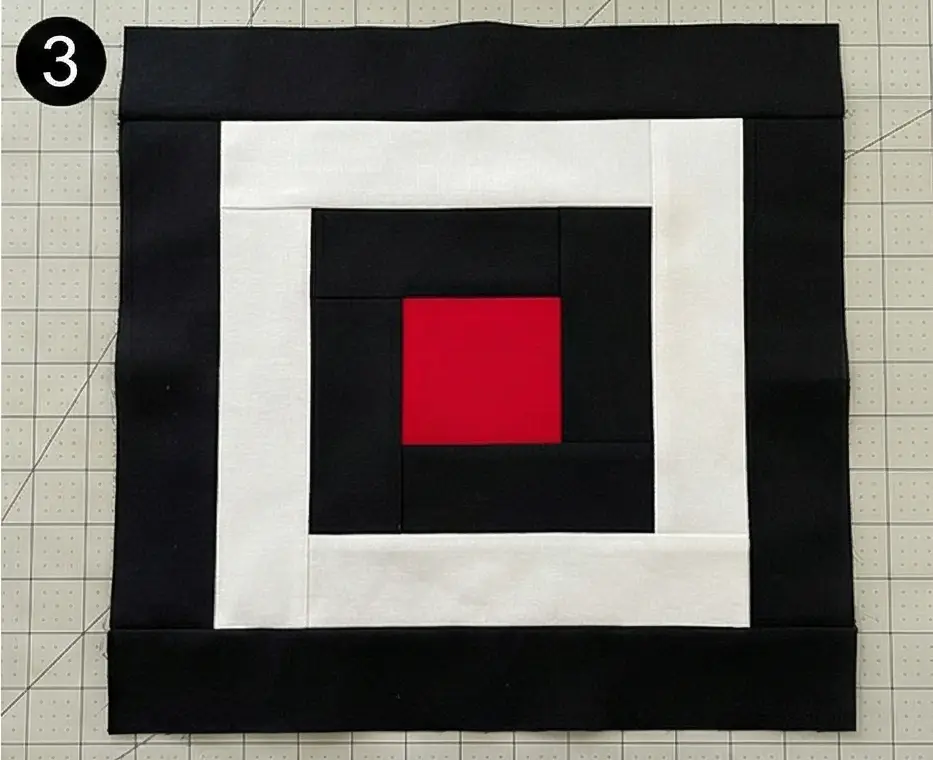
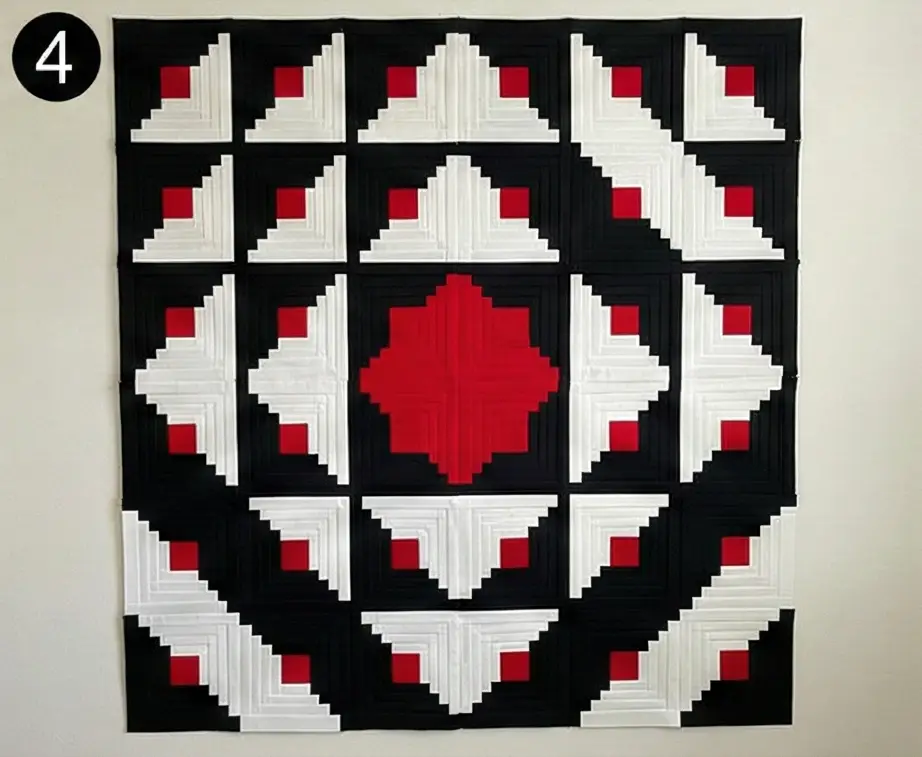
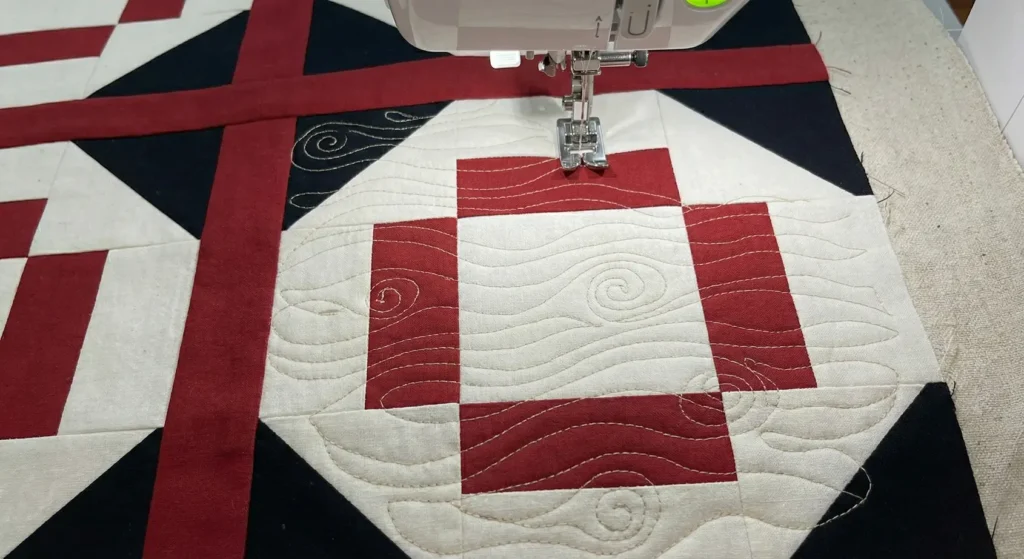
5. Bold Red, Black, and White Patchwork Quilt for Master Bedrooms
The “Crimson Labyrinth” Log Cabin Quilt
The Log Cabin is a quintessential patchwork block, but when executed in high-contrast Black, White, and Red, it transforms from “pioneer” to “modern art.” This design uses the “Barn Raising” layout to create concentric diamonds that pulse outward from the center. The bright red center squares (symbolizing the hearth) create a bold grid of red dots amid the black-and-white geometry.
Finished Dimensions: Queen Size, approximately 90″ x 90″.
Materials Needed:
- Fabric A (Center/Hearth): 1 yard of Bright Red (Solid or subtle tone-on-tone print).
- Fabric B (Dark/Black): 4 yards of Solid Black (or mix of black prints).
- Fabric C (Light/White): 4 yards of Solid White (or mix of low-volume white prints).
- Backing Fabric: 8.5 yards.
- Batting: Queen Size (100″ x 100″).
- Binding: 3/4 yard of Solid Red.
- Notions: Rotary cutter, 12.5″ square ruler (helpful for trimming blocks).
Step 1: Cut the “Logs” and Centers
Log Cabins are built round-by-round. Precision cutting is key.
- Centers: Cut 64 Red squares, measuring 2.5″ x 2.5″.
- Strips: Cut all Black and White fabric into 2.5″ wide strips.
- Efficiency Tip: Don’t cut them to exact lengths yet. Keep them as long Width-of-Fabric (WOF) strips. We will use the “Chain Piecing” method to save hours.
Step 2: Build Round 1 (The First Layer)
Rule: We add logs in a clockwise spiral. Dark on two sides, light on two sides.
- Log 1 (Light): Sew a White strip to the Right side of a Red center square. Trim flush. Press seam out.
- Log 2 (Light): Sew a White strip to the Top of the unit. Trim flush. Press out.
- Log 3 (Dark): Sew a Black strip to the Left side. Trim flush. Press out.
- Log 4 (Dark): Sew a Black strip to the Bottom. Trim flush. Press out.
- Result: A Red center surrounded by White on top/right and Black on bottom/left.
Step 3: Build Rounds 2 and 3
Continue spiraling in the same order: Right (Light), Top (Light), Left (Dark), Bottom (Dark).
- Round 2:
- Add White strip to Right.
- Add White strip to Top.
- Add Black strip to Left.
- Add Black strip to Bottom.
- Round 3: Repeat the sequence one more time.
- Trim: Square up each block to exactly 12.5″ x 12.5″.
- Quantity: Make 64 Blocks.
Step 4: The “Barn Raising” Layout
This is the most famous Log Cabin layout, perfect for a master bedroom focal point.
- Find a large floor space (8 blocks x 8 blocks).
- Center 4 Blocks: Arrange the middle 4 blocks so their Red Centers touch, and their Black sides form a solid black diamond in the very middle.
- Next Layer: Arrange the surrounding blocks to continue the pattern, ensuring the Black strips touch Black strips and White strips touch White strips.
- Visual: It should look like a series of Black diamonds and White diamonds radiating outward from the center red cluster.
Step 5: Web Piecing Assembly
To keep the orientation correct (it’s easy to rotate a Log Cabin block accidentally), use web piecing.
- Lay out the blocks.
- Sew Row 1, Block 1 to Row 1, Block 2. Do not cut the thread!
- Feed in Row 2, Block 1 and Row 2, Block 2.
- Continue “chaining” the pairs together.
- This creates a “web” of blocks held together by threads. You can then sew the vertical seams without losing your layout.
Step 6: “In the Ditch” Quilting
- Baste the sandwich.
- Quilting: Keep the geometry sharp.
- Stitch “in the ditch” (directly in the seam lines) along the spiraling logs.
- Alternatively, quilt a large X through every block.
- Binding: Finish with the Solid Red binding. This thin red frame creates a sharp border that ties back to the red center squares.
Pro Design Tip: The “Scrappy” Masterpiece. To make the quilt look like an expensive heirloom rather than a factory-made blanket, use multiple fabrics for the Black and White logs. Use a mix of black dots, black stripes, and charcoal solids for the darks. Use white-on-white prints, grey lines, and cream for the lights. The variety adds texture and richness, making it suitable for a master suite.
Budget Consideration: Jelly Rolls. Log Cabins are perfect for “Jelly Rolls” (pre-cut 2.5″ strips). You can buy 2 Black Jelly Rolls and 2 White Jelly Rolls. This saves you hours of cutting time and ensures your strips are perfectly straight.
6. Bold Buffalo Check Red, Black, and White Bed Quilts – Plaid Bedspreads
The “Modern Lumberjack” Tricolor Plaid Quilt
Standard Buffalo Check usually relies on shades of one color (like black and grey). However, for a truly bold, graphic look that screams “Modern Farmhouse,” we will create a high-contrast Gingham using Black as the dark value, White as the light value, and Bright Red as the “medium” intersection. The result is a striking, geometric bedspread that anchors a room instantly.
Finished Dimensions: Queen Size, approximately 90″ x 90″.
Materials Needed:
- Fabric A (Dark): 3 yards of Solid Black (or Black Flannel).
- Fabric B (Medium): 4.5 yards of Bright Red (or Red Flannel).
- Fabric C (Light): 3 yards of Solid White (or White Flannel).
- Backing Fabric: 8.5 yards.
- Batting: Queen Size (96″ x 96″).
- Binding: 3/4 yard of Solid Black.
- Notions: Rotary cutter, 6″ x 24″ quilting ruler, neutral thread (grey works best to blend with all three).
Step 1: Cut the Strips
Efficiency Tip: Do not cut individual squares. We use the “Strip Piecing” method to quickly create a queen-size quilt.
- From Fabric A (Black): Cut 18 strips, measuring 5.5″ wide x WOF (Width of Fabric).
- From Fabric B (Red): Cut 36 strips, measuring 5.5″ wide x WOF.
- From Fabric C (White): Cut 18 strips, measuring 5.5″ wide x WOF.
Step 2: Create “Strip Set 1” (The Dark Row)
This set creates rows in which the Black and Red alternate.
- Take 1 Black strip and 1 Red strip.
- Sew them together lengthwise (long edge to long edge) using a 1/4″ seam allowance.
- Press the seam toward the Black strip.
- Repeat to make 18 sets of this Black/Red pairing.
Step 3: Create “Strip Set 2” (The Light Row)
This set creates the rows where the Red and White alternate.
- Take 1 Red strip and 1 White strip.
- Sew them together lengthwise.
- Press the seam toward the Red strip.
- Repeat to make 18 sets of this Red/White pairing.

Step 4: Sub-Cut the Segments
Now we chop these long strips into ready-made two-block units.
- Take your Strip Set 1 (Black/Red). Cross-cut it into vertical segments that are 5.5″ wide.
- You need 162 units total.
- Take your Strip Set 2 (Red/White). Cross-cut it into vertical segments that are 5.5″ wide.
- You need 162 units total.
Step 5: Assemble the Rows
We need to build 18 horizontal rows. Each row will have 18 blocks (9 units).
- Row Type A (Dark): Sew 9 “Black/Red” units together side-by-side.
- Pattern: Black-Red-Black-Red… ending on Red.
- Make 9 of these rows.
- Row Type B (Light): Sew 9 “Red/White” units together side-by-side.
- Pattern: Red-White-Red-White… ending on White.
- Make 9 of these rows.
Step 6: Join the Rows to Finish
- Lay out the rows on the floor.
- Sequence: Alternate Row A (Dark) and Row B (Light).
- Row A: (Black / Red)
- Row B: (Red / White)
- Row A: (Black / Red)
- Visual Check: You should see the Red blocks forming diagonal lines connecting the Black and White rows. The Red acts as the “transparency” layer between the Black and White.
- Sew: Pin at every intersection (nesting your seams so they lock together flat) and sew the rows together.
- Quilting: Quilt straight lines horizontally and vertically through the center of every block to create a grid that enhances the plaid effect.
Pro Design Tip: Texture Mixing. To make this bedspread truly cozy for winter, mix your fabric bases. Use Black Velvet for the dark squares, Red Flannel for the medium squares, and White Sherpa or Fleece for the light squares. The different pile heights will make the plaid feel 3D and incredibly luxurious.
Budget Consideration: Use Wide Backing. A Queen quilt requires a massive amount of backing fabric. Instead of piecing together standard 42″ wide fabric (which requires 8+ yards), buy 108″ Wide Quilt Backing fabric. You only need about 3 yards of wide backing, which is often significantly cheaper and creates a smooth, seamless back.
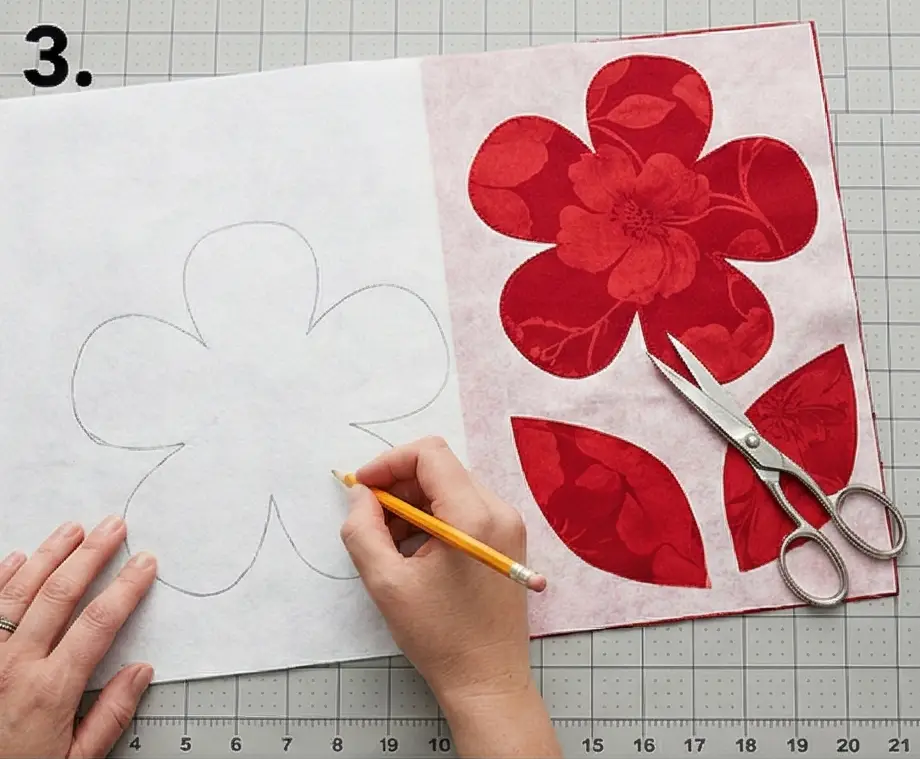
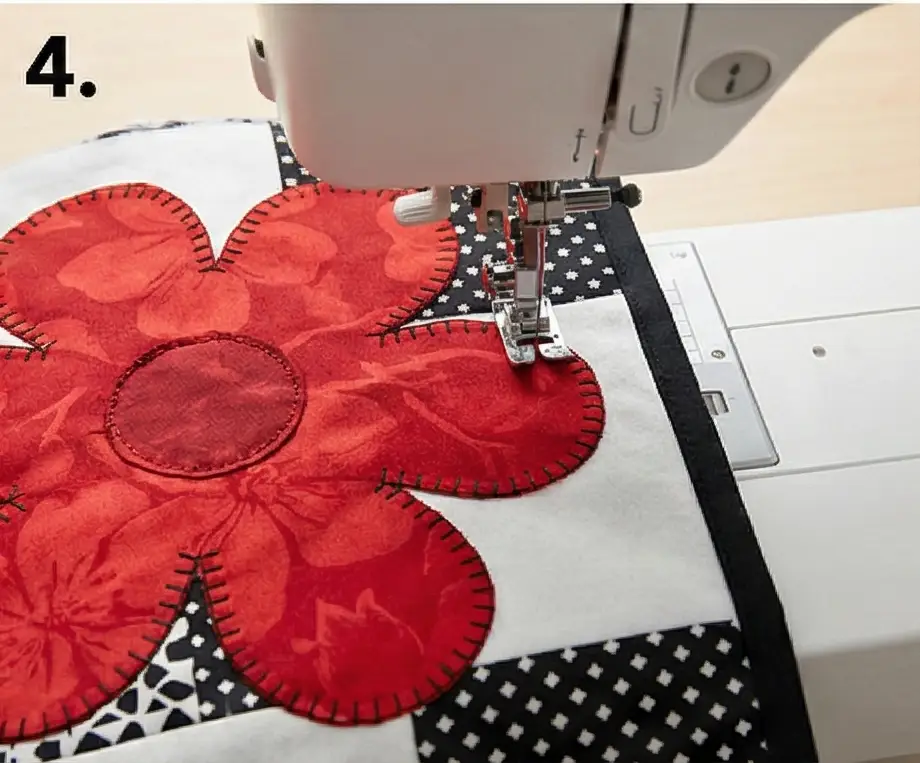
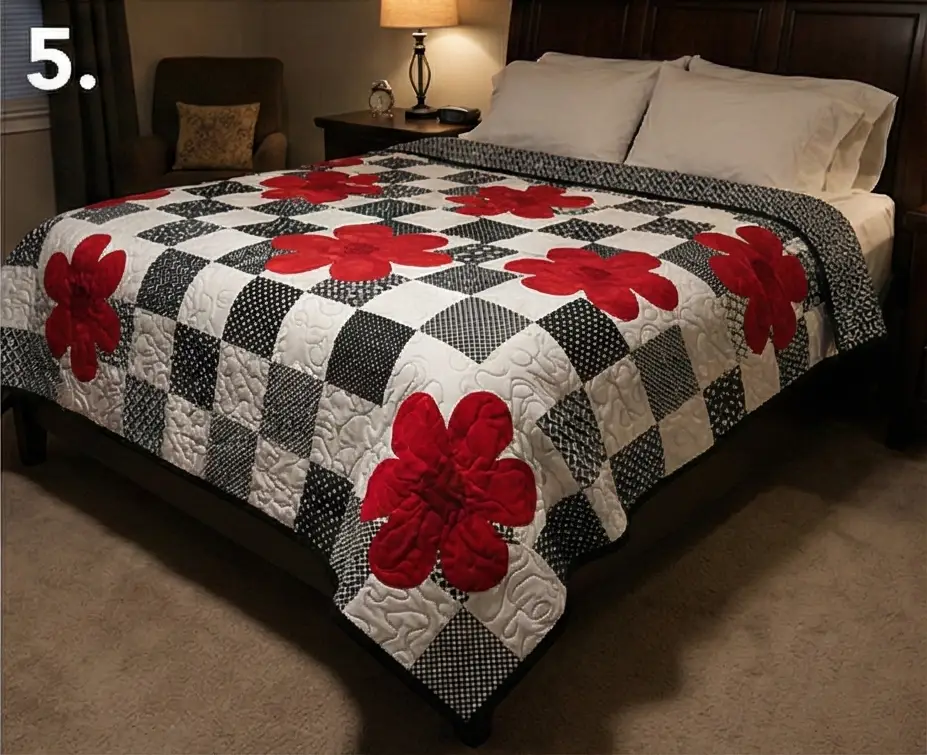
7. Monochrome Floral Accent Quilts with Red Highlights
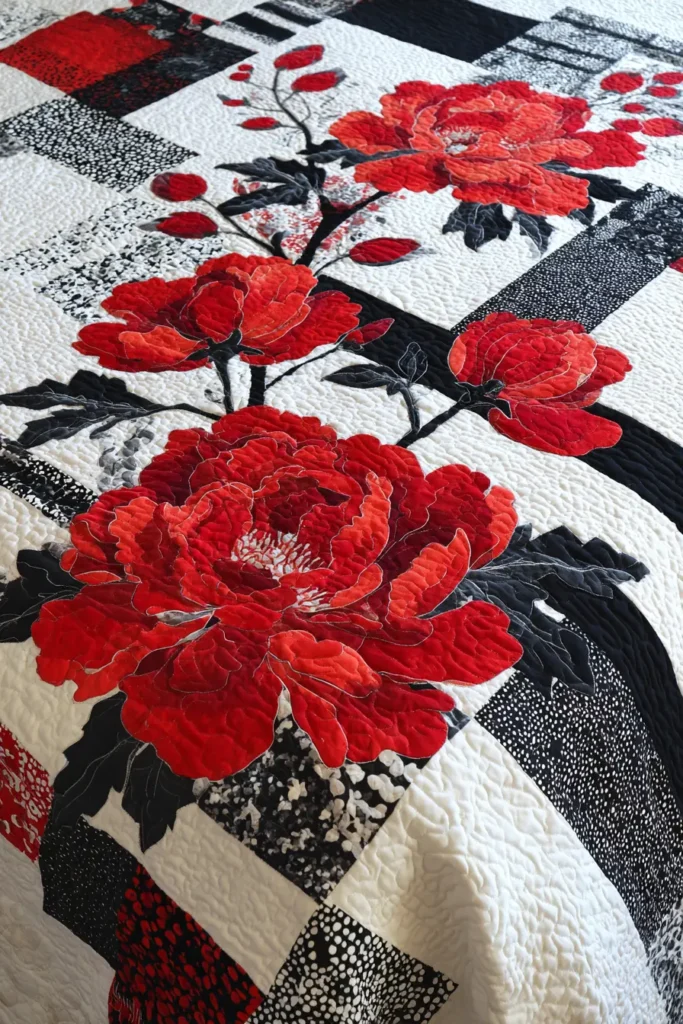
The “Crimson Bloom” Appliqué Block Quilt
This quilt balances stark modern minimalism with soft, organic shapes. The background is a crisp patchwork of Black and White geometric prints, serving as a high-contrast canvas. On top of this rigid grid, we appliqué massive, sprawling red floral blooms. The juxtaposition of the “hard” background and “soft” floral foreground creates a dramatic, artistic statement piece for a bedroom.
Finished Dimensions: Large Throw / Full, approximately 70″ x 80″.
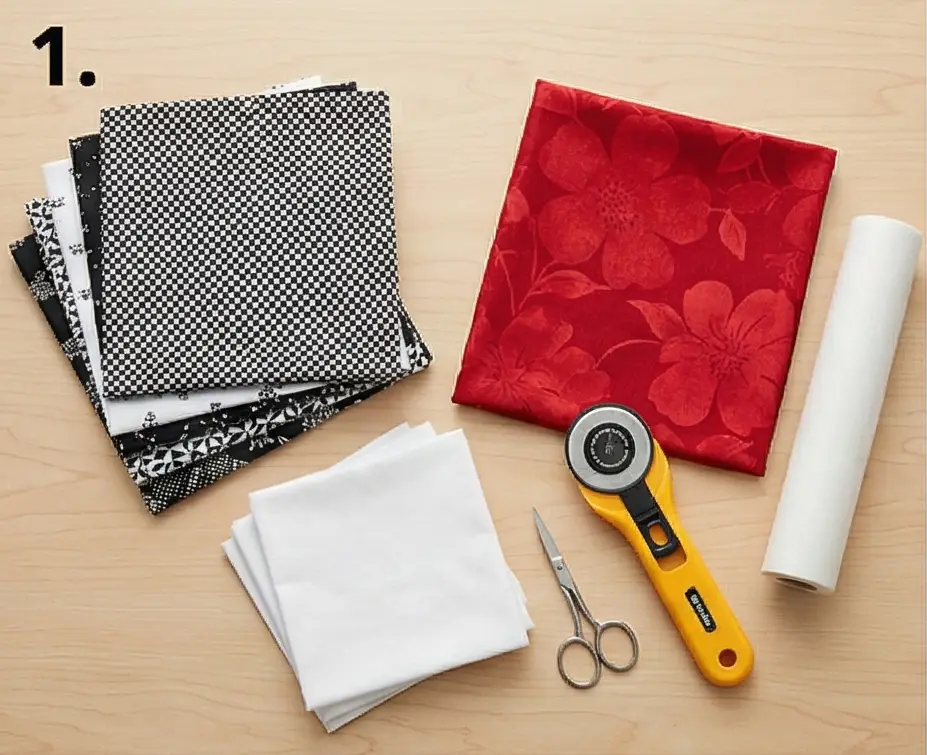
Materials Needed:
- Fabric A (Black Prints): 2 yards of various black-on-white or white-on-black geometric prints (stripes, dots, grids).
- Fabric B (Solid White): 1.5 yards of Solid White (for visual resting space).
- Fabric C (Red Floral): 2 yards of a large-scale Tone-on-Tone Red print (or solid Poppy Red).
- Backing Fabric: 5 yards.
- Batting: Twin/Full Size (80″ x 90″).
- Fusible Web: 3 yards (e.g., HeatnBond Lite) for the appliqué.
- Notions: Rotary cutter, embroidery scissors (small, sharp tips).
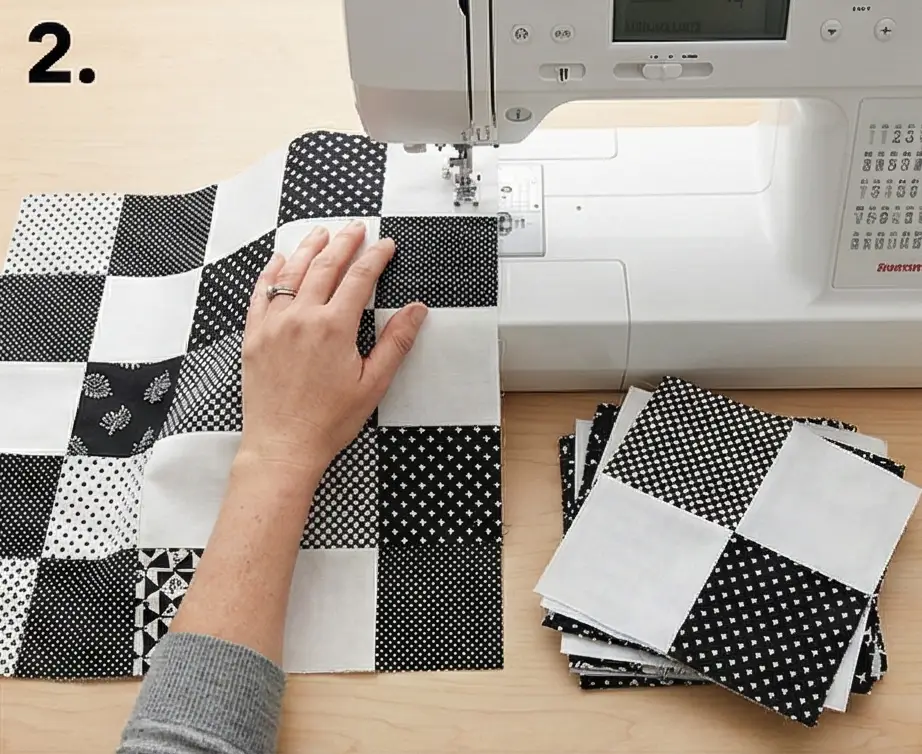
Step 1: Create the “Checkerboard” Background
The background needs to be interesting but not overwhelming.
- Cut Squares:
- From Fabric A (Black Prints): Cut 40 squares, measuring 10.5″ x 10.5″.
- From Fabric B (Solid White): Cut 16 squares, measuring 10.5″ x 10.5″.
- Layout: Arrange them in a grid of 7 blocks wide x 8 blocks tall (56 blocks total).
- Randomly scatter the White squares among the Black Print squares. These white spaces will be the “spotlights” for your red flowers.
- Sew: Stitch the blocks into rows, then sew the rows together.
- Press: Press all seams open to keep the quilt top flat for the appliqué step.
Step 2: Prepare the Red Floral Shapes
We aren’t piecing the flowers; we are drawing them.
- Trace: On the paper side of your Fusible Web, draw large, simple flower shapes.
- Shapes: Think of poppies or hibiscus—5 large petals. Draw them in varying sizes (some 8″ wide, some 12″ wide).
- Leaves: Draw simple leaf shapes as well.
- Fuse: Iron the fusible web onto the wrong side of your Red Fabric.
- Cut: Carefully cut out your red flowers and leaves along the drawn lines.
Step 3: Arrange the Composition
This is the artistic part. Do not place a flower in the center of every square.
- Lay your Checkerboard Background on the floor.
- Scatter: Peel the paper backing off your red flowers. Place them onto the background.
- Design Tip: Place them specifically over the Solid White squares. The red will pop vividly against the white, whereas it might get lost against a busy black print.
- Flow: Arrange the flowers so they appear to drift diagonally across the quilt, rather than in straight rows.
- Fuse: Once you love the layout, iron the flowers down to fuse them to the background.
Step 4: The Appliqué Stitch
- Set your sewing machine to a Blanket Stitch or a tight Zig-Zag Stitch.
- Thread: Use Red Thread to match the flower (for a seamless look) or Black Thread (for a sketchy, outlined look).
- Sew: Stitch slowly around the raw edges of every flower and leaf. This secures the appliqué and prevents fraying.
Step 5: “Vine” Quilting
The quilting should connect the isolated flowers.
- Baste the sandwich.
- Quilting: Use Black Thread.
- Design: Stitch meandering, curvy lines (like vines or stems) that travel from one flower to the next.
- In the negative space (the black print squares), the quilt loosely swirls to soften the geometric grid.
- Inside the red flowers, stitch a simple spiral or circle in the center to add dimension.
Step 6: Binding
- Trim the quilt square.
- Bind: Use a Solid Black binding. This creates a frame that contains the energy of the red flowers and busy background prints.
Pro Design Tip: 3D Petals. For a truly advanced look, cut two layers of fabric for each petal. Sew them right-sides together, turn them inside out (so they are finished shapes), and then tack only the center of the flower to the quilt. The petals will be loose and flutter, creating a stunning 3D texture on the bed.
Budget Consideration: Printed Sheets. Finding 2 yards of large-scale red floral fabric can be hard. Look for a Red Floral Bed Sheet or tablecloth at a discount store. The fabric is wide, cheap, and often features the exact large-scale blooms you need for this project.
8. Modern Geometric Red, Black, and White Quilt Designs for a Modern Bedroom Statement
The “Red Shard” Asymmetrical Triangle Quilt
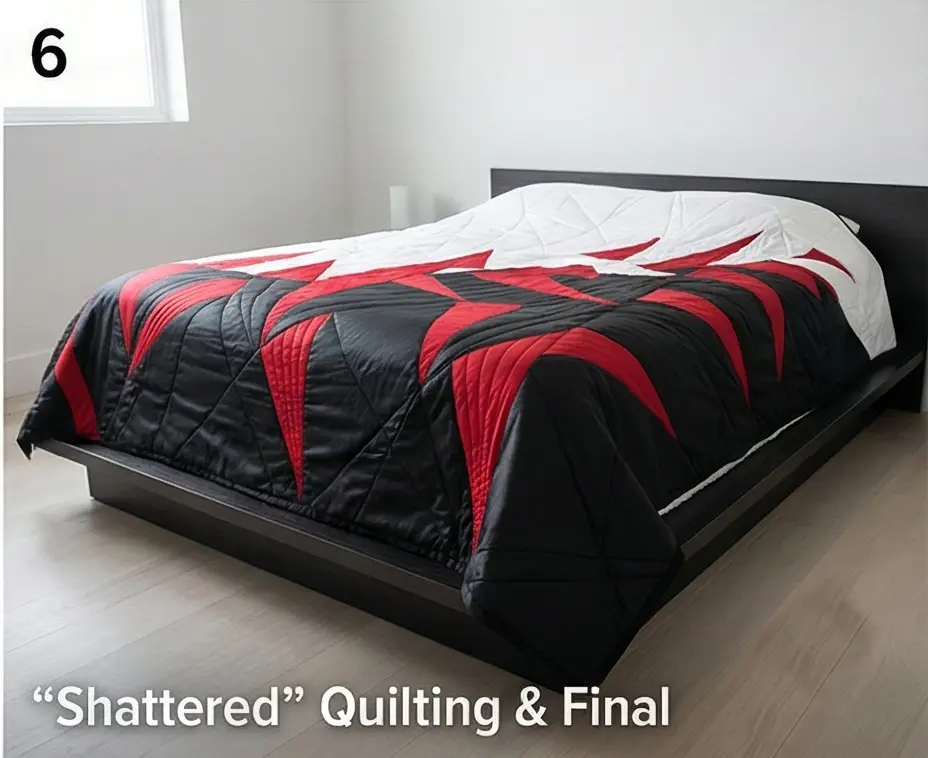
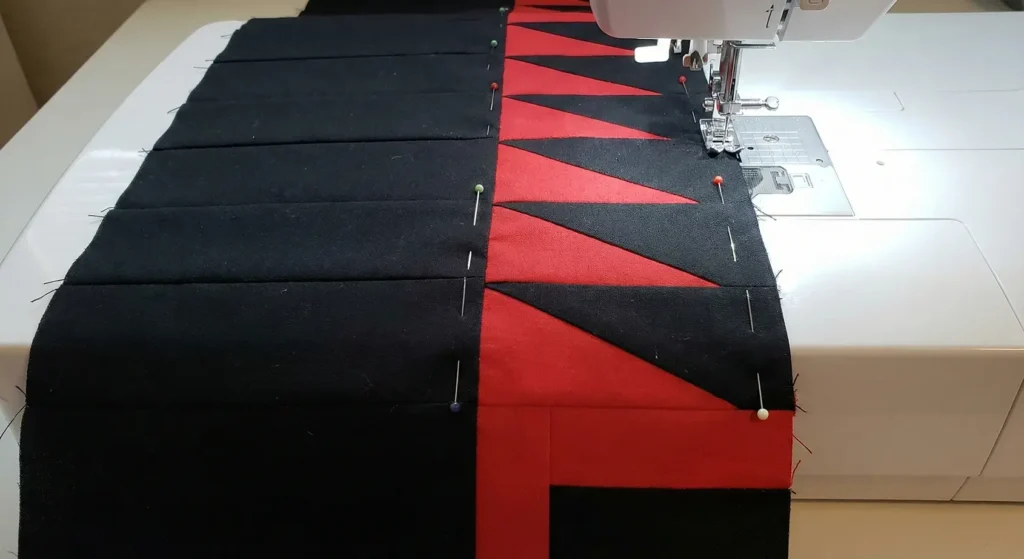
Geometric quilts in modern bedrooms are all about breaking the grid. This pattern, “The Shard,” uses large, irregular triangles to create a look that feels like shattered glass or a modern architectural rendering. A dramatic slash of red cuts through a field of black and white, creating an undeniable focal point.
Finished Dimensions: Queen Size, approximately 85″ x 90″.
Materials Needed:
- Fabric A (Red): 2 yards of Solid Cherry Red.
- Fabric B (Black): 3 yards of Solid Black (or Graphite).
- Fabric C (White): 3 yards of Solid White (or very pale Grey).
- Backing Fabric: 8 yards.
- Batting: Queen Size (96″ x 96″).
- Binding: 3/4 yard of Black and White Stripe.
- Notions: Rotary cutter, 24″ quilting ruler, and Freezer Paper (for creating templates).
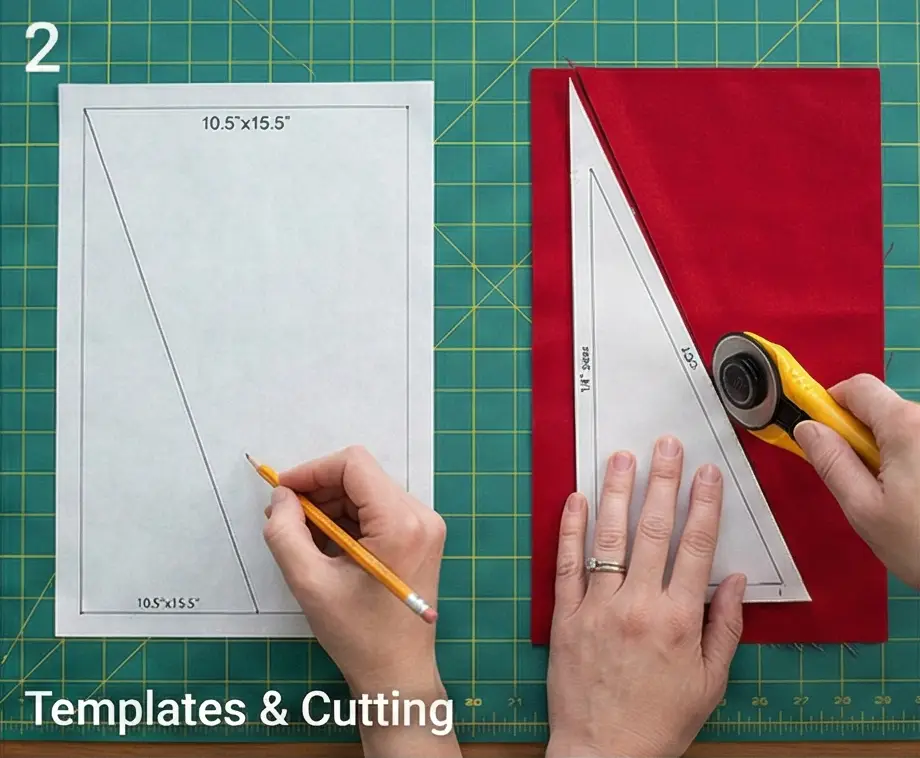
Step 1: Create the “Shard” Templates
Because these triangles are irregular (not equilateral), we cannot just cut strips. We need large paper templates.
- Take a roll of Freezer Paper (or tape large sheets of paper together).
- Draw a rectangle that is 10.5″ wide x 15.5″ tall. This is your block size.
- Draw the Shard: Inside this rectangle, use a ruler to draw a sharp, skinny triangle that stretches from the bottom edge to the top edge. It should look like a jagged spike.
- Label: Label the spike section “A” and the background sections “B” (left) and “C” (right).
- Make 3 or 4 variations of this template (some with left-leaning spikes, some with right-leaning spikes, some wide, some thin).
Step 2: Cut the Fabrics
This is an improvisational-style cut.
- Red Fabric: Use your templates to cut the “Spikes” (Section A). Add a 1/4″ seam allowance to all sides when cutting.
- Black & White Fabrics: Use your templates to cut the “Backgrounds” (Sections B and C).
- Cut half your backgrounds from Black and half from White.
- Design Choice: You can mix them up! A red spike on a black background, a red spike on a white background, or even a white spike on a black background.
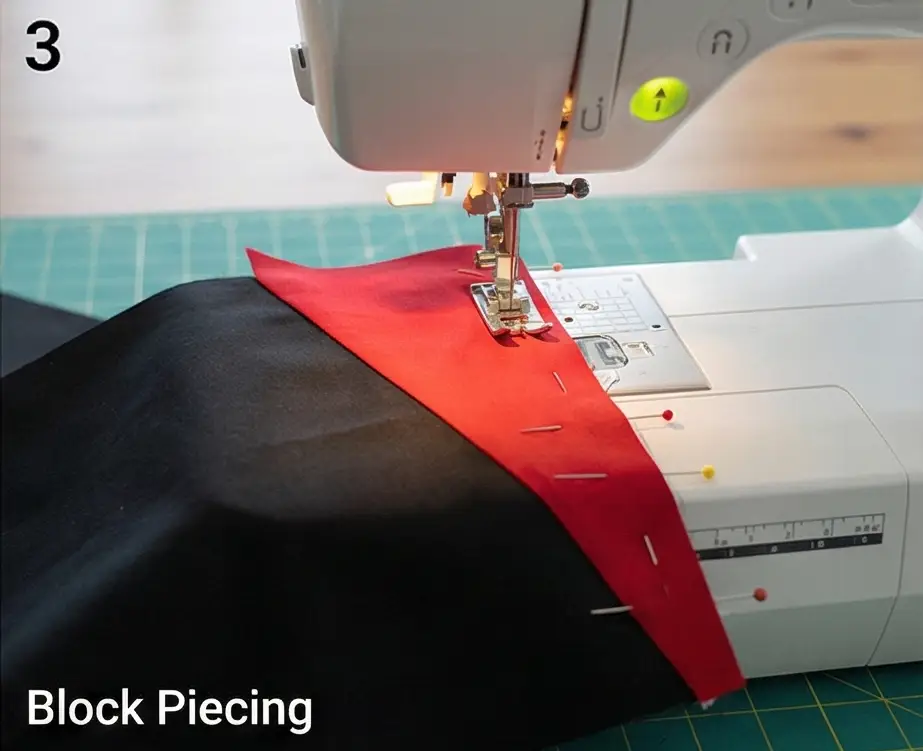
Step 3: Piece the Blocks
- Take a Red Spike (Section A) and a Black Background (Section B).
- Sew them together along the long vertical angle.
- Tip: Because these are biased (stretchy) edges, pin carefully at the top, middle, and bottom. Do not pull the fabric as you sew.
- Press the seam open.
- Sew the Other Background (Section C) to the other side of the spike.
- Square Up: Place your 10.5″ x 15.5″ rectangle ruler (or template) over the finished unit and trim it back to the exact size.
- Quantity: Make roughly 48 Blocks.
Step 4: The “Fault Line” Layout
Do not arrange them randomly. Create a visual strike.
- Lay the blocks out in a grid of 6 blocks wide x 8 blocks tall.
- The Red Zone: Arrange the blocks with Red Spikes so they form a diagonal “slash” or “river” running across the quilt from top-left to bottom-right.
- The Background Zones:
- Fill the upper-right corner with mostly White-background blocks.
- Fill the lower-left corner with mostly Black-background blocks.
- Visual: It should look like a red fissure opening up between a white continent and a black continent.

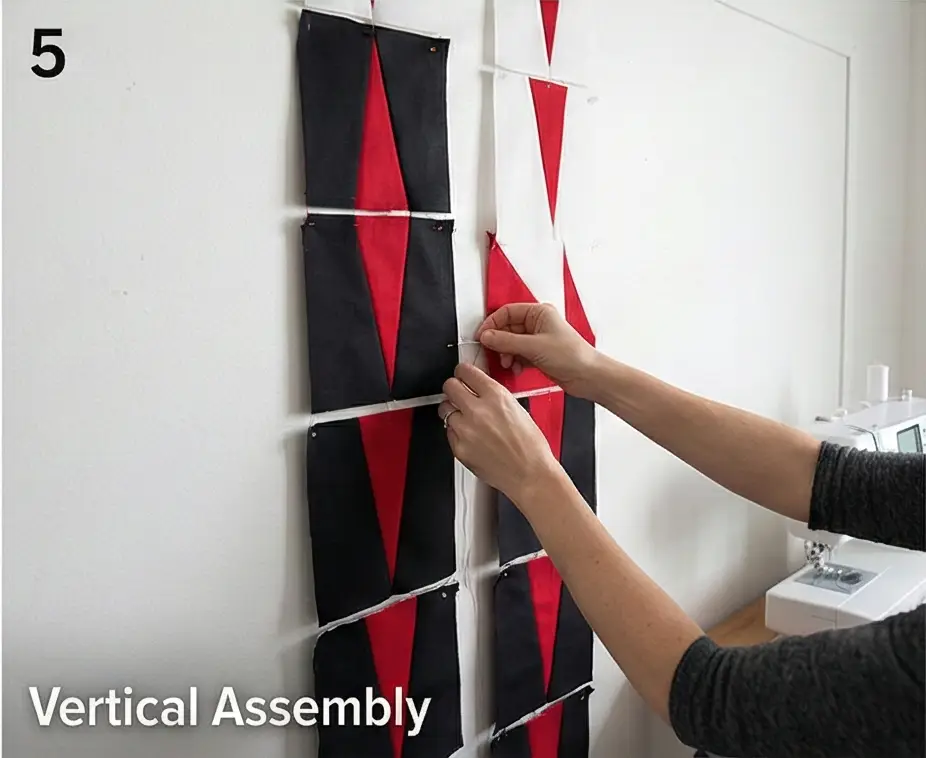
Step 5: Vertical Assembly
- Sew the blocks together into vertical columns (not horizontal rows).
- Why? It is easier to match the vertical lines of the shards this way.
- Press seams open.
- Pin the columns together and sew to complete the top.
Step 6: “Shattered” Quilting
- Baste the sandwich.
- Quilting: Use a walking foot.
- Design: Stitch straight lines that mimic the angles of the shards.
- Quilt 1/4″ inside every red spike.
- In the background areas, quilt dense straight lines at varying angles that clash with one another, reinforcing the “shattered glass” theme.
Pro Design Tip: Glossy Accents. For a truly modern, high-tech look, use Satin or Polished Cotton for the Black sections only. The matte Red and White against the glossy Black creates a sophisticated texture difference that catches the bedroom light beautifully.
Budget Consideration: Upcycled Work Shirts. The “White” section doesn’t have to be quilting cotton. Go to a thrift store and buy large men’s White Dress Shirts. The cotton is usually high quality and crisp. The backs of the shirts feature large fabric panels, perfect for these block backgrounds.
9. Rustic Farmhouse Red, Black, and White Quilt Designs
The “Homestead Churn Dash” Quilt
The Churn Dash is one of the oldest and most beloved quilt blocks, dating back to the 1800s. Its chunky, geometric shape resembles the dasher handle of a butter churn. When sewn in bold Red, Black, and White, it sheds its delicate vintage look and becomes a graphic, rustic statement piece perfect for a modern farmhouse iron bed.
Finished Dimensions: Queen Size, approximately 84″ x 84″.
Materials Needed:
- Fabric A (Red): 2.5 yards of Barn Red or Red Ticking Stripe (used for the “Dash” bars).
- Fabric B (Black): 2 yards of Solid Black or Black Gingham (used for the corners).
- Fabric C (White): 4 yards of Unbleached Muslin or Cream (for a warmer, aged rustic look).
- Backing Fabric: 8 yards.
- Batting: Queen Size (90″ x 90″).
- Binding: 3/4 yard of Black Fabric.
- Notions: Rotary cutter, 12.5″ square ruler.
Step 1: Cut the Components
We are making 36 Blocks, each finishing at 12 inches.
- For the Corners (Half Square Triangles):
- From Black Fabric: Cut 36 squares, 5″ x 5″.
- From White Fabric: Cut 36 squares, 5″ x 5″.
- For the “Dash” Bars (Side Units):
- From Red Fabric: Cut 36 strips, 2.5″ x 9″ (This is a rough estimate; we will strip pieces for speed in Step 3). Correction: Let’s use strip piecing.
- Better Method: Cut 10 strips of Red (2.5″ x WOF) and 10 strips of White (2.5″ x WOF).
- For the Center Squares:
- From White Fabric: Cut 36 squares, measuring 4.5″ x 4.5″.
Step 2: Make the Half Square Triangles (Corners)
- Pair a 5″ Black square with a 5″ White square (Right Sides Together).
- Draw a diagonal line on the back of the white square.
- Sew 1/4″ away from both sides of the line.
- Cut along the center line.
- Press seams toward the Black.
- Trim: Square up every unit to exactly 4.5″ x 4.5″.
- Yield: You need 72 Black/White HST units total.
Step 3: Make the “Dash” Units (Strip Piecing)
Instead of cutting tiny rectangles, we sew long strips.
- Take a Red Strip (2.5″ x WOF) and a White Strip (2.5″ x WOF).
- Sew them together lengthwise. Press seam toward the Red.
- Repeat for all 10 pairs.
- Sub-Cut: Cross-cut these long strip sets into segments measuring 4.5″ wide.
- Result: You now have rectangular units (Red bar/White bar) measuring 4.5″ x 4.5″.
- Yield: You need 144 Dash units.
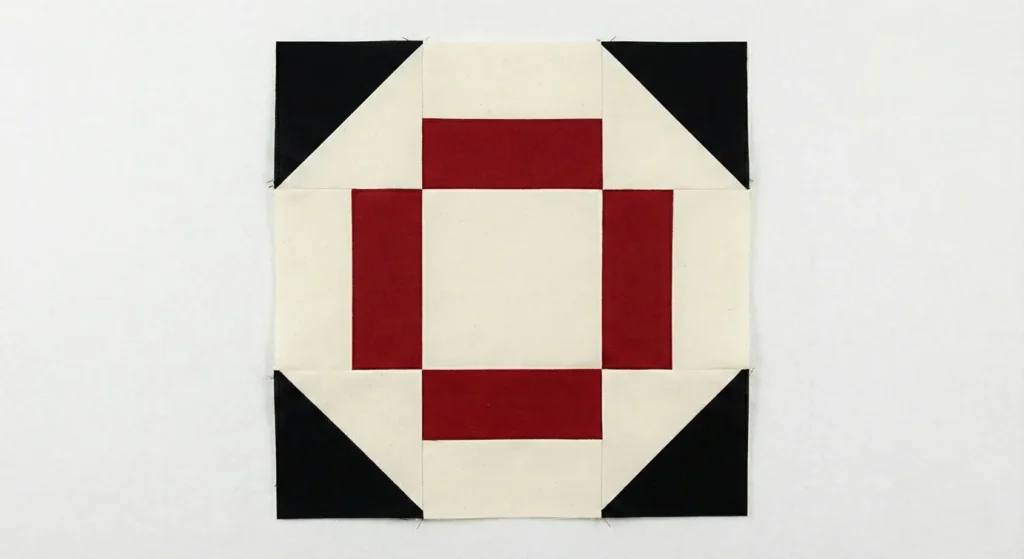
Step 4: Assemble the Churn Dash Block
- Lay out the components for One Block (3×3 grid):
- Top Row: HST (Black corner out) — Dash Unit (Red bar touching center) — HST (Black corner out).
- Middle Row: Dash Unit (Red bar touching center) — White Center Square — Dash Unit (Red bar touching center).
- Bottom Row: HST (Black corner out) — Dash Unit (Red bar touching center) — HST (Black corner out).
- Sew: Stitch the units into rows. Sew the rows together.
- The block should measure 12.5″ x 12.5″ unfinished.
- Repeat to make 36 Blocks.
Step 5: The “Barn Door” Layout
- Arrange the blocks in a 6-block-wide x 6-block-tall grid.
- Sashing (Optional but Recommended): To make the blocks pop and reach Queen size, add Sashing strips.
- Cut Red Sashing strips (2.5″ wide).
- Sew sashing vertically between blocks in each row.
- Sew long horizontal sashing strips between the rows.
- Without sashing, the blocks will touch, creating a dense, tiled look (72″ x 72″). With 2.5″ sashing, it grows to approximately 86″ x 86″.
Step 6: “Wood Grain” Quilting
- Baste the sandwich.
- Quilting: To enhance the farmhouse theme, avoid flowery quilting.
- Design: Use a “Wood Grain” free-motion pattern (wavy lines with occasional “knots” or swirls) to mimic the texture of barn wood.
- Alternatively, straight vertical lines spaced 1 inch apart (Matchstick Quilting) mimic the look of beadboard walls.
Pro Design Tip: Tea Staining. For an authentic rustic look, do not use bright optical white fabric. If you already bought white fabric, soak it in a bathtub with Strong Black Tea for 30 minutes before cutting. This dyes the white to a warm, antique parchment color that looks beautiful against the barn red and black.
Budget Consideration: Drop Cloth Backing. A rustic quilt deserves a rustic back. Use Canvas Drop Cloths (washed and bleached) for the backing. It adds significant weight, making the quilt feel like a heavy, comforting weighted blanket, which is perfect for cold farmhouse nights.
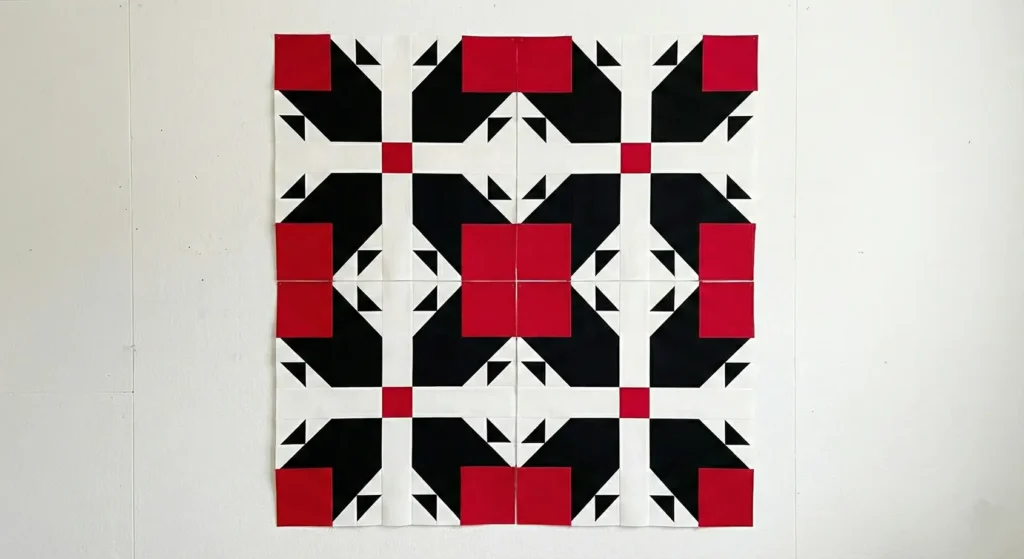
10. Rustic Bear Paw Blocks in Red, Black, and White
The “Grizzly Cabin” Bear Paw Quilt
The Bear Paw is a quintessential rustic block, traditionally symbolizing a connection to nature and hunting. In this bold colorway, we use Red for the Paws (pads), Black for the Claws, and White for the Background. This high-contrast palette turns a country classic into a striking graphic design suitable for a modern cabin or lodge bedroom.
Finished Dimensions: Queen Size, approximately 90″ x 90″.
Materials Needed:
- Fabric A (Red): 2.5 yards (for the main Paw Pads).
- Fabric B (Black): 2 yards (for the Claws/Toes).
- Fabric C (White): 5 yards (for Background and Sashing).
- Backing Fabric: 8.5 yards.
- Batting: Queen Size (96″ x 96″).
- Notions: Rotary cutter, 6.5″ square ruler.
Step 1: Cutting for ONE “Big Bear” Block
A standard Bear Paw layout consists of 4 individual Paws arranged in a cluster pointing outward. We will make 16 Big Blocks (each containing 4 paws).
For a single Big Block (18″ finished):
- Red (Pads): Cut 4 squares, measuring 6.5″ x 6.5″.
- White (Background):
- Cut 4 squares, measuring 3.5″ x 3.5″ (Block Corners).
- Cut 16 squares, measuring 3.875″ (3 7/8″) (for HSTs).
- Cut 5 strips, measuring 1.5″ x 18.5″ (Sashing—optional, but recommended for size).
- Black (Claws):
- Cut 16 squares, measuring 3.875″ (3 7/8″) (for HSTs).
Step 2: Make the “Claws” (Half Square Triangles)
- Pair a 3.875″ Black square with a 3.875″ White square.
- Draw a diagonal line, sew 1/4″ on both sides, cut, and press toward the Black.
- Trim: Square up every unit to exactly 3.5″ x 3.5″.
- Quantity: You need 16 Claws per Big Block.
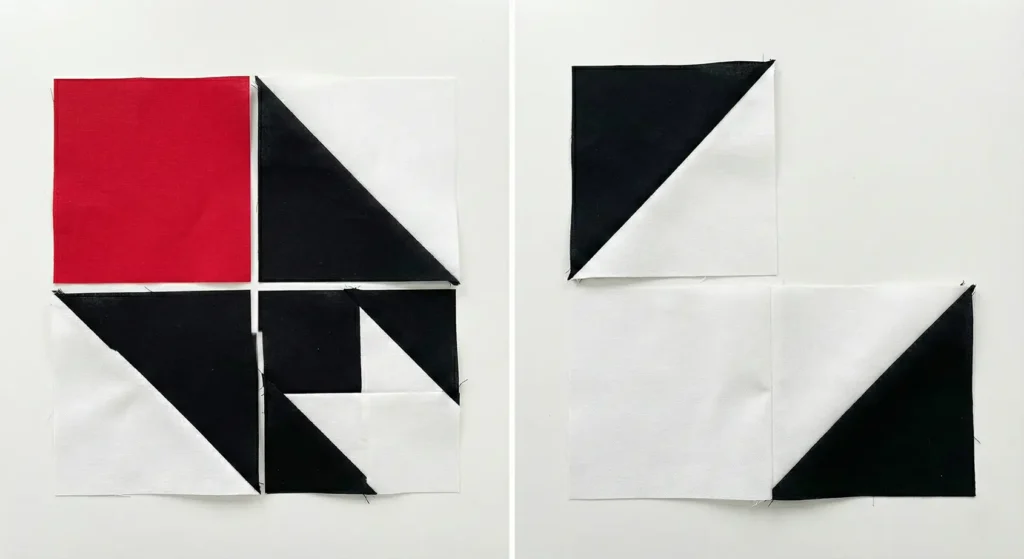
Step 3: Assemble the Individual Paws
Construct 4 Paws.
- The Vertical Toe Strip: Sew 2 Claws (HSTs) together vertically. Make sure the Black triangles point in the same direction (usually “swiping” toward the pad).
- Sew this strip to the Left side of a 6.5″ Red Pad.
- The Horizontal Toe Strip: Sew a 3.5″ White Square to 2 Claws (HSTs).
- Sew this strip to the Top of the Pad/Toe unit.
- Result: You have one Bear Paw unit measuring 9.5″ x 9.5″.
- Repeat to make 4 Paws.
Step 4: Assemble the Big Block (The Cluster)
- Arrange the 4 Paws in a 2×2 grid.
- Rotation: Rotate them so the Red Pads are in the corners and the Claws point inward (or outward, depending on preference. Traditional is claws pointing out, pads in center. But “Pads in Corners” creates a cool X shape with the sashing).
- Classic Layout: Pads in the 4 outer corners, Claws meeting in the middle.
- Sashing (The Cross):
- Sew a 1.5″ White Sashing strip vertically between the left and right pairs.
- Sew a 1.5″ White Sashing strip horizontally between the top and bottom pairs.
- Add a small 1.5″ Red cornerstone in the absolute center if desired.
- Finished Block: This massive block should measure 19.5″ x 19.5″ (19″ finished).
Step 5: Quilt Assembly
- Make 16 Big Blocks.
- Arrange them in a 4×4 grid.
- Sew them together. (At 19″ per block, 4 blocks = 76″. Add a border to reach Queen size).
- Borders: Add a 6-inch Black Border around the entire quilt to frame the rustic motifs and bring it to ~90″.
Step 6: “Bear Track” Quilting
- Baste the sandwich.
- Quilting: Choose a rustic motif.
- Walking Foot: Quilt a large grid on point (diagonal cross-hatch) through the pads.
- Free Motion: Stipple (meander) in the white background to make the Red Paws puff up.
Pro Design Tip: Flannel Accents. To maximize the “cabin” feel, use Red and Black Buffalo Plaid Flannel for the “Pad” squares instead of solid red cotton. It adds texture and warmth.
Budget Consideration: Solid Contrast. Using simple solids (Kona Cotton or similar) is the most affordable way to quilt. This pattern relies on the shape, not the print, so you can buy the cheapest solid broadcloth and still achieve a stunning, professional graphic look.
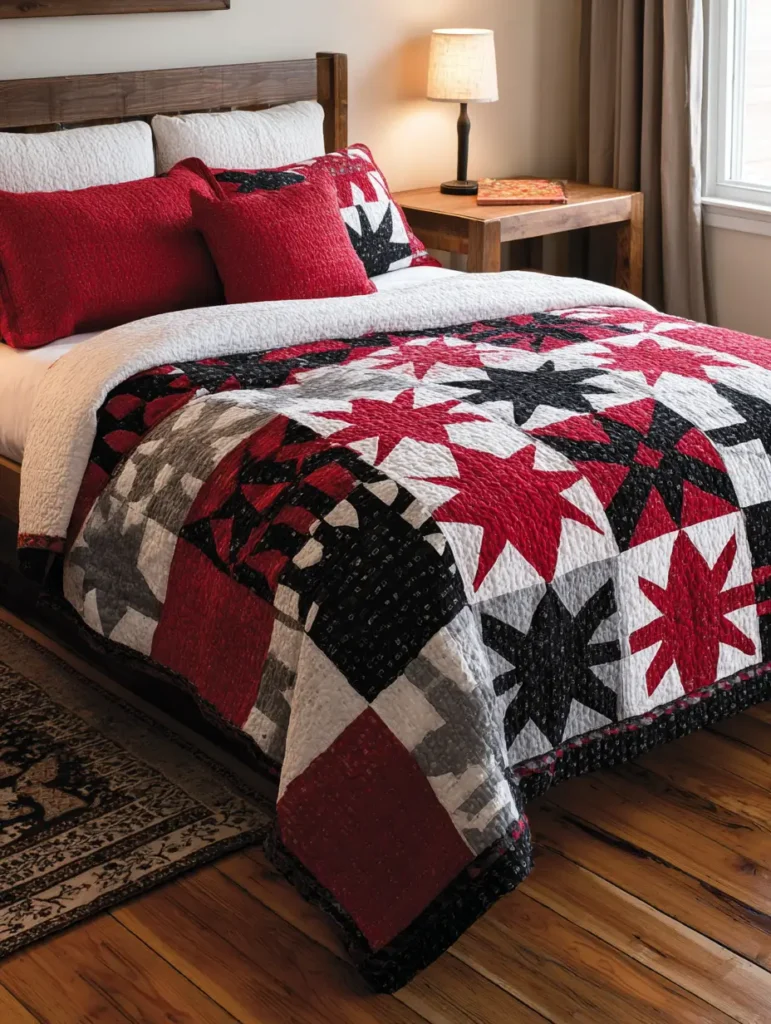
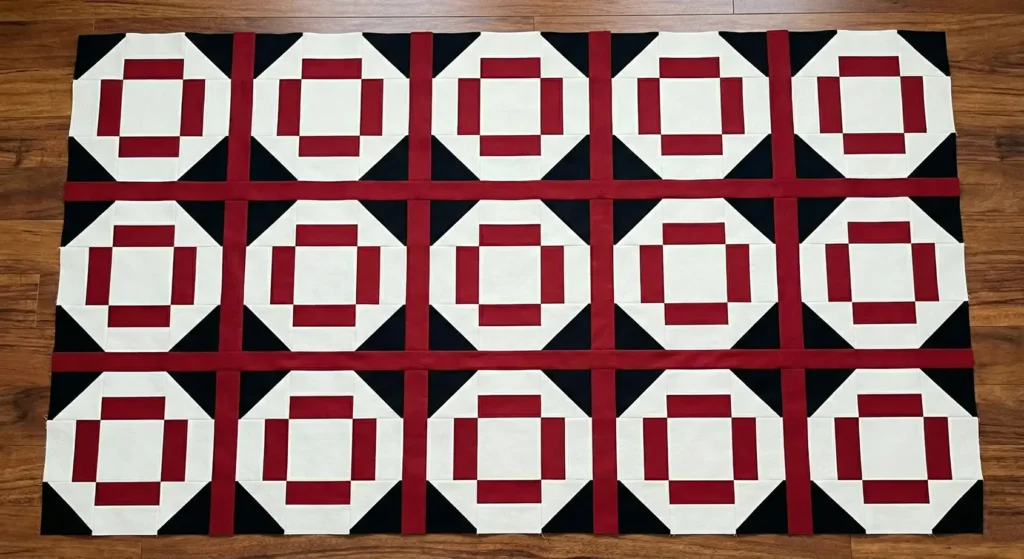
11. Elegant Irish Chain Quilts with Red Accents
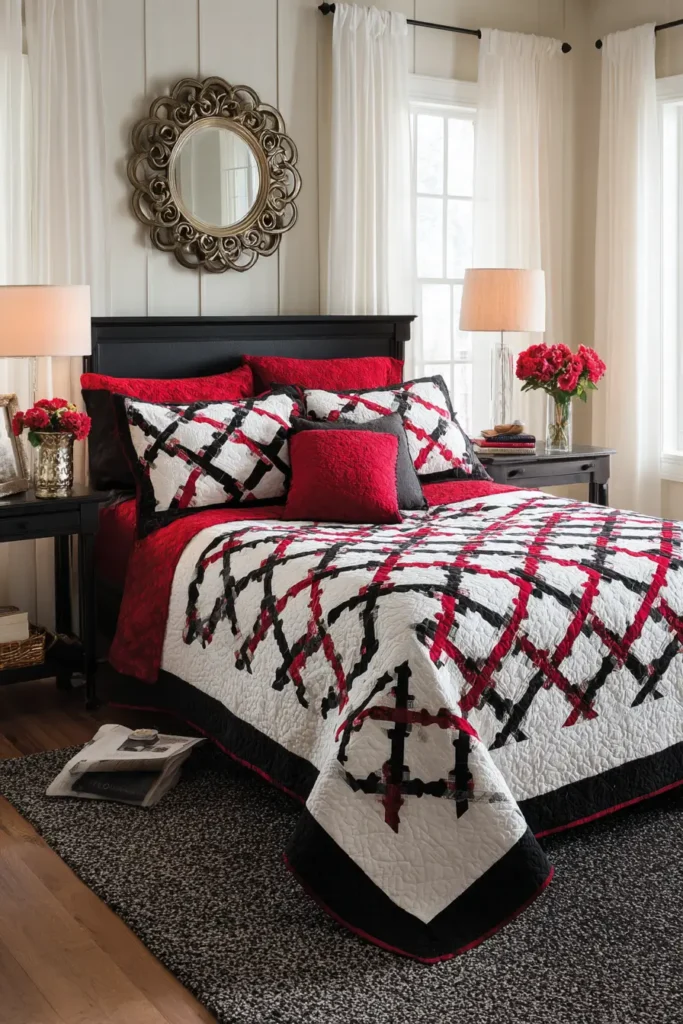
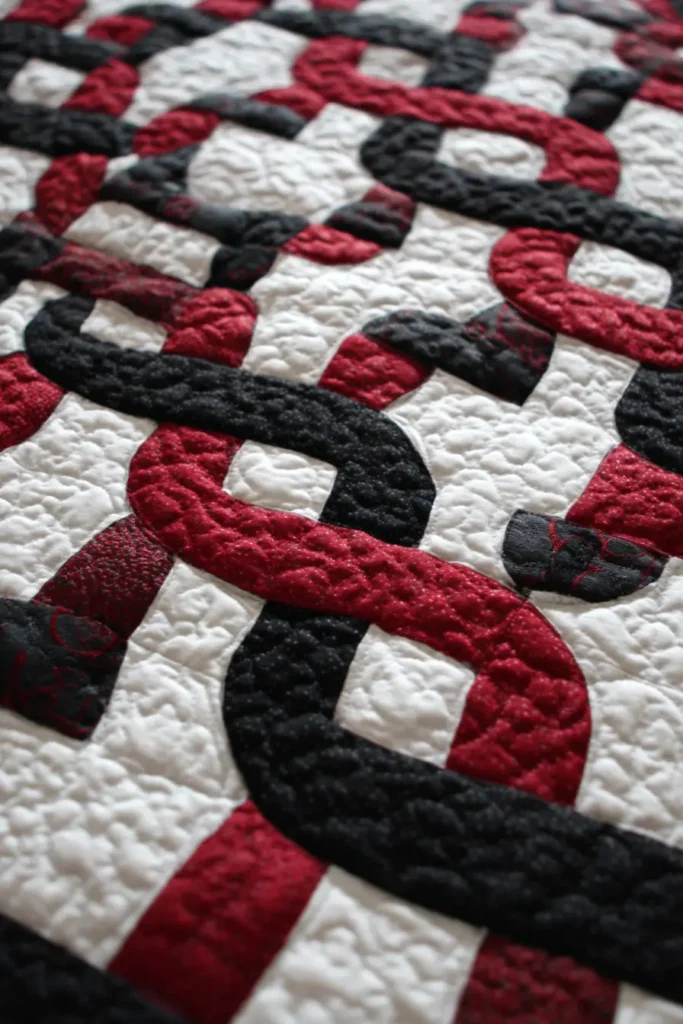
The “Ruby Necklace” Double Irish Chain Quilt
The Double Irish Chain is a masterpiece of negative space. It creates diagonal interlocking rings of color that look intricate but are built from simple strip-pieced squares. In this version, we use Black for the main chains and a piercing Ruby Red for the center connecting squares, making the pattern look like strands of jewels laid out on a white tablecloth.
Finished Dimensions: Queen Size, approximately 90″ x 90″.
Materials Needed:
- Fabric A (Black): 2.5 yards of Solid Black (for the main chain links).
- Fabric B (White): 4.5 yards of Solid White (for background and spacing).
- Fabric C (Red): 1 yard of Deep Red or Metallic Red (for the accent centers).
- Backing Fabric: 8.5 yards.
- Batting: Queen Size (100″ x 100″).
- Binding: 3/4 yard of Solid Red.
- Notions: Rotary cutter, quilting ruler.
Step 1: Understanding the Two Blocks
The Irish Chain is an optical illusion created by alternating just two types of blocks.
- Block A (The “Chain” Block): A 5×5 grid (25-patch) made of Black, White, and Red squares.
- Block B (The “Space” Block): A large, plain White square (or a simple framed square) that gives the eye a rest.
Step 2: Strip Piece “Block A” (The Chain Block)
We need to make a 25-patch block (5 squares wide x 5 squares tall). We will build it using strip sets to avoid cutting 1000 tiny squares.
Cut Strips (All 2.5″ wide):
- Strip Set 1 (Edges): Sew Black – White – Black – White – Black. (Make several sets).
- Sub-cut into 2.5″ segments. (These form Rows 1 and 5 of the block).
- Strip Set 2 (Intermediates): Sew White – Black – White – Black – White. (Make several sets).
- Sub-cut into 2.5″ segments. (These form Rows 2 and 4 of the block).
- Strip Set 3 (Center Accent): Sew White – Black – RED – Black – White. (Make fewer sets).
- Sub-cut into 2.5″ segments. (This forms Row 3, the center row).
Step 3: Assemble Block A
- Gather your segments: Two “Set 1”, Two “Set 2”, and One “Set 3”.
- Sew them in order:
- Row 1: Segment 1 (Black ends)
- Row 2: Segment 2 (White ends)
- Row 3: Segment 3 (Red Center)
- Row 4: Segment 2 (White ends)
- Row 5: Segment 1 (Black ends)
- Pressing: Press seams carefully so they nest (interlock) when stacked.
- Size: The block should measure 10.5″ x 10.5″ (unfinished).
- Quantity: Make 41 Block A’s.
Step 4: Prepare Block B (The Background)
Traditionally, this is just a plain square, but for a “Double” chain effect, we often use a specific 5-patch or just a large solid square. Let’s keep it elegant with a large solid square that highlights the quilting.
- Cut: Cut 40 squares of Solid White fabric, measuring 10.5″ x 10.5″.
- Design Option: If you want more red, you can appliqué a small red diamond in the center of these white squares, but leaving them plain makes the “Chains” stand out more.
Step 5: The Diagonal Layout
- Arrange blocks in a grid of 9 blocks wide x 9 blocks tall (81 blocks total).
- Checkerboard Pattern:
- Row 1: Block A – Block B – Block A – Block B… (Ends with A).
- Row 2: Block B – Block A – Block B – Block A… (Ends with B).
- Row 3: Repeat Row 1.
- Visual Check: Step back. You should see the Black squares connecting diagonally to form “X” shapes or diamond outlines, with the Red squares sparkling at the center of each “X” intersection.
Step 6: Assembly and Border
- Sew the blocks into rows. Press seams toward the solid Block B (less bulk).
- Sew the rows together.
- Borders: Add a 2.5″ White Border first (to float the pattern), followed by a 5.5″ Black Border to frame the quilt like a picture.
Step 7: “Celtic Knot” Quilting
- Baste the sandwich.
- Quilting:
- In the White Blocks (Block B): This is your canvas. Quilt a Feather Wreath or a Celtic Knot design in white thread. The texture will be visible even if the thread blends in.
- In the Chain Blocks (Block A): Stitch in the ditch or do a simple “X” through the squares to secure them.
Pro Design Tip: Velvet Centers. Since you only need small 2.5″ squares of Red for the centers, this is the perfect place to use a luxury fabric. Use Deep Red Velvet or Silk Dupioni for the center squares. It adds a tactile “jewel” feel to the center of every chain link without complicating the construction.
Budget Consideration: Muslin Background. “White” fabric can be stark. For a softer, cheaper, antique look, buy Unbleached Muslin by the bolt (often $2-3/yard). It creates a “Cream/Black/Red” palette that feels warmer and richer than stark bright white.
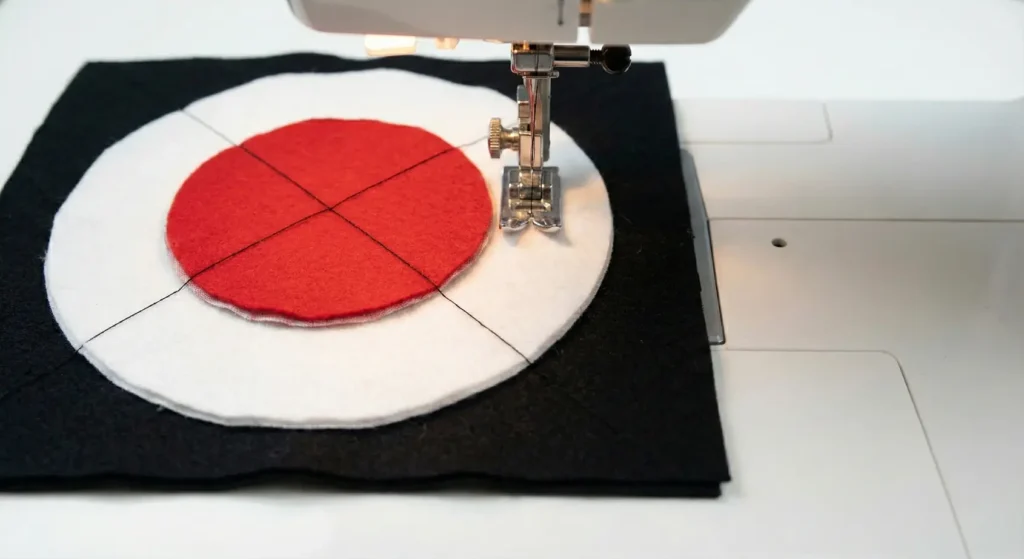
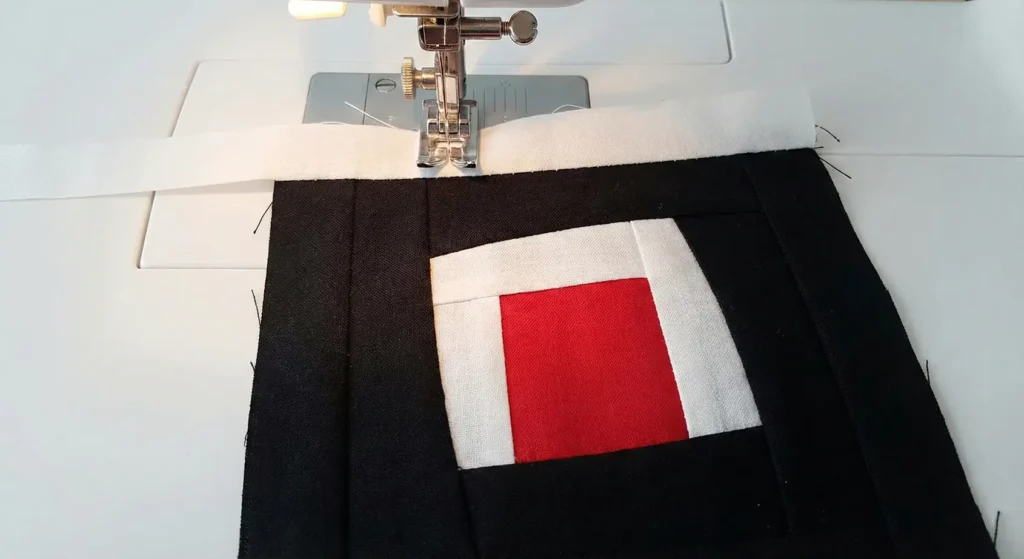
12. Layered Red, Black, and White Quilts for Cozy Statement Bedrooms
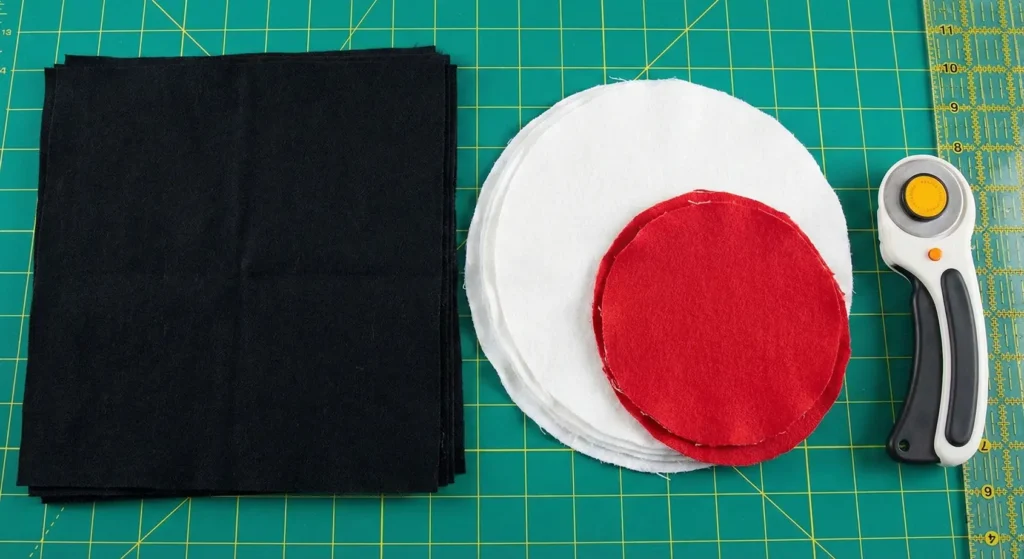
The “Mod Target” Raw-Edge Layered Quilt
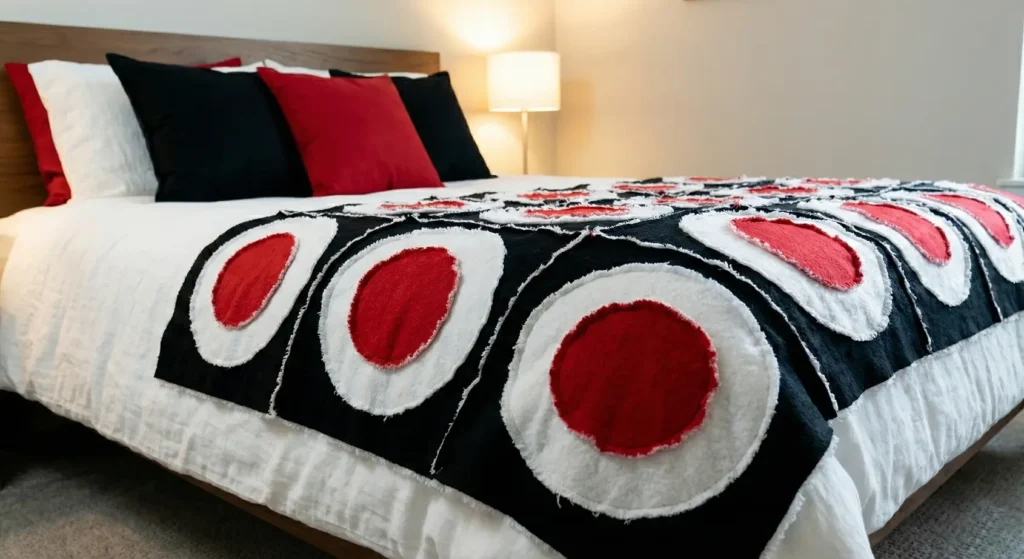
This pattern uses a “Raw-Edge Appliqué” technique to create physical layers of texture. Instead of piecing complicated curves, you simply stack circles of decreasing size onto a square base and sew through the center. When washed, the raw edges of the circles fray and curl, creating a soft, chenille-like texture that makes the bold Red, Black, and White targets feel incredibly cozy and tactile.
Finished Dimensions: Large Throw / Coverlet, approximately 70″ x 70″.
Materials Needed:
- Fabric A (Base/Background): 4 yards of Solid Black Flannel or Brushed Cotton.
- Fabric B (Middle Layer): 2.5 yards of Solid White Flannel.
- Fabric C (Top Layer): 1.5 yards of Bright Red Flannel.
- Backing Fabric: 4.5 yards.
- Batting: Twin Size (72″ x 90″).
- Notions: Rotary cutter, Circle templates (or dinner plates/bowls), Chenille cutter (optional, but scissors work).
Step 1: Cut the Base Squares
The foundation of the quilt is a simple grid of squares.
- From Fabric A (Black): Cut 49 squares, measuring 10.5″ x 10.5″.
- Tip: Using flannel ensures the heavy “rag” texture blooms beautifully when washed.
Step 2: Cut the Circle Layers
You need two circle sizes for the “Target” effect.
- From Fabric B (White): Cut 49 Large Circles, approximately 8″ in diameter.
- Hack: Don’t stress about perfection. Fold the fabric into squares slightly larger than 8″, stack 4-5 layers, pin a paper circle template on top, and cut around it with scissors.
- From Fabric C (Red): Cut 49 Small Circles, approximately 5″ in diameter.
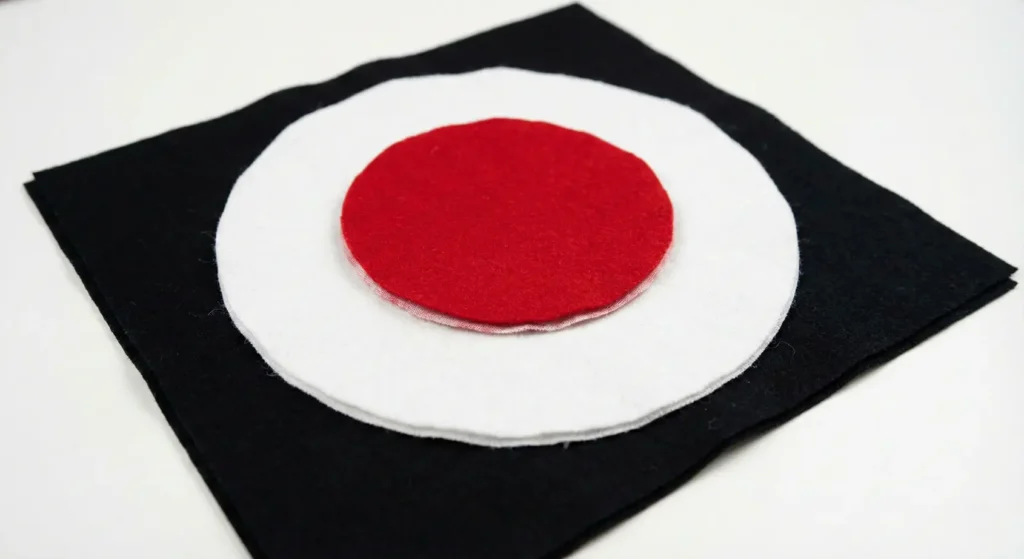
Step 3: Stack the “Targets”
- Lay a Black Square flat (Right Side Up).
- Center a White Circle on top of it.
- Center a Red Circle on top of the White one.
- You now have a 3-layer stack. Repeat for all 49 blocks.
- Design Variant: To make it dynamic, you don’t have to center them perfectly. Slightly off-centering the circles gives a quirky, modern-art vibe.
Step 4: Secure the Layers (The “X” Stitch)
We need to hold the layers together without finishing the edges.
- Take one stack to your sewing machine.
- Sew: Stitch a large “X” through the entire stack, from corner to corner of the Black square.
- This single X secures both circles and the base square simultaneously.
- Optional: For extra security, you can stitch a circle inside the Red circle (about 1″ from the edge), but the X is usually sufficient for the “rag” look.
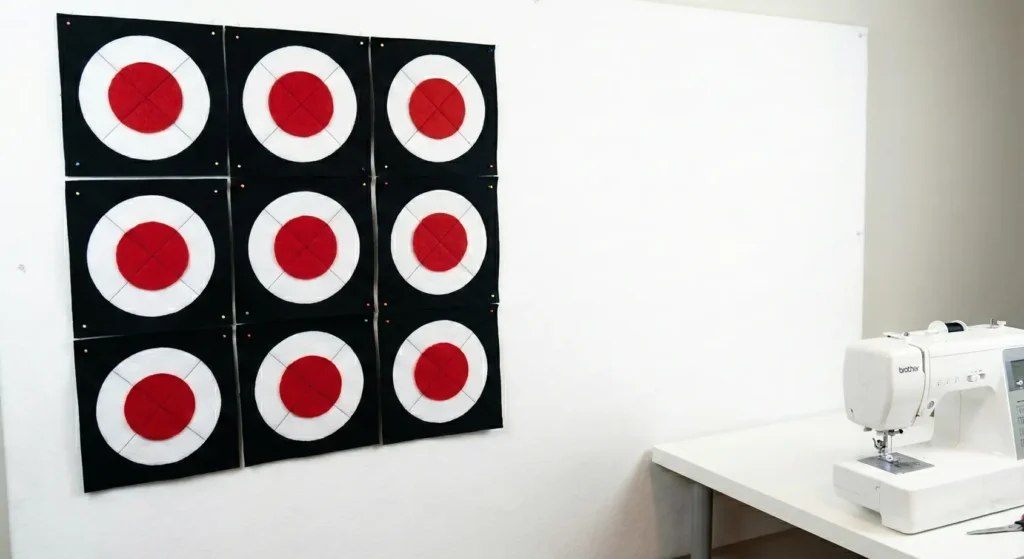
Step 5: Assemble the Quilt Top
- Arrange your 49 blocks in a 7 x 7 grid.
- Sew: Stitch the blocks together using a standard 1/2″ seam allowance.
- Important: Press seams Open. This is crucial to reduce bulk because you are sewing through multiple layers of flannel.
- You now have a quilt top filled with Bullseyes.
Step 6: Quilt, Bind, and Agitate
- Sandwich & Quilt: Layer with the backing and batting. Quilt simply—just stitch “in the ditch” (along the grid lines) between the blocks. Do not quilt over the circles.
- Bind: Finish the edges with a standard binding.
- The Magic Step: Throw the finished quilt into the Washing Machine (Cold Cycle), then into the Dryer.
- The agitation will cause the raw edges of the White and Red circles to fray and curl up.
- When it comes out, the sharp geometric targets will have transformed into soft, fuzzy, “blooming” flowers or textured bullseyes.
Pro Design Tip: The “Eclipse” Block. For a dramatic variation, reverse the colors on half the blocks. Make 25 blocks with Red Base / Black Circle / White Center and 24 blocks with Black Base / White Circle / Red Center. Checkering these two colorways creates a stunning, vibrating visual effect suitable for a high-energy bedroom.
Budget Consideration: Fleece Throws. Flannel can add up. For a cheaper alternative, buy cheap Fleece Throws ($3-5 each) in Red, Black, and White. Cut your circles from the fleece. Fleece doesn’t fray, but it creates a distinct, puffy 3D layer that is incredibly soft and requires no hemming or fray-checking.
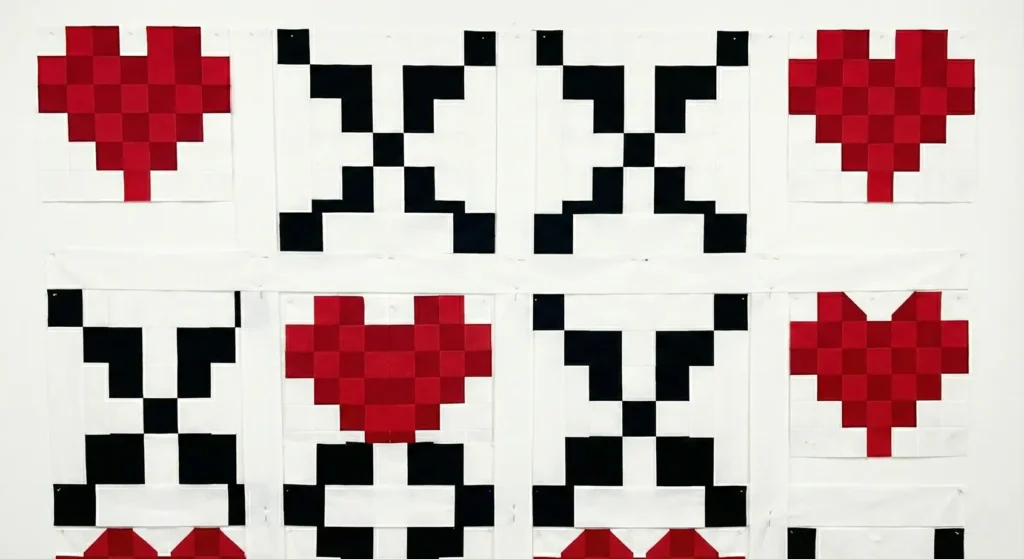
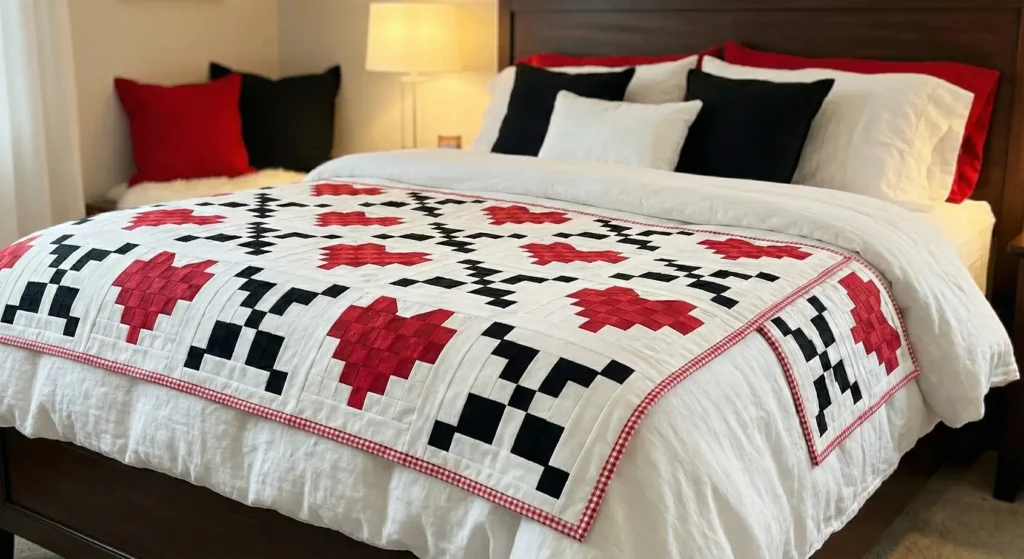
13. Romantic Red Heart Patchwork for Cozy Bedrooms
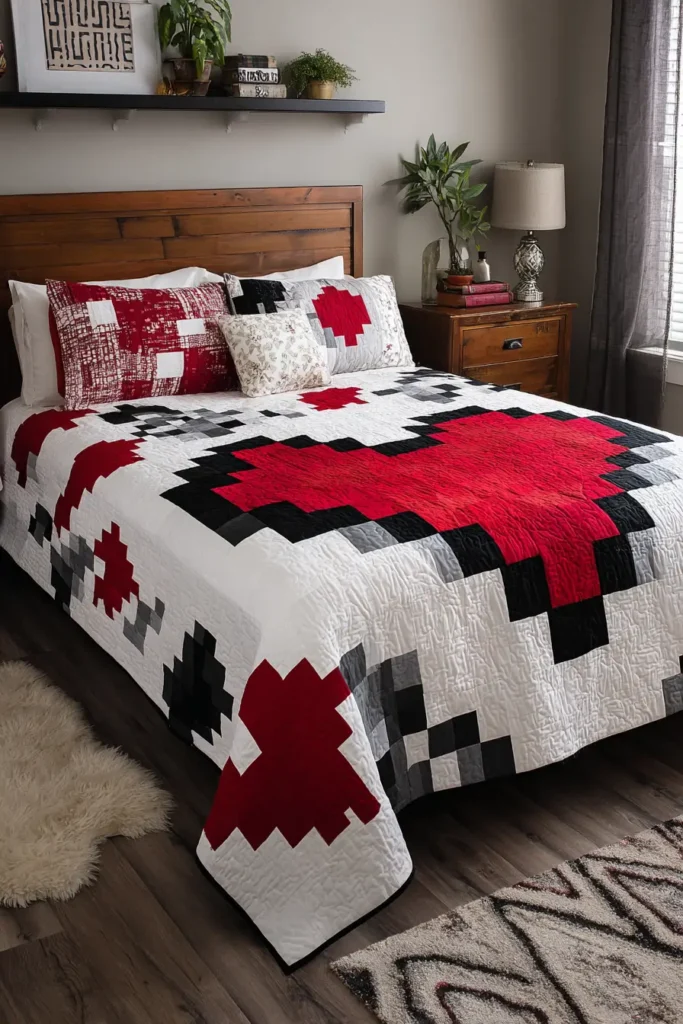
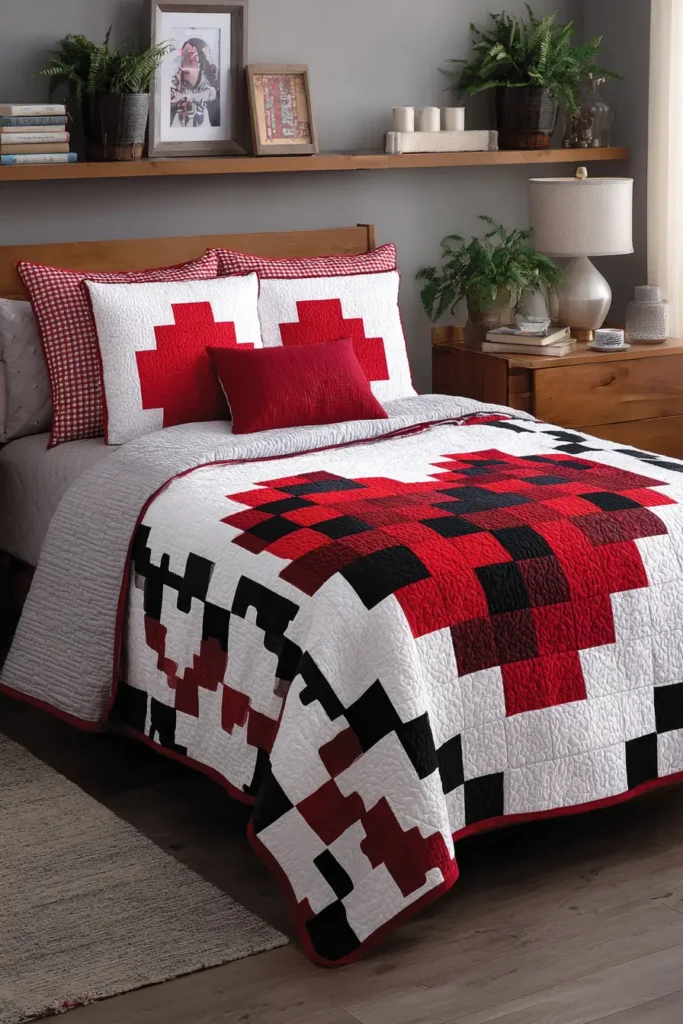
The “Pixelated Heart” Chain Quilt
Nothing says romantic bedroom like a heart motif, but traditional appliqué hearts can look a bit old-fashioned. This “Pixelated Heart” uses simple 2.5-inch squares to create a modern, 8-bit graphic heart shape. We link the hearts together with black chains, symbolizing a strong, unbreakable connection.
Finished Dimensions: Queen Size, approximately 84″ x 84″.
Materials Needed:
- Fabric A (Red): 2.5 yards of tonal Reds (Mix of cherry, ruby, and crimson prints for depth).
- Fabric B (Black): 2 yards of Solid Black (for the outline/shadow).
- Fabric C (White): 4.5 yards of Low-Volume White (white with subtle grey/white dots or text).
- Backing Fabric: 8 yards.
- Batting: Queen Size (90″ x 90″).
- Binding: 3/4 yard of Red/White Gingham.
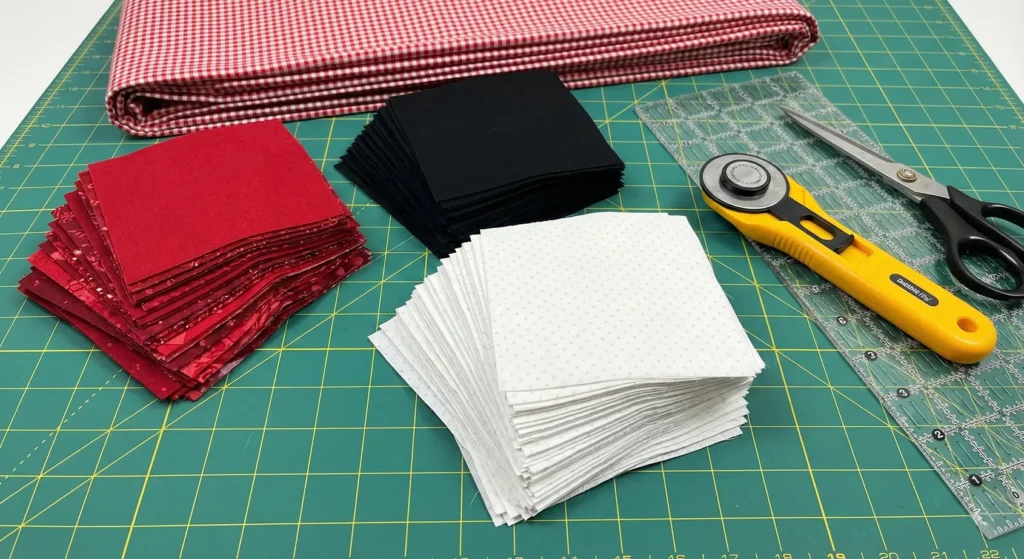
- Notions: Rotary cutter, quilting ruler.
Step 1: Cut the Squares (The Pixels)
This is a pure patchwork quilt made entirely of squares. No triangles!
- From Fabric A (Red): Cut 336 squares, measuring 2.5″ x 2.5″.
- From Fabric B (Black): Cut 336 squares, measuring 2.5″ x 2.5″.
- From Fabric C (White): Cut 800+ squares, measuring 2.5″ x 2.5″.
- Efficiency Tip: Don’t cut them all individually. Cut 2.5″ strips first, then cross-cut them.
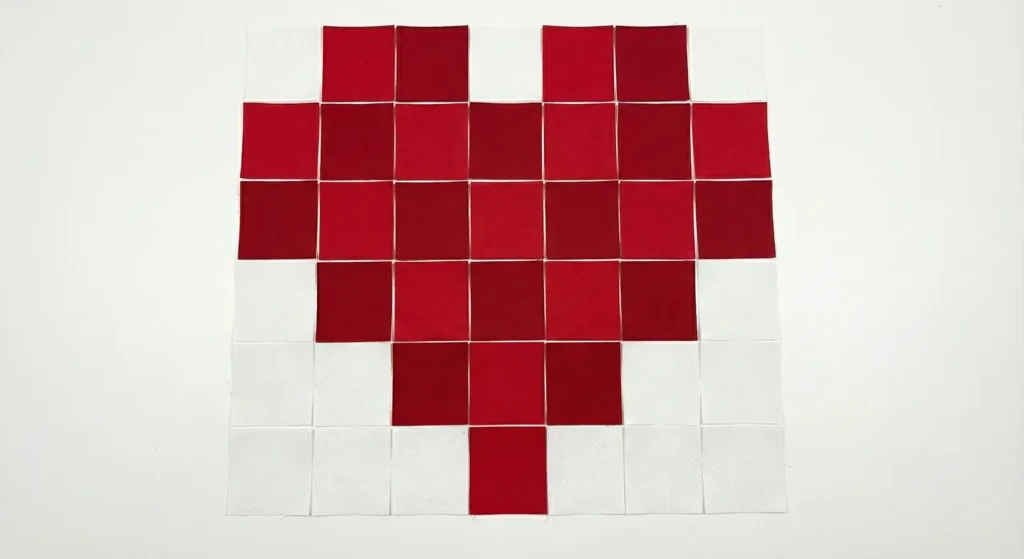
Step 2: The Heart Block Layout
Each Heart Block is a grid of 7 squares wide x 7 squares tall.
- Row 1: White – White – Red – Red – White – White – White
- Row 2: White – Red – Red – Red – Red – White – White
- Row 3: Red – Red – Red – Red – Red – Red – White
- Row 4: Red – Red – Red – Red – Red – Red – White
- Row 5: White – Red – Red – Red – Red – White – White
- Row 6: White – White – Red – Red – White – White – White
- Wait, this is a bit small. Let’s simplify: A 9-patch heart is easier.
- Better Layout (5×5 Grid):
- Row 1: White – Red – White – Red – White
- Row 2: Red – Red – Red – Red – Red
- Row 3: Red – Red – Red – Red – Red
- Row 4: White – Red – Red – Red – White
- Row 5: White – White – Red – White – White
- This creates a perfect 5×5 pixel heart.
- Size: Each block will measure 10.5″ x 10.5″ (unfinished).
- Make 16 Heart Blocks.
- Better Layout (5×5 Grid):
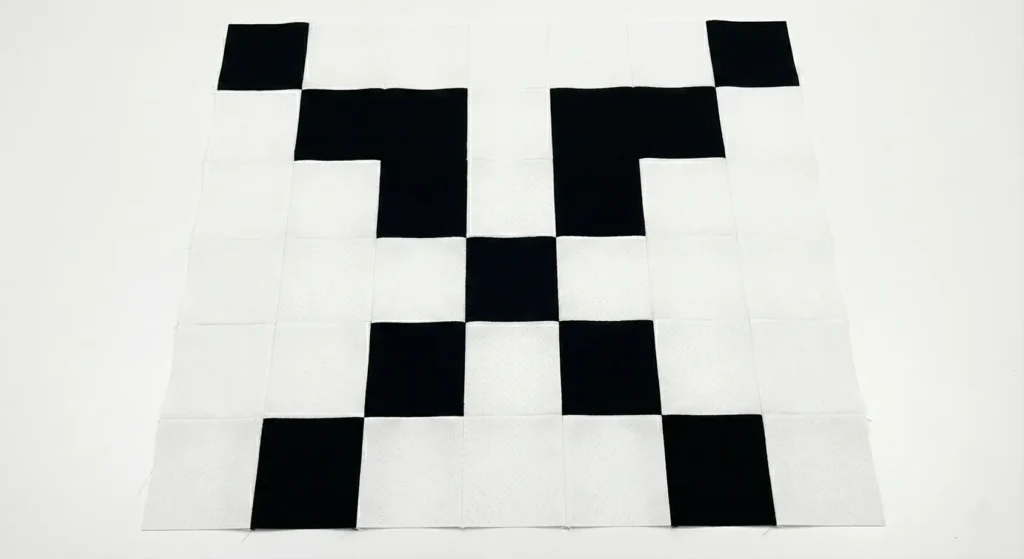
Step 3: The Shadow/Chain Block
To make the hearts pop, we alternate them with a Black “Chain” or “Shadow” block.
- Layout (5×5 Grid):
- Row 1: Black – White – White – White – Black
- Row 2: White – Black – White – Black – White
- Row 3: White – White – Black – White – White
- Row 4: White – Black – White – Black – White
- Row 5: Black – White – White – White – Black
- This creates a distinctive “X” or Chain link shape.
- Make 16 Chain Blocks.
Step 4: Web Assembly
- Lay out the blocks in a grid of 8 blocks wide x 8 blocks tall? (No, that’s 64 blocks. We only made 32. We need more blocks for a queen-size. Let’s assume a 6×6 layout = 36 blocks. Make 18 Hearts and 18 Chains).
- Checkerboard Layout:
- Row 1: Heart – Chain – Heart – Chain – Heart – Chain.
- Row 2: Chain – Heart – Chain – Heart – Chain – Heart.
- Visual: The Black “X” blocks will create a diagonal lattice that frames the Red Hearts perfectly.
Step 5: Sashing (The Expander)
To reach Queen size (84″) with 10″ blocks (60″), we need wide sashing.
- Cut Sashing Strips of Solid White measuring 4.5″ wide.
- Sew vertical sashing strips between every block in the rows.
- Sew long horizontal sashing strips between every row.
- This negative space isolates the pixel hearts, making them look like modern icons.
Step 6: “Heartbeat” Quilting
- Baste the sandwich.
- Quilting: Use Red Thread.
- Design: Quilt a “EKG” or Heartbeat line pattern (zigzag spike, then flat, then zigzag spike) across the horizontal white sashing strips.
- Inside the hearts, stitch a smaller heart shape to secure the layers.
Pro Design Tip: Ombré Hearts. Instead of using one red fabric, make the hearts fade. Use Dark Burgundy for the hearts at the bottom of the quilt, fading to Bright Red in the middle, and Pink/Pale Red at the top. This vertical gradient adds height and sophistication to the room.
Budget Consideration: Scrap Friendly. This pixelated style is the ultimate scrap buster. You can use every distinct scrap of red fabric you own—plaid, polka dot, floral, solid. As long as it reads “Red,” the pixel heart will look cohesive and charmingly scrappy.
14. Dramatic Ombre Red, Black, and White Quilt Patterns
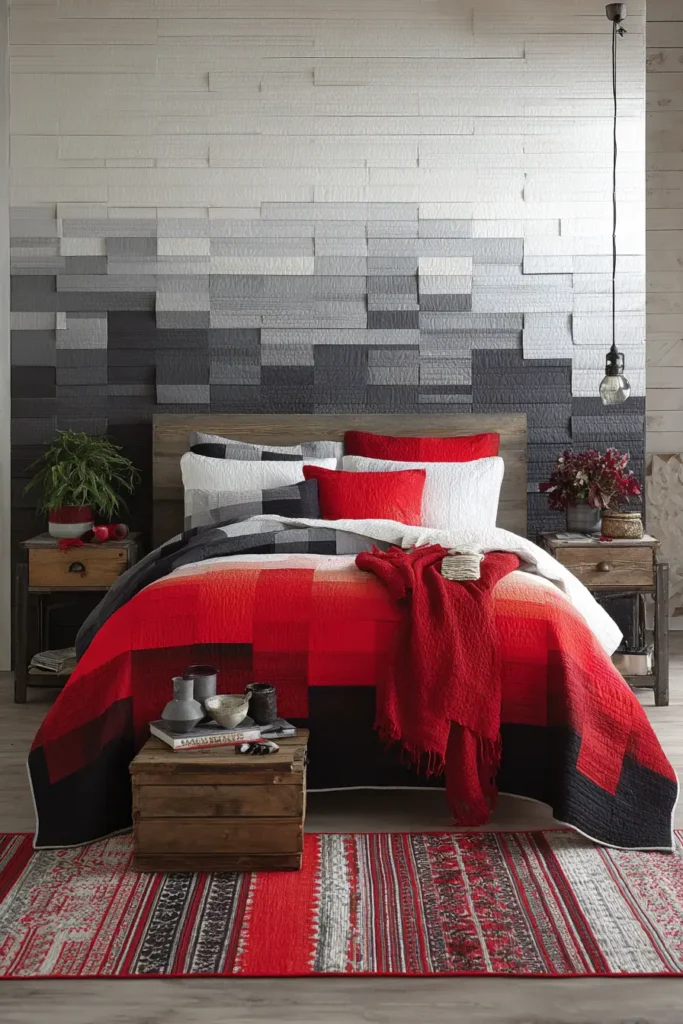
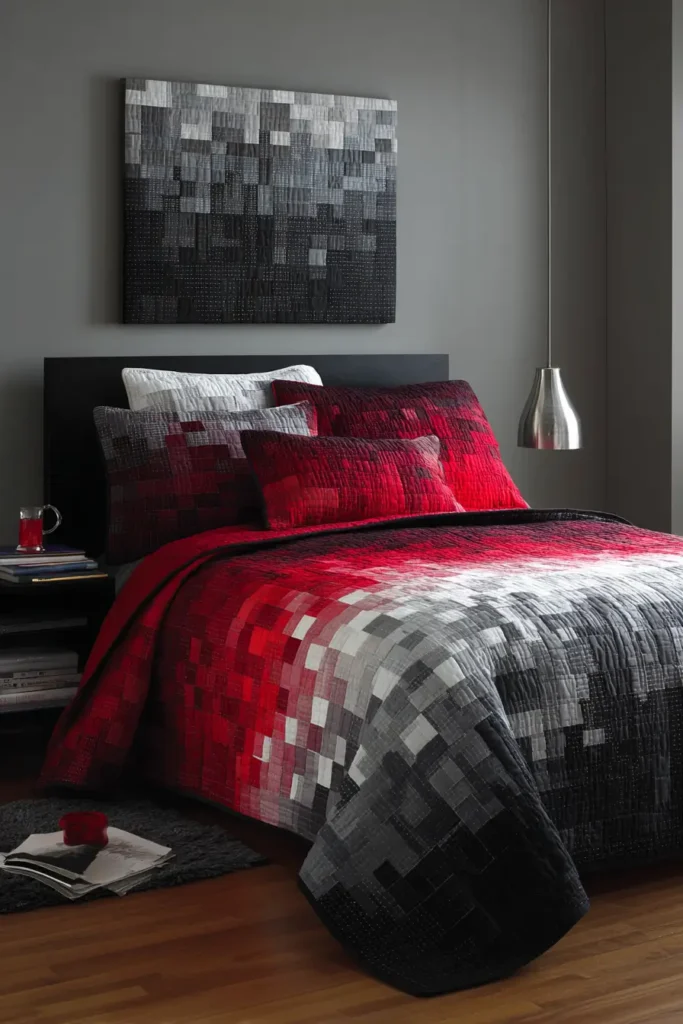
The “Fading Sunset” Bar Quilt
Ombre (gradient) quilts are incredibly modern and create a sense of movement and depth. This design transitions from deep, pitch Black at the foot of the bed, through shades of Charcoal and Grey, bursting into bright Red, and fading into White at the headboard. It mimics a dramatic sunset or embers dying in a fire.
Finished Dimensions: Queen Size, approximately 90″ x 96″.
Materials Needed:
- The Gradient Fabrics (1/2 yard of each):
- Solid Black
- Charcoal Grey
- Medium Grey
- Light Grey
- Deep Burgundy
- True Red
- Bright Poppy Red
- Coral/Pinkish Red
- White
- Backing Fabric: 8.5 yards.
- Batting: Queen Size (96″ x 96″).
- Binding: 3/4 yard of Solid Black.
- Notions: Rotary cutter, 6″ x 24″ ruler.
Step 1: Cut Full-Width Strips
The design relies on horizontal bars of varying widths to create the blend.
- From each of your 9 gradient fabrics, cut strips across the full Width of Fabric (WOF).
- Cut Pattern: For each color, cut:
- One 6.5″ strip
- One 4.5″ strip
- One 2.5″ strip
- One 1.5″ strip
Step 2: Arrange the Gradient
This is the artistic step. Do not sew yet!
- Find a large floor space.
- Start at the bottom with Black. Lay out the widest Black strip (6.5″), then the medium, then the narrow.
- Transition: Mix the narrowest Black strip with the widest Charcoal strip.
- Continue layering upward: Black -> Charcoal -> Grey -> Burgundy -> Red -> Poppy -> White.
- The “Dither” Effect: To make the fade look smooth (rather than striped), interleave the strip widths.
- Example: 4.5″ Grey -> 1.5″ Burgundy -> 2.5″ Grey -> 4.5″ Burgundy.
- This “blending” zone tricks the eye into seeing a smooth gradient.
Step 3: Piece the Long Strips
Standard fabric is only ~42″ wide, but a Queen quilt is 90″ wide. We must join strips.
- Take two matching strips (e.g., two 6.5″ Black strips).
- Sew them end-to-end to create one long strip (~84″).
- Add a partial third strip to reach 90.5″ length.
- Repeat for every single row in your layout.

Step 4: Sew the Horizontal Rows
- Stack your strips in order (label them 1, 2, 3… if needed).
- Sew Row 1 to Row 2.
- Pressing: Press all seams in one direction (usually toward the bottom/darker side).
- Continue adding strips until the quilt top measures approx 96″ tall.
- Tip: If it’s too short, add a wider block of Black at the bottom or White at the top.
Step 5: The “Slice and Shuffle” (Optional Modern Twist)
If plain horizontal stripes feel too simple, add a “glitch” effect.
- Take your completed top.
- Cut it vertically into 4 equal columns (approx 22.5″ wide each).
- Shift Column 2 down by 4 inches.
- Shift Column 4 up by 4 inches.
- Trim the top and bottom to make it square again.
- Sew the columns back together. This creates a staggered, pixelated gradient look.
Step 6: “Waterfall” Quilting
- Baste the sandwich.
- Quilting: Use a walking foot.
- Thread Color: This is tricky on an ombre quilt.
- Option A: Use Invisible Monofilament Thread.
- Option B: Change thread colors as you go (Black thread on bottom, Grey in the middle, Red on top).
- Design: Quilt wavy, organic horizontal lines that look like flowing water or heat waves. The uneven texture enhances the blending effect of the colors.
Pro Design Tip: Texture Gradient. Enhance the ombre by changing fabric textures, not just colors.
- Bottom (Black): Heavy Black Denim or Corduroy.
- Middle (Grey/Red): Standard Cotton.
- Top (White): Light Linen or Voile.
- The quilt literally gets lighter in weight as it moves up your body!
Budget Consideration: Dye Your Own. Buying 9 different shades of red and grey fabric can be annoying. Instead, buy 5 yards of White Cotton and 5 yards of Black Cotton. Use Red RIT Dye.
- Dip-dye the white fabric to get varying shades of pink/red.
- Dip-dye the black fabric (bleach tie-dye) to get varying shades of rust/grey.
- It’s messy, but it creates a truly custom, organic gradient for a fraction of the price.
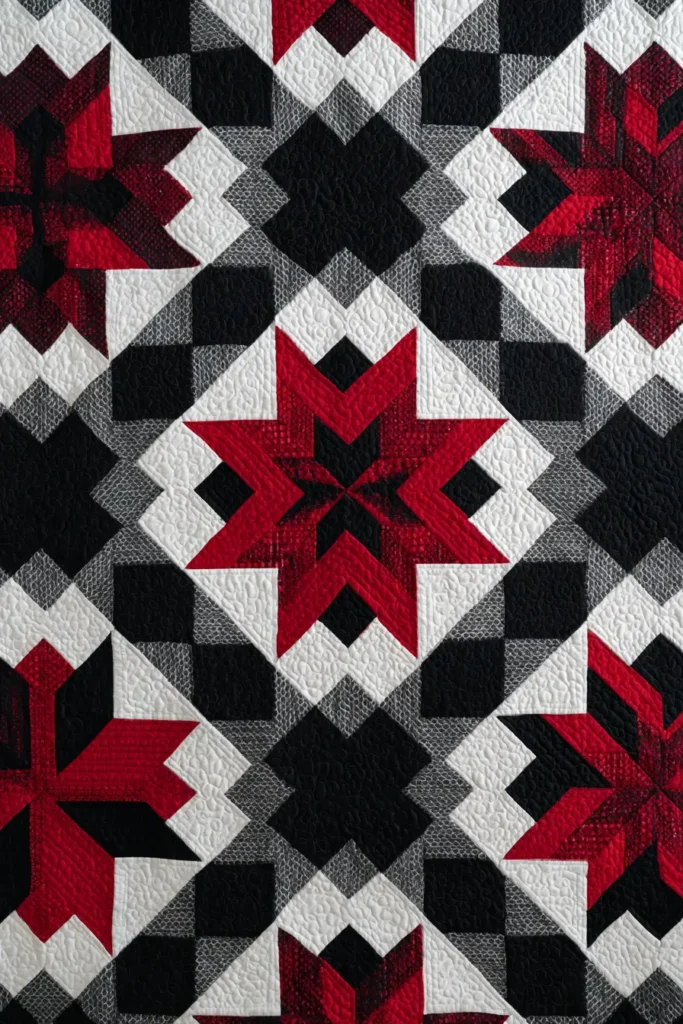
15. Red, Black, and White Sophisticated Log Cabin Quilt Patterns
The “Red Shift” Curved Log Cabin Quilt
Standard Log Cabins are square and rigid. By simply changing the width of the strips (logs) on different sides of the block, you can create an optical illusion where straight lines appear to curve. This pattern creates a mesmerizing “Vortex” or “Tunnel” effect that looks incredibly high-end and complex, despite being sewn with straight seams.
Finished Dimensions: Queen Size, approximately 88″ x 88″.
Materials Needed:
- Fabric A (Centers): 1 yard of Bright Red.
- Fabric B (Light/Inner Curve): 3 yards of Solid White (or Low-Volume White).
- Fabric C (Dark/Outer Curve): 5 yards of Solid Black (or Charcoal).
- Backing Fabric: 8 yards.
- Batting: Queen Size (96″ x 96″).
- Notions: Rotary cutter, 24″ quilting ruler.
Step 1: Cut Two Sizes of Strips
The secret to the “curve” is using narrow strips for the light side and wide strips for the dark side.
- From Fabric A (Red): Cut 64 squares, measuring 3.5″ x 3.5″.
- From Fabric B (White): Cut many strips measuring 1.5″ wide. (These are the “Skinny” logs).
- From Fabric C (Black): Cut many strips measuring 2.5″ wide. (These are the “Fat” logs).
Step 2: Round 1 (The First Layer)
Log Cabin rule: Always add logs in a specific clockwise or counter-clockwise order.
- Take a Red Center Square.
- Log 1 (White/Skinny): Sew a 1.5″ White strip to the Top. Trim flush. Press seam out.
- Log 2 (White/Skinny): Sew a 1.5″ White strip to the Right. Trim flush. Press seam out.
- Log 3 (Black/Fat): Sew a 2.5″ Black strip to the Bottom. Trim flush. Press seam out.
- Log 4 (Black/Fat): Sew a 2.5″ Black strip to the Left. Trim flush. Press seam out.
- Result: The Red center is now “pushed” toward the top-right corner because the black strips are wider than the white ones.
Step 3: Round 2 and 3 (Building the Spiral)
Continue the same sequence.
- Round 2:
- Add 1.5″ White strip to Top.
- Add 1.5″ White strip to Right.
- Add 2.5″ Black strip to Bottom.
- Add 2.5″ Black strip to Left.
- Round 3: Repeat the sequence one last time.
- Trim: Square up the block to 12.5″ x 12.5″.
- Visual Check: You should see a “fan” or “curve” shape. The White section looks small and tight, while the Black section fans out wide.
Step 4: Mass Production
- Repeat the process to make 64 Blocks.
- Efficiency Tip: Use “Chain Piecing.” Sew Log 1 onto all 64 red squares at once, then press them all, then cut them all apart. Then take the log 2 for all 64, etc. This is much faster than making one block at a time.
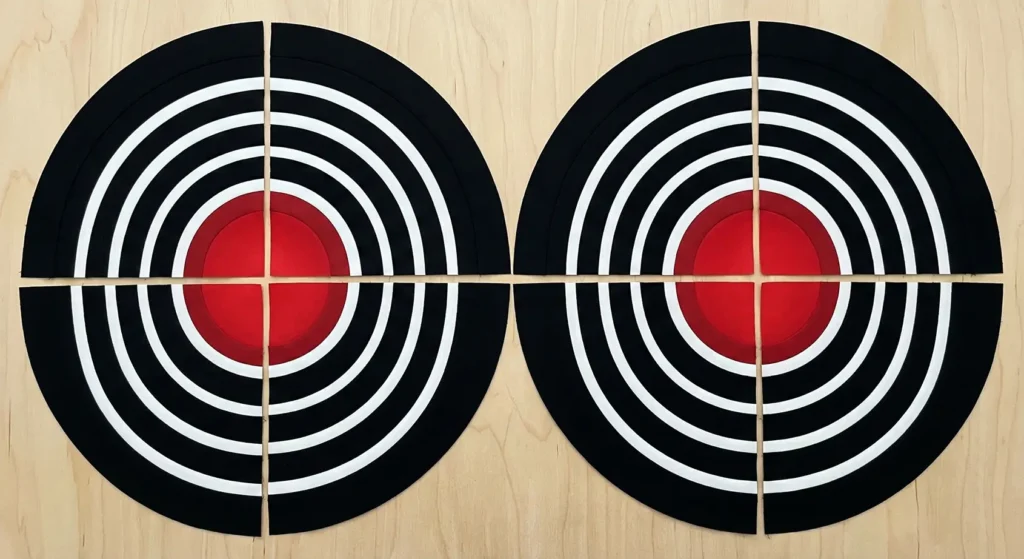
Step 5: The “Big Circle” Layout
This is where the sophistication happens.
- Find a large floor space (8 blocks x 8 blocks).
- Group the blocks in Sets of 4.
- Arrange a Set of 4: Rotate the blocks so the Red Centers all point toward the middle of the 4-block cluster.
- Top Left Block: Red is in the bottom-right corner.
- Top Right Block: Red is in the bottom-left corner.
- Bottom Left Block: Red is in the top-right corner.
- Bottom Right Block: Red is in the top-left corner.
- The Illusion: When 4 blocks are joined this way, the “Curved” black lines connect to form a perfect black circle (or wreath) with a glowing red center.
- Repeat this layout for the whole quilt to create a field of 16 Large Circles.
Step 6: “Spiral” Quilting
- Baste the sandwich.
- Quilting: Enhance the illusion.
- Use a Walking Foot to quilt a continuous spiral. Start in the center of one of the 4-block clusters (the red bullseye) and spiral outward, crossing over the black and white curved lines.
- The circular quilting reinforces the fabric’s visual trick, making the straight lines look even more bent.

Pro Design Tip: Gradient Logs. To make the quilt look like a 3D tunnel, use varying shades of black on the Black side. Use Charcoal for the inner black logs (closer to the red) and Pitch Black for the outer logs. This gradient adds depth, making the red center look like it is glowing deep inside a dark tunnel.
Budget Consideration: Black Bed Sheets. This pattern requires a lot of black fabric (5 yards). High-quality black quilting cotton can be expensive. Buying a King-Size 100% Cotton Black Flat Sheet is a great way to get wide, consistent black fabric at half the price of yardage. Just make sure it is 100% cotton so it doesn’t melt when you iron it!
16. Contemporary Herringbone Quilt Patterns in Red, Black, and White
The “Cardiogram” Split-Herringbone Quilt
This isn’t your grandmother’s herringbone. By playing with the placement of color, we transform the classic “V” shape into a jagged, electric “heartbeat” line. The background is a stark contrast of Black and White split down the middle, with a jagged line of Bright Red connecting the two, mimicking a spike on an EKG monitor.
Finished Dimensions: Queen Size, approximately 85″ x 96″.
Materials Needed:
- Fabric A (Left Side/Black): 3 yards of Solid Black.
- Fabric B (Right Side/White): 3 yards of Solid White.
- Fabric C (The Pulse/Red): 1.5 yards of Bright Neon Red or Poppy.
- Backing Fabric: 8 yards.
- Batting: Queen Size (96″ x 100″).
- Binding: 3/4 yard of Solid Red.
- Notions: Rotary cutter, 8″ square ruler.
Step 1: Mass Produce Large HSTs
Using large blocks makes this modern and fast. We need roughly 210 Half Square Triangles (HSTs) total.
- Cut Squares:
- From Black: Cut 50 squares (8″ x 8″).
- From White: Cut 50 squares (8″ x 8″).
- From Red: Cut 10 squares (8″ x 8″).
- Note: We also need “Transition” squares.
- Cut 25 Black squares (8″ x 8″) to pair with White.
- Cut 25 White squares (8″ x 8″) to pair with Black.
- Cut 20 Black squares (8″ x 8″) to pair with Red.
- Cut 20 White squares (8″ x 8″) to pair with Red.
Step 2: Sew the Combinations
We need specific color pairings to make the design work.
- Black/White Combo: Pair 25 Black squares with 25 White squares. Sew diagonally (HST method). Yields 50 Black/White units.
- Black/Black Combo: Actually, for the solid black side, you just need solid squares? No, Herringbone uses triangles to create the “V”. Pair 50 Black with 50 Black (or just cut triangles). Correction: Let’s stick to HSTs for consistency. Pair Black with Black to make 100 “All Black” HSTs (ghost blocks).
- White/White Combo: Pair White with White to make 100 “All White” HSTs.
- Red/Black Combo: Pair 20 Red with 20 Black. Yields 40 Red/Black units.
- Red/White Combo: Pair 20 Red with 20 White. Yields 40 Red/White units.
- Trim: Square up all units to exactly 7.5″ x 7.5″.
Step 3: The “Split” Layout
This is the most critical design step. Find a large floor space.
- Grid: You are building 12 vertical columns.
- Left Side (Cols 1-5): Use mostly “All Black” units. Orient them to form the herringbone “V” pointing UP.
- Right Side (Cols 8-12): Use mostly “All White” units. Orient them to form the herringbone “V” pointing UP.
- The “Pulse” (Cols 6-7): This is the center fissure.
- Use your Red/Black and Red/White units here.
- Arrange them so the Red triangles form a jagged, continuous lightning bolt running vertically down the center of the quilt.
- Ensure the “V” shape orientation is consistent with the rest of the quilt.
Step 4: Vertical Column Assembly
Herringbone is always easier to sew in vertical strips than horizontal rows.
- Sew the blocks of Column 1 together.
- Sew the blocks of Column 2 together.
- Repeat for all 12 columns.
- Label them! Use sticky notes (C1, C2, C3…) because once you pick them up, it is very easy to get confused.
Step 5: Join the Columns
- Pin Column 1 to Column 2.
- Match Points: The points of the triangles must kiss perfectly. Pin securely at every intersection.
- Sew the columns together.
- Press seams Open to reduce bulk.
Step 6: “Echo Pulse” Quilting
- Baste the sandwich.
- Quilting:
- In the Black Section: Quilt with Black thread using straight vertical lines.
- In the White Section: Quilt with White thread using straight vertical lines.
- In the Red Pulse: Switch to Red Thread. Quilt dense zigzag lines that follow the jagged path of the red triangles. This texture change makes the red line visually vibrate.
Pro Design Tip: The “Fadeway”. Instead of a hard line between black and white, create a gradient. Use Grey/Black HSTs and Grey/White HSTs to transition the outer columns into the center red pulse. It creates a softer, smokier look.
Budget Consideration: Use Solids. This pattern relies entirely on graphic impact, not intricate prints. You can use the most basic Kona Cotton Solids (which are relatively affordable) and still produce a quilt that looks like a piece of modern art worth thousands.
The “Nordic Winter” Cross Quilt
Scandinavian design is defined by simplicity, functionality, and connection to nature. This pattern creates large, pixelated “Snowflakes” or “Nordic Crosses” (resembling the patterns found on classic wool sweaters) using simple squares. The stark contrast of Black and White provides a clean backdrop, while the Red crosses add a warm, festive “Hygge” feeling perfect for winter nights.
Finished Dimensions: Queen Size, approximately 84″ x 84″.
Materials Needed:
- Fabric A (Red): 2.5 yards of Cardinal Red (Solid or subtle texture).
- Fabric B (White): 4.5 yards of Crisp White (Solid).
- Fabric C (Black): 1.5 yards of Solid Black (for accents/corners).
- Backing Fabric: 8 yards.
- Batting: Queen Size (90″ x 90″).
- Binding: 3/4 yard of Red and White Stripe.
- Notions: Rotary cutter, quilting ruler.
Step 1: Cut the Squares (Pixel Construction)
This quilt uses a simple 9-patch structure to build larger motifs. Everything starts with a square.
- From Fabric A (Red): Cut 80 squares, measuring 4.5″ x 4.5″.
- From Fabric B (White): Cut 160 squares, measuring 4.5″ x 4.5″.
- Also Cut: 16 strips of White measuring 4.5″ x 12.5″ (for spacing blocks).
- Also Cut: 4 strips of White measuring 4.5″ x 48″ (sashing – piece as needed).
- From Fabric C (Black): Cut 16 squares, measuring 4.5″ x 4.5″.
Step 2: Assemble the “Cross” Block
We will build 16 large Cross Blocks. Each block is a 3×3 grid (9-patch).
- Layout for ONE Block:
- Row 1: White Square — Red Square — White Square.
- Row 2: Red Square — Black Square (Center) — Red Square.
- Row 3: White Square — Red Square — White Square.
- Visual: This creates a Red “Plus Sign” with a Black center dot, floating in white corners.
- Sew: Stitch the squares into rows. Press seams toward the Red squares.
- Join: Sew the 3 rows together.
- Size: The finished block should measure 12.5″ x 12.5″.
- Quantity: Make 16 Cross Blocks.
Step 3: Create the “Negative Space” Blocks
Scandi style needs breathing room. We don’t want the crosses to be too crowded.
- Cut: You need 9 large plain squares of Solid White fabric.
- Dimensions: Cut them to 12.5″ x 12.5″ (same size as your finished Cross blocks).
- Design Note: Alternatively, you can use a very subtle low-volume grey print here to add texture without breaking the minimalism.
Step 4: The “Snowfall” Layout
- Find a floor space. Arrange a grid of 5 blocks wide x 5 blocks tall.
- Alternating Pattern:
- Row 1: Cross — White — Cross — White — Cross.
- Row 2: White — Cross — White — Cross — White.
- Row 3: Cross — White — Cross — White — Cross.
- Row 4: White — Cross — White — Cross — White.
- Row 5: Cross — White — Cross — White — Cross.
- Result: The red crosses are evenly spaced, creating a balanced, rhythmic pattern.
Step 5: Assembly
- Sew the blocks into horizontal rows.
- Pressing: Press seams toward the Plain White blocks (to reduce bulk at the Cross block seams).
- Sew the 5 rows together.
- Borders: To reach Queen size (currently 60″ x 60″), add borders.
- Border 1 (Inner): 2.5″ strip of Black.
- Border 2 (Outer): 8.5″ strip of Solid White.
- The wide white outer border is very Scandi—it makes the design look like it is floating on a cloud.
Step 6: “Big Stitch” Quilting
- Baste the sandwich.
- Quilting: Hand quilting is very traditional for this style.
- Thread: Use thick Red Perle Cotton (Size 8).
- Stitch: Sew a running stitch (large dashes) approx 1/4″ away from the Red Cross shapes.
- In the plain white blocks, stitch a large “X” from corner to corner.
- The visible hand stitching adds that essential “handmade/hygge” texture.
Pro Design Tip: Wool Batting. To make this a true winter warmer, use Wool Batting instead of cotton. Wool has a higher “loft” (puffiness), making the quilt look thicker and fluffier, like a down duvet. It regulates temperature perfectly for cold Nordic nights.
Budget Consideration: Sweater Upcycle. If you are making a smaller throw version, you can cut the “White” squares from Old White Wool Sweaters (felted in the wash first). Mixing the sweater’s knit texture with the cotton of the red cross creates an incredibly cozy, tactile quilt for almost no cost.
18. Mosaic Tile Inspired Red, Black, and White Quilts
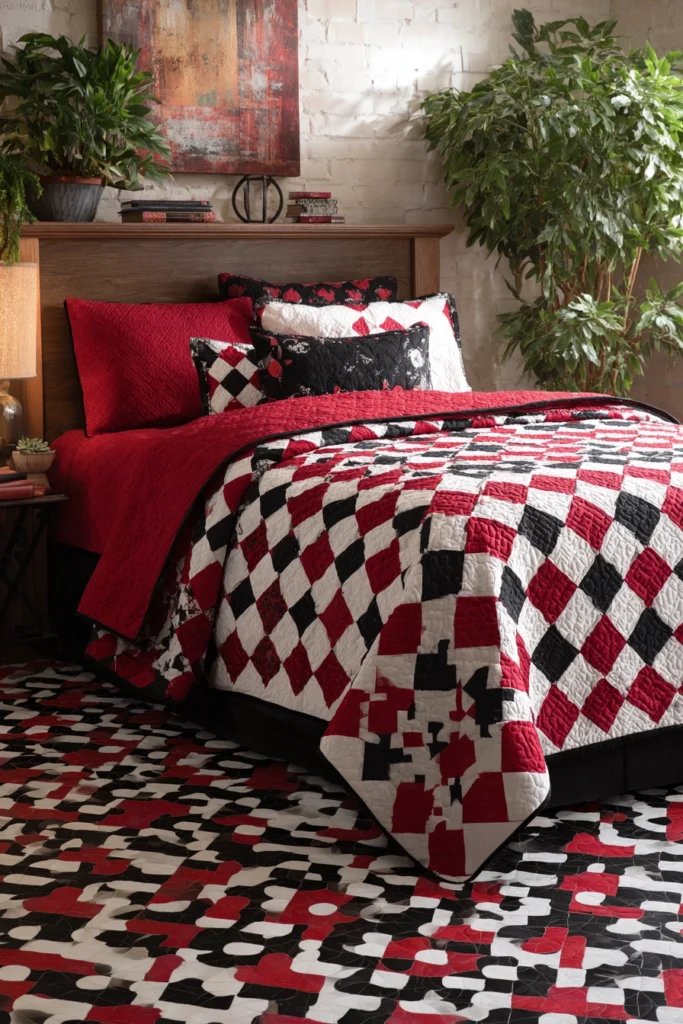
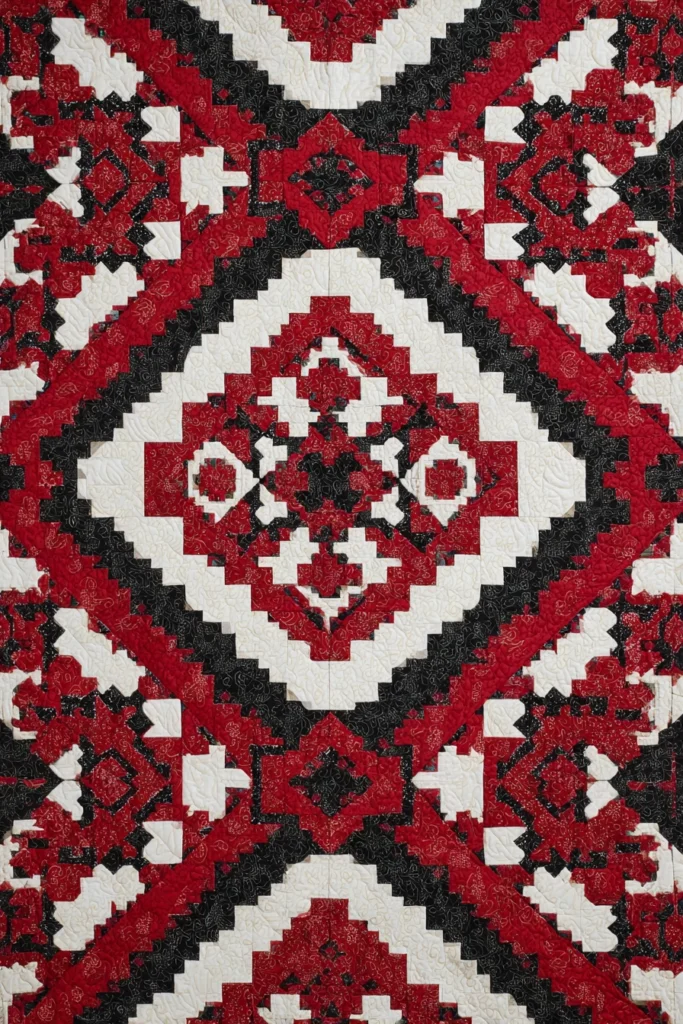
The “Red Piazza” Tiled Jacob’s Ladder Quilt
Mosaic floors are famous for their intricate, interlocking geometric patterns. This quilt mimics that ceramic look using the classic “Jacob’s Ladder” block. By combining checkerboards (the “tiles”) with triangles (the “lattice”), the design creates a stunning, continuous web of Red and Black diamonds on a White background. It looks complex, like a cafe floor in Rome, but is built entirely from simple squares and triangles.
Finished Dimensions: Queen Size, approximately 88″ x 88″.
Materials Needed:
- Fabric A (Red): 2.5 yards of Deep Red (Solid or Small Print).
- Fabric B (Black): 3 yards of Solid Black.
- Fabric C (White): 4 yards of Solid White (or “Crackle” print for a ceramic look).
- Backing Fabric: 8 yards.
- Batting: Queen Size (96″ x 96″).
- Binding: 3/4 yard of Solid Black.
- Notions: Rotary cutter, 6.5″ square ruler.
Step 1: Create Red/White 4-Patches (The Tiles)
The centers of our mosaic are little checkerboards.
- Cut Strips:
- Cut 15 strips of Red (2.5″ wide).
- Cut 15 strips of White (2.5″ wide).
- Strip Piece: Sew one Red strip to one White strip lengthwise. Press toward Red.
- Sub-Cut: Cut the strip sets into 2.5″ wide segments. You now have two-color rectangles.
- Sew Pairs: Take two segments. Flip one so the colors alternate (Red/White over White/Red). Sew them together.
- Result: You have a 4-patch checkerboard measuring 4.5″ x 4.5″.
- Yield: Make 100 of these 4-Patches.
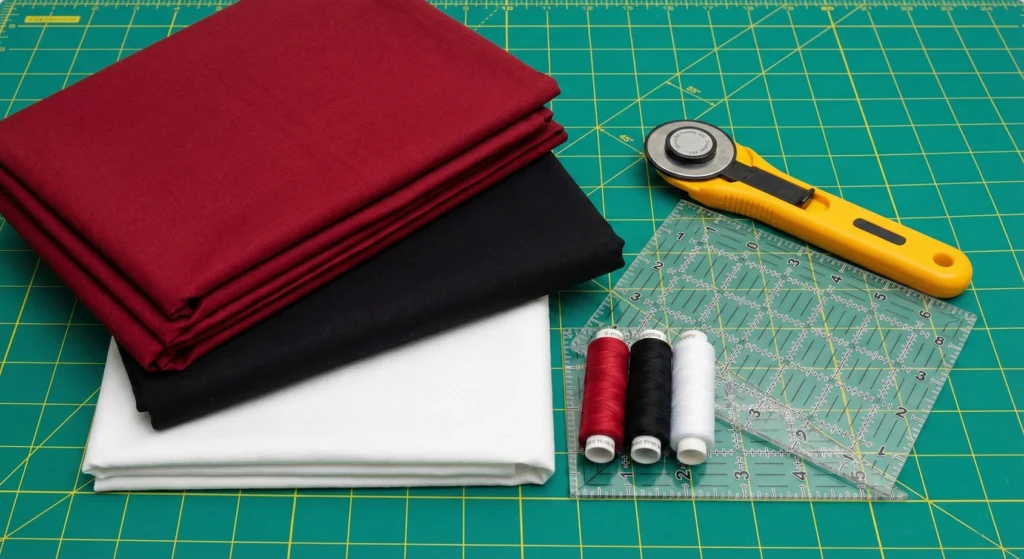
Step 2: Create Black/White HSTs (The Lattice)
These triangles form the dark path connecting the tiles.
- Cut Squares:
- Cut 50 squares of Black (5″ x 5″).
- Cut 50 squares of White (5″ x 5″).
- Sew: Place a Black and White square Right Sides Together. Draw a diagonal line. Sew 1/4″ on both sides. Cut on the line.
- Trim: Square up all Half Square Triangles (HSTs) to 4.5″ x 4.5″.
- Yield: Make 100 Black/White HSTs.
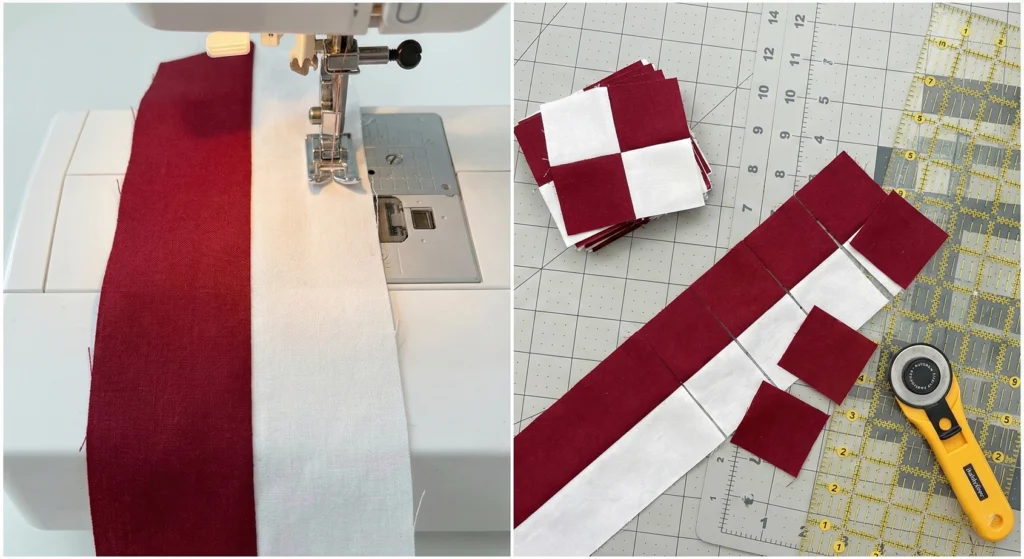
Step 3: Assemble the Jacob’s Ladder Block
Each large block is a 9-patch grid (3×3).
- Layout:
- Corners: 4-Patch (Red/White).
- Center: 4-Patch (Red/White).
- Remaining 4 spots: Black/White HSTs.
- Orientation: Point the Black triangles inward toward the center 4-Patch.
- Sew: Stitch into 3 rows, then sew rows together.
- Size: The block should measure 12.5″ x 12.5″.
- Quantity: Make 25 Blocks. Wait, 5×5 layout is 25 blocks (60″). We need more for Queen. Let’s make 49 Blocks (7×7 layout = 84″).
- Correction: You need roughly double the component counts listed above for a full 7×7 grid.
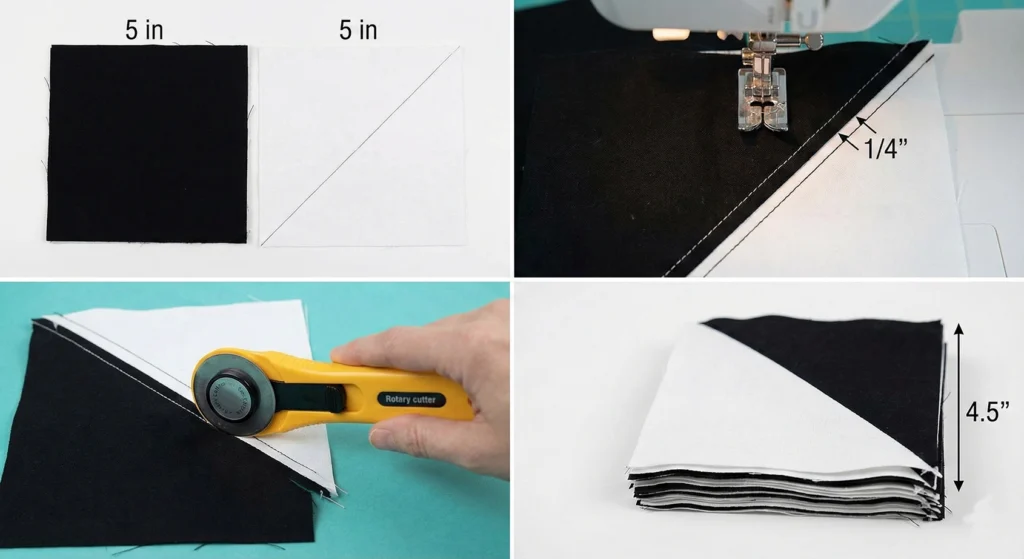
Step 4: The “Mosaic” Layout
- Lay out the 49 blocks in a 7 x 7 grid.
- Standard Layout: Arrange all blocks in the exact same orientation.
- Visual: This creates diagonal staircases of Black running through the quilt, with Red checkerboards stepping between them.
- Mosaic Variation (The “Barn Raising”): Rotate the blocks so the black triangles form concentric diamonds radiating from the center. This looks like a large medallion tile floor.
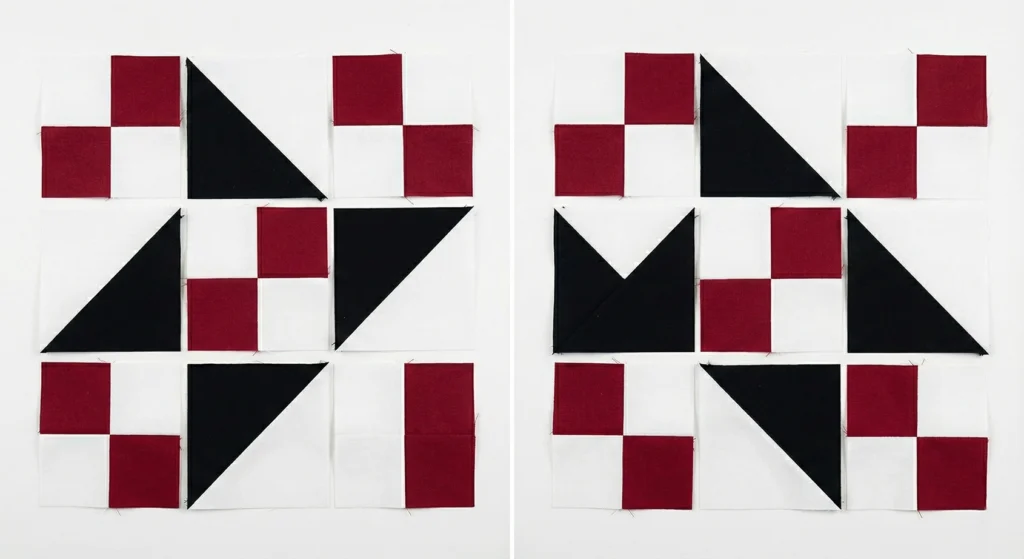
Step 5: Border “Grout” Lines
To finish the tile look, frame it.
- Inner Border: Cut 1.5″ strips of White. Sew to all sides. This acts like the grout line between the main floor and the border.
- Outer Border: Cut 4.5″ strips of Black. Sew to all sides. This solid, heavy frame creates a boundary that keeps the busy mosaic pattern contained.
Step 6: “Stipple” Texture Quilting
- Baste the sandwich.
- Quilting: You want the fabric to look like hard tile.
- Design: Use a dense “Stipple” (meandering puzzle piece line) or “Pebbling” (small circles) in the White areas.
- Leave the Red and Black shapes un-quilted (or lightly quilted). This makes the “colored tiles” puff up slightly, mimicking the 3D relief of actual masonry work.
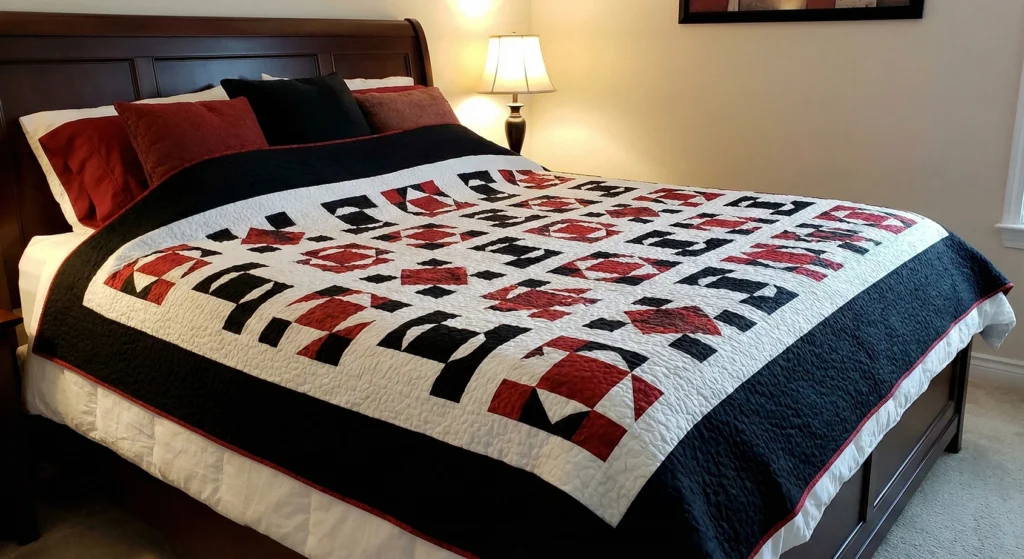
Pro Design Tip: Faux Grout Sashing. Instead of sewing the blocks directly together, insert thin 1-inch strips of Grey fabric between every single block. This literally looks like cement grout lines separating the ceramic tiles and makes the mosaic theme unmistakable.
Budget Consideration: Scrap Checkerboards. The Red/White 4-patches (Step 1) are tiny. You do not need yardage for this. Use every scrap of red fabric you have—old shirts, leftover binding, fat quarters. A “Scrappy” red tile floor looks more authentic, like old-world handmade terracotta tiles that have color variation.
19. Minimalist Red, Black, and White Quilts with Clean Lines
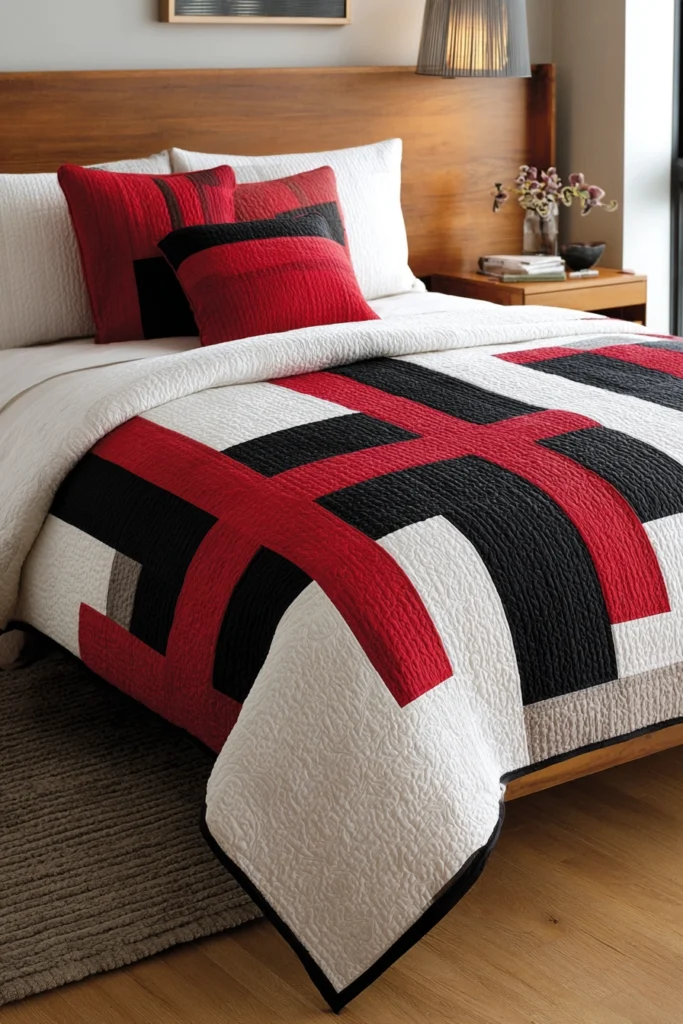
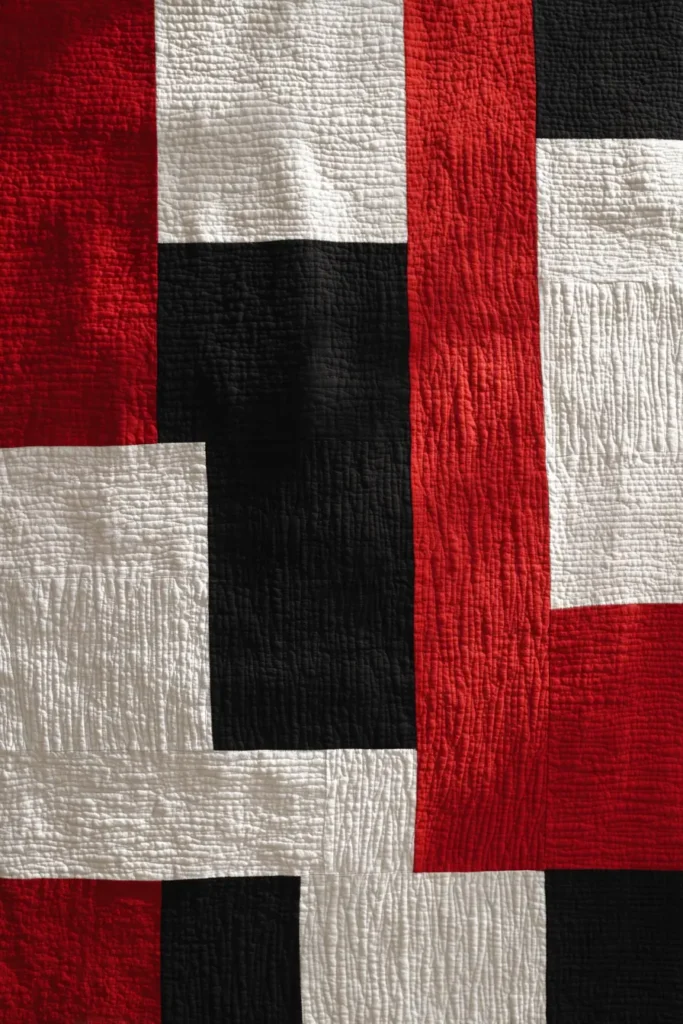
The “Red Shift” Vertical Geese Quilt
Minimalism often relies on heavy negative space and a single, striking design element. This quilt features a vast field of crisp white, interrupted by a single, off-center vertical column of “Flying Geese” triangles. The column is mostly Black triangles, but at a specific focal point, it shifts to Bright Red triangles, drawing the eye instantly. It is sleek, modern, and deceptively simple to make.
Finished Dimensions: Queen Size, approximately 85″ x 92″.
Materials Needed:
- Fabric A (Background/White): 6 yards of Solid White (Kona Snow or White).
- Fabric B (Geese/Black): 1.5 yards of Solid Black.
- Fabric C (Accent/Red): 1/2 yard of Bright Red.
- Backing Fabric: 8 yards.
- Batting: Queen Size (90″ x 100″).
- Binding: 3/4 yard of Solid Black.
- Notions: Rotary cutter, 6.5″ x 12″ ruler.
Step 1: Cut the Geese Components
We will create a single vertical column of Flying Geese. The column needs about 23 Geese stacked vertically to span the length.
- For the Geese Bodies (Rectangles):
- From Black Fabric: Cut 20 rectangles, measuring 4.5″ x 8.5″.
- From Red Fabric: Cut 3 rectangles, measuring 4.5″ x 8.5″.
- For the Geese Wings (Squares):
- From White Fabric: Cut 46 squares, measuring 4.5″ x 4.5″.
- For the Background Panels (The Negative Space):
- Do not cut these yet. We will measure the finished column first to ensure a perfect fit.
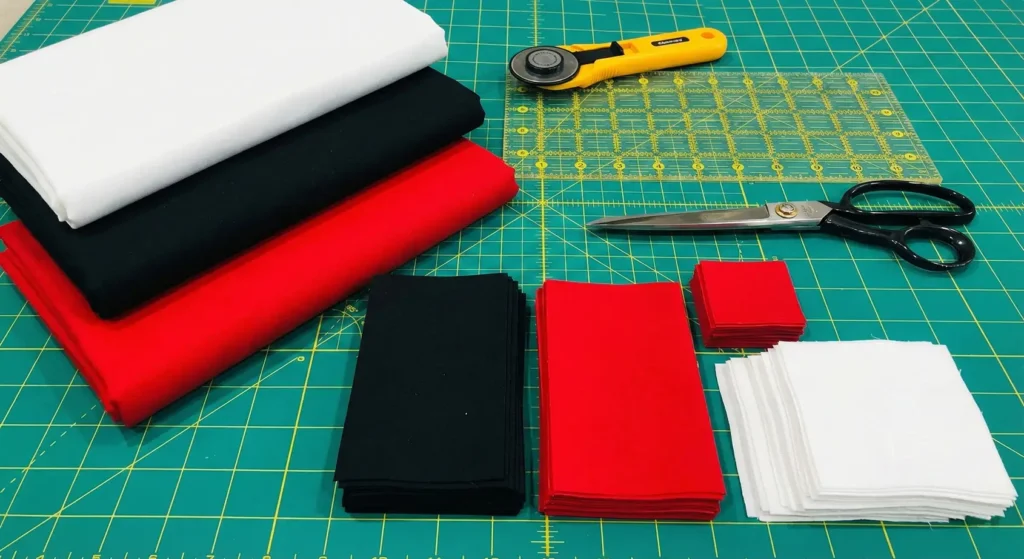
Step 2: Construct the Flying Geese
We use the “Stitch and Flip” method for precision.
- Take one Black Rectangle (4.5″ x 8.5″) and one White Square (4.5″).
- Place the White square on the left side of the rectangle (Right Sides Together).
- Draw a diagonal line on the back of the square (from corner to corner).
- Sew: Stitch directly on the drawn line.
- Trim: Cut off the excess corner fabric (1/4″ away from the seam). Press the white triangle open.
- Repeat: Place another White square on the right side. Sew on the diagonal, trim, and press.
- Result: A Black triangle with White corners (measuring 4.5″ x 8.5″).
- Quantity: Make 20 Black Geese and 3 Red Geese.
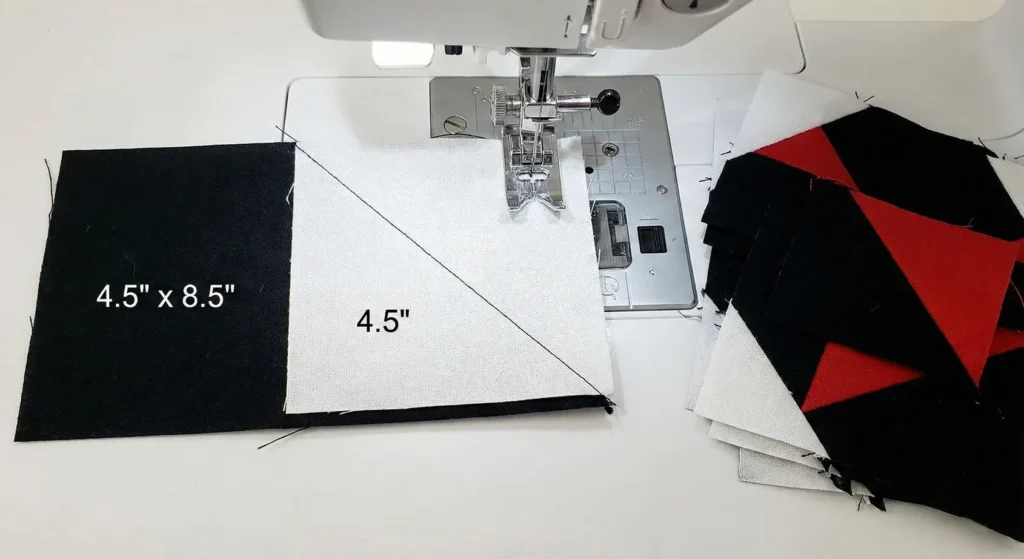
Step 3: Assemble the “Spine” (The Column)
- Lay your geese out on the floor in a single vertical line.
- Design: Arrange them pointing UP.
- Place 15 Black Geese at the bottom.
- Place the 3 Red Geese next.
- Place the remaining 5 Black Geese at the top.
- Visual: This places the red accent near the “shoulder” level of the bed, rather than dead center, which is more artistic.
- Sew: Stitch the geese together into one long strip.
- Measure: The finished column should be 8.5″ wide x roughly 92″ tall. (If it’s too short, add a block of plain white at the top/bottom).
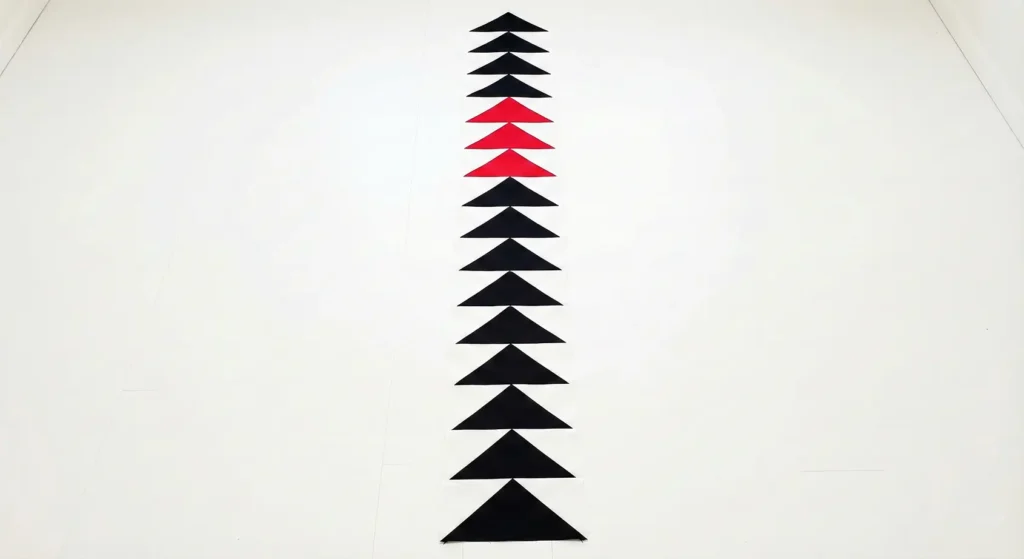
Step 4: Cut and Attach the Left Panel
We want the column to be off-center (asymmetric).
- Cut: Cut a large panel of Solid White fabric measuring 20.5″ wide x 92″ tall. (You will likely need to piece lengths of fabric together to get 92″ height).
- Sew: Pin this panel to the Left side of your Geese Column.
- Press: Press the seam toward the white panel.
Step 5: Cut and Attach the Right Panel
- Cut: Cut a wider panel of Solid White fabric measuring 56.5″ wide x 92″ tall. (Again, piece lengths together horizontally so the seams are subtle).
- Sew: Pin this panel to the Right side of your Geese Column.
- Press: Press the seam toward the white panel.
- Result: Your quilt top is now a vast field of white with a sleek stripe of black and red running down the left-third.
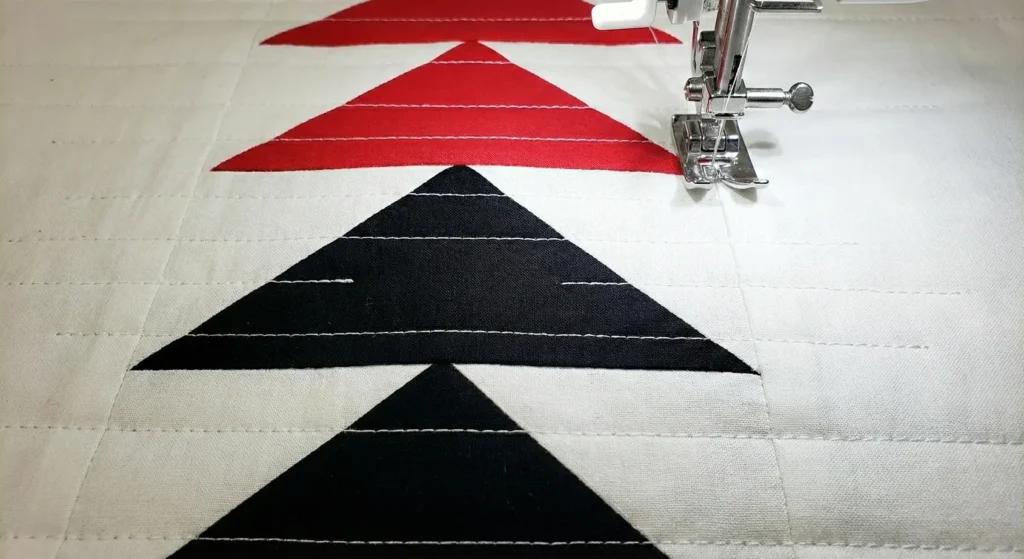
Step 6: “Matchstick” Minimalist Quilting
- Baste the sandwich.
- Quilting: Modern minimalism demands straight lines.
- Design: Quilt straight horizontal lines across the entire quilt.
- Density: Space them irregularly. Some lines 1/4″ apart, some 1 inch apart. This “Matchstick” quilting creates incredible modern texture without adding a new pattern.
- Thread: Use White Thread over the white areas. When you hit the Black/Red column, you can either continue with White (for contrast) or switch to Black/Red (to blend). Minimalists usually stick to White everywhere for a “ghost” effect on the dark fabrics.
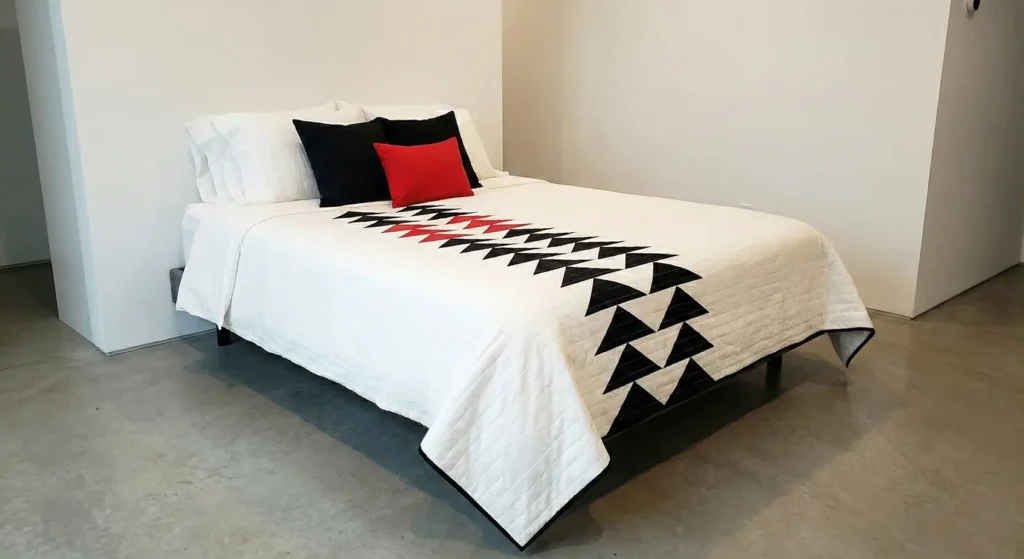
Pro Design Tip: Invert the colors. If you have pets with dark fur, a white quilt is a nightmare. Invert the scheme: Use a Solid Black Background, with White Geese and Red Accents. It looks just as modern but hides dark lint and fur much better.
Budget Consideration: IKEA Sheets. For those massive white side panels, yardage can get expensive and requires seams. Buy two King Size White Flat Sheets (high thread count). Use the full width of the sheets for the side panels to avoid having any horizontal seams in your negative space.
20. Artistic Abstract Red, Black, and White Quilt Designs
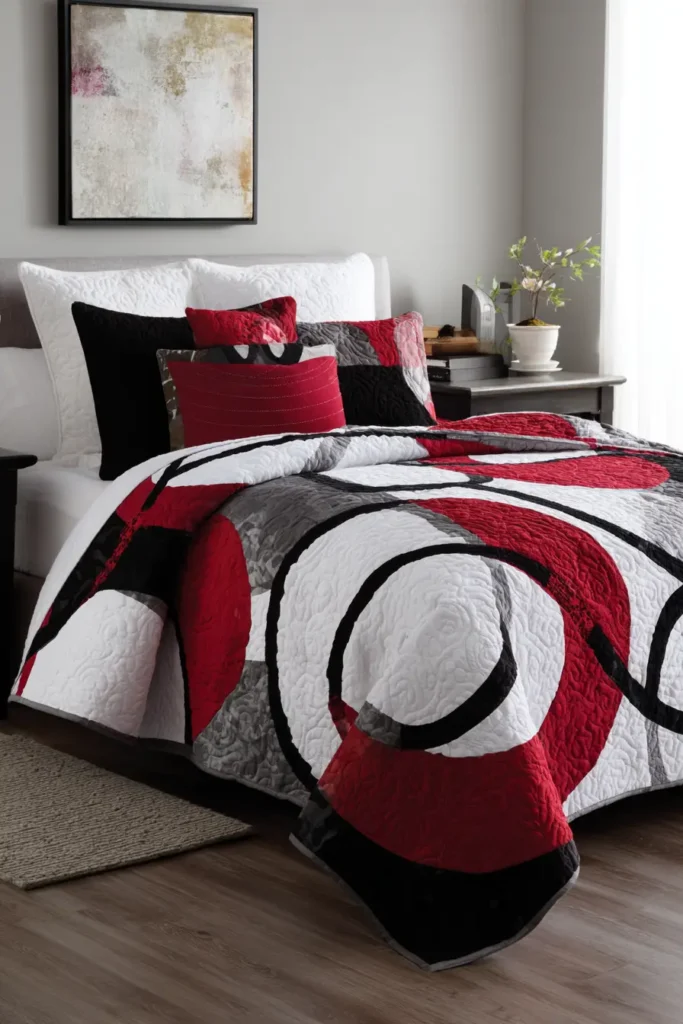
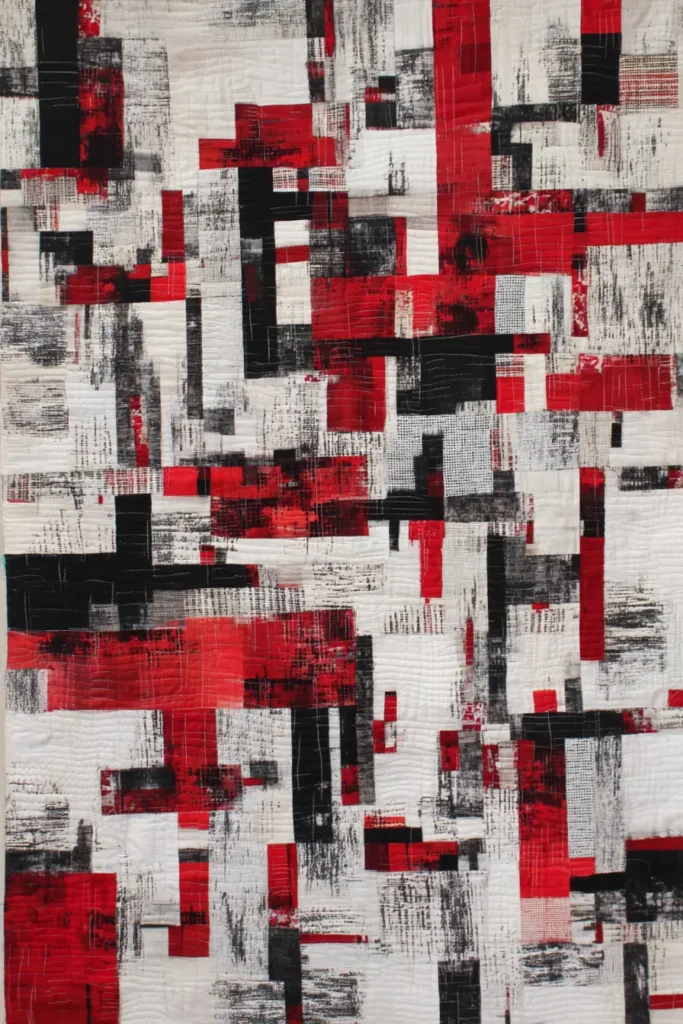
The “Urban Chaos” Improv Wall Hanging
This pattern abandons the ruler and the grid entirely. It uses a technique called “Improvisational Piecing” (or Improv) to create a design that looks like a modern abstract painting. You will create large “slabs” of fabric, slash them apart, and insert jagged lines of Red and Black. It is liberating, artistic, and ensures your quilt is a 100% unique original.
Finished Dimensions: Wall Art or Throw Size, approximately 60″ x 70″.
Materials Needed:
- Fabric A (Background/White): 3 yards of Solid White (or mix of white/cream scraps).
- Fabric B (Contrast/Black): 2 yards of Solid Black (or black-on-black prints).
- Fabric C (Accent/Red): 1.5 yards of various Reds (Solids, prints, stripes).
- Backing Fabric: 4 yards.
- Batting: Twin Size (72″ x 90″).
- Notions: Rotary cutter (with a sharp blade), large cutting mat. Note: You will use your ruler less than usual!
Step 1: Create the “Slabs” (Base Units)
Instead of cutting specific block sizes, we make messy “slabs” of fabric.
- Cut: Randomly cut your White fabric into large, irregular shapes—rectangles, trapezoids, and squares ranging from 10″ to 20″.
- Cut: Cut your Black and Red fabrics into strips of varying widths (1.5″ to 4″ wide).
- Sew: Take a large White shape. Sew a Black strip to one side. Press. Sew a Red strip to the other side. Press.
- Repeat: Do this until you have about 15 large “Slabs” of fabric, roughly 15″ x 15″, though they don’t need to be square yet.
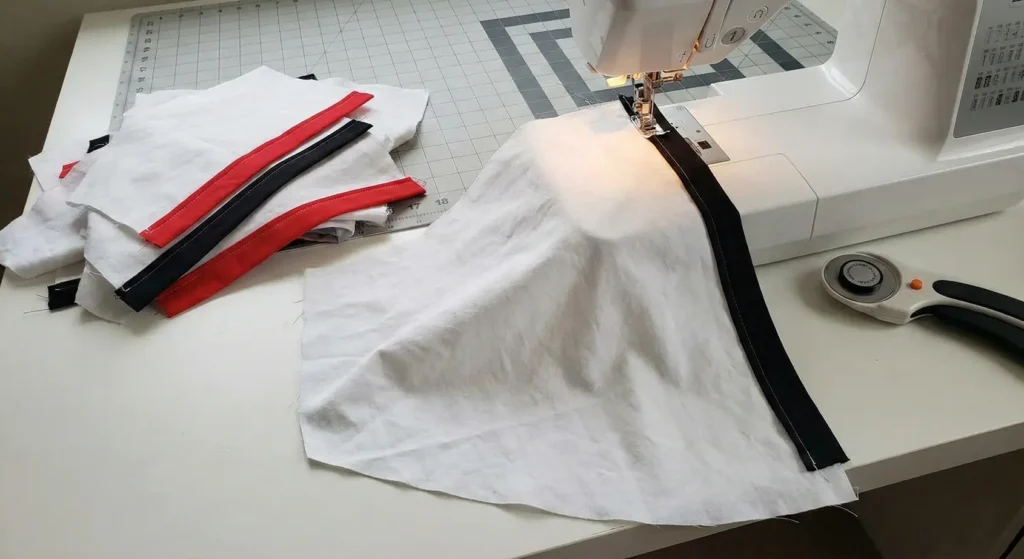
Step 2: The “Slash and Insert” Technique
This creates the sharp, jagged lines typical of abstract art.
- Take one of your White/Black/Red slabs.
- Slash: Take your rotary cutter and slice straight through the fabric at a sharp, random angle. Do not measure!
- Insert: Pick a contrasting strip (e.g., a 1-inch strip of Bright Red).
- Sew: Sew the Red strip between the two cut halves of your slab.
- Press: Press the slab flat.
- Result: You now have a block with a sharp red “laser beam” cutting through it.
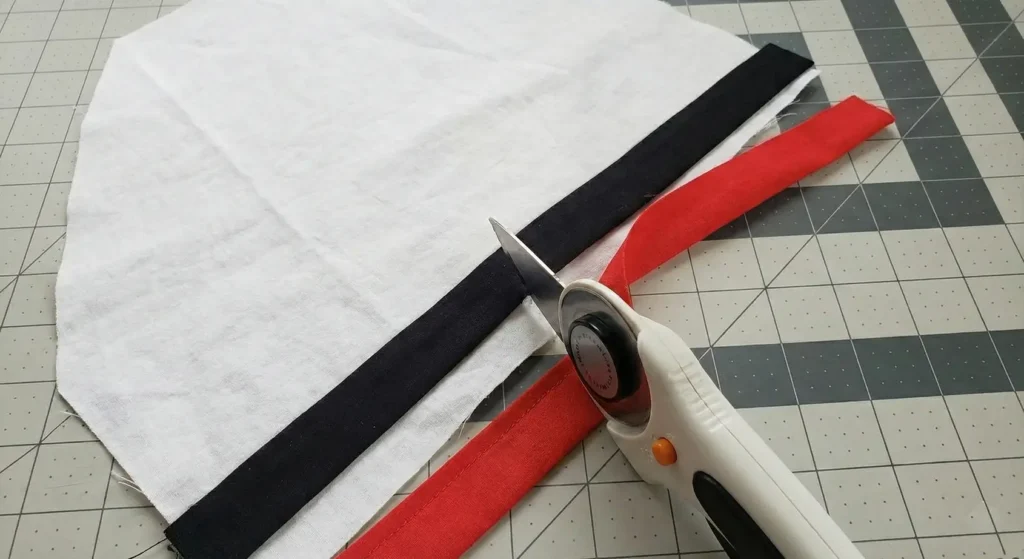
Step 3: Complex Shapes (Curves and Triangles)
Let’s get more artistic.
- Triangles: Cut a corner off a slab. Sew a Red triangle onto that corner.
- Curves (Advanced): If you are brave, slice a gentle curve through a slab. Insert a bias-cut Black strip (stretchy) to follow the curve.
- Goal: Make every slab look different. Some should be mostly White (negative space), while others should be dense with Black and Red strips (chaos).
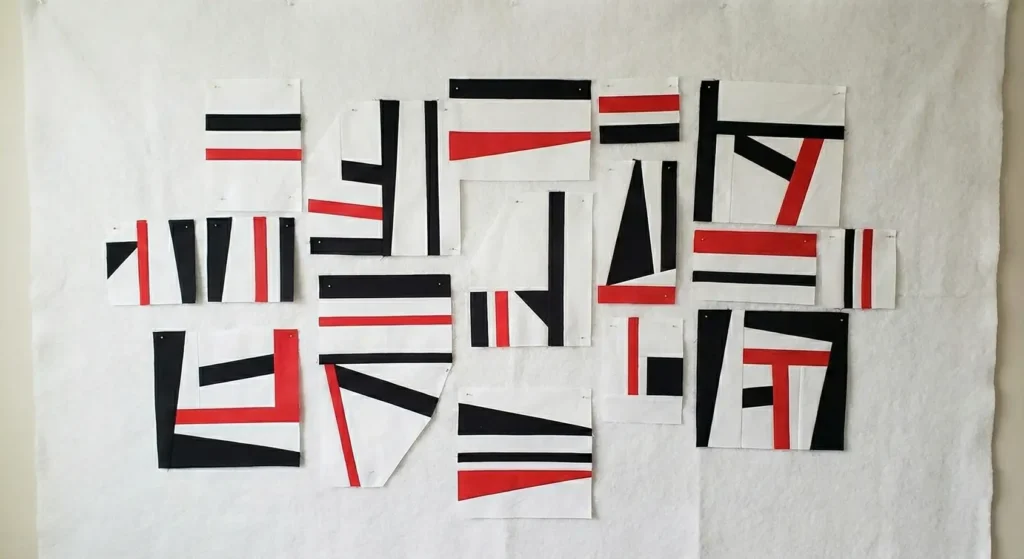
Step 4: The Composition Wall
Abstract art requires compositional balance.
- Find a “Design Wall” (a piece of batting taped to the wall) or a clean floor space.
- Arrange: Pin up your 15+ slabs.
- Analyze:
- Is it too heavy? If one side is all Black, move some White slabs there to balance it.
- Where is the eye drawn? Create a “focal point” of Red near the center-right or top-left (rule of thirds).
- Fillers: You will notice gaps because your slabs are of irregular sizes. Measure these gaps and cut new plain White or Black rectangles to fill them.
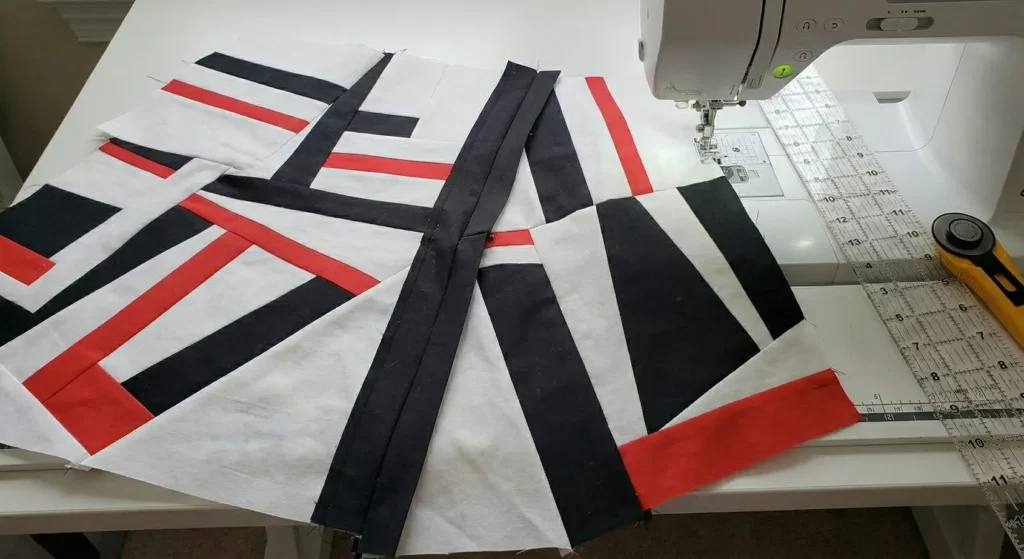
Step 5: Puzzle Assembly
Joining irregular blocks is a puzzle.
- Group: Group the slabs into 3 or 4 large vertical “columns” or “quadrants.”
- Square Up: Trim the edges of the slabs in Group 1 so they fit together. You might need to chop off an inch here or add a strip there.
- Sew: Sew the slabs into these larger columns.
- Join Columns: Sew the large columns together to finish the top.
- Tip: If a seam doesn’t match perfectly, slash it straight with your ruler and add a thin black “coping strip” to bridge the gap. It adds to the design!
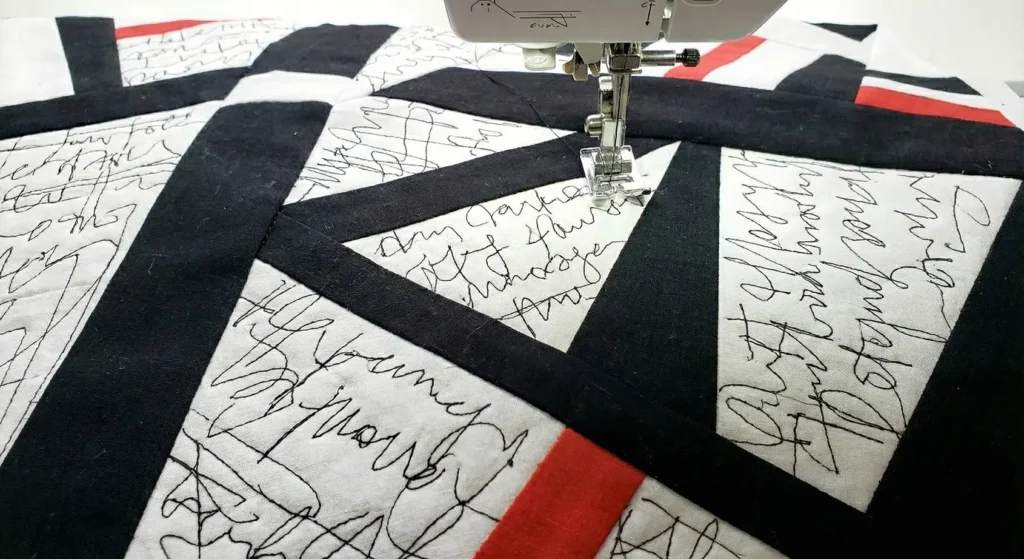
Step 6: “Sketchbook” Quilting
- Baste the sandwich.
- Quilting: Treat the quilt like a sketchbook page.
- Thread: Use Black Thread on the White areas for high contrast.
- Design:
- Scribble: Quilt dense, messy scribbles in the Red areas to make them intense.
- Geometric: Quilt straight parallel lines in the Black areas.
- Words: You can even free-motion quilt abstract words or script into the negative white space (e.g., “Love,” “Dream,” or illegible cursive loops).

Pro Design Tip: The “Bleed” Binding. Instead of a standard frame binding, use a Facing (invisible binding), so the art goes all the way to the edge. Alternatively, use a “matchstick binding” by changing the binding color to match the quilt top (Red binding where the quilt edge is red, White where it is white). This makes the art look as if it continues beyond the canvas.
Budget Consideration: Clothing Scraps. Abstract quilts are the historic home of recycling. Use Old Black T-Shirts (stabilized with interfacing), Red Ties, or White Dress Shirts. The variety of fabric sheens (matte cotton vs. shiny silk ties) adds “museum quality” texture for zero dollars.
Conclusion
Reflecting on these 20 Bold Red, Black, and White Quilt Patterns, it becomes clear that this color story is far more than just a trend; it is a timeless design choice that speaks to confidence and style. We have journeyed through a diverse landscape of designs, from the structured elegance of Sophisticated Log Cabin Patterns to the fluid beauty of Artistic Abstract creations. Each pattern demonstrates that while the colors remain the same, the mood can shift dramatically—from the cozy, cabin-like feel of a Bold Buffalo Check to the refined, gallery-like vibe of Scandinavian-Inspired decor. This flexibility allows you to curate a bedroom that feels uniquely yours while maintaining a cohesive, high-end look.
The true magic of integrating these quilts into your home lies in their ability to shape a room’s visual energy. A Bold Red, Black, and White Stripe Quilt can widen a small space or add height, while Monochrome Floral Accent Quilts can soften the hard edges of modern furniture. By choosing this palette, you are engaging in a design dialogue that balances the masculine and the feminine, the classic and the avant-garde. The layering of these contrasting tones creates a depth that draws the eye in, making your bed not just a place to sleep, but a work of art that anchors the entire room.
Ultimately, embracing a red, black, and white quilt is about creating a space that evokes emotion. Whether you choose the subtle warmth of Rustic Bear Paw Blocks or the intense drama of an Ombre design, you are building a sanctuary that is equal parts stimulating and soothing. As you select your favorite pattern from this list, remember that you are adding a bold, brave, and infinitely cozy layer of personality to your home. Let these ideas inspire your next bedroom transformation, proving that the most dramatic changes often come from the simplest color combinations.
