
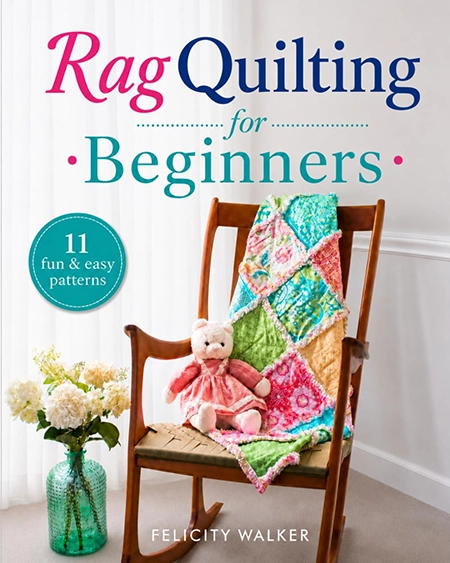
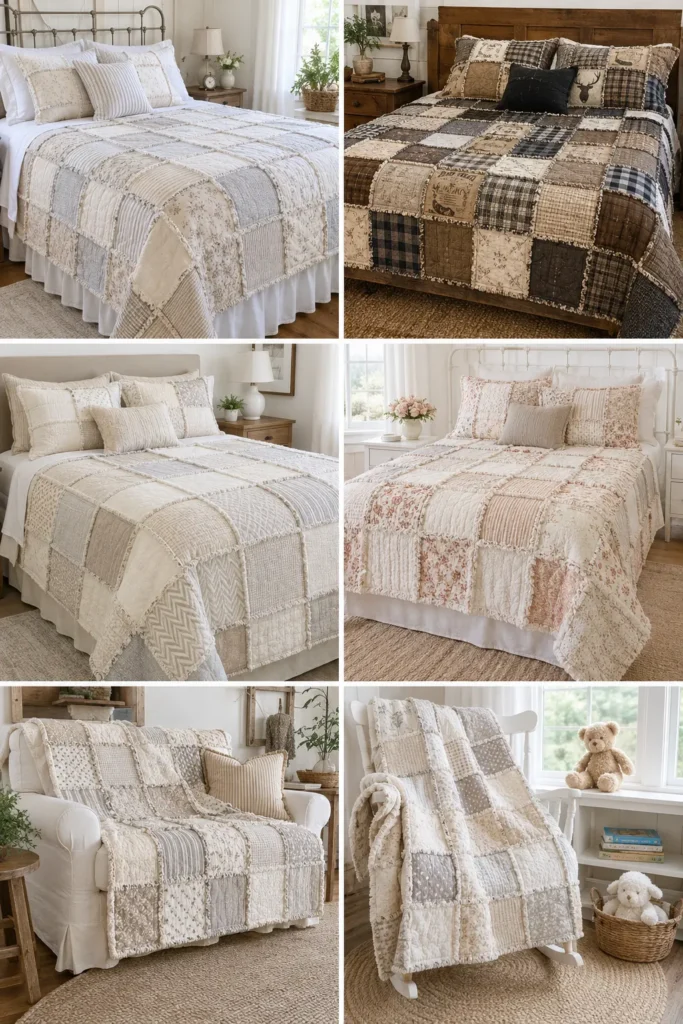
5 Chic Rag Quilt Pattern Ideas for Cozy, Beautiful Home Décor
Rag Quilts: The One Quilt Style That Gets Better Every Time You Wash It
Rag quilt patterns occupy a specific and underappreciated place in quilting — they are the style most likely to be dismissed by experienced quilters as too simple and most likely to be genuinely loved by the people who actually use them. That gap between quilting-world status and real-world performance is worth examining because it explains why rag quilts have remained consistently popular across decades of shifting trends, while more technically demanding styles have cycled in and out of fashion.
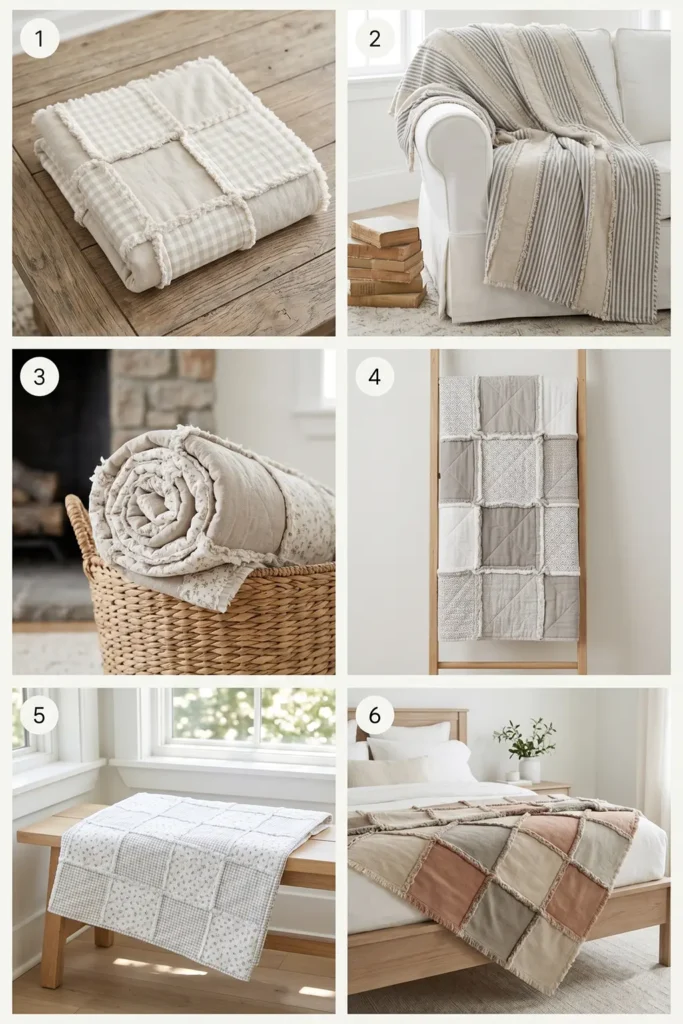
The construction is straightforward and deliberately so: squares of layered fabric — typically two to three layers — sewn together with the seam allowances on the outside rather than hidden within. When the finished quilt goes through a wash cycle, those exposed seams fray. The fraying is not a flaw. It is the point. With each subsequent wash, the frayed edges soften further, the layers bloom slightly, and the quilt develops a texture that no amount of careful pressing and precision piecing can replicate. A rag quilt that has been washed twenty times feels genuinely different from one fresh off the machine, and the twenty-wash version is better.
This is what makes rag quilts particularly well-suited to the people who use quilts most intensively — babies and young children, whose quilts go through the washing machine weekly, and adults who want something to actually use rather than fold carefully at the end of a bed. The more a rag quilt is used and washed, the more it becomes itself.
From a making perspective, rag quilts remove several of the barriers that make traditional quilting intimidating. There are no Y-seams, no precise point matching, and no binding to miter at the corners. The exposed seam construction that creates the characteristic texture also forgives the minor inaccuracies that would be visible in a conventional quilt. This does not make rag quilts easy in a careless sense — fabric choice, layer combination, and cutting accuracy still matter — but the margin for error is genuinely wider, and the result of an imperfect seam is more texture rather than a visible mistake.
Rag Quilt Pattern Ideas
Contents
- 1 Rag Quilt Pattern Ideas
- 2 1. Elegant Floral Rag Quilt Patterns for Cozy Bedroom Décor
- 2.1 Why I Made It
- 2.2 Why This Idea Is Worth Making
- 2.3 Materials Needed
- 2.4 Cutting Measurements
- 2.5 Step-by-Step Guide
- 2.5.1 Step 1: Choose Your Floral Color Palette
- 2.5.2 Step 2: Cut All Quilt Squares
- 2.5.3 Step 3: Make Fabric Sandwiches
- 2.5.4 Step 4: Quilt Each Square
- 2.5.5 Step 5: Arrange the Pattern
- 2.5.6 Step 6: Sew Squares into Rows
- 2.5.7 Step 7: Join the Rows
- 2.5.8 Step 8: Sew Around the Outer Edge
- 2.5.9 Step 9: Clip the Seams
- 2.5.10 Step 10: Wash and Dry the Quilt
- 2.6 Assembly Section
- 2.7 Styling Tip
- 3 2. Neutral Tone Rag Quilt Ideas for Soft Farmhouse Charm
- 3.1 Why I Made It
- 3.2 Why This Idea Is Worth Making
- 3.3 Materials Needed
- 3.4 Cutting Measurements
- 3.5 Step-by-Step Guide
- 3.5.1 Step 1: Choose Your Neutral Farmhouse Palette
- 3.5.2 Step 2: Cut the Fabric Squares
- 3.5.3 Step 3: Build Each Quilt Sandwich
- 3.5.4 Step 4: Quilt Each Individual Square
- 3.5.5 Step 5: Lay Out the Design
- 3.5.6 Step 6: Sew the Squares into Rows
- 3.5.7 Step 7: Join the Rows Together
- 3.5.8 Step 8: Stitch Around the Outside Edge
- 3.5.9 Step 9: Clip the Exposed Seams
- 3.5.10 Step 10: Wash and Dry the Quilt
- 3.6 Assembly Section
- 3.7 Design Variations
- 3.8 Styling Tip
- 4 3. Modern Geometric Rag Quilt Designs for Stylish Home Accents
- 4.1 Why I Made It
- 4.2 Why This Idea Is Worth Making
- 4.3 Materials Needed
- 4.4 Cutting Measurements
- 4.5 Step-by-Step Guide
- 4.5.1 Step 1: Plan the Geometric Layout
- 4.5.2 Step 2: Cut Your Fabric Squares
- 4.5.3 Step 3: Make Each Quilt Sandwich
- 4.5.4 Step 4: Quilt Each Block
- 4.5.5 Step 5: Arrange the Blocks in a Bold Pattern
- 4.5.6 Step 6: Sew Squares into Rows
- 4.5.7 Step 7: Join the Rows
- 4.5.8 Step 8: Sew Around the Outer Edge
- 4.5.9 Step 9: Clip the Seams
- 4.5.10 Step 10: Wash and Dry
- 4.6 Assembly Section
- 4.7 Design Variations
- 4.8 Styling Tip
- 5 4. Soft Flannel Rag Quilt Throws for Cozy Living Room Sofas
- 5.1 Why I Made It
- 5.2 Why This Idea Is Worth Making
- 5.3 Materials Needed
- 5.4 Cutting Measurements
- 5.5 Step-by-Step Guide
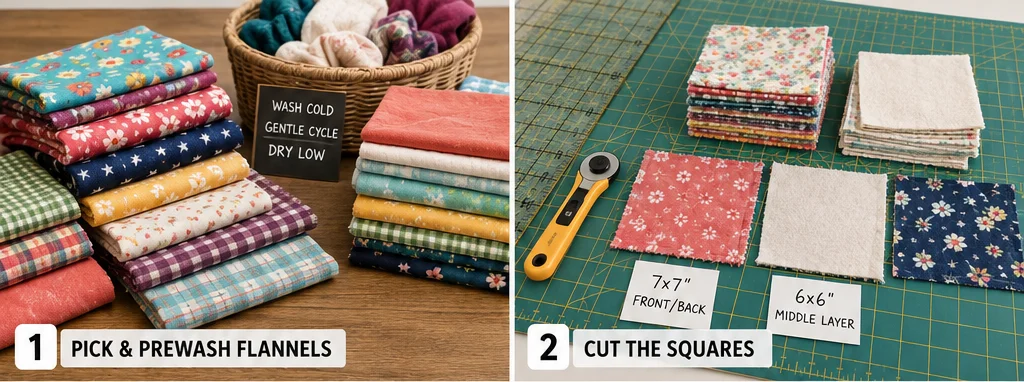
- 5.5.1 Step 1: Pick a Vibrant Flannel Palette
- 5.5.2 Step 2: Prewash and Dry the Flannel
- 5.5.3 Step 3: Cut the Squares
- 5.5.4 Step 4: Make the Quilt Sandwiches
- 5.5.5 Step 5: Quilt Each Block
- 5.5.6 Step 6: Arrange the Blocks
- 5.5.7 Step 7: Sew Blocks into Rows
- 5.5.8 Step 8: Join the Rows
- 5.5.9 Step 9: Sew Around the Outer Edge
- 5.5.10 Step 10: Clip the Seams
- 5.5.11 Step 11: Wash, Dry, and Fluff
- 5.6 Assembly Section
- 5.7 Color and Pattern Ideas
- 5.8 Styling Tip
- 6 5. Luxury-Inspired Rag Quilt Color Combinations for Beautiful Spaces
These five patterns are chosen for homes rather than craft fairs: designs with enough visual character to work as genuine décor pieces while delivering the warmth and washability that make rag quilts worth making in the first place.
See also: Boho quilt patterns · 15 Cozy Winter Quilt Designs · Classic Quilt Patterns
Your Quilting Guide: Books to Learn & Master
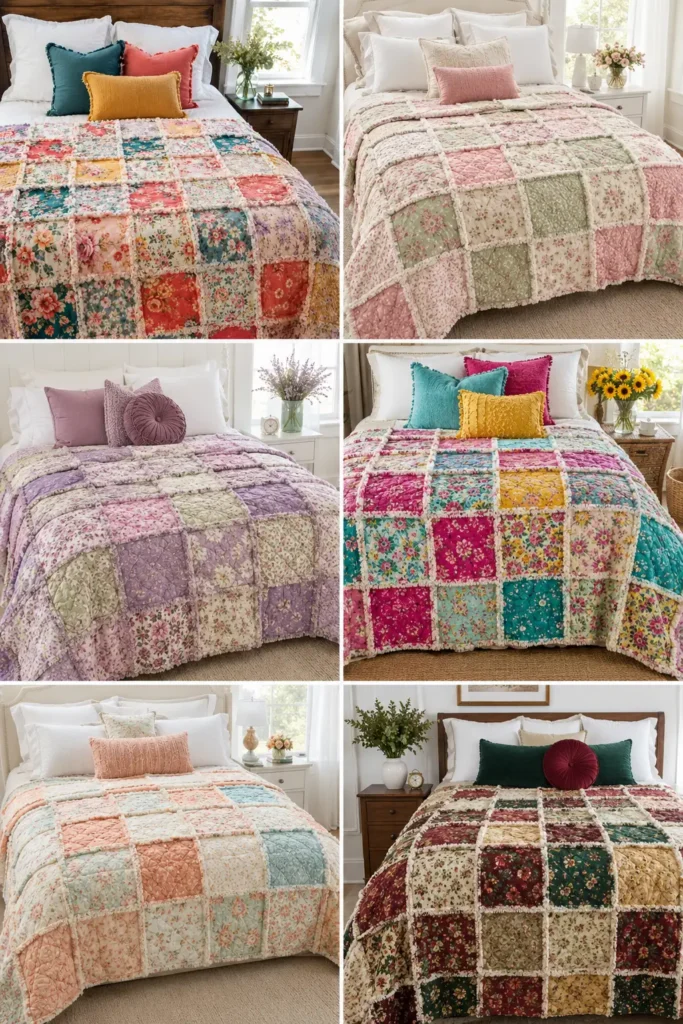
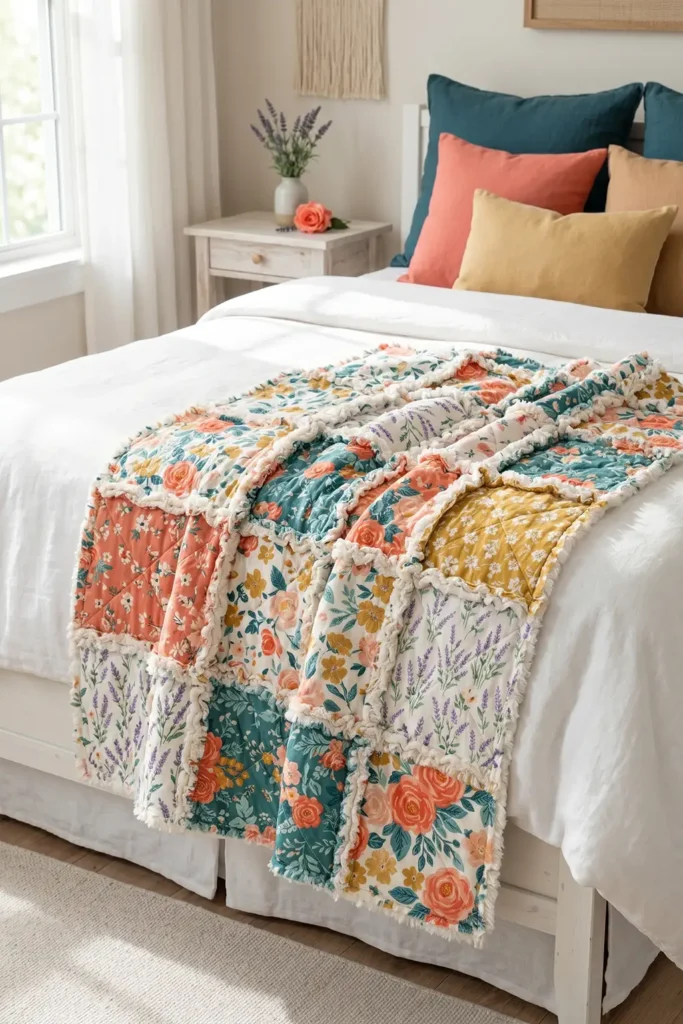
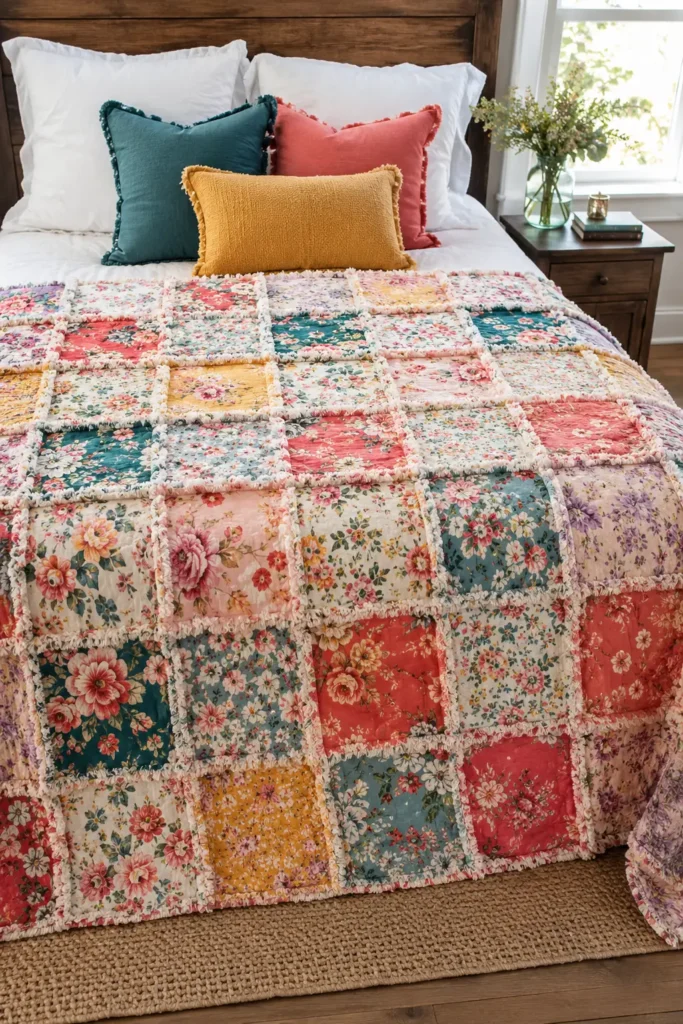
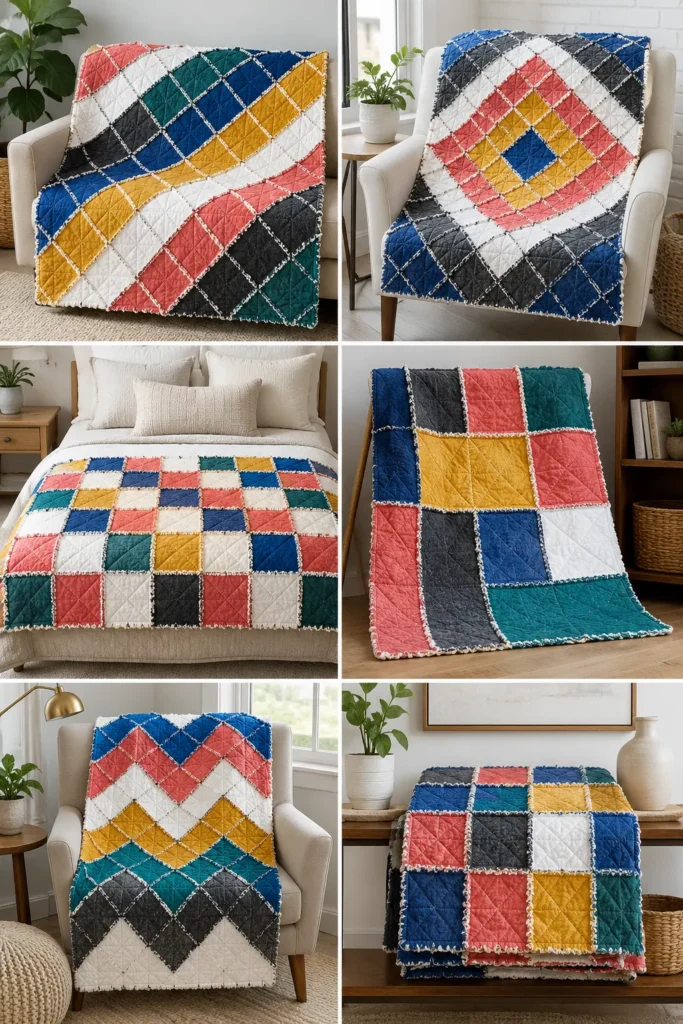
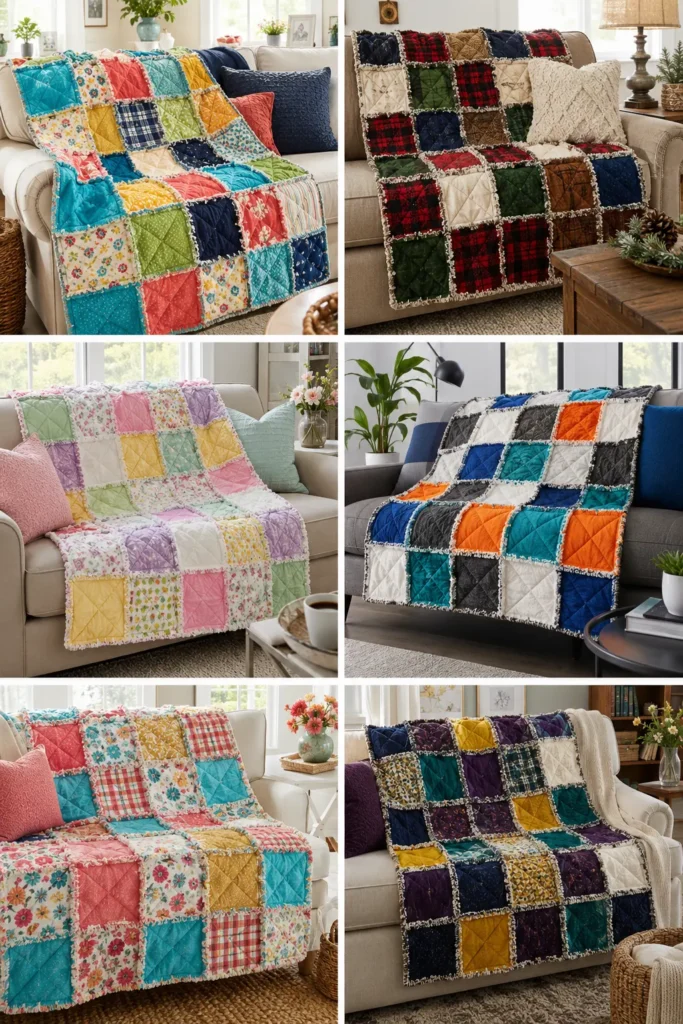
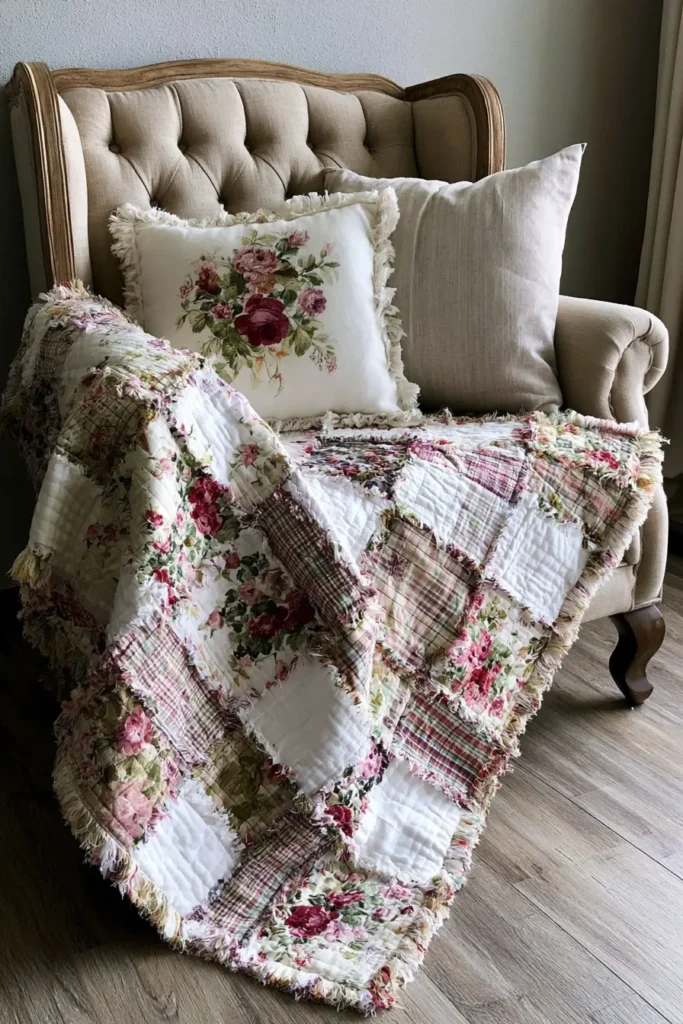
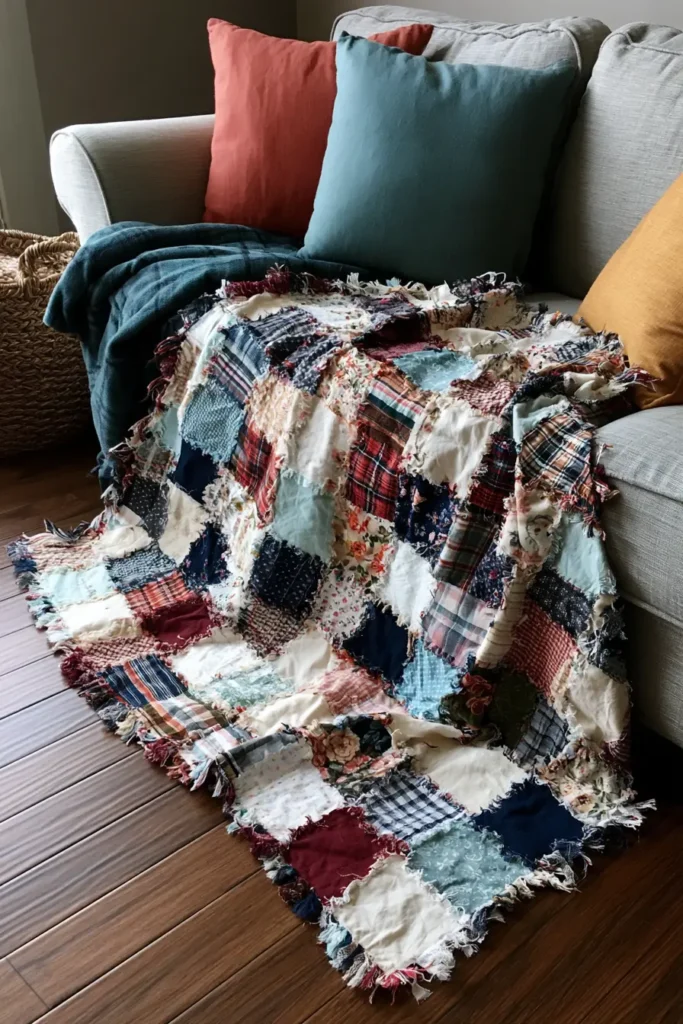
1. Elegant Floral Rag Quilt Patterns for Cozy Bedroom Décor
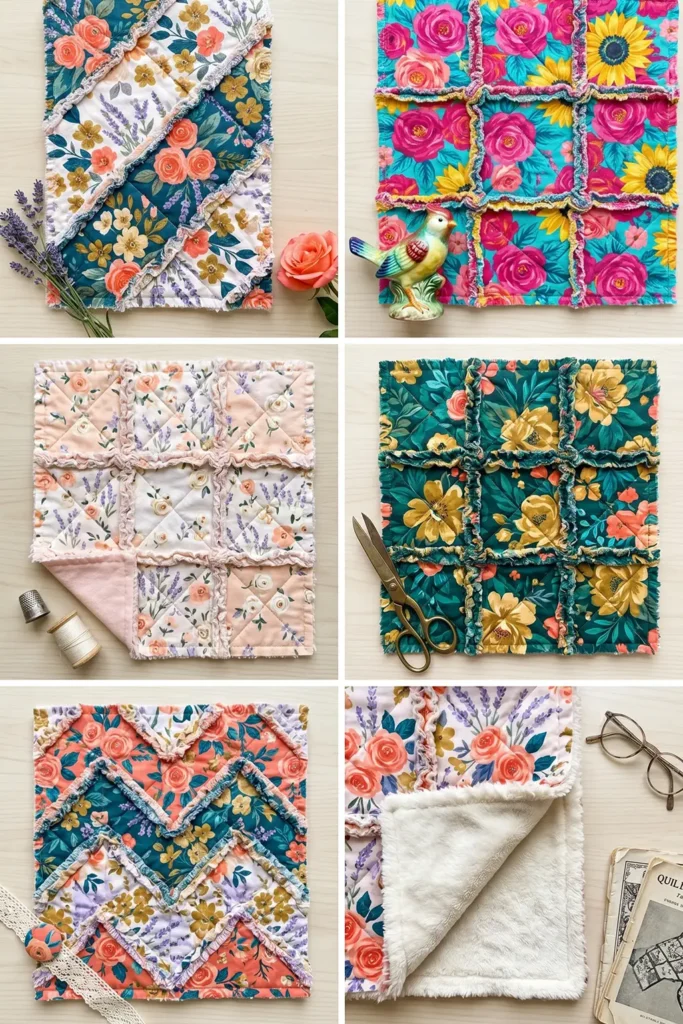
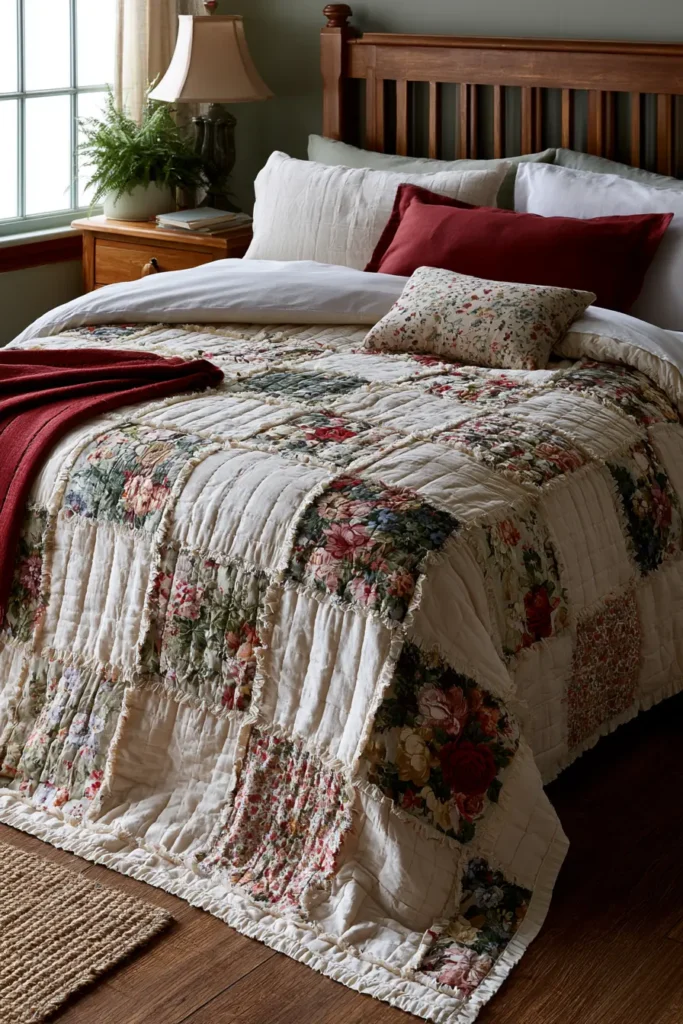
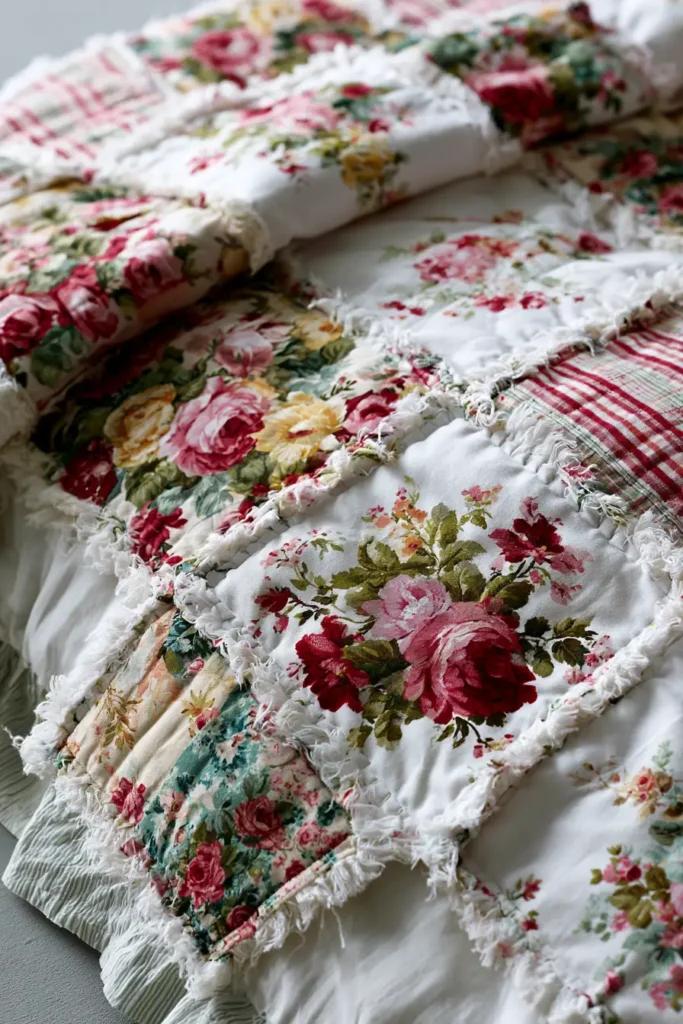
An elegant floral rag quilt is the perfect mix of soft, romantic, and practical. The frayed seams give it a cozy, handmade texture, while vibrant floral fabrics bring color and charm to the bedroom. Think coral roses, deep teal leaves, golden yellow blossoms, lavender sprigs, and crisp white or cream backing for a fresh, cottage-inspired look.
Why I Made It
I made this quilt because I wanted something that felt beautiful enough to display on the bed but still soft and comforting enough for everyday use. Floral quilts have a timeless feel, and rag quilts are especially forgiving for beginners because the exposed seams become part of the design. The more you wash it, the softer and fluffier the edges become.
Why This Idea Is Worth Making
This idea is worth making because it creates a cozy bedroom accent that looks detailed and boutique-style without needing complicated quilting skills. It is colorful, washable, beginner-friendly, and easy to customize for your room’s color palette.
Materials Needed
For a throw-size rag quilt, about 48 x 60 inches, you will need:
- Floral cotton or flannel fabric: about 2½ to 3 yards total
- Backing fabric: about 2½ to 3 yards
- Middle layer flannel or low-loft batting: about 2½ yards
- Sharp scissors or rag quilt snips
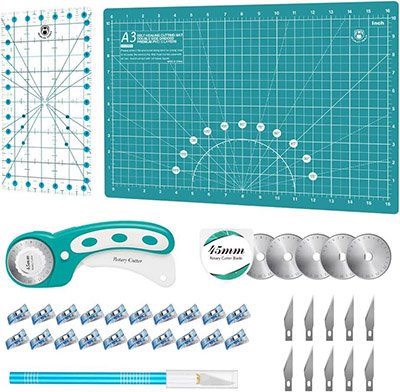
- Rotary cutter and mat
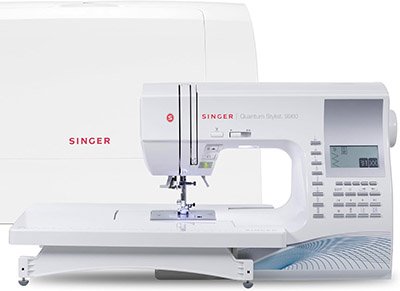
- Sewing machine
- Thread
- Pins or clips
- Measuring ruler
For a vibrant look, choose fabrics in rich colors like fuchsia, turquoise, sunflower yellow, emerald green, lavender, coral, and soft peach.
Cutting Measurements
For a simple throw quilt:
- Cut 80 front squares measuring 7 x 7 inches
- Cut 80 backing squares measuring 7 x 7 inches
- Cut 80 batting or middle-layer squares measuring 6 x 6 inches
This creates a quilt arranged in 8 squares across by 10 squares down. After seams are finished, the finished size will be approximately 48 x 60 inches, depending on seam allowance and shrinkage.
Step-by-Step Guide
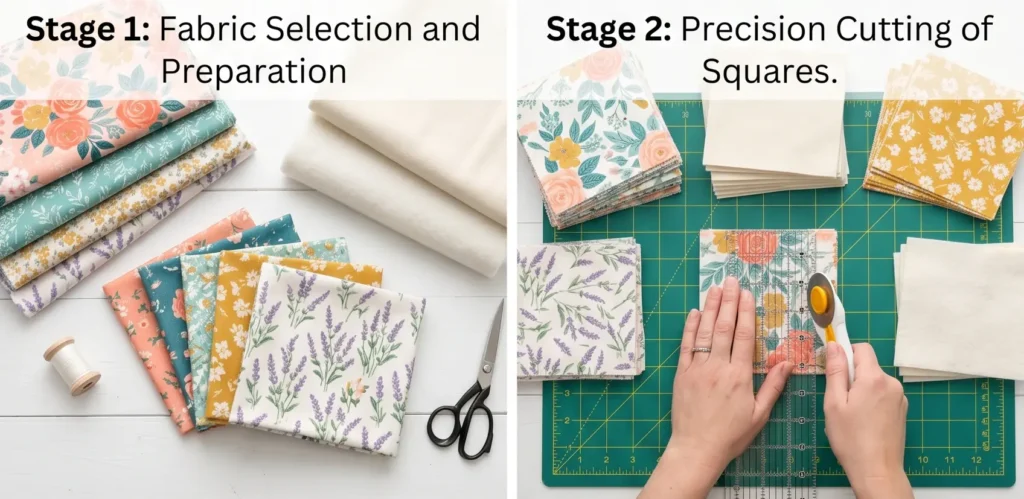
Step 1: Choose Your Floral Color Palette
Pick 4 to 6 floral fabrics that work well together. For an elegant bedroom look, combine large floral prints with smaller coordinating patterns. A beautiful combination could include rose-pink florals, teal greenery, golden blossoms, lavender vines, and a cream backing.
Step 2: Cut All Quilt Squares
Cut your front and backing fabrics into 7-by-7-inch squares. Then cut your middle layer into 6 x 6-inch squares so the batting stays inside the seam allowance and does not bulk up the ragged edges too much.
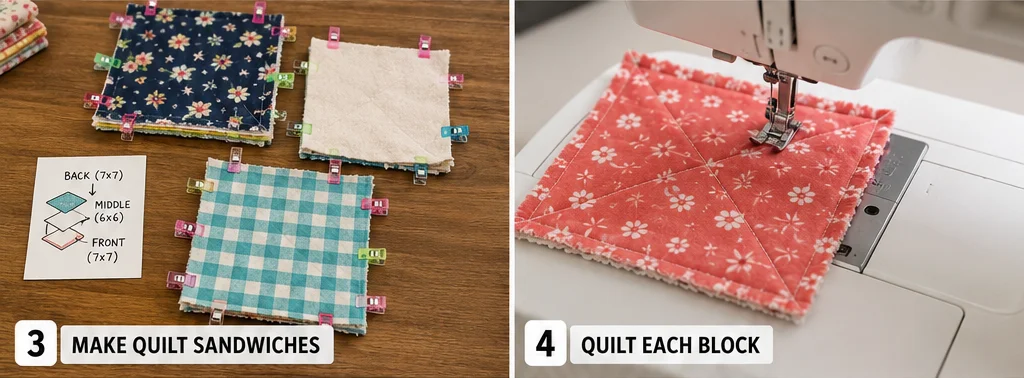
Step 3: Make Fabric Sandwiches
Layer each quilt block like this:
Backing square with wrong side facing up, middle layer centered on top, and floral front square with right side facing up.
Pin or clip the layers together so they do not shift while sewing.
Step 4: Quilt Each Square
Sew an “X” across each square from corner to corner. This holds the layers together and gives the quilt a soft, classic rag-quilt texture. Use a straight stitch and backstitch at the beginning and end.
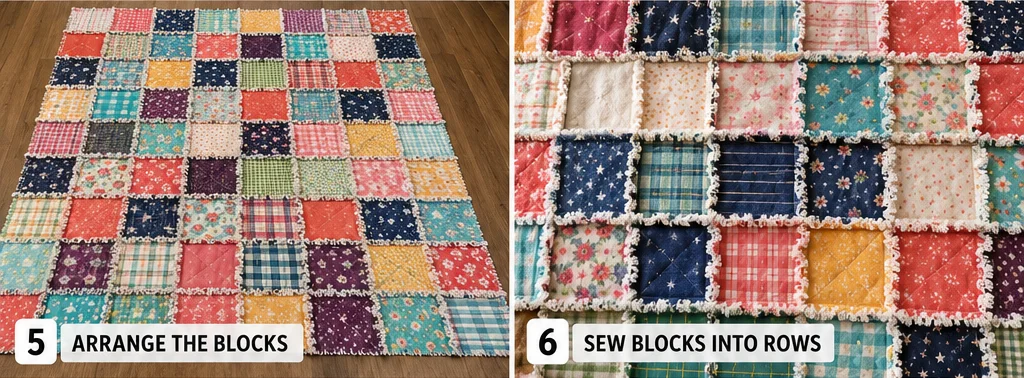
Step 5: Arrange the Pattern
Lay out the squares in 8 rows of 10. Spread the vibrant colors evenly so the quilt feels balanced. Place bold floral squares beside softer prints to keep the design lively but not overwhelming.
Step 6: Sew Squares into Rows
Sew the squares together with the backing sides touching, so the raw seam edges appear on the floral front side. Use a ½-inch seam allowance. This exposed seam is what creates the fluffy rag effect later.
Step 7: Join the Rows
Sew the rows together again, using a ½-inch seam allowance and keeping the raw edges on the front. Match the corners carefully and pin at each seam intersection.
Step 8: Sew Around the Outer Edge
Once the quilt top is assembled, sew all the way around the outside edge using a ½-inch seam allowance. This keeps the edges secure before clipping.
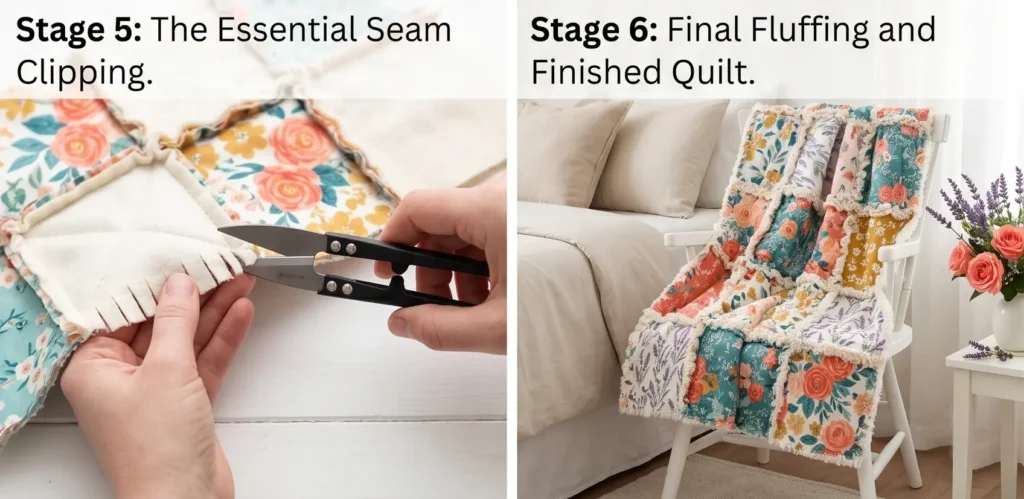
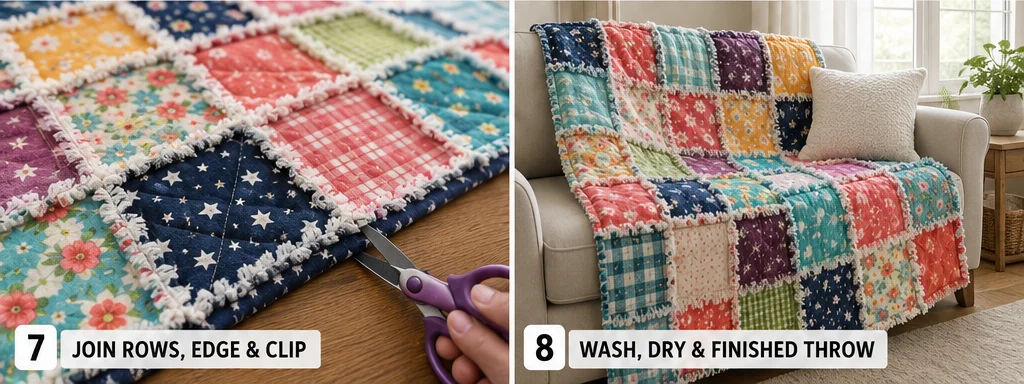
Step 9: Clip the Seams
Using rag quilt scissors or sharp snips, clip into the seam allowance every ¼ to ½ inch. Be careful not to cut through the stitching. Clip all exposed seams and the outside border.
Step 10: Wash and Dry the Quilt
Wash the quilt in cold water, then dry it on low or medium heat. The clipped seams will fray and fluff beautifully. Clean the lint trap often, especially during the first few washes.
Assembly Section
Assemble the quilt in this order:
- Make all quilt sandwiches.
- Quilt an “X” across every square.
- Lay out the squares in an 8 x 10 grid.
- Sew the squares into horizontal rows.
- Sew the rows together.
- Stitch around the full outer edge.
- Clip all seams.
- Wash and dry to create the ragged texture.
For a more polished look, keep the same backing fabric throughout the quilt. A soft cream, blush pink, or pale sage backing works beautifully with vibrant floral fronts.
Styling Tip
Drape the finished floral rag quilt across the foot of a bed with solid-colored pillows in teal, coral, or mustard yellow. The quilt adds instant warmth, texture, and personality without making the room feel cluttered.
Other Design Inspirations – Digitally Modified
Helpful Sewing Kits for New Quilters

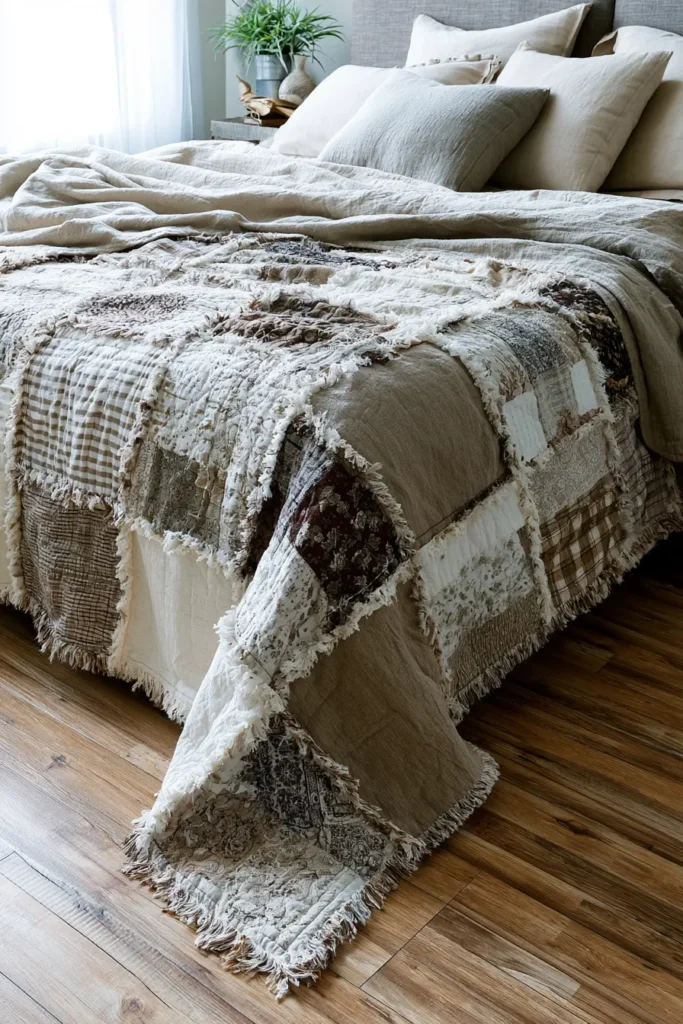
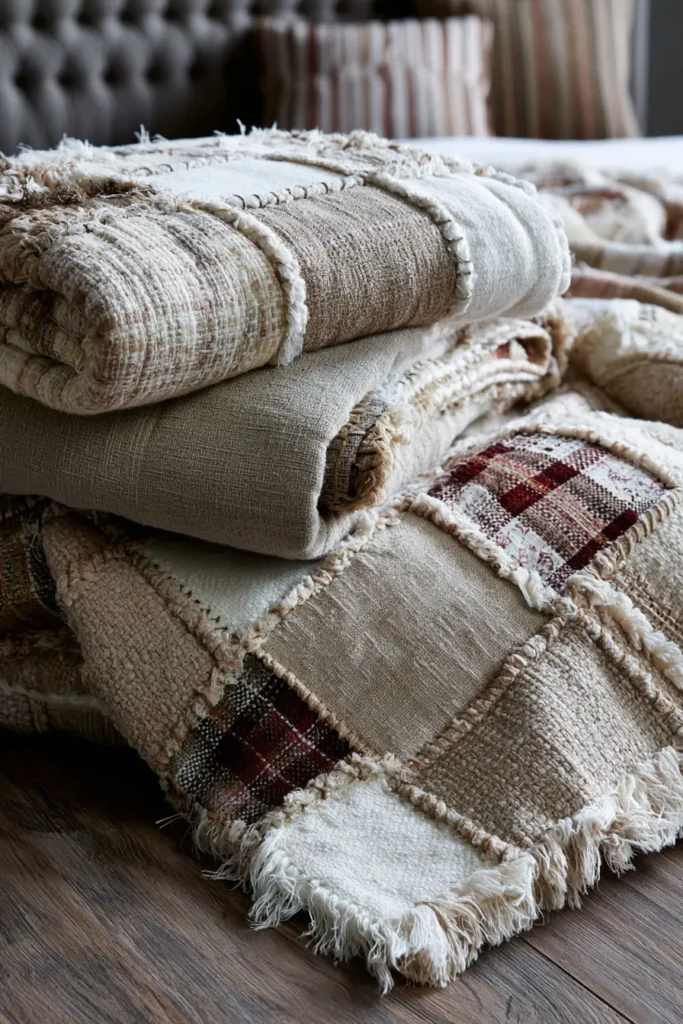
2. Neutral Tone Rag Quilt Ideas for Soft Farmhouse Charm
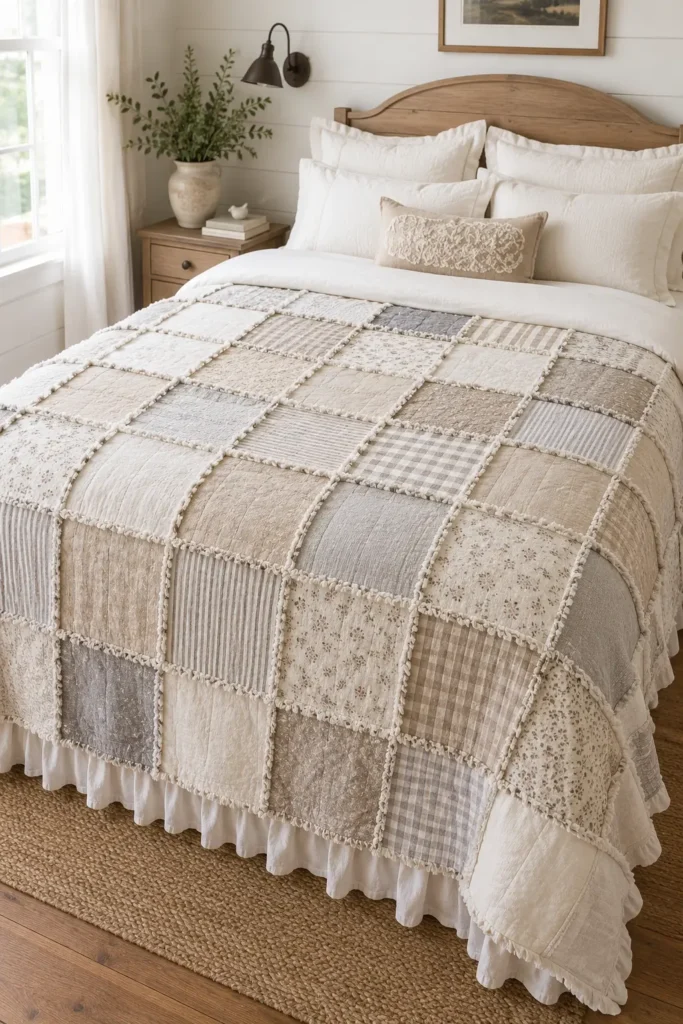
A neutral tone rag quilt is a beautiful way to bring soft farmhouse charm into a bedroom, reading nook, nursery, or cozy living room. Instead of bright floral prints, this quilt uses warm, calming shades like oatmeal, ivory, linen beige, taupe, soft gray, sand, cream, and muted clay. The result feels relaxed, homey, and timeless.
Even with a neutral palette, you can still make the quilt visually interesting by mixing textures and subtle patterns: gingham, ticking stripes, tiny florals, linen-look cotton, soft flannel, and creamy solids.
Why I Made It
I made this quilt because I wanted something that felt peaceful and lived-in, like a favorite blanket folded at the end of a farmhouse bed. Neutral rag quilts have a special charm because they do not compete with the rest of the room. They quietly add texture, warmth, and handmade character.
Rag quilts also have a lovely backstory in home sewing because they are practical, washable, and beginner-friendly. The frayed seams are not a flaw; they are the feature. Every wash makes the quilt softer and more relaxed.
Why This Idea Is Worth Making
This idea is worth making because it gives you a cozy, stylish quilt that works with almost any décor. A neutral farmhouse rag quilt can be used year-round, layered with colorful pillows, gifted for housewarmings, or made from leftover fabric pieces for a thrifty handmade project.

Materials Needed
For a farmhouse throw-size rag quilt, approximately 48 x 60 inches, gather:
- Neutral cotton or flannel fabric for the front: 2½ to 3 yards total
- Backing fabric: 2½ to 3 yards
- Middle layer flannel or low-loft batting: 2½ yards
- Thread in cream, beige, or light gray
- Rotary cutter and cutting mat
- Quilting ruler
- Pins or sewing clips
- Sewing machine
- Sharp scissors or rag quilt snips
For a soft but still lively neutral look, use a mix of ivory, warm beige, soft gray, tan, greige, muted brown, and faded clay.
Tools for Cutting, Pressing, and Sewing
Cutting Measurements
For a simple throw quilt:
- Cut 80 front squares at 7 x 7 inches
- Cut 80 backing squares at 7 x 7 inches
- Cut 80 middle-layer squares at 6 x 6 inches
Arrange the quilt in an 8-square-by-10-square layout. With a ½-inch seam allowance, the finished quilt will be about 48 x 60 inches, depending on fabric shrinkage and seam fraying.
Step-by-Step Guide
Step 1: Choose Your Neutral Farmhouse Palette
Select 4 to 6 fabrics in soft farmhouse tones. A beautiful combination could include cream ticking stripe, beige gingham, oatmeal solid flannel, soft gray mini floral, tan linen-look cotton, and ivory backing.
To keep the quilt from looking flat, mix small prints with solids and textured-looking fabrics.
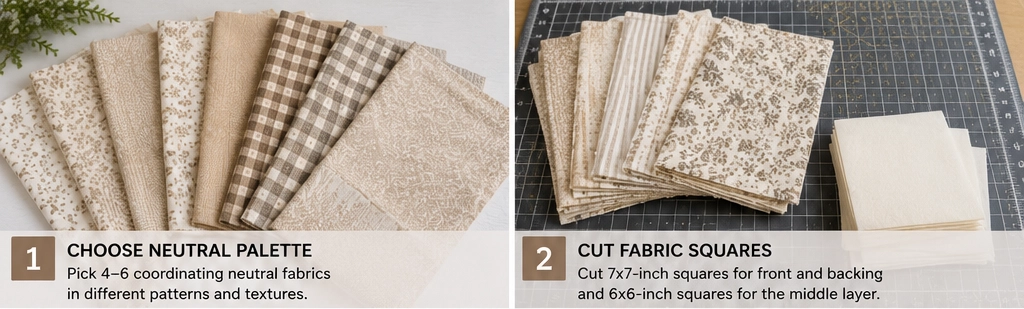
Step 2: Cut the Fabric Squares
Cut the front and backing fabrics into 7 x 7-inch squares. Cut the middle layer into 6 x 6-inch squares. The slightly smaller middle square reduces bulk in the seams, making the quilt easier to sew and clip.
Step 3: Build Each Quilt Sandwich
Make one block at a time by layering:
- Backing square, wrong side facing down
- The middle layer is centered on top
- Front square, right side facing up
Pin or clip each sandwich in place.

Step 4: Quilt Each Individual Square
Sew a large “X” across each square from corner to corner. This keeps the layers together and gives the finished quilt that classic handmade rag quilt look.
Use a straight stitch and backstitch at the beginning and end of each diagonal line.
Step 5: Lay Out the Design
Arrange the quilt blocks in 8 rows of 10 squares. Spread darker neutrals like taupe and tan evenly across the quilt. Place lighter creams and ivories between them so the finished piece feels soft, balanced, and airy.
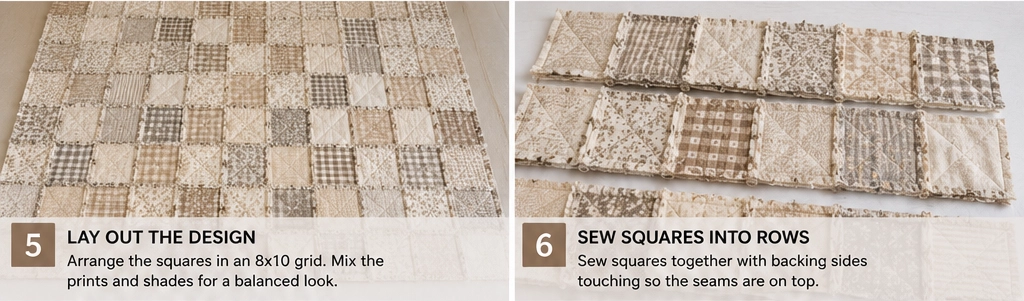
Step 6: Sew the Squares into Rows
Sew the blocks together with the backing sides touching so the raw seams appear on the front of the quilt. Use a ½-inch seam allowance.
This may feel unusual if you are used to traditional quilting, but the exposed seams are what create the fluffy ragged texture.
Step 7: Join the Rows Together
Sew the completed rows together, matching seams carefully. Pin at each intersection so the squares line up neatly. Continue using a ½-inch seam allowance with the raw seams facing the front.
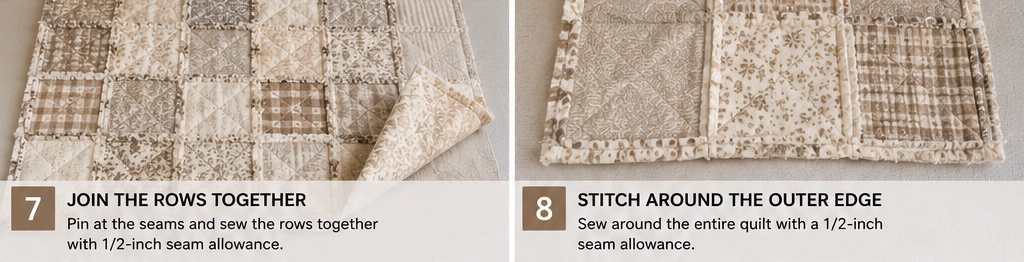
Step 8: Stitch Around the Outside Edge
Once all rows are joined, sew around the entire outside edge of the quilt with a ½-inch seam allowance. This secures the outer border and gives you an edge to clip for the rag effect.
Step 9: Clip the Exposed Seams
Clip into every exposed seam about every ¼ to ½ inch. Do not cut through the stitching line. Clip the seams between the squares and the outside border.
Rag quilt snips make this step easier, especially for larger quilts.
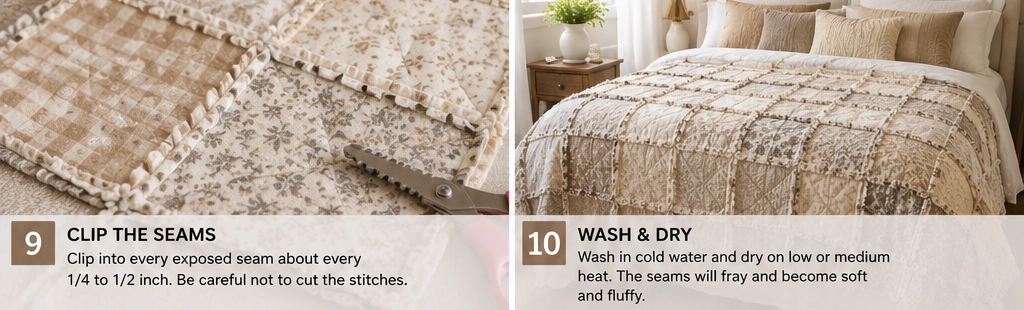
Step 10: Wash and Dry the Quilt
Wash the quilt in cold water and dry it on low or medium heat. The clipped seams will fray into soft, fluffy edges. Check the lint trap often during the first few washes because rag quilts shed a lot at first.
Assembly Section
Assemble the neutral farmhouse rag quilt in this order:
- Cut all front, backing, and middle layer squares.
- Stack each block into a fabric sandwich.
- Sew an “X” across every block.
- Arrange blocks in an 8 x 10 layout.
- Sew blocks into rows using a ½-inch seam allowance.
- Join the rows together with raw seams facing up.
- Sew around the outer border.
- Clip all exposed seams.
- Wash and dry to fluff the edges.
For a cleaner farmhouse look, use the same backing fabric for every square, such as warm ivory flannel or soft beige cotton. This gives the back of the quilt a calm, cohesive finish.
Design Variations
For a softer farmhouse style, use cream, oatmeal, and pale gray with subtle ticking stripes.
For a rustic farmhouse look, add tan, burlap-inspired prints, muted brown, and charcoal gingham.
For a modern neutral quilt, try ivory, greige, stone, clay, and warm white with simple geometric patterns.
Styling Tip
Fold the finished quilt across the foot of a bed, drape it over a white slipcovered sofa, or place it in a woven basket beside a fireplace. Pair it with chunky knit pillows, natural wood furniture, and soft linen curtains for a cozy farmhouse feel.
Other Design Inspirations – Digitally Modified
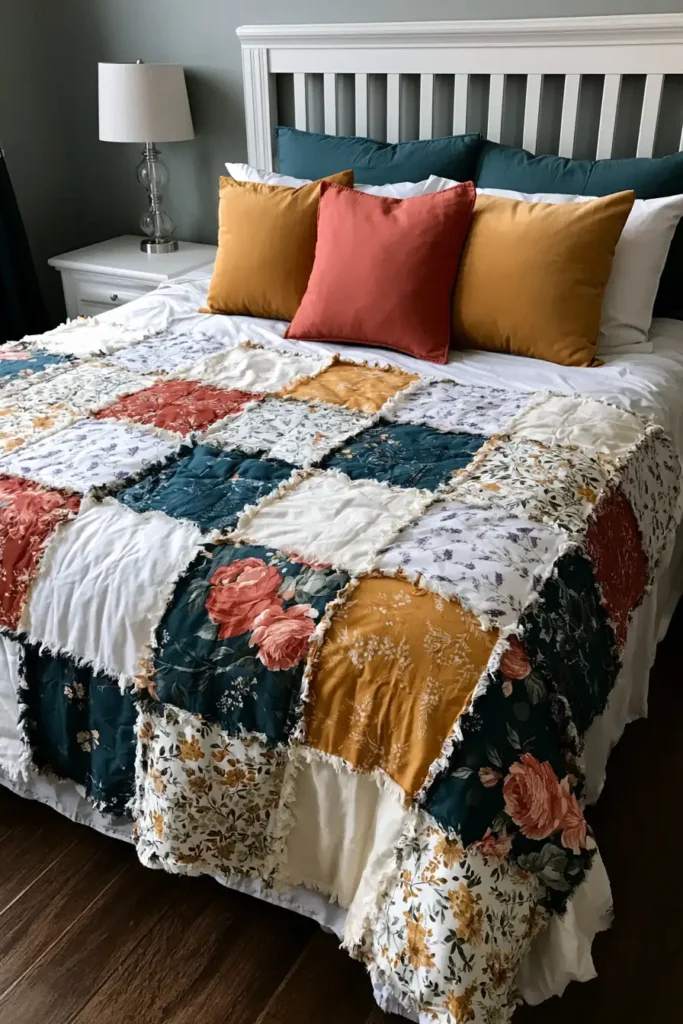
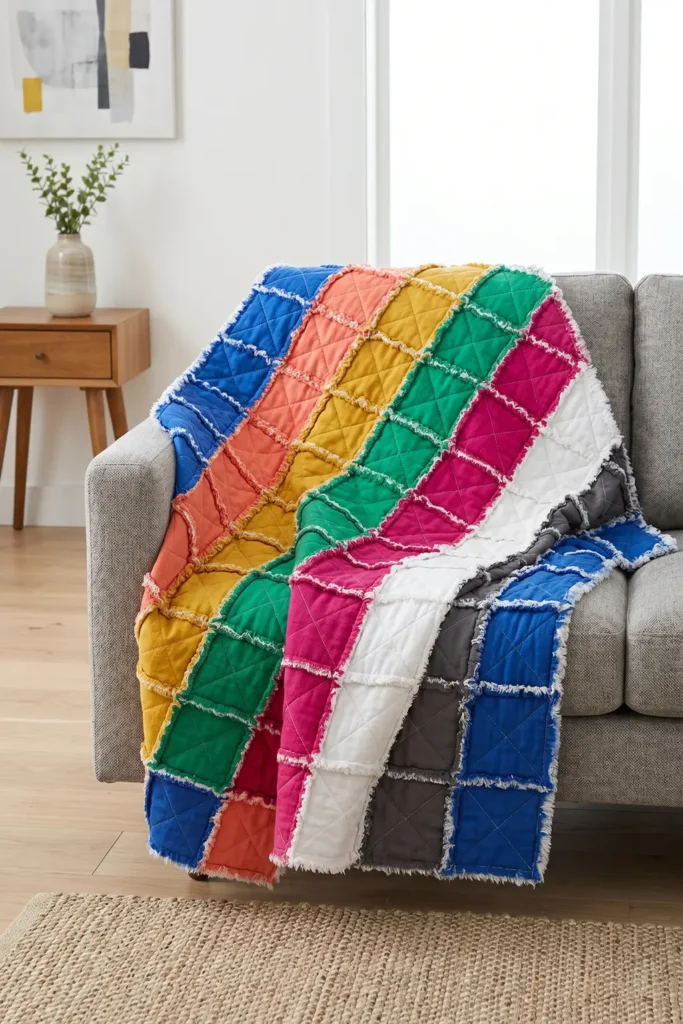
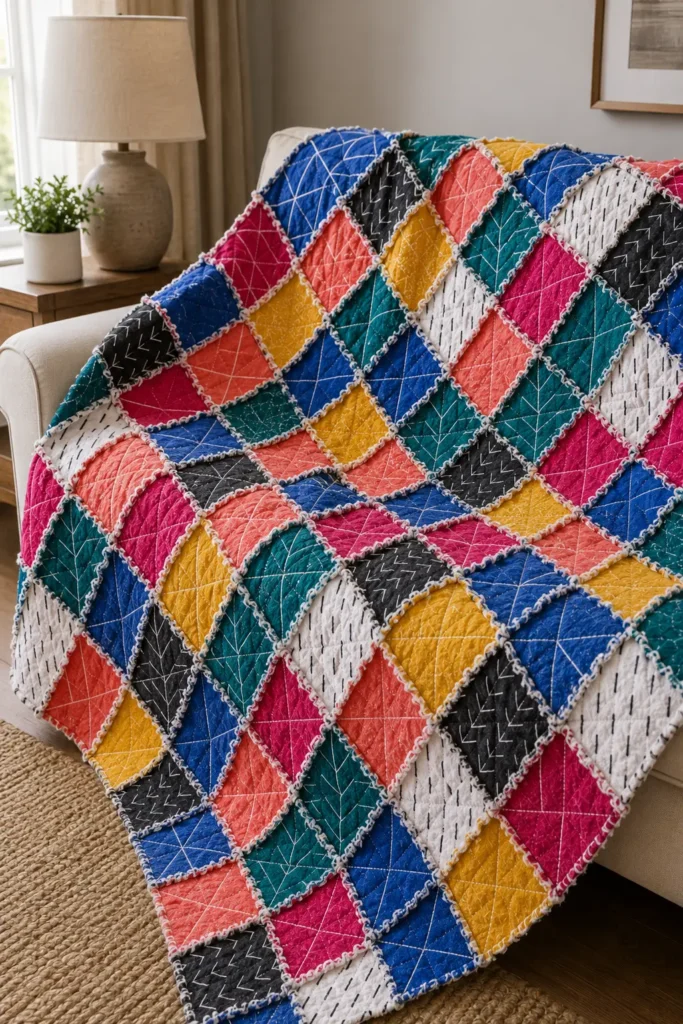
3. Modern Geometric Rag Quilt Designs for Stylish Home Accents
A modern geometric rag quilt is a bold, cozy way to bring contemporary style into your home. Instead of traditional florals or farmhouse checks, this design uses clean shapes, sharp contrast, and vibrant color blocking. Think triangles, diamonds, chevrons, rectangles, and squares in colors like cobalt blue, coral, mustard yellow, emerald green, hot pink, deep plum, crisp white, and charcoal.
The beauty of this quilt is that it feels fresh and artistic, but it still has the soft, frayed texture that makes rag quilts so comforting.
Why I Made It
I made this quilt because I wanted a handmade piece that looked modern enough for a stylish living room but still felt warm and personal. Many rag quilts lean toward a rustic or vintage look, so a geometric version is a fun twist. It turns a simple square-block quilt into something that feels like wall art, especially when you use bright, confident colors.
There is also something satisfying about combining precise geometric layouts with soft, fuzzy rag seams. The contrast makes the quilt feel both structured and cozy.
Why This Idea Is Worth Making
This idea is worth making because it gives you a functional quilt that doubles as a modern home accent. It can brighten a neutral sofa, add personality to a bedroom, or become a handmade gift with a bold designer look. The pattern is beginner-friendly because it still uses simple squares, but the color placement makes it look much more advanced.
Batting, Measuring, Marking, and Clipping Supplies for Quilts
“As an Amazon Associate, I earn from qualifying purchases.“


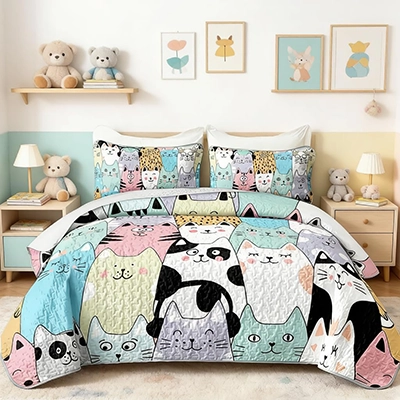
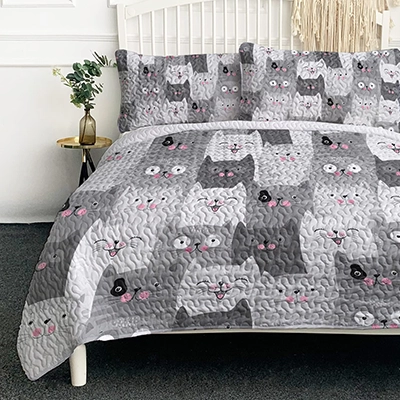
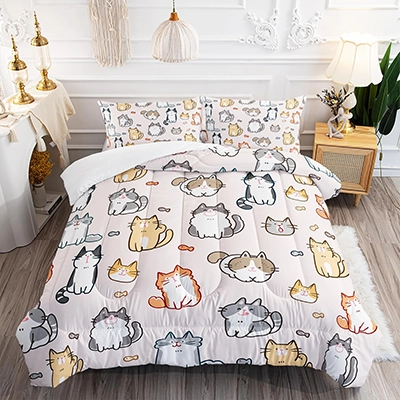
Recommended Ready-Made Cat Quilts
“As an Amazon Associate, I earn from qualifying purchases.“
Materials Needed
For a throw-size quilt, approximately 48 x 60 inches, gather:
- Front fabrics in vibrant geometric colors: 2½ to 3 yards total
- Backing fabric: 2½ to 3 yards
- Middle layer flannel or low-loft batting: 2½ yards
- Thread in white, gray, or a color that blends with most fabrics
- Rotary cutter and cutting mat
- Quilting ruler
- Pins or sewing clips
- Sewing machine
- Sharp scissors or rag quilt snips
Suggested color palette: cobalt blue, coral, mustard yellow, emerald green, magenta, white, and charcoal gray.
Cutting Measurements
For a simple modern throw quilt:
- Cut 80 front squares measuring 7 x 7 inches
- Cut 80 backing squares measuring 7 x 7 inches
- Cut 80 middle layer squares measuring 6 x 6 inches
Arrange the quilt in an 8-square-across by 10-square-down layout. With a ½-inch seam allowance, the finished size will be about 48 x 60 inches, depending on shrinkage and fraying.
For a stronger geometric effect, divide your front squares like this:
- 20 cobalt blue squares
- 15 coral squares
- 15 mustard yellow squares
- 10 emerald green squares
- 10 magenta squares
- 10 charcoal or white squares
Step-by-Step Guide
Step 1: Plan the Geometric Layout
Before cutting everything, sketch a simple 8 x 10 grid on paper. Use colored pencils or markers to plan diagonal stripes, chevrons, diamonds, or color-blocked sections.
For a modern look, try placing charcoal or white squares between bright colors. This creates contrast and makes the bold shades pop.
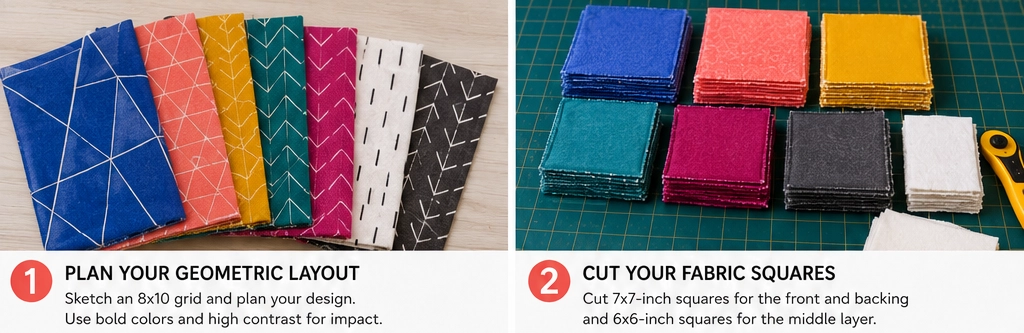
Step 2: Cut Your Fabric Squares
Cut all front and backing fabrics into 7 x 7-inch squares. Cut the middle layer into 6 x 6-inch squares. The smaller middle layer keeps the seams less bulky and easier to clip.
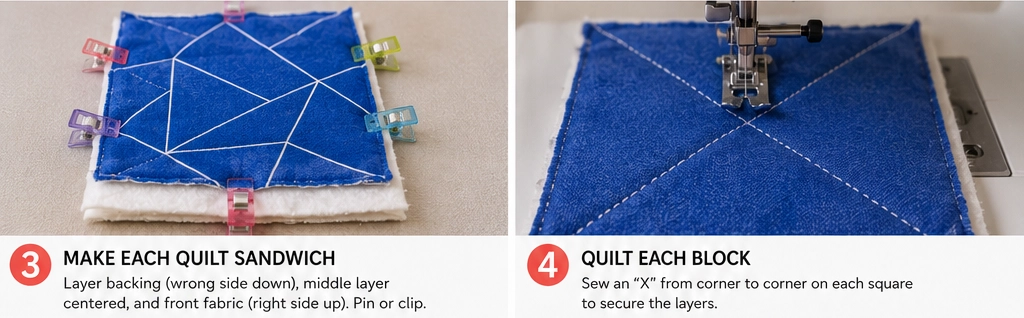
Step 3: Make Each Quilt Sandwich
Layer each block in this order:
- Backing square, wrong side facing down
- The middle layer is centered on top
- Front square, right side facing up
Pin or clip each fabric sandwich securely.
Step 4: Quilt Each Block
Sew an “X” across every square from corner to corner. This keeps the three layers together and adds subtle diagonal lines that work nicely with a geometric design.
Use a straight stitch and backstitch at the beginning and end of each line.
Step 5: Arrange the Blocks in a Bold Pattern
Lay the blocks on the floor or a large table in an 8 x 10 grid. For a geometric accent quilt, try one of these layouts:
- Diagonal stripe: place each color in slanted rows
- Center diamond: Use bright yellow or coral in the middle and darker colors around it
- Checkerboard: alternate white or charcoal with vibrant colors
- Color blocks: group large sections of cobalt, emerald, coral, and mustard
Take a photo of the layout before sewing so you can refer back to it.
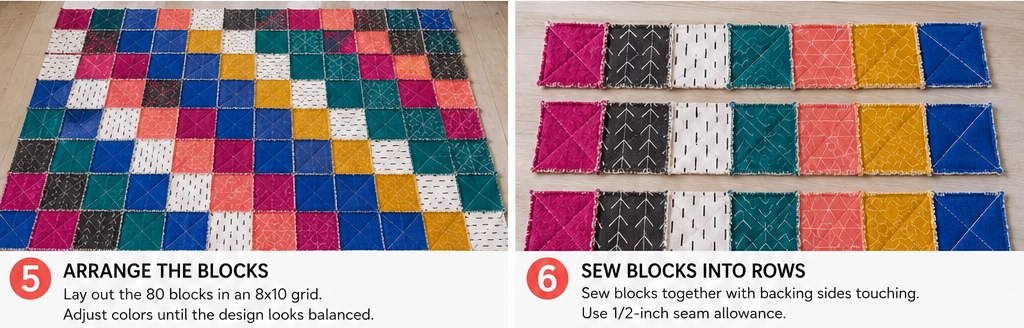
Step 6: Sew Squares into Rows
Sew the blocks together into rows using a ½-inch seam allowance. Place the backing sides together so the raw seams appear on the front side of the quilt.
This exposed seam will become the soft, ragged texture after clipping and washing.
Step 7: Join the Rows
Sew the rows together, matching the seams carefully. Pin at each intersection to keep the grid neat. Continue using a ½-inch seam allowance, with all raw seams facing the front.
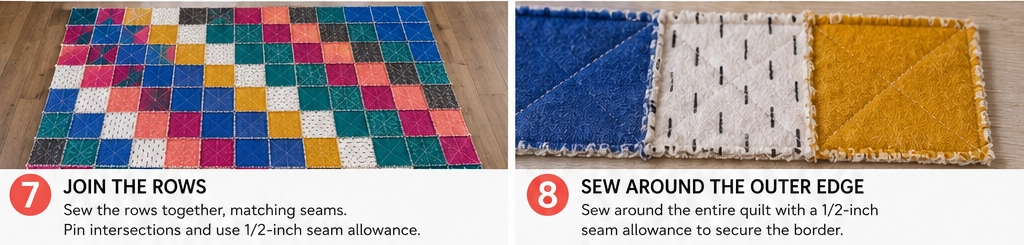
Step 8: Sew Around the Outer Edge
After the quilt top is assembled, sew around the entire outside edge with a ½-inch seam allowance. This creates a secure border and prepares the outside edge for clipping.
Step 9: Clip the Seams
Clip into the exposed seam allowances every ¼ to ½ inch. Do not cut through the stitching. Clip all row seams, block seams, and the outside border.
For a cleaner geometric finish, clip evenly so the frayed lines look soft but intentional.
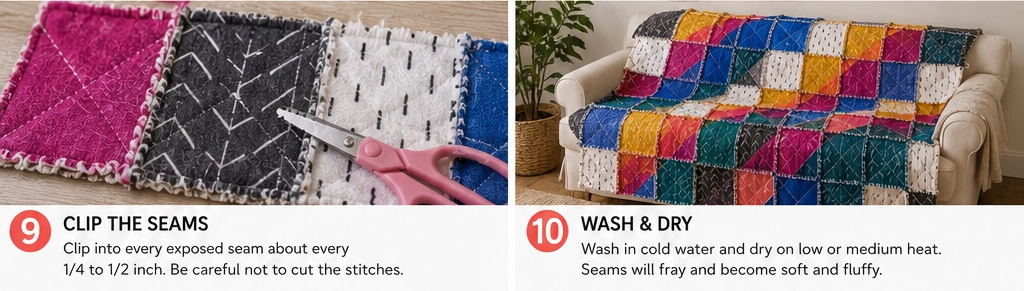
Step 10: Wash and Dry
Wash the quilt in cold water, then dry on low or medium heat. The clipped seams will fray and fluff, creating the classic rag quilt texture. Clean the lint trap often during the first wash and dry cycle.
Assembly Section
Assemble the quilt in this order:
- Choose a bright geometric color palette.
- Cut all front, backing, and middle layer squares.
- Layer each block into a quilt sandwich.
- Sew an “X” across every block.
- Arrange the blocks in an 8 x 10 geometric grid.
- Sew the blocks into rows with raw seams facing up.
- Join all rows together.
- Stitch around the outside border.
- Clip every exposed seam.
- Wash and dry to fluff the rag edges.
For the most stylish result, keep the backing fabric simple, such as solid white, charcoal, or navy. This lets the geometric front stand out while giving the quilt a clean reverse side.
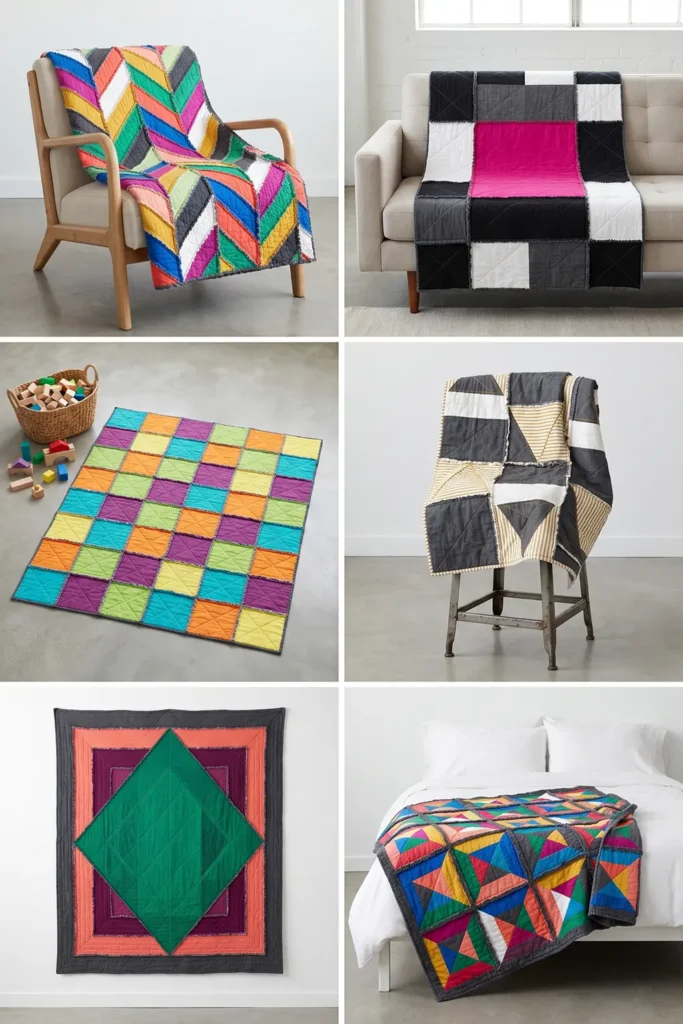
Design Variations
For a bright artistic look, use cobalt blue, coral, mustard, emerald, magenta, and white.
For a modern minimalist look, use black, white, gray, and one bold accent color, such as electric blue or hot pink.
For a playful family-room quilt, use turquoise, orange, lime green, purple, and yellow in a checkerboard or diagonal stripe pattern.
Styling Tip
Drape the finished geometric rag quilt over a neutral sofa, modern accent chair, or the foot of a bed. Pair it with solid pillows in one or two matching colors so the quilt is the room’s focal point.
Other Design Inspirations – Digitally Modified
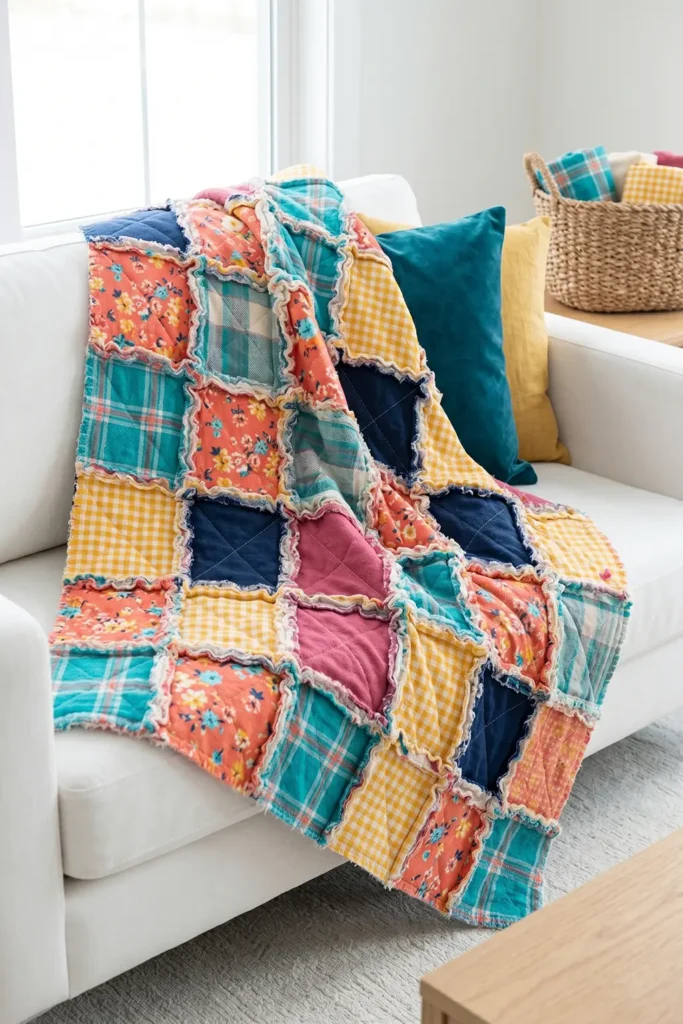
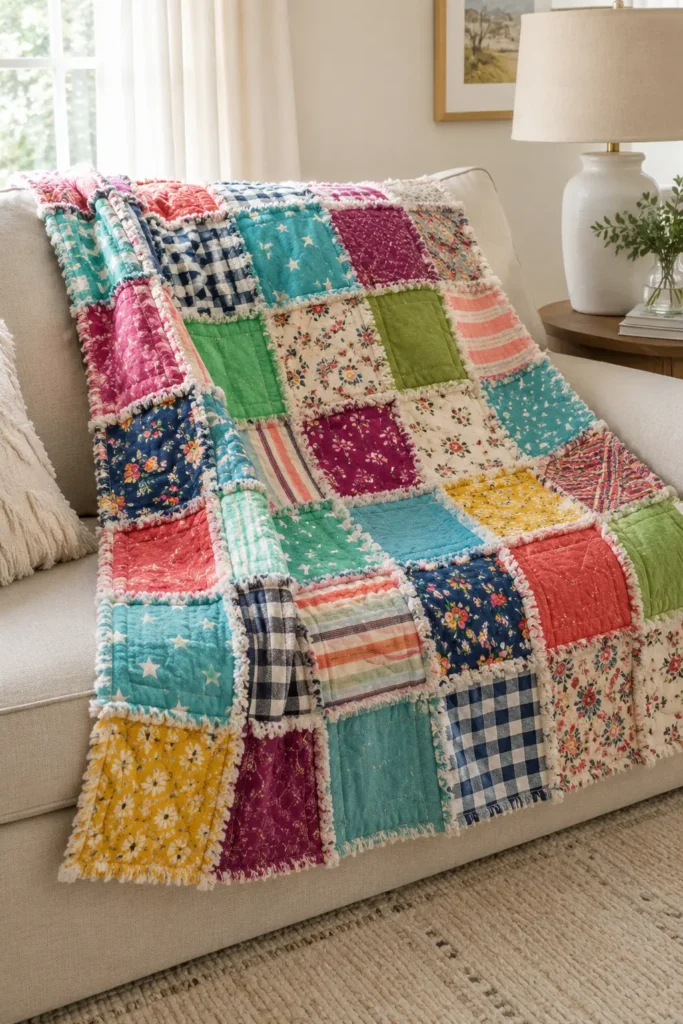
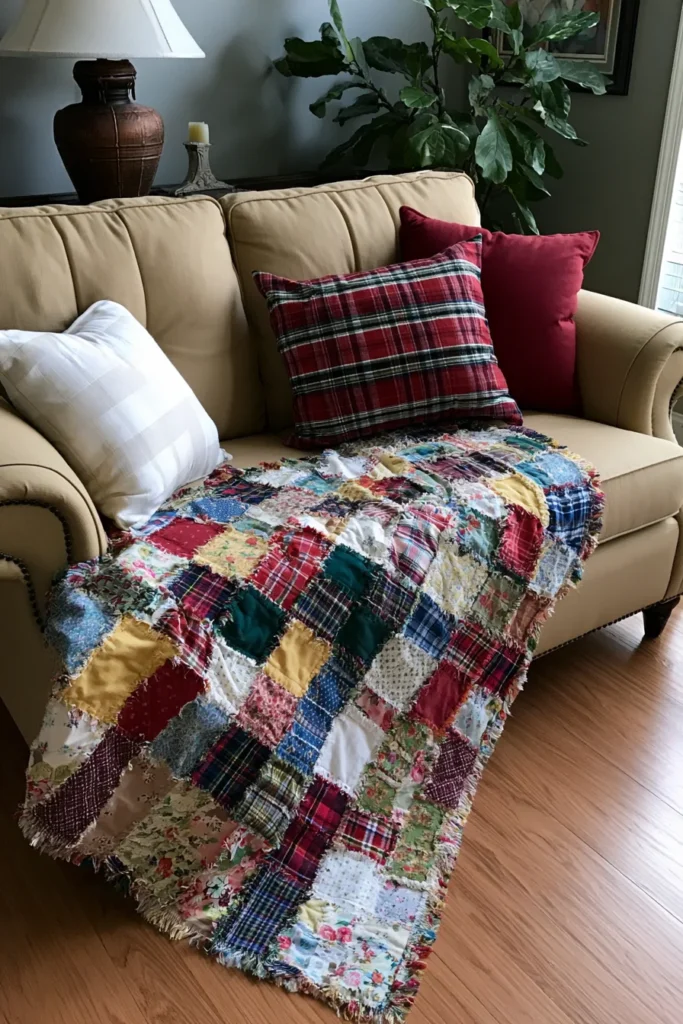
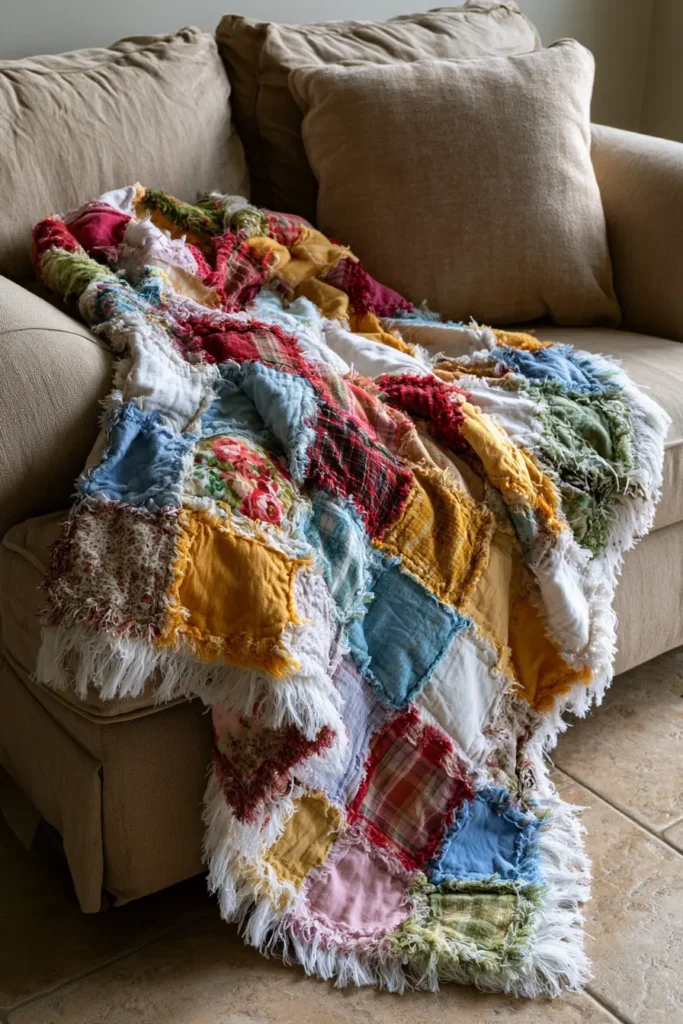
4. Soft Flannel Rag Quilt Throws for Cozy Living Room Sofas
A soft flannel rag quilt throw is one of the coziest projects you can make for a living room. It is warm, washable, relaxed, and beautifully textured. The frayed seams give it that beloved handmade charm, while vibrant flannel prints can make the whole sofa area feel brighter and more inviting.
For a cheerful living room accent, choose colors like turquoise, coral, sunflower yellow, berry pink, apple green, plum, navy, and warm cream. Mix plaid, gingham, florals, stripes, and solid flannels for a quilt that feels playful but still homey.
Why I Made It
I made this quilt because I wanted a throw that could live on the sofa every day, not just be folded away for decoration. Flannel is soft from the start, and when it is used in a rag quilt, the seams become even fluffier after every wash.
There is also a sweet, practical backstory to flannel rag quilts: they are often made as comfort quilts because they are quick to sew, easy to personalize, and perfect for using favorite fabric scraps. They feel casual and welcoming, which makes them ideal for movie nights, chilly mornings, and cozy reading corners.
Why This Idea Is Worth Making
This idea is worth making because it gives you a beautiful sofa throw that is both decorative and useful. It adds vibrant color to your living room, keeps guests warm, and becomes softer over time. It is also beginner-friendly because each square is quilted individually before the throw is assembled.
Materials Needed
For a sofa throw measuring approximately 48 x 60 inches, gather:
- Front flannel fabrics: 2½ to 3 yards total
- Backing flannel fabric: 2½ to 3 yards
- Middle layer flannel or low-loft cotton batting: 2½ yards
- Thread in cream, gray, or a coordinating color
- Rotary cutter and cutting mat
- Quilting ruler
- Pins or sewing clips
- Sewing machine
- Sharp scissors or rag quilt snips
For extra softness, use flannel for all three layers. For a slightly lighter throw, use flannel for the front and back with thin batting in the middle.
Cutting Measurements
For a simple throw-size rag quilt:
- Cut 80 front squares measuring 7 x 7 inches
- Cut 80 backing squares measuring 7 x 7 inches
- Cut 80 middle layer squares measuring 6 x 6 inches
Arrange the blocks in an 8 squares by 10 squares layout. With a ½-inch seam allowance, the finished throw will be about 48 x 60 inches, depending on shrinkage and fraying.
For a smaller sofa throw, use 6 rows by 8 rows of 7-inch squares for a finished size of about 36 x 48 inches.
Step-by-Step Guide
Step 1: Pick a Vibrant Flannel Palette
Choose 5 to 7 flannel fabrics that feel warm and inviting together. A lively living room palette could include turquoise plaid, coral gingham, mustard yellow solid, navy stars, berry floral, green stripe, and cream backing.
Try to balance bold prints with calmer solids so the quilt looks colorful without feeling too busy.
Step 2: Prewash and Dry the Flannel
Flannel can shrink, so prewash and dry your fabric before cutting. This helps the finished quilt keep its shape. Iron the fabric lightly if needed, but do not stretch it.
Step 3: Cut the Squares
Cut the front and backing fabric into 7 x 7-inch squares. Cut the middle layer into 6 x 6-inch squares. The smaller middle square keeps the seams easier to sew and clip.
Step 4: Make the Quilt Sandwiches
Layer each block like this:
- Backing square, wrong side facing down
- Middle layer centered on top
- Front square, right side facing up
Pin or clip the layers together.
Step 5: Quilt Each Block
Sew an “X” across every square from corner to corner. This keeps the layers secure and adds a simple quilted texture. Backstitch at the beginning and end of each line.
Step 6: Arrange the Blocks
Lay out the blocks in an 8 x 10 grid. Spread the bold colors evenly across the quilt. Place darker shades like navy and plum throughout the layout, then brighten the design with coral, turquoise, yellow, and cream.
Take a quick photo of the layout before sewing so you can remember the arrangement.
Step 7: Sew Blocks into Rows
Sew the blocks together into rows using a ½-inch seam allowance. Place the backing sides together so the raw seam edges show on the front side of the quilt.
These exposed seams are what create the fluffy rag-quilt texture after washing.
Step 8: Join the Rows
Sew the rows together, matching seams as closely as possible. Pin at each seam intersection to keep the grid neat. Continue using a ½-inch seam allowance, with the raw seams facing the front.
Step 9: Sew Around the Outer Edge
Once all rows are attached, sew around the entire outside edge of the quilt using a ½-inch seam allowance. This creates a secure border and gives the outside edge a place to fray.
Step 10: Clip the Seams
Clip into the exposed seams every ¼ to ½ inch. Be careful not to cut through the stitching. Clip all seams between blocks and around the outside edge.
Rag quilt snips are helpful because flannel layers can get thick.
Step 11: Wash, Dry, and Fluff
Wash the quilt in cold water and dry it on low or medium heat. The clipped seams will fray and fluff beautifully. Clean the lint trap during drying, especially the first few times.
Assembly Section
Assemble the soft flannel rag quilt throw in this order:
- Prewash and dry all flannel fabric.
- Cut squares from the front, backing, and middle layers.
- Stack each block into a quilt sandwich.
- Sew an “X” across every block.
- Arrange blocks in an 8 x 10 layout.
- Sew blocks into rows with raw seams facing up.
- Join all rows together.
- Sew around the outside border.
- Clip all exposed seams.
- Wash and dry to create fluffy rag edges.
Color and Pattern Ideas
For a bright family-room throw, use turquoise, coral, yellow, apple green, and navy.
For a cozy cabin sofa, use red plaid, forest green, cream, navy, and warm brown.
For a cheerful cottage look, use berry pink, lavender, mint green, butter yellow, and soft white.
For a bold modern sofa accent, use teal, orange, charcoal, cobalt blue, and white.
Styling Tip
Fold the finished flannel rag quilt over the arm of a sofa or place it in a woven basket beside the coffee table. Pair it with solid pillows in coral, teal, or mustard yellow so the quilt becomes a warm and colorful focal point in the room.
Other Design Inspirations – Digitally Modified
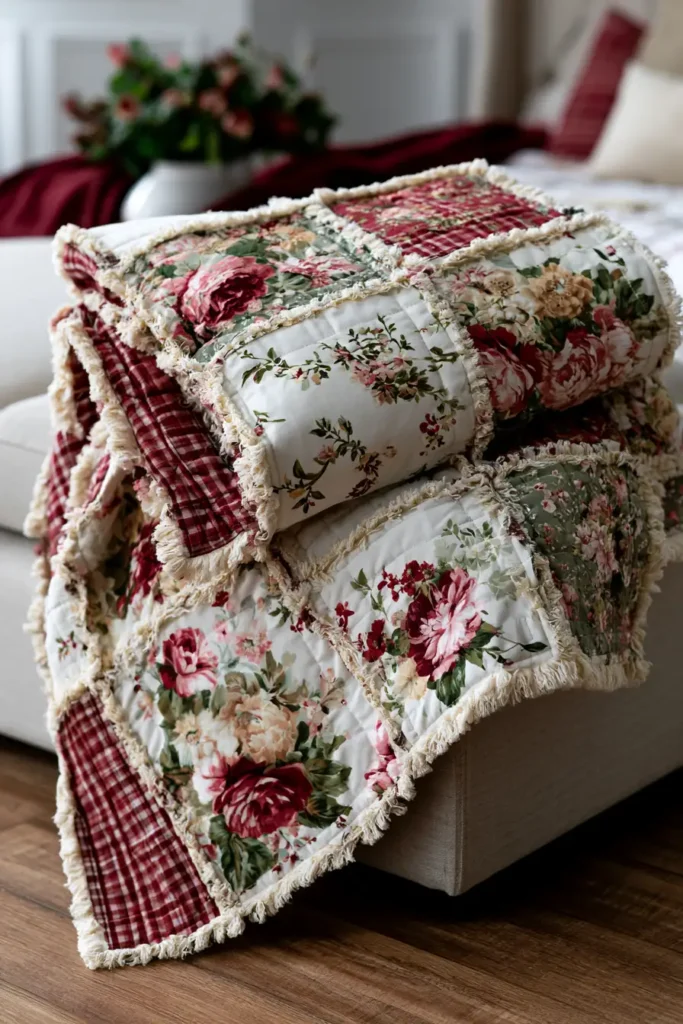
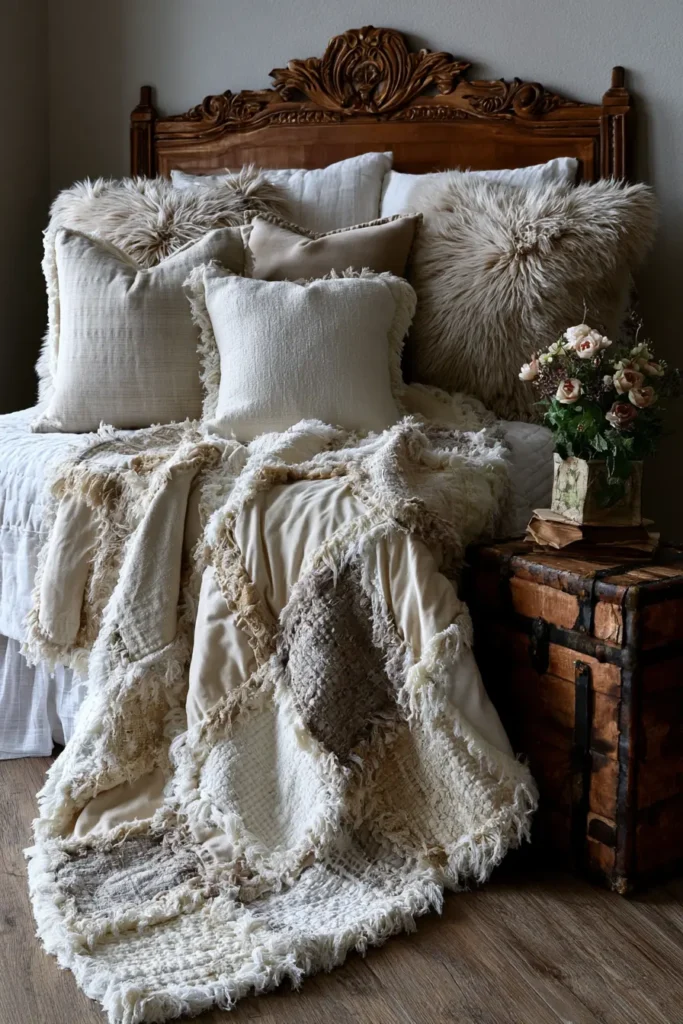
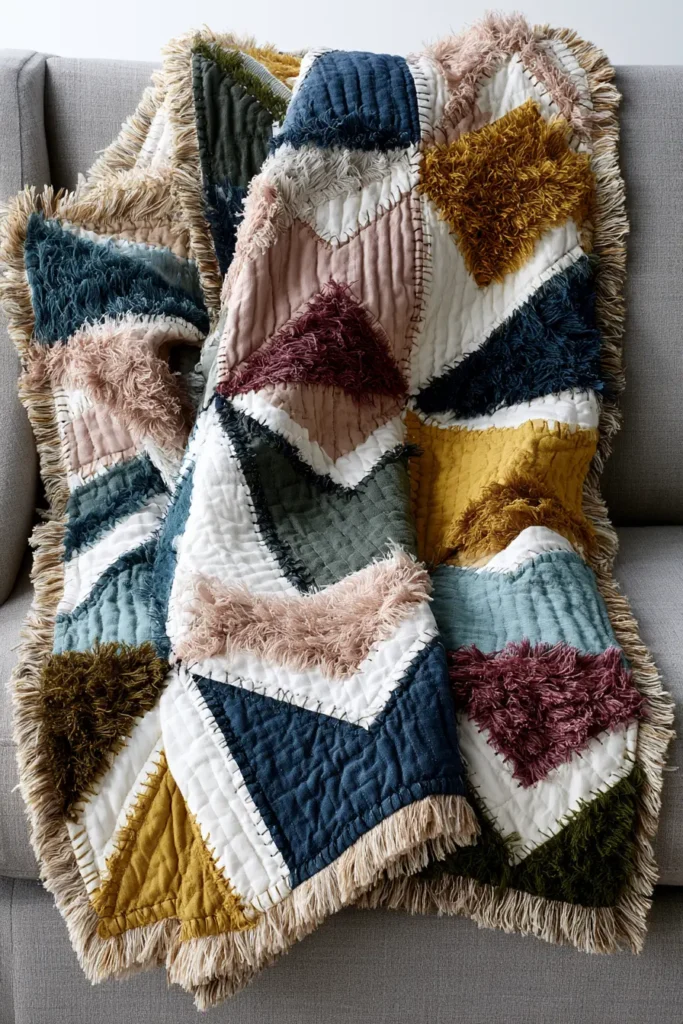
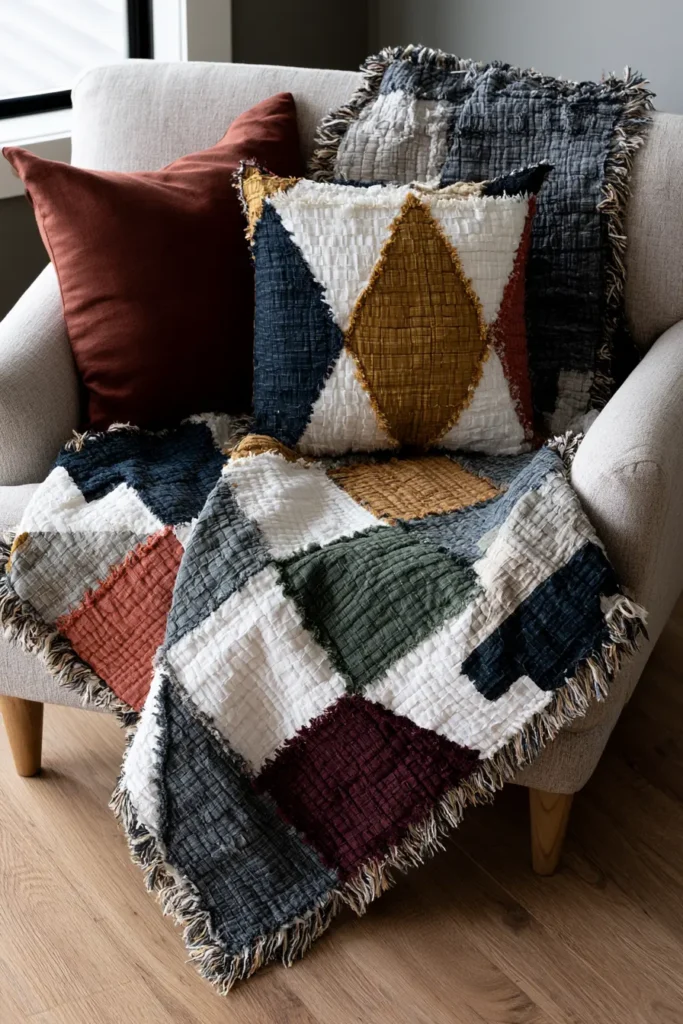
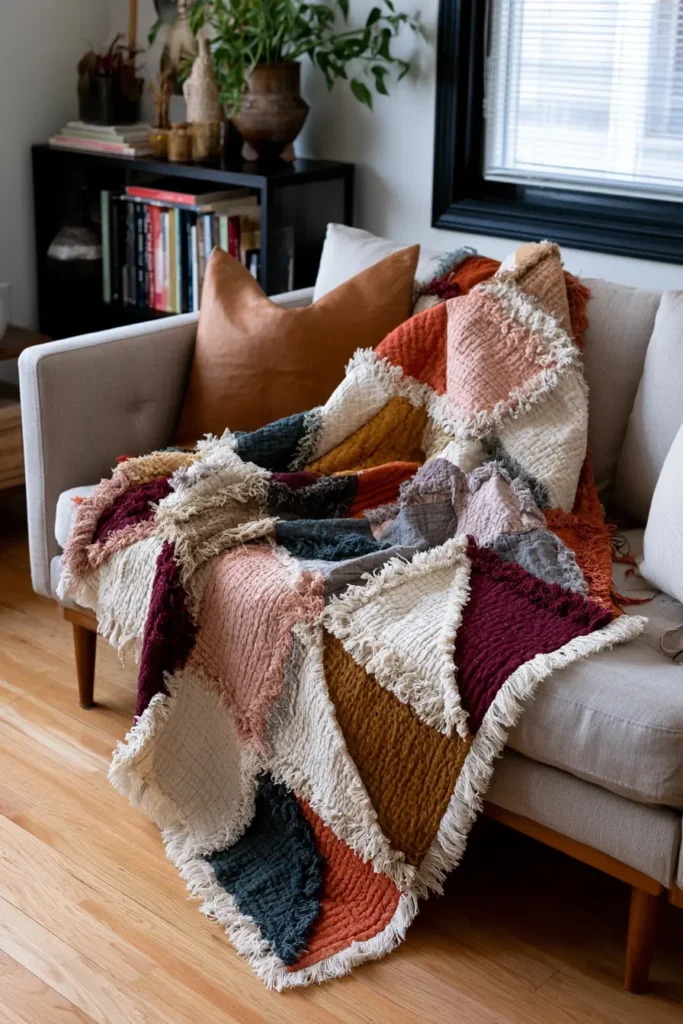
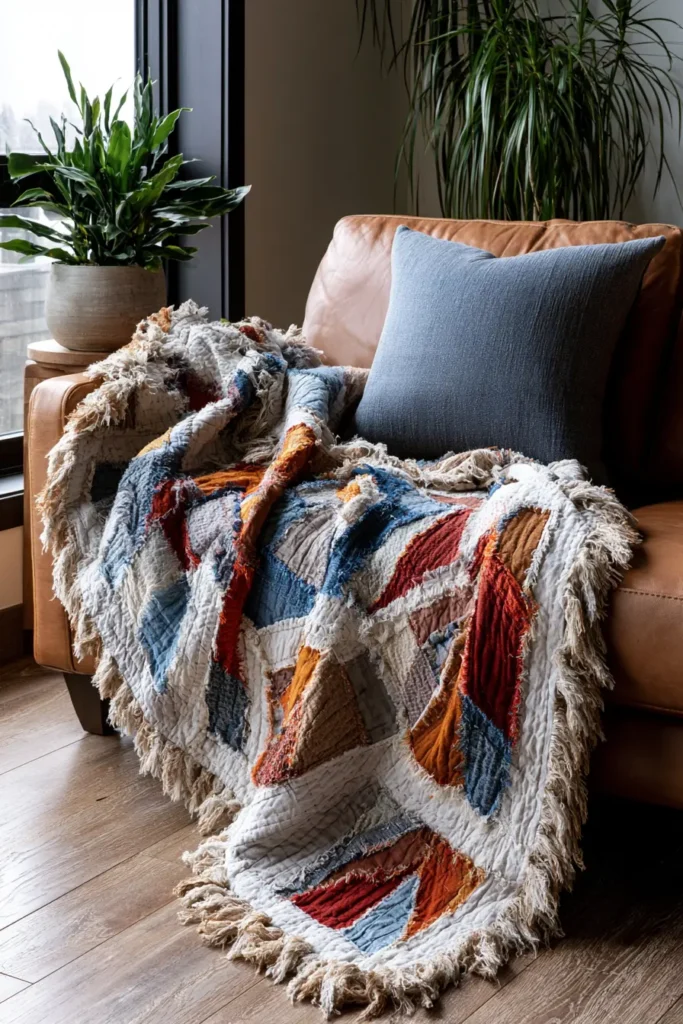
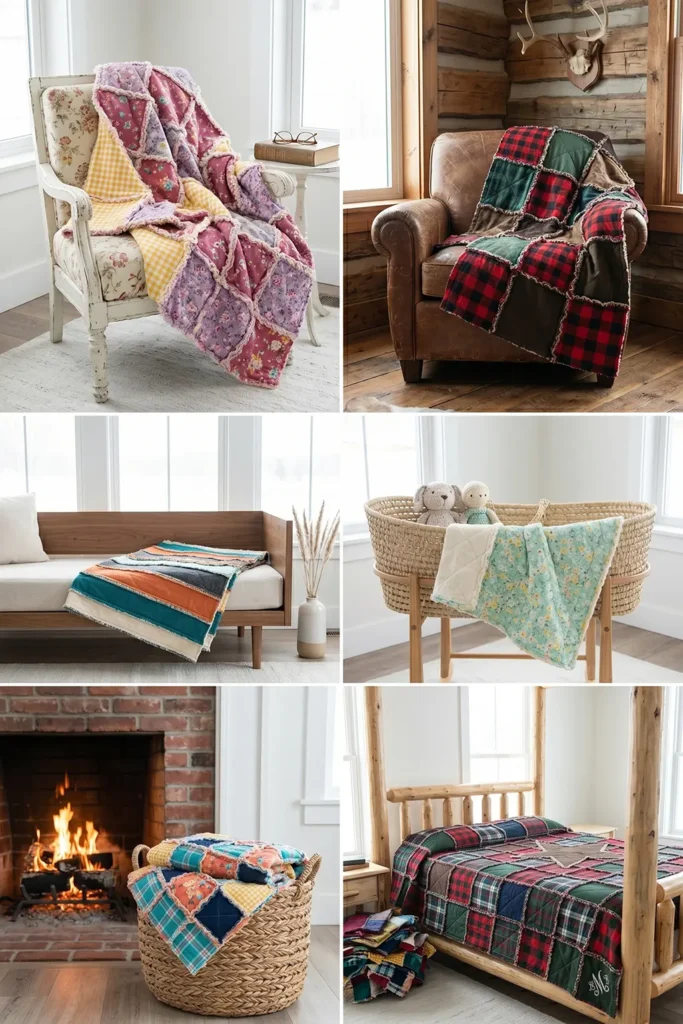
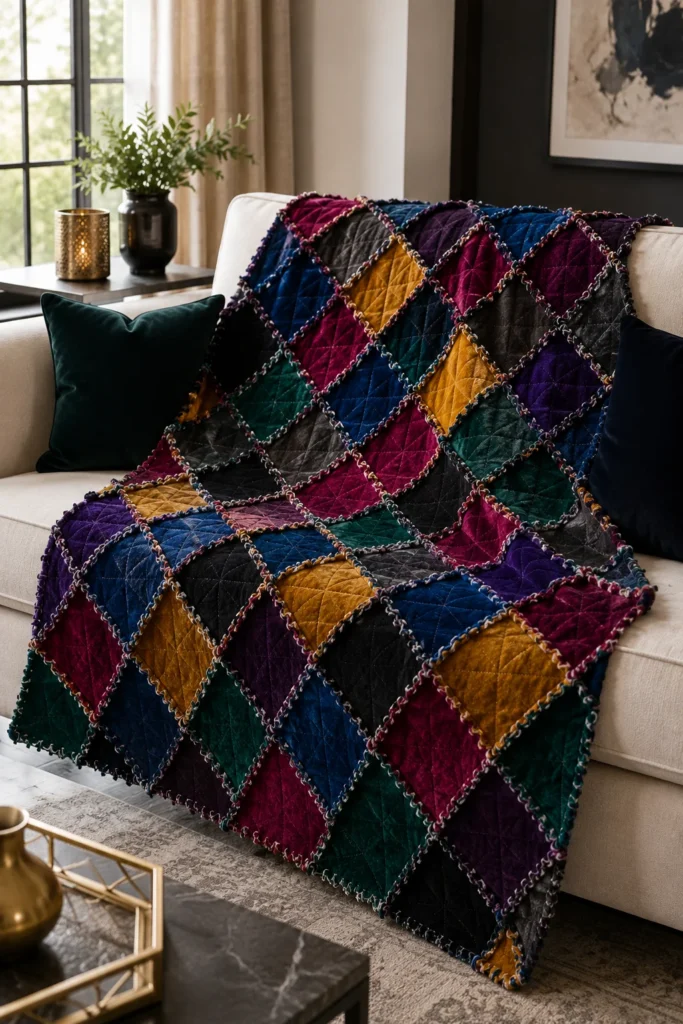
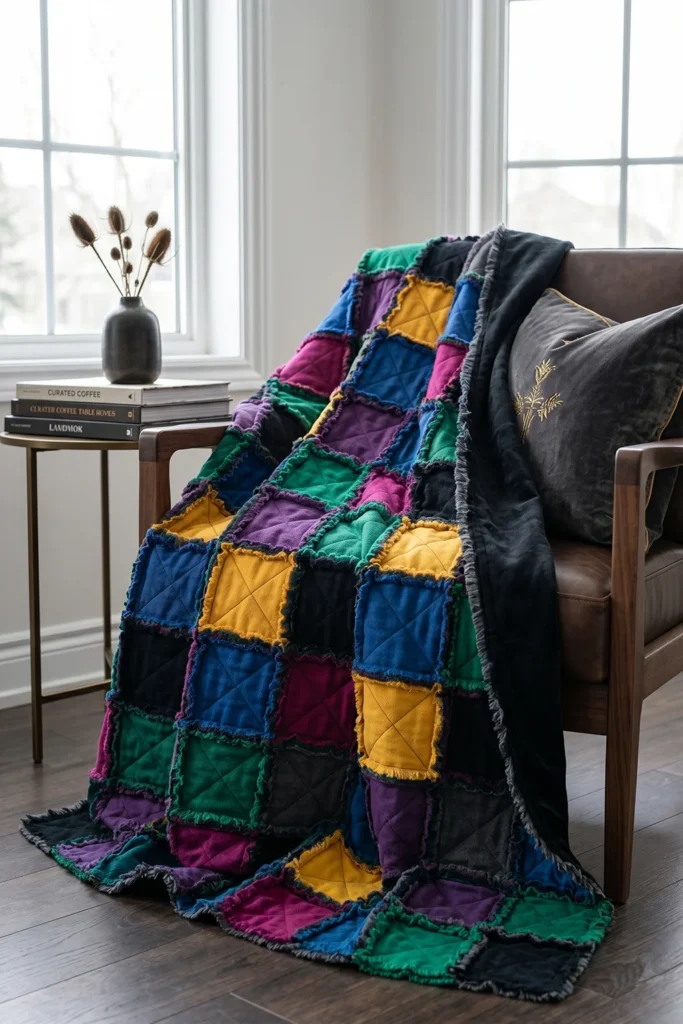
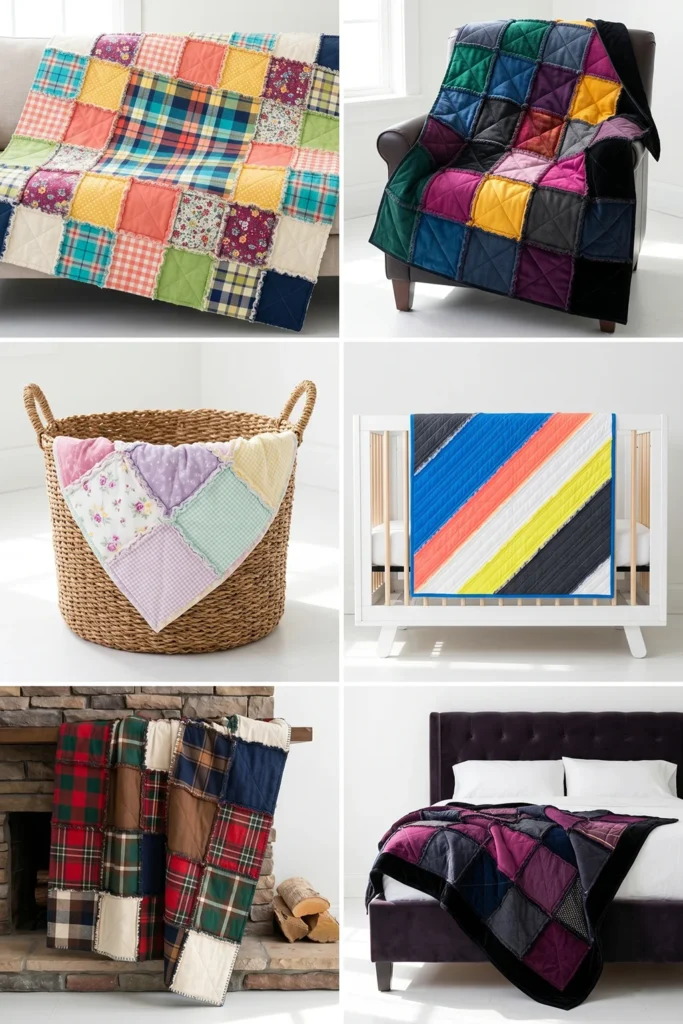
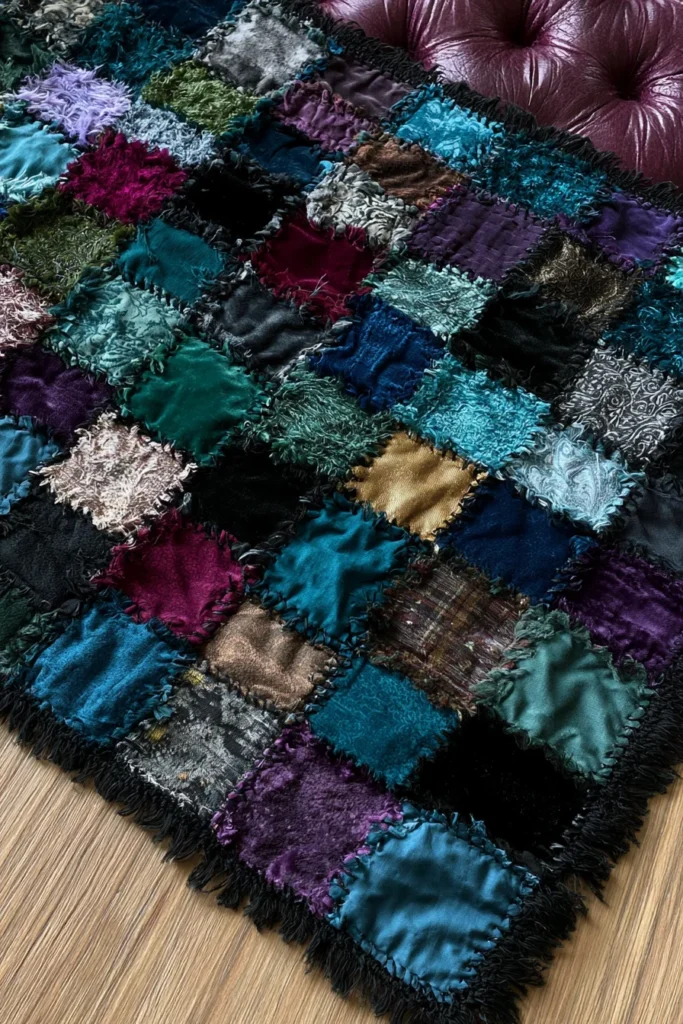
5. Luxury-Inspired Rag Quilt Color Combinations for Beautiful Spaces
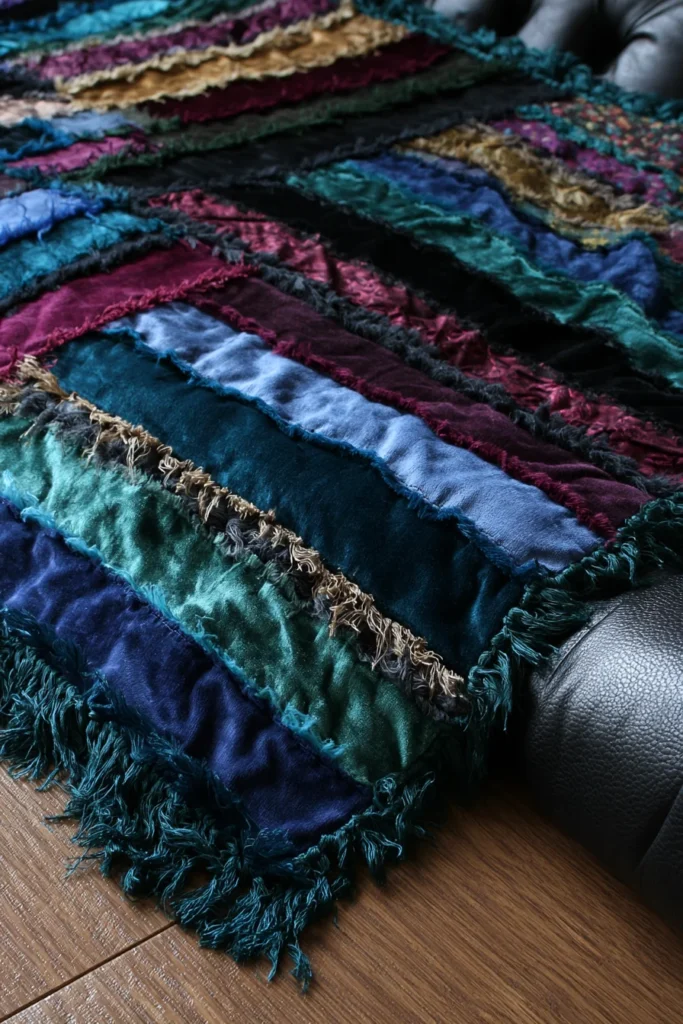
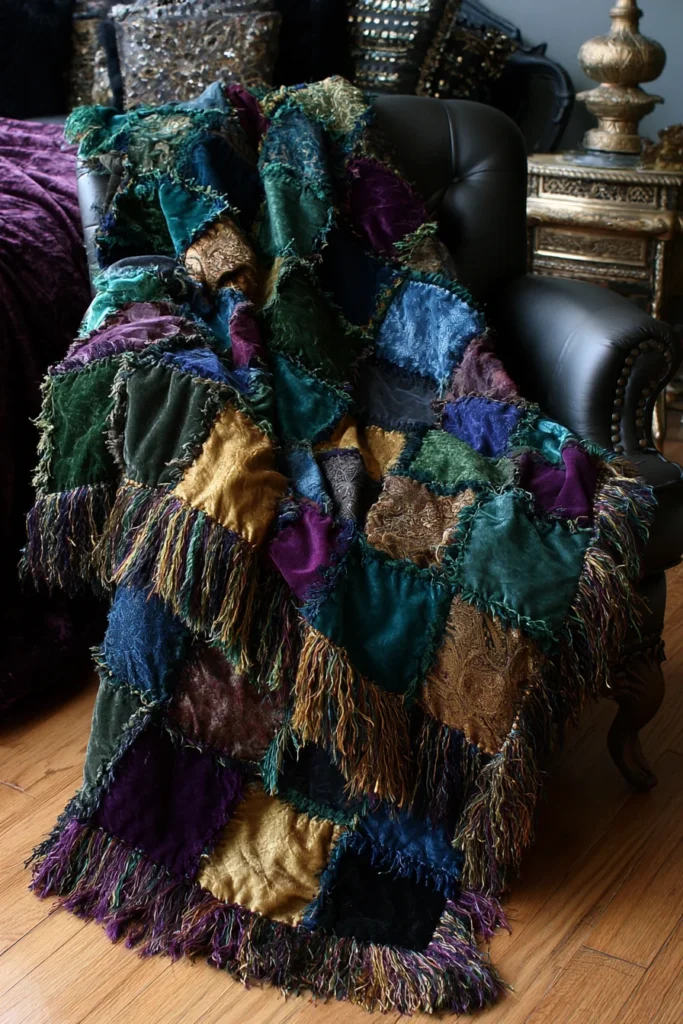
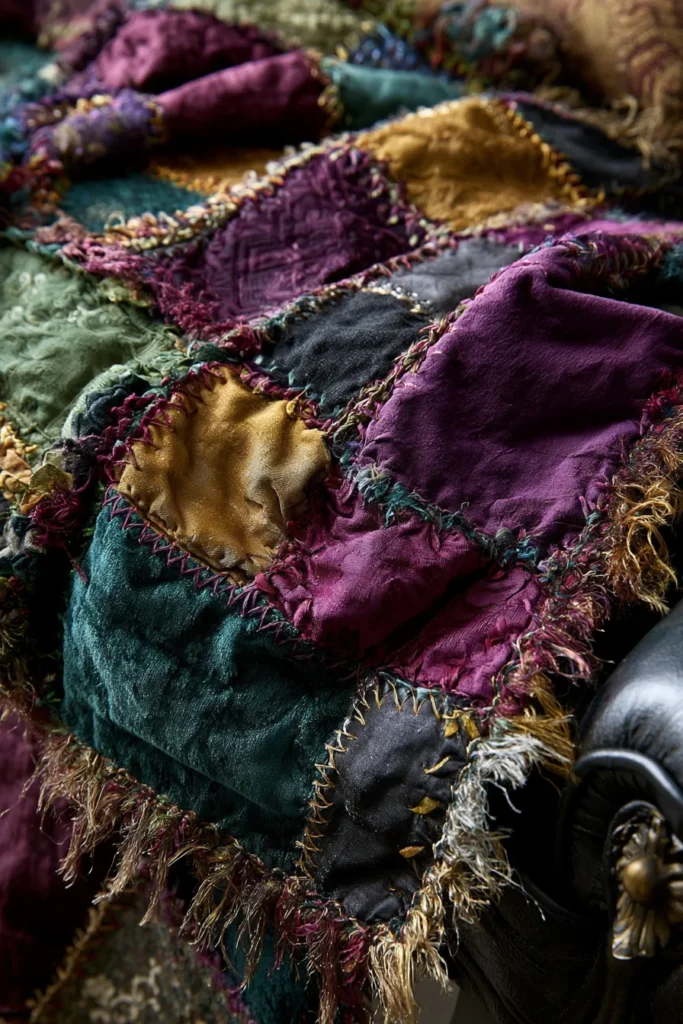
A luxury-inspired rag quilt is an unexpected but stunning way to elevate your home decor. It takes the relaxed, touchable texture of traditional frayed seams and pairs it with rich, high-end fabrics and vibrant, sophisticated color palettes. The distressed edges give it an approachable feel, while the vibrant jewel tones and deep, elegant shades make the entire space feel curated and opulent.
For a truly luxurious accent, choose vibrant colors like emerald green, sapphire blue, rich amethyst, vibrant gold, deep magenta, charcoal, and warm velvet-like black. Mix high-quality cottons, linens, and soft flannels in solid, saturated hues for a quilt that feels dramatic but still incredibly inviting.
Why I Made It
I made this quilt design to challenge the idea that rag quilts belong only in rustic or farmhouse settings. As I often share on comfydwell.com, while many of our patterns start as digital design concepts and creative inspirations, bringing them into the physical world reveals the true magic of textile art. I wanted a piece that felt rich, dramatic, and worthy of a beautifully styled, upscale bedroom or formal living room. When you use deep, vibrant colors, the frayed seams take on a lush, almost fringe-like quality that mimics high-end textured throws.
There is also a sweet, fascinating backstory to this concept: historically, rag quilting was a survivalist craft born of necessity, utilizing old feed sacks and worn clothes. Reinventing this historically frugal craft using striking, luxurious color combinations creates a satisfying, creative contrast. It becomes a functional piece of modern textile art that feels both lavish and deeply comforting.
Why This Idea Is Worth Making
This idea is worth making because it proves that everyday comfort and high-end design can easily coexist. It gives you a beautiful, highly textured throw that feels incredibly soft but looks like an expensive boutique find. It adds vibrant, sophisticated color to your home, elevating the overall aesthetic without sacrificing the coziness of a handmade quilt. It is also a very forgiving and beginner-friendly project that yields high-impact, artistic results.
Materials Needed
For a luxury-inspired throw measuring approximately 51 x 68 inches, gather:
- Front fabrics (high-quality cotton, linen blends, or luxe flannel): 3 to 3½ yards total
- Backing fabric (soft, solid dark flannel for weight and warmth): 3 to 3½ yards
- Middle layer (low-loft cotton batting): 3 yards
- Thread: Charcoal, gold, or a coordinating dark heavy-duty cotton thread
- Tools: Rotary cutter and cutting mat, quilting ruler, pins or sewing clips, sewing machine, and sharp spring-loaded rag quilt snips
For extra luxury, use a deep charcoal or black flannel for the backing to make the vibrant jewel tones pop, and use a dark thread to blend into the shadows of the frayed seams.
Cutting Measurements
For a sleek, luxury-style throw-size rag quilt:
- Cut 96 front squares measuring 8 x 8 inches
- Cut 96 backing squares measuring 8 x 8 inches
- Cut 96 middle layer batting squares measuring 7 x 7 inches
Arrange the blocks in an 8-square-by-12-square layout. With a ½-inch seam allowance, the finished throw will be about 51 x 68 inches, depending on fabric shrinkage and fraying.
Step-by-Step Guide
Step 1: Pick a Vibrant, Luxury Palette. Choose 5 to 7 fabrics that feel rich and sophisticated together. A luxurious palette could include emerald green, sapphire blue, vibrant magenta, rich gold, charcoal grey, and deep plum. Balance these bold, saturated jewel tones with dark neutrals so the quilt looks intensely colorful without losing its elegant edge.
Step 2: Prewash and Press the Fabric. High-quality cottons and flannels can shrink at different rates, so prewash and dry your fabric before cutting. This ensures your sleek geometric lines stay straight. Iron the fabric flat to prepare for precise cutting.

Step 3: Cut the Squares Cut the front and backing fabric into 8 x 8-inch squares. Cut the middle layer batting into 7 x 7-inch squares. The smaller middle square prevents the thick batting from getting caught in your luxury frayed seams.
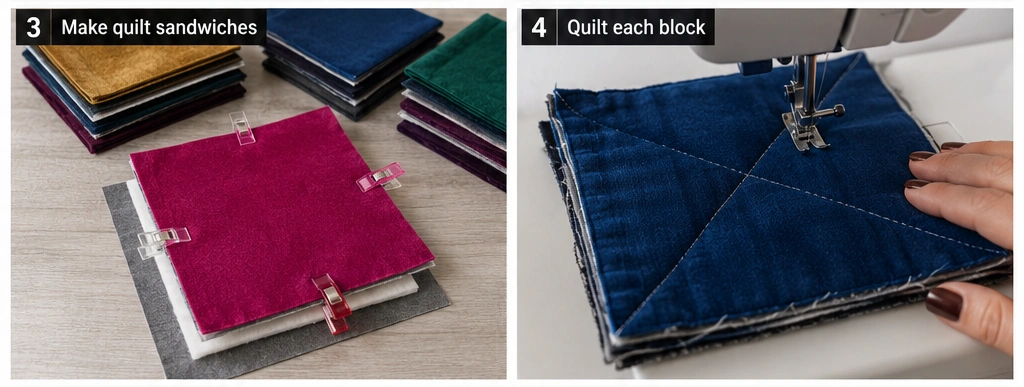
Step 4: Make the Quilt Sandwiches Layer each block like this:
- Backing square, wrong side facing down
- Middle layer batting centered on top
- Front square, right side facing up Pin or clip the layers securely together.
Step 5: Quilt Each Block Sew an “X” across every square from corner to corner. For a more modern, architectural look, you can sew three parallel diagonal lines instead. This keeps the layers secure and adds an elegant quilted texture. Backstitch at the beginning and end of each line.
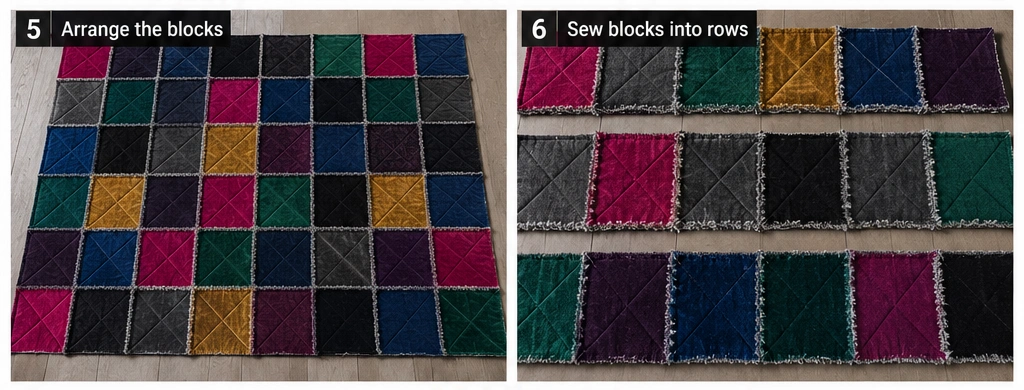
Step 6: Arrange the Blocks Lay out the blocks in an 8 x 12 grid. Spread the vibrant jewel tones strategically. Group contrasting colors like rich gold and amethyst next to grounding shades like charcoal and black for maximum visual impact. Take a quick photo of the layout before sewing so you can remember the sophisticated arrangement.
Step 7: Sew Blocks into Rows Sew the blocks together into rows using a ½-inch seam allowance. Place backing sides together so the raw seam edges show on the front side of the quilt. These exposed seams are what will create the lush, fringe-like texture after washing.
Step 8: Join the Rows Sew the rows together, matching seams perfectly to keep your grid looking sharp and intentional. Pin at each seam intersection. Continue using a ½-inch seam allowance, with the raw seams facing the front.
Step 9: Sew Around the Outer Edge Once all rows are attached, sew around the entire outside edge of the quilt using a ½-inch seam allowance. This creates a secure, clean border and gives the outside edge a place to softly fray.
Step 10: Clip the Seams Clip into the exposed seams every ¼ to ½ inch. Be incredibly careful not to cut through the structural stitching. Clip all seams between blocks and around the outside edge. Rag quilt snips are highly recommended here to easily cut through the layers of premium fabric.
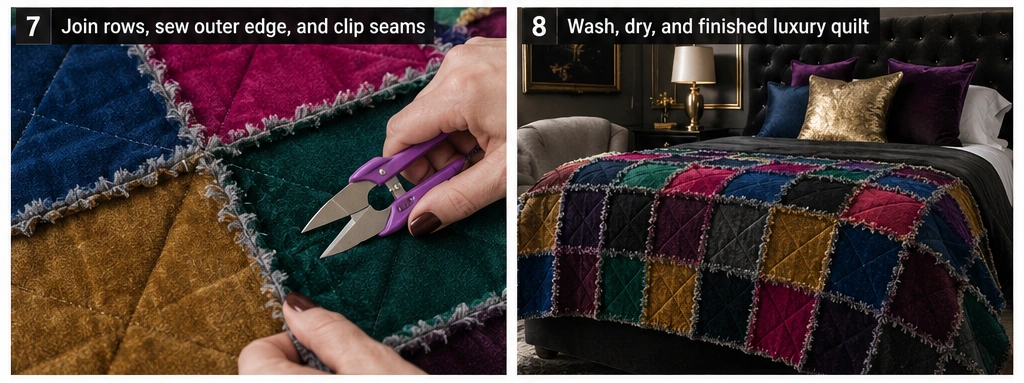
Step 11: Wash, Dry, and Fluff Wash the quilt in cold water on a gentle cycle and dry it on low heat. The clipped seams will fray, turning the raw edges into a soft, luxurious fringe. Clean the lint trap frequently during drying.
Assembly Section
Assemble the luxury-inspired rag quilt throw in this order:
- Prewash and press all fabric.
- Cut front, backing, and middle layer batting squares.
- Stack each block into a quilt sandwich.
- Sew an “X” or parallel lines across every block.
- Arrange blocks in an 8 x 12 high-contrast layout.
- Sew blocks into horizontal rows with raw seams facing up.
- Join all rows together, matching seams precisely.
- Sew around the outside border.
- Clip all exposed seams carefully with rag snips.
- Wash and dry to create the lush, fringed edges.
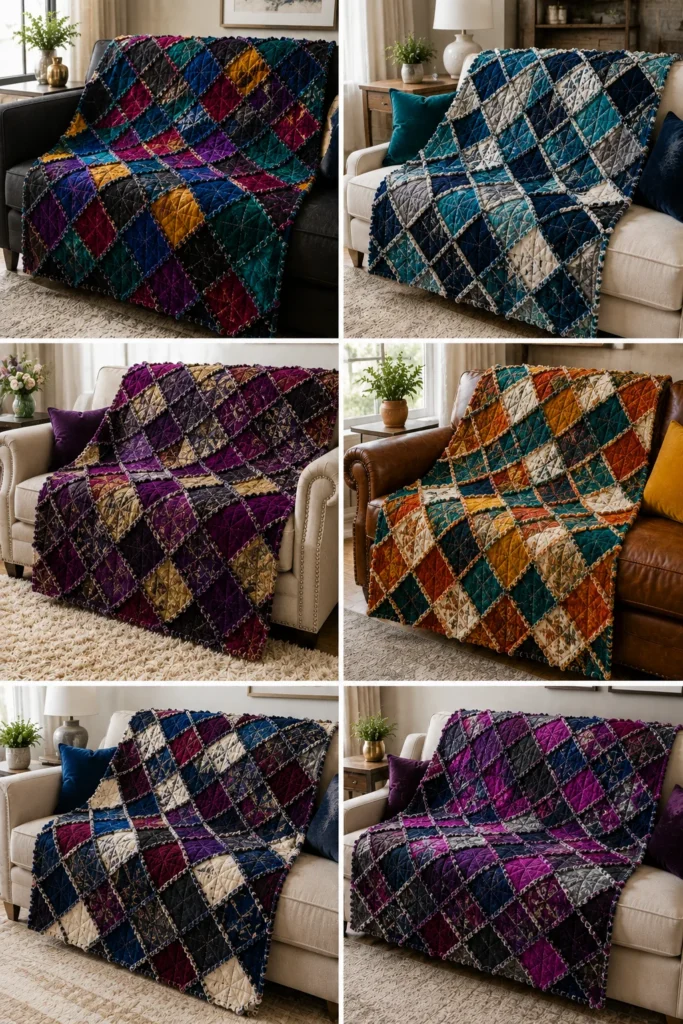
Color and Pattern Ideas
- For an opulent jewel-tone room: Use emerald, sapphire, ruby red, vibrant gold, and black.
- For a dramatic, moody aesthetic: Use deep plum, magenta, charcoal, navy, and metallic-accented geometric prints.
- For a vibrant desert-luxury look: Use rich terracotta, vivid turquoise, ochre, soft blush, and warm cream.
- For a modern high-contrast aesthetic: Use electric blue, neon coral, lemon yellow, crisp white, and deep charcoal.
Styling Tip
Drape the finished luxury rag quilt beautifully across the foot of a velvet upholstered bed or fold it neatly over the back of a sleek leather reading chair. Pair it with dark, moody throw pillows or metallic accents so the quilt’s vibrant jewel tones become a stunning, touchable focal point in your home.
Other Design Inspirations – Digitally Modified
CONCLUSION
A rag quilt earns its place in a home by being used, and the using improves it. That quality — getting better rather than more fragile with regular washing and handling — is genuinely rare in home textiles, and it is the practical case for rag quilts that no amount of aesthetic description quite captures. Choose a pattern that fits the room and the person it is made for, use fabrics with enough weight to fray beautifully rather than just unravel, and wash it before you give it away. The first wash is when it becomes what it is supposed to be.
