
Farmhouse Quilt Tote Bag Ideas With Patchwork Blocks in Gingham and Ticking Stripes
Farmhouse Quilt Tote Bag Ideas begin with something familiar: traditional patchwork blocks cut from gingham checks and ticking stripes, then sewn into useful bags. The checks bring an orderly grid to squares and triangles, while ticking adds narrow lines that can follow a strip or frame a panel.
These cotton fabrics have the plain, hard-wearing character associated with farmhouse sewing, but their patterns need room to read. Cream, ivory, and natural linen can separate darker pieces; charcoal or another deep solid can sharpen pale checks. Once the pieces are joined, quilting holds the layers together and gives the surface its padded texture. Interfacing, a suitable lining, and reinforced handles turn that patchwork panel into a bag meant for carrying, not simply displaying, the fabric.
Farmhouse Quilt Tote Bag Ideas
The designs explore several ways to let patchwork shape a tote rather than merely decorate it. Square-based work includes Nine Patch and Four Patch, while staggered Brickwork rectangles make a continuous surface. Log Cabin and Courthouse Steps organize strips around a center, and Rail Fence changes direction from block to block. For more angled movement, look to Half-Square Triangle diamonds, Pinwheel rotations, and Flying Geese rows; Schoolhouse and Basket use recognizable pictures made from fabric.
These approaches appear on bags for everyday carrying, books, market trips, laptops, and laundry. Each design has its own proportions, fabric combination, internal support, and practical details, chosen for what that bag needs to hold. An illustrated 18-step sewing guide accompanies each one, with calculated measurements for its proposed construction method. Compare the shape and technique before choosing a project.
See also: – Chic Jelly Roll Quilt Tote Bag – Elegant Boho Quilt Tote Bag – Jelly Roll Christmas Quilt Jacket and Vest – Japanese Quilted Bag – Chic Jelly Roll Quilt Tote Bag Ideas – Stylish Quilted Tote Bag
Why Make Farmhouse Quilted Tote Bags?
Farmhouse quilted tote bags give familiar blocks a useful scale. A single Log Cabin can fill a panel without the time or fabric of a full-size quilt, while repeated Nine Patch units make it easy to see how small changes in check placement alter a finished surface. Gingham and ticking suit the purpose: their simple woven patterns work with plain cottons, and both hold up to regular use and washing, as long as the bag’s stabilizers and base allow it. A book tote calls for dependable support beneath a stack of books; a market tote needs a stable base, and a laundry tote must stand ready for bulkier contents.
The Schoolhouse picture on a book bag and the Basket motif on a market bag connect the patchwork subject to the way each bag is used. I grew up in Dhaka watching artisans make Nakshi Kantha from reused cloth, and I appreciate the care that goes into layering and stitching ordinary fabric. Some of these designs are straightforward to piece, but pictorial blocks, precise triangle points, stretchy bias edges, and padded zip-top laptop construction require more planning. That range makes them worthwhile projects or gifts when the technique suits the maker.
What Makes These Designs Different?
The strongest difference among these designs is the way a block controls the bag’s surface. Log Cabin builds strips in rounds around a center square, dividing the panel into light and dark halves; Courthouse Steps uses paired strips on opposite sides, giving its black gingham and cream ticking a more symmetrical rhythm. Nine Patch places separate three-by-three square blocks in a grid, Four Patch makes one oversized four-square statement, and Brickwork continues staggered rectangles across both faces. Triangles create other directions: the Half-Square Triangle everyday tote sets blush-and-charcoal units into diamonds, Pinwheel turns mustard gingham into rotating blades, and Flying Geese uses slate ticking in horizontal rows. Sawtooth Star brings pointed star geometry rather than continuous movement.
Rail Fence alternates the orientation of straight strip blocks, whereas Herringbone forms stacked V shapes from angled strips. The Schoolhouse and Basket blocks use pictorial forms that fit books and market errands. Even the bags that share a purpose differ: the laundry totes set chambray Rail Fence strips against black gingham Courthouse Steps, and the laptop totes pair slate Flying Geese with an oversized rust Four Patch. Color is not the only distinction; a zip-top laptop bag needs padding and a sleeve, while broad market and freestanding laundry bags depend on their bases. Gingham, ticking, linen, chambray, and denim play different roles within those constructions.
Choosing Gingham, Ticking Stripes, and a Color Palette
Start with the scale of the checks. Tiny gingham squares read almost like a textured solid from a distance; larger checks become a second pattern competing with the block. Ticking has its own direction, so decide whether the stripes will run along a Log Cabin strip, vertically on a side panel, or across a Flying Geese unit before cutting. Contrast matters at least as much as color: black gingham against cream-ground ticking makes Courthouse Steps distinct, while blush gingham needs charcoal to reveal its HST diamonds. Slate ticking on natural linen gives Flying Geese a quieter contrast without losing the triangular forms.
In this collection, red, rust, mustard, and brown bring warmth, while navy, slate, sage, forest green, and chambray keep other bags cooler. Denim or canvas can increase bulk at intersections; linen may fray or shift, and ticking is generally denser than gingham. Test dark fabrics for bleeding, prewash everything that will be sewn together, and account for differing shrinkage. Plan lining, handles, and stabilizers as separate fabric requirements, not leftovers.
Planning Tote Size, Shape, and Everyday Use
Begin with the load rather than a single tote template. An everyday bag can be softly structured with an open top and a simple closure, but a book tote is tall and slim and needs a bottom and handles that tolerate concentrated weight. Market totes need wide openings and firm bases for groceries. Laundry designs are oversized and freestanding, with upright walls, sturdy bottoms, and short, well-anchored grab handles; they are not shoulder totes.
Laptop totes need foam-backed structure, a smooth padded sleeve sized to the actual device, and a secure zipper across the top. None of these bags should borrow dimensions from another design simply because the same quilt fabric is used. Before deciding where a motif sits, draw the panel as it will look after seams and boxed corners consume part of its visible area. A pictorial Schoolhouse or Basket must remain legible, while repeating Brickwork can extend across a whole face. Choose batting, fusible fleece, foam, or canvas backing according to how firmly that particular bag must stand.
Piecing, Quilting, Durable Details, and Common Mistakes
Accurate piecing starts with checking the grain. Tilted gingham checks or ticking stripes become obvious once several pieces meet, so align prints before cutting and match visible lines where the design requires it. Press seams with fabric weight in mind, especially where dense ticking meets denim.
Handle half-square triangles, Flying Geese, Pinwheels, Sawtooth Star points, and herringbone’s angled strips carefully because bias edges stretch. After piecing a panel, quilt its layers before assembling the bag. Stitching in the ditch preserves block outlines; quilting along ticking stripes reinforces direction, while lines across plain panels add texture. Dense quilting stiffens fabric, so choose spacing to suit the bag. Reinforce handles, top edges, bases, and zipper ends rather than relying on quilting alone.
Common mistakes often begin before the first seam. Checks cut off grain look slanted, and pale gingham beside ivory can make pieced shapes disappear. Unplanned stripe changes interrupt Courthouse Steps rounds or Flying Geese rows. Lost triangle points, stretched bias edges, or a Rail Fence block turned incorrectly change the intended layout. Pictorial blocks need a consistent plan so the roof, walls, basket body, and handle remain in proportion. Prewash and color-test deep red, navy, rust, plum, and black fabrics before joining them to cream. Check that straps, bases, and closures are supported by structural stitching. A quilted panel cannot compensate for a weak handle attachment.
About the Design Inspiration Images and Sewing Guides
The images in this article illustrate possible farmhouse quilted tote designs and may be AI-generated or digitally modified. Several ideas draw on traditional quilt blocks, including Log Cabin, Nine Patch, and Schoolhouse. These pictures are design references, not photographs of bags that have been sewn and tested, and some small details may differ from the written construction directions. Each accompanying 18-step sewing guide presents a proposed method with calculated measurements for that particular bag, rather than a tested sewing pattern. Treat the written steps as the reference for construction, and check the stated dimensions, seam allowances, and fit before cutting fabric.
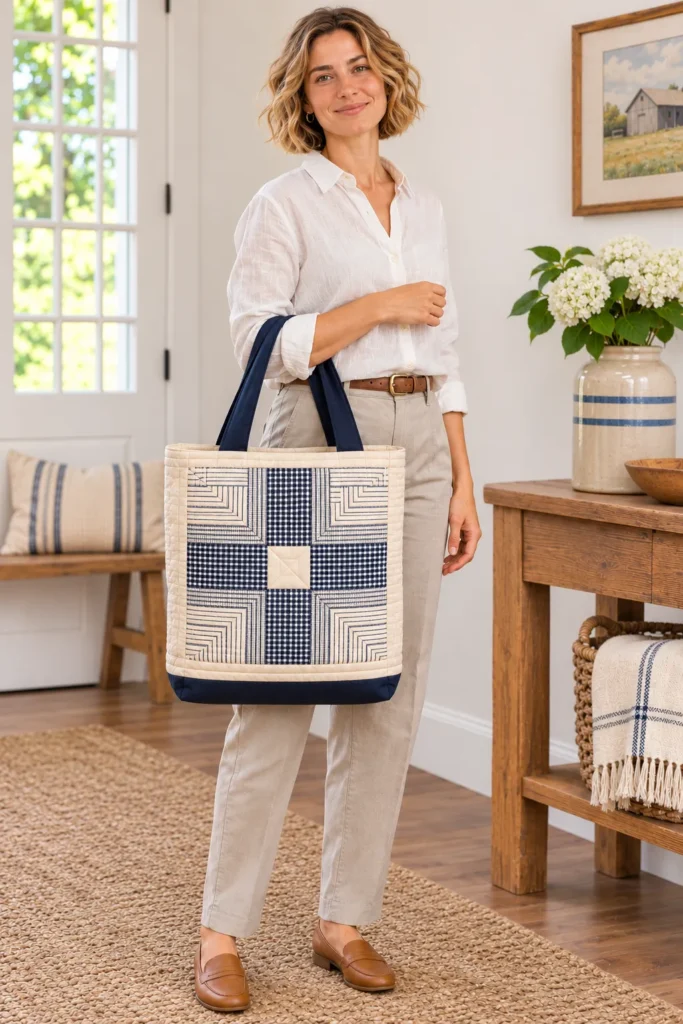
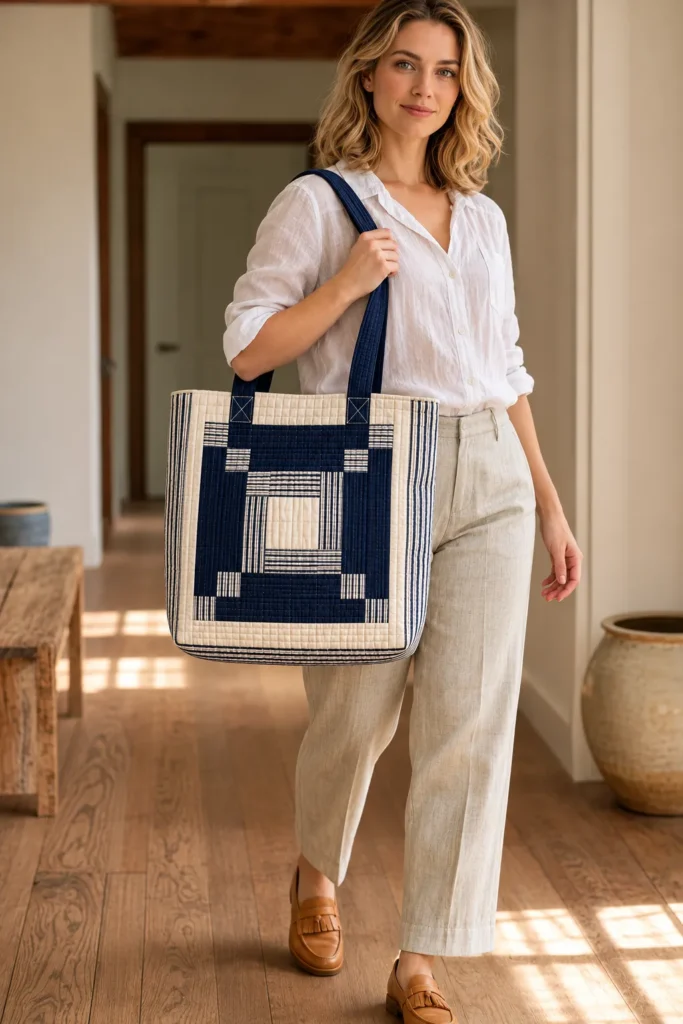
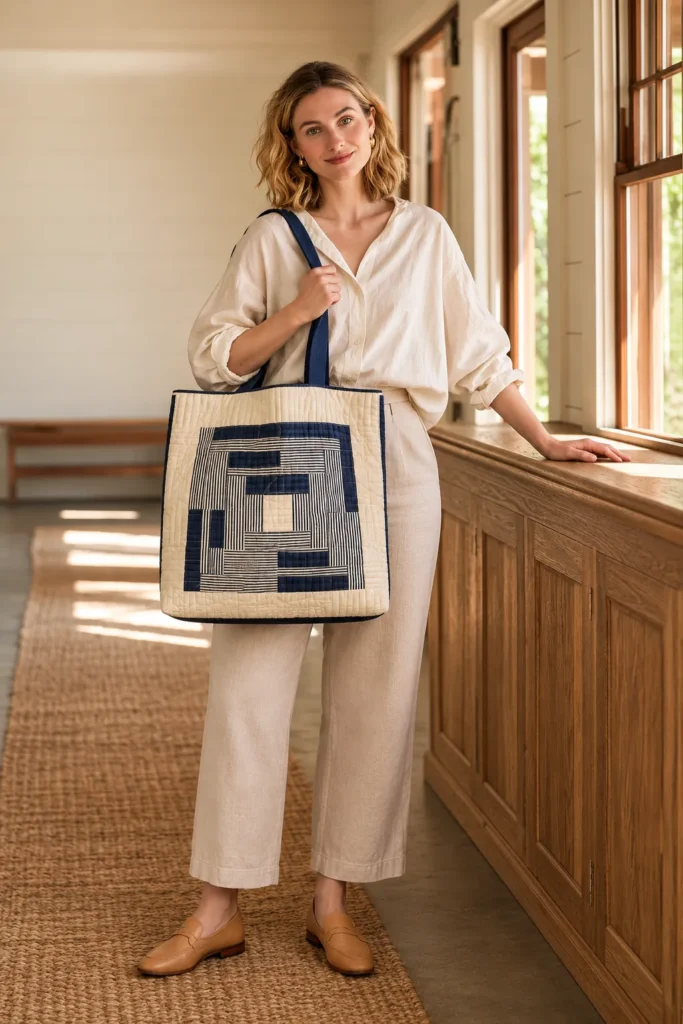
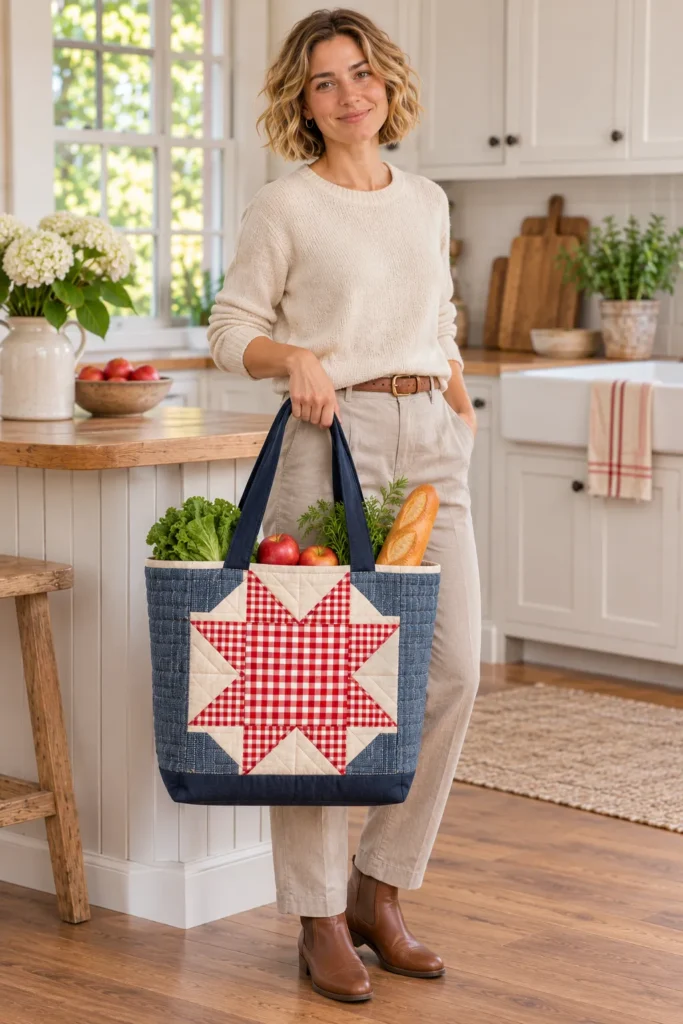
This roomy everyday tote centers one large Log Cabin block on each face, framed by plain cream bands. Narrow logs build outward in two rounds around a cream center square. Cream-ground navy ticking fills the right and top sides of the block, and navy gingham fills the left and bottom. That split gives the block its classic light half and dark half, with a clean diagonal running from corner to corner. The ticking stripes run along the length of every log, so they turn with the block as it grows.
The finished bag is 20″ wide, 15″ tall, and 5″ deep, with a 15″ × 5″ base. That makes it wider than it is tall, a comfortable size for a wallet, a water bottle, a sweater, and the odds and ends of a day out. Low-loft batting and muslin give the quilted panel gentle body without stiffness. The cream lining is interfaced and holds a 9″ × 6″ slip pocket, and a magnetic snap closes the top. Two navy folded handles with a drop of about 10″ sit comfortably on the shoulder.
Design Inspirations – Digitally Modified Images. Texture and color may vary from the actual product.
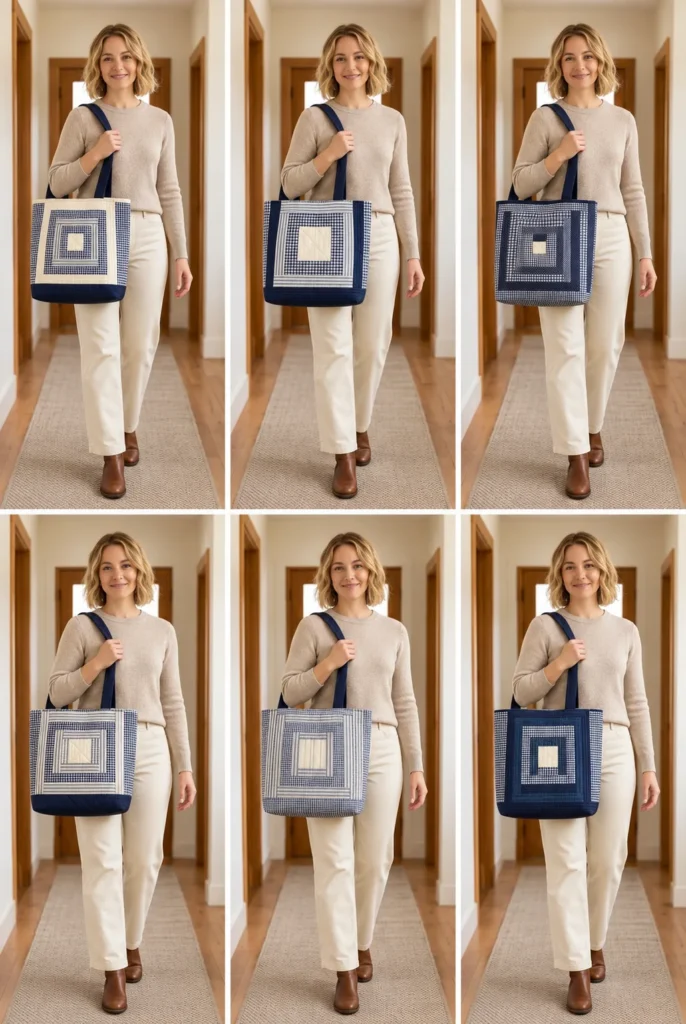
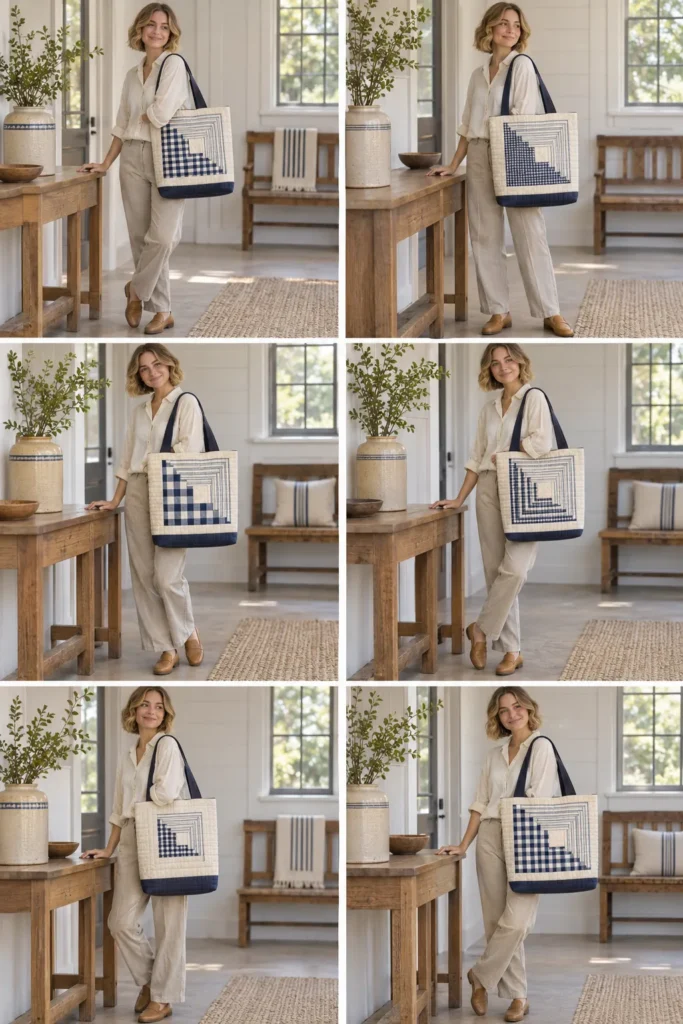
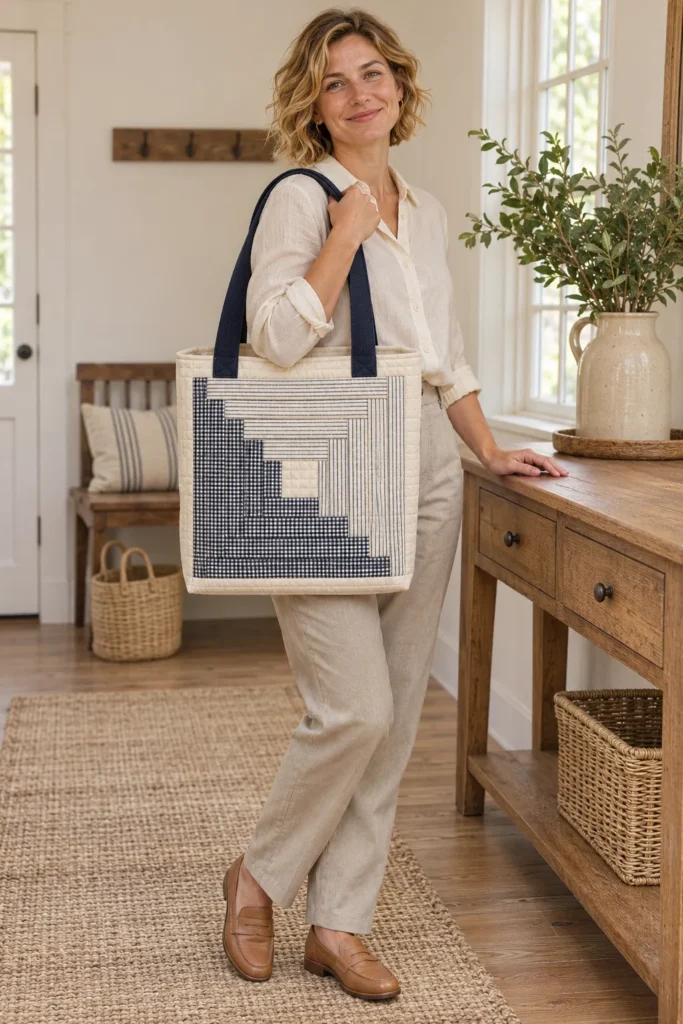
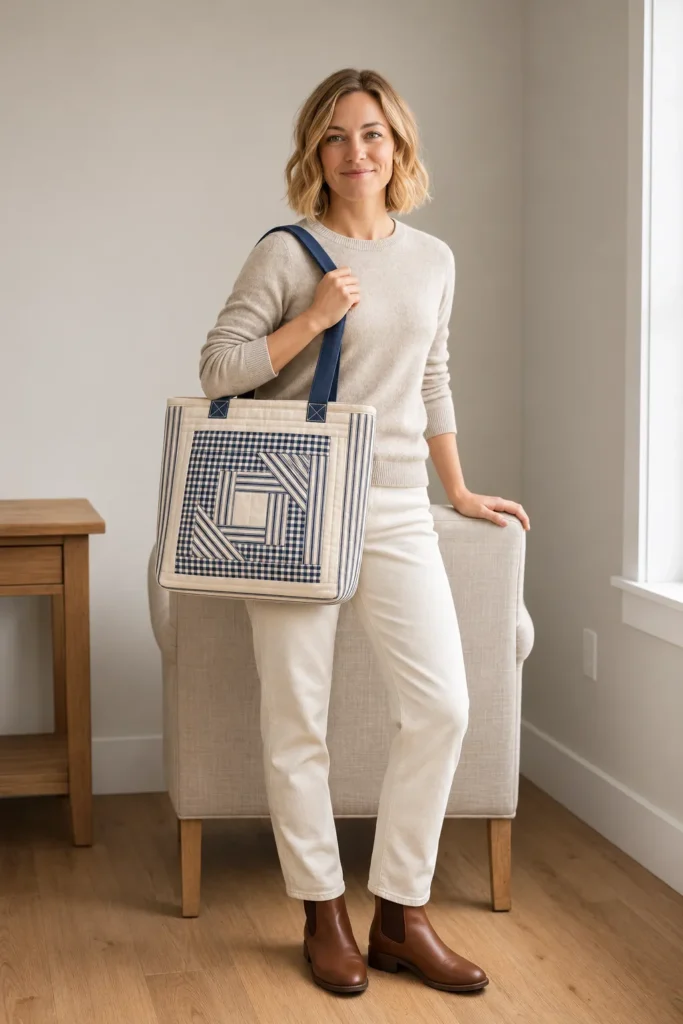
How the Log Cabin Divides Light and Dark
A Log Cabin block grows in rotation. Each new log is sewn to the next side of the center, moving right, top, left, then bottom, and each full round makes the block 4″ larger in both directions. In this version, the right and top logs are always ticking and the left and bottom logs are always navy gingham. The result is a block that reads as two triangles meeting on a diagonal, one light and one dark, with the cream center sitting where they meet.
The 2″ logs keep the block bold at bag scale. Two rounds bring the 4″ center to a 12″ block, so each log is wide enough for the gingham checks and ticking stripes to stay legible from across a room.
Both fabrics carry the same navy, so the contrast comes from pattern and value rather than from a second color. The gingham reads as a darker, all-over texture. The ticking, with its cream ground and fine navy stripes, reads as the light side. Cutting the ticking strips lengthwise keeps the stripes running along each log. On the right side they run up and down; on the top they run side to side. That small change in direction makes the spiral easier to see.
The cream bands and center square are plain on purpose. They give the block a quiet frame and keep the bag from looking busy.
Materials and Tools Needed
- Navy ¼” gingham, 40″ wide: ¼ yard
- Cream-ground navy ticking, 54″ wide: ⅝ yard
- Cream solid cotton: ½ yard (center squares and bands)
- Navy solid cotton: ½ yard (base strip and handles)
- Cream cotton for the lining and pocket: 1¼ yards
- Muslin for the quilt backing: 1¼ yards
- Low-loft cotton batting: one 23″ × 38″ piece
- Medium woven fusible interfacing, 20″ wide: 1 yard
- Lightweight woven fusible interfacing, 20″ wide: 1 yard (handles)
- One sew-in magnetic snap, about ¾”
- Cream all-purpose thread for piecing, quilting, and topstitching; navy thread for the handles
- 80/12 universal needle for piecing; 90/14 topstitch or jeans needle for the bag seams
- Walking foot, point turner, fabric marking pen, rotary cutter, ruler, mat, pins, clips, and an iron
Finished Tote Bag Size
- Width: 20″, measured flat across the top from side seam to side seam
- Height: 15″, measured from the base line to the top edge
- Depth: 5″, measured across the boxed base
- Base: 15″ × 5″
- Handles: 1¼” wide, 26″ visible length, approximate drop 10″ (from the top edge to the top of the handle)
- Interior slip pocket: 9″ × 6″
Cutting Measurements
All measurements include seam allowances. Prewash all fabrics before cutting. Cut the ticking strips lengthwise, parallel to the selvage, so the stripes run along each log.
| Piece | Quantity | Cut Size (W × H) | Purpose |
|---|---|---|---|
| Center square, cream solid | 2 | 4½” × 4½” | Block centers |
| Log 1, ticking | 2 | 2½” × 4½” | Right side, stripes vertical |
| Log 2, ticking | 2 | 6½” × 2½” | Top side, stripes horizontal |
| Log 3, navy gingham | 2 | 2½” × 6½” | Left side |
| Log 4, navy gingham | 2 | 8½” × 2½” | Bottom side |
| Log 5, ticking | 2 | 2½” × 8½” | Right side, stripes vertical |
| Log 6, ticking | 2 | 10½” × 2½” | Top side, stripes horizontal |
| Log 7, navy gingham | 2 | 2½” × 10½” | Left side |
| Log 8, navy gingham | 2 | 12½” × 2½” | Bottom side |
| Side band, cream solid | 4 | 4¾” × 16″ | Left and right of each block |
| Bottom band, cream solid | 2 | 12½” × 1¾” | Below each block |
| Top band, cream solid | 2 | 12½” × 2¾” | Above each block |
| Base strip, navy solid | 1 | 21″ × 6″ | Bag base |
| Low-loft batting | 1 | 23″ × 38″ | Quilt layer |
| Muslin backing | 1 | 23″ × 38″ | Quilt backing |
| Lining, cream cotton | 1 | 21″ × 36″ | One-piece lining |
| Medium woven fusible interfacing | 1 | 20″ × 35″ | Lining structure |
| Slip pocket, cream cotton | 1 | 10″ × 13″ | Interior pocket |
| Handle, navy solid | 2 | 5″ × 27″ | Shoulder handles |
| Lightweight woven fusible interfacing | 2 | 5″ × 27″ | Handle body |
Assembly at a Glance
- Cut and Sort the Fabrics
- Sew the First Round of Logs
- Sew the Second Round of Logs
- Add the Bands to Complete the Front Face
- Add the Bands to Complete the Back Face
- Join the Back Face, Base Strip, and Front Face
- Layer the Outer Panel
- Quilt the Outer Panel
- Trim the Outer Panel and Cut the Boxing Notches
- Sew the Outer Side Seams
- Box the Outer Corners
- Make the Two Handles
- Prepare the Lining
- Sew the Lining Side Seams, Leaving a Turning Gap
- Box the Lining Corners
- Baste the Handles to the Outer Bag
- Sew the Outer Bag and Lining Together at the Top Edge
- Turn Through the Gap, Close It, and Topstitch
Step-by-Step Sewing Tutorial
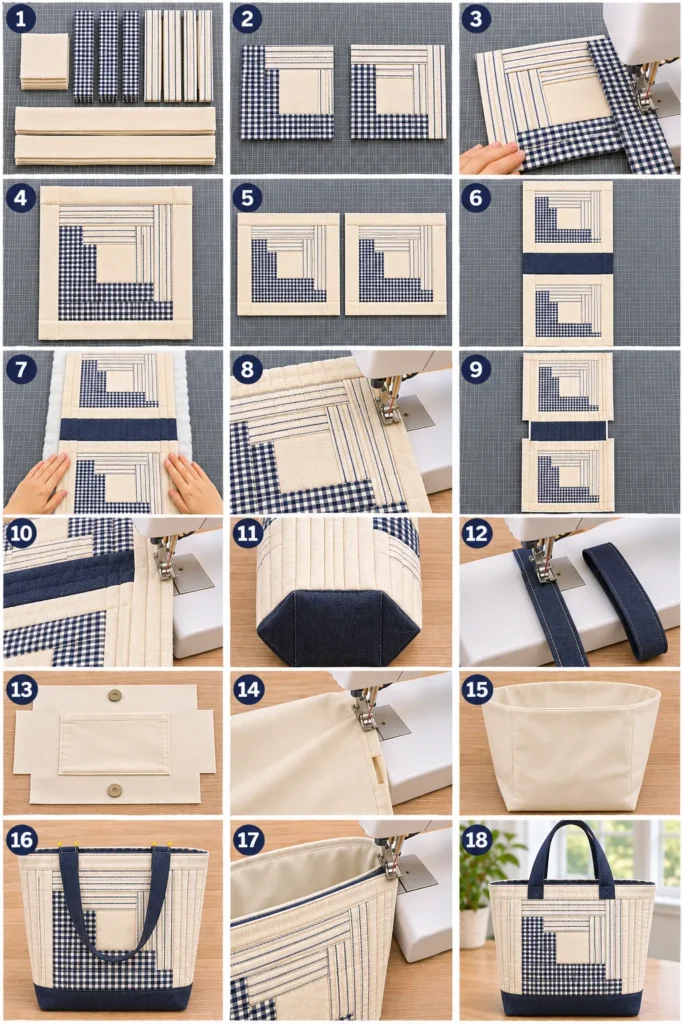
Step-by-Step Illustration – Digitally Created Image. Follow the written steps for measurements and details.
Piecing seams are ¼” and bag seams are ½”, all sewn right sides together unless a step says otherwise.
Step 1 – Cut and Sort the Fabrics
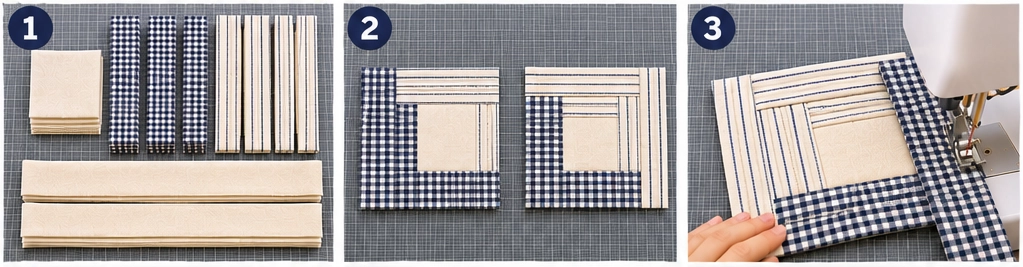
Prewash and press every fabric. Square the gingham to the grain and cut its 2½” strips crosswise with the checks square to the ruler. Cut the ticking into 2½” strips lengthwise, parallel to the selvage, so the stripes run along each strip. Then cut every piece in the table. Sort the logs into two matching block sets, and mark each ticking log with an arrow showing its stripe direction.
Result: All pieces are cut and sorted into two block sets, with every ticking log marked.
Step 2 – Sew the First Round of Logs
Work on both blocks at once. Sew log 1 (2½” × 4½” ticking, stripes vertical) to the right edge of the center square and press toward the log. Sew log 2 (6½” × 2½” ticking, stripes horizontal) across the top, then log 3 (2½” × 6½” navy gingham) down the left side, then log 4 (8½” × 2½” navy gingham) across the bottom. Press each seam toward the new log, and check the unit after each one: 6½” × 4½”, 6½” × 6½”, 8½” × 6½”, then 8½” × 8½”.
Result: Two 8½” × 8½” units, each with ticking on the right and top and gingham on the left and bottom.
Step 3 – Sew the Second Round of Logs
Continue the same rotation. Sew log 5 (2½” × 8½” ticking, stripes vertical) to the right edge, log 6 (10½” × 2½” ticking, stripes horizontal) across the top, log 7 (2½” × 10½” gingham) down the left, and log 8 (12½” × 2½” gingham) across the bottom, pressing toward each new log. Square each block to 12½” × 12½” without trimming into the outer logs.
Result: Two 12½” Log Cabin blocks, each split diagonally into a light ticking half and a dark gingham half.
Step 4 – Add the Bands to Complete the Front Face
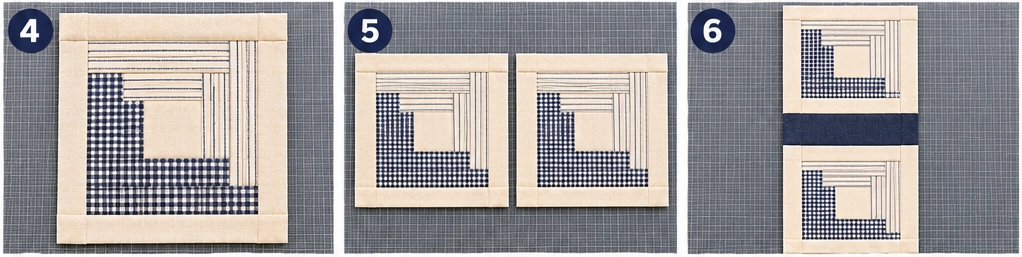
Lay one block right side up with the ticking on the right and top. Sew the 12½” × 1¾” bottom band to its bottom edge and the 12½” × 2¾” top band to its top edge, pressing toward the bands. Sew a 4¾” × 16″ side band to each side of this column, aligning the top and bottom edges, and press toward the side bands.
Result: A 21″ × 16″ front face with the block framed in cream, the wider band at the top.
Step 5 – Add the Bands to Complete the Back Face
Repeat Step 4 with the second block, again with the ticking on the right and top, the narrow band at the bottom, and the wider band at the top.
Result: A 21″ × 16″ back face that matches the front.
Step 6 – Join the Back Face, Base Strip, and Front Face
Sew the bottom edge of the front face (the narrow band) to one long edge of the 21″ × 6″ navy base strip with a ½” seam, side edges aligned. Sew the bottom edge of the back face to the other long edge the same way, so the back face lies upside down in the panel and both faces read correctly from outside. Press both seams toward the base strip. Mark the center line across the strip, 18″ from each end of the panel.
Result: One 21″ × 36″ outer panel with a face at each end and the navy base strip in the middle.
Step 7 – Layer the Outer Panel
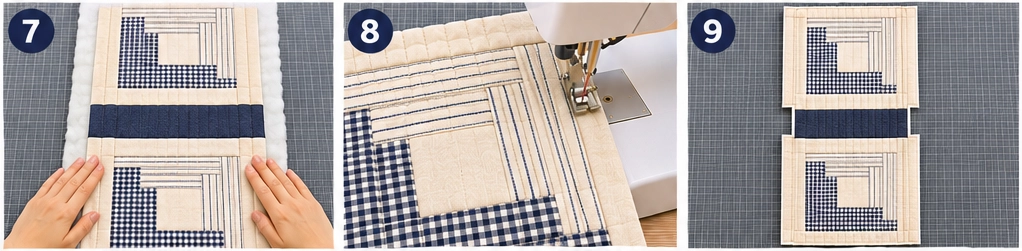
Lay the 23″ × 38″ muslin flat, the batting on top, and the outer panel right side up in the center, leaving about 1″ of batting and muslin showing on every side. Smooth the layers from the center out and pin or spray-baste every few inches.
Result: A flat three-layer quilt sandwich with the patchwork on top.
Step 8 – Quilt the Outer Panel
With a walking foot and cream thread, stitch in the ditch along every log seam and every band seam, including both base strip seams. Then quilt vertical lines 1″ apart across each cream side band, starting at the band seam.
Result: A quilted panel with every block and band outlined and lines on the side bands.
Step 9 – Trim the Outer Panel and Cut the Boxing Notches
Trim the batting and muslin even with the patchwork and square the panel to 21″ × 36″. At both side edges, cut a notch centered on the base strip’s center line, 2½” wide and 4″ tall (2″ above and below the line), through all layers.
Result: A 21″ × 36″ quilted panel with a notch at each side of the base center line.
Step 10 – Sew the Outer Side Seams
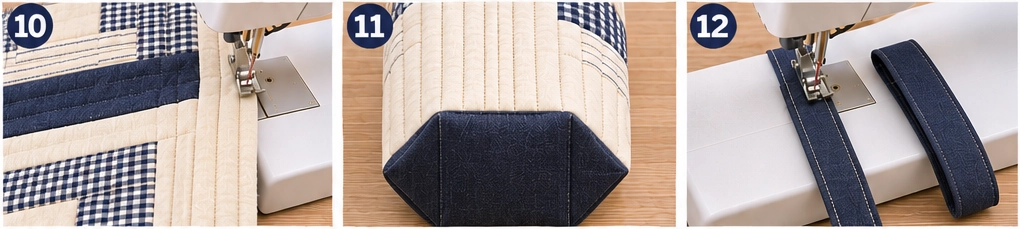
Fold the panel right sides together along the center line, matching the face seams and top edges. Sew both side edges at ½” from the top edge down to the notch, backtacking at both ends. Trim the batting and muslin from the seam allowances and press the seams open.
Result: Two outer side seams sewn, with the notches still open.
Step 11 – Box the Outer Corners
Open one notch and flatten it so the side seam lies on the base strip’s center line and the raw edges form one straight line. Sew across at ½”, backtacking, and trim the batting and muslin from the allowance. Repeat at the other corner.
Result: The outer bag, inside out, with a 15″ × 5″ boxed base.
Step 12 – Make the Two Handles
Fuse a 5″ × 27″ lightweight interfacing strip to the wrong side of each navy handle strip. Fold each strip in half lengthwise and press, open it, fold both raw edges to the center crease, and refold. Edgestitch both long edges ⅛” in navy thread.
Result: Two interfaced 1¼” × 27″ navy handles.
Step 13 – Prepare the Lining
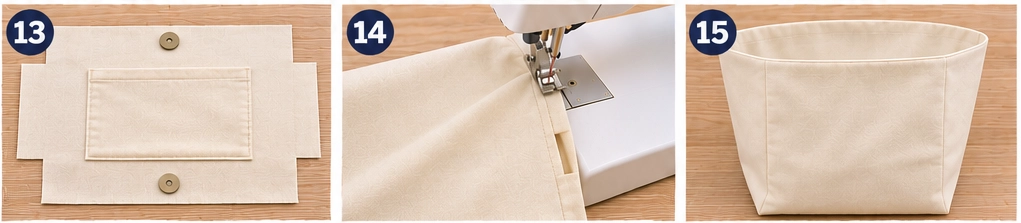
- Fuse the 20″ × 35″ interfacing to the wrong side of the 21″ × 36″ lining, ½” in from every edge.
- Mark the center line 18″ from each end and the base lines 2½” above and below it, then cut the same 2½” × 4″ notches as the outer.
- Fold the 10″ × 13″ pocket in half to 10″ × 6½”, right sides together, sew both sides at ½”, turn, and press with the bottom raw edges turned under ½”.
- Place the pocket on the back half of the lining, fold at the top, 6″ from each side edge, its bottom 5½” from the center line (3″ above the base line). Stitch the sides and bottom ⅛” from the edges, backtacking at the top corners.
- Install the magnetic snap halves on both halves of the lining, each centered 10½” from the left raw edge and 1½” below the top raw edge.
Result: A flat, interfaced, notched lining with the pocket on its back half and a snap half at each top edge.
Step 14 – Sew the Lining Side Seams, Leaving a Turning Gap
Fold the lining right sides together along its center line and sew both side edges at ½” from the top edge to the notch. On one side, leave a 7″ gap centered in the seam, backtacking at both ends of the gap.
Result: Both lining side seams sewn, with a 7″ gap in one.
Step 15 – Box the Lining Corners
Box both lining corners as in Step 11, with each side seam on the lining’s center line.
Result: A boxed lining, wrong side out, with a 15″ × 5″ base and the turning gap still open.
Step 16 – Baste the Handles to the Outer Bag
Turn the outer bag right side out. On the front, pin one handle with its ends centered 7½” and 13½” from the left side seam (6″ apart), raw ends even with the top raw edge, and the loop hanging down over the block, untwisted. Pin the second handle to the back face in the same positions. Baste each end ⅜” from the top edge.
Result: The outer bag right side out with one handle basted at each top edge, loops pointing down.
Step 17 – Sew the Outer Bag and Lining Together at the Top Edge
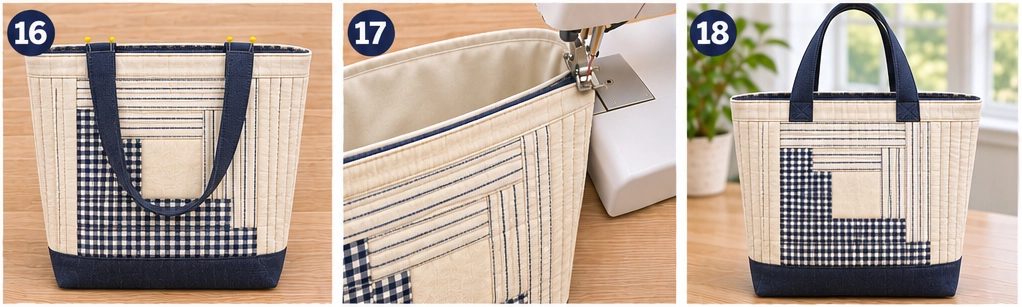
Slip the outer bag, right side out, inside the lining, which is wrong side out, so their right sides face. Match the side seams and top raw edges, keeping the handle loops tucked down between the layers. Sew all around the top edge at ½”. Trim the batting and muslin from the allowance.
Result: The outer bag and lining joined at the top edge, with the handle ends caught in the seam.
Step 18 – Turn Through the Gap, Close It, and Topstitch
Pull the bag right side out through the gap and push out the corners with a point turner. Edgestitch the gap closed ⅛” from the fold. Push the lining into the bag, roll the top seam so the lining sits just inside, and lift the handles up. Topstitch ¼” from the top edge in cream thread, stitching across the handle bases.
Result: A finished 20″ × 15″ × 5″ Log Cabin tote in navy gingham and ticking, with a topstitched top edge, navy handles, and a cream lining with a pocket and snap.
Troubleshooting the Log Cabin Tote
- The block comes out uneven or skewed. Errors build log by log. Check the unit size after every log against the sizes in Steps 2 and 3, and press rather than slide the iron.
- The light and dark halves are in the wrong places. One log went on the wrong side. Keep the rotation the same on every round: right, top, left, bottom, with ticking always on the right and top.
- The ticking stripes run across a log. That log was cut crosswise. Recut it from a lengthwise strip so the stripes run along it.
- The gingham checks look slanted. The strip was cut off grain. Square the fabric to the checks before cutting.
- The back face reads upside down. It was joined to the base strip by its top band. Always join each face by its narrow bottom band.
- Navy dye marks the cream. Prewash the gingham, ticking, and navy solid, and test them against the cream before cutting.
Care: Spot-clean or hand wash gently in cold water and air dry. Wash the tote separately the first few times.
Design Inspiration and Tutorial Note: The images in this section may be AI-generated or digitally developed to show the design idea. The written instructions describe a proposed construction method with calculated measurements, not a physically tested pattern. Before cutting, check the block, panel, and lining sizes against your own fabric, seam allowances, and equipment.
Other Design Inspirations – Digitally Modified Images. Texture and color may vary from the actual product.
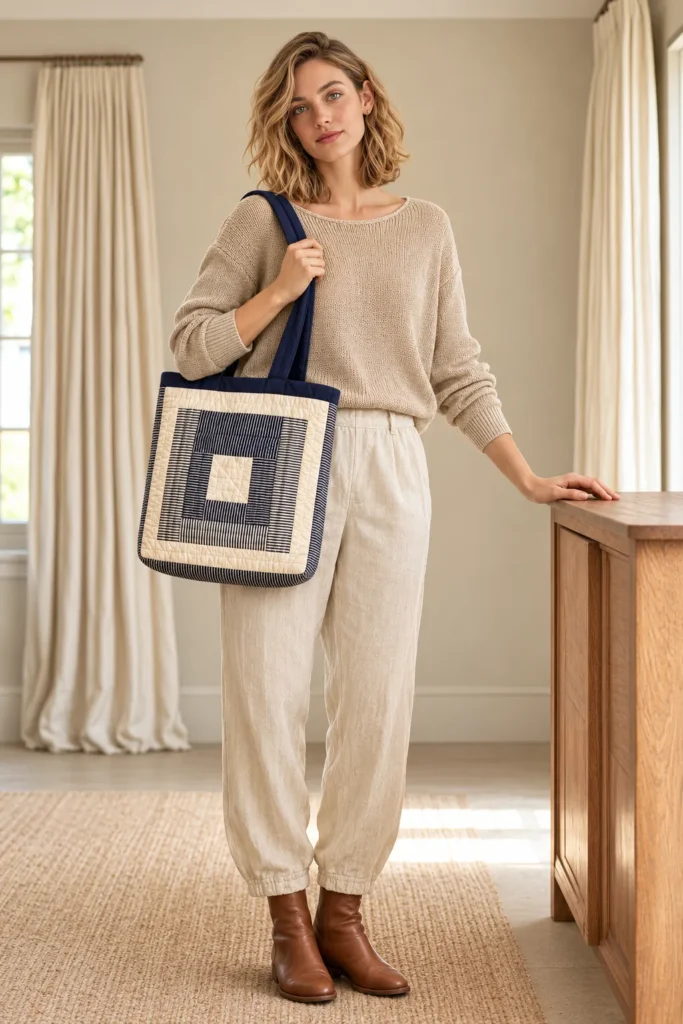
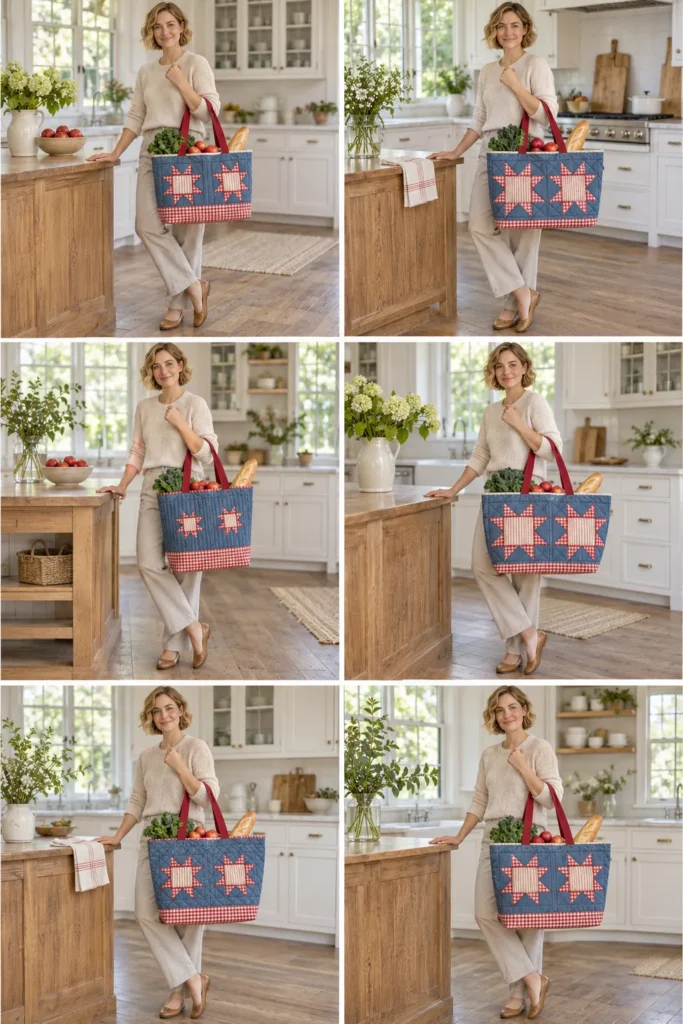
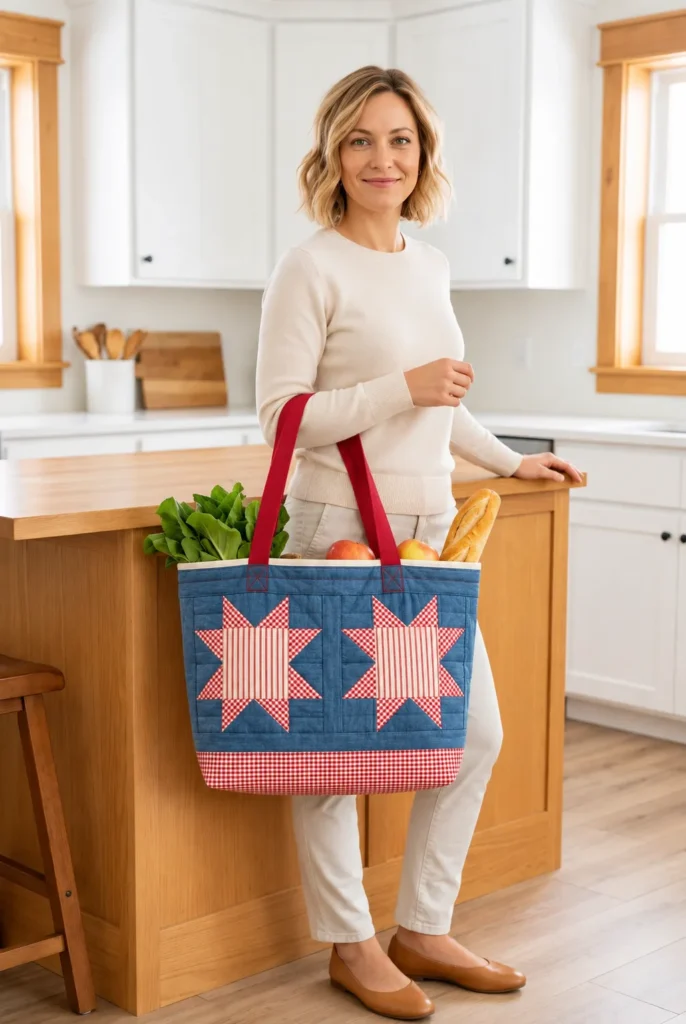
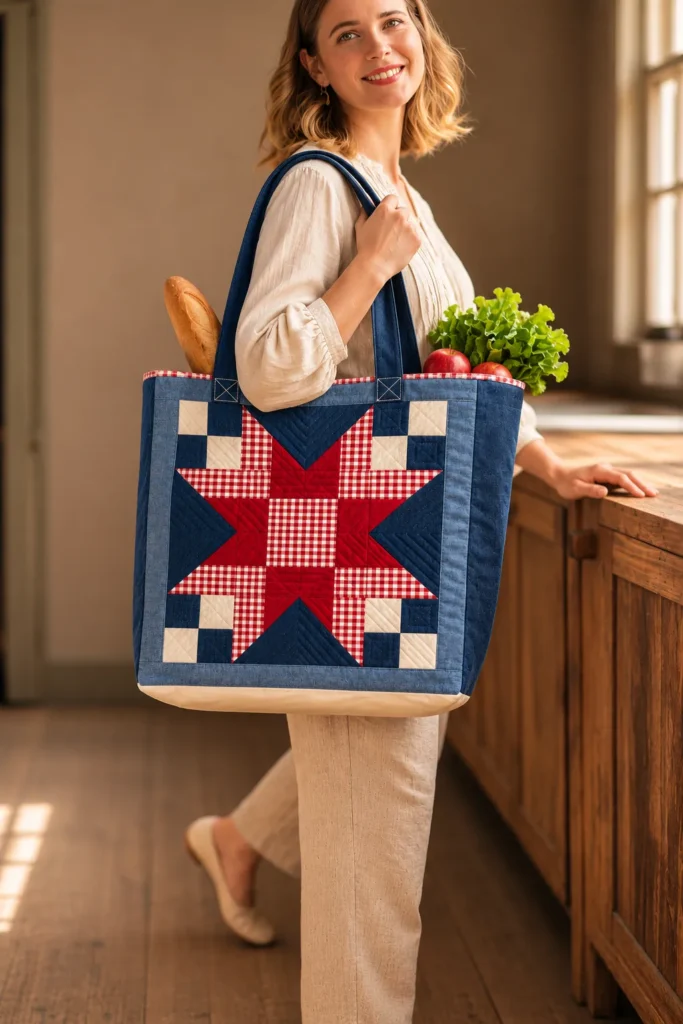
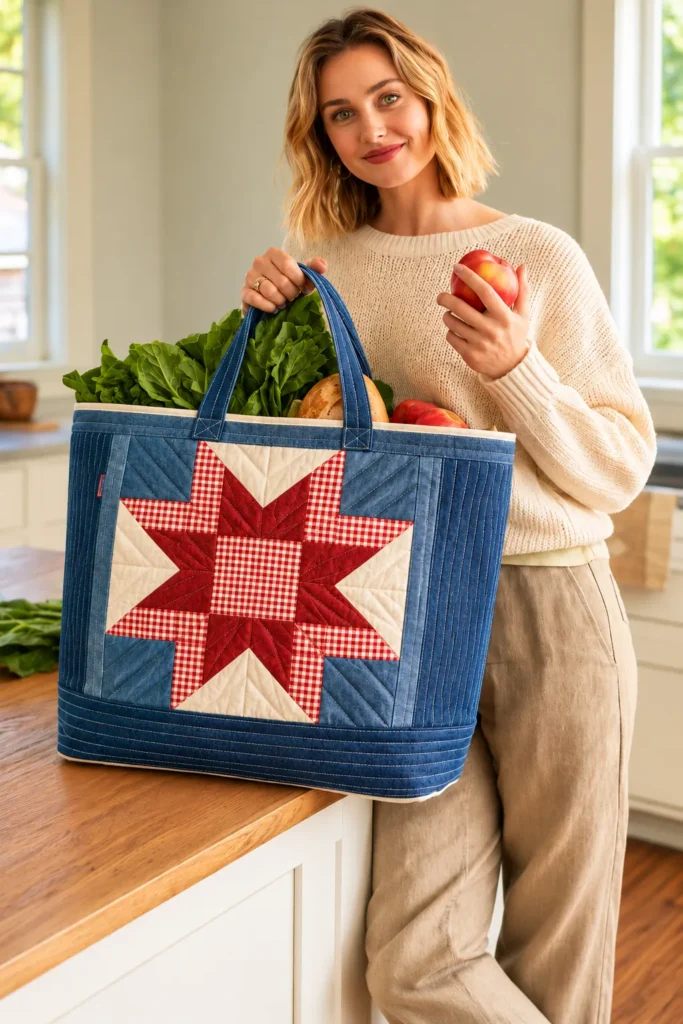
2. Sawtooth Star Farmhouse Quilted Market Tote in Red Gingham and Denim
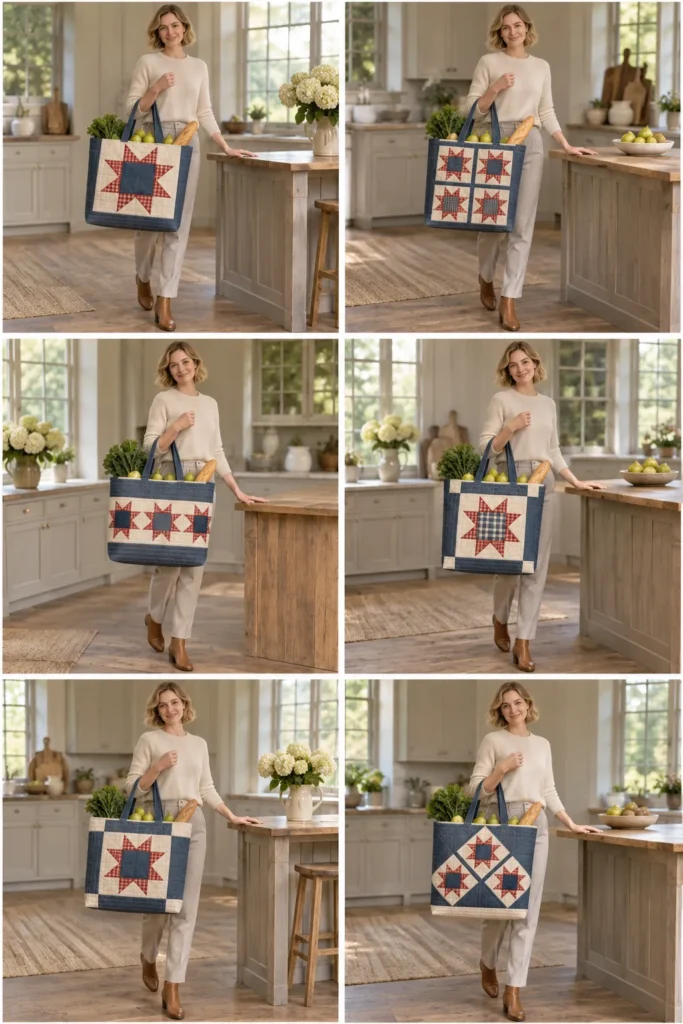
This wide market tote sets two Sawtooth Star blocks side by side across each face, on a body of medium-wash denim. Each star has a cream-ground red ticking center with its stripes running up and down. Eight red gingham points spread from the center to the edges of the block. The denim does double duty: it forms the background of every star and the bands that frame them, so the red points read as if they sit on one continuous field of blue. A red gingham strip runs across the base, tying the star points to the bottom of the bag.
The finished tote is 23″ wide, 16″ tall, and 5″ deep, with an 18″ × 5″ base, a generous size for produce, bread, and a few jars from a market trip. Fusible fleece gives the denim panel body without stiffness, and a removable board in a red gingham cover keeps the base flat under weight. The cream lining is interfaced and carries a 10″ × 6″ slip pocket. Two red 1½” cotton webbing straps, anchored with box-X stitching, give a shoulder drop of about 11″.
Design Inspirations – Digitally Modified Images. Texture and color may vary from the actual product.
How the Sawtooth Star Comes Together
A Sawtooth Star is a nine-part block: a large center square, four Flying Geese units on its sides, and four small squares in the corners. The trick is in the geese. Here the “goose,” the large triangle in each unit, is denim and points toward the star center. The two small triangles at its ends are red gingham. When the four units sit around the center, those red triangles line up in pairs to form eight sharp points, each reaching out to the block’s edge.
Because the goose and the corner squares are cut from the same denim as the bands, the background of the star disappears into the bag. All that reads is the red star and its striped center. That is why the star needs only two colors to look crisp.
Red Gingham, Denim, and a Striped Center
Red gingham and medium-wash denim are a strong pairing: warm against cool, bright against muted, and a small even check against the soft twill of the denim. The contrast keeps every point visible even when the tote is full and the panel curves. The cream-ground red ticking in the center gives each star a lighter heart, and running its stripes vertically adds a quiet line through the middle of the block.
Denim is heavier than quilting cotton, so it changes how the block is sewn. Pressing denim seams open keeps the intersections flat, and a jeans needle handles the extra thickness. Because indigo can bleed, the denim is prewashed on its own before it meets the gingham and ticking.
Materials and Tools Needed
- Medium-wash cotton denim, lightweight (about 6-8 oz), 56″ wide: ⅝ yard
- Red ¼” gingham, 40″ wide: ⅝ yard (star points, base strip, insert cover)
- Cream-ground red ticking, 54″ wide: ¼ yard (star centers)
- Cream cotton for the lining and pocket: 1¼ yards
- Fusible fleece, 45″ wide: 1¼ yards
- Medium woven fusible interfacing, 20″ wide: 1⅓ yards
- Red 1½” cotton webbing: 2 yards
- Heavy template plastic or corrugated plastic: one 17¾” × 4¾” board
- Red thread for the straps and box-X; neutral thread for piecing, quilting, and topstitching
- 80/12 universal needle for the gingham-to-gingham seams; 90/14 jeans needle for piecing denim; 100/16 needle for the boxed corners
- Walking foot, point turner, ruler with a 45° line, fabric marking pen, rotary cutter, mat, clips, and an iron
Finished Tote Bag Size
- Width: 23″, measured flat across the top from side seam to side seam
- Height: 16″, measured from the base line to the top edge
- Depth: 5″, measured across the boxed base
- Base: 18″ × 5″
- Straps: 1½” wide, 30″ visible length, approximate drop 11″ (from the top edge to the top of the strap)
- Interior slip pocket: 10″ × 6″
- Base insert: 17¾” × 4¾” board
Cutting Measurements
All measurements include seam allowances. Prewash the denim separately, and prewash the gingham and ticking before cutting.
| Piece | Quantity | Cut Size (W × H) | Purpose |
|---|---|---|---|
| Center square, red ticking | 4 | 4½” × 4½” | Star centers, stripes vertical |
| Goose rectangle, denim | 16 | 4½” × 2½” | Flying Geese units |
| Star-point square, red gingham | 32 | 2½” × 2½” | Star points |
| Corner square, denim | 16 | 2½” × 2½” | Star corners |
| Side band, denim | 4 | 3¾” × 17″ | Left and right of each face |
| Bottom band, denim | 2 | 17½” × 2¾” | Below the stars |
| Top band, denim | 2 | 17½” × 6¾” | Above the stars |
| Sashing, denim | 2 | 1½” × 8½” | Between the two stars |
| Base strip, red gingham | 1 | 24″ × 6″ | Bag base |
| Fusible fleece | 1 | 24″ × 38″ | Outer structure |
| Lining, cream cotton | 1 | 24″ × 38″ | One-piece lining |
| Medium woven fusible interfacing | 2 | 23″ × 18½” | Lining structure, butted at the center |
| Slip pocket, cream cotton | 1 | 11″ × 13″ | Interior pocket |
| Strap, red cotton webbing | 2 | 1½” × 34″ | Shoulder straps |
| Insert cover, red gingham | 1 | 18¾” × 10½” | Base insert cover |
| Base board, plastic | 1 | 17¾” × 4¾” | Removable insert |
Assembly at a Glance
- Cut and Sort the Fabrics
- Make the Flying Geese Star-Point Units
- Piece the Four Sawtooth Star Blocks
- Piece the Front Face
- Piece the Back Face
- Join the Back Face, Base Strip, and Front Face
- Fuse the Fleece and Quilt the Outer Panel
- Trim the Outer Panel and Cut the Boxing Notches
- Sew the Outer Side Seams
- Box the Outer Corners
- Cut and Seal the Webbing Straps
- Prepare the Lining
- Sew the Lining Side Seams, Leaving a Turning Gap
- Box the Lining Corners
- Baste the Straps to the Outer Bag
- Sew the Outer Bag and Lining Together at the Top Edge
- Turn, Close the Gap, Topstitch, and Box-X the Straps
- Make the Base Insert Cover and Drop In the Board
Step-by-Step Sewing Tutorial
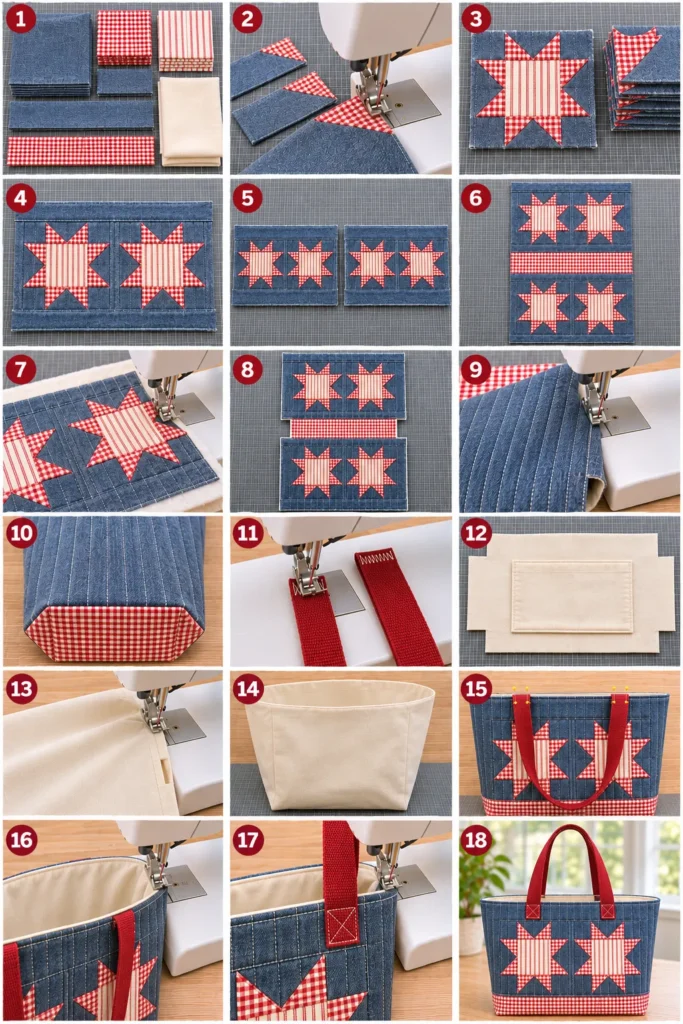
Step-by-Step Illustration – Digitally Created Image. Follow the written steps for measurements and details.
Piecing seams are ¼” and bag seams are ½”, all sewn right sides together unless a step says otherwise.
Step 1 – Cut and Sort the Fabrics
Prewash the denim on its own, then prewash the gingham and ticking, and press everything. Square the gingham to the grain so the checks run square to the ruler. Cut the four 4½” ticking squares with the stripes running parallel to one side, and mark that side “up.” Cut every other piece in the table, then sort the star pieces into four sets: one center, four goose rectangles, eight point squares, and four corners each.
Result: All pieces are cut and sorted into four star sets, with each ticking center marked.
Step 2 – Make the Flying Geese Star-Point Units
Draw a diagonal on the wrong side of every red gingham point square. Place one square on the left end of a 4½” × 2½” denim rectangle, right sides together, with the line running from the top edge down to the bottom corner. Sew on the line, trim ¼” beyond it, and press the red triangle open. Repeat on the right end with the line mirrored, so the two lines meet at the top center. Trim each unit to 4½” × 2½” if needed.
Result: Sixteen Flying Geese units, each a denim triangle pointing to one long edge with a red gingham triangle at each end.
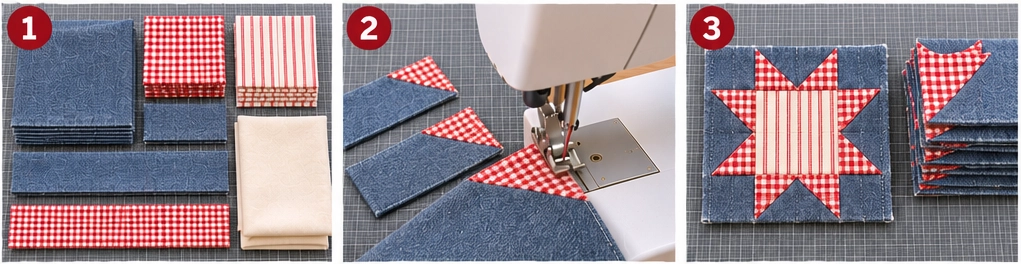
Step 3 – Piece the Four Sawtooth Star Blocks
Lay out each star in three rows. The top row is a corner square, a geese unit with its denim point aimed down at the center, and a corner square. The middle row is a geese unit aimed right, the ticking center with its stripes vertical, and a geese unit aimed left. The bottom row is a corner square, a geese unit aimed up, and a corner square. Sew the rows, pressing the denim seams open. Join the rows, matching seams so each red point meets the center square cleanly.
Result: Four 8½” Sawtooth Star blocks with red gingham points on a denim background and striped centers.
Step 4 – Piece the Front Face
Sew a 1½” × 8½” sashing strip between two stars to make a 17½” × 8½” row. Sew the 17½” × 2¾” bottom band to its lower edge and the 17½” × 6¾” top band to its upper edge. Then sew a 3¾” × 17″ side band to each side of this column, matching the top and bottom edges. Press all seams open.
Result: A 24″ × 17″ front face with two stars in a row on denim, the narrow band at the bottom.
Step 5 – Piece the Back Face
Repeat Step 4 with the remaining two stars and the second set of bands and sashing.
Result: A 24″ × 17″ back face that matches the front.
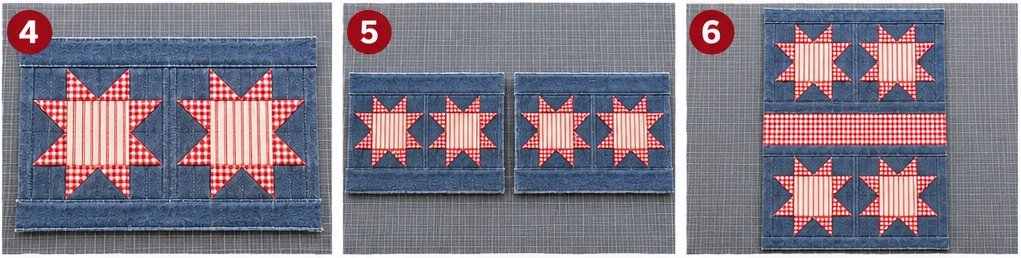
Step 6 – Join the Back Face, Base Strip, and Front Face
Sew the bottom edge of the front face (the narrow band) to one long edge of the 24″ × 6″ red gingham base strip with a ½” seam. Sew the bottom edge of the back face to the other long edge the same way, so the back face lies upside down in the panel and both faces read correctly from outside. Press the seams toward the base strip, and mark the strip’s center line, 19″ from each end of the panel.
Result: One 24″ × 38″ outer panel with a star face at each end and the red gingham base in the middle.
Step 7 – Fuse the Fleece and Quilt the Outer Panel
Fuse the 24″ × 38″ fleece to the wrong side of the panel, working from the center out. With a walking foot and a jeans needle, stitch in the ditch around each star, around each center square, and along every band, sashing, and base strip seam. Then quilt vertical lines 1″ apart on the denim side bands and the top bands.
Result: A fleece-backed panel quilted around every star and lined on the plain denim areas.
Step 8 – Trim the Outer Panel and Cut the Boxing Notches
Square the panel to 24″ × 38″. At both side edges, cut a notch centered on the base strip’s center line, 2½” wide and 4″ tall (2″ above and below the line), through all layers.
Result: A 24″ × 38″ quilted panel with a notch at each side of the base center line.
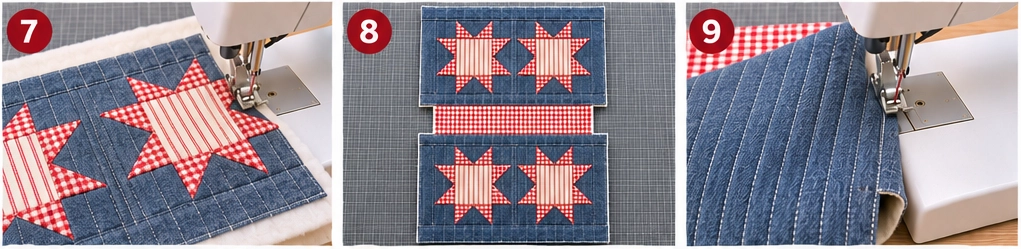
Step 9 – Sew the Outer Side Seams
Fold the panel right sides together along the center line, matching the face seams and top edges. Sew both side edges at ½” from the top edge down to the notch, backtacking. Trim the fleece from the seam allowances and press the seams open.
Result: Two outer side seams sewn, with the notches still open.
Step 10 – Box the Outer Corners
Open one notch and flatten it so the side seam lies on the base strip’s center line and the raw edges form a straight line. Sew across at ½” with the 100/16 needle, backtacking, and trim the fleece from the allowance. Repeat at the other corner.
Result: The outer bag, inside out, with an 18″ × 5″ boxed base.
Step 11 – Cut and Seal the Webbing Straps
Cut two 34″ lengths of red webbing. Zigzag across each cut end, or heat-seal it if the webbing contains synthetic fiber, so the ends cannot fray.
Result: Two sealed 34″ red webbing straps.
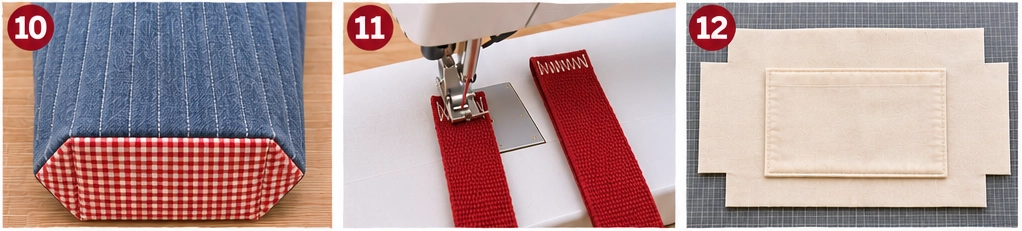
Step 12 – Prepare the Lining
- Fuse the two 23″ × 18½” interfacing pieces to the wrong side of the 24″ × 38″ lining, ½” in from the edges and butted at the center line.
- Mark the center line 19″ from each end and the base lines 2½” above and below it, then cut the same 2½” × 4″ notches as the outer.
- Fold the 11″ × 13″ pocket in half to 11″ × 6½”, right sides together, sew both sides at ½”, turn, and press with the bottom raw edges turned under ½”.
- On the back half of the lining, place the pocket fold at the top, 7″ from each side edge, its bottom 5½” from the center line (3″ above the base line). Stitch the sides and bottom ⅛” from the edges, backtacking at the top corners.
Result: A flat, interfaced, notched lining with the pocket on its back half.
Step 13 – Sew the Lining Side Seams, Leaving a Turning Gap
Fold the lining right sides together along its center line and sew both side edges at ½” from the top edge to the notch. On one side, leave an 8″ gap centered in the seam, backtacking at both ends of the gap.
Result: Both lining side seams sewn, with an 8″ gap in one.
Step 14 – Box the Lining Corners
Box both lining corners as in Step 10, with each side seam on the lining’s center line.
Result: A boxed lining, wrong side out, with an 18″ × 5″ base and the gap still open.
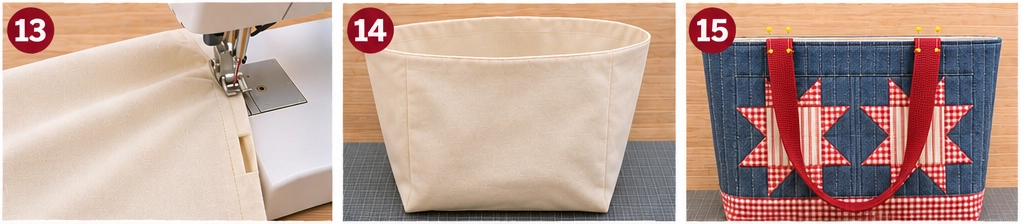
Step 15 – Baste the Straps to the Outer Bag
Turn the outer bag right side out. On the front, pin one strap with its ends centered 8″ and 16″ from the left side seam (8″ apart), each end extending 1½” above the top raw edge, and the loop hanging down over the stars, untwisted. Pin the second strap to the back face in the same positions. Baste each end ⅜” from the top raw edge.
Result: The outer bag right side out with a strap basted at each top edge, loops pointing down.
Step 16 – Sew the Outer Bag and Lining Together at the Top Edge
Slip the outer bag, right side out, inside the lining, which is wrong side out, so their right sides face. Match the side seams and top raw edges, keeping the strap loops tucked down between the layers. Sew all around the top at ½”, then trim the fleece from the allowance.
Result: The outer bag and lining joined at the top edge, with the strap tails caught in the seam.
Step 17 – Turn, Close the Gap, Topstitch, and Box-X the Straps
Pull the bag through the gap, push out the corners with a point turner, and edgestitch the gap closed ⅛” from the fold. Push the lining into the bag, roll the seam so the lining sits just inside, and lift the straps up. Topstitch ¼” from the top edge. Then, at each strap end, stitch a rectangle about 1¼” tall just below the topstitching, plus an X from corner to corner, through the outer, the 2″ strap tail, and the lining.
Result: A turned tote with a topstitched top edge and four box-X reinforced strap ends.
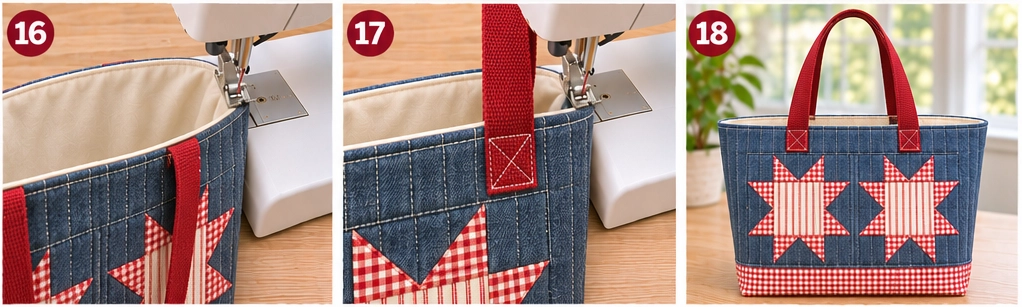
Step 18 – Make the Base Insert Cover and Drop In the Board
Fold the 18¾” × 10½” red gingham cover right sides together to 18¾” × 5¼”. Sew the long edge and one short end at ½”, clip the corners, and turn it right side out. Slide in the 17¾” × 4¾” board, turn the open end in ½”, and edgestitch it closed. Drop the covered board into the bag and press it flat against the base.
Result: A finished 23″ × 16″ × 5″ Sawtooth Star market tote in red gingham and denim, with red webbing straps and a removable firm base.
Troubleshooting the Sawtooth Star Market Tote
- The star points are cut off. The geese seams drifted or the rows were sewn with a wide seam. Keep an accurate ¼” seam and sew just through the “X” where the point meets the next seam.
- A goose points the wrong way. Lay out each star before sewing and check that every denim triangle aims at the center square.
- The center stripes run sideways. The ticking square was turned. Use the “up” mark from Step 1 to keep the stripes vertical.
- The intersections are thick and lumpy. Denim adds bulk. Press its seams open, use the jeans needle, and sew the boxed corners slowly.
- Blue dye rubs onto the red or cream. Prewash the denim separately, and test it against the gingham and ticking before cutting.
- The base sags under heavy groceries. Use a stiff board cut to the full 17¾” × 4¾”, and keep the insert flat against the boxed base.
Care: Remove the base insert, then spot-clean or hand wash in cold water and air dry. Wash the tote separately from light items the first few times.
Design Inspiration and Tutorial Note: The images in this section may be AI-generated or digitally developed to show the design idea. The written instructions describe a proposed construction method with calculated measurements, not a physically tested pattern. Before cutting, check the block, panel, lining, and insert sizes against your own fabric, seam allowances, and equipment.
Other Design Inspirations – Digitally Modified Images. Texture and color may vary from the actual product.
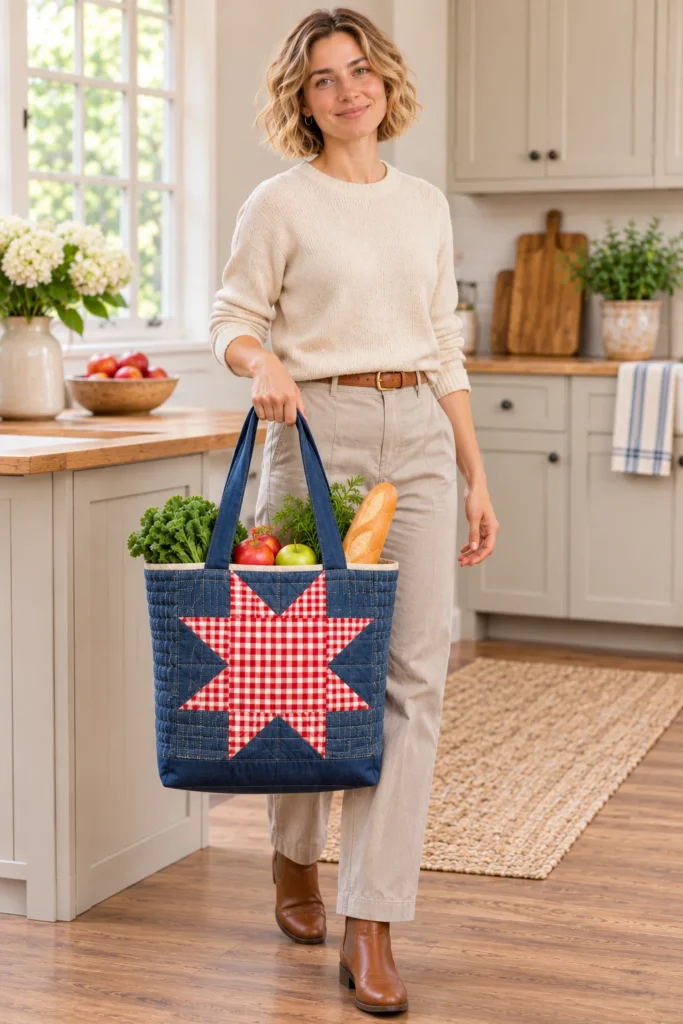
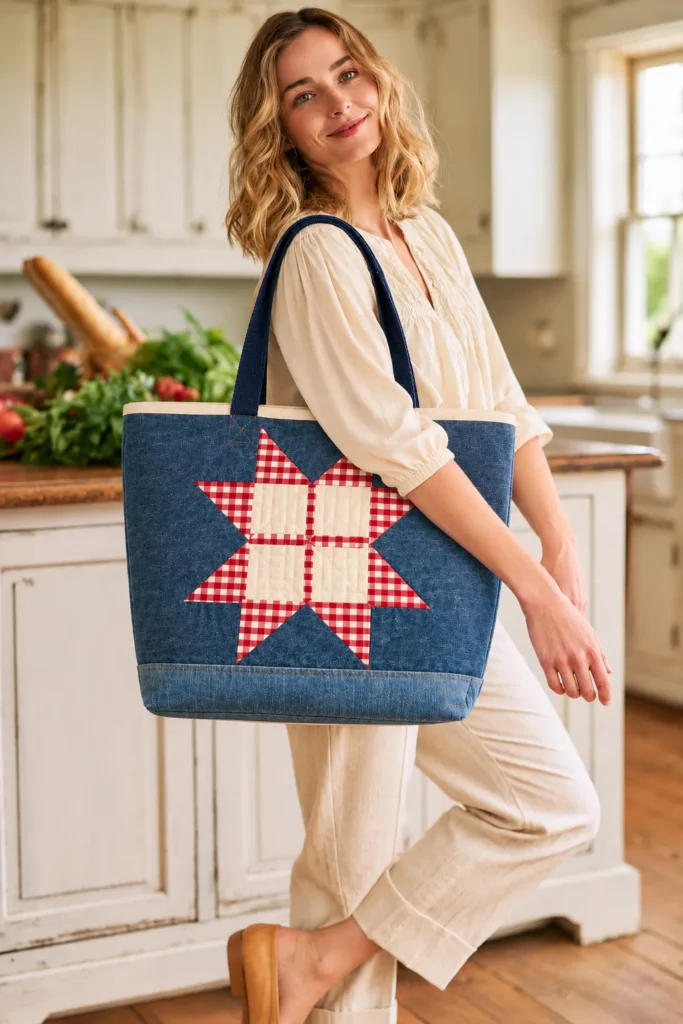
3. Flying Geese Farmhouse Quilted Laptop Tote in Slate Ticking and Linen
Design Inspirations – Digitally Modified Images. Texture and color may vary from the actual product.
Other Design Inspirations – Digitally Modified Images. Texture and color may vary from the actual product.
4. Schoolhouse Block Farmhouse Quilted Book Tote in Red Ticking and Cream
Design Inspirations – Digitally Modified Images. Texture and color may vary from the actual product.
Other Design Inspirations – Digitally Modified Images. Texture and color may vary from the actual product.
5. Rail Fence Farmhouse Quilted Laundry Tote in Chambray and Gray Ticking
Design Inspirations – Digitally Modified Images. Texture and color may vary from the actual product.
Other Design Inspirations – Digitally Modified Images. Texture and color may vary from the actual product.
6. Nine Patch Farmhouse Quilted Everyday Tote in Sage Gingham and Cream
Design Inspirations – Digitally Modified Images. Texture and color may vary from the actual product.
Other Design Inspirations – Digitally Modified Images. Texture and color may vary from the actual product.
More to come …
7. Four Patch Farmhouse Quilted Laptop Tote in Rust Gingham and Ticking
8. Pinwheel Farmhouse Quilted Book Tote in Mustard Gingham and Cream
9. Basket Block Farmhouse Quilted Market Tote in Brown Gingham
10. Courthouse Steps Farmhouse Quilted Laundry Tote in Black Gingham
11. Half-Square Triangle Farmhouse Quilted Everyday Tote in Blush Gingham
12. Herringbone Farmhouse Quilted Book Tote in Plum Ticking and Cream
13. Brickwork Farmhouse Quilted Market Tote in Forest Green Gingham
Final Thoughts on Farmhouse Quilt Tote Bag Ideas
These farmhouse tote ideas show how familiar patchwork can change character when it moves from a quilt top to a bag made for daily use. Gingham checks bring texture and measured repetition; ticking stripes add direction. Squares create calm grids, triangles establish movement, and strips can frame a center or run continuously across a panel.
Picture blocks bring a recognizable subject into the design without replacing the need for a sound bag structure. Just as important, the contrast between a dark fabric and a pale ground determines whether the patchwork reads clearly once the tote is filled and folded into shape. A good result comes from considering the block, fabric weight, quilted texture, and intended silhouette together, rather than choosing a pattern solely for its appearance.
Choose the project by what you will carry and which sewing techniques you want to practice. If precise points or picture blocks are unfamiliar, a Four Patch or Brickwork panel offers a more direct route into piecing; strip layouts follow, then triangle blocks, herringbone’s bias edges, and more detailed Schoolhouse or Basket constructions. Padded, zip-top laptop bags add a separate set of fitting and reinforcement decisions.
Match batting and stabilizers to the amount of structure needed, and settle the handle attachment, base, closure, and lining before you commit to a panel layout. Each design has its own measurements, so do not reuse one tote’s cutting plan for another. Before cutting the feature fabric, sketch the finished front face with seam and corner allowances marked so the complete block remains visible.

