
Chic Rag Quilt Tote Bag Ideas with Frayed Denim and Flannel Patchwork
Chic Rag Quilt Tote Bag Ideas start with a simple reversal of ordinary patchwork: the seam allowances face outward. Each patch is joined wrong sides together, and the wide allowances left on the outside of the bag are clipped at short intervals and washed until they bloom into a soft fringe.
On a tote, that fringe outlines every square, strip, and frame in raised texture, so the patchwork reads as much by touch as by color. Denim suits the method well, giving the bag a sturdy body and a pale fringe from its white weft threads, while cotton flannel frays into a fuzzy, cozy edge. Quilting through the layers gives the panels body, and a smooth lining covers the inside, turning a textured quilt surface into a bag that holds its shape and carries real loads.
Chic Rag Quilt Tote Bag Ideas
The ideas below move from square-block patchwork, such as Nine Patch, Four Patch, and a continuous Checkerboard, to strip and frame designs like Log Cabin, Rail Fence, Windowpane, and staggered Brickwork. Others rely on diagonal geometry, from a rotating Pinwheel to a single bold Diagonal Split, while the Raw-Edge Star and the Patch-Pocket Utility tote are led by an appliqué motif and working pockets.
The bags are built for different jobs: hauling laundry, protecting a laptop, carrying books, making market and grocery runs, and running everyday errands. Because of that, each one has its own size, shape, fabric mix, and structure, from soft all-flannel bodies to all-denim panels. Every design section includes an illustrated 18-step sewing guide with calculated measurements for that particular bag.
See also: – Chic Jelly Roll Quilt Tote Bag – Elegant Boho Quilt Tote Bag – Jelly Roll Christmas Quilt Jacket and Vest – Japanese Quilted Bag – Chic Jelly Roll Quilt Tote Bag Ideas – Stylish Quilted Tote Bag
Why Make Rag Quilt Tote Bags?
A rag quilt tote shows its construction openly, and that is much of its appeal. The frayed seams soften every line of the patchwork, so a slightly mismatched corner disappears into the fringe in a way it would not on a flat, crisply pieced quilt. Familiar blocks such as the Nine Patch or Log Cabin also adapt well to bag panels, and a tote is a manageable size for trying rag quilting before committing to a full quilt.
The pairing of sturdy denim with soft flannel gives the bags a contrast you can feel as well as see. Worn jeans and leftover flannel can find a new use here, though reclaimed fabric still needs checking for thin spots, stains, and stretch before it goes into a bag that will carry weight.
Growing up in Dhaka, I watched artisans layer worn saris into Nakshi Kantha, and reclaimed denim carries some of that same respect for cloth that has already lived one life. Not every design is equally quick, though. Simple squares come together fast, while reinforced pockets, padded laptop compartments, and diagonal seams call for more planning.
What Makes These Designs Different?
Although every bag here uses clipped rag seams, the designs differ in how the patchwork is built, how the panels are arranged, and what the bag has to do. The Nine Patch and Four Patch totes use separate block units of nine or four squares, while the Checkerboard runs one continuous alternating grid with no block divisions at all. The strip designs divide in a similar way: the Log Cabin builds wide logs in a spiral around a center square, whereas the Rail Fence sets parallel denim strips in blocks turned a quarter turn from their neighbors.
The Windowpane frames large cream panes in broad black denim, a different idea from Brickwork’s staggered rows of separate rectangles. On the diagonal side, the Pinwheel repeats rotating triangles, while the Diagonal Split relies on a single dominant line. Bags of the same type are built differently, too. The two laundry totes contrast a soft all-flannel Log Cabin with sturdier denim-and-gray panels, the slim, understated Windowpane laptop tote sits beside a deeper, brighter Pinwheel, and the soft, open Checkerboard market tote is lighter than the wide, boxed grocery tote.
The Raw-Edge Star and the Utility tote are led by an appliqué motif and working pockets rather than by the patchwork alone. Because each tote is shaped by its use, its size, depth, and structure change with it.
Choosing Fabrics and Building a Color Palette
Rag seams need woven fabrics that fray well, and denim, cotton flannel, and chambray each behave differently. Denim is heavy and builds bulk where allowances cross, flannel is softer and blooms into a fuzzy edge, and chambray is lighter and frays more finely. When heavy denim sits beside soft flannel, a fusible stabilizer behind the lighter fabric can help the two hold together evenly. Prewashing matters with this mix, since denim and flannel can shrink at different rates, and dark denim, black denim, and red plaid can bleed onto cream or pastel flannel. A quick color test on a damp scrap can save a finished panel.
Plaids and florals need patches large enough to stay readable once the fringe takes up the edges. Value contrast carries the pattern in designs such as the Windowpane, whose cream panes depend on dark frames, and the Rail Fence, where light, medium, and dark washes define the strips. Some bags pair strong colors, such as cobalt and yellow or teal against washed denim, while others stay soft, like chambray with floral flannel or blue and tan plaid. Plan extra fabric for the lining, handles, pockets, padding, and base.
Planning Tote Size, Shape, and Everyday Use
Each tote is sized for its job rather than cut from one standard pattern. Laundry totes need capacity, broad openings, sturdy bases, and handles anchored well enough to carry a heavy load. Laptop totes start from the laptop itself: as an approximate planning example, a padded compartment usually needs to be roughly an inch larger than the laptop in each direction, and the bag must be wide enough for the laptop lying sideways. Book totes are taller, with strong bottoms and handles that can carry concentrated weight, while a grocery tote benefits from a boxed base that keeps heavy items upright.
On the utility tote, the pockets are planned before the panel size is fixed. Handle length depends on carrying style; as a rough guide, hand-carried handles often drop about 5 to 8 inches, while shoulder straps need roughly 10 to 12 inches or more. Patch and block size also have to fit the panel, so a block, star point, or diagonal is not lost in a side seam or boxed corner, and wide rag allowances use up more fabric than ordinary piecing. Batting, fusible fleece, interfacing, and lining decide whether a bag stands up or slouches.
Quilting Texture, Durable Details, and Common Mistakes
Rag seams are decorative, so the seams that hold the bag together need to be planned separately. The clipped allowances face outward and are snipped close to the stitching without cutting it, while the handles, top edge, pocket corners, and base rely on enclosed, reinforced stitching. Many rag projects quilt each patch with an X or a line through the center, and straight lines or stitching that follows the seams suit these geometric designs. Denser quilting makes a stiffer panel, while lighter quilting lets the bag drape. Where several denim allowances cross, careful clipping and turning the allowances in opposite directions keep the bulk under control. Expect heavy shedding in the first washes, and clean the lint trap often.
Most problems start with small inconsistencies. Seam allowances that drift break both the grid and the fringe, and allowances turned to the inside by mistake leave a flat seam among frayed ones. Stretched bias edges can distort the Pinwheel or Diagonal Split, and a Pinwheel center can disappear under bulk if the points are not managed. Rail Fence blocks turned the wrong way, or Brickwork rows that lose their half-brick offset, are easy to miss until the panel is joined. Too little contrast blurs the pattern, mixed fabric weights without support pucker, and pockets, handles, or a base held only by frayed edges will fail.
About the Design Inspiration Images and Sewing Guides
The images in this article illustrate design possibilities and may be AI-generated or digitally modified. Several designs draw on traditional quilt blocks such as Nine Patch, Log Cabin, and Rail Fence. The images are not photographs of sewn or tested bags, so fine details may not match the written steps exactly. Each 18-step guide describes a proposed method with calculated measurements for that particular bag, not a tested pattern. Treat the written steps as the authority, and check each bag’s dimensions and seam allowances before cutting your fabric.
1. Nine Patch Rag Quilt Tote in Dark Denim and Red Plaid Flannel
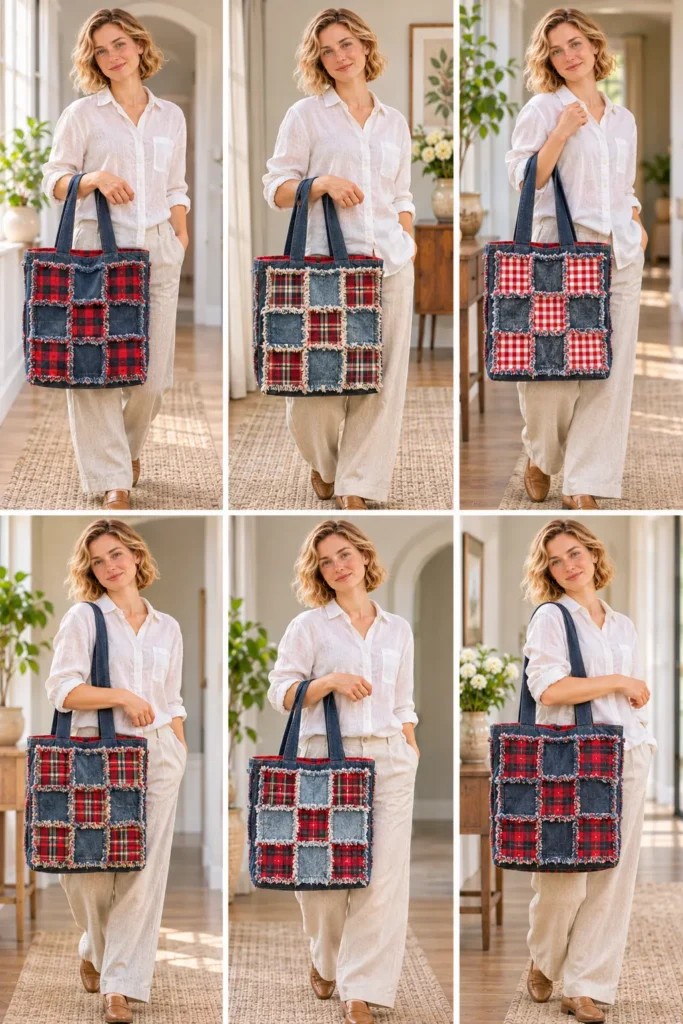
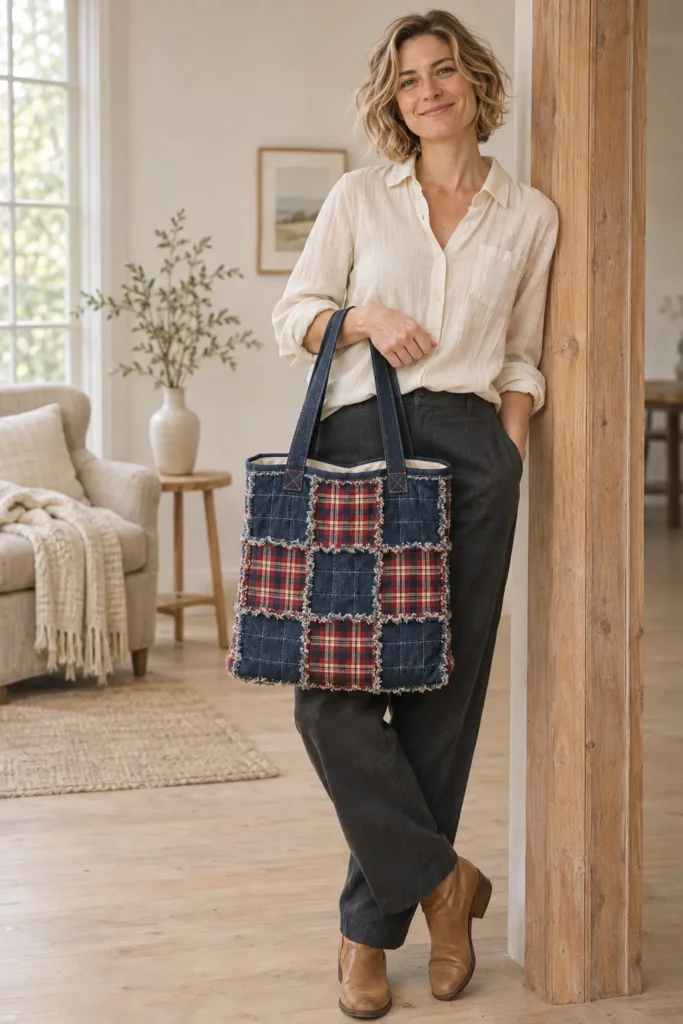
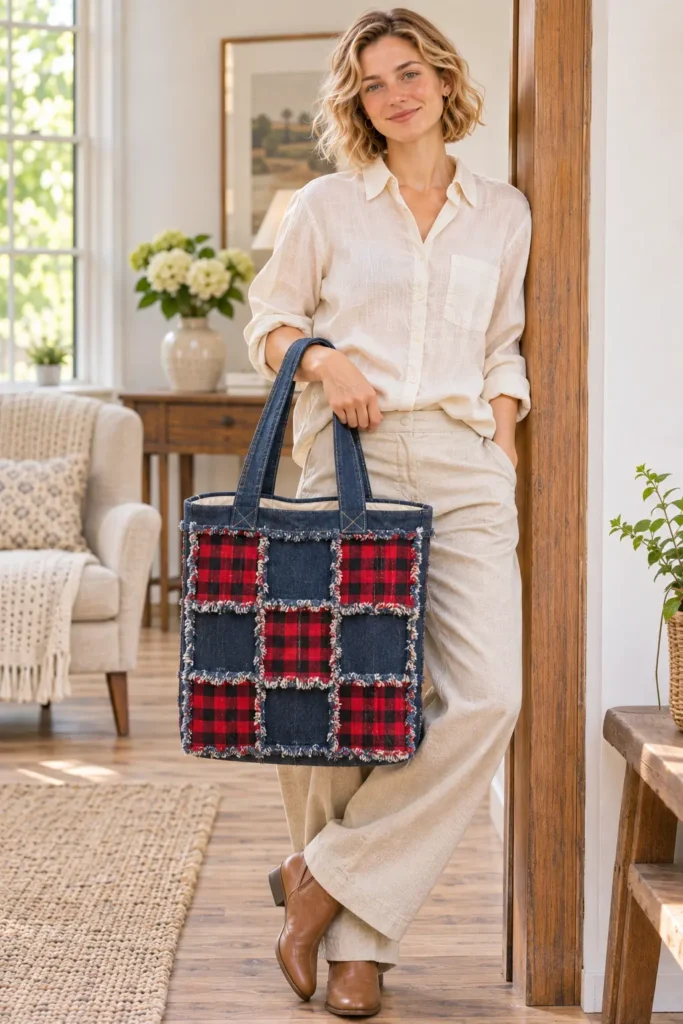
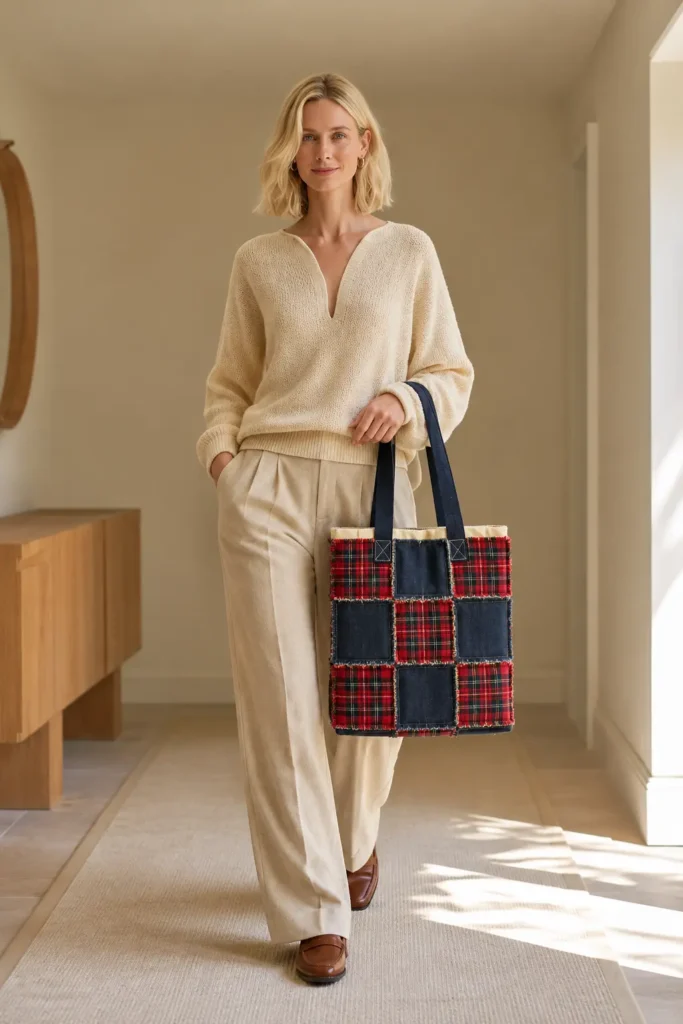
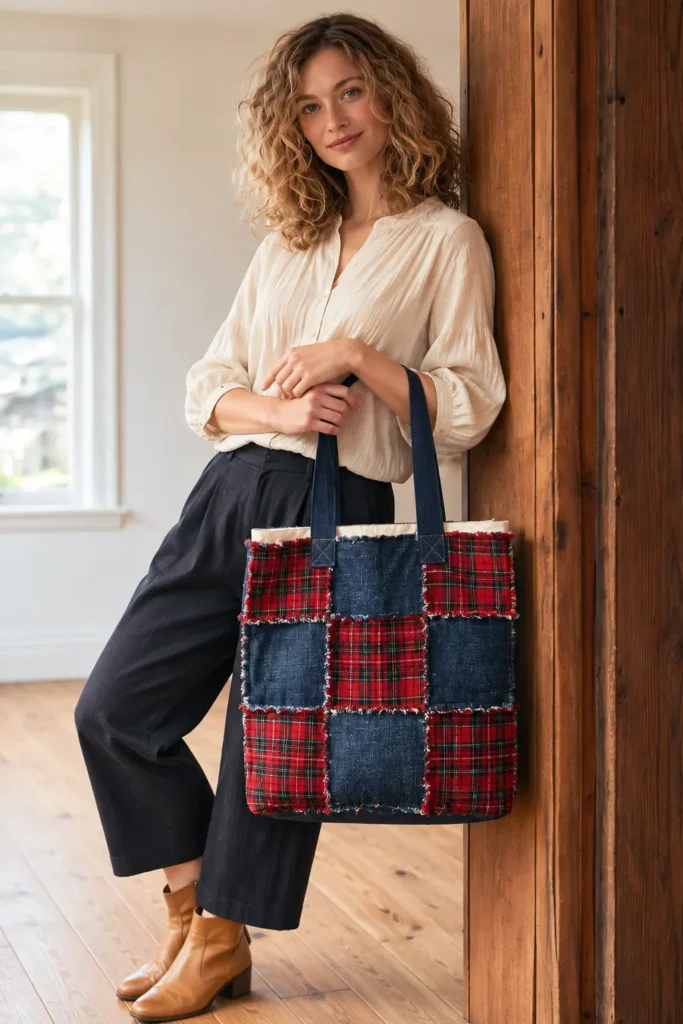
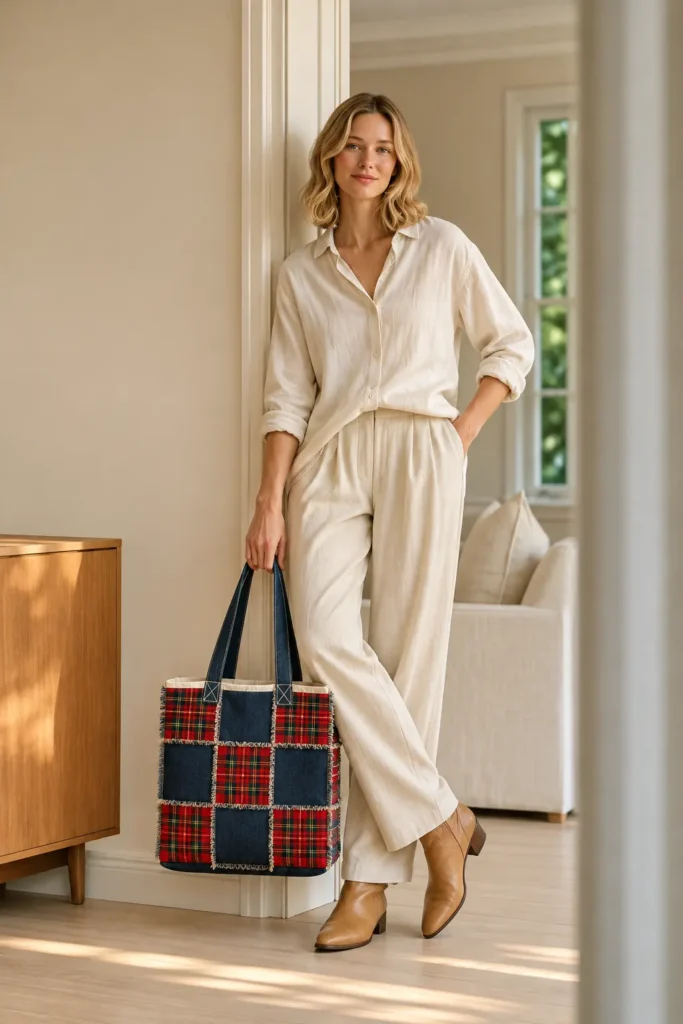
This everyday rag quilt tote centers one Nine Patch block on each face. Red plaid flannel fills the four corners and the center, and dark indigo denim fills the squares between them, so the red forms a bold X against the deep blue. A dark denim frame keeps each block reading as a distinct unit rather than part of a checkerboard. Every patch is joined with its seam allowances on the outside, and once they are clipped and washed, each square gains a soft border of fringe: pale, thready edges from the denim and fuzzy red ones from the flannel.
At 15 inches wide, 15 inches tall, and 4 inches deep, the tote is a classic shoulder bag for daily errands, with room for a paperback, a water bottle, and a light sweater. Dark denim handles drop about 10 inches. A red cotton lining backed with fusible fleece gives the soft rag shell moderate structure, and a red plaid slip pocket keeps keys and a phone off the bottom. The boxed base comes from one dark denim strip running under the bag between the two faces, so the boxed corners never cut into the blocks.
Design Inspirations – Digitally Modified Images. Texture and color may vary from the actual product.
How the Nine Patch Block Works with Rag Seams
In a rag quilt, each of the nine squares is its own small quilt sandwich, and the squares are sewn wrong sides together so their seam allowances stand up on the front. After clipping and washing, those allowances become fringe, outlining the block with soft ridges instead of flat seam lines. The fringe spreads over the edge of every square, so the squares must be large enough to stay visible, which is why this design uses 3-inch finished squares. The denim frame matters as much as the block: without it, two blocks side by side would merge into an all-over grid, and its plain top band gives the handles a solid place to attach.
Dark Denim and Red Plaid Flannel
The two fabrics fray differently, and that contrast is part of the design. Dark denim gives the bag its body and frays into a sparse fringe that shows its white weft threads, while red plaid flannel blooms into a thicker, fuzzier edge. Both can bleed dye, so prewash them separately and use a color catcher sheet in the final wash. Cut the plaid squares along the plaid lines so the checks run straight. Muslin backs keep each patch neat without bulk, and because denim already has weight, the patches skip batting; the fleece-backed lining supplies the structure.
Built as an Everyday Shoulder Tote
The outer bag is one long panel: the back face, the base strip, and the front face. Notches cut into the base strip become the boxed corners, giving a 4-inch depth and an 11-inch by 4-inch base without trimming the blocks. The lining is cut as one matching piece, and a 7-inch gap in one lining side seam leaves room to turn the bulky rag shell. The slip pocket sits 2 inches above the base line, clear of the boxed corners.
Materials and Tools Needed
- ¾ yard of dark indigo denim, 56″ wide (about 24″ is needed after prewashing)
- ⅝ yard of red plaid cotton flannel, 40″ usable width
- ¾ yard of muslin for the patch backs
- ½ yard of red cotton lining fabric, 40″ usable width
- ½ yard of fusible fleece, 45″ wide
- All-purpose polyester thread in a denim-blue shade
- Denim sewing machine needles, size 100/16
- Walking foot (recommended for the thick layers)
- Rotary cutter, cutting mat, and quilting ruler
- Fabric clips (denim is too thick for pins in places)
- Rag snips or sharp, pointed scissors for clipping
- Fabric marking pen or chalk
- Iron and pressing cloth
- Color catcher sheets for the final wash
Reclaimed jeans can supply the squares and side strips; the bands, base strip, and handles are easier to cut from new denim.
Finished Tote Bag Size
Sizes are before the final wash, which may shrink the bag slightly.
- Width: 15″, flat across the top edge, side seam to side seam.
- Height: 15″, from the base line straight up to the top edge.
- Depth: 4″, across the boxed corner seam.
- Base: 11″ × 4″.
- Handles: 1½” wide, 26″ visible; approximate drop 10″.
- Slip pocket: 8″ × 6″.
Cutting Measurements
Every patch is cut 1 inch larger than its finished size, because each exposed rag seam uses ½ inch on each side.
| Piece | Quantity | Cut Size (W × H) | Purpose |
|---|---|---|---|
| Dark denim bands | 4 | 16″ × 4″ | Top and bottom bands of both faces |
| Dark denim side strips | 4 | 4″ × 10″ | Frame strips beside each Nine Patch block |
| Dark denim squares | 8 | 4″ × 4″ | Four non-corner squares in each Nine Patch block |
| Red plaid flannel squares | 10 | 4″ × 4″ | Corners and centers of both Nine Patch blocks |
| Dark denim base strip | 1 | 16″ × 5″ | Boxed base, joining the two faces |
| Muslin backs | 27 | 4 at 16″ × 4″, 4 at 4″ × 10″, 18 at 4″ × 4″, 1 at 16″ × 5″ | One back for each patch top |
| Dark denim handles | 2 | 6″ × 27″ | Two folded shoulder handles |
| Red cotton lining | 1 | 16″ × 35″ | One-piece lining |
| Fusible fleece | 1 | 15″ × 34″ | Structure for the lining |
| Red plaid flannel pocket | 1 | 9″ × 13″ | Interior slip pocket |
Assembly at a Glance
- Cut and Sort the Fabrics
- Layer the Patch Sandwiches
- Quilt the Patch Sandwiches
- Sew the Nine Patch Rows
- Join the Rows into Two Nine Patch Blocks
- Frame Both Blocks to Make the Faces
- Join the Faces to the Base Strip
- Cut the Boxing Notches in the Outer Panel
- Sew the Outer Side Seams
- Box the Outer Corners
- Make the Two Handles
- Prepare the Lining
- Sew the Lining Side Seams, Leaving a Turning Gap
- Box the Lining Corners
- Baste the Handles to the Outer Bag
- Sew the Outer Bag and Lining Together at the Top Edge
- Turn Through the Gap, Close It, and Topstitch
- Clip and Wash the Rag Seams
Step-by-Step Sewing Tutorial
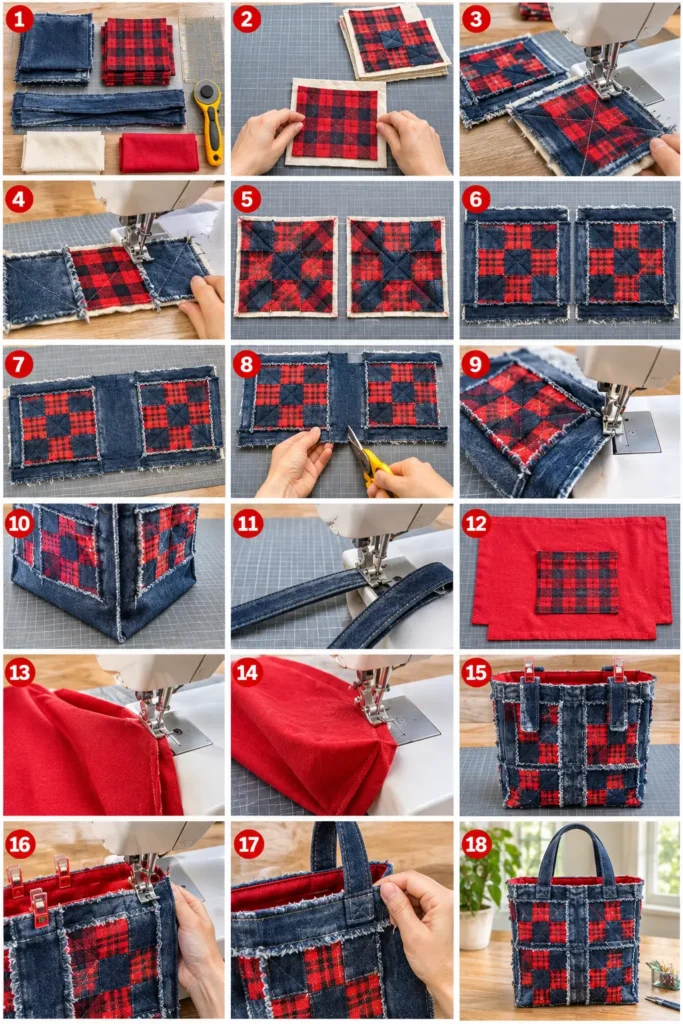
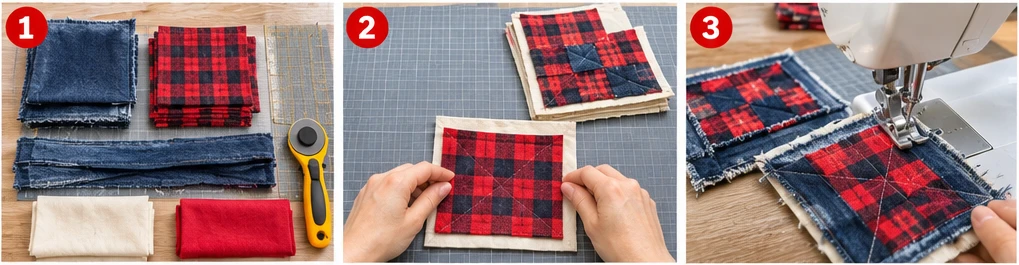
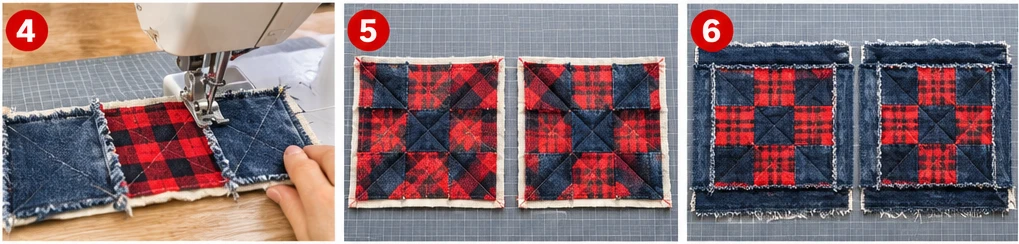
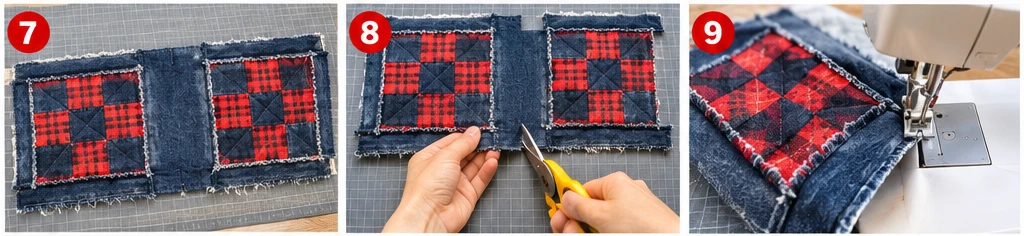
Step-by-Step Illustration – Digitally Created Image. Follow the written steps for measurements and details.
Step 1 – Cut and Sort the Fabrics
Prewash and dry each fabric separately, then press. Cut every piece in the Cutting Measurements table, cutting the plaid squares along the plaid lines. Sort the patch tops into front face (2 bands, 2 side strips, 4 denim squares, 5 red plaid squares), back face (the same), and base strip, each with its muslin backs.
Result: 27 patch tops in three groups with their 27 muslin backs, beside the handles, lining, fleece, and pocket.
Step 2 – Layer the Patch Sandwiches
Place each patch top right side up on its muslin back, wrong side against the muslin, raw edges aligned. Use a pin in the center or temporary spray adhesive if the layers shift. There is no batting.
Result: 27 two-layer patch sandwiches, each with its denim or flannel top facing up and its muslin back underneath, edges matching.
Step 3 – Quilt the Patch Sandwiches
On every 4″ square, stitch an X from corner to corner, starting and stopping ½” from the raw edges so the stitching stays out of the seam allowances. Stitch one lengthwise line down the center of each band and side strip, and two lengthwise lines on the base strip, each 1″ from its center. Use a walking foot and a denim needle.
Result: 27 quilted patch sandwiches, the squares marked with X stitching and the bands, strips, and base strip with straight lengthwise lines.
Step 4 – Sew the Nine Patch Rows
For each block, make three rows of three squares: rows 1 and 3 are red plaid, denim, red plaid; row 2 is denim, red plaid, denim. Place two squares wrong sides together (muslin to muslin) and sew a ½” seam, then add the third square the same way. Make six rows in all. The seam allowances stand up on the front.
Result: six rows, each 10″ × 4″ from raw edge to raw edge, with two raised seam allowances on the front of every row.
Step 5 – Join the Rows into Two Nine Patch Blocks
Lay out one block’s rows with row 2 in the middle. Turn the allowances on rows 1 and 3 toward one side and those on row 2 toward the other, so they lie in opposite directions where seams cross. Sew rows 1 and 2 wrong sides together with a ½” seam, matching the seams, then add row 3. Repeat for the second block.
Result: two Nine Patch blocks, each 10″ × 10″ from raw edge to raw edge (9″ finished), with red plaid in the corners and center and the seam allowances standing up on the front.
Step 6 – Frame Both Blocks to Make the Faces
For each block:
- Sew a 4″ × 10″ side strip to the left and right edges, wrong sides together, with ½” seams.
- Sew a 16″ × 4″ band to the top and bottom edges the same way, turning the allowances opposite to the block’s seams where they meet.
Result: two square faces, each 16″ × 16″ from raw edge to raw edge (15″ finished), each a Nine Patch block framed in dark denim with all seam allowances on the front.
Step 7 – Join the Faces to the Base Strip
Sew the 16″ × 5″ base strip to the front face’s bottom band, wrong sides together, with a ½” seam. Turn the back face upside down so its bottom band meets the base strip and its top band is at the far end, and sew it to the other long edge of the base strip the same way. Keep the side strips of both faces lined up across the base.
Result: one outer panel, 16″ × 35″ from raw edge to raw edge (15″ × 34″ finished), reading front face, base strip, then the upside-down back face, with all rag seams on the front.
Step 8 – Cut the Boxing Notches in the Outer Panel
Mark the center line of the base strip, 17½” from either short end. On each long side edge, mark a rectangle 2″ wide (in from the raw edge) and 3″ tall, centered on that line, running from 16″ to 19″ below the front top raw edge. Cut out both rectangles through all layers. The notches stay inside the base strip and are closed by the boxing seams in Step 10.
Result: the outer panel has a 2″ × 3″ notch cut from the middle of each long side edge, within the base strip.
Step 9 – Sew the Outer Side Seams
Fold the outer panel in half across the base strip, wrong sides together, so the patchwork faces outward and the top raw edges meet. Match the band and block seams of both faces at the sides. Sew a ½” seam down each side from the top raw edge to the notch, backstitching at both ends. These allowances also sit on the outside. Leave the notches open for Step 10.
Result: a right-side-out outer tube, 15″ wide, open at the top and with an unsewn notch at each bottom corner.
Step 10 – Box the Outer Corners
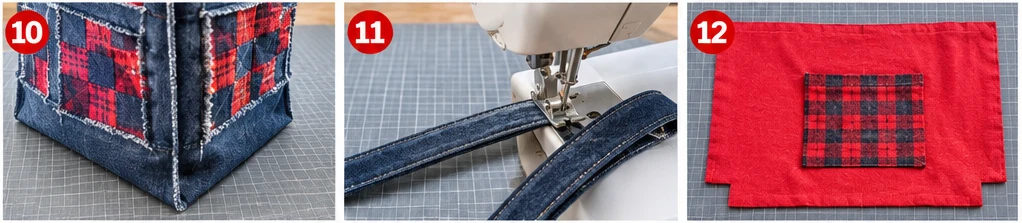
At one notch, pull the cut edges apart and flatten the corner so the side seam lines up with the base strip’s center line; the notch edges now form one straight raw edge. Turn the side seam allowances in opposite directions and sew across with a ½” seam, wrong sides together, backstitching at both ends. Repeat at the other notch, closing both notches from Step 8.
Result: the outer shell, right side out, with a 4″-deep boxed base measuring 11″ × 4″, a height of 15″ on each face, and all rag seam allowances on the outside, still unclipped.
Step 11 – Make the Two Handles
Fold a 6″ × 27″ handle strip in half lengthwise and press a crease. Open it, fold both long raw edges to the crease, press, then refold along the crease to enclose them. Clip and edgestitch ⅛” from both long edges. Repeat for the second handle.
Result: two dark denim handles, each 1½” × 27″, with all raw edges enclosed and both long edges stitched.
Step 12 – Prepare the Lining
Work in this order:
- Center the 15″ × 34″ fleece on the wrong side of the 16″ × 35″ lining, ½” in from every edge, and fuse it following the manufacturer’s directions.
- Fold the 9″ × 13″ pocket right sides together into 9″ × 6½”, fold at the top. Sew the sides and bottom with a ½” seam, leaving a 3″ gap at the bottom center. Clip the corners, turn, and press with the gap edges turned in; item 3 closes the gap.
- On the lining’s right side, place the pocket on one half with its bottom edge 13½” below the top raw edge and its sides 4″ in from the side edges. Edgestitch ⅛” along the sides and bottom, backstitching at the top corners.
- Cut 2″ × 3″ notches from both long edges, 16″ to 19″ below the pocket-half top edge, as in Step 8.
Result: a flat 16″ × 35″ lining with fleece fused to the back, an 8″ × 6″ red plaid slip pocket stitched to one half, and a notch in the middle of each long edge.
Step 13 – Sew the Lining Side Seams, Leaving a Turning Gap
Fold the lining in half, right sides together, so the top raw edges meet. Sew a ½” seam down each side from the top raw edge to the notch. On one side, leave a 7″ gap from 4½” to 11½” below the top raw edge, backstitching at both ends; Step 17 closes it. Leave the notches open for Step 14.
Result: a lining tube, wrong side out, 15″ wide, with an unsewn notch at each bottom corner and a 7″ gap in one side seam.
Step 14 – Box the Lining Corners
Flatten each lining notch so the side seam meets the base center fold, and sew across the straight raw edge with a ½” seam, right sides together, closing the notches from Step 12. Leave the lining wrong side out.
Result: the lining shell, wrong side out, with a 4″-deep boxed base matching the outer shell and the 7″ gap still open in one side seam.
Step 15 – Baste the Handles to the Outer Bag
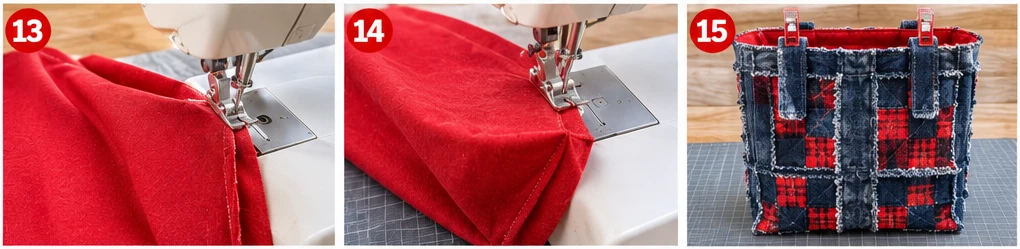
With the outer shell right side out, place one handle on the front face, raw ends aligned with the top raw edge and the loop hanging down. Center each end 4½” in from the nearest side seam, so the end centers are 6″ apart, check for twists, and baste ¼” from the top raw edge. Repeat on the back face in the matching position.
Result: the outer shell, right side out, with one handle basted to each face, the handle loops hanging down against the patchwork.
Step 16 – Sew the Outer Bag and Lining Together at the Top Edge
Place the outer shell, right side out, inside the lining, which is wrong side out, so the right sides face. Match the top raw edges and side seams, turning the outer side seam allowances in opposite directions so they lie flat. Clip all around, with the handles sandwiched between the layers, and sew a ½” seam around the top edge, slowing over the handles and side seams.
Result: the outer bag and lining joined around the top edge, with the lining on the outside and the handles hidden between the layers; the only opening is the 7″ gap in the lining.
Step 17 – Turn Through the Gap, Close It, and Topstitch
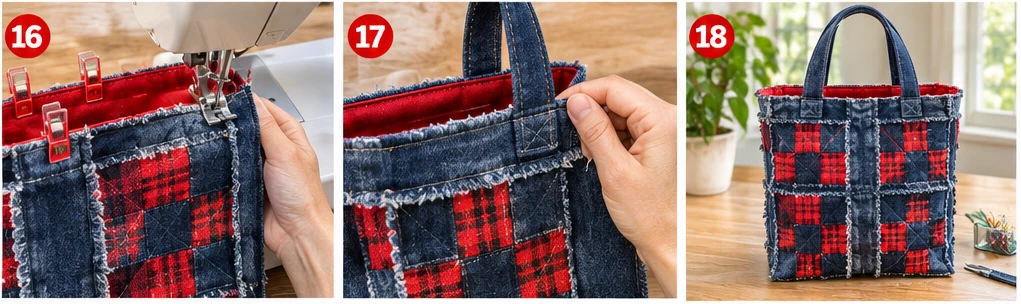
Pull the outer bag out through the 7″ lining gap, then pull the lining through so the whole bag is right side out. Fold the gap edges in by ½” and edgestitch ⅛” from the fold, closing the gap left in Step 13. Push the lining into the bag, roll the top seam to sit exactly on the edge, pull the handles up, and topstitch ⅜” from the top edge all around. Stitch back and forth over each handle end to reinforce it.
Result: a finished, right-side-out tote with the lining inside, the handles standing up, and a topstitched top edge; the rag seam allowances are still unclipped.
Step 18 – Clip and Wash the Rag Seams
With rag snips, clip every exposed seam allowance about every ⅜”, stopping about ⅛” from the stitching: square, frame, band, base strip, side, and boxing seams. Do not clip the enclosed top edge. Wash on a gentle cold cycle with a color catcher sheet and tumble dry on low, cleaning the lint trap during and after drying. Repeat for a fuller fringe.
Result: the finished Nine Patch rag quilt tote, 15″ × 15″ × 4″ before washing, with soft frayed fringe along every exposed seam, red plaid corners and center on each face, and long dark denim handles.
Troubleshooting This Nine Patch Rag Tote
- The red X looks wrong: lay out all three rows before Step 5 and check that red plaid sits only in the corners and center.
- The back face is upside down: join the back face to the base strip by its bottom band (Step 7), so both top bands sit at the short ends of the panel.
- Seams do not line up at the side seams: match the band and block seams across the fold in Step 9, working up from the base.
- Red dye on the muslin or denim: prewash the plaid alone until the water runs clear, and use a color catcher in the final wash.
- The machine struggles at the top seam: the handle ends add four layers of denim. Use a walking foot and a 100/16 needle, and hand-walk the needle over the thickest spots.
- The denim fringe looks thin: denim frays more sparsely than flannel; clip about every ¼” and wash and dry again.
Design Inspiration and Tutorial Note: The images in this section may be AI-generated or digitally developed to show design possibilities. The sewing instructions describe a proposed construction method with calculated measurements, not a physically tested pattern, so check your panel sizes and seam allowances before cutting and joining the pieces.
Other Design Inspirations – Digitally Modified Images. Texture and color may vary from the actual product.
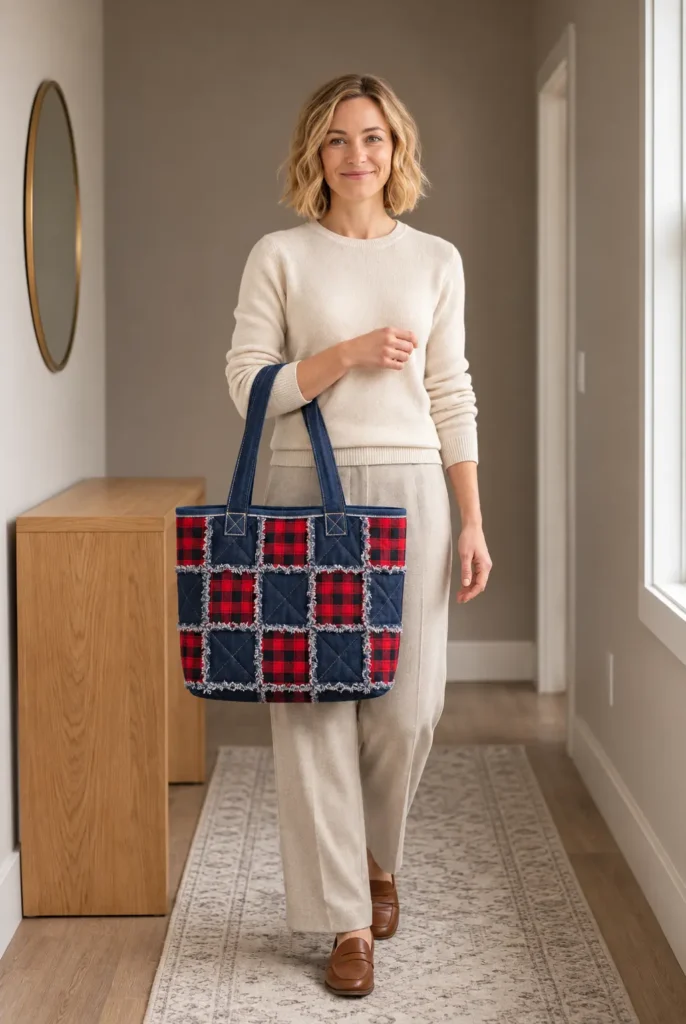
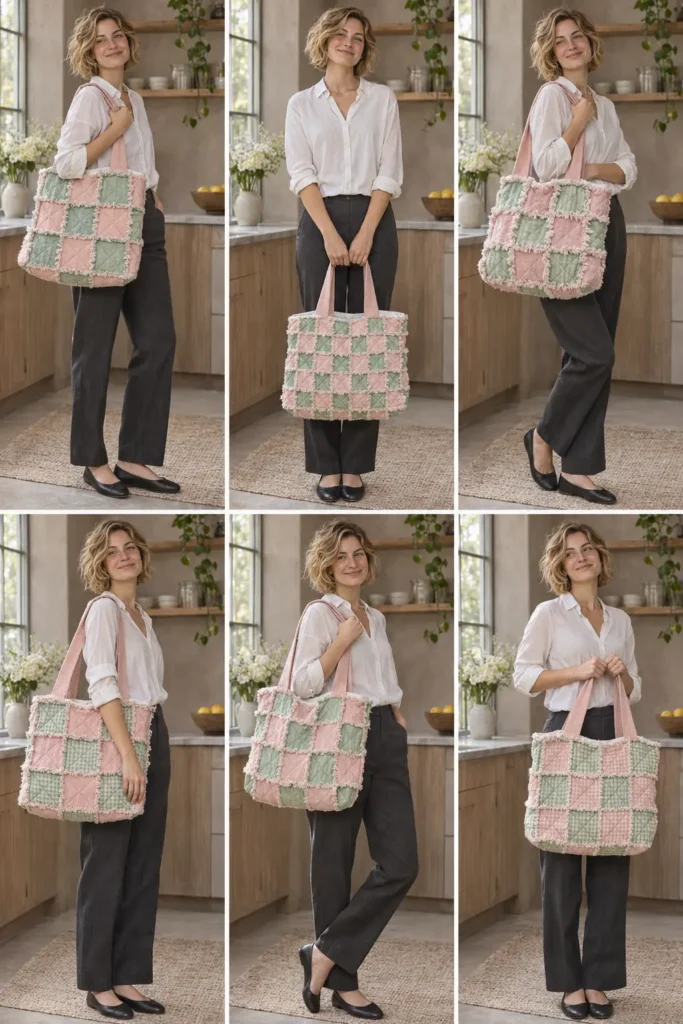
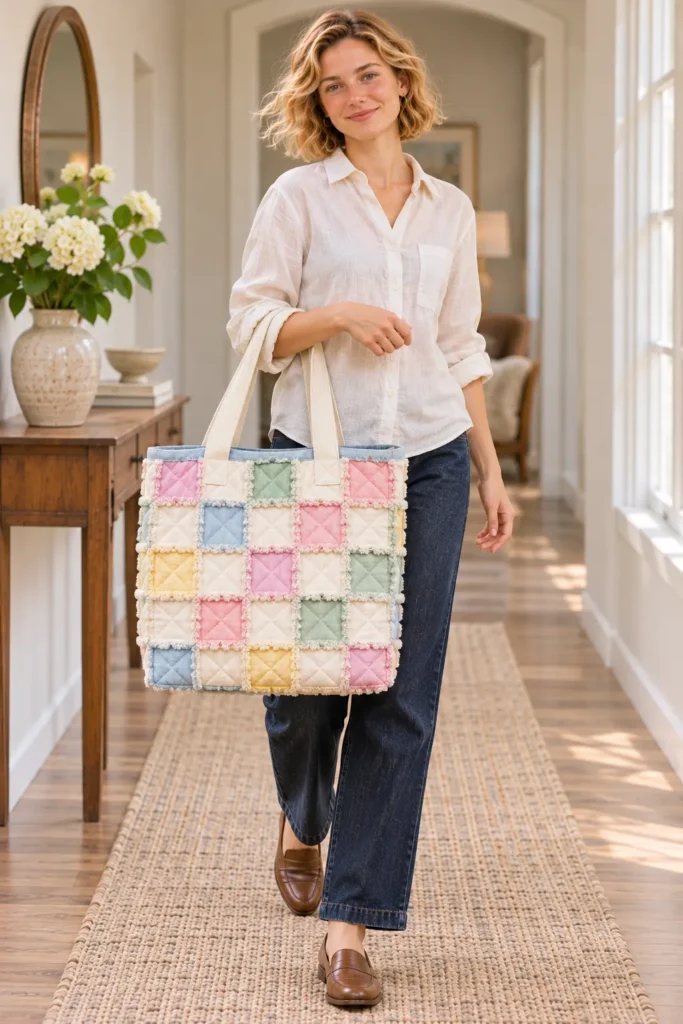
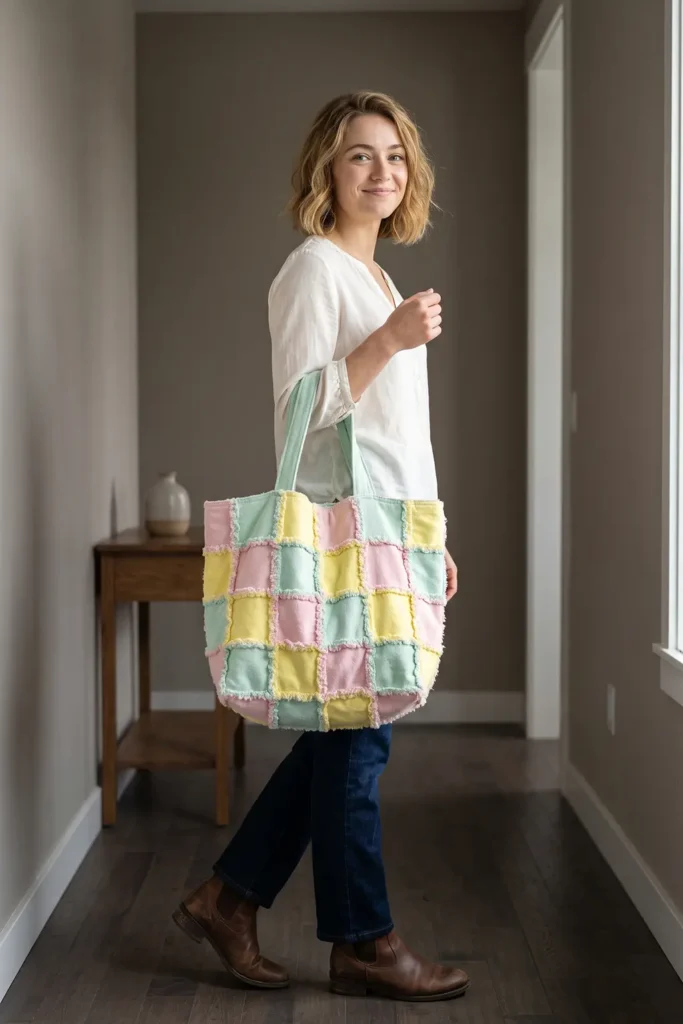
2. Checkerboard Rag Quilt Market Tote in Soft Pastel Flannels
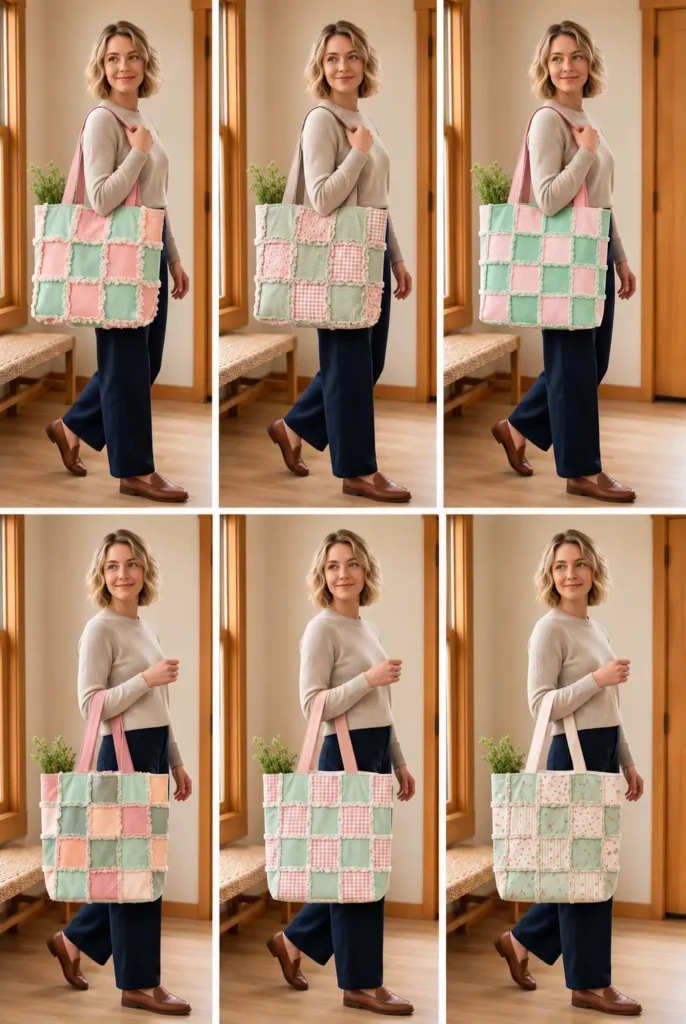
This market tote is one continuous checkerboard of mint green and blush pink cotton flannel squares, with no blocks, borders, or sashing to break the grid. The alternating squares run across the front, wrap under the bag as its base, and climb up the back, so the pattern looks unbroken from every side. Each square is joined with its seam allowances on the outside, and once those allowances are clipped and washed, flannel blooms into a plush, fuzzy fringe that outlines every square in soft ridges of mint and pink.
The tote is shaped for farmers market runs and light shopping: 17½ inches wide, 14 inches tall, and 3½ inches deep, with a wide opening that makes it easy to drop in a bunch of flowers, a loaf of bread, or a few bags of produce. It is the softest bag in this collection. The squares are flannel on both sides with no batting, and the white cotton lining has no interfacing, so the tote folds small, weighs little, and slouches gently when it is only half full. Two long blush flannel handles drop about 11 inches, enough to carry on the shoulder while your hands are full.
Design Inspirations – Digitally Modified Images. Texture and color may vary from the actual product.
Why a Continuous Checkerboard Suits a Rag Tote
A checkerboard is the simplest grid in patchwork, and that simplicity is what makes it work with rag seams. Because every square is the same size and every seam runs straight across the bag, the fringe forms an even lattice instead of a busy tangle. Unlike a Nine Patch or Four Patch, there are no separate blocks to match, only rows of five squares that alternate their starting color. The 3½-inch squares are large enough to stay readable after the fringe spreads over their edges, yet small enough to give the tote a lively, all-over pattern. Because the base row is simply the fifth row of the grid, the checkerboard continues underneath without a break, and both faces begin with mint at the top corners.
Choosing and Pairing Pastel Flannels
The two pastels need enough difference in value to read as a checkerboard from across a room. Mint and blush work because one is cool and one is warm, even though both are light. Solid flannels or very small-scale prints keep the grid crisp; large prints would blur the squares once the fringe blooms. Flannel shrinks more than quilting cotton, so prewash both colors before cutting, and wash them separately the first time in case either bleeds. Because each square is backed with the same flannel, the fringe shows one color on each side of every seam, which keeps the pastel edges clean instead of muddy.
A Light, Soft Bag for the Market
Everything about this tote’s construction keeps it light. There is no batting, no fleece, and no interfacing in the lining, so the bag relies on the two flannel layers in each square and a thin cotton lining for its body. That makes it a market tote rather than a heavy grocery hauler: it suits produce, flowers, bread, and a light jacket, not stacked cans or bottles. The handles are the one stiffened part. Fusible interfacing inside the blush flannel helps them hold their shape and spread the weight across the shoulder, and their ends land in the middle of the squares rather than on a rag seam, where the stitching has a flat surface to grip.
Materials and Tools Needed
- 1 yard of mint green cotton flannel, 40″ usable width (27″ needed after prewashing)
- 1⅛ yards of blush pink cotton flannel, 40″ usable width (32½” needed)
- ⅝ yard of white lightweight cotton for the lining
- 1 yard of medium woven fusible interfacing, 20″ wide
- All-purpose thread in white or light gray
- Universal sewing machine needles, size 80/12 or 90/14
- Walking foot (helpful for keeping the flannel layers aligned)
- Rotary cutter, cutting mat, and quilting ruler
- Pins or fabric clips
- Rag snips or sharp, pointed scissors for clipping
- Fabric marking pen or chalk
- Iron and pressing cloth
Finished Tote Bag Size
Sizes are before the final wash, which may shrink the bag slightly.
- Width: 17½”, flat across the top edge, side seam to side seam.
- Height: 14″, from the base line straight up to the top edge.
- Depth: 3½”, across the boxed corner seam.
- Base: 14″ × 3½”.
- Handles: 1¼” wide, 28″ visible; approximate drop 11″.
Cutting Measurements
Every square is cut 1 inch larger than its finished size, because each exposed rag seam uses ½ inch on each side.
| Piece | Quantity | Cut Size (W × H) | Purpose |
|---|---|---|---|
| Mint flannel squares | 46 | 4½” × 4½” | 23 tops and 23 matching backs |
| Blush flannel squares | 44 | 4½” × 4½” | 22 tops and 22 matching backs |
| Blush flannel handle strips | 2 | 5″ × 29″ | Two folded shoulder handles |
| Medium woven fusible interfacing | 2 | 5″ × 29″ | Stiffening for the handles |
| White cotton lining | 1 | 18½” × 32½” | One-piece lining |
Assembly at a Glance
- Cut and Sort the Fabrics
- Layer the Patch Sandwiches
- Quilt the Patch Sandwiches
- Join the Squares into Nine Rows
- Join the Rows into the Front Face
- Join the Rows into the Back Face
- Join the Front Face, Base Row, and Back Face
- Cut the Boxing Notches in the Outer Panel
- Sew the Outer Side Seams
- Box the Outer Corners
- Make the Two Handles
- Notch the Lining
- Sew the Lining Side Seams, Leaving a Turning Gap
- Box the Lining Corners
- Baste the Handles to the Outer Bag
- Sew the Outer Bag and Lining Together at the Top Edge
- Turn Through the Gap, Close It, and Topstitch
- Clip and Wash the Rag Seams
Step-by-Step Sewing Tutorial
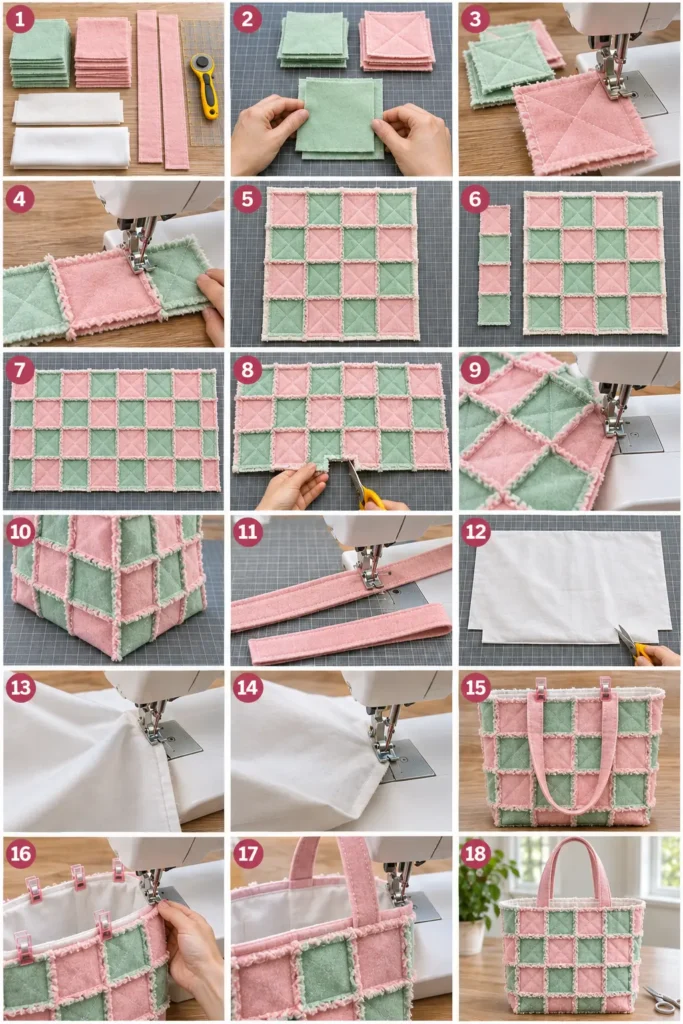
Step-by-Step Illustration – Digitally Created Image. Follow the written steps for measurements and details.
Step 1 – Cut and Sort the Fabrics
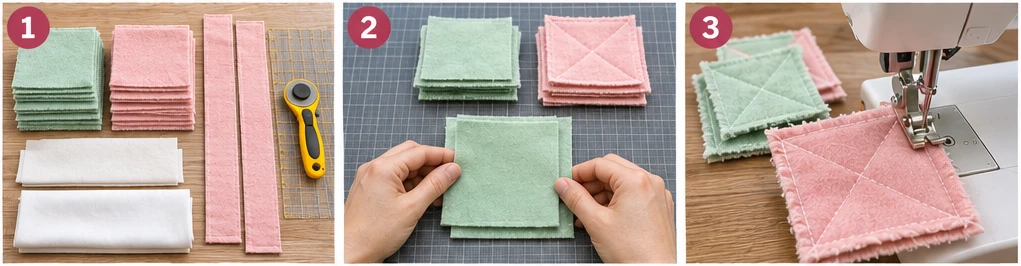
Prewash and dry each flannel and the lining separately, then press. Cut every piece in the Cutting Measurements table, keeping the squares on the straight grain. Stack the mint squares in pairs (23 pairs) and the blush squares in pairs (22 pairs).
Result: 23 pairs of mint squares and 22 pairs of blush squares, beside the two handle strips, two interfacing strips, and the lining.
Step 2 – Layer the Patch Sandwiches
Place each square right side up on its matching back, wrong sides together, raw edges aligned: mint on mint and blush on blush. Pin in the center if the flannel shifts. There is no batting.
Result: 45 two-layer flannel sandwiches, 23 mint and 22 blush, each the same color on both sides.
Step 3 – Quilt the Patch Sandwiches
Stitch an X from corner to corner on every sandwich, starting and stopping ½” from the raw edges so the quilting stays out of the seam allowances. A walking foot keeps the two flannel layers from creeping.
Result: 45 quilted squares, each marked with an X of stitching.
Step 4 – Join the Squares into Nine Rows
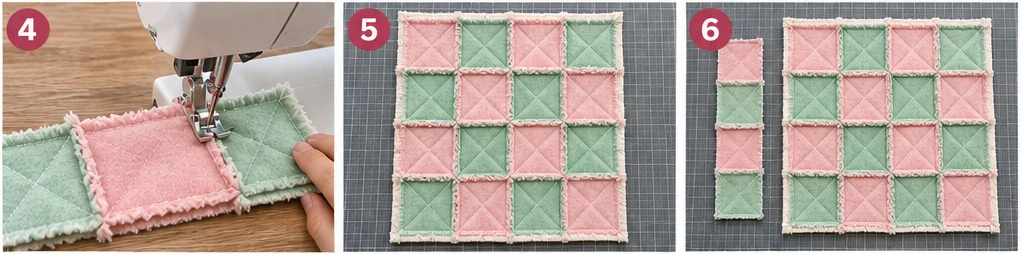
Make five rows that read mint, blush, mint, blush, mint, and four rows that read blush, mint, blush, mint, blush. Place two squares wrong sides together and sew a ½” seam, then add the next square the same way until each row has five. The seam allowances stand up on the front.
Result: nine rows, each 18½” × 4½” from raw edge to raw edge, five starting with mint and four starting with blush.
Step 5 – Join the Rows into the Front Face
Take two mint-start rows and two blush-start rows and lay them out alternating, beginning with a mint-start row at the top. Turn the allowances on the mint-start rows toward one side and those on the blush-start rows toward the other, so they lie in opposite directions where seams cross. Sew the rows wrong sides together with ½” seams, matching the seams.
Result: the front face, 18½” × 15″ from raw edge to raw edge (17½” × 14″ finished), four rows of alternating squares with mint at both top corners.
Step 6 – Join the Rows into the Back Face
Repeat Step 5 with the remaining two mint-start and two blush-start rows, keeping one mint-start row loose for the base. Start with a blush-start row so that, once the panel is joined in Step 7, the back’s top row is a mint-start row.
Result: the back face, 18½” × 15″ from raw edge to raw edge, four alternating rows with a blush-start row at one end and a mint-start row at the other; one mint-start row remains for the base.
Step 7 – Join the Front Face, Base Row, and Back Face
Sew the loose mint-start row to the bottom (blush-start) row of the front face, wrong sides together, with a ½” seam. Sew the blush-start end of the back face to the other edge of that base row the same way. The checkerboard now alternates without a break from one short end of the panel to the other, and the back face’s mint-start row sits at the far end.
Result: one outer panel, 18½” × 32½” from raw edge to raw edge (17½” × 31½” finished), nine rows of continuous checkerboard with the base row in the middle.
Step 8 – Cut the Boxing Notches in the Outer Panel
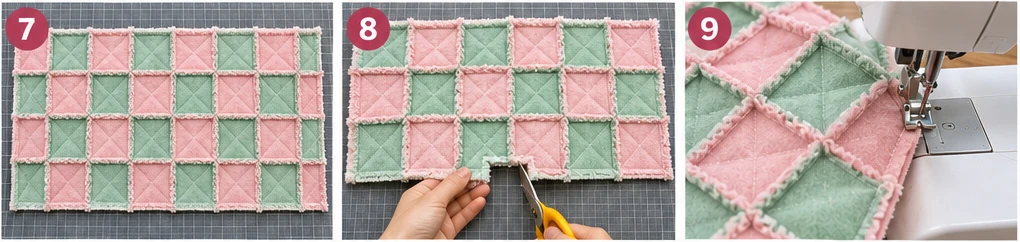
Mark the center line of the base row, 16¼” from either short end. On each long side edge, mark a rectangle 1¾” wide (in from the raw edge) and 2½” tall, centered on that line, running from 15″ to 17½” below the front top raw edge. Cut out both rectangles through both flannel layers. The notches cut only into the end squares of the base row and are closed by the boxing seams in Step 10.
Result: the outer panel has a 1¾” × 2½” notch in the middle of each long side edge, within the base row.
Step 9 – Sew the Outer Side Seams
Fold the outer panel in half across the base row, wrong sides together, so the checkerboard faces outward and the top raw edges meet. Match the row seams of the front and back at each side. Sew a ½” seam down each side from the top raw edge to the notch, backstitching at both ends. These allowances also sit on the outside. Leave the notches open for Step 10.
Result: a right-side-out outer tube, 17½” wide, open at the top and with an unsewn notch at each bottom corner.
Step 10 – Box the Outer Corners
At one notch, pull the cut edges apart and flatten the corner so the side seam lines up with the center line of the base row; the notch edges now form one straight raw edge. Turn the side seam allowances in opposite directions and sew across with a ½” seam, wrong sides together, backstitching at both ends. Repeat at the other notch, closing both notches from Step 8.
Result: the soft outer shell, right side out, with a 3½”-deep base measuring 14″ × 3½”, a height of 14″ on each face, and all rag seam allowances on the outside, still unclipped.
Step 11 – Make the Two Handles
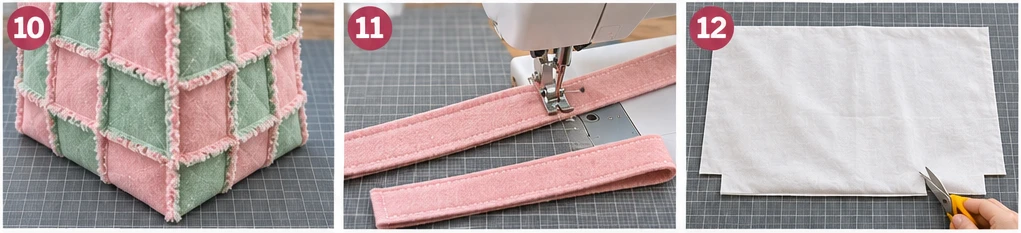
Fuse a 5″ × 29″ interfacing strip to the wrong side of each blush handle strip, following the manufacturer’s directions. Fold each strip in half lengthwise and press a crease, open it, fold both long raw edges to the crease, and press. Refold along the crease to enclose the raw edges, then edgestitch ⅛” from both long edges.
Result: two blush flannel handles, each 1¼” × 29″, with all raw edges enclosed and both long edges stitched.
Step 12 – Notch the Lining
Lay the 18½” × 32½” lining flat, right side up. Mark and cut 1¾” × 2½” notches from both long edges, 15″ to 17½” below one short edge, exactly as in Step 8. The lining has no pockets or interfacing.
Result: a flat white lining with a notch in the middle of each long edge, matching the outer panel.
Step 13 – Sew the Lining Side Seams, Leaving a Turning Gap
Fold the lining in half, right sides together, so the short edges meet. Sew a ½” seam down each side from the top raw edge to the notch. On one side, leave a 7″ gap from 4″ to 11″ below the top raw edge, backstitching at both ends; Step 17 closes it. Leave the notches open for Step 14.
Result: a lining tube, wrong side out, 17½” wide, with an unsewn notch at each bottom corner and a 7″ gap in one side seam.
Step 14 – Box the Lining Corners
Flatten each lining notch so the side seam meets the base center fold, and sew across the straight raw edge with a ½” seam, right sides together, closing the notches from Step 12. Leave the lining wrong side out.
Result: the white lining shell, wrong side out, with a 3½”-deep base matching the outer shell and the 7″ gap still open.
Step 15 – Baste the Handles to the Outer Bag
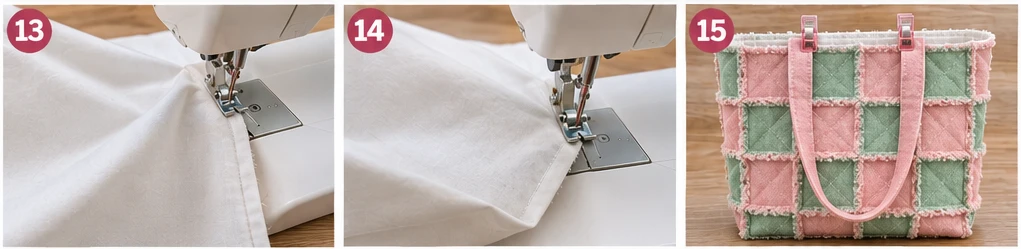
With the outer shell right side out, place one handle on the front face, raw ends aligned with the top raw edge and the loop hanging down. Center each end 5¾” in from the nearest side seam, so the end centers are 6″ apart and each end sits in the middle of a square, not on a rag seam. Check for twists and baste ¼” from the top raw edge. Repeat on the back face in the matching position.
Result: the outer shell, right side out, with one blush handle basted to each face, the loops hanging down against the checkerboard.
Step 16 – Sew the Outer Bag and Lining Together at the Top Edge
Place the outer shell, right side out, inside the lining, which is wrong side out, so the right sides face. Match the top raw edges and side seams. Along the top edge, lay the four vertical rag-seam allowances on each face flat, in alternating directions, and turn the side seam allowances the same way. Pin all around, with the handles sandwiched between the layers, and sew a ½” seam around the top edge.
Result: the outer bag and lining joined around the top edge, with the lining on the outside and the handles hidden between the layers; the only opening is the 7″ gap.
Step 17 – Turn Through the Gap, Close It, and Topstitch
Pull the outer bag out through the 7″ lining gap, then pull the lining through so the whole bag is right side out. Fold the gap edges in by ½” and edgestitch ⅛” from the fold, closing the gap left in Step 13. Push the lining into the bag, roll the top seam to sit on the edge, pull the handles up, and topstitch ⅜” from the top edge all around. Stitch back and forth over each handle end.
Result: a finished, right-side-out tote with the white lining inside, the blush handles standing up, and a topstitched top edge; the rag seams are still unclipped.
Step 18 – Clip and Wash the Rag Seams
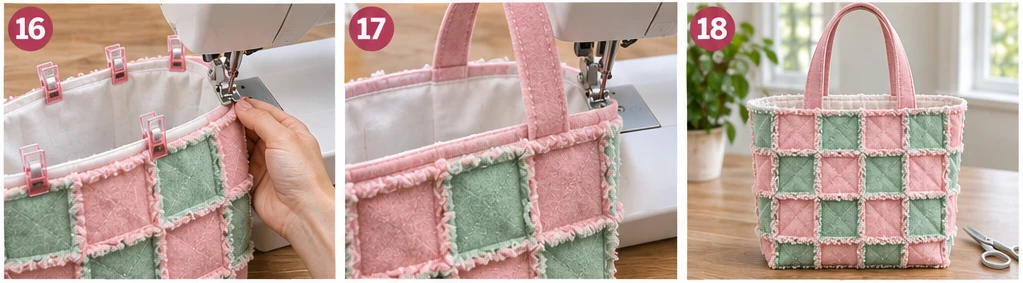
With rag snips, clip every exposed seam allowance about every ⅜”, stopping about ⅛” from the stitching: the seams between squares, the row seams, the base row seams, the side seams, and the boxing seams. Do not clip the enclosed top edge. Wash on a gentle cold cycle and tumble dry on low, cleaning the lint trap during and after drying; flannel sheds heavily the first time. Repeat for a fuller fringe.
Result: the finished Checkerboard rag quilt market tote, 17½” × 14″ × 3½” before washing, with plush mint and blush fringe outlining every square and long blush handles.
Troubleshooting This Checkerboard Rag Tote
- Two squares of the same color sit side by side: a row was turned end for end or placed out of order. Before Step 7, lay the whole panel out and check that the colors alternate in every direction, including across the base row.
- The grid looks wavy: flannel stretches easily. Use a walking foot, pin at every seam crossing, and turn the allowances of neighboring rows in opposite directions.
- The pastels look muddy after washing: one flannel bled. Prewash each color separately and test with a damp white scrap before cutting.
- The top edge is lumpy: the vertical rag-seam allowances were not laid flat before the top seam. Turn them in alternating directions in Step 16.
- The bag sags when full: this tote is built light on purpose. Keep heavy groceries for a structured bag, or add a lightweight fusible interfacing to the lining before Step 12 if you want more body.
- Lint on your purchases: fringe sheds most in the first few washes. Wash and dry the bag twice before its first market trip, and shake it out between uses.
Design Inspiration and Tutorial Note: The images in this section may be AI-generated or digitally developed to show design possibilities. The sewing instructions describe a proposed construction method with calculated measurements, not a physically tested pattern, so check your panel sizes and seam allowances before cutting and joining the squares.
Other Design Inspirations – Digitally Modified Images. Texture and color may vary from the actual product.
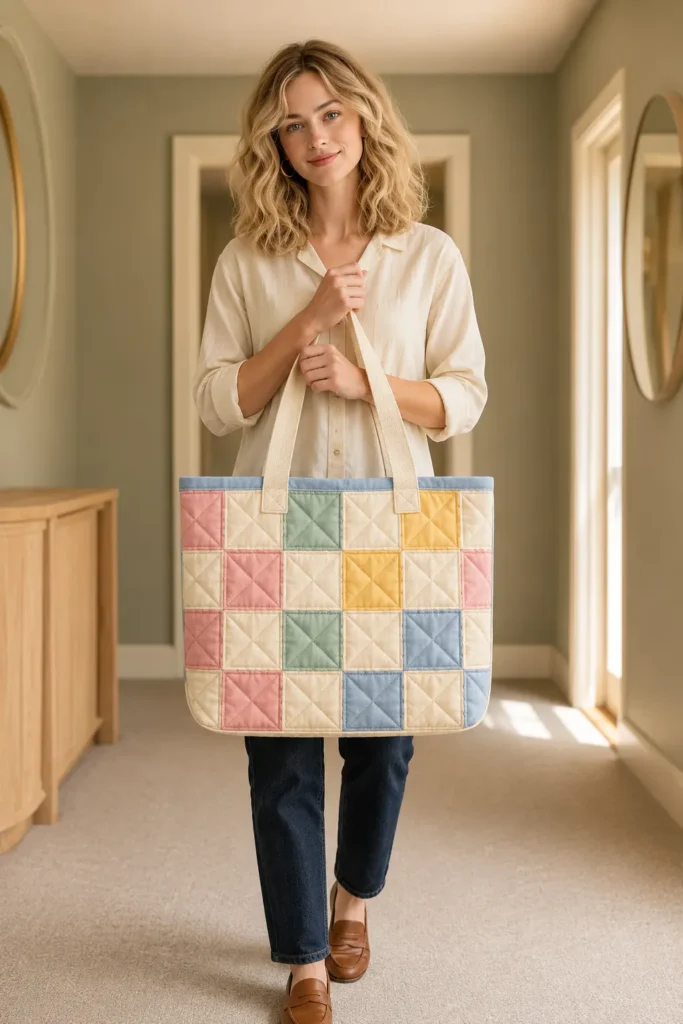
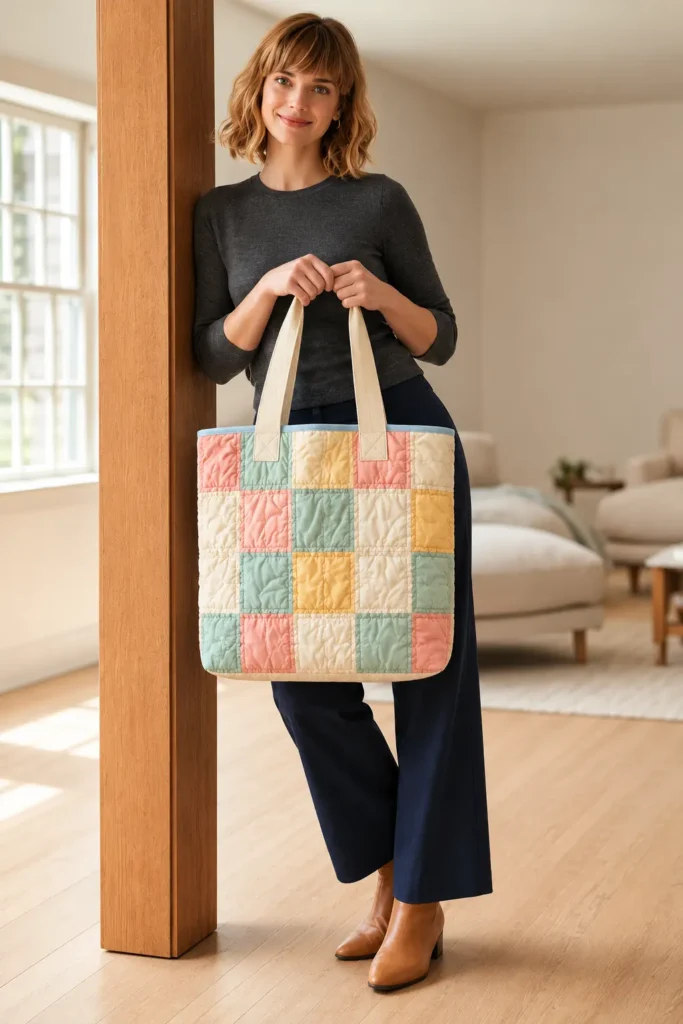
3. Windowpane Rag Quilt Laptop Tote in Black Denim and Cream Flannel
Design Inspirations – Digitally Modified Images. Texture and color may vary from the actual product.
Other Design Inspirations – Digitally Modified Images. Texture and color may vary from the actual product.
4. Oversized Log Cabin Rag Quilt Laundry Tote in Rust and Olive Flannel
Design Inspirations – Digitally Modified Images. Texture and color may vary from the actual product.
Other Design Inspirations – Digitally Modified Images. Texture and color may vary from the actual product.
5. Four Patch Rag Quilt Book Tote in Chambray and Floral Flannel
Design Inspirations – Digitally Modified Images. Texture and color may vary from the actual product.
Other Design Inspirations – Digitally Modified Images. Texture and color may vary from the actual product.
6. Patch-Pocket Rag Quilt Utility Tote in Black Denim and Camel Flannel
Design Inspirations – Digitally Modified Images. Texture and color may vary from the actual product.
Other Design Inspirations – Digitally Modified Images. Texture and color may vary from the actual product.
More to come …
- Raw-Edge Star Appliqué Rag Quilt Tote in Faded Denim and Coral Flannel
- Pinwheel Rag Quilt Laptop Tote in Cobalt Denim and Yellow Flannel
- Diagonal Split Rag Quilt Grocery Tote in Teal Flannel and Washed Denim
- Oversized Rag Quilt Laundry Tote in Faded Denim and Gray Flannel
- Brickwork Rag Quilt Book Tote in Blue and Tan Plaid Flannel
- Rail Fence Rag Quilt Tote in Light, Medium, and Dark Denim Washes
Final Thoughts on Chic Rag Quilt Tote Bag Ideas
Rag quilting gives working bags a texture that ordinary patchwork does not, and these designs show how widely that texture can be used. Denim lends weight and a pale fringe, flannel brings softness and bloom, and chambray adds a lighter, finer edge. The ideas range from traditional blocks like the Nine Patch and Log Cabin to diagonal geometry, raw-edge appliqué, and working pockets. In each case, the finished character comes from how patch scale, color contrast, fringe, and silhouette work together. A well-made rag quilt tote treats the quilt surface and the bag as one design, so the patchwork suits the job the bag has to do.
When choosing a design, start with how the bag will be used and which techniques feel comfortable. Simple squares and rectangles are the most direct way into rag quilting, while diagonal units, appliqué, padded compartments, and oversized panels reward extra planning. Match fabric weight, stabilizer, and quilting density to the shape you want, whether that is a structured laptop tote or a soft market bag.
Plan the handles, base, pockets, and lining before cutting, and follow each bag’s own measurements rather than borrowing another’s. Before cutting a full set of patches, sew, clip, and wash one test seam in your chosen fabrics to see how far the fringe blooms. That tells you whether your patches are large enough to keep the pattern readable.

