15 Scandinavian Quilted Jackets and Vests Ideas for Effortless Nordic Elegance
Scandinavian Quilted Jackets are some of the most satisfying pieces you can make at home, and once you understand why, it’s hard to stop at just one. At their heart, they’re simple constructions — quilted panels, clean seams, relaxed silhouettes — which makes them surprisingly approachable even if you’ve only sewn a few garments before.
But that simplicity is exactly what gives them their Nordic character: there’s nowhere to hide a fussy detail, so the focus stays on good proportions, soft texture, and a quiet, considered finish. When you sew your own, you control all of it — the weight of the fabric, the muted palette, the drape across the shoulders — and you end up with a layering piece that fits your life far better than anything off a rack.
Contents
- 1 Scandinavian Quilted Jackets
- 2 1. Collarless Minimalist Quilted Jacket for Clean Everyday Nordic Style
- 2.1 A Guide to Making a Minimalist Black Quilted Jacket for Timeless Nordic Elegance
- 2.1.1 Why This Idea Is Worth Making
- 2.1.2 Suggested Finished Measurements
- 2.1.3 Materials Needed
- 2.1.4 Step-by-Step Guide
- 2.1.4.1 Step 1: Choose Your Black Fabric and Accent Tone
- 2.1.4.2 Step 2: Make the Quilted Fabric (or Skip if Pre-Quilted)
- 2.1.4.3 Step 3: Cut the Back Panel
- 2.1.4.4 Step 4: Cut the Front Panels
- 2.1.4.5 Step 5: Cut the Sleeves
- 2.1.4.6 Step 6: Sew the Shoulder Seams
- 2.1.4.7 Step 7: Attach the Sleeves
- 2.1.4.8 Step 8: Sew the Side and Sleeve Seams
- 2.1.4.9 Step 9: Finish the Edges with Tonal Binding
- 2.1.4.10 Step 10: Add a Minimal Closure (Optional)
- 2.1.5 Assembly Section
- 2.1.6 Interesting Backstory
- 2.1.7 Personal Styling Touch
- 2.1.8 Final Styling Idea
- 2.1 A Guide to Making a Minimalist Black Quilted Jacket for Timeless Nordic Elegance
- 3 2. Reversible Two-Tone Quilted Jacket for Versatile Scandi Dressing
- 3.1 A Guide to Making a Reversible Two-Tone Quilted Jacket for Versatile Scandi Dressing
- 3.1.1 Why This Idea Is Worth Making
- 3.1.2 Suggested Finished Measurements
- 3.1.3 Materials Needed
- 3.1.4 Step-by-Step Guide
- 3.1.4.1 Step 1: Choose Your Two-Tone Color Pairing
- 3.1.4.2 Step 2: Build the Two-Faced Quilted Fabric
- 3.1.4.3 Step 3: Cut the Back Panel
- 3.1.4.4 Step 4: Cut the Front Panels
- 3.1.4.5 Step 5: Cut the Sleeves
- 3.1.4.6 Step 6: Join Seams with Enclosed or Bound Finishes
- 3.1.4.7 Step 7: Attach the Sleeves with Bound Seams
- 3.1.4.8 Step 8: Sew and Bind the Side and Sleeve Seams
- 3.1.4.9 Step 9: Finish All Outer Edges with Binding
- 3.1.4.10 Step 10: Add a Reversible Closure
- 3.1.5 Assembly Section
- 3.1.6 Interesting Backstory
- 3.1.7 Personal Styling Touch
- 3.1.8 Final Styling Idea
- 3.1 A Guide to Making a Reversible Two-Tone Quilted Jacket for Versatile Scandi Dressing
- 4 3. Longline Quilted Coat for Elegant Cold-Weather Layering
- 4.1 A Guide to Making a Longline Quilted Coat for Elegant Cold-Weather Layering
- 4.1.1 Why This Idea Is Worth Making
- 4.1.2 Suggested Finished Measurements
- 4.1.3 Materials Needed
- 4.1.4 Step-by-Step Guide
- 4.1.4.1 Step 1: Choose a Rich, Wearable Color
- 4.1.4.2 Step 2: Make the Quilted Fabric in Long Panels
- 4.1.4.3 Step 3: Cut the Back Panel
- 4.1.4.4 Step 4: Cut the Front Panels
- 4.1.4.5 Step 5: Cut the Sleeves
- 4.1.4.6 Step 6: Sew the Shoulder Seams
- 4.1.4.7 Step 7: Attach the Sleeves
- 4.1.4.8 Step 8: Sew the Side and Sleeve Seams
- 4.1.4.9 Step 9: Add Pockets and a Collar (Optional but Recommended)
- 4.1.4.10 Step 10: Finish the Edges and Add the Closure
- 4.1.5 Assembly Section
- 4.1.6 Interesting Backstory
- 4.1.7 Personal Styling Touch
- 4.1.8 Final Styling Idea
- 4.1 A Guide to Making a Longline Quilted Coat for Elegant Cold-Weather Layering
- 5 4. Cropped Boxy Quilted Jacket for a Modern Minimalist Silhouette
- 5.1 A Guide to Making a Cropped Boxy Quilted Jacket for a Modern Minimalist Silhouette
- 5.1.1 Why This Idea Is Worth Making
- 5.1.2 Suggested Finished Measurements
- 5.1.3 Materials Needed
- 5.1.4 Step-by-Step Guide
- 5.1.4.1 Step 1: Choose One Confident Color
- 5.1.4.2 Step 2: Make the Quilted Fabric
- 5.1.4.3 Step 3: Cut the Back Panel
- 5.1.4.4 Step 4: Cut the Front Panels
- 5.1.4.5 Step 5: Cut the Sleeves
- 5.1.4.6 Step 6: Sew the Shoulder Seams
- 5.1.4.7 Step 7: Attach the Sleeves
- 5.1.4.8 Step 8: Sew the Side and Sleeve Seams
- 5.1.4.9 Step 9: Finish the Edges with Tonal Binding
- 5.1.4.10 Step 10: Add a Minimal Closure (Optional)
- 5.1.5 Assembly Section
- 5.1.6 Interesting Backstory
- 5.1.7 Personal Styling Touch
- 5.1.8 Final Styling Idea
- 5.1 A Guide to Making a Cropped Boxy Quilted Jacket for a Modern Minimalist Silhouette
- 6 5. Belted Wrap Quilted Jacket for Polished, Tailored Elegance
- 6.1 A Guide to Making a Belted Wrap Quilted Jacket for Polished, Tailored Elegance
- 6.1.1 Why This Idea Is Worth Making
- 6.1.2 Suggested Finished Measurements
- 6.1.3 Materials Needed
- 6.1.4 Step-by-Step Guide
- 6.1.4.1 Step 1: Choose a Rich, Sophisticated Color
- 6.1.4.2 Step 2: Make the Quilted Fabric
- 6.1.4.3 Step 3: Cut the Back Panel
- 6.1.4.4 Step 4: Cut the Wrap Front Panels
- 6.1.4.5 Step 5: Cut the Sleeves
- 6.1.4.6 Step 6: Cut the Belt and Loops
- 6.1.4.7 Step 7: Sew the Shoulder and Sleeve Seams
- 6.1.4.8 Step 8: Sew the Side Seams and Attach Belt Loops
- 6.1.4.9 Step 9: Finish All Edges with Binding
- 6.1.4.10 Step 10: Add an Inner Tie (Recommended)
- 6.1.5 Assembly Section
- 6.1.6 Interesting Backstory
- 6.1.7 Personal Styling Touch
- 6.1.8 Final Styling Idea
- 6.1 A Guide to Making a Belted Wrap Quilted Jacket for Polished, Tailored Elegance
- 7 6. Open-Front Quilted Vest for Relaxed Hygge Layering
- 8 7. Hooded Quilted Vest for Cozy Outdoor Nordic Comfort
- 9 8. Channel-Quilted Jacket for Subtle Vertical Texture and Sleek Lines
- 10 9. Diamond-Quilted Vest for Refined Luxury Texture
- 11 10. Scandi Color-Block Patchwork Jacket for a Vibrant Modern Look
- 12 11. Wool-Blend Quilted Jacket for Premium Cozy Warmth
- 13 12. Lightweight Packable Quilted Vest for Effortless Travel Style
- 14 13. Stand-Collar Quilted Jacket for a Sleek Utilitarian Finish
- 15 14. Shawl-Collar Quilted Wrap Vest for Soft Relaxing Elegance
- 16 15. Contrast-Bound Quilted Jacket with Bold Piping for Playful Nordic Charm
- 17 Conclusion
What makes Scandinavian quilted jackets such a rewarding sewing project is that the “Scandi” philosophy favors restraint over complexity. A collarless boxy jacket, a reversible two-tone layer, a belted wrap, a channel-quilted vest — each one teaches a slightly different technique, but none of them asks for advanced tailoring. I find that especially meaningful because I grew up in Dhaka watching artisans build beauty out of patient, repetitive hand-stitching — Nakshi Kantha quilts made from layered cloth and simple running stitches.
That heritage taught me that the value in a quilted garment lives in the making: the rhythm of the stitches, the texture that builds up layer by layer, the small imperfections that prove a human hand was here. Scandinavian quilting carries that same spirit, just dressed in calmer colors and cleaner lines.
This collection walks you through 15 different jackets and vests, each a distinct project rather than a color swap of the last. You’ll move from minimalist, collarless shapes to longline coats, from diamond and channel quilting techniques to reversible, packable builds, from cozy hooded vests to tailored, belted wraps. Some are quick weekend makes; others are pieces you’ll want to take your time with. Whatever your skill level and whatever mood you’re after — minimalist, luxe, vibrant, or relaxed — there’s a project here worth threading a needle for.
See also: Scandinavian Quilt Pattern – Boho Quilt Jackets – Japanese Quilt Jackets – Nakshi Kantha Accessories Jacket
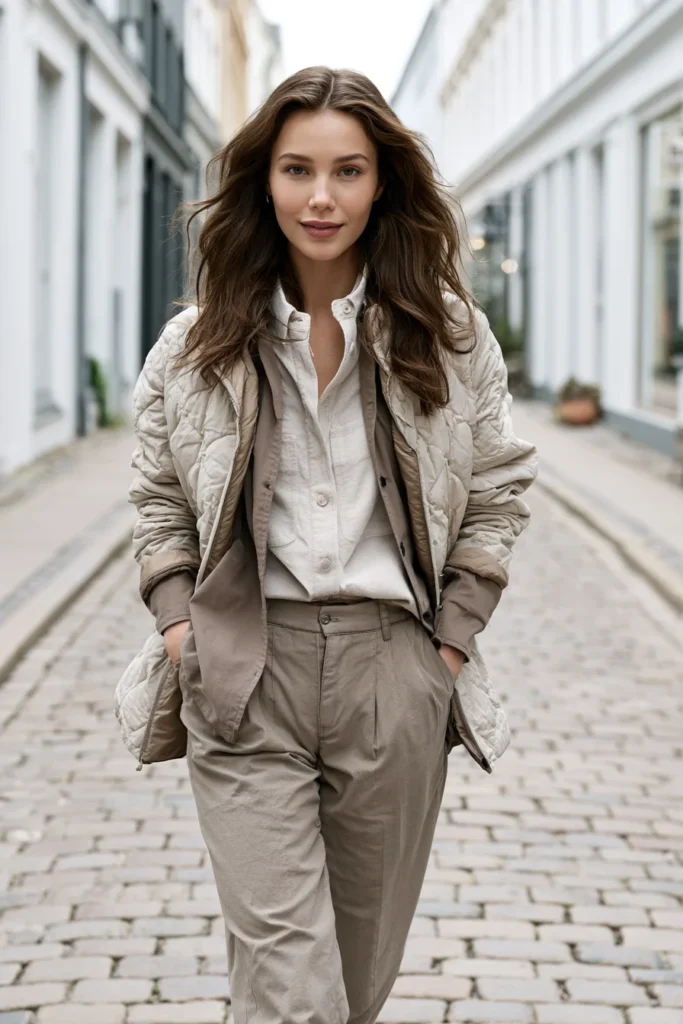
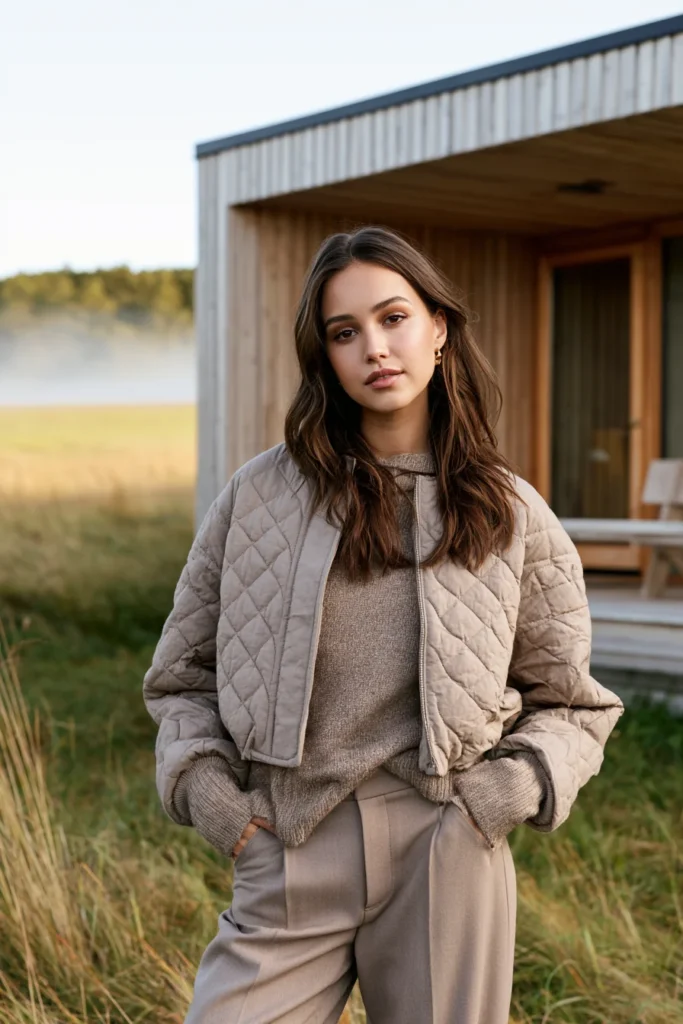
1. Collarless Minimalist Quilted Jacket for Clean Everyday Nordic Style
A Guide to Making a Minimalist Black Quilted Jacket for Timeless Nordic Elegance
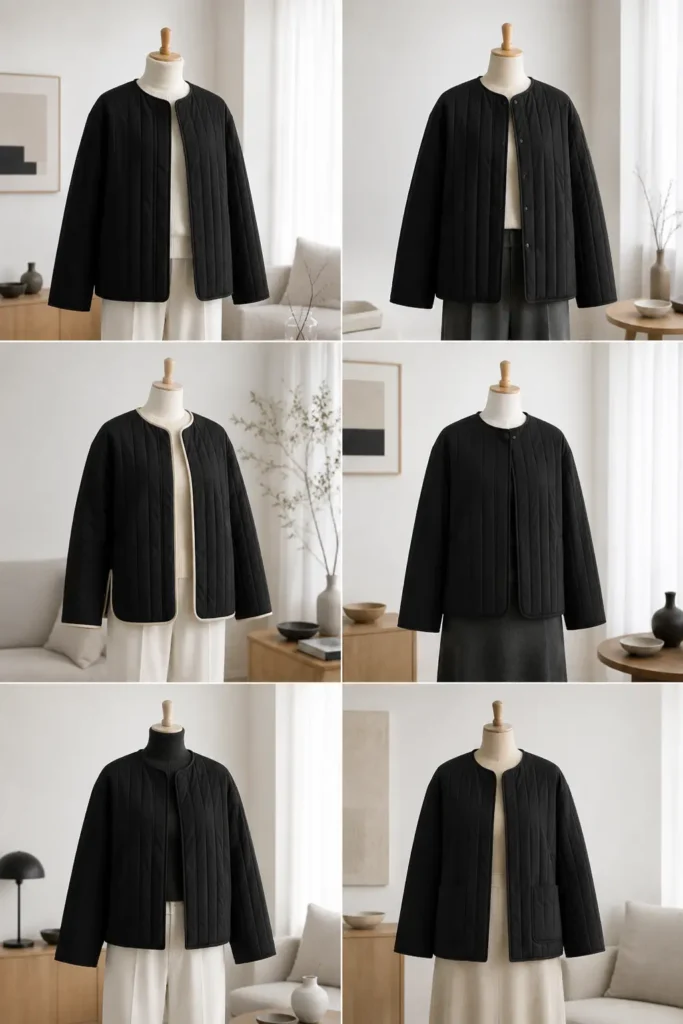
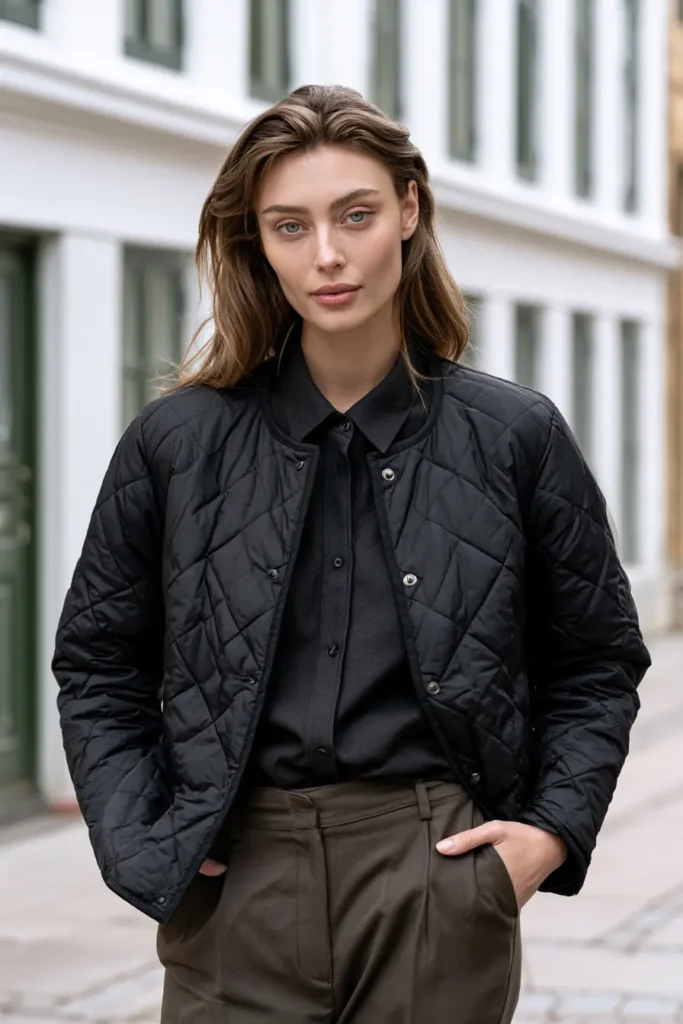
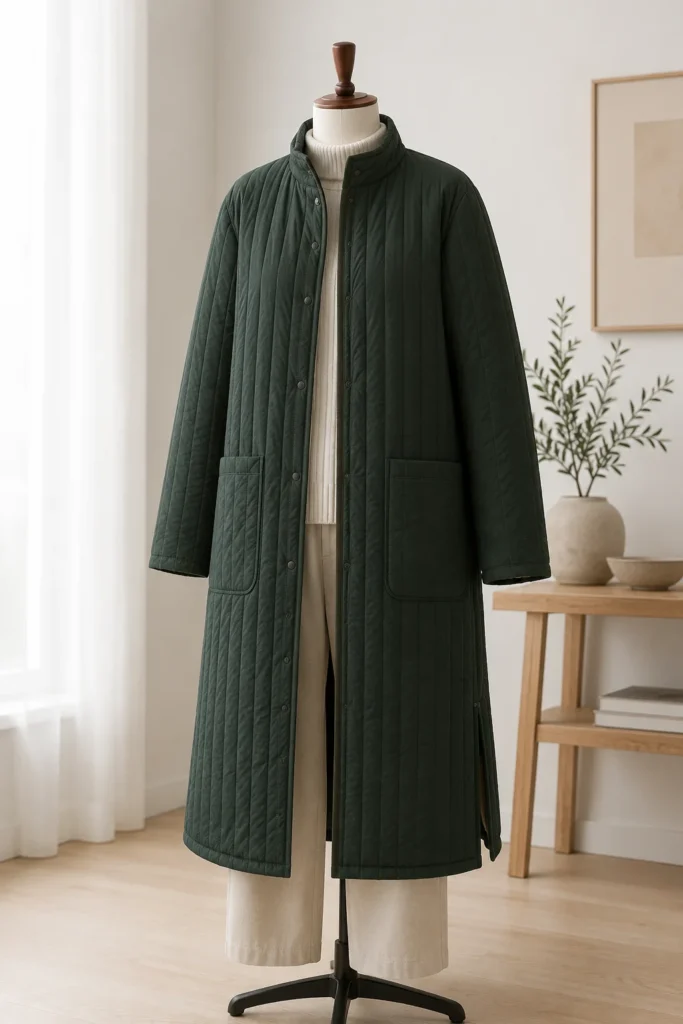
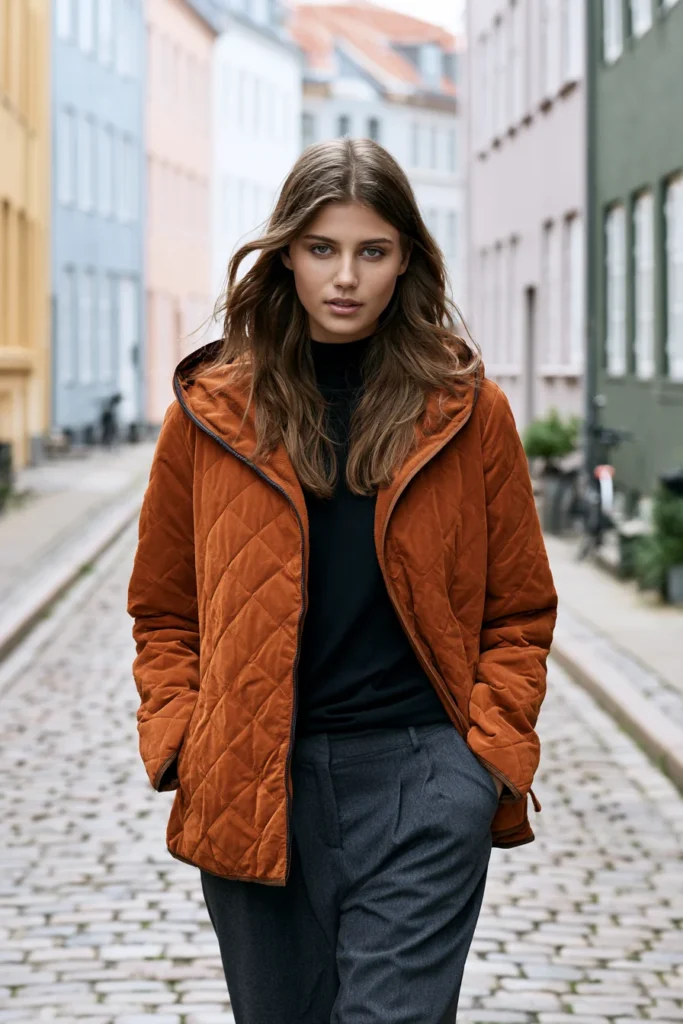
A Minimalist Black Quilted Jacket is a clean, collarless outer layer made from softly quilted fabric in a single deep black tone, with straight quilting lines, a relaxed straight-cut body, and almost no decorative detail. It is the kind of piece that looks expensive precisely because it does so little — no prints, no hardware on display, no fuss. The beauty lives in the proportions, the even quilting, and the matte softness of a good black fabric.
I came up with this idea because black is the hardest color to get right and the most rewarding when you do. A vibrant patchwork jacket forgives a wobbly seam; a minimalist black one shows everything. That challenge is exactly why making one teaches you more about clean garment sewing than almost any other project, and why the finished jacket becomes the layer you reach for endlessly — over jeans, over knitwear, over a dress on a cool evening.
Why This Idea Is Worth Making
Why this idea is worth making: it is the definition of a wardrobe workhorse. A black quilted jacket goes with everything, hides nothing, and never dates. Sewing it yourself means you control the one thing store-bought black jackets get wrong — the weight. You can make it light enough to layer under a coat or substantial enough to stand alone, and you can choose a true matte black instead of the slightly shiny synthetics that fill the shops. It is also a forgiving first step into minimalist garment sewing, because the straight lines and single color mean there are no prints to match and no patchwork to align.
Suggested Finished Measurements
For a relaxed medium-size jacket that hits at the high hip:
- Finished length: 26–28 inches
- Finished chest width: 22–24 inches across
- Shoulder width: 17–18 inches
- Sleeve length from shoulder: 23–24 inches
- Sleeve width: 15–16 inches
- Armhole depth: 10–11 inches
- Seam allowance: ½ inch
For an oversized look, add 2 inches to the body and sleeve widths.
Materials Needed
- Black quilted fabric, or black cotton/linen-blend shell plus thin batting and black lining: 2½ to 3 yards
- Black lining fabric, if quilting your own: 2½ yards
- Thin cotton batting: 2½ yards
- Black bias binding: 5 to 6 yards (or charcoal for a subtle tonal edge)
- Black thread, plus optional bone-white or slate-grey thread for visible topstitching
- 3–4 concealed snaps or one matte-black button, optional
- Rotary cutter or fabric scissors
- Measuring tape
- Fabric chalk (use white or silver chalk so it shows on black)
- Pins or sewing clips
- Walking foot for your sewing machine, recommended for even quilting
- Iron
Step-by-Step Guide
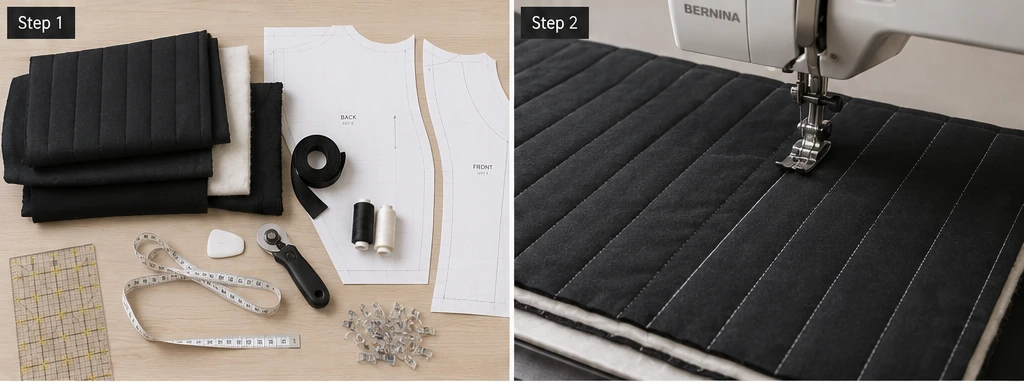
Step 1: Choose Your Black Fabric and Accent Tone
Start with the right black. A matte cotton-linen blend or brushed twill reads as far more elegant than a shiny synthetic. If you want the smallest hint of warmth, choose an accent thread in bone white, soft slate grey, or charcoal for the topstitching. This single restrained accent is the only “color” decision in the whole jacket, and it is what keeps the piece from feeling flat.
For a tonal, almost invisible finish, keep the topstitching black on black. For a subtle Scandi graphic touch, go bone white.
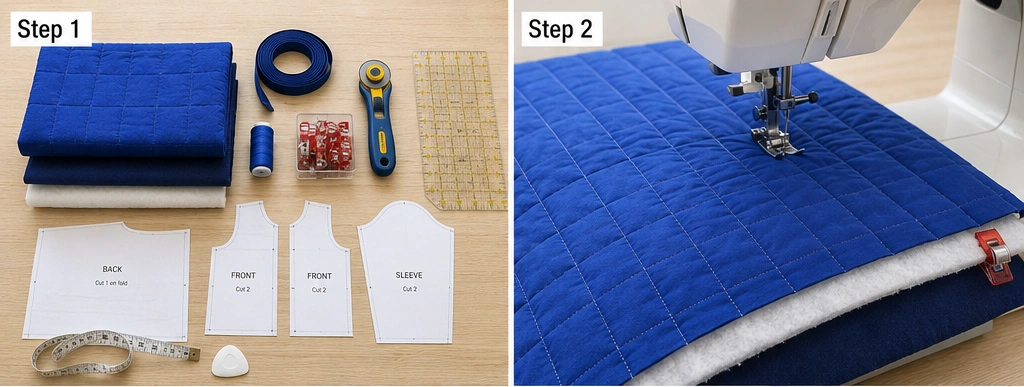
Step 2: Make the Quilted Fabric (or Skip if Pre-Quilted)
If you are quilting your own, layer the black shell, thin batting, and black lining. Smooth the layers and pin generously. Quilt straight vertical lines spaced about 1½ to 2 inches apart using a walking foot. Keep the lines genuinely straight — on black, any wobble shows. Mark guidelines first with white chalk and a ruler.
If using ready-made quilted fabric, you can skip straight to cutting.
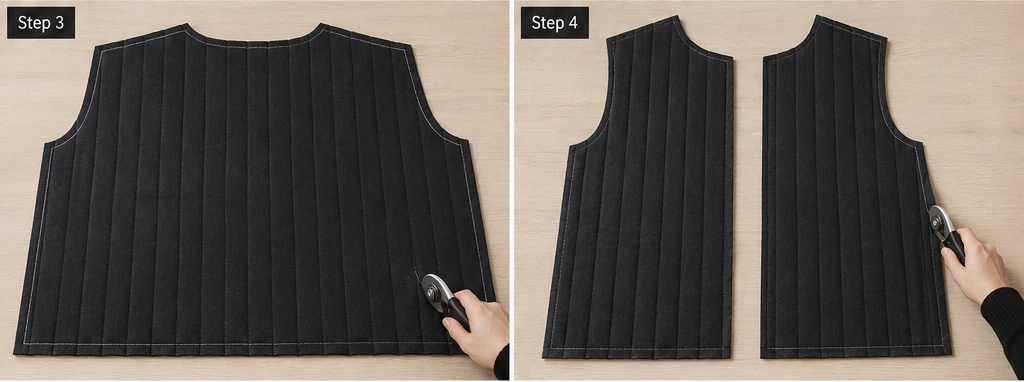
Step 3: Cut the Back Panel
Cut one back panel about 24 inches wide × 28 inches long. Cut a shallow back neckline about 7 inches wide × 1½ inches deep. Keep the hem straight and clean — a minimalist jacket relies on crisp, simple edges.
Step 4: Cut the Front Panels
Cut two front panels, each about 13 inches wide × 28 inches long, matching the back length. Shape the front neckline with a gentle curve from the shoulder down about 5–6 inches along the center front. For a collarless look, keep the neckline clean and rounded rather than notched.
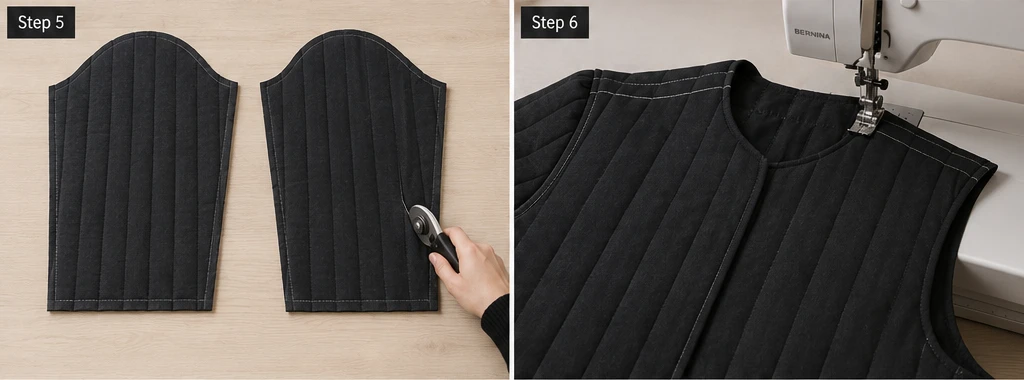
Step 5: Cut the Sleeves
Cut two sleeves about 17 inches wide × 24 inches long. For a slightly cropped, modern sleeve, shorten to 22 inches. Keep the sleeve width consistent rather than tapered — a straight, easy sleeve suits the relaxed Nordic silhouette.
Step 6: Sew the Shoulder Seams
Place the front panels on the back panel, right sides together. Match the shoulder edges and sew with a ½ inch seam allowance. Because quilted black fabric can be bulky, press the seam toward the back and topstitch it down with your chosen accent thread. This is your first chance to let the bone-white or slate topstitching show.
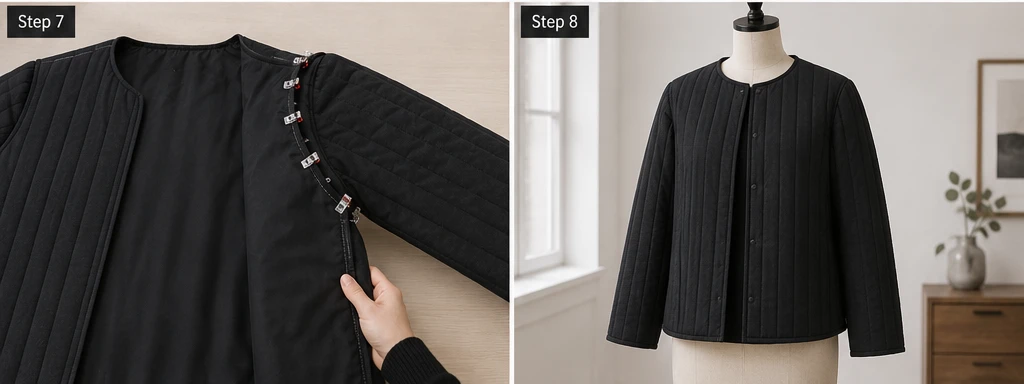
Step 7: Attach the Sleeves
Open the jacket flat, right side up. Center each sleeve along the shoulder seam, right sides together, pin or clip carefully, and sew with a ½ inch seam allowance. Take the armhole curve slowly so the sleeve sits smoothly — clean armholes are what separate a refined jacket from a homemade-looking one.
Step 8: Sew the Side and Sleeve Seams
Fold the jacket right sides together. Match the sleeve edges, underarms, and side seams. Sew in one continuous line from the cuff down to the underarm and along the side. For ease of movement and a softer drape, leave 6–8 inches open at the lower side seams to create discreet side slits.
Step 9: Finish the Edges with Tonal Binding
Bind the neckline, front opening, hem, cuffs, and side slits with black or charcoal bias binding. On a minimalist jacket the binding should disappear into the fabric, framing the shape without announcing itself. Topstitch the binding down evenly — this is the most visible stitching on the jacket, so keep it parallel and clean.
Step 10: Add a Minimal Closure (Optional)
For a true minimalist finish, install 3–4 concealed snaps behind the front opening so the jacket closes without any visible hardware. If you prefer a single focal point, add one matte-black button at the chest. Or leave it completely open — an open-front black quilted jacket is the most effortless option of all.
Assembly Section
Once the shoulders, sleeves, and side seams are sewn, try the jacket on before binding. Check that the shoulders sit cleanly, the sleeves move freely, and the front edges hang straight and even — on black, an uneven hem is glaring, so trim carefully here. When the fit is right, bind all raw edges, then topstitch along the shoulder seams, front opening, and hem for a sharp, finished line. Add the closure last so you can position the snaps or button exactly where the jacket naturally falls closed. Give the whole jacket a final press, since crisp edges are what make a minimalist piece look intentional rather than plain.

Interesting Backstory
Black has a particular history in Nordic design, where long dark winters made deep, practical tones a natural part of everyday dressing, and where the broader Scandinavian design philosophy of “less, but better” turned restraint into a mark of quality rather than poverty of imagination. There is an interesting contrast with the textile world I grew up in: in Dhaka, the Nakshi Kantha quilts I watched artisans make were often joyfully colorful, telling stories through bright running stitches across reclaimed cloth. Making a disciplined black jacket draws on the same patient hand-stitched tradition, just channeled toward stillness instead of story — proof that the craft of quilting can speak in a whisper as easily as in full color.
Personal Styling Touch
My favorite version of this jacket uses a soft matte-black brushed cotton with bone-white topstitching running in clean vertical lines, and concealed snaps so nothing interrupts the surface. The single off-white stitch detail is the whole personality of the piece — restrained, deliberate, and quietly beautiful. It is the kind of jacket I would keep on a hook by the door, knowing it works over almost anything without a second thought.
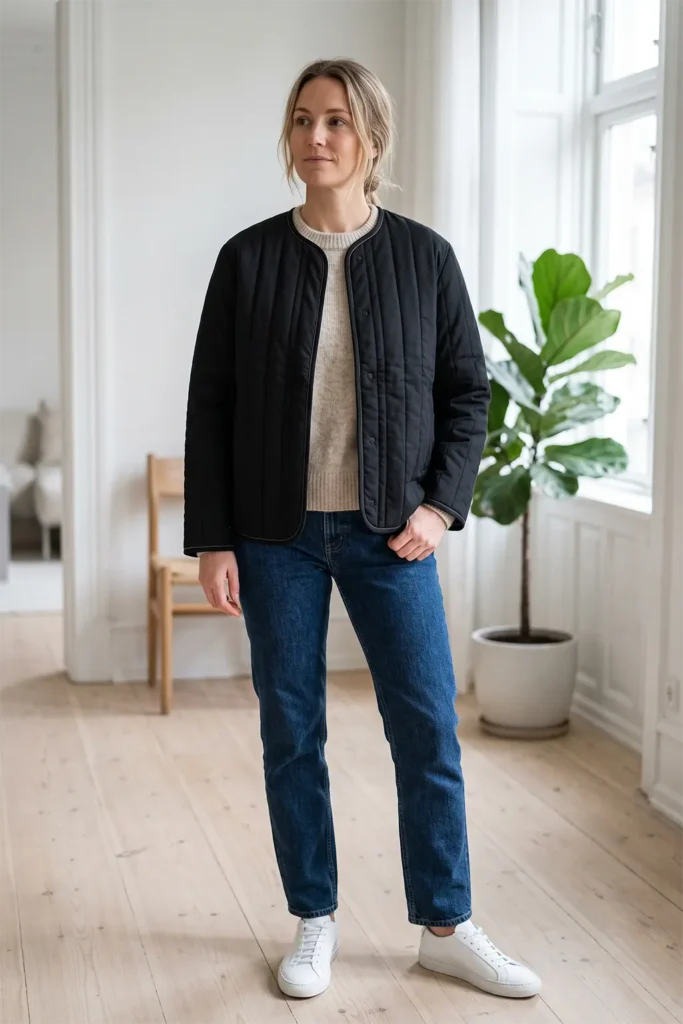
Final Styling Idea
Wear this minimalist black quilted jacket over a charcoal or cream knit with straight-leg jeans and white leather sneakers for an easy everyday look. For something more polished, layer it over a black turtleneck and tailored trousers with ankle boots. For a softer, relaxing weekend feel, throw it open over a bone-white tee and grey lounge trousers.
Keep the palette tight — black, charcoal, slate grey, bone white, and soft cream — and the jacket carries that effortless, timeless Nordic elegance every time.
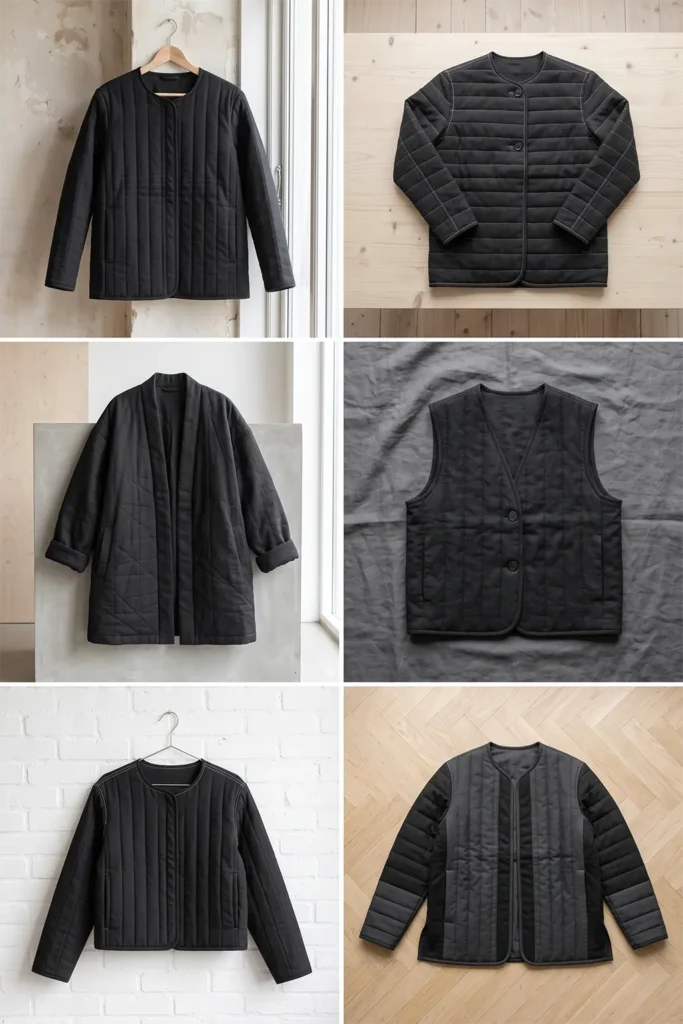
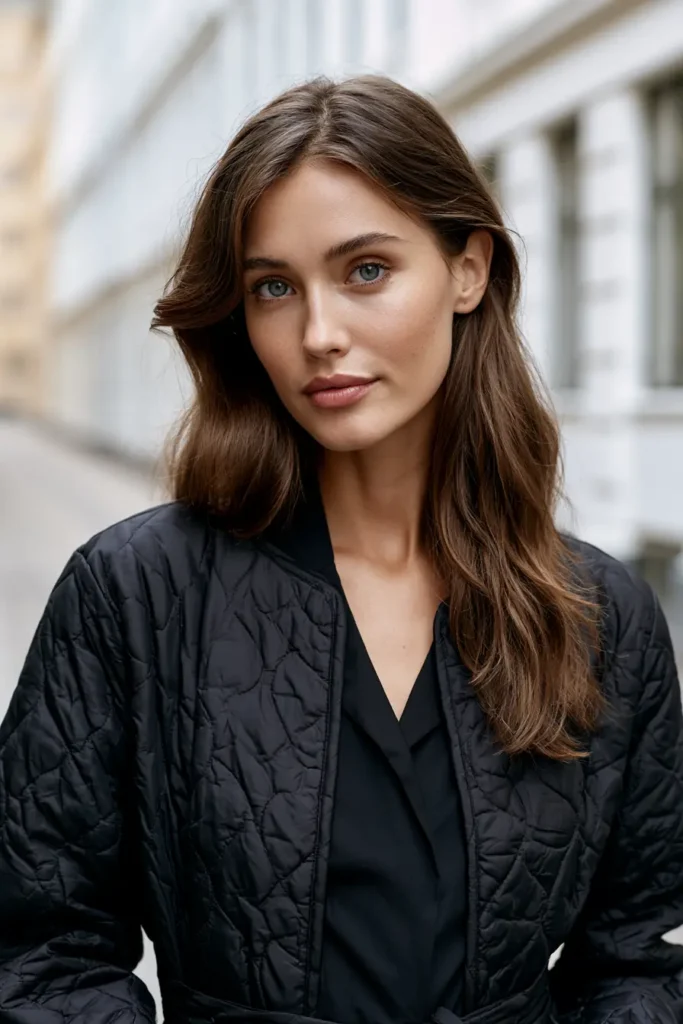
Other Design Inspirations – Digitally Modified
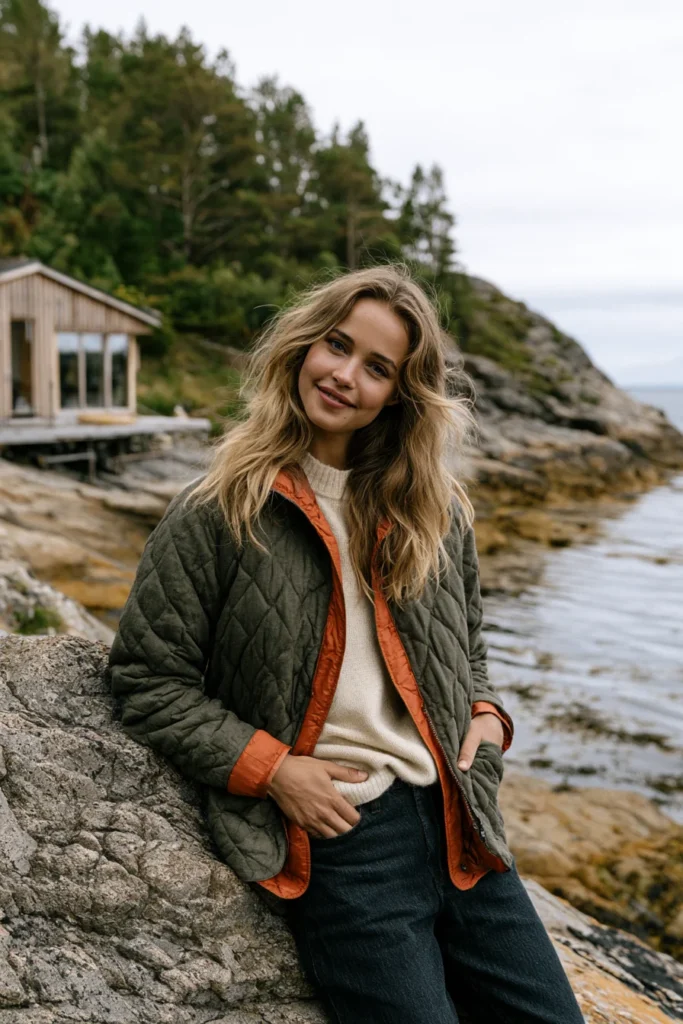
2. Reversible Two-Tone Quilted Jacket for Versatile Scandi Dressing
A Guide to Making a Reversible Two-Tone Quilted Jacket for Versatile Scandi Dressing
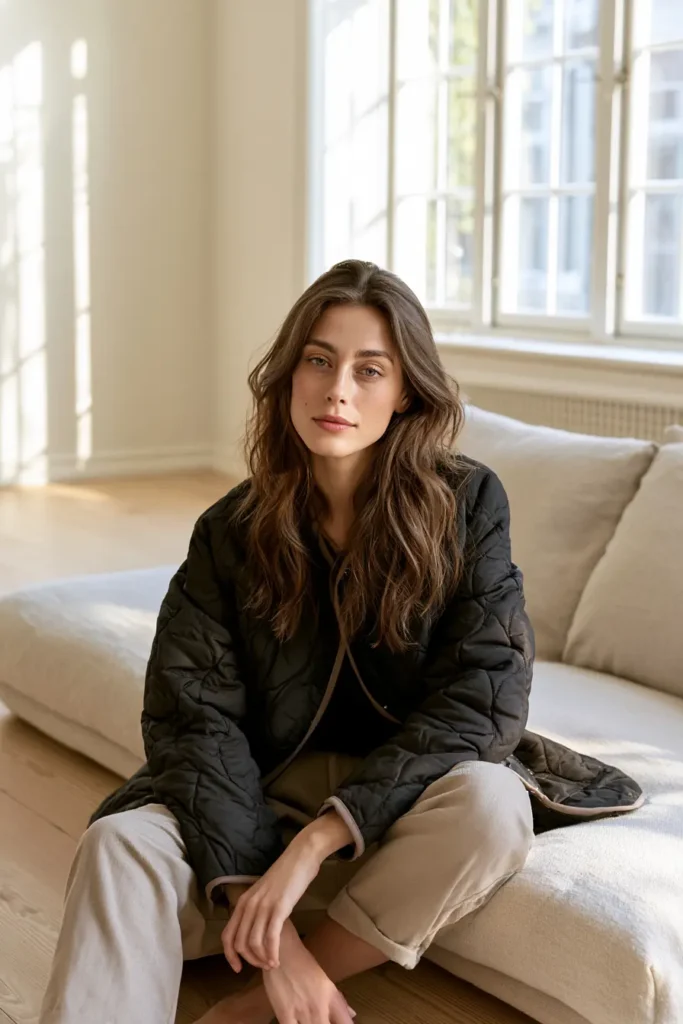
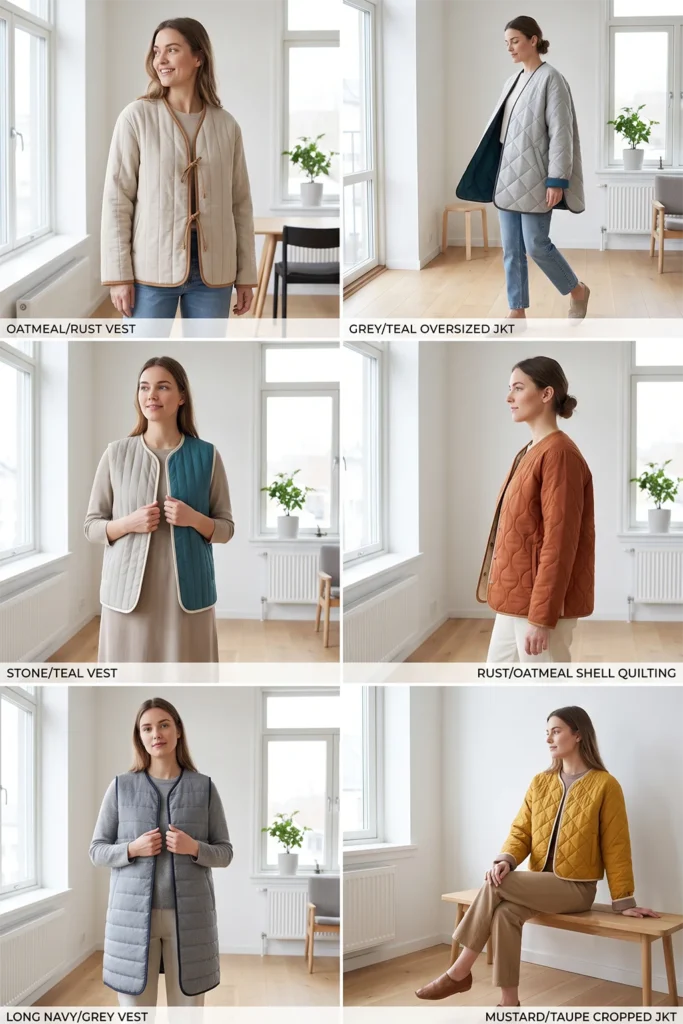
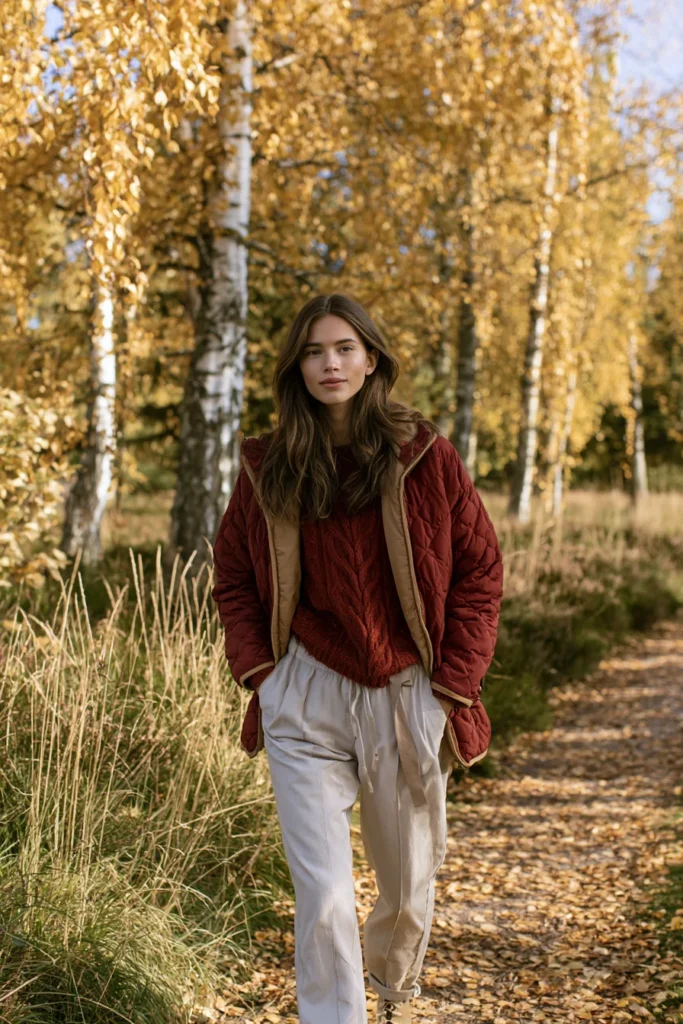
A Reversible Two-Tone Quilted Jacket is a double-faced layer built so both sides are fully wearable, each in a different color, giving you two distinct jackets in one. One face might be a calm oatmeal or soft grey, the other a richer rust, ochre, or deep teal — flip it depending on your mood, your outfit, or the day. Because both sides show, the construction is a little more thoughtful than a standard lined jacket: there are no raw seams hiding anywhere, and every edge is finished to look intentional from either direction.
I came up with this idea because reversibility is the most Scandinavian thing a garment can do — it is quietly practical, it earns its place in a small wardrobe, and it gives you maximum use from a single piece. One jacket, two looks, zero waste. That efficiency-meets-elegance balance is the heart of Nordic dressing, and a two-tone reversible jacket delivers it better than almost anything else you can sew.
Why This Idea Is Worth Making
Why this idea is worth making: it doubles your wardrobe with one project. A reversible jacket means a single make covers two color stories — a muted neutral side for understated days and a warmer, richer side when you want a little presence. It is ideal for travel and capsule wardrobes, since one packed jacket behaves like two. Sewing it yourself also lets you pair colors that actually work together rather than settling for whatever a shop decided, and the double-faced construction teaches you a genuinely useful skill: finishing a garment so cleanly that it has no “wrong” side at all.
Suggested Finished Measurements
For a relaxed medium-size jacket that hits at the hip:
- Finished length: 26–28 inches
- Finished chest width: 23–25 inches across
- Shoulder width: 17–18 inches
- Sleeve length from shoulder: 23–24 inches
- Sleeve width: 15–16 inches
- Armhole depth: 10–11 inches
- Seam allowance: ½ inch
For an oversized fit, add 2 inches to the body and sleeve widths.
Materials Needed
- Fabric for Side A (muted tone — oatmeal, soft grey, or bone): 2½ to 3 yards
- Fabric for Side B (richer tone — rust, ochre, deep teal, or mustard): 2½ to 3 yards
- Thin cotton batting (keep it slim so the jacket stays reversible-friendly): 2½ yards
- Bias binding in a color that bridges both sides (camel, charcoal, or cream): 5 to 6 yards
- Thread to suit both fabrics
- Fabric clips (better than pins for thick double-faced layers)
- Rotary cutter or fabric scissors
- Measuring tape
- Fabric chalk
- Walking foot, recommended
- Iron
Step-by-Step Guide
Step 1: Choose Your Two-Tone Color Pairing
Pick one muted side and one richer accent side. Strong Scandi pairings include oatmeal with rust, soft grey with deep teal, bone with ochre, or stone with mustard. The trick is to keep one side quiet so the jacket always has a “calm” option, while the second side brings warmth and energy. Both colors should be ones you would happily wear on their own.
For the binding, choose a third color that flatters both — camel, charcoal, or cream all bridge a neutral and a warm tone nicely.
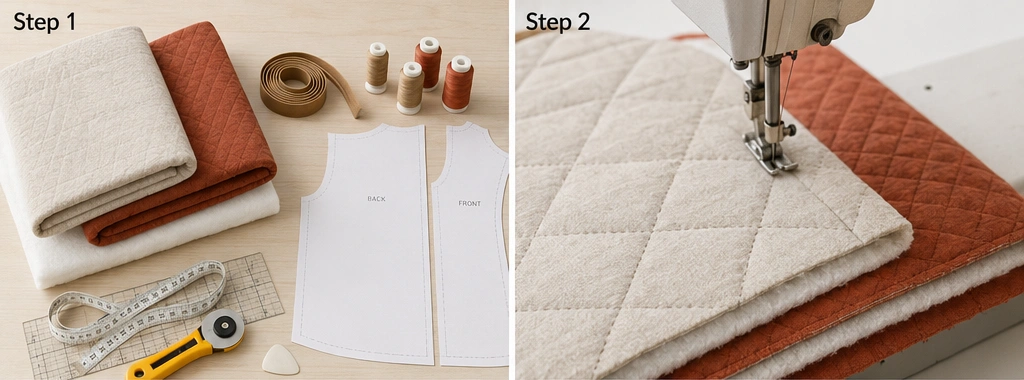
Step 2: Build the Two-Faced Quilted Fabric
Layer Side A fabric, thin batting, and Side B fabric together, with the two right sides facing outward and the batting sandwiched between. Smooth and clip thoroughly. Quilt straight lines or a soft diamond pattern spaced about 1½ to 2 inches apart. Because both faces show, choose a thread that looks good on both colors, or use a bobbin thread matched to Side B and a top thread matched to Side A.
Keep the batting thin — a slim quilt sandwich is what keeps the finished jacket flexible enough to flip and wear comfortably either way.
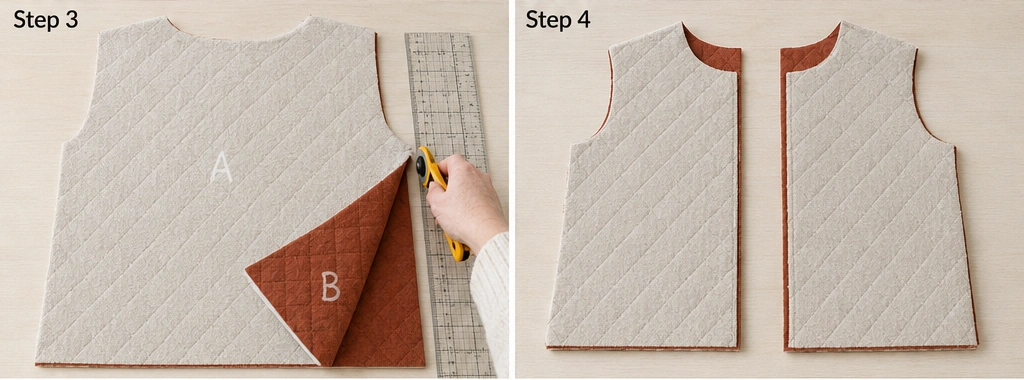
Step 3: Cut the Back Panel
From your quilted two-faced fabric, cut one back panel about 25 inches wide × 28 inches long. Cut a shallow back neckline about 7 inches wide × 1½ inches deep. Mark which side is A and which is B with a removable chalk note so you stay oriented as you build.
Step 4: Cut the Front Panels
Cut two front panels, each about 13 inches wide × 28 inches long, matching the back length. Shape the front neckline with a gentle curve from the shoulder down about 5–6 inches. Keep the front edges straight and clean so they hang evenly when worn open from either side.
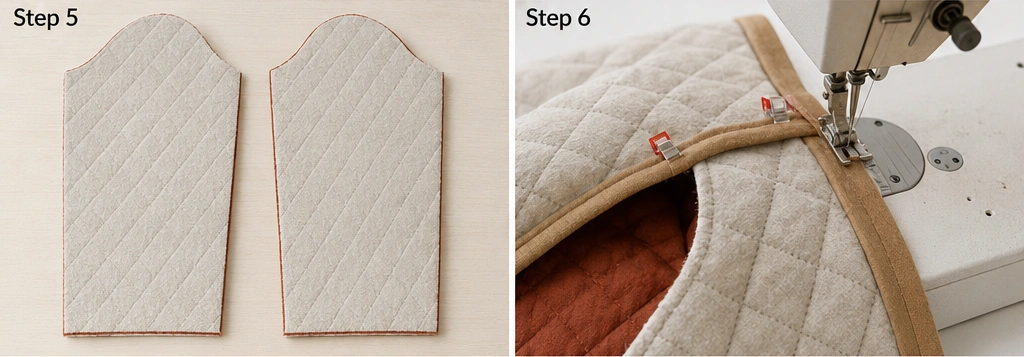
Step 5: Cut the Sleeves
Cut two sleeves about 17 inches wide × 24 inches long. Keep the sleeve a straight, easy shape rather than tapered. Double-check that all your pieces are cut with the same side facing up, so Side A is consistently Side A across the whole jacket.
Step 6: Join Seams with Enclosed or Bound Finishes
This is the key reversible step: every seam must be clean on both sides. Sew the shoulder seams with right sides of Side A together, then finish the seam allowances with bias binding so no raw edge shows on Side B — this is called a bound (or Hong Kong) seam. Repeat for all structural seams. It takes a little longer than a standard seam, but it is what makes the jacket truly two-sided.
Step 7: Attach the Sleeves with Bound Seams
Center each sleeve along the shoulder seam and sew with a ½ inch seam allowance, then bind the armhole seam allowance just as you did the shoulders. Work the curve slowly and clip the binding so it lies flat around the armhole. Clean, bound armholes are the detail that sells the “no wrong side” effect.
Step 8: Sew and Bind the Side and Sleeve Seams
Fold the jacket and sew from cuff to underarm to side hem in one line, then bind that seam allowance. Leave 6–8 inches open at the lower side seams for side slits, and finish those slit edges with binding too. Every edge a viewer could see from either side should now be enclosed.
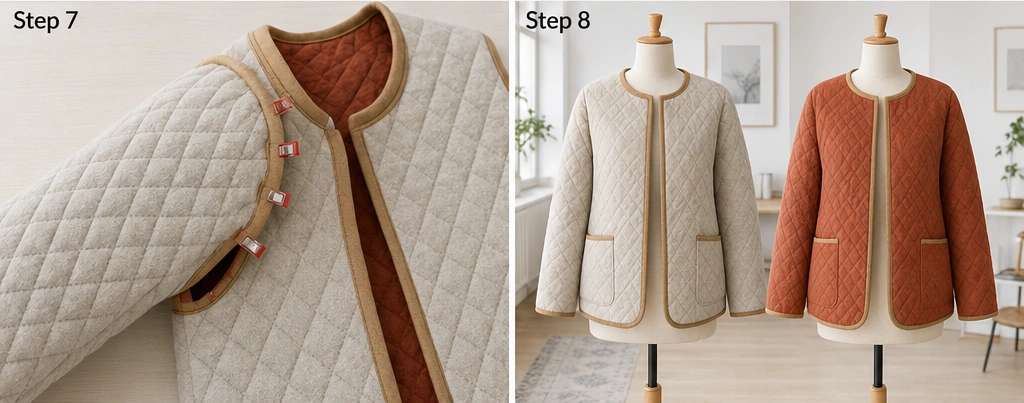
Step 9: Finish All Outer Edges with Binding
Bind the neckline, front opening, hem, and cuffs with your bridging-color bias binding. On a reversible jacket the binding does double duty — it finishes the edge and frames both faces at once, so topstitch it down evenly and slowly. This continuous bound edge is the visual signature of a well-made reversible piece.
Step 10: Add a Reversible Closure
Standard buttons have a wrong side, so for a true reversible jacket use fabric ties (sew one to each front edge, finished on both faces) or double-sided snaps designed to look clean from either direction. Or leave it open — an open-front reversible jacket is the simplest and most versatile option, letting you show whichever side you choose with no closure interrupting the line.
Assembly Section
Once all seams are sewn and bound, try the jacket on both ways before final pressing. Check that the shoulders sit cleanly, the front edges hang even, and — crucially — that both faces look equally finished, with no binding twisting or raw edge peeking through. Trim and re-bind anything that looks off, since on a reversible piece a flaw shows from one side or the other. When everything is clean, give the jacket a thorough press from both sides, add your ties or snaps last, and confirm the closure works neatly whichever way you wear it.
Interesting Backstory
Reversible and double-faced textiles have a long, practical history across many cultures — fabric was valuable, so cloth that could be used on both sides earned its keep. There is a lovely connection to the Nakshi Kantha tradition I grew up around in Dhaka: Kantha is stitched with simple running stitches that pass through every layer, which means the pattern naturally appears on both faces of the cloth. Those quilts were quietly reversible long before reversible became a fashion idea. Building a two-tone Scandi jacket draws on that same logic — a garment with no hidden side, made to be useful from every angle, just dressed here in cool Nordic restraint on one face and warm color on the other.
Personal Styling Touch
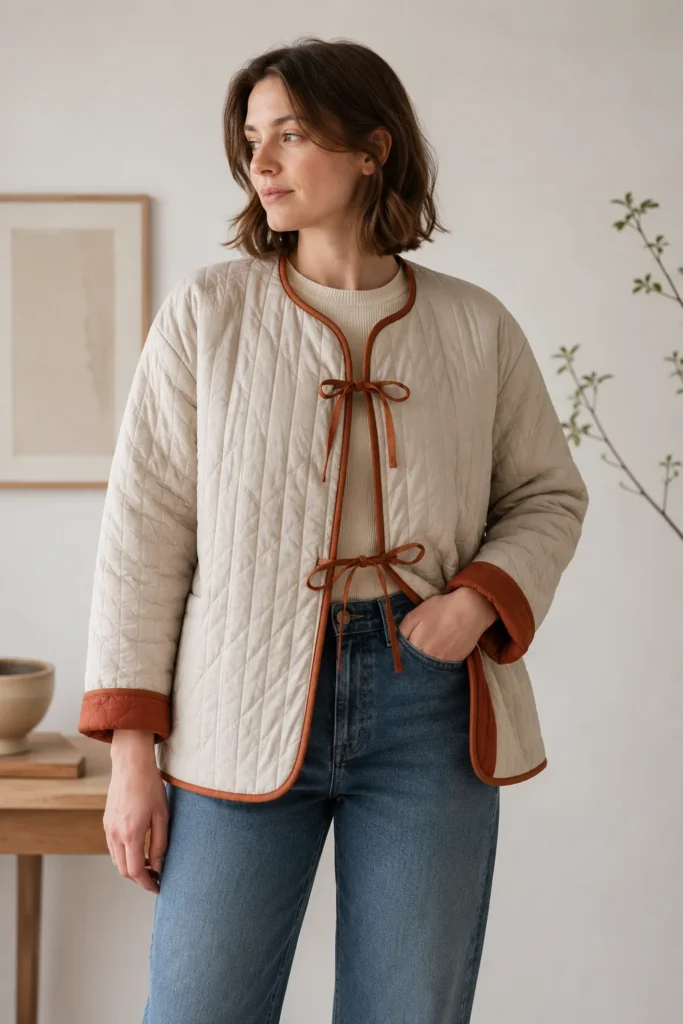
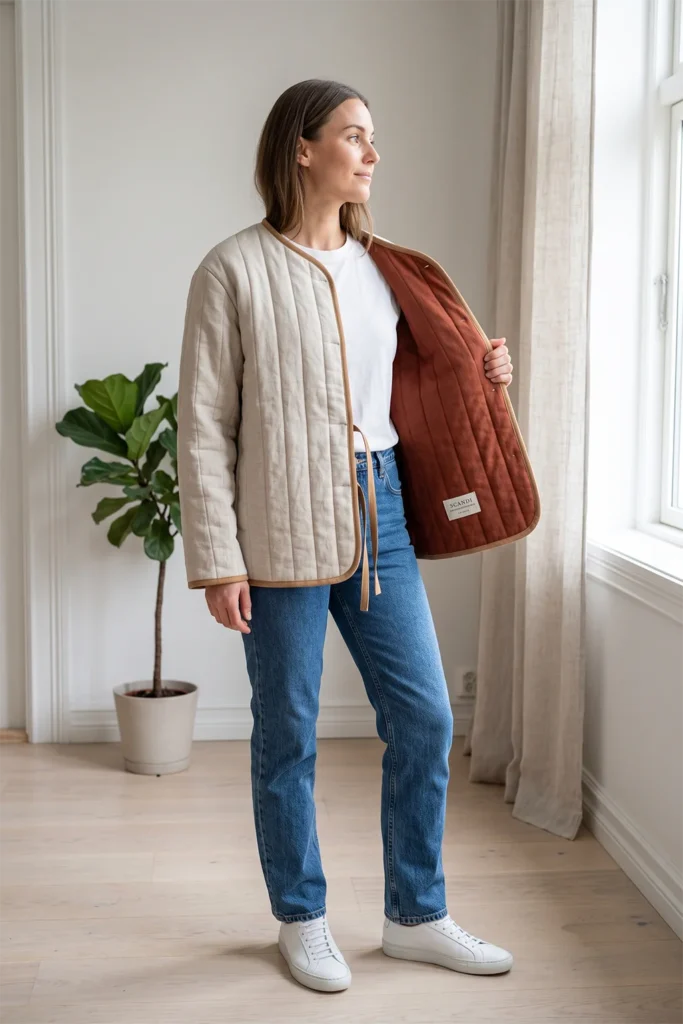
My favorite version pairs a soft oatmeal side with a deep rust reverse, bound all around in warm camel, and closed with two simple fabric ties at the front. On grey, quiet days I wear the oatmeal out; when an outfit needs lifting, I flip to the rust. The camel binding ties both worlds together, so it never looks like two unrelated jackets — just one thoughtful piece with two moods.
Final Styling Idea
Wear the muted side out over a white tee, straight jeans, and clean sneakers for an understated everyday look. Flip to the warm rust or teal side over a cream knit and wide-leg trousers when you want the outfit to carry a little more color and confidence. For travel, this is the one jacket to pack — it covers a quiet daytime look and a richer evening one without taking up a second slot in your bag.
Keep the two palettes intentional — a muted neutral on one side, a warm Nordic accent on the other, bridged by a single binding color — and the jacket delivers genuinely versatile Scandi dressing every time.
Other Design Inspirations – Digitally Modified
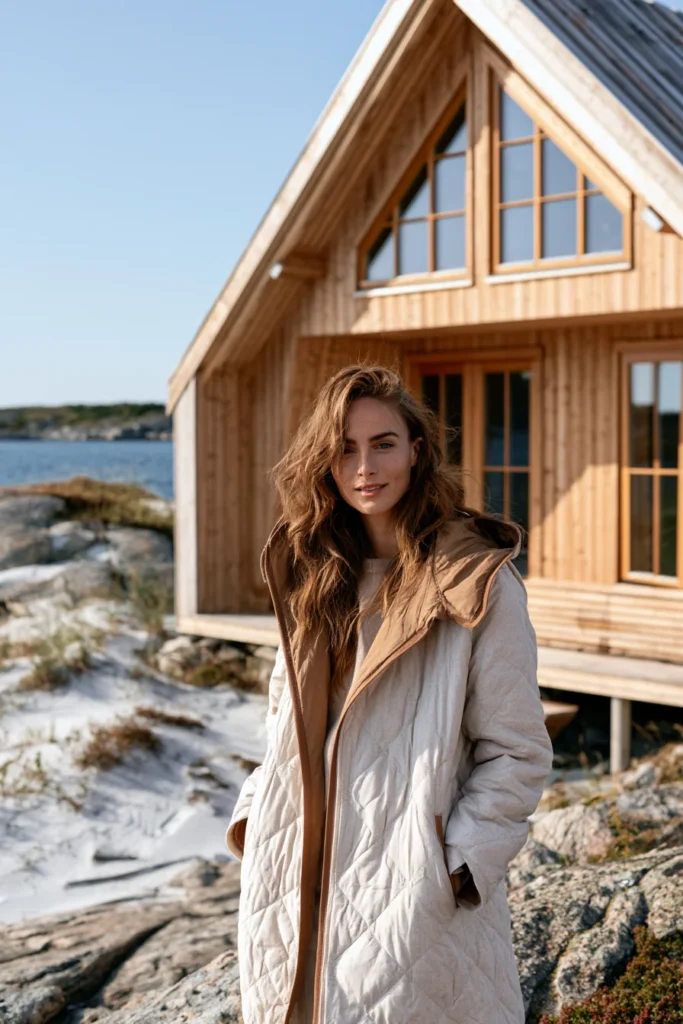
3. Longline Quilted Coat for Elegant Cold-Weather Layering
A Guide to Making a Longline Quilted Coat for Elegant Cold-Weather Layering
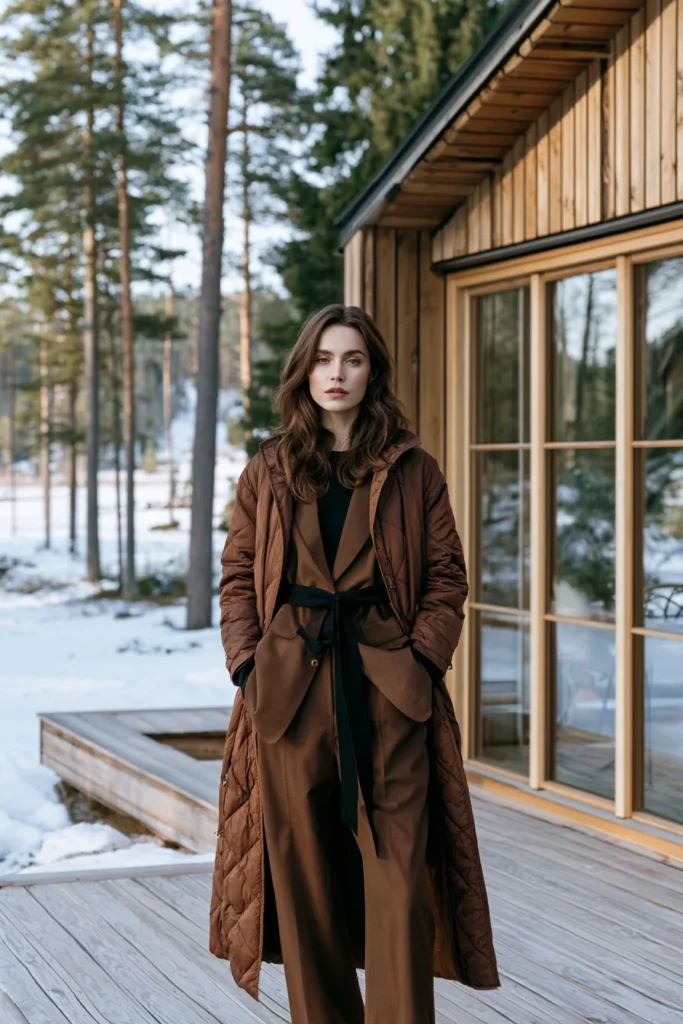
A Longline Quilted Coat is a knee-length or below-the-knee quilted layer built for real warmth and a long, elegant line. Where a short jacket is about ease, a longline coat is about presence and coverage — it falls in a clean column from shoulder to hem, drapes over heavier knitwear, and carries you through the coldest stretch of the year while still looking considered. The length is the whole point: it does the quiet, statuesque thing that defines Nordic winter dressing.
I came up with this idea because the longer you make a quilted piece, the more it has to earn its proportions — and getting those proportions right is deeply satisfying. A longline coat is also the most genuinely useful cold-weather garment in this collection. It is the one you reach for when the temperature actually drops, layered over a sweater on a grey winter walk, and the deep color keeps it from feeling heavy or severe.

Why This Idea Is Worth Making
Why this idea is worth making: it is the warmest, most practical piece you can sew here, and the most quietly dramatic. The extra length means extra warmth across the hips and thighs, real coverage in cold wind, and an elegant column silhouette that flatters almost everyone. Making it yourself lets you choose a length that actually suits your height — store-bought longline coats are notoriously hit-or-miss in terms of proportion — and a rich, wearable color you genuinely love, rather than the endless black and grey on the rails. It also teaches you to handle a larger quilted panel cleanly, which is a real step up in skill.
Suggested Finished Measurements
For a relaxed medium-size coat hitting just below the knee:
- Finished length: 44–48 inches (adjust to your height)
- Finished chest width: 24–26 inches across
- Shoulder width: 17–18 inches
- Sleeve length from shoulder: 24–25 inches
- Sleeve width: 16–17 inches
- Armhole depth: 11–12 inches
- Seam allowance: ½ inch
For an oversized cocoon shape, add 2–3 inches to the body and sleeve widths.
Materials Needed
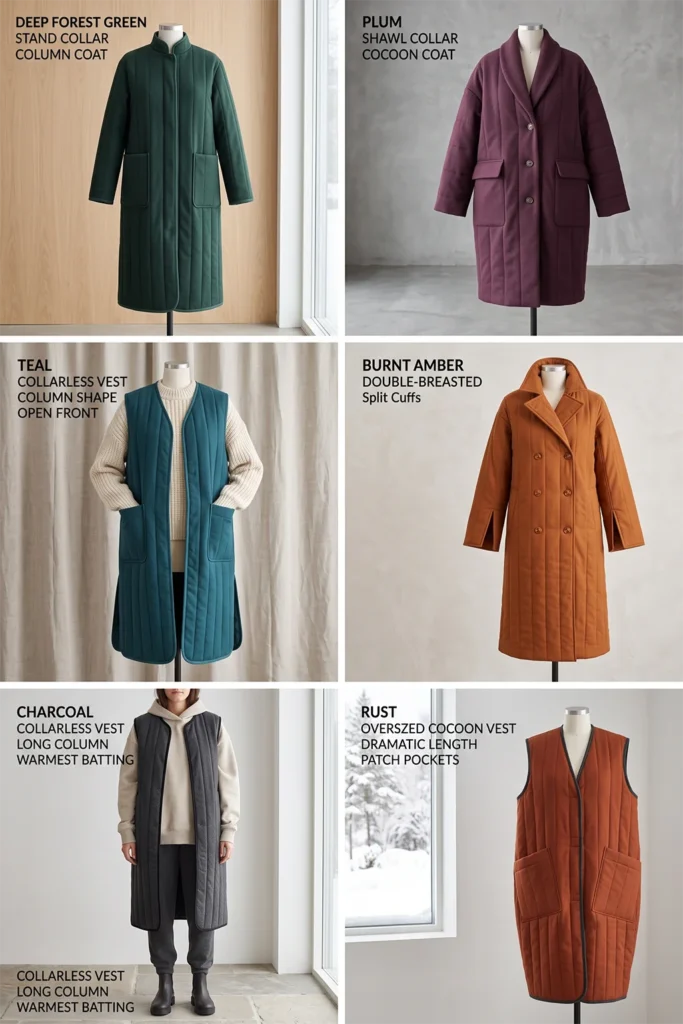
- Quilted fabric in a rich tone (deep forest, plum, burnt amber, or teal): 4 to 4½ yards (more length needs more fabric)
- Lining fabric, if quilting your own: 4 yards
- Cotton or wool batting for extra warmth: 4 yards
- Bias binding in a tonal or subtly contrasting color: 7 to 8 yards
- Matching thread
- 4–5 buttons, large snaps, or a concealed zip
- Rotary cutter or fabric scissors
- Measuring tape
- Fabric chalk
- Fabric clips
- Walking foot, strongly recommended for long quilting lines
- Iron
Step-by-Step Guide
Step 1: Choose a Rich, Wearable Color
A longline coat is a big block of color, so choose a tone with depth that still works as a neutral in your wardrobe. Strong options include deep forest green, plum, burnt amber, rust, or dark teal — colors vibrant enough to feel intentional but grounded enough to wear with everything. For warmth without heaviness, choose a wool-blend batting and a matte shell fabric.
Keep the binding tonal (a slightly deeper shade of the same color) so the long edges read as one clean line.
Step 2: Make the Quilted Fabric in Long Panels
Because the coat is long, plan your quilting in full-length panels. Layer shell, batting, and lining, smooth thoroughly, and clip often — long panels shift easily. Quilt straight vertical lines spaced about 2 inches apart, working from the center outward to prevent bunching. A walking foot is almost essential here; long quilting lines magnify any uneven feed.
Quilt slightly more fabric than you think you need, so you have a clean margin when cutting the long panels.
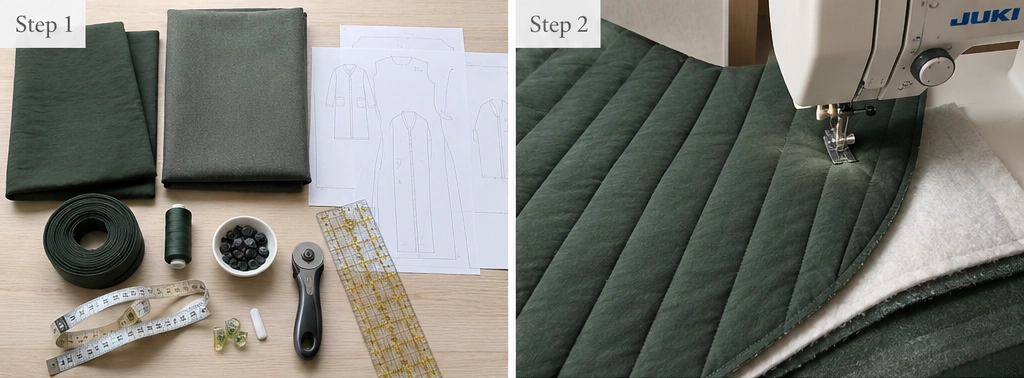
Step 3: Cut the Back Panel
Cut one back panel about 26 inches wide × 48 inches long (adjust length to your height). Cut a shallow back neckline about 7 inches wide × 1½ inches deep. Keep the side edges straight, or angle them out very slightly toward the hem for a subtle A-line sweep.
Step 4: Cut the Front Panels
Cut two front panels, each about 14 inches wide by 48 inches long, to match the back. Shape the front neckline with a gentle curve from the shoulder down about 5–6 inches. If you want a collar later, keep the neckline clean now and add it during finishing.

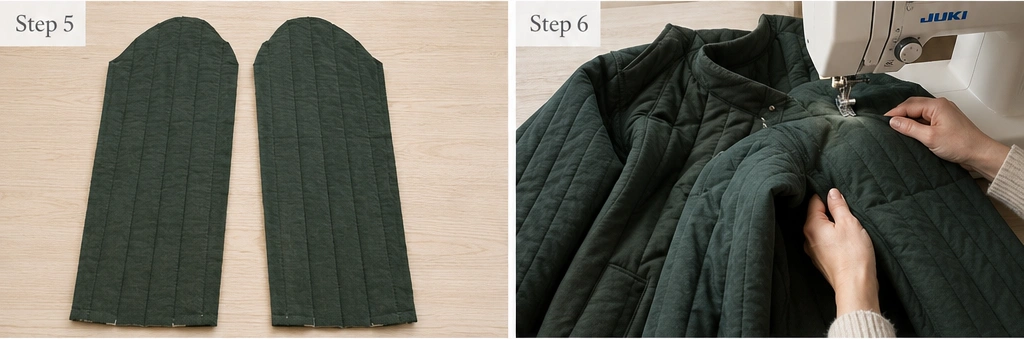
Step 5: Cut the Sleeves
Cut two sleeves about 18 inches wide × 25 inches long. Longline coats suit a slightly longer, fuller sleeve that covers the wrist in cold weather. Keep the shape straight or very gently tapered toward the cuff.
Step 6: Sew the Shoulder Seams
Place the front panels on the back, right sides together, match the shoulders, and sew with a ½ inch seam allowance. Quilted coat fabric is bulky, so press the seam toward the back and topstitch it flat. Sturdy, flat shoulder seams matter more here because they carry the weight of a long, heavier garment.
Step 7: Attach the Sleeves
Open the coat flat, center each sleeve at the shoulder seam, clip carefully, and sew with a ½ inch seam allowance. Work the curve slowly. With a heavy coat, take extra care that both armholes are even — uneven armholes throw off the whole long line.
Step 8: Sew the Side and Sleeve Seams
Fold the coat right sides together and sew from the cuff to the underarm to the hem in one continuous line. For a long coat, leave 10–12 inches open at the lower side seams as generous side slits — these let you walk and sit comfortably and stop the long hem from feeling restrictive.
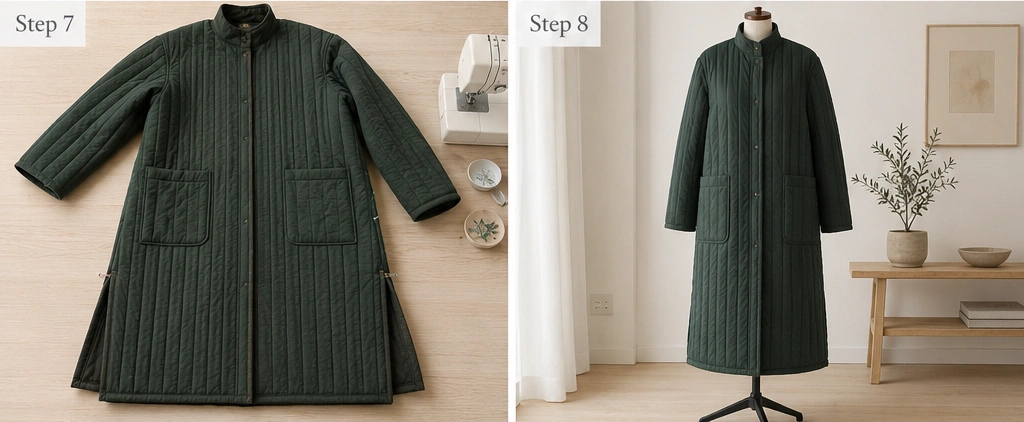
Step 9: Add Pockets and a Collar (Optional but Recommended)
A longline coat really benefits from pockets. Cut two pocket pieces about 8 inches wide × 9 inches tall, finish the top edge, fold the rest under by ½ inch, and topstitch them to the front panels about 28–30 inches down from the shoulder, where your hands naturally rest. If you want a collar, cut a simple stand or shawl collar piece, quilt it to match, and attach it at the neckline before binding.
Step 10: Finish the Edges and Add the Closure
Bind the neckline, front opening, hem, cuffs, side slits, and pocket tops with bias binding. Then add your closure — 4–5 buttons or large snaps spaced evenly down the front, or a concealed zip for a sleeker look. On a long coat, space closures so the front stays closed cleanly without gaping across the chest or pulling at the hip.
Assembly Section
With all seams sewn, try the coat on over a sweater — the layer you’ll actually wear it with — before finishing. Check the length against your height, confirm the shoulders carry the weight cleanly, and make sure the front hangs in a straight column without pulling. Trim the hem level (easy to get wrong on a long garment, so measure from the floor). Once the fit is right, attach pockets and collar, bind all edges, then install the closure last. Give the coat a full press, working the long seams flat, and hang it overnight so the quilted panels settle into their final drape.
Interesting Backstory
The long quilted coat has deep roots in cold-climate dressing across the world — quilted layers were among the earliest and most effective ways to trap warmth long before technical insulation existed. In the Nordic countries, where winter is long and daylight short, practical warmth and understated elegance were never in conflict; a good coat simply had to do both. I find a quiet kinship here with the layered-cloth quilting traditions I grew up around in Dhaka, where stitching multiple layers of fabric together was a centuries-old way to make something warm and lasting from simple materials. A longline quilted coat is the same ancient idea — layers stitched together, made to keep the body warm — carried into a clean, modern Scandinavian silhouette.
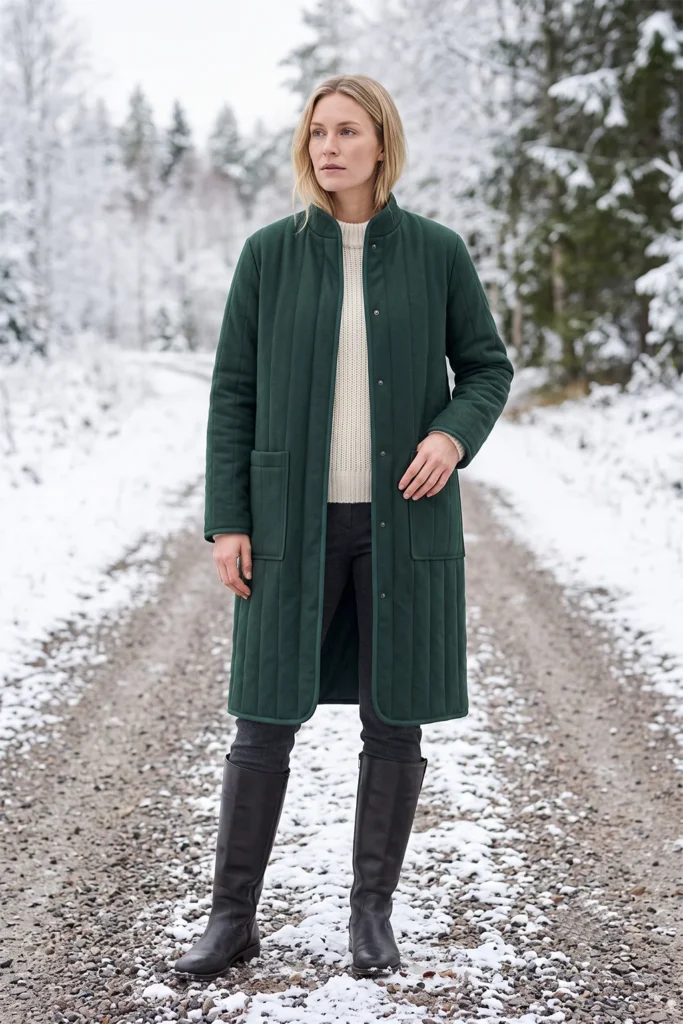
Personal Styling Touch
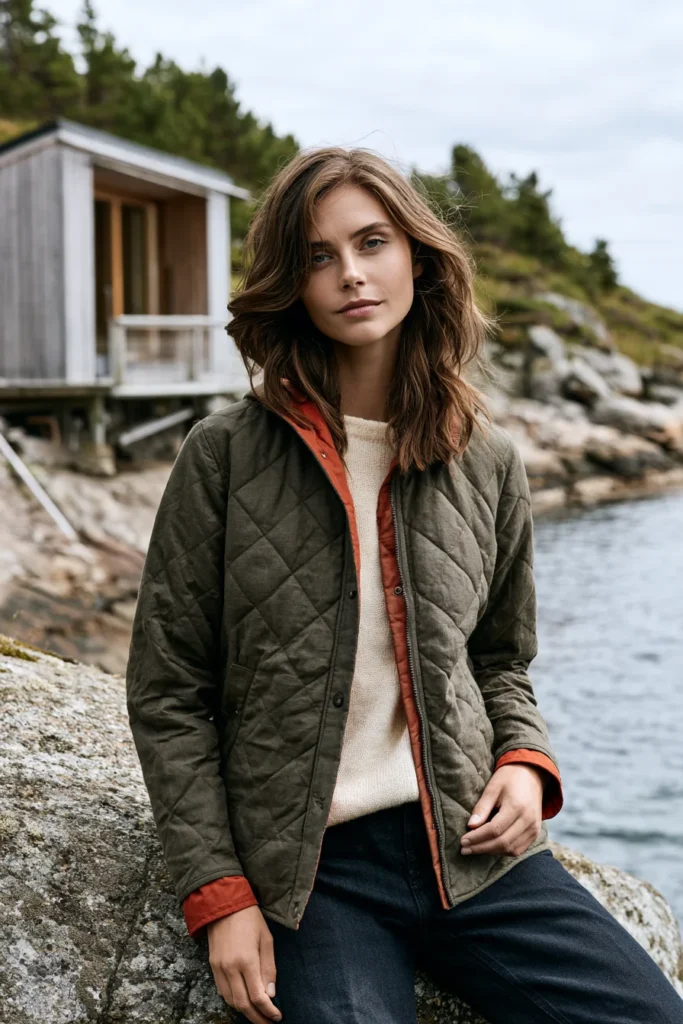
My favorite version is a deep forest-green wool-blend quilt, bound in a slightly darker green so the edges disappear into a single clean line, with deep patch pockets and a simple stand collar. It falls just below the knee and closes with concealed snaps for an uninterrupted front. Worn open over a cream sweater on a cold walk, it has exactly the kind of quiet, statuesque presence I want from a winter coat — warm, elegant, and never fussy.
Final Styling Idea
Wear this longline quilted coat open over a chunky cream or oatmeal knit with slim trousers tucked into tall boots for an elegant cold-weather look. For deeper cold, close it fully over layered knitwear and add a wool scarf in a tone that picks up the coat’s color. For a softer, relaxing weekend version, throw it over loungewear and ankle boots for a quick coffee run.
Keep the palette rich but grounded — deep forest, plum, burnt amber, teal, paired with cream, oatmeal, and charcoal — and the coat delivers elegant, genuinely warm cold-weather layering all winter long.
Other Design Inspirations – Digitally Modified
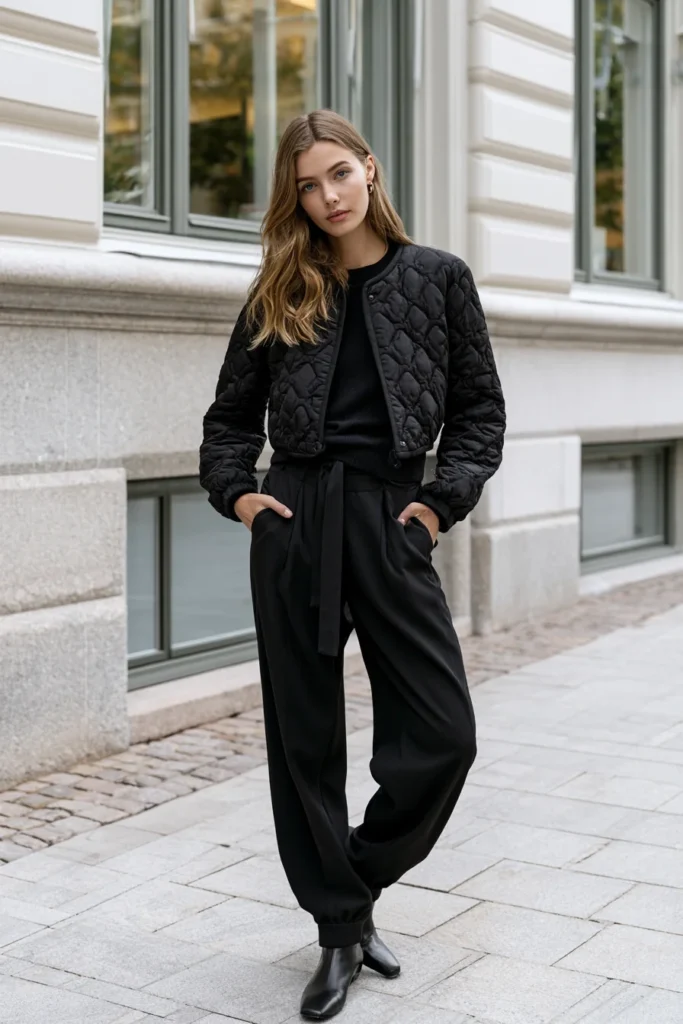
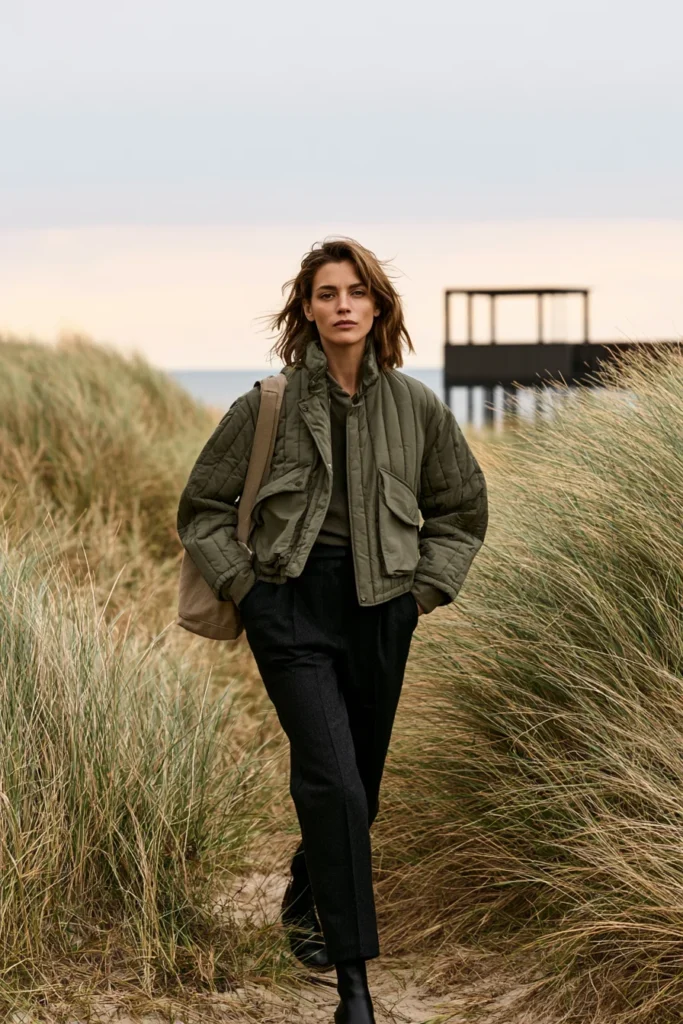
4. Cropped Boxy Quilted Jacket for a Modern Minimalist Silhouette
A Guide to Making a Cropped Boxy Quilted Jacket for a Modern Minimalist Silhouette
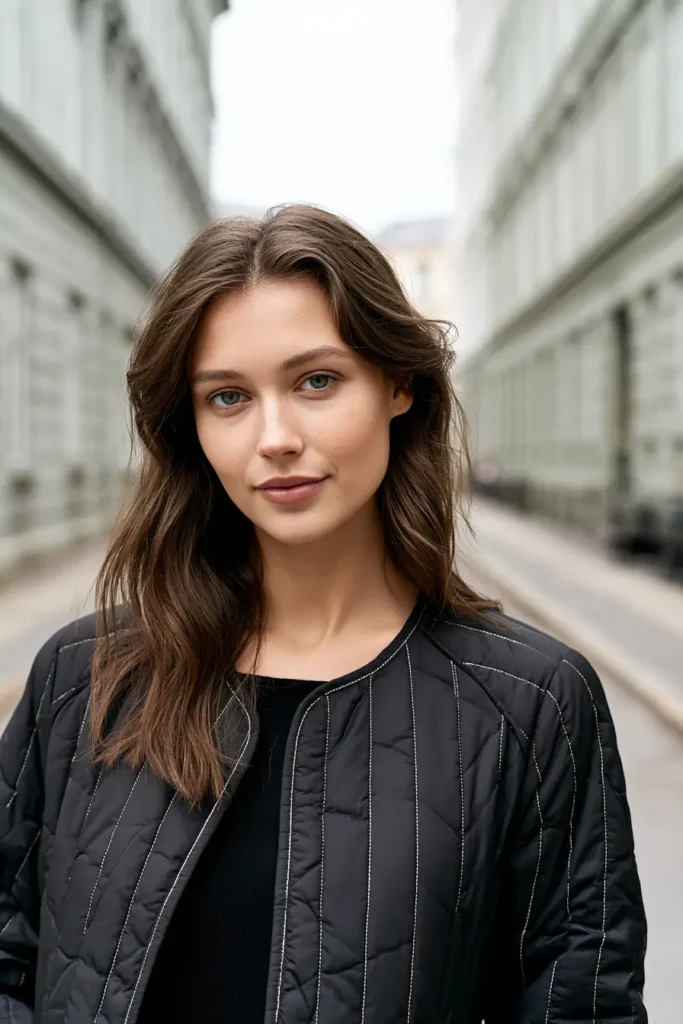
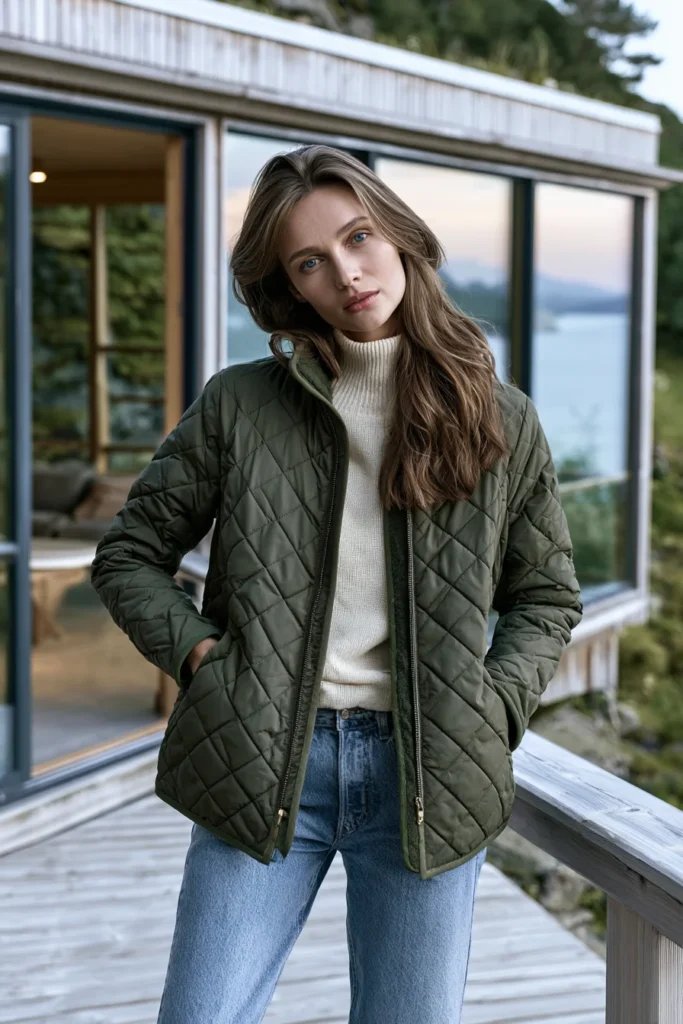
A Cropped Boxy Quilted Jacket is a short, square-cut quilted layer that sits at or just above the waist, with a straight, architectural shape and clean, unfussy lines. Where the longline coat is about coverage, this is about proportion — a deliberately boxy cut that looks modern and graphic, especially worn over high-waisted trousers or a midi skirt. It is minimalism with a bit of attitude: simple construction, strong shape, and ideally a single clear color doing all the talking.
I came up with this idea because the boxy crop is one of the most current silhouettes in modern dressing, and it is genuinely beginner-friendly to sew — straight lines, no shaping, no tricky curves. That combination of easy construction and high-fashion shape makes it one of the most rewarding projects in this collection. A clean cropped jacket in one confident color reads as intentional and contemporary, which is exactly the modern Nordic look we’re after.
Why This Idea Is Worth Making
Why this idea is worth making: it delivers a high-fashion silhouette from the simplest possible construction. The boxy cut means no darts, no tapering, no fitted shaping — just clean straight panels — so it sews up quickly and forgivingly, while still looking sharp and modern. The cropped length is flattering over high-waisted pieces and instantly updates a basic outfit. Sewing it yourself lets you pick one bold, clean color that you’d struggle to find on the rails, and get the crop length exactly right for your proportions, which is the difference between “current” and “awkward.”
Suggested Finished Measurements
For a relaxed medium-sized boxy crop hitting at the waist:
- Finished length: 20–22 inches
- Finished chest width: 24–26 inches across (boxy = wider than fitted)
- Shoulder width: 18–19 inches (slightly dropped)
- Sleeve length from dropped shoulder: 21–22 inches
- Sleeve width: 16–17 inches
- Armhole depth: 11–12 inches (deeper for the boxy drop)
- Seam allowance: ½ inch
For an even boxier, cocoon crop, add 1–2 inches to the body width.
Materials Needed
- Quilted fabric in one clean, confident color (cobalt, mustard, terracotta, or deep green): 2 to 2½ yards
- Lining fabric, if quilting your own: 2 yards
- Thin cotton batting: 2 yards
- Bias binding, tonal or matching: 4½ to 5 yards
- Matching thread
- 2–3 concealed snaps or buttons, optional
- Rotary cutter or fabric scissors
- Measuring tape
- Fabric chalk
- Fabric clips
- Walking foot, recommended
- Iron
Step-by-Step Guide
Step 1: Choose One Confident Color
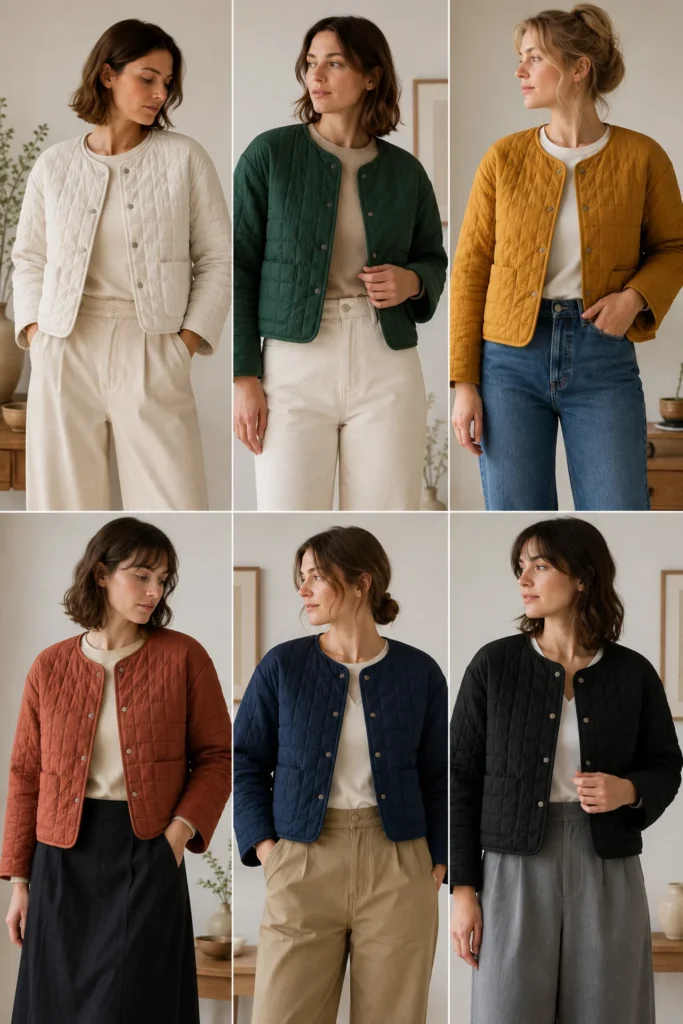
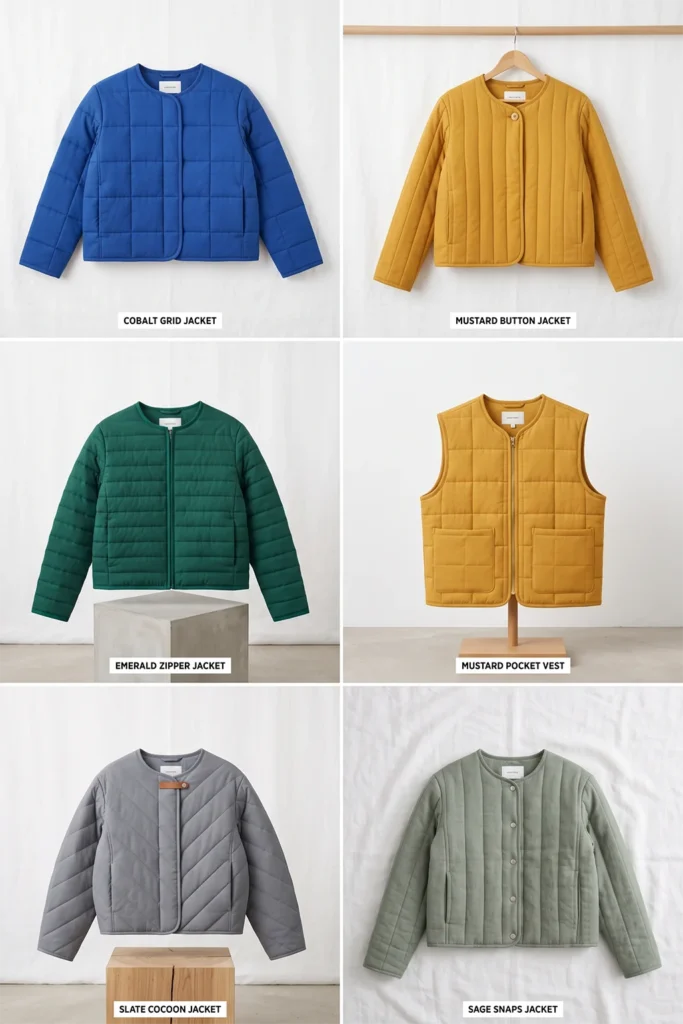
The boxy crop is a small canvas, so let a single clean color be the whole statement. Strong minimalist-but-vibrant choices include cobalt blue, warm mustard, terracotta, or deep emerald — one saturated tone, used simply, reads as modern and intentional. Avoid mixing colors here; the power of this jacket is its graphic, single-block simplicity.
Keep the binding tonal so the clean shape isn’t broken up by a contrasting edge.
Step 2: Make the Quilted Fabric
Layer shell, thin batting, and lining, smooth, and clip. Quilt straight lines spaced about 1½ to 2 inches apart, or a simple grid for a more architectural surface. Because the jacket is small and graphic, the quilting pattern is quite visible, so keep your lines crisp and evenly spaced. A walking foot helps keep them parallel.
Step 3: Cut the Back Panel
Cut one back panel about 26 inches wide × 22 inches long — note it is wider than it is long, which is what creates the boxy proportion. Cut a shallow back neckline about 7 inches wide × 1½ inches deep. Keep the hem dead straight; the clean horizontal hem is central to the boxy look.
Step 4: Cut the Front Panels
Cut two front panels, each about 14 inches wide × 22 inches long, matching the back length. Shape the front neckline with a gentle curve from the shoulder down about 5 inches. Keep the center front edges straight and parallel so the boxy front hangs square.

Step 5: Cut the Sleeves
Cut two sleeves about 18 inches wide × 22 inches long. The boxy jacket suits a slightly dropped shoulder and a straight, roomy sleeve — keep it untapered for the relaxed, architectural feel. For a cropped sleeve, shorten to 20 inches for a bracelet length.
Step 6: Sew the Shoulder Seams
Place the front panels on the back, right sides together, match the shoulders, and sew with a ½ inch seam allowance. Press toward the back and topstitch flat. Because the shoulder is slightly dropped, the seam will sit a little onto the upper arm — that is intentional and gives the boxy silhouette its relaxed line.

Step 7: Attach the Sleeves
Open the jacket flat, center each sleeve at the (dropped) shoulder seam, clip, and sew with a ½ inch seam allowance. The deeper armhole and dropped shoulder make this easier than a fitted set-in sleeve — the sleeve attaches almost straight across, which suits beginners well.
Step 8: Sew the Side and Sleeve Seams
Fold the jacket right sides together and sew from the cuff to the underarm to the hem in one line. Keep the side seams straight so the body stays boxy rather than tapering in at the waist. For a touch of ease, you can leave 2–3 inches open at the lower side seams, though a fully closed straight hem also looks clean and graphic here.
Step 9: Finish the Edges with Tonal Binding
Bind the neckline, front opening, hem, and cuffs with matching or tonal bias binding. On a boxy jacket the binding traces a clean rectangle, so keep it even and crisp — wobbly binding undermines the architectural shape. Topstitch slowly and parallel to the edge.
Step 10: Add a Minimal Closure (Optional)
Keep any closure as quiet as the rest of the jacket. Two or three concealed snaps behind the front edge let it close without visible hardware, preserving the clean block of color. A single button at the chest is the maximum decoration this jacket wants — or leave it open, which suits the modern boxy look perfectly.
Assembly Section
Once the seams are sewn, try the jacket on over a high-waisted piece — trousers or a skirt — since that’s how the crop is meant to be worn, and the proportion only makes sense in context. Check that the hem sits at or just above your waistband, the shoulders drop cleanly, and the body stays square rather than pulling in. Trim the hem perfectly level, since a crisp horizontal line is everything on a boxy crop. Bind all edges, add the optional closure last, and press thoroughly — sharp, pressed edges are what give this simple shape its modern, intentional finish.
Interesting Backstory
The boxy, cropped silhouette has roots in functional workwear and traditional short jackets across many cultures, where a square cut simply used fabric efficiently and allowed free movement. Modern Scandinavian design rediscovered the appeal of that honest, geometric shape — clean lines, no excess, form following function — and turned it into something quietly fashionable. There is a nice echo of the quilting traditions I grew up around in Dhaka, where garments were often built from simple straight panels of layered, stitched cloth rather than complex tailoring; beauty came from the texture and the stitching, not from elaborate shaping. This cropped jacket works the same way — a simple geometric form, made special by clean quilting and one confident color.
Personal Styling Touch
My favorite version is a clean cobalt-blue quilt with a simple grid stitch, bound tonally in the same blue, and closed with two hidden snaps so the front stays a smooth block of color. Worn open over a white tee and high-waisted cream trousers, it does exactly what I want — one bright, graphic shape against a quiet outfit. The single strong color carries the whole look, which is minimalism working at its most confident.
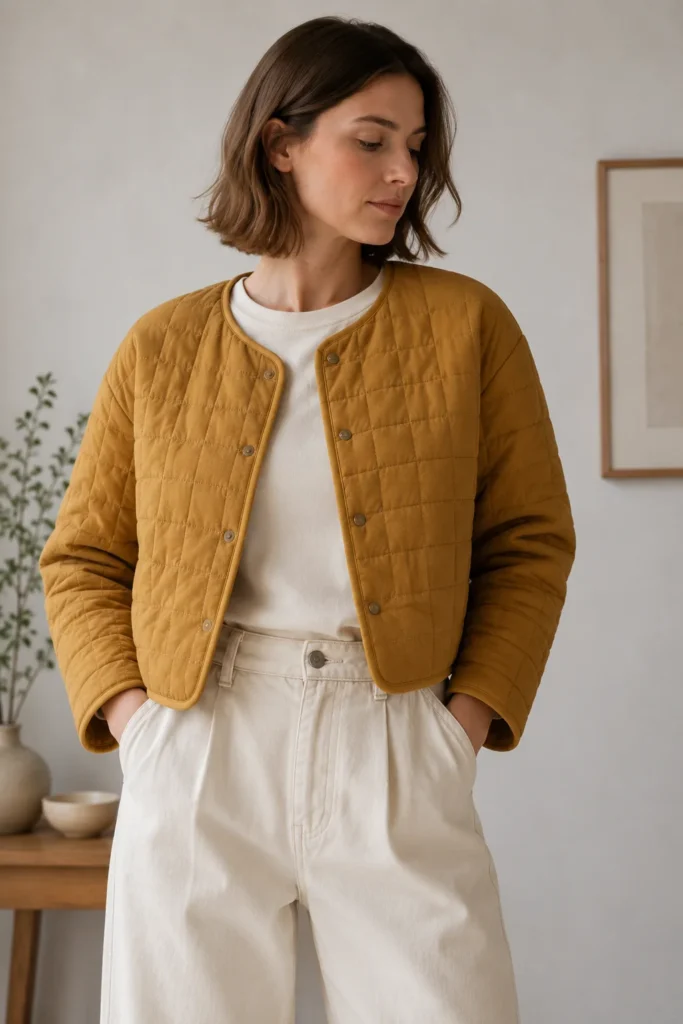
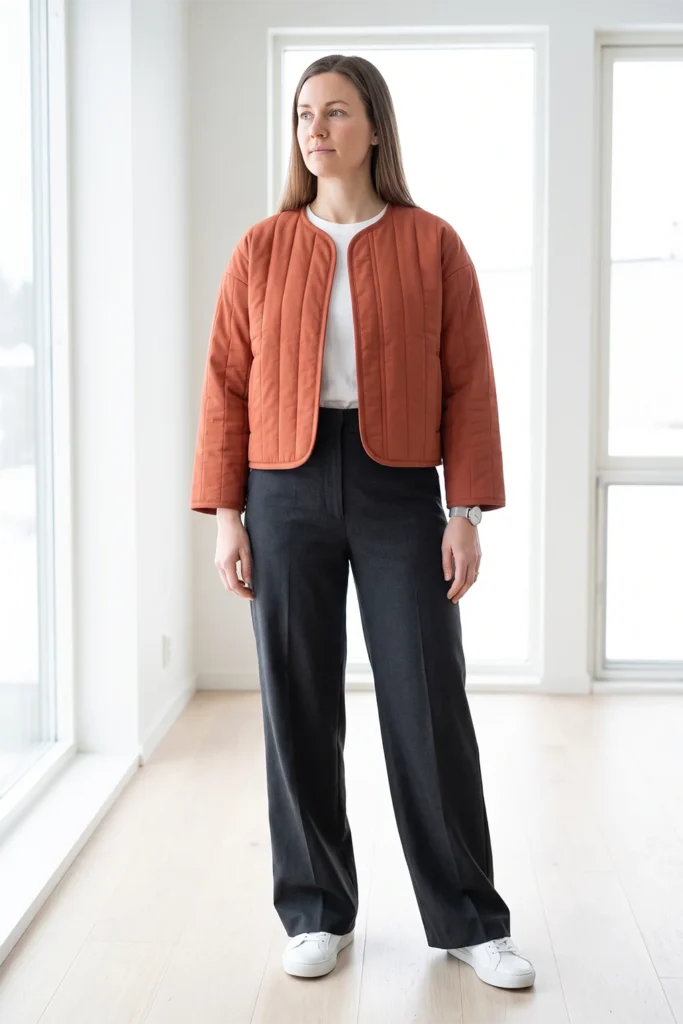
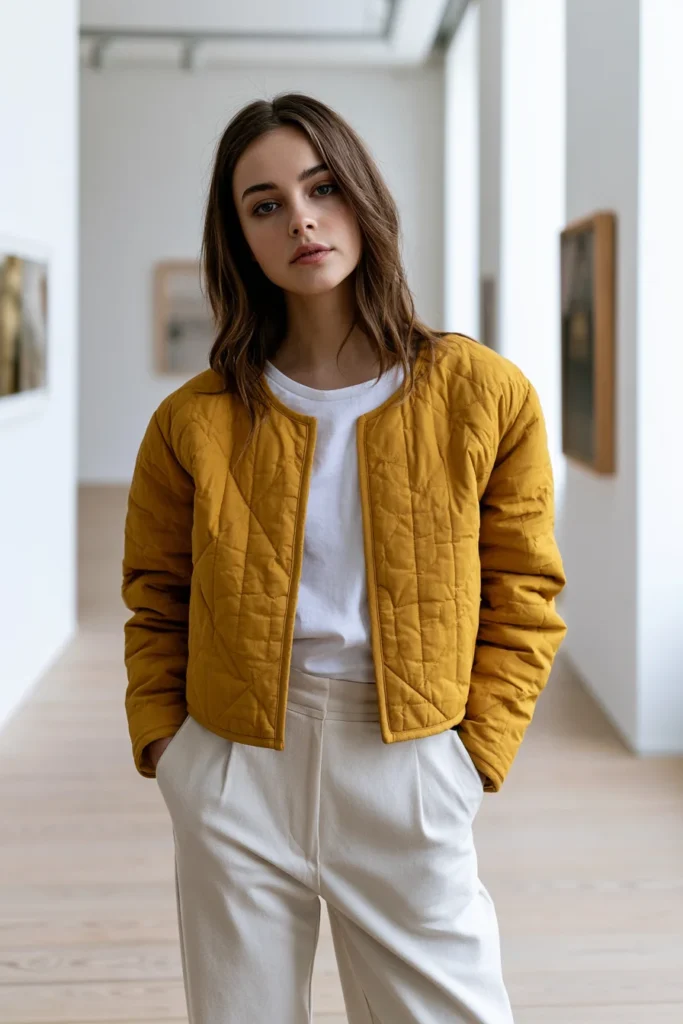
Final Styling Idea
Wear this cropped, boxy quilted jacket over a white tee, with high-waisted trousers and loafers, for a clean, modern everyday look. For a sharper outfit, pair it with a midi skirt and ankle boots so the crop highlights the waistline. For a relaxed weekend version, throw it over a fitted knit and pair it with straight jeans and white sneakers.
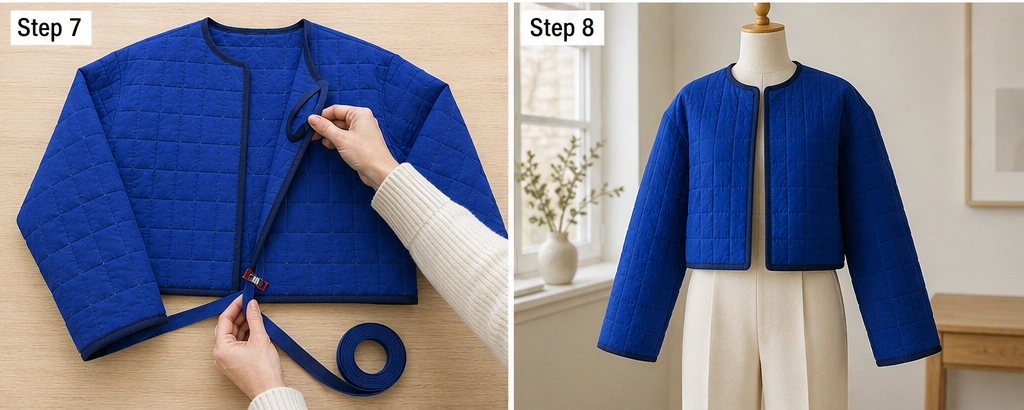
Keep the rest of the outfit quiet so the single color leads — one confident tone like cobalt, mustard, or terracotta, against cream, white, charcoal, or stone — and the jacket delivers that modern minimalist silhouette every time.
Other Design Inspirations – Digitally Modified
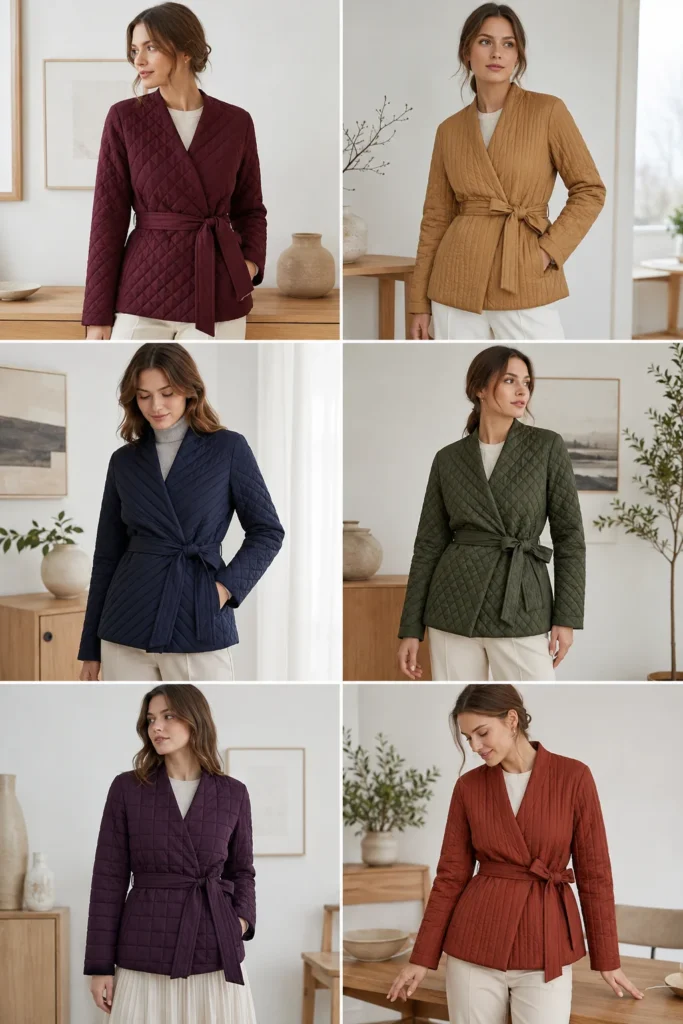
5. Belted Wrap Quilted Jacket for Polished, Tailored Elegance
A Guide to Making a Belted Wrap Quilted Jacket for Polished, Tailored Elegance
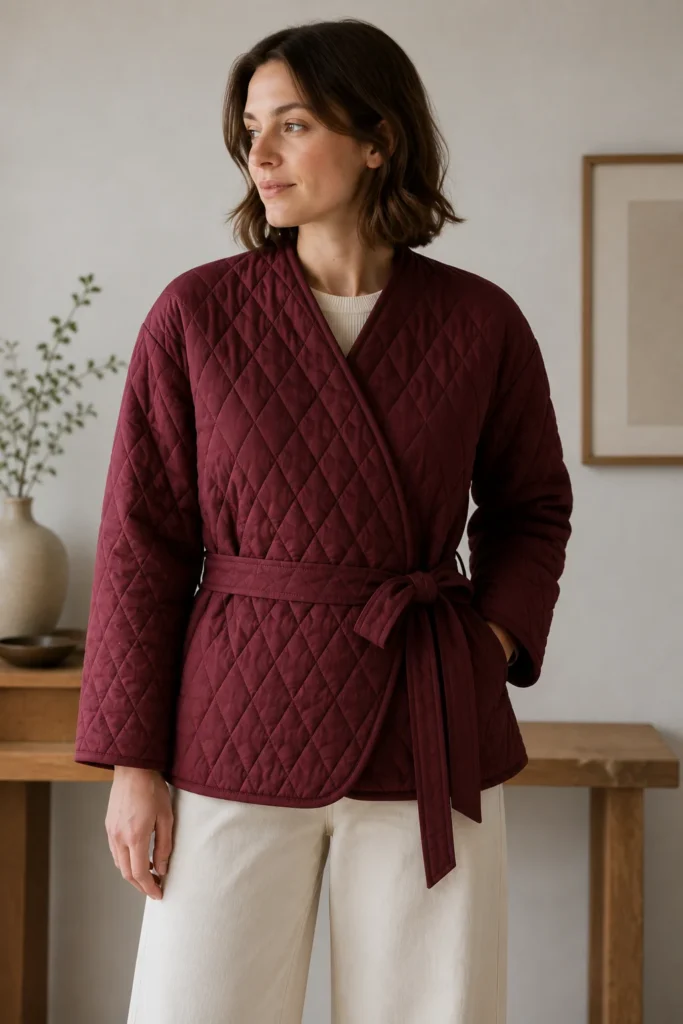
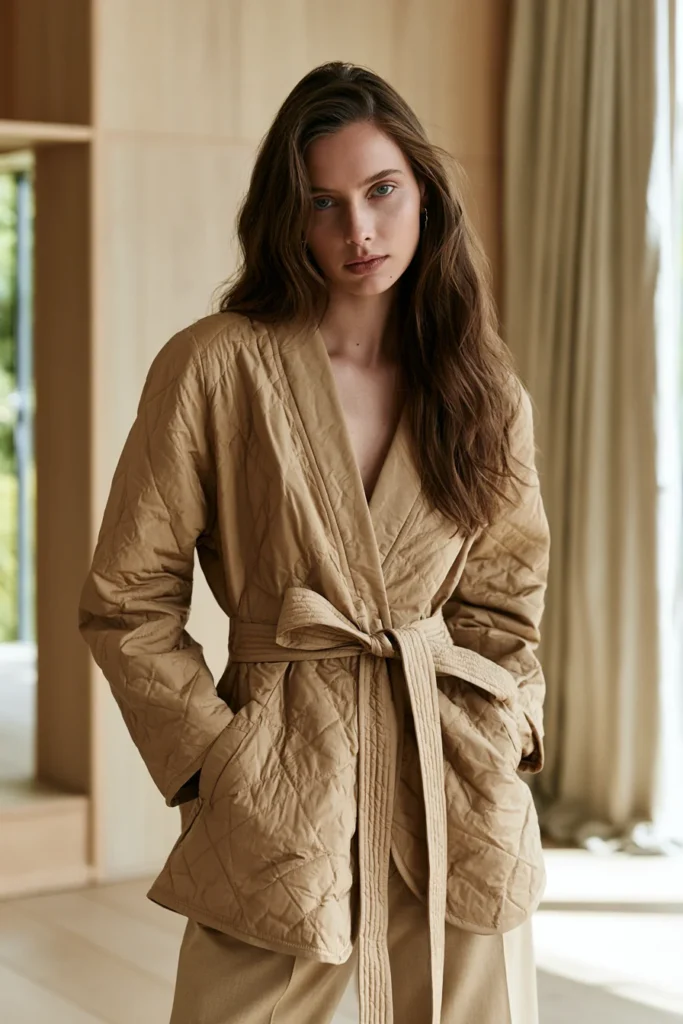
A Belted Wrap Quilted Jacket is a collarless quilted layer with no buttons or zips, closed instead by wrapping the front panels and cinching a self-fabric tie belt at the waist. That single belt does something the other jackets in this collection don’t — it creates a defined waist, turning a soft quilted shape into something genuinely tailored and elegant. It is the most grown-up, polished piece here: robe-like in its ease, but pulled together and refined in the way it sits on the body.
I came up with this idea because a belt is the simplest way to add shape to a quilted garment without having to learn complex tailoring. There are no darts to fit, no closures to align — just a wrap front and a tie — yet the finished jacket looks far more considered than its construction suggests. That high-elegance, low-difficulty ratio is exactly why this one is so satisfying to make, and why it earns a place when you want quilted comfort that still looks dressed.
Why This Idea Is Worth Making
Why this idea is worth making: it gives you a tailored, waist-defining silhouette without the difficulty of real tailoring. The wrap-and-belt closure means no buttonholes, no zip insertion, and no precise fitting — yet the result reads as polished and intentional, easily the dressiest option in this collection. A self-tie belt also makes the jacket adjustable, so it flatters across a range of layering thicknesses and body shapes. Sewing it yourself lets you choose a rich, sophisticated color and get the wrap depth and belt length exactly right, which is what separates an elegant wrap from a sloppy one.
Suggested Finished Measurements
For a relaxed medium-size wrap jacket hitting at the hip:
- Finished length: 28–30 inches
- Finished chest width: 24–26 inches across (extra width for the wrap overlap)
- Shoulder width: 17–18 inches
- Sleeve length from shoulder: 23–24 inches
- Sleeve width: 15–16 inches
- Armhole depth: 10–11 inches
- Belt: 70–75 inches long × 3 inches wide (long enough to wrap and tie)
- Belt loops: 2 inches each
- Seam allowance: ½ inch
For a more enveloping wrap, add 2–3 inches to each front panel width.
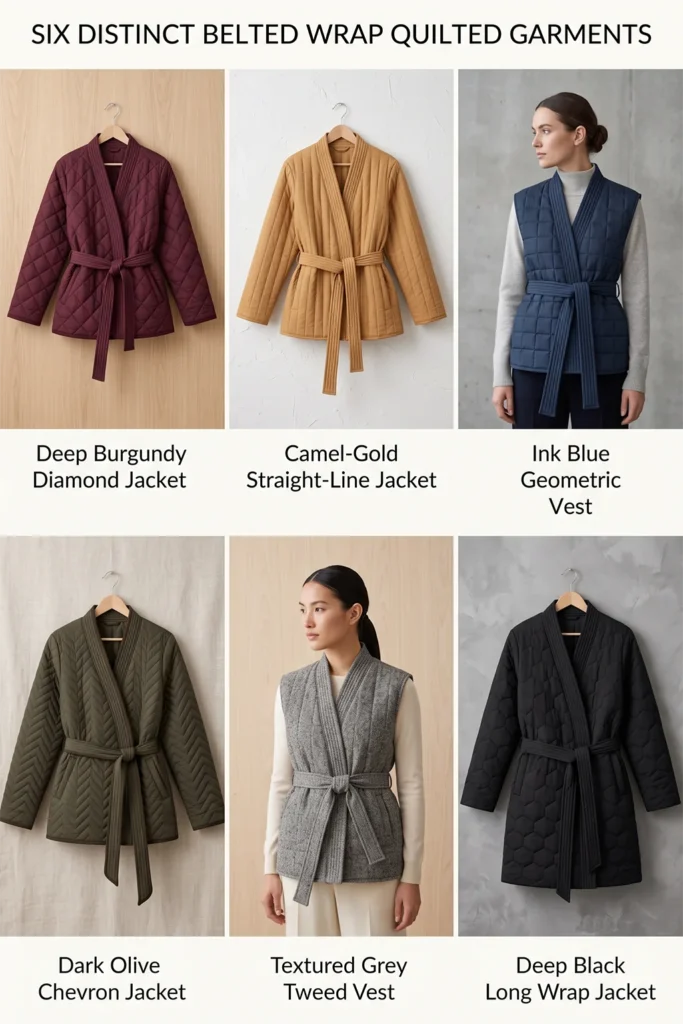
Materials Needed
- Quilted fabric in a rich, sophisticated tone (deep burgundy, camel-gold, ink blue, or olive): 3 to 3½ yards (extra for the belt)
- Lining fabric, if quilting your own: 3 yards
- Thin-to-medium cotton batting: 3 yards
- Bias binding, tonal: 6 to 7 yards
- Matching thread
- Rotary cutter or fabric scissors
- Measuring tape
- Fabric chalk
- Fabric clips
- Walking foot, recommended
- Iron
Step-by-Step Guide
Step 1: Choose a Rich, Sophisticated Color
A wrap jacket is the dressiest piece here, so choose a color with depth and polish. Strong choices include deep burgundy, camel-gold, ink blue, or dark olive — saturated, grown-up tones that look tailored rather than casual. The belt is cut from the same fabric, so the whole jacket reads as one elegant block of color.
Keep the binding tonal so the wrap edges and belt stay clean and uninterrupted.
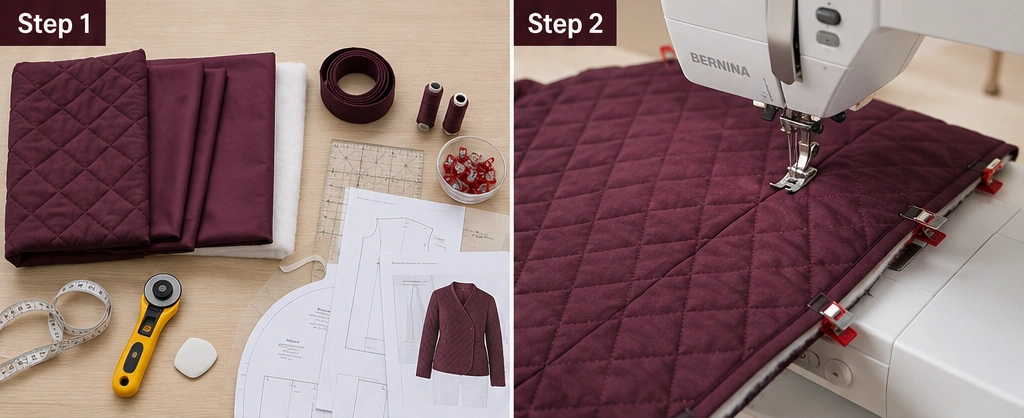
Step 2: Make the Quilted Fabric
Layer shell, batting, and lining, smooth, and clip. Quilt straight lines or a soft diamond pattern spaced about 1½ to 2 inches apart. Keep the batting on the thinner side of medium — a wrap jacket needs to fold and cinch at the waist without becoming bulky, so avoid heavy padding around the midsection.
Quilt enough extra fabric to cut the belt and loops from the same yardage for a perfect match.
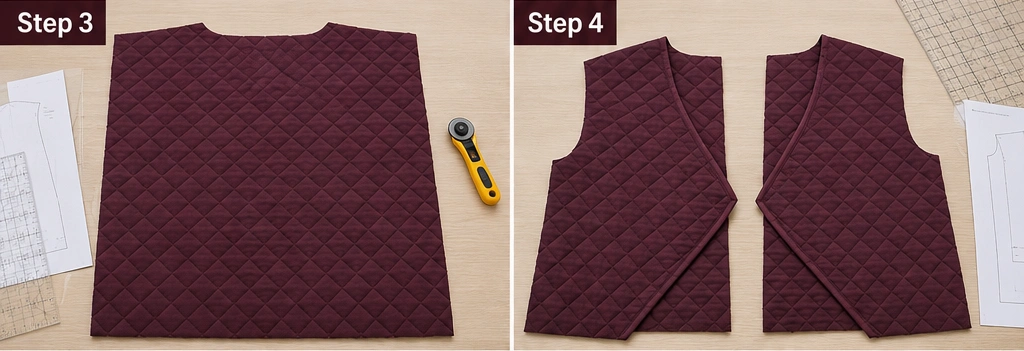
Step 3: Cut the Back Panel
Cut one back panel about 26 inches wide × 30 inches long. Cut a shallow back neckline about 7 inches wide × 1½ inches deep. Keep the side edges straight; the belt will create the waist shaping, so the panels themselves stay simple and straight-cut.
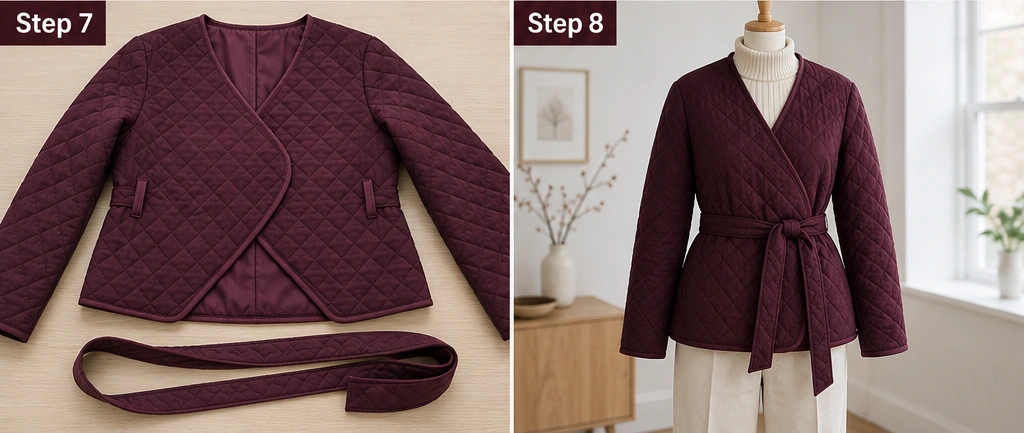
Step 4: Cut the Wrap Front Panels
This is the key step. Cut two front panels wider than usual — each about 17 inches wide × 30 inches long — so they overlap generously across the body when wrapped. Shape the neckline into a long diagonal: start at the shoulder and angle down toward the opposite hip, so the panels cross in a deep V. This diagonal wrap line is what gives the jacket its elegant, robe-like front.
Step 5: Cut the Sleeves
Cut two sleeves about 17 inches wide × 24 inches long. Keep them straight and easy. A wrap jacket suits a clean, slightly fitted sleeve that balances the soft volume of the wrapped body.
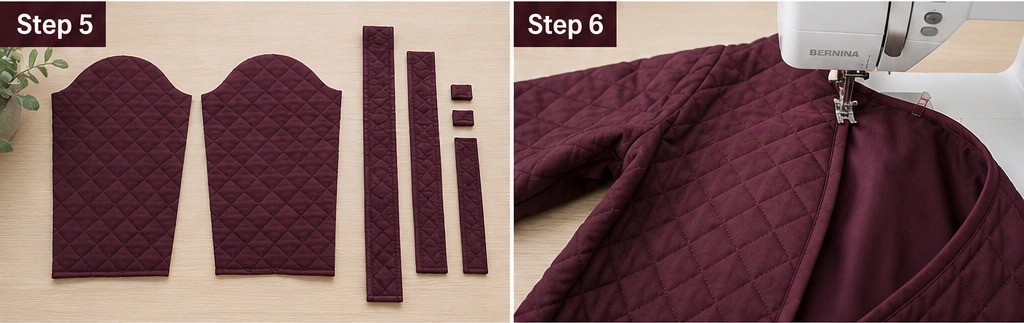
Step 6: Cut the Belt and Loops
Cut the belt to about 75 inches long × 6 inches wide (it folds in half to a finished width of 3 inches), piecing lengths together if needed. Cut two belt loops about 3 inches × 2 inches. Fold the belt lengthwise right sides together, sew the long edge and one end, turn it right side out, press flat, and topstitch. Clean, crisp belt construction matters — the belt is the focal point of the whole jacket.
Step 7: Sew the Shoulder and Sleeve Seams
Place the wrap front panels on the back, right sides together, match the shoulders, and sew with a ½ inch seam allowance. Press toward the back and topstitch. Then attach each sleeve at the shoulder seam and sew with a ½ inch seam allowance, working the armhole curve slowly. Press and topstitch the armhole seams flat.
Step 8: Sew the Side Seams and Attach Belt Loops
Fold the jacket right sides together and sew from the cuff to the underarm to the hem in one continuous line. Before finishing, position the two belt loops at the side seams at your natural waist (about 16–17 inches down from the shoulder) and stitch them securely top and bottom — they must hold the belt firmly, so reinforce with backstitching.
Step 9: Finish All Edges with Binding
Bind the neckline, the full diagonal wrap front, the hem, cuffs, and any side slits with tonal bias binding. The long diagonal front edge is the most visible line on the jacket, so bind it slowly and evenly — a clean wrap edge is what makes this piece look tailored rather than thrown together.
Step 10: Add an Inner Tie (Recommended)
A wrap jacket holds its shape best with an inner anchor tie. Sew a short fabric tie to the inside of the underneath front panel and a corresponding tie at the side seam, so the inner layer ties closed first before you wrap and belt the outer panel. This prevents the wrap from gaping and keeps the front sitting smoothly all day — the small detail that separates an elegant wrap from a fussy one.
Assembly Section
Once the seams, loops, and belt are done, try the jacket on and practice the wrap: tie the inner panel first, fold the outer panel across, thread the belt through the loops, and cinch at the natural waist. Check that the wrap front lies flat without gaping, the belt sits at the narrowest part of your waist, and the diagonal edges fall cleanly. Adjust the inner tie position if the front pulls. When the wrap sits right, bind all edges, give the whole jacket and the belt a thorough press so every line is crisp, and tie the belt in a soft knot or bow to finish — the press and the clean belt are what give this piece its polished, tailored elegance.

Interesting Backstory
The wrap-and-tie closure is one of the oldest and most universal ways to fasten a garment, found across countless cultures long before buttons and zips became common — a simple sash could shape and close a robe with elegance and ease. There is a direct line to the textile world I grew up in: in and around Dhaka, draped and wrapped garments secured with a tie or sash were everyday dress, and the beauty came from how the cloth fell and folded rather than from rigid tailoring. A belted wrap quilted jacket carries that same wisdom — let the fabric wrap and the belt shape — into a structured Nordic silhouette, proving you don’t need complex construction to achieve genuine elegance.
Personal Styling Touch
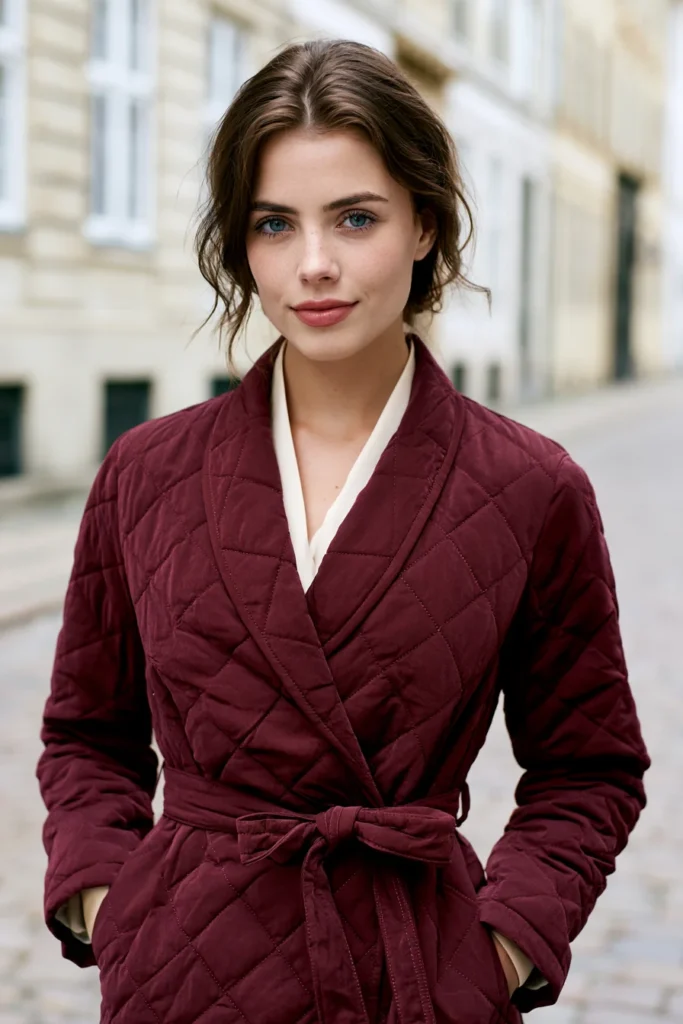
My favorite version is a deep burgundy quilt with a soft diamond stitch, bound tonally, with a generous self-tie belt and a hidden inner anchor tie so the wrap never gapes. Cinched at the waist over a fine cream knit, it looks genuinely tailored — the defined waist does all the work, turning a soft quilted layer into something I’d happily wear to dinner. It is the piece in this collection that proves quilted can also mean dressed-up.
Final Styling Idea
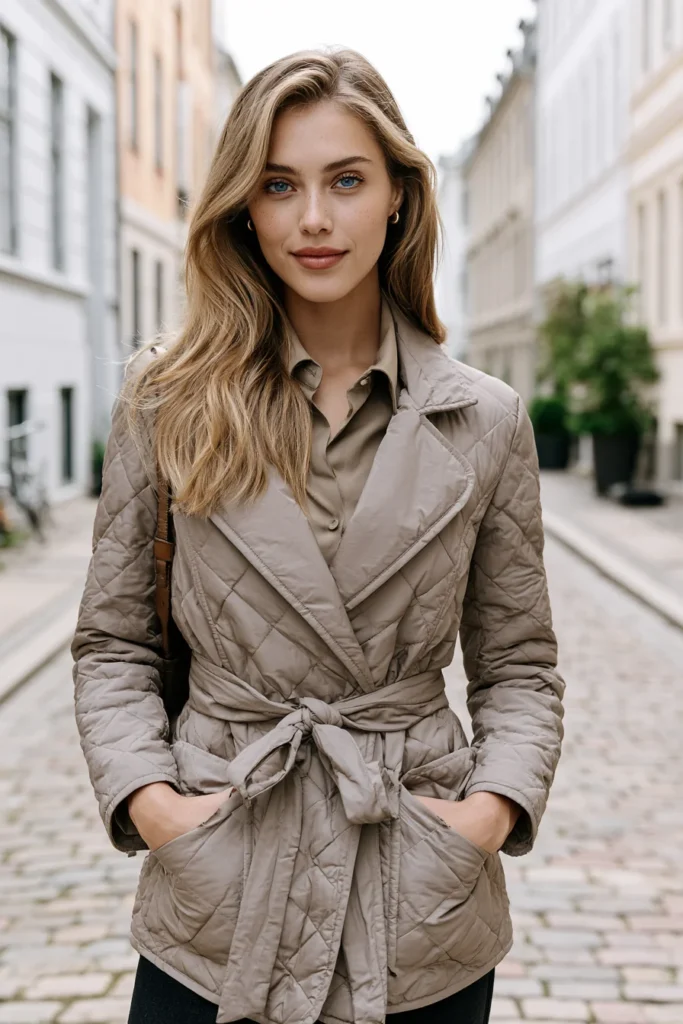
Wear this belted wrap quilted jacket over a fine-knit sweater with slim trousers and heeled boots for a polished, elegant look. For something softer, wrap it over a midi dress and let the belt define the waist. For a relaxed yet pulled-together weekend version, belt it over a fitted top and straight-leg jeans with loafers.
Keep the palette rich and grown-up — deep burgundy, camel-gold, ink blue, or olive, paired with cream, stone, and charcoal — and the belt does the rest, delivering that polished, tailored elegance every time.
Other Design Inspirations – Digitally Modified
6. Open-Front Quilted Vest for Relaxed Hygge Layering
Other Design Inspirations – Digitally Modified
7. Hooded Quilted Vest for Cozy Outdoor Nordic Comfort
Other Design Inspirations – Digitally Modified
8. Channel-Quilted Jacket for Subtle Vertical Texture and Sleek Lines
Other Design Inspirations – Digitally Modified
9. Diamond-Quilted Vest for Refined Luxury Texture
Other Design Inspirations – Digitally Modified
10. Scandi Color-Block Patchwork Jacket for a Vibrant Modern Look
Other Design Inspirations – Digitally Modified
11. Wool-Blend Quilted Jacket for Premium Cozy Warmth
Other Design Inspirations – Digitally Modified
12. Lightweight Packable Quilted Vest for Effortless Travel Style
Other Design Inspirations – Digitally Modified
13. Stand-Collar Quilted Jacket for a Sleek Utilitarian Finish
Other Design Inspirations – Digitally Modified
14. Shawl-Collar Quilted Wrap Vest for Soft Relaxing Elegance
Other Design Inspirations – Digitally Modified
15. Contrast-Bound Quilted Jacket with Bold Piping for Playful Nordic Charm
Other Design Inspirations – Digitally Modified
Conclusion
Fifteen projects is a lot of ground to cover, but that’s the point: by working through these Scandinavian quilted jackets and vests, you don’t just end up with a wardrobe of handmade layers — you build real skills along the way. Each construction teaches something the next one builds on, whether it’s mastering clean reversible seams, getting your channel quilting perfectly straight, or learning to handle thicker wool-blend fabric without bulk. Start with one of the simpler collarless or open-front pieces if you’re newer to garment sewing, and work your way toward the belted wraps and pieced color-block designs as your confidence grows.
What I hope you take from this collection is that a handmade quilted jacket carries something a store-bought one never can. When you choose the fabric, set the proportions, and stitch every seam yourself, the finished piece holds your time and intention in a way mass-produced outerwear simply doesn’t. It’s the same truth I learned watching Kantha makers in Dhaka turn worn cloth into something treasured — the making is what gives the garment its soul, and that soul is exactly what makes it feel so good to wear.
So pick the project that speaks to you, gather your fabric and a little patience, and start stitching. There’s no rush to make all fifteen, and no single “right” one to begin with. Choose the silhouette and mood that fit how you actually live — minimalist, cozy, tailored, or playful — and you’ll find that the quilted jacket you make with your own hands becomes the one you reach for again and again.
