
5 Modern Flame Stitch: Elegant Bargello Quilt Pattern Ideas for Stylish Homes
Bargello Quilt Pattern Ideas have a reputation that is both earned and slightly misleading. The earned part: Bargello quilts look genuinely difficult. The flowing, flame-stitch wave effect — color shifting up and down across the quilt surface in rhythmic progressions that create the impression of movement through a static textile — looks like it requires advanced skills and considerable experience to produce.
The misleading part: the technique is built entirely from straight strips and straight seams. There are no curves, no Y-seams, no complex geometry. The optical illusion of curved, flowing waves is created purely through color placement and the precise vertical offsetting of rectangular blocks. Once that logic clicks, the pattern becomes significantly less intimidating — though not, it should be said, forgiving of imprecision.
The name comes from Bargello needlepoint, a Florentine embroidery tradition dating to the 17th century, where the same flame-stitch principle was worked in thread across canvas. The translation into quilting fabric follows the same logic: small units of color, arranged in careful progressions, shifted incrementally to create movement across the surface. What makes Bargello quilts genuinely different from most other pattern families is that the design is not in the block — it is in the arrangement. The same strip sets, reordered differently, produce completely different wave effects. That relationship between construction and composition is what makes the technique endlessly interesting to work with once you understand it.
The difficulty that quilters actually report is almost always in two specific places: precision cutting, where small inaccuracies in strip width compound across a full quilt width and throw the wave alignment off, and strip alignment during assembly, where keeping the offset consistent requires careful attention that a standard four-patch block simply does not demand. Neither is beyond an intermediate quilter. Both require more focus than the construction complexity alone suggests.
I find Bargello quilts compelling for the same reason I find Nakshi Kantha compelling: the finished surface rewards sustained attention. A Bargello quilt across a bed does not reveal everything at once. The wave shifts depending on viewing angle and distance. That quality — a textile that is still interesting after years of daily exposure — is worth the precision the technique demands.
See also: Contemporary quilt patterns · Modern quilt pattern ideas · Classic Quilt Patterns
Bargello Quilt Pattern Ideas
Contents
- 1 Bargello Quilt Pattern Ideas
- 2 1. Elegant Modern Flame Stitch Bargello Quilt Patterns for Luxurious Bedrooms
- 2.1 Why I Made It
- 2.2 Why This Idea Is Worth Making
- 2.3 Finished Size
- 2.4 Materials Needed
- 2.5 Vibrant Flame Stitch Palette
- 2.6 Beginner-Friendly Cutting Measurements
- 2.7 Step-by-Step Guide
- 2.7.1 Step 1: Arrange the Fabric Color Order
- 2.7.2 Step 2: Sew the Strip Sets
- 2.7.3 Step 3: Turn Each Strip Set into a Tube
- 2.7.4 Step 4: Cut the Bargello Columns
- 2.7.5 Step 5: Open Each Ring at a Different Color
- 2.7.6 Step 6: Lay Out the Flame Stitch Design
- 2.7.7 Step 7: Sew the Columns Together
- 2.7.8 Step 8: Trim the Quilt Center
- 2.7.9 Step 9: Add Borders
- 2.7.10 Step 10: Layer and Quilt
- 2.7.11 Step 11: Bind the Quilt
- 2.7.12 Assembly at a Glance
- 2.8 Color Combination Ideas
- 2.9 Beginner Tips for Success
- 2.10 Styling Tip
- 3 2. Chic Monochrome and Neutral Tone Bargello Designs for Sophisticated Interiors
- 3.1 Why I Made It
- 3.2 Why This Idea Is Worth Making
- 3.3 Finished Size
- 3.4 Materials Needed
- 3.5 Sophisticated Neutral Palette
- 3.6 Beginner-Friendly Cutting Measurements
- 3.7 Step-by-Step Guide
- 3.8 Step 2: Sew the Strip Sets
- 3.9 Step 3: Make Fabric Tubes
- 3.9.1 Step 4: Cut the Bargello Rings
- 3.9.2 Step 5: Open the Rings to Create the Flame Stitch Movement
- 3.9.3 Step 6: Lay Out the Bargello Columns
- 3.9.4 Step 7: Sew the Columns Together
- 3.9.5 Step 8: Trim the Bargello Center
- 3.9.6 Step 9: Add the Borders
- 3.9.7 Step 10: Layer and Baste
- 3.9.8 Step 11: Quilt with Simple Elegant Lines
- 3.9.9 Step 12: Bind the Quilt
- 3.10 Assembly at a Glance
- 3.11 Chic Monochrome and Neutral Color Ideas
- 3.12 Beginner Tips for Success
- 3.13 Styling Tip
- 4 3. Bold Color Wave and Ombre Bargello Patterns for Elegant Living Rooms
- 4.1 Why I Made It
- 4.2 Why This Idea Is Worth Making
- 4.3 Finished Size
- 4.4 Materials Needed
- 4.5 Bold Ombré Color Palette
- 4.6 Beginner-Friendly Cutting Measurements
- 4.7 Step-by-Step Guide
- 4.8 Step 2: Sew the Strip Sets
- 4.8.1 Step 3: Sew Each Strip Set into a Tube
- 4.8.2 Step 4: Cut the Bargello Rings
- 4.8.3 Step 5: Open the Rings at Different Color Points
- 4.8.4 Step 6: Lay Out the Ombré Wave
- 4.8.5 Step 7: Sew the Columns Together
- 4.8.6 Step 8: Trim the Bargello Center
- 4.8.7 Step 9: Add Borders
- 4.8.8 Step 10: Layer and Baste the Quilt
- 4.8.9 Step 11: Quilt with Simple Lines
- 4.8.10 Step 12: Bind and Finish
- 4.9 Assembly at a Glance
- 4.10 Bold Color Wave Ideas
- 4.11 Beginner Tips for Success
- 4.12 Styling Tip
- 5 4. Mesmerizing Optical Illusion Bargello Quilts for Striking Statement Pieces
- 5.1 Why I Made It
- 5.2 Why This Idea Is Worth Making
- 5.3 Finished Size
- 5.4 Materials Needed
- 5.5 Optical Illusion Color Palette
- 5.6 Beginner-Friendly Cutting Measurements
- 5.7 Step-by-Step Guide
- 5.7.1 Step 1: Arrange the Colors for Maximum Illusion
- 5.7.2 Step 2: Sew the Strip Sets
- 5.7.3 Step 3: Turn the Strip Sets into Tubes
- 5.7.4 Step 4: Cut Rings in Varied Widths
- 5.7.5 Step 5: Open the Rings at Shifting Color Points
- 5.7.6 Step 6: Lay Out the Illusion Before Sewing
- 5.7.7 Step 7: Sew the Columns Together
- 5.7.8 Step 8: Trim the Bargello Center
- 5.7.9 Step 9: Add a Strong Border
- 5.7.10 Step 10: Layer and Baste
- 5.7.11 Step 11: Quilt with Simple Motion Lines
- 5.7.12 Step 12: Bind and Finish
- 5.8 Assembly at a Glance
- 5.9 Optical Illusion Color Ideas
- 5.10 Beginner Tips for Success
- 5.11 Styling Tip
- 6 5. Geometric Flame Stitch Bargello Accents for Chic, Layered Home Decor
- 6.1 Why I Made It
- 6.2 Why This Idea Is Worth Making
- 6.3 Finished Size
- 6.4 Materials Needed
- 6.5 Vibrant Geometric Flame Palette
- 6.6 Beginner-Friendly Cutting Measurements
- 6.7 Step-by-Step Guide
- 6.7.1 Step 1: Plan the Flame Stitch Color Order
- 6.7.2 Step 2: Sew the Strip Sets
- 6.7.3 Step 3: Create Fabric Tubes
- 6.7.4 Step 4: Cut the Bargello Rings
- 6.7.5 Step 5: Open the Rings at Different Colors
- 6.7.6 Step 6: Add Geometric Accent Bands
- 6.7.7 Step 7: Arrange the Quilt Center
- 6.7.8 Step 8: Sew the Columns Together
- 6.7.9 Step 9: Trim the Bargello Center
- 6.7.10 Step 10: Add Geometric Borders
- 6.7.11 Step 11: Layer and Quilt
- 6.7.12 Step 12: Bind and Finish
- 6.8 Assembly at a Glance
- 6.9 Geometric Flame Stitch Color Ideas
- 6.10 Beginner Tips for Success
- 6.11 Styling Tip
- 7 Conclusion
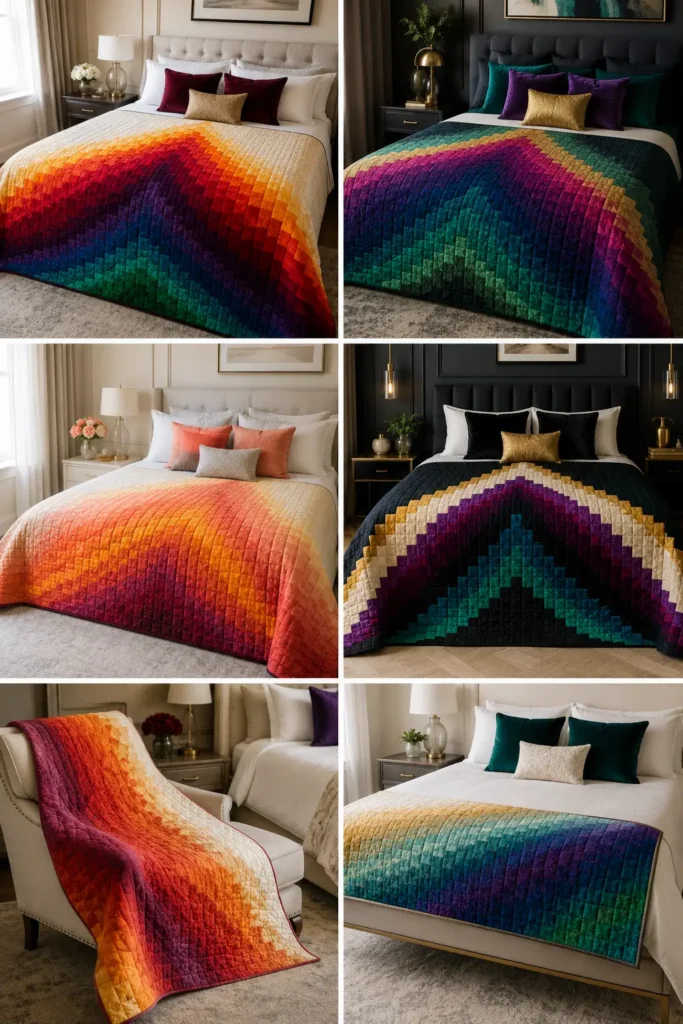
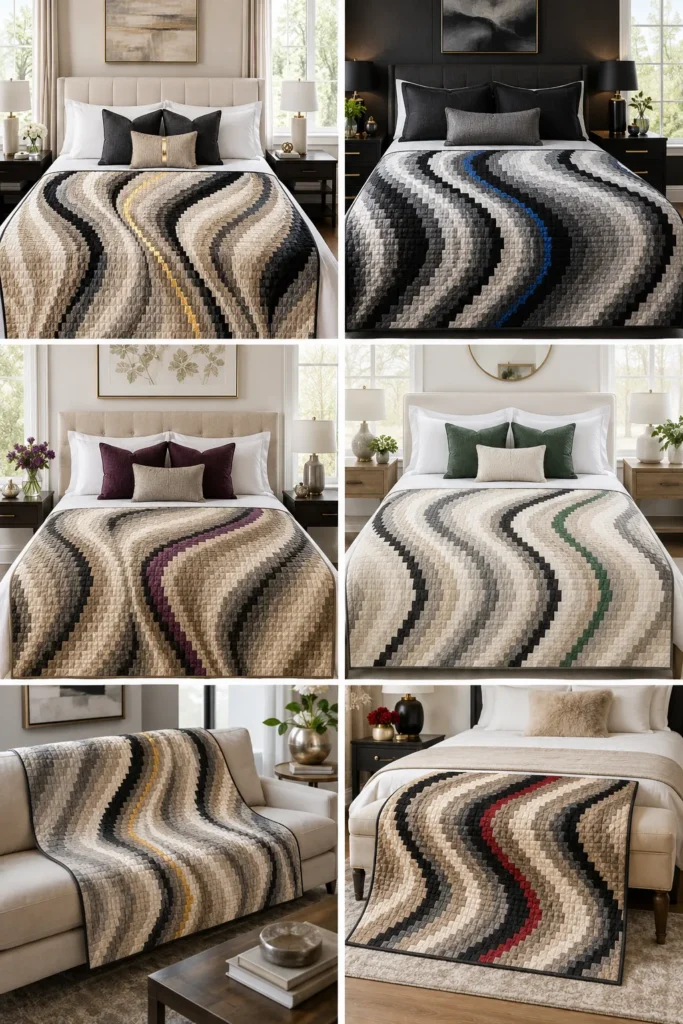
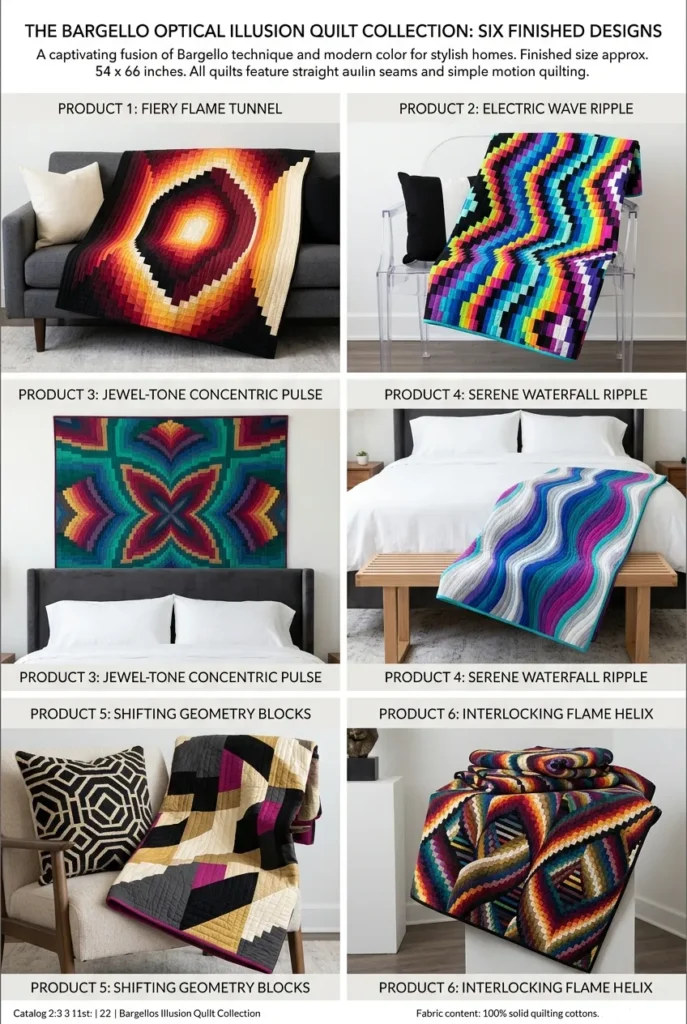
What These Five Patterns Offer
These ideas move across the Bargello range: serene monochrome waves for rooms that need movement without color drama, bold ombre progressions for spaces that can absorb visual intensity, and geometric interpretations that bring the flame-stitch logic into a more contemporary register.
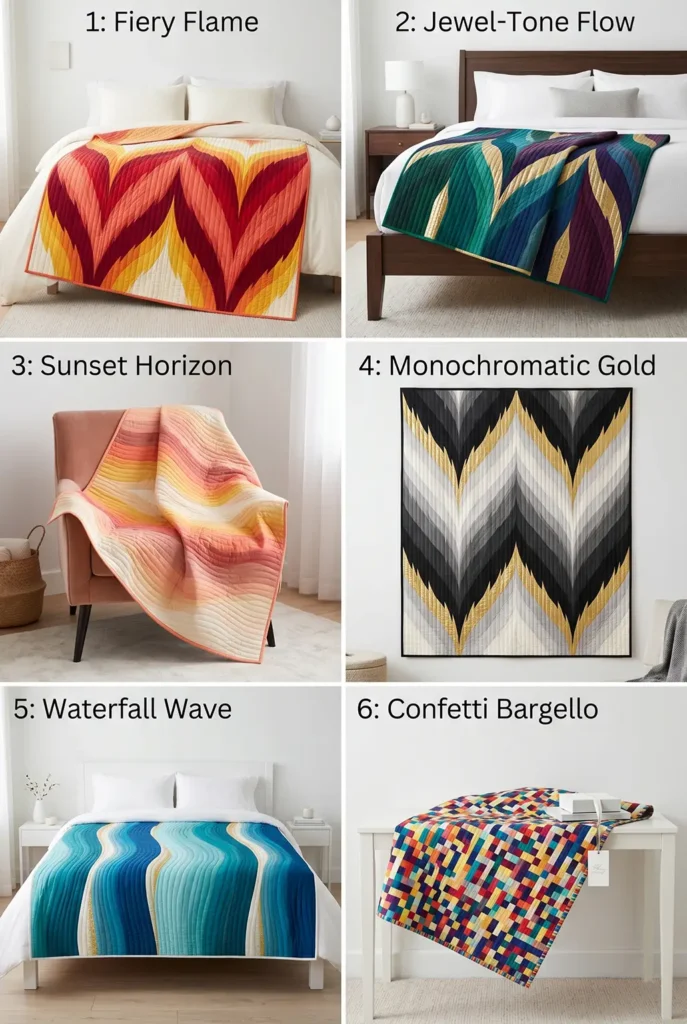
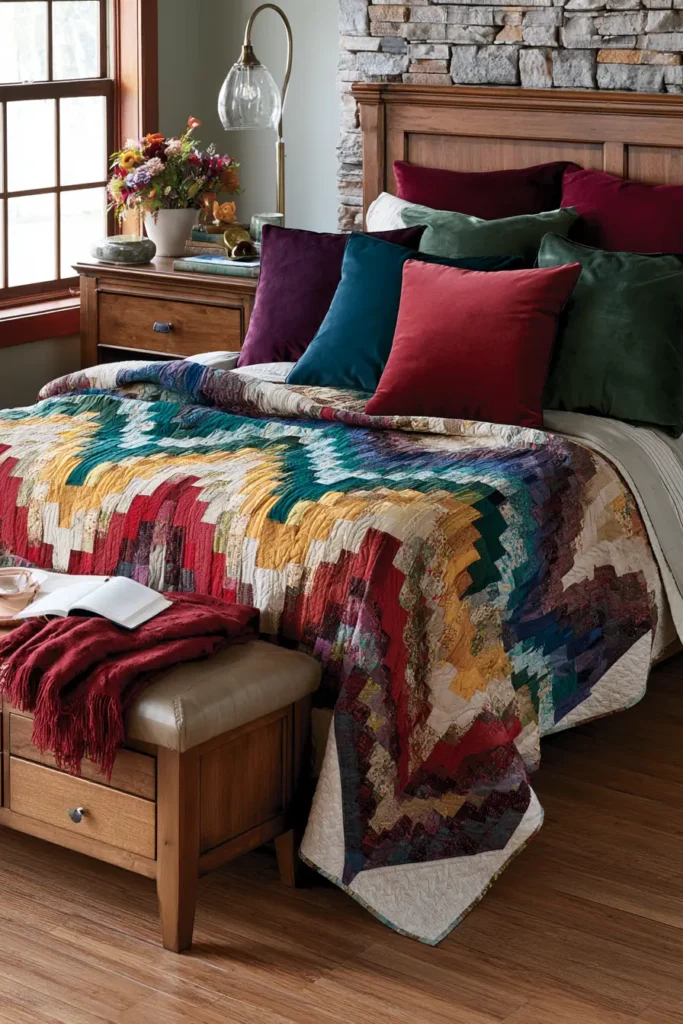
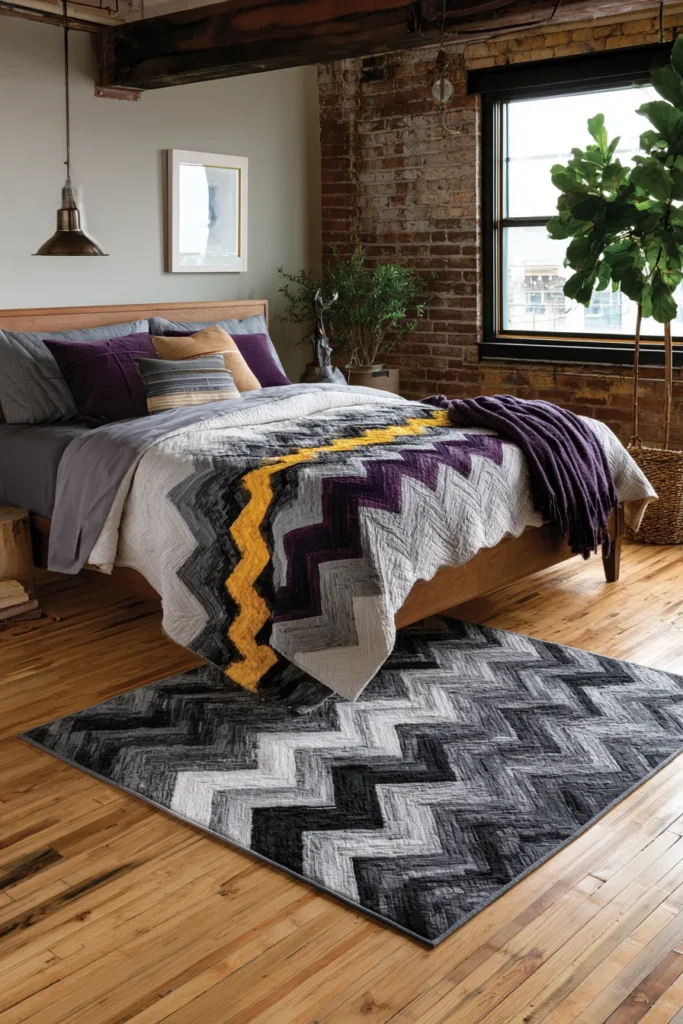
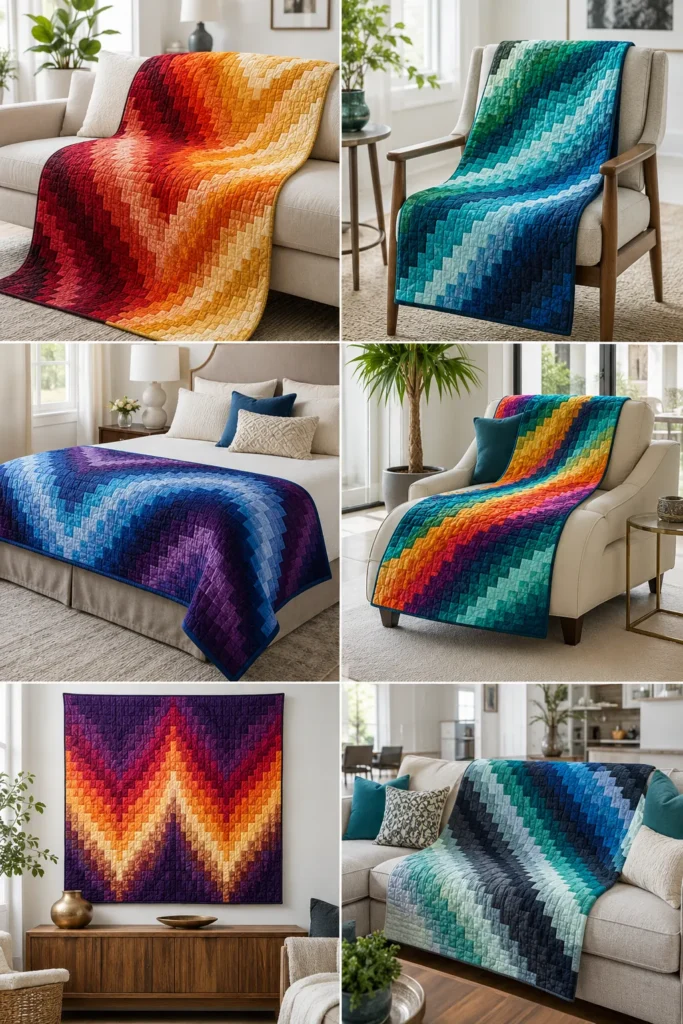
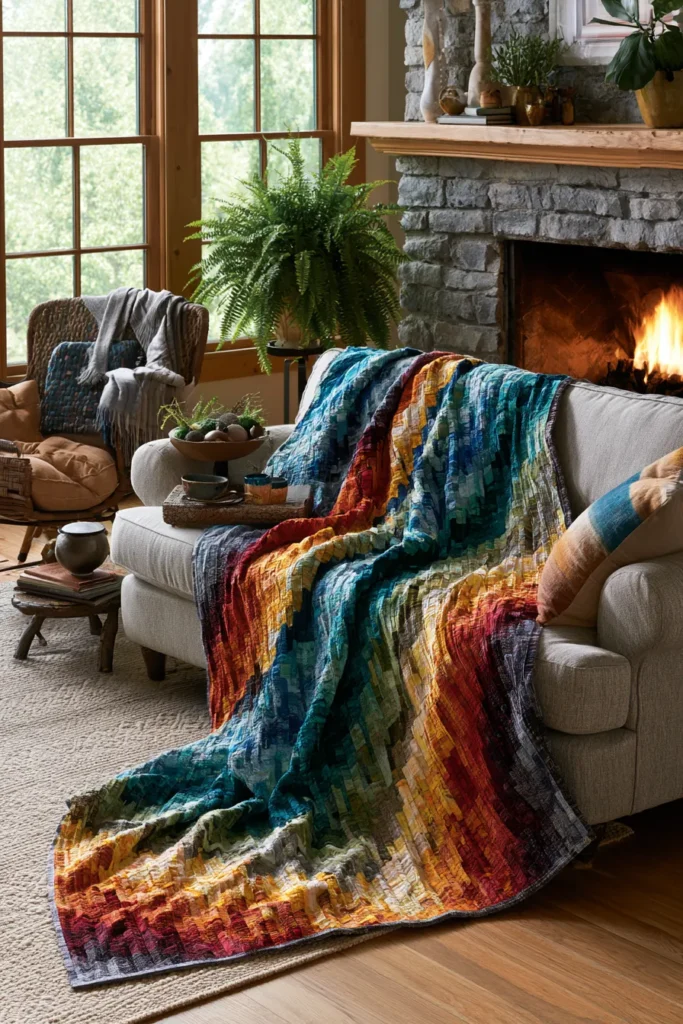
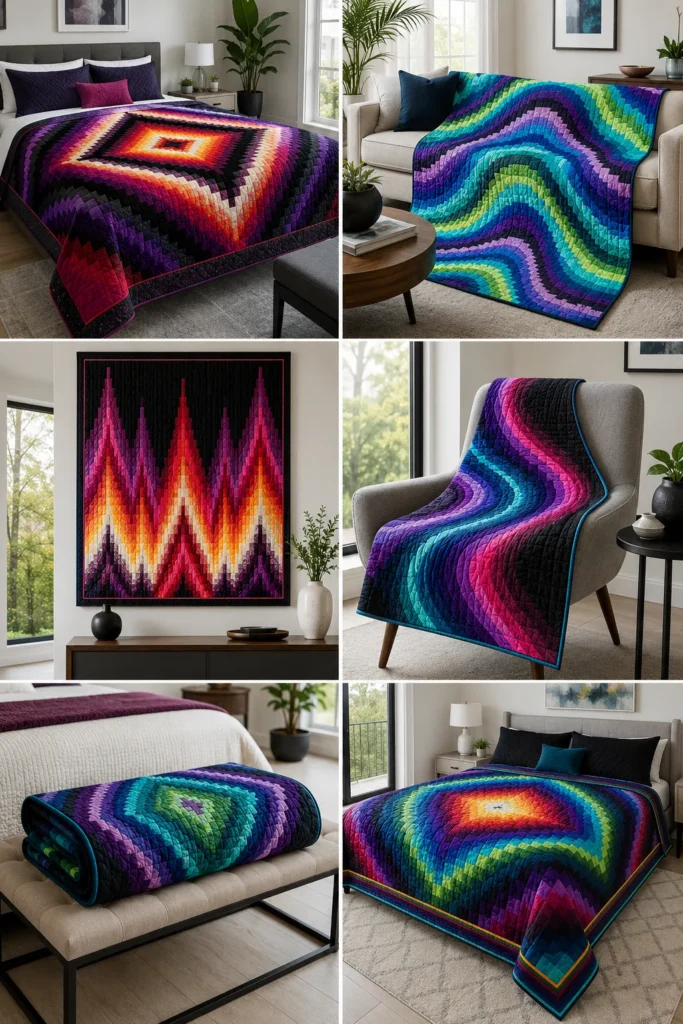
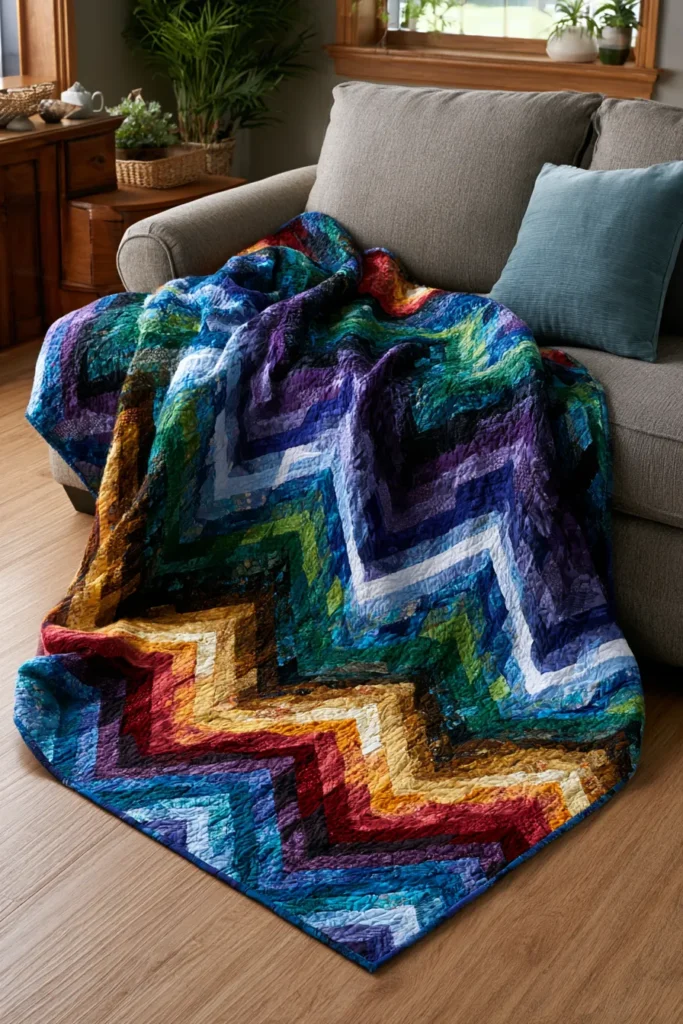
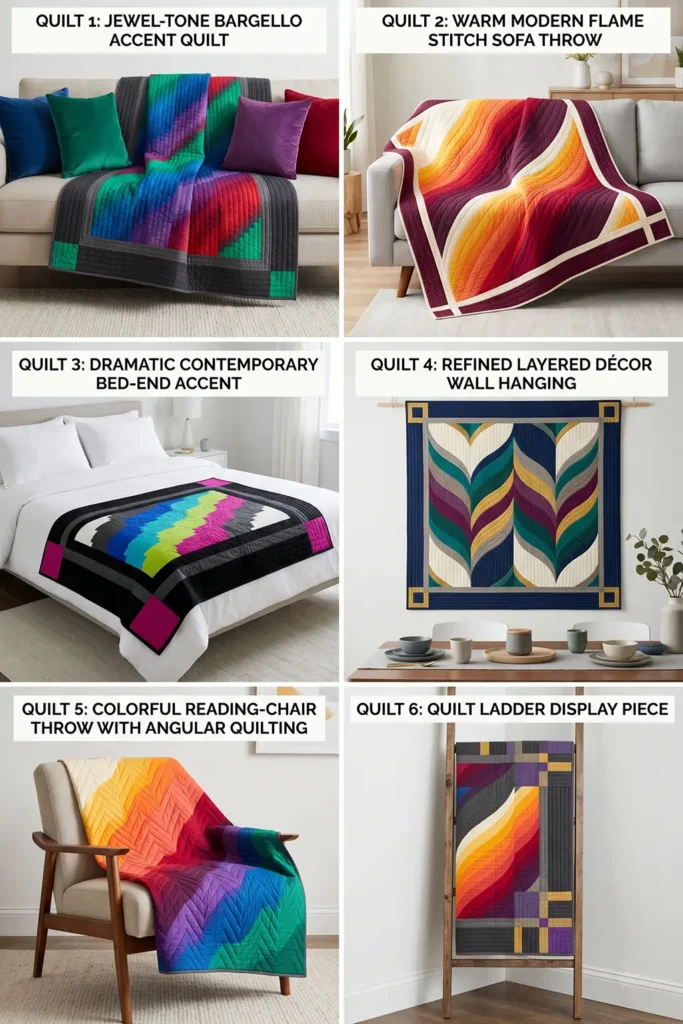
1. Elegant Modern Flame Stitch Bargello Quilt Patterns for Luxurious Bedrooms
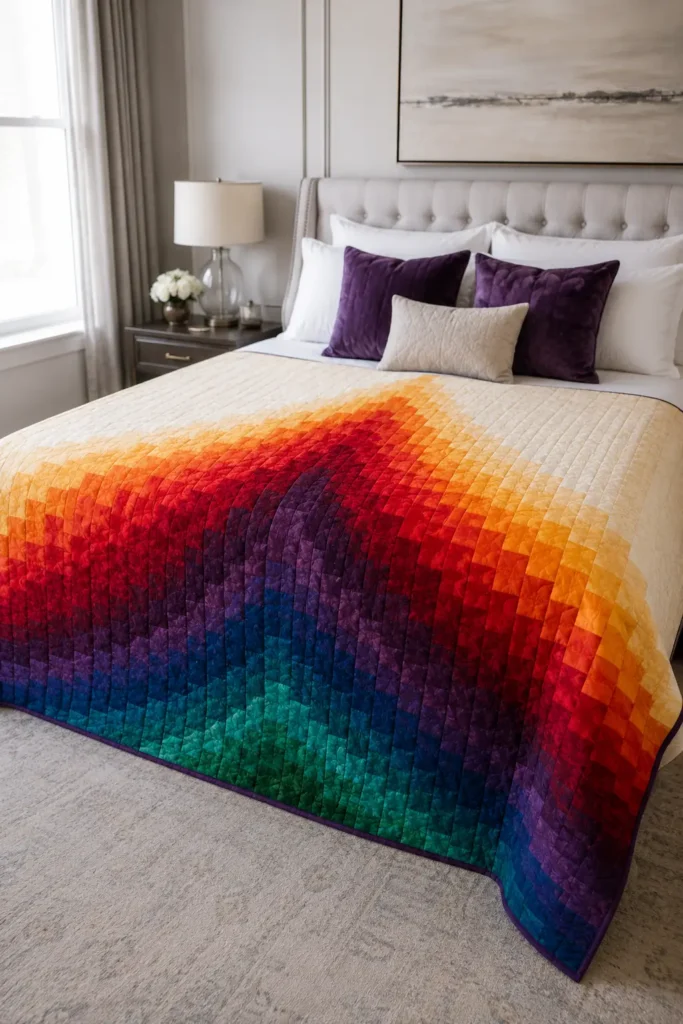
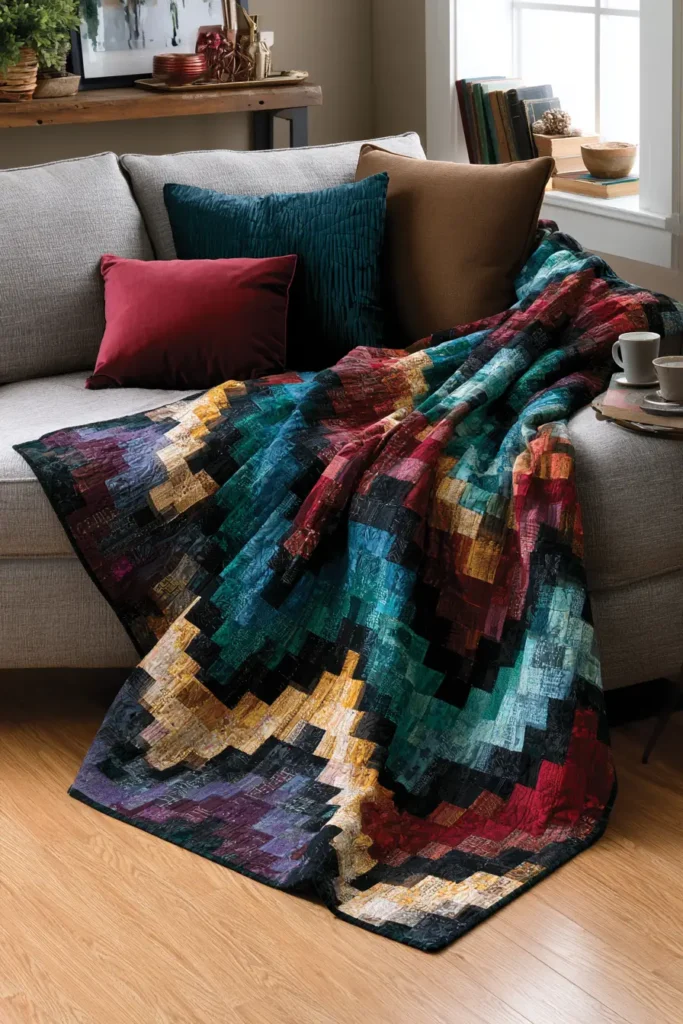
An elegant modern flame stitch Bargello quilt brings movement, color, and luxury into a bedroom. The design is inspired by rising flames, flowing waves, and rich ombré color shifts. Instead of using complicated curved piecing, Bargello quilts create movement with straight fabric strips arranged in stepped columns.
For a luxurious bedroom look, use vibrant colors such as ruby red, coral, tangerine, saffron yellow, champagne gold, emerald green, teal, sapphire blue, deep plum, and ivory. The finished quilt feels dramatic and polished, but the construction is surprisingly beginner-friendly because most of the design comes from simple strip sewing.
Why I Made It
I made this quilt because I wanted a bedroom quilt that felt elegant, warm, and full of motion. Flame stitch patterns have a beautiful way of making the eye travel across the quilt, almost like watching candlelight move across a room.
The backstory behind this design comes from Bargello needlework, which is known for its stepped, flame-like patterns. Traditional Bargello often used repeated vertical stitches to create waves, peaks, and rich color gradients. Translating that idea into a quilt gives the same luxurious movement, but with soft fabric and cozy texture.
Why This Idea Is Worth Making
This idea is worth making because it looks much more advanced than it actually is. You can create a dramatic designer-style quilt using straight seams, repeated strips, and careful color placement. It is perfect for a luxurious bedroom because the flame stitch movement adds energy, while the rich colors make the space feel warm, stylish, and intentional.

Finished Size
This guide makes a generous lap or bed-accent quilt measuring approximately 54 x 66 inches.
Use it as:
- A folded accent quilt at the foot of a bed
- A statement throw for a bedroom chair
- A dramatic wall-hanging quilt
- A colorful, luxury-style, handmade gift
Materials Needed
For one modern flame stitch Bargello quilt, gather:
- 10 coordinating fabrics: ¼ to ⅓ yard each
- Background or border fabric: 1½ yards
- Backing fabric: 3½ yards
- Batting: at least 60 x 72 inches
- Binding fabric: ½ yard
- Thread: ivory, gold, plum, or a coordinating neutral
- Rotary cutter and cutting mat
- 6 x 24-inch quilting ruler
- Pins or sewing clips
- Sewing machine
- Iron and ironing board
Vibrant Flame Stitch Palette
Arrange your fabrics from light to dark or warm to cool. A beautiful modern luxury sequence is:
- Ivory
- Champagne gold
- Saffron yellow
- Tangerine orange
- Coral
- Ruby red
- Deep plum
- Sapphire blue
- Teal
- Emerald green
This gives the quilt a glowing flame effect with jewel-tone depth.
Beginner-Friendly Cutting Measurements
Cut from each of the 10 fabrics:
- 4 strips measuring 2½ inches x width of fabric
You will sew these strips into strip sets, then cut the strip sets into vertical columns.
For borders:
- Cut 2 side border strips at 4½ x 66 inches
- Cut 2 top and bottom border strips at 4½ x 54 inches
For binding:
- Cut 7 strips measuring 2½ inches x width of fabric
Step-by-Step Guide
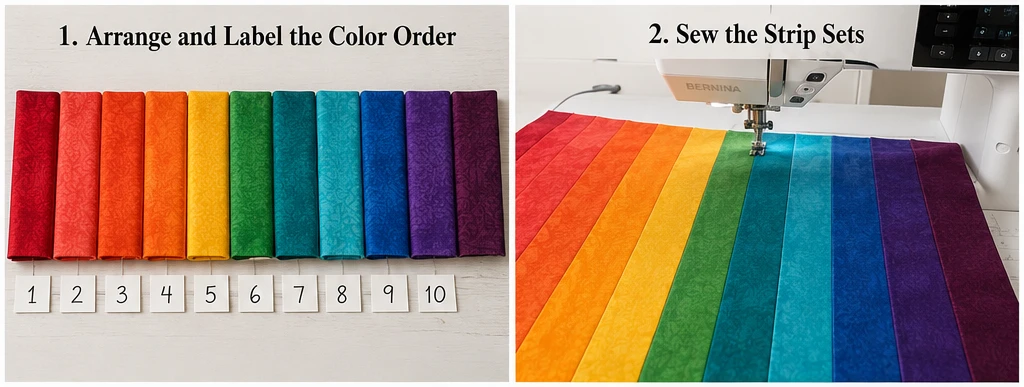
Step 1: Arrange the Fabric Color Order
Lay your 10 fabrics in a smooth color sequence. Start with ivory and gold, move into yellow, orange, coral, and ruby, then finish with plum, sapphire, teal, and emerald.
This color order is important because Bargello quilts rely on gradual movement. Take a photo of the order before sewing so you do not accidentally switch the fabrics.
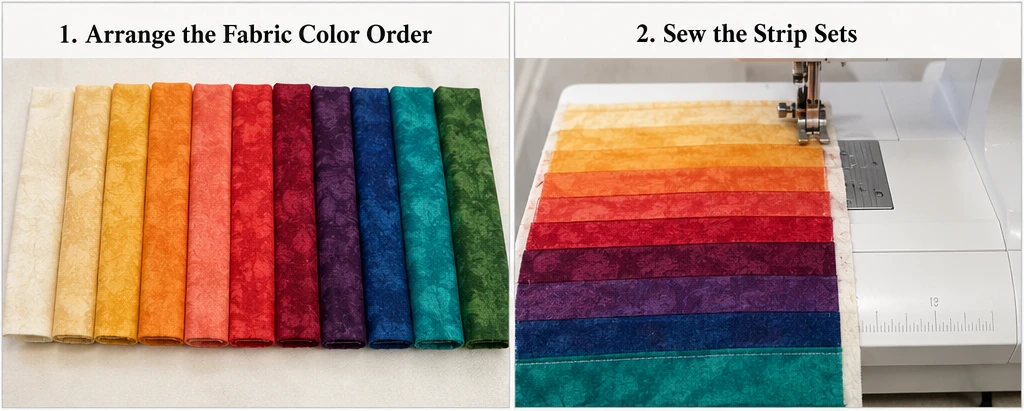
Step 2: Sew the Strip Sets
Sew one strip of each fabric together lengthwise using a ¼-inch seam allowance. Keep the color order the same from top to bottom.
Make 4 identical strip sets. Each strip set should include all 10 fabrics and measure about 20½ inches tall before trimming, since each 2½-inch strip finishes at 2 inches after seams.
Press seams in one direction on the first strip set, then in the opposite direction on the next strip set. This helps seams nest when you join columns later.
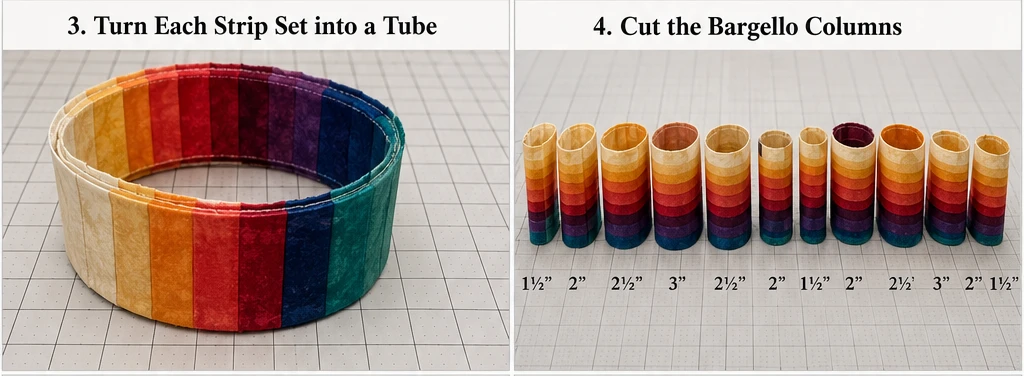
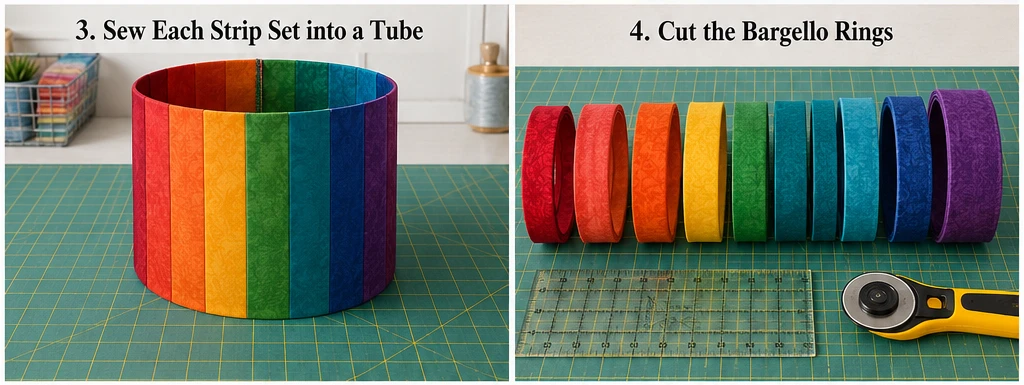
Step 3: Turn Each Strip Set into a Tube
Fold one strip set right sides together, matching the top fabric to the bottom fabric. Sew the long edge with a ¼-inch seam allowance to form a fabric tube.
Repeat with all strip sets. This tube method allows you to open each column at a different color point, creating the stepped flame effect.
Step 4: Cut the Bargello Columns
From each fabric tube, cut vertical rings in different widths. Use this beginner-friendly cutting sequence:
- 1½ inches
- 2 inches
- 2½ inches
- 3 inches
- 2½ inches
- 2 inches
- 1½ inches
- 2 inches
- 2½ inches
- 3 inches
- 2½ inches
- 2 inches
- 1½ inches
Cut enough rings to create about 26 to 30 columns total.
The changing column widths create movement, while the stepped color placement creates the flame stitch effect.
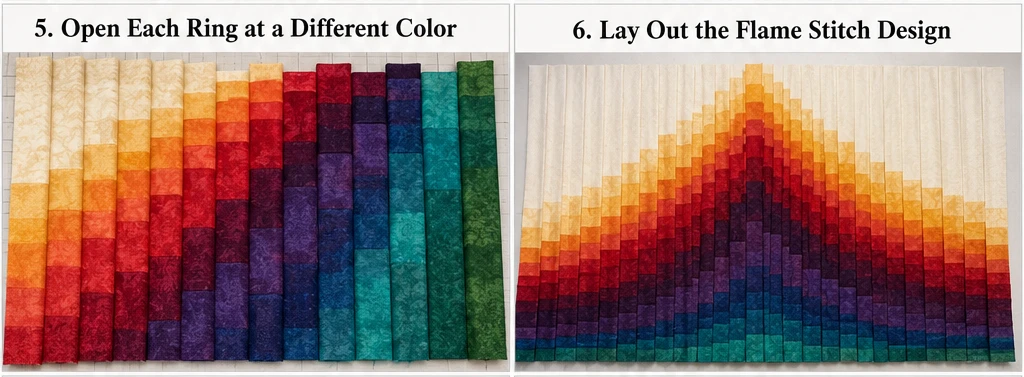
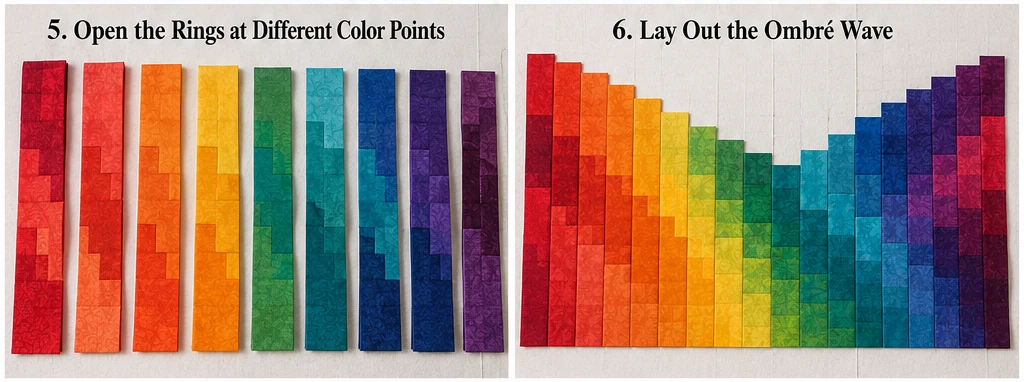
Step 5: Open Each Ring at a Different Color
Use a seam ripper to open each ring at a different fabric. For the first column, open at ivory. For the next column, open at champagne gold. Then open the next at saffron, then tangerine, then coral, and continue shifting the opening point by one fabric each time.
This creates the signature Bargello staircase. When the columns are placed side by side, the colors will rise and fall like elegant flames.
Step 6: Lay Out the Flame Stitch Design
Place the opened columns on a design wall, bed, or clean floor. Arrange them so the colors form waves or peaks.
For a modern flame look, let the warm colors rise through the center and allow the cooler jewel tones to dip toward the edges. Step back often and adjust the columns until the movement feels balanced.
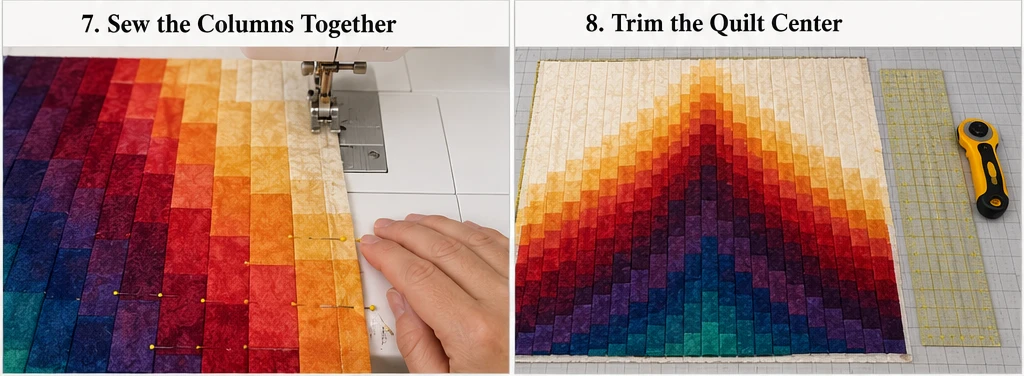
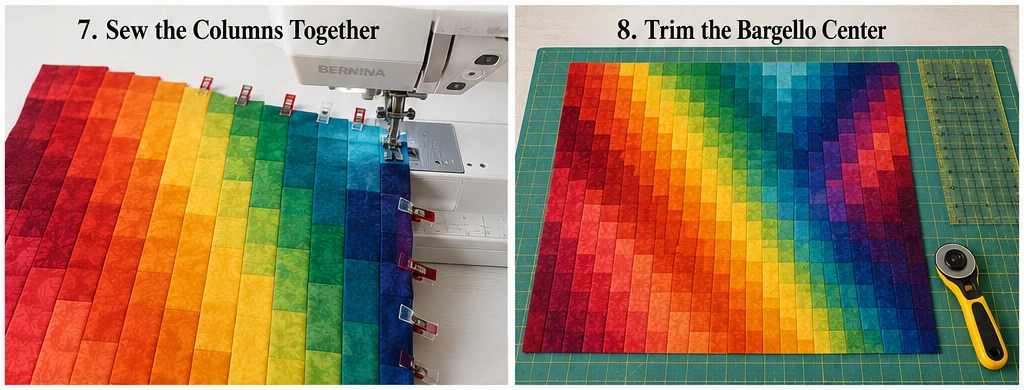
Step 7: Sew the Columns Together
Sew the columns together one at a time using a ¼-inch seam allowance. Pin at key seam intersections to keep the color bands aligned.
Press gently after every few columns. Bargello quilts have many seams, so do not stretch the fabric while pressing. Lift and press rather than drag the iron.
Step 8: Trim the Quilt Center
Once all columns are joined, trim the quilt center so the edges are straight. A good center size is about 46 x 58 inches before borders.
Do not worry if the edges look slightly uneven before trimming. That is normal with strip-pieced Bargello designs.
Step 9: Add Borders
Sew the side borders first. Use 4½-inch-wide border strips in ivory, champagne, charcoal, or deep plum.
Then sew the top and bottom borders. Borders calm the movement of the flame stitch center and make the quilt look polished enough for a luxurious bedroom.
Step 10: Layer and Quilt
Place the backing fabric wrong side up, batting in the middle, and quilt top right side up. Baste well with pins or spray.
For quilting, use simple vertical lines, soft waves, or gentle diagonal lines. Space quilting lines about 2 to 3 inches apart for a soft, drapey quilt.
A gold or ivory thread adds subtle elegance without competing with the flame stitch design.
Step 11: Bind the Quilt
Trim the edges square. Join the 2½-inch binding strips end to end, press them in half lengthwise, and sew them around the quilt.
A binding in deep plum, sapphire, ruby, or champagne gold gives the finished quilt a rich, designer-style frame.
Assembly at a Glance
- Choose 10 fabrics in a vibrant flame-inspired color order.
- Cut 2½-inch strips from each fabric.
- Sew strips into 4 identical strip sets.
- Sew each strip set into a tube.
- Cut tube rings in varied widths from 1½ to 3 inches.
- Open each ring at a different color point.
- Arrange the columns into a flame-stitch Bargello layout.
- Sew columns together with a ¼-inch seam allowance.
- Trim the quilt center to about 46 x 58 inches.
- Add 4½-inch borders.
- Layer with batting and backing.
- Quilt with simple lines and bind with 2½-inch strips.
Color Combination Ideas
For a fiery luxury bedroom quilt, use ruby, coral, tangerine, saffron, champagne, ivory, and plum.
For a jewel-tone flame stitch quilt, use emerald, teal, sapphire, amethyst, magenta, gold, and charcoal.
For a warm sunset-inspired quilt, use peach, coral, orange, golden yellow, rose, burgundy, and cream.
For a dramatic modern bedroom, use black, ivory, cobalt blue, emerald, plum, ruby, and metallic gold prints.
Beginner Tips for Success
Choose fabrics with similar weight and texture, especially if this is your first Bargello quilt. Quilting cotton is easiest to sew and press.
Label your fabric order from 1 to 10 before cutting. Bargello depends on color sequence, so labels help prevent confusion.
Use a consistent ¼-inch seam allowance. Small changes can affect how neatly the columns line up.
Press gently and often. Many narrow seams can stretch if handled roughly.
Styling Tip
Place the finished flame stitch Bargello quilt across the foot of a bed with velvet pillows in plum, sapphire, emerald, ruby, or gold. The quilt will act like a luxurious textile centerpiece, adding movement, warmth, and vibrant color to the entire bedroom.
Other Design Inspirations – Digitally Modified
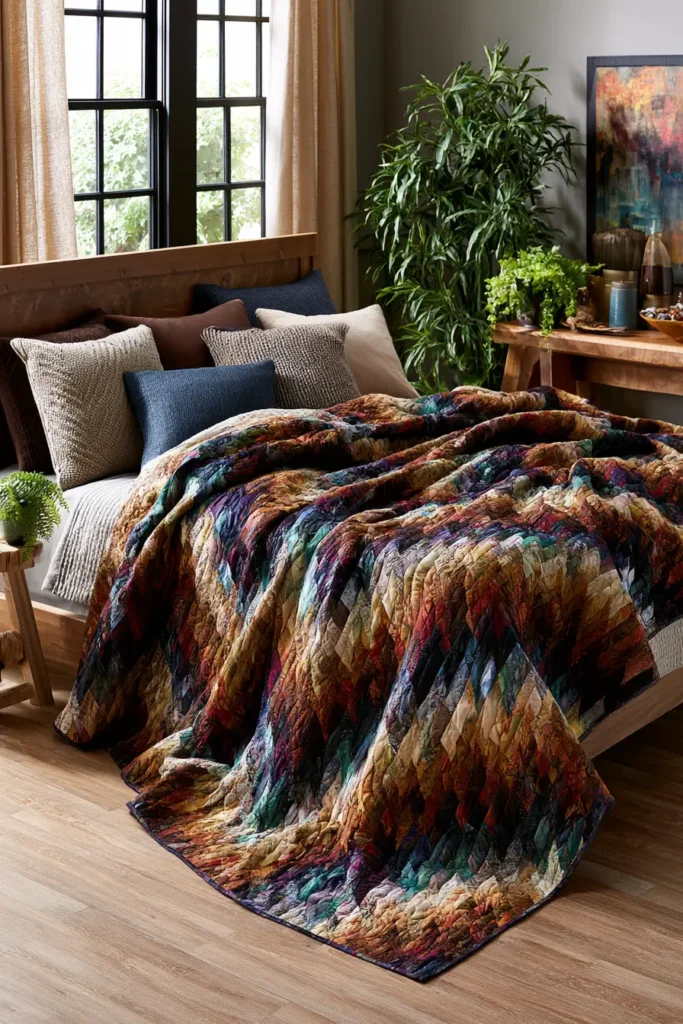
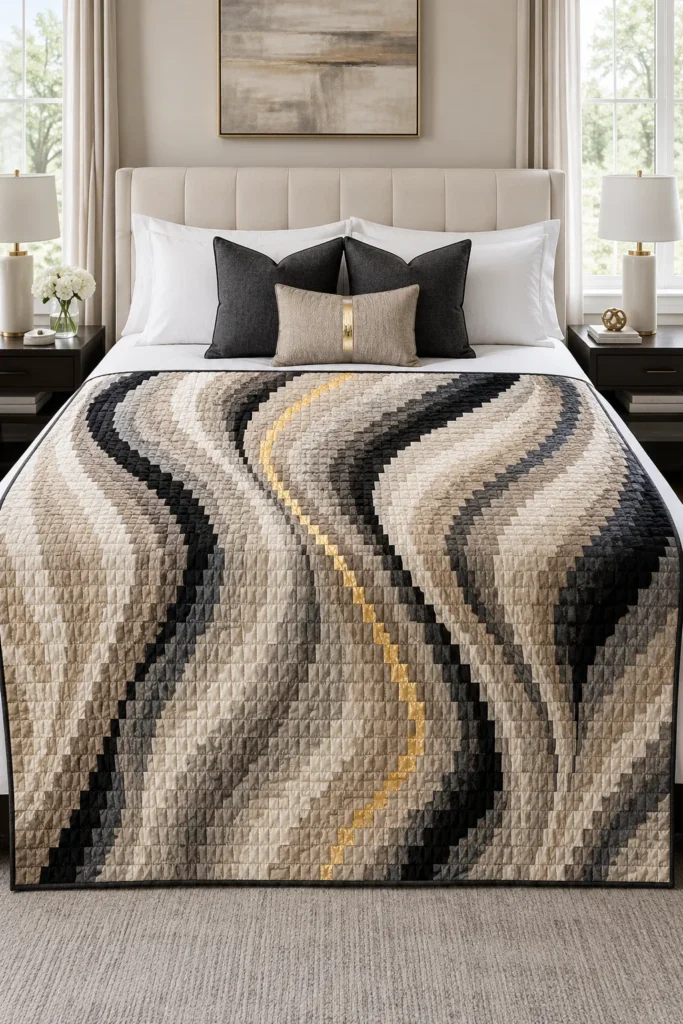
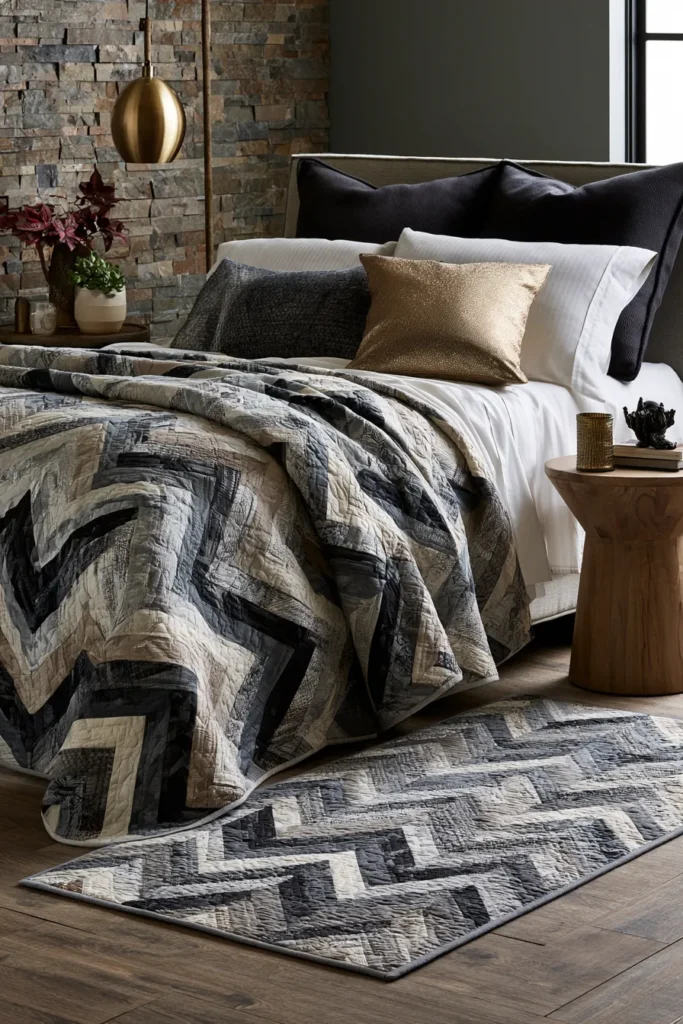
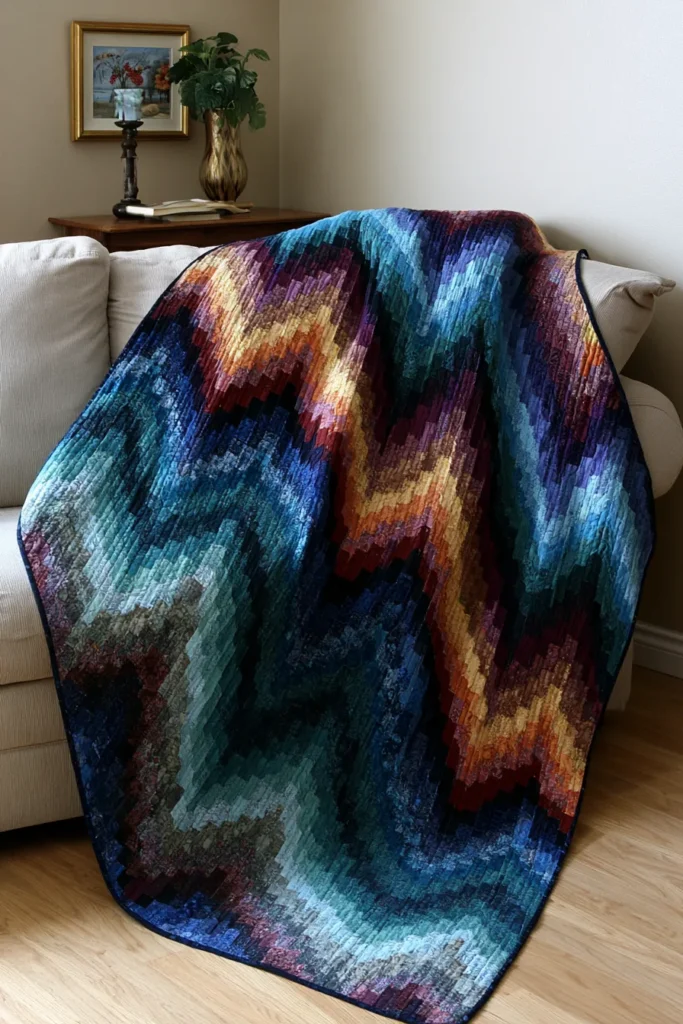
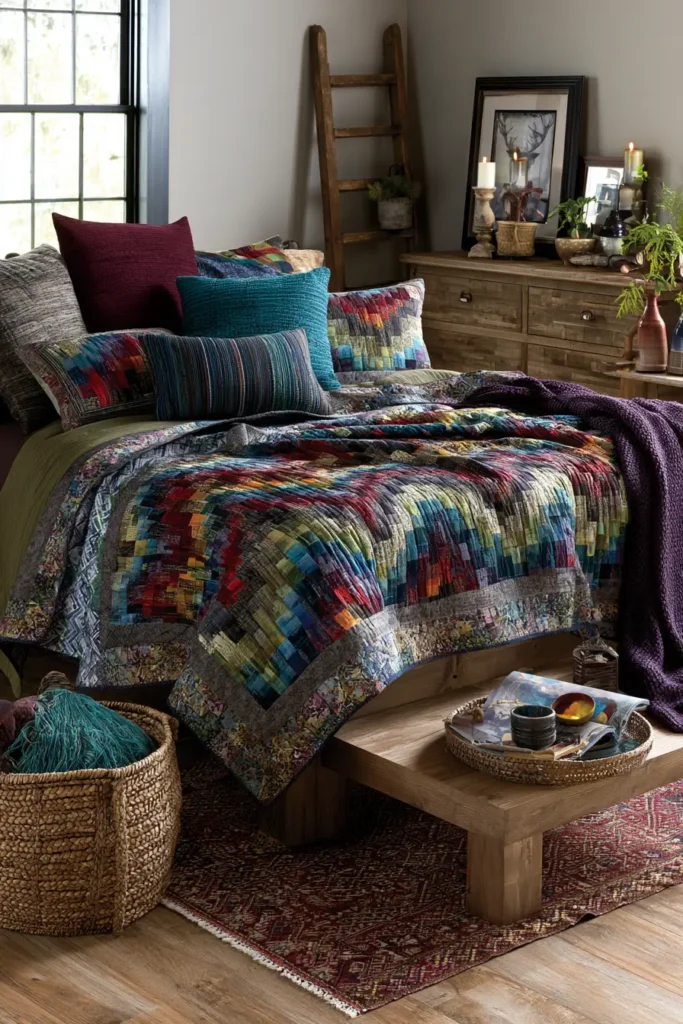
2. Chic Monochrome and Neutral Tone Bargello Designs for Sophisticated Interiors
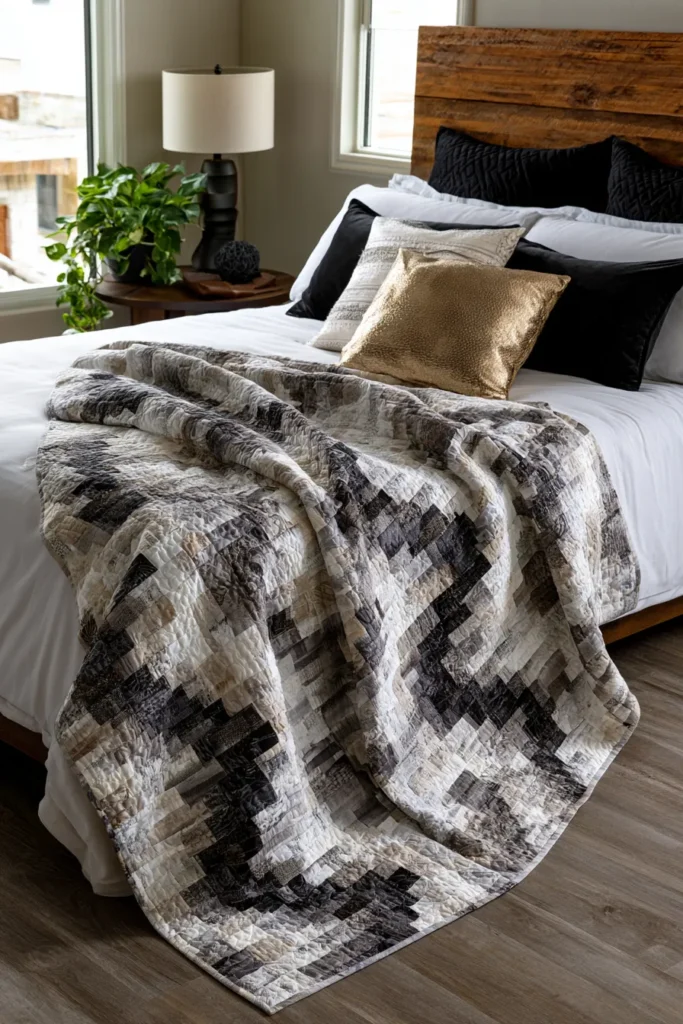
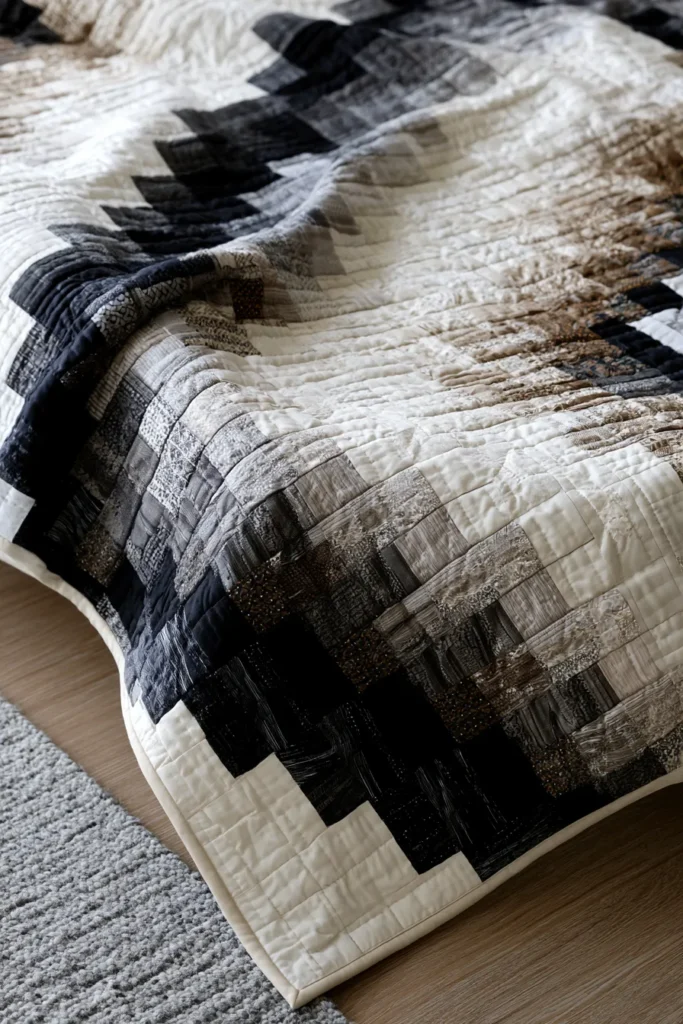
A chic monochrome-and-neutral-tone Bargello quilt is perfect for interiors that feel calm, polished, and modern. Instead of using a rainbow of colors, this design creates movement through value: light ivory, warm cream, beige, taupe, greige, soft gray, charcoal, and black. The flame stitch effect still feels dramatic, but the overall look is elegant enough for a sophisticated bedroom, living room, or guest space.
To keep the quilt from feeling flat, add one vibrant accent color in small amounts. A narrow line of sapphire blue, emerald green, deep plum, ruby red, or metallic gold can make the neutral Bargello pattern feel designer-made.
Why I Made It
I made this quilt because I wanted a Bargello design that felt luxurious without being loud. Traditional Bargello patterns can be bright and energetic, but a monochrome version has a quieter beauty. It looks like rippling stone, candle smoke, shadows on linen, or soft architectural waves.
The backstory of this idea comes from classic Bargello needlework, known for stepped, flame-like patterns. When translated into quilting, those stepped columns create movement using only straight seams. That makes the design look complex while staying approachable for beginners who are comfortable sewing strips.
Why This Idea Is Worth Making
This idea is worth making because it gives you a high-impact quilt that still works with calm, sophisticated décor. The neutral palette makes it easy to style, while the Bargello flame stitch movement keeps it from looking plain. It is a wonderful project for anyone who wants a modern quilt that feels elegant, expensive, and handmade.

Finished Size
This guide makes a throw or bed-accent quilt measuring approximately 54 x 66 inches.
It works beautifully as:
- A folded quilt at the foot of a bed
- A neutral sofa throw
- A guest room accent quilt
- A modern wall-hanging quilt
- A handmade gift for someone who loves understated interiors
Materials Needed
For one quilt, gather:
- 8 neutral quilting cotton fabrics: ⅓ yard each
- 1 accent fabric: ¼ yard in gold, emerald, sapphire, plum, or ruby
- Border fabric: 1½ yards in ivory, charcoal, or warm taupe
- Backing fabric: 3½ yards
- Batting: at least 60 x 72 inches
- Binding fabric: ½ yard
- Thread: ivory, gray, taupe, or charcoal
- Rotary cutter and cutting mat
- 6 x 24-inch quilting ruler
- Pins or sewing clips
- Sewing machine
- Iron and ironing board
- Fabric labels or sticky notes for numbering fabrics
Sophisticated Neutral Palette
Arrange your fabrics from light to dark. A beautiful monochrome sequence is:
- Soft ivory
- Warm cream
- Sand beige
- Oatmeal
- Taupe
- Greige
- Slate gray
- Charcoal
- Accent color: champagne gold, emerald, sapphire, plum, or ruby
For the most elegant result, keep the accent fabric narrow and intentional. It should act like a flash of jewelry against a tailored neutral outfit.
Beginner-Friendly Cutting Measurements
From each of the 8 neutral fabrics, cut:
- 4 strips measuring 2½ inches x width of fabric
From the accent fabric, cut:
- 2 strips measuring 2½ inches x width of fabric
From the border fabric, cut:
- 2 side borders measuring 4½ x 58 inches
- 2 top and bottom borders measuring 4½ x 54 inches
From the binding fabric, cut:
- 7 strips measuring 2½ inches x width of fabric
Beginner note: If your fabric width varies slightly, do not worry. You will trim the Bargello center before adding borders.
Step-by-Step Guide
Step 1: Arrange and Label the Fabric Order
Lay your fabrics from lightest to darkest. Place the accent fabric between two mid-to-dark neutrals so it looks intentional, not random.
A strong order is:
Ivory, cream, beige, oatmeal, taupe, gold accent, greige, slate gray, charcoal.
Label each fabric 1 through 9. Bargello designs depend on color order, so labels help prevent mistakes later.
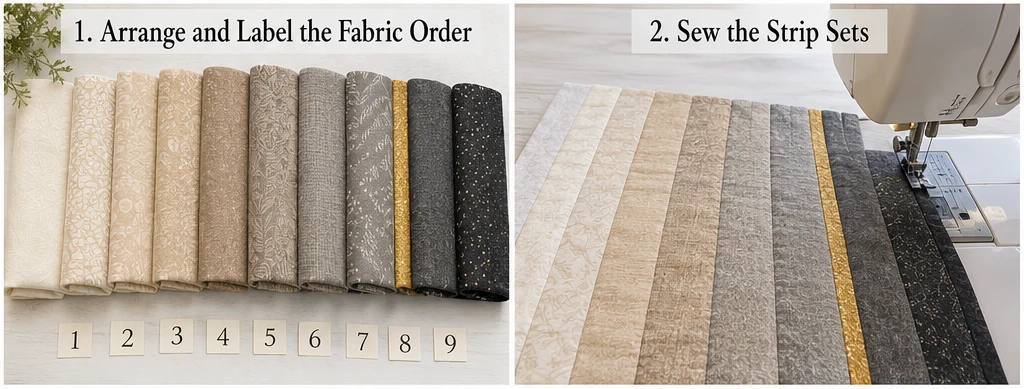
Step 2: Sew the Strip Sets
Sew one strip from each fabric together lengthwise using a ¼-inch seam allowance. Keep the fabrics in the exact same order.
Make 4 strip sets total. Each strip set should include all 9 fabrics.
Press the seams in one direction on the first strip set. Press the next strip set in the opposite direction. Alternating the pressing direction helps seams nest neatly when the columns are joined.
Step 3: Make Fabric Tubes
Fold one strip set right sides together, matching the first fabric to the last fabric. Sew the long edge with a ¼-inch seam allowance to create a tube.
Repeat with all 4 strip sets.
This tube method is what makes Bargello easier. You can open each tube ring at a different color to create the stepped flame stitch pattern.
Step 4: Cut the Bargello Rings
Cut the fabric tubes into rings of different widths. Use this beginner-friendly cutting sequence:
- 1½ inches
- 2 inches
- 2½ inches
- 3 inches
- 2½ inches
- 2 inches
- 1½ inches
- 2 inches
- 2½ inches
- 3 inches
- 2½ inches
- 2 inches
- 1½ inches
Repeat this sequence until you have about 26 to 30 rings.
The narrow and wide columns help create the soft flame movement that makes Bargello quilts so beautiful.
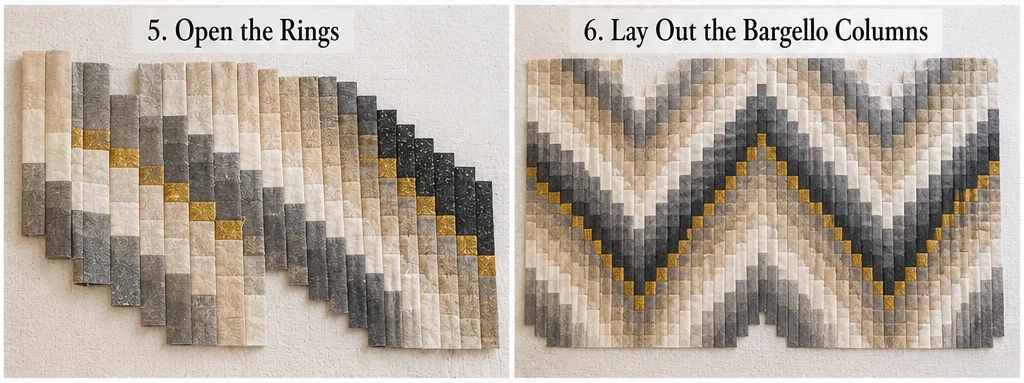
Step 5: Open the Rings to Create the Flame Stitch Movement
Use a seam ripper to open each ring in a different fabric.
For example:
- Column 1: open above ivory
- Column 2: open above cream
- Column 3: open above beige
- Column 4: open above oatmeal
- Column 5: open above taupe
- Column 6: open above the accent color
- Column 7: open above greige
- Column 8: open above slate gray
- Column 9: open above charcoal
Then reverse the order so the colors rise and fall like a wave. This creates a soft flame-stitch effect without curved stitching.
Step 6: Lay Out the Bargello Columns
Place the opened columns on a bed, table, floor, or design wall. Arrange them side by side until the colors form a pleasing wave.
For a sophisticated interior look, keep the brightest accent color flowing through the center like a narrow ribbon. The neutral fabrics should move around it like shadows and highlights.
Step back and check the design before sewing. Take a photo once you like the layout.
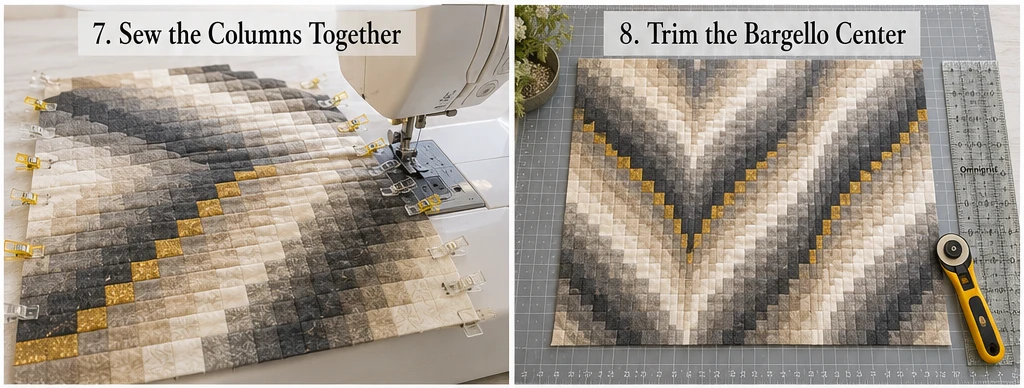
Step 7: Sew the Columns Together
Sew the columns together one at a time using a ¼-inch seam allowance. Pin at important seam intersections so the color bands line up neatly.
Press gently after every few columns. Do not drag the iron across the strips, because narrow Bargello columns can stretch. Lift and press instead.
Step 8: Trim the Bargello Center
After the columns are joined, trim the quilt center so the sides are straight. Aim for a center measuring approximately 46 x 58 inches.
If your center is slightly smaller or larger, that is okay. You can adjust the border width by ½ inch if needed.
Step 9: Add the Borders
Sew the side borders first, then the top and bottom borders. Use 4½-inch-wide borders in ivory, charcoal, taupe, or soft black.
Borders are especially helpful for Bargello quilts because they frame the movement and make the finished quilt look clean and intentional.
Step 10: Layer and Baste
Place the backing fabric wrong side up, batting in the middle, and quilt top right side up. Smooth the layers carefully.
Baste with safety pins or spray. Pin every 4 to 5 inches so the layers stay secure while quilting.
Step 11: Quilt with Simple Elegant Lines
Quilt vertical lines, soft waves, or gentle diagonal lines. For a beginner-friendly finish, quilt straight vertical lines about 2½ to 3 inches apart.
Use thread that blends with the quilt, such as ivory, taupe, gray, or charcoal. For a subtle luxury touch, use gold thread only in the accent area.
Step 12: Bind the Quilt
Trim the quilt edges square. Join the 2½-inch binding strips end to end, press them in half lengthwise, and sew them around the quilt.
For a polished look, choose charcoal binding on a light quilt or ivory binding on a dark quilt. For a bolder finish, use the same accent color as the narrow Bargello ribbon.
Assembly at a Glance
- Choose 8 neutral fabrics and 1 vibrant accent fabric.
- Label fabrics from light to dark.
- Cut 2½-inch strips from each fabric.
- Sew strips into 4 identical strip sets.
- Sew each strip set into a tube.
- Cut tube rings from 1½ to 3 inches wide.
- Open each ring at a different color point.
- Arrange columns into a wave or flame stitch layout.
- Sew columns together with a ¼-inch seam allowance.
- Trim the center to about 46 x 58 inches.
- Add 4½-inch borders.
- Layer, quilt, and bind with 2½-inch binding strips.
Chic Monochrome and Neutral Color Ideas
For a warm sophisticated quilt, use ivory, cream, beige, oatmeal, taupe, cocoa, greige, and charcoal with a champagne gold accent.
For a cool modern quilt, use white, silver, dove gray, pewter, slate, charcoal, black, and icy blue with a sapphire accent.
For a dramatic bedroom quilt, use cream, mushroom, taupe, smoke gray, charcoal, black, and deep espresso with a ruby red accent.
For a soft luxury guest room, use ivory, linen, sand, pale gray, warm taupe, and greige with a dusty plum accent.
Beginner Tips for Success
Use quilting cotton for your first Bargello quilt. It presses well, cuts cleanly, and keeps the columns easier to align.
Choose fabrics with strong contrast from light to dark. A monochrome quilt needs value contrast so the flame stitch pattern is visible.
Label everything. Even experienced quilters can lose track of Bargello fabric order.
Keep your seam allowance consistent. A steady ¼-inch seam helps the columns line up and keeps the quilt from leaning.
Press gently and often. Bargello quilts have many seams, so careful pressing makes a big difference.
Styling Tip
Fold the finished quilt across the foot of a bed with crisp white bedding, charcoal pillows, and one accent pillow in gold, sapphire, plum, emerald, or ruby. The quilt will bring quiet movement, soft texture, and a refined designer look to the room without overwhelming the space.
Other Design Inspirations – Digitally Modified
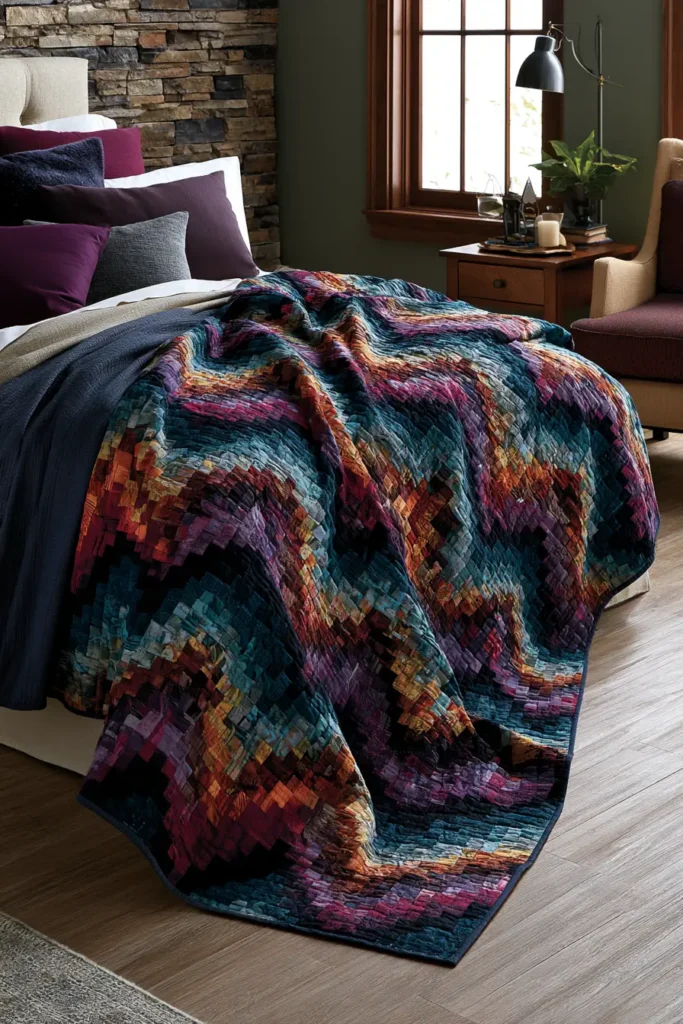
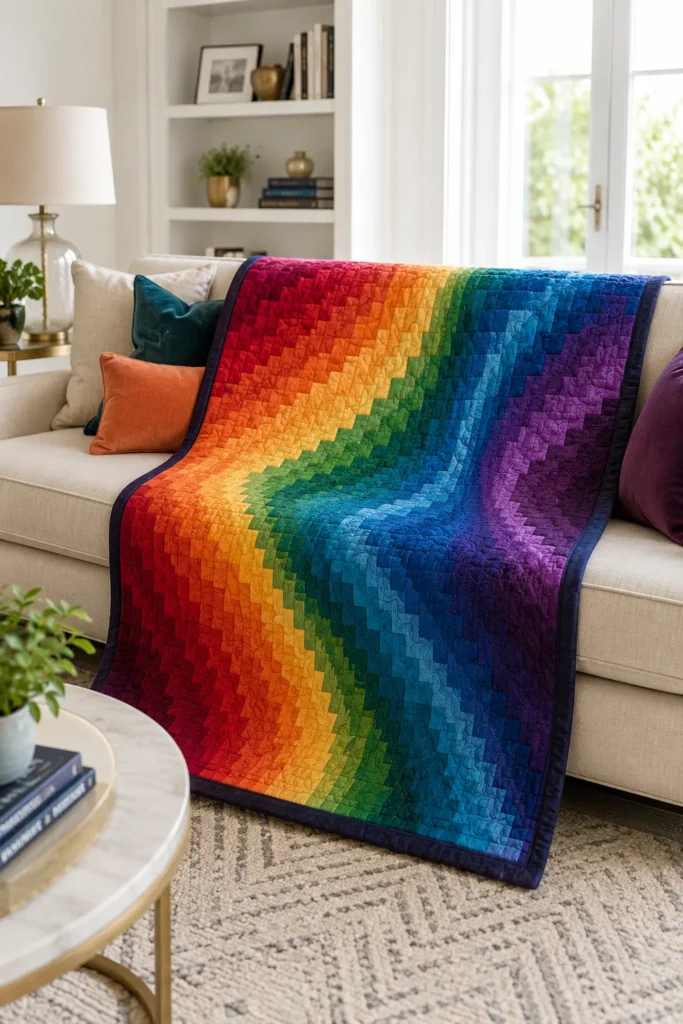
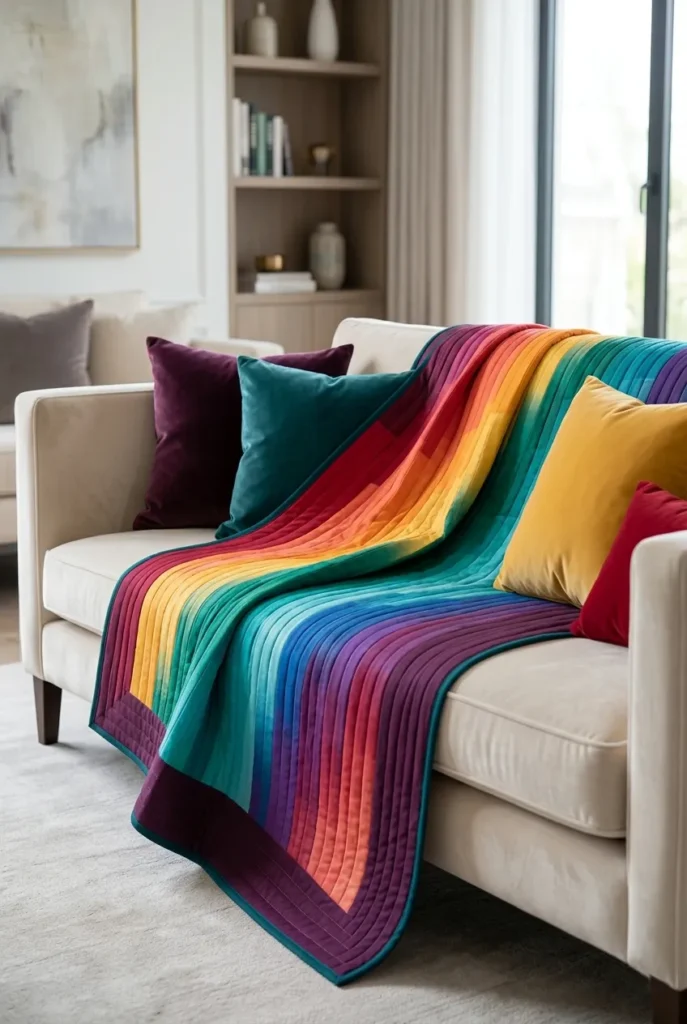
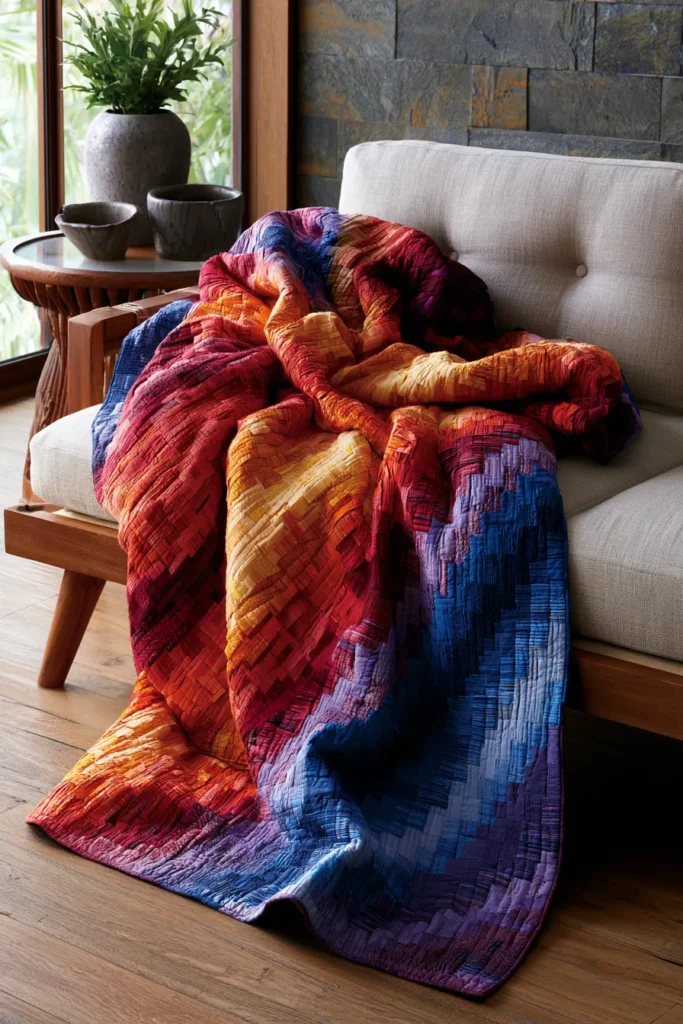
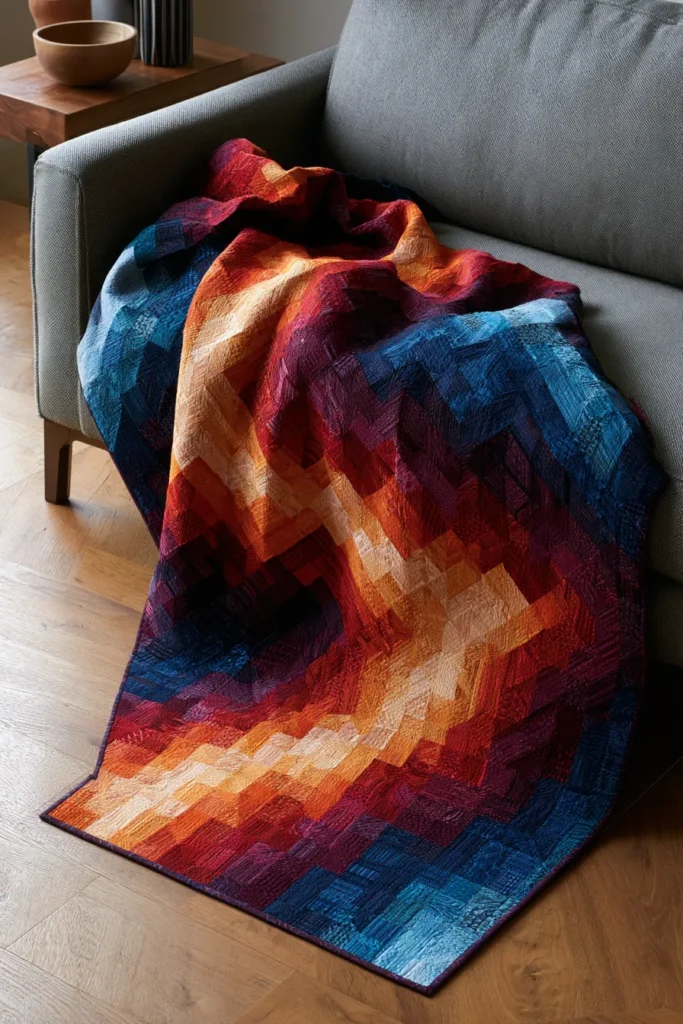
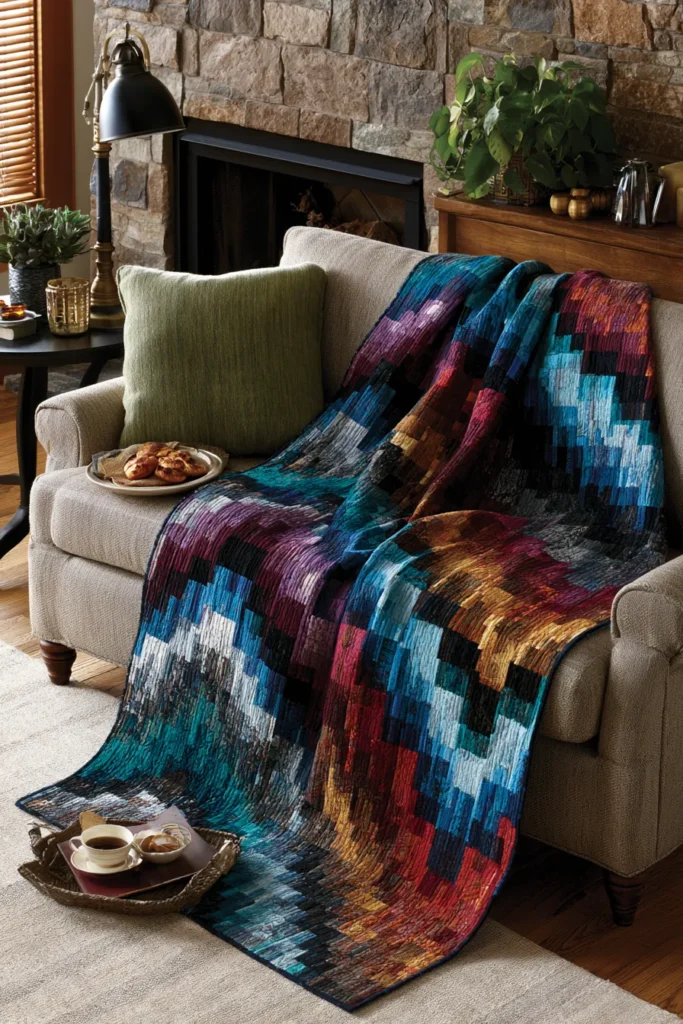
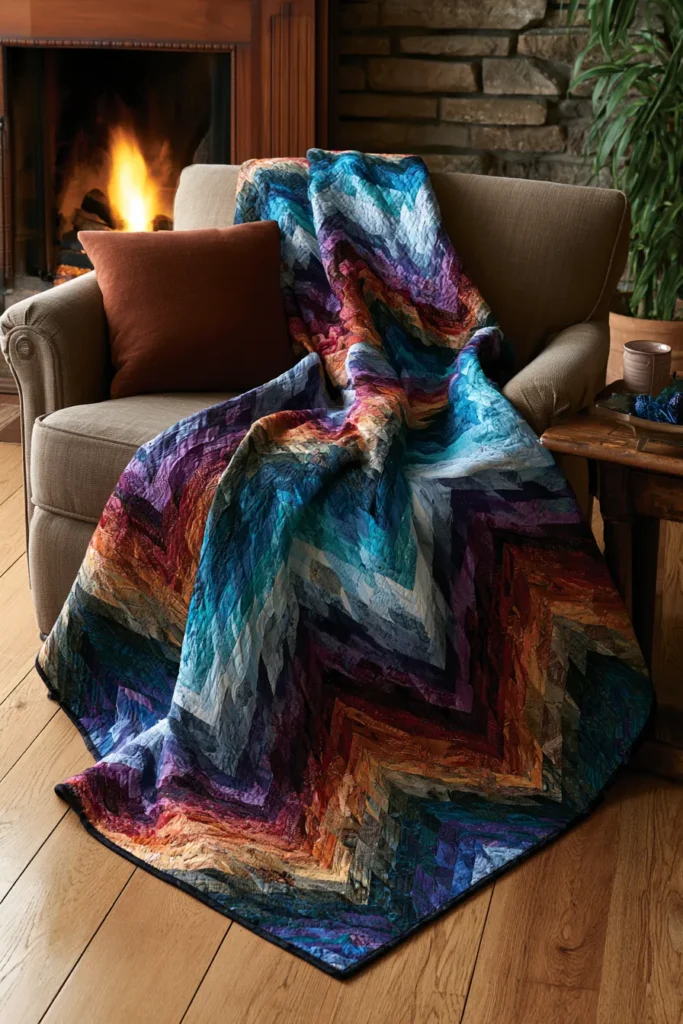
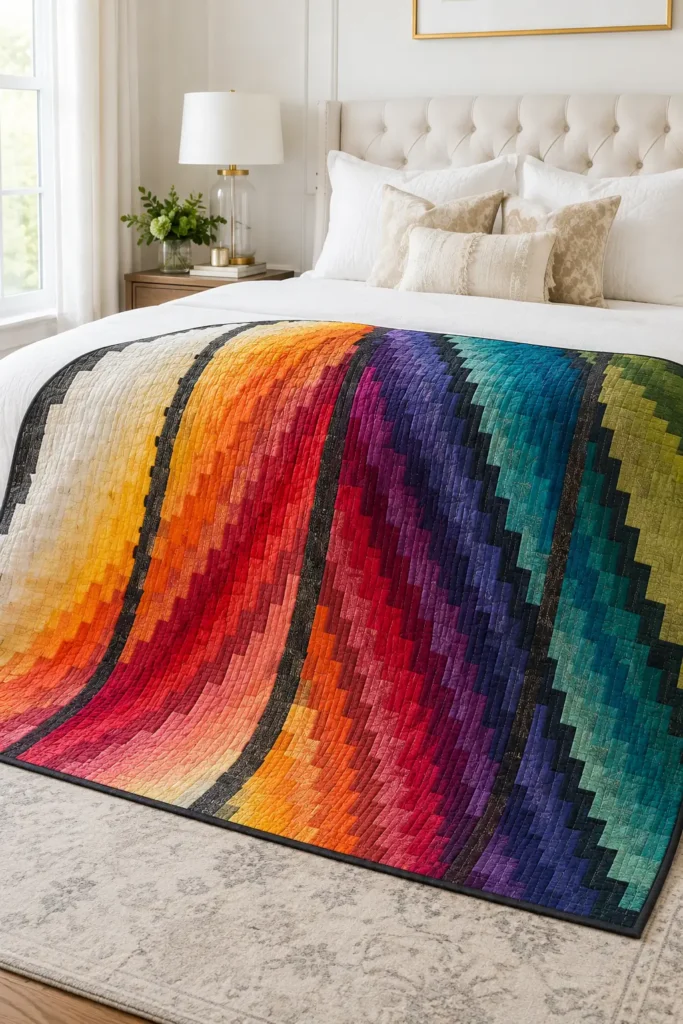
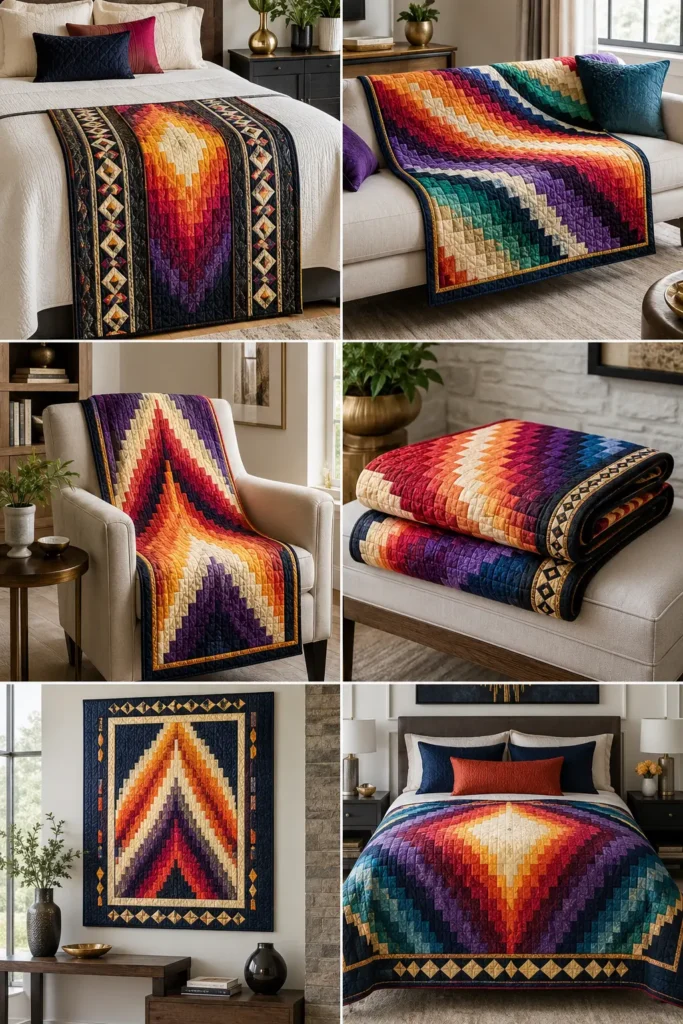
3. Bold Color Wave and Ombre Bargello Patterns for Elegant Living Rooms
A bold color wave Bargello quilt is one of the most striking ways to bring movement, warmth, and personality into an elegant living room. The design looks like rippling water, glowing flame, or a rolling ribbon of color, but it is made with beginner-friendly strip piecing and straight seams.
For a vibrant living room accent, choose an ombré-style palette that moves smoothly from one color family into another. Think ruby red, coral, tangerine, saffron yellow, emerald green, teal, turquoise, sapphire blue, violet, and deep plum. The finished quilt feels dramatic enough to display over a sofa but soft and practical enough for everyday use.
Why I Made It
I made this quilt because I wanted a living room throw that could act like art without losing its cozy purpose. A Bargello quilt has that special quality: from across the room, it looks like a flowing color wave, but up close, you can see the careful rows of fabric and the handmade detail.
The backstory behind this design comes from Bargello needlework, famous for its stepped flame-like patterns and rich color movement. In quilting, the same effect is created by sewing fabric strips together, cutting them into columns, and shifting the colors up and down. It looks complex, but the process is very manageable when you keep the color order labeled.
Why This Idea Is Worth Making
This idea is worth making because it gives you a high-impact quilt using simple sewing skills. The ombré color wave makes the quilt look modern and luxurious, while the strip-piecing method keeps the construction approachable for beginners. It is perfect for brightening a neutral sofa, adding warmth to a minimalist room, or creating a handmade statement piece that guests will notice immediately.
Finished Size
This guide makes a living room throw measuring approximately 54 x 66 inches.
It works beautifully as:
- A sofa throw
- A folded quilt over an accent chair
- A colorful wall-hanging quilt
- A bed-end accent quilt
- A handmade housewarming gift
Materials Needed
For one quilt, gather:
- 10 ombré color fabrics: ⅓ yard each
- Border fabric: 1½ yards
- Backing fabric: 3½ yards
- Batting: at least 60 x 72 inches
- Binding fabric: ½ yard
- Thread: ivory, gray, teal, gold, or a coordinating neutral
- Rotary cutter and cutting mat
- 6 x 24-inch quilting ruler
- Pins or sewing clips
- Sewing machine
- Iron and ironing board
- Sticky notes or fabric labels
Bold Ombré Color Palette
Arrange the fabrics in a smooth color wave. A beautiful sequence is:
- Ruby red
- Coral
- Tangerine orange
- Saffron yellow
- Emerald green
- Teal
- Turquoise
- Sapphire blue
- Violet
- Deep plum
For a more elegant living room look, choose mostly solid fabrics or small tone-on-tone prints. This keeps the movement bold but polished.
Beginner-Friendly Cutting Measurements
From each of the 10 color fabrics, cut:
- 4 strips measuring 2½ inches x width of fabric
From the border fabric, cut:
- 2 side borders measuring 4½ x 58 inches
- 2 top and bottom borders measuring 4½ x 54 inches
From the binding fabric, cut:
- 7 strips measuring 2½ inches x width of fabric
Beginner note: You will trim the Bargello center before adding borders, so small size differences are okay.
Step-by-Step Guide
Step 1: Arrange and Label the Color Order
Lay the 10 fabrics in the order you want the wave to flow. For a bold ombré effect, move from warm colors into cool colors: ruby, coral, orange, yellow, green, teal, turquoise, blue, violet, and plum.
Label the fabrics 1 through 10. This is one of the most important steps because Bargello patterns depend on consistent color order.
Step 2: Sew the Strip Sets
Sew one strip from each fabric together lengthwise using a ¼-inch seam allowance. Keep the fabrics in the exact same order from 1 to 10.
Make 4 identical strip sets. Each strip set should measure about 20½ inches tall before trimming because the 2½-inch strips finish at 2 inches after seams.
Press seams gently. Press the first strip set in one direction, then press the next strip set in the opposite direction. This helps the seams nest when columns are sewn together.
Step 3: Sew Each Strip Set into a Tube
Fold one strip set right sides together so fabric 1 meets fabric 10. Sew the long edge with a ¼-inch seam allowance to create a fabric tube.
Repeat with all 4 strip sets.
This tube method makes it easy to create the stepped color movement because each ring can be opened at a different fabric.
Step 4: Cut the Bargello Rings
Cut the fabric tubes into rings of different widths. Use this beginner-friendly wave sequence:
- 1½ inches
- 2 inches
- 2½ inches
- 3 inches
- 3½ inches
- 3 inches
- 2½ inches
- 2 inches
- 1½ inches
- 2 inches
- 2½ inches
- 3 inches
- 3½ inches
- 3 inches
- 2½ inches
- 2 inches
- 1½ inches
Repeat this sequence until you have about 28 to 32 rings.
The changing ring widths help the finished quilt look like a flowing wave instead of a flat stripe.
Step 5: Open the Rings at Different Color Points
Use a seam ripper to open each ring at a different fabric. Start by opening the first ring above fabric 1, the next above fabric 2, then fabric 3, and so on.
After you reach fabric 10, reverse the direction:
- Column 1: open above ruby
- Column 2: open above coral
- Column 3: open above tangerine
- Continue through plum
- Then reverse back toward ruby
This creates the rising and falling wave effect that makes Bargello so beautiful.
Step 6: Lay Out the Ombré Wave
Place the opened columns side by side on a design wall, bed, or clean floor. Adjust the columns until the colors move smoothly across the quilt.
For an elegant living room design, let the warm colors rise through one side and let the cooler colors dip through the other. This creates a dramatic but balanced wave.
Take a photo before sewing so you can remember the layout.
Step 7: Sew the Columns Together
Sew the columns together one at a time with a ¼-inch seam allowance. Pin at the main seam intersections so the color bands line up neatly.
Work slowly and avoid stretching the narrow strips. Bargello columns can shift if they are pulled too much.
Press gently after every few columns. Lift and press the iron instead of sliding it across the fabric.
Step 8: Trim the Bargello Center
After all columns are joined, trim the edges straight. Aim for a Bargello center of about 46 x 58 inches.
Do not worry if the edges look uneven before trimming. That is normal with Bargello strip construction.
Step 9: Add Borders
Sew the side borders first, then the top and bottom borders. Use 4½-inch-wide borders in a color that frames the quilt without competing with the wave.
Good border choices include deep plum, charcoal, ivory, navy, or dark teal.
The borders help calm the bold center and make the quilt look polished enough for an elegant living room.
Step 10: Layer and Baste the Quilt
Place the backing fabric wrong side up, the batting in the middle, and the quilt top right side up. Smooth all layers carefully.
Baste with safety pins or spray. Place pins every 4 to 5 inches so the quilt layers stay secure while stitching.
Step 11: Quilt with Simple Lines
For a beginner-friendly finish, quilt soft vertical lines, gentle diagonal lines, or loose waves across the quilt.
Space quilting lines about 2½ to 3 inches apart if you want a soft, drapey sofa throw. Use a thread that blends with most of the colors, such as ivory, gray, teal, or gold.
Step 12: Bind and Finish
Trim the quilt edges square. Join the 2½-inch binding strips end to end, press in half lengthwise, and sew around the quilt.
A binding in deep plum, sapphire, teal, charcoal, or ruby gives the quilt a strong, finished frame.
Assembly at a Glance
- Choose 10 vibrant fabrics in a smooth ombré color order.
- Label the fabrics from 1 to 10.
- Cut 2½-inch strips from each fabric.
- Sew strips into 4 identical strip sets.
- Sew each strip set into a tube.
- Cut tube rings from 1½ to 3½ inches wide.
- Open each ring at a different color point.
- Arrange the columns into a rising and falling wave.
- Sew columns together using a ¼-inch seam allowance.
- Trim the Bargello center to about 46 x 58 inches.
- Add 4½-inch borders.
- Layer, quilt, and bind with 2½-inch binding strips.
Bold Color Wave Ideas
For a fiery sunset wave, use ruby, coral, orange, saffron, peach, magenta, plum, and cream.
For a jewel-tone living room quilt, use emerald, teal, turquoise, sapphire, violet, plum, gold, and charcoal.
For a tropical ombré quilt, use lime green, aqua, turquoise, cobalt, fuchsia, coral, yellow, and white.
For a dramatic modern sofa throw, use black, charcoal, ruby, orange, gold, teal, sapphire, and violet.
Beginner Tips for Success
Use quilting cotton for your first Bargello project. It is easier to cut, sew, and press slippery or stretchy fabrics.
Keep your color order consistent. Bargello quilts can quickly become confusing if the strips are not labeled.
Use a steady ¼-inch seam allowance. A small difference in seam width can affect how the wave lines up.
Press gently and often. The more carefully you press, the flatter and cleaner the quilt top will look.
Step back from the layout before sewing. Bargello is all about movement, so viewing it from a distance helps you see the wave clearly.
Styling Tip
Drape the finished quilt over a neutral sofa in white, cream, gray, navy, or charcoal. Add pillows in teal, ruby, saffron, plum, or emerald to echo the quilt colors. The bold ombré wave will become the living room’s artistic centerpiece while still feeling warm, soft, and usable.
Other Design Inspirations – Digitally Modified
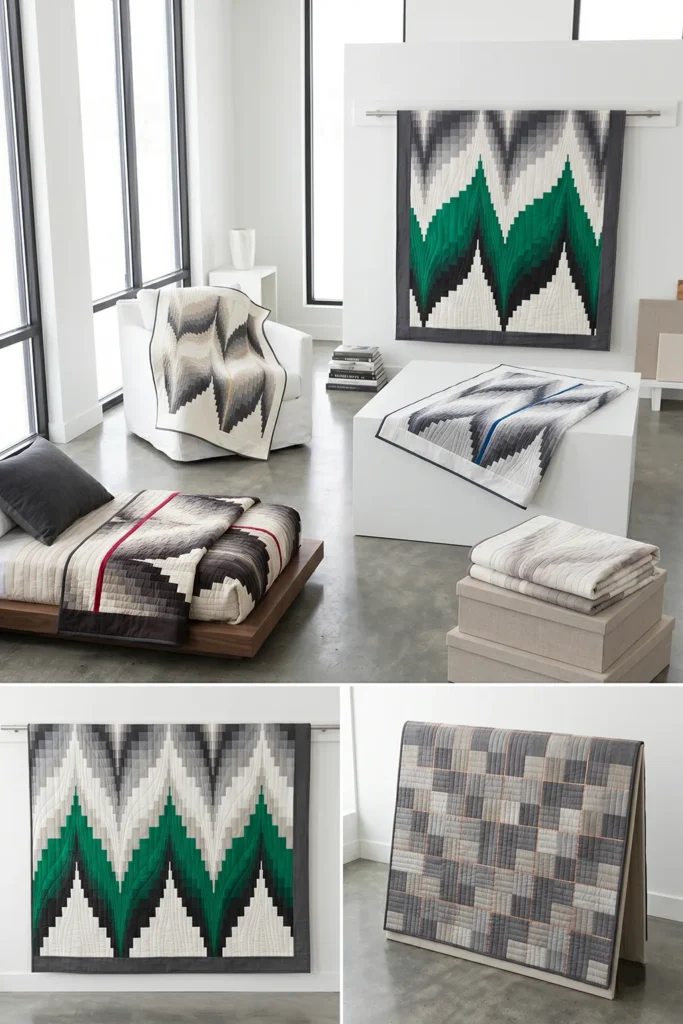
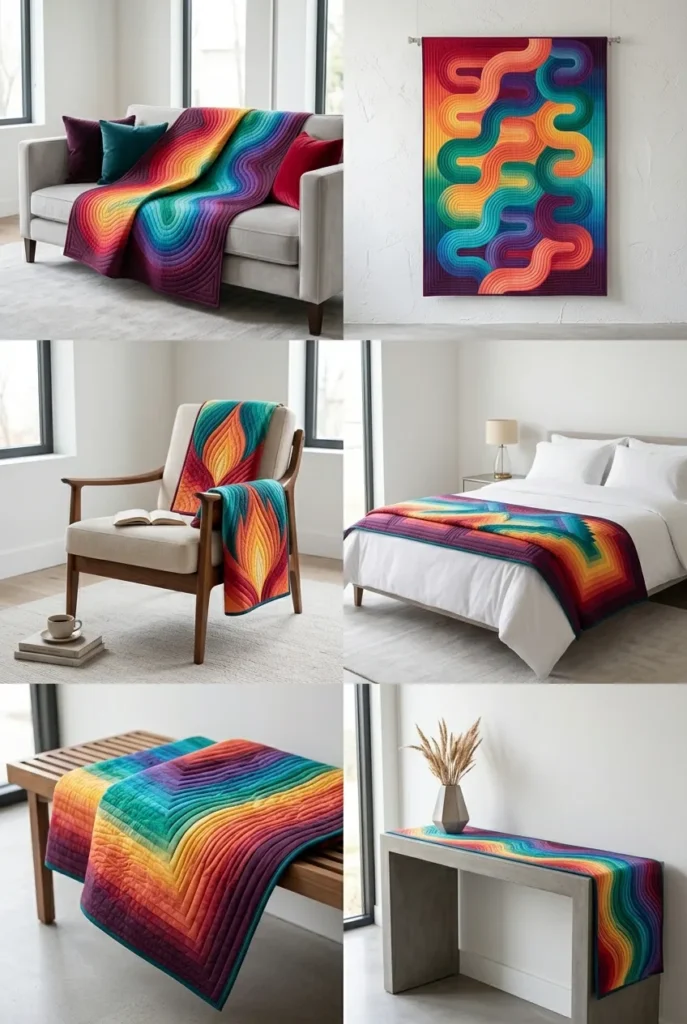
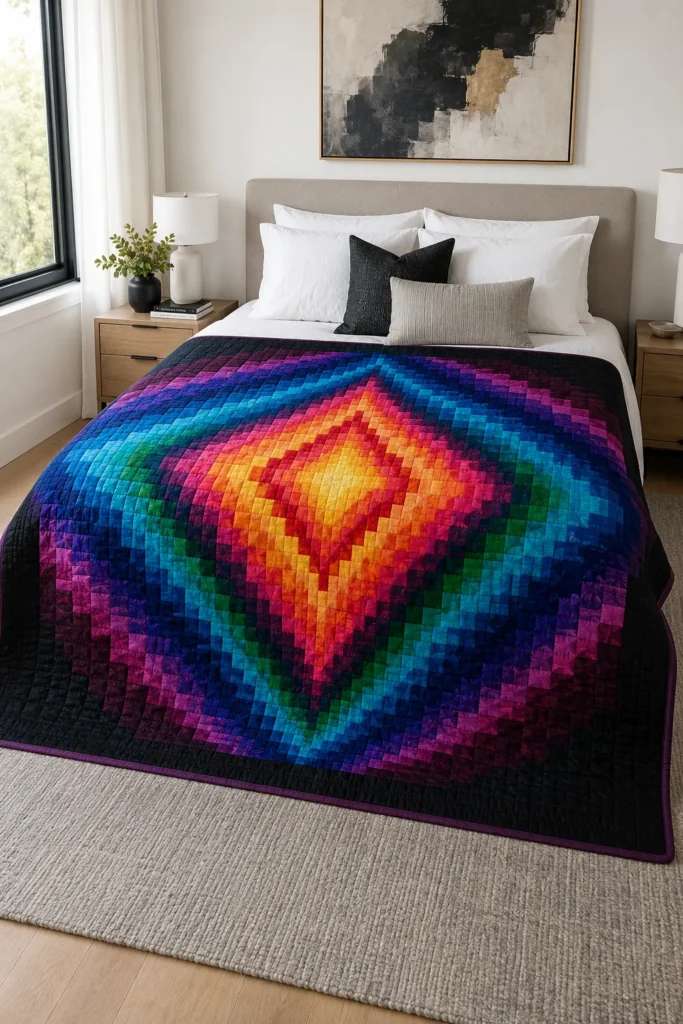
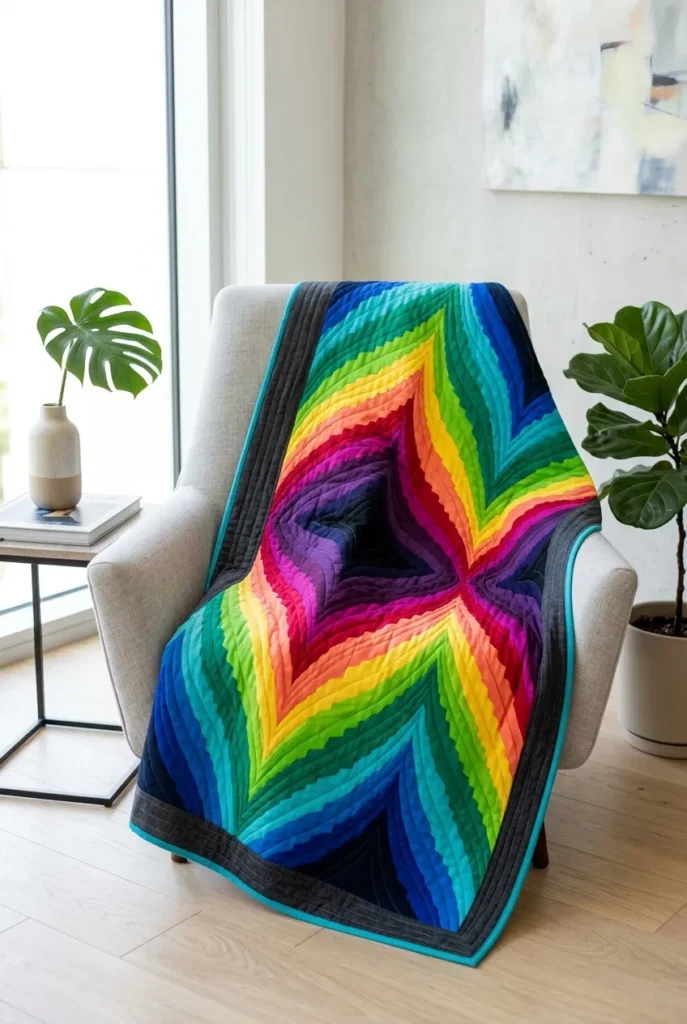
4. Mesmerizing Optical Illusion Bargello Quilts for Striking Statement Pieces
A mesmerizing optical illusion Bargello quilt is a dramatic way to turn fabric into movement. This design uses repeated strip sets, careful color order, and stepped columns to create the look of waves, flames, ripples, or even a tunnel of color. From across the room, the quilt seems to shift and move, but up close, you can see that it is built from simple, straight seams.
For a striking statement piece, use vibrant colors with strong contrast: electric blue, turquoise, emerald green, lime, saffron yellow, coral, ruby red, magenta, violet, deep plum, black, and crisp white. The secret is to place light and dark fabrics side by side so the eye sees depth, glow, and motion.
Why I Made It
I made this quilt because I wanted a piece that felt like textile art but could still be used and loved every day. Optical illusion designs have a way of pulling you in, and Bargello quilting is perfect for that effect because the colors rise and fall like a visual rhythm.
The backstory behind this idea comes from classic Bargello needlework, where long vertical stitches created flame-like patterns and waves. Quilters adapted that idea by using fabric strips instead of stitches. What looks like a complicated illusion is really a smart arrangement of color, contrast, and repeated columns.
Why This Idea Is Worth Making
This idea is worth making because it gives you a show-stopping quilt without requiring curved piecing or advanced blocks. The finished quilt looks complex, modern, and artistic, but the construction is beginner-friendly if you label your fabrics and sew carefully. It is perfect as a living room wall hanging, a sofa throw, a bedroom accent, or a handmade gift for someone who loves bold design.
Finished Size
This guide makes a statement through a quilt measuring approximately 54 x 66 inches.
It works beautifully as:
- A wall-hanging quilt behind a sofa or bed
- A bold living room throw
- A folded quilt over a modern accent chair
- A dramatic bed-end accent
- A colorful, handmade statement piece
Materials Needed
For one optical illusion Bargello quilt, gather:
- 12 color fabrics: ¼ to ⅓ yard each
- Border fabric: 1½ yards, such as black, charcoal, navy, or ivory
- Backing fabric: 3½ yards
- Batting: at least 60 x 72 inches
- Binding fabric: ½ yard
- Thread: black, charcoal, ivory, teal, or a coordinating neutral
- Rotary cutter and cutting mat
- 6 x 24-inch quilting ruler
- Pins or sewing clips
- Sewing machine
- Iron and ironing board
- Sticky notes or fabric labels
Optical Illusion Color Palette
For the strongest illusion, arrange fabrics from dark to bright, then back toward dark. A beginner-friendly sequence is:
- Black
- Deep plum
- Violet
- Magenta
- Ruby red
- Coral
- Saffron yellow
- Lime green
- Emerald green
- Turquoise
- Electric blue
- Navy
This order creates a glowing wave that moves from dark shadow to bright highlight and back into depth.
For an even more dramatic illusion, use mostly solid fabrics. Solids make the stepped Bargello movement easier to see.
Beginner-Friendly Cutting Measurements
From each of the 12 color fabrics, cut:
- 4 strips measuring 2½ inches x width of fabric
From the border fabric, cut:
- 2 side borders measuring 4½ x 58 inches
- 2 top and bottom borders measuring 4½ x 54 inches
From the binding fabric, cut:
- 7 strips measuring 2½ inches x width of fabric
Beginner note: Your Bargello center may vary slightly in size depending on seam allowance and trimming. That is normal. Trim the center first, then adjust border strips if needed.
Step-by-Step Guide
Step 1: Arrange the Colors for Maximum Illusion
Lay out the 12 fabrics in the exact order you want the eye to travel. For an optical illusion effect, place the brightest color near the center of the sequence and surround it with darker shades.
A strong order is black, plum, violet, magenta, ruby, coral, saffron, lime, emerald, turquoise, electric blue, navy.
Label each fabric 1 through 12. This step is simple but very important. If the order changes accidentally, the illusion will look uneven.
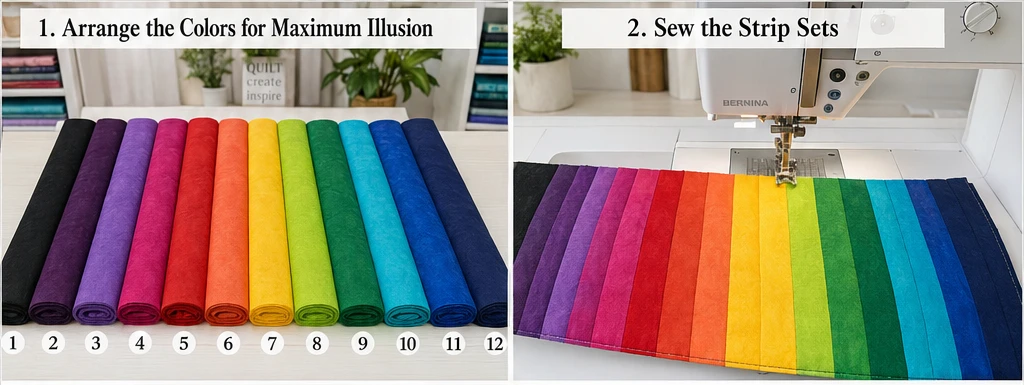
Step 2: Sew the Strip Sets
Sew one strip from each fabric together lengthwise using a ¼-inch seam allowance. Keep the order exactly the same from fabric 1 to fabric 12.
Make 4 identical strip sets. Each strip set will include all 12 fabrics and should measure about 24½ inches tall before trimming because the 2½-inch strips finish at 2 inches after seams.
Press seams gently. Press one strip set in one direction and the next strip set in the opposite direction. This helps seams nest when you join the Bargello columns.
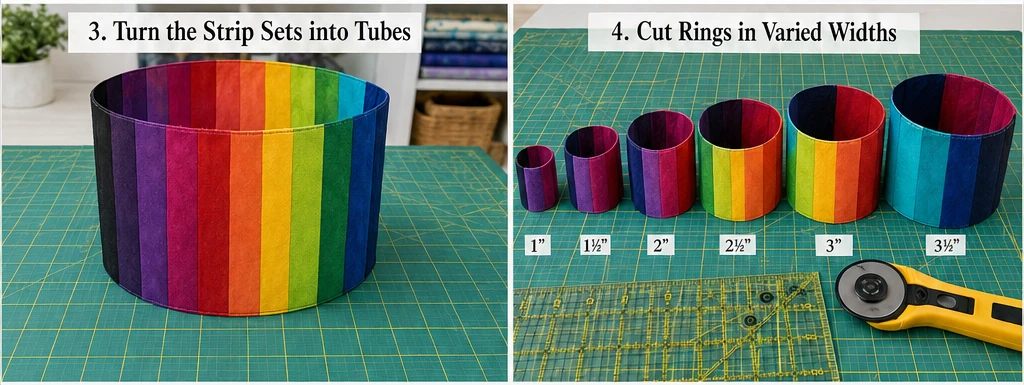
Step 3: Turn the Strip Sets into Tubes
Fold one strip set right sides together so fabric 1 meets fabric 12. Sew the long edge with a ¼-inch seam allowance to create a fabric tube.
Repeat with all 4 strip sets.
The tube method lets you cut rings and open each ring at a different color point. This is what creates the stepped movement of the optical illusion.
Step 4: Cut Rings in Varied Widths
Cut each tube into rings using varied widths. For a bold illusion effect, use this sequence:
- 1 inch
- 1½ inches
- 2 inches
- 2½ inches
- 3 inches
- 3½ inches
- 3 inches
- 2½ inches
- 2 inches
- 1½ inches
- 1 inch
- 1½ inches
- 2 inches
- 2½ inches
- 3 inches
- 3½ inches
- 3 inches
- 2½ inches
- 2 inches
- 1½ inches
- 1 inch
Cut enough rings to make about 30 to 34 columns.
Narrow columns create sharper movement. Wider columns create slower waves. Using both makes the design feel like it is pulsing across the quilt.
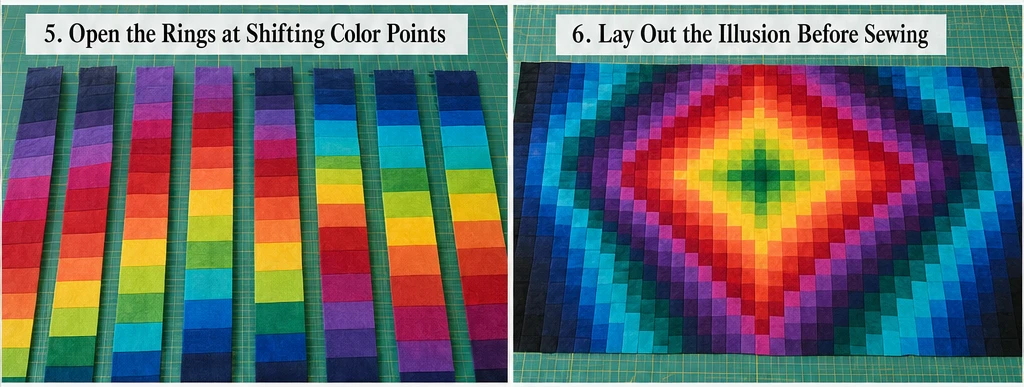
Step 5: Open the Rings at Shifting Color Points
Use a seam ripper to open each ring at a different fabric. Begin by opening the first ring above fabric 1, the second above fabric 2, the third above fabric 3, and continue through fabric 12.
Then reverse the order so the colors rise and fall:
- Columns 1 to 12: shift upward one fabric at a time
- Columns 13 to 24: shift downward one fabric at a time
- Remaining columns: repeat the rise-and-fall sequence
This creates the optical illusion of movement, almost like a ripple or glowing tunnel.
Step 6: Lay Out the Illusion Before Sewing
Place all opened columns side by side on a design wall, bed, or clean floor. Do not sew yet.
Stand several feet away and look at the movement. The bright colors should appear to travel through the quilt, while the dark colors create shadow and depth. Move columns around until the design feels balanced.
Take a photo of the final layout before sewing.
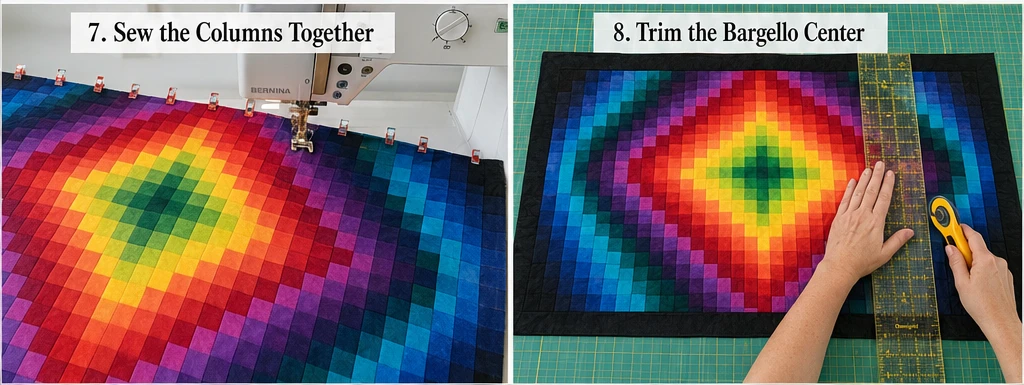
Step 7: Sew the Columns Together
Sew the columns together one at a time using a ¼-inch seam allowance. Pin at important seam intersections so the color bands line up.
Because the strips are narrow, do not pull the fabric as you sew. Let the machine feed the fabric evenly.
Press gently after every few columns. Lift and press the iron rather than slide it, as narrow Bargello strips can stretch.
Step 8: Trim the Bargello Center
Once all columns are joined, trim the edges straight. Aim for a center measuring approximately 46 x 58 inches.
If the edges look wavy before trimming, do not worry. Bargello quilts often need squaring up because the columns are cut in different widths.
Step 9: Add a Strong Border
Sew the side borders first, then the top and bottom borders. Use 4½-inch-wide border strips.
For a bold optical illusion quilt, excellent border choices include black, charcoal, midnight navy, deep plum, or crisp white. A dark border makes bright colors glow, while a white border gives the quilt a clean gallery-style finish.
Step 10: Layer and Baste
Place the backing fabric wrong side up, batting in the middle, and quilt top right side up. Smooth everything carefully.
Baste with safety pins or spray. Place pins every 4 to 5 inches to keep the layers stable while quilting.
Step 11: Quilt with Simple Motion Lines
For a beginner-friendly finish, quilt gentle vertical waves, diagonal lines, or straight lines that follow the Bargello movement.
Space quilting lines about 2½ to 3 inches apart for a soft throw. For a wall hanging, quilt a little closer, about 1½ to 2 inches apart, so the quilt hangs flatter.
Use thread that blends with the darker fabrics, such as charcoal or navy, or choose a subtle variegated thread for extra visual movement.
Step 12: Bind and Finish
Trim the quilt edges square. Join the 2½-inch binding strips end to end, press them in half lengthwise, and sew around the quilt.
A binding in black, deep plum, sapphire, magenta, or bright turquoise makes the statement piece feel finished and intentional.
Assembly at a Glance
- Choose 12 vibrant fabrics with strong light-to-dark contrast.
- Label fabrics from 1 to 12.
- Cut 2½-inch strips from each fabric.
- Sew strips into 4 identical strip sets.
- Sew each strip set into a tube.
- Cut rings from 1 to 3½ inches wide.
- Open each ring at a shifting color point.
- Arrange columns into a ripple, tunnel, or flame-like illusion.
- Sew columns together using a ¼-inch seam allowance.
- Trim the Bargello center to about 46 x 58 inches.
- Add 4½-inch borders.
- Layer, quilt, and bind with 2½-inch binding strips.
Optical Illusion Color Ideas
For a neon statement quilt, use black, electric blue, turquoise, lime, saffron, magenta, violet, and white.
For a jewel-tone illusion, use emerald, teal, sapphire, amethyst, plum, ruby, gold, and charcoal.
For a fiery flame illusion, use black, burgundy, ruby, coral, orange, saffron, gold, and cream.
For a modern gallery wall quilt, use black, white, silver gray, cobalt blue, teal, violet, and magenta.
Beginner Tips for Success
Use solid quilting cottons for the clearest optical illusion. Busy prints can interrupt the movement.
Choose high contrast. Dark, medium, and bright fabrics are what make the quilt appear to shift.
Label every fabric and every strip set. Bargello becomes much easier when the color order is protected.
Cut carefully with a sharp rotary blade. Clean edges help the columns line up.
Press gently and often. Bargello has many seams, and neat pressing makes the finished quilt look polished.
Styling Tip
Hang the finished quilt behind a sofa, drape it across a clean-lined chair, or fold it at the foot of a modern bed. Pair it with solid pillows in black, turquoise, magenta, sapphire, plum, or saffron so the quilt remains the star of the room. The optical illusion effect gives the space instant energy, movement, and artistic personality.
Other Design Inspirations – Digitally Modified
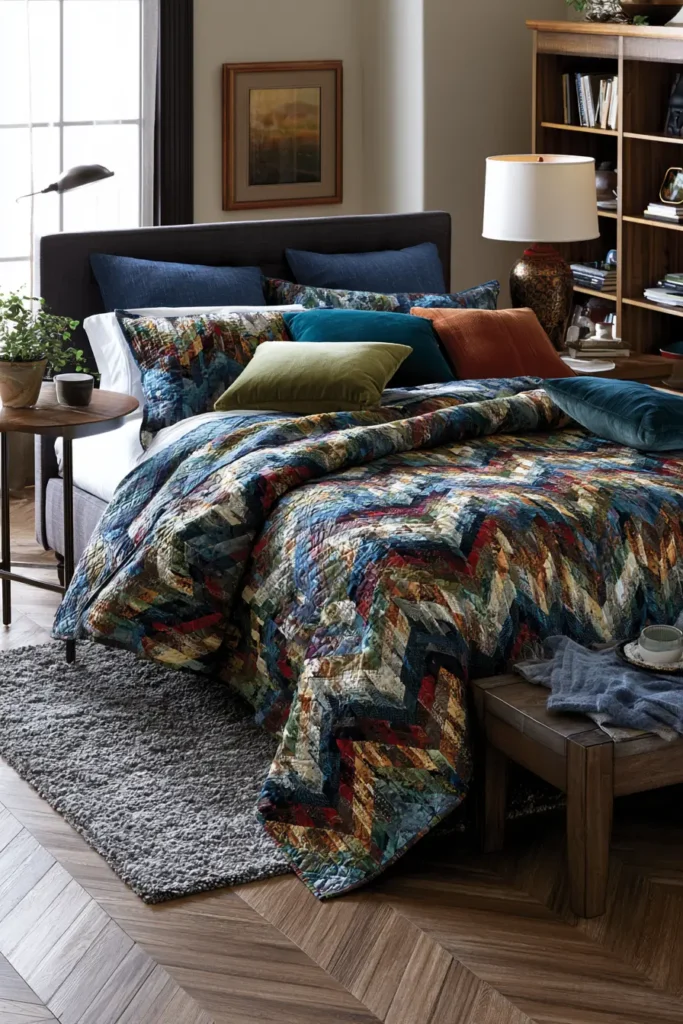
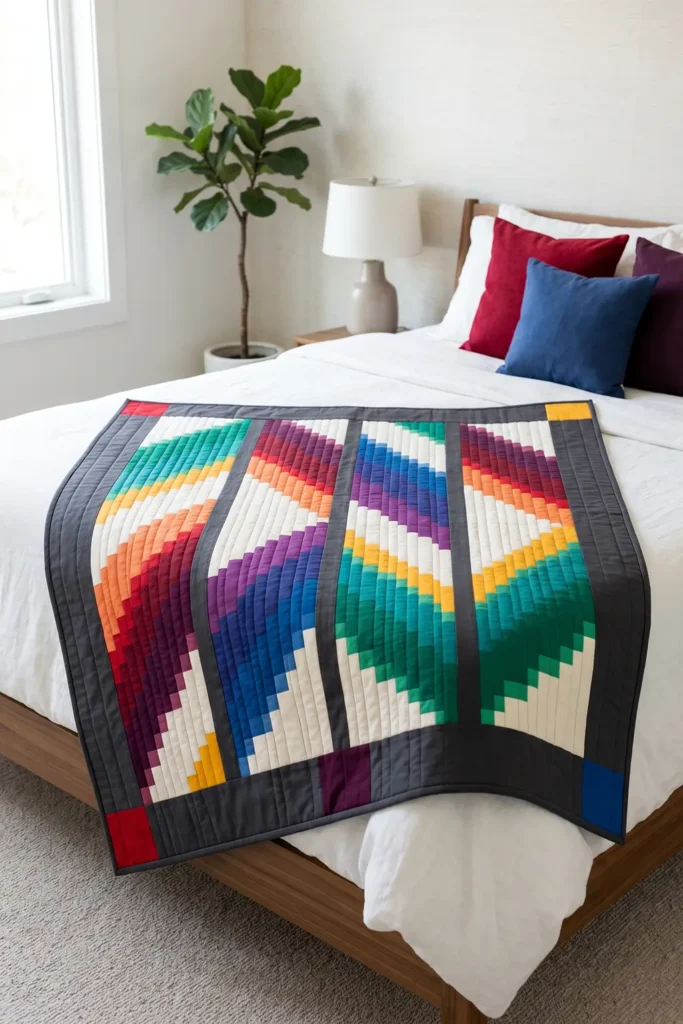
5. Geometric Flame Stitch Bargello Accents for Chic, Layered Home Decor
A geometric flame stitch Bargello quilt is a beautiful way to add movement, color, and structure to a stylish home. This design blends the flowing energy of Bargello with a more modern geometric look, using stepped columns, sharp color shifts, and clean borders to create a quilt that feels both artistic and elegant.
For a chic layered home décor style, use vibrant colors such as ruby red, coral, saffron yellow, emerald green, teal, sapphire blue, amethyst purple, deep plum, charcoal, and ivory. The result is a statement accent that looks polished on a sofa, folded at the foot of a bed, or displayed on a quilt ladder.
Why I Made It
I made this quilt because I wanted a Bargello design that felt bold but still easy to style in a real home. Traditional flame stitch patterns can feel very fluid and dramatic, while geometric accents give the design a cleaner, more architectural look.
The backstory behind this idea comes from Bargello needlework, where stepped stitches created flame-like patterns and waves. In quilting, we can recreate that feeling with fabric strips and carefully shifted columns. By adding geometric borders or blocky accent bands, the quilt becomes more modern and easier to layer with pillows, throws, rugs, and wall art.
Why This Idea Is Worth Making
This idea is worth making because it gives you a high-impact quilt without requiring complicated curves or advanced piecing. The Bargello center creates movement, while the geometric accents make the quilt feel neat, modern, and designer-inspired. It is also a practical project for beginners who want to build confidence with strip piecing, color order, and careful assembly.
Finished Size
This guide makes a chic accent quilt measuring approximately 54 x 66 inches.
It works well as:
- A sofa throw
- A bed-end accent quilt
- A colorful reading-chair throw
- A modern wall hanging
- A quilt ladder display piece
Materials Needed
For one quilt, gather:
- 10 flame stitch fabrics: ⅓ yard each
- Geometric accent fabric: ½ yard, such as charcoal, ivory, gold, navy, or black
- Border fabric: 1¼ yards
- Backing fabric: 3½ yards
- Batting: at least 60 x 72 inches
- Binding fabric: ½ yard
- Thread: ivory, gray, charcoal, teal, or gold
- Rotary cutter and cutting mat
- 6 x 24-inch quilting ruler
- Pins or sewing clips
- Sewing machine
- Iron and ironing board
- Sticky notes or fabric labels
Vibrant Geometric Flame Palette
Choose colors that move from warm to cool, then ground them with one strong neutral.
A stylish color order is:
- Ivory
- Saffron yellow
- Tangerine orange
- Coral
- Ruby red
- Deep plum
- Amethyst purple
- Sapphire blue
- Teal
- Emerald green
For the geometric accents, use charcoal, black, navy, ivory, or champagne gold. These accent fabrics help frame the Bargello movement and make the quilt look sophisticated.
Beginner-Friendly Cutting Measurements
From each of the 10 flame stitch fabrics, cut:
- 4 strips measuring 2½ inches x width of fabric
From the geometric accent fabric, cut:
- 6 strips measuring 2½ inches x width of fabric for accent bands
- Optional: 12 squares measuring 4½ x 4½ inches for corner or border accents
From the border fabric, cut:
- 2 side borders measuring 4½ x 58 inches
- 2 top and bottom borders measuring 4½ x 54 inches
From the binding fabric, cut:
- 7 strips measuring 2½ inches x width of fabric
Beginner note: Bargello centers often need trimming after assembly, so it is fine if your center is slightly larger before borders are added.
Step-by-Step Guide
Step 1: Plan the Flame Stitch Color Order
Lay the 10 fabrics in a smooth sequence from light to warm to cool. A good beginner order is ivory, yellow, orange, coral, ruby, plum, purple, sapphire, teal, and emerald.
Label the fabrics 1 through 10. This keeps the Bargello sequence organized and prevents confusion once the strips are sewn together.
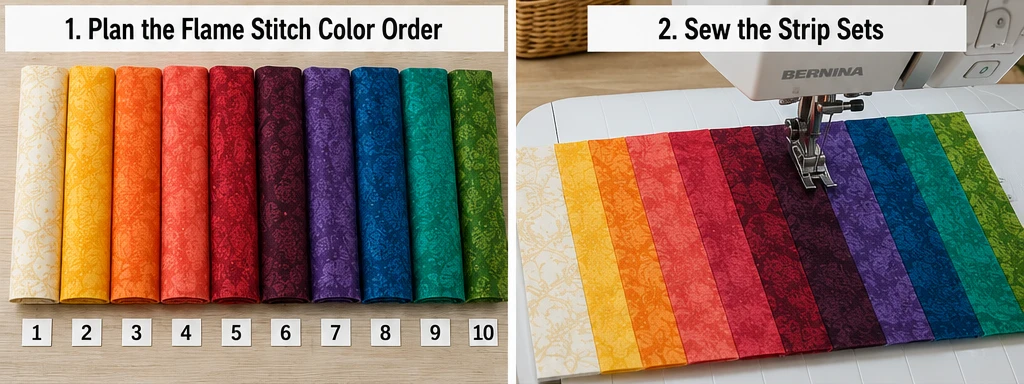
Step 2: Sew the Strip Sets
Sew one strip from each fabric together lengthwise using a ¼-inch seam allowance. Keep the order exactly the same in every strip set.
Make 4 identical strip sets. Each strip set should include all 10 fabrics.
Press the seams gently. Press one strip set in one direction and the next strip set in the opposite direction so the seams can nest later.
Step 3: Create Fabric Tubes
Fold one strip set right sides together so fabric 1 meets fabric 10. Sew the long edge with a ¼-inch seam allowance to make a tube.
Repeat with all 4 strip sets.
This tube method lets you open each cut ring at a different color point, which creates the stepped flame stitch movement.
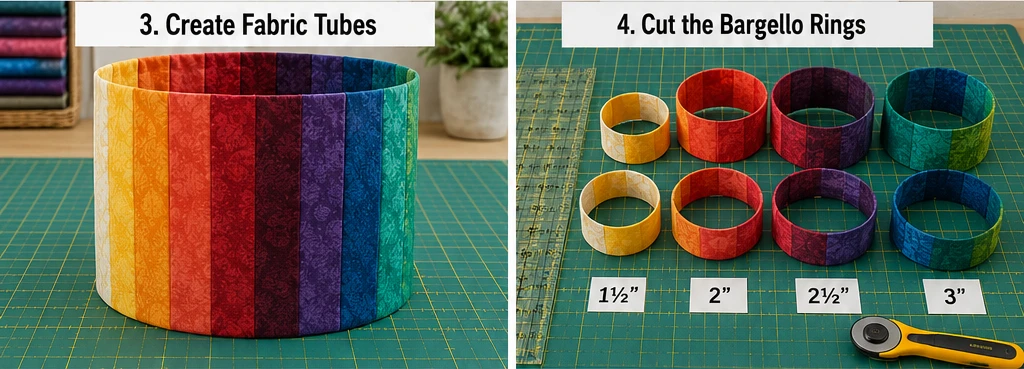
Step 4: Cut the Bargello Rings
Cut the tubes into rings using a mix of narrow and wide cuts. For a geometric flame look, use a slightly sharper sequence:
- 1½ inches
- 1½ inches
- 2 inches
- 2½ inches
- 3 inches
- 3 inches
- 2½ inches
- 2 inches
- 1½ inches
- 1½ inches
- 2 inches
- 2½ inches
- 3 inches
- 2½ inches
- 2 inches
- 1½ inches
Repeat until you have about 28 to 32 rings.
The repeated narrow cuts make the flame movement feel crisp and angular, while the wider cuts give the design room to breathe.
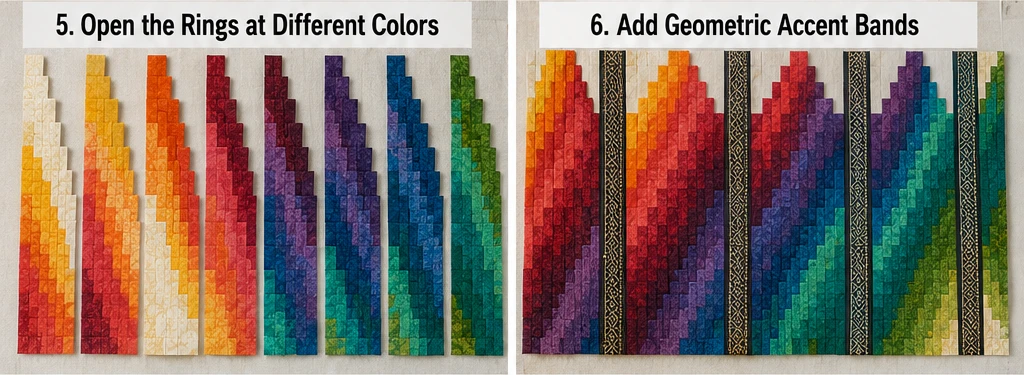
Step 5: Open the Rings at Different Colors
Use a seam ripper to open each ring at a different fabric.
For the first 10 columns, open them in order:
- Column 1: open above fabric 1
- Column 2: open above fabric 2
- Column 3: open above fabric 3
- Continue through fabric 10
Then reverse the order for the next group of columns. This rise-and-fall shift creates the Bargello flame shape.
Step 6: Add Geometric Accent Bands
Before sewing all the Bargello columns together, decide where to add accent bands. A simple beginner-friendly option is to place one 2½-inch charcoal or gold strip vertically after every 6 to 8 Bargello columns.
These accent bands break up the movement and create a more modern, architectural look. They also make the quilt easier to square up because the straight accent strips act like visual resting points.
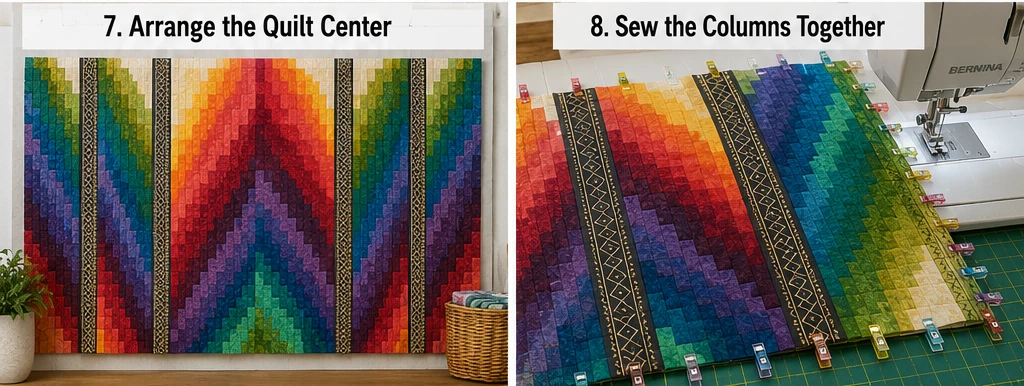
Step 7: Arrange the Quilt Center
Lay the opened Bargello columns and accent bands on a design wall, bed, or clean floor. Arrange them until the colors form a pleasing flame or wave.
For a chic home décor look, let the brightest warm colors rise near the center and let the cooler colors flow toward the sides. Place the geometric accent bands where the design needs structure.
Take a photo before sewing so you can remember the layout.
Step 8: Sew the Columns Together
Sew the columns and accent bands together using a ¼-inch seam allowance. Pin at important intersections so the color bands line up neatly.
Press gently after every few columns. Bargello strips can stretch if handled roughly, so lift and press the iron instead of sliding it.
Step 9: Trim the Bargello Center
Once the center is sewn, trim the edges straight. Aim for a center measuring approximately 46 x 58 inches.
If you added several accent bands, your center may be a little wider. Trim evenly from both sides so the design stays balanced.
Step 10: Add Geometric Borders
Sew the side borders first, then the top and bottom borders. Use 4½-inch-wide borders in charcoal, ivory, navy, plum, or deep teal.
For extra geometric detail, add 4½-inch accent squares to the corners before attaching the top and bottom borders. This gives the quilt a framed, designer-style finish.
Step 11: Layer and Quilt
Place the backing fabric wrong side up, batting in the middle, and quilt top right side up. Smooth the layers and baste with safety pins or spray.
For quilting, use straight vertical lines, diagonal lines, or simple angular zigzags. Space quilting lines about 2½ to 3 inches apart for a soft throw. For a wall hanging, quilt closer together, about 1½ to 2 inches apart, so it hangs flatter.
Step 12: Bind and Finish
Trim the quilt edges square. Join the 2½-inch binding strips end to end, press in half lengthwise, and sew around the quilt.
A binding in charcoal, sapphire, deep plum, emerald, ruby, or champagne gold gives the quilt a strong, polished frame.
Assembly at a Glance
- Choose 10 vibrant flame stitch fabrics and 1 geometric accent fabric.
- Label the main fabrics from 1 to 10.
- Cut 2½-inch strips from each main fabric.
- Sew strips into 4 identical strip sets.
- Sew each strip set into a tube.
- Cut tube rings from 1½ to 3 inches wide.
- Open rings at shifting color points.
- Add vertical accent bands every 6 to 8 columns.
- Arrange columns into a flame or wave layout.
- Sew columns and accent bands together.
- Trim the center to about 46 x 58 inches.
- Add 4½-inch borders, then layer, quilt, and bind.
Geometric Flame Stitch Color Ideas
For a jewel-tone accent quilt, use emerald, teal, sapphire, amethyst, plum, ruby, gold, and charcoal.
For a warm modern flame, use ivory, saffron, orange, coral, ruby, burgundy, and deep plum.
For a dramatic contemporary look, use black, charcoal, cobalt blue, turquoise, lime, magenta, and white.
For a refined layered décor style, use navy, ivory, teal, gold, plum, emerald, and warm gray.
Beginner Tips for Success
Use quilting cotton for the first version. It is easier to cut, sew, press, and align than slippery fabrics.
Keep the geometric accent bands simple. Too many extra details can distract from the Bargello movement.
Label your fabrics and columns. Bargello is much easier when the color order stays organized.
Use a consistent ¼-inch seam allowance. This helps the columns line up and keeps the quilt from leaning.
Press gently and often. Clean pressing makes the finished quilt look much more polished.
Styling Tip
Layer the finished geometric flame stitch quilt over a neutral sofa, leather chair, or crisp white bedspread. Add pillows in emerald, saffron, sapphire, plum, ruby, or charcoal to echo the quilt colors. The geometric accents make the quilt feel modern, while the Bargello movement keeps it vibrant, cozy, and full of energy.
Other Design Inspirations – Digitally Modified

Conclusion
A Bargello quilt earns its reputation not through genuine difficulty but through the precision it demands at every stage — and the way that precision compounds into something that looks far beyond what straight strips and straight seams should be able to produce. That gap between apparent complexity and actual construction is its particular appeal. Make one carefully, get the strip widths consistent and the offset alignment right, and the wave effect will do the rest. These five patterns are starting points for understanding what the technique can do in a real room rather than a craft photograph — choose the one whose color logic fits the space it is going into, and trust the geometry.
