
7 Stylish Boho Quilt Jackets, and Vests Ideas for Elegant Everyday Layering
Boho Quilted Outerwear: Why a Jacket That Looks Like a Quilt Makes Complete Sense
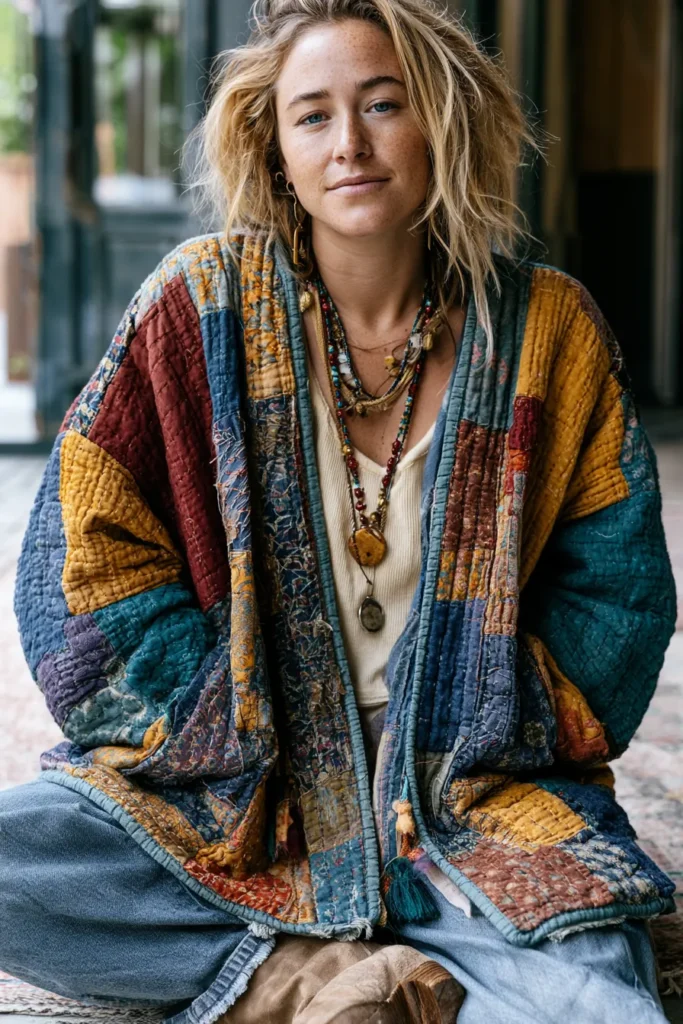
The appeal of a boho quilted jacket is not complicated once you understand what it is actually offering: the warmth and texture of a quilt, made wearable. That sounds obvious, but it explains something that purely trend-based analysis misses – why these pieces feel immediately comfortable in a way that most fashion outerwear does not. You are essentially wearing something with the physical qualities of a bed quilt. Of course, it feels good.
What the boho aesthetic adds to that comfort is permission to be eclectic. Patchwork panels in mismatched prints, kantha hand-stitching in irregular patterns, fringe edges, embroidered trim, repurposed fabric with visible history – none of these elements need to coordinate precisely, because the entire design philosophy is built on the idea that personal expression matters more than uniformity. A boho quilted jacket looks collected rather than manufactured, and in a clothing market saturated with identical fast-fashion outerwear, that quality is increasingly rare and genuinely valued.
The current visibility of this style connects to several overlapping trends – cottagecore, grandmacore, slow fashion, vintage textile revival – but I would argue that the pieces that last beyond trend cycles are those that were never primarily about the trend. A well-made kantha jacket or a boro-inspired patchwork vest is connected to real textile traditions. It ages in the right direction. The stitching softens, the fabrics develop character, and the piece becomes more personal over time rather than more dated.
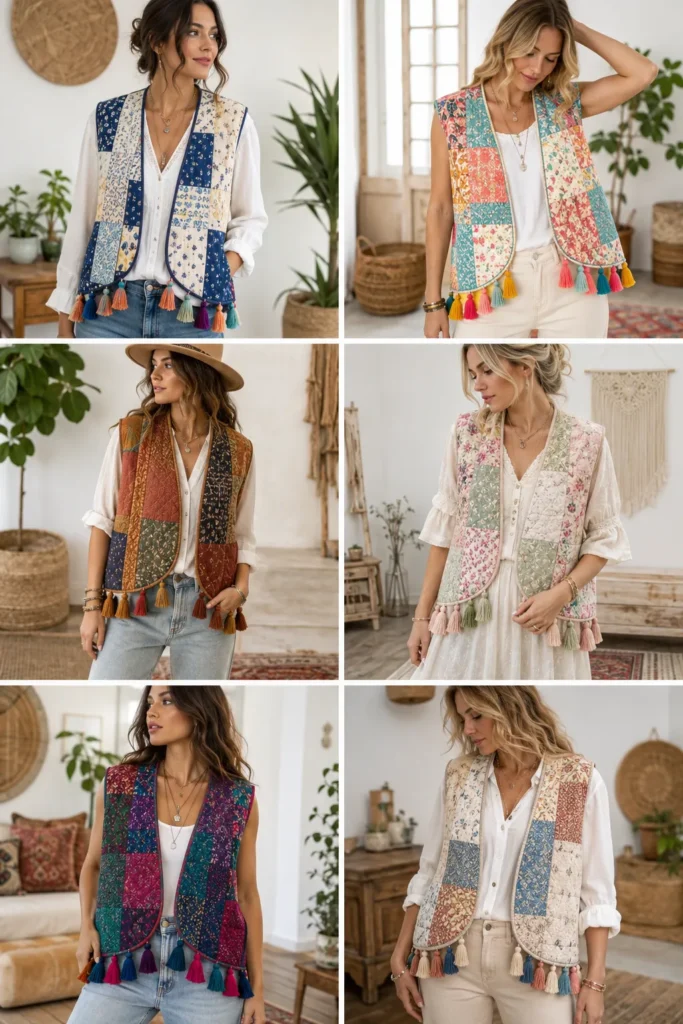
Boho Quilt Jackets, Vests, and Tops Ideas
Contents
- 1 Boho Quilt Jackets, Vests, and Tops Ideas
- 2 1. Elegant Longline Boho Quilt Jackets for Effortless Everyday Layering
- 2.1 A Guide to Making Elegant Longline Boho Quilt Jackets for Effortless Everyday Layering
- 2.2 Why This Idea Is Worth Making
- 2.3 Suggested Finished Measurements
- 2.4 Materials Needed
- 2.5 Step-by-Step Guide
- 2.5.1 Step 1: Choose a Vibrant Boho Quilt Fabric
- 2.5.2 Step 2: Cut the Back Panel
- 2.5.3 Step 3: Cut the Front Panels
- 2.5.4 Step 4: Cut the Sleeves
- 2.5.5 Step 5: Shape the Neckline
- 2.5.6 Step 6: Sew the Shoulder Seams
- 2.5.7 Step 7: Attach the Sleeves
- 2.5.8 Step 8: Sew the Side Seams
- 2.5.9 Step 9: Add Patch Pockets
- 2.5.10 Step 10: Finish the Edges
- 2.6 Assembly Section
- 2.7 Personal Styling Touch
- 2.8 Final Styling Idea
- 3 2. Oversized Boro-Inspired Boho Quilt Jackets with Vintage Vibes
- 3.1 Why This Idea Is Worth Making
- 3.2 Suggested Finished Measurements
- 3.3 Materials Needed
- 3.4 Step-by-Step Guide
- 3.4.1 Step 1: Choose a Vintage Boho Color Palette
- 3.4.2 Step 2: Create the Patchwork Quilt Panels
- 3.4.3 Step 3: Stitch the Patches in Place
- 3.4.4 Step 4: Add Batting and Quilt the Panels
- 3.4.5 Step 5: Cut the Jacket Shape
- 3.4.6 Step 6: Sew the Shoulder Seams
- 3.4.7 Step 7: Attach the Oversized Sleeves
- 3.4.8 Step 8: Sew the Side and Sleeve Seams
- 3.4.9 Step 9: Add Large Patch Pockets
- 3.4.10 Step 10: Bind the Raw Edges
- 3.5 Assembly Section
- 3.6 Interesting Backstory
- 3.7 Personal Styling Touch
- 3.8 Final Styling Idea
- 4 3. Cropped Kantha Stitch Boho Jackets for Modern Bohemian Outfits
- 4.1 Why This Idea Is Worth Making
- 4.2 Suggested Finished Measurements
- 4.3 Materials Needed
- 4.4 Step-by-Step Guide
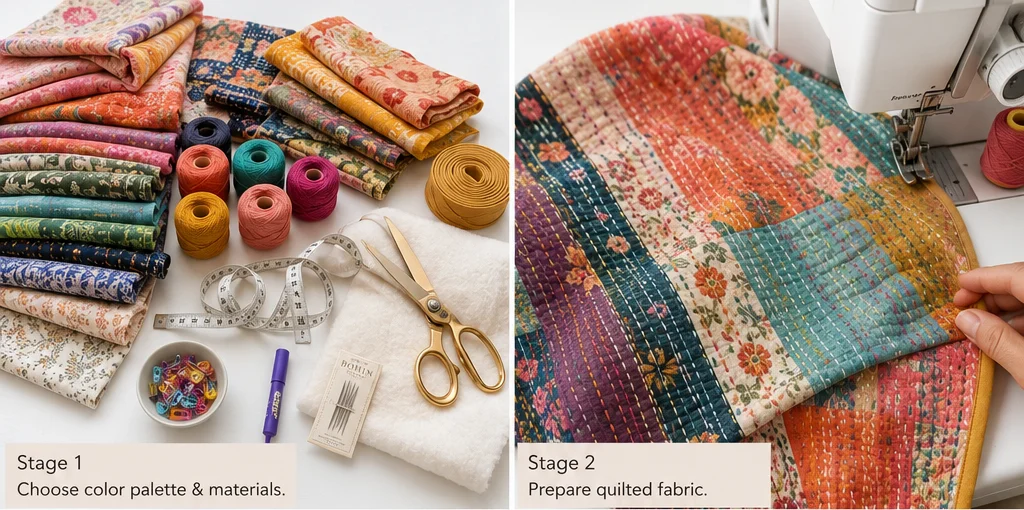
- 4.4.1 Step 1: Choose a Bright Bohemian Color Palette
- 4.4.2 Step 2: Select or Make the Quilted Fabric
- 4.4.3 Step 3: Cut the Back Panel
- 4.4.4 Step 4: Cut the Front Panels
- 4.4.5 Step 5: Cut the Sleeves
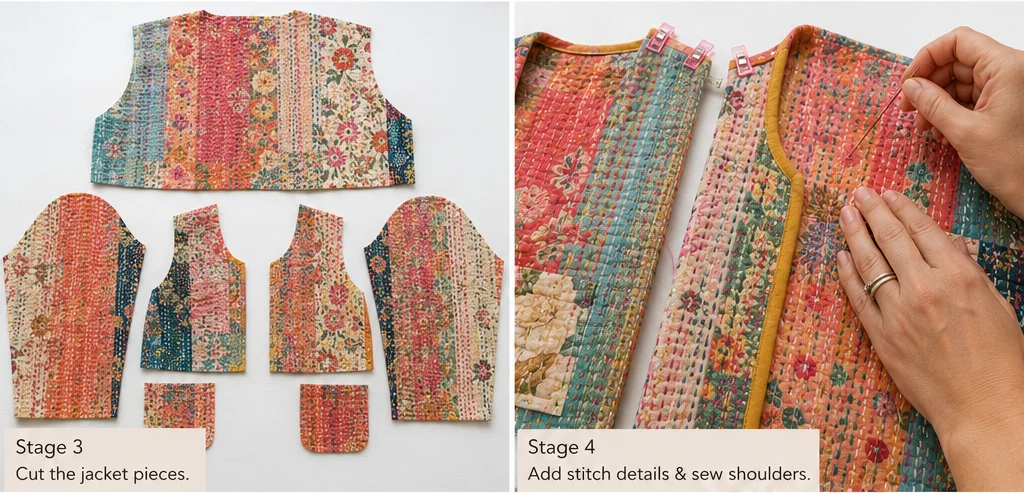
- 4.4.6 Step 6: Add Kantha-Style Stitch Details
- 4.4.7 Step 7: Sew the Shoulder Seams
- 4.4.8 Step 8: Attach the Sleeves
- 4.4.9 Step 9: Sew the Side Seams
- 4.4.10 Step 10: Add Small Patch Pockets
- 4.5 Assembly Section
- 4.6 Interesting Backstory
- 4.7 Personal Styling Touch
- 4.8 Final Styling Idea
- 5 4. Reversible Floral Boho Quilt Jackets for Versatile, Elegant Looks
- 5.1 Why This Idea Is Worth Making
- 5.2 Suggested Finished Measurements
- 5.3 Materials Needed
- 5.4 Step-by-Step Guide
- 5.4.1 Step 1: Choose Two Beautiful Fabric Personalities
- 5.4.2 Step 2: Make a Lightweight Quilt Sandwich
- 5.4.3 Step 3: Cut the Back Panel
- 5.4.4 Step 4: Cut the Front Panels
- 5.4.5 Step 5: Cut the Sleeves
- 5.4.6 Step 6: Add Decorative Quilting Details
- 5.4.7 Step 7: Sew the Shoulder Seams
- 5.4.8 Step 8: Attach the Sleeves
- 5.4.9 Step 9: Sew the Side Seams
- 5.4.10 Step 10: Finish the Edges with Binding
- 5.5 Assembly Section
- 5.6 Interesting Backstory
- 5.7 Personal Styling Touch
- 5.8 Final Styling Idea
- 6 5. Fringed Suede Trim Boho Quilt Vests for Cozy Layered Looks
- 6.1 Why This Idea Is Worth Making
- 6.2 Suggested Finished Measurements
- 6.3 Materials Needed
- 6.4 Step-by-Step Guide
- 6.4.1 Step 1: Choose a Vibrant Boho Color Palette
- 6.4.2 Step 2: Cut the Back Panel
- 6.4.3 Step 3: Cut the Front Panels
- 6.4.4 Step 4: Cut the Armholes
- 6.4.5 Step 5: Add Light Quilting or Stitch Details
- 6.4.6 Step 6: Sew the Shoulder Seams
- 6.4.7 Step 7: Sew the Side Seams
- 6.4.8 Step 8: Prepare the Suede Trim
- 6.4.9 Step 9: Add the Fringe
- 6.4.10 Step 10: Finish the Raw Edges
- 6.5 Assembly Section
- 6.6 Interesting Backstory
- 6.7 Personal Styling Touch
- 6.8 Final Styling Idea
- 7 6. Open Front Bohemian Quilted Vest Patterns with Tassel Accents
- 7.1 Why This Idea Is Worth Making
- 7.2 Suggested Finished Measurements
- 7.3 Materials Needed
- 7.4 Step-by-Step Guide
- 7.4.1 Step 1: Choose a Vibrant Bohemian Palette
- 7.4.2 Step 2: Prepare the Quilted Fabric
- 7.4.3 Step 3: Cut the Back Panel
- 7.4.4 Step 4: Cut the Front Panels
- 7.4.5 Step 5: Shape the Armholes
- 7.4.6 Step 6: Sew the Shoulder Seams
- 7.4.7 Step 7: Sew the Side Seams
- 7.4.8 Step 8: Finish the Edges
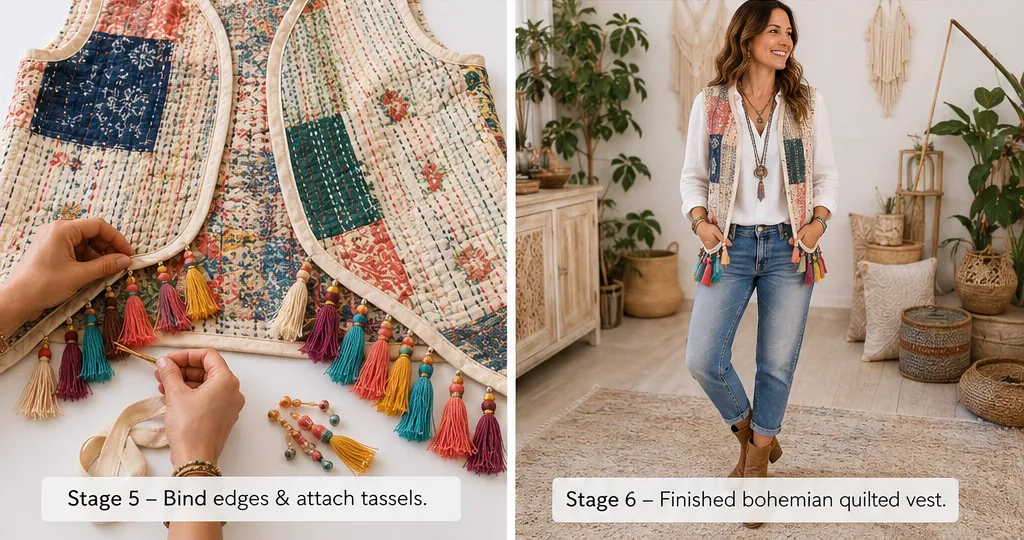
- 7.4.9 Step 9: Make the Tassels
- 7.4.10 Step 10: Attach the Tassels
- 7.5 Assembly Section
- 7.6 Interesting Backstory
- 7.7 Personal Styling Touch
- 7.8 Final Styling Idea
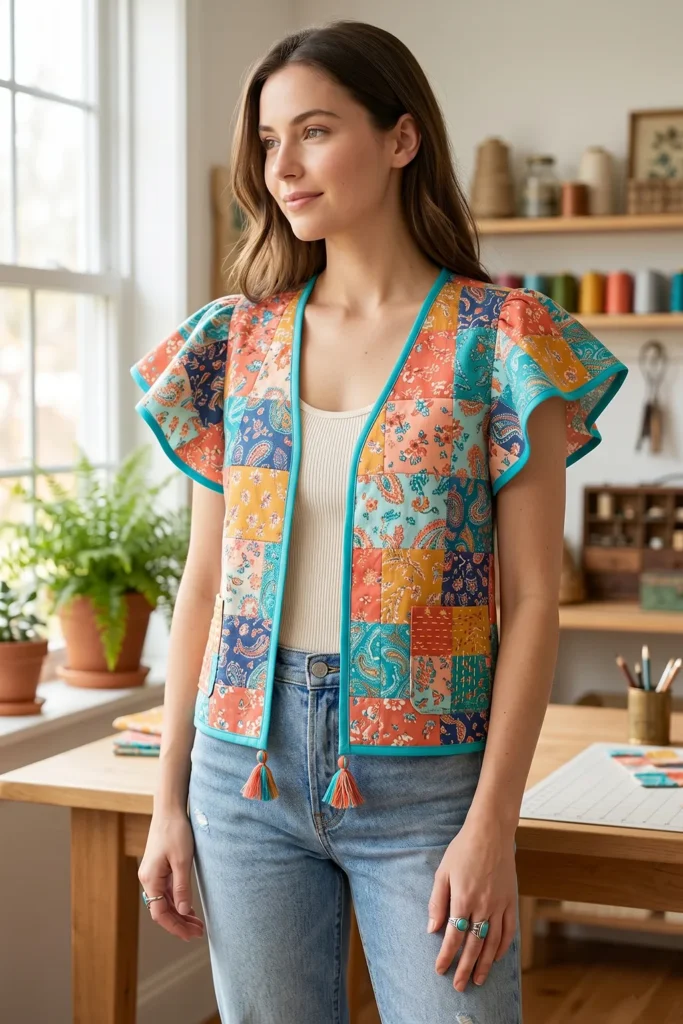
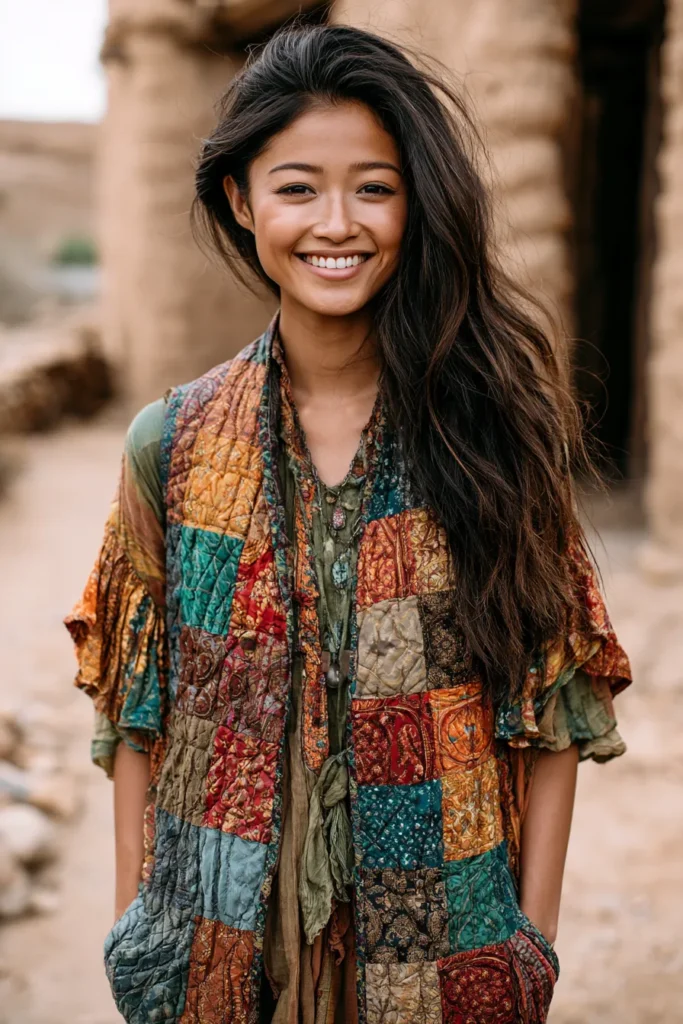
- 8 7. Flutter Sleeve Patchwork Boho Quilt Tops for Elegant Everyday Wear
- 8.1 Why This Idea Is Worth Making
- 8.2 Suggested Finished Measurements
- 8.3 Materials Needed
- 8.4 Step-by-Step Guide
- 8.4.1 Step 1: Choose a Vibrant Boho Color Palette
- 8.4.2 Step 2: Create the Patchwork Fabric
- 8.4.3 Step 3: Add Light Quilting
- 8.4.4 Step 4: Cut the Back Panel
- 8.4.5 Step 5: Cut the Front Panels
- 8.4.6 Step 6: Cut the Flutter Sleeves
- 8.4.7 Step 7: Sew the Shoulder Seams
- 8.4.8 Step 8: Attach the Flutter Sleeves
- 8.4.9 Step 9: Sew the Side Seams
- 8.4.10 Step 10: Finish the Edges
- 8.5 Assembly Section
- 8.6 Interesting Backstory
- 8.7 Personal Styling Touch
- 8.8 Final Styling Idea
- 9 Conclusion
These garments also appeal across a wider age range than most fashion categories. Younger wearers are drawn to the artsy, sustainable, handmade quality—the visible stitching and repurposed fabric that signal intentional consumption rather than impulse buying. People in their twenties through forties tend to value the versatility: a quilted vest layers over almost anything, from a plain shirt to a dress, without requiring the outfit to reorganize itself around the outerwear. And the craftsmanship appeal – the stitching traditions, the textile history – resonates with anyone who appreciates things made carefully rather than quickly.
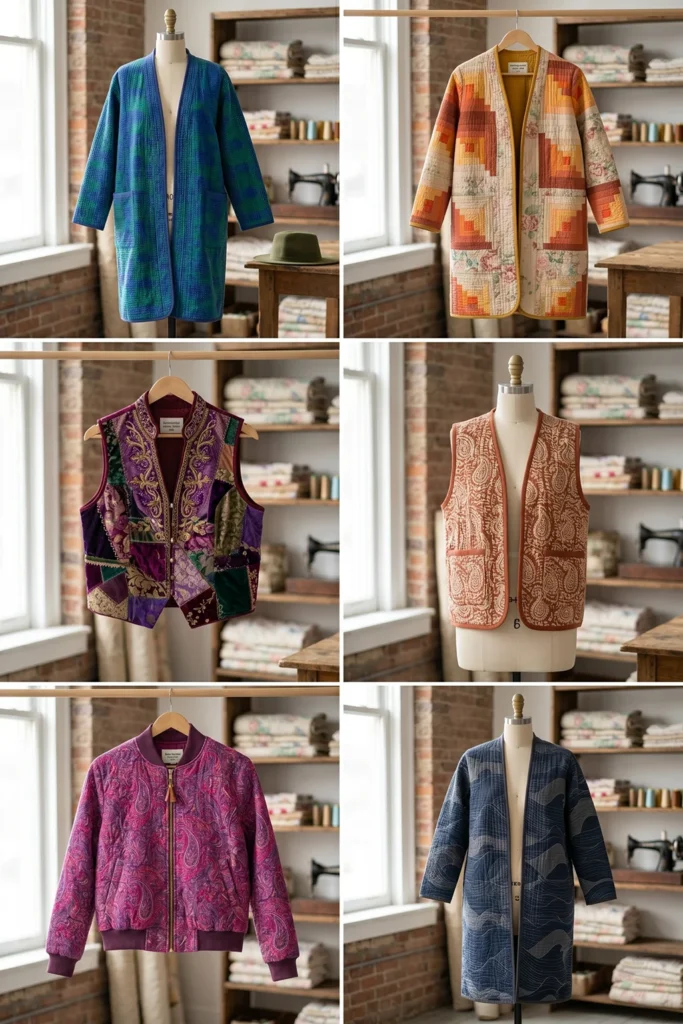
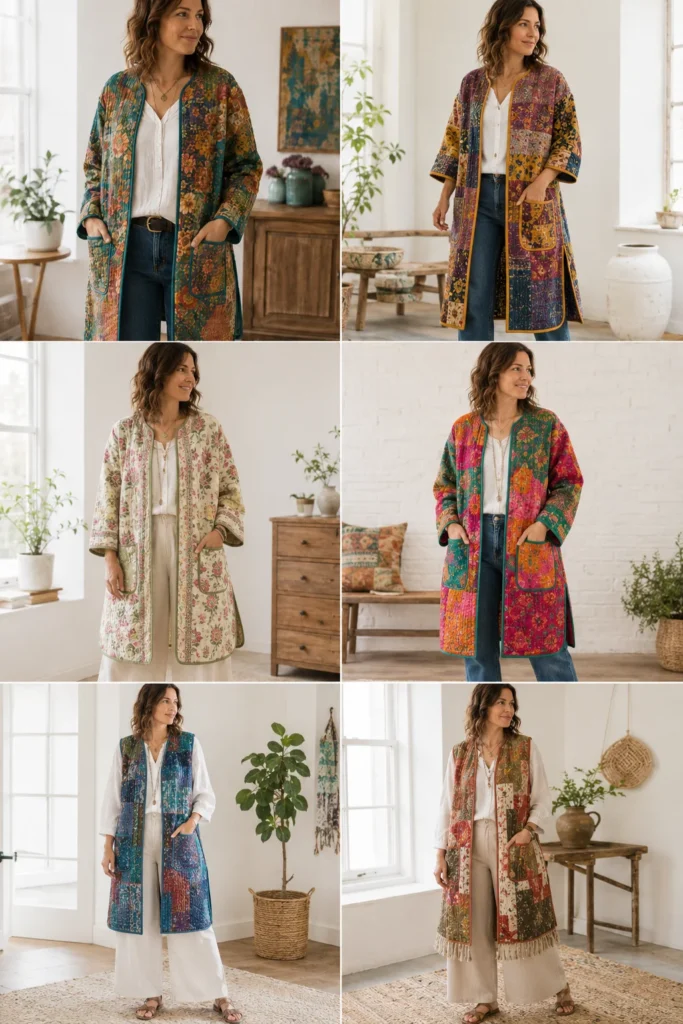
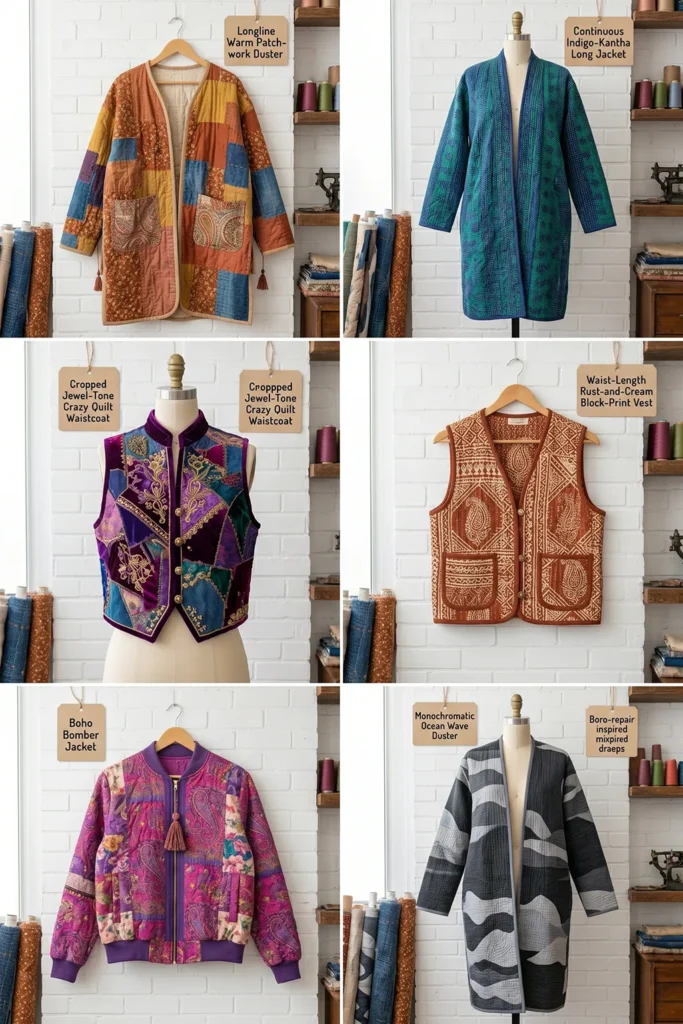
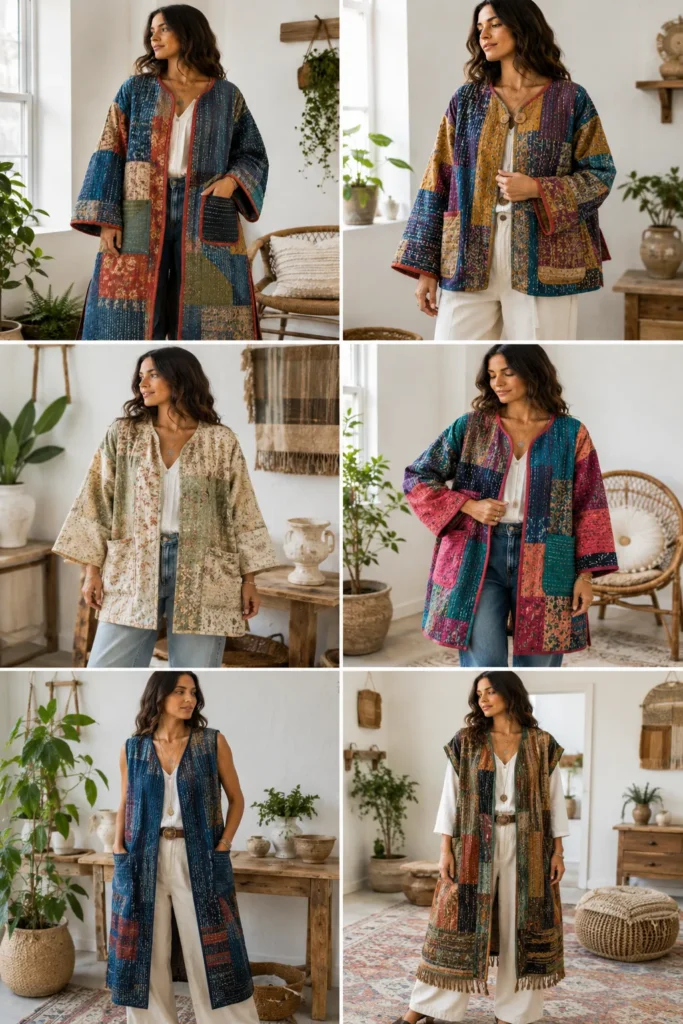
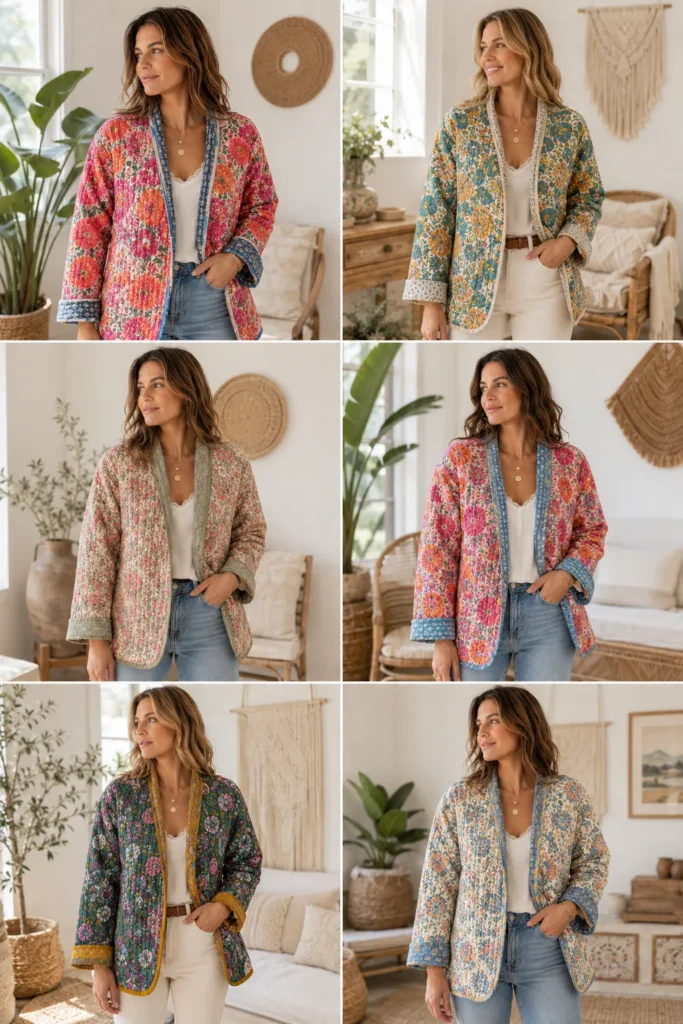
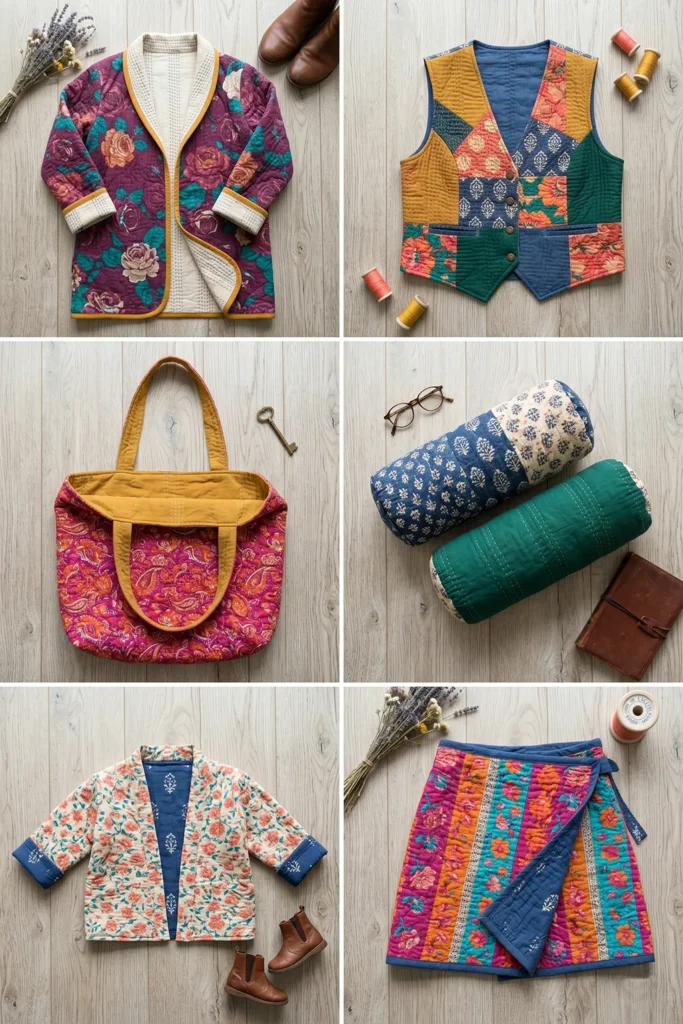
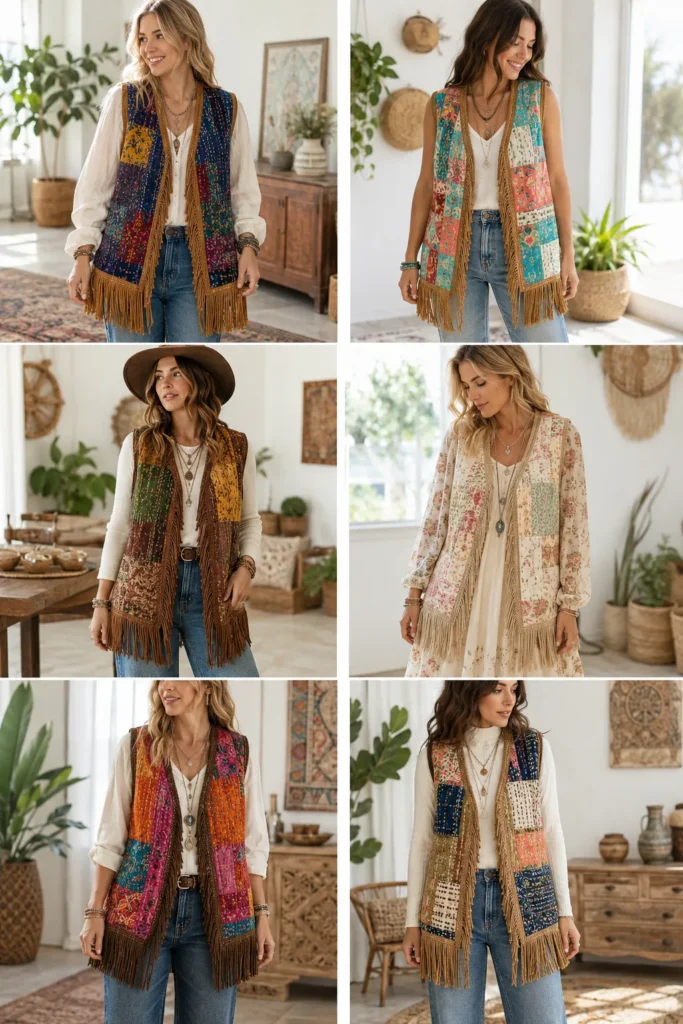
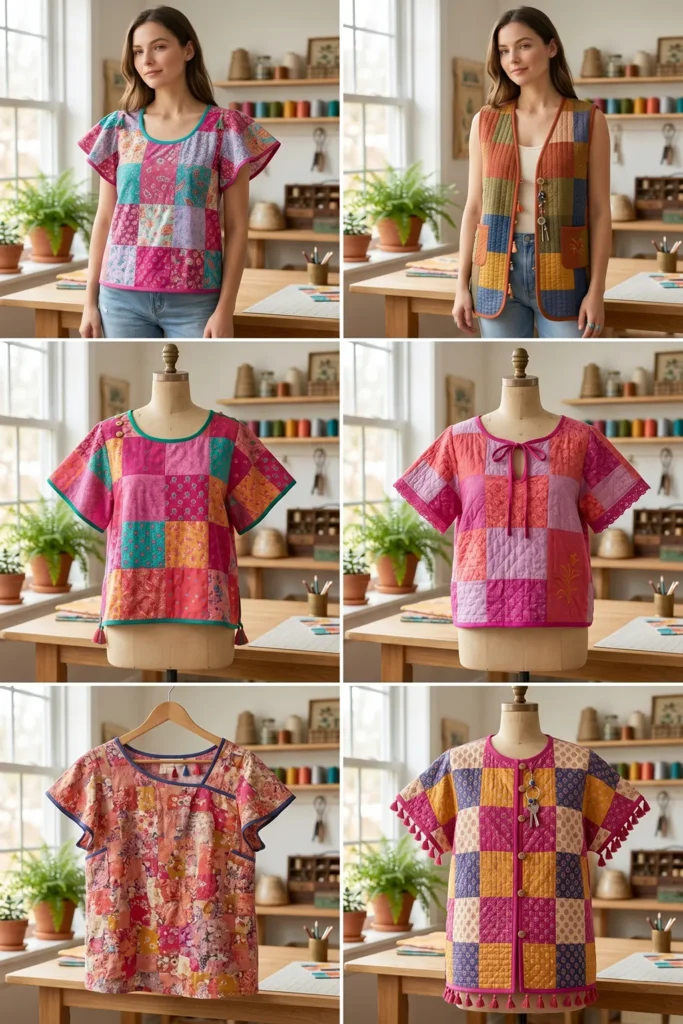
This collection covers seven ideas across the boho quilted outerwear range: longline jackets for effortless coverage, oversized boro-inspired pieces with vintage depth, cropped kantha jackets, reversible floral designs, fringed vests, open-front layering pieces, and flutter-sleeve patchwork tops for warmer days.
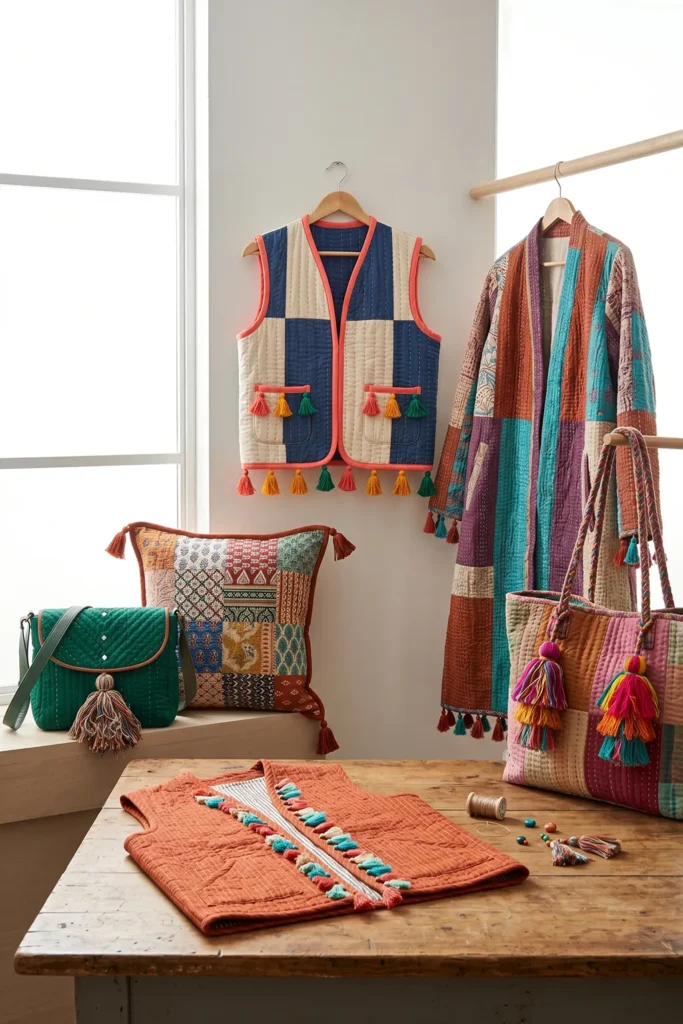
See also: Japanese quilted jackets and vests · Nakshi Kantha accessories · Boho quilt patterns
Recommended Supplies
“As an Amazon Associate, I earn from qualifying purchases.“
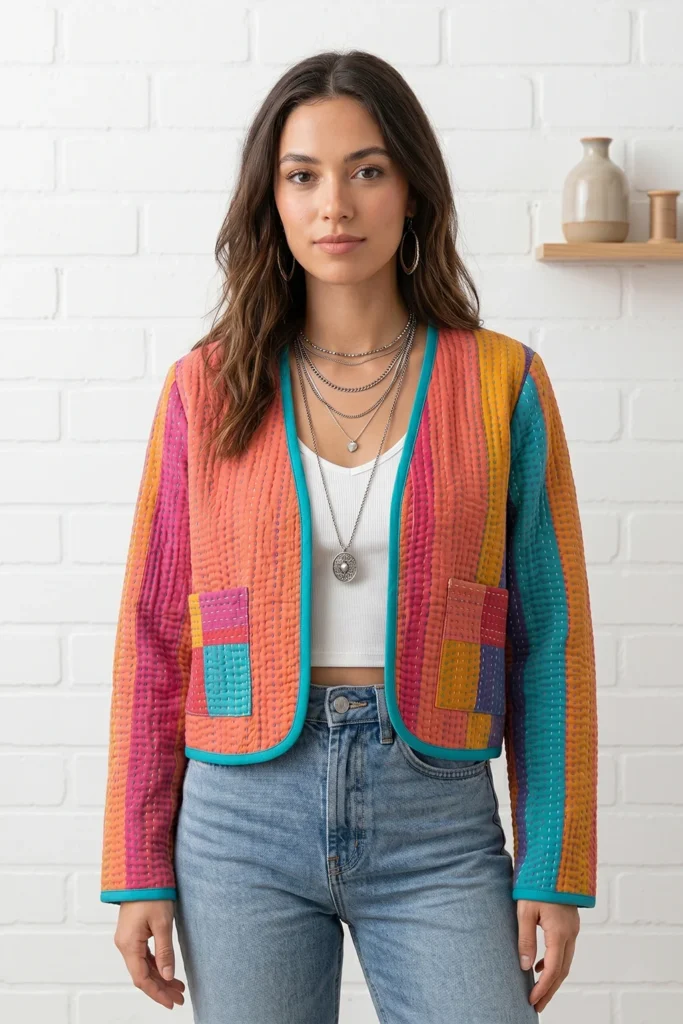
1. Elegant Longline Boho Quilt Jackets for Effortless Everyday Layering
A Guide to Making Elegant Longline Boho Quilt Jackets for Effortless Everyday Layering
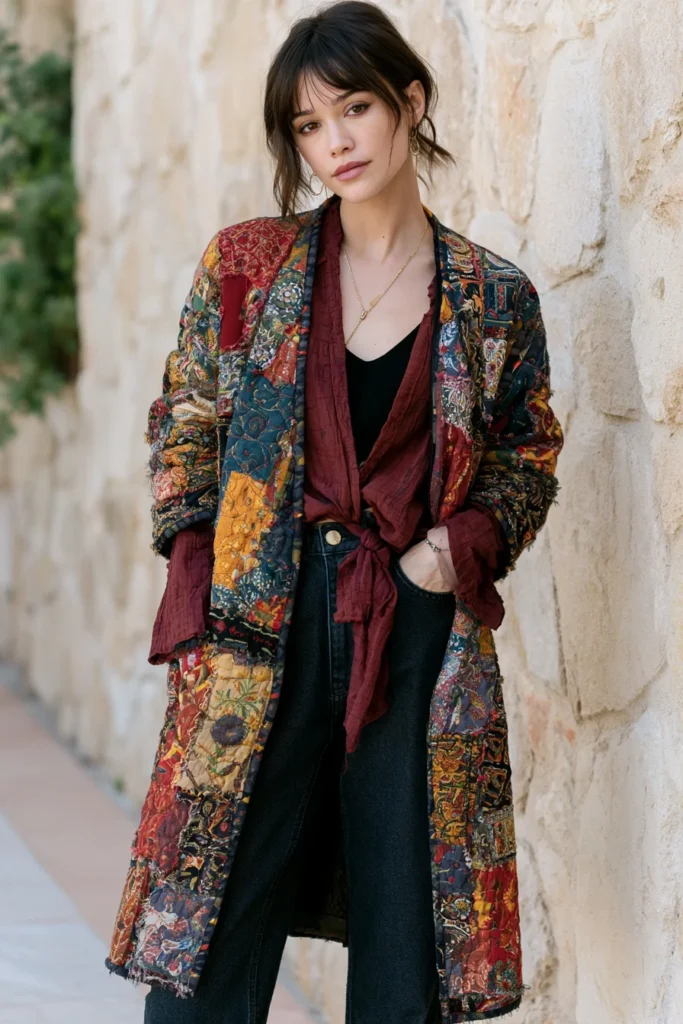
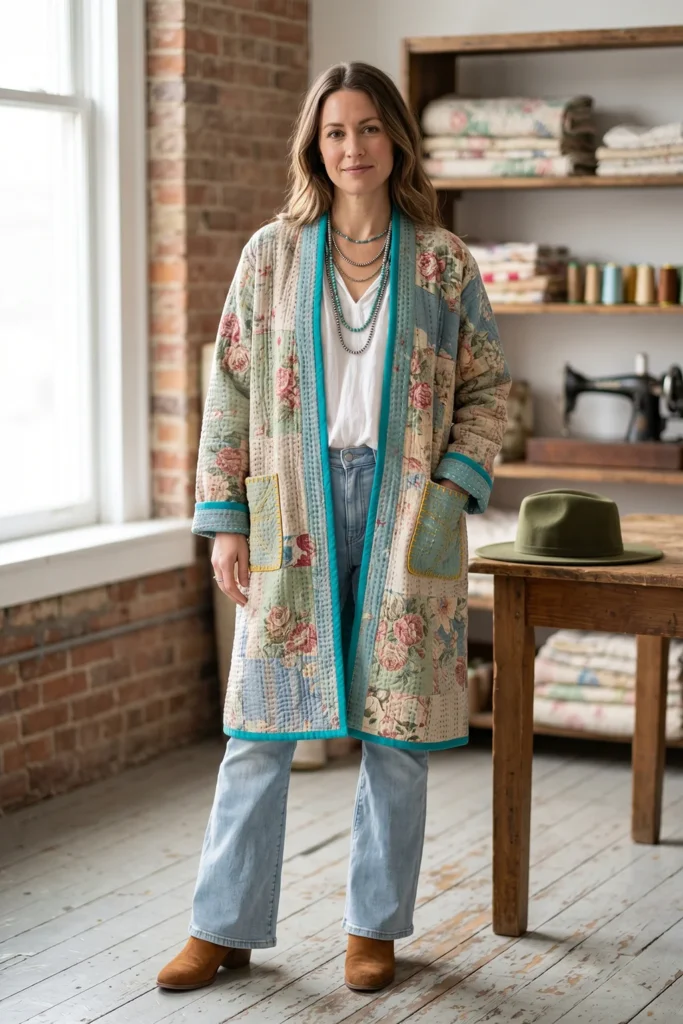
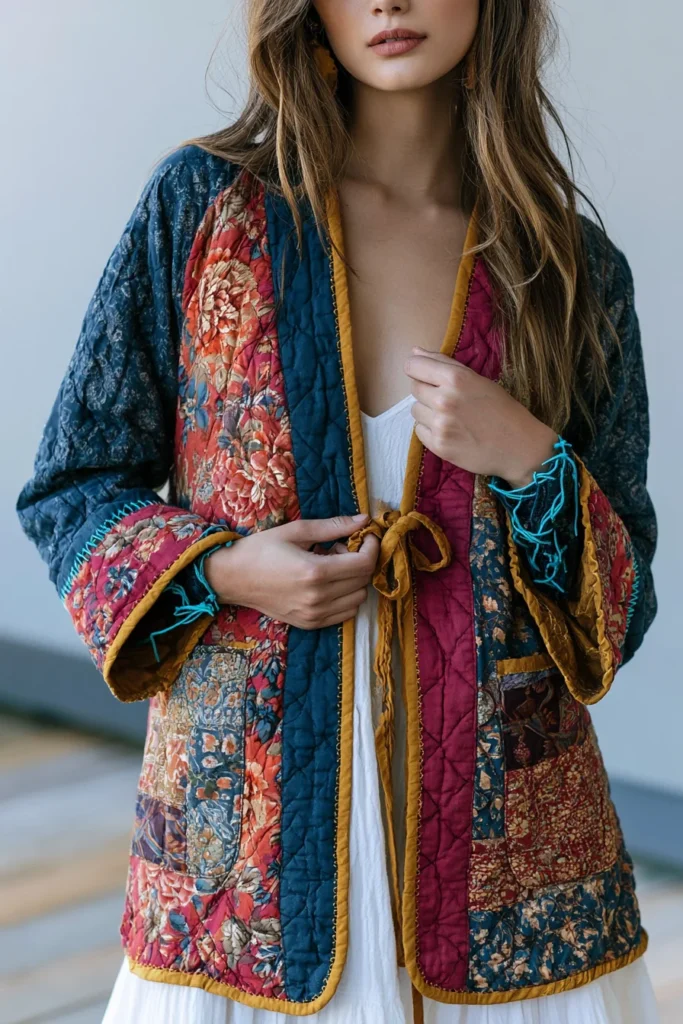
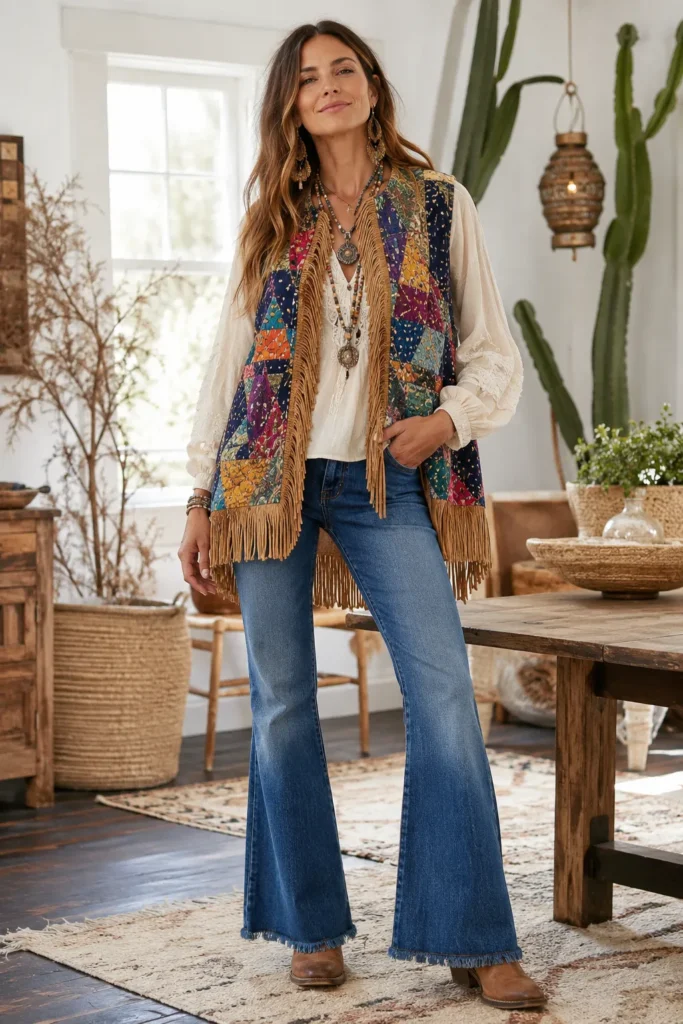
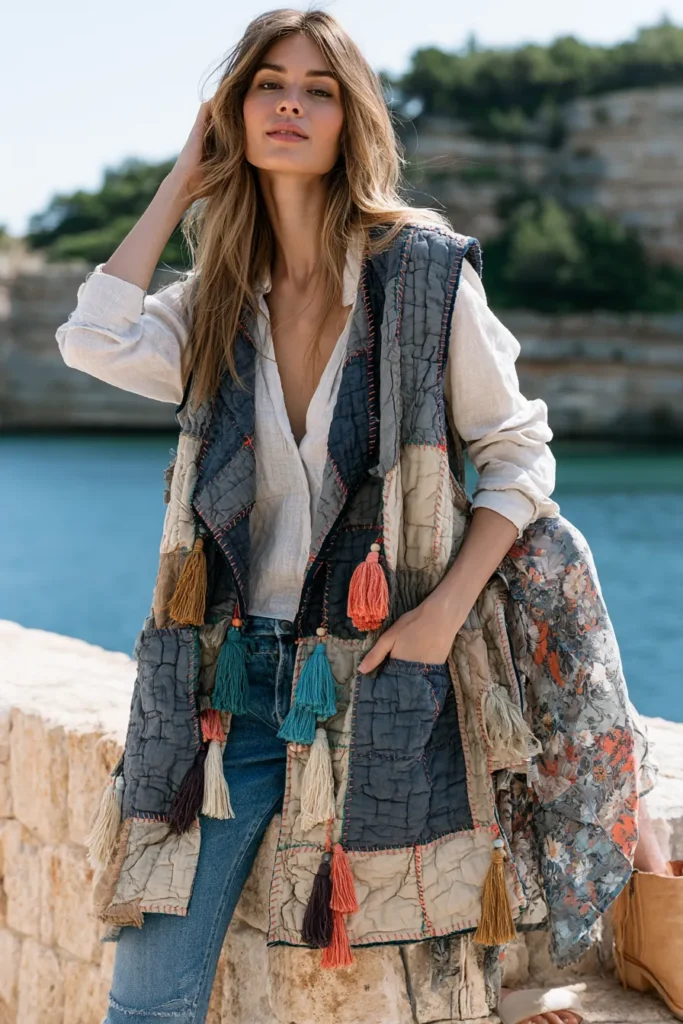
An Elegant Longline Boho Quilt Jacket is a relaxed, flowing outer layer made from quilted fabric, patchwork blocks, or repurposed quilt panels. It combines the comfort of a soft blanket with the expressive charm of bohemian style. Think earthy texture, vibrant prints, hand-stitched details, and an easy open-front shape that can be worn over jeans, maxi dresses, linen pants, or casual everyday outfits.
I came up with this idea because longline jackets are one of the easiest ways to make a simple outfit look styled without feeling overdressed. There is something special about taking quilted fabric—especially vintage-inspired florals, kantha-style prints, or bold patchwork—and turning it into a wearable layer that feels warm, artistic, and personal.
Why This Idea Is Worth Making
Why this idea is worth making: it is practical, stylish, and surprisingly versatile. A longline quilt jacket gives warmth without looking bulky, and the longer length creates an elegant silhouette. It is also a beautiful way to reuse an old quilt, thrifted blanket, kantha throw, or fabric scraps. Instead of buying a basic jacket, you can create a one-of-a-kind statement piece with color, memory, and handmade charm.
Suggested Finished Measurements
For a relaxed medium-size jacket:
- Finished length: 34–38 inches
- Finished width across chest: 22–24 inches
- Sleeve length from shoulder: 20–22 inches
- Sleeve width: 15–17 inches
- Front opening: open-front, no zipper needed
- Seam allowance: ½ inch
For a more oversized boho look, add 2 inches to the body width and sleeve width.
Materials Needed
- Quilted fabric, kantha quilt, or lightweight vintage quilt: about 2½ to 3 yards
- Lining fabric, optional: 2½ yards
- Bias binding: 4 to 5 yards
- Matching or contrast thread
- Fabric scissors or rotary cutter
- Measuring tape
- Pins or sewing clips
- Sewing machine
- Iron
- Fabric chalk
- Optional: embroidery thread, tassels, fringe trim, wooden buttons, or patch pockets
Step-by-Step Guide
Step 1: Choose a Vibrant Boho Quilt Fabric
Pick a quilted fabric that feels expressive and wearable. For a vibrant boho look, try turquoise, coral, mustard yellow, plum purple, sunset orange, emerald green, fuchsia, or deep indigo. Floral prints, paisley designs, kantha-style running stitches, and mixed patchwork blocks all work beautifully.
A slightly worn quilt can be especially charming because the faded areas and stitched repairs add character.
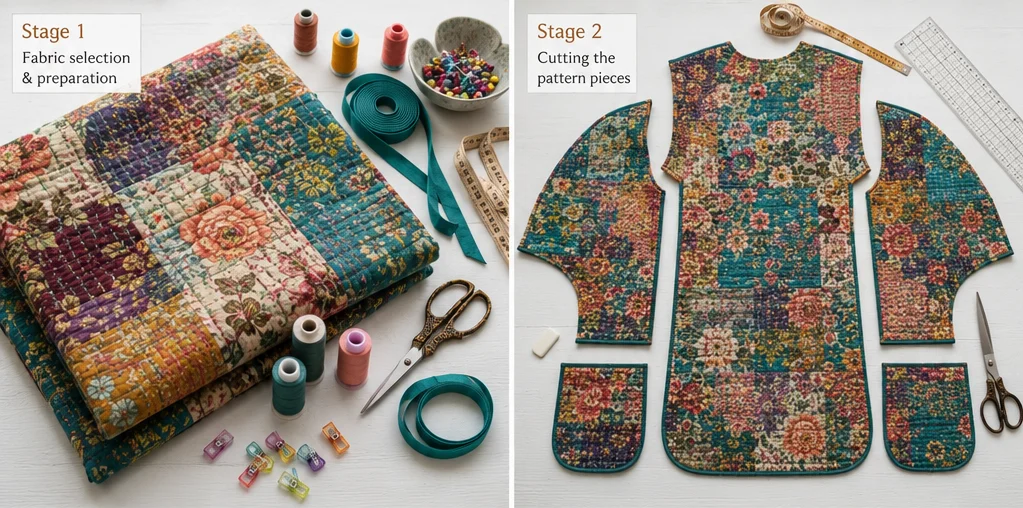
Step 2: Cut the Back Panel
Cut one back panel measuring about 26 inches wide × 36 inches long. For a more oversized jacket, cut it 28 inches wide. Round the bottom corners slightly for a softer, robe-like shape.
The long back panel creates an elegant drape, making this jacket feel polished rather than boxy.
Step 3: Cut the Front Panels
Cut two front panels, each about 14 inches wide × 36 inches long. These should match the back panel length. If you want the jacket to hang open beautifully, keep the front edges straight and simple.
For a more dramatic boho style, cut the front panels slightly wider at the hem so they fall with extra movement.
Step 4: Cut the Sleeves
Cut two sleeve pieces measuring about 18 inches wide × 22 inches long. If you prefer a relaxed drop-shoulder look, make the sleeves about 20 inches wide.
Boho jackets look best when the sleeves are comfortable, not tight. You can also crop the sleeves to bracelet length, around 18–19 inches, for a lighter everyday style.
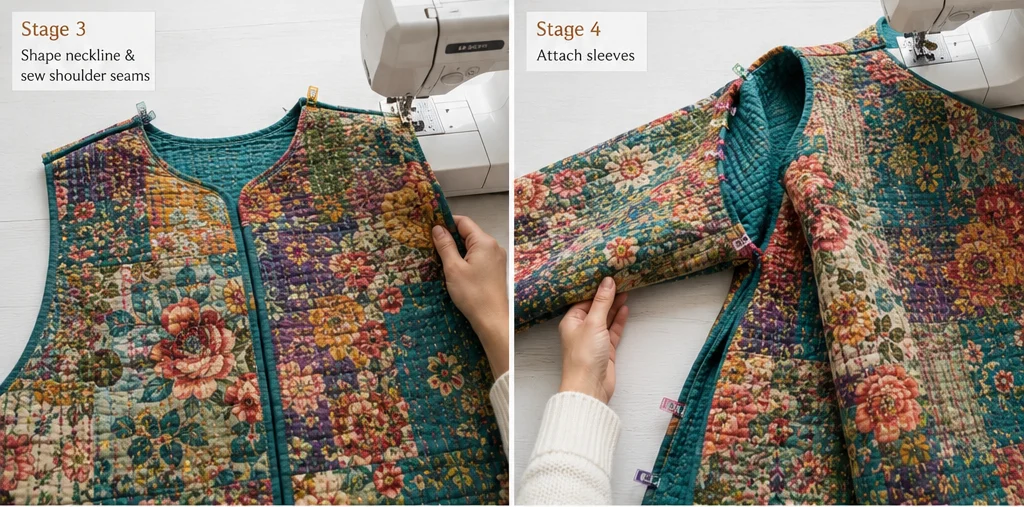
Step 5: Shape the Neckline
On the back panel, cut a shallow neckline about 7 inches wide × 1½ inches deep. On each front panel, shape the neckline by cutting a gentle curve from the shoulder down about 6–8 inches along the center front edge.
Keep the neckline simple, as the quilted fabric already adds plenty of texture and detail.
Step 6: Sew the Shoulder Seams
Place the front panels on top of the back panel with right sides together. Match the shoulder edges and sew using a ½ inch seam allowance. Press the seams open if the quilt is not too bulky. If the fabric is thick, press the seam toward the back and topstitch it down.
Step 7: Attach the Sleeves
Open the jacket flat with the right side facing up. Center one sleeve along the shoulder seam, right sides together. Pin carefully, then sew the sleeve to the body using a ½ inch seam allowance. Repeat for the second sleeve.
Use plenty of clips instead of pins if your quilt is thick.
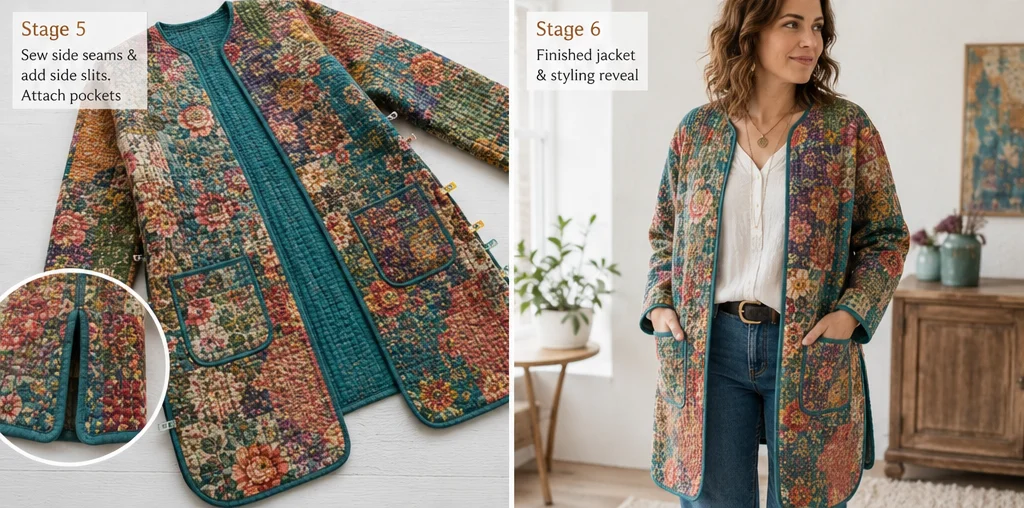
Step 8: Sew the Side Seams
Fold the jacket right sides together. Match the sleeve edges, underarm seams, and side seams. Sew from the sleeve cuff down to the underarm and then along the side of the jacket in one continuous seam.
For easier movement, stop sewing about 8–10 inches above the bottom hem to create side slits. These slits give the longline jacket a graceful, flowing shape.
Step 9: Add Patch Pockets
Cut two pocket pieces measuring about 8 inches wide × 9 inches tall. Fold the top edge down by ½ inch, press, and stitch. Fold the remaining edges under by ½ inch and press.
Place the pockets on the front panels about 10–12 inches below the shoulder and 3 inches from the center front edge. Stitch around the sides and bottom, leaving the top open.
Step 10: Finish the Edges
Bind the raw edges with bias tape around the neckline, front opening, hem, sleeve cuffs, and side slits. Use a bold contrast binding such as hot pink, golden yellow, teal, red, or emerald green for a vibrant boho finish.
This step makes the jacket look clean and helps protect the quilted layers from fraying.
Assembly Section
Once the main jacket is sewn, check the fit before adding decorative details. Try it on over a lightweight top and make sure the shoulders feel relaxed, the sleeves allow movement, and the front hangs evenly.
After the fit is right, finish all raw edges with bias binding. Add pockets, then topstitch along the shoulder seams, front opening, and hem for extra strength. For a more artistic, handmade look, add visible running stitches around the pockets, cuffs, and hem using embroidery thread in coral, turquoise, mustard, or ivory.
You can also add tassels to the side slits, fringe along the hem, or a wooden button near the chest for a soft closure.
Personal Styling Touch
My favorite version of this jacket features a faded floral quilt with a bright teal binding and mustard-yellow hand stitches around the pockets. It feels like something found at a vintage market and made new again. That is the beauty of a boho quilt jacket: it does not need to be perfect. The little irregularities, color shifts, and stitched details make it feel soulful.
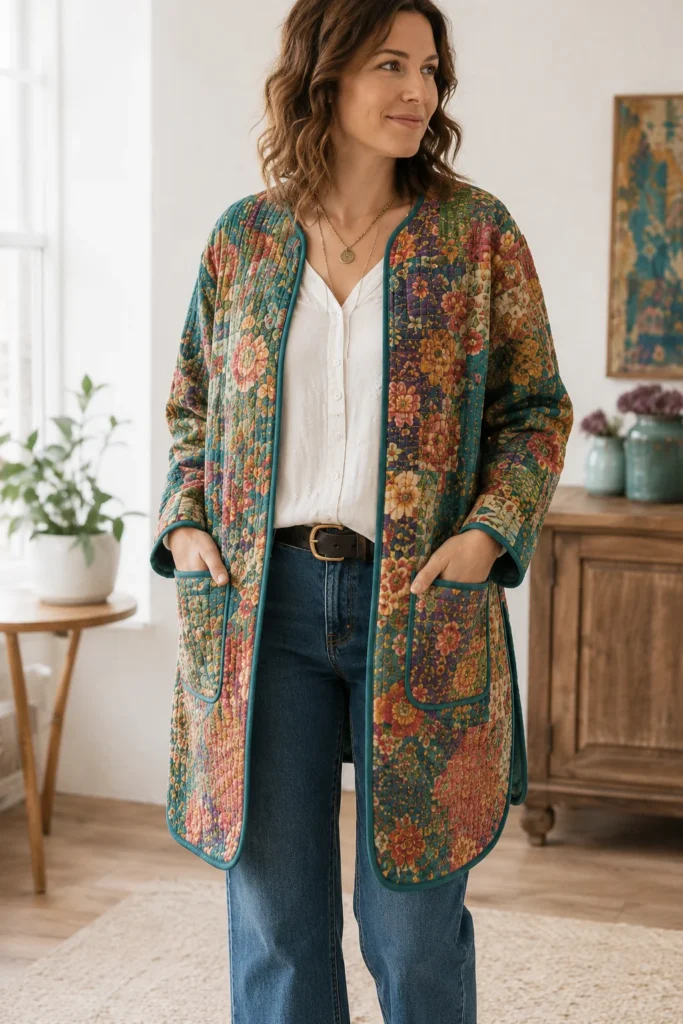
Final Styling Idea
Wear this longline boho quilt jacket with a white cotton blouse, flared jeans, ankle boots, and layered necklaces for an easy everyday outfit. For a softer look, layer it over a cream maxi dress with sandals. For cooler days, pair it with a turtleneck, wide-leg pants, and a felt hat.
Use turquoise, coral, saffron, plum, emerald, and indigo to keep the look vibrant, elegant, and unmistakably bohemian.
More Recommended Supplies
“As an Amazon Associate, I earn from qualifying purchases.
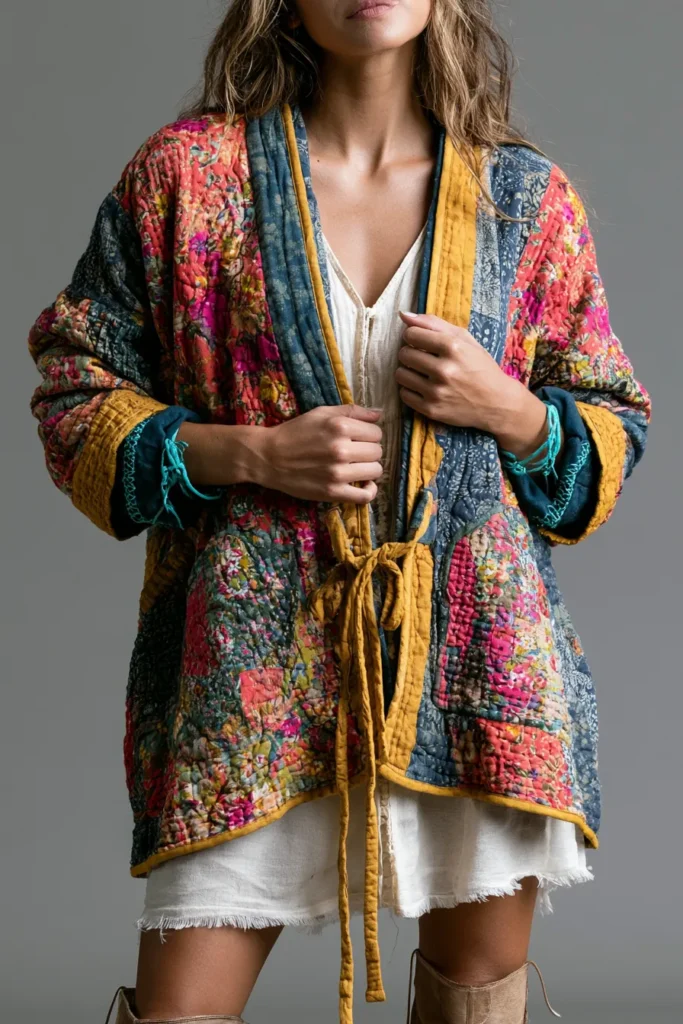
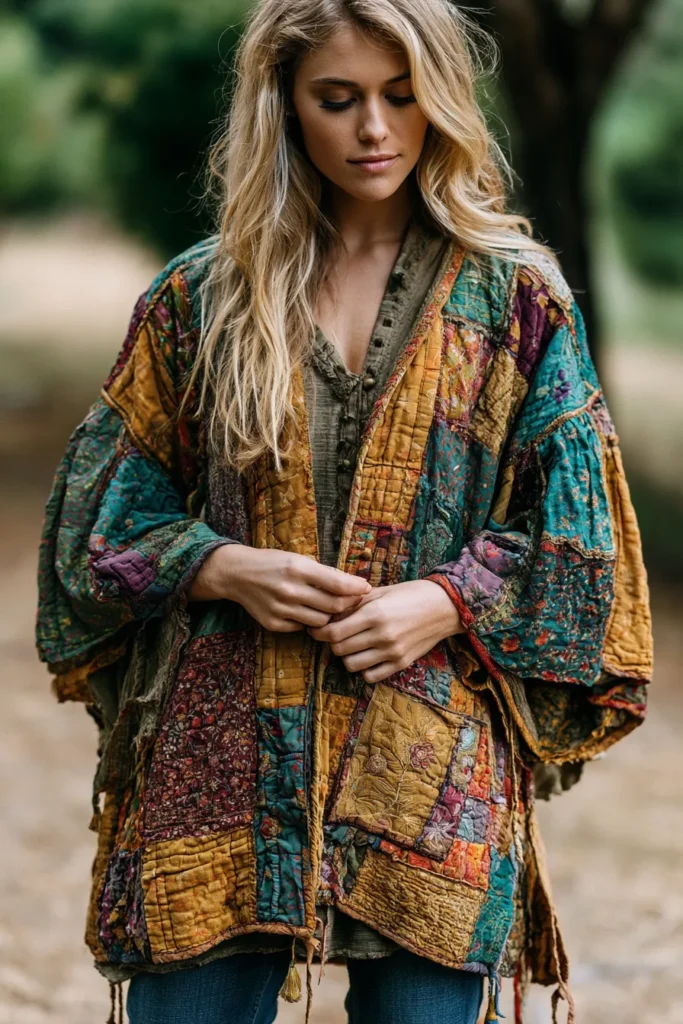
2. Oversized Boro-Inspired Boho Quilt Jackets with Vintage Vibes
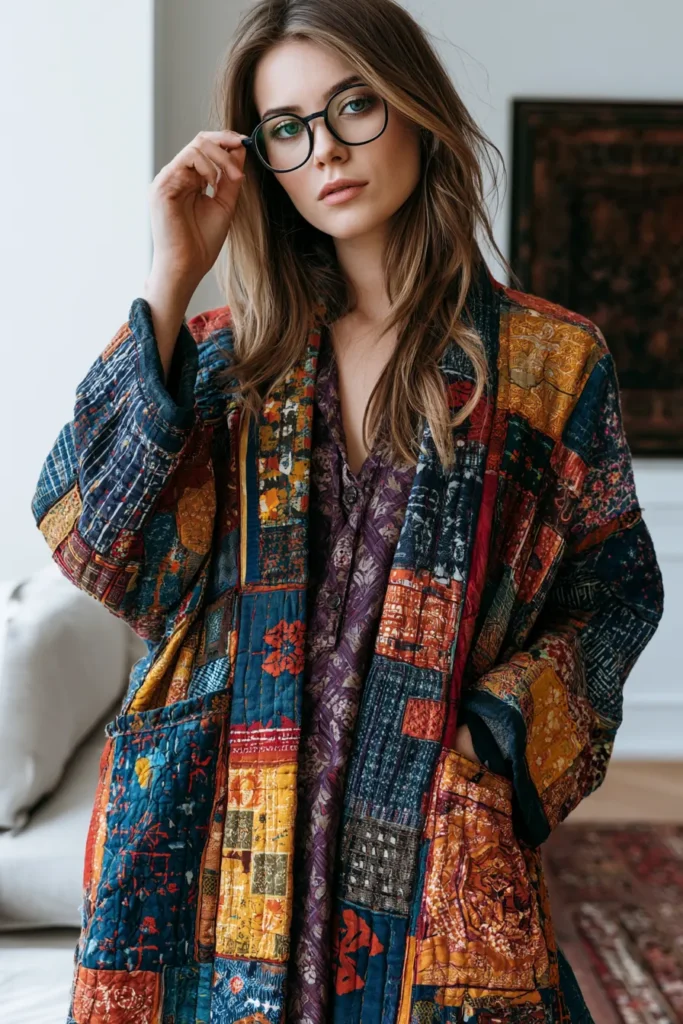
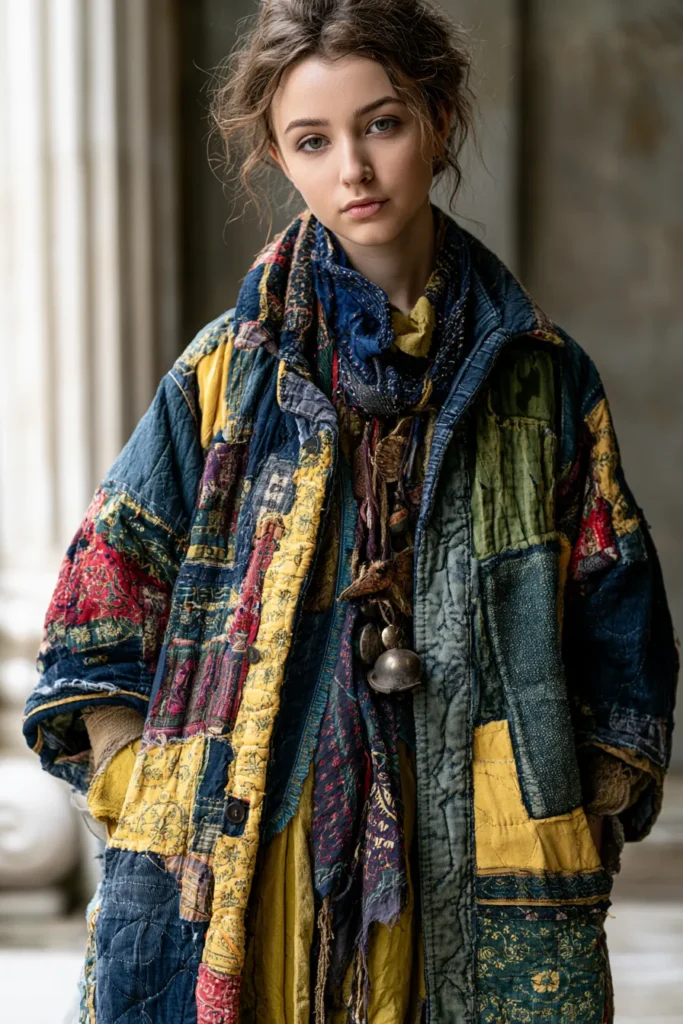
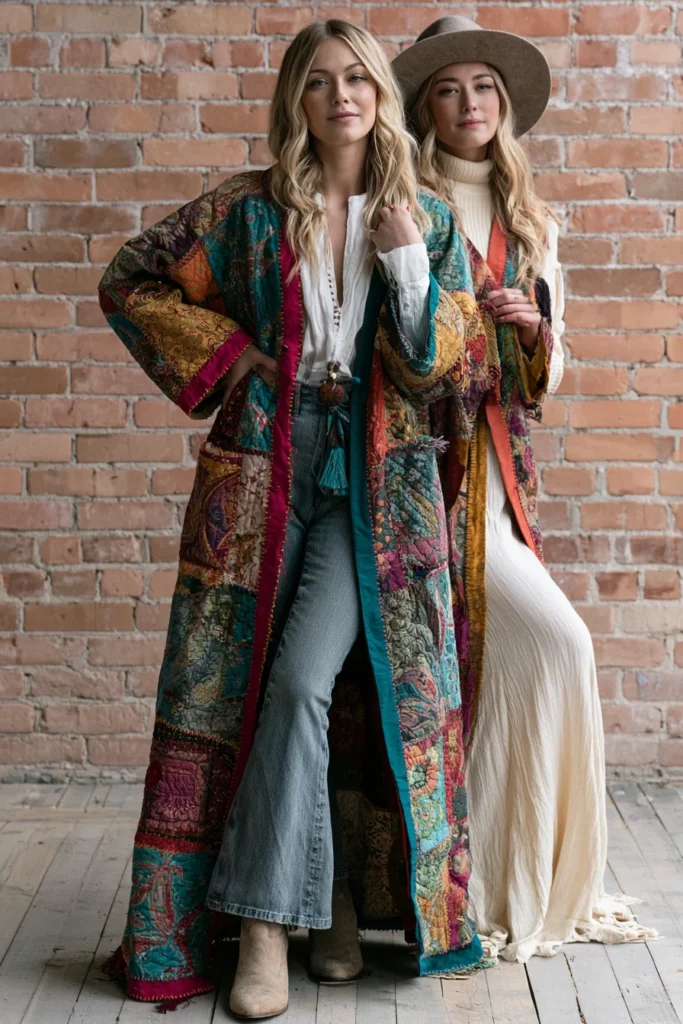
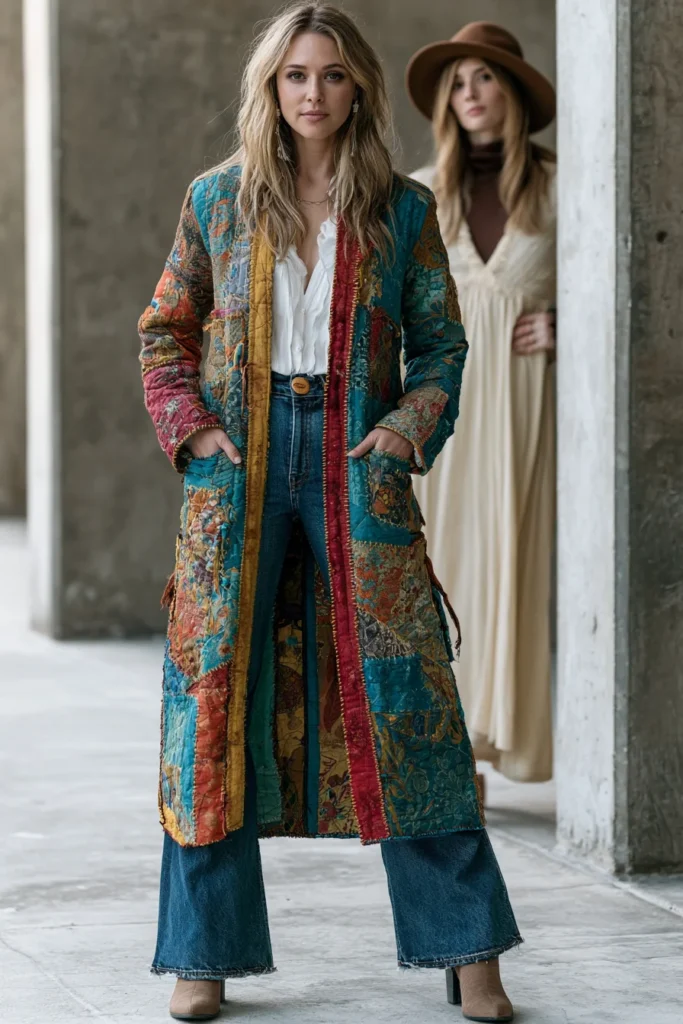
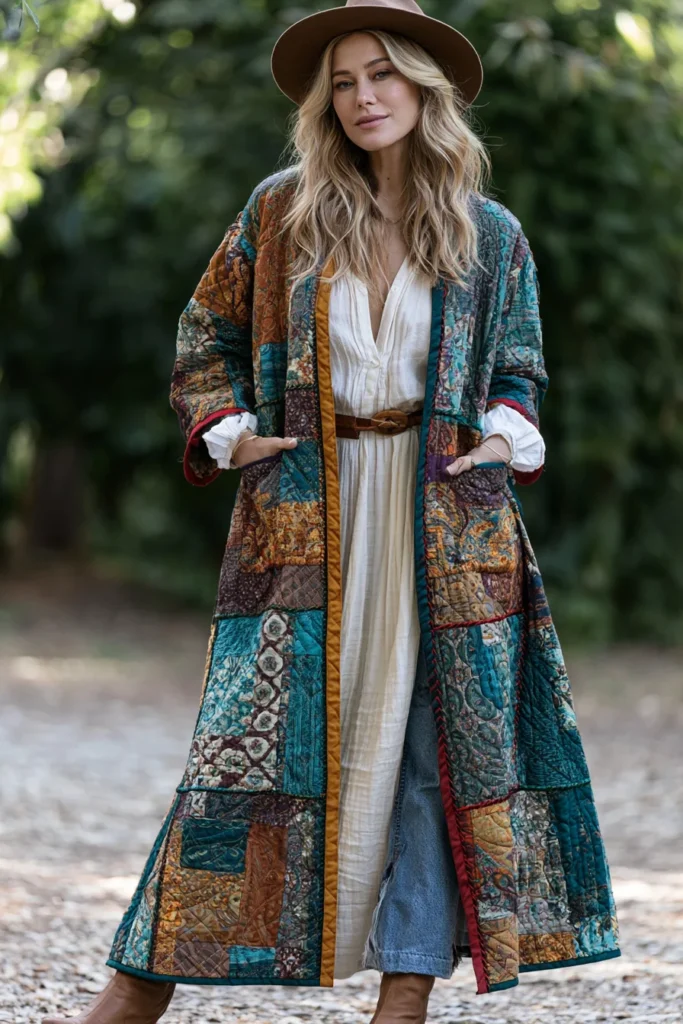
An Oversized Boro-Inspired Boho Quilt Jacket is a relaxed, roomy outer layer made with patchwork fabric, visible stitching, soft quilting, and a beautifully worn-in vintage look. It draws inspiration from Japanese boro textiles, where fabric pieces were layered, repaired, and stitched over time, and blends that history with bohemian style through bold colors, artistic patches, and an easy, oversized shape.
I came up with this idea because oversized quilt jackets have that rare mix of comfort and personality. They feel like wrapping yourself in a favorite old blanket, but they still look stylish enough to wear with jeans, boots, linen dresses, or wide-leg trousers. This design is especially perfect if you love clothing that feels collected, handmade, and full of story.
Why This Idea Is Worth Making
Why this idea is worth making: it gives new life to fabric scraps, old quilts, denim pieces, worn cotton, or leftover patchwork blocks. Instead of creating something that looks brand-new and perfect, this jacket celebrates texture, repair, softness, and imperfection. The oversized fit also makes it beginner-friendly because it does not require tight tailoring, while the boro-inspired patchwork makes every jacket completely unique.
Suggested Finished Measurements
For a relaxed oversized medium fit:
- Finished jacket length: 28–32 inches
- Finished chest width: 25–28 inches across
- Sleeve length from dropped shoulder: 19–21 inches
- Sleeve width: 18–20 inches
- Armhole depth: 11–12 inches
- Seam allowance: ½ inch
For a more dramatic, slouchy look, add 2–3 inches to the body and sleeve widths.
Materials Needed
- Base quilted fabric or lightweight quilt: 2½ to 3 yards
- Assorted patchwork scraps: denim, cotton, linen, floral prints, paisley, or solid fabric
- Optional lining fabric: 2½ yards
- Cotton batting, if making your own quilted panels: 2½ yards
- Bias binding: 4 to 5 yards
- Embroidery thread, sashiko thread, or pearl cotton
- Sewing machine
- Hand-sewing needle
- Fabric chalk
- Measuring tape
- Pins or clips
- Scissors or rotary cutter
- Iron
- Optional: wooden buttons, fringe trim, tassels, or large patch pockets
Step-by-Step Guide
Step 1: Choose a Vintage Boho Color Palette
Start with a base of indigo blue, faded denim, warm cream, soft brown, charcoal, or dusty olive. Then add vibrant patches in rust orange, turquoise, mustard yellow, magenta, emerald green, plum purple, and coral red. The goal is to make the jacket look relaxed and timeworn, but still colorful and expressive.
For a true boro-inspired feeling, mix old and new fabrics. A worn denim shirt, leftover quilt cotton, vintage floral scraps, or faded linen pieces can all become part of the design.
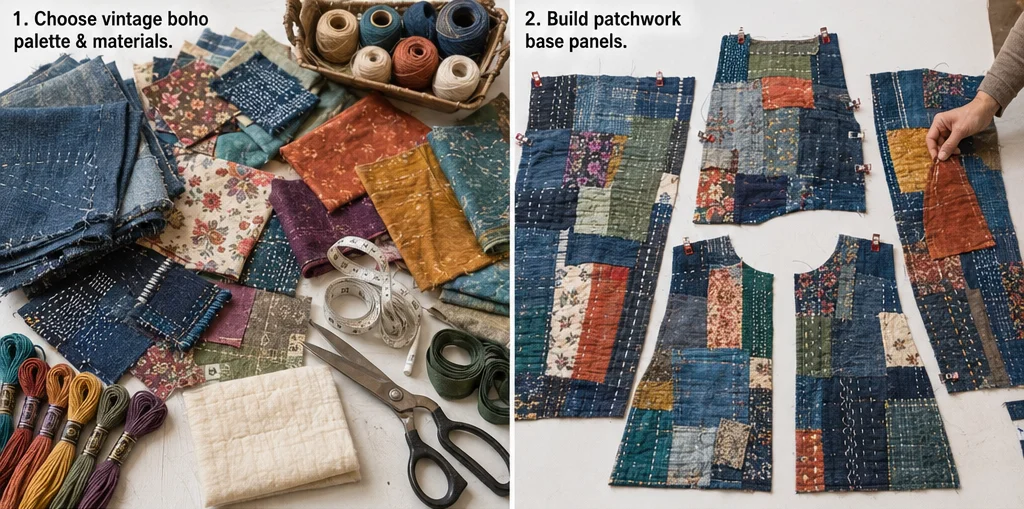
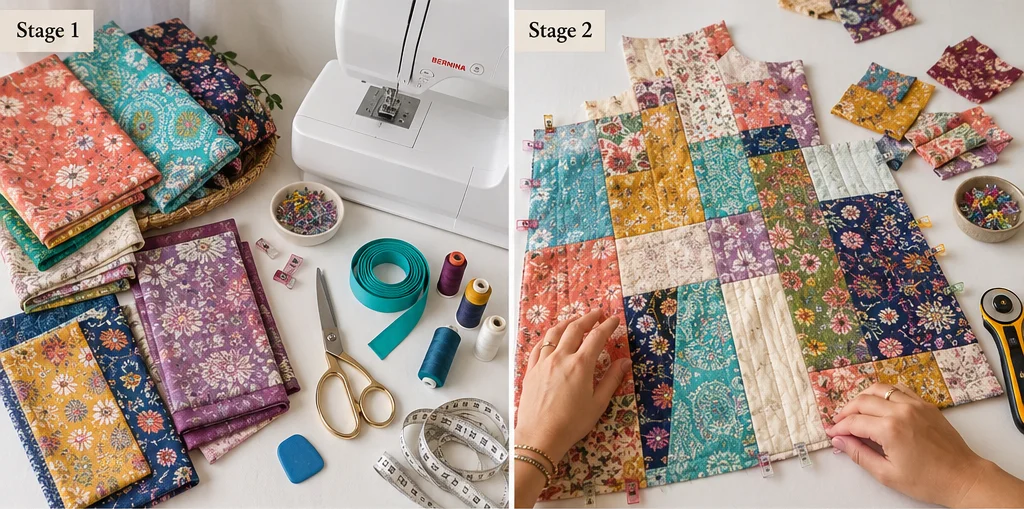
Step 2: Create the Patchwork Quilt Panels
If you are not using a ready-made quilt, create quilted panels first. Cut a back panel base about 30 inches wide × 32 inches long, two front panel bases about 16 inches wide × 32 inches long, and two sleeve bases about 22 inches wide × 21 inches long.
Lay fabric scraps over these base pieces in irregular layers. Overlap the edges by about ¼ inch. Do not worry about making the patches perfectly even. Boro-inspired style looks best when the layout feels organic.
Step 3: Stitch the Patches in Place
Pin or clip each patch to the base fabric. Sew around the edges using a straight stitch, zigzag stitch, or hand-running stitch. For a handmade vintage look, use visible thread in ivory, golden yellow, turquoise, red, or deep blue.
Add rows of simple running stitches across larger patches. This gives the jacket a repaired, collected over time feeling.
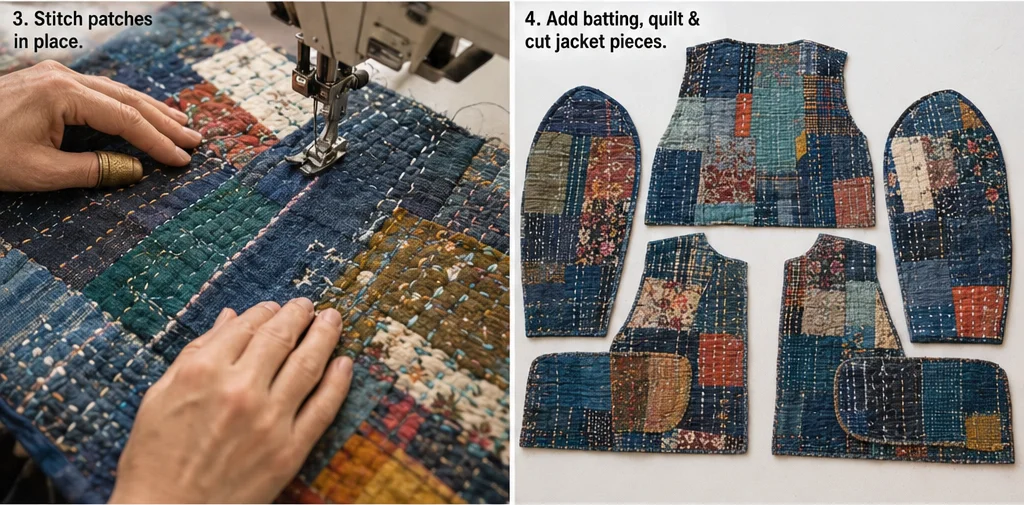
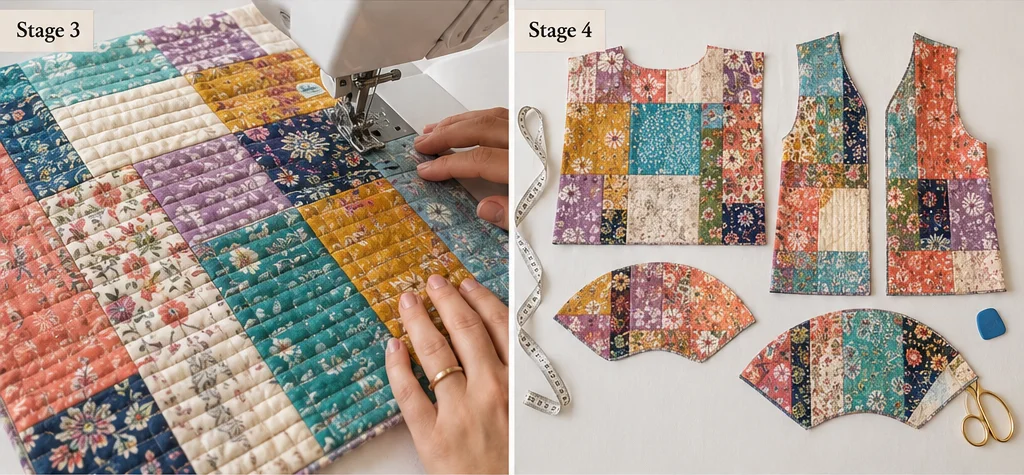
Step 4: Add Batting and Quilt the Panels
Place batting behind each patchwork panel. Quilt through the layers using straight lines, wavy lines, or uneven hand-stitched rows spaced about 1½ to 2 inches apart. The quilting does not need to be perfect; slightly irregular lines add charm.
This step gives the jacket warmth, structure, and that cozy blanket-like texture.
Step 5: Cut the Jacket Shape
Trim the quilted pieces into the final jacket shapes:
- Back panel: 28–30 inches wide × 30–32 inches long
- Two front panels: 15–16 inches wide × 30–32 inches long
- Two sleeves: 20–22 inches wide × 20–21 inches long
- Optional pockets: 9 inches wide × 10 inches tall
Cut a shallow back neckline about 7 inches wide × 1½ inches deep. On the front panels, shape a gentle neckline curve from the shoulder down about 6 inches along the front opening.
Step 6: Sew the Shoulder Seams
Place the front panels on the back panel with right sides together. Match the shoulder edges, then sew with a ½-inch seam allowance. Because quilted fabric can be thick, press the seams gently and topstitch them down for strength.
If your fabric is bulky, use clips instead of pins and sew slowly.
Step 7: Attach the Oversized Sleeves
Open the jacket body flat. Center each sleeve along the shoulder seam, right sides together. Pin carefully, then sew with a ½-inch seam allowance. The sleeve should feel roomy and slightly dropped at the shoulder.
This dropped-shoulder shape is what gives the jacket its relaxed boho silhouette.
Step 8: Sew the Side and Sleeve Seams
Fold the jacket right sides together. Match the sleeve edges, underarms, and side seams. Sew from the sleeve cuff to the underarm, then down the side seam.
For extra movement, leave 6–8 inches open at the lower side seams to create side slits. These slits help the oversized jacket drape better and feel less boxy.
Step 9: Add Large Patch Pockets
Cut two pocket pieces measuring 9 × 10 inches. Finish the top edge by folding it down ½ inch twice and stitching. Fold the remaining edges under by ½ inch and press.
Place the pockets on the front panels about 11–13 inches below the shoulder. Stitch around the sides and bottom. Add visible hand stitches around the pocket edges for a true boro-inspired detail.
Step 10: Bind the Raw Edges
Use bias binding to finish the neckline, front opening, hem, sleeve cuffs, and side slits. Choose a vibrant binding color such as turquoise, saffron yellow, rust orange, deep red, or emerald green.
Binding keeps the quilted edges neat and prevents fraying, especially if you used old textiles or layered scraps.

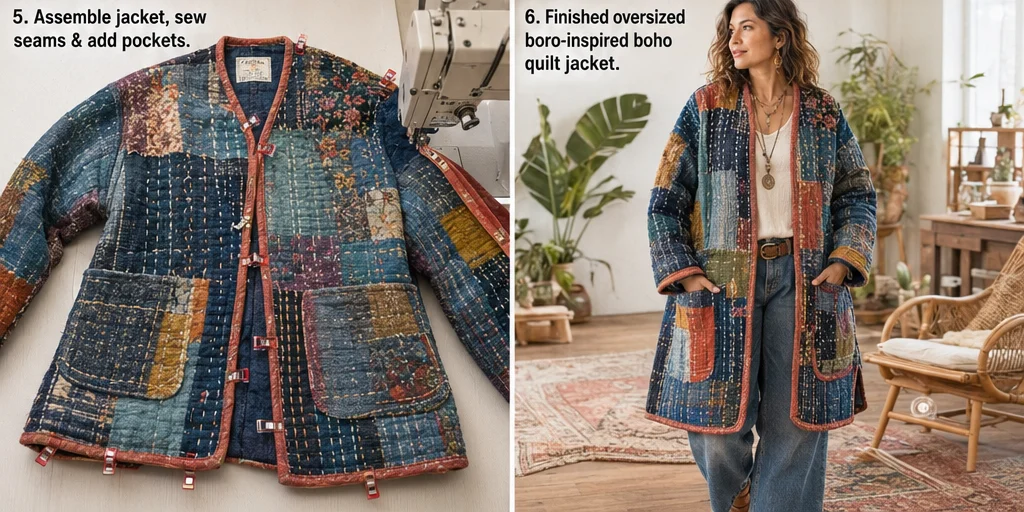
Assembly Section
After sewing the shoulder, sleeve, and side seams, try the jacket on before finishing the edges. Check that the oversized fit feels comfortable across the shoulders, chest, and arms. Trim the hem or sleeve length if needed.
Once the fit is right, bind all raw edges. Add the pockets last so you can place them exactly where your hands naturally fall. Finish with decorative running stitches around the cuffs, pockets, neckline, and hem. For a more bohemian touch, add small tassels to the side slits, a strip of fringe along the back yoke, or one large wooden button near the chest.
Interesting Backstory
Boro textiles were originally born from necessity, not trend. In rural Japan, fabric was precious, so families repaired garments and bedding again and again with patches and rows of stitching. Over time, those repairs became visually beautiful because every layer showed use, care, and history. This jacket borrows that spirit in a modern boho way: it is about making something useful, soulful, and expressive from pieces that might otherwise be forgotten.
Personal Styling Touch
My favorite version of this jacket would use faded denim as the base, then patches of rust, floral cotton, mustard linen, teal paisley, and deep indigo scraps. I would leave some stitches slightly uneven on purpose because that handmade texture is what gives the jacket warmth. It should feel like a piece collected from a flea market, repaired by hand, and worn on a slow weekend morning.
Final Styling Idea
Style this oversized boro-inspired quilt jacket with a cream tank, relaxed jeans, suede ankle boots, and layered silver or brass jewelry. For a softer outfit, wear it over a linen maxi dress with sandals. For colder days, layer it over a turtleneck and wide-leg pants.
Use indigo, rust, mustard, turquoise, plum, coral, and emerald to keep the jacket vibrant, vintage-inspired, and full of boho character.
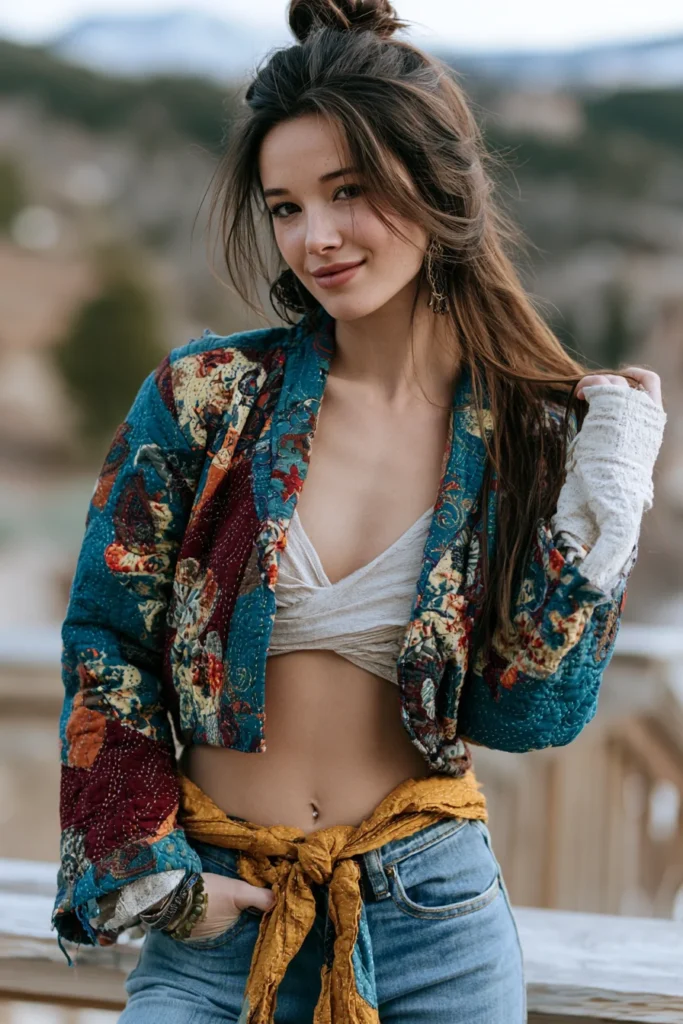
3. Cropped Kantha Stitch Boho Jackets for Modern Bohemian Outfits
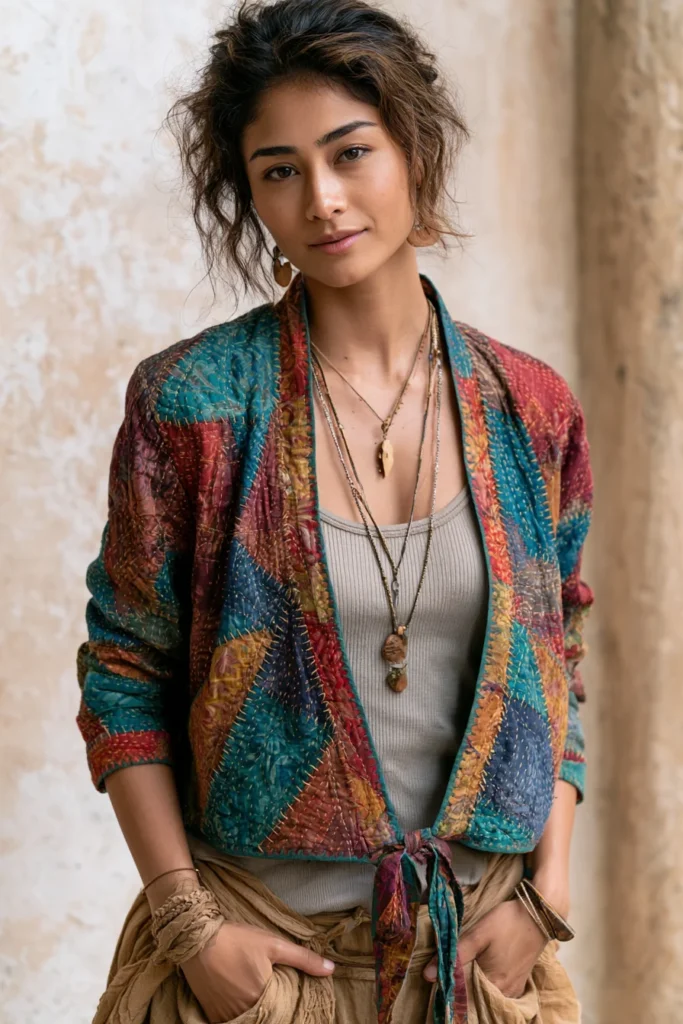

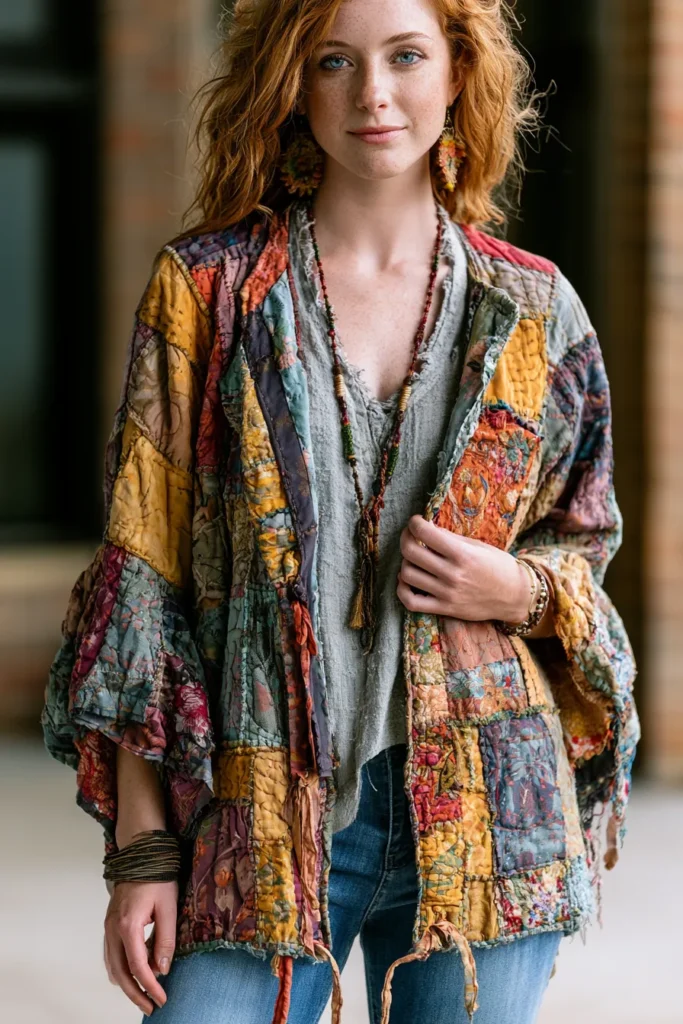
A Cropped Kantha Stitch Boho Jacket is a lightweight quilted layer made from soft fabric, featuring visible running stitches and a short, modern silhouette. Kantha stitching is traditionally associated with hand-stitched textiles from South Asia, where layers of old saris and cotton cloth were stitched together to create beautiful, useful blankets and garments. In a boho jacket, that same stitched texture brings movement, color, and handmade charm.
I came up with this idea because cropped jackets are easy to style and perfect for everyday outfits when you want a little warmth without wearing something heavy. The shorter length looks fresh with high-waisted jeans, maxi skirts, linen pants, sundresses, and simple tank tops. It feels relaxed, artistic, and modern while still carrying that soulful handmade quality.
Why This Idea Is Worth Making
Why this idea is worth making: it is lightweight, stylish, and easier to sew than a structured coat. The cropped shape keeps the jacket casual and youthful, while kantha-style stitching gives it texture and personality. It is also a beautiful way to reuse colorful cotton fabric, sari-inspired prints, floral scraps, or a lightweight vintage quilt.
This jacket works especially well for spring, early fall, cool summer evenings, travel outfits, and festival-style layering. It gives you the comfort of quilting without the bulk of a winter jacket.
Suggested Finished Measurements
For a relaxed medium-size cropped jacket:
- Finished length: 20–22 inches
- Finished chest width: 22–24 inches across
- Shoulder width: 17–18 inches
- Sleeve length: 18–20 inches
- Sleeve width: 15–17 inches
- Armhole depth: 9–10 inches
- Seam allowance: ½ inch
For an oversized, cropped look, add 1–2 inches to the body and sleeve widths.
Materials Needed
- Lightweight quilted cotton, kantha fabric, or soft cotton quilt: 2 to 2½ yards
- Lightweight lining fabric, optional: 2 yards
- Thin cotton batting, if quilting your own fabric: 2 yards
- Bias binding: 3½ to 4 yards
- Embroidery thread or pearl cotton for kantha-style stitching
- Sewing machine
- Hand-sewing needle
- Fabric chalk
- Measuring tape
- Pins or clips
- Scissors or rotary cutter
- Iron
- Optional: small patch pockets, tassels, wooden buttons, ribbon trim, or contrast cuffs
Step-by-Step Guide
Step 1: Choose a Bright Bohemian Color Palette
Pick colors that feel lively but still wearable. Beautiful combinations include coral, turquoise, saffron yellow, fuchsia, emerald green, sky blue, plum purple, and warm cream. For a softer look, use faded florals with pops of mustard and teal. For a bolder jacket, mix hot pink, indigo, orange, and jade green.
Kantha-style jackets look best when the colors feel collected rather than perfectly matched.
Step 2: Select or Make the Quilted Fabric
You can use ready-made kantha fabric, a lightweight quilt, or two layers of cotton with thin batting in between. If making your own, layer the outer cotton, batting, and lining together. Hand-stitch or machine-stitch long running lines across the fabric, spacing the rows about ¾ to 1 inch apart.
For a handmade kantha effect, use visible thread in white, yellow, turquoise, red, or pink.
Step 3: Cut the Back Panel
Cut one back panel measuring about 24 inches wide × 22 inches long. If you want a boxier cropped jacket, make it 26 inches wide. Keep the bottom edge straight for a clean, modern look.
Cut a shallow back neckline about 7 inches wide × 1½ inches deep.
Step 4: Cut the Front Panels
Cut two front panels, each about 13 inches wide × 22 inches long. These should be the same length as the back panel. Shape the front neckline with a gentle curve starting at the shoulder and dropping about 5–6 inches along the center front edge.
For a more open boho look, angle the front edges slightly outward from chest to hem.
Step 5: Cut the Sleeves
Cut two sleeve pieces measuring about 17 inches wide × 20 inches long. For a lighter jacket, use bracelet-length sleeves at 17–18 inches long. For a more relaxed festival style, cut the sleeves wider, about 18–19 inches.
Wide sleeves make the jacket feel breezy and comfortable over tops or dresses.
Step 6: Add Kantha-Style Stitch Details
Before assembling the jacket, add extra running stitches across the front panels, sleeve cuffs, or back yoke. Use colorful thread such as coral, gold, teal, magenta, or ivory. Stitch in straight rows, soft waves, or simple geometric lines.
This step adds personality to the jacket and makes it look intentionally handmade.
Step 7: Sew the Shoulder Seams
Place the two front panels on top of the back panel with right sides together. Match the shoulder edges and sew with a ½ inch seam allowance. Press the seams gently. If the fabric is quilted and bulky, press the seam toward the back and topstitch it down.
Step 8: Attach the Sleeves
Open the jacket body flat with the right side facing up. Center each sleeve at the shoulder seam, right sides together. Pin or clip the sleeve in place, then sew with a ½ inch seam allowance.
Take your time around the armhole so the sleeve sits smoothly.
Step 9: Sew the Side Seams
Fold the jacket right sides together. Match the sleeve edges, underarm seams, and side seams. Sew from the sleeve cuff to the underarm, then down the side seam in one continuous line.
For a relaxed cropped shape, leave 2–3 inches open at the bottom side seams to create small side slits.
Step 10: Add Small Patch Pockets
Cut two pocket pieces measuring 6½ inches wide × 7 inches tall. Fold the top edge down by ½ inch, press, and stitch. Fold the remaining edges under by ½ inch.
Place the pockets on the lower front panels, about 3 inches above the hem and 2½ inches from the front opening. Stitch around the sides and bottom, leaving the top open.
Assembly Section
After the shoulders, sleeves, and side seams are sewn, try the jacket on and check the cropped length. The hem should sit around the natural waist, high hip, or just above the hip, depending on your preference. Trim the hem evenly if needed.
Finish the neckline, front opening, hem, sleeve cuffs, and side slits with bias binding. A contrast binding in turquoise, saffron, coral, emerald, or hot pink makes the jacket feel vibrant and polished. Topstitch around the edges for strength. Add patch pockets last, then decorate the pocket edges with a few rows of kantha-style running stitches.
For a simple closure, sew on one wooden button near the chest, add fabric ties, or leave the jacket open for an effortless layered look.
Interesting Backstory
Kantha stitching began as a practical way to reuse and strengthen old fabric. Layers of soft cloth were hand-stitched together, often with simple running stitches that created texture and movement. What started as an everyday necessity has become loved for its beauty, sustainability, and emotional warmth.
That history fits naturally with boho fashion because both celebrate reuse, individuality, and imperfect handmade details.
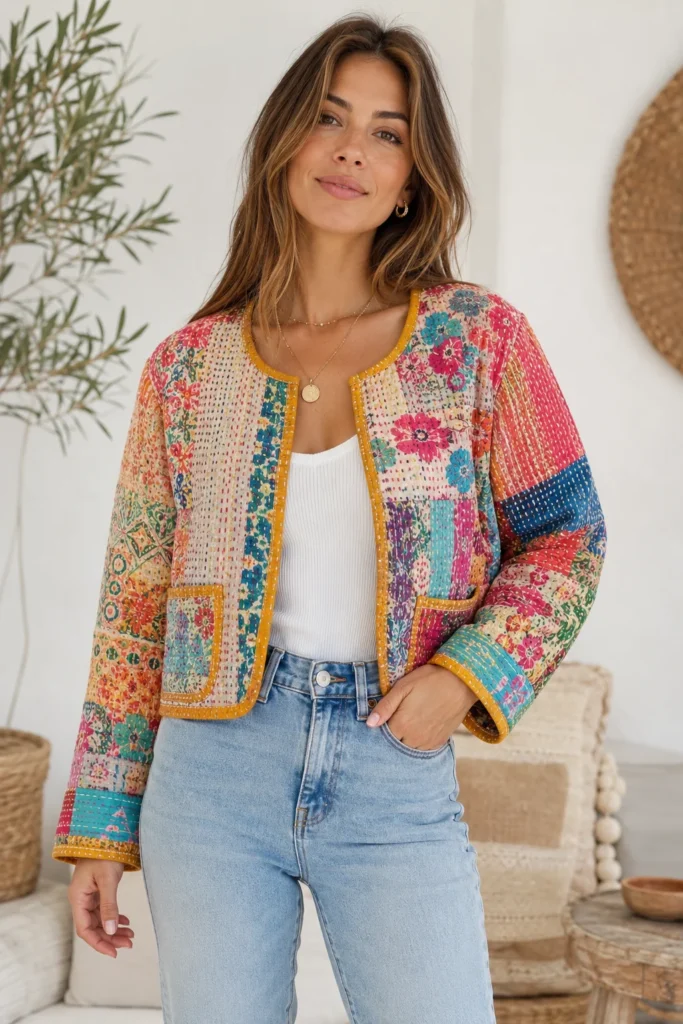
Personal Styling Touch
My favorite version of this light jacket would use a faded floral cotton base with rows of coral and turquoise kantha stitching. I would add mustard-yellow binding and tiny, mismatched patches near the cuffs, almost like little memories stitched into the sleeves. It is the kind of jacket I would throw over a plain white dress and instantly feel more styled.
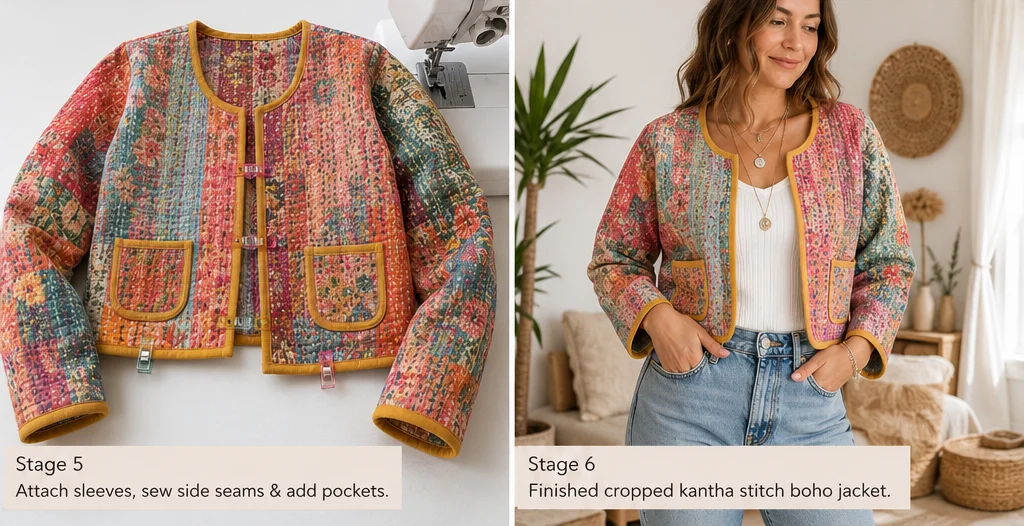
Final Styling Idea
Wear this cropped kantha stitch boho jacket with high-waisted jeans, a ribbed tank, ankle boots, and layered necklaces for a modern everyday outfit. For a softer bohemian look, pair it with a flowy maxi skirt, sandals, and a woven bag.
Use coral, turquoise, saffron, fuchsia, emerald, plum, and indigo to keep the jacket colorful, light, and full of bohemian charm.

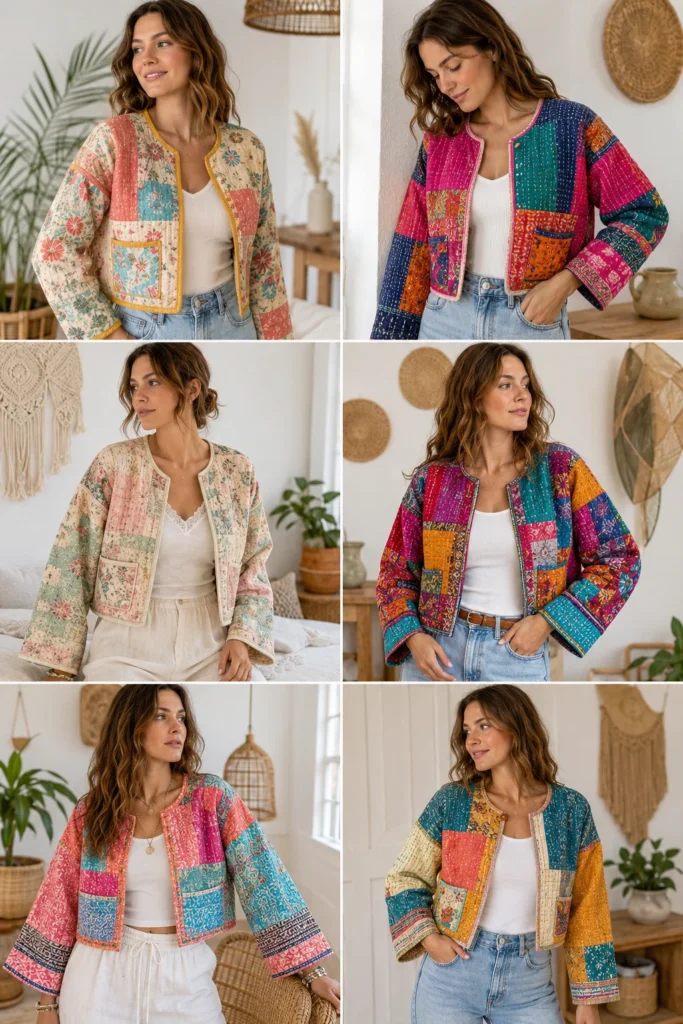
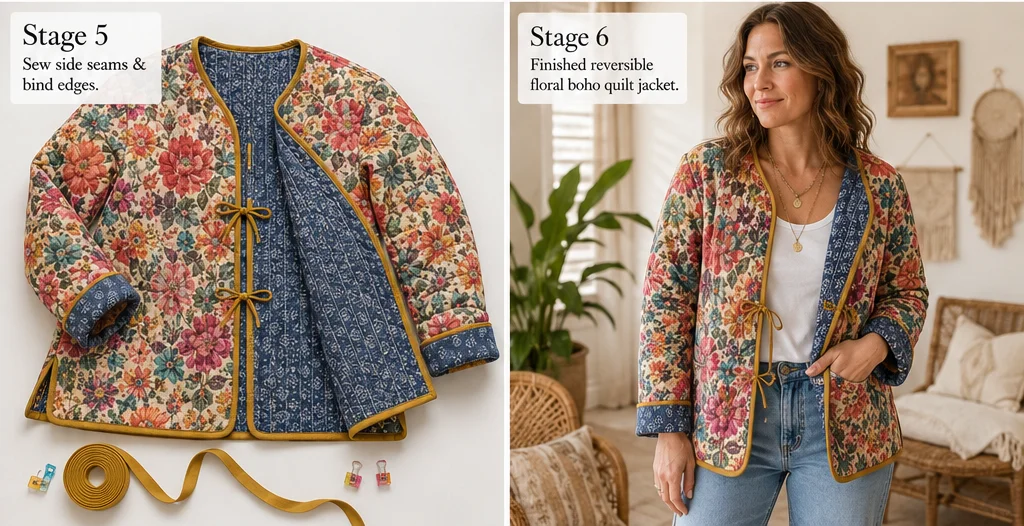
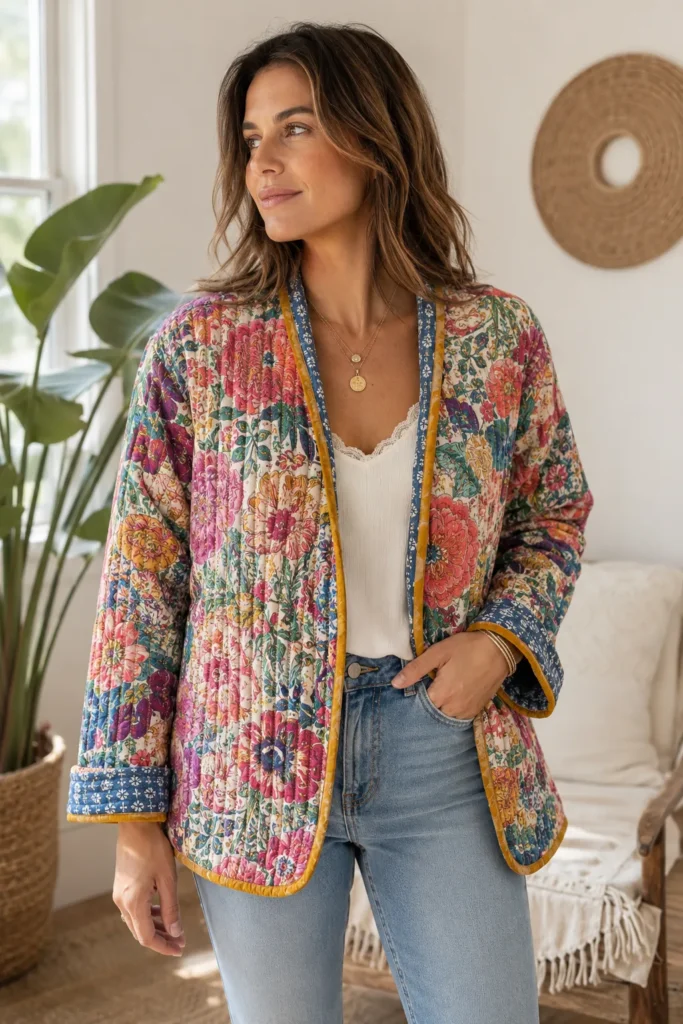
4. Reversible Floral Boho Quilt Jackets for Versatile, Elegant Looks
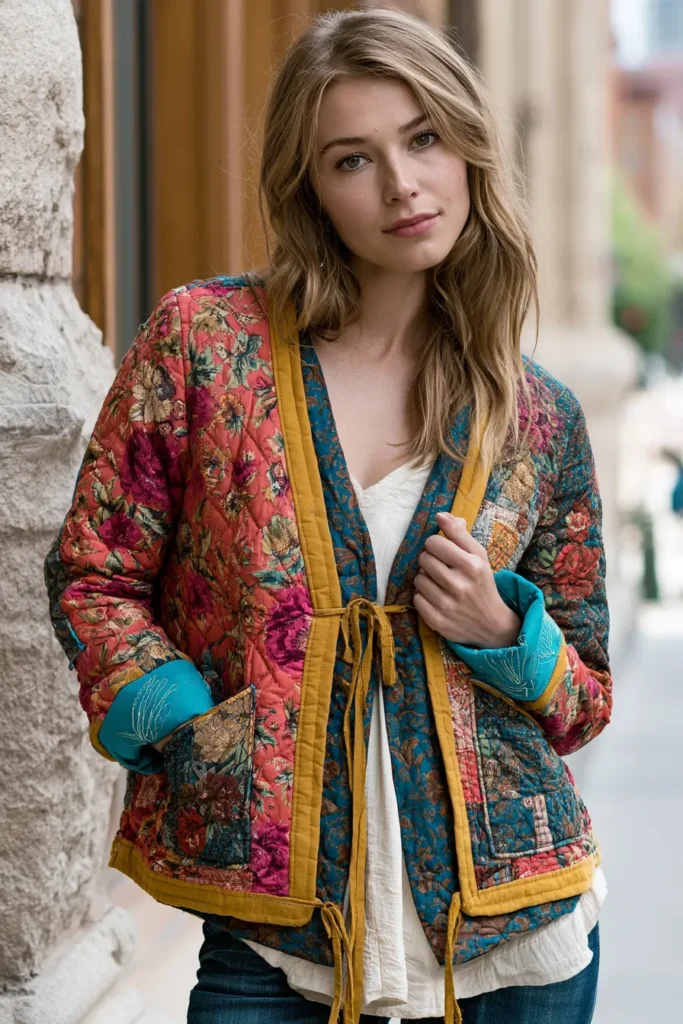
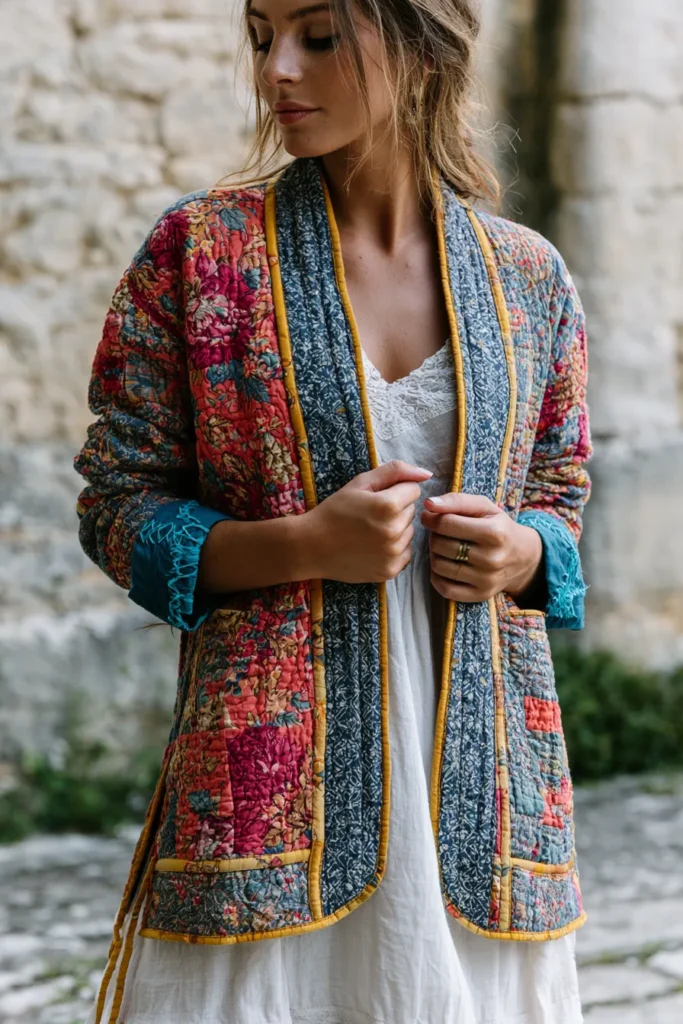
A Reversible Floral Boho Quilt Jacket is a lightweight quilted jacket designed with two wearable sides, giving you two different outfits in one piece. One side can feature bold floral prints, while the other can use a calmer, solid, small-scale print, patchwork design, or kantha-inspired stitched fabric. It is soft, relaxed, colorful, and perfect for everyday layering without feeling heavy.
I came up with this idea because reversible jackets are practical yet still feel creative. Some days you may want a bright floral statement, and other days, a softer, more understated layer. This design gives both options while keeping the cozy charm of quilting and the free-spirited beauty of boho fashion.
Why This Idea Is Worth Making
Why this idea is worth making: it gives you twice as many styling possibilities with one handmade jacket. A reversible quilt jacket is useful for travel, small wardrobes, seasonal layering, and anyone who loves versatile pieces. It also lets you play with color in a fun way—one side can be vibrant and expressive, while the other side can be elegant and easy to match.
Because this is a light jacket, it is comfortable for spring, cool summer nights, early fall, festivals, coffee dates, casual errands, or layering over dresses. It feels artistic without being too bulky.
Suggested Finished Measurements
For a relaxed medium-size light jacket:
- Finished length: 24–26 inches
- Finished chest width: 22–24 inches across
- Shoulder width: 17–18 inches
- Sleeve length: 19–21 inches
- Sleeve width: 15–17 inches
- Armhole depth: 9–10 inches
- Seam allowance: ½ inch
For a more oversized boho fit, add 1–2 inches to the body width and sleeve width.
Materials Needed
- Floral fabric for Side A: 2 to 2½ yards
- Contrast fabric for Side B: 2 to 2½ yards
- Thin cotton batting: 2 to 2½ yards
- Bias binding or handmade binding: 4 to 5 yards
- Matching or contrast thread
- Fabric chalk
- Measuring tape
- Pins or sewing clips
- Sewing machine
- Iron
- Scissors or rotary cutter
- Optional: wooden buttons, fabric ties, tassels, ribbon trim, or small reversible patch pockets
Step-by-Step Guide
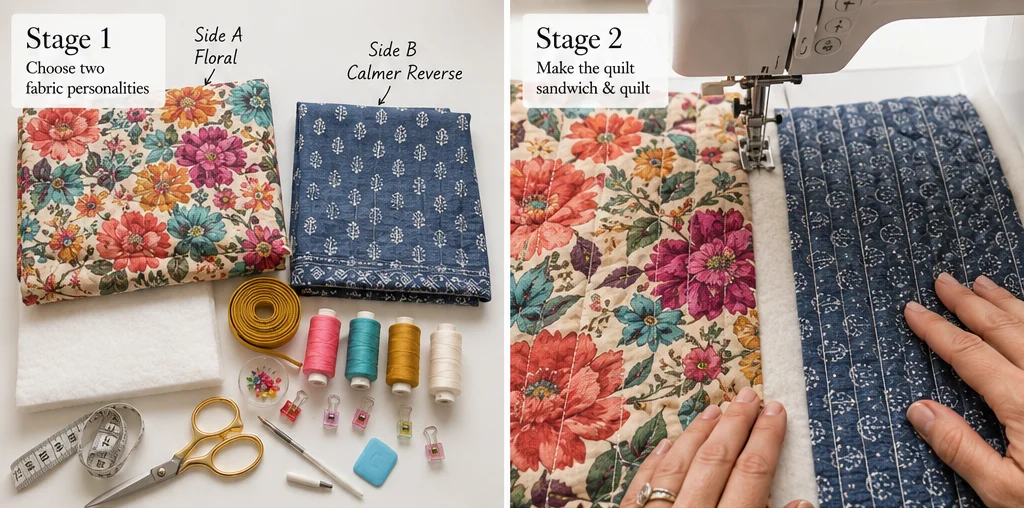
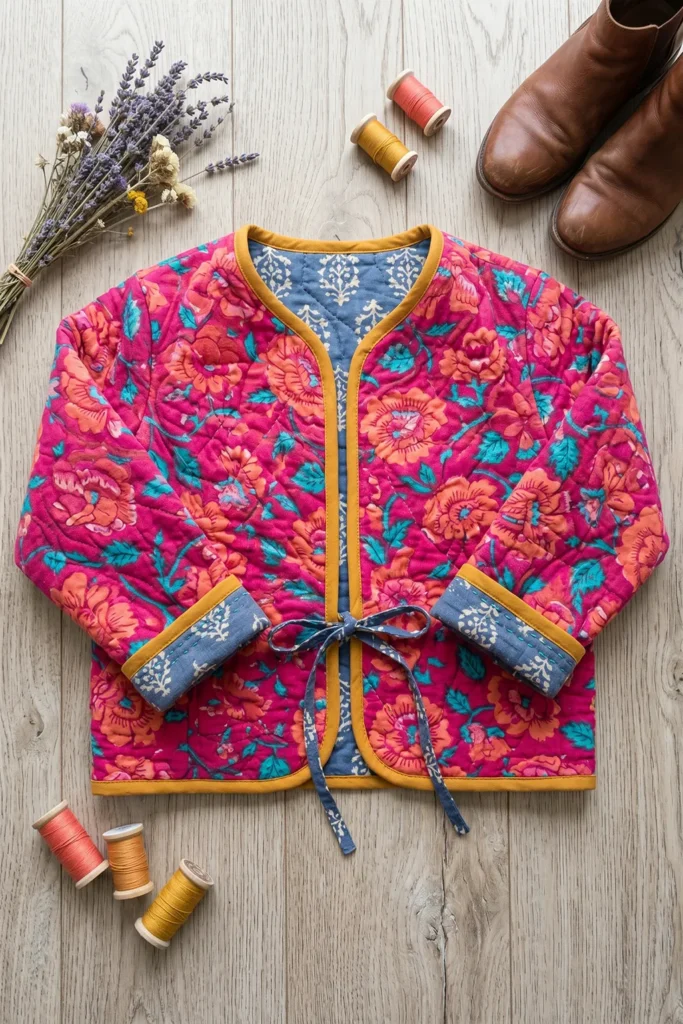
Step 1: Choose Two Beautiful Fabric Personalities
Pick one bold floral fabric and one calmer coordinating fabric. For a vibrant boho look, try fuchsia florals with teal, coral roses with mustard yellow, indigo florals with cream, or emerald green prints with plum purple. The key is to make both sides attractive enough to wear on the outside.
For Side A, choose the statement floral. For Side B, choose a smaller print, a solid linen-look cotton, tiny paisley, a soft stripe, or a patchwork-inspired fabric.
Step 2: Make a Lightweight Quilt Sandwich
Layer the Side A fabric, thin cotton batting, and Side B fabric together with the wrong sides facing the batting. Smooth the layers carefully and pin or baste them. Since this jacket is reversible, both sides need to look neat, so avoid bulky batting.
Quilt the layers together using straight lines, soft waves, or diamond quilting spaced about 1½ to 2 inches apart.
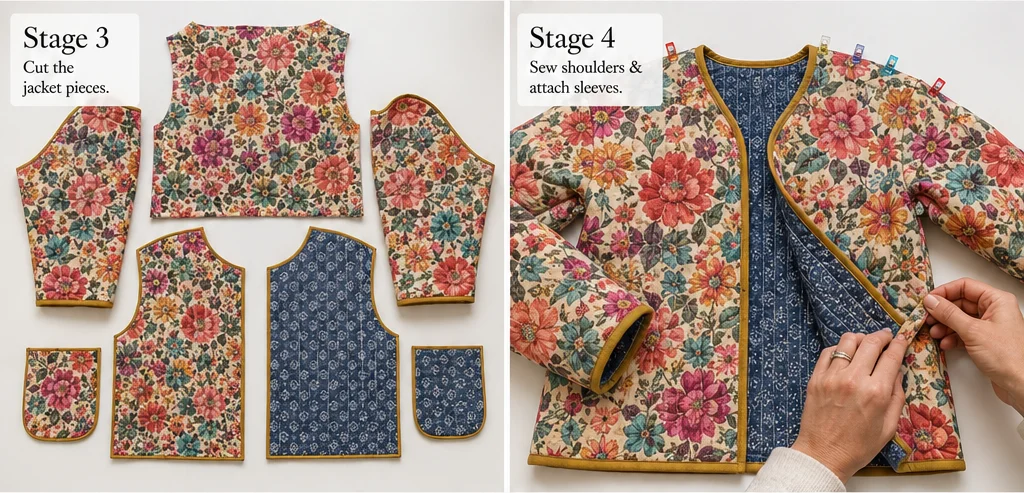
Step 3: Cut the Back Panel
Cut one back panel from the quilted fabric, measuring about 24 inches wide × 26 inches long. For a roomier fit, cut it 26 inches wide.
Cut a shallow back neckline about 7 inches wide × 1½ inches deep. Keep the shape simple so both reversible sides look clean.
Step 4: Cut the Front Panels
Cut two front panels, each about 13 inches wide × 26 inches long. Shape the neckline by cutting a gentle curve from the shoulder down about 6 inches along the center front opening.
If you want a more relaxed boho drape, slightly angle the center front edges so the jacket hangs softly when open.
Step 5: Cut the Sleeves
Cut two sleeve pieces measuring about 17 inches wide × 21 inches long. For a light, breezy jacket, you can shorten the sleeves to 18–19 inches for a bracelet-length style.
Wider sleeves work well for boho jackets because they layer easily over tops, dresses, and tunics.
Step 6: Add Decorative Quilting Details
Before sewing the jacket together, add extra quilting or hand stitches to highlight the floral fabric. You can stitch around large flowers, add simple kantha-style running stitches, or sew vertical lines in contrast thread.
Use vibrant thread colors such as gold, turquoise, coral, hot pink, emerald, or ivory. Since the jacket is reversible, make sure the stitching looks attractive on both sides.
Step 7: Sew the Shoulder Seams
Place the front panels on the back panel with the Side A fabrics facing each other. Sew the shoulder seams with a ½-inch seam allowance. Press gently with steam, then topstitch the seam to keep it tidy on both sides.
A flat, neat seam is important because the jacket will be reversible.
Step 8: Attach the Sleeves
Open the jacket body flat. Center each sleeve along the shoulder seam, right sides together. Pin or clip carefully, then sew with a ½ inch seam allowance.
After sewing, press the seam toward the sleeve and topstitch it down. This keeps the inside clean and strengthens the armhole.
Step 9: Sew the Side Seams
Fold the jacket so the front and back pieces line up. Sew from the sleeve cuff to the underarm, then down the side seam using a ½ inch seam allowance.
For easy movement, leave 3–4 inches open at the bottom side seams to create small side slits. Finish or bind the slit edges neatly because they will show on both sides.
Step 10: Finish the Edges with Binding
Bind the neckline, front opening, hem, sleeve cuffs, and side slits with bias binding. Choose a color that works with both sides, such as mustard yellow, teal, coral, cream, plum, or deep indigo.
Binding is one of the best finishing methods for reversible quilt jackets because it covers raw edges and creates a polished border.
Assembly Section
Once the shoulders, sleeves, and side seams are complete, try the jacket on and check the fit. Make sure the jacket hangs evenly on both sides and that the sleeves feel comfortable. Trim any uneven edges before binding.
Finish all outer edges with bias binding. If adding closures, use fabric ties instead of heavy buttons so the jacket looks good both ways. Sew one tie to the inside edge and one to the outside edge, or add two sets of ties so each reversible side has a finished look. If you want pockets, make simple patch pockets from leftover quilted fabric and place them carefully so they look intentional on both sides.
Topstitch around the front opening, cuffs, and hem to keep everything flat and durable.
Interesting Backstory
Reversible garments have always been loved by travelers, makers, and practical dressers because they offer more use with less bulk. In boho fashion, this idea feels especially natural because the style celebrates mixing prints, layering textures, and wearing clothing in flexible ways. A reversible floral quilt jacket carries that same spirit: it is beautiful, useful, and never limited to just one look.
The floral side brings romance and movement, while the reverse side can feel calm, earthy, or vintage. Together, they create a jacket that feels collected and personal.
Personal Styling Touch
My favorite version would have a bold coral and fuchsia floral side with a softer indigo block-print reverse. I would finish it with mustard-yellow binding and add a few rows of turquoise hand-stitching near the cuffs. That small detail would make the jacket feel handmade without looking overdone.
This is the kind of light jacket I would keep by the door because it works with almost everything—jeans, dresses, skirts, and even simple lounge outfits.
Final Styling Idea
Wear the floral side outward with a white dress, ankle boots, and layered jewelry for a romantic boho look. Flip it to the calmer reverse side for errands, travel, or casual everyday layering with jeans and a cotton tee.
Use coral, fuchsia, turquoise, mustard, emerald, plum, indigo, and cream to keep the jacket vibrant, elegant, and versatile. The finished piece gives you two stylish looks in one soft, lightweight quilted layer.
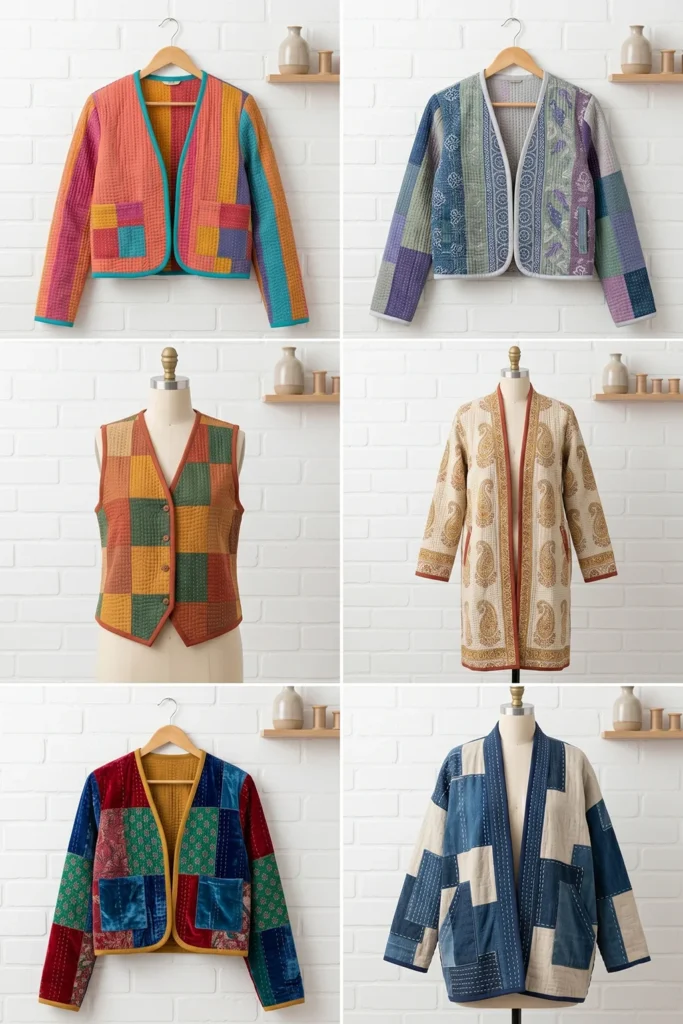
5. Fringed Suede Trim Boho Quilt Vests for Cozy Layered Looks
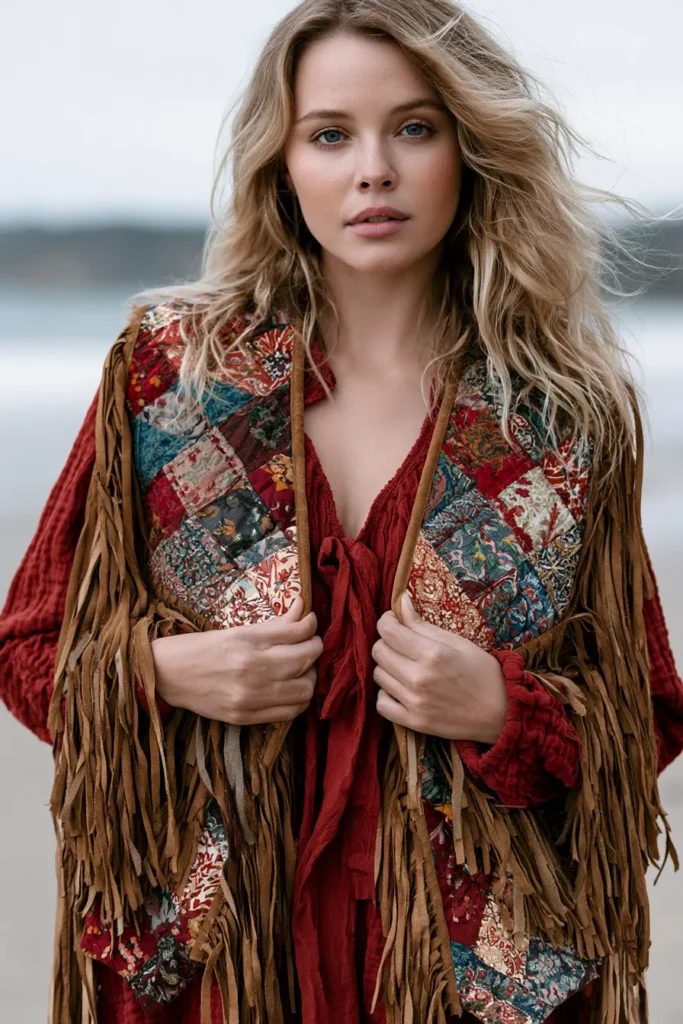
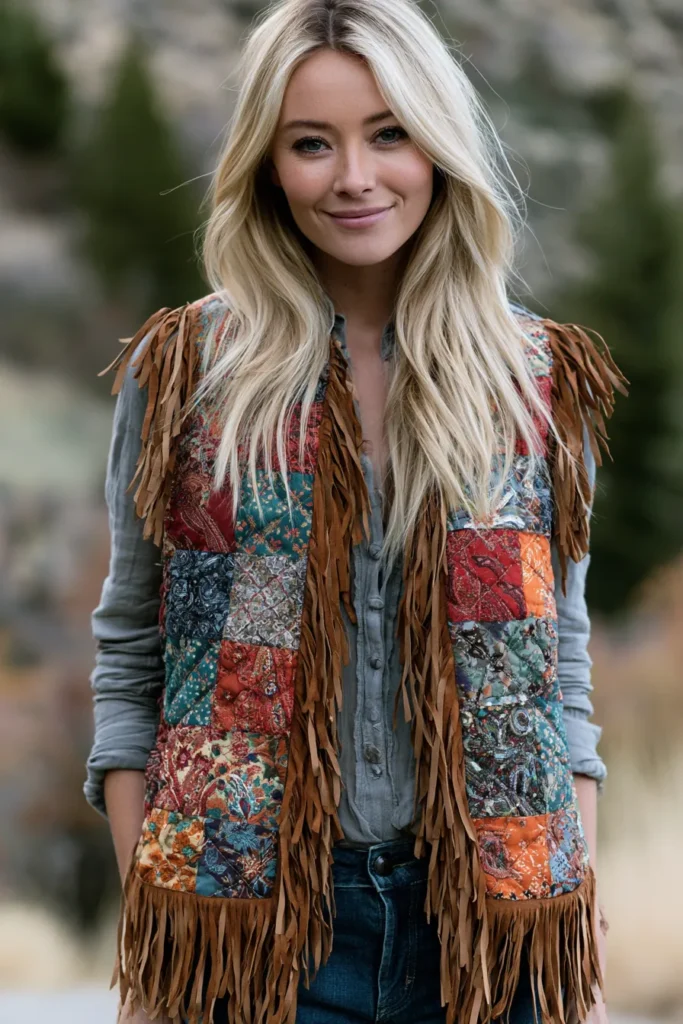
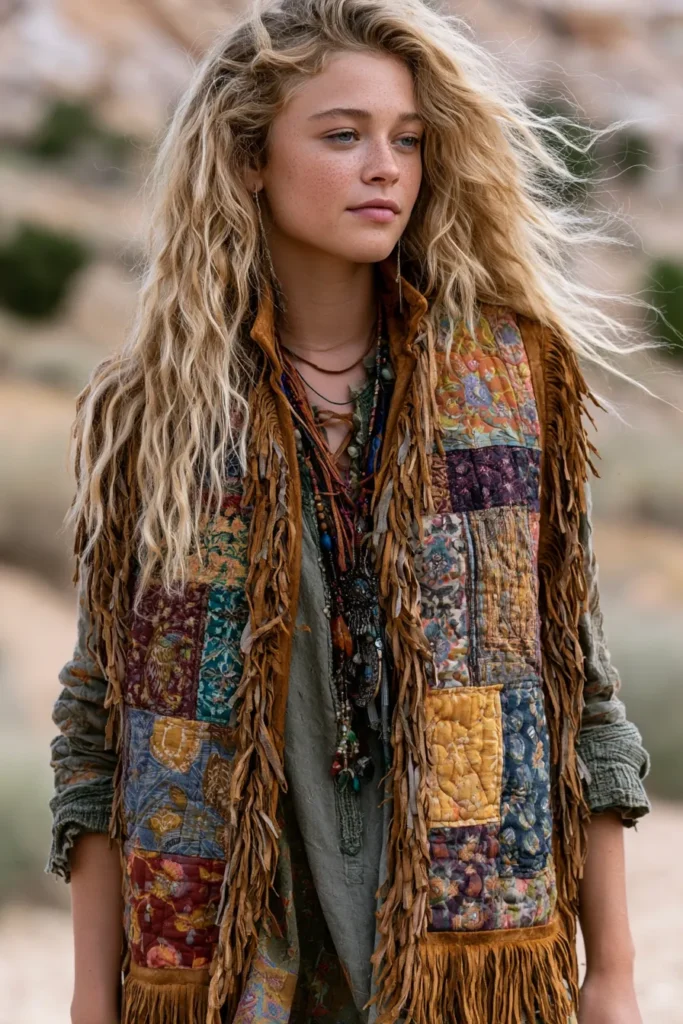
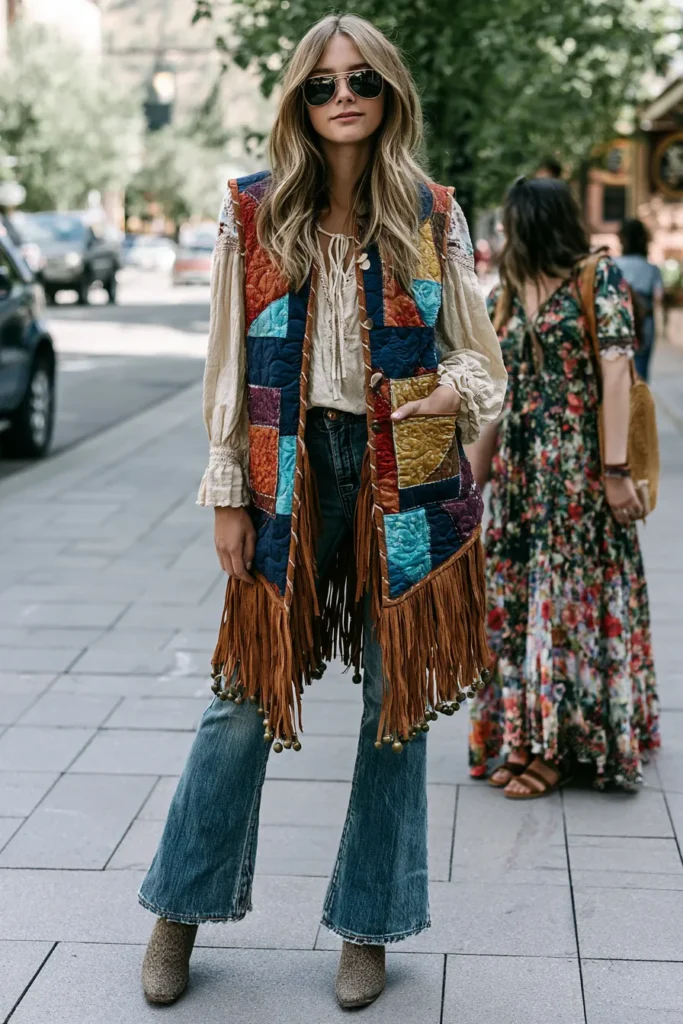
A Fringed Suede Trim Boho Quilt Vest is a lightweight sleeveless layering piece made from quilted fabric and finished with soft suede-style trim or fringe. It has the comfort of a quilt, the relaxed shape of a vest, and the earthy charm of bohemian fashion. The fringe gives it movement, while the quilted body adds texture, warmth, and a handmade feel.
I came up with this idea because a light vest is one of the easiest pieces to layer when the weather is cool but not cold. It can be worn over a cotton blouse, a fitted tee, a maxi dress, a turtleneck, or a simple linen top. The suede trim gives the vest a slightly rustic, vintage-inspired look without making it feel heavy.
Why This Idea Is Worth Making
Why this idea is worth making: it is stylish, practical, and easier to sew than a full jacket because there are no sleeves to attach. The quilted fabric gives the vest softness and structure, while the fringe adds personality and a free-spirited boho finish. It is also a great way to reuse quilt scraps, old blankets, kantha fabric, or patchwork panels.
This light vest is perfect for transitional weather, festival outfits, weekend layering, casual errands, and cozy indoor styling. It adds instant texture to basic outfits without feeling bulky.
Suggested Finished Measurements
For a relaxed medium-size light vest:
- Finished length: 24–26 inches
- Finished chest width: 21–23 inches across
- Shoulder width: 14–15 inches
- Armhole depth: 9–10 inches
- Front opening: open-front style
- Fringe length: 3–5 inches
- Seam allowance: ½ inch
For a roomier boho fit, add 1–2 inches to the body width.
Materials Needed
- Lightweight quilted fabric, kantha quilt, or patchwork quilt panel: 1½ to 2 yards
- Lining fabric, optional: 1½ yards
- Faux suede trim or suede-look fabric: ½ yard
- Fringe trim: 2½ to 3 yards
- Bias binding: 3 yards
- Matching or contrast thread
- Fabric chalk
- Measuring tape
- Pins or sewing clips
- Sewing machine
- Scissors or rotary cutter
- Iron
- Optional: wooden button, leather-look tie, beads, tassels, or patch pockets
Step-by-Step Guide
Step 1: Choose a Vibrant Boho Color Palette
Start with quilted fabric in rich, expressive colors. Beautiful choices include turquoise, rust orange, mustard yellow, plum purple, deep indigo, emerald green, coral, cream, and warm brown. For the suede trim, use earthy shades like tan, camel, chocolate, chestnut, or sand.
The best boho look comes from mixing cozy quilt texture with natural-looking trim and bold accent colors.
Step 2: Cut the Back Panel
Cut one back panel measuring about 24 inches wide × 26 inches long. For a shorter vest, use 24 inches long. For a more relaxed draped style, use 27–28 inches long.
Shape the back neckline by cutting a shallow curve about 7 inches wide × 1½ inches deep.
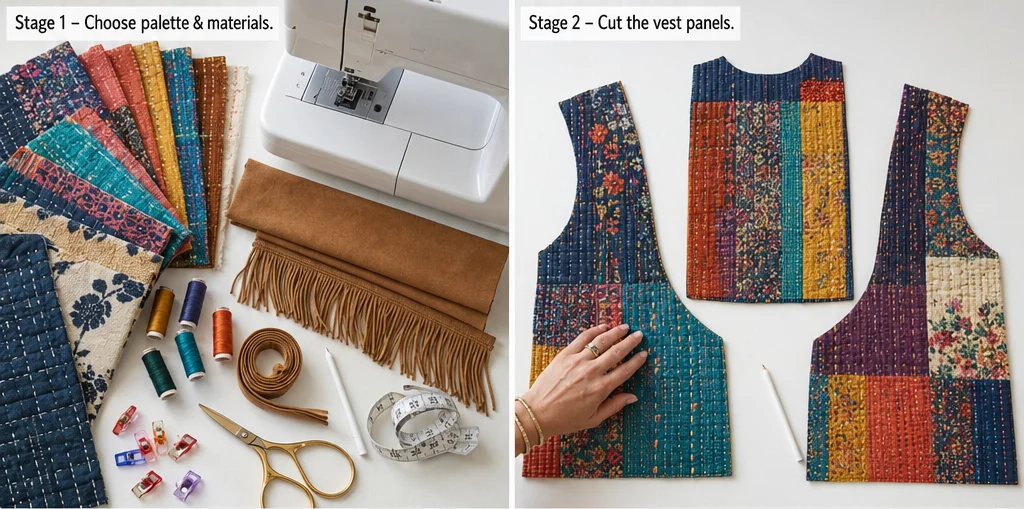
Step 3: Cut the Front Panels
Cut two front panels, each about 13 inches wide × 26 inches long. Shape the front neckline with a soft curve starting at the shoulder and dropping about 7–8 inches down the center front.
For a more flowing open-front vest, angle the center front edge slightly outward from the chest to the hem.
Step 4: Cut the Armholes
Lay the front panels over the back panel at the shoulders to check the armhole shape. Cut a gentle armhole curve about 9–10 inches deep. Keep it roomy enough to layer over shirts or dresses.
If you want a relaxed festival-style vest, make the armholes slightly deeper, around 10½ inches.
Step 5: Add Light Quilting or Stitch Details
If your fabric is already quilted, add a few decorative stitch lines for personality. If you are making your own quilted fabric, layer the outer fabric, thin batting, and lining, then quilt straight lines or soft waves about 1½ inches apart.
Use vibrant thread such as gold, turquoise, coral, red, ivory, or emerald green to make the stitching stand out.
Step 6: Sew the Shoulder Seams
Place the front panels on the back panel with right sides together. Match the shoulder edges and sew using a ½ inch seam allowance. Press gently. If the quilted fabric is thick, press the seams toward the back and topstitch them down.
Topstitching helps the vest sit flatter and makes the seams stronger.
Step 7: Sew the Side Seams
With right sides together, match the side seams and sew from the lower armhole down to the hem using a ½ inch seam allowance. For more movement, leave 3–4 inches open at the lower side seams to create small side slits.
Side slits make the vest more comfortable when sitting, walking, or layering over longer tops.
Step 8: Prepare the Suede Trim
Cut suede-look trim strips about 2 inches wide for the front opening and hem. If making your own fringe, cut strips about 4–5 inches wide, then snip narrow fringe lines about ¼ inch apart, stopping ½ inch from the top edge.
For an easier option, use ready-made faux suede fringe trim.
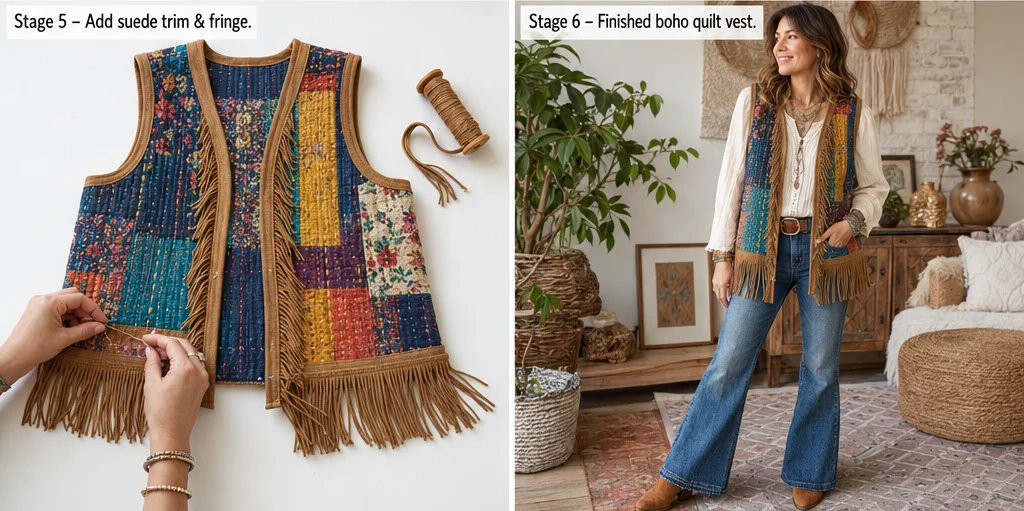
Step 9: Add the Fringe
Pin the fringe trim along the bottom hem, front edges, or side slits. Keep the fringe facing inward if sewing it into a seam, or place it on top of the finished edge if topstitching it down.
Sew slowly, especially if using faux suede, because the layers can shift. A walking foot can help if the fabric is thick.
Step 10: Finish the Raw Edges
Finish the neckline, armholes, front opening, and hem with bias binding or suede-look trim. Use tan suede trim for an earthy look, or choose a bold contrast binding in turquoise, mustard, coral, or plum for a more colorful boho style.
Clean edges make the vest look polished and help the quilted fabric last longer.
Assembly Section
After sewing the shoulder and side seams, try the vest on before adding the final trim. Check that the armholes feel comfortable and that the front opening hangs evenly. Trim any uneven edges if needed.
Next, bind the armholes and neckline. Add suede trim along the front opening and hem, then attach the fringe. If you want pockets, cut two patch pockets about 7 inches wide × 8 inches tall, fold the edges under by ½ inch, and stitch them to the lower front panels. Finish with topstitching around the front edges, pockets, and hem for extra strength.
For a closure, add one wooden button near the chest, a leather-look tie, or two small fabric ties. You can also leave the vest completely open for a relaxed layered look.
Interesting Backstory
Fringe has long been connected with movement, craft, and practical clothing. In many traditional garments, fringe came from fabric edges, leather strips, or woven textiles and later became a decorative detail in bohemian, Western, festival, and vintage fashion. When paired with quilted fabric, it creates a beautiful contrast: soft stitched warmth with playful movement.
That is why this vest feels so wearable. It has the comfort of a quilt, the ease of a sleeveless layer, and the expressive detail of fringe.
Personal Styling Touch
My favorite version would use a deep indigo quilted base with patches of rust, mustard, turquoise, and plum, finished with camel suede fringe along the hem. I would add small brass beads to a few fringe ends for a subtle handmade detail. It feels like the kind of vest you would find in a vintage shop and never want to give away.
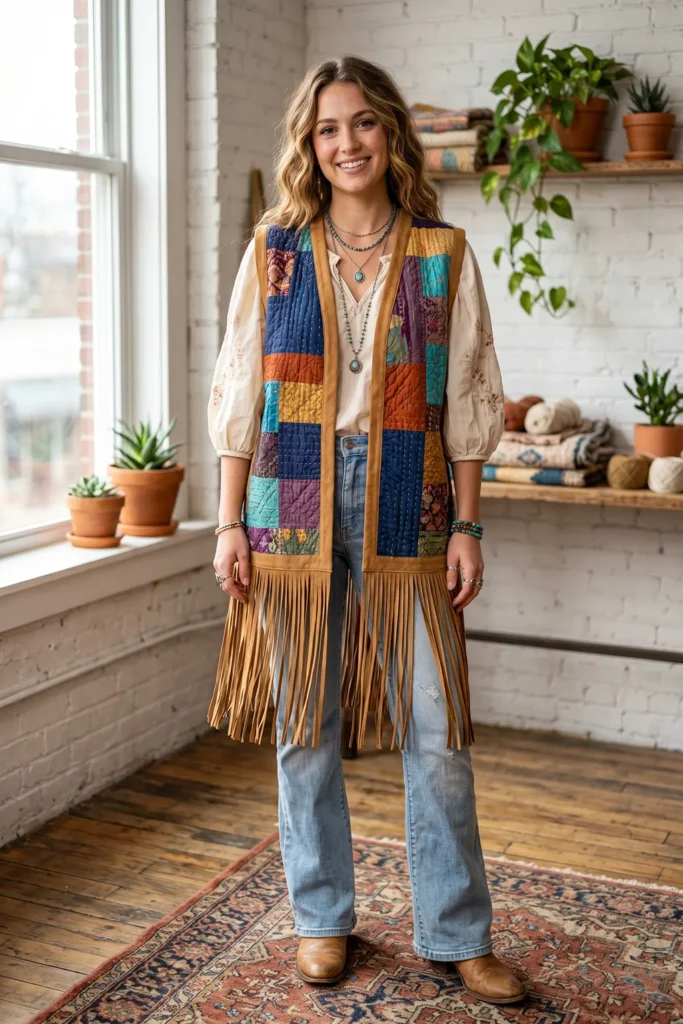
Final Styling Idea
Wear this fringed suede trim boho quilt vest over a cream peasant blouse, flared jeans, and ankle boots for a cozy everyday look. For a softer outfit, layer it over a floral maxi dress with sandals and a woven bag.
Use turquoise, rust, mustard, coral, emerald, plum, indigo, and camel brown to keep the vest vibrant, earthy, and full of bohemian charm.
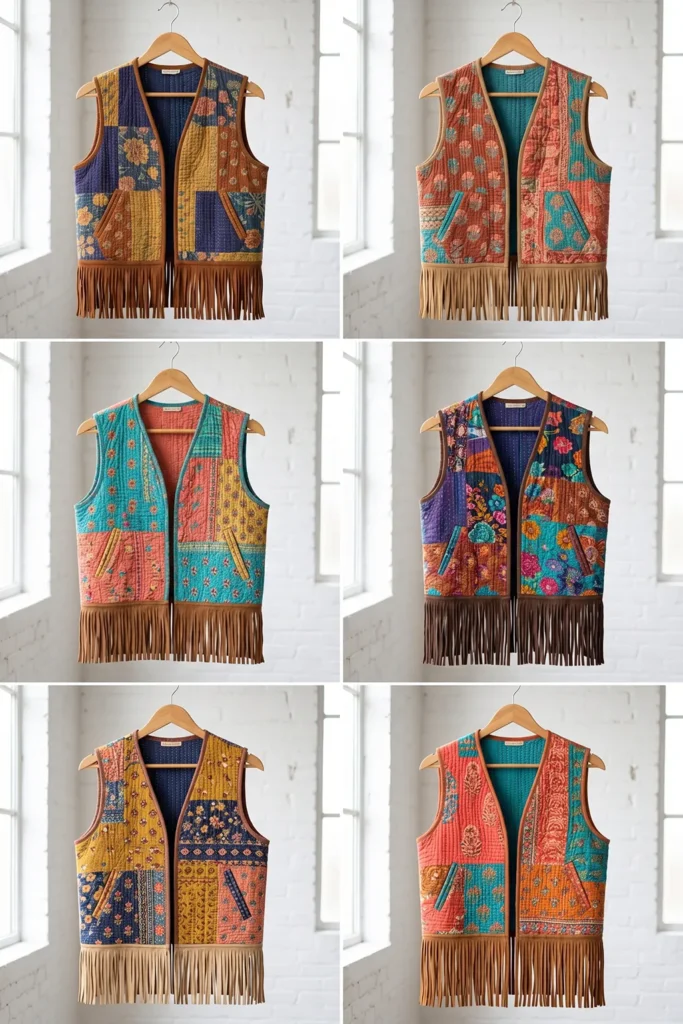
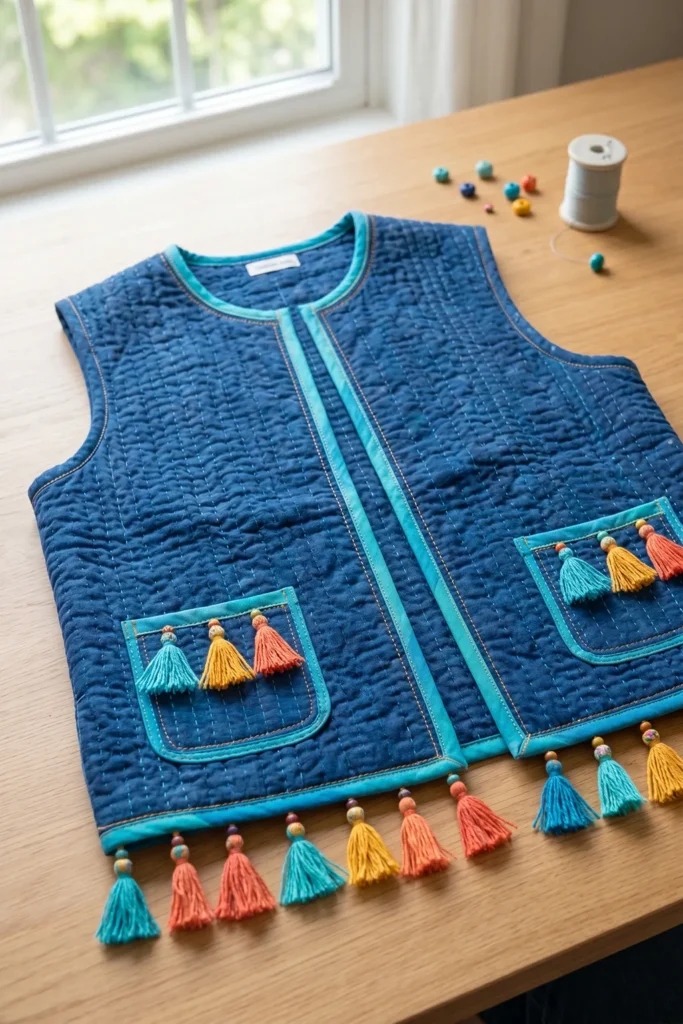
6. Open Front Bohemian Quilted Vest Patterns with Tassel Accents
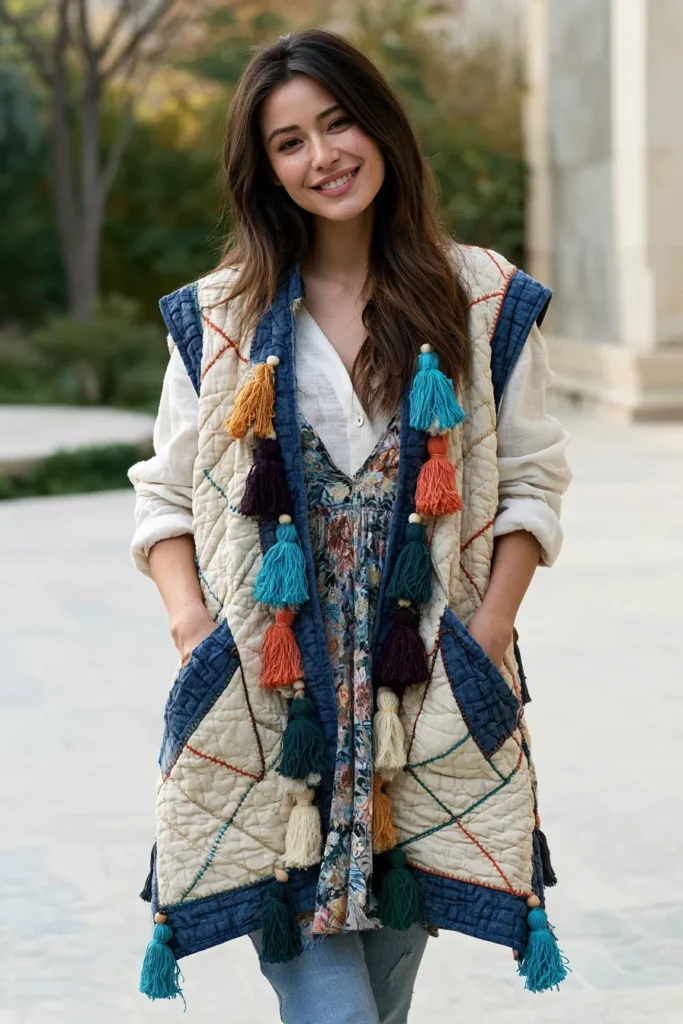
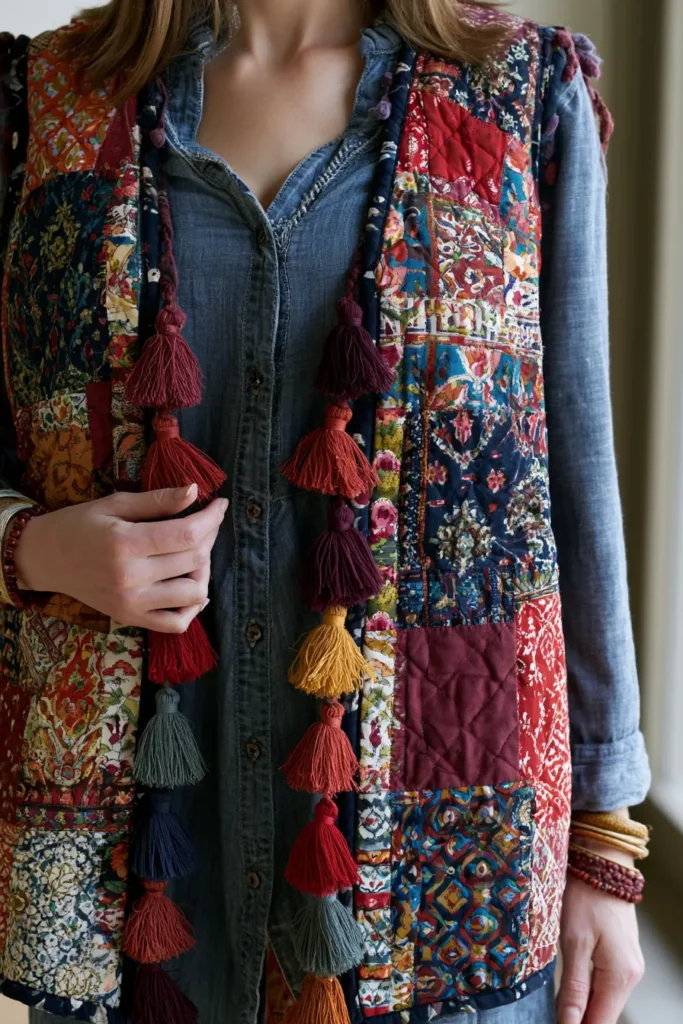
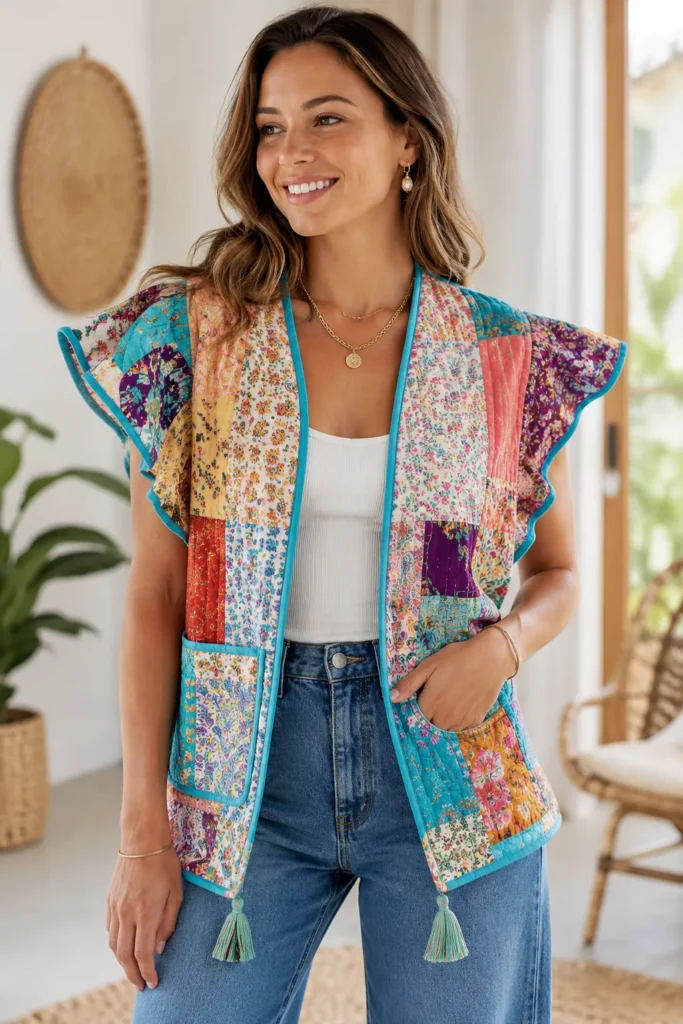
An Open Front Bohemian Quilted Vest is a light, sleeveless layering piece with a relaxed shape, soft quilted texture, and decorative tassel details. Unlike a fitted vest, this style is meant to hang loosely and move easily over dresses, tunics, linen shirts, tank tops, or simple tees. The open front keeps it effortless, while the quilting adds warmth, structure, and handmade charm.
I came up with this idea because open-front vests are incredibly wearable. They do not feel restrictive, they suit many body shapes, and they instantly make a plain outfit look more stylish. The tassels add that small bohemian detail that feels playful without being too loud.
Why This Idea Is Worth Making
Why this idea is worth making: it is beginner-friendly, lightweight, and easy to personalize with color, trim, and stitching. Since there are no sleeves, zippers, or complicated closures, this project is simpler than a jacket but still looks polished when finished. It is also a great way to use a small quilt, kantha fabric, patchwork panels, or leftover quilted yardage.
This light vest works beautifully for spring, fall, cool summer evenings, festival outfits, travel layering, and everyday casual style.
Suggested Finished Measurements
For a relaxed medium-size vest:
- Finished length: 24–27 inches
- Finished chest width: 21–23 inches across
- Shoulder width: 14–15 inches
- Armhole depth: 9–10 inches
- Front opening: open, no closure needed
- Tassel length: 3–4 inches
- Seam allowance: ½ inch
For a flowier boho fit, add 1–2 inches to each front panel width.
Materials Needed
- Lightweight quilted fabric, kantha cloth, or patchwork quilt panel: 1½ to 2 yards
- Optional lining fabric: 1½ yards
- Thin cotton batting, if quilting your own fabric: 1½ yards
- Bias binding: 3 to 3½ yards
- Embroidery thread or yarn for tassels
- Matching or contrast thread
- Fabric chalk
- Measuring tape
- Pins or sewing clips
- Sewing machine
- Hand-sewing needle
- Iron
- Scissors or rotary cutter
- Optional: beads, small mirrors, ribbon trim, patch pockets, or decorative topstitching
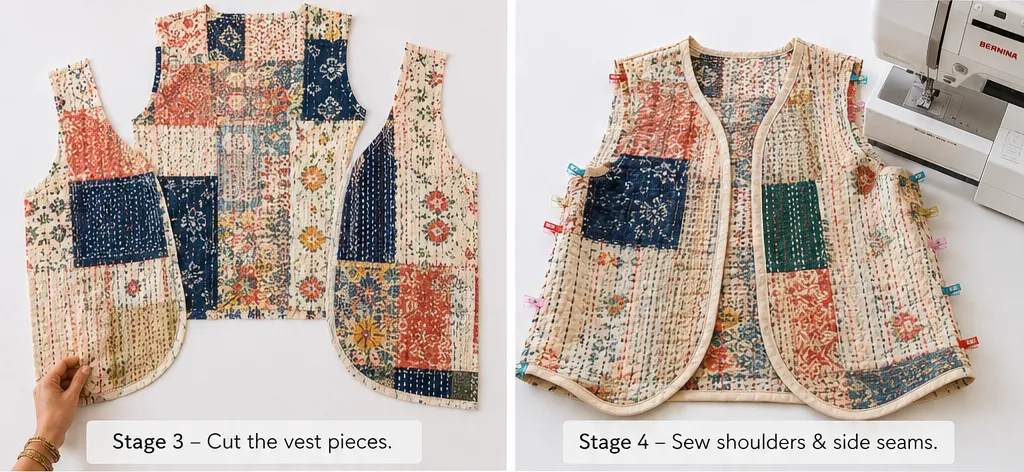
Step-by-Step Guide
Step 1: Choose a Vibrant Bohemian Palette
Pick colors that feel warm, artistic, and easy to layer. Try turquoise, coral, saffron yellow, plum purple, emerald green, rust orange, deep indigo, hot pink, and warm cream. For a more earthy look, combine cream, camel, olive, and rust with pops of teal or magenta.
The tassels can match the quilted fabric or stand out in a bold contrast color.
Step 2: Prepare the Quilted Fabric
Use ready-made quilted fabric, a lightweight kantha throw, or a small vintage quilt. If making your own quilted panel, layer the outer fabric, thin batting, and lining together. Quilt simple vertical lines, soft waves, or diamonds spaced about 1½ inches apart.
For a handmade boho feel, add a few visible running stitches in gold, turquoise, coral, ivory, or pink.

Step 3: Cut the Back Panel
Cut one back panel measuring about 24 inches wide × 26 inches long. For a longer vest, cut it 27–28 inches long. Shape the back neckline with a shallow curve about 7 inches wide × 1½ inches deep.
Keep the back shape simple so the quilting and tassel accents can stand out.
Step 4: Cut the Front Panels
Cut two front panels, each about 13 inches wide × 26 inches long. For a more draped, open-front look, cut each panel 14–15 inches wide.
Shape the front neckline by cutting a gentle curve from the shoulder down about 7 inches along the center front edge. This creates a soft, flattering opening.
Step 5: Shape the Armholes
Place the front panels over the back panel at the shoulders. Mark an armhole curve about 9–10 inches deep. Cut the curves evenly on both sides.
The armholes should be roomy enough to wear over blouses, tees, or light sweaters without pulling.
Step 6: Sew the Shoulder Seams
Place the front panels and back panel right sides together at the shoulders. Sew using a ½ inch seam allowance. Press the seams gently. If the quilted fabric is bulky, press the seam toward the back and topstitch it down.
This creates a stronger shoulder and gives the vest a cleaner finish.
Step 7: Sew the Side Seams
Match the side seams with right sides together. Sew from the lower armhole to the hem using a ½ inch seam allowance. For easier movement and a more relaxed boho look, leave 3–4 inches open at the bottom for side slits.
Side slits help the vest hang better over dresses and longer tops.
Step 8: Finish the Edges
Bind the neckline, front opening, armholes, hem, and side slits with bias binding. Choose a bold binding color such as mustard yellow, teal, coral, plum, emerald, or deep red.
Binding is especially useful for quilted fabric because it covers the raw layers and gives the vest a professional finish.
Step 9: Make the Tassels
Wrap embroidery thread or yarn around a piece of cardboard about 3–4 inches tall. Wrap it 20–30 times, slide it off, tie one end tightly, and trim the other end to create a tassel. Make 6–10 tassels, depending on how decorative you want the vest to be.
Use colors like turquoise, coral, saffron, plum, cream, and emerald for a vibrant boho effect.
Step 10: Attach the Tassels
Hand stitch tassels along the lower front edges, side slits, hem corners, or pocket edges. Space them about 3–4 inches apart. For extra charm, add a small bead above each tassel before stitching it to the vest.
Keep the tassels balanced so the vest looks intentional rather than overloaded.
Assembly Section
After sewing the shoulder and side seams, try the vest on and check the length, armhole comfort, and front drape. Trim uneven edges before binding. Once the fit looks right, neatly bind all raw edges.
Attach tassels after the main sewing is complete so you can decide exactly where they look best. If adding pockets, cut two pocket pieces about 7 inches wide × 8 inches tall, fold the edges under by ½ inch, and stitch them to the lower front panels before placing tassels nearby. Finish with topstitching around the front opening and hem to keep the vest flat and durable.
Interesting Backstory
Tassels have been used in clothing and textiles for centuries, often serving both as decoration and as symbolism. In bohemian fashion, they became popular because they add movement, color, and a handmade feeling. When paired with quilted fabric, tassels soften the vest’s structure and make it feel more playful, relaxed, and artistic.
This style works because it balances comfort and expression. The quilting keeps it cozy, while the tassels bring personality.
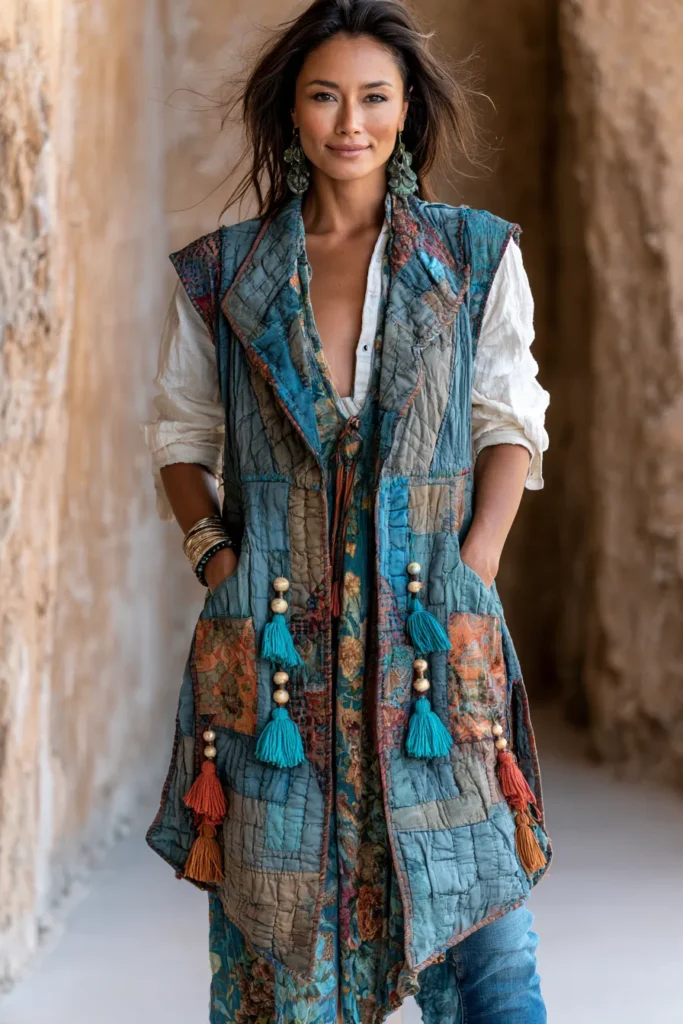
Personal Styling Touch
My favorite version would use a cream-and-indigo quilted base with pops of coral, saffron, and emerald in the stitching. I would add tassels in mixed colors along the lower front edges, rather than all around the hem, so the vest still feels elegant and easy to wear. It is the kind of piece I would keep near my closet door for days when a plain outfit needs a little soul.
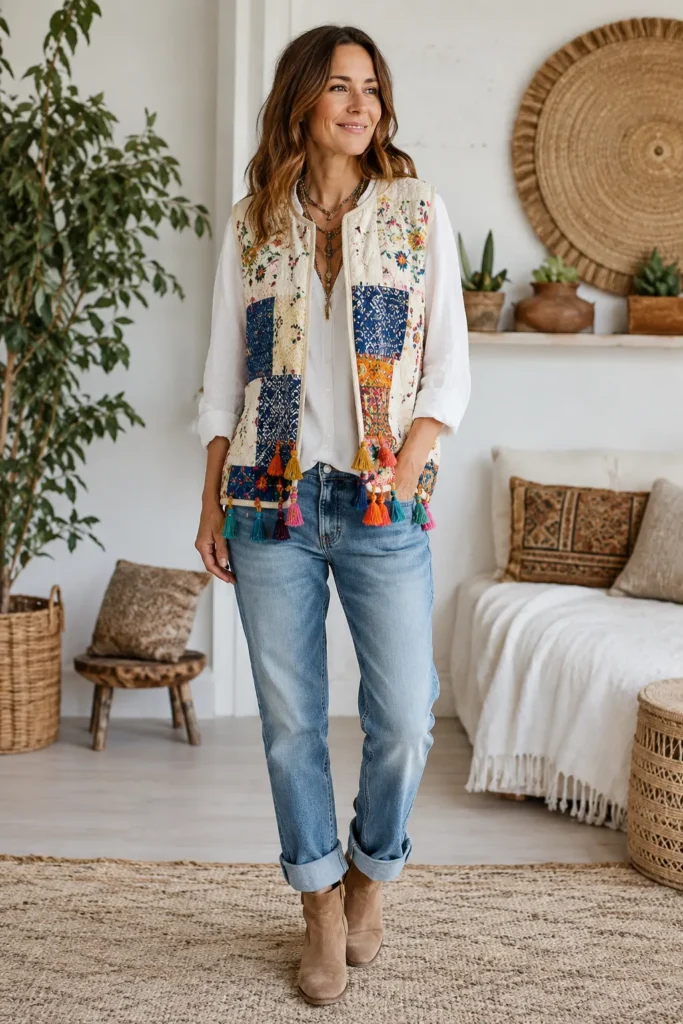
Final Styling Idea
Wear this open front bohemian quilted vest over a white linen shirt, faded jeans, and tan ankle boots for a relaxed everyday look. For a softer outfit, layer it over a floral maxi dress with sandals and a woven tote.
Use turquoise, coral, saffron, plum, emerald, rust, indigo, and cream to keep the vest vibrant, lightweight, and beautifully bohemian.
7. Flutter Sleeve Patchwork Boho Quilt Tops for Elegant Everyday Wear
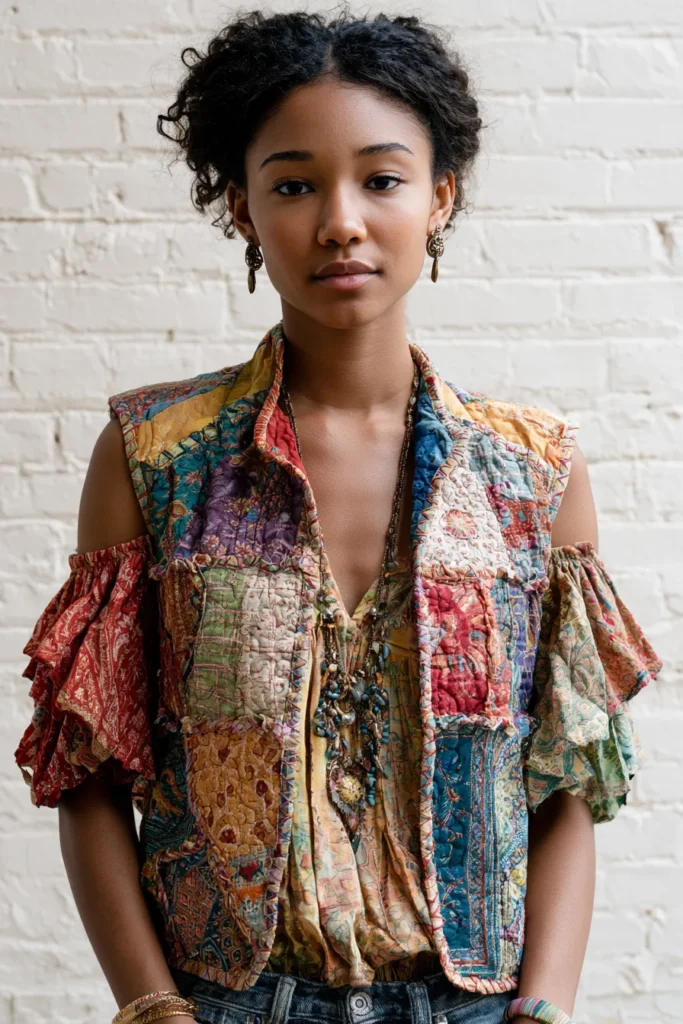
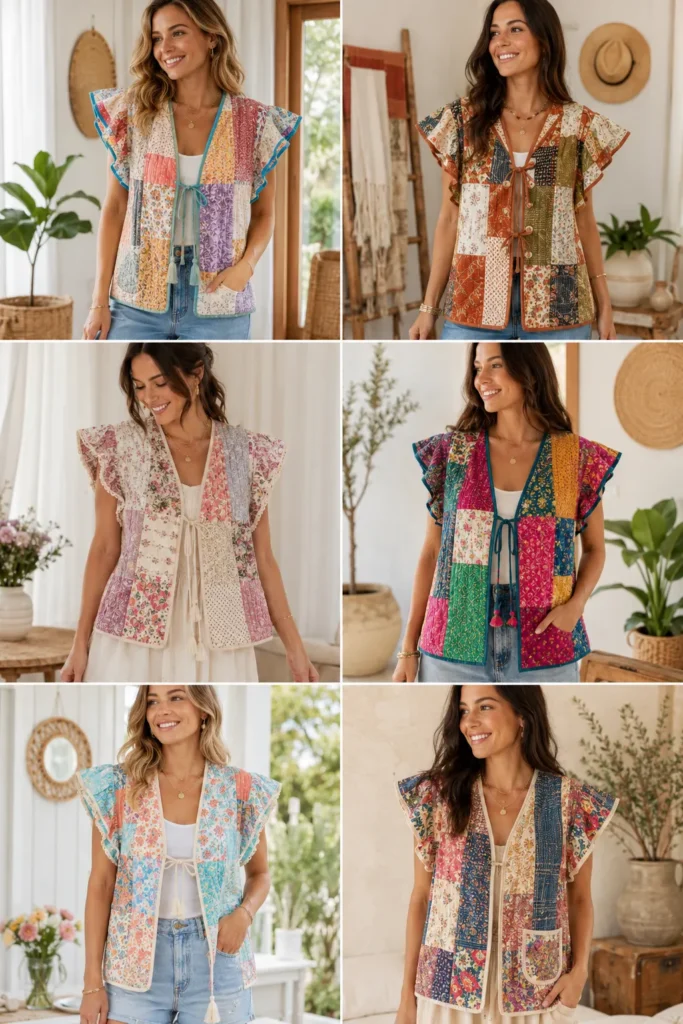
A Flutter Sleeve Patchwork Boho Quilt Top is a lightweight quilted or patchwork-inspired top with soft, flowing sleeves and a relaxed bohemian shape. Even though it is called a top, it can also work like a very light vest when worn open over a tank, camisole, fitted tee, or slip dress. The flutter sleeves add movement and femininity, while the patchwork quilting adds texture, color, and handmade charm.
I came up with this idea because some quilted garments can feel heavy, but this one stays light, airy, and easy to wear. It is perfect for days when you want the artistic look of quilting without the warmth of a jacket. The patchwork makes it feel creative and personal, while the flutter sleeves keep it elegant enough for everyday outfits, brunch, market walks, casual gatherings, or summer layering.
Why This Idea Is Worth Making
Why this idea is worth making: it offers the beauty of quilting in a soft, breathable, wearable form. The flutter sleeves are easier to sew than fitted sleeves, and the loose body makes the project more forgiving for beginners. It is also a beautiful way to use small fabric scraps, leftover quilt blocks, kantha pieces, floral cotton, or vintage fabric remnants.
This light vest-style top is worth making because it can be worn across seasons. Wear it over a simple tank in warm weather, layer it over a long-sleeve tee in cooler months, or style it as a delicate statement layer over a dress.
Suggested Finished Measurements
For a relaxed medium-size top or light vest:
- Finished length: 22–24 inches
- Finished chest width: 21–23 inches across
- Shoulder width: 14–15 inches
- Flutter sleeve length: 7–9 inches
- Sleeve opening width: 12–14 inches
- Armhole depth: 9–10 inches
- Seam allowance: ½ inch
For a looser boho fit, add 1–2 inches to the front and back width.
Materials Needed
- Lightweight cotton patchwork fabric or quilted fabric: 1½ to 2 yards
- Thin cotton batting, optional: 1 yard if making quilted panels
- Lightweight lining fabric, optional: 1½ yards
- Bias binding: 3 to 3½ yards
- Assorted fabric scraps for patchwork
- Matching or contrast thread
- Embroidery thread for decorative stitching
- Fabric chalk
- Measuring tape
- Pins or sewing clips
- Sewing machine
- Iron
- Scissors or rotary cutter
- Optional: small tassels, lace trim, wooden buttons, ribbon ties, or tiny patch pockets
Step-by-Step Guide
Step 1: Choose a Vibrant Boho Color Palette
Select colors that feel joyful, soft, and wearable. Beautiful choices include coral pink, turquoise, saffron yellow, emerald green, lavender, plum purple, rust orange, indigo, cream, and fuchsia. For a romantic look, use floral scraps. For a more earthy boho feel, mix rust, olive, cream, indigo, and mustard.
Try to keep one color as the anchor so the patchwork feels intentional instead of too busy.
Step 2: Create the Patchwork Fabric
Piece together fabric scraps into two large panels: one for the front and one for the back. Aim for each panel to measure at least 24 inches wide × 26 inches long before trimming. Use squares, rectangles, strips, or soft irregular shapes.
For a cleaner look, use patch pieces between 3 × 3 inches and 6 × 8 inches. For a more artistic boho style, mix different sizes and let the layout feel spontaneous.
Step 3: Add Light Quilting
If you want a quilted texture, place thin batting behind each patchwork panel and quilt with simple lines spaced about 1½ inches apart. Use straight lines, soft waves, or diagonal stitching.
For a lighter summer version, skip batting and use only patchwork cotton. You can still add decorative running stitches in gold, turquoise, coral, ivory, or pink for a quilt-inspired look without extra weight.
Step 4: Cut the Back Panel
Cut one back panel measuring about 24 inches wide × 24 inches long. For a shorter top, use 22 inches long. For more coverage, use 25–26 inches long.
Cut a shallow back neckline about 7 inches wide × 1½ inches deep. Keep the shape simple so the colorful patchwork remains the main feature.
Step 5: Cut the Front Panels
For a vest-style open front, cut two front panels, each about 13 inches wide × 24 inches long. Shape the neckline with a gentle curve that drops about 7 inches from the shoulder down the center front.
For a pullover-style top, cut one front panel about 24 inches wide × 24 inches long, then cut a scoop neckline about 8 inches wide × 5 inches deep.
Step 6: Cut the Flutter Sleeves
Cut two flutter sleeve pieces in the shape of wide half-circles or soft rectangles. The beginner-friendly size is 16 inches wide × 9 inches long per sleeve. Curve the lower edge slightly to give the sleeve a soft drape.
For extra movement, make each sleeve 18 inches wide × 9 inches long. The wider the sleeve, the more graceful the flutter effect.
Step 7: Sew the Shoulder Seams
Place the front panel (s) on the back panel with right sides together. Sew the shoulder seams using a ½ inch seam allowance. Press the seams gently. If the fabric is quilted, press the seams toward the back and topstitch them down for strength.
Step 8: Attach the Flutter Sleeves
Mark the center of each flutter sleeve and match it to the shoulder seam. Pin the sleeve along the armhole curve with right sides together. Sew slowly using a ½ inch seam allowance.
The sleeve should fall loosely over the upper arm. Do not make it too tight, as the charm of this design lies in its soft movement.

Step 9: Sew the Side Seams
With right sides together, sew from the lower sleeve edge to the hem using a ½-inch seam allowance. For a breezy vest-style top, leave 3–4 inches open at the lower side seams to create small side slits.
Side slits help the top move easily and make it comfortable over jeans, skirts, or dresses.
Step 10: Finish the Edges
Finish the neckline, front opening, sleeve hems, bottom hem, and side slits with bias binding. Choose a bright binding color such as turquoise, coral, saffron, plum, emerald, or fuchsia.
For a softer romantic finish, use lace trim along the sleeve edges. For a more playful boho look, add tiny tassels to the lower front edges.
Assembly Section
After sewing the shoulder seams, flutter sleeves, and side seams, try the top on before finishing the edges. Check that the sleeves drape softly, the chest feels relaxed, and the length sits comfortably at the high hip or mid-hip.
Once the fit feels right, bind the neckline and front opening first, then finish the sleeve edges and hem. If making an open-front light vest version, add two small ribbon ties at the chest, or leave it open for a relaxed layered look. If making a pullover version, finish the neckline carefully so it slips over the head comfortably.
For extra detail, add a small patch pocket about 6 inches wide × 6½ inches tall on one front side. Stitch around it with colorful embroidery thread for a handmade boho finish.
Interesting Backstory
Patchwork has always carried a sense of resourcefulness and memory. Many traditional quilts were made from leftover clothing, old linens, or treasured fabric pieces that still had life left in them. Boho style embraces that same spirit by mixing colors, prints, and textures in a way that feels personal rather than perfect.
Flutter sleeves add another layer of charm by bringing softness and movement to the quilted structure. Together, patchwork and flutter sleeves create a piece that feels light, expressive, and easy to love.
Personal Styling Touch
My favorite version would use a cream cotton base with patches of coral florals, turquoise paisley, mustard yellow, lavender, and deep indigo. I would finish the edges with bright turquoise binding and add a tiny tassel at each front corner. It would feel light enough for warm afternoons but special enough to make a plain outfit look intentional.
This is the kind of piece I would wear over a simple white tank when I want comfort, color, and a little handmade joy.
Final Styling Idea
Wear this flutter-sleeve patchwork boho quilt top over a fitted tank, with high-waisted jeans and sandals for easy everyday style. For a softer look, layer it over a slip dress or maxi skirt with woven accessories.
Use coral, turquoise, saffron, emerald, lavender, plum, indigo, cream, and fuchsia to keep the design vibrant, feminine, and beautifully bohemian.
Conclusion
Boho quilted jackets, vests, and tops occupy an unusual position in a wardrobe — they are outerwear that feels like comfort wear, statement pieces that do not demand attention, and fashion choices rooted in genuine craft tradition. The visible stitching, the patchwork panels, the soft batting underneath — these are not decorative details. They are what the garment is made of, and they are why it feels the way it does.
These seven ideas are starting points rather than instructions. Sew one from new fabric, repurpose an old quilt, or find a maker whose work reflects the same values. However you arrive at it, a well-chosen boho quilted layer is one of those wardrobe pieces that earns its place by actually being worn.
