
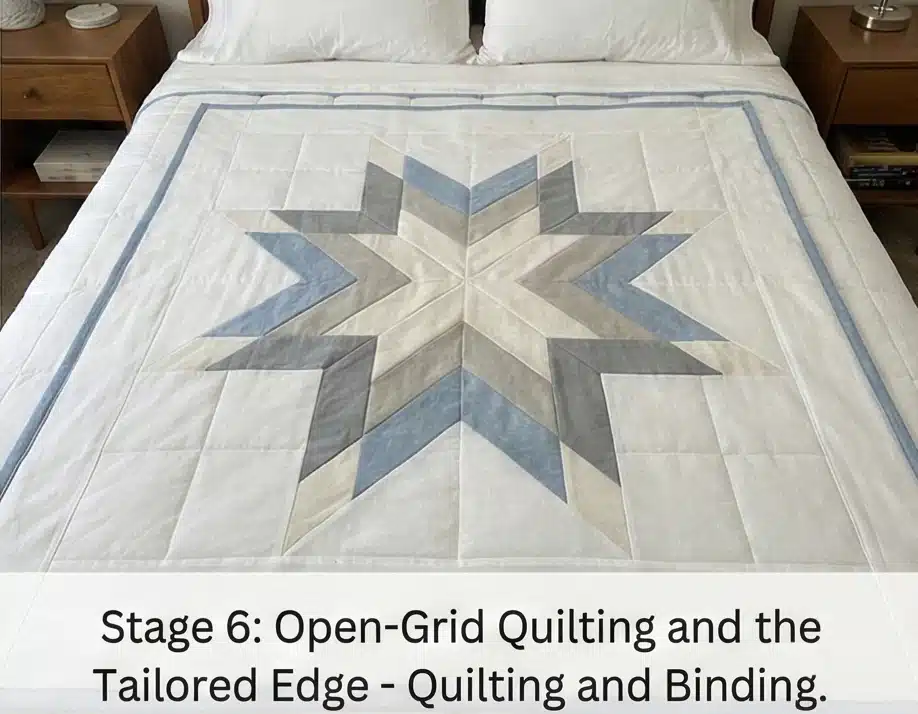
20 Elegant Lakota Star Quilt Pattern Ideas: Timeless Comfort and Sophisticated Style for Cozy Homes
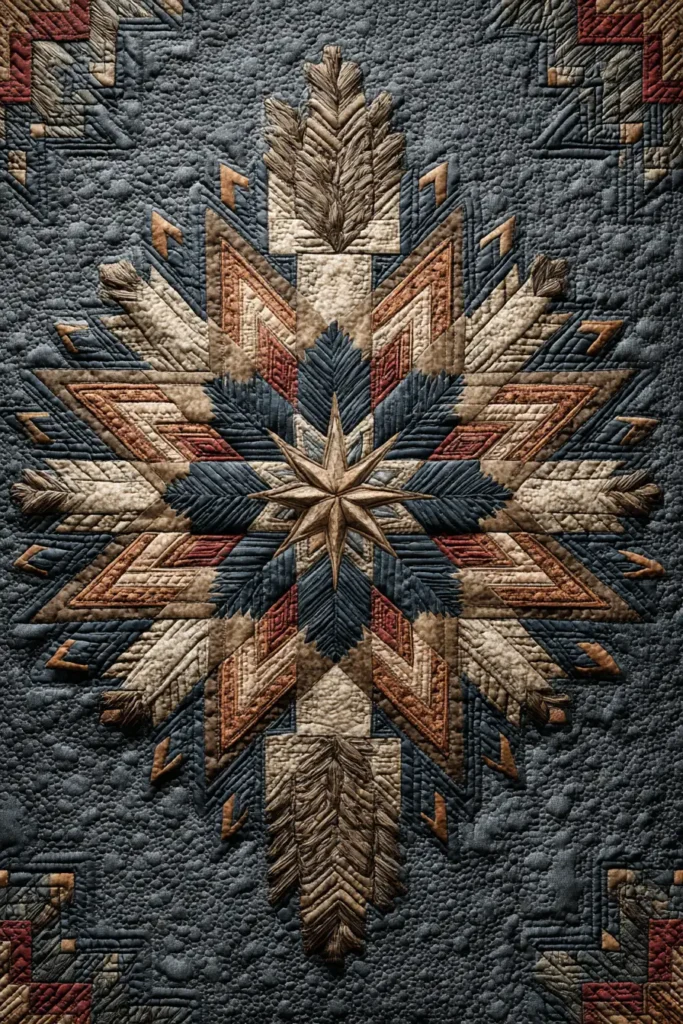
The Lakota Star: Geometry With a Purpose
I have a particular fascination with indigenous quilts and textile arts – the way geometric forms carry meaning beyond decoration, the way a pattern can encode a worldview as precisely as any written language. The Lakota Star is one of the clearest examples of this I have encountered in any quilting tradition.
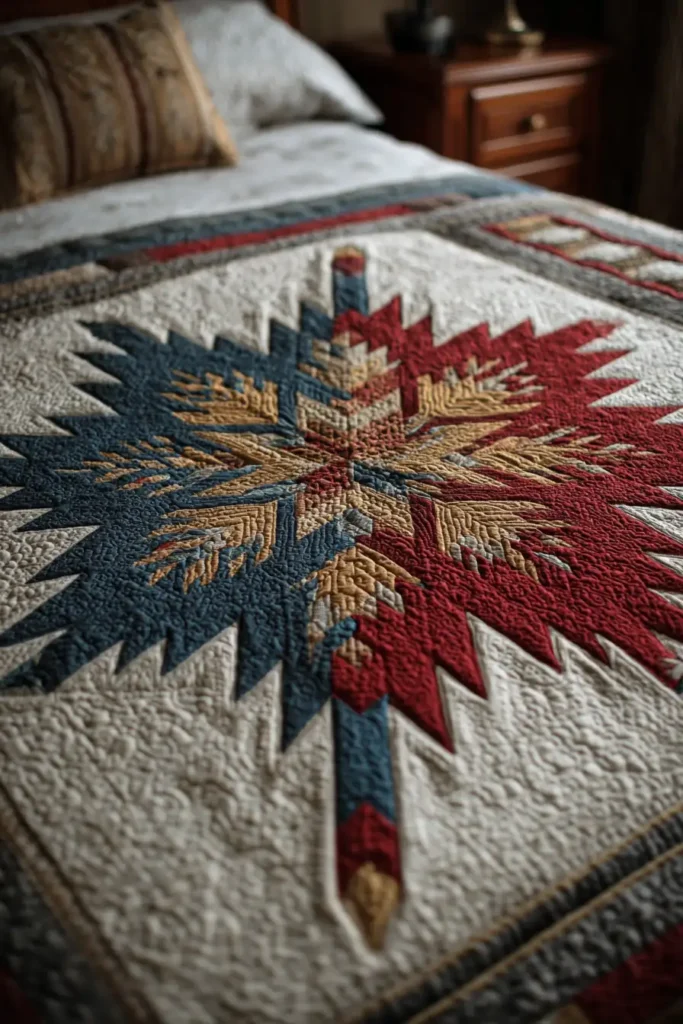
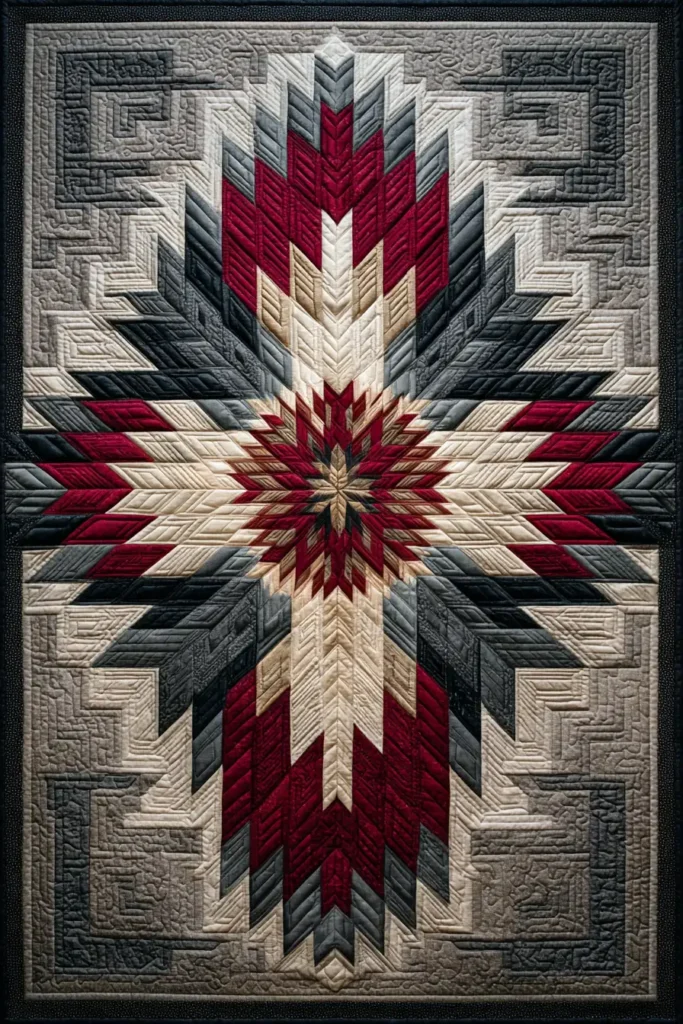
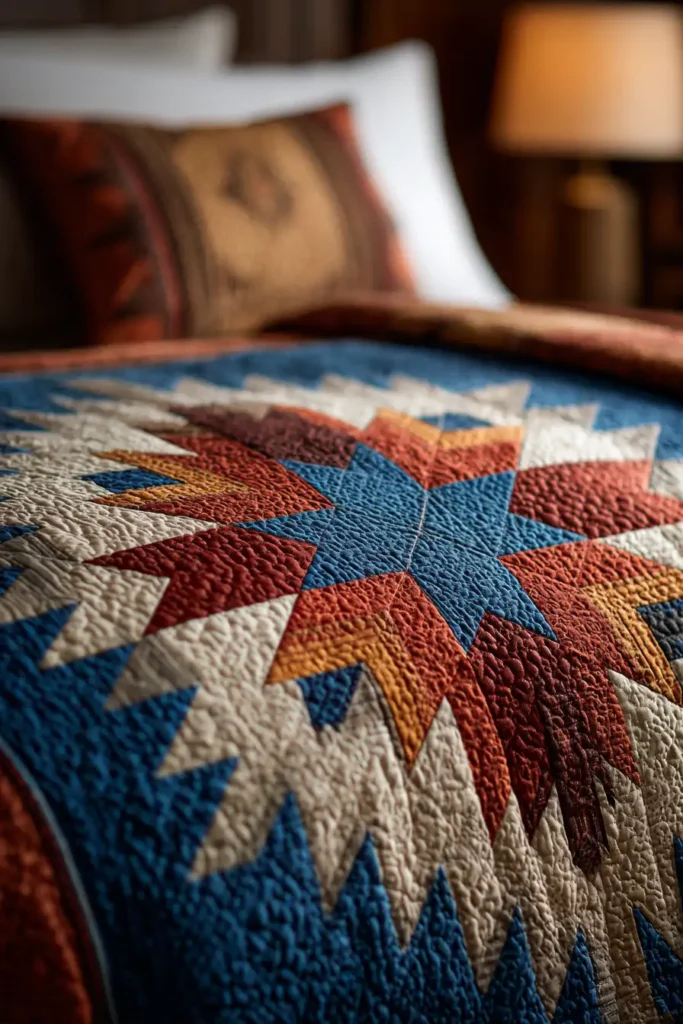
Known in Lakota as Wičháȟpi Owíŋža – Morning Star quilt – this eight-pointed star pattern emerged in the late 19th century, when Lakota and Dakota women adapted their visual traditions into quilting following the collapse of buffalo culture. The design is believed to echo the geometric motifs of earlier buffalo robes, translated into fabric through a new medium. What did not translate was reduced: what remained was the essential geometry – the diamond-pieced star, radiating outward from a strong center — and the meaning attached to it.
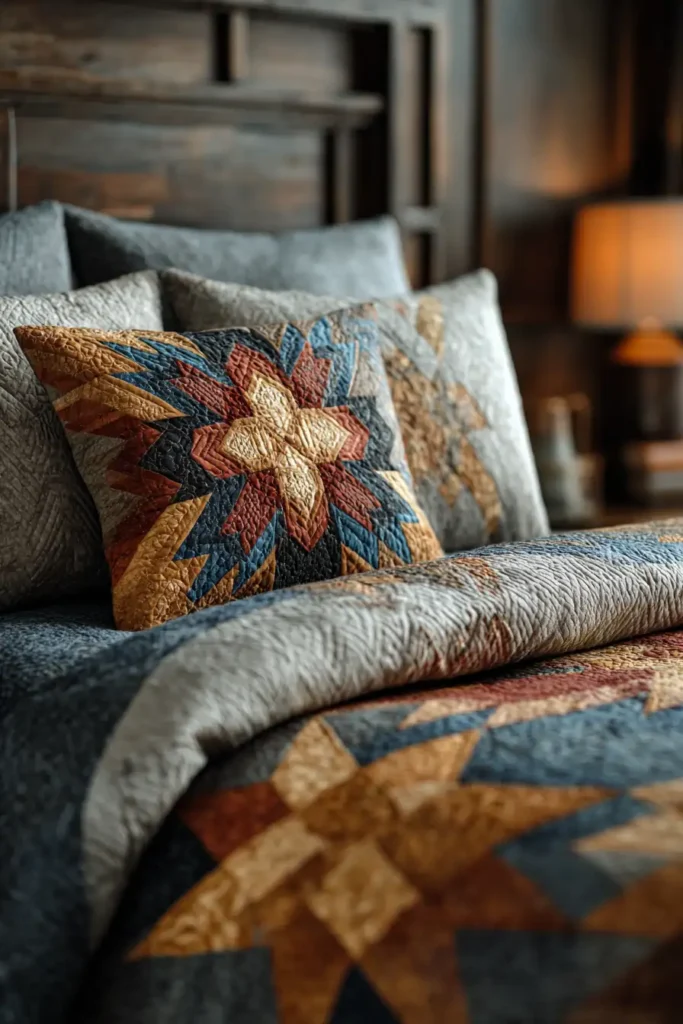
That meaning is specific and serious. Lakota Star quilts are traditionally made for and given at significant life moments: births, graduations, marriages, and funerals. They are expressions of honor and communal connection in the giveaway tradition – a cultural practice in which giving, not accumulating, is the mark of esteem. A quilt given in this context is not a decorative object. It is a statement about relationship and respect. Even in a modern interior, that intention comes through. There is a presence to these designs that purely decorative patterns rarely achieve.
How It Compares to Other Indigenous Traditions
The Lakota Star is sometimes grouped loosely with other Indigenous textile traditions, but the distinctions are real. Navajo designs are woven rather than pieced, built from horizontal bands and directional geometry rather than radiating star forms. Cherokee quilting traditions lean toward floral appliqué. Other Plains groups use star motifs, but not always with the same ceremonial weight tied specifically to Lakota giveaway culture. The Lakota Star’s combination of geometric clarity and layered cultural meaning is its own thing – grounded and structured on the surface, symbolic and expressive underneath.
Lakota Star Quilt Pattern Ideas
Contents
- 1 Lakota Star Quilt Pattern Ideas
- 2 1. Traditional Eight-Pointed Lakota Star Quilt Patterns for Elegant Master Bedrooms
- 3 2. Sophisticated Two-Tone Lakota Star Bed Covers for Timeless Style
- 4 3. Luxurious King-Size Lakota Star Bedspreads for Ultimate Comfort
- 5 4. Cozy Lakota Star Quilted Bed Runners for Layered Bedding Elegance
- 6 5. Soft Pastel Lakota Star Quilt Designs for Inviting Guest Rooms
- 7 6. Modern Minimalist Lakota Star Pillow Shams for Serene Sleep Sanctuaries
- 8 7. Lightweight Cotton Lakota Star Summer Quilts for Comfortable Layering
- 9 8. Reversible Lakota Star Quilted Bed Blankets for Versatile Styling
- 10 9. Lakota Star Quilted Headboard Accents for Cultural Bedroom Elegance
- 11 10. Statement Lakota Star Sofa Throws for Stylish Living Rooms
- 12 11. Durable Lakota Star Quilted Couch Covers for Everyday Luxury
- 13 12. Elegant Lakota Star Table Runners for Dining Room Sophistication
- 14 13. Morning Star Quilted Placemats for Culturally Inspired Tablescapes
- 15 14. Decorative Lakota Star Cushion Covers for Cozy Living Room Seating
- 16 15. Cozy Lakota Star Lap Quilts for Relaxing Reading Nooks
- 17 16. Intricate Lakota Star Quilted Table Toppers for Dining Centerpieces
- 18 17. Chic Lakota Star Quilt Pattern Tote Bags for Everyday Elegance
- 19 18. Sophisticated Lakota Star Quilted Market Totes for a Comfortable Carry
- 20 19. Durable Quilted Lakota Star Laundry Bags for Stylish Home Organization
- 20.1 “The Crimson Vessel” Heavy-Duty Lakota Star Laundry Bag
- 20.1.1 Step 1: Scaling the Geometry for a Curved Canvas
- 20.1.2 Step 2: Strip-Piecing the Vessel Strata
- 20.1.3 Step 3: Assembling the Central Focal Star
- 20.1.4 Step 4: Engineering the Cylinder Body
- 20.1.5 Step 5: Foam Basting and Architectural Quilting
- 20.1.6 Step 6: Waterproof Assembly and Grommet Finishing
- 20.1 “The Crimson Vessel” Heavy-Duty Lakota Star Laundry Bag
- 21 20. Striking Lakota Star Quilted Tapestries for Elegant Focal Walls
- 22 Conclusion
Bringing the Lakota Star Into a Modern Home
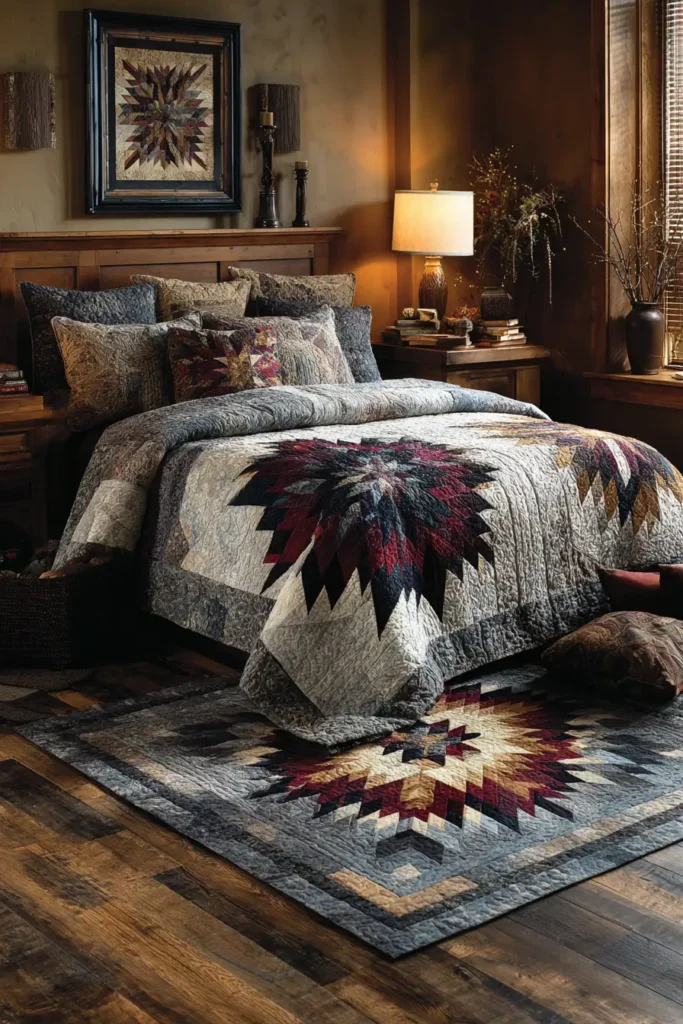
In a bedroom, a full eight-pointed star quilt functions as a visual anchor – strong enough to define the space without requiring anything else to compete with it. Softer palettes work well in guest rooms where the geometry provides structure and the quieter colors keep the room restful. Pillow covers, bed runners, and quilted accents introduce the pattern at a smaller scale for rooms where a full quilt would feel like too much.
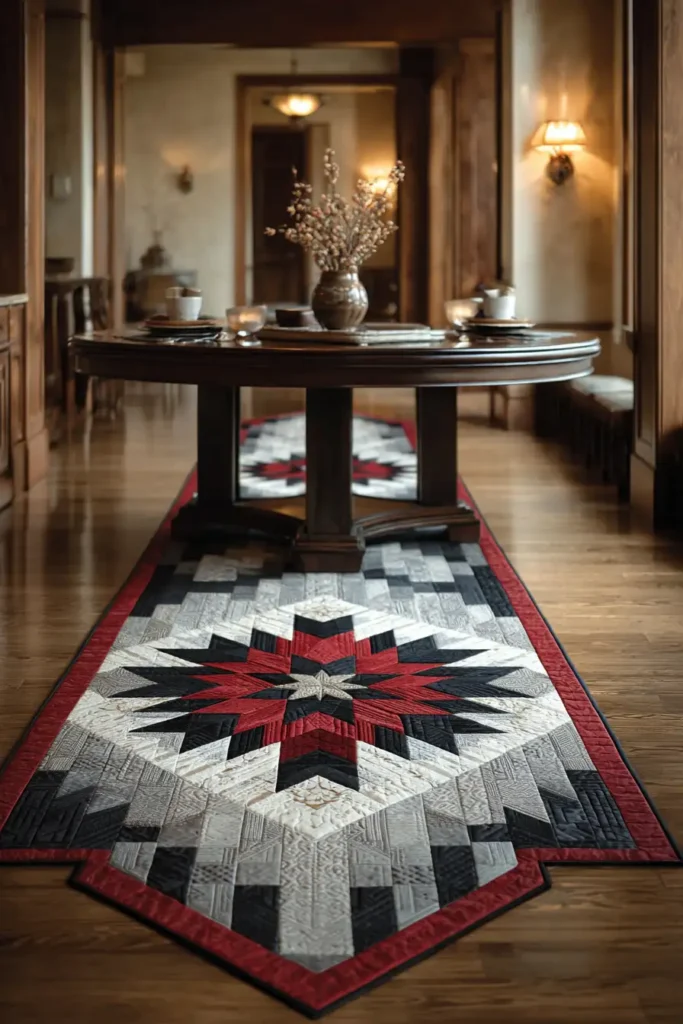
In living spaces, the pattern translates naturally into sofa throws and wall hangings, where it functions genuinely as textile art, adding warmth and absorbing sound while creating a focal point that holds its own. Table runners carry the same geometry into the dining room in a more subtle register.
A note worth stating clearly: these designs carry cultural significance within living Indigenous communities. Approaching them with that awareness – understanding what you are drawing from and why – is not a caveat. It is part of what makes the work considered rather than merely decorative.
See also: Navajo quilt patterns · Hawaiian quilts · Indigenous Quilt Patterns · Heritage & Cultural Quilts
Recommended Supplies
“As an Amazon Associate, I earn from qualifying purchases.“
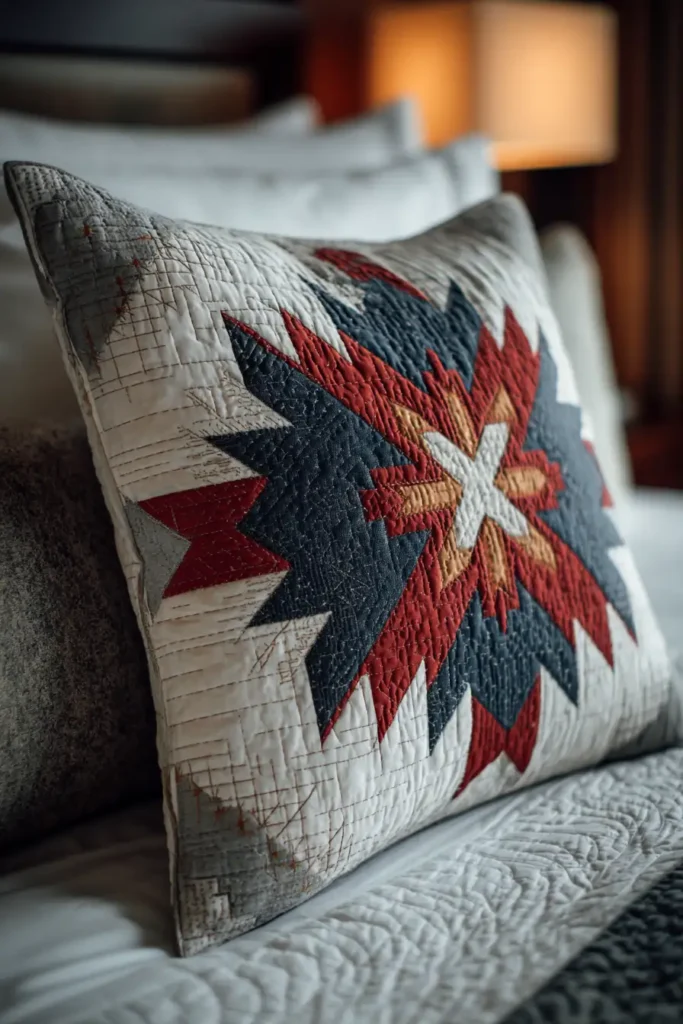
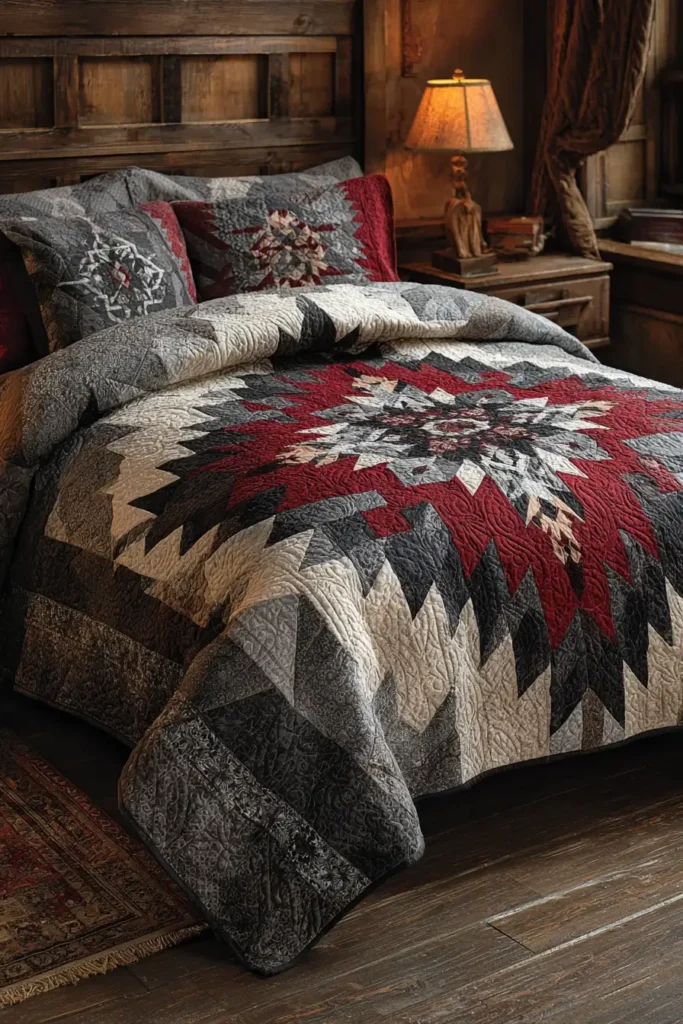
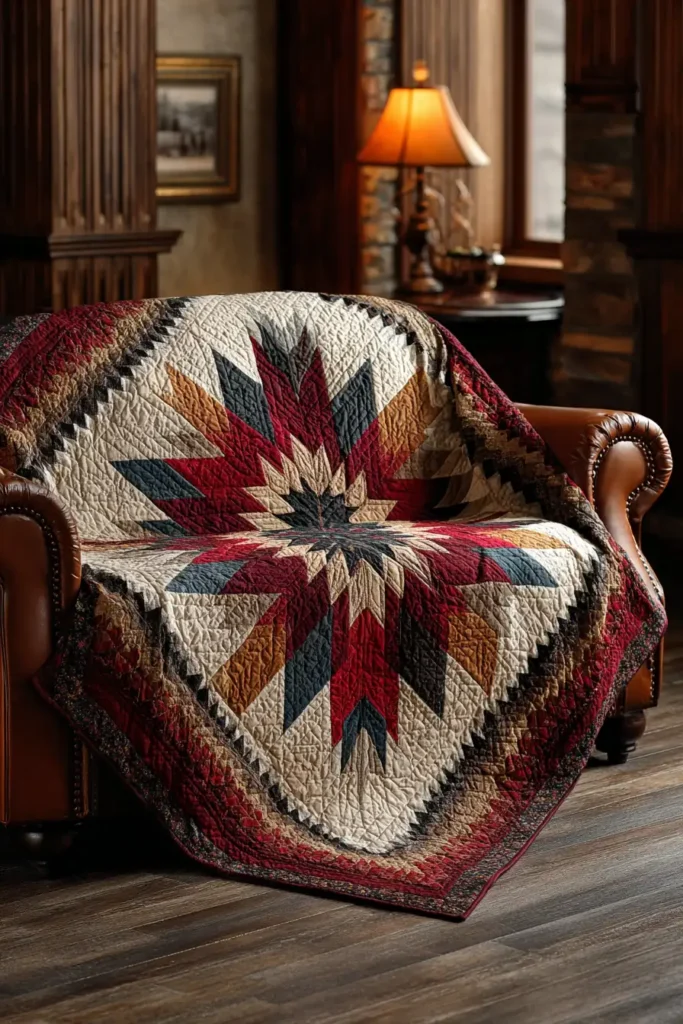
1. Traditional Eight-Pointed Lakota Star Quilt Patterns for Elegant Master Bedrooms
“The Crimson Morning” Eight-Pointed Star Quilt
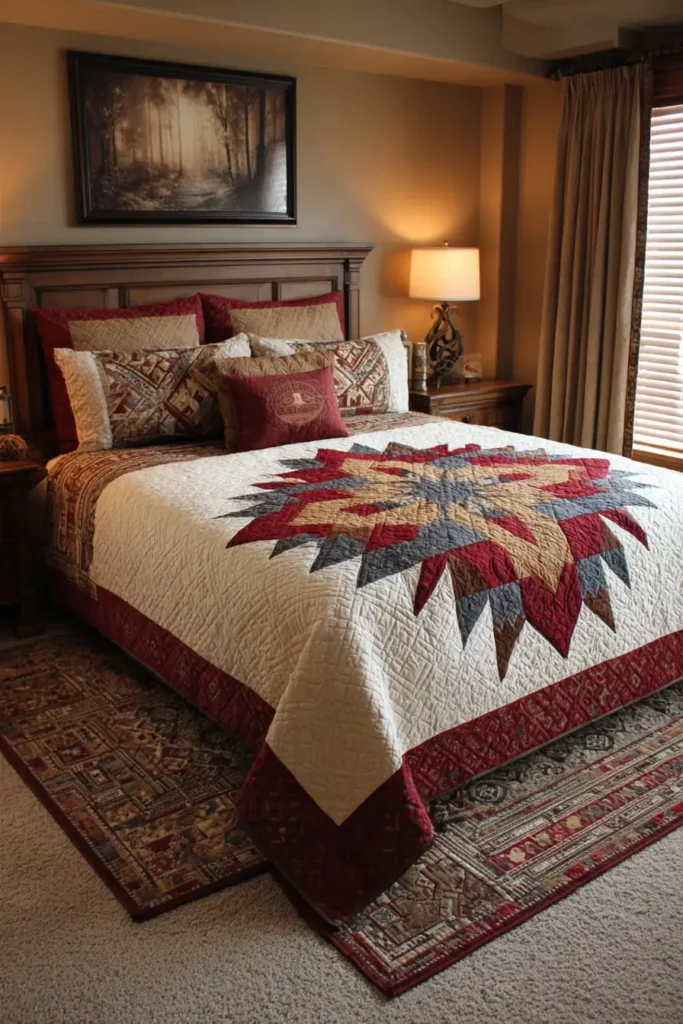
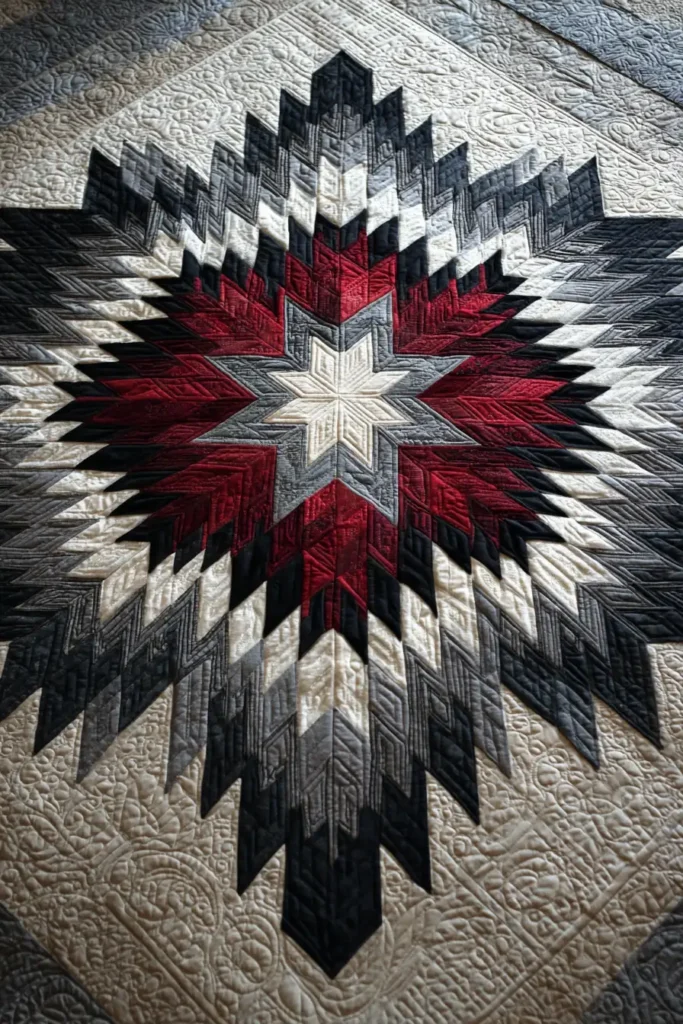
A master bedroom is a place of rest, reflection, and deep comfort. To anchor this space with profound meaning and striking geometry, the Lakota Star (often called the Morning Star) is unparalleled. This design features a massive, radiating eight-pointed star constructed from interlocking diamonds. By rendering this deeply traditional pattern in a tailored, high-contrast palette of crisp White, soft Greige, deep Charcoal, Black, and anchored by a powerful Deep Red core, the quilt becomes a masterpiece of modern elegance. The use of precision strip-piecing means this breathtaking, complex-looking star comes together with rhythmic logic.
Finished Dimensions: Generous Queen / Standard King Coverlet, 92″ x 92″.
Materials Needed:
- The Star (Diamond Strips): 1/2 yard each of 6 solid fabrics to form the radiating rings: Deep Red, White, Greige, Charcoal, Black, and a final ring of Deep Red for the tips.
- The Background (Negative Space): 4.5 yards of solid White or Greige to allow the geometric star to float elegantly.
- Backing: 8.5 yards of high-quality Black Cotton Sateen.
- Batting:100% Wool or a Bamboo/Cotton Blend.
- Why: A master bedroom quilt should drape luxuriously over the bed rather than sticking out rigidly. Wool and bamboo are incredibly breathable, premium fibers that offer superior temperature regulation, keeping you warm in the winter and cool in the summer without the heavy, stifling weight of polyester.
- Thread: 50wt cotton thread in Dove Grey.
- Notions: A large acrylic ruler with a distinct 45-degree angle line, a rotary cutter with a fresh blade, and ultra-fine glass-head pins.
Cultural Backstory: The eight-pointed star is a sacred symbol to the Lakota, Dakota, and Nakota nations, representing the Morning Star—the last and brightest star in the eastern sky before dawn. It represents the direction from which spirits travel to earth and is a profound symbol of honor, protection, and new life. In Plains Native cultures, giving a Morning Star quilt is one of the highest honors, traditionally draped over the shoulders of the recipient during marriages, graduations, or naming ceremonies to wrap them in respect and warmth.
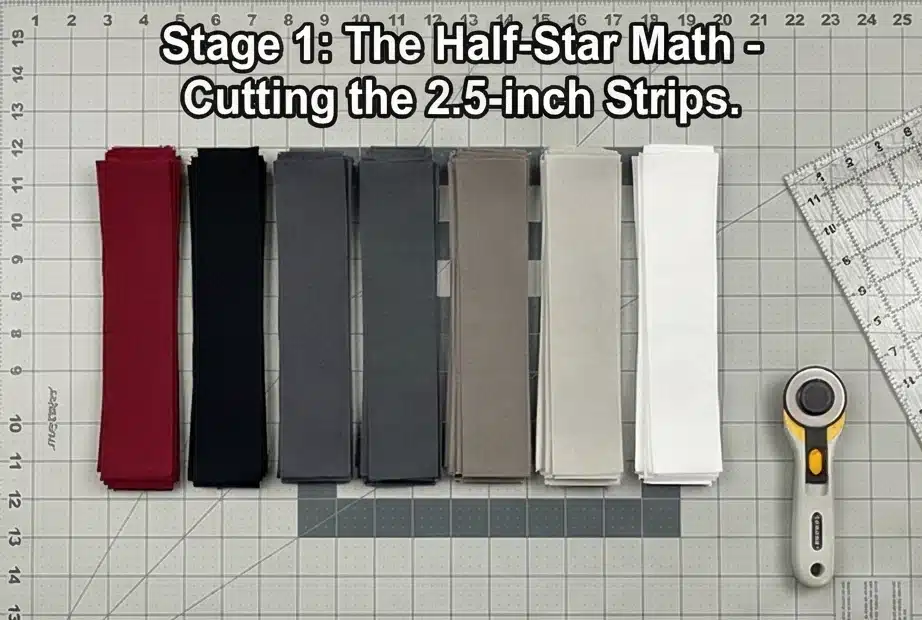
Step 1: Cutting the Fabric “Tubes”
Modern star quilts use strip-piecing to avoid sewing hundreds of individual diamonds.
- Cut the Strips: Cut exactly eight 2.5-inch strips from each of your 6 star colors across the width of the fabric (WOF).
- Organize the Sequence: Lay the strips out in the exact order they will radiate from the center: Red -> White -> Greige -> Charcoal -> Black -> Red.

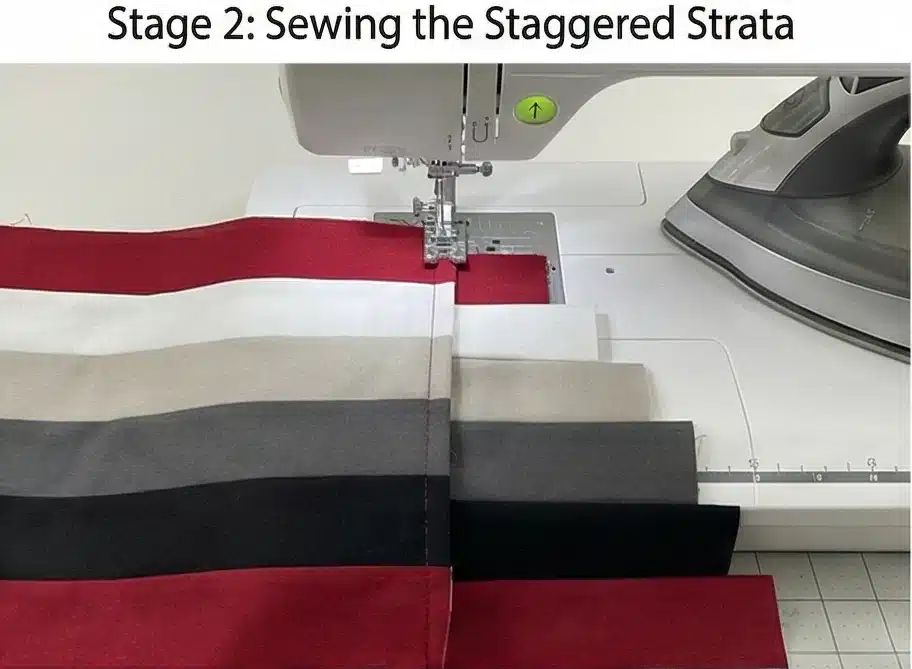
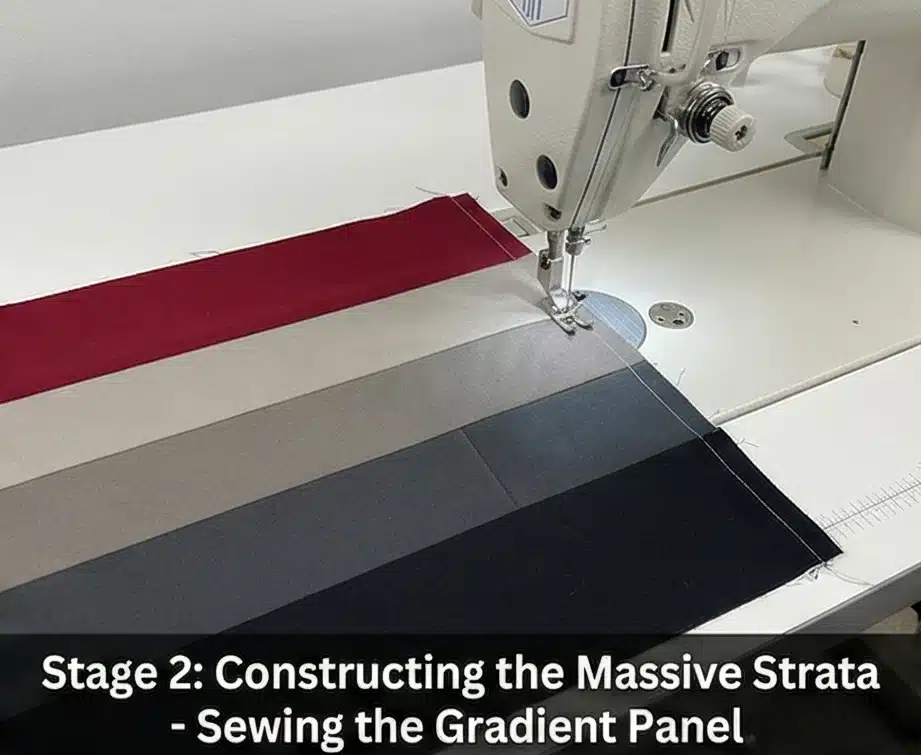
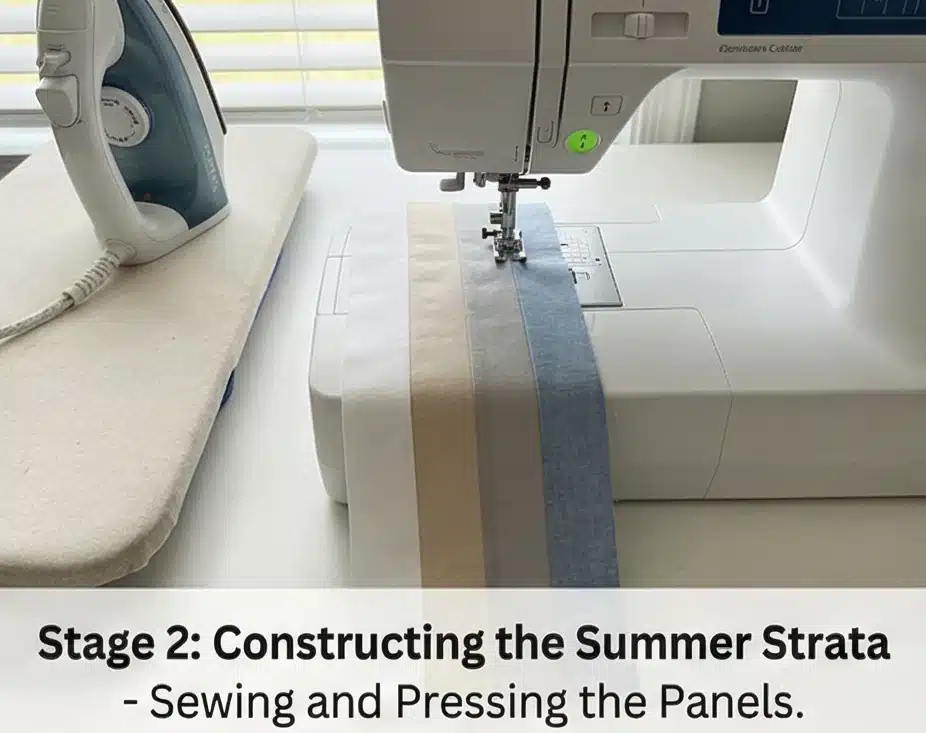
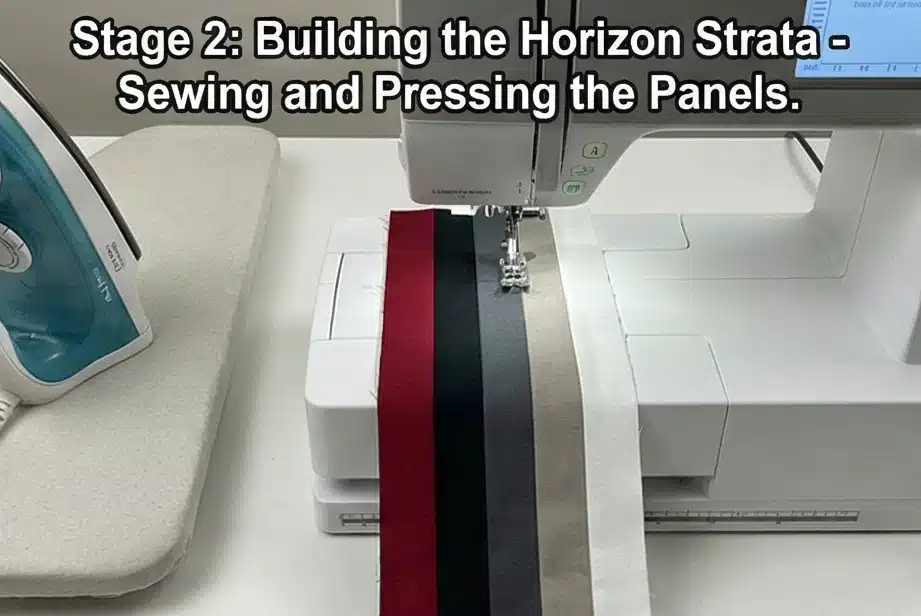
Step 2: Sewing the Staggered Strata
Staggering the strips saves fabric when cutting the 45-degree angles.
- The Drop: Take the Red strip. Place the White strip right-sides together with it, but drop the White strip exactly 2 inches lower than the top of the Red strip. Sew them together.
- Build the Panel: Continue adding the strips in order, dropping each subsequent strip 2 inches lower than the last.
- Pressing: Press all seams in a single direction (e.g., toward the darker colors). You will need to make 8 identical staggered strip sets (strata).
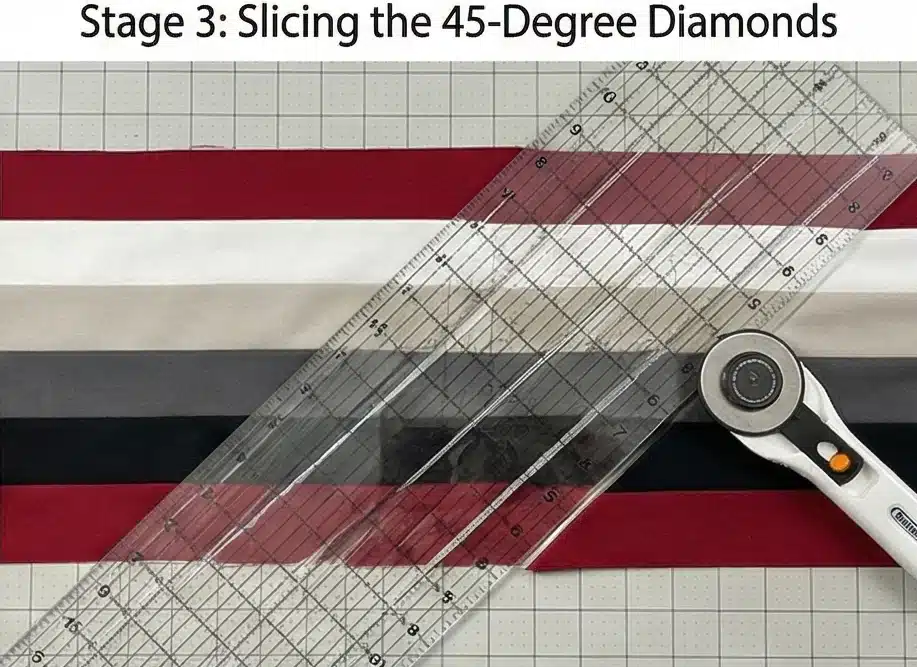
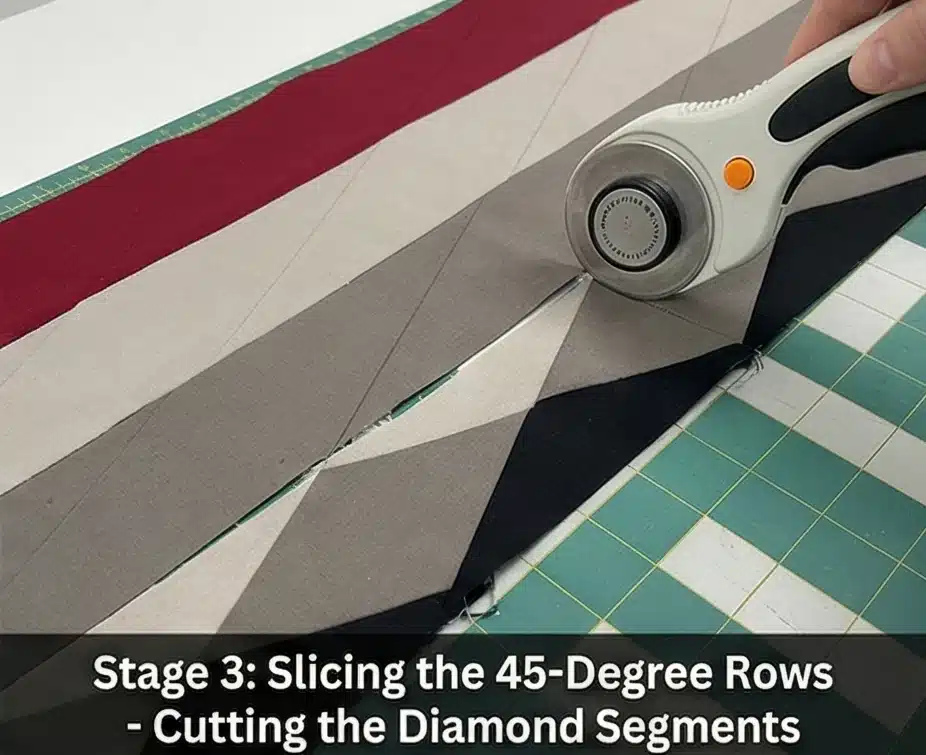
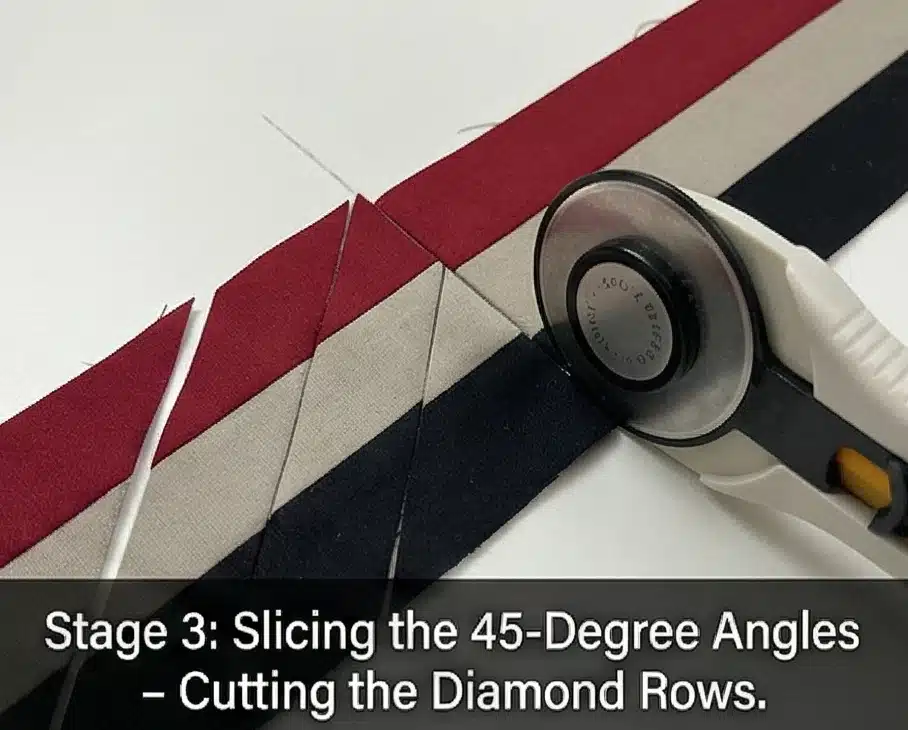
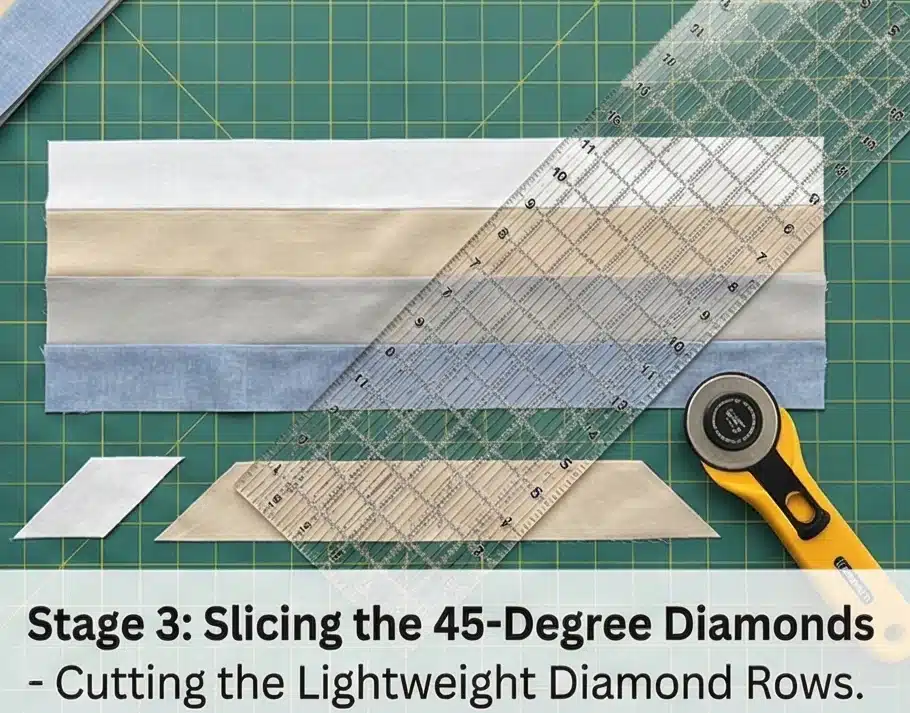
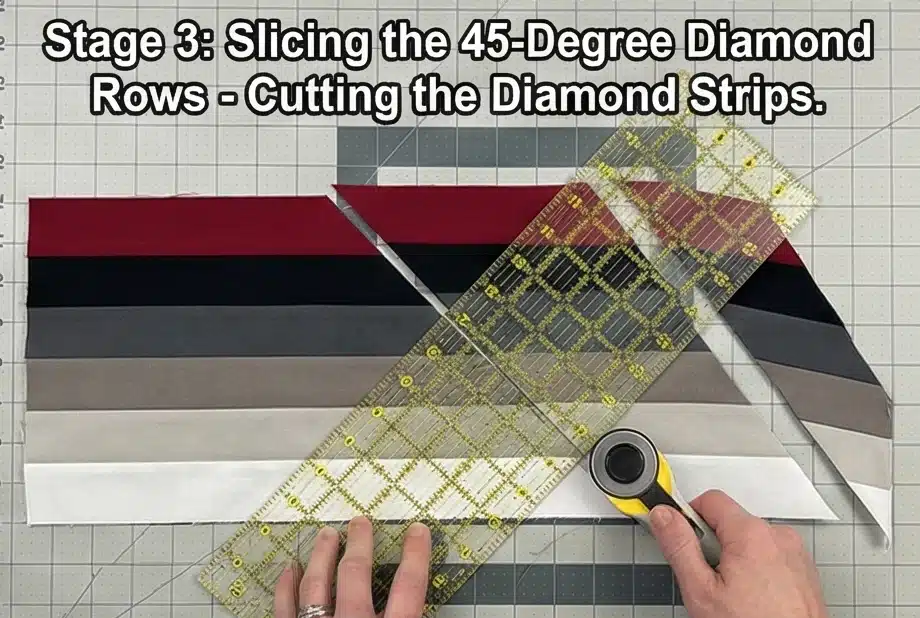
Step 3: Slicing the 45-Degree Diamonds
This transforms straight stripes into angled star points.
- Align the Angle: Lay a strip set flat on your cutting mat. Align the 45-degree line of your acrylic ruler along the bottom horizontal seam of the strip set.
- The First Cut: Slice the jagged left edge off the entire strip set at this 45-degree angle.
- Sub-Cut the Rows: Measure exactly 2.5 inches over from that newly angled cut. Make your next parallel cut. You now have a strip of six diamonds joined end to end.
- Yield: Cut six diamond strips from each of the 8 strata. Keep them meticulously organized.
Step 4: Assembling the Eight Star Points
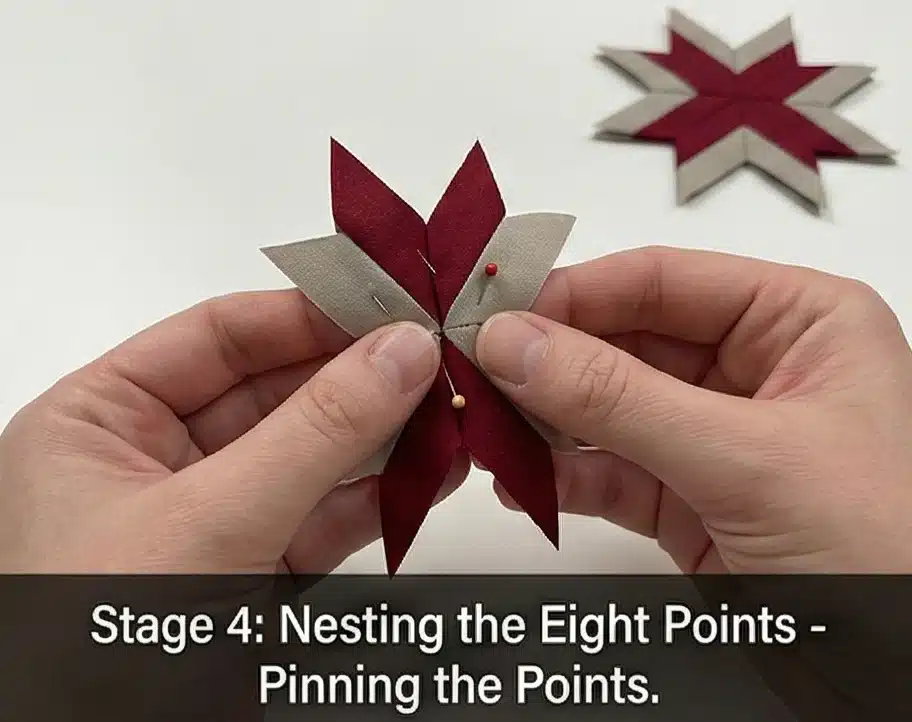
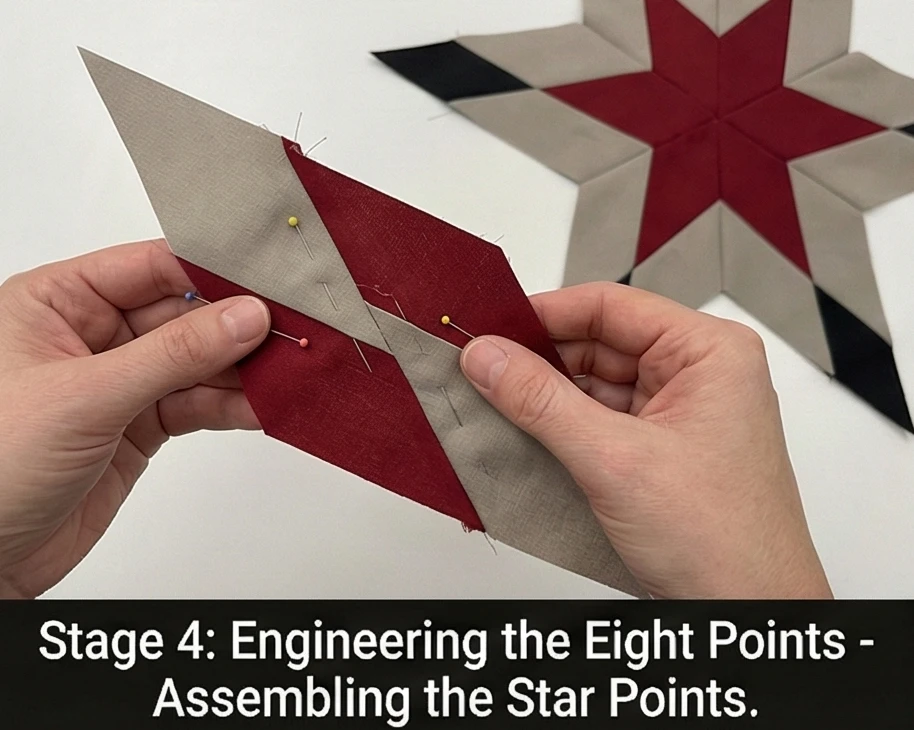
Nesting the seams creates perfect intersections.
- The Offset Match: Take two diamond strips. Place them right sides together, offsetting them by one diamond (so the Red diamond on the second strip aligns with the White diamond on the first strip).
- Pinning: Push a pin exactly through the 1/4-inch seam intersections. Because you pressed your seams all in the same direction in Step 2, the seams will naturally “nest” against each other, ensuring razor-sharp points.
- Complete the Point: Sew six diamond strips together in this offset stair-step pattern to create a massive, single diamond block. Make 8 of these large diamond blocks in total.

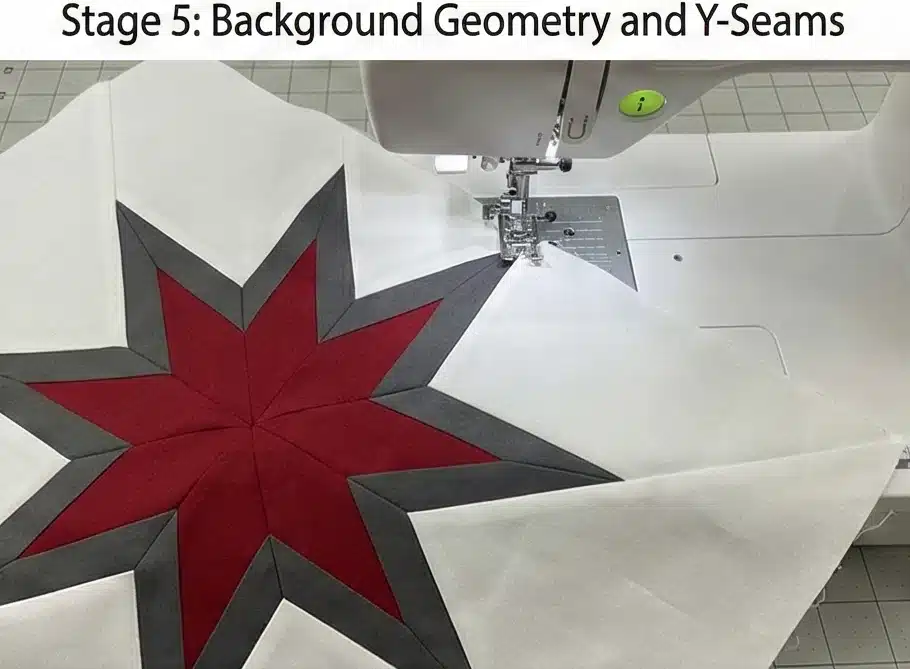
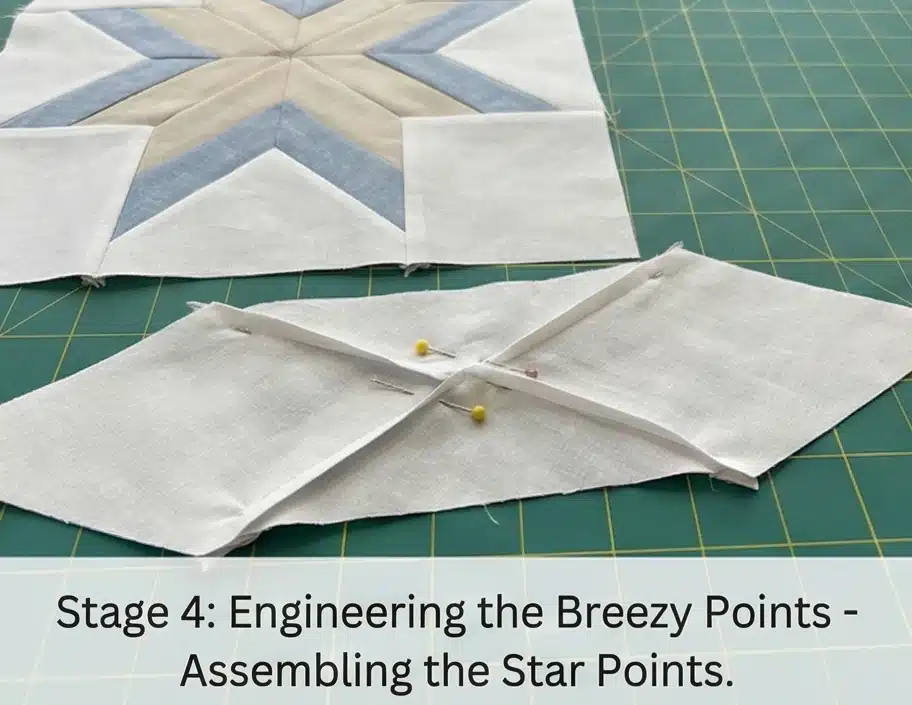
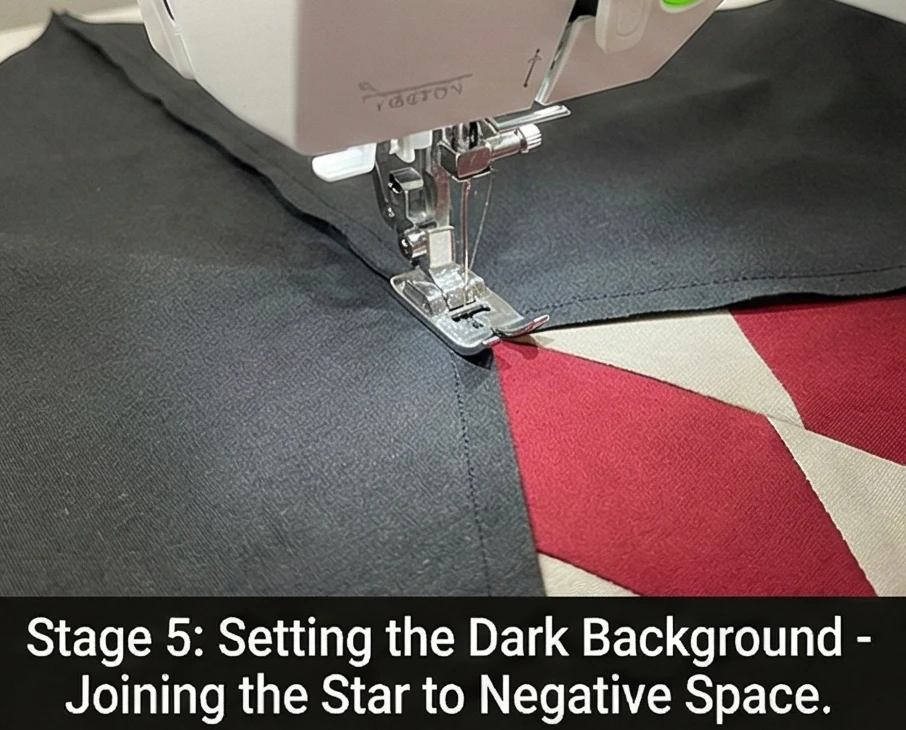
Step 5: Background Geometry and Y-Seams
Setting the star into the negative space.
- Cut the Background: From your White/Greige yardage, cut exactly four large 22-inch squares (for the four corners of the quilt) and four large 22-inch squares cut in half diagonally to yield eight triangles (to fill the spaces between the star points).
- Half First: Sew four of your large diamond blocks together to create the top half of the star. Sew the other four together to create the bottom half.
- Insert the Background: Use the traditional “Y-seam” method (stopping your stitch exactly 1/4 inch before the edge of the fabric) to set the background triangles into the deep V-shapes between the star points, and the large squares into the outer corners. Finally, join the top and bottom halves of the star together across the center.
Step 6: “Radiating” Quilting and the Tailored Finish
Quilting should enhance the star’s movement.
- The Baste: Sandwich the massive 92″ x 92″ star top, the premium wool or bamboo batting, and the backing fabric.
- Echo Quilting: Using a walking foot, quilt straight lines that echo the diamond shapes, starting at the center and radiating outward. Quilt 1/4 inch inside every seam line. This not only secures the layers but gives the quilt a beautiful, ribbed, architectural texture that emphasizes the burst of the star.
- The Frame: Trim the edges perfectly square and bind the quilt using a solid Black fabric. This dark, sharp boundary contains the vibrant, expansive energy of the star and anchors it elegantly to the master bed.
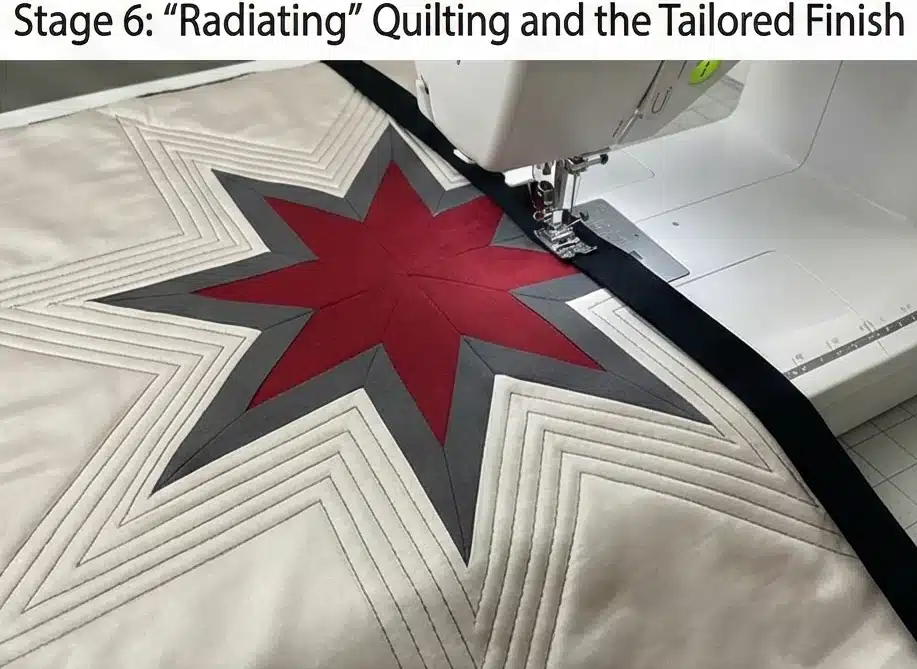
Usability Note: A quilt with hundreds of bias-cut diamond seams requires careful handling before quilting to prevent stretching. Always lift the star top gently rather than pulling it across the table. Once it is fully quilted with the dense echo stitching, the fabric is locked in place, making it incredibly durable for daily use and machine washing (on cold/gentle).
More Recommended Supplies
“As an Amazon Associate, I earn from qualifying purchases.“
2. Sophisticated Two-Tone Lakota Star Bed Covers for Timeless Style
“The Obsidian Eclipse” Two-Tone Minimalist Star Quilt
There is unparalleled power in simplicity. While traditional star quilts often feature a dazzling, multi-colored spectrum, reducing the palette to a strict, high-contrast duo transforms the historic block into a piece of stark, modern architecture. “The Obsidian Eclipse” uses only crisp White and deep Black for the radiating star, set against a vast expanse of negative white space. To ground the design and add a touch of inviting warmth, the entire quilt is framed with a sharp, tailored binding in Deep Red. This creates a visually arresting, gallery-quality bed cover that feels profoundly cozy without cluttering the visual serenity of a sleep sanctuary.
Finished Dimensions: Elegant Queen Coverlet, 90″ x 90″.
Materials Needed:
- The “Night” (Dark Strips): 2.5 yards of solid Black or Charcoal cotton.
- The “Day” (Light Strips & Background): 6 yards of pristine, solid White cotton.
- Backing: 8.5 yards of high-quality White Sateen or Greige Percale.
- Batting:100% Bamboo Batting.
- Why: A two-tone minimalist design demands a smooth, fluid drape. Bamboo batting is incredibly lightweight, naturally antibacterial, and offers supreme temperature regulation. It allows the massive geometric star to puddle beautifully over the edges of the mattress rather than sticking out like a stiff board.
- The Frame (Binding): 3/4 yard of solid Deep Red fabric.
- Thread: 50wt cotton thread in an invisible Dove Grey.
- Notions: A large acrylic ruler with a 45-degree marking, a rotary cutter with a fresh blade, and ultra-fine glass-head pins.
Cultural Backstory: In Plains Native traditions, the Morning Star is a symbol of the dawn—the exact moment when light pierces the darkness. A two-tone, black-and-white quilt perfectly encapsulates this duality. By stripping away extraneous colors, the focus returns entirely to the mathematical precision of the diamonds and the profound symbolism of the star breaking through the negative space.
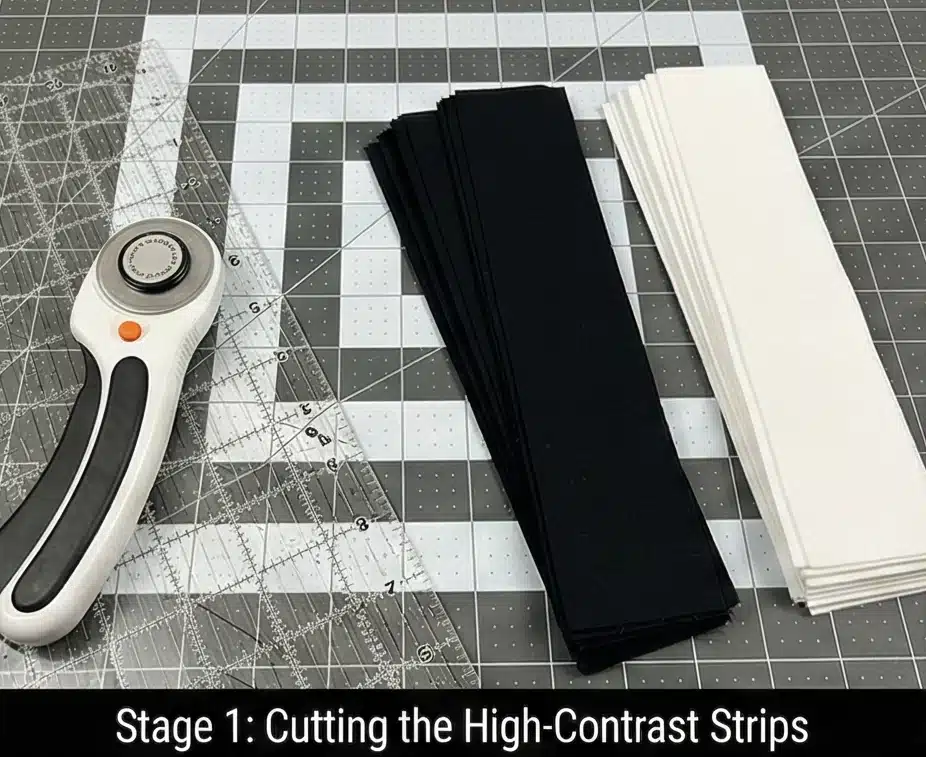
Step 1: Cutting the High-Contrast Strips
Precision cutting is the foundation of a flat star.
- The Dark Strips: Cut exactly sixteen 2.5-inch strips from your solid Black yardage across the width of the fabric.
- The Light Strips: Cut exactly sixteen 2.5-inch strips from your solid White yardage.
Step 2: Sewing the Alternating Strata
Building the striped panels that will become diamonds.
- The Sequence: You will create panels consisting of four strips, alternating Black and White.
- The Stagger: Take a Black strip. Place a White strip right-sides together, but drop the top edge of the White strip exactly 2 inches below the top edge of the Black strip. Sew the long seam.
- Build the Panel: Add another Black strip (dropped 2 inches), and finally another White strip (dropped 2 inches).
- Pressing: Press all seams toward the Black strips. You need to create 8 identical strata panels using this method.

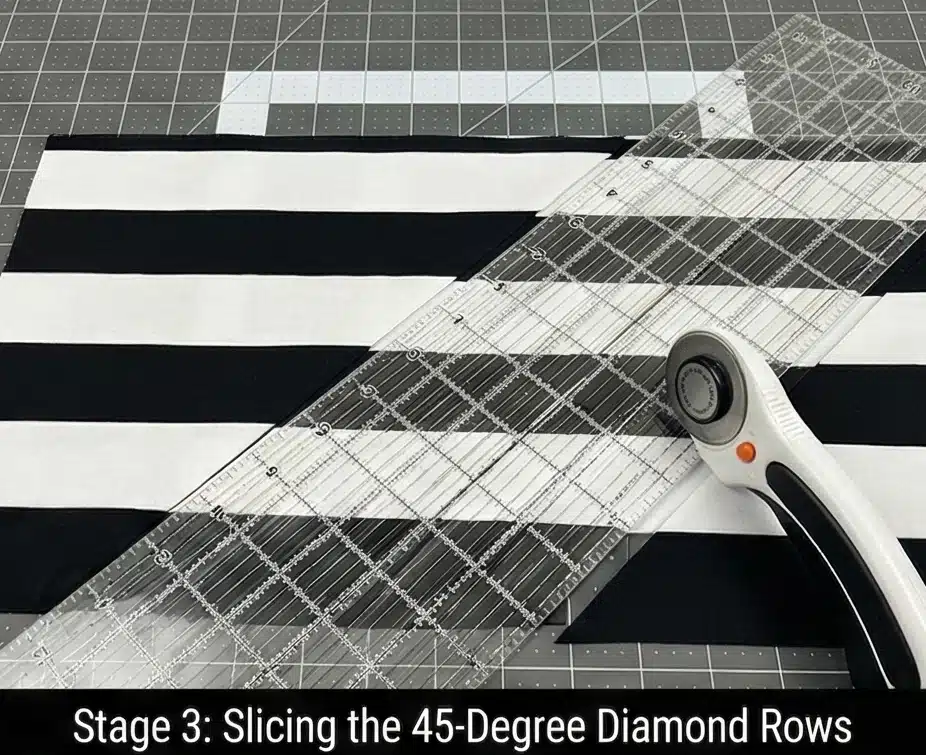
Step 3: Slicing the 45-Degree Diamond Rows
The geometry emerges from the stripes.
- Align the Ruler: Lay a strata panel flat. Align the 45-degree line of your ruler precisely along one of the horizontal seams.
- The First Angle: Slice the staggered, jagged edge off the left side of the panel to create a clean 45-degree angle.
- Sub-Cut the Rows: Measure exactly 2.5 inches over from that newly cut angle. Make a parallel cut. You now have a strip of four alternating Black and White diamonds.
- Yield: Cut six of these diamond rows from each of your 8 strata panels.
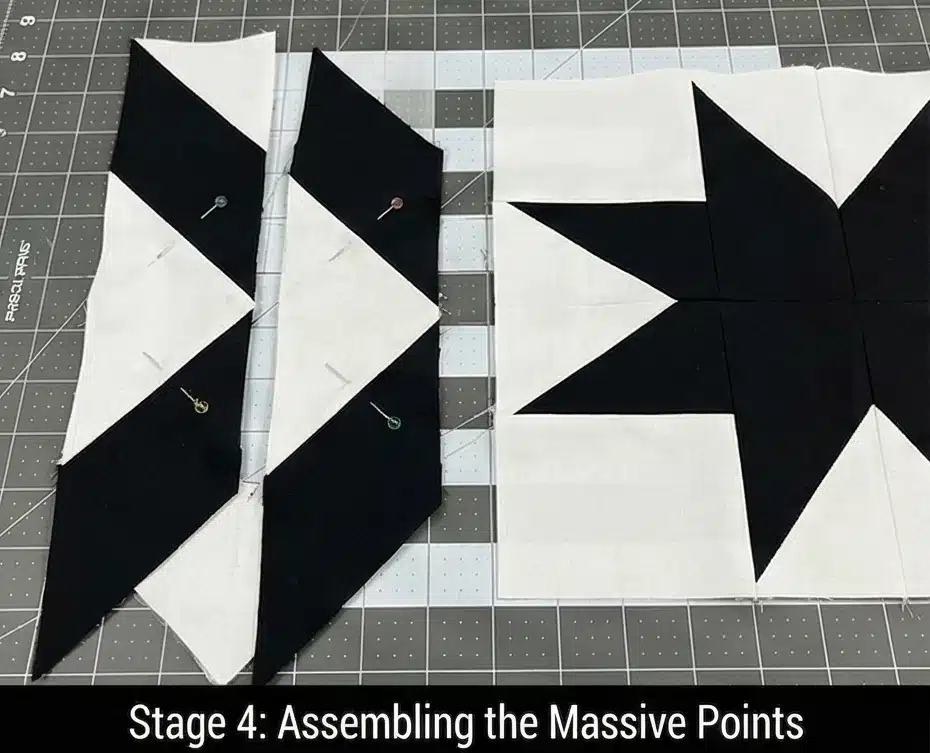
Step 4: Assembling the Massive Points
Nesting seams for razor-sharp intersections.
- The Offset Join: Take two diamond rows. Place them right sides together, shifting them so the Black diamond on the top row perfectly aligns with the White diamond on the bottom row.
- Pinning: Push a pin vertically through every single 1/4-inch seam intersection. Because you pressed your seams toward the Black fabric in Step 2, they will mechanically “nest” together, eliminating bulk.
- Complete the Point: Sew six diamond rows together in this staggered fashion to form one large diamond measuring four units wide by six units long. Repeat this to construct all 8 massive star points.
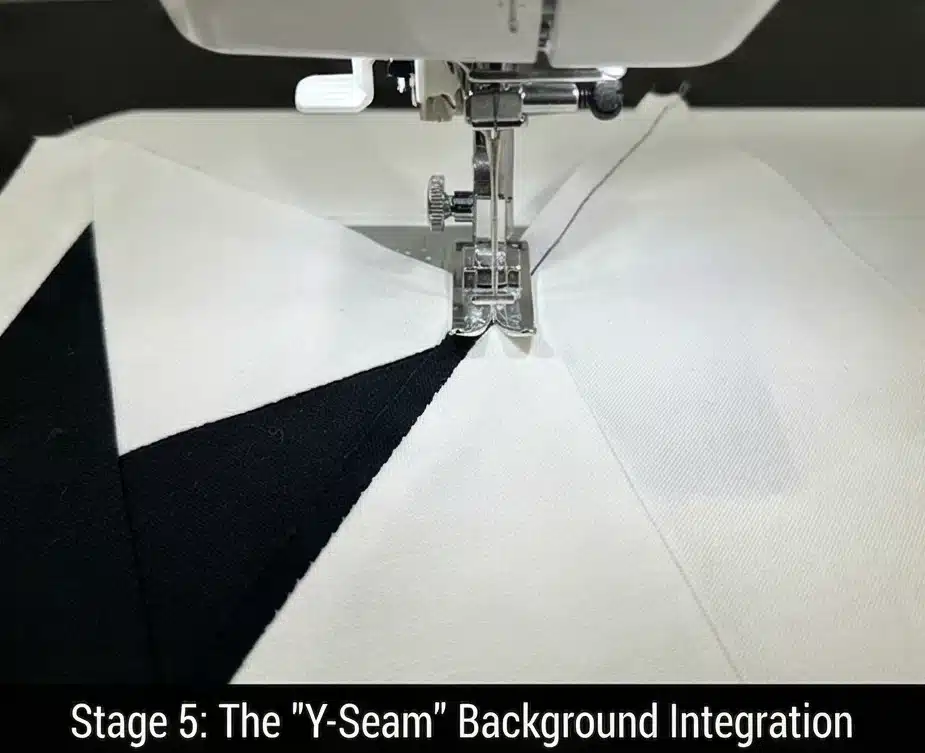
Step 5: The “Y-Seam” Background Integration
Floating the star in a sea of white.
- Cut the Voids: From your remaining White yardage, cut exactly four 22-inch squares (for the outer corners) and four 22-inch squares cut in half diagonally (yielding eight triangles for the inner spaces between the star points).
- Sewing the Halves: Sew four star points together to create the top hemisphere of the star, and four together for the bottom hemisphere.
- The Pivot: Use the Y-seam technique to insert the White background pieces. Stop your machine exactly 1/4 inch before the edge of the star point, leave the needle down, pivot the heavy fabric, and sew up the other side to seamlessly embed the background without puckering the star’s center. Finally, join the two halves across the middle.
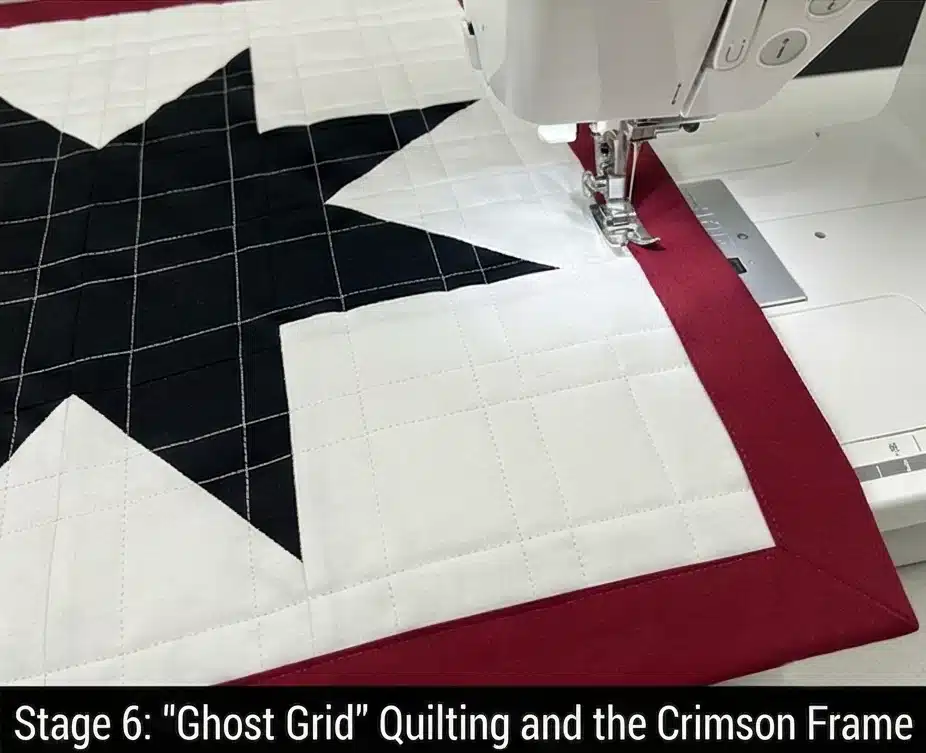
Step 6: “Ghost Grid” Quilting and the Crimson Frame
Finishing the architecture.
- Baste: Sandwich the minimalist top, the breathable bamboo batting, and the backing fabric. Use safety pins every 4 inches to stabilize the heavy bias seams.
- Grid Quilting: Instead of outlining the star, use a walking foot to quilt a continuous 2-inch grid of straight horizontal and vertical lines across the entire 90-inch quilt. This “Ghost Grid” flattens the seams, secures the bamboo batting for maximum durability, and contrasts beautifully against the diagonal geometry of the star.
- The Binding: Trim the quilt perfectly square. Bind the outer edges with your solid Deep Red fabric. This sharp, highly saturated frame acts as a visual boundary, elevating the monochromatic star from a simple bedspread into a striking piece of tailored room decor.
Usability Note: High-contrast quilts (pure Black against pure White) may experience dye migration during the first wash. Include two or three color catcher sheets in the washing machine and wash on a cold, gentle cycle. Tumble dry on low to allow the bamboo batting to achieve its signature, cozy crinkle.
3. Luxurious King-Size Lakota Star Bedspreads for Ultimate Comfort
“The Regal Zenith” King-Size Ombré Star Quilt
Scaling a traditional Lakota Star to fit a modern King-size bed requires more than just adding borders; the star itself must expand in majestic proportion. “The Regal Zenith” builds upon the classic eight-pointed architecture by incorporating an extended Ombré Gradient. Starting with a blazing Deep Red core, the diamond rings ripple outward, transitioning smoothly through warm Greige, dense Charcoal, and finally anchoring into a striking, solid Black edge against a crisp White background. The resulting bedspread is a breathtaking, high-contrast focal point that honors cultural heritage while providing the ultimate, enveloping comfort required for a master suite.
Finished Dimensions: Oversized King Bedspread, 108″ x 108″.
Materials Needed:
- The “Zenith” (Diamond Strips): 5 yards total of solid fabrics divided into an ombré sequence (Deep Red, Greige, Charcoal, and Black).
- The Background (Negative Space): 6.5 yards of pristine White solid cotton.
- Backing: 9.5 yards of luxurious Greige Sateen or High-Thread-Count Percale.
- Batting:100% Wool or a Bamboo/Cotton Blend.
- Why: A 108-inch square quilt is incredibly heavy if made with standard cotton or polyester batting, making it stifling to sleep under and nearly impossible to wash at home. Wool and bamboo are premium, feather-light insulators. They provide necessary warmth while remaining highly breathable, ensuring the massive quilt drapes elegantly over the edges of a king mattress without feeling like a weighted blanket.
- Thread: 50wt cotton thread in Dove Grey.
- Notions: A large acrylic ruler with a true 45-degree angle line, a fresh rotary blade, and heavy-duty curved basting pins.
Cultural Backstory: In the tradition of the Plains Native nations, the size of a Morning Star quilt often correlates with the magnitude of the honor being bestowed. A massive, floor-draping star is a testament to immense respect and profound protection. When translated into modern home design, a King-size Lakota star acts as an architectural anchor, turning the bed into a monumental centerpiece of warmth and stability.
Step 1: Scaling the Master Geometry
A King-size star requires more rings to reach the edges.
- The Expanded Math: Instead of the standard 6 rings of diamonds, a King-size star requires 8 to 10 rings to ensure the points reach the edges of the mattress gracefully.
- Cut the Strips: Cut exactly eight 2.5-inch strips for each of your 8 ring colors (e.g., 2 Red, 2 Greige, 2 Charcoal, 2 Black) across the width of the fabric.
Step 2: Constructing the Massive Strata
Building the gradient panels.
- The Ombré Sequence: Lay your strips out to form the gradient. Place the first Deep Red strip right sides together with the second Deep Red strip.
- The 2-Inch Drop: Drop the second strip exactly 2 inches lower than the first to create a staggered, staircase edge. Sew them together.
- Complete the Panel: Continue adding the Greige, Charcoal, and Black strips in order, dropping each one 2 inches. Press all seams in one direction (toward the darker Black edge). You will need to make 8 identical, wide, staggered panels.
Step 3: Slicing the 45-Degree Rows
Cutting the extended diamond rows.
- Align the Angle: Lay one of your massive strata panels flat. Align the 45-degree line of your acrylic ruler along the bottom horizontal seam.
- The First Cut: Slice off the staggered left edge at a perfect 45-degree angle.
- Sub-Cut the Diamonds: Measure exactly 2.5 inches over from that cut. Slice again. You now have a long strip containing 8 interlocking diamonds fading from Red to Black.
- Yield: Cut eight of these rows from each of your 8 strata panels.
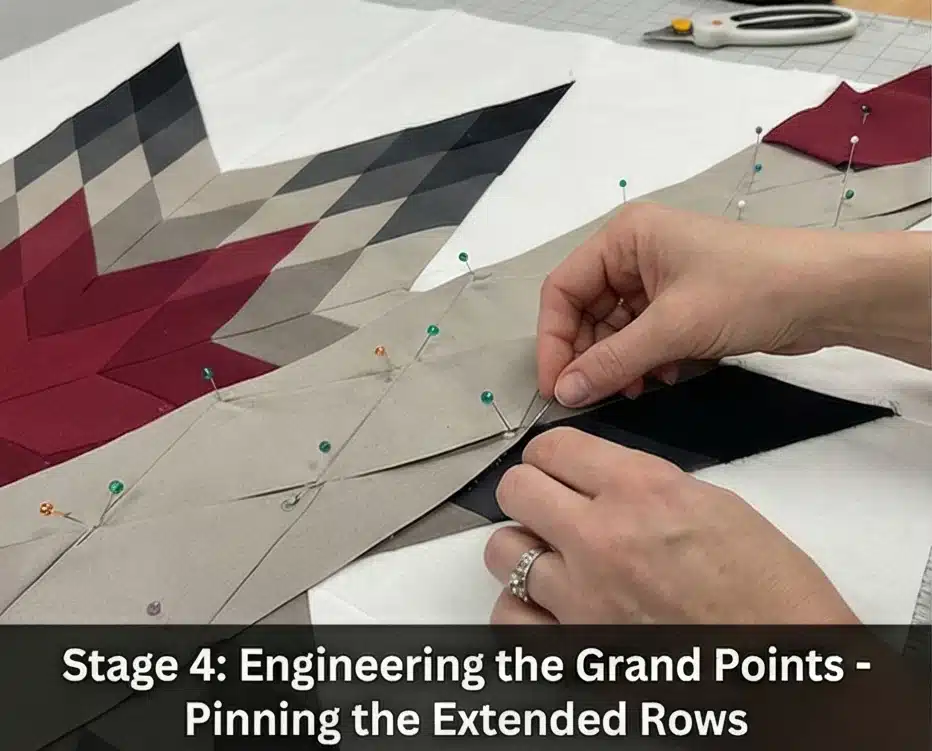
Step 4: Engineering the Grand Points
Precision is paramount at scale.
- The Offset Match: Place two diamond rows right-sides together, offsetting them so the first Red diamond on the second row aligns with the second Red diamond on the first row.
- Nesting Seams: Pin heavily through every 1/4-inch seam intersection. With 8 intersecting points per row, taking your time here ensures the massive star lies perfectly flat.
- Build the Point: Sew eight rows together in this offset pattern. You have now created one massive diamond point. Repeat to construct all 8 grand star points.
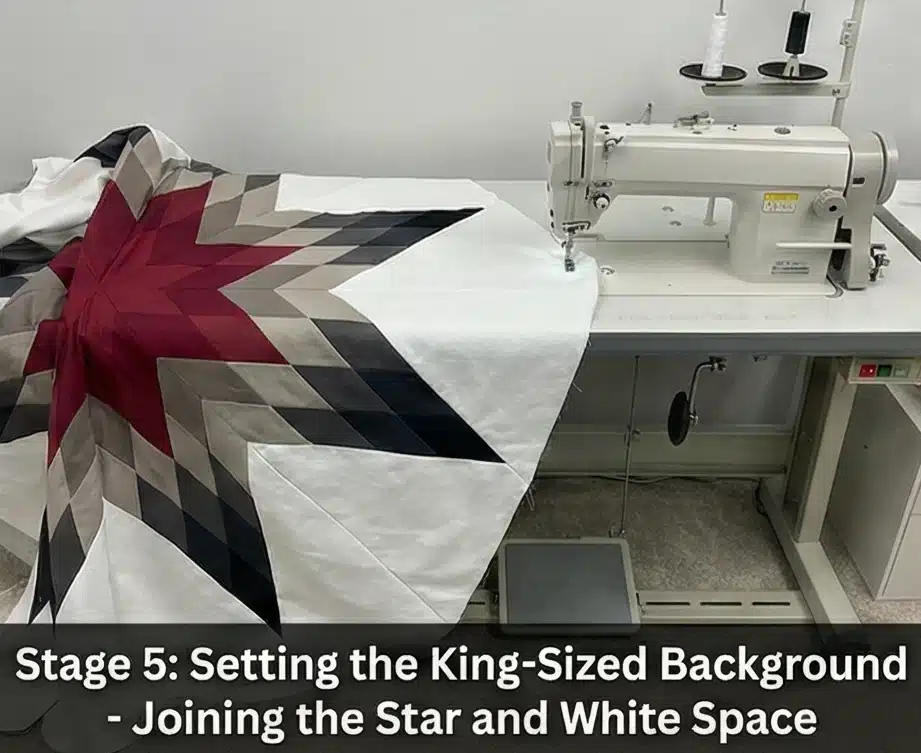
Step 5: Setting the King-Sized Background
Handling immense bias edges requires care.
- Cut the Vast Voids: From your solid White yardage, cut exactly four 26-inch squares (for the outer corners) and four 26-inch squares cut in half diagonally (yielding eight massive triangles for the spaces between the points).
- Sew the Hemispheres: Sew four grand points together for the top half, and four for the bottom half.
- The Heavy Y-Seam: Because you are handling nearly 100 inches of fabric, support the weight of the star on a large table while sewing. Use the Y-seam technique to carefully drop the White background squares and triangles into the deep V-shaped voids. Finally, sew the top and bottom hemispheres together across the very center.
Step 6: Structural Basting and Tailored Frame
Finishing a quilt of this magnitude.
- Floor Basting: A 108″ x 108″ quilt requires a significant amount of floor space. Tape your Sateen backing taut to a hard floor. Smooth the wool/bamboo batting over it, followed by the pieced top. Use curved safety pins every 4 to 5 inches to prevent shifting.
- Architectural Quilting: Using a walking foot, quilt straight lines parallel to the diamond shapes, stitching 1/4 inch inside the seams. For the vast White negative space, quilt a clean 2-inch grid. This dual-texture approach ensures the heavy quilt is perfectly secured for daily use.
- The Anchor Edge: Square up the massive edges and bind the quilt using a solid Black or Deep Red fabric to sharply frame the sprawling geometry.
Usability Note: A King-size quilt, even with lightweight batting, becomes exceptionally heavy when wet. Do not attempt to wash this in a standard top-loading agitator machine, as the bias seams may stretch or tear. Take it to a laundromat and use a front-loading commercial washer on a gentle cycle, or have it professionally laundered to maintain its crisp, elegant architecture.
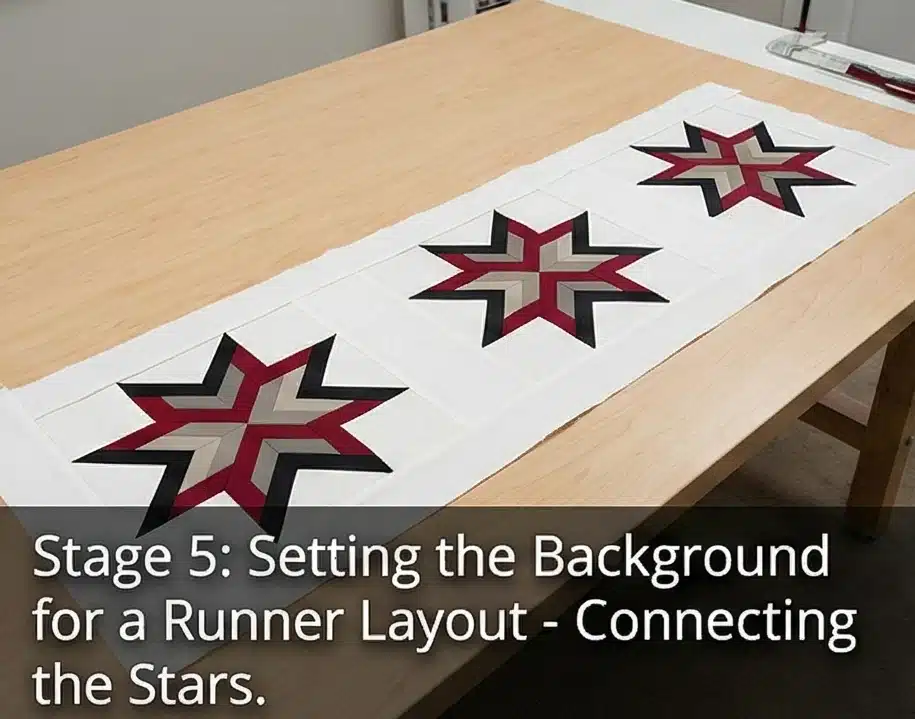
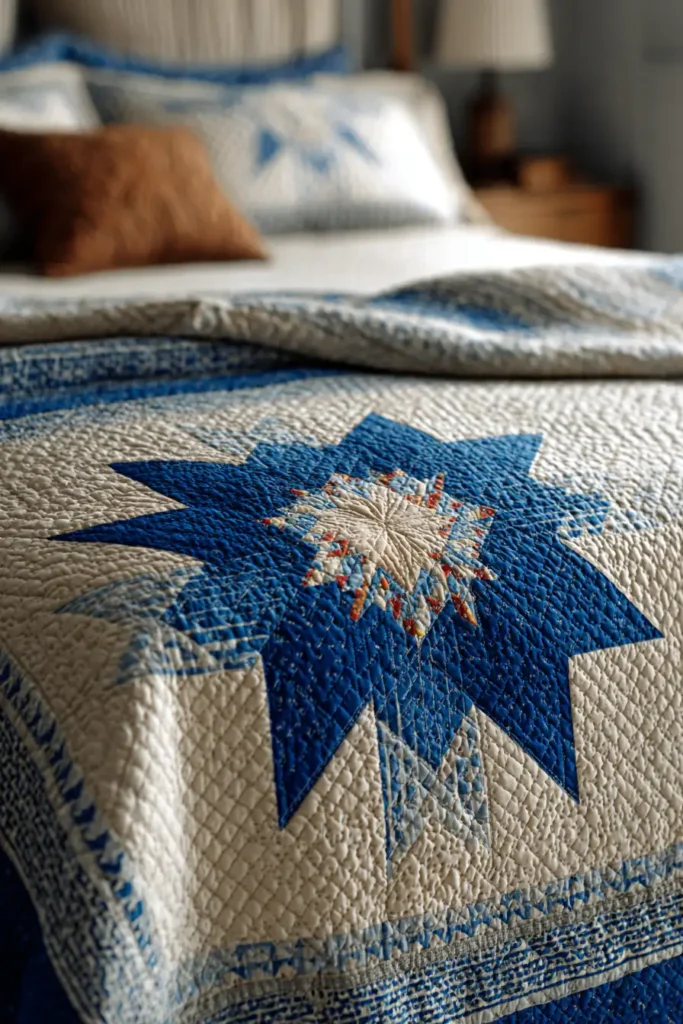
4. Cozy Lakota Star Quilted Bed Runners for Layered Bedding Elegance

“The Crimson Constellation” Lakota Star Bed Runner
A bed runner is the ultimate interior styling tool, offering the layered, bespoke look of a boutique hotel without the stifling weight of a secondary duvet. By taking the monumental architecture of the Lakota Star and scaling it down into a triptych—three perfectly aligned, smaller stars floating across a vast horizontal plane—you create a breathtaking focal point for the foot of the bed. “The Crimson Constellation” executes this layout in a highly tailored, sophisticated palette. Three brilliant Deep Red centers radiate out into soft Greige and terminate in sharp Black points, all suspended in a crisp White negative space. It brings profound cultural geometry and modern elegance into perfect alignment.
Finished Dimensions: King/Queen Bed Runner, 24″ x 90″.
Materials Needed:
- The “Constellation” (Diamonds): 1/4 yard each of solid Deep Red, Greige, Charcoal, and Black cotton.
- The “Sky” (Background): 2.5 yards of pristine White solid cotton.
- Backing: 2.5 yards of heavy-weight Black or Greige cotton sateen.
- Batting:100% Bamboo Batting.
- Why: A bed runner sits precisely where people toss their luggage, sit to tie their shoes, or fold extra blankets. Bamboo batting is incredibly resilient and naturally temperature-regulating. Most importantly, it has a fluid, luxurious drape, ensuring the long runner cascades effortlessly over the mattress corners rather than sticking out like a stiff board.
- Thread: 50wt cotton thread in an invisible Dove Grey.
- Notions: A small acrylic ruler with a 45-degree angle line, a rotary cutter with a fresh blade, and fine glass-head pins.
Cultural Backstory: The eight-pointed Morning Star represents direction, guidance, and protection in Lakota culture. Traditionally given to honor a loved one, the star motif is meant to wrap the recipient in warmth from dawn to dusk. While a bed runner historically originated in luxury European hotels simply to protect pristine white duvet covers from dirty luggage wheels, integrating the Morning Star transforms this purely functional textile into a symbolic guardian at the foot of the bed.
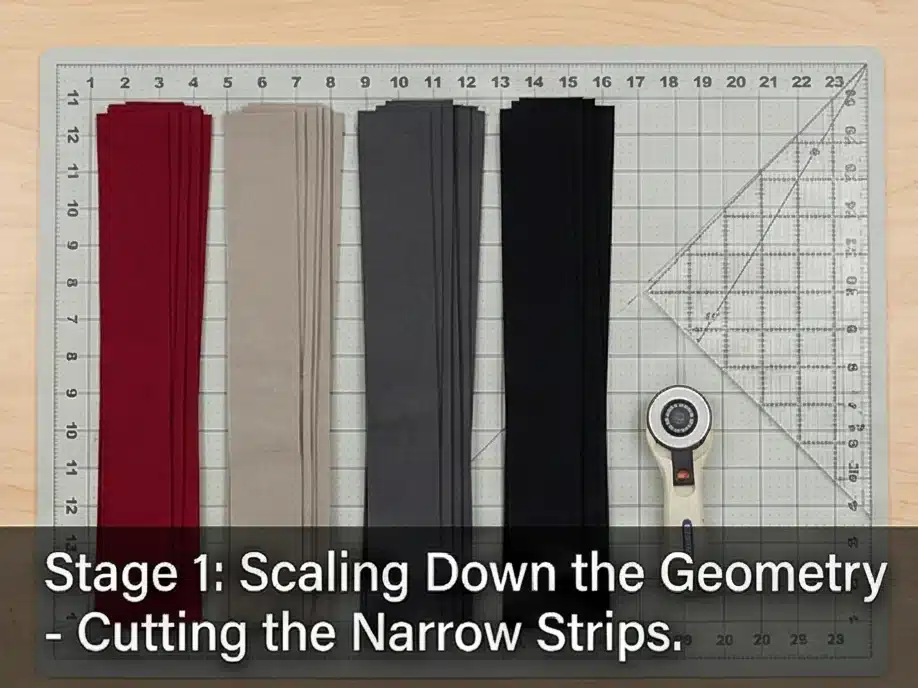
Step 1: Scaling Down the Geometry
Miniature stars require narrower strip sets.
- Cut the Strips: To make three stars that fit perfectly within a 24-inch-wide runner, we must shrink the diamonds. Cut exactly six 1.5-inch strips from your Red, Greige, Charcoal, and Black fabrics across the width of the fabric (WOF).
- Organize: You will build a rapid, high-contrast gradient: Red (center) -> Greige -> Charcoal -> Black (outer tips).
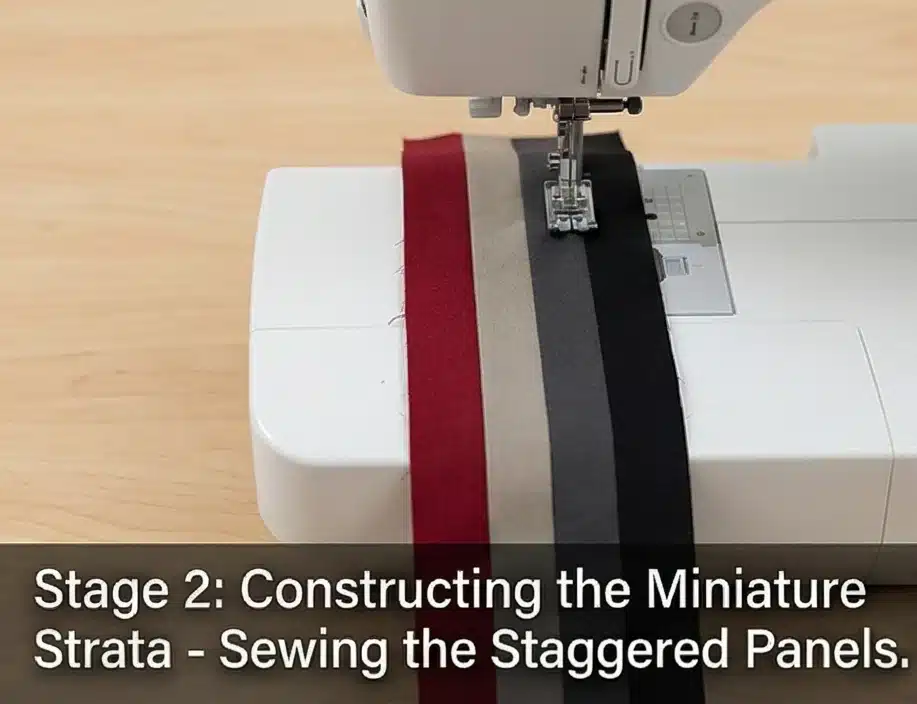
Step 2: Constructing the Miniature Strata
Building the scaled-down gradient panels.
- The Stagger: Place a Greige strip right-sides together over a Red strip. Drop the Greige strip exactly 1.5 inches lower than the top of the Red strip to create the staircase offset. Sew them together with a precise 1/4-inch seam.
- Complete the Set: Add the Charcoal strip (dropped 1.5 inches), and finally the Black strip (dropped 1.5 inches).
- Pressing: Press all seams strictly toward the darker outer edge. Make 6 identical, staggered panels.
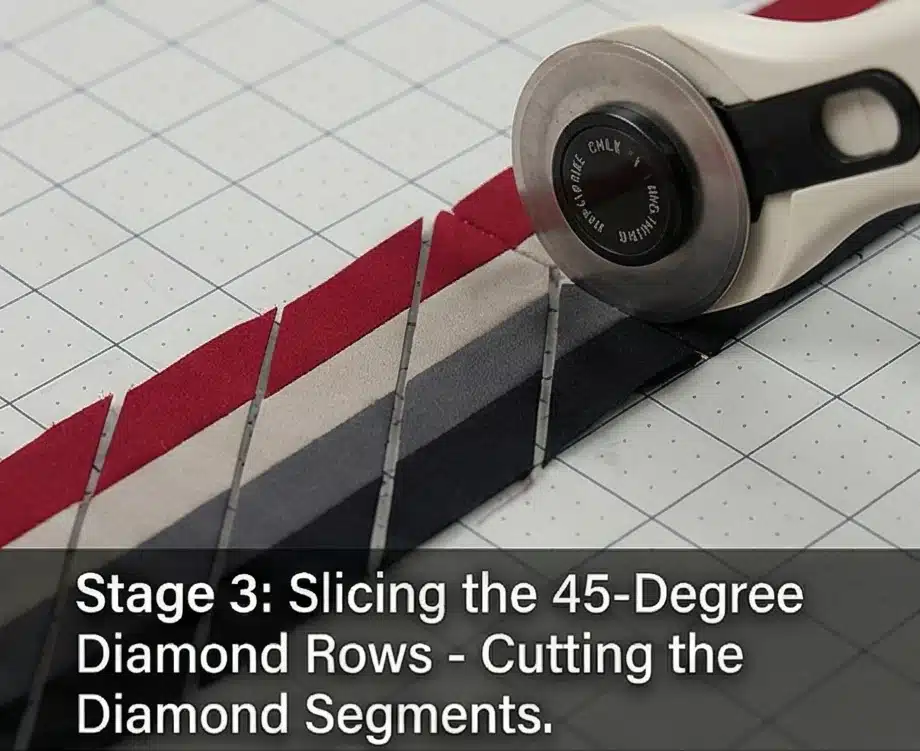
Step 3: Slicing the 45-Degree Diamond Rows
Precision is key when working with scaled-down pieces.
- Align the Angle: Lay a strata panel flat. Align the 45-degree line of your ruler along the bottom horizontal seam. Slice off the jagged left edge.
- The Sub-Cut: Measure exactly 1.5 inches over from that 45-degree cut and slice. You now have a row of four tiny, interconnected diamonds.
- The Yield: Cut eight of these diamond rows to build one star. Because you need three stars for the runner, you must cut 24 diamond rows in total.
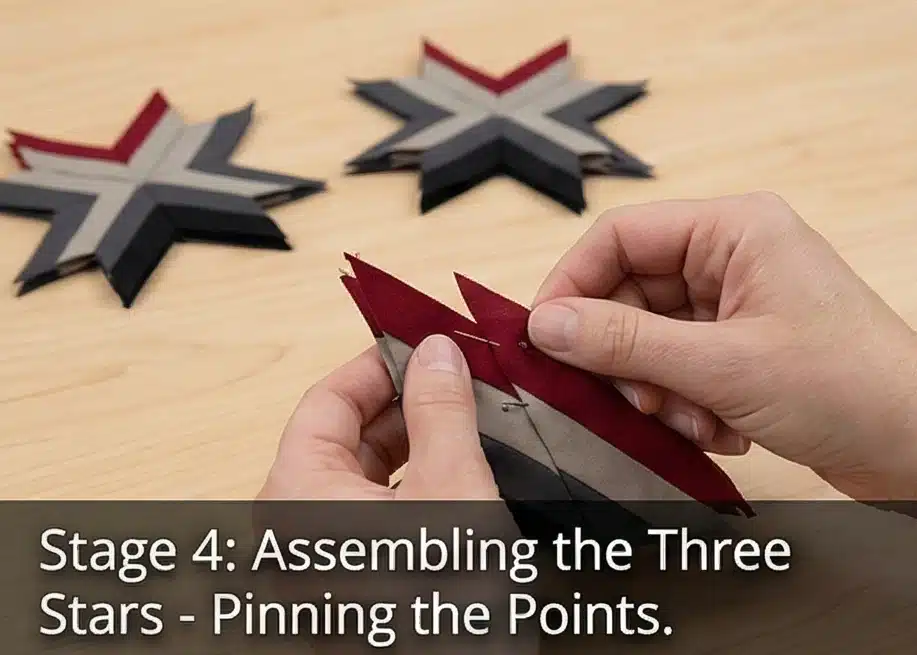
Step 4: Assembling the Three Stars
Nesting seams to create sharp, miniature points.
- Offset and Pin: Take two diamond rows. Place them right-sides together, offsetting them so the Red diamond on the top row meets the Greige diamond on the bottom row. Push a pin vertically through every intersection to ensure the tiny seams nest perfectly.
- Build the Points: Sew four rows together to make one star point. You will need 8 points per star.
- Complete the Triptych: Carefully sew the 8 points together, stopping 1/4 inch from the center to avoid a large knot. Complete this process until you have three identical, pristine stars, each measuring about 16 inches across.
Step 5: Setting the Background for a Runner Layout
Floating the constellation in negative space.
- Cut the Voids: From your solid White yardage, cut the necessary squares and triangles to fill the V-shaped gaps between the star points, just as you would for a large quilt, using the Y-seam technique.
- The Bridge Panels: To connect the three stars into a single 90-inch line, cut two solid White “bridge” panels measuring approximately 16.5″ x 10″. Sew these between the completed square star blocks.
- The Outer Borders: Add long, solid White borders to the top, bottom, left, and right of the connected stars to bring the entire runner to its final 24″ x 90″ dimension.
Step 6: Architectural Quilting and Tailored Frame
Structure guarantees longevity.
- Baste: Sandwich the pieced runner, the fluid bamboo batting, and the heavy Sateen backing. Baste densely with safety pins.
- Channel and Echo Quilting: Using a walking foot, quilt tight, straight horizontal lines (channel quilting) across the vast White negative space. When your needle reaches the stars, switch to quilting inside the diamond seams to make the deep reds and blacks puff up and stand out from the flattened white background.
- The Binding: Trim the runner perfectly flush. Bind the edges in solid Black fabric to provide a crisp, graphic frame that anchors the floating constellation to the end of the bed.
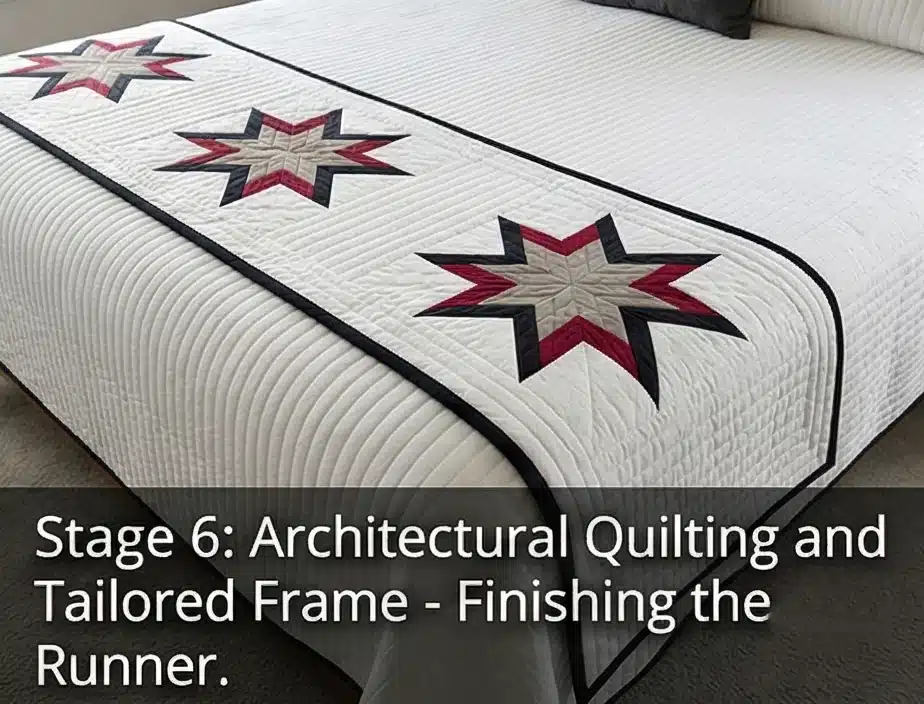
Usability Note: Because a bed runner acts as a shield for the rest of your bedding, it will absorb the brunt of daily wear. The dense channel quilting over the white background is a deliberate choice—it creates a highly durable, easily washable canvas that resists stretching and tearing even when pulled repeatedly across the mattress.

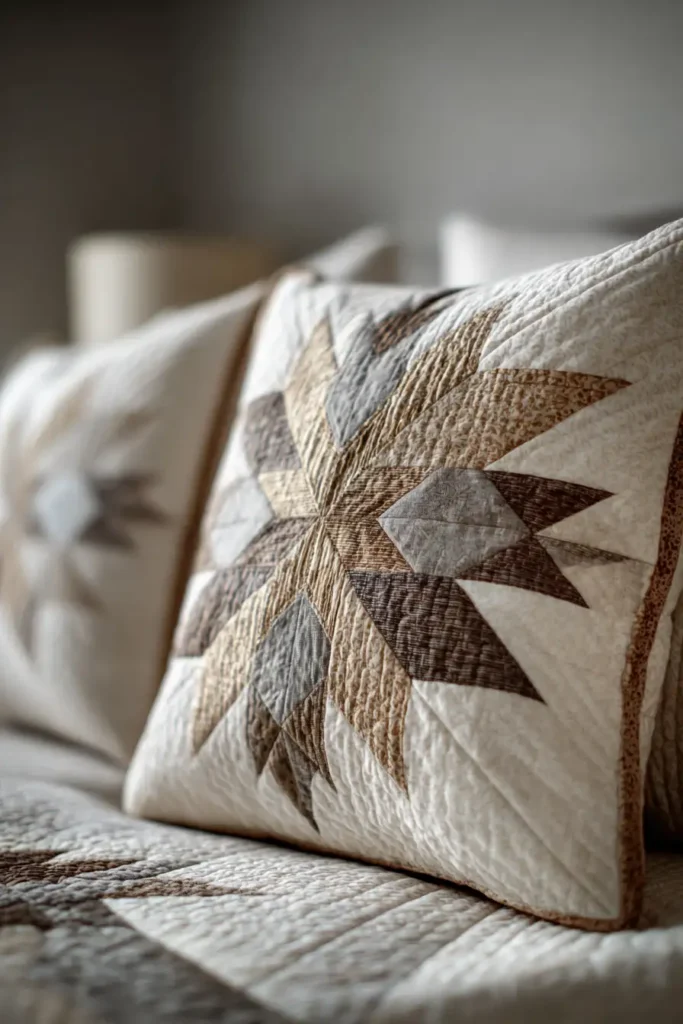
5. Soft Pastel Lakota Star Quilt Designs for Inviting Guest Rooms
“The Whispering Dawn” Pastel Lakota Star Quilt
A guest room should feel like a serene sanctuary, instantly wrapping visitors in a profoundly calming atmosphere. By rendering the highly architectural Lakota Star in a sophisticated palette of modern, muted pastels—think warm Cream, pale Taupe, soft Dusty Rose, and muted Sage—you maintain crisp, geometric elegance while offering a gentle, restorative aesthetic. This design relies on a subtle, luminous ombré transition, creating a beautiful focal point that feels incredibly tailored yet deeply welcoming.
Finished Dimensions: Generous Full/Queen Coverlet, 84″ x 84″.
Materials Needed:
- The “Dawn” (Diamond Strips): 1/2 yard each of 5 solid pastel fabrics (e.g., Warm Cream, Pale Taupe, Dusty Rose, Muted Sage, and a slightly deeper Taupe for the tips).
- The Background (Negative Space): 4.5 yards of solid Warm Cream to allow the muted star to float softly.
- Backing: 7.5 yards of high-quality Cream Percale (crisp and inviting for guests).
- Batting: Wool or a Bamboo/Cotton Blend.
- Why: Guests have unpredictable sleep preferences. Bamboo and wool are premium, naturally thermoregulating fibers that provide superior breathability. They ensure the quilt feels luxuriously cozy without ever becoming stifling, guaranteeing a comfortable night’s rest regardless of the season.
- Thread: 50wt cotton thread in an invisible Cream.
- Notions: A large acrylic ruler with a distinct 45-degree angle line, a rotary cutter with a fresh blade, and fine glass-head pins.
Cultural Backstory: In Plains Native traditions, the Morning Star represents the break of dawn—the quiet, soft light that pushes back the darkness and signals a new beginning. Translating this sacred geometric block into soft, luminous pastels perfectly captures the physical appearance of the early morning sky. Draping a guest bed in these symbolic colors is a beautiful way to offer your visitors a peaceful, protected space for renewal.
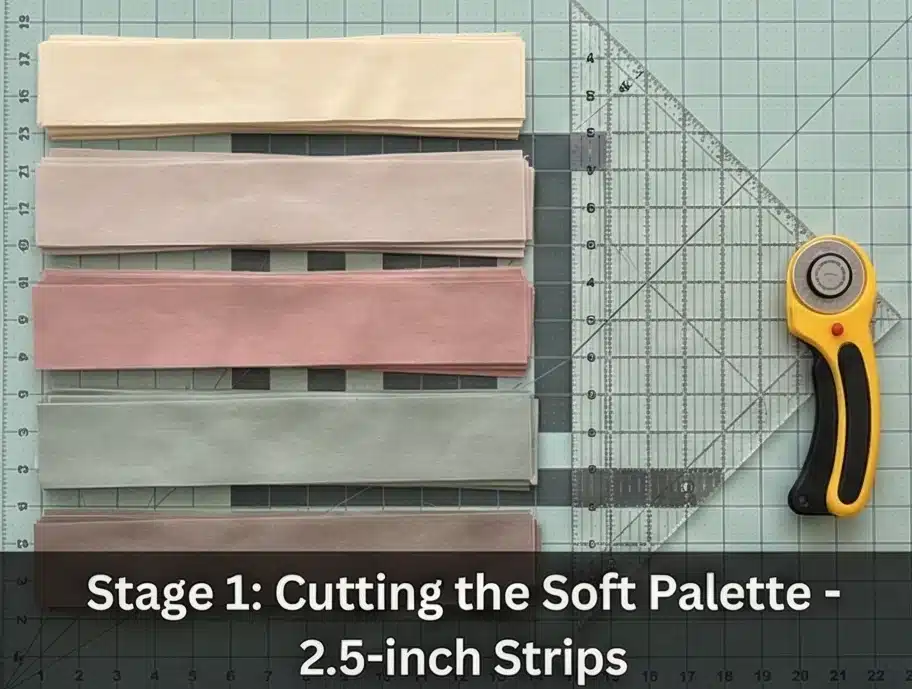
Step 1: Cutting the Soft Palette
Organization is key to a smooth ombré transition.
- Cut the Strips: Cut exactly eight 2.5-inch strips from each of your 5 pastel fabrics across the width of the fabric (WOF).
- Organize the Gradient: Lay the strips out in the exact sequence they will radiate from the center: Cream -> Pale Taupe -> Dusty Rose -> Muted Sage -> Deeper Taupe.
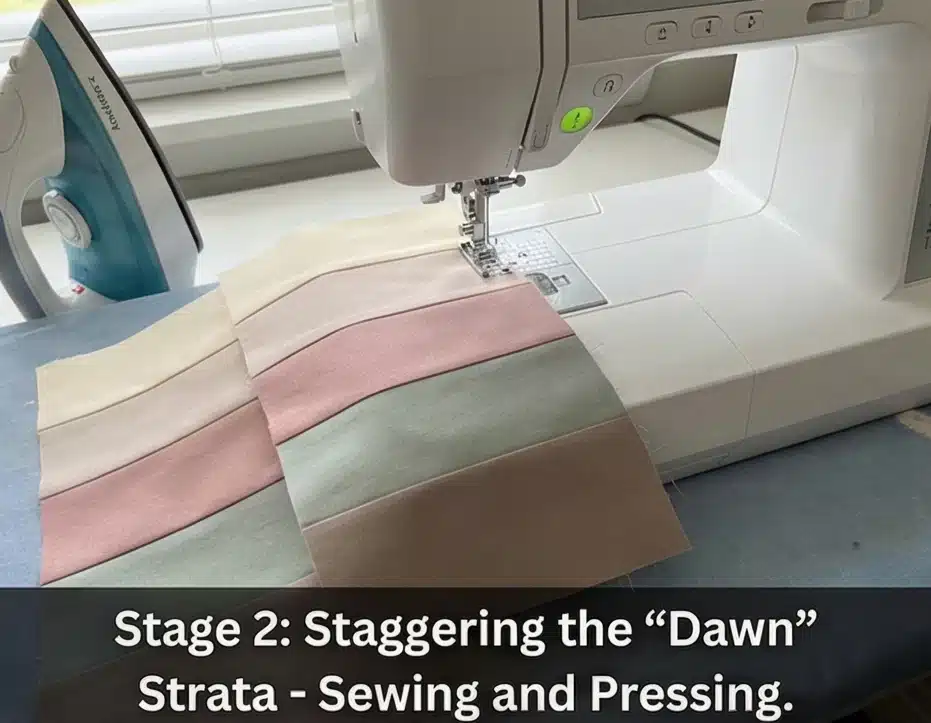
Step 2: Staggering the “Dawn” Strata
Building the striped panels efficiently.
- The Drop: Place the Pale Taupe strip right sides together over the center Cream strip. Drop the Pale Taupe strip exactly 2 inches lower than the top edge of the Cream strip. Sew the long seam.
- Build the Panel: Continue adding the Dusty Rose, Muted Sage, and Deeper Taupe strips in order, ensuring each subsequent strip drops 2 inches lower to create a staircase effect.
- Pressing: Press all seams strictly in one direction (e.g., toward the darker Taupe edge). You will need to make 8 identical staggered strip sets (strata).
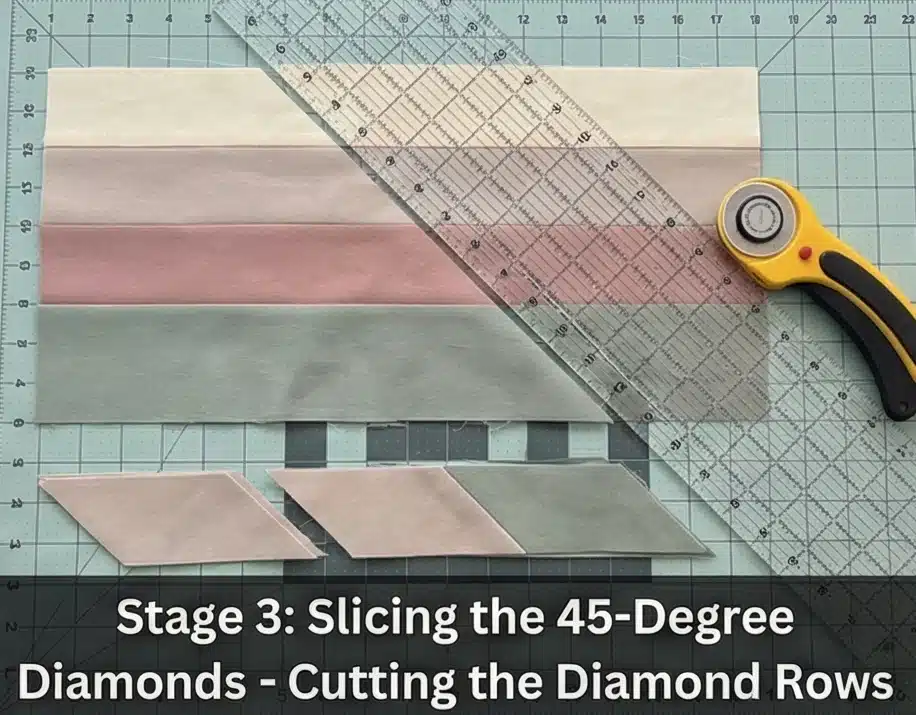
Step 3: Slicing the 45-Degree Diamonds
Revealing the geometry hidden in the stripes.
- Align the Angle: Lay a soft strata panel flat on your cutting mat. Align the 45-degree line of your acrylic ruler along the bottom horizontal seam of the strip set.
- The First Cut: Slice the jagged left edge off the entire strip set to establish a perfect 45-degree angle.
- Sub-Cut the Rows: Measure exactly 2.5 inches over from that newly angled cut. Make a parallel slice. You now have a seamless strip of five pastel diamonds.
- Yield: Cut six diamond strips from each of the 8 strata panels.
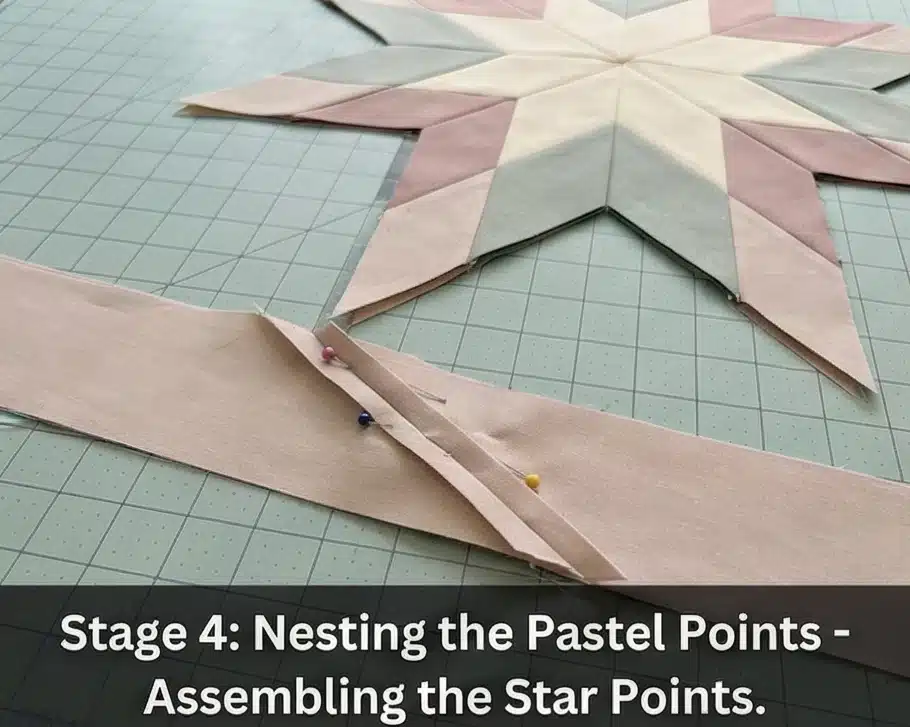
Step 4: Nesting the Pastel Points
Precision creates elegance.
- The Offset Match: Take two diamond strips. Place them right sides together, offsetting them so the Cream diamond on the top strip aligns perfectly with the Pale Taupe diamond on the bottom strip.
- Pinning: Push a pin vertically through every 1/4-inch seam intersection. Because your seams were pressed in the same direction, they will “nest” tightly together.
- Complete the Point: Sew six diamond strips together in this staggered fashion to create a massive, single diamond block. Make 8 of these large points in total.
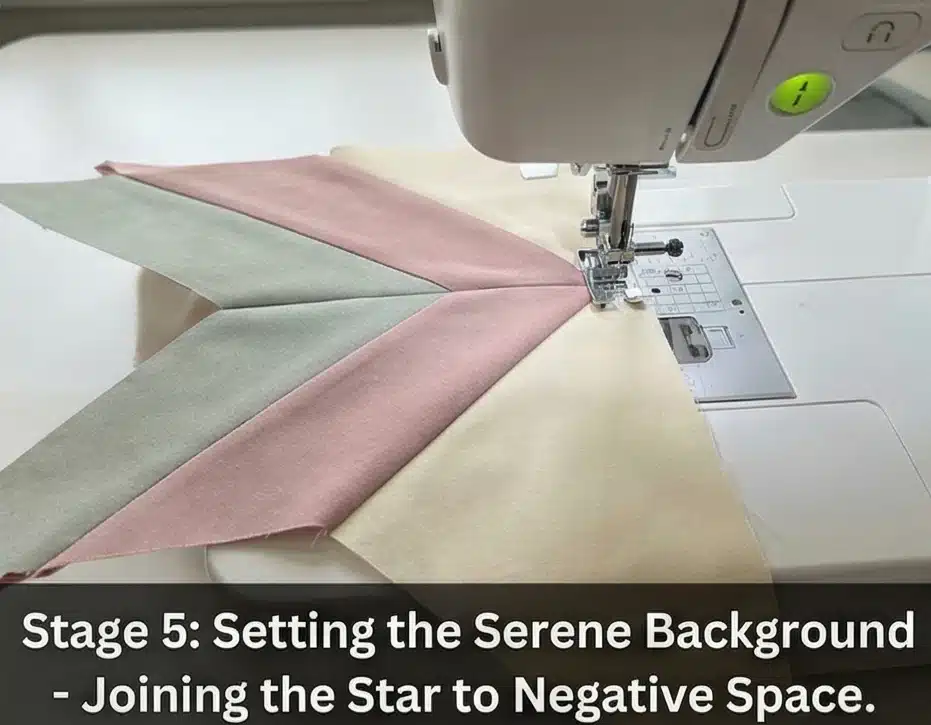
Step 5: Setting the Serene Background
Floating the geometric star seamlessly.
- Cut the Voids: From your Warm Cream yardage, cut exactly four large 20-inch squares (for the outer corners) and four large 20-inch squares cut in half diagonally (yielding eight triangles to fill the spaces between the points).
- Sew the Halves: Sew four large pastel points together to create the top half of the star, and four together to create the bottom half.
- The Y-Seam Pivot: Use the traditional Y-seam technique to gently set the Cream background triangles into the deep V-shapes between the star points, and the large squares into the outer corners. Finally, smoothly join the top and bottom halves of the star at the center.
Step 6: Breathable Quilting and Tailored Edge
Finishing the sanctuary centerpiece.
- The Baste: Sandwich the pieced star top, the breathable bamboo or wool batting, and the crisp percale backing.
- Echo Quilting: Using a walking foot, quilt elegant, straight lines that echo the diamond shapes, radiating outward from the center. Quilt 1/4 inch inside every seam line. This provides a stunning architectural texture that elevates the soft pastels and beautifully secures the layers.
- The Frame: Trim the edges perfectly square. Bind the quilt using a solid Deeper Taupe or Sage fabric. This grounds the floating, airy design with a soft but tailored boundary, finishing the guest room perfectly.
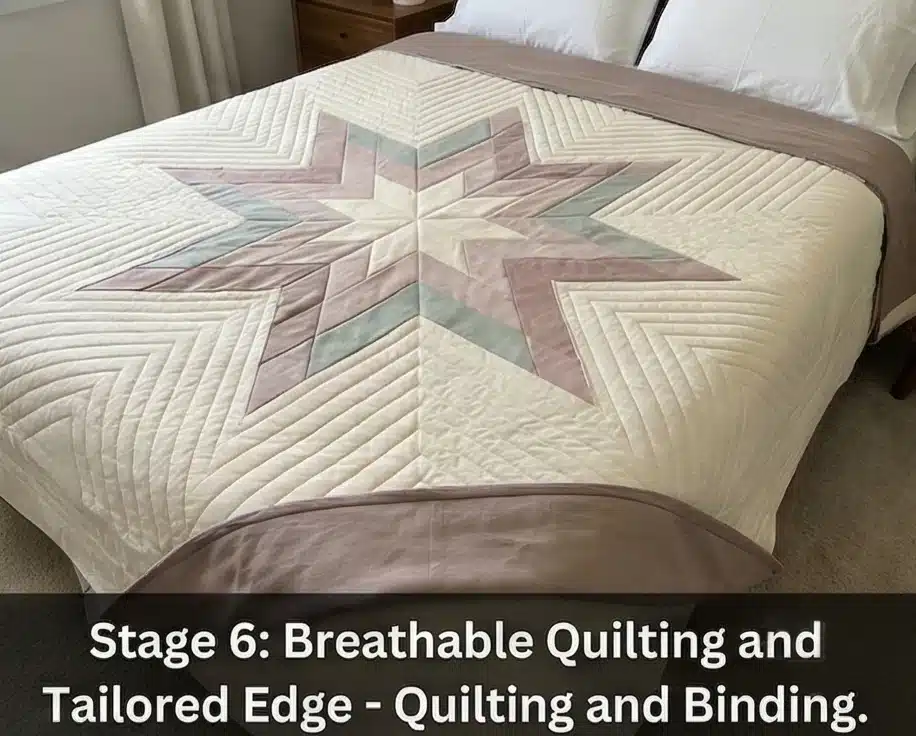
Usability Note: Light-colored, pastel guest quilts show minor scuffs and marks more easily than dark textiles. Because the dense echo quilting thoroughly secures the piece’s structural integrity, this quilt is easily machine-washable. Launder on a cool, gentle cycle with a mild detergent, and tumble dry on low to refresh the breathable loft of the bamboo batting.
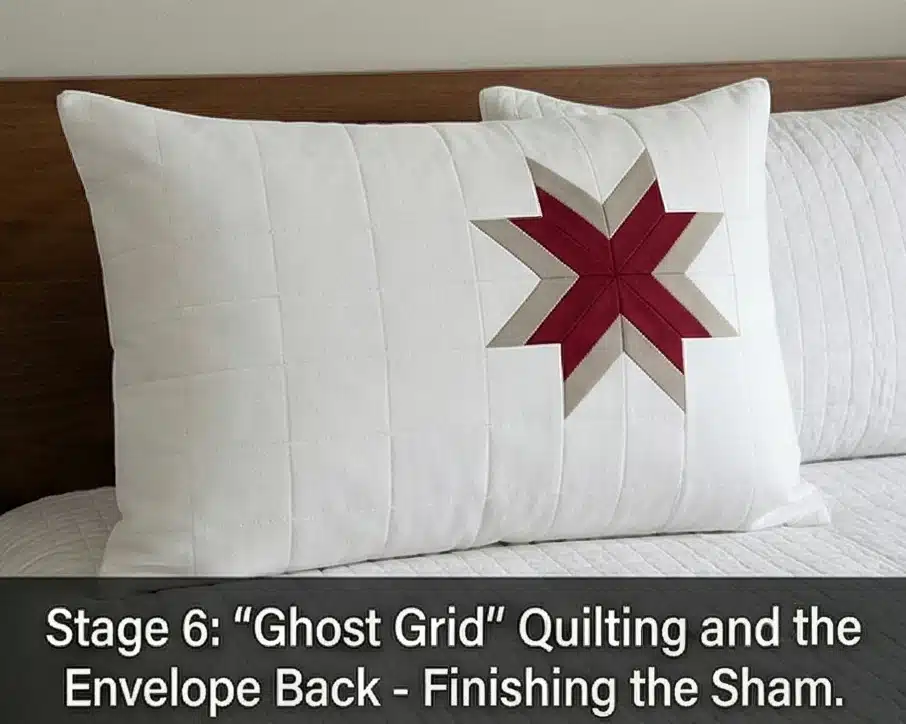
6. Modern Minimalist Lakota Star Pillow Shams for Serene Sleep Sanctuaries
“The Solstice Point” Minimalist Star Pillow Sham
A serene sleep sanctuary requires textiles that are deeply calming but visually tailored. Translating the monumental architecture of the Lakota Star into a pillow sham demands a shift in scale and composition. By floating a scaled-down, precision-pieced star heavily off-center against a vast expanse of negative space, “The Solstice Point” sham becomes a work of modern art. Executed in a sharp, high-contrast palette of crisp White, soft Greige, and deep Black, with a vibrant Deep Red core, this design offers striking geometry while maintaining the breathable, luxurious comfort required for a restful night’s sleep.
Finished Dimensions: Standard Pillow Sham, 20″ x 26″ (Make a pair to mirror each other on the bed).
Materials Needed (For One Sham):
- The “Star” (Diamonds): 1/8 yard each of solid Deep Red, Greige, and Black cotton.
- The “Void” (Background & Envelope Back): 1.5 yards of high-thread-count White Percale.
- Batting:100% Bamboo Batting.
- Why: Because the sham rests directly behind the sleeper’s head, temperature regulation is critical. Bamboo batting is incredibly breathable and naturally cooling. It provides a plush, quilted texture that showcases the star without trapping body heat, ensuring ultimate sleeping comfort.
- Thread: 50wt cotton thread in an invisible Dove Grey.
- Notions: A small acrylic ruler with a 45-degree angle line, a fresh rotary blade, and a water-soluble fabric marker.
Cultural Backstory: The eight-pointed Morning Star is a profound symbol of protection, dawn, and renewal in Plains Native cultures. By placing this protective emblem directly on a pillow sham, you are honoring the tradition of wrapping a loved one in safety while they rest. The minimalist, off-center placement is a nod to modern contemporary design, representing a single, brilliant star floating in the vast expanse of the early morning sky.
Step 1: Scaling the Miniature Geometry
A smaller canvas requires precise, scaled-down strips.
- Cut the Strips: To create a star measuring roughly 12 inches across, use narrower strips. Cut exactly eight 1.5-inch strips from your Deep Red, Greige, and Black fabrics.
- Organize the Gradient: Lay out the sequence to build your high-contrast points: Deep Red (center) -> Greige (middle) -> Black (outer tip).

Step 2: Strip-Piecing the Micro-Strata
Building the staggered panels for the diamond cuts.
- The Drop: Place a Greige strip right-sides together over a Deep Red strip. Offset the Greige strip so it drops exactly 1.5 inches lower than the top of the Red strip. Sew them together with a 1/4-inch seam allowance.
- Complete the Panel: Add the Black strip to the Greige, dropping it another 1.5 inches.
- Pressing: Press the seams outward toward the Black strip to reduce bulk. You need to make 8 identical miniature strata panels.
Step 3: Slicing the 45-Degree Angles
Extracting the tiny diamonds from the striped panels.
- Align the Angle: Lay a strata panel flat. Align the 45-degree line of your ruler along the bottom horizontal seam. Slice off the jagged left edge.
- The Sub-Cut: Measure exactly 1.5 inches over from the newly cut angle. Slice again. You now have a continuous row of three tiny, connected diamonds.
- The Yield: Cut three of these diamond rows from each strata panel to build your eight star points.
Step 4: Nesting the Eight Points
Tiny intersections require exact pinning.
- Offset and Pin: Take two diamond rows. Place them right-sides together, shifting them so the Red diamond on the top row perfectly meets the Greige diamond on the bottom row. Push a pin vertically through the seam intersection.
- Sew the Points: Sew three rows together to build a single star point. Repeat this process until you have 8 miniature star points.
- Assemble the Star: Carefully sew the points together to form the two halves of the star, then join the halves across the center, pressing the final bulky intersection open to ensure it lies flat against the pillow.
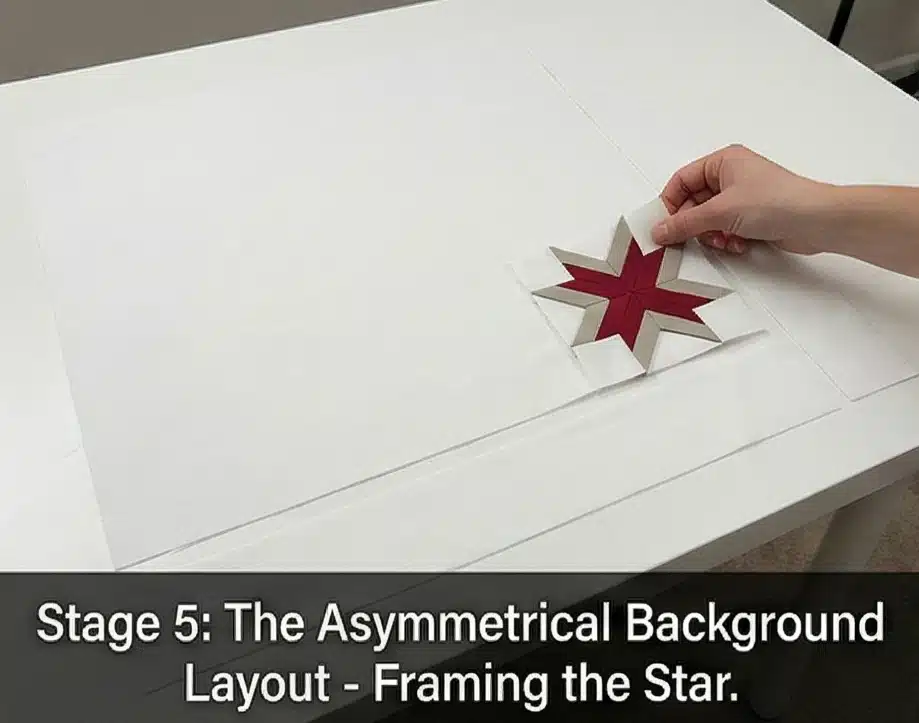
Step 5: The Asymmetrical Background Layout
Floating the star in modern negative space.
- Cut the Voids: From your crisp White yardage, cut the small squares and triangles needed to fill the V-shaped gaps between the star points, inserting them using the Y-seam technique. Your completed block will now be a solid square.
- The Offset Framing: To achieve the minimalist look, do not center the star. Sew a wide 12-inch White panel to the Right side of the star block, and a narrower 4-inch White panel to the Left side. Add White borders to the top and bottom until the entire sham front measures exactly 20.5″ x 26.5″.
Step 6: “Ghost Grid” Quilting and the Envelope Back
Securing the layers for heavy use and easy washing.
- Baste and Quilt: Sandwich your pieced top, the cooling bamboo batting, and a scrap piece of muslin (for the interior lining). Using a walking foot, quilt a subtle 1-inch grid strictly in the White negative space, leaving the geometric star unquilted. This makes the colorful star visually “pop” off the crisp background.
- Prepare the Backing: Cut two rectangles of White Percale for the envelope closure (e.g., 20.5″ x 18″ and 20.5″ x 14″). Fold and topstitch one long edge on each piece to create a clean hem.
- Assembly: Place the quilted top face up. Lay the backing pieces face down, overlapping the hemmed edges in the center. Sew a 1/2-inch seam around the entire perimeter, clip the corners, and turn right-side out. Insert a plump sleeping pillow for a flawless finish.
Usability Note: Pillow shams absorb oils and require frequent laundering. Backstitch heavily over the envelope overlaps during Step 6 so the seams do not tear when wrestled onto a thick pillow. Wash on a cool cycle to prevent the high-contrast Deep Red and Black fabrics from bleeding into the pristine White background.
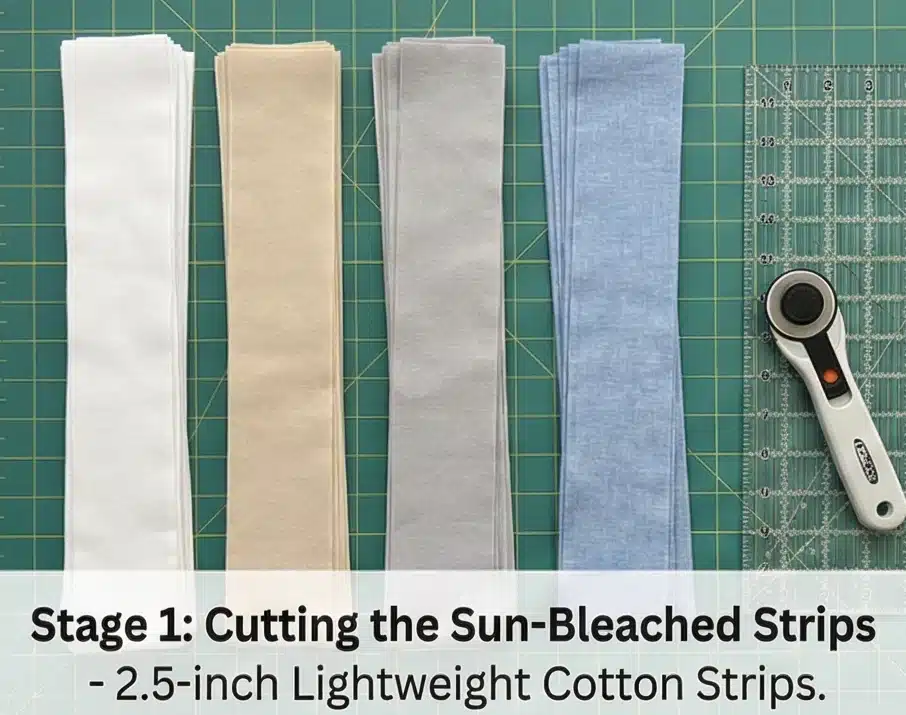
7. Lightweight Cotton Lakota Star Summer Quilts for Comfortable Layering

“The Prairie Zephyr” Lightweight Chambray Star Quilt
Summer bedding requires a delicate balance: it must provide the comforting, tactile weight of a quilt without trapping stifling heat. “The Prairie Zephyr” achieves this by pairing the striking, monumental geometry of the traditional Lakota Star with exceptionally lightweight, breathable textiles. Rendered in a sun-bleached, coastal-inspired palette of Soft Chambray Blue, Warm Sand, Dove Grey, and Crisp White, this design moves away from heavy winter flannels. By utilizing sheer cotton voile for the background and a minimal-loft bamboo batting, the quilt becomes a feather-light, elegant coverlet perfect for warm, breezy nights or layered styling at the foot of the bed.
Finished Dimensions: Summer Coverlet / Oversized Throw, 72″ x 72″.
Materials Needed:
- The “Zephyr” (Diamond Strips): 1/2 yard each of 4 lightweight solid cottons (e.g., Crisp White, Warm Sand, Dove Grey, and Soft Chambray Blue).
- The Background (Negative Space): 3.5 yards of White Cotton Voile or lightweight Poplin.
- Backing: 4.5 yards of Cotton Double Gauze or Voile.
- Why: Double gauze and voile are incredibly sheer, airy fabrics typically used for summer garments. Using them for a quilt backing instantly reduces the overall weight by half, giving the coverlet a luxurious, cloud-like drape that breathes effortlessly.
- Batting:100% Bamboo Batting (Lowest Loft).
- Why: Bamboo is a naturally cooling fiber that wicks away moisture. A low-loft bamboo batting provides the structural layer necessary to hold the quilt’s geometry together while ensuring it remains highly suitable for summer temperatures.
- Thread: 50wt cotton thread in an invisible White.
- Notions: A large acrylic ruler with a 45-degree angle line, a rotary cutter with a fresh blade, and fine glass-head pins.
Cultural Backstory: The Morning Star is an enduring symbol of guidance, renewal, and the breaking dawn across Plains Native cultures. While historically, early star quilts were crafted from heavier trade blankets and wool to survive harsh winters, the design itself represents the light and warmth of the sun. Adapting this iconic, radiating pattern into a lightweight summer textile honors the solstice—the season of maximum light—and brings that bright, renewing energy into the modern home.
Step 1: Cutting the Sun-Bleached Strips
Preparing the lightweight cottons for the gradient.
- The Scale: Because this is a 72-inch throw rather than a massive bedspread, we use slightly fewer strips per point. Cut exactly six 2.5-inch strips from each of your 4 star colors (White, Sand, Grey, Chambray) across the width of the fabric (WOF).
- Organize the Sequence: Lay the strips out from the center outward: White -> Warm Sand -> Dove Grey -> Chambray Blue.
Step 2: Constructing the Summer Strata
Building the staggered gradient panels.
- The Offset: Place the Warm Sand strip right-sides together over the White center strip. Drop the Sand strip exactly 2 inches lower than the top edge of the White strip to create the staircase effect. Sew with a precise 1/4-inch seam.
- Complete the Panel: Add the Grey strip (dropped 2 inches), and finally the Chambray strip (dropped 2 inches).
- Pressing: Press all seams strictly toward the darker, outer Chambray edge. The lightweight cotton will press beautifully flat. You need to make 6 identical staggered strata panels.
Step 3: Slicing the 45-Degree Diamonds
Cutting the angled rows from the straight stripes.
- Align the Angle: Lay a strata panel flat. Align the 45-degree line of your acrylic ruler along the bottom horizontal seam of the panel. Slice off the jagged left edge.
- The Sub-Cut: Measure exactly 2.5 inches beyond the newly cut angle, and slice again. You now have a continuous row of four lightweight diamonds.
- The Yield: Cut six of these diamond rows from each of the 6 strata panels to build your eight star points.
Step 4: Engineering the Breezy Points
Nesting the lightweight seams.
- Offset and Pin: Take two diamond rows. Place them right-sides together, shifting them so the White diamond on the top row perfectly meets the Sand diamond on the bottom row. Push a pin vertically through every 1/4-inch intersection.
- Build the Points: Sew six rows together in this staggered fashion to construct a single star point. The thin cotton will nest seamlessly without bulk. Repeat to create all 8 star points.
- Assemble the Star: Carefully sew the points together to form the top and bottom halves of the star, then join them across the center, pressing the final intersection open.
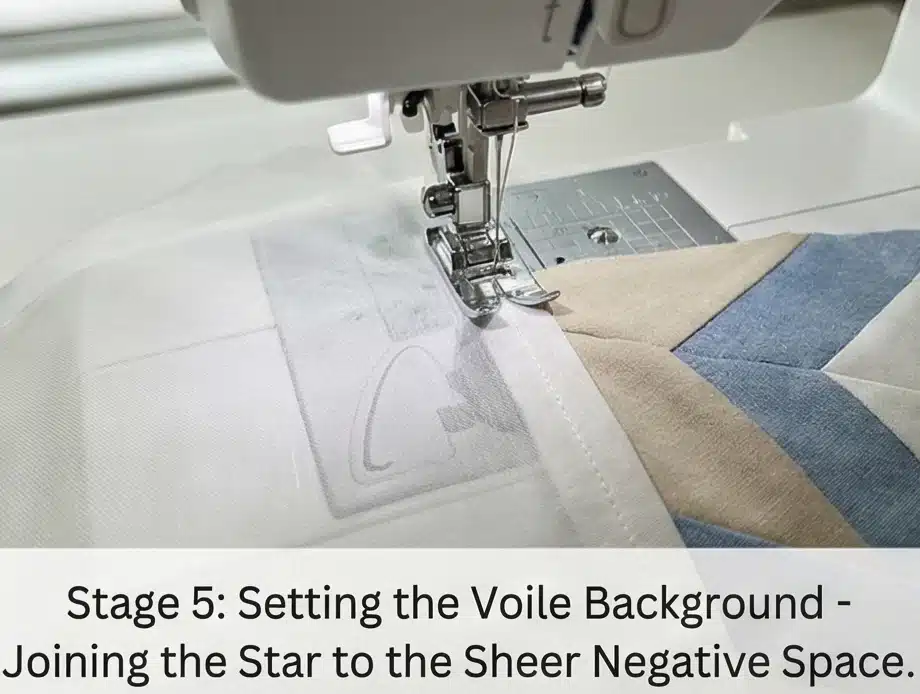
Step 5: Setting the Voile Background
Handling semi-sheer fabric requires gentle precision.
- Cut the Voids: From your sheer White Voile yardage, cut exactly four 18-inch squares (for the outer corners) and four 18-inch squares cut in half diagonally (yielding eight triangles for the gaps between the points).
- The Y-Seam Pivot: Because voile stretches easily on the bias, handle these pieces gently. Use the Y-seam technique to drop the voile triangles and squares into the deep V-shaped voids between the star points, stopping exactly 1/4 inch from the edges to pivot smoothly.
Step 6: Open-Grid Quilting and the Tailored Edge
Do not over-quilt a summer blanket.
- The Baste: Sandwich the pieced star, the thin bamboo batting, and the double gauze backing. Baste heavily with safety pins to prevent the sheer backing from shifting.
- Wide Quilting: To maintain the ultimate drape and softness, avoid dense, heavy quilting. Using a walking foot, quilt an open, wide grid. Stitch straight lines spaced 3 to 4 inches apart across the entire quilt. This secures the layers but allows the fabric to remain highly pliable and airy.
- The Binding: Trim the quilt square. Bind the edges using the solid Chambray Blue fabric to frame the piece and cleanly contain the soft, lightweight layers.
Usability Note: Cotton double gauze and voile are prone to delightful, natural crinkling when washed. Machine wash this quilt on a cold, delicate cycle and tumble dry on the lowest heat setting. The quilt will emerge with a gorgeously soft, lived-in texture that begs to be draped over a reading chair or pulled across the shoulders on a cool summer evening.
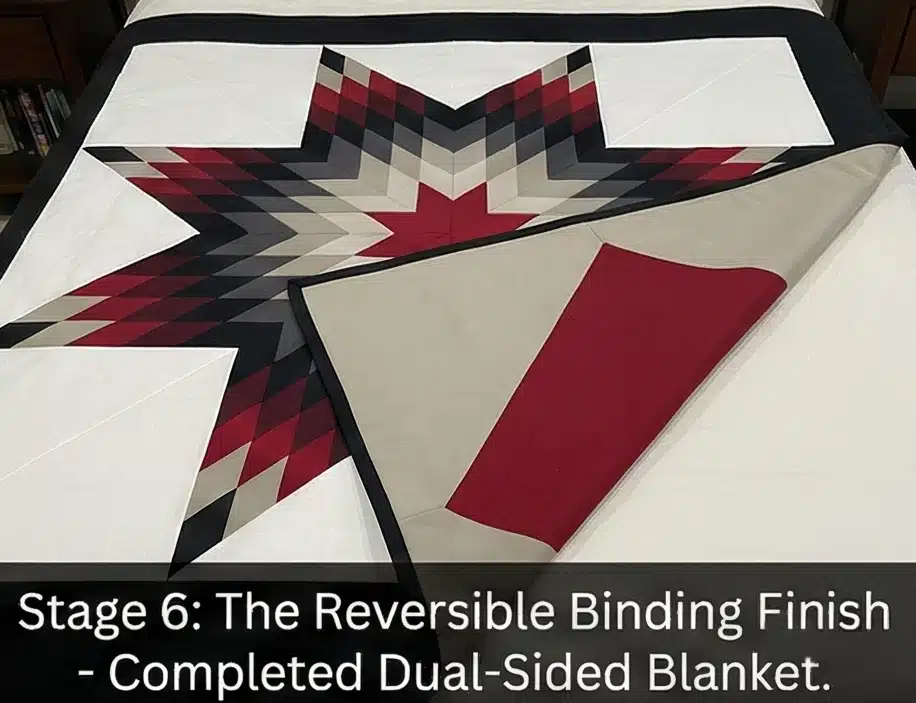
8. Reversible Lakota Star Quilted Bed Blankets for Versatile Styling
“The Equinox Dual” Reversible Star Quilt
Versatility is a hallmark of intelligent interior design. A reversible quilt offers two entirely distinct atmospheres in a single luxurious textile, allowing you to instantly shift a room’s energy with a simple flip of the bedding. “The Equinox Dual” pairs a highly intricate, traditional eight-pointed Lakota Star on one side with a massive, minimalist geometric diamond motif on the reverse. Executed in a striking, high-contrast palette, Side A features a dynamic burst of Crisp White, Charcoal, and Black, anchored by a Deep Red core. Side B offers profound serenity with a vast expanse of soothing Greige, punctuated by an oversized Deep Red architectural diamond. It is the ultimate expression of tailored, dual-purpose comfort.
Finished Dimensions: Elegant Queen Reversible Blanket, 90″ x 90″.
Materials Needed:
- Side A (The Intricate Star): 1/2 yard each of solid White, Greige, Charcoal, Black, and Deep Red cotton. 4 yards of solid White for the negative space.
- Side B (The Minimalist Reverse): 6 yards of solid Greige cotton (for the background) and 1.5 yards of solid Deep Red (for the oversized geometric motif).
- Batting:100% Bamboo Batting or a premium Wool Blend.
- Why: A reversible quilt essentially has two heavy “tops” and no lightweight backing. Using dense batting will make the quilt uncomfortably stiff and heavy. Bamboo batting provides the perfect ultra-lightweight, breathable core. It thermoregulates beautifully, ensuring this dual-layered blanket drapes fluidly and remains invitingly cozy year-round.
- The Frame (Binding): 3/4 yard of solid Black cotton.
- Thread: 50wt cotton thread in an invisible Dove Grey (which blends perfectly on both the White and Greige backgrounds).
- Notions: A large acrylic ruler with a 45-degree angle line, a fresh rotary blade, and heavy-duty curved basting pins.
Cultural Backstory: In historical quilting traditions across North America, materials were precious and nothing was wasted. Reversible quilts—sometimes called “summer/winter” quilts—were practical masterpieces. One side often featured a complex, formal block for display when guests arrived, while the reverse featured a simpler, darker utilitarian design for daily family use. By adopting this dual-sided approach with the Lakota Star, you honor the heritage of resourcefulness while bringing high-end, adaptable styling to the modern bedroom.
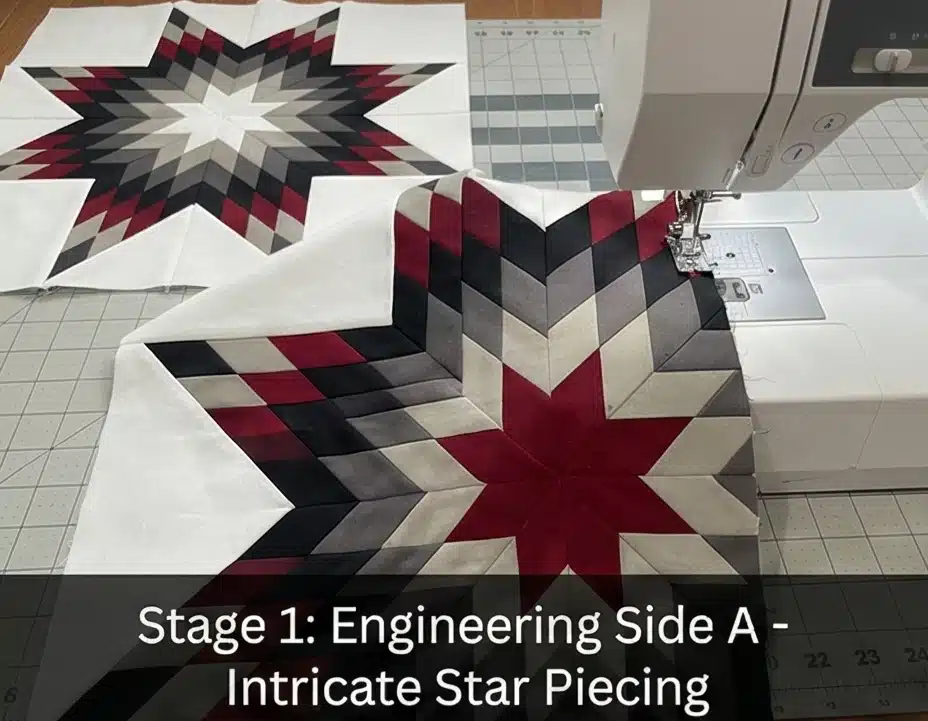
Step 1: Engineering Side A (The Intricate Star)
Building the classic radiating geometry.
- Cut the Strips: Cut exactly eight 2.5-inch strips from your Red, White, Greige, Charcoal, and Black fabrics.
- The Staggered Strata: Sew the strips right sides together into 8 identical gradient panels, dropping each subsequent strip exactly 2 inches lower than the previous one to create a staircase edge.
- The Diamond Cut: Align the 45-degree line of your ruler along the bottom horizontal seam. Slice off the jagged edge, then make parallel cuts every 2.5 inches to yield your diamond rows.
- Assemble and Set: Nest the seams to build the 8 large star points. Using the Y-seam technique, insert your crisp White background squares and triangles into the V-shaped voids to create a perfectly flush, 90″ x 90″ intricate star top.
Step 2: Engineering Side B (The Minimalist Reverse)
Creating a bold, large-scale graphic background.
- The Deep Red Diamond: From your Deep Red yardage, cut a massive square measuring 32″ x 32″. Turn this square on its point so it acts as a giant floating diamond.
- The Greige Voids: Cut four massive triangles from your solid Greige yardage to surround the Red diamond.
- Assemble the Reverse: Sew the Greige triangles to the four angled sides of the Red diamond. Add wide Greige borders to the top, bottom, and sides until this minimalist backing also measures exactly 90″ x 90″.
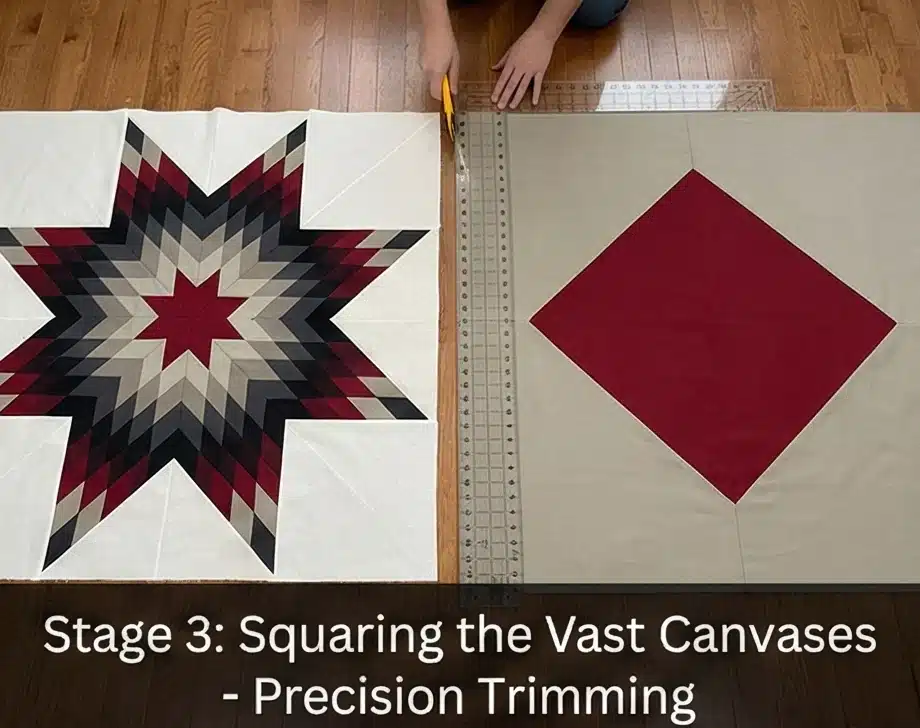
Step 3: Squaring the Vast Canvases
A reversible quilt requires perfect alignment.
- The Precision Trim: Lay Side A completely flat on the floor and measure it carefully. Do the same for Side B.
- The Match: Trim both massive canvases to precisely the same dimensions. If one top is even slightly larger than the other, the finished quilt will pucker, fold, and refuse to lie flat on the bed.
Step 4: The Double-Sided Baste
There is no “wrong side” to hide mistakes in.
- The Sandwich: Tape Side B firmly to the floor, wrong-side up. Smooth the feather-light bamboo batting perfectly over it. Carefully lay Side A right-side up on top.
- Symmetrical Pinning: Because both sides must remain flawless, baste with curved safety pins at 3 to 4-inch intervals. Smooth the fabric constantly from the center outward to ensure neither the White background nor the Greige reverse develops hidden wrinkles.

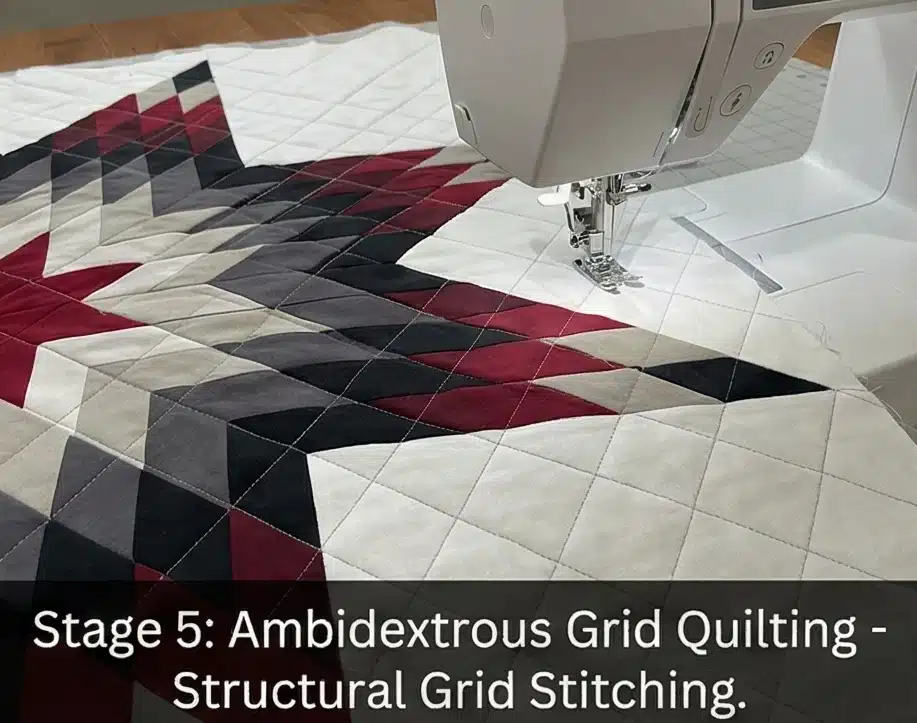
Step 5: Ambidextrous Grid Quilting
The stitching must complement two different designs.
- The Universal Pattern: When a quilt is reversible, the quilting motif appears on both sides. Do not quilt to the specific shape of the complex star, as those stitch lines will look completely random and chaotic on the minimalist reverse side.
- The Structural Grid: Using a walking foot and Dove Grey thread, quilt a strict, continuous 2-inch grid of straight horizontal and vertical lines across the entire 90-inch expanse.
- Why: This dense, architectural grid acts as a unifying texture. It flattens the seams of the complex star on Side A, and it adds profound, modern texture to the vast, solid expanses of Greige on Side B.
Step 6: The Reversible Binding Finish
Framing the dual masterpiece.
- The Anchor Frame: Trim any excess batting from the edges. Bind the quilt using your solid Black fabric.
- The Visual Effect: Because both Side A (White/Black/Red) and Side B (Greige/Red) feature high-contrast, tailored aesthetics, the sharp Black binding acts as the perfect, unifying frame for whichever side you choose to display.
Usability Note: Reversible quilts are inherently slightly heavier due to the density of having two pieced tops. Wash this majestic blanket on a cold, gentle cycle to preserve the deep reds and blacks. Tumble dry on low with wool dryer balls to ensure the bamboo batting fluffs evenly, creating a gorgeously soft, crinkled texture that looks equally inviting whether displayed with the complex star or the minimalist diamond.
9. Lakota Star Quilted Headboard Accents for Cultural Bedroom Elegance
“The Artisan’s Crown” Half-Star Quilted Headboard
A bedroom should be an acoustic and visual sanctuary. Hard walls and high ceilings can sometimes make a sleeping space feel cavernous or echoing. Introducing a quilted textile directly above the bed—acting as a suspended headboard or a massive piece of framed art—absorbs sound while providing a breathtaking architectural focal point. “The Artisan’s Crown” adapts the monumental Lakota Star into a wide, rectangular format, featuring a “Rising Star” (a half-star composed of four radiating points). Executed in a high-contrast, modern palette of crisp White, soft Greige, and deep Black, anchored by a vibrant Deep Red horizon line, this suspended headboard brings profound cultural geometry and profound coziness to the room.
Finished Dimensions: Queen/King Headboard Accent, 30″ tall x 60″ wide.
Materials Needed:
- The “Rising Star” (Diamonds): 1/4 yard each of solid Deep Red, Black, Charcoal, Greige, and White cotton.
- The “Sky” (Negative Space): 2 yards of solid White or Greige cotton.
- Backing: 2 yards of sturdy Black Canvas or Cotton Twill.
- Batting:100% Wool or a Bamboo/Cotton Blend.
- Why: When hanging a textile on a wall, acoustic dampening is the primary functional goal. Wool and bamboo are incredibly dense yet breathable fibers that absorb ambient room noise and echoes beautifully. Furthermore, if you sit up in bed to read, leaning back against a wool-batted suspended headboard offers exceptionally comfortable, firm support.
- The Mounting: 1/2 yard of fabric for the hanging sleeve, plus a sleek metal or wooden curtain rod (at least 64″ long) for installation.
- Thread: 50wt cotton thread in Dove Grey.
- Notions: A large acrylic ruler with a 45-degree angle line, a rotary cutter, and a water-soluble fabric marker.
Cultural Backstory: In Plains Native cultures, the interior walls of traditional lodges (tipis) were often lined with decorated “dew cloths” or insulated textiles. These linings prevented drafts, managed moisture, and provided a canvas for storytelling and geometric art. Hanging a beautifully pieced Morning Star above the bed honors this ancient tradition of wrapping the sleeping space in protective, insulating, and meaningful textiles, modernizing the concept for contemporary architecture.
Step 1: The Half-Star Math
A wide aspect ratio requires modifying the classic eight points.
- Cut the Strips: Because we are building a “Rising Star” that sits flat against a bottom horizon line, we only need four points instead of eight. Cut exactly four 2.5-inch strips from each of your 5-star colors (Red, Black, Charcoal, Greige, White).
- Organize the Horizon: Lay the strips out in your gradient order, starting with Deep Red at the core and fading outward to White.
Step 2: Building the Horizon Strata
Strip-piecing the gradient for the four points.
- The Stagger: Place the Black strip right-sides together over the Deep Red strip. Drop the Black strip exactly 2 inches lower than the top edge of the Red strip to create the offset. Sew them together with a precise 1/4-inch seam.
- Complete the Panel: Add the Charcoal, Greige, and White strips in sequence, dropping each one 2 inches lower than the last.
- Pressing: Press all seams strictly toward the darker, inner Deep Red edge. You need to make 4 identical staggered strata panels.
Step 3: Slicing the 45-Degree Diamond Rows
Extracting the geometry.
- Align the Angle: Lay a strata panel flat. Align the 45-degree line of your acrylic ruler along the bottom horizontal seam. Slice off the jagged left edge.
- The Sub-Cut: Measure exactly 2.5 inches over from the cut and slice again. You now have a row of five diamonds connected end to end.
- The Yield: Cut six of these diamond rows from each of the 4 strata panels.
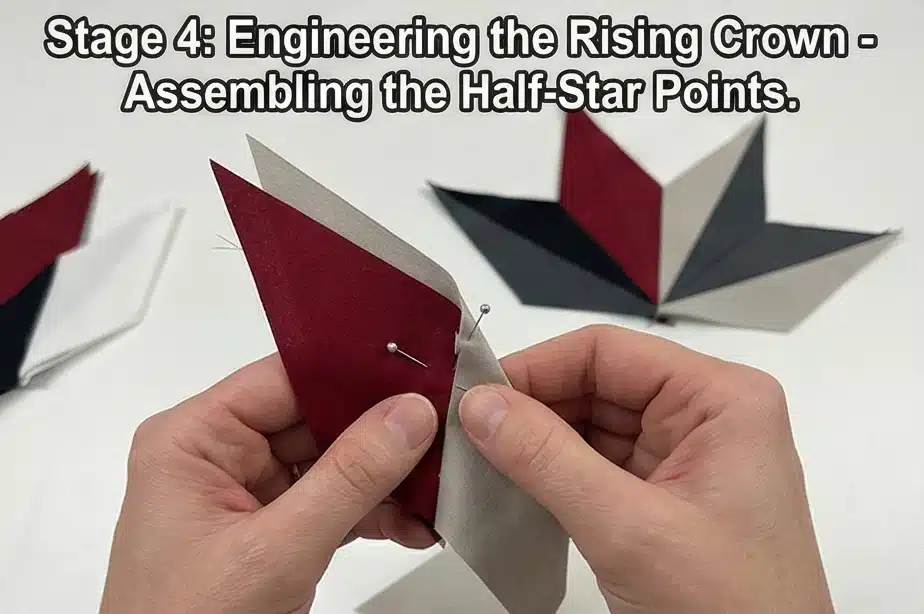
Step 4: Engineering the Rising Crown
Nesting the half-star.
- Offset and Pin: Take two diamond rows. Place them right-sides together, shifting them so the Red diamond on the top row perfectly meets the Black diamond on the bottom row. Push a pin vertically through every seam intersection.
- Build the Four Points: Sew six rows together in this staggered pattern to build one massive star point. Repeat to construct the 4-star points.
- Assemble the Arch: Sew the four points together, side by side. The bottom edges will align perfectly to form a completely flat, horizontal baseline, while the four points radiate upward into a stunning semi-circle or “crown.”
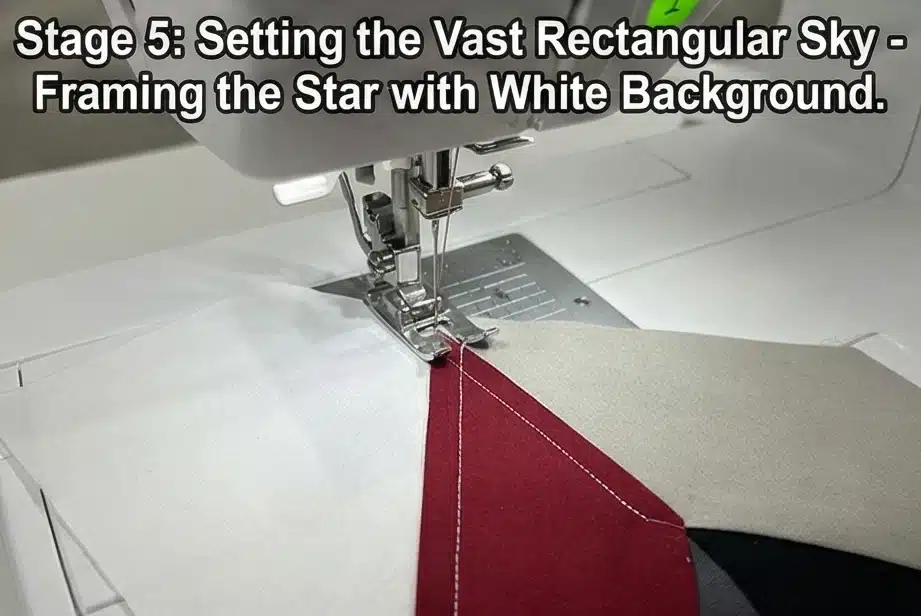
Step 5: Setting the Vast Rectangular Sky
Framing the geometry for the wall.
- Cut the Voids: From your solid White or Greige yardage, cut three large triangles (using the Y-seam technique) to drop into the V-shaped gaps between the four rising points.
- Square the Canvas: Cut two massive right-angle triangles to attach to the far left and far right sides of the star, transforming the arched top edge into a perfectly flush, straight horizontal line. Trim the entire assembled piece to a sleek 30″ tall by 60″ wide rectangle.
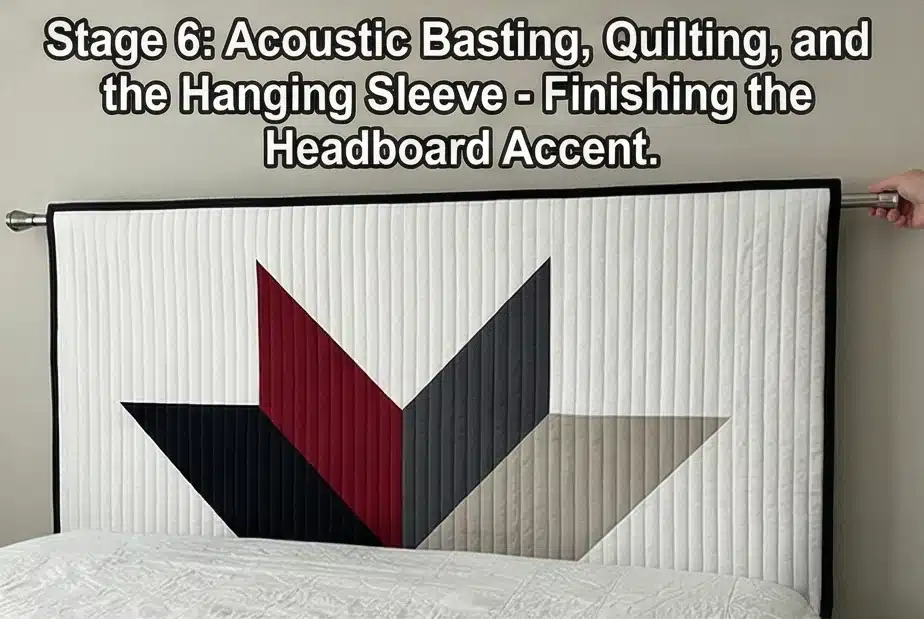
Step 6: Acoustic Basting, Quilting, and the Hanging Sleeve
Preparing the textile for suspension.
- The Baste: Sandwich the pieced star, the sound-dampening wool/bamboo batting, and the heavy Canvas backing. Baste densely.
- Architectural Quilting: Using a walking foot, quilt straight, vertical lines spaced 1 inch apart across the entire headboard. This dense, matchstick quilting makes the textile incredibly stiff and architectural, ensuring it will hang perfectly flat against the wall without sagging or bowing.
- The Hanging Sleeve: Before binding the edges, cut a 58-inch-long, 8-inch-wide strip of canvas. Hem the short ends. Fold it in half lengthwise (wrong sides together) to make a 4-inch wide tube. Baste the raw edges of this tube along the top back edge of your quilt.
- The Finish: Bind the entire 30″ x 60″ headboard in solid Black fabric. Slip your sleek metal curtain rod through the hidden sleeve on the back, and mount the hardware above your bed for a stunning, tactile centerpiece.
Usability Note: A wall-hanging does not require frequent washing, but it will collect ambient dust. Once a month, use the upholstery brush attachment on your vacuum cleaner on its lowest suction setting to gently pull dust from the dense vertical quilting lines, keeping the high-contrast White and Black fabrics pristine.
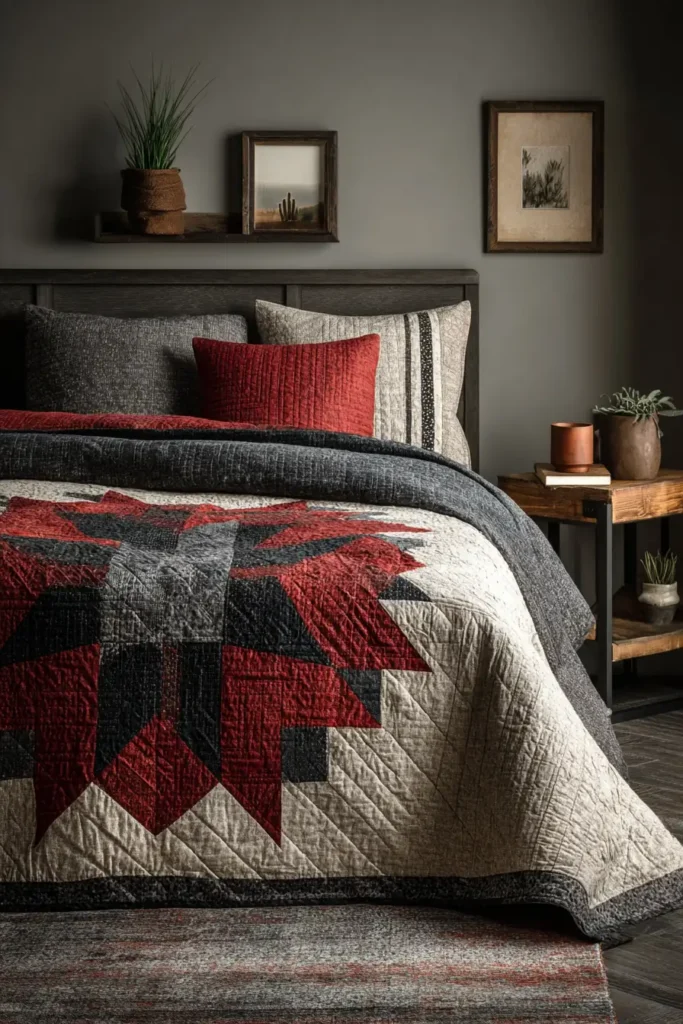
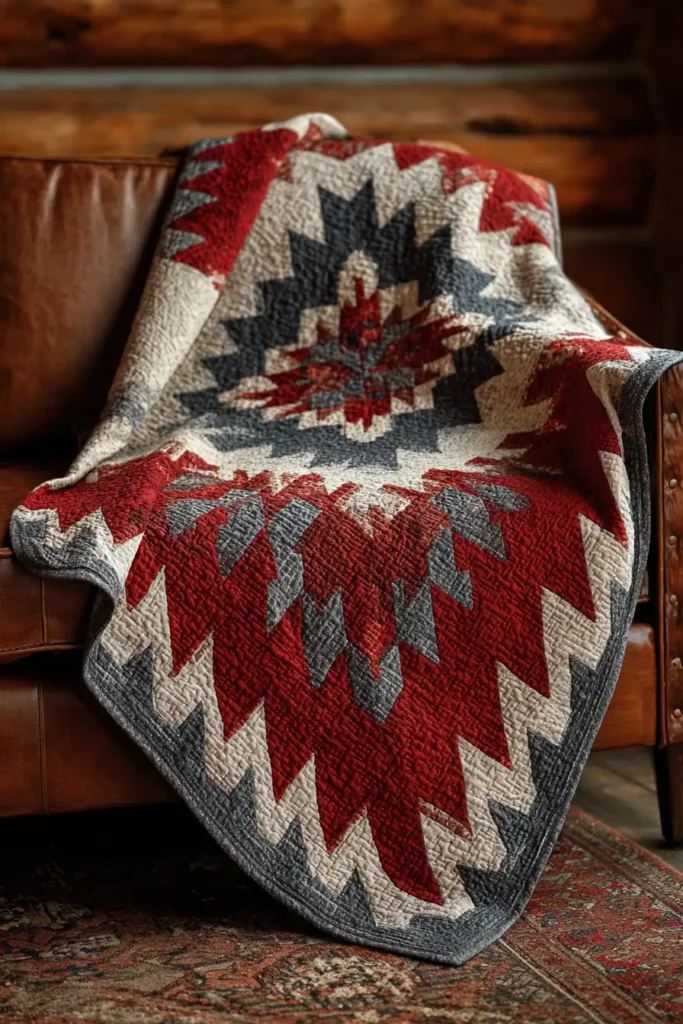
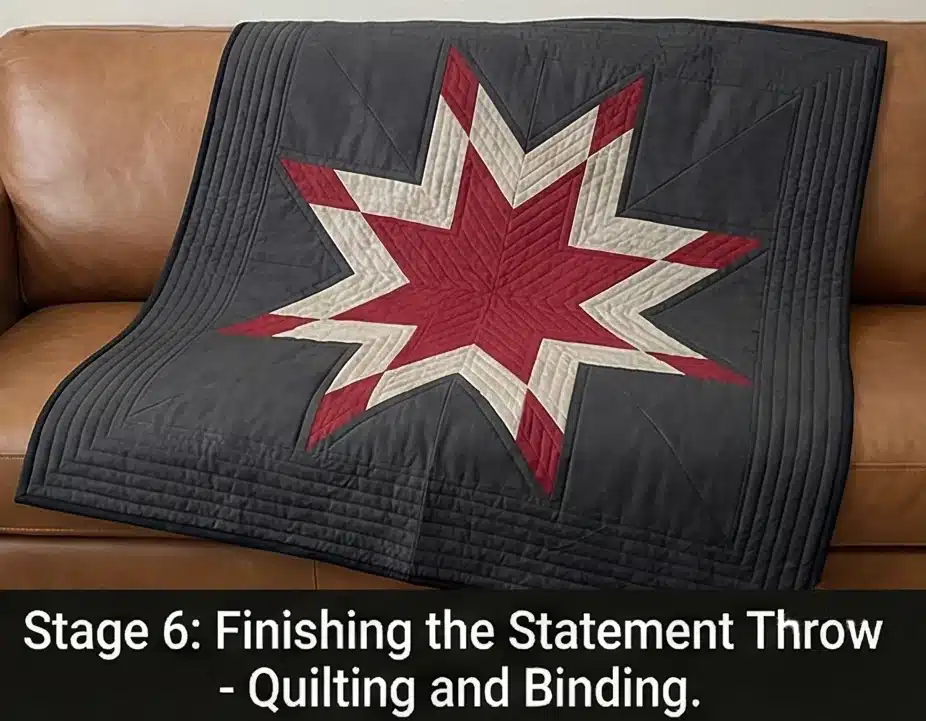
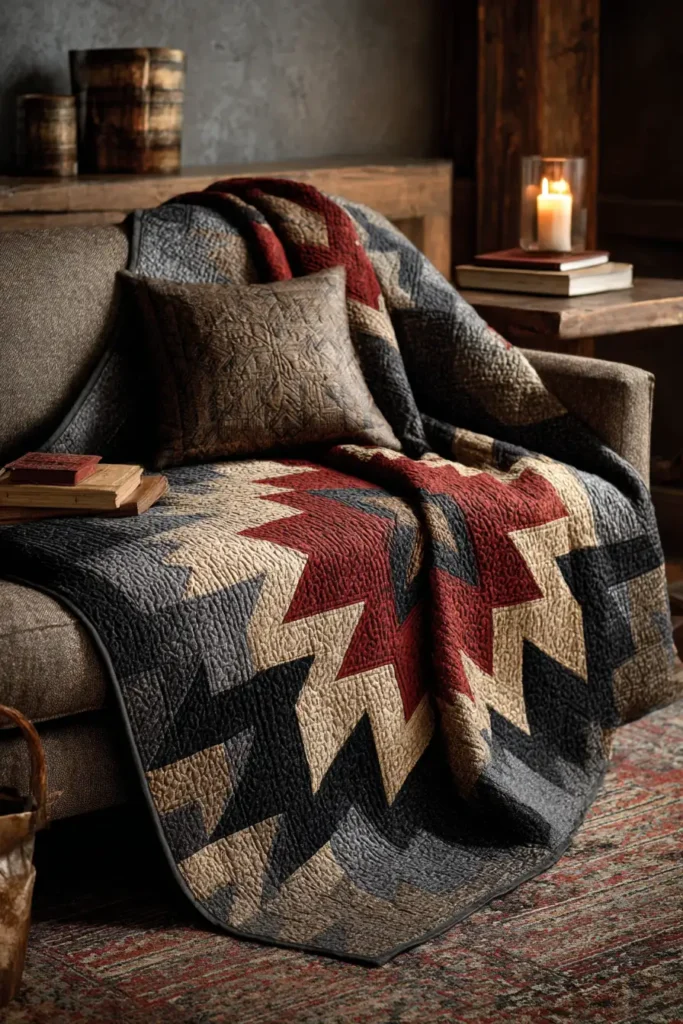
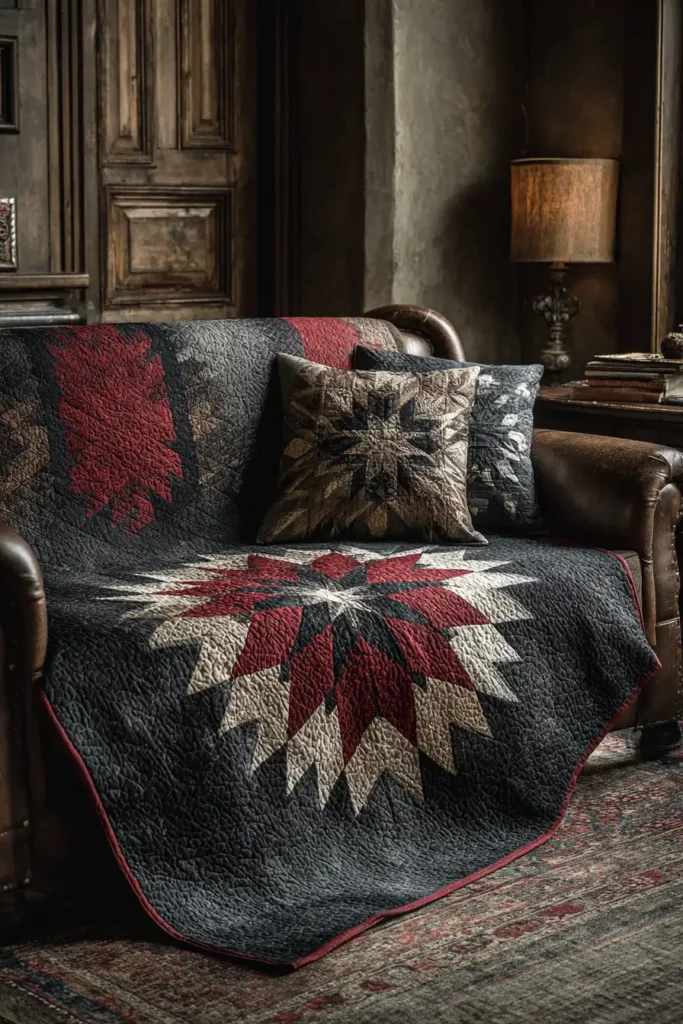
10. Statement Lakota Star Sofa Throws for Stylish Living Rooms


“The Hearthstone Star” Statement Sofa Throw
The living room is the communal heart of the home, requiring textiles that serve as stunning visual anchors while withstanding the rigors of daily family life. Translating the monumental Lakota Star into a statement sofa throw bridges the gap between heritage art and everyday comfort. “The Hearthstone Star” scales the eight-pointed geometry perfectly for a couch drape. Executed in a highly sophisticated, stain-forgiving palette of deep Charcoal, warm Greige, and solid Black, punctuated by an unmissable Deep Red core, this design transforms a simple blanket into a captivating piece of functional decor.
Finished Dimensions: Large Sofa Throw, 60″ x 60″.
Materials Needed:
- The “Hearthstone” (Diamonds): 1/2 yard each of 4 solid cottons (Deep Red, Greige, Charcoal, Black).
- The Background (Negative Space): 2.5 yards of solid Greige or Charcoal (a dark background hides coffee spills and pet hair much better than white).
- Backing: 3.5 yards of heavyweight Greige Flannel or Brushed Cotton.
- Why: A living room throw must not slide off the leather or upholstery the moment someone sits down. Flannel or brushed cotton provides a soft but “grippy” texture that acts as a natural non-slip backing, keeping the star draped beautifully over the sofa arm.
- Batting:100% Bamboo Batting or a Bamboo/Cotton Blend.
- Why: A sofa throw needs extreme fluidity to conform to the body during a movie night. Bamboo batting offers unparalleled drape and breathability, preventing the stiff, puffy look of synthetic battings.
- Thread: 50wt cotton thread in Dove Grey.
- Notions: A large acrylic ruler with a 45-degree angle line, a rotary cutter with a fresh blade, and fine glass-head pins.
Cultural Backstory: The Morning Star symbol in Plains Native cultures is a universal emblem of hope, new beginnings, and protection. While historically gifted for major life events, bringing this motif into the communal living space—draped over a sofa where family and guests gather—extends that symbolic protection to everyone who enters the home. It acts as a geometric hearth, radiating warmth and safety.
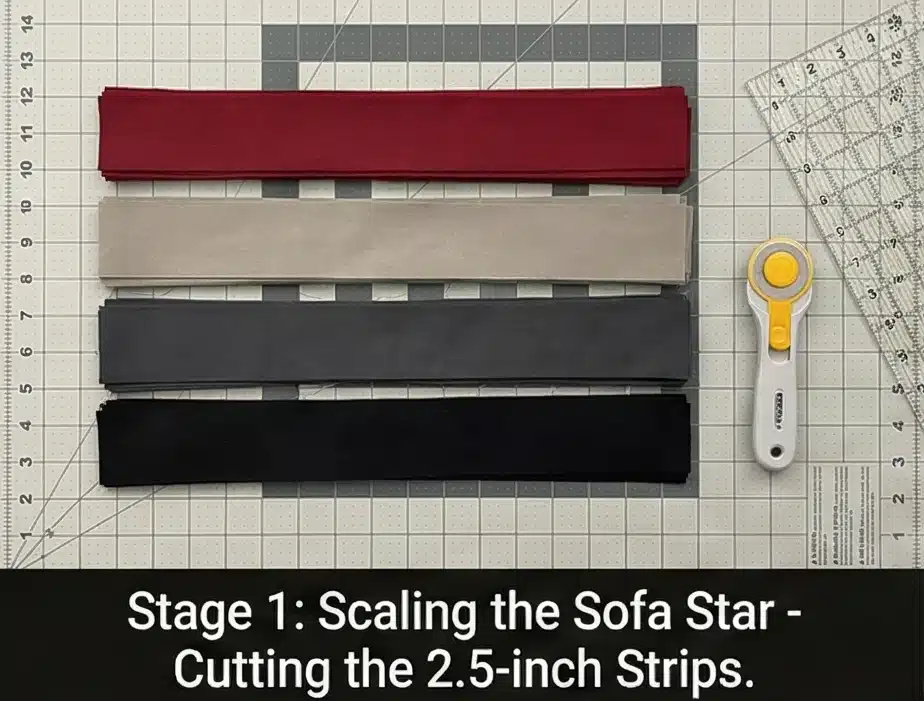
Step 1: Scaling the Sofa Star
Adjusting the math for a 60-inch canvas.
- Cut the Strips: To create a star that spans beautifully across a throw without reaching the absolute edges, we will use a 4-color gradient. Cut exactly eight 2.5-inch strips from each of your 4 star colors (Red, Greige, Charcoal, Black) across the width of the fabric (WOF).
- Organize the Sequence: Lay the strips out radiating from the core: Deep Red -> Greige -> Charcoal -> Black.
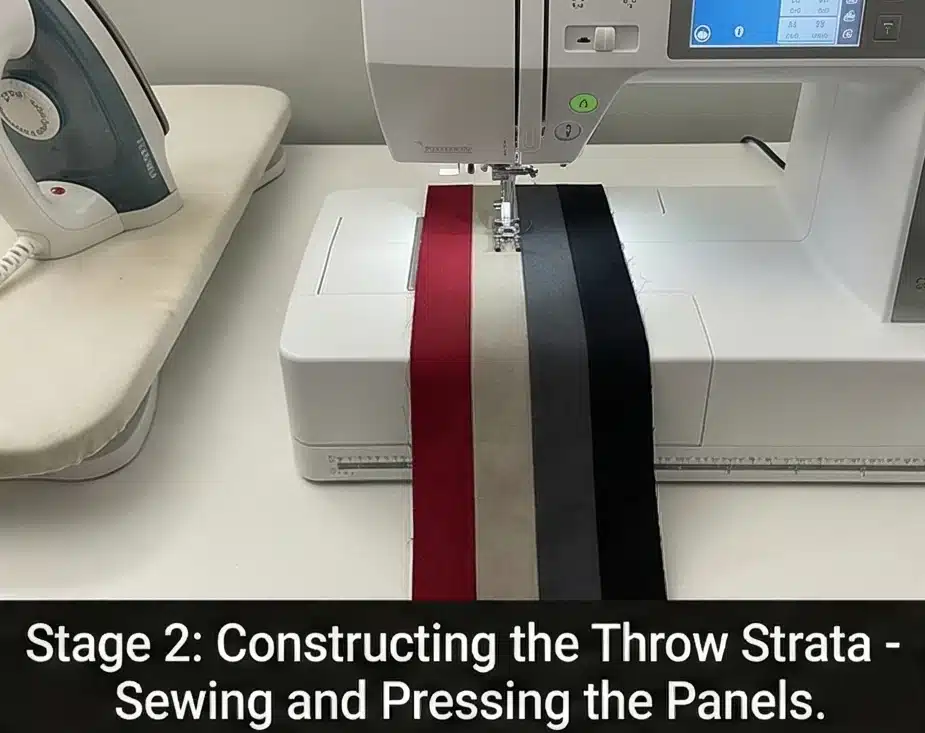
Step 2: Constructing the Throw Strata
Strip-piecing the gradient.
- The Stagger: Place the Greige strip right sides together over the Deep Red strip. Drop the Greige strip exactly 2 inches lower than the top edge of the Red strip to create the offset. Sew them together with a precise 1/4-inch seam.
- Complete the Panel: Add the Charcoal strip (dropped 2 inches), and finally the Black strip (dropped 2 inches).
- Pressing: Press all seams strictly toward the darker, outer Black edge. Make 8 identical staggered strata panels.
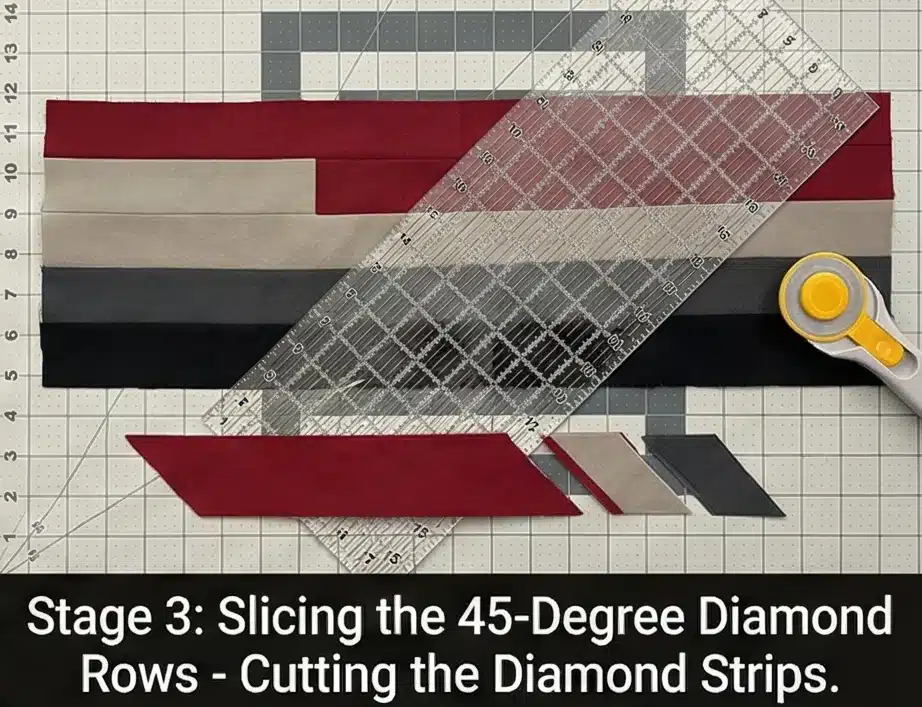
Step 4: Slicing the 45-Degree Diamond Rows
Extracting the tailored geometry.
- Align the Angle: Lay a strata panel flat. Align the 45-degree line of your acrylic ruler along the bottom horizontal seam of the panel. Slice off the jagged left edge.
- The Sub-Cut: Measure exactly 2.5 inches over from the cut and slice again. You now have a row of four interconnected diamonds.
- The Yield: Cut eight of these diamond rows from each of the 8 strata panels to ensure you have enough to build large, impactful star points.
Step 5: Engineering the Eight Points
Nesting the seams for durability.
- Offset and Pin: Take two diamond rows. Place them right-sides together, shifting them so the Red diamond on the top row perfectly aligns with the Greige diamond on the bottom row. Push a pin vertically through every 1/4-inch intersection.
- Build the Points: Sew eight rows together in this staggered pattern to build one massive star point. Repeat to construct all 8 star points.
- Assemble the Star: Sew the four points together for the top half, and four for the bottom half.
Step 6: Setting the Dark Background and Finishing
Floating the star and locking the layers.
- Cut the Voids: From your solid Greige or Charcoal yardage, cut exactly four 16-inch squares (for the outer corners) and four 16-inch squares cut in half diagonally (yielding eight triangles for the gaps between the points).
- The Y-Seam: Drop the background triangles and squares into the deep V-shaped voids between the star points using the Y-seam technique. Join the top and bottom halves across the center.
- Baste and Quilt: Sandwich the pieced top, the bamboo batting, and the non-slip flannel backing. Using a walking foot, quilt a dense, continuous pattern—such as an interlocking geometric meander or straight horizontal lines spaced 1 inch apart. Dense quilting ensures the throw can survive heavy daily friction.
- The Binding: Trim the throw to 60″ x 60″ and square it. Bind the edges in solid Black fabric to sharply frame the star and provide a tailored, durable edge.
Usability Note: Sofa throws are the most heavily used in the home. The combination of dense quilting and dark background fabric makes this piece exceptionally forgiving. Wash it confidently on a cold, gentle cycle and tumble dry on low; the bamboo batting will soften beautifully, increasing the drape and coziness over time.
11. Durable Lakota Star Quilted Couch Covers for Everyday Luxury
“The Obsidian Shield” Heavyweight Lakota Star Couch Cover
A couch cover is often treated as a purely utilitarian object—something to be hidden away when guests arrive. By reimagining the cover as a sprawling, high-end textile canvas, you can protect your upholstery while actively elevating your living room’s design. “The Obsidian Shield” transforms the eight-pointed Lakota Star into a durable, rectangular tapestry engineered specifically to withstand children, pets, and daily family lounging. Rendered in a dirt-forgiving, high-contrast palette of deep Black, rugged Charcoal, and soft Greige, bursting from a structural Deep Red core, this cover combines profound cultural artistry with heavy-duty construction.
Finished Dimensions: Oversized Sofa Protector, 70″ x 90″ (Designed to center the star on the seating area while the rectangular extensions drape elegantly over the armrests).
Materials Needed:
- The “Shield” (Diamonds): 3/4 yard each of 4 solid cottons (Deep Red, Greige, Charcoal, Black).
- The Background (Negative Space): 3.5 yards of heavy-duty Charcoal or Black Cotton Canvas.
- Why: Standard quilting cotton is too thin for the constant friction of a sofa seat. Using canvas for the massive negative space ensures the cover won’t stretch, warp, or tear when people plop down on it.
- Backing: 5.5 yards of heavy Greige Wide-Wale Corduroy or Upholstery-Weight Flannel.
- Why: If you put a cotton-backed quilt on a leather or microfiber sofa, it will slide onto the floor immediately. The textured “grip” of corduroy or flannel acts as a natural non-slip anchor, keeping the heavy cover perfectly in place.
- Batting:100% Wool or a dense Bamboo/Cotton Blend.
- Why: Wool and bamboo bounce back. They absorb the compression of heavy sitting without permanently flattening out, ensuring your couch cover retains its luxurious, quilted loft rather than looking like a deflated pancake after a week of use.
- Thread: Heavy-duty 40wt cotton thread in Charcoal.
- Notions: A rotary cutter, a large acrylic ruler, and heavy-duty sewing machine needles (Size 90/14).
Cultural Backstory: Before the introduction of woven fabrics, Plains Native nations utilized beautifully painted buffalo robes for both ceremonial honors and daily survival against harsh winters. As textiles became available, the Morning Star quilt adopted the dual role of the robe: it was a sacred canvas of high honor, but it was also a profoundly durable, functional layer meant to be used, slept under, and lived with every single day. Building a heavy-duty star for everyday family use honors this utilitarian strength.
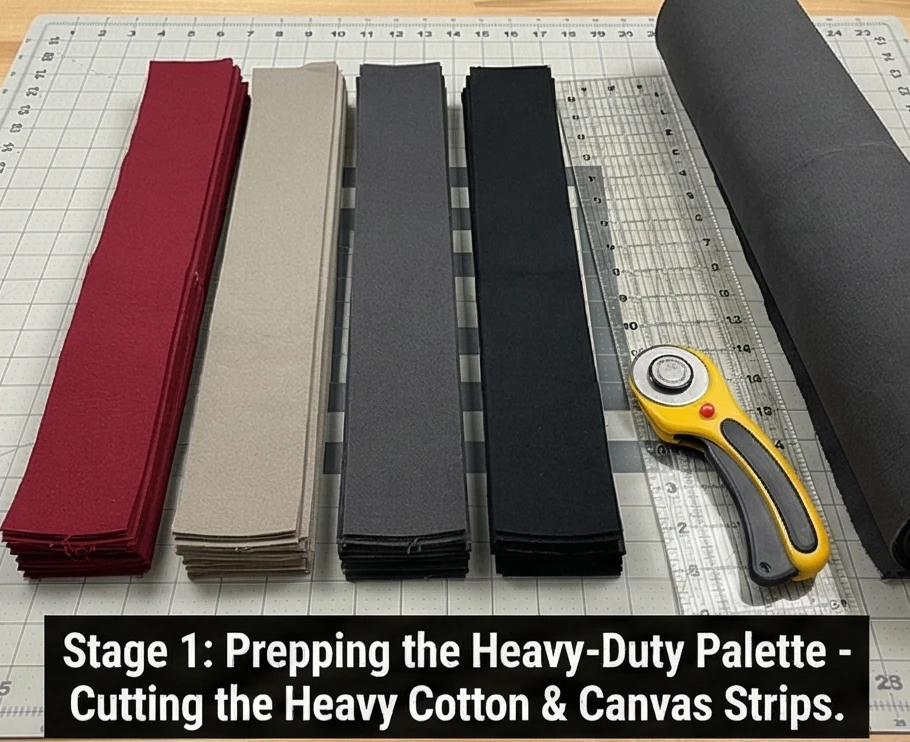
Step 1: Prepping the Heavy-Duty Palette
Canvas and thick cottons require a sharp blade.
- Cut the Strips: To build a central star that measures roughly 60 inches across, cut exactly eight 2.5-inch strips from each of your 4 star colors (Deep Red, Greige, Charcoal, Black) across the width of the fabric.
- Organize the Sequence: Lay the strips out from the center radiating outward: Red -> Greige -> Charcoal -> Black.
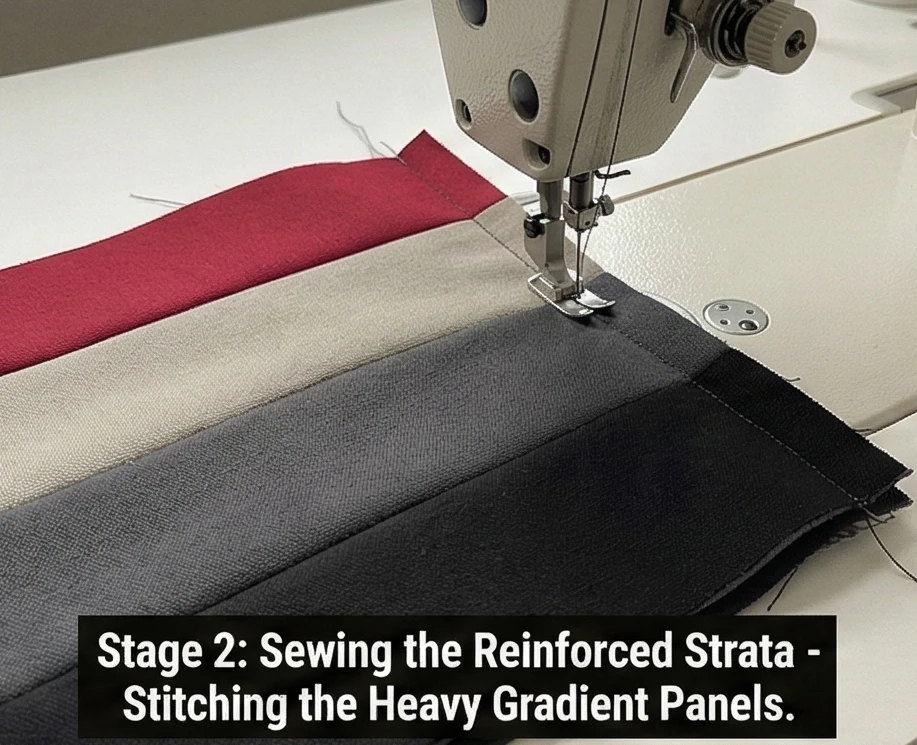
Step 2: Sewing the Reinforced Strata
Building the gradient strip sets.
- The Stagger: Place the Greige strip right sides together over the Deep Red strip. Drop the Greige strip exactly 2 inches lower than the top edge of the Red strip to create a staggered, staircase edge.
- Sew with Strong Thread: Because this piece will take body weight, use a slightly shorter stitch length (e.g., 2.0 mm) and your heavy-duty 40wt thread. Sew the long seam.
- Complete the Panel: Add the Charcoal strip (dropped 2 inches), and the Black strip (dropped 2 inches). Make 8 identical staggered strata panels, pressing all seams toward the dark Black edge.
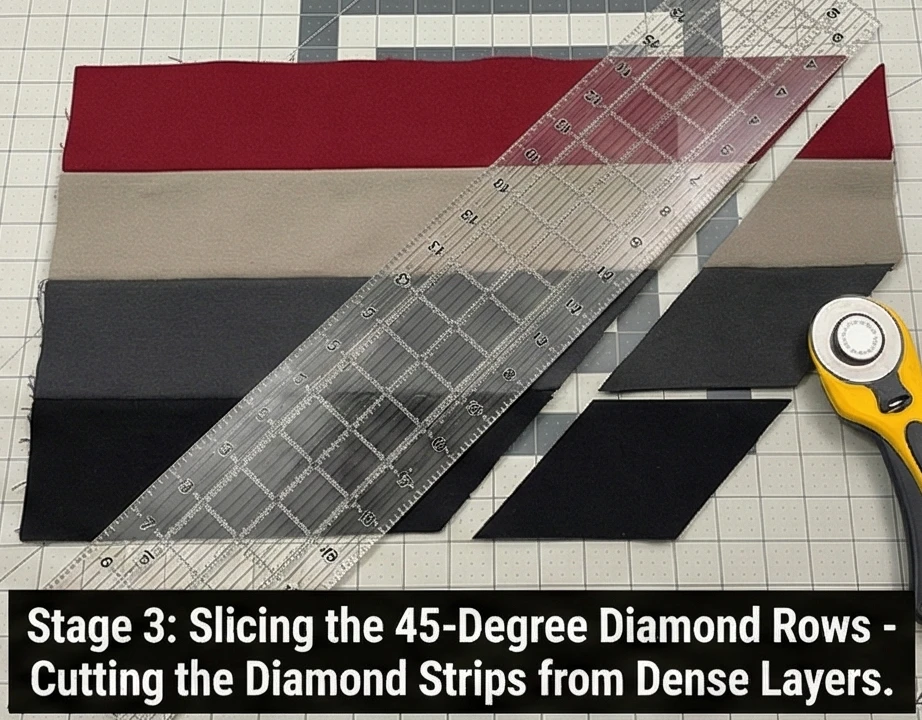
Step 3: Slicing the 45-Degree Diamond Rows
Cutting through the dense layers.
- Align the Angle: Lay a strata panel flat. Align the 45-degree line of your acrylic ruler along the bottom horizontal seam. Slice off the jagged left edge to establish the angle.
- The Sub-Cut: Measure exactly 2.5 inches over from the cut and slice again. You now have a continuous row of four interlocking diamonds.
- The Yield: Cut eight of these rows from each of the 8 strata panels to build your oversized star points.
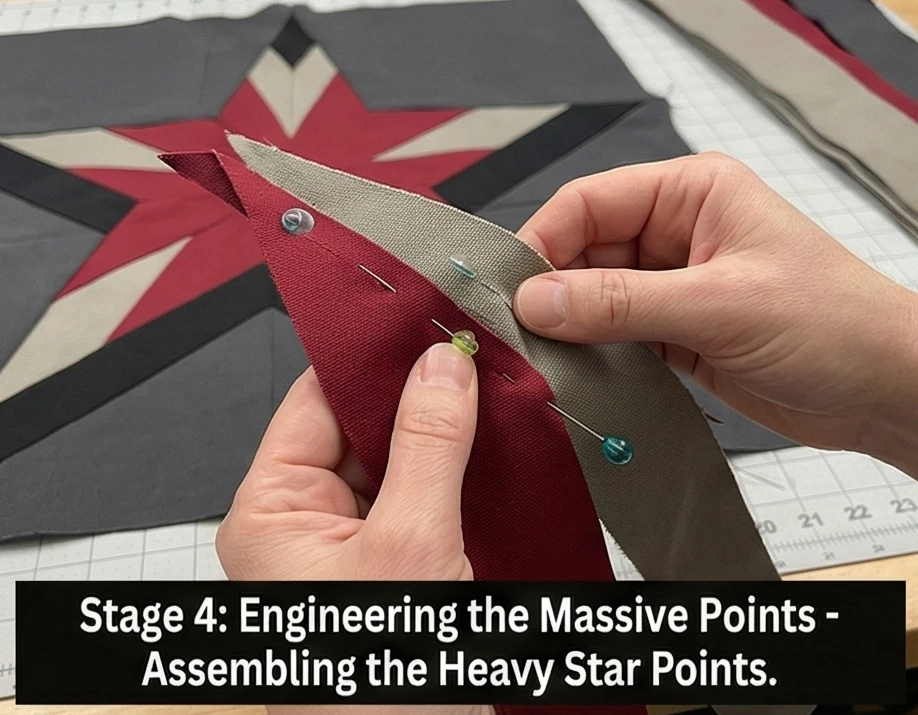
Step 4: Engineering the Massive Points
Nesting the thick seams for a flat surface.
- Offset and Pin: Place two diamond rows right-sides together, shifting them so the Red diamond on the top row perfectly aligns with the Greige diamond on the bottom row.
- Pin Heavily: Thicker fabrics shift easily. Pin directly through every 1/4-inch seam intersection so the diamonds lock together perfectly.
- Build the Eight Points: Sew eight rows together in a staggered pattern to create one large point. Repeat to construct all 8 star points, then carefully join them to complete the massive 60-inch center star.
Step 5: The Upholstery-Grade Rectangular Setting
Adapting a square star for a long couch.
- The Y-Seam Voids: From your heavy Charcoal Canvas, cut the four large triangles and four large squares needed to fill the V-shaped gaps between the star points. Insert them using the Y-seam technique to square up the 60″ x 60″ block.
- The Armrest Extensions: A couch cover needs to be rectangular to drape over the arms. Cut two massive panels of Charcoal Canvas measuring 15.5″ wide by 60.5″ long.
- Attach the Extensions: Sew these wide panels to the left and right sides of your squared-off star. Your finished top is now a sprawling 70″ x 90″ rectangle.

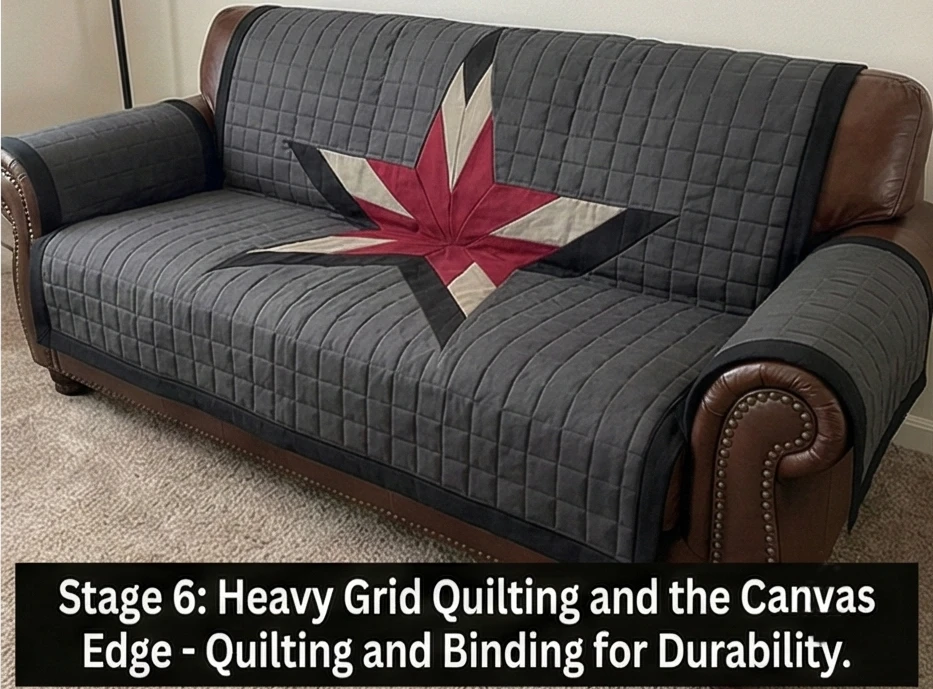
Step 6: Heavy Grid Quilting and the Canvas Edge
Locking the architecture for daily abuse.
- The Baste: Sandwich the canvas top, the resilient wool batting, and the heavy, grippy corduroy backing. Use curved safety pins every 3 inches.
- The Armor Grid: Do not do delicate custom quilting on a couch cover. Using a walking foot, quilt a dense, continuous grid of straight horizontal and vertical lines spaced exactly 2 inches apart across the entire 70″ x 90″ surface. This dense grid fuses the three layers into a solid, impenetrable upholstery fabric that will not warp under the strain of people sitting on it.
- The Finish: Bind the entire piece using a solid Black Canvas strip (cut slightly wider at 2.75″ to accommodate the thick layers). Machine-stitch the binding to the front and back for maximum edge durability against shoes and friction.
Usability Note: This cover is built like a tank. Because of the heavy canvas, corduroy, and dense grid quilting, you can confidently launder this piece. Wash on cold to preserve the dark dyes, and tumble dry on medium heat with wool dryer balls to effortlessly fluff the internal batting back to its cozy, inviting loft.
12. Elegant Lakota Star Table Runners for Dining Room Sophistication
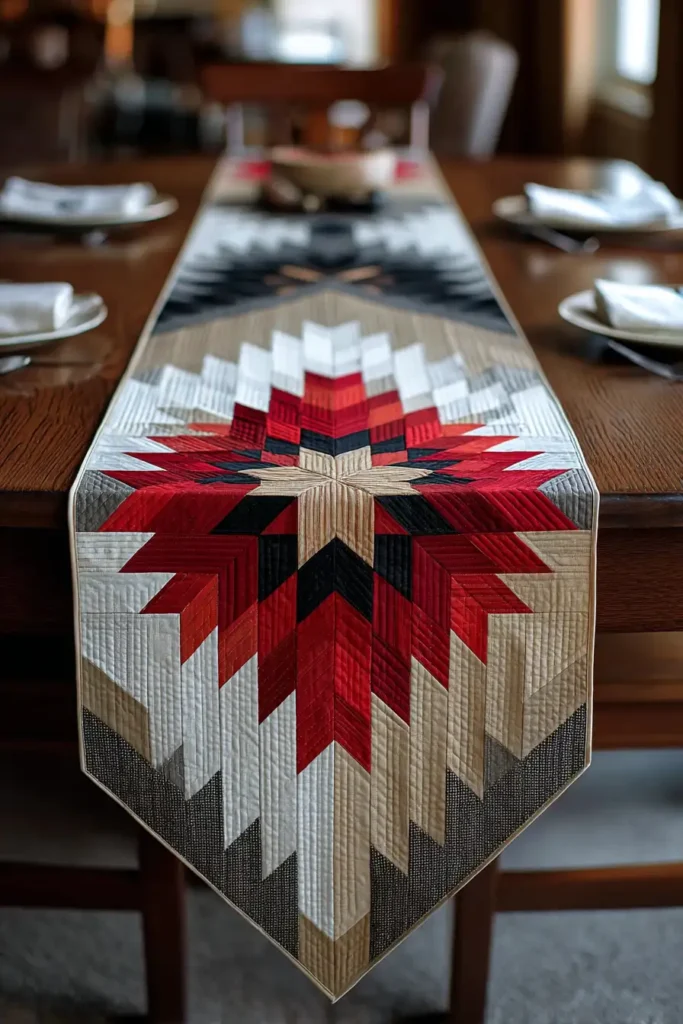
“The Crimson Apex” Lakota Star & Geese Table Runner
A formal dining room demands a centerpiece that anchors the space without overwhelming the table setting. Translating the monumental architecture of the Lakota Star into a narrow table runner requires a delicate balance of scale and negative space. “The Crimson Apex” achieves this by placing a single, meticulously pieced eight-pointed star directly in the center of the table. To extend the runner to a formal 72-inch length, the star is flanked by sharp, geometric Flying Geese columns pointing outward toward the heads of the table. Executed in a highly sophisticated, modern palette of crisp White, soft Greige, and deep Black, and anchored by a vibrant Deep Red core, this runner brings profound cultural geometry and modern elegance into perfect harmony.
Finished Dimensions: Formal Dining Runner, 16″ x 72″ (Designed to drape elegantly over the ends of a standard 6-person table).
Materials Needed:
- The “Apex” (Diamonds & Geese): 1/4 yard each of solid Deep Red, Greige, and Black cotton.
- The Background (Negative Space): 1.5 yards of pristine White solid cotton.
- Backing: 2 yards of high-quality Black Cotton Sateen.
- Batting: Insul-Bright (heat-resistant fleece) AND a thin layer of Bamboo Batting.
- Why: Elegance must seamlessly integrate with usability. The Insul-Bright reflects heat, protecting your polished wood or glass table from hot serving dishes. The bamboo batting adds an incredibly soft, breathable drape, ensuring the ends of the runner cascade beautifully off the edges of the table instead of sticking out rigidly.
- Thread: 50wt cotton thread in an invisible Dove Grey.
- Notions: A small acrylic ruler with a 45-degree angle line, a rotary cutter with a fresh blade, and a water-soluble marking pen.
Cultural Backstory: The Morning Star is the ultimate symbol of gathering and new beginnings in Plains Native cultures. Historically, community and family gathered around the central hearth fire for sustenance and connection. By placing the Lakota Star at the exact center of a dining table, the textile acts as a modern geometric hearth, radiating warmth outward and inviting guests to gather, share, and connect.
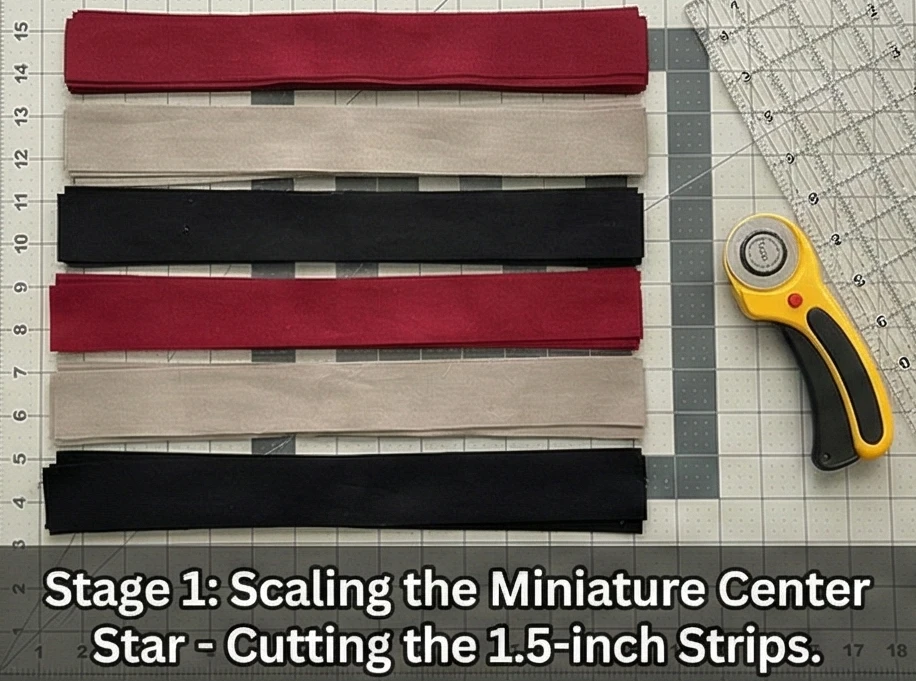
Step 1: Scaling the Miniature Center Star
A 16-inch wide runner requires a precisely scaled 12-inch star.
- Cut the Diamond Strips: Cut exactly eight 1.5-inch strips from your Red, Greige, and Black fabrics across the width of the fabric (WOF).
- Organize the Gradient: Lay out the sequence to build your high-contrast points: Deep Red (center) -> Greige (middle) -> Black (outer tip).
Step 2: Strip-Piecing the Micro-Strata
Building the staggered panels for the central star.
- The Stagger: Place the Greige strip right sides together over the Deep Red strip. Offset the Greige strip so it drops exactly 1.5 inches lower than the top of the Red strip. Sew them together with a 1/4-inch seam allowance.
- Complete the Panel: Add the Black strip to the Greige, dropping it another 1.5 inches. Press the seams outward toward the Black strip. Make 8 identical strata panels.
- Slice the Diamonds: Align the 45-degree line of your ruler along the bottom seam. Slice off the jagged edge, then make parallel cuts every 1.5 inches to yield your diamond rows.
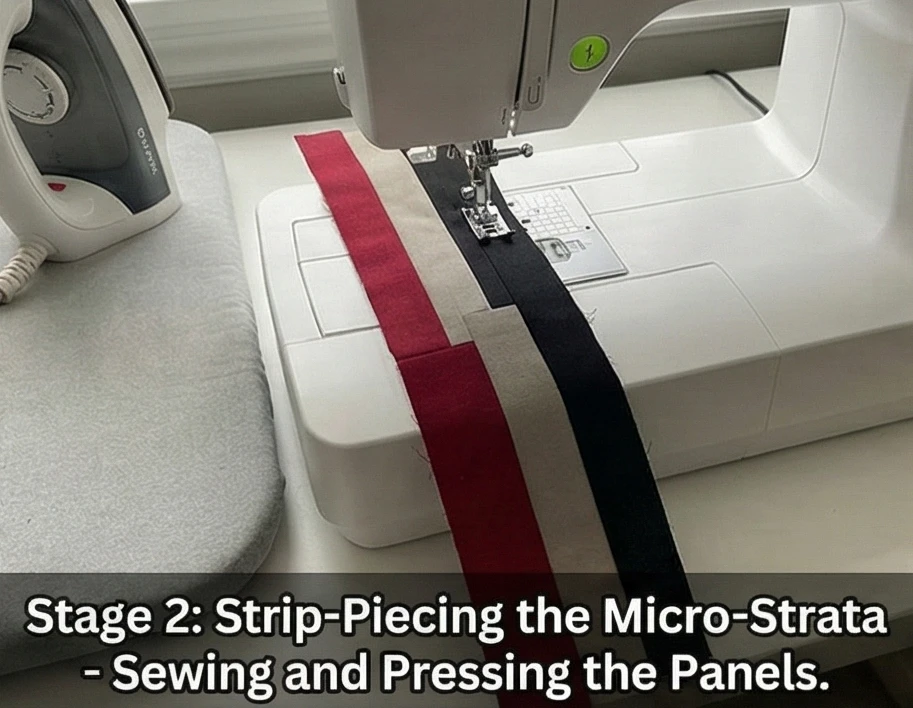
Step 3: Assembling the Central Hearth
Nesting the tiny intersections.
- Build the Points: Sew three diamond rows together in a staggered offset to build a single star point. Repeat until you have 8 miniature star points.
- Set the Star: Sew the 8 points together. Using the traditional Y-seam technique, insert crisp White squares and triangles into the V-shaped gaps between the points to square off the star into a flawless 12.5″ x 12.5″ block.
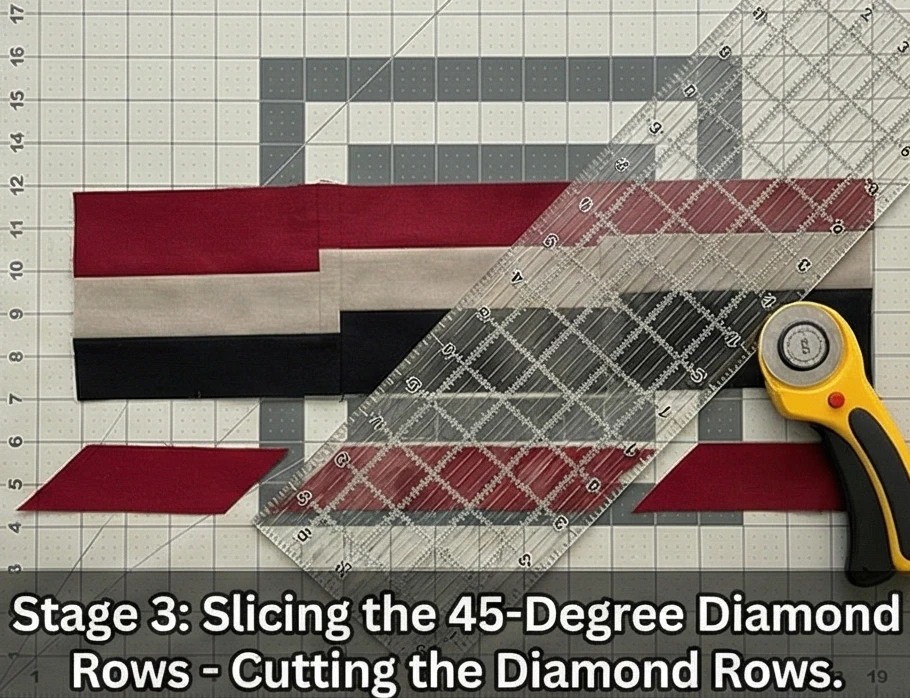
Step 4: Constructing the Flying Geese Extensions
Creating the architectural pathways that lengthen the runner.
- The Geese Bodies (Red/Black): Cut twelve rectangles measuring 2.5″ x 4.5″ from your Deep Red and Black yardage.
- The Sky Corners (White): Cut twenty-four 2.5″ x 2.5″ squares from your solid White background fabric.
- Stitch-and-Flip: Draw a diagonal line on the back of the White squares. Sew them to the left and right sides of the colored rectangles, trim the excess, and press outward to create crisp, perfect triangles.
- The Columns: Sew six Geese together top-to-bottom to create a vertical column. Make two of these columns.
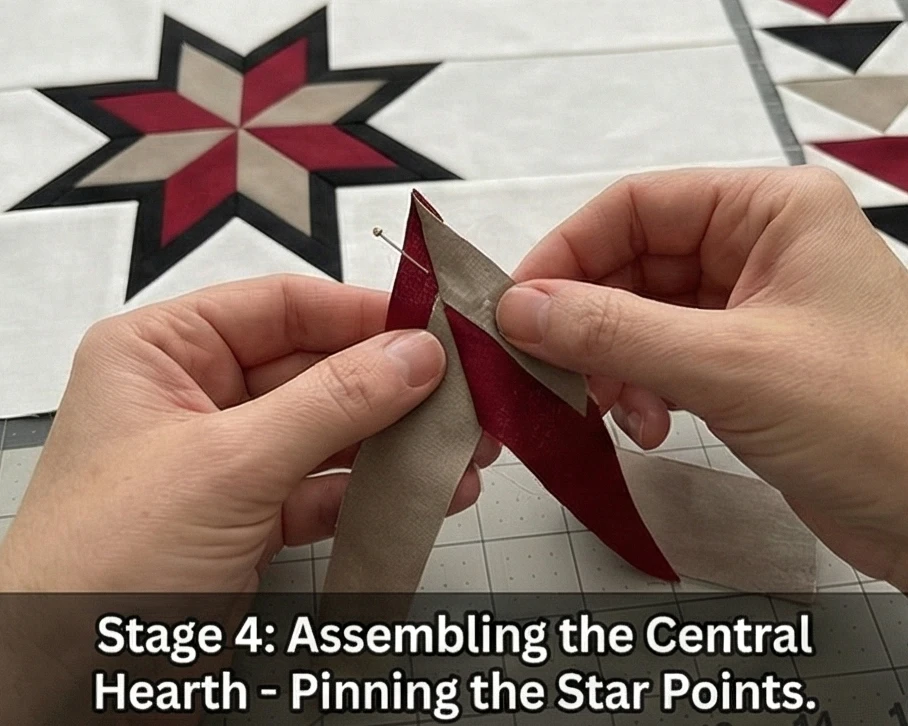
Step 5: The Elongated Table Layout
Bridging the central star to the geometric borders.
- The Negative Space Panels: Cut two solid White panels measuring 12.5″ wide by 20″ long. Sew these to the left and right sides of your central 12.5″ star block.
- Attach the Geese: Sew one Flying Geese column to the far left edge of the runner (pointing outward), and the second column to the far right edge (also pointing outward).
- The Outer Borders: Add a continuous 2-inch White border to the top and bottom edges of the entire assembly to bring the final width to a sleek 16 inches.
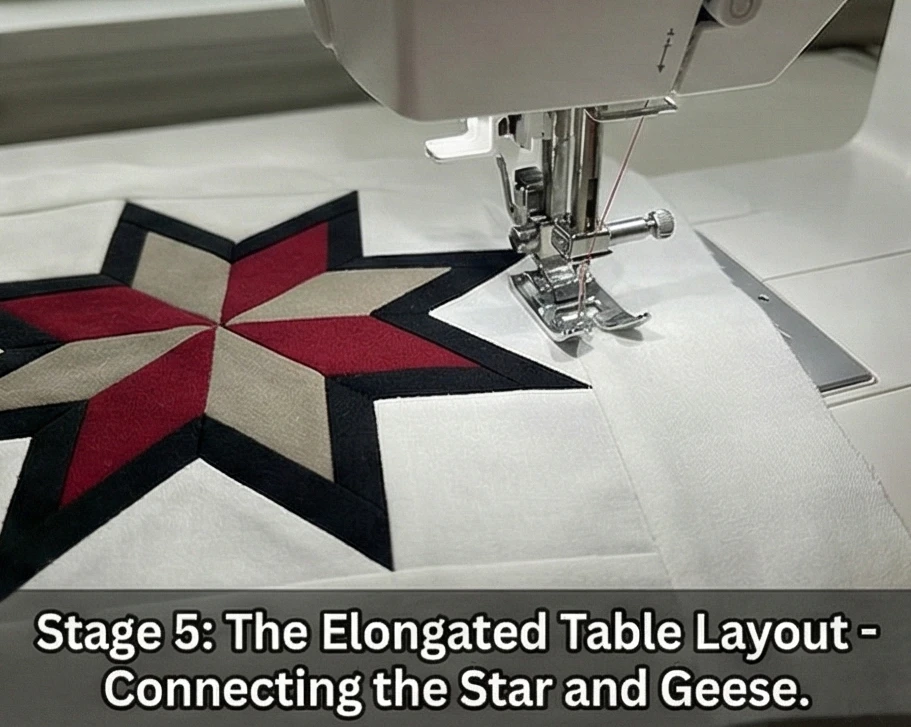
Step 6: Heat-Proof Basting and Tailored Quilting
Protecting the table with structured stitching.
- The Thermal Stack: Lay your Black Sateen backing right-side down. Top it with the shiny side of Insul-Bright (facing up toward the hot plates), then the soft layer of Bamboo batting, and finally your pieced runner top. Baste densely with safety pins.
- Linear Quilting: Using a walking foot, quilt straight lines running the entire length of the runner, stitching parallel lines exactly 1 inch apart through the vast White negative space. Leave the central Star and the outer Geese completely unquilted.
- Why: This heavy, linear channel quilting flattens the thermal layers into a stable, firm surface for wine glasses, while allowing the unquilted geometric shapes to subtly puff up and catch the dining room light.
- The Binding: Trim the runner to exactly 16″ x 72″. Bind the edges tightly in a solid Black fabric to cleanly frame the geometric pathways.
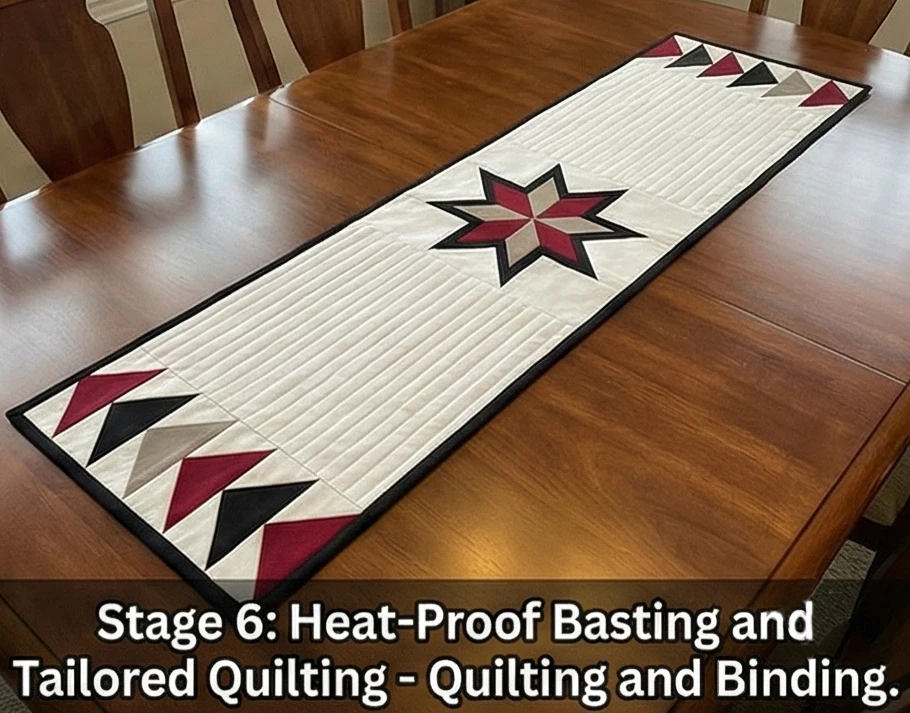
Usability Note: Because the runner features pristine White negative space, spot-treat any dining spills (like wine or sauce) immediately with cold water. When machine washing, use a gentle cycle with a color-catcher sheet to prevent the deep red from migrating, and lay the runner flat to dry to preserve the heat-reflective integrity of the Insul-Bright layer.
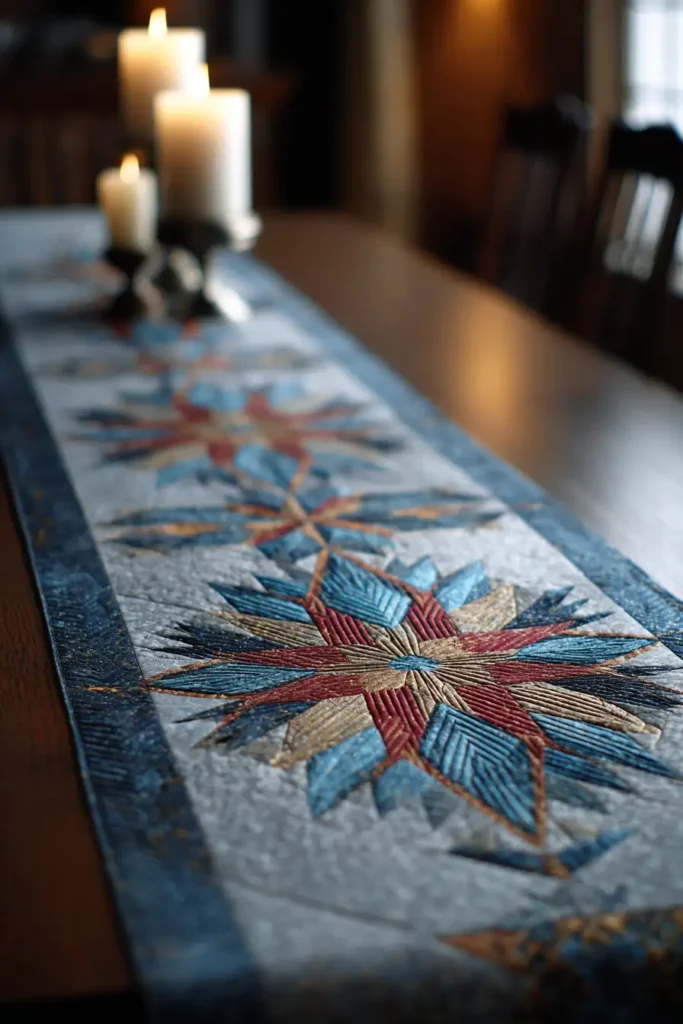
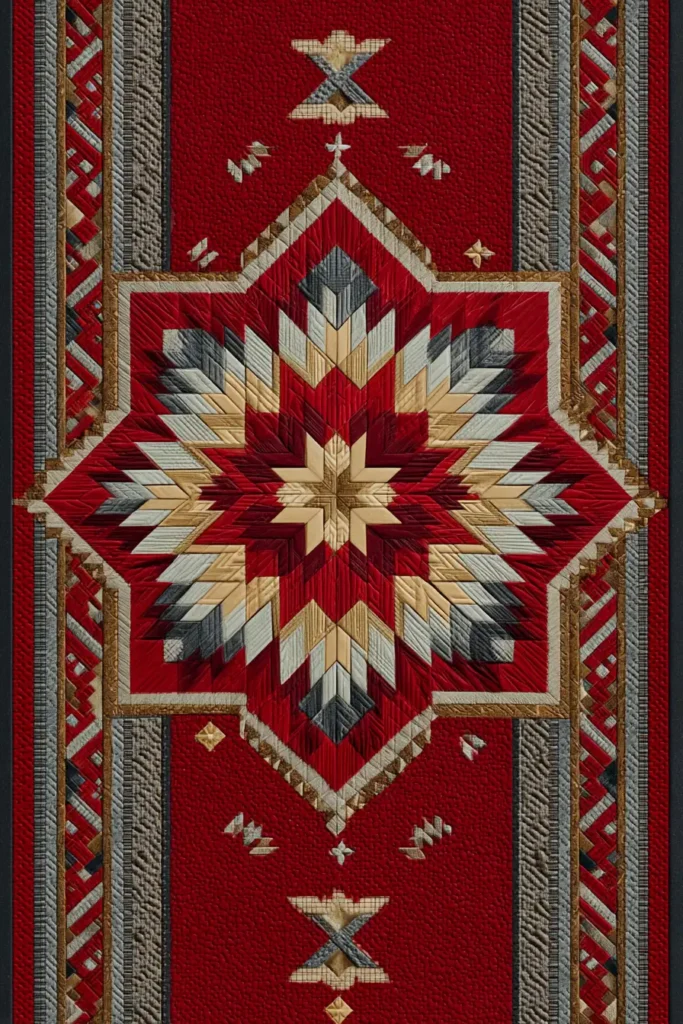
13. Morning Star Quilted Placemats for Culturally Inspired Tablescapes
“The Crimson Dawn” Asymmetrical Star Placemats
A beautifully set table is the cornerstone of hospitality, transforming a simple meal into an elegant gathering. Integrating the monumental Lakota Star into a placemat requires a shift in traditional centering. If placed directly in the middle, the intricate star would be completely obscured by a dinner plate. “The Crimson Dawn” solves this with a sophisticated, asymmetrical layout. A miniaturized, 10-inch geometric star—fading from a striking Deep Red core through Greige, Charcoal, and Black—sits offset to the far left. This creates a dedicated “plate zone,” while an expanse of pristine White negative space on the right forms an elegant resting place for silverware and glassware.
Finished Dimensions: Standard Rectangular Placemat, 14″ x 20″ (Set of 4).
Materials Needed:
- The “Dawn” (Diamonds): 1/8 yard (or Jelly Roll scraps) of solid Deep Red, Greige, Charcoal, and Black cotton.
- The “Tablescape” (Background): 1.5 yards of crisp White solid cotton.
- Backing & Binding: 2 yards of heavyweight Black Cotton Sateen.
- Batting: Insul-Bright (heat-resistant fleece) AND a thin layer of Bamboo Batting.
- Why: Elegance must endure real-world dining. Insul-Bright contains a hollow, metalized film that reflects the heat of hot soup bowls away from your polished wood table. However, it can feel stiff. Adding a sheer layer of bamboo batting softens the placemat, absorbs condensation from iced drinks, and ensures it lies perfectly flat.
- Thread: 50wt cotton thread in an invisible Dove Grey.
- Notions: A small acrylic ruler with a 45-degree angle line, a rotary cutter with a sharp micro-blade, and ultra-fine pins.
Cultural Backstory: The Morning Star is a powerful symbol of a new day, dawn, and the welcoming of light. In Plains Native cultures, sharing food is a profound act of community, generosity, and honoring guests. Bringing the Morning Star motif to the dining table beautifully unites these traditions. The star acts as a geometric blessing for the meal and a warm, protective emblem for those gathered around the table.
Step 1: Miniaturizing the Star Math
A 10-inch star requires micro-piecing.
- Cut the Tiny Strips: To keep the proportions elegant on a placemat, you must cut very narrow strips. Cut exactly eight 1.25-inch strips from each of your 4 star colors (Deep Red, Greige, Charcoal, Black).
- Organize the Gradient: Lay out the sequence: Red (center) -> Greige -> Charcoal -> Black (outer tips).
Step 2: Strip-Piecing the Micro-Strata
Building the staggered panels for the miniature points.
- The Drop: Place a Greige strip right-sides together over a Deep Red strip. Offset the Greige strip so it drops exactly 1.25 inches lower than the top of the Red strip. Sew them together with a 1/4-inch seam allowance.
- Complete the Panel: Add the Charcoal strip, and then the Black strip, dropping each one 1.25 inches.
- Pressing: Press all seams outward toward the Black strip. You need to make 8 identical miniature strata panels to complete a set of 4 placemats.
Step 3: Slicing the 45-Degree Diamond Rows
Extracting the scaled-down geometry.
- Align the Angle: Lay a strata panel flat. Align the 45-degree line of your ruler along the bottom horizontal seam. Slice off the jagged left edge to create the angle.
- The Sub-Cut: Measure exactly 1.25 inches over from the newly cut angle. Slice again. You now have a tiny row of four connected diamonds.
- The Yield: Cut eight of these diamond rows per placemat (32 rows total for a set of 4).
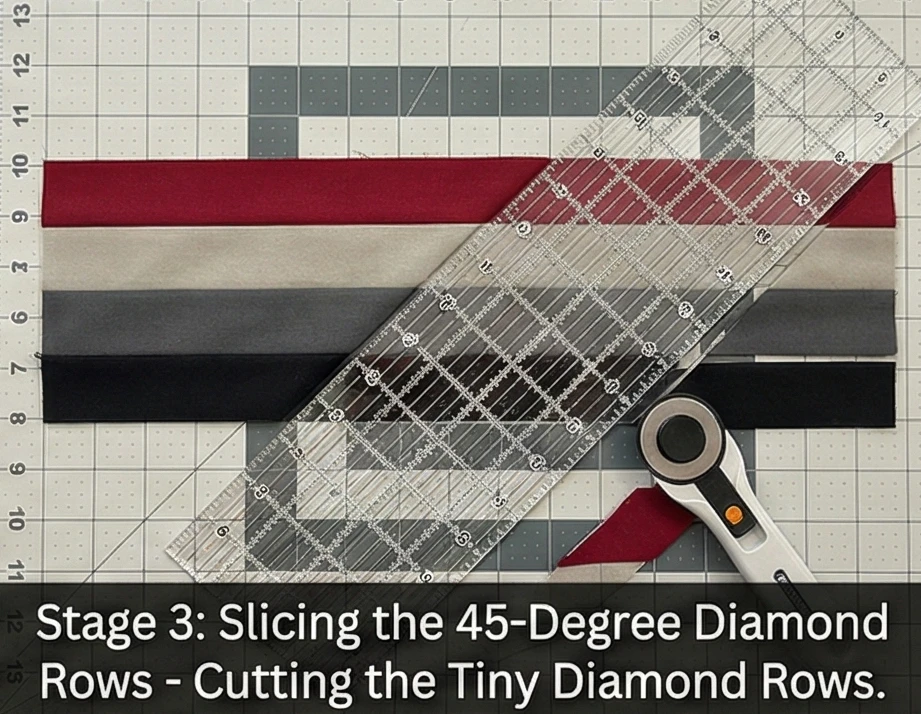
Step 4: Assembling the Offset Star
Nesting the tiny intersections for flat points.
- Build the Points: Take two diamond rows, offset them so the Red meets the Greige, and pin perfectly through the 1/4-inch seam. Sew them together. Join four rows to make one point. Repeat until you have 8 points.
- Set the Star: Sew the 8 points together to form the central 10-inch star.
- The Background Voids: Using the Y-seam technique, insert crisp White squares and triangles into the V-shaped gaps between the points. Square off the completed block so it measures exactly 10.5″ x 10.5″.
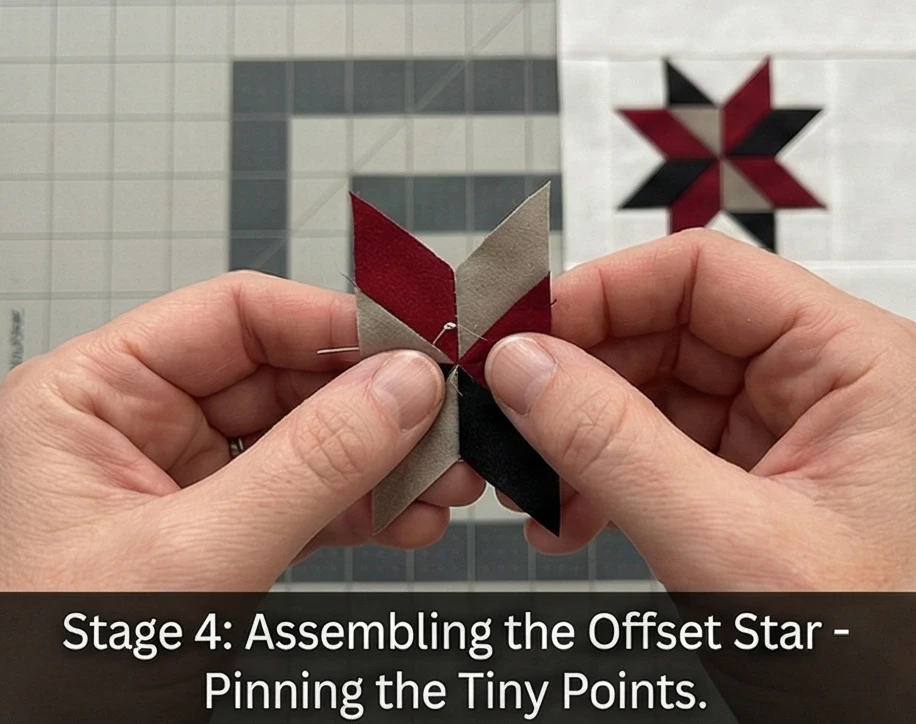
Step 5: The Asymmetrical Rectangular Layout
Creating the plate and silverware zones.
- The Silverware Zone: Cut a solid White rectangle measuring 10″ wide by 10.5″ tall. Sew this to the Right side of your 10.5″ star block. Your piece now measures 20″ wide by 10.5″ tall.
- The Top and Bottom Frames: Cut two long White strips measuring 2.25″ tall by 20″ wide. Sew these to the top and bottom of your placemat. The finished, unquilted top will now measure exactly 14.5″ x 20.5″.
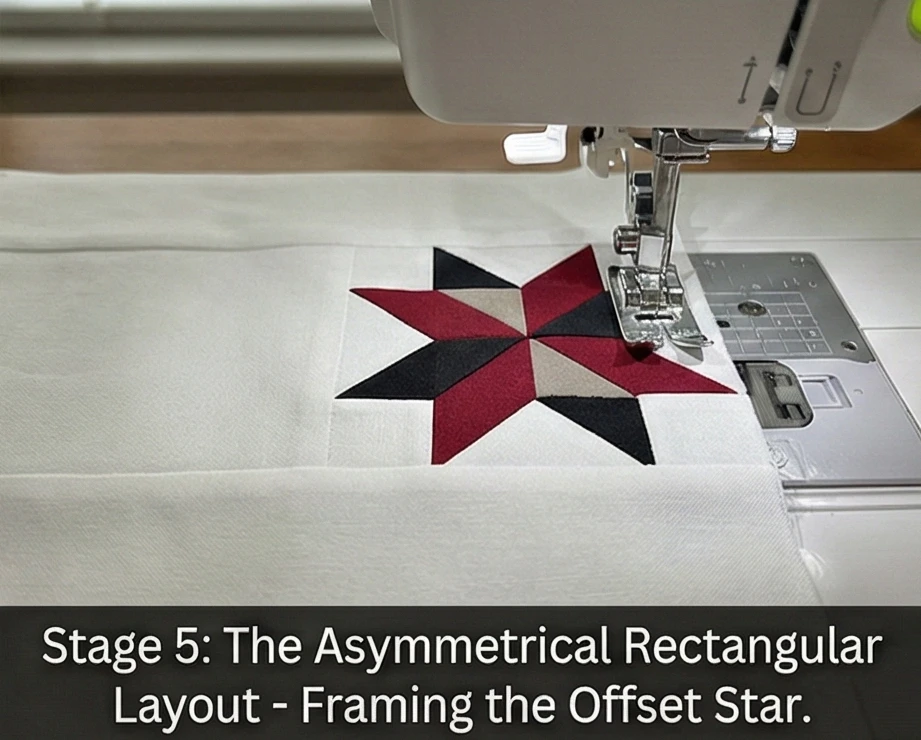
Step 6: Thermal Basting and Structural Quilting
Protecting the dining surface.
- The Layering: Place your Black Sateen backing face down. Add the Insul-Bright (shiny side up), then the Bamboo batting, and finally your pieced top. Baste densely with safety pins to prevent the metallic film from shifting.
- Channel Quilting: Using a walking foot, quilt tight, straight horizontal lines spaced 1/2-inch apart, but only in the pristine White negative space. Leave the intricately pieced Morning Star completely unquilted. This structural channel quilting perfectly flattens the thermal layers for wine glasses while allowing the unquilted geometric star to pop up beautifully.
- The Tailored Frame: Trim the placemats down to a flush 14″ x 20″. Bind the edges tightly in solid Black fabric to cleanly frame the asymmetrical layout.
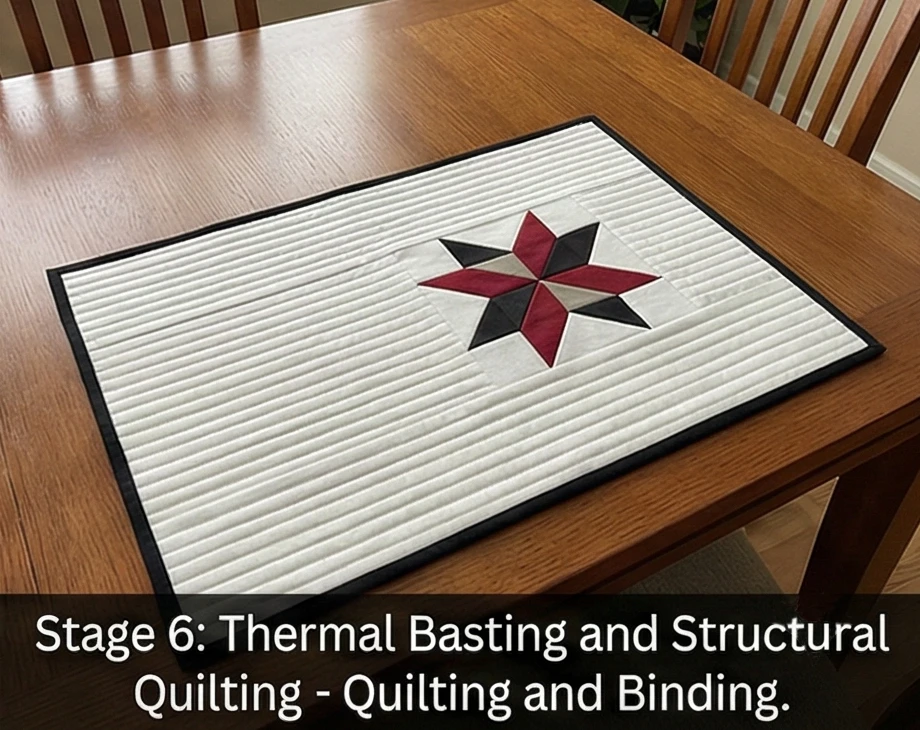
Usability Note: Dining placemats encounter daily wear. The dense channel quilting ensures these mats will not warp or twist in the washing machine. Wash on a warm, gentle cycle and lay flat to dry to ensure the heat-reflective Insul-Bright layer maintains its smooth, protective integrity. Never microwave them on warm plates, as the metallic core will spark.
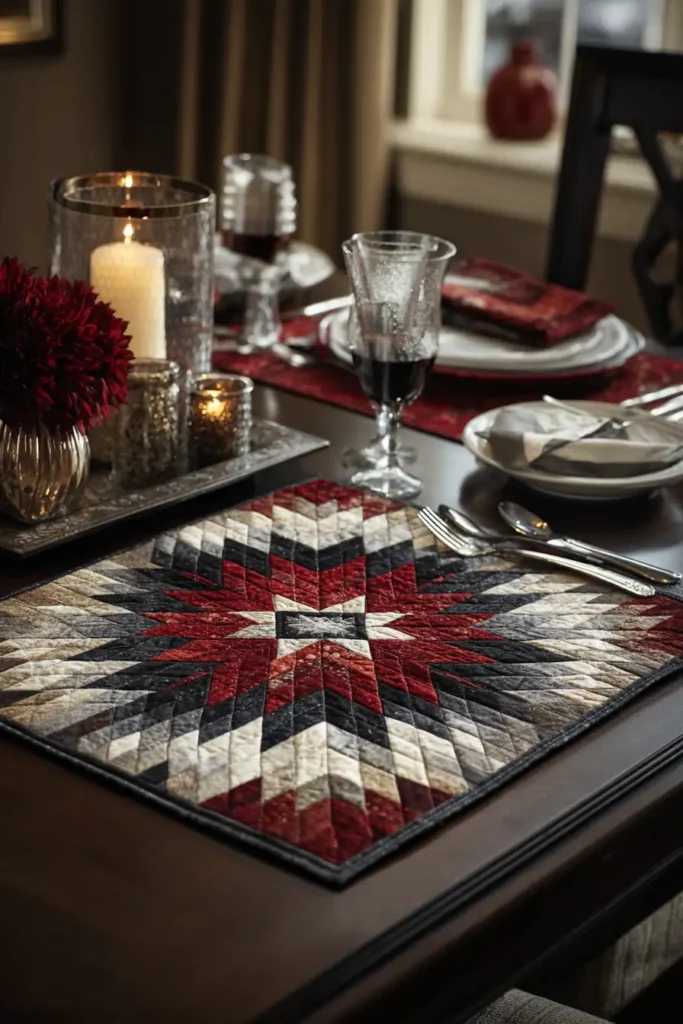
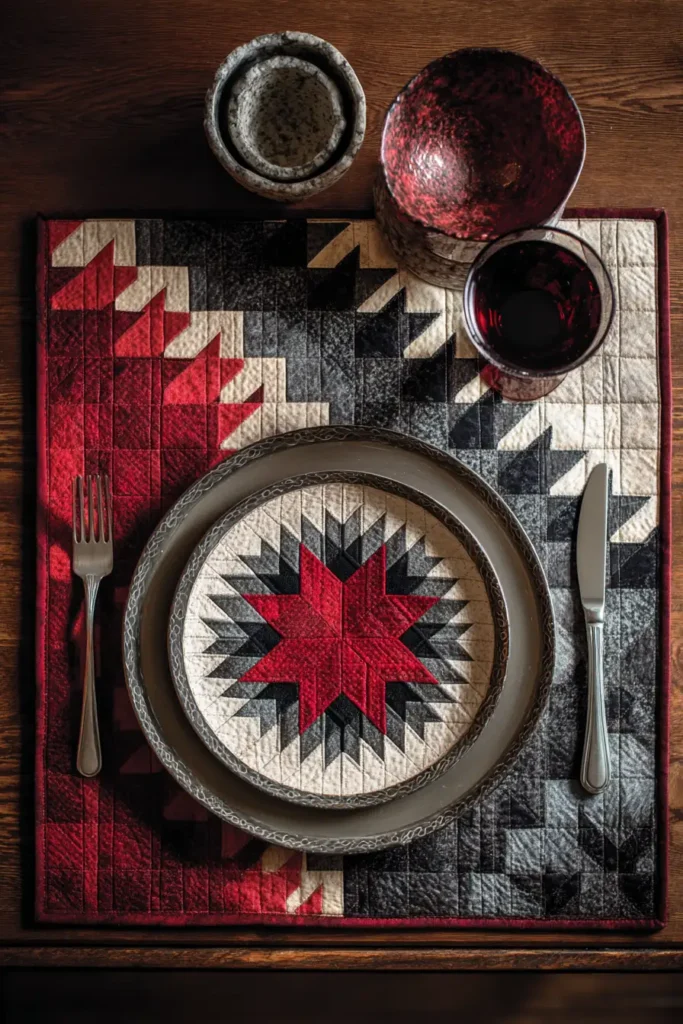
14. Decorative Lakota Star Cushion Covers for Cozy Living Room Seating
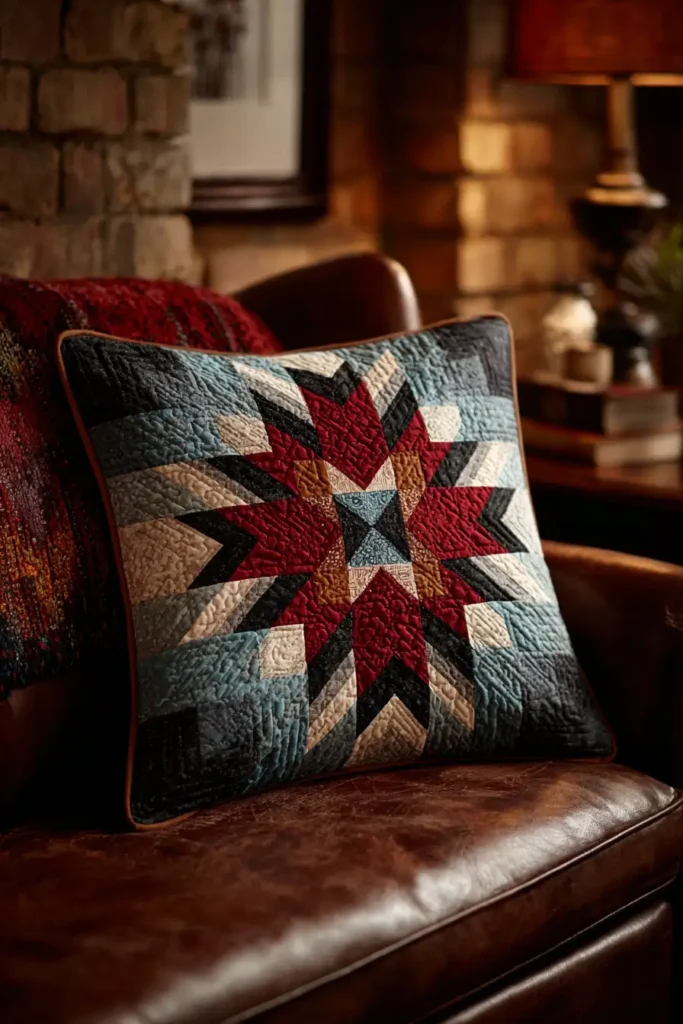
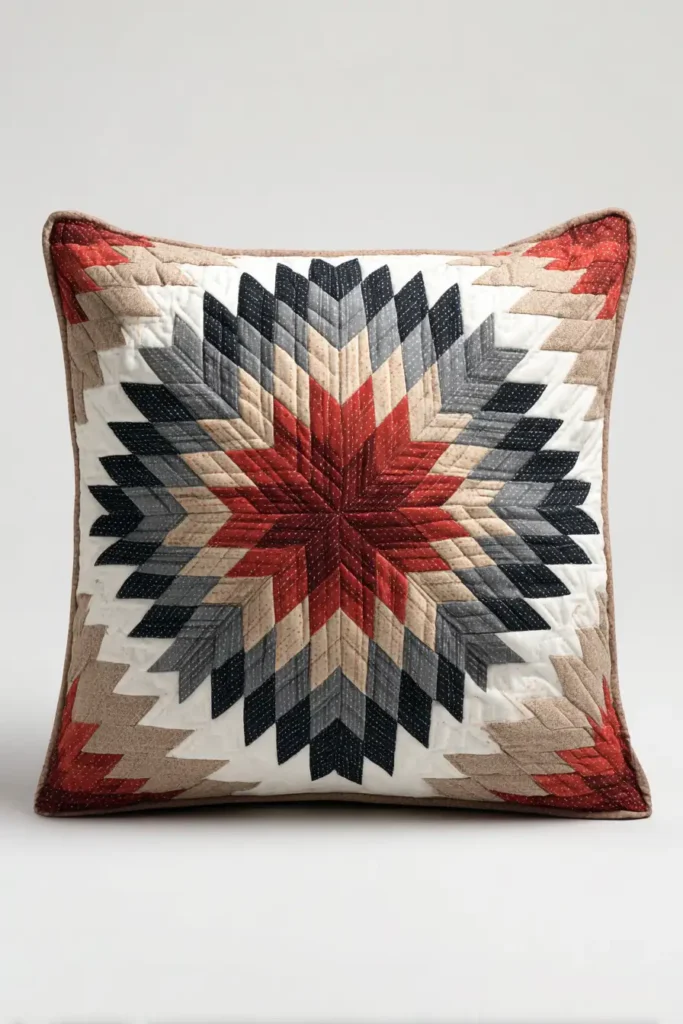
“The Midnight Ember” Lakota Star Cushion Cover
A living room sofa is the communal heart of the home, and decorative cushions serve as its architectural accents. However, heavily used living spaces demand textiles that are structurally resilient without sacrificing high-end aesthetic appeal. “The Midnight Ember” scales the monumental Lakota Star down into a flawless, 20-inch geometric centerpiece. Bursting from a vibrant Deep Red core, the diamonds ripple outward through warm Greige and deep Charcoal, terminating in sharp Black points against a pristine White background. By utilizing an envelope closure and an upholstery-grade backing, this cushion cover transforms a sacred, culturally rich motif into a durable, everyday luxury.
Finished Dimensions: Standard Large Throw Pillow, 20″ x 20″ (Make a pair for balanced, elegant sofa seating).
Materials Needed (For One Cushion):
- The “Ember” (Diamonds): 1/8 yard (or Jelly Roll scraps) of solid Deep Red, Greige, Charcoal, and Black cotton.
- The Background (Negative Space): 1/2 yard of crisp White solid cotton.
- Backing & Envelope Flaps: 1 yard of heavyweight Black Cotton Canvas or Linen.
- Batting:100% Wool or Bamboo Batting.
- Why: Living room cushions are leaned against, hugged, and napped upon daily. Wool and bamboo are premium, highly resilient fibers that immediately bounce back from heavy compression. This prevents the quilted cover from flattening out over time, ensuring the star remains plump, dimensional, and comfortably breathable against the skin.
- Thread: 50wt cotton thread in an invisible Dove Grey.
- Notions: A small acrylic ruler with a precise 45-degree angle line, a rotary cutter with a fresh blade, ultra-fine glass-head pins, and a plush 20″ x 20″ feather or down-alternative pillow insert.
Cultural Backstory: In Plains Native traditions, the eight-pointed Morning Star represents direction, the break of dawn, and the protective light of the sun. Historically, placing a star quilt in a home was a way to bless the space and its inhabitants. Bringing this radiant geometry to a living room cushion beautifully honors that tradition, placing a geometric emblem of warmth and protection exactly where family and guests gather to rest.
Step 1: Scaling the Diamonds for a Cushion
A 20-inch canvas requires a perfectly proportioned 16-inch star.
- Cut the Narrow Strips: To ensure the star floats elegantly with enough negative space around it, you must use narrower diamond segments. Cut exactly eight 1.5-inch strips from each of your 4 star colors (Deep Red, Greige, Charcoal, Black).
- Organize the Gradient: Lay out the sequence to build your high-contrast rings: Deep Red (center) -> Greige -> Charcoal -> Black (outer tips).

Step 2: Strip-Piecing the Micro-Strata
Building the staggered gradient panels.
- The Stagger: Place a Greige strip right-sides together over a Deep Red strip. Offset the Greige strip so it drops exactly 1.5 inches lower than the top of the Red strip. Sew them together with a 1/4-inch seam allowance.
- Complete the Panel: Add the Charcoal strip, and then the Black strip, dropping each one 1.5 inches to create a staircase edge.
- Pressing: Press all seams outward toward the darkest Black strip. You need to make 8 identical miniature strata panels.
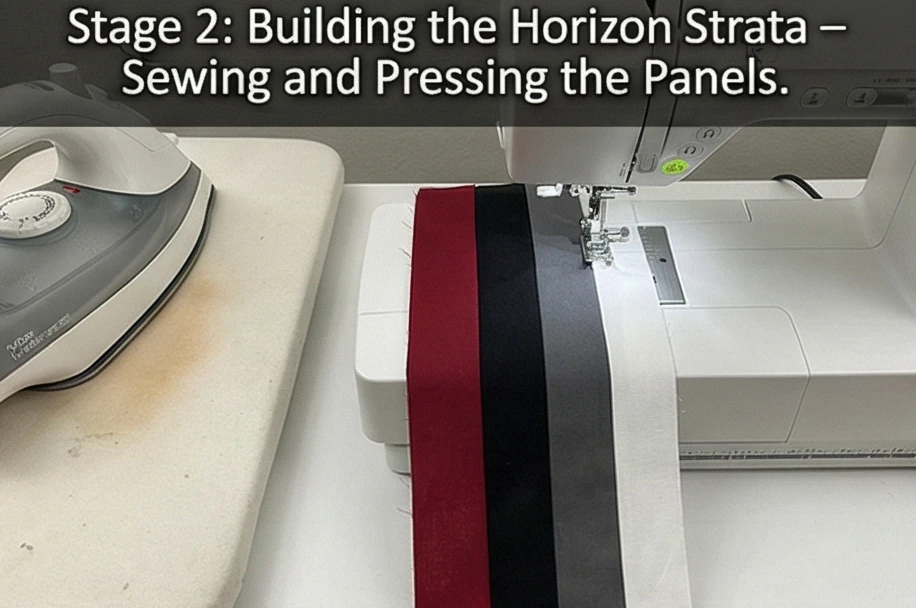
Step 3: Slicing the 45-Degree Angles
Extracting the geometric rows.
- Align the Ruler: Lay a strata panel flat. Align the 45-degree line of your acrylic ruler along the bottom horizontal seam. Slice off the jagged left edge.
- The Sub-Cut: Measure exactly 1.5 inches over from the newly cut angle. Slice again. You now have a tiny, continuous row of four connected diamonds.
- The Yield: Cut eight of these 4-diamond rows to build your star points.
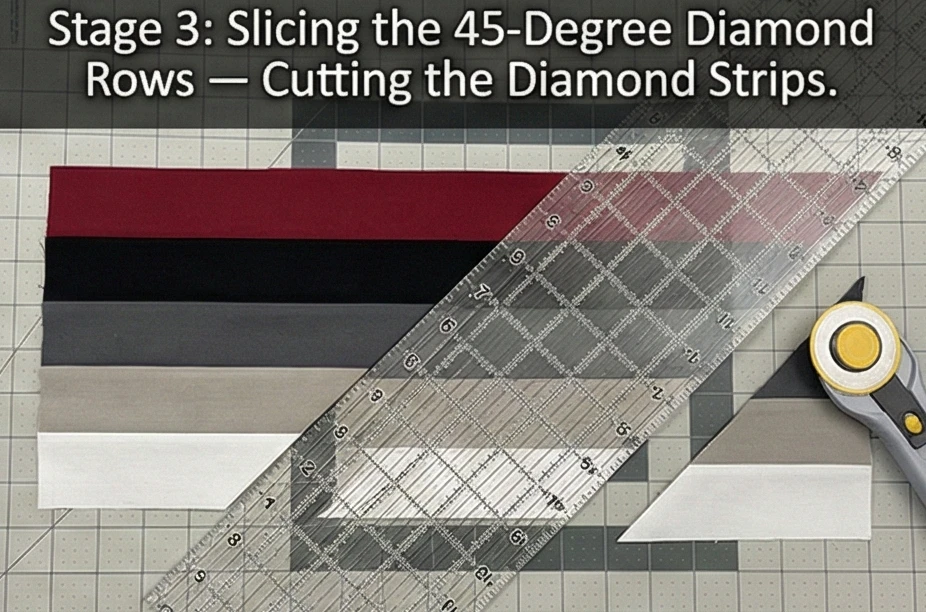
Step 4: Nesting the Eight Points
Tiny intersections require exact pinning to lie flat.
- Offset and Pin: Take two diamond rows. Place them right-sides together, shifting them so the Red diamond on the top row perfectly meets the Greige diamond on the bottom row. Push a pin vertically directly through the 1/4-inch seam intersection.
- Build the Star: Sew four rows together in this staggered pattern to build a single point. Repeat until you have 8 miniature star points.
- Assemble the Core: Carefully sew the points together to form the top and bottom halves of the star, then join them seamlessly across the center.
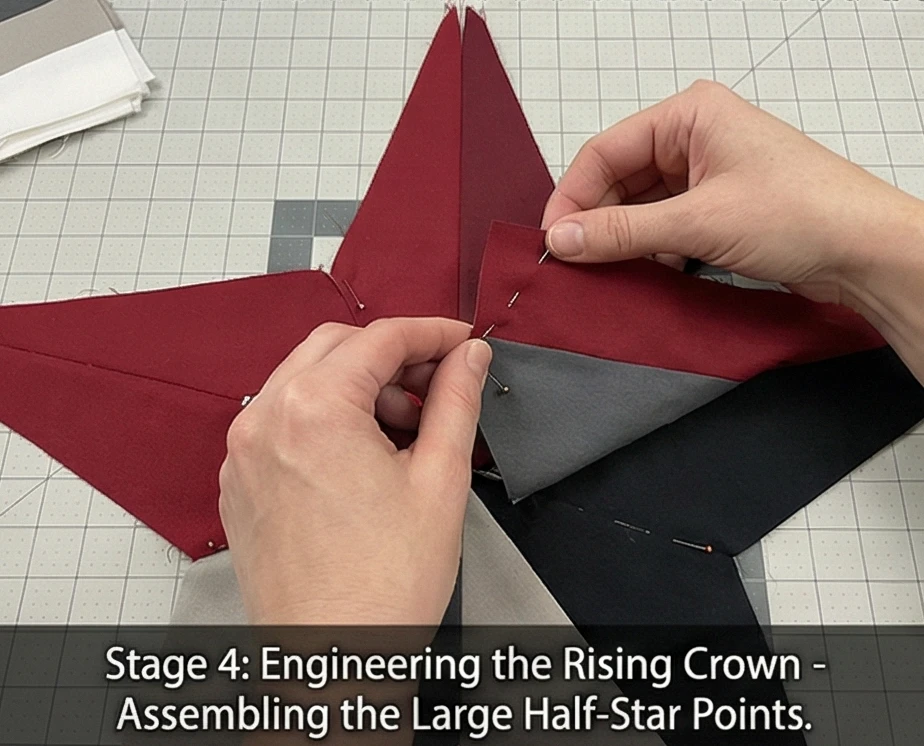
Step 5: The “Y-Seam” Background Setting
Floating the geometric star in the white void.
- Cut the Voids: From your crisp White yardage, cut four large squares (for the corners) and four squares cut in half diagonally (for the deep V-shaped gaps between the points).
- The Pivot: Use the traditional Y-seam technique to gently drop the White background pieces into the voids. Stop your needle exactly 1/4 inch before the edge of the star point, pivot the fabric, and sew up the other side.
- Square Up: Trim the completed block to 20.5″ x 20.5″, ensuring the star is perfectly centered.
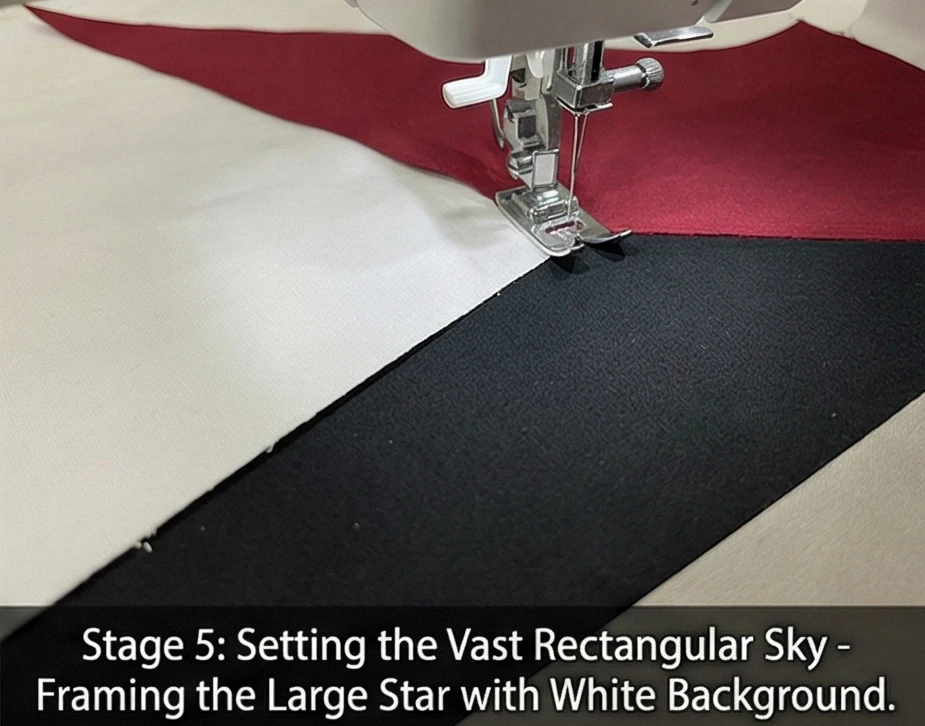
Step 6: Basting, Grid Quilting, and Envelope Construction
Securing the layers for heavy sofa use.
- Baste and Quilt: Sandwich your pieced top, the resilient wool batting, and a scrap piece of muslin (for the interior lining). Using a walking foot, quilt an elegant 1-inch grid strictly in the White negative space, leaving the geometric star unquilted so it visually “pops.”
- Prepare the Backing: Cut two rectangles of heavy Black Canvas for the envelope closure (e.g., 20.5″ x 15″ and 20.5″ x 12″). Fold and topstitch one long edge on each piece to create a clean, durable hem.
- Final Assembly: Place the quilted top face up. Lay the canvas backing pieces face down, overlapping the hemmed edges in the center. Sew a 1/2-inch seam around the entire perimeter, backstitching heavily over the envelope overlap. Clip the corners, turn right-side out, and insert your plush 20″ pillow.
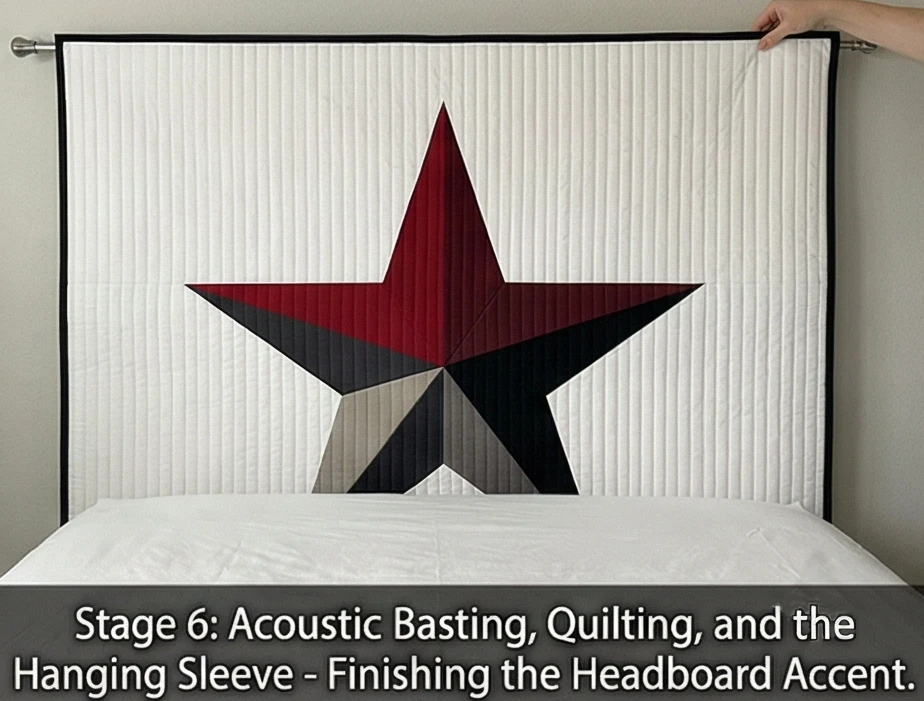
Usability Note: Always use a pillow insert that is exactly the same size as your finished cover (a 20″ insert for a 20″ cover). The wool batting layer adds luxurious thickness to the cover, so a generous, plump insert is required to fill out the corners and give the cushion that high-end, bespoke designer look. Wash the cover inside-out on a cold, gentle cycle to protect the dense quilting.
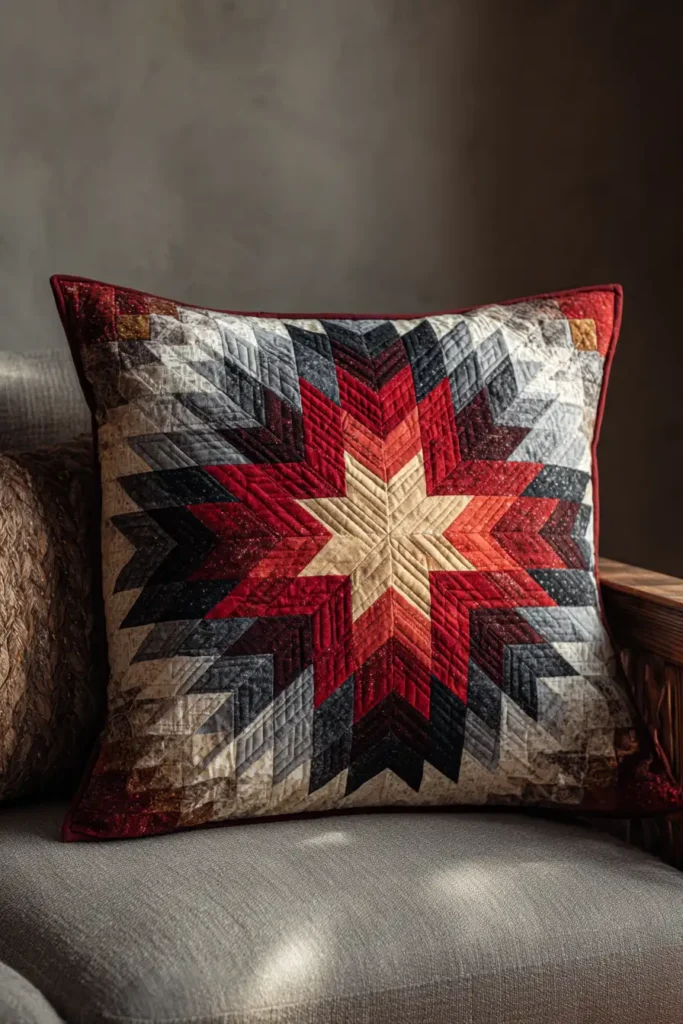
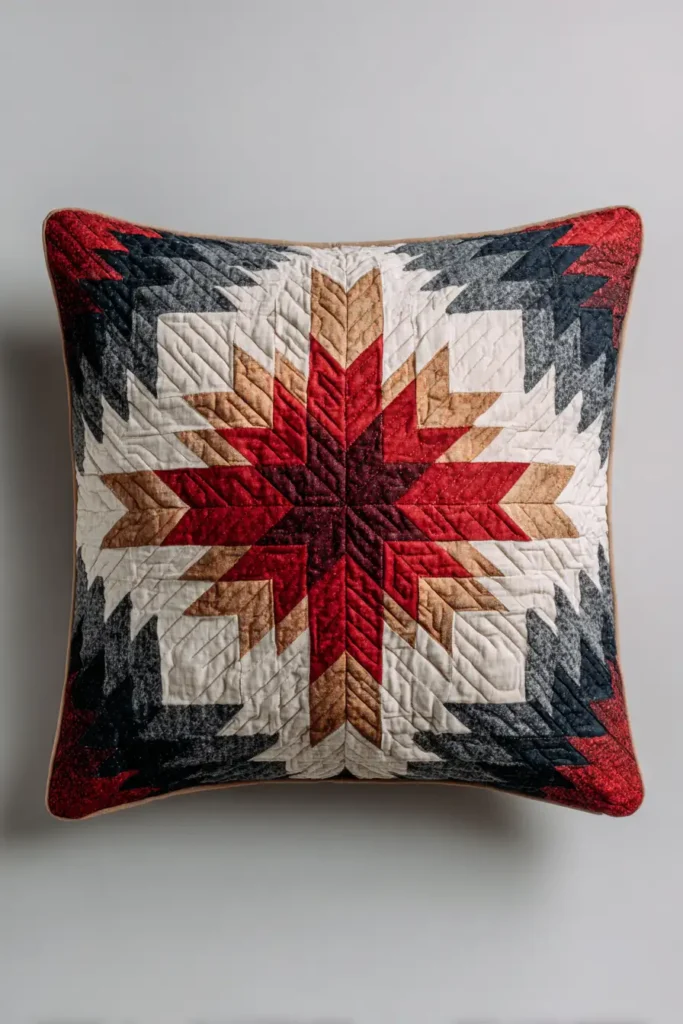
15. Cozy Lakota Star Lap Quilts for Relaxing Reading Nooks
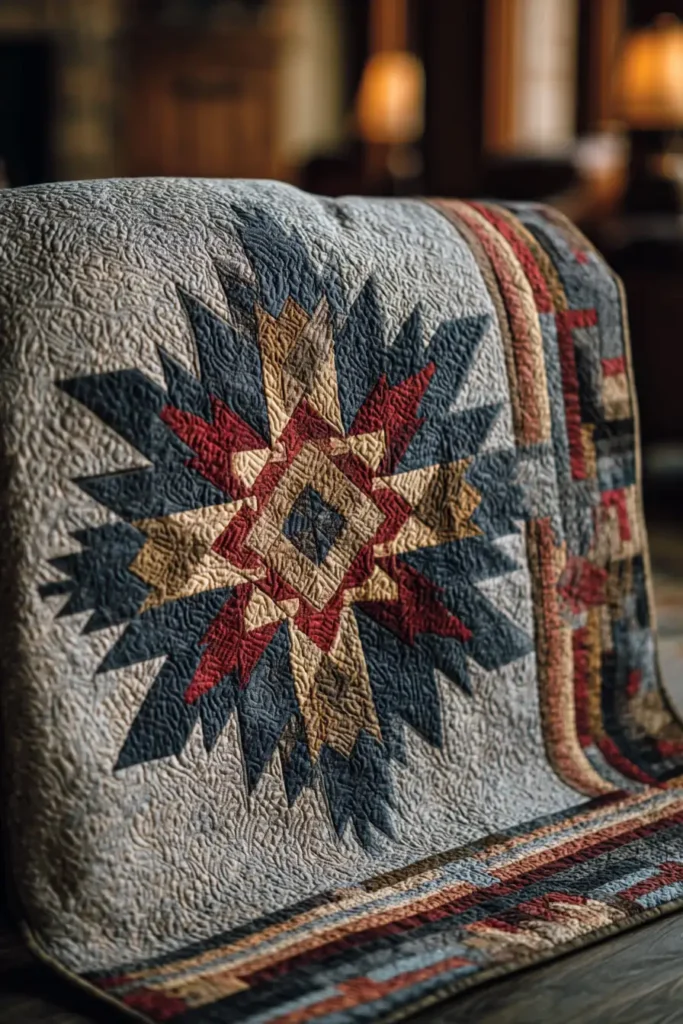
“The Hearthside Beacon” Cozy Lakota Star Lap Quilt
A dedicated reading nook is an intimate sanctuary for the mind, demanding a textile that offers profound physical comfort without overwhelming the small space. “The Hearthside Beacon” scales the monumental Lakota Star down to a perfect, wrap-around lap size. Executed in a highly sophisticated, grounding palette of crisp White, soft Greige, deep Charcoal, and solid Black, with a vibrant Deep Red core, this quilt acts as a striking piece of geometric art draped over a leather armchair. With a heavy flannel backing and premium, breathable batting, this lap quilt delivers the ultimate cozy embrace for hours of uninterrupted reading.
Finished Dimensions: Generous Armchair/Lap Quilt, 54″ x 54″ (The ideal square proportion to cover the legs and tuck around the shoulders without dragging heavily on the floor).
Materials Needed:
- The “Beacon” (Diamond Strips): 1/3 yard each of 4 solid cottons (Deep Red, Greige, Charcoal, Black).
- The Background (Negative Space): 3 yards of pristine White solid cotton.
- Backing: 3.5 yards of high-quality Black Flannel or Brushed Cotton.
- Why: When you sit still for hours reading, your body temperature naturally drops. Flannel backing provides instant, tactile warmth the second you pull it over your lap, trapping body heat far more efficiently than standard crisp cotton.
- Batting:100% Wool Batting.
- Why: A reading quilt must drape fluidly over bent knees and shoulders. Wool is exceptionally resilient and feather-light. It acts as a breathable furnace, providing necessary warmth without the stifling, sweaty weight of synthetic polyester, ensuring you remain perfectly comfortable through entire chapters.
- Thread: 50wt cotton thread in an invisible Dove Grey.
- Notions: A large acrylic ruler with a 45-degree angle line, a fresh rotary blade, and ultra-fine glass-head pins.
Cultural Backstory: The eight-pointed Morning Star represents guidance, light, and the pursuit of a new path in Plains Native cultures. Bringing this specific geometry into a reading nook—a space dedicated to learning, imagination, and exploring new worlds—creates a beautiful metaphorical connection. The star acts as a beacon of knowledge, wrapping the reader in a protective, historic emblem of enlightenment.
Step 1: Scaling the Medium Lap Star
Adjusting the math for a 54-inch canvas.
- Cut the Strips: To create a star that spans beautifully across a lap quilt while leaving an elegant border of negative space, cut exactly eight 2-inch strips from each of your 4 star colors (Deep Red, Greige, Charcoal, Black) across the width of the fabric (WOF).
- Organize the Sequence: Lay the strips out from the center radiating outward: Deep Red -> Greige -> Charcoal -> Black.
Step 2: Constructing the Lap Strata
Strip-piecing the gradient.
- The Stagger: Place the Greige strip right sides together over the Deep Red strip. Drop the Greige strip exactly 1.5 inches lower than the top edge of the Red strip to create the offset staircase edge. Sew them together with a precise 1/4-inch seam.
- Complete the Panel: Add the Charcoal strip (dropped 1.5 inches), and finally the Black strip (dropped 1.5 inches).
- Pressing: Press all seams strictly toward the darker, outer Black edge. Make 8 identical staggered strata panels.
Step 3: Slicing the 45-Degree Diamond Rows
Extracting the tailored geometry.
- Align the Angle: Lay a strata panel flat. Align the 45-degree line of your acrylic ruler along the bottom horizontal seam of the panel. Slice off the jagged left edge to establish the perfect angle.
- The Sub-Cut: Measure exactly 2 inches over from the cut and slice again. You now have a row of four interconnected diamonds.
- The Yield: Cut eight of these diamond rows from each of the 8 strata panels to build your star points.
Step 4: Engineering the Eight Points
Nesting the seams for durability and precision.
- Offset and Pin: Take two diamond rows. Place them right-sides together, shifting them so the Red diamond on the top row perfectly aligns with the Greige diamond on the bottom row. Push a pin vertically through every 1/4-inch intersection to lock the seams.
- Build the Points: Sew eight rows together in this staggered pattern to build one solid star point. Repeat to construct all 8 star points.
- Assemble the Star: Carefully sew the four points together to form the top half of the star, and four to form the bottom half. Join the two halves across the center.
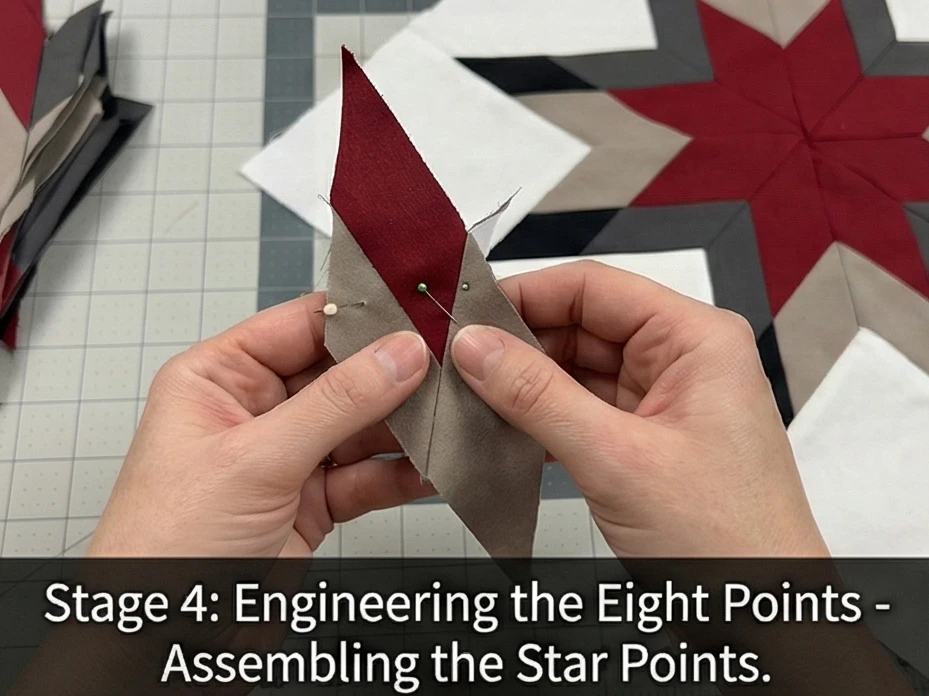
Step 5: Setting the Background Void
Floating the beacon in the white space.
- Cut the Background: From your solid White yardage, cut exactly four 15-inch squares (for the outer corners) and four 15-inch squares cut in half diagonally (yielding eight triangles for the deep V-shaped gaps between the points).
- The Y-Seam: Drop the White background triangles and squares into the voids using the traditional Y-seam technique, stopping 1/4 inch from the edges to pivot the fabric smoothly without puckering the star.
- The Framing Border: To bring the quilt up to a generous 54″ x 54″ dimension, cut four long White strips measuring 4.5 inches wide and sew them around the entire perimeter of the squared-off star block.
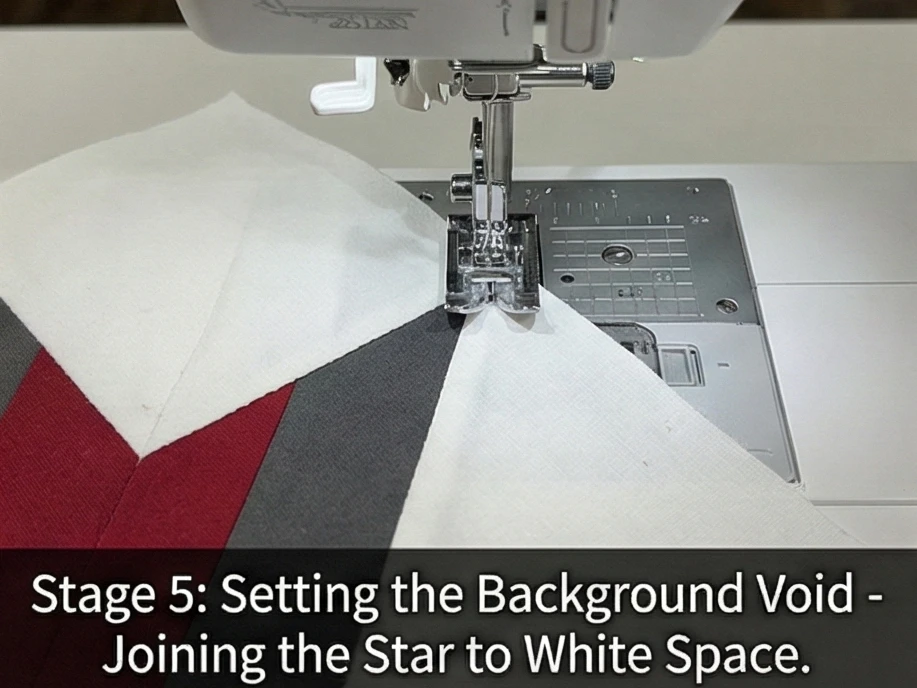
Step 6: Basting, “Page” Quilting, and Tailored Edge
Finishing the quilt for maximum drape and coziness.
- The Baste: Sandwich the pieced star top, the feather-light wool batting, and the cozy Black Flannel backing. Baste heavily with curved safety pins.
- Linear Quilting: To maintain the extreme softness and drape required for a lap quilt, avoid over-quilting. Using a walking foot, quilt straight, horizontal lines exactly 1.5 inches apart across the entire piece. This linear quilting mimics the text lines on a book page and securely holds the wool batting without making the quilt stiff.
- The Binding: Trim the quilt perfectly flush. Bind the edges in solid Black fabric to sharply frame the bright, floating star and provide a tailored, durable boundary that looks gorgeous draped over a chair arm.
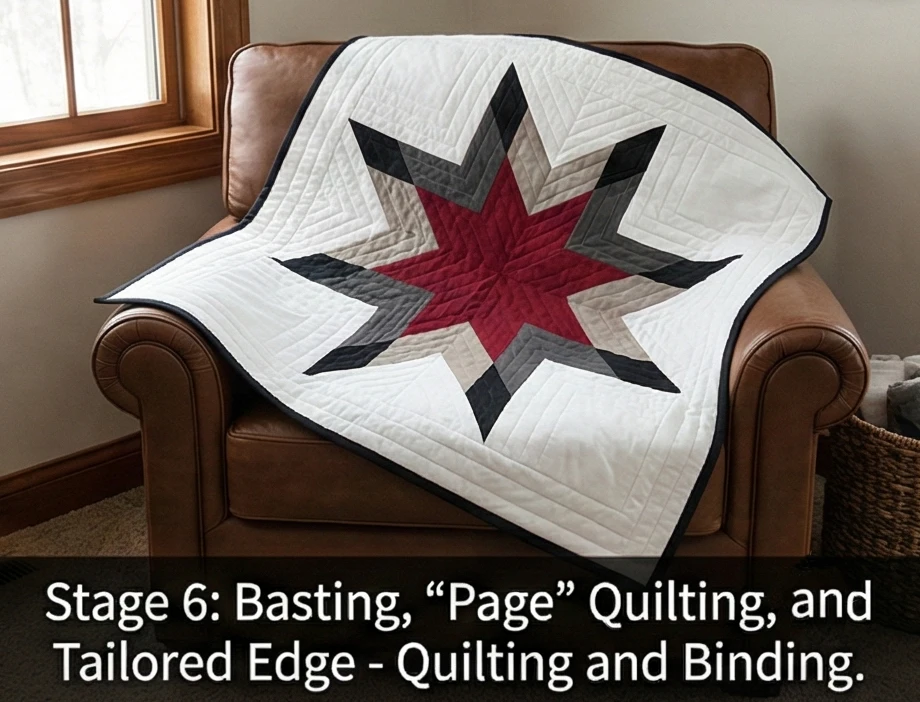
Usability Note: Flannel backing is the ultimate luxury, but it can shrink slightly during its first encounter with heat. Wash the finished lap quilt on a cold, gentle cycle and tumble dry on low. This allows the wool batting and the flannel to shrink at the exact same rate, creating a gorgeously soft, crinkled texture that begs to be snuggled under with a good book.
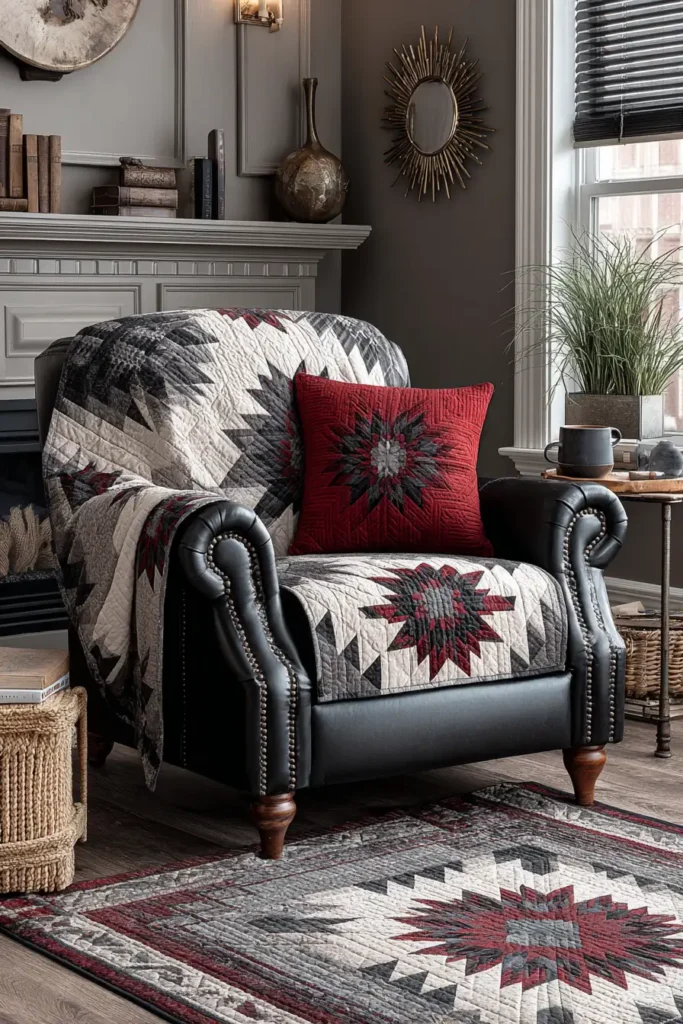
16. Intricate Lakota Star Quilted Table Toppers for Dining Centerpieces
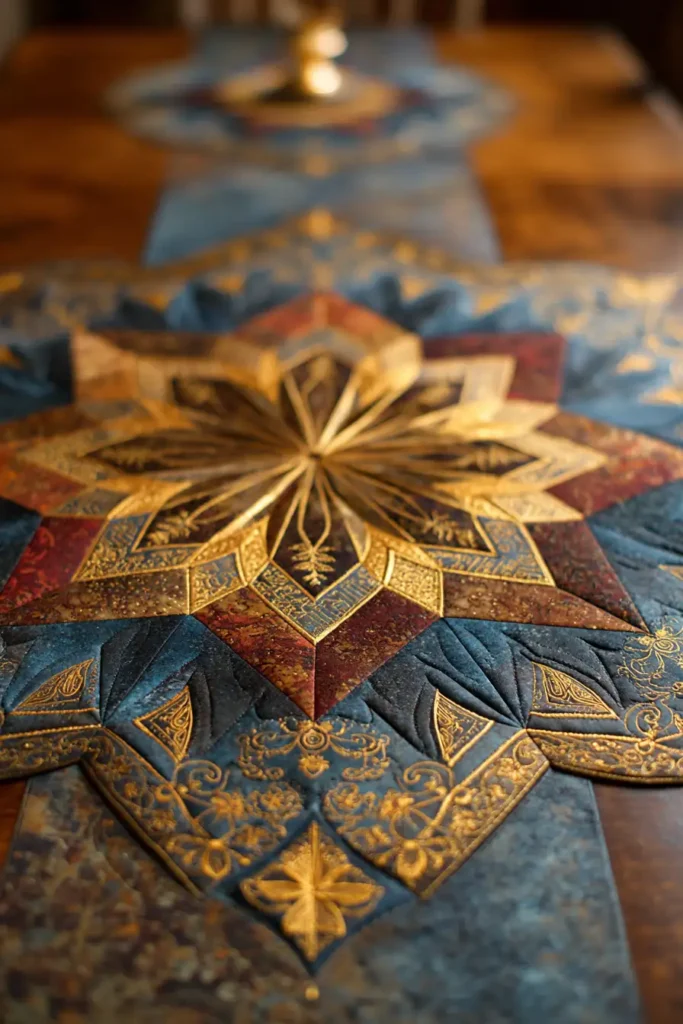
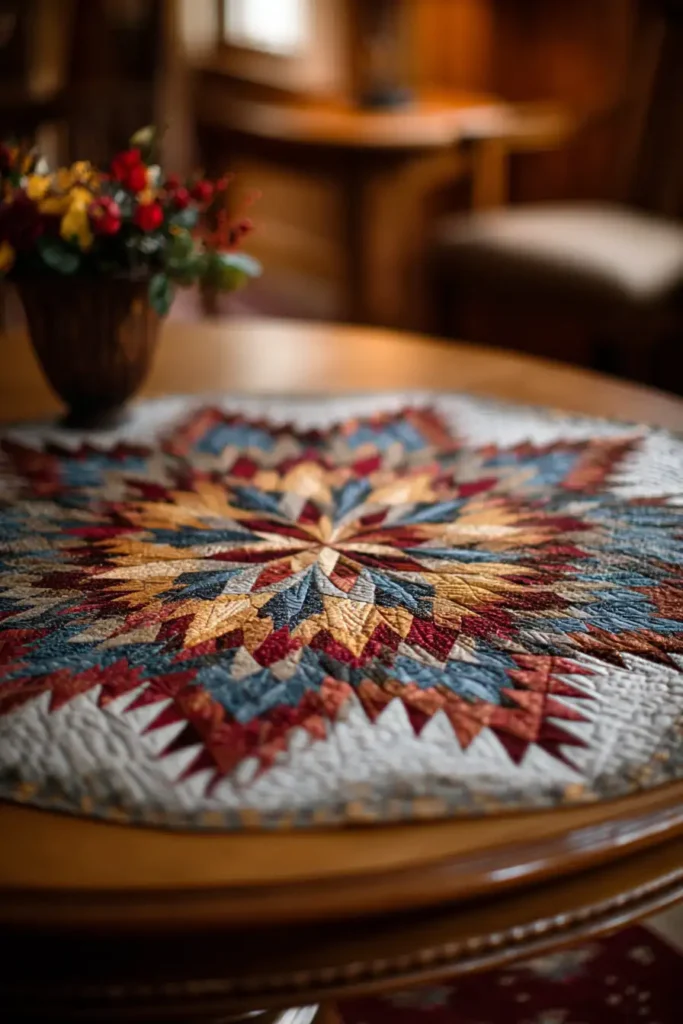
“The Crimson Nexus” Intricate Star Centerpiece
A formal dining table or a grand coffee table requires a centerpiece that anchors the room’s decor while providing a functional foundation for heavy vases, candelabras, or serving platters. Translating the monumental architecture of the Lakota Star into a compact, highly detailed table topper creates a mesmerizing focal point. “The Crimson Nexus” scales the eight-pointed geometry down into an intricate, tightly woven geometric burst. Executed in our signature, highly sophisticated palette of crisp White, soft Greige, deep Charcoal, and solid Black, radiating from a vibrant Deep Red core, this centerpiece brings profound cultural artistry directly to the heart of your gathering space.
Finished Dimensions: Large Square Centerpiece Mat, 28″ x 28″.
Materials Needed:
- The “Nexus” (Diamonds): 1/4 yard each of 4 solid cottons (Deep Red, Greige, Charcoal, Black).
- The Background (Negative Space): 1 yard of pristine White solid cotton.
- Backing: 1 yard of high-quality Black Cotton Sateen.
- Batting: Insul-Bright (heat-resistant fleece) AND a thin layer of Bamboo Batting.
- Why: A table topper is the frontline defense for your expensive furniture. Insul-Bright contains a hollow, metalized film that reflects the heat of hot serving dishes or warm candle wax away from your polished wood or glass surfaces. Adding a sheer layer of bamboo batting softens the stiff metallic fleece, ensuring the topper lies flawlessly flat and looks like a bespoke textile rather than a stiff piece of cardboard.
- Thread: 50wt cotton thread in an invisible Dove Grey.
- Notions: A small acrylic ruler with a precise 45-degree angle line, a rotary cutter with a sharp micro-blade, and ultra-fine glass-head pins.
Cultural Backstory: In Plains Native cultures, the Morning Star is deeply associated with gathering. The center of the star symbolically mirrors the center of the lodge—the communal hearth fire where families share stories, warmth, and sustenance. By placing an intricately pieced Lakota Star directly at the center of your dining or coffee table, you are laying down a geometric hearth, actively inviting connection and honoring the shared experience of the meal.
Step 1: Precision Scaling for the Centerpiece
An intricate star requires narrow, precise strips.
- Cut the Tiny Strips: To fit a complex, multi-ringed star into a 28-inch square, you must use highly detailed piecing. Cut exactly eight 1.5-inch strips from each of your 4 star colors (Deep Red, Greige, Charcoal, Black) across the width of the fabric.
- Organize the Gradient: Lay the strips out radiating from the core outward: Deep Red -> Greige -> Charcoal -> Black.
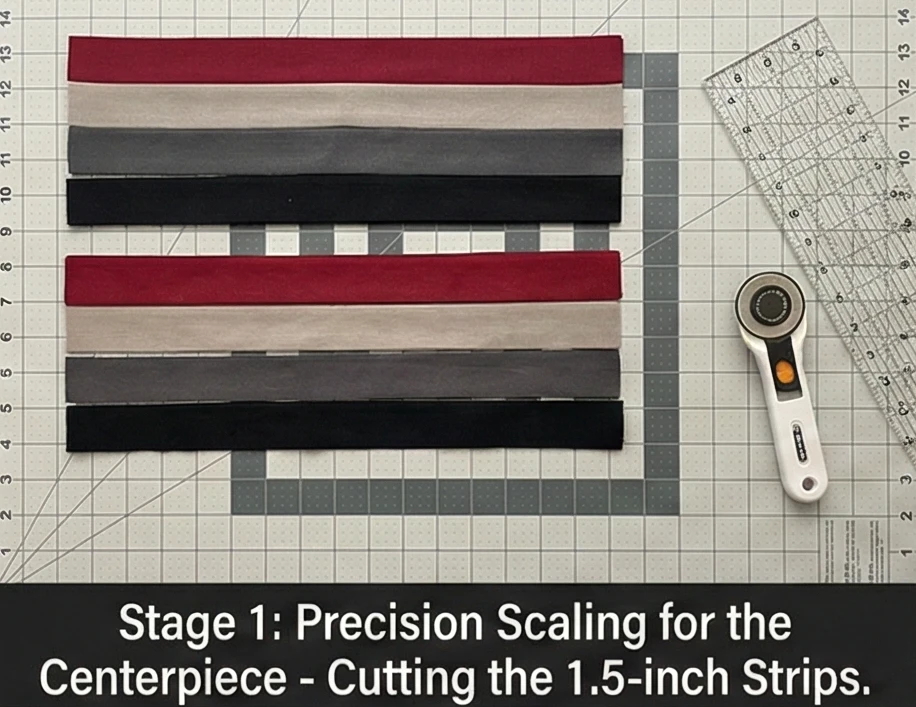
Step 2: Strip-Piecing the Micro-Strata
Building the staggered gradient panels.
- The Stagger: Place the Greige strip right sides together over the Deep Red strip. Offset the Greige strip so it drops exactly 1.5 inches lower than the top of the Red strip to create a staircase edge. Sew them together with a strict, perfect 1/4-inch seam.
- Complete the Panel: Add the Charcoal strip, and then the Black strip, dropping each one 1.5 inches.
- Pressing: Press all seams strictly outward toward the darkest Black strip. You need to make 8 identical miniature strata panels.
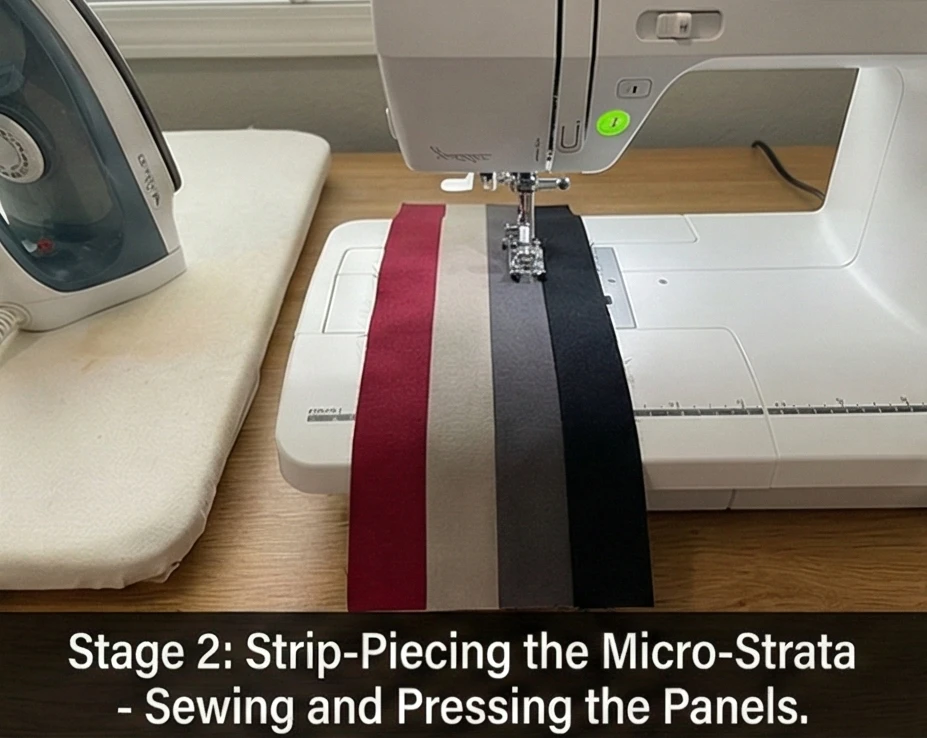
Step 3: Slicing the 45-Degree Diamond Rows
Extracting the intricate geometry.
- Align the Angle: Lay a strata panel flat. Align the 45-degree line of your acrylic ruler along the bottom horizontal seam of the panel. Slice off the jagged left edge to establish your baseline angle.
- The Sub-Cut: Measure exactly 1.5 inches over from the newly cut angle. Slice again. You now have a tiny row of four connected diamonds.
- The Yield: Cut eight of these diamond rows from each of the 8 strata panels.
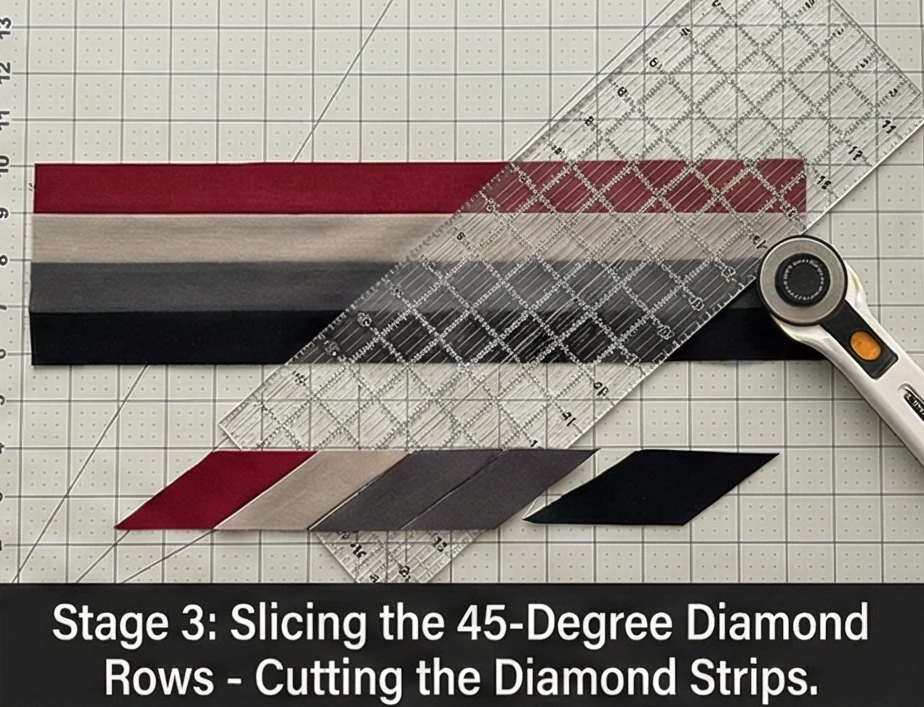
Step 4: Nesting the Intricate Points
Locking the tiny intersections for a completely flat surface.
- Offset and Pin: Take two diamond rows. Place them right-sides together, shifting them so the Red diamond on the top row perfectly aligns with the Greige diamond on the bottom row. Because these pieces are small, you must push a pin vertically through every single 1/4-inch seam intersection.
- Build the Points: Sew eight rows together in this staggered pattern to build one highly detailed star point. Repeat to construct all 8 intricate star points.
- Assemble the Nexus: Sew the four points together for the top half, and four for the bottom half. Press the seams open where the eight points meet in the absolute center to reduce the bulky fabric knot.
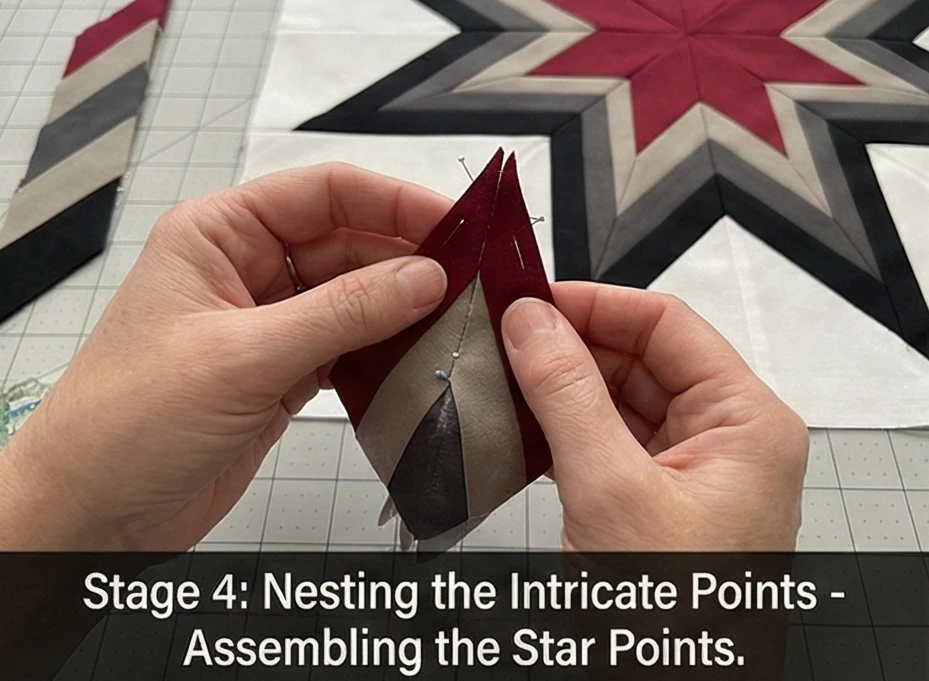
Step 5: The Seamless Y-Seam Background
Floating the nexus in pristine white space.
- Cut the Voids: From your crisp White yardage, cut exactly four 10-inch squares (for the outer corners) and four 10-inch squares cut in half diagonally (yielding eight triangles for the deep V-shaped gaps between the points).
- The Pivot Insertion: Drop the White background pieces into the voids using the traditional Y-seam technique. Stop exactly 1/4 inch from the edges to pivot the fabric smoothly without stretching the intricate bias edges of your star points. Your block should now be perfectly squared off.
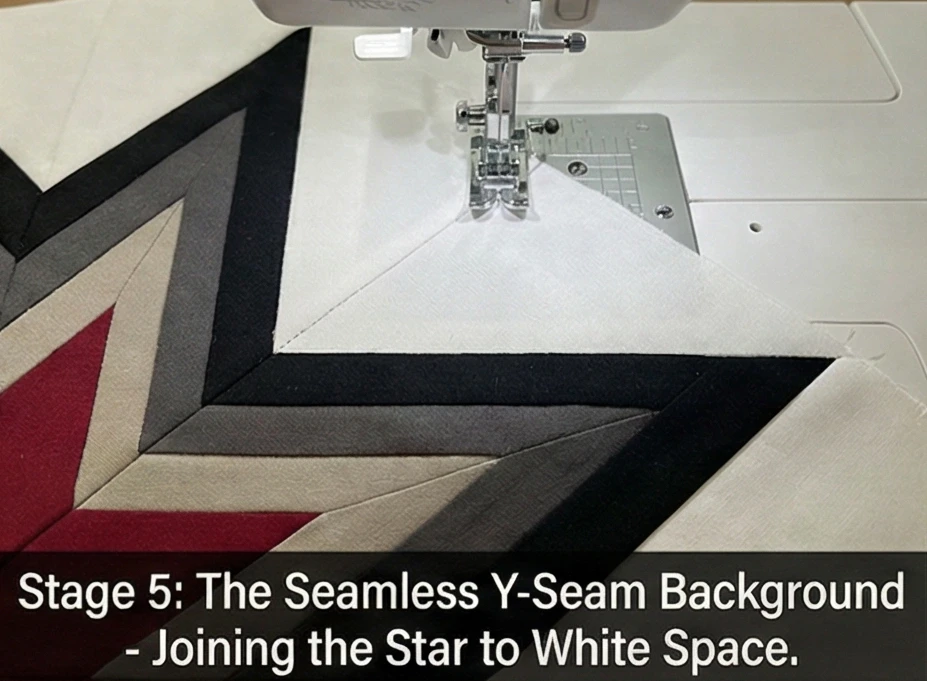
Step 6: Thermal Basting and Sculptural Quilting
Protecting the table and enhancing the 3D effect.
- The Thermal Stack: Place your Black Sateen backing face down. Add the Insul-Bright (shiny side up), then the breathable Bamboo batting, and finally your pieced top. Baste densely with safety pins to prevent the metallic film from shifting.
- Sculptural Echo Quilting: Using a walking foot, do not quilt straight across the piece. Instead, quilt “in the ditch” (directly inside the seam lines) of the White background, outlining the entire star. Then, quilt straight lines parallel to the diamond shapes, 1/4-inch inside the Black, Charcoal, and Greige sections.
- Why: This traps the batting inside the geometric shapes, causing the individual diamonds to puff up slightly into a magnificent, 3D quilted texture that perfectly supports heavy centerpieces without wobbling.
- The Tailored Frame: Trim the topper to exactly 28″ x 28″. Bind the edges tightly in solid Black fabric to sharply frame the intricate interior architecture.
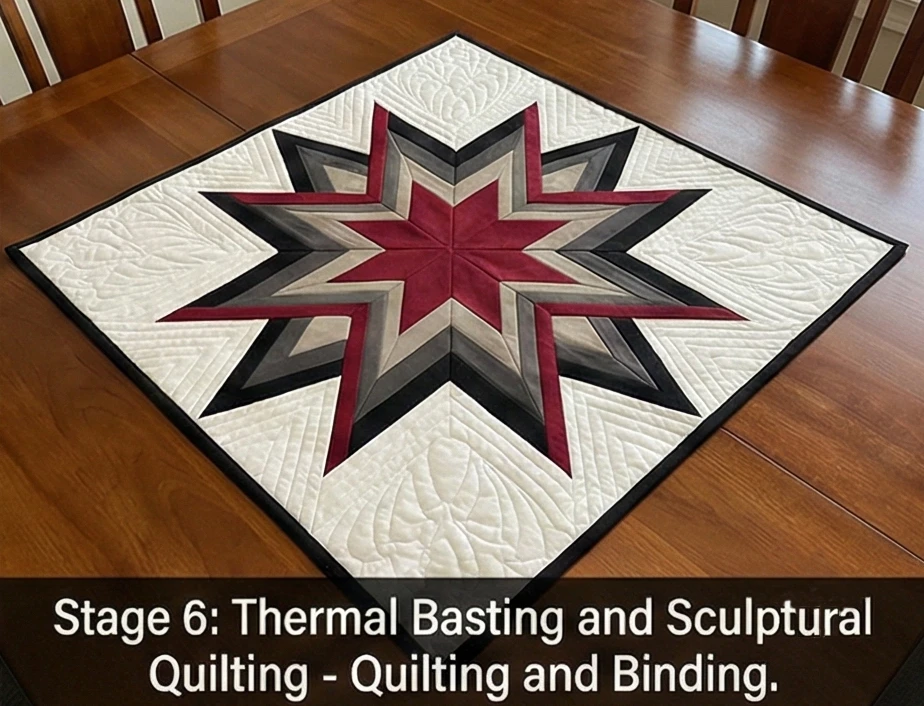
Usability Note: A table centerpiece will inevitably catch drips from candles or spills from serving dishes. Because of the thermal Insul-Bright layer, immediately spot-clean stains with cold water. When machine washing is necessary, use a cold, gentle cycle, and lay the topper completely flat on a towel to dry so the internal metallic heat-shield maintains its smooth integrity.
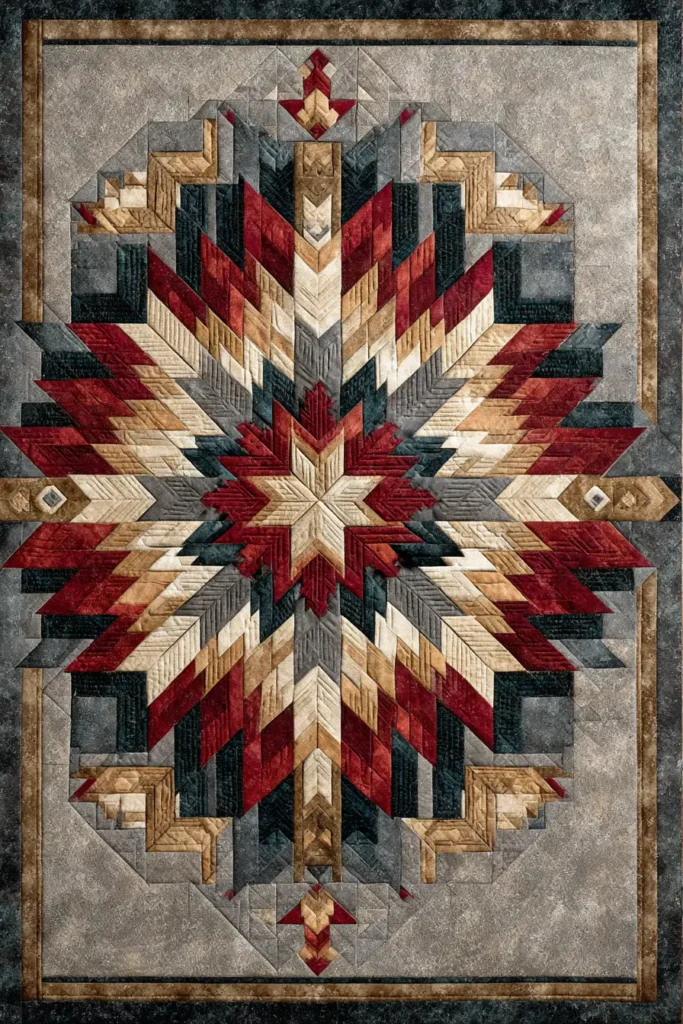
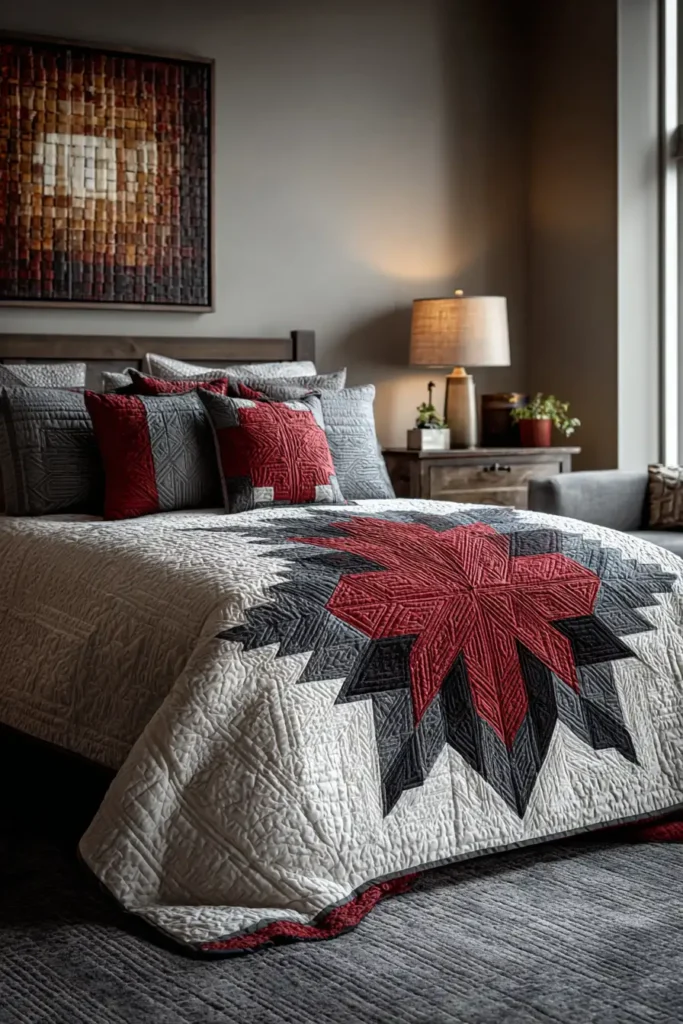
17. Chic Lakota Star Quilt Pattern Tote Bags for Everyday Elegance
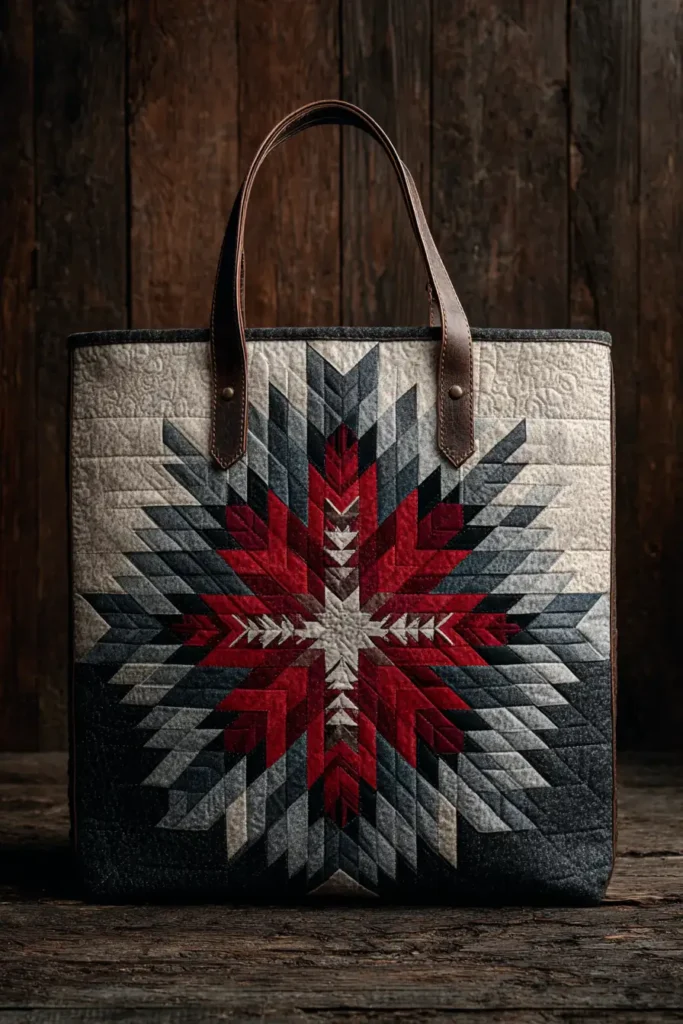
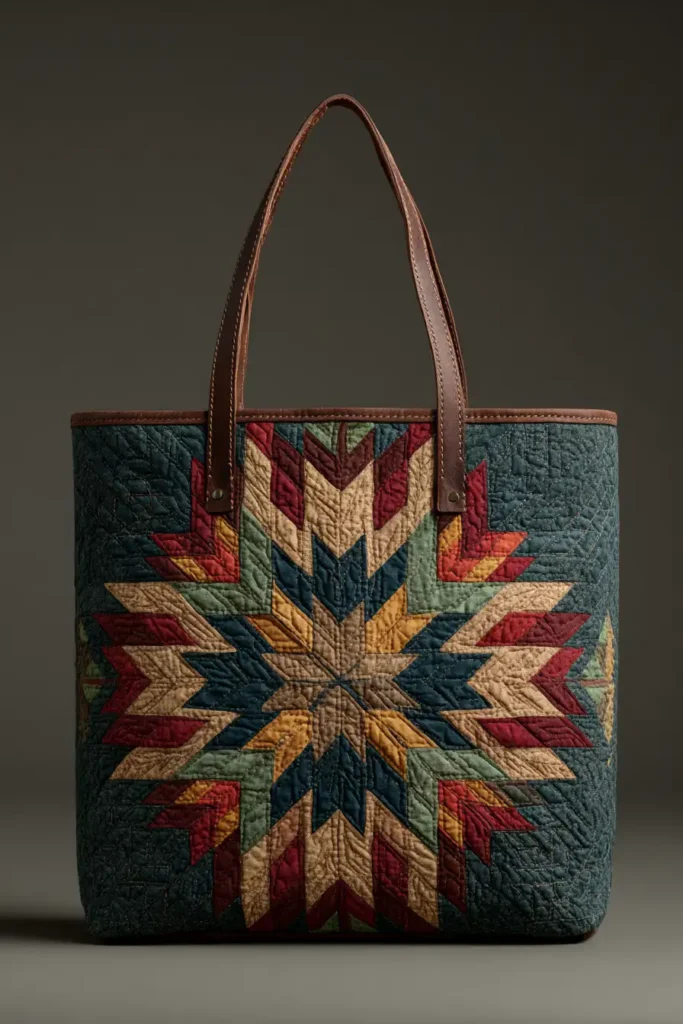
“The Morning Path” Everyday Elegance Star Tote
True elegance is not confined to the home; it should accompany you out into the world. A tote bag is the ultimate utilitarian accessory, but when adorned with the striking, monumental geometry of the Lakota Star, it becomes a piece of moving, functional art. “The Morning Path” scales the eight-pointed star down into a flawless 10-inch geometric centerpiece set against the dark, dirt-forgiving background of a heavy canvas tote. Executed in our signature, high-contrast palette of Crisp White, soft Greige, and deep Charcoal, radiating from a vibrant Deep Red core, this tote beautifully bridges the gap between ancestral heritage and chic, modern daily utility.
Finished Dimensions: Generous Everyday Tote, 18″ wide x 16″ tall x 6″ deep (Perfect for a laptop, books, or a weekend market run).
Materials Needed:
- The “Path” (Diamonds): 1/8 yard (or Jelly Roll scraps) of solid Deep Red, Greige, Charcoal, and White cotton.
- The Body (Background & Base): 1 yard of heavy-duty Black Cotton Canvas.
- Why: A tote bag is placed on floors, tossed into cars, and exposed to the elements. Canvas provides an indestructible, sleek foundation that hides scuffs and daily wear beautifully.
- Lining: 1 yard of crisp White Percale or Greige Cotton Sateen.
- Structural Interfacing: 1 yard of Foam Stabilizer (such as ByAnnie’s Soft and Stable).
- Why: A floppy tote bag feels messy and makes it difficult to find your belongings. A dense foam stabilizer gives the bag architectural rigidity, allowing it to stand up completely on its own while offering protective, cushioned padding for laptops or tablets.
- Handles: Two 28-inch lengths of Black Leather Strapping or heavy-duty Cotton Webbing.
- Thread: 50wt heavy-duty cotton thread in Black.
- Notions: A small acrylic ruler with a 45-degree angle line, a rotary cutter, and heavy-duty sewing machine needles (Size 90/14 or 100/16).
Cultural Backstory: In Plains Native traditions, the Morning Star represents guidance, direction, and protection on a journey. It is the last star seen before the dawn, assuring travelers they are on the right path. Placing this deeply symbolic motif on a tote bag—a vessel used specifically for carrying your essentials as you navigate your day—is a beautiful, modern homage to its protective heritage.
Step 1: Miniaturizing the Star Geometry
A 10-inch star requires meticulous, scaled-down strips.
- Cut the Tiny Strips: To fit perfectly on the front panel of a tote, cut exactly eight 1.25-inch strips from your Red, Greige, Charcoal, and White fabrics.
- Organize the Gradient: Lay the sequence out radiating from the core: Deep Red -> Greige -> Charcoal -> White (outer tips).
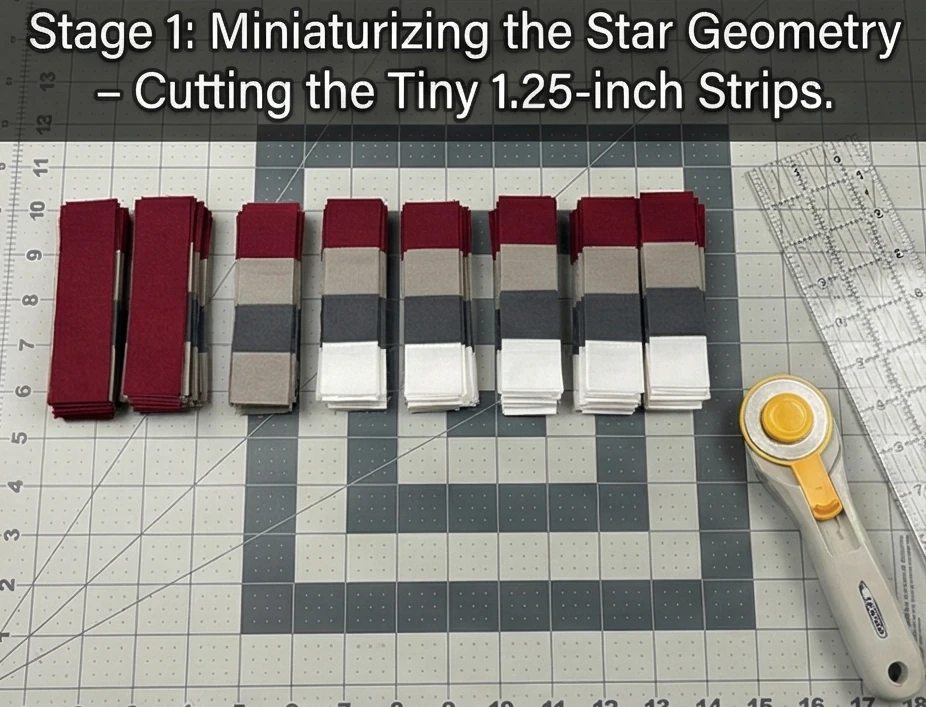
Step 2: Strip-Piecing the Micro-Strata
Building the staggered gradient panels.
- The Stagger: Place a Greige strip right-sides together over a Deep Red strip. Offset the Greige strip so it drops exactly 1.25 inches lower than the top of the Red strip. Sew them together with a strict 1/4-inch seam.
- Complete the Panel: Add the Charcoal strip, and then the White strip, dropping each one 1.25 inches to create a staircase edge.
- Pressing: Press all seams outward toward the White strip. Make 8 identical miniature strata panels.
- Slice the Diamonds: Align the 45-degree line of your ruler along the bottom horizontal seam. Slice off the jagged left edge, then measure exactly 1.25 inches over and slice again to yield rows of four tiny connected diamonds. Cut 32 rows total.
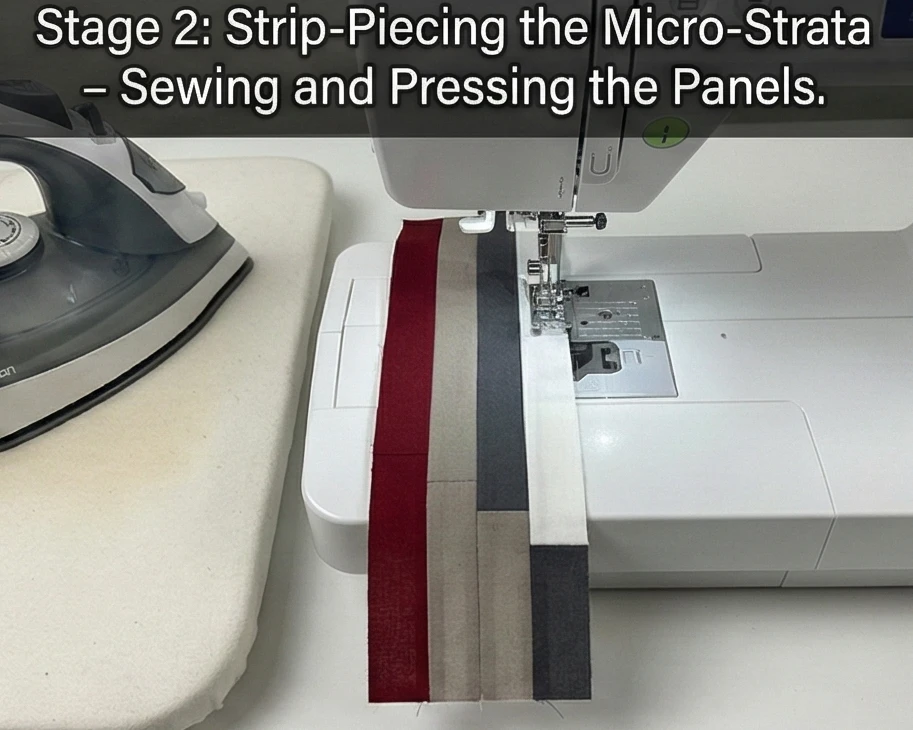
Step 3: Assembling the Offset Front Panel
Nesting the points and setting the star.
- Build the Points: Sew four diamond rows together in a staggered pattern to build one point. Repeat until you have 8 miniature star points. Sew them together to form the central 10-inch star.
- The Canvas Voids: From your heavy Black Canvas, cut the small squares and triangles needed for the Y-seam voids to square off the star block to exactly 10.5″ x 10.5″.
- The Tote Framing: To achieve an elegant, modern look, frame the star asymmetrically. Cut wide panels of Black Canvas and sew them to the top, bottom, and sides of the star block until the entire front panel measures 19″ wide by 19″ tall. Cut a matching 19″ x 19″ solid Black Canvas square for the back panel.
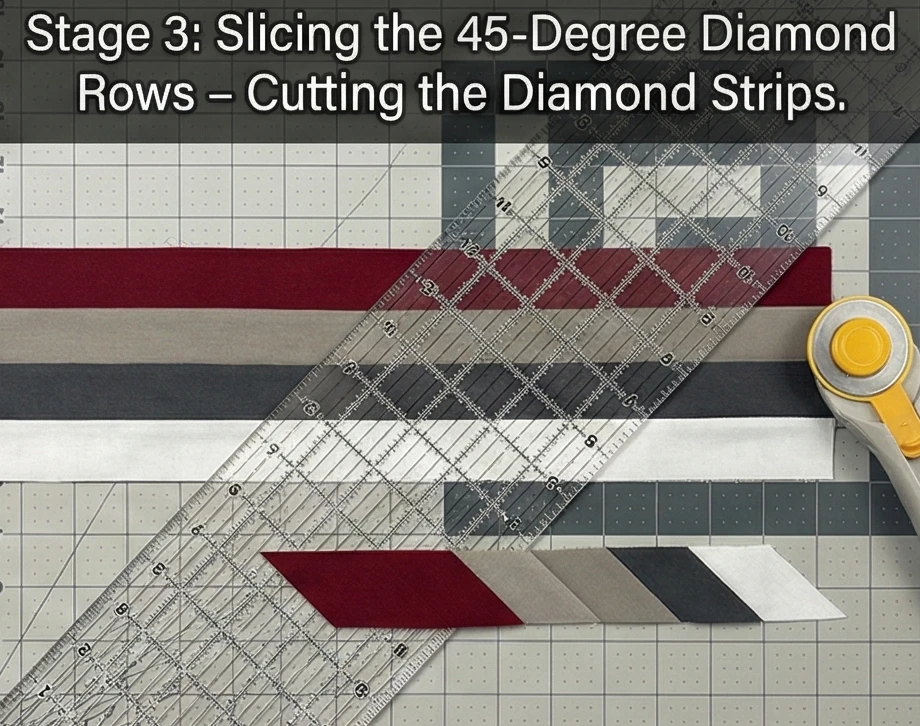
Step 4: Structural Quilting
Giving the bag its high-end, free-standing architecture.
- The Foam Baste: Cut two 19″ x 19″ squares of your foam stabilizer. Baste the front canvas panel to one piece of foam, and the back canvas panel to the other.
- Dense Linear Quilting: Using a walking foot, quilt straight, vertical lines exactly 1 inch apart across the heavy Black Canvas background, leaving the intricately pieced star unquilted so it visually “pops.” Do the same for the solid back panel. This securely fuses the canvas to the foam, creating a stiff, upholstery-grade material.
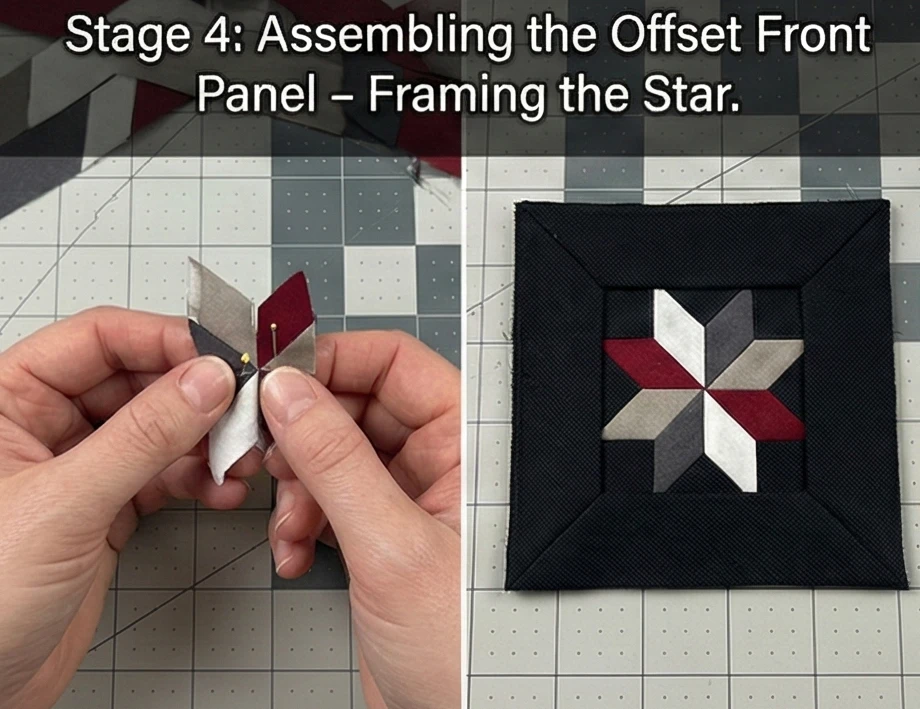
Step 5: Creating the Boxed Base
Transforming flat panels into a 3D vessel.
- Sew the Shell: Place the quilted front and back panels right sides together. Sew along the left, bottom, and right edges with a heavy 1/2-inch seam allowance. Backstitch well at the top corners. Leave the top open.
- Box the Corners: Keep the bag inside out. Flatten one of the bottom corners so the side seam aligns precisely with the bottom seam, forming a point. Measure 3 inches down from the point and draw a straight horizontal line across the triangle. Sew directly on this line, then trim the excess fabric. Repeat on the other corner.
- Result: When you turn the bag right-side out, it will have a perfectly flat, highly structured 6-inch deep base.
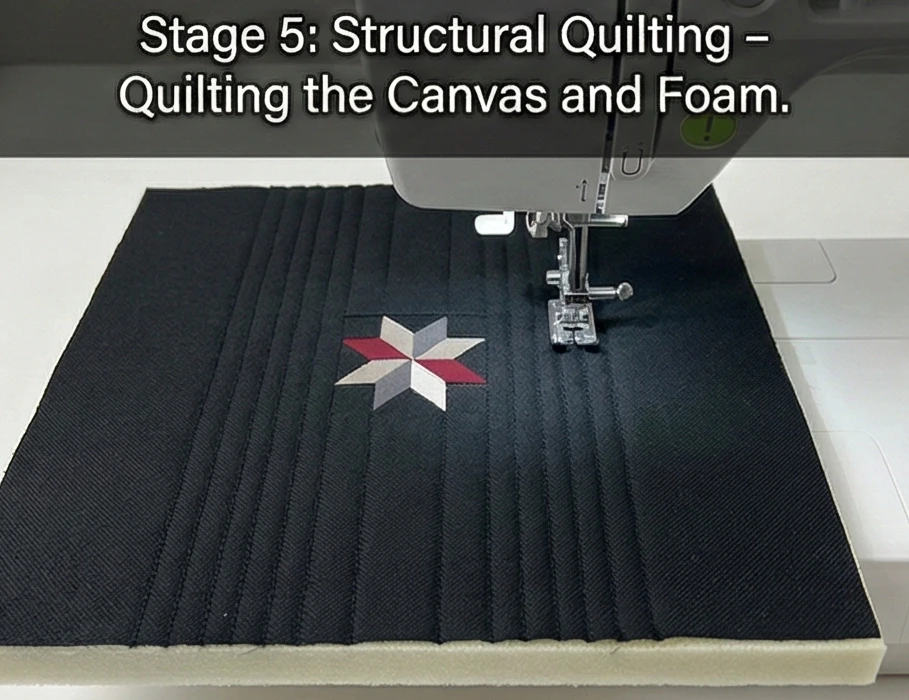
Step 6: Lining and Handle Installation
The tailored, professional finish.
- The Lining: Repeat Step 5 with your White Percale lining fabric, but leave a 5-inch gap in the bottom seam for turning.
- Attach the Handles: On the outside of your main canvas bag, pin the raw ends of your leather or webbing straps to the top edge, spacing them about 6 inches apart and centered. Baste them in place.
- The Final Join: Slip the canvas bag inside the lining bag so they are right sides together (the handles will be sandwiched between them). Sew around the entire top circular rim.
- Turn and Topstitch: Pull the bag right-side out through the gap in the lining’s bottom. Stitch the lining gap closed. Push the lining down into the bag, press the top rim firmly, and topstitch 1/4 inch around the top edge to lock the lining and handles permanently in place.
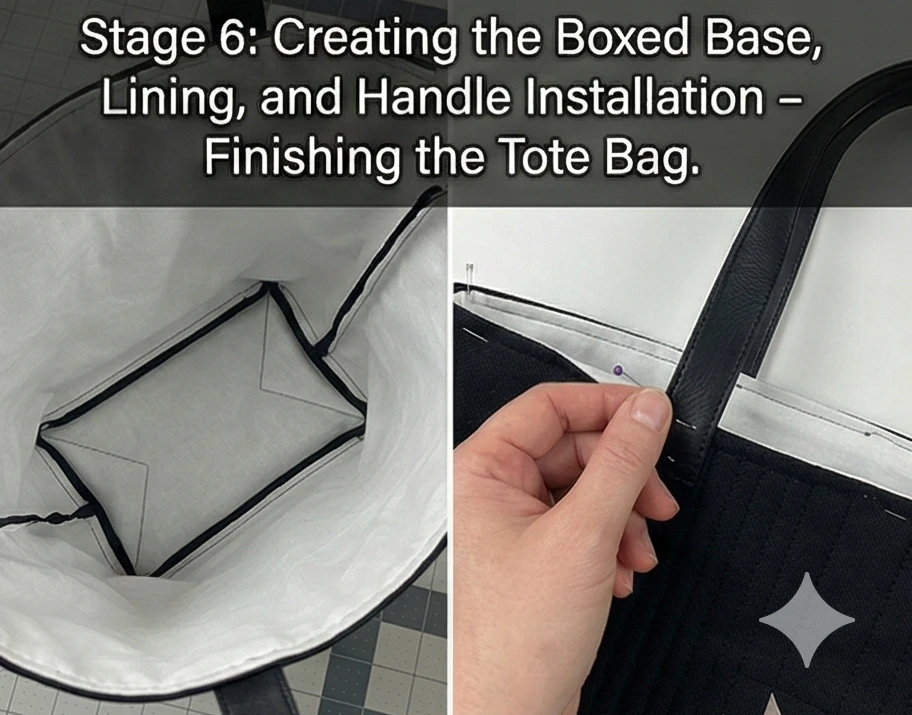

Usability Note: Canvas and foam stabilizer make this bag exceptionally tough, but the leather straps require care. If you use cotton webbing for the handles, the entire bag is machine-washable on a gentle cycle. If using leather, spot-treat the canvas with a damp cloth and mild detergent to preserve the straps and the star’s crisp geometry.
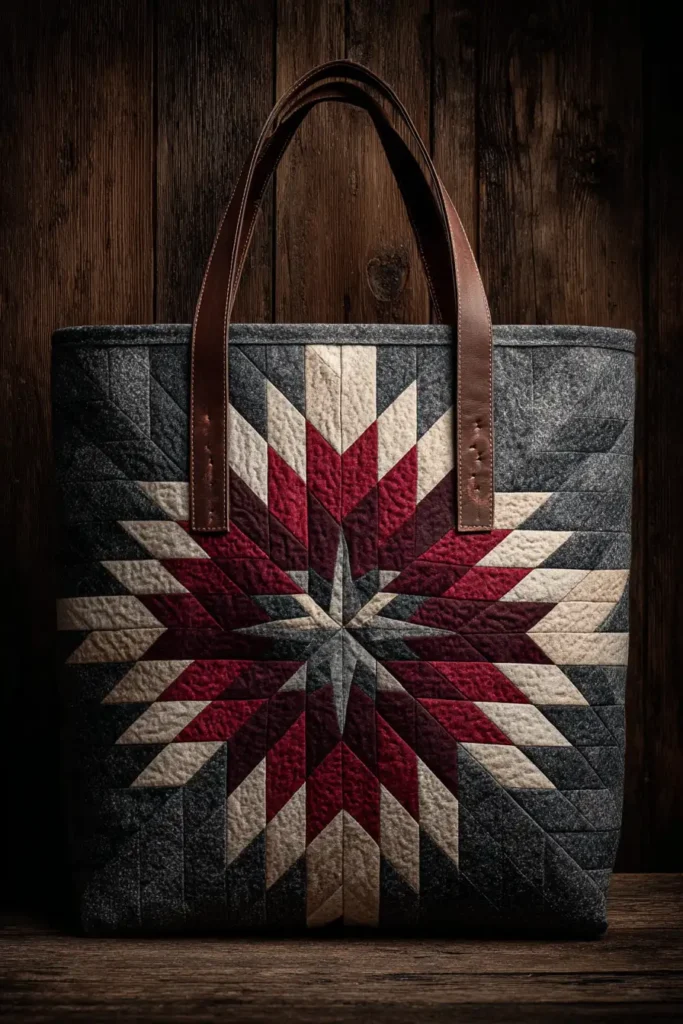
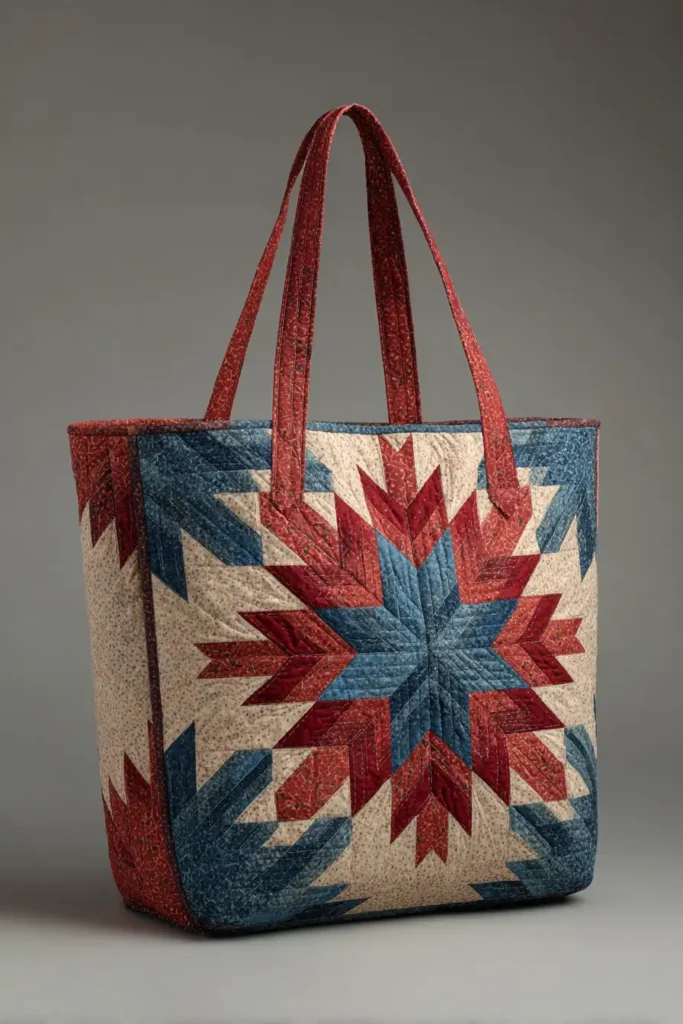
18. Sophisticated Lakota Star Quilted Market Totes for a Comfortable Carry
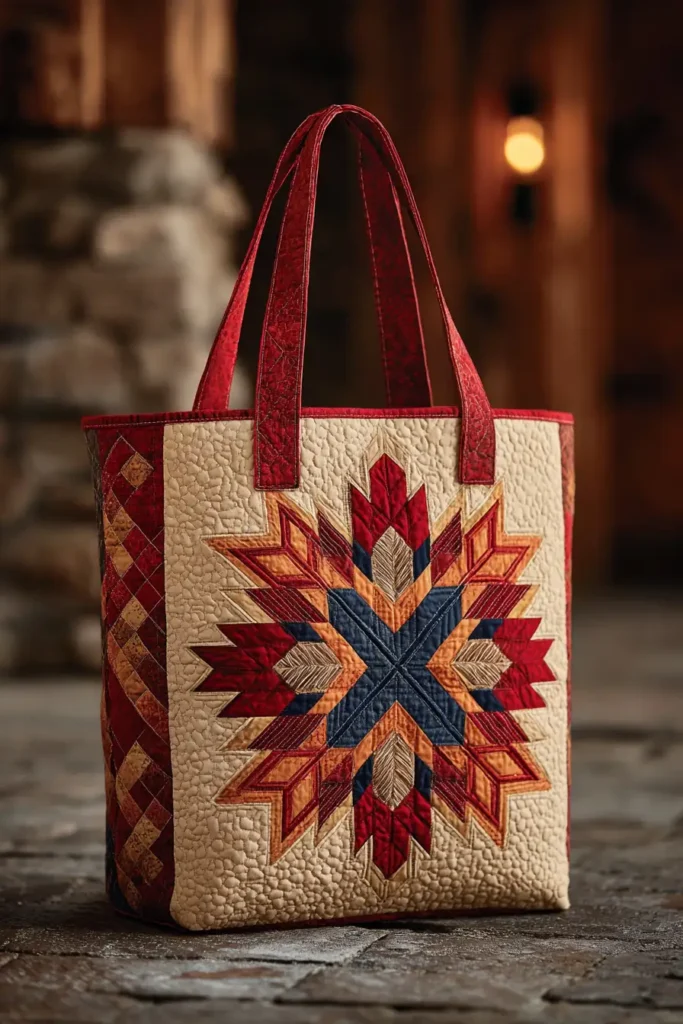
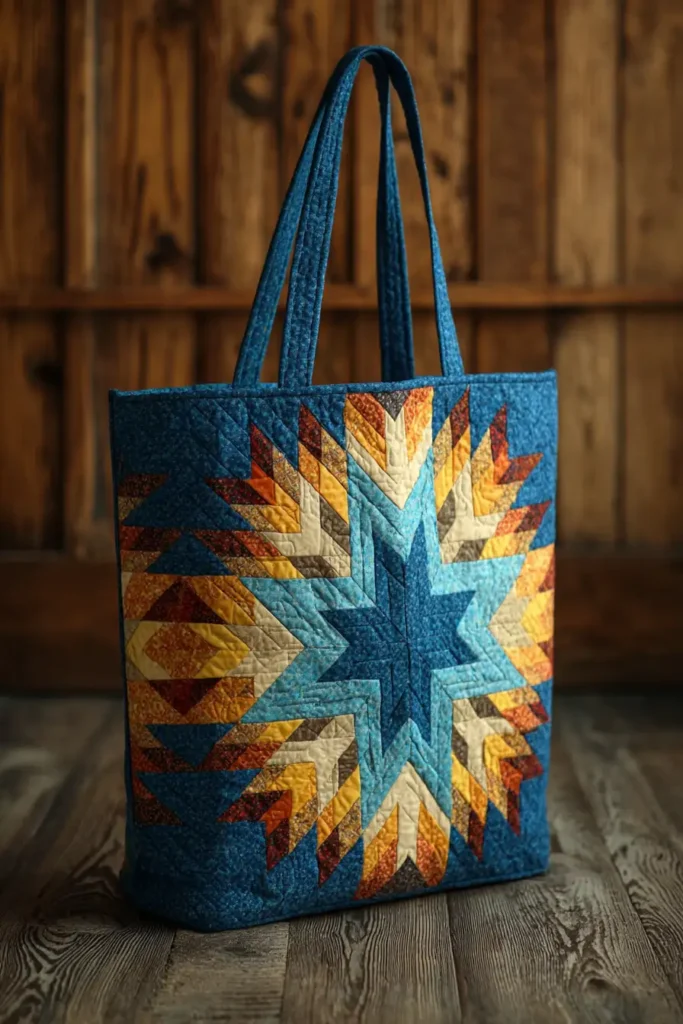
“The Midnight Harvest” Oversized Market Tote
A trip to the farmer’s market or local artisan shop requires a vessel that is exceptionally durable, remarkably spacious, and comfortable enough to carry heavy loads without digging into your shoulder. By integrating a striking, oversized, asymmetrical Lakota Star into a heavily structured canvas body, “The Midnight Harvest” elevates the utilitarian grocery bag into a piece of sophisticated, mobile architecture. Rendered in a dirt-forgiving palette of Black Canvas, deep Charcoal, soft Greige, and a piercing Deep Red focal point, this market tote is engineered with padded, wide-set straps and a wipeable interior, ensuring that your weekly gathering is as elegant as it is effortless.
Finished Dimensions: Oversized Market Tote, 20″ wide x 15″ tall x 8″ deep (A wide, flat-bottomed base designed to carry produce, flowers, and heavy jars upright).
Materials Needed:
- The “Harvest Star” (Diamonds): 1/8 yard each of solid Deep Red, Greige, and Charcoal cotton.
- The Body (Background & Base): 1.5 yards of heavy-duty Black Cotton Canvas.
- Why: Market bags are frequently set down on concrete sidewalks or damp grass. Heavy black canvas provides a rugged, scuff-proof exterior that naturally hides dirt and wear while providing a sleek, modern backdrop for the geometric star.
- Lining: 1.5 yards of Waterproof Canvas or Ripstop Nylon in a light Grey or Greige.
- Why: Produce can bruise, and condensation from cold items will soak through standard cotton linings. A waterproof interior lets you wipe the bag clean with a damp cloth after every market trip.
- Structural Interfacing: 1 yard of dense Foam Stabilizer (e.g., ByAnnie’s Soft and Stable).
- Strap Padding: A scrap of 100% Cotton Batting (about 5″ x 40″).
- Thread: 40wt heavy-duty cotton thread in Black.
- Notions: A small acrylic ruler with a 45-degree angle line, a rotary cutter, and heavy-duty sewing machine needles (Size 90/14 or 100/16).
Cultural Backstory: In Plains Native communities, gathering has always been a communal, highly respected activity—whether harvesting prairie turnips, chokecherries, or sweetgrass. The Morning Star is a symbol of guidance and provision, often associated with the light that welcomes a day of hard work and community care. Adorning a market tote with this geometry honors the ancestral tradition of gathering food and returning home to share the harvest.
Step 1: Scaling the Oversized Corner Star
An asymmetrical design leaves room for a durable, solid canvas base.
- Cut the Strips: To create an impactful star that sweeps across the upper corner of the tote, cut exactly eight 2-inch strips from your Deep Red, Greige, and Charcoal fabrics.
- Organize the Sequence: Lay out the three-color gradient: Deep Red (center) -> Greige -> Charcoal (outer tips).
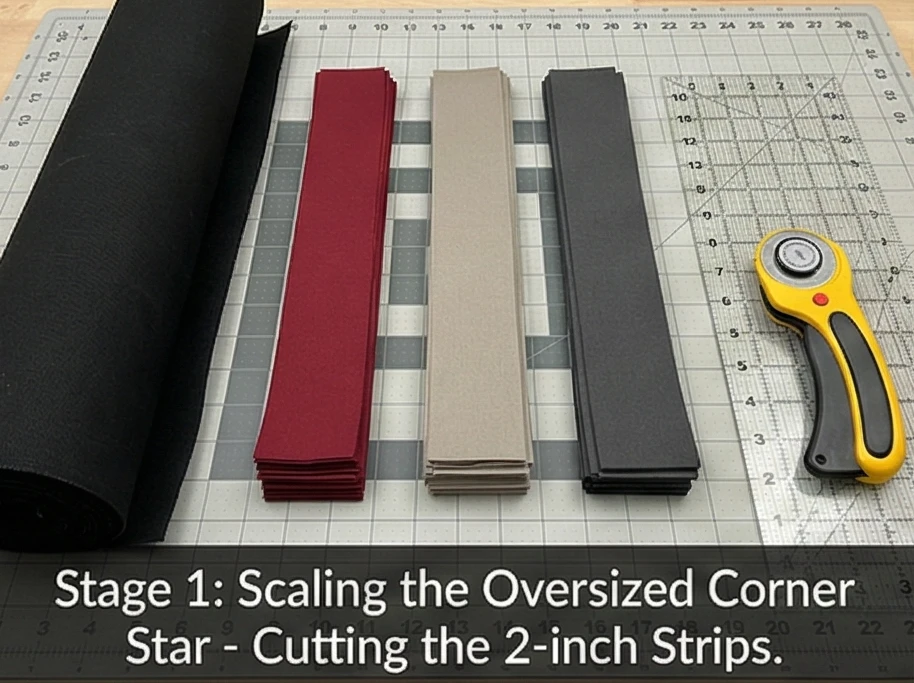
Step 2: Strip-Piecing the Market Strata
Building the gradient panels.
- The Stagger: Place a Greige strip right-sides together over a Deep Red strip. Offset the Greige strip so it drops exactly 1.5 inches lower than the top of the Red strip. Sew them together with a precise 1/4-inch seam.
- Complete the Panel: Add the Charcoal strip, dropping it another 1.5 inches to create the staircase edge. Press seams outward toward the darkest Charcoal strip. Make 8 identical strata panels.
- Slice the Diamonds: Align the 45-degree line of your ruler along the bottom horizontal seam. Slice off the jagged left edge, then measure exactly 2 inches over and slice again to yield rows of three connected diamonds.
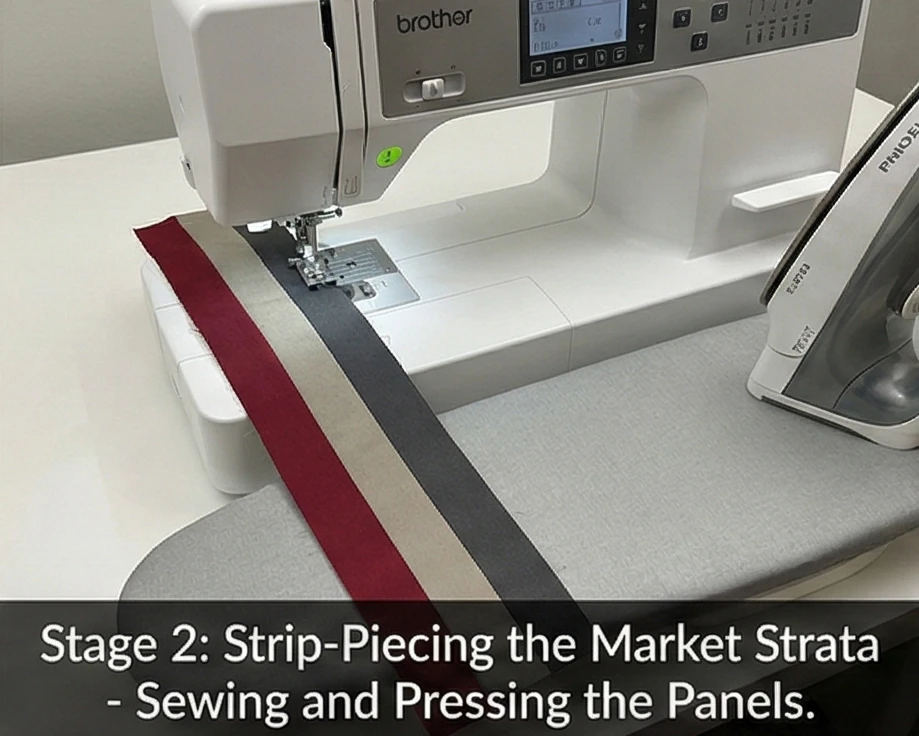
Step 3: Assembling the Off-Center Front Panel
Nesting the points and building the canvas face.
- Build the Star: Sew three diamond rows together in a staggered pattern to build one point. Repeat until you have 8 star points. Sew them together to form the central geometric star.
- The Canvas Voids: From your heavy Black Canvas, cut the squares and triangles needed for the Y-seam voids, squaring the star block off cleanly.
- The Asymmetrical Setting: To position the star elegantly, sew a wide 10-inch panel of Black Canvas to the bottom of the star block, and a 6-inch panel to the right side. Trim the entire completed front panel to exactly 21″ wide by 21″ tall. Cut a matching 21″ x 21″ solid Black Canvas square for the back panel.
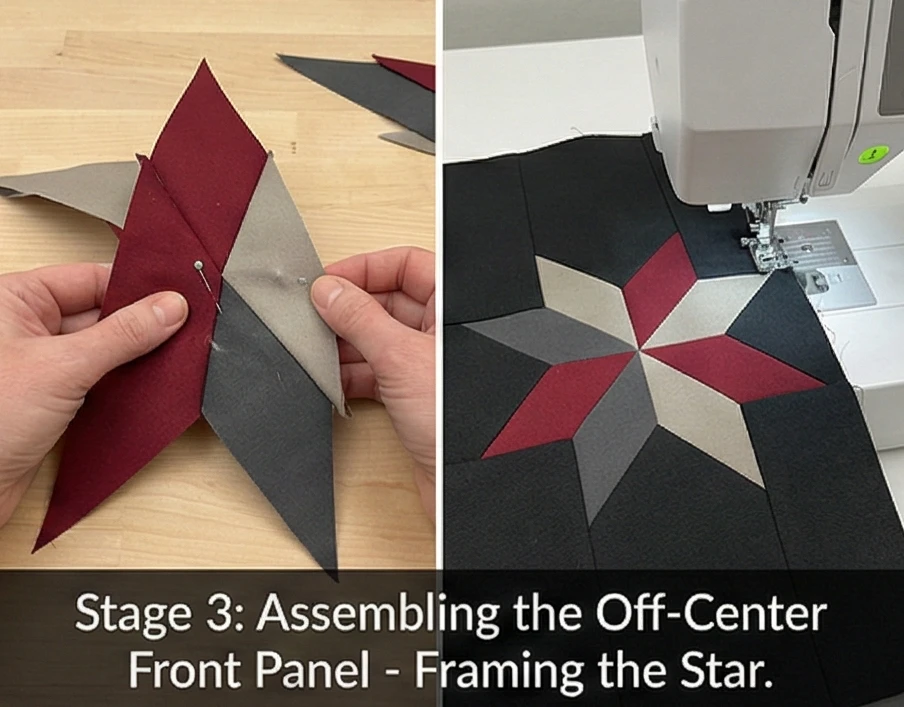
Step 4: Structural Foam Quilting
Giving the market bag its free-standing rigidity.
- The Foam Baste: Cut two 21″ x 21″ squares of foam stabilizer. Baste the front canvas panel to one piece of foam, and the solid back canvas panel to the other.
- Heavy Grid Quilting: Using a walking foot, quilt a continuous 1.5-inch grid of straight horizontal and vertical lines across the heavy Black Canvas background. Leave the colorful pieced star completely unquilted. This structurally fuses the canvas to the foam, creating a stiff, protective shell that will keep delicate market goods from being crushed.
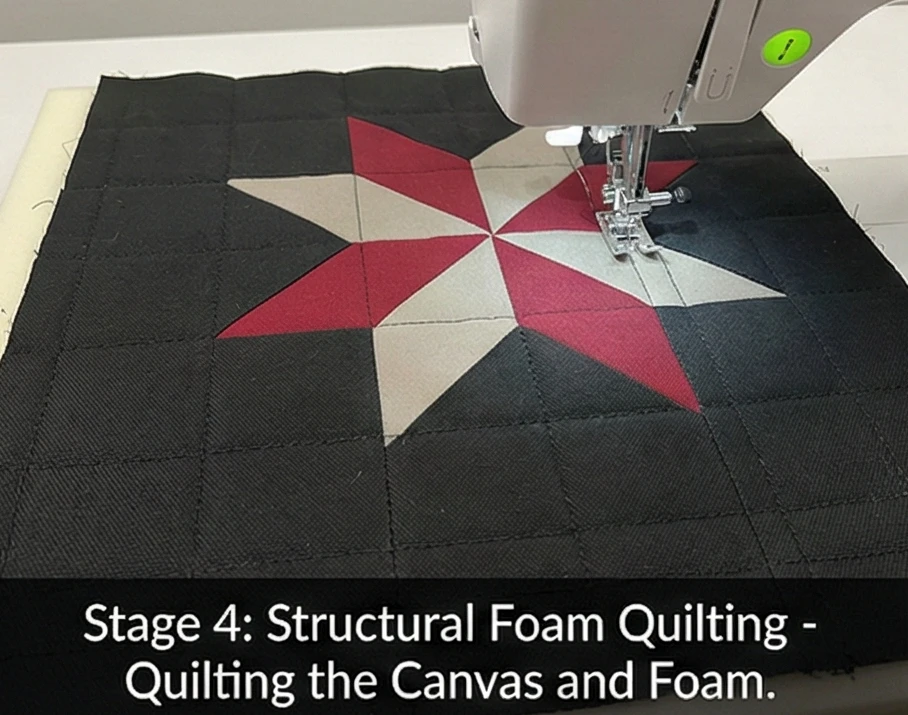
Step 5: Engineering the Comfort-Carry Straps
The most critical element for usability.
- Cut the Straps: Cut two strips of Black Canvas measuring 5″ wide by 30″ long. Cut two strips of cotton batting measuring 2″ wide by 30″ long.
- The Padded Fold: Center the cotton batting along the wrong side of a canvas strip. Fold the long raw edges of the canvas in by 1/2 inch, then fold the entire strap in half lengthwise, encasing the batting. Pin heavily.
- Structural Topstitching: Topstitch 1/8 inch along both long edges of the strap. Then, sew three more parallel lines of stitching down the center.
- Why: This dense quilting compresses the cotton batting, creating a wide, heavily padded strap that will not dig into your shoulder or fold in half under the weight of heavy groceries.
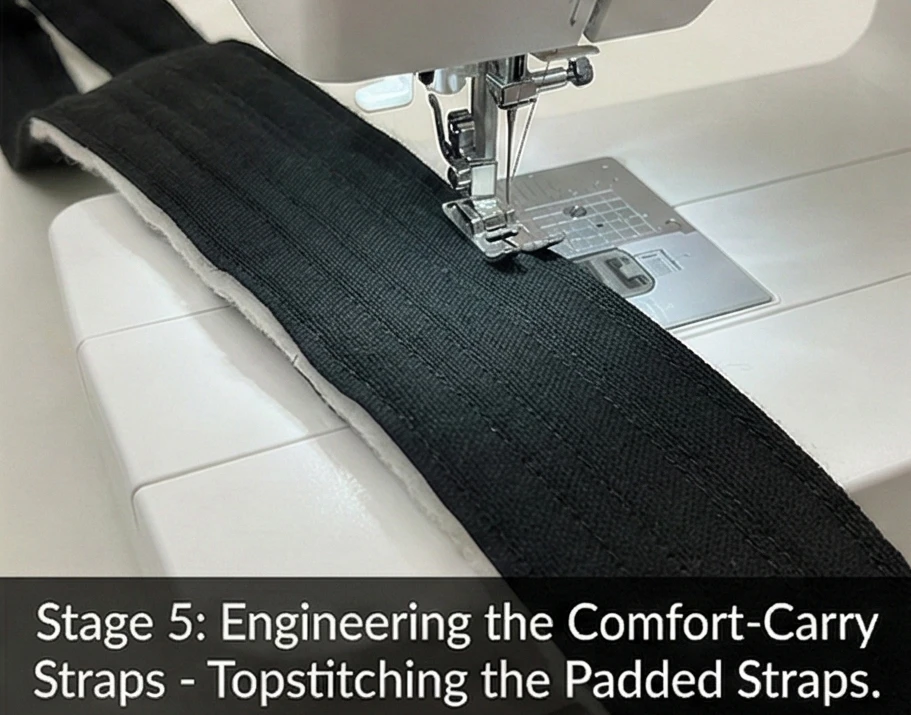
Step 6: Boxed Gussets and Waterproof Assembly
Building the deep, wipeable interior.
- Attach the Straps: Baste the raw ends of your padded straps to the top edge of your front and back quilted panels, placing them about 7 inches apart.
- Sew the Exterior: Place the quilted front and back panels right sides together. Sew along the left, bottom, and right edges with a heavy 1/2-inch seam allowance.
- The Massive 8-Inch Base: Keep the bag inside out. Flatten a bottom corner so the side seam meets the bottom seam. Measure exactly 4 inches down from the point and draw a horizontal line (the line should be exactly 8 inches long). Sew strictly on this line and trim the excess triangle. Repeat on the other corner to create a massive, deep bucket base.
- The Waterproof Lining: Repeat this exact assembly and boxing process with your Waterproof Canvas lining, leaving an 8-inch gap in the bottom seam.
- Final Join: Slip the canvas bag into the lining bag (right sides together). Sew around the top rim. Pull the bag right-side out through the lining gap, stitch the gap closed, and topstitch the top rim heavily to finalize the tote.
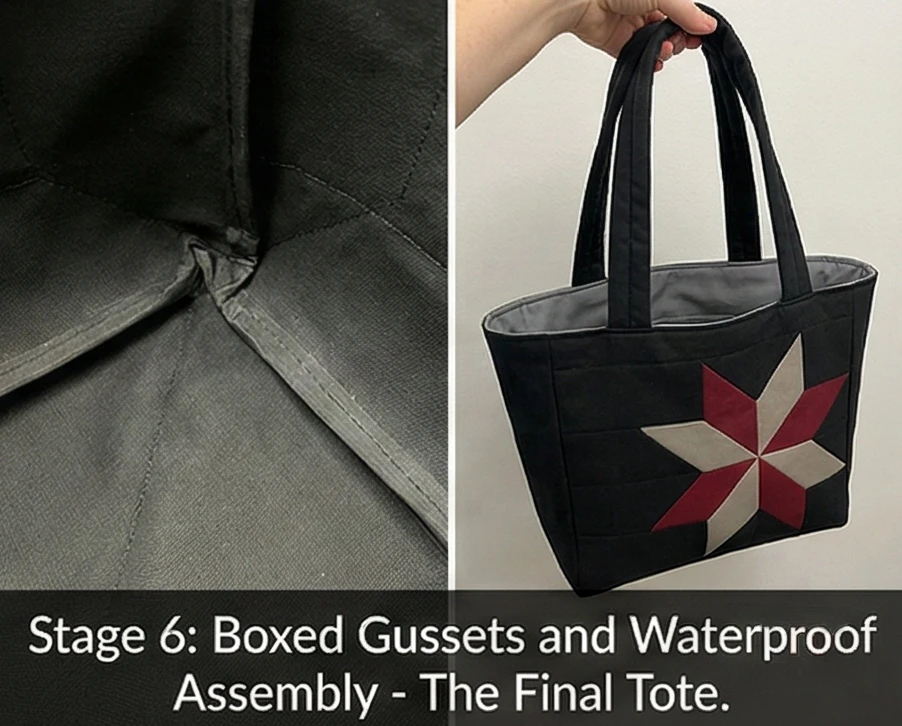
Usability Note: Never machine-wash a bag with a foam stabilizer and waterproof lining, as agitation can warp the foam and degrade the waterproof coating. To clean, simply wipe the waterproof interior out with a soapy sponge, and spot-clean the canvas exterior with a damp cloth.
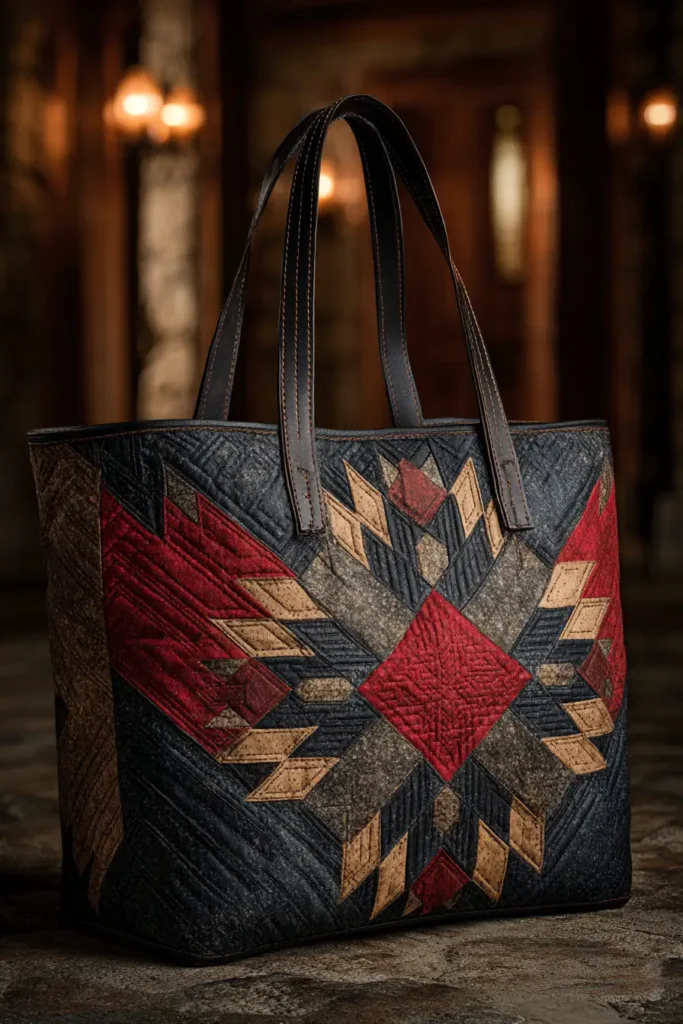
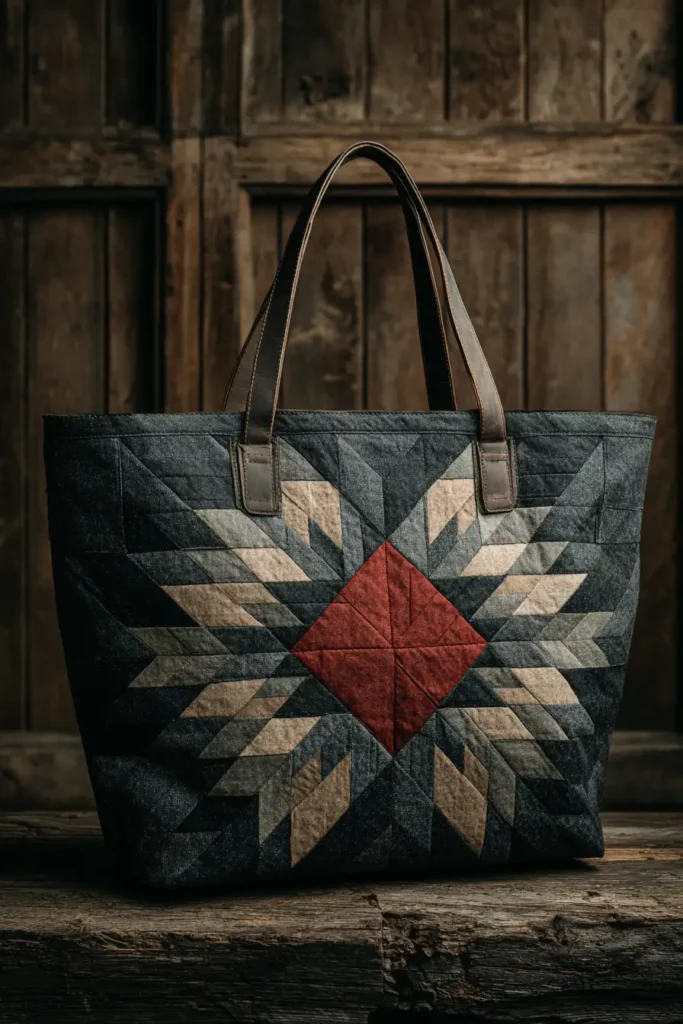
19. Durable Quilted Lakota Star Laundry Bags for Stylish Home Organization
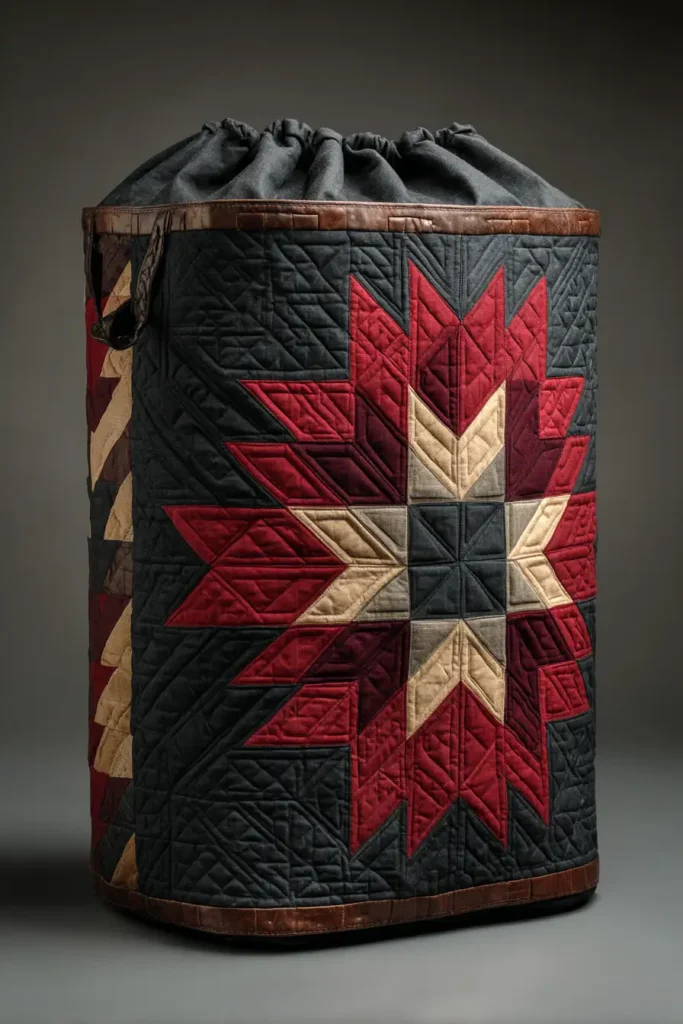

“The Crimson Vessel” Heavy-Duty Lakota Star Laundry Bag
Home organization often relies on purely utilitarian plastic bins or flimsy wire hampers that disrupt a beautifully designed room. A laundry bag should be a piece of soft architecture—a durable, free-standing vessel that conceals its contents while adding a stunning visual element to your bedroom or bathroom. “The Crimson Vessel” transforms the Lakota Star into a functional masterpiece. Set against an indestructible background of heavy Black Canvas, the striking Deep Red, Greige, and Charcoal star becomes a commanding piece of floor art. By incorporating a moisture-resistant lining, dense structural batting, and heavy-duty brass grommets, this bag merges profound cultural geometry with rugged everyday utility.
Finished Dimensions: Large Free-Standing Cylinder Hamper, 28″ tall x 18″ diameter (Spacious enough to hold a week’s worth of linens or clothing).
Materials Needed:
- The “Vessel Star” (Diamonds): 1/8 yard each of solid Deep Red, Greige, and Charcoal cotton.
- The Body (Background & Base): 2 yards of heavy-duty Black Cotton Canvas or Duck Cloth.
- Why: A laundry bag sits on the floor and is frequently dragged or carried. Canvas provides an ultra-durable, scuff-resistant exterior that holds its shape and hides dust perfectly.
- Lining: 2 yards of Water-Resistant Ripstop Nylon or Laminated Cotton in a subtle Grey.
- Why: Damp towels or gym clothes will ruin a standard cotton lining and cause mildew. A water-resistant interior ensures the beautiful exterior canvas remains pristine, and allows you to wipe the inside of the hamper clean with a disinfecting cloth.
- Structural Interfacing: 1.5 yards of dense Foam Stabilizer (e.g., ByAnnie’s Soft and Stable).
- Hardware: 8 heavy-duty Brass Grommets (1-inch internal diameter) and 3 yards of thick Cotton Rope for the drawstring handle.
- Thread: 40wt heavy-duty cotton thread in Black.
- Notions: A small acrylic ruler with a 45-degree line, a rotary cutter, heavy-duty machine needles (Size 100/16), and a grommet setting tool.
Cultural Backstory: In nomadic Plains Native cultures, belongings, clothing, and food were historically carried and stored in a “parfleche”—a highly durable rawhide container. These essential utility vessels were rarely left plain; they were intricately painted with bold geometric designs, ensuring that even the most functional items were treated as canvases for art and storytelling. Constructing a meticulously pieced, heavy-duty laundry vessel honors this ancestral tradition of elevating everyday organization through beautiful, meaningful design.
Step 1: Scaling the Geometry for a Curved Canvas
A 14-inch star fits perfectly on the curve of the cylinder.
- Cut the Narrow Strips: To ensure the star wraps gracefully around the side of the bag, cut exactly eight 1.5-inch strips from your Deep Red, Greige, and Charcoal fabrics.
- Organize the Sequence: Lay out your three-color gradient: Deep Red (center) -> Greige -> Charcoal (outer tips).
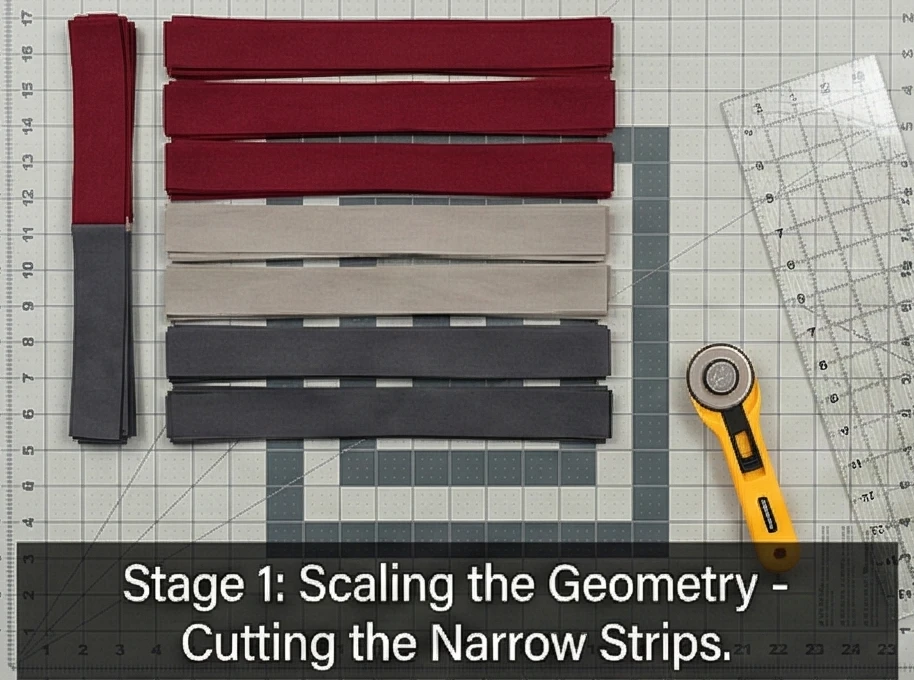
Step 2: Strip-Piecing the Vessel Strata
Building the staggered panels.
- The Stagger: Place a Greige strip right-sides together over a Deep Red strip. Offset the Greige strip so it drops exactly 1.5 inches lower than the top of the Red strip. Sew them together with a precise 1/4-inch seam.
- Complete the Panel: Add the Charcoal strip, dropping it another 1.5 inches. Press the seams outward toward the darkest Charcoal edge. Make 8 identical strata panels.
- Slice the Diamonds: Align the 45-degree line of your ruler along the bottom horizontal seam. Slice off the jagged left edge, then measure exactly 1.5 inches over and slice again to yield rows of three connected diamonds.
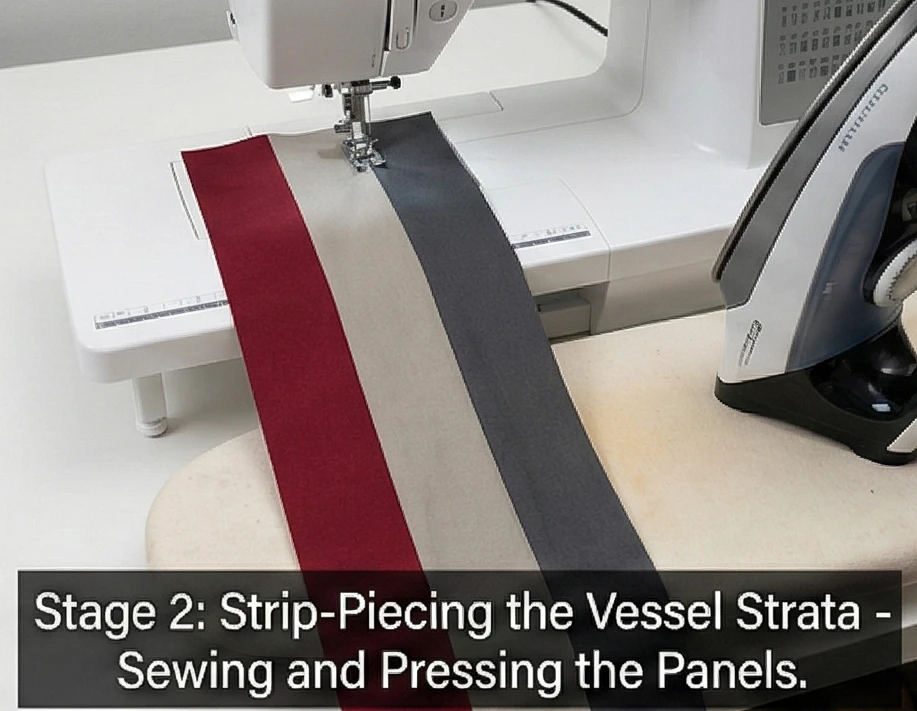
Step 3: Assembling the Central Focal Star
Nesting the points for a flawless, flat intersection.
- Build the Star: Sew three diamond rows together in a staggered pattern to build one point. Repeat until you have 8 star points. Sew them together carefully to form the central 14-inch geometric star.
- The Canvas Voids: From your heavy Black Canvas, cut the necessary squares and triangles to fill the V-shaped gaps between the star points using the Y-seam technique, cleanly squaring off the star block to roughly 14.5″ x 14.5″.
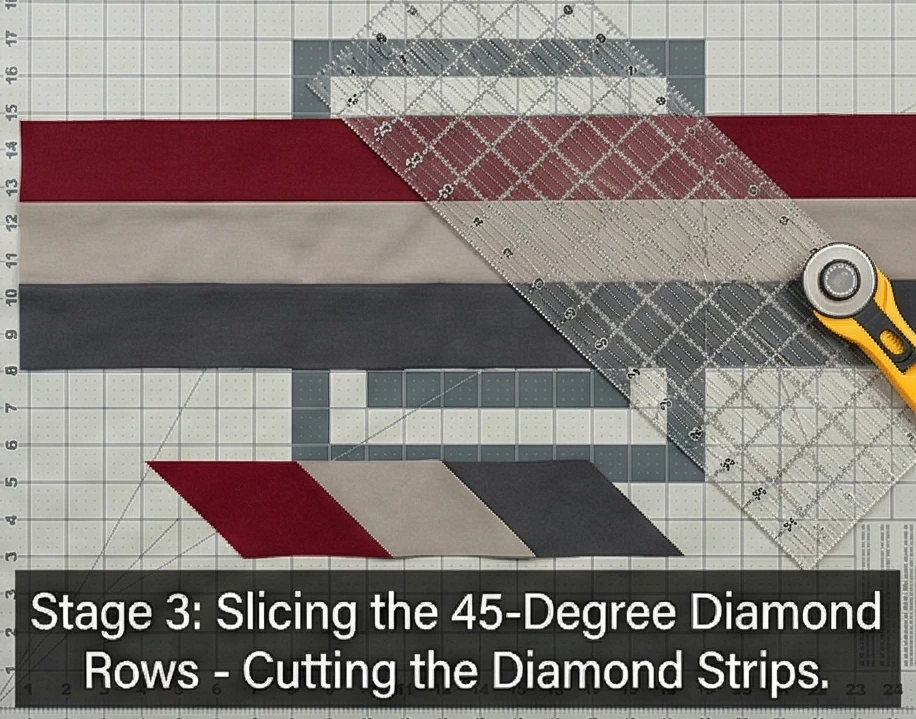
Step 4: Engineering the Cylinder Body
Creating the massive exterior wall.
- The Main Canvas Panel: To create an 18-inch diameter cylinder, your side panel must be long enough to wrap around the circular base. Cut a massive piece of Black Canvas measuring 57.5″ wide by 29″ tall.
- Insetting the Star: Instead of appliqué, we want the star embedded seamlessly. Cut a 14.5″ x 14.5″ square out of the direct center of your massive canvas panel. Insert your pieced Lakota Star block into this hole, sewing it in with a 1/2-inch seam allowance.
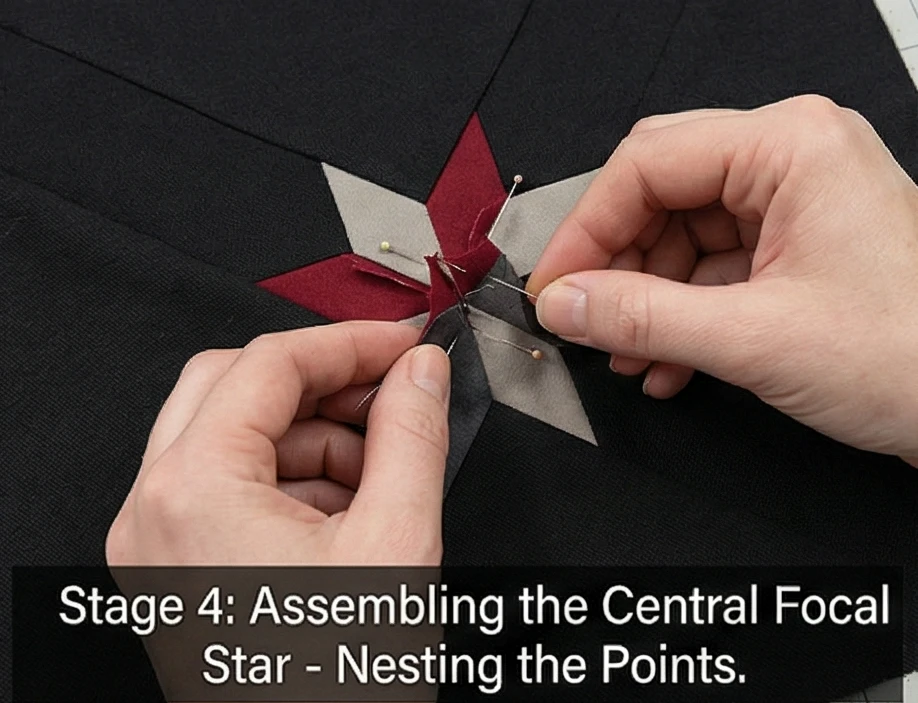
Step 5: Foam Basting and Architectural Quilting
Giving the hamper its free-standing rigidity.
- The Foam Support: Cut a 57.5″ x 29″ piece of foam stabilizer. Baste your entire canvas panel (with the inset star) to the foam.
- Vertical Matchstick Quilting: Using a walking foot, quilt heavy, straight vertical lines exactly 1 inch apart across the entire black canvas background. Leave the intricate star completely unquilted. This dense vertical quilting forces the canvas to stand rigidly upright, creating a stiff, drum-like wall that won’t slouch when empty.
- The Circular Base: Cut an 18.5-inch diameter circle from the Black Canvas and a matching circle from the foam. Quilt them together in a heavy grid pattern.
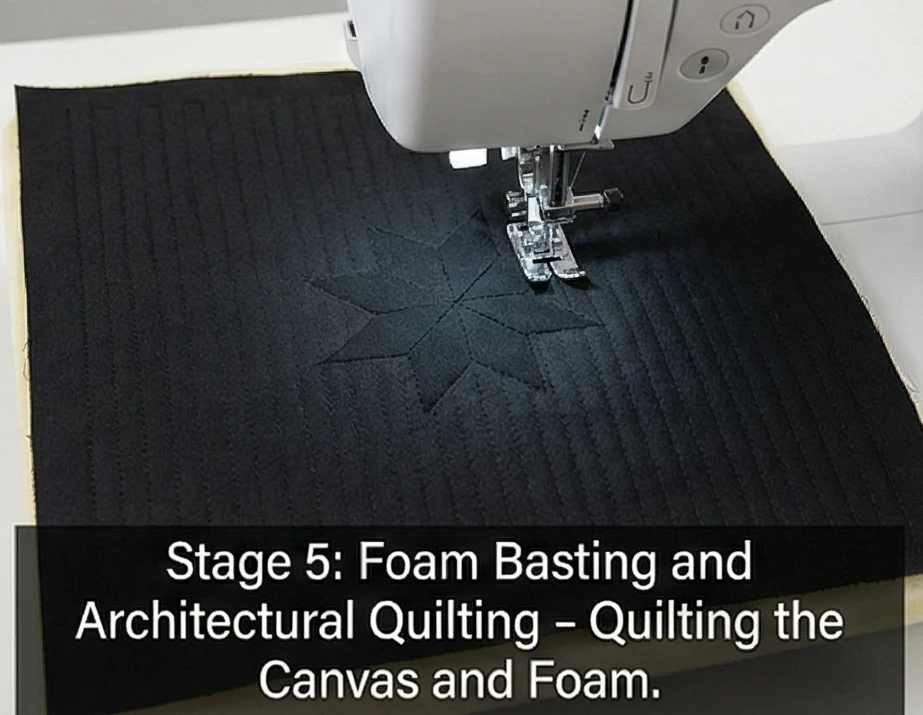
Step 6: Waterproof Assembly and Grommet Finishing
Bringing the 3D vessel to life.
- Sew the Cylinder: Fold your massive quilted wall in half (right sides together) and sew the short 29-inch ends together to create a tube.
- Attach the Base: Pin the quilted circular base to the bottom rim of your tube. Sew carefully around the entire perimeter with a 1/2-inch seam. Turn the massive bucket right-side out.
- The Ripstop Lining: Repeat the tube-and-circle assembly using your water-resistant Ripstop Nylon lining. Drop the lining inside the canvas bucket (wrong sides touching).
- The Top Rim: Fold the top raw edges of both the canvas and the lining inward by 1 inch. Pin heavily around the top rim and topstitch through all layers to seal the bag.
- Set the Hardware: Mark 8 evenly spaced points around the top rim, about 2 inches down from the edge. Use your setting tool to punch and secure the heavy brass grommets.
- The Drawstring Handle: Thread your thick cotton rope in and out through the grommets. Knot the ends securely. This creates a highly functional closure that doubles as a heavy-duty carrying strap for laundry day.
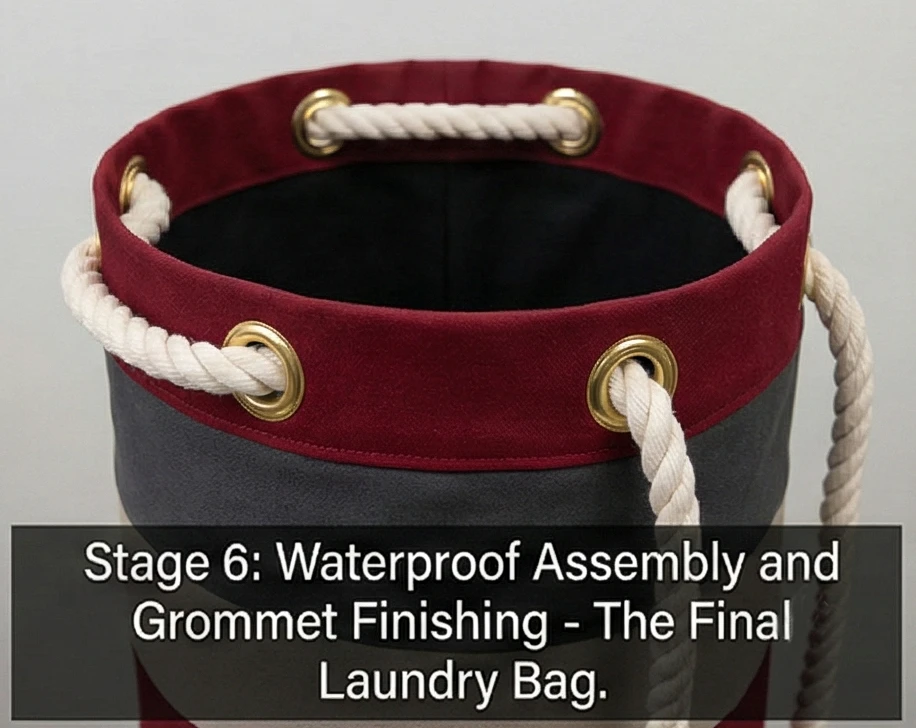
Usability Note: Never machine-wash a bag made with dense foam and a waterproof lining, as agitation can compromise its structural integrity. To clean, simply wipe the waterproof interior out with a damp, soapy cloth, and spot-clean the heavy exterior canvas to keep the geometric star looking immaculate.
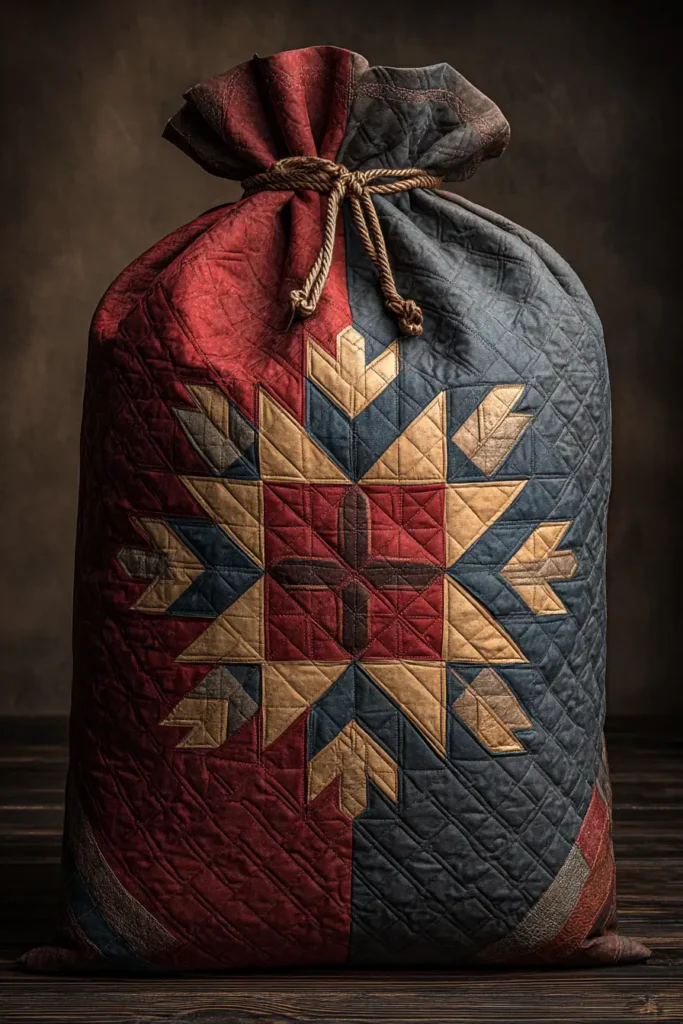
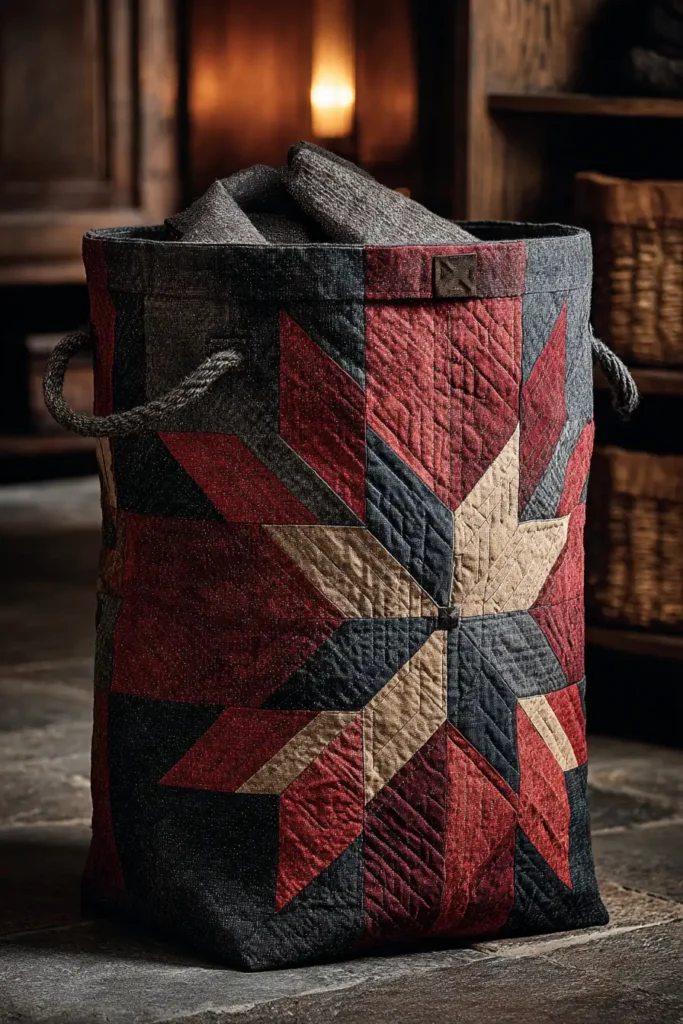
20. Striking Lakota Star Quilted Tapestries for Elegant Focal Walls
“The Crimson Expanse” Grand Lakota Star Wall Tapestry
A vast, blank wall in a living room, dining area, or entryway can often make a home feel cold or echoing. While painted canvas art is beautiful, introducing a monumental textile tapestry instantly transforms a room’s acoustics and visual warmth. “The Crimson Expanse” takes the traditional Lakota Star and scales it into a massive, breathtaking framed gallery art piece. By suspending this intricate geometry—radiating from a Deep Red core through Greige and Charcoal, and melting into a vast, dark Black background—you create a profound focal point that absorbs ambient noise and grounds the entire space in cultural elegance.
Finished Dimensions: Grand Wall Tapestry, 80″ x 80″ (Designed to command a two-story entryway or a large living room focal wall).
Materials Needed:
- The “Expanse” (Diamonds): 1/2 yard each of 5 solid cottons (Deep Red, Greige, Medium Grey, Charcoal, Black).
- The Background (Negative Space): 4.5 yards of solid Black Cotton Sateen or Canvas.
- Why: A dark background forces the lighter Greige and Red star points to visually burst forward. Canvas or Sateen provides a highly structured, heavy foundation that will hang flat against the wall without sagging.
- Backing: 4.5 yards of sturdy Muslin or Cotton Twill.
- Batting:100% Wool Batting or Dense Bamboo.
- Why: Elegance must serve a purpose. Large, hard-surfaced rooms suffer from severe echoing. Wool batting is exceptionally dense and breathable, making it a high-end acoustic damping panel. It absorbs sound waves beautifully while remaining light enough to hang securely.
- The Mounting: 1 yard of fabric for the hanging sleeve, plus a heavy-duty wooden or metal gallery rod (at least 84″ long).
- Thread: 50wt cotton thread in an invisible Charcoal.
- Notions: A large acrylic ruler with a precise 45-degree angle line, a rotary cutter, and a heavy tailor’s clapper for pressing flat seams.
Cultural Backstory: In historical Plains Native architecture, the interior walls of a lodge were often lined with “dew cloths”—large, insulated hides that managed drafts and acoustics. These linings were never left blank; they were masterfully painted with geometric designs that told stories and recorded history. Hanging a massive Morning Star quilt on a modern wall honors this ancient tradition, transforming a functional insulator into a magnificent canvas of storytelling and protection.
Step 1: Scaling the Grand Geometry
A wall-spanning star requires a wider gradient.
- Cut the Strips: To ensure the star points elegantly span an 80-inch canvas, cut exactly 8 2.5-inch strips from each of your 5 star colors (Red, Greige, Grey, Charcoal, Black) across the width of the fabric.
- Organize the Radiance: Lay the strips out in their strict gradient sequence, from the vibrant center to the dark outer edge.
Step 2: Strip-Piecing the Strata
Building the staggered panels for the massive points.
- The Stagger: Place a Greige strip right-sides together over a Deep Red strip. Offset the Greige strip so it drops exactly 2 inches lower than the top of the Red strip to create a staircase edge. Sew them together with a precise 1/4-inch seam.
- Complete the Panel: Continue adding the Grey, Charcoal, and Black strips in sequence, dropping each one exactly 2 inches lower than the last.
- Pressing: Press all seams in one direction (toward the darkest Black edge). Make 8 identical staggered strata panels.
Step 3: Slicing the 45-Degree Diamond Rows
Extracting the tailored geometric rows.
- Align the Angle: Lay a strata panel completely flat. Align the 45-degree line of your acrylic ruler along the bottom horizontal seam of the panel. Slice off the jagged left edge to establish your perfect baseline angle.
- The Sub-Cut: Measure exactly 2.5 inches over from the newly cut angle. Slice again. You now have a continuous row of five connected diamonds.
- The Yield: Cut eight of these diamond rows from each of the 8 strata panels to ensure you have the 64 total rows needed for the grand points.
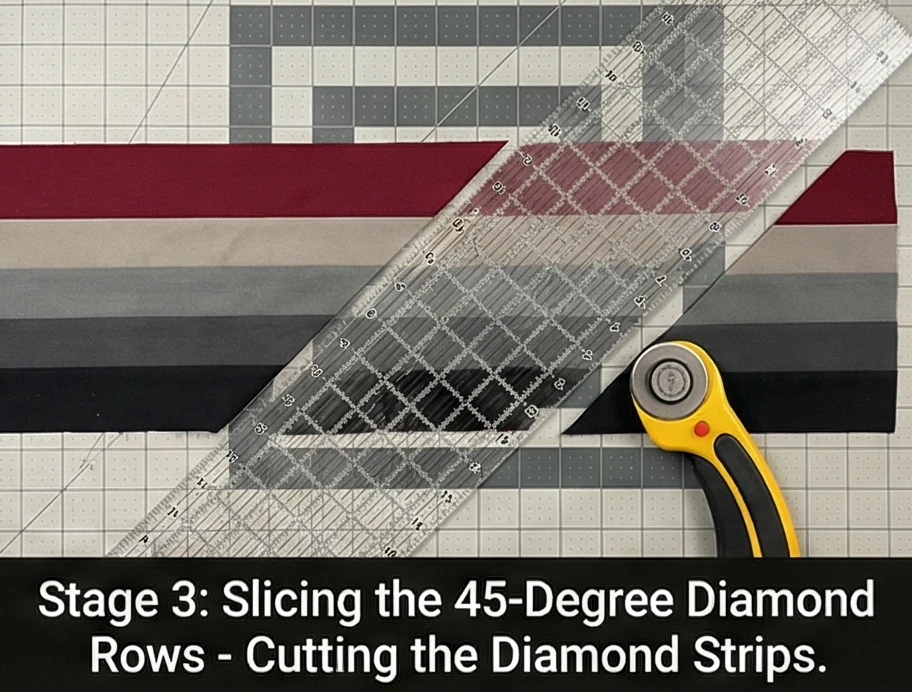
Step 4: Engineering the Eight Points
Nesting the seams for a flawless, flat intersection.
- Offset and Pin: Take two diamond rows. Place them right-sides together, shifting them so the Red diamond on the top row perfectly aligns with the Greige diamond on the bottom row. Because this piece will hang flat on a wall, precision is critical—push a pin vertically directly through every 1/4-inch seam intersection.
- Build the Star: Sew eight rows together in this staggered pattern to build one massive star point. Repeat to construct all 8 star points.
- Assemble the Core: Carefully sew the points together to form the top and bottom halves of the star, then join them seamlessly across the center. Use a heavy tailor’s clapper to press the bulky center intersection as flat as possible.
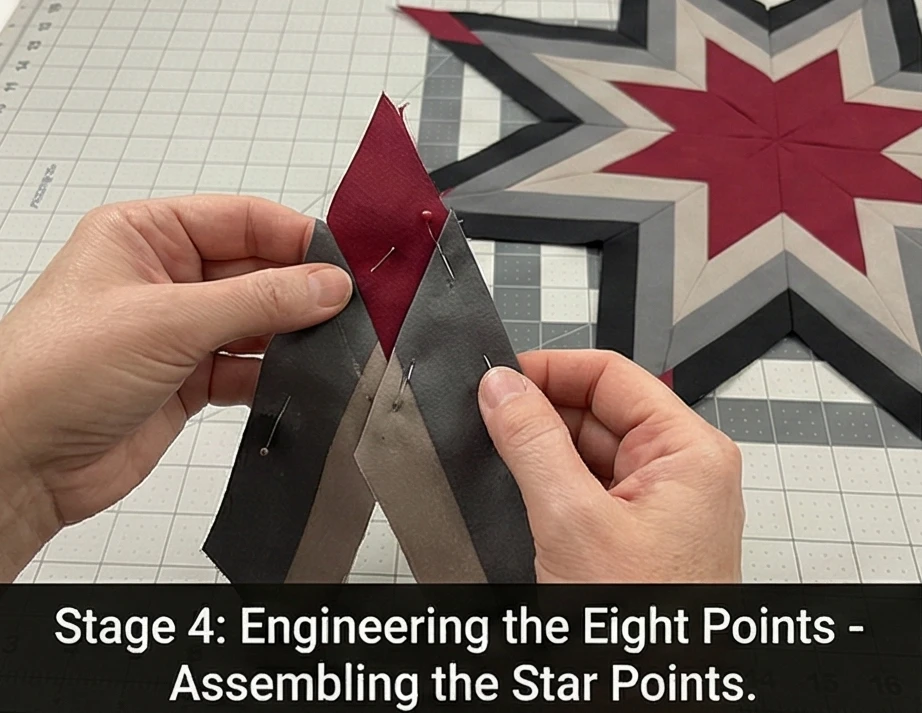
Step 5: The “Y-Seam” Gallery Background
Floating the geometric star in the dark expanse.
- Cut the Voids: From your heavy Black Sateen or Canvas, cut four massive squares (measuring roughly 22″ x 22″) and four squares cut in half diagonally (yielding eight triangles) to fill the deep V-shaped gaps between the star points.
- The Pivot: Use the Y-seam technique to gently drop the Black background pieces into the voids. Stop your needle exactly 1/4 inch before the edge of the star point, pivot the heavy fabric, and sew up the other side. This creates a completely flush, perfectly squared 80″ x 80″ textile canvas.
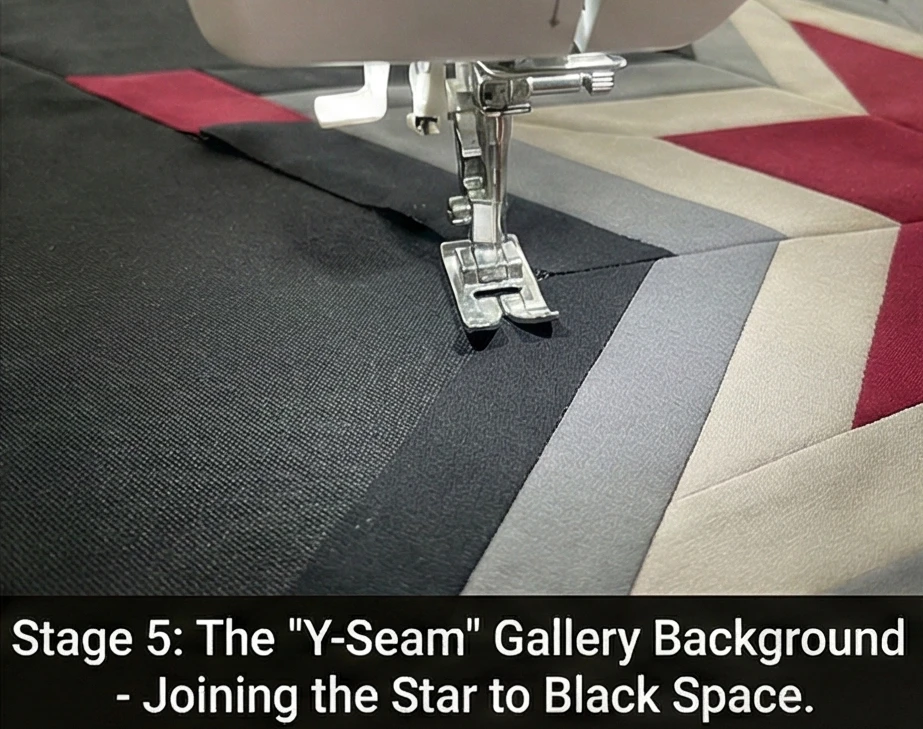
Step 6: Acoustic Quilting and the Hanging Sleeve
Preparing the textile for permanent gallery suspension.
- The Baste: Sandwich the pieced top, the sound-dampening wool batting, and the backing fabric. Baste very densely with safety pins to prevent the heavy fabric from shifting during quilting.
- Architectural Echo Quilting: Using a walking foot, quilt straight lines parallel to the diamond shapes, starting at the center and radiating all the way out into the dark negative space. Space the lines exactly 1 inch apart. This dense, structured quilting gives the tapestry incredible rigidity, ensuring it hangs perfectly flat without bowing.
- The Hanging Sleeve: Cut a 9-inch wide strip of canvas that is 76 inches long. Hem the short ends. Fold it in half lengthwise (wrong sides together) to make a 4.5-inch wide tube. Before binding the quilt, baste the raw edges of this tube along the top back edge of your tapestry.
- The Tailored Frame: Bind the entire piece in solid Black fabric to sharply frame the artwork. Slip your heavy gallery rod through the hidden sleeve on the back, and mount the hardware to your wall studs.
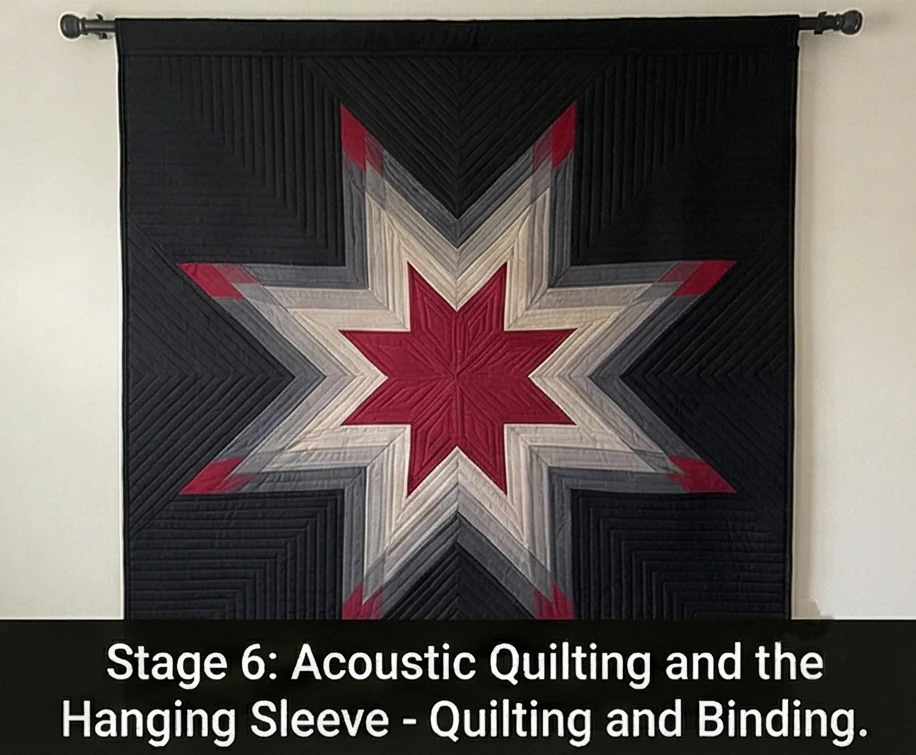
Usability Note: Unlike a bed quilt, a wall tapestry rarely needs washing, but it will collect ambient dust and fade if exposed to harsh, direct sunlight. Protect the deep Reds and Blacks by hanging the piece out of direct sunlight. Once a month, use a clean microfiber duster or the upholstery attachment on your vacuum to gently pull dust from the dense quilting lines.
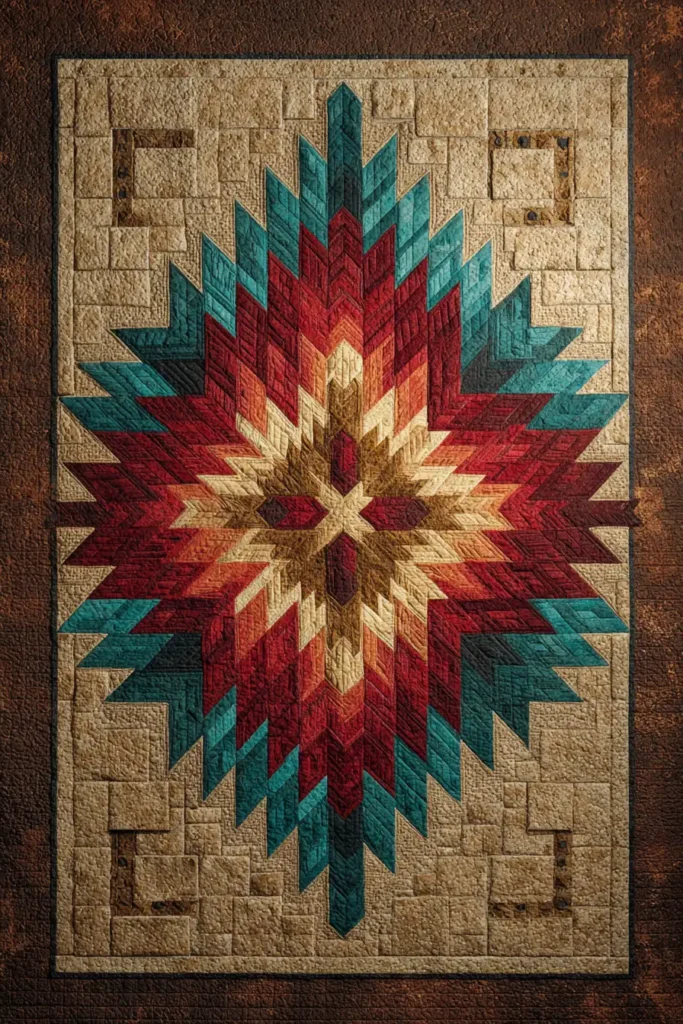
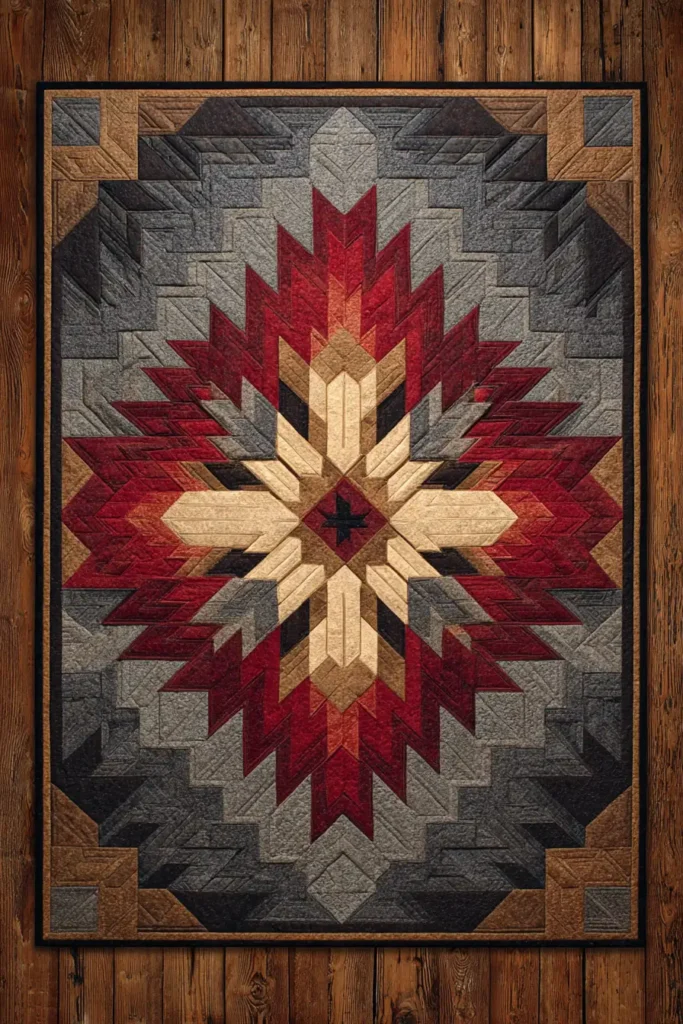
Conclusion
Integrating these elegant designs into your daily life is about more than just decorating; it is about embracing a rich textile tradition that brings profound warmth and geometric harmony into your home. The striking precision of the eight-point star offers a visual anchor that commands attention, yet it feels inherently comforting and grounded. Whether you are seeking the ultimate comfort of a Reversible Lakota Star Quilted Bed Blanket or the everyday utility of Decorative Lakota Star Cushion Covers, these projects prove that sophisticated style and deep, inviting comfort can coexist perfectly within a single design.
The true brilliance of this collection lies in its incredible versatility across both home and lifestyle items. A Cozy Lakota Star Lap Quilt transforms a simple reading nook into a dedicated sanctuary, just as Morning Star Quilted Placemats elevate a standard family dinner into a culturally inspired tablescape. Furthermore, the inclusion of practical, stylish accessories, such as Sophisticated Lakota Star Quilted Market Totes, demonstrates that high-end quilted art need not remain confined to the home. The quilted star’s thick, structured nature provides a comfortable carry and everyday elegance wherever you go, bridging the gap between home comfort and personal style.
Ultimately, choosing to feature these timeless patterns in your home decor or personal accessories is a celebration of enduring artistry. Each stitch contributes to a beautiful, cohesive environment that honors heritage while meeting the rigorous needs of a modern, stylish lifestyle. Let this comprehensive collection inspire you to explore the Morning Star’s stunning symmetry. By thoughtfully placing these textiles—from luxurious Two-Tone Lakota Star Bed Covers to bold wall hangings—you will craft a truly sophisticated, cozy sanctuary that resonates with both historical meaning and flawless, contemporary design.
