
20 Jelly Roll Quilt Pattern Ideas: Elegant, Comfortable & Sophisticated Designs for Beautiful Homes
The Honest Truth About Jelly Rolls
Let me correct something that appears on almost every jelly roll quilting site, including some reputable ones: jelly rolls are not a classic quilting tradition. They are not rooted in the 19th century. No Civil War-era quilter bundled her strips into a coordinated roll and reached for a rail fence pattern. Jelly rolls were introduced by Moda Fabrics somewhere between 2002 and 2005 as a product – a convenient bundle of pre-cut 2.5-inch strips, color-coordinated by the manufacturer, designed to make strip piecing faster and more accessible.
That is not a criticism. It is a clarification that actually makes jelly rolls more interesting, not less. They are a modern solution applied to ancient problems: how do you cut accurately, how do you coordinate color, how do you get from fabric to finished quilt without losing a weekend to preparation? Jelly rolls answer all three. The patterns they produce – rail fences, braids, chevrons, bargello – are not new patterns. They are classic strip-piecing structures that have existed for generations, now made achievable in an afternoon.
The distinction matters because it changes what you are making. A Log Cabin quilt, dating to the 1860s, carries the weight of a genuine historical tradition – the construction method, the symbolic red center square, the light-and-dark logic of the block all connect to a specific time and culture. A jelly roll quilt offers something different: the sophistication of traditional patchwork, combined with the precision of modern manufacturing. Both are worth making. They are just not the same thing.
What a Jelly Roll Actually Does
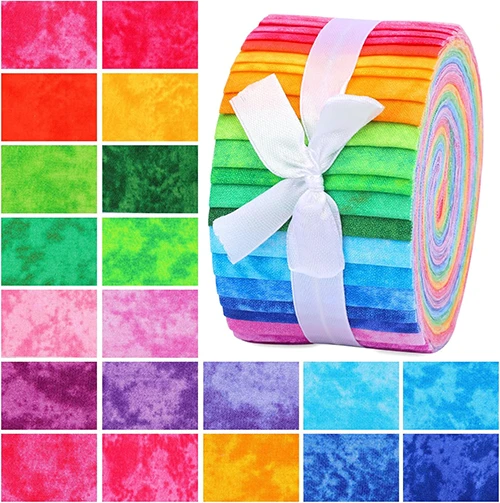
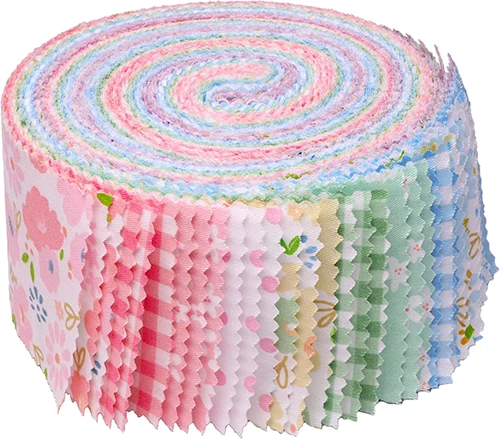
The practical case for jelly rolls is straightforward and genuinely compelling. The strips are pre-cut to an exact 2.5 inches – more precise than most home cutting, and consistent across every strip in the bundle. The color coordination is done by a textile designer at Moda or another fabric house, which means the combinations work together in ways that can take an experienced quilter hours to achieve from scratch. The most tedious stages of strip piecing – the measuring, the cutting, the auditioning of fabric combinations – are already handled before you sit down at your machine.
In practice, this means you spend your time on layout and construction rather than on preparation. That is where the design decisions actually live. How you arrange the strips – which colors sit next to each other, which pattern you build from them, whether you go for the flowing movement of a bargello or the graphic punch of a herringbone – is entirely yours. The jelly roll removes the friction. It does not remove the creativity.
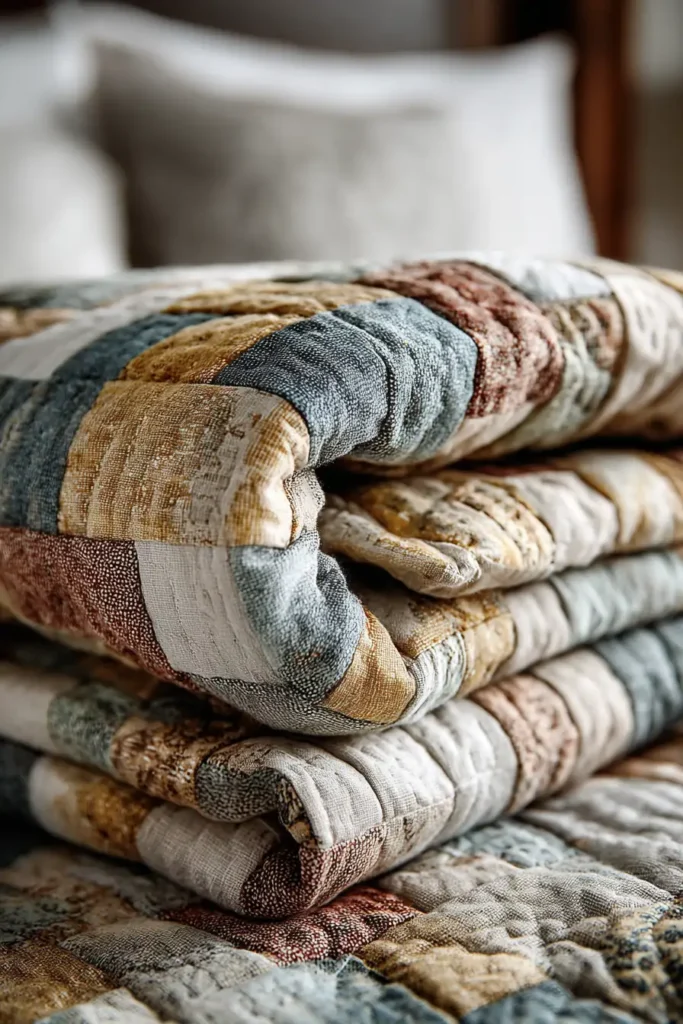
I will say something that most jelly roll guides do not: the quality of the bundle matters enormously. I have worked with high-quality 100% cotton jelly rolls and with cheaper blended alternatives, and the difference in the finished quilt is not subtle. Good cotton holds its shape through washing, takes dye evenly so the colors stay true, and stitches cleanly at a quarter-inch seam allowance without fraying. A well-made project from good materials can be a quilt that lasts for decades. A fast project made from cheap strips is fast. Choose the bundle as carefully as you would choose yardage.
Jelly Roll Quilt Pattern Ideas
Contents
- 1 Jelly Roll Quilt Pattern Ideas
- 2 1. Elegant Woven Jelly Roll Quilt Patterns for Master Bedrooms
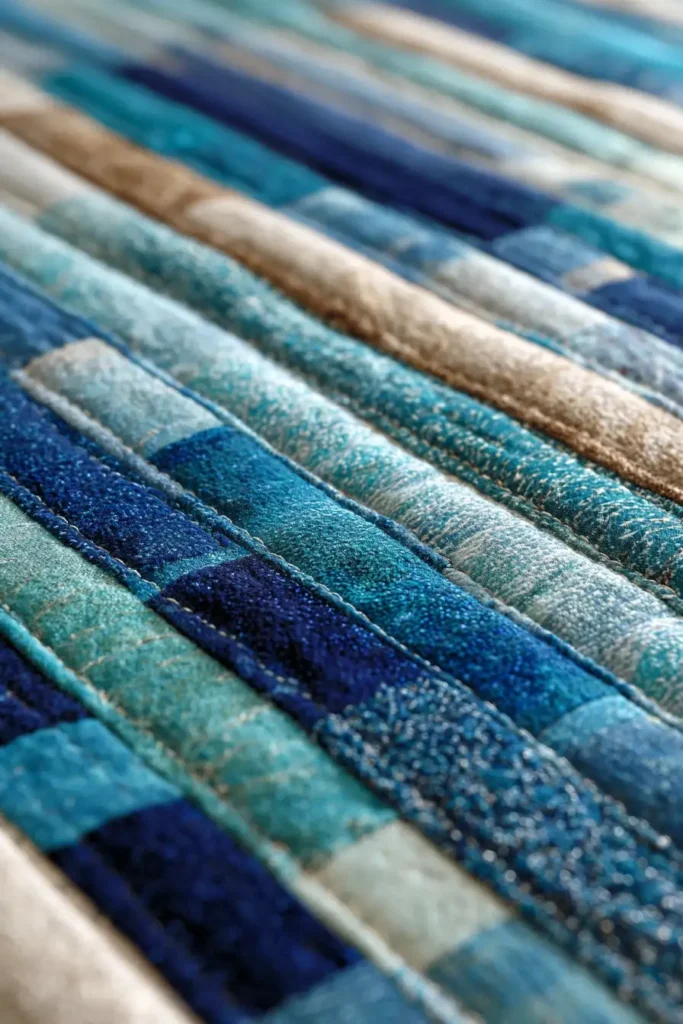
- 3 2. Luxurious Bargello Jelly Roll Quilt Designs for Statement Bedding
- 4 3. Classic Jelly Roll Race Quilt Patterns for Cozy Bed Covers
- 5 4. Cozy Log Cabin Jelly Roll Quilts for Inviting Guest Rooms
- 6 5. Sophisticated Striped Jelly Roll Bed Runners for a Layered Look
- 7 6. Chic Chevron Pattern Pillow Shams from Jelly Roll Strips
- 8 7. Minimalist Monochrome Jelly Roll Quilts for Serene Sleep Sanctuaries
- 9 8. Lightweight All-Season Jelly Roll Quilts for Ultimate Comfort
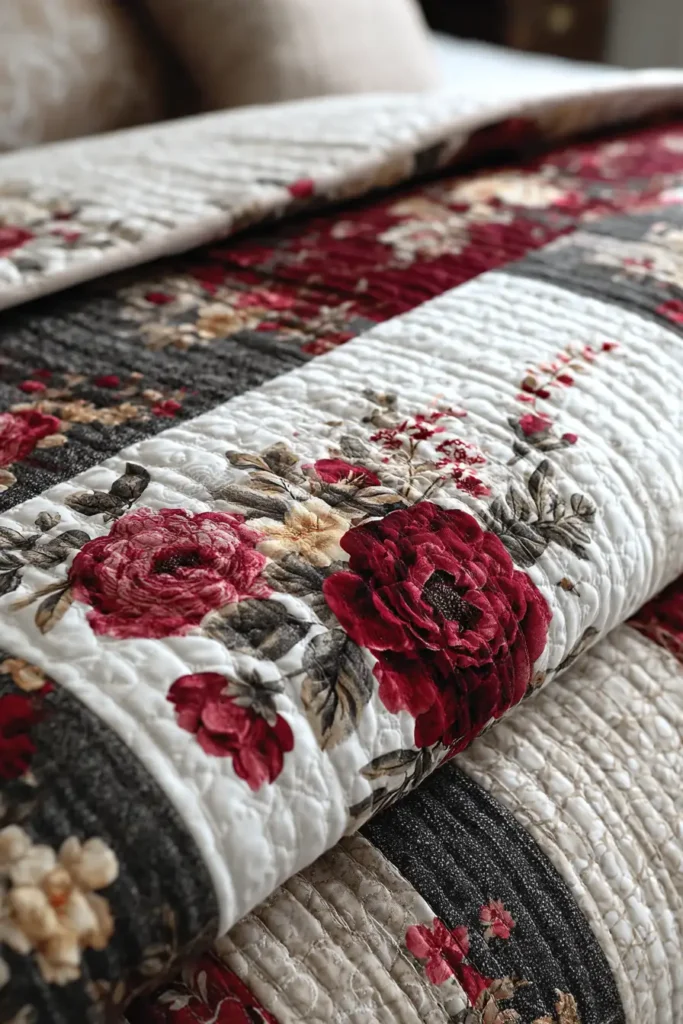
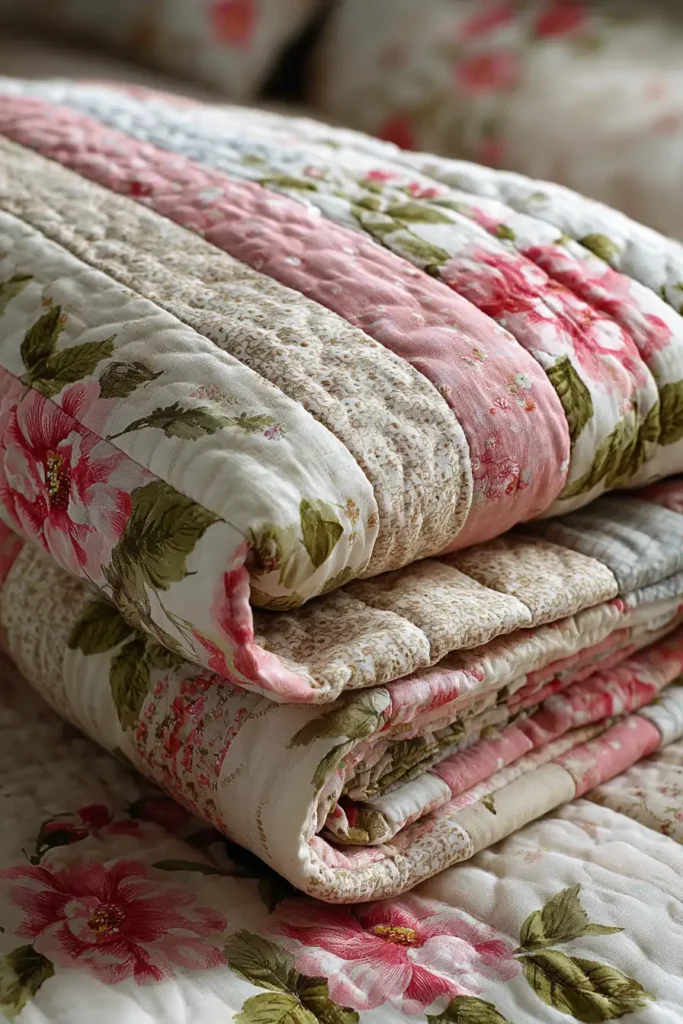
- 10 9. Romantic Floral Jelly Roll Quilts for Sophisticated Bedrooms
- 11 10. Living and Dining Room: Throws, Runners, and Seating
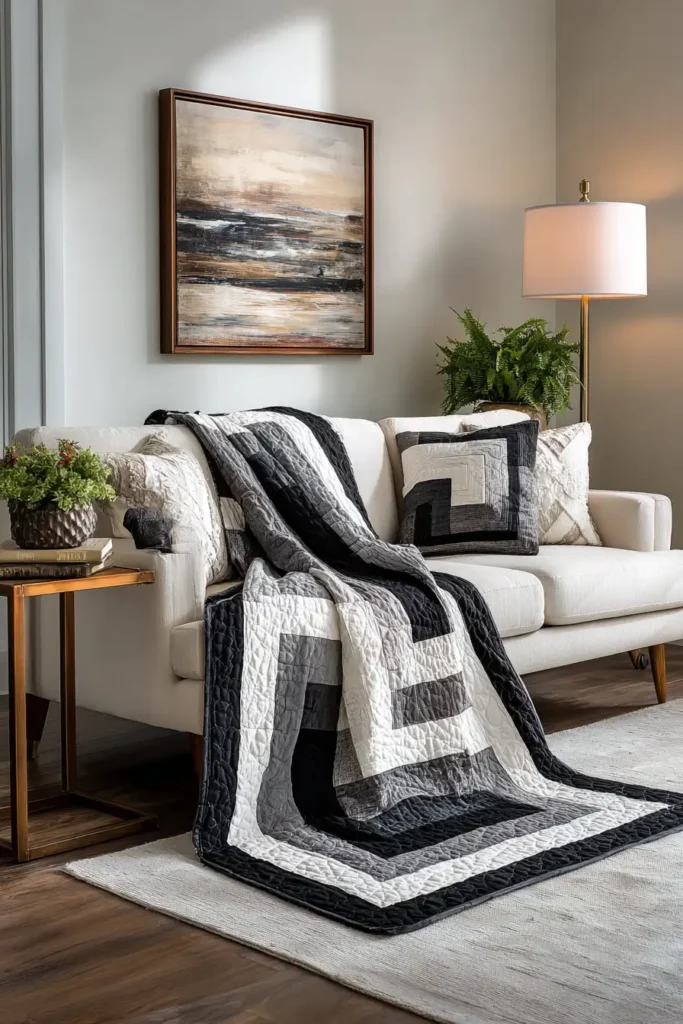
- 12 11. Stylish Jelly Roll Sofa Throws for Cozy Living Rooms
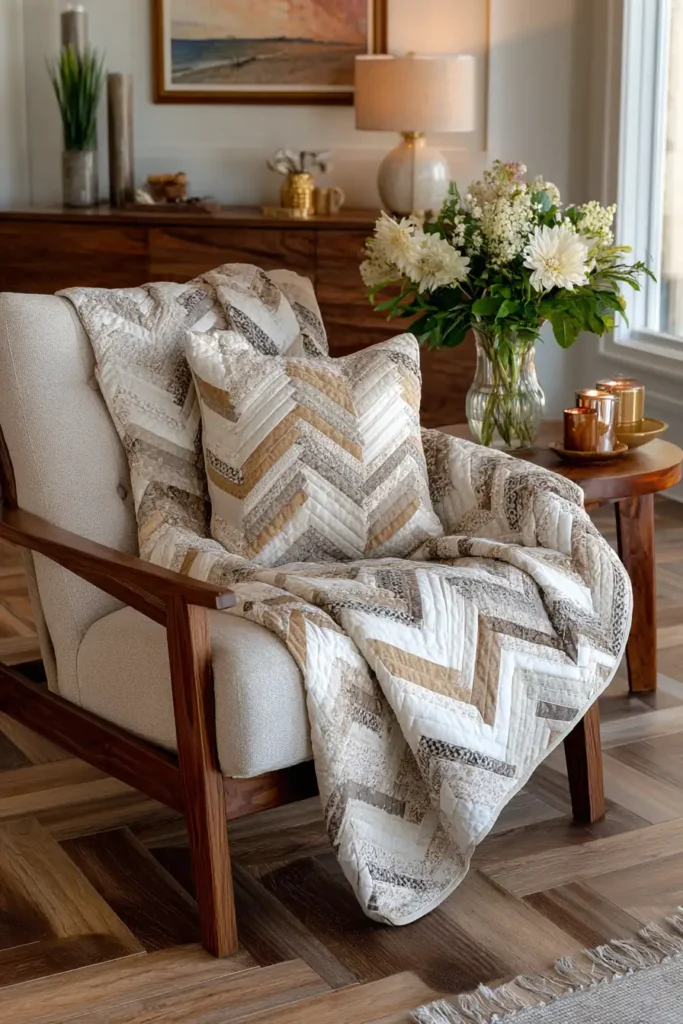
- 13 12. Sophisticated Herringbone Quilt Patterns for Modern Sofas
- 14 13. Durable Jelly Roll Couch Covers for Everyday Family Comfort
- 15 14. Elegant Jelly Roll Table Runners for Formal Dining Spaces
- 16 15. Farmhouse Chic Jelly Roll Placemats for Beautiful Dining
- 17 16. Intricate Braided Jelly Roll Table Toppers for Centerpieces
- 18 17. Cozy Jelly Roll Lap Quilts for Relaxing Reading Nooks
- 19 18. Decorative Jelly Roll Cushion Covers for Living Room Seating
- 20 19. Quilted Jelly Roll Floor Pillows for Extra Living Room Comfort
- 21 20. Framed Mini Jelly Roll Quilt Blocks for Gallery Wall Art
- 22 Conclusion
How Jelly Roll Quilts Fit Into a Home
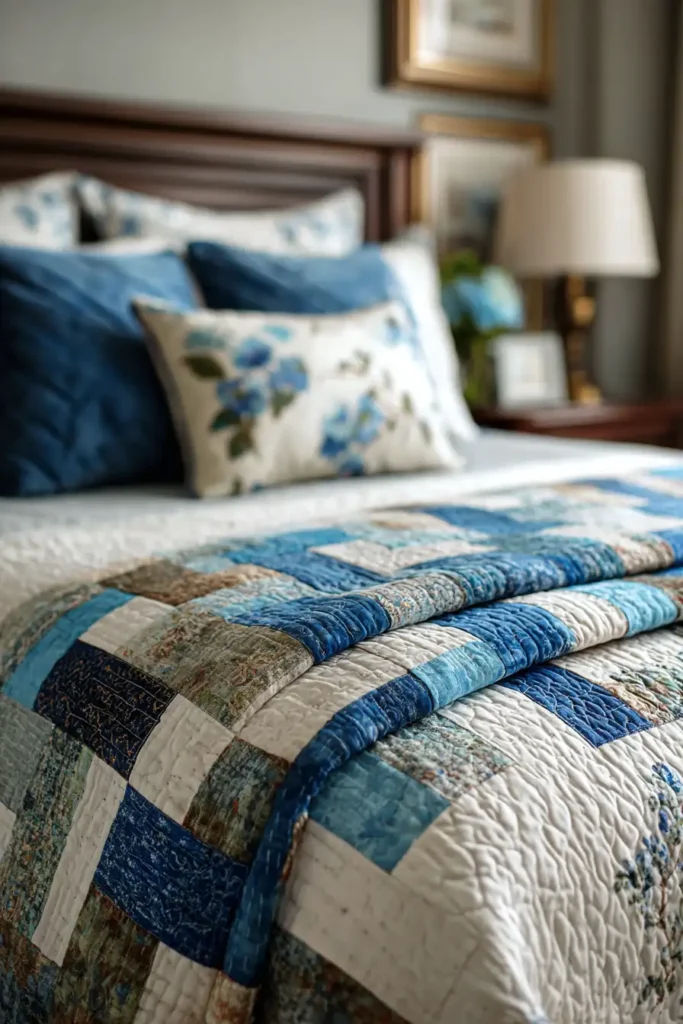
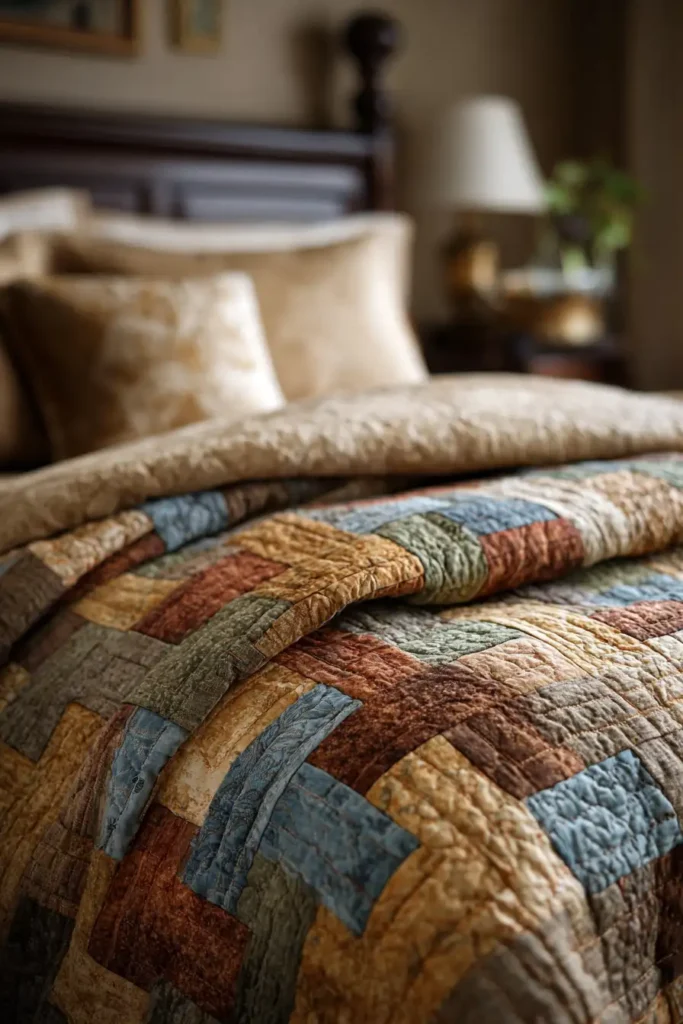
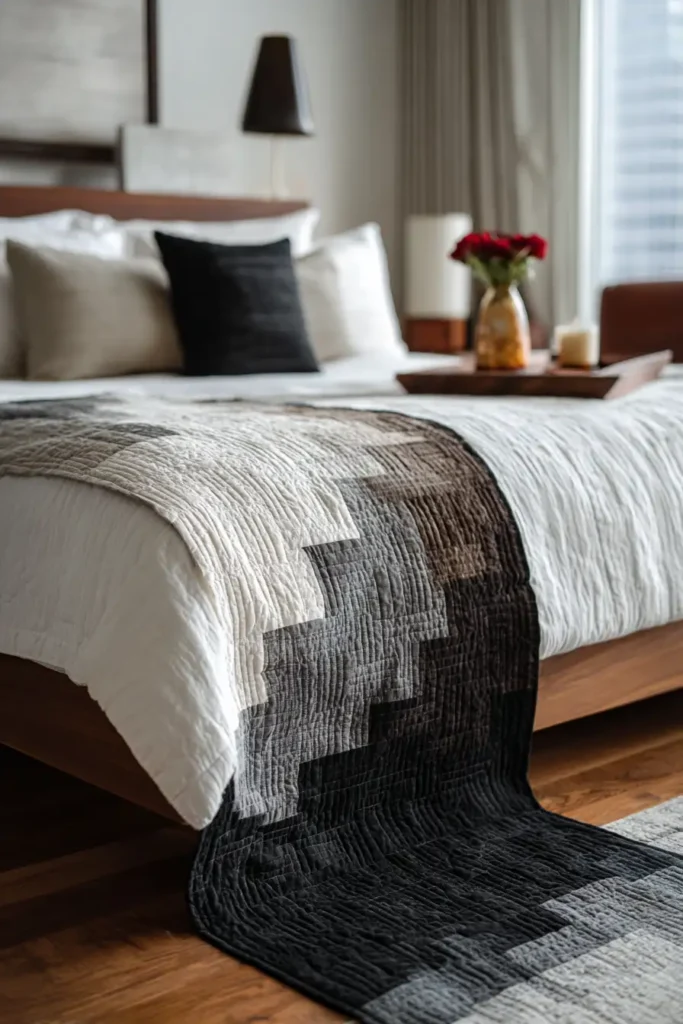
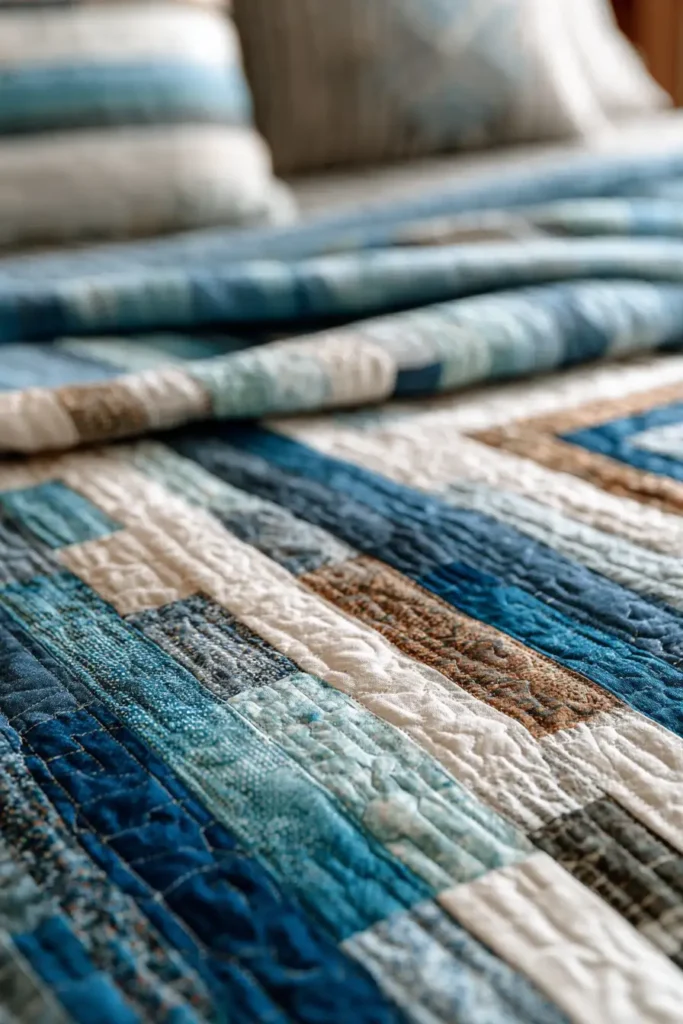
The versatility of jelly roll quilts across different rooms is one of their underappreciated qualities. In a bedroom, strip-based patterns like Bargello and Woven designs produce bold, graphic bed covers that read as intentional and sophisticated – not like a beginner’s project, which is what they technically are. The movement and depth of color these patterns create from simple horizontal strips are consistently surprising, even to experienced quilters.
Some of the Best Jelly Roll Fabrics for These Quilt Patterns

In living and dining spaces, the same strip logic scales down beautifully. A jelly roll sofa throw or herringbone couch cover protects furniture while adding a layer of warmth and a considered design element. Jelly roll table runners – particularly in farmhouse or Scandinavian palettes – create a cohesive foundation for a dining table that coordinates with the room without looking obviously matched or dated.
The range in this collection reflects that versatility: statement bedroom quilts at one end, practical table runners and sofa covers at the other, with everything in between built on the same honest premise – that speed of construction and quality of result are not opposites, as long as you start with good material and finish with care.
Jelly rolls work particularly well with strip-based classic patterns. See our guides on Log Cabin quilts, Modern Farmhouse quilts, and Contemporary quilt patterns for the designs that translate most naturally to strip piecing.
1. Elegant Woven Jelly Roll Quilt Patterns for Master Bedrooms
“The Oxford Weave” Basketweave Strip Quilt
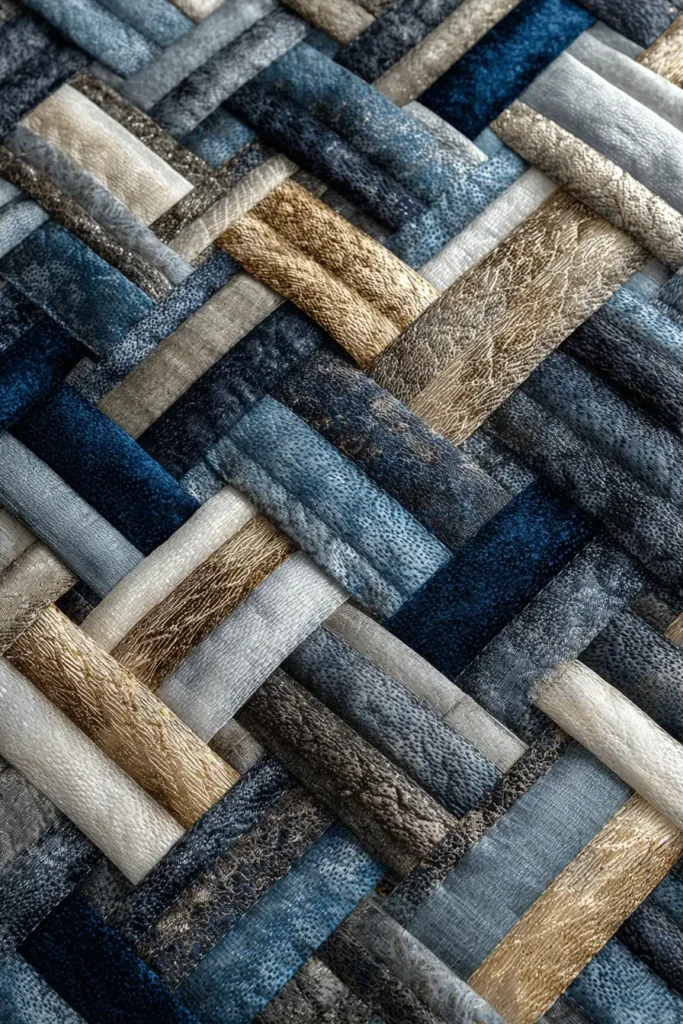
A master bedroom should be a sanctuary of calm and tailored sophistication. “The Oxford Weave” quilt brings the bespoke feel of menswear and high-end haberdashery into your bedding. By taking simple Jelly Roll strips (pre-cut 2.5-inch widths) and assembling them into alternating blocks, this pattern creates a stunning optical illusion of interlocking warp and weft threads. Rendered in a sophisticated palette of champagne, slate, and charcoal, it looks like an intricately woven tapestry but comes together with the speed and ease of straight-line machine piecing.
Finished Dimensions: Generous Queen Size, 80″ x 96″.
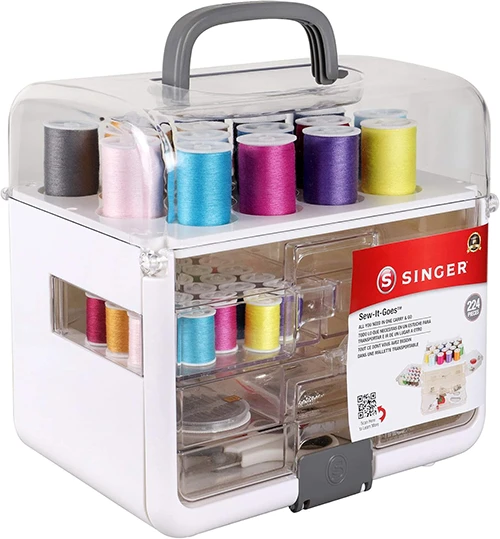
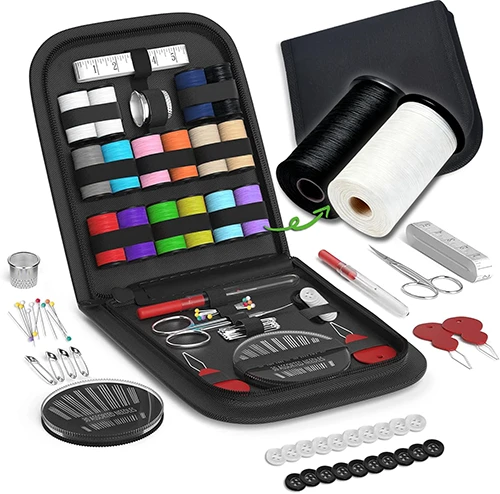
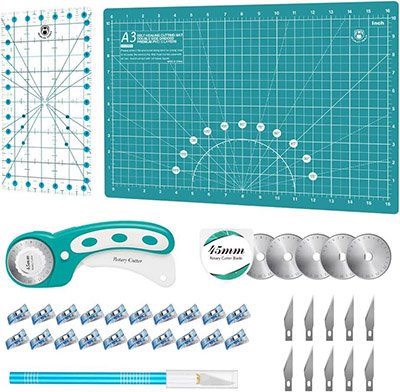
Helpful Sewing Kits for New Quilters

Materials Needed:
- The “Yarn” (Strips): 3 standard Jelly Rolls (approx. 120 strips measuring 2.5″ x 42″).
- Color Strategy: For the most elegant woven effect, choose two tonal gradient rolls (e.g., shades of grey and slate) and one high-contrast metallic or light roll (e.g., champagne, pearl, or ivory).
- Backing: 7.5 yards of high-thread-count Cotton Sateen (for a cool, luxurious feel against the skin).
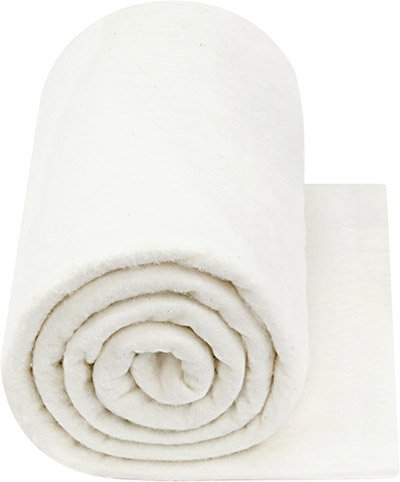
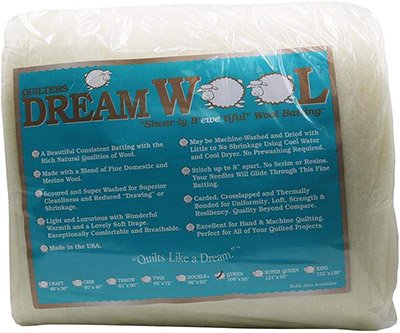
- Batting: Silk or Bamboo Blend.
- Why: For a master bedroom coverlet, you want drape, not puffiness. Silk and bamboo breathe beautifully and puddle luxuriously over the edges of the bed, unlike stiff polyester.
- Thread: 50wt cotton thread in a neutral tone (e.g., Dove Grey).
- Notions: A large 8.5-inch square acrylic ruler, a rotary cutter with a new blade, and plenty of fine glass-head pins.
Cultural Backstory: The basketweave is among the oldest textile patterns in human history, dating back more than 10,000 years to early basketry and mat weaving. In bedding, a woven geometric pattern mimics the luxurious texture of jacquard loom fabrics popularized in 19th-century France. This quilt honors ancient geometry while utilizing the distinctly modern convenience of pre-cut rotary strips.
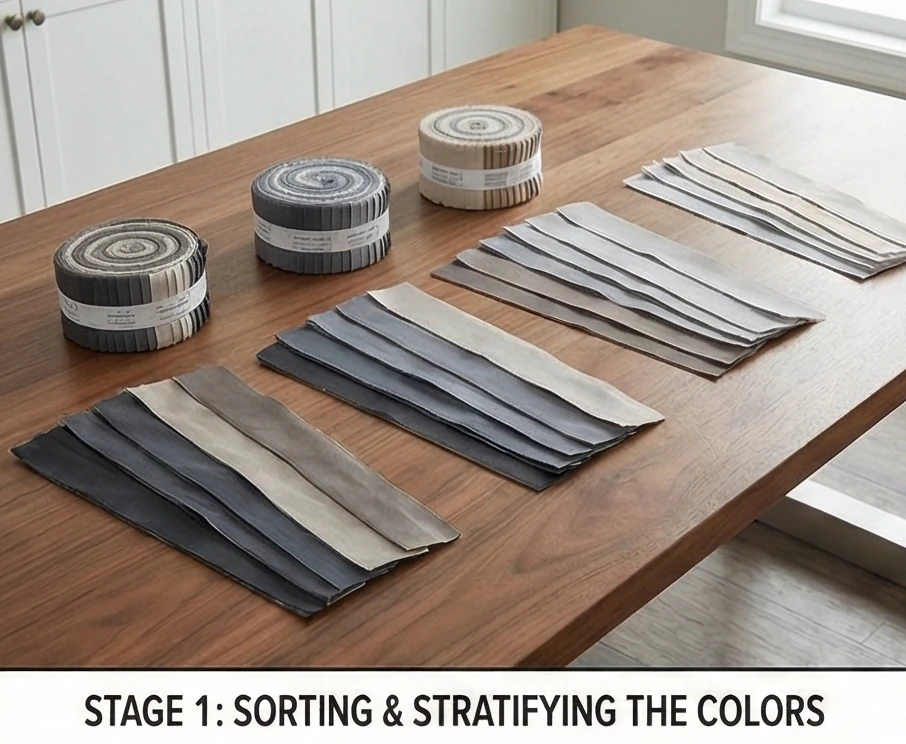
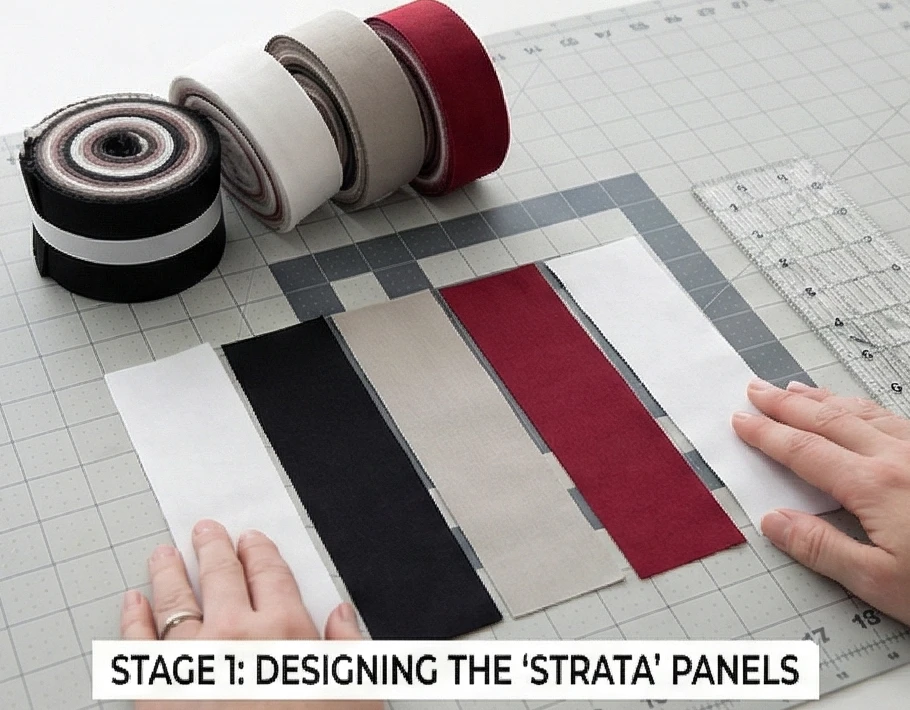
Step 1: Sorting and Stratifying the Colors
A true woven illusion requires contrast.
- Separate the Strips: Unroll your Jelly Rolls and separate the strips by value (Dark, Medium, Light).
- Plan the “Strata”: Sew strips together in groups of four. Plan your sets to create distinct “ribbons.”
- Example: Create some sets that are Dark-Medium-Dark-Medium, and others that are Light-Medium-Light-Medium. This contrast is what makes the final weave “pop.”
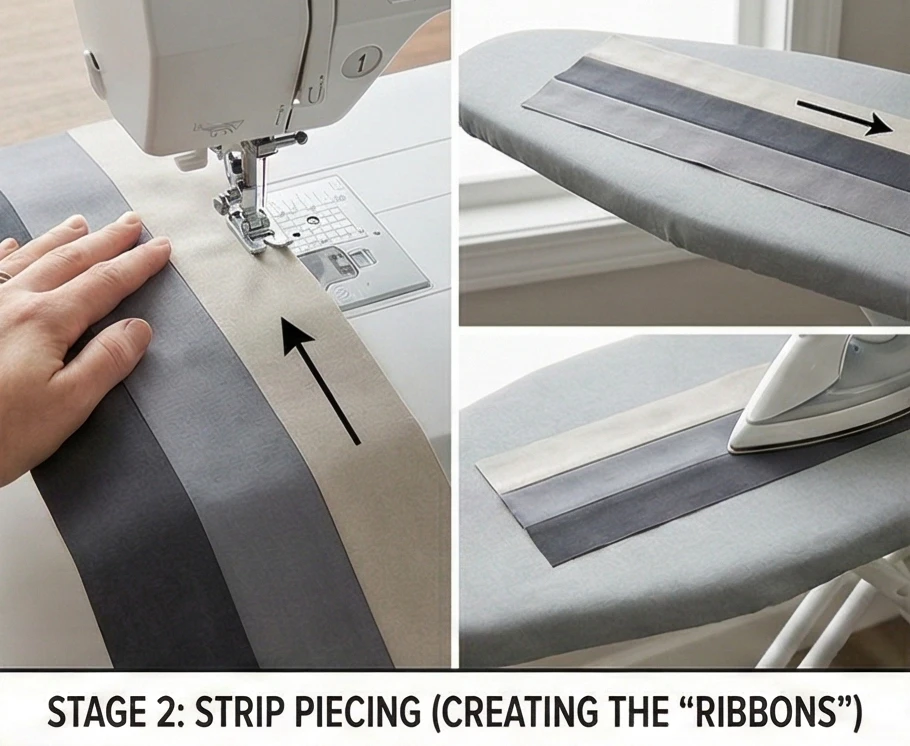
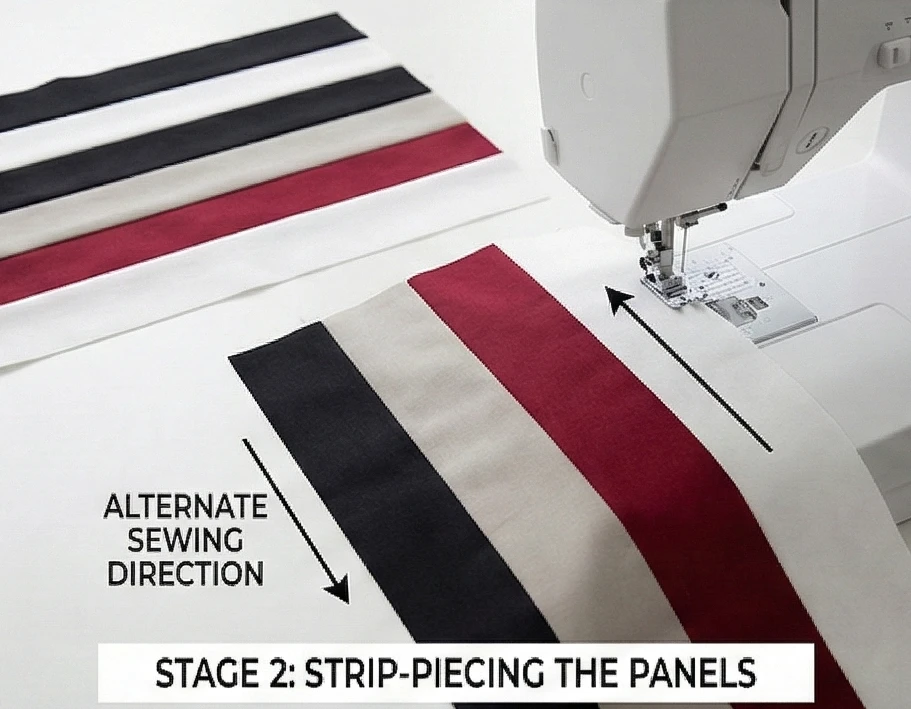
Step 2: Strip Piecing (Creating the “Ribbons”)
Sewing long strips can cause bowing. Technique is key.
- Pinning: Take 4 strips and pin them together along their long edges, right sides together.
- The “Alternate Direction” Rule: Sew Strip 1 to Strip 2 going from Top to Bottom. When you sew Strip 3 to the set, flip the fabric and sew from Bottom to Top.
- Crucial Technique: Alternating sewing directions prevents the entire strip set from curving into a rainbow shape.
- Pressing: Press all seams in one direction (usually toward the darkest fabric). You now have a wide, striped panel. Repeat this until you have 30 Strip Sets.
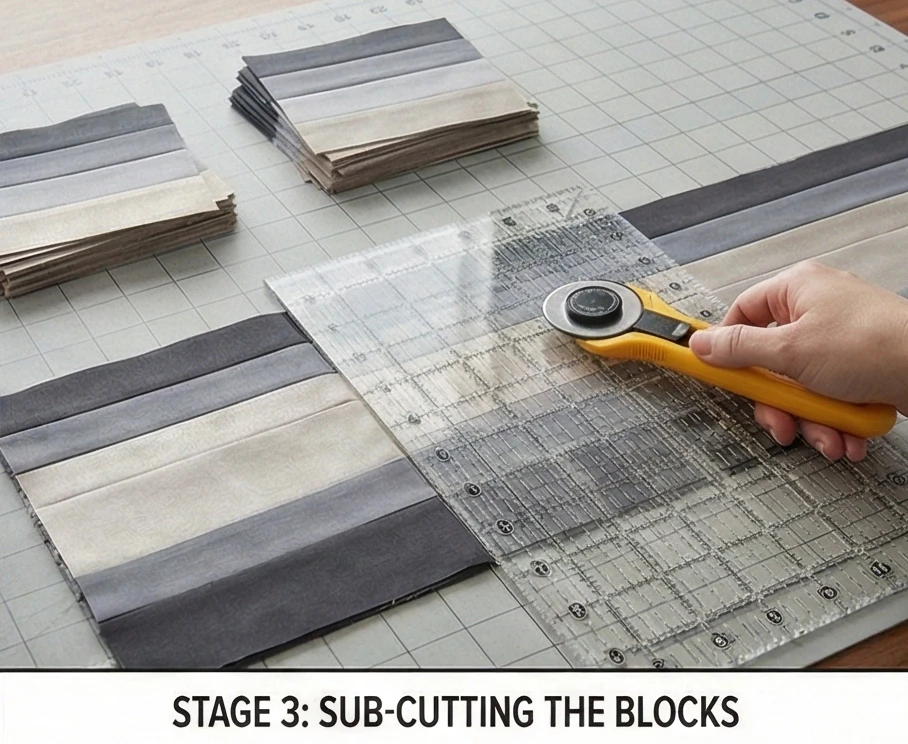
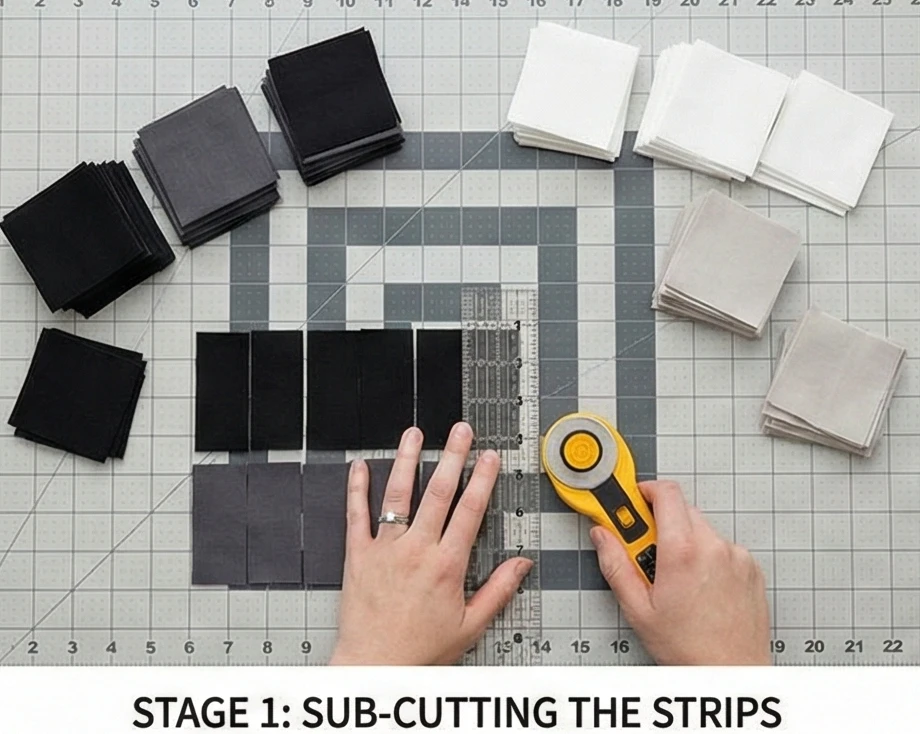
Step 3: Sub-Cutting the Blocks
Accuracy here ensures the weave aligns perfectly.
- Square Up the Edge: Lay a Strip Set flat on your cutting mat. Trim off the messy selvage edge to ensure a perfectly straight starting point.
- The Cut: Using your acrylic ruler, cut the Strip Set into exact 8.5″ x 8.5″ squares.
- Yield: Each 42-inch Strip Set will yield four perfect 8.5-inch squares.
- Total: From your 30 Strip Sets, you will generate the 120 blocks needed for the quilt.
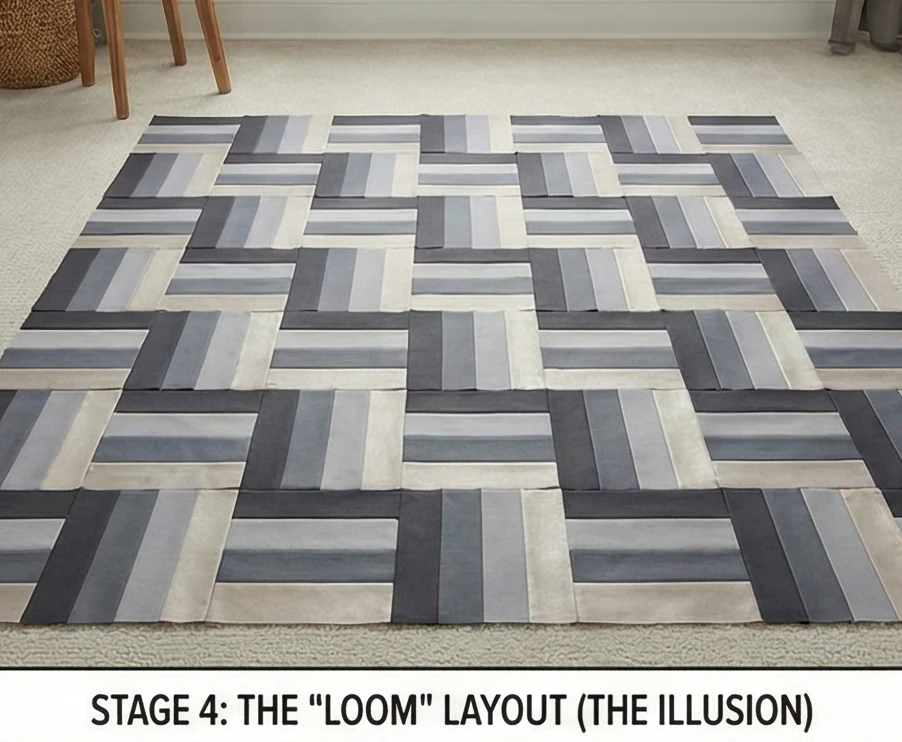
Step 4: The “Loom” Layout (The Illusion)
This is where the magic happens.
- Row 1: Place your first block so the stripes run vertically. Place the second block next to it so the stripes run horizontally. Alternate Vertical-Horizontal-Vertical across a row of 10 blocks.
- Row 2: Start this row with a Horizontal block, followed by a Vertical block.
- The Weave Check: Stand back and look at the layout. The alternating blocks should immediately create an optical illusion of ribbons crossing over and under each other. Adjust specific blocks if a dark ribbon suddenly “disappears” next to another dark block.
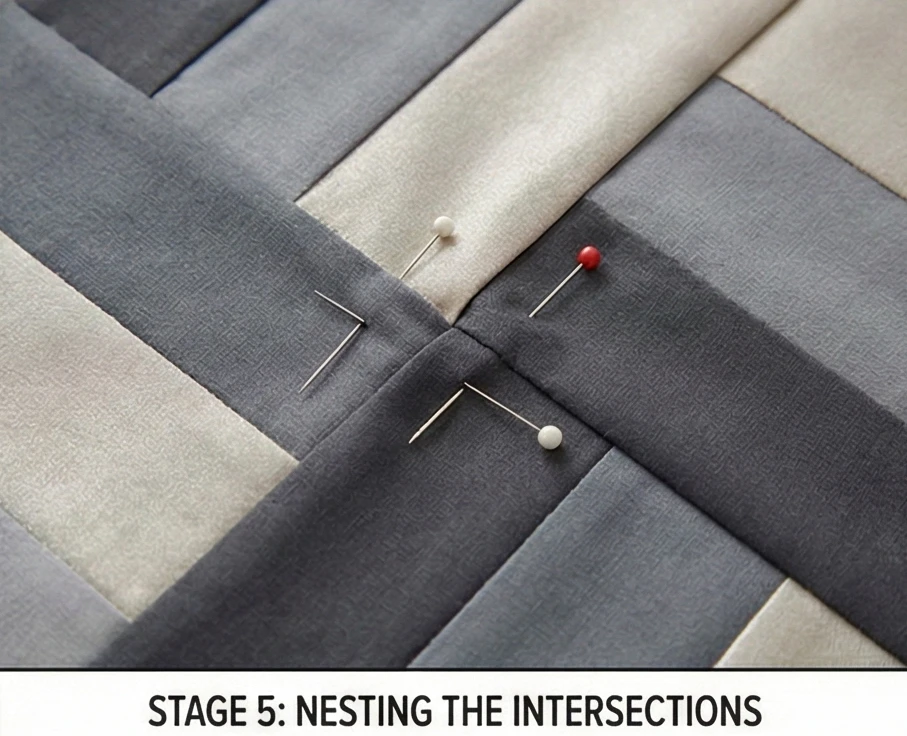
Step 5: Nesting the Intersections
To maintain the illusion of continuous ribbons, the corners must meet perfectly.
- Pin the Corners: When sewing the blocks into rows, push a pin exactly through the seam where the vertical and horizontal blocks meet.
- Nest the Seams: Because you pressed your seams in one direction in Step 2, the vertical block seams will naturally “lock” or “nest” against the horizontal block seams, reducing bulk and creating razor-sharp corners.
- Assemble: Sew the 10 blocks into rows, then sew the 12 rows together to complete the 80″ x 96″ top.
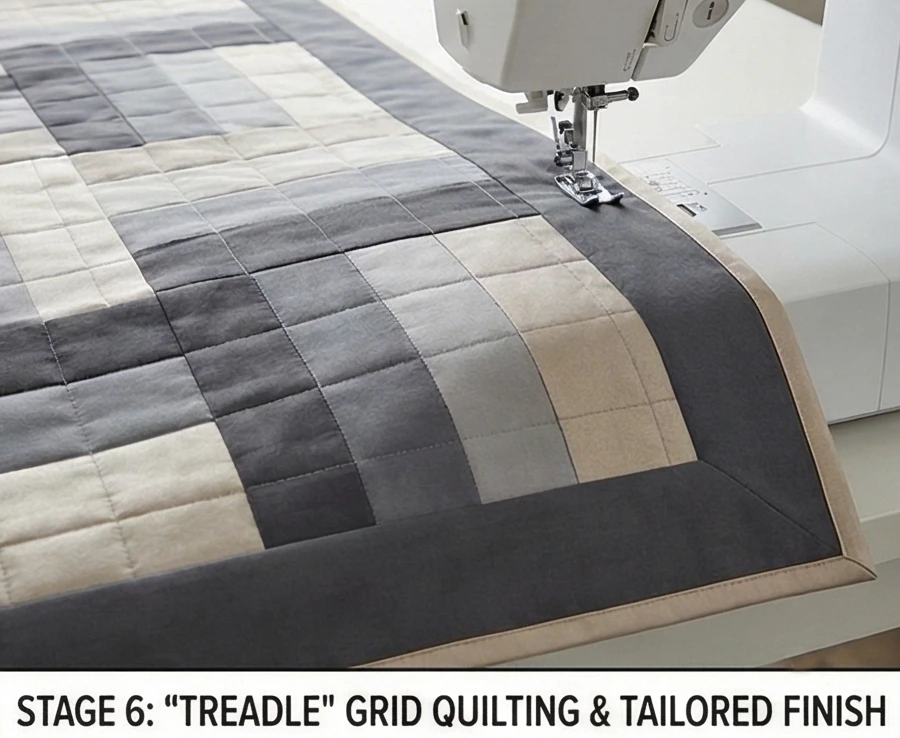
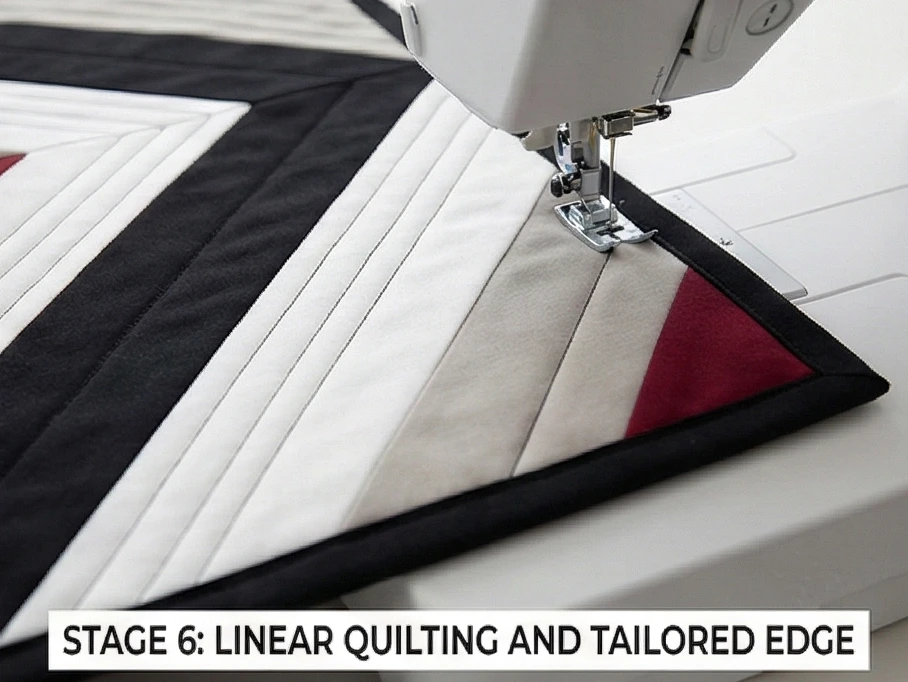
Step 6: “Treadle” Grid Quilting and Tailored Finish
A geometric quilt demands geometric quilting.
- The Quilting Plan: Baste your quilt top, bamboo batting, and sateen backing together. Quilt a continuous grid of straight lines spaced 2 inches apart across the entire surface.
- Effect: The grid mimics the literal warp and weft threads of a loom, flattening the seams and giving the quilt the tailored weight of an upholstery fabric.
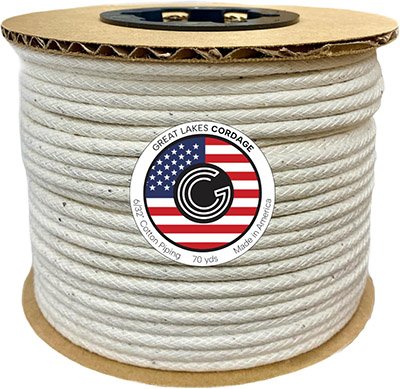
- The Flange Binding: Finish the edges with a “Flange Binding”—a technique that adds a tiny, 1/8-inch pop of contrasting color (like the champagne metallic) just inside the main binding. This detail elevates the quilt from a standard craft project to a bespoke piece of bedroom decor.
Usability Note: Pre-cut Jelly Rolls are known to shed lint and have “pinked” (zigzagged) edges that can obscure a true 1/4-inch seam. Always measure from the inner “valley” of the pinked edge, not the outer peak, to ensure your 8.5-inch blocks stay perfectly square.
Tools for Cutting, Pressing, and Sewing


2. Luxurious Bargello Jelly Roll Quilt Designs for Statement Bedding
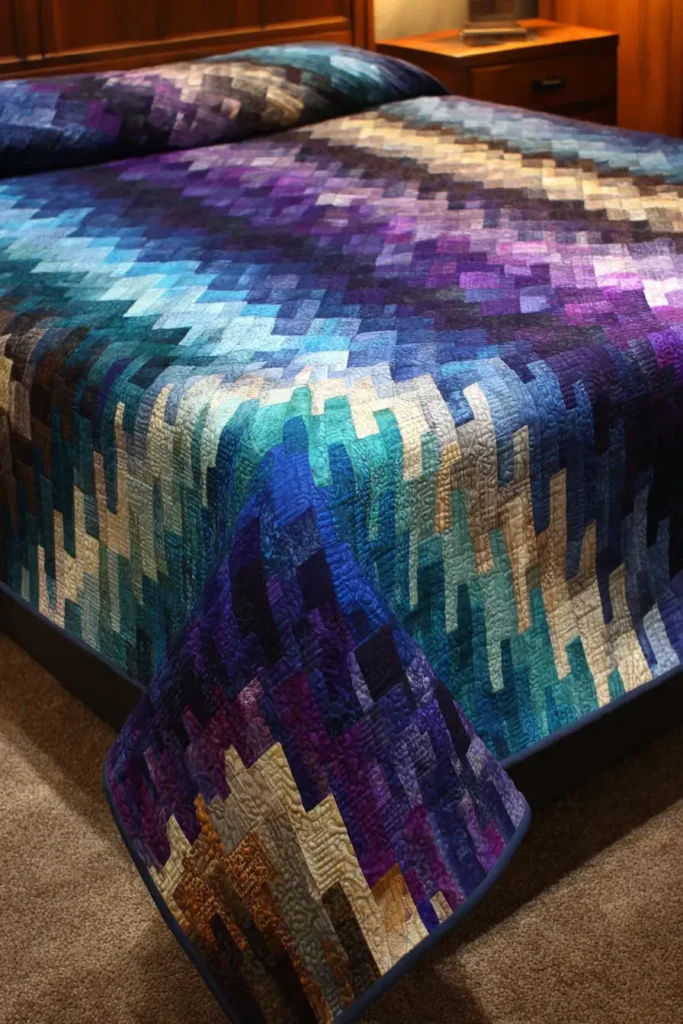
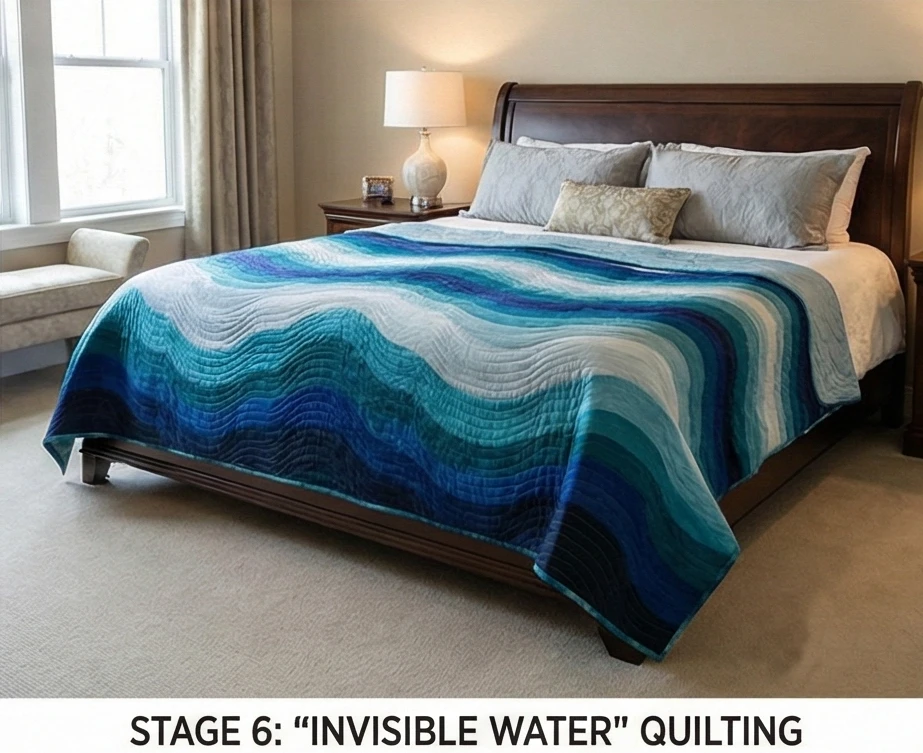
“The Florentine Wave” Sweeping Bargello Quilt
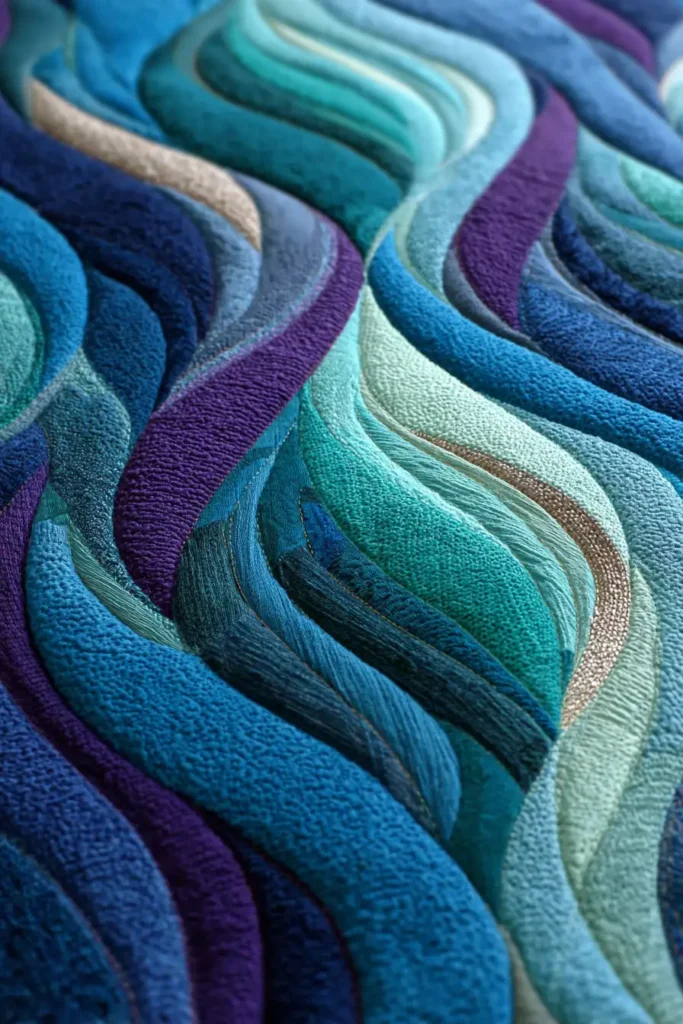
A Bargello quilt is the ultimate trompe l’œil of the textile world. It appears as though the fabric has been magically bent and curved into undulating, three-dimensional waves. However, “The Florentine Wave” contains not a single curved seam. It is constructed entirely of straight Jelly Roll strips. By sewing the strips into a massive tube, slicing the tube into loops of varying widths, and staggering the seams, you create a breathtaking optical illusion. Rendered in a gradient of Sapphire, Peacock, Ice Blue, and Silver, this quilt acts as a massive, sweeping piece of fluid art for a master bed.
Finished Dimensions: King Coverlet, 96″ x 96″.
Materials Needed:
- The “Paint” (Strips): 3 identical Jelly Rolls (approx. 120 strips measuring 2.5″ x 42″).
- Color Strategy: You need exactly 40 distinct colors/values arranged in a perfect gradient from darkest to lightest, and back to darkest.
- Backing: 8.5 yards of a luxurious Cotton Voile or Wide-Back Sateen.
- Batting:100% Bamboo Batting.
- Why: Bargello quilts have hundreds of intersections. Bamboo batting is incredibly thin yet heavy, allowing the dense patchwork to drape fluidly over the bed’s edges rather than sticking out like a stiff board.
- Thread: Invisible Monofilament Thread (for quilting) and 50wt cotton (for piecing).
- Notions: A seam ripper (your most important tool here), masking tape, and a design wall.
Cultural Backstory: The name “Bargello” comes from a series of chairs found in the Bargello Palace in Florence, Italy, dating back to the 17th century. The chairs were upholstered with a specific flame-stitch needlepoint. In the 1990s, quilters brilliantly adapted this embroidery technique to strip-pieced fabric, enabling the fiery, rolling waves to be created on a massive scale for bedding.
Batting, Measuring, Marking, and Clipping Supplies for Quilts
“As an Amazon Associate, I earn from qualifying purchases.“


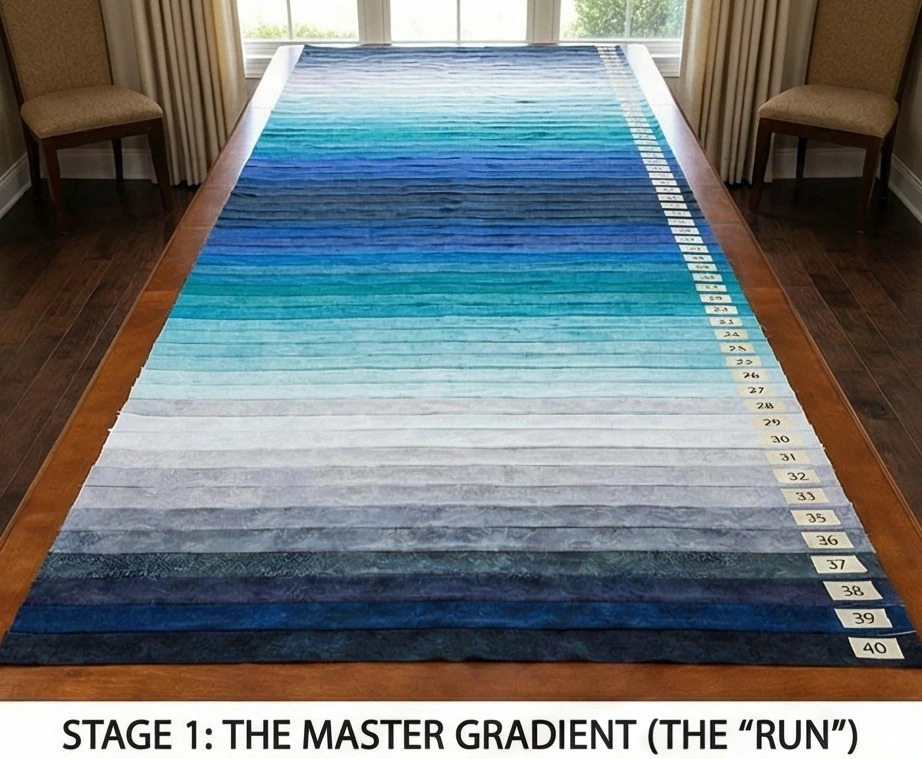
Step 1: The Master Gradient (The “Run”)
The entire illusion relies on the order of your colors.
- Join for Length: Take two identical 2.5″ strips of Color 1 and sew them short-end to short-end. You now have an 80-inch-long strip. Repeat for all 40 colors.
- Order the Run: Lay your 40 long strips out. Arrange them from Darkest (Color 1), fading to Lightest (Color 20), and then fading back to Darkest (Color 40).
- Label: Number every single strip 1 through 40 with a piece of masking tape. Do not skip this step!
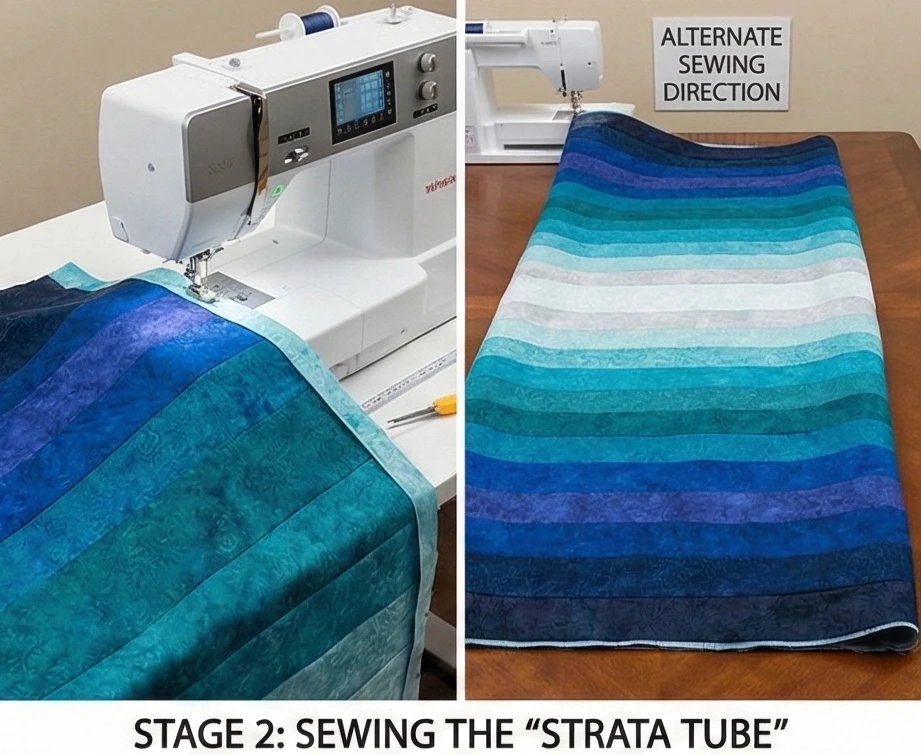
Step 2: Sewing the “Strata Tube”
You are building a giant, striped cylinder.
- Sew the Flat Panel: Sew Strip 1 to Strip 2 along the long edge. Continue adding strips in exact numerical order until all 40 strips are sewn together into a massive, striped rectangle.
- Crucial Technique: Alternate your sewing direction (sew left-to-right, then right-to-left) to keep the panel from bowing. Press all seams strictly in one direction (e.g., UP towards Strip 1).
- Close the Tube: Bring Strip 1 to meet Strip 40 (Right Sides Together). Sew them together. You now have a large fabric tube that resembles a striped infinity scarf.
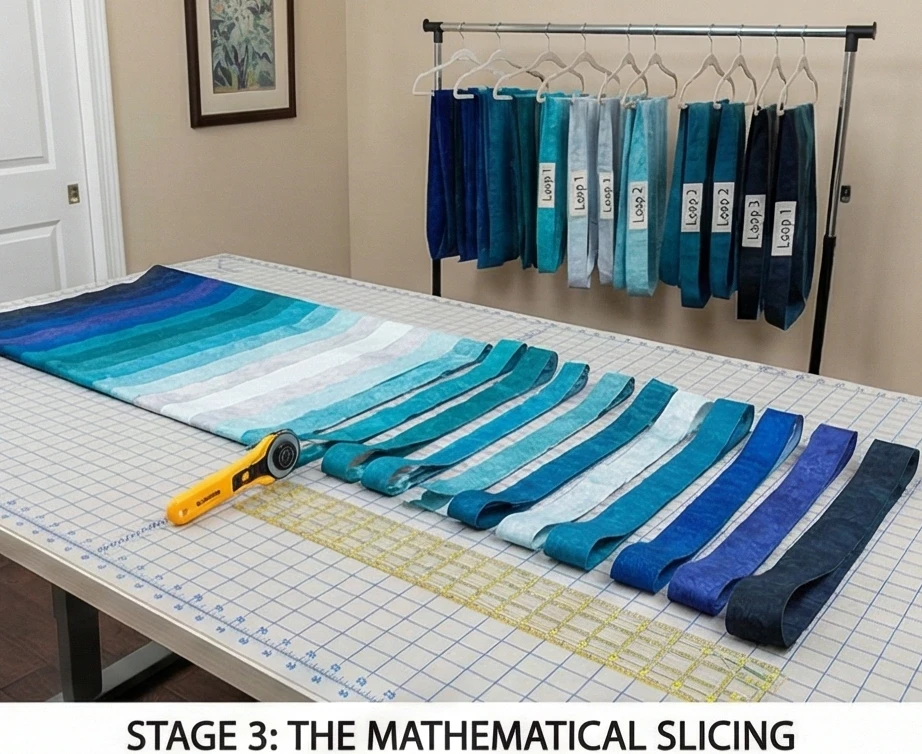
Step 3: The Mathematical Slicing
The width of the cut determines the “speed” of the wave.
- Flatten the Tube: Lay the tube flat on your cutting mat. Use a square ruler to align the horizontal seams so they are perfectly straight.
- Slice into Loops: You will cut vertical slices off the end of this tube. The changing widths create the illusion of a curve.
- Steep Peaks (Fast movement): Cut narrow slices (e.g., 1 inch, 1.25 inches).
- Shallow Curves (Slow movement): Cut wider slices (e.g., 2.5 inches, 3 inches).
- Keep in Order: As you slice a loop off the tube, pin a numbered label to it (Loop 1, Loop 2, etc.) and hang it over a hanger. You will cut about 50-60 loops of varying widths to reach a 96-inch width.
Step 4: The “Un-Sewing” (Creating the Wave)
This is the genius of the Bargello.
- Loop 1 (The Anchor): Take Loop 1. Use your seam ripper to unpick the seam between Color 40 and Color 1. Lay the strip flat vertically. Color 1 is at the top.
- Loop 2 (The Step): Take Loop 2. Unpick the seam between Color 1 and Color 2. Lay it flat next to the first strip. Color 2 is now at the top.
- The Visual: Notice how the entire color gradient has shifted up by one square!
- Continue the Wave: By choosing which seam to unpick, you control the design. Unpick progressively higher numbers to make the wave climb; unpick progressively lower numbers to make the wave dive. Pin them to your design wall to watch the waveform.

Step 5: Nesting and Assembly
Precision pinning creates the seamless flow.
- Pin Rows Together: Place Strip 1 and Strip 2 right sides together. Because you pressed all seams in the same direction in Step 2, one seam will point up, and the matching seam will point down. They will “nest” together perfectly.
- Pin Every Intersection: Pin at every single square intersection.
- Sew: Sew the long vertical strips together. The blocks will align to form smooth, sweeping curves across the quilt’s width.
Step 6: “Invisible Water” Quilting
Do not let the quilting distract from the piecing.
- Thread: Load your machine with Invisible Monofilament Thread in the top and a fine, matching 50wt cotton thread in the bobbin.
- The Stitch: Quilt smooth, rolling horizontal waves that follow the general flow of the color bands.
- Effect: The invisible thread sinks into the seams, providing the necessary structural stability (essential for a quilt with this many tiny seams) without adding a distracting grid or floral pattern over your masterpiece.
- Finish: Bind with the darkest color in your gradient (e.g., Sapphire) to frame the rolling waves sharply.
Usability Note: A Bargello quilt contains thousands of seams. It will feel much stiffer than a standard patchwork quilt before washing. To soften it for elegant, comfortable bedding, wash on a warm cycle with a cup of white vinegar, and tumble dry with wool dryer balls. The seams will soften and crinkle, turning the stiff fabric into a cozy, luxurious coverlet.
3. Classic Jelly Roll Race Quilt Patterns for Cozy Bed Covers
“The Heirloom Ribbon” Elevated Race Quilt
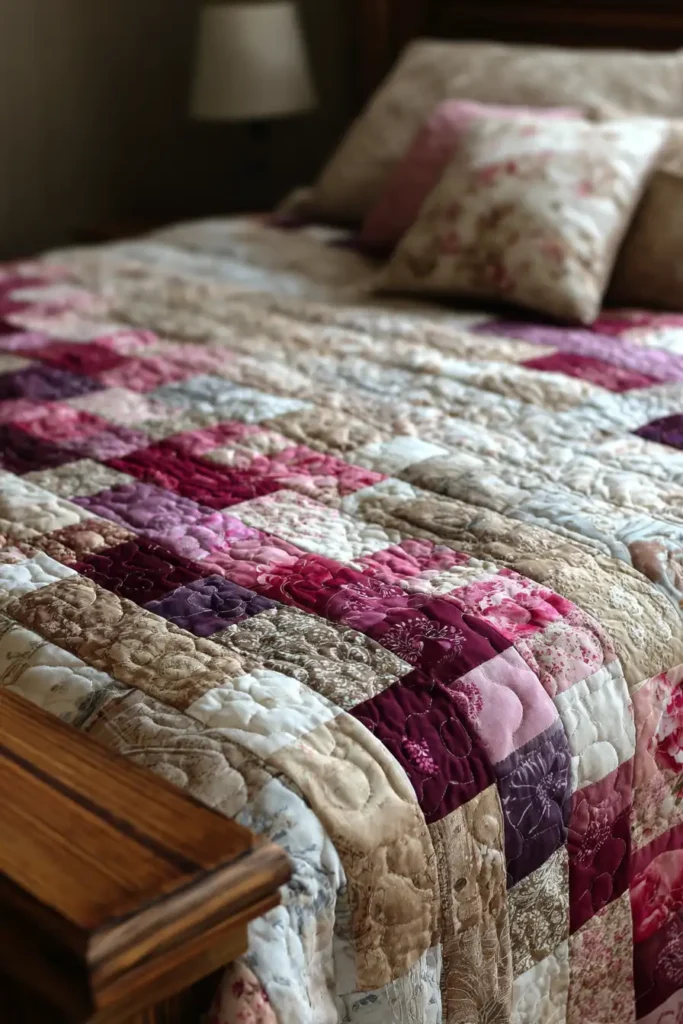
The traditional “Jelly Roll Race” is known for its fast pace and chaotic, scrappy appearance. However, with a few deliberate design tweaks, this lightning-fast technique can produce a deeply sophisticated textile. “The Heirloom Ribbon” elevates the classic race by introducing two elements: a strictly curated, tonal color palette (think shades of Sage, Linen, and Parchment) and a tiny, contrasting “Cornerstone” square inserted between every strip. This transforms a random jumble of fabric into a deliberate, rhythmic sequence that looks like a high-end woven blanket.
Finished Dimensions: Cozy Twin/Oversized Throw, 64″ x 75″. (Note: To make a Queen size, simply double the materials and repeat the final folding step one more time).
Materials Needed:
- The “Ribbon” (Strips): 1 standard Jelly Roll (40 strips measuring 2.5″ x 42″) in a sophisticated, low-contrast palette.
- The “Cornerstones”: 1/4 yard of a high-contrast solid fabric (e.g., Charcoal or Deep Navy).
- Backing: 4.5 yards of Minky, Cuddle Fleece, or high-quality Flannel.
- Why: A race quilt is structurally simple, making it the perfect candidate for an ultra-cozy, heavy backing. It turns the elegant top into a highly usable, deeply comforting bed cover for cold nights.
- Batting: Low-Loft Cotton. (If using Minky backing, keep the batting thin so the quilt doesn’t become too heavy for your home machine).
- Thread: 50wt cotton thread for piecing, 40wt for quilting.
- Notions: A rotary cutter, a large bobbin stash (you will sew continuously for a very long time).
Cultural Backstory: The “Jelly Roll Race” (sometimes called the “1600 Quilt” because it utilizes 1,600 inches of fabric) originated as a quilting guild challenge to see who could stitch a quilt top the fastest—often in under an hour. It democratized quilting, proving that you don’t need years of precision piecing experience to create a beautiful, functional blanket for your home.
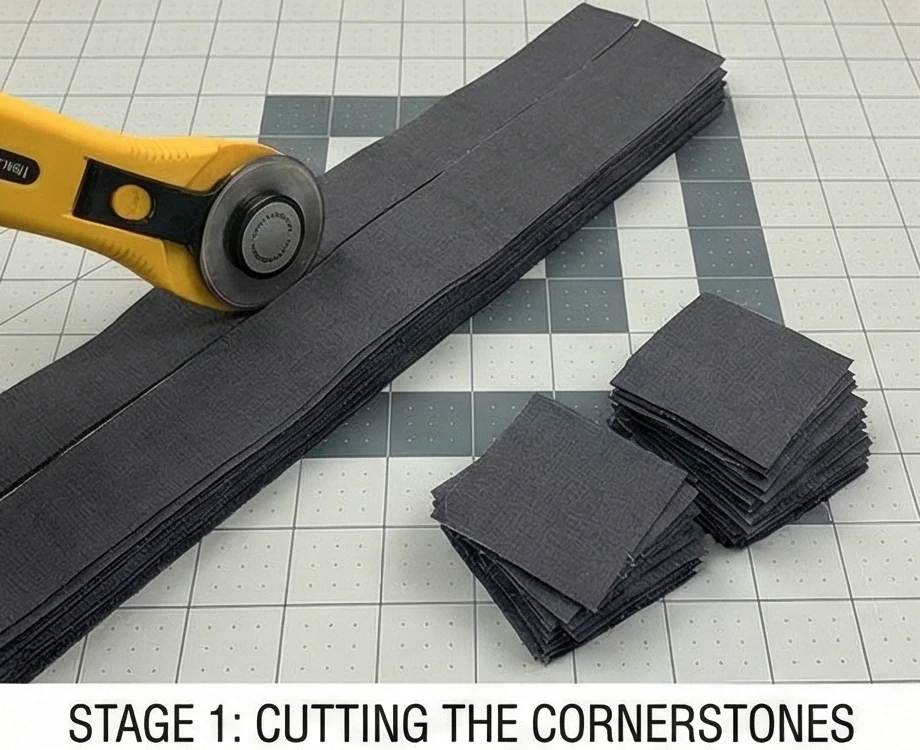
Step 1: Cutting the Cornerstones
This small detail is what makes the quilt look expensive and deliberate rather than chaotic.
- Cut Strips: Cut three 2.5-inch strips from your high-contrast solid yardage.
- Sub-Cut Squares: Sub-cut those strips into exactly forty 2.5″ x 2.5″ squares.
Step 2: The “Marathon Seam” (Creating the Mega-Strip)
You are going to create one continuous ribbon of fabric nearly 45 yards long.
- The Chain: Take your first Jelly Roll strip. Sew a 2.5″ Cornerstone square to the end of it (Right Sides Together).
- Add the Next: Sew the second Jelly Roll strip to the other side of that Cornerstone.
- Repeat: Continue this process: Strip -> Cornerstone -> Strip -> Cornerstone.
- Crucial Tip: Do not overthink the strip order! Just grab randomly from your curated roll. The beauty of the race is in the organic blending of the curated palette.
- Trim the Ends: Once all 40 strips and cornerstones are attached, trim 18 inches off the very beginning of the mega-strip. This keeps the seams from stretching, so your cornerstones don’t accidentally line up perfectly when folded.

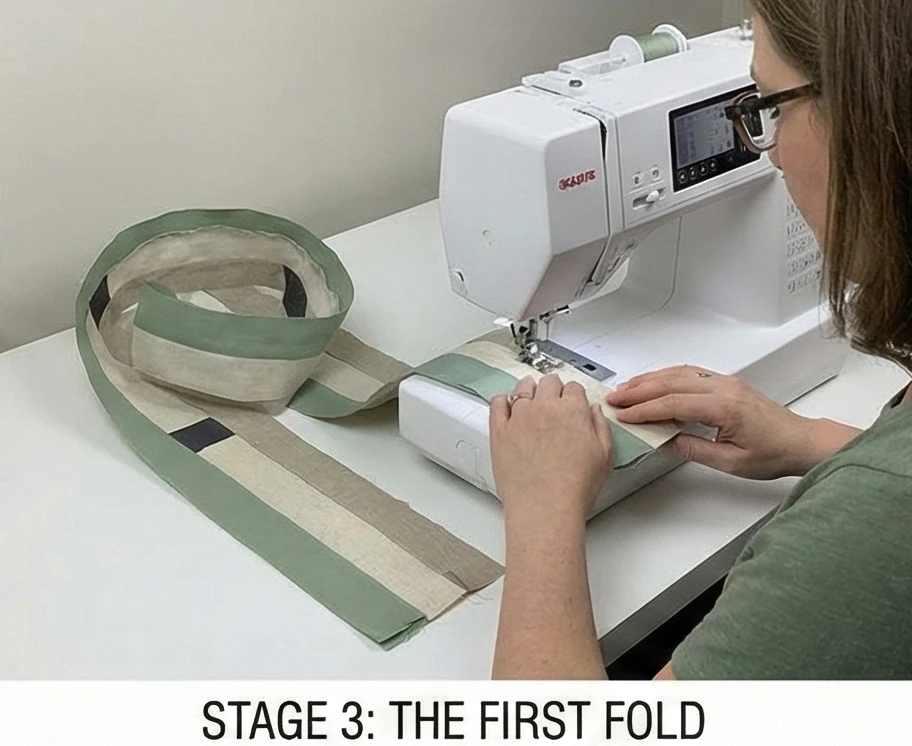
Step 3: The First Fold (The 800-Inch Dash)
The race begins here.
- Bring Ends Together: Take the very beginning of your mega-strip and bring it to the very end of your mega-strip, right sides together.
- Sew the Side: Start sewing down the long side, joining the two layers.
- The Loop: When you reach the end (the fold where the strip halves itself), simply take your scissors, snip the fold to separate them, and sew straight off the edge.
- Result: You now have a strip that is 2 fabric strips wide (about 4.5″ wide) and 800 inches long.
Step 4: Geometric Progression
Watch the quilt top magically appear.
- Fold 2: Bring the ends of your new, wider strip together (right sides facing). Sew down the long side. Snip the fold at the end. (You now have a piece 4 strips wide and 400 inches long).
- Fold 3: Repeat. (8 strips wide, 200 inches long).
- Fold 4: Repeat. (16 strips wide, 100 inches long).
- Fold 5: Repeat. (32 strips wide, 50 inches long).
- The Reveal: Open it up. You now have a completed quilt top featuring a staggered, brick-like pattern of horizontal stripes punctuated by chic, dark cornerstones.

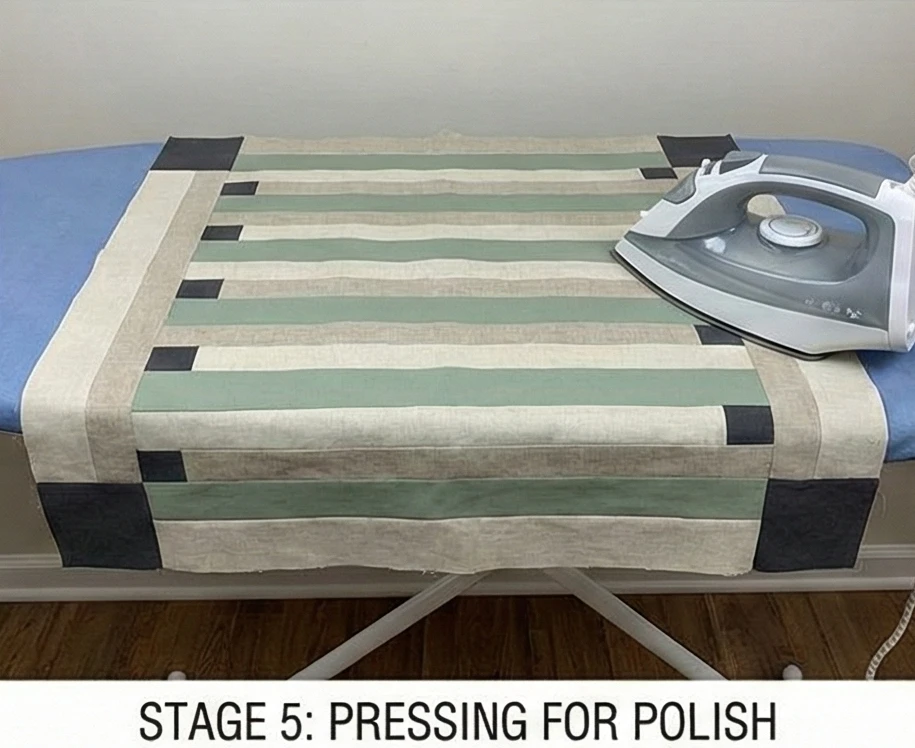
Step 5: Pressing for Polish
Because we sewed continuously, the seams are currently unruly.
- The Long Press: Lay the top on your ironing board. Press all the long horizontal seams in one direction.
- Why: Pressing standardizes the fabric, removes the puckers from the “speed sewing,” and gives the piece the crisp, tailored look required for an elegant bed cover.
Step 6: “Edge-to-Edge” Wavy Quilting
Keep it soft and usable.
- Baste: Baste your Top, Cotton Batting, and cozy Flannel/Minky backing together.
- The Quilting: Set your machine to a wide, elongated zigzag or a serpentine stitch. Quilt gentle, undulating waves vertically down the quilt (perpendicular to your pieced stripes).
- Effect: The vertical waves soften the rigid horizontal geometry of the jelly roll strips. Because the quilting lines are organic and widely spaced (about 2 inches apart), the quilt remains highly drapable and soft, avoiding the stiff “cardboard” feel of over-quilted pieces.

Usability Note: If you are using a plush backing like Minky or Cuddle, be aware that it stretches significantly. Use twice as many basting pins as you normally would, and always use a Walking Foot on your sewing machine to feed the slippery backing and the cotton top through the machine at the same rate.
4. Cozy Log Cabin Jelly Roll Quilts for Inviting Guest Rooms
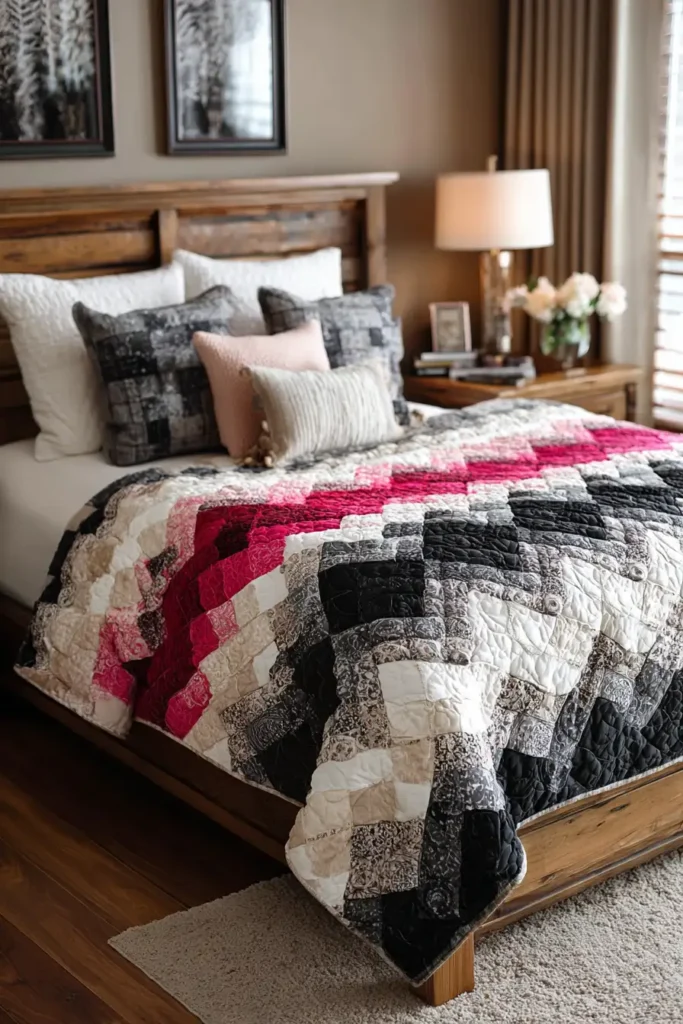
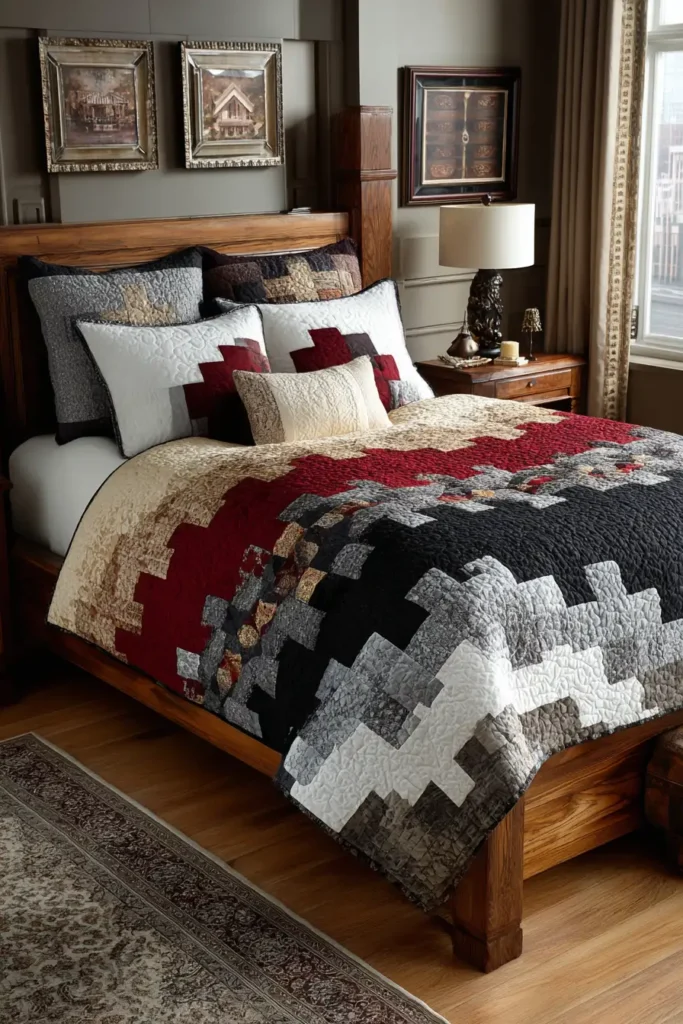
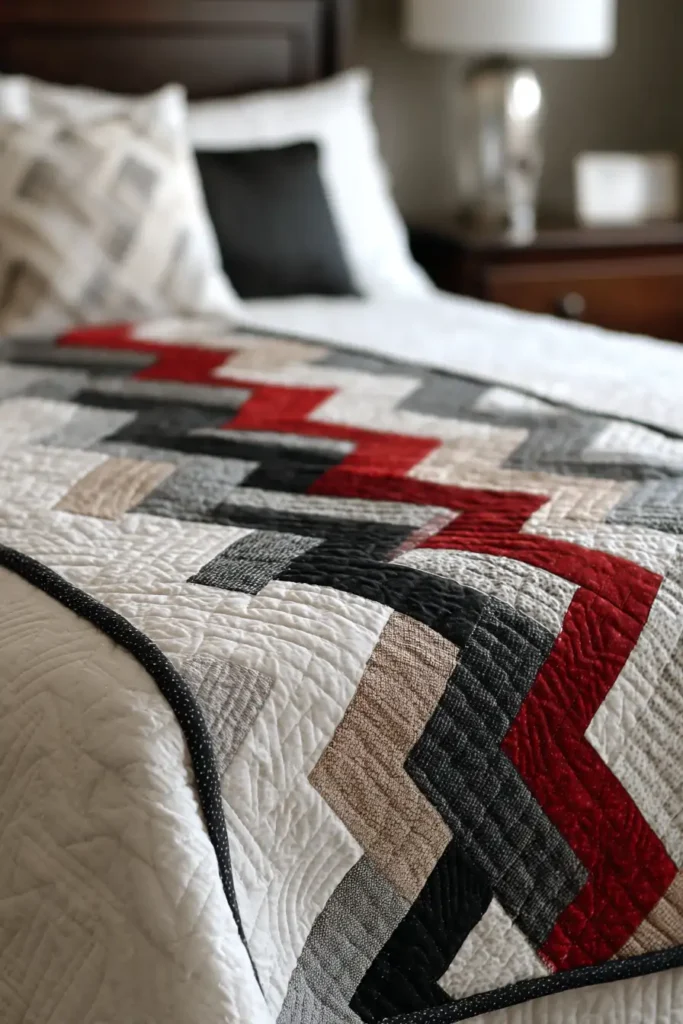
“The Crimson Hearth” Courthouse Steps Strip Quilt
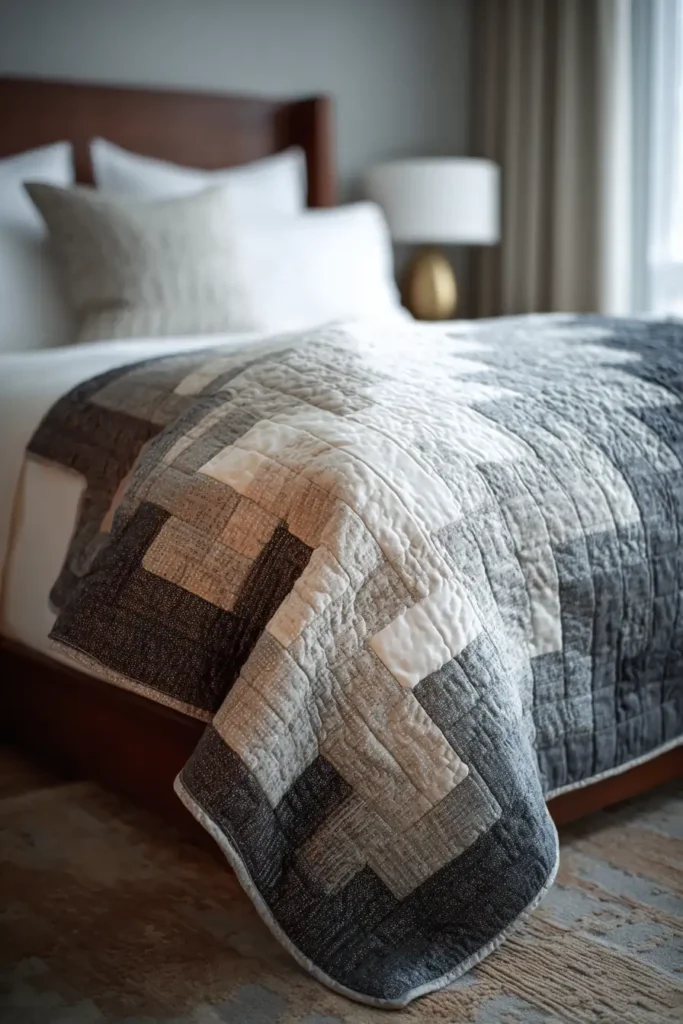
A guest room should feel instantly welcoming, wrapping visitors in warmth while maintaining the tailored elegance of a boutique hotel. To achieve this, we turn to the Courthouse Steps, a highly geometric and formal variation of the traditional Log Cabin block. Rather than spiraling around the center, the strips are added to opposite sides in pairs. Rendered in a striking, high-contrast palette of crisp Black and White, warmed by soft neutral Greige or Taupe, and anchored by a Deep Red center, this quilt is both architecturally striking and deeply comforting. Because it uses pre-cut 2.5-inch Jelly Roll strips, the complex-looking blocks come together surprisingly quickly.
Finished Dimensions: Generous Full/Queen Coverlet, 84″ x 84″.
Materials Needed:
- The “Logs” (Strips): 2 standard Jelly Rolls (approx. 80 strips measuring 2.5″ x 42″).
- Color Strategy: Ensure half the strips are “Lights” (White, Cream, Greige) and half are “Darks” (Black, Charcoal, Deep Taupe).
- The “Hearth” (Center): 1/4 yard of a solid Deep Red or Crimson.
- Backing: 7.5 yards of high-quality Cotton Percale (crisp and breathable for guests).
- Batting: Wool or a Bamboo/Cotton Blend.
- Why: Wool and bamboo offer superior temperature regulation. Guests have varying sleep preferences; these breathable battings ensure the quilt is warm in winter but comfortably cool in summer, preventing the dreaded “stifling” feeling of synthetic bedding.
- Thread: 50wt neutral cotton thread (Grey blends well with both the darks and lights).
- Notions: A large square ruler (at least 14.5″), rotary cutter, and spray starch.
Cultural Backstory: The Log Cabin block emerged in the United States during the mid-19th century. Traditionally, the red center square represented the hearth—the warm, beating heart of the home—while the light strips represented the sunlit side of the cabin, and the dark strips represented the fire’s shadow. The “Courthouse Steps” variation, with its mirrored, stepped concentric squares, gained popularity shortly after, reflecting the stately architecture of civic buildings and offering a more formal, ordered aesthetic.
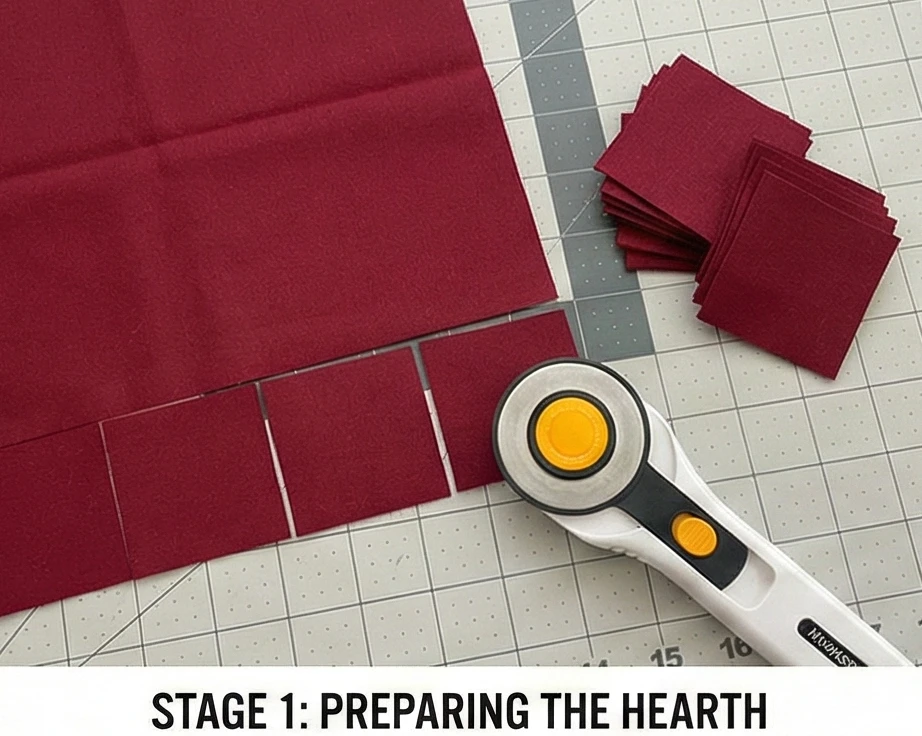
Step 1: Preparing the Hearth
Every cabin starts with the fire.
- Starch: Heavily starch your Deep Red yardage before cutting. This prevents the center squares from stretching, which is crucial for keeping the rest of the block square.
- Cut: Sub-cut the yardage into thirty-six 2.5″ x 2.5″ squares. These will form the center of each of your 36 blocks.
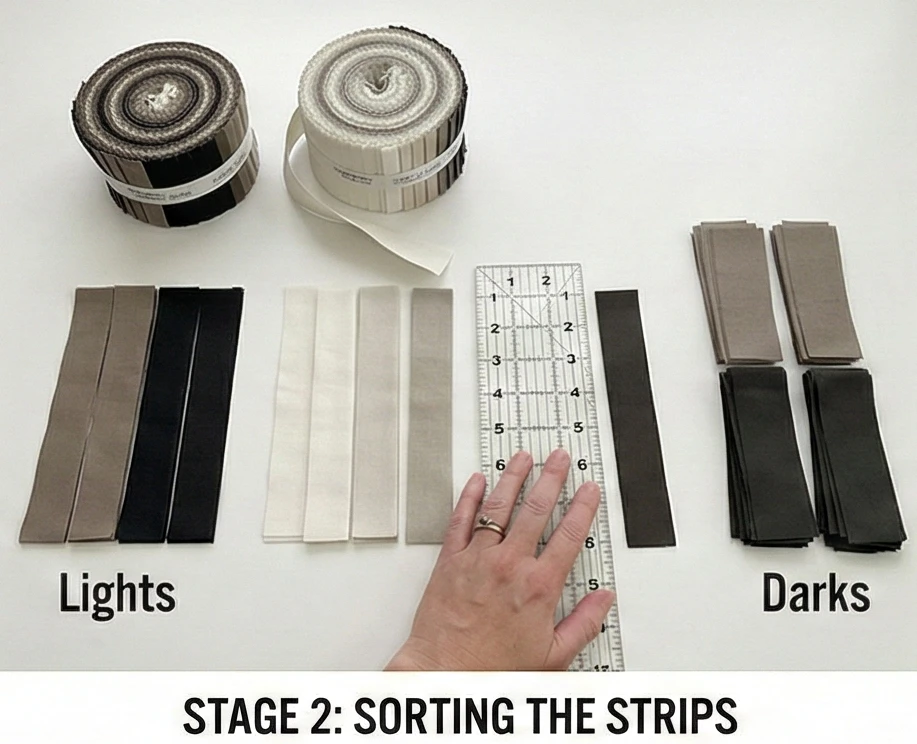
Step 2: Sorting the Strips
Organization is the secret to a fast Jelly Roll quilt.
- Separate by Value: Unroll your Jelly Rolls. Create a “Light Pile” (whites, creams, light greige) and a “Dark Pile” (blacks, charcoals, dark taupes).
- Sub-Cut the First Rounds: To save time, cut a handful of strips from both piles into shorter starting lengths.
- Cut a few strips into 2.5″ lengths.
- Cut a few strips into 6.5″ lengths. (You will measure and cut the longer outer logs as you sew to accommodate slight variations in seam allowances).
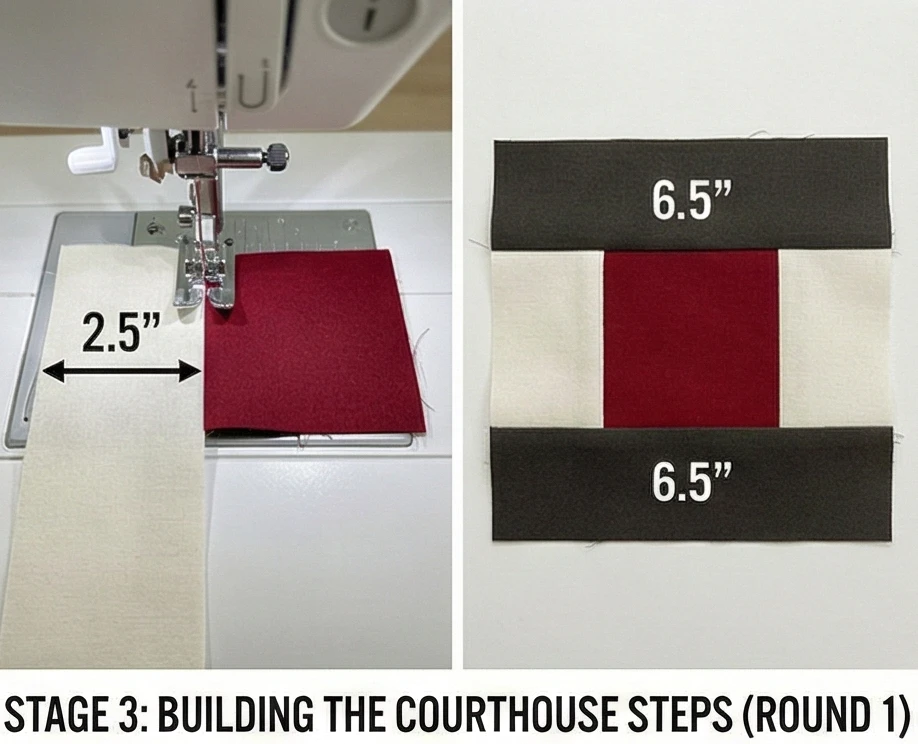
Step 3: Building the Courthouse Steps (Round 1)
Unlike a standard Log Cabin, we work in mirrored pairs.
- The Light Steps (Sides): Take a Red center square. Sew a 2.5″ Light strip to the Left side. Press the seam outward. Sew another 2.5″ Light strip to the Right side. Press outward.
- Result: You now have a rectangle measuring 2.5″ x 6.5″.
- The Dark Steps (Top & Bottom): Sew a 6.5″ Dark strip to the Top of the unit. Press outward. Sew another 6.5″ Dark strip to the Bottom. Press outward.
- Result: Your center square is now perfectly framed, measuring 6.5″ x 6.5″.
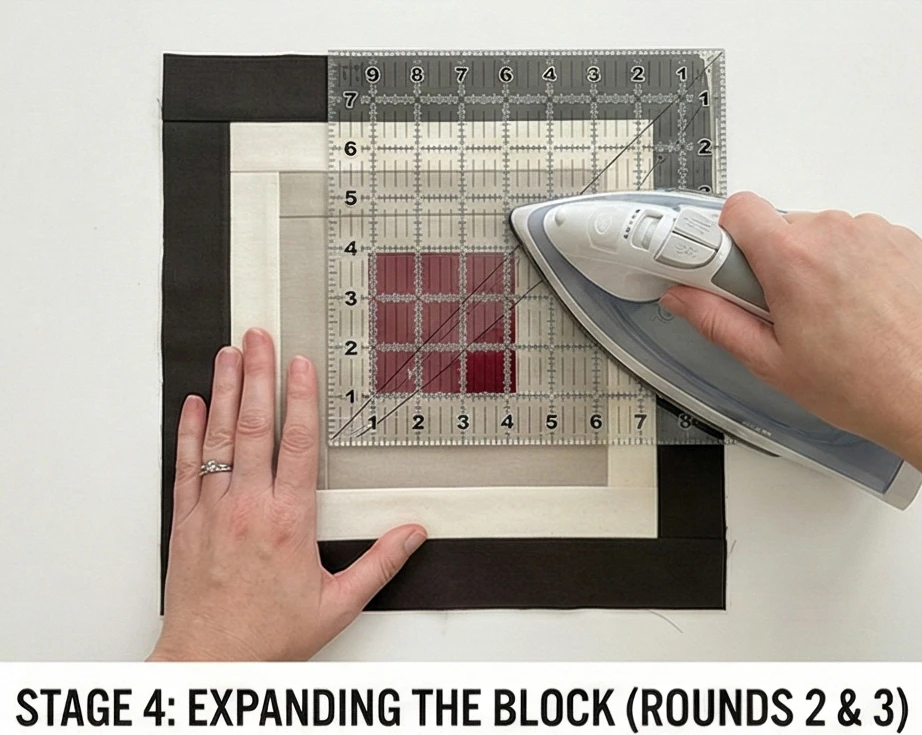
Step 4: Expanding the Block (Rounds 2 & 3)
The geometric rhythm takes over.
- Round 2: * Measure the height of your block (it should be 6.5″). Cut two Light strips to this length. Sew them to the Left and Right sides. Press.
- Measure the new width of your block (it should be 10.5″). Cut two Dark strips to this length. Sew them to the Top and Bottom. Press.
- Round 3:
- Repeat the process. Add Light strips to the Left/Right and Dark strips to the Top/Bottom.
- Finish: Square up the finished block to exactly 14.5″ x 14.5″. You will make 36 blocks total.
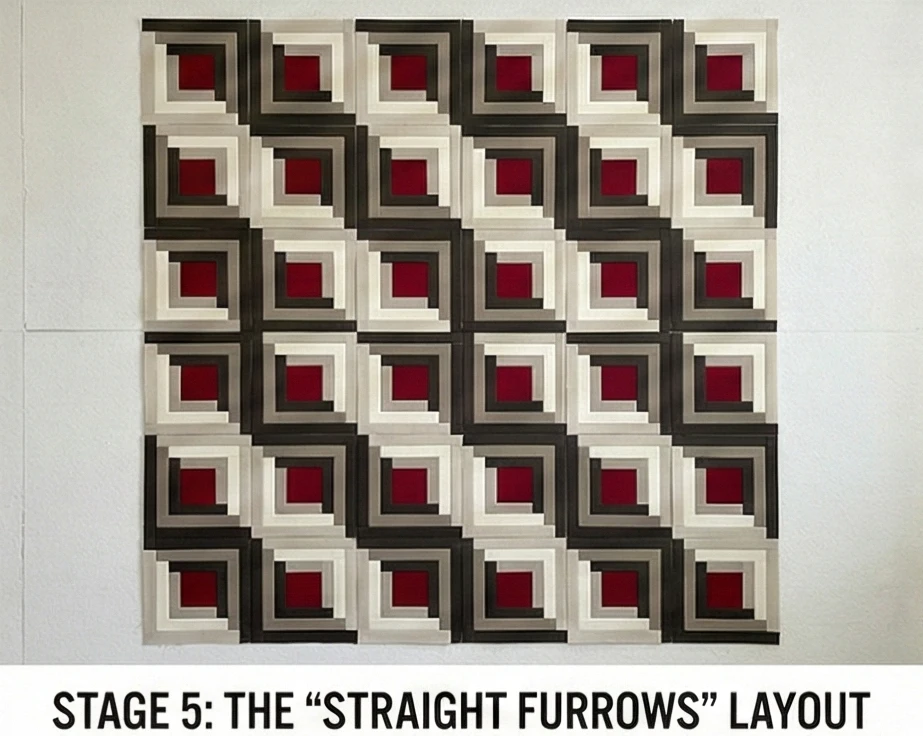
Step 5: The “Straight Furrows” Layout
How you rotate the blocks changes the entire quilt.
- The Layout: For a modern, elegant look, use the “Straight Furrows” setting. Arrange the blocks in a 6 x 6 grid so that the Dark steps all form continuous diagonal lines across the bed.
- The Visual: This layout creates striking, dark “staircases” that draw the eye, while the warm greige and white lights create broad, calming negative spaces. It appears highly complex but is achieved entirely through block rotation.
- Assemble: Sew the blocks into 6 horizontal rows. Press the seams of Row 1 to the left, and Row 2 to the right, so they “nest” perfectly when you join the rows together.
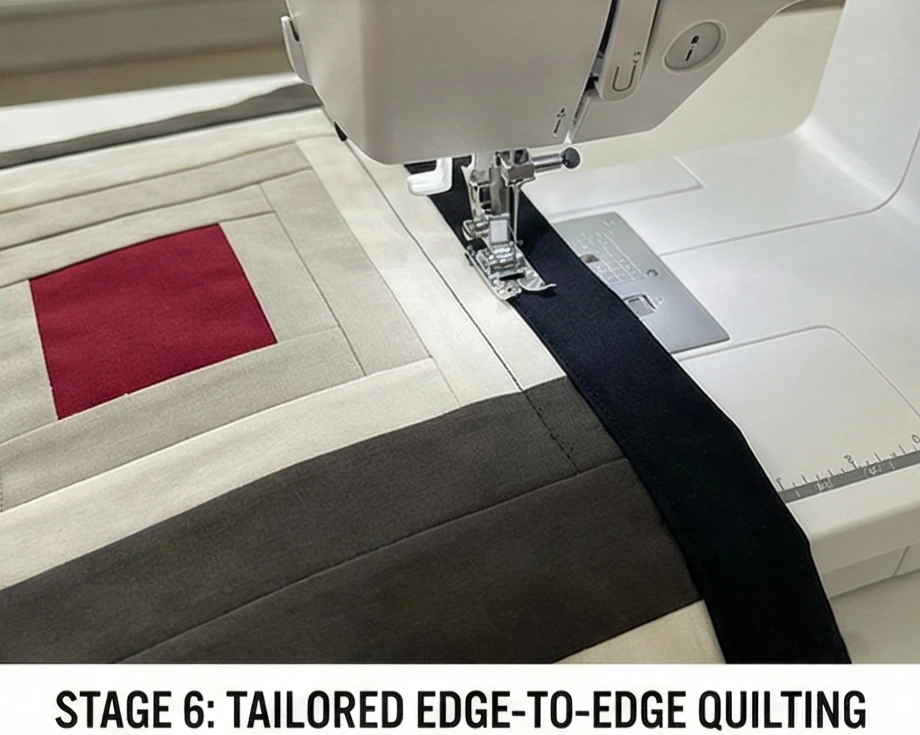
Step 6: Tailored Edge-to-Edge Quilting
A formal block requires tailored finishing.
- Baste: Sandwich the top, your wool or bamboo batting, and the percale backing.
- Stitch-in-the-Ditch (Optional but Recommended): To highlight the architectural nature of the Courthouse Steps, use a walking foot to quilt straight lines right inside the seams where the Light strips meet the Dark strips.
- Edge Finish: Bind the quilt using a solid Black fabric. This acts as a sharp, sophisticated frame, containing the dynamic geometry of the blocks and giving the quilt a polished, high-end hotel finish.
Usability Note: Guest room quilts are washed more frequently than others. Because Jelly Roll strips feature pinked (zigzag) edges, it is vital to use an exact scant 1/4-inch seam allowance. If your seams are too narrow, the raw edges can fray and pop open during heavy laundering. Check your seam allowance on a scrap piece before beginning the main blocks!
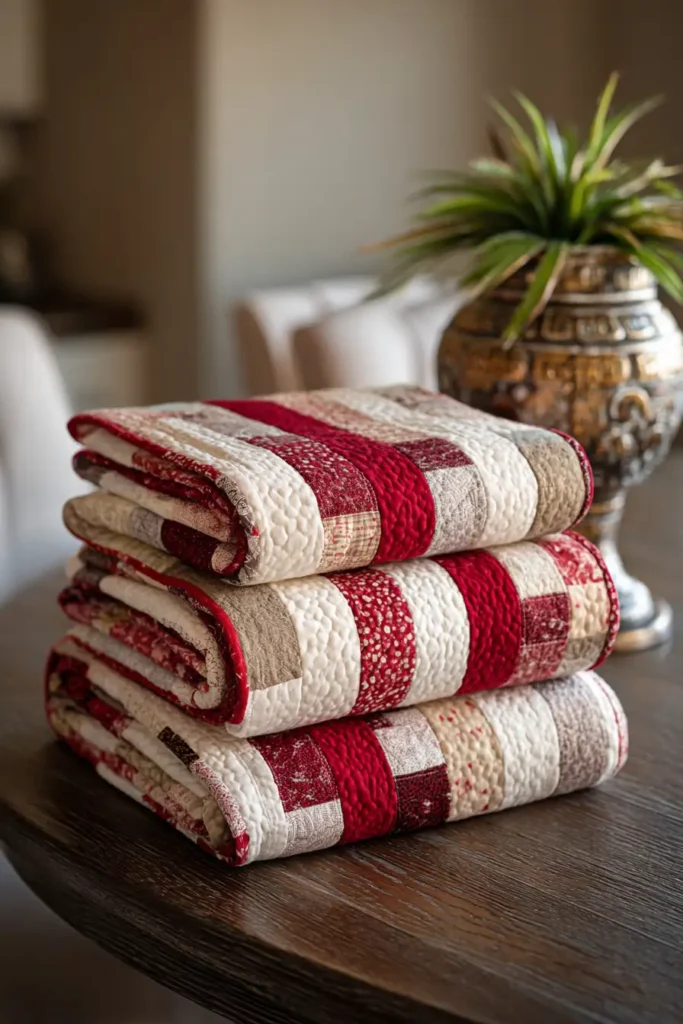
5. Sophisticated Striped Jelly Roll Bed Runners for a Layered Look
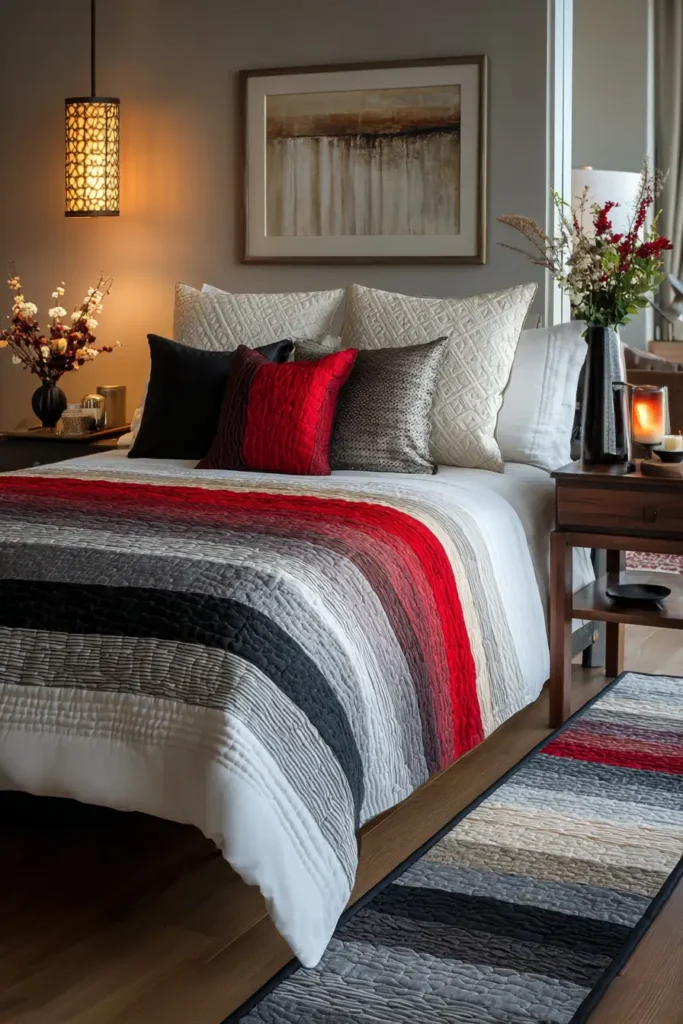
“The Gradient Horizon” Ombre Striped Bed Runner
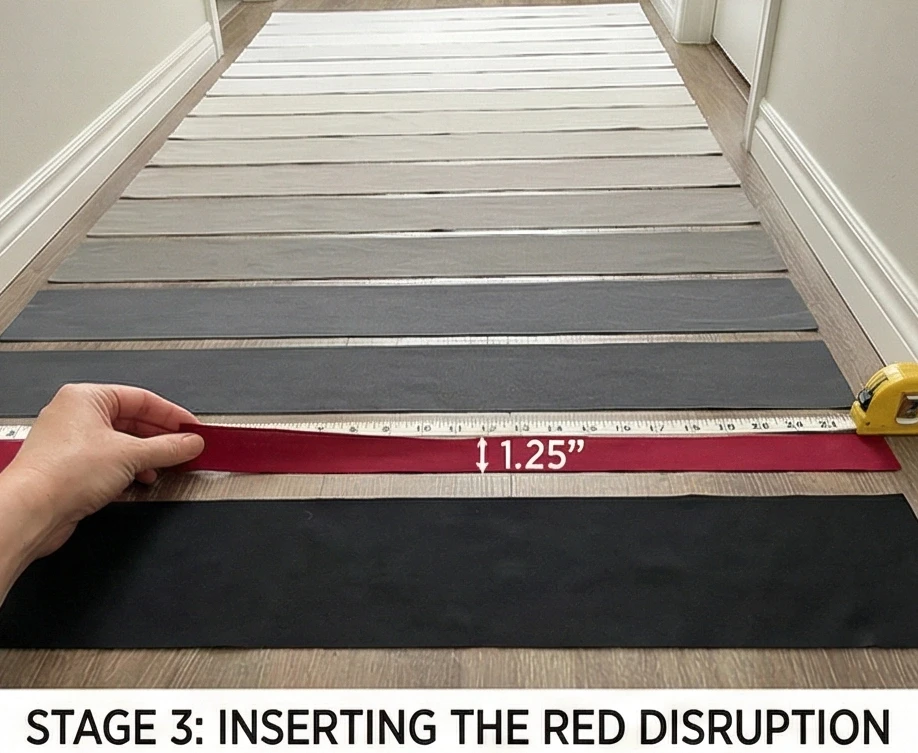
The bed runner is the ultimate interior design secret for achieving a layered, boutique-hotel aesthetic without the bulk of a secondary duvet. Arranging Jelly Roll strips in a strict Ombré Gradient—transitioning seamlessly from crisp White through neutral Greige, down to deep Charcoal and solid Black—creates a highly sophisticated visual anchor at the foot of the bed. To elevate this from a simple color fade to a striking geometric statement, insert a single, razor-thin Deep Red accent stripe near the darkest edge to create a high-contrast disruption.
Finished Dimensions: King/Queen Bed Runner, 24″ x 90″.
Materials Needed:
- The Gradient (Strips): About 30 strips from a Black/White/Grey Jelly Roll.
- The Disruption (Accent): 1/4 yard of a solid Deep Red fabric.
- Backing: 2.5 yards of high-quality Black or Greige cotton sateen.
- Batting: Wool or Bamboo Batting.
- Why: Runners sit at the foot of the bed where a heavy drape is paramount. Wool and bamboo are dense yet incredibly fluid, allowing the runner to fold beautifully over the mattress corners rather than sticking out rigidly, as polyester would. They are also highly breathable and cozy if a guest pulls them up over their feet at night.
- Thread: 50wt cotton thread in an invisible grey.
- Notions: A large acrylic ruler, plenty of glass-head pins.
Cultural Backstory: The bed runner (historically known as a “bed scarf”) originated in luxury European hotels as a highly functional textile designed to protect pristine white duvet covers from luggage wheels and shoes. Today, it has evolved into a purely aesthetic layering tool in home design, breaking up large, monolithic expanses of bedding and adding a tailored, architectural element to the room.
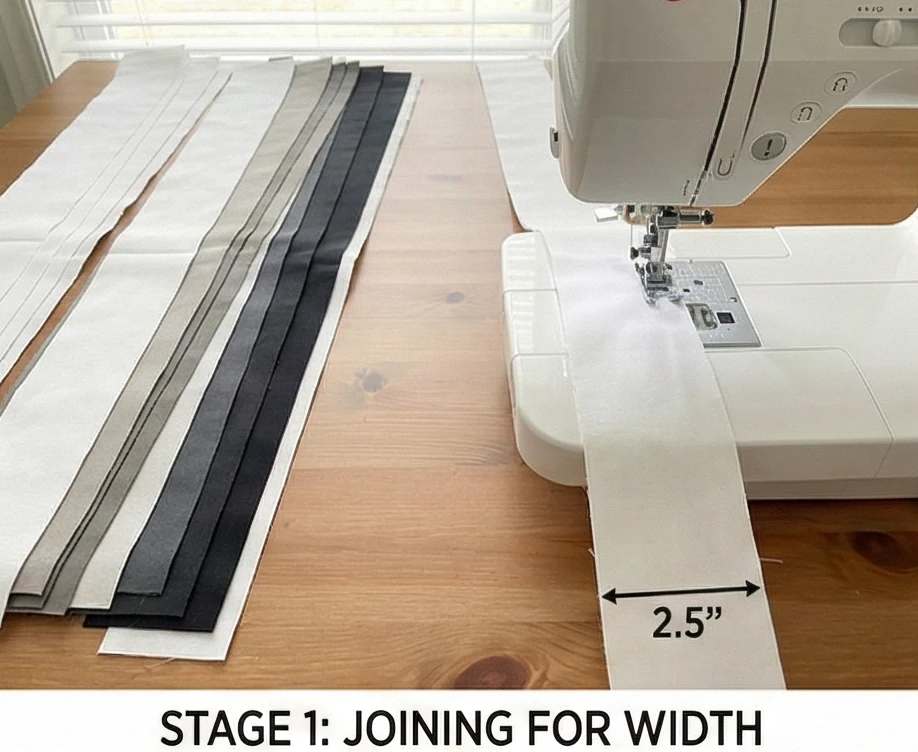
Step 1: Joining for Width (The 90-Inch Span)
Standard Jelly Roll strips are only 42 inches long; a bed runner requires horizontal length.
- Select the Colors: Choose 10 distinct values from your Jelly Roll (2 Whites, 3 Greiges, 3 Charcoals, 2 Blacks). You will need roughly three 42-inch strips of each color.
- End-to-End Piecing: Take the three strips of your first color (e.g., White). Sew them short-end to short-end to create one massive strip that is 120 inches long.
- Press and Repeat: Press the joining seams open to reduce bulk. Repeat this process for all 10 color values.
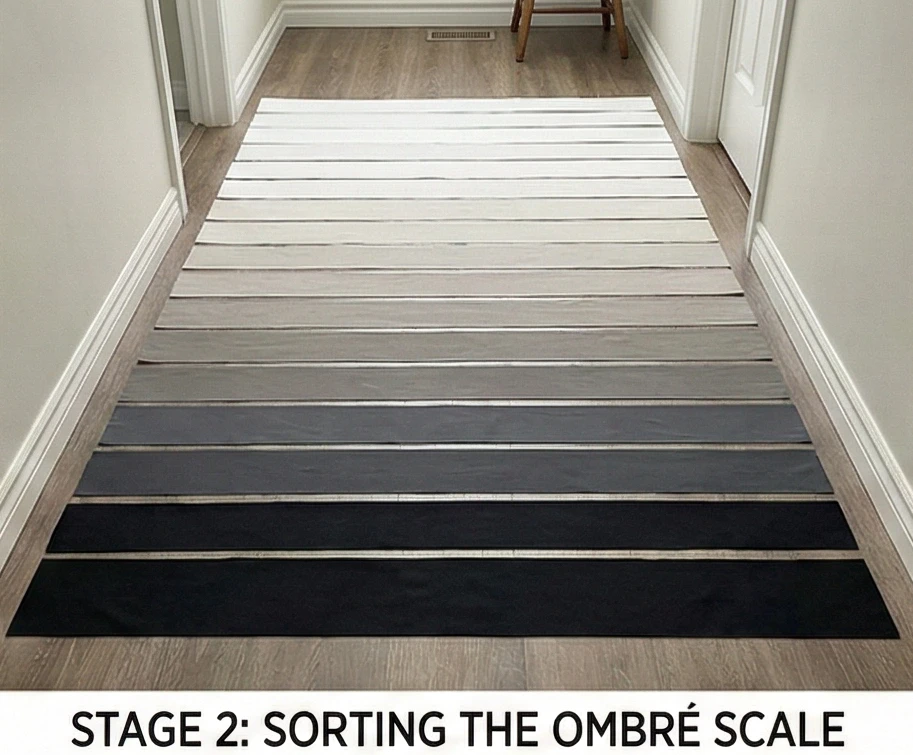
Step 2: Sorting the Ombré Scale
The gradient must be flawless.
- The Layout: Lay the extra-long strips horizontally on the floor. Arrange them meticulously from the lightest White at the top, through the mid-tone Greiges and Charcoals, to the solid Blacks at the bottom.
- Verify Contrast: Stand back or take a black-and-white photo with your phone to ensure the transition is smooth and no dark strips are accidentally mixed into the light section.
Step 3: Inserting the Red Disruption
This thin line provides the modern, high-contrast edge.
- Cut the Accent: Cut a narrow strip from your solid Deep Red yardage measuring 1.25″ wide by 100″ long (you will need to piece it end-to-end to reach this length).
- Placement: Insert this red strip directly above your final, darkest Black strip. Because it is cut narrower than the 2.5″ Jelly Roll strips, it will finish at a razor-thin 3/4-inch width, creating a sharp boundary line.
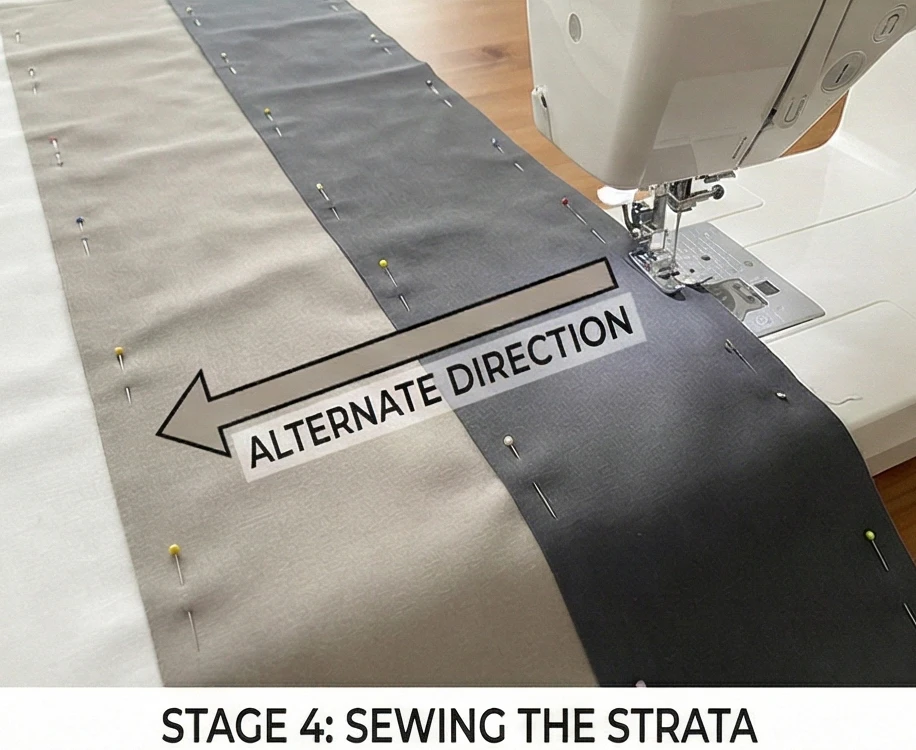
Step 4: Sewing the Strata
Sewing 90-inch seams requires structural care.
- Pinning: Pin the horizontal edges of the strips together generously.
- Alternate Directions: Sew the first two strips together from left to right. When adding the third strip, flip the panel and sew from right to left.
- Crucial Technique: If you sew every single seam in the same direction, the 90-inch panel will inevitably warp and bow into a banana shape. Alternating directions keeps the tension perfectly straight.
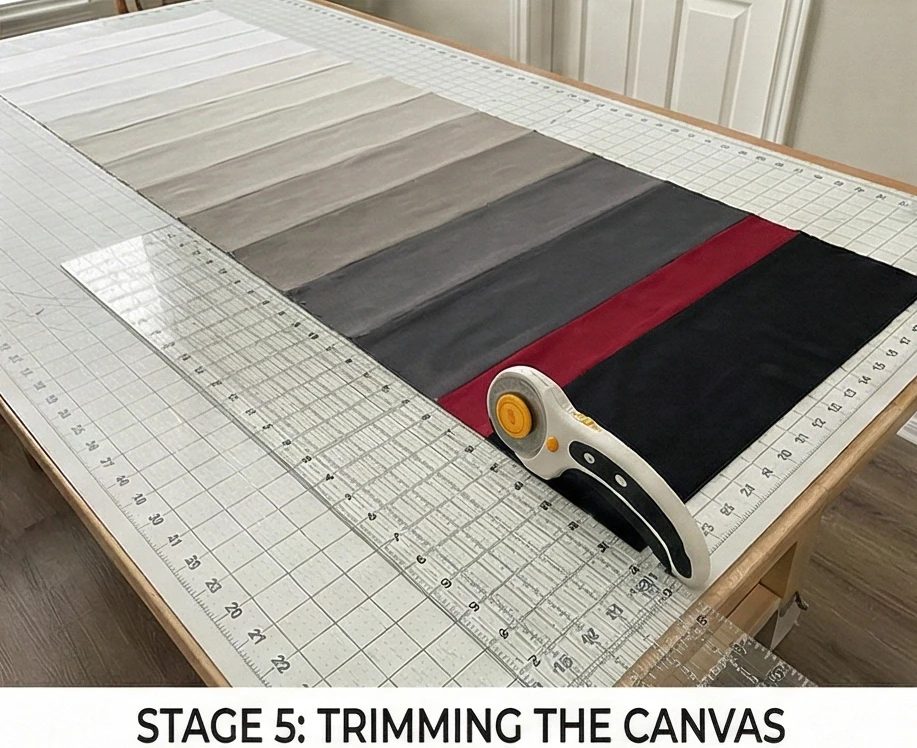
Step 5: Trimming the Canvas
Squaring up long panels.
- Press: Press all long seams in one direction (ideally toward the dark Black edge).
- Trim: The horizontal panel will have uneven, staggered short ends from the piecing process. Use a large square ruler to trim the left and right sides perfectly flush, resulting in a crisp, exact 24″ x 90″ rectangle.
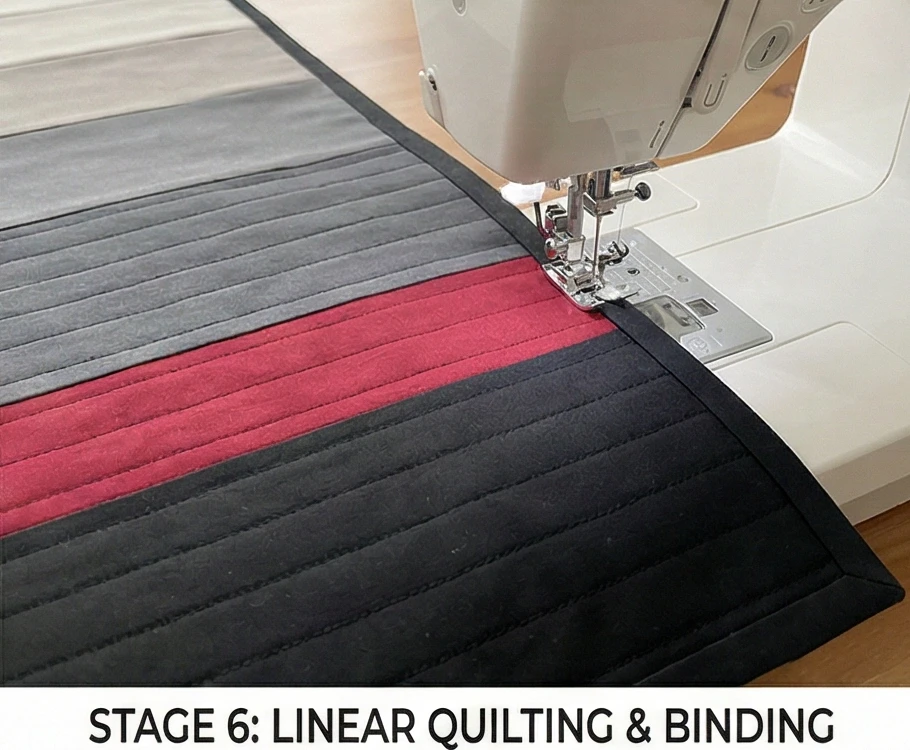
Step 6: Linear Quilting & Binding
Quilting should emphasize the architectural width.
- Baste: Sandwich the top, your wool/bamboo batting, and the backing fabric.
- Channel Quilting: Using a walking foot, quilt straight horizontal lines spanning the entire 90-inch width. Stitch a line 1/4 inch above and below every single seam. This flattens the seams beautifully and gives the runner a heavy, ribbed texture.
- The Frame: Bind the runner using the darkest Black fabric to sharply frame the piece and contain the high-contrast aesthetic.
Usability Note: Bed runners are the secret weapon for frequently used guest rooms. Because they sit at the foot of the bed, they absorb the brunt of daily wear (suitcases, sitting, pets). Washing a 24″ x 90″ runner is infinitely easier and faster than laundering a heavy King-sized quilt, keeping your guest bed pristine with minimal effort.
6. Chic Chevron Pattern Pillow Shams from Jelly Roll Strips
“The Apex Angle” Geometric Chevron Sham
The Chevron is a powerful geometric motif that instantly injects modern energy into a space. While piecing individual triangles can be tedious, utilizing pre-cut Jelly Roll strips makes creating these sharp, undulating peaks surprisingly fast. The “The Apex Angle” pillow sham features a high-contrast, sophisticated palette of crisp White, deep Black, and warm Greige, interrupted by a single, striking band of Deep Red. This creates a tailored graphic accent that completes a well-appointed guest bed, offering both visual impact and deep comfort.
Finished Dimensions: Standard Pillow Sham, 20″ x 26″ (Make two for a complete set).
Materials Needed (For Two Shams):
- The “Angles” (Strips): 16 Jelly Roll strips (2.5″ x 42″) in Black, White, and Greige, plus 2 strips of Deep Red.
- Backing & Envelope Back: 1.5 yards of high-quality White Cotton Percale.
- Batting: Bamboo/Cotton Blend.
- Why: Shams rest directly beneath or behind the sleeper’s head. Bamboo batting is exceptionally breathable and naturally temperature-regulating, ensuring the pillow remains cool to the touch rather than trapping body heat.
- Thread: 50wt cotton thread in a neutral Greige.
- Notions: An acrylic ruler with a 45-degree angle line, a rotary cutter.
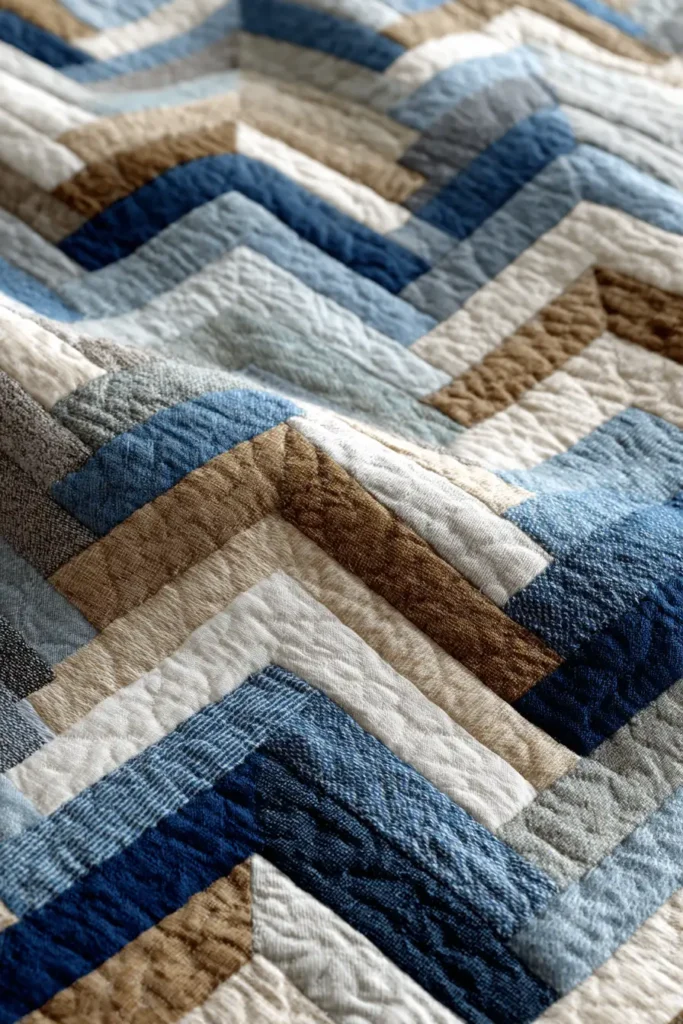
Cultural Backstory: It is a common misconception that Chevron and Herringbone are the same pattern. While Herringbone features a staggered, broken zig-zag (like the bones of a fish), a true Chevron features a continuous, unbroken “V” shape where the seams meet perfectly in the center. Traced back to ancient Greek pottery and medieval heraldry, the Chevron has always symbolized structure, architecture, and forward movement.
Step 1: Sorting and Pairing the Strips
Contrast is what makes the Chevron visible.
- Create the Sequence: Group your strips into sets of four. To make the pattern pop, alternate light and dark values strictly.
- The Master Set: Create an order that you will repeat. For example: Strip 1 (White) -> Strip 2 (Black) -> Strip 3 (Greige) -> Strip 4 (Deep Red).
- Prepare for Sewing: Lay out four identical sets of these four strips.
Step 2: Sewing the “Strata”
We build horizontal panels before cutting the angles.
- Pin and Sew: Sew your first set of four strips together along their long edges, maintaining a perfect 1/4-inch seam allowance.
- Alternate Direction: Remember to sew Strip 1 to 2 going left-to-right, and Strip 2 to 3 going right-to-left to prevent the panel from bowing.
- Pressing: Press all seams in the same direction (e.g., toward the Black/Red strips). You now have a striped panel measuring 8.5″ wide by 42″ long. Repeat to make four identical panels.
Step 3: The 45-Degree Magic Cut
This transforms straight stripes into dynamic angles.
- Align the Ruler: Lay a striped panel flat. Find the 45-degree line on your acrylic ruler. Place that line directly over one of the horizontal seams in your panel.
- The First Cut: Trim the rough left edge off the panel at this 45-degree angle.
- Sub-Cutting Blocks: Now, measure exactly 8.5 inches over from that newly cut angled edge. Make your next parallel cut. You will produce a diamond-shaped block made of diagonal stripes.
- Repeat: Cut as many 8.5″ diamond blocks as you can from all four panels. (You will need 12 blocks per sham).
Step 4: Designing the Zig-Zag
Flipping the blocks creates the apex.
- The Left Side: Take one block. The diagonal stripes should be pointing up and to the right.
- The Right Side: Take a second block. Rotate it so the diagonal stripes are pointing up and to the left.
- The “V”: Place them side-by-side. The stripes will meet exactly in the middle, forming a downward “V” or an upward peak.
- Layout the Sham: Arrange your blocks into 3 rows of 4 blocks each to create continuous, undulating zig-zags.
Step 5: Joining the Intersections
Precision pinning guarantees sharp points.
- Pin the Peaks: When sewing the left block to the right block, the horizontal seams of the Black and Red stripes must match exactly at the center.
- The Nest: Push a pin straight down through the intersection. Because you pressed your seams in Step 2, they should “nest” securely against one another.
- Sew Rows: Stitch the blocks into pairs, then into full horizontal rows, and finally join the rows together to complete the 20.5″ x 26.5″ top.
Step 6: “Echo” Quilting and the Envelope Finish
A tailored edge completes the look.
- Baste and Quilt: Sandwich your pieced top, bamboo batting, and a scrap of muslin (for the inside). Quilt straight lines that echo the “V” shapes of the Chevron, stitching 1/4 inch away from the seams. This reinforces the geometry.
- Prepare the Back: Cut two pieces of White Percale for the envelope back (e.g., 20.5″ x 18″ and 20.5″ x 14″). Hem one long edge of each piece.
- Assemble: Place the quilted top Right Side Up. Place the backing pieces Right Side Down, ensuring the hemmed edges overlap by a few inches in the center.
- Sew and Turn: Stitch a 1/4-inch seam around the entire perimeter. Clip the corners to reduce bulk, and turn the sham right side out through the envelope opening. Insert a plump pillow to reveal the crisp, striking design.
Usability Note: Pillow shams are more susceptible to physical abuse than standard decorative pillows. To ensure longevity, backstitch securely over the envelope’s overlapping edges during the final assembly (Step 6). This prevents the seams from tearing when a guest wrestles a thick pillow insert into the sham.
7. Minimalist Monochrome Jelly Roll Quilts for Serene Sleep Sanctuaries

“The Midnight Geese” Minimalist Monochrome Quilt
A serene sleep sanctuary requires visual calm. Stripping away chaotic prints in favor of a strict, high-contrast monochromatic palette—crisp White, deep Black, and soft, grounding Greige—creates an environment of sophisticated tranquility. “The Midnight Geese” utilizes the classic geometric Flying Geese block, but abstracts it by floating single columns of striking black triangles within vast expanses of negative space. By constructing the entire quilt from pre-cut 2.5-inch Jelly Roll strips, the sharp, architectural angles come together with rhythmic precision.
Finished Dimensions: Queen Size Coverlet, 88″ x 92″.
Materials Needed:
- The “Geese” (Dark Strips): 1 Jelly Roll (or 20 strips) of solid Black and Charcoal.
- The “Sky” & Negative Space (Light Strips): 3 Jelly Rolls (approx. 120 strips) of solid White and subtle Greige.
- Backing: 8 yards of high-thread-count White Percale or Sateen.
- Batting: Wool or a Bamboo/Cotton Blend.
- Why: For a quilt that is both visually striking and highly usable, breathability is paramount. Wool and bamboo provide incredible coziness without trapping body heat, ensuring the quilt drapes elegantly and regulates temperature throughout the night.
- Thread: 50wt Light Grey cotton thread (blends seamlessly across high-contrast seams).
- Notions: A rotary cutter, a small square ruler (at least 4.5″), and a water-soluble marking pen.
Cultural Backstory: The Flying Geese block is one of the oldest and most versatile geometric patterns in North American quilting. While folklore often associates the directional triangles with the Underground Railroad—acting as subtle compasses pointing north to freedom—in contemporary design, the repeating triangles represent forward momentum, architectural structure, and the minimalist beauty of a migrating flock against an open sky.
Step 1: Sub-Cutting the Strips
Jelly Rolls do the heavy lifting for the math.
- The Geese Bodies (Dark): Take your Black and Charcoal strips. Cut them into rectangles measuring 2.5″ x 4.5″. You will need exactly 160 rectangles.
- The Sky Corners (Light): Take a portion of your White and Greige strips. Cut them into perfect 2.5″ x 2.5″ squares. You will need 320 squares (two for every goose).
- The Negative Space: Leave the remaining White/Greige strips completely intact (2.5″ x 42″). These will form the calming vertical voids between your flocks.
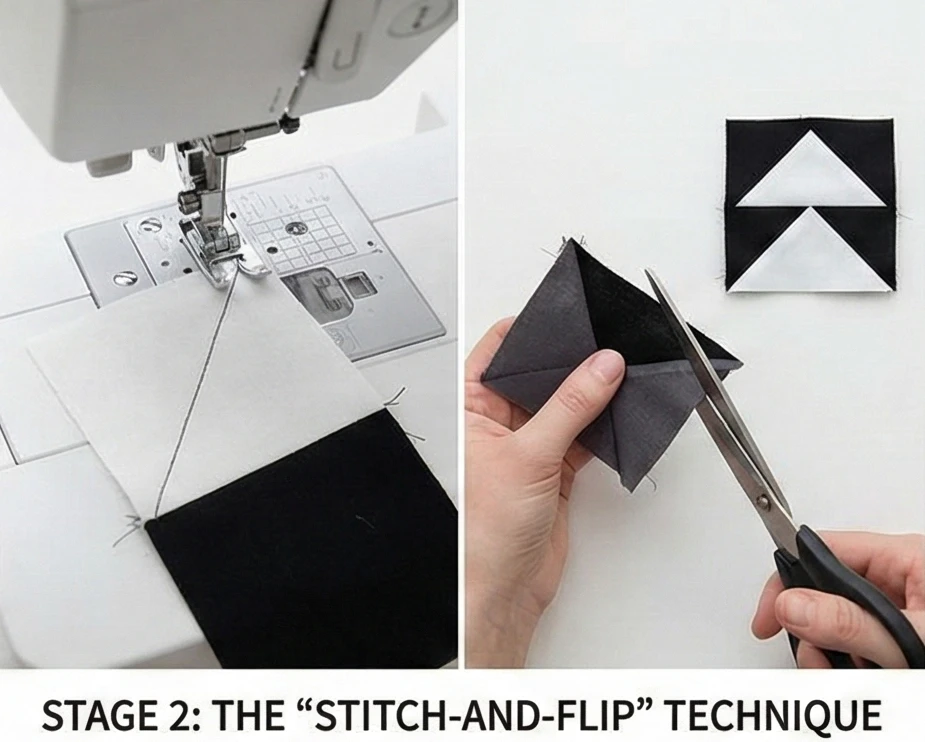
Step 2: The “Stitch-and-Flip” Technique
Creating sharp points without sewing bias triangles.
- Mark the Sky: Draw a diagonal line from corner to corner on the back of all 320 Light squares.
- The First Wing: Place a Light square face down on the right side of a Dark rectangle. Align the edges perfectly. The drawn line should angle from the bottom-center of the rectangle up to the top-right corner.
- Sew and Trim: Stitch directly on the drawn line. Trim the excess fabric off the corner, leaving a 1/4-inch seam allowance.
- Press: Press the Light fabric open to form a crisp triangle.
- The Second Wing: Repeat this exact process on the left side of the rectangle.
- Result: You have created a perfect Flying Goose block measuring 2.5″ x 4.5″ unfinished.
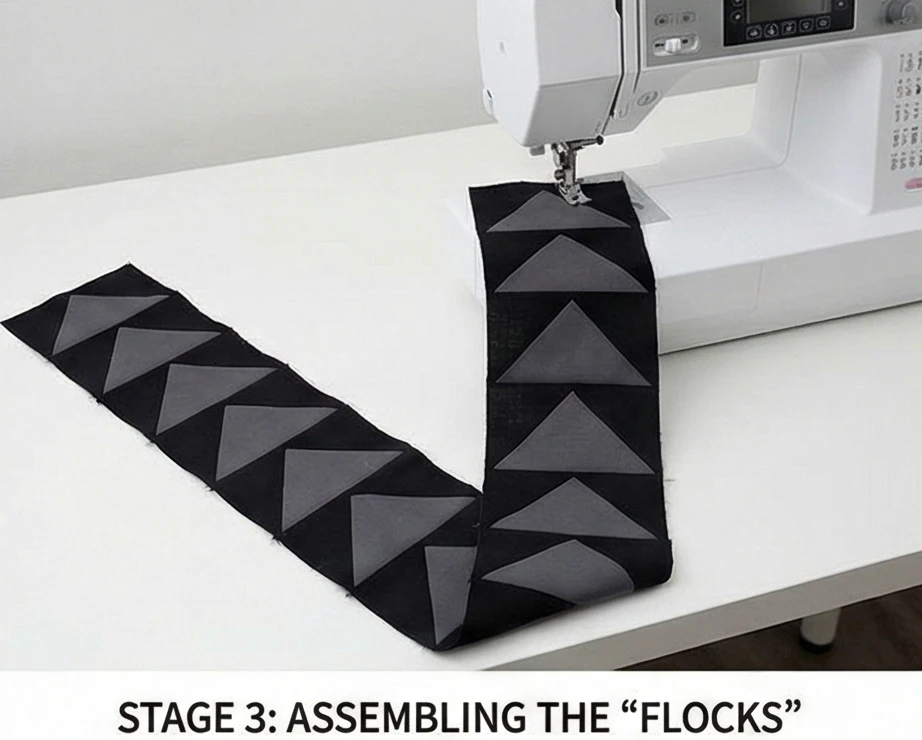
Step 3: Assembling the “Flocks”
Building the vertical columns.
- Chain Piecing: Take 40 Flying Geese blocks and sew them together vertically, end-to-end. The point of one goose should touch the flat base of the goose above it.
- The Columns: Create 4 identical vertical columns, each containing 40 geese. These columns will measure 4.5″ wide by approx 80.5″ long.
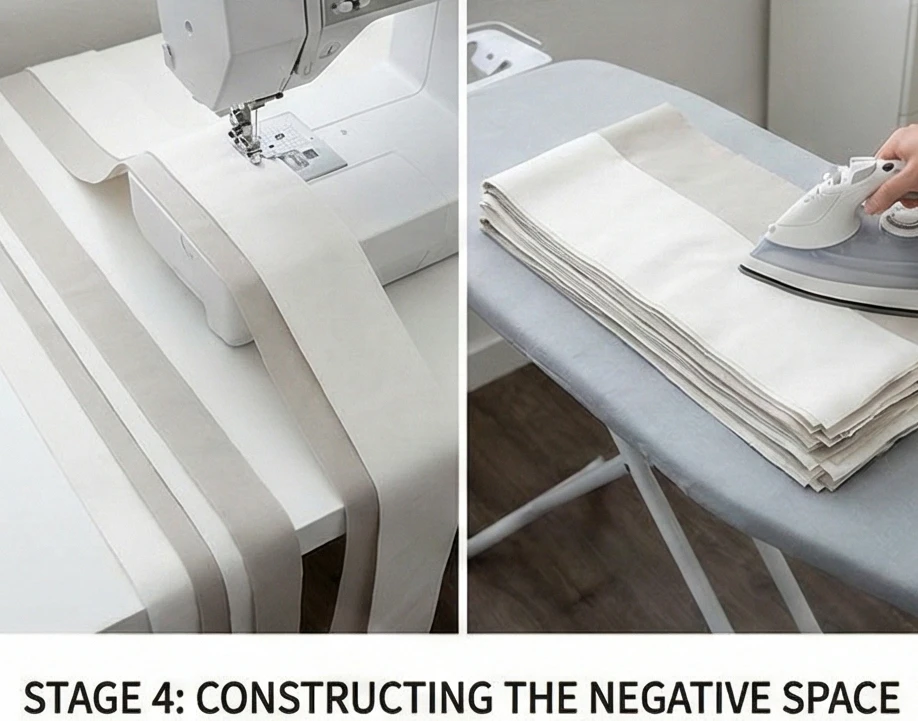
Step 4: Constructing the Negative Space
The silence between the notes is what makes the music.
- Join Light Strips: Take your uncut White and Greige Jelly Roll strips. Sew them together along their long edges to create wide, serene panels.
- The Spacers: Create 5 vertical panels, each consisting of about 15 Light strips sewn together (finishing around 30.5″ wide). Trim them to match the 80.5″ length of your goose columns.
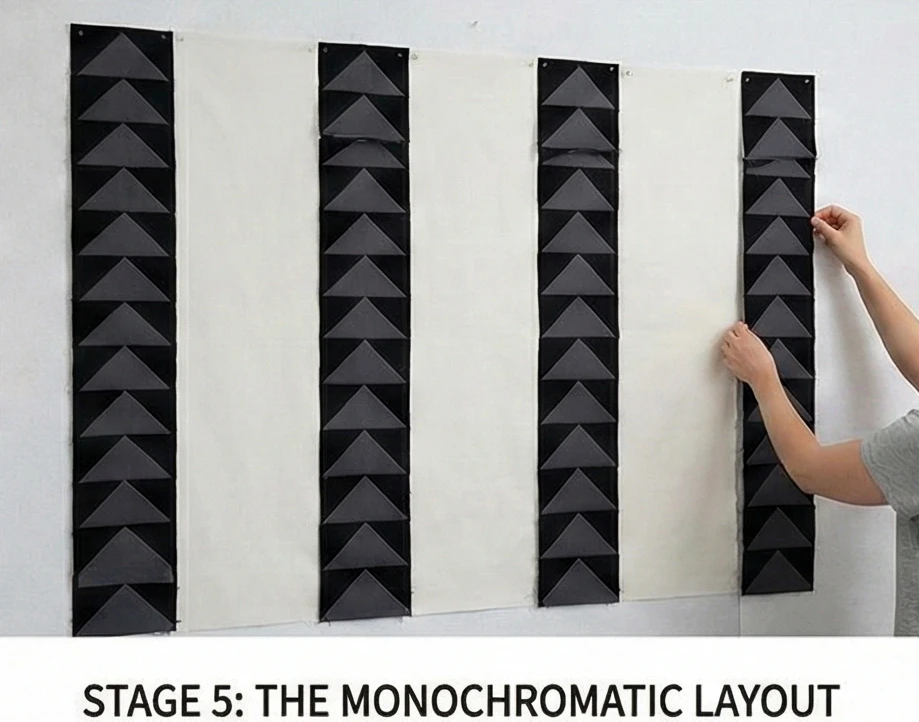
Step 5: The Monochromatic Layout
Interlocking the void with the structure.
- The Arrangement: Alternate the wide, calming Light panels with the sharp, striking Geese columns.
- Sequence: Light Panel -> Geese Column -> Light Panel -> Geese Column -> Light Panel (etc.).
- Pinning the Long Seams: When attaching these massive 80-inch columns, use pins at 4-inch intervals. Sew with even tension to prevent the top from bowing or stretching out of square.
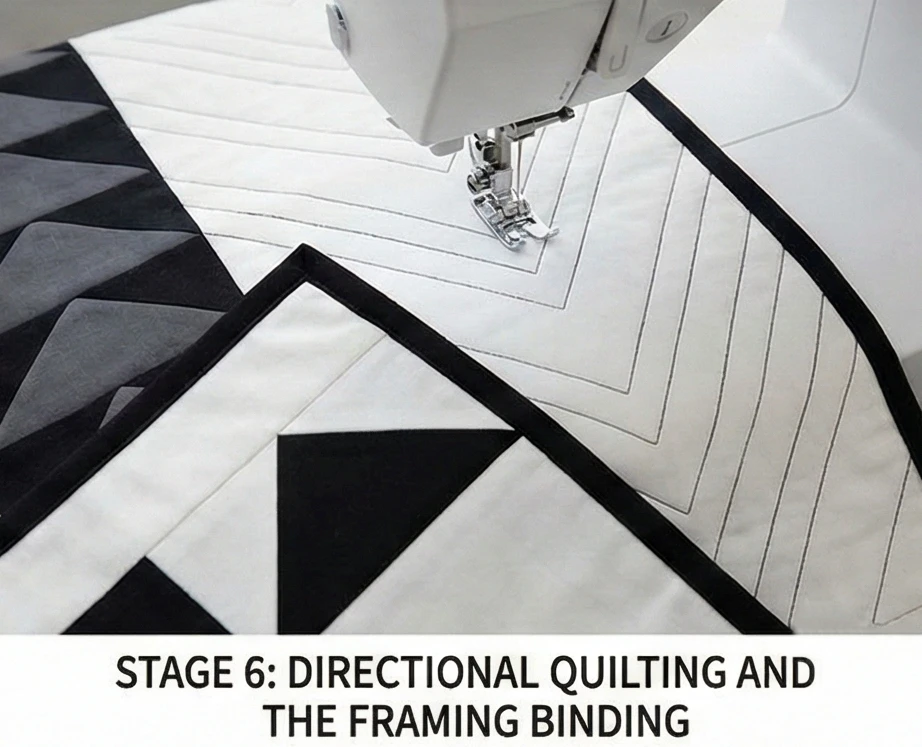
Step 6: Directional Quilting and the Framing Binding
Enhancing the forward movement.
- Baste: Sandwich the minimalist top, the breathable wool/bamboo batting, and the crisp backing.
- Echo Quilting: Using a walking foot, quilt straight vertical lines through the negative space panels. When you reach the Geese columns, switch to quilting “V” shapes that perfectly echo the angles of the dark triangles. This underscores the design’s geometric precision.
- The Frame: Bind the entire quilt in a solid Black fabric. A dark, thin binding acts like a matte frame around a piece of modern art, containing the sweeping vertical lines and anchoring the quilt to the bed.
Usability Note: When pairing high-contrast colors such as deep Black with pure White, pre-washing is usually recommended to prevent bleeding. Because you cannot pre-wash Jelly Roll strips without them unraveling into a tangled mess, use a Color Catcher sheet in the washing machine the first few times you launder this quilt to trap any stray dark dyes before they settle onto the pristine white background.

8. Lightweight All-Season Jelly Roll Quilts for Ultimate Comfort
“The Zephyr Step” Lightweight Geometric Ombré Quilt
Achieving ultimate comfort in bedding means mastering temperature regulation. The “all-season” quilt must be cozy enough for a chilly evening but breathable enough to prevent overheating in warmer months. “The Zephyr Step” achieves this delicate balance by pairing an airy, lightweight construction with a visually calming, architectural design. Utilizing Jelly Roll strips, this pattern creates a geometric “stepped” ombré effect—cascading smoothly from crisp White through elegant shades of Greige and Taupe. Finished with a striking, high-contrast Black or Deep Red binding, it delivers modern elegance without the heavy, stifling bulk of traditional winter bedding.
Finished Dimensions: Oversized Throw/All-Season Coverlet, 70″ x 80″.
Materials Needed:
- The “Steps” (Strips): 1.5 Jelly Rolls (approx. 60 strips measuring 2.5″ x 42″) in a smooth gradient of White, Greige, and Taupe.
- Backing: 4.5 yards of Cotton Voile or Double Gauze.
- Why: Voile is a semi-sheer, wildly soft, and highly breathable cotton. Backing a quilt with voile immediately reduces its overall weight by half, giving it the luxurious, cloud-like drape of high-end boutique bedding.
- Batting:100% Bamboo Batting.
- Why: Bamboo is the secret weapon for an all-season quilt. It is naturally antibacterial, incredibly lightweight, and boasts superior moisture-wicking and thermal-regulating properties. It keeps you warm in winter and cool in summer.
- Thread: 50wt cotton thread in an invisible Greige.
- Notions: A rotary cutter, a 6.5″ x 24″ acrylic ruler, and fine glass-head pins.
Cultural Backstory: The concept of the “summer quilt” dates back centuries. Before the advent of air conditioning, quilters in the American South would often create “summer spreads”—quilts woven with very little to no batting, relying strictly on the layered cotton for a gentle, breathable weight. Today, modern textile innovations like bamboo fibers allow us to achieve that same featherlight, all-season comfort while still maintaining a beautiful, quilted loft.
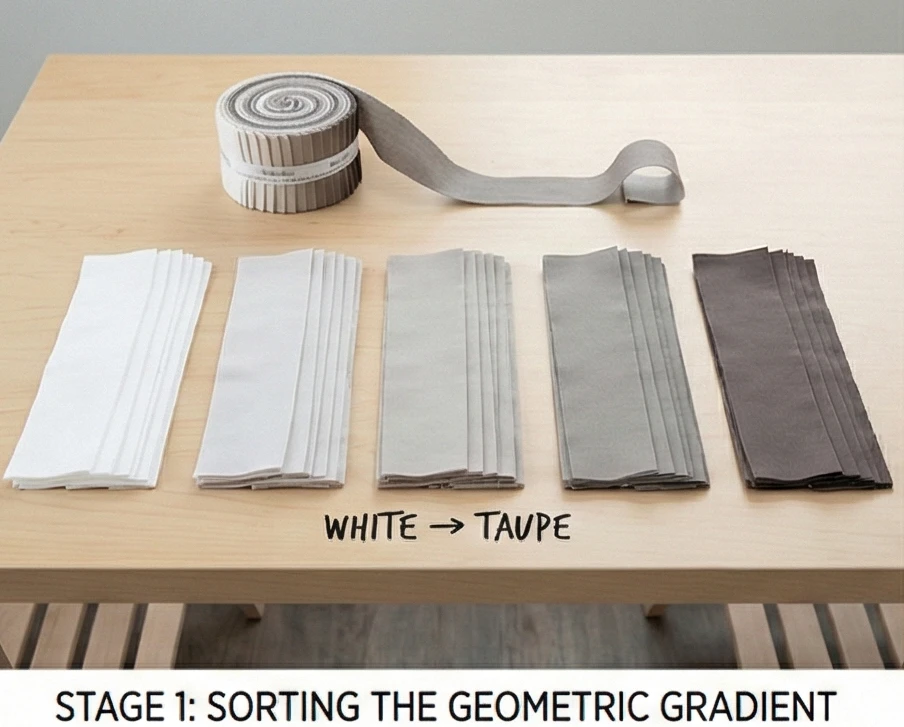
Step 1: Sorting the Geometric Gradient
The success of an ombré lies in the subtle transitions.
- The Value Scale: Unroll your strips and lay them out in daylight. Arrange them in a strict gradient from the purest White, down through the warm Greiges, ending with the deepest, richest Taupe.
- Group by Shade: Divide this long gradient into 5 distinct color groups (e.g., Pure White, Light Greige, Medium Greige, Dark Greige, Deep Taupe). You should have about 12 strips per group.
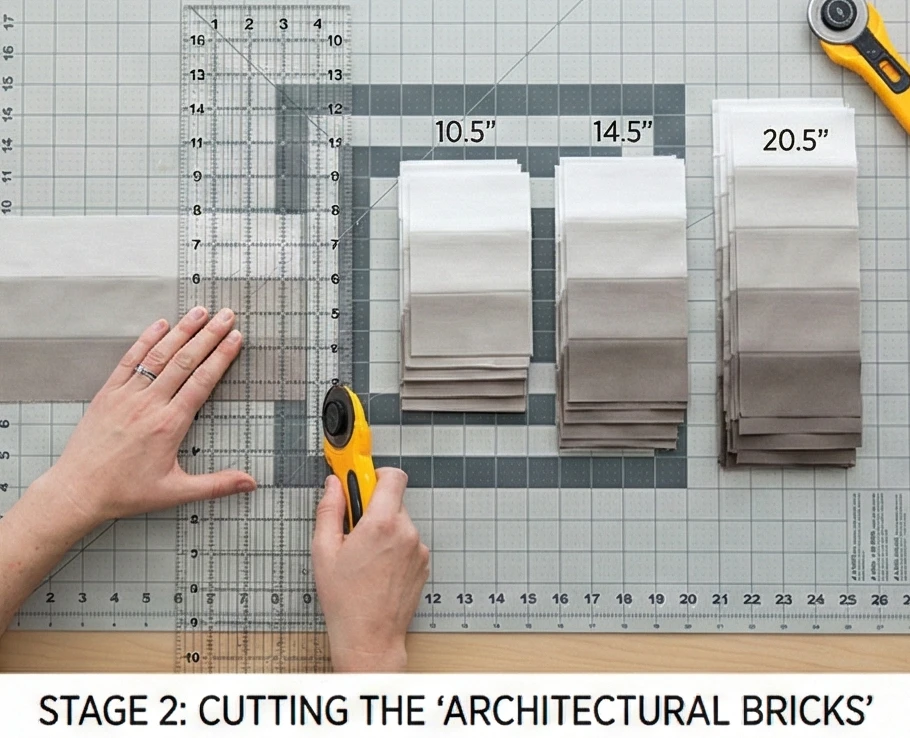
Step 2: Cutting the “Architectural Bricks”
Creating the staggered geometry.
- Sub-Cut the Strips: To create the stepped, brick-like pattern, you will not sew full 42-inch strips together. Instead, cut the strips from each color group into varying lengths:
- Cut some at 10.5 inches.
- Cut some at 14.5 inches.
- Cut some at 20.5 inches.
- Organize: Keep your freshly cut “bricks” separated by their color group to maintain the gradient during assembly.
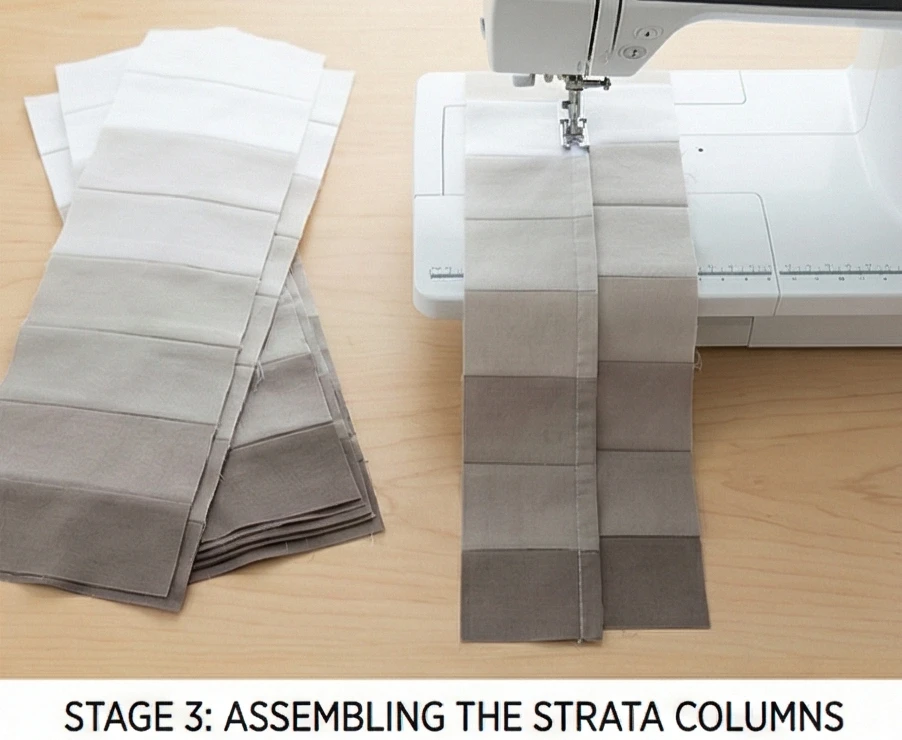
Step 3: Assembling the Strata Columns
Building the quilt vertically.
- The Vertical Flow: You will build this quilt in vertical columns rather than horizontal rows. Each column will be exactly 2.5 inches wide and 80.5 inches long.
- Sewing the Gradient: Take a white brick, sew it short-end to short-end with a Light Greige brick, then a Medium Greige brick, down to the Deep Taupe.
- Stagger the Seams: The key to the “stepped” architectural look is to ensure the horizontal seams do not align. Because you cut your bricks at different lengths (10.5″, 14.5″, 20.5″), the horizontal seams will naturally stagger, creating an interlocking, geometric cascade. Make 35 vertical columns.
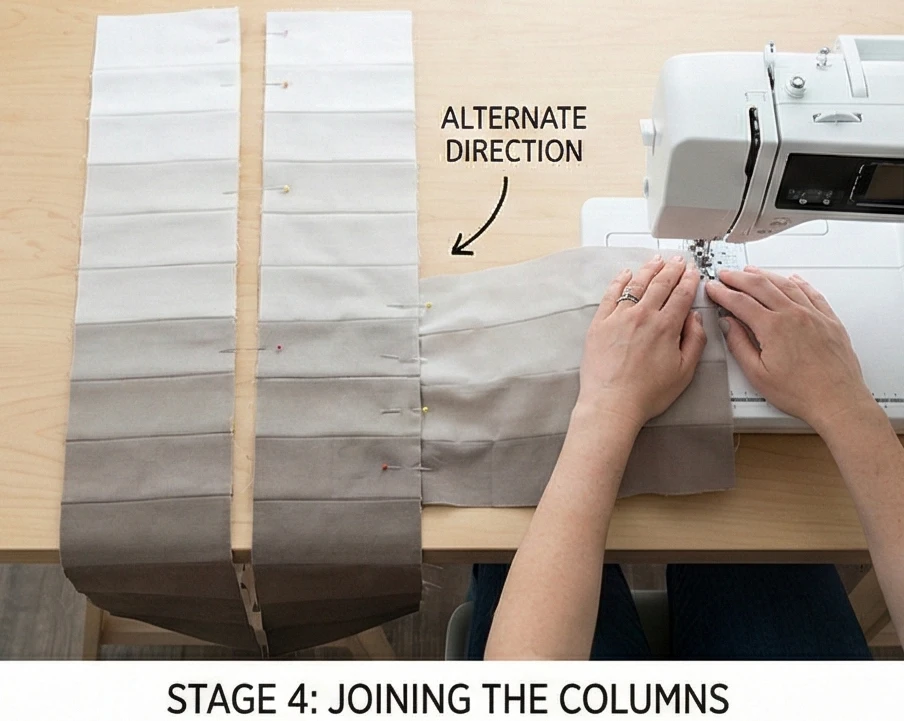
Step 4: Joining the Columns
Precision and tension control.
- Pinning: Place Column 1 and Column 2 right sides together. Pin every 5 to 6 inches down the entire 80-inch length.
- Alternate Direction: Sew Column 1 to Column 2 from top to bottom. When adding Column 3, sew from bottom to top. This prevents the lightweight fabric from warping.
- Pressing: Press all the long vertical seams in one direction. The quilt top will look like a seamless, cascading waterfall of neutral tones.
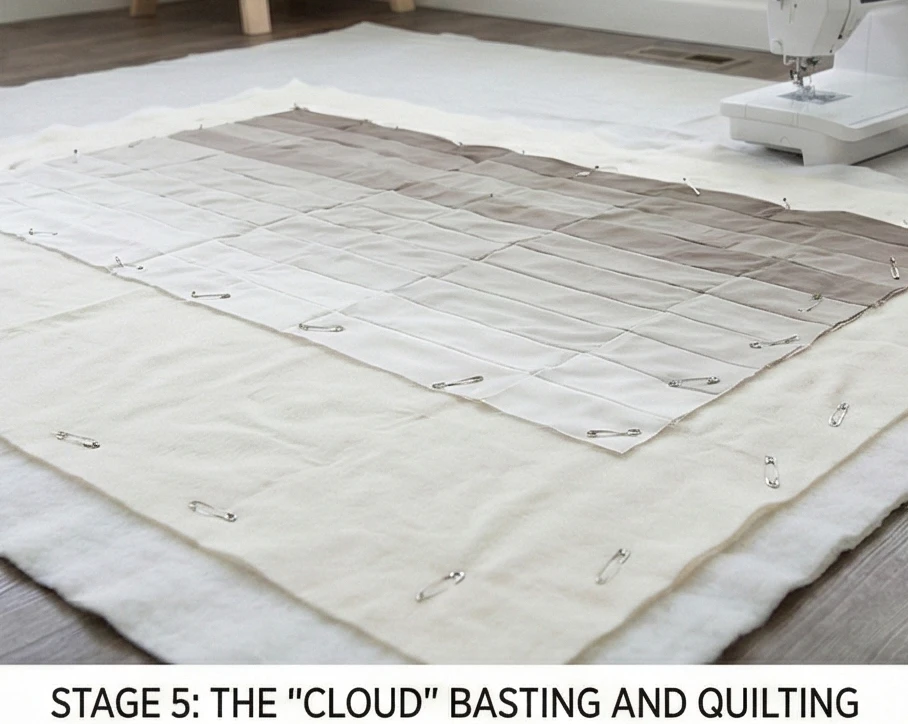
Step 5: The “Cloud” Basting and Quilting
Heavy quilting creates a stiff blanket. Keep it soft.
- The Lightweight Sandwich: Lay your voile backing flat, top with the bamboo batting, and smooth the pieced top over it. Because voile and bamboo are both incredibly soft, use plenty of safety pins to baste the layers securely.
- Open-Grid Quilting: To maintain the ultimate drape and softness, avoid dense quilting. Use a walking foot to quilt a wide, open grid. Stitch straight vertical and horizontal lines spaced 4 inches apart. This secures the batting while keeping the fabric pliable, soft, and breathable.
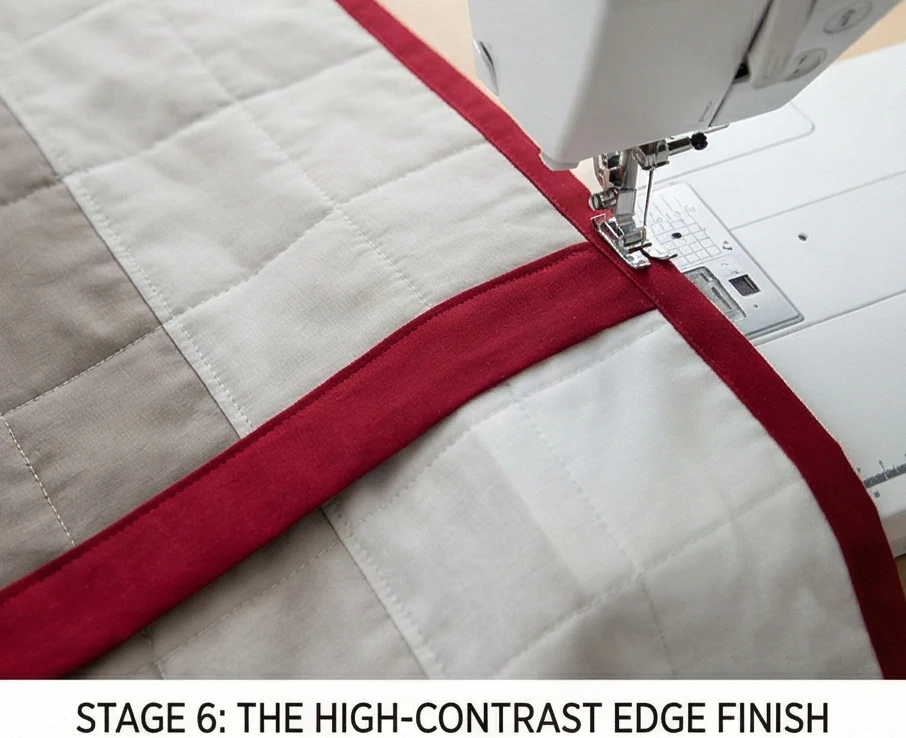
Step 6: The High-Contrast Edge Finish
A minimalist design demands a sharp, tailored boundary.
- Square Up: Trim the outer edges of the quilt so it is perfectly square.
- The Binding: Bind the quilt using a solid Deep Red or Black fabric. This sudden, high-contrast disruption against the soft Greige/Taupe gradient elevates the design from a simple blanket to a striking, modern decor piece, anchoring it beautifully on a bed or sofa.
Usability Note: Bamboo batting may shrink slightly more than cotton during the first wash (approximately 3-5%). To enhance the “cozy” factor, machine wash the finished quilt in cold water and tumble dry on low. The slight shrinkage will create a beautiful, subtle crinkle across the voile and the geometric steps, making the quilt feel instantly loved and lived-in.
9. Romantic Floral Jelly Roll Quilts for Sophisticated Bedrooms
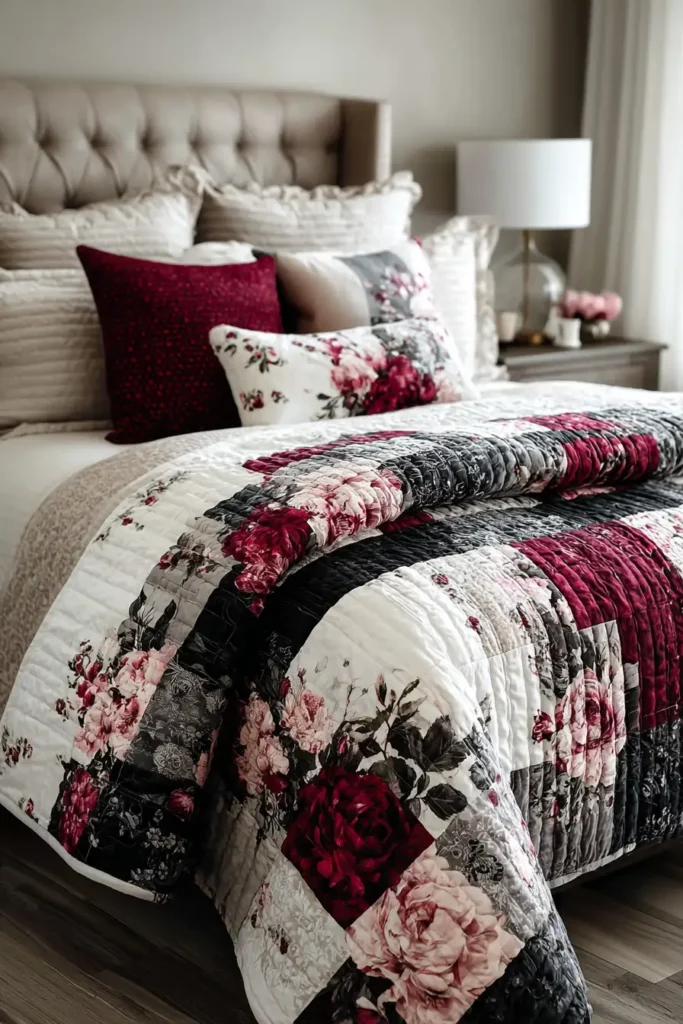
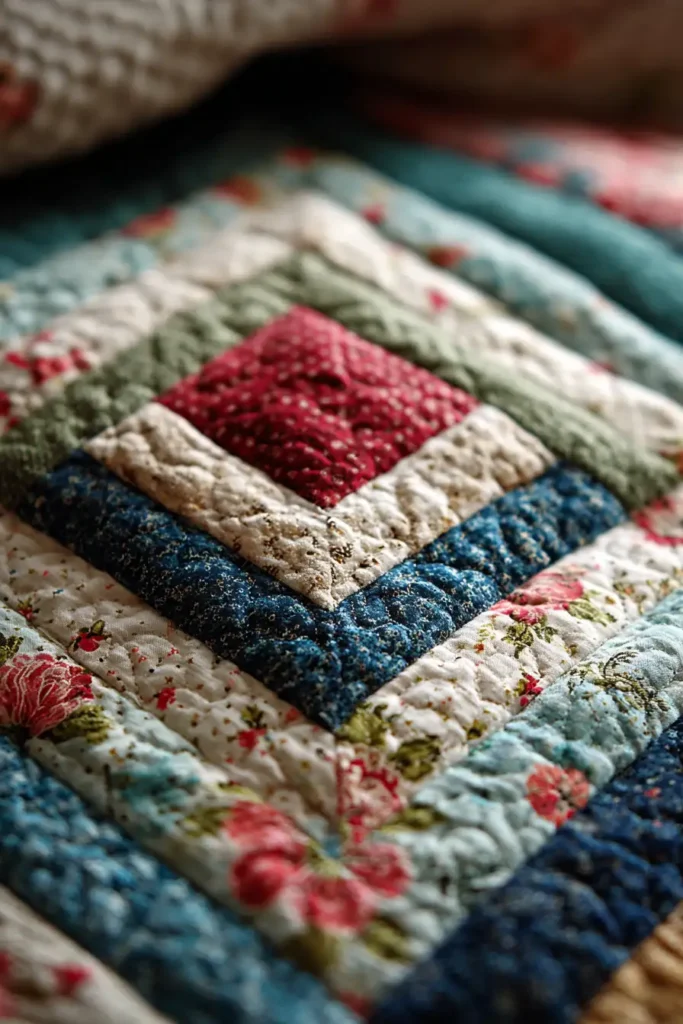
“The Briar Rose” Floral Log Cabin Quilt
Floral quilts often run the risk of looking overly traditional or chaotic. To elevate a floral design to sophisticated, modern elegance, we must introduce architectural structure and a highly curated palette. “The Briar Rose” utilizes the classic Log Cabin block to tame the wildness of nature. By strictly dividing the block—using moody, large-scale botanical prints in Deep Crimson, Charcoal, and Black on one side, and serene, solid Crisp White and Greige on the other—the quilt achieves a stunning balance. It marries the romantic softness of a midnight garden with the sharp, chic geometry of a tailored suit.
Finished Dimensions: King Size Coverlet, 96″ x 96″.
Materials Needed:
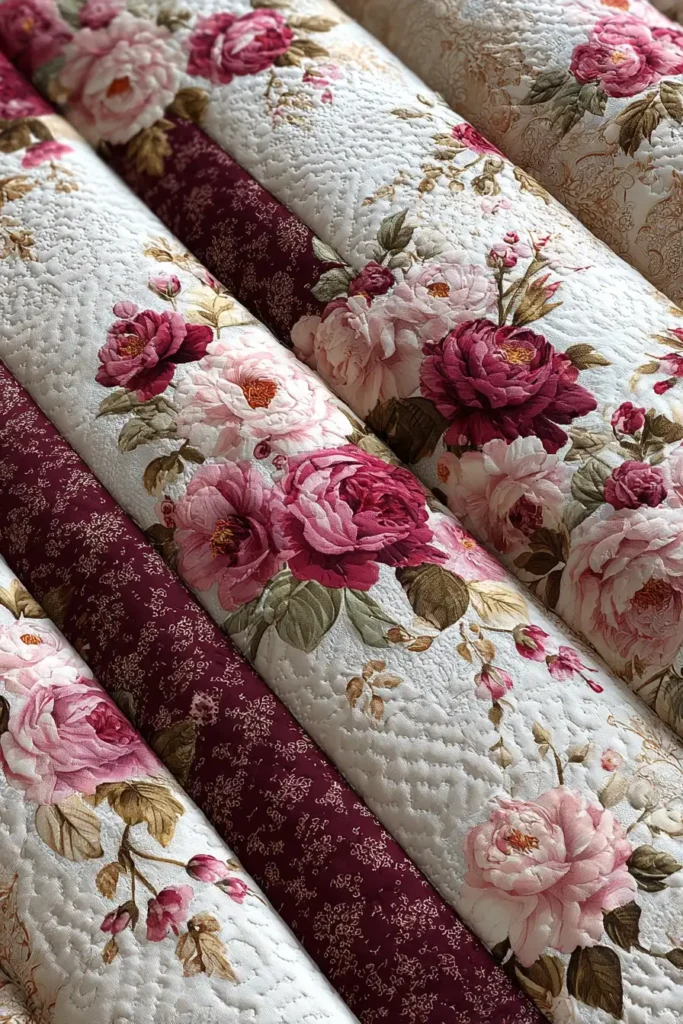
- The “Blooms” (Dark Strips): 1.5 Jelly Rolls (approx. 60 strips measuring 2.5″ x 42″) featuring sophisticated, large-scale floral prints in Deep Red, Crimson, and Charcoal.
- The “Pathways” (Light Strips): 1.5 Jelly Rolls of solid White and warm Greige.
- The “Heart” (Center Squares): 1/2 yard of solid Black fabric.
- Backing: 8.5 yards of luxurious Deep Red or Black Cotton Sateen.
- Batting:100% Wool Batting.
- Why: For a quilt to be truly comfortable in a sophisticated bedroom, it must breathe. Wool is a premium, naturally thermoregulating fiber. It provides a sumptuous, cozy loft that drapes beautifully over the body, keeping you warm in winter without overheating in summer.
- Thread: 50wt Charcoal cotton thread (blends the high-contrast seams smoothly).
- Notions: A large square acrylic ruler (at least 14.5″), rotary cutter, and spray starch.
Cultural Backstory: During the Victorian era, the “Language of Flowers” (Floriography) turned botanical motifs into complex, silent poetry. Deep red roses and dark foliage symbolized deep, abiding romance and mystery. By taking these highly romantic Victorian motifs and forcing them into the strict, utilitarian geometry of the pioneer Log Cabin block, this quilt creates a beautiful design tension: the untamed beauty of nature contained within human architecture.
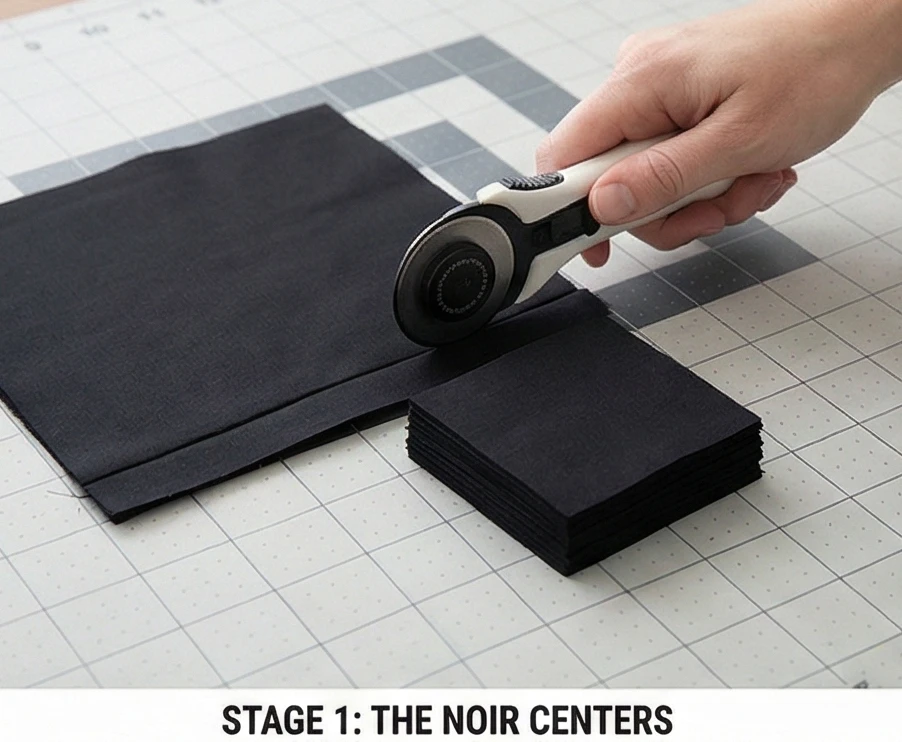
Step 1: The Noir Centers
Every cabin needs a grounding anchor.
- Starch and Cut: Heavily starch your solid Black yardage. Cut it into precise 2.5″ x 2.5″ squares.
- Quantity: You will need exactly 64 squares to serve as the structural centers for your blocks.
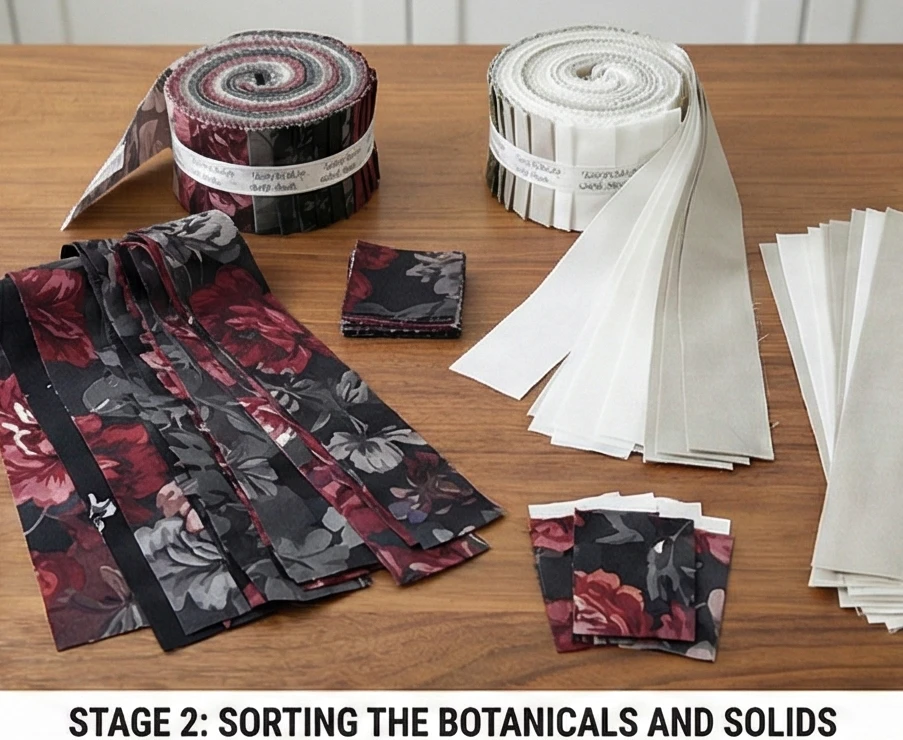
Step 2: Sorting the Botanicals and Solids
The organization ensures the geometry remains sharp.
- The Floral Pile: Unroll your botanical Jelly Rolls. Ensure these strips appear visually “Dark” to maintain high contrast.
- The Neutral Pile: Unroll your solid White and Greige strips. These will provide the serene negative space that allows the florals to breathe.
- Sub-Cut Starters: To speed up the chain-piecing process, cut a handful of strips from both piles into 2.5″ and 4.5″ lengths.
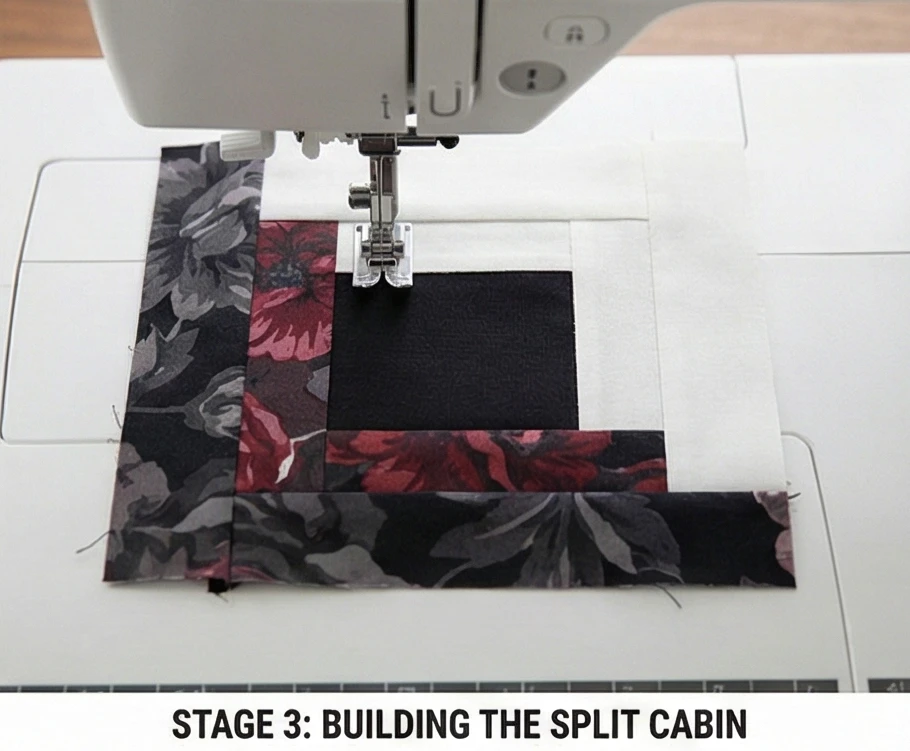
Step 3: Building the Split Cabin
The magic happens in the strict division of light and dark.
- Round 1 (The Light): Take a Black center square. Sew a 2.5″ solid White/Greige strip to the Top. Press outward. Sew a 4.5″ White/Greige strip to the Right side. Press outward.
- Round 1 (The Dark): Sew a 4.5″ Floral strip to the Bottom. Press outward. Sew a 6.5″ Floral strip to the Left side. Press outward.
- Notice the pattern: The top and right sides will always be your serene solids. The bottom and left sides will always be your romantic florals.
- Grow the Block: Continue adding rounds in a clockwise motion (Light, Light, Dark, Dark). Stop when the block measures 12.5″ x 12.5″. You will make 64 blocks total.
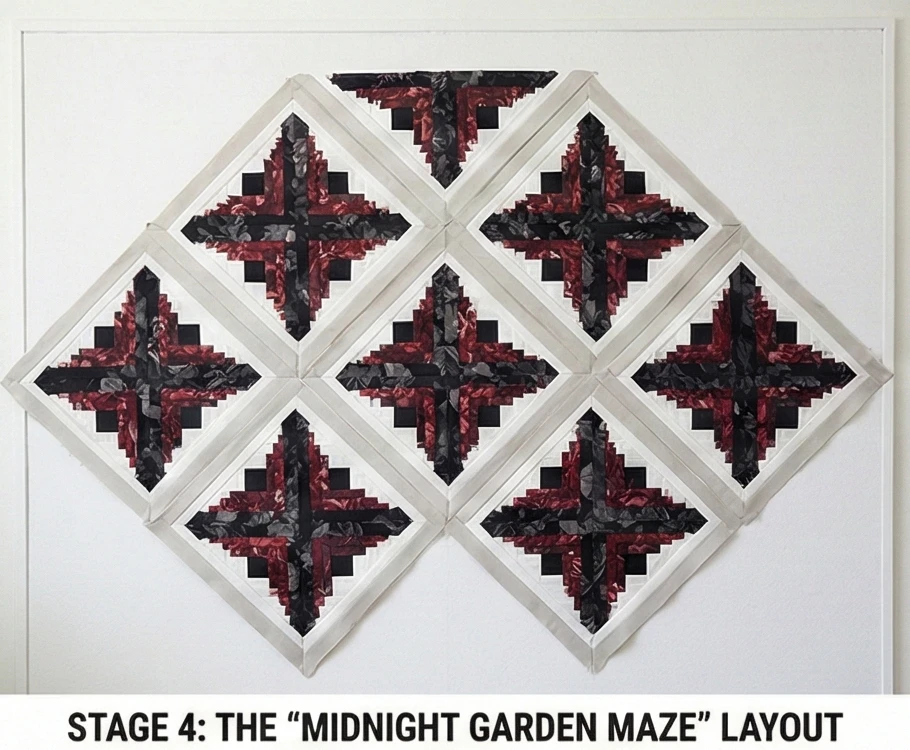
Step 4: The “Midnight Garden Maze” Layout
Rotation transforms the simple blocks into sweeping diamonds.
- The Barn Raising Setting: Arrange your 64 blocks into an 8-by-8 grid. Rotate the blocks so that the floral halves of four adjacent blocks meet in the center to form a massive, dark floral diamond.
- The Visual Effect: This layout creates large, cascading rings of crimson and charcoal blooms radiating outward from the center of the bed, separated by striking, geometric pathways of crisp white and greige. It looks intricately pieced, yet it is merely the result of strategic block placement.
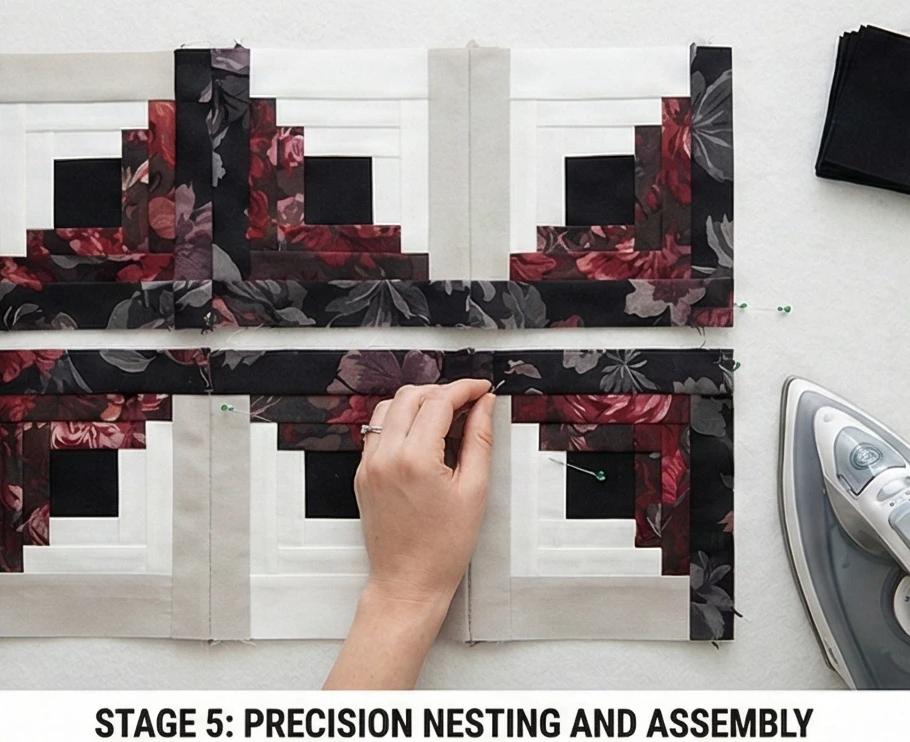
Step 5: Precision Nesting and Assembly
Heavy seams require careful matching.
- Pinning: When joining the blocks into rows, push a pin directly through the seam intersections. Because Log Cabin blocks have multiple fabric layers, maintaining sharp 90-degree corners is crucial to the elegant look.
- Pressing Open: To reduce the bulky intersections where four blocks meet, press the long row seams open rather than to one side. This ensures the quilt top lies perfectly flat and smooth on the bed.
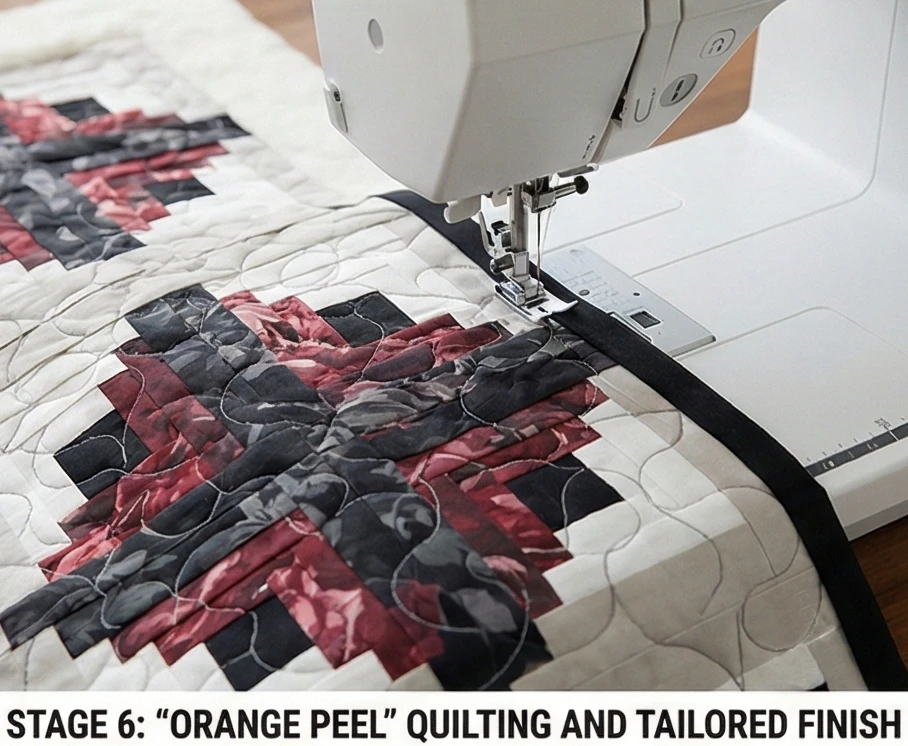
Step 6: “Orange Peel” Quilting and Tailored Finish
Softening the geometry with curved quilting.
- Baste: Sandwich your pieced top, the cozy wool batting, and the sateen backing.
- Curved Quilting: To complement the romantic floral prints and soften the rigid, straight lines of the piecing, quilt an interlocking “Orange Peel” or overlapping circle motif across the entire surface. The high loft of the wool batting will make these curves puff up beautifully, creating a rich, sculpted texture.
- The Binding: Finish the quilt with a solid Black or Deep Red binding. This dark, tailored edge acts as a formal frame, securing the high-contrast masterpiece.
Usability Note: Deeply saturated reds and blacks are notorious for bleeding onto lighter fabrics. Because Jelly Roll strips cannot be pre-washed, include 3 to 4 Color Catcher sheets in the washing machine during the first few washes. Wash on cold on a gentle cycle, and tumble dry on low to allow the wool batting to achieve its perfect, breathable loft.
10. Living and Dining Room: Throws, Runners, and Seating
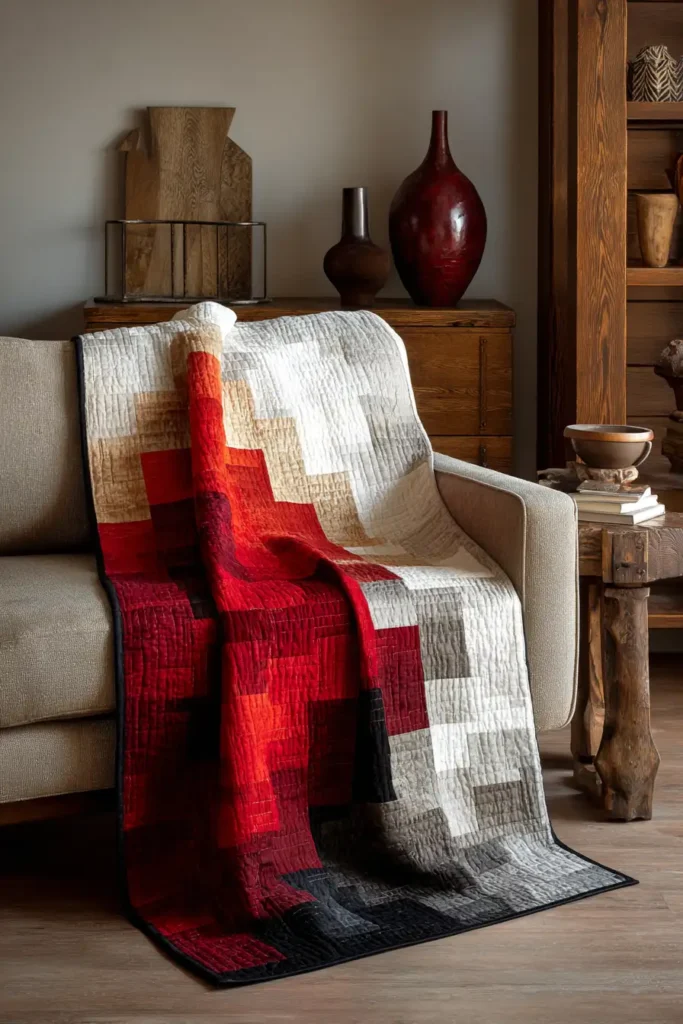
“The Cardinal Flight” Asymmetrical Ombré Sofa Throw
The living and dining areas are the public-facing spaces of your home, requiring textiles that act as striking decor while remaining highly functional and inviting. “The Cardinal Flight” bridges this gap perfectly. By combining a soothing Ombré Gradient (fading from stark White through warm Greige, down to deep Black) with a single, sharp, vertical column of Deep Red Flying Geese, this design becomes a piece of modern, geometric art. Built efficiently from 2.5-inch Jelly Roll strips, this pattern is highly adaptable: scale it up for a cozy sofa throw, or shorten the strip lengths to create a dramatic, matching dining table runner and padded chair seats.
Finished Dimensions: Large Sofa Throw, 60″ x 72″. (For a Table Runner, adjust length to 18″ x 72″).
Materials Needed:
- The Background (Gradient Strips): 1.5 Jelly Rolls (approx. 60 strips measuring 2.5″ x 42″) in a strict monochrome palette of White, Greige, Charcoal, and Black.
- The “Flight” (Geese): 1/2 yard of a solid Deep Red fabric.
- Backing: 4 yards of high-quality Greige Flannel or Brushed Cotton.
- Batting: Wool or a Bamboo/Cotton Blend.
- Why: A living room throw must be cozy enough for a movie night but elegant enough to drape beautifully over a modern sofa. Wool and bamboo offer a luxurious, heavy drape that conforms to the body, remaining highly breathable and preventing the stiff “board-like” feel of polyester.
- Thread: 50wt cotton thread in an invisible Dove Grey.
- Notions: A rotary cutter, an acrylic ruler, and a water-soluble marking pen.
Cultural Backstory: The “Flying Geese” motif is deeply rooted in American textile history, symbolizing forward momentum, migration, and the changing of seasons. When rotated vertically and placed asymmetrically off-center—a hallmark of Mid-Century Modern and Bauhaus design—the flock ceases to look like a traditional pioneer quilt and instead acts as a sleek, architectural arrow drawing the eye through the room.
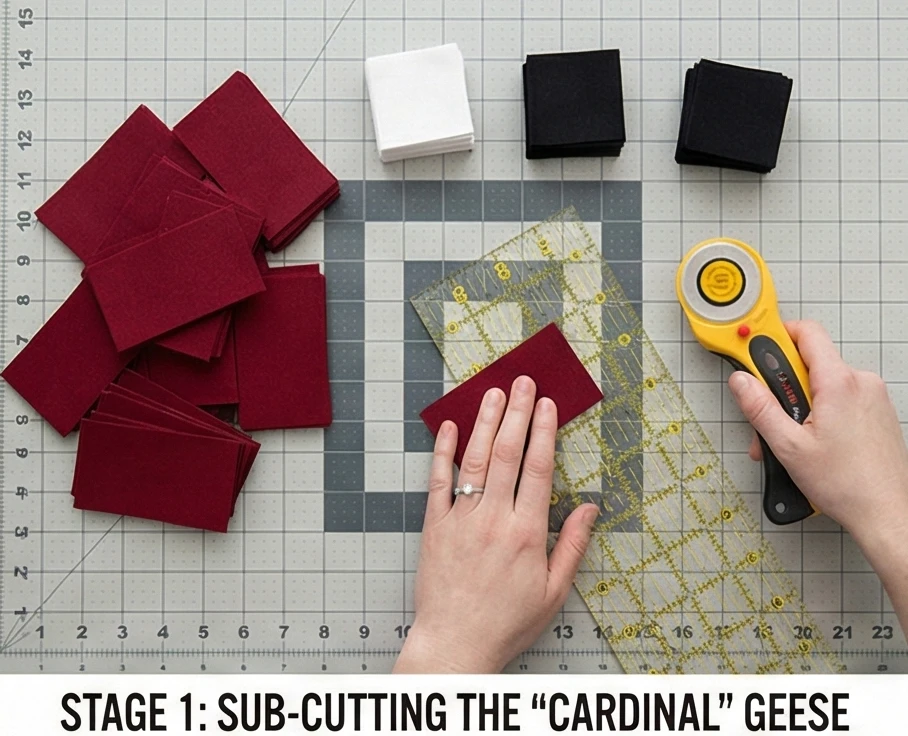
Step 1: Sub-Cutting the “Cardinal” Geese
The high-contrast focal point of the design.
- The Red Bodies: Cut your Deep Red yardage into rectangles measuring 2.5″ x 4.5″. You will need exactly 36 rectangles.
- The Sky Corners: Take a few strips of your starkest White and deepest Black Jelly Roll strips. Sub-cut them into perfect 2.5″ x 2.5″ squares. You need 72 squares total.
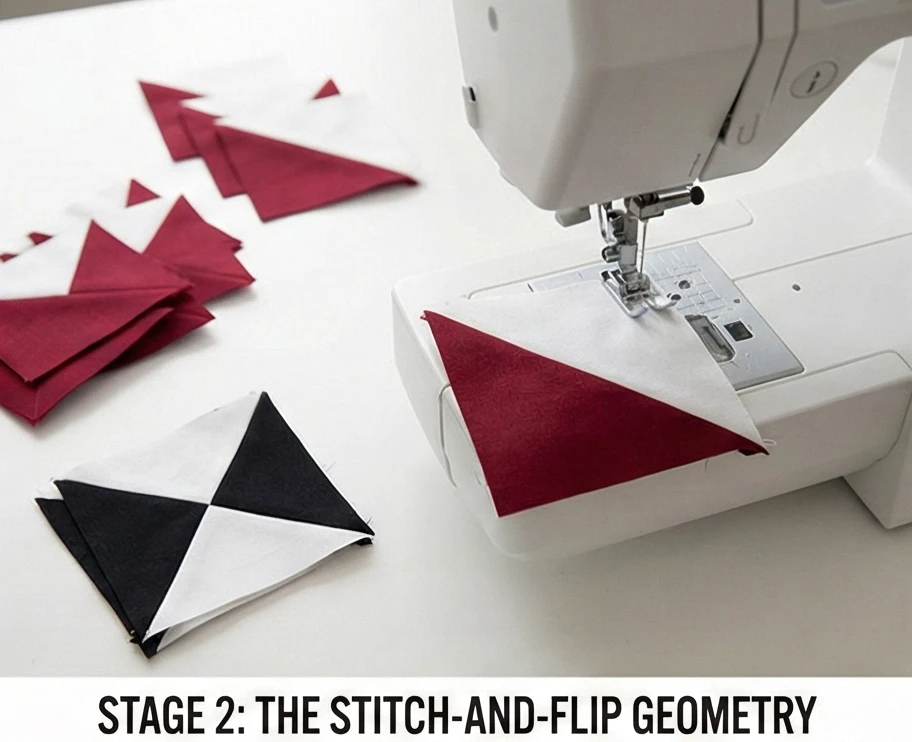
Step 2: The Stitch-and-Flip Geometry
Creating the sharp red arrows.
- Mark: Draw a diagonal line across the back of all 72 square corners.
- First Wing: Place a square face-down on the right side of a Deep Red rectangle. Stitch directly on the drawn diagonal line. Trim the excess corner fabric (leaving a 1/4″ seam) and press the triangle open.
- Second Wing: Repeat on the left side.
- The Gradient Shift: Make 18 Geese with White corners (for the top half of the quilt) and 18 Geese with Black corners (for the bottom half). Sew them end-to-end into one long, vertical 72-inch column.
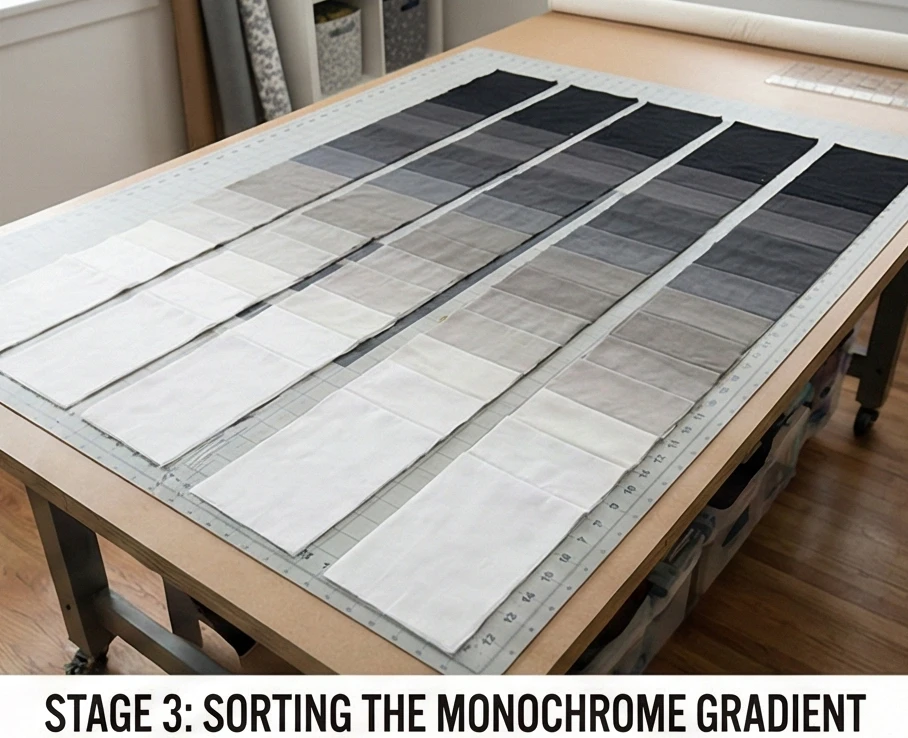
Step 3: Sorting the Monochrome Gradient
The backdrop must transition seamlessly.
- The Fade: Organize your uncut Jelly Roll strips into a strict value scale: pure White, transitioning into soft Greige, darkening into Charcoal, and ending in solid Black.
- Sewing the Panels: Sew these strips together along their long edges to create massive horizontal strata panels.
- Crucial Technique: Always alternate your sewing direction (left-to-right, then right-to-left) to prevent the long strips from warping or bowing.
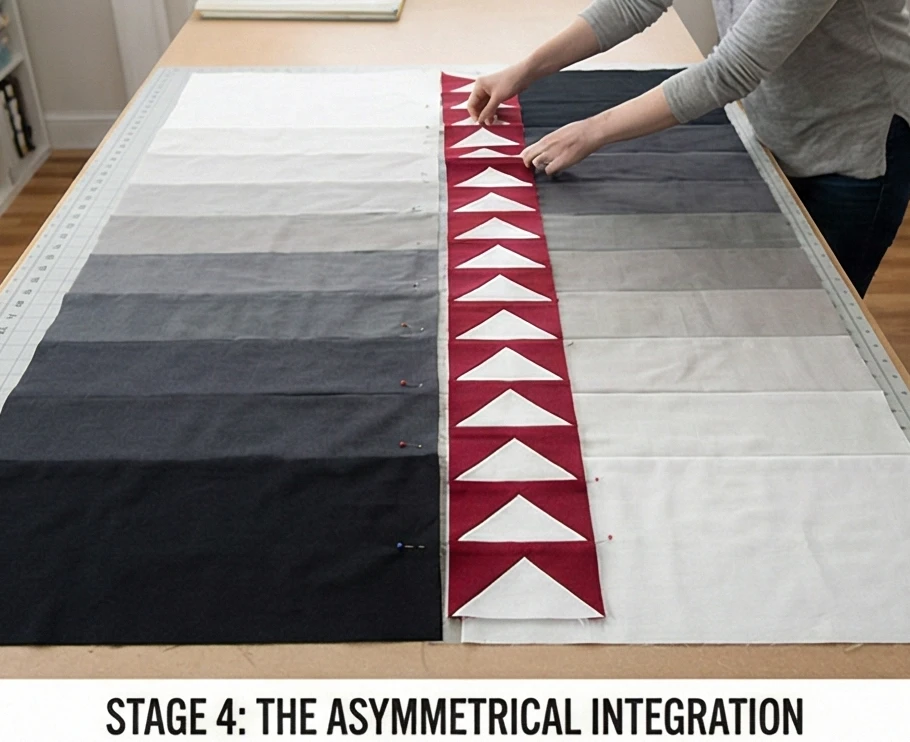
Step 4: The Asymmetrical Integration
Off-center placement creates modern tension.
- The Slice: Once your Ombré panel is fully sewn (approx. 60″ wide by 72″ long), lay it flat. Measure 18 inches in from the right edge and slice the entire quilt vertically from top to bottom.
- The Insertion: Take your long, vertical column of Deep Red Flying Geese. Pin it between the two sections of the Ombré panel you just sliced.
- Sew and Press: Stitch the three massive sections together. Press the seams toward the dark red Geese to reduce bulk. The red column now acts as a sharp, striking disruption, cutting through the soft, horizontal fade.
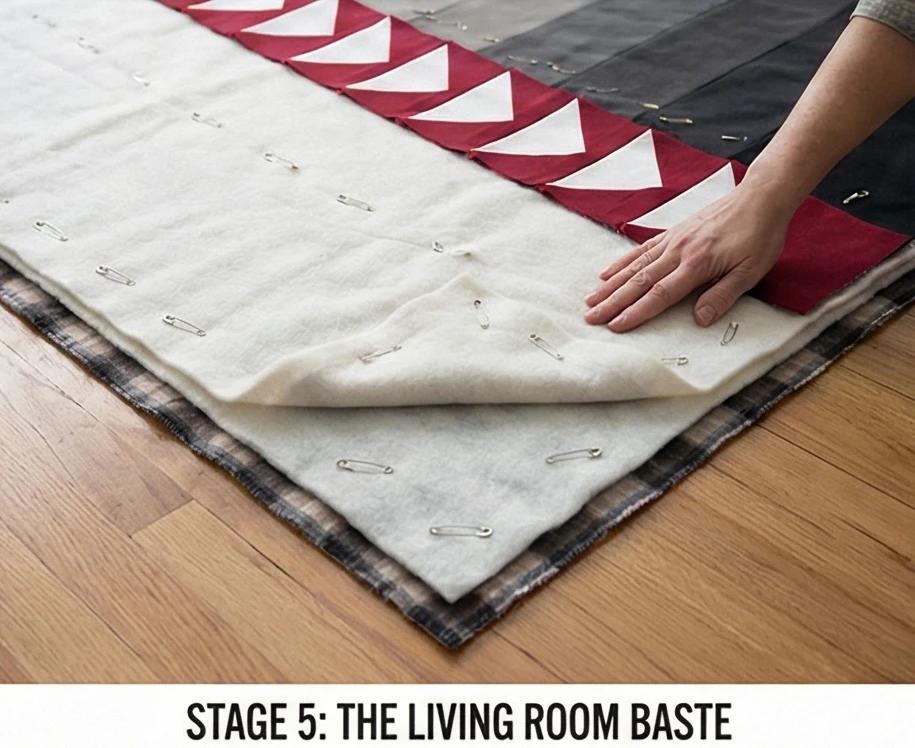
Step 5: The Living Room Baste
Prioritize touch and feel.
- Layering: Lay your soft Greige flannel backing flat on the floor, wrong side up. Top it with your breathable wool or bamboo batting, and carefully smooth the pieced top over it.
- Pinning: Because sofa throws are pulled, folded, and sat upon constantly, baste heavily. Place a safety pin every 4 inches to prevent the layers from shifting during quilting or washing.
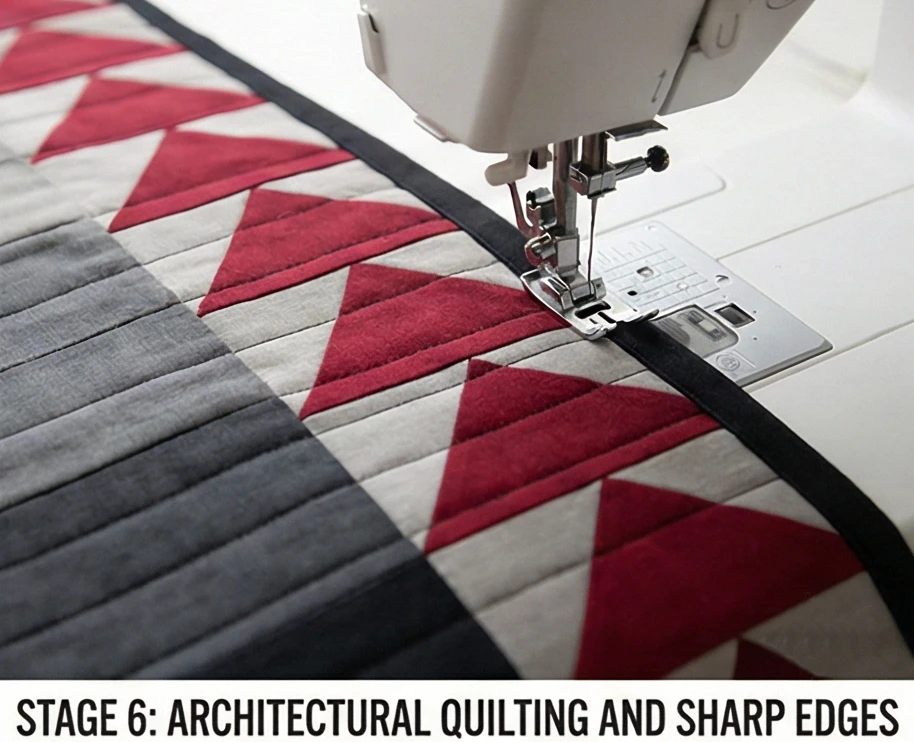
Step 6: Architectural Quilting and Sharp Edges
Finish with tailored precision.
- Matchstick or Grid Quilting: Using a walking foot, quilt straight horizontal lines tracing the seams of the Jelly Roll strips. For a highly modern, structured look, quilt lines are just 1/2 inch apart through the Ombré sections. Leave the Deep Red Geese unquilted so they physically “pop” and puff up from the surface.
- The Obsidian Frame: Bind the outer edge of the throw using a solid Black fabric. This grounds the design, providing a crisp, picture-frame finish that looks exceptionally chic draped over the arm of a sofa or folded at the base of a dining bench.
Usability Note: If you adapt this pattern into dining room chair pads, use Insul-Fleece or high-density upholstery foam instead of wool batting, and finish with a boxed-corner zipper so the covers can be easily removed and washed after dinner parties.
11. Stylish Jelly Roll Sofa Throws for Cozy Living Rooms
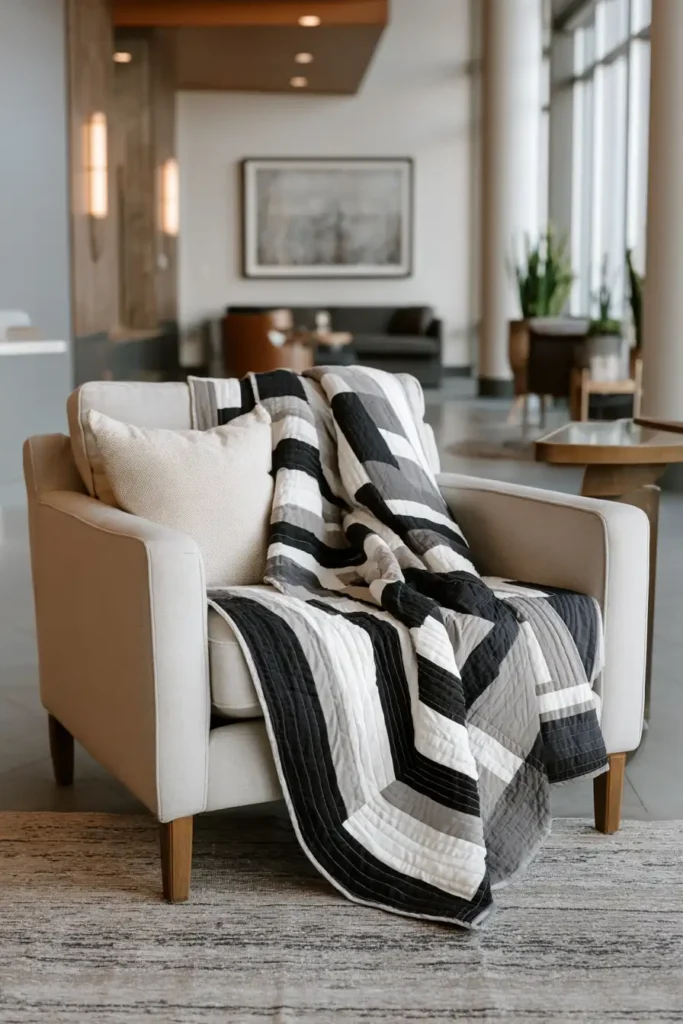
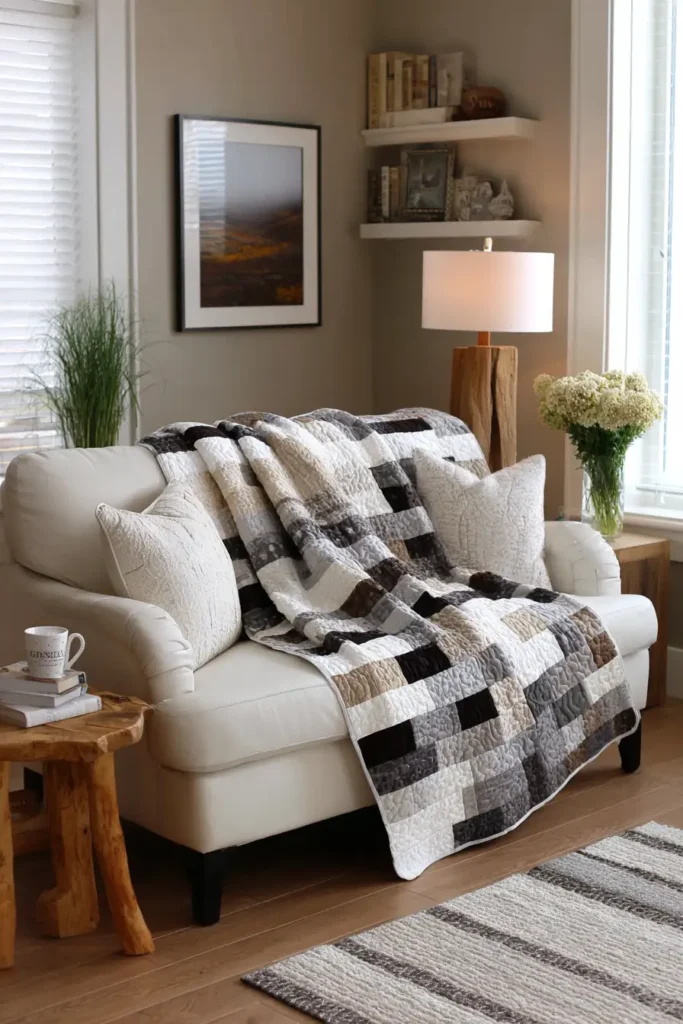
“The Deconstructed Courthouse” Minimalist Sofa Throw
A sofa throw in a living room serves a dual purpose: it is a highly functional layer of warmth and a piece of folded modern art. To achieve an elegant, contemporary aesthetic, we take the highly formal Courthouse Steps block and “deconstruct” it. By allowing the concentric strips to fade into vast expanses of negative space, the rigid geometry is disrupted, creating striking asymmetry. Rendered in a sophisticated, high-contrast palette of crisp White, deep Black, and grounding Greige, this design looks like a modern gallery piece but retains the profound coziness required for a living space.
Finished Dimensions: Large Square Sofa Throw, 60″ x 60″.
Materials Needed:
- The “Steps” (Strips): 1 Jelly Roll (approx. 40 strips measuring 2.5″ x 42″) in solid Black and Charcoal.
- The Negative Space (Background): 2.5 yards of solid White or light Greige cotton.
- Backing: 4 yards of high-quality Greige Flannel or Brushed Cotton.
- Batting:100% Bamboo Batting.
- Why: A living room throw must drape elegantly over the arm of a sofa without looking stiff or puffy. Bamboo batting is exceptionally fluid and breathable, providing luxurious weight and warmth that conforms perfectly to the body during a movie night, while the flannel backing ensures it doesn’t slip off leather furniture.
- Thread: 50wt cotton thread in White.
- Notions: A large square ruler, a rotary cutter, and spray starch.
Cultural Backstory: The classic Courthouse Steps block, born in the mid-19th century, represents civic order, balance, and institutional stability. By “deconstructing” it—removing sides, shifting the center, and floating the steps in empty space—modern quilters play with the tension between rigid history and contemporary minimalism. It honors the heritage of the craft while rebelling against its strict rules.
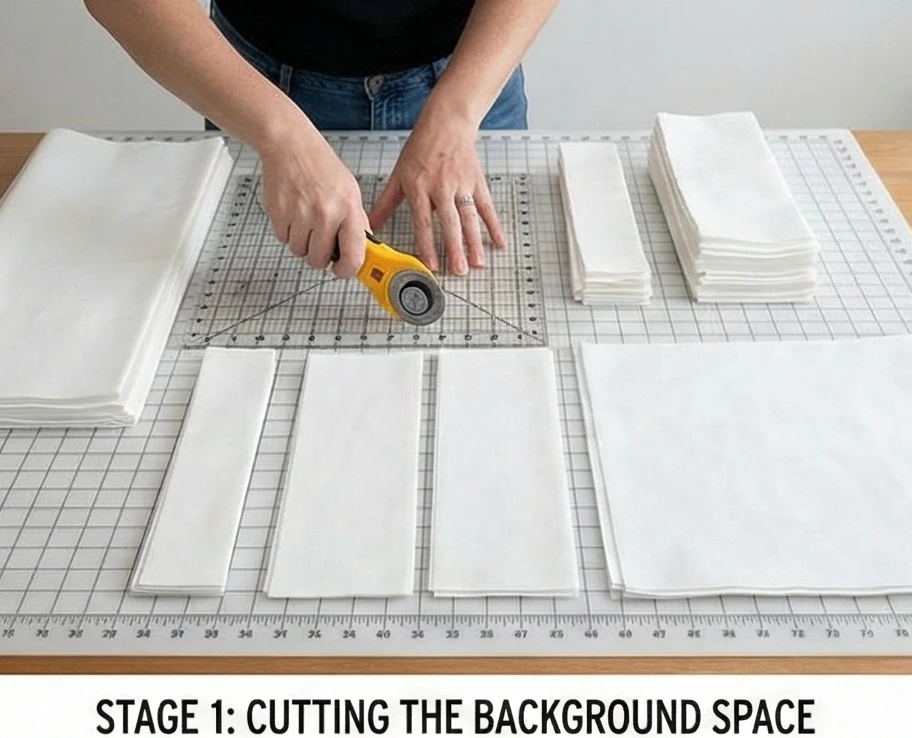
Step 1: Cutting the Background Space
We are floating the strips, which requires solid yardage.
- The Centers: Cut four rectangles from your White/Greige yardage measuring 4.5″ x 6.5″. Unlike a traditional square center, an elongated rectangle immediately shifts the visual weight.
- The Voids: Cut several large panels from the remaining background yardage (e.g., 10.5″ x 20.5″, 14.5″ x 14.5″). These will act as the negative space where the “steps” abruptly end.
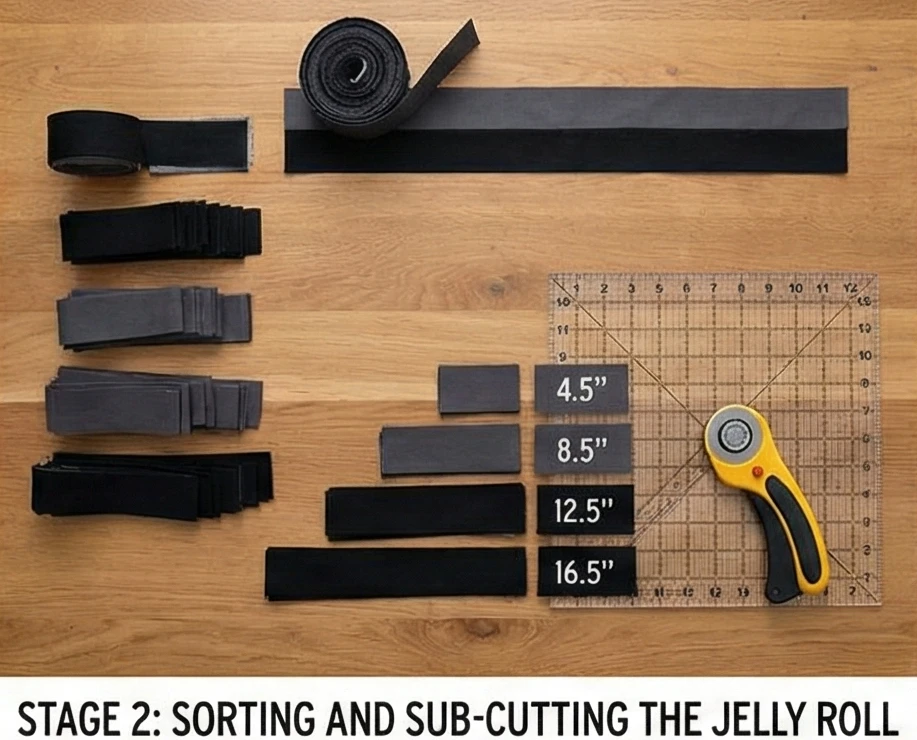
Step 2: Sorting and Sub-Cutting the Jelly Roll
Contrast creates the architecture.
- The Dark Steps: Take your Black and Charcoal strips. Sub-cut them into varying lengths: 4.5″, 8.5″, 12.5″, and 16.5″.
- The Light Steps: Take any White or Greige Jelly Roll strips you have and cut them to the same varying lengths.
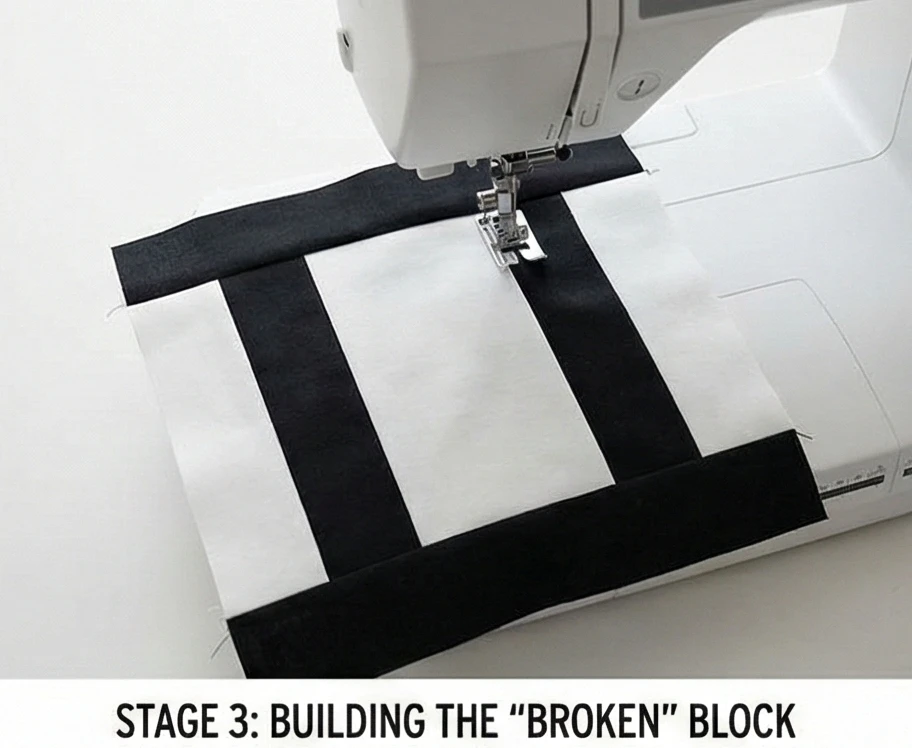
Step 3: Building the “Broken” Block
We only build on three sides.
- The Core: Take a White 4.5″ x 6.5″ center rectangle. Sew a 4.5″ Black strip to the Left side. Press outward.
- The Top and Bottom: Sew an 8.5″ White/Greige strip to the Top. Press outward. Sew another 8.5″ White/Greige strip to the Bottom. Press outward.
- The Missing Side: Do not add a strip to the Right side. Leave it bare.
- Grow the Asymmetry: Add a 12.5″ Black strip to the Left. Add 16.5″ White/Greige strips to the Top and Bottom. You now have a block that resembles a Courthouse Step, sliced cleanly down the middle. Make 4 oversized half-blocks.
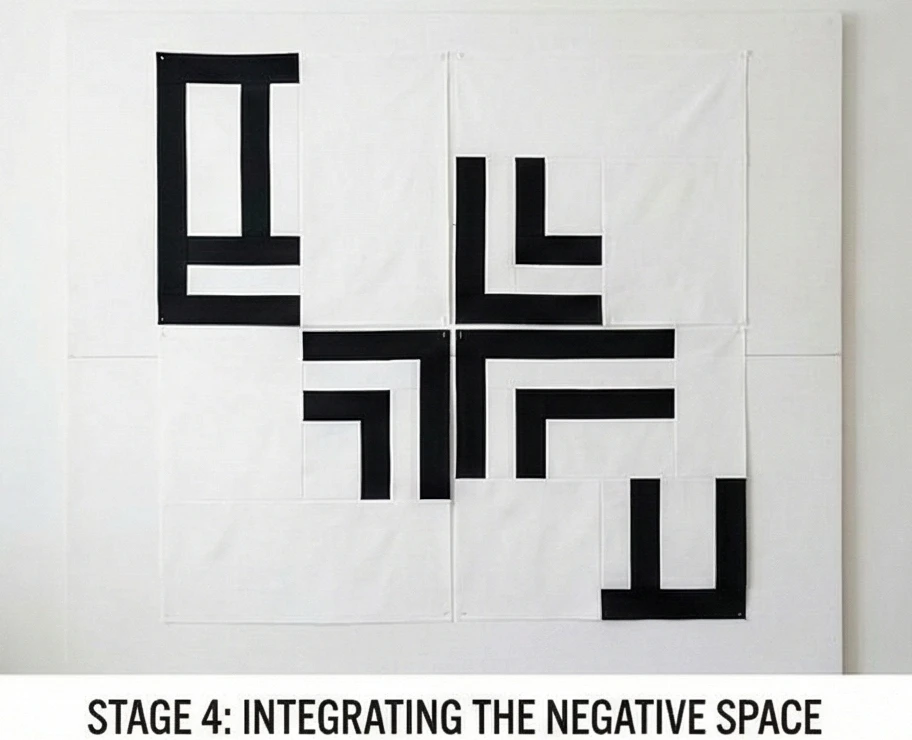
Step 4: Integrating the Negative Space
The blocks must breathe.
- Floating the Blocks: Take your large background “Void” panels (cut in Step 1). Sew them directly to the bare right edges of your broken blocks.
- The Layout: Arrange the four oversized sections into a 60″ x 60″ grid. Rotate them so the heavy Black “steps” point in different directions—some cascading from the top left, others anchoring the bottom right. This creates a sweeping, dynamic movement across the entire throw.
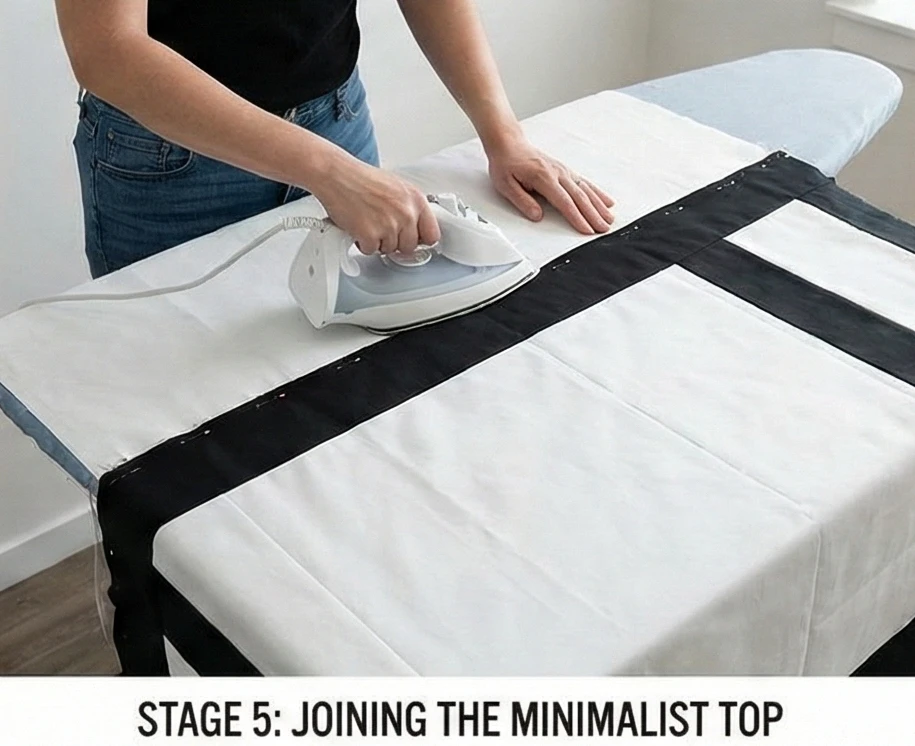
Step 5: Joining the Minimalist Top
Handling large expanses of solid fabric.
- Pinning: When sewing large blocks of solid background fabric together, bias stretch is a real danger. Starch the edges lightly and use fine glass-head pins every 3 inches before sewing the four massive quadrants together.
- Pressing: Press all intersecting seams open so the quilt top lies completely flat and architectural.
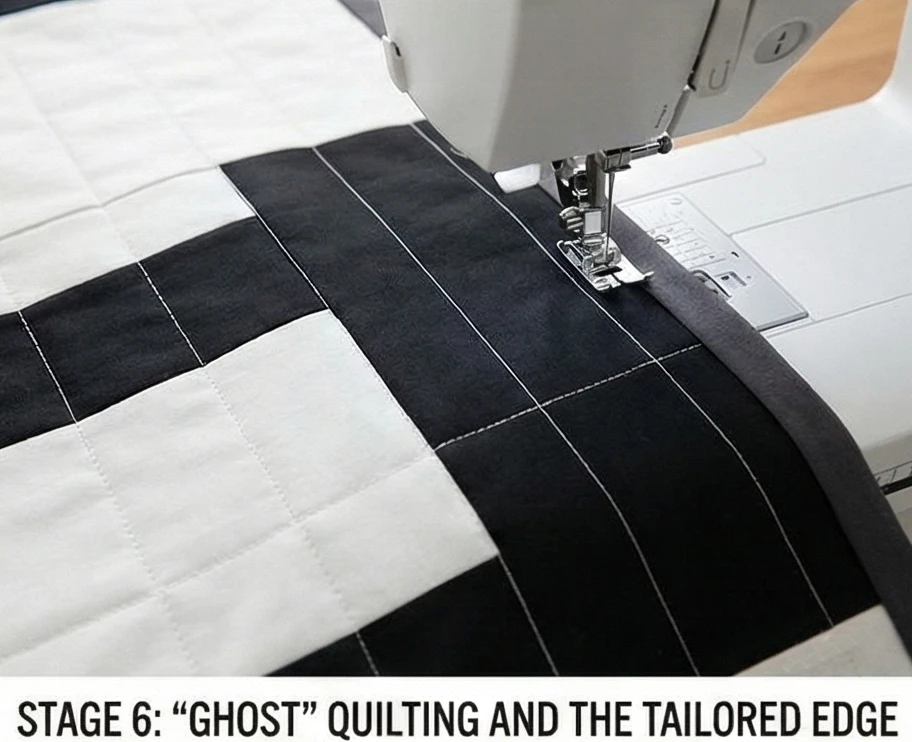
Step 6: “Ghost” Quilting and the Tailored Edge
Texture without distraction.
- Baste: Sandwich the minimalist top, the bamboo batting, and the cozy flannel backing.
- Ghost Lines: Using a walking foot and White thread, quilt straight horizontal and vertical lines spaced 2 inches apart across the entire quilt. When the white thread crosses the dark Black strips, it creates a subtle, modern grid. When it crosses the solid White background, it creates beautiful, purely textural “ghost” lines.
- The Finish: Bind the quilt using a solid Charcoal or Black fabric. This sharp, dark edge serves as a boundary, framing the chaotic asymmetry of the deconstructed blocks and finishing the throw with bespoke elegance.
Usability Note: Living room throws are subjected to coffee spills, pet hair, and daily lounging. Flannel and bamboo are both highly durable and machine washable. Wash this throw on a cool, gentle cycle and tumble dry on low. The bamboo batting will soften beautifully with each wash, giving the architectural top a slightly crinkled, deeply inviting texture.
12. Sophisticated Herringbone Quilt Patterns for Modern Sofas
“The Obsidian Herringbone” High-Contrast Sofa Throw
The Herringbone pattern is the epitome of tailored sophistication. Often confused with the Chevron, a true Herringbone staggers its angles, creating a broken, interlocking zig-zag that feels incredibly architectural and dynamic. “The Obsidian Herringbone” brings this menswear-inspired geometry to the living room. Assembled from pre-cut Jelly Roll strips in a striking palette of crisp White, deep Black, and soft Greige, punctuated by a single sharp strip of Deep Red, this throw becomes a focal point of modern elegance. Because it utilizes strip-piecing rather than individual triangles, this complex-looking design comes together with brilliant efficiency.
Finished Dimensions: Generous Sofa Throw, 60″ x 70″.
Materials Needed:
- The “Weave” (Strips): 1.5 Jelly Rolls (approx. 60 strips measuring 2.5″ x 42″) in a mix of Black, White, and Greige.
- The “Accent” (Strips): 4 to 6 Jelly Roll strips of solid Deep Red.
- Backing: 4 yards of high-quality Greige Flannel or Brushed Cotton.
- Batting:100% Bamboo Batting or a Wool Blend.
- Why: A modern sofa throw must drape effortlessly without feeling stiff or bulky. Bamboo batting is exceptionally fluid, breathable, and temperature-regulating, ensuring the throw is luxuriously cozy for a movie night but sleek enough to lie beautifully flat over the armrest of a leather sofa.
- Thread: 50wt cotton thread in an invisible Dove Grey.
- Notions: A large acrylic ruler with a 45-degree angle line, a rotary cutter, and spray starch.
Cultural Backstory: The Herringbone pattern, formally known as “Opus spicatum” (spiked work), was invented by the Roman Empire for paving their legendary roadways. The interlocking brickwork absorbed the shock of heavy carts better than straight lines. In the 18th and 19th centuries, Scottish and Irish weavers adopted the pattern for tweed suiting, cementing it as a timeless symbol of durable, refined elegance.
Step 1: Designing the “Strata” Panels
The color rhythm determines the final look.
- Plan the Sequence: Group your strips into sets of five. To create a high-contrast, modern aesthetic, alternate your values and strategically insert the accent color.
- Example Sequence: White -> Black -> Greige -> Deep Red -> White.
- Prepare for Sewing: Lay out roughly 12 identical sets of these five strips. Starch them lightly to prevent the edges from stretching later.
Step 2: Strip-Piecing the Panels
Sewing the horizontal blocks.
- Sew and Alternate: Sew the sets of five strips together along their long edges to create wide panels. Remember to alternate your sewing direction (sew strip 1 to 2 from top-to-bottom, then strip 2 to 3 from bottom-to-top) to keep the panel perfectly straight.
- Press: Press all the seams in one direction (e.g., toward the Black/Red strips). You now have several striped panels measuring 10.5″ wide by 42″ long.
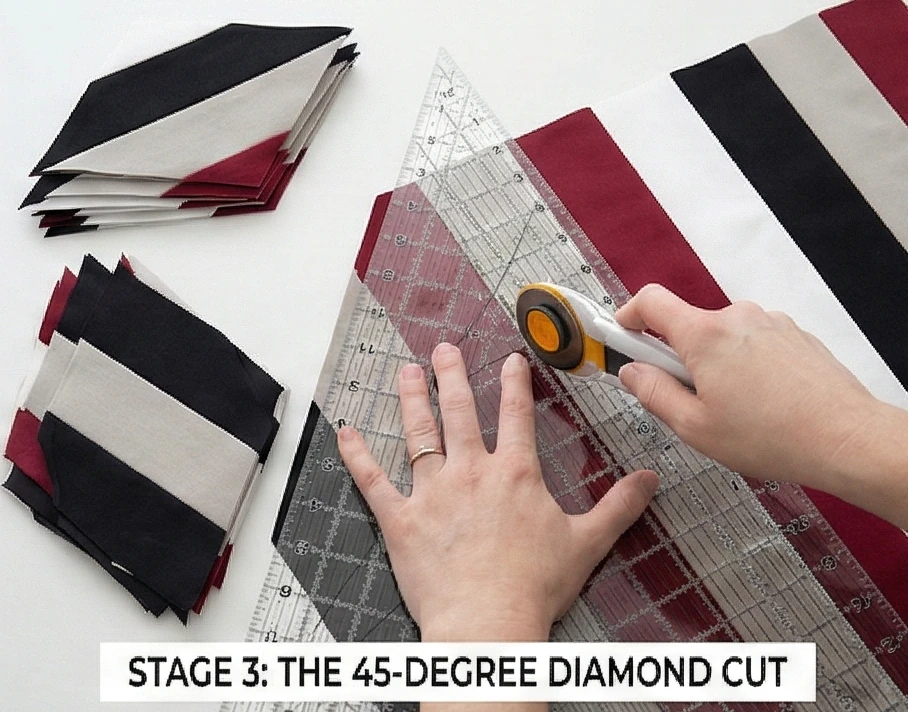
Step 3: The 45-Degree Diamond Cut
Slicing the stripes into angles.
- Align the Ruler: Lay a striped panel flat on your cutting mat. Find the 45-degree line on your acrylic ruler and align it precisely with one of the horizontal seams in your panel.
- The First Cut: Slice the raw edge off the left side of the panel at this 45-degree angle.
- Sub-Cut the Blocks: Measure exactly 10.5 inches over from that newly cut angled edge and make your next parallel cut. You will produce a large diamond-shaped block made of diagonal stripes. Cut as many 10.5″ blocks as you can from all your panels.
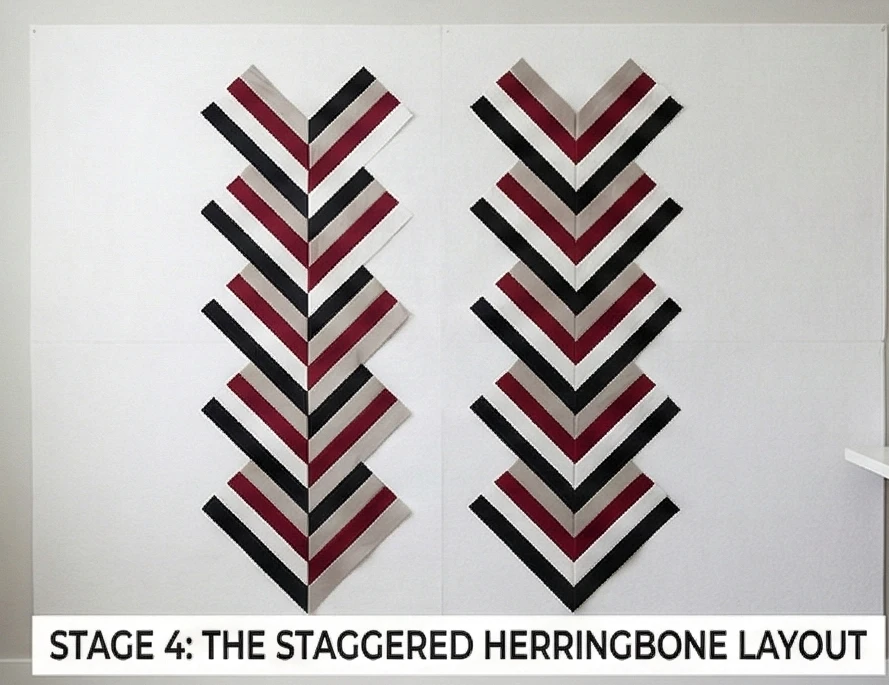
Step 4: The Staggered Herringbone Layout
This is where Herringbone separates from Chevron.
- Column A (Right-Leaning): Take half of your blocks. Arrange them vertically so the stripes point up and to the right. Sew them together, top-to-bottom, to create long vertical columns.
- Column B (Left-Leaning): Take the other half of your blocks. Arrange them vertically so the stripes point up and to the left. Sew them into vertical columns.
- The Stagger: Place Column A next to Column B. Do not match the stripes perfectly. Slide Column B up or down so the stripes hit the middle of the opposing stripes. This deliberate misalignment creates the classic, broken “fishbone” look.
Step 5: Joining the Bias Edges
Handling the stretchy seams.
- Pin Generously: The long edges of these columns are cut on the bias, meaning they are stretchy and delicate. Use fine glass-head pins every 2 to 3 inches when joining the columns together.
- Sew: Stitch the columns together slowly, letting the machine feed the fabric without pulling it. Press the long vertical seams open to keep the quilt top perfectly flat and smooth.

Step 6: Linear Quilting and Tailored Edge
Enhancing the architectural lines.
- Baste: Sandwich the pieced Herringbone top, the breathable bamboo batting, and the cozy flannel backing. Baste heavily with safety pins.
- Echo Quilting: Using a walking foot, quilt straight lines parallel to the diagonal stripes, stitching about 1/4 inch from the seams. This reinforces the herringbone pattern and gives the throw a gorgeous, ribbed texture.
- The Binding: Finish the quilt with a solid Black binding. This provides a sharp, tailored frame that contains the dynamic movement of the diagonal lines, giving it a highly polished, gallery-ready finish.
Usability Note: Bias-cut quilts (like this Herringbone) can warp if hung over a thin clothesline while wet. To maintain the crisp, geometric shape of this throw, wash it on a cool, gentle cycle and tumble dry on low heat until it is about 80% dry, then lay it flat across a bed or a drying rack to finish air-drying.

13. Durable Jelly Roll Couch Covers for Everyday Family Comfort
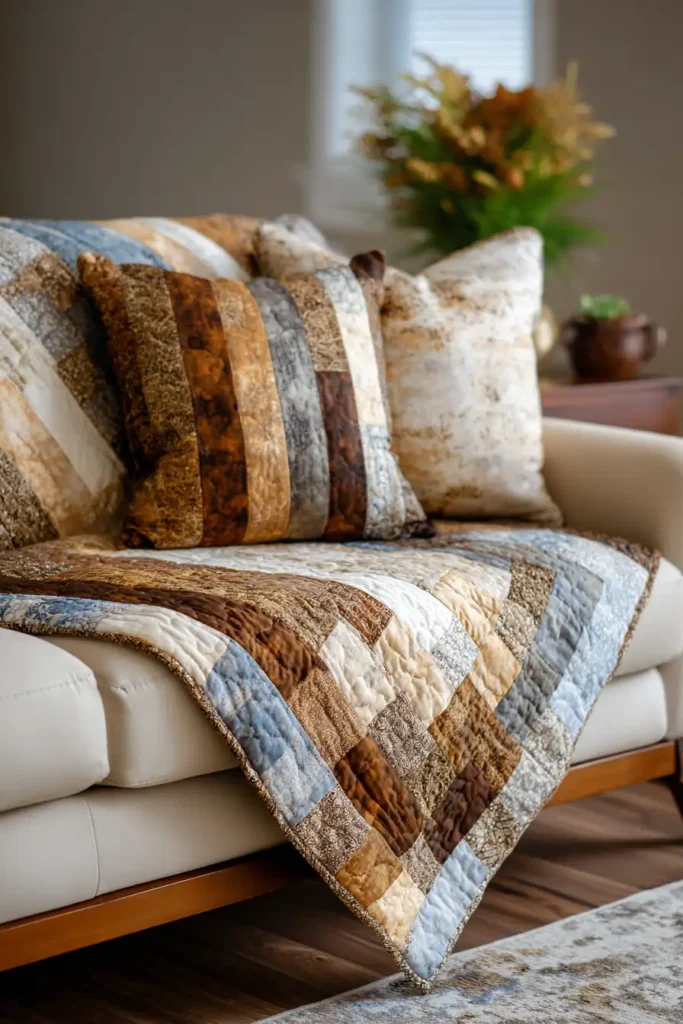
“The Urban Brickwork” Heavyweight Couch Cover
Couch covers are notoriously difficult to get right; they often look rumpled, sloppy, or purely utilitarian. To create a cover that actively elevates a living room while surviving the daily friction of family life, pets, and movie nights, we must combine heavy-duty construction with a striking, tailored aesthetic. “The Urban Brickwork” achieves this by utilizing a modernized, staggered “Rail Fence” or brick layout. Rendered in a high-contrast, dirt-concealing palette of crisp White, soft Greige, and deep Black, punctuated by structural cornerstones of Deep Red, this piece acts as a massive geometric tapestry that protects your upholstery in style.
Finished Dimensions: Oversized Sofa Protector, 70″ x 90″ (Drapes generously over a standard 3-seater sofa).
Materials Needed:
- The “Bricks” (Strips): 2 Jelly Rolls (approx. 80 strips measuring 2.5″ x 42″) in a solid gradient of Black, Charcoal, Greige, and White.
- The “Mortar” (Cornerstones): 1/2 yard of solid Deep Red fabric.
- Backing: 5.5 yards of heavy Greige Wide-Wale Corduroy or Upholstery-Weight Flannel.
- Why: Standard cotton backing will slide right off a leather or microfiber sofa the moment someone sits down. Corduroy or heavy flannel provides a “grippy” texture that acts as a natural non-slip anchor, keeping the elegant cover perfectly in place.
- Batting: Wool or a Bamboo/Cotton Blend.
- Why: For a family couch cover, you need extreme durability without sacrificing breathability. Wool and bamboo are highly resilient fibers that recover from heavy compression (sitting) while remaining cozy and temperature-regulating.
- Thread: 40wt or 50wt Heavy-Duty cotton thread in Charcoal.
- Notions: A rotary cutter, a large acrylic ruler, and heavy-duty sewing machine needles (Size 90/14).
Cultural Backstory: The staggered “Brickwork” or “Rail Fence” pattern is one of the oldest utilitarian quilt designs in the world, originally created to use up heavy scraps of corduroy and suiting wool to make indestructible draft-blockers. By staggering the seams (just like a mason lays bricks), early quilters realized they were creating a structurally superior textile that was far less likely to rip under heavy strain than blocks with perfectly aligned intersections.
Step 1: Prepping the “Mortar” Cornerstones
These tiny squares provide the modern color pop and the structural break.
- Cut Strips: Cut six 2.5-inch strips from your solid Deep Red yardage.
- Sub-Cut Squares: Cut those strips into perfect 2.5″ x 2.5″ squares. You will need roughly 80 to 100 squares to act as your visual “mortar.”
Step 2: Slicing the Jelly Roll “Bricks”
Varying lengths create the modern, staggered geometry.
- The Dark Bricks: Take your Black and Charcoal strips. Cut them into random lengths ranging from 6.5 inches to 18.5 inches.
- The Light Bricks: Cut your White and Greige strips into similar but varying lengths.
- The Piles: Keep your light bricks and dark bricks in separate piles to make assembling the high-contrast rows easier.
Step 3: Chain-Piecing the Rows
Building the long, horizontal panels.
- The Sequence: Take a Black brick. Sew a Deep Red cornerstone to the end of it. Then, sew a Greige brick to the other side of the red square.
- Build the Width: Continue this random sequence (Dark Brick -> Red Square -> Light Brick -> Red Square) until the row measures approximately 72 inches long.
- Repeat: Create 36 individual horizontal rows using this exact method. Press all seams in one direction (towards the darker fabrics).
Step 4: The Masonry Layout (Staggering the Joints)
The secret to structural integrity.
- Floor Assembly: Lay Row 1 on the floor. Place Row 2 directly beneath it.
- The Golden Rule: Shift Row 2 left or right until the vertical seams (and the Red cornerstones) are completely staggered from the row above it. Never let two Red squares or two vertical seams touch. This guarantees the cover won’t have weak points that tear when someone plops down heavily on the couch.
- Trim: Once you are happy with the staggered layout, use a long ruler to trim the jagged left and right edges so the entire panel forms a flush 70″ x 90″ rectangle.
Step 5: Heavy-Duty Basting and Grid Quilting
This is upholstery, not a delicate heirloom.
- The Baste: Sandwich the pieced top, the wool/bamboo batting, and the heavy non-slip corduroy backing. Use twice as many safety pins as you normally would, as heavy backing fabrics shift easily.
- The Grid: Using a walking foot and heavy-duty thread, quilt a tight, continuous grid of straight horizontal and vertical lines spaced exactly 2 inches apart.
- Why: Dense grid quilting locks the three layers together permanently. It flattens the seams and prevents the batting from stretching or tearing under the localized pressure of elbows, knees, and pets.
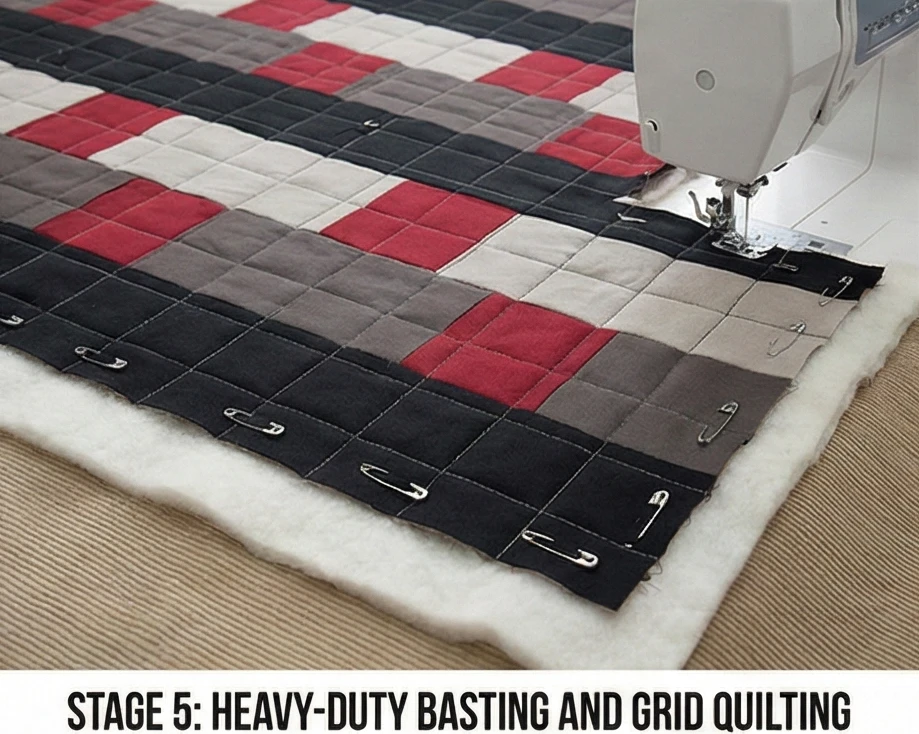
Step 6: The “Canvas Frame” Binding
The edges take the most friction.
- The Binding Fabric: Do not use standard quilting cotton for the binding. Instead, use a solid Black Canvas, Denim, or Twill.
- Double-Fold Finish: Cut your heavy binding strips 2.75″ wide (slightly wider to accommodate the thick cover). Machine-sew the binding to the front, wrap it tightly around the raw edge, and machine-stitch it down on the back. A machine-finished canvas edge will withstand years of shoes brushing against the bottom of the sofa.
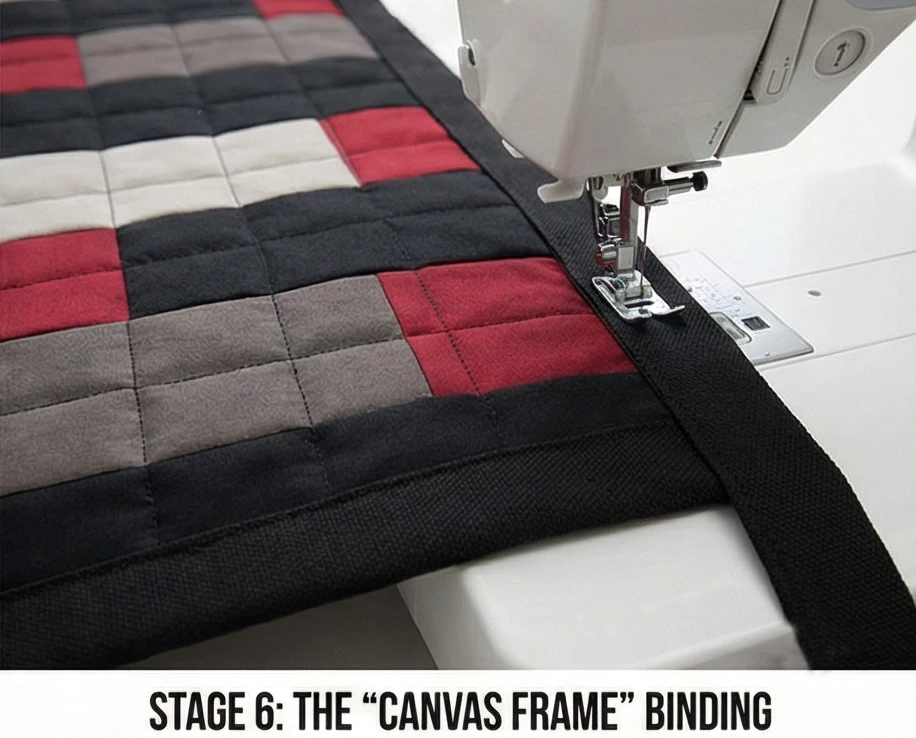
Usability Note: Because this cover is built for a bustling family room, washability is key. The dense 2-inch quilting grid means you can confidently throw this massive piece into a heavy-duty washing machine. Wash on cold to preserve the deep Blacks and Reds, and tumble dry on medium heat with wool dryer balls to fluff the internal batting back to its cozy loft.
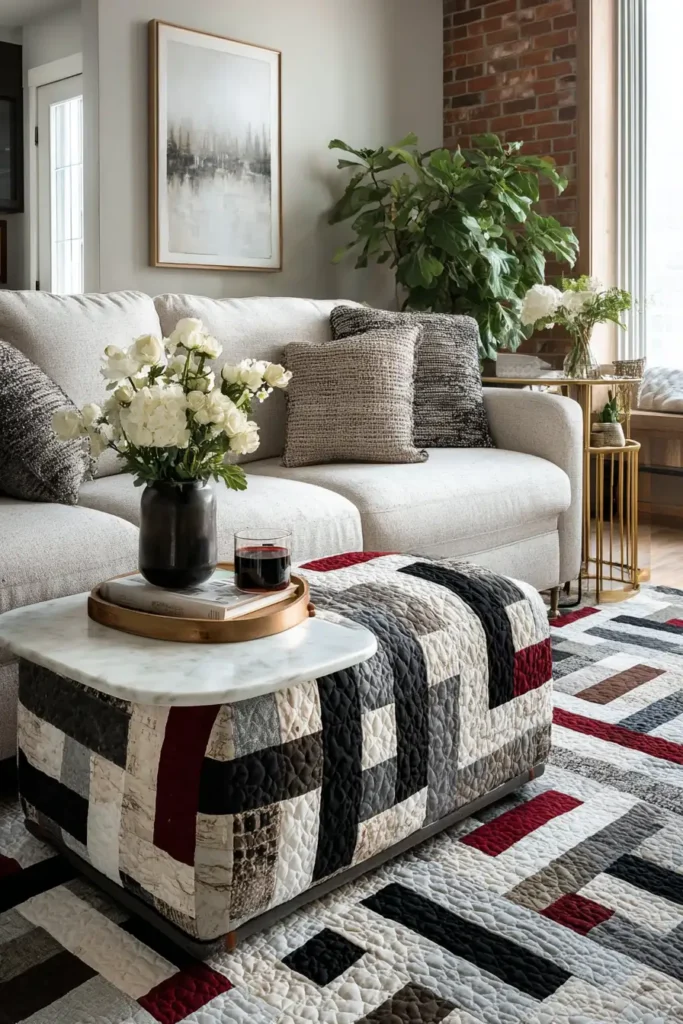
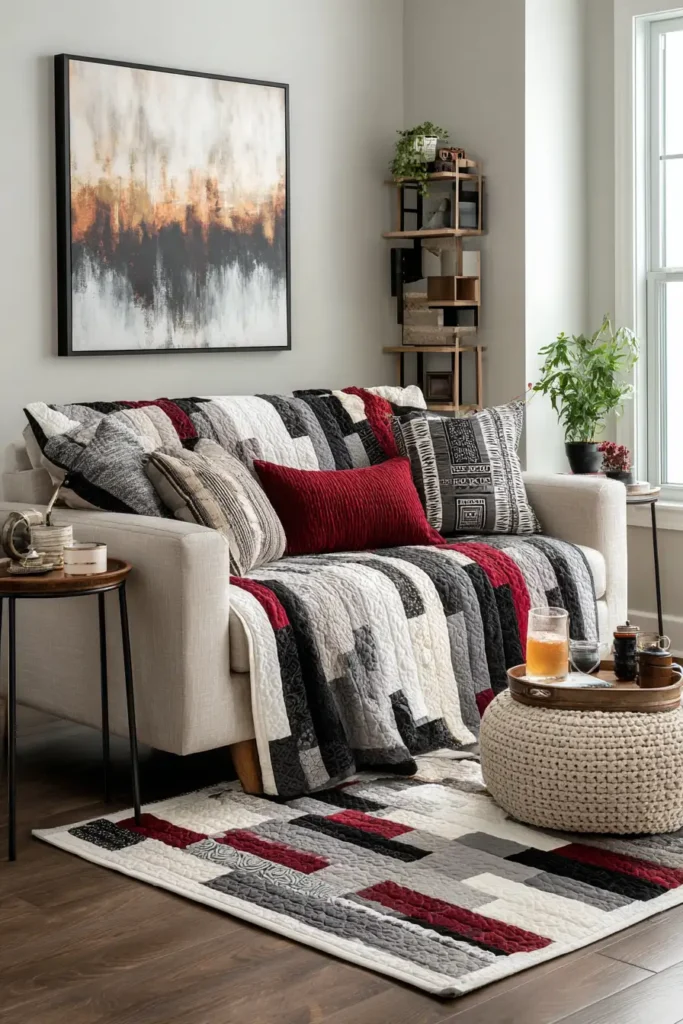
14. Elegant Jelly Roll Table Runners for Formal Dining Spaces
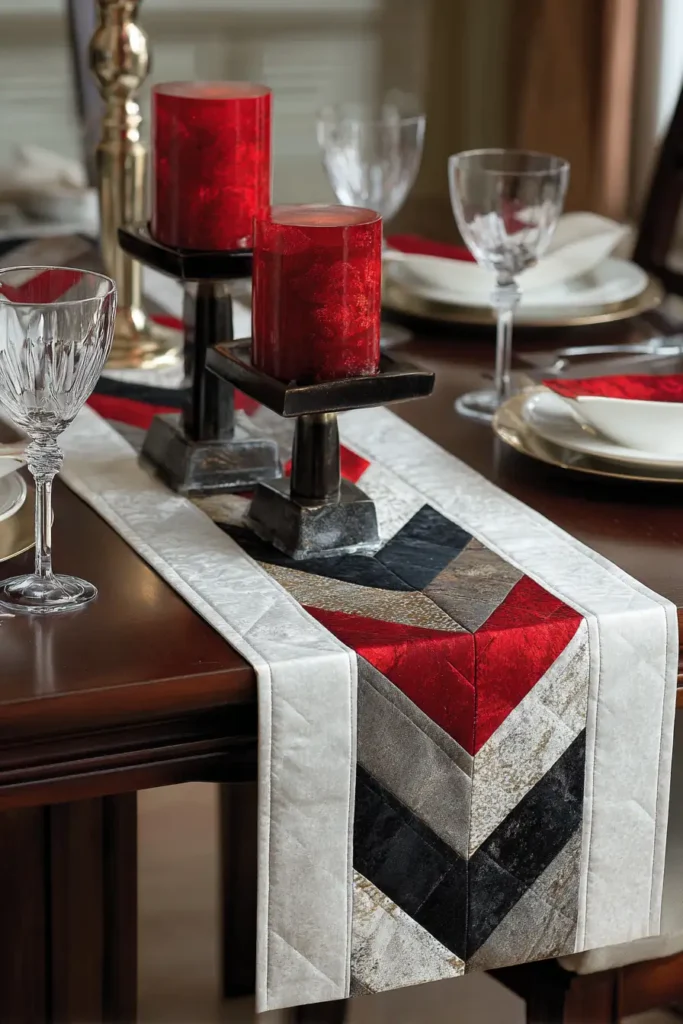
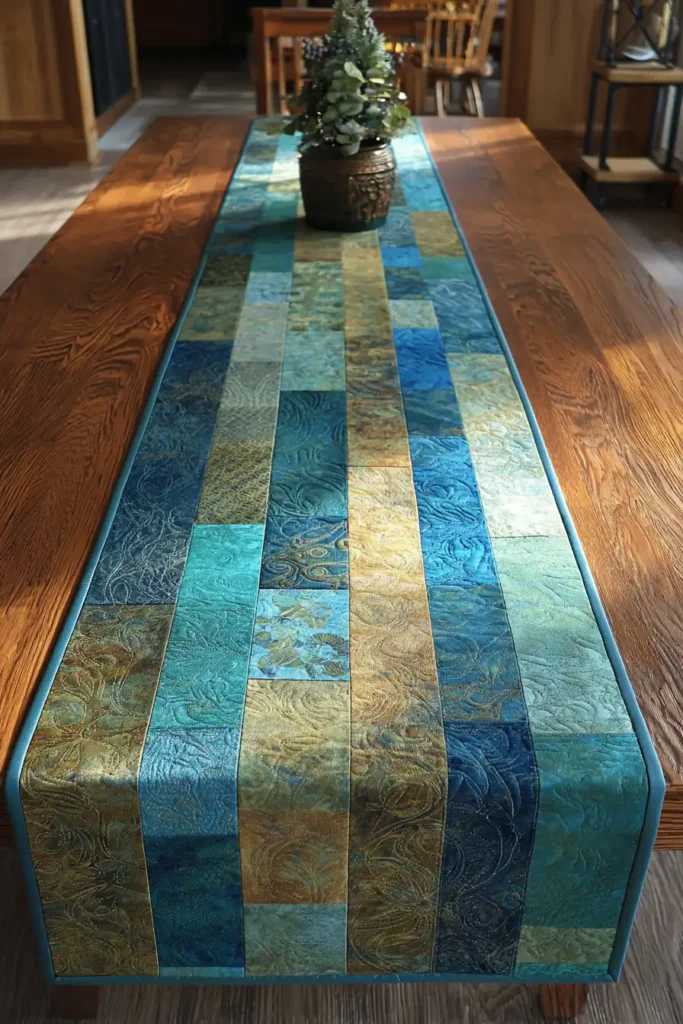
“The Metropolitan Arrow” Geometric Flying Geese Runner
A formal dining table is a centerpiece of the home, often featuring beautiful polished wood or sleek glass. A full tablecloth conceals the architecture, while a tailored table runner serves as a sophisticated accent, protecting the surface while guiding the eye along the length of the room. “The Metropolitan Arrow” uses the classic Flying Geese block, arranging the triangles to point elegantly toward the centerpieces. Rendered in a striking, high-contrast palette of crisp White, deep Black, and subtle Greige, and punctuated by a piercing center column of Deep Red, this runner brings sharp, modern geometry to your next dinner party.
Finished Dimensions: Formal Dining Runner, 16″ x 72″ (Designed to drape slightly over the ends of a standard 6-person table).
Materials Needed:
- The “Flight” (Center Geese): 1/4 yard of solid Deep Red fabric (for the geese bodies) and 4 strips from a White Jelly Roll (for the sky corners).
- The “Borders” (Ombré Strips): 8 Jelly Roll strips (2.5″ x 42″) in a gradient of White, Greige, Charcoal, and Black.
- Backing: 2 yards of high-quality Black Cotton Sateen.
- Batting: Insul-Bright (heat-resistant fleece) AND a layer of Bamboo Batting.
- Why: Elegance must meet usability. The Insul-Bright reflects heat, protecting your table’s finish from hot serving dishes. The bamboo batting adds an incredibly soft, breathable drape, ensuring the runner cascades beautifully off the table edges rather than sticking out rigidly.
- Thread: 50wt cotton thread in an invisible Dove Grey.
- Notions: A rotary cutter, a small square acrylic ruler, and a water-soluble marking pen.
Cultural Backstory: The table runner evolved during the Middle Ages. Originally, massive tablecloths were used to cover rough-hewn banquet tables, and diners wiped their hands directly on them. As dining etiquette became more refined, the “runner” was introduced as a narrow, easily washable strip placed down the center to catch spills from serving platters. Today, aligning directional quilt blocks like “Flying Geese” down a runner mimics the long, grand perspective of a formal banquet hall.
Step 1: Cutting the Geese Components
Using the 2.5-inch strip width for perfect math.
- The Red Bodies: Cut your solid Deep Red yardage into rectangles measuring 2.5″ x 4.5″. You will need exactly 18 rectangles.
- The White Sky: Take your crisp White Jelly Roll strips and sub-cut them into perfect 2.5″ x 2.5″ squares. You will need 36 squares.
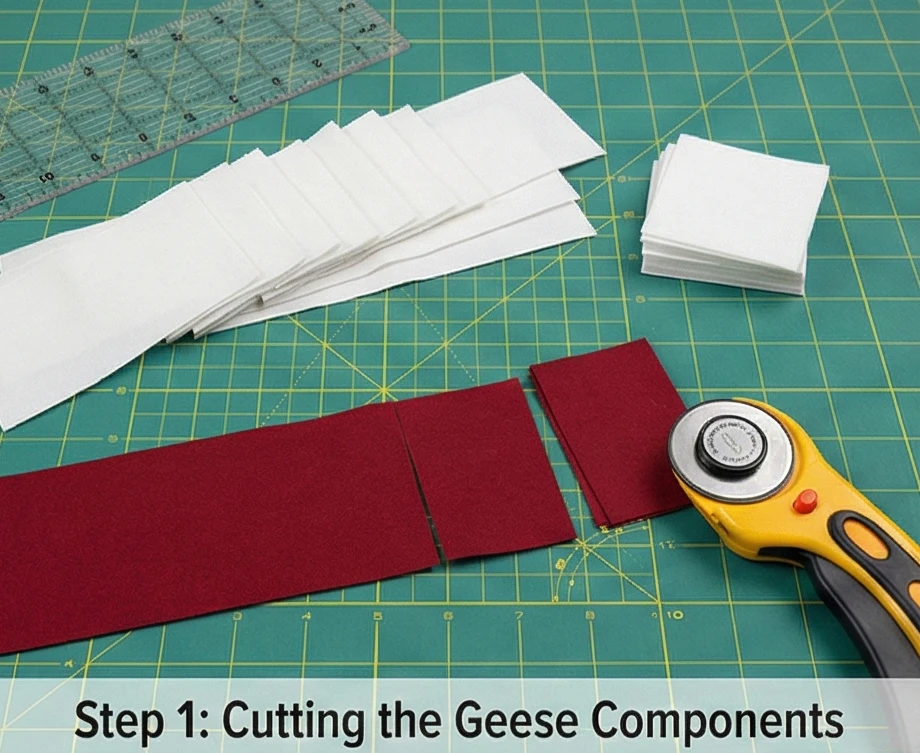
Step 2: The “Stitch-and-Flip” Geese
Creating perfect triangles without sewing bias edges.
- Mark the Corners: Draw a diagonal line from corner to corner on the back of all 36 White squares.
- The Right Wing: Place a White square face-down on the right side of a Deep Red rectangle. Stitch directly on the drawn line. Trim the excess corner fabric, leaving a 1/4-inch seam, and press the white triangle open.
- The Left Wing: Repeat this process on the left side of the rectangle.
- Result: You now have 18 vibrant Deep Red Flying Geese, bordered by White sky, each measuring 2.5″ x 4.5″ unfinished.
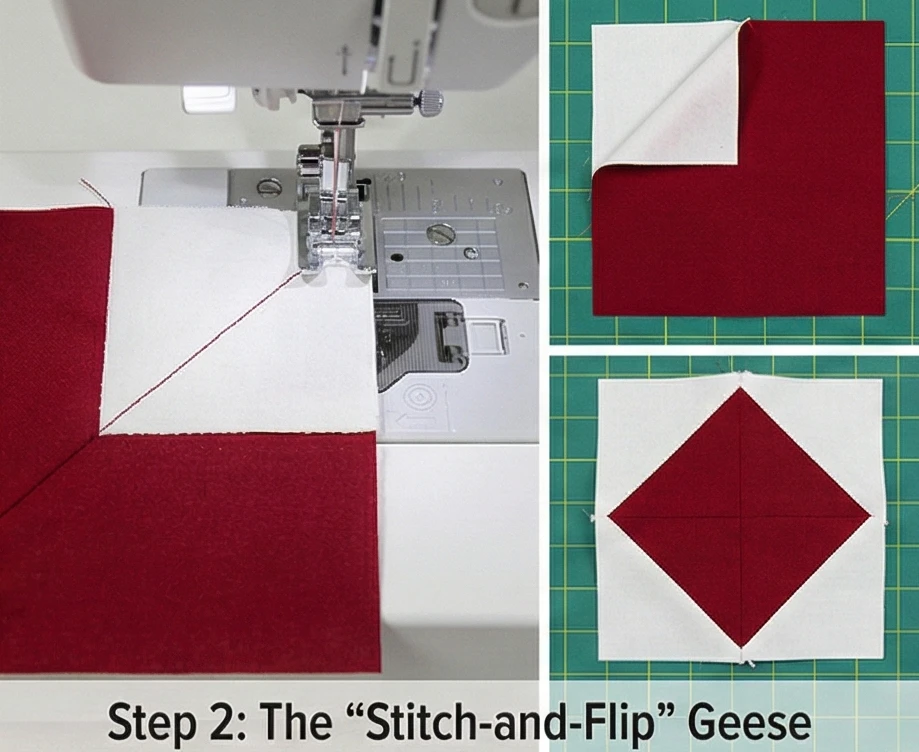
Step 3: Assembling the “Arrow” Center
Creating the directional focal point.
- The Layout: Arrange the 18 Geese blocks in a single vertical column. Have 9 geese pointing “Up” and 9 geese pointing “Down,” so they all point toward the exact center of the runner (where a floral arrangement or candle would sit).
- Sew the Column: Chain-piece the geese together, top-to-bottom. Press all the seams open to keep this center column lying incredibly flat. The finished column will measure 4.5″ wide by 36.5″ long. (Note: You will extend this length in Step 4).
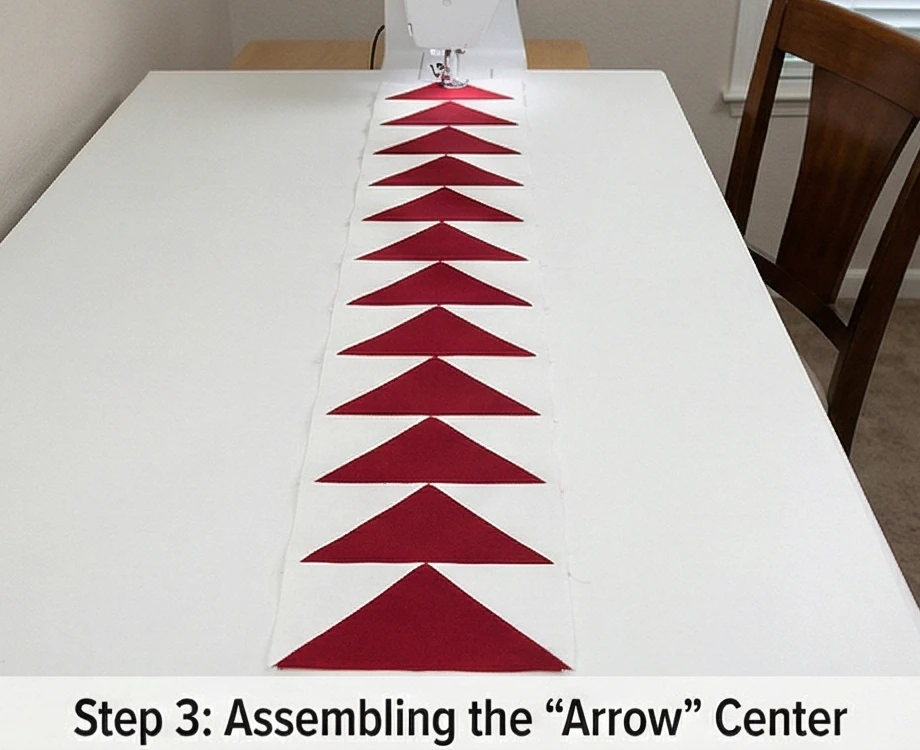
Step 4: The Ombré Strip Borders
Framing the geometry with a smooth fade.
- Prepare the Strips: Take your remaining Jelly Roll strips and sew them end-to-end so you have two long strips of White, two of Greige, two of Charcoal, and two of Black (each measuring at least 75″ long).
- Build the Gradient: Sew these long strips together along their sides to create two Ombré border panels. The sequence should be: White (inner) -> Greige -> Charcoal -> Black (outer edge).
- Attach to the Center: Sew one border panel to the left side of your Geese column, and the other to the right side.
- Length Adjustment: Because the border strips are 72 inches long but the geese column is only 36.5 inches, the geese will sit directly in the middle of the table, flanked by solid, sleek ombré stripes that extend gracefully down the sides and drape off the edges.
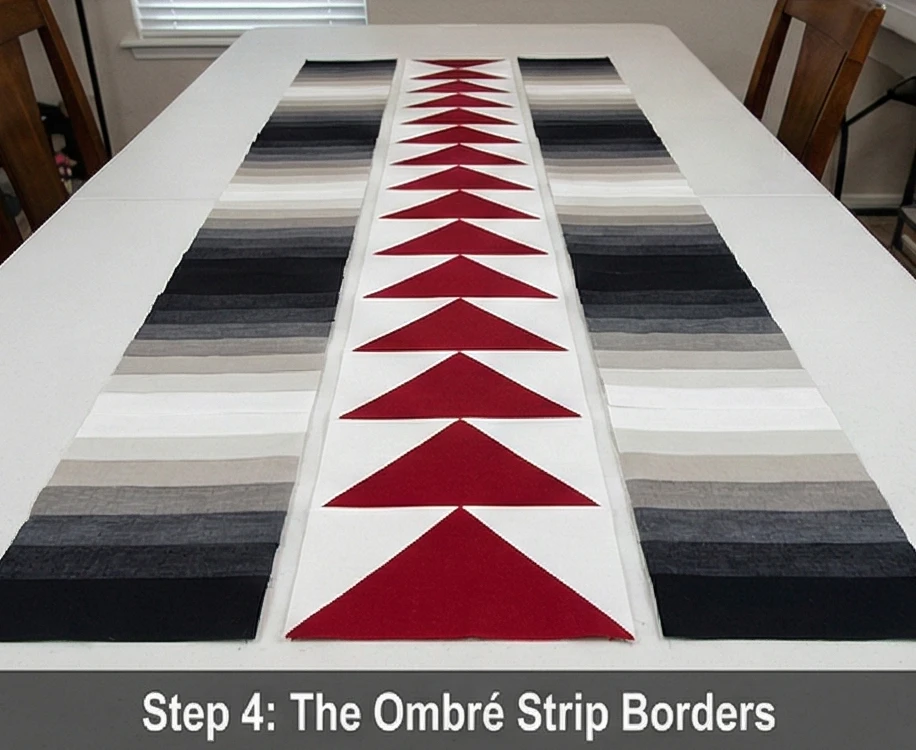
Step 5: The Heat-Proof Sandwich
Layering for dining room protection.
- The Stack: Lay your Black Sateen backing right-side down. Top it with the shiny layer of Insul-Bright (shiny side facing up toward the heat source), then the soft layer of Bamboo batting, and finally your pieced runner top.
- Baste Securely: Because of the dense Insul-Bright layer, use plenty of safety pins to baste this sandwich. Spray baste does not adhere well to the metallic film inside heat-resistant batting.
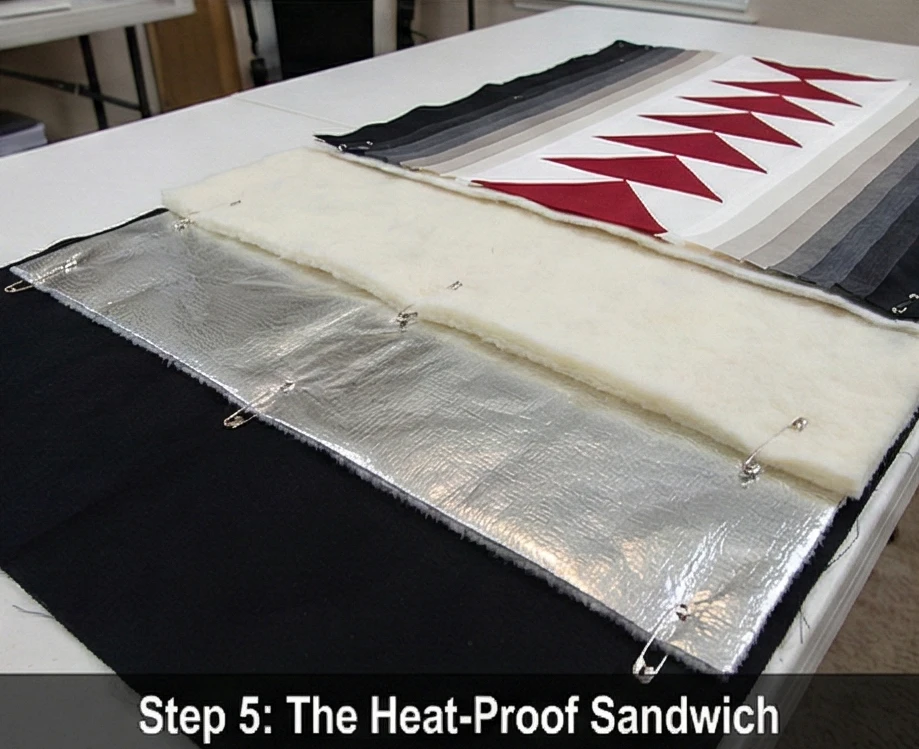
Step 6: “Echo” Quilting and the Tailored Edge
Structured stitching for a flat surface.
- Quilt the Borders: Using a walking foot, quilt straight lines running the entire length of the runner, stitching “in the ditch” between the Black, Charcoal, Greige, and White strips. This linear quilting flattens the runner, creating a stable surface for wine glasses and vases.
- Echo the Geese: In the center column, quilt “V” shapes that mimic the angles of the Deep Red triangles.
- The Binding: Trim the runner to exactly 16″ x 72″. Bind the edges in a solid Black fabric to sharply frame the piece and cleanly contain the dark outer borders.
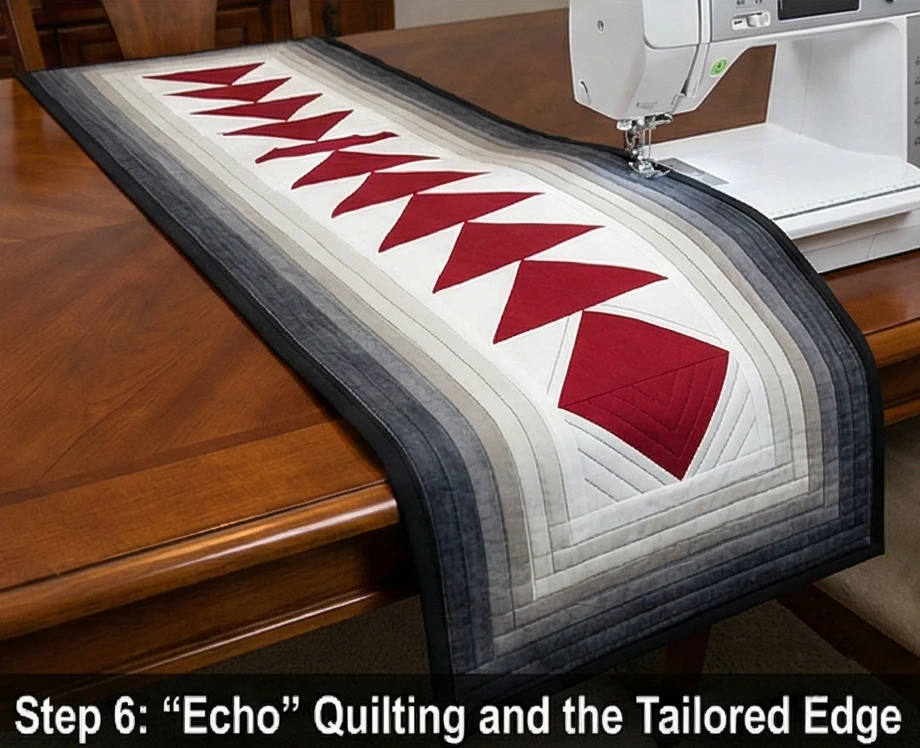
Usability Note: Dining runners are inevitably subject to wine drips or sauce splatters. The dark borders and deep red center naturally camouflage minor accidents during a dinner party. When washing, treat stains immediately in cold water, select a gentle cycle, and lay flat to dry so the Insul-Bright layer maintains its smooth, heat-reflective integrity.
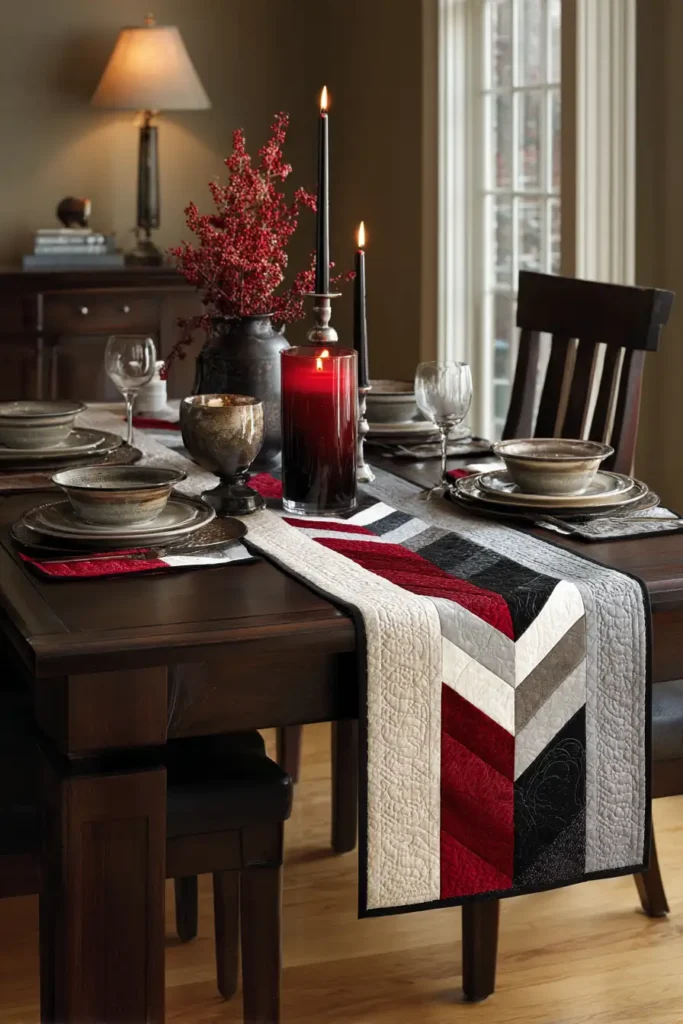

15. Farmhouse Chic Jelly Roll Placemats for Beautiful Dining
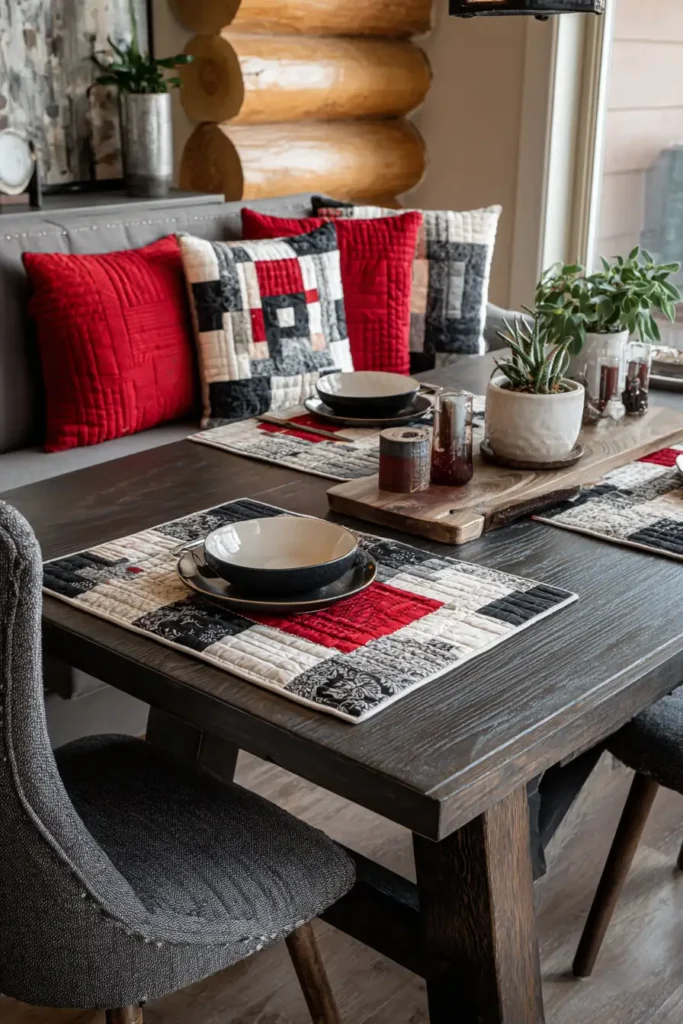
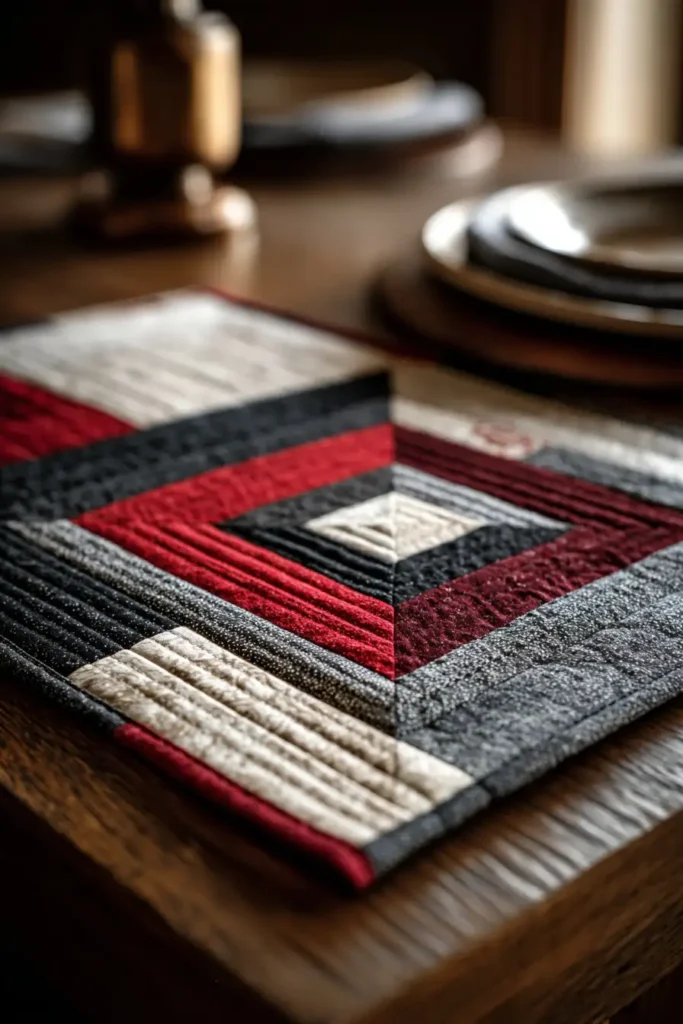
“The Hearthside Cabin” Modern Farmhouse Placemats
“Farmhouse Chic” often evokes rustic charm, but in a modern dining space, it should feel tailored, deliberate, and deeply inviting. “The Hearthside Cabin” placemats take the ultimate farmhouse staple—the traditional Log Cabin block—and refine it. Rendered in a striking, high-contrast palette of crisp White, deep Black, and soft Greige, and anchored by a single Deep Red center square, this design bridges the gap between cozy rustic roots and sleek, elegant geometry. By extending the log cabin block asymmetrically, you create a perfect 14″ x 20″ rectangle that frames a dinner plate beautifully while protecting your table.
Finished Dimensions: Standard Rectangle Placemat, 14″ x 20″ (Set of 4).
Materials Needed:
- The “Logs” (Strips): About 20 Jelly Roll strips (2.5″ x 42″) in a mix of Black, White, Charcoal, and Greige.
- The “Hearth” (Centers): A scrap of solid Deep Red fabric.
- Backing: 1.5 yards of high-quality Black Cotton Sateen or Flannel.
- Batting: Insul-Bright (heat-resistant fleece) AND a thin layer of Bamboo Batting.
- Why: Farmhouse dining implies hot, family-style meals. Insul-Bright is required here to dissipate heat from soup bowls and casseroles away from your wooden table. The bamboo batting provides a soft, breathable cushion that absorbs condensation from iced drinks and keeps the placemat perfectly flat.
- Thread: 50wt cotton thread in an invisible Dove Grey.
- Notions: A rotary cutter, a square acrylic ruler, and fabric clips (which handle thick layers better than pins).
Cultural Backstory: The Log Cabin block is the quintessential American farmhouse pattern. In pioneer lore, the center square was traditionally cut from red cloth to represent the hearth—the warm, beating heart of the home where the family gathered for meals. The light strips represented the sunlit walls of the cabin, while the dark strips represented the shadows cast by the fire. By placing this historic block on the modern dining table, you invite that same ancestral warmth into your home.
Step 1: Prepping the Hearth
Starting at the center of the home.
- Cut the Centers: Cut four exact 2.5″ x 2.5″ squares from your solid Deep Red fabric. These will serve as the focal point for each of your four placemats.

Step 2: Sorting the Light and Dark Logs
Contrast is the key to modern farmhouse style.
- The Light Pile: Gather your White and Greige strips.
- The Dark Pile: Gather your Black and Charcoal strips.
- Sub-Cut for Speed: Cut a few strips from both piles into shorter 2.5″, 4.5″, and 6.5″ lengths so they are ready to grab as you begin chain-piecing the centers.
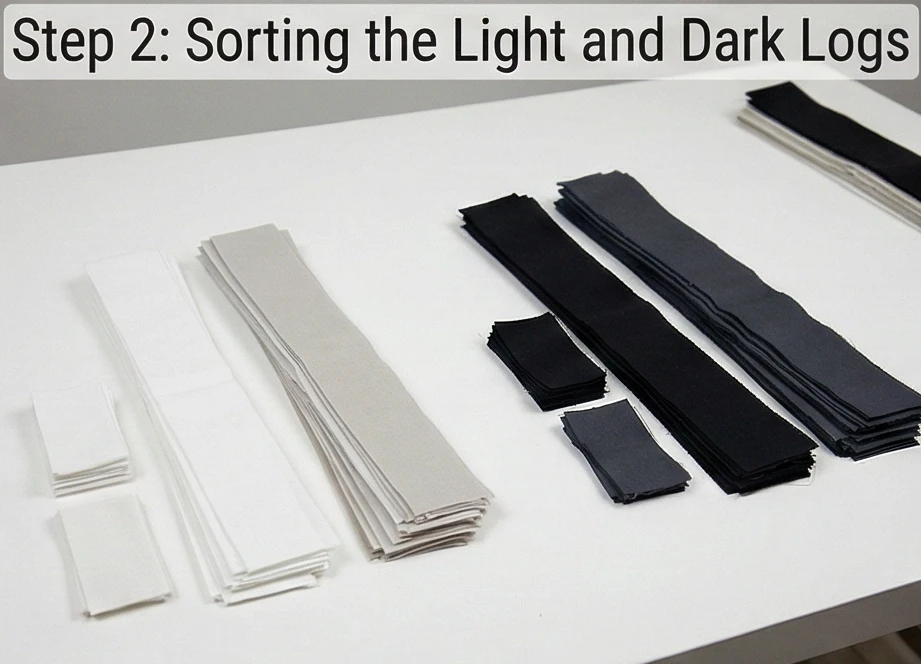
Step 3: Building the Square Cabin
Working in the traditional spiral.
- Round 1: Take a Red center square. Sew a 2.5″ Light strip to the Top. Press outward. Sew a 4.5″ Light strip to the Right. Press outward.
- Complete the Spiral: Sew a 4.5″ Dark strip to the Bottom. Press outward. Sew a 6.5″ Dark strip to the Left. Press outward. (You now have a 6.5″ block).
- Grow the Block: Continue this clockwise spiral (Light, Light, Dark, Dark) until you have completed three full rounds.
- Square Up: Your finished square block should measure exactly 14.5″ x 14.5″.
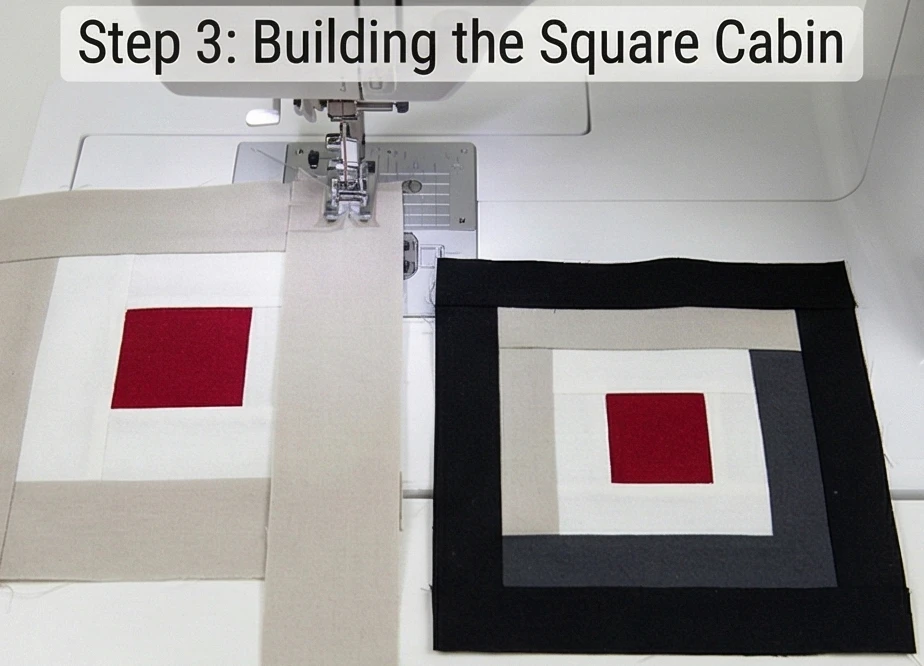
Step 4: The Asymmetrical Extension
Converting a square block into a rectangular placemat.
- The Modern Shift: A 14″ square is too small for a plate and silverware. We must extend it, but only on one side to create a chic, asymmetrical look.
- Add the Side Bars: Cut three strips measuring 14.5″ long (e.g., one Black, one Greige, one White).
- Sew to the Edge: Sew these three strips vertically to the Right side only of your Log Cabin block.
- Result: The block now measures 14.5″ tall by 20.5″ wide. The red hearth sits striking and off-center to the left (perfect for placing the dinner plate), while the sleek vertical stripes sit on the right (perfect for resting the silverware).
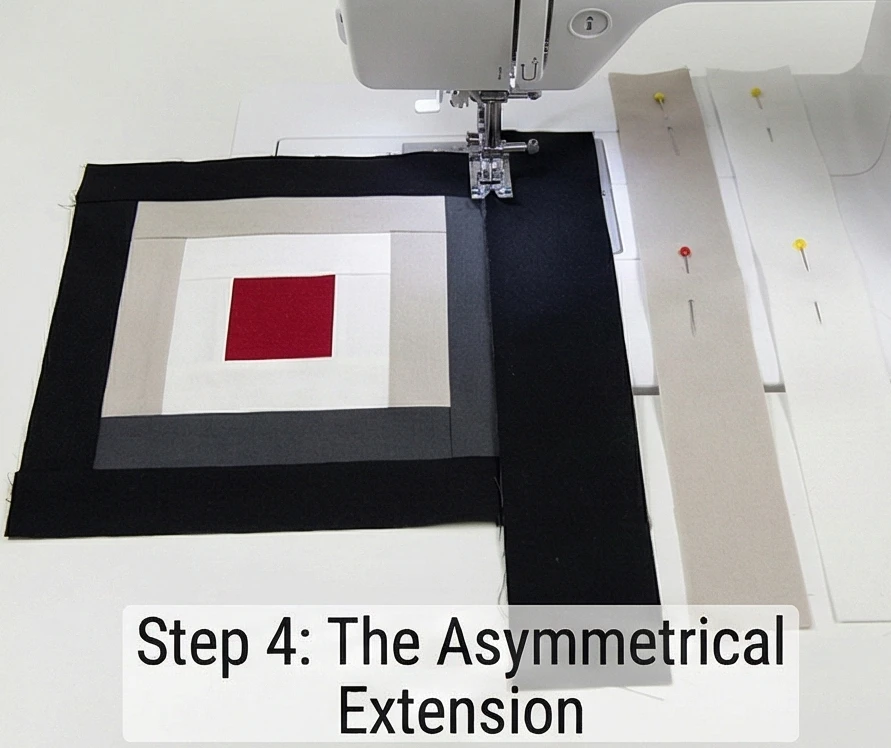
Step 5: The Thermal Basting Sandwich
Functionality meets comfort.
- Layering: Place your backing fabric face down. Top it with the Insul-Bright (shiny, metallic side facing up toward the hot plates). Finally, add the layer of thin Bamboo batting, and smooth your pieced top over it.
- Secure: Use fabric clips or safety pins at 3-inch intervals. Insul-Bright can be slippery, so dense basting is required to prevent puckers.
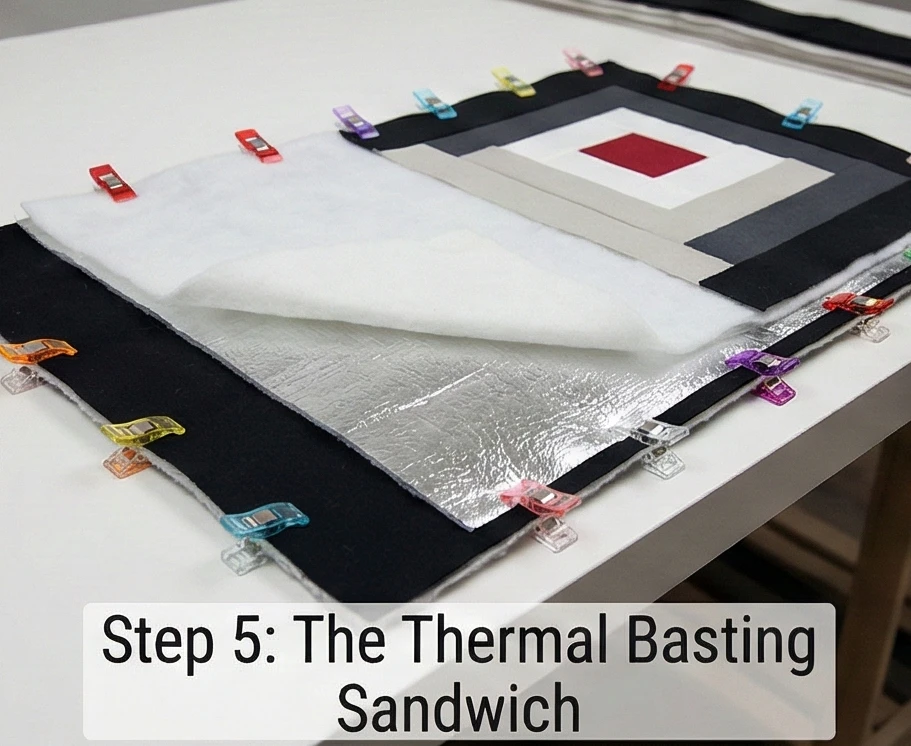
Step 6: Channel Quilting and the Tailored Frame
Creating a durable, wipeable surface.
- Linear Stitching: Drop your feed dogs or use a walking foot. Quilt straight horizontal lines across the entire placemat, spacing them exactly 1 inch apart.
- Why: Heavy channel quilting compresses the thick heat-resistant layers into a dense, flat, almost canvas-like surface. This prevents wine glasses from tipping over and makes the placemats incredibly sturdy.
- The Finish: Trim the placemats to exactly 14″ x 20″. Bind the edges tightly in a solid Black fabric to sharply frame the geometric farmhouse design and conceal the thick batting layers.
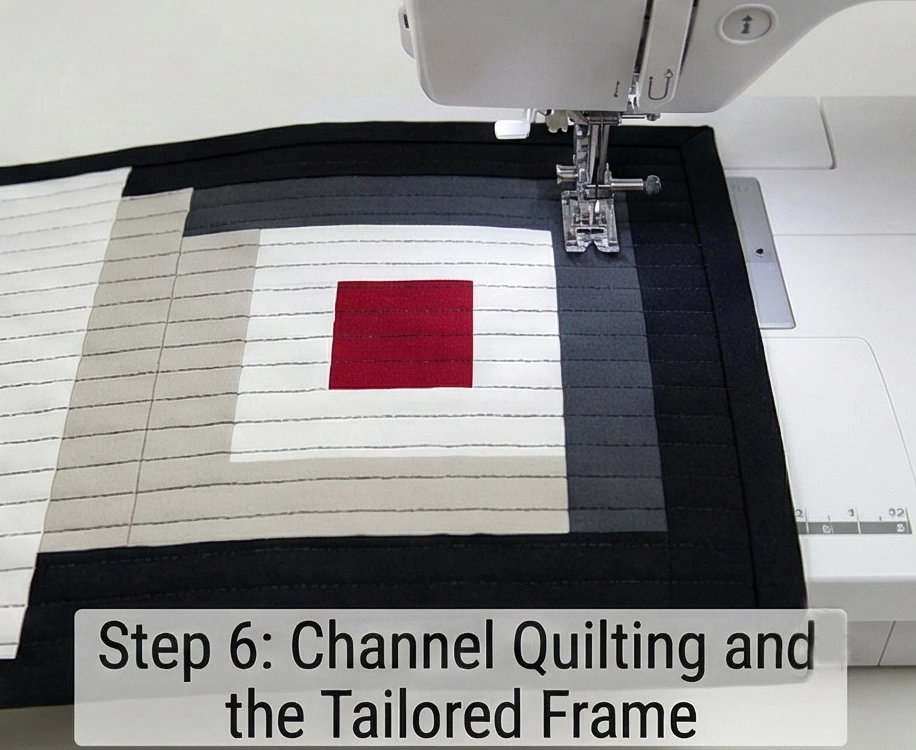
Usability Note: Dining placemats are subjected to daily spills. The heavy channel quilting ensures these placemats can survive frequent machine washing. Wash on a warm cycle and lay flat to dry. Do not microwave these placemats to warm them, as the metallic film inside the Insul-Bright can spark and cause a fire.
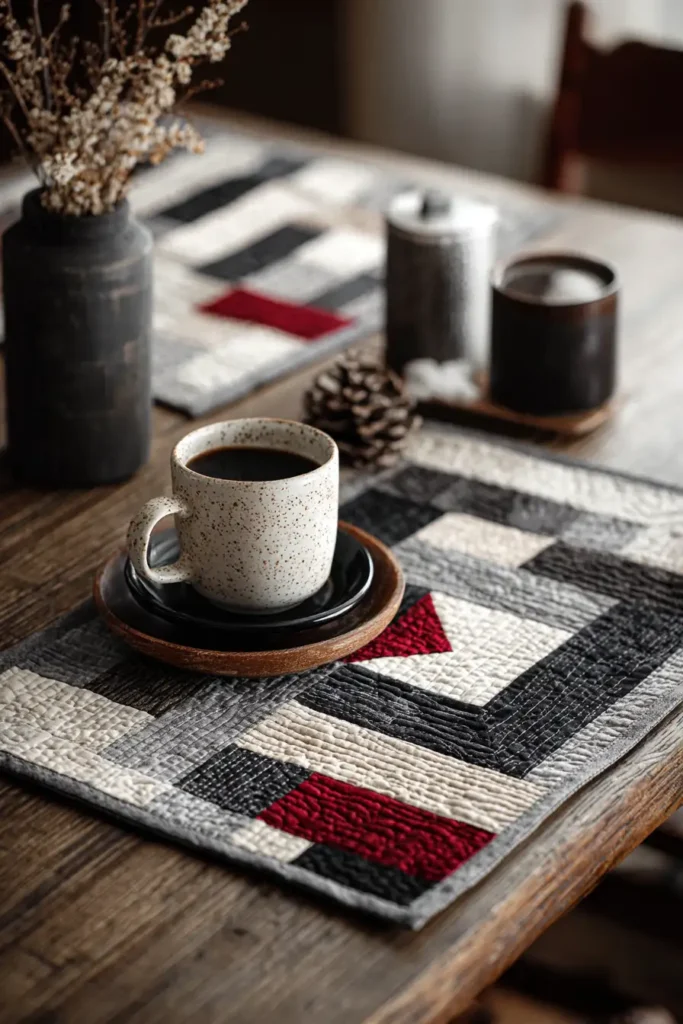
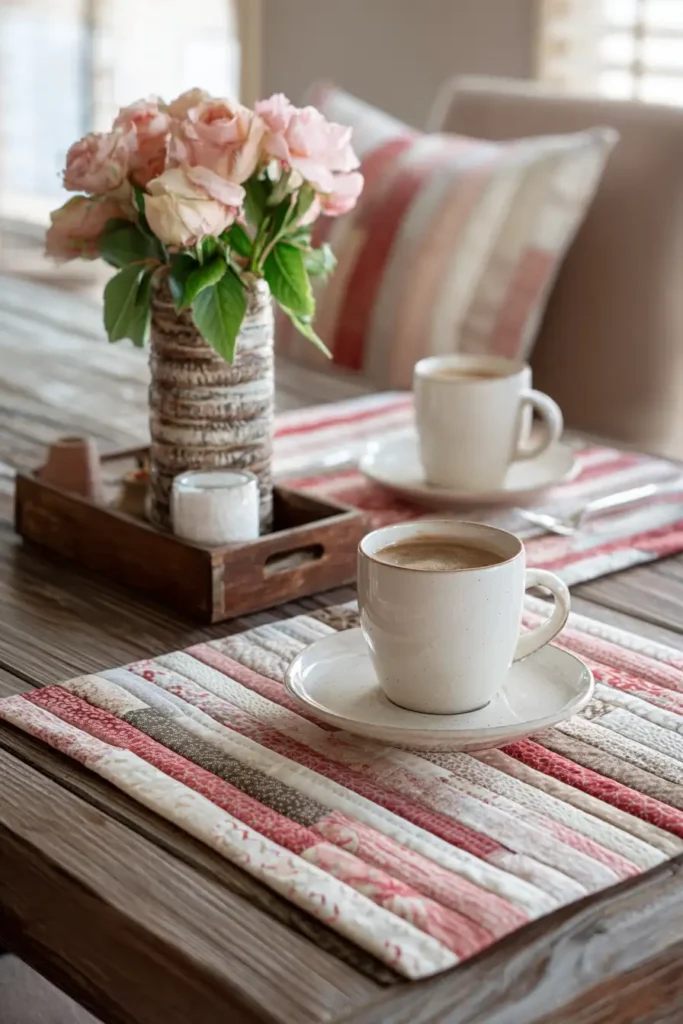
16. Intricate Braided Jelly Roll Table Toppers for Centerpieces
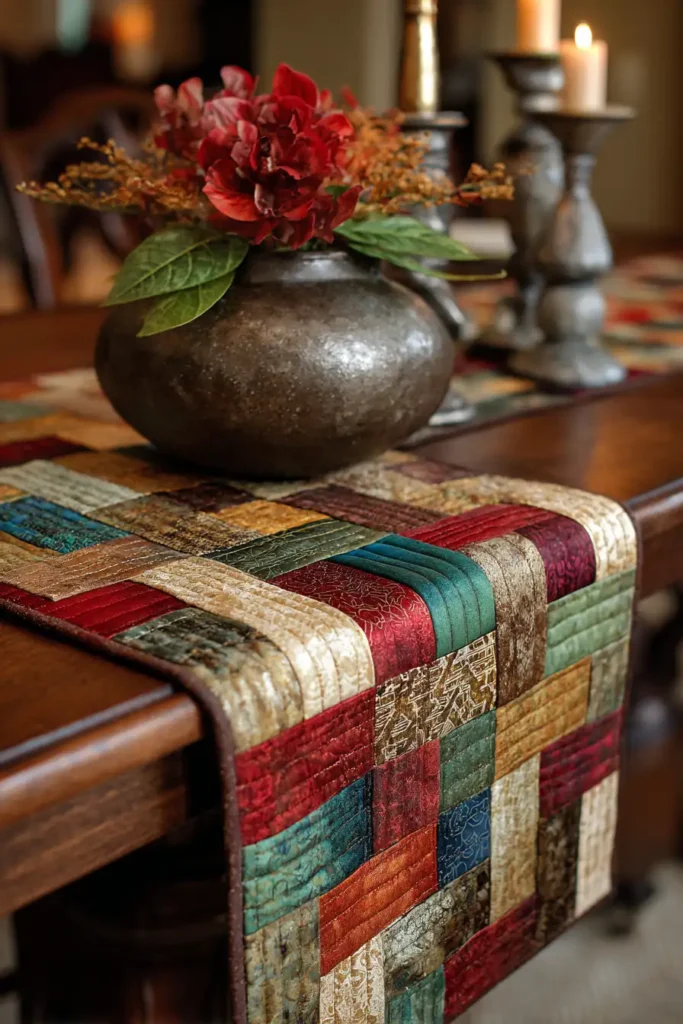
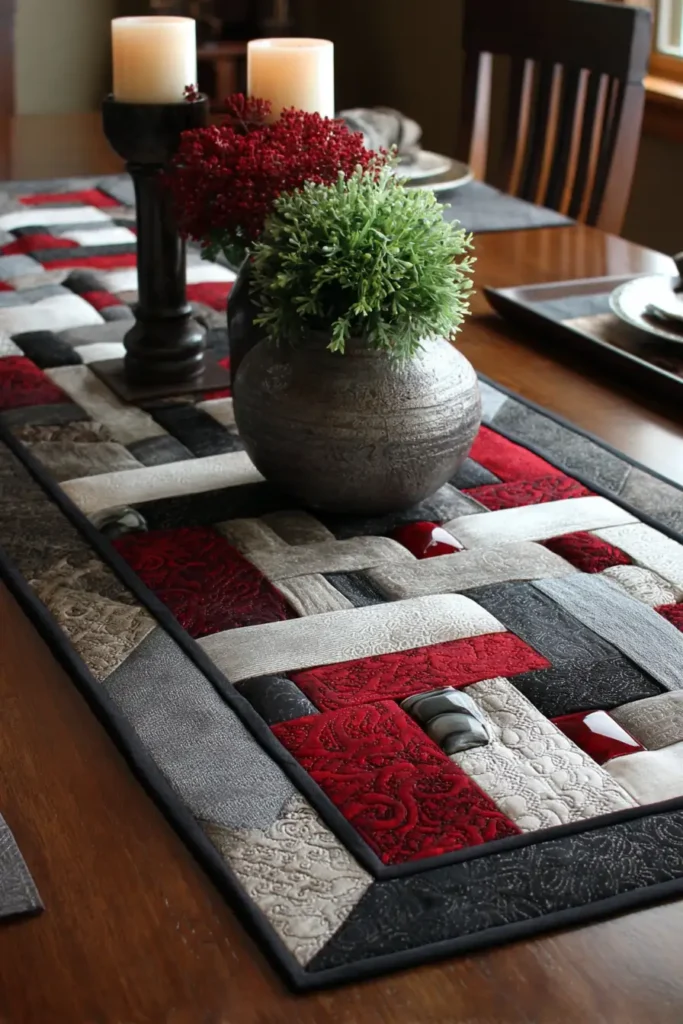
“The Obsidian Braid” French Braid Centerpiece Mat
A formal dining or coffee table centerpiece—whether a heavy candelabra or a lavish floral arrangement—needs an anchor to ground it in the room. “The Obsidian Braid” provides a stunning, textured foundation. Using the classic “French Braid” technique, this pattern creates the optical illusion of interlocking, woven ribbons. By continuing our established, highly sophisticated palette of crisp White, soft Greige, and deep Black, punctuated by a striking Deep Red keystone, the resulting topper looks incredibly complex but is constructed entirely of straight seams.
Finished Dimensions: Large Centerpiece Mat, 24″ x 36″.
Materials Needed:
- The “Ribbons” (Strips): About 25 Jelly Roll strips (2.5″ x 42″) in an even mix of Black, Charcoal, White, and Greige.
- The “Keystones” (Centers): A small scrap of solid Deep Red fabric.
- Backing: 1 yard of high-quality Black Cotton Sateen.
- Batting: Insul-Bright (heat-resistant fleece) AND a thin layer of Bamboo Batting.
- Why: A centerpiece mat often holds hot serving dishes or warm candle wax. Insul-Bright protects your wood surfaces, while the bamboo batting gives the intricate braid a soft, plush dimension that allows it to lie perfectly flat.
- Thread: 50wt cotton thread in an invisible Dove Grey.
- Notions: A rotary cutter, a large 6.5″ x 24″ acrylic ruler, and a water-soluble marking pen.
Cultural Backstory: The braided quilt technique mimics the aesthetic of woven textiles and the intricate hair braiding of the French court. In early America, braided rugs were a staple, made by tearing old wool clothes into strips and physically weaving them together to create thick, durable floor coverings. The French Braid quilt block captures that same cozy, interwoven history but translates it into a sleek, flat, architectural design for modern surfaces.
Step 1: The Precision Cut
The illusion relies on perfectly uniform strips.
- Cut the Keystones: Cut exactly three 2.5″ x 2.5″ squares from your Deep Red solid fabric. These will be the starting anchors for your three braided columns.
- Sub-Cut the Ribbons: Cut your Jelly Roll strips into smaller rectangles measuring 2.5″ x 6.5″. Keep the light (White/Greige) and dark (Black/Charcoal) strips in separate piles to make pattern creation easier.
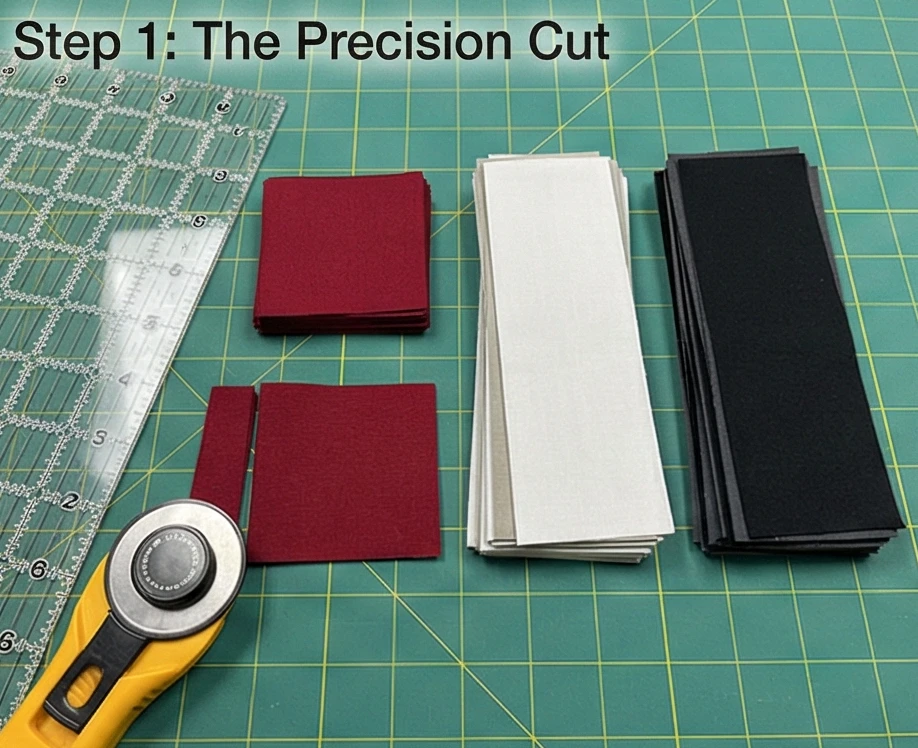
Step 2: Initiating the Weave
Every braid starts with a single knot.
- The Starting Point: Lay one Deep Red keystone square flat.
- The First Ribbon (Right): Take a White 6.5″ rectangle. Align its top short edge with the right side of the red square. Sew them together with a 1/4″ seam and press the seam away from the red square.
- The Second Ribbon (Left): Take a Black 6.5″ rectangle. Align its top short edge with the left side of the red square and the top edge of the White ribbon you just attached. Sew the long seam down the side. Press the seam outward.
- Result: You have formed a crisp “V” shape wrapping around the red keystone.
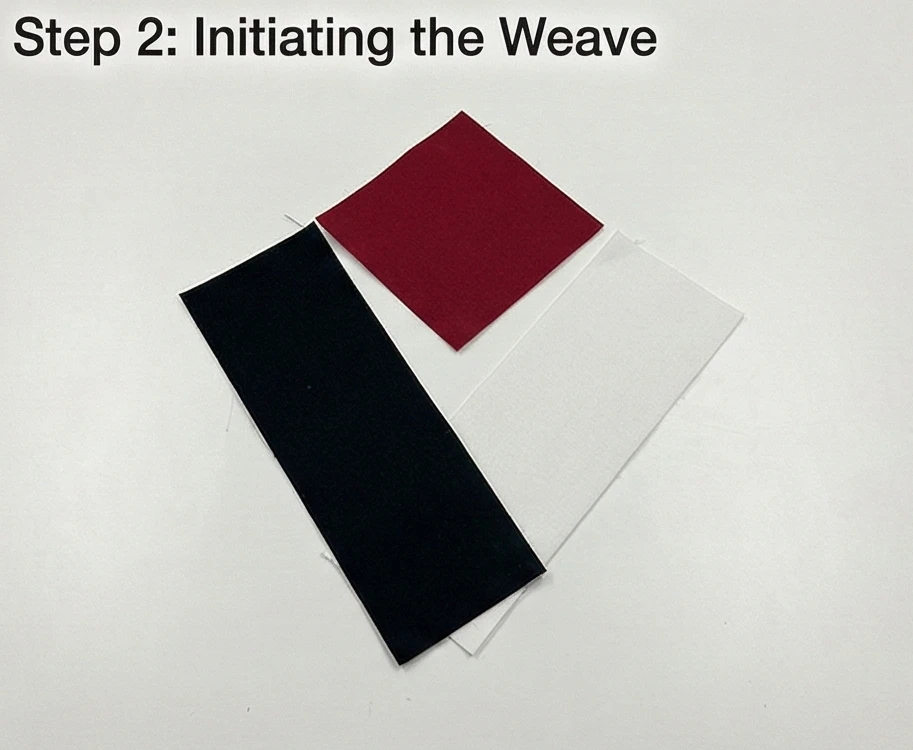
Step 3: Building the Braid (The Rhythm)
Alternate sides and alternate values to create the woven look.
- The Pattern: Continue adding ribbons down the column. Always sew a Light rectangle to the Right side, and a Dark rectangle to the Left side.
- The Alignment: As you add a new rectangle, align its top edge with the bottom edge of the previous rectangle on that side.
- The Length: Keep building this zigzagging column until it is about 38 inches long. Make 3 identical columns using this method.

Step 4: Squaring the Columns
Taming the jagged edges into straight lines.
- The Trim: Your braided columns will feature raw, staggered edges resembling a staircase. Lay a long acrylic ruler vertically down the center of the braid.
- The Cut: Trim exactly 4.25 inches from the absolute center of the “V” to the left, and 4.25 inches to the right.
- Result: You will slice off the jagged ends, leaving a perfectly straight vertical column measuring 8.5″ wide by 38″ long. The “woven” ribbons now appear to be cleanly contained within a border.
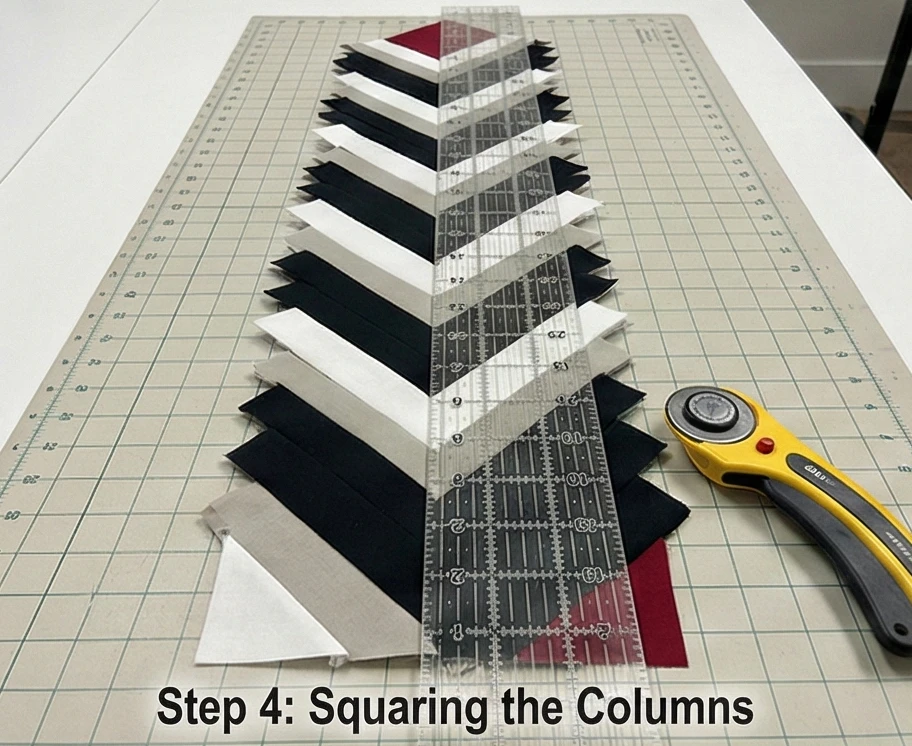
Step 5: Assembly and the Thermal Sandwich
Protecting the dining table.
- Join Columns: Sew your three 8.5″ wide columns together side-by-side. Your topper top is now complete.
- The Layering: Place your Black Sateen backing right-side down. Add the layer of Insul-Bright (shiny side facing up), then the soft Bamboo batting, and carefully center your braided top over it.
- Baste: Use safety pins every 3 inches. The interlocking seams of a French Braid can shift, so dense basting is non-negotiable.

Step 6: Sculptural Quilting and Tailored Edge
Emphasizing the weave.
- Echo the “V”: Using a walking foot, do not quilt straight across the mat. Instead, quilt directly inside the pieced ribbons. Stitch a continuous “V” shape 1/4 inch inside every single seam line.
- Why: This “sculptural” quilting makes the individual ribbons puff up slightly, drastically enhancing the 3D optical illusion of overlapping fabric.
- The Binding: Trim the entire piece to exactly 24″ x 36″. Finish the edges with a tight, solid Black binding to cleanly frame the intricate interior geometry.
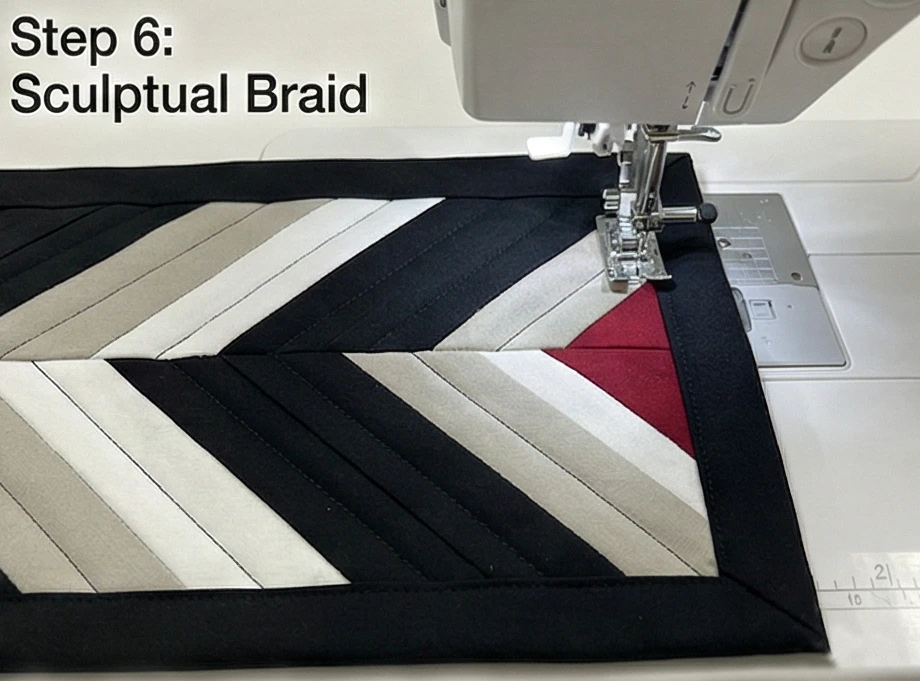
Usability Note: The dense intersections of the French Braid pattern make this topper exceptionally structurally sound, meaning it can support the weight of heavy ceramic vases or cast-iron candelabras without stretching or warping.
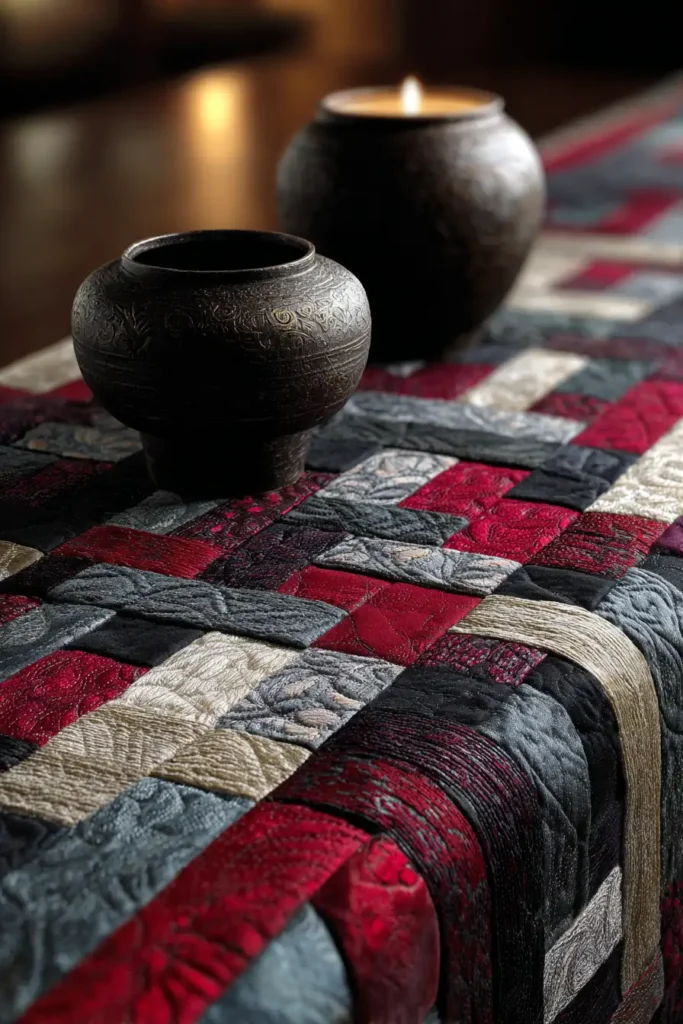
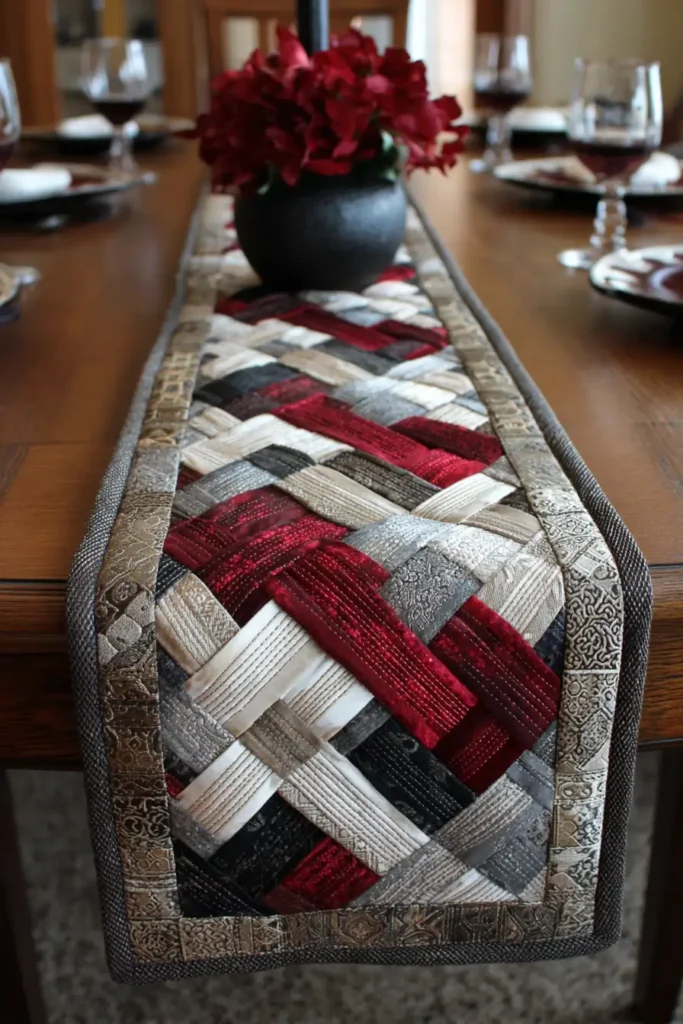
17. Cozy Jelly Roll Lap Quilts for Relaxing Reading Nooks
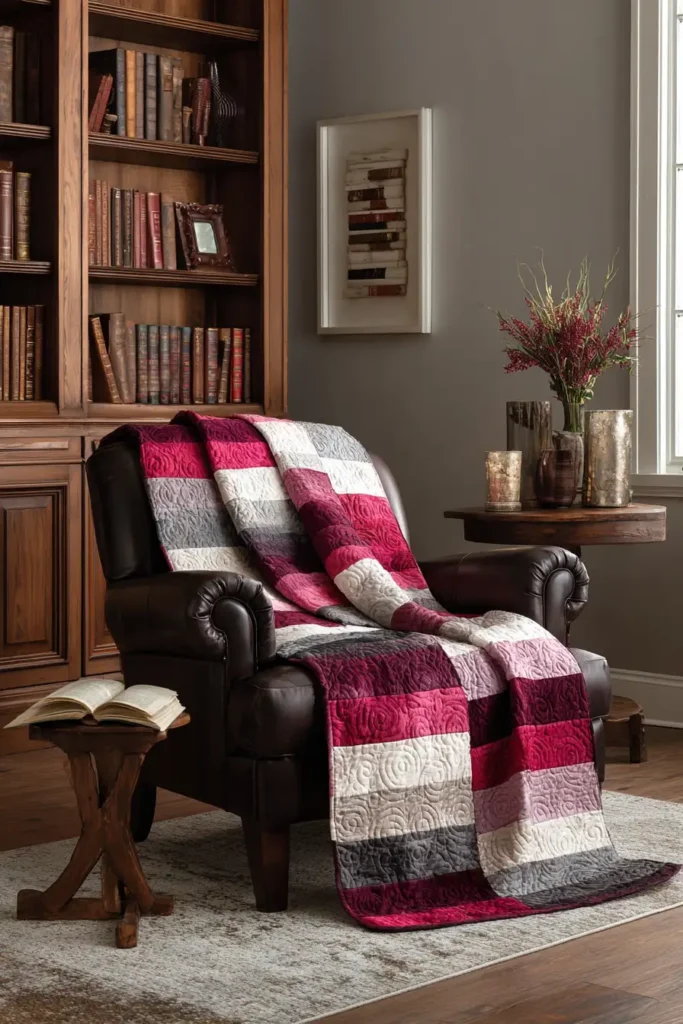
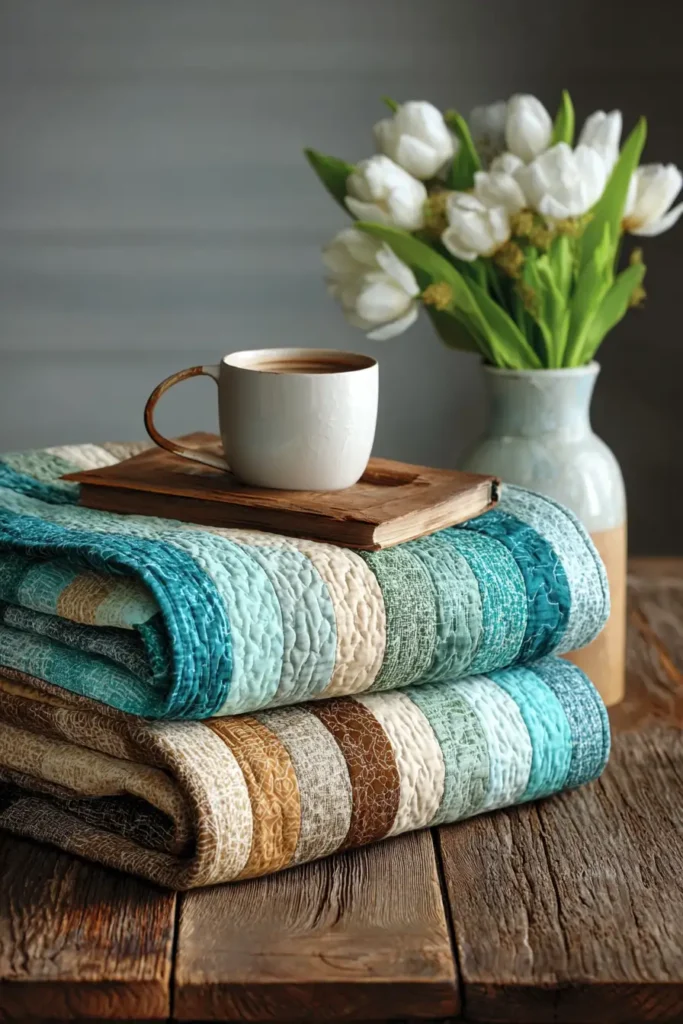
“The Crimson Archive” Ombré Stacked Coin Lap Quilt
A dedicated reading nook is a quiet retreat, requiring a textile that is deeply comforting yet visually serene enough not to distract from a good book. The traditional “Stacked Coin” pattern—featuring vertical columns of horizontally stacked fabric strips—perfectly mimics the geometry of books stacked on a library shelf. “The Crimson Archive” modernizes this look with a strict Ombré Gradient, fading softly from pure White through warm Greige to deep Black. By inserting a single, vibrant Deep Red “spine” into each column, you create a sophisticated, tailored lap quilt that looks magnificent draped over a leather armchair.
Finished Dimensions: Generous Armchair/Lap Quilt, 50″ x 60″ (The ideal proportion to cover the legs without dragging on the floor).
Materials Needed:
- The “Spines” (Strips): 1 Jelly Roll (approx. 40 strips measuring 2.5″ x 42″) in a strict gradient of Black, Charcoal, Greige, and White.
- The “Accents”: 3 strips of solid Deep Red fabric.
- The “Shelves” (Sashing): 1.5 yards of solid White or Greige fabric.
- Backing: 3.5 yards of high-quality Black Flannel.
- Batting:100% Wool or a Bamboo/Cotton Blend.
- Why: When you are sitting still for hours reading, your body temperature drops. Wool and bamboo offer superior, breathable insulation, acting like a lightweight furnace that traps your body heat without the suffocating, sweaty weight of synthetic polyester.
- Thread: 50wt cotton thread in an invisible Dove Grey.
- Notions: A rotary cutter, a 6.5″ x 24″ acrylic ruler, and a water-soluble marking pen.
Cultural Backstory: The “Stacked Coin” (sometimes called “Chinese Coins”) pattern is an ingenious scrap-busting block that originated in the 1800s. It gets its name from its visual resemblance to a stack of ancient bronze coins strung together on a cord for safekeeping. While historically created from a chaotic jumble of leftover calico prints, restricting the palette to a modern monochrome gradient elevates the humble block into striking architectural art.
Step 1: Sorting the “Library” Gradient
An ombré requires seamless visual transitions.
- The Scale: Unroll your Jelly Roll and arrange the strips into a perfect value scale: Stark White -> Light Greige -> Dark Greige -> Charcoal -> Black.
- Sub-Cut the “Coins”: Cut all the strips (including your Deep Red accent strips) into uniform rectangles measuring 2.5″ x 6.5″. Keep the colors separated in individual piles to keep the gradient organized.
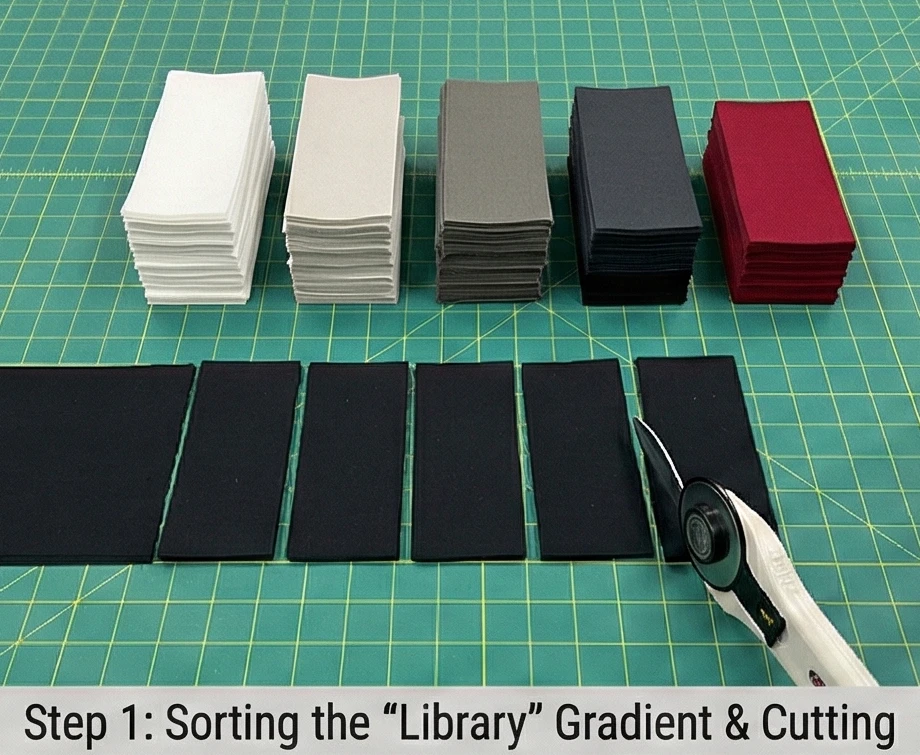
Step 2: Stacking the Columns
Building the architectural stacks.
- The Fade: To build one column, start with a White rectangle. Sew it along its long edge to a Light Greige rectangle. Continue sewing rectangles top-to-bottom, fading down into the darkest Black.
- The Red Disruption: Somewhere in the middle of the dark Charcoal or Black section, insert a single Deep Red rectangle. This acts as a striking focal point, much like a special leather-bound volume on a shelf.
- The Height: Continue adding rectangles until the vertical stack measures exactly 50.5 inches long (about 25 “coins” per column). Make 5 identical columns.
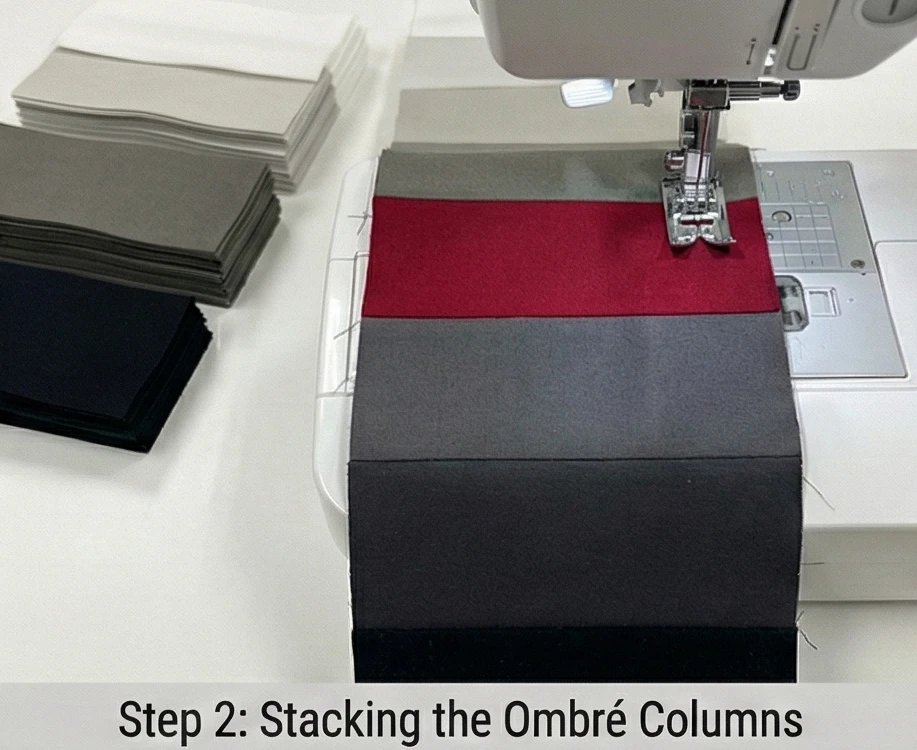
Step 3: Preparing the “Negative Space” Sashing
The columns need breathing room.
- Cut the Sashing: From your solid White or Greige yardage, cut exactly six strips measuring 4.5″ wide by 50.5″ long.
- The Purpose: These wide strips act as the negative space or “shelving” between the coin stacks, giving the eye a place to rest and preventing the geometric pattern from feeling cluttered.
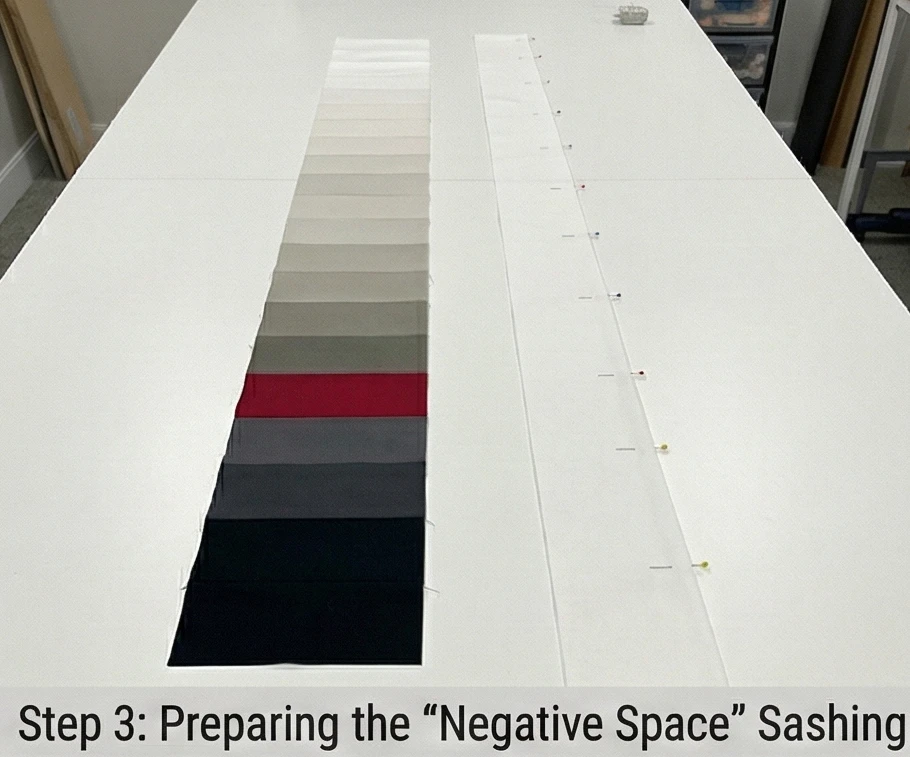
Step 4: Assembling the Reading Quilt
Alternating structure and silence.
- The Layout: Alternate your sashing strips and your pieced columns: Sashing -> Coin Column -> Sashing -> Coin Column, ending with a sashing strip on the far right.
- Pinning Long Seams: Because the coin columns contain dozens of horizontal seams, they are prone to stretching. Pin heavily (every 3-4 inches) when attaching them to the solid sashing strips to ensure the quilt top remains perfectly square and flat.
- Pressing: Press all the long vertical seams toward the solid sashing strips to reduce bulk.
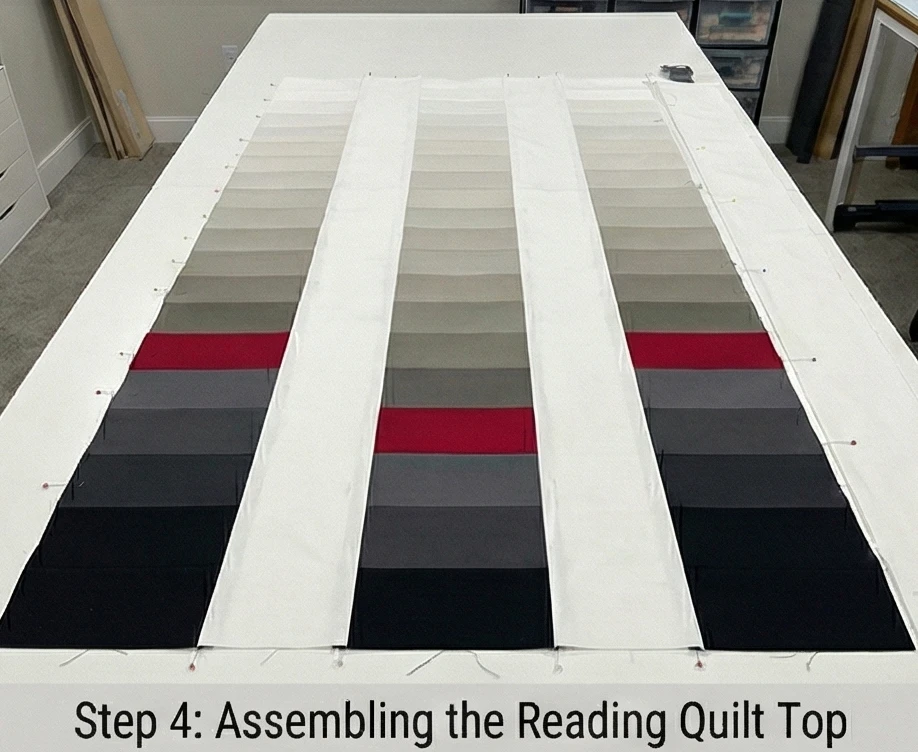
Step 5: The “Armchair” Baste
Layering for ultimate lap comfort.
- The Sandwich: Lay your cozy Black Flannel backing wrong-side up. Smooth the breathable wool or bamboo batting over it, and top with your pieced ombré design.
- Baste: Use safety pins to secure all three layers. Because lap quilts are frequently gathered and folded over the knees, dense basting is required to keep the interior layers from shifting.
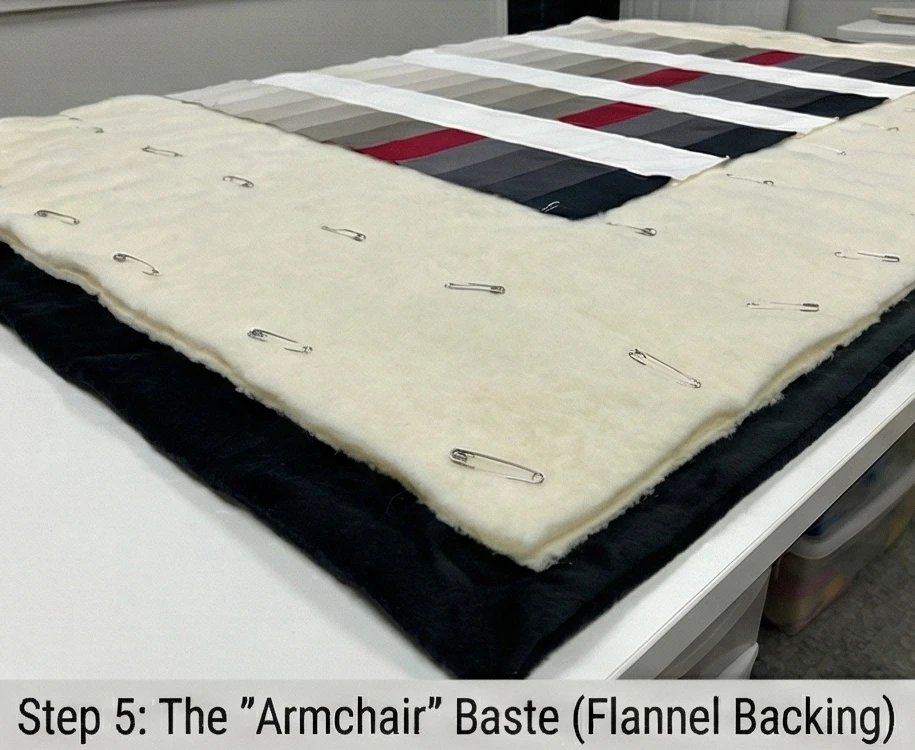
Step 6: “Book Page” Quilting and Tailored Edge
Linear stitching emphasizes the theme.
- Horizontal Lines: Drop your feed dogs or use a walking foot. Quilt perfectly straight horizontal lines across the entire width of the quilt, spacing them about 1.5 inches apart.
- Why: This mimics the linear look of stacked book pages. It also flattens the seams of the “coins” beautifully, creating a dense, heavy drape that feels incredibly secure and comforting over the lap.
- The Binding: Trim the quilt to exactly 50″ x 60″. Finish the edges with a solid Black binding. This dark frame features an ombré fade, giving the lap quilt the polished, bespoke finish of a luxury throw.
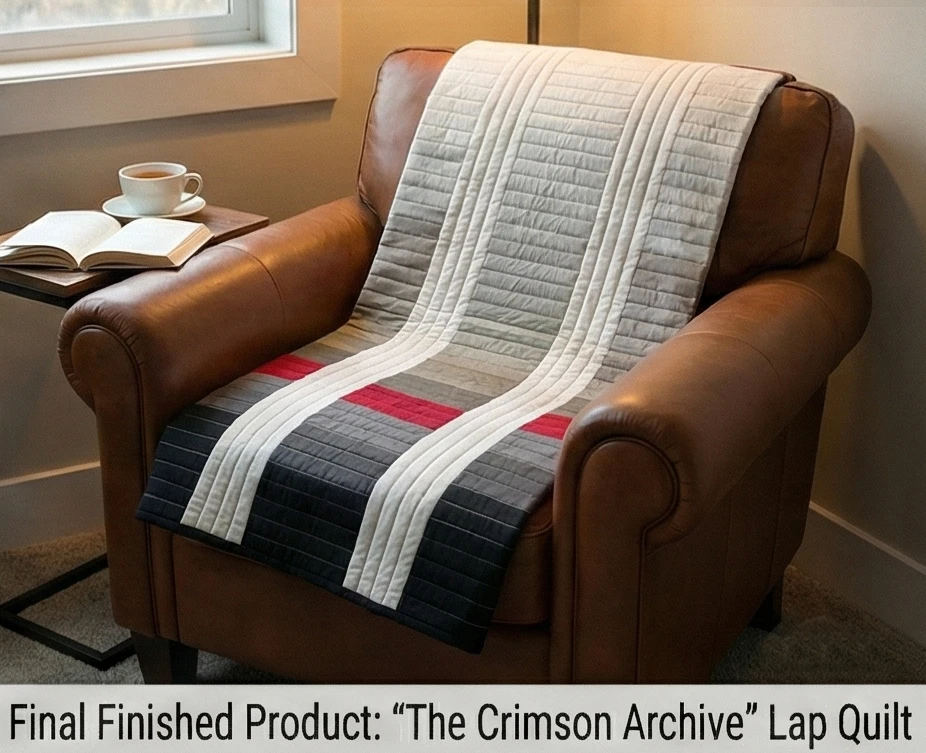
Usability Note: Flannel backing is the ultimate luxury for a reading nook, but it may experience minor shrinkage when first exposed to heat. Wash the finished lap quilt on a cold, gentle cycle and tumble dry on low. This will allow the wool batting and the flannel to shrink at the exact same rate, creating a gorgeously soft, crinkled texture that invites snuggling.
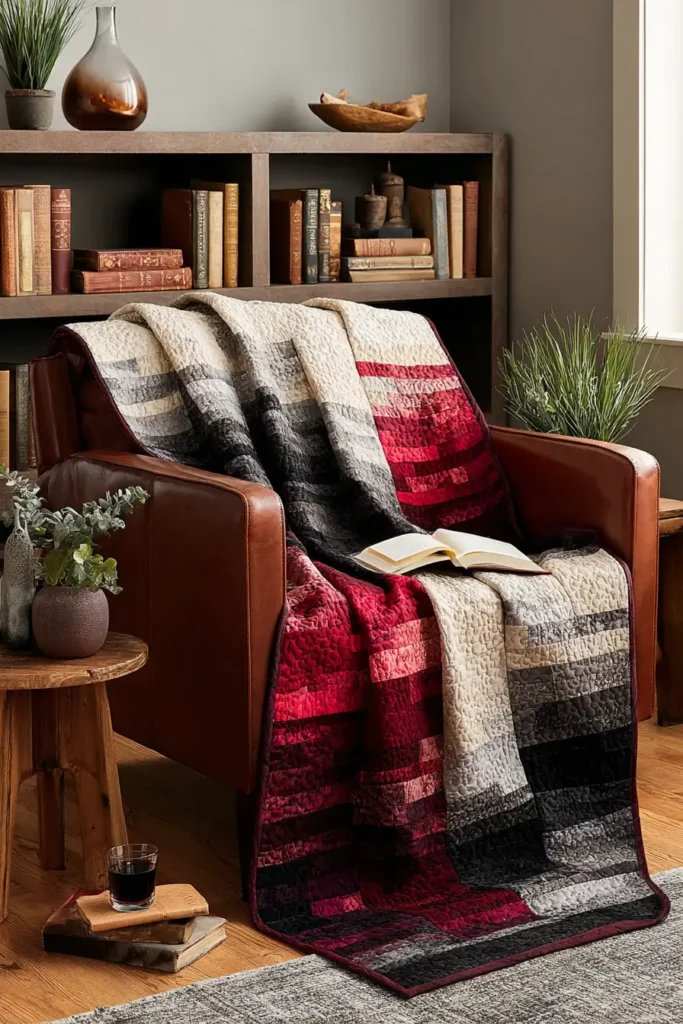
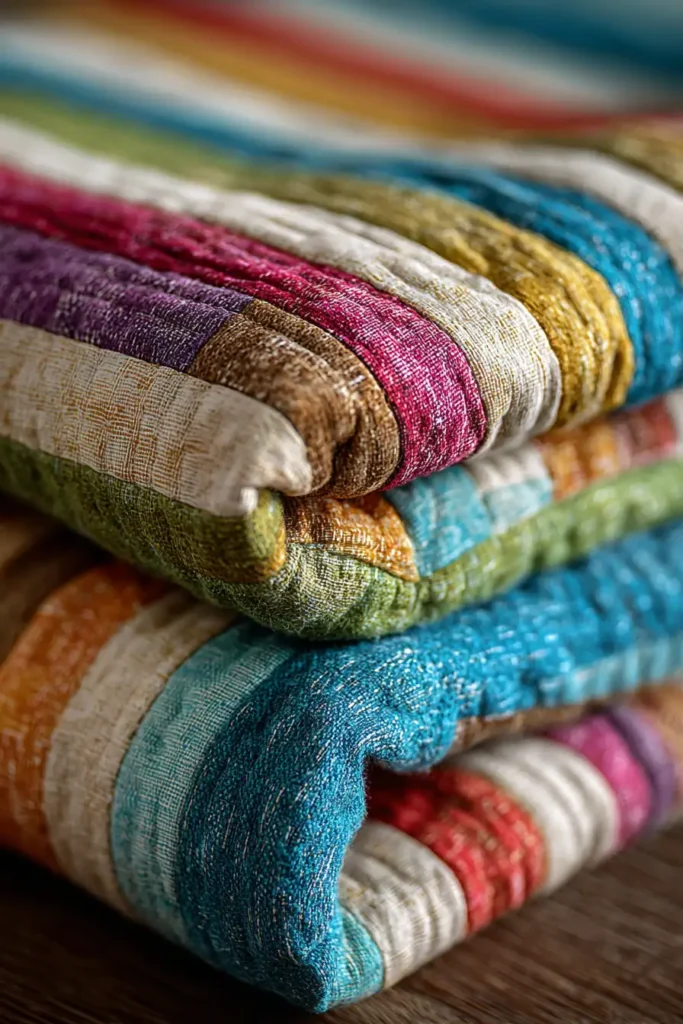
18. Decorative Jelly Roll Cushion Covers for Living Room Seating
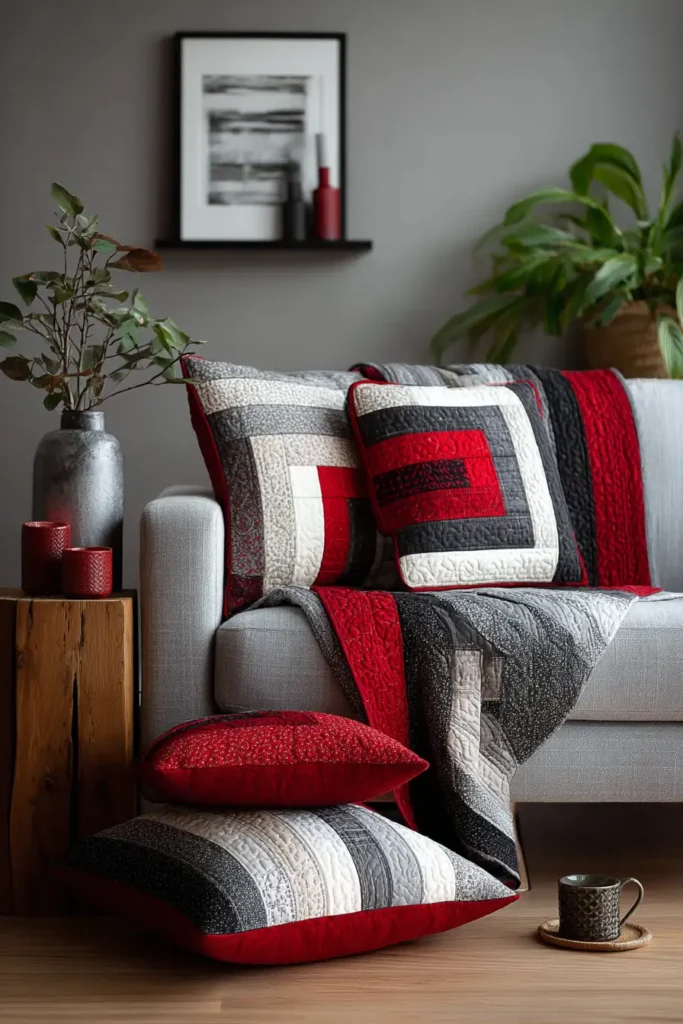
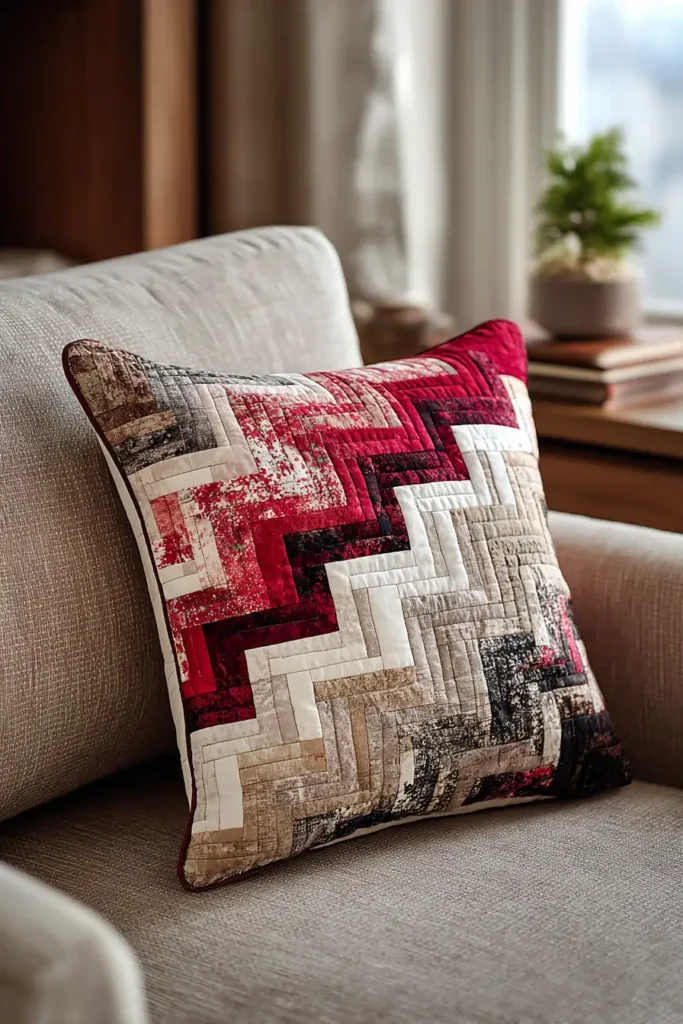
“The Crimson Offset” Quarter Log Cabin Cushion
A living room sofa is a canvas, and decorative cushions are the art. However, a heavily used living space demands textiles that are as structurally sound and comfortable as they are beautiful. “The Crimson Offset” cushion cover reinvents the traditional Log Cabin block by utilizing a “Quarter Cabin” technique. By placing a vibrant Deep Red square in the bottom corner and radiating pre-cut Jelly Roll strips outward in a high-contrast sequence of crisp White, soft Greige, and deep Black, the design creates a striking, modern geometric sunburst. It delivers architectural elegance that perfectly complements both minimalist and cozy interiors.
Finished Dimensions: Standard Large Throw Pillow, 20″ x 20″ (Make a pair for balanced sofa seating).
Materials Needed (For One Cushion):
- The “Radiance” (Strips): About 12 Jelly Roll strips (2.5″ x 42″) in a curated mix of solid White, Greige, Charcoal, and Black.
- The “Hearth” (Cornerstone): 1 scrap of solid Deep Red fabric.
- Backing & Envelope Flaps: 1 yard of heavyweight Black Cotton Canvas or Linen.
- Batting:100% Wool or Bamboo Batting.
- Why: A living room cushion is hugged, leaned against, and napped upon. Wool and bamboo are highly breathable and quickly recover from compression. This prevents the quilted cover from flattening out over time and ensures it stays comfortably cool against the skin.
- Thread: 50wt cotton thread in an invisible Dove Grey.
- Notions: A rotary cutter, a large 12.5″ or 20.5″ square acrylic ruler, and a 20″ x 20″ plush feather or down-alternative pillow insert.
Cultural Backstory: While cushions are ubiquitous today, in ancient civilizations—from Rome to the Middle East—they were status symbols available only to the elite, signaling that one was wealthy enough to sit softly rather than on hard wood or stone. The “Quarter Log Cabin” block is a mid-century modern evolution of the pioneer classic. By pushing the “hearth” (the red center) completely off-center, modernists created dynamic, asymmetrical tension that draws the eye and plays beautifully with negative space.
Step 1: Establishing the Anchor
The entire geometry radiates from this single point.
- The Crimson Hearth: Cut one perfect 4.5″ x 4.5″ square from your Deep Red solid fabric. This larger-than-normal starting square ensures the pop of color won’t be lost once the cushion is stuffed.
- Placement: Mentally designate this red square as the Bottom-Left corner of your cushion. You will only be sewing strips to the Top and Right sides of this square.
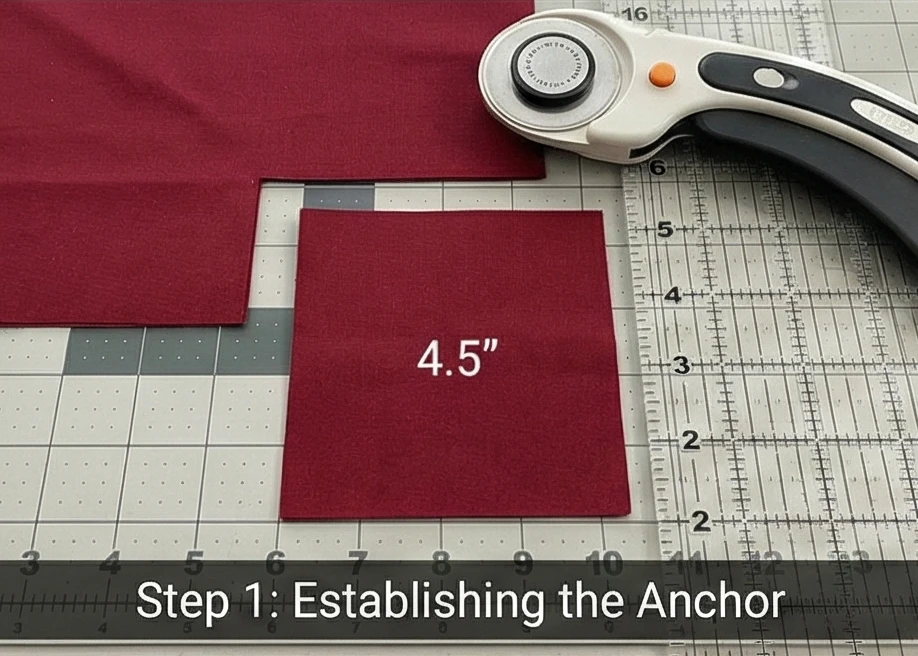
Step 2: Sorting the Monochrome Radiance
Organizing the strips for high visual impact.
- The Value Sequence: To create the expanding geometric rings, arrange your strips so the colors alternate sharply.
- Suggested Order: White -> Greige -> Charcoal -> Black -> White -> Greige -> etc.
- Sub-Cut the First Rounds: To save time, cut a few of your lightest strips (White and Greige) into 4.5″, 6.5″, and 8.5″ lengths.
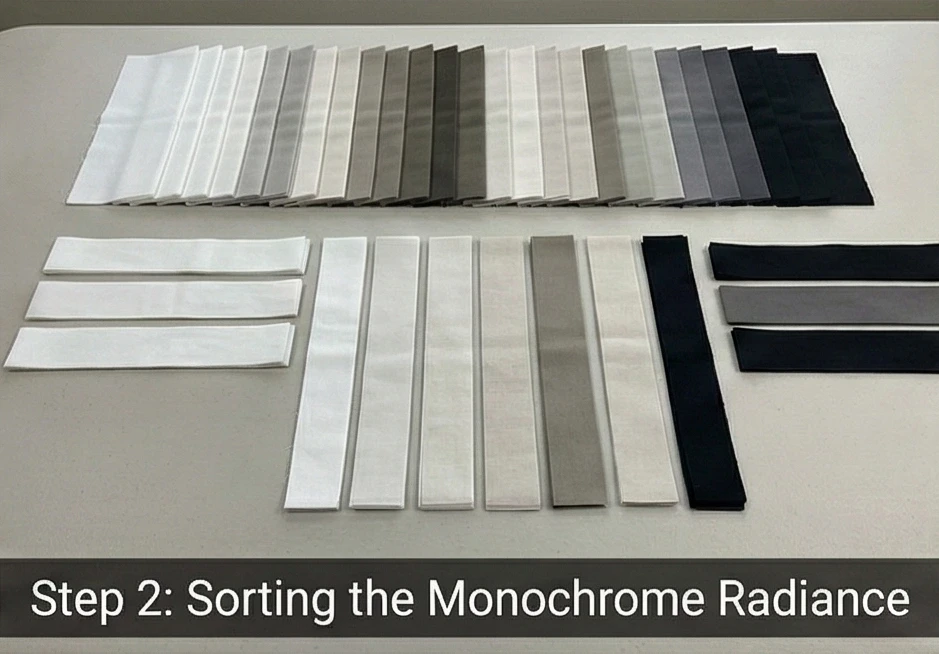
Step 3: Building the Quarter Cabin
Sewing the asymmetrical rings.
- Round 1: Take your 4.5″ Deep Red square. Sew a 4.5″ White strip to the Top. Press the seam up. Sew a 6.5″ White strip to the Right side. Press the seam to the right.
- Round 2: Take a Greige strip. Measure the new height of your block (it should be 6.5″). Sew a 6.5″ Greige strip to the Top. Press up. Sew an 8.5″ Greige strip to the Right. Press right.
- The Expansion: Continue adding strips in this exact manner—always to the Top, then to the Right—following your Black/White/Greige color sequence.
- Square Up: Stop when the block measures just over 20.5 inches on each side. Trim the outer edges to achieve a perfectly flush 20.5″ x 20.5″ pieced top.
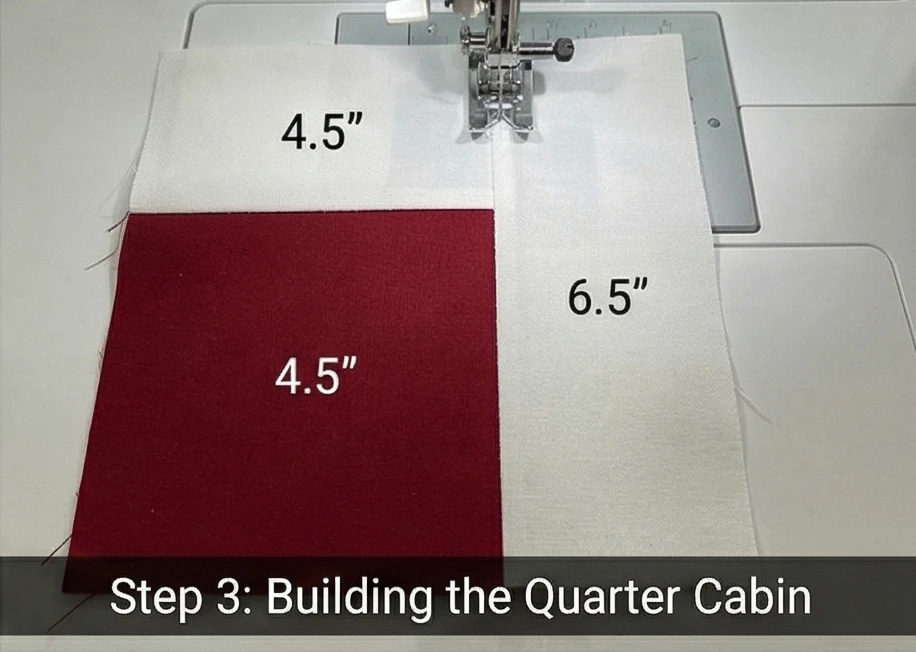
Step 4: The Breathable Basting Sandwich
Quilting the cover makes it a durable textile, not just a thin pillowcase.
- Layering: Cut a 22″ x 22″ square of scrap muslin (this will be hidden inside the pillow). Lay it down, top it with your wool or bamboo batting, and place your pieced cushion top right-side up.
- Pinning: Use safety pins to secure the three layers. Baste smoothly to ensure there are no wrinkles, as the dense quilting in the next step will permanently lock everything in place.
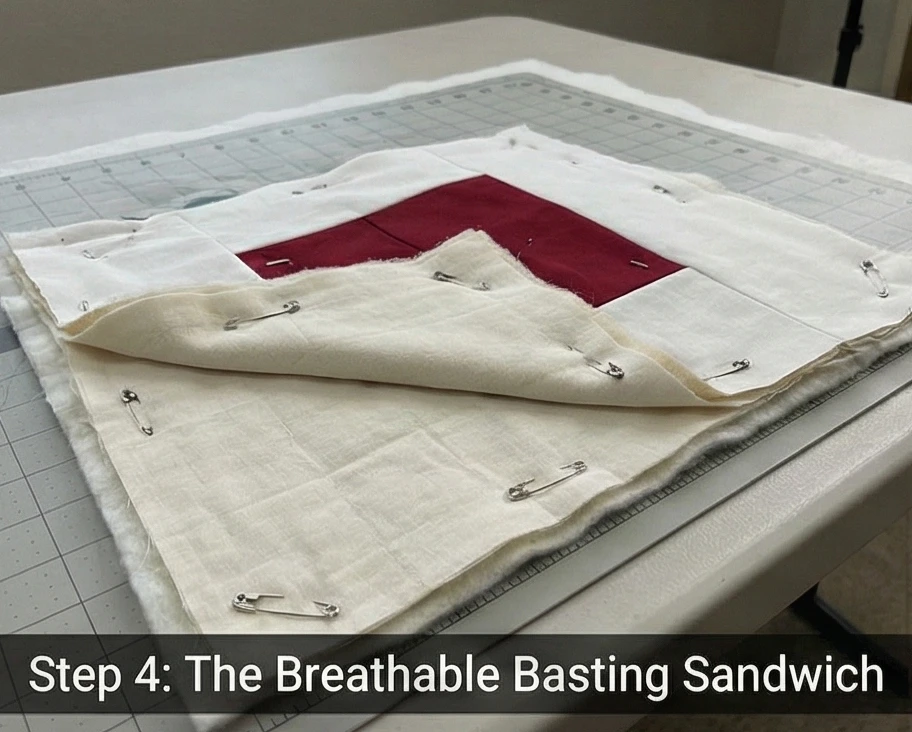
Step 5: Architectural Grid Quilting
Enhancing the geometry for daily wear.
- The Echo Stitch: Using a walking foot, quilt straight lines that perfectly echo the “L” shape of the pieced strips. Stitch a line 1/4 inch inside every single seam.
- The Function: This geometric quilting secures the soft bamboo/wool batting and imparts a highly structured, tailored rigidity to the cushion cover. It will look like an expensive, upholstered piece of furniture rather than a floppy craft project.
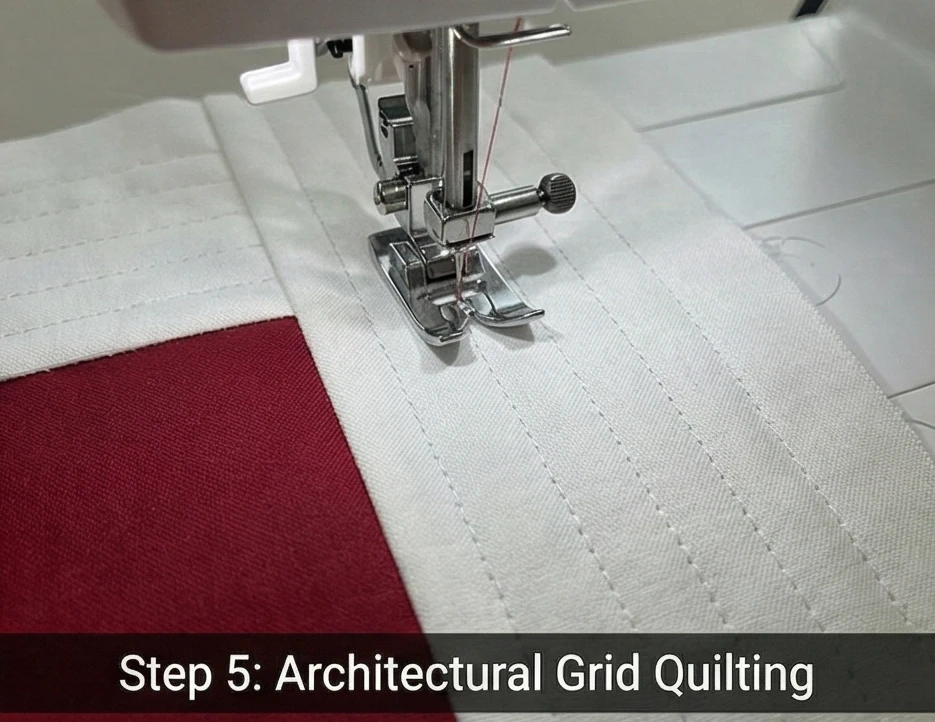
Step 6: The Canvas Envelope Finish
A heavy-duty back ensures the sofa’s longevity.
- Cut the Backing: From your heavy Black Canvas, cut two rectangles for the envelope back: one measuring 20.5″ x 15″ and one measuring 20.5″ x 12″.
- Hem the Edges: Fold one long edge of each canvas rectangle over by 1/2 inch, then another 1/2 inch, and topstitch to create a clean, finished hem.
- Assembly: Place your quilted top right-side UP. Place the larger canvas rectangle right-side DOWN, aligning the raw edges with the top and sides of the quilted piece. Place the smaller canvas rectangle right-side DOWN, aligning it with the bottom and sides. The hemmed edges will overlap generously in the middle.
- Sew and Turn: Stitch a 1/2-inch seam around the entire 20.5″ perimeter. Backstitch heavily over the overlapped canvas hems (this area takes the most strain when stuffing the pillow). Clip the corners, turn right-side out, and insert your plush 20″ cushion.
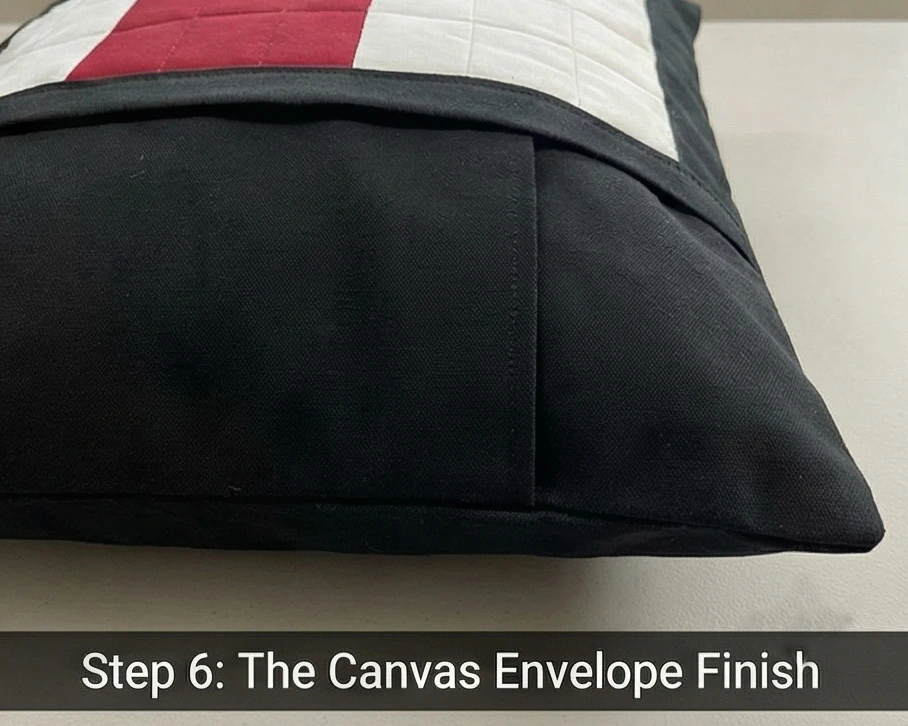
Usability Note: Always use a pillow insert that is exactly the same size as, or slightly larger than, your finished cover (e.g., a 20″ insert for a 20″ cover). The batting layer adds thickness to the cover, so a generous insert is required to fill out the corners and give the cushion that luxurious, plump, high-end designer look.
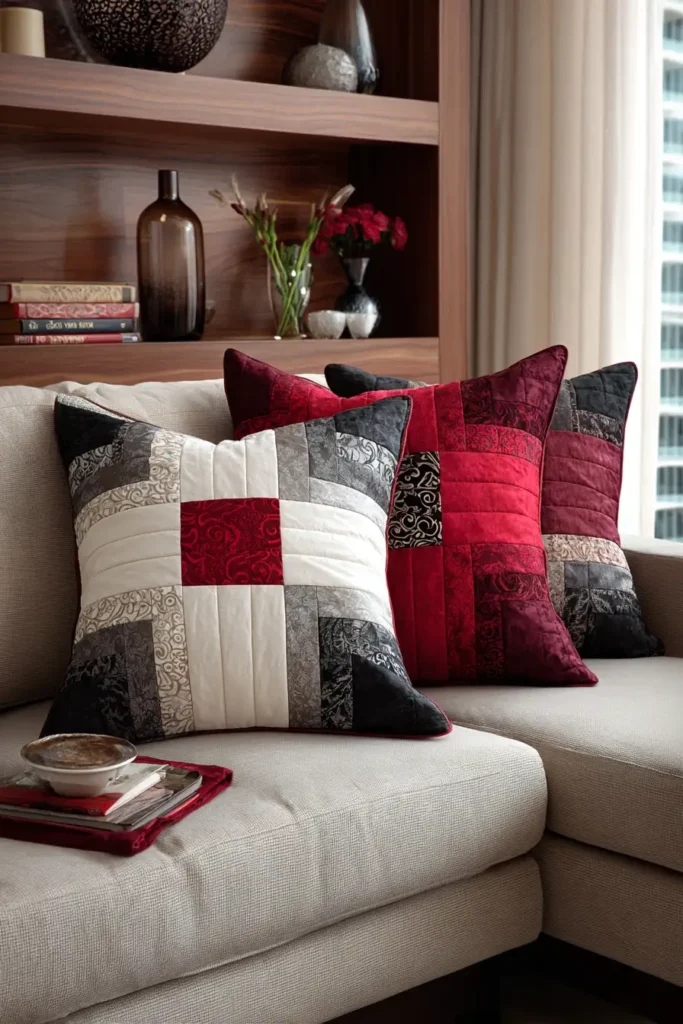
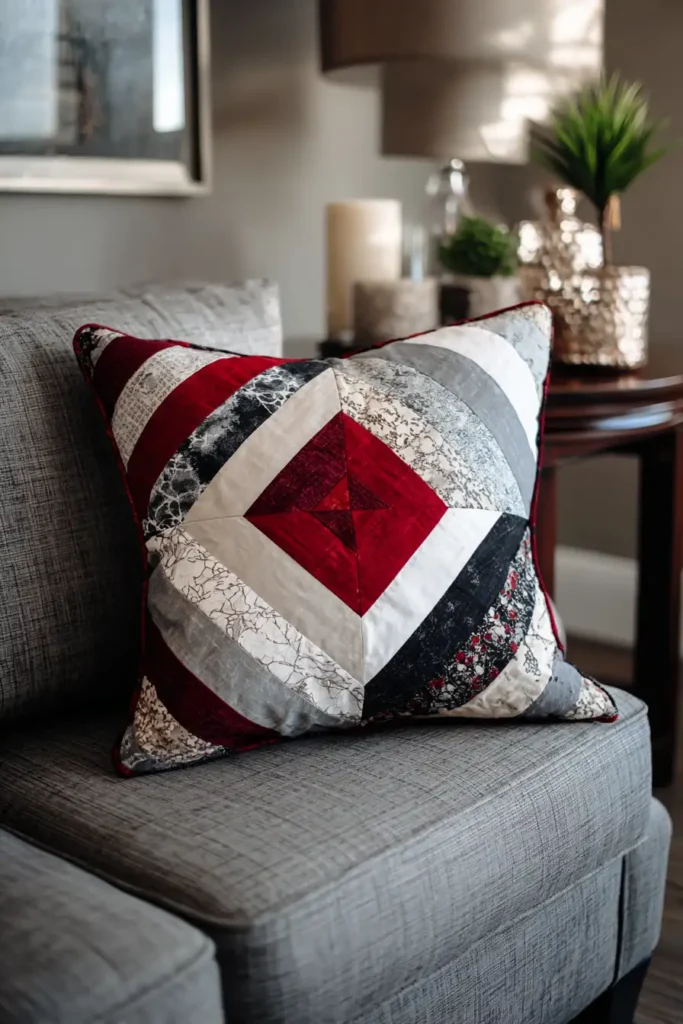
19. Quilted Jelly Roll Floor Pillows for Extra Living Room Comfort
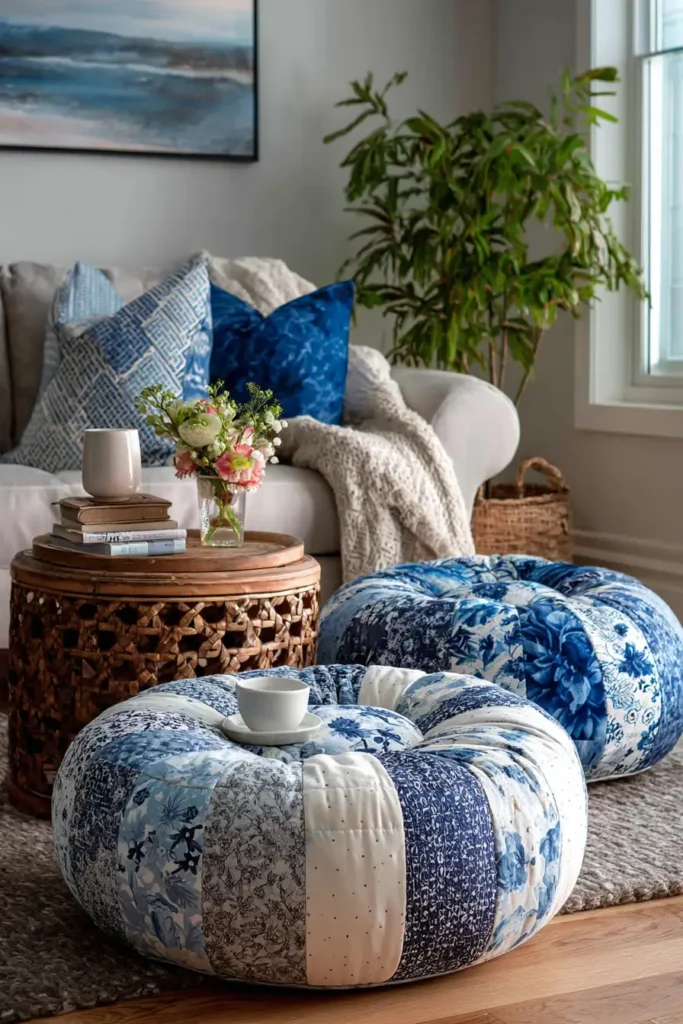
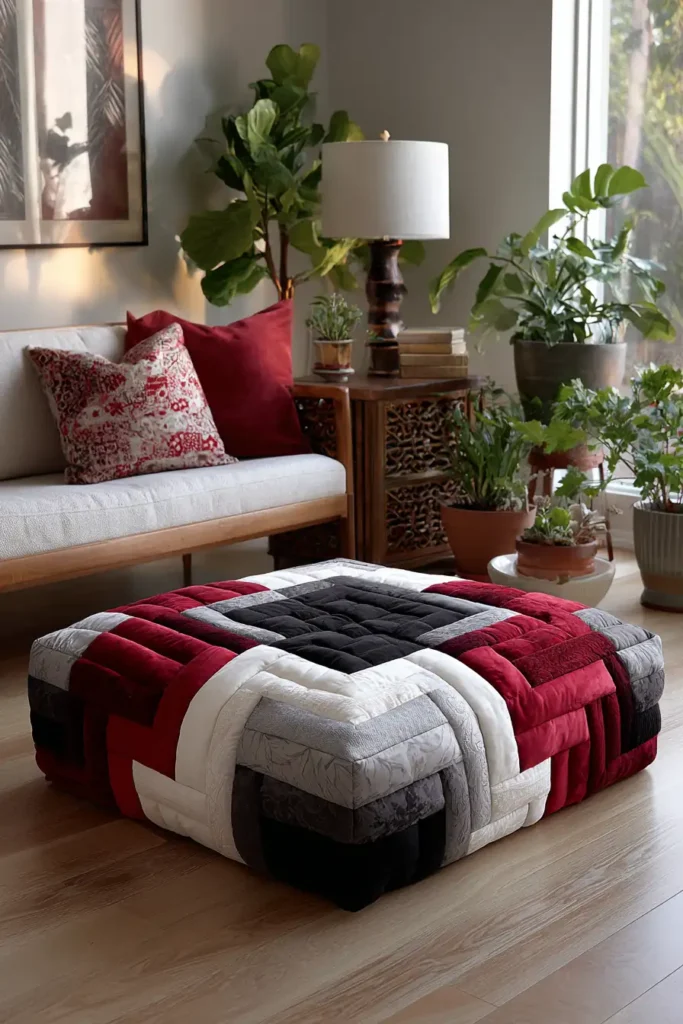
“The Crimson Labyrinth” Oversized Geometric Floor Pouf
Floor seating often evokes a casual, bohemian aesthetic, but it can be engineered to feel incredibly tailored and high-end. “The Crimson Labyrinth” transforms the humble floor pillow into a structured, architectural centerpiece. By utilizing a massive, oversized Courthouse Steps block, the design expands outward in a strict Ombré Gradient—starting from a striking Deep Red core, rippling through crisp White and soft Greige, and anchoring in heavy Charcoal and Black. When constructed with a 3D boxed gusset, this floor cushion becomes a highly functional, elegant ottoman that provides breathable, luxurious seating without cluttering the visual space of a modern living room.
Finished Dimensions: Oversized Square Floor Pouf, 36″ x 36″ x 6″ deep.
Materials Needed:
- The “Labyrinth” (Strips): 1 Jelly Roll (approx. 40 strips measuring 2.5″ x 42″) in a smooth gradient of White, Greige, Charcoal, and Black.
- The Core: 1 fat quarter of solid Deep Red fabric.
- The Gussets & Backing: 2.5 yards of heavy-duty Black Canvas or Upholstery Twill.
- Why: Floor pillows endure friction against rugs and hardwood. Canvas ensures the bottom and sides won’t wear through, keeping the elegant pieced top pristine.
- Batting:100% Wool Batting (for the quilted top).
- Why: Wool is exceptionally resilient. When a guest sits on the pouf, the wool batting will compress but immediately spring back to its original loft once they stand, preventing the quilted cover from looking deflated or rumpled. It is also highly breathable, preventing overheating.
- The Insert: A 36″ x 36″ x 6″ high-density upholstery foam block, or a heavy muslin insert filled with shredded memory foam.
- Notions: A heavy-duty zipper (34 inches long), 50wt cotton thread, and upholstery needles for your machine.
Cultural Backstory: Floor culture has deep roots in Japanese, Moroccan, and Indian interior design, where low-profile seating promotes a grounded, open atmosphere and encourages better posture. In the mid-20th century, modernists adopted this concept to make living rooms feel larger and ceilings feel higher. A geometric, structured floor pouf honors this tradition while elevating it from a simple cushion to a distinct piece of contemporary furniture.
Step 1: The Crimson Core
Establishing the architectural center.
- Cut the Center: Cut one large square from your solid Deep Red yardage measuring 8.5″ x 8.5″. A massive floor pouf requires a proportionately large center so the focal point isn’t lost in the expanding geometry.
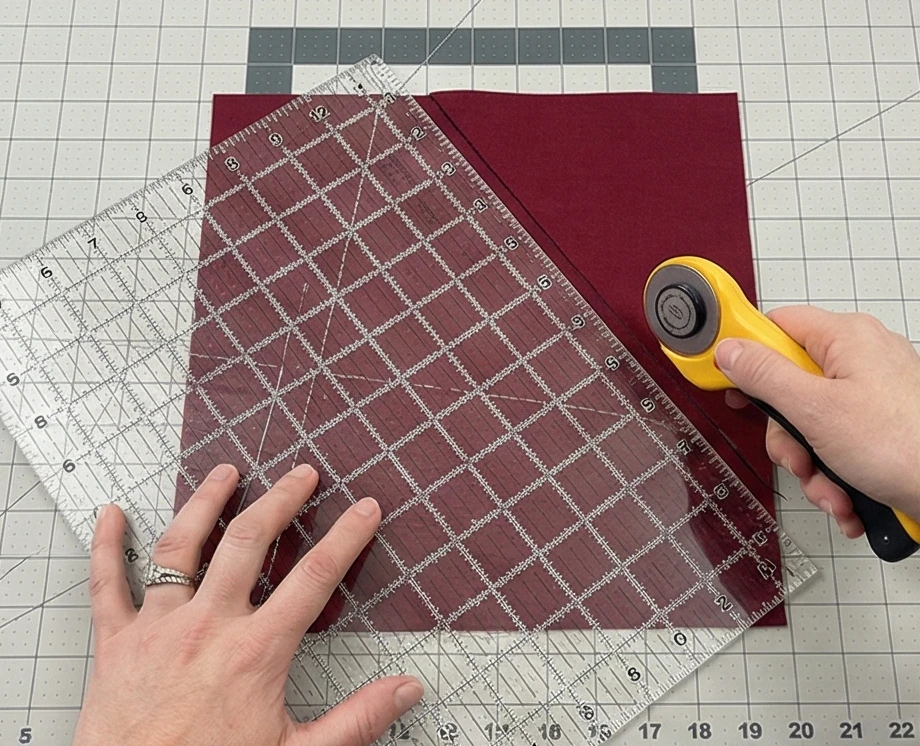
Step 2: Sorting the Ombré Steps
Organizing the gradient for the Courthouse layout.
- The Light and Dark Axes: A Courthouse Steps block builds on opposite sides. Designate your White and Greige strips for the Top and Bottom sides, and your Charcoal and Black strips for the Left and Right sides.
- Sub-Cut Starting Strips: Cut a few White/Greige strips to 8.5″ and a few Charcoal/Black strips to 12.5″ to begin the piecing process.
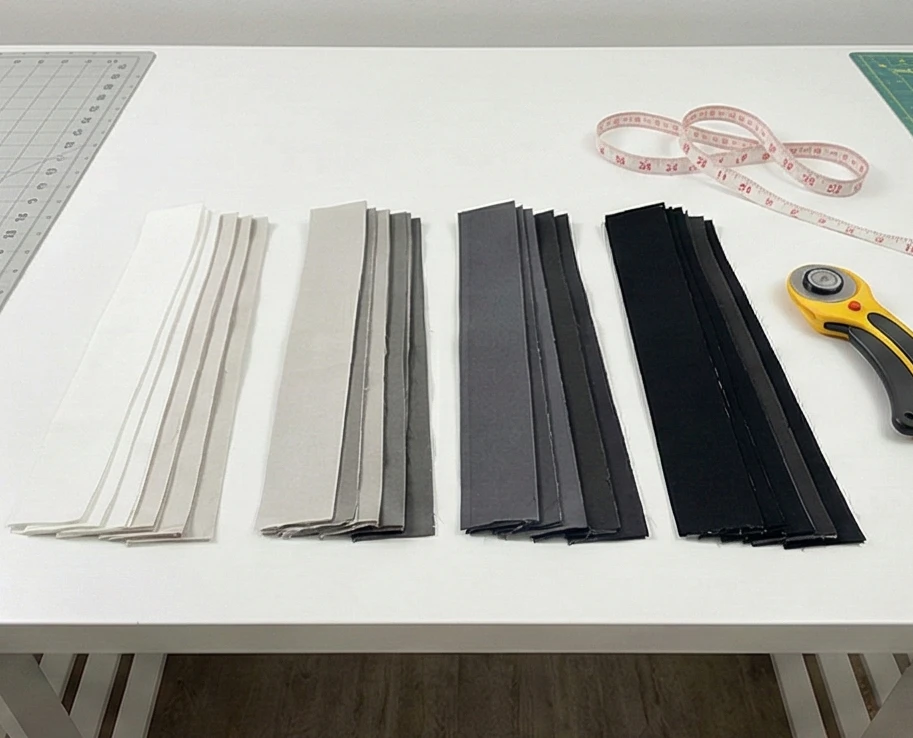
Step 3: Expanding the Massive Block
Building the labyrinth outward.
- Round 1: Sew an 8.5″ White strip to the Top of the Deep Red square. Press outward. Sew another 8.5″ White strip to the Bottom. Press outward.
- The Dark Framing: Measure the new height (12.5″). Sew a 12.5″ Black strip to the Left side. Press outward. Sew a 12.5″ Black strip to the Right side. Press outward.
- Continue the Gradient: Keep adding strips in pairs (Top/Bottom, then Left/Right). Let the top and bottom slowly transition into Greige, while the sides transition into lighter Charcoal.
- Square Up: Continue until the giant block measures exactly 37″ x 37″.

Step 4: Upholstery-Grade Basting and Quilting
This piece must withstand body weight.
- The Top Panel Sandwich: Cut a 38″ x 38″ square of scrap muslin. Lay it flat, top with the resilient wool batting, and smooth the pieced Labyrinth top over it. Baste heavily with safety pins.
- Dense Grid Quilting: Using a walking foot, quilt a continuous grid of straight horizontal and vertical lines spaced 1 inch apart across the entire 37-inch panel.
- Why: Dense grid quilting physically locks the fabric and wool together, creating a stiff, canvas-like upholstery textile that won’t stretch or warp when sat upon.
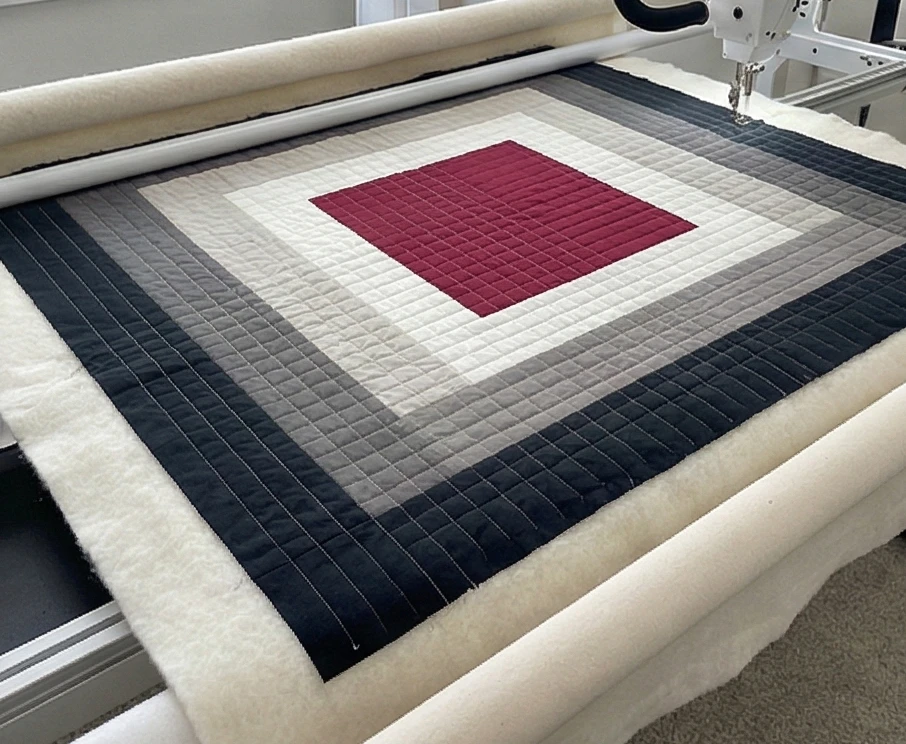
Step 5: Constructing the 3D Gusset
Creating depth for the foam insert.
- Cut the Sides: From your heavy Black Canvas, cut four long strips measuring 7″ wide by 37″ long. These are your side walls (gussets).
- Attach the Zipper: Cut one of those canvas strips in half lengthwise. Insert your heavy-duty 34-inch zipper between the two halves. This zippered panel will be the back wall of your pouf.
- Sew the Ring: Sew the four canvas strips end-to-end (Right Sides Together) to create a massive continuous loop. Stop your seams 1/2 inch away from the top and bottom edges.

Step 6: Final Box Assembly
Bringing the cushion to life.
- Attach the Top: Pin the top edge of your canvas loop to the outer edges of your quilted Labyrinth top (Right Sides Together). Pivot carefully at the corners. Sew all the way around with a 1/2-inch seam allowance.
- Attach the Base: Cut a solid 37″ x 37″ square of Black Canvas for the bottom of the pouf. Unzip the zipper halfway! Pin the bottom canvas square to the bottom edge of your canvas loop. Sew all the way around.
- Finish and Stuff: Turn the massive cover right-side out through the open zipper. Carefully slide your high-density foam block inside, ensuring the corners of the foam meet the sharp corners of the cover. Zip it closed to reveal a stunning, structured piece of modern floor seating.
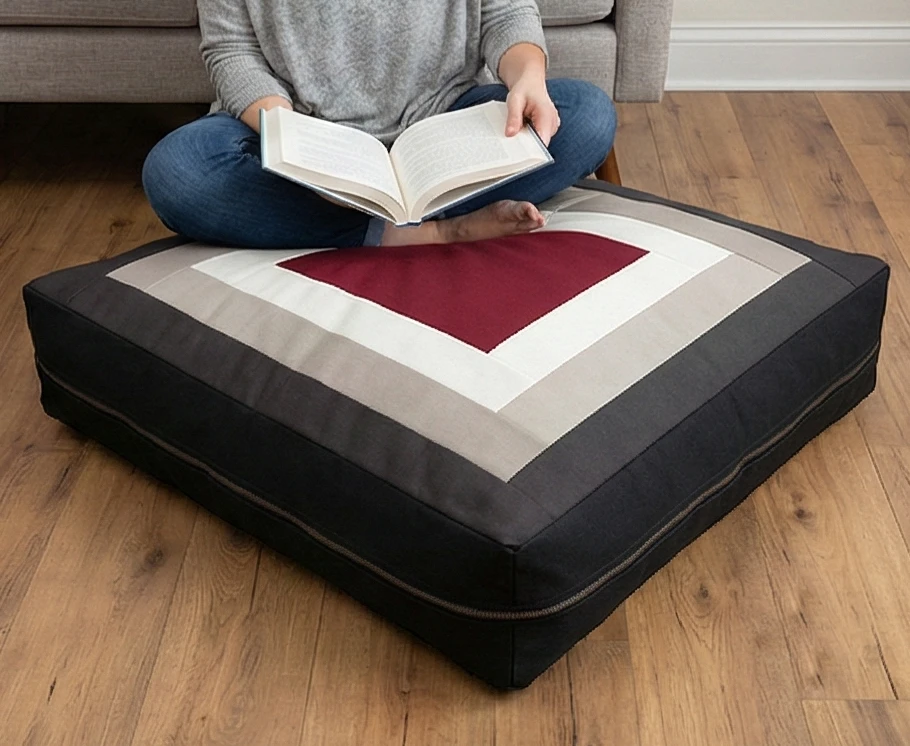
Usability Note: Because the pouf rests on the floor, the heavy canvas base will attract dust and pet hair. The zippered design makes it easy to remove the cover. Wash the cover alone on a cold, gentle cycle, and let it air-dry completely before reinserting the foam to prevent the wool batting from shrinking.
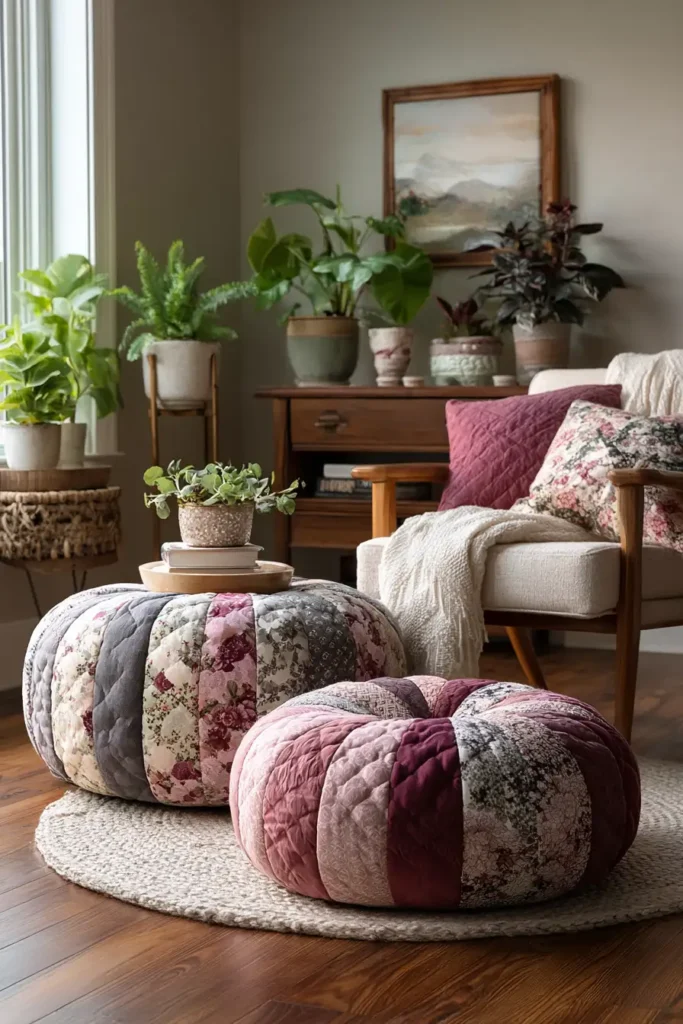
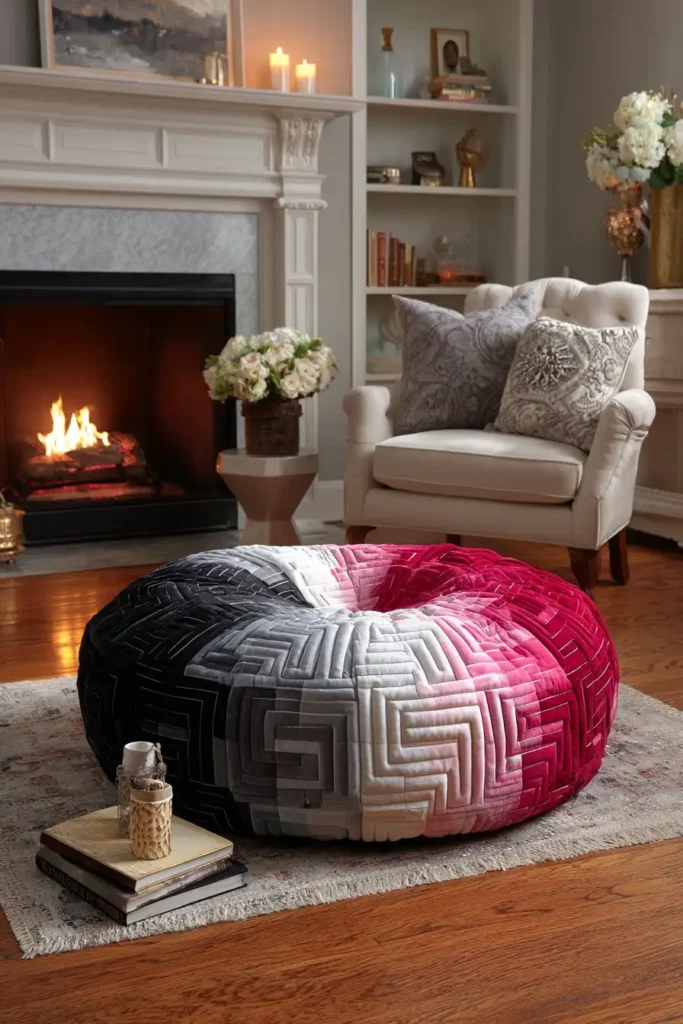
20. Framed Mini Jelly Roll Quilt Blocks for Gallery Wall Art
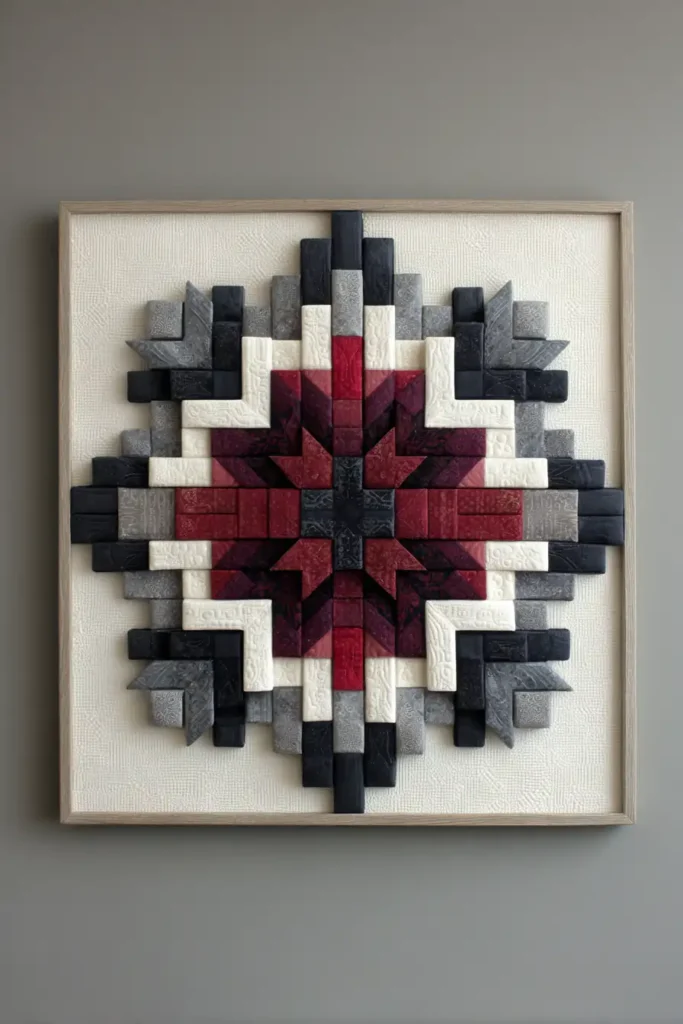
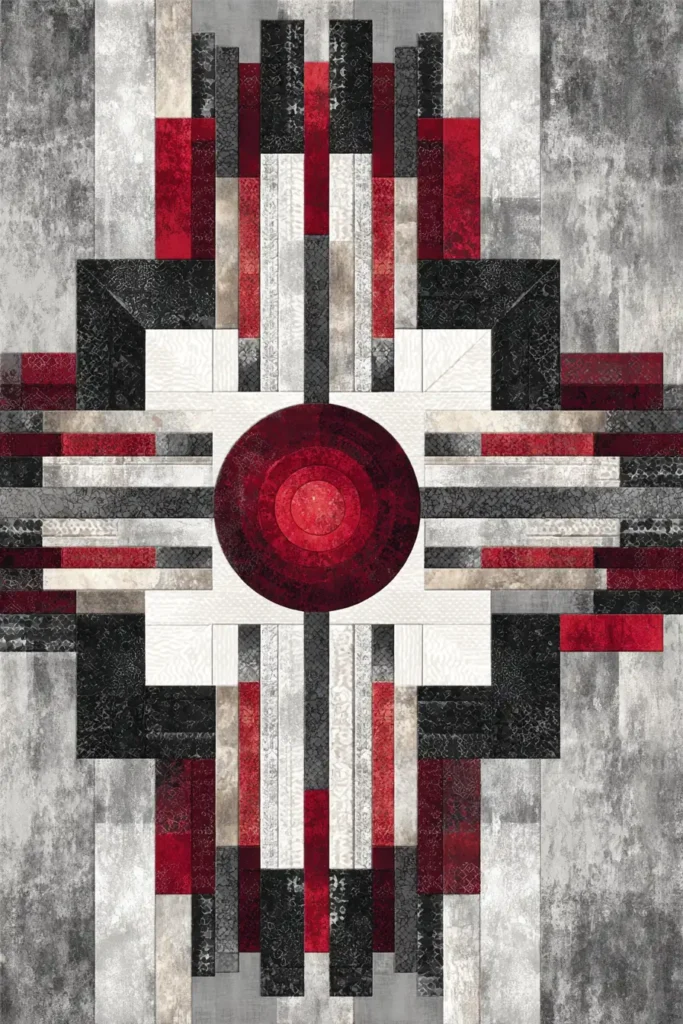
“The Crimson Crown” Miniature Geese Gallery Art
Wall art dictates the mood of a room. While paintings and prints are beautiful, framed textile art introduces a profound sense of visual comfort and acoustic softness to spaces dominated by hard walls and glass. “The Crimson Crown” takes the scrap-busting leftovers of your Jelly Rolls and elevates them into a gallery-worthy masterpiece. By miniaturizing the bold, geometric Flying Geese pattern into a tight, circular “crown” layout, you create a striking focal point. Rendered in a high-contrast palette of crisp White, deep Black, and soft Greige, with a piercing Deep Red center, this mini-quilt looks incredibly sophisticated when mounted in a modern “floating” frame.
Finished Dimensions: Framed Art Piece, 12″ x 12″ (The quilt block itself finishes at exactly 10″ x 10″).
Materials Needed:
- The “Geese” (Strips): Jelly Roll scraps (2.5″ wide) in solid Black, Charcoal, and Deep Red.
- The “Sky” (Background): Jelly Roll scraps in solid White and Greige.
- Mounting Board: A 12″ x 12″ acid-free foam core board or heavy artist’s canvas.
- Adhesive: Archival-quality double-sided tape or fabric spray adhesive.
- The Frame: A 12″ x 12″ shadowbox or “floating” gallery frame.
- Thread: 50wt cotton thread in an invisible Dove Grey.
- Notions: A small, precise acrylic ruler, a rotary cutter with a fresh blade, and a water-soluble marking pen.
Cultural Backstory: The individual quilt block was historically the basic unit of currency in the quilting world. Women in the 19th century would trade “sampler blocks” through the mail to learn new geometries before committing to a full bedspread. Framing a single, intricately pieced block honors this heritage. It isolates the geometry, allowing the viewer to appreciate the intersection of math and fabric as pure, architectural art rather than just a functional blanket.
Step 1: Miniaturizing the Math
A gallery piece requires precision.
- The Deep Red Geese: To make miniature Flying Geese from your 2.5-inch Jelly Roll strips, you must sub-cut them. Cut your Deep Red strip into four rectangles measuring exactly 1.5″ x 2.5″.
- The Black/Charcoal Geese: Cut four rectangles from your Black/Charcoal strips measuring 1.5″ x 2.5″.
- The Sky Corners: Cut your crisp White and Greige strips into perfect 1.5″ x 1.5″ squares. You will need exactly 16 squares.
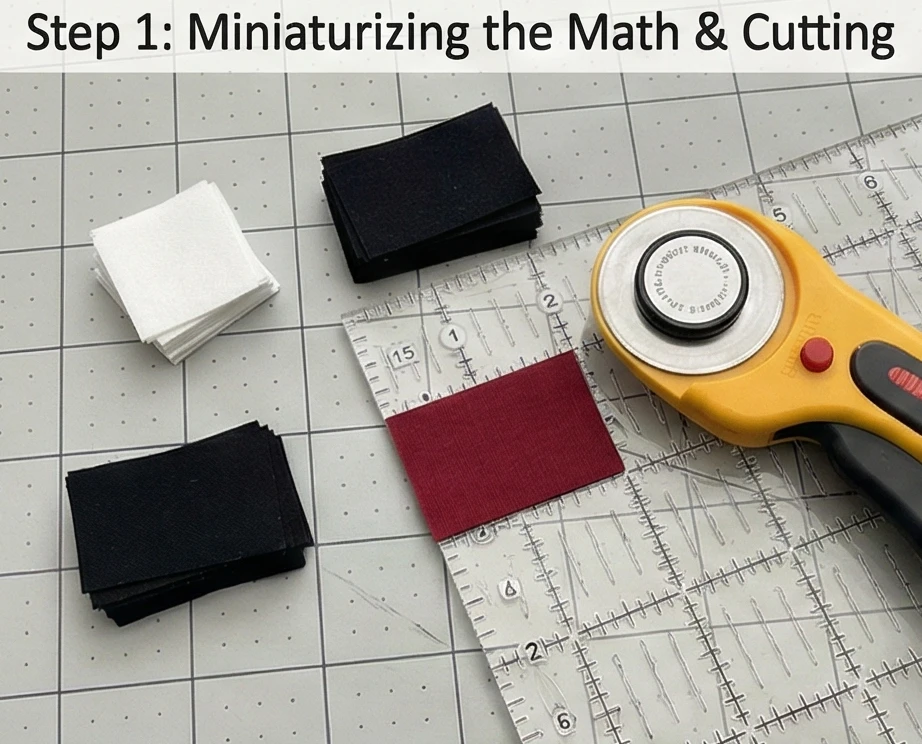
Step 2: Micro “Stitch-and-Flip”
Tiny seams require careful handling.
- Mark the Sky: Draw a diagonal line across the back of all 16 White/Greige squares.
- The Wings: Place a square face-down on the right side of a colored rectangle. Stitch directly on the line. Trim the excess (leaving a tiny 1/4″ seam) and press open. Repeat on the left side.
- The Yield: You now have 4 miniature Deep Red geese and 4 miniature Black geese, each measuring a tiny 1.5″ x 2.5″ unfinished.
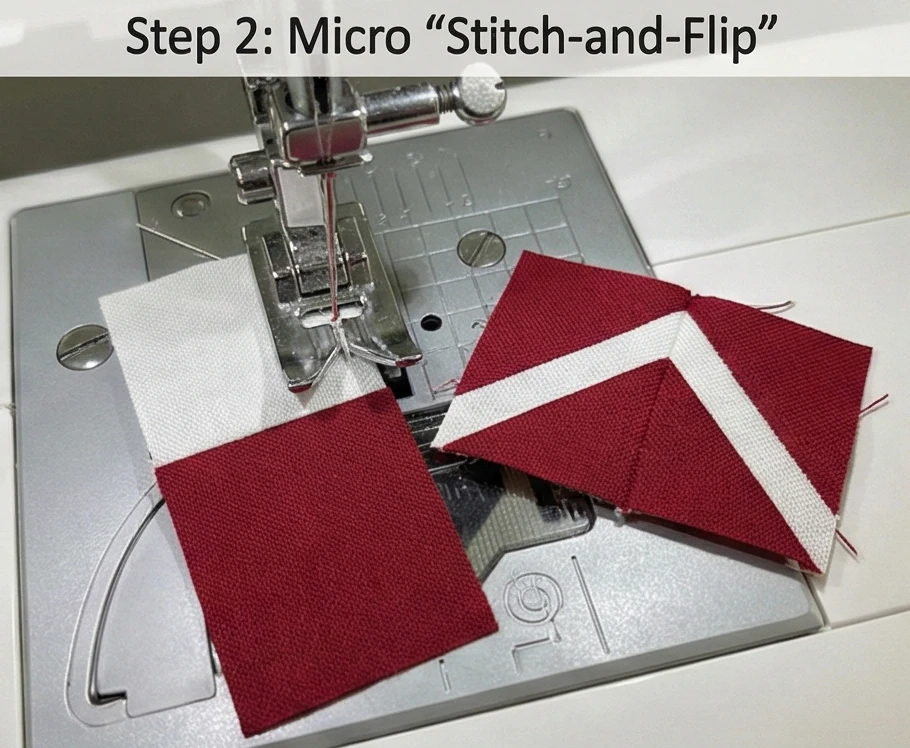
Step 3: Building the “Crown” Layout
Creating the geometric rotation.
- The Center: Cut one perfect 4.5″ x 4.5″ square from your White Jelly Roll strips.
- The Inner Ring (Red): Sew one Deep Red goose to the center of a 1.5″ x 4.5″ White strip. Repeat to make four of these units. Sew them to all four sides of the center square so the red triangles point outward.
- The Outer Ring (Black): Sew your Black geese into the four corners of a larger white border.
- Assemble: Stitch the remaining borders together to frame the red ring. The geometry will form an intricate, radiating crown. Trim the finished block to exactly 10″ x 10″.

Step 4: Pressing for a Museum Finish
When fabric is art, there is no batting to hide lumpy seams.
- Starch: Lightly mist the back of the completed block with spray starch.
- The Clapper: Press all the seams open. Use a tailor’s clapper (a heavy piece of smooth wood) and press it down firmly over the hot seams until they cool. This forces the tiny intersections to lie incredibly flat, creating a razor-sharp, canvas-like surface.
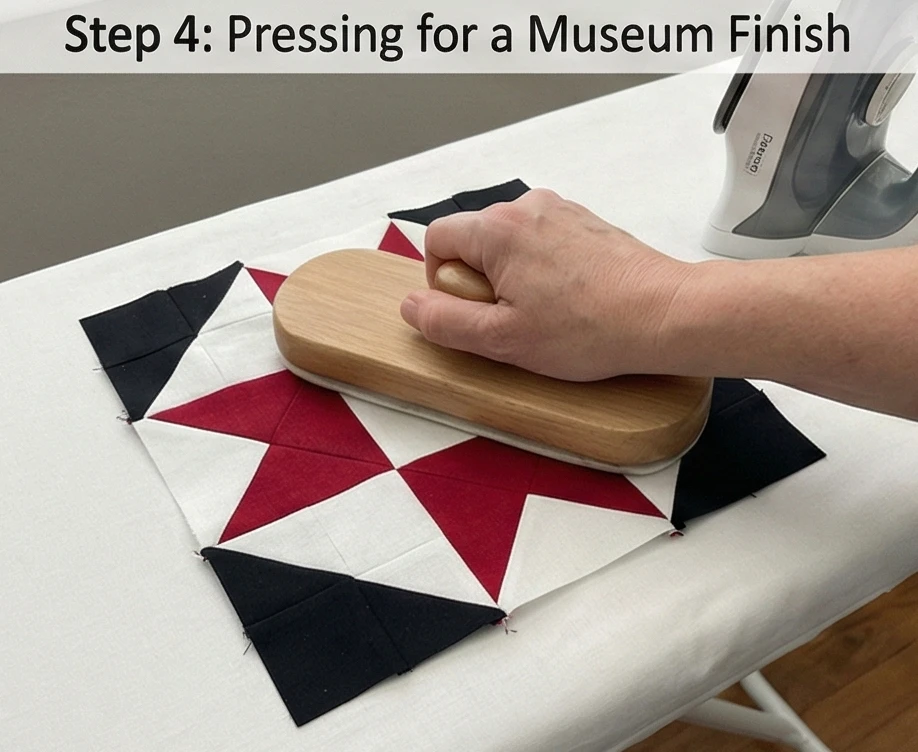
Step 5: Archival Mounting
Preparing the textile for the frame.
- Center the Block: Lay your 12″ x 12″ foam core board flat. Center your 10″ x 10″ pieced block on top. You should have a perfect 1-inch border of negative space all the way around.
- Secure the Art: Use archival double-sided tape or a very light mist of fabric adhesive to secure the back of the block to the board. Ensure the grain lines of the fabric are perfectly parallel to the edges of the board.
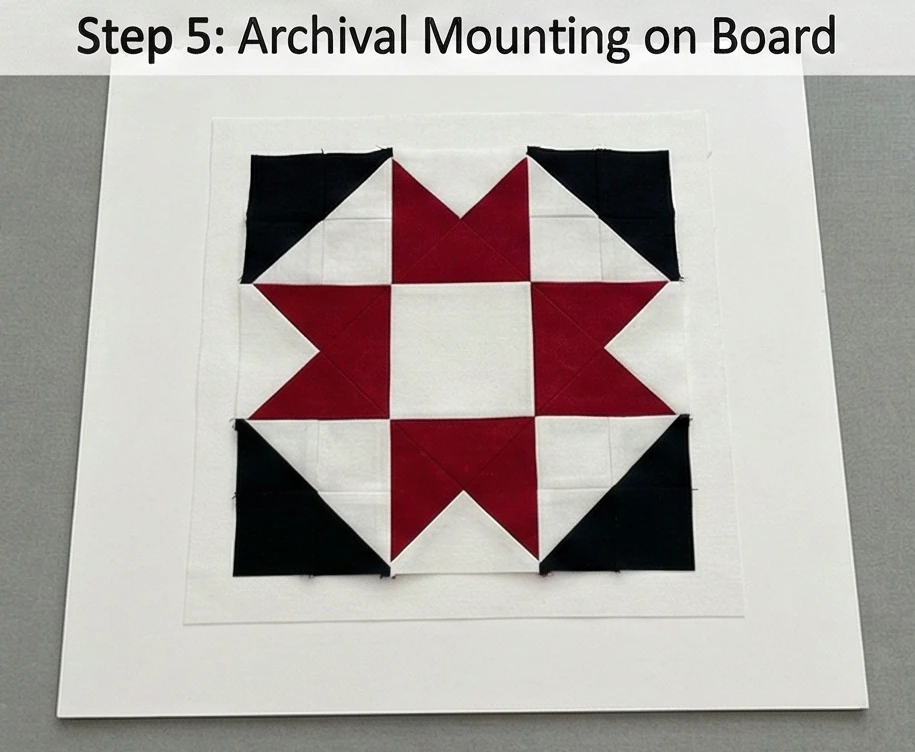
Step 6: The Shadowbox Framing
Do not crush the fabric.
- The Spacer: Never press glass directly against textile art; it flattens the texture and can trap moisture. Use a shadowbox frame with a built-in spacer that keeps the glass floating at least 1/2 inch away from the fabric.
- Seal: Place your mounted block into the frame, secure the backing clips, and hang it on your gallery wall. The high-contrast geometry will pop off the wall, providing a sleek, tactile element to your decor.
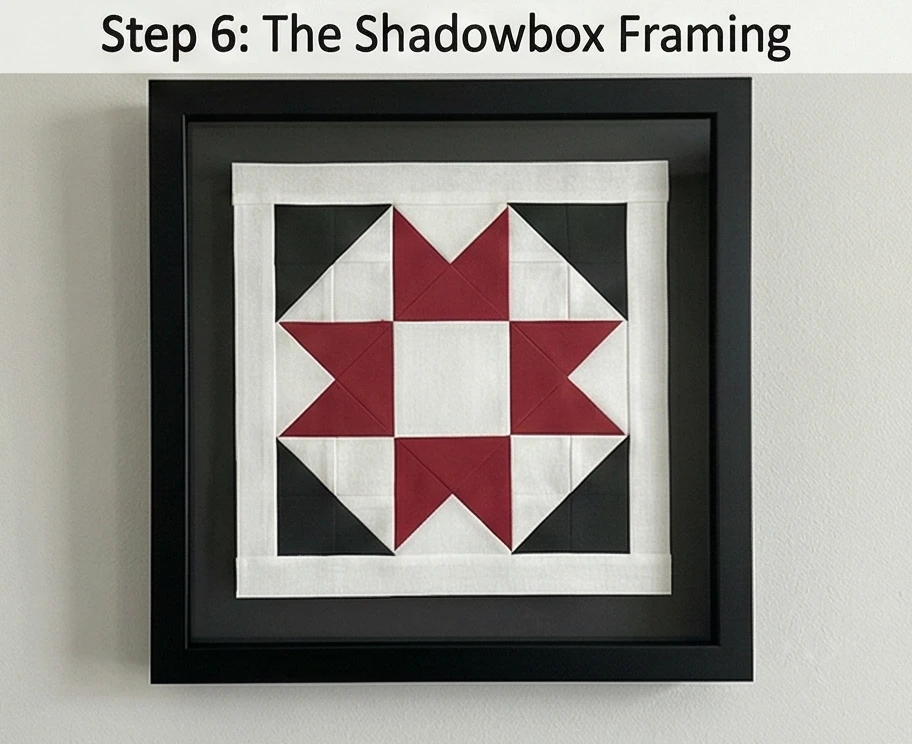
Usability Note: If you choose to frame the block without glass (to show the fabric’s true texture), it will require maintenance. To clean an unglazed textile art piece, do not use a rag or water. Instead, use a clean, dry microfiber duster or a lint roller to gently lift dust off the surface every few weeks.
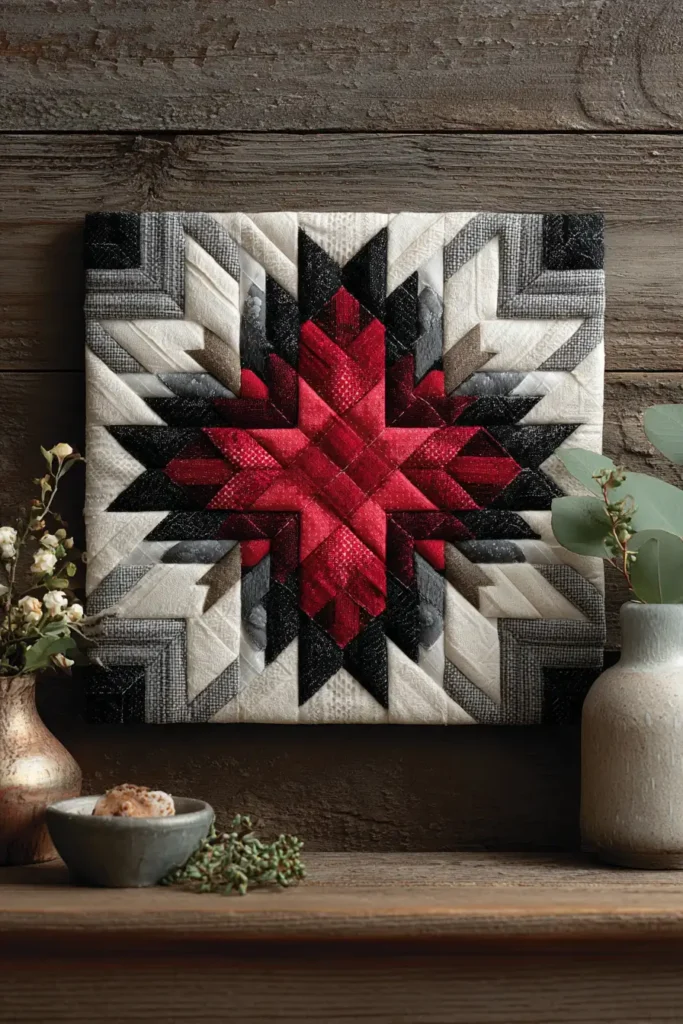
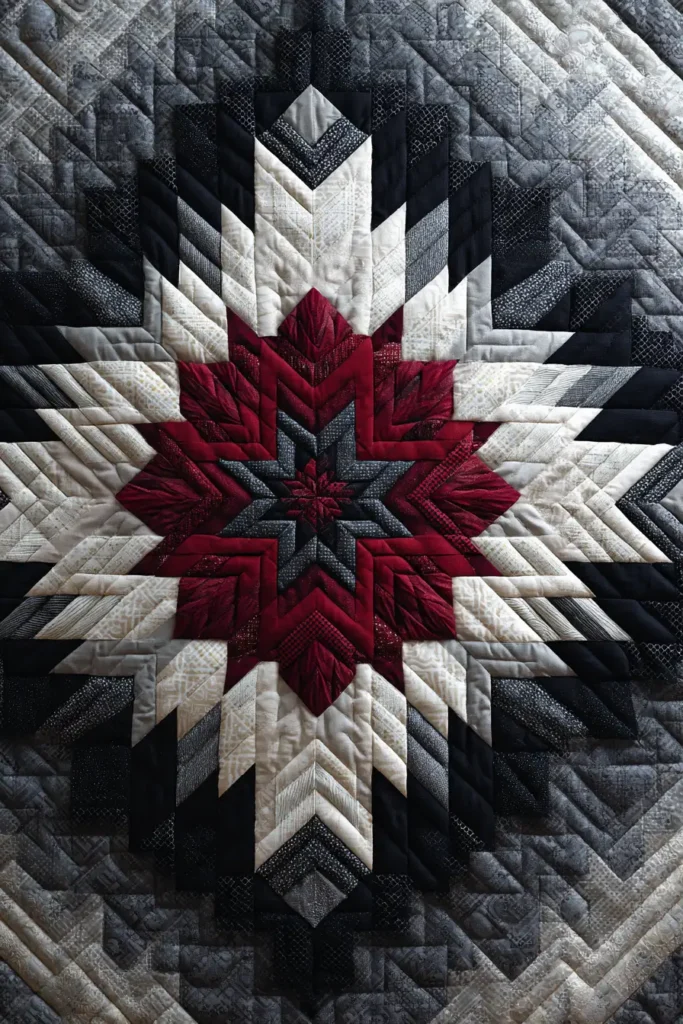
Conclusion
Embracing these sophisticated projects allows you to reimagine your home’s textiles, demonstrating that accessible, strip-pieced methods can yield genuinely luxurious results. Whether you are wrapping yourself in a Lightweight All-Season Quilt or sinking into a living room chair adorned with Decorative Jelly Roll Cushion Covers, these creations infuse your spaces with an undeniable sense of elegance and bespoke warmth. The true brilliance of working with these pre-cut strips is how they democratize high-end interior design. They empower you to achieve striking geometries—such as a stunning Bargello or a modern Herringbone—with straightforward, manageable sewing techniques that fit seamlessly into a busy lifestyle, making sophisticated decor achievable for anyone.
The practical utility of these textiles is just as important as their visual appeal, making them invaluable additions to a well-appointed home. A Durable Jelly Roll Couch Cover or a set of Quilted Jelly Roll Floor Pillows is incredibly useful for active family rooms, providing necessary protection for upholstery and offering extra, movable seating options while maintaining a chic, cohesive look. Similarly, using Intricate Braided Jelly Roll Table Toppers lets you instantly refresh your dining room for different seasons or hosting occasions without investing in entirely new furniture. By strategically placing these quilted elements throughout your home, you are effectively using texture and color to guide the eye and create defined, welcoming zones in open-concept spaces.
Ultimately, these elegant patterns offer a beautiful pathway to personalizing your home with tactile, handmade luxury that serves a daily purpose. Every strip you sew into a Minimalist Monochrome Quilt or a Geometric Tapestry is a direct investment in your daily comfort and your home’s unique, inviting atmosphere. Let this collection inspire you to unroll those beautiful fabric strips and begin crafting pieces that are not only a joy to create but also highly functional, enduring, and sophisticated anchors for your cozy, beautiful sanctuary.
