
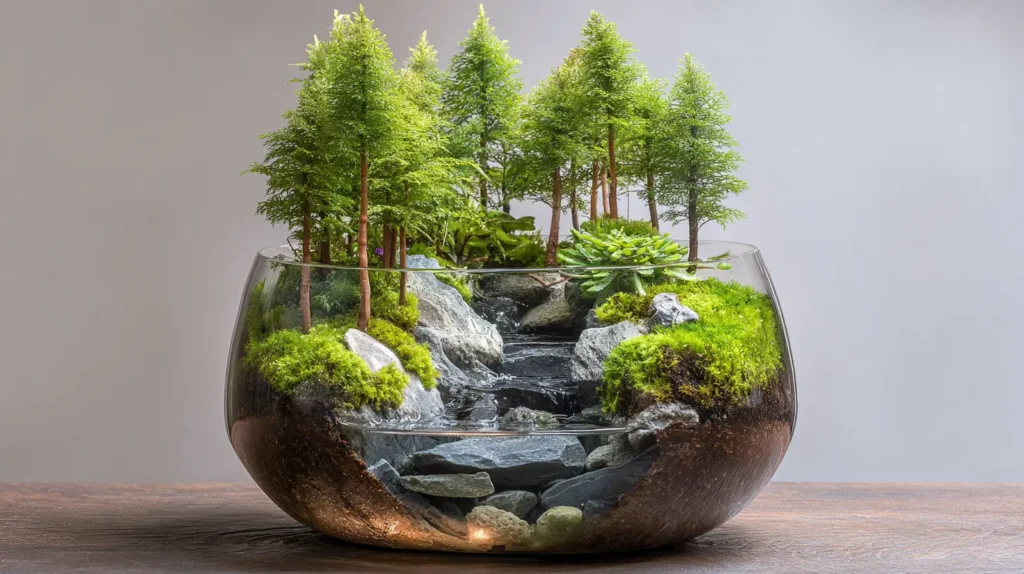
20 Water Stream and Forest Terrarium Ideas: Lush Green Canopies and Woodland Scenes in Glass Jars
Water Stream and Forest Terrarium Ideas: A Fascination I Cannot Fully Explain
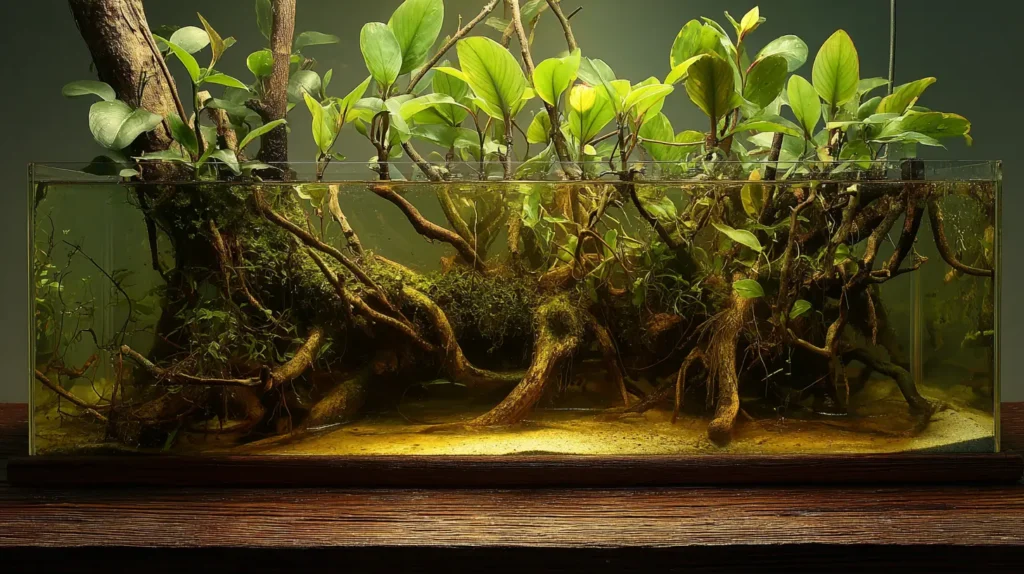
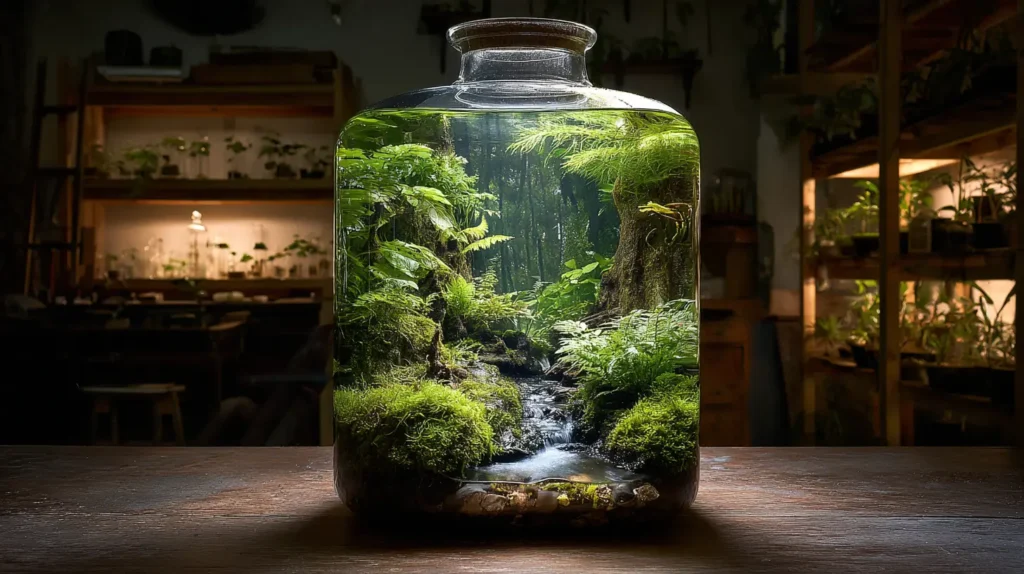
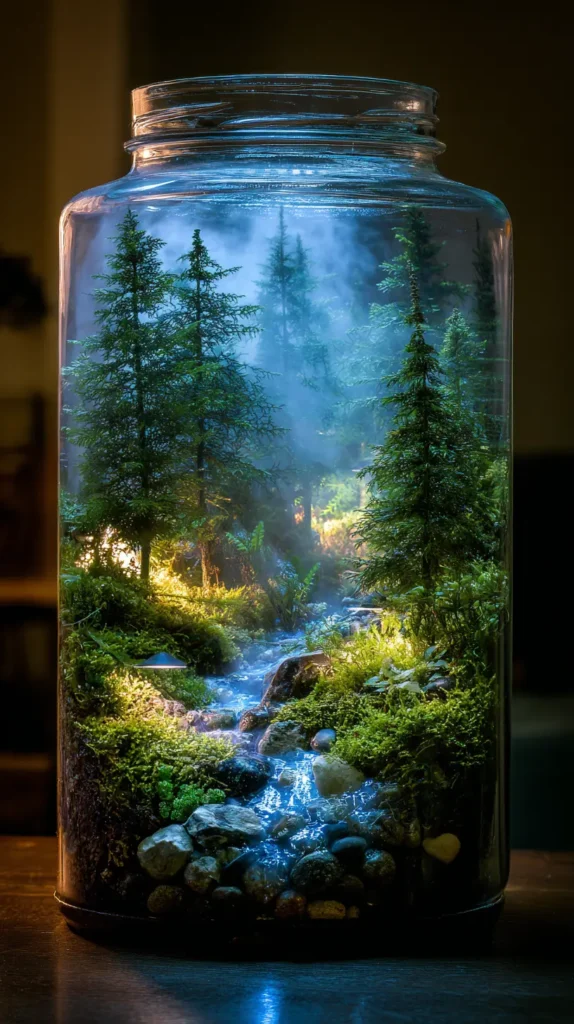
Water Stream and Forest Terrarium Ideas occupy a category of craft that I find genuinely difficult to look away from — and I say that as someone who works professionally with interior spaces and has seen a considerable range of decorative objects. There is something specific that happens when you see a glass jar containing a miniature forest in motion, with moving water. It is not the same response you have to a beautiful painting or a well-designed room. It is closer to the feeling of watching something alive that should not, by any reasonable logic, be alive in that particular place.
I have watched more terrarium-building videos than I can account for. I understand the substrate layers — drainage gravel, separation mesh, soil, surface moss. I have seen how the pump is hidden beneath stones and how the water circuit is established. I know, intellectually, how these things are made. It still looks like magic when it is working. That gap between understanding and wonder is what keeps drawing me back to this category, and it is why I wanted to build a collection around it despite the fact that several of these ideas sit well beyond what I could personally construct.
Why Terrariums Fascinate
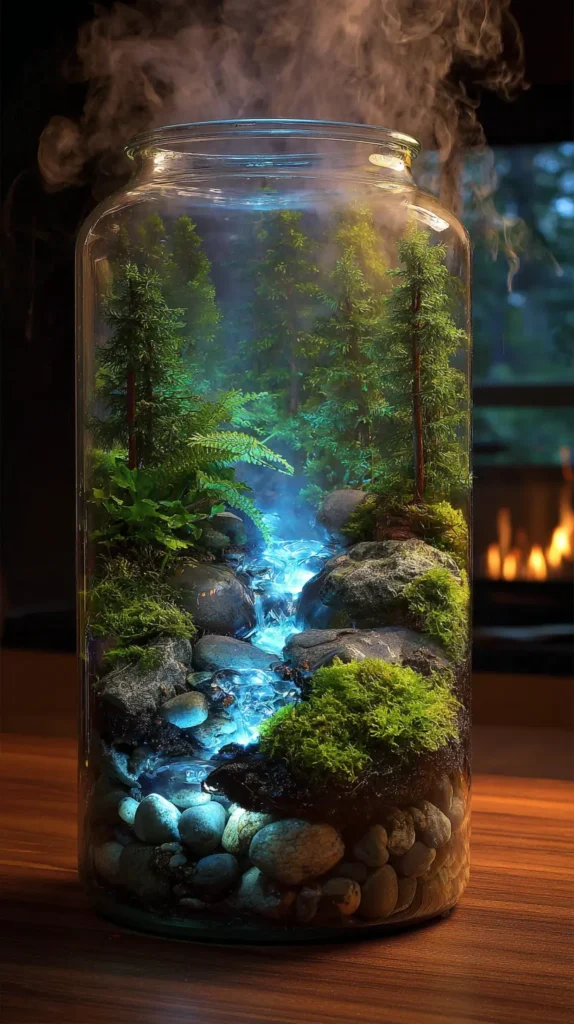
A flowing-water terrarium is a self-contained system — moisture evaporates, condenses on the glass, and returns to the substrate; plants grow toward available light; the water moves in a circuit that requires only a small pump to sustain. Watching something maintain its own equilibrium within a sealed or semi-sealed glass container elicits a particular kind of attention. You keep looking for the edges of the system, trying to find where the maintenance is hidden. In the best examples, you cannot find it. The thing simply persists, quietly, on a shelf.
The reactions of others to these objects are part of the appeal, too. There is always a moment of pause — a closer look, a “how does that work” — that very few decorative objects generate. A terrarium with moving water stops people in a way that most interior design elements do not, which makes it unusually powerful as a focal point in a room.
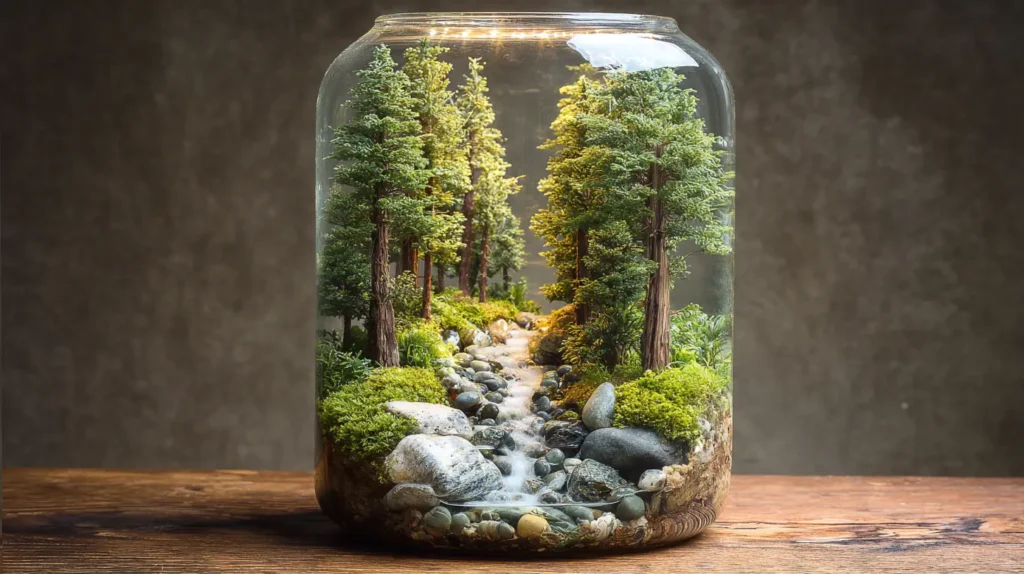
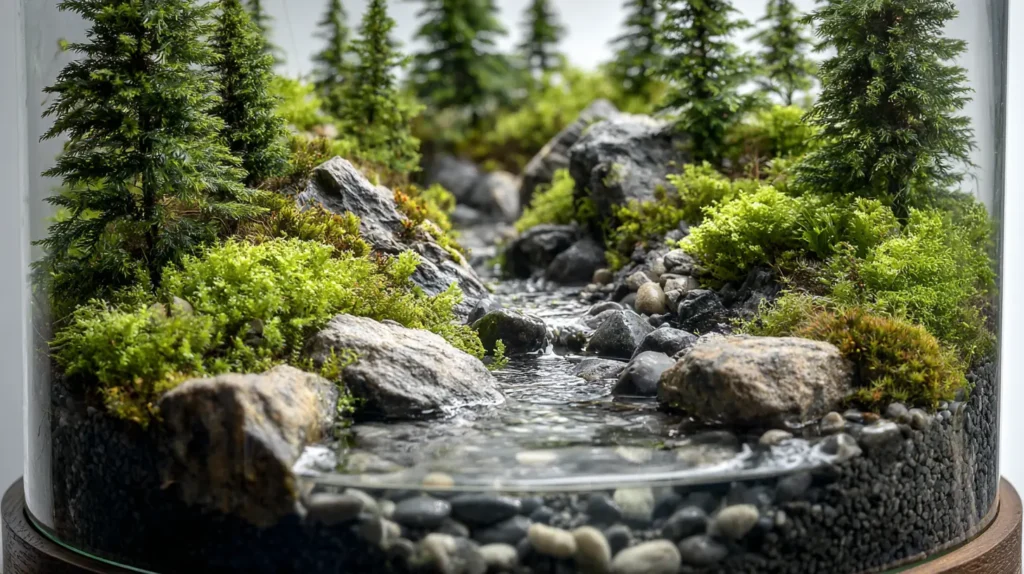
Water Stream and Forest Terrarium Ideas
The 20 ideas here range considerably in ambition. Some are practical starting points — achievable with the right materials, some patience, and a willingness to lose a few plants in the learning process. Others are more conceptual: dense tropical scenes, elaborate multi-level water systems, and woodland arrangements that would require significant skill and time to realize. A handful are honestly more imagination than instruction — ideas I would love to see someone build, rendered here as possibility rather than tutorial.
That range is intentional. The ideas here are here to help you get started. The ambitious ones are here to show you where the craft can go. And the conceptual ones are here because sometimes the point of an idea is the wondering, not the making.
See also: Green bedroom ideas · Living room plant ideas · Miniature town in glass bottles
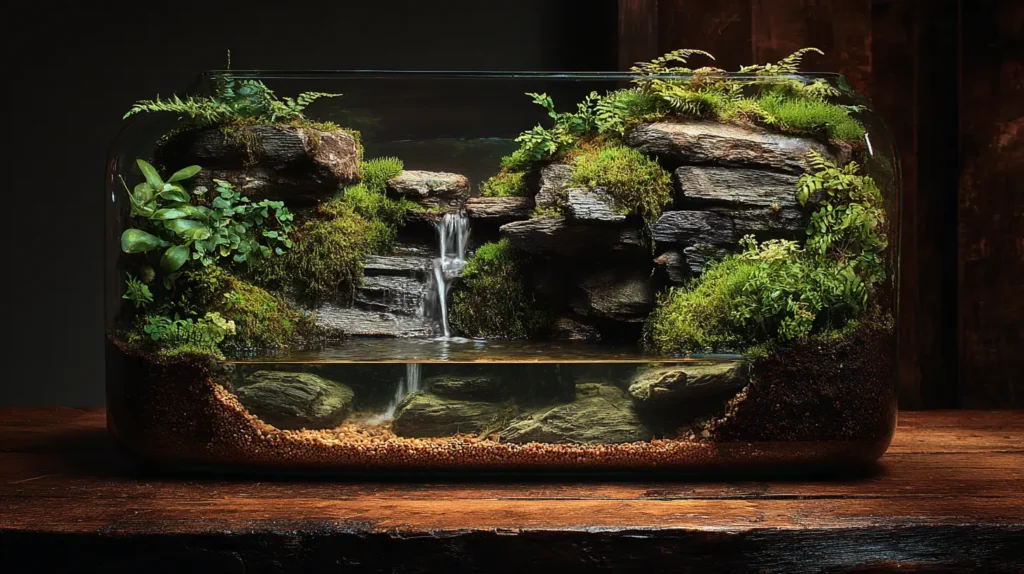
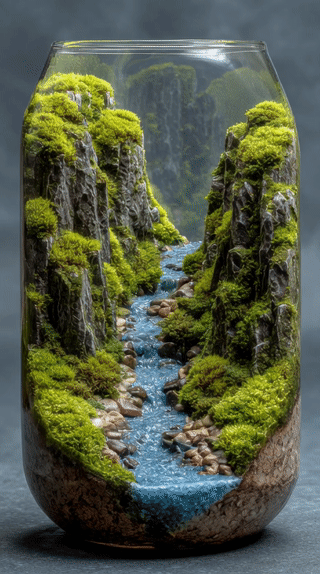
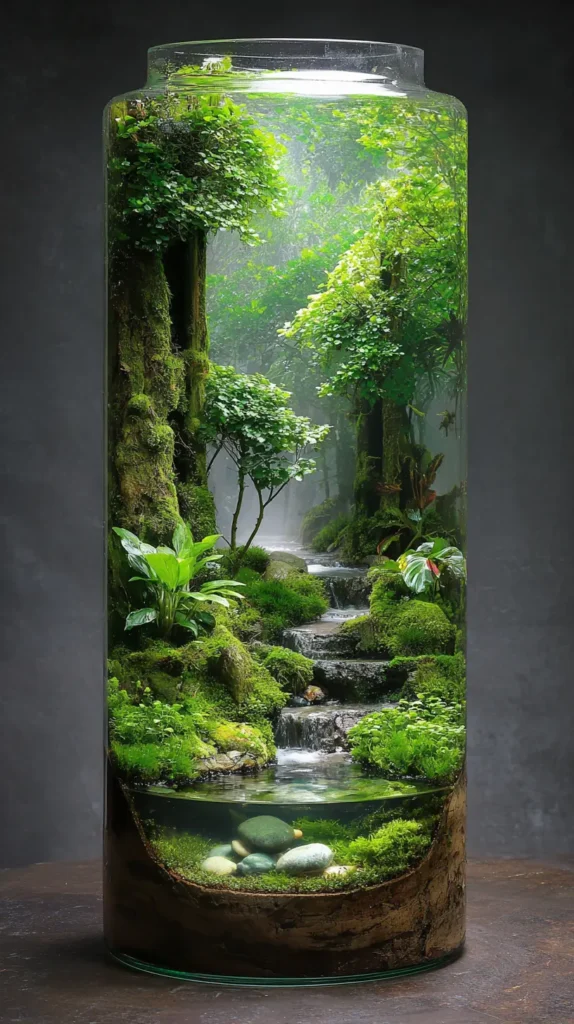
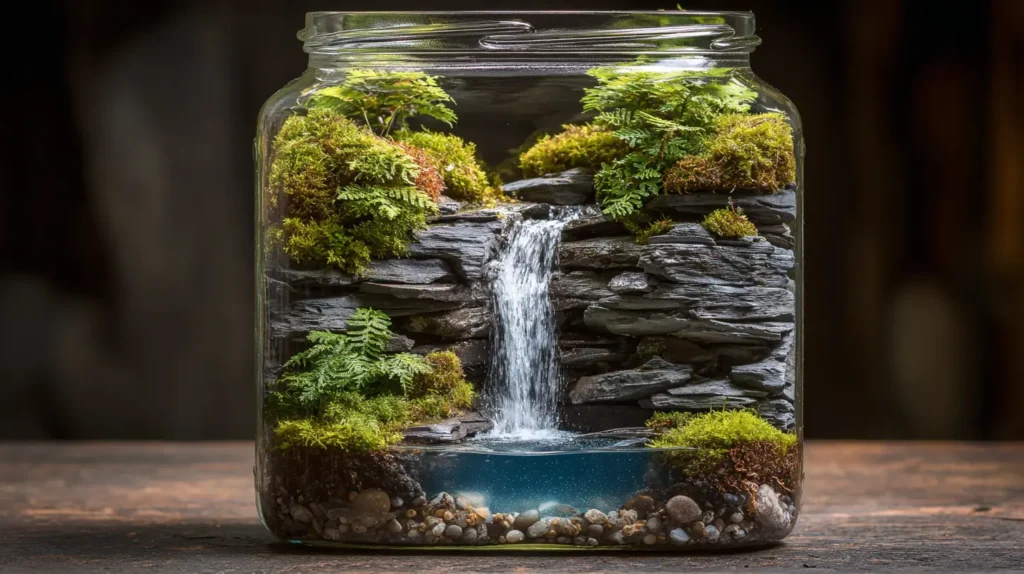
1. The Classic Cascading Waterfall Paludarium
Contents
- 1 1. The Classic Cascading Waterfall Paludarium
- 2 2. Enchanted Mossy Woodland Terrarium with Gentle Stream
- 3 3. Mountain River Valley Scape in a Glass Bowl
- 4 4. Tropical Rainforest Canopy with Hidden Pool
- 5 5. Vertical Mason Jar Waterfall Ecosystem
- 6 6. Zen Garden Bamboo Forest with Koi Pond Effect
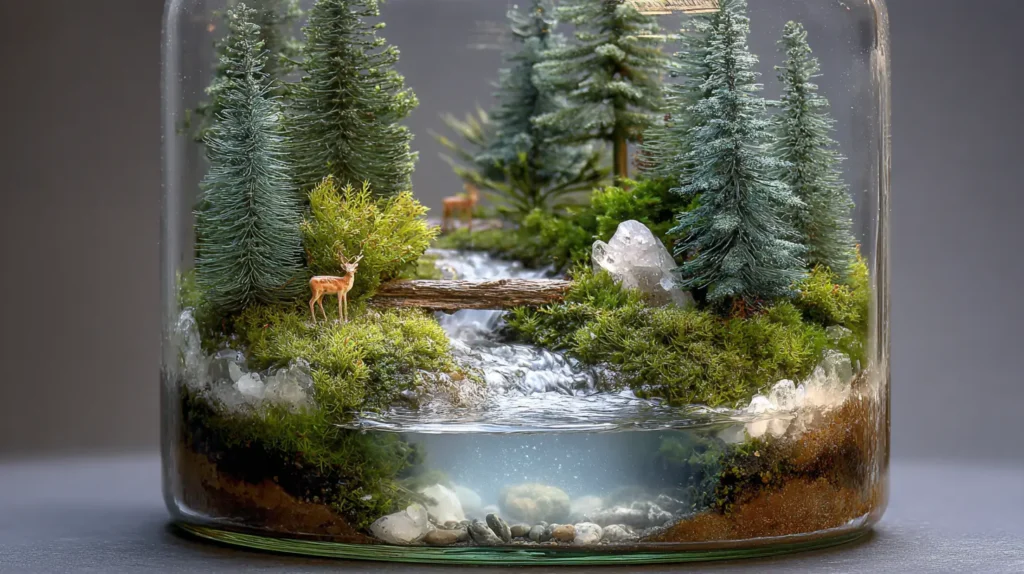
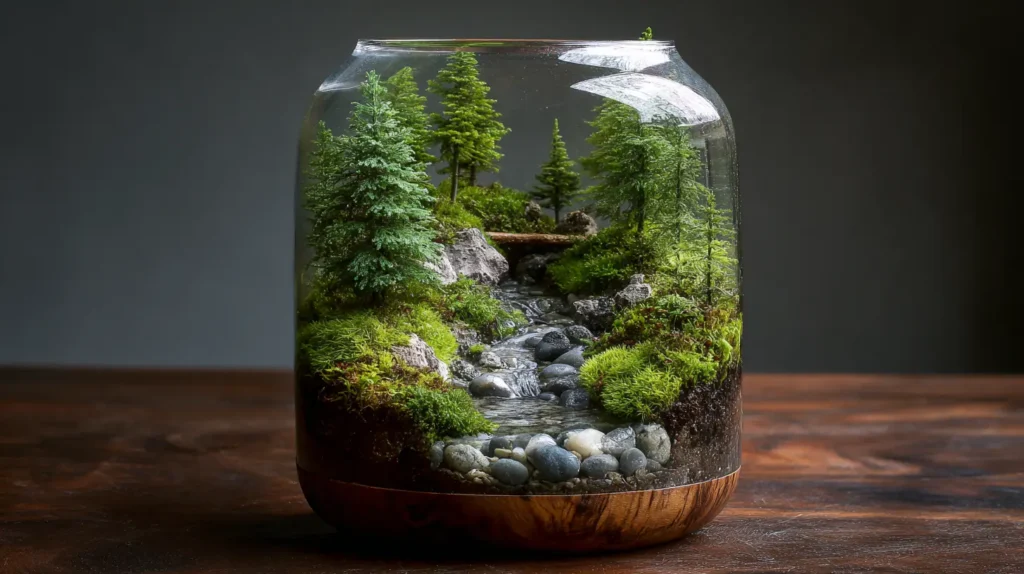
- 7 7. Miniature Pine Forest Terrarium with Flowing Water Feature
- 8 8. Misty Pine Woodland with Rocky Riverbed
- 9 9. Floating Island Jungle with Water Feature
- 10 10. Hidden Cave Waterfall and Grotto Design
- 11 11. Ancient Tree Stump with Trickling Water
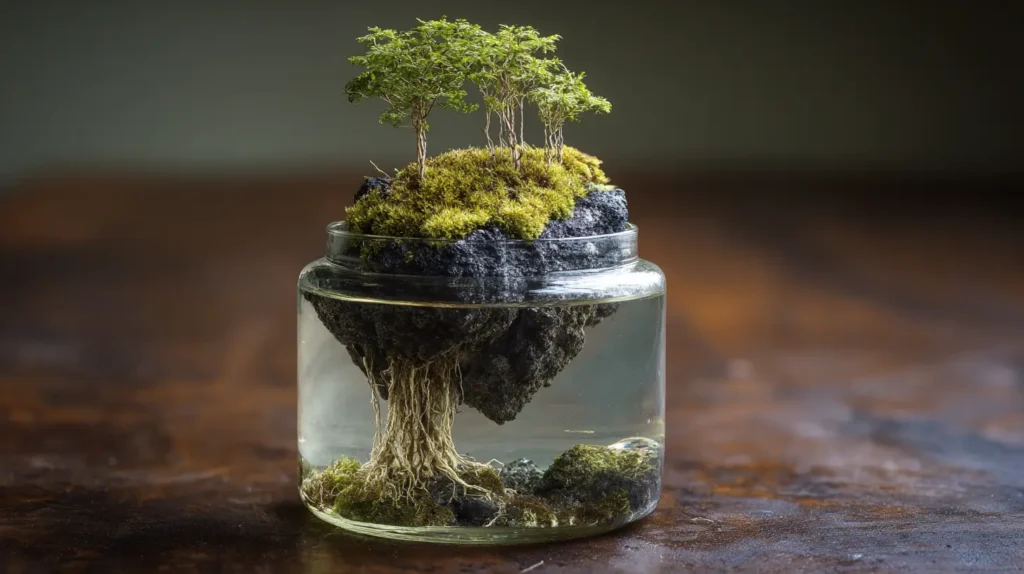
- 12 12. Bonsai Tree on a Cliff with Waterfall
- 13 13. Amazon River Basin Biotope in a Jar
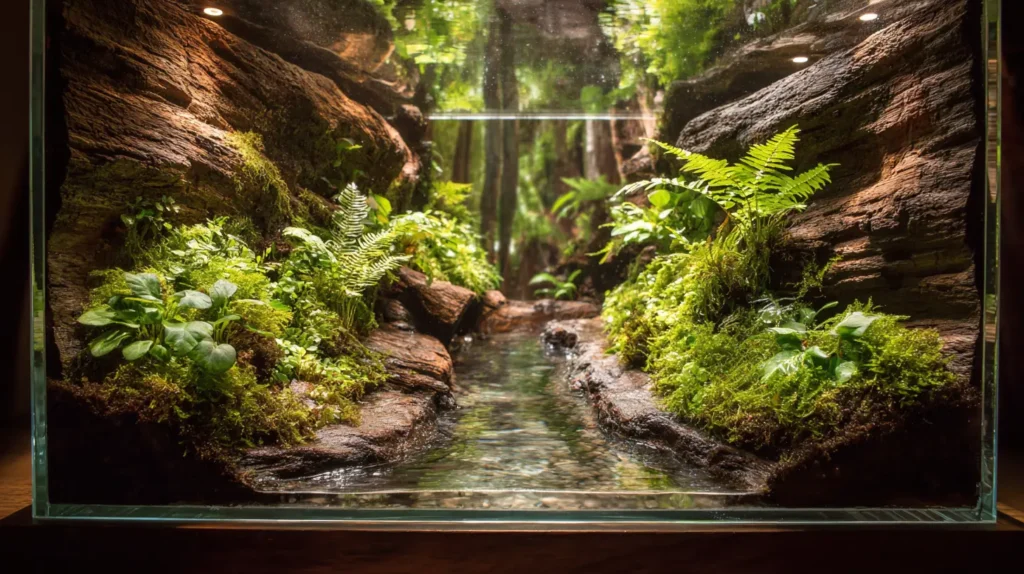
- 14 14. Fern Canyon with Winding Stream
- 15 15. Minimalist Iwagumi Style River Scape
- 16 16. Birch Tree Grove Terrarium with Pebble Stream Bed
- 17 17. Rocky Gorge with Rushing Rapids Effect
- 18 18. Misty Swamp and Bog Garden Aesthetic
- 19 19. Redwood Giant Mini Forest Terrarium with Misty Waterfall
- 20 20. Foggy Morning Forest with LED Stream Decor
- 21 Conclusion
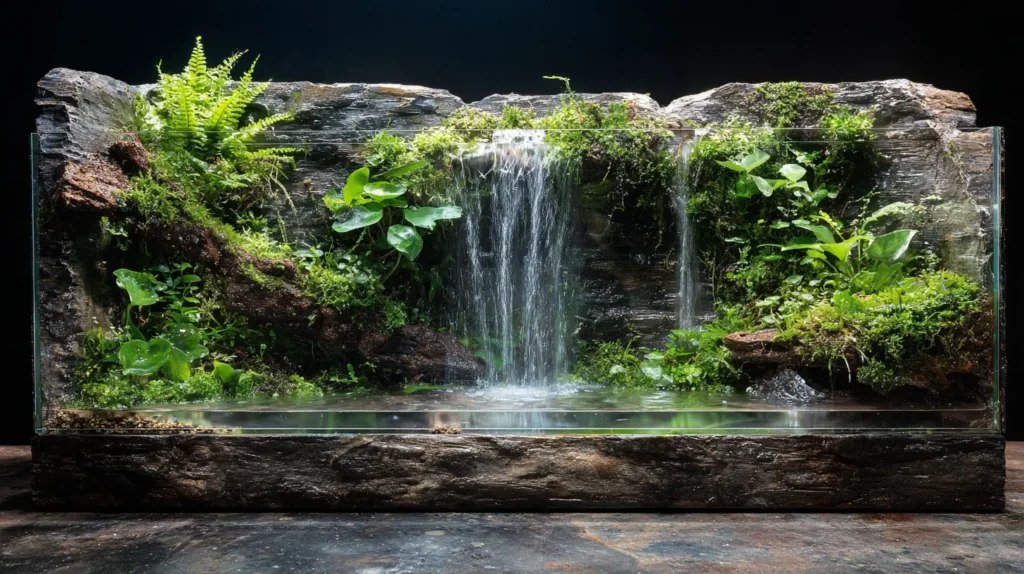
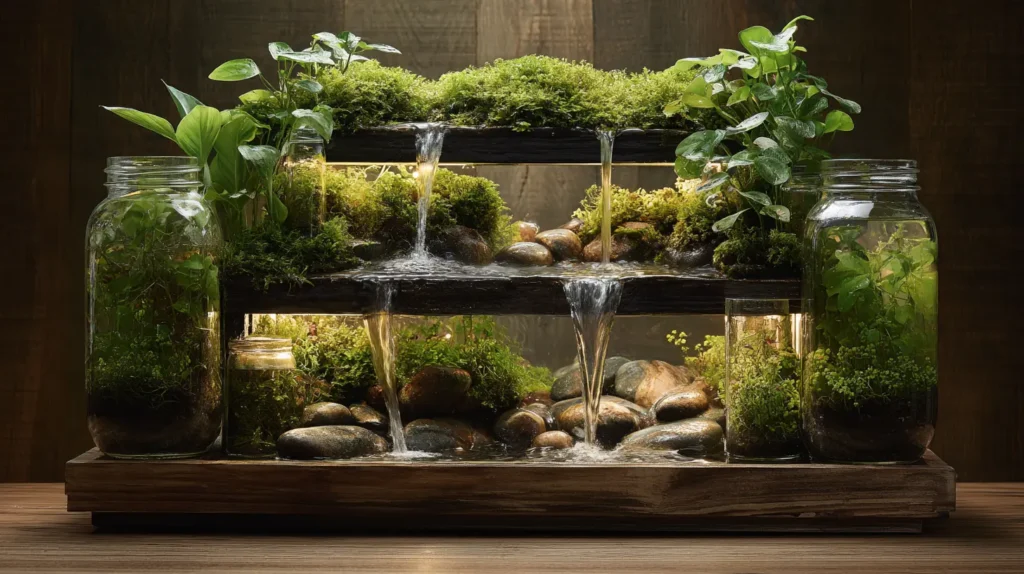
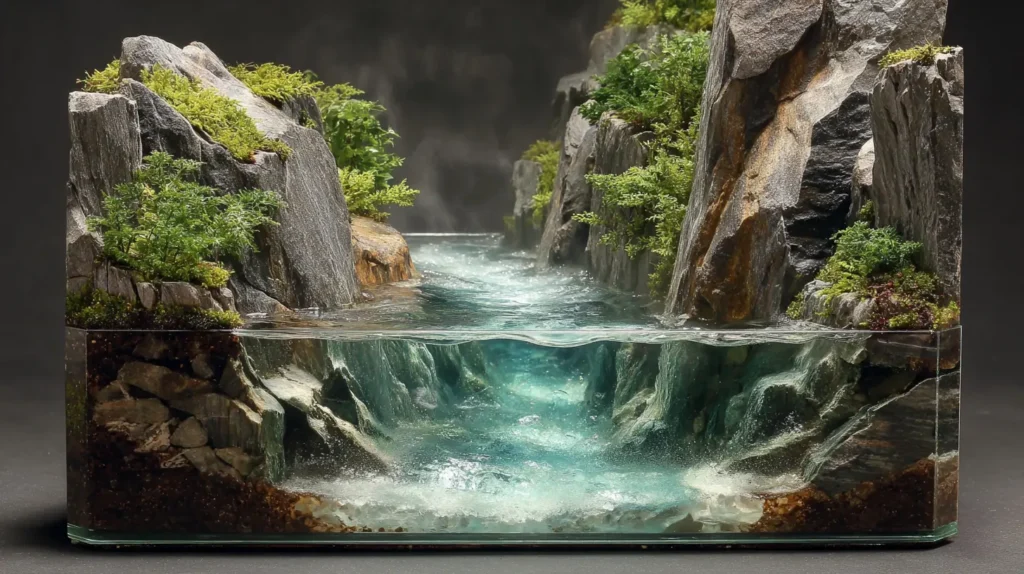
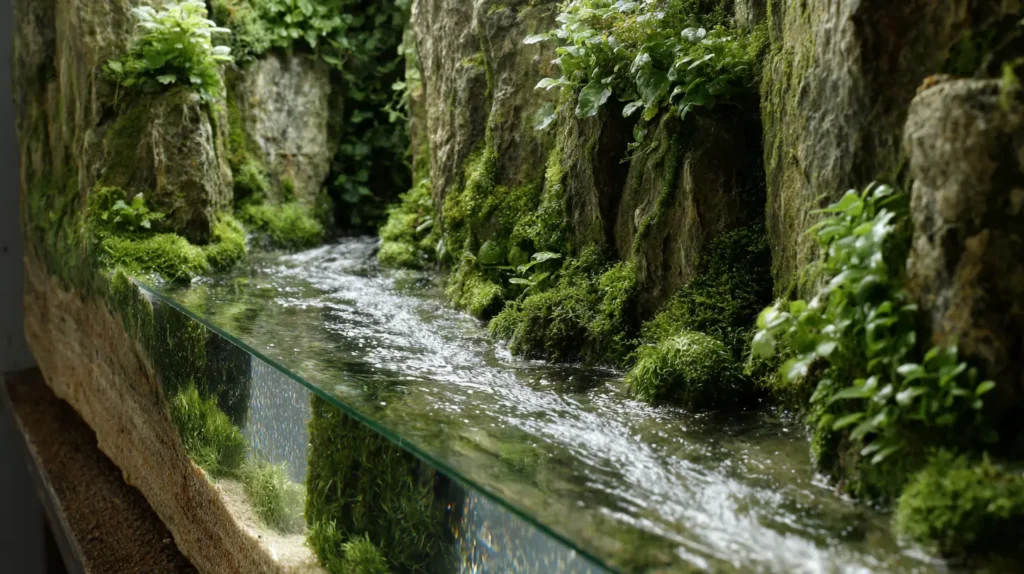
Envision a dynamic, living ecosystem where land meets water in a mesmerizing display of motion. This isn’t just a static jar; it’s a moving piece of art featuring a working waterfall that trickles down a rugged wall of slate or dragon stone into a crystal-clear pool below. The soothing sound of running water instantly calms the room. Lush ferns and weeping mosses cling to the wet rocks in the “splash zone,” thriving in the high humidity, while small aquatic plants like Anubias wave gently in the water below. It captures the essence of a hidden rainforest grotto, bringing nature’s sights and sounds directly to your desk.
- The Engine Room: You will need a small, submersible water pump (often USB-powered) hidden at the bottom of the tank to push water up through a tube to the top of your rock formation.
- Build a False Bottom: Use egg crate (light diffuser) or a layer of LECA clay balls to separate the land section from the water reservoir, preventing soil from turning into a muddy swamp.
- Hardscape Construction: Stack flat rocks, such as slate or shale, to create the waterfall steps. Test the water flow frequently to ensure it trickles over the rocks and not behind them.
- Plant Zoning: distinct zones are key. Use aquatic plants (Java Fern, Cryptocoryne) in the water, moisture-loving mosses on the waterfall rocks, and terrestrial ferns on the dry land section.
- Filtration: Because there is moving water, consider hiding a small sponge filter behind the rocks to keep the water clear and odorless.
Pro Design Tip: The secret to a natural-looking waterfall is “Sticky Soil” or expanding foam. Coat the plastic tubing and the back of the tank with expanding foam or silicone, and immediately press coco coir (coconut fiber) or dry moss into it before it cures. This completely hides the mechanical plumbing and creates a textured surface for moss to grow on later.
Budget Consideration: You do not need an expensive “paludarium” tank. A standard 5-gallon aquarium or a large thrift-store glass vase works perfectly. The water pump itself is surprisingly cheap—you can find “mini USB submersible pumps” online for under $10 that are perfectly sized for small terrarium projects.
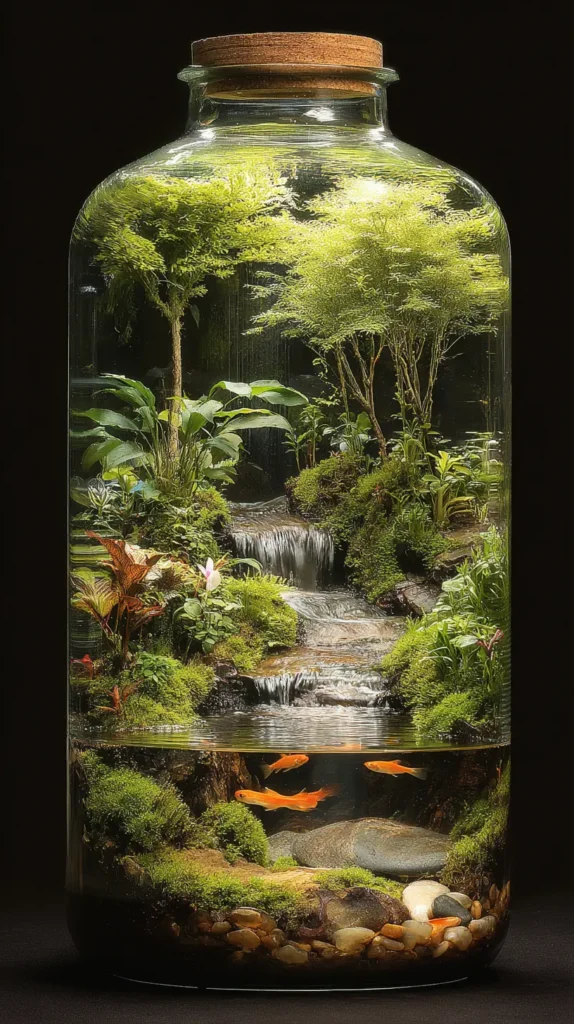
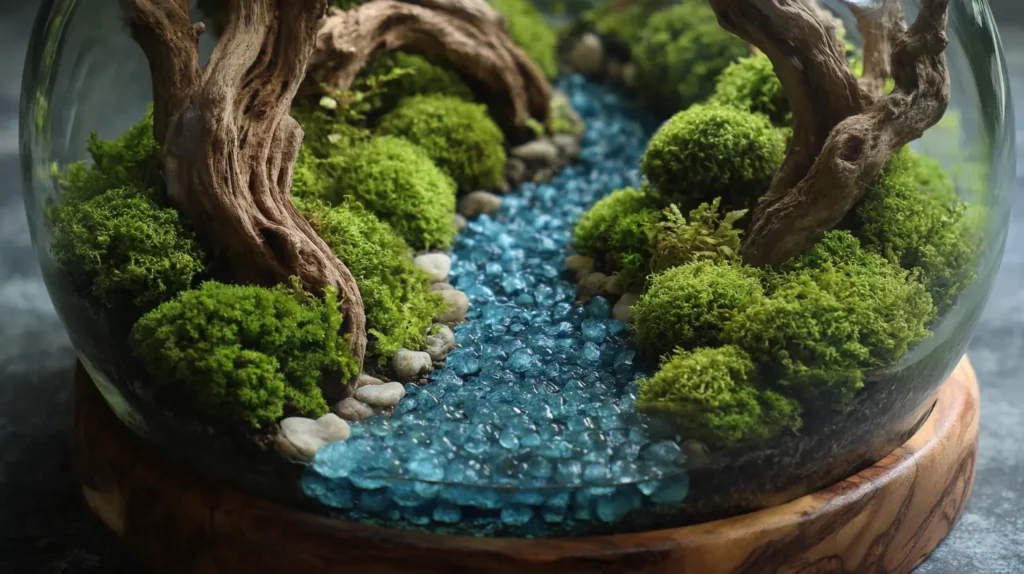
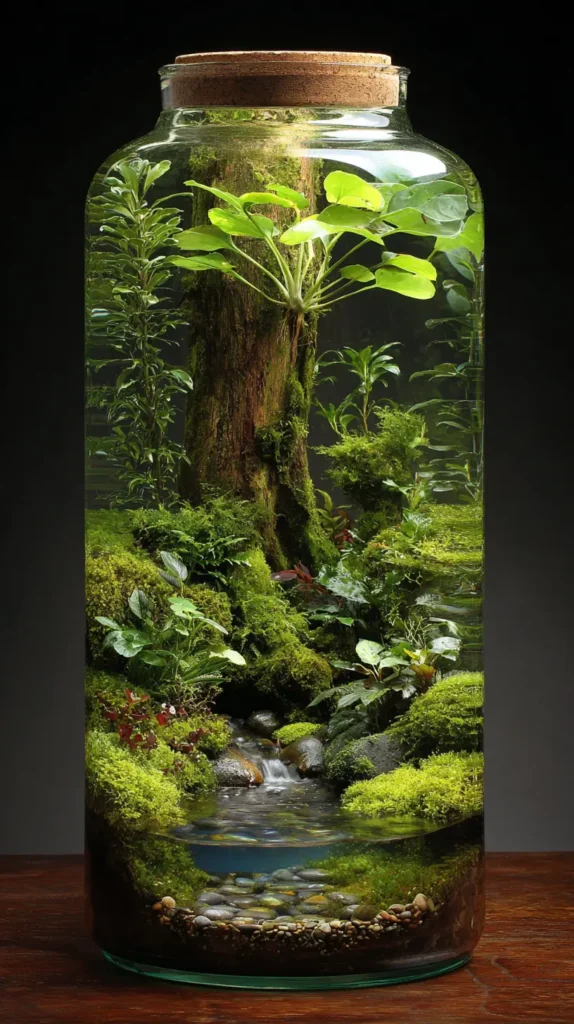
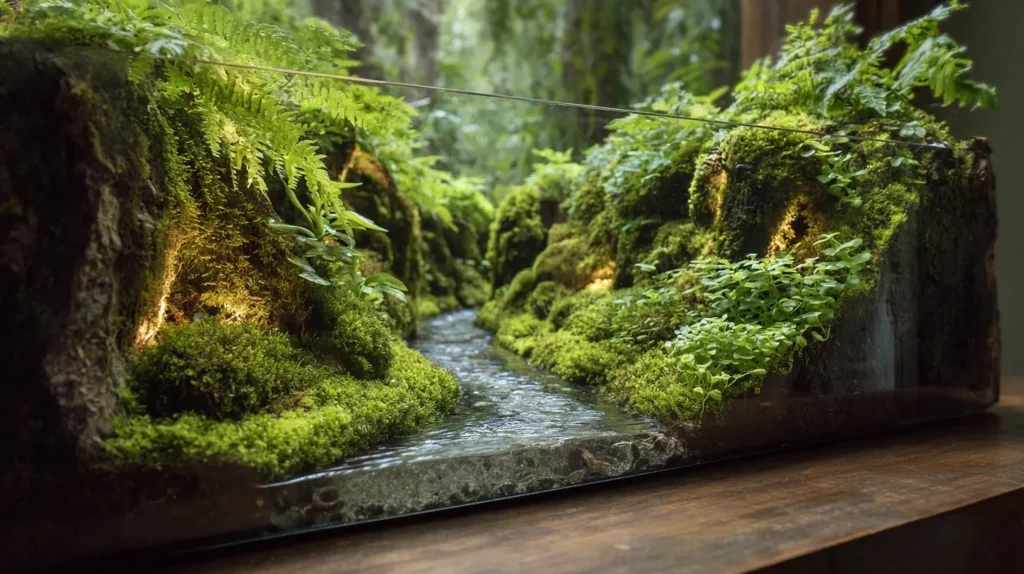
2. Enchanted Mossy Woodland Terrarium with Gentle Stream
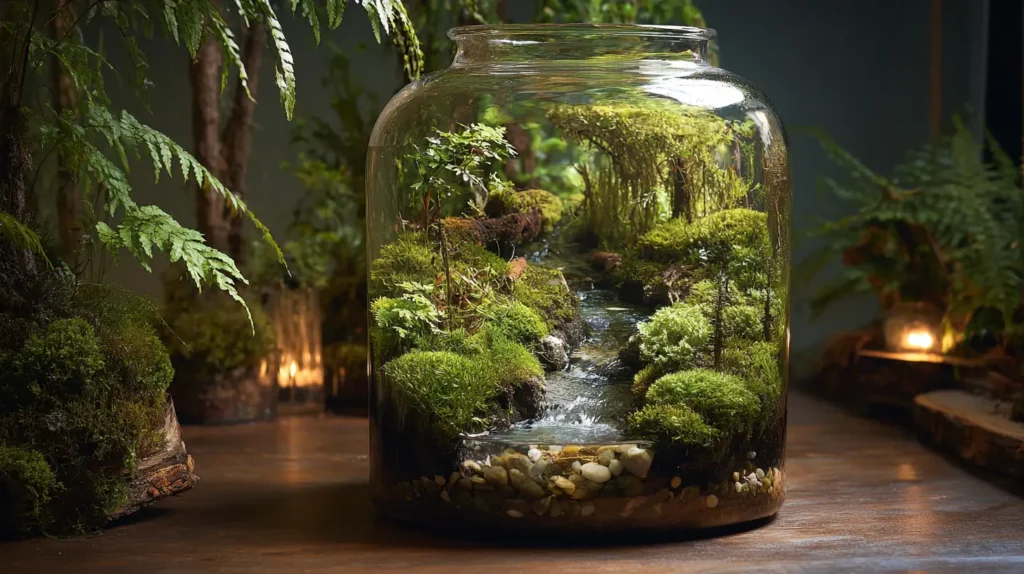
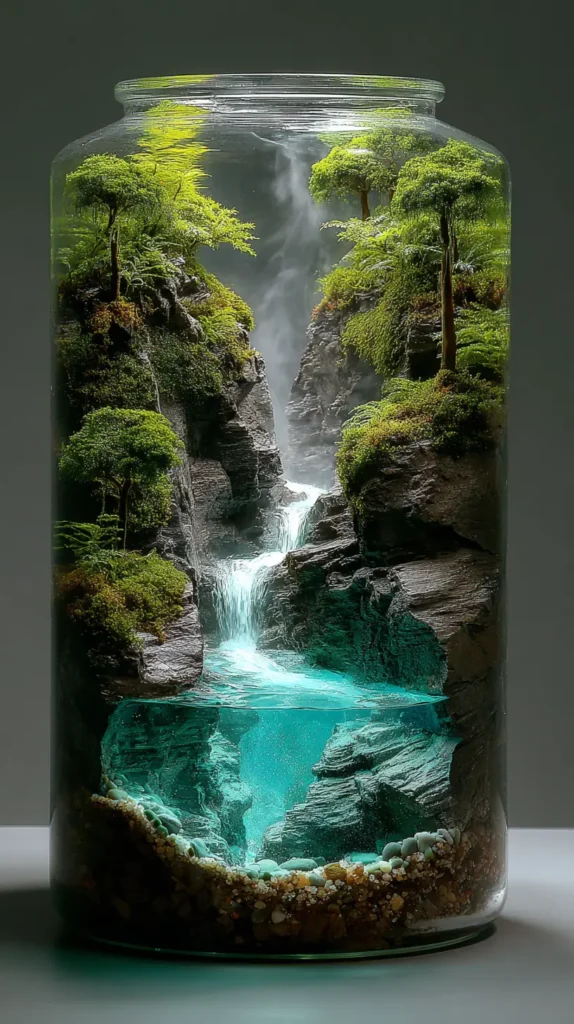
This enchanted mossy woodland terrarium with gentle stream brings a whisper-quiet slice of ancient forest right onto your shelf, where a tall, wide-mouth glass jar or bell cloche becomes a living fairy-tale world—soft sheets of emerald and lime preserved moss carpet the ground like velvet, rising into gentle hills around a delicate hand-poured resin stream that glimmers like real water as it trickles between smooth pebbles and tiny quartz crystals. Miniature ferns, baby tears, and dwarf mondo grass form a lush, dripping canopy overhead, while delicate sprigs of faux or preserved reindeer moss cling to weathered driftwood branches that arch like ancient trees.
A hidden battery-powered micro-pump keeps a whisper-thin ribbon of real mist drifting across the scene, keeping everything dewy and alive, and a few firefly-sized LED lights tucked beneath the moss create a soft, moonlit glow at night—turning your tabletop into a magical, self-contained woodland that feels like you’ve bottled an actual enchanted glade.
Use a large 10–20 litre glass jar or apothecary jar with a removable lid for easy access and humidity control.
Layer moss, sheet moss, and cushion moss in varying shades of green for a realistic forest-floor texture.
Create the stream with clear resin poured in thin, rippled layers—add a drop of blue alcohol ink and a drop of white for foam.
Add a tiny USB or battery mist maker hidden under the moss for gentle, constant fog (no plumbing needed).
Include one or two small live accent plants (fittonia or selaginella) in the highest-humidity zone for subtle movement.
Pro Design Tip: Place the tallest driftwood piece slightly off-center and let the moss and ferns grow (or be styled) thicker on one side—the natural asymmetry plus the drifting mist creates the illusion of real depth and mystery in even a modest jar.
Budget Consideration: Large glass jar $20–$50, preserved moss assortment $25–$40, clear resin & mist maker $30–$45, miniature plants & lights $20—complete living, misty woodland wonder under $180 while looking like a $600 artisanal masterpiece.
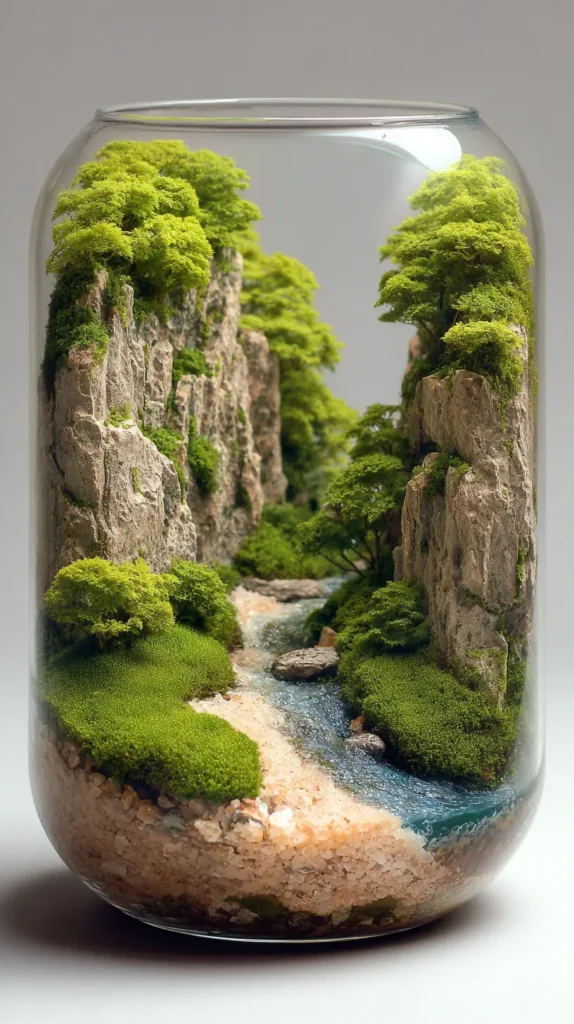
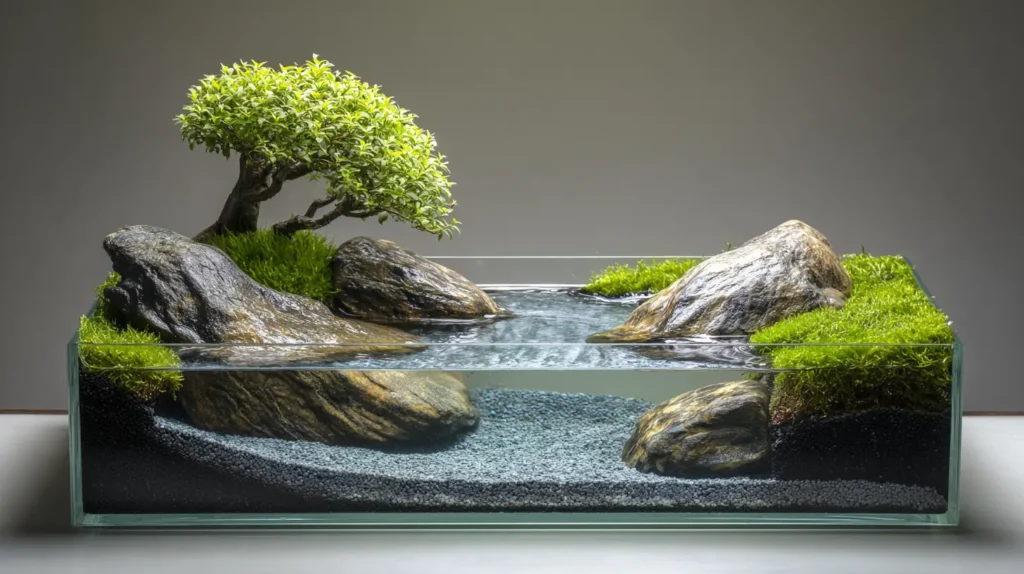
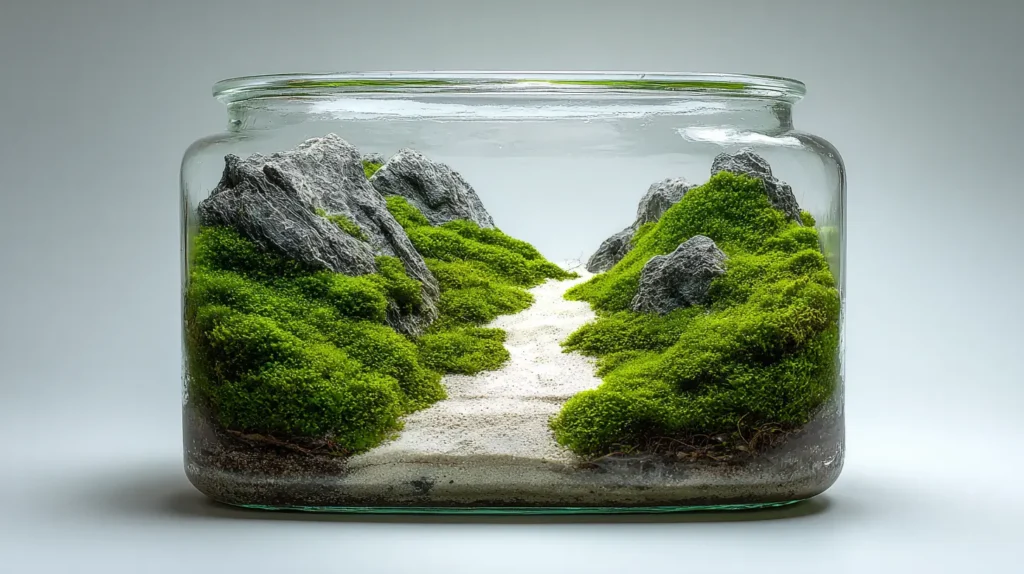
3. Mountain River Valley Scape in a Glass Bowl
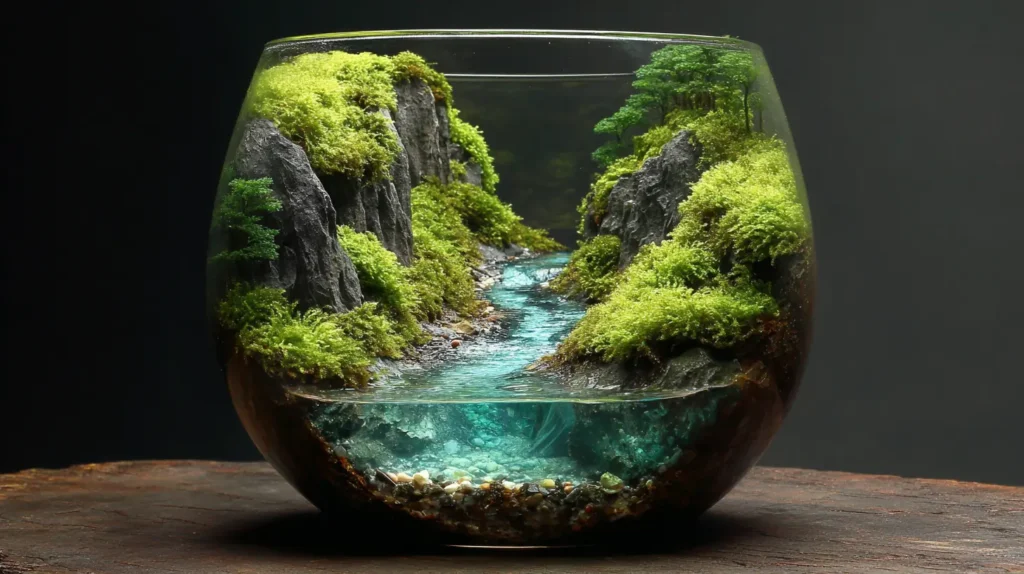
Picture a serene, high-altitude meadow enclosed within a glass sphere. In this version, the focus is on a winding “dry stream” made of shimmering silica sand that meanders between two mossy hills. The landscape is soft and rolling, mimicking an Alpine pasture rather than jagged cliffs. Small, fern-like plants (like Selaginella) dot the banks of the sand river, looking like miniature trees. The scene uses negative space and a winding S-shape path to draw the viewer’s eye deep into the bowl, creating a peaceful, Zen-like view that feels miles away from the chaos of the real world.
- The S-Curve: To create the illusion of distance in a round bowl, shape your riverbed in a winding “S” shape rather than a straight line. This makes the path look longer.
- Bank Stabilization: Use small pebbles or slate chips to line the edges of your sand river. This keeps the black soil from mixing with your pristine white sand.
- Layering: Place larger stones in the front and smaller pebbles in the back to enhance the depth perspective.
- Plant Choice: Use “sheet moss” or “carpet moss” to create the look of rolling grassy hills. Avoid tall, leafy plants that will break the illusion of scale.
- Mist, Don’t Pour: When watering, use a fine mist sprayer. Pouring water directly will disturb the sand river and ruin the clean lines of your valley.
Alternatively, choose a wide, shallow glass bowl (12–20 inches) so the river can meander naturally. Use two-part clear epoxy resin for the water—tint one layer slightly blue and add a few drops of white for rapids. Layer preserved reindeer and sheet moss in different shades of green for realistic forest depth. Add a tiny LED spotlight or fairy light string underneath the bowl for a magical evening glow. Seal everything with a light coat of matte spray varnish to protect from dust while keeping it natural.
Pro Design Tip: Place a single, tiny piece of driftwood or a twig across the sand river to create a “fallen log bridge.” It provides an immediate sense of scale, making the moss look like grass and the twig look like a massive tree trunk.
Create subtle “depth” by pouring the resin in two stages—first, a shallow pool; let it cure; then, a flowing river on top—so the water appears to have real movement and dimension.
Budget Consideration: You don’t need expensive epoxy resin to create water. High-quality “cosmetic sand” (sold for aquariums) creates a beautiful, convincing stream effect for a fraction of the cost and is much easier to work with—plus, you can reshape it whenever you want!
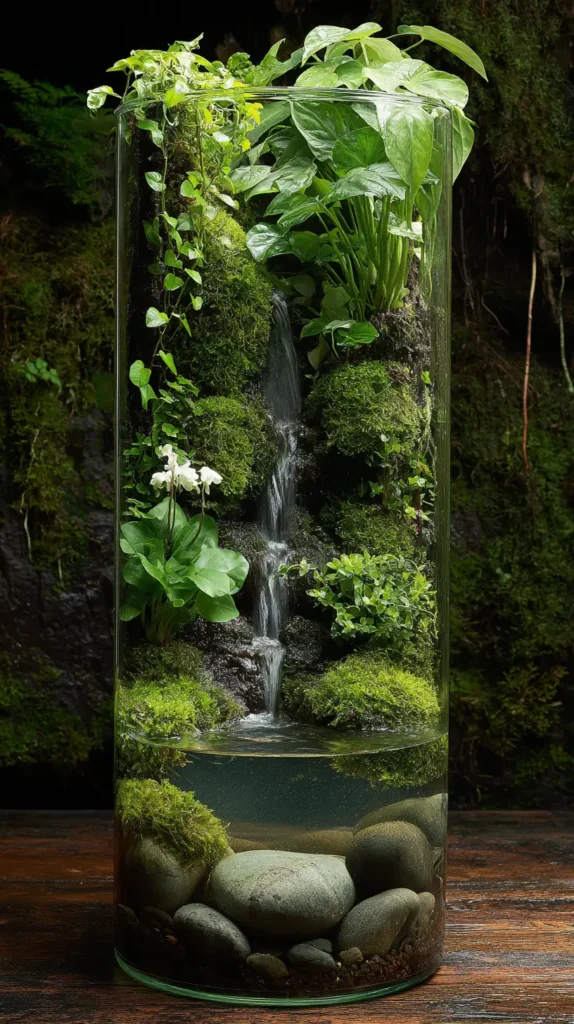
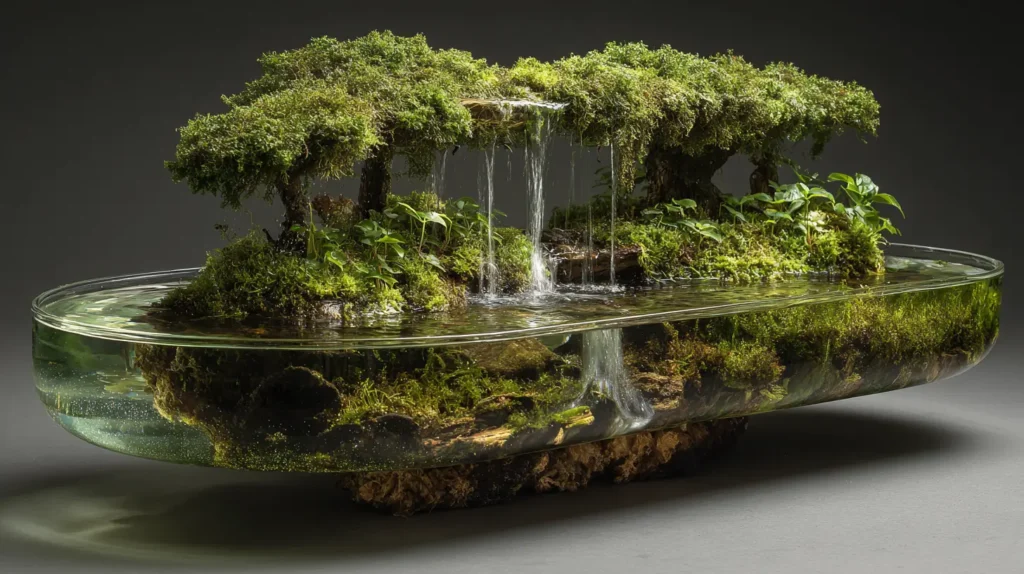
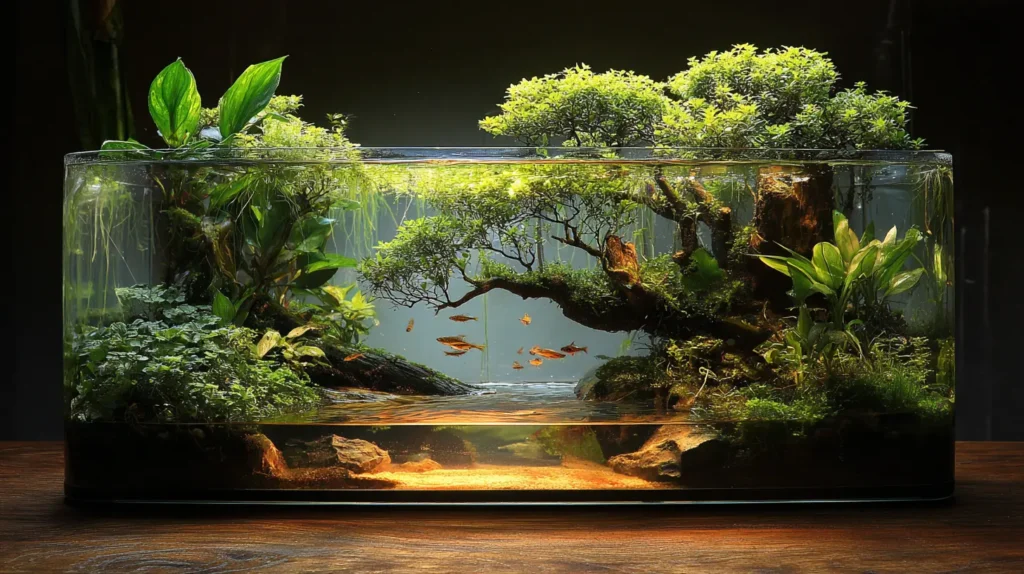
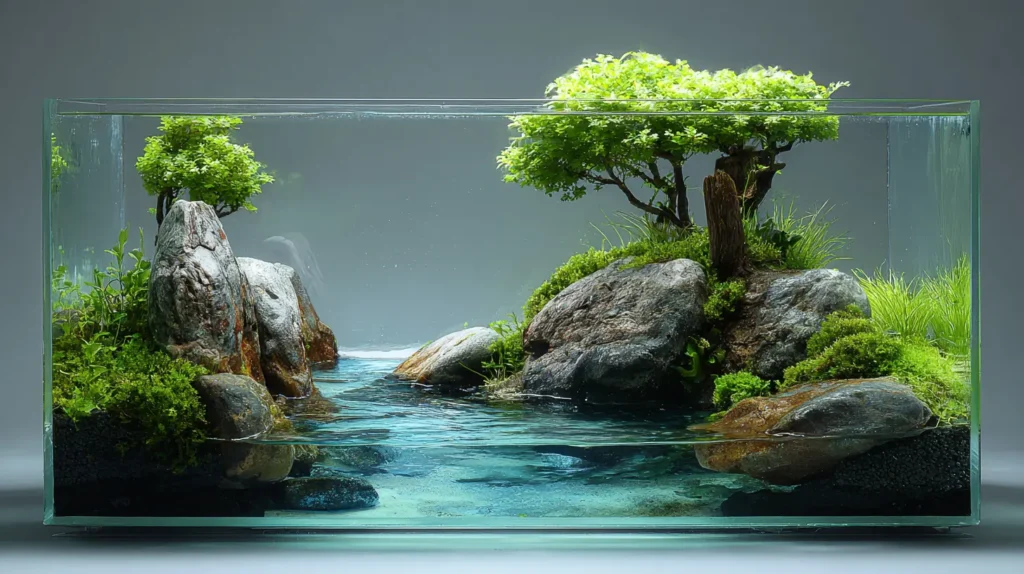
4. Tropical Rainforest Canopy with Hidden Pool
Step into a miniature Amazon with a terrarium that emphasizes vertical depth and lush, suffocating greenery. Instead of a flat landscape, this design focuses on height, using a piece of vertical cork bark or branching driftwood as a “tree trunk” that reaches toward the top of the jar. Climbing vines like Ficus pumila (Creeping Fig) scale the wood, creating a dense overhead canopy of green. Peeking through the foliage at the very bottom is a “hidden pool”—a small, secluded area of realistic water (resin or actual water) that reflects the overhanging leaves. It’s a moody, humid ecosystem that feels like stumbling upon a secret cenote deep within the jungle.
- Build Vertically: Use a tall, central hardscape element (wood or dragonstone) to draw the eye upward and provide a structure for plants to climb.
- Create the Canopy: Plant climbing vines at the base of your hardscape. Over time, they will grow up and over the wood, creating a “roof” of leaves.
- The Hidden Pool: Use deep blue or black epoxy resin at the base to create a pool that looks deep and mysterious. Alternatively, bury a small glass dish flush with the soil to hold real water.
- Plant Choice: Mix broad-leafed plants like Fittonia (Nerve Plant) at the bottom with delicate ferns and mosses on the wood to simulate different levels of the rainforest.
- High Humidity: This setup requires a closed lid to maintain the high moisture levels needed for the “jungle” effect and to keep the moss lush.
Pro Design Tip: To make the pool look incredibly realistic and deep, paint the bottom of the glass (where the pool will be) black on the outside before building. When you pour clear resin or water over black gravel inside, the black background creates a mirror-like reflection of the plants above, adding infinite depth to the water.
Budget Consideration: You don’t need to buy expensive terrarium plants. This is the perfect place to use cuttings from your existing houseplants. A single Golden Pothos node or a strand of Heartleaf Philodendron can be planted at the base; they love humidity and will quickly climb the wood to form a canopy for free.
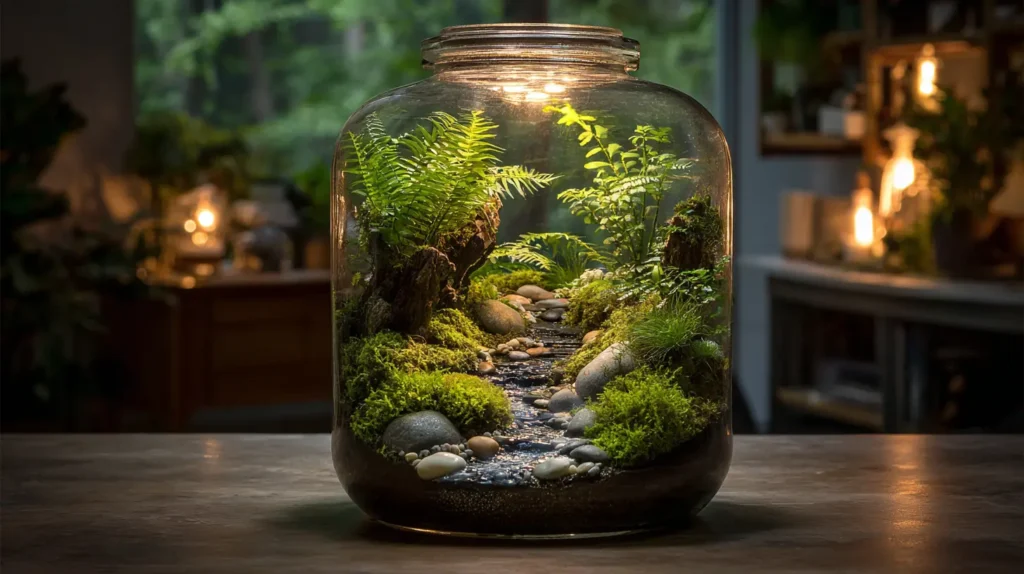
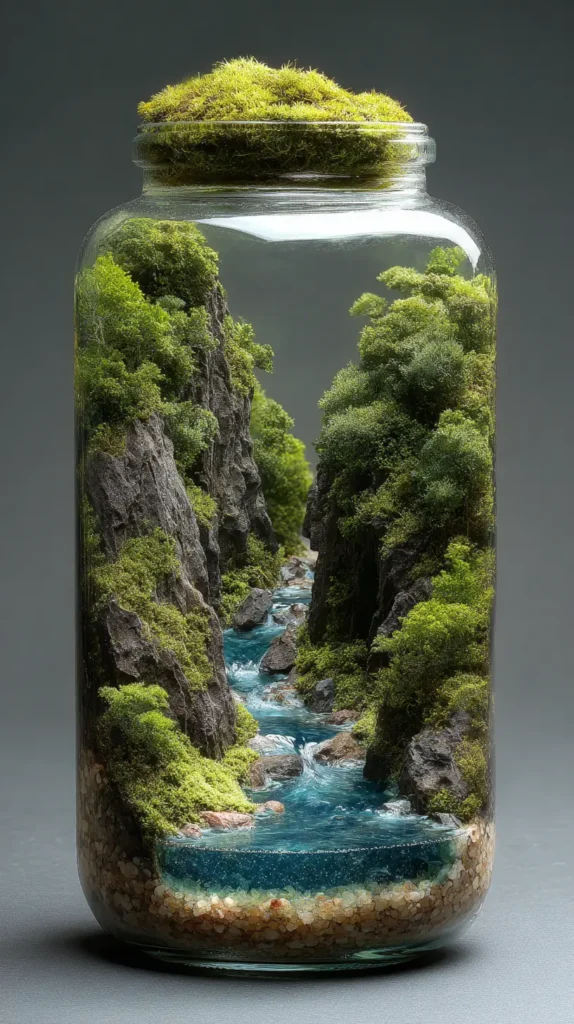
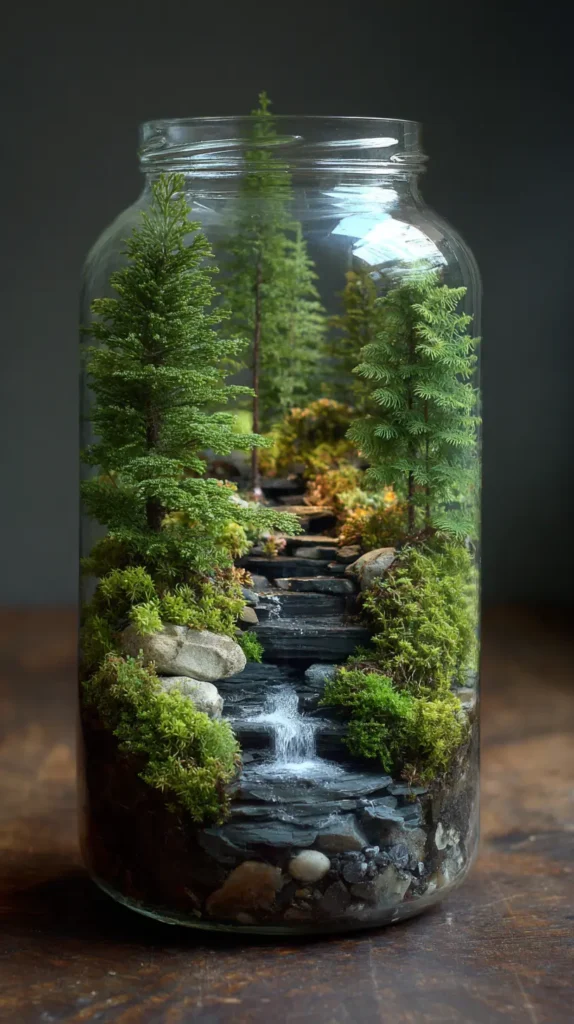
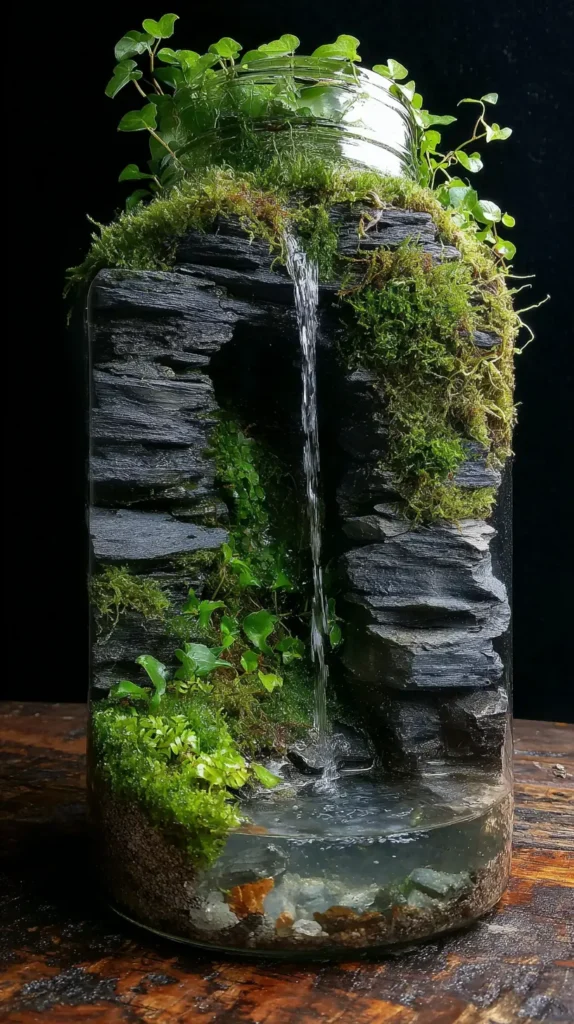
5. Vertical Mason Jar Waterfall Ecosystem
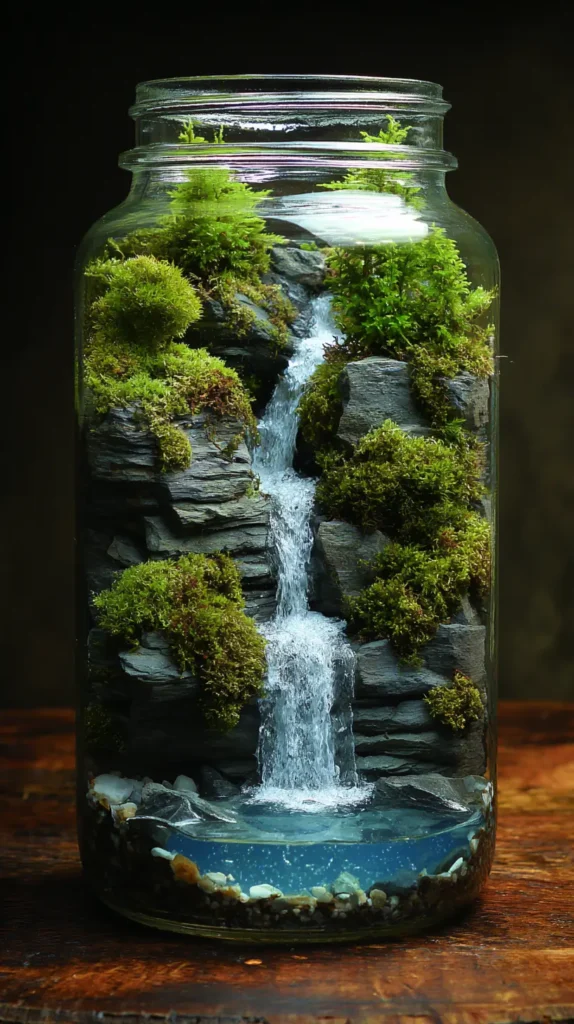
Transform a standard 32-ounce wide-mouth mason jar into a towering, vertical cliffside captured in glass. The back of the jar is dominated by a jagged wall of slate chips, or dragonstone, stacked nearly to the rim. Crashing down the center of this rock face is a frozen moment of motion: a hyper-realistic waterfall crafted from clear UV resin, complete with white frothy “splashes” at the base where it hits a deep blue pool. Surrounding this dynamic focal point, verdant mosses (like Java moss or Christmas moss) creep up the damp rocks, thriving in the sealed jar’s humidity. It looks like a slice of a mountain ravine, magically shrunk down and preserved on your bookshelf.
- Vertical Hardscape: Glue small pieces of slate or shale to the back wall of the jar (using aquarium-safe silicone or super glue) to create the “cliff” for your waterfall.
- The Resin Waterfall: Use clear UV resin to create the water. Pour it slowly down the rocks and cure it instantly with a UV light to freeze the “drips” in place.
- Splash Effects: Use a tiny bit of white acrylic paint mixed with the resin at the bottom of the falls to simulate churning foam and bubbles.
- Moisture Lovers: Since mason jars hold humidity well, plant moisture-loving species like Ficus pumila (Creeping Fig) or miniature ferns near the base of the waterfall.
- The False Bottom: Essential for jars without holes: put a 1-inch layer of gravel at the very bottom to hold excess water so the soil doesn’t rot.
Pro Design Tip: For a “wet look” without the mess of real water, coat the slate rocks next to the waterfall with a thin layer of glossy, clear nail polish or epoxy. This makes the stones look perpetually soaked by the spray of the falls, enhancing the realism.
Budget Consideration: This is the ultimate upcycle project. An old pasta sauce jar or pickle jar works perfectly once scrubbed clean. You can find slate rocks for free (if legal to collect) or buy a single piece of slate tile from a hardware store for under $2 and shatter it with a hammer to get the perfect shards.
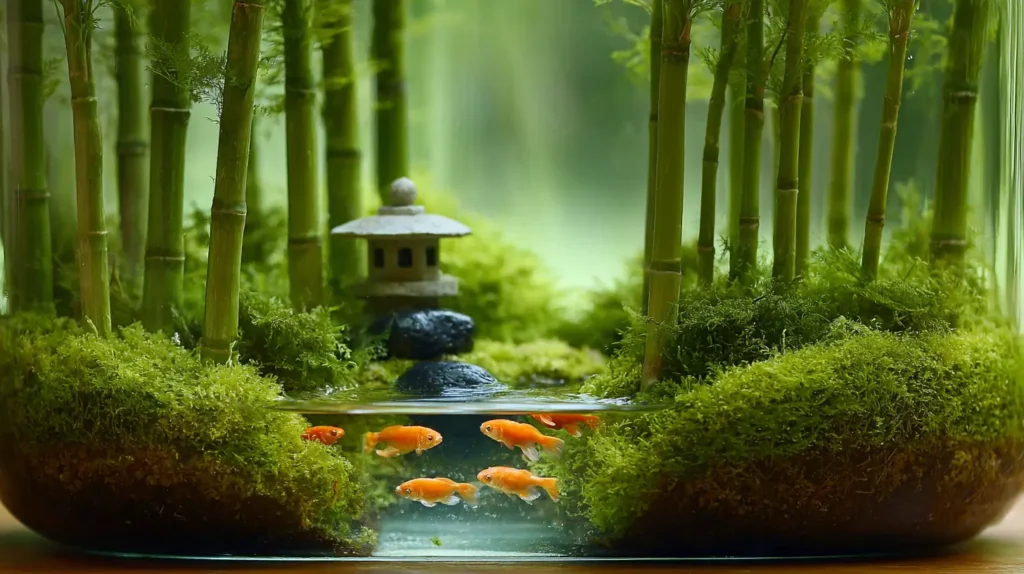
6. Zen Garden Bamboo Forest with Koi Pond Effect
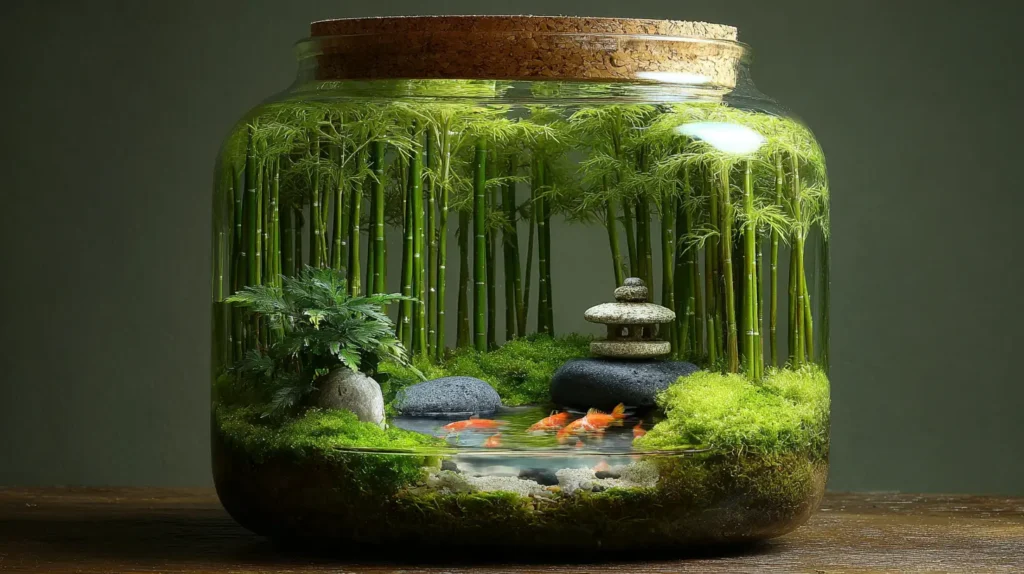
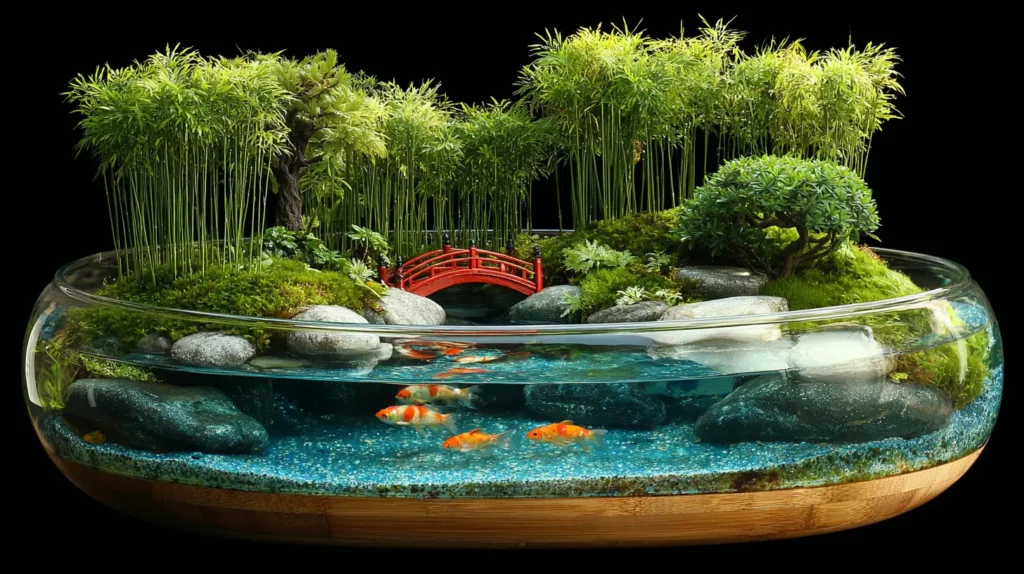
Transport yourself to a Kyoto temple garden without leaving your desk. This terrarium captures the essence of tranquility, featuring a vertical grove of “Lucky Bamboo” stalks that rise like emerald pillars toward the top of the jar. Beneath this canopy lies a serene, meticulously arranged landscape: a patch of soft green moss bordering a “koi pond” made of crystal-clear epoxy resin. Suspended within the resin are tiny, hand-painted orange koi fish that appear to be gliding effortlessly through the water. A smooth, dark river stone or a miniature stone lantern sits at the water’s edge, completing a scene of absolute balance and stillness that serves as a living meditation tool.
- The “Bamboo” Trick: True outdoor bamboo grows too fast for jars. Instead, use Dracaena sanderiana (“Lucky Bamboo”) or Chamaedorea elegans (Parlor Palm), which mimic bamboo but grow slowly and prefer humidity.
- Creating the Pond: Excavate a small depression in the soil and line it with sand or pebbles. Pour clear epoxy resin in layers to simulate deep, still water.
- The Koi Illusion: You can buy tiny resin fish figurines, or paint fish directly onto a cured layer of resin before pouring the final top layer for a 3D effect.
- Vertical Emphasis: Choose a tall, cylindrical jar to accommodate the height of the bamboo stalks and emphasize the vertical lines of the composition.
- Minimalist Hardscape: Keep it simple. Use smooth, rounded river stones (Zen stones) rather than jagged rocks to maintain the peaceful, soft aesthetic.
Pro Design Tip: To create a “deep water” effect in the pond, mix a tiny drop of green or blue alcohol ink into the bottom layer of your resin. Keep the top layer clear. This gradient mimics how natural pond water gets darker as it gets deeper, making your miniature pond look surprisingly realistic.
Budget Consideration: “Lucky Bamboo” is incredibly affordable and often sold at grocery stores or IKEA for a few dollars. You don’t need expensive miniature figurines for the pond; you can simply use colorful pebbles or glass beads to represent “spirit stones” at the bottom of the water for a similar Zen vibe without the cost of hand-painted koi.
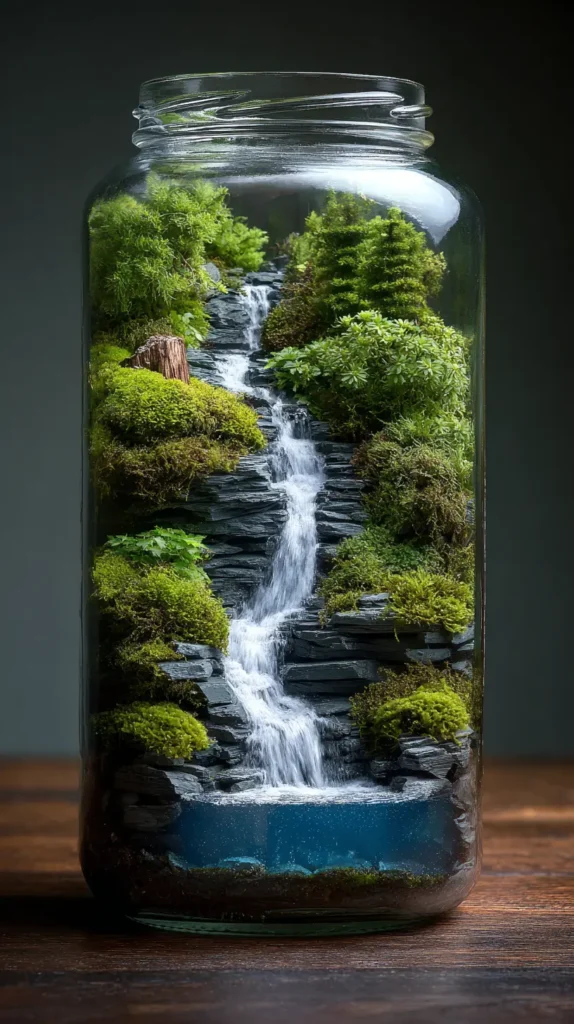
7. Miniature Pine Forest Terrarium with Flowing Water Feature
Create a living slice of the Pacific Northwest or a Scandinavian woodland right on your tabletop. This terrarium is defined by its verticality and the soothing sound of trickling water. Imagine “trees” formed by Asparagus setaceus (Plumosa Fern) or seedling Norfolk Island Pines, their feathery, needle-like foliage creating a dense evergreen canopy high above the soil. Below, a working water feature—powered by a tiny, hidden USB pump—circulates water down a tiered bed of grey slate rocks, mimicking a cold mountain brook. The water collects in a small pool at the front before being recycled, creating a dynamic, humid environment where lush cushion mosses thrive on the “riverbanks,” glistening with perpetual dew.
- The “Pine” Look: Use Asparagus setaceus (Plumosa Fern). Although not a true pine, when pruned correctly, its delicate fronds look exactly like miniature evergreen branches.
- The Water Engine: Hide a mini submersible pump (approx. 3×3 cm) at the bottom back of the jar, beneath a layer of LECA or egg crate (false bottom) to create the water circulation.
- Rock Selection: Choose dark grey slate or shale. The flat, layered nature of these stones mimics the geology often found in pine forests, making it easier to build a waterfall spillway.
- Miniature Details: Scatter “Alder cones” (which look like tiny pinecones) or small twigs on the mossy floor to simulate fallen forest debris.
- Fog Effect: Because of the moving water and high humidity, the glass will naturally fog up slightly in the mornings, adding to the moody, misty mountain aesthetic.
Pro Design Tip: To turn a bushy fern into a “tree,” perform aggressive pruning. Snip off all the lower fronds and stems, leaving only the foliage at the very top of the stalk. This reveals the “trunk” and creates a distinct canopy, instantly transforming the terrarium into a towering forest.
Budget Consideration: You don’t need a specialized terrarium tank. A large, clear glass cookie jar (1-2 gallons) from a discount store is perfect. For the water feature, cheap “mini USB fountain pumps” are available online for under $8. Pair this with rocks from your garden (boiled to sterilize) and you have a high-tech-looking setup for a low-tech price.
8. Misty Pine Woodland with Rocky Riverbed
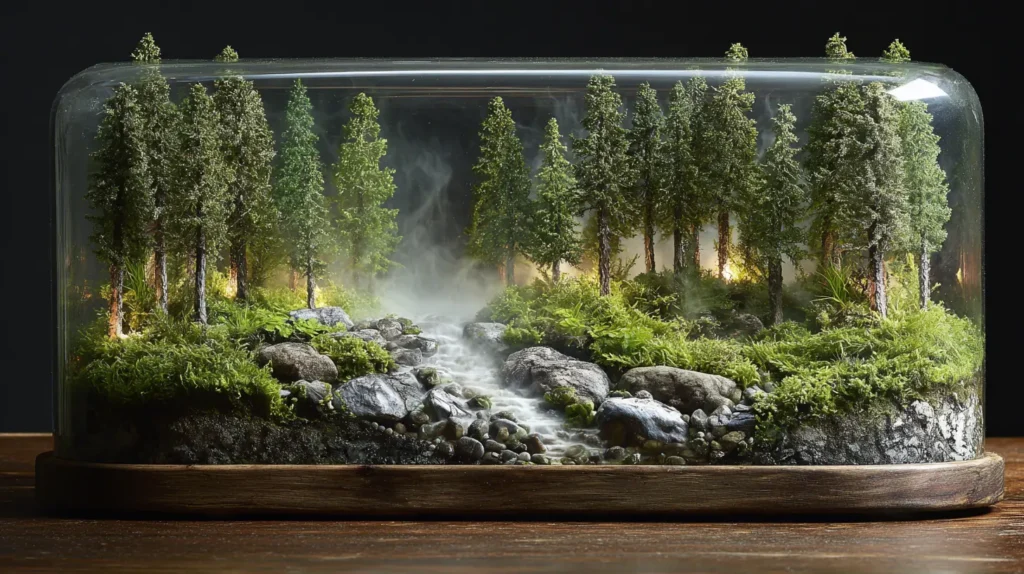
Capture the serene atmosphere of a foggy mountain morning inside a glass vessel. This design mimics a high-altitude coniferous forest, featuring “trees” with feathery, needle-like foliage that tower over a rugged, rocky terrain. Winding through the center of this dense woodland is a hyper-realistic riverbed, crafted from smooth, grey river stones and crystal-clear epoxy resin that simulates rushing mountain water. Patches of lush, vibrant cushion moss cling to the “riverbanks,” softening the harsh lines of the rock. The enclosed environment naturally retains moisture, creating a light condensation on the glass that mimics a rolling morning mist, completing the illusion of a cool, damp forest at dawn.
- The “Pine” Illusion: Since real pine trees don’t thrive in terrariums, use Asparagus setaceus (Plumosa Fern). Its wispy, horizontal fronds look exactly like miniature evergreen branches.
- Riverbed Construction: Use a mix of small grey pebbles and larger slate chips to create a natural-looking channel. Pour clear resin over the stones to create a “wet” permanent stream.
- Create Elevation: Build the soil much higher in the back corners of the jar. This allows you to “plant” your trees higher up, creating a sense of a sloping valley leading down to the river.
- Mossy Banks: Use “Clump Moss” or “Leucobryum” to create rolling green hills between the rocks and the trees.
- Atmosphere: Mist the terrarium daily. The water droplets clinging to the “pine” needles and the glass add a sparkle that enhances the fresh, misty aesthetic.
Pro Design Tip: To turn a bushy fern into a convincing “old growth tree,” trim away the lower fronds and leaves, exposing the bottom 2-3 inches of the stem. This creates a distinct “trunk” and “canopy” silhouette, instantly changing the terrarium’s scale from a pot of weeds to a towering forest.
Budget Consideration: You don’t need expensive aquascaping rocks. A bag of “natural river mix” gravel from the aquarium section of a pet store (or even the dollar store) provides the perfect variety of grey and brown stones needed for the riverbed. For the “water,” if resin is out of budget, simply use glossy blue glass pebbles or clear marbles buried among the rocks to create a charming, abstract stream effect.
9. Floating Island Jungle with Water Feature
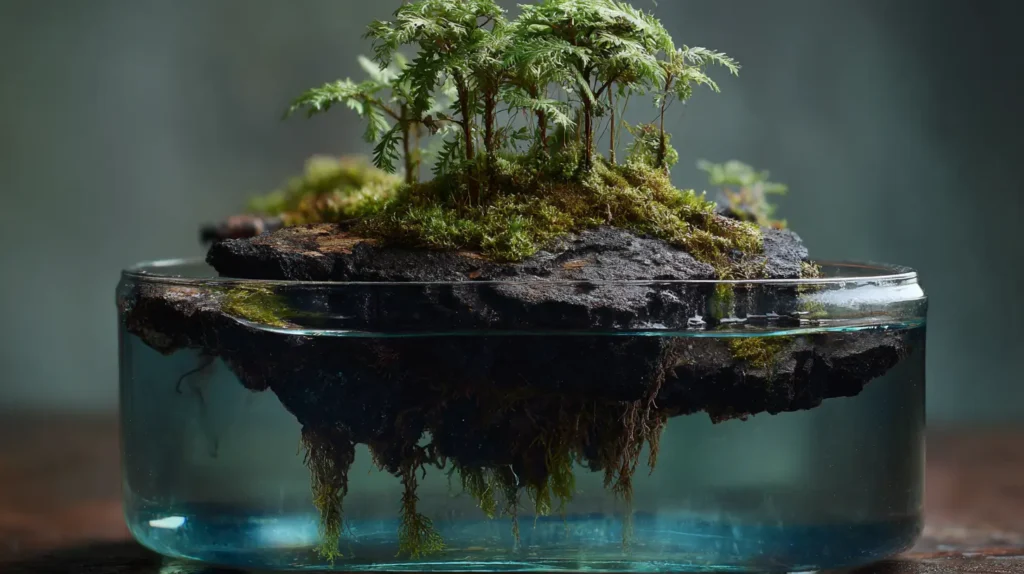
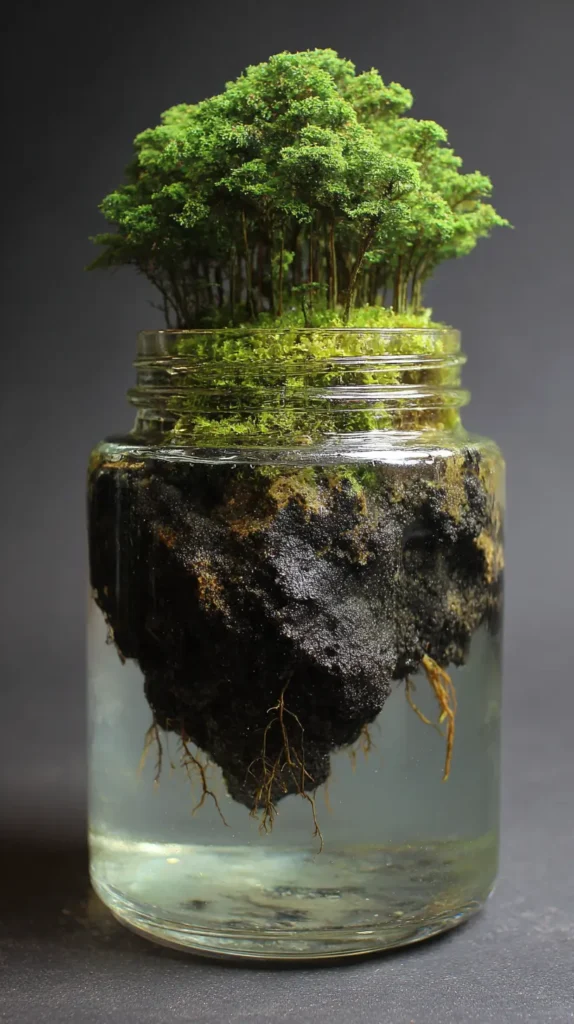
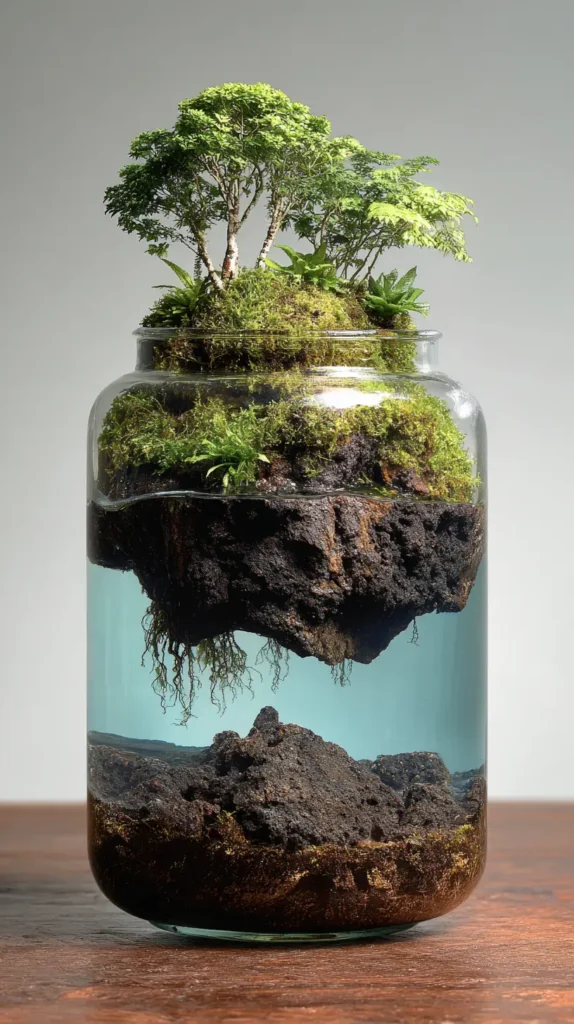
Defy gravity and create a scene straight out of a fantasy novel or the movie Avatar. Imagine a jagged “island” of dark lava rock or cork bark that appears to levitate in the center of the jar, suspended in humid air. Lush, vibrant mosses and tiny ferns crown the top of this floating rock, creating a dense green canopy. Beneath the island, gnarly roots and vines dangle down into a crystal-clear pool of water that fills the bottom of the vessel.
This dual-level design creates a stunning contrast: a terrestrial jungle above and a serene, aquatic world below, connected only by the trailing roots that drink from the pool. It’s a mesmerizing, three-dimensional ecosystem that invites you to look at nature from a completely new perspective.
- The Suspension Trick: Create the illusion of floating by using aquarium-safe silicone to glue a lightweight piece of Lava Rock or Ohko Stone directly to the back glass of the jar.
- Lightweight Materials: Use Pumice or Lava Rock for the island base. They are porous (good for plant roots) and light enough that they won’t slide down the glass while the glue sets.
- The Water Reservoir: Fill the bottom 2-3 inches of the jar with real water (distilled is best to prevent water spots). This maintains high humidity and creates the “pool” below.
- Dangling Roots: Glue dried spider wood twigs or “roots” to the underside of your floating island, reaching down into the water. Over time, moss may grow down these structures.
- Planting the Island: Since the island has limited soil, use epiphytes (plants that grow on rocks) like Anubias (which loves high humidity), air plants, or sheet moss.
Pro Design Tip: Add life to the water section. Drop in a few Marimo Moss Balls or, if the jar is large enough (1+ gallon), introduce a couple of tiny aquatic snails or shrimp. They will help keep the water clean by eating algae, and watching them swim beneath the floating jungle adds a whole new layer of entertainment.
Budget Consideration: You don’t need expensive “aquascaping” glue. Plain 100% silicone sealant (clear) from a hardware store works perfectly to attach the rock to the glass. Just make sure the bottle says “100% silicone” and does not contain mold inhibitors (which are toxic to plants/animals). A single tube costs about $5 and will last for dozens of projects.
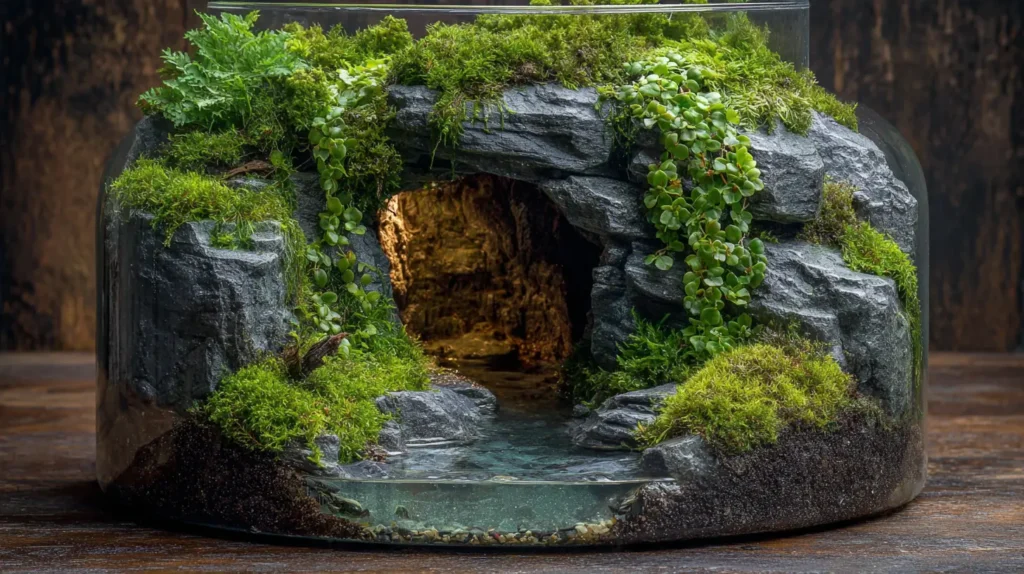
10. Hidden Cave Waterfall and Grotto Design
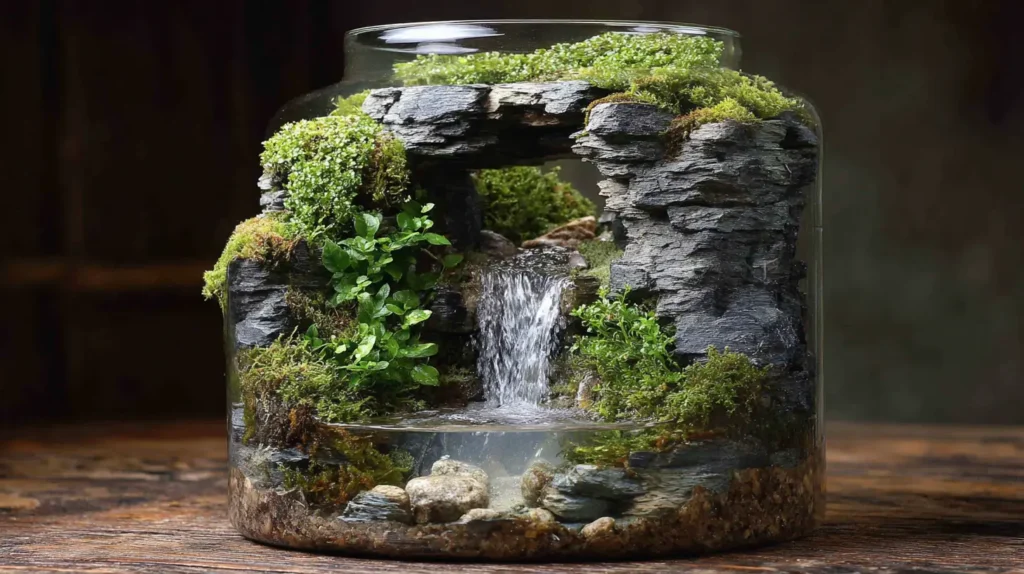
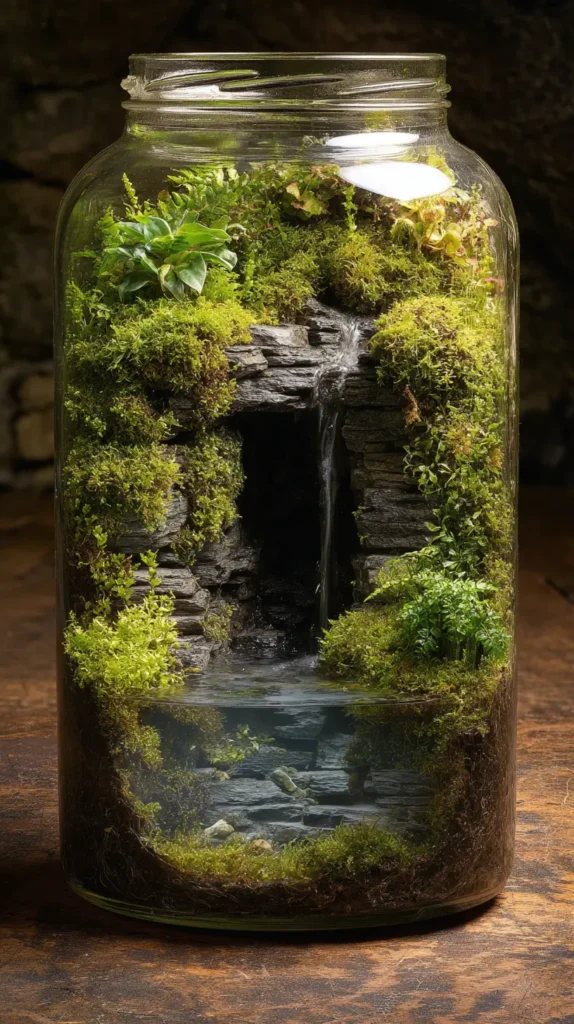
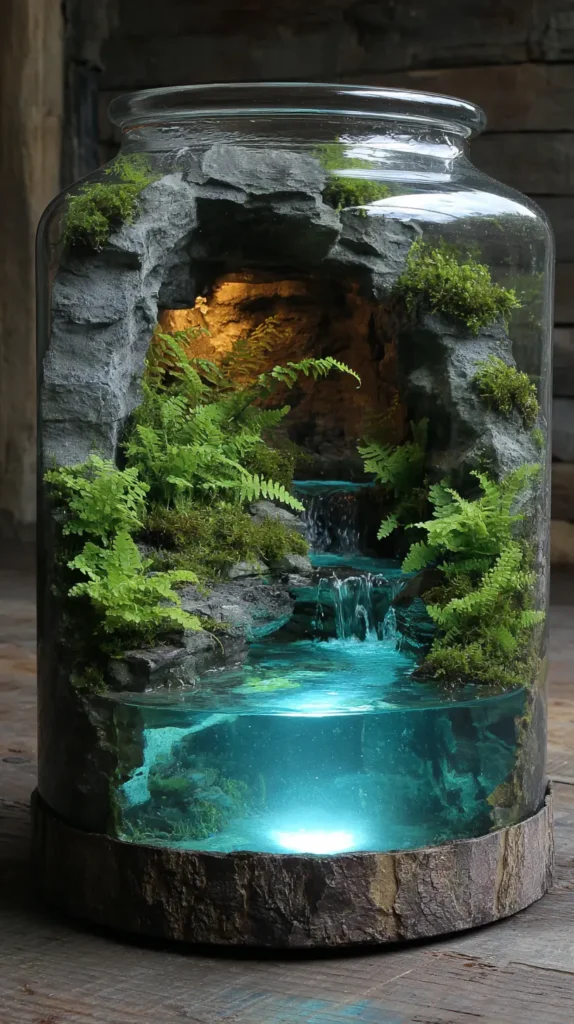
Create a scene of mystery and discovery by building a terrarium centered around a secluded, shadowy grotto. Imagine a rugged wall of dark slate or dragon stone that rises up the back of the jar, forming a distinct, cavernous opening at the base.
Cascading over the mouth of this cave is a shimmering waterfall—frozen in time with clear UV resin or kept in motion by a hidden pump—that veils the darkness within. The water collects in a crystal-clear pool at the foot of the cave, while lush, trailing mosses and creeping vines hang down from the rocks above, partially obscuring the entrance. It evokes the feeling of stumbling upon a secret sanctuary deep within an ancient forest, where sunlight rarely touches the ground.
- Structure is Key: Construct the “cave” framework first using flat pieces of slate, shale, or a curved piece of cork bark. Ensure it is stable before adding soil or plants around it.
- The Waterfall Effect: Use clear UV resin to sculpt the water. Pour it onto a piece of clear plastic film, cure it in a cascading shape, and then glue it to the rocks so it hangs over the cave opening like a curtain.
- Create Depth: Use black or dark grey sand inside the cave and lighter sand or gravel outside in the pool area. This contrast makes the cave look deeper and more shadowy.
- Planting the “Roof”: Plant hanging species like Ficus pumila (Creeping Fig) or Selaginella on top of the cave structure. Let the vines grow down over the opening to enhance the “hidden” aesthetic.
- Splash Zone: Use white acrylic paint or white sand at the bottom of the waterfall to simulate the churning foam where the water hits the pool.
Pro Design Tip: Add a “glow” from within. Before building the final cave structure, hide a tiny, waterproof LED light (or a fiber optic strand) deep inside the grotto. When turned on, the light will shine through the resin waterfall and the cracks in the rocks, creating a magical, bioluminescent effect.
Budget Consideration: You don’t need expensive aquascaping rocks to build a cave. A halved coconut shell or a clean, broken terracotta plant pot makes an excellent, free structural base for a cave. Simply cover the outside with silicone, then press garden dirt, moss, or small pebbles onto it to completely disguise the material.

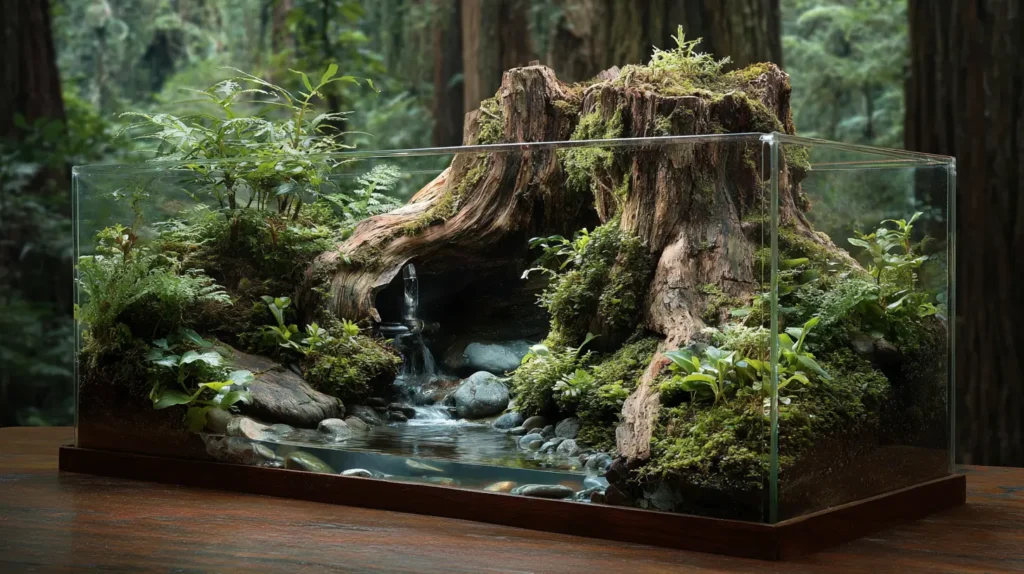
11. Ancient Tree Stump with Trickling Water
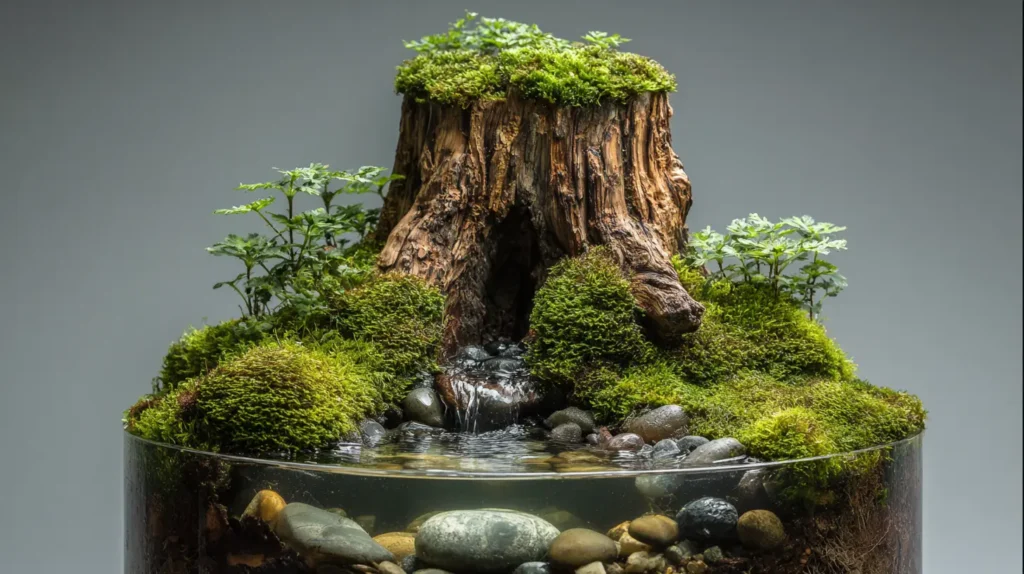
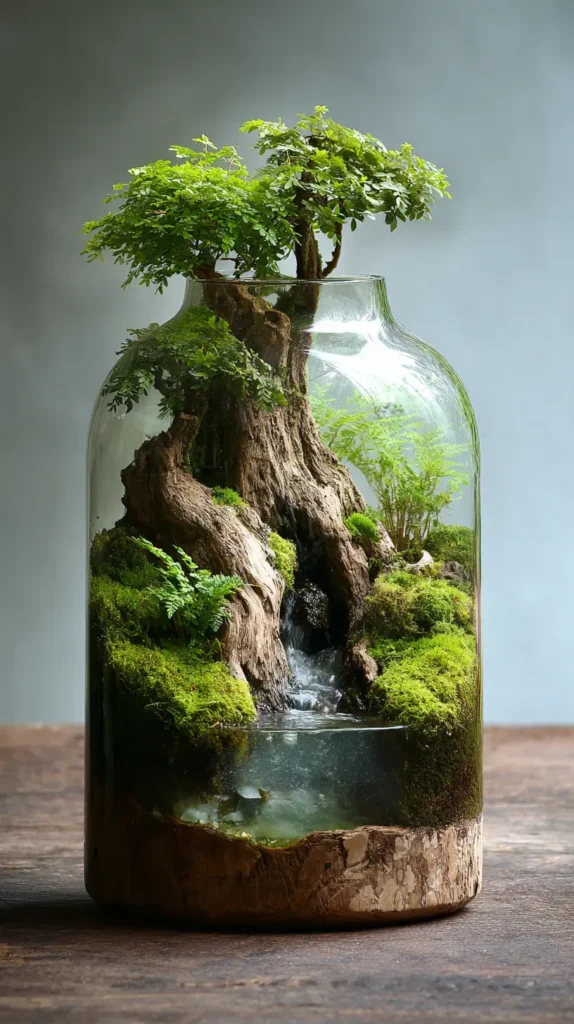
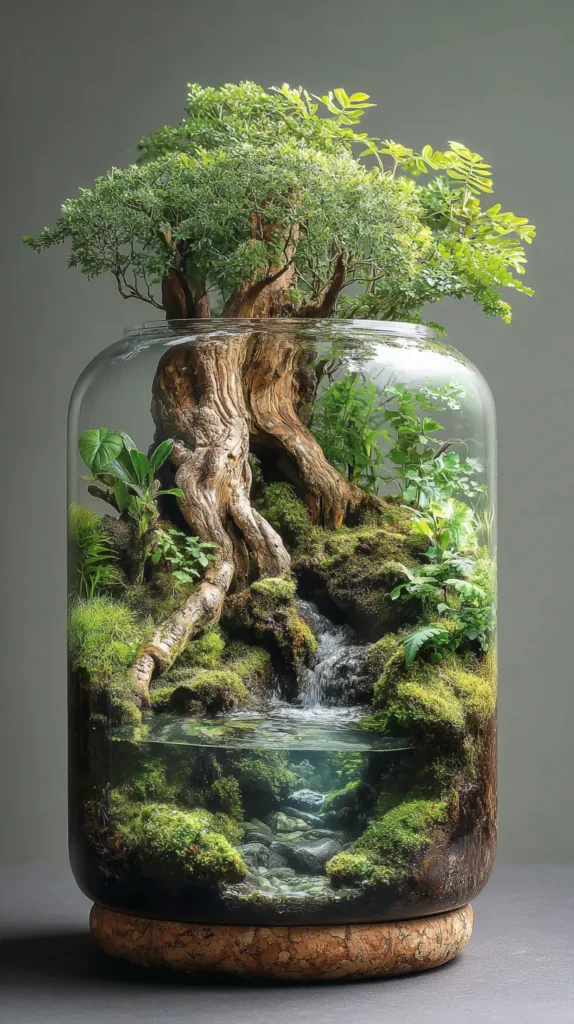
Center your terrarium on the majestic decay of an “ancient” tree stump, creating a scene that speaks to nature’s quiet, regenerative power. Imagine a gnarled, thick piece of Mopani wood or cork bark acting as the centerpiece, its textured surface blanketed in patches of velvety green moss. A gentle, mesmerizing stream of water trickles down the bark’s grooves, mimicking a natural spring emerging from the tree’s heart. The water gathers in a small, crystal-clear pool amongst the twisting roots before disappearing back into the earth. Surrounding the stump, delicate ferns unfurl their fronds, creating a lush, verdant canopy that suggests this tree has stood in the forest for centuries, slowly being reclaimed by the earth.
- The Stump Material: Use a hollow cork round or a piece of Mopani wood. These resist rot in high humidity and have the rugged texture of old-growth timber.
- The Water Source: Hide a tiny USB water pump inside the hollow of the “stump.” Run the outlet tube to the top so water bubbles up and flows gently down the bark.
- Moss Application: Don’t cover the whole stump. Apply moss (like Java moss or Christmas moss) in patches using super glue or thread to make it look like natural overgrowth.
- Root Structure: Arrange smaller twigs or “spider wood” pieces at the base of the stump, burying the ends in the soil to look like sprawling roots anchoring the tree.
- Planting Pockets: Tuck tiny Anubias or Bucephalandra plants into the cracks and crevices of the wood; these plants love “wet feet” and thrive in the splash zone of the trickle.
Pro Design Tip: Create a “Nurse Log” effect. Crush a small dried leaf or place a tiny mushroom figurine on the mossy stump. This small detail reinforces the narrative of the old tree supporting new life, adding a layer of realism and storytelling to the composition.
Budget Consideration: Aquarium driftwood can be pricey. A fantastic budget alternative is to find a uniquely shaped rock in your garden that looks like a stump (vertical with ridges). Scrub it clean and glue moss to it. Once covered in greenery, a rock mimics the shape and presence of an old tree stump perfectly, but will never rot, no matter how much water flows over it.
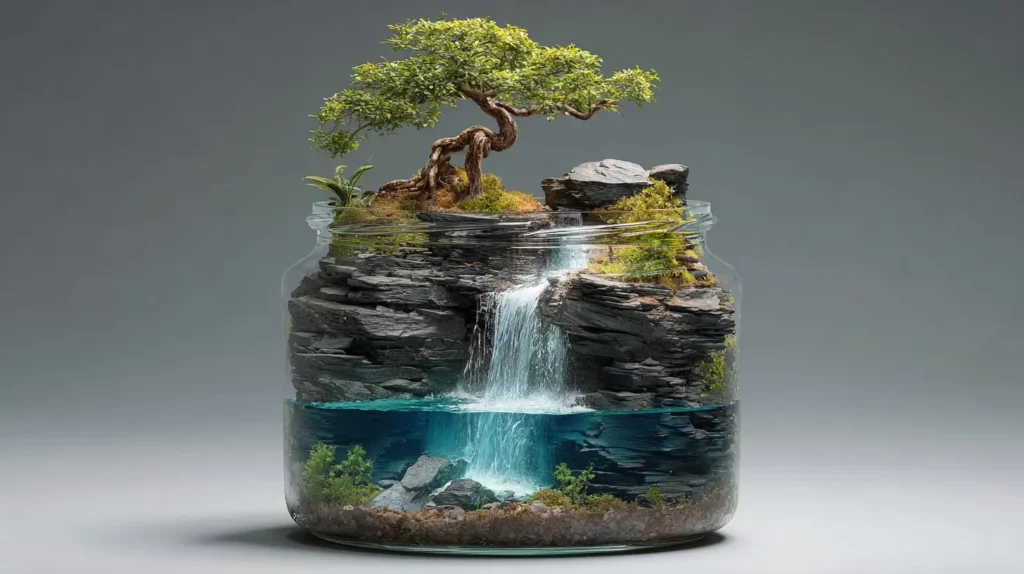
12. Bonsai Tree on a Cliff with Waterfall
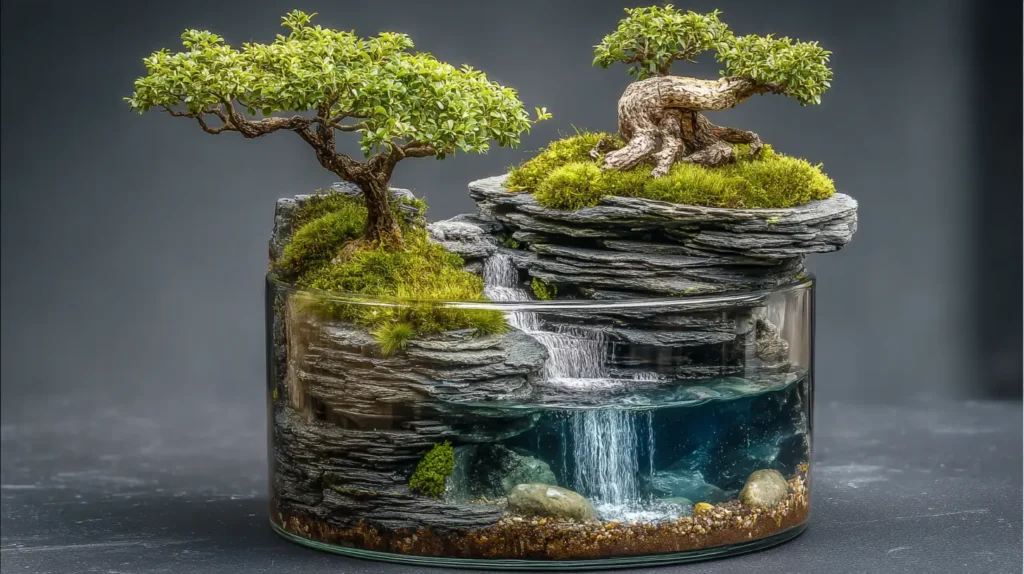

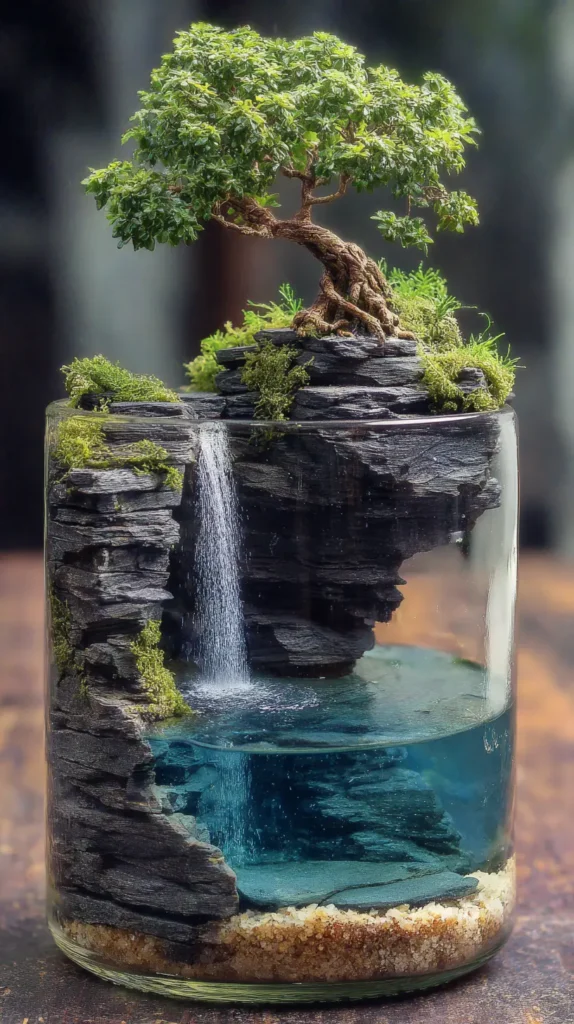
Create a dramatic, windswept landscape that captures nature’s resilience in miniature. Imagine a rugged, jagged cliff face, constructed from stacked layers of dark slate or dragonstone, rising steeply from the bottom of the jar. Perched precariously on the very edge of this precipice is a solitary, twisted bonsai tree—perhaps a Ficus Ginseng or a Juniper—its gnarled roots gripping the rock. Plunging down the side of the cliff, beneath the tree’s canopy, is a spectacular waterfall made of clear resin. It crashes into a serene, deep blue pool below, creating a scene of dynamic contrast: the stoic, still strength of the tree against the eternal motion of the falling water.
- Building the Cliff: Use flat, horizontal pieces of Slate or Scenery Stone stacked on top of each other to simulate natural sedimentary rock strata.
- Tree Selection: For open terrariums, a real Juniper or Elm works well. For closed jars, use a Ficus microcarpa (Ginseng Ficus) or create a “faux bonsai” using a piece of driftwood with moss glued to the tips.
- The Waterfall: Create the water effect using UV resin. Drip it down the face of the slate cliff and cure it with a UV light to freeze it in a “cascading” shape.
- Scale Perspective: Place tiny pebbles at the base of the cliff and larger rocks near the top. This trick enhances the height, making the cliff look massive and the tree look like an ancient giant.
- Greenery: Keep the planting simple. Use a carpet of short moss (like velvet moss) on top of the cliff to mimic high-altitude grass, ensuring it doesn’t distract from the tree.
Pro Design Tip: Wire your bonsai tree (or driftwood) so it leans slightly over the waterfall, and the branches sweep in one direction. This creates a “windswept” aesthetic, implying that the tree has withstood strong mountain winds for decades, adding an incredible narrative element to the scene.
Budget Consideration: Real bonsai trees can be expensive and finicky. To save money and frustration, forage for a woody, thick root or branch outdoors that looks like a tree trunk. Bake it to sterilize, then glue clumps of preserved moss to the branch tips. You get the exact look of an ancient bonsai tree for free, and it never needs pruning or watering!
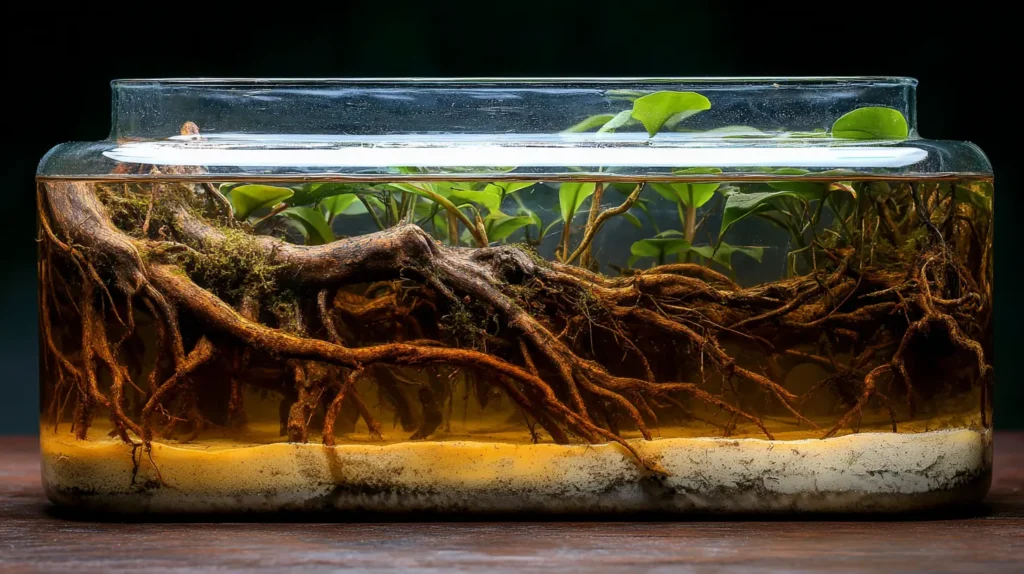
13. Amazon River Basin Biotope in a Jar
Recreate the wild, untamed beauty of a “flooded forest” ecosystem right on your desktop. This biotope style mimics the unique environment of the Amazon, where river water rises to submerge tree roots and forest floors. Imagine a layer of fine, pale sand at the bottom, covered in scattered leaf litter and seed pods. Rising from this riverbed are tangled, gnarled branches (driftwood) that break the water’s surface, mimicking the complex root systems of mangroves.
The water itself is tinted a rich, tea-colored amber (known as “blackwater”) from natural tannins, creating a moody, authentic atmosphere. Above the waterline, lush tropical plants like Philodendrons and Sword plants cling to the wood, creating a dense, humid canopy that thrives in the enclosed moisture.
- The Blackwater Look: This is the defining feature. Use botanicals like Indian Almond leaves or alder cones in the water to release tannins, turning it a natural, healthy amber color that mimics the Amazon.
- Root Heavy Hardscape: Use “Spider Wood” or “Manzanita” wood. Orient the branches pointing downward into the substrate to look like roots growing into the riverbank.
- Leaf Litter: Scatter dried leaves (oak or magnolia work well) and small twigs on the sandy bottom. As they decay, they provide food for microfauna and add a sense of incredible realism.
- Floating Vegetation: Add floating plants like Salvinia, Frogbit, or Duckweed to the water’s surface. Their hanging roots add filtered light and depth to the underwater section.
- Riparian Planting: Plant moisture-loving species like Anubias or Peace Lilies so their roots are in the water but their leaves are in the air (emersed growth).
Pro Design Tip: Create a “bank” effect by banking the soil high on one side of the jar and leaving the other side bare for water. Use rocks or wood to hold the soil back. This creates a clear transition from “land” to “river,” allowing you to see the roots’ cross-section as they enter the water.
Budget Consideration: You don’t need to buy expensive aquarium botanicals to get the blackwater look. Organic Rooibos tea (pure, with no additives) is a safe, cheap, and instant way to tint your water that distinct Amazonian amber color. Just brew a strong cup, let it cool completely, and mix it into your terrarium water.
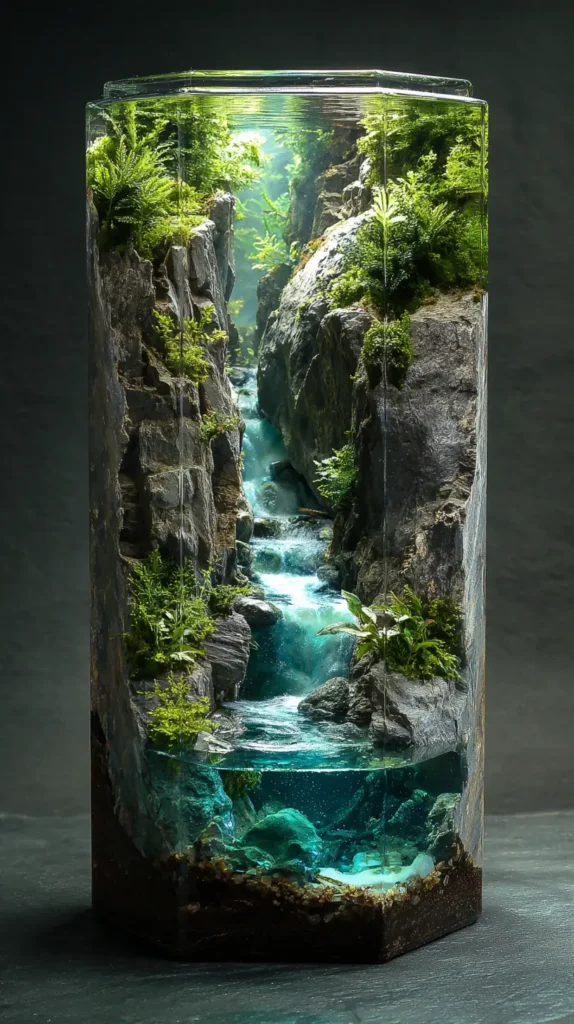
14. Fern Canyon with Winding Stream

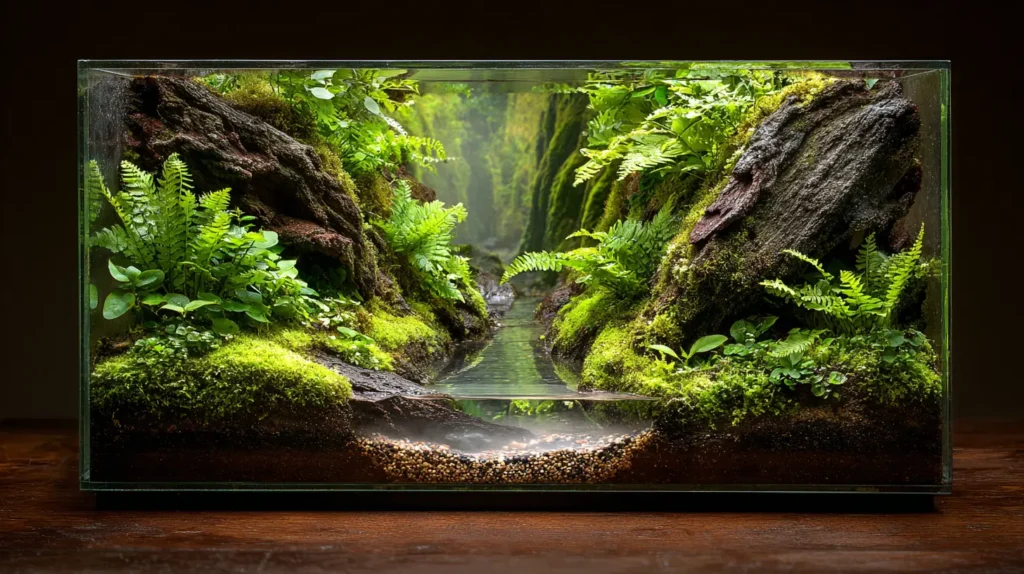
Recreate the prehistoric majesty of a narrow ravine, where towering walls of green rise up on either side of a meandering creek. Imagine looking into the jar to see steep “cliffs” made of cork bark or textured stone, completely carpeted with a variety of miniature ferns. The fronds cascade down the walls like green waterfalls, dripping with humidity. At the bottom of this lush gorge lies a winding stream bed—crafted from fine sand or clear resin—that curves out of sight behind a bend in the canyon, inviting the viewer to imagine what lies beyond. This terrarium captures the feeling of a secluded, ancient world untouched by time, where the air is thick with moisture and life.
- Vertical Planting: The key to this look is planting on the walls. Use aquarium-safe silicone to attach cork bark to the back and sides of the jar, creating a surface to pin ferns and moss onto.
- Fern Variety: Mix textures to create depth. Combine the delicate, lacy fronds of a Rabbit’s Foot Fern with the rounder, darker leaves of a Button Fern or the architectural shape of a Bird’s Nest Fern.
- The Stream Path: Don’t make the stream straight. A winding “S” shape that disappears behind a rock or fern at the back creates a sense of mystery and makes the jar look deeper.
- Substrate Walls: Use a “sticky soil” mix (keto soil or clay-based muck) pressed into the background texture. This allows moss and small ferns to grow vertically without falling off.
- Lighting: Ferns love dappled light. Place this jar in bright, indirect light to keep the canyon lush without scorching the delicate leaves.
Pro Design Tip: Use the “forced perspective” technique to make the canyon look massive. Plant larger ferns with broad leaves at the very front of the jar, and use tiny, fine-textured mosses or micro-ferns at the very back. This trick tricks the eye into thinking the canyon stretches back for miles.
Budget Consideration: You don’t need to buy five different potted ferns. Buy one large, bushy “variety pot” or a single Boston Fern from a grocery store. Remove it from the pot and gently tease the root ball apart. You will often find 5-10 individual plantlets that can be separated and planted individually throughout your canyon, saving you significant money.
15. Minimalist Iwagumi Style River Scape
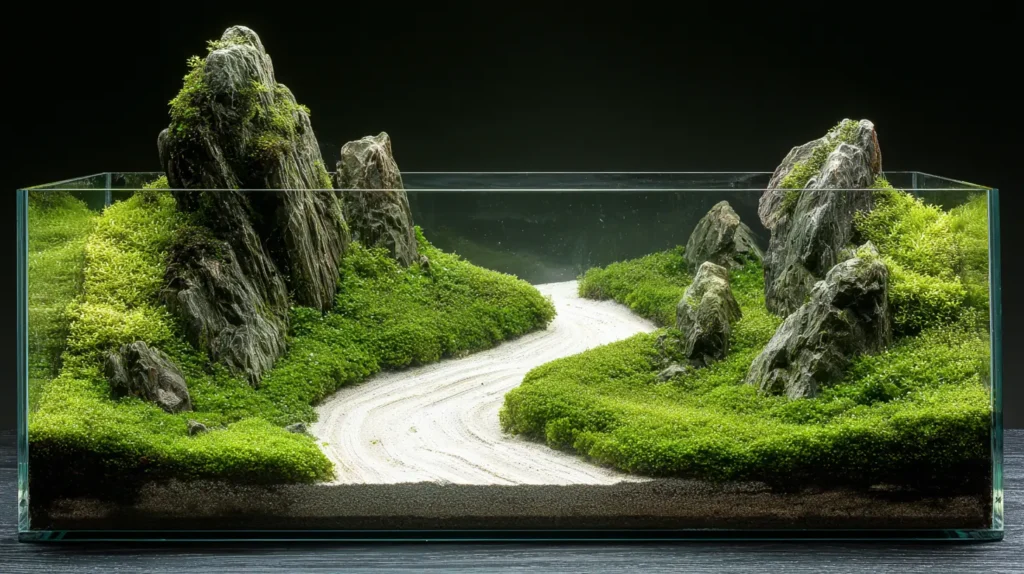
Channel the serene discipline of Japanese aquascaping with a terrarium that focuses on balance, stone, and negative space. Imagine a vast, rolling meadow created by a single, uniform carpet of short, vibrant green moss. Rising from this green sea is a carefully orchestrated arrangement of odd-numbered rocks—usually three or five—that look like majestic mountains jutting out of the earth. A pristine, winding river of white cosmetic sand cuts through the center, separating the rock formations. This style eschews the “jungle” look for something cleaner and more meditative, where the placement of every single stone feels intentional and harmonious.
- The Rule of Odds: In Iwagumi style, always use an odd number of stones (3, 5, or 7) to prevent the layout from looking artificial or “split.”
- The Oyaishi: Start with one large “Main Stone” (Oyaishi) that serves as the focal point. Angle it slightly to create a sense of movement or current.
- Single Species Planting: To maintain the minimalist aesthetic, use only one type of moss or low-growing plant (like Hemianthus callitrichoides “Cuba” or short Hairgrass) to create a seamless, lawn-like carpet.
- Texture Harmony: Use stones of the same type and texture (like Seiryu stone or Dragon stone) so they look like they belong to the same geological formation.
- The Sand Path: Keep the sand river clean and free of debris. Its brightness acts as “negative space,” providing a visual rest for the eye against the texture of the rocks and plants.
Pro Design Tip: Pay close attention to the “grain” or flow of your rocks. When placing them, ensure the texture lines on the stones all run in the same general direction (usually mimicking the direction of the river flow). This subtle detail creates a subconscious sense of unity and realism, making the scene feel like a natural slice of a river valley.
Budget Consideration: Authentic “aquascaping stones” like Seiryu stone are sold by the pound and can be very expensive at pet stores. Instead, visit a local landscape supply yard or a garden center that sells bulk rock. You can often find “Grey Mountain Stone” or slate rubble for pennies a pound that creates the exact same dramatic, craggy look.
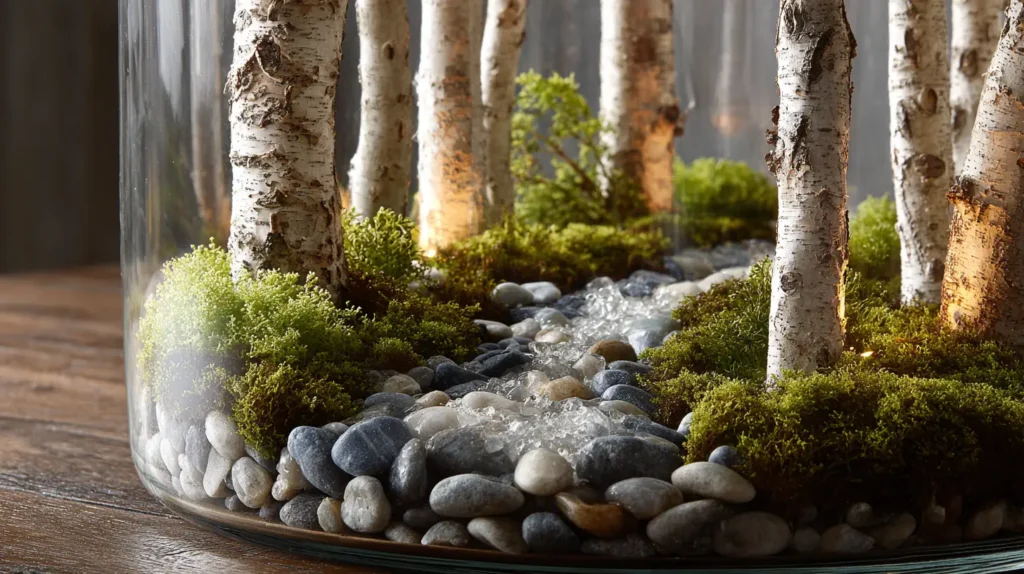
16. Birch Tree Grove Terrarium with Pebble Stream Bed
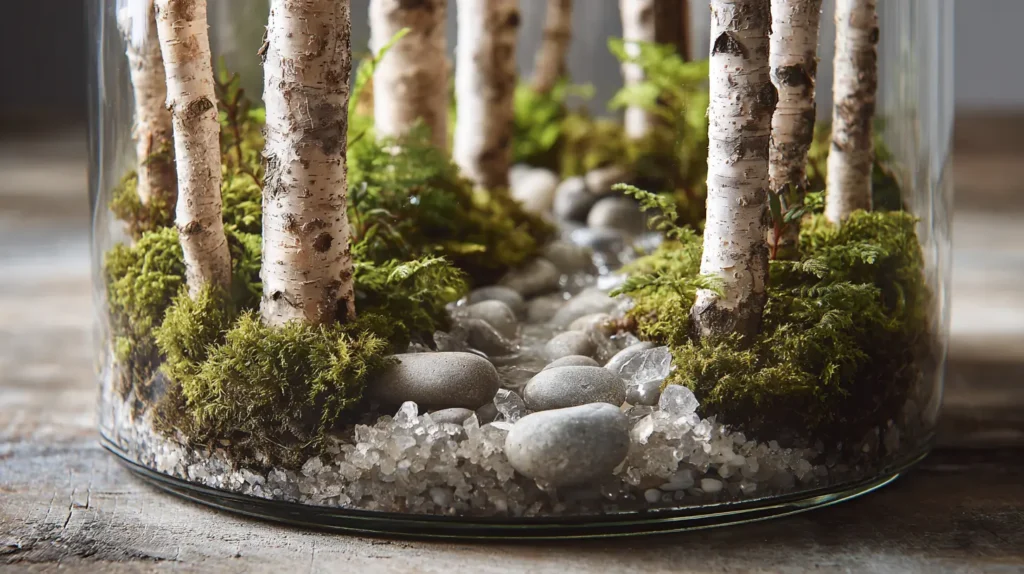

Capture the striking elegance of a deciduous forest by recreating a grove of white-barked trees inside your glass vessel. Imagine a serene woodland scene where slender, vertical white trunks rise from a lush carpet of bright green moss, mimicking the distinct look of a birch or aspen forest. Winding through the center of this grove is a dry stream bed composed of smooth, multi-colored river pebbles, suggesting a seasonal creek that flows after the rains. The contrast between the stark white “bark,” the vibrant green floor, and the earthy tones of the stones creates a bright, airy aesthetic that feels crisp and refreshing, like a walk in the woods on a cool autumn day.
- The “Birch” Illusion: Real birch trees won’t survive in a jar. Instead, use dried hardwood twigs or thick dowels painted matte white.
- Create the Markings: To make the twigs look like authentic birch bark, use a fine-tip black waterproof marker or paint to add small, horizontal dashes and “eye” shapes (lenticels) up the trunk.
- The Stream Bed: excavate a shallow channel in the soil and fill it with smooth, polished river pebbles (pea gravel size). Keep the stones loose and natural, not glued down.
- Undergrowth: Plant low-growing “Baby’s Tears” or “Selaginella” at the base of the white trunks to simulate the bushy undergrowth found in real forests.
- Canopy Suggestion: You don’t need leaves on the trees. The “winter dormancy” look (bare white branches) is incredibly stylish. Alternatively, glue tiny pieces of preserved green moss to the branch tips to simulate a summer canopy.
Pro Design Tip: Create depth by using different thicknesses of twigs. Place the thickest, tallest “trees” in the foreground and use thinner, shorter twigs in the background. This perspective trick makes the grove look dense and expansive, as if the forest continues far back into the jar.
Budget Consideration: You don’t need to buy expensive model train scenery trees. Go to your backyard or a local park and forage for straight, dry twigs. A $2 bottle of white acrylic paint and a black Sharpie are all you need to transform free sticks into a high-end birch forest.
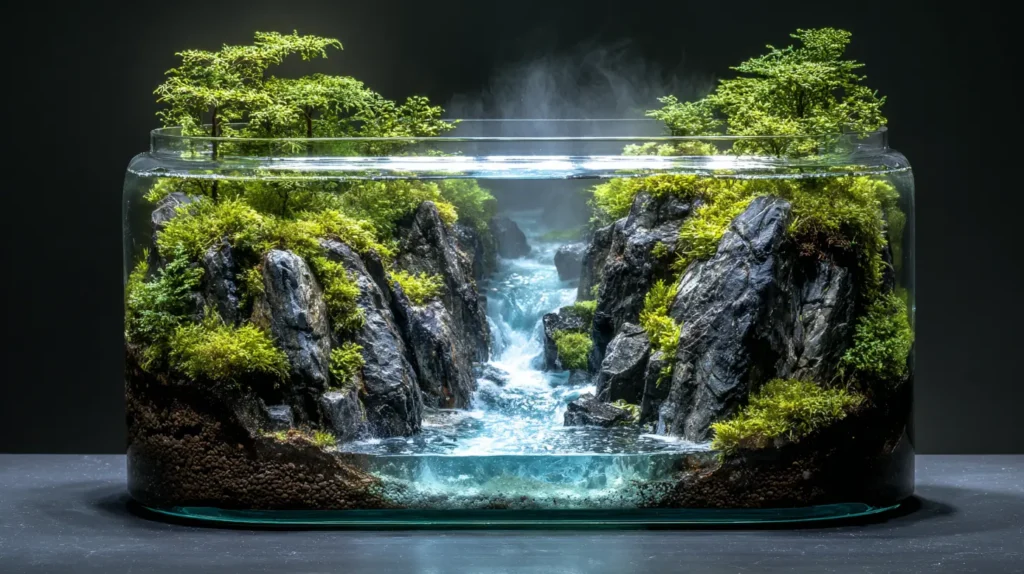
17. Rocky Gorge with Rushing Rapids Effect
Capture the raw power of nature by building a terrarium that freezes a moment of high-energy motion. Imagine looking down into a deep, narrow canyon carved by centuries of water erosion. Tall, jagged walls of Dragon Stone or Ohko Stone rise steeply on either side, their clay-like texture pitted with holes and crevices.
Rushing through the bottom of this gorge is a “white-water river”—crafted from cotton fibers and resin—that looks like it is churning and crashing over boulders. Lush, verdant mosses cling precariously to the cliff faces, thriving in the spray of the imaginary rapids. This design creates a dramatic, vertical scene that feels loud and dynamic, even though it is perfectly silent and still inside the glass.
- Create the “Whitewater”: To simulate fast-moving foam, use aquarium filter floss (polyester fiber) or cotton balls pulled into thin, wispy strands. Lay them in the riverbed and pour clear resin over them to freeze the “motion.”
- Build Vertically: This look relies on height. Stack your rocks high against the side glass to create a deep ravine effect, leaving only a narrow channel in the center.
- Stone Choice: Use jagged, textured rocks like Dragon Stone. Their natural nooks and crannies are perfect for planting small plugs of moss or tiny ferns.
- Obstacle Course: Place small “boulders” in the middle of your river path. Arranging the “water” (fiber/resin) to flow around and over these rocks enhances the illusion of a strong current.
- Scale Perspective: Make the gorge wider at the front and narrower at the back. This “funnel” shape forces the perspective, making the river look like it is rushing from a great distance.
Pro Design Tip: For hyper-realism, use a small, stiff brush with a tiny amount of white acrylic paint (dry-brushing) to lightly stipple the tops of the resin “waves” after they cure. This highlights the water’s crests, mimicking the frothy bubbles of churning rapids.
Budget Consideration: You don’t need expensive water effects kits. A bag of “poly-fil” (pillow stuffing) or aquarium filter floss costs about $3 and provides enough material for dozens of rapids. Combined with simple super glue or a small amount of resin, you can sculpt incredibly realistic water motion for pennies.
18. Misty Swamp and Bog Garden Aesthetic
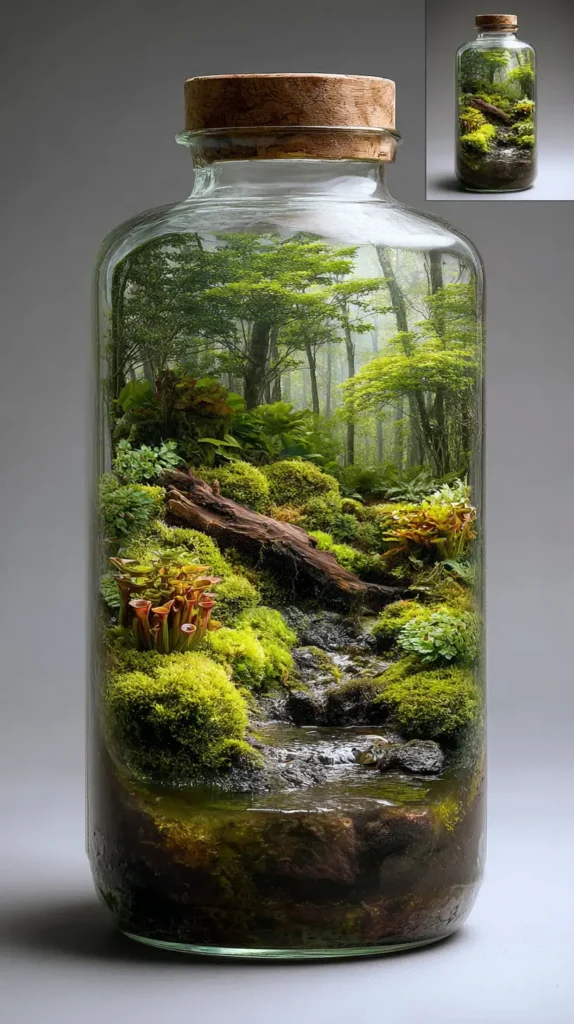
Step away from the typical bright woodland scenes and embrace the moody, ethereal beauty of a bog. Imagine a prehistoric landscape enclosed in glass, where the air is thick with humidity, and the ground is a sponge of vibrant, living Sphagnum moss. Rising from this damp carpet are the alien-like shapes of carnivorous plants—crimson Sundews glistening with sticky “dew,” tall trumpet Pitcher Plants, or the infamous Venus Flytrap. Dark, tea-colored water pools around the base of gnarled driftwood that mimics ancient cypress knees. This terrarium captures a mysterious, “bayou” atmosphere, where the glass remains perpetually fogged with condensation, blurring the line between water and land.
- The Soil Mix is Critical: Unlike standard terrariums, bogs need nutrient-poor, acidic soil. Use a mix of sphagnum peat moss and silica sand (50/50) to keep carnivorous plants happy.
- Water Matters: Never use tap water. Bog plants are sensitive to minerals. You must use distilled water, rainwater, or reverse-osmosis water to prevent root burning.
- Plant Selection: Feature carnivorous species like Drosera (Sundews), Sarracenia (Pitcher Plants), or Pinguicula (Butterworts), which thrive in soggy, boggy conditions.
- Live Sphagnum: Top dress the soil with live green Sphagnum moss. It holds immense amounts of water and creates that iconic, fluffy “bog” look that dead moss cannot replicate.
- Hardscape: Use dark, twisted wood like “Spider Wood” or “Bog Wood,” positioned vertically to look like trees rising from a swamp.
Pro Design Tip: To truly achieve the “Misty” aesthetic, install a tiny ultrasonic mist maker (fogger) in a small water dish hidden behind a rock or log. When turned on, it generates a heavy, rolling fog that creeps over the moss and settles in the jar’s low points, creating a spine-tingling, movie-quality swamp effect.
Budget Consideration: Carnivorous plants can be expensive at specialty nurseries. However, many big-box hardware stores sell “death cube” terrarium kits (small plastic boxes with a Venus Flytrap) for $5-$10. If you rescue these, repot them in proper bog soil and give them good light, they will explode with growth at a very low entry cost.

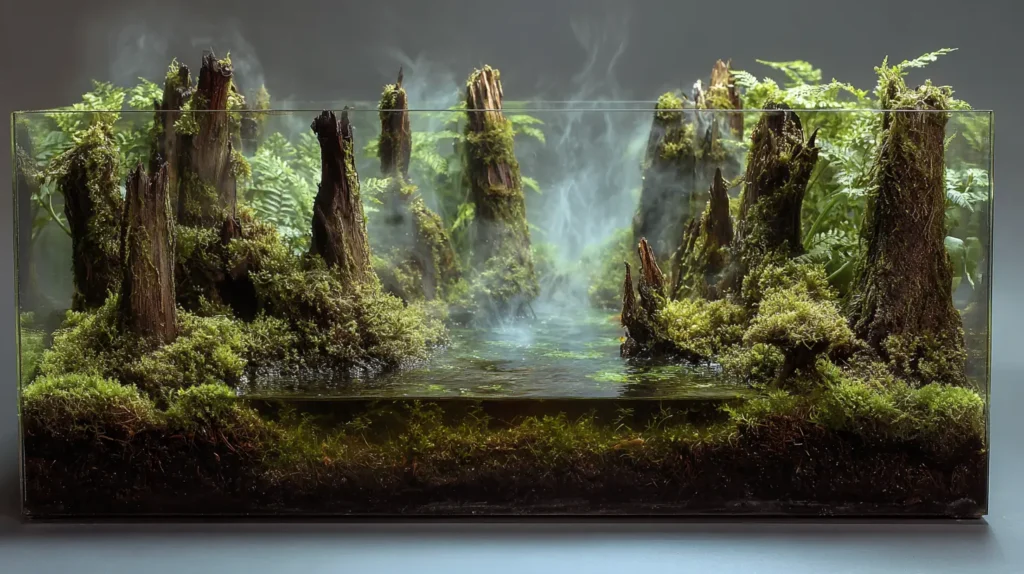
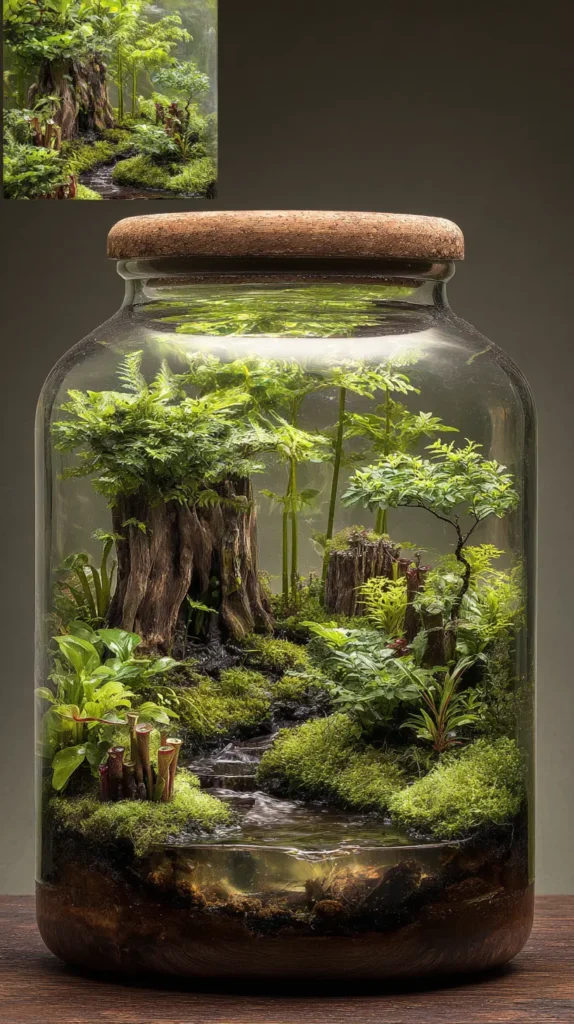
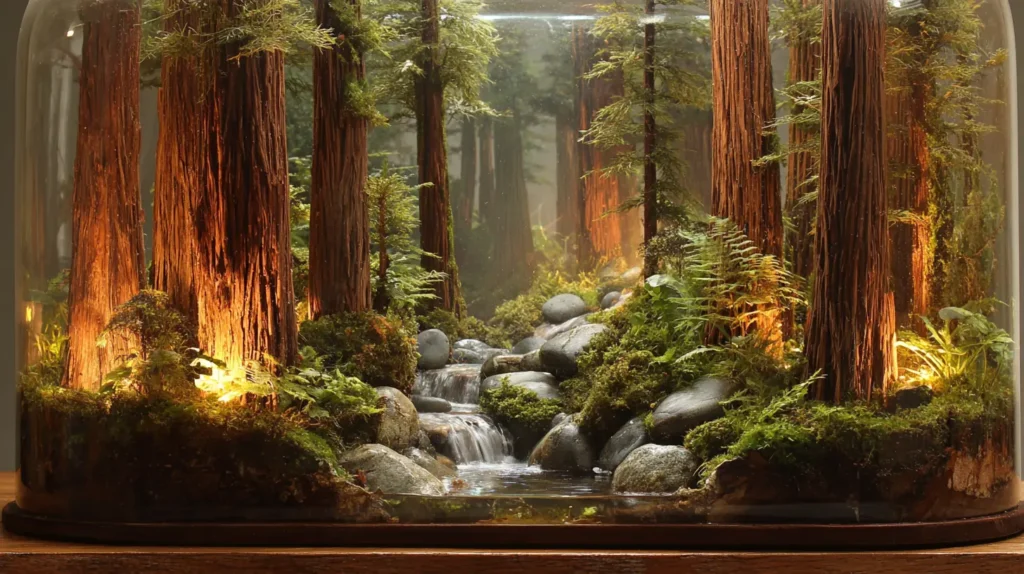
19. Redwood Giant Mini Forest Terrarium with Misty Waterfall
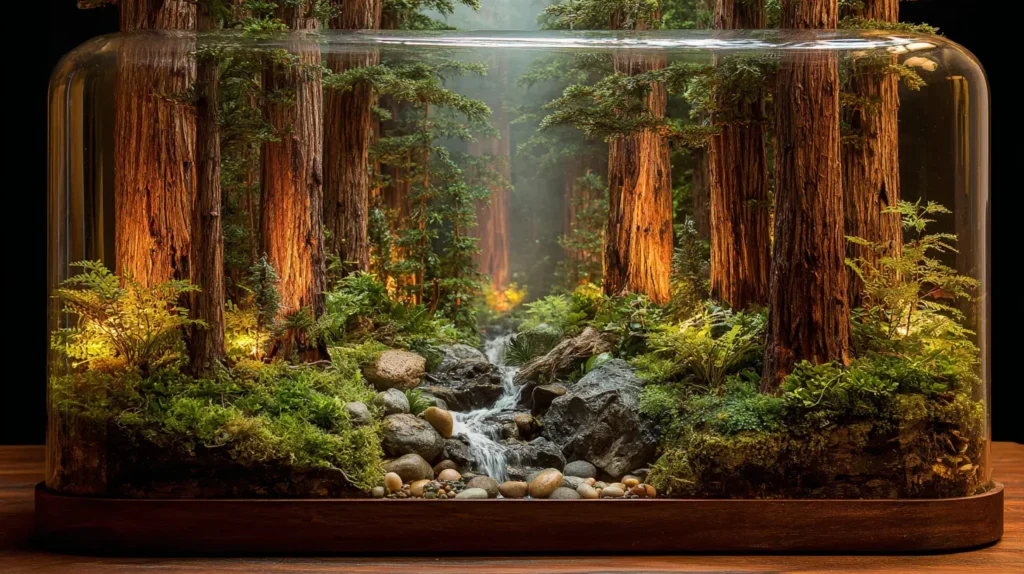
Transport yourself to the ancient, fog-laden coast of Northern California by recreating a forest of towering giants inside a vertical glass vessel. Imagine massive, reddish-brown tree trunks (simulated with vertical driftwood or cork bark) rising straight up from the soil, disappearing into a lush green canopy at the very top of the jar. Threading its way through these “ancient” trees is a misty waterfall that cascades down a moss-covered rock face, splashing into a fern-lined pool below. The scene utilizes extreme vertical scale to make the viewer feel small, looking up at nature’s skyscrapers, while the enclosed humidity creates a perpetual morning mist that clings to the bark and greenery.
- Mimic the Giants: Use thick, straight pieces of reddish wood like “Spider Wood,” Cedar, or tubes of Cork Bark standing vertically to simulate the massive trunks of Redwood trees.
- High Canopy: Don’t plant foliage at the bottom of the trunks. Glue clumps of moss or “Asparagus Fern” foliage only at the very top of the wood to mimic the high canopy of mature trees.
- The Misty Falls: Build a waterfall using dark slate rocks in the background. Use a tiny ultrasonic mist maker (fogger) in the water reservoir to generate rolling fog that drifts through the trees.
- Fern Floor: Carpet the ground with Sword Ferns or Boston Fern plantlets, which look like prehistoric undergrowth compared to the giant trees.
- Scale Reference: Keep the ground clear of large rocks. Use tiny pebbles or sand to trick the eye into thinking the trees are hundreds of feet tall.
Pro Design Tip: To enhance the realism of an “old growth” forest, use super glue to attach tiny patches of Ficus pumila (Creeping Fig) or moss halfway up the vertical wooden trunks. This mimics the ivy and lichen that grow on real Redwoods, breaking up the brown texture and adding age to the scene.
Budget Consideration: You don’t need to buy expensive aquarium driftwood. Look for a bag of “Redwood Mulch” or “Bark Nuggets” at a garden center. Find the largest, longest strips of bark in the bag and glue them together to form hollow “trunks.” It creates an incredibly realistic bark texture for a fraction of the cost of sandblasted driftwood.
20. Foggy Morning Forest with LED Stream Decor
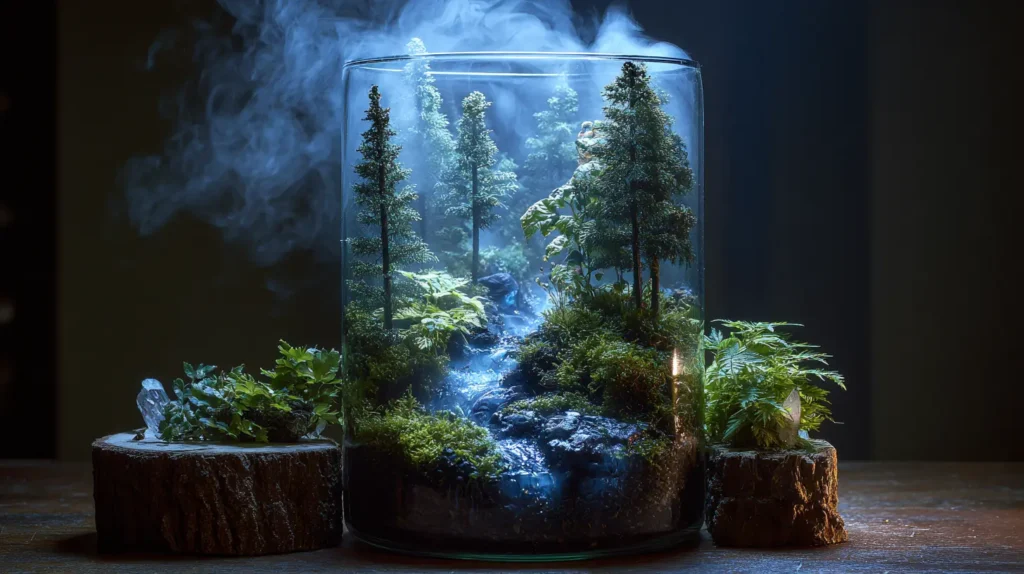
Create a terrarium that bridges the gap between nature and fantasy by replacing traditional water with light. Imagine a dense, mossy woodland scene shrouded in the dim light of early dawn. Winding through the center of this dark forest is a “bioluminescent” stream that glows with a soft, ethereal blue or cool white light. This effect is achieved using waterproof EL wire or LED strips buried beneath a layer of translucent glass stones or crushed clear quartz. When the room lights go down, the stream comes alive, casting a magical, moody glow upward onto the overhanging ferns and illuminating the condensation on the glass like morning dew.
- The “Magic” Water: Use EL Wire (Electroluminescent wire) or a waterproof LED strip in blue or cool white. These flexible lights can be snaked through the soil to mimic a river’s winding path.
- Diffusion is Key: Don’t leave the wire exposed. Cover it with clear glass marbles, tumbled quartz, or pale blue aquarium glass. This diffuses the harsh LED dots into a soft, continuous flow of light.
- Hide the Power: Bury the battery pack inside the false bottom (if waterproof) or mount it to the underside of the jar lid for easy access, concealing the wire with a piece of cork bark or moss.
- Atmospheric Fog: The heat from the LEDs (even minimal) combined with the moisture in the closed jar creates natural condensation, enhancing the “foggy morning” vibe without a machine.
- Contrast Planting: Use dark green plants like Selaginella uncinata (Peacock Moss), which has iridescent blue hues, to complement the glowing stream.
Pro Design Tip: Create a “frozen” river effect. If you want the stream to look good even when the lights are off, pour a thin layer of clear UV resin over the glass stones that cover the LEDs. This gives you a wet, glossy river by day and a glowing, magical stream by night.
Budget Consideration: This is often cheaper and safer than real water features. A 3-foot strand of battery-operated EL wire costs under $10 online. You avoid the cost of water pumps and tubing and the risk of water leaks, while gaining a stunning night-light feature.

Conclusion
A water stream terrarium is one of those objects that earns its place in a room by being genuinely interesting rather than merely decorative. It changes over time — plants grow, moss spreads, the water finds its preferred path. That slow change is part of what makes it worth having. Start with the achievable ideas in this collection, accept that the first attempt will teach you more than any guide can, and build toward the more ambitious ones as the process becomes familiar. Some of the conceptual ideas here may never be practically realizable — but they are worth imagining, and occasionally someone with enough skill and patience surprises everyone.
