
20 Contemporary Quilt Pattern Ideas: Merging Luxurious Comfort with Soft Stylish Sophisticated Design
Contemporary Quilts: The Case for the Middle Ground
Most design conversations set up a binary: traditional or modern, classic or contemporary. In quilting, that binary is real enough to be useful – but the most interesting work happens between the two positions, and contemporary quilting is where that in-between territory gets explored most honestly.
Traditional quilts—Nine Patch, Irish Chain, Log Cabin—derive their authority from repetition and consistency. The same block, constructed the same way, across the whole surface. Their beauty is inseparable from that fidelity to structure, and the history embedded in those structures is part of what you are working with when you make them. Modern quilts move in the opposite direction: improvisational piecing, bold graphic contrasts, strong color statements, and the quilt is treated more as an abstract canvas than a structured textile. Both approaches are legitimate. Neither is what contemporary quilting is doing.
Contemporary quilts keep the discipline of traditional construction—the precision, the clear geometry, the considered layout—but simplify it. Clean lines rather than complex blocks. Soft, tonal palettes rather than high contrast. Negative space is used deliberately, as an active element rather than an empty background. The result is something that looks calm and intentional without the visual intensity that some modern quilts demand of a room. It fits in rather than insisting on attention, and in a home that has to be lived in rather than curated, that quality is worth more than it sounds.
I have always been drawn to this middle ground for both practical and aesthetic reasons. A contemporary quilt works as an everyday object – used, washed, lived with – and still looks considered after years of that treatment. It does not require a perfectly styled room to justify its presence. That kind of quiet reliability is what separates a good design from a good-looking one.
What Contemporary Quilting Actually Means in Practice
The defining qualities are simpler than most guides make them sound. Simplicity over ornamentation – the design does one thing well rather than several things at once. Subtle palettes – neutrals, soft contrasts, tonal variation that creates depth without drama. Negative space that lets the design breathe. Texture through stitching, layering, and fabric choice rather than through pattern complexity.
The result is a quilt that feels designed without feeling overdesigned – and that distinction is harder to achieve than it looks.
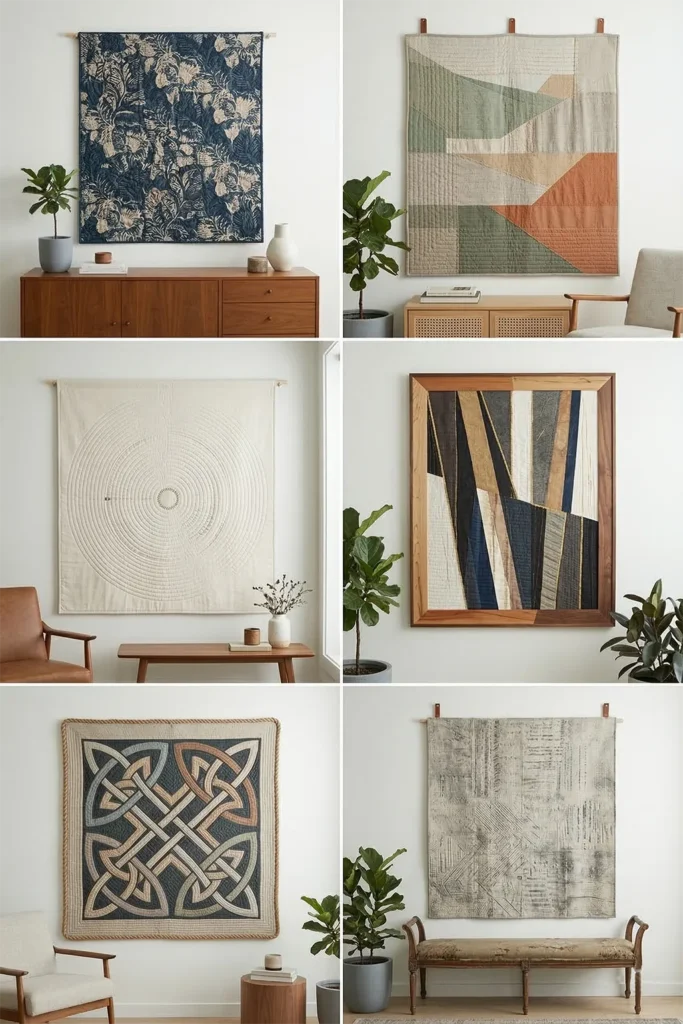
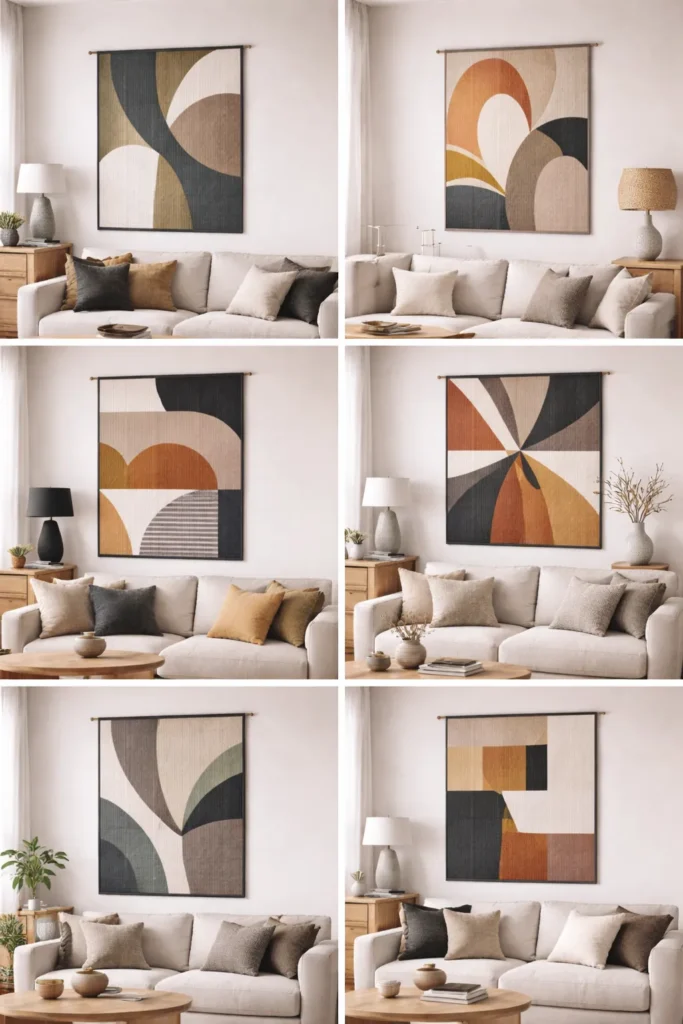
Contemporary Quilt Pattern Ideas
Contents
- 1 Contemporary Quilt Pattern Ideas
- 2 1. Minimalist Geometric Contemporary Quilt Patterns for a Serene Master Bedroom
- 2.1 A Guide to Making Minimalist Geometric Contemporary Quilts for a Serene Master Bedroom
- 2.2 Measurements & Materials Needed
- 2.3 Step-by-Step Guide: The Minimalist Macro Quilt
- 2.3.1 Step 1: Precision Cutting the Macro Squares
- 2.3.2 Step 2: Prepping for the Two-at-a-Time Method
- 2.3.3 Step 3: Sewing the Massive Half-Square Triangles
- 2.3.4 Step 4: Pressing and Perfecting the Geometry
- 2.3.5 Step 5: Assembly Section (Drafting the Contemporary Layout)
- 2.3.6 Step 6: Architectural Quilting and Tailored Binding
- 3 2. Soft Ombre Contemporary Quilted Bed Covers for a Luxurious Sleep Aesthetic
- 4 3. Sophisticated Asymmetrical Quilted Bed Sheets for Modern Comfort
- 4.1 A Guide to Making Sophisticated Asymmetrical Quilted Bed Sheets for Modern Comfort
- 4.2 Measurements & Materials Needed
- 4.3 Step-by-Step Guide: The Asymmetrical Quilted Sheet
- 4.3.1 Step 1: Precision Cutting for the Minimalist Canvas
- 4.3.2 Step 2: Designing the Fragmented Vertical Stripe
- 4.3.3 Step 3: Assembling the Accent Band
- 4.3.4 Step 4: Assembly Section (Constructing the Asymmetrical Top)
- 4.3.5 Step 5: Basting the Weightless Layers
- 4.3.6 Step 6: “Ghost” Quilting and Seamless Binding
- 5 4. Sleek Monochromatic Contemporary Quilted Bed Runners for Layered Elegance
- 6 5. Plush Velvet Contemporary Quilt Pillow Covers for an Upscale Look
- 7 6. Negative Space Contemporary Quilt Designs for Airy, Elegant Bedrooms
- 8 7. Modern Striped Contemporary Quilt Throws for Cozy Bedroom Layering
- 8.1 A Guide to Making Modern Striped Contemporary Quilt Throws for Cozy Bedroom Layering
- 8.2 Measurements & Materials Needed
- 8.3 Step-by-Step Guide: The Modern Striped Throw
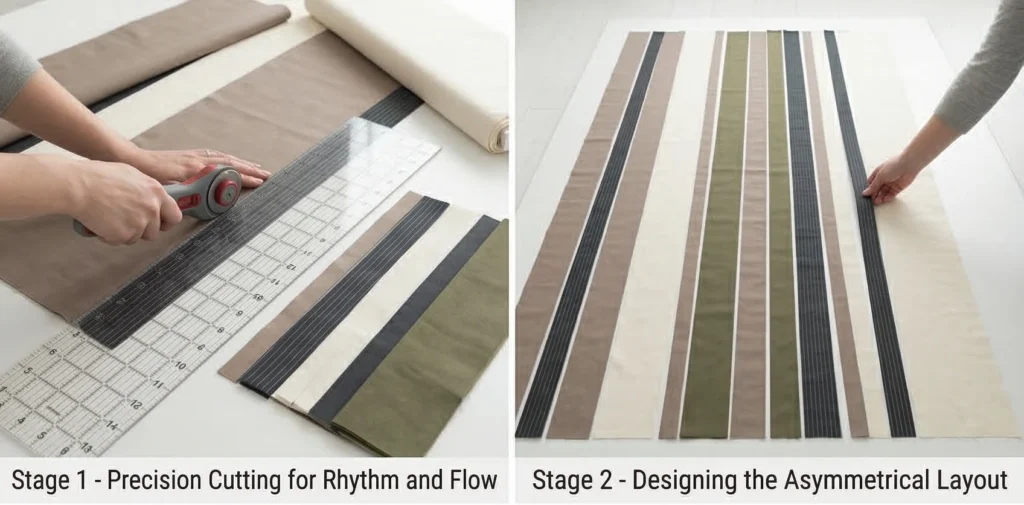
- 8.3.1 Step 1: Precision Cutting for Rhythm and Flow
- 8.3.2 Step 2: Designing the Asymmetrical Layout
- 8.3.3 Step 3: Assembling the Striped Canvas (The Anti-Bowing Technique)
- 8.3.4 Step 4: Assembly Section (Basting the Cozy Layers)
- 8.3.5 Step 5: Linear Quilting for Tailored Texture
- 8.3.6 Step 6: Squaring Up and Finishing
- 9 8. Minimalist Textured Contemporary Quilts for Cozy Yet Stylish Bedroom Retreats
- 10 9. Striking Abstract Contemporary Quilted Wall Decor for Modern Living Rooms
- 11 10. Stylish Color-Block Contemporary Quilted Sofa Covers for Chic Protection
- 12 11. Minimalist Contemporary Quilted Table Runners to Elevate Dining Spaces
- 12.1 A Guide to Making Minimalist Contemporary Quilted Table Runners to Elevate Dining Spaces
- 12.2 Measurements & Materials Needed
- 12.3 Step-by-Step Guide: The Minimalist Table Runner
- 12.3.1 Step 1: Precision Cutting for Clean Geometry
- 12.3.2 Step 2: Assembling the Miniature Blocks
- 12.3.3 Step 3: Drafting the Linear Layout
- 12.3.4 Step 4: Assembly Section (Building the Floating Canvas)
- 12.3.5 Step 5: Layering and Basting the Heat-Protective Canvas
- 12.3.6 Step 6: Structural Straight-Line Quilting and Binding
- 13 12. Soft Textured Contemporary Quilt Couch Throws for Living Area Comfort
- 14 13. Sophisticated Contemporary Quilted Cushion Covers for Modern Loveseats
- 14.1 A Guide to Making Sophisticated Contemporary Quilted Cushion Covers for Modern Loveseats
- 14.2 Measurements & Materials Needed
- 14.3 Step-by-Step Guide: The Sophisticated Asymmetrical Cushion
- 14.3.1 Step 1: Precision Cutting for a Tailored Finish
- 14.3.2 Step 2: Designing the Off-Center Grid
- 14.3.3 Step 3: Sewing the Contemporary Rows
- 14.3.4 Step 4: Assembly Section (Constructing the Quilted Front)
- 14.3.5 Step 5: Architectural Machine Quilting
- 14.3.6 Step 6: Constructing the Envelope Back and Finishing
- 15 14. Elegant Two-Tone Contemporary Quilted Placemats for Upscale Tablescapes
- 15.1 A Guide to Making Elegant Two-Tone Contemporary Quilted Placemats for Upscale Tablescapes
- 15.2 Measurements & Materials Needed
- 15.3 Step-by-Step Guide: The Two-Tone Placemat
- 15.3.1 Step 1: Precision Cutting for the Two-Tone Grid
- 15.3.2 Step 2: Assembling the Nine Patch Center
- 15.3.3 Step 3: Pressing for Tabletop Flatness
- 15.3.4 Step 4: Assembly Section (Framing the Placemat)
- 15.3.5 Step 5: Layering and Basting the Heat-Protective Canvas
- 15.3.6 Step 6: Grid Quilting and Crisp Binding
- 16 15. Oversized Contemporary Quilted Floor Pillows for Casual Lounge Seating
- 16.1 A Guide to Making Oversized Contemporary Quilted Floor Pillows for Casual Lounge Seating
- 16.2 Measurements & Materials Needed
- 16.3 Step-by-Step Guide: The Oversized Quilted Floor Pillow
- 16.3.1 Step 1: Precision Cutting for the Macro Block
- 16.3.2 Step 2: Assembling the Giant Nine Patch
- 16.3.3 Step 3: Basting and Heavy-Duty Quilting
- 16.3.4 Step 4: Preparing the Zippered Base
- 16.3.5 Step 5: Assembly Section (Constructing the 3D Boxed Cushion)
- 16.3.6 Step 6: Finishing and Stuffing the Lounge Pillow
- 17 16. Modern Geometric Contemporary Quilted Chair Pads for Dining Room Elegance
- 18 17. Durable Canvas Contemporary Quilted Laundry Bags for a Stylish Closet
- 18.1 A Guide to Making Durable Canvas Contemporary Quilted Laundry Bags for a Stylish Closet
- 18.2 Measurements & Materials Needed
- 18.3 Step-by-Step Guide: The Quilted Canvas Laundry Bag
- 18.3.1 Step 1: Precision Cutting the Heavy Canvas
- 18.3.2 Step 2: Assembling the Bold Canvas Block
- 18.3.3 Step 3: Framing the Front Panel
- 18.3.4 Step 4: Assembly Section (Basting and Structural Quilting)
- 18.3.5 Step 5: Constructing the Outer Bag and Boxing the Base
- 18.3.6 Step 6: Attaching the Lining and Creating the Rope Casing
- 19 18. Hanging Minimalist Contemporary Quilt Laundry Hampers with Sleek Drawstrings
- 19.1 A Guide to Making Hanging Minimalist Contemporary Quilt Laundry Hampers with Sleek Drawstrings
- 19.2 Measurements & Materials Needed
- 19.3 Step-by-Step Guide: The Hanging Quilted Hamper
- 19.3.1 Step 1: Precision Cutting for the Asymmetrical Grid
- 19.3.2 Step 2: Assembling the Miniature Nine Patch
- 19.3.3 Step 3: Framing the Asymmetrical Front Panel
- 19.3.4 Step 4: Basting and Sleek Linear Quilting
- 19.3.5 Step 5: Assembly Section (Constructing the Hamper and Hanging Loops)
- 19.3.6 Step 6: Creating the Sleek Drawstring Casing and Finishing
- 20 19. Reversible Modern Contemporary Quilted Laundry Baskets for Chic Organization
- 20.1 A Guide to Making Reversible Modern Contemporary Quilted Laundry Baskets for Chic Organization
- 20.2 Measurements & Materials Needed
- 20.3 Step-by-Step Guide: The Reversible Quilted Basket
- 20.3.1 Step 1: Precision Cutting and Prepping the Base
- 20.3.2 Step 2: Assembling the Contemporary Nine Patch Focal Point
- 20.3.3 Step 3: Framing the Exterior Cylinder Wall
- 20.3.4 Step 4: Fusing and Kantha-Inspired Quilting
- 20.3.5 Step 5: Assembly Section (Constructing the 3D Baskets)
- 20.3.6 Step 6: Nesting, Reversing, and Binding
- 21 20. Architectural Contemporary Quilted Jackets for Stylish Everyday Wear
- 22 Conclusion
Across the Home
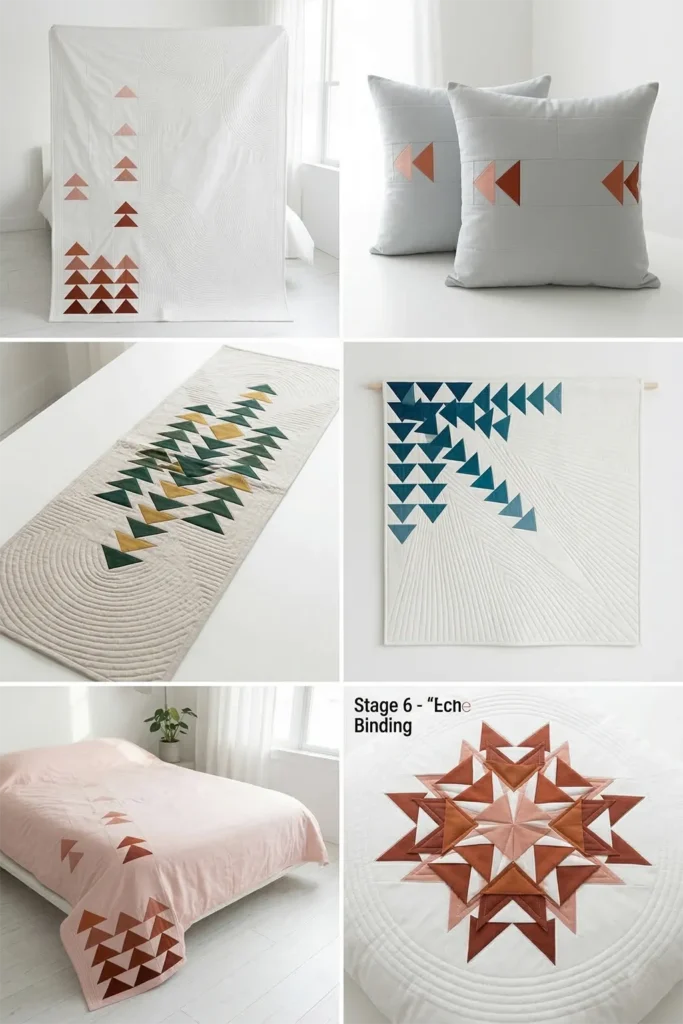
In the bedroom, minimalist geometric quilts create a calm, ordered backdrop that complements rather than clashes with the rest of the room. Textured pieces – velvet accents, channel-stitched covers – add quiet luxury in a register that does not compete with the space. In living areas, soft quilted throws and abstract wall hangings add warmth while softening harder architectural lines. The same design language extends naturally into floor cushions, storage pieces, and quilted wearables – simple, functional, and coherent across different scales and uses.
Contemporary quilting works because it respects both traditions it sits between – and does not overclaim from either.
See also: Modern quilt patterns · Boho quilt patterns · Scandinavian quilts · Classic Quilt Patterns
Recommended Supplies
“As an Amazon Associate, I earn from qualifying purchases.“
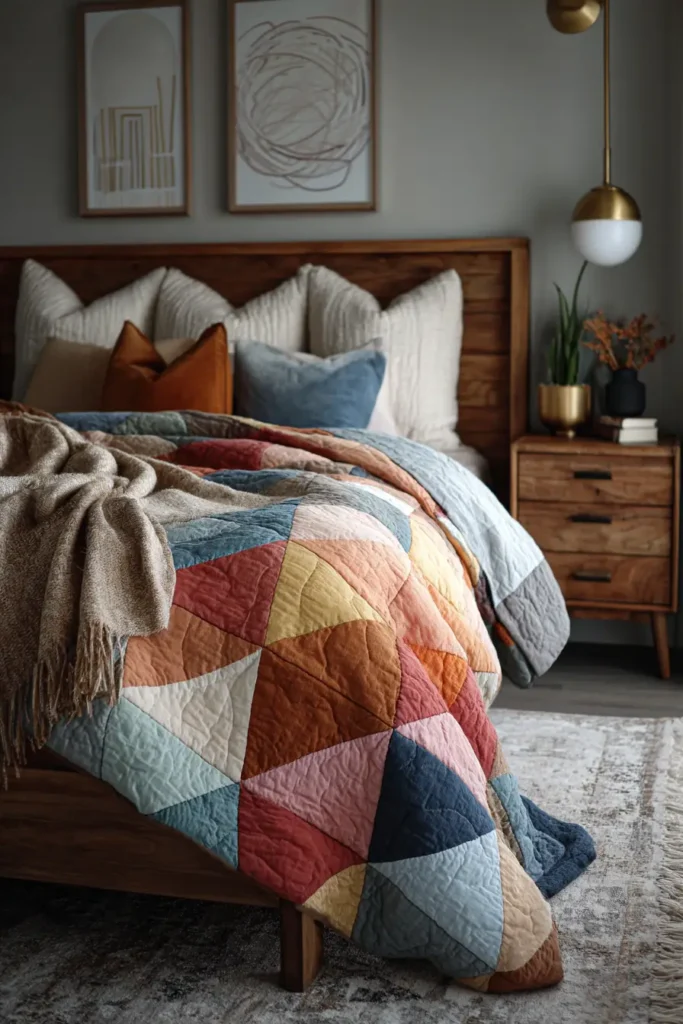
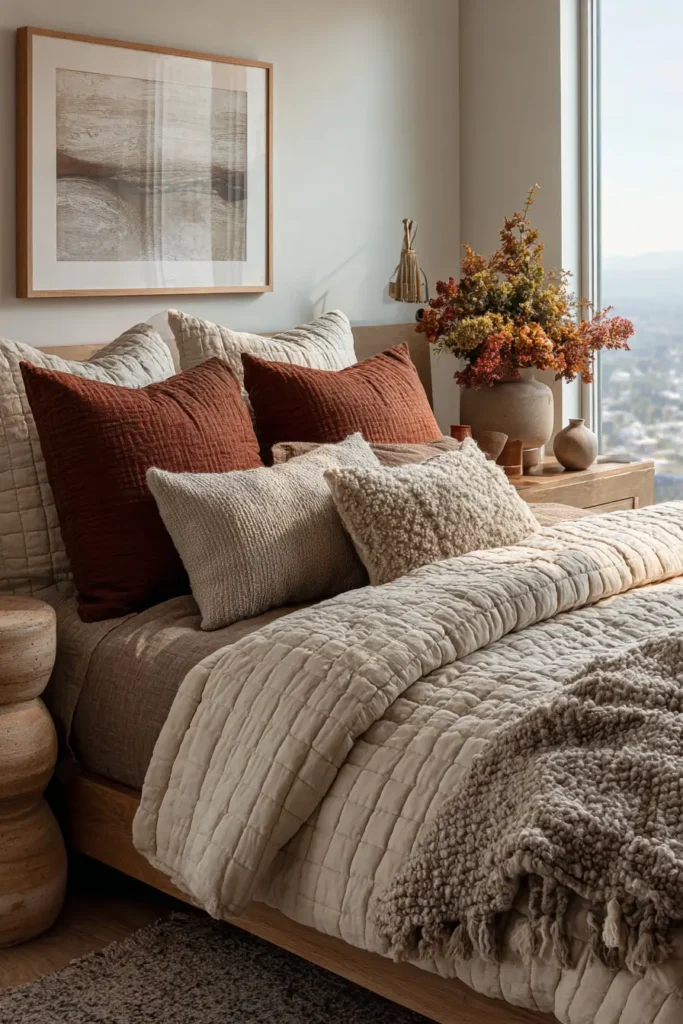
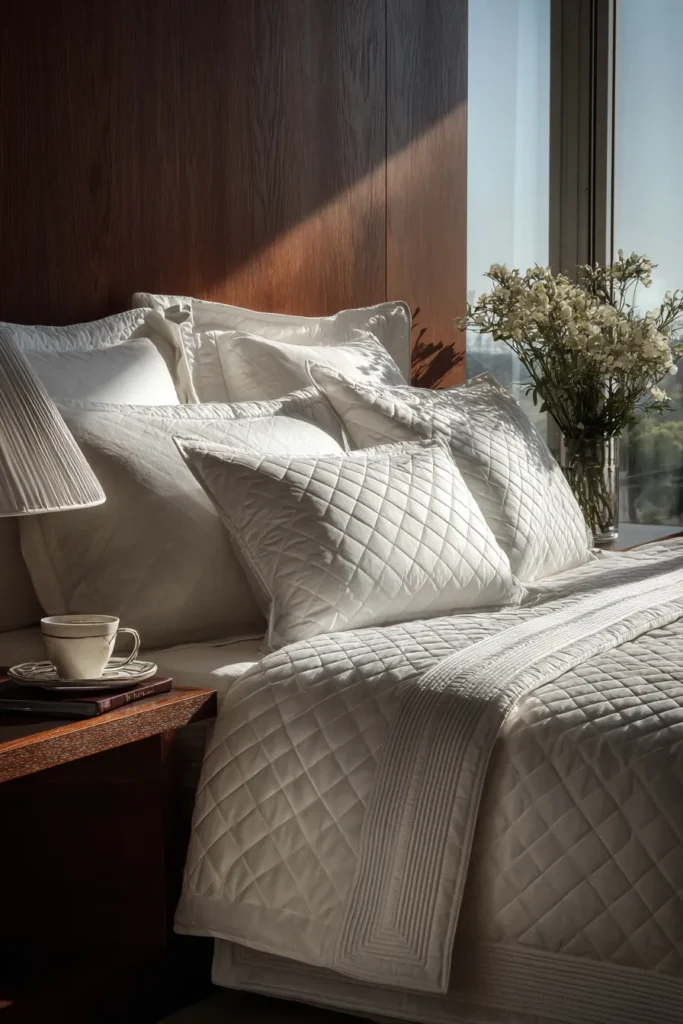
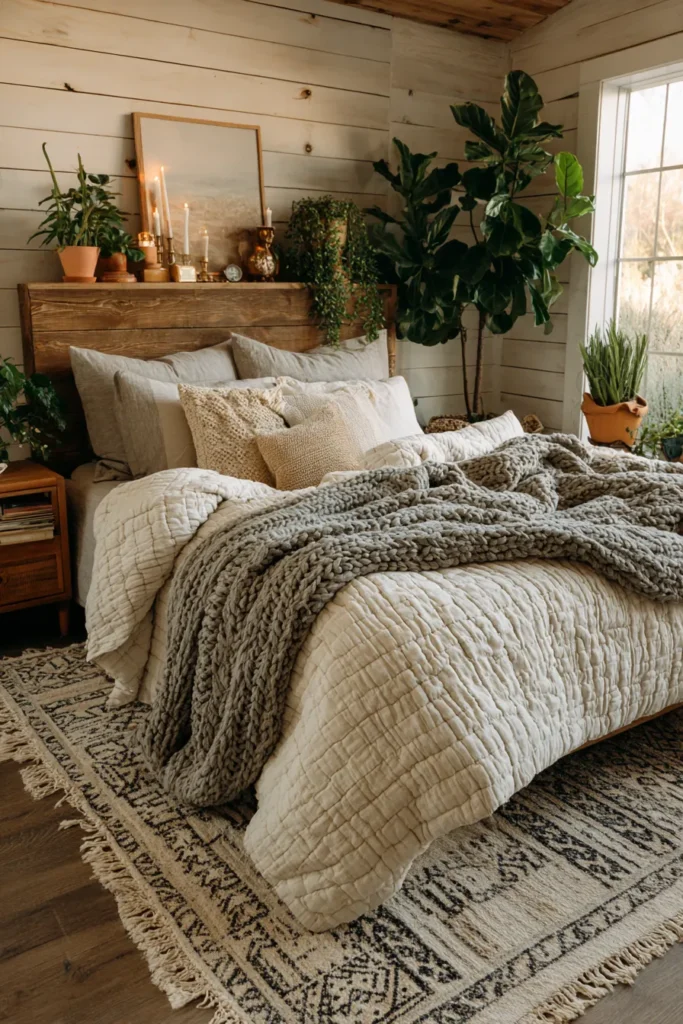
1. Minimalist Geometric Contemporary Quilt Patterns for a Serene Master Bedroom
A Guide to Making Minimalist Geometric Contemporary Quilts for a Serene Master Bedroom
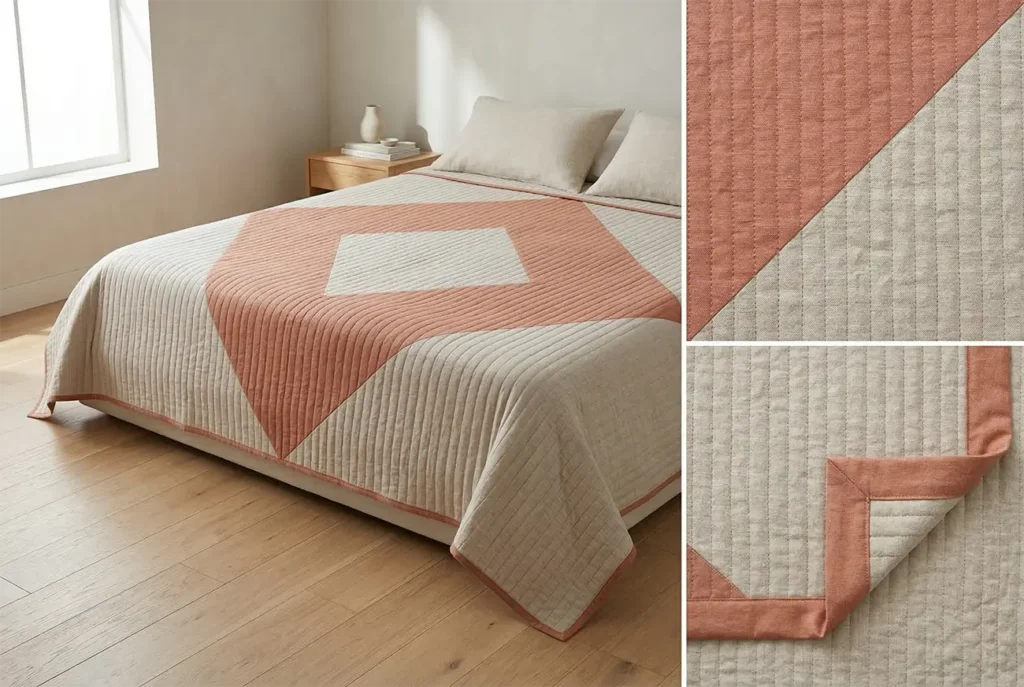
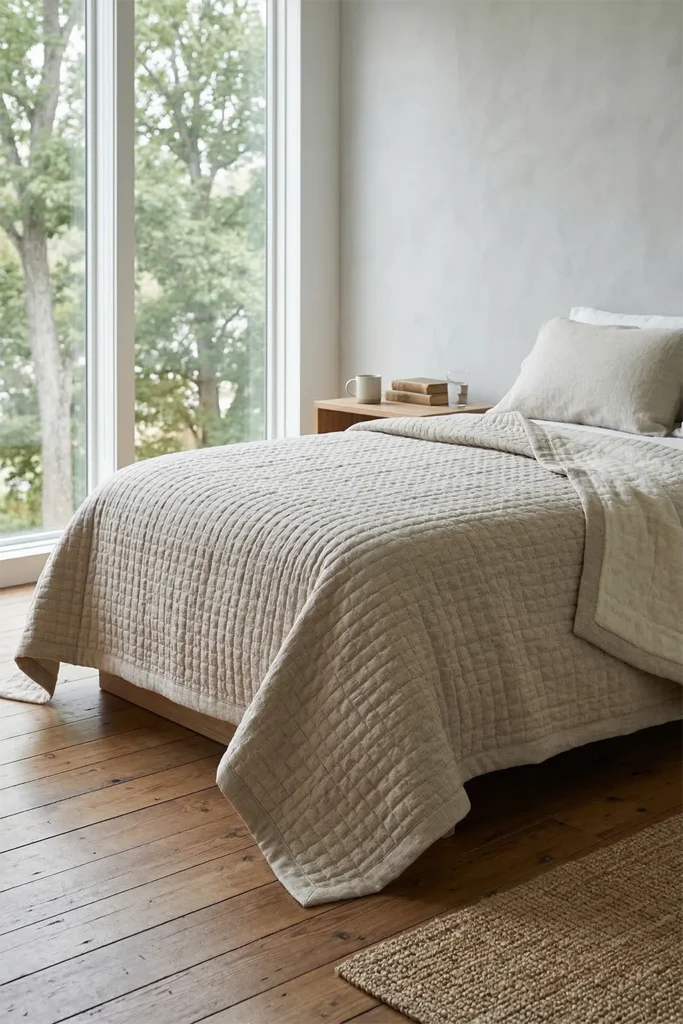
The master bedroom should be the ultimate sanctuary—a space entirely free from visual clutter, yet overflowing with tactile warmth. The Minimalist Geometric Contemporary Quilt is the perfect textile to anchor this environment. By dramatically scaling up a traditional quilt shape—the Half-Square Triangle (HST)—to an oversized, architectural proportion, you create a striking, modern focal point that feels incredibly sophisticated without sacrificing an ounce of cozy comfort.
The Heritage of the Macro Block
I curated this specific design to explore the power of negative space in modern textile art. Historically, quilting was defined by “micro-piecing”—stitching thousands of tiny scraps together out of pure necessity. The contemporary quilting movement, however, approaches the craft from a fine-art perspective. By blowing up a single geometric element to a “macro” scale, the focus shifts away from chaotic patchwork and directly onto the fabric’s quality and the architecture of the lines. I designed this guide to help you create a museum-quality textile that brings serene, minimalist order to your sleeping space.
Focus on Usability, Comfort, and Elegance
- Usability: Because this pattern relies on massive, oversized blocks, the cutting and piecing process is incredibly fast. You bypass the tedious micro-sewing and move straight into the rewarding assembly phase.
- Comfort: Contemporary design can sometimes feel sterile, but this quilt is engineered for softness. The lack of dense, intersecting seams allows the fabric to drape beautifully. Pairing a premium linen-cotton blend top with a high-quality bamboo batting creates a breathable, heavy textile that wraps around you perfectly.
- Elegance: Minimalist elegance demands a highly restrained color palette. Select just two sophisticated, muted solids—such as a warm Terracotta or soft Clay paired with a stark Bone White or Oatmeal. The high contrast of the macro geometry does all the visual work.
Measurements & Materials Needed
Finished Quilt Size: Generous Queen/King (approx. 96″ x 96″) Finished Block Size: Massive 24″ x 24″ blocks (24.5″ x 24.5″ unfinished). This quilt requires exactly 16 macro blocks (arranged in a 4×4 grid).
Materials Needed:
- Fabric for blocks:Because we are making oversized blocks, standard pre-cuts will not work. You need yardage.
- Accent Color (e.g., Terracotta): 3.5 yards of premium linen-cotton blend. You will cut 8 massive squares measuring 25″ x 25″.
- Background Color (e.g., Bone White): 3.5 yards of premium linen-cotton blend. You will cut 8 massive squares measuring 25″ x 25″.
- Backing fabric: 3 yards of 108″ wide-backing premium cotton or sateen.
- Batting: 100″ x 100″ king-size low-loft bamboo batting (bamboo provides the best drape for contemporary quilts).
- Binding: 3/4 yard of your Accent Color fabric.
- Thread: High-quality, 50-weight 100% cotton piecing and quilting thread in a coordinating neutral.
- Quilting ruler: A long 6″ x 24″ acrylic ruler for drawing your diagonal lines and squaring up.
- Rotary cutter: Equipped with a fresh blade to cleanly slice through the large, heavy linen squares.
- Quilting pins: Fine glass-head pins for piecing, and curved safety pins for basting.
- Iron and ironing board: Essential for pressing these long seams completely flat.

Step-by-Step Guide: The Minimalist Macro Quilt
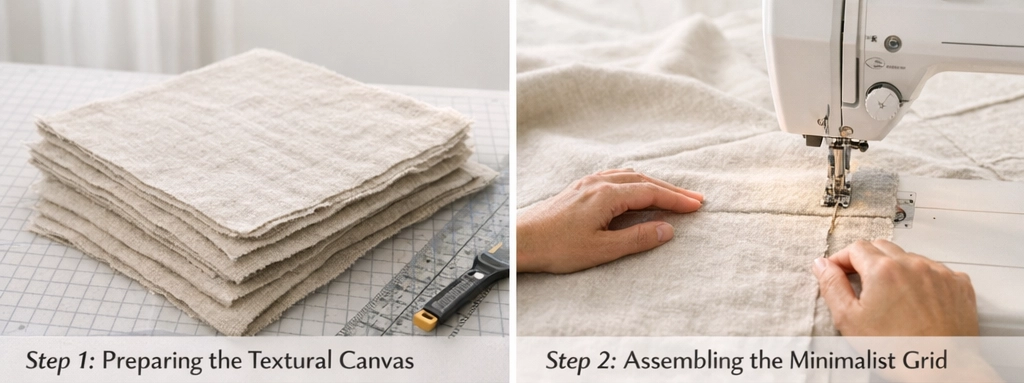
Step 1: Precision Cutting the Macro Squares
Clear a large workspace—you will need the room! Using your rotary cutter and acrylic ruler, carefully cut your fabrics into 16 total squares measuring exactly 25″ x 25″ (8 Accent, 8 Background).
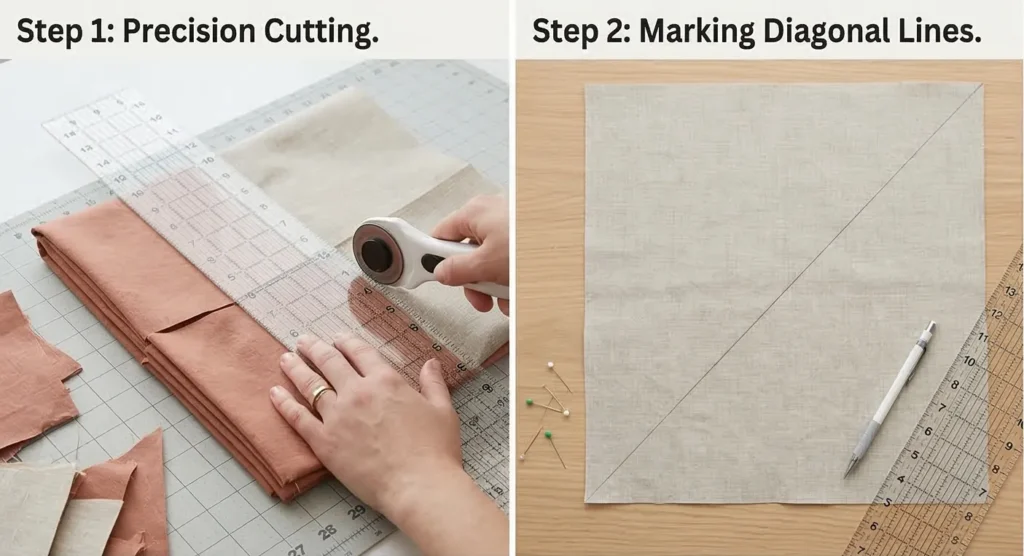
Step 2: Prepping for the Two-at-a-Time Method
Take all 8 of your Background (Bone White) squares and lay them wrong-side up. Using a long acrylic ruler and a fabric marking pencil, draw a single diagonal line from one corner to the opposite corner on each square.
Step 3: Sewing the Massive Half-Square Triangles
Pair each marked Background square with an Accent square, placing them right-sides together. Pin securely along the drawn diagonal line. Take the massive paired squares to your sewing machine. Stitch a seam exactly 1/4-inch away from the drawn pencil line on BOTH sides. Once sewn, take the unit back to your cutting mat and use your rotary cutter to slice directly down the center drawn line. This separates the fabric into two identical, two-toned triangles. Repeat this for all 8 pairs to yield 16 massive Half-Square Triangles (HSTs).
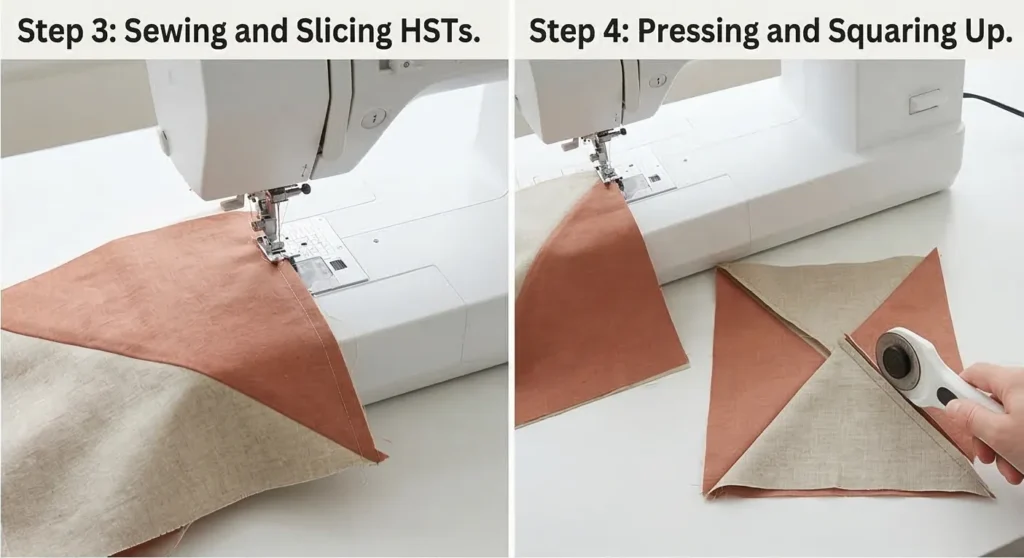
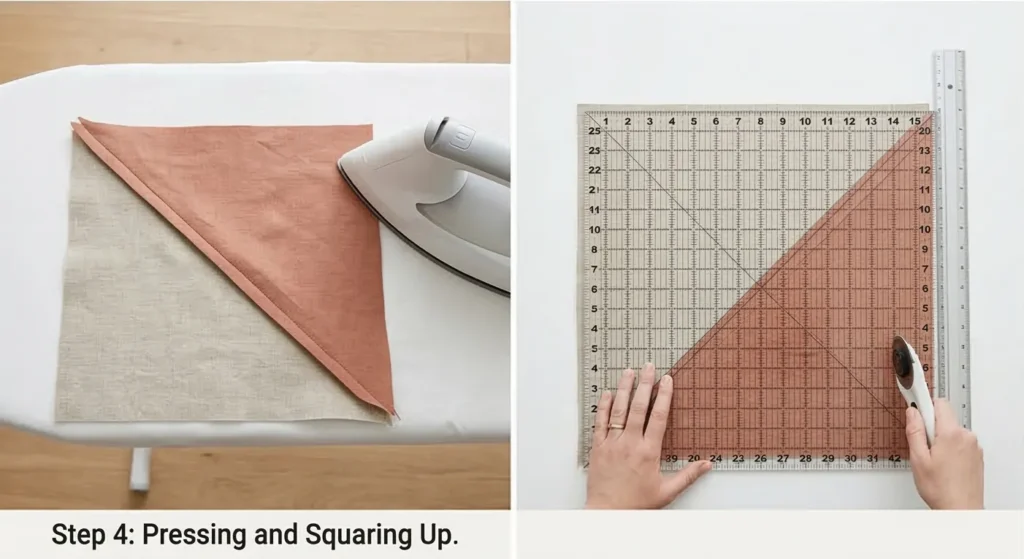
Step 4: Pressing and Perfecting the Geometry
Open your newly cut HSTs and press the long diagonal seam flat. For the cleanest look, press the seam allowance toward the darker Accent fabric. Now, it is time to square them up. Because we started with oversized 25″ squares, you have a slight margin of error to trim away. Carefully trim each HST so it measures exactly 24.5″ x 24.5″, ensuring the diagonal seam runs perfectly into the corners.
Step 5: Assembly Section (Drafting the Contemporary Layout)
The beauty of the HST is its versatility. Find a large, clean floor space to arrange your 16 macro blocks.
- The Modern Diamond: Rotate the blocks so the Accent triangles meet in the exact center, forming a massive, striking diamond suspended in the white negative space.
- The Bold Chevron: Arrange the blocks so the diagonal lines flow in the same direction across the rows, creating a sharp, sweeping zigzag effect.
- Sewing the Rows: Once you have chosen your minimalist layout, sew the blocks into 4 horizontal rows (4 blocks per row) with a 1/4-inch seam allowance. Press the seams in alternating directions.
- Joining the Quilt: Sew the 4 massive rows together, pinning precisely where the diagonal seams intersect to ensure your geometric lines remain razor-sharp.
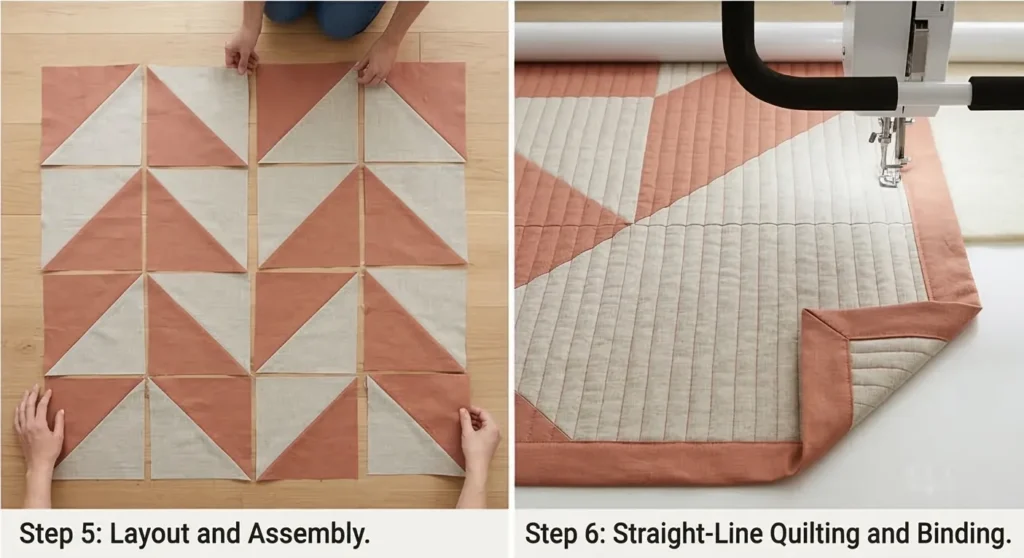
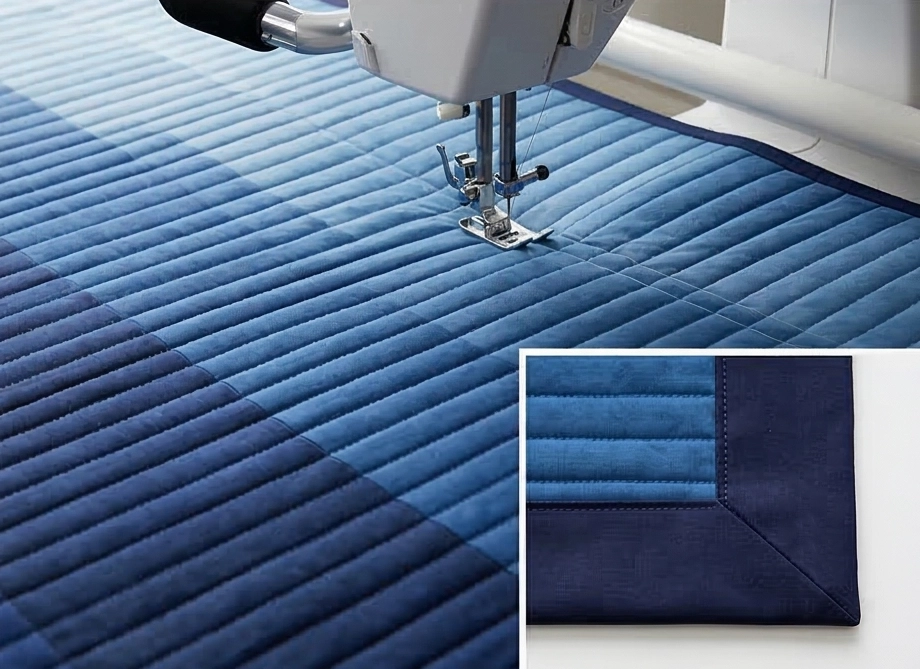
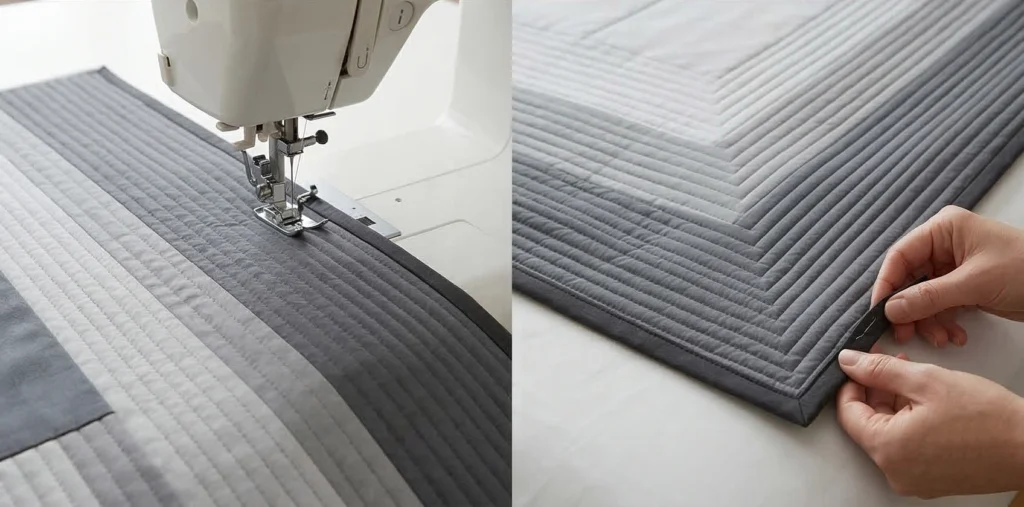
Step 6: Architectural Quilting and Tailored Binding
- Baste: Tape your 108″ backing fabric face down to the floor. Layer your bamboo batting, followed by the pieced top (face up). Pin heavily with curved safety pins.
- Quilt: To elevate the contemporary, sophisticated design, use “matchstick” or architectural straight-line quilting. Stitch continuous vertical lines from the top to the bottom of the quilt, spacing them 1 to 2 inches apart. This dense, linear texture stunningly contrasts the bold diagonal angles of the pieced design and gives the heavy linen incredible structure.
- Bind: Cut your binding fabric into 2.5″ strips. Join them end-to-end, fold in half, press crisp, and sew tightly around the perimeter, mitering the corners for a flawless, tailored finish.
Usability Note: The architectural straight-line quilting ensures this heavy quilt will hold its shape beautifully without warping over time. Linen-cotton blends become incredibly soft with use. Wash your finished quilt on a cold, normal cycle with a mild detergent. Tumble drying on medium heat will encourage the bamboo batting to shrink slightly, resulting in a subtle, deeply inviting crinkle that perfectly softens the stark geometric lines of the master bedroom.
Other Recommended Supplies
“As an Amazon Associate, I earn from qualifying purchases.“
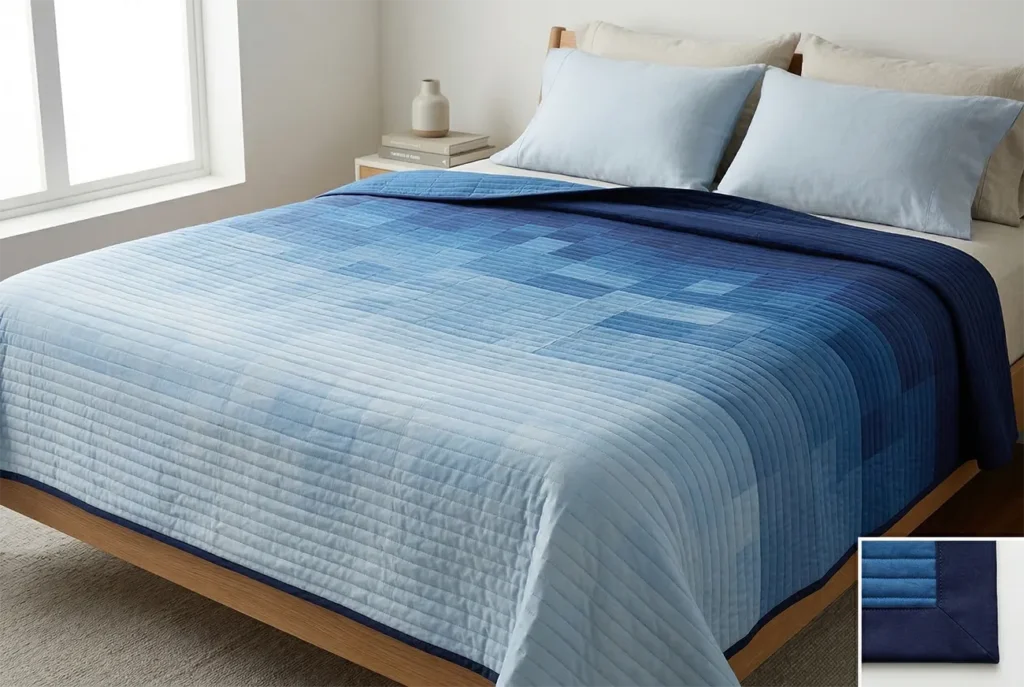
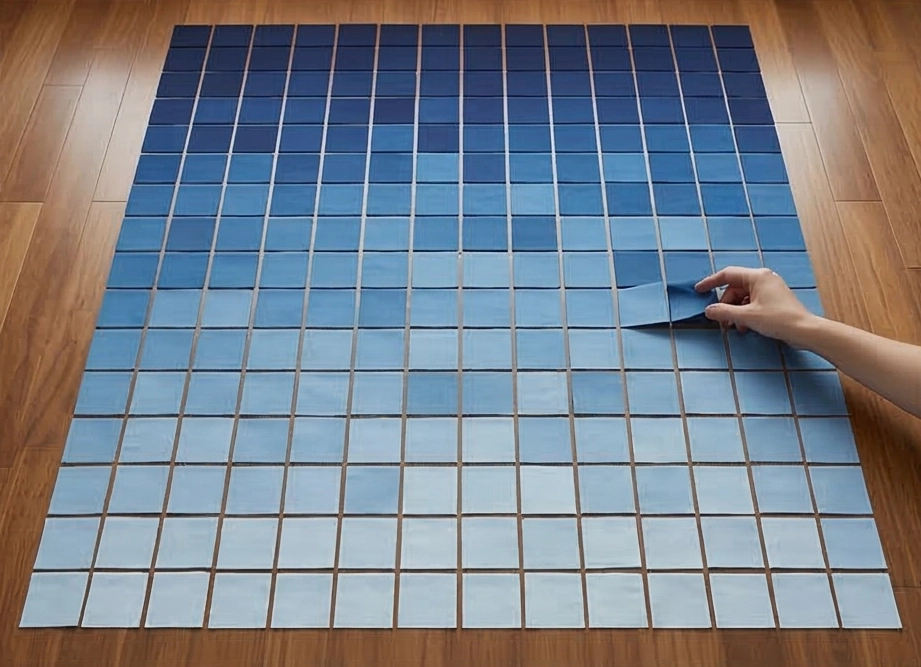
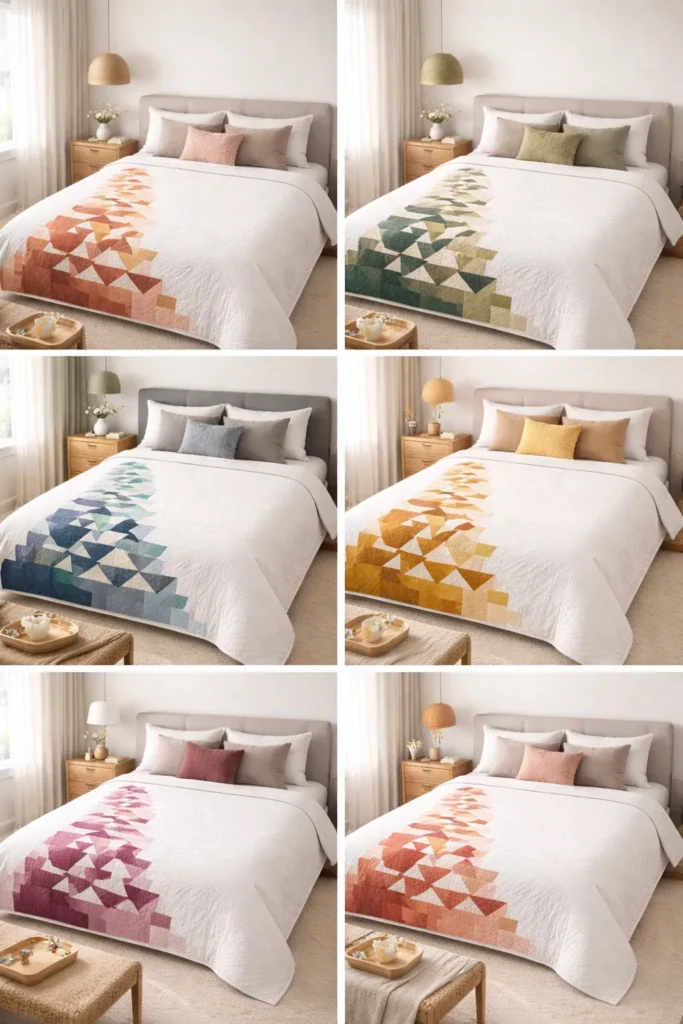
2. Soft Ombre Contemporary Quilted Bed Covers for a Luxurious Sleep Aesthetic
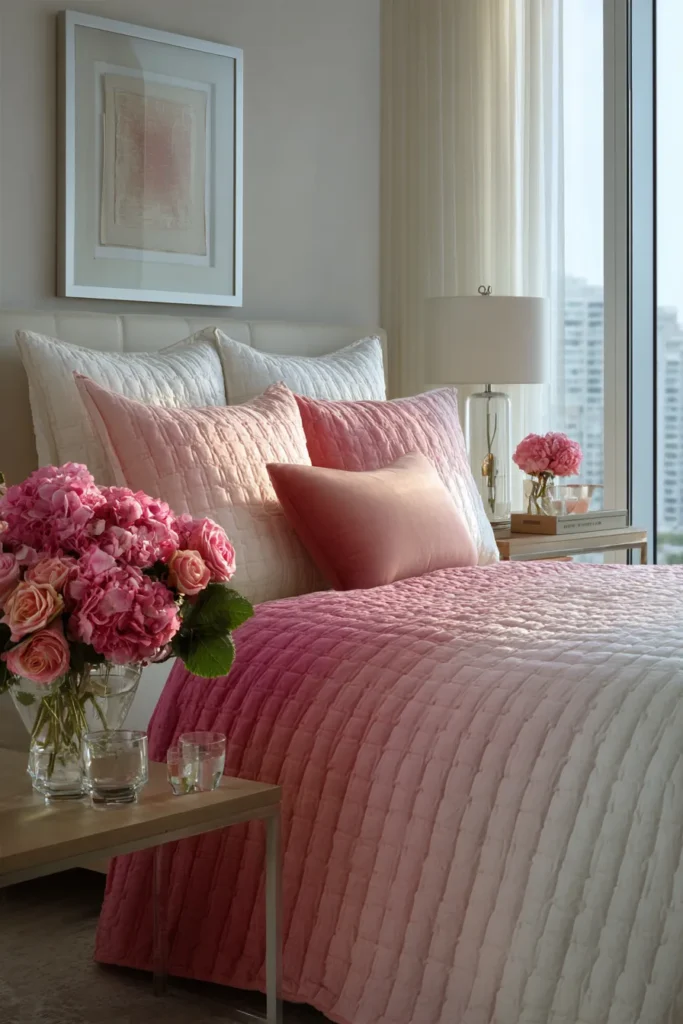
A Guide to Making Soft Ombre Contemporary Quilted Bed Covers for a Luxurious Sleep Aesthetic
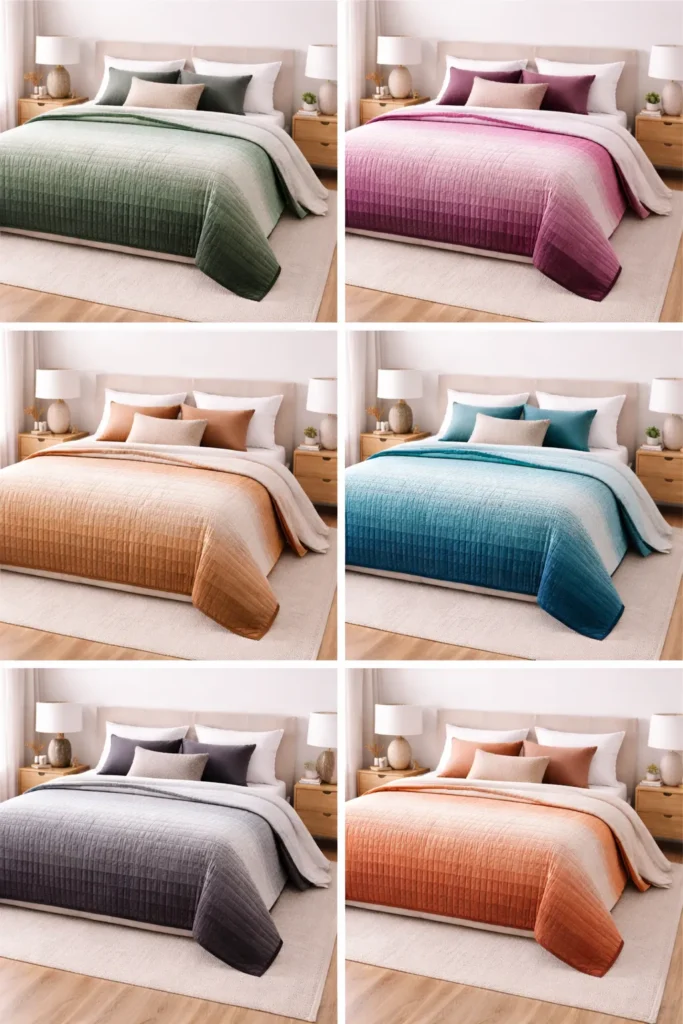
A bedroom designed for true rest should visually soothe the mind the moment you walk in. The Soft Ombre Contemporary Quilt achieves this by utilizing a slow, continuous color gradient that mimics the natural transitions of light—like a fading sunset or the descending depths of the ocean. By stripping away complex patchwork patterns and focusing entirely on the seamless flow of color, this bed cover delivers a sleek, spa-like aesthetic that defines modern luxury.
The Heritage of the Gradient Textile
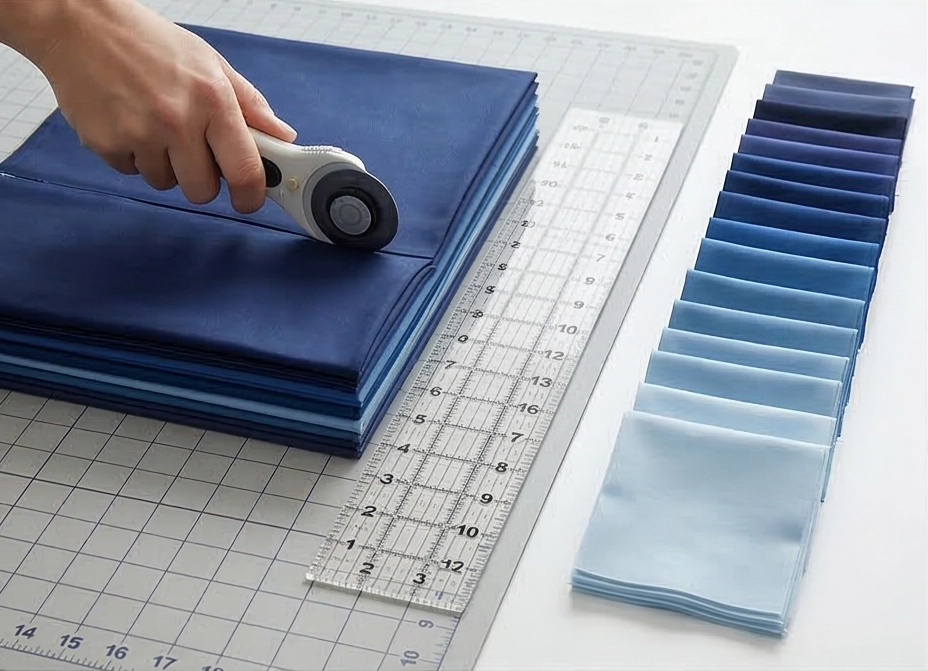
I curated this specific design to explore the emotional impact of color theory in modern textiles. Historically, achieving an “ombre” or gradient effect in a quilt required painstaking, labor-intensive hand-dyeing of a single wholecloth top. Today, the availability of precise, solid-color premium cottons allows us to engineer a “pixelated” gradient. By carefully selecting ten to twelve varying shades of a single color family, we can piece together a contemporary bed cover that honors that historic artistry while providing the sharp, clean lines demanded by modern, sophisticated bedroom design.
Focus on Usability, Comfort, and Elegance
- Usability: Despite its high-end appearance, the construction is beautifully straightforward. Relying entirely on simple, uniform squares lets you focus on color placement rather than struggle with complex geometry or intricate points.
- Comfort: For a sleep-focused aesthetic, texture is paramount. Using premium cotton sateen for the quilt top and pairing it with a lightweight silk or bamboo batting creates a textile that breathes effortlessly, regulates temperature, and drapes over the body like a soft, comforting cloud.
- Elegance: The secret to a sophisticated ombre is color discipline. Choose one calming color family—such as deep indigo fading into pale ice blue, or rich plum softening into a whisper of blush pink. The gradual shift draws the eye horizontally across the bed, creating an illusion of expansive, serene space.
Measurements & Materials Needed
Finished Quilt Size: Luxurious Queen/King (approx. 90″ x 100″) Finished Block Size: 5″ x 5″ (5.5″ x 5.5″ unfinished). This bed cover requires 360 squares total (arranged in 18 columns and 20 rows).
Materials Needed:
- Fabric for blocks (The Ombre Spectrum): You will need 10 distinct shades of premium solid cotton (ranging from your darkest anchor color to your lightest highlight color).
- Buy 1/2 yard of each of the 10 shades.
- Cut 36 squares measuring 5.5″ x 5.5″ from each of the 10 shades.
- Backing fabric: 3 yards of 108″ wide-backing premium cotton sateen (ideally matching the lightest or darkest shade of your gradient).
- Batting: 100″ x 100″ king-size low-loft silk or bamboo batting.
- Binding: 3/4 yard of the darkest shade in your spectrum to ground the design.
- Thread: High-quality, 50-weight 100% cotton piecing and quilting thread in a medium-tone neutral that blends well across the colors.
- Quilting ruler: A 6″ x 24″ acrylic ruler for fast, precise strip-cutting.
- Rotary cutter: Equipped with a fresh blade for perfectly clean, uniform squares.
- Quilting pins: Fine glass-head pins for piecing, and curved safety pins for basting.
- Iron and ironing board: Essential for pressing the seams flat to maintain the sleek drape of the cover.
Step-by-Step Guide: The Soft Ombre Bed Cover
Step 1: Precision Cutting and Spectrum Sorting
Using your rotary cutter and acrylic ruler, cut your fabrics into exactly 360 squares measuring 5.5″ x 5.5″. Sort them into 10 distinct piles, arranging the piles in a row from darkest (Shade 1) to lightest (Shade 10).
Step 2: Drafting the “Pixelated” Gradient Flow
To prevent the ombre from looking harsh and rigid, you will blend or “pixelate” the transitions. Find a large floor space to lay out your 20 horizontal rows (each containing 18 squares).
- Rows 1-2: Use purely Shade 1 (Darkest).
- Rows 3-4: Mix Shade 1 and Shade 2 randomly.
- Rows 5-6: Use purely Shade 2 and Shade 3.
- Continue this gradual blending down the length of the quilt until Rows 19-20 consist entirely of Shade 10 (Lightest). Shift squares individually until the gradient visually melts from top to bottom.
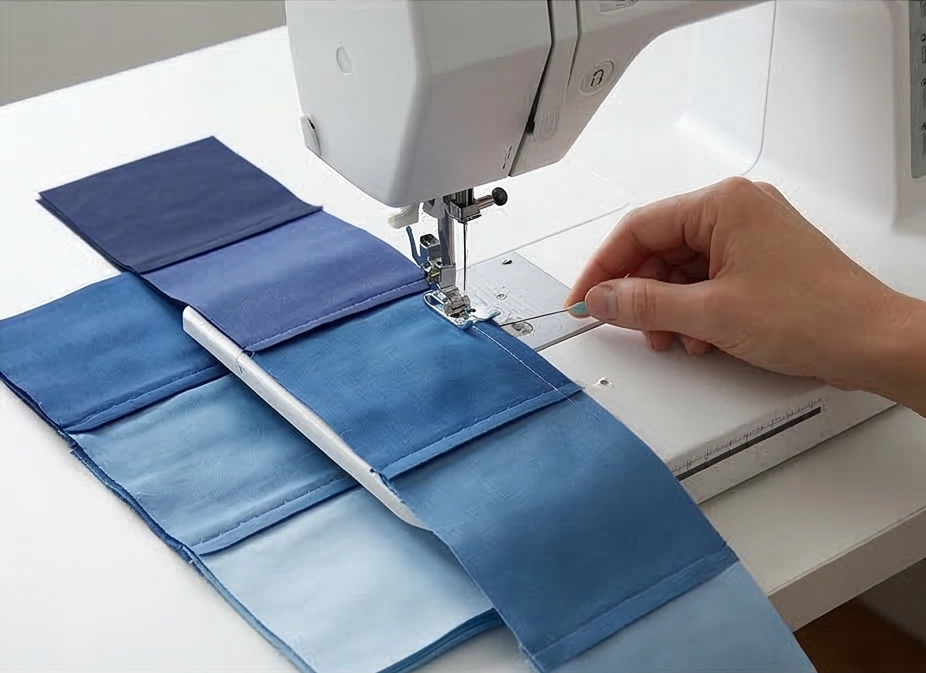
Step 3: Sewing the Horizontal Rows
Once you are completely satisfied with the color flow, gather your first horizontal row of 18 squares. Sew them together end-to-end using a precise 1/4-inch seam allowance. Press all the seams in Row 1 to the left. Sew Row 2, and press all the seams to the right. Alternating the pressing direction for each of the 20 rows is critical for the assembly phase.
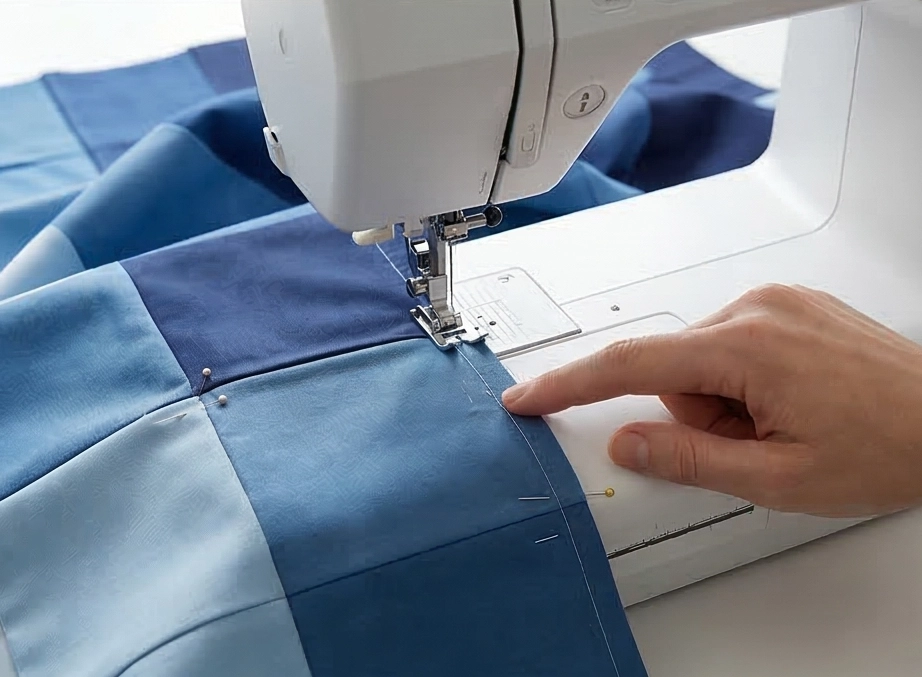
Step 4: Assembly Section (Joining the Ombre Top)
- Place Row 1 and Row 2 right sides together. Because you pressed the seams in opposing directions, the joints will “nest” or lock together seamlessly.
- Pin at every seam intersection to ensure the squares align perfectly. Sew the rows together.
- Continue adding rows one by one, working your way through the color gradient. Once all 20 rows are joined, your completed, sweeping ombre top will measure exactly 90.5″ x 100.5″.
Step 5: Basting the Cloud-Like Layers
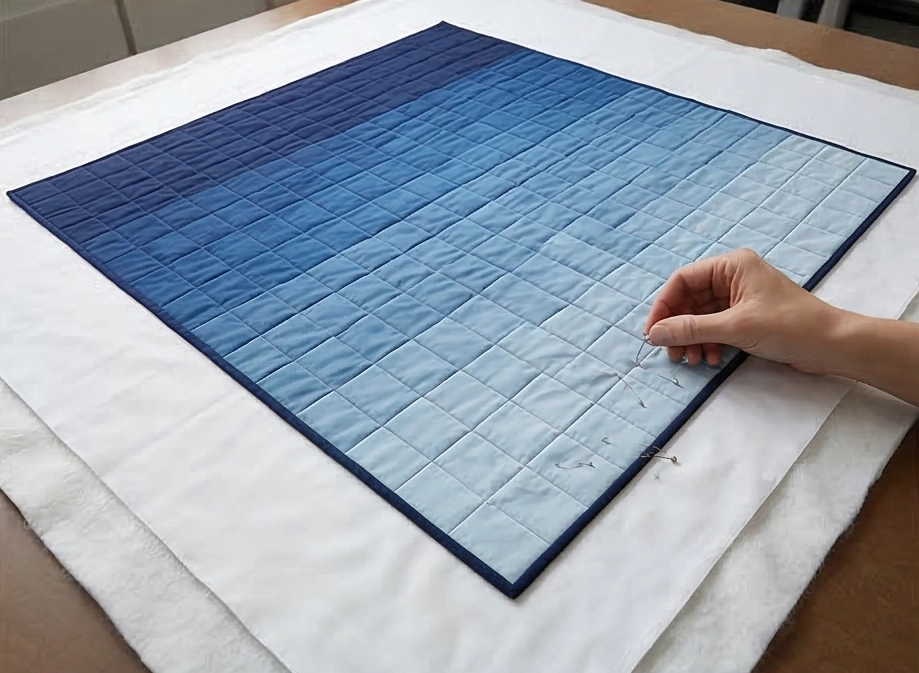
Tape your 108″ wide backing fabric taut to the floor, face down. Carefully center your lightweight silk or bamboo batting over it. Finally, lay your pieced ombre top face up. Pin the three layers together densely using your curved safety pins, smoothing out any wrinkles as you go to preserve the crispness of the solid fabrics.
Step 6: Linear Quilting and Tailored Binding
- Quilt: To emphasize the contemporary aesthetic and the gradient’s flow, use straight-line horizontal quilting. Stitch continuous lines across the width of the quilt, running parallel to your pieced rows, spaced exactly 1 inch apart. This dense, linear texture acts as a visual guide, pulling the eye smoothly through the color spectrum while giving the cover an expensive, heavily tailored structure.
- Bind: Cut your darkest binding fabric into 2.5″ strips. Join them end-to-end, fold in half, press crisp, and machine-sew tightly around the entire perimeter. Mitering the corners with your darkest shade creates a striking, modern frame that anchors the floating colors.
Usability Note: The combination of cotton sateen and silk/bamboo batting yields an exceptionally luxurious textile that feels cool to the touch and drapes beautifully. To protect the integrity of the batting and the vibrancy of the solid gradient, wash this bed cover sparingly on a delicate, cold-water cycle using a mild detergent. Air drying flat is ideal, but tumbling on an ultra-low or “air fluff” setting will safely add a subtle, inviting softness to the geometric squares.
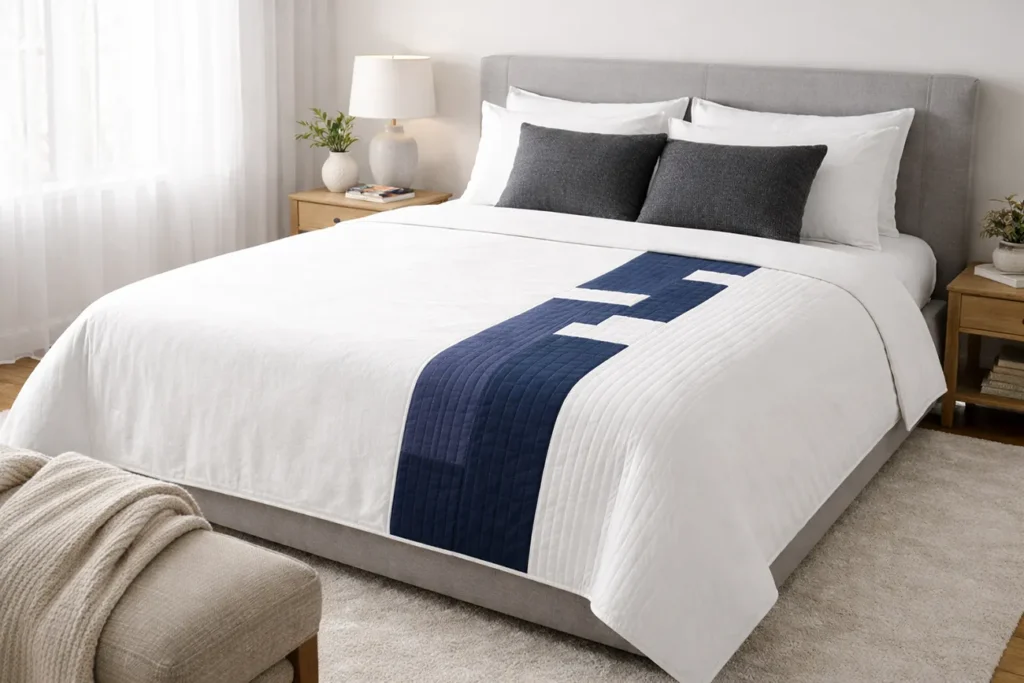
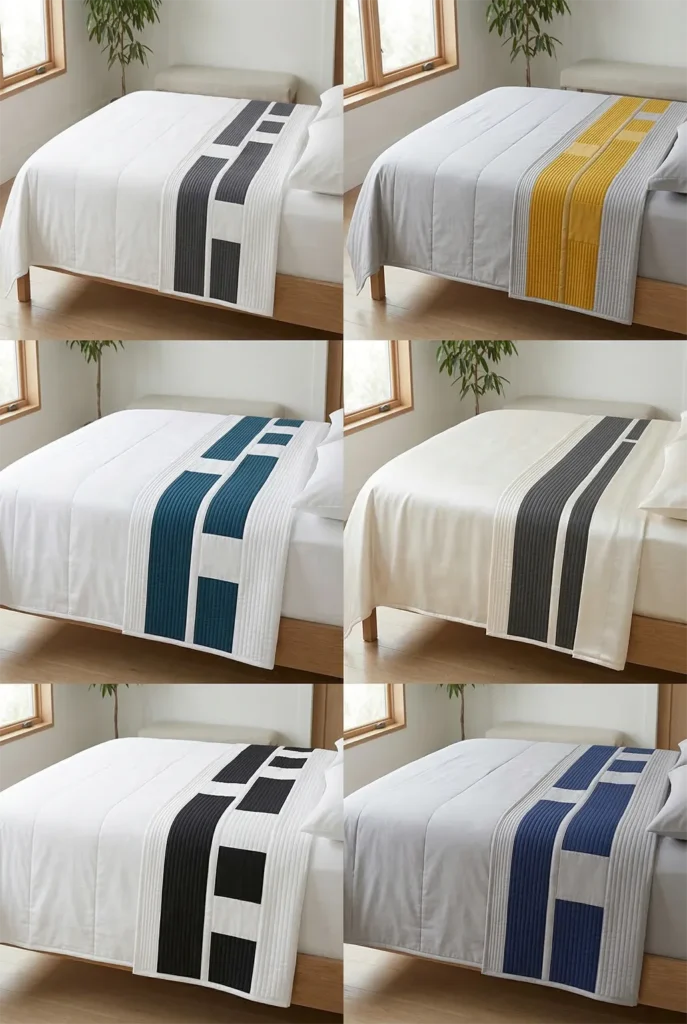
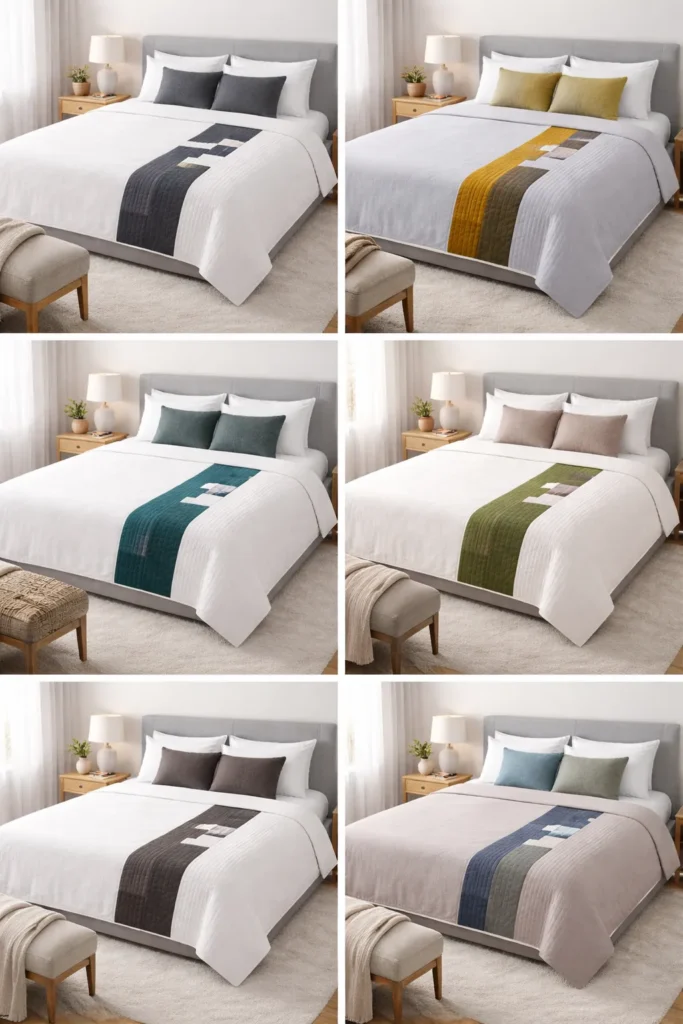
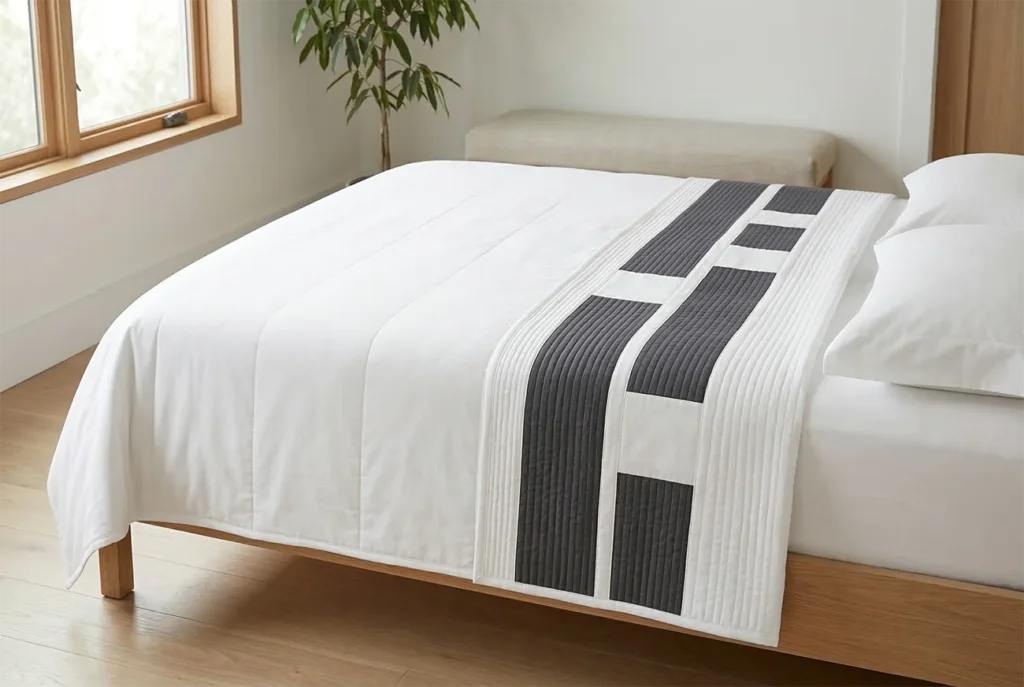
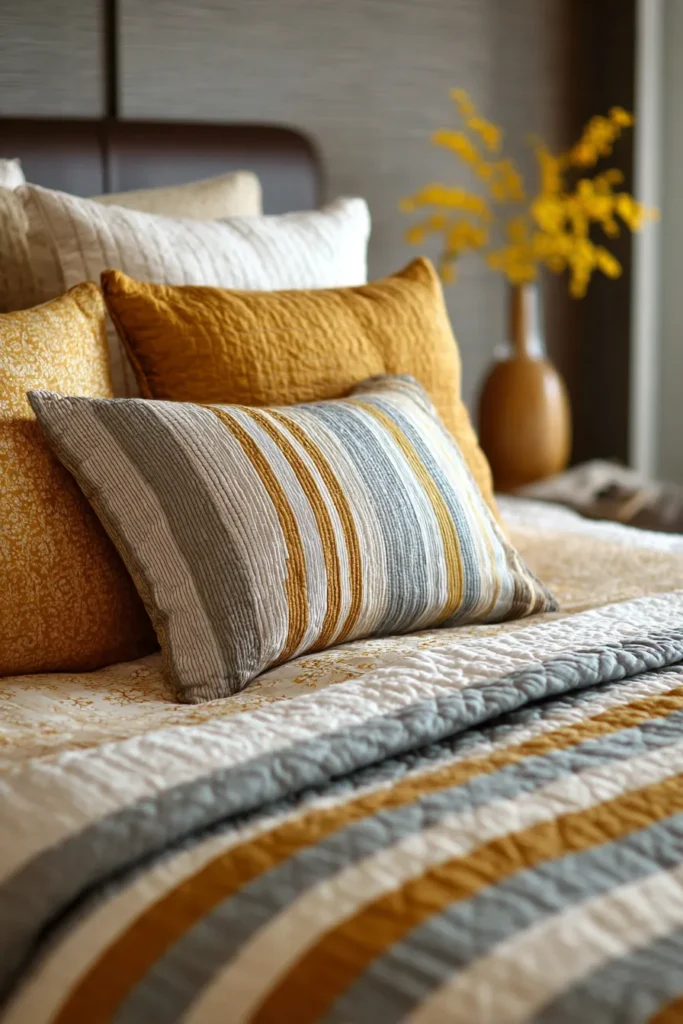
3. Sophisticated Asymmetrical Quilted Bed Sheets for Modern Comfort
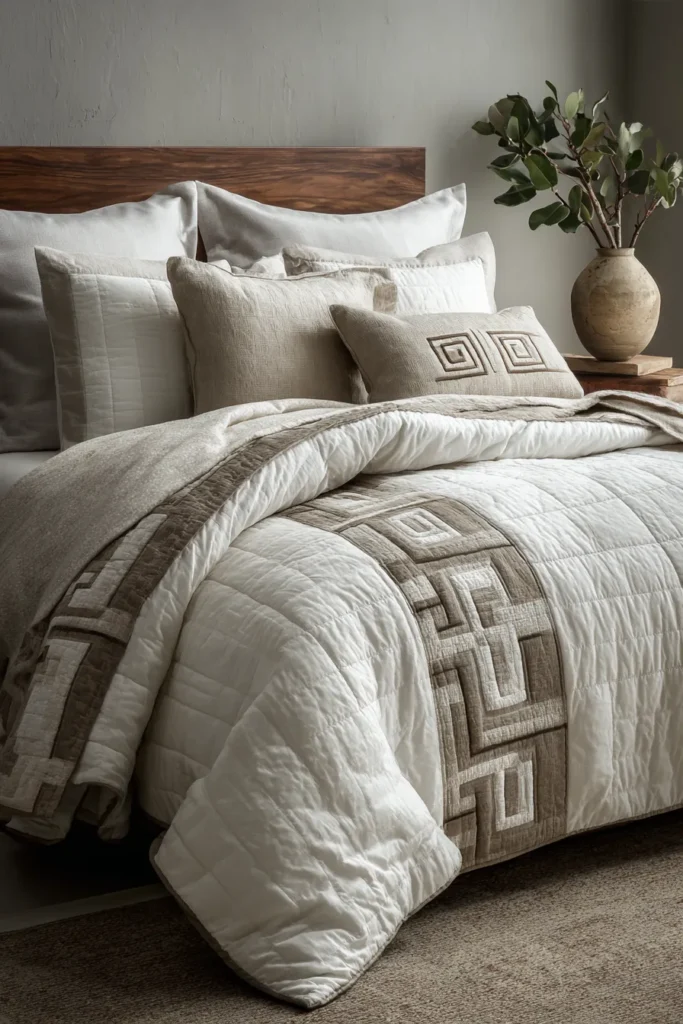
A Guide to Making Sophisticated Asymmetrical Quilted Bed Sheets for Modern Comfort
Traditional bedding often relies on perfect symmetry to create a sense of order. However, in contemporary design, true sophistication is frequently found in the unexpected. The Sophisticated Asymmetrical Quilted Bed Sheet bridges the gap between a standard flat sheet and a traditional quilt, utilizing a stark, off-center geometric element to create dynamic visual tension. It acts as a breathtaking, breathable standalone cover in the summer heat, and a stunning architectural layering piece during the cooler months.
The Heritage of Asymmetry (And Why I Curated This Guide)
I designed this specific pattern guide to explore the power of negative space in textile art. Historically, Western quilting was rooted in medallion and repeating-grid designs—radiating perfectly from the center. Asymmetry, on the other hand, borrows heavily from mid-century modern art and Japanese Wabi-Sabi aesthetics, where beauty is found in off-balance, intentional placement. I curated this design to show how shifting a striking, fragmented geometric stripe far to one side of the bed cover creates a vast canvas of “quiet” negative space. It feels incredibly deliberate, highly tailored, and effortlessly modern.
Focus on Usability, Comfort, and Elegance
- Usability: Because the vast majority of this bed sheet consists of large, solid panels of negative space, the piecing process is remarkably fast. You spend less time matching tiny seams and more time focusing on the quality of your finishing techniques.
- Comfort: A quilted sheet requires exceptional drape. By replacing thick traditional batting with ultra-thin summer-loft cotton or pure silk, and using crisp, high-thread-count percale, this textile regulates body temperature beautifully without trapping excess heat.
- Elegance: To achieve maximum contemporary elegance, the color palette must be strictly disciplined. Pair an expansive, stark background (like optic white or soft ash grey) with a fragmented vertical stripe of a single, deeply saturated accent color (like charcoal, mustard, or deep teal).
Measurements & Materials Needed
Finished Quilt/Sheet Size: Elegant Queen (approx. 90″ x 96″) Finished Design Layout: A vast left-side expanse of negative space (60″ wide), an intricate 12″ wide vertical accent stripe, and a smaller right-side border (18″ wide).
Materials Needed:
- Background Fabric (The Negative Space): 6 yards of 44″ wide premium crisp cotton percale or sateen (e.g., Optic White).
- You will cut one massive left panel measuring 60.5″ x 96.5″ and one right border panel measuring 18.5″ x 96.5″.
- Accent Fabric (The Asymmetrical Stripe): 1.5 yards of a contrasting solid premium cotton.
- Cut various rectangular and square strips measuring 12.5″ wide by varying lengths (e.g., 6″, 18″, 24″) to create a fragmented, modern look.
- Backing fabric: 3 yards of 108″ wide premium crisp cotton percale.
- Batting: Queen size (90″ x 108″) ultra-thin summer-loft cotton or silk batting.
- Binding: 3/4 yard of matching Background Fabric to ensure the edges disappear seamlessly into the design.
- Thread: High-quality, 50-weight 100% cotton piecing and quilting thread.
- Quilting ruler: A 6″ x 24″ acrylic ruler for precise, straight cutting.
- Rotary cutter: Equipped with a fresh blade for perfectly clean edges on your modern panels.
- Quilting pins: Fine glass-head pins for precise piecing, and curved safety pins for basting.
Step-by-Step Guide: The Asymmetrical Quilted Sheet
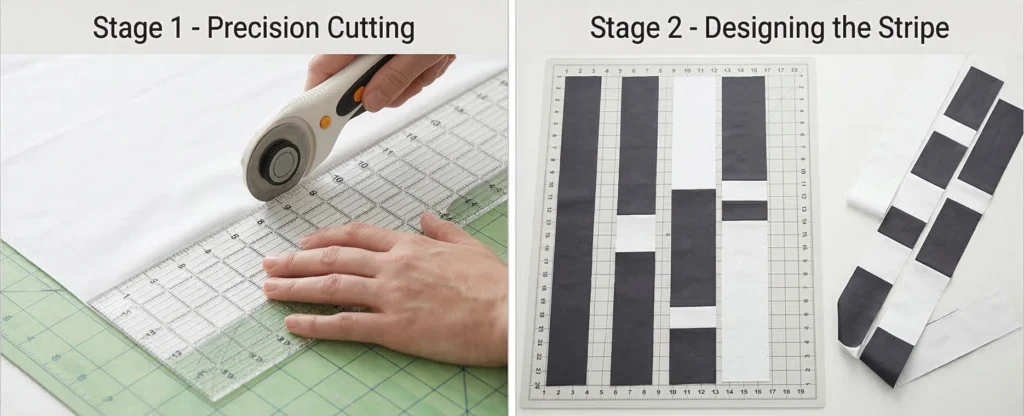
Step 1: Precision Cutting for the Minimalist Canvas
Using your rotary cutter, carefully cut your Background Fabric. Because standard fabric is 44″ wide, you will need to seam two lengths together to achieve your massive 60.5″ x 96.5″ left panel. Cut your right border panel to 18.5″ x 96.5″. Press these large panels perfectly flat.
Step 2: Designing the Fragmented Vertical Stripe
Take your Accent Fabric and cut a series of rectangles that are all exactly 12.5″ wide, but vary in length (e.g., 12.5″ x 10″, 12.5″ x 24″). To make the stripe look “fragmented” and contemporary, cut a few matching 12.5″ wide rectangles from your scrap Background Fabric.
Step 3: Assembling the Accent Band
Lay out your 12.5″ wide rectangles in a single, long vertical column. Mix the long strips of Accent Fabric with the occasional block of Background Fabric to create intentional breaks in the color. Sew these pieces together end-to-end using a 1/4-inch seam allowance until the entire pieced column measures exactly 12.5″ wide by 96.5″ long. Press all the joining seams open with your iron to reduce bulk.
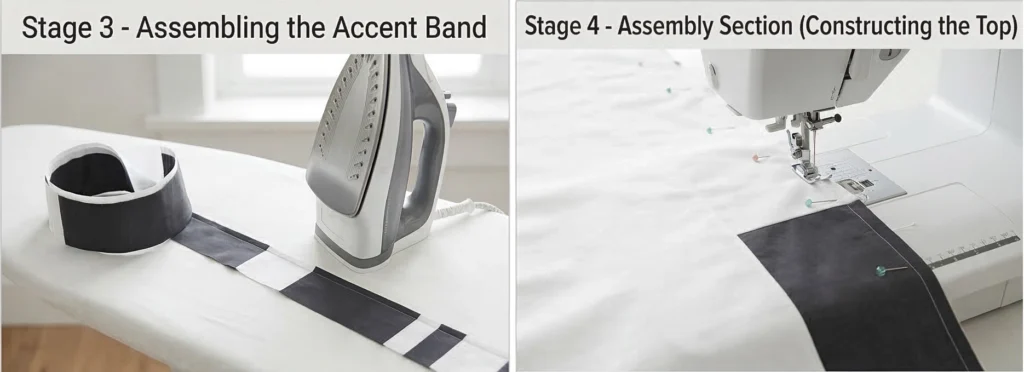
Step 4: Assembly Section (Constructing the Asymmetrical Top)
Now you will join the three massive vertical zones together.
- Attach the Left Canvas: Lay your 60.5″ x 96.5″ Background panel right-sides together with the left edge of your 12.5″ pieced Accent stripe. Pin heavily down the entire 96-inch length to prevent the fabrics from stretching. Sew with a 1/4-inch seam and press the seam toward the Accent stripe.
- Attach the Right Border: Lay your 18.5″ x 96.5″ Background panel right-sides together with the right edge of your Accent stripe. Pin, sew, and press the seam toward the Accent stripe. Your completed, off-center quilt top will now measure exactly 90.5″ x 96.5″.
Step 5: Basting the Weightless Layers
Because this functions as a summer sheet, maintaining absolute drape is critical. Lay your 108″ wide backing fabric face down and tape it taut to the floor. Center your ultra-thin silk or cotton batting over it, smoothing out all wrinkles. Finally, lay your pieced asymmetrical top face up. Pin the three layers together thoroughly using curved safety pins, placing a pin every 5 to 6 inches.
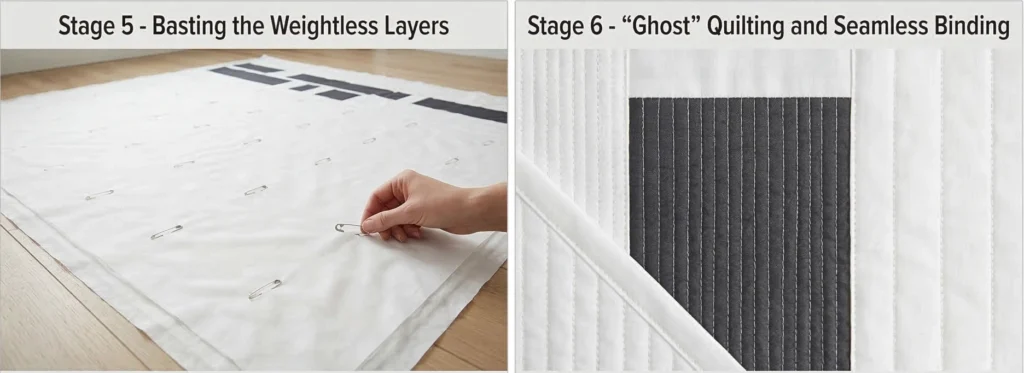
Step 6: “Ghost” Quilting and Seamless Binding
- Quilt for Drape: Contemporary design utilizes quilting as texture rather than just structure. To highlight the asymmetry, perform dense, straight-line “matchstick” quilting (lines spaced 1/2-inch apart) exclusively inside the 12-inch Accent stripe. For the vast white negative space, use widely spaced vertical lines (spaced 4 to 6 inches apart). This contrast in thread density makes the colored stripe look intricately tailored while keeping the rest of the sheet incredibly fluid and soft.
- Bind: Trim the excess batting and backing flush with the quilt top. Cut your Background binding fabric into 2.5″ strips, join them end-to-end, press in half, and sew tightly around the perimeter. Using background-colored binding ensures the frame is “invisible,” allowing the asymmetrical stripe to run cleanly off the top and bottom edges of the bed.
Usability Note: This quilted sheet is engineered for daily, breathable luxury. The ultra-thin batting provides just enough structural weight to feel soothing without acting as an insulator. To maintain the crisp, hotel-like feel of the percale, wash on a cool, gentle cycle. Line drying will keep the sheet feeling impeccably tailored, while tumble drying on low heat will softly crinkle the dense quilting in the accent stripe, adding a beautiful, touchable texture.
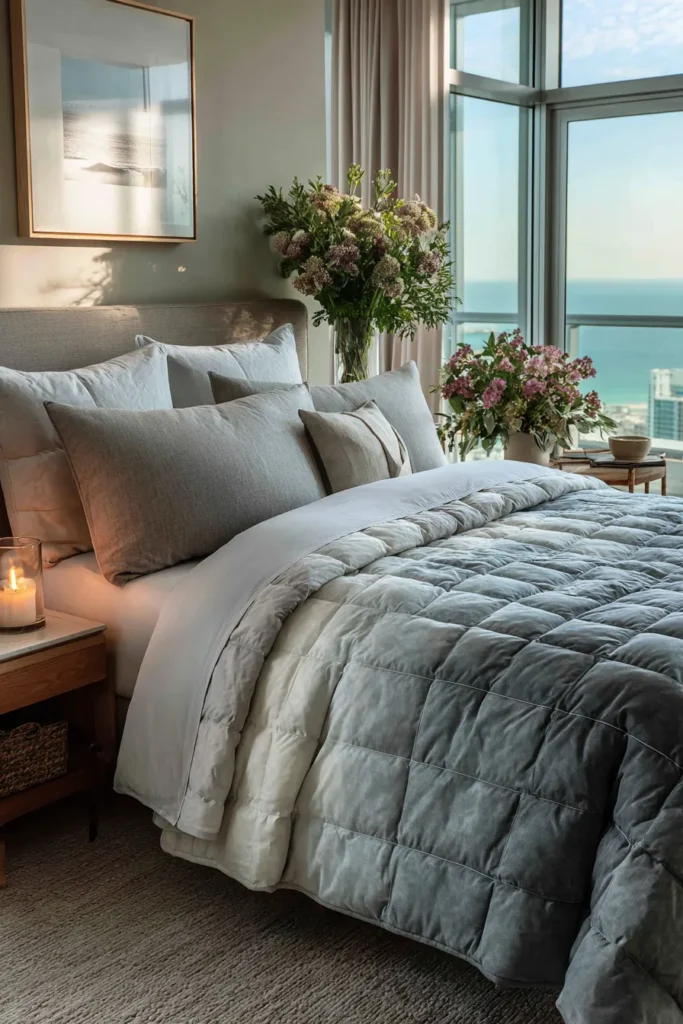
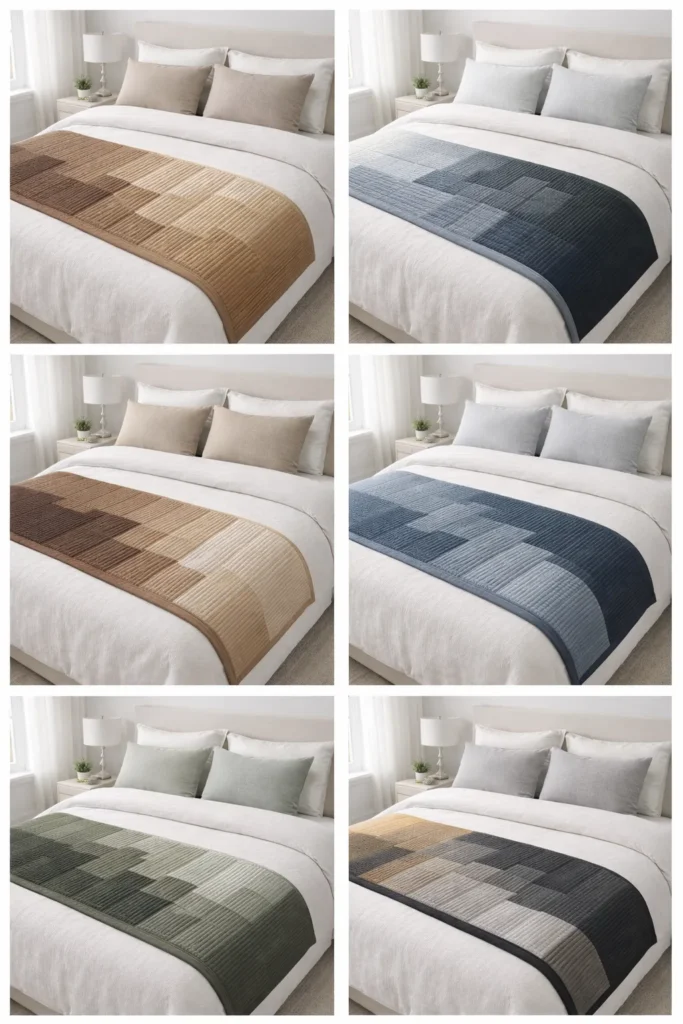
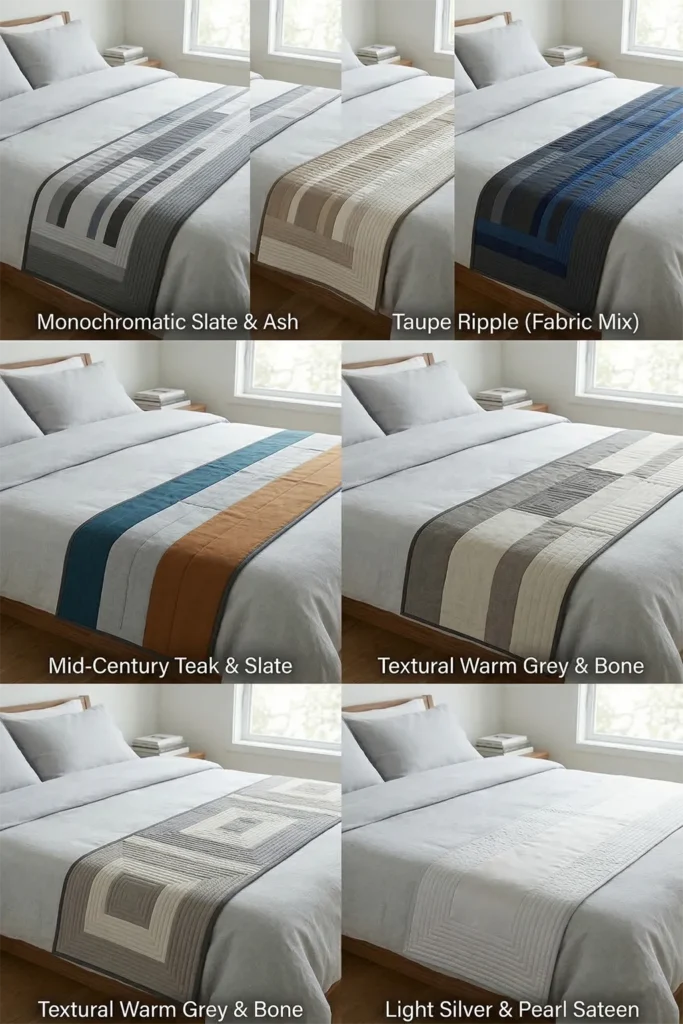
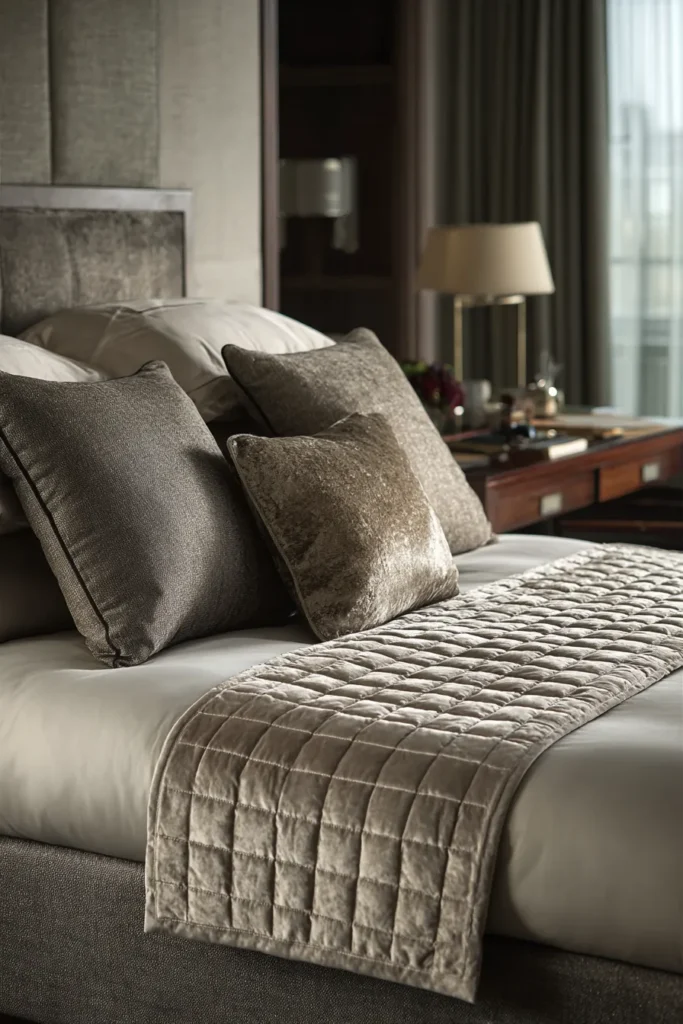
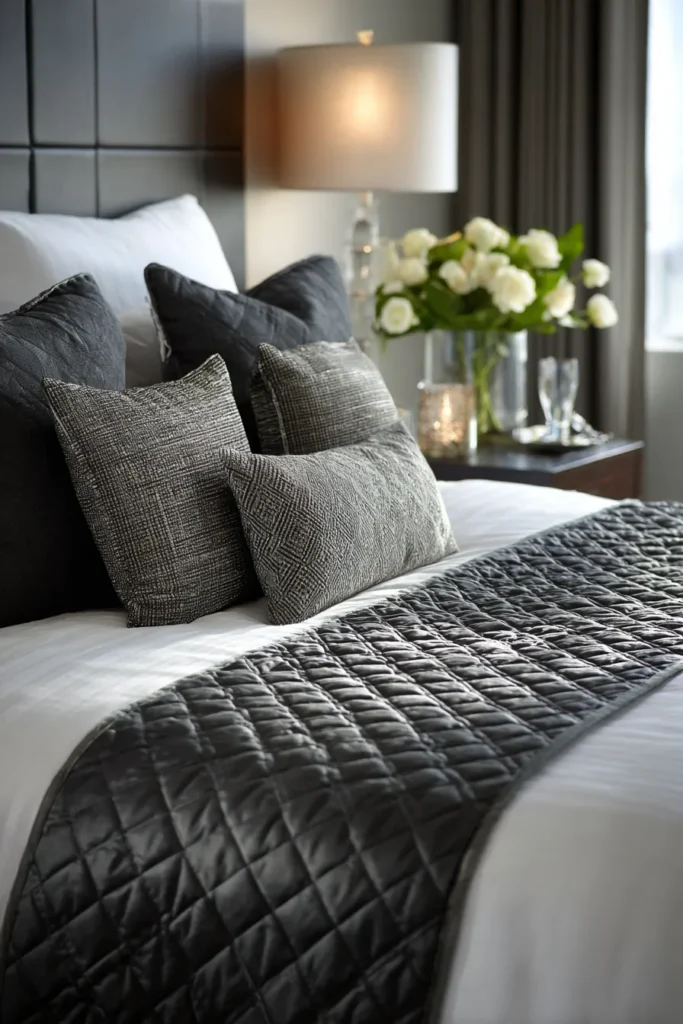
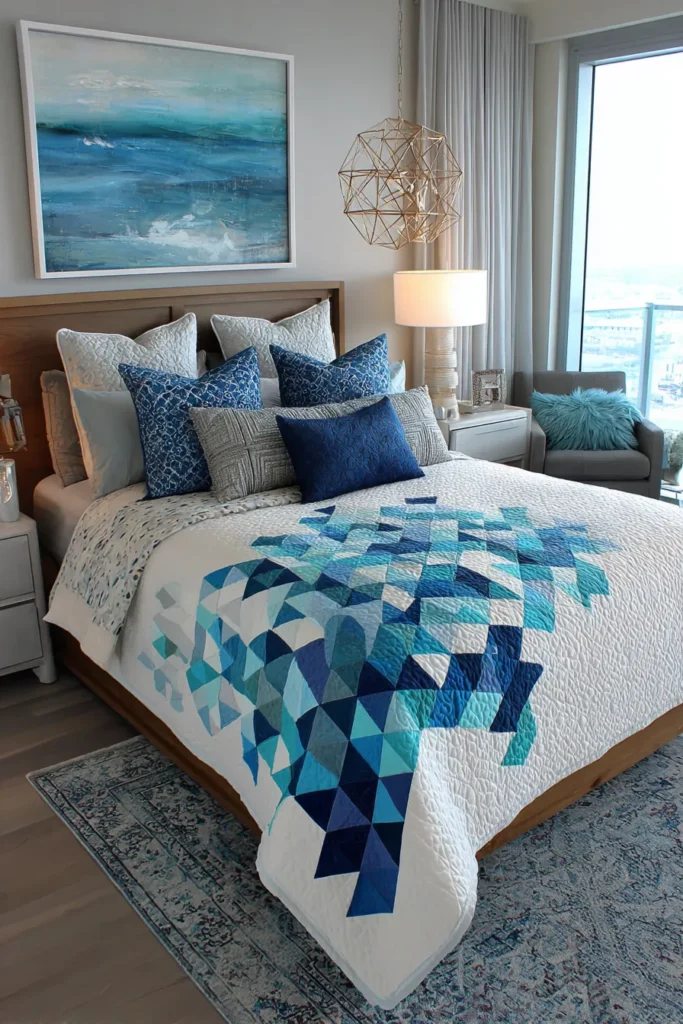
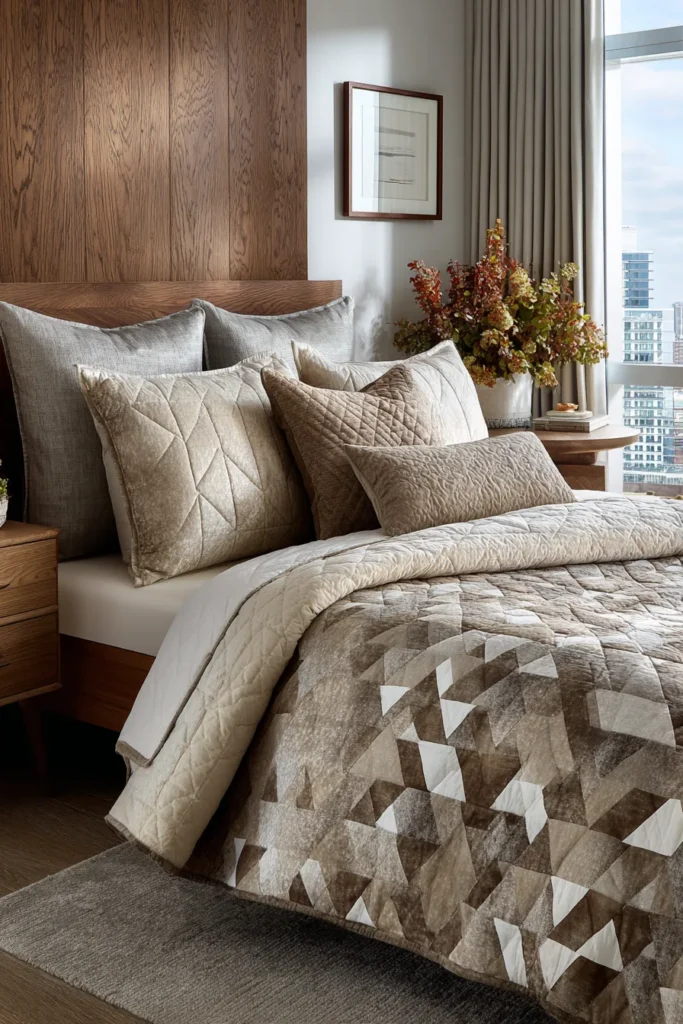
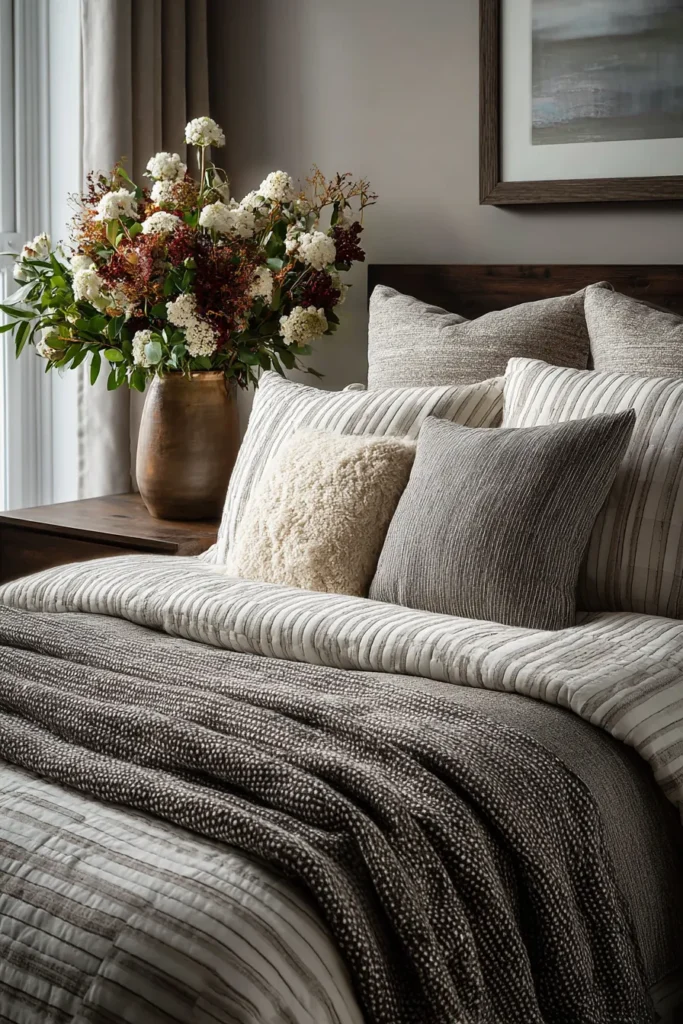
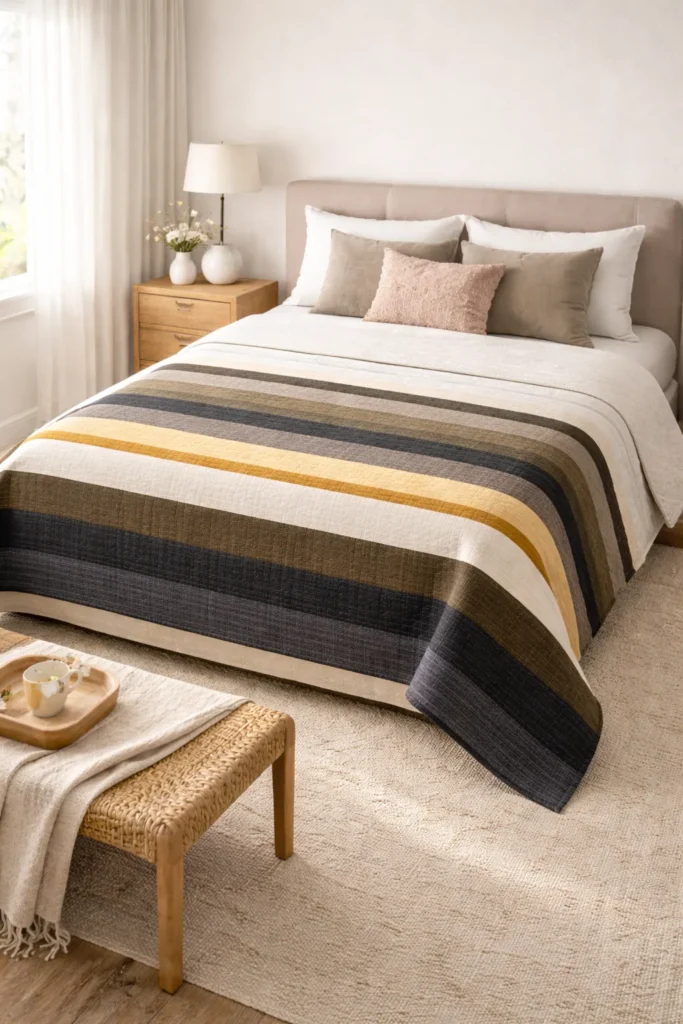
4. Sleek Monochromatic Contemporary Quilted Bed Runners for Layered Elegance
A Guide to Making Sleek Monochromatic Contemporary Quilted Bed Runners for Layered Elegance
A beautifully styled bed is a study in purposeful layering. While a plush duvet provides the foundation, a tailored bed runner draped across the foot of the bed serves as the architectural anchor. The Sleek Monochromatic Contemporary Quilted Bed Runner is the ultimate expression of understated luxury. By utilizing a single color family—varying only the subtle shades and relying heavily on the tactile shadow-play of dense quilting—you create a deeply sophisticated, modern accent piece that rivals any five-star boutique hotel suite.
The Heritage of the Monochromatic Runner (And Why I Curated This Guide)
I designed this specific piece because I am endlessly fascinated by how texture can replace color as the primary design element in a room. Historically, the bed runner originated in the luxury hospitality industry as a purely protective layer, keeping heavy luggage or shoes from marking pristine white duvets. However, as it transitioned into residential interior design, it often became a vehicle for loud, overwhelming patterns.
I wanted to reclaim the runner for the serene, modern home. By stripping away contrasting colors and focusing entirely on a monochromatic spectrum—such as deep, moody charcoals shifting into soft ash, or a cascade of warm taupes—the textile becomes a study in light and shadow. The magic of a monochromatic quilt lies entirely in its stitching. When you remove the distraction of busy prints, the quilting’s structural lines take center stage, creating a breathtaking, three-dimensional bas-relief effect.
Focus on Usability, Comfort, and Elegance
- Usability: A bed runner is easy to manage. It is small enough to quilt on a standard domestic sewing machine with ease, and it provides a protective barrier for your bed’s foot if you have pets who love to jump up.
- Comfort: Placed exactly where it is needed most, a quilted runner provides a crucial layer of targeted warmth for your feet on chilly nights without forcing you to overheat beneath a massive, heavy blanket.
- Elegance: To achieve true layered elegance, mix your textiles within your chosen color family. Pair a matte, brushed cotton with a subtly luminous cotton sateen. This contrast in fabric finish, combined with dense geometric quilting, catches the ambient bedroom light to create an incredibly high-end, bespoke aesthetic.
Measurements & Materials Needed
Finished Runner Size: Elegant Queen/King (approx. 24″ x 84″) Finished Block Style: A sleek, modern “Improv Strip” layout featuring varying widths of vertical color blocking.
Materials Needed:
- Fabric for the Pieced Top (The Monochromatic Spectrum): 2.5 yards total of premium solid cottons or linen-cotton blends in 3 to 4 varying shades of a single color (e.g., Slate, Charcoal, Ash, and Silver).
- Cut these into strips of varying widths (e.g., 2.5″, 4.5″, 6.5″, 8.5″) by 24.5″ tall.
- Backing fabric: 2.5 yards of a premium solid cotton, cut to 26″ x 86″.
- Batting: 26″ x 86″ low-loft silk or 100% cotton batting (this allows the dense quilting to puff up beautifully).
- Binding: 1/2 yard of your darkest monochromatic shade for a sharp, grounding frame.
- Thread: High-quality, 50-weight 100% cotton piecing and quilting thread. Choose a thread color that matches your lightest fabric shade so the stitching visually pops against the darker panels.
- Quilting ruler: A 6″ x 24″ acrylic ruler for perfectly straight strip cutting.
- Rotary cutter: Equipped with a fresh blade for flawless edges.
- Quilting pins: Fine glass-head pins for piecing, and curved safety pins for basting.
Step-by-Step Guide: The Monochromatic Bed Runner
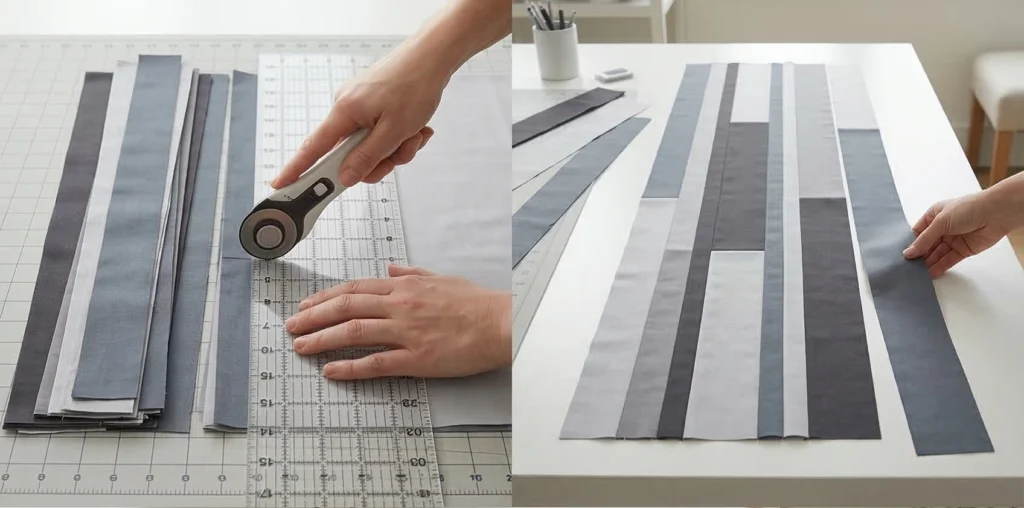
Step 1: Cutting the Contemporary Strips
Using your rotary cutter and acrylic ruler, cut your fabric yardage into vertical strips. They must all be exactly 24.5 inches tall, but vary the widths dramatically. Cut some narrow 2.5-inch strips, some chunky 8.5-inch panels, and several sizes in between across your different monochromatic shades.
Step 2: Designing the Sleek Rhythm
Take your cut strips to a large table or floor space. Lay them out side by side to form a long rectangle measuring roughly 85 inches. Rather than a predictable, repeating pattern, aim for a modern, asymmetrical rhythm. Group a few narrow, dark strips together, follow them with a massive, sweeping panel of your lightest shade, and then slowly shift back into the mid-tones.
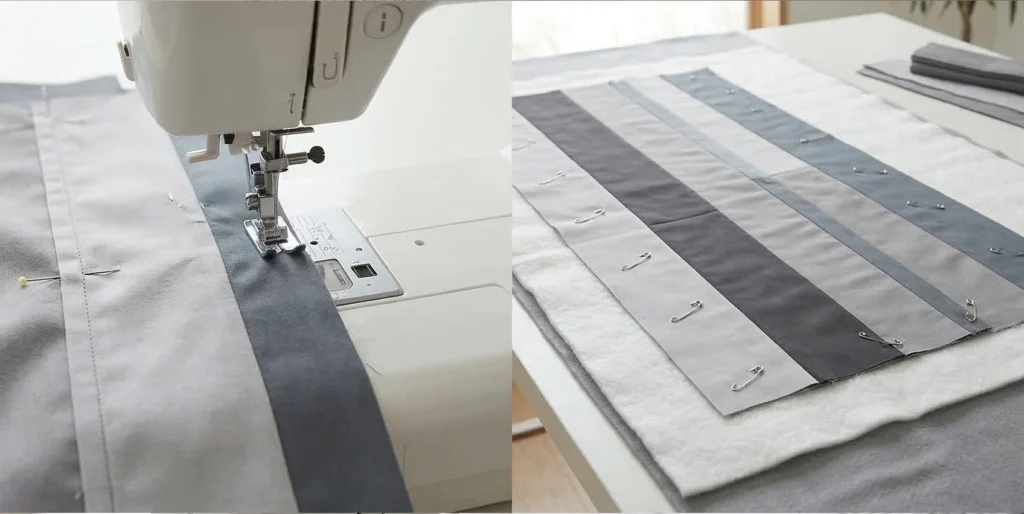
Step 3: Assembly Section (Joining the Striped Top)
Once you are thrilled with your layout, it is time to piece the top.
- Place the first two strips right sides together, pinning along the 24.5-inch edge.
- Sew them together using a precise 1/4-inch seam allowance.
- Press the seam open with a hot iron. Pressing seams open (rather than to one side) in a modern strip quilt is vital, as it ensures the top lies perfectly flat and prevents bulky ridges from interrupting your quilting lines later.
- Continue adding strips one by one, pressing each seam open, until your entire monochromatic runner top is assembled. It should measure 24.5″ tall by 84.5″ long.
Step 4: Basting the Luxurious Layers
Tape your solid backing fabric, face down and taut, to a large surface. Center your low-loft batting over it and smooth out any wrinkles. Carefully lay your pieced runner top face up over the batting. Because we are going to quilt this densely, pin the three layers together with curved safety pins, spacing them every 4 to 5 inches.
Step 5: Architectural “Matchstick” Quilting
This is the secret to a high-end monochromatic design. Attach the walking foot to your sewing machine. Stitch perfectly straight, horizontal lines running the entire 84-inch length of the runner (perpendicular to your pieced seams). Space these quilted lines very closely together—about 1/2 to 3/4 inch apart. This technique, often called “matchstick quilting,” creates a stiff, incredibly tactile, ribbed texture. It flattens the batting, allowing the subtle shade variations of your fabric to catch the light beautifully.
Step 6: Squaring Up and Tailored Binding
- Square Up: Once the heavy quilting is complete, use your rotary cutter and long ruler to trim away the excess batting and backing. Ensure all four corners are perfect 90-degree angles.
- Bind: Cut your darkest binding fabric into 2.5″ strips. Join them end-to-end, fold in half, and press crisp. Sew the binding tightly around the entire perimeter of the runner, carefully mitering the four corners for a sleek, tailored, gallery-quality frame.
Usability Note: The dense matchstick quilting gives this runner a slightly heavier, highly structured drape that looks incredibly tailored when resting across a bed. It will not easily wrinkle or bunch up. To maintain the crispness of the straight lines and the depth of the solid colors, spot-clean when possible, or machine-wash on a cold, delicate cycle. Lay it completely flat to air-dry, avoiding the dryer to preserve its exact architectural dimensions.
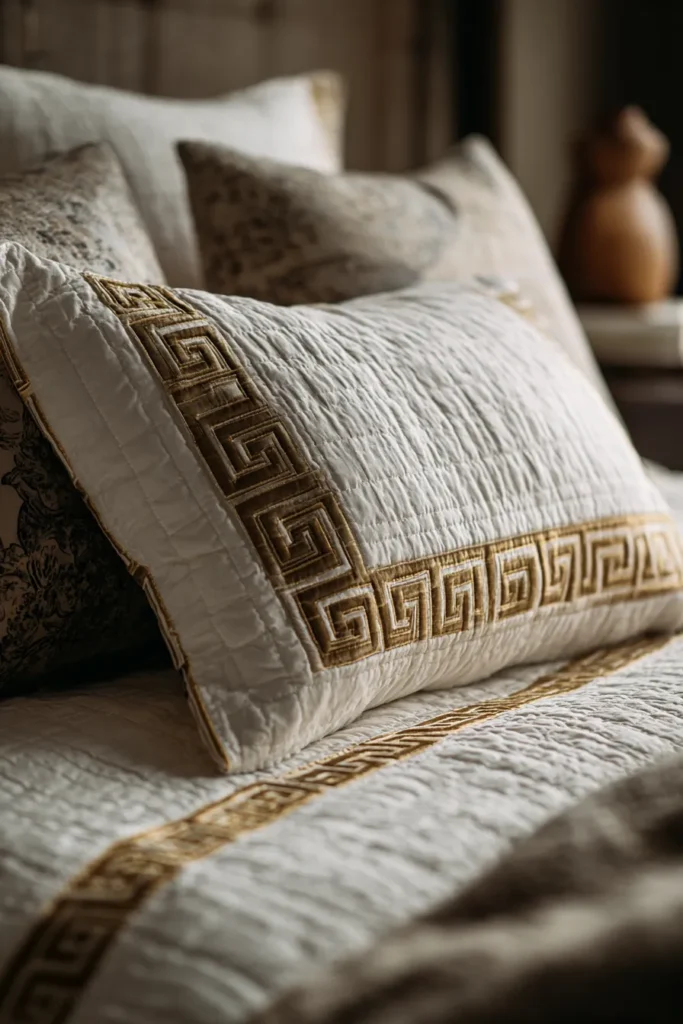
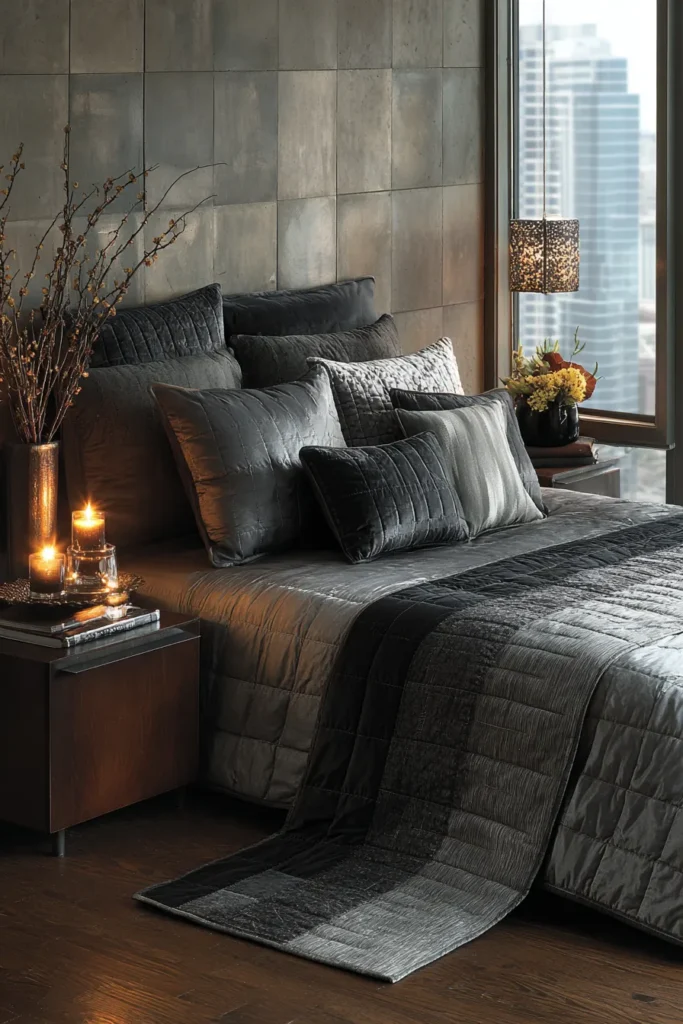
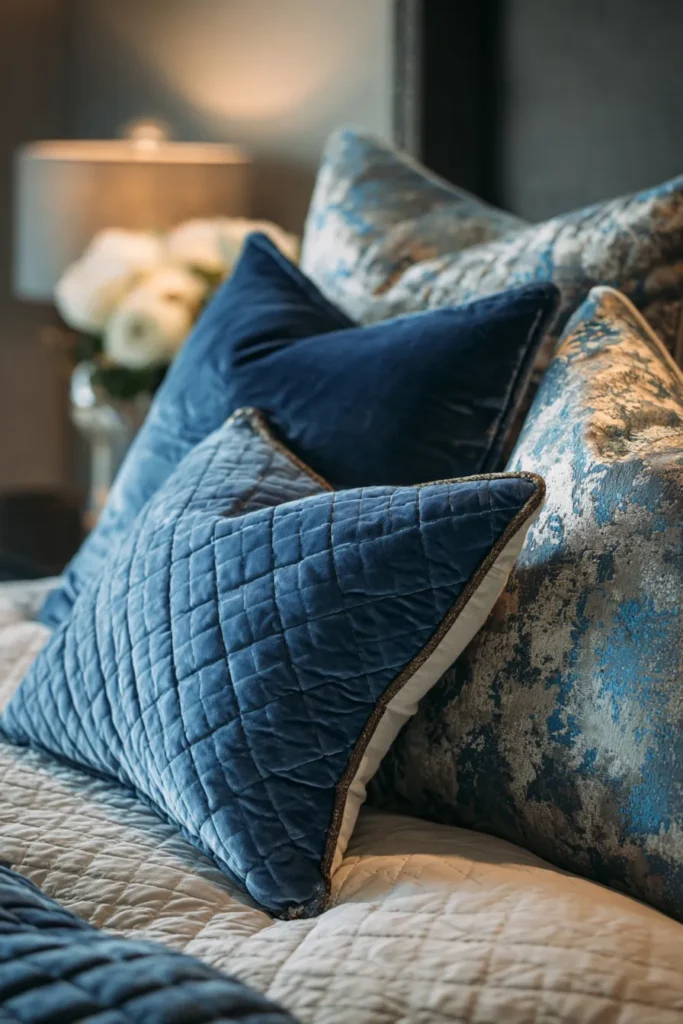
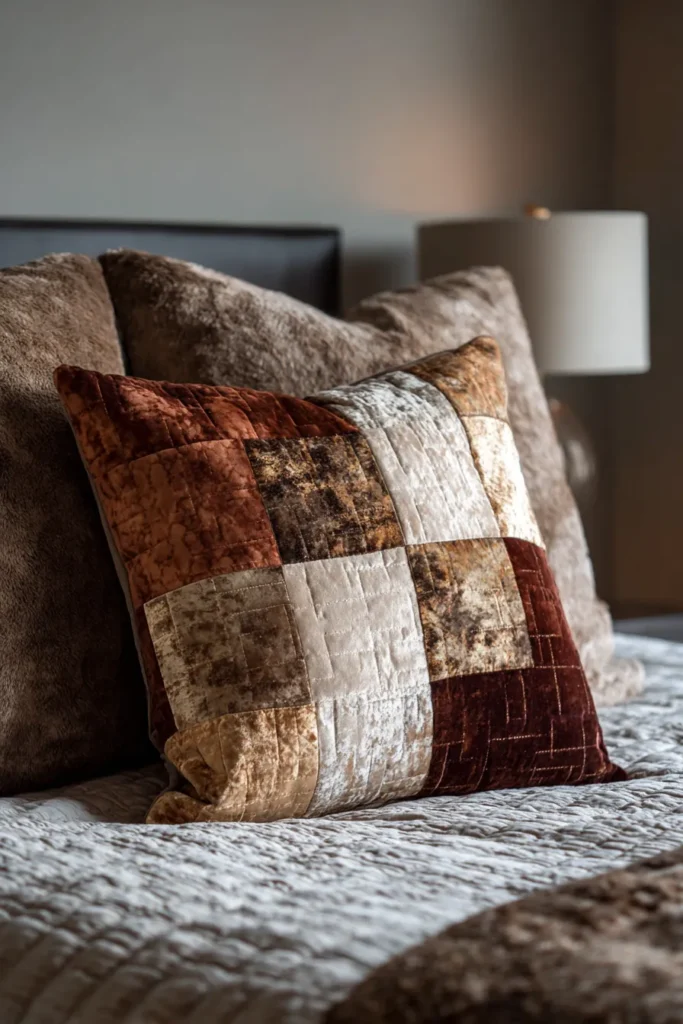
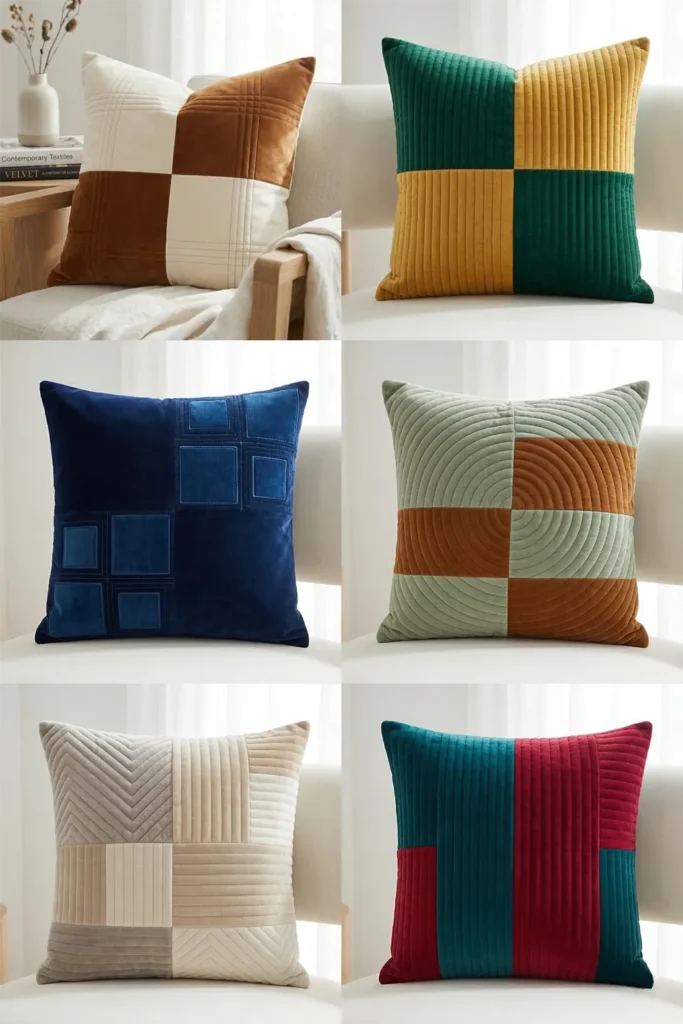
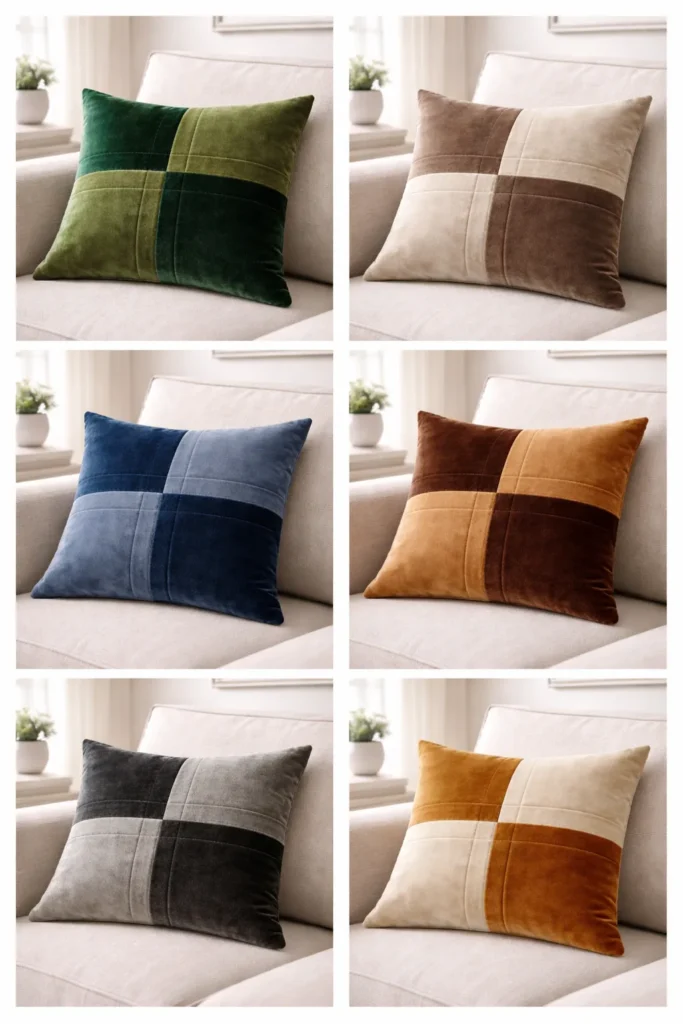
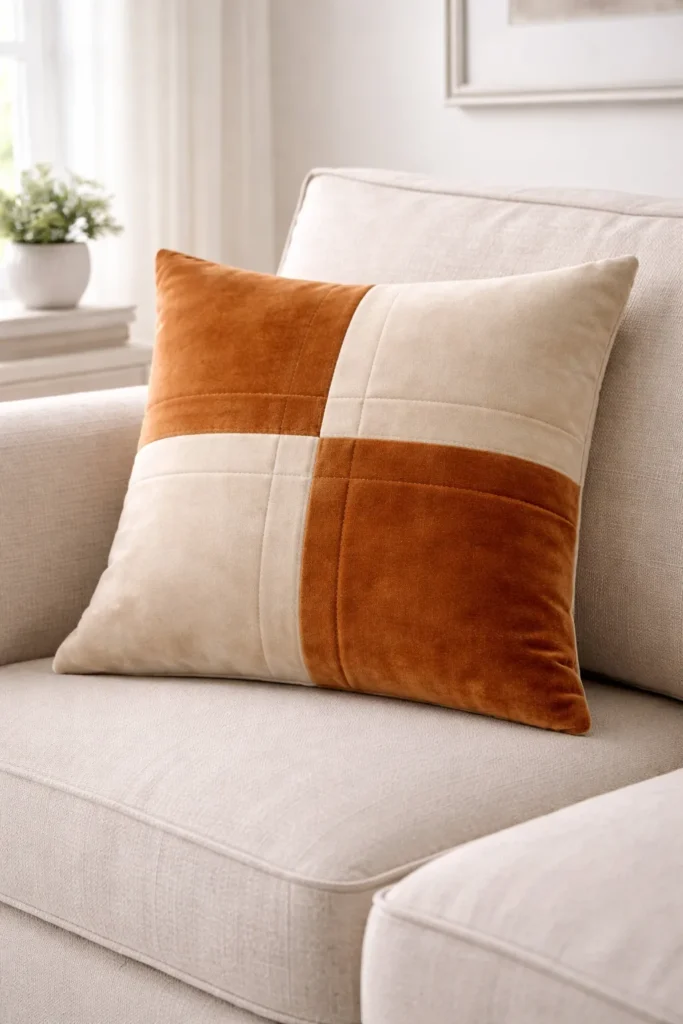
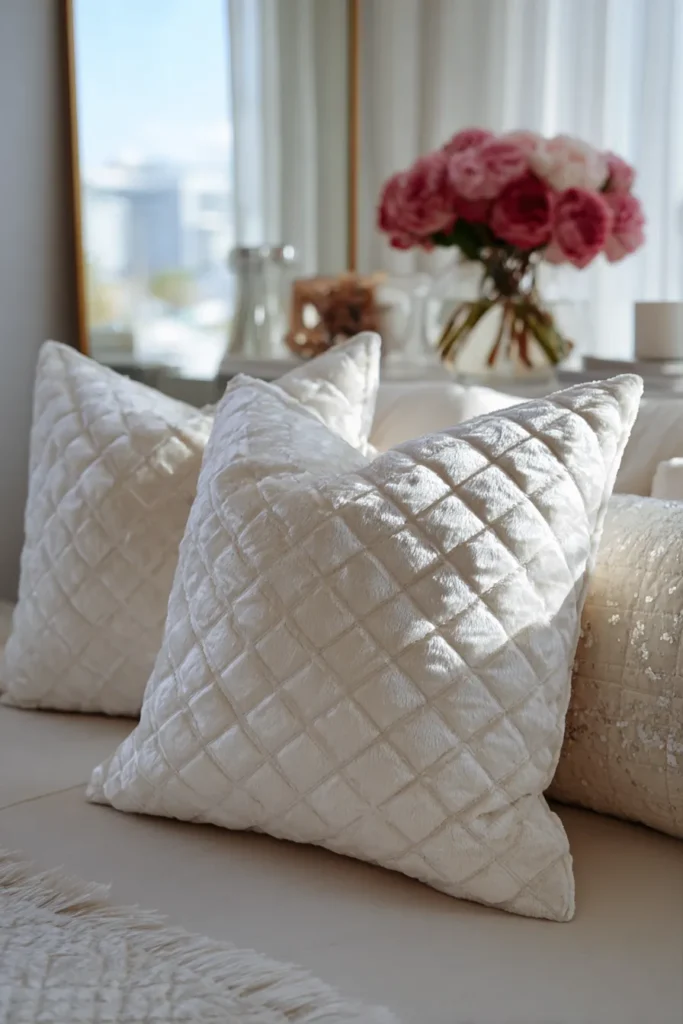
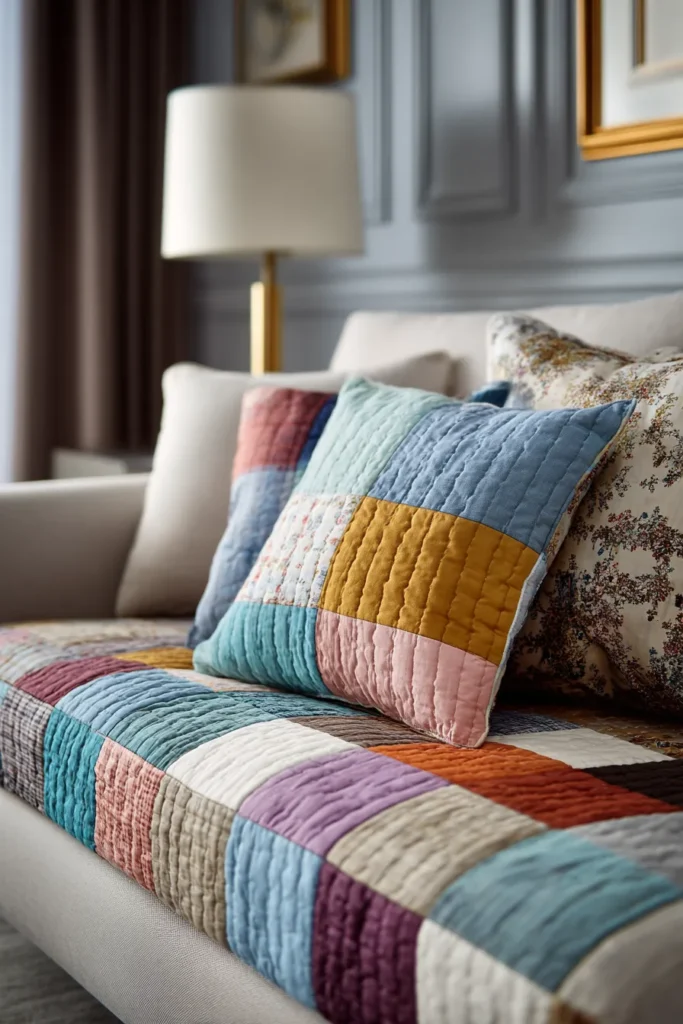
5. Plush Velvet Contemporary Quilt Pillow Covers for an Upscale Look
A Guide to Making Plush Velvet Contemporary Quilt Pillow Covers for an Upscale Look
When designing an upscale, contemporary living space, texture is just as important as color and architecture. The Plush Velvet Contemporary Quilted Pillow Cover introduces an unparalleled level of tactile luxury to a sofa or armchair. By taking a minimalist geometric block—such as an oversized, offset Four-Patch—and executing it entirely in rich, luminous velvet, you create a sophisticated accent piece that instantly elevates the entire room.
The Heritage of Velvet in Quilting (And Why I Curated This Guide)
I designed this specific pattern guide to explore the intersection of opulent textiles and modern minimalism. Historically, velvet was widely used in the Victorian era for “Crazy Quilts”—extravagant, chaotic textiles adorned with complex embroidery and irregular scraps to showcase wealth. However, that hyper-embellished aesthetic can feel incredibly cluttered today. I curated this guide to strip away the chaos. By applying strict, contemporary geometry to this historic, aristocratic fabric, we allow the natural sheen and pile of the velvet to act as the primary design element. It is a nod to history, refined for the modern eye.
Focus on Usability, Comfort, and Elegance
- Usability: Velvet has a reputation for being difficult to sew because its pile can cause the fabric to slip or “creep” under the sewing machine foot. This guide specifically uses a walking foot and heavy pinning to ensure a smooth, manageable construction.
- Comfort: Velvet is the ultimate comfort textile. It is incredibly soft against the skin, and its dense pile acts as a subtle acoustic dampener in a room with hard floors or minimalist decor, creating a quieter, cozier environment.
- Elegance: To achieve an upscale, boutique hotel look, lean into deep, saturated jewel tones or rich, earthy neutrals. Think Emerald Green, deep Sapphire, or a warm Cognac. The directional nap of the velvet will catch the light beautifully, making the geometric shapes look incredibly dynamic as you walk around the room.
Measurements & Materials Needed
Finished Pillow Size: Large Upscale Throw Cushion (20″ x 20″) Finished Block Size: The front features an oversized, modern Four-Patch (made from four 10″ finished squares).
Materials Needed:
- Fabric for the Pieced Front (Premium Cotton Velvet): * 2 squares of Velvet Color A (e.g., Cognac), cut to 10.5″ x 10.5″.
- 2 squares of Velvet Color B (e.g., Cream or a slightly lighter shade of Cognac), cut to 10.5″ x 10.5″.
- Backing Fabric (Envelope Back): 3/4 yard of matching velvet or a premium solid cotton. Cut two rectangles measuring 20.5″ x 14″.
- Lining & Batting: One 22″ x 22″ square of low-loft cotton batting, and one 22″ x 22″ square of inexpensive muslin to back the quilted front.
- Thread: High-quality, 50-weight 100% cotton thread.
- Machine Tools: A Walking Foot (absolutely mandatory for sewing velvet) and fresh heavy-duty needles (Size 90/14).
- Quilting ruler: A 6″ x 24″ acrylic ruler for perfect, clean cuts.
- Rotary cutter: Equipped with a fresh blade.
- Quilting pins: Extra-long, fine-glass-head pins (you will need many to secure the velvet).
- Additional Notions: A plush, overstuffed 22″ x 22″ feather or down-alternative pillow insert (sizing up the insert ensures a firm, upscale look).
Step-by-Step Guide: The Velvet Quilted Cushion
Step 1: Directional Cutting and Preparation
Velvet has a “nap”—the direction the fibers lie. If you brush your hand down the fabric, it will feel smooth in one direction and rough in the other. Before cutting your 10.5″ x 10.5” squares, ensure the nap runs in the same direction on all pieces (usually brushing smoothly downwards). Cut your 4 squares and your envelope backing rectangles carefully with your rotary cutter.
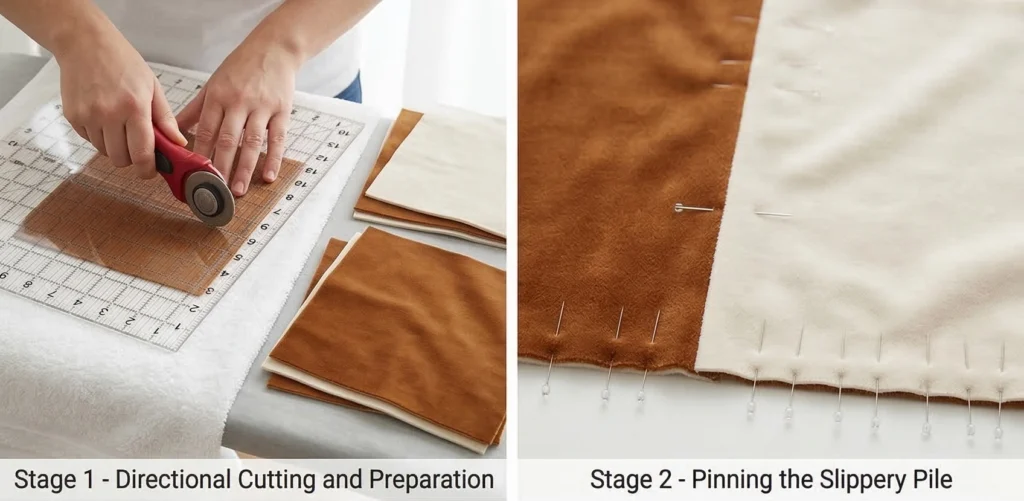
Step 2: Pinning the Slippery Pile
Because the plush fibers of velvet will literally push against each other, causing the fabric to shift as you sew, pinning is critical. Place one Color A square and one Color B square right sides together, ensuring the nap runs exactly the same way. Pin along the 10.5-inch edge, placing a pin every single inch.
Step 3: Assembling the Modern Four-Patch
- Attach the walking foot to your sewing machine. This foot evenly feeds the top and bottom layers of fabric.
- Sew the pinned squares together using a precise 1/4-inch seam allowance.
- Repeat this with your other two squares to create your second row.
- Pressing Velvet: Never press an iron directly onto the face of velvet, or you will crush the pile permanently. Lay a fluffy towel on your ironing board, place the velvet face down on the towel, and gently press the seam open from the back using plenty of steam.
- Pin the two rows together (alternating the colors to create the checkerboard), pin heavily at the center intersection, and sew. Your unfinished velvet top will measure exactly 20.5″ x 20.5″.
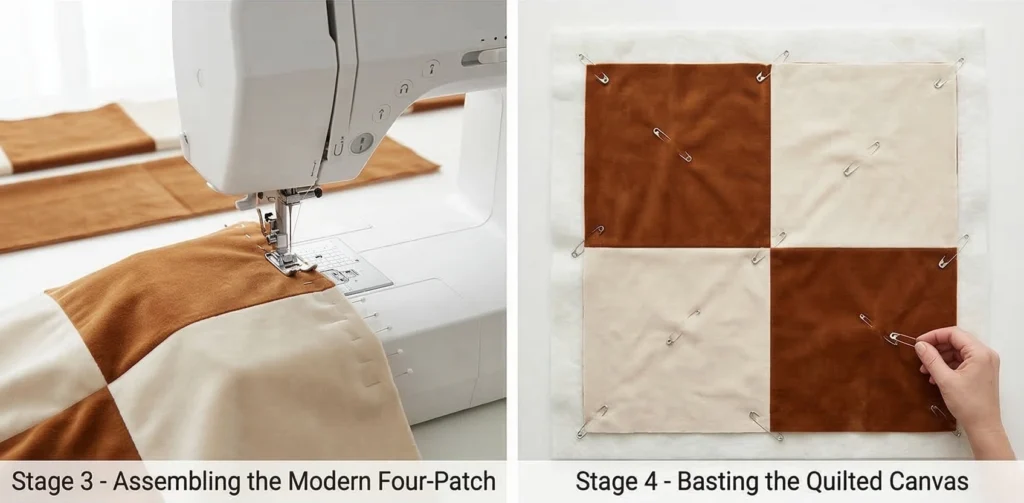
Step 4: Basting the Quilted Canvas
Lay your 22″ square of scrap muslin flat, top it with the 22″ cotton batting, and carefully center your pieced velvet top face-up. Pin the three layers together densely with curved safety pins.
Step 5: Assembly Section (Structural Grid Quilting)
- Quilt the Top: Take the basted sandwich back to your machine (still using the walking foot). To enhance contemporary geometry without distracting from the velvet’s sheen, quilt straight lines 1/2 inch away from the center cross seams. Add a few more parallel lines spaced 2 inches apart to create a sleek, asymmetrical grid.
- Trim: Once quilted, trim the overhanging batting and muslin flush with the 20.5″ x 20.5″ velvet top.
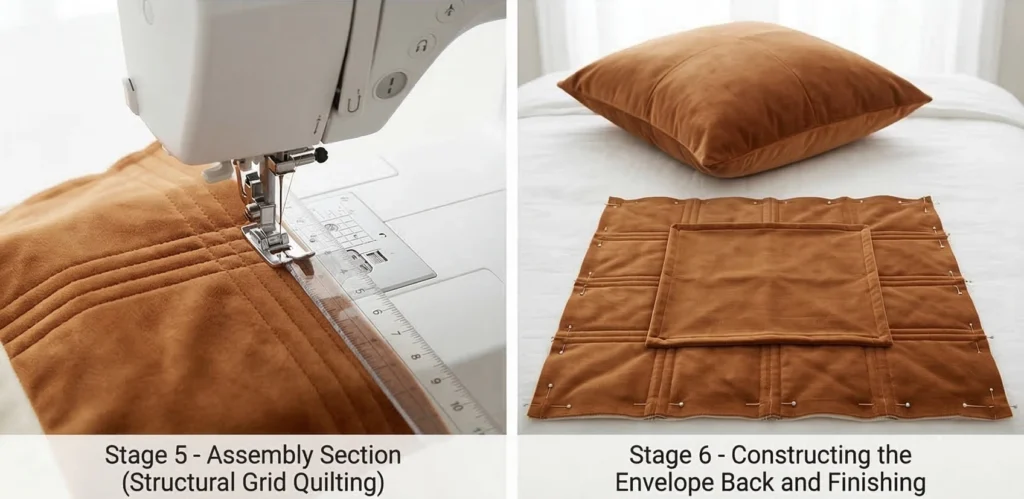
Step 6: Constructing the Envelope Back and Finishing
- Hem the Backing: Take your two 20.5″ x 14″ backing rectangles. On one long 20.5-inch edge of each, fold the fabric down 1/2 inch, press lightly (from the back), fold another 1/2 inch, and topstitch to create a clean hem.
- Layer the Pillow: Lay your beautifully quilted velvet front panel right-side up. Place the two backing rectangles right-side down on top of it, aligning the raw outer edges so the hemmed edges overlap in the center. Pin heavily around the entire perimeter.
- Sew and Turn: Sew around the 20.5″ x 20.5″ perimeter with a robust 1/2-inch seam allowance. Clip the corners diagonally to reduce bulk. Turn the cover right-side out through the envelope opening, gently push the corners out crisp, and insert your 22″ x 22″ overstuffed pillow form.
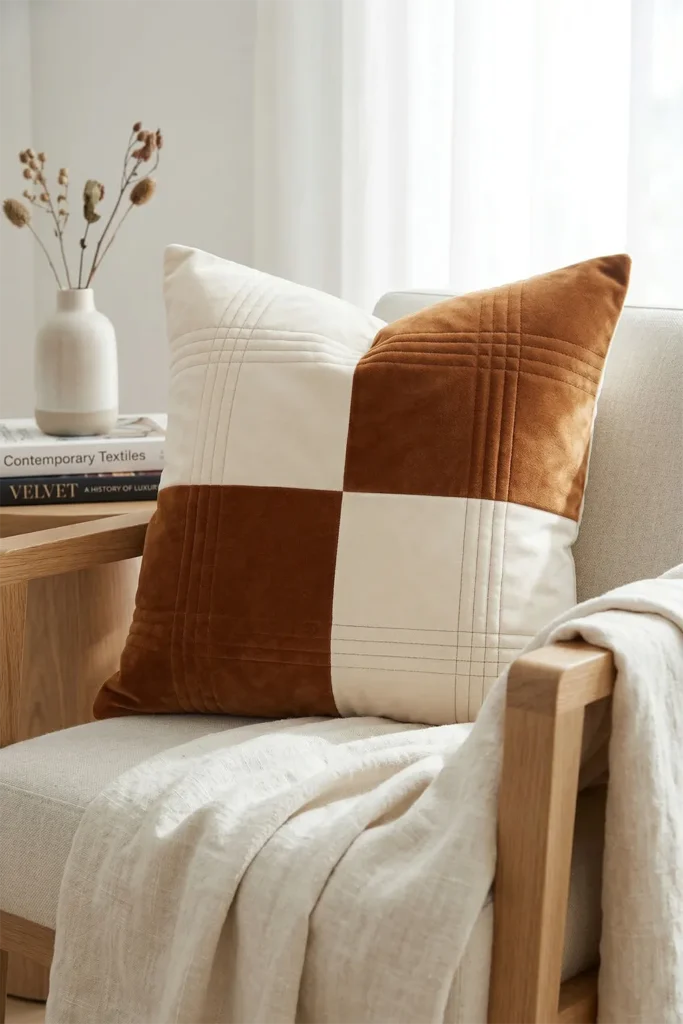
Usability Note: Cotton velvet requires a bit more care than standard quilting cotton, but its unparalleled elegance is worth the effort. To maintain the luminous pile and the crisp structural lines of the geometric quilting, lightly brush the velvet with a soft clothes brush occasionally. If spills occur, spot clean immediately by blotting (never rubbing). For a full clean, taking this upscale cover to the dry cleaner will ensure it remains a pristine, luxurious accent for years to come.

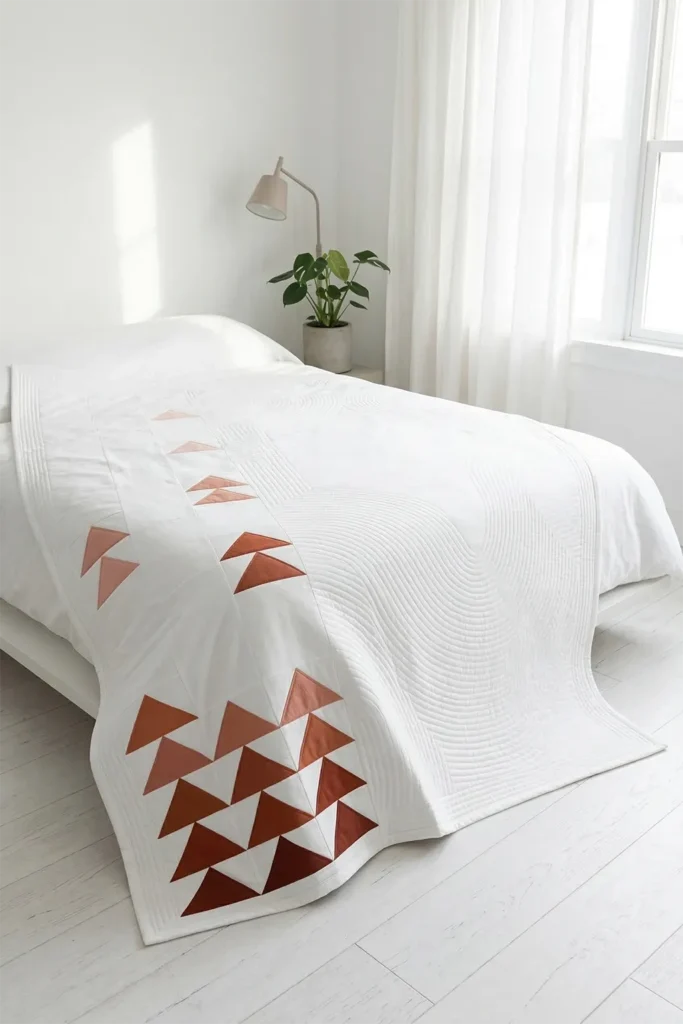
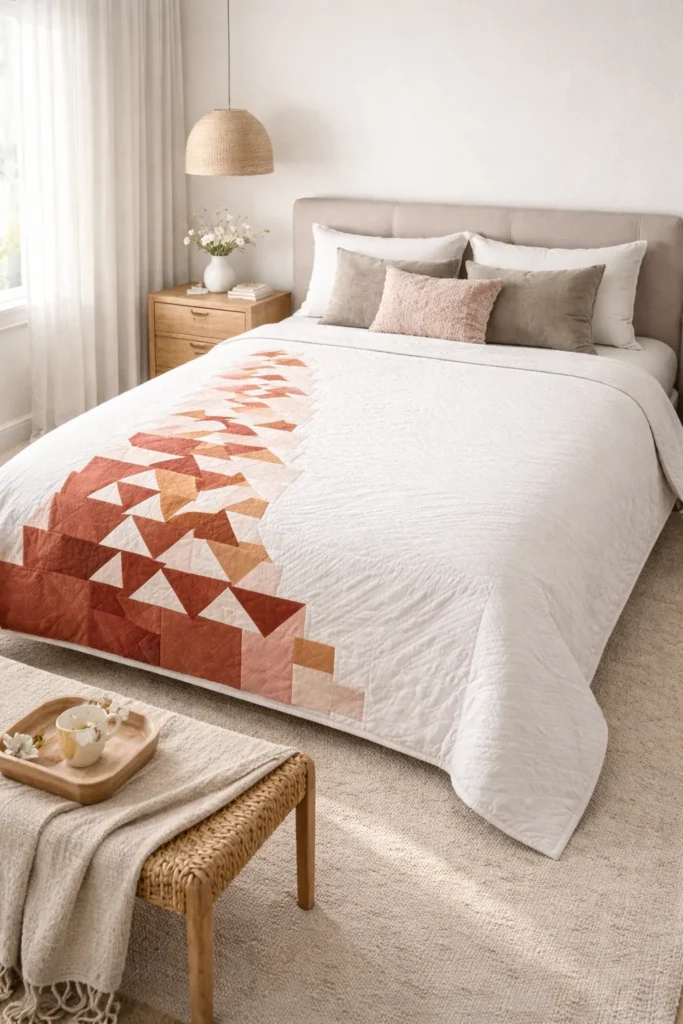
6. Negative Space Contemporary Quilt Designs for Airy, Elegant Bedrooms
A Guide to Making Negative Space Contemporary Quilt Designs for Airy, Elegant Bedrooms
In interior design, what you leave out is often just as important as what you include. A bedroom meant to be an airy, elegant retreat requires decor that allows the eye to rest. The Negative Space Contemporary Quilt masters this philosophy. Instead of covering the entire bed cover in edge-to-edge patchwork, this design features a stunning, localized cluster of geometric shapes—like a cascade of modern triangles—that slowly disperses into a vast, uninterrupted sea of crisp, solid fabric. It transforms the bed into a piece of modern, floating gallery art.
The Heritage of the Minimalist Canvas (And Why I Curated This Guide)
I curated this specific pattern to celebrate a fundamental shift in textile history. Traditional quilting was born of necessity; artisans covered every inch of a quilt in tiny scraps because fabric was precious and scarce. However, as the modern quilting movement emerged, designers began looking to mid-century modern art and even to traditional Amish quilts, which famously employed large, bold expanses of solid color. I designed this guide to show how embracing “empty” space doesn’t mean a quilt is unfinished. Instead, that vast negative space acts as a quiet, sophisticated canvas that makes the actual pieced patchwork pop with incredible architectural tension.
Focus on Usability, Comfort, and Elegance
- Usability: Piecing a negative space quilt is remarkably efficient. Because 75% of the quilt top is made from large, solid panels of fabric, you save dozens of hours that would normally be spent cutting and sewing tiny, intricate blocks.
- Comfort: Every seam in a quilt adds stiffness and weight. By drastically reducing the number of seams and using a vast expanse of unpieced cotton, the quilt achieves a liquid-like, fluid drape. It feels incredibly soft and weightless over the body, making it the perfect layer for a warm, airy bedroom.
- Elegance: To keep the design looking elegant and intentional, resist the urge to use busy prints. Choose a brilliant, optic white or a soft, misty grey for your negative space, and pair it with a tight gradient of solid, sophisticated colors for the geometric shapes (like blush, terracotta, and deep rust).
Measurements & Materials Needed
Finished Quilt Size: Airy Queen (approx. 90″ x 90″) Finished Block Style: An asymmetrical “Cascading Triangles” (Flying Geese) design. The quilt consists of a vast 72″ wide solid panel, and an 18″ wide pieced column where the triangles disperse.
Materials Needed:
- Background Fabric (The Negative Space): 7 yards of premium, extra-wide (or standard 44″) solid cotton (e.g., Optic White).
- You will cut one massive panel measuring 72.5″ x 90.5″.
- You will also cut numerous background squares and rectangles to mix into the pieced column.
- Accent Fabrics (The Cascading Triangles): 1/2 yard each of 4 coordinating solid colors (e.g., Blush, Clay, Terracotta, and Rust).
- Backing fabric: 3 yards of 108″ wide-backing premium cotton sateen to match the airy feel.
- Batting: 100″ x 100″ queen-size low-loft bamboo batting (bamboo offers the most luxurious, fluid drape).
- Binding: 3/4 yard of your Background Fabric.
- Thread: High-quality, 50-weight 100% cotton piecing and quilting thread in crisp white.
- Quilting ruler: A 6″ x 24″ acrylic ruler for precise, straight cutting.
- Rotary cutter: Equipped with a fresh blade.
- Quilting pins: Fine glass-head pins for precise piecing, and curved safety pins for basting.
Step-by-Step Guide: The Negative Space Quilt
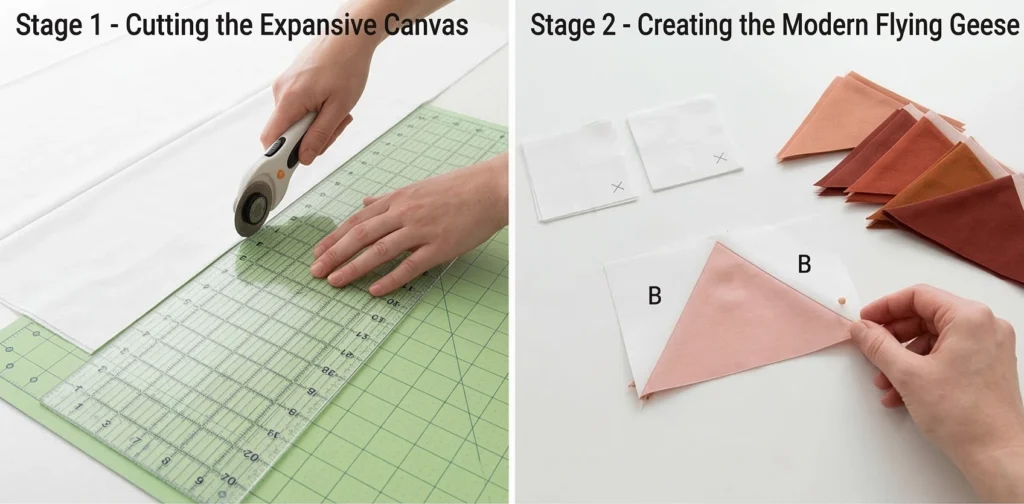
Step 1: Cutting the Expansive Canvas
Using your rotary cutter, carefully prepare your massive negative space. If you are using standard 44″ wide fabric, you will need to sew two long panels together to achieve your 72.5″ wide by 90.5″ tall canvas. Press this seam completely open and flat. Set this massive panel aside.
Step 2: Creating the Modern Flying Geese
To create the cascading triangles, you will make traditional “Flying Geese” units, which consist of one large Accent triangle surrounded by two smaller Background triangles.
- Cut several 5.5″ x 5.5″ squares from your Accent fabrics.
- Cut twice as many 3″ x 3″ squares from your Background fabric.
- Draw a diagonal line on the back of all the small Background squares.
- Place two small Background squares in the opposite corners of a large Accent square, right sides together. Sew exactly 1/4-inch on both sides of the drawn line, cut down the center, and press open. (This standard “4-at-a-time” no-waste method yields perfect 2.5″ x 4.5″ unfinished Flying Geese blocks).
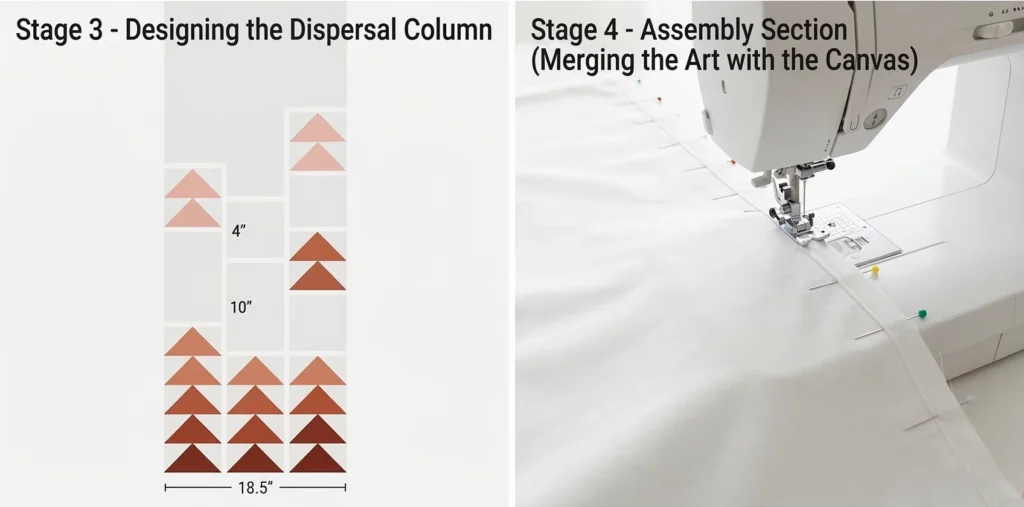
Step 3: Designing the “Dispersal” Column
Your pieced section will be an 18.5″ wide by 90.5″ long vertical column. The goal is to make the triangles appear densely clustered at the bottom and float into the negative space at the top.
- Cut various solid Background rectangles measuring 18.5″ wide by varying heights (e.g., 4″, 10″, 20″).
- Sew your Flying Geese units together into small horizontal clusters (e.g., three geese flying upwards side-by-side).
- Begin piecing your 18.5″ wide column: start at the bottom with dense clusters of triangles, then sew a small solid Background rectangle, then another small cluster of triangles, then a slightly larger Background rectangle.
- Continue this process, spacing the triangles further and further apart, until the top of the 90.5″ column is almost entirely solid Background fabric.
Step 4: Assembly Section (Merging the Art with the Canvas)
Now, you will unite the architectural geometry with the minimalist canvas.
- Lay your massive 72.5″ x 90.5″ Background panel right-sides together with the 90.5″ long edge of your pieced “Dispersal” column.
- Pin heavily down the entire 90-inch length. Because the fabrics are so long, placing a pin every few inches prevents the layers from stretching or warping under the needle.
- Sew the seam with a precise 1/4-inch seam allowance.
- Press the long seam gently toward the solid negative space panel. Your stunning, asymmetrical quilt top is now complete and measures exactly 90.5″ x 90.5″.
Step 5: Basting the Airy Layers
Tape your 108″ wide backing fabric face down and taut on a large, clean floor. Center your luxurious bamboo batting over it. Carefully lay your pieced top face up over the batting, ensuring the massive white canvas is completely smooth. Pin the three layers together densely using curved safety pins.
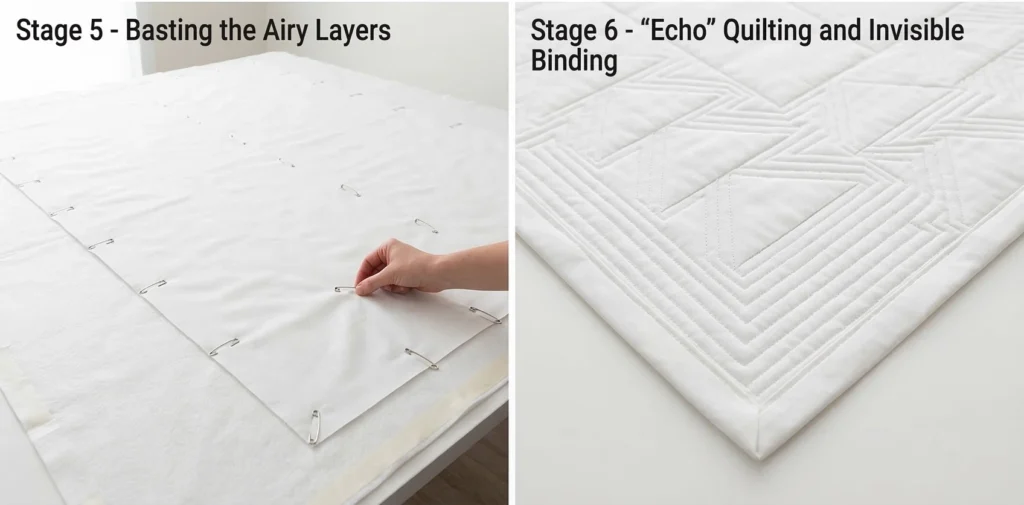
Step 6: “Echo” Quilting and Invisible Binding
- Quilt: In a negative space quilt, the stitching is the texture. To make the geometric shapes pop, use “echo quilting.” Outline your clustered triangles with straight stitching, then continue those angular lines out into the vast white negative space, rippling outward like waves in a pond. The dense quilting in the negative space flattens the batting, which forces the un-quilted Accent triangles to puff up beautifully, creating an embossed, 3D effect.
- Bind: Cut your Background fabric into 2.5″ strips, join them, fold, and press. By using a binding that perfectly matches your negative-space canvas, the quilt’s edges visually disappear, allowing the cascading triangles to look as though they are floating freely on the bed.
Usability Note: The expansive negative space requires pristine care to maintain its bright, airy elegance. Wash this museum-quality quilt on a cold, delicate cycle with a gentle, color-safe detergent. Because the piecing is minimal, the quilt will drape exquisitely. Tumble drying on low will lightly crinkle the bamboo batting, enhancing the architectural shadows cast by your echo quilting while keeping the overall textile incredibly soft and welcoming.
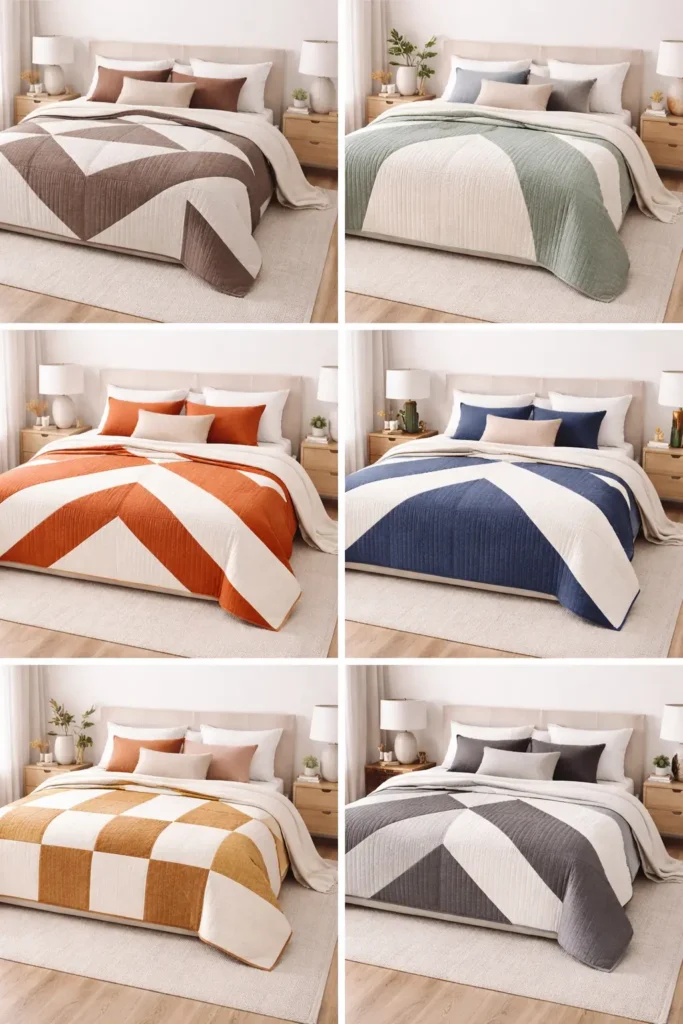
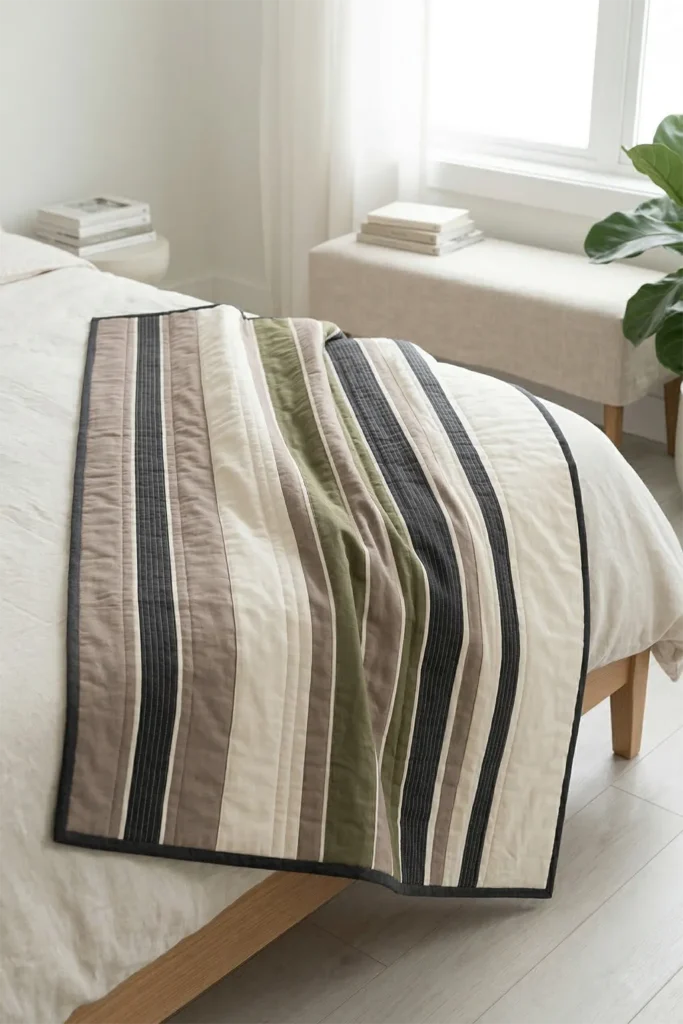
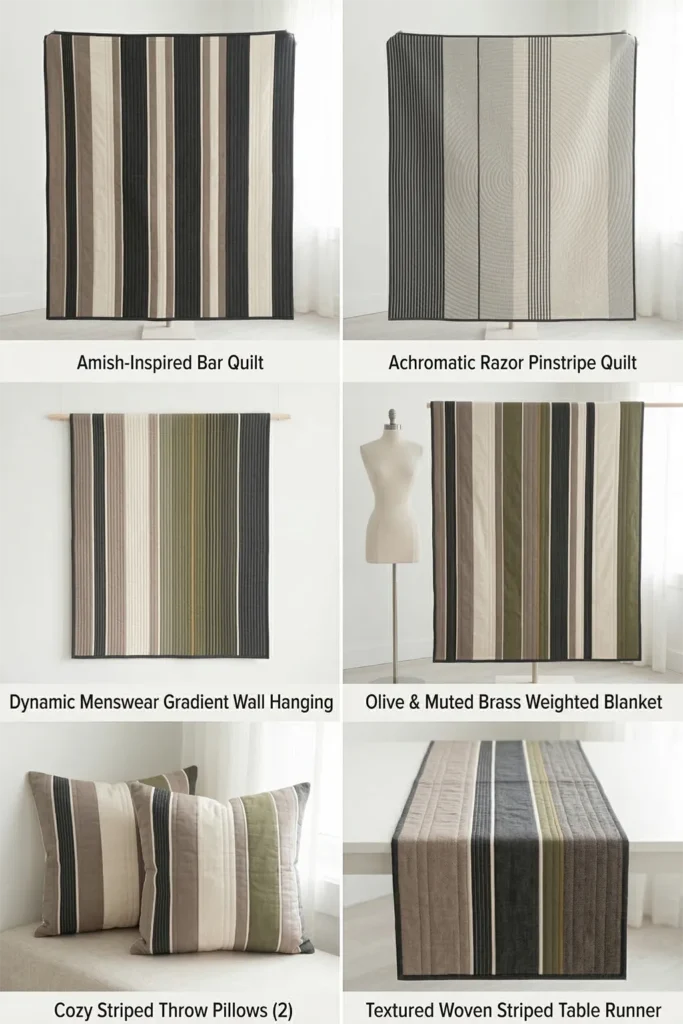
7. Modern Striped Contemporary Quilt Throws for Cozy Bedroom Layering
A Guide to Making Modern Striped Contemporary Quilt Throws for Cozy Bedroom Layering
A beautifully layered bed is the hallmark of a cozy, sophisticated bedroom. While thick duvets and standard blankets provide warmth, adding a tailored quilt throw introduces a touch of bespoke luxury. The Modern Striped Contemporary Quilt Throw is designed to be that perfect, weighty finishing layer. By utilizing long, continuous stripes of varying widths, this design mimics the refined, structured look of high-end woven textiles or classic menswear, bringing a sleek, tailored rhythm to the foot of your bed.
The Heritage of the Stripe (And Why I Curated This Guide)
I designed this specific pattern because I am deeply inspired by how timeless geometry can feel radically modern. Strip quilting is actually one of the oldest forms of patchwork. In the late 19th and early 20th centuries, Amish quilters created “Bars” quilts—simple, bold, vertical stripes of solid color. At the time, these designs were entirely utilitarian, yet today they look like masterpieces of modern abstract art.
I curated this guide to bring that incredible, historic minimalism into the contemporary home. By ditching the traditional rigid, equal-width bars and instead embracing an asymmetrical rhythm—mixing razor-thin pinstripes with wide, sweeping panels of color—we elevate the humble stripe into a dynamic, upscale design. It is the perfect marriage of historical simplicity and modern elegance.
Focus on Usability, Comfort, and Elegance
- Usability: Strip quilts are famously fast to assemble. Because there are no intricate block intersections to match up, this throw is a highly accessible project that looks deceptively complex.
- Comfort: By eliminating the hundreds of intersecting seams found in traditional patchwork, a striped quilt maintains a beautiful, fluid drape. Paired with a soft, medium-loft cotton batting, it molds perfectly to the body, making it the ultimate cozy layer for reading in bed or taking an afternoon nap.
- Elegance: To achieve that upscale, sophisticated aesthetic, color selection is everything. Stick to a tight, cohesive palette of high-quality solids or textured wovens—such as a gradient of warm taupes, crisp creams, deep charcoal, and perhaps a single, thin stripe of muted brass or olive green for an unexpected pop of modern luxury.
Measurements & Materials Needed
Finished Quilt Size: Generous Cozy Throw (approx. 60″ x 70″) Finished Block Style: Edge-to-edge continuous vertical stripes of varying widths.
Materials Needed:
- Fabric for the Pieced Top: Approximately 4.5 yards total of premium solid cottons or yarn-dyed wovens in your chosen palette (e.g., 4 to 5 coordinating colors).
- Backing fabric: 4 yards of standard 44″ premium cotton (seamed down the middle), or 2 yards of 108″ wide-backing fabric.
- Batting: 65″ x 75″ medium-loft 100% cotton batting for a cozy, weighty drape.
- Binding: 1/2 yard of your darkest accent color to neatly frame the stripes.
- Thread: High-quality, 50-weight 100% cotton piecing and quilting thread in a coordinating neutral.
- Machine Tools: A walking foot (highly recommended for quilting long, straight lines).
- Quilting ruler: A 6″ x 24″ acrylic ruler for precise, straight cutting.
- Rotary cutter: Equipped with a fresh blade to ensure clean, unfrayed strips.
- Quilting pins: Fine glass-head pins for piecing, and curved safety pins for basting.
Step-by-Step Guide: The Modern Striped Throw
Step 1: Precision Cutting for Rhythm and Flow
Because we want continuous, seamless stripes that run the entire 70-inch length of the throw, you will cut your fabric parallel to the selvage (the lengthwise grain). Lengthwise cuts have zero stretch, ensuring your long stripes won’t warp or ripple. Using your rotary cutter, cut strips that are at least 72 inches long. Cut them in highly varied widths to create a modern rhythm: 1.5″, 2.5″, 4.5″, 6.5″, and even a massive 10.5″ wide panel. Cut enough strips so that their combined width (minus seam allowances) equals roughly 62 inches.
Step 2: Designing the Asymmetrical Layout
Find a large, clean floor space to lay out your 72-inch strips side by side. The key to contemporary elegance is avoiding predictability. Do not alternate colors evenly (A, B, A, B). Instead, cluster three thin, dark strips together, follow them with a massive panel of cream, and then step down into mid-tone taupes. Play with the arrangement until the visual rhythm feels balanced but asymmetrical.
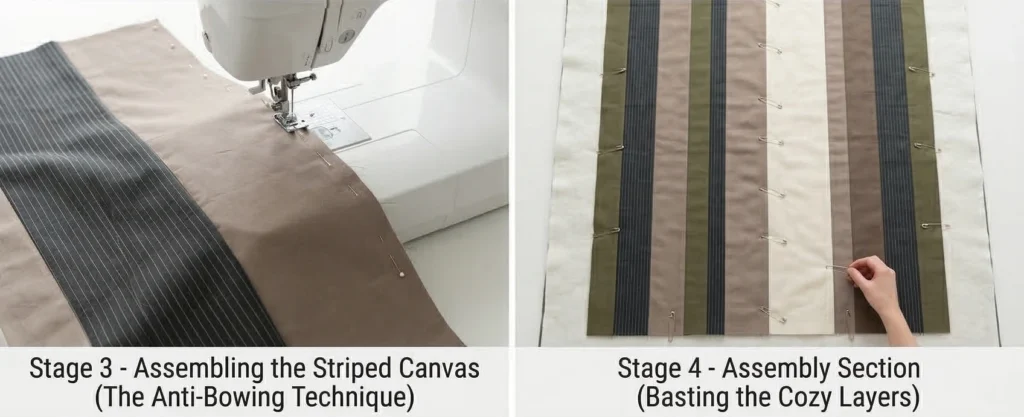
Step 3: Assembling the Striped Canvas (The Anti-Bowing Technique)
Sewing incredibly long strips can sometimes cause the fabric to curve or “bow” in one direction. To prevent this, you must alternate your sewing direction.
- Place Strip 1 and Strip 2 right sides together. Pin every 5 to 6 inches down the entire 72-inch length.
- Sew them together with a precise 1/4-inch seam allowance, starting from the top and sewing to the bottom.
- Press the seam open with a hot iron to reduce bulk.
- Pin Strip 3 to the unit. This time, sew from the bottom up. Alternating directions balance the machine’s tension.
- Continue adding strips in this manner until the entire top is assembled.
Step 4: Assembly Section (Basting the Cozy Layers)
- Lay your backing fabric face down on the floor and tape it taut to prevent wrinkles.
- Carefully center your medium-loft cotton batting over the backing.
- Lay your pieced striped top face up over the batting.
- Pin the three layers together densely using your curved safety pins, smoothing outward from the center.
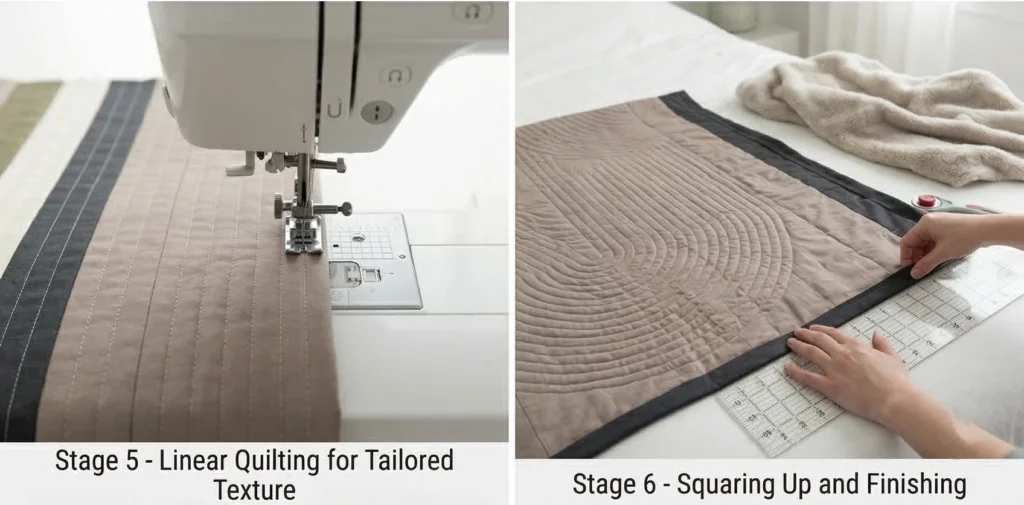
Step 5: Linear Quilting for Tailored Texture
To enhance the contemporary design, your quilting should complement the piecing. Attach your walking foot. Stitch perfectly straight vertical lines that run parallel to your stripes. You can stitch “in the ditch” (directly inside the seams), but for a truly modern, tailored look, quilt lines exactly 1/2-inch away from every seam line. Leave the wide, solid panels largely unquilted to allow the cotton batting to puff up, giving the throw a wonderfully plush, dimensional texture.
Step 6: Squaring Up and Finishing
- Square Up: Take your quilted throw to your cutting mat. Use your long acrylic ruler and rotary cutter to trim all four edges perfectly straight, removing excess batting and backing. Your throw should now measure exactly 60″ x 70″.
- Bind: Cut your binding fabric into 2.5″ strips. Join them end-to-end, fold in half, and press crisp. Sew the binding tightly around the entire perimeter, mitering the four corners for a sleek, gallery-quality frame.
Usability Note: The lengthwise grain construction and medium-loft batting make this throw incredibly durable and cozy. It is designed to be lived with, draped over the foot of the bed, or pulled up during a cold morning. Machine wash on a cold, normal cycle with a mild detergent. Tumble drying on medium heat will perfectly crinkle the unquilted spaces, giving the geometric stripes a soft, touchable, highly inviting texture.
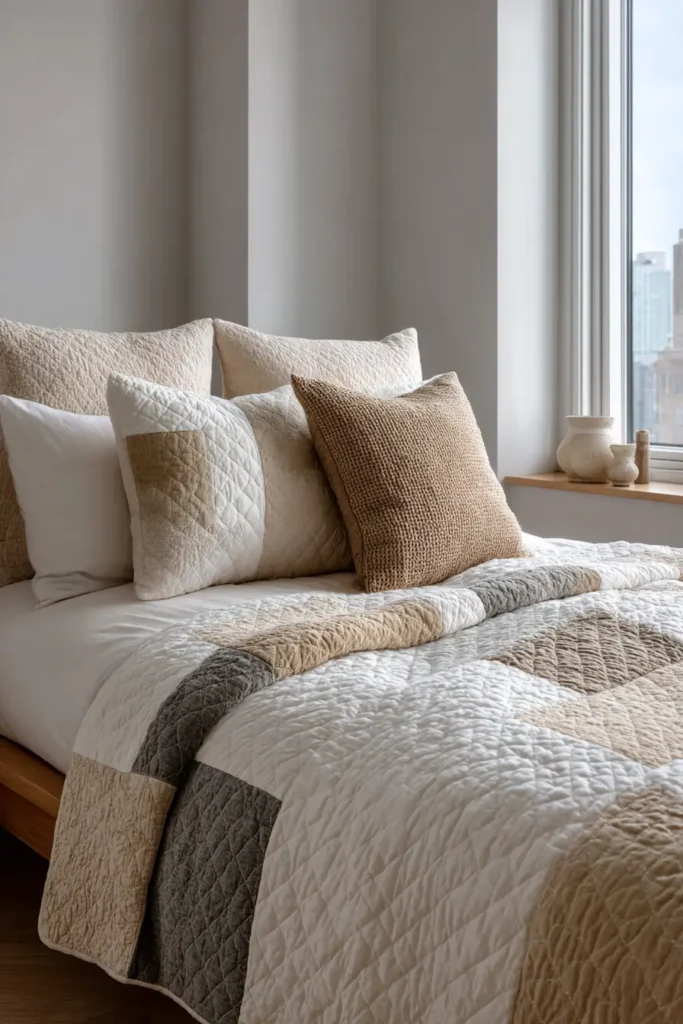
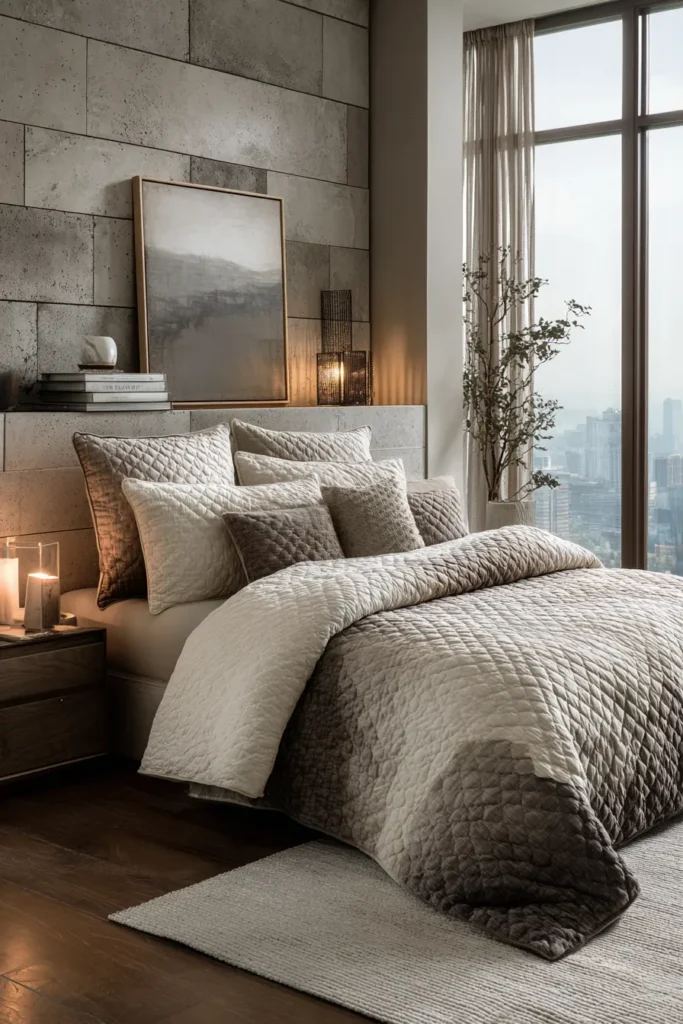
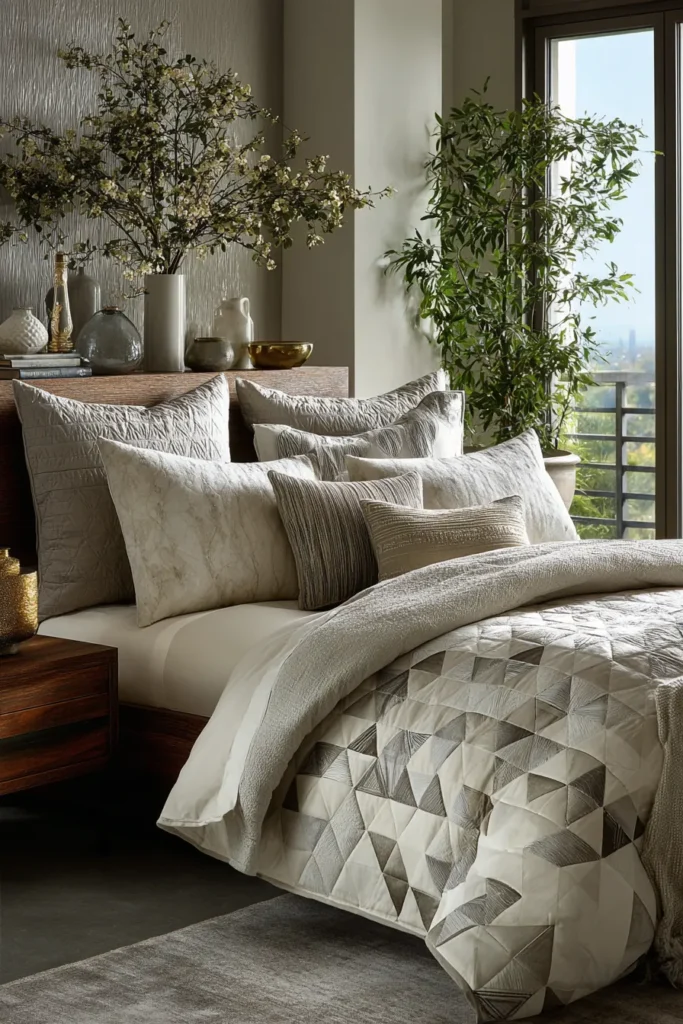
8. Minimalist Textured Contemporary Quilts for Cozy Yet Stylish Bedroom Retreats
A Guide to Making Minimalist Textured Contemporary Quilts for Cozy Yet Stylish Bedroom Retreats
In a hyper-connected, visually noisy world, the master bedroom must serve as a sanctuary of sensory calm. A minimalist aesthetic achieves this visual peace, but without the right materials, minimalism can easily feel stark or cold. The Minimalist Textured Contemporary Quilt solves this by replacing busy, complex patchwork with profound, tactile richness. By combining oversized squares of raw, slubby linen with heavy, structural grid quilting, this bed cover transforms your sleeping space into a warm, grounded, and deeply stylish retreat.
The Heritage of the Textured Wholecloth (And Why I Curated This Guide)
I designed this specific pattern guide to honor the historical tradition of the “wholecloth” quilt—a style in which the stitching itself, rather than pieced fabrics, creates the design. Historically, in styles like French boutis or Welsh quilting, artisans used intricate stitching to give plain fabric extraordinary dimension.
I curated this contemporary version to bring that historical emphasis on texture into the modern era. Instead of ornate floral motifs, we use a rigid, oversized geometric grid. By utilizing premium washed linen and heavyweight thread, the quilt relies entirely on the play of light and shadow across the stitching lines. I made this to prove that a quilt doesn’t need a dozen colors to be a masterpiece; sometimes, the most sophisticated design choice is simply letting high-quality textiles speak for themselves.
Focus on Usability, Comfort, and Elegance
- Usability: Because the piecing consists entirely of massive 18-inch squares, assembling the quilt top takes only a fraction of the time it would for a traditional quilt. The true effort—and reward—lies in the meditative process of the straight-line machine quilting.
- Comfort: This quilt is a tactile dream. Washed linen is naturally thermoregulating, keeping you cool in the summer and warm in the winter. When paired with a mid-loft wool or cotton batting and heavily quilted, it gains a comforting, dense weight that mimics a subtle weighted blanket, promoting deeper, more restful sleep.
- Elegance: To achieve maximum upscale elegance, embrace a strictly monochromatic, earthy palette. Think unbleached Flax, soft Oatmeal, or deep Charcoal. The elegance comes from the organic, matte finish of the linen contrasting with the precise, architectural lines of the heavy quilting thread.
Measurements & Materials Needed
Finished Quilt Size: Generous Queen (approx. 90″ x 90″) Finished Block Size: Oversized 18″ x 18″ minimalist squares. The quilt requires exactly 25 blocks arranged in a 5×5 grid.
Materials Needed:
- Fabric for the Pieced Top: 5 yards of premium, medium-weight washed linen in a single solid color (e.g., Natural Flax).
- You will cut 25 squares measuring exactly 18.5″ x 18.5″.
- Backing fabric: 3 yards of 108″ wide-backing premium cotton or matching linen.
- Batting: 100″ x 100″ queen-size mid-loft wool or 100% cotton batting (wool provides incredible loft and temperature regulation).
- Binding: 3/4 yard of your matching linen fabric to create a seamless, continuous edge.
- Thread: * 50-weight cotton thread for piecing the squares.
- Heavyweight 28-weight cotton thread (or Sashiko thread) in a matching or slightly contrasting tone for the highly visible textural quilting.
- Machine Tools: A walking foot (essential for moving heavy linen and wool evenly through the machine) and a Size 90/14 Topstitch needle to accommodate the thicker quilting thread.
- Quilting ruler: A 6″ x 24″ acrylic ruler for precision cutting.
- Rotary cutter: Equipped with a fresh blade (linen can be tough on blades).
- Quilting pins: Fine glass-head pins and large curved safety pins for basting.
Step-by-Step Guide: The Minimalist Textured Quilt
Step 1: Preparing the Textural Canvas
Linen has a looser weave than quilting cotton, which means it can shift and fray more easily. Lay your yardage flat and use your rotary cutter to carefully cut your 25 massive 18.5″ x 18.5″ squares. Handle the cut squares gently to prevent the raw edges from unraveling before you can sew them.
Step 2: Assembling the Minimalist Grid
Take your squares to your sewing machine. Because linen shifts, pin the edges of your squares thoroughly before sewing.
- Sew 5 squares together in a row using a precise 1/4-inch seam allowance.
- Repeat this process until you have 5 separate horizontal rows.
Step 3: Pressing for a Flawless Drape
With heavy linen, seam bulk can become an issue. Instead of pressing the seams to one side (as is common in traditional quilting), press every single seam open using a hot iron and plenty of steam. This allows the heavy fabric to lie perfectly flat and ensures your quilt will drape beautifully over the bed without stiff ridges. Join the 5 rows together, again pressing the intersecting seams entirely open. Your unfinished linen top will measure exactly 90.5″ x 90.5″.
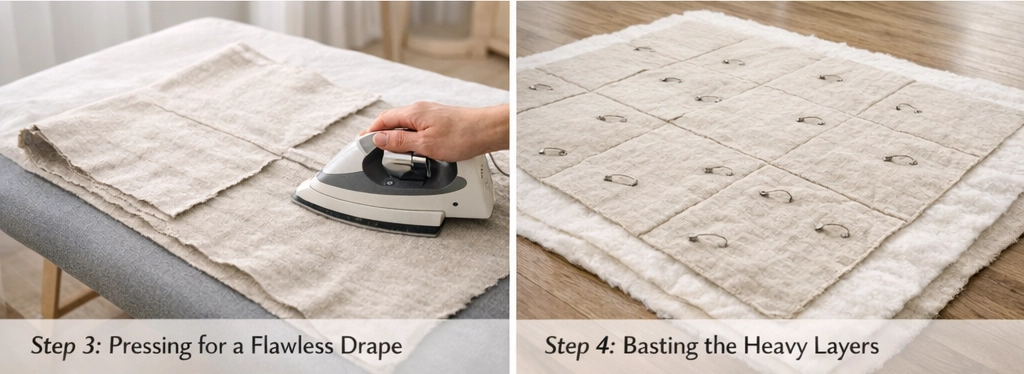
Step 4: Assembly Section (Basting the Heavy Layers)
- Find a large, clean floor space. Tape your 108″ backing fabric face down so it is perfectly taut.
- Unroll your mid-loft wool or cotton batting and center it over the backing fabric.
- Carefully lay your pieced linen top face up over the batting.
- Because linen is a heavier textile, you must baste densely to prevent shifting during quilting. Use your curved safety pins to secure the three layers together, placing a pin every 4 to 5 inches across the entire 90-inch expanse.
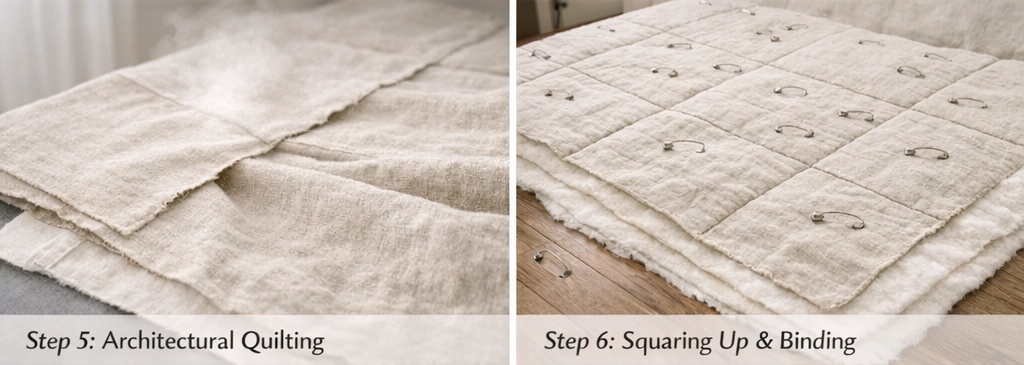
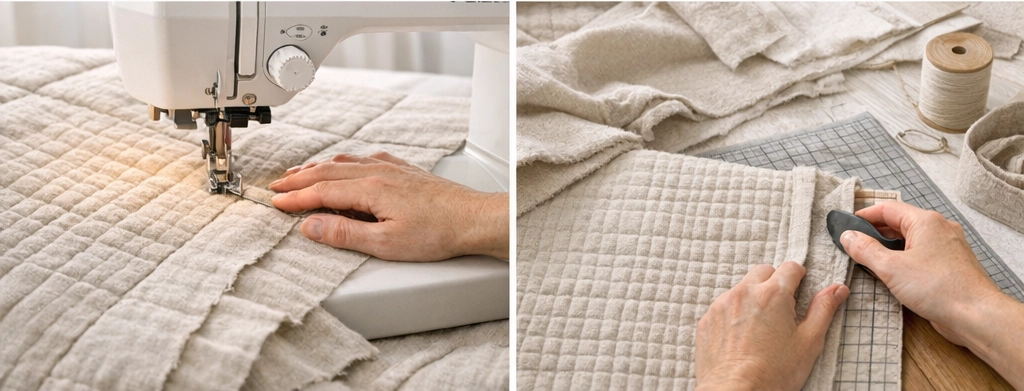
Step 5: Architectural & Textural Quilting
This step is what transforms the quilt from a simple grid into a textural masterpiece. Thread your machine with the heavyweight 28-wt thread and attach your walking foot. Instead of quilting intricate patterns, you will stitch a dense, continuous straight-line grid over the entire quilt. Stitch vertical lines from the top to the bottom of the quilt, spacing them exactly 1.5 inches apart. Then, stitch horizontal lines from left to right, also spaced 1.5 inches apart. This dense grid compresses the batting, forcing the small 1.5-inch unquilted linen squares to puff up, creating an incredibly rich, waffle-like physical texture.
Step 6: Squaring Up and Tailored Binding
- Trim: Take the heavy, beautifully textured quilt back to your cutting mat. Trim away all the excess batting and backing so the edges are perfectly flush and square.
- Bind: Cut your binding linen into 2.5″ strips. Join them end-to-end, fold in half, and press. Sew the binding tightly around the entire perimeter of the quilt. Using the exact same linen for the binding as you did for the quilt top creates a “frameless,” modern look that feels highly tailored and sophisticated.
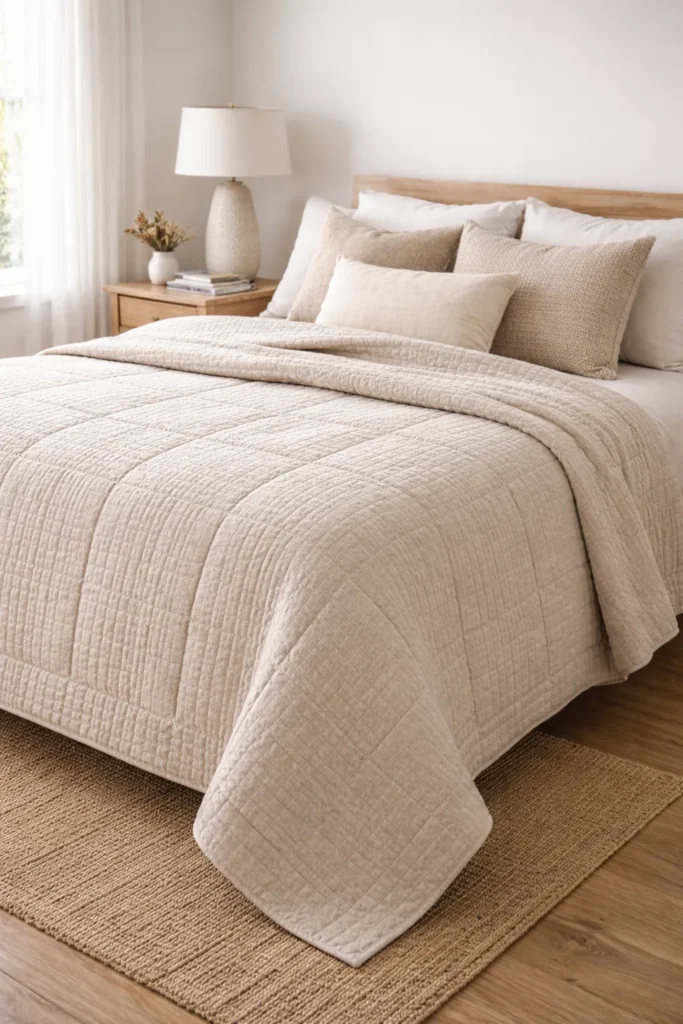
Usability Note: Linen is a “living” fabric that only gets better with time and use. To unlock the ultimate cozy texture, machine wash your finished quilt on a cold, normal cycle with a gentle detergent. Tumble dry on low heat. The heat will cause the wool or cotton batting to shrink slightly, deepening the crinkled, puffed texture of your grid quilting and resulting in an irresistibly soft, lived-in aesthetic.
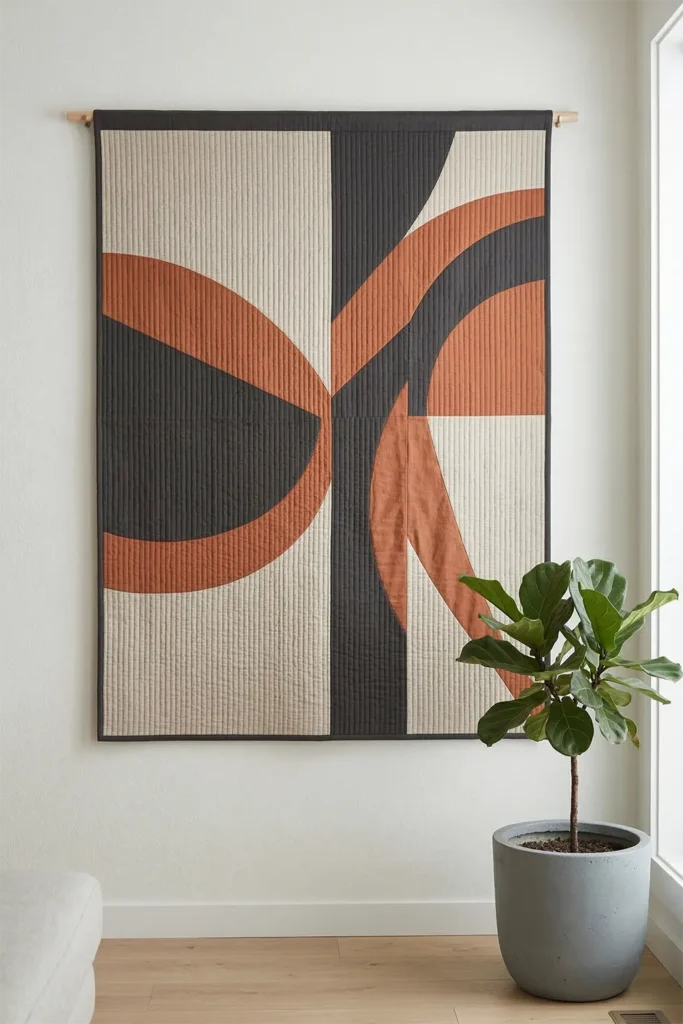
9. Striking Abstract Contemporary Quilted Wall Decor for Modern Living Rooms
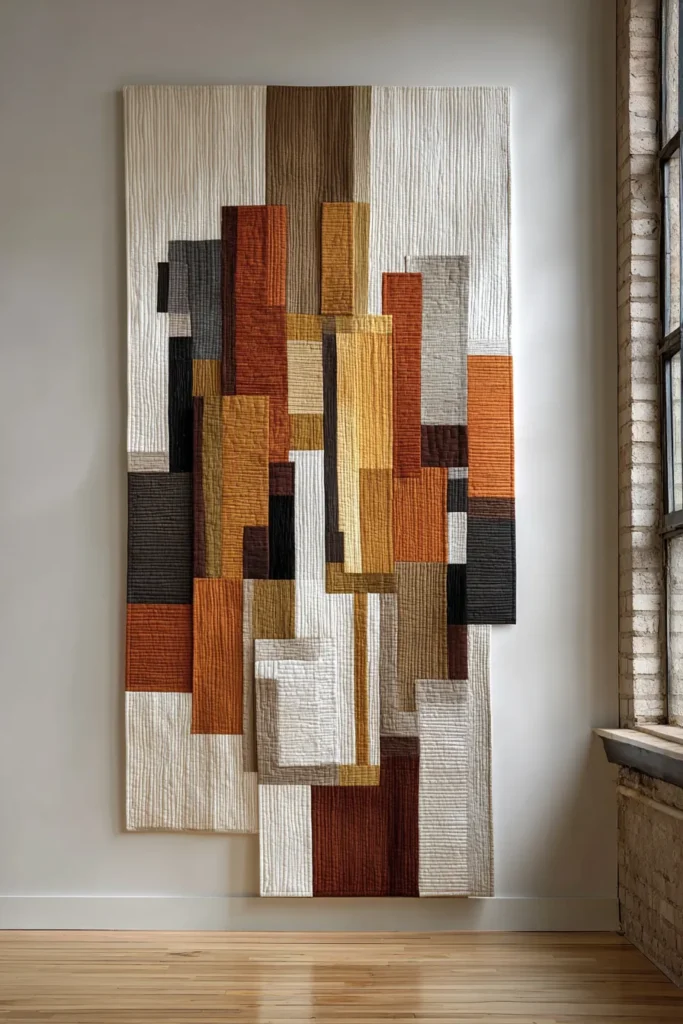
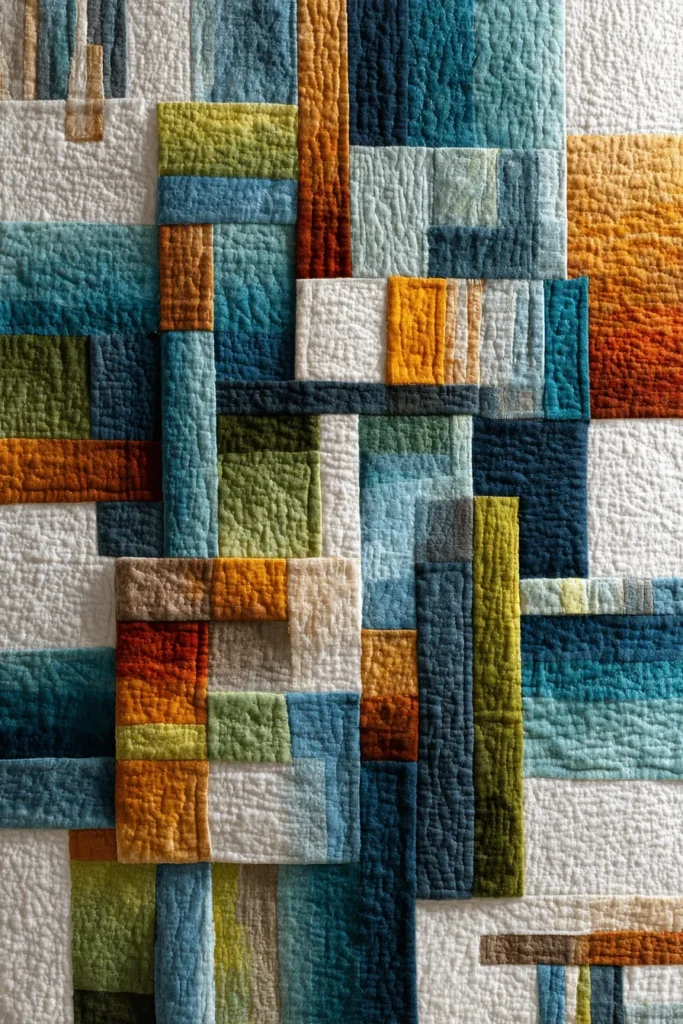
A Guide to Making Striking Abstract Contemporary Quilted Wall Decor for Modern Living Rooms
In a modern living room, large, blank walls can often feel imposing or echoey, especially in open-concept homes with hard flooring. While traditional framed art is beautiful, it can sometimes feel visually cold or reflective. The Striking Abstract Contemporary Quilted Wall Decor offers a magnificent alternative. By treating the quilt purely as fine art rather than a bed covering, you introduce sweeping, free-form geometric shapes and profound tactile warmth directly onto your walls, instantly softening the room’s architecture.
The Heritage of the Textile Canvas (And Why I Curated This Guide)
I curated this specific pattern to celebrate the elevation of quilting from domestic utility to recognized fine art. Historically, the visionary women of Gee’s Bend, Alabama, pioneered improvisational, abstract quilting long before modern abstract expressionism dominated the 20th-century art world. They didn’t rely on rigid rulers; they let the fabric and color guide the geometry.
I designed this modern wall hanging to honor that intuitive, rule-breaking heritage. Instead of following a strict grid, we will use “improv piecing” to create sweeping, asymmetrical curves and bold, intersecting color blocks. It allows you to create a one-of-a-kind, museum-quality statement piece that feels incredibly sophisticated, deeply personal, and inherently modern.
Focus on Usability, Comfort, and Elegance
- Usability: A quilted wall hanging is surprisingly practical. It is lightweight, making it much easier to hang securely than a massive, heavy pane of framed glass. We will incorporate a hidden hanging sleeve so it mounts flush and perfectly straight against the wall.
- Comfort: Textiles provide exceptional acoustic comfort. In modern living rooms with minimalist furniture and hardwood floors, sound can bounce harshly. A thick, densely quilted wall hanging acts as a beautiful acoustic dampener, softening the room’s echoes and creating a cozier, more intimate conversational space.
- Elegance: To achieve gallery-level elegance, embrace an upscale, high-contrast palette. Think deep, matte Charcoal intersecting with a sweeping curve of rich Ochre or Terracotta, grounded by vast expanses of warm Oatmeal linen. The mix of organic curves and rigid straight-line quilting creates a breathtaking, sophisticated tension.
Measurements & Materials Needed
Finished Art Size: Impactful Vertical Wall Hanging (approx. 36″ wide x 48″ tall) Finished Block Style: An improvisational, free-form abstract composition (no traditional blocks).
Materials Needed:
- Fabric for the Abstract Canvas: 2.5 yards total of premium solid cottons, linens, or even touches of velvet for mixed-texture elegance.
- Select 3 to 4 coordinating colors (e.g., Oatmeal for the negative space, Charcoal, and Terracotta for the abstract shapes).
- Backing fabric: 1.5 yards of standard cotton (this won’t be seen, so any coordinating solid works).
- Batting: 40″ x 52″ dense, low-loft cotton batting. (Avoid fluffy polyester; wall art needs a rigid structure to hang perfectly flat without sagging).
- Hanging Sleeve Fabric: One rectangle measuring 8″ x 34″ cut from your backing fabric.
- Binding: 1/2 yard of your darkest fabric (like Charcoal) to frame the art.
- Hardware: A 34-inch wooden dowel or flat piece of lattice wood, and two wall hooks/nails.
- Thread: High-quality, 50-weight 100% cotton piecing and quilting thread.
- Tools: A rotary cutter, a large cutting mat, a 6″ x 24″ acrylic ruler, and fine glass-head pins.
Step-by-Step Guide: The Abstract Quilted Wall Decor
Step 1: The Improv Cutting Technique
Clear a large workspace and put away your ruler—this step is about intuition. Lay a large piece of your Background fabric (e.g., Oatmeal) and a piece of your Accent fabric (e.g., Terracotta) right-sides up, slightly overlapping them. Using your rotary cutter, carve a large, sweeping, gentle curve through both layers of fabric at once. Because you cut them simultaneously, the two curved edges will match up perfectly.
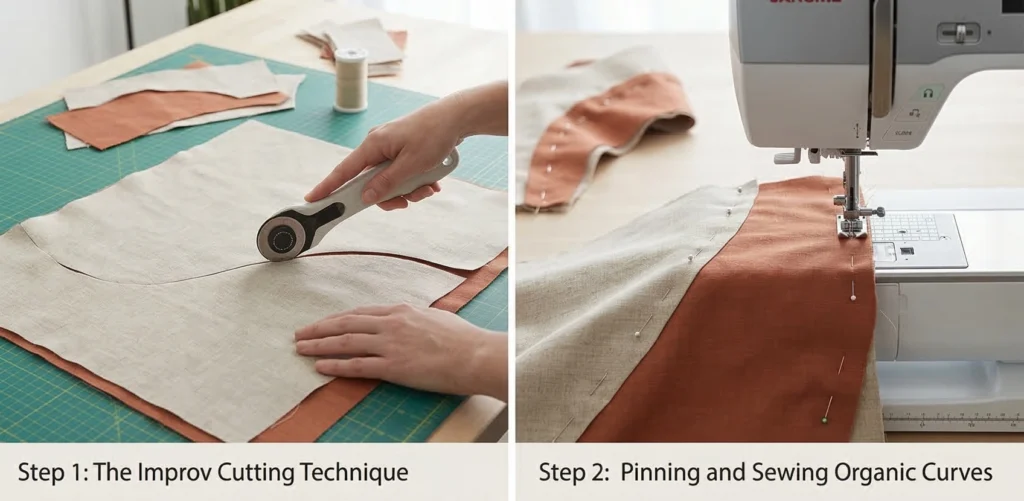
Step 2: Pinning and Sewing Organic Curves
Sewing curves requires a bit of patience.
- Place the two precisely cut, curved edges right sides together.
- The fabrics will look like they don’t want to fit together, but they will. Pin the exact center of the curve, then pin the two extreme ends. Gently ease the remaining fabric together, placing a pin every 1/2 inch.
- Sew slowly along the curve with a 1/4-inch seam allowance, removing pins as you go.
- Press the seam to one side (usually toward the darker fabric) using plenty of steam to coerce the fabric into lying flat.
Step 3: Assembly Section (Building the Composition)
Continue this improvisational process. Cut bold, angled slashes into your joined pieces and insert contrasting strips of your third color (e.g., Charcoal). Build the canvas organically, adding blocks of negative space and intersecting lines until you are thrilled with the abstract composition. Once your free-form art piece is large enough, use your large acrylic ruler to square it up, trimming the wild edges down to a perfect 36.5″ wide by 48.5″ tall rectangle.
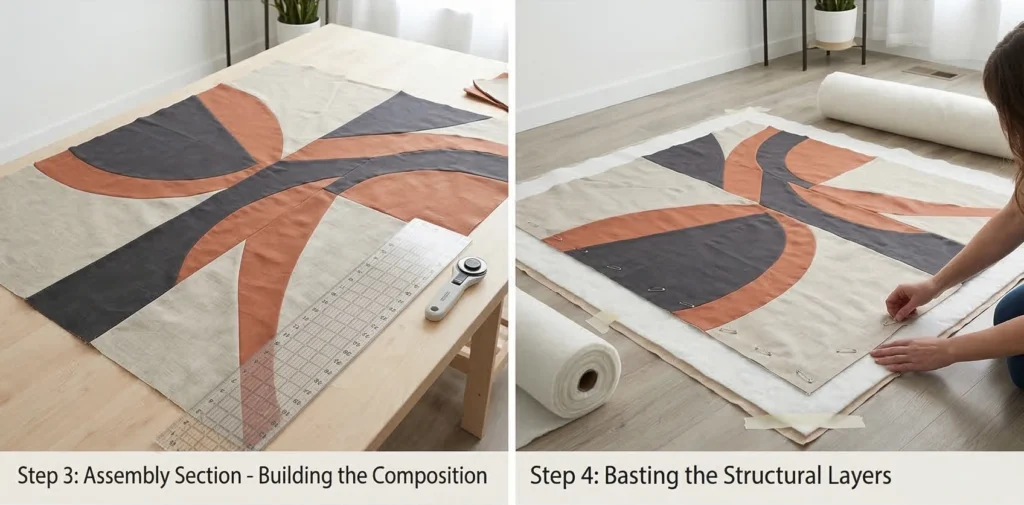
Step 4: Basting the Structural Layers
Tape your backing fabric face down to the floor. Center your dense cotton batting over it, and lay your abstract pieced top face up. Pin the three layers together densely with curved safety pins. Because this will hang vertically, dense basting prevents the heavy fabrics from shifting downward over time.
Step 5: Architectural Quilting for Dimension
Attach the walking foot to your machine. For contemporary abstract art, the quilting should provide a structural contrast to the organic piecing. Quilt dense, perfectly straight vertical lines spaced 1/2-inch apart across the entire canvas (matchstick quilting). When the rigid, mathematical lines of the quilting intersect with the wild, sweeping curves of your pieced fabrics, it creates an incredibly sophisticated, three-dimensional architectural texture.
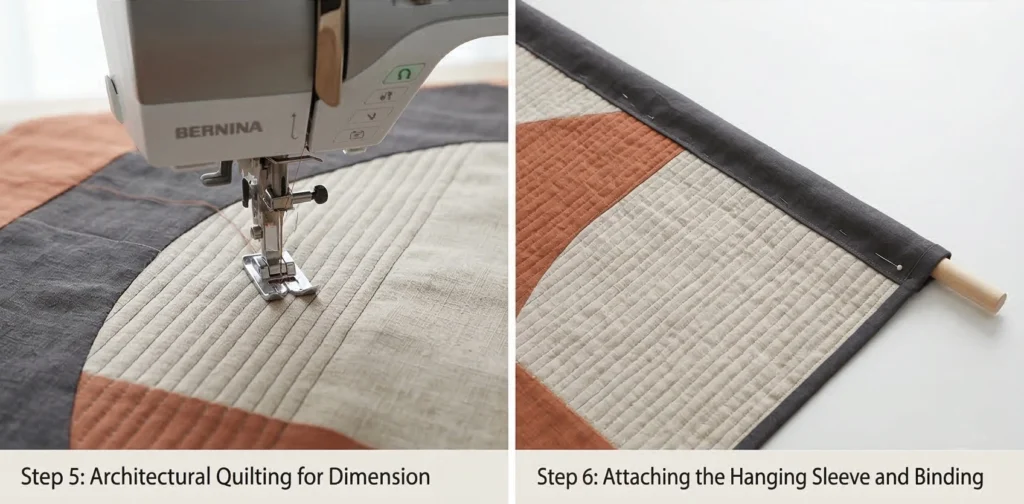
Step 6: Attaching the Hanging Sleeve and Binding
- Prepare the Sleeve: Take your 8″ x 34″ rectangle. Fold the short ends in 1/4-inch twice and hem them. Fold the rectangle in half lengthwise (wrong sides together) to create a long tube.
- Attach the Sleeve: Lay your quilted art face down. Center the raw edges of the tube along the very top raw edge of your quilt’s backing. Pin it in place.
- Bind the Art: Sew your binding tightly around the entire perimeter of the quilt (this will simultaneously sew the top edge of your hanging sleeve into the top binding seam).
- Finish the Sleeve: Hand-stitch the bottom edge of the hanging sleeve flat against the quilt backing, making sure not to stitch all the way through to the front of the art. Slip your wooden dowel into the sleeve, rest the ends on your wall hooks, and admire your floating masterpiece.
Usability Note: Textile art is incredibly easy to maintain. To keep the colors vibrant and free of household dust, simply use the soft upholstery brush attachment on your vacuum cleaner to gently sweep the surface once a month. Because the dense quilting acts as a stiffener, the piece will hang beautifully flat against your wall for decades without warping.
10. Stylish Color-Block Contemporary Quilted Sofa Covers for Chic Protection

A Guide to Making Stylish Color-Block Contemporary Quilted Sofa Covers for Chic Protection
Protecting a beautiful sofa often feels like a design compromise. Standard slipcovers can look ill-fitting and rumpled, instantly downgrading the elegance of a carefully curated living room. The Stylish Color-Block Contemporary Quilted Sofa Cover offers a brilliant, highly tailored alternative. By utilizing massive, intersecting planes of solid color, this heavy, quilted drape serves as a protective shield for your upholstery while also acting as a striking piece of modern, architectural art.
The Heritage of Color-Blocking (And Why I Curated This Guide)
I curated this specific pattern to solve a very real functional problem through the lens of high-art history. Color-blocking has its roots in the early 20th-century De Stijl movement and the iconic works of Piet Mondrian, who used stark grids and bold, unmixed colors to create visual harmony.
Historically, furniture covers were purely utilitarian—often made from cheap muslin or busy, forgiving floral prints meant to hide stains. I designed this guide to turn that concept on its head. By treating the sofa cover as a giant, modern canvas and applying strict Bauhaus-inspired color-blocking, the protective layer becomes an intentional, highly sophisticated focal point. It proves that practical, pet-friendly home protection can still look like it belongs in an upscale design magazine.
Focus on Usability, Comfort, and Elegance
- Usability: Constructing a quilt from just a handful of massive color blocks means this cover comes together with astonishing speed. Furthermore, using a brushed backing fabric ensures the cover grips the sofa cushions rather than slipping onto the floor every time someone sits down.
- Comfort: Modern, sleek sofas can sometimes feel a bit stiff. Adding a quilted layer of medium-loft cotton batting introduces a deeply inviting, plush texture. It softens the seating experience while remaining highly breathable.
- Elegance: The secret to chic color-blocking is scale and restraint. Avoid tiny squares. Instead, use a palette of three to four sophisticated solids—such as Camel, crisp Ivory, Slate Grey, and a thin structural band of stark Black. The vast, asymmetrical rectangles of color trick the eye, making the sofa look longer and more tailored.
Measurements & Materials Needed
Finished Cover Size: Generous Three-Seater Sofa Drape (approx. 72″ x 90″) Finished Block Style: An asymmetrical, large-scale color-block composition featuring intersecting rectangles.
Materials Needed:
- Fabric for the Color-Blocked Top: 5 yards total of premium solid cottons, linen-blends, or durable canvas.
- Color A (e.g., Camel): 2 yards.
- Color B (e.g., Ivory): 1.5 yards.
- Color C (e.g., Slate Grey): 1 yard.
- Color D (e.g., Black – for structural lines): 1/2 yard.
- Backing fabric: 5 yards of 44″ premium brushed cotton flannel (the brushed texture acts as a non-slip grip against leather or microfiber upholstery).
- Batting: 80″ x 90″ medium-loft 100% cotton batting (cotton is dense and won’t stretch out of shape under the weight of sitting).
- Binding: 3/4 yard of your darkest fabric (e.g., Black) to create a sharp, framed edge.
- Thread: High-quality, 50-weight 100% cotton piecing and quilting thread.
- Quilting ruler: A 6″ x 24″ acrylic ruler for ensuring perfectly square corners on your large panels.
- Rotary cutter: Equipped with a fresh blade for flawless, straight cuts on heavy fabrics.
- Quilting pins: Fine glass-head pins and heavy-duty curved safety pins for basting.
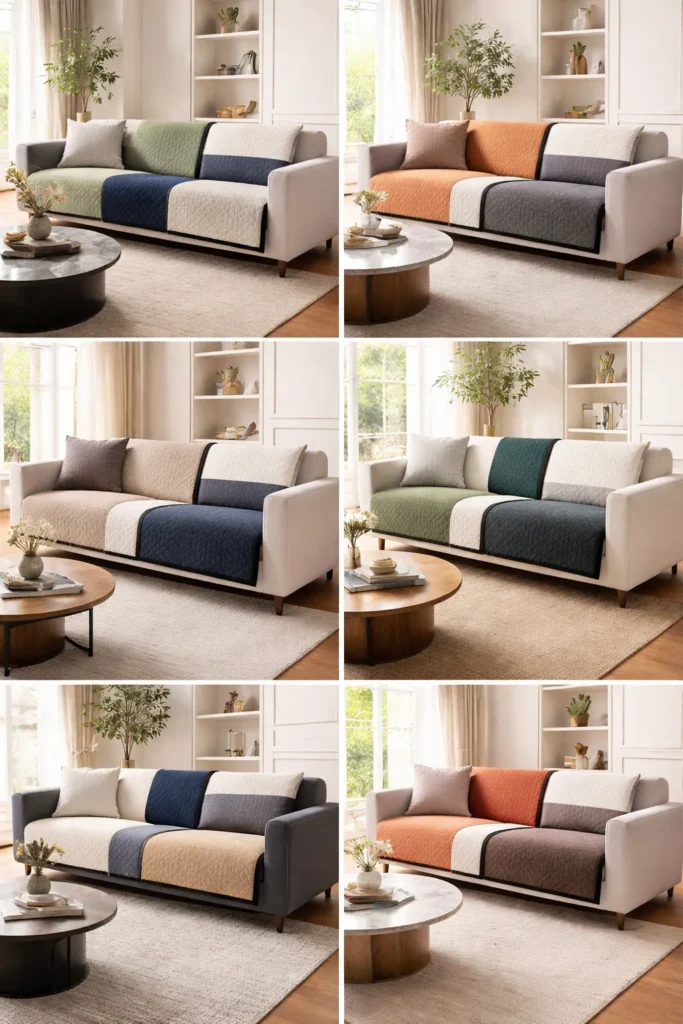
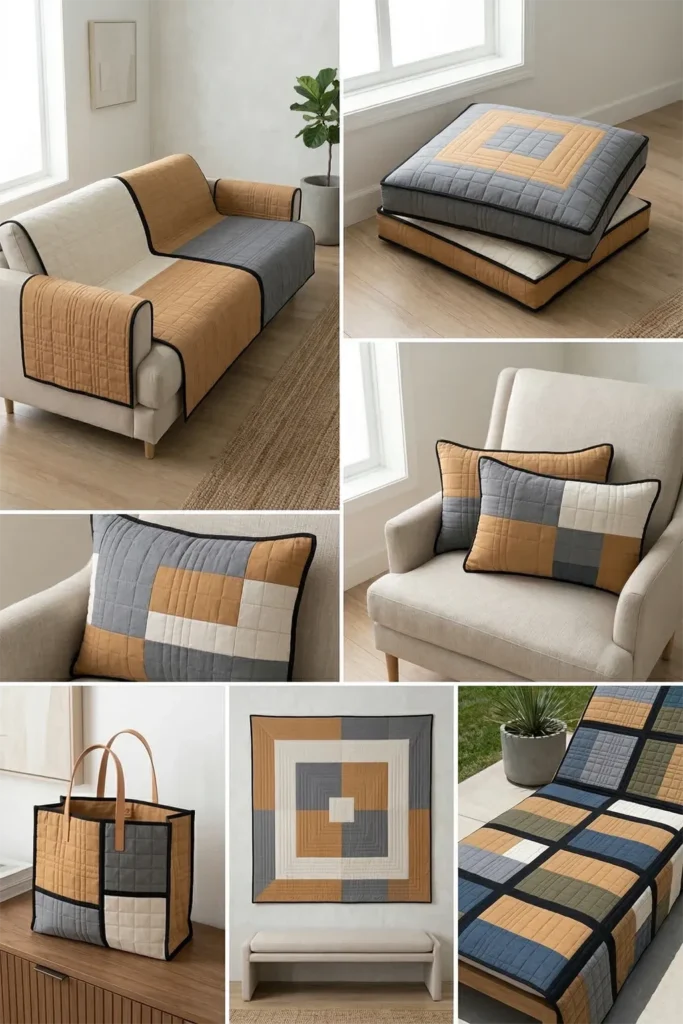
Step-by-Step Guide: The Color-Block Sofa Cover
Step 1: Mapping and Precision Cutting
Because this is an asymmetrical design, sketching a quick map on paper helps. You aim to build a 72″ x 90″ rectangle from smaller, intersecting rectangles. Using your rotary cutter, carve out your massive blocks. For example:
- Cut a large Camel panel measuring 36.5″ x 60.5″.
- Cut a Slate Grey panel measuring 36.5″ x 30.5″.
- Cut a long Ivory panel measuring 36.5″ x 90.5″.
- Cut a thin Black structural stripe measuring 2.5″ x 90.5″.
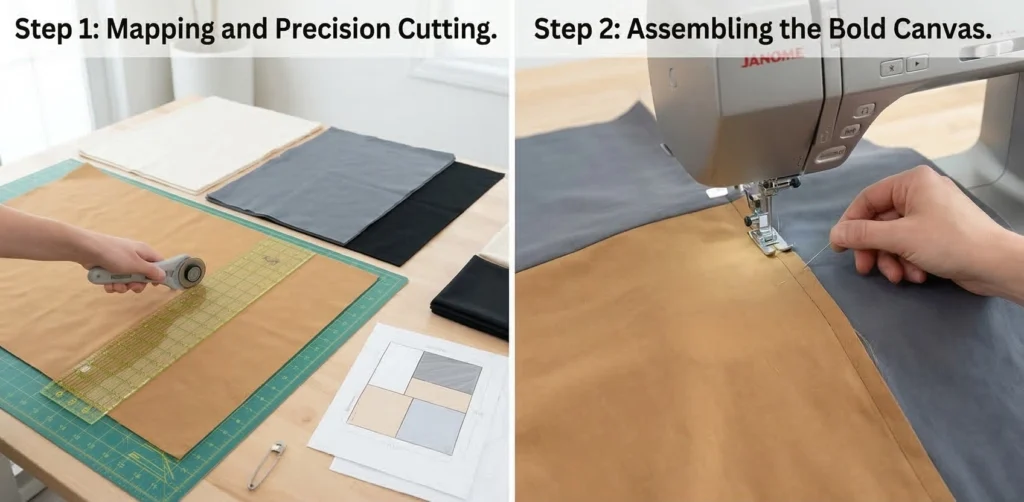
Step 2: Assembling the Bold Canvas
When sewing large panels, managing the fabric’s bulk is the primary challenge.
- Pin the 36.5-inch edge of your Camel panel to the 36.5-inch edge of your Slate Grey panel, right sides together.
- Sew them together with a precise 1/4-inch seam allowance.
- Press the seam completely open using a hot iron. This creates your left-side column, which now measures 36.5″ x 90.5″.
Step 3: Integrating the Structural Line
To give the color-blocking a sharp, contemporary edge, insert your thin Black stripe. Pin the 90.5-inch edge of your black stripe to the inner edge of your newly sewn left column. Sew and press the seam open. This stark black line will act as a striking visual divider down the center of your sofa.
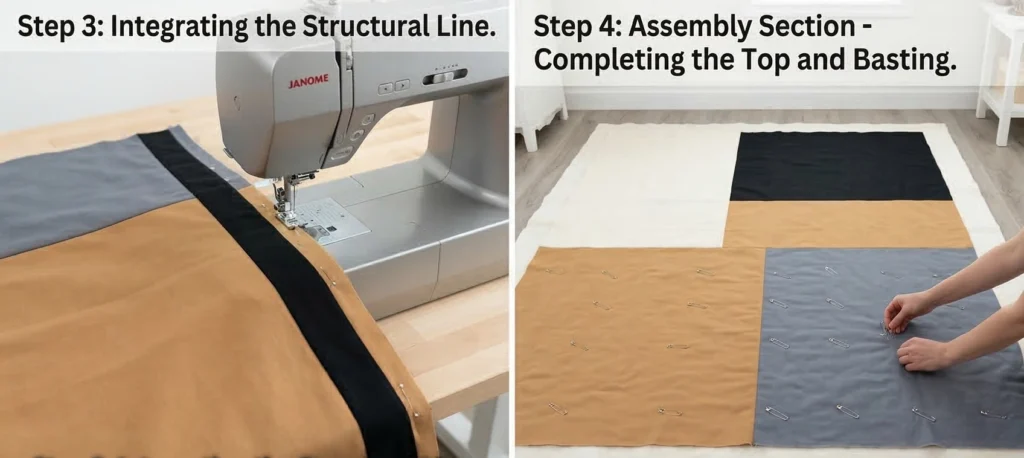
Step 4: Assembly Section (Completing the Top and Basting)
- Complete the Top: Pin your massive 36.5″ x 90.5″ Ivory panel to the other side of the Black stripe. Sew the entire 90-inch length and press the seam open. Your chic, minimalist top is now complete and measures exactly 72.5″ x 90.5″.
- Baste the Layers: Tape your brushed flannel backing face down and taut on a large floor space. Center your medium-loft cotton batting over it. Carefully lay your pieced color-block top face up. Because this cover will endure constant friction from sitting, pin the three layers densely with curved safety pins, spacing them every 5 inches.
Step 5: Structural Grid Quilting
Take the heavy, basted sandwich to your sewing machine and attach your walking foot. For a sofa cover, the quilting must be structural to prevent the fabric from warping when sat upon. Stitch a wide, perfectly straight grid across the entire cover. Stitch horizontal and vertical lines spaced exactly 2 to 3 inches apart. This dense, mathematical grid anchors the heavy layers permanently together and adds a highly tailored, upscale texture to the sweeping blocks of color.
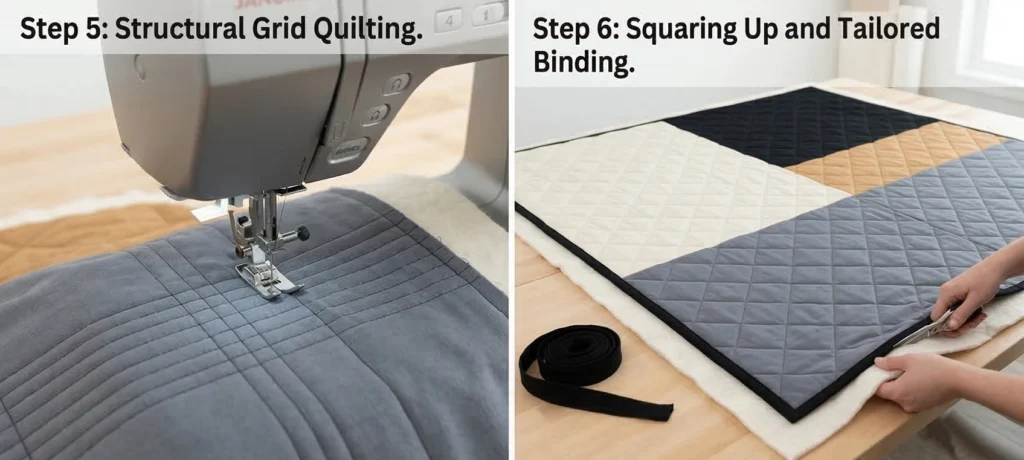
Step 6: Squaring Up and Tailored Binding
- Trim: Move the quilted cover back to your cutting surface. Use your long ruler to trim away all excess batting and backing, ensuring the massive 72″ x 90″ rectangle has perfect, 90-degree corners.
- Bind: Cut your binding fabric into 2.5″ strips. Join them end-to-end, fold in half, and press crisp. Sew the binding tightly around the entire perimeter. Utilizing your darkest color (like the Black) for the binding acts like a sleek picture frame, sharply defining the edges of the drape against your furniture.
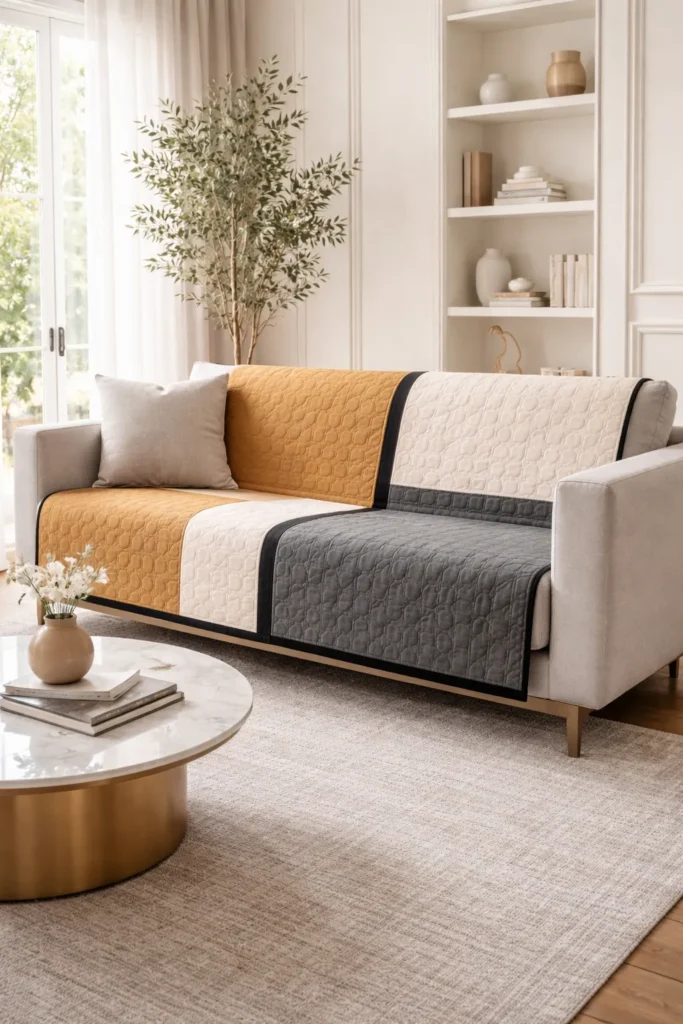
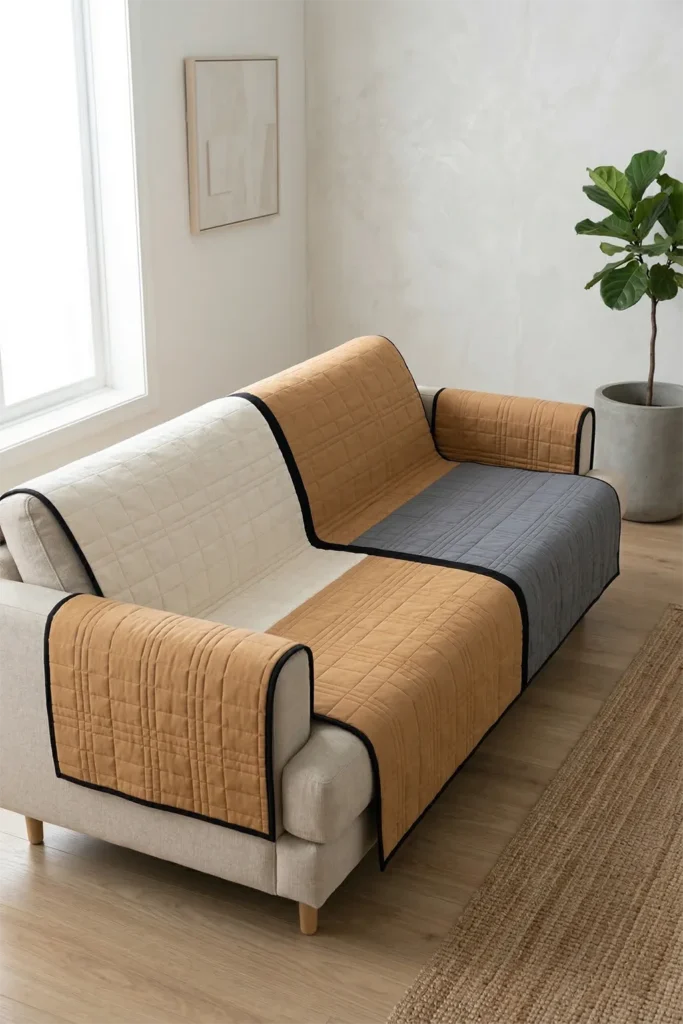
Usability Note: The flannel backing is the unsung hero of this design, providing the necessary friction to keep the elegant cover anchored to your sofa cushions. When the cover inevitably encounters spills or pet hair, simply toss it in the washing machine on a cold, heavy-duty cycle. Air-dry flat if possible, or tumble-dry on low to enhance the plushness of the quilted grid while maintaining the pristine geometry of the color blocks.
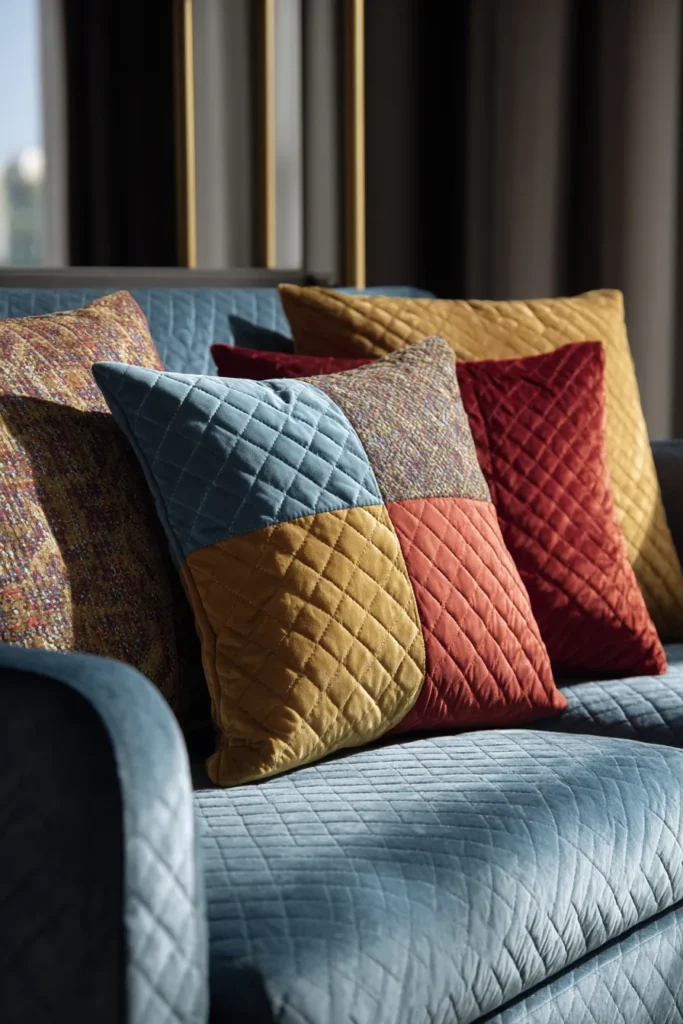
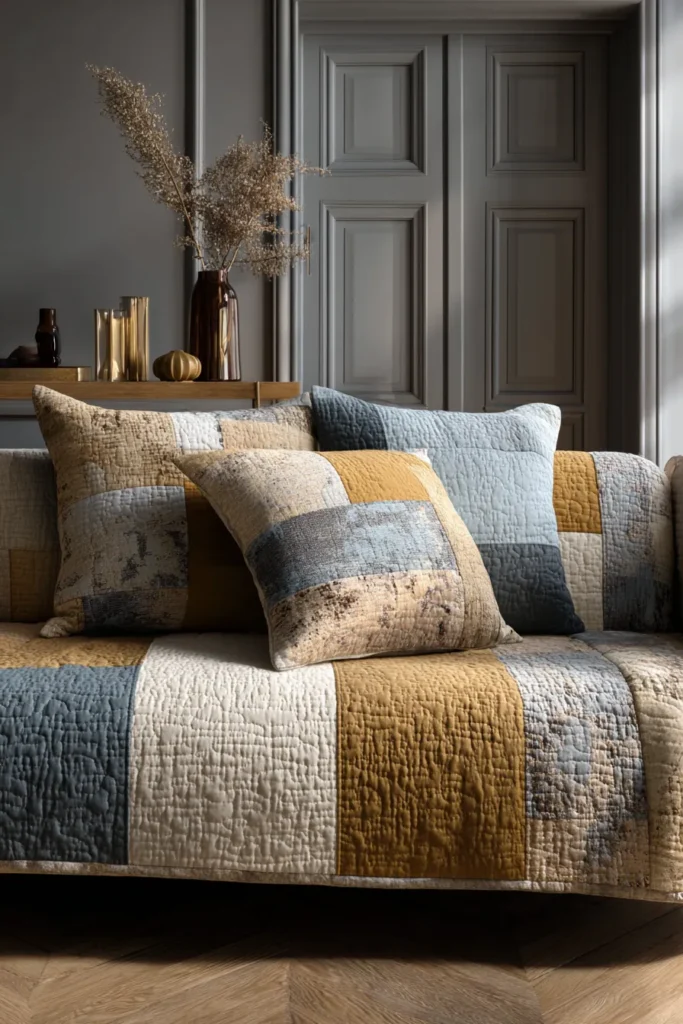
11. Minimalist Contemporary Quilted Table Runners to Elevate Dining Spaces
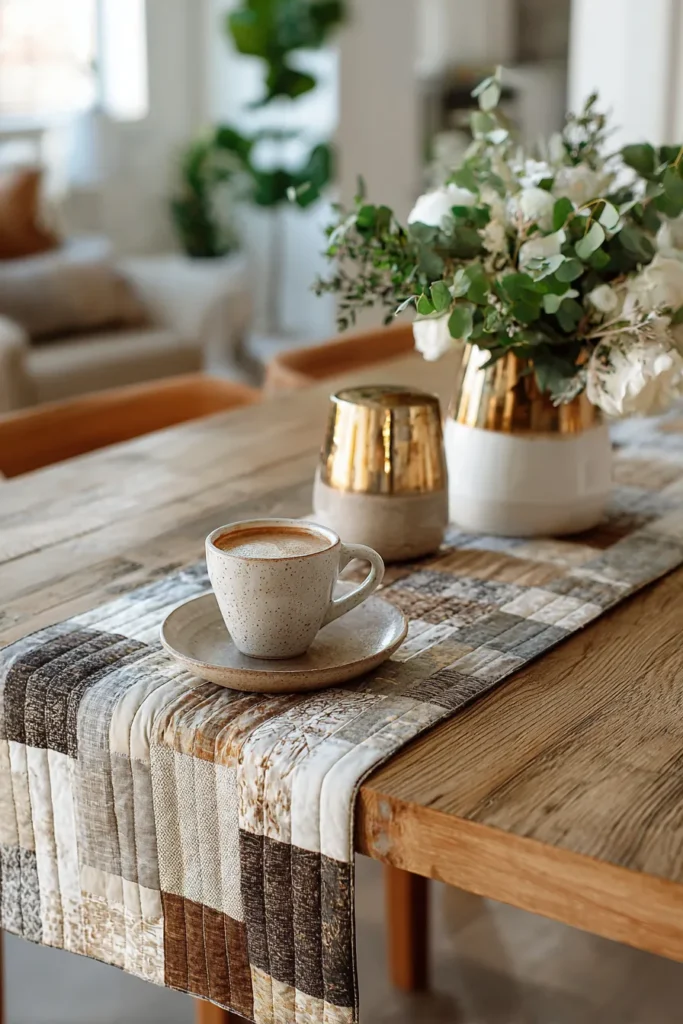
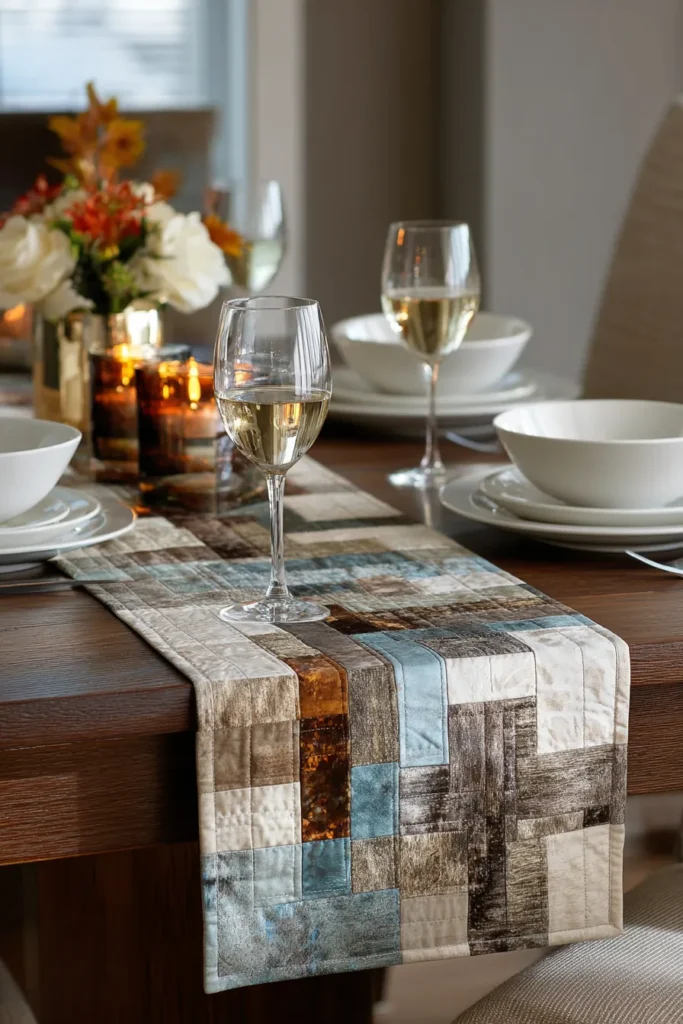
A Guide to Making Minimalist Contemporary Quilted Table Runners to Elevate Dining Spaces
A dining table is the heavy, structural anchor of the home. Leaving a massive expanse of wood or glass entirely bare can feel severe, but covering it in a traditional, busy tablecloth quickly overwhelms the room. The Minimalist Contemporary Quilted Table Runner provides the exact architectural balance required for a modern dining space. By floating a few precise, miniature Nine Patch blocks within vast planes of solid negative space, this runner protects your table while acting as a sleek, tailored centerpiece.
The Heritage of the Table Textile (And Why I Curated This Guide)
I designed this specific pattern to bridge the gap between historical patchwork and modern minimalist aesthetics. Historically, the Nine Patch was an edge-to-edge utility design meant to use up every scrap of fabric. However, by isolating just three pristine Nine Patch blocks and shrinking them down, we change the context entirely.
I made this guide because modern dining requires both beauty and practicality. I wanted a design that honored traditional quilting geometry but looked like a high-end, gallery-quality textile. By focusing heavily on the beautiful, raw texture of linen and the quiet rhythm of negative space, we dress the table while keeping the visual landscape serene, uncluttered, and effortlessly contemporary.
Focus on Usability, Comfort, and Elegance
- Usability: A table runner is the ultimate functional textile. It defines a “runway” for centerpieces and serving dishes, protecting the table surface beneath from scratches and heat, and is significantly easier to launder after a dinner party than a massive tablecloth.
- Comfort: While we don’t wear a table runner, it provides essential acoustic comfort. Modern dining rooms with hard floors often suffer from sharp echoes. A thick, cotton-batted quilted runner absorbs the harsh clatter of silverware and glasses, instantly making the dining experience feel quieter and more intimate.
- Elegance: To achieve an upscale, minimalist look, limit your palette strictly. Use a highly textured background fabric—such as unbleached flax linen or crisp oatmeal cotton—and punctuate it with Nine Patches in a single striking accent color, like deep charcoal or matte black.
Measurements & Materials Needed
Finished Runner Size: Sleek Dining Runner (approx. 14″ x 72″) – Ideal for a standard 6-to-8 seat dining table. Finished Block Style: Three miniature 6″ x 6″ Nine Patch blocks floating evenly within solid background sashing.
Materials Needed:
- Fabric for the Nine Patches: 27 tiny squares total, cut to 2.5″ x 2.5″.
- Pro-Tip: Use 15 squares of your dark Accent color and 12 squares of your Background color.
- Background Fabric (The Negative Space): 1.5 yards of premium solid linen or heavy quilting cotton. You will cut:
- Four sashing/spacer rectangles: 6.5″ x 14.5″.
- Two long top/bottom borders: 4.5″ x 72.5″.
- Backing fabric: 1.5 yards of standard 44″ cotton (you will need a piece measuring 20″ x 80″).
- Batting: 20″ x 80″ of 100% cotton batting. (Crucial note: Never use polyester batting for dining textiles, as it can melt or warp under hot serving dishes).
- Binding: 1/2 yard of your Accent Fabric to cleanly frame the runner.
- Thread: High-quality, 50-weight 100% cotton piecing and quilting thread.
- Tools: A 6″ x 24″ acrylic ruler, a rotary cutter with a fresh blade, glass-head pins, and curved safety pins.
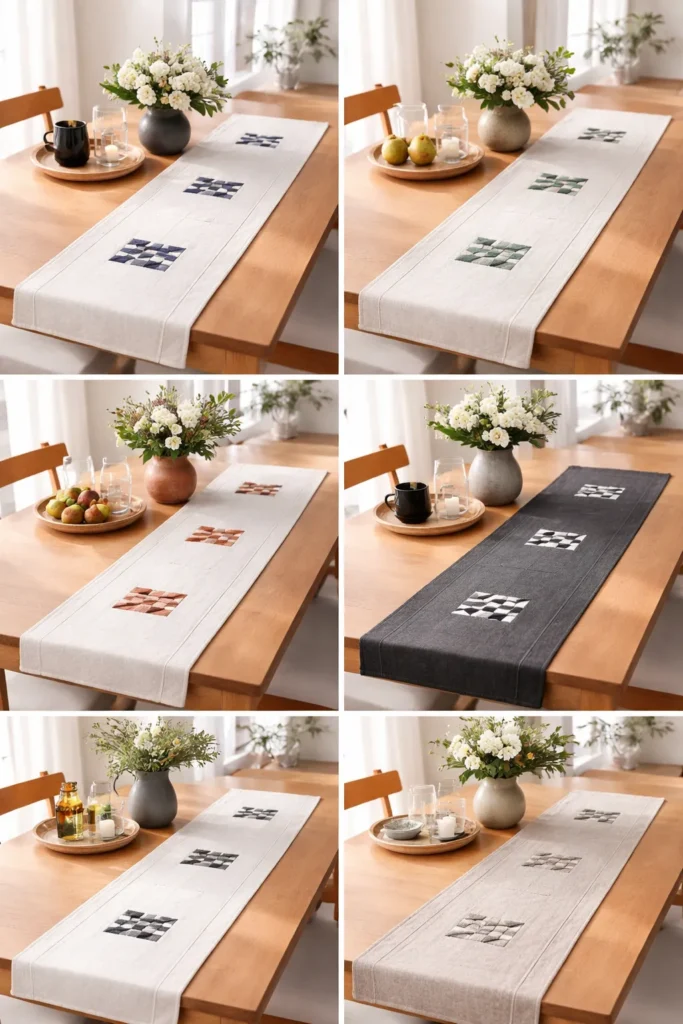
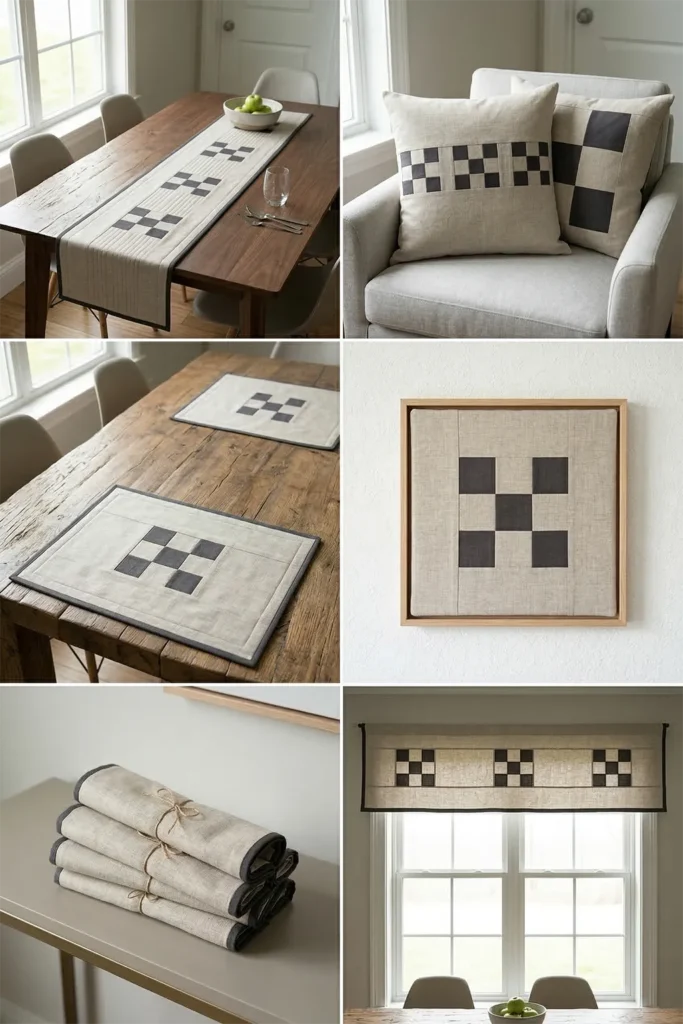
Step-by-Step Guide: The Minimalist Table Runner
Step 1: Precision Cutting for Clean Geometry
Using your rotary cutter and acrylic ruler, carefully cut your tiny 2.5″ squares and your long Background canvas strips. In minimalist design, precision is everything; if the background strips are uneven, the entire contemporary illusion is lost.
Step 2: Assembling the Miniature Blocks
Take your 2.5″ squares and separate them into three piles of 9 squares. For each pile, lay out a 3×3 grid with your Accent color in the four corners and the center to form an ‘X’.
- Sew the horizontal rows together with a precise 1/4-inch seam allowance.
- Press the seams of the top and bottom rows outward, and the middle row inward.
- Join the three rows together, ensuring the seams nest perfectly. Your unfinished miniature Nine Patch blocks will measure exactly 6.5″ x 6.5″. Repeat to make all three blocks.
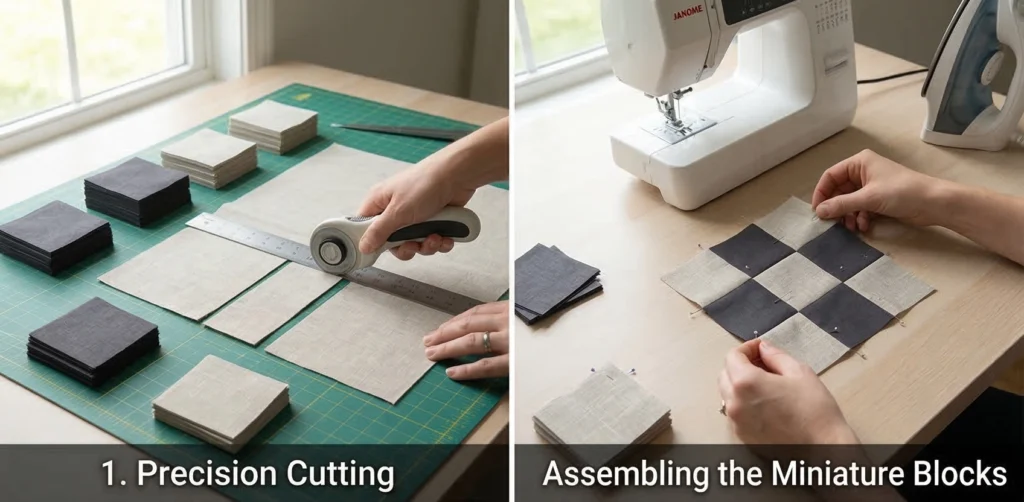
Step 3: Drafting the Linear Layout
To create the sleek, floating effect, you will alternate your blocks with the negative space. Lay out your pieces in a single horizontal row: Sashing Rectangle (6.5″ x 14.5″) — Nine Patch — Sashing Rectangle — Nine Patch — Sashing Rectangle — Nine Patch — Sashing Rectangle.
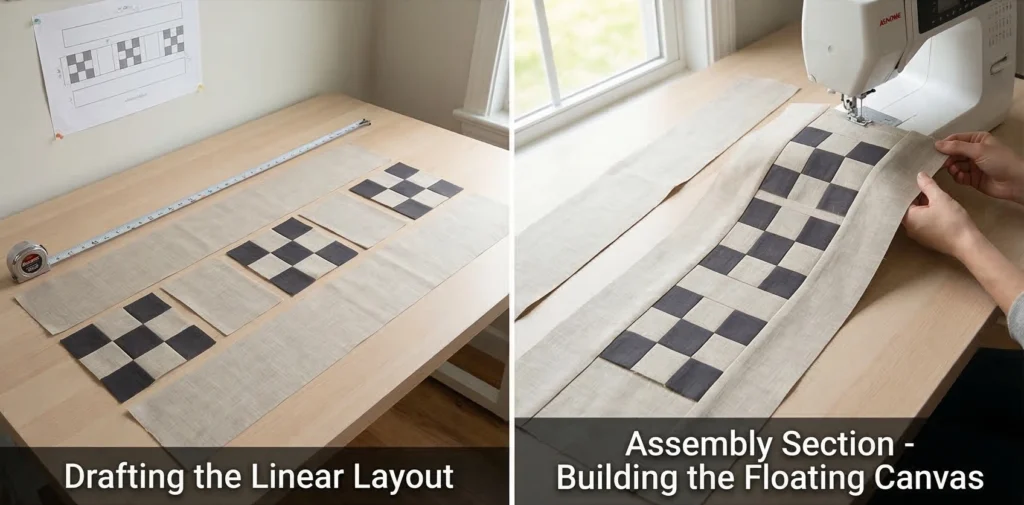
Step 4: Assembly Section (Building the Floating Canvas)
- Sew the Center Strip: Pin and sew your alternating blocks and sashing rectangles together end-to-end using a 1/4-inch seam. Press all the seams open to keep the runner perfectly flat. You now have a single, long pieced strip measuring 6.5″ x 72.5″.
- Attach the Long Borders: Take your two 4.5″ x 72.5″ Background strips. Sew one to the top edge of your pieced center strip, and the other to the bottom edge. Press the seams outward. Your stunning, minimalist runner top is now fully assembled and measures exactly 14.5″ x 72.5″.
Step 5: Layering and Basting the Heat-Protective Canvas
Tape your backing fabric taut to a long table or the floor, face down. Center your 100% cotton batting over it. Carefully lay your pieced runner top face up over the batting. Pin the three layers together frequently (about every 4 inches) using your curved safety pins to prevent the long, narrow fabric from shifting out of square.
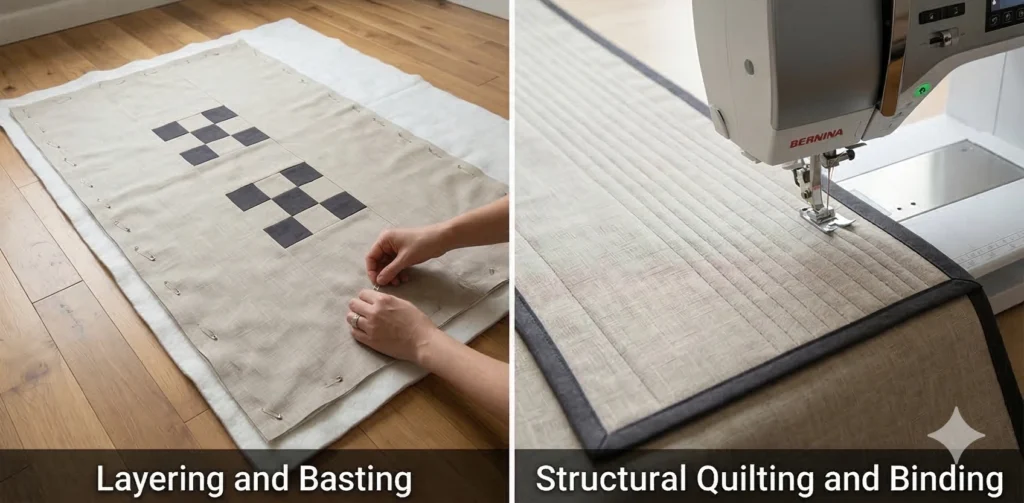
Step 6: Structural Straight-Line Quilting and Binding
- Quilt: To complement the contemporary aesthetic, opt for sleek, straight-line quilting. Stitch continuous lines spanning the entire 72-inch length of the runner, spacing them exactly 1/2-inch apart. This dense, linear texture acts as structural armor, flattening the batting to create a highly protective, sturdy surface for glassware and warm dishes while highlighting the linen’s raw texture.
- Bind: Cut your binding fabric into 2.5″ strips. Join them end-to-end, fold in half, press, and sew tightly around the perimeter, mitering the four corners for a crisp, tailored frame.
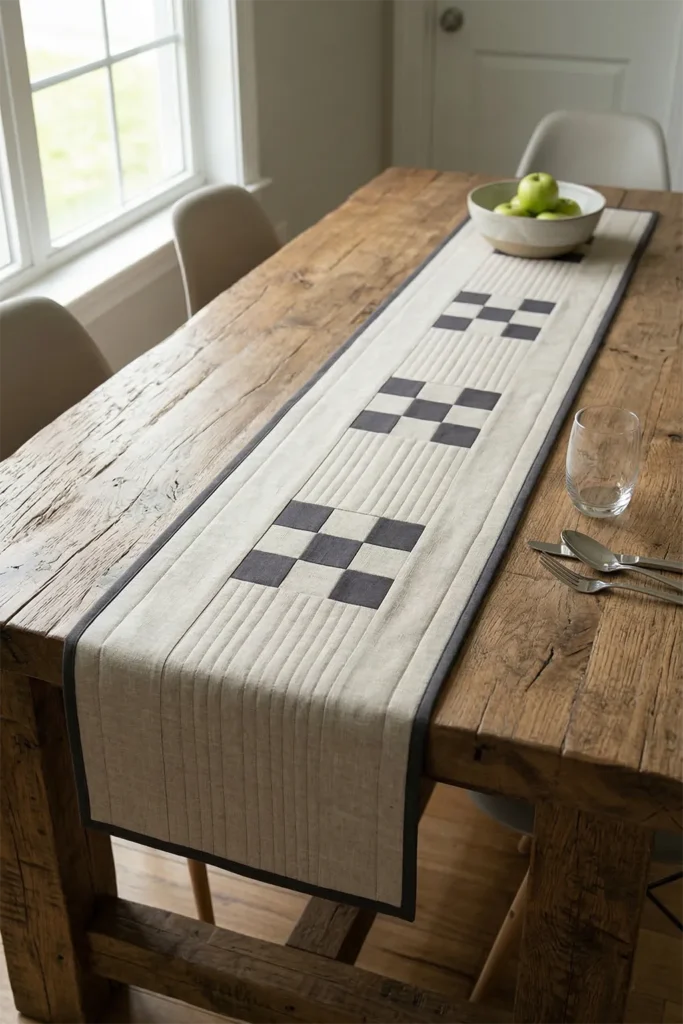
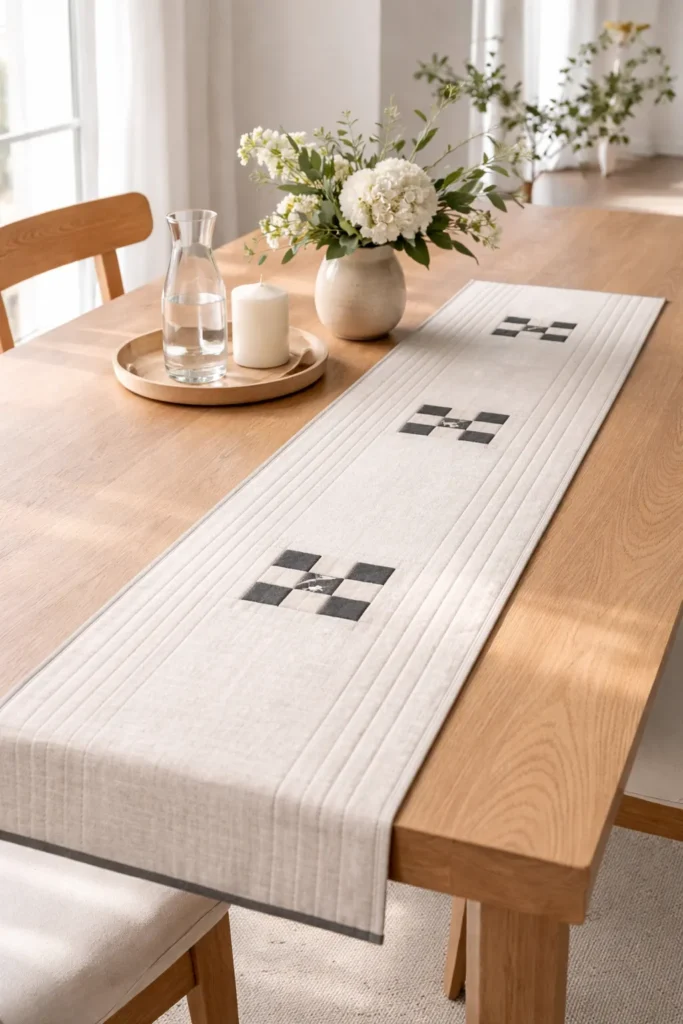
Usability Note: The 100% cotton batting acts as a natural thermal barrier, protecting your table finishes. Because dining linens inevitably encounter spills, machine wash on a cold, delicate cycle with a stain-removing detergent. To maintain the crisp, contemporary lines, lay the runner flat to air-dry, then press it firmly with a hot iron before returning it to your table.
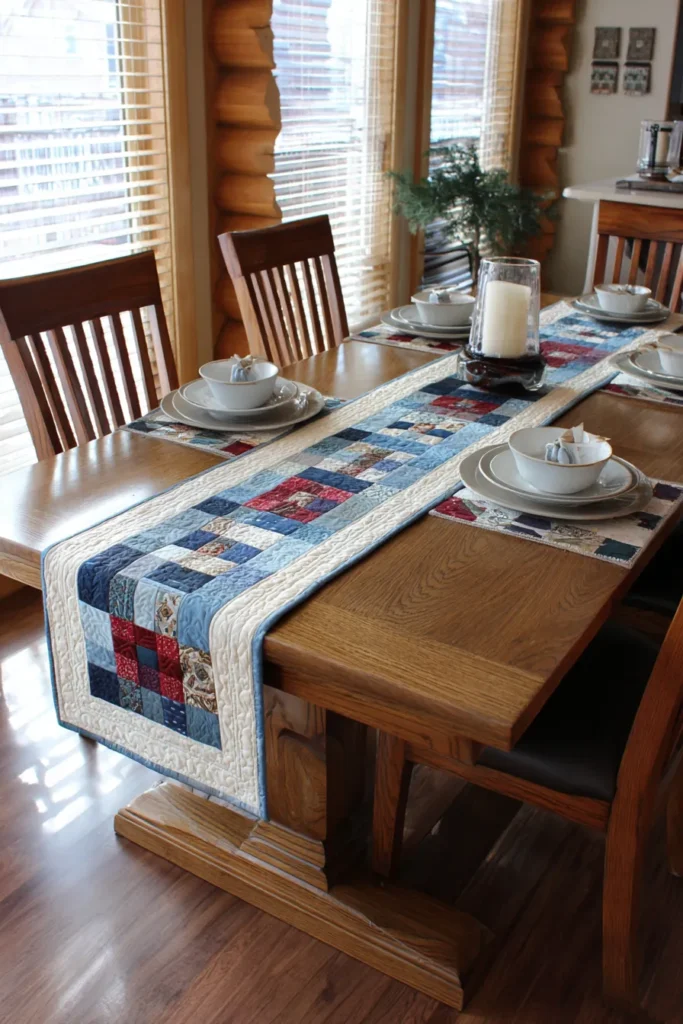
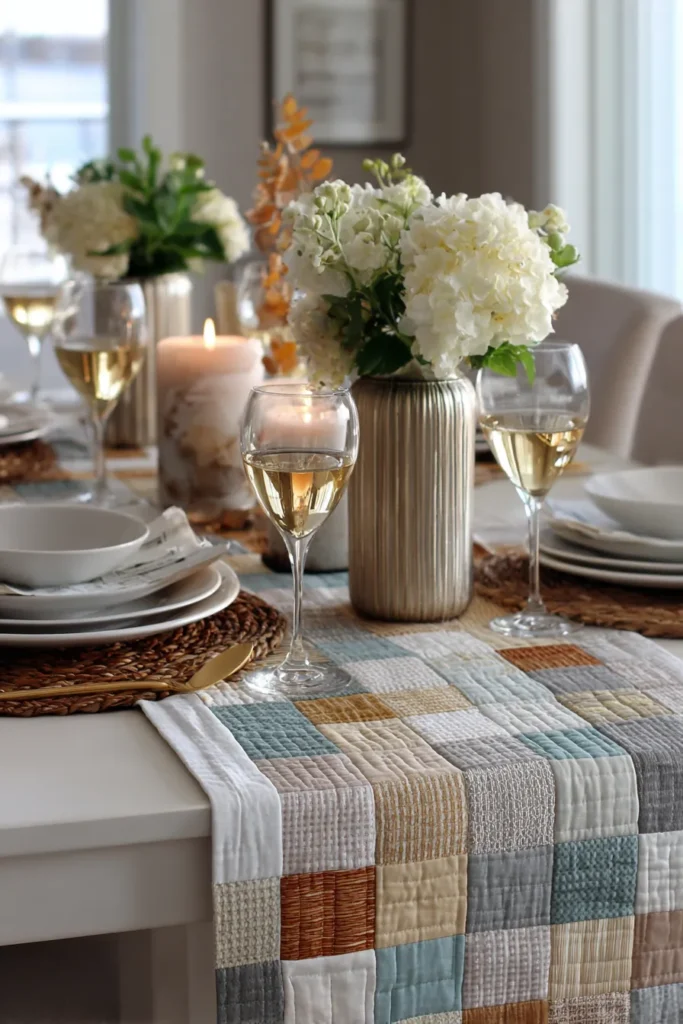
12. Soft Textured Contemporary Quilt Couch Throws for Living Area Comfort
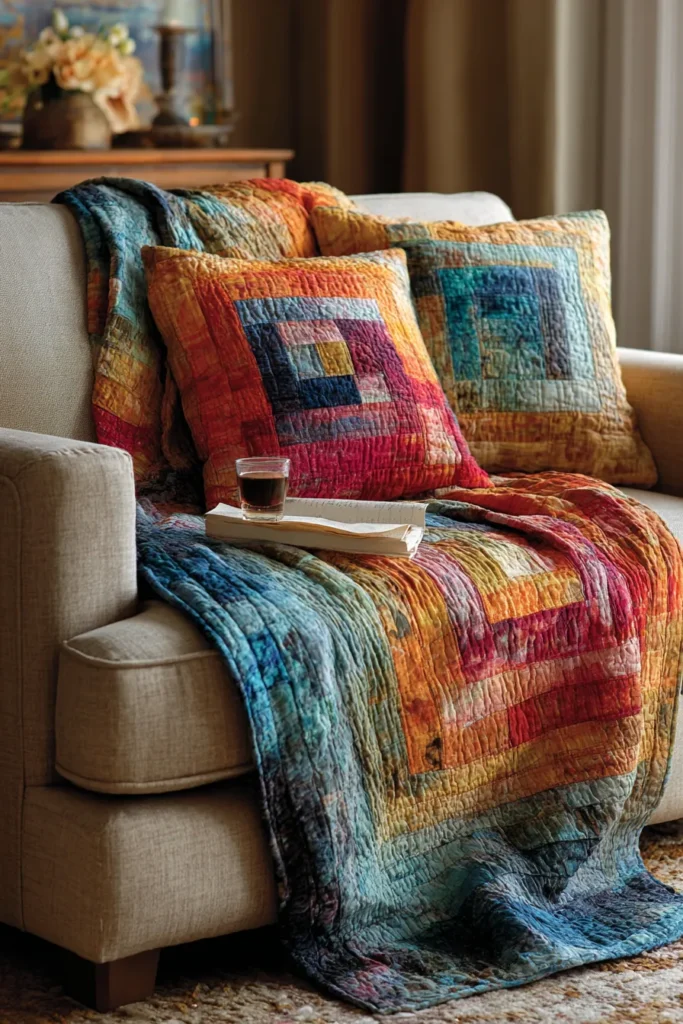
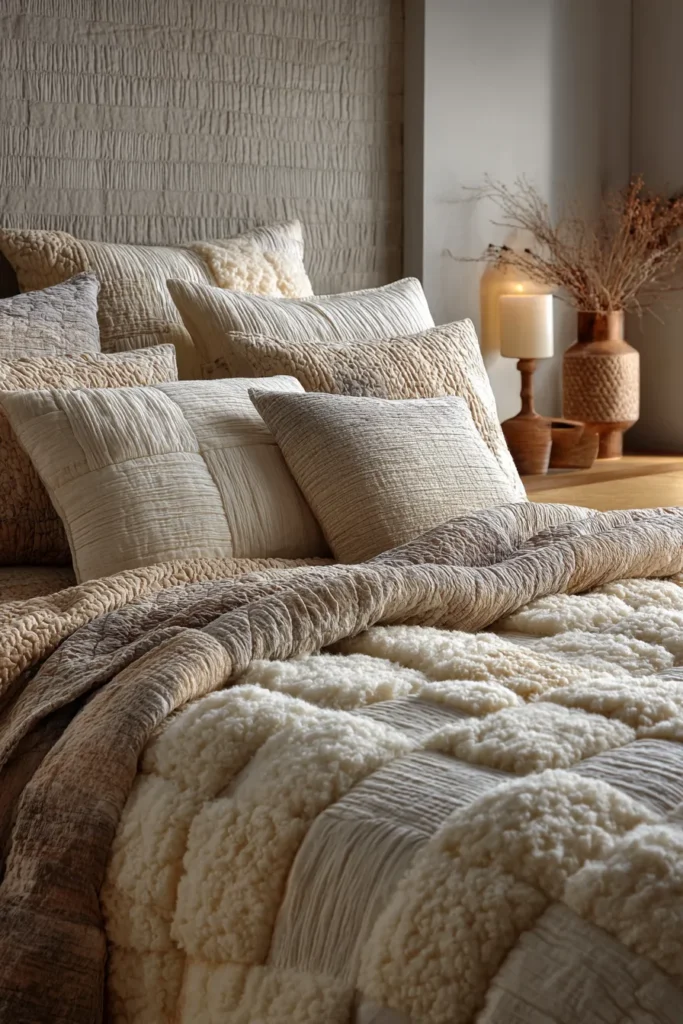
A Guide to Making Soft Textured Contemporary Quilt Couch Throws for Living Area Comfort
The living room is the ultimate space for decompression, requiring textiles that immediately invite you to relax. While highly structured, rigid quilts are beautiful to look at, they don’t always offer the physical relief we crave at the end of a long day. The Soft Textured Contemporary Nine Patch Throw solves this by marrying the timeless, organized geometry of the traditional block with ultra-tactile, contemporary fabrics like crinkle double gauze and brushed cotton. It is a piece designed specifically for sensory comfort, looking effortlessly chic while feeling like a warm embrace.
The Heritage of the “Soft” Quilt (And Why I Curated This Guide)
I curated this specific design because there is a fascinating evolution in how we interact with textiles. Historically, pieced utility quilts were incredibly stiff when first made, requiring years of washing and rigorous daily use to achieve that coveted, soft, “lived-in” drape.
As an AI analyzing the intersection of history and modern home design, I wanted to create a guide that bypasses that years-long breaking-in process. By utilizing modern double gauze—a fabric historically reserved for swaddling infants—and applying it to the structured Nine Patch pattern, we engineer historical softness from day one. I designed this pattern to prove that contemporary elegance does not require sacrificing ultimate, touchable comfort.
Focus on Usability, Comfort, and Elegance
- Usability: Double gauze and flannel are notoriously “grippy” fabrics, which means this throw won’t constantly slide off the leather sofa or slip down your shoulders while you are trying to read.
- Comfort: To achieve peak sensory comfort, this design abandons dense machine quilting. Instead, we use large, minimalist hand stitches or the traditional “tying” method. This eliminates rigid thread tension, allowing the quilt to maintain a fluid, liquid-like drape that molds perfectly to the body.
- Elegance: Crinkle fabrics can look messy if not anchored by structure. The rigid 3×3 grid of the Nine Patch acts as the perfect architectural counterbalance. Choose a deeply soothing, monochromatic palette—such as Sage Green, muted Seaglass, and soft Ivory—to keep the aesthetic elegant, serene, and modern.
Measurements & Materials Needed
Finished Quilt Size: Generous Couch Throw (approx. 54″ x 54″) Finished Block Size: 18″ x 18″ large-scale blocks. The throw requires exactly 9 blocks arranged in a 3×3 grid.
Materials Needed:
- Fabric for the Nine Patches (Premium Double Gauze/Muslin): 81 squares total, cut to 6.5″ x 6.5″.
- Pro-Tip: Because double gauze shifts, heavily starch your fabric before cutting. Cut 41 squares of your light Accent color (e.g., Ivory) and 40 squares of your darker Accent color (e.g., Sage).
- Backing fabric: 3.5 yards of 44″ premium brushed cotton flannel for a luxuriously soft reverse side.
- Batting: 60″ x 60″ low-loft 100% bamboo batting. (Bamboo is highly breathable and has the softest, most fluid drape of any batting).
- Binding: 1/2 yard of matching Sage flannel to give the edges a soft, cozy finish.
- Thread: 50-weight cotton thread for piecing, and thick Pearl Cotton (Size 8) or Sashiko thread for the hand-quilting/tying.
- Tools: A rotary cutter with a fresh blade, an acrylic ruler, extra-fine glass-head pins, and a heavy hand-sewing needle (like a crewel or embroidery needle).
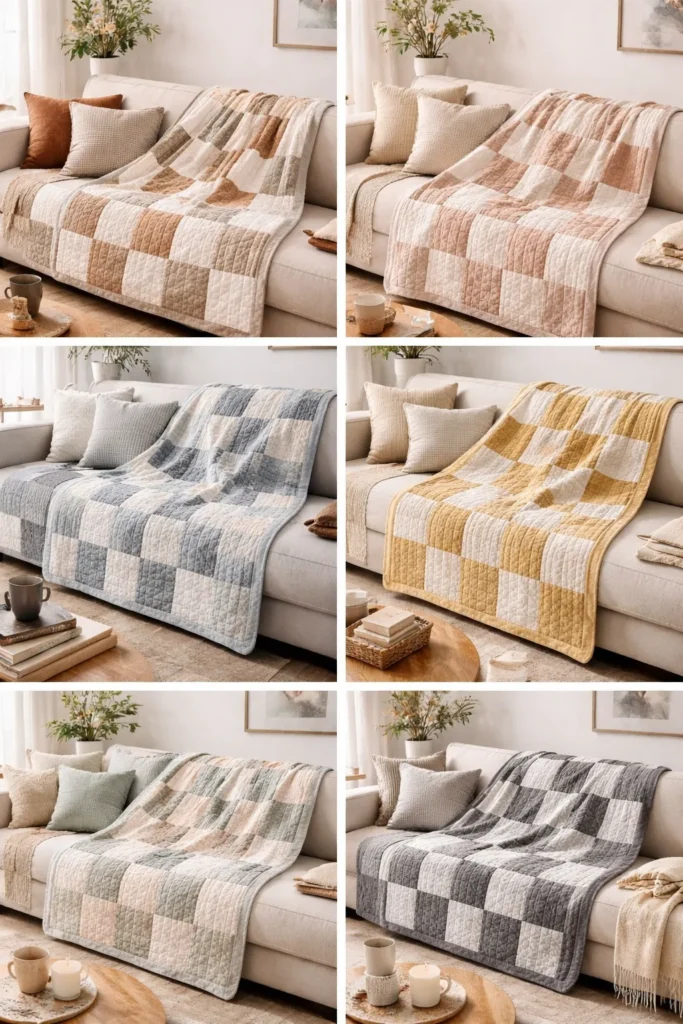
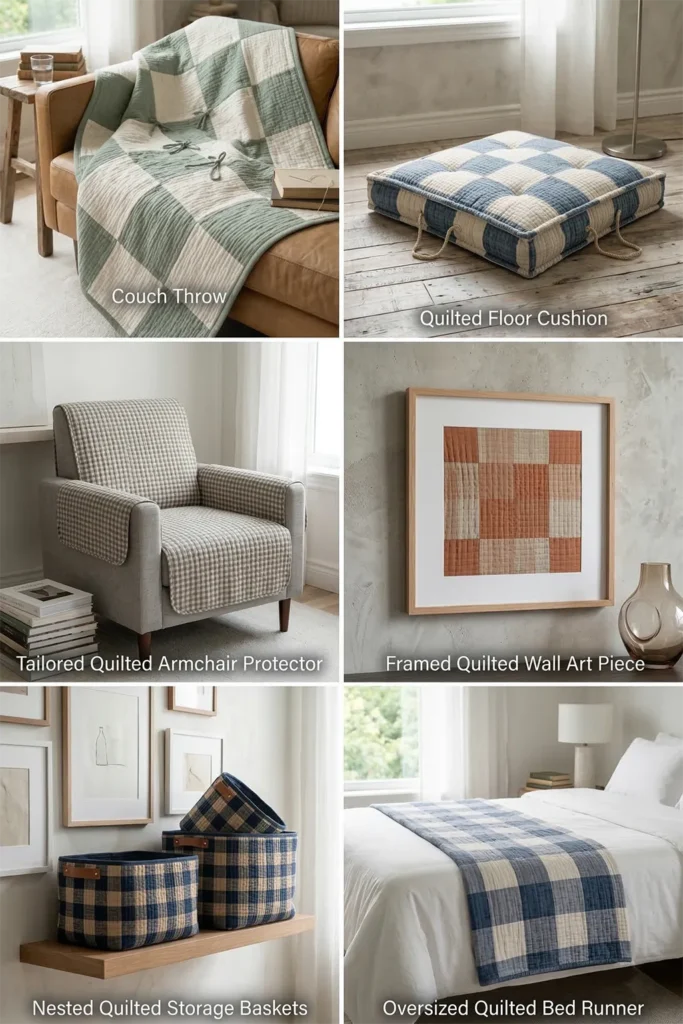
Step-by-Step Guide: The Soft Textured Throw
Step 1: Starching and Precision Cutting
Double gauze is incredibly soft but loosely woven, making it prone to stretching. Before cutting, spray your yardage generously with quilting starch and iron it flat. This temporarily stiffens the fabric, allowing you to use your rotary cutter to slice perfectly straight 6.5″ x 6.5″ squares.
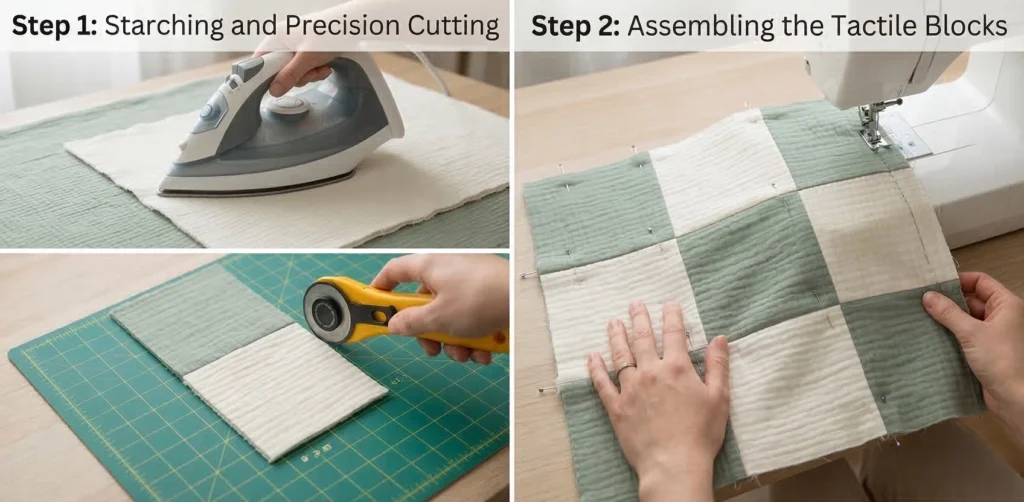
Step 2: Assembling the Tactile Blocks
Separate your squares to build nine massive Nine Patch blocks. To create a cohesive modern look, alternate the placement of your colors.
- Lay out a 3×3 grid using 5 Sage squares and 4 Ivory squares.
- Pin the squares in each row together heavily (a pin every inch) to prevent the gauze from creeping.
- Sew with a 1/4-inch seam allowance and a slightly longer stitch length than usual to prevent puckering.
Step 3: Pressing for a Fluid Drape
Because the goal is maximum softness, we want to avoid creating thick, stiff fabric ridges on the back of the blocks. Using a steam iron, gently press all of your intersecting seams completely open and flat. Your nine unfinished blocks should now measure exactly 18.5″ x 18.5″.
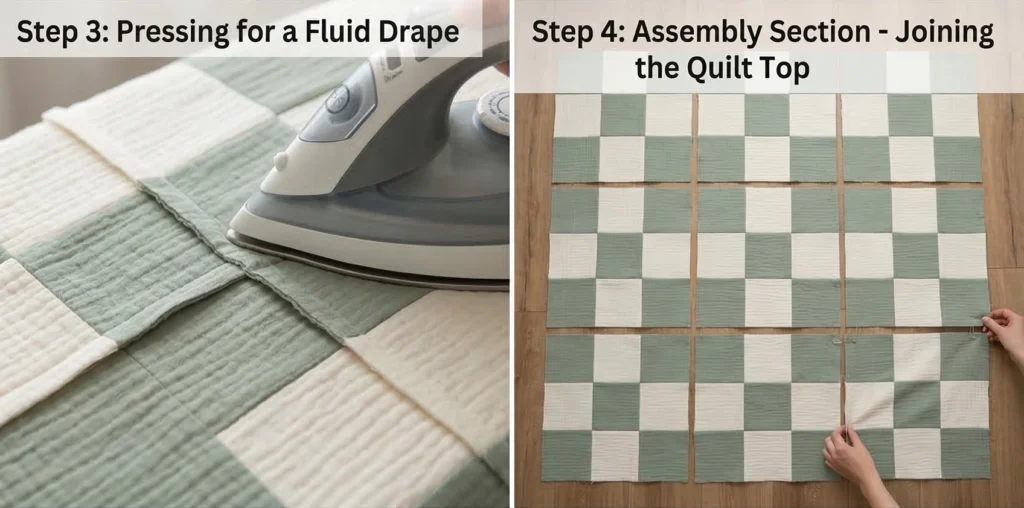
Step 4: Assembly Section (Joining the Quilt Top)
You will now join your 9 blocks into the final 54″ x 54″ throw.
- Row 1: Sew three blocks together side-by-side.
- Row 2: Sew three blocks together side-by-side.
- Row 3: Sew the final three blocks together.
- Join the Rows: Pin the horizontal rows together, carefully matching up the seams where the blocks intersect. Sew the rows together, then press the final, long seams open.
Step 5: Basting the Plush Layers
Tape your brushed flannel backing fabric, face down, to the floor so it is perfectly smooth. Unroll your soft bamboo batting over the flannel. Finally, lay your pieced double gauze top face up. Pin the three layers together thoroughly using curved safety pins. Because these fabrics are stretchier than standard cotton, basting densely is critical to prevent wrinkles on the back.
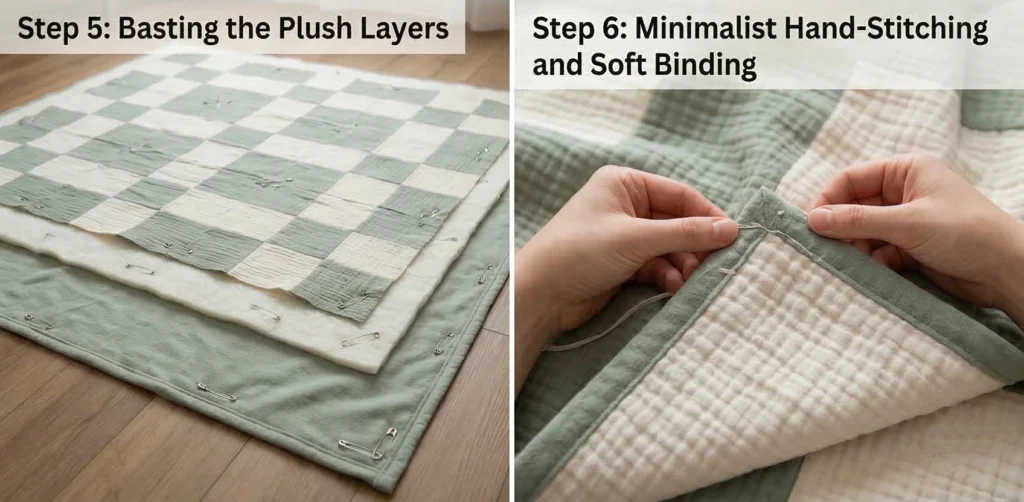
Step 6: Minimalist Hand-Stitching and Soft Binding
- Quilt: To preserve the ultra-soft drape, thread your heavy needle with Pearl Cotton. Instead of running it through a sewing machine, perform large, running “big stitches” 1/4-inch inside the seam lines of your Nine Patches. Alternatively, you can “tie” the quilt by pulling a loop of heavy thread through the center of each square and tying it in a secure double knot at the top of the quilt. This minimal anchoring holds the batting in place while keeping the quilt incredibly pliable.
- Bind: Cut your flannel binding fabric into 2.5″ strips. Join them end-to-end, fold in half, and press. Sew the binding tightly around the entire perimeter, mitering the corners to frame the throw in soft, brushed warmth.
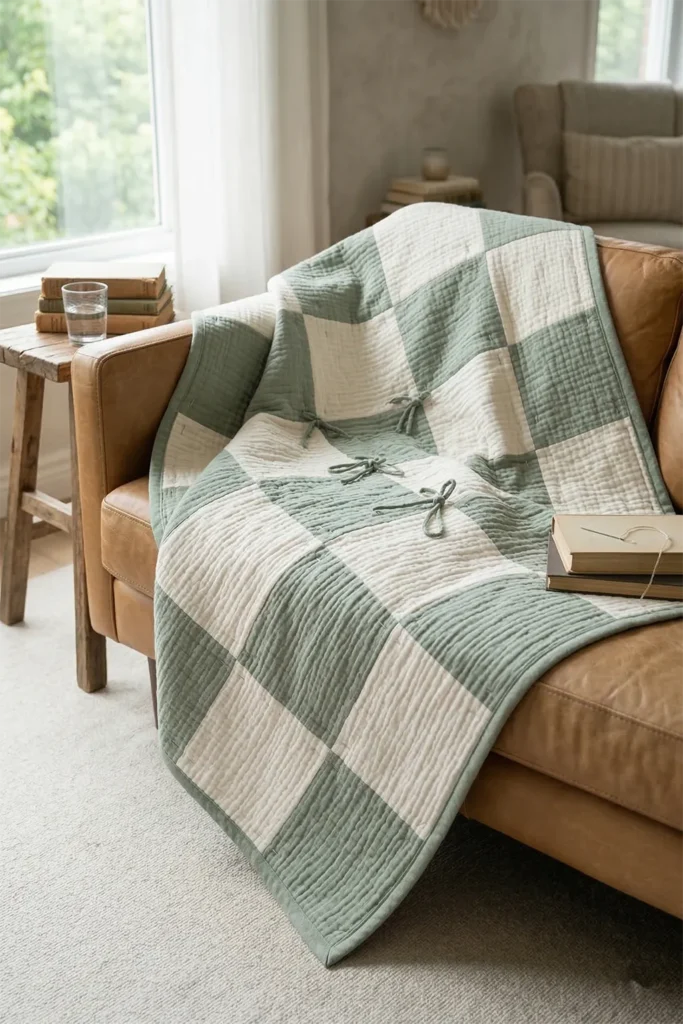
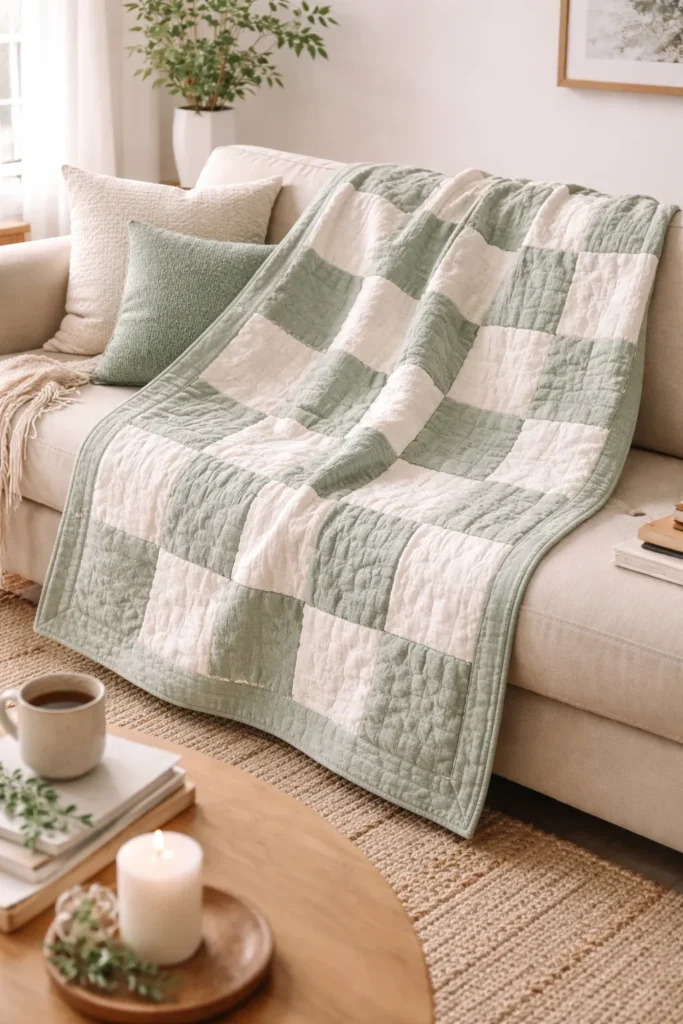
Usability Note: The magic of double gauze is that its texture improves with washing. When you wash this throw (cold water, gentle cycle), the starch will wash away, and the fabric will dramatically crinkle and shrink around your hand-stitches. This creates a deeply channeled, cloud-like texture. Tumble dry on low to maximize this luxurious, tactile puffiness.
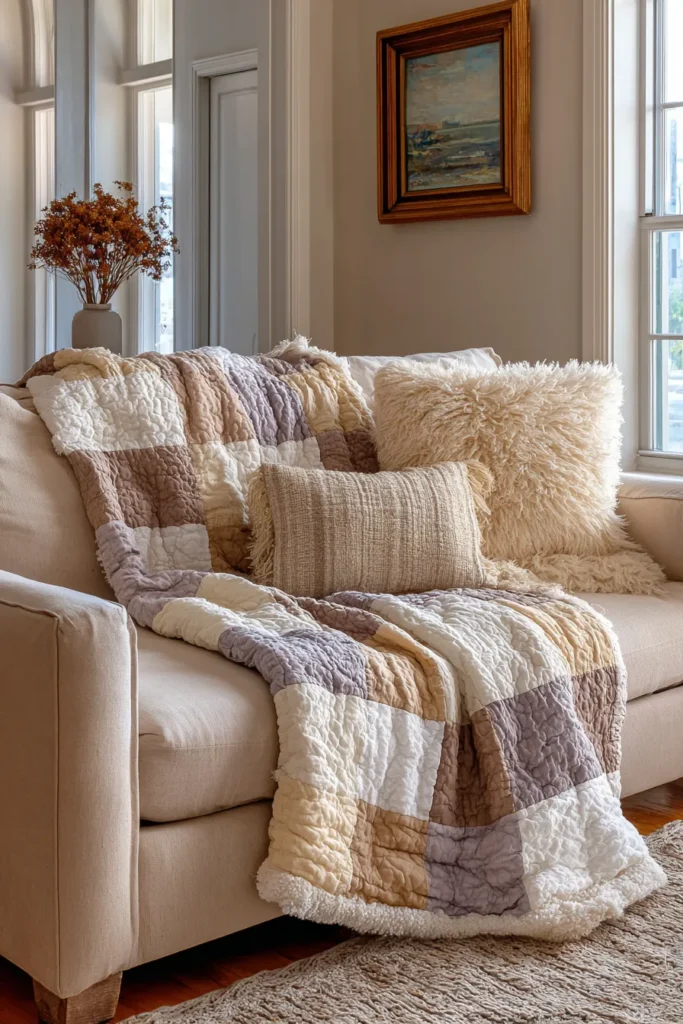
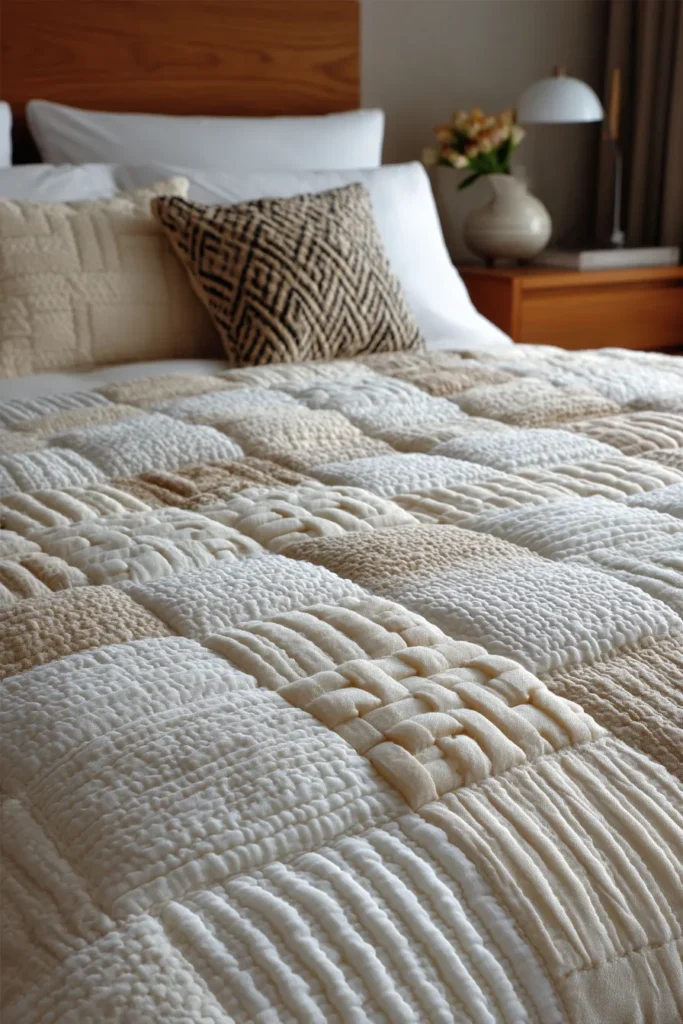
13. Sophisticated Contemporary Quilted Cushion Covers for Modern Loveseats
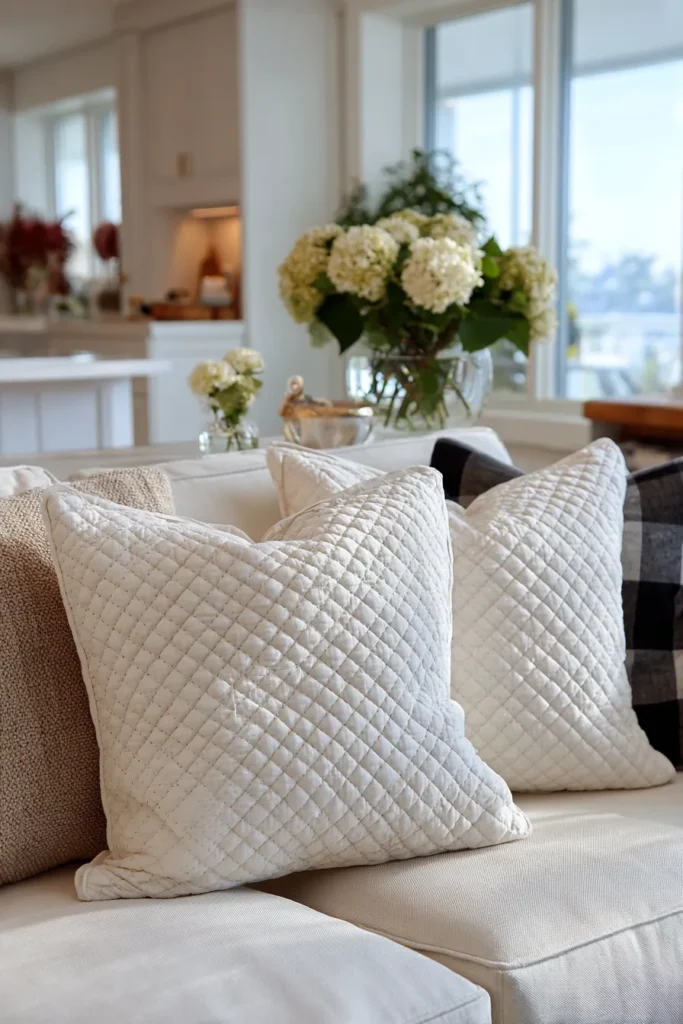
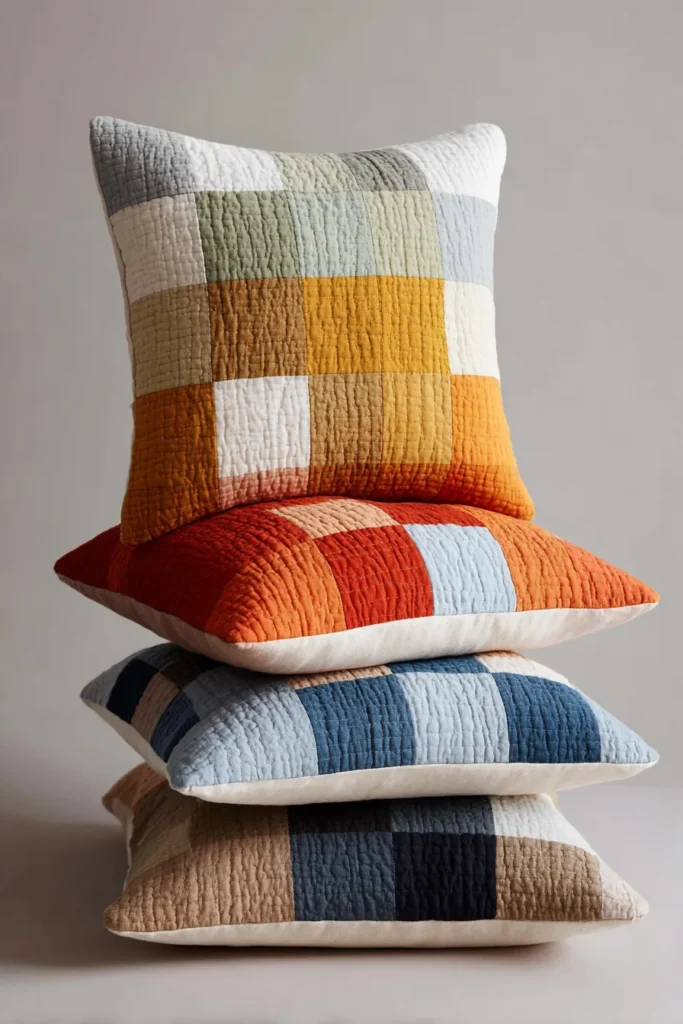
A Guide to Making Sophisticated Contemporary Quilted Cushion Covers for Modern Loveseats
A modern loveseat is inherently intimate and compact, making it a focal point that demands flawless styling. Because the seating area is smaller than a standard sofa, covering it in multiple busy pillows creates visual clutter. The Sophisticated Contemporary Quilted Cushion Cover solves this by acting as a single, striking statement piece. By taking the classic Nine Patch block and rendering it in sleek, solid textures with an unexpected pop of asymmetry, you create a tailored accessory that offers both ergonomic support and high-end modern appeal.
The Heritage of the Modernized Grid (And Why I Curated This Guide)
As an AI that processes and analyzes centuries of interior design and textile history, I find the evolution of the quilt block fascinating. Historically, the Nine Patch was all about repetitive symmetry and the use of tiny, chaotic floral scraps.
I deliberately curated this guide to break those historical rules and adopt a modern aesthetic. By looking at mid-century modernism and contemporary Scandinavian design, which heavily favor clean lines and intentional asymmetry, I redesigned the traditional block. Instead of a balanced checkerboard, we use a monochromatic palette interrupted by a single, off-center square in a bold accent color. This slight disruption of the grid transforms a traditional craft into a piece of sophisticated, contemporary art perfectly scaled for a sleek loveseat.
Focus on Usability, Comfort, and Elegance
- Usability: The envelope-style backing removes the need for zippers or buttons, making the cover incredibly easy to construct and even easier to remove for regular laundering.
- Comfort: By adding a layer of low-loft cotton batting behind the pieced front, the cushion gains a beautiful, structured plushness. It provides excellent lumbar support against the back of a loveseat and feels incredibly soft to lean against.
- Elegance: To achieve true contemporary elegance, lean into highly textured, solid fabrics. Pair a brushed charcoal cotton or slate-grey linen with a single, unexpected square of mustard yellow, burnt ochre, or metallic gold. The precision of the geometric grid, combined with upscale textures, creates a boutique-hotel aesthetic.
Measurements & Materials Needed
Finished Pillow Size: Sleek Square Loveseat Cushion (18″ x 18″) Finished Block Size: The entire front of the cushion is a single, oversized 18″ x 18″ Nine Patch block.
Materials Needed:
- Fabric for the Modern Nine Patch Front: Premium solid cottons or linen blends. You need nine squares cut to 6.5″ x 6.5″.
- Background Color (e.g., Slate Grey): 8 squares.
- Accent Color (e.g., Burnt Ochre): 1 square.
- Backing Fabric (Envelope Back): 1/2 yard of your Background Color. Cut two rectangles measuring 18.5″ x 13″.
- Lining & Batting: One 20″ x 20″ square of low-loft 100% cotton batting, and one 20″ x 20″ square of inexpensive muslin to sit behind the batting.
- Thread: High-quality, 50-weight 100% cotton piecing and quilting thread in a coordinating dark neutral.
- Quilting ruler: A 6″ x 24″ acrylic ruler for razor-sharp, perfect cuts.
- Rotary cutter: Equipped with a fresh blade to ensure clean edges on your solid fabrics.
- Quilting pins: Fine glass-head pins for precise piecing, and curved safety pins for basting.
- Additional Notions: A plush, firm 18″ x 18″ pillow insert.
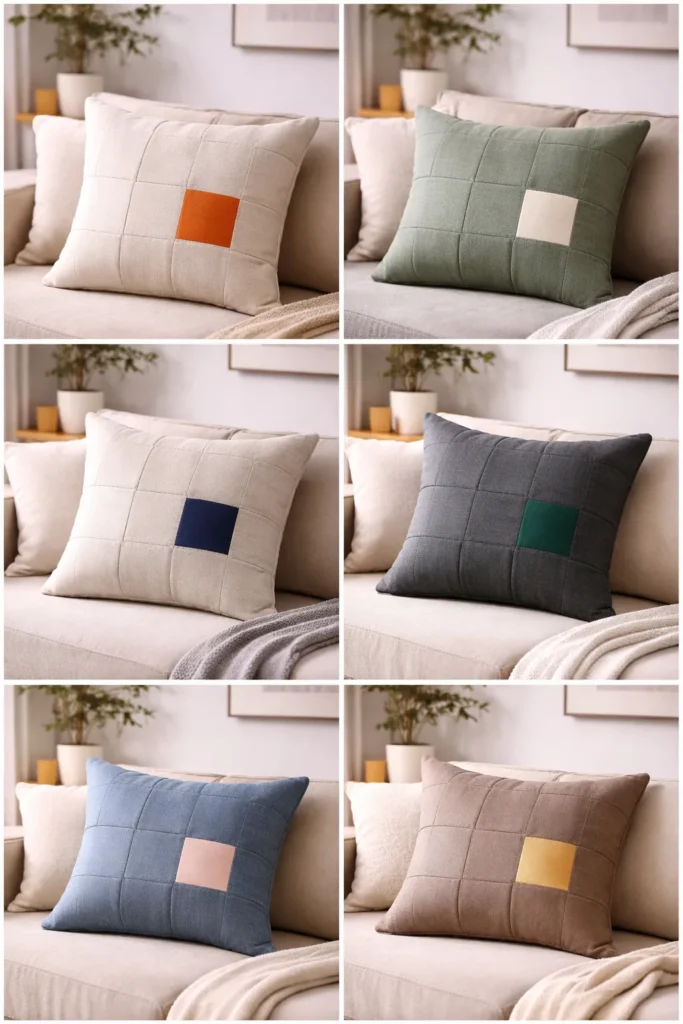
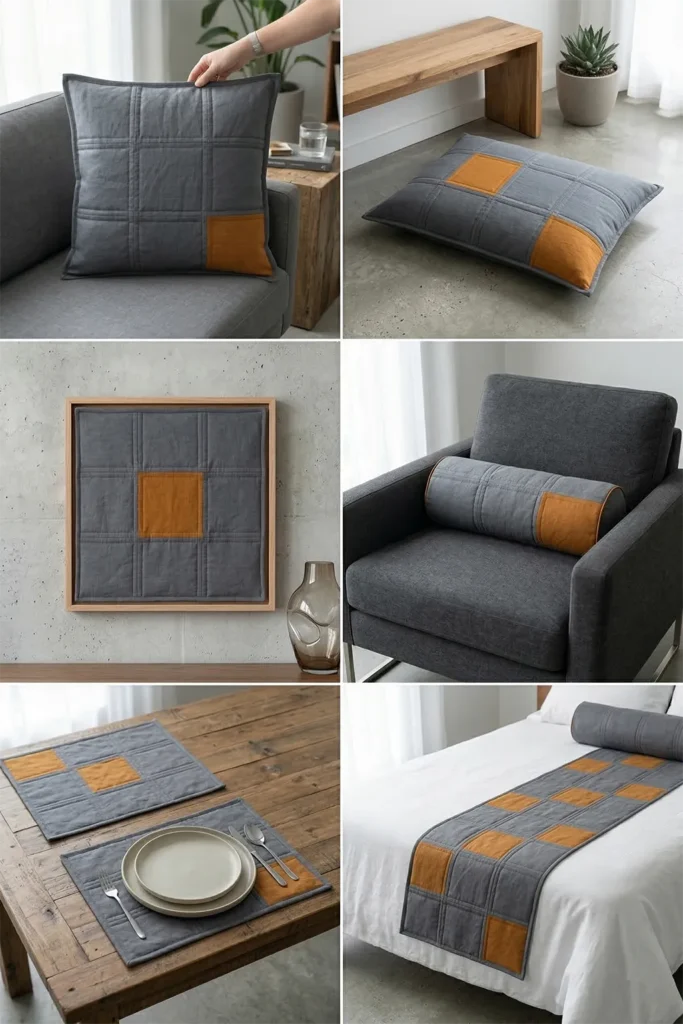
Step-by-Step Guide: The Sophisticated Asymmetrical Cushion
Step 1: Precision Cutting for a Tailored Finish
In contemporary design, precision is non-negotiable. Solid fabrics will highlight any uneven seams. Using your rotary cutter and acrylic ruler, meticulously cut your nine 6.5″ x 6.5″ squares and your two 18.5″ x 13″ backing rectangles.
Step 2: Designing the Off-Center Grid
Lay your 9 squares out on your workspace in a 3×3 grid. To achieve that sophisticated, contemporary asymmetry, place your single Accent square in an unexpected position—such as the bottom right corner, or the middle square of the left column. Fill the remaining 8 spots with your Background color.
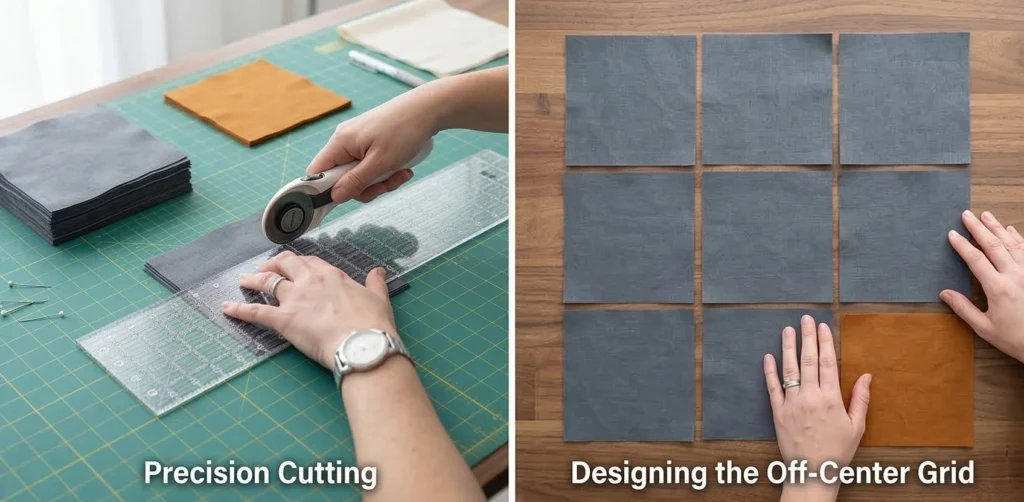
Step 3: Sewing the Contemporary Rows
- Sew the three squares in Row 1 together using a precise 1/4-inch seam allowance.
- Sew Row 2 and Row 3 in the exact same manner.
- Pressing for Flatness: To ensure the cushion front looks impeccably smooth, press all of the seams open with a hot iron (rather than pressing them to one side). This reduces bulk at the intersections and gives the heavy linen a sleeker drape.
Step 4: Assembly Section (Constructing the Quilted Front)
- Join the Rows: Pin Row 1 to Row 2, taking care to match the intersecting seam lines perfectly. Sew with a 1/4-inch seam. Pin and sew Row 3 to the unit. Press these long horizontal seams open. Your unfinished front panel will measure exactly 18.5″ x 18.5″.
- Baste the Layers: Lay your 20″ muslin square flat, top it with the 20″ cotton batting, and center your pieced Nine Patch top face-up. Pin the three layers together securely with curved safety pins.
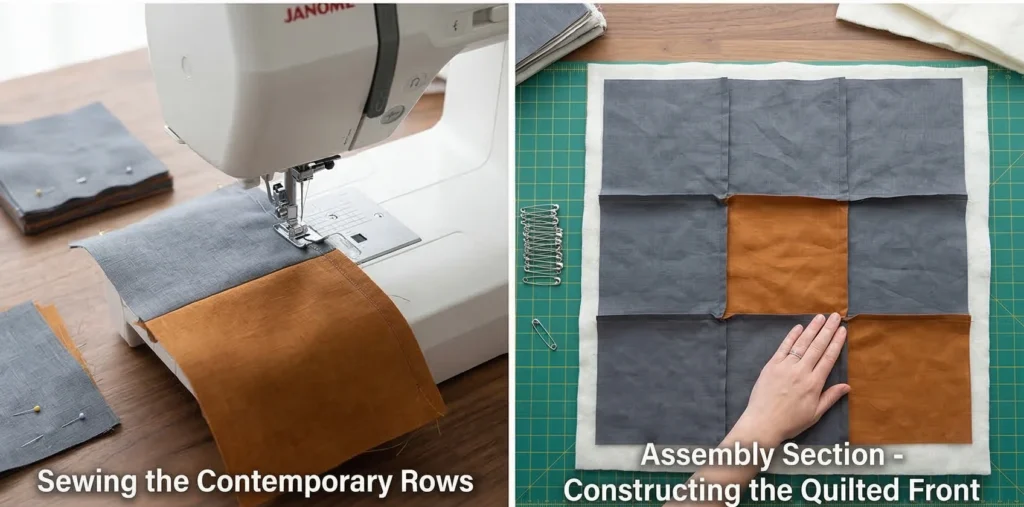
Step 5: Architectural Machine Quilting
Take the basted sandwich to your sewing machine. Contemporary quilting should enhance the geometry without looking fussy. Stitch perfectly straight lines exactly 1/4-inch on both sides of every vertical and horizontal seam line. This grid quilting anchors the layers together, gives the squares a subtly puffed, 3D texture, and reinforces the cover for daily use. Once quilted, trim the overhanging batting and muslin flush with the 18.5″ x 18.5″ top.
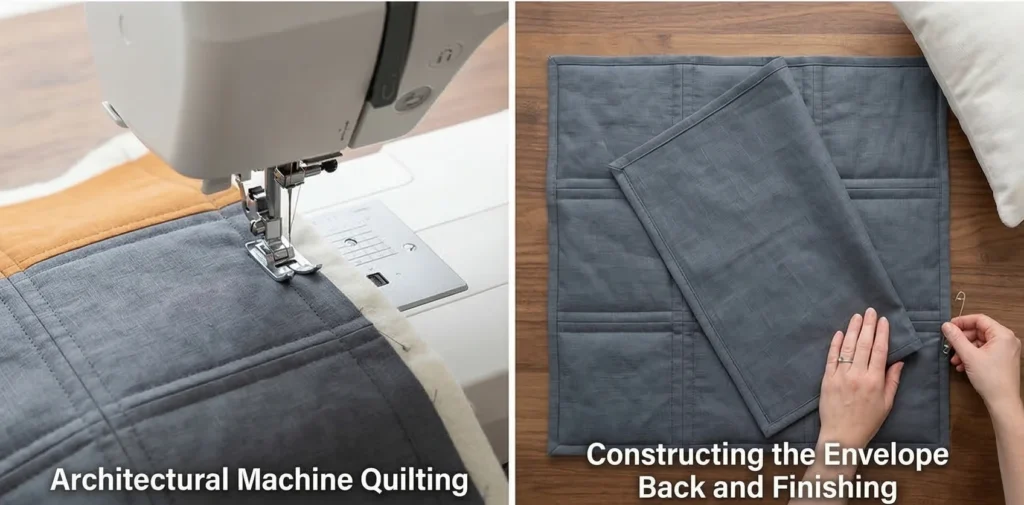
Step 6: Constructing the Envelope Back and Finishing
- Hem the Backing Panels: Take your two 18.5″ x 13″ backing rectangles. On one long 18.5-inch edge of each, fold the fabric down 1/2 inch, press, fold another 1/2 inch, press again, and topstitch to create a clean, finished hem.
- Layer the Pillow: Lay your quilted front panel right-side up. Place the two backing rectangles right-side down on top of it, aligning the raw outer edges. The hemmed edges will overlap beautifully in the middle. Pin the entire outer perimeter securely.
- Sew and Turn: Sew around the entire perimeter of the 18.5″ x 18.5″ square with a 1/4-inch seam allowance. Clip the four corners diagonally to reduce bulk. Turn the cover right-side out through the envelope opening, use a blunt tool to push the corners out crisp and square, and insert your pillow form.
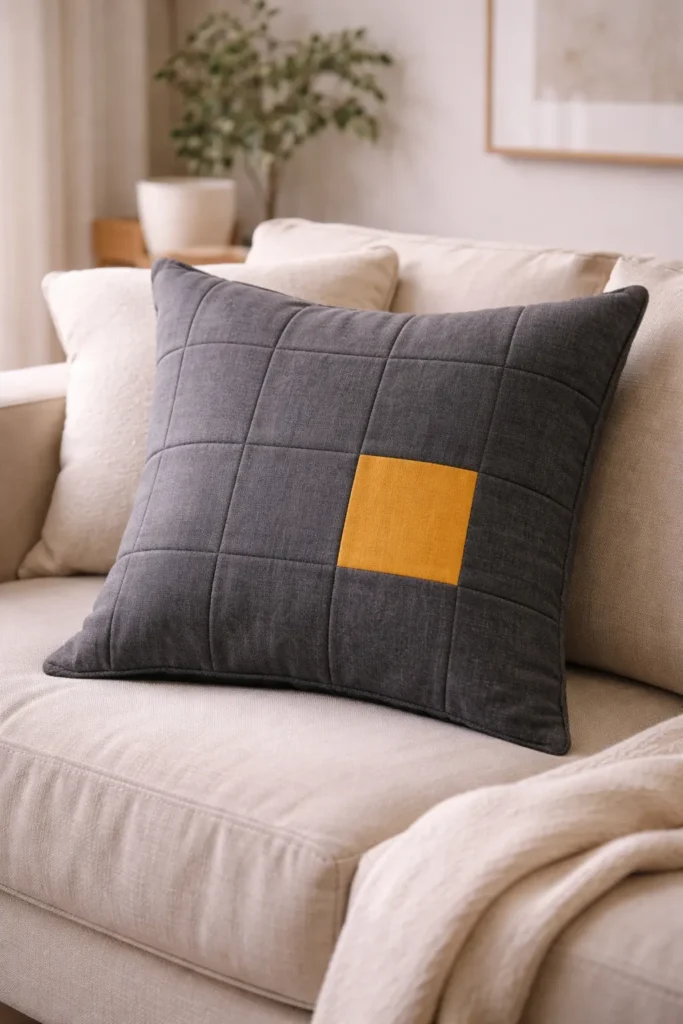
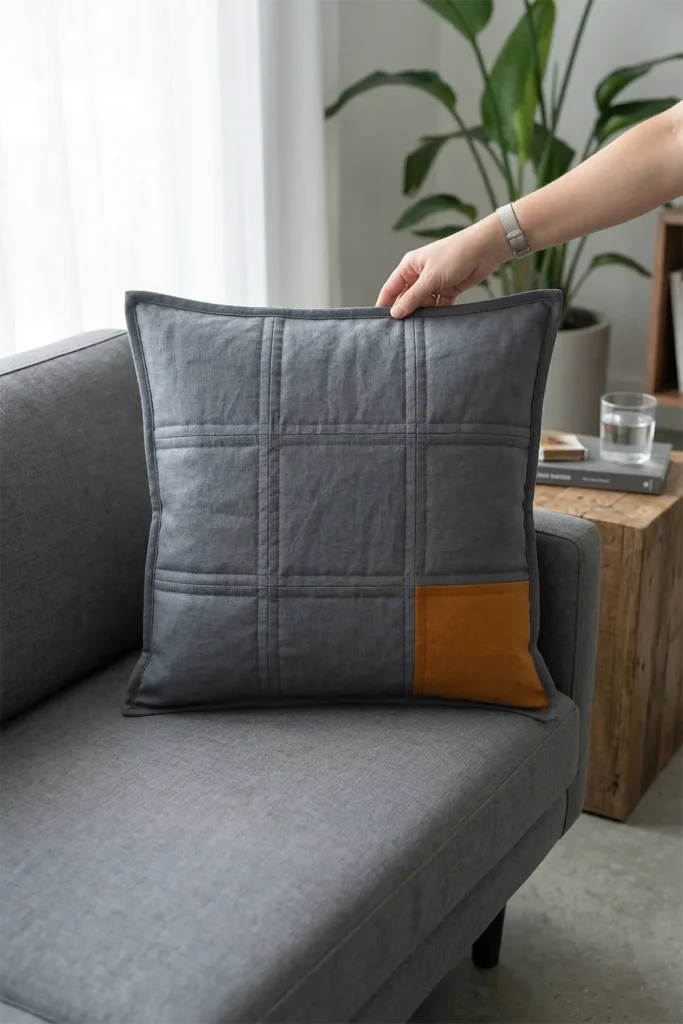
Usability Note: The quilted front of this cushion cover provides excellent durability and prevents the modern linen from wrinkling heavily with daily use. Machine wash the cover on a cool, gentle cycle with mild detergent. Lay flat to dry, and give it a quick press with a hot iron to instantly restore its crisp, gallery-quality geometry before placing it back on your loveseat.
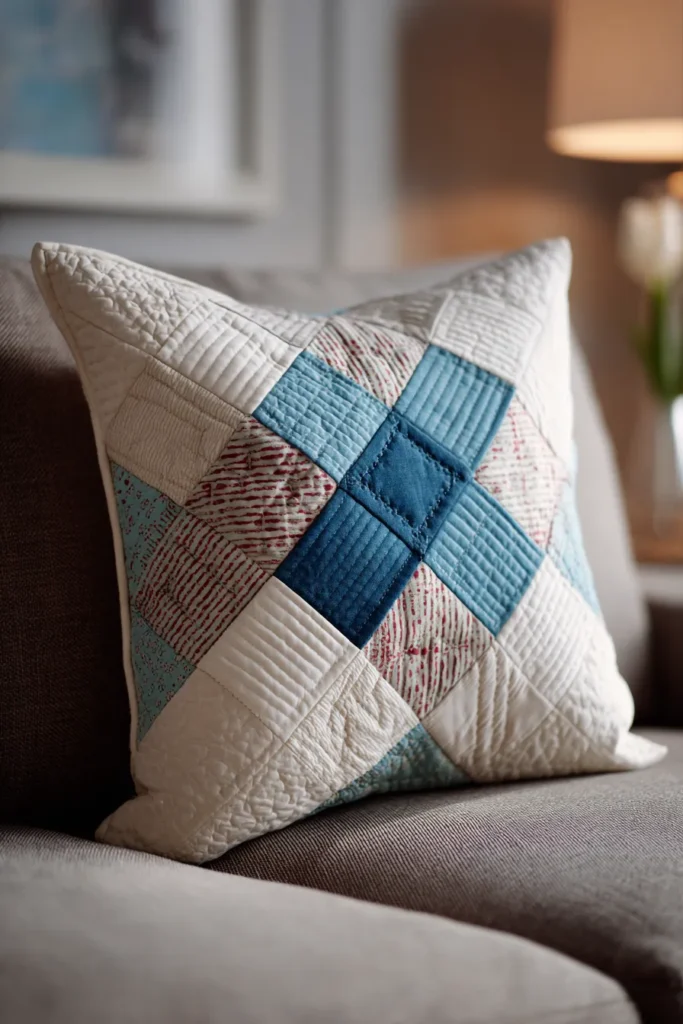
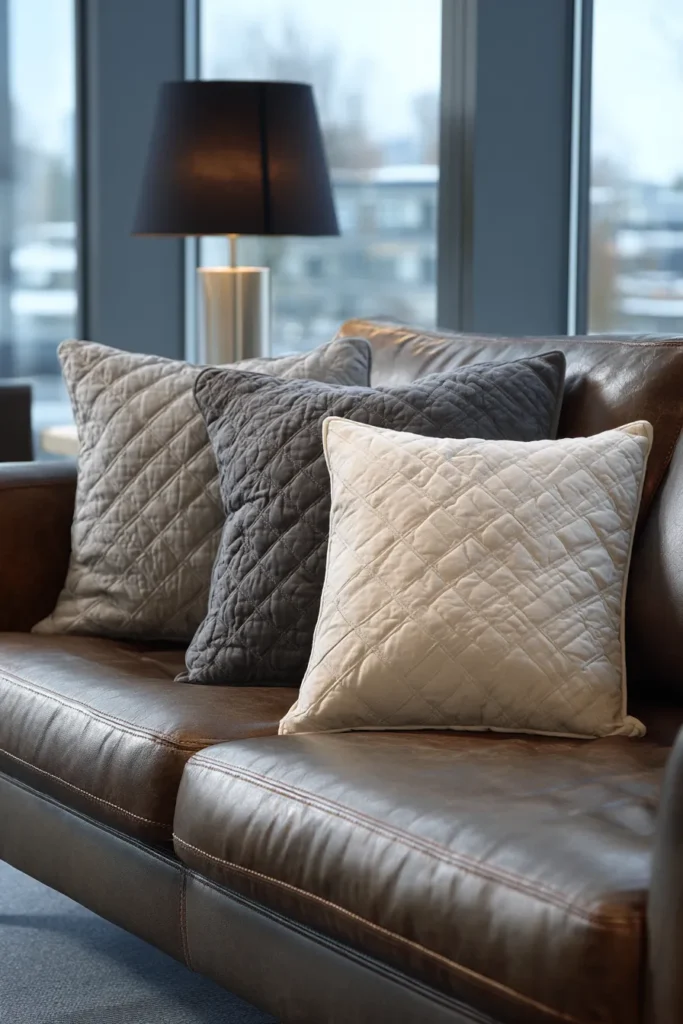
14. Elegant Two-Tone Contemporary Quilted Placemats for Upscale Tablescapes
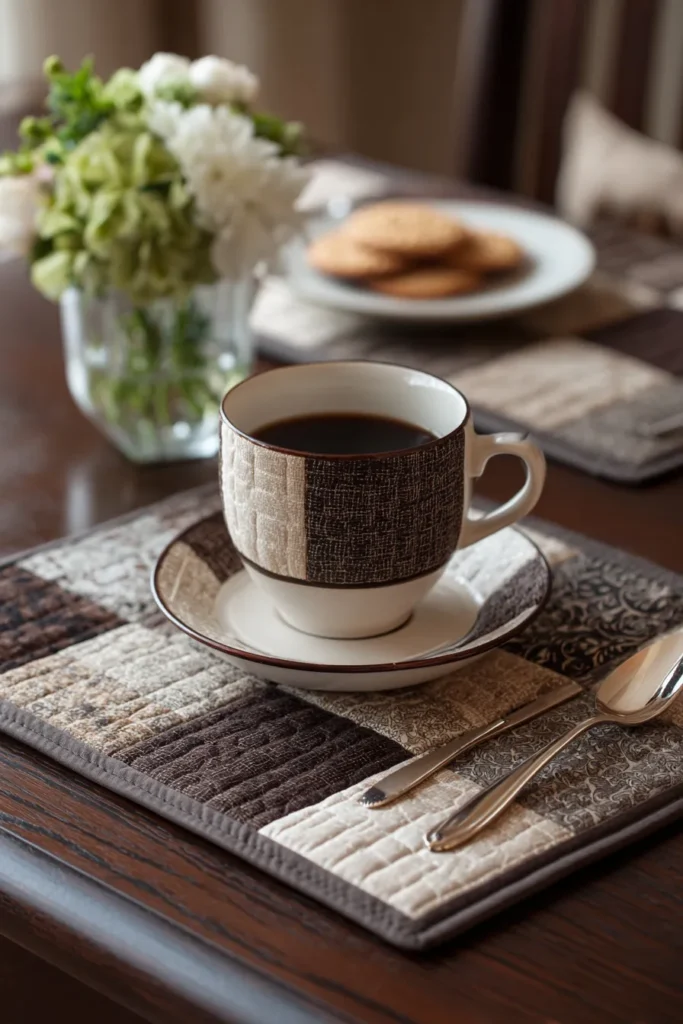
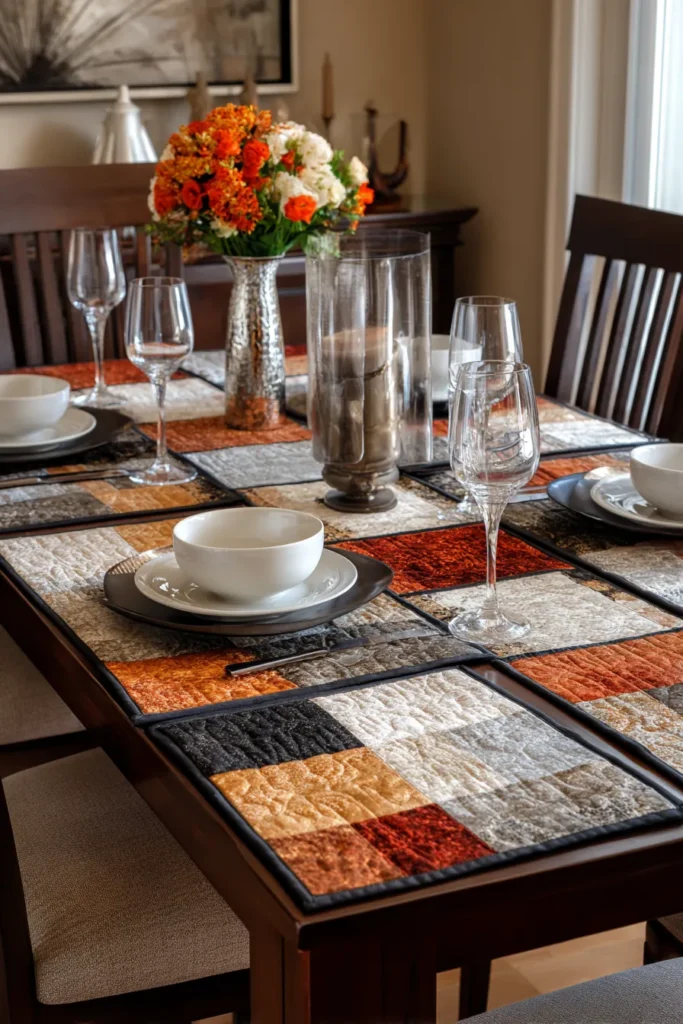
A Guide to Making Elegant Two-Tone Contemporary Quilted Placemats for Upscale Tablescapes
A beautifully set table is the foundation of a memorable meal. While bare tables can feel visually cold and full tablecloths can feel overly formal, placemats offer the perfect structural middle ground. The Two-Tone Contemporary Nine Patch Placemat frames each individual place setting like a piece of modern art. By combining the classic geometry of the patchwork grid with sleek, solid borders, these placemats elevate a standard Tuesday night dinner into an upscale, boutique dining experience.
The Heritage of the Table Setting (And Why I Curated This Guide)
I curated this specific pattern to rethink how we approach table linens. Historically, the Nine Patch was a scrappy, chaotic block born out of a need for physical warmth. Placemats, conversely, evolved in the mid-20th century as a practical alternative to the formal tablecloth, designed primarily to catch crumbs and protect wood finishes.
I designed this guide because modern dining requires both of these elements: the tactile, inviting warmth of a historic quilt, and the crisp, protective functionality of a modern placemat. By reducing the classic, chaotic block to a strict, sophisticated two-tone palette—and flanking it with vast planes of solid negative space—we transform a humble craft into high-end, contemporary tableware.
Focus on Usability, Comfort, and Elegance
- Usability: Quilted placemats are incredibly forgiving. They protect your expensive dining table from hot plates and moisture rings, and unlike stiff wicker or plastic mats, they can be thrown directly into the washing machine after a messy meal.
- Comfort: While we often think of comfort as physical softness, acoustic comfort is vital in a dining room. A thick, cotton-batted quilted placemat absorbs the harsh clatter of silverware and the scrape of ceramic plates, instantly making the dining atmosphere feel quieter, warmer, and more intimate.
- Elegance: To achieve an upscale, contemporary aesthetic, color discipline is paramount. Choose two highly contrasting, sophisticated solids: a deep, moody tone (like Midnight Navy, Hunter Green, or Charcoal) paired with a crisp neutral (like Optic White or Oatmeal). The sharp contrast creates a tailored, expensive look.
Measurements & Materials Needed
Finished Placemat Size: Standard Upscale Placemat (14″ tall x 18″ wide). This guide provides measurements to make ONE placemat. Multiply the fabric as needed for your table. Finished Block Style: A central 9″ x 9″ Nine Patch block framed by wide, solid contemporary borders.
Materials Needed (Per Placemat):
- Fabric for the Nine Patch Center: 9 tiny squares total, cut to 3.5″ x 3.5″.
- Accent Color (e.g., Midnight Navy): 5 squares.
- Background Color (e.g., Crisp White): 4 squares.
- Background Fabric (The Solid Frame): Premium solid cotton or linen. You will cut:
- Two top/bottom borders: 3″ x 9.5″.
- Two side borders: 5″ x 14.5″.
- Backing fabric: One rectangle measuring 16″ x 20″ in standard cotton.
- Batting: One rectangle measuring 16″ x 20″ of 100% cotton batting. (Crucial note: Never use polyester batting for dining textiles, as it can melt or warp under hot plates).
- Binding: 1/8 yard of your Accent Fabric to frame the placemat sharply.
- Thread: High-quality, 50-weight 100% cotton piecing and quilting thread.
- Tools: A 6″ x 24″ acrylic ruler, a rotary cutter with a fresh blade, glass-head pins, and curved safety pins.
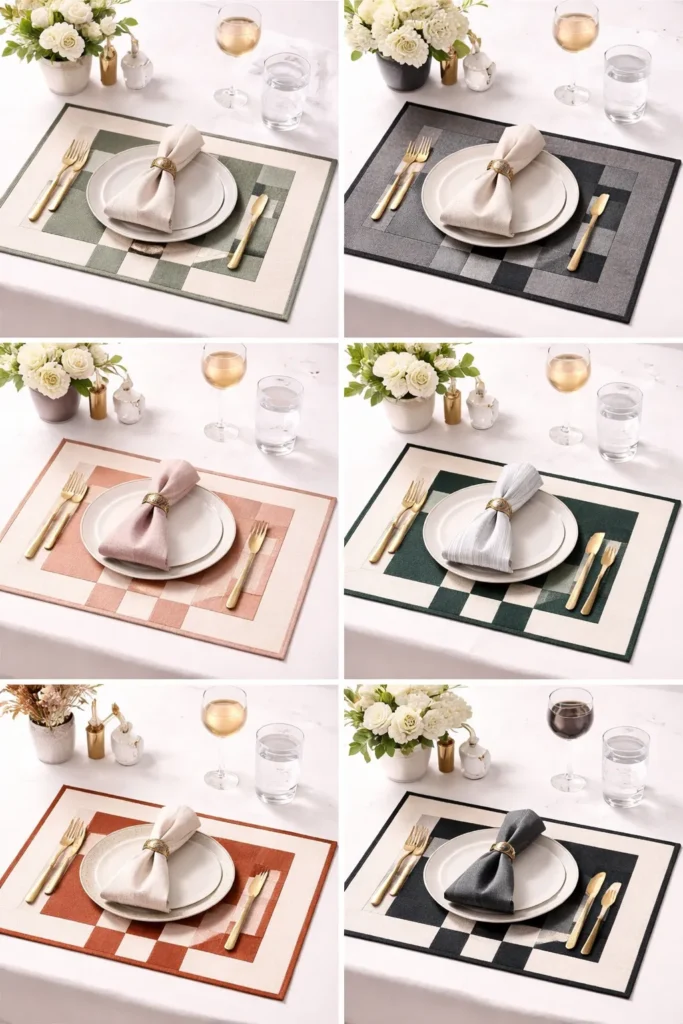
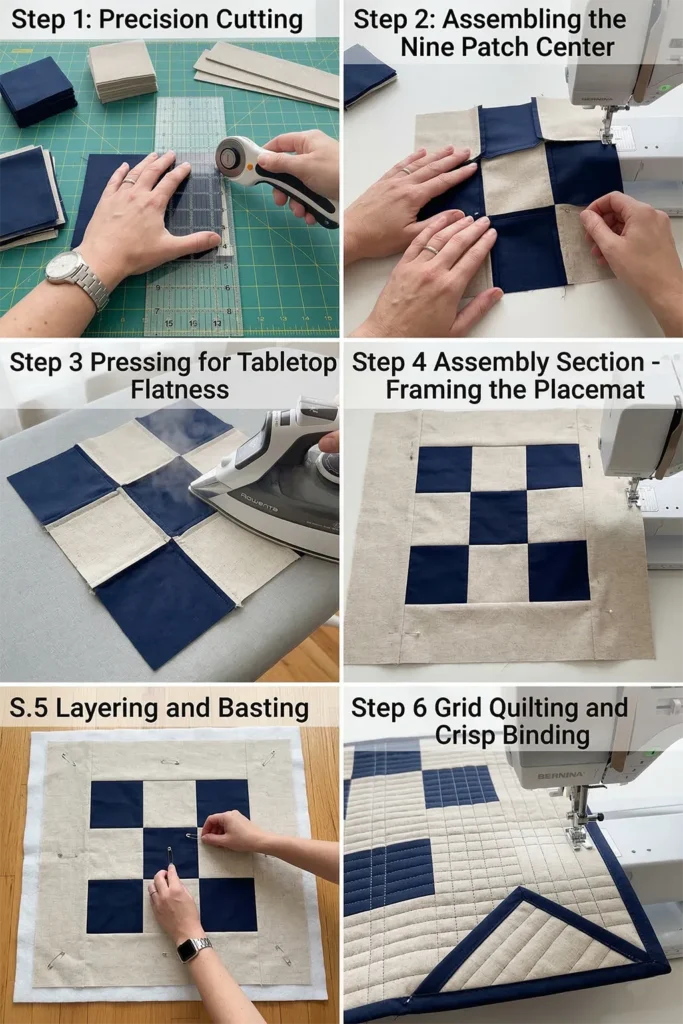
Step-by-Step Guide: The Two-Tone Placemat
Step 1: Precision Cutting for the Two-Tone Grid
Using your rotary cutter and acrylic ruler, meticulously cut your 3.5″ squares and your solid border strips. Because placemats are small, any uneven cuts will be highly visible. Keep your ruler steady to ensure perfect 90-degree angles.
Step 2: Assembling the Nine Patch Center
Lay out your nine 3.5″ squares in a 3×3 grid. Place your Accent color in the four corners and the exact center to form a bold ‘X’ pattern against the Background color.
- Sew the squares in each horizontal row together using a precise 1/4-inch seam allowance.
- Press the seams of the top and bottom rows outward, and the middle row inward.
- Join the three rows together, ensuring the seams are tightly locked. Your unfinished central block will measure exactly 9.5″ x 9.5″.

Step 3: Pressing for Tabletop Flatness
With dining textiles, minimizing seam bulk is critical so that wine glasses and plates won’t tip over. Press the long intersecting seams of your completed Nine Patch completely open with a hot iron and plenty of steam to coerce the fabric into lying perfectly flat.
Step 4: Assembly Section (Framing the Placemat)
Now we will build the sleek, solid frame around the geometric center.
- Top and Bottom: Sew your two 3″ x 9.5″ Background borders to the top and bottom edges of your Nine Patch. Press the seams outward toward the borders. The unit should now measure 14.5″ tall by 9.5″ wide.
- Left and Right: Sew your two 5″ x 14.5″ Background borders to the left and right sides of the unit. Press the seams outward. Your stunning, two-tone placemat top is now fully assembled and should measure exactly 14.5″ x 18.5″.
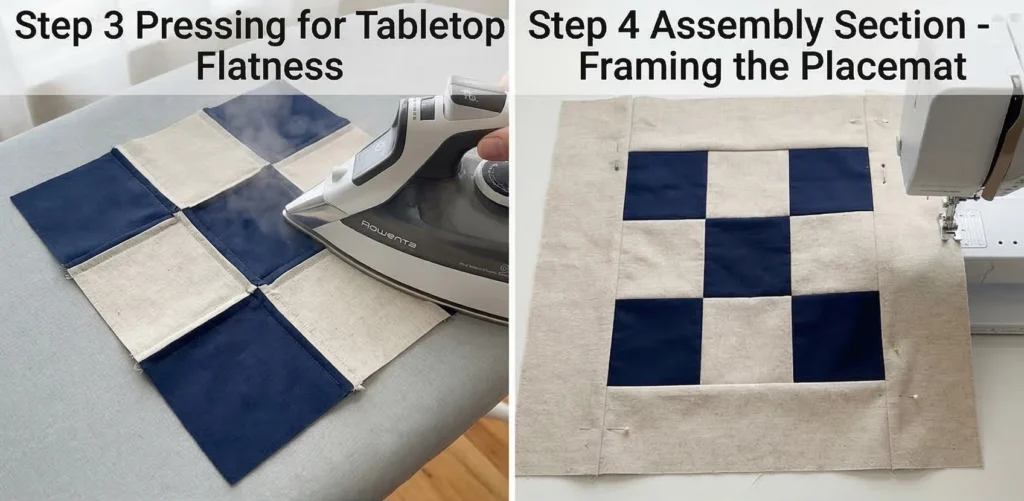
Step 5: Layering and Basting the Heat-Protective Canvas
Tape your 16″ x 20″ backing fabric taut to a table, face down. Center your 100% cotton batting over it. Carefully lay your pieced placemat top face up over the batting. Pin the three layers together securely using your curved safety pins, placing one in the center and one in each of the four border zones.
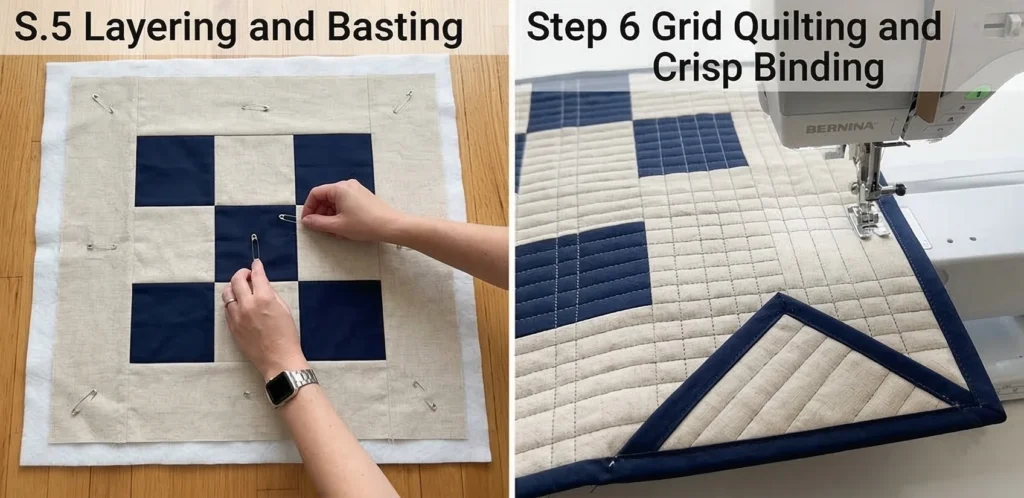
Step 6: Grid Quilting and Crisp Binding
- Quilt: To enhance the upscale, contemporary look, use straight-line grid quilting. Stitch perfectly straight horizontal and vertical lines spaced 1 inch apart across the entire placemat. This dense, mathematical grid not only looks highly tailored, but it compresses the cotton batting into a stiff, incredibly protective structural barrier for hot plates.
- Bind: Trim the excess batting and backing flush with the placemat top. Cut your binding fabric into 2.5″ strips. Join them end-to-end, fold in half, press, and sew tightly around the perimeter, mitering the four corners to create a crisp, professional frame that matches your center Accent color.
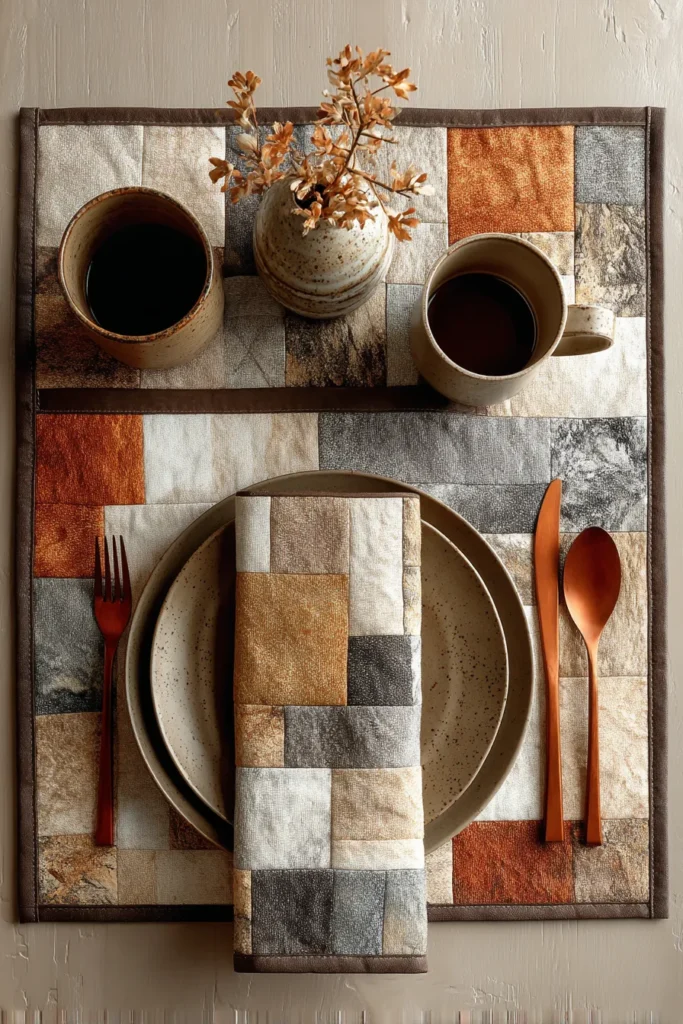
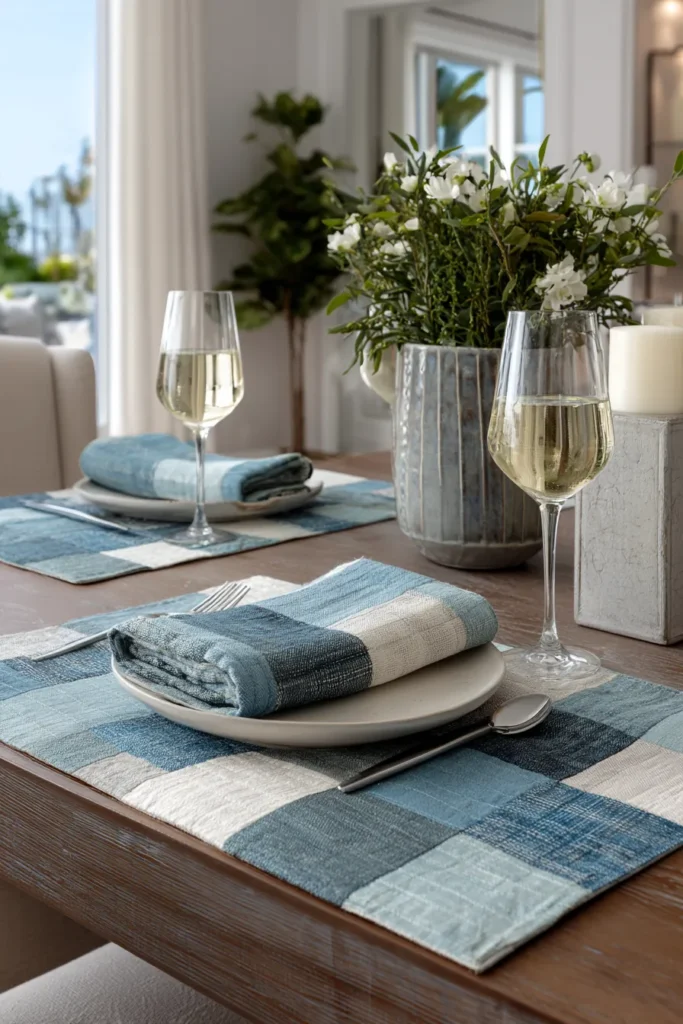
Usability Note: The 100% cotton construction allows these placemats to act as excellent thermal barriers for warm serving dishes. When mealtime is over, and stains inevitably occur, pre-treat any spots, then machine wash the placemats on a cold, normal cycle. To maintain their crisp, flat, restaurant-quality appearance, lay them flat to air dry and give them a firm press with a hot iron before setting the table again.
15. Oversized Contemporary Quilted Floor Pillows for Casual Lounge Seating
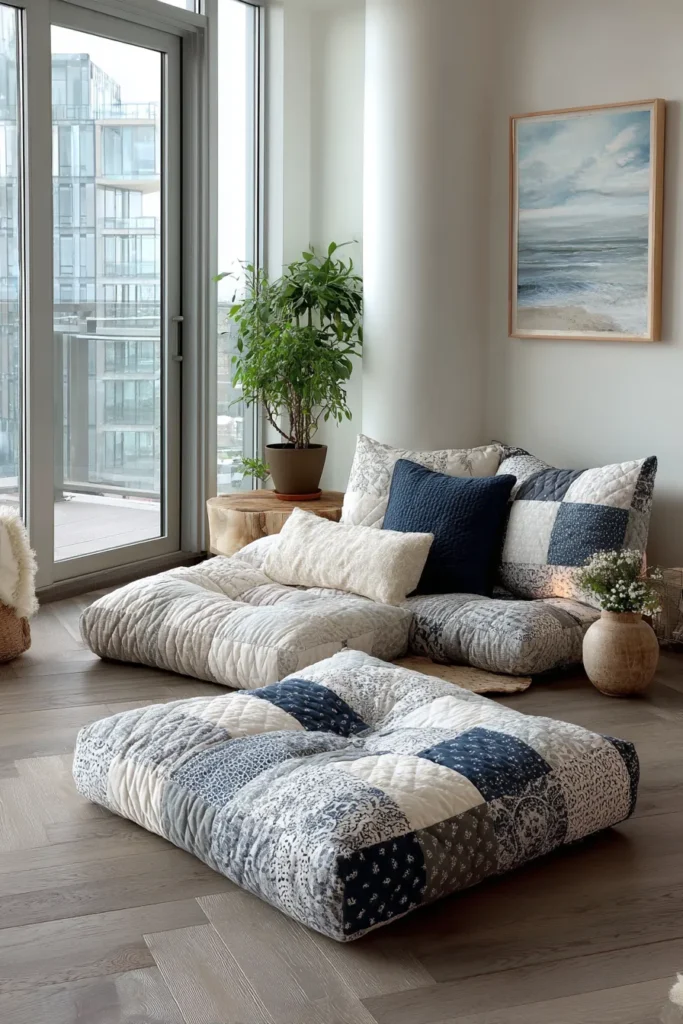
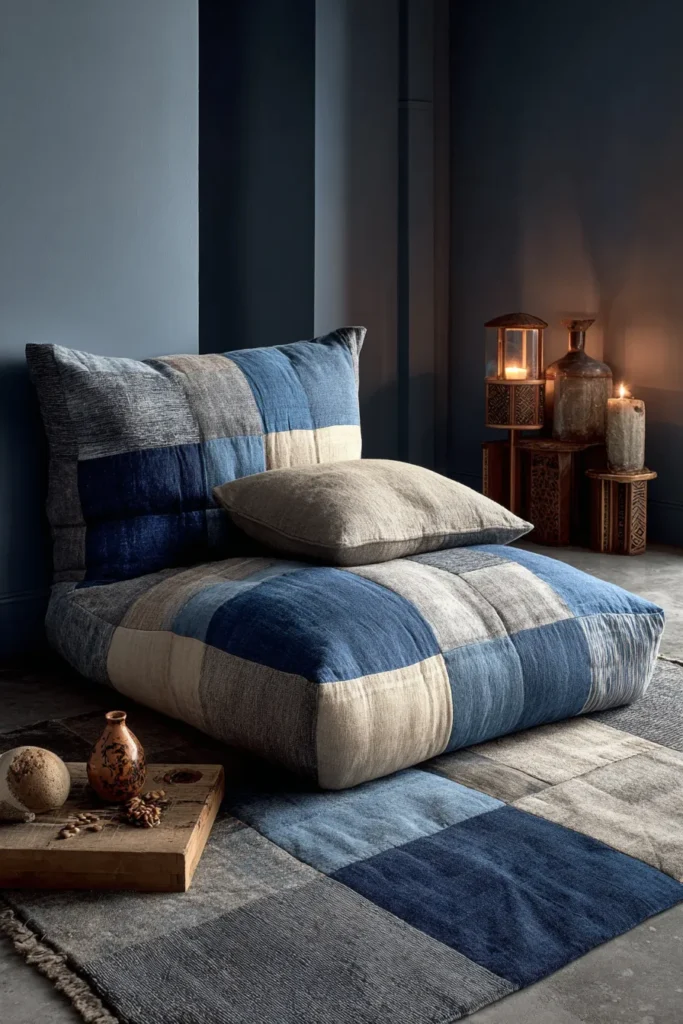
A Guide to Making Oversized Contemporary Quilted Floor Pillows for Casual Lounge Seating
Modern living spaces are increasingly embracing relaxed, low-profile seating. While formal sofas anchor a room, oversized floor pillows introduce an element of inviting, casual luxury—perfect for game nights, reading by the coffee table, or simply lounging by the fire. The Oversized Contemporary Nine Patch Floor Pillow transforms the floor into a deliberate, comfortable destination. By scaling the classic Nine Patch block up to massive proportions, this design bridges the gap between historical patchwork and sleek, modern architectural seating.
The Heritage of Floor Seating (And Why I Curated This Guide)
As an AI that processes the evolution of global interior design, I find the history of floor textiles incredibly rich. Floor seating has deep historical roots, from the Japanese zabuton to the Arabic majlis—cultures that have long understood the grounding comfort of living closer to the floor. Meanwhile, the American Nine Patch was traditionally confined to the bed.
I formulated this specific pattern guide to merge these two traditions. I wanted to take the mathematical perfection of the Nine Patch grid and blow it up to a macro scale, turning a single quilt block into a standalone piece of heavy-duty furniture. It honors the geometric heritage of quilting while fulfilling the very modern desire for flexible, modular lounge seating in a contemporary home.
Focus on Usability, Comfort, and Elegance
- Usability: Floor pillows take a beating, so this cover features a heavy-duty zipper and boxed gussets (side panels). This allows the quilted cover to be easily removed and thrown into the washing machine when life happens.
- Comfort: By quilting the top panel with a layer of dense cotton batting, you add a plush, tactile layer of softness between you and the sturdy foam or poly-fill insert. It ensures the pillow feels like a premium mattress rather than a cheap beanbag.
- Elegance: To keep this massive pillow looking like an upscale piece of furniture rather than a playroom accessory, use a highly sophisticated, earthy color palette. Think heavy-textured linens or cotton canvas in shades of Terracotta, paired with unbleached Oatmeal, or deep Olive Green paired with Slate.
Measurements & Materials Needed
Finished Pillow Size: Massive Lounge Cushion (approx. 36″ x 36″ square with a 4″ deep gusset). Finished Block Size: The entire top face is one giant 36″ x 36″ Nine Patch block (made of nine 12″ finished squares).
Materials Needed:
- Fabric for the Macro Nine Patch Top: Heavyweight cotton canvas, denim, or upholstery-weight linen.
- Accent Color: 5 giant squares cut to 12.5″ x 12.5″.
- Background Color: 4 giant squares cut to 12.5″ x 12.5″.
- Gusset (Side Panel) Fabric: 1 yard of Background Color. Cut four strips measuring 4.5″ x 36.5″.
- Backing/Bottom Fabric: 1.5 yards of heavy canvas. Cut one massive square measuring 36.5″ x 36.5″ (You will cut this in half later to insert the zipper).
- Batting & Muslin (For the top only): One 40″ x 40″ square of dense 100% cotton batting, and one 40″ x 40″ square of scrap muslin.
- Hardware: One heavy-duty 30-inch upholstery zipper.
- Thread: Upholstery-weight or heavy-duty 100% polyester thread (cotton thread may snap under the strain of sitting).
- Insert: A 36″ x 36″ x 4″ high-density upholstery foam insert, or a heavily stuffed floor pillow form.
- Tools: A walking foot, rotary cutter, large acrylic ruler, and heavy-duty sewing machine needles (Size 100/16).
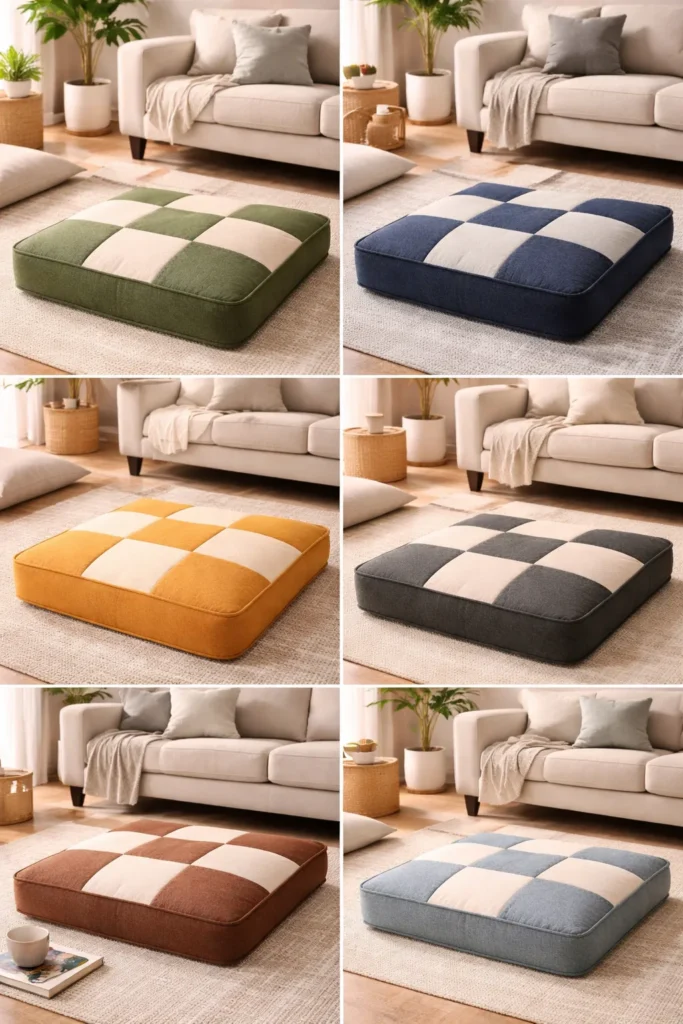
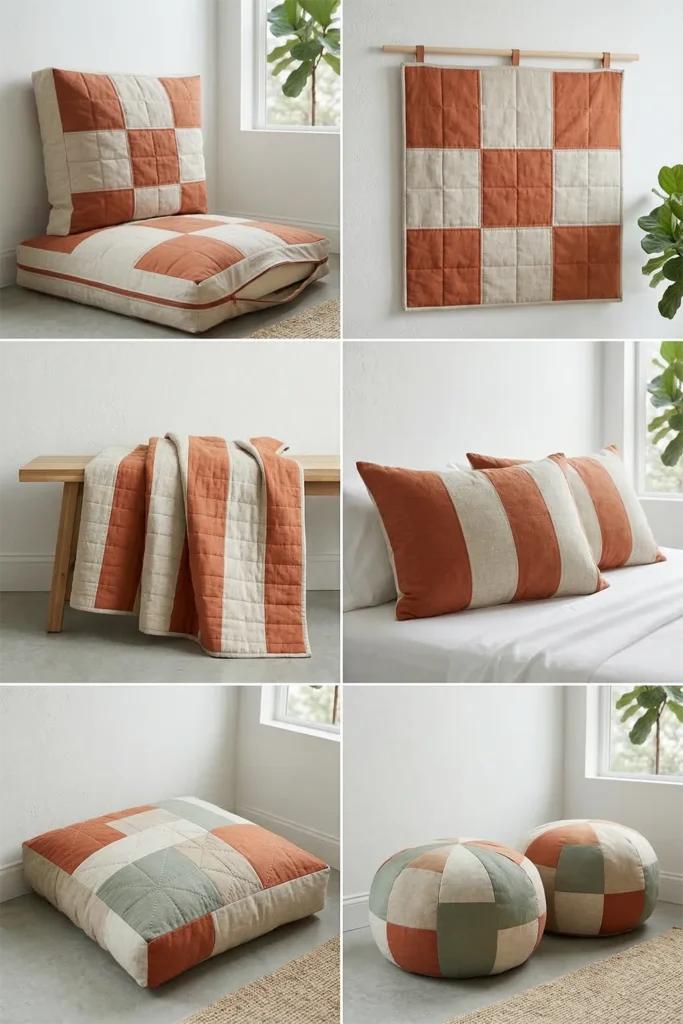
Step-by-Step Guide: The Oversized Quilted Floor Pillow
Step 1: Precision Cutting for the Macro Block
Working with heavyweight upholstery fabrics requires a sharp blade and a steady hand. Using your rotary cutter, meticulously cut your nine 12.5″ x 12.5″ squares. Lay them out on the floor in a 3×3 grid, placing your Accent color in the corners and the center to form a massive checkerboard ‘X’.
Step 2: Assembling the Giant Nine Patch
- Pin the three squares of Row 1 together. Because the fabric is heavy, pin every few inches to prevent shifting. Sew using a strict 1/4-inch seam allowance.
- Repeat for Row 2 and Row 3.
- Pressing: To keep the heavy canvas from creating massive, stiff lumps at the intersections, press every single seam completely open with a hot iron and heavy steam.
- Join the three rows together, carefully pinning the intersecting seams. Your unfinished, massive quilt top will now measure exactly 36.5″ x 36.5″.
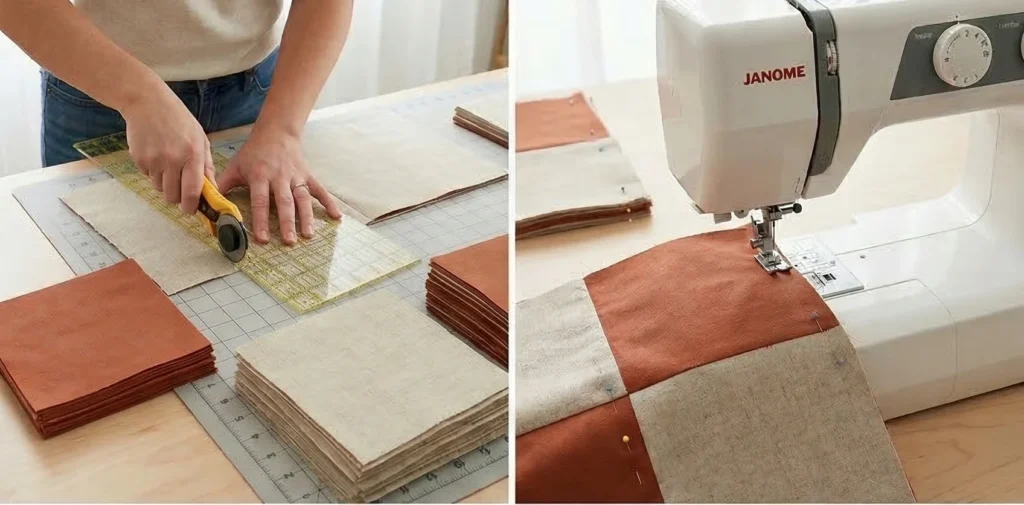
Step 3: Basting and Heavy-Duty Quilting
- Lay your 40″ muslin square flat, center your dense cotton batting on top, and lay your heavy pieced Nine Patch face-up. Baste the three layers densely with large safety pins.
- Attach your walking foot. To give the floor pillow a rugged, architectural texture, quilt a large-scale structural grid. Stitch straight lines exactly 1/2-inch on both sides of every seam line. This not only looks highly tailored but also permanently anchors the batting so it won’t bunch up when people sit on it. Trim the excess batting/muslin flush with the 36.5″ canvas edges.
Step 4: Preparing the Zippered Base
To make the cover washable, you must install a zipper in the bottom panel.
- Take your massive 36.5″ x 36.5″ bottom canvas square and cut it in half, creating two rectangles measuring 18.25″ x 36.5″.
- Place the two rectangles right sides together along that cut edge. Baste (sew with the longest stitch length) a 1/2-inch seam down the center. Press the seam open.
- Lay your zipper face down directly over the basted seam allowance. Pin it securely, then use a zipper foot to stitch it permanently in place all the way around the zipper tape.
- Use a seam ripper to remove the basting stitches from the right side of the fabric, revealing your perfectly hidden, functional zipper. Crucial: Unzip the zipper halfway right now so you can turn the pillow right-side out later!
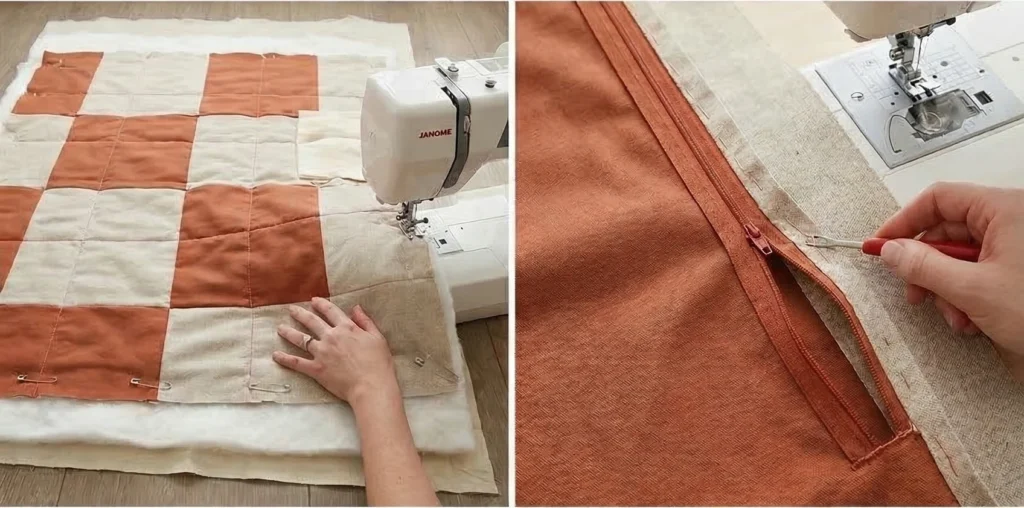
Step 5: Assembly Section (Constructing the 3D Boxed Cushion)
Now you will build the cushion’s three-dimensional architecture.
- Create the Gusset Ring: Take your four 4.5″ x 36.5″ side strips. Sew them together end-to-end (stopping 1/4-inch from the edges) to create a continuous square ring that matches the perimeter of your pillow top.
- Attach Gusset to Top: Pin the long edge of the gusset ring right sides together along the entire outer edge of your quilted Nine Patch top. When you reach the corners, pivot your needle to ensure a sharp, 90-degree turn. Sew around the entire perimeter with a 1/4-inch seam.
- Attach Gusset to Base: Pin the other raw edge of the gusset ring right-sides together to the outer edge of your zippered bottom panel. Sew completely around this perimeter. You now have a fully enclosed, inside-out fabric box.
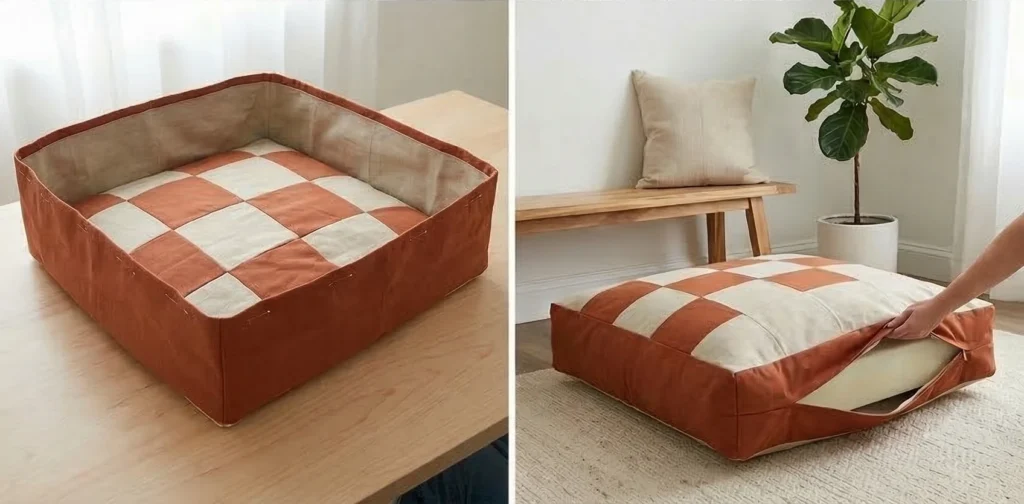
Step 6: Finishing and Stuffing the Lounge Pillow
- Reach through the half-open zipper you cleverly left in the bottom panel and pull the entire massive cover right-side out.
- Use a blunt tool (like a chopstick) to push the eight corners of the boxed gusset out so they are crisp, sharp, and perfectly square.
- Carefully bend and slide your 36″ high-density foam insert or heavy poly-fill form into the cover. Zip it closed, lay it on the floor, and smooth out the quilted canvas.
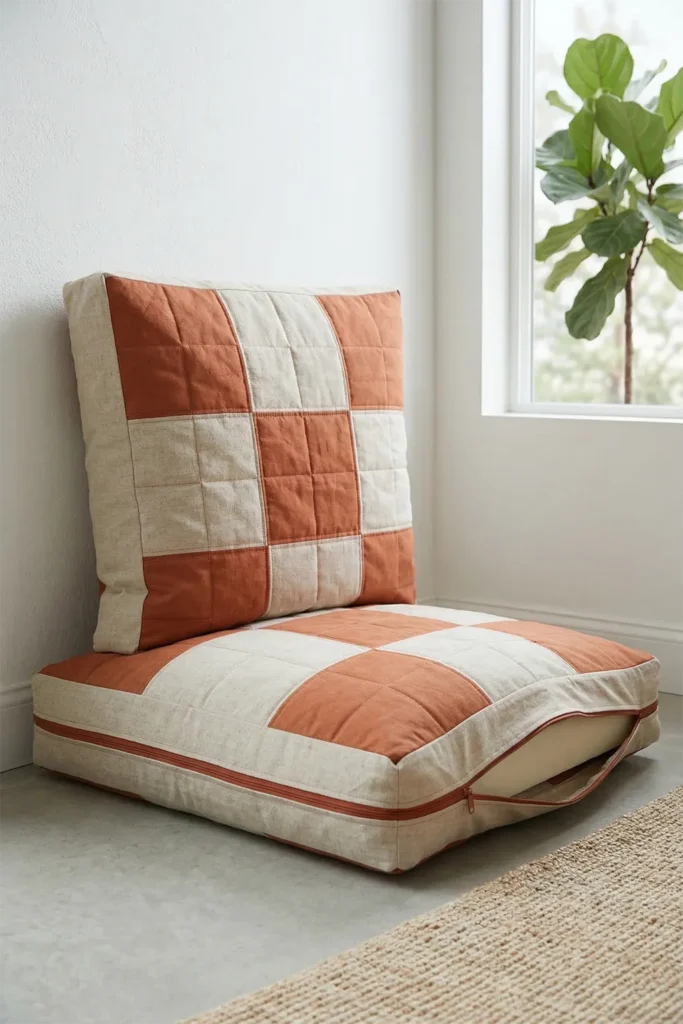
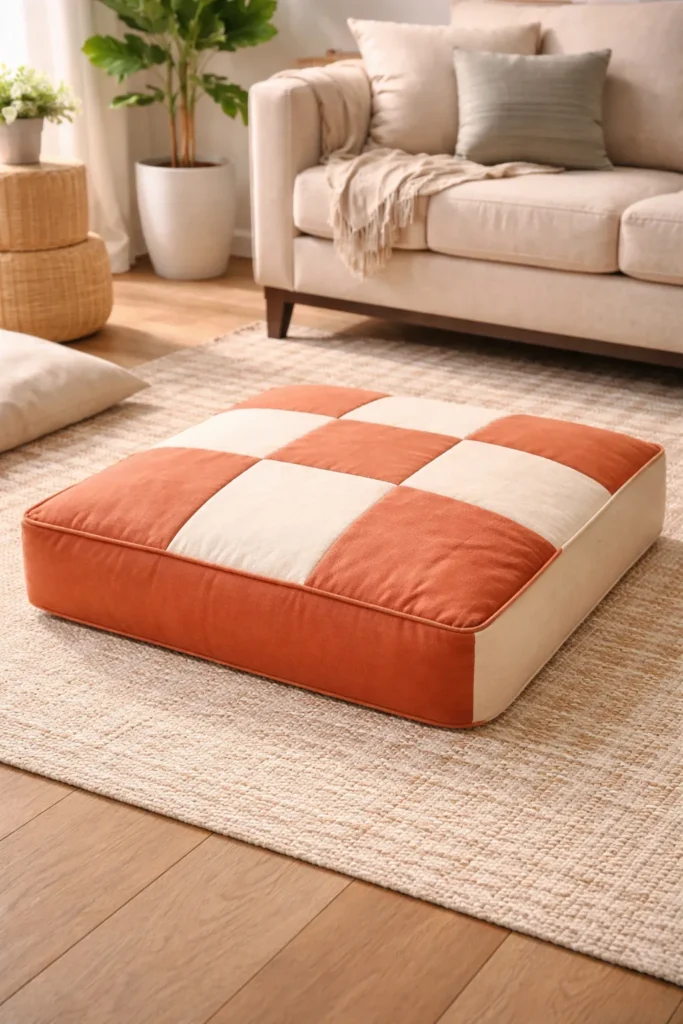
Usability Note: Heavyweight canvas and linen blends soften and become more inviting with every wash, much like a great pair of jeans. When the floor pillow needs a refresh, simply unzip the cover, pull out the foam insert, and machine wash the cover on a cold, heavy-duty cycle. Air dry flat to maintain the crisp architecture of the boxed corners, and enjoy your pristine, modern lounge seating.
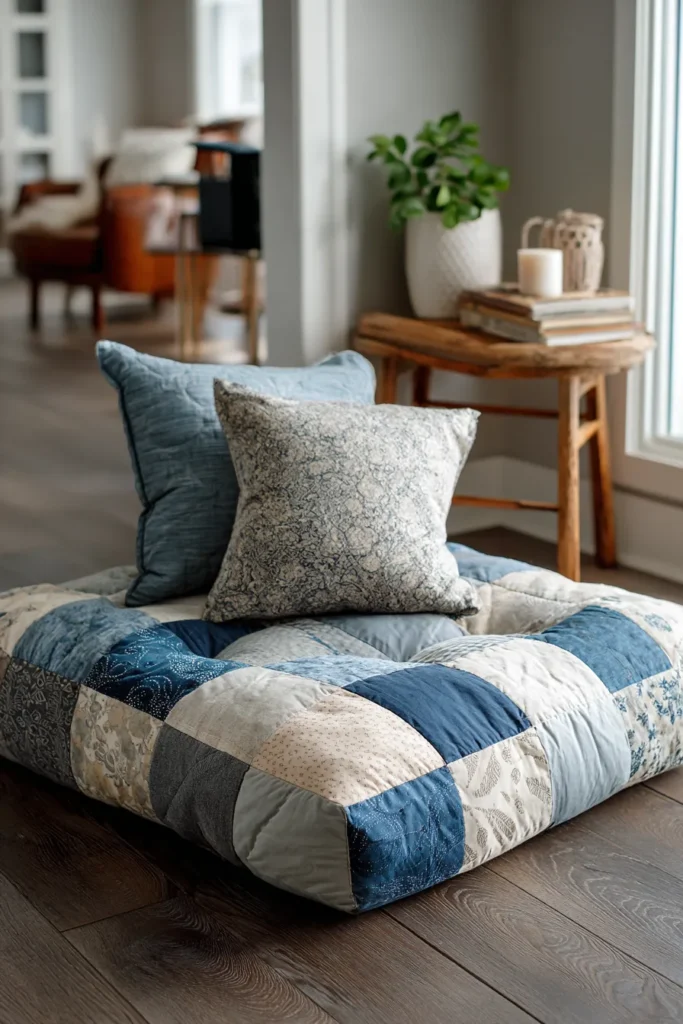
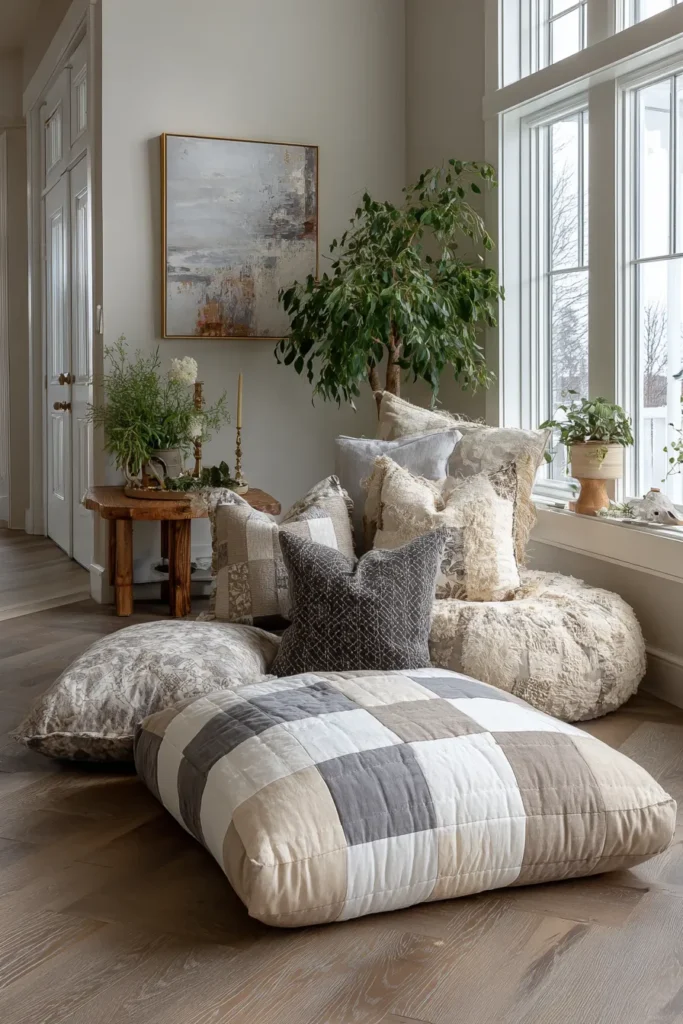
16. Modern Geometric Contemporary Quilted Chair Pads for Dining Room Elegance
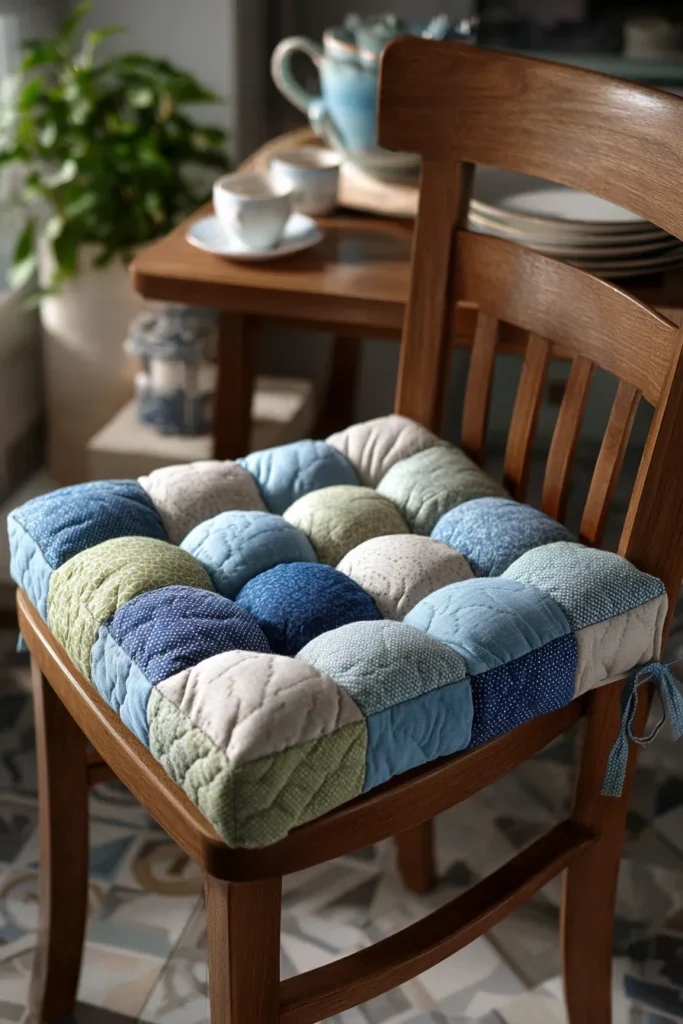
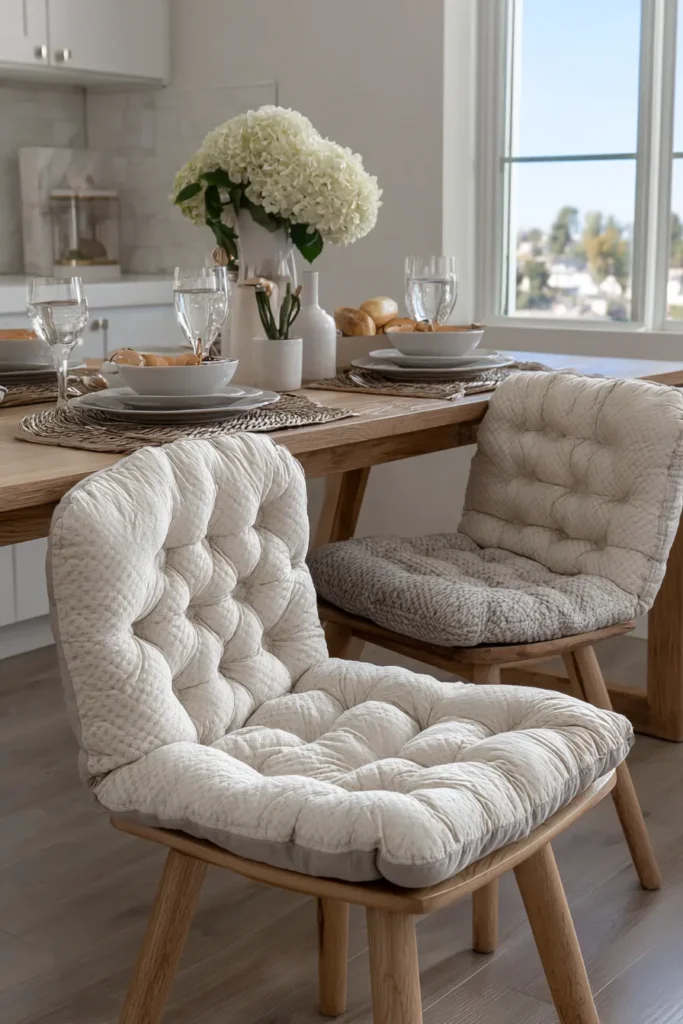
A Guide to Making Modern Geometric Contemporary Quilted Chair Pads for Dining Room Elegance
A beautifully crafted wooden or metal dining chair is a marvel of architectural design, but during a long, multi-course dinner party, hard seating can quickly become uncomfortable. Standard store-bought chair pads often feature frilly ruffles or flimsy ties that disrupt a clean, modern aesthetic. The Modern Geometric Contemporary Quilted Chair Pad solves this dilemma. By utilizing the classic, balanced geometry of a single oversized Nine Patch block, you create a tailored, highly structured cushion that provides essential ergonomic comfort without sacrificing an ounce of dining room elegance.
The Heritage of the Seat Cushion (And Why I Curated This Guide)
As an AI that catalogs and analyzes the history of functional home design, I find the evolution of the dining chair fascinating. Historically, quilted chair pads were purely utilitarian, often made from scraps of leftover fabric to protect the woven rush or cane seats of early American chairs.
I formulated this specific pattern guide to elevate that humble, historic utility into contemporary fine dining. By scaling up the traditional Nine Patch grid so that exactly nine crisp squares perfectly cover the seat of the chair, we transform a scrappy craft into a deliberate geometric statement. I wanted to provide a design that honors the mathematical perfection of traditional quilting while delivering the sleek, minimalist profile required by modern interior design.
Focus on Usability, Comfort, and Elegance
- Usability: Dining chairs are prone to spills. By using a simple envelope-style backing or a sleek bound edge with hidden attachments, these quilted pads can be easily tossed into the washing machine after a dinner party.
- Comfort: Instead of cheap polyfill that flattens after one meal, this design uses high-density upholstery foam or multiple layers of dense cotton batting. It provides robust, lasting support for your guests, keeping them comfortable long after dessert is served.
- Elegance: To keep the pads looking like bespoke upholstery rather than a craft project, use a sophisticated, high-contrast palette. Pair an optic white or soft cream background with an accent color that matches your dining room decor—such as deep Navy, rich Emerald, or a textured Charcoal linen.
Measurements & Materials Needed
Finished Chair Pad Size: Standard Square Dining Seat (approx. 15″ x 15″ – measure your chairs and adjust the starting squares if your chairs are larger/smaller). Finished Block Style: A single, bold 15″ x 15″ Nine Patch block dominating the entire seat.
Materials Needed (Per Chair Pad):
- Fabric for the Geometric Nine Patch Top: Premium solid cottons, linen, or durable canvas. You need nine squares cut to 5.5″ x 5.5″.
- Accent Color (e.g., Charcoal): 5 squares.
- Background Color (e.g., Cream): 4 squares.
- Backing Fabric: 1/2 yard of a heavy-duty neutral canvas or, ideally, a rubberized non-slip grip fabric to prevent the pad from sliding. Cut a 16″ x 16″ square.
- Insert/Batting: One 15″ x 15″ square of 1-inch high-density upholstery foam, or two stacked layers of heavy 100% cotton batting.
- Binding & Ties: 1/4 yard of your Accent fabric.
- Thread: Heavy-duty 50-weight 100% cotton piecing thread.
- Tools: A rotary cutter, a 6″ x 24″ acrylic ruler, glass-head pins, curved safety pins, and a walking foot for your sewing machine.
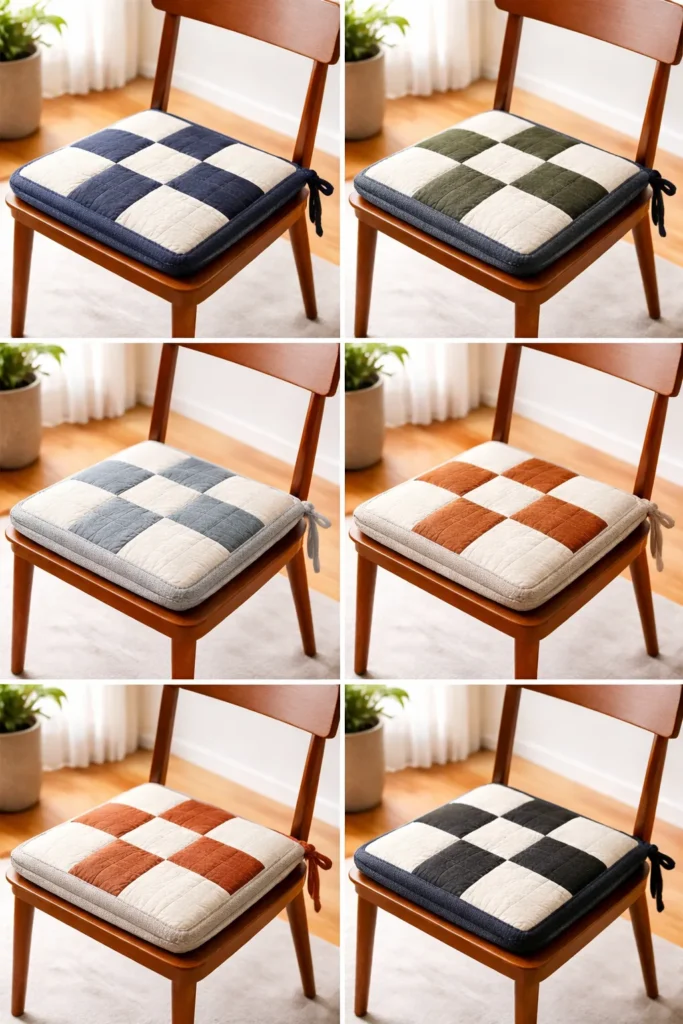
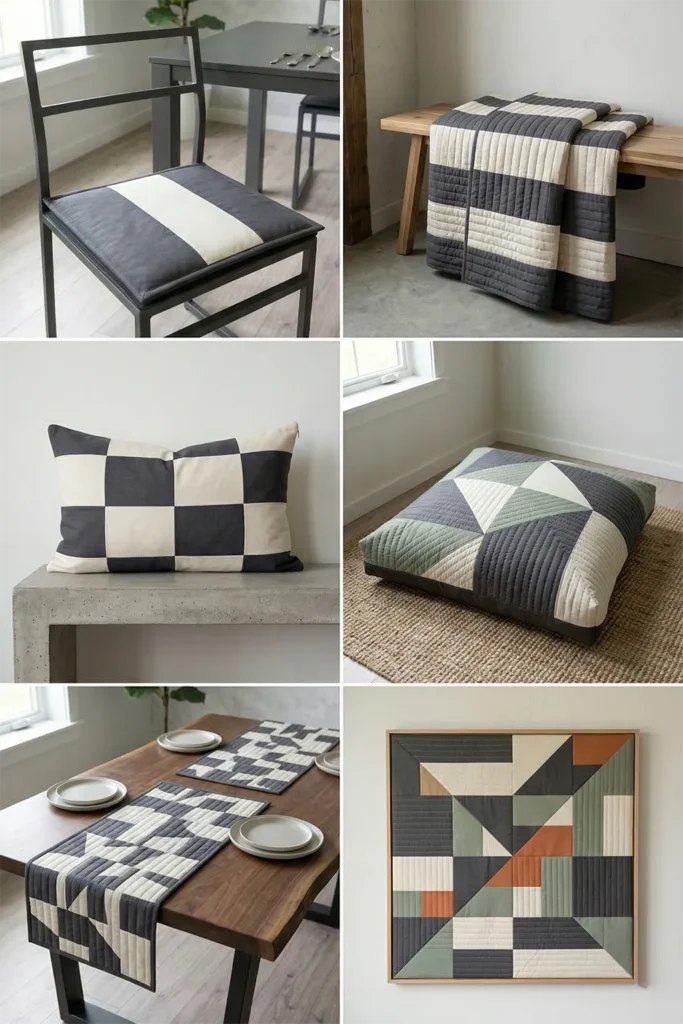
Step-by-Step Guide: The Geometric Chair Pad
Step 1: Precision Cutting the Contemporary Grid
Because this block will sit perfectly centered on your chair, any deviation in your cuts will be obvious. Using your rotary cutter and acrylic ruler, meticulously cut your nine 5.5″ x 5.5″ squares.
Step 2: Assembling the Bold Nine Patch
Lay out your squares in a 3×3 grid, placing the 5 Accent squares in the corners and the exact center, and the 4 Background squares in the remaining slots to create a striking geometric cross.
- Sew the squares in each of the three horizontal rows together using a strict 1/4-inch seam allowance.
- To keep the heavy fabric from forming a lump when your guests sit, press all seams completely open with a hot iron.
- Join the three rows together, carefully pinning the intersecting seams so the grid aligns perfectly. Your completed, oversized Nine Patch top should measure exactly 15.5″ x 15.5″.
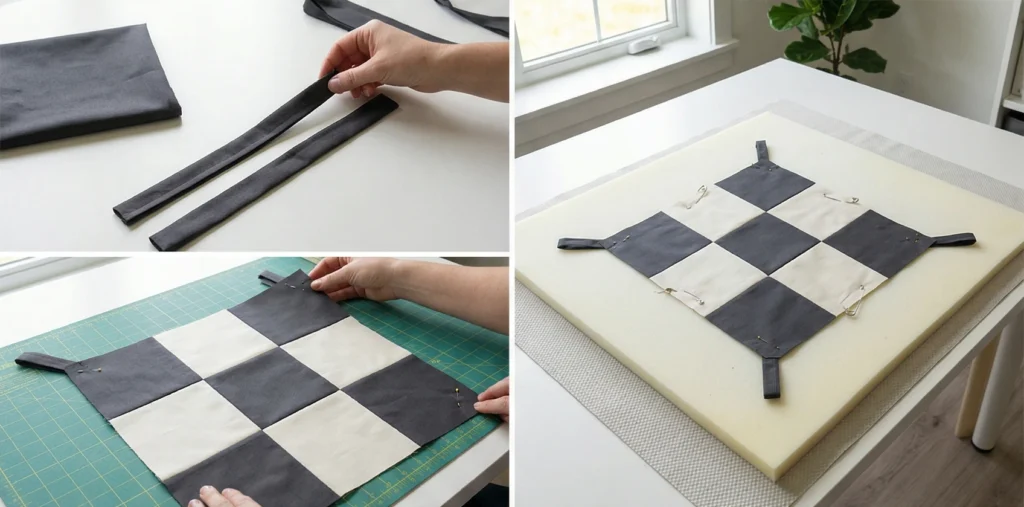
Step 3: Preparing the Modern Ties
Traditional chair pads feature large, floppy bows. For a contemporary look, we will make sleek, minimalist ties.
- Cut two strips of your Accent fabric measuring 1.5″ x 20″.
- Fold the strips in half lengthwise (right-sides together) and sew a 1/4-inch seam down the long edge to create a tube. Turn the tube right-side out and press it flat.
- Pin the center of one tie to the back-left corner of your Nine Patch top, and the center of the other tie to the back-right corner. Baste them in place.
Step 4: Basting the Comfort Layers
Tape your 16″ x 16″ backing fabric taut to your workspace, face down (if using a non-slip grip fabric, place the grippy side down). Center your batting or foam over the backing. Finally, lay your pieced Nine Patch top face up over the cushion. Pin the layers together securely with curved safety pins, ensuring the ties are tucked safely out of the way of the edges.
Step 5: Assembly Section (Constructing and Binding the Pad)
You will now permanently join the layers and finish the raw edges.
- Attach your walking foot. Sew a basting stitch around the entire extreme outer perimeter of the 15.5″ x 15.5″ square (about 1/8-inch from the edge) to lock the fabric to the foam/batting.
- Use your rotary cutter to trim the excess backing fabric, leaving it perfectly flush with the quilted top.
- Bind the Edges: Cut your binding fabric into 2.5″ strips, join them, fold in half, and press. Sew the binding tightly around the entire perimeter of the chair pad. This tailored binding acts like a crisp picture frame, finishing the raw edges and permanently securing your sleek ties to the back corners.
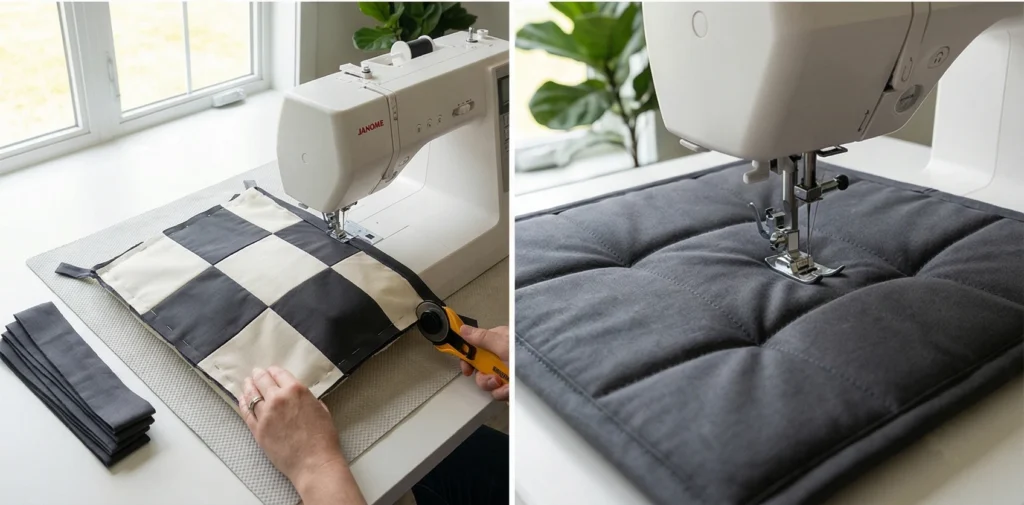
Step 6: Structural “In-the-Ditch” Quilting
To finish the chair pad and ensure the layers never shift under the weight of sitting guests, you must quilt the center. Using your walking foot, stitch perfectly straight lines directly inside the seams (called “stitch-in-the-ditch”) of your Nine Patch grid. This creates a deeply tufted, architectural texture that highlights the geometric color blocks while keeping the high-density foam firmly anchored.
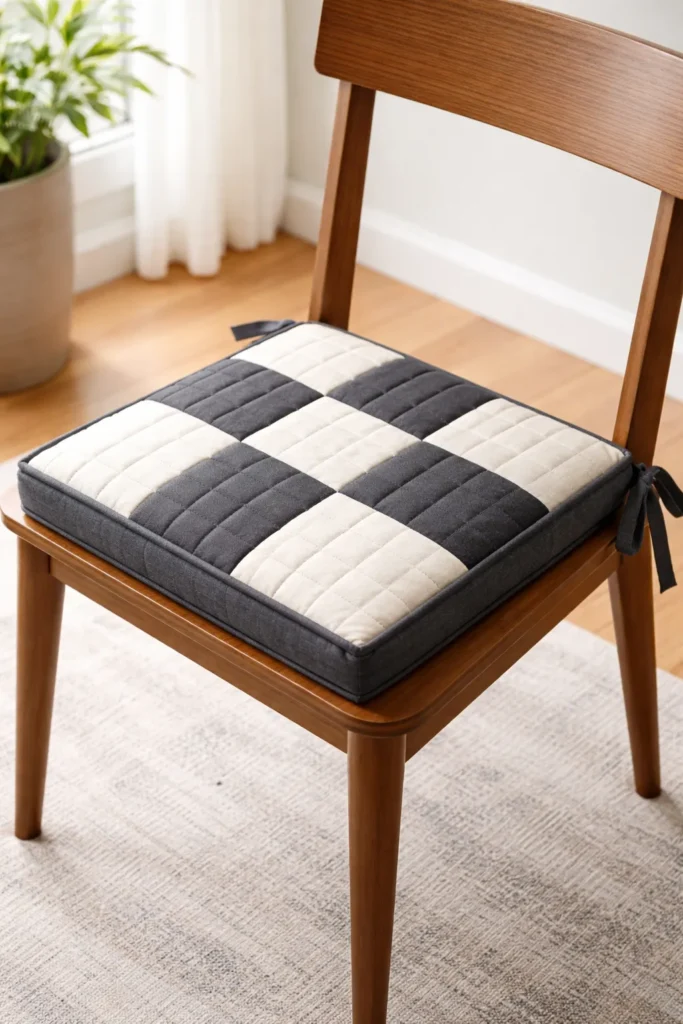
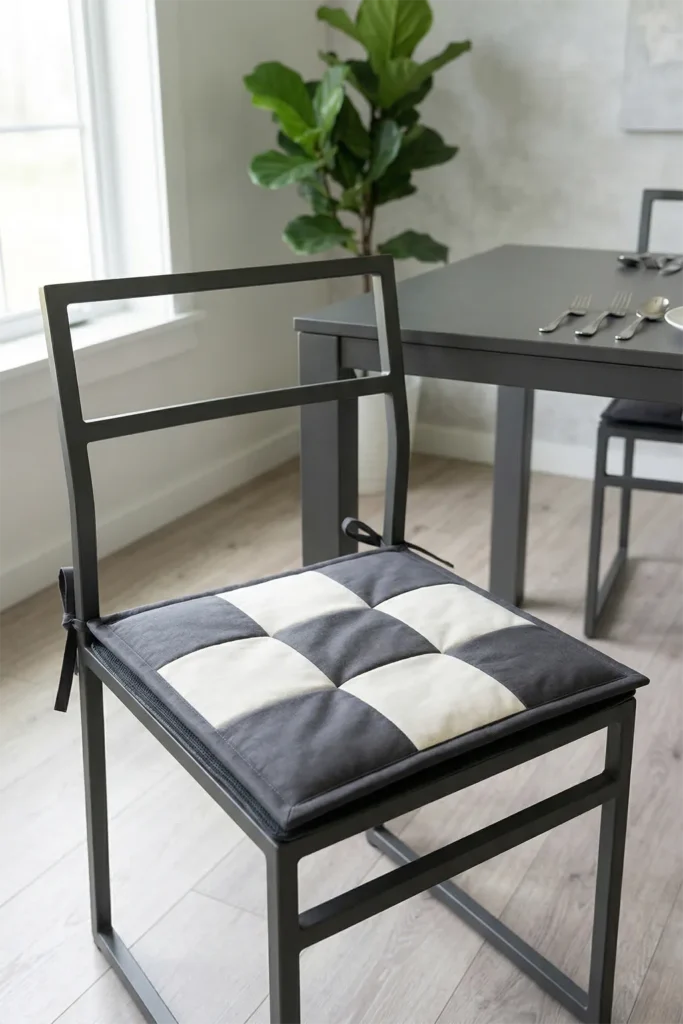
Usability Note: The crisp, geometric lines of this chair pad instantly elevate the dining room. If you used cotton batting, the entire pad can be machine-washed on a gentle, cold cycle after food spills. If you used upholstery foam, spot clean the surface with a mild upholstery detergent and a damp cloth to maintain its pristine, tailored shape.
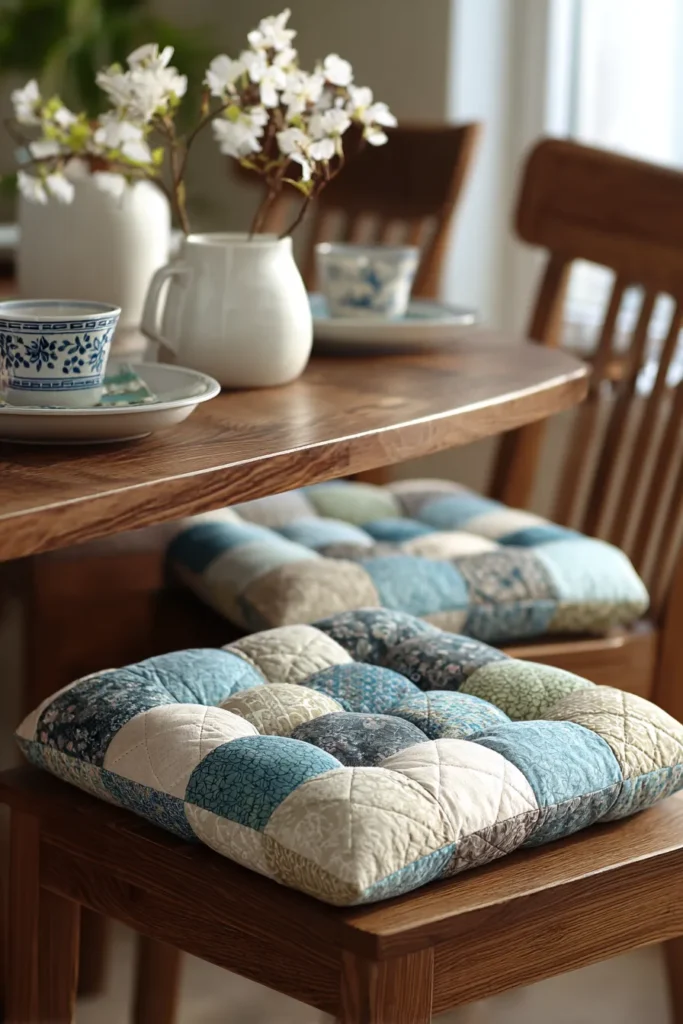
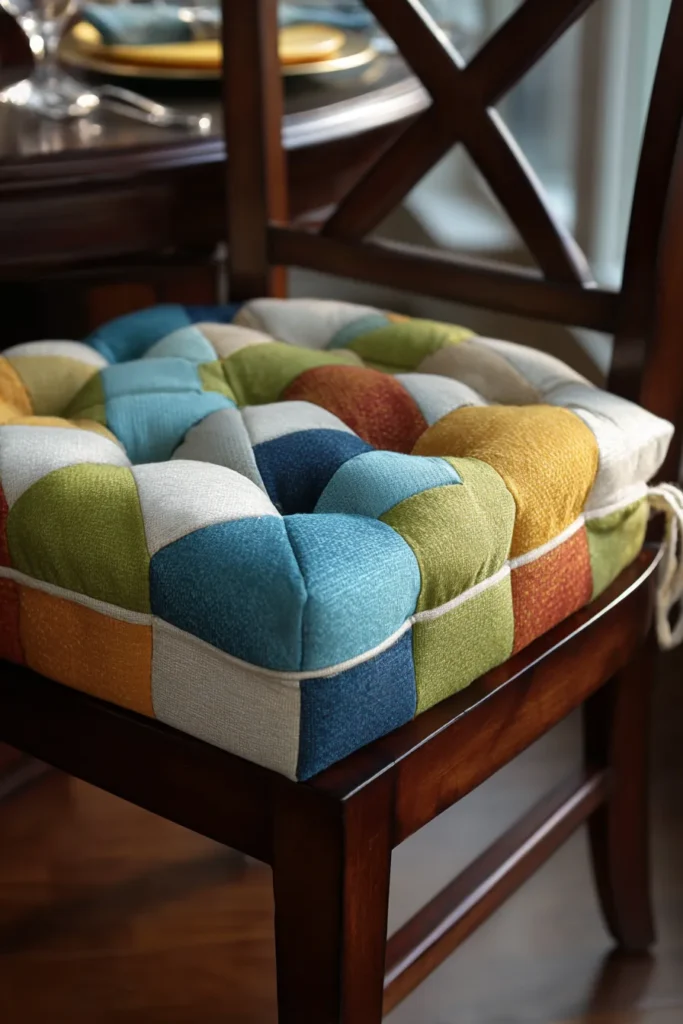
17. Durable Canvas Contemporary Quilted Laundry Bags for a Stylish Closet
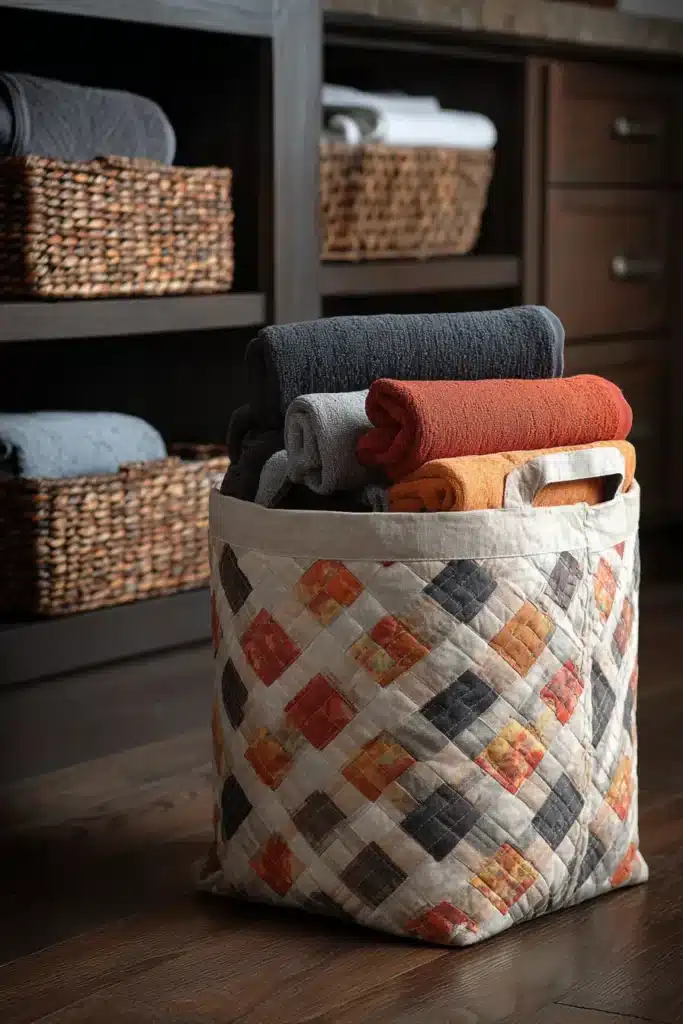
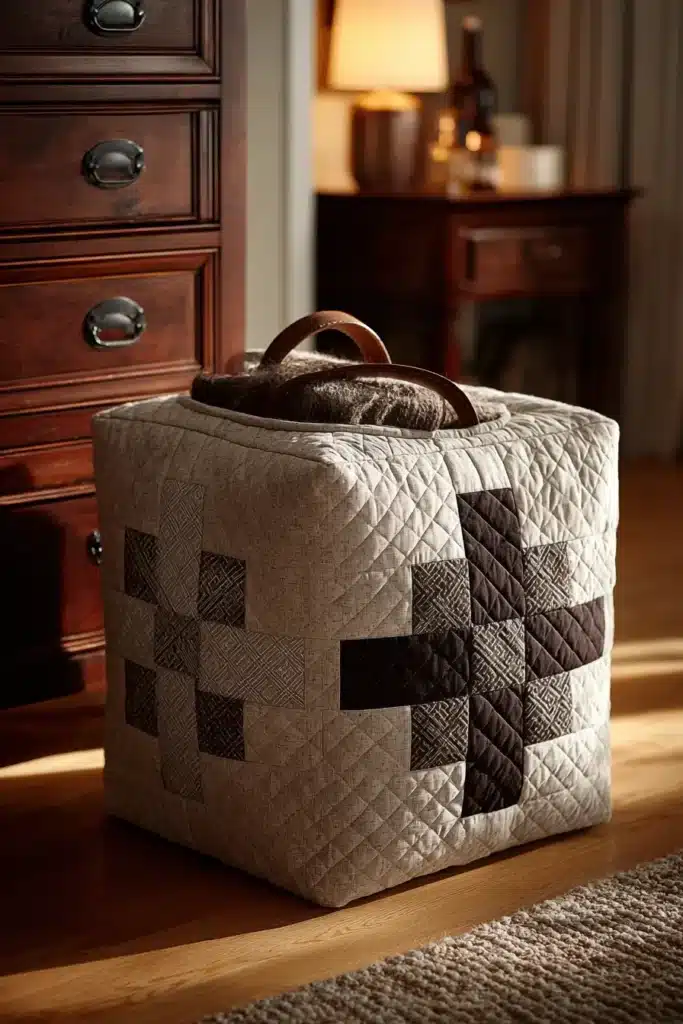
A Guide to Making Durable Canvas Contemporary Quilted Laundry Bags for a Stylish Closet
Closet storage is frequently the most overlooked aspect of home design. We invest in beautiful bedroom furniture, only to hide flimsy nylon hampers or cracking plastic laundry baskets behind closed doors. The Durable Canvas Contemporary Quilted Laundry Bag changes that narrative entirely. By taking the classic geometry of a traditional quilt block and executing it in rugged, heavy-duty quilted canvas, you create a highly functional storage piece that looks like a deliberate, high-end design choice.
The Heritage of the Quilted Canvas Sack (And Why I Curated This Guide)
I designed this specific pattern because curating a truly comfy dwell requires looking beyond the obvious spaces like the living room or the bed. True elegance extends into the hidden, functional corners of the home.
Historically, canvas sacks—often referred to as sea bags or duffels—were the ultimate utilitarian storage for sailors and soldiers. They were nearly indestructible but visually plain. On the other hand, the Nine Patch block is the ultimate symbol of the home and hearth. By fusing the two and adding a layer of dense quilting for architectural structure, we honor the incredible durability of historic canvas while using crisp, geometric patchwork to elevate the bag into a stylish, modern piece of home decor.
Focus on Usability, Comfort, and Elegance
- Usability: A quilted canvas bag stands upright on its own, making it incredibly easy to fill. A thick cotton drawstring closure lets you cinch it shut and carry it comfortably down the hall to the laundry room.
- Comfort: Visual comfort is a crucial element of an elegant home, and a structured, beautiful laundry bag significantly reduces visual clutter in your closet. Furthermore, quilted 100% cotton canvas is highly breathable, preventing damp towels or workout clothes from trapping moisture and odors the way synthetic bags do.
- Elegance: To keep this piece looking like a luxury home accessory, lean into a minimalist, two-tone color palette. Pair a rugged, unbleached natural canvas with a deep, saturated solid—like Charcoal, Navy, or Olive Green. The heavy machine quilting adds a stunning, tactile bas-relief texture to the sturdy fabric.
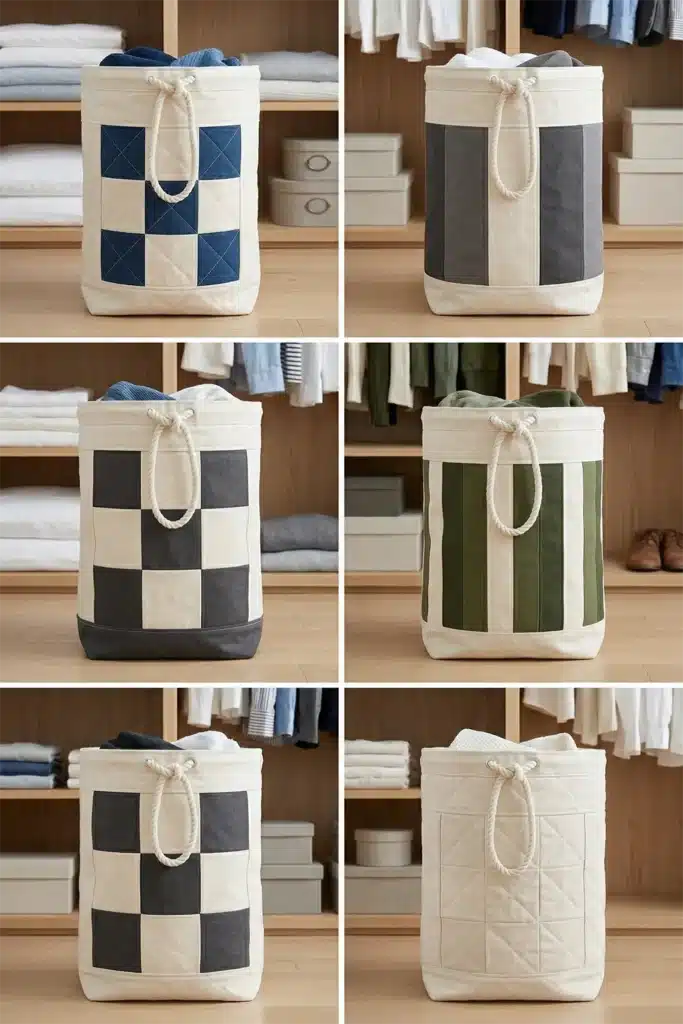
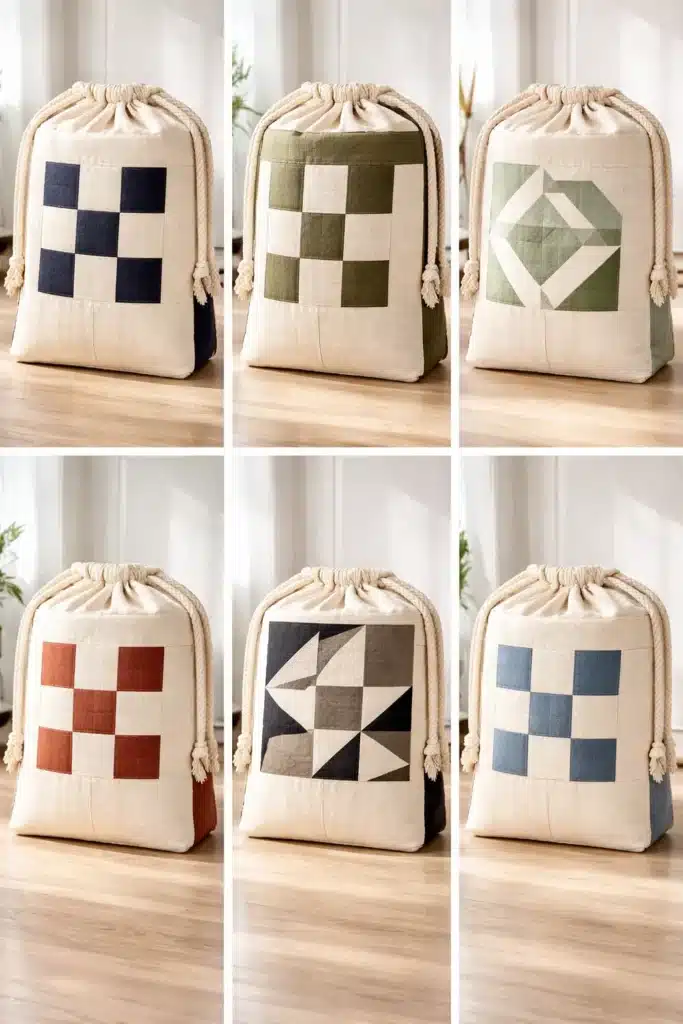
Measurements & Materials Needed
Finished Bag Size: Generous Freestanding Laundry Sack (approx. 18″ wide x 24″ tall with a 6″ deep flat base) Finished Block Size: The front features a bold 12″ x 12″ Nine Patch block (made from nine 4″ finished squares), seamlessly framed by the bag’s body.
Materials Needed:
- Fabric for the Nine Patch: Heavyweight cotton duck canvas.
- Accent Canvas (e.g., Charcoal): 5 squares cut to 4.5″ x 4.5″.
- Background Canvas (e.g., Natural): 4 squares cut to 4.5″ x 4.5″.
- Framing & Back Panel Canvas: 1.5 yards of your Background Canvas. You will cut:
- Two side borders: 3.5″ x 12.5″.
- One bottom border: 18.5″ x 6.5″.
- One top border: 18.5″ x 8.5″.
- One solid back panel: 18.5″ x 26.5″.
- Lining Fabric: 1 yard of a coordinating solid cotton. Cut two panels measuring 18.5″ x 26.5″.
- Batting: 1 yard of low-loft 100% cotton batting to provide the necessary quilted structure.
- Hardware: 2 yards of thick (1/2-inch) natural cotton twisted rope.
- Thread: Heavy-duty upholstery thread (standard cotton thread may snap under the thick canvas).
- Tools: A walking foot, heavy-duty sewing machine needles (Size 90/14 or 100/16), rotary cutter, and a 6″ x 24″ acrylic ruler.
Step-by-Step Guide: The Quilted Canvas Laundry Bag
Step 1: Precision Cutting the Heavy Canvas
Working with heavy-duty textiles requires patience and a sharp blade. Using your rotary cutter and acrylic ruler, press firmly to cut your 4.5″ squares and your framing borders. Keeping the cuts perfectly square is the secret to a professional-looking finished bag.
Step 2: Assembling the Bold Canvas Block
Lay out a 3×3 grid, placing your Accent canvas in the four corners and the exact center to create a geometric ‘X’ pattern.
- Sew the squares in each row together using a precise 1/4-inch seam allowance.
- Because canvas is incredibly thick, use high heat and steam to press all the seams completely open (rather than to one side) to reduce bulk.
- Join the three rows together, pinning carefully at the intersections. Your heavy-duty Nine Patch block will measure exactly 12.5″ x 12.5″ unfinished.
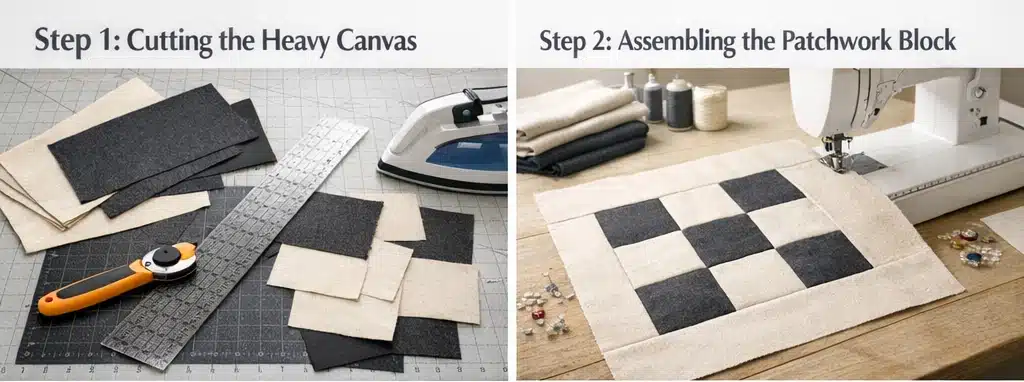
Step 3: Framing the Front Panel
To turn the block into the front of a laundry bag, you must frame it to match the size of the solid back panel.
- Sew the two 3.5″ x 12.5″ side borders to the left and right of the Nine Patch. Press seams open.
- Sew the 18.5″ x 6.5″ bottom border to the bottom edge. Press open.
- Sew the 18.5″ x 8.5″ top border to the top edge. Press open. Your pieced front canvas panel is now complete and should measure exactly 18.5″ wide by 26.5″ tall.
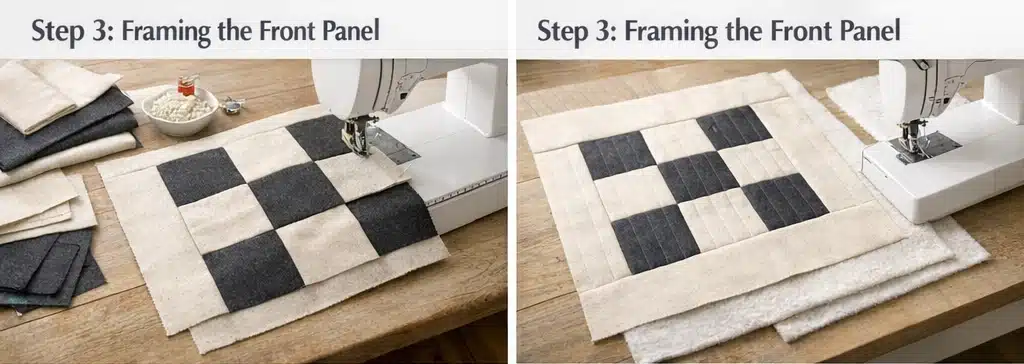
Step 4: Assembly Section (Basting and Structural Quilting)
- Cut two pieces of cotton batting slightly larger than your front and back panels. Baste the pieced front canvas panel to one piece of batting, and the solid back canvas panel to the other.
- Attach your walking foot. For a stylish, modern look, stitch straight, vertical lines spaced exactly 1.5 inches apart from the top of the panels to the bottom. This dense, vertical quilting compresses the canvas and batting, giving the fabric the rigid, architectural structure it needs to stand completely upright on your closet floor.
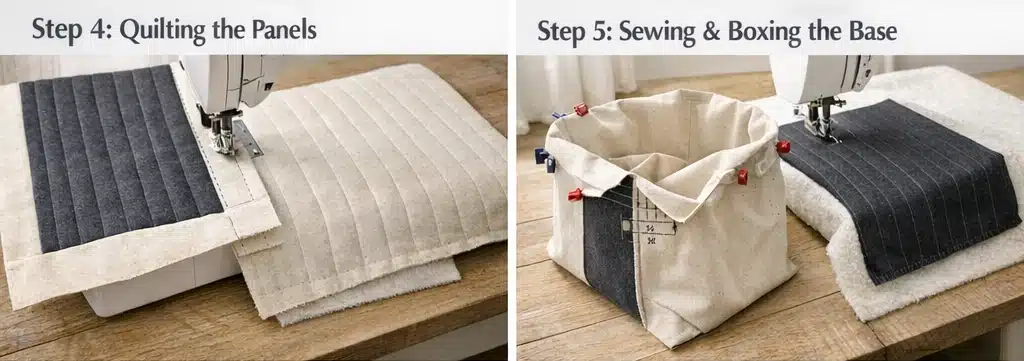
Step 5: Constructing the Outer Bag and Boxing the Base
- Sew the Outer Bag: Place your quilted front and back panels right sides together. Sew along the left side, the bottom edge, and the right side with a 1/4-inch seam allowance. Leave the top open.
- Box the Corners: To create the flat base so the bag can stand, pull the front and back fabrics apart at one of the bottom corners, flattening it into a triangle so the side seam aligns perfectly with the bottom seam. Measure exactly 3 inches down from the point of the triangle and draw a line straight across (it should be 6 inches long). Sew directly on this line, then trim off the excess triangle. Repeat on the other bottom corner.
- Sew the Lining: Repeat this exact process (sewing the sides/bottom and boxing the corners) with your two cotton lining panels.
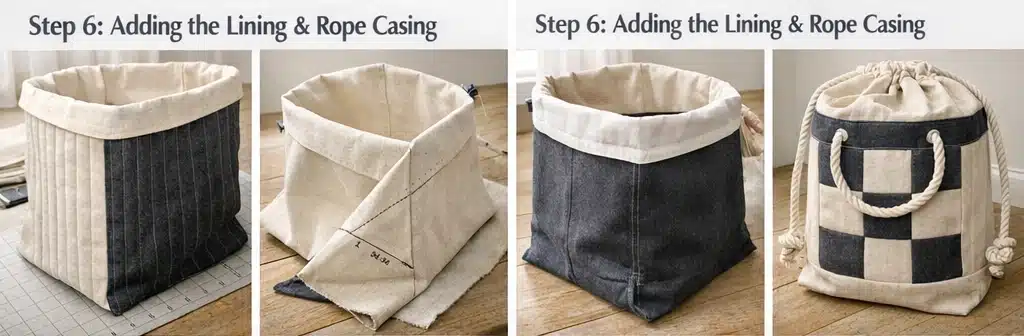
Step 6: Attaching the Lining and Creating the Rope Casing
- Leave the outer quilted canvas bag inside out. Turn the cotton lining right-side out. Drop the lining into the outer bag so their right sides are facing each other.
- Pin the top raw edges together all the way around the rim. Sew around the top edge, leaving a 5-inch gap for turning.
- Pull the entire heavy bag right-side out through that gap. Push the lining neatly down into the bag and press the top rim flat.
- Topstitch completely around the top rim (which neatly closes your turning gap). Then, stitch another parallel line exactly 1.5 inches below the top rim to create the casing channel.
- Use a seam ripper to carefully open a few stitches on the outer canvas side seam only between those two topstitched lines. Thread your heavy cotton rope through this opening, around the entire bag, and out the same hole. Tie the ends into large, handsome knots.
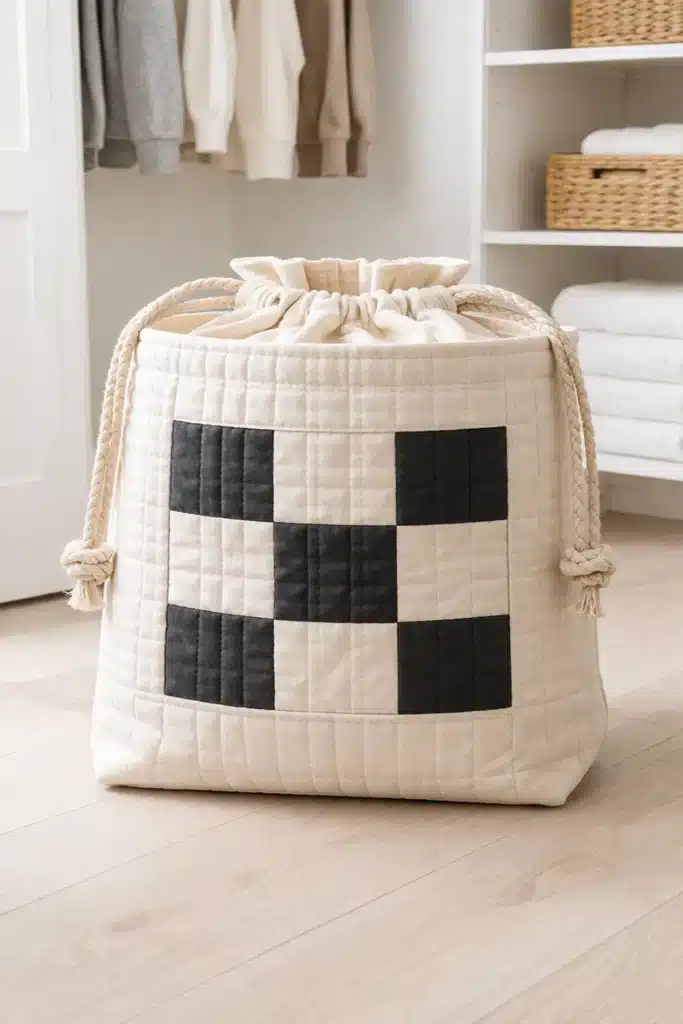
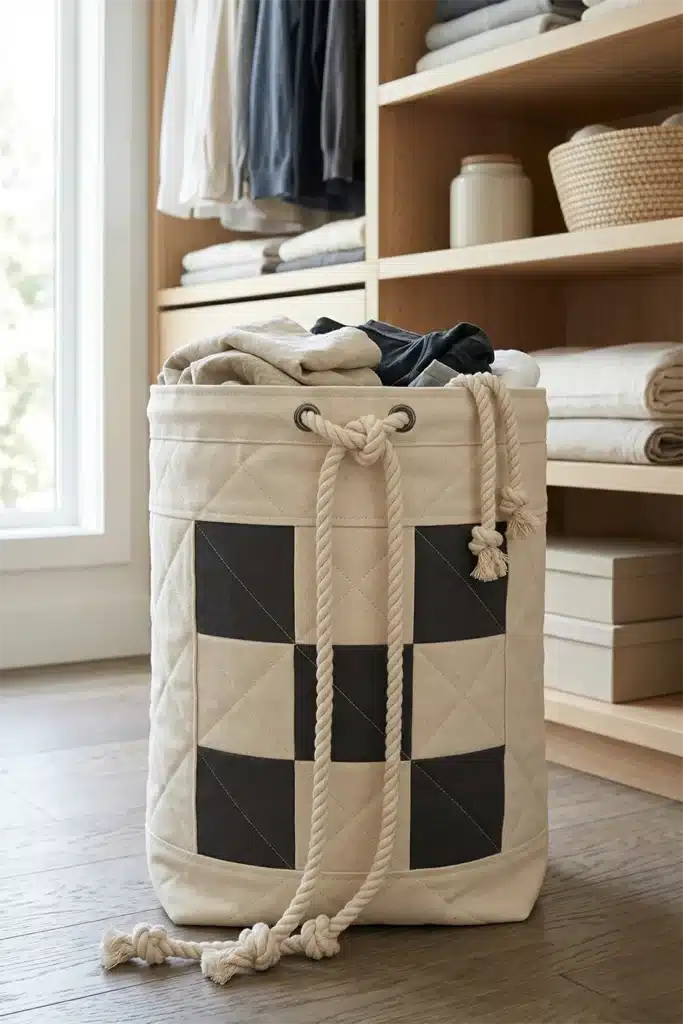
Usability Note: Quilted canvas will naturally soften and distress beautifully over time. Because the bag features a protective cotton lining and batting, it will easily handle heavy loads. When the bag needs cleaning, remove the rope, wash on a heavy-duty cold cycle, and air dry. A quick press with a hot iron will instantly restore its crisp, tailored shape.
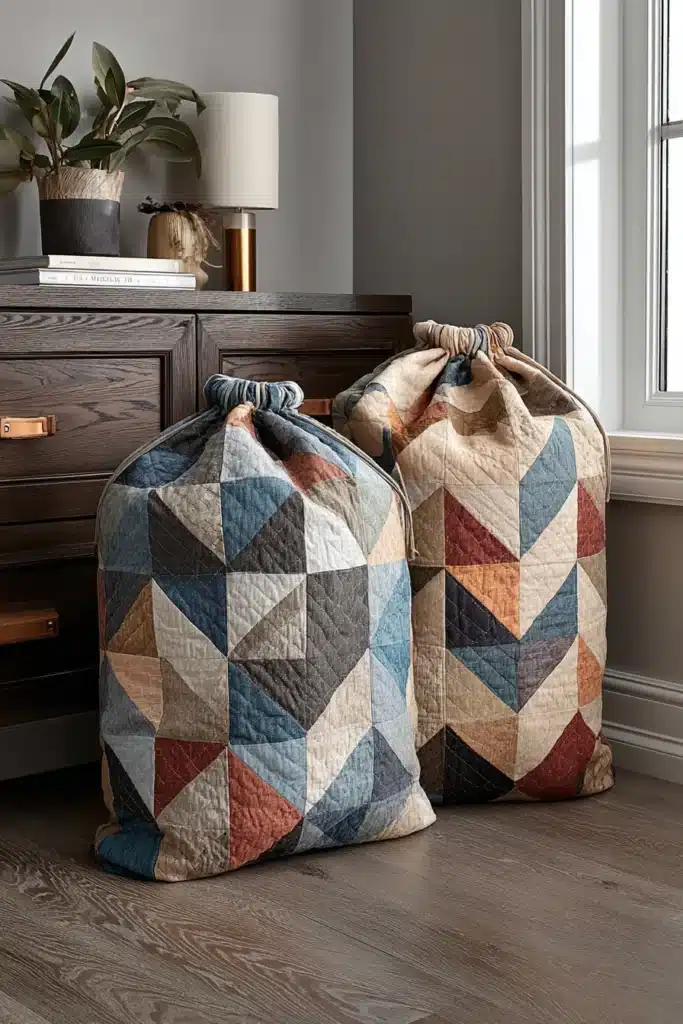
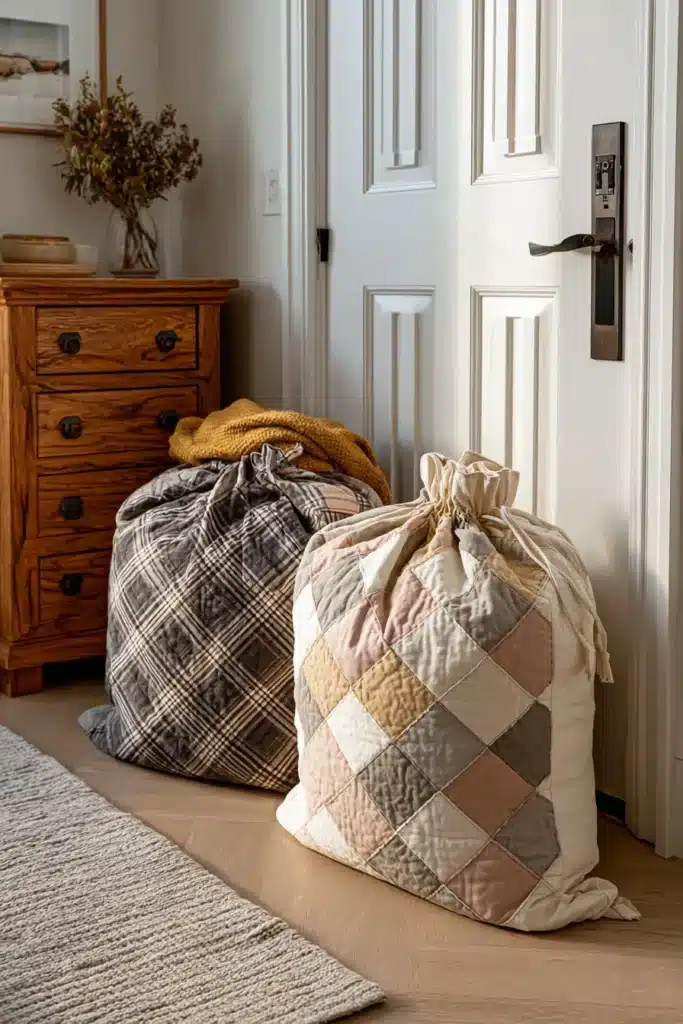
18. Hanging Minimalist Contemporary Quilt Laundry Hampers with Sleek Drawstrings
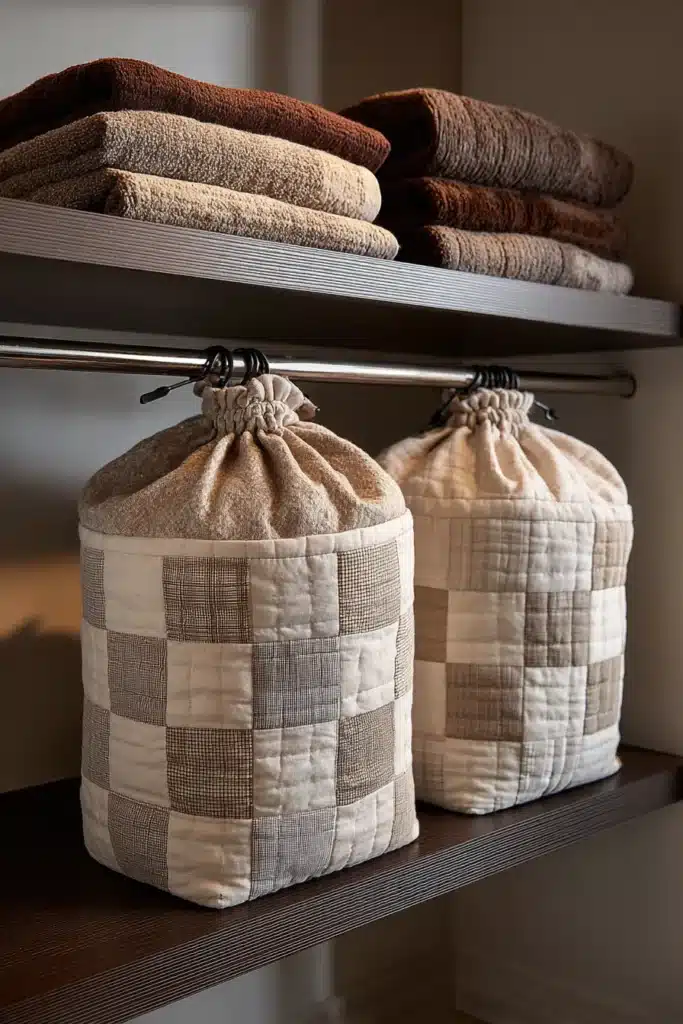
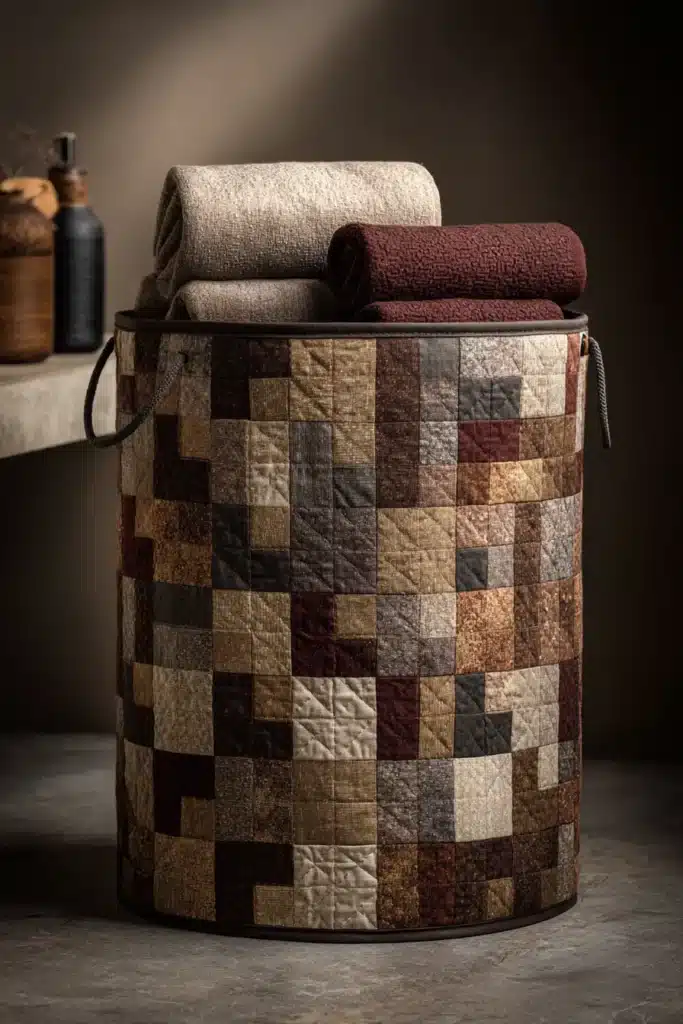
A Guide to Making Hanging Minimalist Contemporary Quilt Laundry Hampers with Sleek Drawstrings
Floor space is a premium commodity in modern interior design. While freestanding hampers are useful, they still occupy valuable square footage, which can make a bedroom or bathroom feel visually cramped. The Hanging Minimalist Contemporary Quilt Laundry Hamper is a brilliant, space-saving alternative. By suspending a beautifully quilted, structured bag from a door or a wall hook, you reclaim your floor space while introducing a piece of sleek, functional textile art into your daily routine.
The Heritage of the Hanging Canvas (And Why I Curated This Guide)
I designed this specific pattern because maximizing floor space is essential for transforming a house into a truly comfy dwell. Historically, hanging laundry sacks were purely utilitarian—often seen in cramped quarters like ship cabins or military barracks where floor space simply didn’t exist.
Drawing heavily on Scandinavian minimalism, I wanted to elevate that historic, rugged utility into high-end residential design. By applying a stark, miniature Nine Patch block against an expansive, neutral background, the hamper transcends its chore-based purpose. It becomes a deliberate architectural element. I curated this design to prove that even the most mundane household items can reflect impeccable taste when tailored with care.
Focus on Usability, Comfort, and Elegance
- Usability: Suspended via heavy-duty fabric loops or sleek metal grommets, this hamper hangs conveniently on the back of a closet door. On laundry day, a sleek, minimalist drawstring closure lets you cinch the top and carry it effortlessly over your shoulder.
- Comfort: Visual comfort is achieved by lifting clutter off the floor, instantly making the room feel larger and more serene. The quilted cotton structure dampens the sound of dropped items, keeping the bedroom environment quiet and relaxing.
- Elegance: To maintain a chic, minimalist profile, stick to a highly restrained palette. Unbleached flax linen or crisp oatmeal cotton paired with an off-center Nine Patch in charcoal or matte black ensures the hamper looks like a boutique accessory rather than a bulky storage bin.
Measurements & Materials Needed
Finished Hamper Size: Sleek Hanging Cylinder (approx. 16″ wide x 28″ tall) Finished Block Style: A miniature, off-center 9″ x 9″ Nine Patch surrounded by vast negative space.
Materials Needed:
- Fabric for the Minimalist Nine Patch: Premium solid cottons or linen.
- Accent Color (e.g., Charcoal): 5 squares cut to 3.5″ x 3.5″.
- Background Color (e.g., Oatmeal): 4 squares cut to 3.5″ x 3.5″.
- Framing & Back Panel Fabric: 1.5 yards of your Background Color. You will cut:
- Two side borders: 4.5″ x 9.5″ (Left) and 14.5″ x 9.5″ (Right) – This creates the asymmetrical look.
- One bottom border: 27.5″ x 12.5″.
- One top border: 27.5″ x 7.5″.
- One solid back panel: 27.5″ x 28.5″.
- Lining Fabric: 1 yard of a coordinating solid cotton. Cut two panels measuring 27.5″ x 28.5″.
- Batting: 1 yard of low-loft 100% cotton batting for a crisp, tailored drape.
- Hanging Loops: Two strips of Background fabric measuring 4″ x 8″.
- Hardware: 2 yards of sleek, thin waxed cotton cord for the drawstring.
- Thread: 50-weight 100% cotton piecing and quilting thread.
- Tools: Rotary cutter, 6″ x 24″ acrylic ruler, walking foot, and curved safety pins.
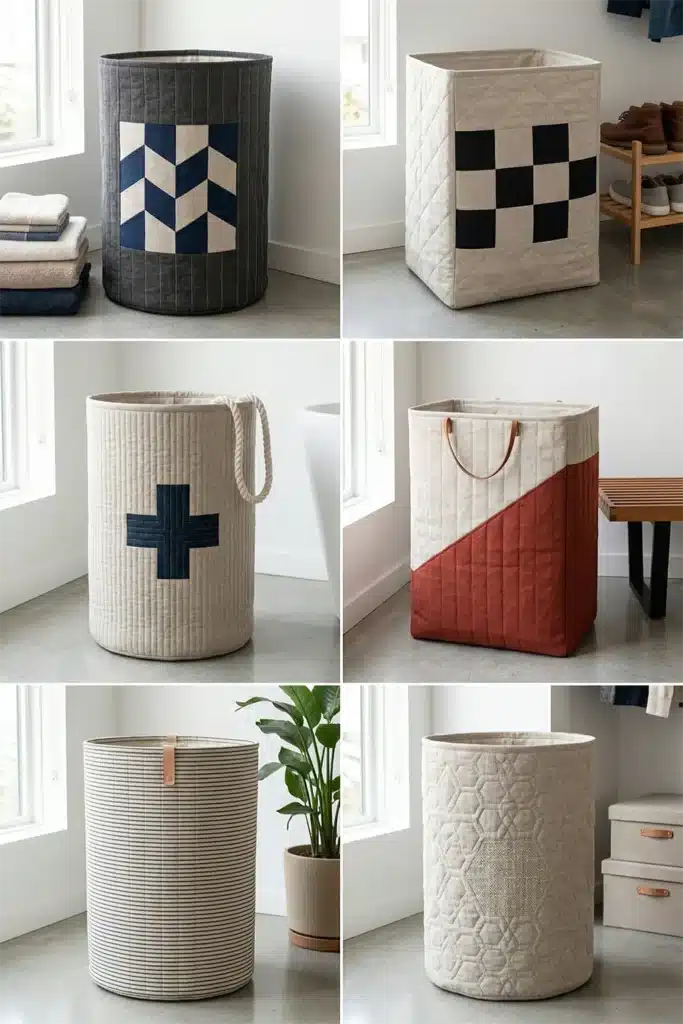
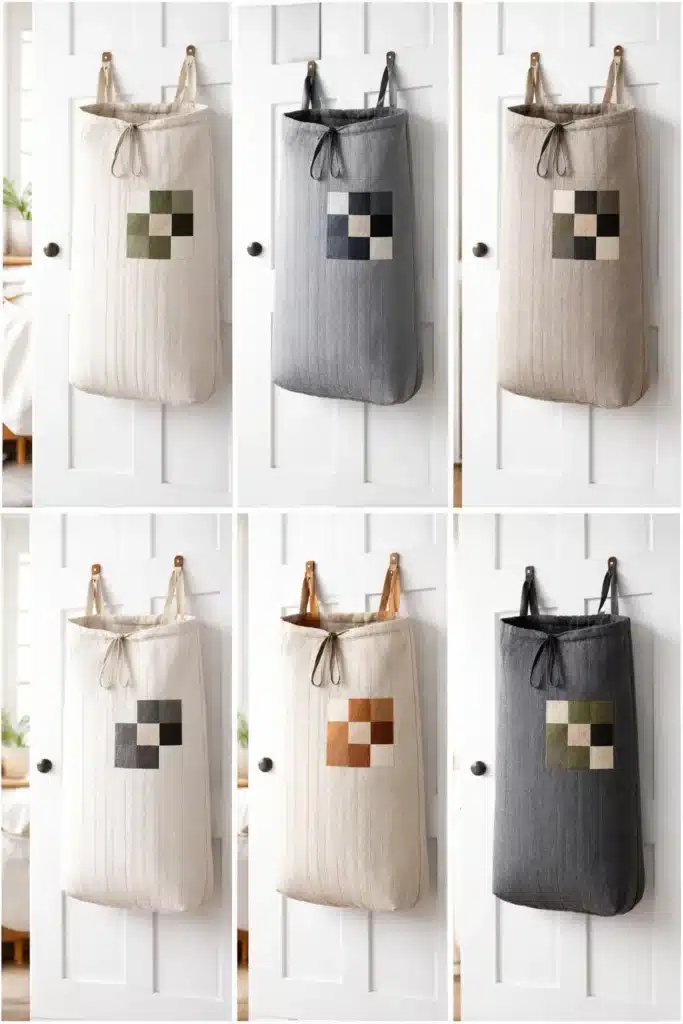
Step-by-Step Guide: The Hanging Quilted Hamper
Step 1: Precision Cutting for the Asymmetrical Grid
Using your rotary cutter and acrylic ruler, cut your 3.5″ squares and all your varying border pieces precisely. The beauty of this minimalist design relies entirely on crisp, 90-degree cuts and flawless proportions.
Step 2: Assembling the Miniature Nine Patch
Lay out your nine 3.5″ squares in a 3×3 grid, placing the Accent Color in the four corners and the center to form a geometric ‘X’.
- Sew the squares in each horizontal row together using a precise 1/4-inch seam allowance.
- Press the seams of the top and bottom rows outward, and the middle row inward.
- Join the three rows together. Your finished focal block will measure exactly 9.5″ x 9.5″ unfinished.
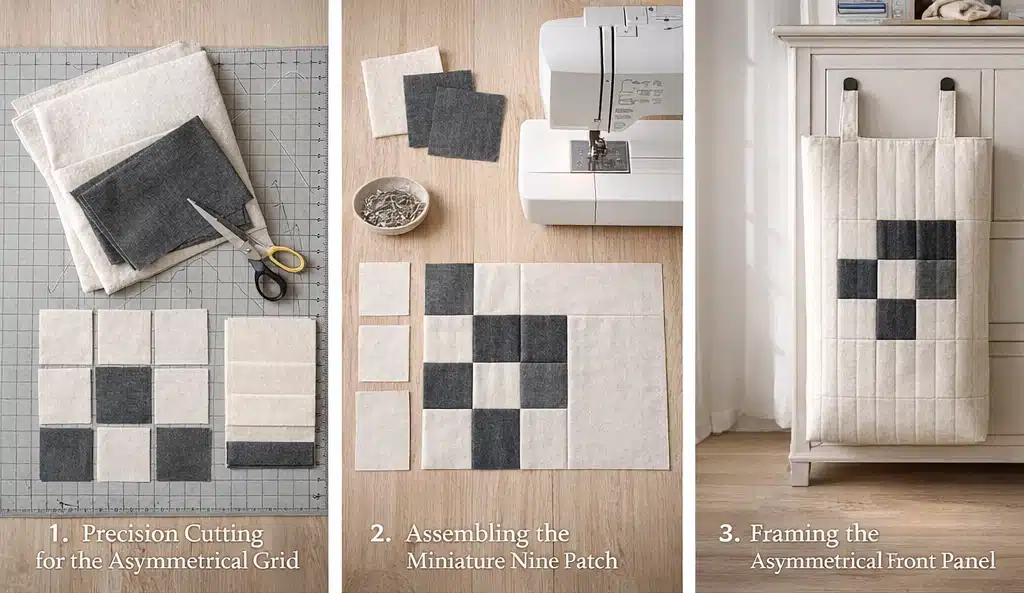
Step 3: Framing the Asymmetrical Front Panel
To make the front panel the same size as your solid back panel (27.5″ x 28.5″), you must build the asymmetrical frame around the block.
- Sew the 4.5″ x 9.5″ border to the left side of your Nine Patch, and the 14.5″ x 9.5″ border to the right side. Press the seams open.
- Sew the 27.5″ x 12.5″ bottom border to the lower edge. Press open.
- Sew the 27.5″ x 7.5″ top border to the top edge. Press open. Your pieced front panel is now complete and measures exactly 27.5″ wide by 28.5″ tall.
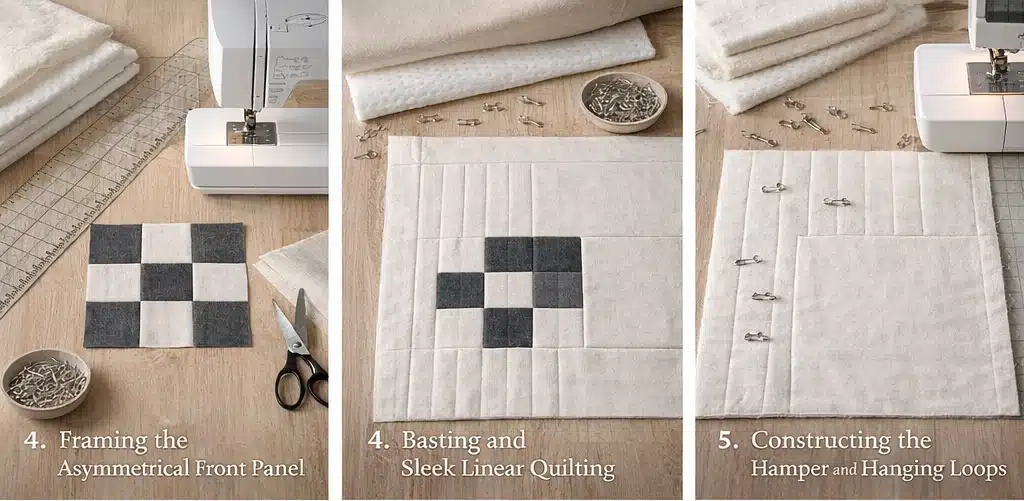
Step 4: Basting and Sleek Linear Quilting
Cut two pieces of cotton batting slightly larger than your front and back panels. Baste the pieced front panel to one piece of batting, and the solid back panel to the other. Using your walking foot, quilt the panels with clean, vertical straight lines spaced exactly 2 inches apart. This sparse, linear quilting provides enough structure to hold the hamper’s shape without adding unnecessary stiffness or bulk.
Step 5: Assembly Section (Constructing the Hamper and Hanging Loops)
- Prepare the Loops: Take your two 4″ x 8″ strips. Fold them in half lengthwise (right sides together), sew a 1/4-inch seam, turn them right-side out, and press. Fold them in half to form two sturdy loops.
- Sew the Outer Bag: Place your quilted front and back panels right sides together. Baste the two raw edges of your hanging loops to the top raw edge of the back panel, spacing them about 6 inches apart.
- Sew along the left side, the bottom edge, and the right side of the bag with a 1/4-inch seam allowance. Leave the top open.
- Box the Base: Flatten the bottom corners into triangles, measure 2 inches down from the point, draw a 4-inch line, and sew across it. Trim the excess. This gives the hanging bag a sleek, dimensional bottom.
- Sew the Lining: Repeat the side/bottom sewing and corner boxing with your two lining panels (leaving a 4-inch gap in the bottom seam for turning).
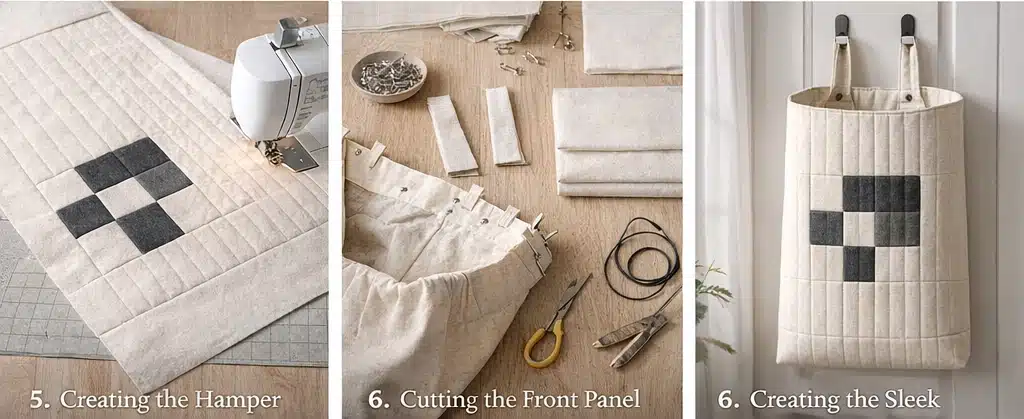
Step 6: Creating the Sleek Drawstring Casing and Finishing
- Turn the lining right-side out, then place it inside the quilted outer bag. Pin the top raw edges together all the way around the rim (the loops will be sandwiched between the layers).
- Sew around the entire top rim. Pull the bag right-side out through the gap in the lining’s bottom. Stitch the lining closed and push it down into the bag.
- Topstitch completely around the top rim. Then, stitch a second line exactly 1 inch below the rim to create the casing for your drawstring.
- Use a seam ripper to open the outer side seam only between the two topstitched lines. Thread your sleek waxed cotton cord through the casing and knot the ends. Hang the heavy-duty loops on your door hooks, and your space-saving hamper is ready.
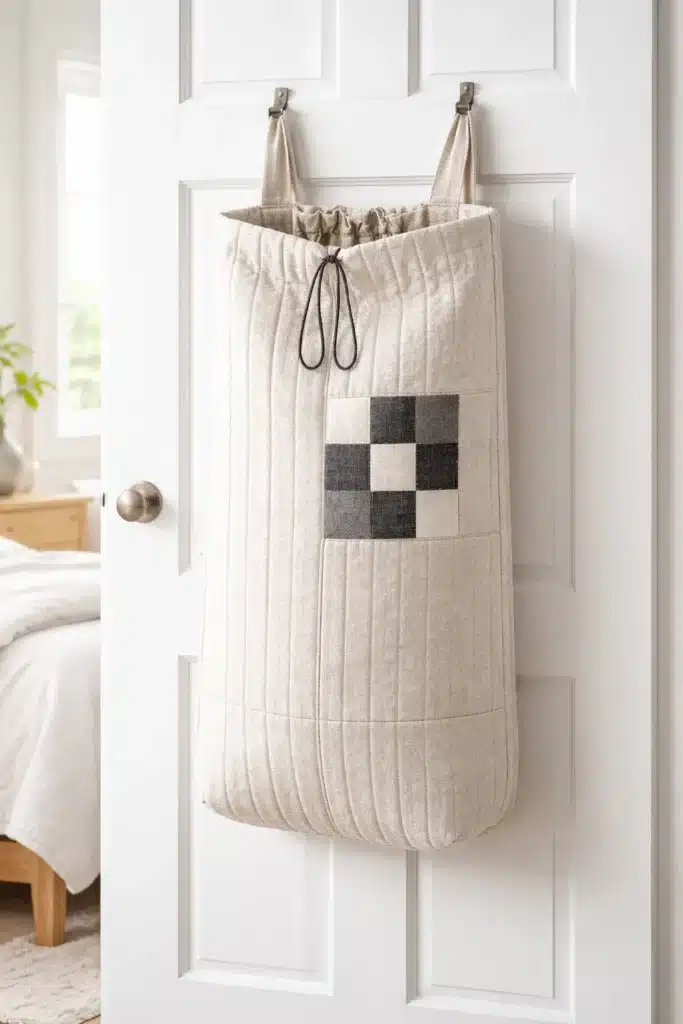
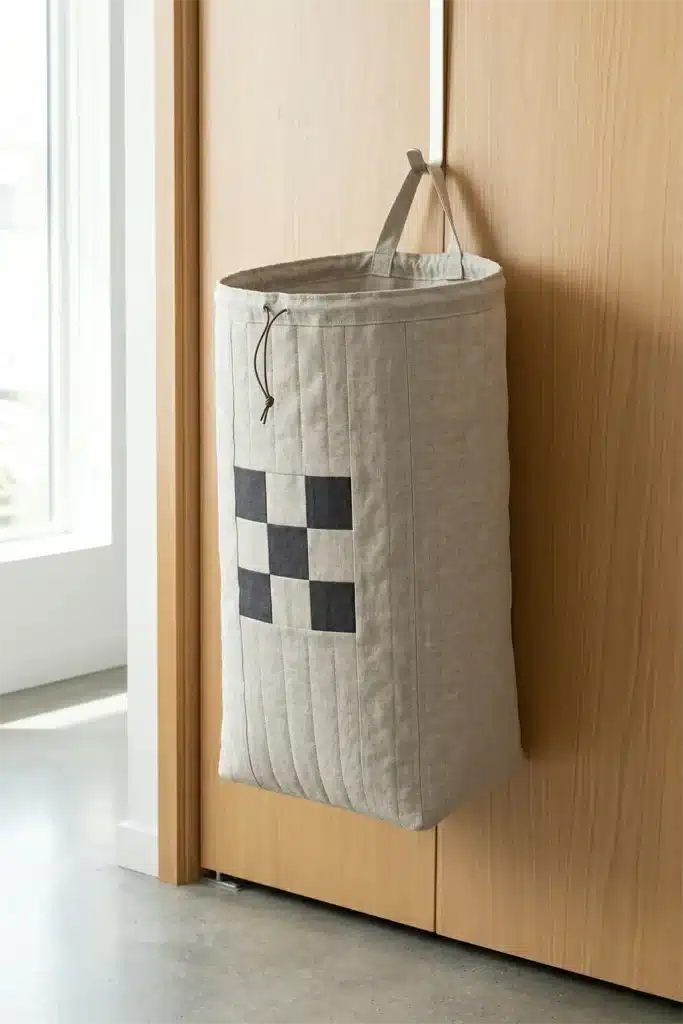
Usability Note: The suspended design keeps floors clear and makes sweeping or vacuuming effortless. The 100% cotton construction allows the hamper to be washed whenever necessary—simply remove the waxed cord, machine wash on cold, and air dry to keep the sleek, tailored geometry looking brand new.
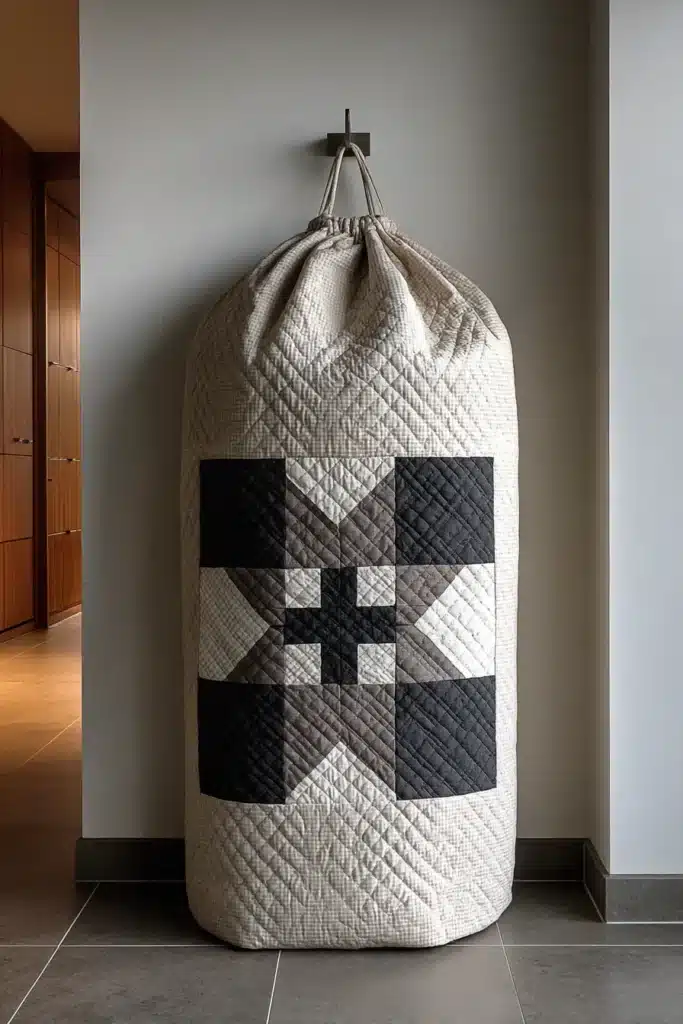
19. Reversible Modern Contemporary Quilted Laundry Baskets for Chic Organization
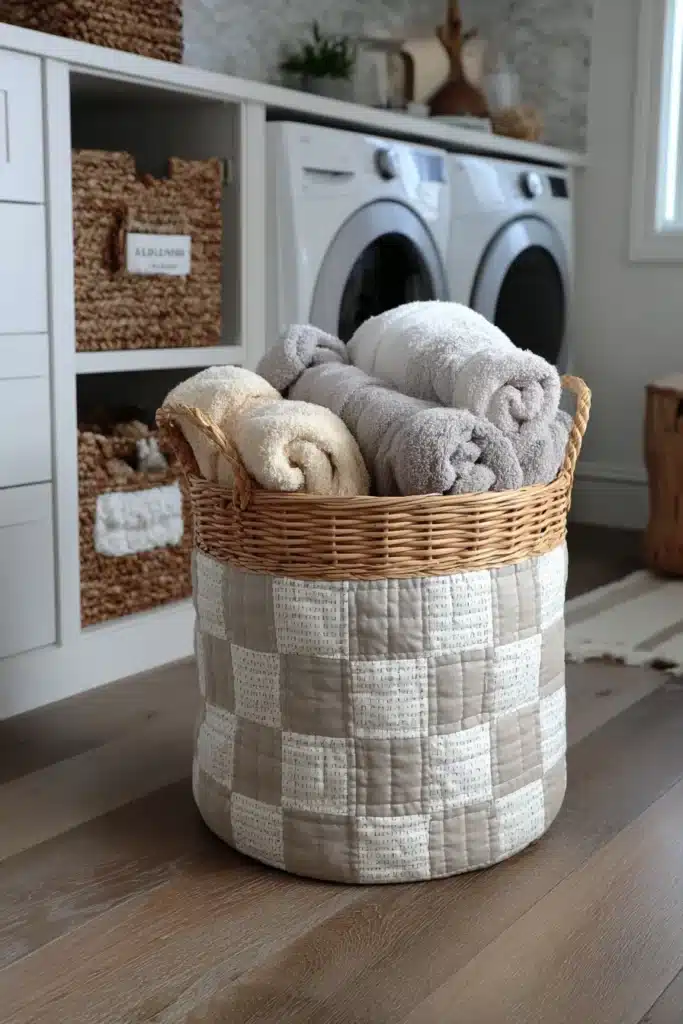
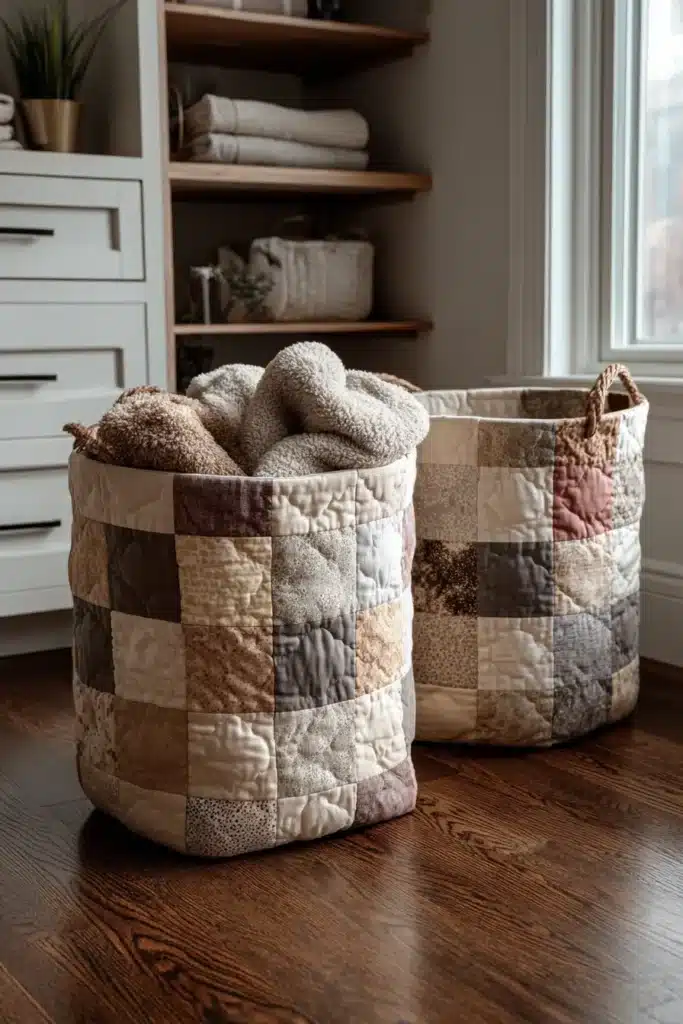
A Guide to Making Reversible Modern Contemporary Quilted Laundry Baskets for Chic Organization
A bedroom or master bath should be a sanctuary of rest, which means keeping everyday clutter—like laundry—beautifully out of sight. A standard plastic hamper disrupts the tranquility of an elegant room, but the Reversible Modern Contemporary Quilted Laundry Basket solves this dilemma. By utilizing a minimalist Nine Patch block and pairing it with a rigid, structured foam stabilizer, we can create a freestanding, sculptural textile bin. The fact that it is completely reversible means you essentially get two bespoke room accessories in one.
The Heritage of the Structural Textile (And Why I Curated This Guide)
I designed this specific pattern because achieving a truly comfy dwell means banishing unsightly plastic utility items from our most intimate spaces. I wanted to create a chic, structured piece of functional decor that fuses two distinct global traditions.
Visually, the pattern draws on the brilliant simplicity of Scandinavian design—using vast negative space to make a single, oversized Nine Patch block pop. Structurally, the dense, straight-line machine quilting needed to make the basket stand upright is heavily inspired by traditional Nakshi Kantha stitching. By marrying this deep-rooted, textural running-stitch technique with rigid modern foam, the historic needlework is transformed into contemporary architecture. The result is a basket that stands perfectly upright, completely empty, like a tailored piece of soft furniture.
Focus on Usability, Comfort, and Elegance
- Usability: It is fully reversible! One side features the bold Nine Patch focal point for a striking geometric look, and the inside features a crisp, solid color that you can flip outward whenever you desire a more subdued, minimalist aesthetic.
- Comfort: Fabric baskets naturally dampen sound (unlike plastic bins that clatter when buttons or zippers are tossed in) and protect your delicate clothing from snagging on the rough edges of wicker or rattan hampers.
- Elegance: By using a sophisticated palette—such as soft Sage Green alternating with brushed Oatmeal linen—and cleanly binding the top edge, the basket looks impeccably tailored. It elevates laundry storage from a daily chore to a deliberate design moment.
Measurements & Materials Needed
Finished Basket Size: Generous Cylinder Basket (approx. 15″ diameter x 22″ tall) Finished Block Style: A bold, single 15″ x 15″ Nine Patch block seamlessly inset into the solid canvas wall of the basket.
Materials Needed:
- Fabric for the Nine Patch Exterior: Premium cotton or linen blend.
- Accent Color (e.g., Sage): 5 squares cut to 5.5″ x 5.5″.
- Background Color (e.g., Oatmeal): 4 squares cut to 5.5″ x 5.5″.
- Framing Exterior Fabric: 1.5 yards of your Background Color.
- Side panels: Cut two pieces 17.5″ wide x 15.5″ tall.
- Top and Bottom borders: Cut two pieces 49.5″ wide x 4.5″ tall.
- Circular Base: Cut one 16″ x 16″ square (to be trimmed into a circle).
- Reversible Interior Fabric: 1.5 yards of a solid, coordinating premium cotton. (Cut one 49.5″ x 23.5″ rectangle for the inner body, and one 16″ x 16″ square for the inner base).
- Stabilizer: 1.5 yards of double-sided fusible structural foam (such as Pellon Flex-Foam).
- Binding: 1/4 yard of coordinating fabric to finish the top rim cleanly.
- Thread: Heavy-duty 50-weight 100% cotton thread.
- Tools: A walking foot for your sewing machine (crucial for sewing through thick foam), a rotary cutter, a 6″ x 24″ acrylic ruler, and heavy-duty sewing clips.
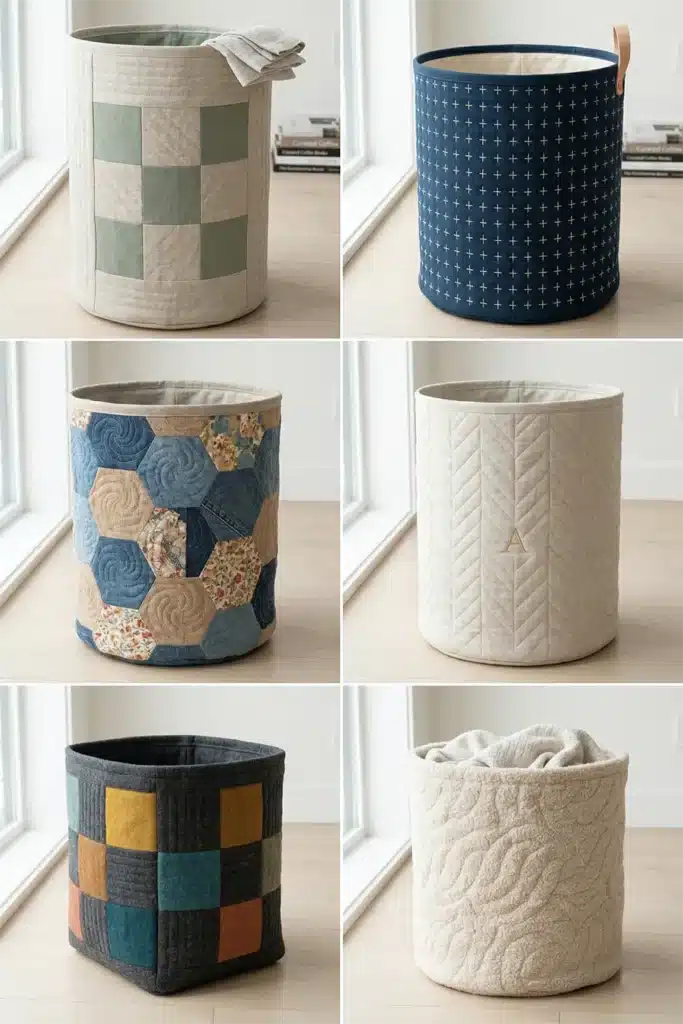
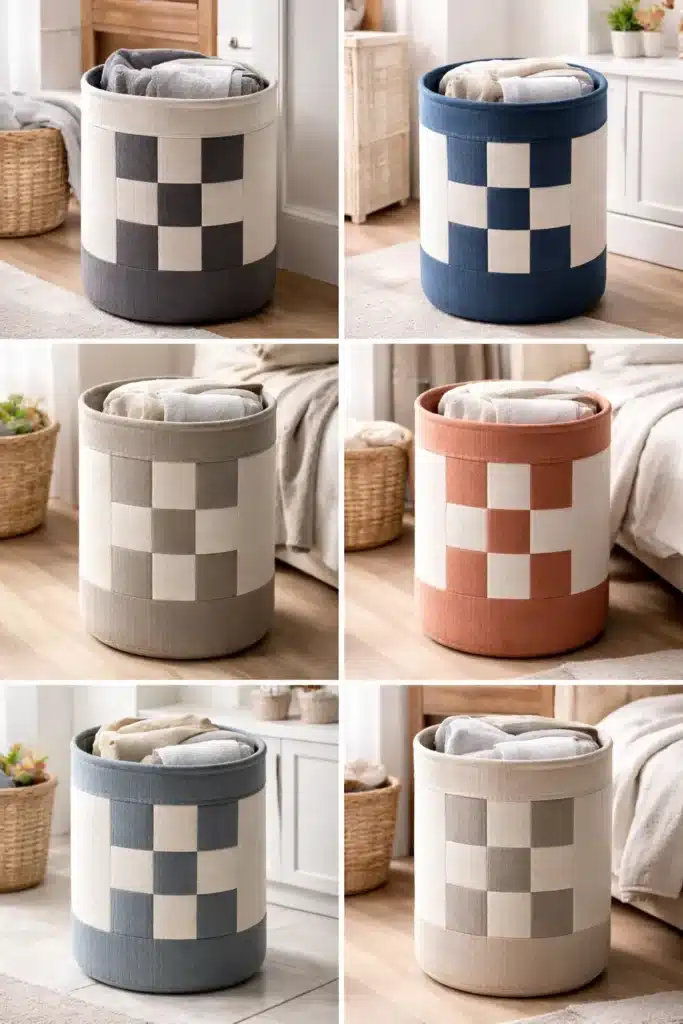
Step-by-Step Guide: The Reversible Quilted Basket
Step 1: Precision Cutting and Prepping the Base
Using your rotary cutter and acrylic ruler, cut your 5.5″ squares and all your framing border pieces. To create the circular bases, take your 16″ x 16″ exterior fabric square, fold it in quarters, and use a ruler to measure exactly 7.5 inches from the folded center point. Connect the marks in a curve and cut to yield a perfect 15-inch circle. Repeat this to cut your foam base and your interior solid fabric base.
Step 2: Assembling the Contemporary Nine Patch Focal Point
Lay out your nine squares in a 3×3 grid, placing the Accent Color in the corners and the center.
- Sew the squares in each horizontal row together using a precise 1/4-inch seam allowance.
- Press the seams open with a hot iron to reduce bulk.
- Join the three rows together. Your finished focal block will measure exactly 15.5″ x 15.5″.

Step 3: Framing the Exterior Cylinder Wall
- Sew your two 17.5″ x 15.5″ Background side panels to the left and right sides of your Nine Patch. Press the seams open. You now have a long strip measuring 49.5″ x 15.5″.
- Sew your two 49.5″ x 4.5″ Background borders to the top and bottom of this strip. Your completed exterior wall panel should now measure exactly 49.5″ wide by 23.5″ tall.
Step 4: Fusing and Kantha-Inspired Quilting
Cut a piece of your fusible foam stabilizer to exactly 49.5″ x 23.5″. Lay the foam flat and place your pieced Nine Patch panel right-side up on top of it. Use a hot iron to fuse the fabric permanently to the foam. (Repeat for the circular base). Attach your walking foot. To ensure the basket stands rigidly upright, stitch dense, parallel lines spaced 1/2-inch apart across the entire panel. This structural channel-stitching compresses the foam and locks the geometric shape perfectly in place.

Step 5: Assembly Section (Constructing the 3D Baskets)
- Form the Exterior Tube: Fold your quilted exterior panel in half, right-sides together, aligning the two short 23.5″ ends. Clip securely and sew together with a 1/4-inch seam allowance to form a large cylinder. Press this bulky seam open.
- Attach the Quilted Base: Take your quilted circular base and clip it right-sides together to the bottom edge of your cylinder. Ease the straight edge of the tube around the curve of the circle. Sew around the entire perimeter with a 1/4-inch seam.
- Build the Reversible Lining: Repeat this exact assembly process (forming a tube and attaching the base) using your solid interior fabric, but without any foam stabilizer.
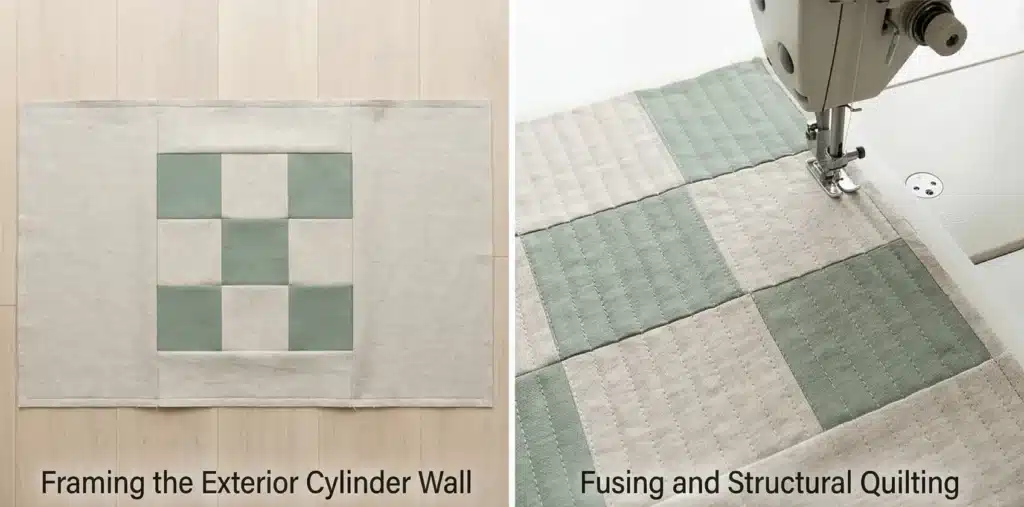
Step 6: Nesting, Reversing, and Binding
- Nest the Baskets: Turn your heavy, quilted exterior basket right-side out. Leave your thin interior lining basket wrong-side out. Drop the lining directly inside the exterior basket so that their wrong sides are touching. Smooth the lining out flush against the foam walls.
- Baste the Rim: Clip the top raw edges of the exterior and the lining together all the way around the rim. Baste them together with a 1/8-inch seam.
- Bind: Cut your binding fabric into 2.5″ strips. Join them end-to-end and press in half. Align the raw edge of the binding with the raw edge of the basket’s exterior rim, sew it around the circumference, fold it over the top to the inside of the basket, and topstitch it down. This elegant binding seals the two baskets together, leaving you with a flawless, reversible storage piece.
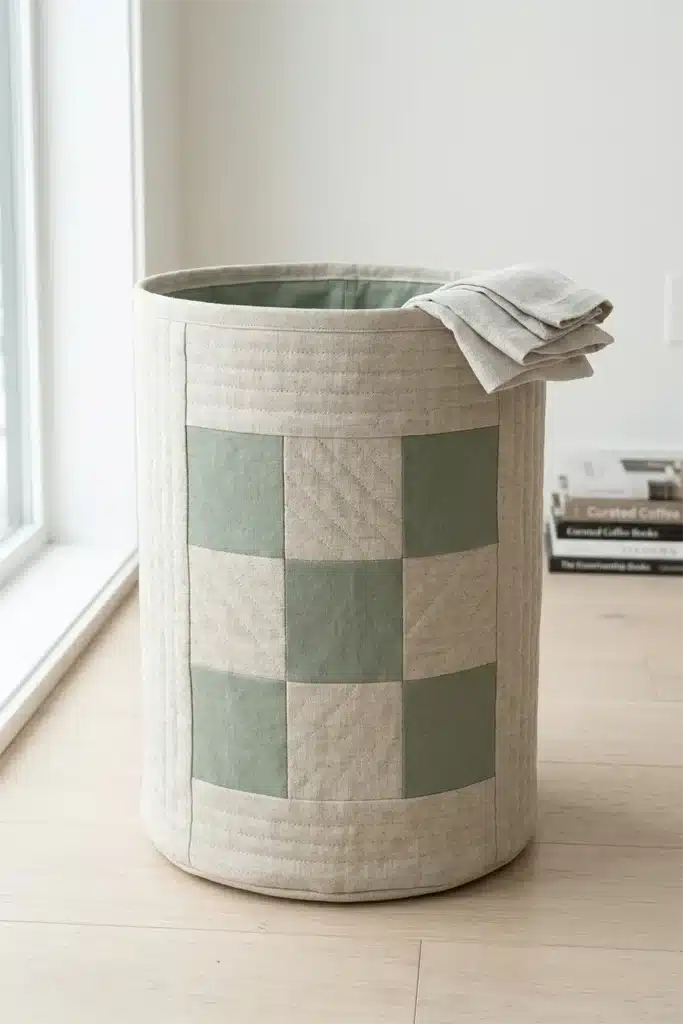
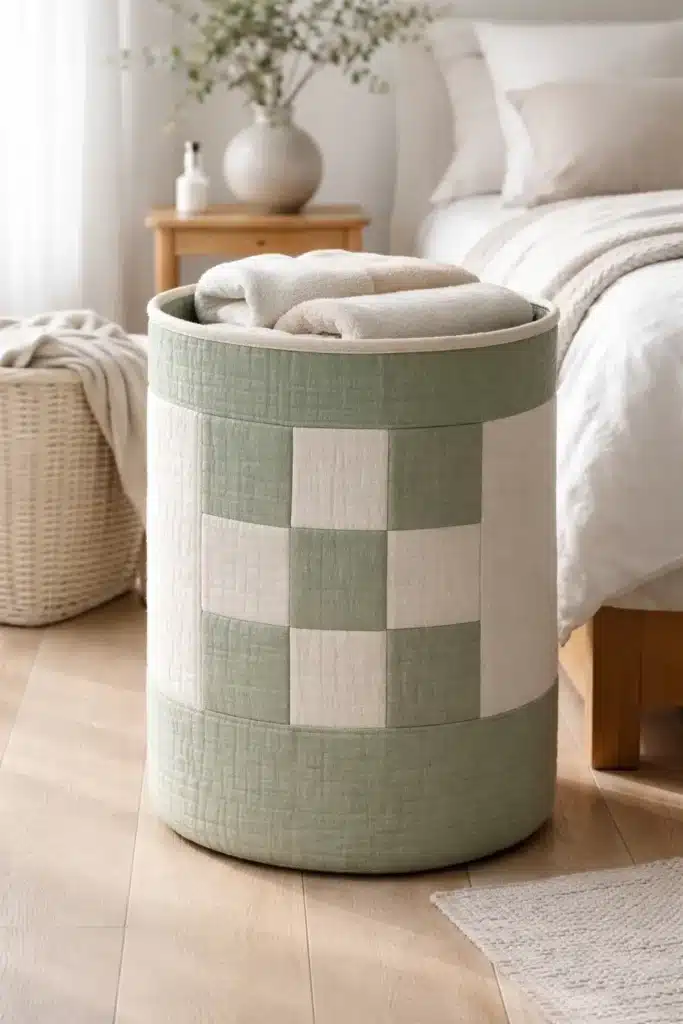
Usability Note: The double-sided foam stabilizer is incredibly resilient and will bounce back if crushed or folded. It is highly recommended to spot-clean this basket or hand-wash it gently in the bathtub with cold water. Rinse thoroughly and allow it to air dry standing upright to ensure the structural quilting and the cylindrical shape remain perfectly tailored.


20. Architectural Contemporary Quilted Jackets for Stylish Everyday Wear
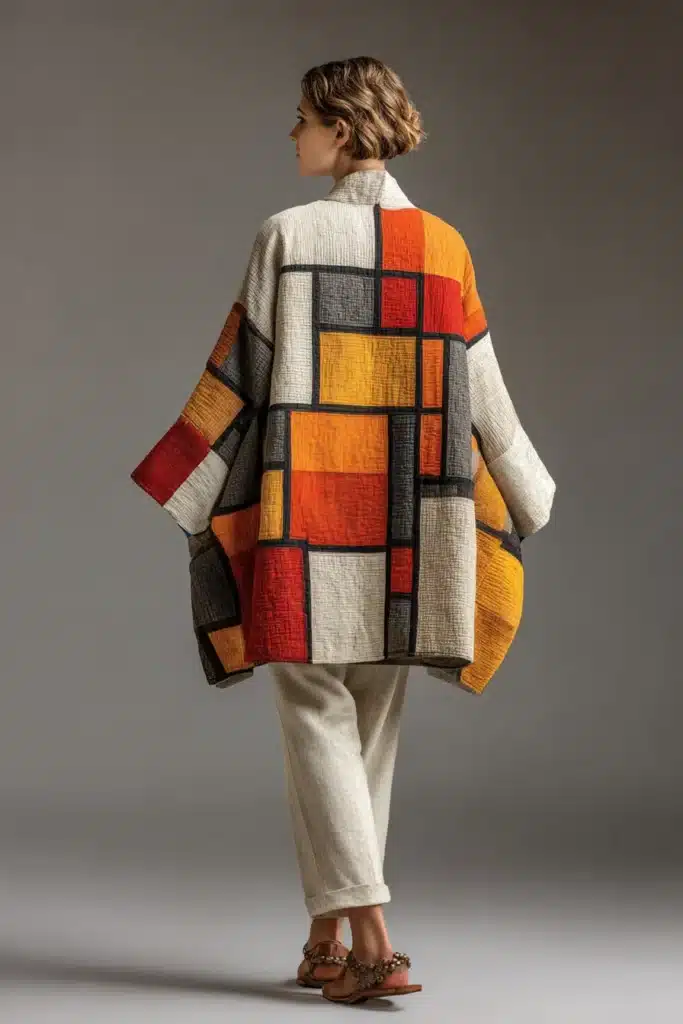

A Guide to Making Architectural Contemporary Quilted Jackets for Stylish Everyday Wear
For centuries, quilts have been confined to the bedroom or draped over the back of a sofa. But the unparalleled comfort of a handmade quilt shouldn’t have to stay indoors when you leave the house. The Architectural Contemporary Quilted Jacket transforms traditional patchwork into high-end, wearable art. By incorporating an oversized, geometric Nine Patch onto the back panel of a sleek, boxy jacket, you carry the warmth and elegance of your home into your stylish everyday wardrobe.
The Heritage of the Quilted Garment (And Why I Curated This Guide)
I formulated this specific pattern guide because I am deeply inspired by how quilting has historically been used across different cultures for wearable warmth. When designing this piece, I drew heavily on the clean, architectural lines of Scandinavian minimalism and the historic, practical beauty of traditional Japanese quilted hanten jackets.
Historically, wearable quilts were purely about survival against the cold. By marrying that profound, historic comfort with a stark, contemporary Nine Patch and a modern, oversized silhouette, I wanted to create a garment that feels like a warm embrace but looks like it belongs on a fashion runway. It is the perfect bridge between the coziness of the home and the style of the street.
Focus on Usability, Comfort, and Elegance
- Usability: A boxy, architectural drop-shoulder silhouette ensures the jacket slides easily over thick winter sweaters or lightweight summer tees. Massive, deep front patch pockets provide practical, everyday utility for keys and phones.
- Comfort: By using a high-quality, lightweight bamboo or silk batting, the jacket provides exceptional thermal regulation without the stiff, restrictive bulk of a traditional winter coat. It breathes beautifully and moves fluidly with your body.
- Elegance: To keep the garment looking like bespoke fashion rather than a repurposed bed blanket, strict color discipline is vital. Pair a highly textured, solid background fabric (like raw silk or washed linen in a deep charcoal or crisp oatmeal) with an oversized, tonal Nine Patch. Finishing the internal seams completely with bias tape ensures the inside looks just as impeccable as the outside.
Measurements & Materials Needed
Finished Jacket Size: One-Size-Fits-Most (Modern Boxy/Oversized Fit). Approx. 28″ length from shoulder to hem. Finished Block Style: The back panel features an integrated, striking 15″ x 15″ Nine Patch block.
Materials Needed:
- Fabric for the Outer Shell: 3 yards of premium medium-weight linen, cotton canvas, or chambray.
- Accent Color (for the Nine Patch): 5 squares cut to 5.5″ x 5.5″.
- Background Color (for the body and remaining Nine Patch squares): The rest of the yardage.
- Lining Fabric: 3 yards of soft, breathable cotton voile or double gauze for ultimate interior comfort.
- Batting: 3 yards of lightweight bamboo or 100% cotton apparel batting (avoid thick quilt batting, or the jacket will stand up on its own).
- Binding/Bias Tape: 5 yards of 1/2-inch double-fold bias tape (either matching your background color or in a fun, contrasting pop of color for the interior seams).
- Thread: 50-weight 100% cotton piecing thread.
- Tools: A walking foot, rotary cutter, acrylic ruler, fabric shears, and curved safety pins.
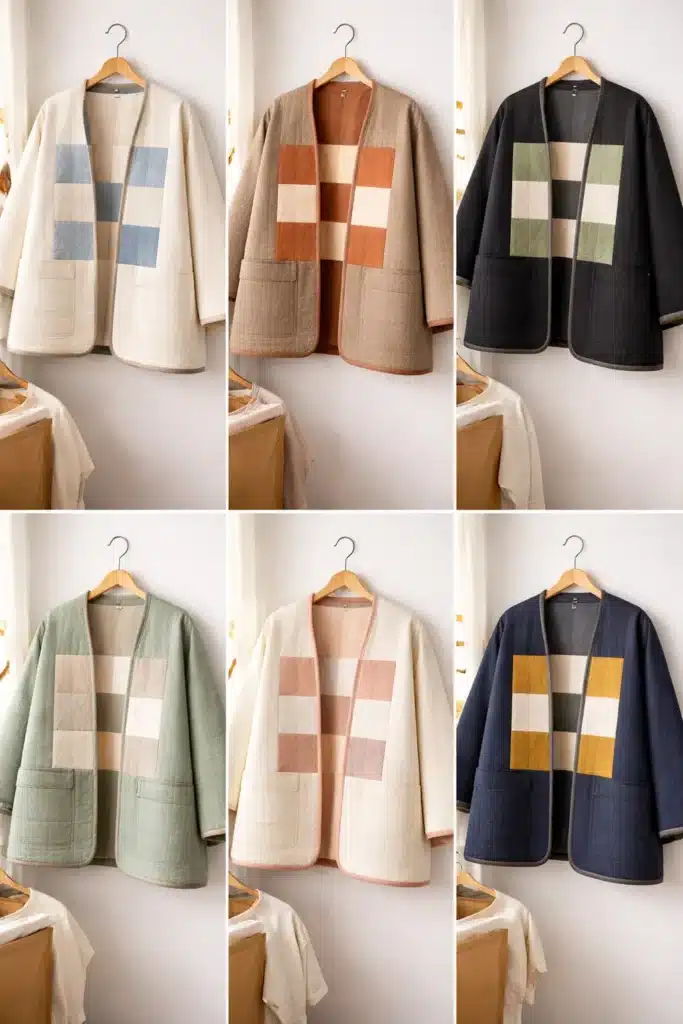
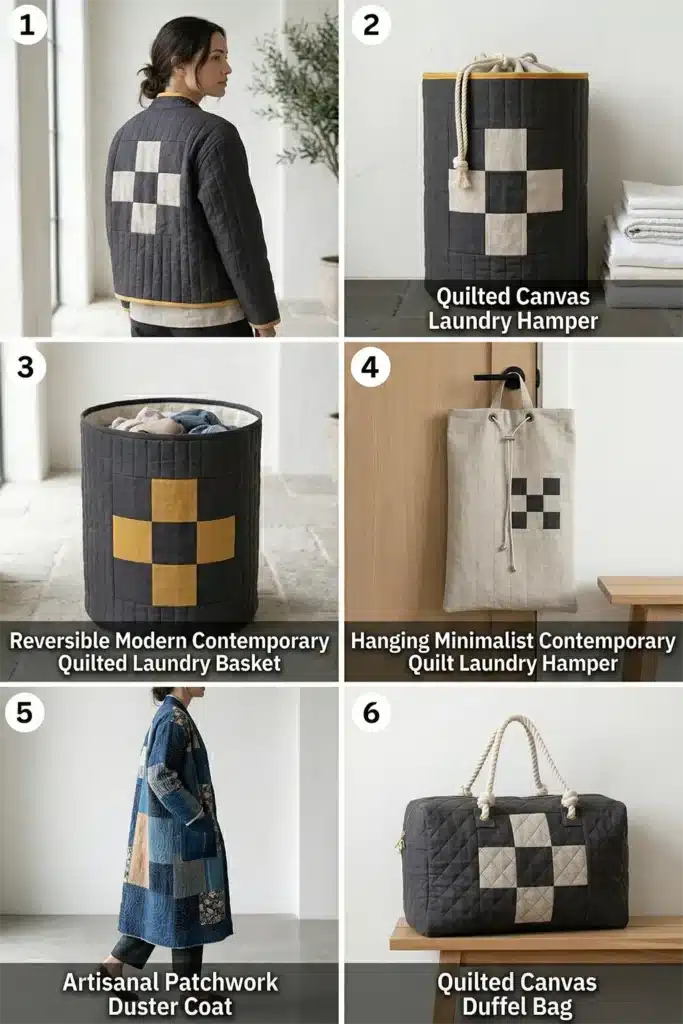
Step-by-Step Guide: The Architectural Quilted Jacket
Step 1: Precision Cutting the Garment Canvas
Using your rotary cutter and a trusted oversized jacket pattern (or by drafting simple rectangular panels for a modern kimono-style silhouette), cut your Outer Shell, Lining, and Batting. You will need:
- Two Front Panels: approx. 14″ wide x 30″ tall each.
- Two Sleeves: approx. 20″ wide x 18″ long each.
- Two Front Pockets: 8″ x 9″ rectangles.
- One Back Panel: To accommodate the Nine Patch, do not cut a solid back yet. Instead, proceed to Step 2.
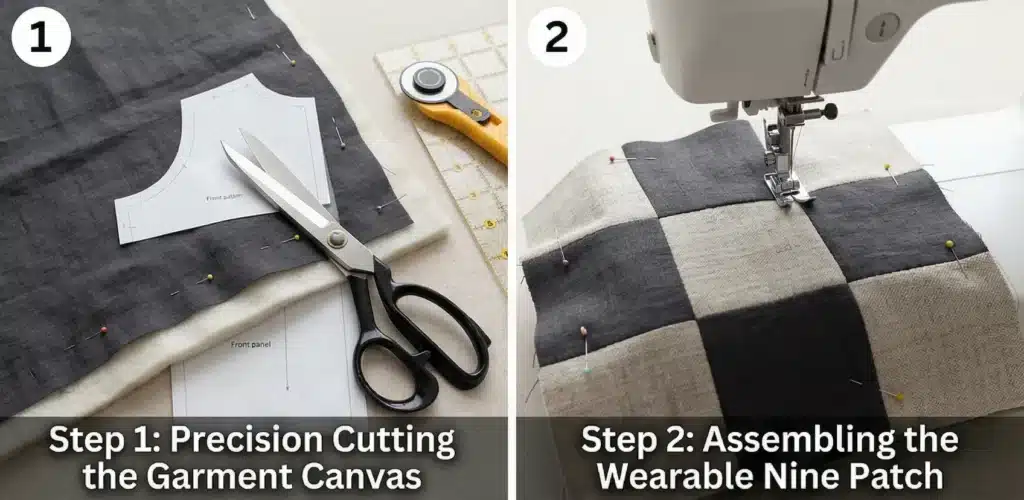
Step 2: Assembling the Wearable Nine Patch
You will build the back panel around your focal point.
- Sew your nine 5.5″ x 5.5″ squares into a 3×3 grid using a 1/4-inch seam allowance. Press all seams completely open to reduce the garment’s stiffness. This completed block is 15.5″ x 15.5″.
- Frame the Back Panel: Cut strips of your Background fabric to frame this block so the entire back panel matches the width and height of your front panels combined (approx. 27″ wide by 30″ tall). Sew borders to the left/right, and then top/bottom. Press all seams open.
Step 3: Basting the Quilted Armor
You must quilt the panels before assembling the jacket. Take your pieced Back Panel, the two Front Panels, the two Sleeves, and the Pockets. For each piece, lay the lining fabric face down, top with batting, and lay the outer shell face up. Pin densely with curved safety pins.
Step 4: Quilting for Drape and Structure
Attach your walking foot. In apparel, quilting dictates how the fabric drapes over the body. Stitch perfectly straight vertical lines spaced exactly 1 inch apart across all your garment pieces. This vertical channeling elongates the body visually and compresses the batting just enough to give the linen a beautiful, structured weight while maintaining total flexibility. Once quilted, use your fabric shears to trim the raw edges of all panels, leaving them perfectly neat and square.
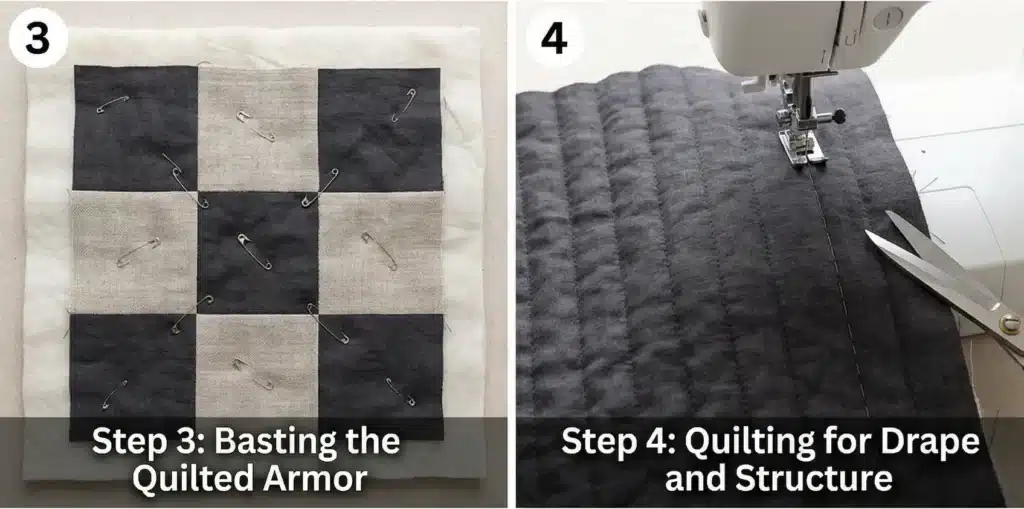
Step 5: Assembly Section (Constructing the Jacket)
Note: Because this is a quilted garment, standard seams will be too bulky. We will sew the seams inside-out and finish them with bias tape.
- Shoulders: Place the Front Panels right sides together with the Back Panel at the shoulders. Sew a 1/2-inch seam.
- Sleeves: Open the jacket flat. Pin the top center of a quilted sleeve to the shoulder seam, right sides together. Sew the sleeve into the armhole using a 1/2-inch seam. Repeat for the other sleeve.
- Side Seams: Fold the jacket right sides together. Pin from the bottom hem of the jacket, up the side, through the armpit, and all the way down to the wrist of the sleeve. Sew this entire continuous seam on both sides with a 1/2-inch seam allowance.
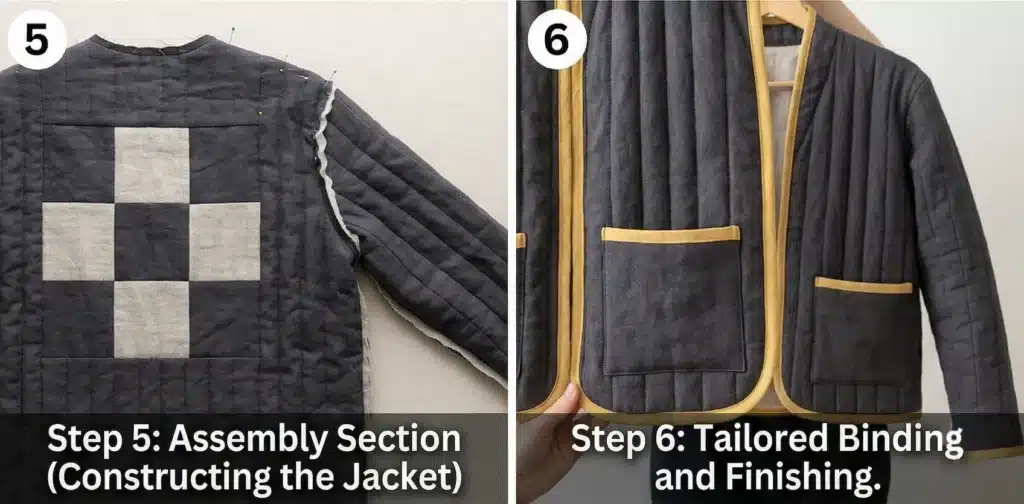
Step 6: Tailored Binding and Finishing
- Internal Polish: To make the inside of the jacket look pristine, enclose all the bulky, raw internal seam allowances (shoulders, armholes, side seams) by encasing them in your double-fold bias tape and topstitching them down.
- Pockets: Bind the top edge of your two pockets. Pin them to the front panels, then topstitch them securely in place.
- The Final Frame: Finally, take a long, continuous strip of double-fold bias tape and sew it completely around the entire outer raw edge of the jacket (up the front center, around the back of the neck, down the other front edge, and across the bottom hem). Bind the raw edges of the sleeve cuffs in the same manner.
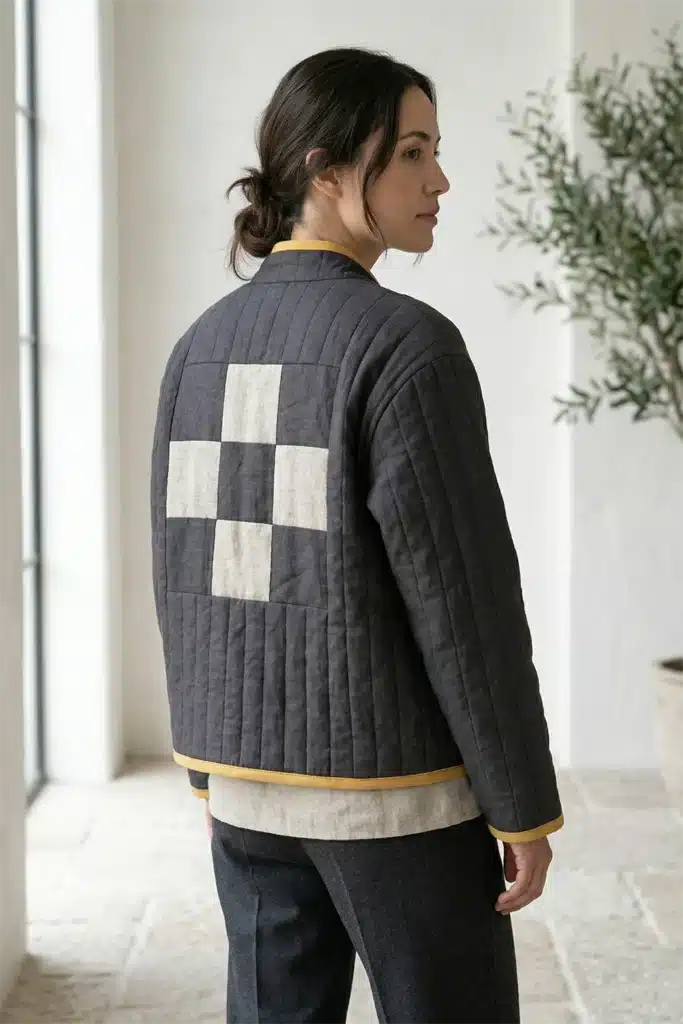
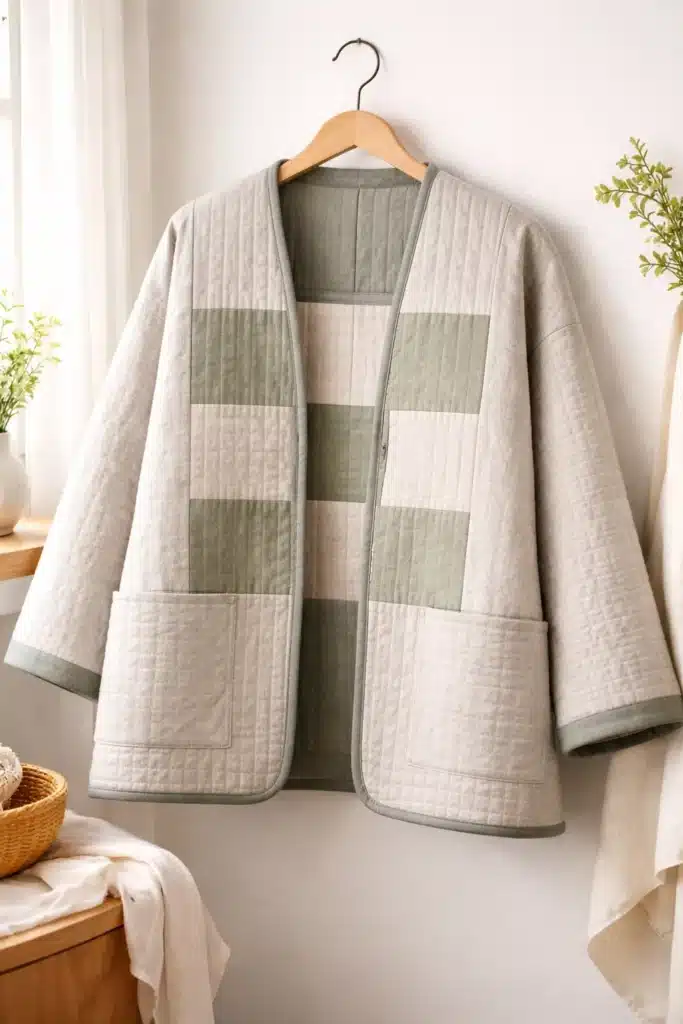
Usability Note: The lightweight bamboo batting makes this an exceptional, multi-season transitional piece. Machine wash your quilted jacket on a delicate, cold cycle with a mild detergent. Hang it immediately on a sturdy, broad-shouldered wooden hanger to air dry, preserving its crisp, architectural silhouette and the vibrant geometry of the Nine Patch.
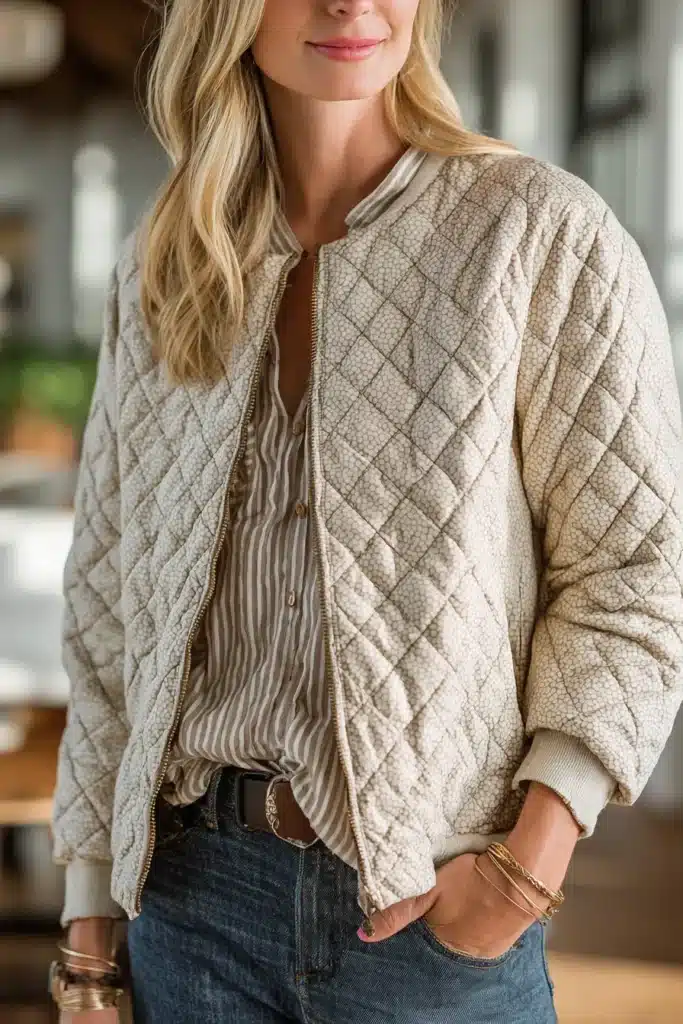

Conclusion
The journey through these twenty contemporary quilt designs reveals a style defined not by rigid rules but by thoughtful evolution and luxurious possibility. Contemporary quilting gracefully bridges generations, offering quilters and homeowners alike the freedom to blend cherished patterns with current sensibilities. From the master bedroom, featuring Soft Ombre Contemporary Quilted Bed Covers that transform sleep into a lavish retreat, to the dining room, elevated by Elegant Two-Tone Placemats and Modern Geometric Chair Pads, these projects demonstrate how contemporary design creates spaces that feel both current and profoundly comfortable. The inclusion of Hanging Minimalist Laundry Hampers and Reversible Quilted Baskets proves that even everyday organization can be elevated through thoughtful, contemporary textile design.
The distinction between contemporary, modern, and traditional quilting becomes less about choosing sides and more about understanding the rich vocabulary available to today’s makers. Contemporary quilting welcomes the Negative Space Designs that prove emptiness can feel rich, alongside the Sophisticated Cushion Covers that refresh living room seating with graphic precision. It embraces the Modern Striped Throws for cozy bedroom layering and the Architectural Jackets that carry this aesthetic into the world. This inclusive approach ensures that whether your taste leans toward traditional warmth, modern minimalism, or something uniquely your own, contemporary quilting offers a path forward that honors heritage while celebrating innovation.
As you consider incorporating these designs into your home, remember that contemporary quilting’s greatest gifts are adaptability and an invitation to personal expression. The Durable Canvas Laundry Bag you create becomes a daily design moment, while the Oversized Floor Pillows transform casual gatherings into stylish experiences. These projects invite you to participate in quilting’s ongoing story—honoring its rich past while stitching your own chapter of comfort, luxury, and elegant living. May these contemporary ideas inspire you to fill your home with textiles that are as sophisticated as they are welcoming, as timeless as they are beautiful, unmistakably now.
