
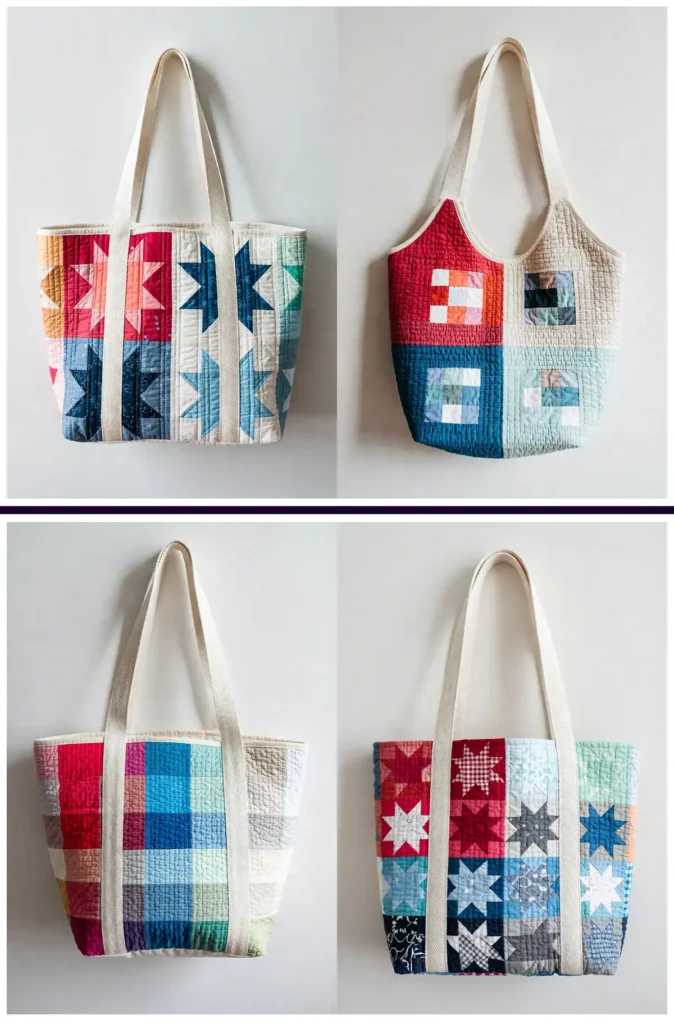
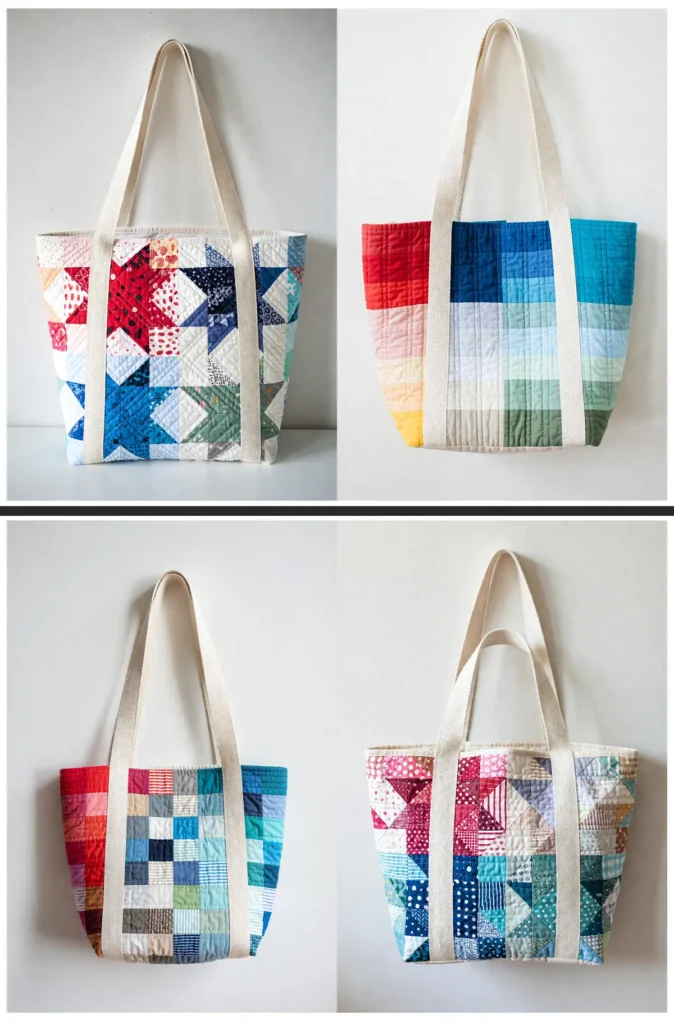
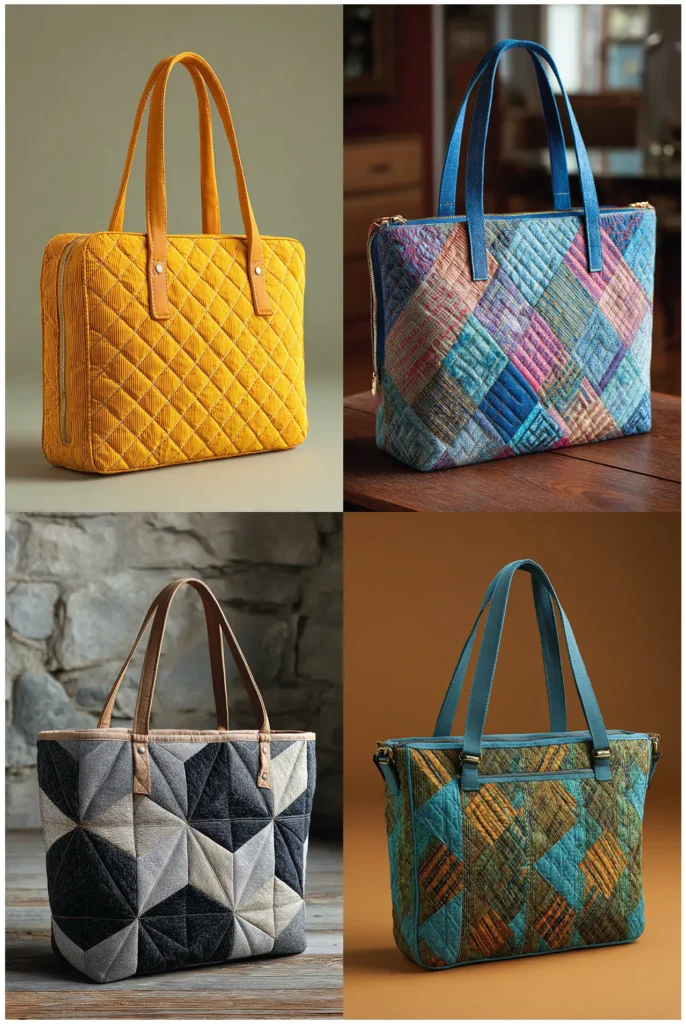
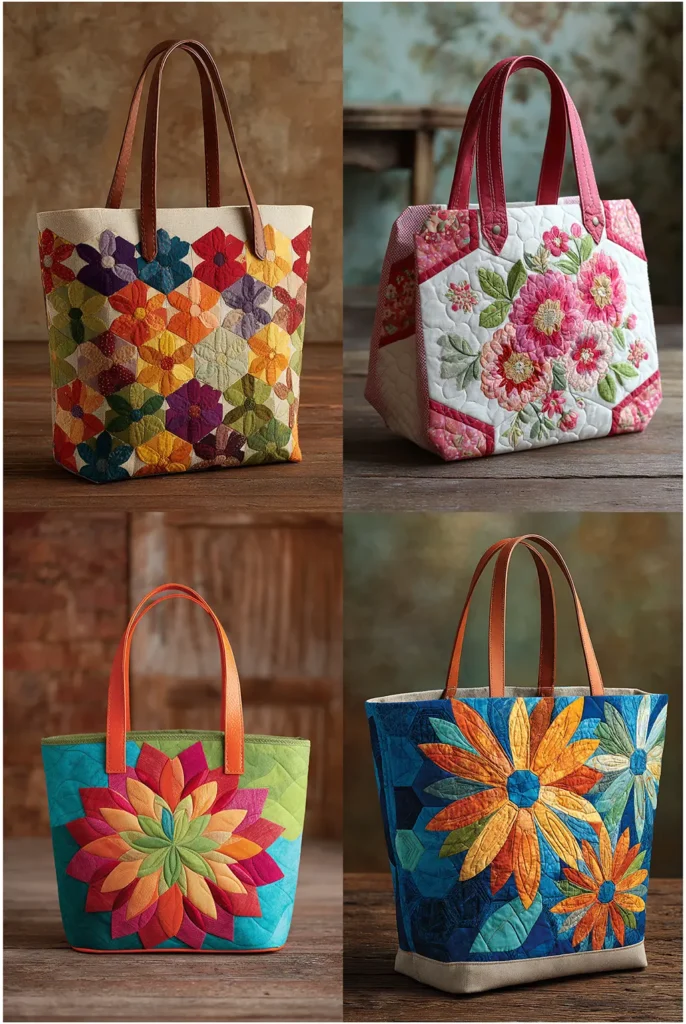
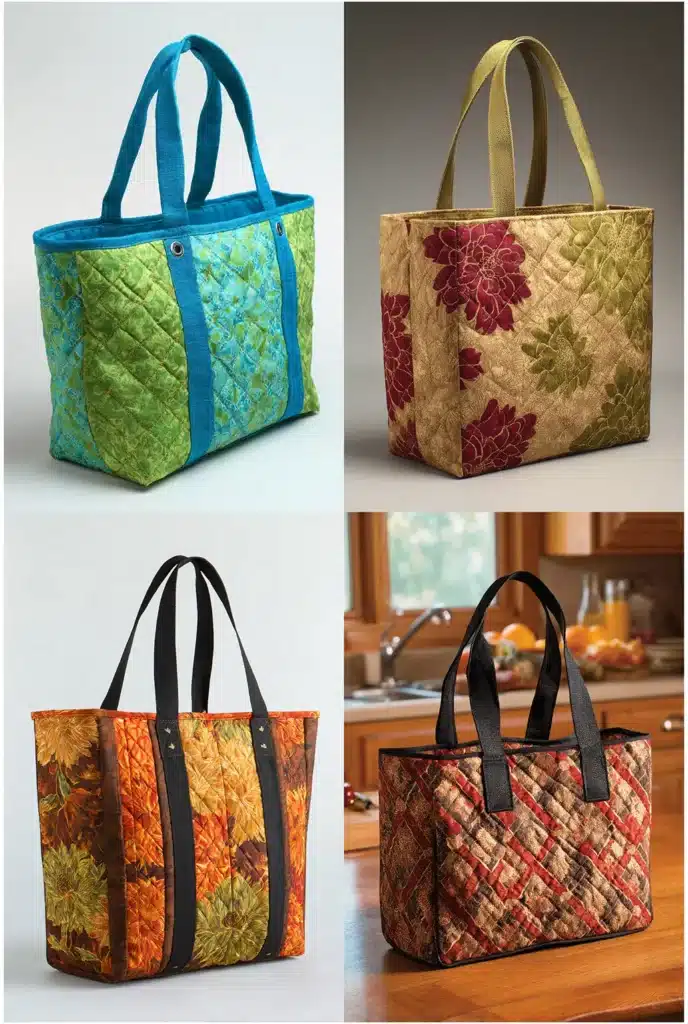
20 Stylish Quilted Tote Bag Patterns: From Market Shoppers to Laptop Bags
Why a Quilted Tote Feels Different
There is a moment when you pick up a quilted tote for the first time and notice it is not quite what you expected. It is lighter than it looks. The texture is softer than the structure suggests. It has weight without heaviness – the particular quality of something made in layers rather than cut from a single piece of cloth.
That quality is not accidental. The layered construction of a quilted tote – top fabric, batting, backing, stitched together – distributes weight more evenly than a single-layer bag, which is why a well-made quilted tote holds its shape after two years of daily use while a standard canvas tote sags and softens into a shapeless sack. The padding protects the contents without adding bulk. The quilting lines hold the structure without making it rigid. These are engineering decisions as much as aesthetic ones, and they explain why quilted bags have been made in some form across cultures and centuries while canvas totes get replaced every season.
From a design perspective, quilting adds something that is harder to name but immediately recognizable: depth. A quilted surface catches light differently depending on the angle – the raised areas reflect, the stitched channels shadow. This is why a neutral quilted tote in cream or charcoal reads as quietly elevated rather than plain, and why the same construction in a bold print reads as considered rather than busy. The texture does the work that color and pattern would otherwise have to do.
A Bag That Does More Than One Thing
I have always been drawn to bags that do not commit too hard to a single purpose. Something I can take to the market in the morning, carry into a meeting after lunch, and leave on the kitchen counter in the evening without it looking out of place in any of those contexts. Quilted totes tend to manage that range better than most bag styles – they are not precious enough to feel wrong at a farmers’ market, and not casual enough to feel wrong anywhere that requires a degree of intention.
That balance shaped how this collection was assembled. These 20 patterns cover a deliberate range of uses, constructions, and aesthetics – but every one of them was chosen because it solves a real problem rather than just looking good in a photograph.
What Construction Does to a Bag
This is the part most tote bag guides skip, and it is the part that matters most: small decisions in construction completely change how a bag behaves in use.
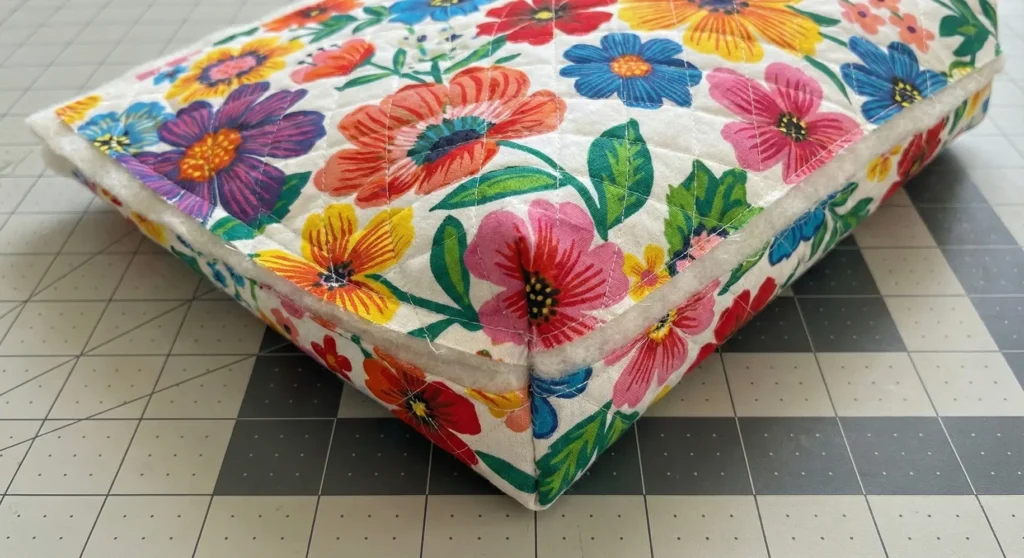
A boxy, flat base creates a stable grocery bag that stands upright when set down and distributes weight across the bottom rather than letting it pull the handles down. Denser quilting – smaller squares, tighter stitch lines – adds rigidity and protection, which is what makes a quilted laptop bag actually safe for a laptop rather than just padded in a general sense.
Lighter stitching at wider intervals produces a softer, more relaxed carry – the kind of bag that molds to what is inside it rather than imposing its own shape. Handle length and attachment method determine whether a bag sits comfortably on a shoulder or works better carried by hand. Interfacing choice – whether you use one layer or two, fusible or sew-in – determines whether the bag holds its structure after washing or slowly goes floppy.
None of these decisions is complicated. But making them consciously, rather than following a pattern without understanding why it specifies what it does, is the difference between a bag that lasts and one that disappoints.
Quilted Tote Bag Patterns
Contents
- 1 Quilted Tote Bag Patterns
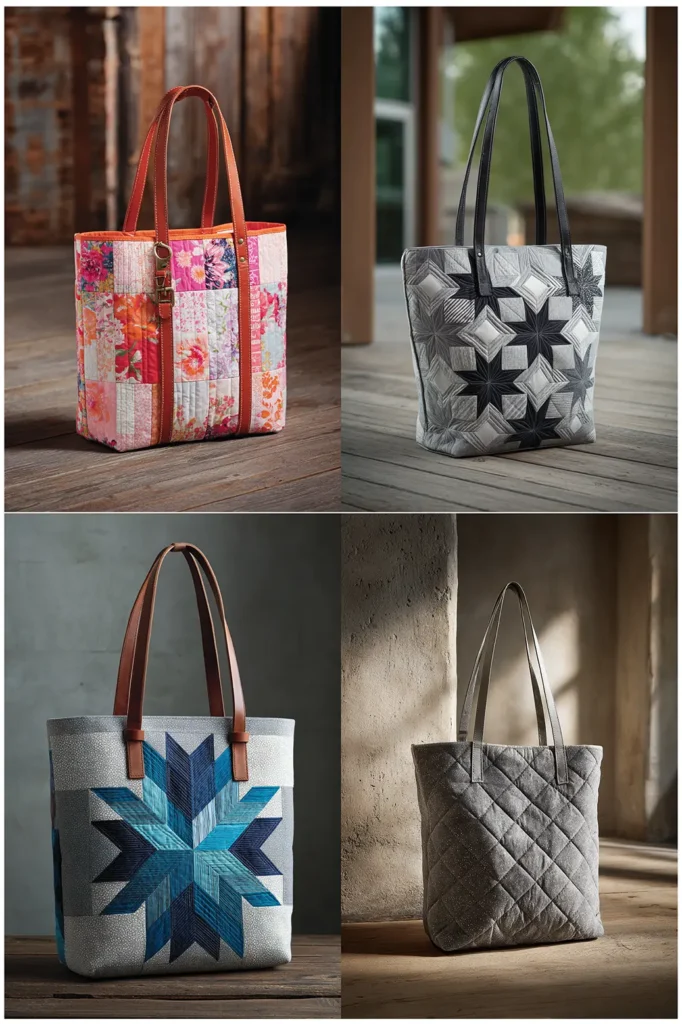
- 2 1. Classic Patchwork Quilted Tote Bag Pattern
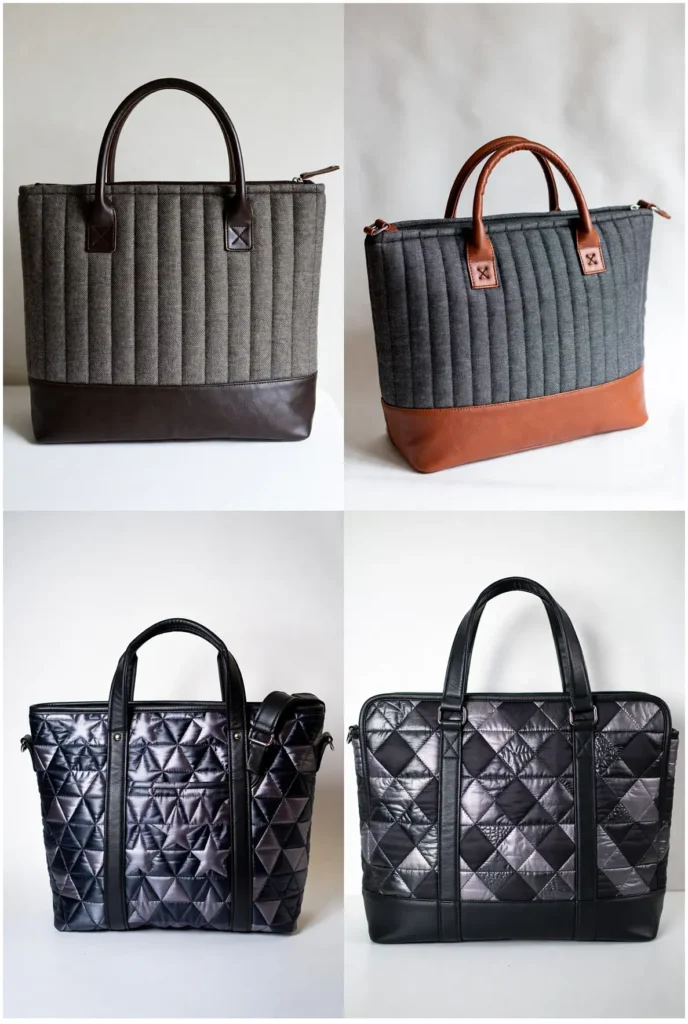
- 3 2. Protective Padded Laptop Bag with Geometric Stitching
- 4 3. Leather Trim Quilted Professional Laptop Bag
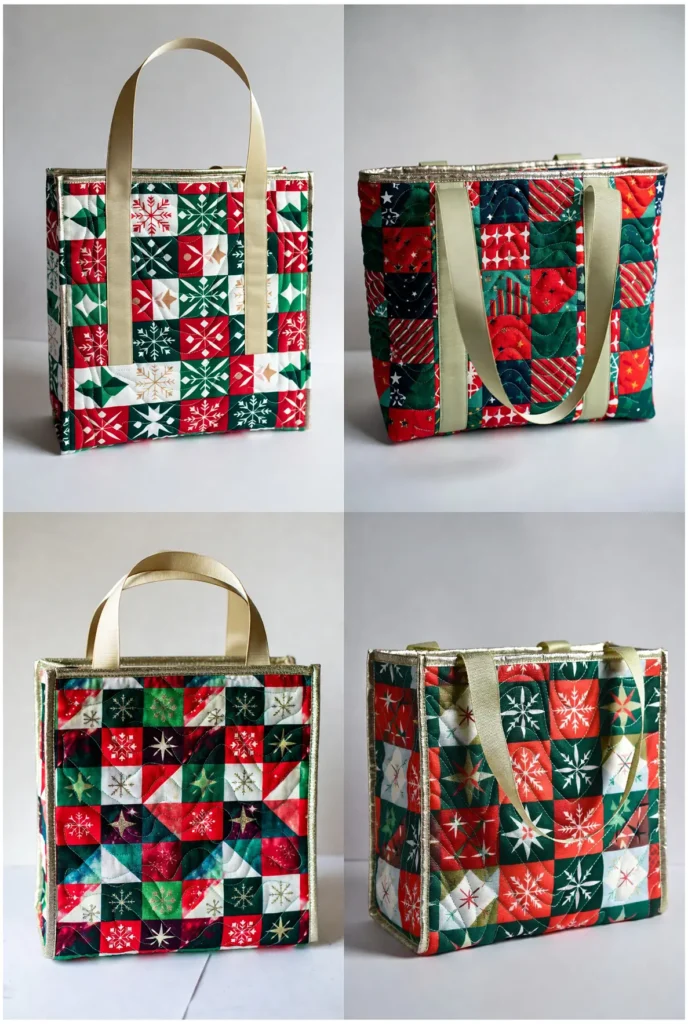
- 5 4. Festive Holiday Quilted Gift Bag with Metallic Thread
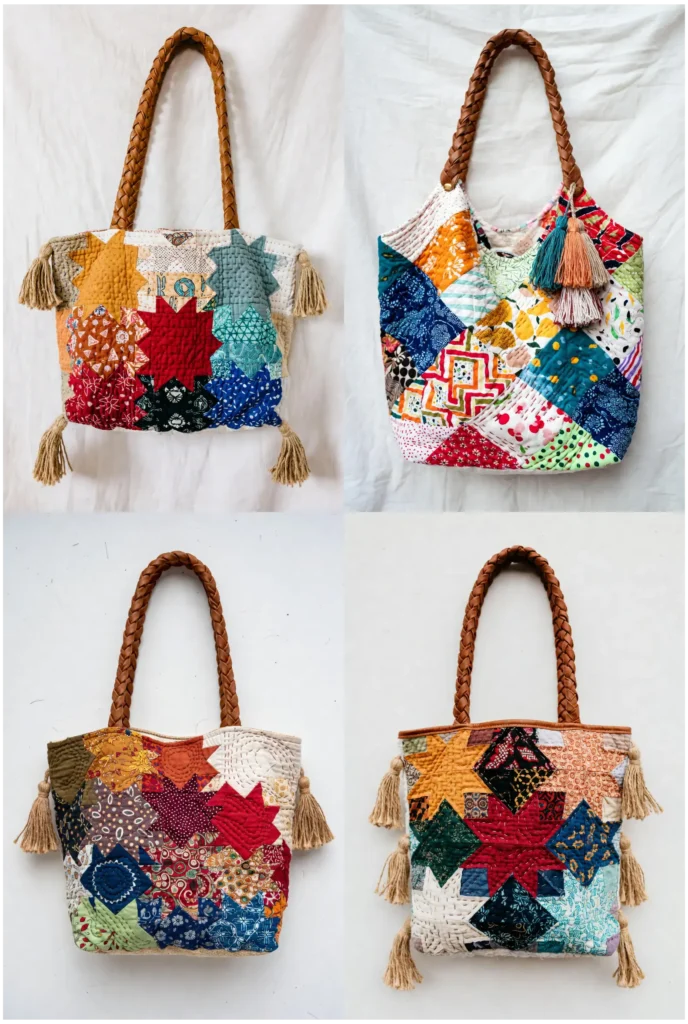
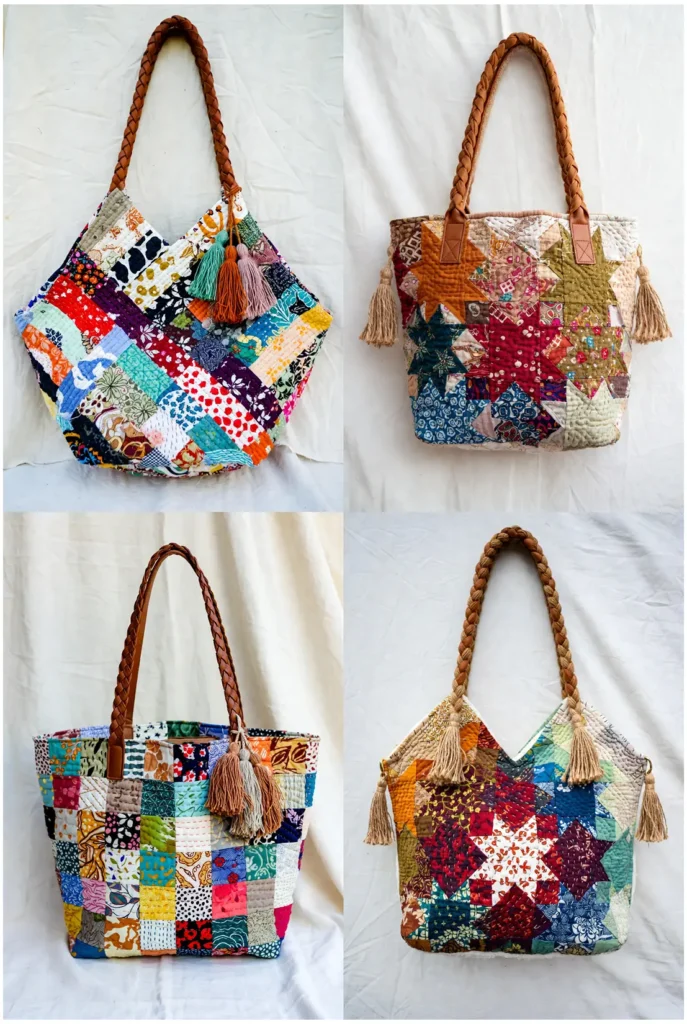
- 6 5. Scrappy Patchwork Quilted Shopper for Boho Style with Tassel Details
- 7 6. Vertical Quilted Library Bag for Books and Tablets
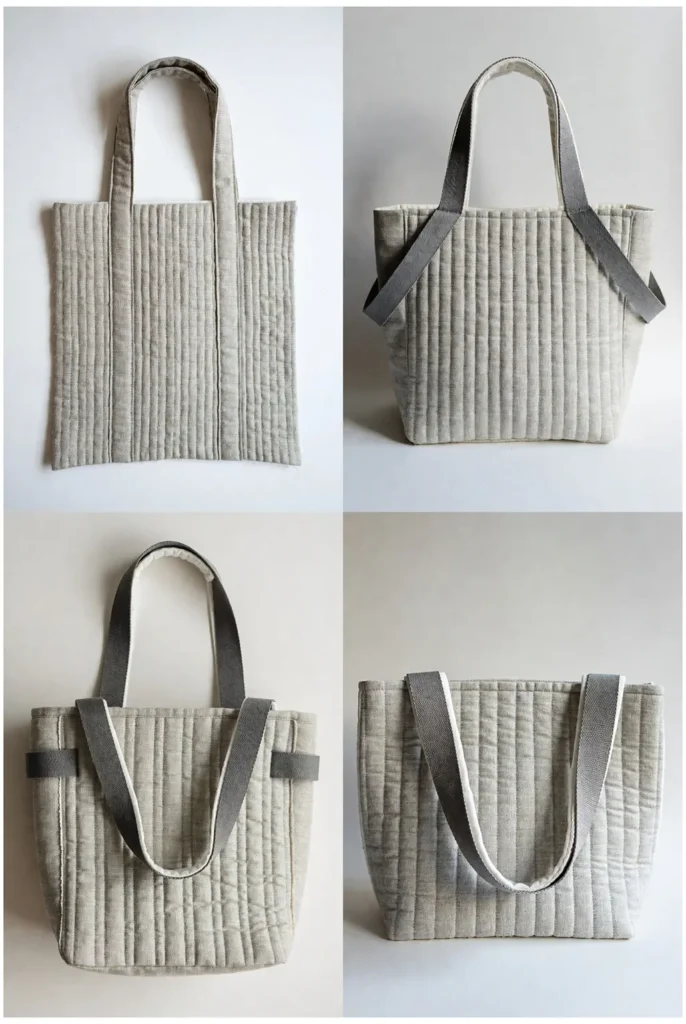
- 8 7. Minimalist Linen Tote with Vertical Channel Quilting
- 9 8. Modern Log Cabin Quilt Block Tote Pattern
- 10 9. Reversible Quilted Tote Bag Pattern for Versatility
- 11 10. Rainbow Quilted Kids Tote Bag Pattern with Fun Prints
- 12 11. Vintage Lace Quilted Evening Clutch Pattern
- 13 12. Hexagon Paper Pieced Quilted Flower Bag
- 14 13. Upcycled Denim Quilted Bag with Sashiko Embroidery
- 15 14. Free-Motion Art Quilted Tote Bag Inspiration
- 16 15. Luxurious Velvet Quilted Mini Tote for Evenings
- 17 16. Japanese-Sashiko Inspired Quilted Tote Bag
- 18 17. Structured Box Bottom Grocery Shopper Bag
- 19 18. Rustic Farmhouse Quilted Grocery Tote
- 20 19. Ombre Quilted Yoga Mat Tote Ideas
- 21 20. Nautical Quilted Beach Shopper Design
- 22 Conclusion
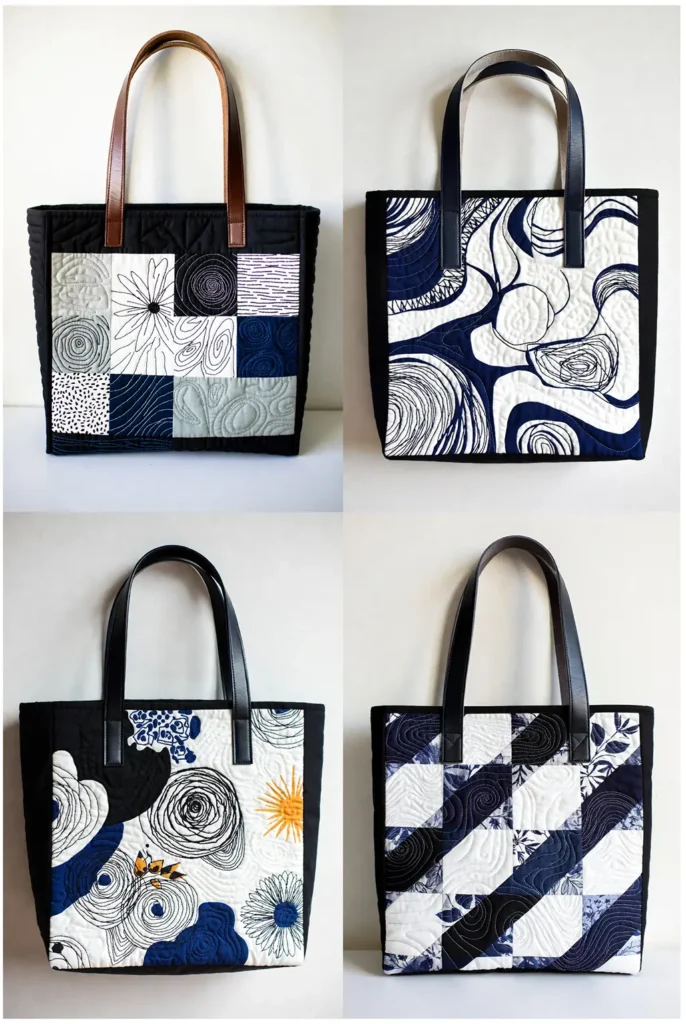
What This Collection Covers
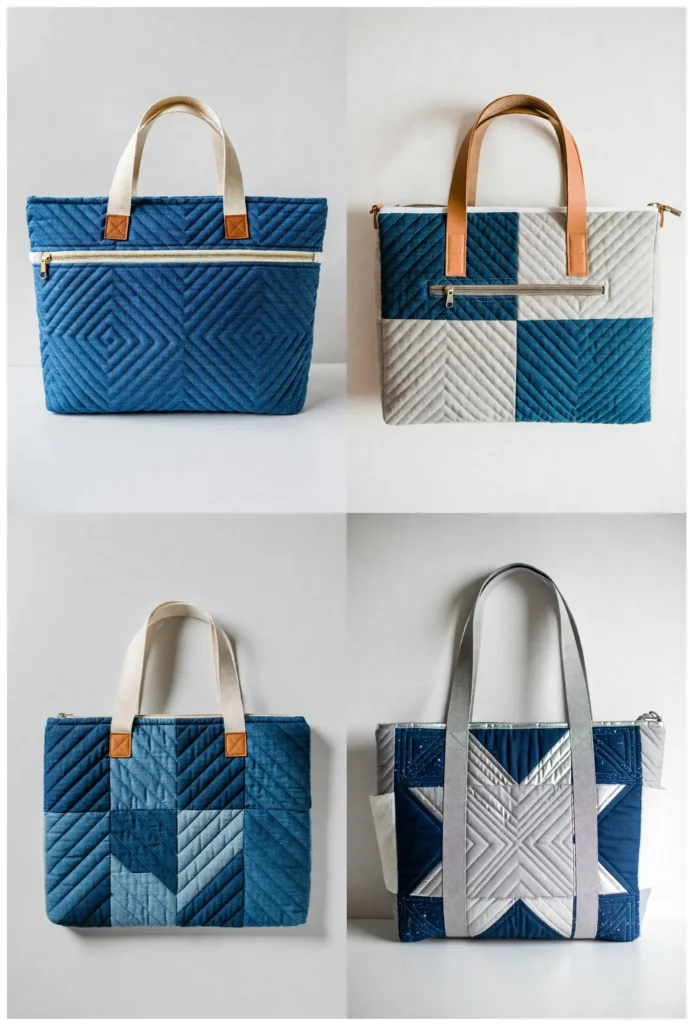
The range here runs from structured laptop bags with clean geometric quilting to oversized market shoppers soft enough to fold into a pocket when empty. Sashiko-inspired designs draw on the Japanese tradition of functional surface stitching – dense, precise, and beautiful, improving with age and use. Scrappy patchwork totes take the opposite approach: relaxed, playful, and a natural home for fabric offcuts that would otherwise go to waste. Upcycled denim bags sit at the practical, sustainable end of the spectrum – familiar material, new construction, built to outlast almost anything else in this collection.
Smaller designs are included for gifting: a well-made quilted pouch or project bag is one of those presents that people actually use rather than put away in a drawer.
Quilted totes work naturally alongside other quilted accessories in the home. See our guides on Nakshi Kantha accessories — jackets, vests, and bags in the Bengali textile tradition — and our full Quilted Wearables & Bags collection.
Recommended Supplies
“As an Amazon Associate, I earn from qualifying purchases.“
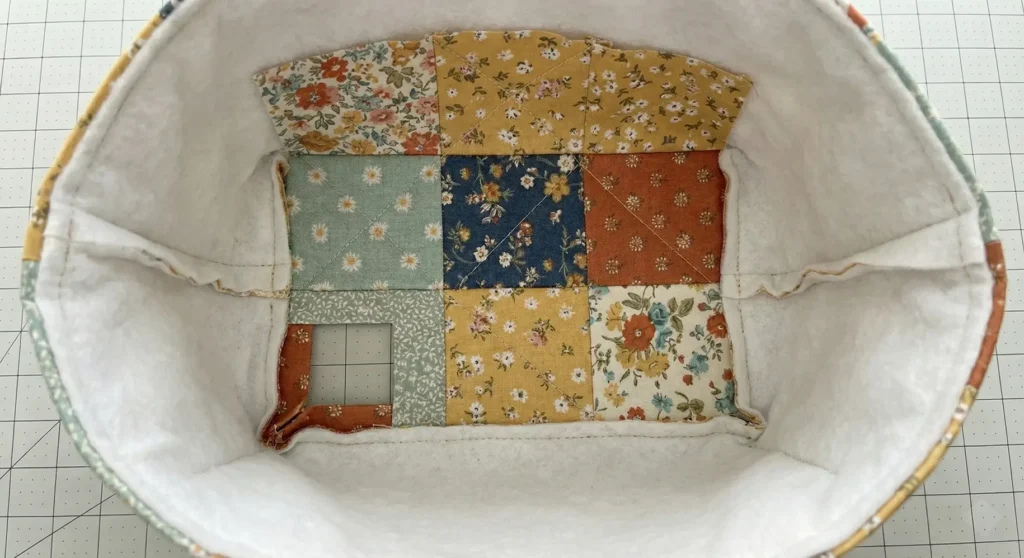
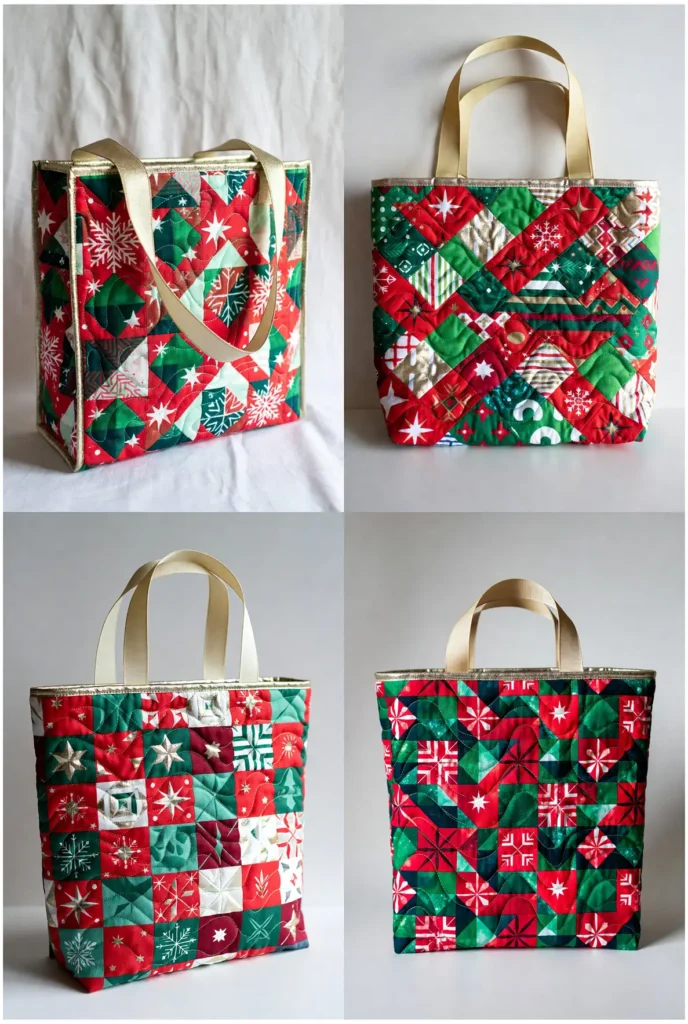
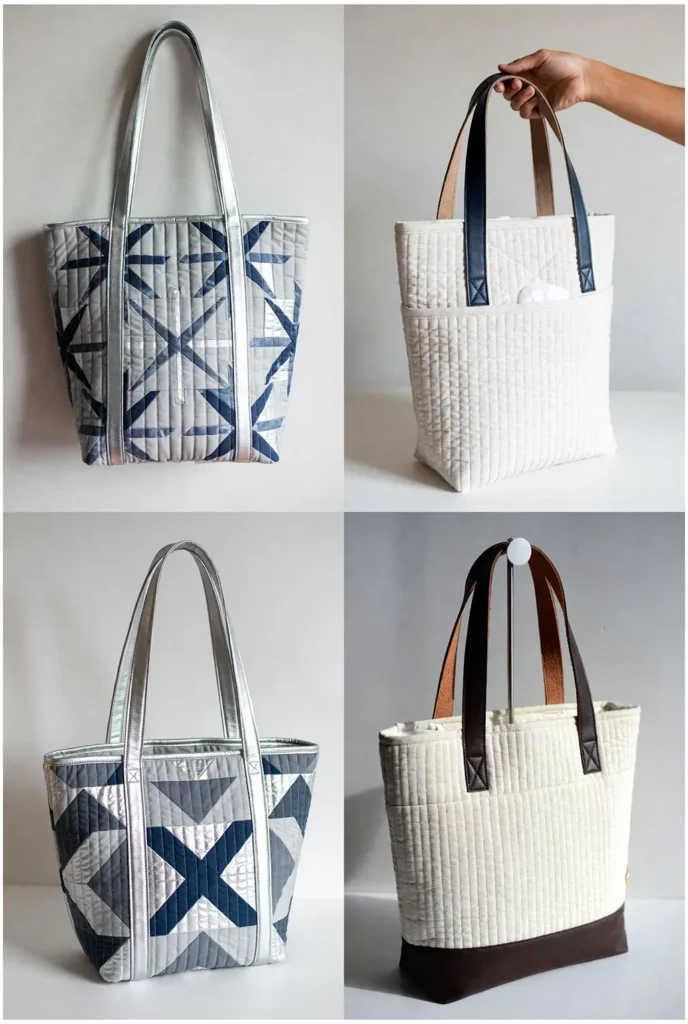
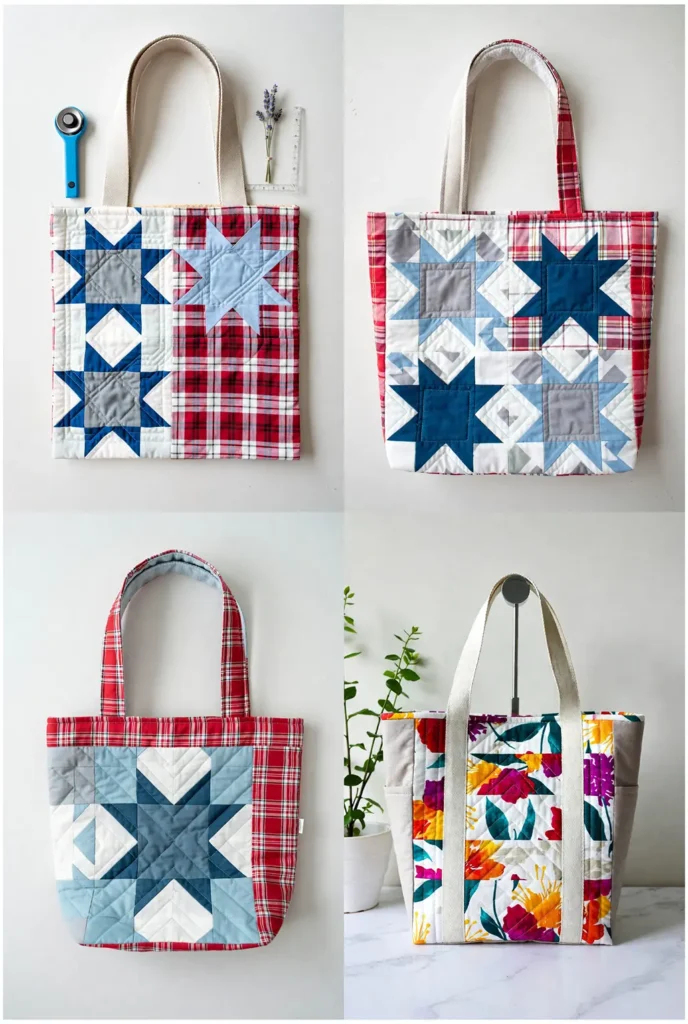
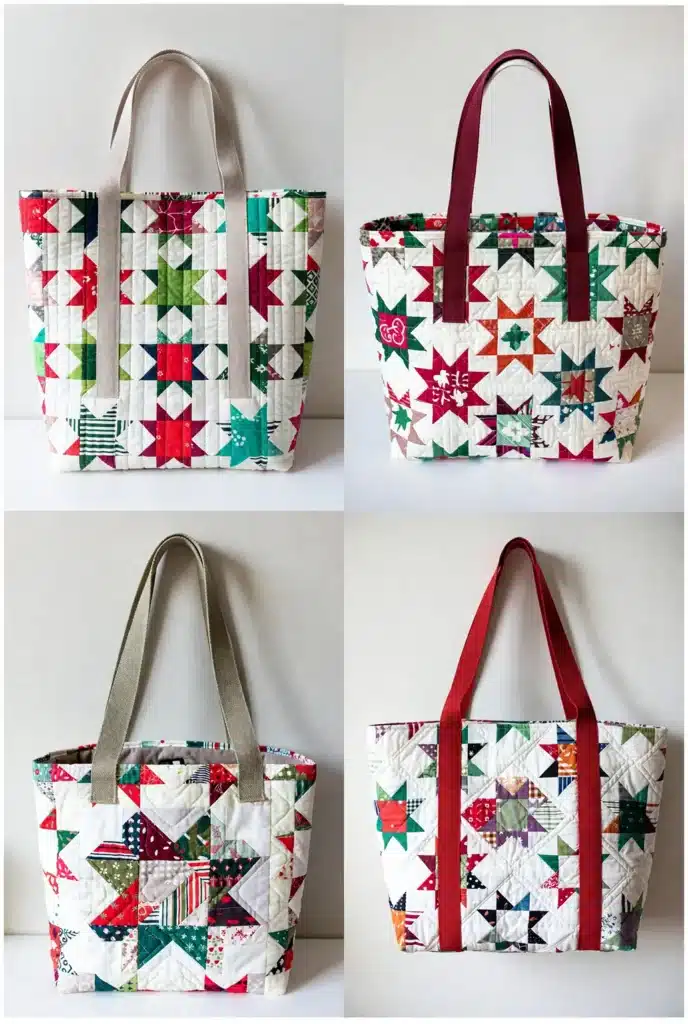
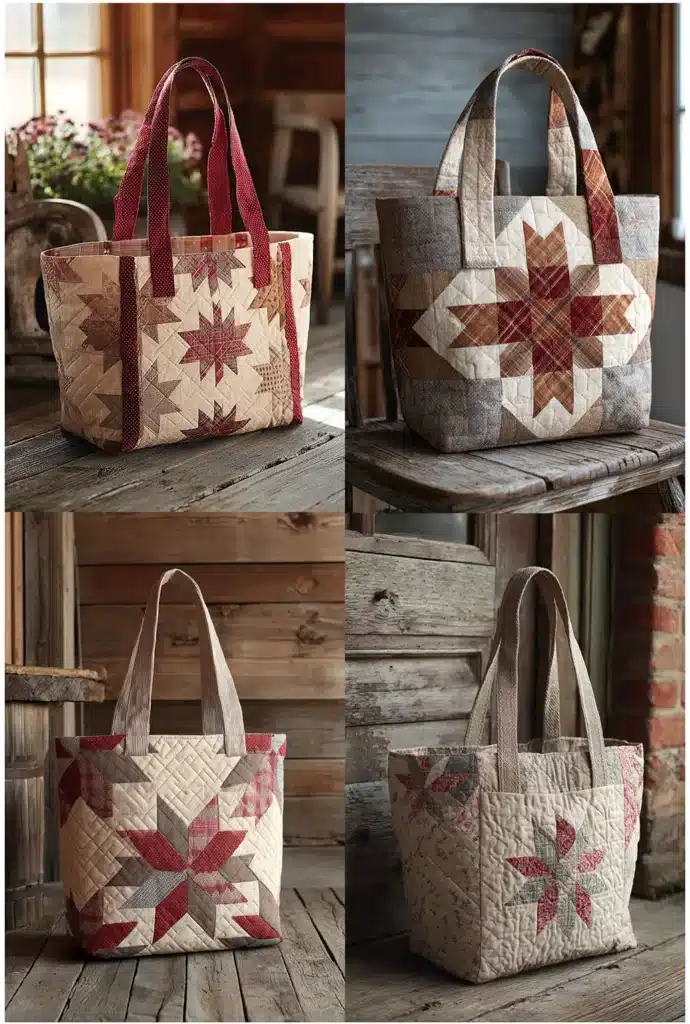
1. Classic Patchwork Quilted Tote Bag Pattern

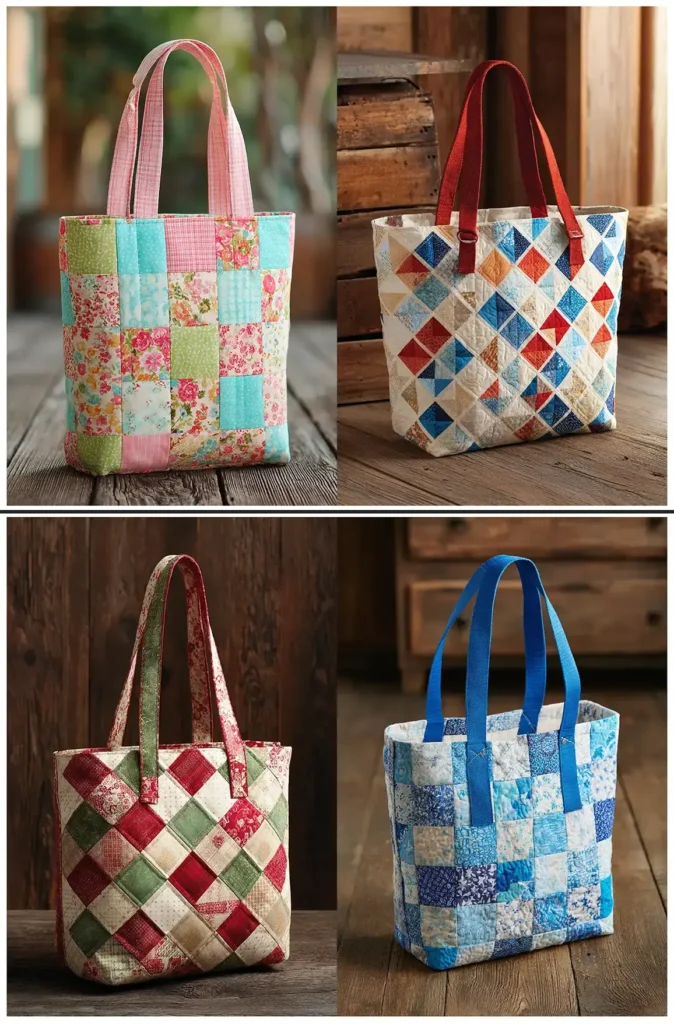
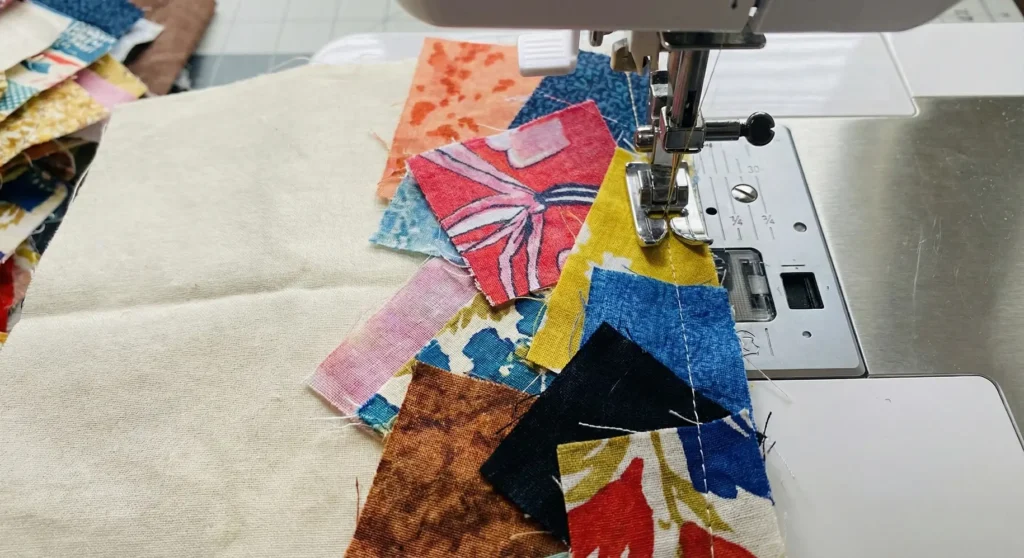
This timeless design uses simple squares to create a charming, durable “market-style” tote. It is perfect for beginners and ideal for using up scrap fabric or “charm packs” (pre-cut 5-inch squares).
Finished Dimensions: Approximately 11″ tall x 9″ wide x 4″ deep.
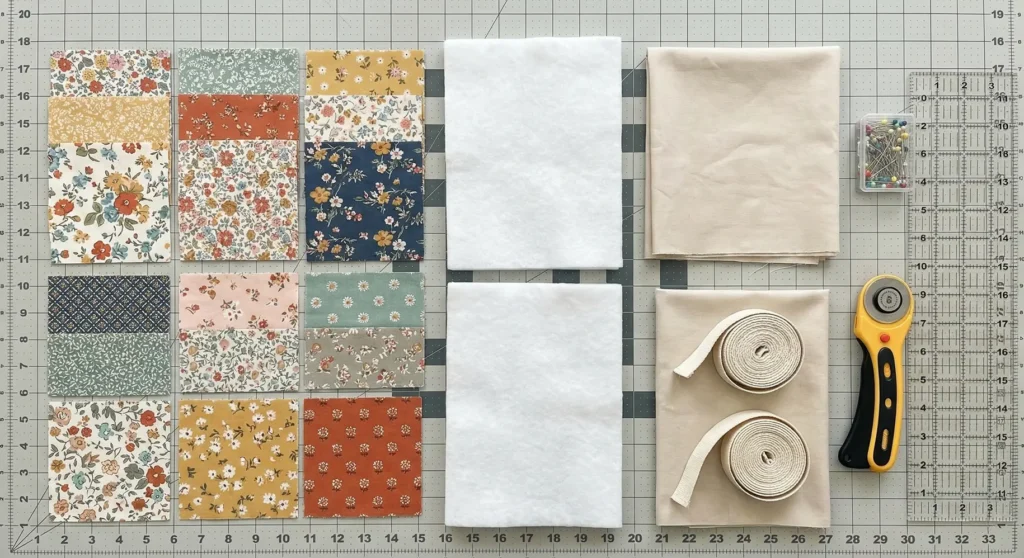
Materials Needed:
- Outer Fabric: 18 squares (5″ x 5″) — 9 for the front, 9 for the back.
- Lining Fabric: 2 pieces, cut to 14″ x 14″.
- Batting: 2 pieces (cotton batting or fusible fleece), cut to 15″ x 15″.
- Handles: 2 strips of cotton webbing (1.25″ wide), each 22″ long.
- Notions: Thread, rotary cutter, ruler, pins/clips.
Step 1: Piece the Patchwork Panels
- Arrange your 5″ squares into two sets of a 3×3 grid (3 rows of 3 squares).
- Sew the squares together into rows using a 1/4″ seam allowance. Press seams in alternating directions (row 1 to the left, row 2 to the right, etc.) to help them nest flat.
- Sew the three rows together to complete the front panel. Repeat for the back panel.
- Press the final panels flat. They should measure approximately 14″ x 14″.
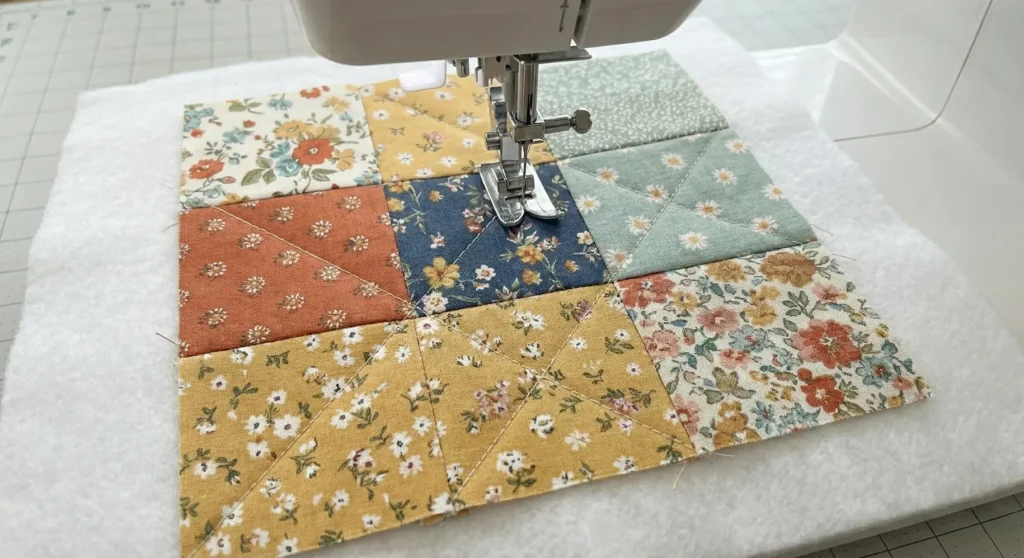
Step 2: Quilt the Exterior
- Place one patchwork panel right side up on top of a piece of batting. Baste with pins or spray adhesive.
- Quilt the layers together. A simple cross-hatch (diagonal lines through the squares) or straight vertical lines look professional and clean.
- Trim the excess batting so the quilted panel matches the fabric edge perfectly. Repeat for the second panel.

Step 3: Attach the Handles
- On the right side of the front panel, measure 3 inches in from the left and right edges along the top.
- Place the ends of one handle strap at these marks, ensuring the loop faces down toward the bottom of the bag and the belt is not twisted.
- Baste (sew) the ends in place with a scant 1/8″ seam allowance. Repeat for the back panel.
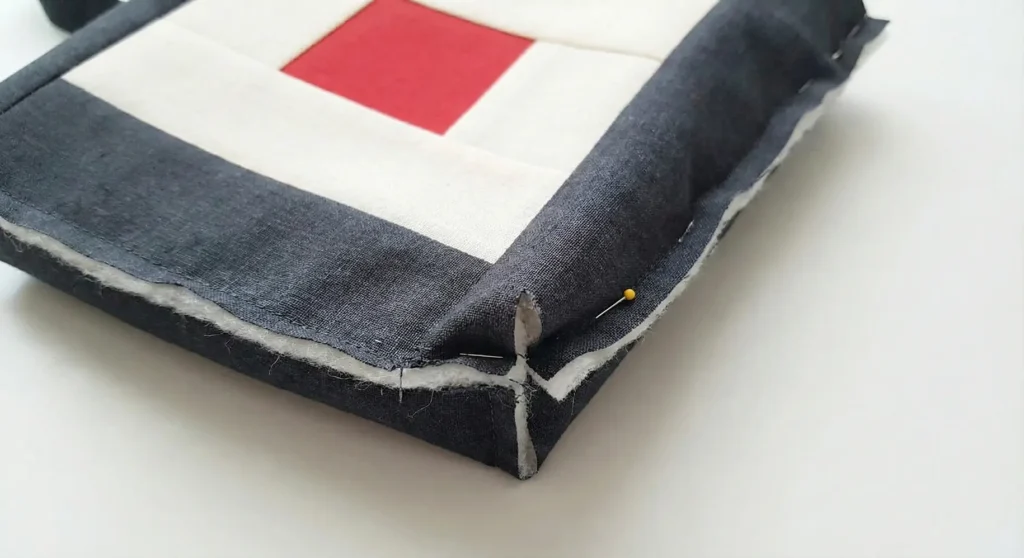
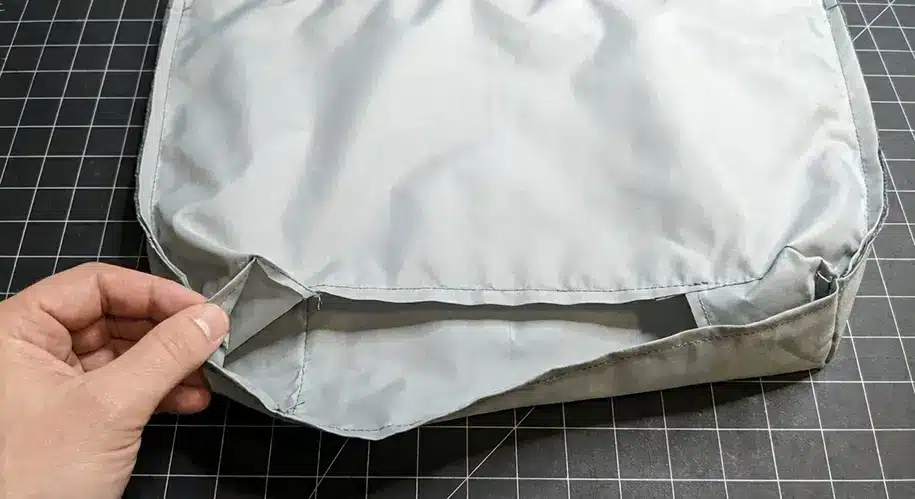
Step 4: Assemble the Bag Body (Box Your Corners)
- Place the front and back quilted panels Right Sides Together (RST).
- Sew along the sides and bottom with a 1/4″ seam allowance. Leave the top open.
- To box the corners: Cut a 2″ square out of the bottom-left and bottom-right corners of the sewn bag (measure from the seam line, not the raw edge).
- Pinch the opening of the cut corner so the side seam meets the bottom hem. Pin flat and sew across perpendicular to the seams. This gives the bag a flat bottom.
Step 5: Construct the Lining
- Place the two lining fabric pieces RST.
- Sew the sides and bottom, but leave a 4-inch gap in the bottom seam for turning the bag later.
- Box the lining corners exactly as you did the exterior (cut 2″ squares, pinch, and sew).
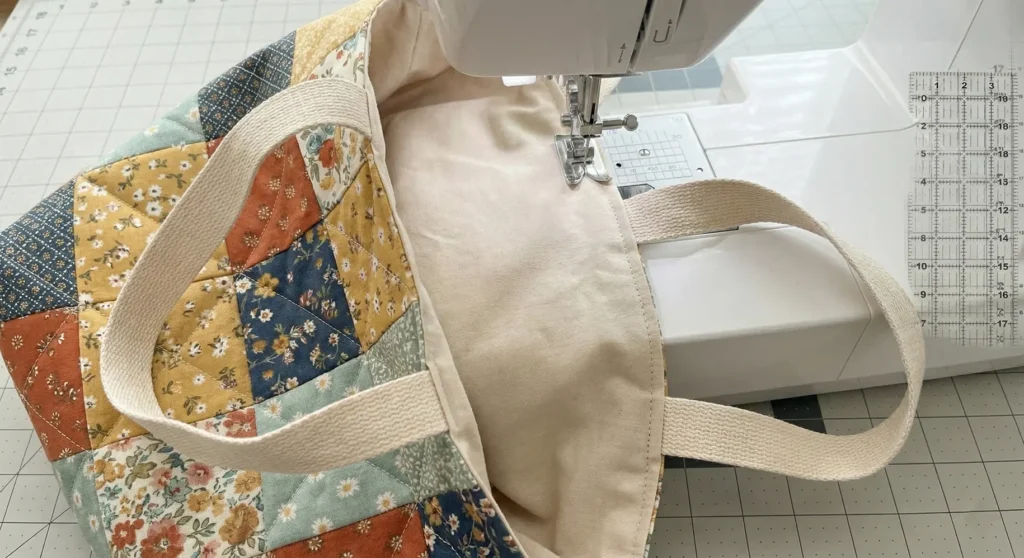
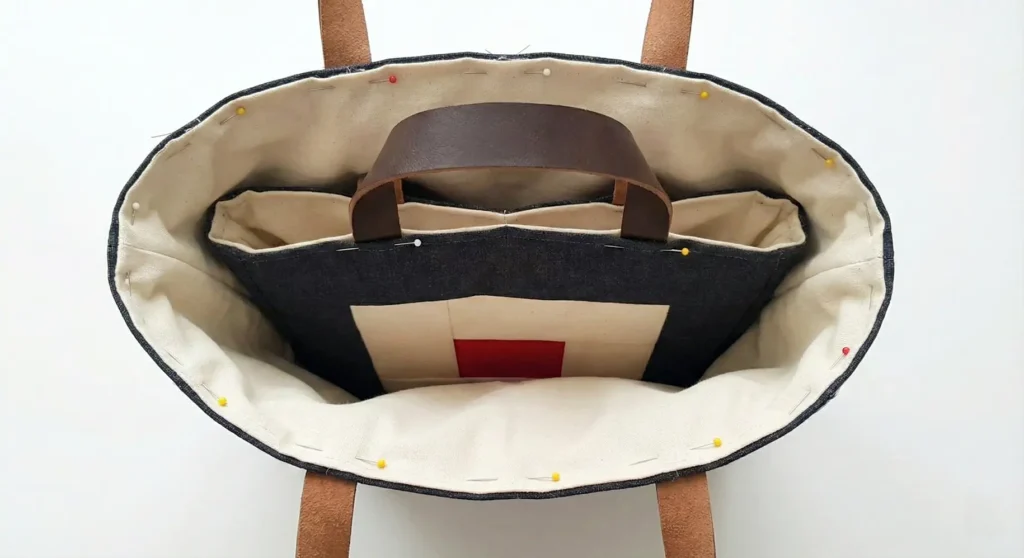
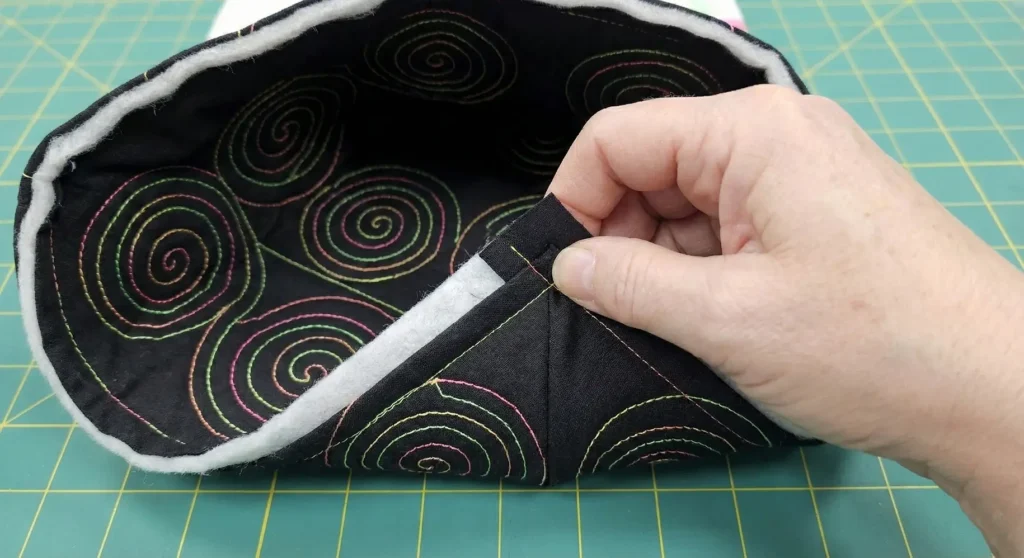
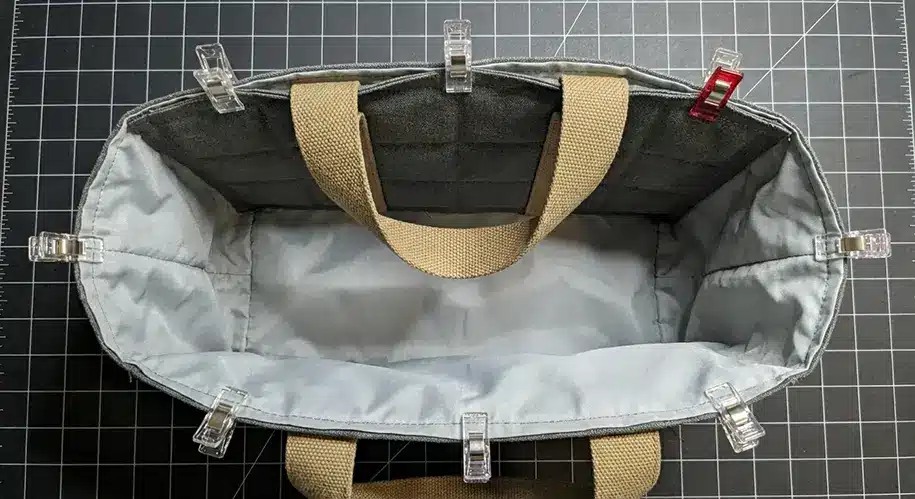
Step 6: Final Assembly
- Turn the outer bag Right Side Out and keep the lining Inside Out.
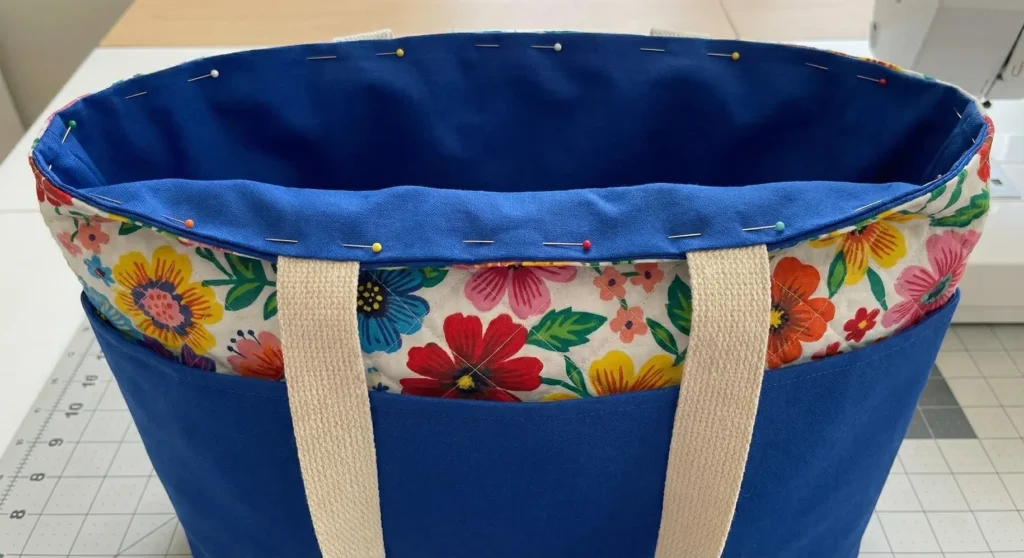
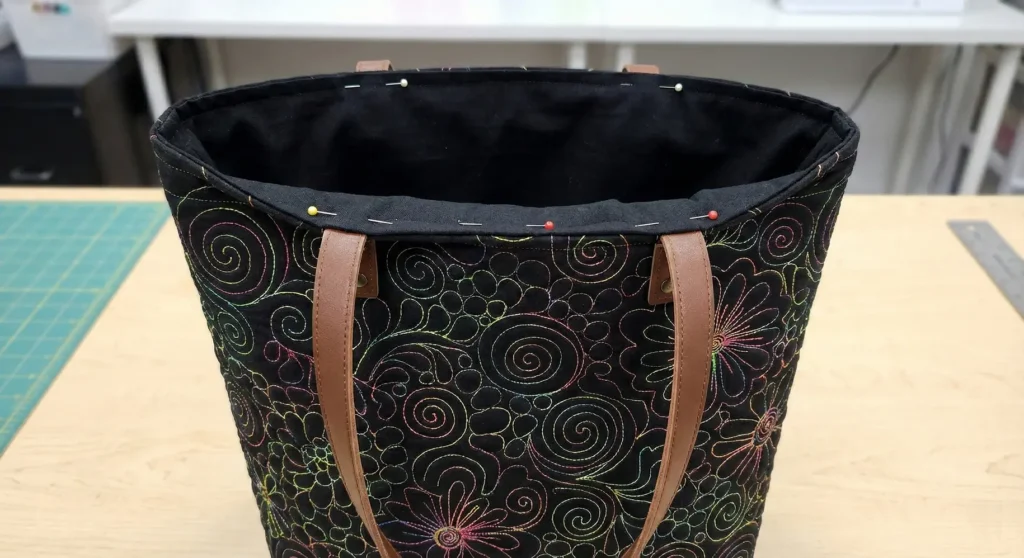
- Insert the outer bag inside the lining bag. They should be Right Sides Together. Match the side seams and pin well around the top rim.
- Sew around the entire top edge with a 1/4″ or 3/8″ seam allowance.
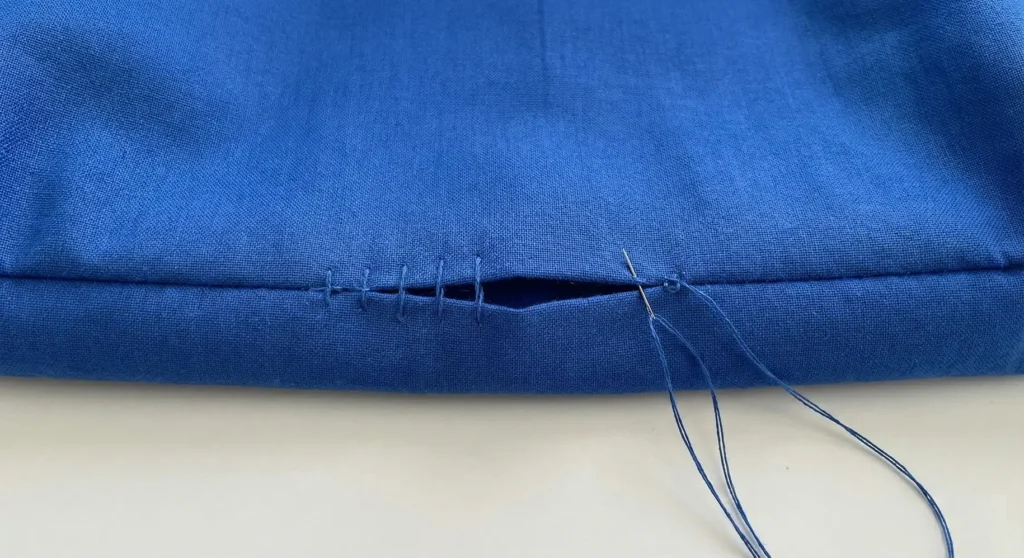
- Turn the bag right side out through the gap in the lining of the bottom. Stitch the lining gap closed.
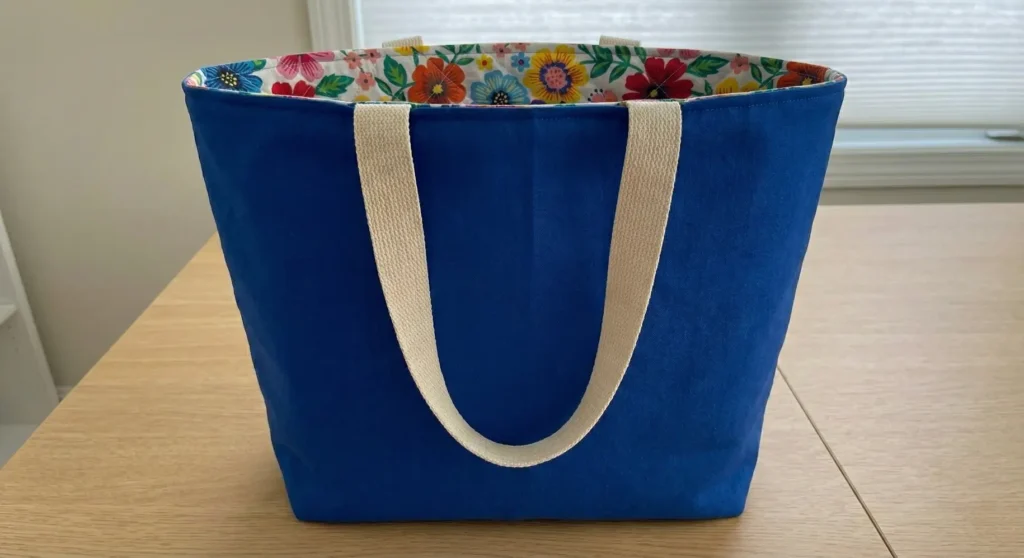
- Push the lining into the bag, press the top edge crisp, and topstitch around the rim (1/8″ from the edge) to secure the lining and handles in place.
Pro Design Tip:
For a bag that stands up on its own and looks professionally made, fuse a layer of woven interfacing (like Pellon SF101) to the back of your lining pieces before assembling. This adds structure without making the bag stiff or crunchy, preventing the “floppy” look common in homemade totes.
Budget Consideration:
To make this bag for $0, use old denim jeans for the bottom row of squares on both panels. Denim is incredibly durable for the base of a bag, and you can mix it with lighter cotton scraps for the top two rows to create a stylish “mixed media” look.
More Recommended Supplies
“As an Amazon Associate, I earn from qualifying purchases.“
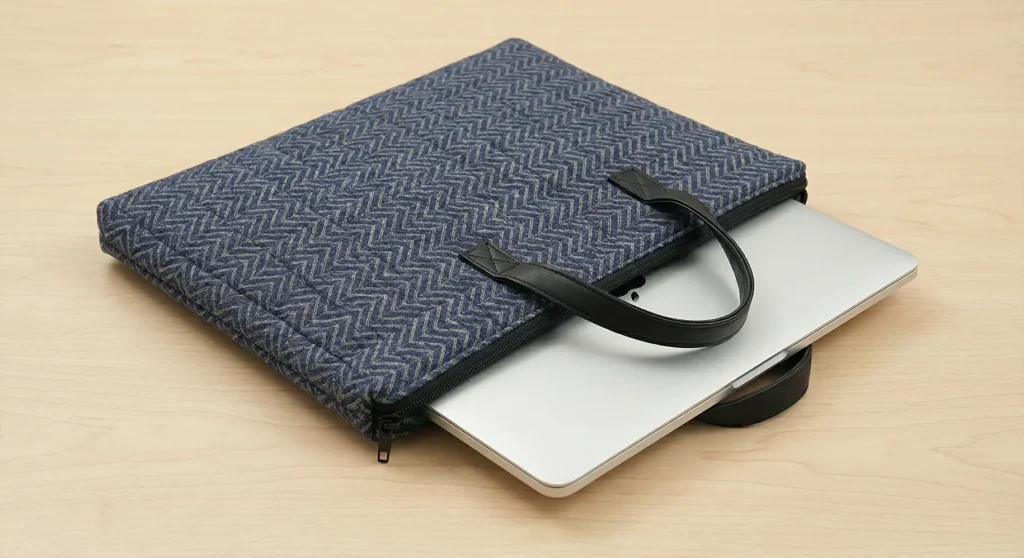
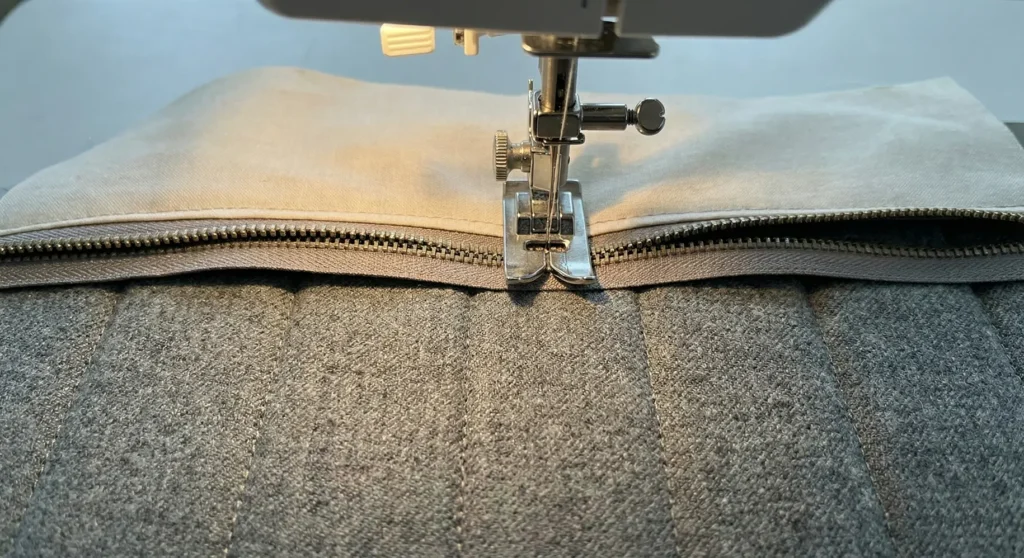
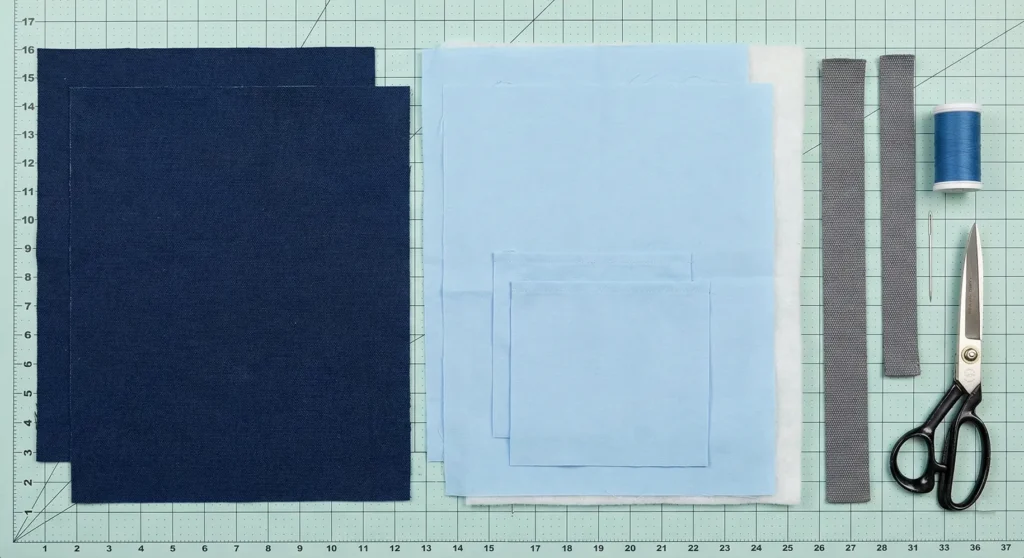
2. Protective Padded Laptop Bag with Geometric Stitching

This project shifts focus from simple carrying to protection. By using a foam stabilizer and dense geometric quilting, you create a shock-absorbing structure that protects electronics. This pattern makes a horizontal “briefcase-style” bag suitable for a 13-14-inch laptop.
Finished Dimensions: Approximately 14″ wide x 10.5″ tall x 1″ deep.
Materials Needed:
- Outer Fabric: 2 pieces, cut to 15″ x 11.5″ (Heavy cotton canvas or denim works best).
- Lining Fabric: 2 pieces, cut to 15″ x 11.5″ (Soft cotton or flannel to prevent scratches).
- Stabilizer: 2 pieces of sew-in foam stabilizer (like Annie’s Soft and Stable or Pellon Flex-Foam), cut to 16″ x 12″ (cut larger than fabric to account for shrinkage).
- Zipper: One 16-inch (or longer) nylon coil handbag zipper.
- Handles: 2 strips of cotton webbing or leather, 14″ long each.
- Notions: Masking tape (painter’s tape), zipper foot, walking foot.
Step 1: Quilt the Geometric Panels
- Baste your Outer Fabric pieces onto the Foam Stabilizer pieces (right side facing up). Do not include the lining yet.
- Use masking tape to mark your geometric pattern. A popular modern choice is a Chevron or Herringbone pattern. Place a strip of tape diagonally at a 45-degree angle, sew along the edge, move the tape, and repeat.
- Quilt both panels.
- Trim the quilted panels down to the final size of 15″ x 11.5″. The quilting will have slightly shrunk the fabric, which is why we started with larger foam.

Step 2: Attach the Handles
- On the right side of one quilted panel, measure 4 inches in from both the left and right sides along the top edge.
- Place the ends of the handle strap at these marks to form a “U” shape. The loop should hang down over the body of the bag.
- Baste the handle ends in place with a 1/8″ seam allowance. Repeat for the second panel.
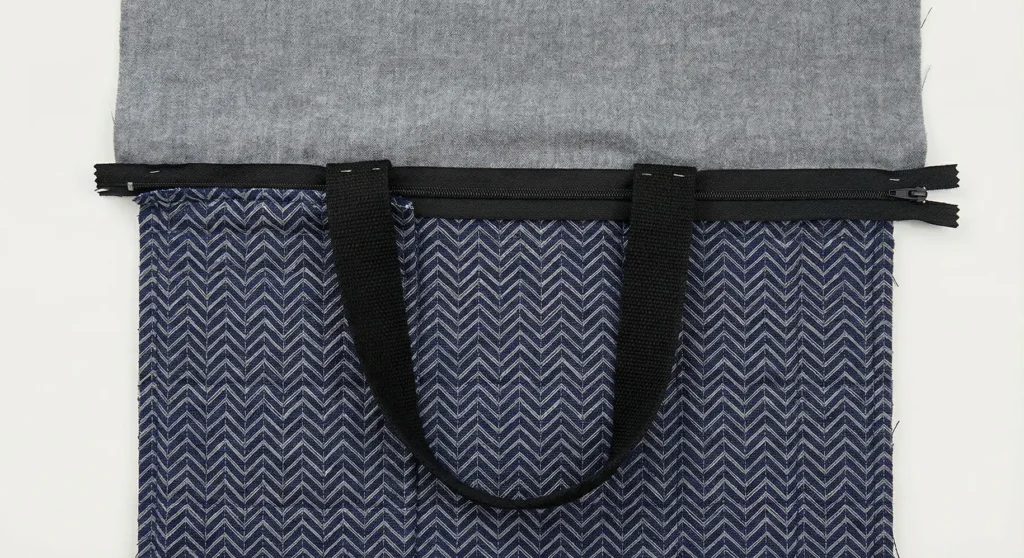
Step 3: Install the Zipper (Sandwich Method)
- Place one quilted panel right side up.
- Place the zipper face down along the top edge (zipper pull should be facing the fabric).
- Place one lining piece right side down on top, creating a sandwich (Quilted Panel -> Zipper -> Lining).
- Using a zipper foot, sew along the top edge. Flip the fabrics away from the zipper and press (avoid melting the coils!). Topstitch along the fold to keep the fabric from getting caught in the zipper teeth.
Step 4: Repeat for the Other Side
- Place the second quilted panel right side up.
- Place the zipper (with the first panel attached) face down onto this second panel.
- Place the second lining piece right side down on top.
- Sew, flip, press, and topstitch exactly as you did in Step 3. You now have two sides connected by the zipper.
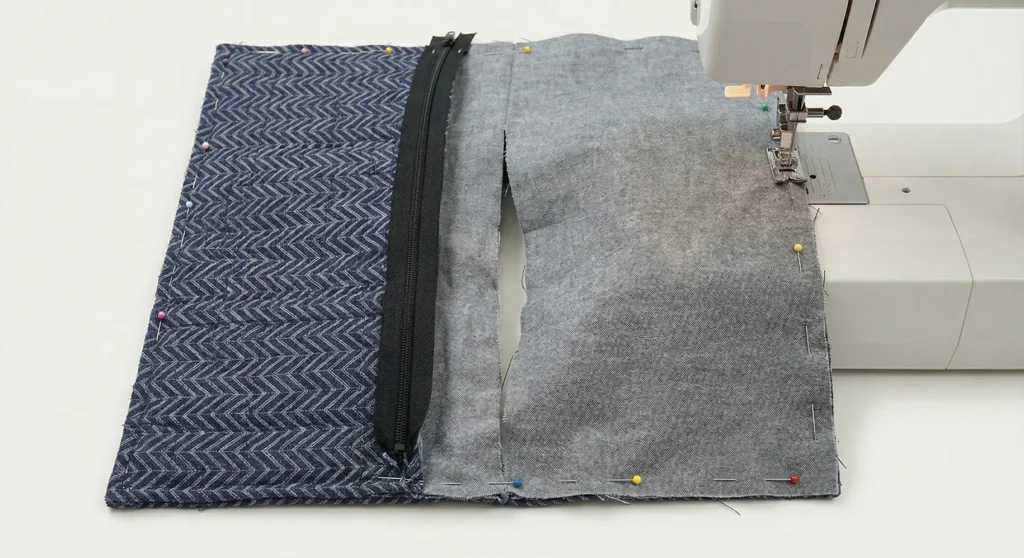
Step 5: Sew the Perimeter
- Open the zipper halfway. (Crucial! If you forget this, you cannot turn the bag right side out.)
- Open the layers so the two Quilted Panels are Right Sides Together, and the two Lining Pieces are Right Sides Together.
- Pin all around the rectangle. Ensure the zipper teeth are folded toward the lining side.
- Sew around the entire perimeter using a 3/8″ seam allowance, leaving a 5-inch gap at the bottom of the lining section for turning.
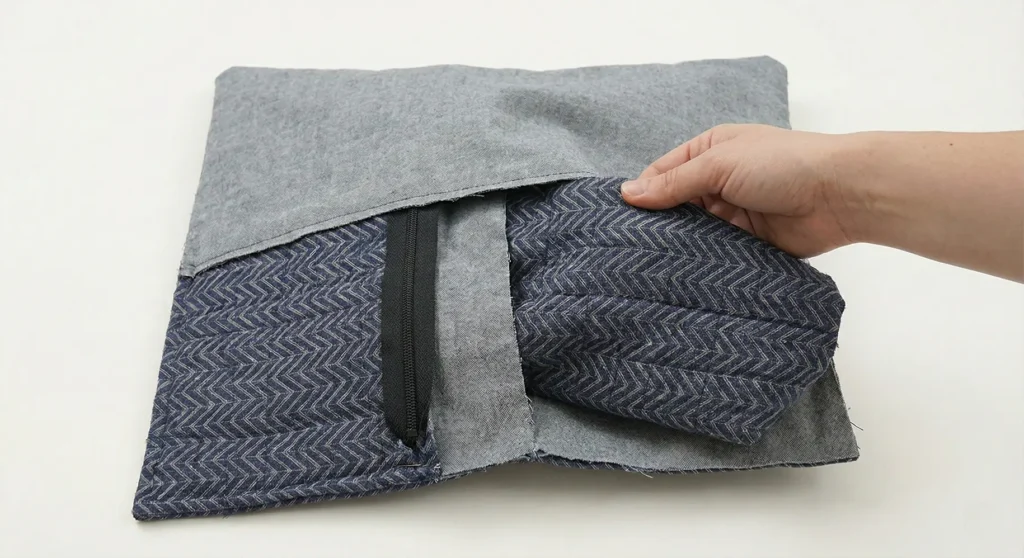
Step 6: Finish the Bag
- Trim the excess foam from the seam allowances to reduce bulk. Clip the four corners diagonally (without cutting the stitching).
- Turn the bag right side out through the gap in the lining.
- Gently push the corners out with a chopstick or a point turner.
- Fold the raw edges of the lining gap inward and stitch it closed (by machine or hand).
- Push the lining inside the bag and zip it up to reshape.
Pro Design Tip: Use a Nylon Coil Zipper rather than a metal zipper. Metal zippers look stylish, but they have sharp teeth that can scratch the aluminum casing of a laptop every time you slide it in or out. Nylon is softer and more forgiving against electronics.
Budget Consideration: Foam stabilizer is the most expensive part of this build. A cheap and effective alternative is to use an automobile headliner fabric (available at many fabric stores for much less) or a thrifted fleece blanket folded into two layers. While less rigid than foam, layered fleece provides excellent scratch and bump protection for pennies.
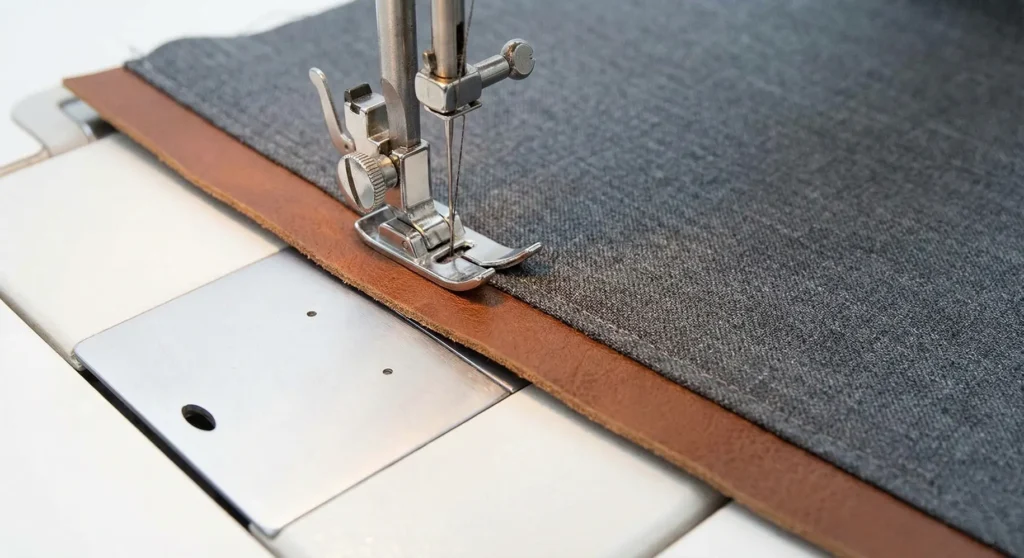
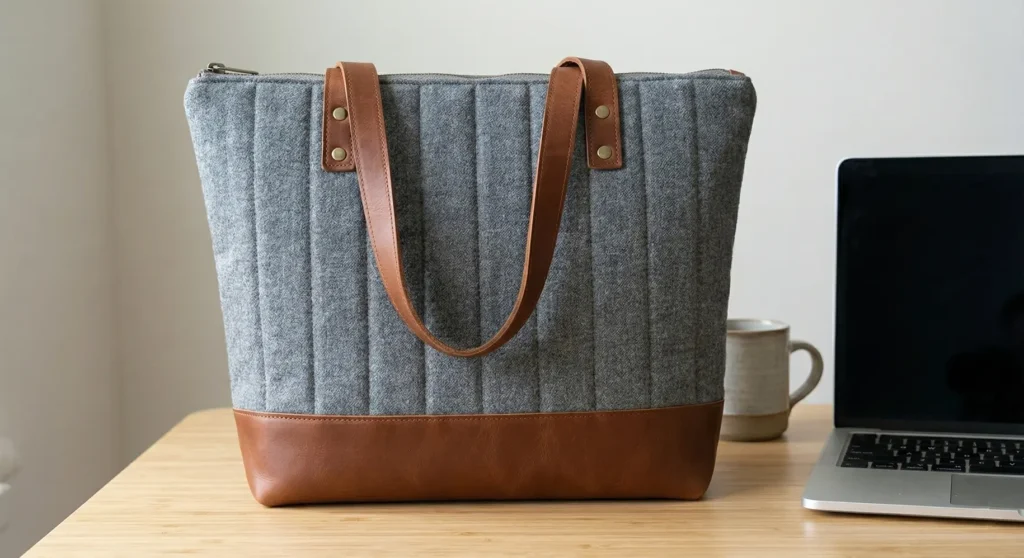
3. Leather Trim Quilted Professional Laptop Bag
This design elevates the humble quilted bag into office-appropriate gear. By combining a soft, quilted upper body with a durable leather (or faux-leather) base and handles, you create a sophisticated accessory that is rugged on the bottom and soft on electronics.
Finished Dimensions: Approximately 15″ wide x 11″ tall x 3″ deep.
Materials Needed:
- Main Outer Fabric: 2 pieces, cut to 16″ x 10″ (Suiting wool, tweed, or linen blend looks professional).
- Leather/Vinyl Accent (Base): 2 pieces, cut to 16″ x 5″.
- Lining Fabric: 2 pieces, cut to 16″ x 13.5″.
- Foam Stabilizer: 2 pieces, cut to 16″ x 13.5″ (Soft and Stable or similar).
- Leather Straps: 2 pre-made leather straps (24″ long) OR two strips of leather (1″ x 24″).
- Zipper: One 16-inch or more extended metal zipper (size #5 looks best).
- Notions: Double-sided tape (Wonder Tape), leather needle, heavy-duty thread, sewing clips (do not use pins on leather).
Step 1: Create the Main Exterior Panels
- Align one Leather Base piece with the bottom edge of one Main Outer Fabric piece, Right Sides Together (RST).
- Sew them together with a 3/8″ seam allowance.
- Press the seam allowance up toward the fabric (use a pressing cloth if using faux leather to avoid melting). Topstitch on the fabric side, 1/8″ from the seam, to secure the bulk.
- You now have a panel that is roughly 16″ x 14″. Repeat for the second set.

Step 2: Quilt the Fabric Section Only
- Baste your assembled exterior panel onto the Foam Stabilizer.
- Quilt only the fabric section. Straight vertical lines spaced 1 inch apart look sleek and modern. Stop your stitching exactly at the leather seam line; do not quilt over the leather base.
- Baste the outer edges of the leather to the foam to keep it from shifting during final assembly.
Step 3: Attach Leather Handles with Hardware
- Instead of sewing the handles into the rim, apply them to the face of the bag for a “tote” look.
- Measure 4 inches in from the sides and 1.5 inches down from the top edge.
- Use Rivets or sew a square-with-an-X box stitch to attach the leather handle ends to the quilted fabric. Ensure the handle loops are facing up. (Rivets provide a much more commercial/professional finish).
Step 4: Install the Zipper with Tabs
- Cut two small leather rectangles (1.5″ x 2″) to make zipper tabs. Fold them over the raw ends of your zipper and stitch. This makes the zipper slightly shorter than the bag width (about 14″ total), creating neat “dent” corners.
- Center the zipper face down on the top edge of the exterior panel.
- Place the lining right side down on top.
- Sew the sandwich (Exterior -> Zipper -> Lining) using a zipper foot. Flip open and topstitch on the exterior side to prevent the lining from snagging. Repeat for the other side.
Step 5: Box Corners and Sew Sides
- Open the zipper (Crucial!). Place Exteriors RST and Linings RST.
- Cut a 1.5″ square from the bottom corners of the Exterior (leather part) and the Lining.
- Sew the side seams and the bottom seams. Leave a 6-inch gap in the bottom of the lining for turning.
- Box the corners: Pinch the cut corners so the side seam touches the bottom seam. Sew across. (Go slowly over the leather seams; if your machine struggles, use a “humper jumper” tool or folded cardboard to level the foot).
Step 6: Final Turn and Finish
- Turn the bag right side out through the lining gap. This will take some effort due to the stiff leather and foam—be patient and gentle to avoid ripping the lining.
- Poke the leather corners out firmly to get a sharp box shape.
- Stitch the lining gap closed and tuck it inside.
- Roll the top edge where the zipper is installed and give it a final press (avoiding the leather) to ensure a crisp, professional silhouette.
Pro Design Tip: When sewing leather or vinyl, standard metal presser feet will stick to the material and cause skipped stitches. Use a Teflon (non-stick) foot or a Walking Foot. If you don’t have those, place a piece of matte scotch tape on the bottom of your standard foot to help it glide.
Budget Consideration: High-quality leather hardware (d-rings, rivets, swivel hooks) can be pricey. Source these from thrifted purses. Buy an ugly bag at a thrift store for $5 that has good hardware and handles, cut them off, and reuse them on your custom quilted bag.

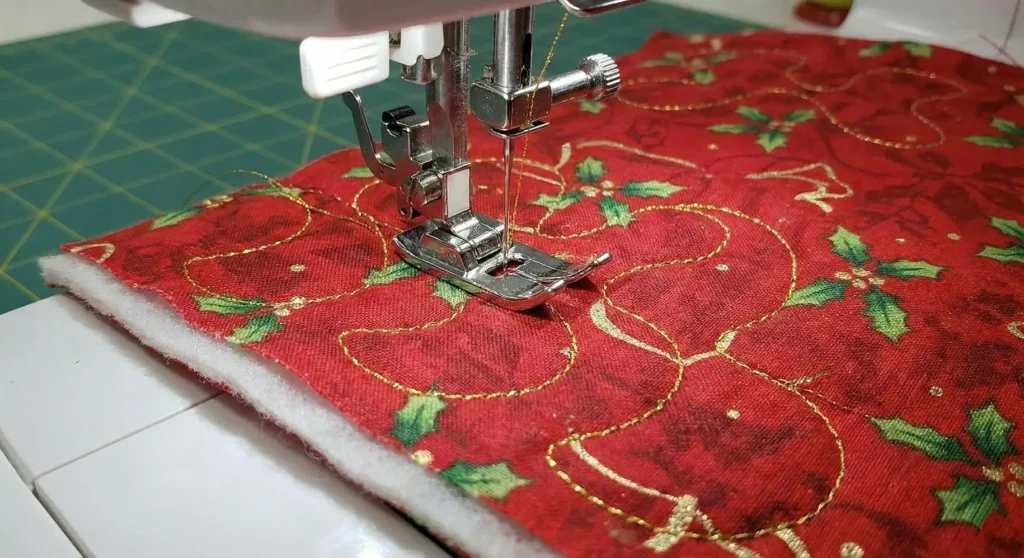
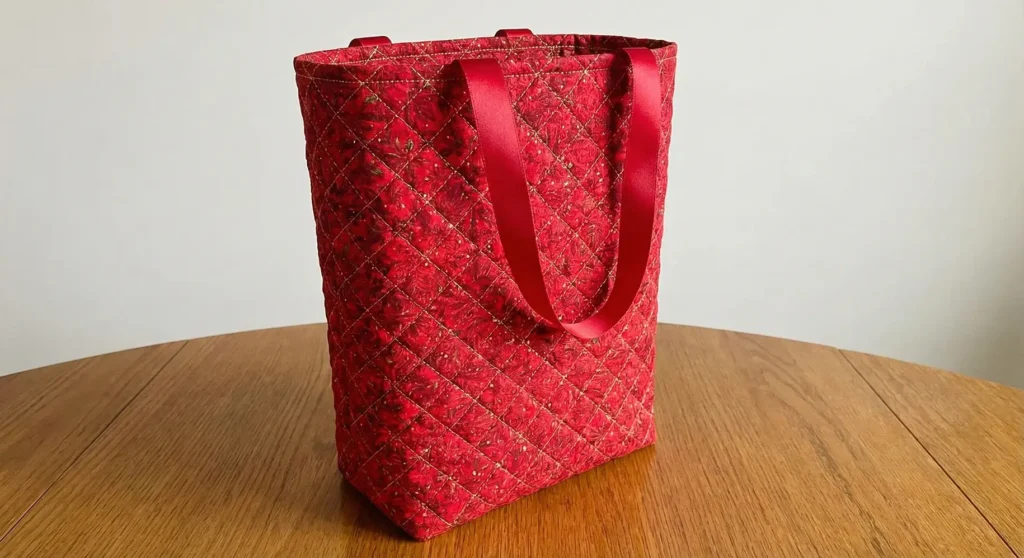
4. Festive Holiday Quilted Gift Bag with Metallic Thread
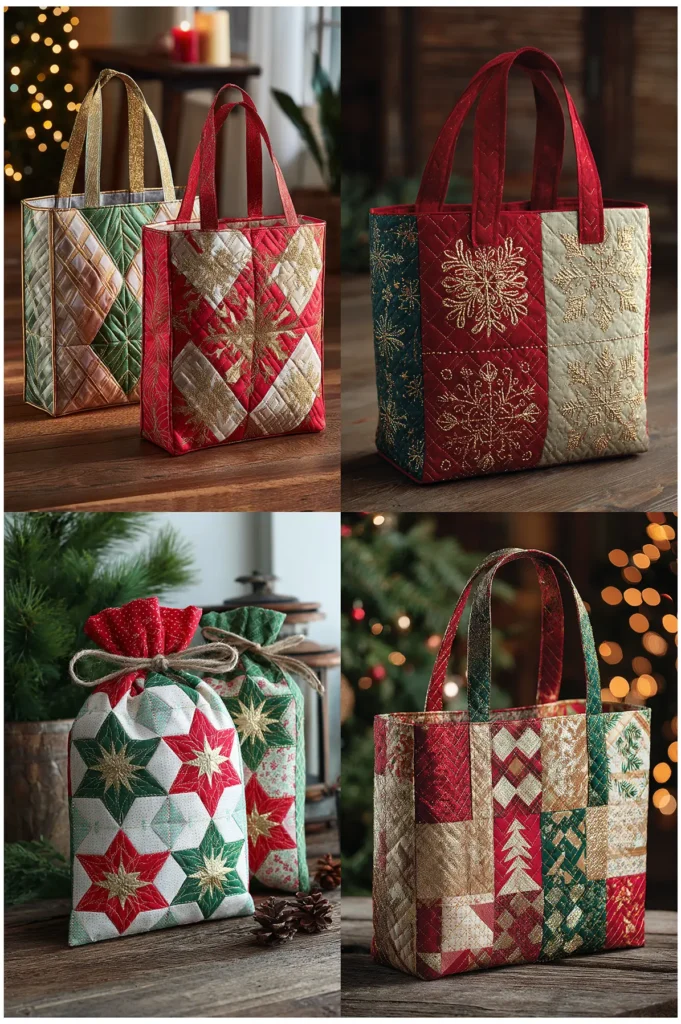
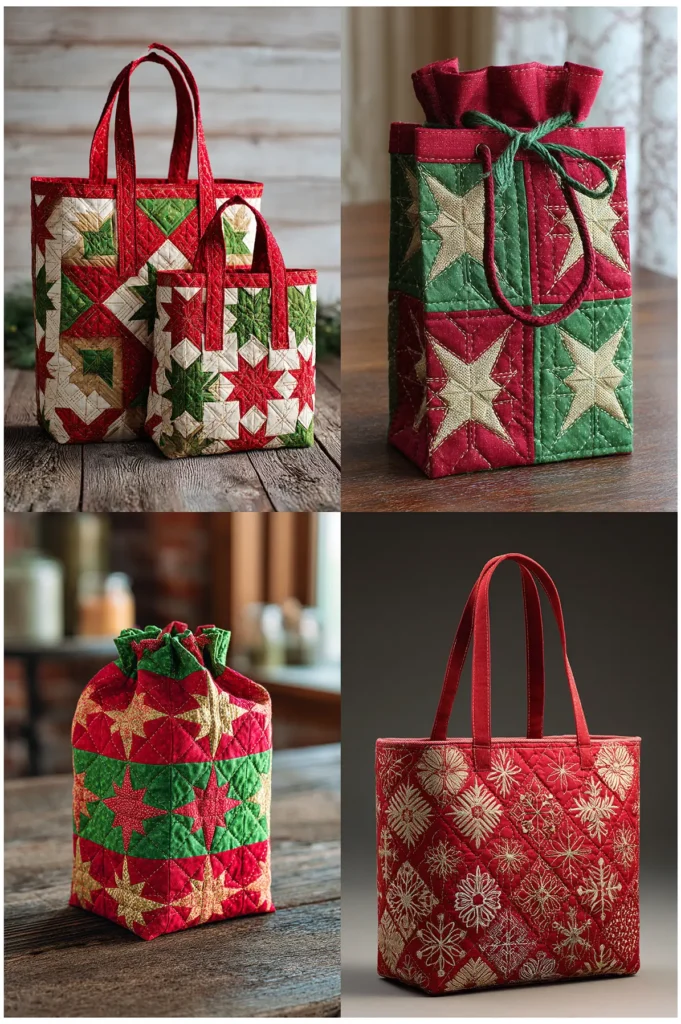
Replace disposable paper waste with a stunning, reusable heirloom gift bag. This project uses metallic thread to outline holiday motifs or create shimmering geometric patterns, turning the packaging itself into a valuable part of the present.
Finished Dimensions: Approximately 10″ wide x 12″ tall x 4″ deep.
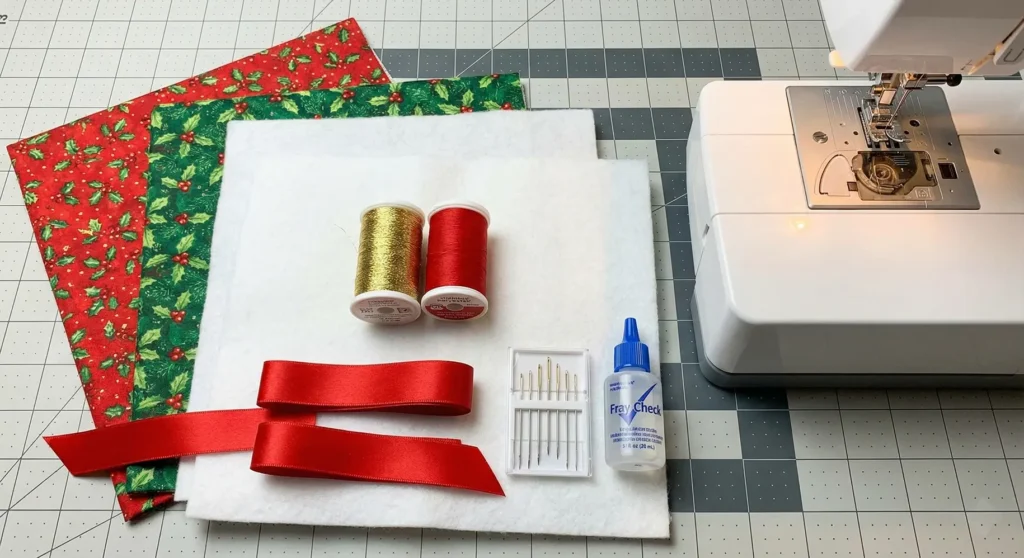
Materials Needed:
- Outer Fabric: 2 pieces, cut to 15″ x 13″ (Holiday prints or solid red/green).
- Lining Fabric: 2 pieces, cut to 15″ x 13″.
- Batting: 2 pieces of fusible fleece or lightweight cotton batting, cut to 15″ x 13″.
- Thread: High-quality Gold or Silver metallic thread (and standard polyester thread for construction).
- Handles: 2 lengths of wide satin ribbon or grosgrain ribbon, 18″ long each.
- Notions: Metallic sewing needle (Size 90/14), walking foot, fray check.
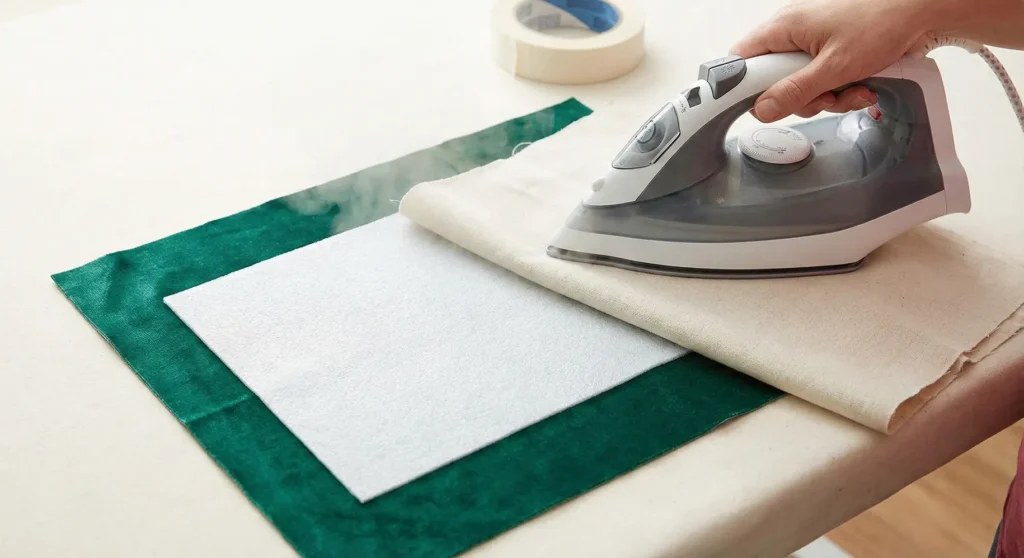
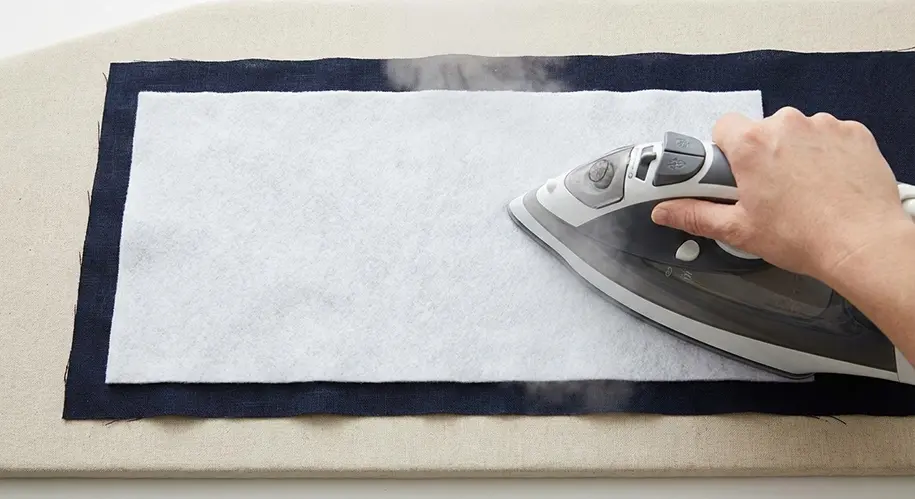
Step 1: Fuse and Prepare Layers
- Iron the Fusible Fleece to the wrong side of your Outer Fabric pieces. If using non-fusible batting, use a basting spray to secure the layers temporarily.
- Ensuring the fabric is smooth and adheres well is crucial, as metallic thread is less forgiving of shifting layers than standard cotton thread.
Step 2: Quilt with Metallic Thread
- Thread your machine with Metallic Thread in the top and a standard matching polyester thread in the bobbin.
- Install a Metallic or Topstitch Needle (90/14). These have larger eyes that prevent the delicate metallic foil from shredding during high-speed stitching.
- Lower your top tension slightly (usually down to 3 or 4).
- Quilt a decorative design. Simple wavy lines (to mimic ribbon) or outlining specific motifs on the holiday print (like tracing around snowflakes or trees) looks spectacular.
Step 3: Construct the Bag Exterior
- Place the two quilted outer panels Right Sides Together (RST).
- Switch back to standard polyester thread for structural sewing; metallic thread is not strong enough for seams.
- Sew down the two sides and across the bottom with a 1/4″ seam allowance.
- Press the side seams open (carefully, so you don’t melt the metallic thread if it’s synthetic).
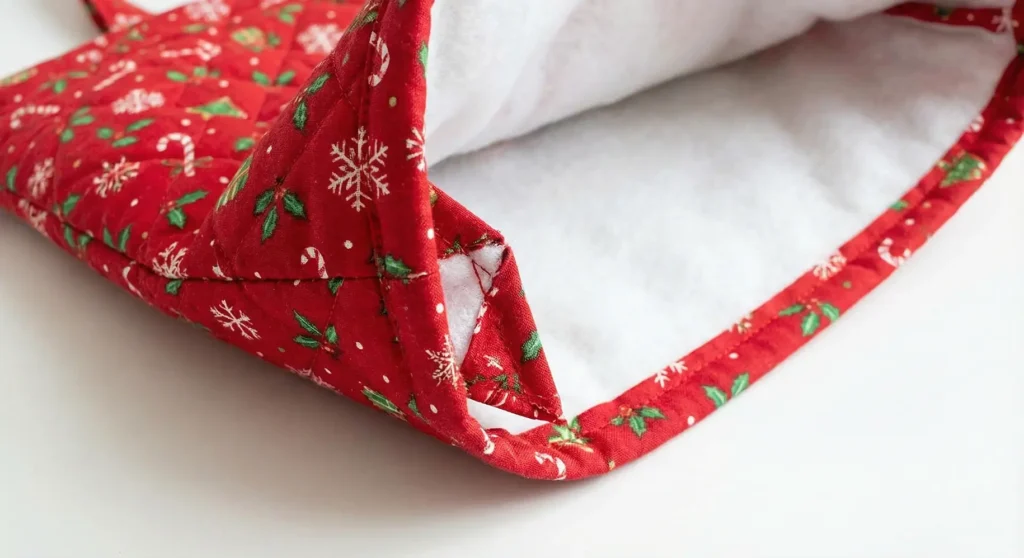
Step 4: Box the Corners
- Cut a 2″ square from the bottom-left and bottom-right corners of the sewn bag.
- Pinch the corners so the side seam matches the bottom hem.
- Sew across the raw edge to create a flat base. This allows the bag to stand upright when filled with gifts.
Step 5: Attach Ribbon Handles
- On the right side of the outer bag, measure 3.5 inches in from the side seams along the top edge.
- Place the raw ends of your ribbon handles at these marks to form a loop. Ensure the ribbon is not twisted.
- Baste the ribbon ends in place with a scant 1/8″ stitch.
- Optional: Apply a drop of “Fray Check” to the raw ends of the ribbon to prevent unraveling inside the bag later.
Step 6: Line and Finish
- Assemble the lining pieces (sew sides/bottom, box corners) just like the exterior, but leave a 4-inch gap in the bottom seam.
- Place the outer bag inside the lining bag (Right Sides Together).
- Sew around the top rim with a 3/8″ seam allowance.
- Turn the bag right side out through the lining gap. Stitch the gap closed.
- Topstitch the upper edge with your Metallic Thread again for a final sparkling finish.
Pro Design Tip: When quilting with metallic thread, increase your stitch length to 3.0mm or 3.5mm. Longer stitches reflect more light, making the “sparkle” more visible, and they reduce the friction on the thread, preventing breakage.
Budget Consideration: Instead of buying expensive holiday yardage, use cloth napkins or placemats from discount home goods stores. They are often sold in sets of 4 for cheap after the holidays, are pre-hemmed (saving time on lining if you modify the pattern), and come in beautiful festive weaves.
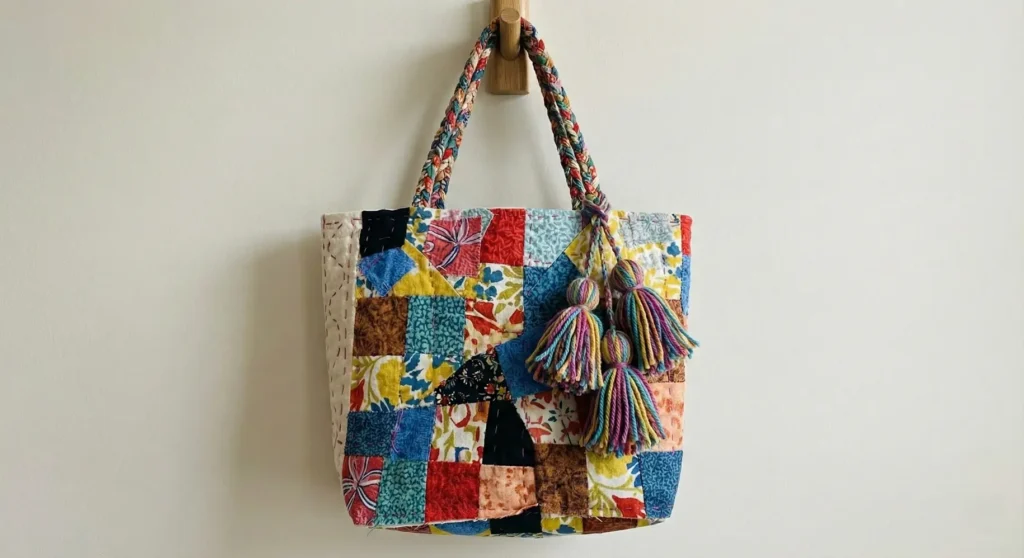
5. Scrappy Patchwork Quilted Shopper for Boho Style with Tassel Details
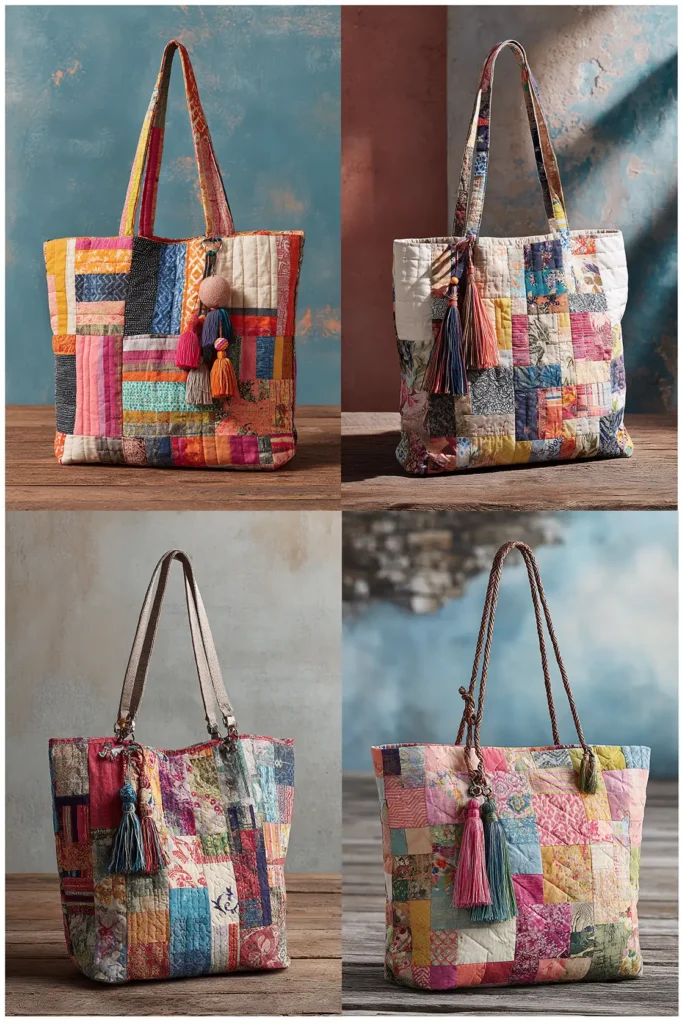
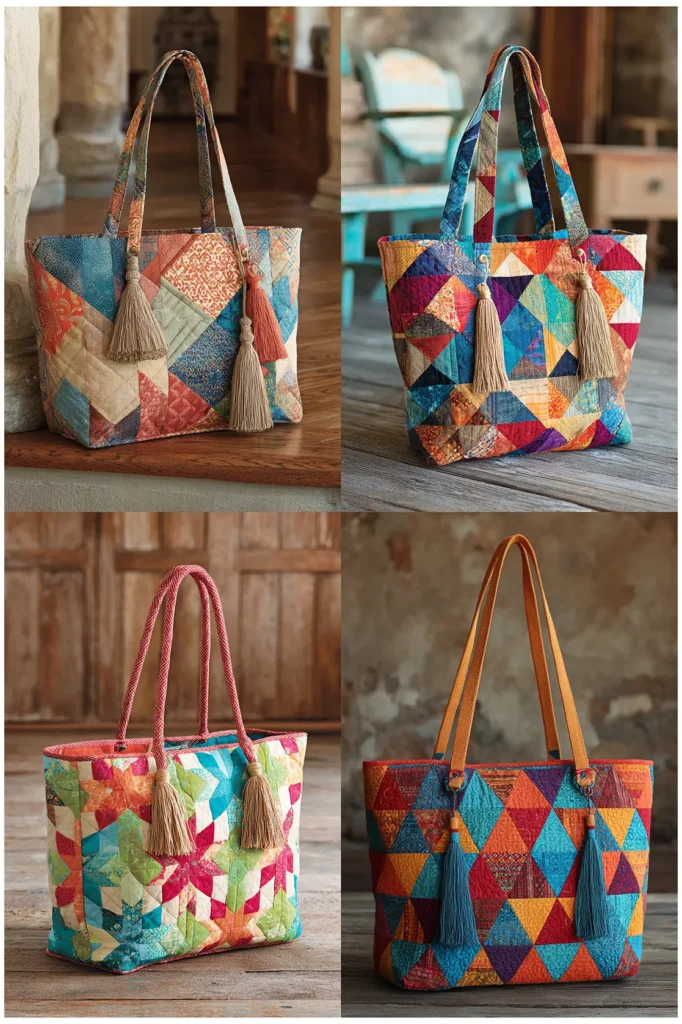
Embrace the “perfectly imperfect” aesthetic with this relaxed, slouchy shopper. This project utilizes “improv piecing” and high-texture embellishments to create a bag that feels curated and artistic—perfect for farmers’ markets or festivals.
Finished Dimensions: Large, approx. 16″ wide x 15″ tall x 5″ deep.
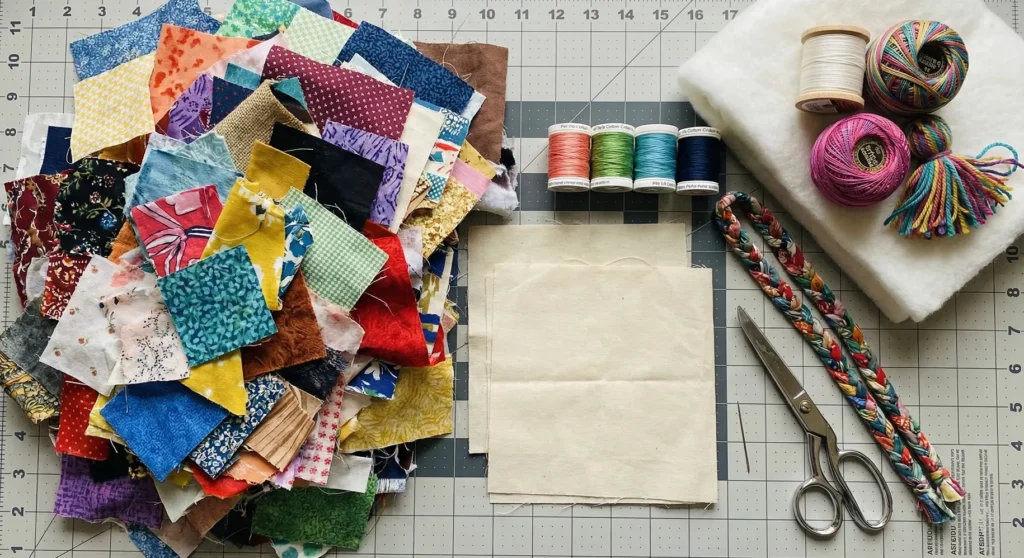
Materials Needed:
- Scraps: A large volume of fabric scraps (strips, squares, odd shapes) in eclectic prints.
- Foundation Fabric: 2 pieces of muslin or old sheeting, cut to 19″ x 19″ (to serve as the base for piecing).
- Lining Fabric: 2 pieces, cut to 18″ x 18″.
- Batting: 2 pieces of low-loft cotton batting, cut to 18″ x 18″.
- Thread: Standard thread for construction, plus Perle Cotton (Size 8) or embroidery floss for visible quilting.
- Tassel Materials: Yarn, embroidery floss, or thin leather strips.
- Handles: 2 braided fabric strips or leather straps, 26″ long (for shoulder carry).
Step 1: Create “Crazy Quilt” Panels
- Lay your 19″ x 19″ Foundation Fabric flat.
- Place one scrap in the center, right side up. Place a second scrap on top, right side down. Sew along one edge. Flip the second scrap open and press.
- Continue adding scraps to any straight raw edge, working in a spiral or random fashion until the entire foundation cloth is covered.
- There are no rules here—angled seams and wonky shapes add to the boho charm.
- Trim the messy edges to create a clean 18″ x 18″ square panel. Repeat for the second side.
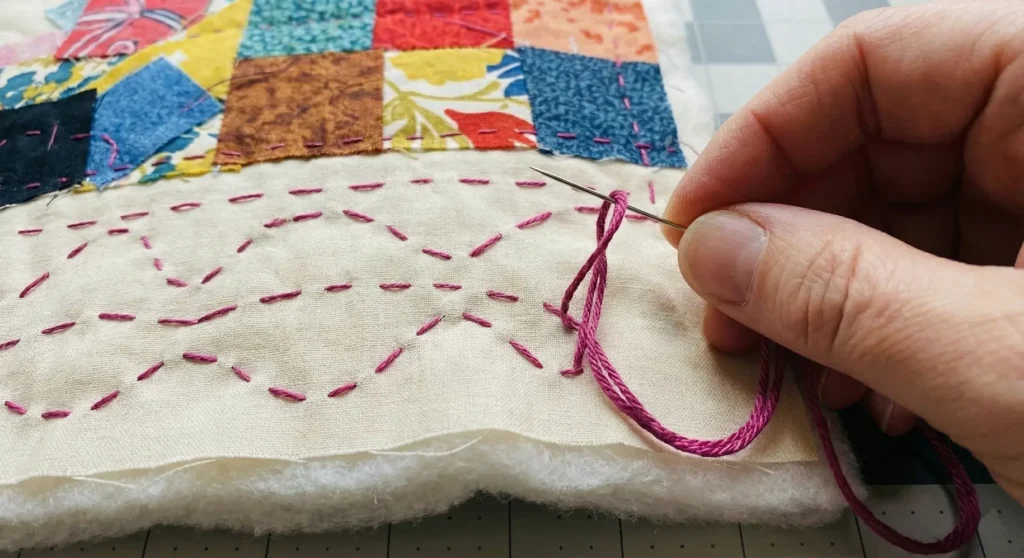
Step 2: Kantha-Style Hand Quilting
- Baste your scrappy top to the batting (no backing fabric needed yet; the lining covers the inside).
- Thread a hand-sewing needle with contrasting Perle Cotton or embroidery floss.
- Sew lines of large running stitches (up and down) across the bag. They don’t need to be perfectly straight; wavy, organic lines enhance the look.
- This “Kantha” style stitching adds texture and makes the bag feel soft and pliable.
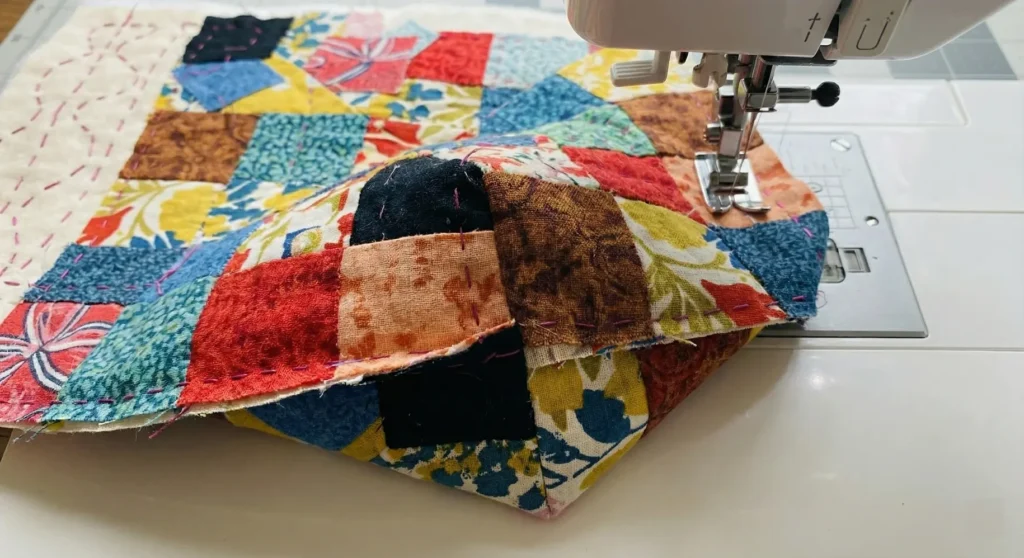
Step 3: Construct the Shopper Body
- Place your two quilted panels, Right Sides Together.
- Sew the side seams and the bottom seam with a 3/8″ seam allowance.
- Box the corners deeply: Cut a 2.5″ square from both bottom corners. Pinch the openings so the side and bottom seams align, and sew across. This creates a broad 5-inch base for carrying groceries.
Step 4: Prepare the Handles
- If using fabric, braid three 2-inch-wide strips together to create thick, sturdy ropes.
- Baste the handle ends to the top edge of the bag exterior, measuring 4 inches in from the side seams.
- Ensure the handles are securely attached with multiple backstitches, as this bag is large and may carry heavy loads.
Step 5: Install the Lining
- Sew your lining pieces together (sides and bottom), leaving a 5-inch gap in the bottom. Box the lining corners to match the exterior (2.5″ cut).
- Place the exterior bag inside the lining bag (Right Sides Together).
- Sew around the top perimeter.
- Turn the bag right side out through the lining gap, stitch the gap closed, and tuck the lining inside. Topstitch the rim 1/4″ from the edge.
Step 6: Create and Attach Tassels
- Wrap yarn or embroidery floss around a piece of cardboard (approx. 4″ tall) about 20-30 times.
- Slide a piece of yarn under the loops at the top and tie it tight (this is your hanger). Cut the loops at the bottom.
- Wrap another piece of yarn around the “neck” of the tassel (about 1 inch down from the top) to create the head. Secure tightly.
- Hand-sew 2 or 3 large tassels to the base of one handle strap for a dangling, kinetic detail that defines the boho style.
Pro Design Tip: For a truly authentic boho look, incorporate a variety of fabric textures into your scrappy panel. Mix quilting cottons with bits of linen, silk, or even velvet. The different shrink rates and textures will make the bag feel wonderfully tactile and aged.
Budget Consideration: This is the ultimate “zero waste” project. Use selvage edges (the white edges of fabric with the manufacturer’s text) as design elements, or cut up old clothing that is stained or torn. The “crazy quilt” method hides imperfections beautifully.
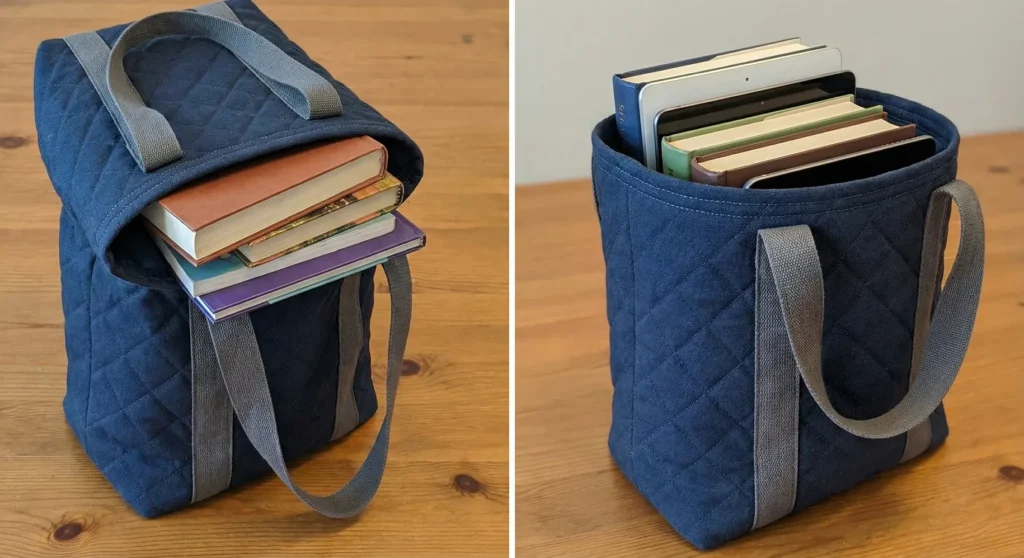
6. Vertical Quilted Library Bag for Books and Tablets

Designed specifically for heavy loads like hardcover books and electronics, this bag features a slim, vertical profile that keeps items upright and secure. It includes an internal padded divider to separate your tablet from sharp book corners.
Finished Dimensions: Approximately 12″ wide x 15″ tall x 2″ deep.
Materials Needed:
- Outer Fabric: 2 pieces, cut to 14″ x 17″ (Canvas, denim, or twill recommended for durability).
- Lining Fabric: 2 pieces, cut to 14″ x 17″.
- Tablet Pocket Fabric: 2 pieces, cut to 14″ x 12″.
- Batting: 2 pieces for the body (15″ x 18″) and 1 piece for the pocket (14″ x 12″). Use a dense batting like Warm & Natural or fusible fleece.
- Handles: 2 strips of webbing or strong leather, 20″ long (shorter handles prevent the bag from dragging on the ground when heavy).
- Notions: Heavy-duty needle (Jeans/Denim size 100/16).
Step 1: Quilt for Strength
- Baste your Outer Fabric pieces to the main Batting pieces.
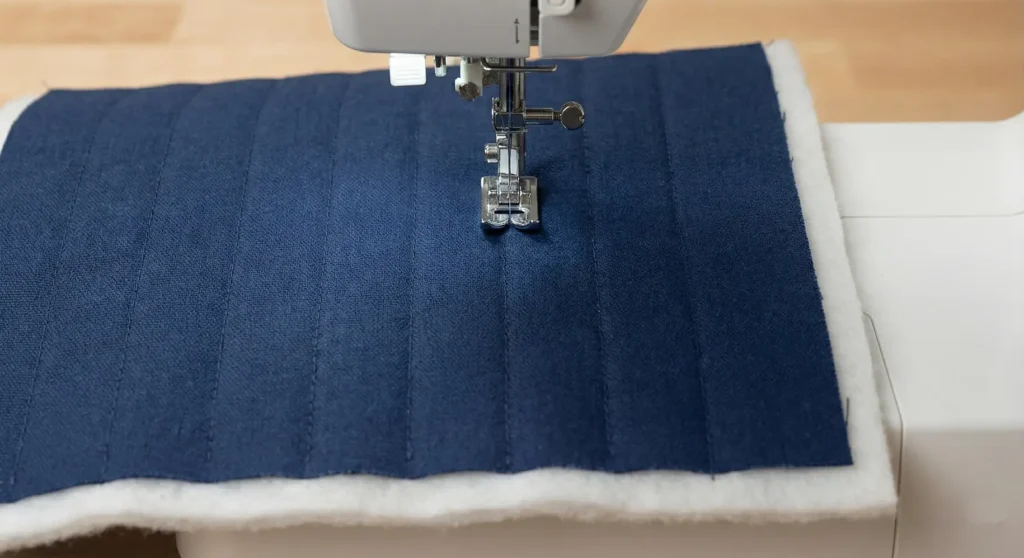
- Quilt engaging vertical straight lines spaced 1 inch apart. Vertical quilting reinforces the “up and down” stress of the bag when it is loaded with heavy books, preventing the fabric from sagging over time.
- Trim the panels back down to 14″ x 17″.
Step 2: Create the Padded Tablet Pocket
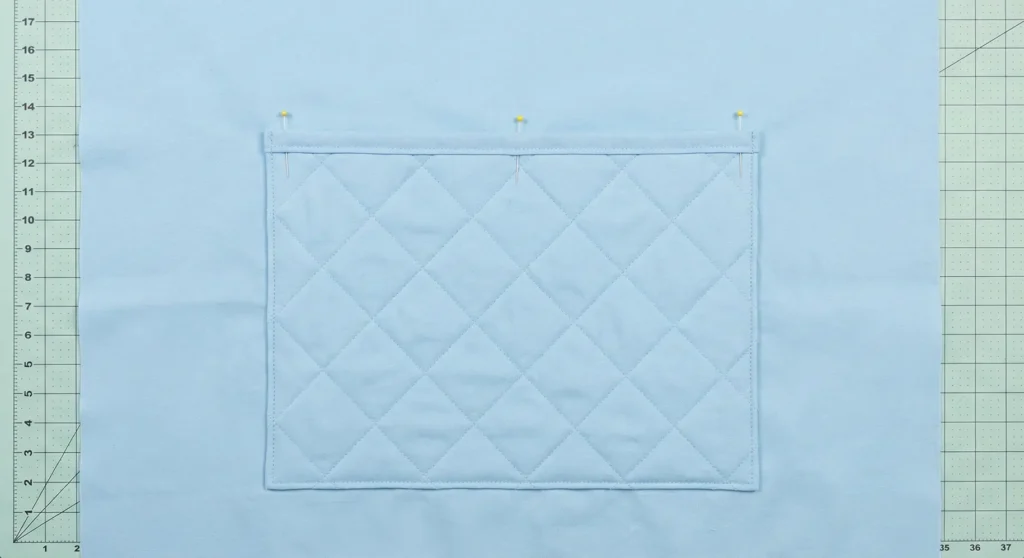
- Sandwich the Tablet Pocket Batting between the two Tablet Pocket Fabric pieces.
- Quilt a simple grid or diagonal cross-hatch to compress the layers.
- Bind the top long edge with a strip of fabric or bias tape for a clean finish.
- Baste this pocket onto the Right Side of one of your Lining pieces, matching the bottom and side raw edges.
Step 3: Attach Reinforced Handles
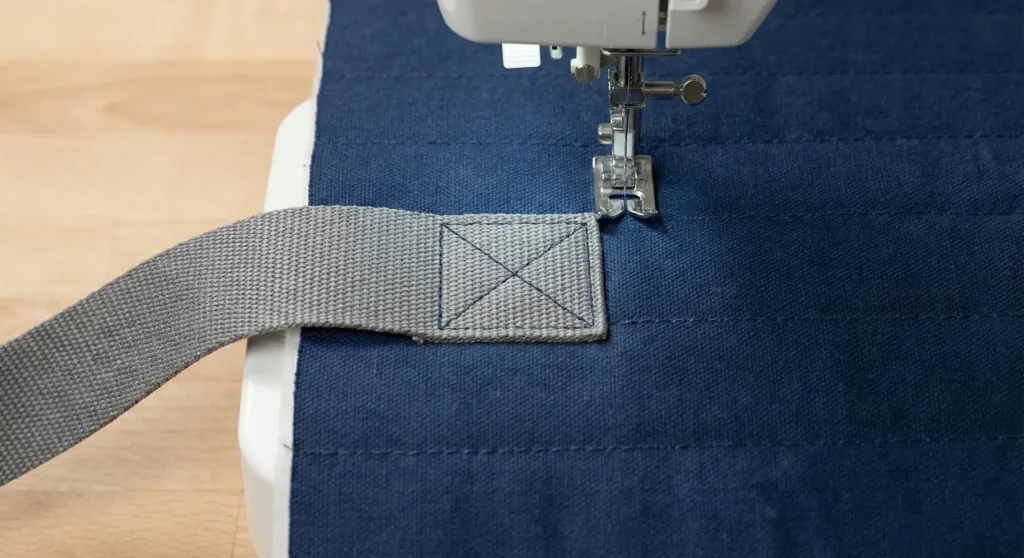
- On the exterior front panel, measure 3 inches in from the sides.
- Place the handle ends and stitch them down.
- Reinforce the stitching: Because books are heavy, sew an “X-box” (a square with an X inside) at the base of each handle strap. This distributes the weight and prevents the handle from ripping out of the fabric.
Step 4: Construct the Exterior
- Place the front and back quilted panels Right Sides Together.
- Sew the sides and bottom with a 1/2″ seam allowance (a wider seam is stronger for heavy bags).
- Box the corners slightly: Cut a small 1″ square from the bottom corners. Pinch and sew. This gives just enough depth for a few thick books without making the bag bulky.
Step 5: Assemble the Lining
- Place the two lining pieces RST (ensure the tablet pocket is on the inside).
- Sew sides and bottom, leaving a generous 6-inch gap in the bottom seam (stiff materials need a bigger gap to turn).
- Box the lining corners (1″ cut) to match the exterior.
Step 6: Final Assembly and Topstitch
- Turn the outer bag right side out. Place it inside the lining (RST).
- Sew around the top rim.
- Turn the right side out through the gap. Close the gap.
- Topstitch the rim twice: Sew one line 1/8″ from the edge, and a second 1/4″ from the first. This double row of stitching adds significant structural integrity to the opening, helping it hold its shape under the weight of textbooks or devices.
Pro Design Tip: If you carry a stylus or expensive pens, add a vertical seam to the internal tablet pocket. Measure 2 inches from one side of the pocket and sew a perpendicular line from top to bottom. This creates a narrow slot specifically for a pen, keeping it from falling to the bottom of the bag.
Budget Consideration: For the outer fabric, look for heavyweight cotton curtains at thrift stores. They are often made of durable canvas or barkcloth, come in large yardages, and are pre-treated to resist fading—perfect for a library bag that sees a lot of travel.
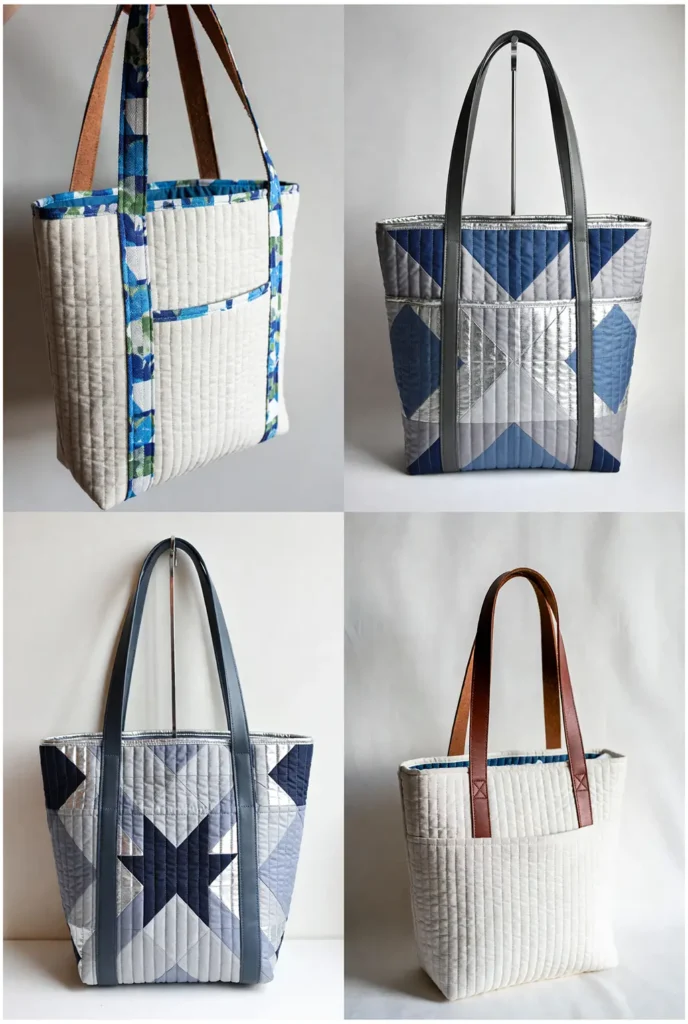
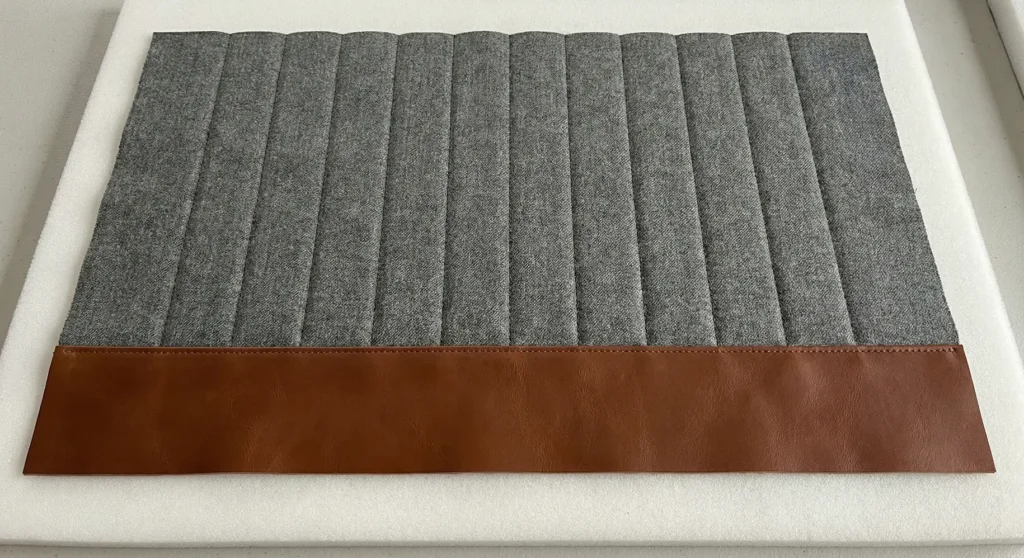
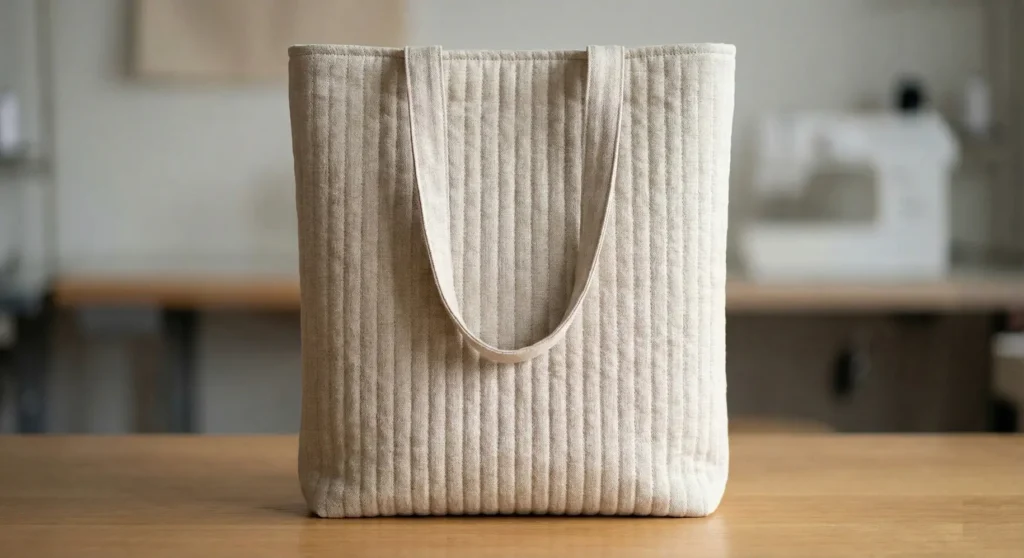
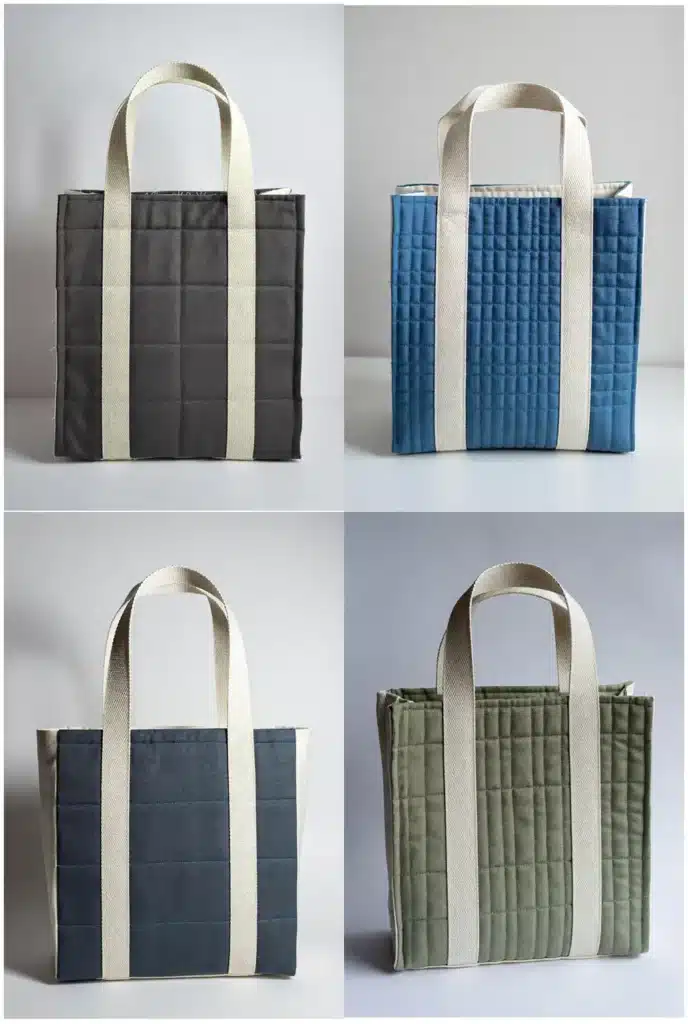
7. Minimalist Linen Tote with Vertical Channel Quilting
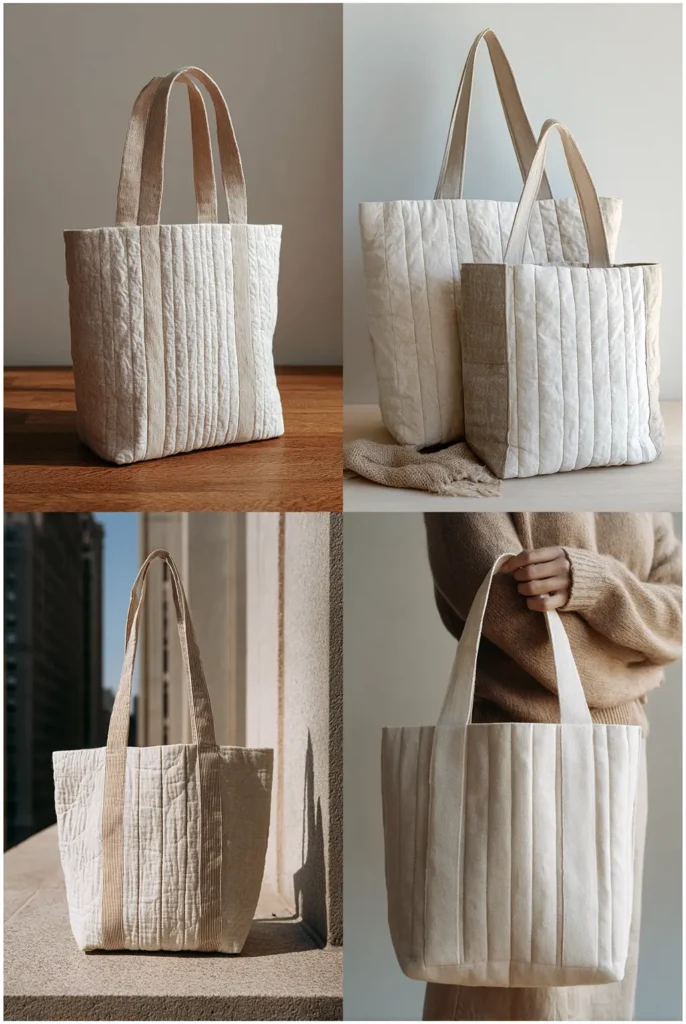
This design is inspired by Japanese aesthetics, featuring natural linen fabric and dense vertical channel quilting. The texture becomes the main design element, offering a sophisticated, understated look that pairs perfectly with a capsule wardrobe.
Finished Dimensions: Approximately 13″ wide x 15″ tall x 3″ deep.
Materials Needed:
- Outer Fabric: 2 pieces of medium-weight linen, cut to 15″ x 17″.
- Lining Fabric: 2 pieces of cotton or linen blend, cut to 15″ x 17″.
- Batting: 2 pieces of 100% cotton batting, cut to 16″ x 18″ (Cotton batting offers a better drape for linen than polyester).
- Interfacing: Lightweight fusible interfacing for the handles.
- Handles: 2 strips of linen (same as outer), cut to 4″ x 26″.
- Notions: Walking foot (essential for linen), masking tape, or Hera marker.
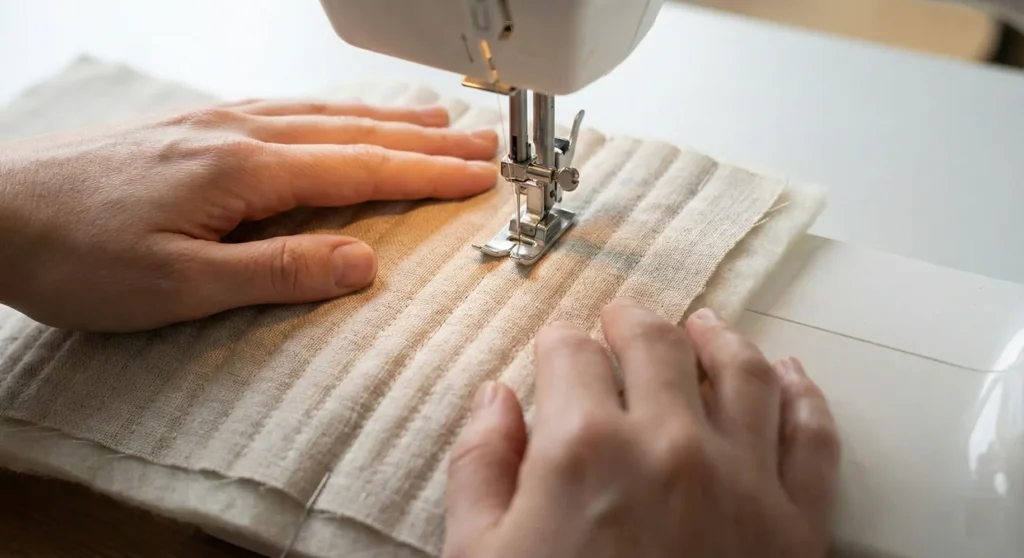
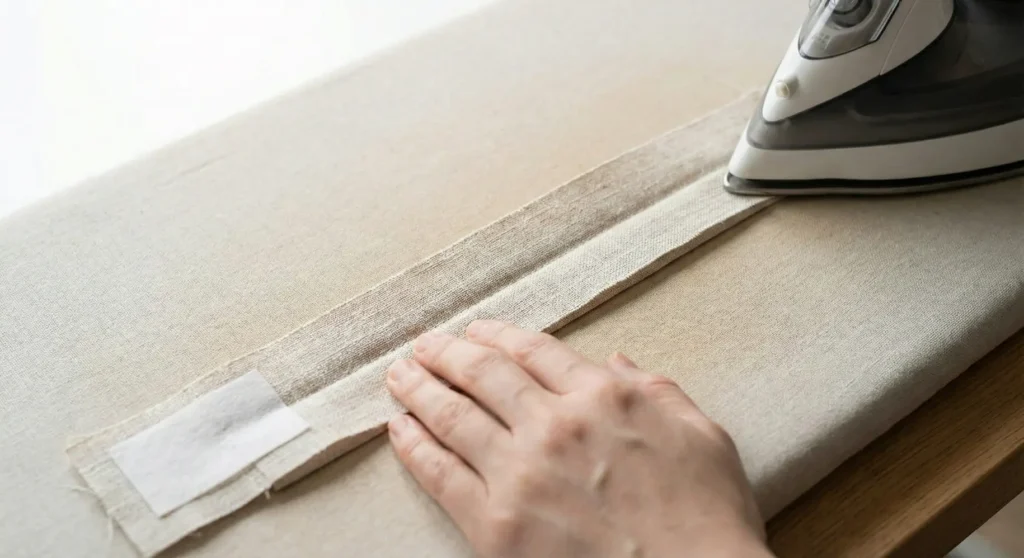
Step 1: Mark and Quilt the Channels
- Baste the Linen Outer Fabric onto the slightly larger Batting.
- Starting from the center of the panel, mark vertical lines spaced 1/2 inch to 3/4 inch apart. Using a creasing tool (Hera marker) is better than ink on linen.
- Install your walking foot. This is crucial, as linen shifts easily.
- Stitch down every marked line. Sew in the same direction for every line (top to bottom) or alternate; however, sewing all in one direction usually prevents the fabric from torquing (twisting).
- Trim the panels back down to 15″ x 17″.
Step 2: Create Self-Fabric Handles
- Take your 4″ x 26″ linen strips. Fuse a strip of interfacing down the center for strength.
- Fold the strip in half lengthwise (wrong sides together) and press.
- Open it, then fold the two raw long edges into the center crease. Press again.
- Fold in half again to create a strap that is 1 inch wide with four layers of fabric.
- Topstitch down both sides of the strap, 1/8″ from the edge.
Step 3: Attach Handles
- On the exterior panel, measure 3.5 inches in from the sides along the top edge.
- Place the handle ends at these marks.
- Baste them in place with a 1/8″ seam allowance. Ensure the handles are not twisted.
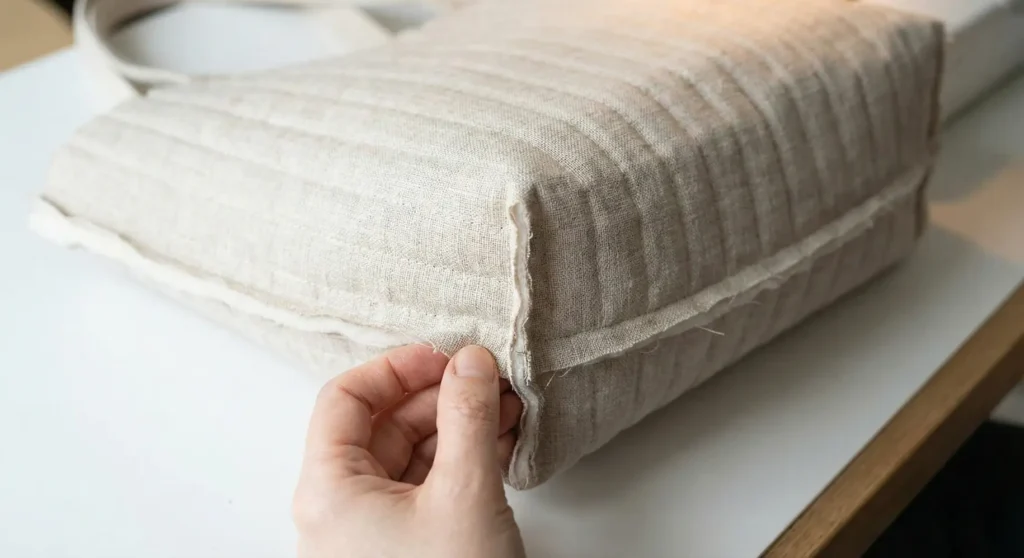
Step 4: Construct the Bag Body
- Place the two quilted panels Right Sides Together.
- Sew the side seams and bottom seam with a 3/8″ seam allowance.
- Box the corners: Cut a 1.5″ square from the bottom corners. Pinch the opening flat (aligning side and bottom seams) and sew across.
- Press the side seams open to reduce bulk.
Step 5: Prepare the Lining
- Place the two lining pieces Right Sides Together.
- Sew the sides and bottom, leaving a 4-inch gap in the bottom seam.
- Box the corners (1.5″ cut) exactly as you did for the exterior.
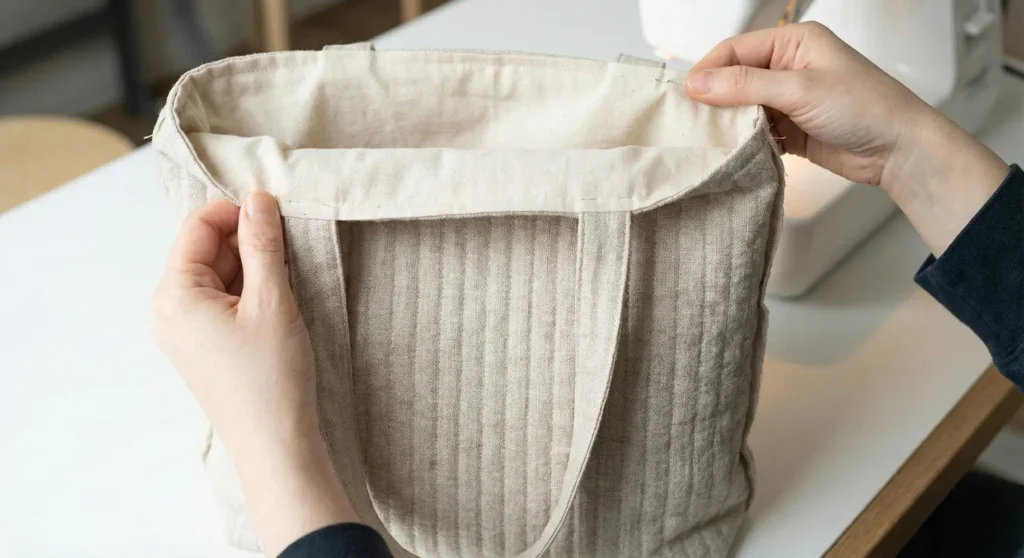
Step 6: Assemble and Finish
- Turn the exterior bag Right Side Out.
- Place the exterior bag inside the lining bag (Right Sides Together).
- Align the side seams and pin the top edge thoroughly.
- Sew around the perimeter with a 3/8″ seam allowance.
- Turn the bag right side out through the gap in the lining. Stitch the gap closed.
- Press the top edge carefully and topstitch around the rim to finish.
Pro Design Tip: Linen tends to fray significantly. Before you begin assembly, serge or zigzag stitch the edges of your quilted panels immediately after trimming them. This ensures the internal structural integrity of the bag lasts through wash and wear.
Budget Consideration: Linen is pricey. A fantastic alternative is a canvas drop cloth from a hardware store ($10–$15 for a huge sheet). Wash and bleach it first to soften it; it mimics the texture and color of raw linen perfectly for a fraction of the cost.
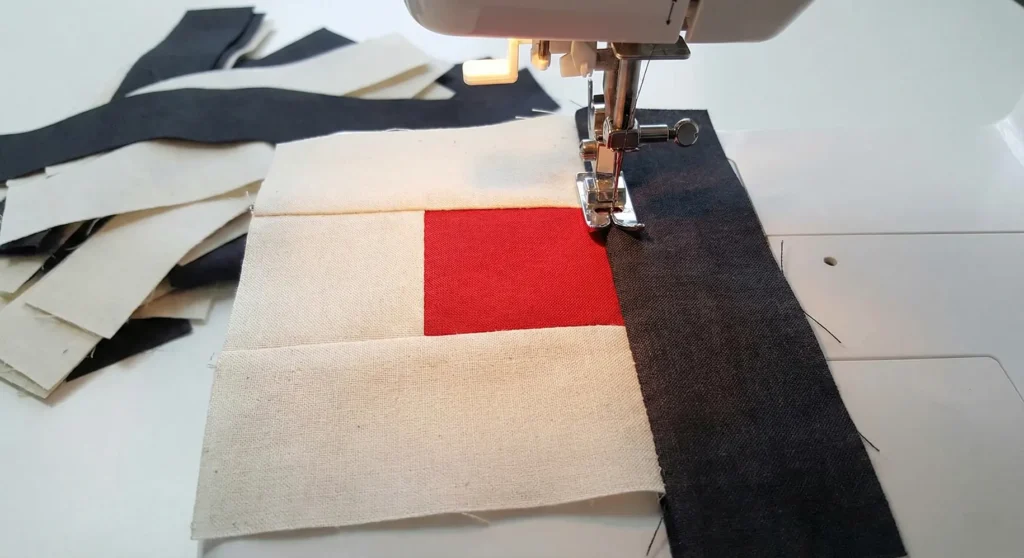
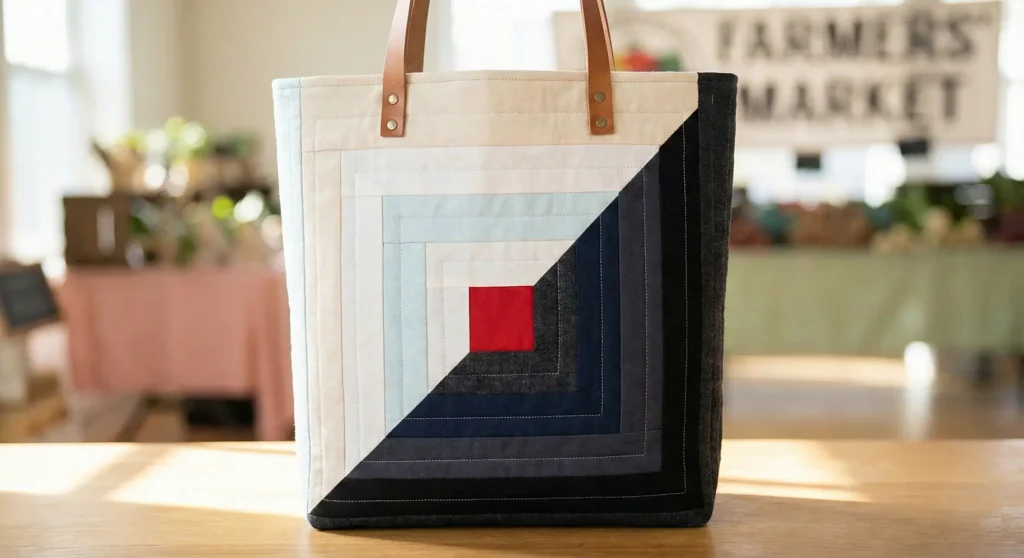
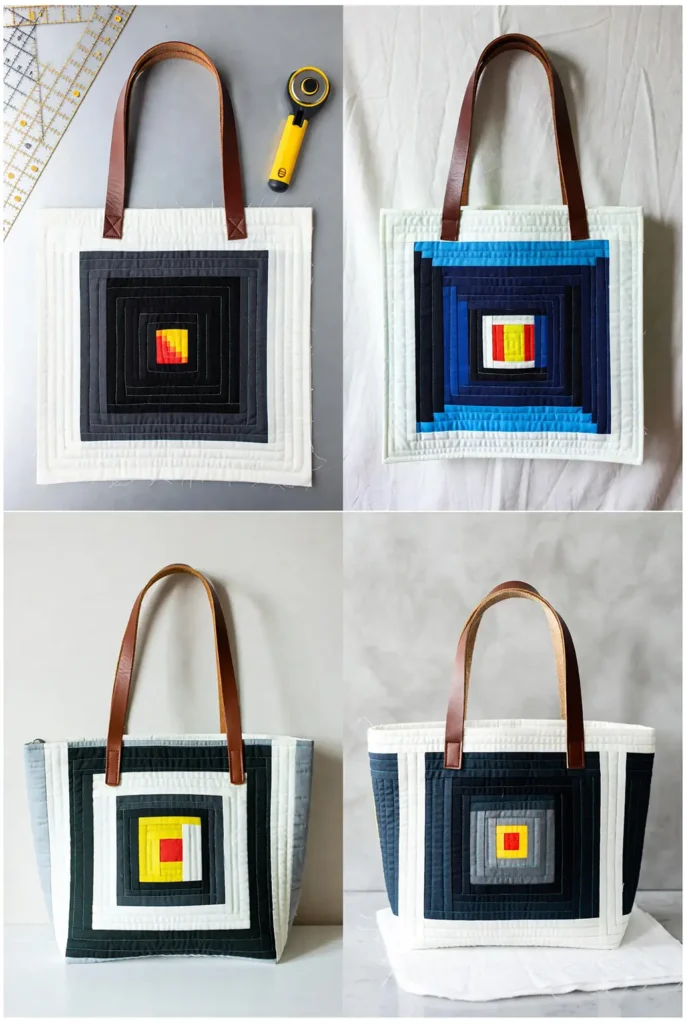
8. Modern Log Cabin Quilt Block Tote Pattern

This design uses a single, oversized Log Cabin block for each side of the bag. By using high-contrast fabrics (light on one side, dark on the other) and 2.5-inch strips, you create a striking, graphic impact that looks far more complex than it actually is.
Finished Dimensions: Approximately 14″ wide x 14″ tall x 4″ deep.
Materials Needed:
- Fabric Strips: A variety of strips cut to 2.5″ wide (perfect for “Jelly Rolls”). You need lights and darks.
- Center Square: 2 squares cut to 2.5″ x 2.5″ (usually a bright accent color like red or yellow).
- Lining Fabric: 2 pieces, cut to 16.5″ x 16.5″.
- Batting: 2 pieces, cut to 18″ x 18″.
- Handles: 2 leather straps or cotton webbing, 25″ long.
- Notions: Rotary cutter, quilting ruler.
Step 1: Construct the Log Cabin Block (Front Panel)
- Start with your 2.5″ center square.
- Take a Light Strip. Sew it to the right side of the center square (1/4″ seam). Press open. Trim the strip to match the square’s edge.
- Rotate the block 90 degrees. Sew another Light Strip to the new edge. Press and trim.
- Rotate. Switch to a Dark Strip. Sew, press, trim.
- Rotate. Sew another Dark Strip. Press, trim.
- Continue this “Light, Light, Dark, Dark” rotation, adding strips around the center until the block measures at least 16.5″ square.
- Repeat this entire process to make a second block for the back of the bag.
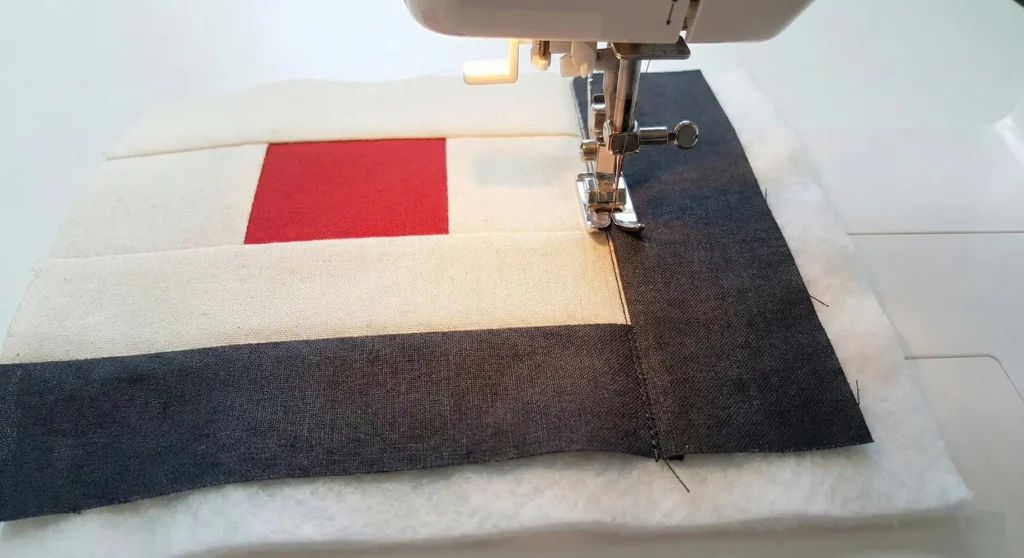
Step 2: Quilt “In the Ditch”
- Place your finished Log Cabin block on top of a piece of batting (Right Side Up).
- Quilt “in the ditch”: Stitch exactly in the seam lines between the strips. This reinforces the construction and gives the bag a puffy, textured look without distracting from the geometric pattern.
- Trim the quilted panel and batting down to a perfect 16.5″ x 16.5″ square.
Step 3: Attach the Handles
- On the front panel, measure 4 inches in from the left and right edges along the top.
- Place the ends of your handle strap at these marks.
- Baste them in place with a 1/8″ seam allowance. Ensure the loops are facing down and not twisted.
Step 4: Assemble the Outer Bag
- Place the Front and Back panels Right Sides Together.
- Sew the side seams and the bottom seam with a 1/4″ seam allowance.
- Box the corners: Cut a 2″ square from both bottom corners. Pinch the opening so the side seam meets the bottom seam, and sew across the raw edge.
Step 5: Construct the Lining
- Place the two Lining pieces Right Sides Together.
- Sew the sides and bottom, leaving a 5-inch gap in the bottom seam for turning.
- Box the lining corners (2″ cut) exactly as you did for the exterior.
Step 6: Final Assembly
- Turn the exterior bag Right Side Out. Keep the lining Inside Out.
- Slip the exterior bag inside the lining (Right Sides Together). Match the side seams and pin the top edge.
- Sew around the top perimeter with a 3/8″ seam allowance.
- Turn the bag right side out through the lining gap. Stitch the gap closed.
- Tuck the lining inside, press the top edge well, and topstitch 1/4″ from the rim to secure everything in place.
Pro Design Tip: For a truly “Modern” look, vary the width of your strips. Instead of keeping them all 2.5 inches, use some 1.5-inch strips and some 3.5-inch strips. This creates an “improv” or “wonky” Log Cabin effect that looks artistic and less traditional.
Budget Consideration: This pattern is ideal for swapping fabric with friends. Since you need long strips of many different prints, ask a sewing friend to trade half a yard of their fabric for half a yard of yours. You both get more variety for your log cabin blocks without spending extra money.
9. Reversible Quilted Tote Bag Pattern for Versatility
This clever construction creates two bags in one. By finishing the seams cleanly and using high-quality fabric for both the “exterior” and the “interior,” you can flip the bag inside out to match different outfits or occasions—perhaps a bold floral print for the weekend and a solid neutral for the workday.
Finished Dimensions: Approximately 14″ wide x 15″ tall x 4″ deep.
Materials Needed:
- Fabric Side A (Print): 2 pieces, cut to 16″ x 18″.
- Fabric Side B (Solid/Contrast): 2 pieces, cut to 16″ x 18″.
- Batting: 2 pieces of low-loft cotton batting, cut to 17″ x 19″ (cut slightly larger for quilting).
- Handles: 2 strips of cotton webbing or sturdy fabric handles, 24″ long.
- Notions: Coordinating thread for both sides, walking foot, hand sewing needle.
Step 1: Quilt Side A (The Structure)
- Baste the Fabric Side A pieces onto the Batting pieces.
- Quilt these panels as desired. A simple diagonal grid or free-motion meandering works well.
- Trim the quilted panels back down to the exact size of 16″ x 18″.
- Note: To keep the bag flexible, we usually do not quilt Side B to batting; Side A provides enough structure for both.
Step 2: Attach Handles
- On the Right Side of the Side A front panel, measure 4 inches in from the left and right edges.
- Place the handle ends at these marks, loop facing down.
- Baste the handles in place with a 1/8″ seam allowance. Repeat for the back panel of Side A.
- Important: Do not attach handles to Side B; they are sewn into the rim shared by both sides.
Step 3: Construct Side A (The “Outer” Bag)
- Place the two Side A quilted panels Right Sides Together.
- Sew the side seams and the bottom seam with a 3/8″ seam allowance.
- Box the corners: Cut a 2″ square from both bottom corners. Pinch the opening so the side seam meets the bottom seam, and sew across.
- Press the side seams open to reduce bulk at the top rim later.
Step 4: Construct Side B (The “Inner” Bag)
- Place the two Side B fabric pieces Right Sides Together.
- Sew the side seams and the bottom seam, but leave a generous 6-inch gap in the bottom seam. This gap is crucial for turning the bag later.
- Box the corners (2″ cut) exactly as you did for Side A.
Step 5: Join the Bags
- Turn Side A Right Side Out. Keep Side B Inside Out.
- Place Side A inside Side B. They should be Right Sides Together (the pretty sides of both bags touching each other). The handles should be sandwiched between the layers.
- Align the side seams perfectly and pin securely around the entire top rim.
- Sew around the top rim with a 1/2″ seam allowance. Backstitch over the handle areas for extra strength.
Step 6: Turn and Finish
- Pull Side A through the gap in the bottom of Side B so the entire bag is right side out.
- Close the gap: Fold the raw edges of the gap in Side B inward. Since this bag is reversible, this seam will be visible when you use Side B. Use a Ladder Stitch (invisible hand stitch) to close it neatly for a professional finish.
- Push Side B inside Side A. Roll the top rim seam between your fingers to smooth it out and press well.
- Topstitch: Sew around the top rim 1/4″ from the edge. This keeps the lining from rolling out and reinforces the handles.
Pro Design Tip: For a truly versatile reversible bag, install a patch pocket on both sides before assembly. Sew a pocket onto the front of Side A and a different style pocket onto Side B. This ensures that no matter which way you wear it, you always have a place for your keys and phone.
Budget Consideration: This is the best pattern for using vintage bedsheets. High-quality vintage cotton sheets are soft, durable, and come in huge yardages. One patterned sheet and one solid sheet found at a thrift store can yield enough fabric for 4 or 5 reversible tote bags.
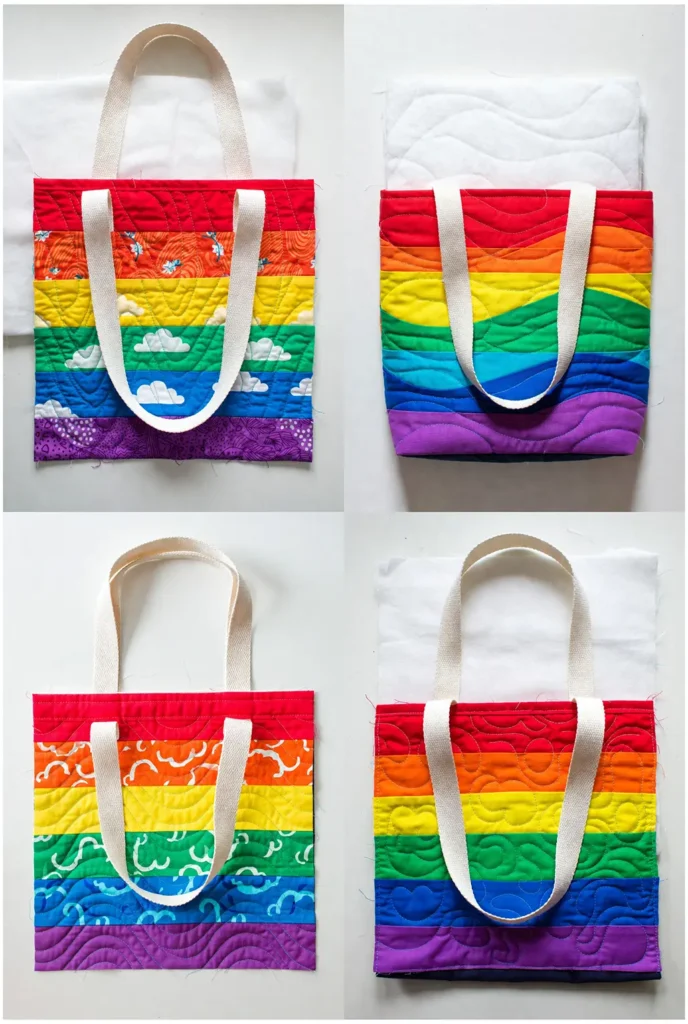
10. Rainbow Quilted Kids Tote Bag Pattern with Fun Prints
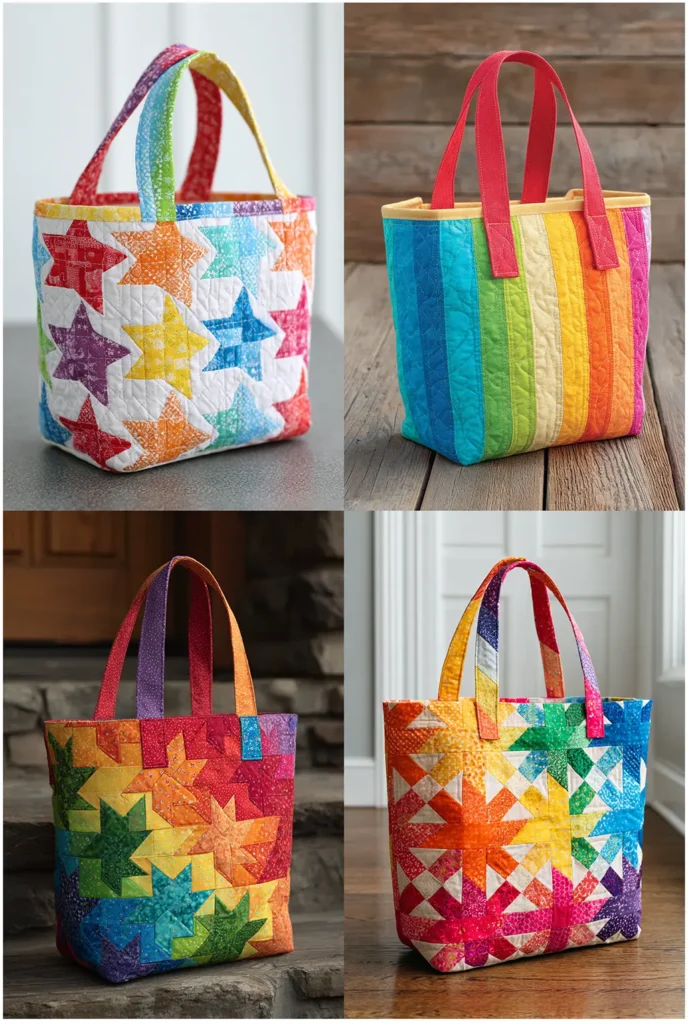
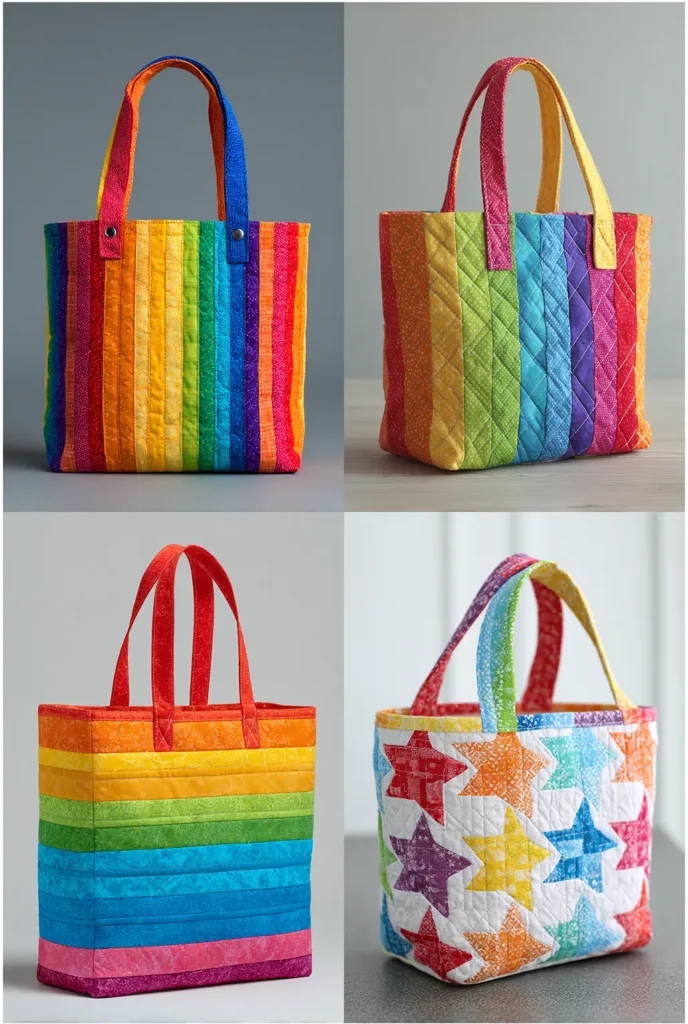
This bright, cheerful bag is sized perfectly for little hands to carry library books, toys, or treasures found on a nature walk. The rainbow strip design is a fantastic way to teach kids about colors or use up small vibrant scraps from your stash.
Finished Dimensions: Approximately 10″ wide x 10″ tall x 2″ deep.
Materials Needed:
- Rainbow Strips: 12 strips (2.5″ x 12″) in Red, Orange, Yellow, Green, Blue, Purple (2 of each color).
- Lining Fabric: 2 pieces, cut to 11″ x 11″.
- Batting: 2 pieces, cut to 12″ x 12″.
- Handles: 2 strips of cotton webbing or fabric, 14″ long (shorter length prevents the bag from dragging on the ground).
- Notions: Coordinating thread, pins/clips.
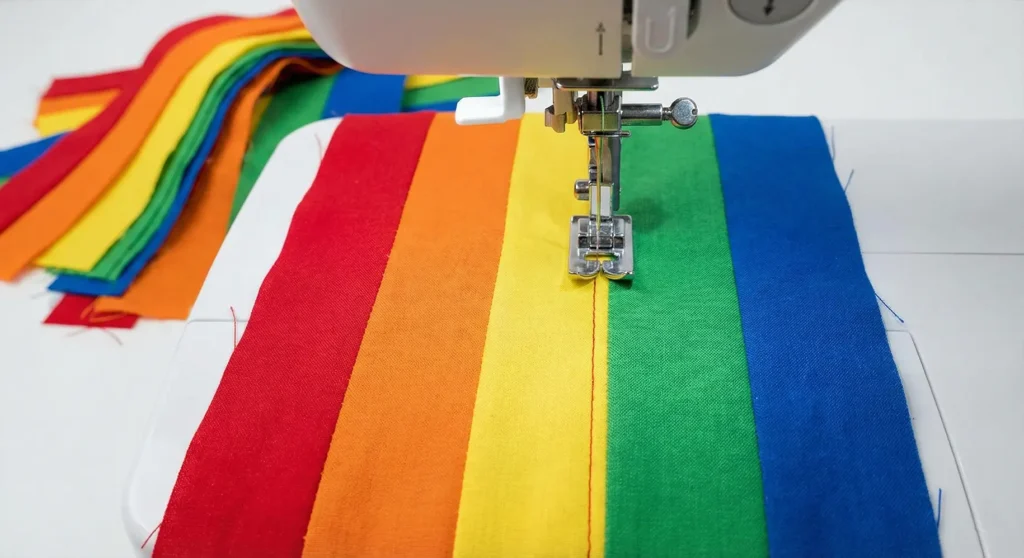
Step 1: Piece the Rainbow Panels
- Arrange your strips in rainbow order (Red, Orange, Yellow, Green, Blue, Purple).
- Sew the strips together along the long edges using a 1/4″ seam allowance.
- Press the seams open or to one side.
- Repeat to create a second identical panel.
- Trim both pieced panels down to 11″ x 11″ squares (ensure the purple strip is at the bottom for visual weight).
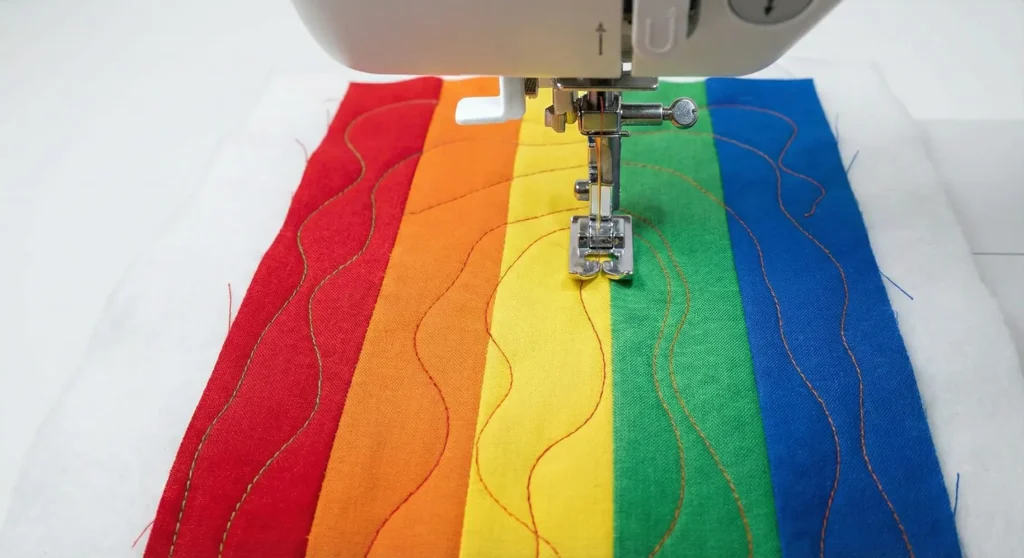
Step 2: Quilt the Layers
- Baste your rainbow panels onto the Batting pieces.
- Quilt wavy lines: Use a walking foot to sew gentle, organic waves across the strips horizontally. This mimics clouds or wind and keeps the bag soft and flexible for a child.
- Trim any excess batting sticking out from the edges.
Step 3: Attach Child-Sized Handles
- On the front panel (Red strip at the top), measure 2.5 inches in from the left and right edges.
- Place the handle ends at these marks.
- Baste them securely with a 1/8″ seam allowance. Double-check that the handles aren’t twisted.
Step 4: Construct the Bag Body
- Place the front and back panels Right Sides Together.
- Sew the side seams and the bottom seam with a 1/4″ seam allowance.
- Box the corners: Cut a small 1″ square from both bottom corners. Pinch the opening flat and sew across. This gives just enough depth for a few books or a stuffed animal.
Step 5: Assemble the Lining
- Place the two lining pieces Right Sides Together.
- Sew the sides and bottom, leaving a 4-inch gap in the bottom seam.
- Box the lining corners (1″ cut) to match the exterior.
Step 6: Final Assembly
- Turn the exterior bag Right Side Out.
- Insert it into the lining bag (Right Sides Together).
- Sew around the top rim with a 3/8″ seam allowance.
- Turn the bag right side out through the lining gap. Stitch the gap closed.
- Topstitch around the rim (on the Red strip) to secure the layers.
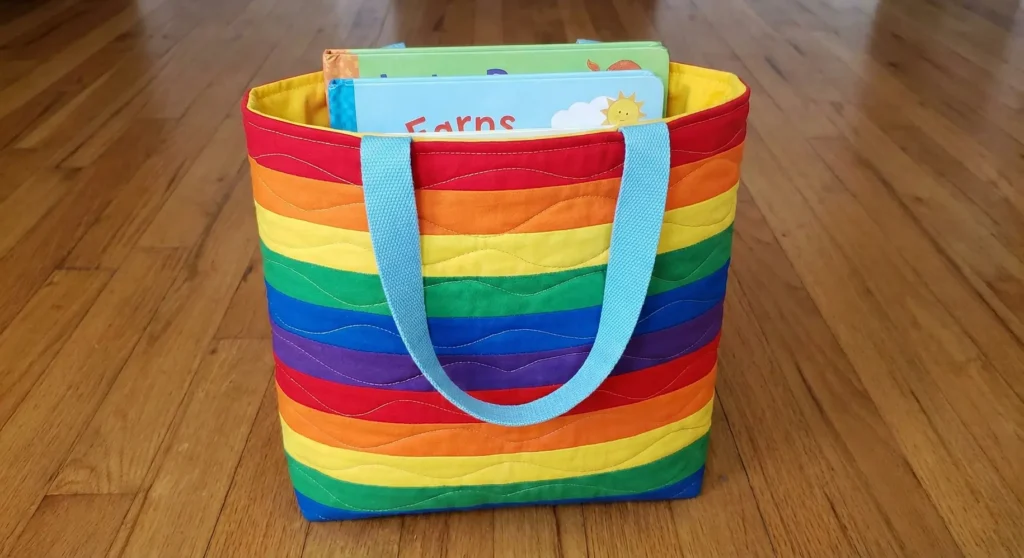
Pro Design Tip: Use a darker fabric (like Navy Blue or Black) for the very bottom strip instead of Purple. Kids often set their bags down in grass or dirt, and a dark bottom strip will hide stains much better than a bright color.
Budget Consideration: This project is perfect for “upcycling” old graphic T-shirts. Cut the colorful parts of old shirts into strips. Use a lightweight iron-on interfacing on the back of the t-shirt knit to stabilize it before sewing it like regular cotton.
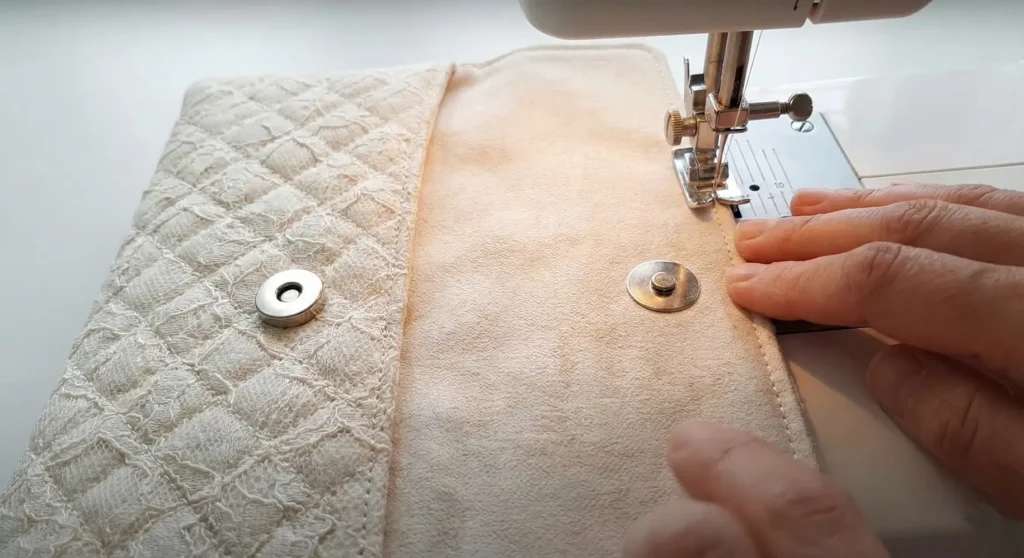
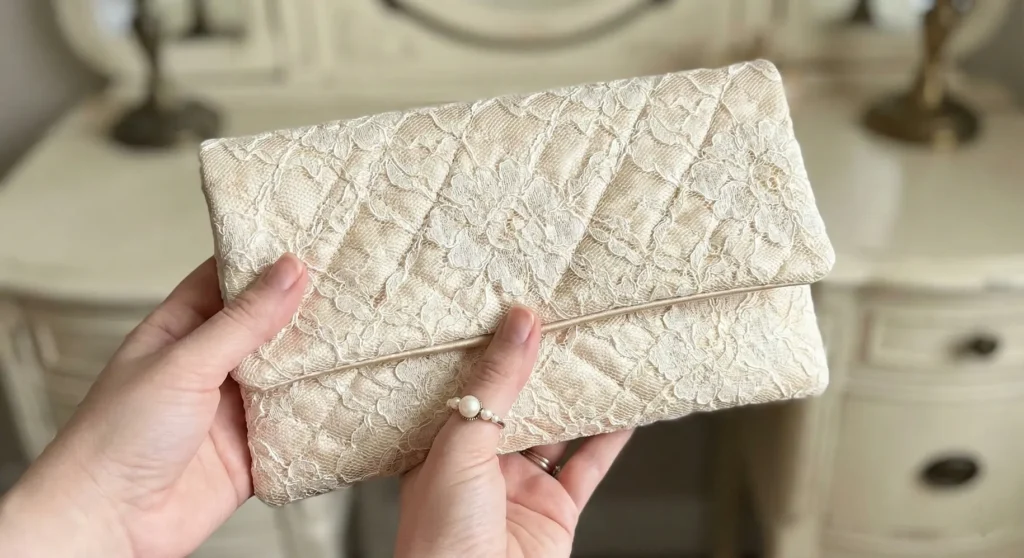
11. Vintage Lace Quilted Evening Clutch Pattern
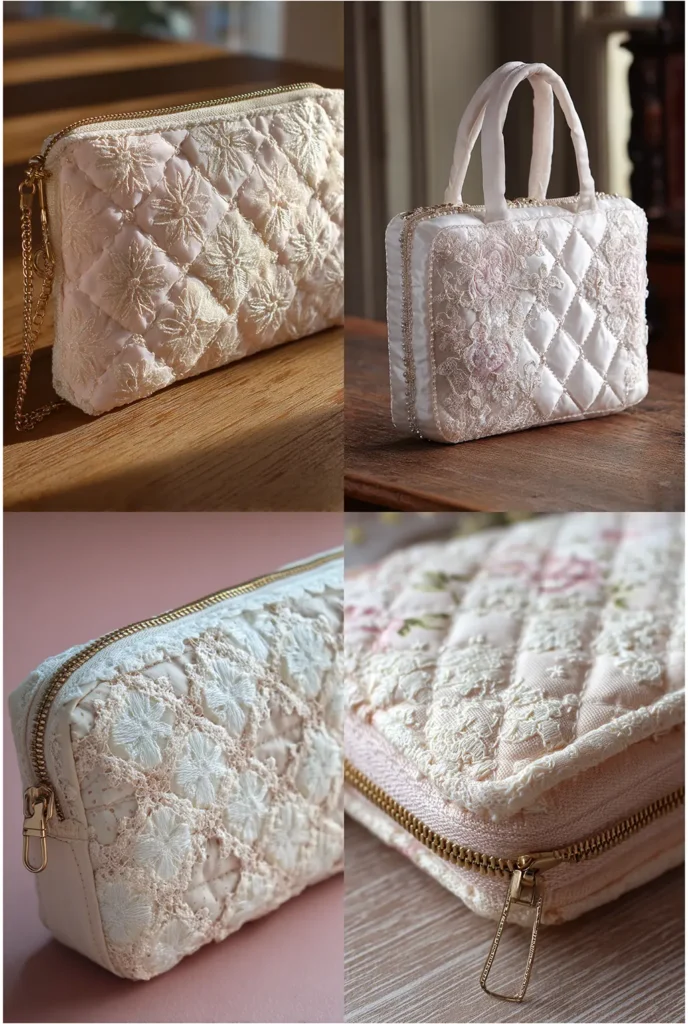
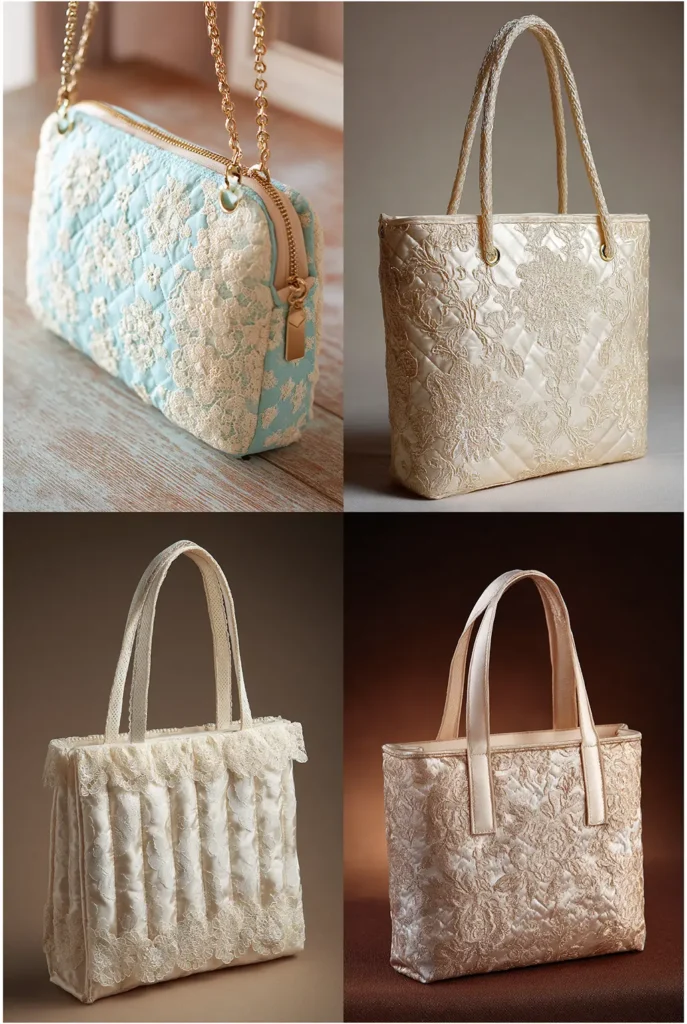
This elegant project transforms delicate vintage lace into a durable accessory suitable for weddings or holiday parties. By quilting the lace onto a satin or cotton base, you give the fragile fabric strength and structure without losing its romantic appeal.
Finished Dimensions: Approximately 10″ wide x 6″ tall (Fold-over style).
Materials Needed:
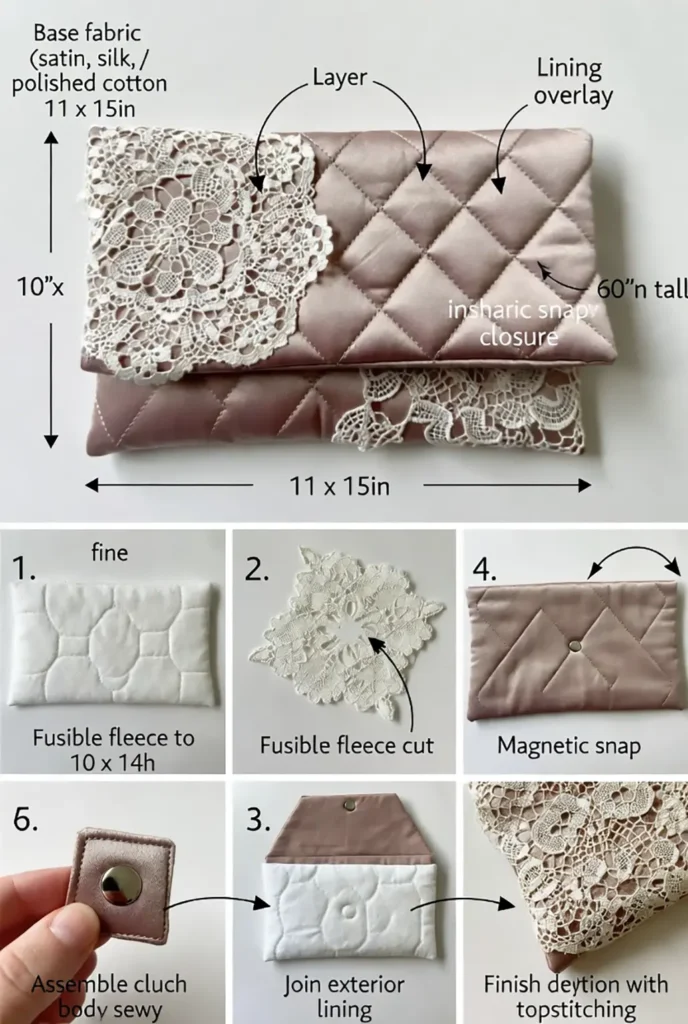
- Base Fabric: 1 piece, cut to 11″ x 15″ (Satin, Silk, or Polished Cotton).
- Lace Overlay: 1 piece, cut to 11″ x 15″ (or a collection of vintage doilies arranged to fit).
- Lining Fabric: 1 piece, cut to 11″ x 15″.
- Fusible Fleece: 1 piece, cut to 10″ x 14″ (cut smaller to reduce bulk in seams).
- Closure: 1 Magnetic Snap.
- Notions: Invisible thread or fine silk thread, water-soluble marking pen.
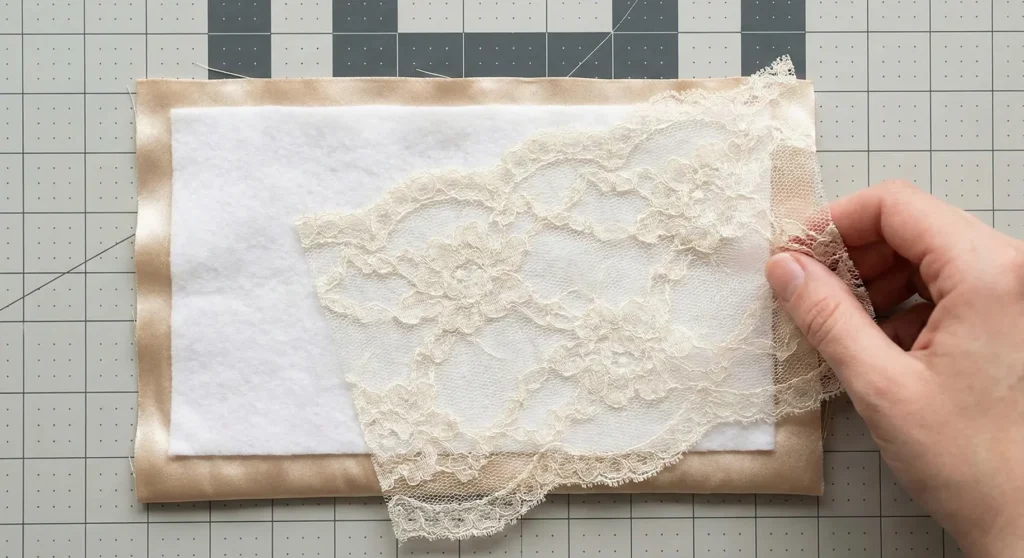
Step 1: Fuse and Layer
- Iron the Fusible Fleece to the wrong side of your Base Fabric. Center it so there is a 1/2″ margin of fabric around the fleece.
- Flip the Base Fabric right side up.
- Lay your Lace Overlay on top. Smooth it out gently.
- Baste the lace to the fabric around the very edge (within the 1/4″ seam allowance) to hold it in place.
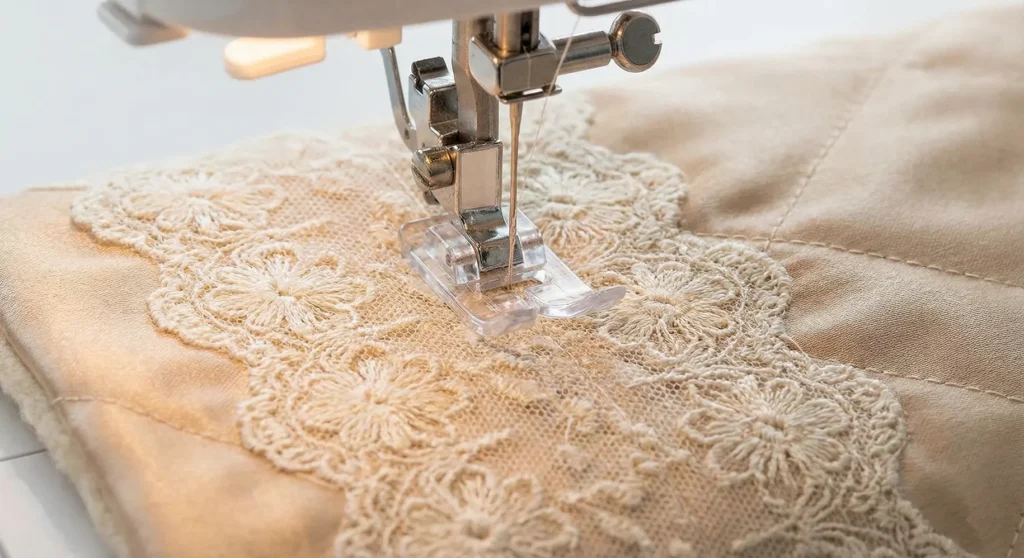
Step 2: Shadow Quilt the Lace
- Lower the feed dogs on your machine or use a darning foot.
- Using invisible thread or thread that matches the lace perfectly, outline the major motifs of the lace design.
- This “shadow quilting” traps the lace against the satin, creating a puffy, 3D texture that highlights the floral or geometric patterns of the vintage lace.
Step 3: Install the Magnetic Snap
- Mark the placement:
- Bottom Half (Body): Measure 2.5 inches up from the bottom edge, centered horizontally. Install the “Male” (thinner) half of the snap here on the lace side.
- Top Half (Flap): Measure 1.5 inches down from the top edge, centered. Install the “Female” (thicker) half here on the Lining Fabric (Right Side).
- Use small scraps of interfacing behind the snaps to prevent them from ripping through delicate fabrics.
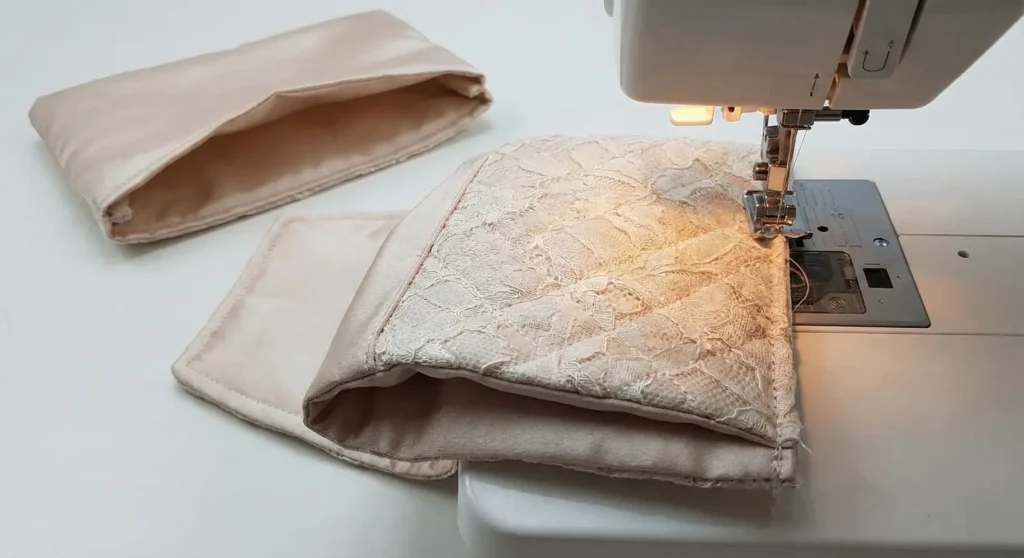
Step 4: Assemble the Clutch Body
- Fold the quilted exterior panel Right Sides Together. Bring the bottom edge up 6 inches. This creates the pouch, leaving a 3-inch flap at the top.
- Sew the side seams of the folded pouch section with a 1/4″ seam allowance. Do not sew the flap edges yet.
- Repeat this folding and sewing process for the Lining Fabric.
Step 5: Join Exterior and Lining
- Turn the Exterior Pouch Right Side Out. Keep the Lining Pouch Inside Out.
- Slide the Exterior inside the Lining. The Right Sides (Lace side and Snap side) should be touching.
- Pin along the raw edges of the flap and the front opening.
- Sew along the flap edges and the front opening curve, leaving a 4-inch gap along the straight edge of the front opening for turning.
Step 6: Turn and Topstitch
- Turn the clutch right side out through the gap. Use a point turner to gently push out the corners of the flap.
- Press the edges carefully (use a pressing cloth to protect the lace).
- Topstitch 1/8″ along the entire edge of the flap and opening. This closes the turning gap and gives the clutch a crisp, finished look.
- Fold the flap down and snap it shut.
Pro Design Tip: If your vintage lace is white or cream but has stains, tea dye it before sewing. Soaking the lace in strong black tea gives it a uniform antique beige color that hides imperfections and adds warmth to the final piece.
Budget Consideration: You don’t need to buy expensive lace yardage. Look for vintage lace table runners or doilies at estate sales or thrift shops. You can piece several small doilies together on the base fabric to create a unique “collage” clutch for just a few dollars.
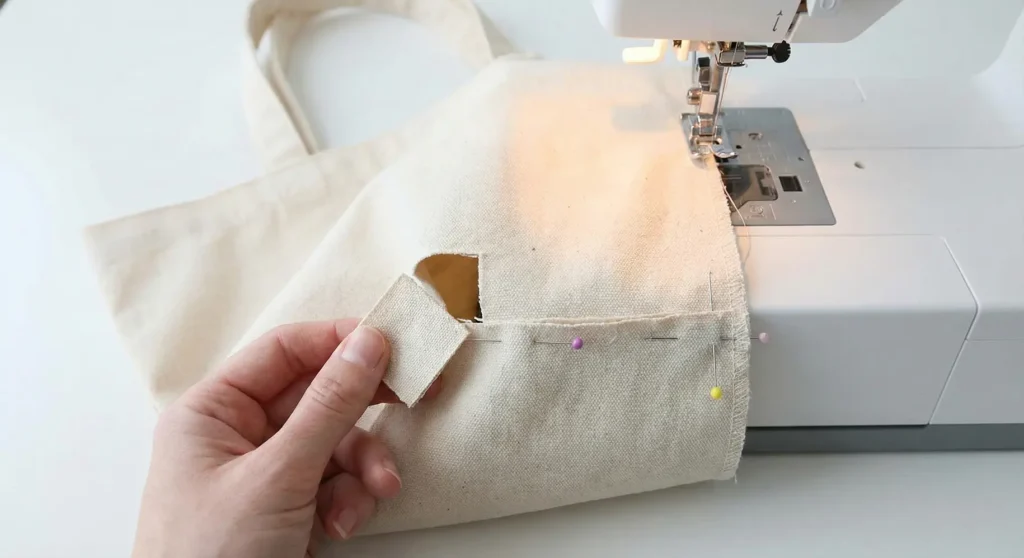
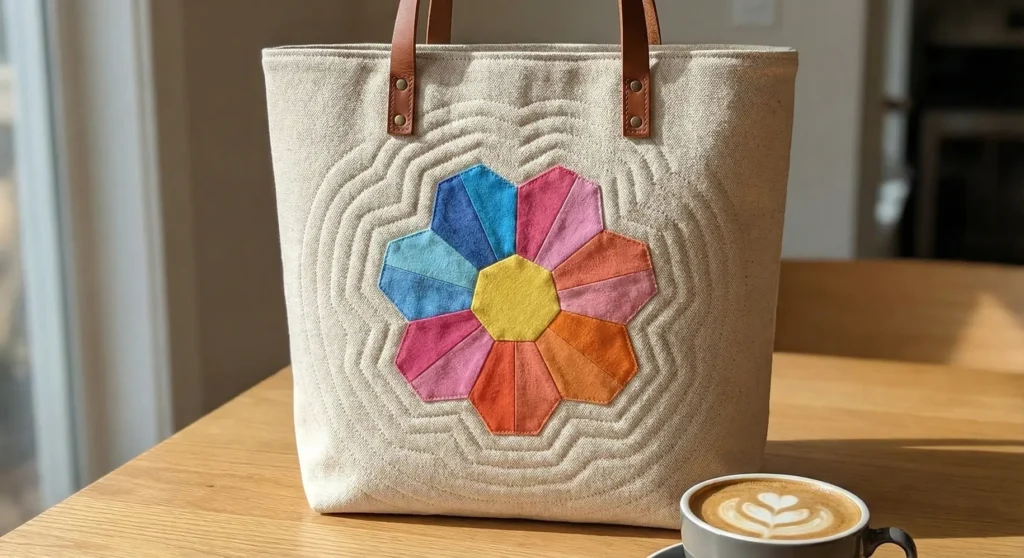
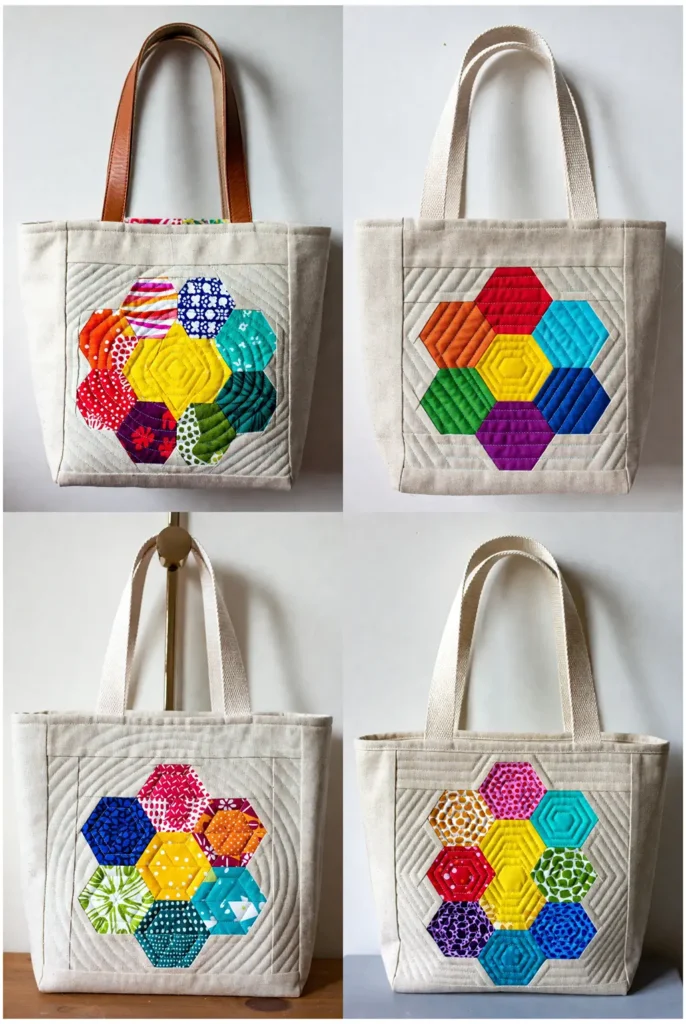
12. Hexagon Paper Pieced Quilted Flower Bag
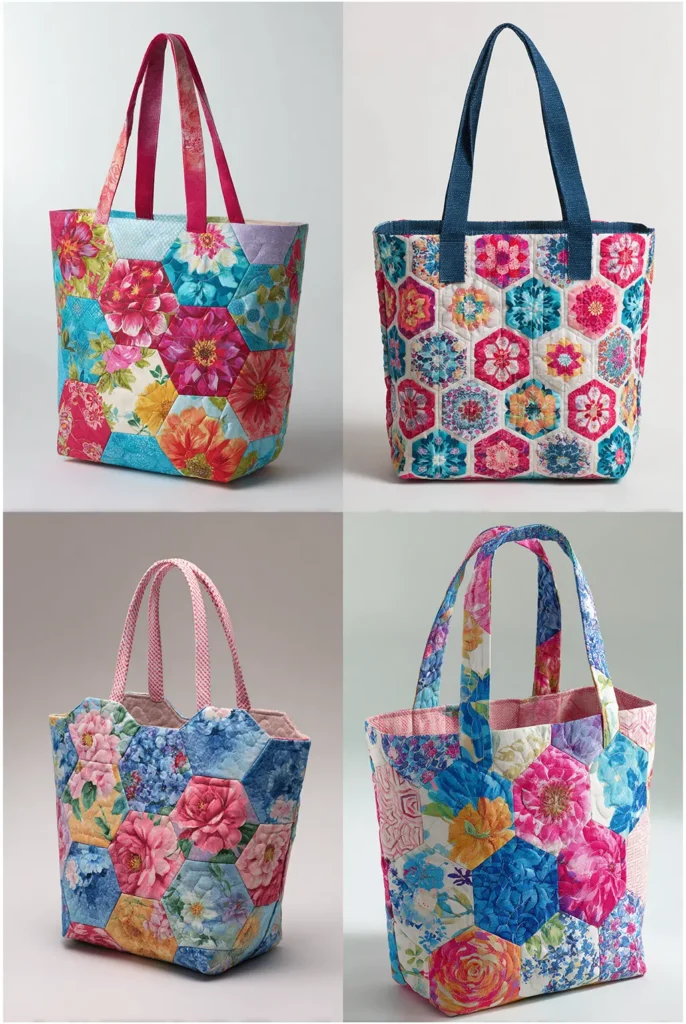
This project blends the slow, meditative art of English Paper Piecing (EPP) with modern bag construction. Instead of constructing the entire bag from fragile hexagons, you will create a stunning floral “Grandmother’s Flower Garden” appliqué panel to feature on the front of a sturdy canvas tote.
Finished Dimensions: Approximately 13″ wide x 15″ tall x 3″ deep.
Materials Needed:
- Hexagon Templates: 7 cardstock hexagon templates (1-inch side length).
- Scrap Fabric: Small colorful scraps for the flower petals (6 pieces) and center (1 piece).
- Background Fabric: 2 pieces of canvas or linen, cut to 15″ x 17″ (one for the front, one for the back).
- Lining Fabric: 2 pieces, cut to 15″ x 17″.
- Fusible Fleece/Batting: 2 pieces, cut to 15″ x 17″.
- Handles: 2 cotton webbing straps or leather handles, 24″ long.
- Notions: Fabric glue pen (or needle/thread for basting), appliqué needle, water-soluble glue.
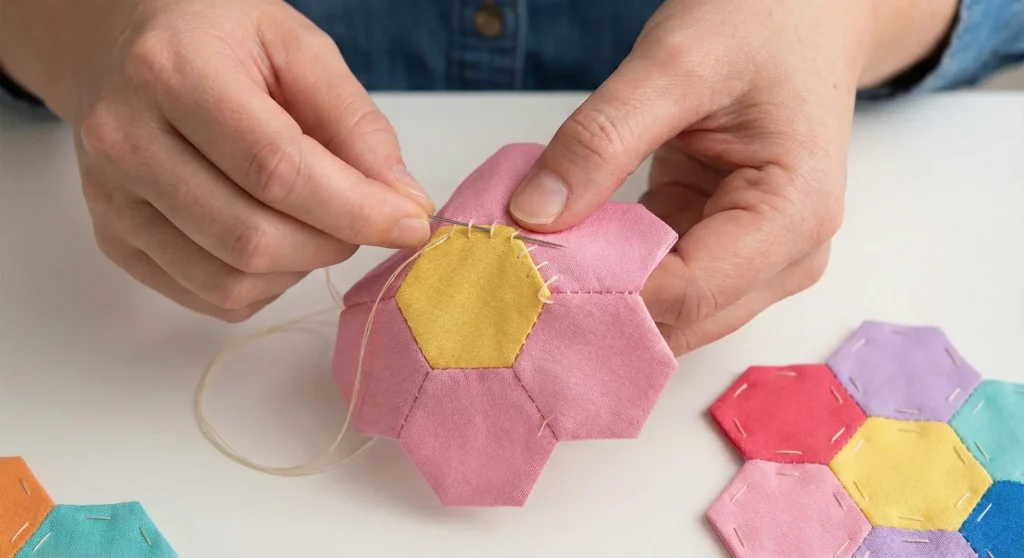
Step 1: Baste the Hexagons
- Cut your scrap fabrics into squares slightly larger than your paper templates (approx. 2.5″ squares).
- Place a paper template in the center of the wrong side of the fabric.
- Fold the fabric edges over the paper. Secure them with a dab of fabric glue or by basting with a needle and thread through the corners.
- Repeat until you have 1 yellow center and 6 colorful petal hexagons.

Step 2: Assemble the Flower
- Place the center hexagon and one petal hexagon Right Sides Together.
- Using a fine needle and thread, whipstitch along one edge, catching only the fabric fold (not the paper).
- Unfold. Place the next petal against the center and the side of the first petal. Whipstitch the connecting edges.
- Continue until all 6 petals surround the center. You now have a hexagonal flower unit. Press it flat with a hot iron.
Step 3: Appliqué to Background
- Take one 15″ x 17″ Background Fabric piece. Fuse the fleece/batting to the wrong side.
- Center your paper-pieced flower on the Right Side of the background fabric. Use a little water-soluble glue to hold it in place.
- Appliqué the flower: Stitch around the entire outer perimeter of the flower using a blind stitch (by hand) or a narrow zigzag stitch (by machine).
- Remove the papers: Carefully slit the backing fabric behind the flower (through the background canvas, not the flower itself) to pop the papers out, OR (easier method) leave the papers in if using water-soluble paper, OR simply remove the basting stitches and pull the papers out before you appliqué if you pressed the edges crisply enough. Note: Most bag makers leave the papers in if using water-soluble paper, or remove them before stitching down.
- Correction for Bag Strength: The best method for bags is to remove the basting threads and pop the papers out before you sew it to the bag. Press the shape well, pin it down, and topstitch it 1/8″ from the edge.
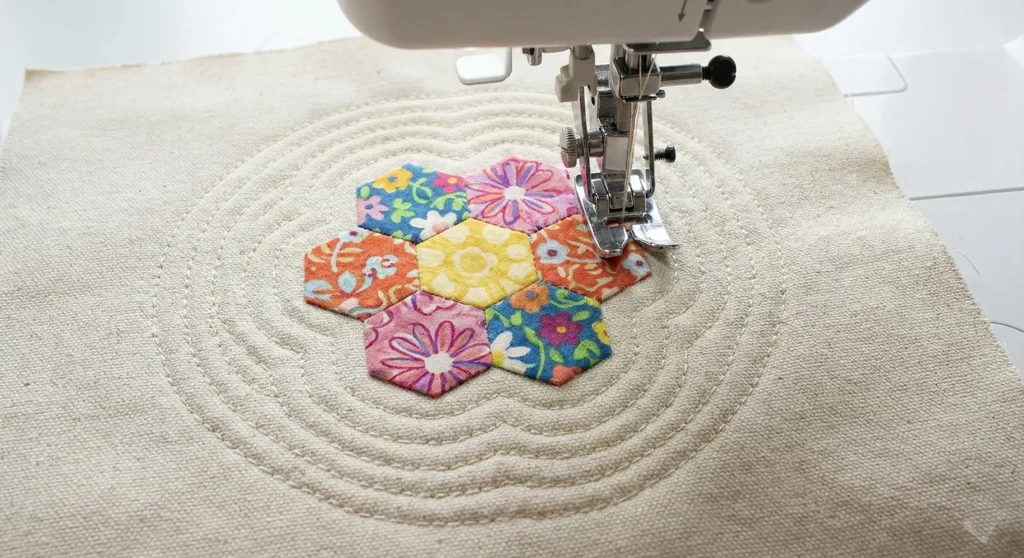
Step 4: Quilt the Echoes
- Install a standard foot or walking foot.
- Stitch around the flower shape, about 1/4″ away from the appliqué edge.
- Continue stitching concentric “echo” rings radiating outward from the flower until the quilting fills the upper half of the bag panel. This secures the batting and highlights the flower shape.
Step 5: Construct the Bag Body
- Attach your handles to the top edge of the front and back panels (measure 3.5″ in from sides).
- Place Front and Back panels Right Sides Together.
- Sew the sides and bottom with a 3/8″ seam allowance.
- Box the corners: Cut a 1.5″ square from both bottom corners. Pinch, align seams, and sew across to create the 3-inch base.
Step 6: Line and Finish
- Sew your lining pieces together (leave a 5-inch turning gap in the bottom). Box the lining corners.
- Place the Exterior Bag (Right Side Out) inside the Lining Bag (Inside Out).
- Sew around the top rim.
- Turn right side out through the gap. Stitch the gap closed.
- Topstitch the rim securely.
Pro Design Tip: Punch a hole in the center of your paper templates using a standard hole punch before basting. When it’s time to remove the papers, you can insert a crochet hook or small tool into that hole to hook the paper and pull it out easily without distorting the fabric shape.
Budget Consideration: You do not need to buy expensive pre-cut cardstock templates. Use old junk mail postcards, cereal boxes, or stiff magazine subscription inserts. They are the perfect weight for EPP—stiff enough to hold the shape but flexible enough to remove easily.

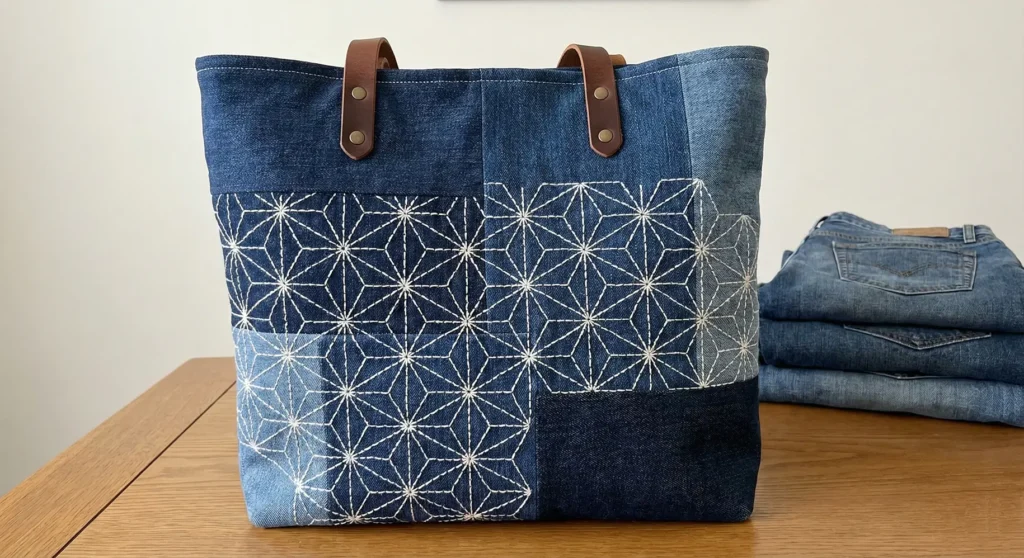
13. Upcycled Denim Quilted Bag with Sashiko Embroidery
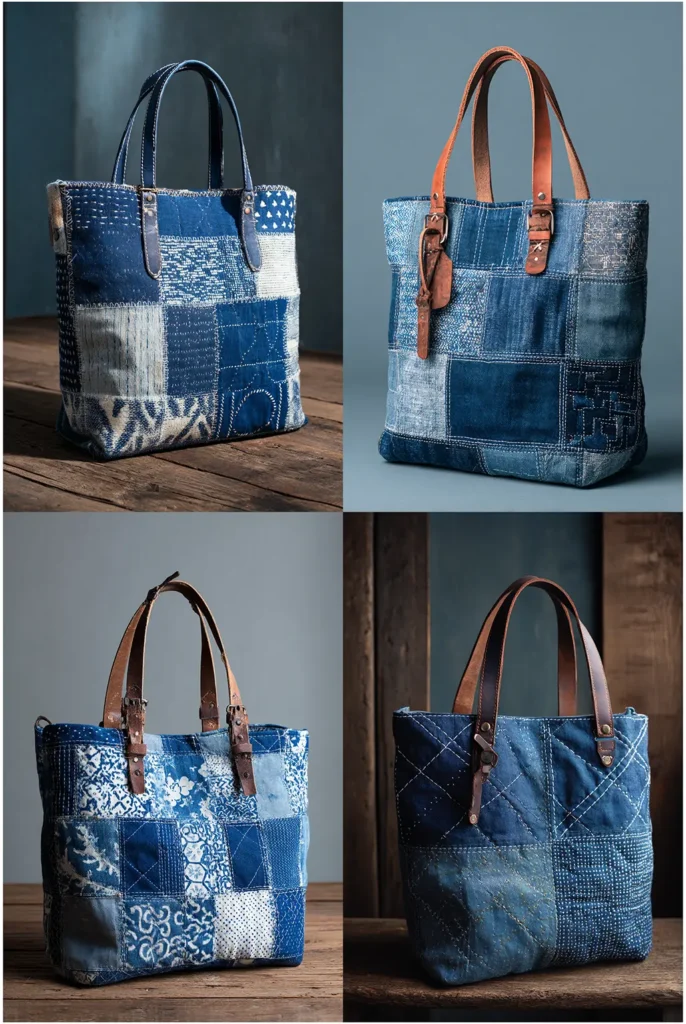
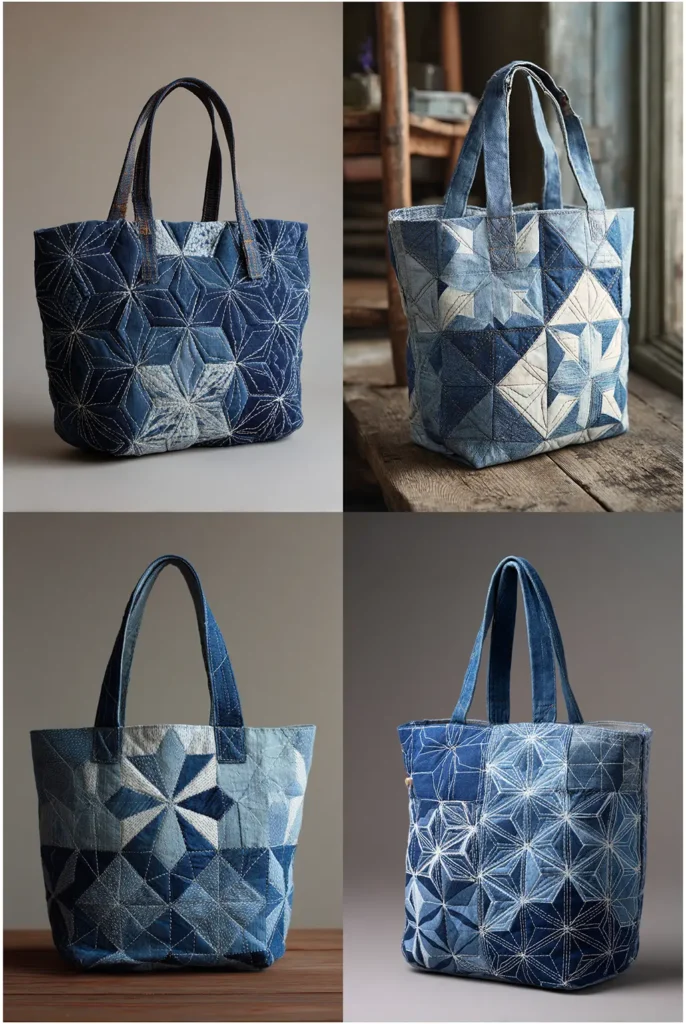
This project combines sustainability with the ancient Japanese art of Sashiko (visible mending). By using the sturdy legs of old jeans as your canvas, you create a rugged, stylish tote where the white stitching creates a striking contrast against the indigo blue.
Finished Dimensions: Approximately 14″ wide x 13″ tall x 4″ deep.
Materials Needed:
- Outer Fabric: 2 pairs of old jeans (or large scraps). You need enough to piece together two panels sized 16″ x 15″.
- Lining Fabric: 2 pieces, cut to 16″ x 15″ (Cotton prints look great here).
- Fusible Fleece: 2 pieces, cut to 15″ x 14″.
- Thread: White Sashiko thread (or thick Pearl Cotton #8) for embroidery; Navy polyester thread for construction.
- Needles: Long Sashiko needle (for hand stitching) and a Denim machine needle (100/16).
- Handles: 2 leather straps or recycled denim waistbands, 24″ long.
- Notions: White water-soluble marking pencil or chalk, ruler.
Step 1: Prep and Piece the Denim Panels
- Cut the legs off the jeans and slit them open along the inseam to create flat fabric.
- If one leg isn’t wide enough, sew two strips together using a flat-felled seam (or press seam open) to create a panel.
- Trim your denim panels to 16″ x 15″. You need one for the front and one for the back.
- Fuse the Fleece to the wrong side of the denim. This provides stability and gives the Sashiko stitches something to “bite” into, creating a nice texture.
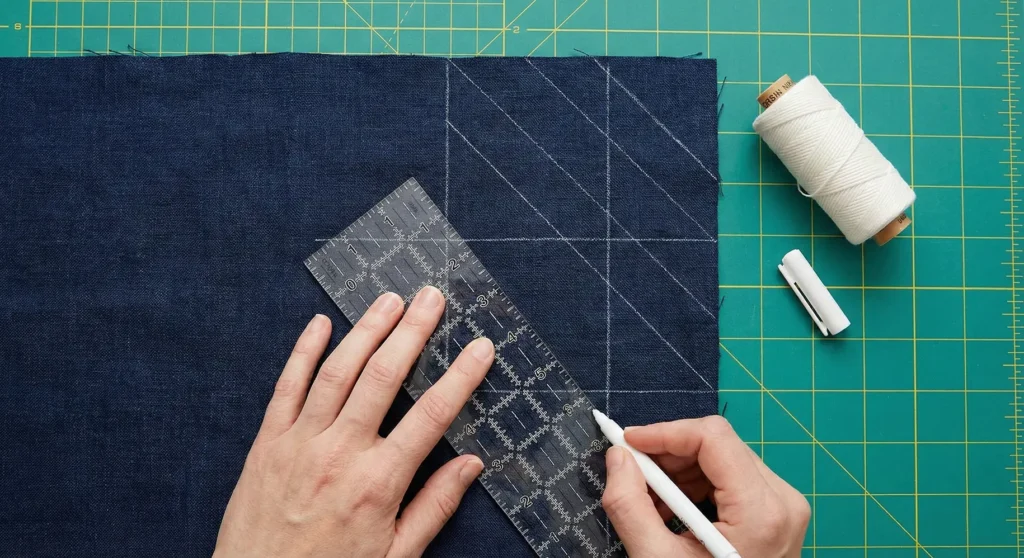
Step 2: Mark the Sashiko Grid
- On the Right Side of the denim, use your ruler and white chalk/pencil to draw a grid or pattern.
- A classic “Persimmon Flower” or simple “Cross Hatch” works well. For beginners, draw horizontal lines spaced 1/2 inch apart, then vertical lines spaced 1/2 inch apart to create a grid.
- Do not mark inside the 1/2″ seam allowance at the edges.

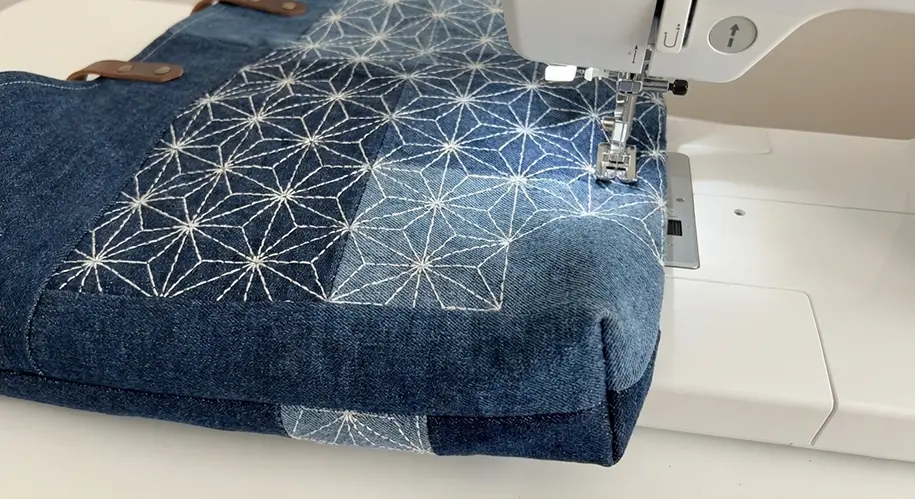
Step 3: Stitch the Sashiko Design
- Thread your Sashiko needle with a long strand of white thread (do not double it). Knot the end.
- Use a running stitch (over-under-over-under) to follow your marked lines.
- The Golden Rule of Sashiko: Your stitches should be longer on the top (the white part) and tiny on the bottom (the gap). Aim for a “grain of rice” look.
- Stitch all parallel horizontal lines first, then switch to the vertical lines.
- Do not pull the thread tight; keep the fabric flat to avoid puckering.
Step 4: Construct the Bag Body
- Place the two embroidered panels Right Sides Together.
- Sew the side seams and the bottom seam with a 1/2″ seam allowance. (Denim frays, so a wider seam is safer).
- Box the corners: Cut a 2″ square from both bottom corners. Pinch the opening so the side seam meets the bottom seam. Sew firmly across the raw edge.
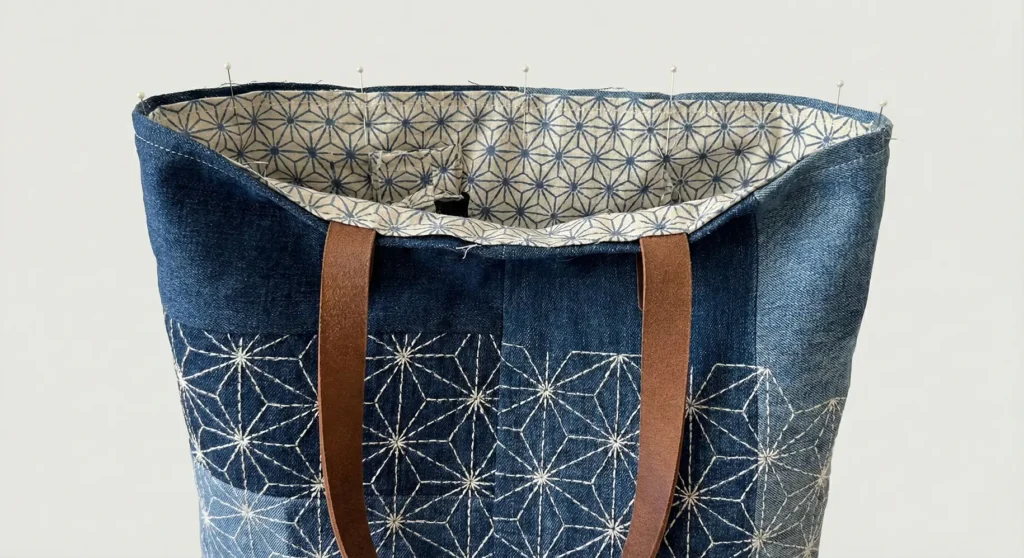
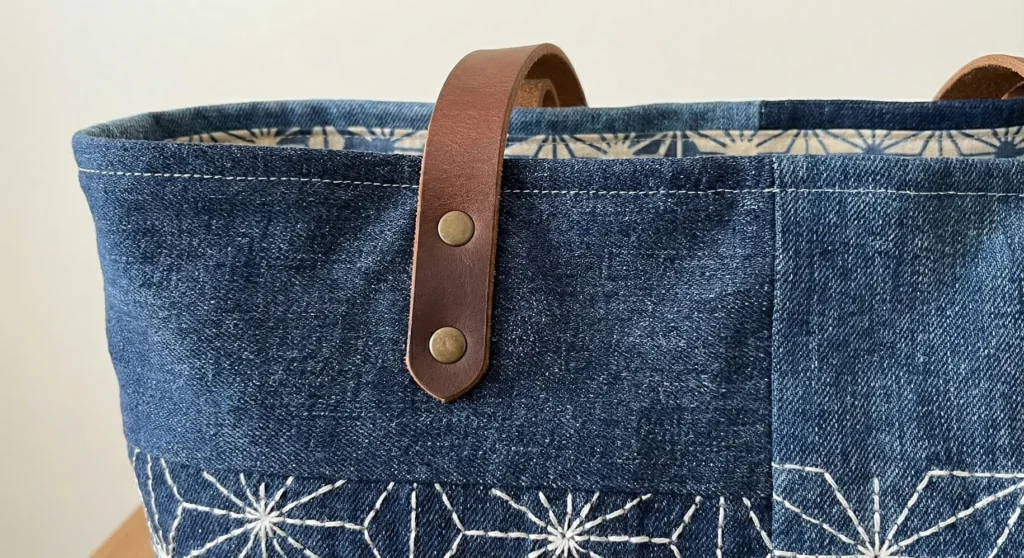
Step 5: Prepare and Attach Handles
- If using the waistbands from the jeans: Cut the button/hole off and join pieces if necessary to get 24″ lengths. Topstitch them for strength.
- On the exterior bag, measure 4 inches in from the sides.
- Baste the handles in place. If the denim is very thick at the rim, you may want to rivet them on after the bag is finished, but for sewing, baste them now.
Step 6: Line and Finish
- Sew your lining pieces together (sides/bottom), leaving a 5-inch turning gap in the bottom. Box the lining corners (2″ cut).
- Place the denim bag (Right Side Out) inside the lining (Inside Out). Right Sides Together.
- Sew around the top rim with a 1/2″ seam allowance. Go slowly over the side seams where the denim is thickest; you may need to hand-crank the machine wheel over bulky spots.
- Turn the bag right side out. Stitch the gap closed.
- Topstitch the rim with your navy thread (or white, if you want it to stand out) to secure the lining.
Pro Design Tip: When turning corners in Sashiko (or intersecting lines), leave a “breathing room” gap at the intersection. The threads should not cross over each other on the top side of the fabric; they should meet in the center of the cross without touching. This keeps the geometric pattern clean and distinct.
Budget Consideration: This project should cost almost nothing. Ask friends or family for their “retired” jeans (blown-out knees/thighs are fine since you use the lower legs). If you don’t have Sashiko thread, you can use multiple strands of standard white sewing thread twisted together or white crochet thread.


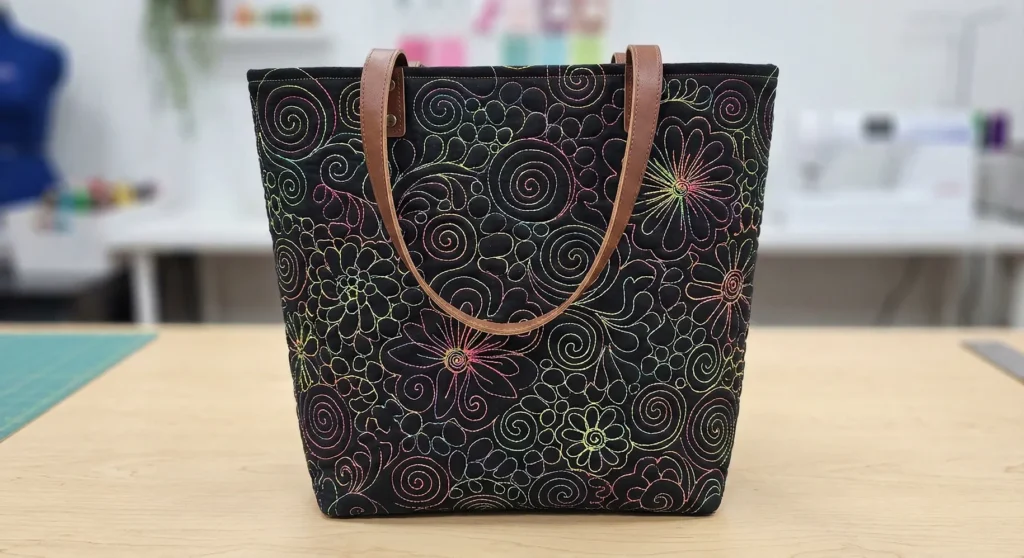
14. Free-Motion Art Quilted Tote Bag Inspiration

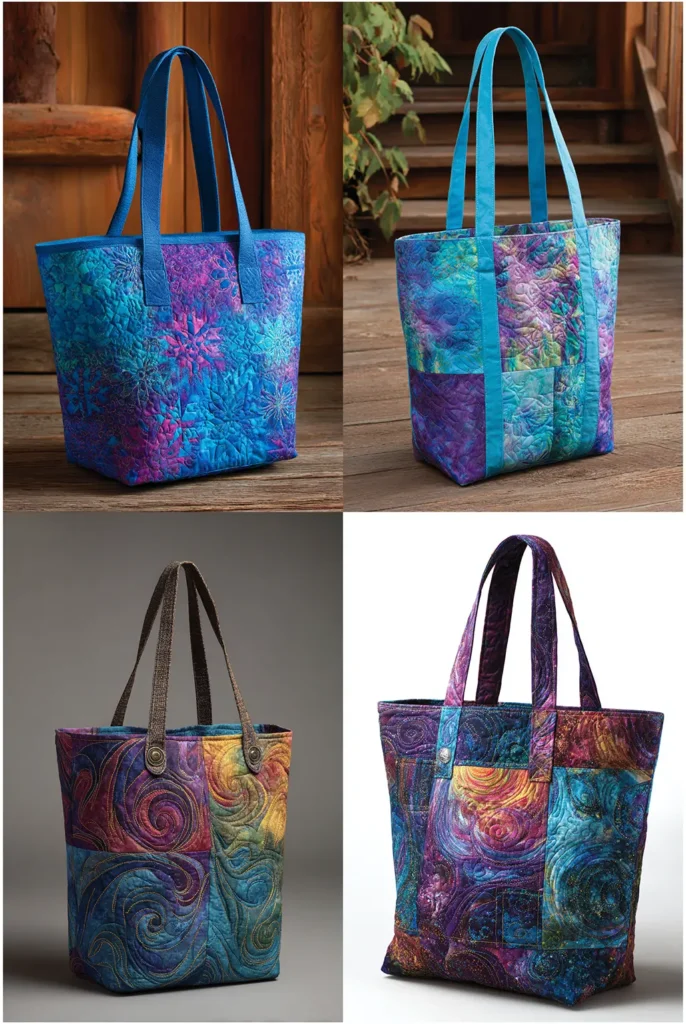
Turn your tote bag into a moving canvas. This project is less about precise piecing and more about “thread painting.” Using a solid-color fabric as your base allows your free-motion quilting stitches—whether swirls, pebbles, or floral sketches—to become the star of the show.
Finished Dimensions: Approximately 13″ wide x 14″ tall x 4″ deep.
Materials Needed:
- Solid Outer Fabric: 2 pieces, cut to 16″ x 18″ (Solid black, white, or navy shows thread best). Cut larger than needed to account for shrinkage during quilting.
- Lining Fabric: 2 pieces, cut to 15″ x 17″.
- Batting: 2 pieces of high-quality cotton batting, cut to 16″ x 18″.
- Thread: High-contrast thread (e.g., Neon on Black, or Variegated thread).
- Handles: 2 leather straps or cotton webbing, 24″ long.
- Notions: Darning foot (free-motion foot), quilting gloves (optional for grip), temporary spray adhesive.
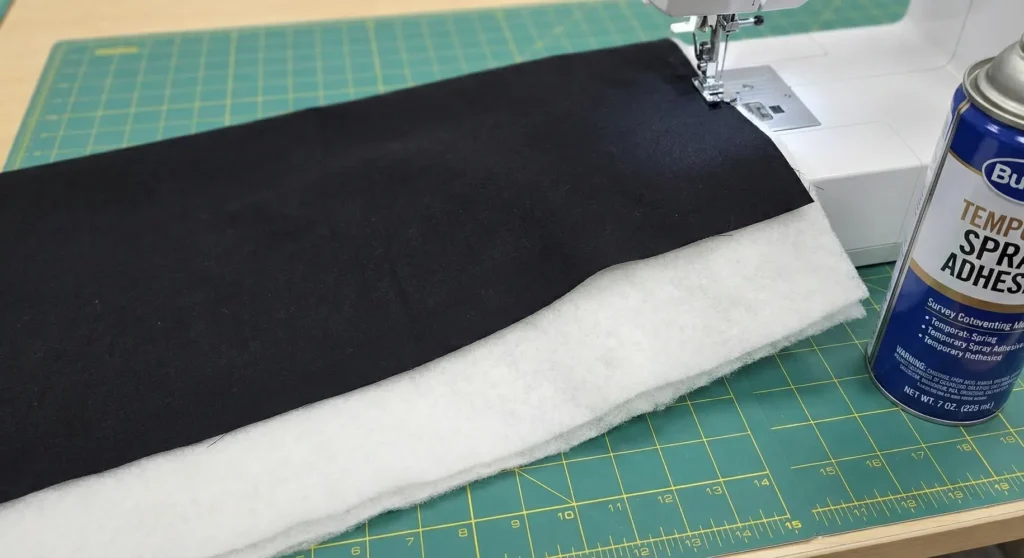
Step 1: Create the “Canvas” Sandwich
- Place your backing/batting down. (You can use muslin as a backing layer just for quilting, as the bag will be lined later.)
- Place your Solid Outer Fabric on top.
- Spray-baste the layers together thoroughly. Pins can get in the way of free-motion movement, so spray adhesive is preferred here to keep the surface perfectly flat.
Step 2: Set Up for Free-Motion
- Install your Darning Foot (or Free-Motion Foot).
- Drop the feed dogs on your sewing machine (refer to your manual). This gives you total control over the fabric’s direction.
- Set your stitch length to 0 (since you control the length by moving the fabric).
- Put on quilting gloves if you have them; they help you grip the fabric without straining your hands.
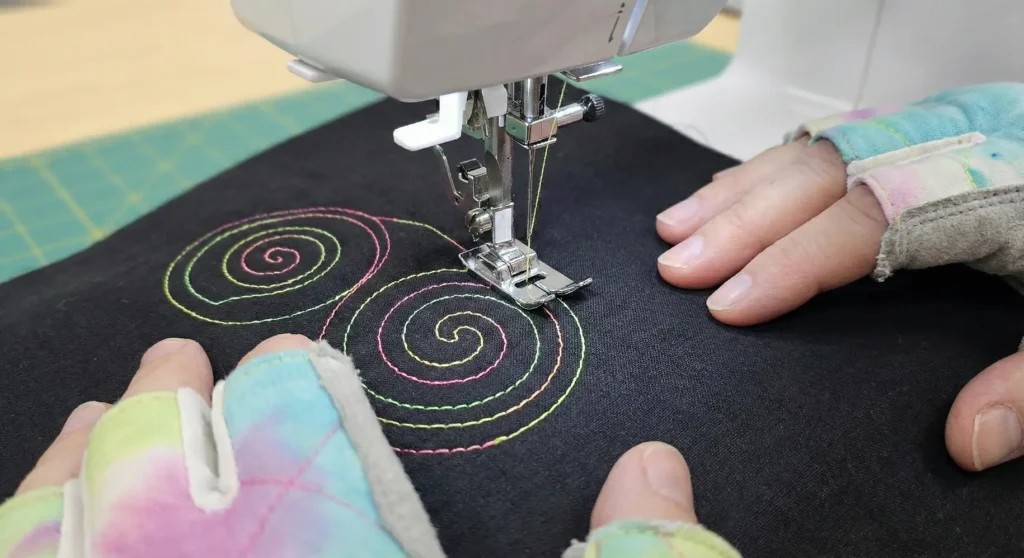
Step 3: Draw with Thread
- Begin stitching in the center and work your way out.
- Design Ideas:
- The Doodler: Fill the space with continuous loops, stippling, or “McTavishing” (long, flowing lines).
- The Sketch: Draw a specific object, like a large flower or a cityscape profile, by going over your lines 2-3 times to make them bold (thread sketching).
- Don’t worry about perfection; the texture is the goal. Move the fabric at a steady pace to keep stitch lengths somewhat even.
Step 4: Trim and Square Up
- Dense free-motion quilting pulls the fabric in, significantly shrinking it.
- Once quilting is done, press the panels with steam to block them flat.
- Trim the panels down to the final size of 15″ x 17″.
Step 5: Construct the Bag Body
- Attach your handles to the top edge of the quilted panels (measure 3.5″ in from the sides).
- Place the two quilted panels Right Sides Together.
- Sew the side seams and the bottom seam with a 3/8″ seam allowance.
- Box the corners: Cut a 2″ square from both bottom corners. Pinch the opening so the seams align, and sew across to create the base.
Step 6: Line and Finish
- Assemble the lining pieces (sew sides/bottom, leaving a 5-inch gap for turning). Box the lining corners (2″ cut).
- Place the Art Bag (Right Side Out) inside the Lining (Inside Out).
- Sew around the top rim.
- Turn the right side out through the gap. Stitch the gap closed.
- Topstitch the rim. Use a matching thread for the topstitch so it doesn’t distract from your art quilting.
Pro Design Tip: Use Variegated Thread (thread that changes color every few inches) on a solid black or white background. It creates a stunning, complex visual effect that looks like a watercolor painting, even if you are stitching simple loops or swirls.
Budget Consideration: This is the best project for using “Ugly” Batting Scraps. Since the quilting is dense and textured, you can piece together small, unusable strips of leftover batting using a zigzag stitch to make the 16×18 panel. The dense threadwork will hide any lumpiness in the joined batting.

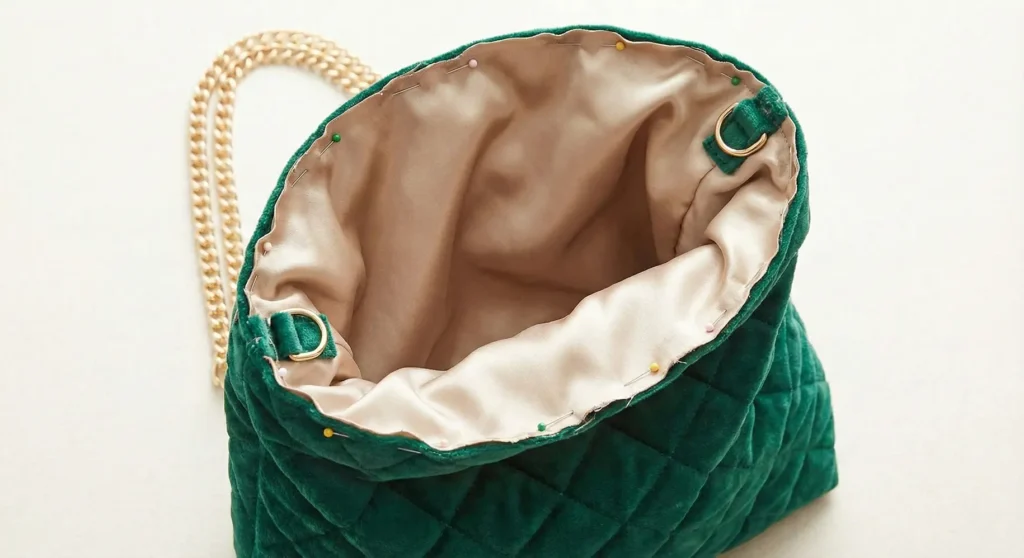
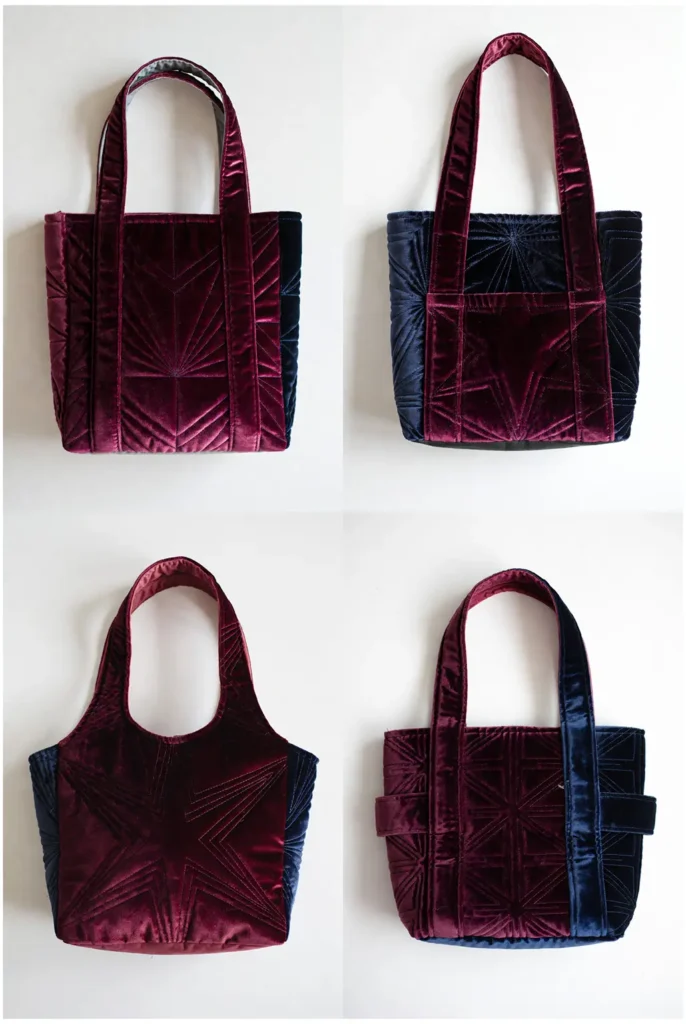
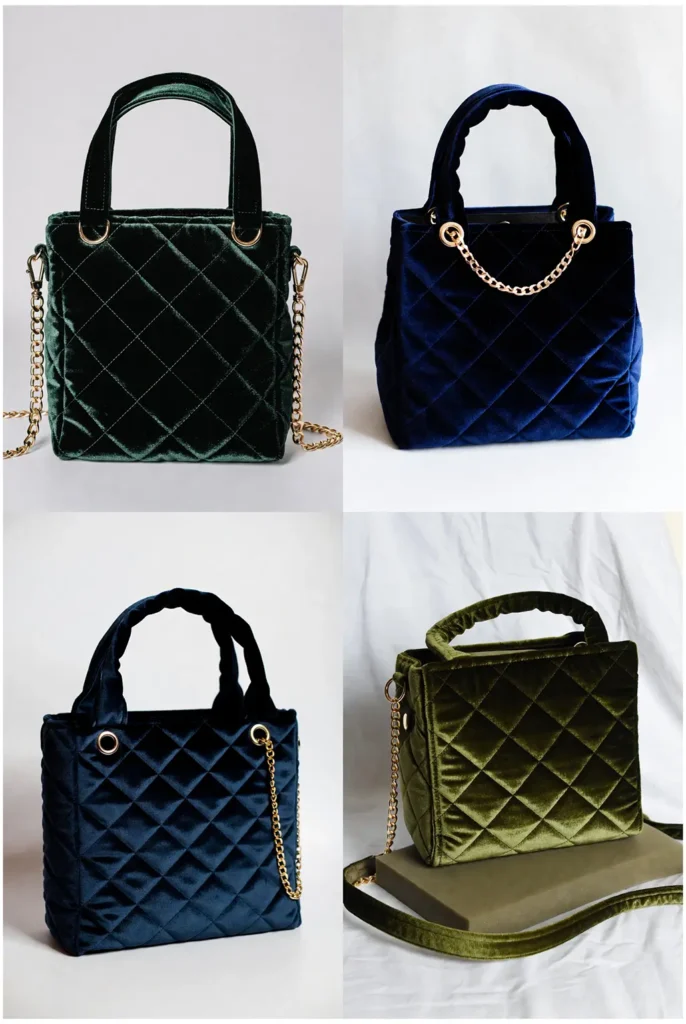
15. Luxurious Velvet Quilted Mini Tote for Evenings
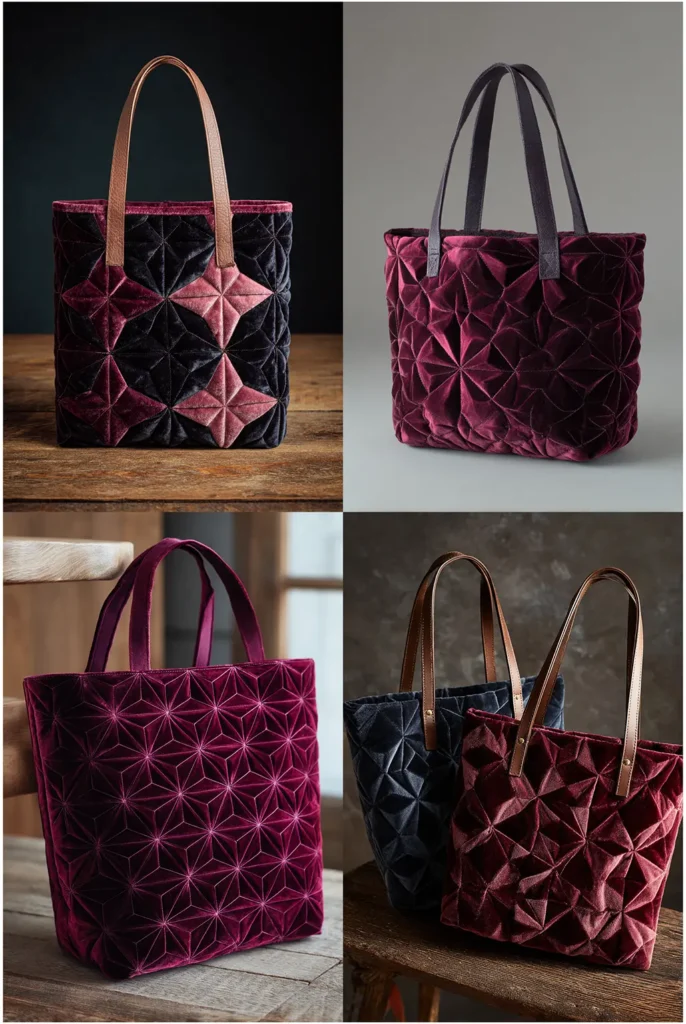

This petite, opulent bag is designed for formal events where you only need to carry essentials like a phone, lipstick, and a cardholder. The plush texture of the velvet, combined with classic diamond quilting, catches the light beautifully, creating a high-end look without the designer price tag.
Finished Dimensions: Approximately 9″ wide x 8″ tall x 3″ deep.
Materials Needed:
- Outer Fabric: 2 pieces of Rayon or Cotton Velvet, cut to 11″ x 10″.
- Lining Fabric: 2 pieces of Satin or Silk, cut to 11″ x 10″.
- Stabilizer: 2 pieces of fusible foam (like Pellon Flex-Foam), cut to 10″ x 9″ (keep it out of the seam allowances to reduce bulk).
- Interfacing: Lightweight fusible interfacing (for the back of the velvet).
- Handles: 2 short velvet straps (12″ long) OR D-rings with a detachable gold chain.
- Closure: 1 Magnetic Snap.
- Notions: Walking foot (essential!), tissue paper.
Step 1: Stabilize the Velvet
- Velvet is stretchy and slippery. First, fuse lightweight interfacing to the wrong side of both velvet pieces. This stops the fabric from distorting while you work.
- Center your Fusible Foam on the back of the interfaced velvet (leave a 1/2″ margin of fabric around the edges) and fuse according to instructions. Use a pressing cloth to protect the velvet pile from being crushed by the iron.
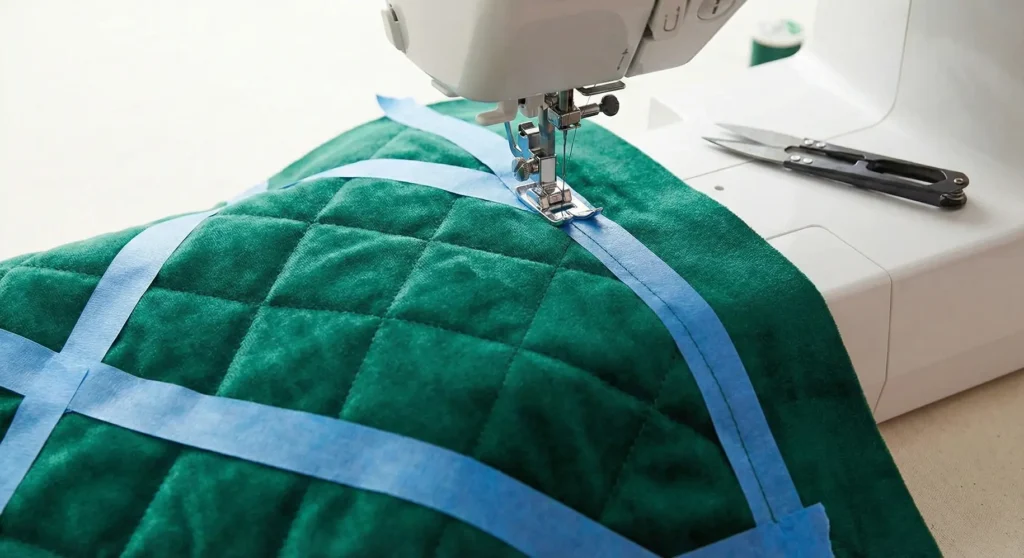
Step 2: Mark and Quilt Diamonds
- Do not mark the front of the velvet with chalk or pens, as it can be hard to remove. Instead, apply painter’s tape in a diagonal grid pattern (lines spaced 1.5″ apart) to guide your sewing.
- Install your walking foot.
- Quilt along the edge of the tape. Remove the tape gently, then reposition for the next line.
- Stitch a cross-hatch diamond pattern. The foam gives the diamonds a luxurious, puffed effect.
Step 3: Prepare Handles/Hardware
- Option A (Velvet Straps): Make narrow velvet tubes, turn them right side out, and topstitch. Baste them to the top edge (2 inches in from the sides).
- Option B (Chain): Cut two small tabs of velvet (2″ long). Slide a D-ring onto each. Baste these tabs to the side seams or the top edge so you can clip on a metal chain later.
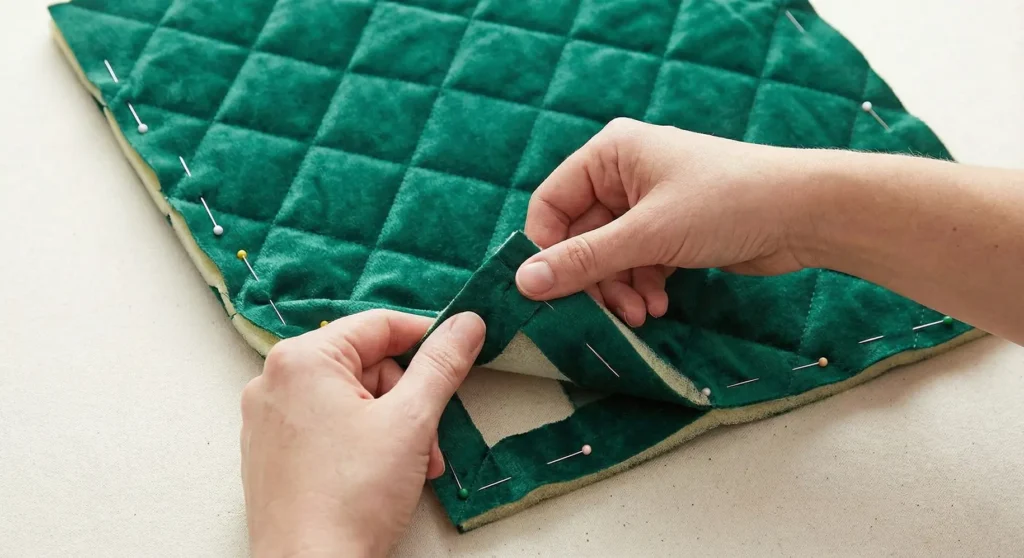
Step 4: Construct the Bag Body
- Place the two quilted velvet panels, Right Sides Together.
- Pin frequently (every inch). Velvet likes to “creep” or shift against itself.
- Sew the sides and bottom with a 1/2″ seam allowance.
- Box the corners: Cut a 1.5″ square from both bottom corners. Pinch, align, and sew.
- Tip: If the seams are bulky, grade them (trim one layer shorter than the other) to help them lie flat.
Step 5: Install Snap and Lining
- Install the Magnetic Snap on the lining pieces (centered, 1.5″ down from the top edge). Reinforce the back of the satin with a scrap of interfacing so the snap doesn’t rip through.
- Sew the lining pieces together (sides/bottom), leaving a 4-inch gap in the bottom.
- Box the lining corners (1.5″ cut).
Step 6: Final Assembly
- Place the Velvet Bag (Right Side Out) inside the Satin Lining (Inside Out).
- Sew around the top rim with a 3/8″ seam allowance.
- Turn the bag right side out carefully.
- Stitch the lining gap closed.
- Topstitch: Instead of topstitching on the machine (which might crush the velvet rim), consider hand-stitching the top edge with a blind stitch to keep the lining inside, or use a very long stitch length (4.0mm) if you must machine stitch.
Pro Design Tip: When sewing velvet seams, the “pile” (fuzzy fibers) on the two layers will fight each other, causing the layers to shift. To prevent this, place a layer of tissue paper between the fabric and the feed dogs, and use a Walking Foot. The paper tears easily after sewing.

Budget Consideration: Velvet is often found in the home decor section of thrift stores in the form of curtains or throw pillows. A single velvet pillowcase usually provides enough fabric for a mini tote like this, often with a zipper you can harvest and reuse!
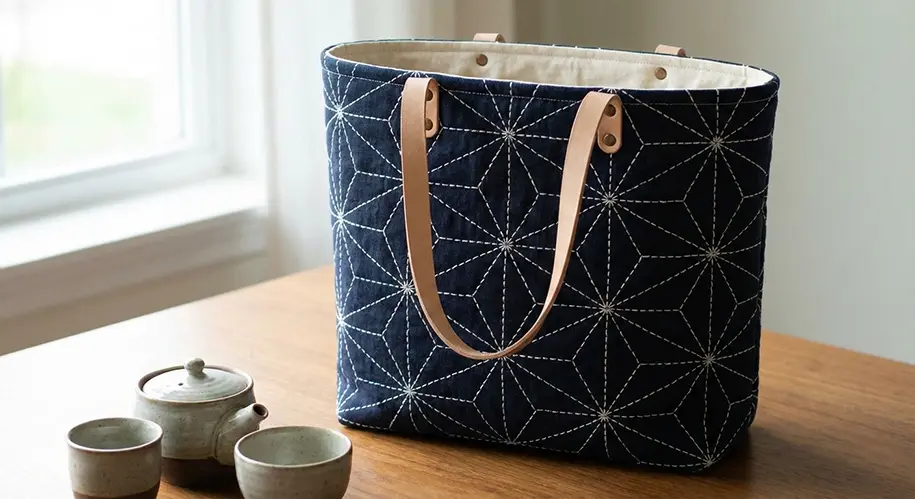
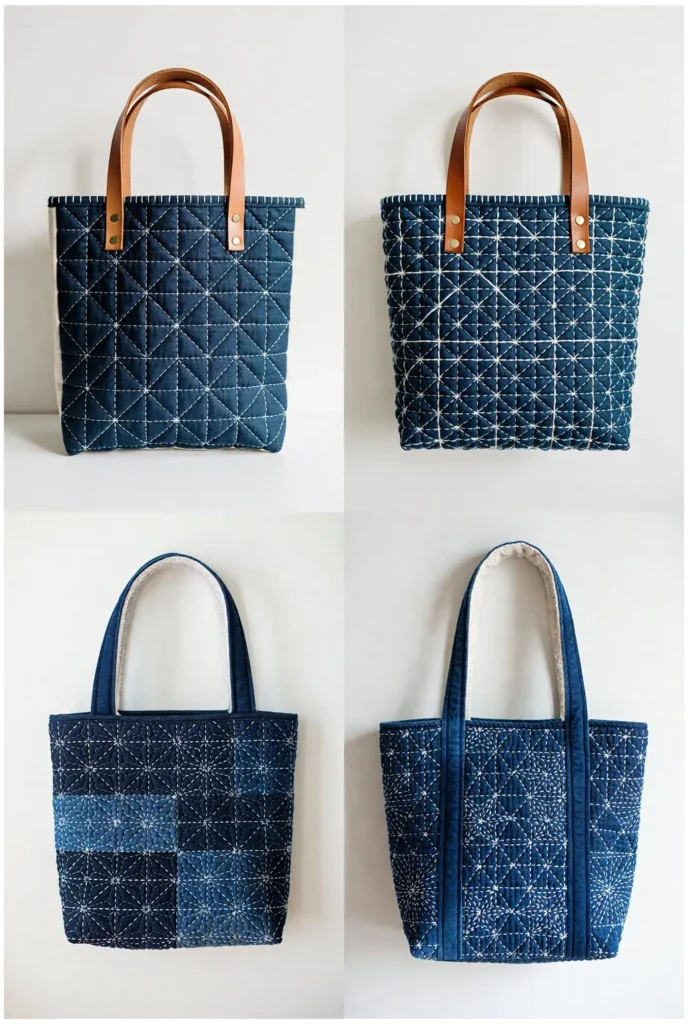
16. Japanese-Sashiko Inspired Quilted Tote Bag

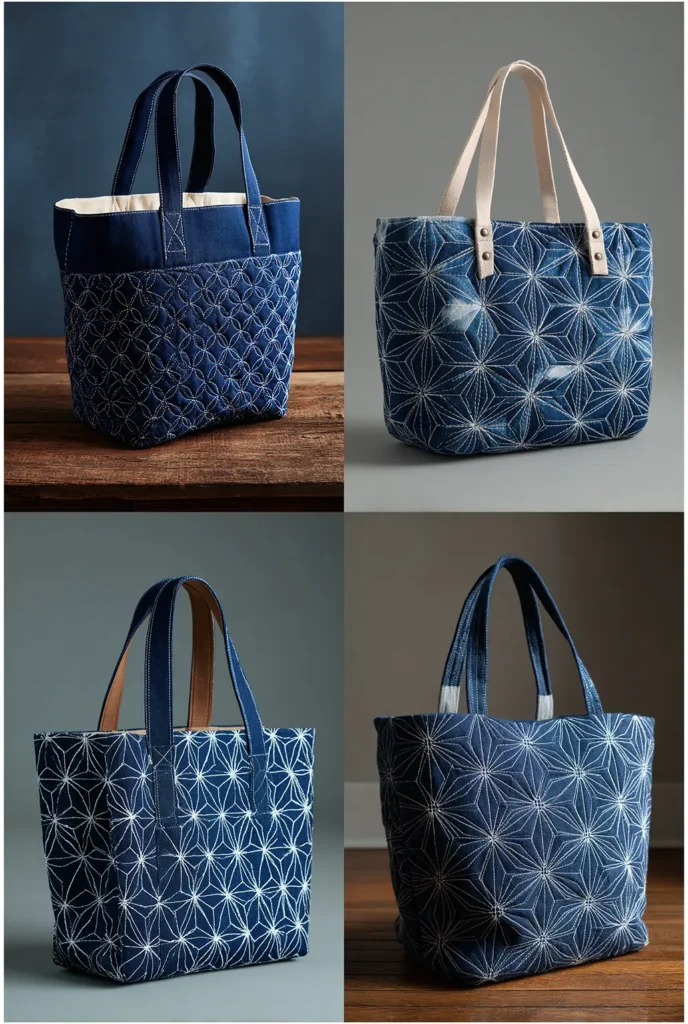
This design captures the serene beauty of traditional Japanese Sashiko (white stitching on indigo) but adapts it for modern machine sewing. By using a specific machine stitch and navy linen, you achieve the crisp, geometric aesthetic of Sashiko in a fraction of the time it takes to hand-stitch, creating a sophisticated everyday bag.
Finished Dimensions: Approximately 13″ wide x 15″ tall x 3″ deep.
Materials Needed:
- Outer Fabric: 2 pieces of Deep Navy or Indigo Linen/Cotton Canvas, cut to 15″ x 17″.
- Lining Fabric: 2 pieces of cream or light grey cotton, cut to 15″ x 17″.
- Batting/Stabilizer: 2 pieces of Fusible Fleece, cut to 14″ x 16″ (keep bulk out of seams).
- Thread: Thick White Topstitching Thread (30wt or 12wt) for the needle; standard navy thread for the bobbin.
- Needles: Topstitch Needle (Size 90/14 or 100/16) to handle the thick thread.
- Handles: 2 strips of vegetable-tanned leather, 24″ long.
- Notions: White marking pen (chalk or gel), quilting ruler, rivets (optional).
Step 1: Prepare the “Indigo” Canvas
- Center the Fusible Fleece on the wrong side of your Navy Outer Fabric pieces. Fuse according to the manufacturer’s instructions.
- Leaving the 1/2″ seam allowance free of fleece ensures your heavy seams won’t be too bulky to sew later.
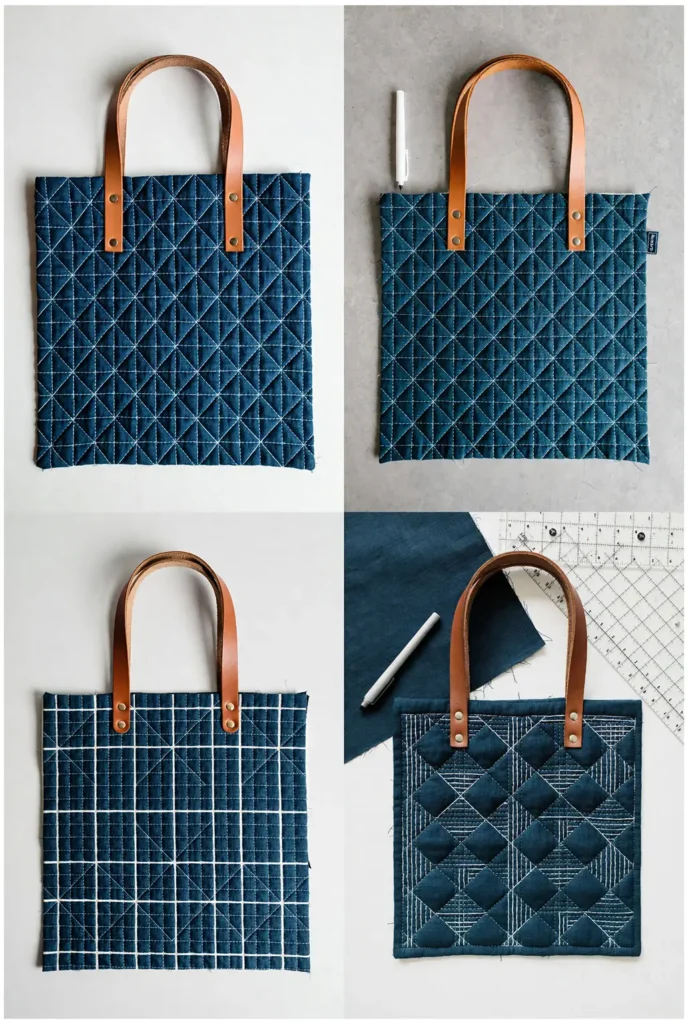
Step 2: Mark the Geometric Pattern
- On the Right Side of the navy fabric, use a white marking pen and a ruler to draw your grid.
- Design Choice: A traditional “Asanoha” (Hemp Leaf) pattern looks stunning but is complex to mark. For a simpler yet equally stylish look, draw a 45-degree cross-hatch grid (diamond-shaped) with lines spaced 1 inch apart.
- Ensure your lines are crisp; these are your sewing guides.
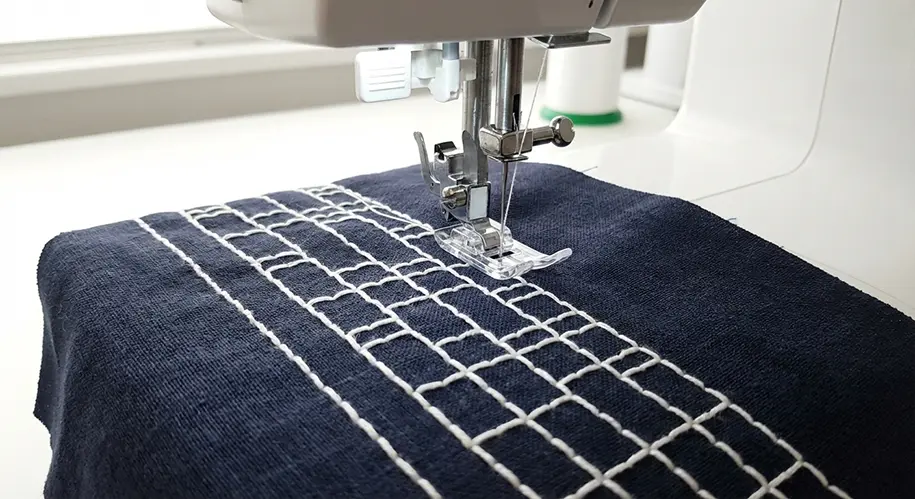
Step 3: Machine “Sashiko” Quilting
- Thread your machine with the Thick White Thread on top and navy in the bobbin.
- Select a “Triple Stretch Stitch” (or Bean Stitch) if your machine has it. This stitch goes forward, back, then forward again, creating a bold, thick line that mimics the weight of hand embroidery. If not, set your stitch length to a long 3.5mm or 4.0mm.
- Stitch precisely over your marked lines. Sew all the diagonal lines in one direction first, then sew the crossing lines.
- The result is a high-contrast, tactile geometric texture.
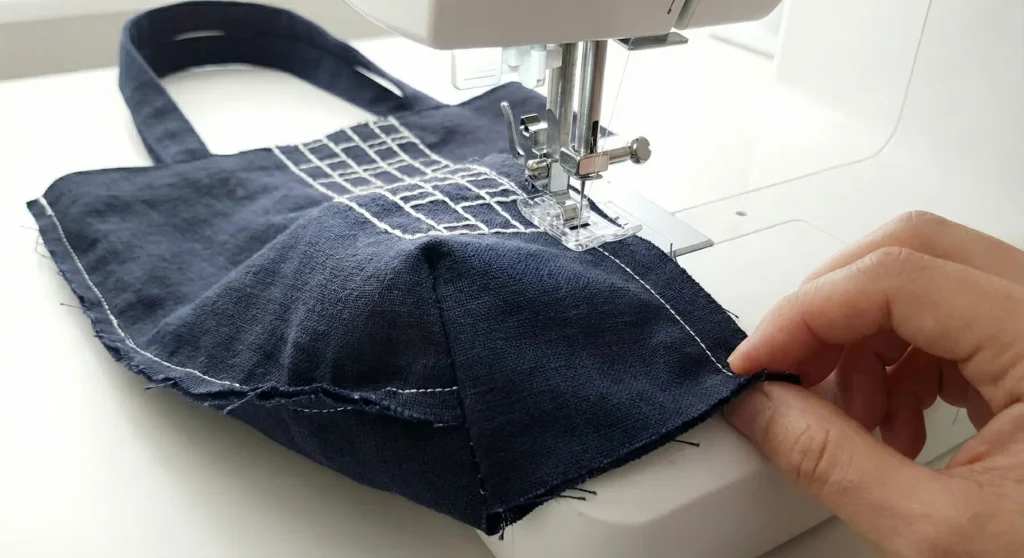
Step 4: Construct the Bag Exterior
- Place the two quilted panels Right Sides Together.
- Sew the side seams and the bottom seam with a 1/2″ seam allowance (using standard navy thread, not the thick topstitch thread).
- Box the corners: Cut a 1.5″ square from both bottom corners. Pinch the opening so the seams align, and sew across to create the flat base.
- Press the side seams open.
Step 5: Assemble the Lining
- Place the lining pieces Right Sides Together.
- Sew the sides and bottom, leaving a 5-inch gap in the bottom seam.
- Box the lining corners (1.5″ cut) to match the exterior.
Step 6: Final Join and Finish
- Turn the Exterior Bag Right Side Out. Place it inside the Lining Bag (Inside Out).
- Align the side seams and pin the top edge.
- Sew around the top rim with a 1/2″ seam allowance.
- Turn the bag right side out through the lining gap. Stitch the gap closed.
- Topstitch the Rim: Switch back to your White Topstitch Thread and lengthen the stitch. Sew one perfect line 1/4″ from the top edge to mimic a final row of Sashiko stitching.
- Attach the leather handles using rivets or by stitching a square-box pattern (using the white thread for contrast).
Pro Design Tip: To truly mimic the “hand-stitched” look with a machine, slightly increase your top tension. This pulls the bobbin thread up just a tiny bit, making the top white thread sit higher on the fabric surface, resembling a hand-embroidered running stitch rather than a flat machine lockstitch.
Budget Consideration: If leather handles are too expensive, make “Kumihimo” style braided cords. Braiding three strands of navy and cream cotton rope together creates a strong, comfortable handle that fits the Japanese aesthetic perfectly and costs pennies to make.
17. Structured Box Bottom Grocery Shopper Bag
This heavy-duty tote is designed to replicate the dimensions of a standard paper grocery sack but with significantly more durability. The key feature is the extra-wide “box bottom” and stiff interfacing, which allow the bag to stand open on its own in the checkout lane or in the trunk.
Finished Dimensions: Approximately 12″ wide x 13″ tall x 7″ deep.
Materials Needed:
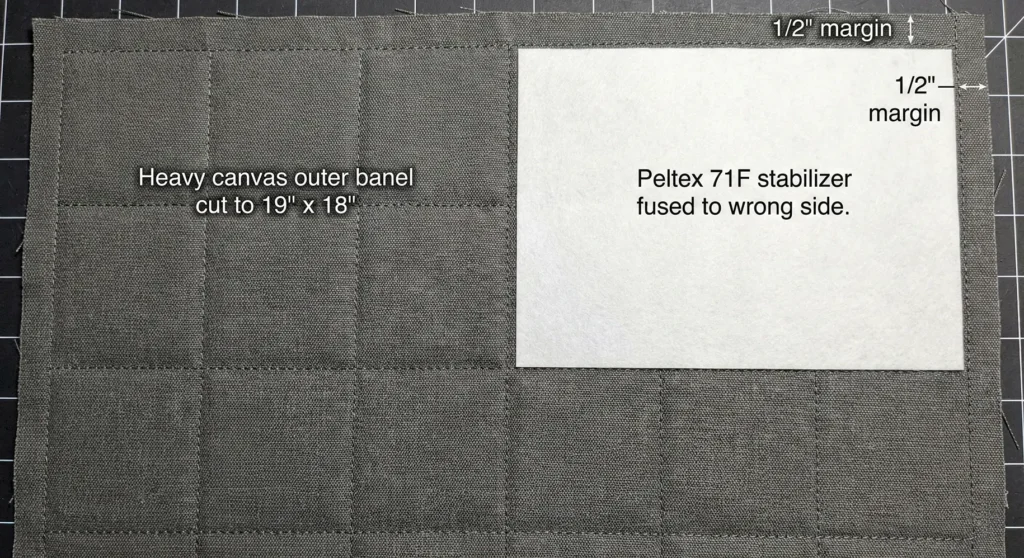
- Outer Fabric: 2 pieces of heavy canvas or upholstery-weight fabric, cut to 19″ x 18″.
- Lining Fabric: 2 pieces of wipeable nylon or cotton, cut to 19″ x 18″.
- Stabilizer (Crucial): 2 pieces of Peltex 71F (ultra-firm single-sided fusible stabilizer), cut to 18″ x 17″. You need a stiff stabilizer so the bag stands upright.
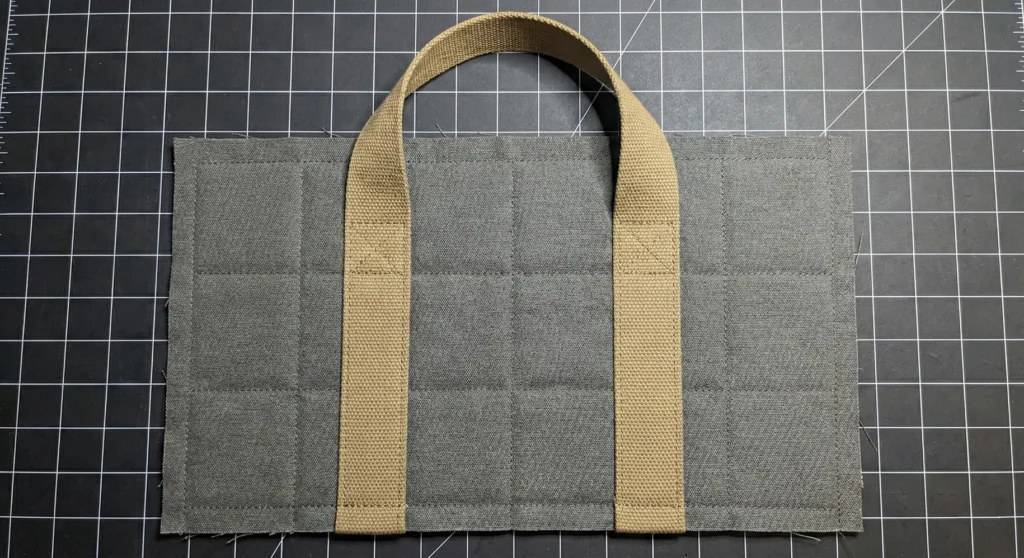
- Handles: 2 strips of 1.5″ wide cotton webbing, each 45″ long (for wrap-around strength).
- Notions: Heavy-duty needle (Size 100/16), clips (pins will bend in the stiff stabilizer).
Step 1: Fuse and Quilt for Rigidity
- Fuse the Peltex Stabilizer to the wrong side of your Outer Fabric panels. Center it so there is a 1/2″ margin of fabric around the edges (this keeps the bulk out of your seams).
- Quilt a large grid: Using a long stitch length (3.5mm), quilt a simple grid with lines spaced 3 inches apart. This permanently bonds the fabric to the stiff stabilizer.
Step 2: Attach Wrap-Around Handles
- On the front outer panel, mark a vertical line 5 inches in from the left and right edges.
- Take one webbing strip. Place it along these lines to form a “U” shape. The ends should align with the bottom raw edge of the bag, and the loop should extend past the top.
- Stitch the webbing down along both edges of the strap, starting from the bottom edge and stopping 2 inches from the top edge.
- Repeat for the back panel. This wrap-around style supports heavy weight (like milk jugs) from the bottom up.
Step 3: Construct the Outer Shell
- Place the Front and Back panels Right Sides Together.
- Sew the side seams and the bottom seam with a 1/2″ seam allowance.
- Note: The stiff stabilizer makes this stiff to handle; use clips generously.
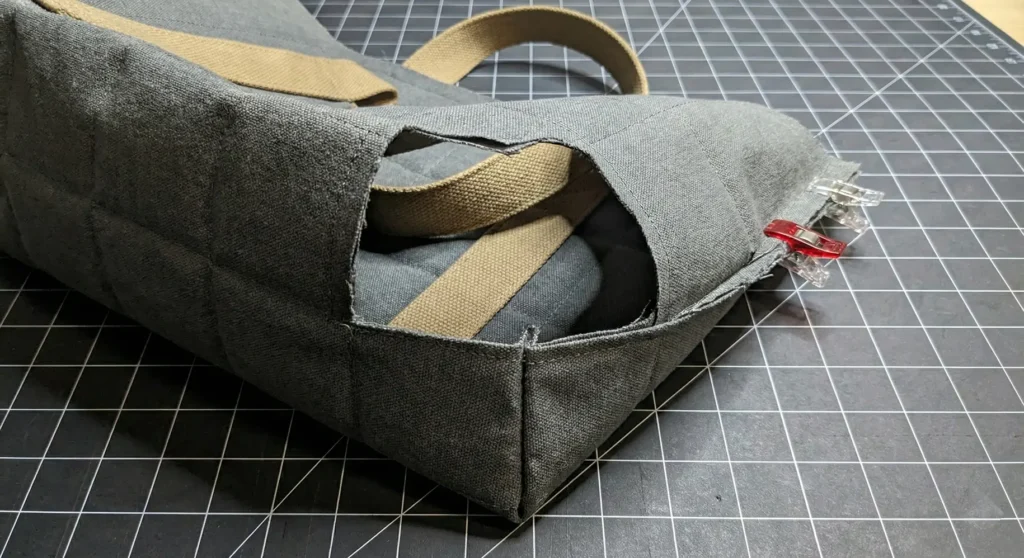
Step 4: Create the Deep Box Bottom
- Cut the corners: Cut a large 3.5″ square out of both bottom corners (measure from the seam line).
- Box the corners: Open the bag and pinch the corners so the side seam meets the bottom seam. Flatten the gusset.
- Sew across this raw edge. This creates a wide, 7-inch rectangular base perfect for cereal boxes and cartons.
Step 5: Construct the Lining
- Sew the lining pieces together (sides and bottom), leaving a generous 8-inch gap in the bottom seam. (Stiff bags are very hard to turn, so you need a big opening.
- Box the lining corners by cutting out 3.5″ squares and sewing, matching the exterior dimensions.
Step 6: Final Assembly
- Turn the Outer Bag Right Side Out (this will take some wrestling). Push the corners out firmly.
- Place the Outer Bag inside the Lining (Inside Out). Right Sides Together.
- Clip around the top rim. Ensure the handles are tucked safely between the layers.
- Sew around the top rim with a 1/2″ seam allowance.
- Turn the bag right side out through the lining gap.
- Stitch the gap closed.
- Topstitch: Tuck the lining inside. Topstitch around the rim twice—once 1/8″ from the edge and again 1/4″ from the edge—to secure the stiff layers and handle tops.
Pro Design Tip: For the ultimate grocery bag, add a removable rigid base. Measure the bottom of your finished bag (approx. 11″ x 7″). Cut a piece of corrugated plastic (like from a yard sign) or foam core to this size. Slide it into the bottom of the bag. This prevents the bottom from sagging when carrying heavy canned goods.
Budget Consideration: Instead of buying expensive Peltex stabilizer, use cheap plastic placemats from the dollar store. Cut them to size and insert them between your outer fabric and lining layers (baste them in place). They are stiff, waterproof, and highly durable for a grocery bag base.
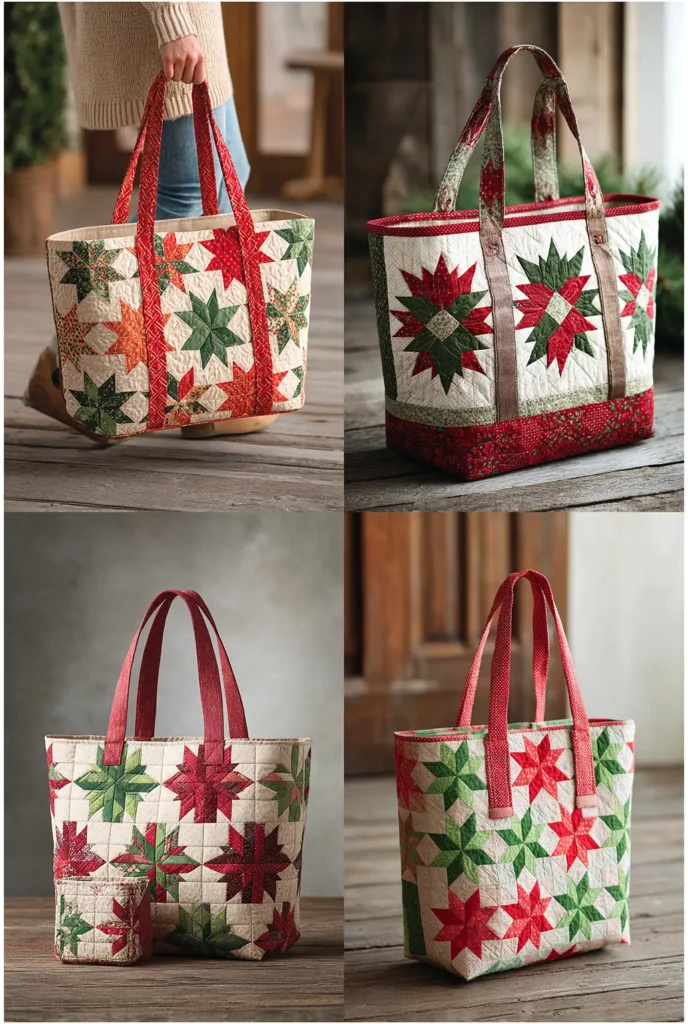
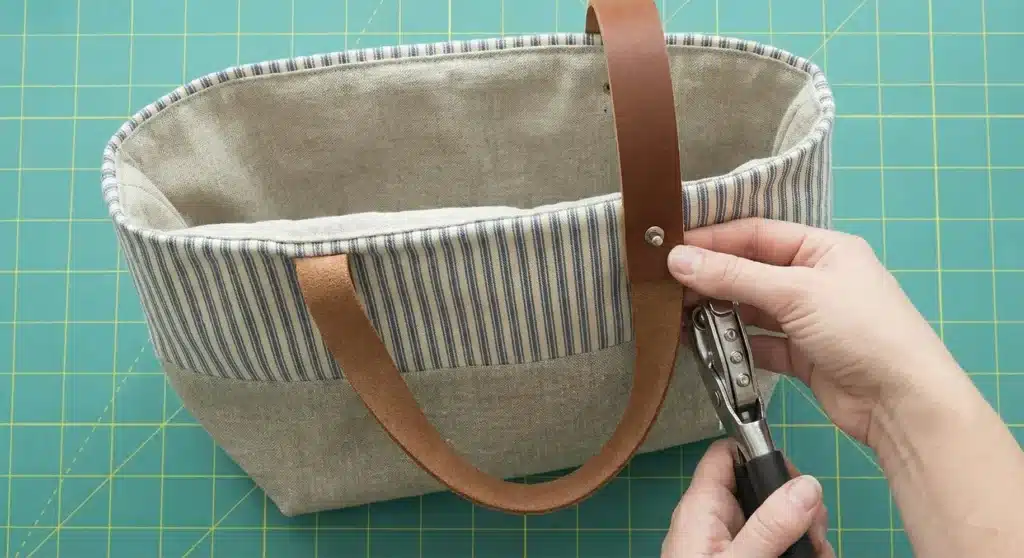
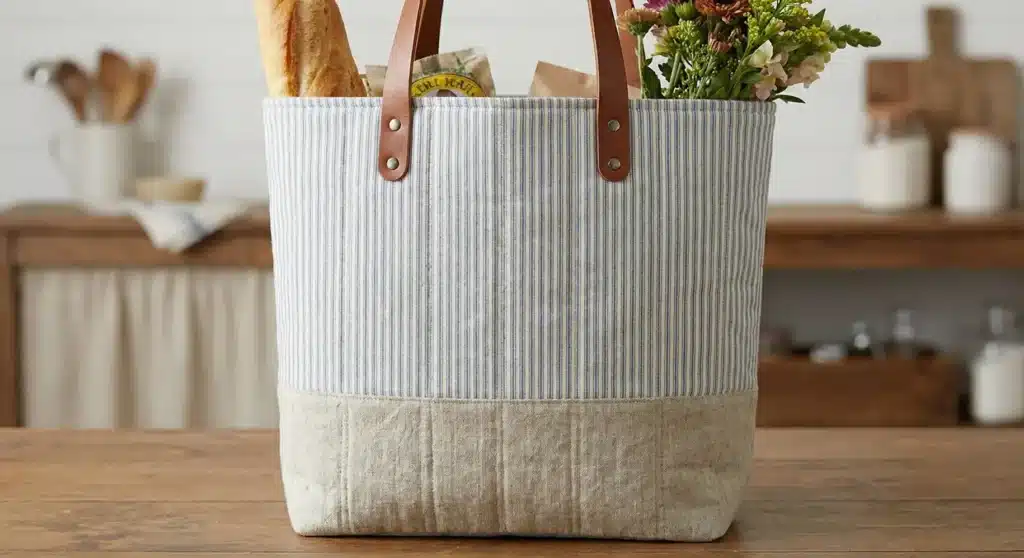
18. Rustic Farmhouse Quilted Grocery Tote
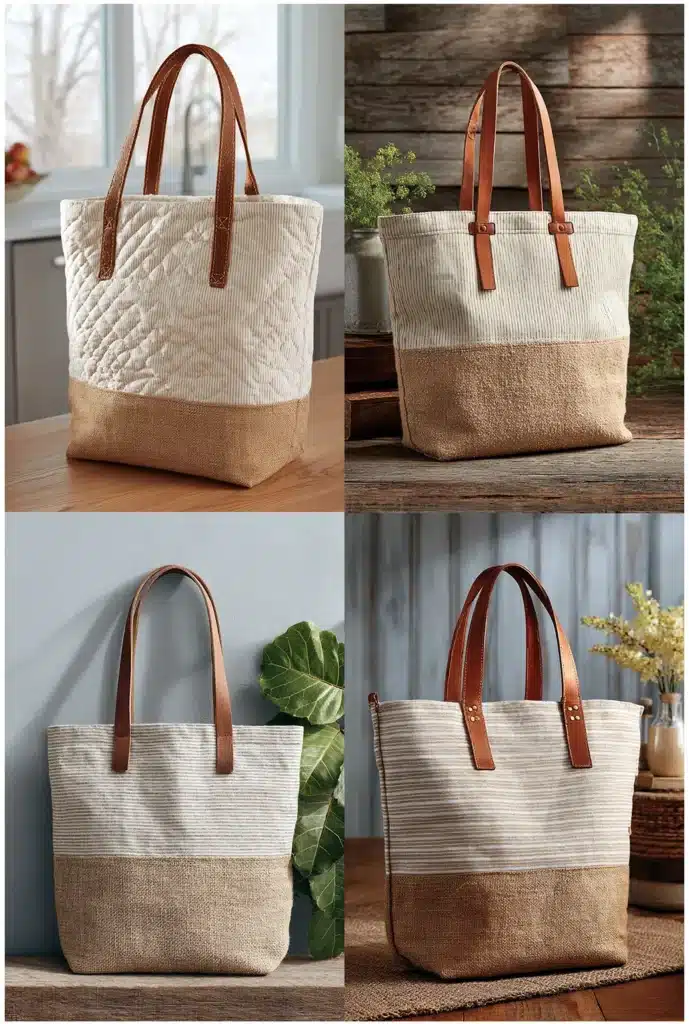
This tote embodies the cozy, utilitarian aesthetic of modern farmhouse style. By combining classic “ticking stripe” fabric with a durable textured bottom (like faux burlap or linen), you create a bag that looks right at home at a farmers’ market or hanging on a mudroom hook.
Finished Dimensions: Approximately 15″ wide x 16″ tall x 4″ deep.
Materials Needed:
- Top Outer Fabric (Ticking Stripe): 2 pieces, cut to 17″ x 12″.
- Bottom Outer Fabric (Linen or Faux Burlap): 2 pieces, cut to 17″ x 8″ (Darker color is better for the base to hide dirt).
- Lining Fabric: 2 pieces of unbleached muslin or canvas, cut to 17″ x 19″.
- Batting: 2 pieces of low-loft cotton batting, cut to 17″ x 19″.
- Handles: 2 strips of leather (1″ wide), 26″ long.
- Notions: Rivets (optional) or heavy-duty thread, denim needle.
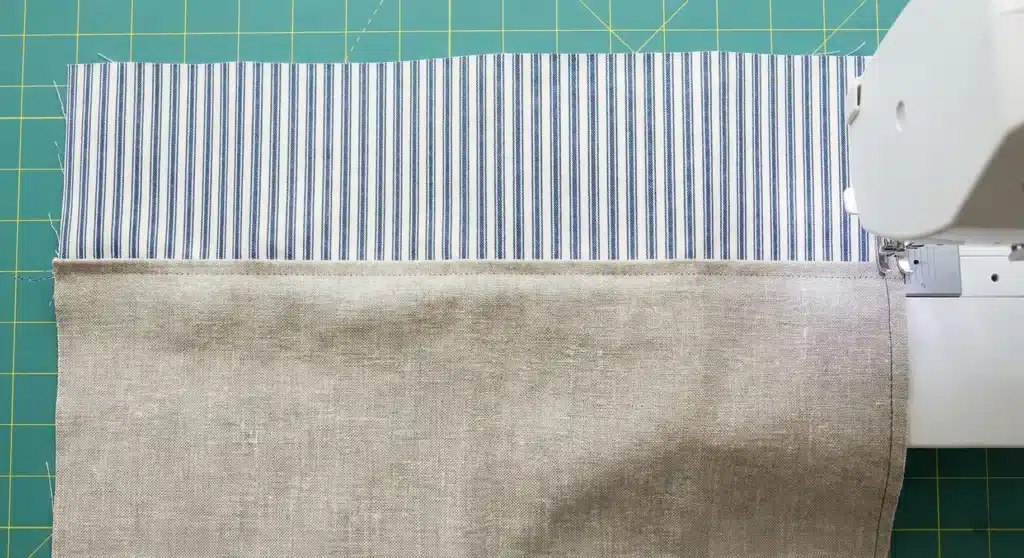
Step 1: Create the Two-Tone Panel
- Place one Top Fabric piece (stripe) and one Bottom Fabric piece (linen), Right Sides Together.
- Sew them together along the long (17″) edge with a 1/2″ seam allowance.
- Press the seam allowance toward the darker bottom fabric.
- Topstitch 1/8″ away from the seam on the bottom fabric side. This strengthens the joint.
- Repeat for the second panel. You now have two panels measuring approximately 17″ x 19″.
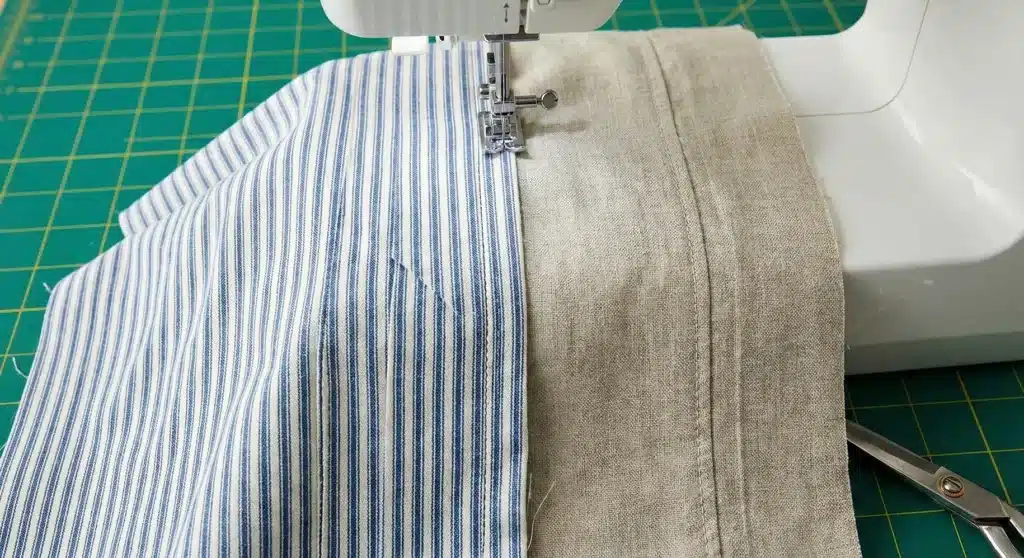
Step 2: Quilt the Vertical Lines
- Place your pieced panel on top of the batting. Baste in place.
- Quilt vertical channels: Follow the lines of the ticking stripe fabric! Stitch straight vertical lines spaced about 1 to 2 inches apart down the length of the bag.
- This simple quilting adds structure without distracting from the rustic fabric texture.
Step 3: Attach Leather Handles
- On the front panel, measure 4.5 inches in from the left and right sides.
- Place the raw ends of your leather straps at these marks, overlapping the top edge of the fabric by about 1 inch.
- Attach: You can sew a box-with-an-X through the leather (use a leather needle) OR punch holes and set metal rivets for an authentic farmhouse look. (If using rivets, wait until the bag is fully finished to install them through all layers, or install now through just the outer panel).
Step 4: Construct the Bag Exterior
- Place the front and back panels, Right Sides Together. Ensure the seam lines where the stripe meets the bottom linen match up perfectly on the sides.
- Sew the side seams and the bottom seam with a 1/2″ seam allowance.
- Box the corners: Cut a 2″ square from both bottom corners. Pinch the opening so the side seam meets the bottom hem, and sew across.
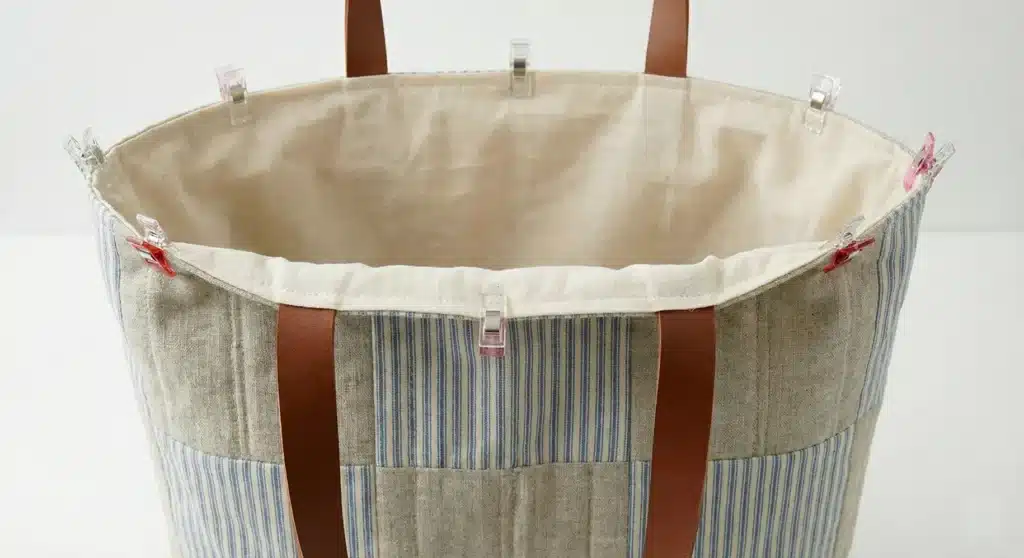
Step 5: Assemble the Lining
- Place the lining pieces Right Sides Together.
- Sew the sides and bottom, leaving a 6-inch gap in the bottom seam.
- Box the lining corners (2″ cut) to match the exterior.
Step 6: Final Assembly
- Turn the exterior bag Right Side Out.
- Please insert it into the lining bag (Right Sides Together).
- Sew around the top rim with a 1/2″ seam allowance.
- Turn the bag right side out through the lining gap. Stitch the gap closed.
- Topstitch: Tuck the lining inside and press the rim well. Topstitch 1/4″ from the edge. (If you didn’t rivet the handles in Step 3, you can attach them now using rivets through the finished rim).
Pro Design Tip: “Faux Burlap” (a polyester/cotton weave that looks like burlap but is soft) is much better than real burlap for this project. Real burlap sheds fibers, has a distinct smell, and scratches skin. If you want the look without the itch, look for “Osnaburg” cotton or a heavy linen-look upholstery fabric.
Budget Consideration: Upcycle coffee bean sacks or grain sacks for the bottom panel. Many local coffee roasters will give you empty burlap sacks for free or for a few dollars. If using real burlap, be sure to line it with a layer of scrap cotton before quilting, so the batting doesn’t bear (poke through) the loose weave.
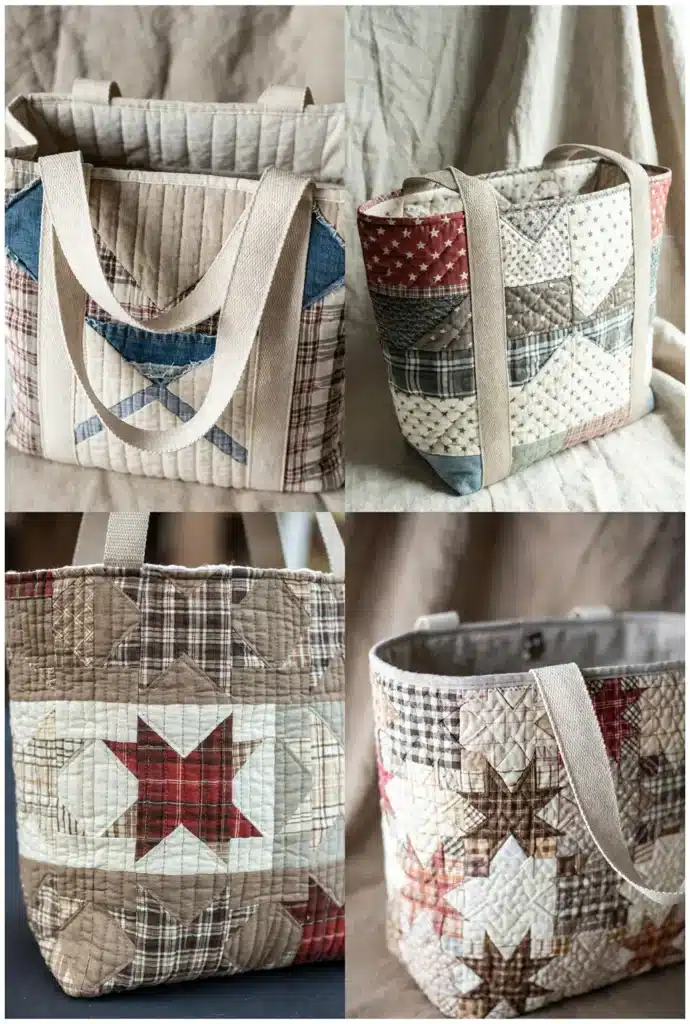
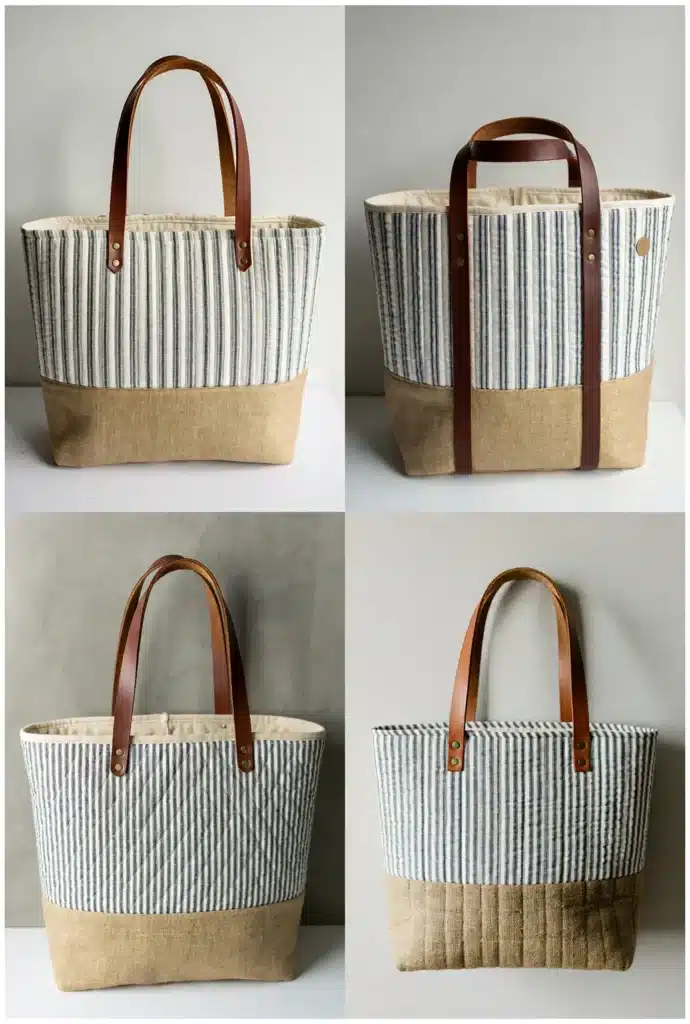
19. Ombre Quilted Yoga Mat Tote Ideas
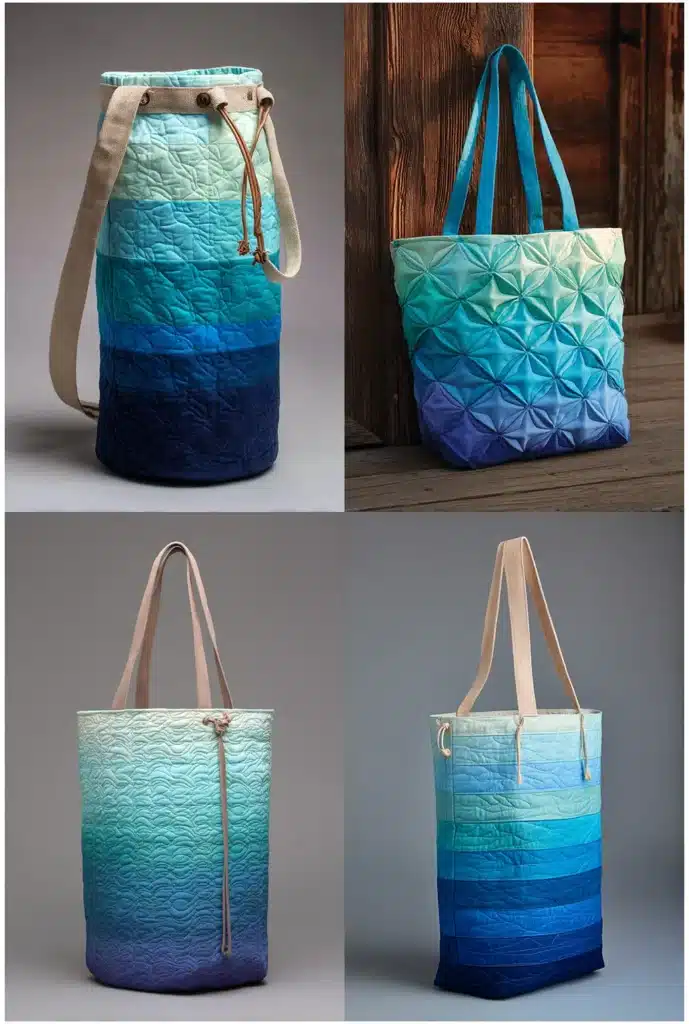
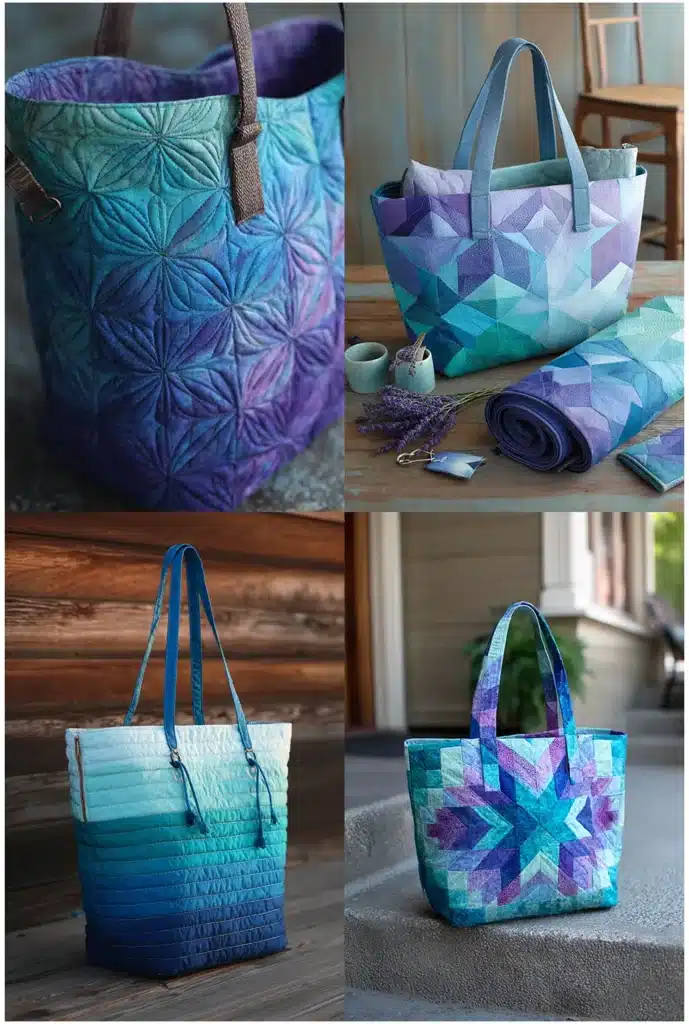
This bag is designed specifically for wellness enthusiasts. It features a tall, slender shape to accommodate a rolled standard yoga mat, with a serene “ombre” gradient effect that transitions from light to dark—perfect for setting a calming mood before class.
Finished Dimensions: Approximately 26″ tall x 8″ wide x 6″ deep (Cylindrical/Boxy shape).
Materials Needed:
- Ombre Fabrics: 5 strips of fabric in a gradient (e.g., Pale Blue, Sky Blue, Teal, Navy, Midnight), each cut to 6.5″ x 22″.
- Lining Fabric: 1 piece, cut to 29″ x 22″ (Water-resistant nylon is good for sweaty gear).
- Batting: 1 piece, cut to 30″ x 23″.
- Strap: 1 piece of sturdy cotton webbing, 36″ long (for cross-body carry).
- Drawstring Casing: 1 strip of fabric, 5″ x 21″.
- Cord/Toggle: 1 yard of cord and a spring toggle.
Step 1: Piece the Ombre Panel
- Arrange your 5 fabric strips in order from lightest to darkest.
- Sew them together along the long (22″) edges using a 1/4″ seam allowance.
- Press seams open or toward the darker fabric.
- You now have one tall panel (approx 30″ tall x 22″ wide). This will form the entire body of the bag (front, back, and sides wrapping around).
- Trim the panel to exactly 29″ tall x 21″ wide.
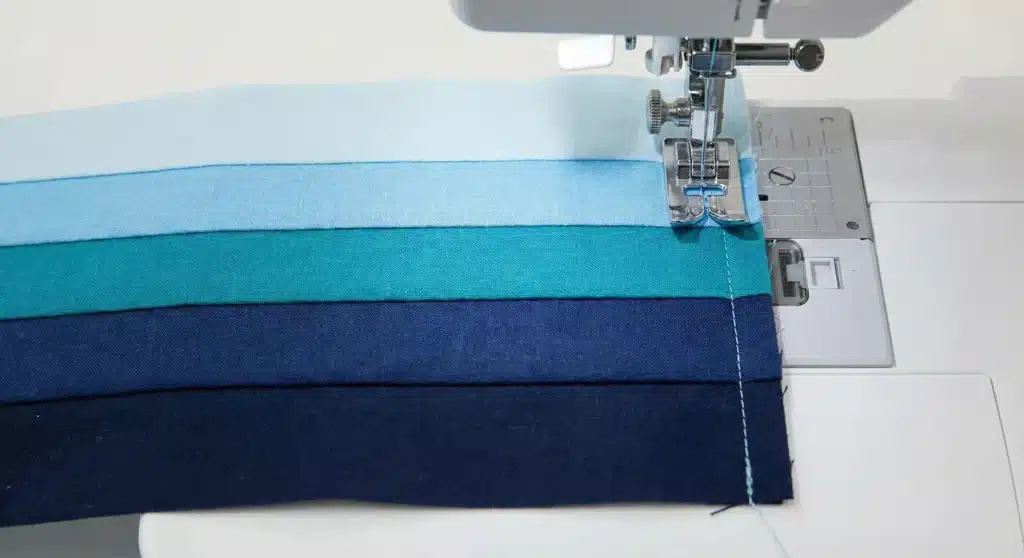
Step 2: Wave Quilting
- Baste the ombre panel to the batting.
- Quilt organic waves: Instead of straight lines, use a walking foot to sew gentle, flowing horizontal waves across the color changes. This mimics water or energy flow.
- Trim excess batting.
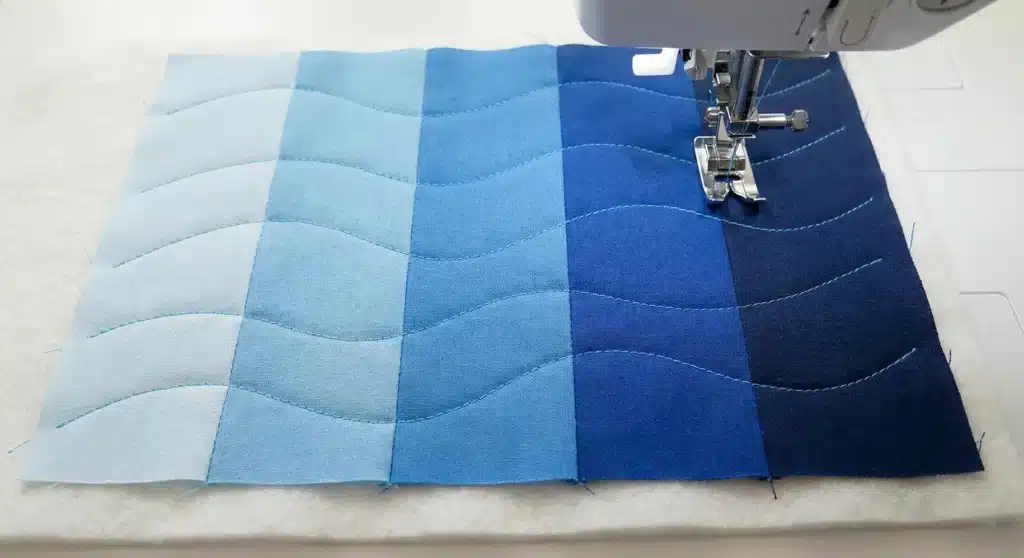
Step 3: Construct the Tube
- Fold the quilted panel in half lengthwise, Right Sides Together. It should now measure 29″ tall x 10.5″ wide.
- Sew along the long side edge and the bottom edge with a 1/2″ seam allowance.
- Box the bottom: This bag needs a deep base to fit a rolled mat. Cut a 3″ square from both bottom corners. Pinch, align seams, and sew across. This creates a 6-inch square base.
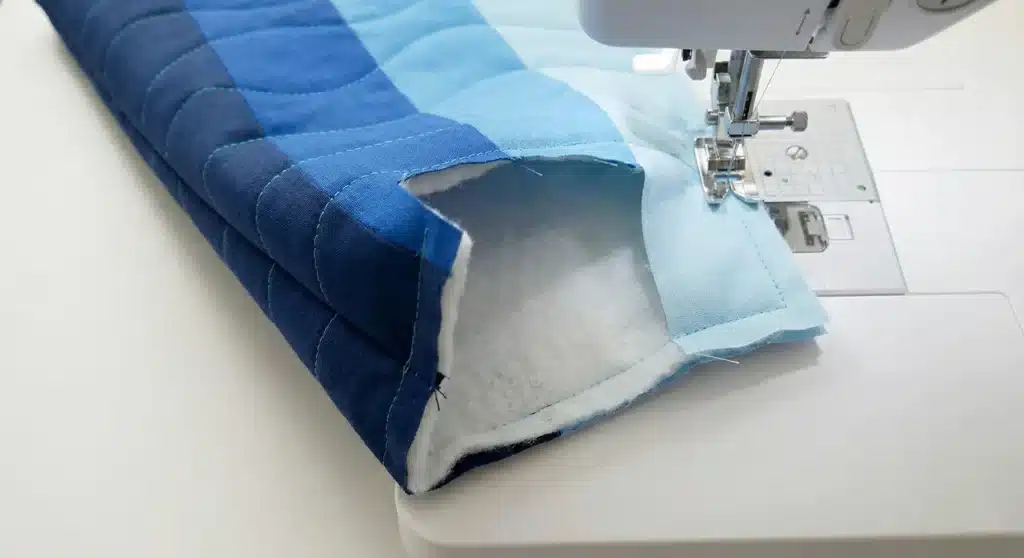
Step 4: Attach the Strap
- Turn the bag Right Side Out.
- Position the webbing strap ends. Since this is a tall vertical bag, attach one end of the strap to the top rim and the other end about 10 inches down from the top (on the back seam or side). This balance keeps the bag from tipping over while you walk.
- Baste the strap ends securely in place.
Step 5: Create Drawstring Lining
- Sew the Lining Fabric into a tube (side/bottom), box corners (3″ cut), leaving a gap in the bottom for turning.
- Make the Casing: Take your 5″ x 21″ casing strip. Sew the short ends together to make a loop (leave a small 1″ opening in the seam for the cord). Fold in half lengthwise (wrong sides together).
- Sandwich the folded casing loop between the Exterior Bag (Right Side Out) and the Lining Bag (Inside Out). The raw edges of the casing should align with the raw edges of the bag rim.
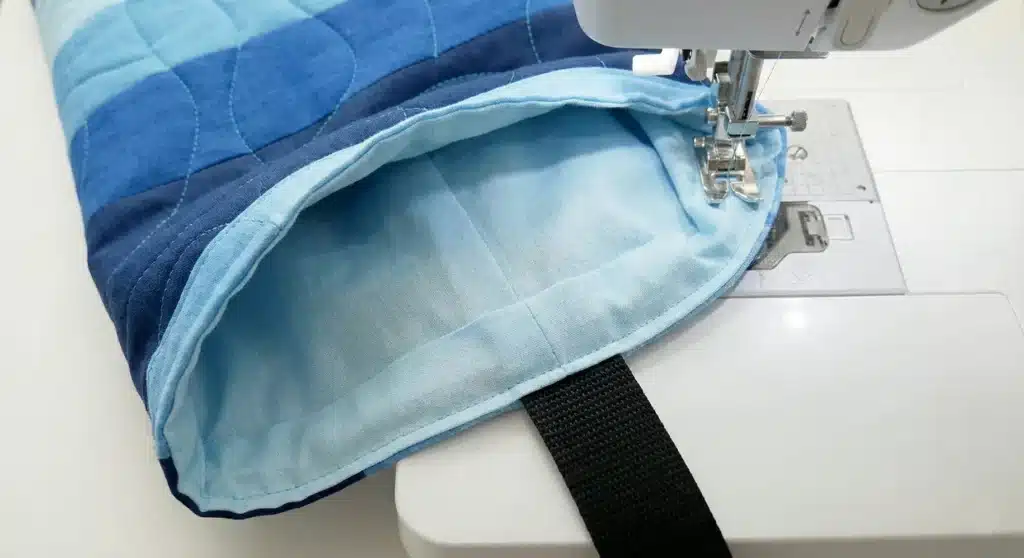
Step 6: Final Assembly
- Sew around the top rim (through Exterior, Strap, Casing, and Lining).
- Turn the right side out through the lining gap. Close the gap.
- Topstitch the rim to flip the casing upward.
- Thread your cord through the casing opening using a safety pin, attach the toggle, and knot the ends. This allows you to cinch the top closed over your mat.
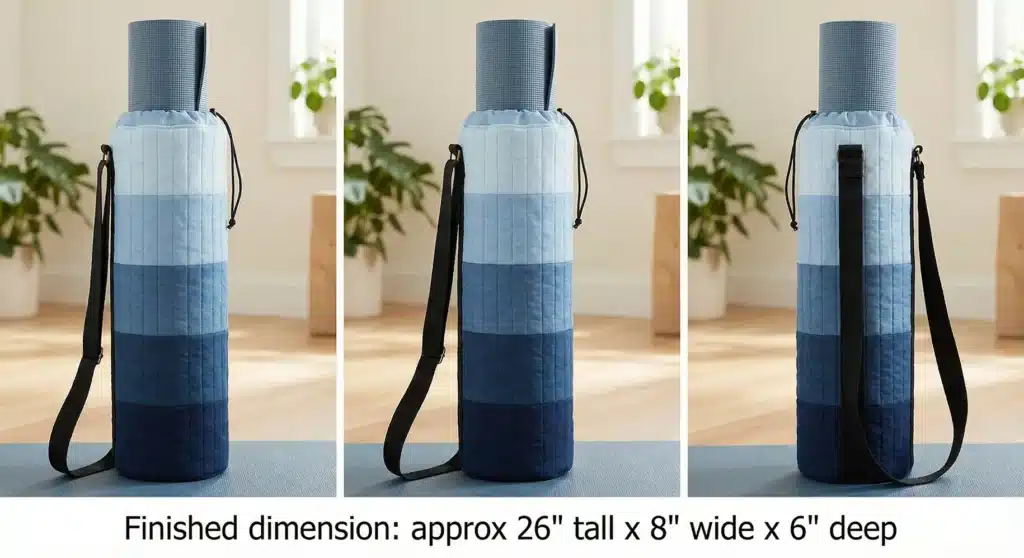
Pro Design Tip: Add a ventilation grommet. Yoga mats can get sweaty. Install a large metal grommet (1/2″ size) near the bottom of the quilted exterior panel before you sew the bag together. This allows air to circulate and prevents odors from building up inside the bag.
Budget Consideration: You can achieve a perfect ombre effect without buying 5 different fabrics by using one white cotton sheet and fabric dye. Dip-dye the fabric, gradually adding more water to dilute the dye as you move up the fabric, creating a seamless gradient for the cost of a single bottle of Rit dye.
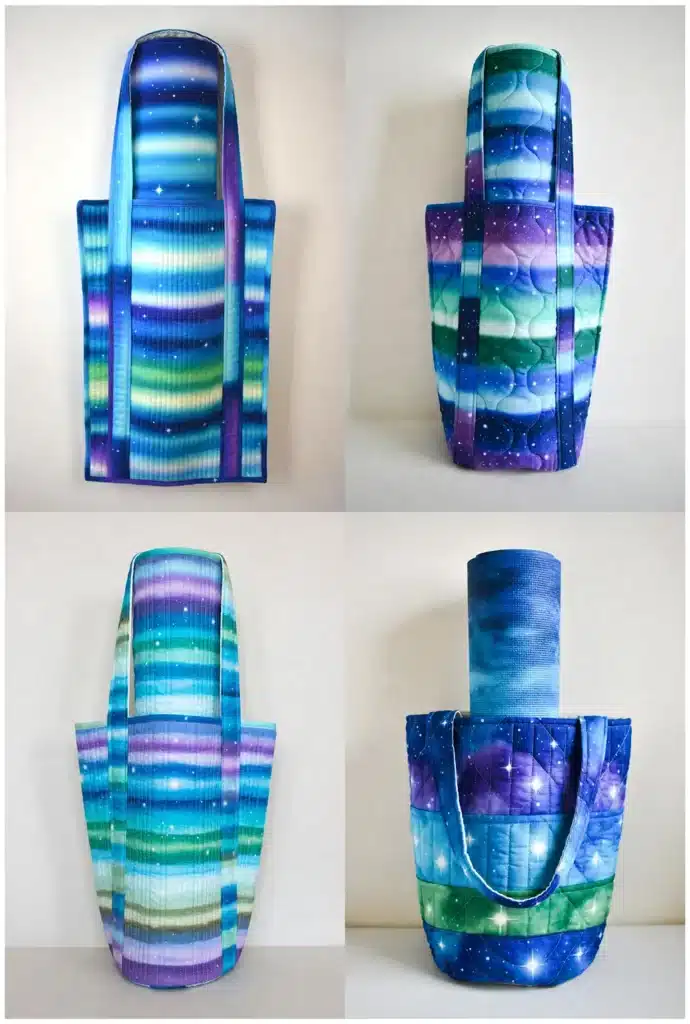
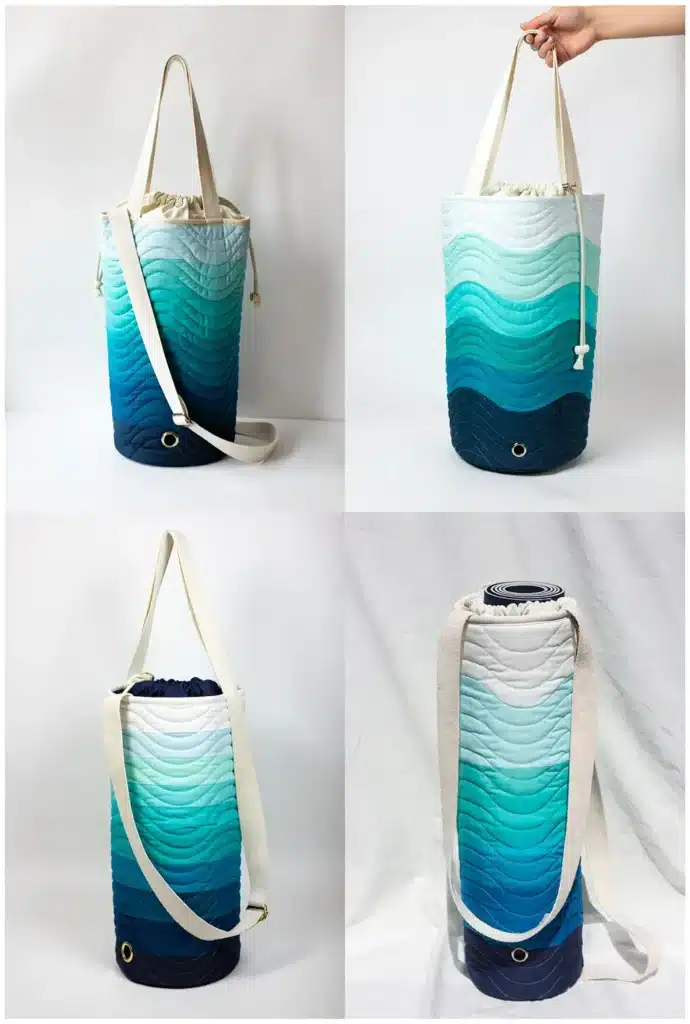
20. Nautical Quilted Beach Shopper Design
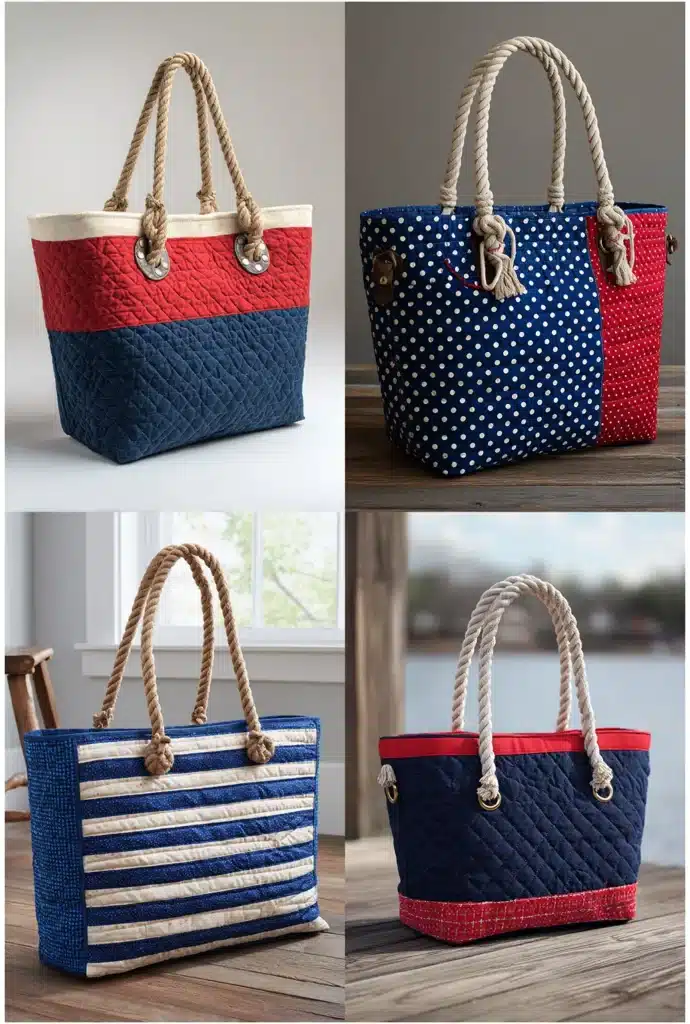
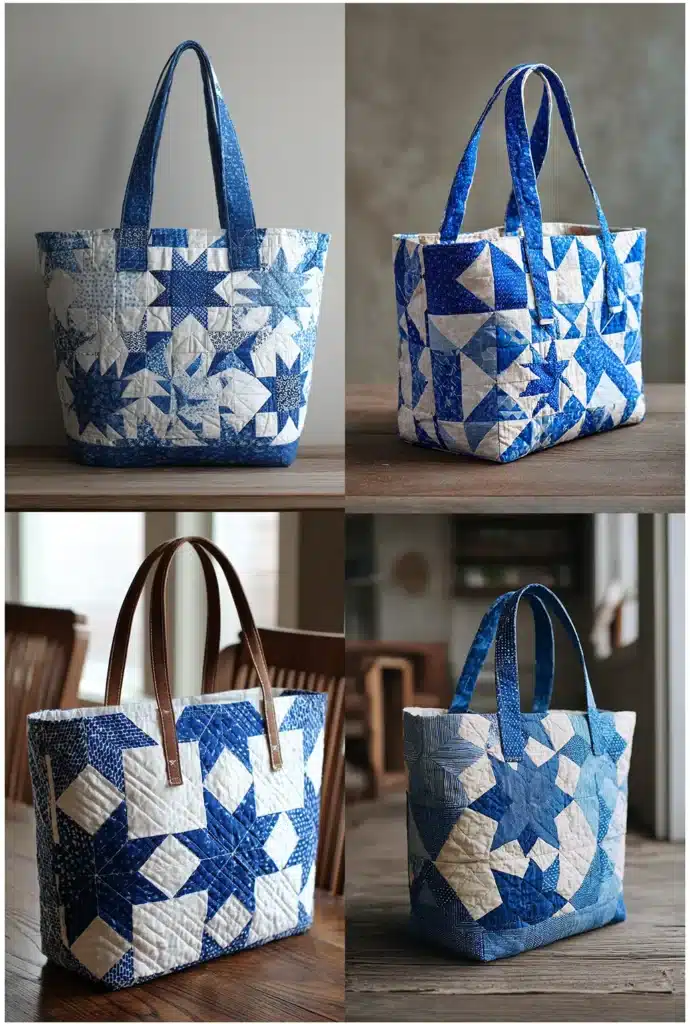
This oversized tote is designed for days by the water. It features classic nautical elements like rope handles and metal grommets, combined with a spacious interior that can fit three beach towels, sunscreen, and a book.
Finished Dimensions: Large! Approximately 18″ wide x 15″ tall x 6″ deep.
Materials Needed:
- Outer Fabric: 2 pieces of Navy Blue or Red Canvas, cut to 22″ x 19″.
- Lining Fabric: 2 pieces of water-resistant fabric (like PUL or nylon), cut to 22″ x 19″.
- Batting: 2 pieces of low-loft cotton batting or fusible fleece, cut to 22″ x 19″.
- Handles: 2 yards of thick cotton rope (1/2″ diameter).
- Hardware: 4 large metal grommets (curtain grommets work perfectly, usually 1.5″ diameter).
- Notions: Fray Check or tape (for rope ends), hammer (for setting grommets).
Step 1: Quilt the “Waves”
- Sandwich your Outer Fabric and Batting together (baste with spray or pins).
- Quilt wave patterns: Using your walking foot, stitch gentle, undulating horizontal lines across the width of the bag. Space them about 2 inches apart. This mimics the ocean swell and adds a nice texture to the solid canvas.
- Trim the panels to ensure they are square (approx 22″ x 19″).
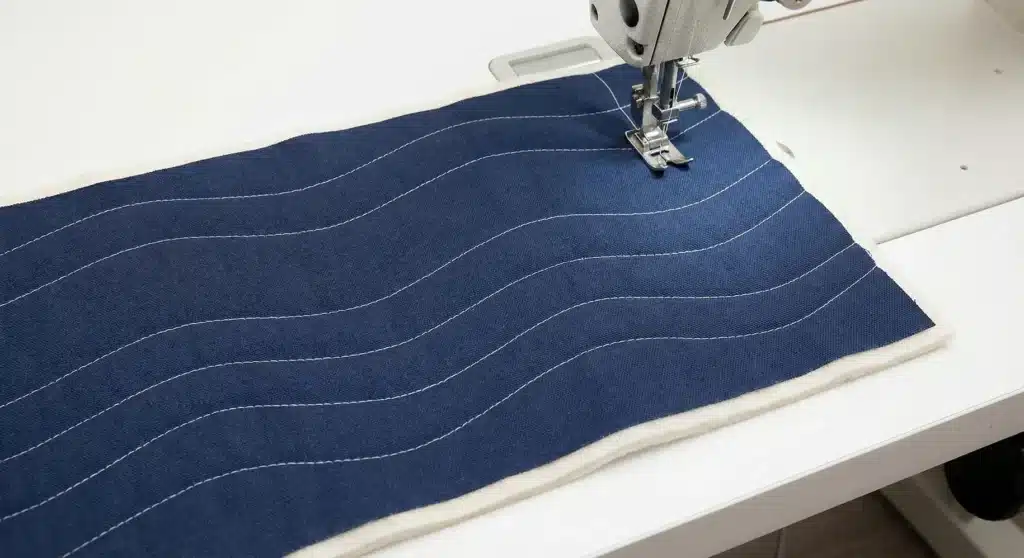
Step 2: Construct the Outer Bag
- Place the two quilted panels Right Sides Together.
- Sew the side seams and the bottom seam with a 1/2″ seam allowance.
- Box the corners: Cut a 3″ square from both bottom corners. Pinch the opening so the side seam matches the bottom hem. Sew across the raw edge. This creates a wide 6-inch base for stability in the sand.
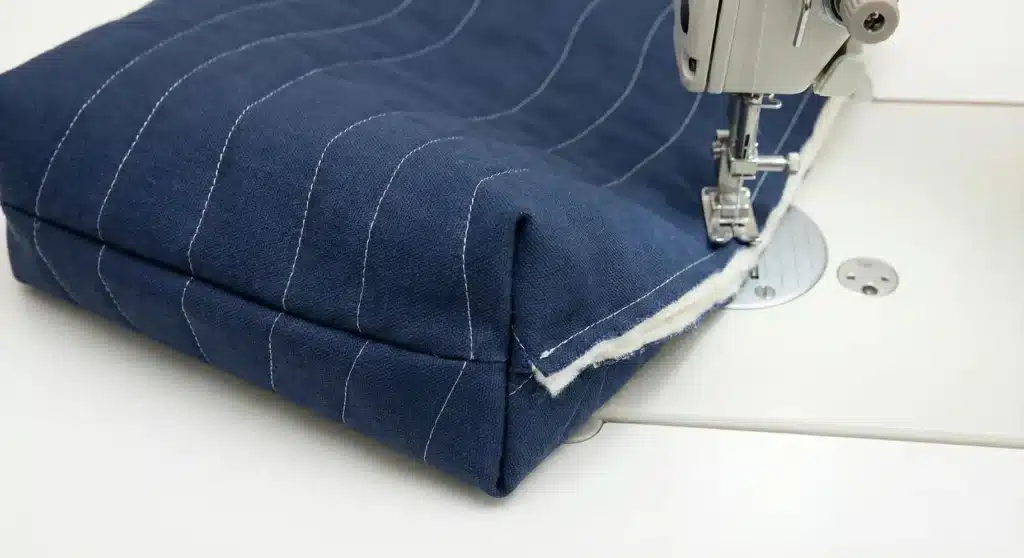
Step 3: Construct the Lining
- Place your lining pieces, Right Sides Together.
- Sew the side seams and the bottom seam, leaving a huge 8-inch gap in the bottom seam (thick rope handles and canvas need a big exit hole).
- Box the lining corners (3″ cut) to match the exterior.
Step 4: Assemble the Bag Layers
- Turn the Outer Bag Right Side Out.
- Place it inside the Lining Bag (Inside Out). Right Sides Together.
- Sew around the top rim with a 1/2″ seam allowance.
- Turn the bag right side out through the lining gap. Stitch the gap closed.
- Topstitch: Tuck the lining inside. Topstitch around the rim twice (1/8″ and 1/2″ from the edge) to tightly bind the layers before installing hardware.
Step 5: Install Grommets
- Measure 5 inches in from the side seams and 1.5 inches down from the top edge on both the front and back. Mark these 4 spots.
- Trace the inner circle of your grommet at these marks.
- Carefully cut the holes through all layers (outer, batting, and lining).
- Snap the grommets in place (most curtain grommets just snap together by hand or with a firm press of the palm; others require a hammer).
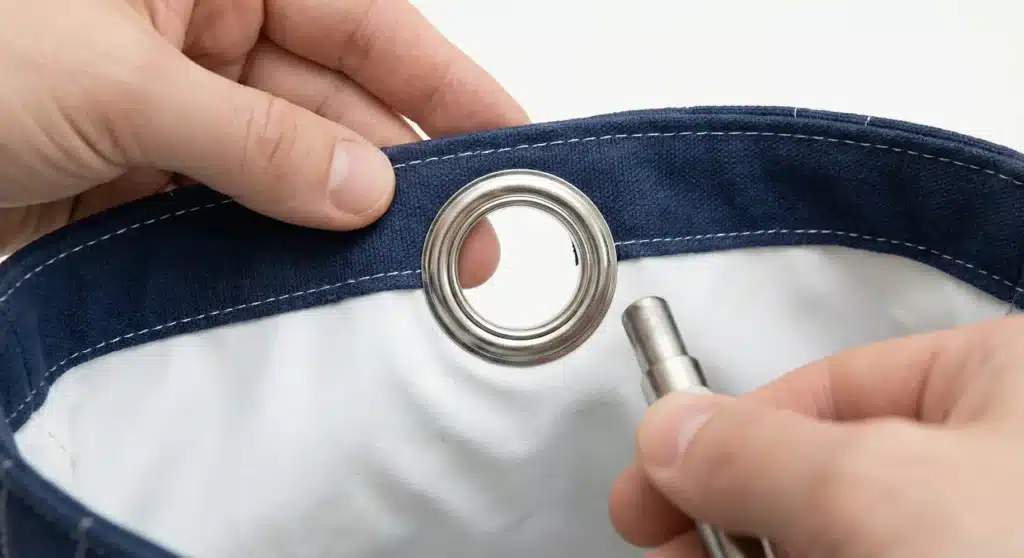
Step 6: Attach Rope Handles
- Cut your rope into two 36-inch lengths.
- Wrap the ends of the rope with masking tape to prevent fraying while you work.
- Thread one end of the rope through a grommet from the outside to the inside.
- Tie a tight overhand knot on the inside. Remove the tape and apply “Fray Check” or heat-seal the rope end (if synthetic) to keep it neat.
- Thread the other end through the corresponding grommet and knot. Repeat for the second handle.
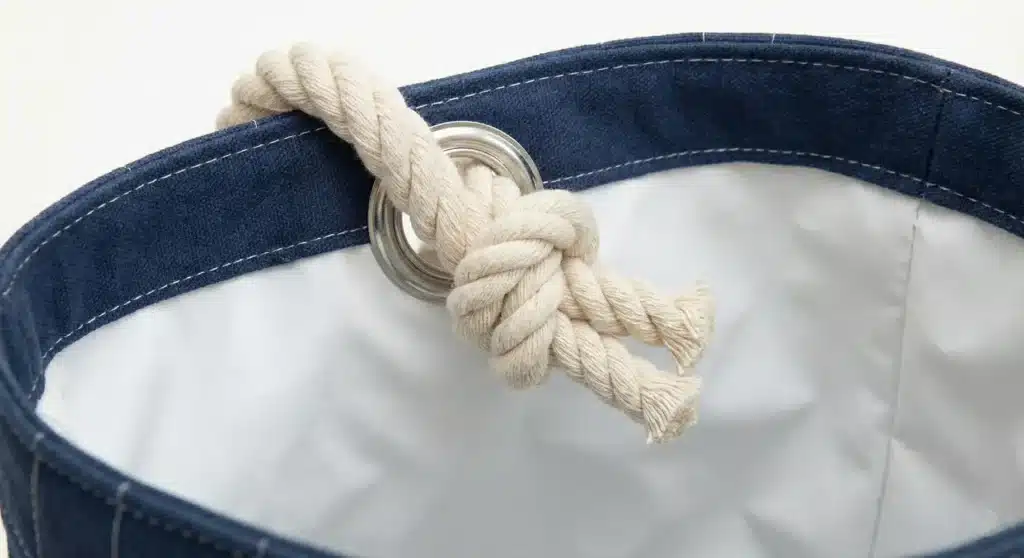
Pro Design Tip: Create a “Sand-Release” bottom. Instead of using canvas for the boxed bottom corners of the lining, sew in a strip of heavy-duty mesh. If sand gets in your bag, you can pull the lining out, give it a shake, and the sand will fall right through the mesh without you having to vacuum the corners of the bag.
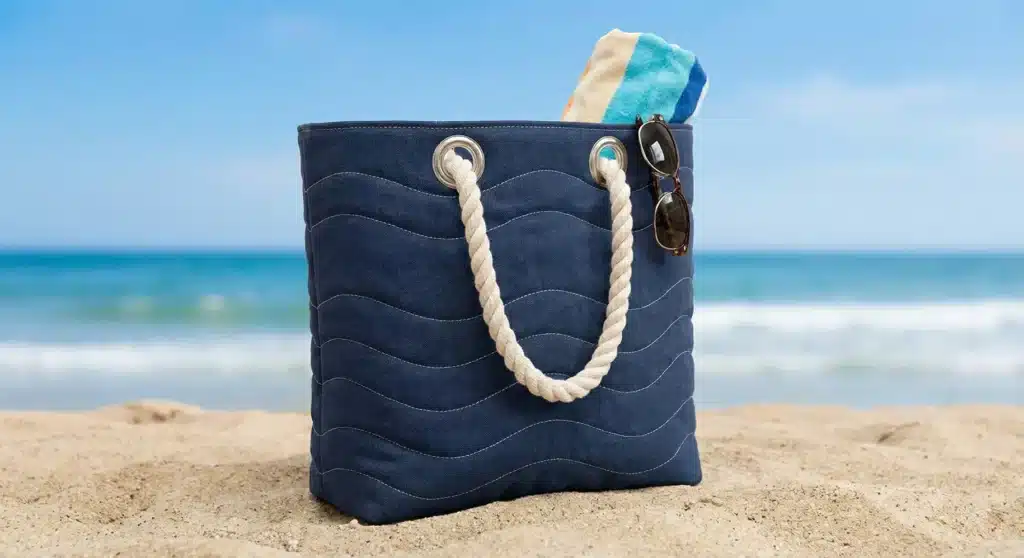
Budget Consideration: Instead of buying expensive waterproof lining fabric, use a vinyl shower curtain. You can buy a patterned or solid shower curtain at a dollar store for under $5, and it provides enough waterproof material to line 3 or 4 beach bags.
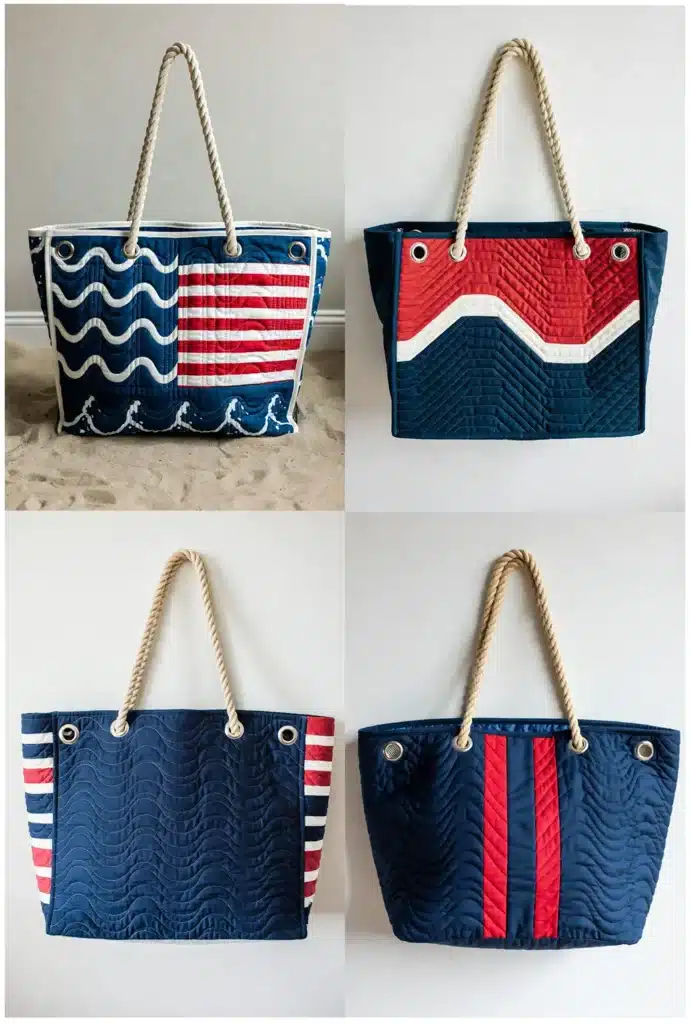
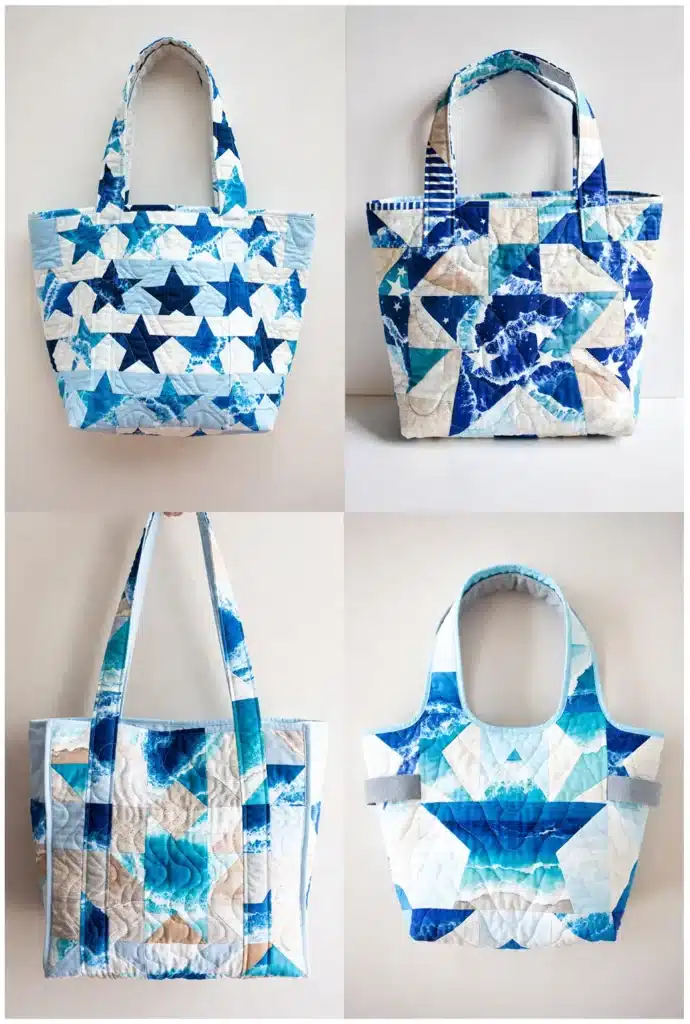
Conclusion
In exploring these 20 Stylish Quilted Tote Bag Patterns, it becomes abundantly clear that the realm of quilted carryalls is one of limitless potential and personalized utility. Each pattern, from the Classic Patchwork to the French Seam Quilted Tote with Clean Finish, serves as a building block for creating something that is uniquely yours—a piece that blends practical needs with artistic satisfaction. The journey from a simple market shopper to a sophisticated leather-trimmed laptop bag illustrates how quilting elevates the ordinary tote into a specialized item, infused with intention, durability, and beauty.
The actual value of this collection lies in its celebration of diversity in both technique and purpose. It demonstrates that quilting is not a monolithic craft but a flexible language of texture and pattern. Whether drawn to the bold geometry of a modern design, the rustic charm of a farmhouse aesthetic, or the meticulous detail of paper piecing, there is a pathway here for every maker. These projects empower you to create bags that are not merely functional containers but also expressions of individuality, turning everyday errands into moments of style.
As you close this guide, you are equipped with more than just a list of patterns; you hold a blueprint for crafting companions for life’s varied adventures. The Reversible Quilted Tote offers versatile flair, the Protective Padded Laptop Bag provides peace of mind, and the Nautical Quilted Beach Shopper promises sunny-day fun. Each completed tote becomes a testament to skill learned and creativity unleashed, a handmade object designed to be used, admired, and loved.
Therefore, let this not be the end, but a beginning. Select the pattern that speaks to your next need or creative whim, gather your fabrics, and embark on the rewarding process of making. With every stitch, you are weaving together function and art, crafting a quilted tote that is as dependable as it is distinctive, ready to carry your world with style and grace.
