
Sophisticated Desert Elegance: 20 Navajo Quilt Pattern Ideas for a Stylish and Comfortable Home
When designing a warm, inviting living space, exploring Navajo Quilt Pattern Ideas offers a uniquely powerful approach to interior styling. What truly sets a Navajo quilt pattern apart from others is its architectural translation of historic, woven tapestries into pieced fabric. Unlike the delicate florals of vintage patchwork or the soft, sweeping curves of traditional appliqué, Navajo-inspired designs rely on bold, serrated diamonds, striking step-motifs, and strong horizontal stripes grounded in rich desert earth tones. This distinct geometric structure is incredibly useful for the modern home; it serves as a bold visual anchor that commands attention, allowing you to establish a sophisticated, high-end aesthetic without cluttering the room with additional decor.
Contents
- 1 Navajo Quilt Pattern Ideas
- 2 1. Elegant Navajo Quilt Pattern Designs for Master Bedroom Bed Covers
- 2.1 “The Sedona Mesa” Southwestern Geometric Bed Cover
- 2.1.1 Step 1: Cutting the Horizontal Horizon Bands
- 2.1.2 Step 2: Crafting the Stepped Terraces (HSTs)
- 2.1.3 Step 3: Assembling the Central Diamond (The Hub)
- 2.1.4 Step 4: Piecing the Edge and Corner Motifs
- 2.1.5 Step 5: Setting the Desert Tapestry
- 2.1.6 Step 6: “Loom Warp” Quilting and the Tailored Frame
- 2.1 “The Sedona Mesa” Southwestern Geometric Bed Cover
- 3 2. Earth Tone Navajo Quilts for Warm and Stylish Master Suites
- 4 3. Sophisticated Navajo Quilt Patterns for Stylish Bed Runners
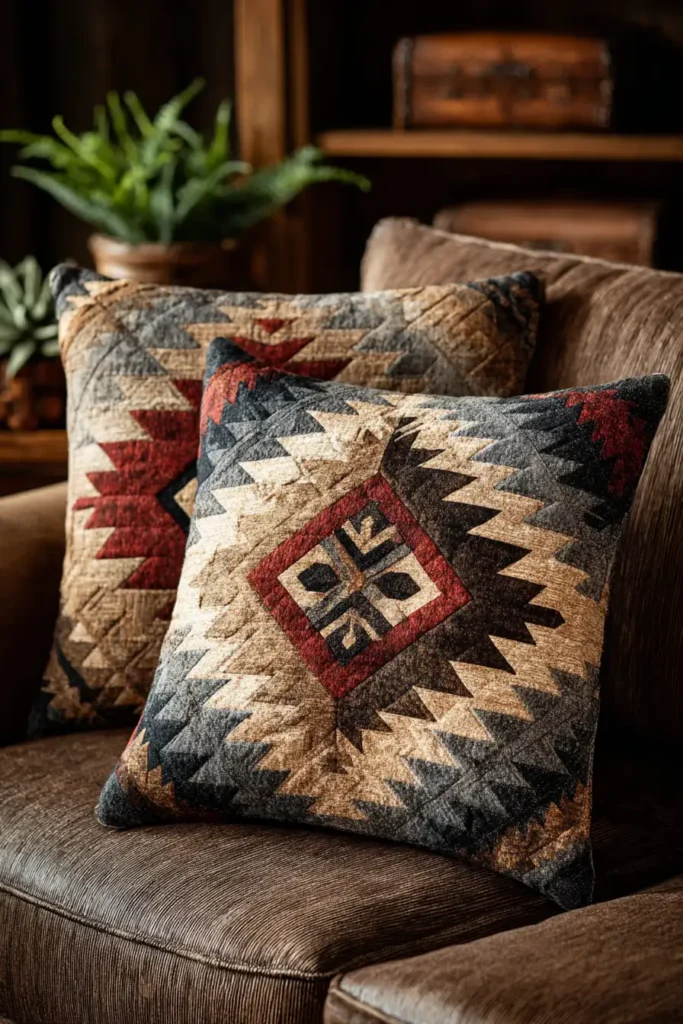
- 5 4. Modern Desert Inspired Navajo Quilt Pillow Covers for Serene Sleep
- 6 5. Soft Cotton Navajo Quilt Sets for Comfortable Layered Bedding
- 6.1 “The Mesa Breeze” Lightweight Layering Quilt Set
- 6.1.1 Step 1: Cutting the Desert Palette for the Set
- 6.1.2 Step 2: Crafting the “Sunrise” Half-Square Triangles
- 6.1.3 Step 3: Assembling the Central Medallions
- 6.1.4 Step 4: Engineering the Layered Coverlet
- 6.1.5 Step 5: Constructing the Matching Pillow Shams
- 6.1.6 Step 6: Breathable Basting and “Desert Wind” Quilting
- 6.1 “The Mesa Breeze” Lightweight Layering Quilt Set
- 7 6. Traditional Navajo Quilt Patterns for Elegant Southwestern Bedrooms
- 8 7. Minimalist Navajo Quilt Designs for Modern Rustic Bedroom Accents
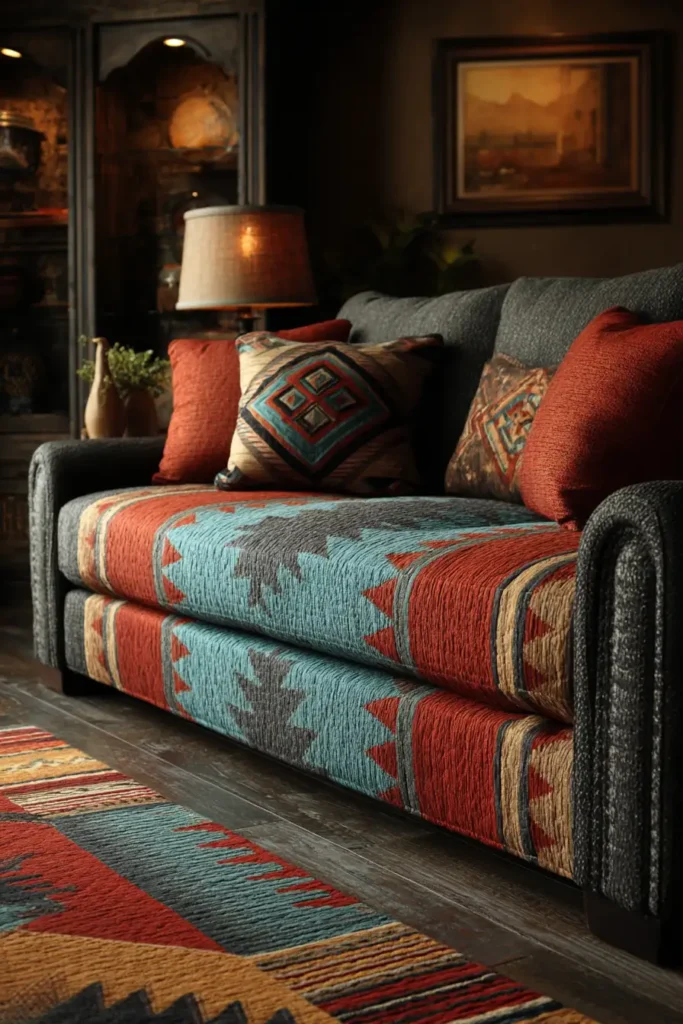
- 9 8. Chic Navajo Quilt Pattern Sofa Covers for Stylish Living Rooms
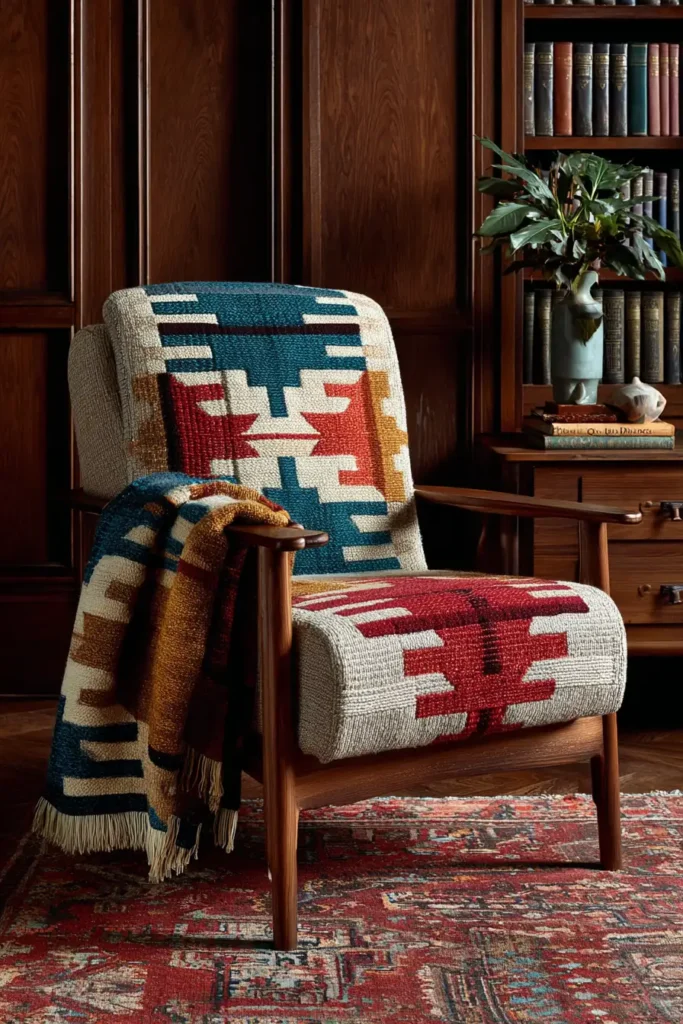
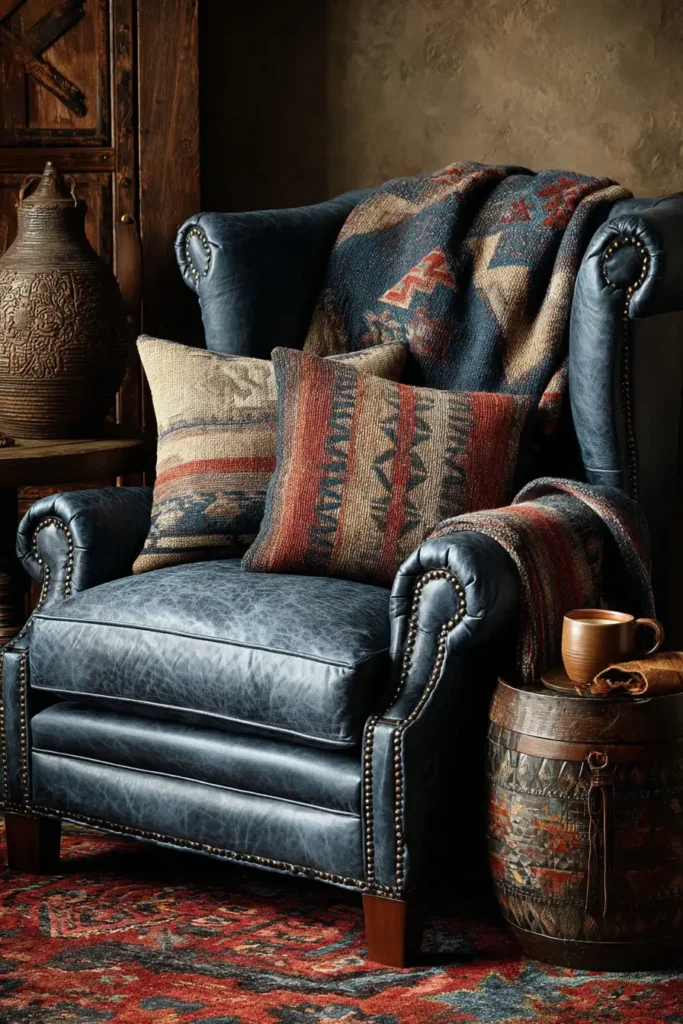
- 10 9. Sophisticated Navajo Tapestry Quilt Throws for Cozy Armchairs
- 11 10. Elegant Southwestern Navajo Quilt Table Runners for Dining Rooms
- 12 11. Durable Navajo Quilt Cushion Covers for Everyday Family Comfort
- 13 12. Rustic Desert Navajo Quilt Placemats for Beautiful Tablescapes
- 14 13. Cozy Quilted Navajo Floor Pillows for Relaxed Open Concept Spaces
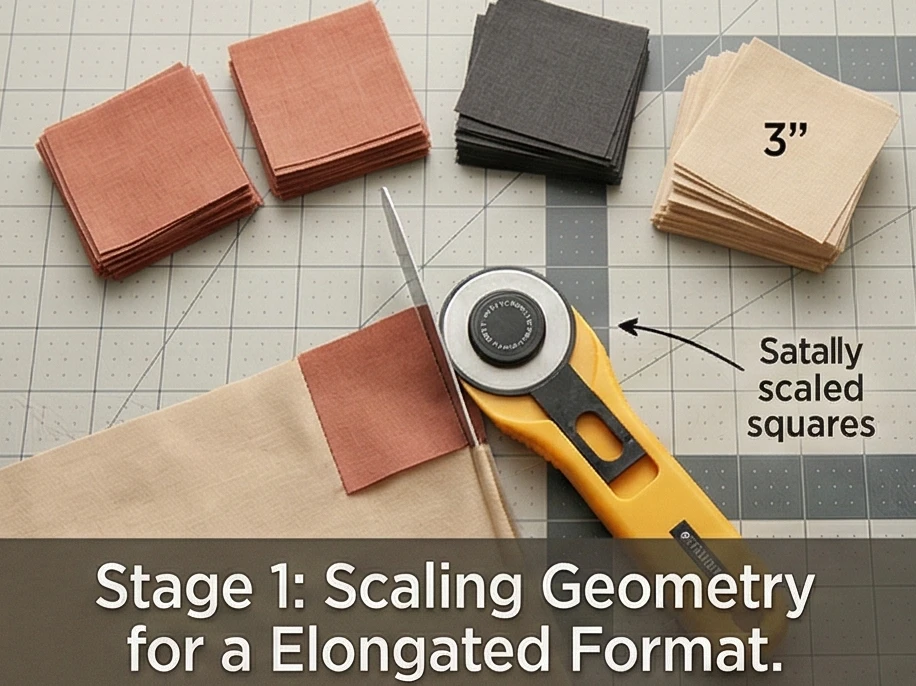
- 14.1 “The Canyon Floor” Oversized Quilted Floor Pouf
- 14.1.1 Step 1: Scaling the Monumental Geometry
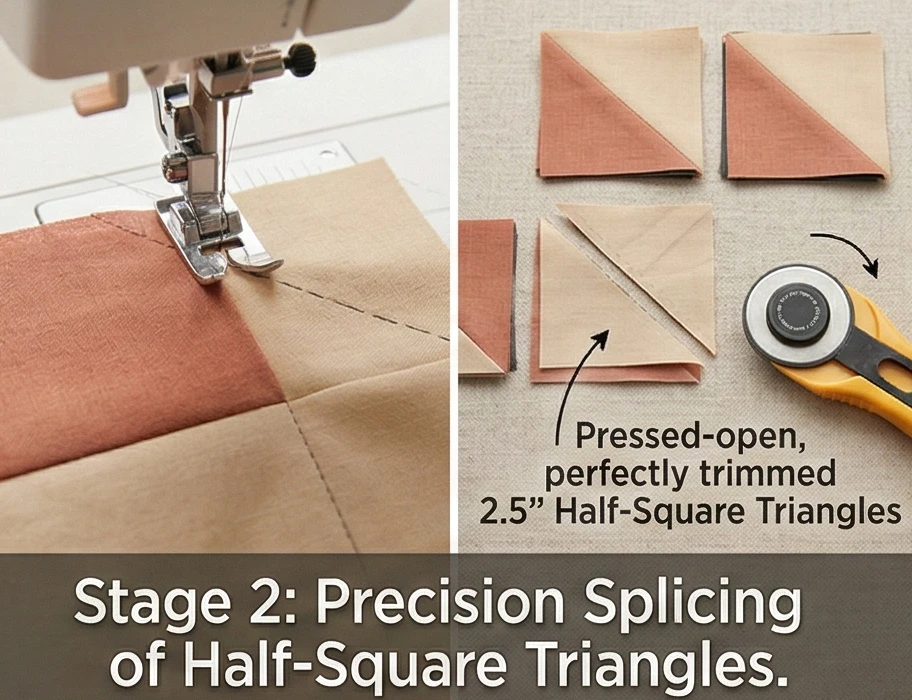
- 14.1.2 Step 2: Crafting the Large Terraces (HSTs)
- 14.1.3 Step 3: Assembling the Massive Medallion
- 14.1.4 Step 4: Framing the Seating Surface
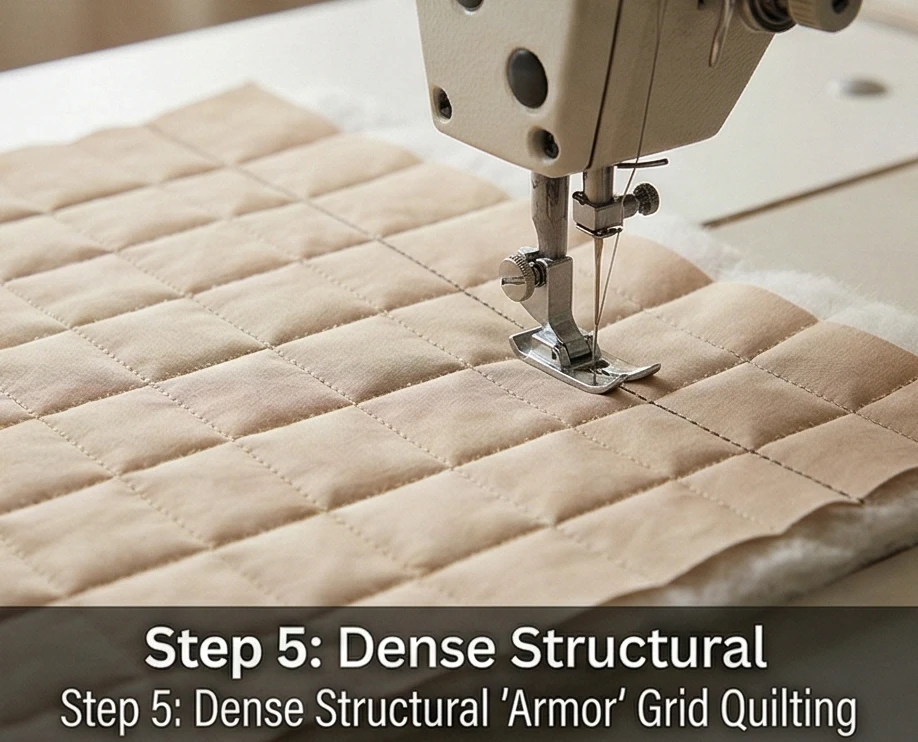
- 14.1.5 Step 5: Heavy Basting and “Woven Tapestry” Grid Quilting
- 14.1.6 Step 6: Engineering the 3D Gusset and Zipper Assembly
- 14.1 “The Canyon Floor” Oversized Quilted Floor Pouf
- 15 14. Modern Geometric Navajo Quilt Table Toppers for Centerpieces
- 16 15. Stylish Navajo Quilt Pattern Tote Bags for Everyday Elegance
- 16.1 “The Canyon Pathway” Everyday Elegance Navajo Tote
- 16.1.1 Step 1: Scaling the Vertical Geometry
- 16.1.2 Step 2: Crafting the Miniature Terraces (HSTs)
- 16.1.3 Step 3: Assembling the Central Tapestry Column
- 16.1.4 Step 4: Engineering the Heavy-Duty Canvas Shell
- 16.1.5 Step 5: Creating the Boxed Base (The Gusset)
- 16.1.6 Step 6: Waterproof Lining and Tailored Handles
- 16.1 “The Canyon Pathway” Everyday Elegance Navajo Tote
- 17 16. Chic Navajo Quilt Pattern Laundry Bags for Elegant Home Organization
- 18 17. Durable Quilted Navajo Market Bags for a Comfortable Carry
- 18.1 “The Canyonside” Heavy-Duty Market Bag
- 18.1.1 Step 1: Scaling the Oversized Central Motif
- 18.1.2 Step 2: Crafting the Stepped Terraces (HSTs)
- 18.1.3 Step 3: Assembling the Canyonside Medallion
- 18.1.4 Step 4: Engineering the Heavy-Duty Canvas Shell
- 18.1.5 Step 5: Building the Comfort-Carry Straps
- 18.1.6 Step 6: Boxed Gussets and Waterproof Assembly
- 18.1 “The Canyonside” Heavy-Duty Market Bag
- 19 18. Sturdy Southwestern Navajo Quilted Storage Totes for Utility and Style
- 19.1 “The High Desert Hold” Heavy-Duty Storage Tote
- 19.1.1 Step 1: Precision Scaling for the Storage Medallion
- 19.1.2 Step 2: Crafting the Heavy-Duty Terraces (HSTs)
- 19.1.3 Step 3: Assembling the Central Medallion
- 19.1.4 Step 4: Engineering the Structured Canvas Walls
- 19.1.5 Step 5: Foam Integration and Architectural Grid Quilting
- 19.1.6 Step 6: 3D Assembly, Lining, and Hardware
- 19.1 “The High Desert Hold” Heavy-Duty Storage Tote
- 20 19. Sophisticated Desert Motif Navajo Quilt Handbags for Daily Use
- 21 20. Striking Geometric Navajo Quilt Patterns for Elegant Wall Hangings
- 21.1 “The Canyon Wall” Acoustic Tapestry
- 21.1.1 Step 1: Scaling the Monumental Columns
- 21.1.2 Step 2: Crafting the “Falling Rain” Terraces (HSTs)
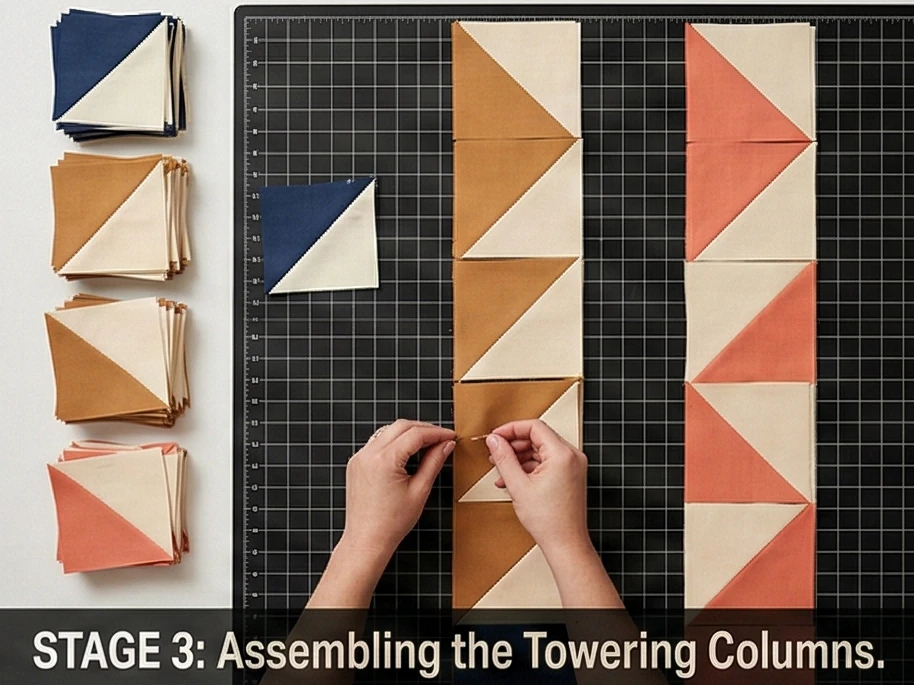
- 21.1.3 Step 3: Assembling the Towering Tapestry Panels
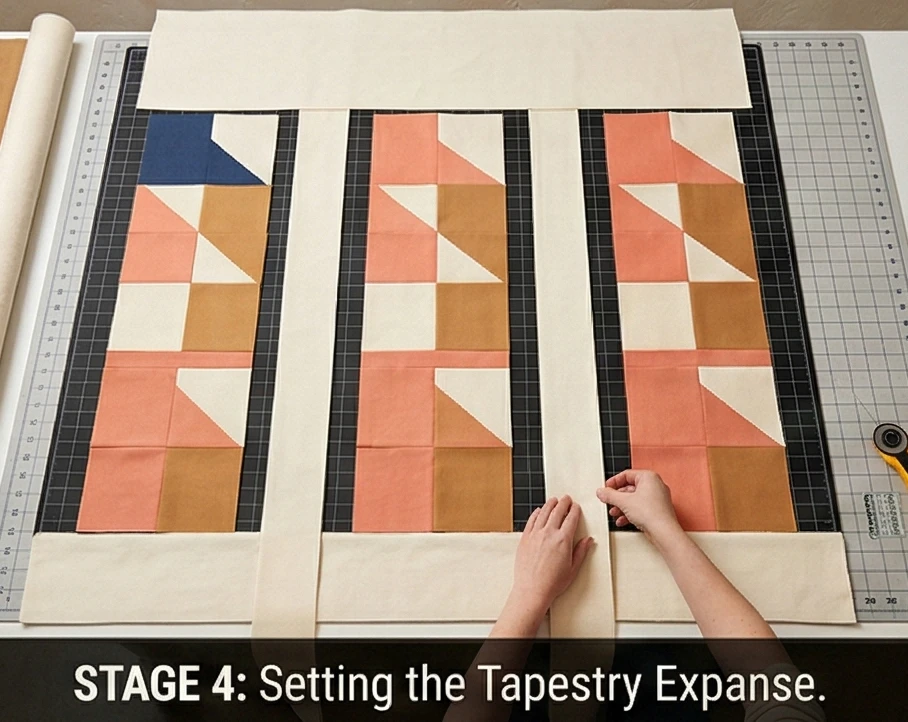
- 21.1.4 Step 4: Setting the Vast Canvas
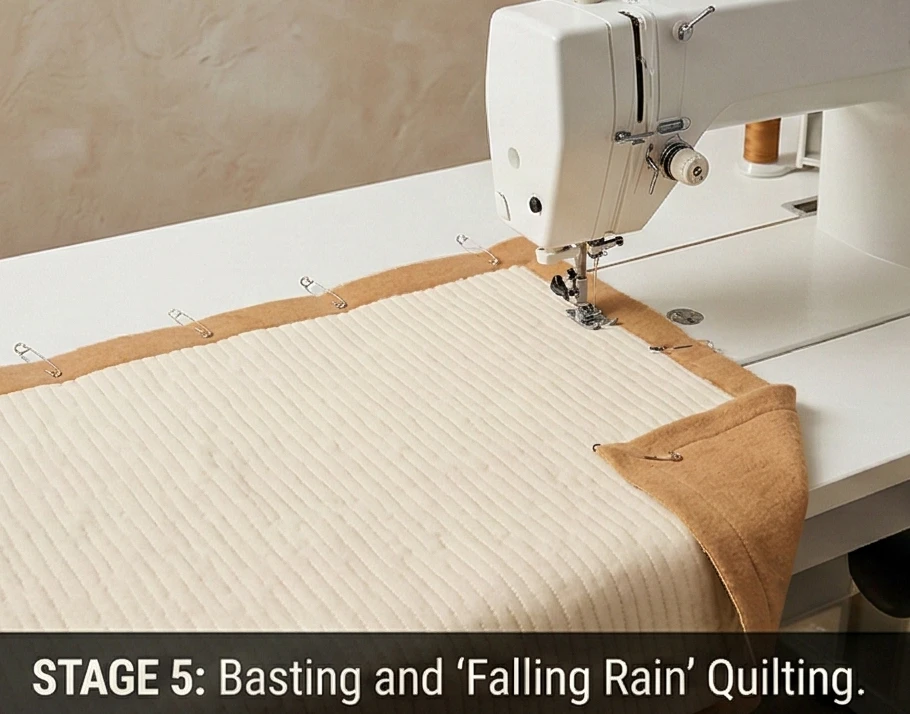
- 21.1.5 Step 5: Acoustic Basting and Structural Quilting
- 21.1.6 Step 6: The Gallery Hanging Sleeve and Tailored Finish
- 21.1 “The Canyon Wall” Acoustic Tapestry
- 22 Conclusion
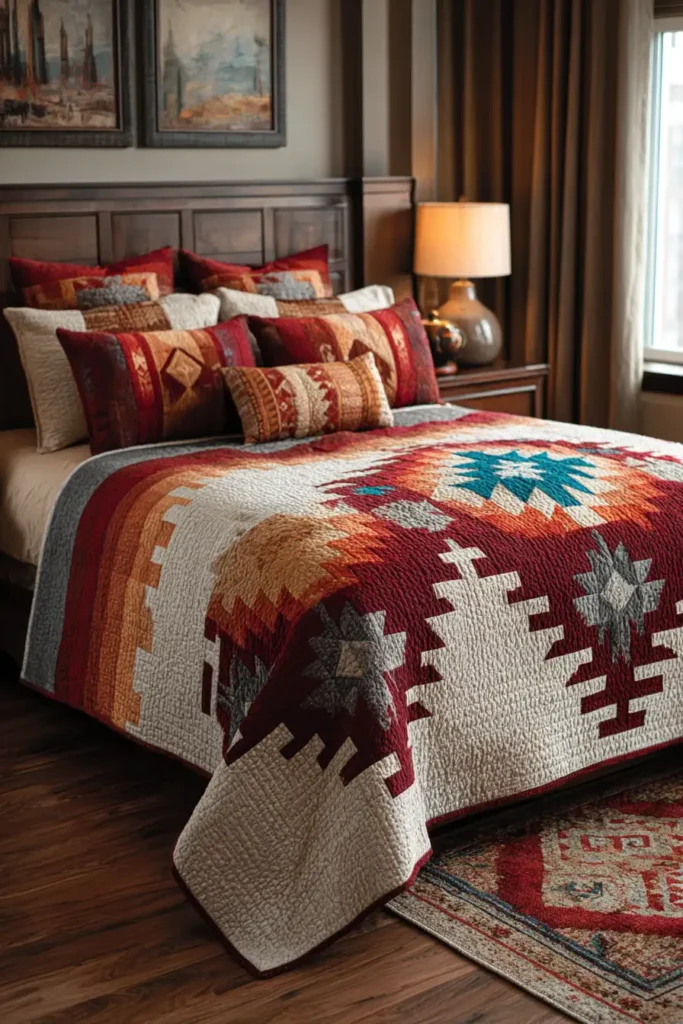
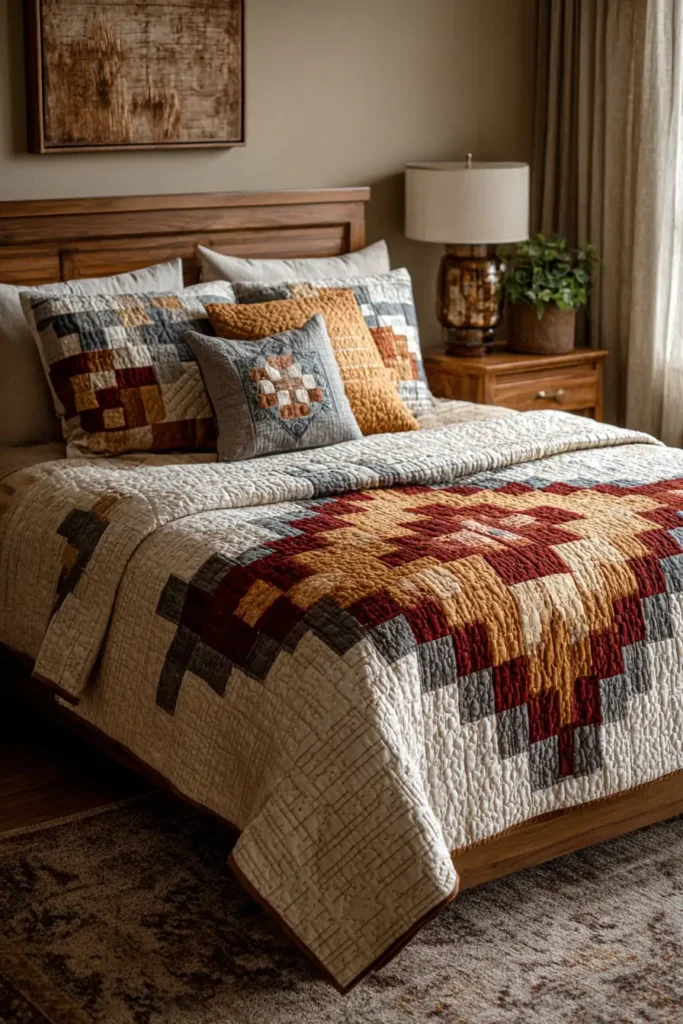
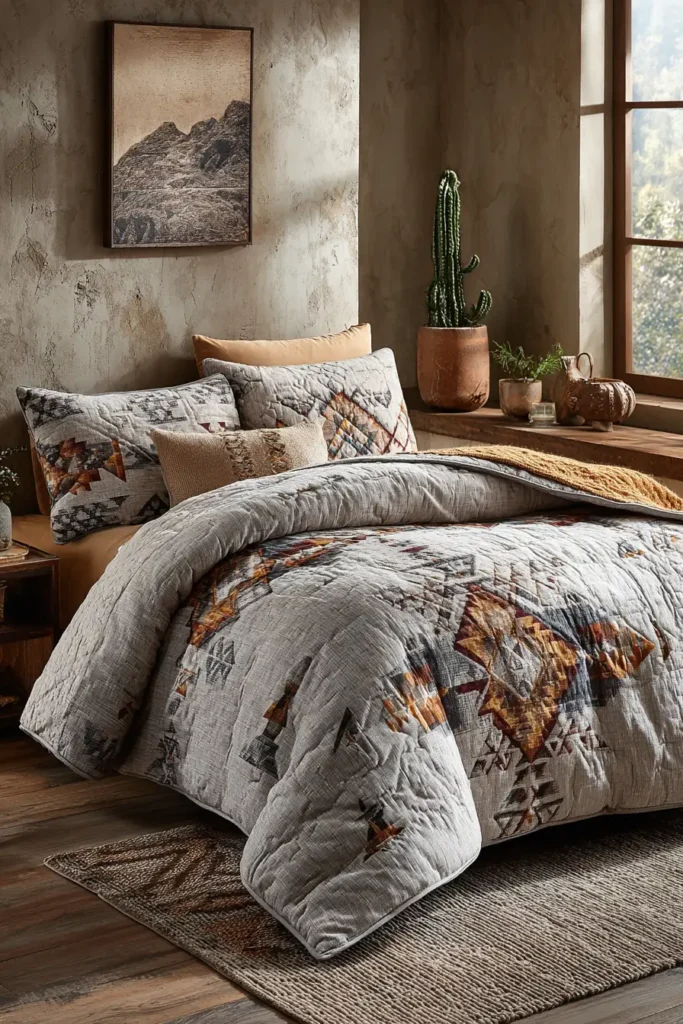
Bringing this desert elegance into your primary living spaces is a highly effective way to balance striking artistry with everyday comfort. In the bedroom, utilizing Elegant Navajo Quilt Pattern Designs for Master Bedroom Bed Covers or Earth Tone Navajo Quilts is exceptionally useful for creating a deeply grounding, serene sleep environment.
The rich colors naturally warm up the room, while smaller accents like Sophisticated Bed Runners and Modern Desert-Inspired Pillow Covers allow you to introduce rich texture and color layering without the commitment of replacing your entire bedding set. Similarly, extending this style into the family room with Chic Sofa Covers and Durable Cushion Covers serves a brilliant dual purpose: they effortlessly protect your expensive upholstery from daily wear and tear while elevating the room’s design to look professionally curated.
The utility of these geometric patterns extends far beyond traditional bedding and upholstery, offering brilliant solutions for organizing and accessorizing your life.
Integrating Chic Navajo Quilt Pattern Laundry Bags and Sturdy Storage Totes into your home is a fantastic strategy for elegantly concealing everyday clutter, transforming mundane storage into intentional pieces of decor. For those on the go, a Stylish Tote Bag or Durable Market Bag leverages the thick, padded nature of quilted fabric to provide a comfortable, protective carry for your belongings that won’t dig into your shoulder. Finally, utilizing Striking Geometric Wall Hangings is a highly useful way to introduce large-scale, custom art that not only creates a breathtaking focal point but also naturally dampens sound, making your home feel infinitely more cozy and refined.
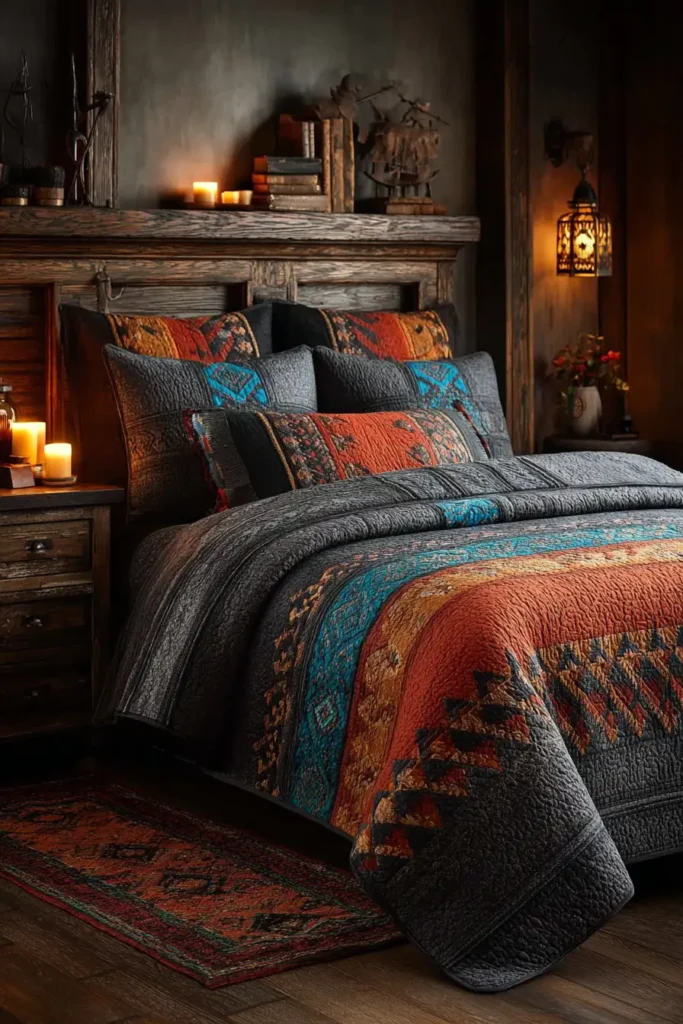
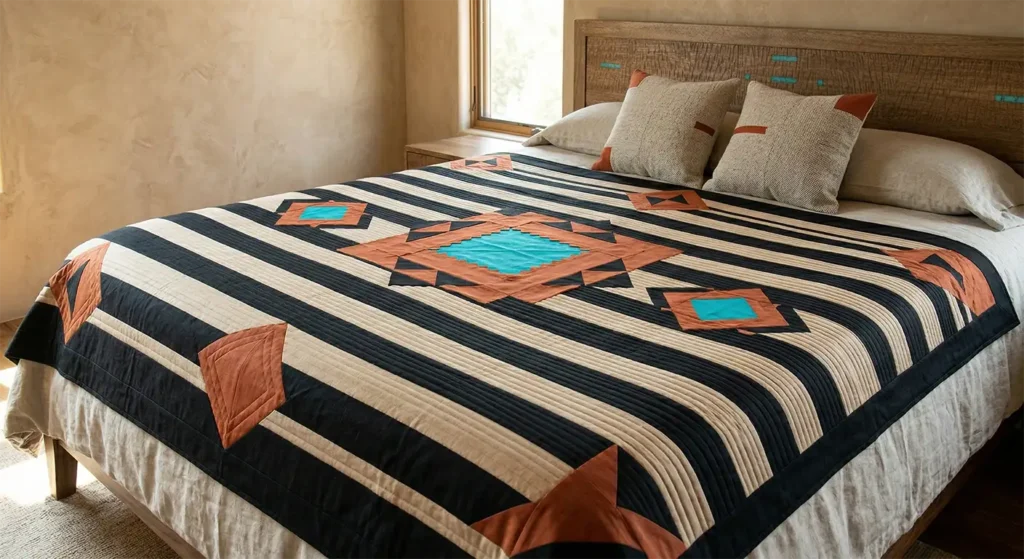
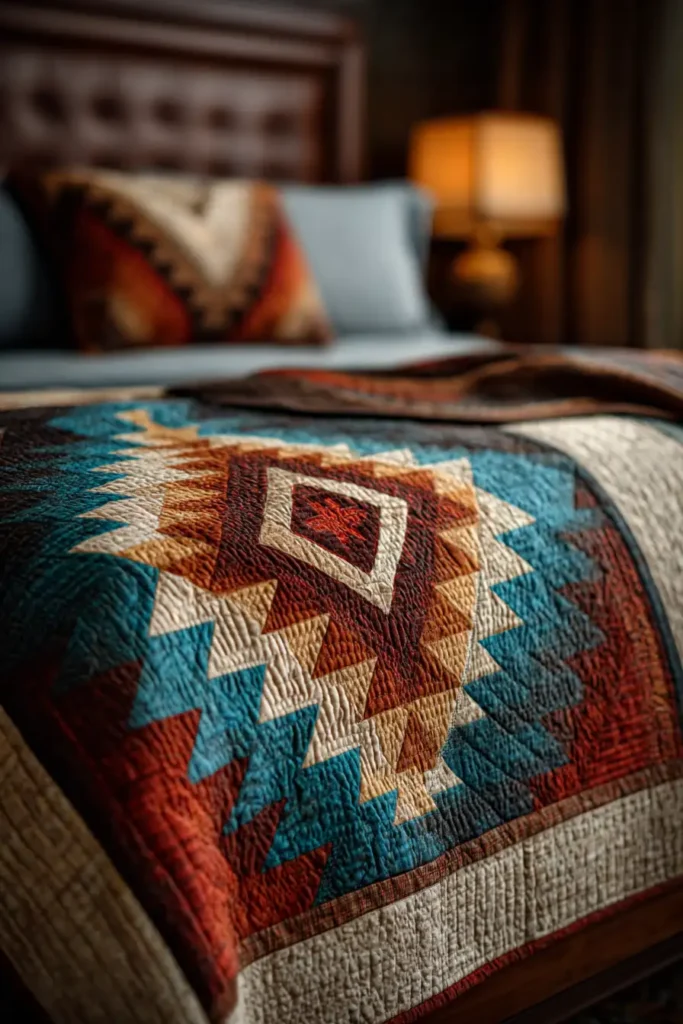
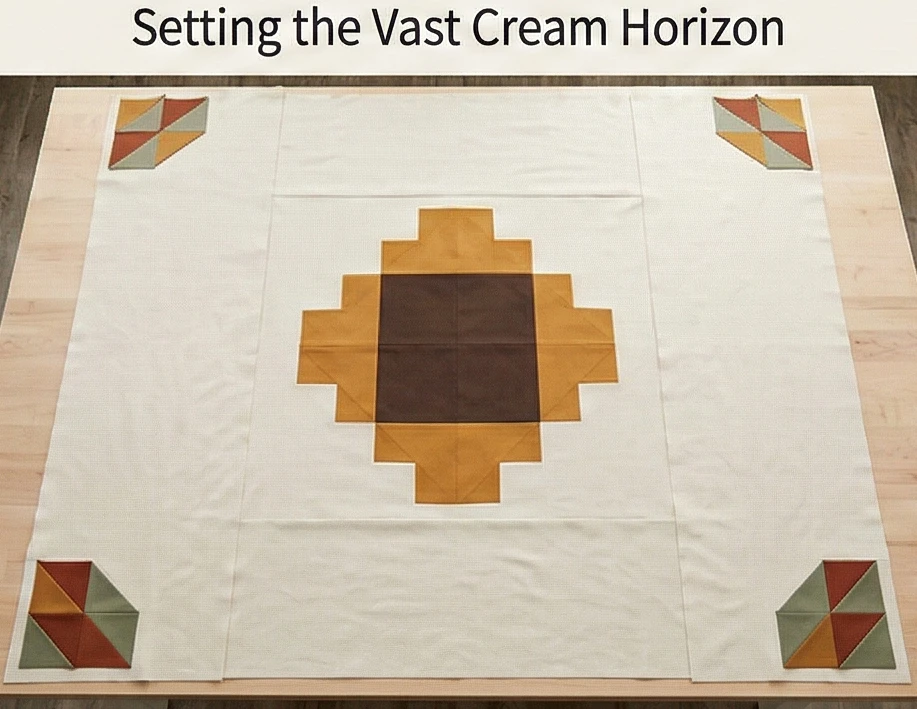
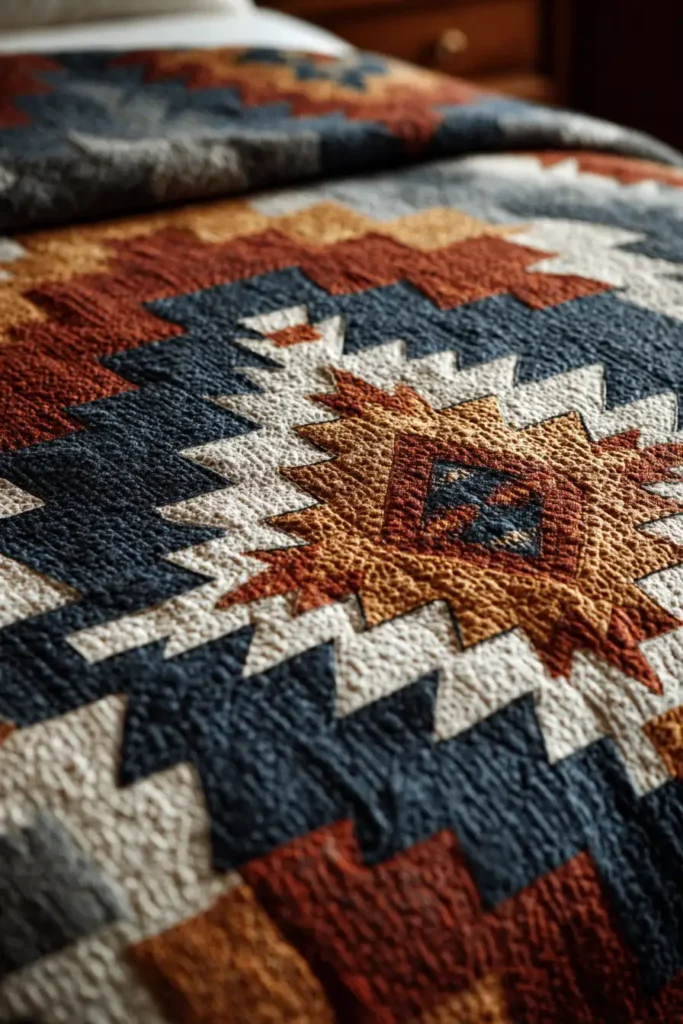
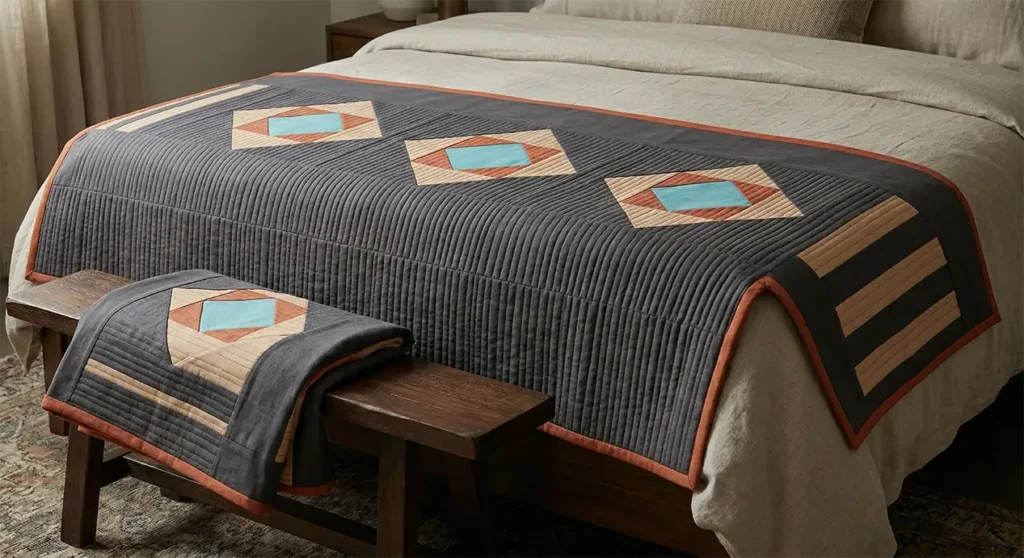
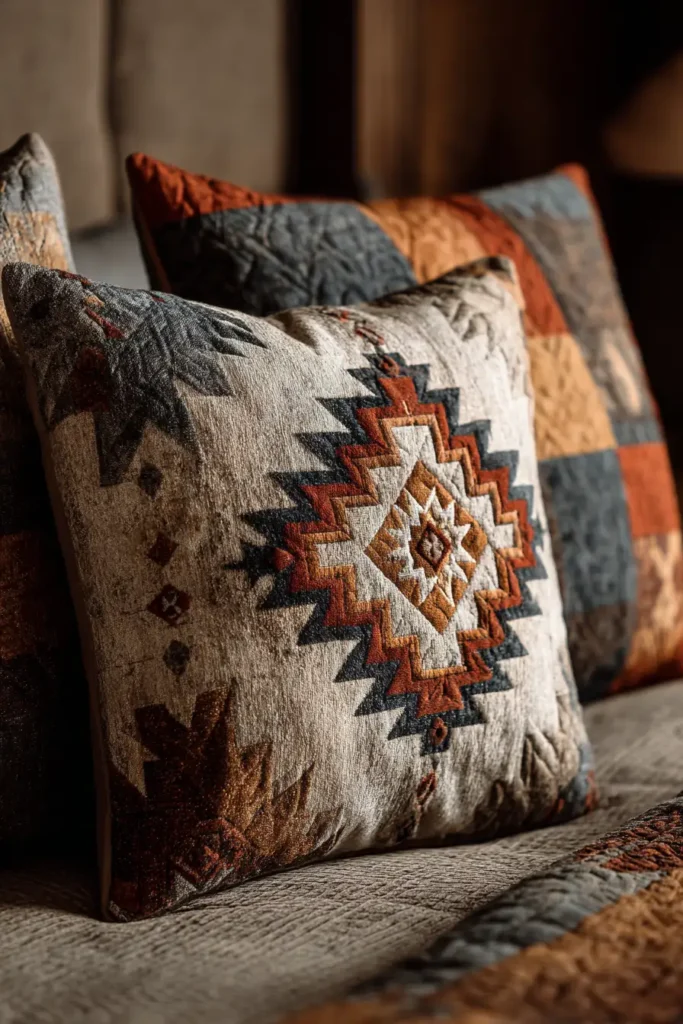
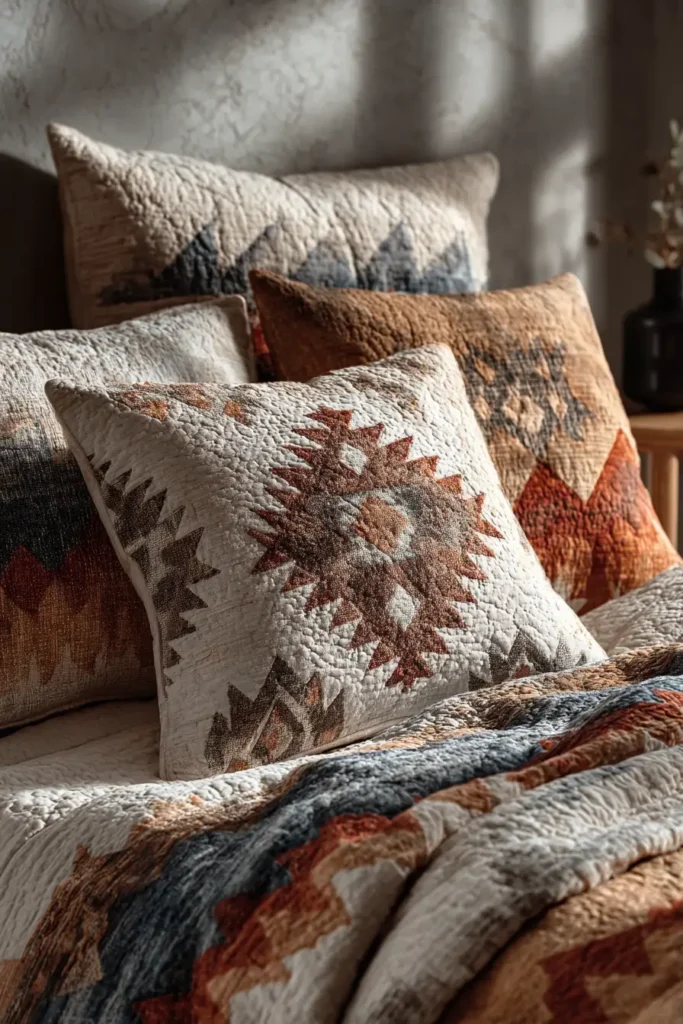
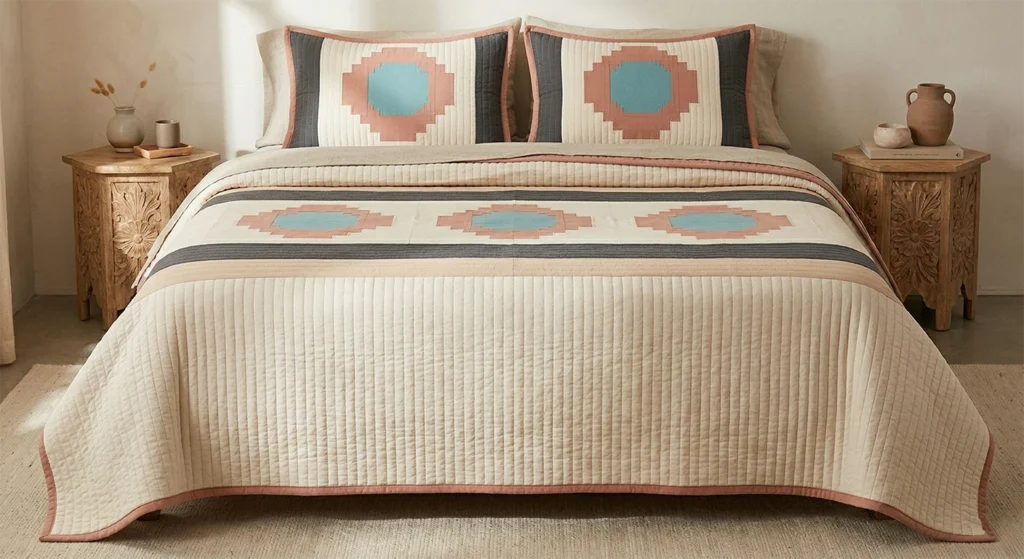
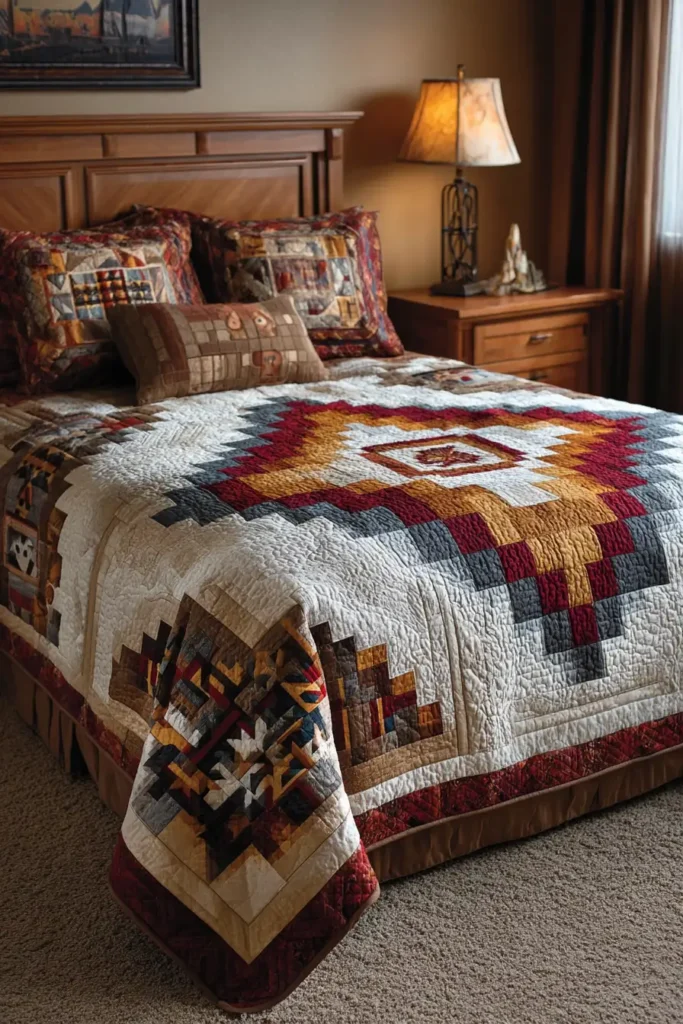
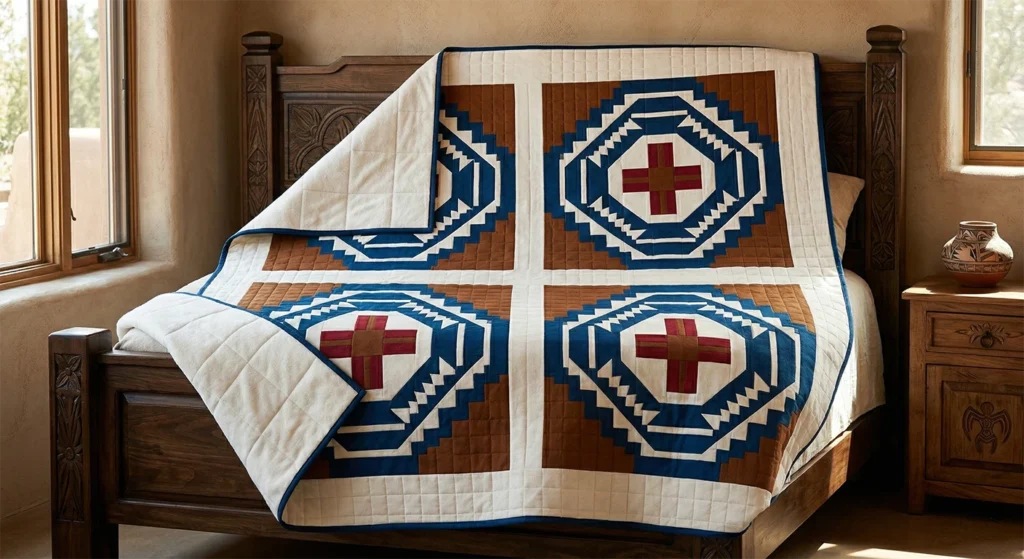
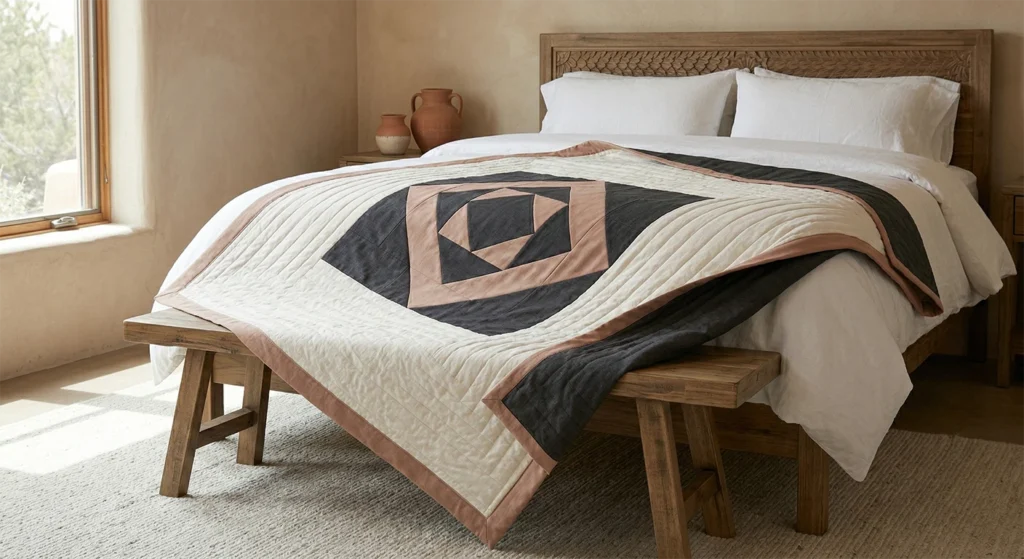
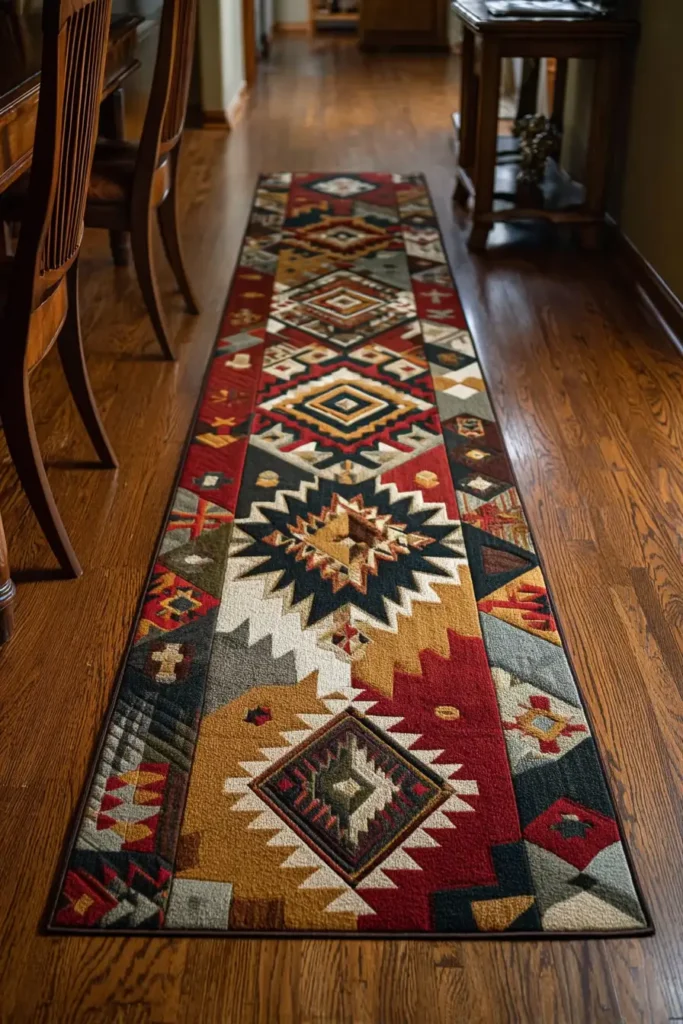
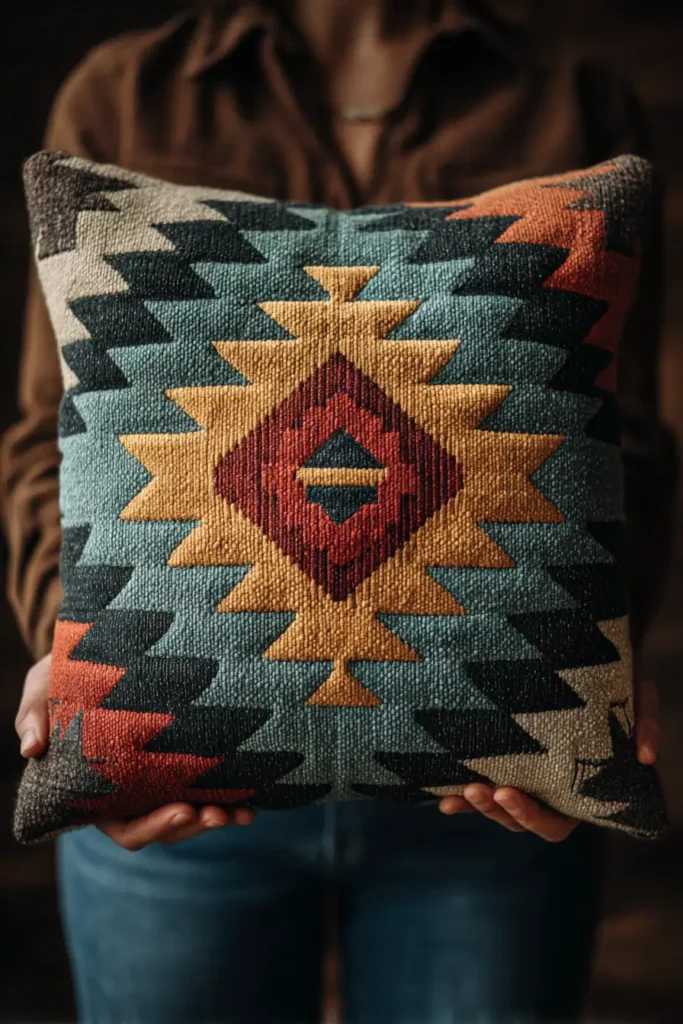
“The Sedona Mesa” Southwestern Geometric Bed Cover
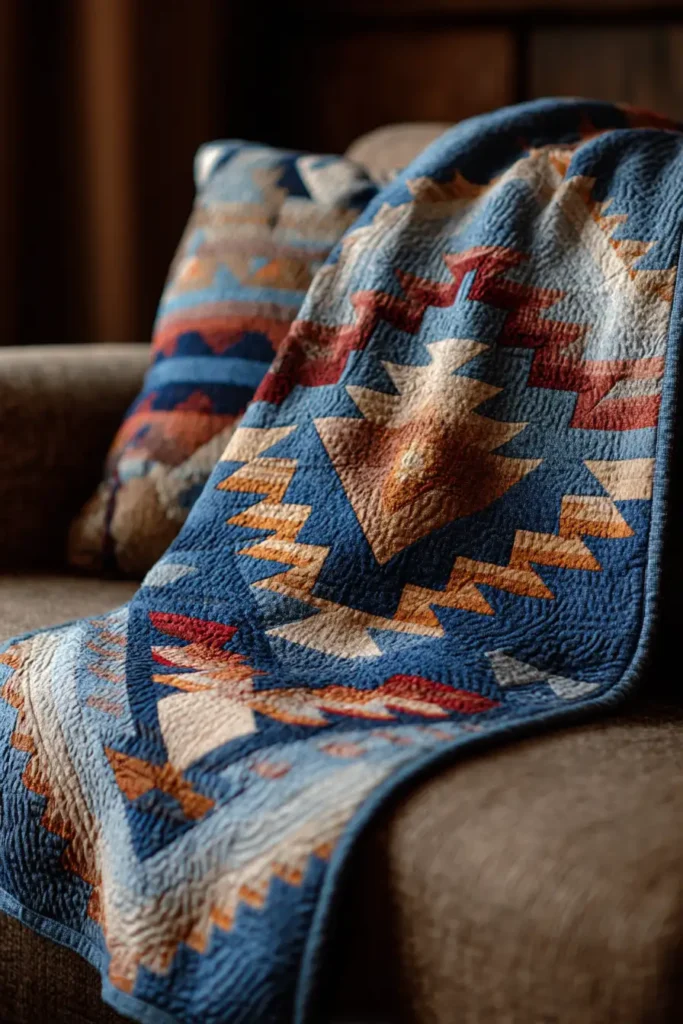
The master bedroom is a sanctuary that benefits immensely from textiles that offer both visual warmth and profound grounding. Traditional Navajo (Diné) weaving is globally celebrated for its striking, symmetrical geometry and deep connection to the desert landscape. “The Sedona Mesa” translates these iconic woven motifs—specifically the banded horizons and stepped diamonds of historic “Chief’s Blankets”—into a pieced cotton quilt. Executed in a sophisticated, earth-toned palette of Terracotta, Onyx Black, Warm Sand, and punctuated by a spark of vibrant Turquoise, this massive bed cover acts as a breathtaking tapestry that anchors the room in timeless desert elegance.
Finished Dimensions: Generous Queen / Standard King Coverlet, 90″ x 96″.
Materials Needed:
- The “Bands” (Background): 3 yards of Onyx Black and 3 yards of Warm Sand solid cotton.
- The “Terraces” (Geometric Motifs): 1.5 yards of Terracotta and 3/4 yard of Turquoise.
- Backing: 8.5 yards of high-quality Warm Sand Sateen.
- Batting:100% Wool Batting or a Cotton/Bamboo Blend.
- Why: To mimic the comforting weight of a traditional woven blanket without the rough texture, wool is the ultimate choice. It provides a luxurious, breathable loft that drapes seamlessly over the edges of a large mattress, regulating your temperature perfectly through both freezing winter nights and warm summer evenings.
- Thread: 50wt cotton thread in an invisible Taupe.
- Notions: A large square acrylic ruler (at least 9.5″ x 9.5″), a rotary cutter with a fresh blade, and a water-soluble fabric marker.
Cultural Backstory: True Navajo textiles are masterfully woven on upright looms using hand-spun wool, not quilted. The iconic “Third Phase Chief’s Blanket” design emerged in the 1860s, characterized by nine diamond or cross-shaped motifs set against strong horizontal stripes. These garments were so highly valued that they were traded across the continent as luxury items. Translating this visual language into a pieced cotton quilt is a homage to that striking desert geometry, offering the aesthetic power of the Southwest with the washable, soft drape of modern bedding.
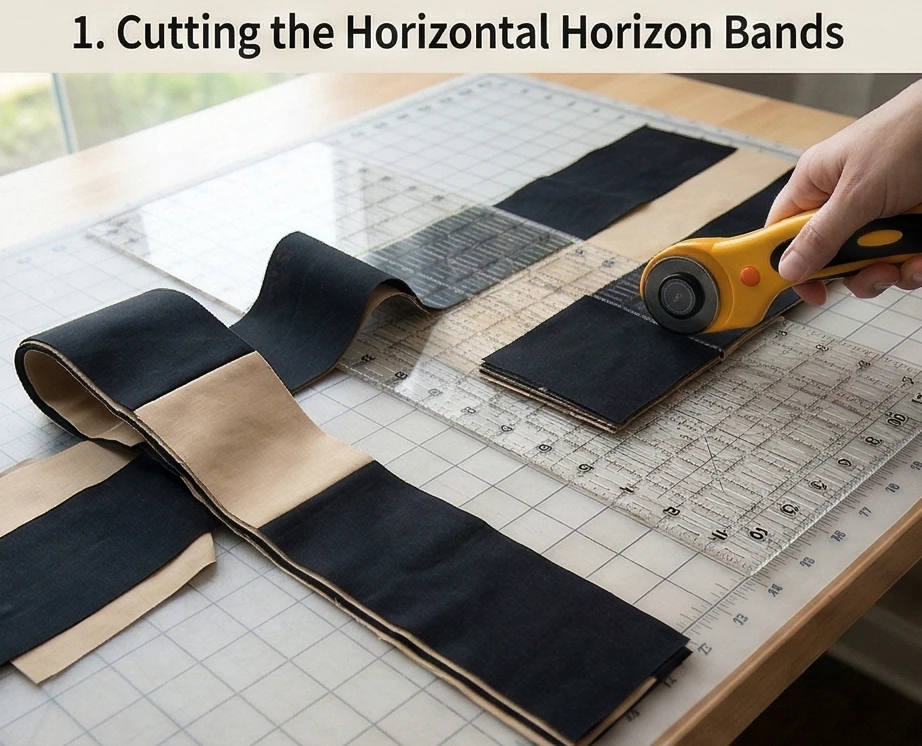
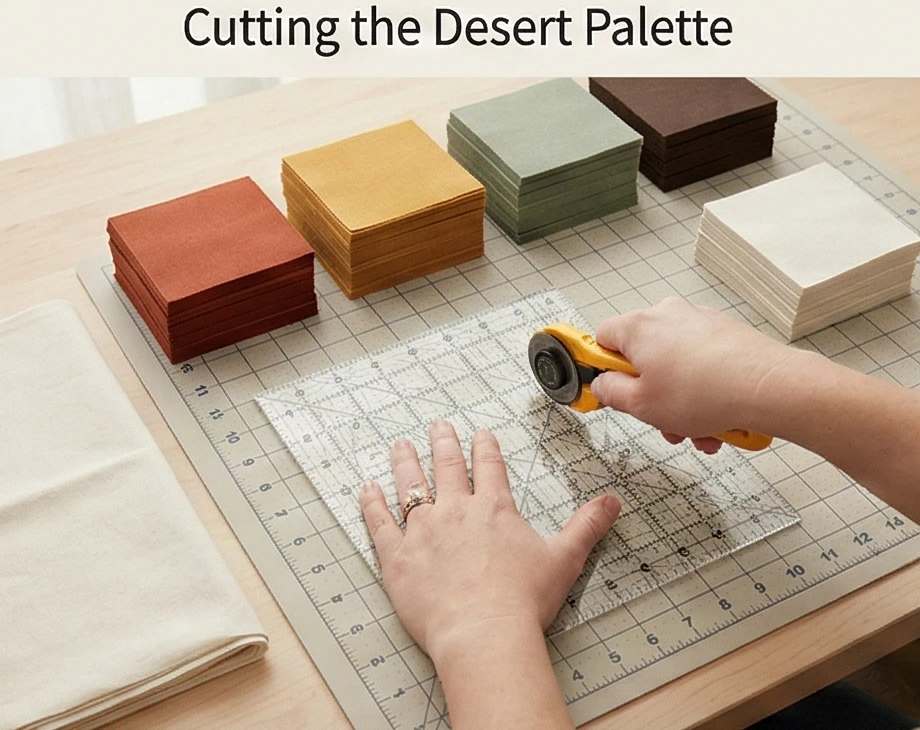
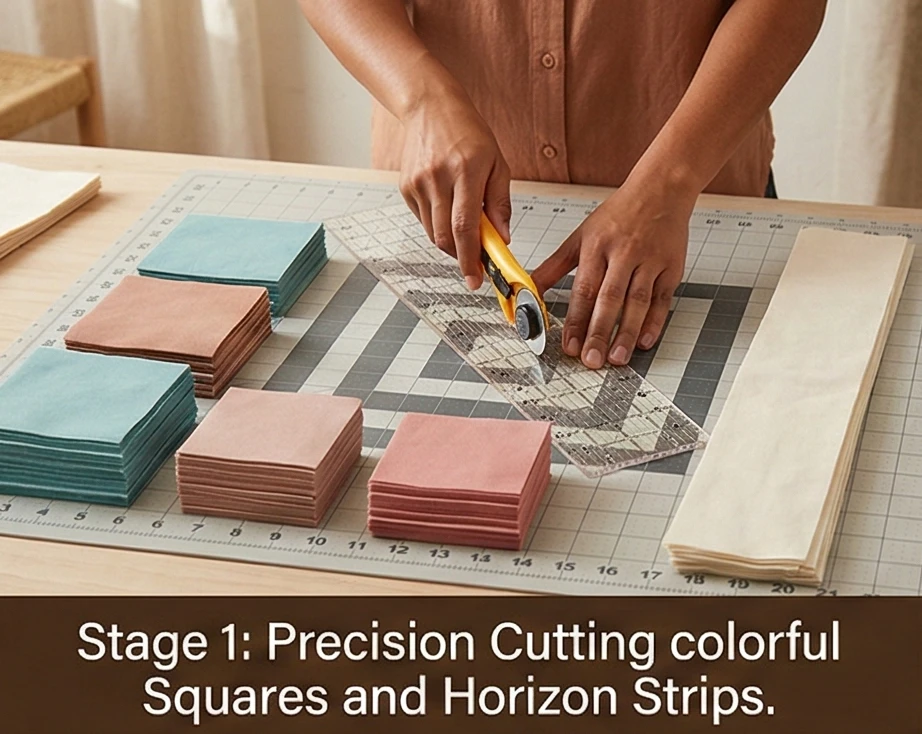
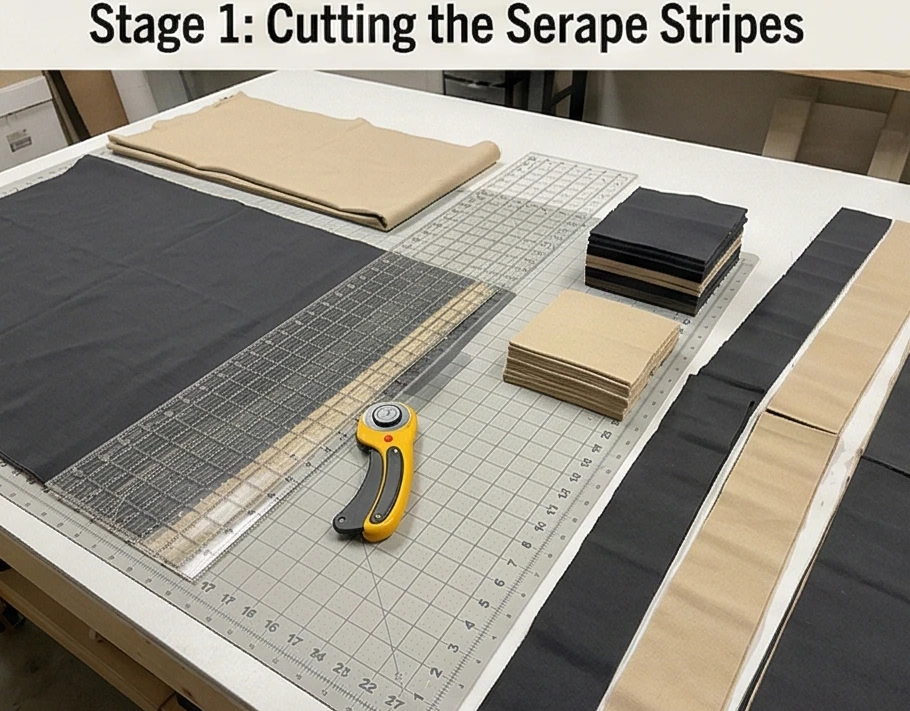
Step 1: Cutting the Horizontal Horizon Bands
Establishing the bold, sweeping background.
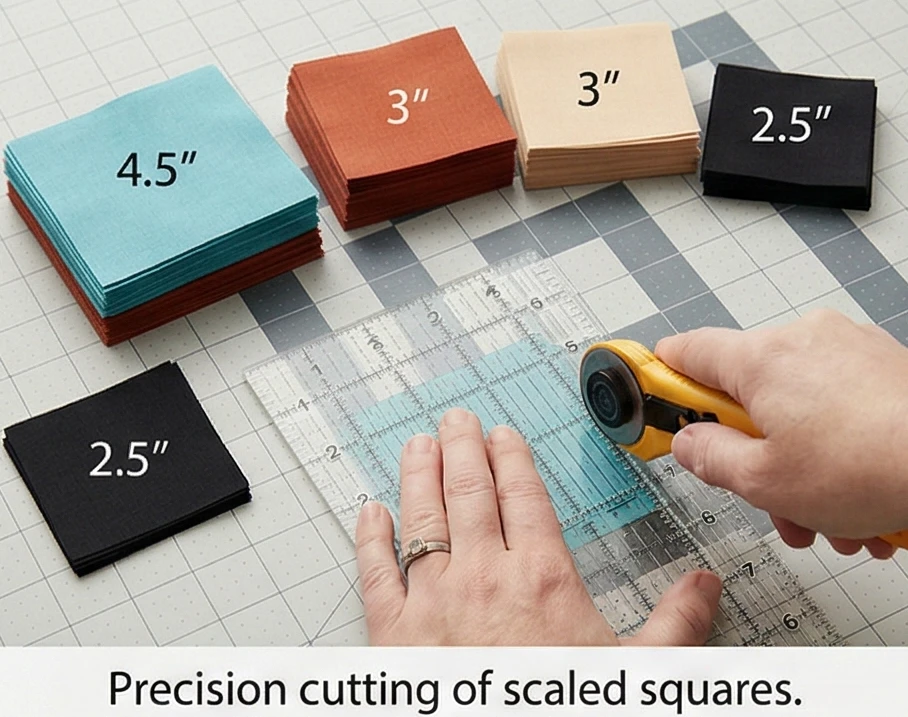
- The Wide Strips: Cut exactly twelve 6.5-inch strips from your Onyx Black yardage and twelve 6.5-inch strips from your Warm Sand yardage across the width of the fabric.
- The Assembly: Sew these strips end-to-end to create incredibly long bands (over 90 inches). You will alternate these thick black and sand bands to form the quilt’s vast, striped background.
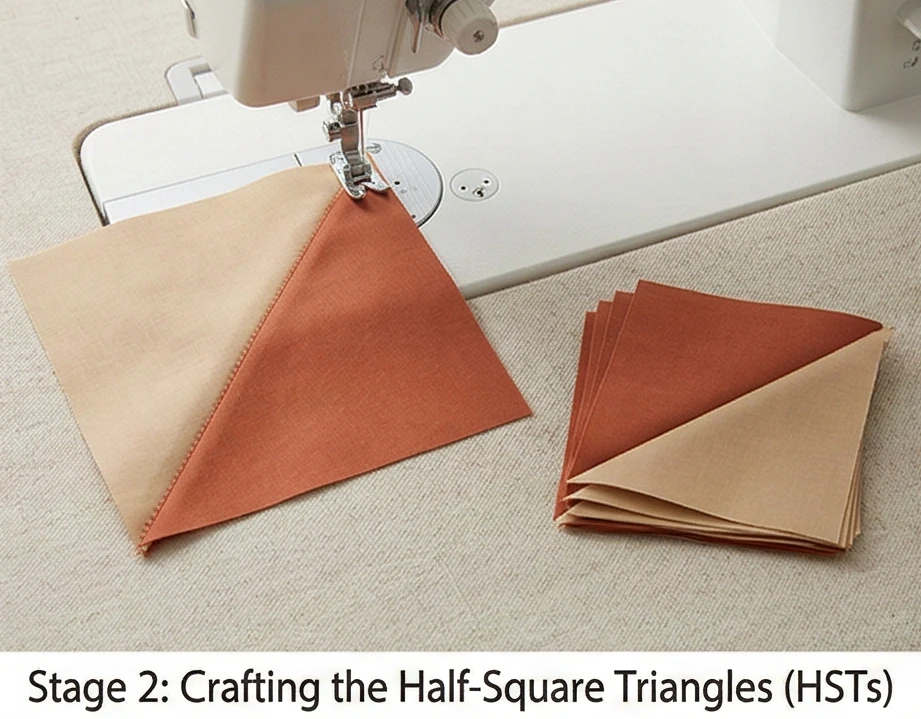
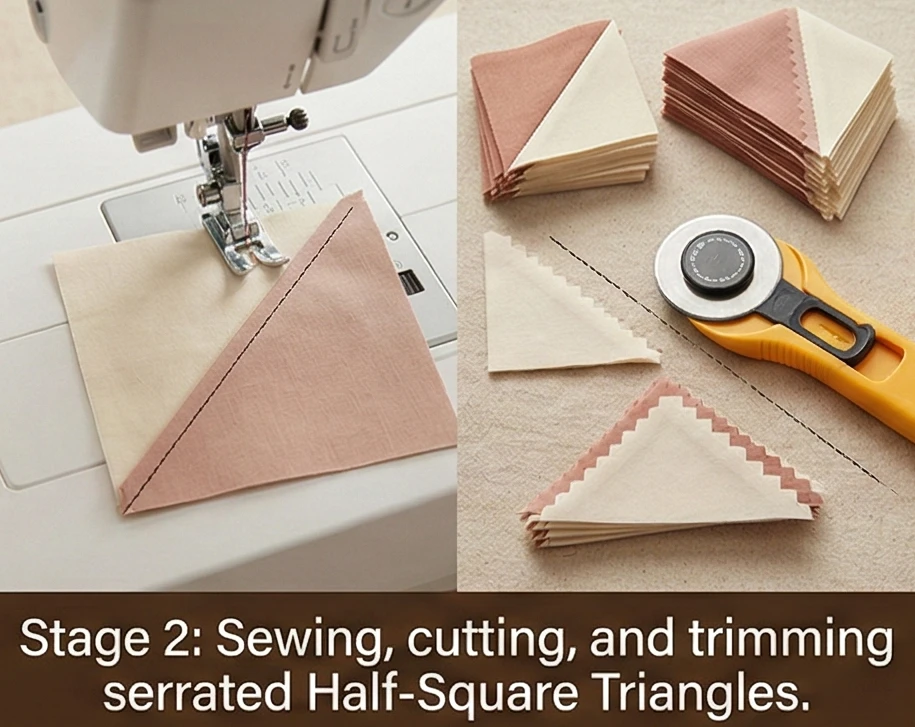
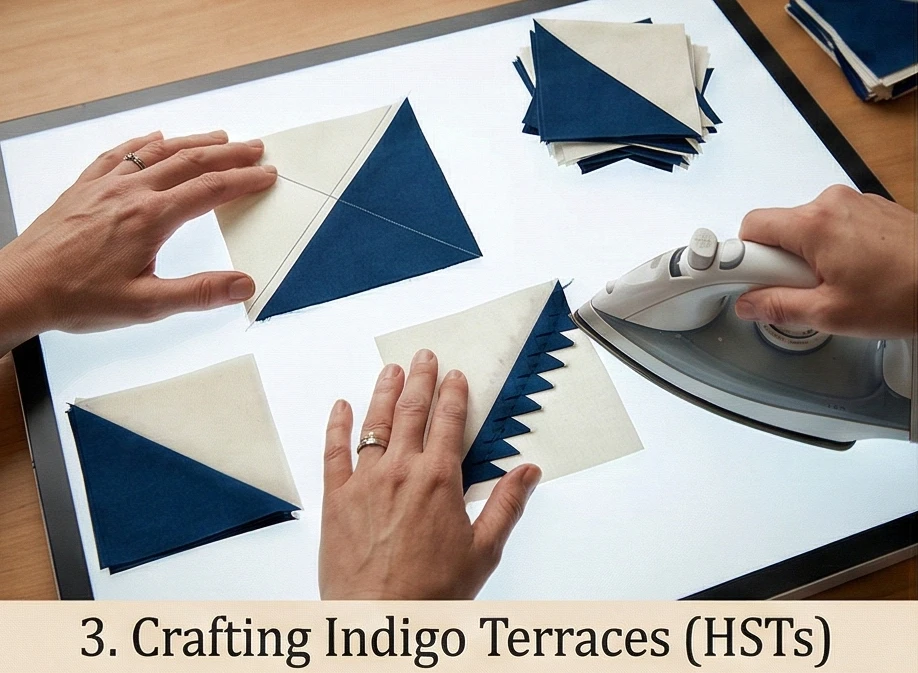
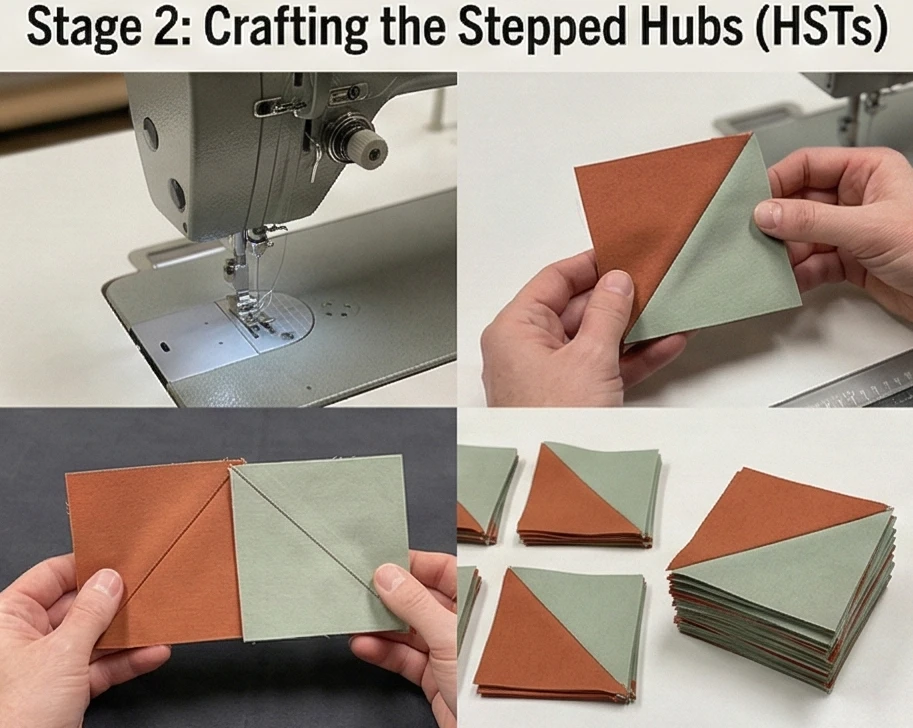
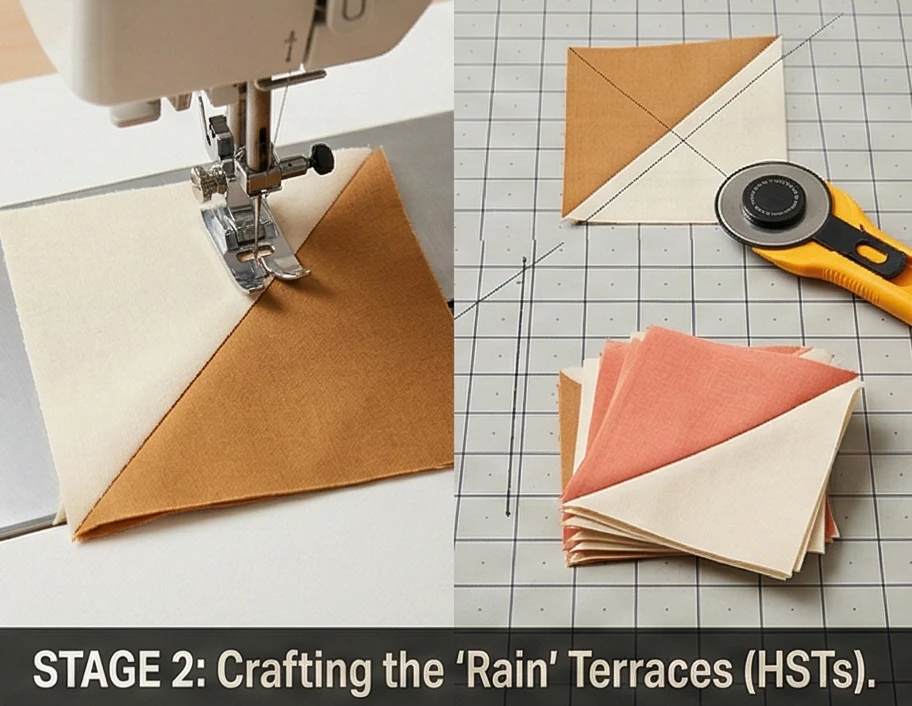
Step 2: Crafting the Stepped Terraces (HSTs)
Creating the serrated edges of the diamonds without complex Y-seams.
- The Squares: Cut forty 4.5-inch squares of Terracotta, and forty 4.5-inch squares of Onyx Black.
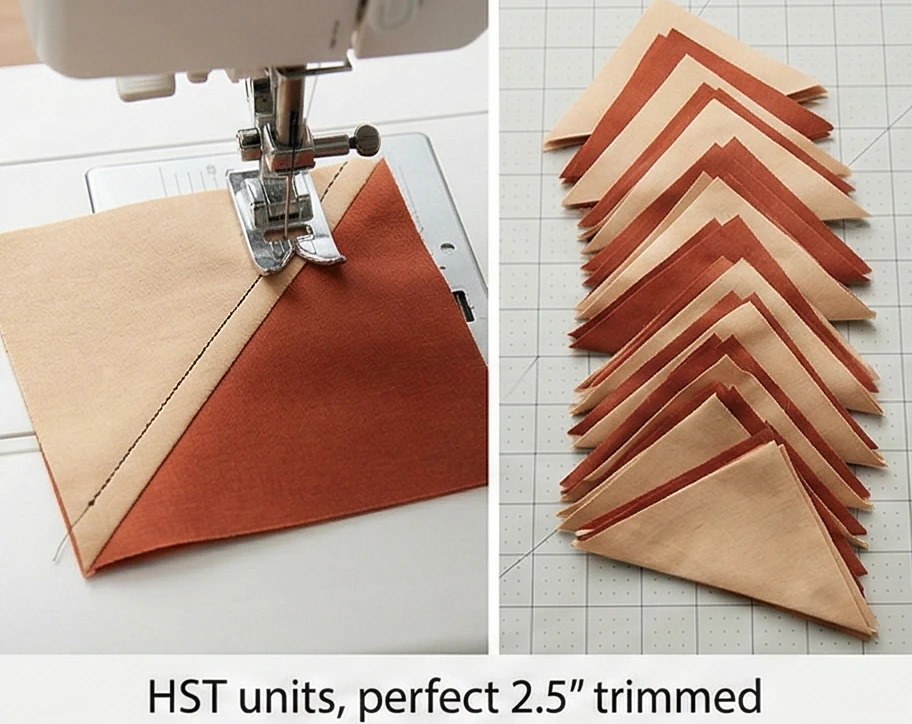
- The Half-Square Triangles (HSTs): Draw a diagonal line across the back of the Black squares. Place them right sides together with the Terracotta squares. Sew a 1/4-inch seam on both sides of the drawn line.
- Cut and Press: Cut directly on the drawn line to yield two two-tone squares. Press the seams open. Trim every single HST block to exactly 4″ x 4″. You will need exactly 72 of these pristine HSTs to build the stepped edges of your diamonds.

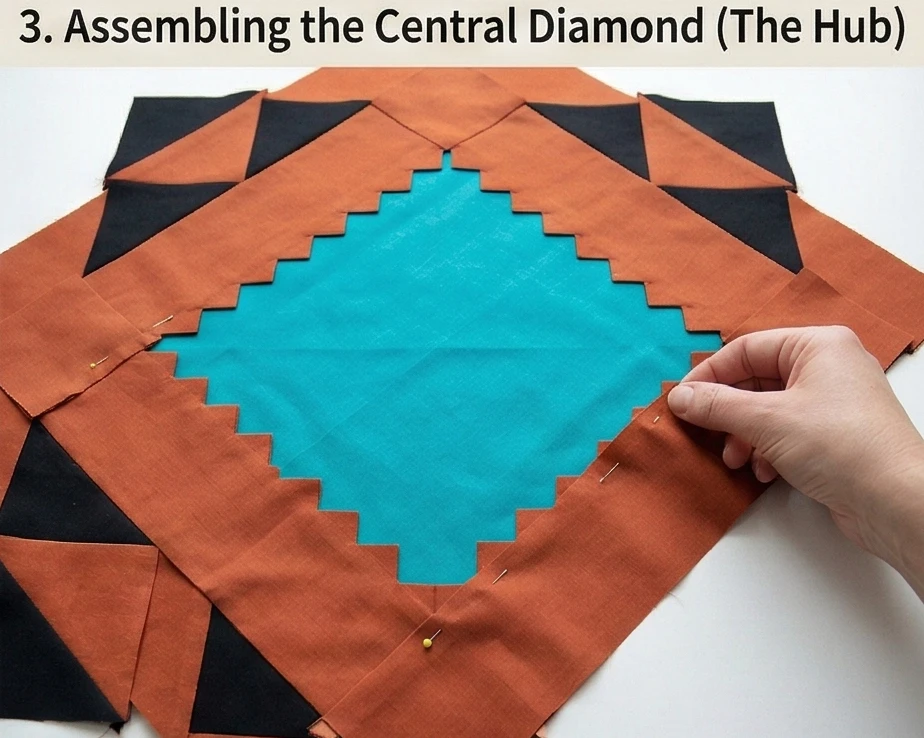
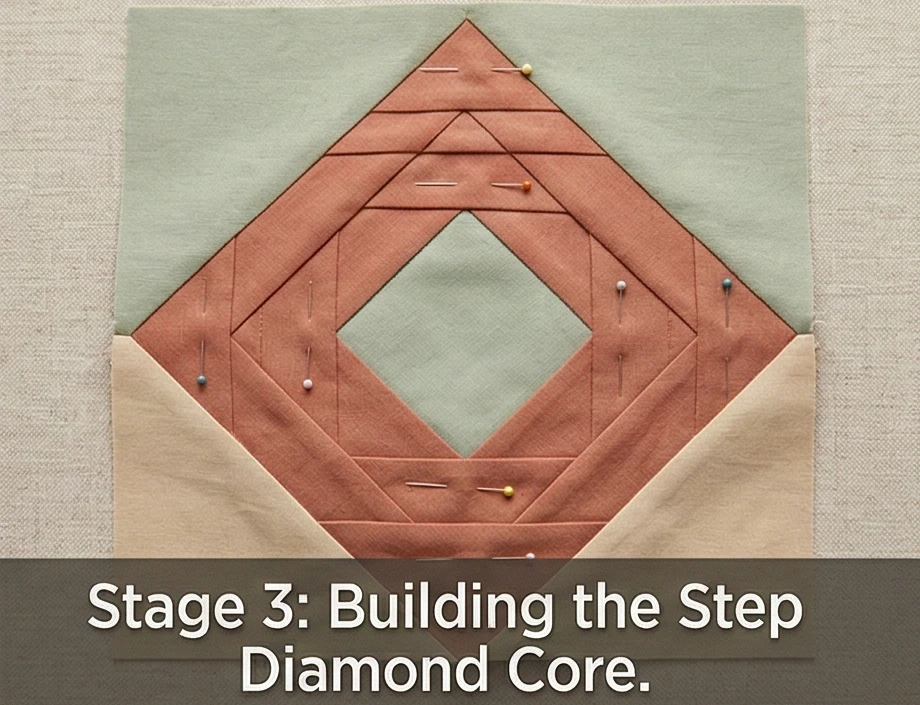
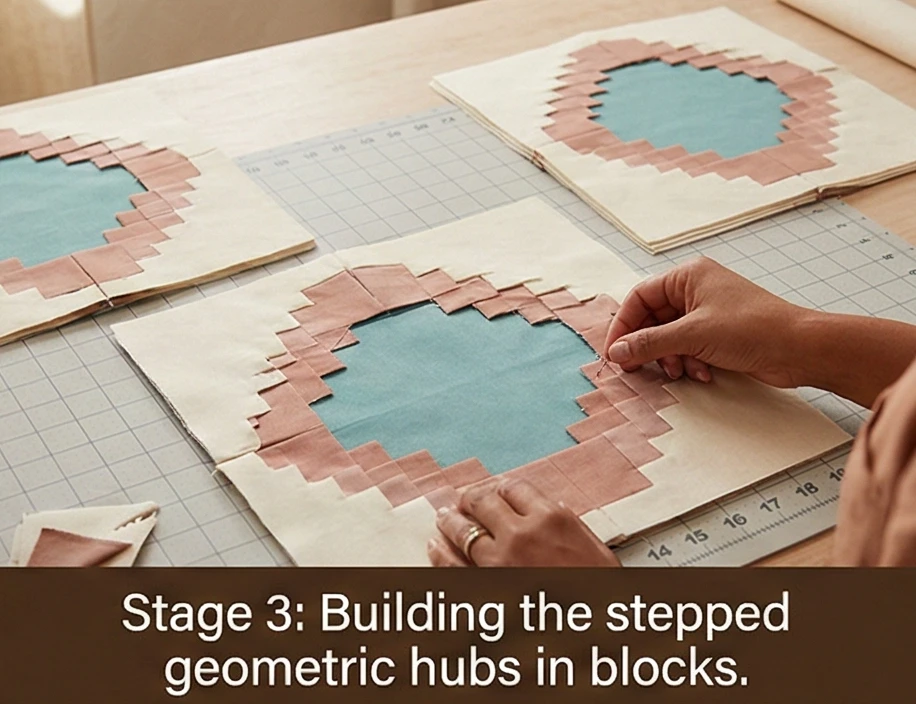
Step 3: Assembling the Central Diamond (The Hub)
Building the massive focal point of the bed cover.
- The Core: Cut a large 12.5″ x 12.5″ square of solid Turquoise.
- The Stepped Rings: Surround the Turquoise center with a ring of solid Terracotta 4-inch squares.
- The Serrated Edge: For the outermost ring of the diamond, use your meticulously trimmed Terracotta/Black HSTs. Orient the triangles so the Terracotta points inward and the Black points outward, creating a stepped, staircase effect that mimics a woven textile.
- Square the Hub: Sew this massive block together in rows. The completed central diamond block should measure roughly 36 inches across.
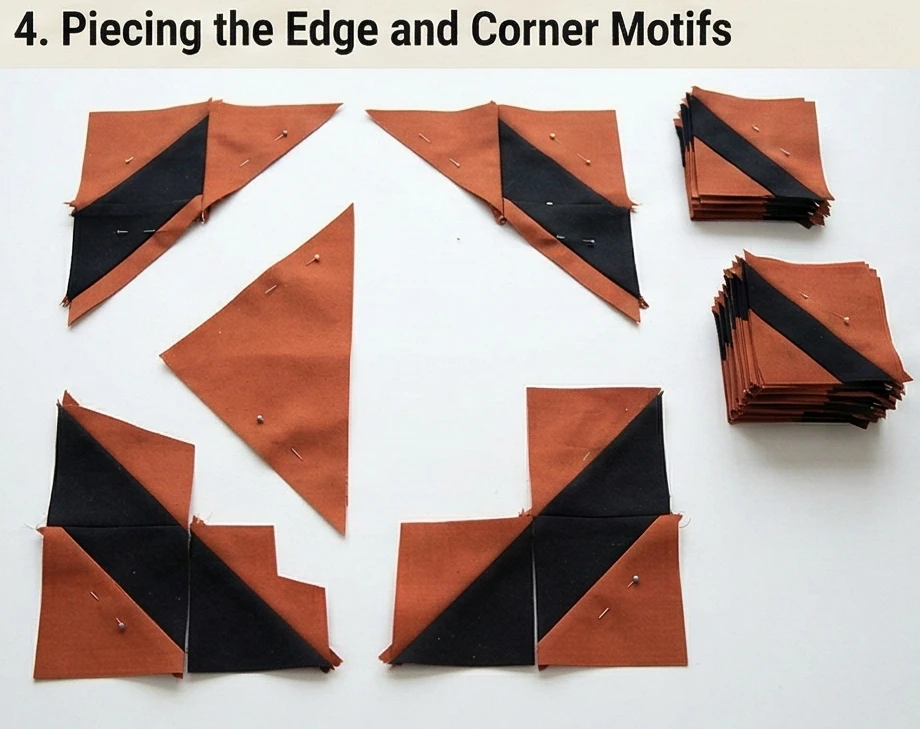
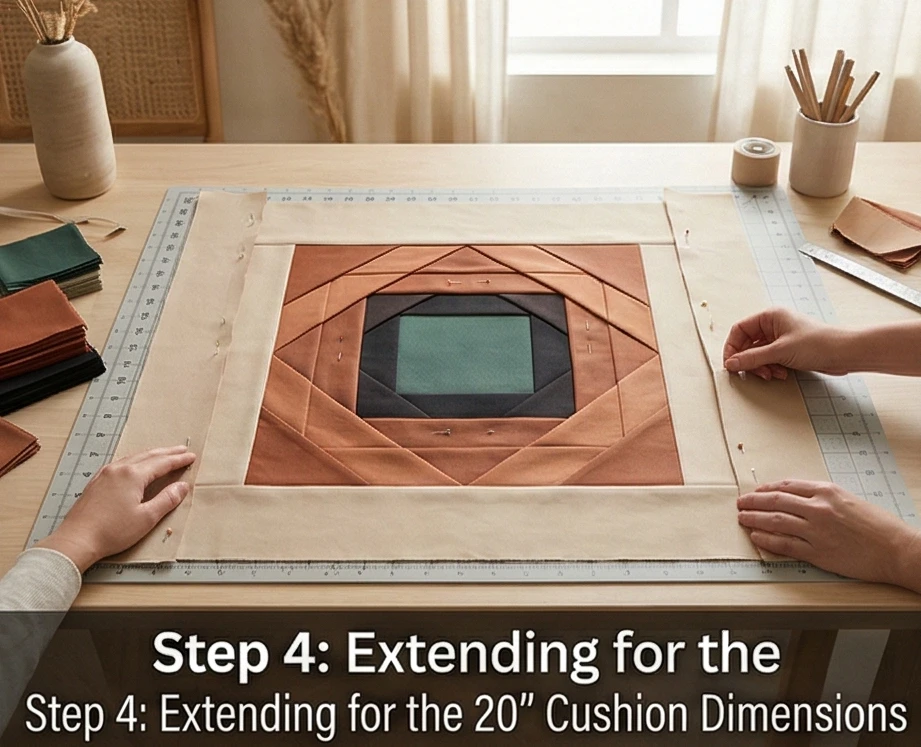
Step 4: Piecing the Edge and Corner Motifs
Completing the traditional “Nine-Point” layout.
- The Half-Diamonds: Using the same HST method, build four “half-diamonds” (bisected horizontally) to sit at the exact center of the top, bottom, left, and right edges of the quilt.
- The Quarter-Diamonds: Build four “quarter-diamonds” (just the corners of the motif) to anchor the absolute four corners of the bedspread. This placement creates the optical illusion that the quilt pattern extends infinitely beyond the edges of the bed.
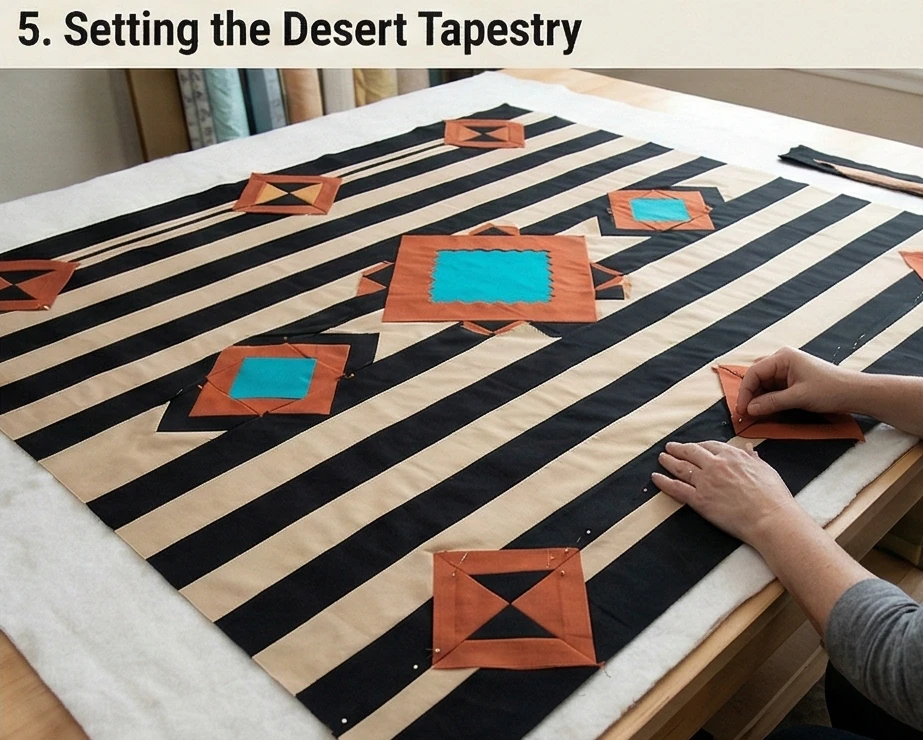
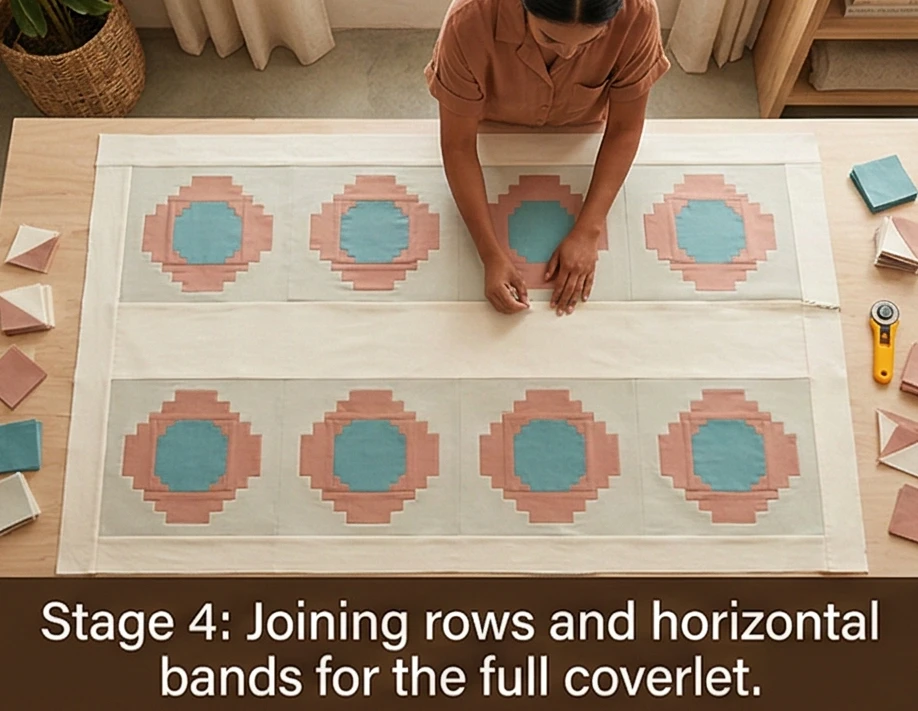
Step 5: Setting the Desert Tapestry
Integrating the geometry into the striped horizon.
- The Row Assembly: Because of the massive scale, this quilt is assembled in horizontal sections. Sew your striped Warm Sand and Onyx Black bands between your geometric motifs.
- Nesting the Seams: Ensure that the black and sand horizontal bands align perfectly with the black and sand backgrounds in your pieced diamond blocks. Pin heavily at these intersections so the stripes flow uninterrupted, completely across the 90-inch expanse of the quilt.
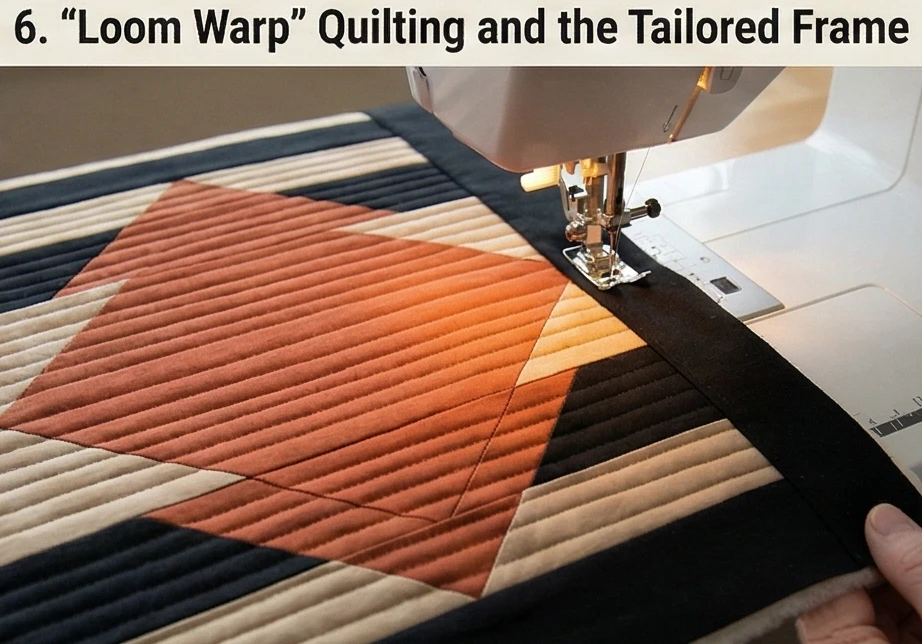
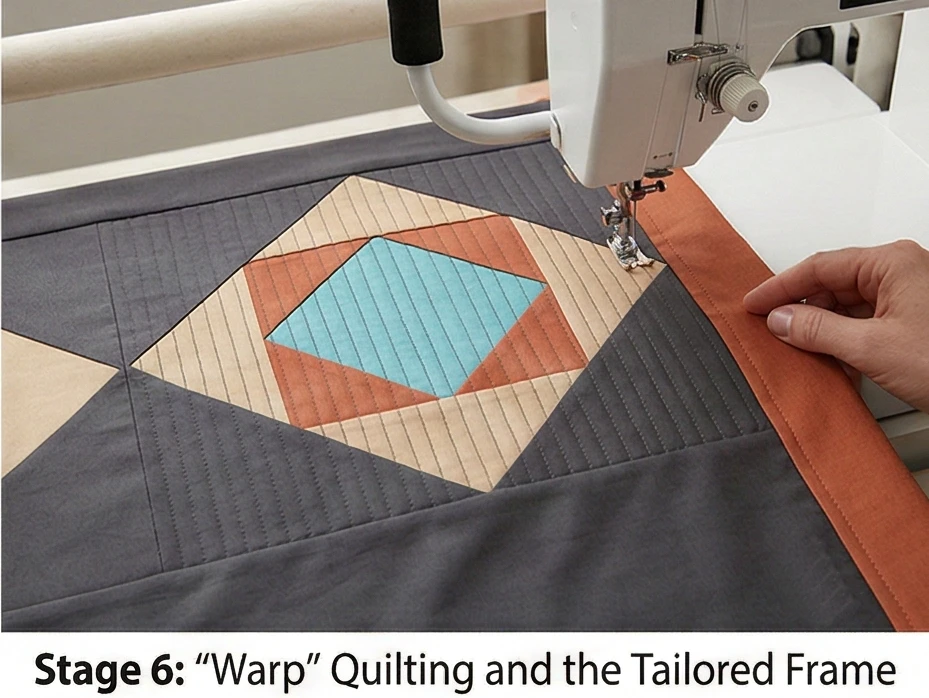
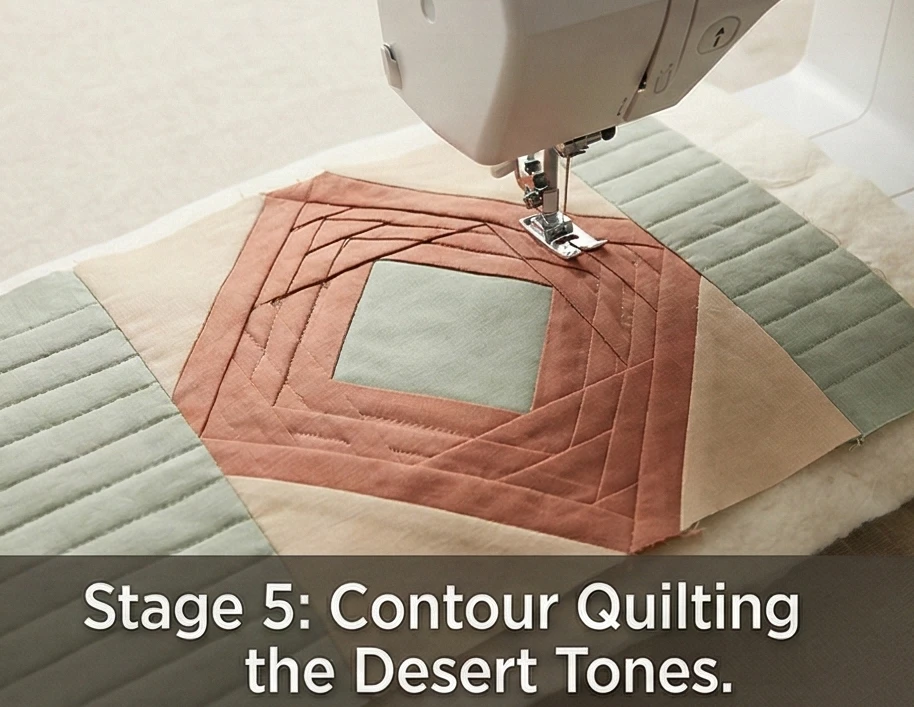
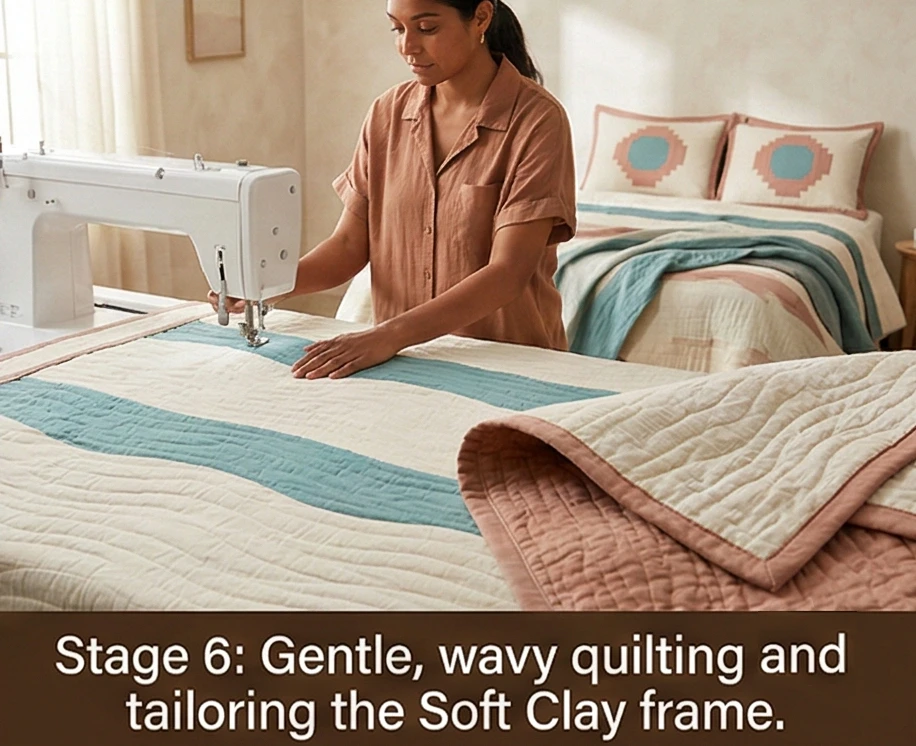
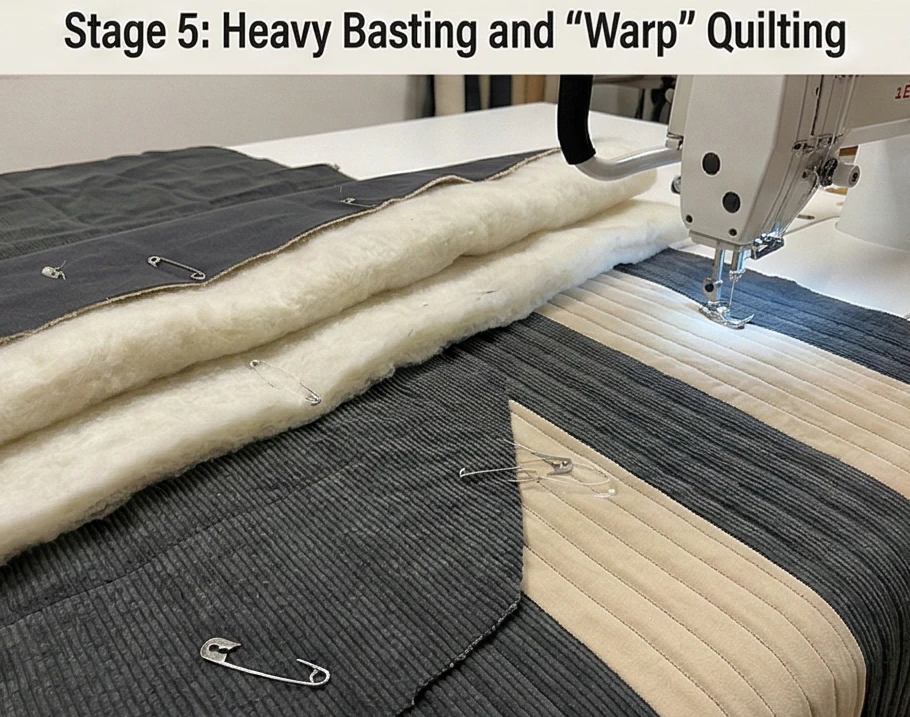
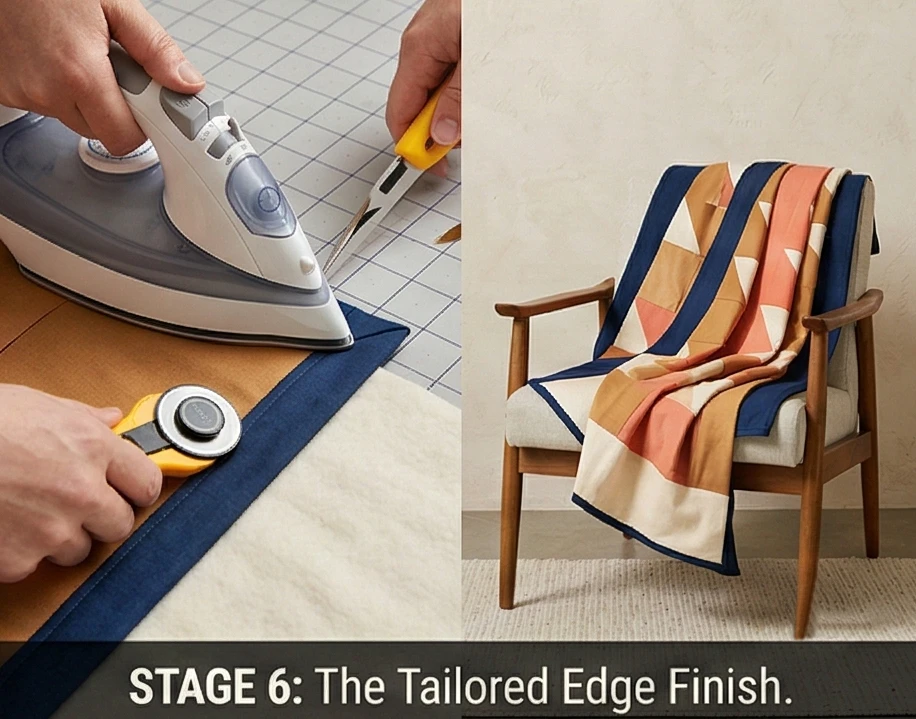
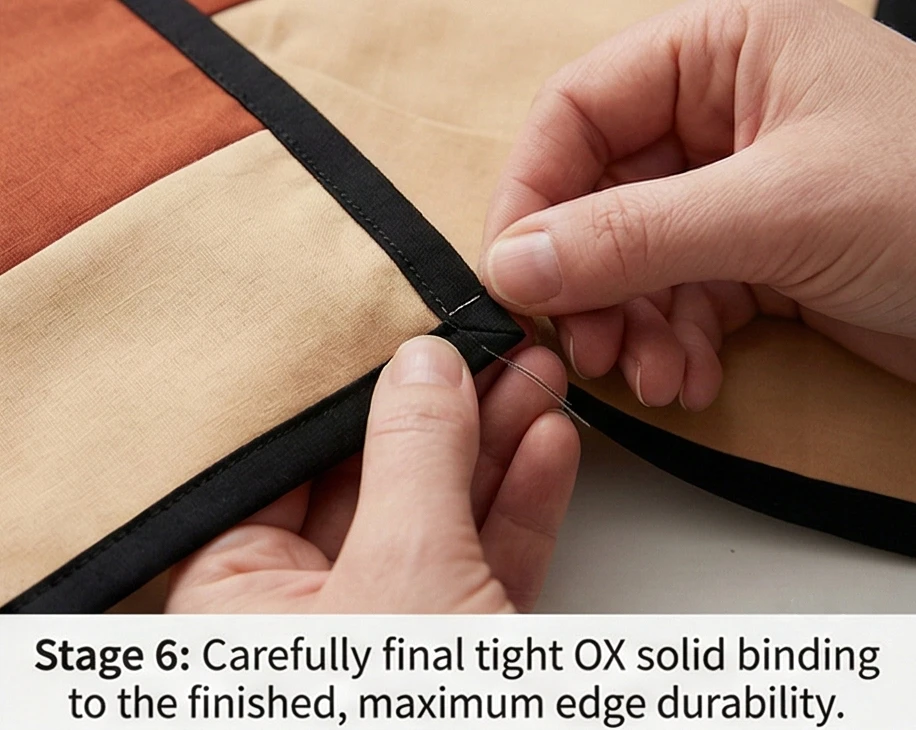
Step 6: “Loom Warp” Quilting and the Tailored Frame
Adding texture that honors the inspiration.
- The Baste: Sandwich the massive pieced top, the premium wool batting, and the Warm Sand sateen backing. Use curved safety pins every 4 inches to manage the fabric’s immense weight.
- Warp-and-Weft Quilting: Do not use swirling or floral quilting motifs on a geometric Southwestern design. Using a walking foot, quilt perfectly straight, horizontal lines strictly spaced 1/2-inch apart across the entire quilt, sewing right over the diamonds and the stripes.
- Why: This dense, linear quilting physically mimics the heavy horizontal “weft” threads of a Navajo loom. It provides a stunning, ribbed texture that gives the cotton quilt the substantial, architectural feel of a woven blanket.
- The Binding: Trim the 90″ x 96″ quilt perfectly square. Bind the edges tightly in solid Onyx Black fabric to contain the sweeping horizontal bands and frame the bed beautifully.
Usability Note: The dense horizontal quilting not only adds cultural texture but locks the wool batting firmly in place, making this massive bedspread incredibly durable. Wash in a large-capacity commercial washer on a cold, gentle cycle to prevent the deep Onyx and Terracotta dyes from migrating, and tumble dry on low heat.
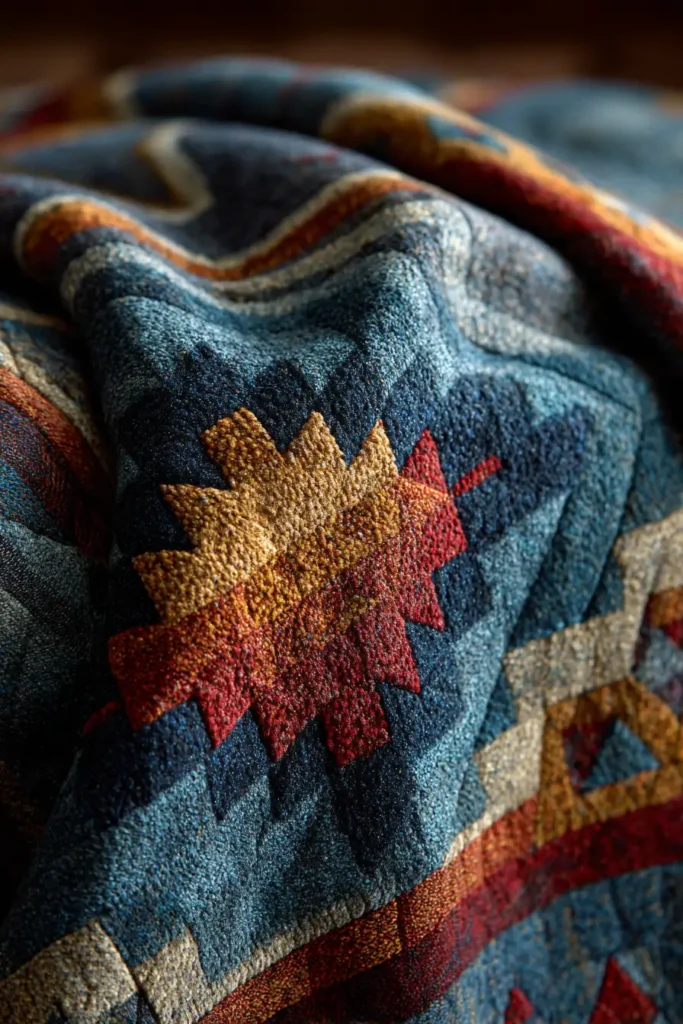
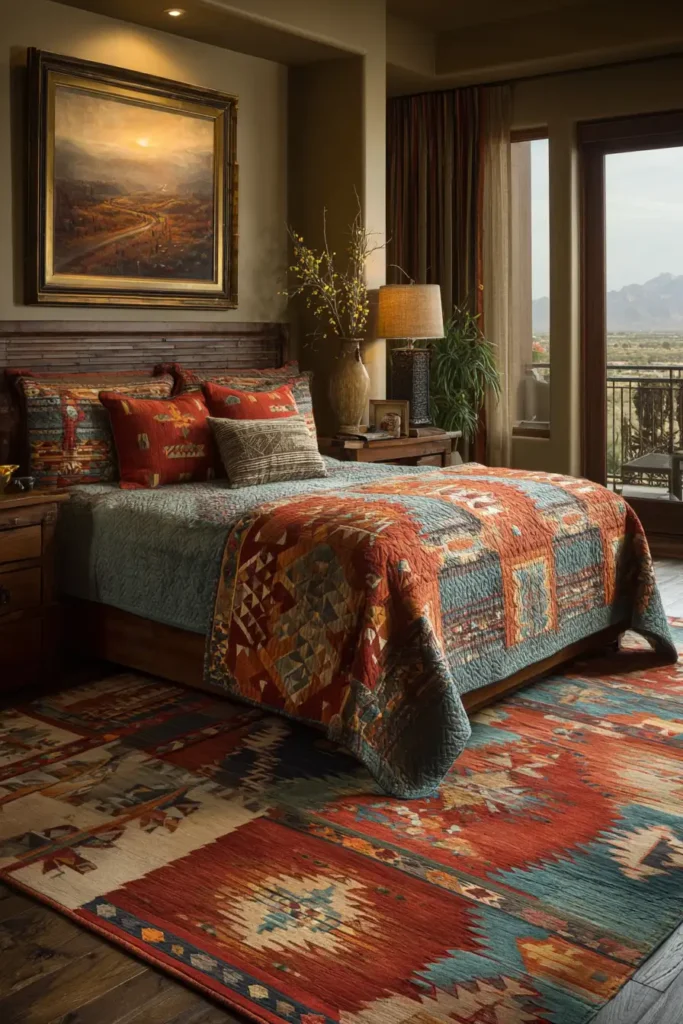
“The Painted Desert” Stepped Diamond Tapestry Quilt
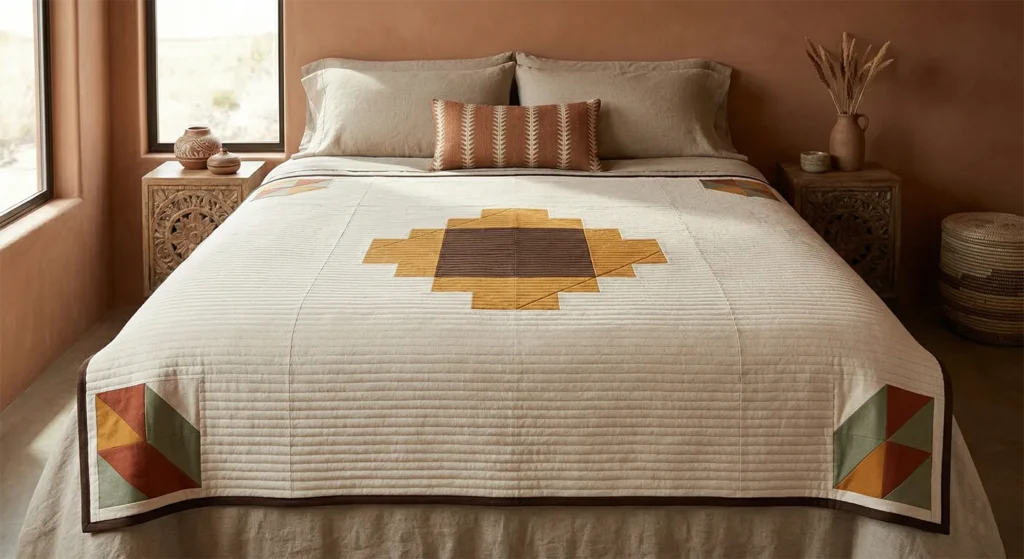
A master suite should be a grounding retreat, offering physical warmth and visual calm. To capture the essence of the American Southwest without overwhelming a modern bedroom, we must turn to the rich, natural palette of the desert landscape. “The Painted Desert” quilt utilizes the iconic stepped diamond—a hallmark of Navajo-inspired geometry—rendered in soothing earth tones of Deep Rust, Golden Ochre, Muted Sage, and Espresso Brown. Floating against a vast background of Unbleached Cream, this design creates a masterful balance between striking cultural architecture and the serene, inviting comfort required for restful sleep.
Finished Dimensions: Elegant Queen Bedspread, 92″ x 92″.
Materials Needed:
- The “Earth” (Geometric Motifs): 1 yard each of solid Deep Rust, Golden Ochre, and Muted Sage cotton. 1/2 yard of Espresso Brown.
- The “Air” (Negative Space): 5.5 yards of solid Unbleached Cream cotton or high-quality linen blend.
- Backing: 8.5 yards of luxurious Muted Sage Sateen.
- Batting:100% Wool Batting or a Bamboo/Cotton Blend.
- Why: Earth-toned master suites evoke warmth, and the tactile experience of the quilt must match the visual. Wool is a premium, highly breathable fiber that acts as a natural thermostat, keeping sleepers cozy in the winter and cool in the summer without the heavy, stifling weight of synthetic materials.
- Thread: 50wt cotton thread in an invisible Cream.
- Notions: A square acrylic ruler (at least 6.5″ x 6.5″), a rotary cutter with a fresh blade, and a water-soluble fabric marker.
Cultural Backstory: The spectacular earth tones found in historic Navajo (Diné) textiles were originally achieved through masterful natural dyeing techniques. Weavers used local desert resources—such as wild plum roots for reds, rabbitbrush for yellows, and wild walnuts for rich browns—to color their hand-spun wool. The stepped diamond motif frequently represents mountains, the cosmos, or the interconnectedness of nature. Bringing these specific colors and shapes into a master suite honors the profound harmony between the artisan and the natural world.
Step 1: Cutting the Desert Palette
Precision cutting ensures the “steps” of the diamonds align perfectly.
- The Solid Blocks: Cut exactly forty 4.5-inch squares from your Deep Rust, Golden Ochre, and Muted Sage yardage. Cut sixteen 4.5-inch squares from the Espresso Brown.
- The Cream Background: Cut exactly 80 4.5-inch squares from your Unbleached Cream yardage for the geometric intersections, and set the remaining yardage aside for the large negative-space borders.
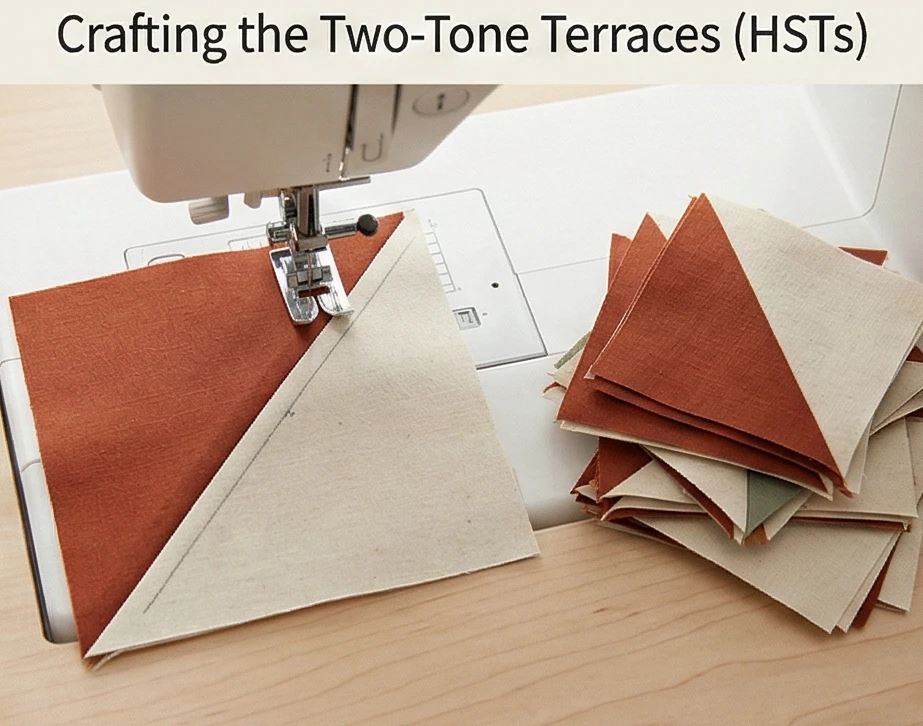
Step 2: Crafting the Two-Tone Terraces (HSTs)
Building the serrated, woven-style edges.
- The Pairing: Place a Cream square right-sides together with a colored square (e.g., Deep Rust). Draw a diagonal line from corner to corner across the back of the Cream square.
- The Stitch: Sew exactly 1/4 inch away from the drawn line on both sides. Slice directly down the drawn line to separate the two halves.
- Press and Trim: Press the seams open to reduce bulk. Trim every single Half-Square Triangle (HST) to a perfect 4″ x 4″ square. Repeat this process to create the stepped edges for all your rust, ochre, and sage rings.
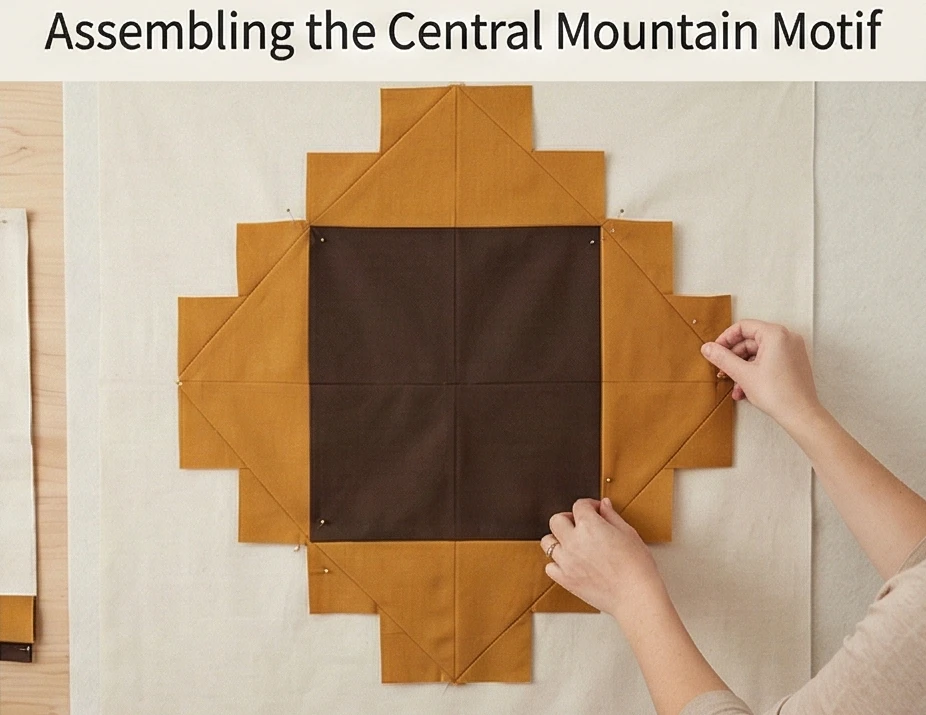
Step 3: Assembling the Central Mountain Motif
Building the geometric core from the inside out.
- The Espresso Core: Sew four Espresso Brown 4-inch squares together to form the dark, grounding center of the medallion.
- The Ochre Ring: Surround the Espresso core with your Golden Ochre solid squares and HSTs, turning the triangles so the color points inward and the cream points outward. This forms the first “stepped” diamond ring.
- The Expanding Radiance: Add a ring of Deep Rust, followed by an outer ring of Muted Sage, carefully nesting the 1/4-inch seams at every intersection. The completed central medallion will measure a striking 42 inches square.
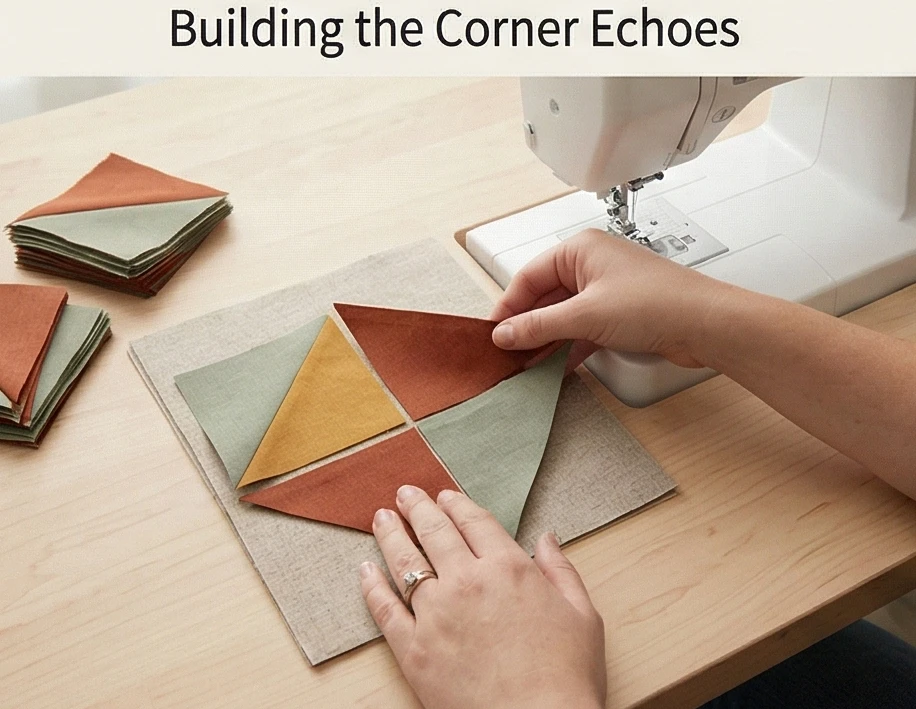
Step 4: Building the Corner Echoes
Creating symmetry across the vast bedspread.
- The Quarter-Diamonds: Using your remaining HSTs and solid squares, construct four smaller, partial diamonds. These will sit in the absolute four corners of the final quilt.
- The Purpose: When placed at the edges of the Unbleached Cream negative space, these corner motifs create the optical illusion that the massive central diamond radiates outward, echoing across the bed’s surface.
Step 5: Setting the Vast Cream Horizon
Framing the geometry for a Queen-sized drape.
- The Border Panels: From your remaining Unbleached Cream yardage, cut four massive panels measuring 25.5″ wide by 42.5″ long.
- The Assembly: Sew these wide Cream panels to the top, bottom, left, and right sides of your 42-inch central medallion.
- Attach the Corners: Finally, sew your four quarter-diamond blocks to the four outer corners of the Cream panels to square off the entire 92″ x 92″ tapestry perfectly.
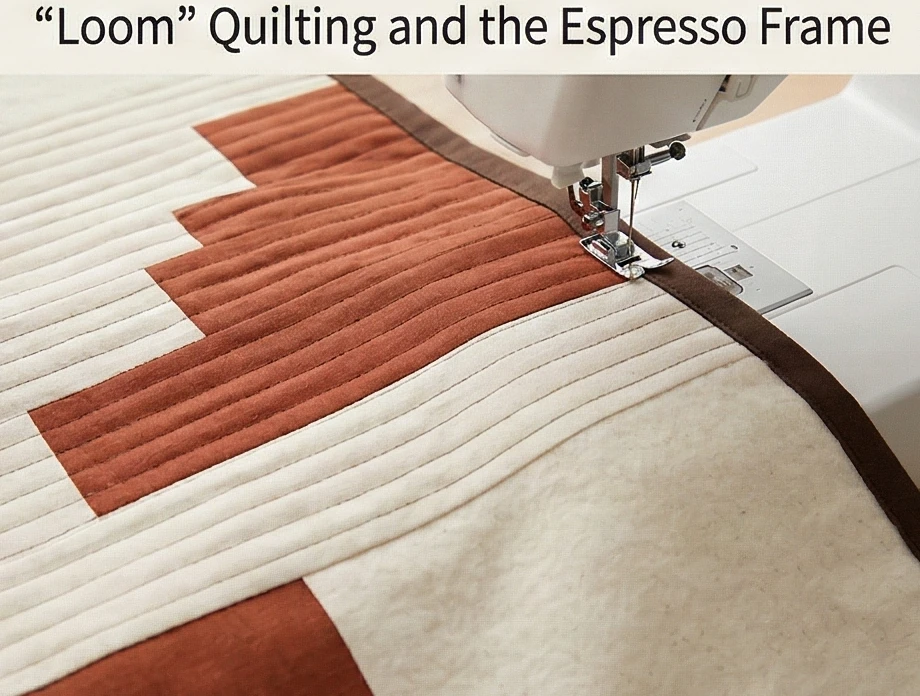
Step 6: “Loom” Quilting and the Espresso Frame
Texturizing the quilt to mimic a woven blanket.
- The Baste: Sandwich the pieced top, the breathable wool batting, and the soft Sage Sateen backing. Use curved safety pins every 4 inches, working from the center outward to ensure the large Cream expanses remain perfectly flat.
- Warp-and-Weft Quilting: Using a walking foot, quilt continuously, straight horizontal lines spaced 3/4-inch apart across the entire piece. This strict, linear quilting mimics the heavy weft threads of a traditional upright loom, giving the flat cotton an incredible, tactile, woven-like drape.
- The Binding: Trim the heavy quilt perfectly square. Bind the edges tightly in the solid Espresso Brown fabric. This dark, grounding frame contains the light, expansive design and anchors the quilt elegantly to the bed.
Usability Note: Deep earth tones like Rust and Ochre can occasionally release excess dye during their first wash. Always wash this quilt in cold water on a gentle cycle, throwing in two or three “color catcher” sheets to protect the pristine Unbleached Cream background. Tumble dry on low heat to preserve the life and loft of the wool batting.
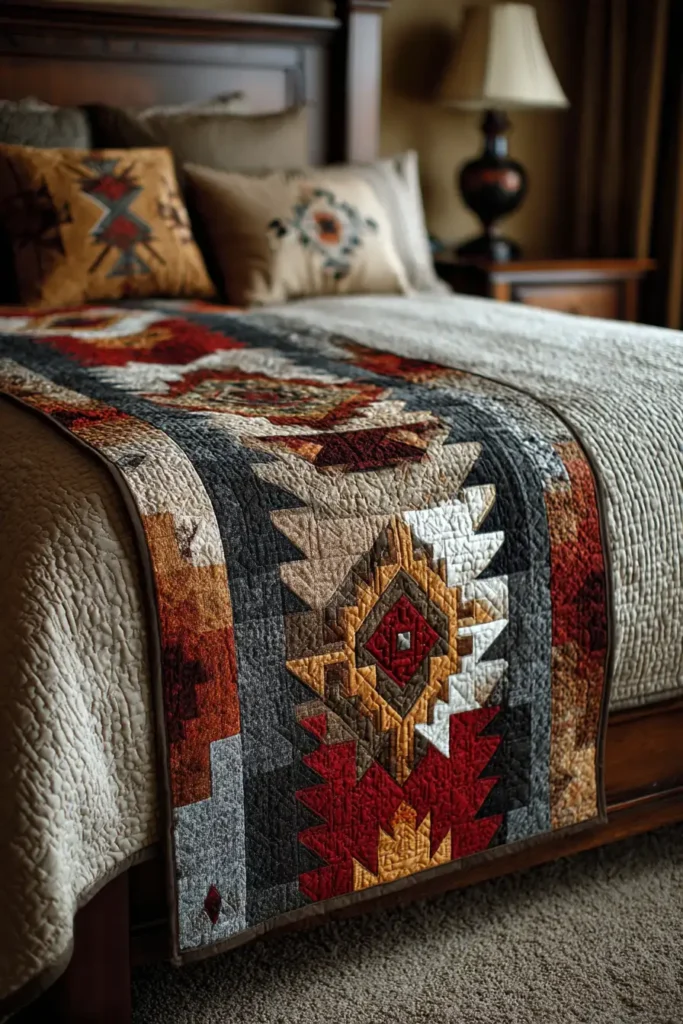
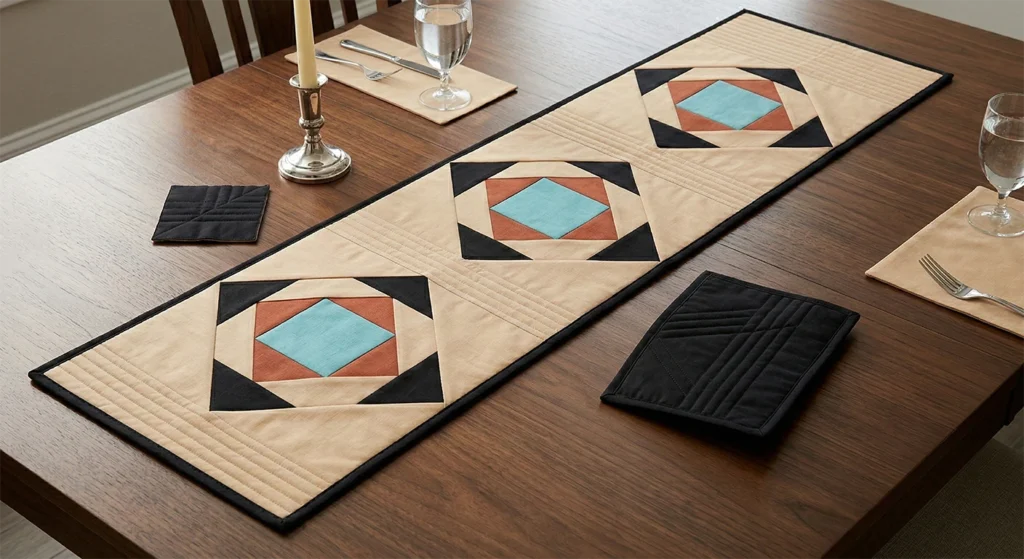
A bed runner offers the tailored, layered aesthetic of a boutique hotel while providing highly functional protection for your bedding. Translating the bold, geometric impact of a Navajo-inspired textile into a narrow, horizontal runner requires condensing the architecture. “The Canyon Weaver” achieves this by featuring a striking triptych—three perfectly aligned, stepped desert diamonds—suspended across strong, uninterrupted horizontal bands. Executed in a highly sophisticated, muted palette of Faded Turquoise, Warm Sand, Terracotta, and deep Charcoal, this runner introduces a profound element of Southwestern elegance to the foot of the bed without the heavy warmth of a secondary duvet.
Finished Dimensions: King/Queen Bed Runner, 24″ x 90″.
Materials Needed:
- The “Diamonds” (Motifs): 1/2 yard each of solid Faded Turquoise and Terracotta cotton.
- The “Bands” (Background): 1.5 yards of Warm Sand and 1 yard of Charcoal solid cotton.
- Backing: 2.5 yards of luxurious Charcoal Sateen or Brushed Cotton.
- Batting:100% Bamboo Batting.
- Why: A bed runner sits precisely where you toss a suitcase, sit to tie your shoes, or fold extra blankets. Bamboo batting is incredibly resilient, springing back from heavy compression. Most importantly, it possesses a fluid, luxurious drape, ensuring the 90-inch runner cascades effortlessly down the sides of the mattress rather than sticking out like a stiff board.
- Thread: 50wt cotton thread in an invisible Taupe.
- Notions: A square acrylic ruler, a rotary cutter with a fresh blade, and a water-soluble fabric marker.
Cultural Backstory: In Diné (Navajo) weaving traditions, horizontal stripes are often foundational, representing the vast, sweeping horizons of the desert landscape. The introduction of serrated or stepped diamonds—frequently associated with the “Eyedazzler” style of the late 19th century—symbolizes mountains, clouds, or the dynamic energy of the natural world. By placing a triptych of these diamonds over horizontal bands, this runner perfectly mimics the visual rhythm of a traditional loom-woven textile, honoring the artisan’s connection to the earth and sky.
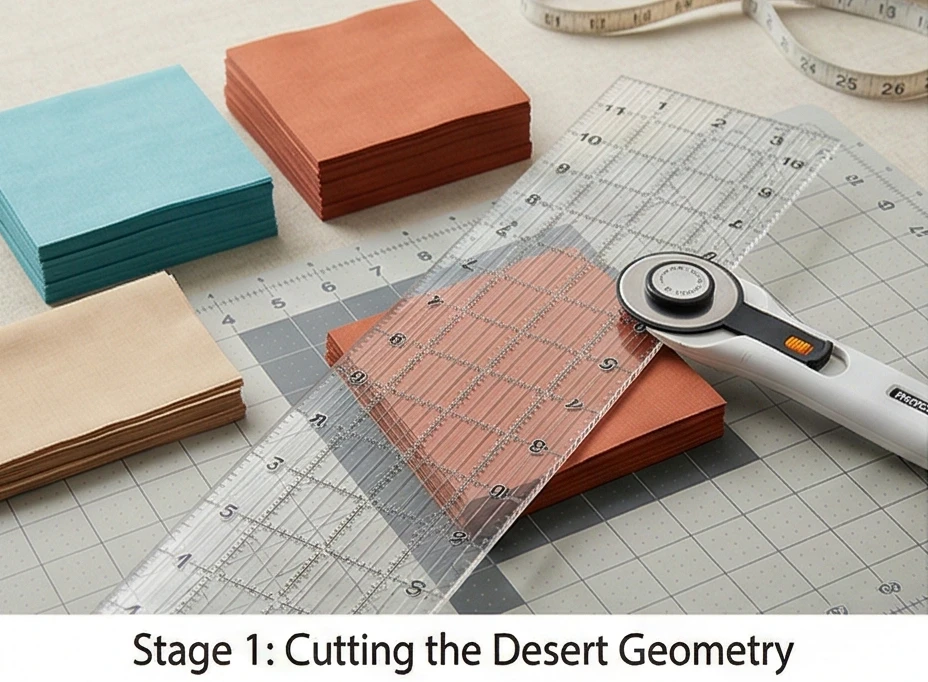
Step 1: Cutting the Desert Geometry
Preparing the precise squares for the stepped triptych.
- The Solid Cores: Cut exactly three 6.5-inch squares of solid Faded Turquoise for the center of your three diamonds.
- The Stepped Edges: Cut exactly twenty-four 4.5-inch squares of Terracotta, and twenty-four 4.5-inch squares of Warm Sand.
- The Horizontal Canvas: From your Charcoal and Warm Sand yardage, cut long, 3.5-inch wide strips across the width of the fabric (WOF). Sew these end-to-end to create the sweeping horizontal bands that will flank the diamonds.
Step 2: Crafting the Half-Square Triangles (HSTs)
Building the serrated, woven-style edges of the diamonds.
- The Pairing: Place a Warm Sand square right-sides together with a Terracotta square. Draw a diagonal line from corner to corner across the back of the Sand square.
- The Stitch: Sew a precise 1/4-inch seam on both sides of the drawn line.
- Press and Trim: Slice directly down the drawn line to separate the two halves. Press the seams open to reduce bulk. Trim every single HST block to exactly 4″ x 4″. You will yield 48 perfect HSTs.
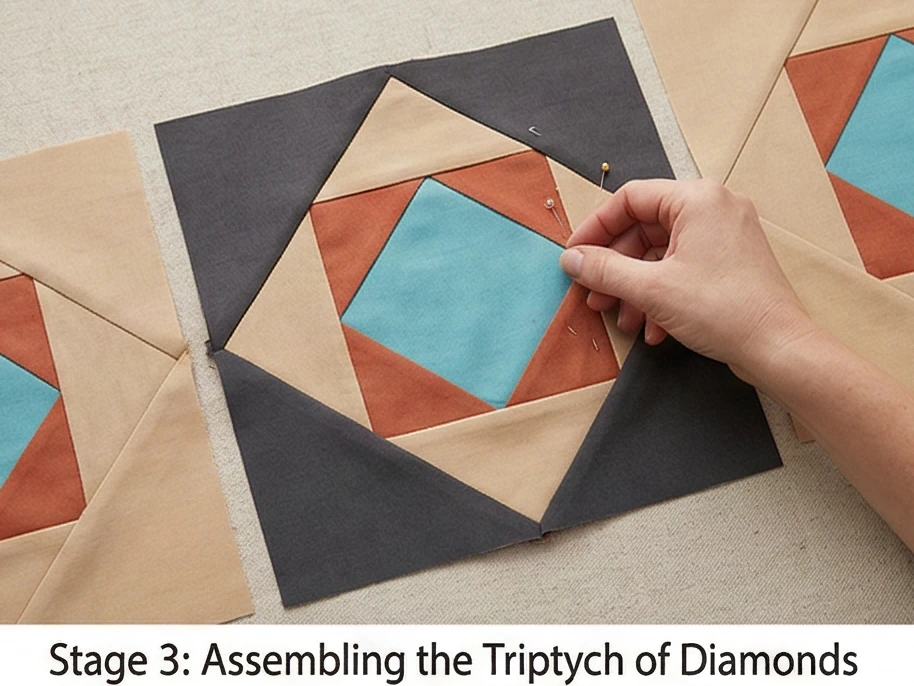
Step 3: Assembling the Triptych of Diamonds
Constructing the three focal points.
- The Layout: For one diamond, take your 6.5-inch Turquoise core. Surround it with a ring of your Terracotta/Sand HSTs.
- The Orientation: Rotate the HSTs so the Terracotta triangles point inward toward the Turquoise, and the Warm Sand triangles point outward. This creates the iconic “stepped” staircase effect.
- The Assembly: Sew the HSTs into rows, and then attach the rows to the Turquoise core. The completed block should measure a flawless 14.5″ x 14.5″. Repeat this process two more times to create your three identical desert diamonds.
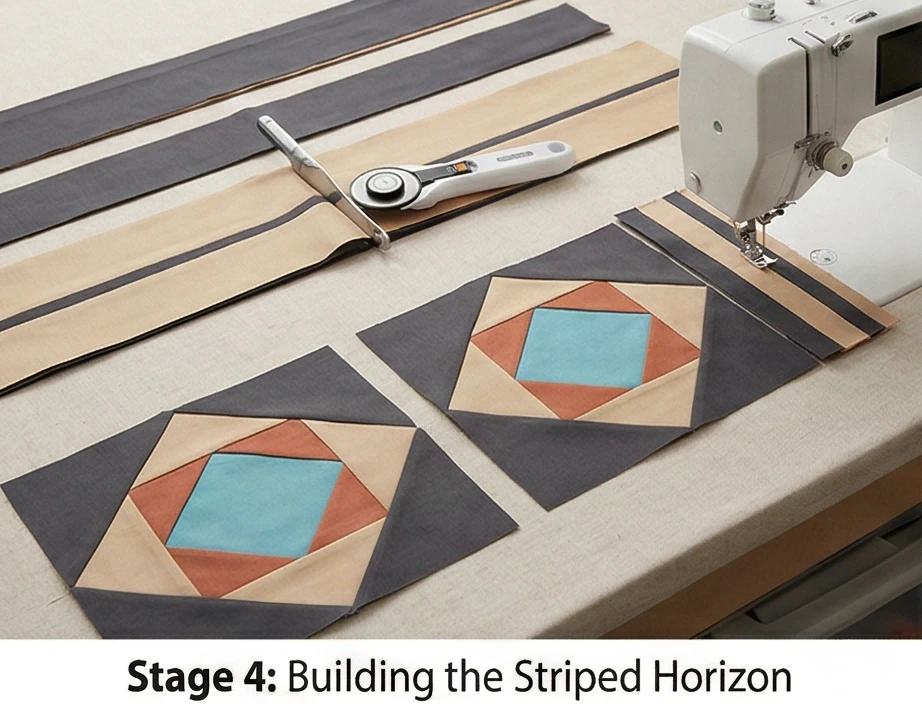
Step 4: Building the Striped Horizon
Creating the horizontal background bands.
- The Connecting Bridges: To space the three diamonds evenly across the 90-inch runner, you must build striped “bridge” blocks. Sew a Charcoal strip, a Sand strip, and another Charcoal strip together horizontally.
- Cut the Bridges: Cut this striped panel into two 14.5″ x 10″ rectangles.
- The Center Line: Sew the three diamond blocks together in a row, placing a striped bridge block between them. You now have a single, long central column measuring 14.5″ tall by roughly 62″ long.
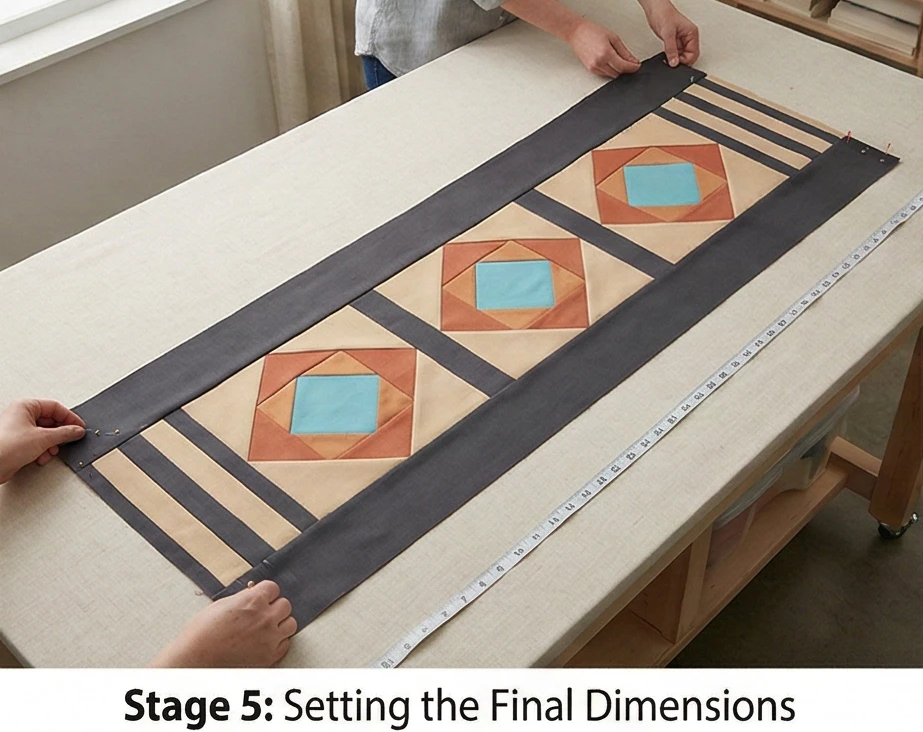
Step 5: Setting the Final Dimensions
Framing the geometry for a luxurious drape.
- The Outer Horizons: Cut two massive, striped panels (alternating Sand and Charcoal strips) measuring 14.5″ tall by 14.5″ wide. Sew these to the far left and far right ends of your runner to extend it to its full 90-inch length.
- The Top and Bottom Frames: Cut two long, continuous strips of solid Charcoal measuring 5.5″ wide by 90″ long. Sew these to the top and bottom of the entire pieced runner. The completed top will now measure exactly 24.5″ x 90.5″.
Step 6: “Warp” Quilting and the Tailored Frame
Locking the layers and texturizing the runner.
- The Baste: Sandwich the pieced runner, the fluid bamboo batting, and the Charcoal sateen backing. Baste densely with safety pins to ensure the long horizontal stripes do not warp or bow.
- Vertical Warp Quilting: Using a walking foot, quilt continuous, straight vertical lines spaced strictly 1/2-inch apart across the entire 90-inch length.
- Why: Because the pieced design heavily features horizontal stripes, quilting it vertically mimics the hidden “warp” threads of a Navajo loom. It provides an incredible, tactile, woven-like drape and locks the layers perfectly for heavy daily use.
- The Binding: Trim the heavy runner perfectly square. Bind the edges tightly in the solid Terracotta fabric. This vibrant frame features dark, sweeping horizontal bands and elegantly anchors the runner to the bed.
Usability Note: A bed runner acts as a shield for your duvet, absorbing the brunt of daily friction from luggage, pets, and shoes. The dense, vertical matchstick quilting creates a highly durable canvas that resists stretching. Wash this runner confidently on a cold, delicate cycle and tumble dry on low to preserve the vivid Terracotta and Turquoise dyes.
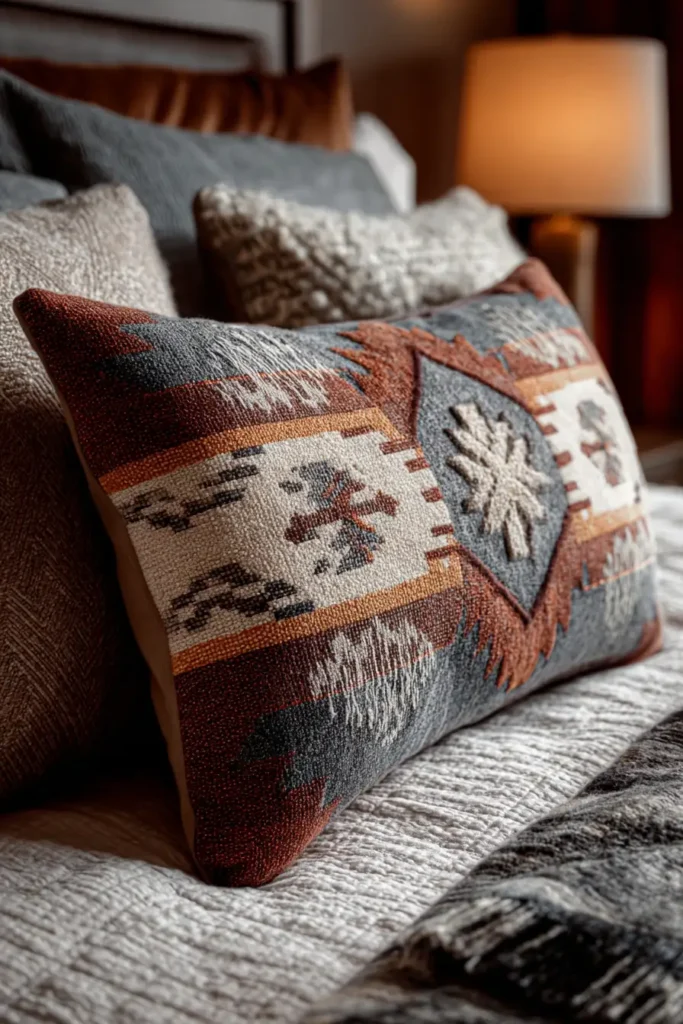
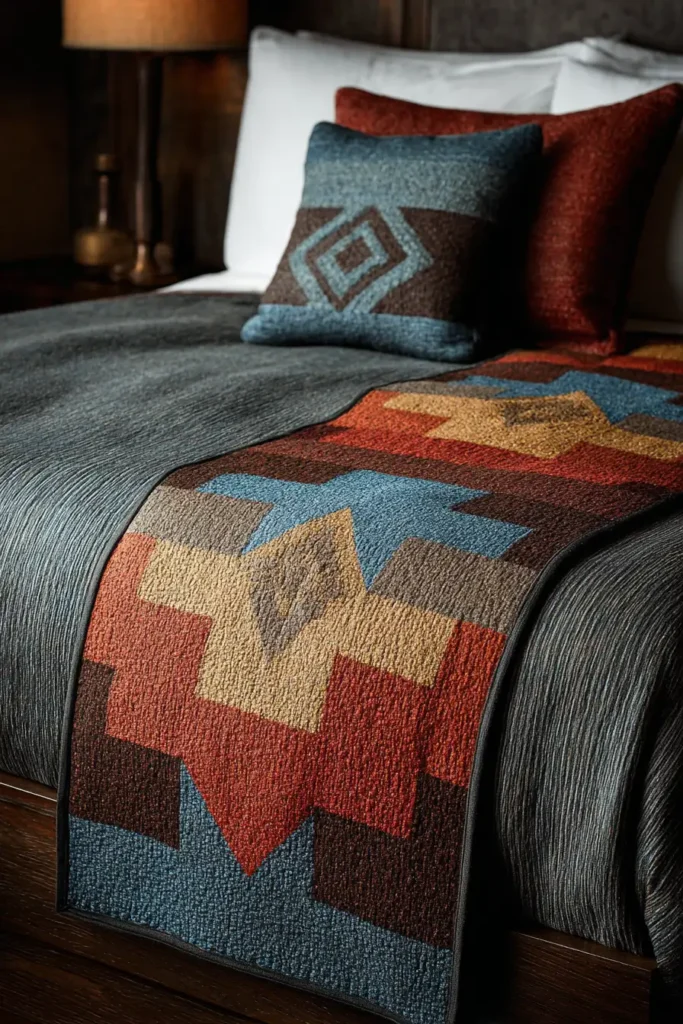
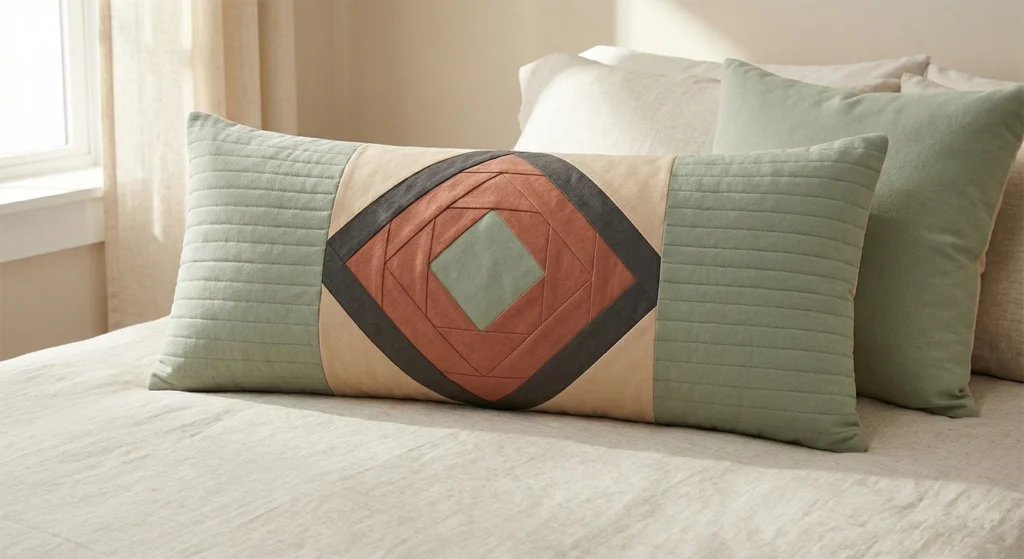
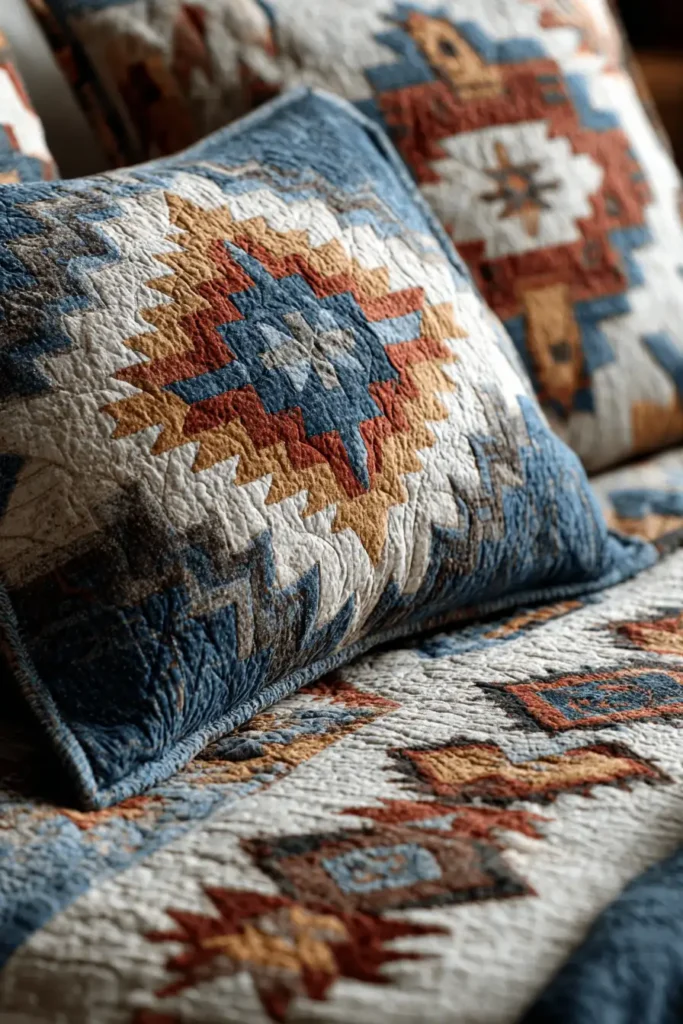
“The High Desert” Serene Lumbar Pillow Cover
A master bed requires a crowning focal point, but one that doesn’t disrupt the peaceful atmosphere necessary for a restful night. A long lumbar pillow provides excellent lower back support for reading in bed while drastically reducing the daily chore of arranging a dozen small throw pillows. “The High Desert” translates the intricate geometry of Navajo textiles into a sleek, elongated format. Executed in a highly calming, muted palette of Soft Sage, Warm Sand, Faded Terracotta, and Charcoal, this design features a central stepped diamond flanked by vast, serene horizontal bands. It brings profound cultural balance and modern minimalist elegance directly to the center of the bed.
Finished Dimensions: Oversized Lumbar Pillow, 14″ tall x 36″ wide.
Materials Needed (For One Lumbar Cover):
- The “Desert” (Motifs): 1/4 yard each of solid Soft Sage, Faded Terracotta, and Charcoal cotton.
- The “Sky” (Background & Envelope Back): 1.5 yards of crisp Warm Sand solid cotton.
- Batting:100% Bamboo Batting.
- Why: Because this pillow rests directly against the sleeper’s body when reading or lounging, temperature regulation is critical. Bamboo batting is incredibly breathable and naturally cooling. It provides a plush, quilted texture that showcases the geometric design without trapping body heat, ensuring ultimate comfort.
- Thread: 50wt cotton thread in an invisible Taupe.
- Notions: A small acrylic ruler with a 45-degree angle line, a fresh rotary blade, and a plush 14″ x 36″ down or down-alternative lumbar insert.
Cultural Backstory: In Diné (Navajo) philosophy, the concept of Hózhó represents a state of complete balance, beauty, and harmony with the natural world. This profound philosophy is visually reflected in the precise symmetry of their historic weaving. By bringing this symmetrical, balanced geometry into the bedroom using calming, earth-toned colors, you are actively cultivating an environment of Hózhó—a perfectly harmonious space designed for rest and restoration.
Step 1: Scaling the Miniature Geometry
A lumbar pillow requires a tightly scaled central focal point.
- The Solid Core: Cut exactly one 4.5-inch square of solid Soft Sage for the center of your diamond.
- The Stepped Edges: Cut exactly eight 3-inch squares of Faded Terracotta, eight 3-inch squares of Charcoal, and sixteen 3-inch squares of Warm Sand.
Step 2: Crafting the Two-Tone Terraces (HSTs)
Building the serrated, woven-style edges for the central diamond.
- The Pairing: Place a Warm Sand square right-sides together with a Faded Terracotta square. Draw a diagonal line from corner to corner across the back of the Sand square. Sew a precise 1/4-inch seam on both sides of the drawn line.
- The Charcoal Set: Repeat this exact process, pairing the remaining Warm Sand squares with the Charcoal squares.
- Press and Trim: Slice directly down the drawn lines to separate the halves. Press the seams open to reduce bulk. Trim every single Half-Square Triangle (HST) to exactly 2.5″ x 2.5″.
Step 3: Assembling the Central Medallion
Constructing the balanced desert focal point.
- The Inner Ring: Surround the 4.5-inch Sage core with the Terracotta/Sand HSTs. Rotate the HSTs so the Terracotta triangles point inward and the Warm Sand triangles point outward. Sew them into rows and attach them to the center block.
- The Outer Ring: Surround that completed section with a ring of the Charcoal/Sand HSTs, again pointing the dark color inward to create the final “stepped” staircase effect.
- Square Up: The completed central diamond block should measure a flawless 14.5″ x 14.5″.
Step 4: Building the Elongated Canvas
Extending the design to fit a 36-inch lumbar insert.
- The Striped Horizons: From your remaining Sage, Charcoal, and Warm Sand fabrics, cut long 2.5-inch wide strips. Sew them together lengthwise to create two striped panels that mimic the vast desert horizon.
- The Side Panels: Cut these striped panels down to measure 14.5″ tall by 11.5″ wide.
- The Layout: Sew one 11.5-inch striped panel to the left side of your 14.5-inch central diamond, and the second panel to the right side. The entire completed pieced front will now measure exactly 14.5″ tall by 36.5″ wide.

Step 5: Breathable Basting and Contour Quilting
Locking the layers while maintaining a soft drape.
- Baste and Quilt: Sandwich your pieced top, the cooling bamboo batting, and a scrap piece of muslin (for the interior lining).
- Contour Echo Quilting: Using a walking foot, do not quilt heavily over the center star. Instead, quilt straight lines “in the ditch” (exactly inside the seams) to outline the stepped diamond. For the striped side panels, quilt straight horizontal lines exactly 1 inch apart. This technique makes the central medallion physically pop forward while securing the wide sides.
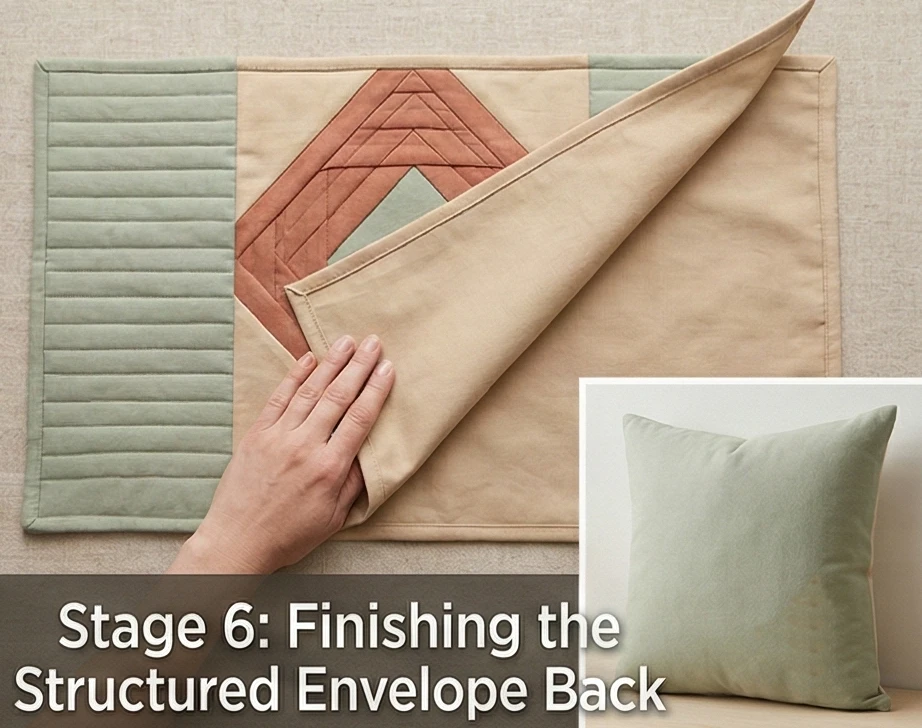
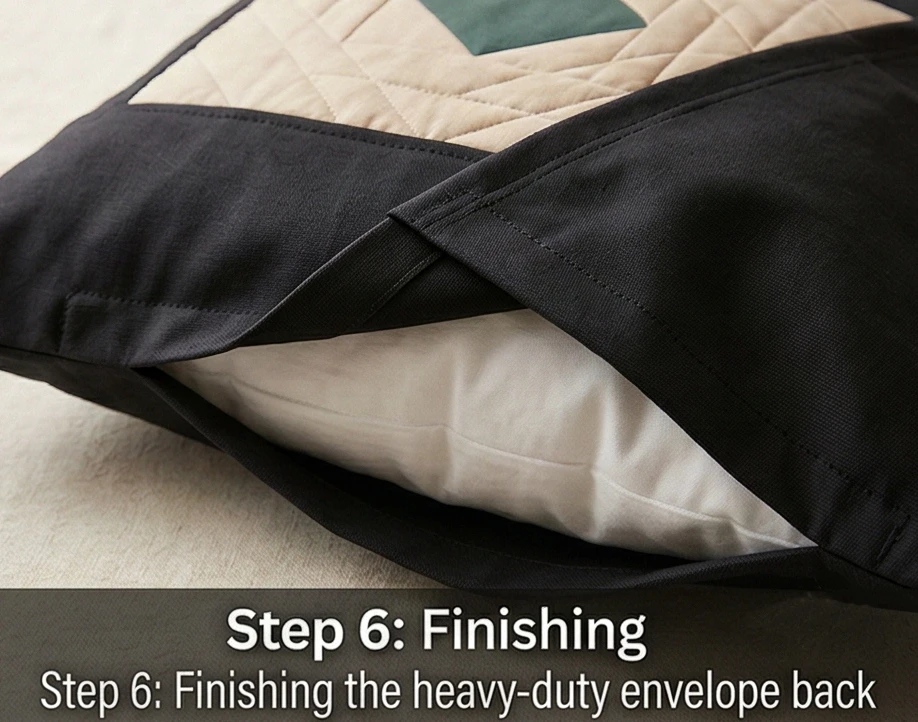
Step 6: The Heavy-Duty Envelope Construction
Finishing the cover for easy removal and laundering.
- Prepare the Backing: Cut two massive rectangles of Warm Sand cotton for the envelope closure (e.g., 14.5″ x 24″ and 14.5″ x 20″). Fold, press, and topstitch one long 14.5-inch edge on each piece to create a clean, durable hem.
- Assembly: Place the quilted top face up. Lay the backing pieces face down, overlapping the hemmed edges deeply in the center.
- The Final Stitch: Sew a 1/2-inch seam around the entire perimeter. Because lumbar pillows require wrestling a long insert into the cover, backstitch heavily over the envelope overlap on the top and bottom edges to prevent tearing. Clip the corners, turn right-side out, and insert your plush pillow.
Usability Note: Lumbar pillows absorb body oils and skin care products from sleepers leaning against them. The envelope closure makes this cover effortlessly removable. Wash on a cool, gentle cycle to protect the dense echo quilting, and tumble dry on low to re-fluff the bamboo batting’s breathable loft.

“The Mesa Breeze” Lightweight Layering Quilt Set
The secret to a beautifully styled, highly comfortable bed lies in intelligent layering. A heavy winter duvet is impractical year-round, but a soft, lightweight cotton quilt set provides the perfect versatile middle layer. “The Mesa Breeze” translates the bold, striking geometry of historic Southwestern weaving into an airy, highly breathable textile package. Rendered in a sun-washed palette of Soft Clay, Muted Turquoise, Dusty Rose, and Sun-Bleached Cream, this set includes a generous coverlet and matching shams. Featuring horizontal bands interspersed with repeating, geometric “Sunrise” diamonds, this set honors the desert’s aesthetic while prioritizing serene, adaptable comfort.
Finished Dimensions: Queen Layering Coverlet, 84″ x 90″ AND Two Standard Shams, 20″ x 26″.
Materials Needed (For the Complete Set):
- The “Sunrise” (Geometric Motifs): 1.5 yards each of Soft Clay, Muted Turquoise, and Dusty Rose soft-washed cotton.
- The “Horizon” (Background & Bands): 6 yards of Sun-Bleached Cream soft-washed cotton.
- Backing: 8 yards of incredibly soft Cream Cotton Voile or Percale.
- Batting:100% Cotton Batting (Low Loft).
- Why: For layered bedding, you want to avoid dense, heavy insulators like wool or thick polyester. Low-loft cotton batting breathes effortlessly, wicks away moisture, and provides a delicate, crinkled texture when washed, ensuring the quilt drapes fluidly over the body rather than feeling stiff.
- Thread: 50wt cotton thread in Cream.
- Notions: A square acrylic ruler, a rotary cutter, and a water-soluble fabric marker.
Cultural Backstory: The climate of the American Southwest is one of extremes, featuring blazing hot days and freezing nights. Diné (Navajo) weavers historically adapted to this environment by producing textiles of varying weights—from dense, tightly woven “wearing blankets” designed to repel winter wind, to lighter, softer pieces used for trade and daily layering. By rendering these iconic stepped-diamond patterns in ultra-lightweight, breathable cottons, this quilt set honors the ancestral necessity of adaptable, climate-responsive textiles.
Step 1: Cutting the Desert Palette for the Set
Preparing the geometry for both the coverlet and the shams.
- The Core Squares: Cut exactly twenty 6.5-inch squares of Muted Turquoise (16 for the coverlet, 4 for the shams).
- The Stepped Edges: Cut eighty 3.5-inch squares of Soft Clay, eighty 3.5-inch squares of Dusty Rose, and one hundred and sixty 3.5-inch squares of Sun-Bleached Cream.
- The Horizon Bands: From the remaining Cream yardage, cut long, 6.5-inch-wide strips across the width of the fabric (WOF). Sew these end-to-end to create the sweeping horizontal bands that will separate your geometric rows.
Step 2: Crafting the “Sunrise” Half-Square Triangles
Building the serrated edges efficiently.
- The Pairing: Place a Cream square right-sides together with a Soft Clay square. Draw a diagonal line from corner to corner across the back of the Cream square.
- The Stitch: Sew exactly 1/4 inch away from the drawn line on both sides. Slice directly down the drawn line to separate the two halves.
- Press and Trim: Press the seams open so the thin cotton lies perfectly flat. Trim every single Half-Square Triangle (HST) to exactly 3″ x 3″. Repeat this process to create all your Clay/Cream and Rose/Cream HSTs.
Step 3: Assembling the Central Medallions
Building the repeated geometric hubs.
- The Inner Ring: Take one 6.5-inch Turquoise core. Surround it with a ring of Clay/Cream HSTs, pointing the Soft Clay inward to create a stepped staircase effect.
- The Outer Ring: Surround that unit with a ring of Rose/Cream HSTs, again pointing the color inward.
- Square Up: Sew these into blocks. Each completed “Sunrise” medallion will measure roughly 16.5″ x 16.5″. You will build 20 of these blocks total (16 for the quilt, 4 for the two shams).
Step 4: Engineering the Layered Coverlet
Setting the medallions into the striped horizon.
- The Geometric Rows: Sew four Sunrise blocks together side-by-side, placing a 16.5″ x 4.5″ vertical Cream rectangle between each one to give the motifs room to breathe. Make four of these rows.
- The Sweeping Bands: Take your long, 6.5-inch wide horizontal Cream strips. Sew one strip between each of your geometric rows, ensuring the horizontal horizon lines run continuously across the entire width of the quilt.
- The Frame: Add a final 4-inch Cream border around the entire perimeter to bring the coverlet to its final dimensions of 84″ x 90″.
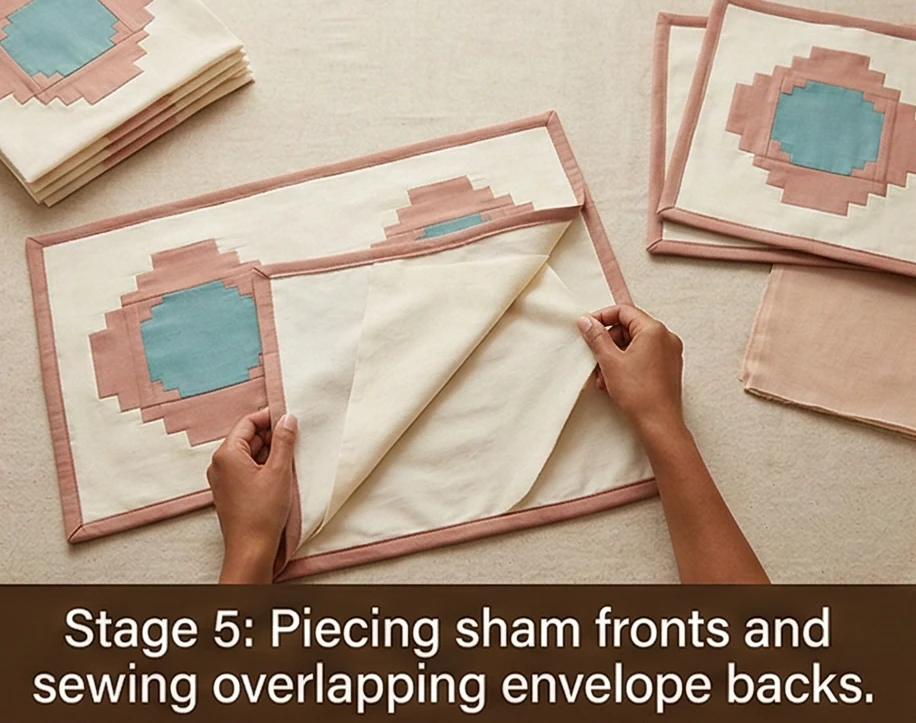
Step 5: Constructing the Matching Pillow Shams
Carrying the elegance up to the headboard.
- The Sham Fronts: For each sham, sew two Sunrise blocks side by side, separated by a 4.5-inch Cream rectangle. Add Cream borders to the top, bottom, and sides until the front panel measures 20.5″ x 26.5″.
- The Envelope Backs: Cut two overlapping rectangles of Cream soft cotton for the back of each sham (e.g., 20.5″ x 18″ and 20.5″ x 14″). Hem one long edge of each piece.
- Sham Assembly: Place the pieced sham front right-sides together with the overlapping backing pieces. Sew around the perimeter with a 1/2-inch seam allowance. Turn right-side out.
Step 6: Breathable Basting and “Desert Wind” Quilting
Locking the layers without adding stiffness.
- The Baste: Sandwich the coverlet top, the low-loft cotton batting, and the sheer Voile backing. Baste with safety pins. Do the same for the front panels of your shams.
- The Quilting: To ensure the quilt remains soft and pliable for layering, do not quilt densely. Using a walking foot, quilt gentle, undulating horizontal lines across the entire coverlet and sham fronts, spacing the “wind” waves about 2 to 3 inches apart. This secures the batting while maximizing the cotton’s fluid drape.
- The Tailored Frame: Bind the coverlet and the shams’ raw edges tightly in solid Soft Clay fabric, creating a warm, tailored edge that visually unites the three pieces of the set.
Usability Note: Because this set utilizes low-loft cotton batting and washed cotton fabrics, it is exceptionally easy to care for at home. Machine-wash the coverlet and shams together on a warm cycle, then tumble dry on medium heat. The layers will shrink slightly and uniformly, creating a gorgeously soft, crinkled texture that looks effortlessly chic when casually tossed over the bed.
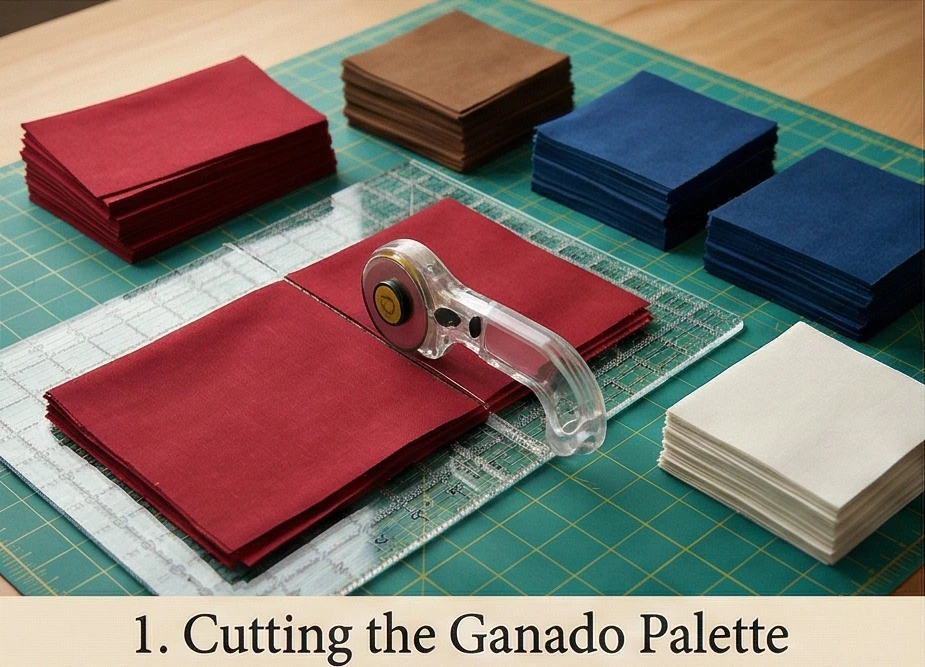
“The Chaco Canyon” Traditional Stepped Cross Quilt
To anchor an elegant Southwestern bedroom in genuine heritage, one must look to the foundational colors and motifs of classic Diné (Navajo) weaving. “The Chaco Canyon” quilt draws inspiration directly from the historic Ganado regional style, characterized by a dominant, deep Crimson ground, stark Natural White, deep Indigo Blue, and grounding Earthy Brown. This pattern features four massive, interconnected “Spider Woman Crosses” framed by deeply serrated geometric borders. When draped over a large bed, this striking, symmetrical design creates a profound sense of historical weight, traditional beauty, and sophisticated comfort.
Finished Dimensions: Full/Queen Heritage Quilt, 88″ x 88″.
Materials Needed:
- The “Heritage” (Geometric Motifs): 2 yards of deep Indigo Blue, 1.5 yards of rich Crimson, and 1 yard of Earthy Brown solid cotton.
- The “Canvas” (Background & Sashing): 5 yards of Natural White (unbleached) cotton.
- Backing: 8 yards of high-quality Natural White Flannel or Premium Percale.
- Batting:100% Wool Batting.
- Why: Traditional Navajo blankets were woven entirely of wool, providing unparalleled insulation in the harsh desert climate. Using wool batting inside a cotton quilt honors this material legacy while providing modern, breathable comfort. Wool regulates body temperature dynamically, ensuring the heavy quilt keeps you perfectly warm in winter without causing night sweats in the summer.
- Thread: 50wt cotton thread in an invisible Cream.
- Notions: A large square acrylic ruler (at least 12.5″ x 12.5″), a fresh rotary blade, and ultra-fine glass-head pins.
Cultural Backstory: In Diné (Navajo) cosmology, Na’ashjé’ii Asdzáá (Spider Woman) is a revered holy figure who taught the Navajo people how to weave upon a loom built from the earth and sky. The “Spider Woman Cross” is a traditional, symmetrical cross motif often woven into blankets as a symbol of balance, protection, and respect for this foundational teaching. Incorporating this specific geometry into a bedroom quilt transforms the bed into a sanctuary of historic protection and harmony.
Step 1: Cutting the Ganado Palette
Preparing the precise geometry for the four large quadrants.
- The Cross Components: Cut exactly eight 4.5-inch by 12.5-inch rectangles from your Crimson yardage, and four 4.5-inch by 4.5-inch squares from your Earthy Brown yardage (these form the absolute center of each cross).
- The Stepped Edges: Cut exactly eighty 4.5-inch squares of Indigo Blue, and eighty 4.5-inch squares of Natural White.
- The Sashing: Cut long, continuous 4.5-inch-wide strips from your Natural White background fabric to separate the massive blocks.
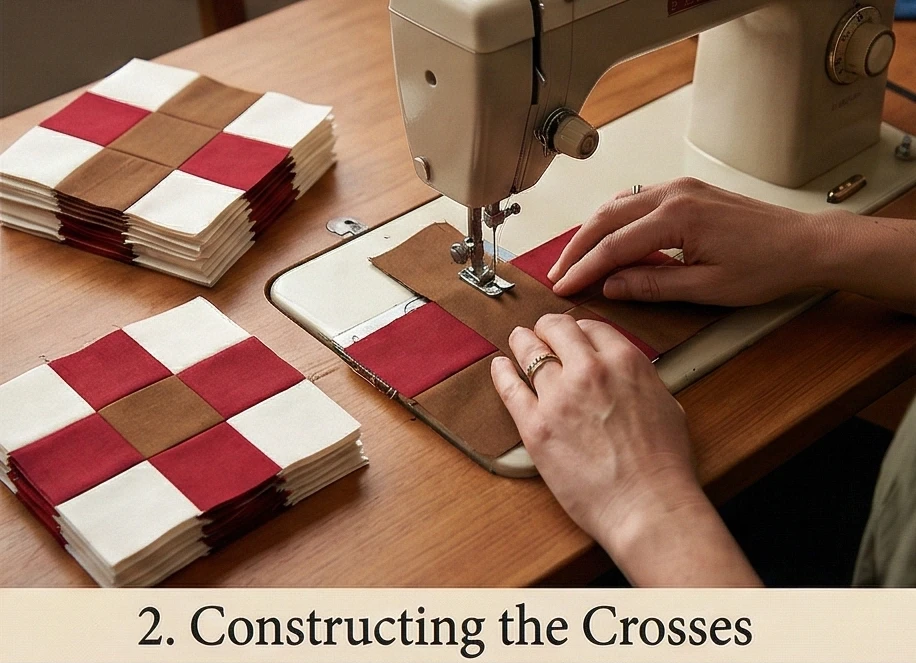
Step 2: Constructing the “Spider Woman” Crosses
Building the historic central motifs.
- The Core Block: Take one 4.5-inch Earthy Brown square. Sew a 4.5″ x 12.5″ Crimson rectangle to the left side, and another to the right side.
- The Vertical Arms: Cut four Crimson rectangles down to 4.5″ x 4.5″. Sew these to the top and bottom of your Earthy Brown square to complete the cross.
- Square Up: Fill in the four corners of this cross unit with 4.5-inch Natural White squares. Your completed central cross block will measure exactly 12.5″ x 12.5″. Repeat to make four identical cross blocks.
Step 3: Crafting the Indigo Terraces (HSTs)
Building the serrated, woven-style borders.
- The Pairing: Place a Natural White square right-sides together with an Indigo Blue square. Draw a diagonal line from corner to corner across the back of the White square.
- The Stitch: Sew precisely 1/4 inch away from the drawn line on both sides.
- Press and Trim: Slice directly down the drawn line to separate the halves. Press the seams open so the cotton lies perfectly flat. Trim every single Half-Square Triangle (HST) to exactly 4″ x 4″. You will yield 160 perfect Indigo/White HSTs.
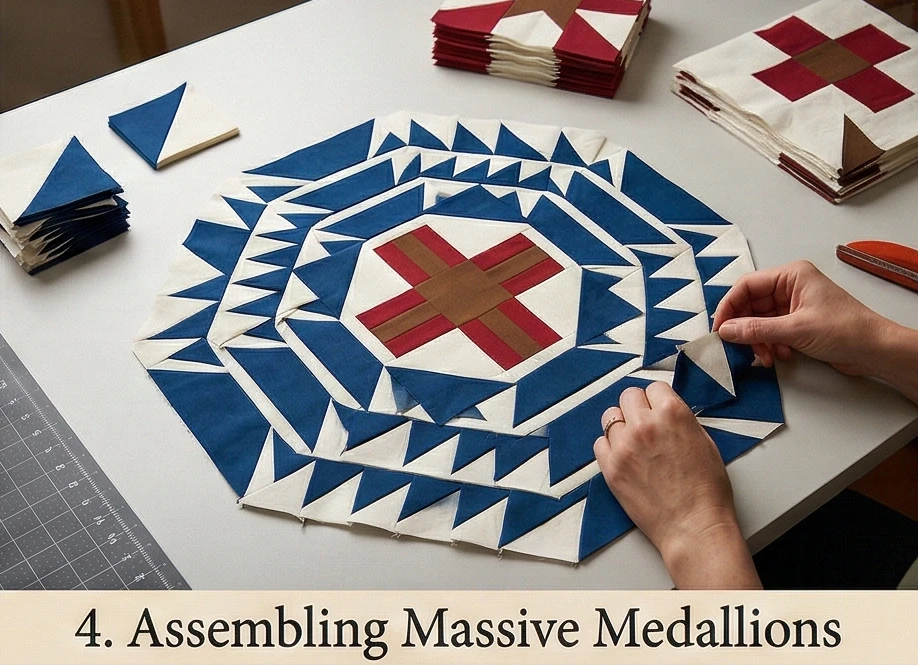
Step 4: Assembling the Four Massive Medallions
Wrapping the crosses in geometric protection.
- The Inner Ring: Take one 12.5-inch cross block. Surround it with a ring of your Indigo/White HSTs. Rotate the HSTs so the Indigo triangles point inward toward the cross, and the White triangles point outward. This creates the classic “stepped” staircase effect.
- The Outer Ring: Build a second, larger ring of HSTs around the first, this time pointing the Indigo outward.
- The Yield: Carefully nest the 1/4-inch seams at every intersection. Each of the four completed massive medallions will measure exactly 36.5″ x 36.5″.
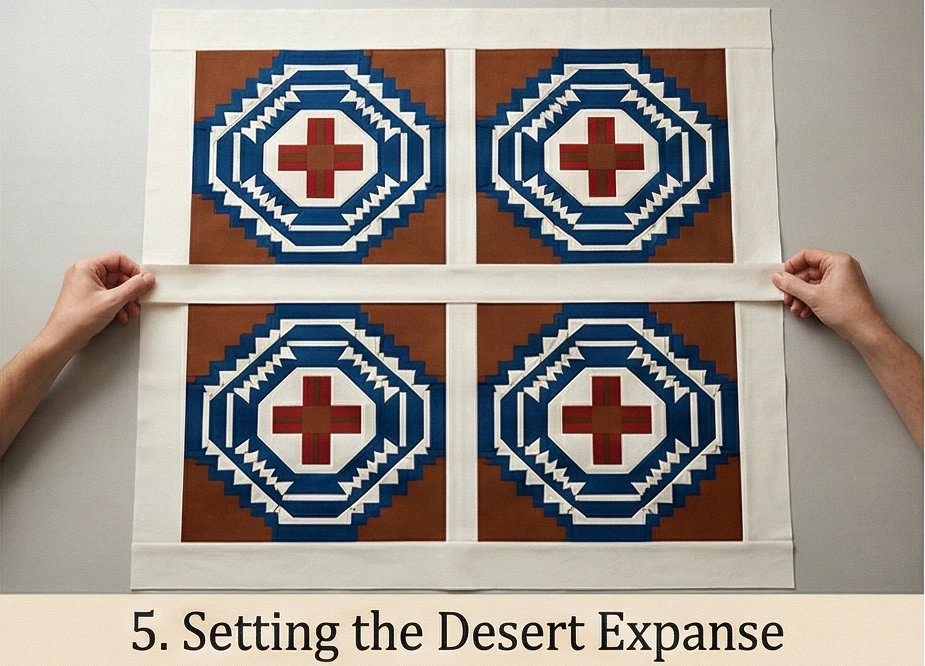
Step 5: Setting the Desert Expanse
Joining the quadrants into a cohesive bed cover.
- The Central Cross Sashing: Sew a 4.5-inch-wide by 36.5-inch-long Natural White sashing strip between two of your large medallions to create the top half of the quilt. Repeat for the bottom half.
- The Horizontal Bridge: Sew a continuous 4.5-inch-wide by 76.5-inch-long Natural White strip horizontally between the top and bottom halves. The four medallions are now perfectly spaced.
- The Frame: Add a wide, uninterrupted 6-inch Natural White border around the entire outer perimeter of the quilt to beautifully float the dark geometric motifs. The quilt top will now measure 88″ x 88″.
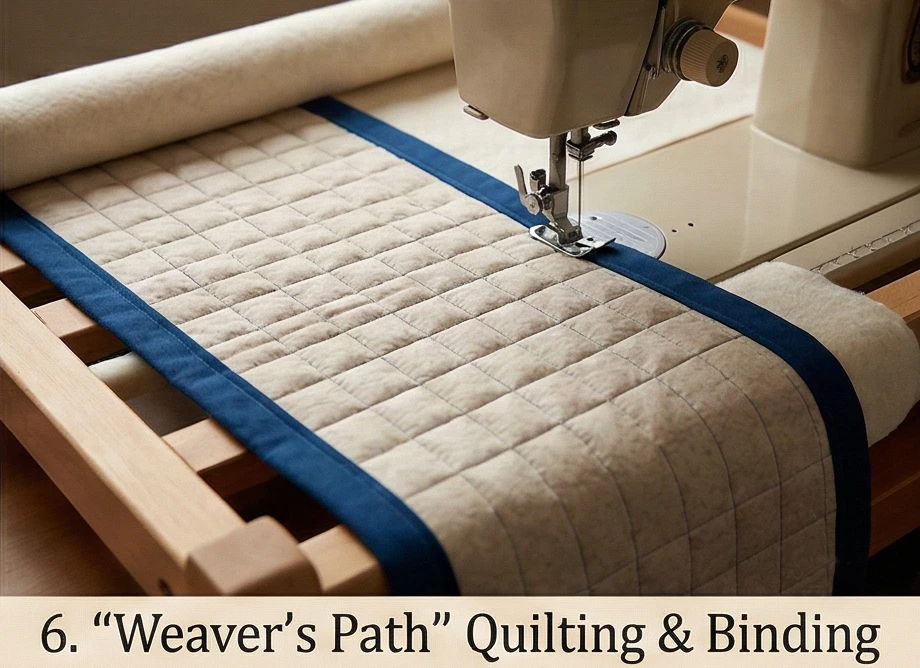
Step 6: “Weaver’s Path” Quilting and Tailored Binding
Finishing the quilt for luxurious drape and durability.
- The Baste: Sandwich the pieced top, the breathable wool batting, and the soft Natural White Flannel backing. Baste heavily with curved safety pins to support the weight of the 88-inch canvas.
- Linear Grid Quilting: Do not use swirling or modern free-motion quilting on a historic design. Using a walking foot, quilt a strict, continuous 1-inch grid of straight horizontal and vertical lines across the entire surface. This dense, architectural grid flattens the seams, mimics the woven texture of a loom, and perfectly secures the wool batting for decades of use.
- The Binding: Trim the massive quilt perfectly square. Bind the edges tightly in the solid Indigo Blue fabric. This dark, grounding frame contains the sweeping white background and ties the entire Southwestern bedroom aesthetic together.
Usability Note: Traditional color palettes featuring deep Indigo and Crimson can bleed during their first wash. To protect the stark Natural White background, launder this quilt in cold water with at least three “color catcher” sheets. Tumble dry on a low, gentle setting to allow the wool batting to fluff up and provide that incredibly soft, inviting texture.

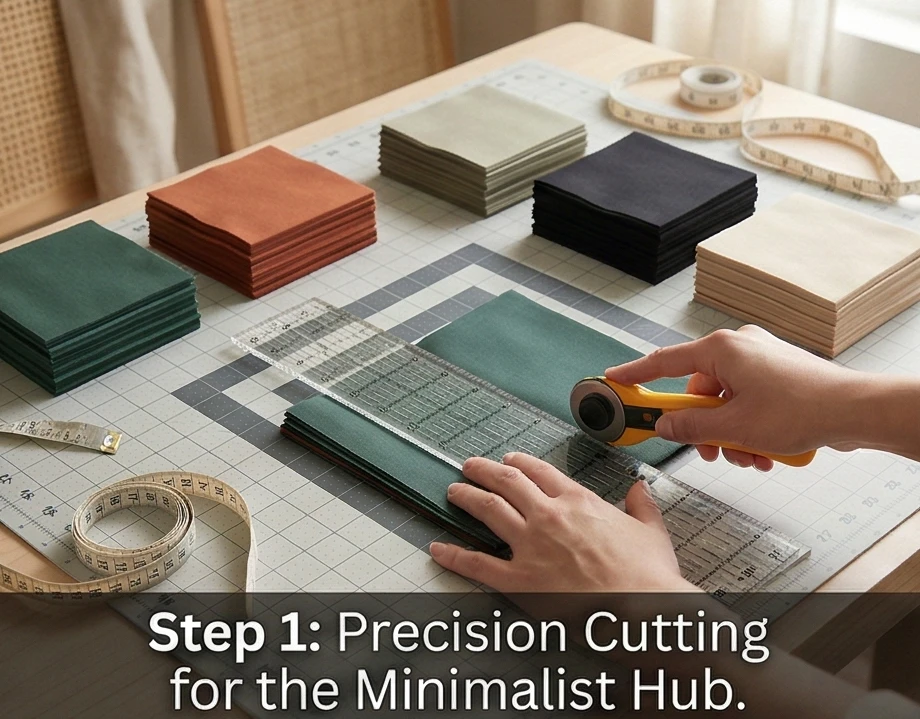
“The White Sands” Minimalist Geometric Accent Quilt
Modern rustic design relies on the delicate balance between raw, natural textures and clean, intentional lines. To bring Navajo-inspired geometry into a minimalist bedroom, we must strip the traditional complexity down to its most powerful essence: the striking contrast of a single, bold motif against a vast expanse of negative space. “The White Sands” achieves this by placing one perfectly scaled, stepped geometric diamond directly in the center of an uninterrupted field of unbleached cotton. Executed in an ultra-refined palette of Crisp Ivory, deep Charcoal, and a subtle hint of Soft Clay, this accent quilt provides profound visual serenity while offering the luxurious, tactile warmth required for a cozy bedroom.
Finished Dimensions: Generous Accent / Throw Quilt, 60″ x 72″ (Perfect for draping across the foot of a Queen or King bed).
Materials Needed:
- The “Motif” (The Diamond): 1/2 yard of solid Charcoal and 1/4 yard of Soft Clay cotton.
- The “Expanse” (Negative Space): 4.5 yards of solid Crisp Ivory cotton or a high-quality linen-cotton blend.
- Backing: 4 yards of luxurious Charcoal Linen or Brushed Cotton.
- Why: Modern rustic style thrives on texture. A linen or brushed cotton backing adds a beautiful, tactile weight to the quilt, ensuring it doesn’t slide off the bed while introducing a cozy, lived-in feel that softens the stark geometry of the front.
- Batting:100% Bamboo Batting.
- Why: In minimalist design, a quilt should drape fluidly, not puff up stiffly like a marshmallow. Bamboo batting provides an exceptionally slim profile with unparalleled drape and thermoregulation, making it the perfect year-round layer.
- Thread: 50wt cotton thread in Ivory.
- Notions: A square acrylic ruler, a fresh rotary blade, and ultra-fine glass-head pins.
Cultural Backstory: While many recognize the vibrant, complex “Eyedazzler” patterns of the late 19th century, the earliest Navajo (Diné) wearing blankets—known as Phase I Chief’s Blankets—were masterpieces of minimalism. They consisted solely of stark, alternating horizontal bands of natural brown/black and white wool. “The White Sands” pays homage to this early understanding of high contrast and the power of restraint, utilizing a single, striking geometric anchor to speak volumes without visually overwhelming the space.
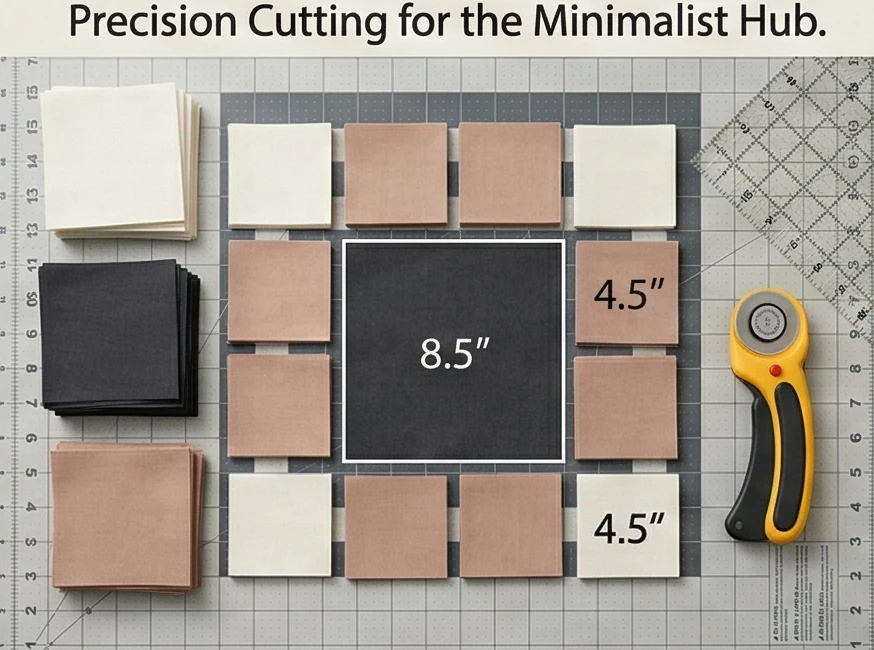
Step 1: Precision Cutting for the Minimalist Hub
A sparse design means every single seam must be flawless.
- The Central Anchor: Cut exactly one 8.5-inch square of solid Charcoal for the absolute core of the diamond.
- The Stepped Components: Cut exactly eight 4.5-inch squares of Soft Clay, eight 4.5-inch squares of Charcoal, and sixteen 4.5-inch squares of Crisp Ivory.
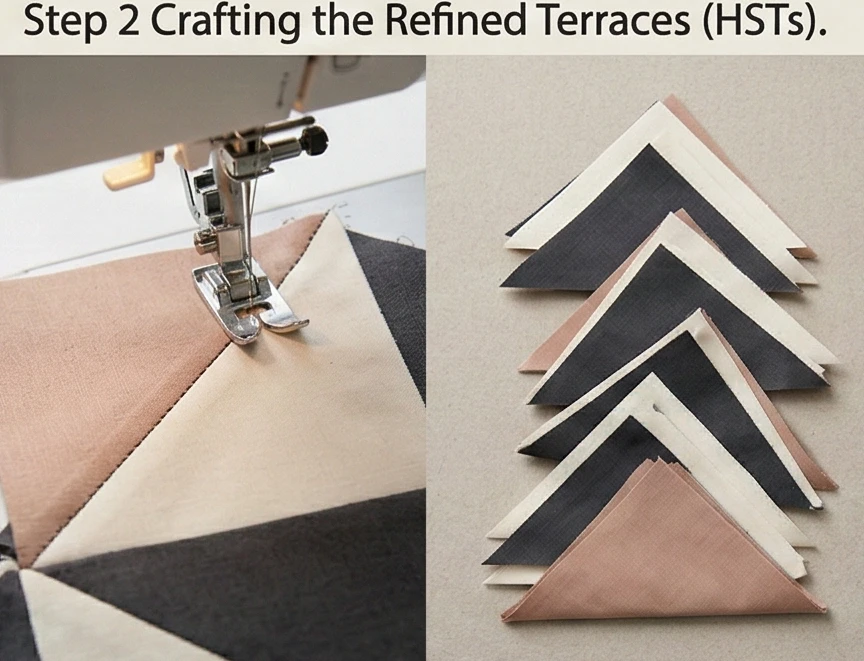
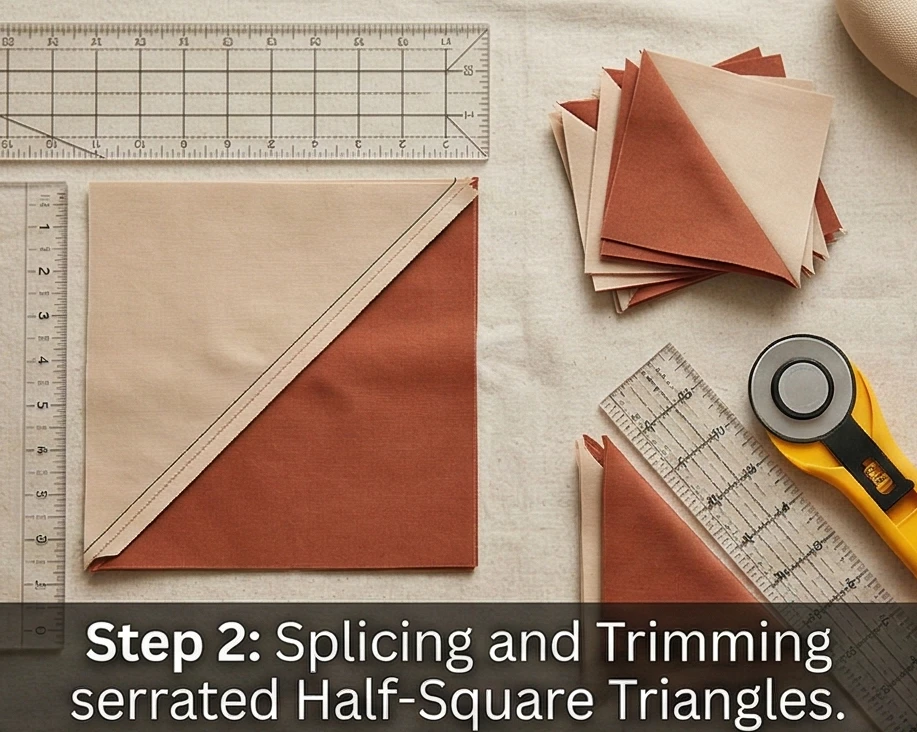
Step 2: Crafting the Refined Terraces (HSTs)
Building the subtle serrated edges.
- The Clay Pairing: Place eight Crisp Ivory squares right-sides together with your eight Soft Clay squares. Draw a diagonal line from corner to corner across the back of the Ivory squares. Sew a 1/4-inch seam on both sides of the drawn line.
- The Charcoal Pairing: Repeat this process, pairing the remaining eight Ivory squares with the eight Charcoal squares.
- Trim to Perfection: Slice directly down the drawn lines, press the seams open to maintain a perfectly flat surface, and trim every single Half-Square Triangle (HST) to exactly 4″ x 4″.
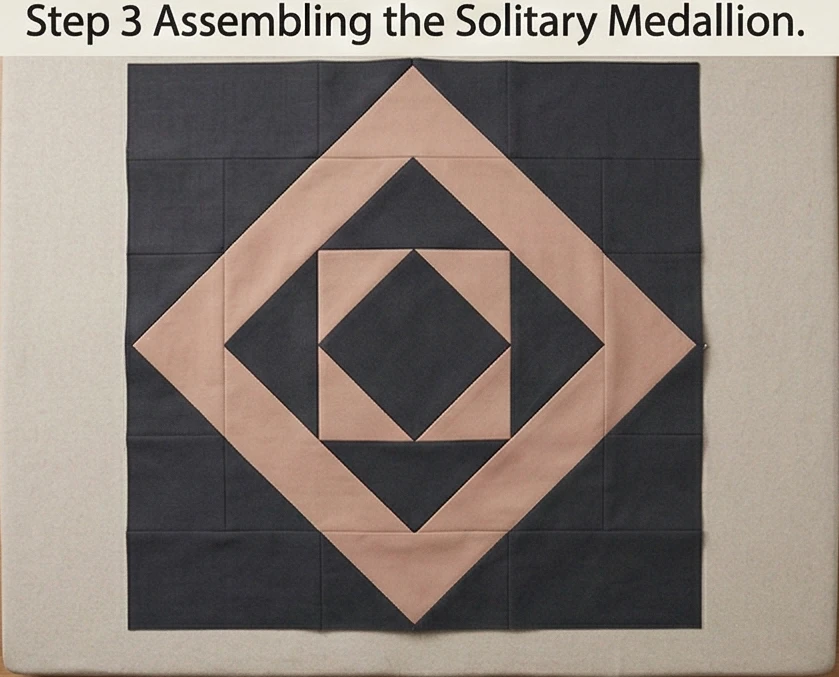
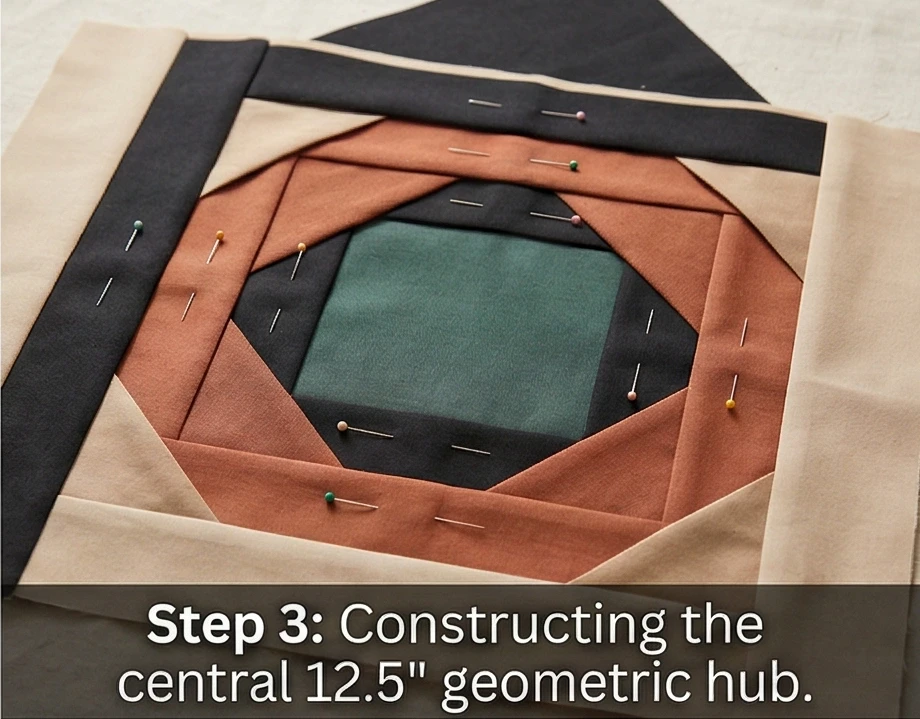
Step 3: Assembling the Solitary Medallion
Constructing the single geometric focal point.
- The Soft Clay Ring: Surround the massive 8.5-inch Charcoal core with the Clay/Ivory HSTs. Rotate the HSTs so the Soft Clay points inward and the Ivory points outward, creating a delicate, terracotta-colored stepped ring.
- The Charcoal Frame: Surround the Clay ring with your Charcoal/Ivory HSTs, again pointing the dark color inward.
- Square Up: Carefully nest the seams and sew the rows together. Your completed, solitary diamond block will measure a striking 24.5″ x 24.5″.
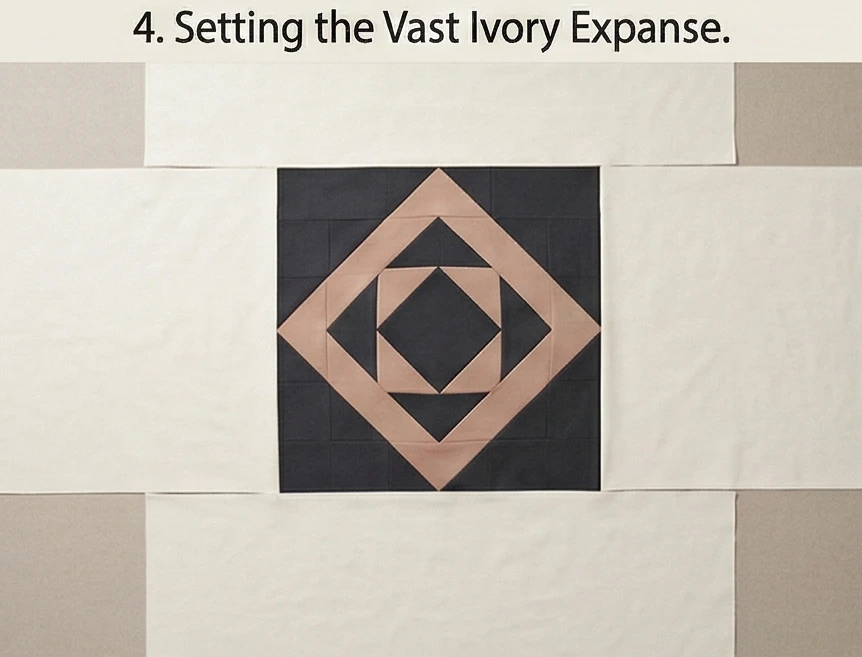
Step 4: Setting the Vast Ivory Expanse
Floating the geometry in serene negative space.
- The Vertical Borders: From your Crisp Ivory yardage, cut two massive side panels measuring 18.25″ wide by 24.5″ tall. Sew these to the left and right sides of your central medallion. The center row now measures 60″ wide.
- The Horizontal Horizons: Cut two enormous Ivory panels measuring 60″ wide by 24.25″ tall. Sew one to the top of the center row, and one to the bottom.
- The Result: Your 24.5-inch dark diamond is now perfectly suspended in the dead center of a pristine 60″ x 72″ minimalist canvas.
Step 5: Basting and “Desert Wind” Channel Quilting
Adding structure without sacrificing the soft drape.
- The Baste: Sandwich the pieced top, the ultra-thin bamboo batting, and the textured Charcoal Linen backing. Baste smoothly with curved safety pins, taking extra care to smooth out the large, unpieced Ivory panels.
- Wide Channel Quilting: In minimalist design, complex quilting is a distraction. Using a walking foot, quilt perfectly straight, continuous horizontal lines spaced exactly 2 inches apart across the entire quilt. This wide channel quilting creates a soft, ribbed texture that enhances the rustic drape and honors the horizontal orientation of traditional loom weaving.

Step 6: The Tailored Soft Clay Frame
Finishing the accent piece with a subtle spark.
- Square and Trim: Trim the outer edges of the quilt perfectly square, removing any excess batting or backing.
- The Binding: Bind the edges tightly in the solid Soft Clay fabric. Against the vast expanse of Ivory, this thin, terracotta-colored frame provides a warm, tailored boundary that visually connects the edge of the quilt to the inner ring of the central diamond.

Usability Note: The beauty of combining crisp cotton with a linen-blend backing is how it ages. Wash this quilt on a cold, gentle cycle and tumble dry on low. With each wash, the bamboo batting will soften, and the linen back will develop a luxurious, slightly crinkled texture, perfectly embodying the relaxed elegance of a modern rustic retreat.
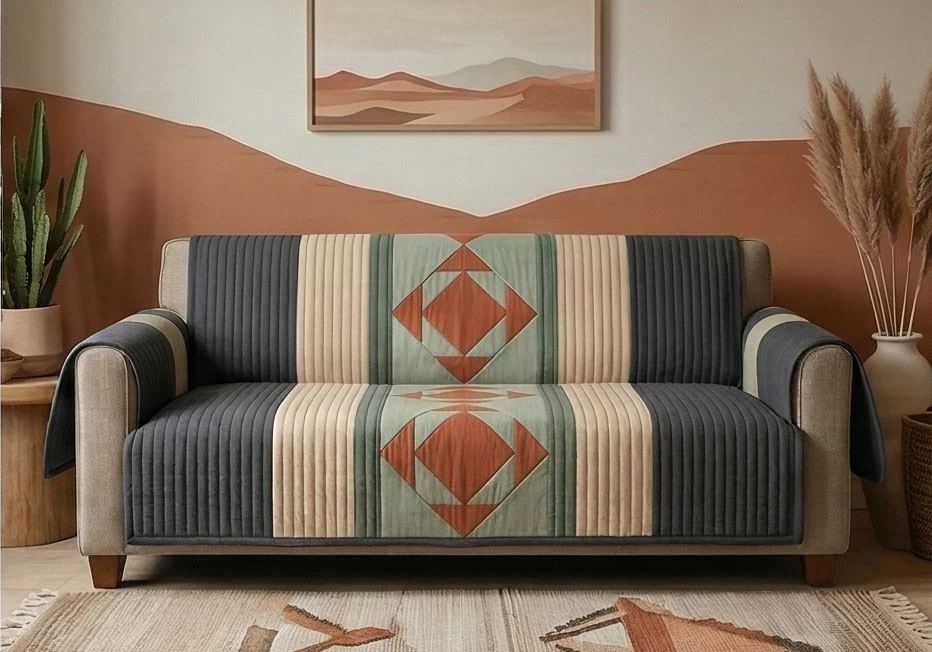
“The Mesa Stripe” Heavy-Duty Quilted Sofa Cover
The living room sofa is the anchor of the modern home—a place for gathering, resting, and daily family life. However, protecting your upholstery shouldn’t require sacrificing your interior design. “The Mesa Stripe” elevates the utilitarian couch cover into a stunning piece of functional textile art. Inspired by the bold, sweeping horizontal bands of late 19th-century Navajo serapes, this design embeds three vibrant, stepped geometric diamonds within wide stripes of deep Charcoal, Soft Sage, and Warm Sand, anchored by a Terracotta core. By utilizing heavy-duty cottons and a non-slip backing, this cover provides uncompromising elegance and rugged durability for high-traffic living spaces.
Finished Dimensions: Oversized Sofa Protector, 70″ x 90″ (Engineered to center the geometric motifs on the seating area while the striped ends drape elegantly over the armrests).
Materials Needed:
- The “Mesa” (Geometric Motifs): 3/4 yard each of solid Terracotta and Soft Sage cotton.
- The “Serape” (Background Stripes): 3 yards of heavy-weight Charcoal cotton and 2 yards of Warm Sand cotton or light canvas.
- Backing: 5.5 yards of heavy Charcoal Wide-Wale Corduroy or Upholstery-Weight Flannel.
- Why: A standard cotton quilt will immediately slide off a leather or microfiber sofa the moment someone sits down. The textured “grip” of corduroy or heavy flannel acts as a natural, non-slip anchor, keeping the heavy cover perfectly positioned, even with kids, pets, and daily lounging.
- Batting:100% Wool Batting or a dense Bamboo/Cotton Blend.
- Why: A couch cover must absorb the compression of heavy sitting without permanently flattening out. Wool naturally springs back, ensuring your sofa cover retains its luxurious, quilted loft rather than looking paper-thin after a week of use.
- Thread: Heavy-duty 40wt cotton thread in Charcoal.
- Notions: A large acrylic ruler, a rotary cutter, and heavy-duty sewing machine needles (Size 90/14).
Cultural Backstory: While Navajo (Diné) weaving is famous for its intricate rugs, historically, many of these textiles were woven as “wearing blankets” designed to protect the wearer from the harsh, biting winds of the high desert. They were masterclasses in combining breathtaking geometric beauty with absolute, rugged utility. Designing a heavy-duty sofa cover with these motifs honors that utilitarian strength, creating a textile that is meant to be lived with, used heavily, and relied upon for comfort and protection every single day.
Step 1: Cutting the Serape Stripes
Preparing the sweeping horizontal bands.
- The Wide Bands: Cut exactly six 8.5-inch strips from your heavy Charcoal cotton across the width of the fabric (WOF).
- The Narrow Bands: Cut exactly eight 4.5-inch strips from your Warm Sand yardage.
- Splicing the Horizons: Sew the WOF strips end-to-end to create ultra-long, continuous bands (at least 92 inches long) that span the entire width of the sofa.
Step 2: Crafting the Stepped Hubs (HSTs)
Building the three central Terracotta diamonds.
- The Core Squares: Cut three 6.5-inch squares of solid Terracotta.
- The HST Components: Cut exactly twenty-four 4.5-inch squares of Terracotta, and twenty-four 4.5-inch squares of Soft Sage.
- The Construction: Place the Sage squares right sides together with the Terracotta squares. Draw a diagonal line on the back of the Sage squares, sew 1/4 inch on both sides of the line, and cut apart. Press the seams open, then trim each Half-Square Triangle (HST) to exactly 4″ x 4″.
Step 3: Assembling the Central Triptych
Nesting the seams to create the focal points.
- Build the Diamonds: Surround one 6.5-inch Terracotta core with a ring of your Terracotta/Sage HSTs. Orient the triangles so the Terracotta points inward and the Sage points outward, creating the stepped effect.
- Square Up: Sew the rows together to complete a single diamond block measuring exactly 14.5″ x 14.5″. Repeat to build all three diamond blocks.
- The Center Row: Sew the three diamond blocks side-by-side, placing a 14.5″ x 4.5″ vertical Charcoal rectangle between them to space them perfectly for the sofa’s seating area.

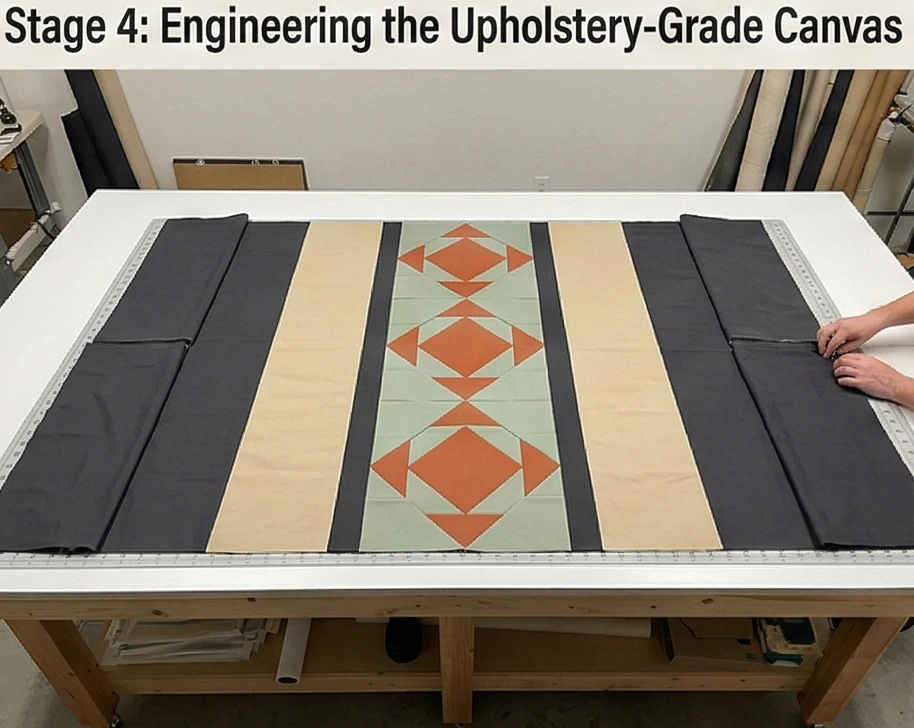
Step 4: Engineering the Upholstery-Grade Canvas
Embedding the diamonds into the striped horizon.
- The Stripe Sequence: Take your ultra-long Charcoal and Sand bands from Step 1. Sew them together in alternating rows (Charcoal, Sand, Charcoal) to create a massive striped panel for the top half of the quilt, and a matching panel for the bottom half.
- Setting the Hub: Sew the top striped panel to the top edge of your central diamond row, and the bottom striped panel to the bottom edge.
- The Armrest Extensions: Because the diamond row is shorter than the 90-inch stripes, cut two 14.5″ tall by 20″ wide Charcoal rectangles. Sew these to the left and right ends of the diamond row to flush out the sides. Trim the entire assembled top to a perfectly flush 70″ x 90″ rectangle.
Step 5: Heavy Basting and “Warp” Quilting
Locking the architecture for daily abuse.
- The Armor Baste: Sandwich the heavy cotton top, the resilient wool batting, and the grippy corduroy backing. Use curved safety pins every 4 inches.
- Vertical Channel Quilting: Do not use delicate, looping quilt patterns on a high-traffic cover. Using a walking foot, quilt dense, straight vertical lines spaced exactly 1 inch apart across the entire 90-inch length of the quilt.
- Why: This mimics the vertical “warp” threads of a loom, adding incredible aesthetic texture. More importantly, it fuses the three layers into a solid, impenetrable upholstery fabric that will not warp, stretch, or tear when people sit on it.
Step 6: The Canvas Edge Finish
Framing the textile for maximum durability.
- Square and Trim: Trim the heavy 70″ x 90″ quilt perfectly square.
- The Heavy-Duty Binding: Bind the entire piece using a solid Charcoal fabric cut slightly wider (2.75 inches) to accommodate the thick corduroy and wool layers. Machine-stitch the binding to both the front and back for maximum edge durability against shoes and friction.
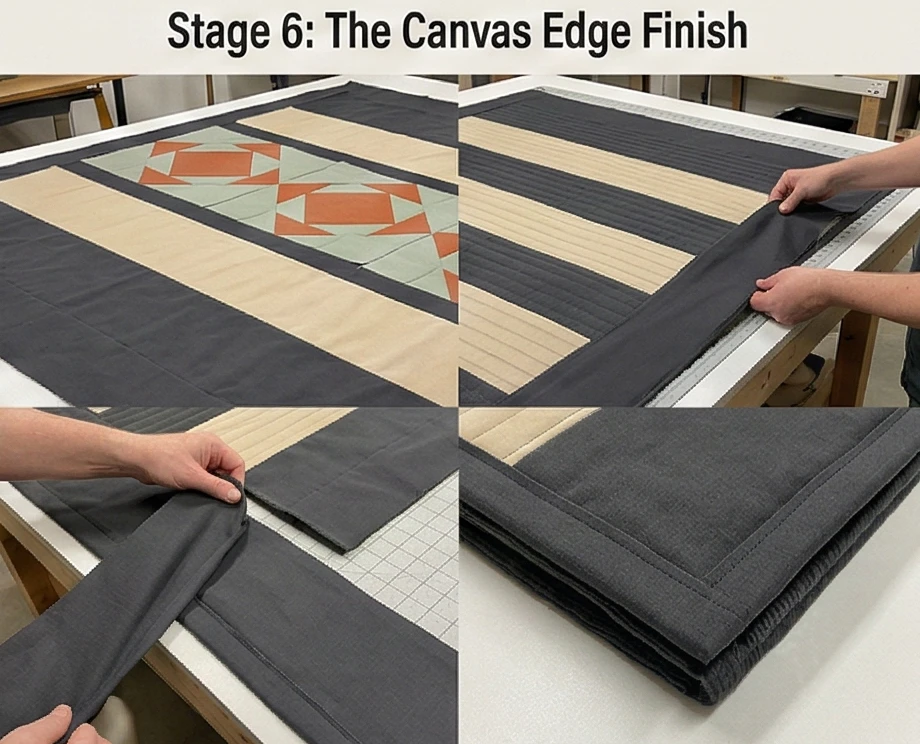
Usability Note: This cover is built for real life. Because of the heavy-duty cotton, corduroy, and dense channel quilting, you can launder this piece confidently. Wash on cold to preserve the deep Charcoal dyes, and tumble dry on medium heat with wool dryer balls to effortlessly fluff the internal batting back to its cozy, inviting loft.
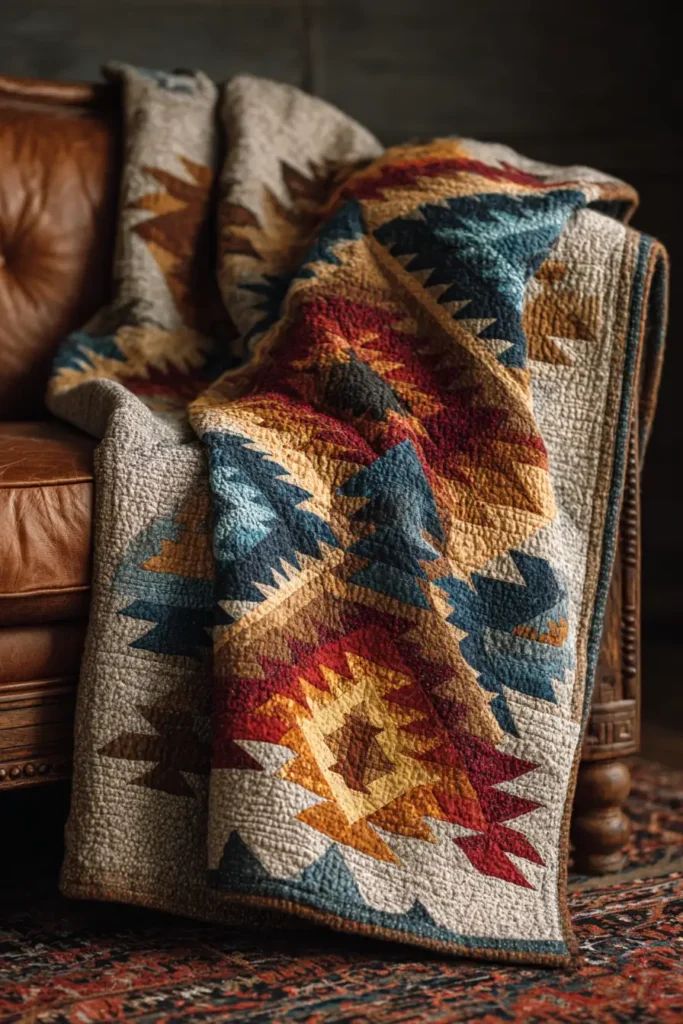
“The Desert Oasis” Tapestry Quilt Throw
An armchair is a personal sanctuary—a dedicated space for reading, savoring morning coffee, or unwinding after a long day. The ideal textile for this space must provide profound, cocoon-like comfort without engulfing the chair in excessive, bulky fabric. “The Desert Oasis” scales the striking verticality of traditional Navajo weaving into an impeccably tailored lap throw. Featuring three towering, stepped geometric columns in Deep Indigo, Rich Camel, and a spark of Desert Coral, set against a soothing Cream background, this throw acts as a vertical tapestry draped over the back of your favorite chair. Backed with luxurious flannel, it delivers immediate, tactile warmth and uncompromised Southwestern elegance.
Finished Dimensions: Generous Armchair Throw, 50″ x 60″ (Proportioned to cover the legs completely while seated, without dragging heavily on the floor).
Materials Needed:
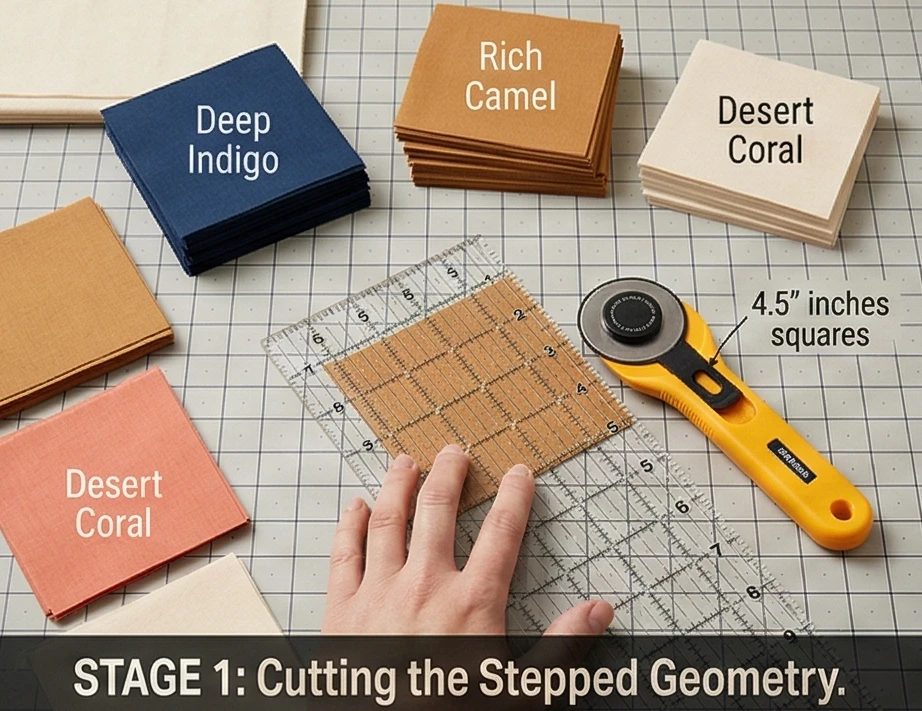
- The “Columns” (Motifs): 1 yard of Deep Indigo, 1/2 yard of Rich Camel, and 1/4 yard of Desert Coral solid cotton.
- The “Canyon” (Background): 2.5 yards of crisp Cream cotton.
- Backing: 3.5 yards of ultra-soft Rich Camel Flannel or Brushed Cotton.
- Why: When you sit still in a chair, your body temperature drops. Flannel instantly traps body heat the moment you pull it over your lap, eliminating the initial “chill” of crisp percale or sateen cottons.
- Batting:100% Bamboo Batting.
- Why: A throw quilt must have a fluid, highly pliable drape to tuck easily around the shoulders and knees. Bamboo batting is incredibly thin and feather-light, ensuring the quilt wraps like a luxurious scarf rather than resting stiffly like a board.
- Thread: 50wt cotton thread in Cream.
- Notions: A square acrylic ruler, a fresh rotary blade, and ultra-fine glass-head pins.
Cultural Backstory: In Diné (Navajo) weaving, pronounced vertical lines and cascading geometric columns often represent falling rain or the towering, protective walls of the canyon landscape. Rain is a profound blessing in the high desert, symbolizing life, sustenance, and renewal. Draping a textile featuring these “falling rain” columns over your reading chair symbolically wraps you in that same sense of provision, shelter, and restorative calm.
Step 1: Cutting the Stepped Column Geometry
Preparing the elements for the vertical layout.
- The Core Squares: Cut precisely twenty-four 4.5-inch squares of Deep Indigo. These will form the solid center line of your three columns.
- The Stepped Edges: Cut exactly forty-eight 4.5-inch squares of Cream, twenty-four 4.5-inch squares of Rich Camel, and twenty-four 4.5-inch squares of Desert Coral.
- The Vertical Sashing: From your Cream yardage, cut four long strips measuring 6.5 inches wide by the width of the fabric (WOF).
Step 2: Crafting the “Rain” Terraces (HSTs)
Building the serrated, woven-style borders for the columns.
- The Camel Pairing: Place twenty-four Cream squares right-sides together with your twenty-four Rich Camel squares. Draw a diagonal line across the back of the Cream squares. Sew a precise 1/4-inch seam on both sides of the line, cut apart, and press open.
- The Coral Pairing: Repeat the exact same process, pairing the remaining twenty-four Cream squares with the twenty-four Desert Coral squares.
- Trim to Perfection: Trim every single Half-Square Triangle (HST) to exactly 4″ x 4″. You will yield 48 Camel/Cream HSTs and 48 Coral/Cream HSTs.
Step 3: Assembling the Towering Columns
Stacking the blocks to create the vertical tapestry effect.
- The Column Row: To build a single row of the column, take one 4.5-inch Deep Indigo square. Sew a Camel/Cream HST to the left and right sides (pointing the Camel inward).
- The Alternating Motif: For the next row, sew Coral/Cream HSTs to the left and right of an Indigo square (pointing the Coral inward).
- Stack the Tower: Alternate these Camel and Coral rows, stacking eight blocks vertically to create one towering column measuring 11.5″ wide by 32.5″ tall. Repeat this process to build three identical stepped columns.
Step 4: Setting the Tapestry Expanse
Spacing the columns to cover a 50-inch width.
- The Cream Bridges: Sew your 6.5-inch-wide Cream sashing strips between the three columns. Sew another 6.5-inch strip to the far left edge, and one to the far right edge. Your pieced center will now measure approximately 50″ wide by 32.5″ tall.
- The Top and Bottom Horizons: To reach the luxurious 60-inch length needed for a lap throw, cut two massive Cream panels measuring 50.5″ wide by 14.5″ tall. Sew one to the top of the column block and one to the bottom.
Step 5: Basting and “Falling Rain” Quilting
Locking the layers and enhancing the verticality.
- The Cozy Baste: Sandwich the pieced top, the fluid bamboo batting, and the plush Camel Flannel backing. Baste smoothly with curved safety pins.
- Vertical Matchstick Quilting: Using a walking foot, quilt continuously, perfectly straight vertical lines spanning from the very top of the quilt to the very bottom. Space these lines strictly 1 inch apart.
- Why: This dense, linear quilting accentuates the “falling rain” motif, mimicking the heavy vertical warp threads of an upright loom. Most importantly, it secures the flannel backing perfectly, ensuring the layers never shift or warp when the throw is tossed over the armrest.
Step 6: The Tailored Edge Finish
Framing the oasis.
- Square and Trim: Trim the 50″ x 60″ throw perfectly square, removing any excess batting or backing.
- The Binding: Bind the edges tightly in the solid Deep Indigo fabric. This dark, grounding frame beautifully contains the soaring vertical columns and provides a clean, highly tailored border that looks exceptionally chic folded on a sofa or armchair.
Usability Note: Flannel is the pinnacle of cozy luxury, but it requires gentle laundering to prevent excessive pilling. Wash this lap throw on a cold, delicate cycle and tumble dry on the lowest possible heat setting. The dense vertical quilting ensures the quilt will emerge from the wash looking perfectly crisp and architecturally sound.
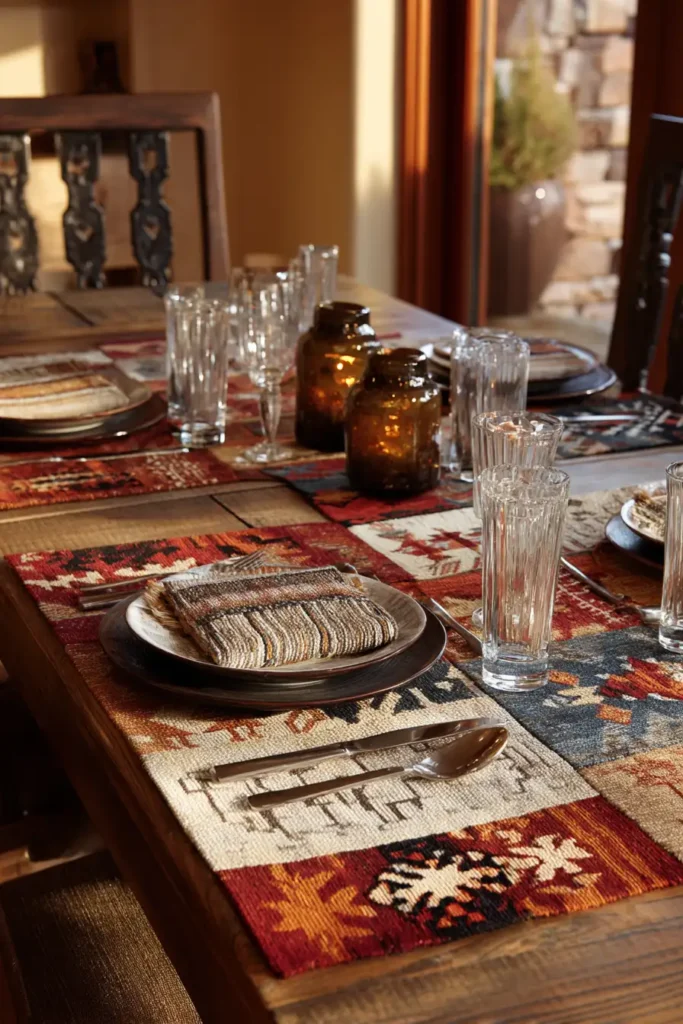
“The Painted Horizon” Southwestern Dining Runner
A formal dining room serves as the gathering place for family and friends, requiring a centerpiece that anchors the space without obstructing conversation or overwhelming the table setting. Translating the bold, sweeping geometry of Navajo textiles into a narrow table runner demands a thoughtful reduction in scale. “The Painted Horizon” achieves this by placing a triptych of meticulously pieced, stepped diamonds along a vast horizontal expanse. Executed in a sophisticated palette of Deep Terracotta, Faded Turquoise, Onyx Black, and a grounding Warm Sand background, this runner brings profound cultural artistry directly to the center of your meals.
Finished Dimensions: Formal Dining Runner, 16″ x 72″ (Designed to drape elegantly over the ends of a standard 6-to-8-person table).
Materials Needed:
- The “Motifs” (Diamonds): 1/4 yard each of solid Deep Terracotta, Faded Turquoise, and Onyx Black cotton.
- The “Desert” (Background): 1.5 yards of crisp Warm Sand solid cotton.
- Backing: 2 yards of high-quality Onyx Black Cotton Sateen.
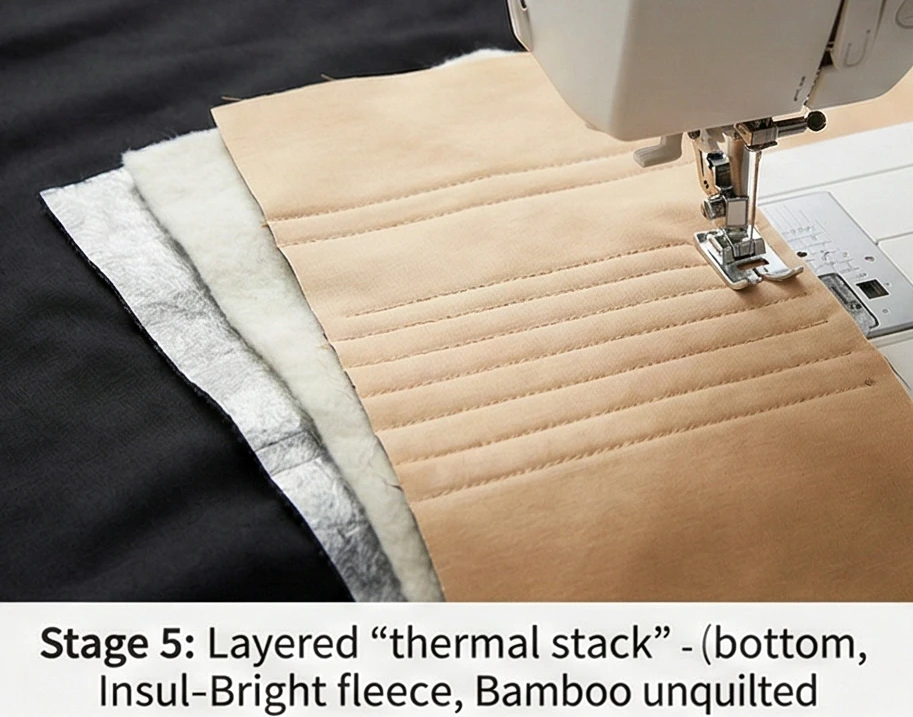
- Batting: Insul-Bright (heat-resistant fleece) AND a thin layer of Bamboo Batting.
- Why: A dining runner must be as functional as it is elegant. Insul-Bright contains a hollow, metalized film that reflects the heat of hot serving platters away from your polished wood or glass table. However, thermal fleece can feel stiff. Adding a sheer layer of bamboo batting softens the runner, ensuring the ends cascade beautifully off the table’s edges instead of sticking out rigidly.
- Thread: 50wt cotton thread in an invisible Taupe.
- Notions: A small acrylic ruler, a rotary cutter with a sharp micro-blade, and a water-soluble marking pen.
Cultural Backstory: In Diné (Navajo) culture, the concept of Hózhó—balance, harmony, and beauty—extends to all aspects of life, including the sharing of food and hospitality. Traditional weavers often incorporated symmetrical, repeating diamond motifs to represent the four sacred mountains or the interconnectedness of family and nature. By placing this balanced, protective geometry at the exact center of a dining table, the textile acts as a modern geometric hearth, inviting guests to gather and share in that harmonious energy.
Step 1: Scaling the Miniature Medallions
A 16-inch wide runner requires precisely scaled 8.5-inch diamonds.
- The Solid Cores: Cut exactly three 4.5-inch squares of solid Faded Turquoise for the center of your three diamonds.
- The Stepped Edges: Cut exactly twenty-four 3-inch squares of Deep Terracotta, and twenty-four 3-inch squares of Warm Sand.
- The Onyx Accents: Cut twelve 2.5-inch squares of Onyx Black to anchor the outer corners of the motifs.
Step 2: Crafting the Miniature Terraces (HSTs)
Building the serrated, woven-style edges for the central diamonds.
- The Pairing: Place a Warm Sand square right-sides together with a Deep Terracotta square. Draw a diagonal line from corner to corner across the back of the Sand square.
- The Stitch: Sew exactly 1/4 inch away from the drawn line on both sides. Slice directly down the drawn line to separate the two halves.
- Press and Trim: Press the seams open to ensure the small pieces lie perfectly flat. Trim every single Half-Square Triangle (HST) to exactly 2.5″ x 2.5″. You will yield 48 perfect miniature HSTs.
Step 3: Assembling the Triptych of Diamonds
Constructing the three focal points.
- The Inner Ring: Take one 4.5-inch Turquoise core. Surround it with a ring of your Terracotta/Sand HSTs. Rotate the HSTs so the Terracotta triangles point inward toward the Turquoise, and the Warm Sand triangles point outward.
- The Corner Anchors: Sew your 2.5-inch Onyx Black squares to the four outer corners of this ring to complete the block.
- Square Up: Sew these units together in rows. The completed block will measure a flawless 8.5″ x 8.5″. Repeat this process to create your three identical desert diamonds.

Step 4: The Elongated Table Layout
Bridging the medallions across the dining surface.
- The Negative Space Sashing: From your Warm Sand yardage, cut two rectangles measuring 8.5″ tall by 12.5″ wide. Sew these between your three diamond blocks to space them perfectly along the center of the table.
- The Outer Horizons: Cut two more Warm Sand rectangles measuring 8.5″ tall by 11.5″ wide. Sew these to the far left and far right ends of the runner.
- The Top and Bottom Frames: Add a continuous 4.25-inch-wide Warm Sand border to the top and bottom edges of the entire assembly, bringing the final width to a sleek 16 inches. The unquilted top will now measure 16.5″ x 72.5″.

Step 5: Thermal Basting and Linear Quilting
Protecting the table while enhancing the geometric architecture.
- The Thermal Stack: Lay your Onyx Black Sateen backing right-side down. Top it with the shiny layer of Insul-Bright (shiny side facing up toward the hot plates), then the soft layer of Bamboo batting, and finally your pieced runner top. Baste densely with safety pins.
- “Weft” Channel Quilting: Using a walking foot, quilt strictly straight horizontal lines running the entire length of the runner. Space the lines exactly 1/2-inch apart through the vast Warm Sand negative space, but leave the three geometric diamonds completely unquilted.
- Why: This dense, linear quilting flattens the thermal layers into a highly stable, firm surface for wine glasses and candelabras, while allowing the unquilted turquoise and terracotta diamonds to subtly puff up and catch the dining room light.
Step 6: The Tailored Edge Finish
Framing the textile for maximum durability.
- Square and Trim: Trim the runner perfectly flush to exactly 16″ x 72″, ensuring the thick thermal layers are even.
- The Binding: Bind the edges tightly in a solid Onyx Black fabric. This dark, grounding frame cleanly contains the sweeping Warm Sand horizons and provides a durable edge against the friction of dining chairs and serving dishes.
Usability Note: Dining runners are prone to spills. Spot-treat wine or sauce stains immediately with cold water and mild soap. When machine washing is necessary, use a delicate cycle with a color-catcher sheet to protect the Warm Sand background, and lay the runner flat to dry to preserve the heat-reflective integrity of the internal Insul-Bright layer.

“The Agave Geometric” Heavy-Duty Cushion Cover
A family living room demands decor that is as resilient as it is beautiful. Throw pillows are the ultimate functional accents—they are leaned against, sat upon, used as floor cushions by kids, and claimed by pets. To survive this daily wear while elevating the room’s design, textiles must be engineered for endurance. “The Agave Geometric” scales a striking, stepped Navajo-inspired diamond into a perfectly proportioned 20-inch block. Executed in a stain-forgiving, earth-toned palette of Deep Agave Green, Terracotta, Onyx Black, and Warm Sand, this cushion cover features an upholstery-grade backing, resilient batting, and dense structural quilting to ensure that profound cultural geometry withstands the rigors of modern family life.
Finished Dimensions: Standard Large Throw Pillow, 20″ x 20″ (Make a pair to bookend a high-traffic sofa).
Materials Needed (For One Cushion):
- The “Agave” (Motifs): 1/8 yard each of solid Deep Agave Green, Terracotta, and Onyx Black cotton.
- The Background (Negative Space): 1/2 yard of crisp Warm Sand solid cotton.
- Backing & Envelope Flaps: 1 yard of heavyweight Onyx Black Cotton Canvas or Denim.
- Why: The back of a sofa cushion takes the brunt of the friction against the upholstery. Standard quilting cotton will pill and tear over time. Canvas or denim provides an indestructible, scuff-proof foundation.
- Batting:100% Wool or a dense Bamboo/Cotton Blend.
- Why: Synthetic polyester batting permanently flattens out after being sat on repeatedly, leaving you with a sad, deflated pillow. Wool and bamboo fibers are naturally springy. They absorb heavy compression and instantly bounce back, keeping the quilted cover plump and dimensional for years.
- Thread: 40wt heavy-duty cotton thread in an invisible Taupe.
- Notions: A square acrylic ruler, a rotary cutter with a fresh blade, heavy-duty sewing machine needles (Size 90/14), and a plush 20″ x 20″ feather or high-quality down-alternative insert.
Cultural Backstory: Historically, Diné (Navajo) weavers did not just create garments and large rugs; they masterfully wove saddle blankets. These specific textiles were engineered for absolute, rugged durability to protect horses and riders during long, grueling journeys across the high desert, yet they were still deeply imbued with beautiful, symmetrical geometry. Designing a heavy-duty cushion cover with these motifs honors that specific tradition of weaving breathtaking art meant to endure heavy, daily friction.
Step 1: Cutting the Desert Palette
Preparing the geometry for a 20-inch canvas.
- The Solid Core: Cut exactly one 4.5-inch square of solid Deep Agave Green for the absolute center of your geometric diamond.
- The Stepped Edges: Cut exactly eight 4.5-inch squares of Terracotta, eight 4.5-inch squares of Onyx Black, and sixteen 4.5-inch squares of Warm Sand.
Step 2: Crafting the Heavy-Duty Terraces (HSTs)
Building the serrated, woven-style edges.
- The Terracotta Pairing: Place eight Warm Sand squares right sides together with your eight Terracotta squares. Draw a diagonal line from corner to corner across the back of the Sand squares. Sew exactly 1/4 inch away from the drawn line on both sides.
- The Onyx Pairing: Repeat this exact process, pairing the remaining eight Warm Sand squares with the eight Onyx Black squares.
- Trim to Perfection: Slice directly down the drawn lines. Press the seams open so the multiple layers of fabric lie completely flat. Trim every single Half-Square Triangle (HST) to exactly 4″ x 4″.
Step 3: Assembling the Central Medallion
Constructing the durable geometric focal point.
- The Inner Ring: Surround the 4.5-inch Agave Green core with your Terracotta/Sand HSTs. Rotate the HSTs so the Terracotta points inward and the Warm Sand points outward. Sew these into three rows, then join the rows.
- The Outer Ring: Surround that completed unit with a ring of your Onyx/Sand HSTs, again pointing the dark color inward to create the final “stepped” staircase effect.
- Square Up: Carefully nest the 1/4-inch seams at every intersection. Your completed central diamond block will measure a flawless 12.5″ x 12.5″.
Step 4: Framing the Medallion
Extending the design to fit a 20-inch insert perfectly.
- The Side Borders: From your Warm Sand yardage, cut two rectangles measuring 4.5″ wide by 12.5″ tall. Sew these to the left and right sides of your central block.
- The Top and Bottom Horizons: Cut two more Warm Sand panels measuring 20.5″ wide by 4.5″ tall. Sew one to the top and one to the bottom of the block.
- The Canvas: The entire pieced front panel now measures exactly 20.5″ x 20.5″.
Step 5: Structural Grid Quilting
Fusing the layers for armor-like durability.
- The Baste: Sandwich your pieced top, the resilient wool batting, and a scrap piece of muslin (to act as an interior lining).
- The Armor Grid: Do not use delicate, free-motion quilting on a family cushion. Using a walking foot, quilt a strict, continuous 1-inch grid of straight horizontal and vertical lines across the entire 20.5″ surface.
- Why: This dense, structural grid acts as a net. It flattens the seams, prevents the fabric from stretching when pulled, and permanently locks the batting in place so it survives heavy use and frequent trips through the washing machine.
Step 6: The Heavy-Duty Envelope Construction
Finishing the cover to withstand wrestling the insert.
- Prepare the Canvas Backing: Cut two overlapping rectangles of Onyx Black Canvas for the envelope closure (e.g., 20.5″ x 15″ and 20.5″ x 12″). Fold, press, and topstitch one long edge on each piece to create a thick, durable hem.
- Assembly: Place the quilted top face up. Lay the canvas backing pieces face down, overlapping the hemmed edges deeply in the center.
- The Final Stitch: Sew a 1/2-inch seam around the entire perimeter. Because family cushions are frequently restuffed, backstitch heavily over the envelope overlap on the top and bottom edges to prevent the seams from tearing when a plump pillow is shoved inside. Clip the corners, turn right-side out, and insert your pillow.
Usability Note: Always use a pillow insert that is exactly the same size as your finished cover (a 20″ insert for a 20″ cover). The wool batting layer adds luxurious thickness, so a plump insert is required to tightly fill the corners. Because of the heavy grid quilting and canvas backing, this cover is machine washable. Wash inside-out on a cold, standard cycle, and tumble dry on medium heat.
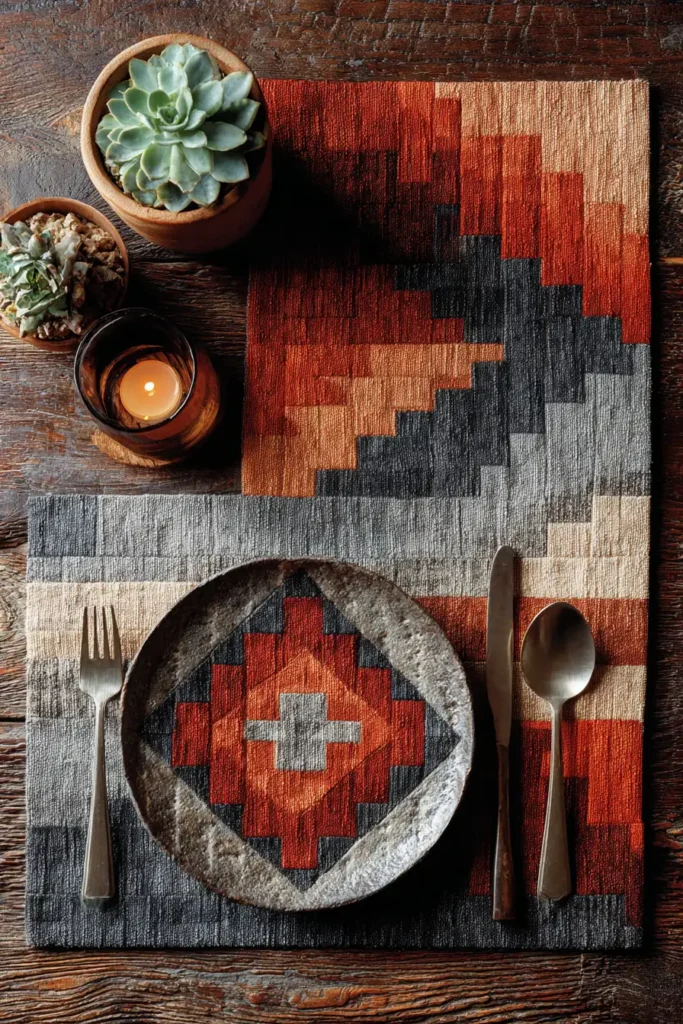
“The Painted Mesa” Asymmetrical Dining Placemats
A beautifully set table transforms a daily meal into an intentional gathering. Bringing the profound geometry of Navajo-inspired weaving to the dining room requires a design that accommodates plates and glassware without hiding the artwork. “The Painted Mesa” achieves this with a chic, asymmetrical layout. A scaled-down, stepped-geometric diamond—anchored in Deep Rust and Charcoal—sits offset to the left, serving as a vibrant frame for the plate. To the right, sweeping horizontal bands of Warm Sand and Soft Clay create a textured, serene resting place for silverware. Complete with a heat-reflective core, these placemats merge rustic desert elegance with absolute dining utility.
Finished Dimensions: Standard Rectangular Placemat, 14″ x 20″ (Set of 4).
Materials Needed (For a Set of 4):
- The “Mesa” (Diamonds & Stripes): 1/2 yard of solid Deep Rust, 1/2 yard of Charcoal, and 1/2 yard of Soft Clay cotton.
- The “Desert” (Background): 1.5 yards of crisp Warm Sand solid cotton.
- Backing & Binding: 2 yards of heavyweight Charcoal Cotton Canvas or Linen.
- Batting: Insul-Bright (heat-resistant fleece) AND a thin layer of Bamboo Batting.
- Why: A placemat must protect your wooden dining table from hot plates and warm serving bowls. Insul-Bright features a metalized film that reflects heat upward, preventing white heat rings on your furniture. The sheer bamboo batting softens the stiff metallic fleece, ensuring the placemat absorbs condensation from iced drinks and lies perfectly flat.
- Thread: 50wt cotton thread in an invisible Taupe.
- Notions: A small acrylic ruler, a rotary cutter with a sharp micro-blade, and ultra-fine glass-head pins.
Cultural Backstory: In Diné (Navajo) culture, weaving is a profound expression of the landscape. The striking horizontal stripes so prevalent in traditional blankets represent the vast, unending horizons of the desert, while the stepped elements represent mesas, canyons, and clouds. Sharing food is a cornerstone of community and hospitality. By placing these specific geometric horizons onto a placemat, you are setting a table that visually honors the earth’s bounty and warmly welcomes your guests to the gathering.
Step 1: Scaling the Micro-Geometry
Preparing the precise cuts for four miniature diamonds.
- The Solid Cores: Cut exactly four 4.5-inch squares of solid Deep Rust (one for the center of each placemat’s diamond).
- The Stepped Edges: Cut exactly sixteen 3-inch squares of Charcoal, and sixteen 3-inch squares of Warm Sand.
- The Horizon Stripes: Cut long, 2.5-inch wide strips from your Soft Clay, Charcoal, and Warm Sand yardage across the width of the fabric to build the right-side expanse.

Step 2: Crafting the Miniature Terraces (HSTs)
Building the serrated, woven-style edges.
- The Pairing: Place your sixteen Warm Sand squares right sides together with your sixteen Charcoal squares. Draw a diagonal line from corner to corner across the back of the Sand squares.
- The Stitch: Sew exactly 1/4 inch away from the drawn line on both sides. Slice directly down the drawn line to separate the halves.
- Press and Trim: Carefully press the seams open on a small block to minimize bulk. Trim every single Half-Square Triangle (HST) to exactly 2.5″ x 2.5″. You will yield 32 perfect miniature HSTs.
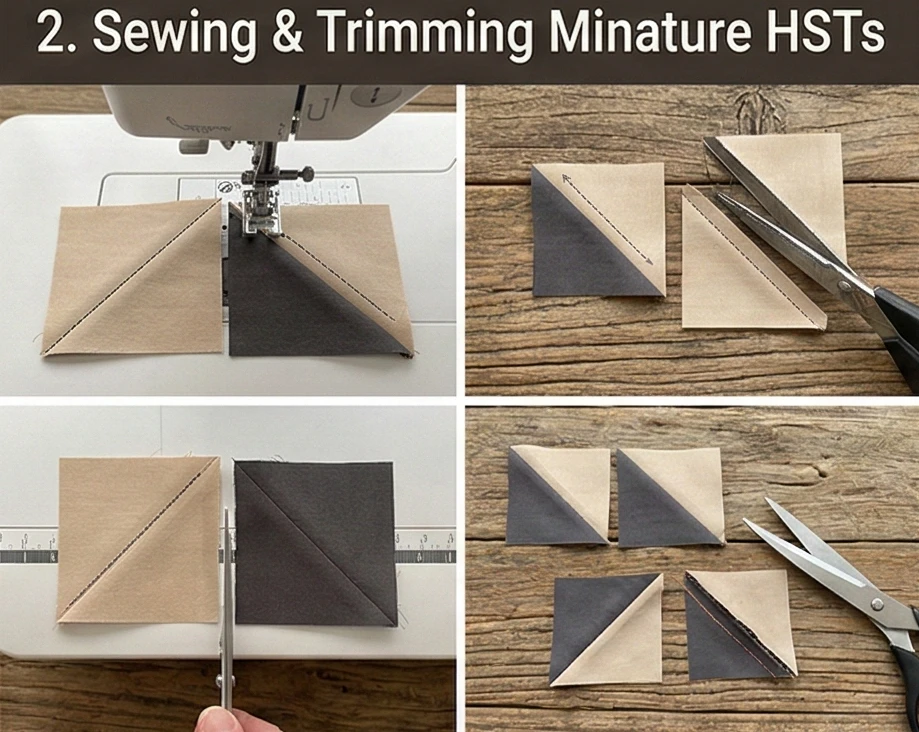
Step 3: Assembling the Offset Medallion
Constructing the geometric focal point for the left side.
- The Diamond Ring: Take one 4.5-inch Rust core. Surround it with a ring of eight Charcoal/Sand HSTs. Rotate the HSTs so the dark Charcoal triangles point inward toward the Rust, and the Warm Sand triangles point outward.
- Square Up: Carefully nest the 1/4-inch seams and sew the rows together. Your completed miniature diamond block will measure exactly 8.5″ x 8.5″. Repeat to build four identical blocks.
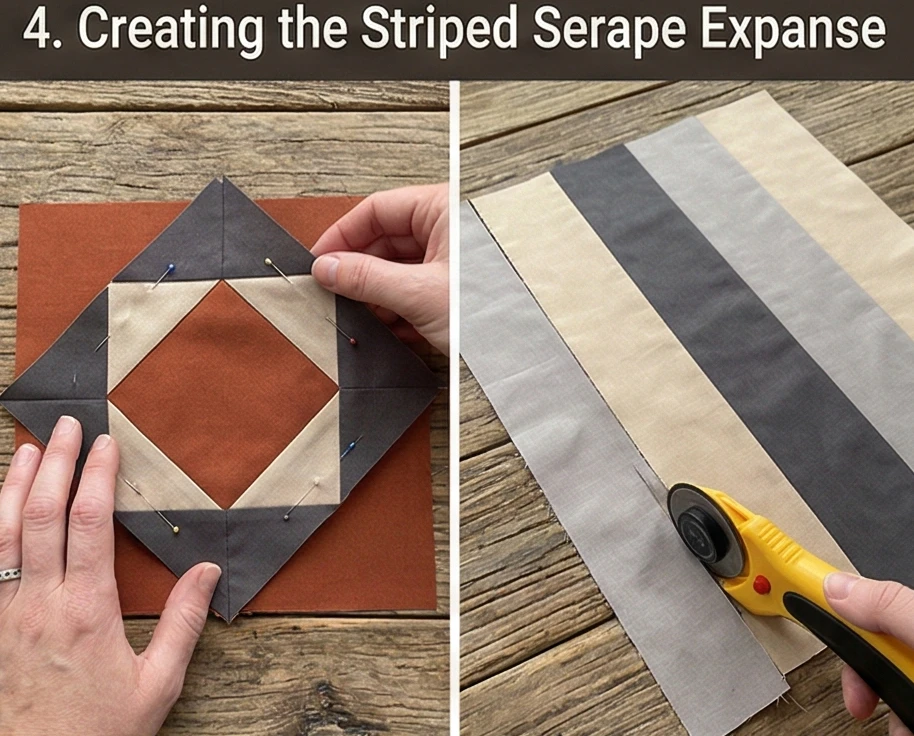
Step 4: Building the Striped Horizon
Creating the horizontal expanse for the silverware zone.
- The Serape Stripes: Sew your long 2.5-inch strips of Soft Clay, Warm Sand, and Charcoal together lengthwise to create a large, striped panel mimicking a woven blanket.
- Cut the Expanse: From this striped panel, cut four rectangles measuring 8.5″ tall by 12″ wide. Ensure the stripes run horizontally across the 12-inch width.
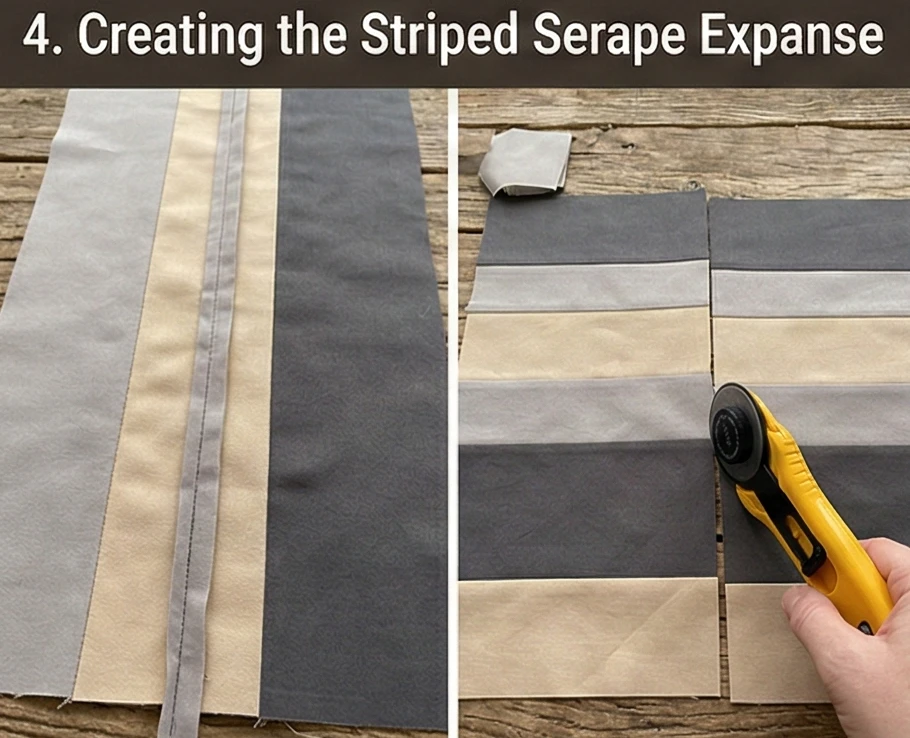
Step 5: The Asymmetrical Rectangular Layout
Joining the motif to the landscape.
- The Central Seam: Sew the 8.5-inch-tall striped panel to the right side of your 8.5-inch square diamond block. The pieced center now measures 8.5″ tall by 20″ wide.
- The Top and Bottom Frames: Cut eight long strips of Warm Sand measuring 3.25″ tall by 20″ wide. Sew one strip to the top and one to the bottom of each placemat.
- The Final Canvas: Your unquilted placemat top will now measure exactly 14.5″ x 20″.
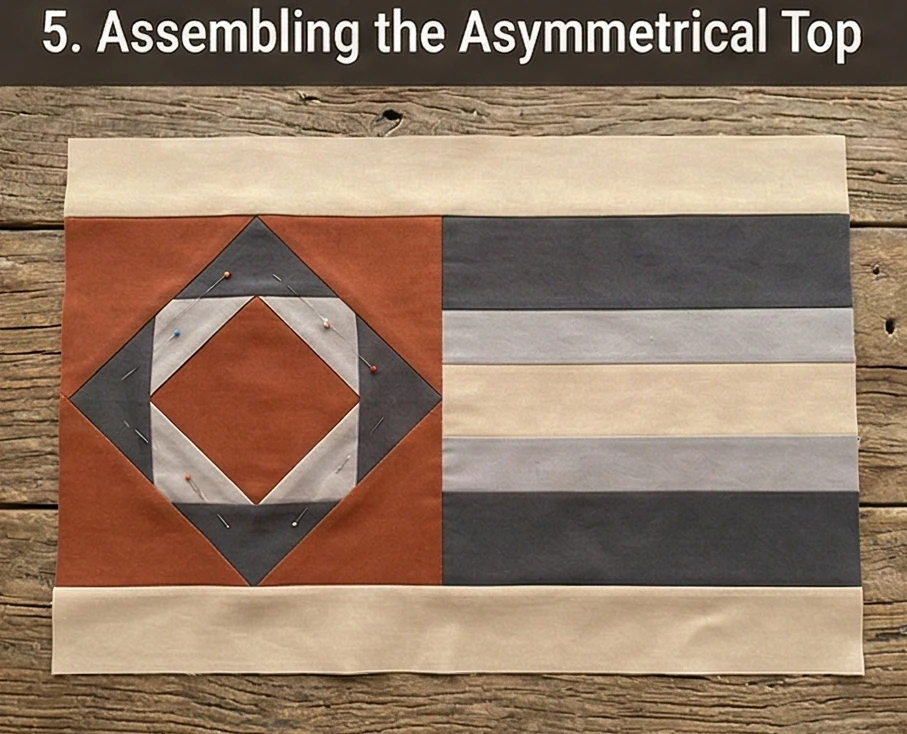
Step 6: Thermal Basting and “Warp” Quilting
Protecting the table while enhancing the geometric architecture.
- The Thermal Stack: Lay your Charcoal backing right-side down. Add the Insul-Bright (shiny side up toward the hot plates), then the Bamboo batting, and finally your pieced top. Baste densely with safety pins to prevent the metallic film from shifting.
- Channel Quilting: Using a walking foot, quilt tight, straight horizontal lines spaced exactly 1/2-inch apart, but only across the striped right side and the top/bottom Warm Sand borders. Leave the intricately pieced 8.5-inch diamond completely unquilted.
- Why: This heavy horizontal channel quilting flattens the thermal layers perfectly for wine glasses to sit securely, while allowing the unquilted geometric diamond to pop up beautifully, creating a stunning 3D texture.
- The Tailored Frame: Trim the placemats to 14″ x 20″ flush. Bind the edges tightly in solid Charcoal fabric to cleanly frame the asymmetrical layout.
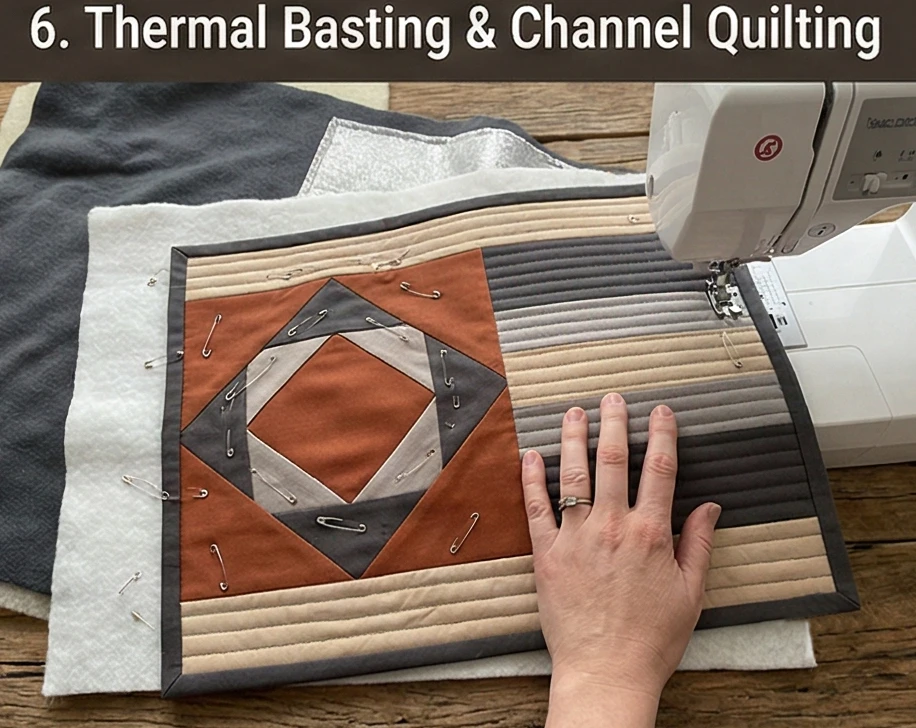
Usability Note: Dining placemats encounter daily wear. The dense channel quilting ensures these mats will not warp or twist. Wash on a warm, gentle cycle and lay completely flat to dry to ensure the heat-reflective Insul-Bright layer maintains its smooth, protective integrity. Never place them in a microwave to warm plates, as the metallic core will spark.
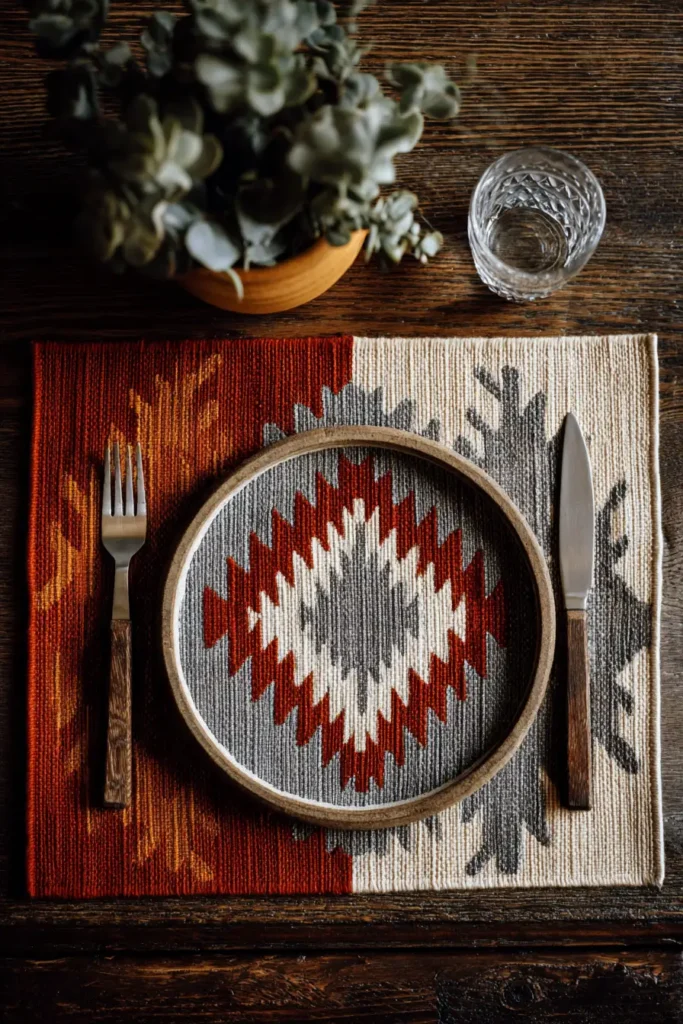
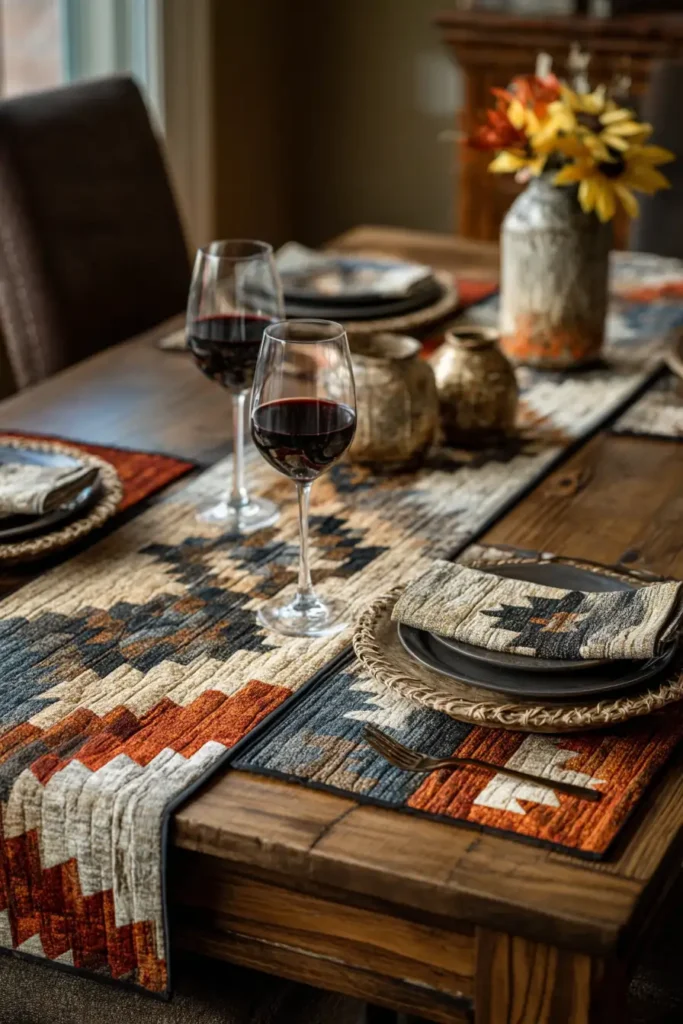
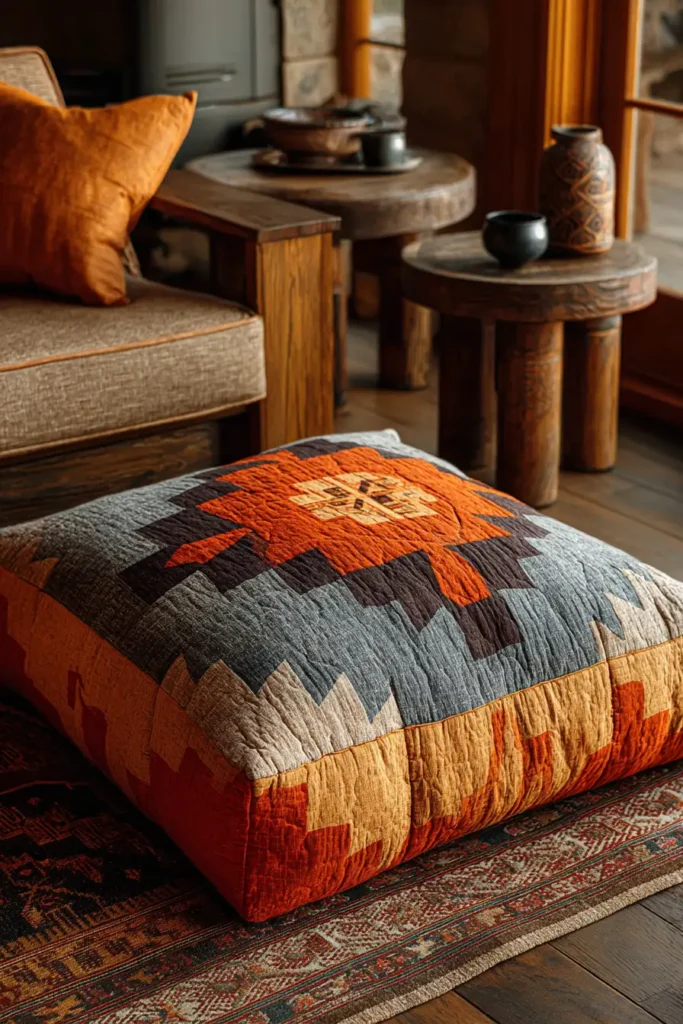
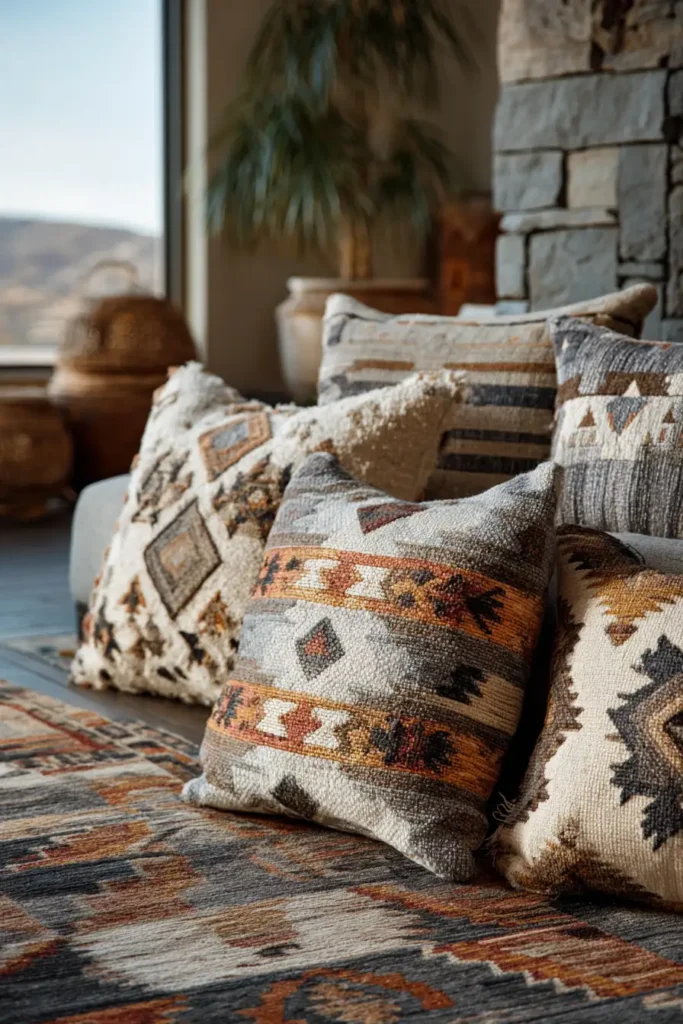
“The Canyon Floor” Oversized Quilted Floor Pouf
Open-concept living spaces thrive on flexibility, requiring seating that is easily moved, highly comfortable, and visually grounding. A beautifully engineered floor pillow bridges the gap between formal furniture and casual lounging. “The Canyon Floor” scales traditional Diné (Navajo) geometric motifs into a massive, 32-inch boxed cushion. Featuring a monumental stepped diamond in Burnt Orange and Deep Aubergine against a Warm Sand background, this piece acts as an architectural anchor for a room. By incorporating a durable 6-inch canvas gusset, heavy-duty zippers, and dense structural quilting, this floor pouf provides a sophisticated, tactile invitation to gather near the hearth or coffee table.
Finished Dimensions: Massive Boxed Floor Cushion, 32″ x 32″ x 6″ deep (Large enough to comfortably seat an adult).
Materials Needed:
- The “Canyon” (Motifs): 1/2 yard of solid Burnt Orange and 1/2 yard of Deep Aubergine cotton.
- The “Horizon” (Background): 1.5 yards of crisp Warm Sand solid cotton.
- The Base & Gusset: 2.5 yards of heavy-duty Espresso Brown Cotton Canvas or Duck Cloth.
- Why: Floor pillows are dragged across hardwood, carpets, and rugs daily. A delicate cotton base will pill and tear. Heavy-duty canvas creates an indestructible “shoe” for the pillow, hiding dust and preventing the bottom and sides from wearing out.
- Batting & Structure:100% Wool Batting (for the quilted top) AND a 32″ x 32″ x 6″ High-Density Upholstery Foam Block.
- Why: A floor pillow must support body weight without completely flattening against the hard floor. High-density foam provides the necessary structural resistance, while the quilted wool top layer softens the seat, adding breathable, luxurious comfort.
- Hardware: One heavy-duty 30-inch Upholstery Zipper.
- Thread: 40wt heavy-duty cotton thread in Espresso.
- Notions: A large square acrylic ruler, a rotary cutter, heavy-duty sewing machine needles (Size 100/16), and ultra-fine glass-head pins.
Cultural Backstory: In Diné (Navajo) tradition, the earth—Nahasdzáán (Mother Earth)—is a profoundly revered, living entity. Historically, daily life, storytelling, and the masterful art of weaving on upright looms all took place while seated directly upon the earth, grounded and connected to the natural world. Bringing beautifully crafted, geometric floor seating into a modern home honors this ancestral practice of gathering low to the ground, fostering intimacy, groundedness, and a deep sense of shared space.
Step 1: Scaling the Monumental Geometry
A massive floor pillow requires large, impactful blocks.
- The Central Anchor: Cut exactly one 8.5-inch square of solid Burnt Orange for the absolute core of your diamond.
- The Stepped Components: Cut exactly eight 4.5-inch squares of Deep Aubergine, eight 4.5-inch squares of Burnt Orange, and sixteen 4.5-inch squares of Warm Sand.
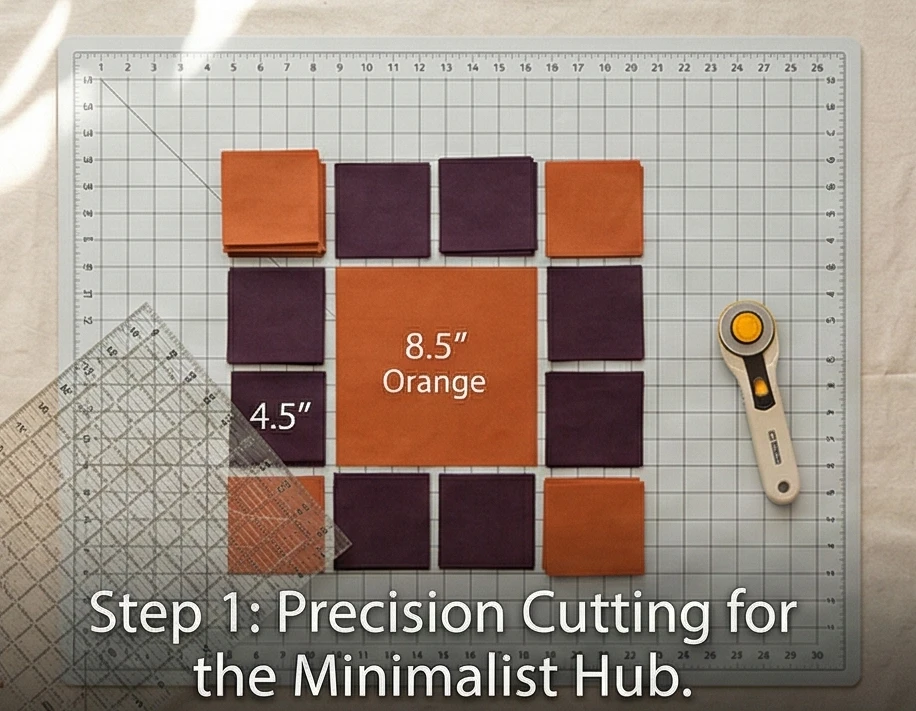
Step 2: Crafting the Large Terraces (HSTs)
Building the bold, serrated edges of the motif.
- The Aubergine Pairing: Place eight Warm Sand squares right-sides together with your eight Deep Aubergine squares. Draw a diagonal line from corner to corner across the back of the Sand squares. Sew exactly 1/4 inch away from the drawn line on both sides.
- The Orange Pairing: Repeat this process, pairing the remaining eight Warm Sand squares with the eight Burnt Orange squares.
- Trim to Perfection: Slice directly down the drawn lines, press the seams open to maintain a perfectly flat surface, and trim every Half-Square Triangle (HST) to exactly 4″ x 4″.
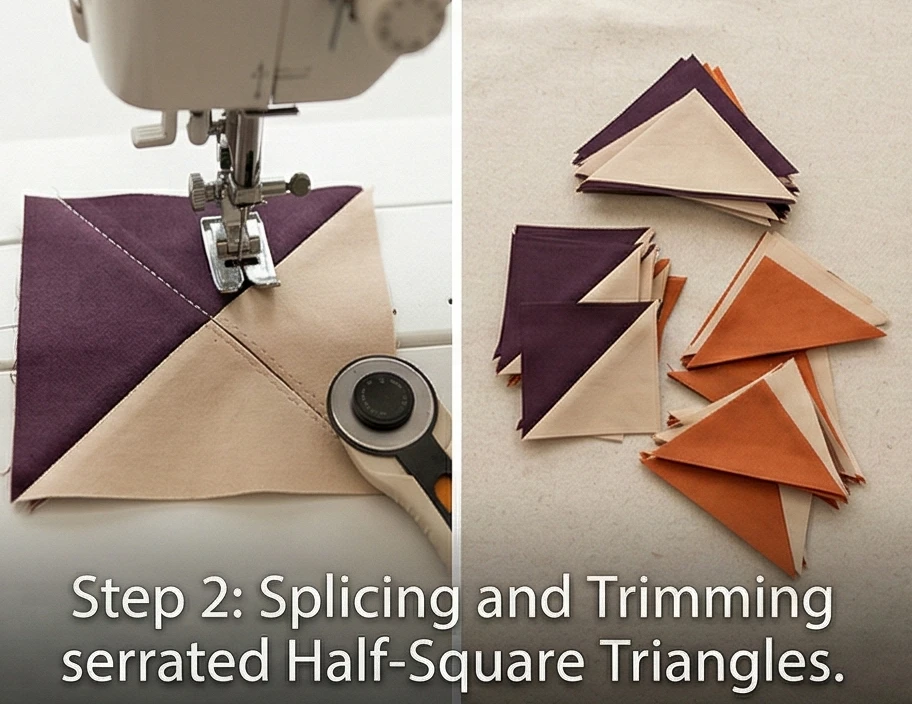
Step 3: Assembling the Massive Medallion
Constructing the geometric focal point.
- The Inner Ring: Surround the massive 8.5-inch Burnt Orange core with the Aubergine/Sand HSTs. Rotate the HSTs so the dark Aubergine points inward and the Warm Sand points outward. Sew into rows and attach to the core.
- The Outer Ring: Surround this unit with your Orange/Sand HSTs, again pointing the rich color inward.
- The Canvas Core: Carefully nest the seams and sew the rows together. Your completed, striking central block will measure exactly 22.5″ x 22.5″.

Step 4: Framing the Seating Surface
Expanding the top panel to fit the 32-inch foam block.
- The Sand Borders: From your Warm Sand yardage, cut two 5.5″ x 22.5″ strips. Sew these to the left and right sides of your medallion.
- The Top and Bottom: Cut two massive Warm Sand panels measuring 32.5″ wide by 5.5″ tall. Sew one to the top and one to the bottom of the block.
- The Finished Top: The entire pieced seating surface now measures exactly 32.5″ x 32.5″ (which perfectly accounts for the 1/4-inch seam allowances).

Step 5: Heavy Basting and “Woven Tapestry” Grid Quilting
Locking the architecture for heavy daily seating.
- The Armor Baste: Sandwich the pieced cotton top, the resilient wool batting, and a scrap piece of muslin (to act as the interior lining).
- Dense Grid Quilting: Using a walking foot, quilt a strict, continuous 1.5-inch grid of straight horizontal and vertical lines across the entire 32.5-inch surface.
- Why: When a person sits on a cushion, the fabric is pulled tight in all directions. This dense structural grid acts as a net, preventing the cotton top from stretching, warping, or tearing under localized body-weight pressure.
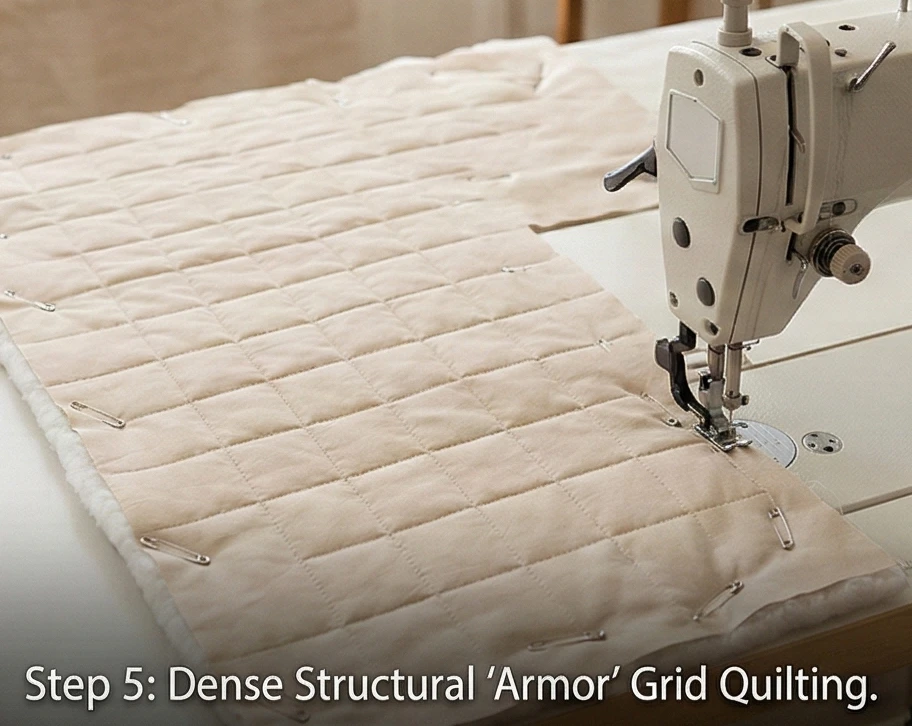
Step 6: Engineering the 3D Gusset and Zipper Assembly
Building the architectural box cushion.
- The Canvas Gussets: From your Espresso Brown Canvas, cut four long strips measuring 6.5″ tall by 32.5″ wide. Sew these four strips together end-to-end (stopping exactly 1/4 inch from the edges) to form a large square ring.
- Attach the Top: Pin the top edge of this canvas ring to the outer perimeter of your quilted square top, right-sides together. Sew completely around the perimeter, pivoting precisely at the corners.
- The Zipper Base: Cut a 32.5″ x 32.5″ square of Espresso Canvas for the bottom. Cut it in half horizontally. Install your 30-inch heavy-duty upholstery zipper between these two halves.
- Final Enclosure: Unzip the zipper halfway (crucial for turning!). Pin the canvas base to the bottom edge of the gusset ring, right sides together. Sew around the perimeter. Turn the entire massive cover right-side out through the zipper, poke out the boxy corners, and slide your high-density foam block inside.
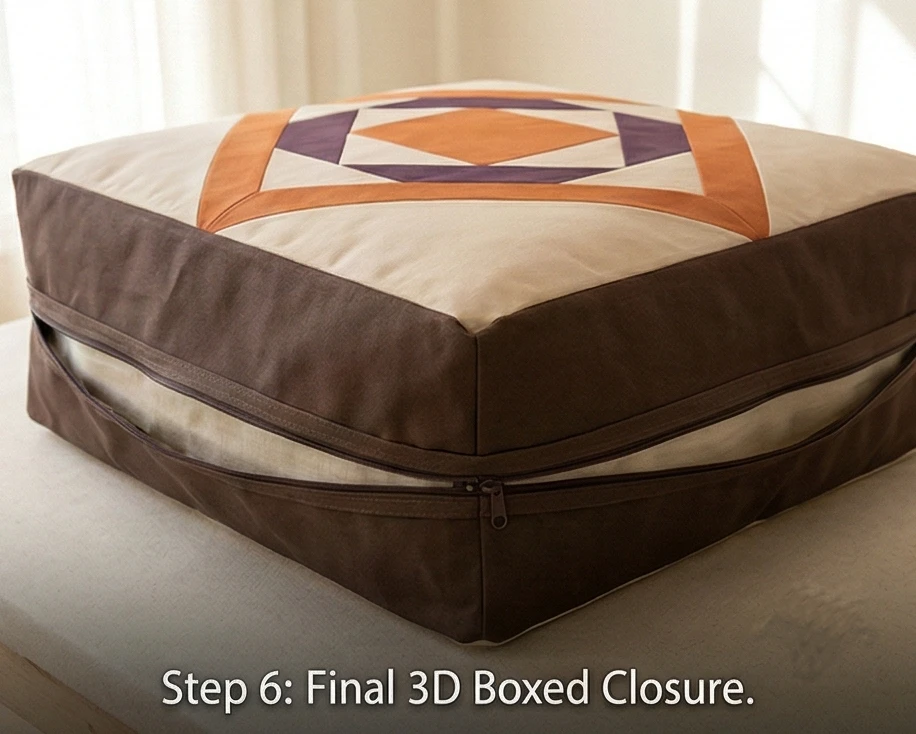
Usability Note: Because the base and sides are made of heavy canvas, you can safely drag this pouf across the room by its edge. When it requires cleaning, simply unzip the base, remove the foam core, and wash the cover on a cold, heavy-duty cycle. Tumble dry on medium heat to re-fluff the quilted wool top.
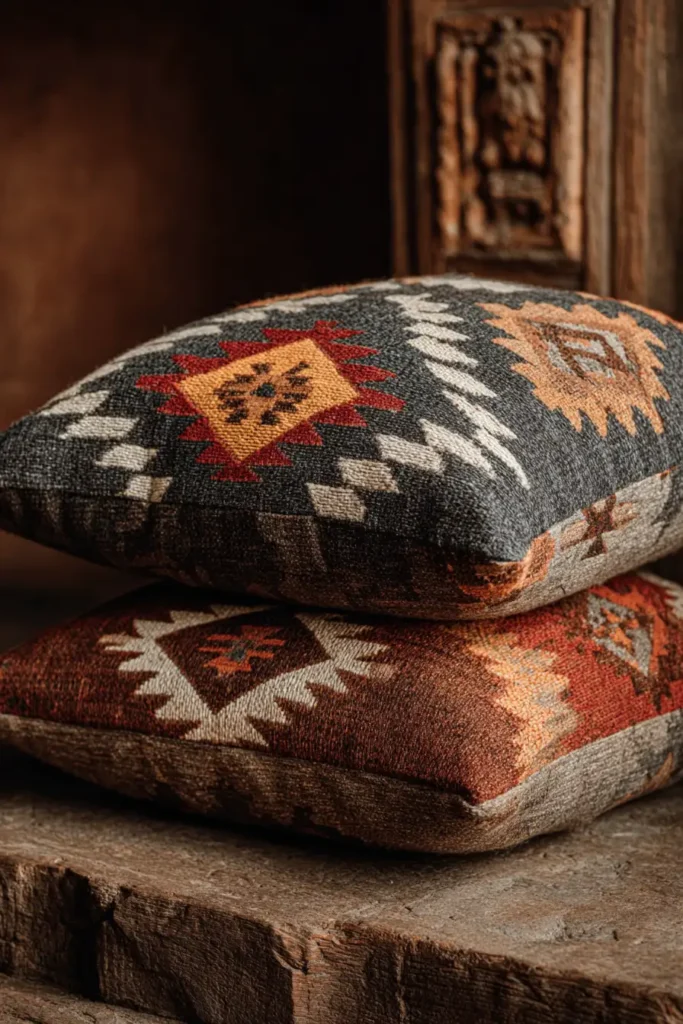
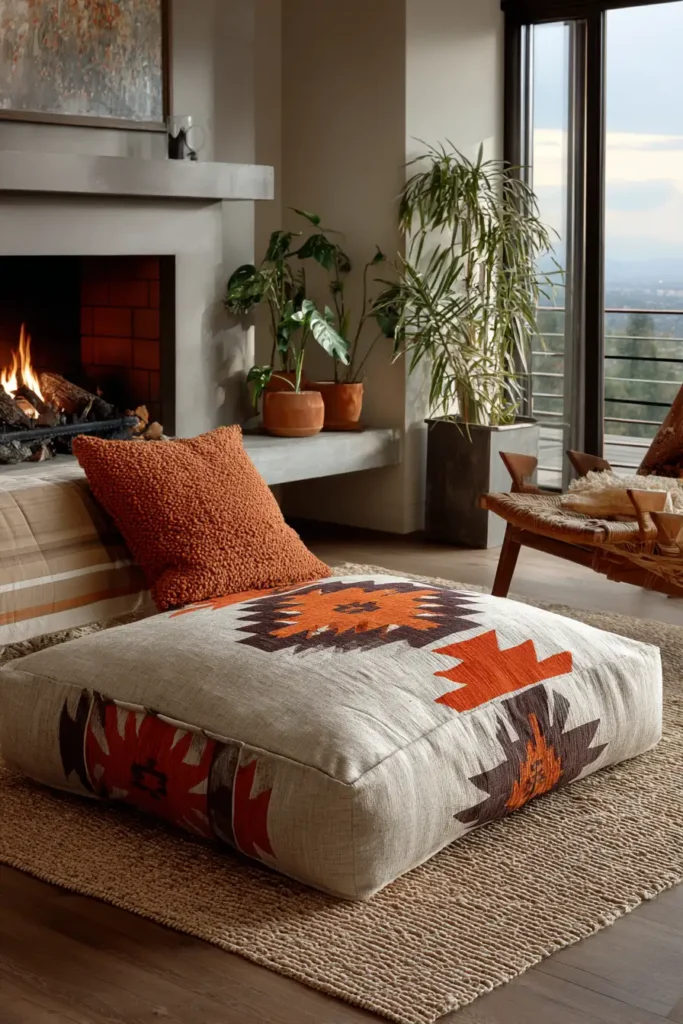
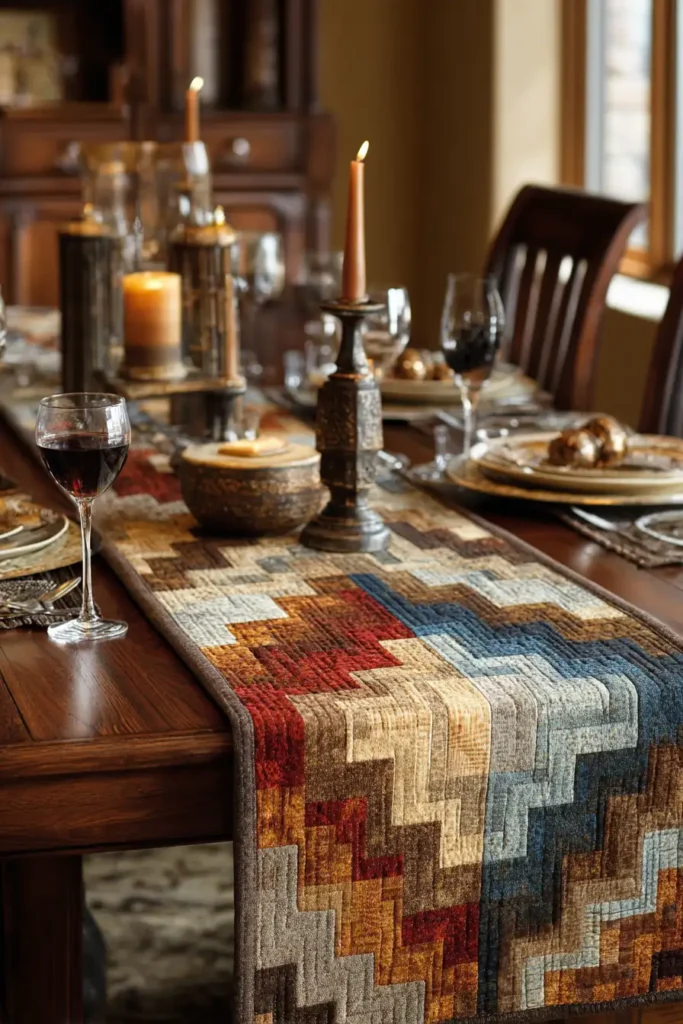
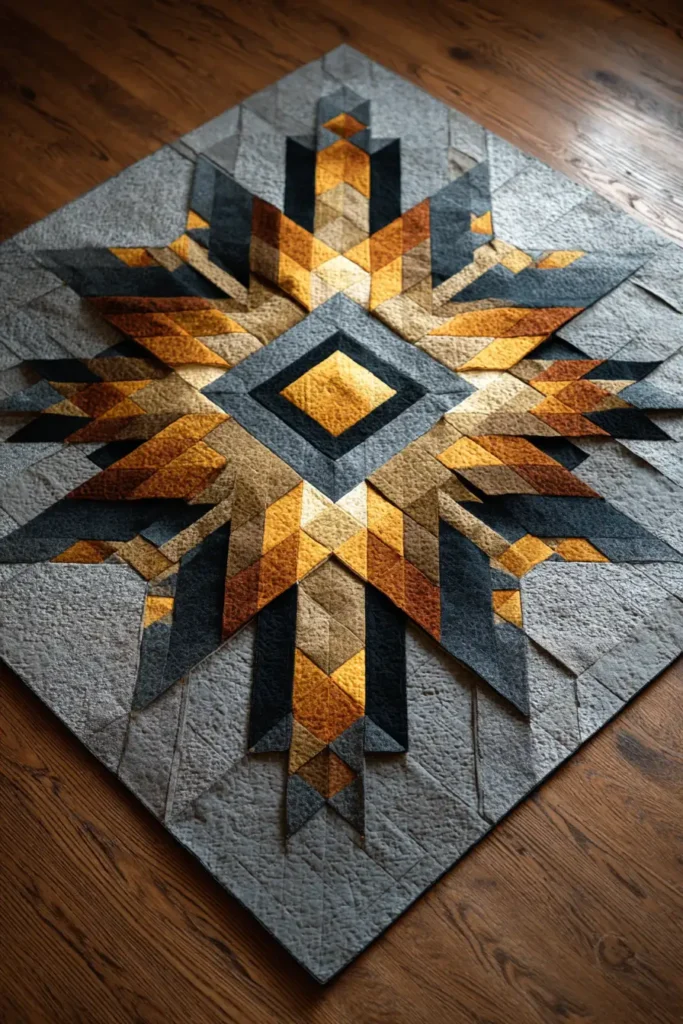
“The Obsidian Mesa” Geometric Table Topper
A dining table centerpiece must strike a delicate balance: it needs enough visual gravity to anchor the room, yet remain flat and functional enough to support heavy vases, candelabras, or serving platters. “The Obsidian Mesa” translates the bold, radiating geometry of regional Navajo textiles into a sleek, modern square silhouette. Executed in an ultra-refined, high-contrast palette of Obsidian Black, Desert Gold, Muted Sage, and vast Warm Sand, this piece centers around a tightly stepped diamond medallion. By incorporating thermal fleece and dense architectural quilting, this table topper is engineered to protect your surfaces while providing a sophisticated, modern-rustic focal point.
Finished Dimensions: Large Square Table Topper, 36″ x 36″ (Perfectly proportioned to ground the center of a round or large rectangular dining table).
Materials Needed:
- The “Mesa” (Geometric Motifs): 1/2 yard of solid Obsidian Black, 1/4 yard of Desert Gold, and 1/4 yard of Muted Sage cotton.
- The “Expanse” (Background & Borders): 1.5 yards of solid Warm Sand cotton.
- Backing: 1.5 yards of high-quality Obsidian Black Cotton Sateen.
- Batting: Insul-Bright (heat-resistant fleece) AND a thin layer of 100% Cotton Batting.
- Why: To serve as a true centerpiece under a hot soup tureen or warm serving dish, you must protect your table’s wood finish. Insul-Bright’s hollow, metalized core reflects heat upward. Layering it with low-loft cotton batting ensures the topper lies impeccably flat and crisp, rather than puffing up like a bed quilt.
- Thread: 50wt cotton thread in an invisible Taupe.
- Notions: A square acrylic ruler, a fresh rotary blade, and ultra-fine glass-head pins.
Cultural Backstory: As Navajo (Diné) weaving evolved through the late 19th and early 20th centuries, regional styles emerged. The Teec Nos Pos and Red Mesa styles, for example, became famous for their highly complex, radiating geometric centers and intricate zigzag borders. “The Obsidian Mesa” draws from this era of design evolution, where weavers began experimenting with intense contrast and sharp, jagged linework, creating textiles that felt incredibly modern, vibrating with directional energy and bold symmetry.
Step 1: Cutting the Modern Desert Geometry
Preparing the precise squares for the central medallion.
- The Golden Core: Cut exactly one 8.5-inch square of solid Desert Gold for the radiant center of your table topper.
- The Stepped Components: Cut exactly eight 4.5-inch squares of Obsidian Black, eight 4.5-inch squares of Muted Sage, and sixteen 4.5-inch squares of Warm Sand.
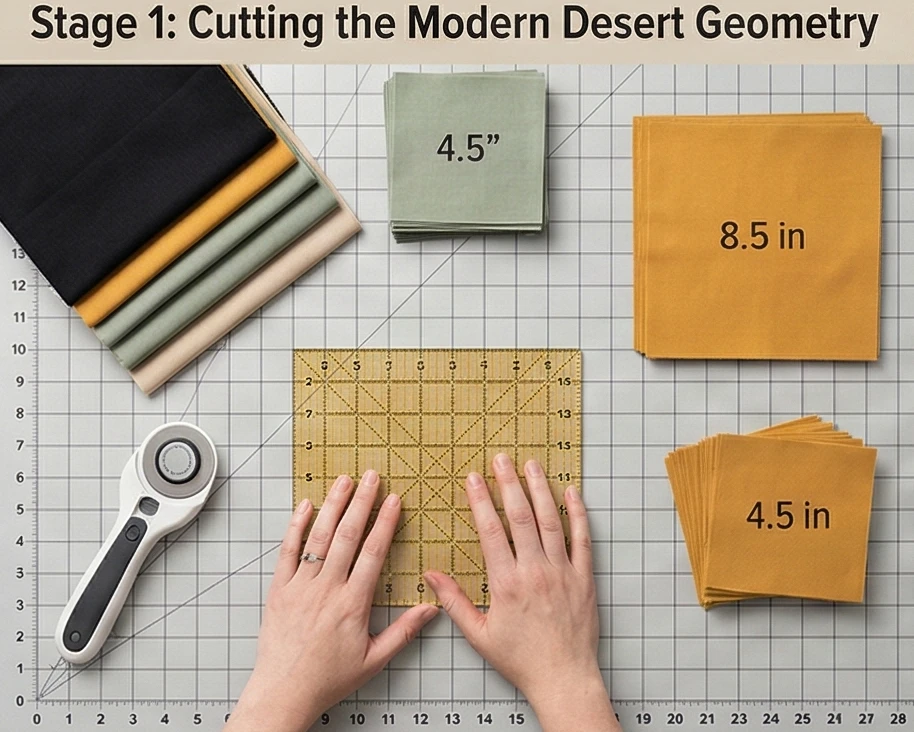
Step 2: Crafting the Two-Tone Terraces (HSTs)
Building the serrated, woven-style edges for the concentric diamonds.
- The Sage Pairing: Place eight Warm Sand squares right-sides together with your eight Muted Sage squares. Draw a diagonal line from corner to corner across the back of the Sand squares. Sew exactly 1/4 inch away from the drawn line on both sides.
- The Obsidian Pairing: Repeat this exact process, pairing the remaining eight Warm Sand squares with the eight Obsidian Black squares.
- Trim to Perfection: Slice directly down the drawn lines, press the seams open to ensure the cotton lies flawlessly flat, and trim every Half-Square Triangle (HST) to exactly 4″ x 4″.
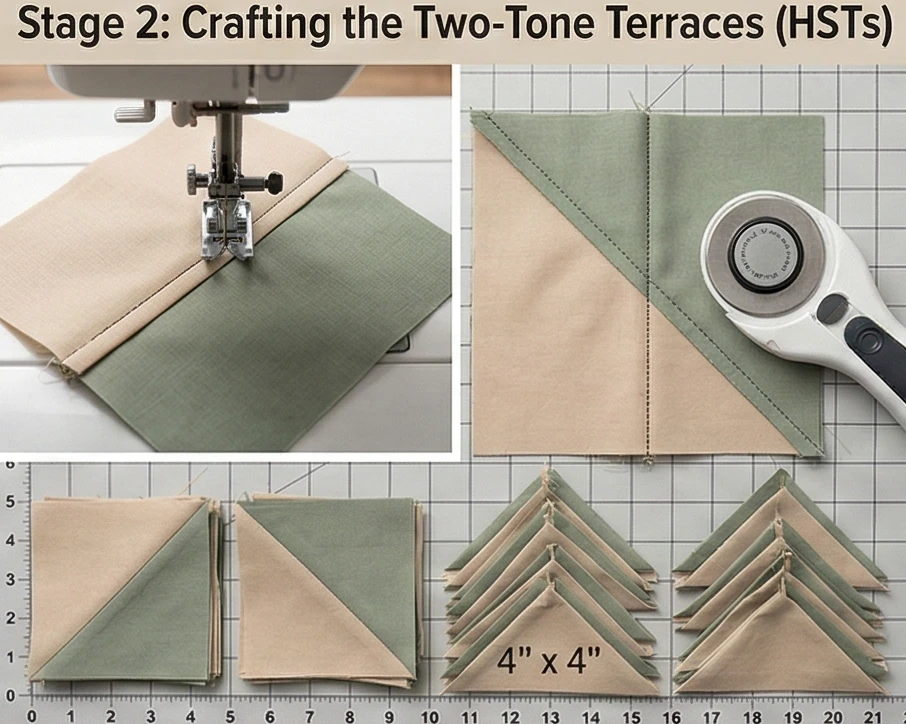
Step 3: Assembling the Concentric Medallion
Constructing the sharp, radiating focal point.
- The Inner Sage Ring: Surround your 8.5-inch Desert Gold core with the Sage/Sand HSTs. Rotate the HSTs so the Muted Sage triangles point strictly inward toward the gold, and the Warm Sand points outward. Sew these into rows, then attach to the center block.
- The Outer Obsidian Ring: Surround that completed unit with a ring of your Obsidian/Sand HSTs. Again, point the dark Obsidian inward to create a striking, high-contrast stepped staircase effect.
- Square Up: Carefully nest all 1/4-inch seam intersections. Your completed central geometric block will measure exactly 16.5″ x 16.5″.
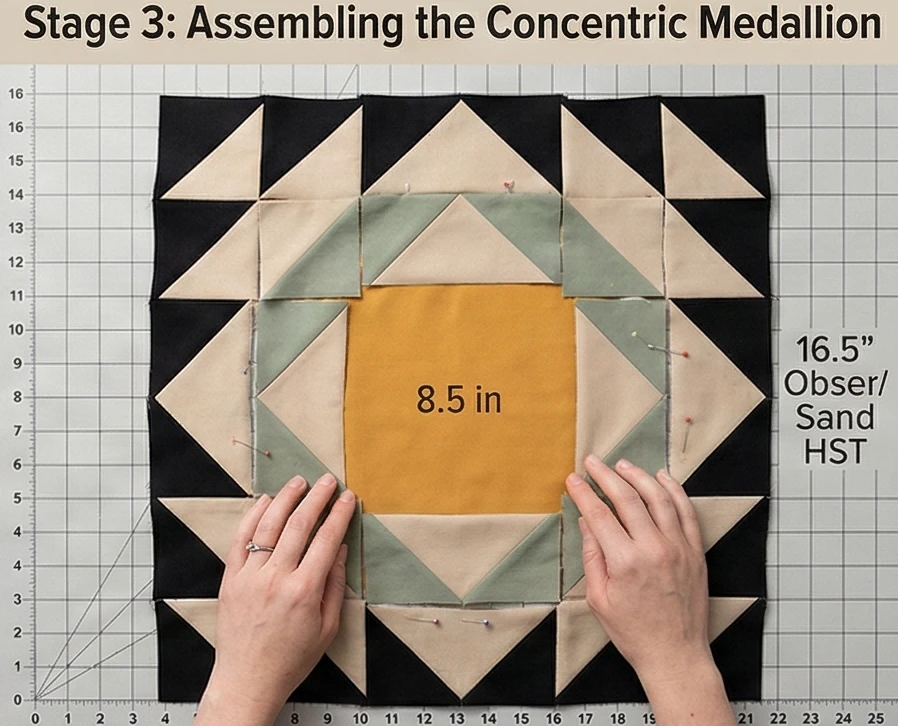
Step 4: Framing the Table Canvas
Floating the dense geometry in serene negative space.
- The Vertical Borders: From your Warm Sand yardage, cut two thick panels measuring 10.5″ wide by 16.5″ tall. Sew these to the left and right sides of your 16.5-inch central medallion. The center row now measures 36.5″ wide.
- The Horizontal Horizons: Cut two massive Warm Sand panels measuring 36.5″ wide by 10.5″ tall. Sew one to the top of the center row, and one to the bottom.
- The Finished Top: The unquilted top now measures a perfectly flush 36.5″ x 36.5″, allowing the intricate center to command attention while leaving plenty of uncluttered border space for place settings or flatware.
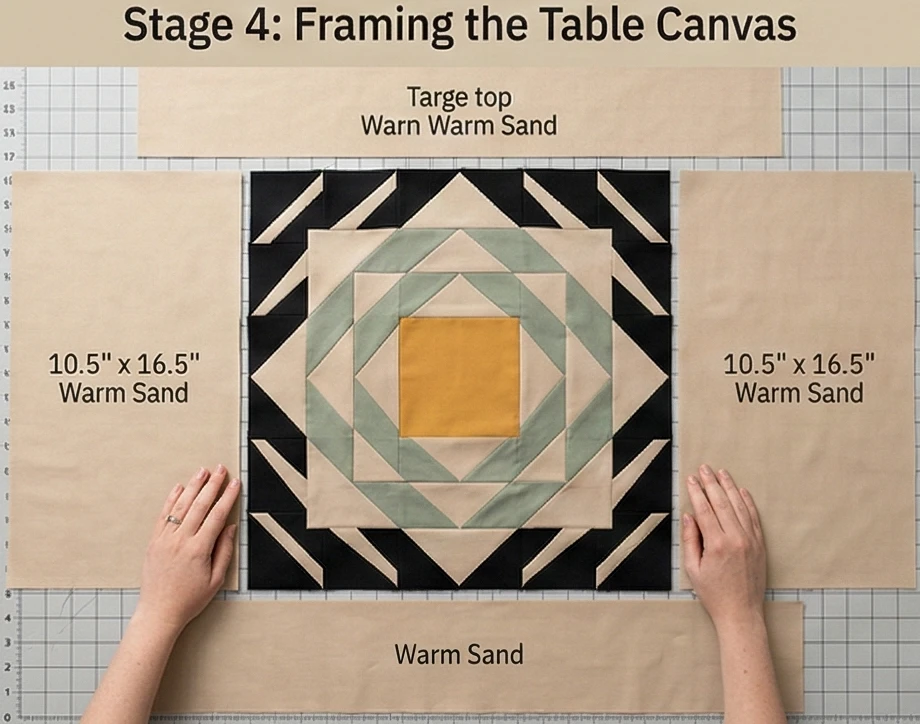
Step 5: Thermal Basting and Architectural Echo Quilting
Protecting the dining surface while adding 3D texture.
- The Thermal Stack: Lay your Obsidian Sateen backing right-side down. Add the layer of Insul-Bright (shiny side up), then the flat cotton batting, and finally your pieced top. Baste very densely with safety pins.
- Concentric Echo Quilting: Do not quilt heavily over the central motif. Using a walking foot, quilt “in the ditch” (exactly inside the seam lines) to outline the entire stepped diamond. Then, radiate outward into the Warm Sand borders, quilting concentric, stepped diamonds spaced exactly 1 inch apart.
- Why: This structural echo quilting ripples the geometric design all the way out to the edges of the table topper, firmly locking the thermal layers together so the centerpiece remains rigid, completely flat, and highly supportive of heavy serving dishes.
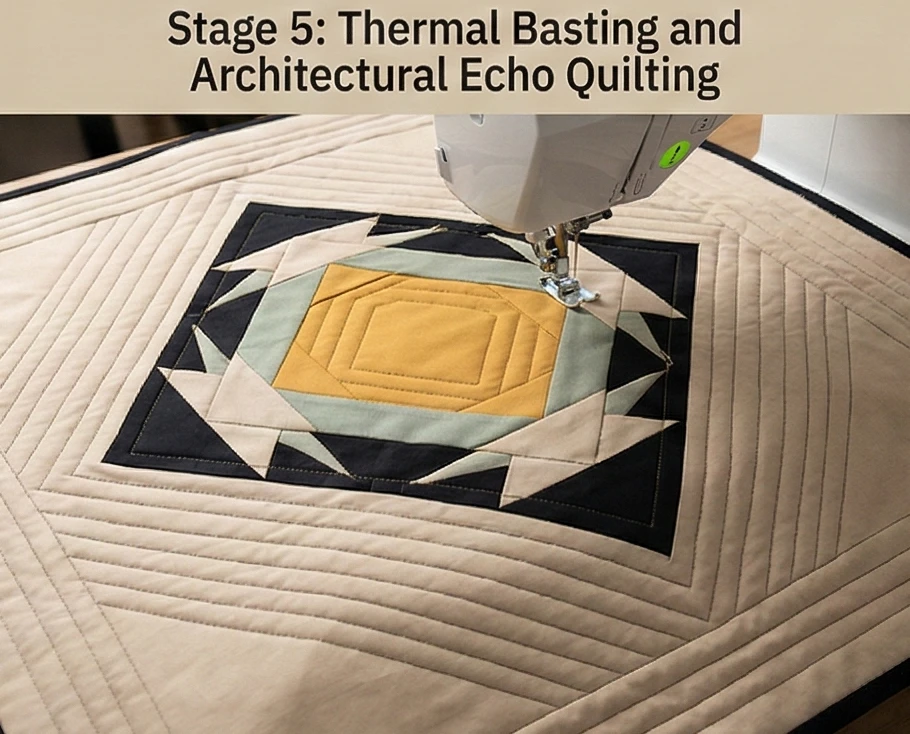
Step 6: The Tailored Edge Finish
Framing the modern textile art.
- Square and Trim: Trim the topper to a perfect 36″ x 36″ square, ensuring the thick thermal edges are even and free of excess batting.
- The Sharp Binding: Bind the edges tightly in the solid Obsidian Black fabric. This dark, crisp frame provides a modern, tailored boundary that visually connects the edge of the topper directly to the dark outer ring of the central diamond.
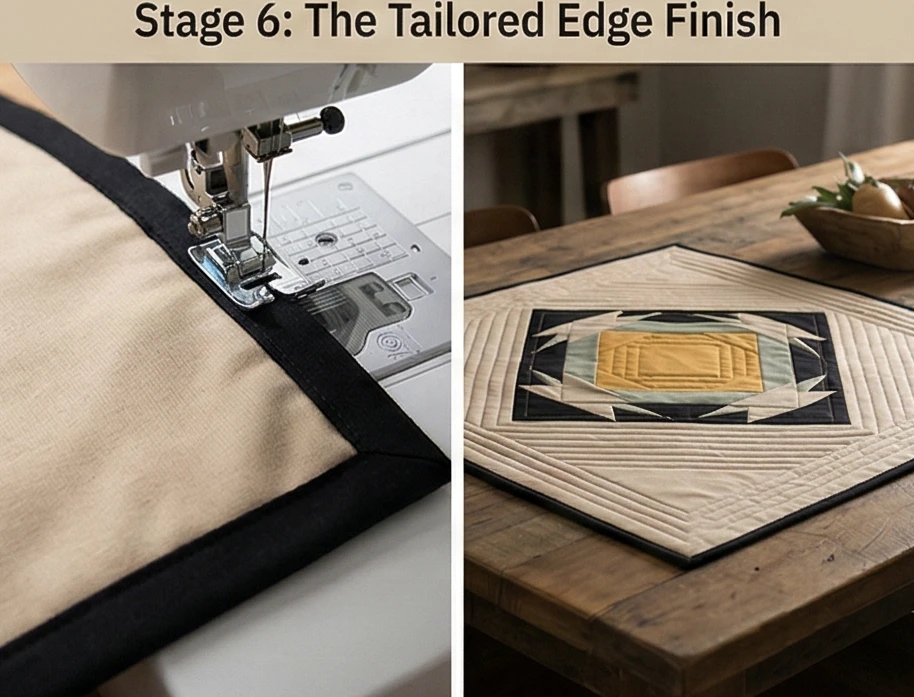
Usability Note: Dining centerpieces are prone to occasional spills. Thanks to the internal thermal layer, immediately spot-clean any stains with a damp cloth and mild soap. If machine washing is absolutely necessary, wash on a cold, delicate cycle with a color catcher (to protect the Warm Sand borders from the Obsidian Black), and lay it completely flat to dry so the metallic heat-shield maintains its pristine, flat architecture.
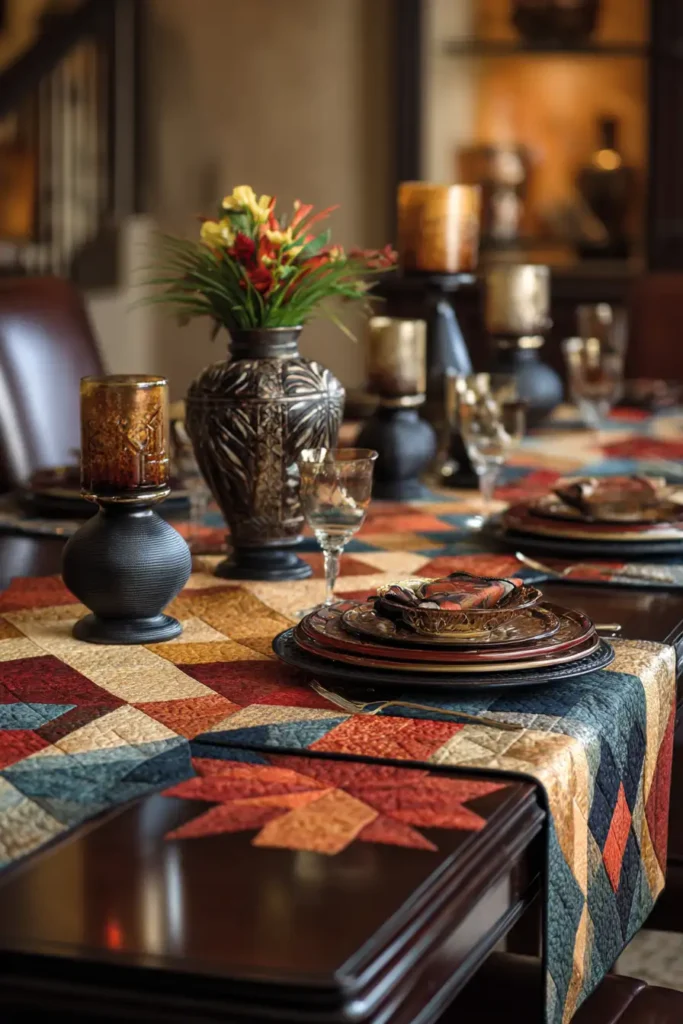
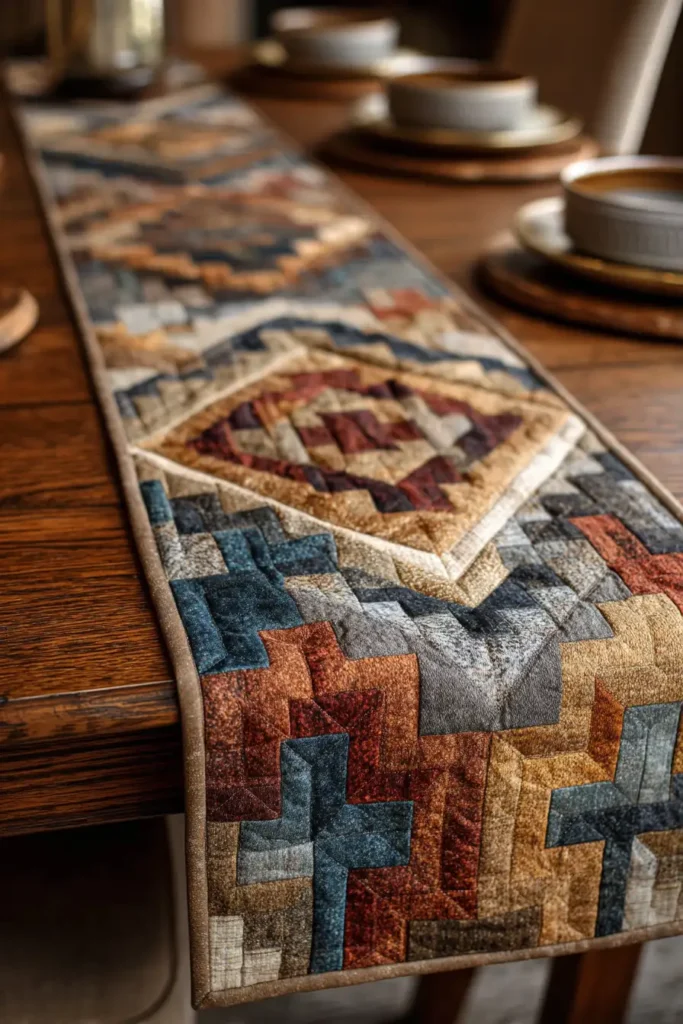
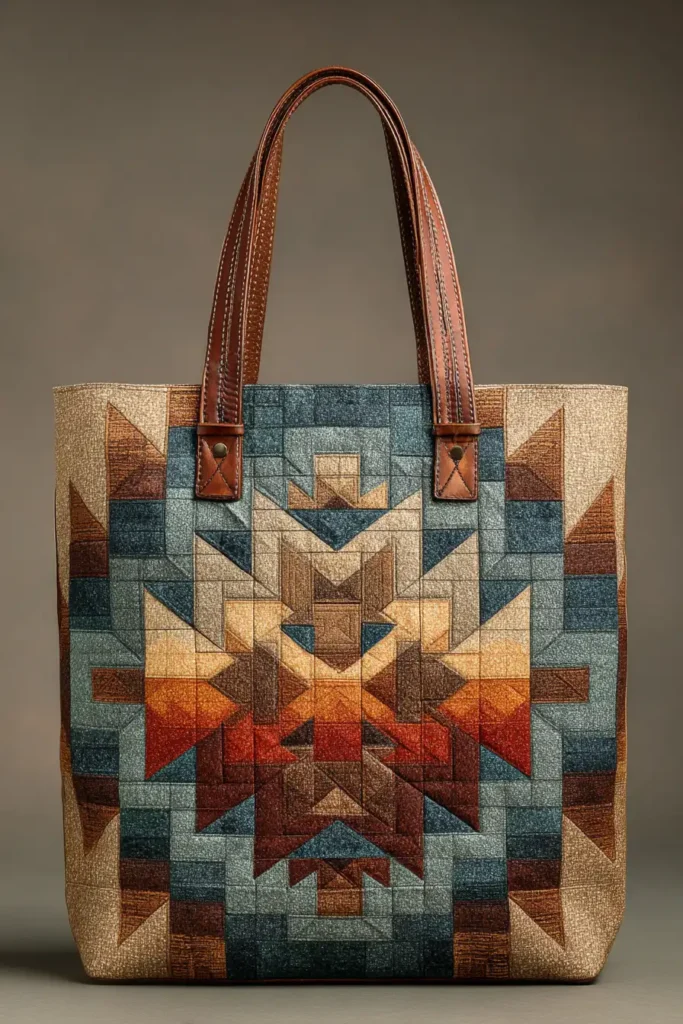
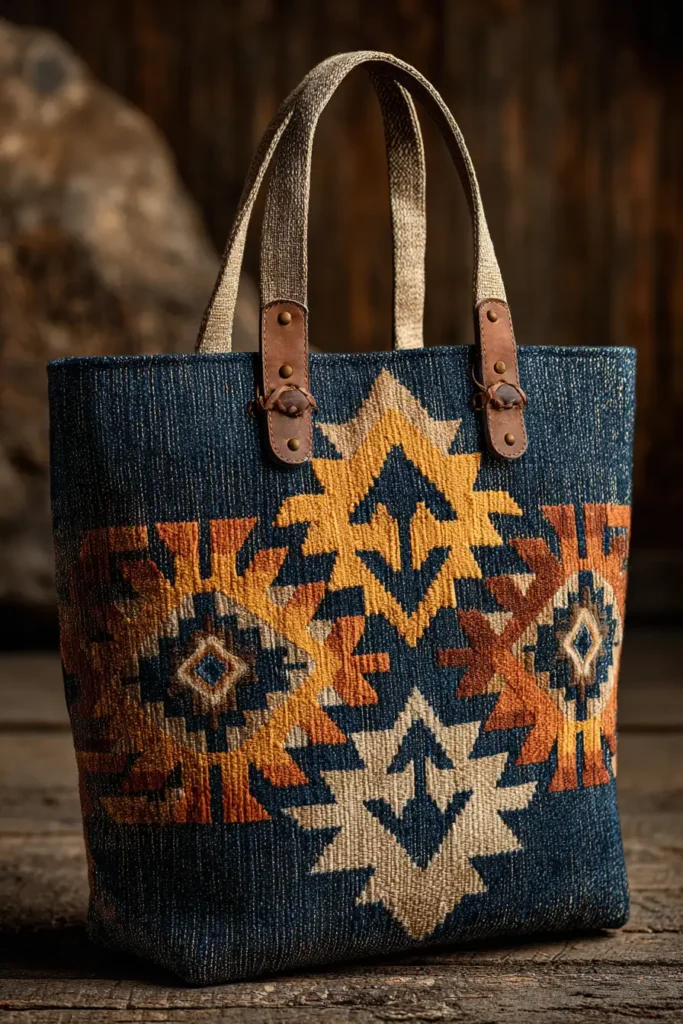
True elegance should not be confined within the walls of a home; it should accompany you effortlessly out into the world. A tote bag is the ultimate utilitarian vessel, but when adorned with the monumental, striking geometry of Southwestern weaving, it transcends its function to become a piece of moving, functional art. “The Canyon Pathway” embeds a striking vertical column of stepped diamonds directly into the front of a heavily structured, dirt-forgiving canvas body. Executed in a rich, grounding palette of Deep Turquoise, Terracotta, and Charcoal, set against a Warm Sand background, this tote seamlessly bridges the gap between profound cultural heritage and chic, modern daily utility.
Finished Dimensions: Generous Everyday Tote, 18″ wide x 16″ tall x 6″ deep (Perfectly proportioned for a laptop, a weekend market run, or daily essentials).
Materials Needed:
- The “Pathway” (Motifs): 1/8 yard each of solid Deep Turquoise, Terracotta, and Charcoal cotton.
- The Body (Background & Base): 1.5 yards of heavy-duty Warm Sand Cotton Canvas.
- Why: A tote bag is subjected to the elements, placed on floors, and tossed into cars. Canvas provides an indestructible, scuff-resistant foundation that holds its shape and provides a sleek, modern backdrop for the intricate cotton geometry.
- Lining: 1.5 yards of Waterproof Canvas or Ripstop Nylon in a coordinating Charcoal.
- Why: Spilled coffee or condensation from a water bottle will ruin a standard cotton lining. A waterproof interior allows you to easily wipe the bag clean with a damp cloth, ensuring the interior remains as pristine as the exterior.
- Structural Interfacing: 1 yard of dense Foam Stabilizer (such as ByAnnie’s Soft and Stable).
- Why: A floppy tote bag feels unkempt and makes it impossible to organize your belongings. Dense foam stabilizer gives the bag architectural rigidity, allowing it to stand completely upright on its own while offering protective, cushioned padding for delicate electronics.
- Handles: Two 28-inch lengths of Saddle Brown Leather Strapping or heavy-duty cotton webbing.
- Thread: 40wt heavy-duty cotton thread in Taupe.
- Notions: A square acrylic ruler, a fresh rotary blade, heavy-duty sewing machine needles (Size 90/14 or 100/16), and optional brass rivets for the handles.
Cultural Backstory: In Diné (Navajo) philosophy, the concept of the “pathway” or “trail” is profoundly significant, often symbolizing the journey of life, the pursuit of Hózhó (balance and beauty), and the interconnectedness of all living things. Stepped diamonds and connected geometric columns are frequently woven to represent this ongoing journey through the landscape. Placing this specific, journey-oriented geometry onto a tote bag is a beautiful, modern homage to carrying one’s heritage, protection, and balanced energy wherever the path leads.
Step 1: Scaling the Vertical Geometry
A tall bag requires an elongated, stacked motif.
- The Solid Cores: Cut exactly three 4.5-inch squares of solid Deep Turquoise for the centers of your three diamonds.
- The Stepped Edges: Cut exactly twelve 3-inch squares of Terracotta, twelve 3-inch squares of Charcoal, and twenty-four 3-inch squares of Warm Sand.
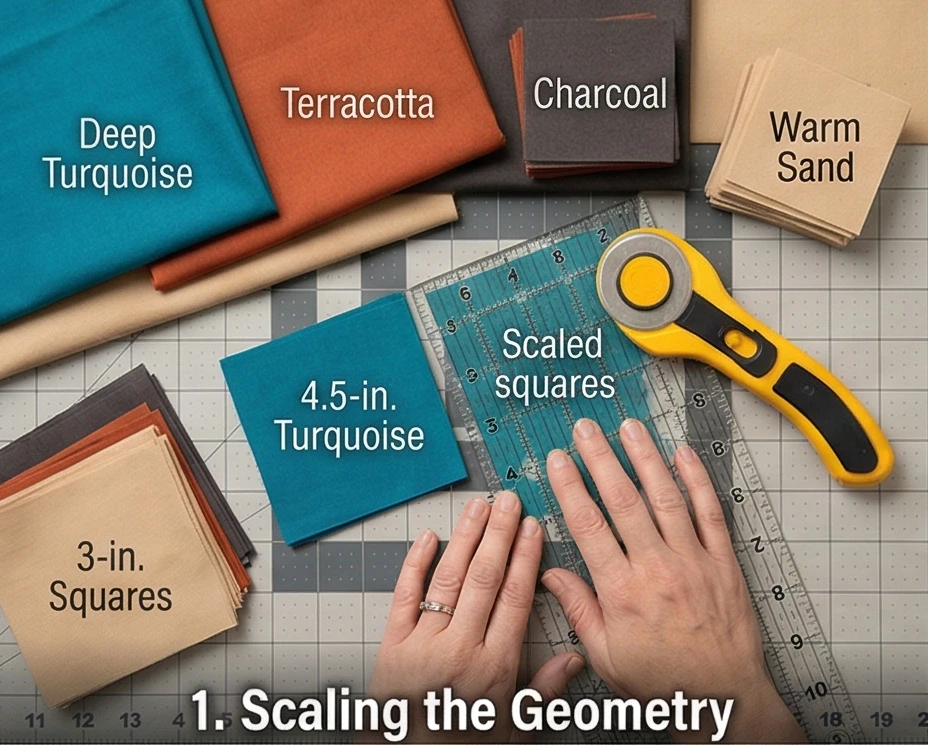
Step 2: Crafting the Miniature Terraces (HSTs)
Building the serrated edges efficiently.
- The Terracotta Pairing: Place twelve Warm Sand squares right sides together with your twelve Terracotta squares. Draw a diagonal line from corner to corner across the back of the Sand squares. Sew exactly 1/4 inch away from the drawn line on both sides.
- The Charcoal Pairing: Repeat this exact process, pairing the remaining twelve Warm Sand squares with the twelve Charcoal squares.
- Trim to Perfection: Slice directly down the drawn lines, press the seams open to minimize bulk, and trim every Half-Square Triangle (HST) to exactly 2.5″ x 2.5″.
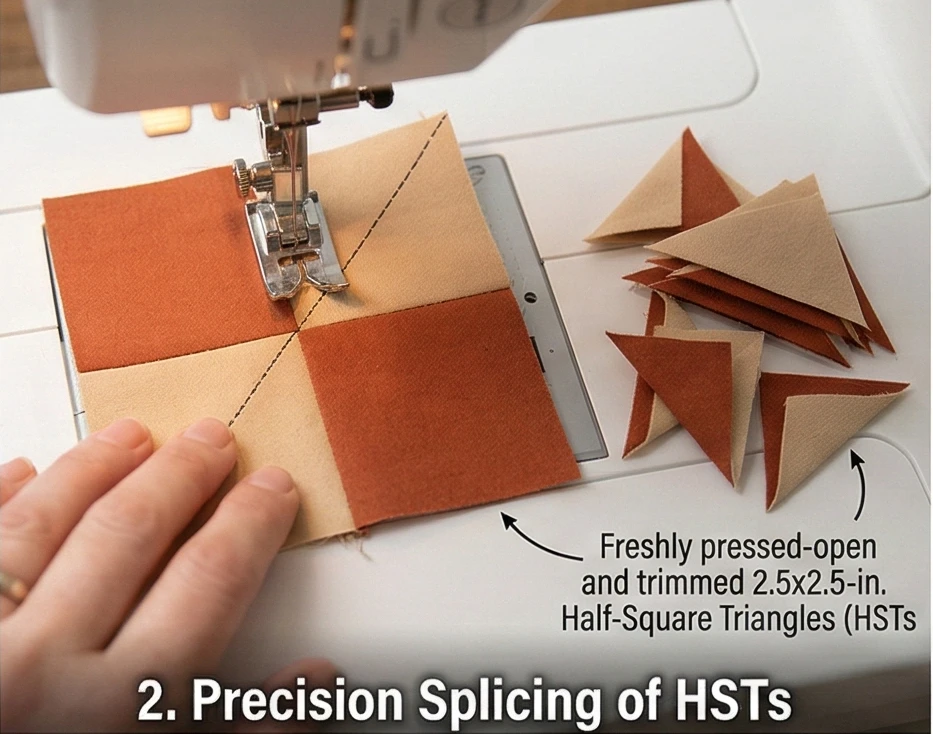
Step 3: Assembling the Central Tapestry Column
Constructing the striking vertical focal point.
- The Inner Ring: Surround one 4.5-inch Turquoise core with your Terracotta/Sand HSTs. Rotate the HSTs so the Terracotta triangles point inward and the Warm Sand triangles point outward.
- The Outer Anchors: Sew Charcoal/Sand HSTs to the four outer corners of this ring to complete the stepped diamond.
- Stack the Pathway: Sew the components into rows. The completed diamond block will measure exactly 8.5″ x 8.5″. Repeat to build three identical diamonds. Sew the three diamonds together vertically to create a stunning, continuous column measuring 8.5″ wide by 24.5″ tall.
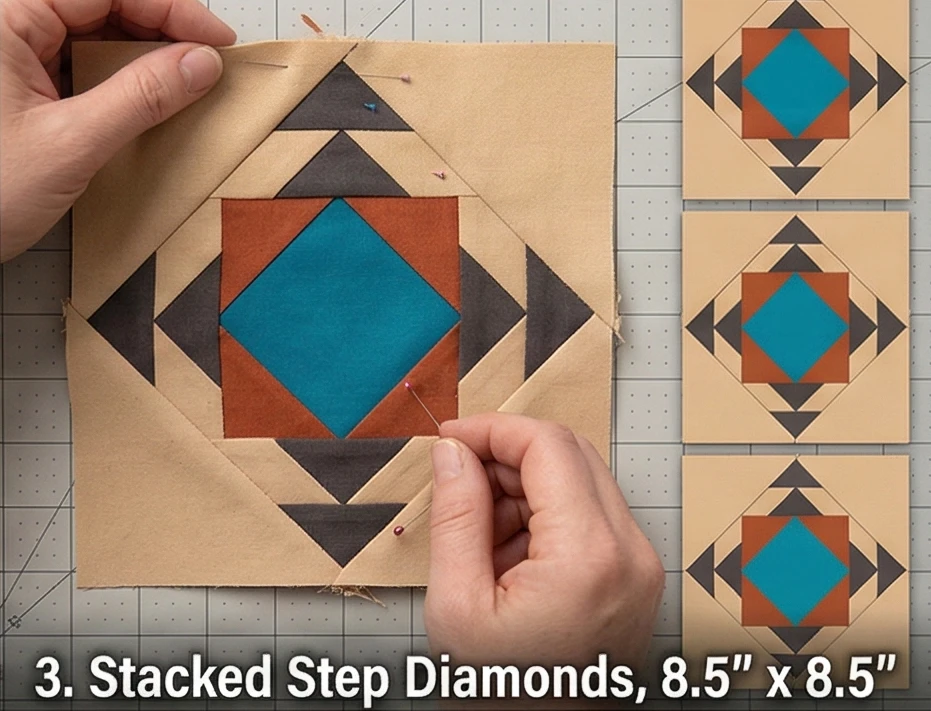
Step 4: Engineering the Heavy-Duty Canvas Shell
Embedding the column into the structured body.
- The Front Panel: From your Warm Sand Canvas, cut two panels measuring 6″ wide by 24.5″ tall. Sew these to the left and right sides of your pieced diamond column. Your entire front panel now measures exactly 19.5″ wide by 24.5″ tall.
- The Back Panel: Cut a matching solid Warm Sand Canvas rectangle measuring 19.5″ wide by 24.5″ tall for the back of the tote.
- The Foam Baste: Cut two 19.5″ x 24.5″ rectangles of your foam stabilizer. Baste the pieced front panel to one piece of foam, and the solid back canvas panel to the other.
- “Warp” Channel Quilting: Using a walking foot, quilt straight vertical lines exactly 1 inch apart across the vast Warm Sand canvas sections. Leave the intricate diamond column unquilted. This mimics traditional loom weaving and permanently fuses the canvas to the foam, creating a stiff, free-standing material.
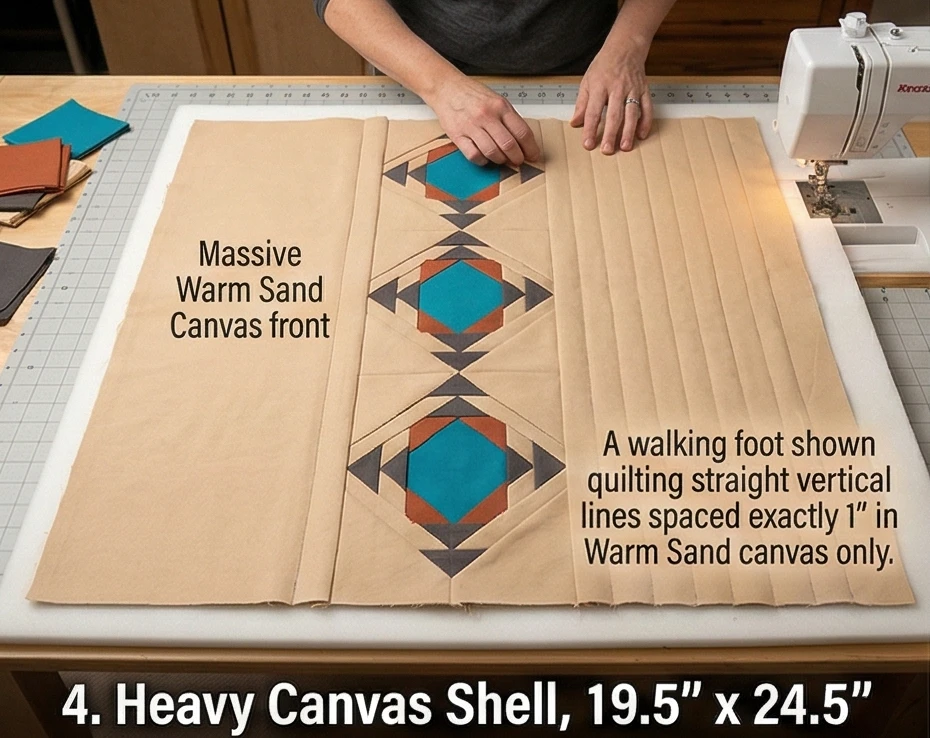
Step 5: Creating the Boxed Base (The Gusset)
Transforming the flat panels into a deep 3D vessel.
- Sew the Shell: Place the quilted front and back panels right sides together. Sew along the left, bottom, and right edges with a heavy 1/2-inch seam allowance. Backstitch heavily at the top corners. Keep the bag inside out.
- Box the Corners: Flatten one of the bottom corners so the side seam aligns perfectly with the bottom seam, forming a sharp triangle. Measure exactly 3 inches down from the point and draw a straight horizontal line across the triangle.
- The 6-Inch Base: Sew strictly on this drawn line, then trim off the excess triangular tip. Repeat on the other bottom corner. When turned right-side out, the bag will have a perfectly flat, highly structured 6-inch-deep base.
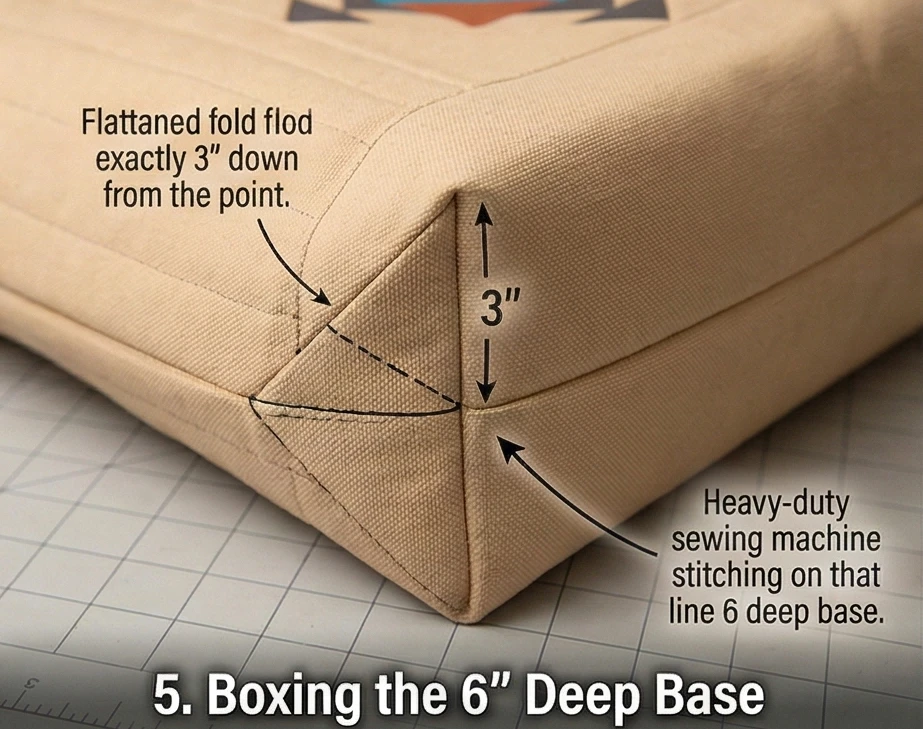
Step 6: Waterproof Lining and Tailored Handles
The professional, high-end finish.
- The Lining: Repeat Step 5 with your Waterproof Canvas lining fabric, but leave a generous 6-inch gap in the bottom seam for turning the bag right-side out later.
- Position the Handles: On the outside of your main canvas bag, pin the raw ends of your Saddle Brown leather straps to the top edge, spacing them about 6 inches apart, perfectly centering them over the geometric column. Baste in place.
- The Final Join: Slip the stiff canvas bag inside the waterproof lining bag (so they are right-sides together, with the handles sandwiched between). Sew entirely around the top circular rim.
- Turn and Topstitch: Pull the heavy canvas bag right-side out completely through the gap in the lining’s bottom. Stitch the lining gap closed. Push the lining down firmly into the bag, press the top rim flat, and topstitch 1/4 inch around the entire top edge to lock the layers. (Optional: Secure the leather straps with heavy brass rivets for an ultra-chic, bespoke look).
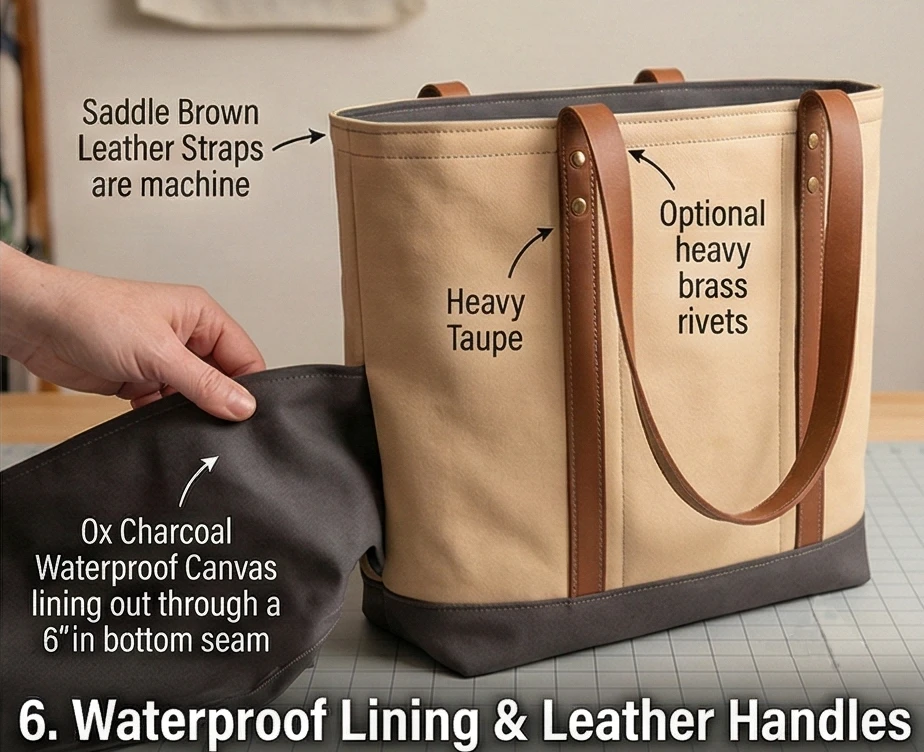
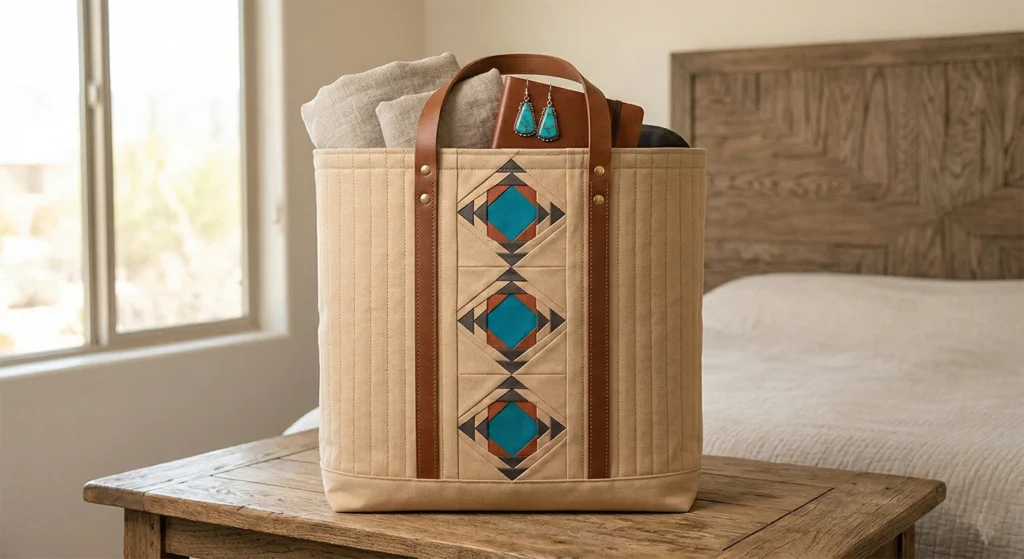
Usability Note: Never machine-wash a bag with a dense foam stabilizer, leather handles, and a waterproof lining, as the agitation can warp the structure and strip the leather. To clean, simply wipe the waterproof interior out with a soapy sponge, and spot-clean the canvas exterior with a damp cloth and mild detergent to preserve the vivid Southwestern dyes.
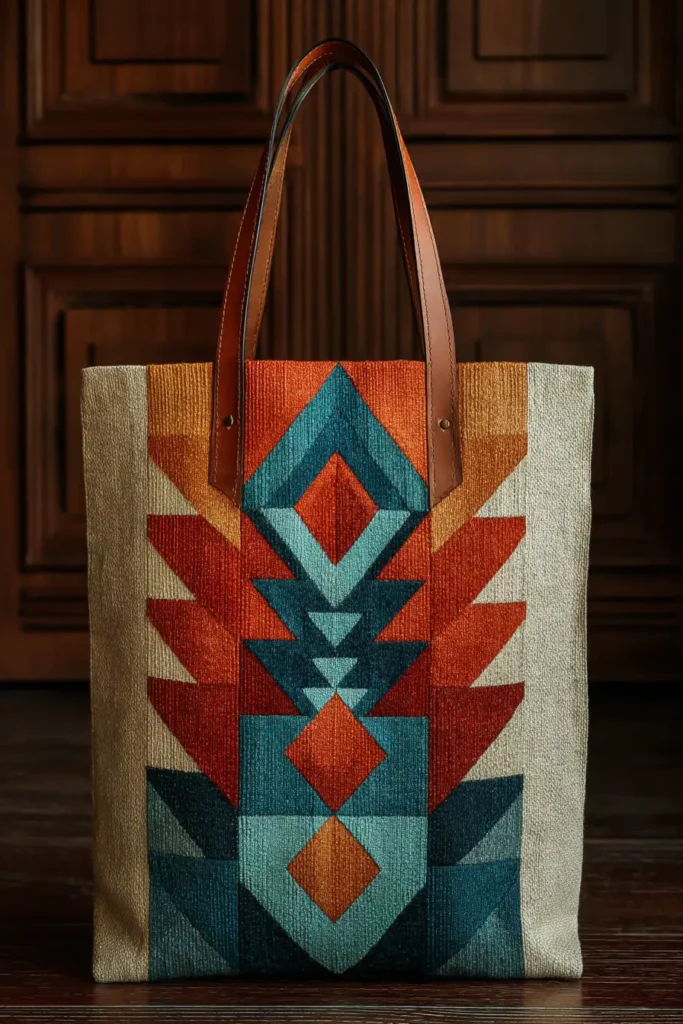
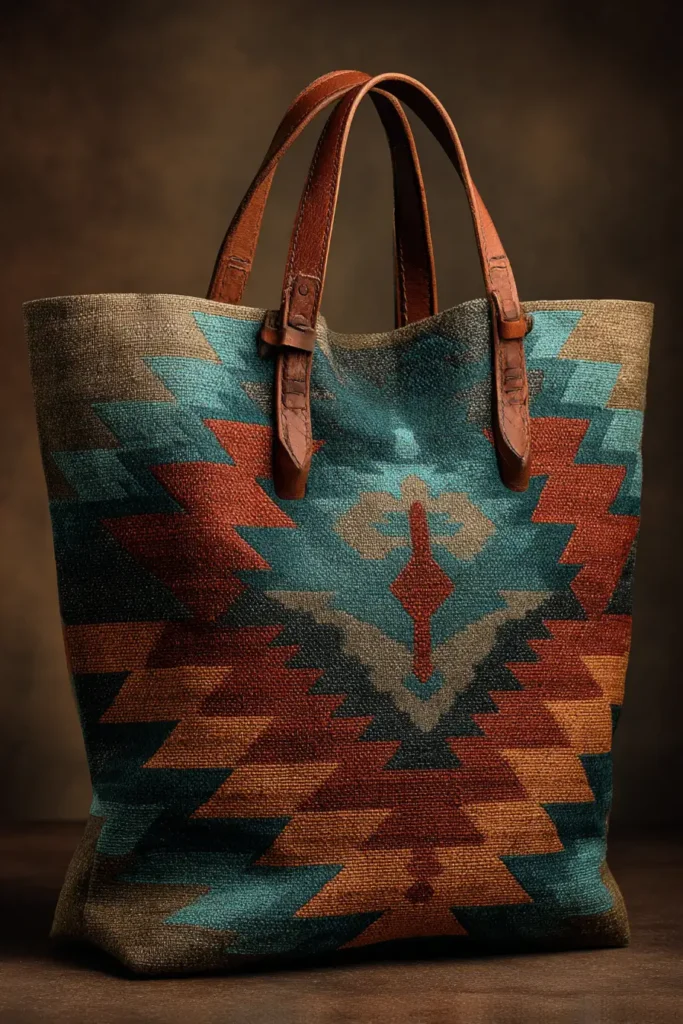
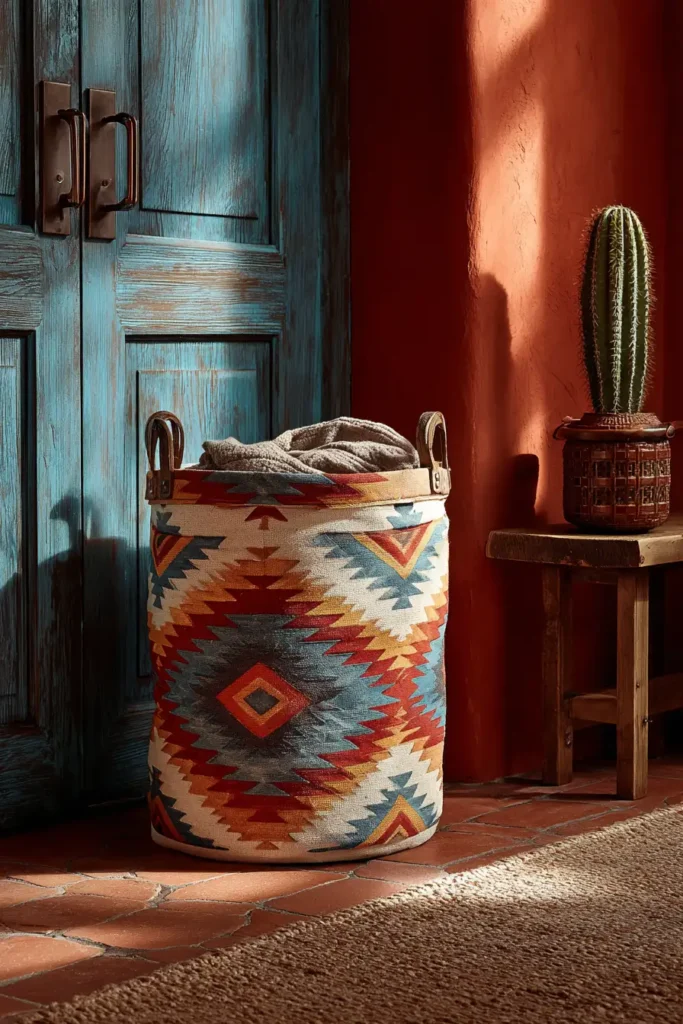
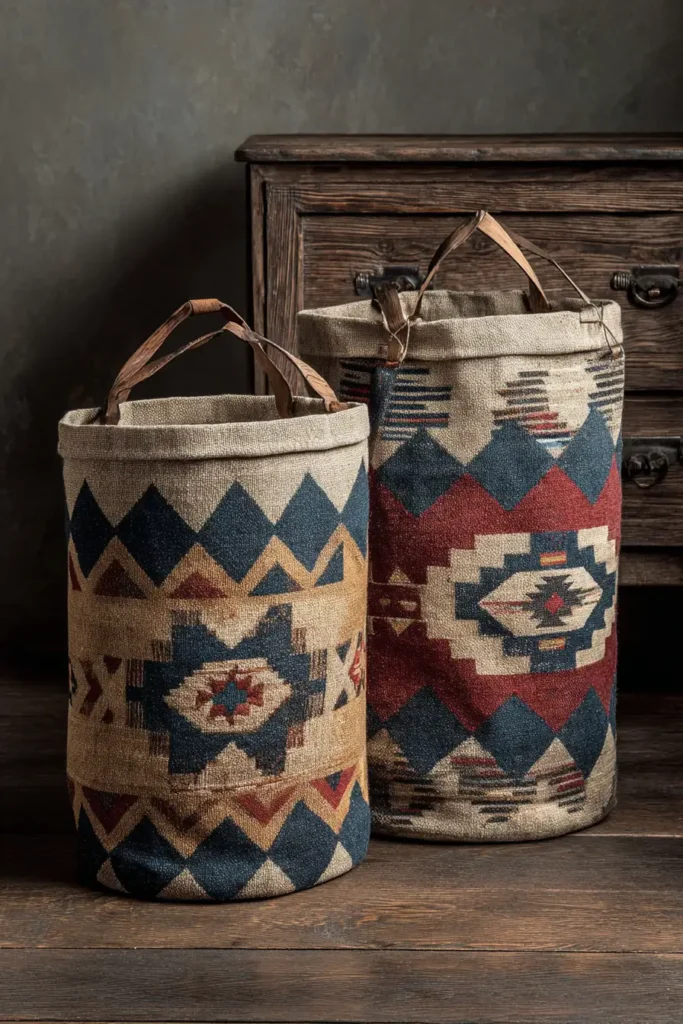
“The Mesa Vessel” Freestanding Geometric Laundry Bag
Home organization often defaults to purely utilitarian plastics or flimsy wire hampers that clash with a beautifully curated bedroom or bathroom. A laundry bag should be a piece of soft architecture—a highly durable, free-standing vessel that elegantly conceals its contents. “The Mesa Vessel” elevates the everyday hamper by integrating the striking, stepped geometry of Navajo-inspired textiles into a rugged canvas cylinder. Rendered in a desert-washed palette of Terracotta, Faded Turquoise, and Charcoal set against an indestructible Warm Sand Canvas, this bag merges profound cultural artistry with the heavy-duty utility required for a busy household. Complete with a water-resistant lining and heavy brass grommets, this vessel brings balance and beauty to your daily routines.
Finished Dimensions: Large Free-Standing Cylinder Hamper, 28″ tall x 18″ diameter (Spacious enough to hold a full week’s worth of linens or clothing).
Materials Needed:
- The “Mesa” (Motifs): 1/4 yard each of solid Terracotta, Faded Turquoise, and Charcoal cotton.
- The Body (Background & Base): 2 yards of heavy-duty Warm Sand Cotton Canvas or Duck Cloth.
- Why: A laundry hamper sits on the floor and is frequently dragged to the laundry room. Standard quilting cotton will wear thin. Canvas provides an ultra-durable, scuff-resistant exterior that naturally holds its shape and hides dust perfectly.
- Lining: 2 yards of Water-Resistant Ripstop Nylon or Laminated Cotton in a neutral Cream.
- Why: Damp towels or sweaty gym clothes will ruin a standard cotton lining and cause mildew. A water-resistant interior ensures the beautiful exterior canvas remains pristine and allows you to wipe the inside of the hamper clean with a disinfecting cloth.
- Structural Interfacing: 1.5 yards of dense Foam Stabilizer (e.g., ByAnnie’s Soft and Stable).
- Hardware: 8 heavy-duty Antique Brass Grommets (1-inch internal diameter) and 3 yards of thick Cotton Rope for the drawstring.
- Thread: 40wt heavy-duty cotton thread in Taupe.
- Notions: A square acrylic ruler, a fresh rotary blade, heavy-duty machine needles (Size 100/16), and a grommet setting tool.
Cultural Backstory: In Diné (Navajo) culture, the concept of Hózhó represents a state of complete balance, beauty, and order in the world. This philosophy extends beyond grand ceremonies and into the mindful execution of daily tasks. Historically, woven textiles and sturdy storage bags were created with incredible care, ensuring that even the most functional, everyday items were imbued with beauty. By taking the time to craft a breathtaking geometric vessel for something as mundane as laundry, you are actively inviting the spirit of Hózhó into the everyday maintenance of your home.
Step 1: Scaling the Desert Diamond
A 14-inch focal point fits perfectly on the curve of the cylinder.
- The Central Core: Cut exactly one 6.5-inch square of solid Faded Turquoise for the center of your diamond.
- The Stepped Edges: Cut exactly eight 4.5-inch squares of Terracotta, eight 4.5-inch squares of Charcoal, and sixteen 4.5-inch squares of Warm Sand.
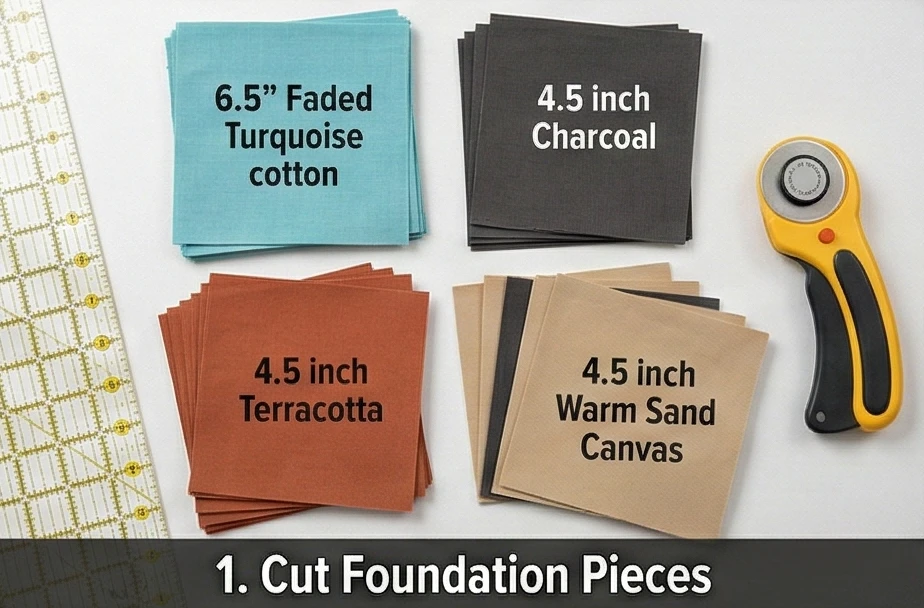
Step 2: Crafting the Miniature Terraces (HSTs)
Building the serrated, woven-style borders.
- The Terracotta Pairing: Place eight Warm Sand squares right sides together with your eight Terracotta squares. Draw a diagonal line across the back of the Sand squares. Sew exactly 1/4 inch away from the drawn line on both sides.
- The Charcoal Pairing: Repeat this exact process, pairing the remaining eight Warm Sand squares with the eight Charcoal squares.
- Trim to Perfection: Slice down the drawn lines, press the seams open to lay perfectly flat, and trim every single Half-Square Triangle (HST) to exactly 4″ x 4″.
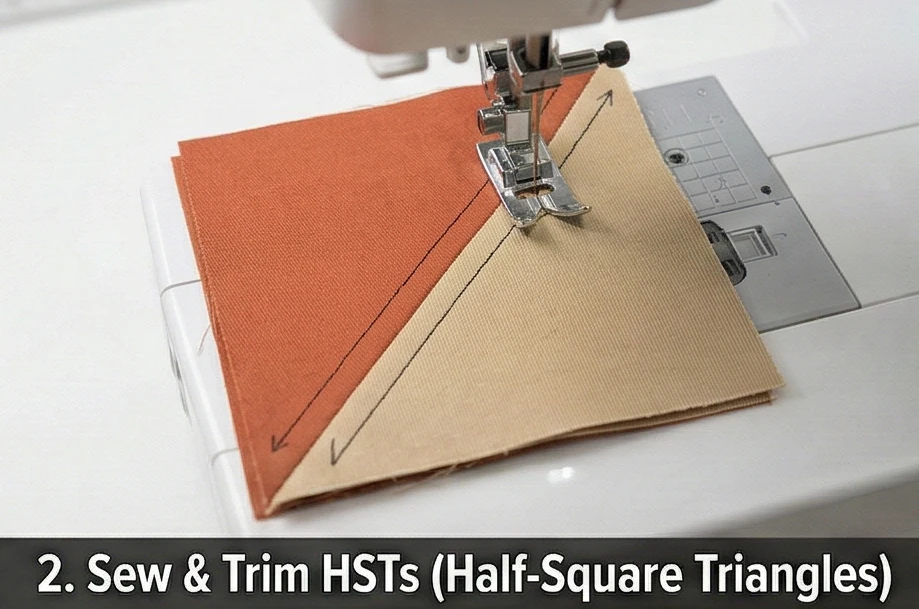
Step 3: Assembling the Central Medallion
Constructing the geometric focal point.
- The Inner Ring: Surround the 6.5-inch Turquoise core with the Terracotta/Sand HSTs. Rotate the HSTs so the Terracotta points strictly inward and the Warm Sand points outward. Sew into rows and attach to the core.
- The Outer Ring: Surround this unit with your Charcoal/Sand HSTs, again pointing the dark color inward to create a striking stepped staircase effect.
- Square Up: Carefully nest the seams. Your completed central geometric block will measure exactly 14.5″ x 14.5″.
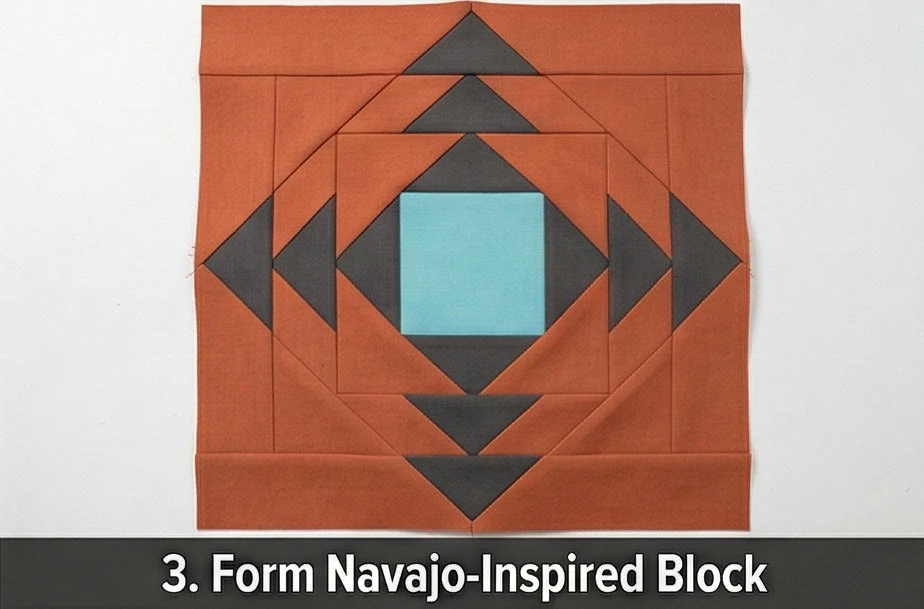
Step 4: Engineering the Cylinder Body
Creating the massive, wrap-around exterior wall.
- The Main Canvas Panel: To create an 18-inch diameter cylinder, your side panel must be long enough to wrap around the circular base. Cut a massive piece of Warm Sand Canvas measuring 57.5″ wide by 29″ tall.
- Insetting the Medallion: Instead of adding bulk with appliqué, embed the star seamlessly. Cut a 14.5″ x 14.5″ square out of the direct center of your massive canvas panel. Insert your pieced Navajo diamond block into this hole, sewing it in with a precise 1/4-inch seam allowance.
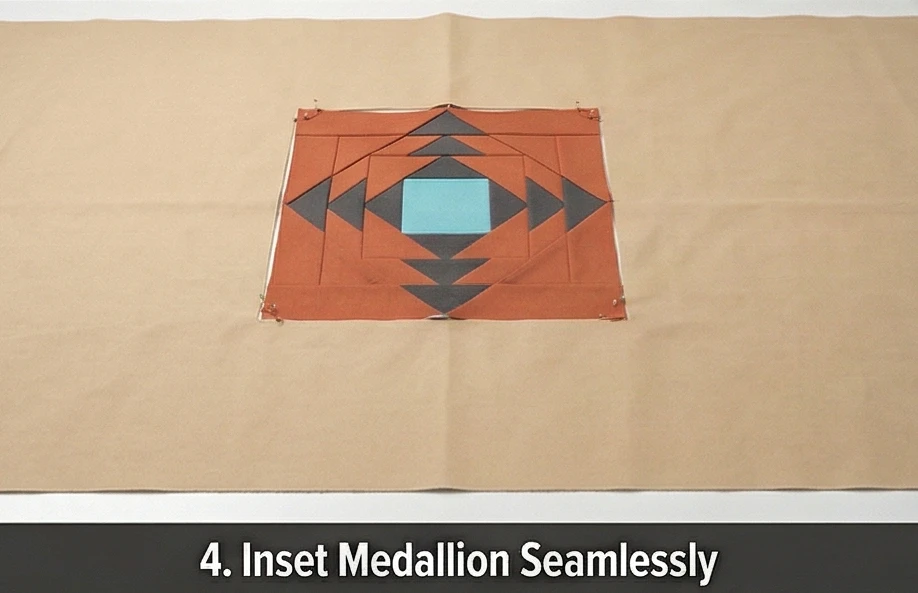
Step 5: Foam Basting and Architectural Quilting
Giving the hamper its free-standing rigidity.
- The Foam Support: Cut a 57.5″ x 29″ piece of foam stabilizer. Baste your entire canvas panel (with the inset diamond) to the foam.
- Vertical “Warp” Quilting: Using a walking foot, quilt heavy, straight vertical lines exactly 1 inch apart across the entire Warm Sand canvas background. Leave the intricate diamond completely unquilted. This dense vertical quilting forces the canvas to stand rigidly upright, creating a stiff, drum-like wall that will not slouch or collapse when empty.
- The Circular Base: Cut an 18.5-inch diameter circle from the Warm Sand Canvas and a matching circle from the foam. Quilt them together in a heavy grid pattern.

Step 6: Waterproof Assembly and Grommet Finishing
Bringing the 3D vessel to life.
- Sew the Cylinder: Fold your massive quilted wall in half (right-sides together) and sew the short 29-inch ends together to create a tube.
- Attach the Base: Pin the quilted circular base to the bottom rim of your canvas tube. Sew carefully around the entire perimeter with a 1/2-inch seam. Turn the massive bucket right-side out.
- The Ripstop Lining: Repeat the tube-and-circle assembly using your water-resistant Ripstop Nylon lining. Drop the lining inside the canvas bucket (with the wrong sides touching).
- The Top Rim: Fold the top raw edges of both the canvas and the lining inward by 1 inch. Pin heavily around the top rim and topstitch through all layers to seal the bag completely.
- Set the Hardware: Mark 8 evenly spaced points around the top rim, about 2 inches down from the edge. Use your setting tool to punch and secure the heavy Antique Brass grommets.
- The Drawstring Handle: Thread your thick cotton rope through the grommets. Knot the ends securely. This creates a highly functional closure that doubles as a heavy-duty carrying strap for laundry day.
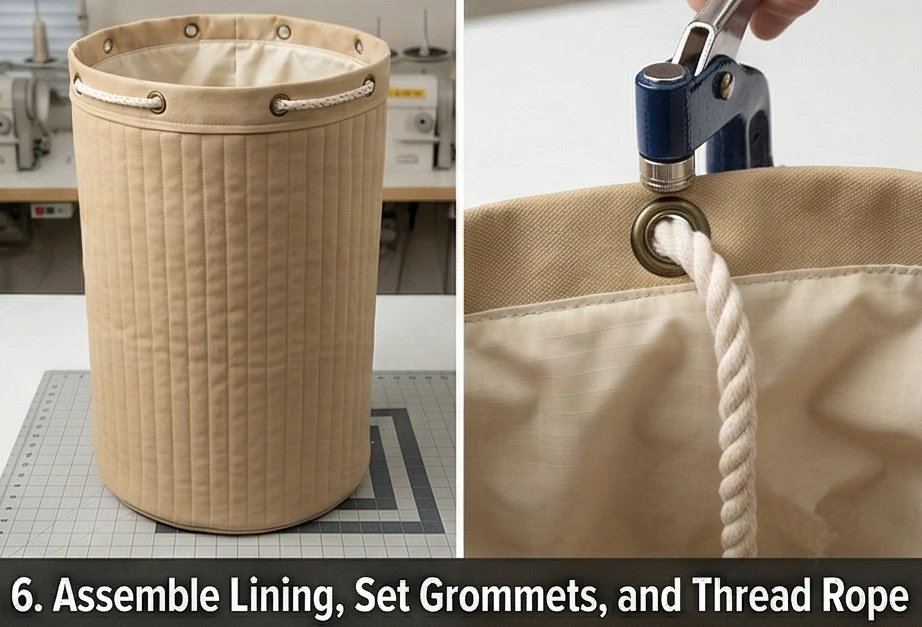
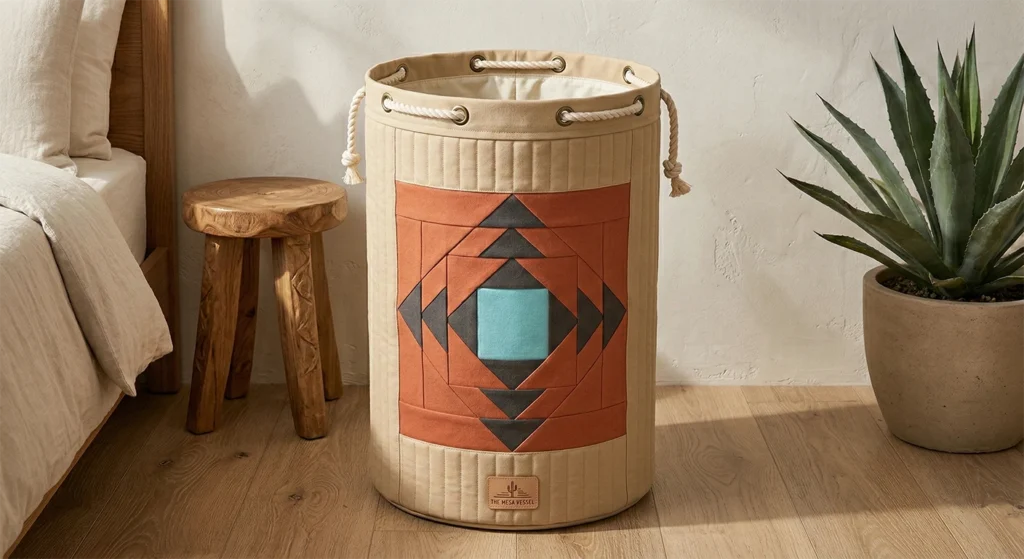
Usability Note: Never machine-wash a bag made of dense foam and a waterproof lining, as agitation can break down the structural integrity and the waterproof coating. To clean, simply wipe the waterproof interior out with a damp, soapy cloth, and spot-clean the heavy exterior canvas to keep the geometric motifs looking immaculate.
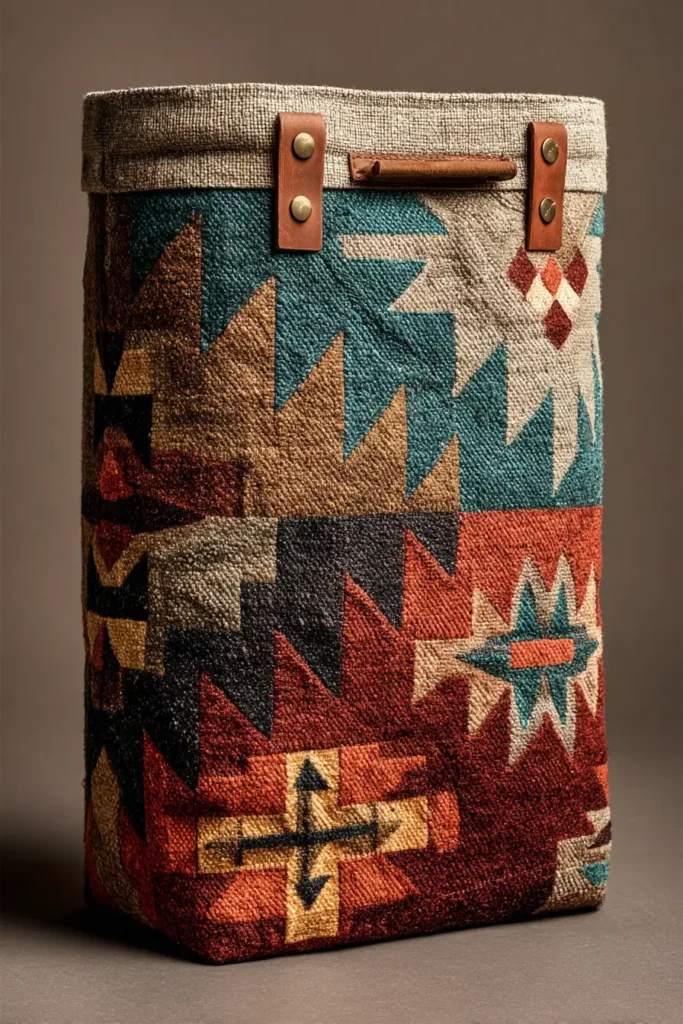
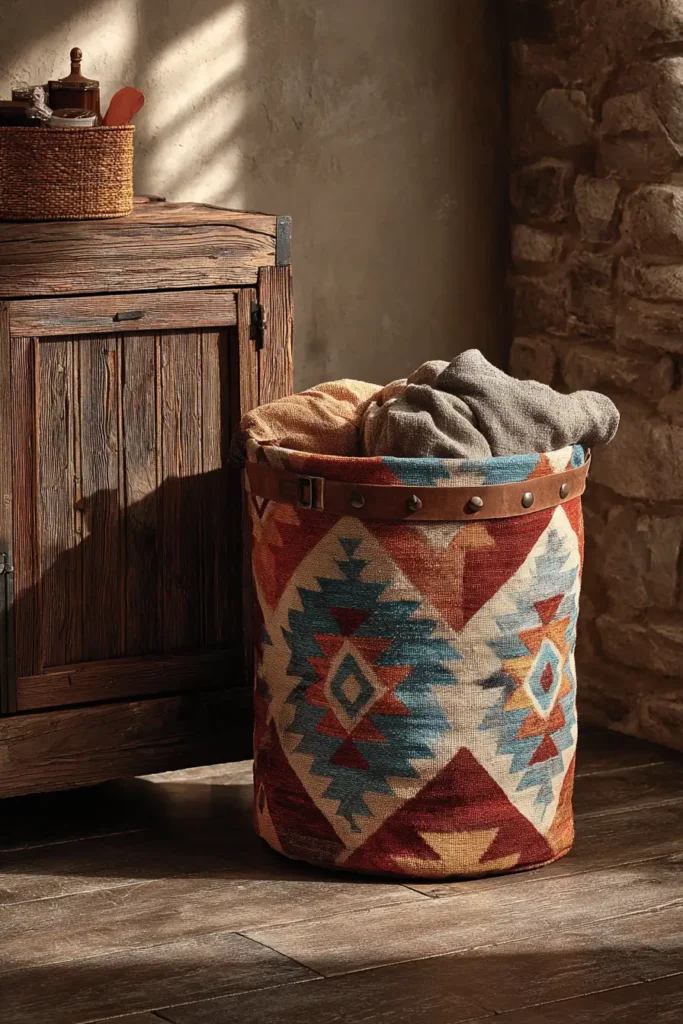

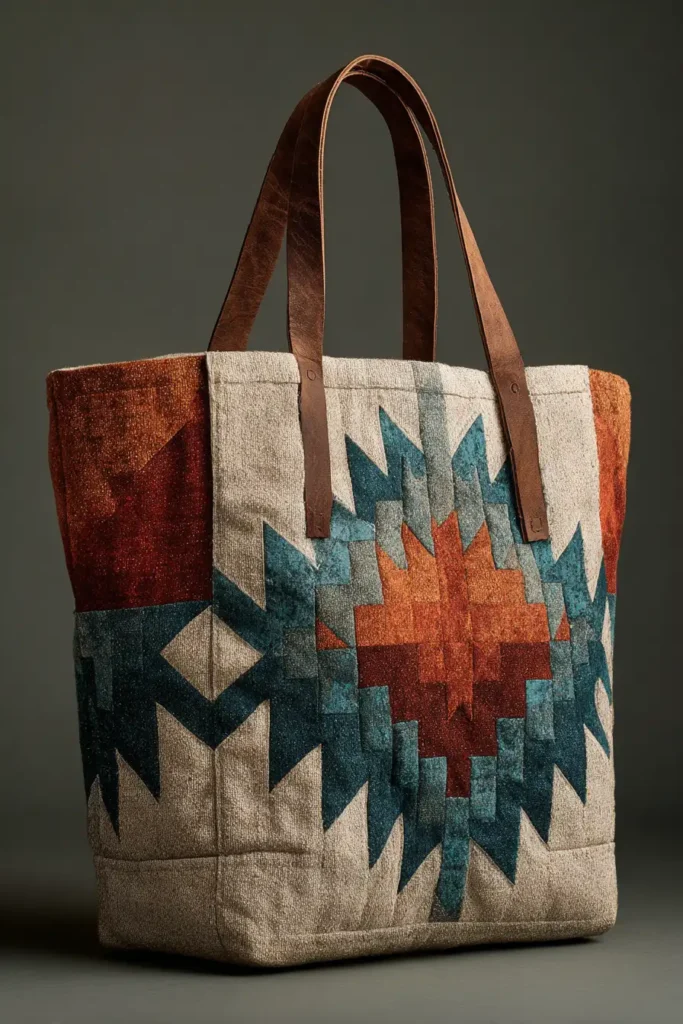
“The Canyonside” Heavy-Duty Market Bag
A trip to the farmer’s market or local artisan shop requires a vessel that is exceptionally durable, remarkably spacious, and comfortable enough to carry heavy loads without digging into your shoulder. “The Canyonside” elevates the utilitarian grocery bag into a piece of sophisticated, mobile architecture. Featuring a striking, Navajo-inspired stepped geometric medallion in Deep Rust, Faded Turquoise, and Charcoal set against a heavy Warm Sand Canvas, this market tote merges profound cultural aesthetics with rugged utility. Engineered with densely padded, wide-set straps and a wipeable, waterproof interior, this bag ensures that your weekly gathering is as elegant as it is effortless.
Finished Dimensions: Oversized Market Tote, 20″ wide x 15″ tall x 8″ deep (Featuring a wide, flat-bottomed base designed to carry produce, flowers, and heavy jars perfectly upright).
Materials Needed:
- The “Canyon” (Motifs): 1/8 yard each of solid Deep Rust, Faded Turquoise, and Charcoal cotton.
- The Body (Background & Base): 1.5 yards of heavy-duty Warm Sand Cotton Canvas.
- Why: Market bags are frequently set down on concrete sidewalks, damp grass, or market stall floors. Heavy canvas provides a rugged, scuff-proof exterior that holds its shape and provides a sleek, modern backdrop for the geometric star.
- Lining: 1.5 yards of Waterproof Canvas or Ripstop Nylon in a light neutral tone.
- Why: Fresh produce can bruise, and condensation from cold items will soak right through standard cotton linings. A waterproof interior lets you easily wipe the bag clean with a damp cloth after every market trip.
- Structural Interfacing: 1 yard of dense Foam Stabilizer (e.g., ByAnnie’s Soft and Stable).
- Strap Padding: A scrap of 100% Cotton Batting (about 5″ x 40″).
- Thread: 40wt heavy-duty cotton thread in Taupe.
- Notions: A small acrylic ruler, a rotary cutter, and heavy-duty sewing machine needles (Size 90/14 or 100/16).
Cultural Backstory: In Plains and Southwestern Native communities, gathering has always been a communal, highly respected activity. Historically, woven utility baskets and durable textiles were crafted with immense care to carry the harvest—whether piñon nuts, corn, or wild herbs. These vessels were rarely left plain; they were adorned with geometric patterns representing the landscape and the concept of a fruitful journey. Adorning a modern market tote with this geometry honors the ancestral tradition of gathering sustenance and returning home in balance and beauty.
Step 1: Scaling the Oversized Central Motif
A robust bag requires a bold, highly visible geometric anchor.
- The Central Core: Cut exactly one 4.5-inch square of solid Faded Turquoise for the heart of the diamond.
- The Stepped Edges: Cut exactly eight 3-inch squares of Deep Rust, eight 3-inch squares of Charcoal, and sixteen 3-inch squares of Warm Sand.
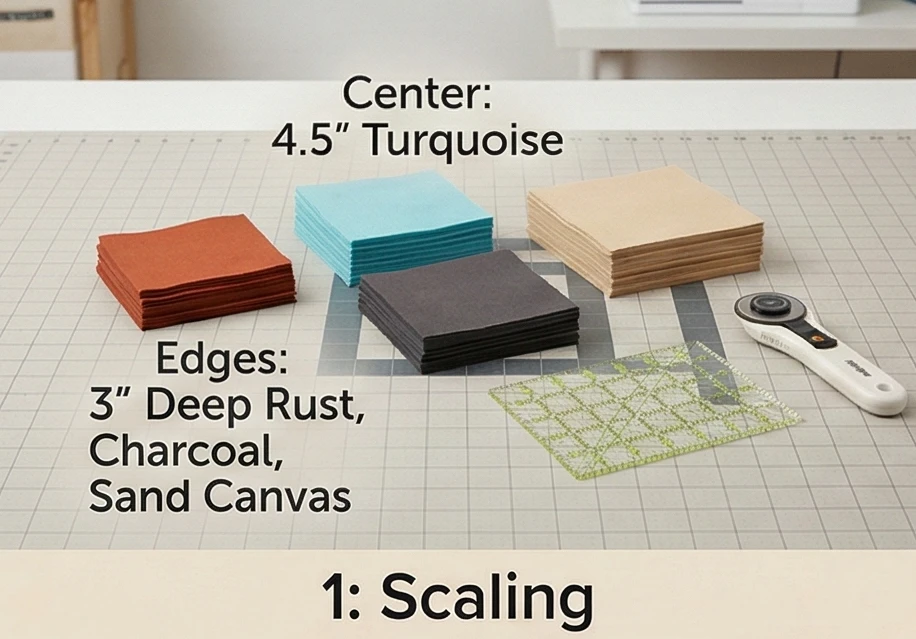
Step 2: Crafting the Stepped Terraces (HSTs)
Building the serrated borders of the desert diamond.
- The Rust Pairing: Place eight Warm Sand squares right-sides together with your eight Deep Rust squares. Draw a diagonal line across the back of the Sand squares. Sew exactly 1/4 inch away from the drawn line on both sides.
- The Charcoal Pairing: Repeat this exact process, pairing the remaining eight Warm Sand squares with the eight Charcoal squares.
- Trim to Perfection: Slice directly down the drawn lines, press the seams open to maintain a flat block, and trim every single Half-Square Triangle (HST) to exactly 2.5″ x 2.5″.
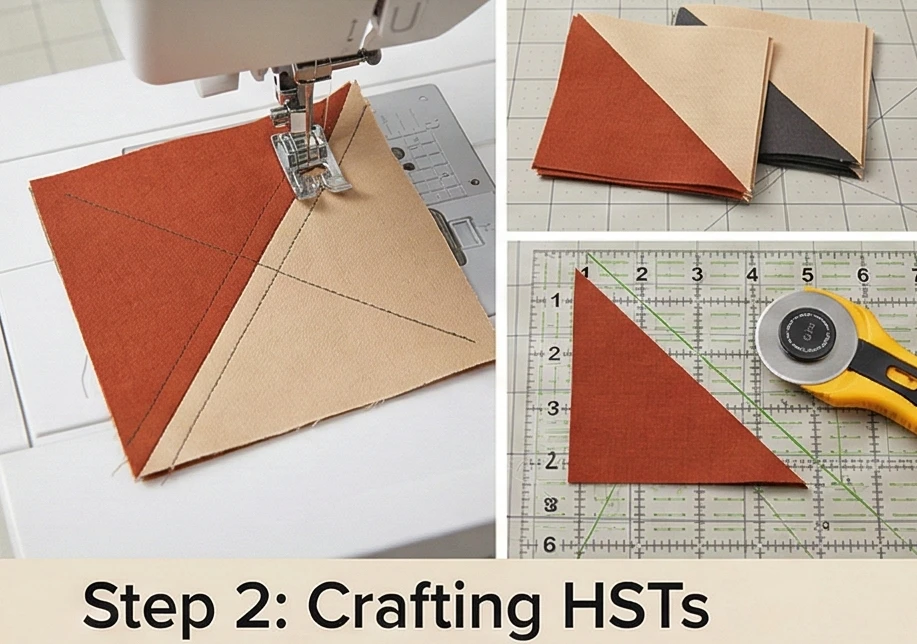
Step 3: Assembling the Canyonside Medallion
Nesting the points and building the canvas face.
- The Inner Ring: Surround the 4.5-inch Turquoise core with the Rust/Sand HSTs. Rotate the HSTs so the Rust points inward and the Warm Sand points outward. Sew into rows and attach to the center.
- The Outer Ring: Surround this unit with your Charcoal/Sand HSTs, pointing the dark color inward to create a striking stepped staircase effect.
- Square Up: The completed central geometric block will measure a flawless 8.5″ x 8.5″.
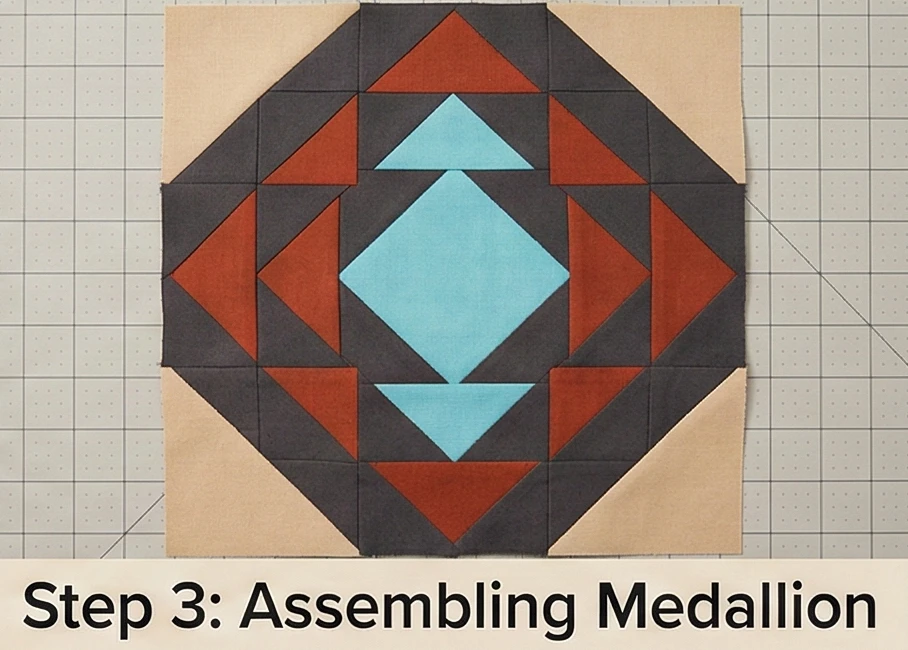
Step 4: Engineering the Heavy-Duty Canvas Shell
Embedding the geometry into the structured body.
- The Front Panel Framing: Cut two Warm Sand Canvas panels measuring 6.5″ wide by 8.5″ tall and sew them to the left and right sides of your medallion. Cut two more canvas panels measuring 20.5″ wide by 4.5″ tall and sew them to the top and bottom. The pieced front panel now measures exactly 20.5″ wide by 16.5″ tall.
- The Back Panel: Cut a matching solid Warm Sand Canvas rectangle measuring 20.5″ wide by 16.5″ tall for the back of the tote.
- The Foam Baste & Grid Quilting: Cut two 20.5″ x 16.5″ rectangles of foam stabilizer. Baste the front and back canvas panels to the foam. Using a walking foot, quilt a continuous 1.5-inch grid of straight horizontal and vertical lines across the Warm Sand canvas background, leaving the geometric motif unquilted. This fuses the canvas to the foam, creating a stiff, protective shell.
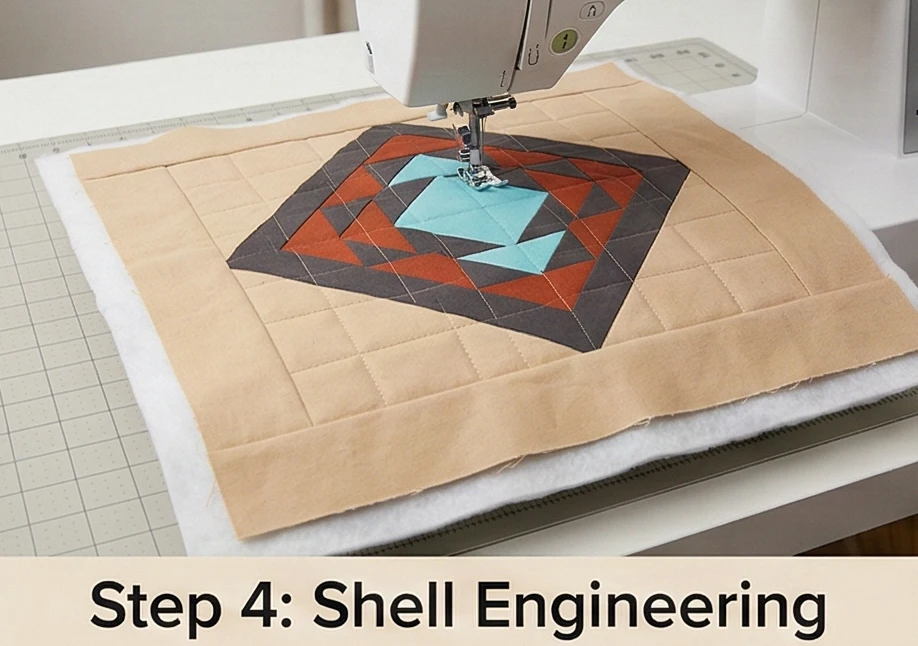
Step 5: Building the Comfort-Carry Straps
The most critical element for usability and market comfort.
- Cut the Straps: Cut two strips of Warm Sand Canvas measuring 5″ wide by 30″ long. Cut two strips of cotton batting measuring 2″ wide by 30″ long.
- The Padded Fold: Center the cotton batting down the middle of the wrong side of a canvas strip. Fold the long raw edges of the canvas in by 1/2 inch, then fold the entire strap in half lengthwise, fully encasing the batting. Pin heavily.
- Structural Topstitching: Topstitch 1/8 inch along both long edges of the strap. Then, sew three more parallel lines of stitching strictly down the center.
- Why: This dense, linear quilting compresses the cotton batting, creating a wide, heavily padded strap that will not dig into your shoulder or fold in half under the weight of heavy groceries and glass jars.
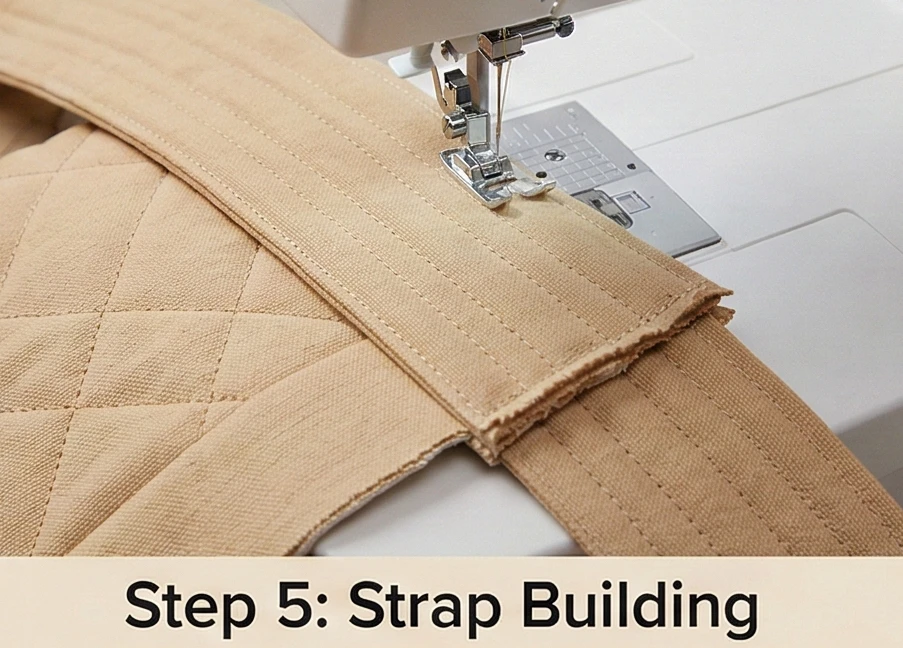
Step 6: Boxed Gussets and Waterproof Assembly
Building the deep, wipeable interior.
- Attach the Straps: Baste the raw ends of your padded straps to the top edge of your front and back quilted panels, placing them about 7 inches apart.
- Sew the Exterior: Place the quilted front and back panels right sides together. Sew along the left, bottom, and right edges with a heavy 1/2-inch seam allowance.
- The Massive 8-Inch Base: Keep the bag inside out. Flatten a bottom corner so the side seam meets the bottom seam. Measure exactly 4 inches down from the point, then draw a horizontal line (it should be exactly 8 inches long). Sew strictly on this line and trim the excess triangle. Repeat on the other corner to create a massive, deep bucket base.
- The Waterproof Lining: Repeat this exact assembly and boxing process with your Waterproof Canvas lining, leaving an 8-inch gap in the bottom seam.
- Final Join: Slip the canvas bag inside the lining bag (right-sides together). Sew around the top rim. Pull the bag right-side out through the lining gap, stitch the gap closed, and topstitch the top rim heavily to finalize the tote.
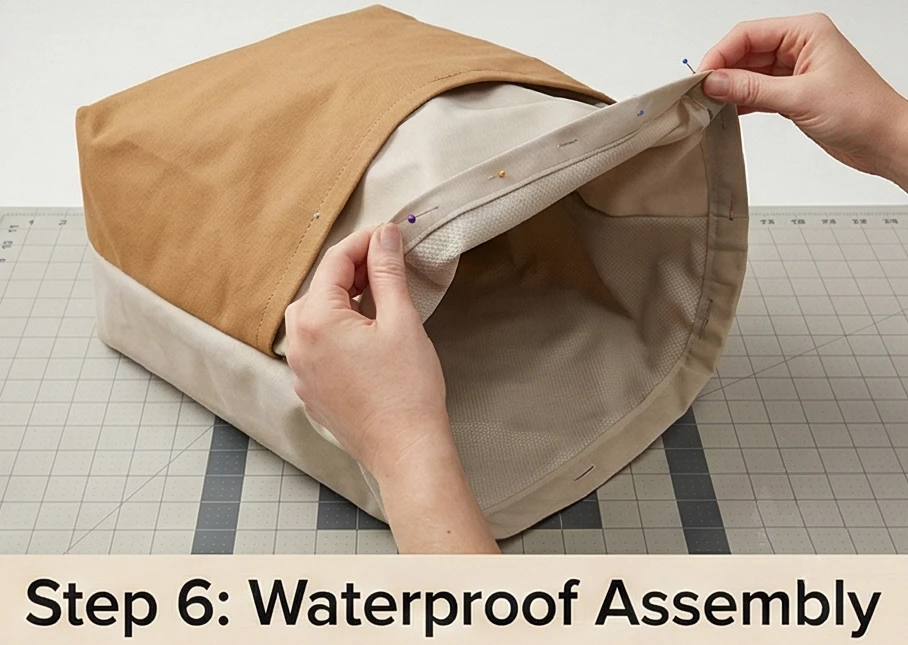
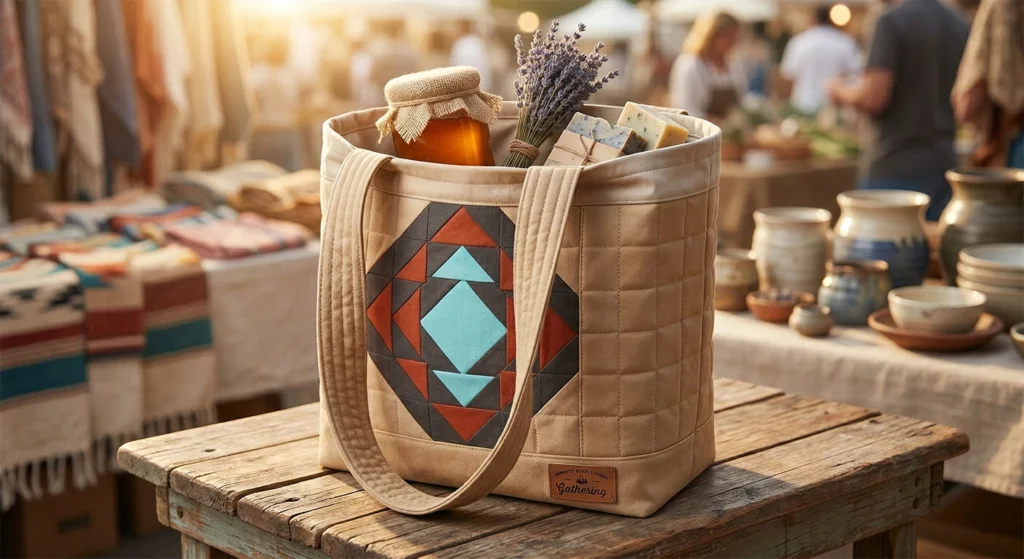
Usability Note: Never machine-wash a bag with a foam stabilizer and waterproof lining, as agitation can warp the foam and degrade the waterproof coating. To clean, simply wipe the waterproof interior out with a soapy sponge, and spot-clean the canvas exterior with a damp cloth.

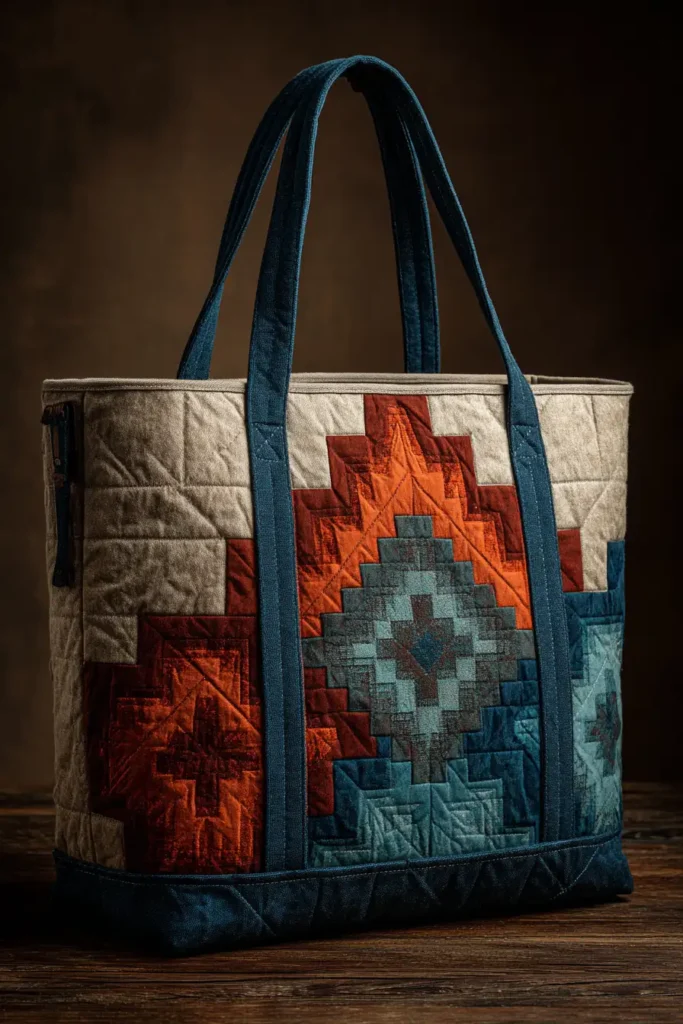

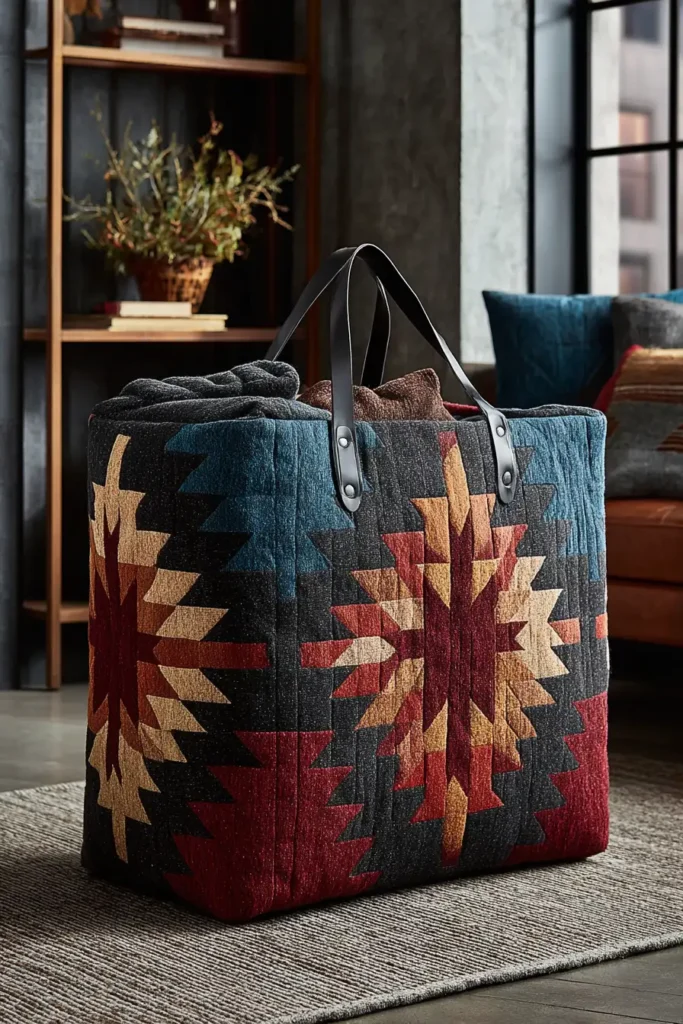
“The High Desert Hold” Heavy-Duty Storage Tote
A well-appointed home requires storage solutions that conceal daily clutter without introducing uninspired plastic bins or flimsy fabric cubes into your meticulously designed living space. “The High Desert Hold” transforms the concept of utility storage into a freestanding piece of architectural textile art. Featuring a striking, symmetrical Navajo-inspired stepped medallion rendered in Midnight Blue, Deep Terracotta, and Warm Sand, this piece is set against a rugged Charcoal Canvas body. Engineered with ultra-dense foam, a rigid stabilized base, and heavy leather strapping, this massive tote is designed to elegantly corral everything from heavy firewood and winter blankets to living room magazines, holding its crisp shape whether full or entirely empty.
Finished Dimensions: Large Freestanding Floor Bin, 16″ wide x 16″ tall x 12″ deep (A wide, highly stable rectangular footprint).
Materials Needed:
- The “Hold” (Geometric Motifs): 1/4 yard each of solid Midnight Blue, Deep Terracotta, and Warm Sand cotton.
- The Body (Background, Sides, & Base): 2 yards of heavy-duty Charcoal Cotton Canvas.
- Why: Floor storage bins are pushed, kicked, and dragged. Heavyweight canvas provides a rugged, scuff-resistant armor that naturally repels dust and pet hair, ensuring your storage remains looking pristine in high-traffic family rooms.
- Lining: 1.5 yards of heavy Natural Duck Canvas or Laminated Cotton.
- Why: A heavy lining adds another layer of structural rigidity. If storing items like firewood or potted plants, a laminated or treated interior makes it easy to wipe away debris and soil.
- Structural Interfacing: 1.5 yards of dense Foam Stabilizer (e.g., ByAnnie’s Soft and Stable) AND one 16″ x 12″ rectangle of Ultra-Firm Stabilizer (e.g., Peltex 71F).
- Handles: Two 18-inch lengths of thick Saddle Brown Leather Strapping.
- Hardware: Four heavy-duty Antique Brass Rivets.
- Thread: 40wt heavy-duty cotton thread in Charcoal.
- Notions: A square acrylic ruler, a fresh rotary blade, heavy-duty sewing machine needles (Size 100/16), and a rivet setting tool.
Cultural Backstory: In historical Diné (Navajo) and surrounding Southwestern cultures, creating vessels for storage—whether tightly coiled baskets or durable, woven wool bags—was an exercise in uniting absolute utility with profound beauty. These items were essential for storing harvested corn, piñon nuts, and spun wool, yet they were intricately designed with symmetrical geometry meant to reflect Hózhó (the concept of balance and harmony in the universe). Crafting a beautifully geometric, rugged storage bin for your home honors this ethos, ensuring that even the most functional objects contribute to the beauty and balance of your living space.
Step 1: Precision Scaling for the Storage Medallion
A 12.5-inch block perfectly anchors the 16-inch front panel.
- The Central Core: Cut exactly one 4.5-inch square of solid Midnight Blue for the striking center of your diamond.
- The Stepped Edges: Cut exactly eight 5-inch squares of Deep Terracotta, and eight 5-inch squares of Warm Sand. (Note: Cutting slightly larger 5-inch squares gives you room to trim the thick canvas to a perfect, flush measurement later.)
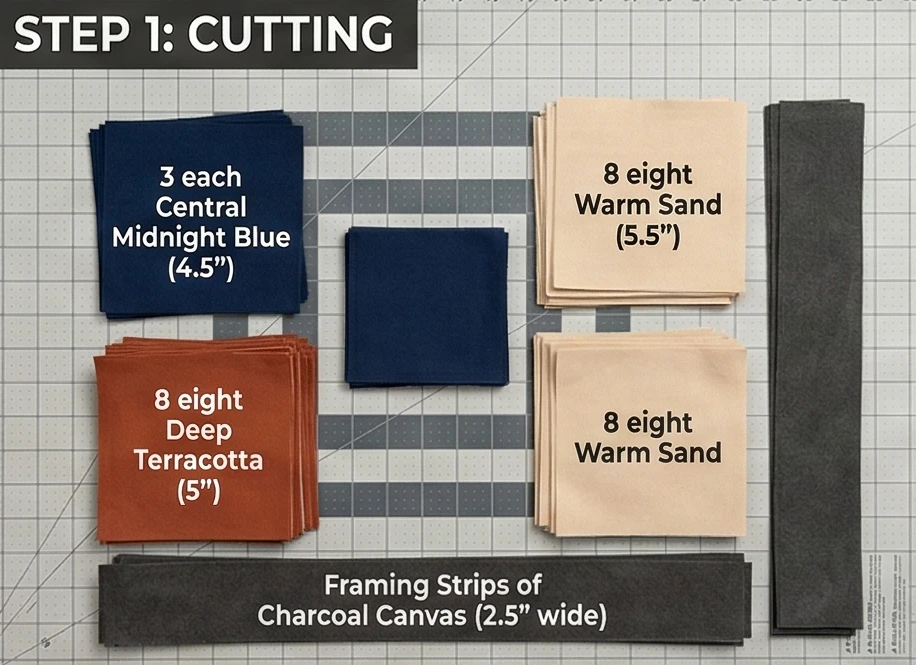
Step 2: Crafting the Heavy-Duty Terraces (HSTs)
Building the serrated borders of the motif.
- The Terracotta Pairing: Place your eight Warm Sand squares right sides together with your eight Deep Terracotta squares. Draw a diagonal line across the back of the Sand squares.
- The Stitch and Trim: Sew exactly 1/4 inch away from the drawn line on both sides. Slice directly down the drawn lines to separate the halves. Press the seams completely open to reduce bulk.
- Square Up: Trim every single Half-Square Triangle (HST) to exactly 4.5″ x 4.5″. You will yield 16 perfect, oversized HSTs.
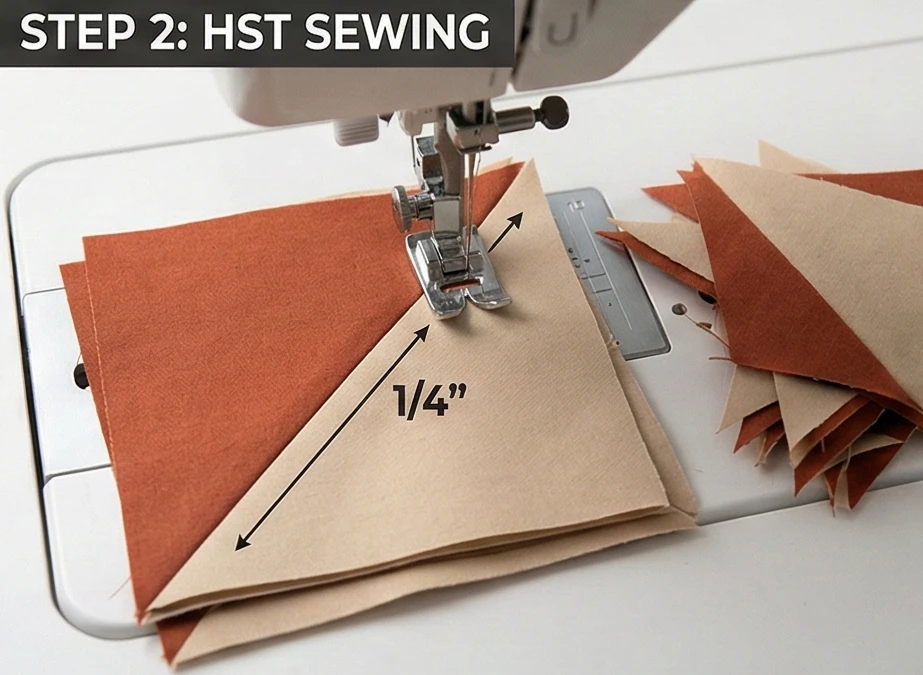
Step 3: Assembling the Central Medallion
Constructing the durable geometric focal point.
- The Diamond Architecture: Take your 4.5-inch Midnight Blue core. Surround it with a ring of your Terracotta/Sand HSTs. Rotate the HSTs so the Terracotta triangles point inward and the Warm Sand points outward, creating the stepped staircase effect.
- The Corner Anchors: Cut four 4.5-inch squares of Warm Sand and sew them into the four corners of your ring to square off the block.
- The Final Block: Sew the units together in rows. The completed central geometric block will measure exactly 12.5″ x 12.5″.
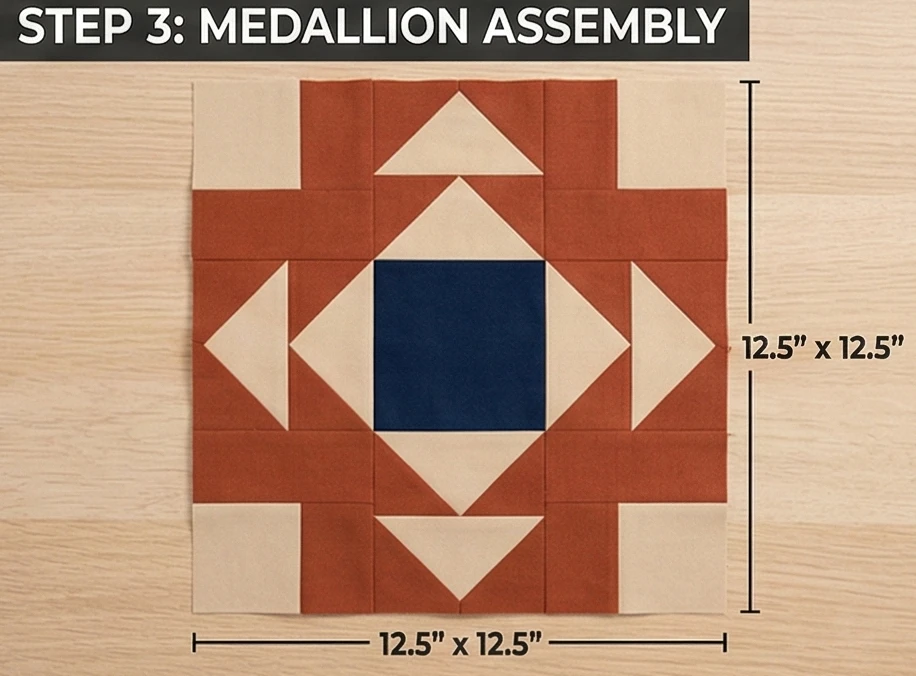
Step 4: Engineering the Structured Canvas Walls
Framing the medallion and building the 3D panels.
- The Front Motif Panel: From your Charcoal Canvas, cut two 2.5″ x 12.5″ strips and sew them to the left and right sides of your medallion. Cut two strips, 16.5″ wide by 2.5″ tall, and sew them to the top and bottom. The pieced front panel now measures exactly 16.5″ wide by 16.5″ tall.
- The Remaining Walls & Base: Cut one 16.5″ x 16.5″ Charcoal Canvas square (Back Panel). Cut two 12.5″ x 16.5″ Charcoal Canvas rectangles (Side Panels). Cut one 16.5″ x 12.5″ Charcoal Canvas rectangle (Base Panel).
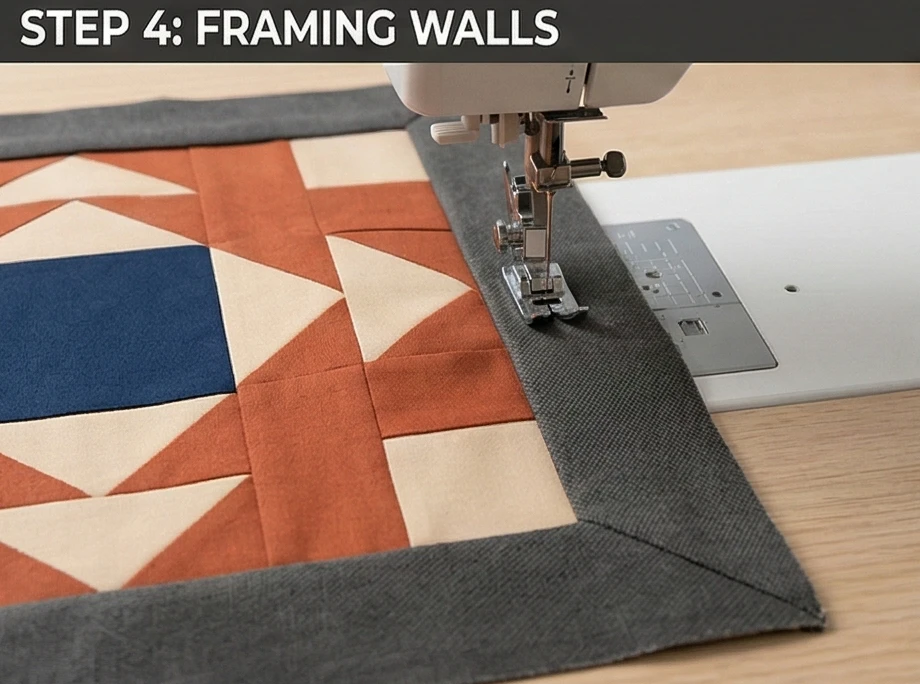
Step 5: Foam Integration and Architectural Grid Quilting
Giving the bin its free-standing, rigid architecture.
- The Foam Baste: Cut pieces of your dense foam stabilizer to perfectly match your five canvas panels (Front, Back, two Sides, and Base). Baste the canvas to the foam panels.
- “Warp and Weft” Grid Quilting: Using a walking foot, quilt a heavy, continuous 1.5-inch grid across the Charcoal Canvas panels. Leave the Midnight Blue and Terracotta geometric motif entirely unquilted. This dense grid quilting structurally fuses the heavy canvas to the thick foam, resulting in walls that stand rigidly upright on their own.
- The Rigid Floor: Take your quilted Base Panel and fuse your ultra-firm Peltex 71F stabilizer directly to the foam side. This ensures the floor of the bin remains a perfectly flat, hard rectangle, preventing the bin from sagging when lifted.
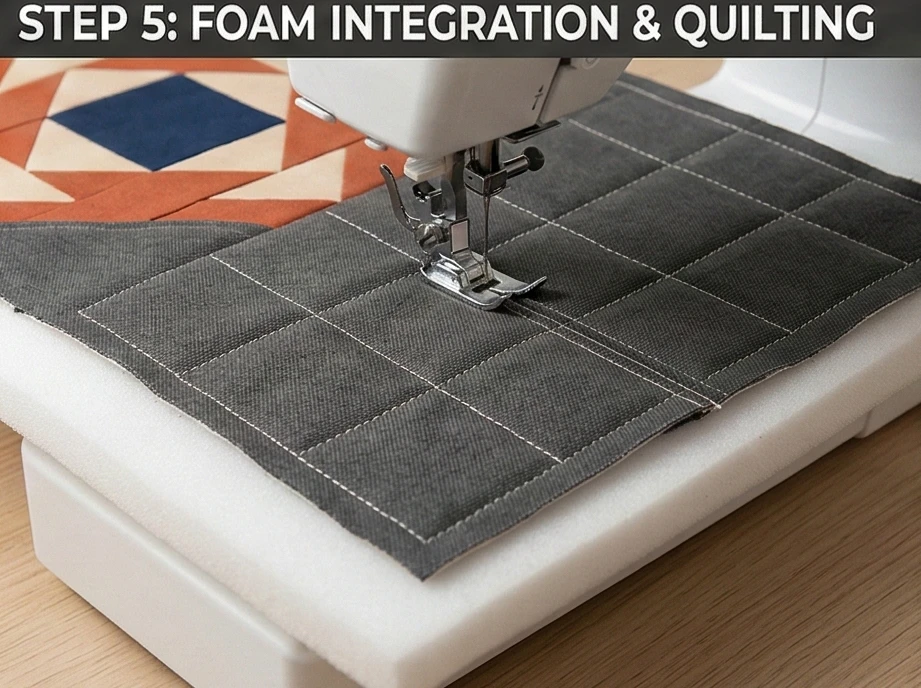
Step 6: 3D Assembly, Lining, and Hardware
Transforming the flat walls into an elegant vessel.
- Sew the Exterior Shell: Place the Front Panel and a Side Panel right sides together, then sew the 16.5-inch vertical seam with a heavy 1/2-inch seam allowance. Continue joining the walls until you have a square tube. Finally, drop the Base Panel in, pin it to the bottom edges of the four walls, and sew around the rectangular perimeter.
- The Drop-In Lining: Repeat the exact 3D assembly process using your heavy Natural Duck Canvas lining, but leave a 6-inch gap in one side seam.
- The Rim and Turn: Drop the assembled exterior shell inside the lining (right sides together). Sew entirely around the top 16×12 rectangular rim. Pull the heavy exterior shell right-side out through the gap in the lining. Stitch the lining gap closed and push the lining down into the bin.
- Hardware Installation: Topstitch 1/4 inch around the top rim to secure the layers. Position your Saddle Brown leather handles perfectly centered on the Side Panels, about 1.5 inches down from the rim. Punch holes through all layers and set the heavy Antique Brass rivets to permanently lock the handles in place.
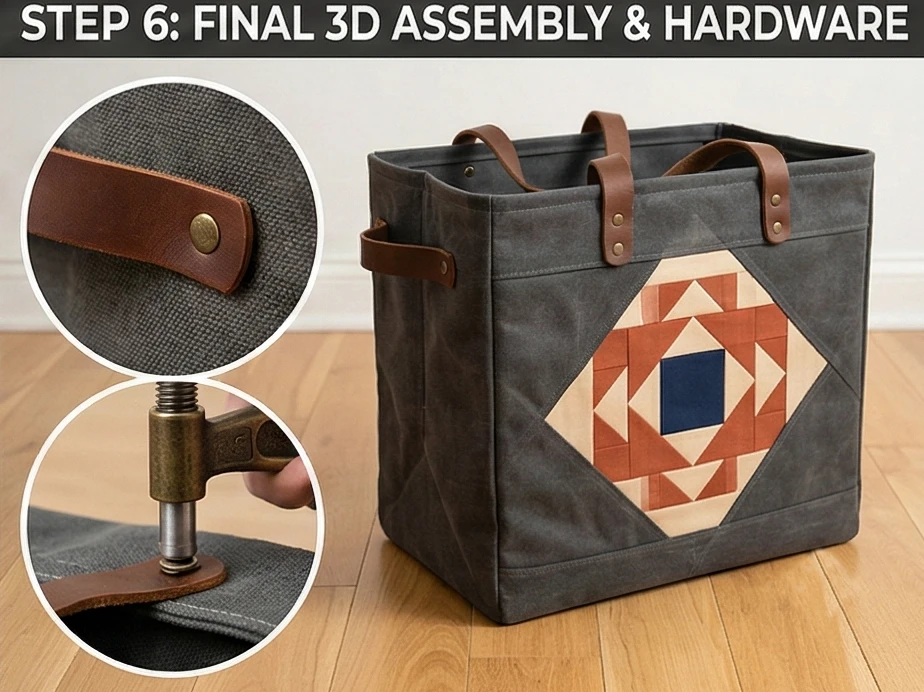
Usability Note: This structured storage bin is not machine washable due to the rigid base stabilizer and leather handles. To maintain its pristine appearance, vacuum the interior to remove dust, and spot-clean the heavy canvas exterior with a damp cloth and upholstery cleaner.
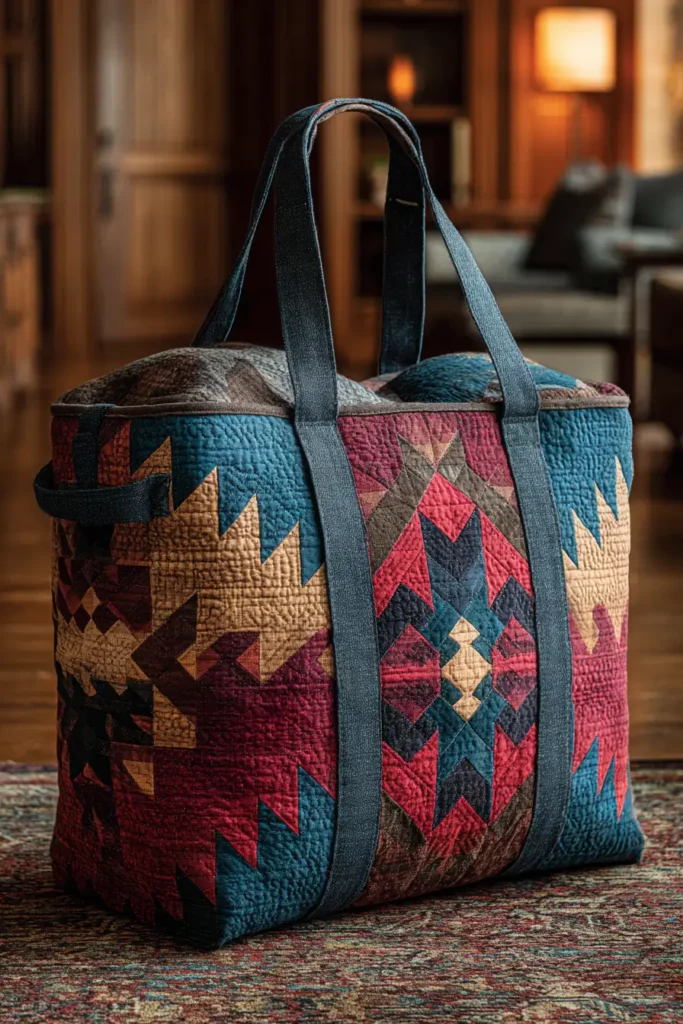
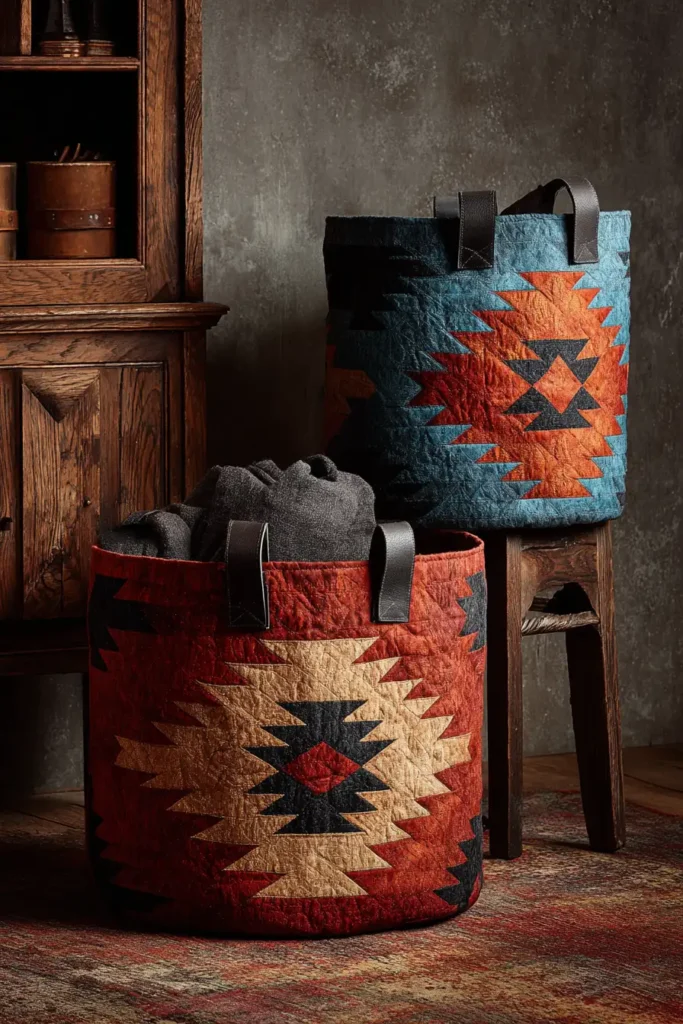
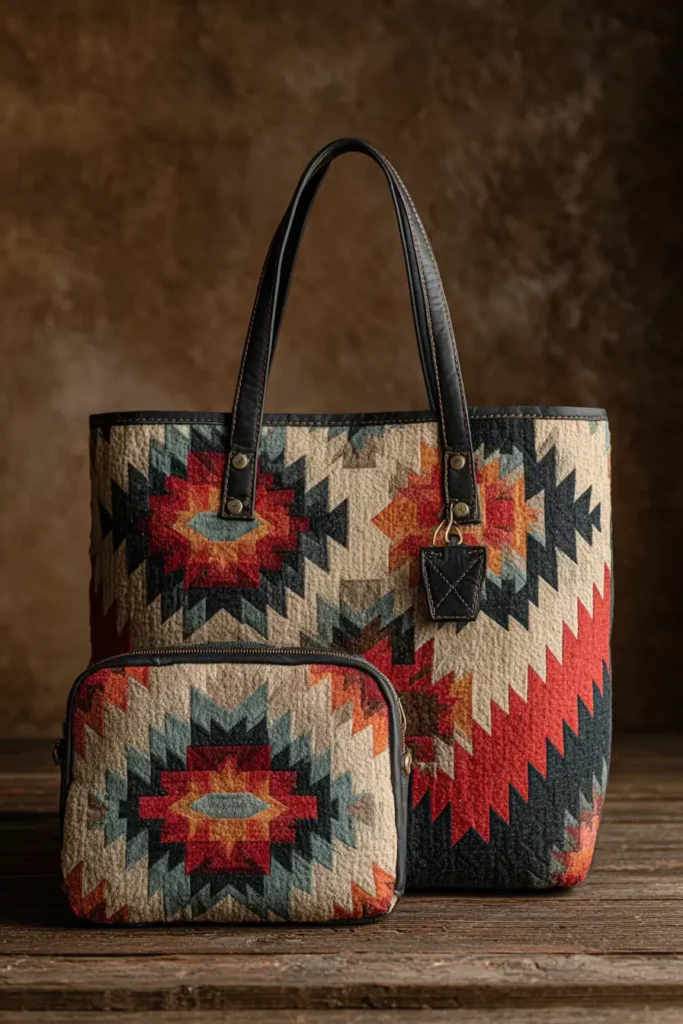
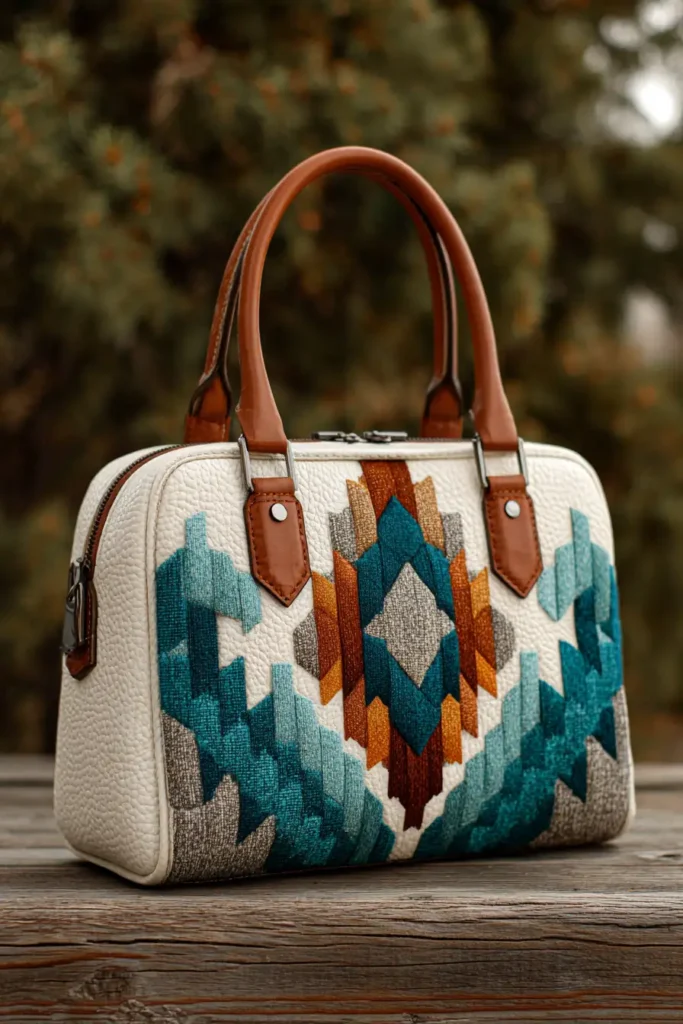
“The Arroyo Edge” Sophisticated Desert Motif Handbag
While oversized totes are excellent for market days and travel, a daily handbag requires a more refined, tailored silhouette. “The Arroyo Edge” scales the powerful geometry of Diné (Navajo) weaving into a sleek, sophisticated crossbody bag. Featuring an intricate, miniaturized stepped diamond in Vibrant Turquoise, Oxidized Silver (Grey), and Deep Onyx, set against a structured Cream Canvas, this handbag is a statement piece. Engineered with dense foam stabilization, a recessed zipper closure, and premium leather accents, it offers the perfect balance of cultural artistry, elegant structure, and everyday security.
Finished Dimensions: Medium Daily Handbag, 12″ wide x 10″ tall x 4″ deep (Proportioned to elegantly hold a wallet, phone, keys, and daily essentials without bulk).
Materials Needed:
- The “Motif” (The Diamond): 1/8 yard each of solid Vibrant Turquoise, Oxidized Silver, and Deep Onyx cotton.
- The Body (Background & Base): 1 yard of heavy-duty Cream Cotton Canvas.
- Why: A daily handbag is constantly handled. Canvas provides a crisp, high-end look while offering the necessary abrasion resistance to prevent the bag from wearing out against your hip.
- Lining: 1 yard of Satin or Water-Resistant Ripstop in Deep Onyx.
- Why: A dark lining hides ink marks or makeup smudges, and a slick material like satin or ripstop allows you to easily slide items in and out.
- Structural Interfacing: 1/2 yard of dense Foam Stabilizer (e.g., ByAnnie’s Soft and Stable) and a 12″ x 4″ strip of Ultra-Firm Stabilizer (e.g., Peltex) for the base.
- Hardware: One 12-inch Handbag Zipper (with metal teeth), two Antique Brass D-Rings, and one adjustable Black Leather Crossbody Strap.
- Thread: 40wt heavy-duty cotton thread in Cream.
- Notions: A small acrylic ruler, a rotary cutter with a micro-blade, and heavy-duty sewing machine needles (Size 90/14).
Cultural Backstory: In Navajo culture, turquoise (Dootł’izhii) is far more than a beautiful stone; it is a sacred element representing the sky, water, and protection. Historically, it was paired with masterful silverwork to create wearable art that carried profound personal meaning and status. Integrating a “turquoise and silver” color palette into the woven geometry of a personal handbag is a modern nod to this silversmithing heritage, carrying the protective and balancing energy of the stone into your daily life.
Step 1: Micro-Scaling the Centerpiece
A 12-inch handbag requires a flawlessly precise, 6.5-inch focal point.
- The Turquoise Core: Cut exactly one 2.5-inch square of solid Vibrant Turquoise for the heart of the medallion.
- The Stepped Edges: Cut exactly eight 2.5-inch squares of Oxidized Silver, eight 2.5-inch squares of Deep Onyx, and sixteen 2.5-inch squares of Cream Canvas.
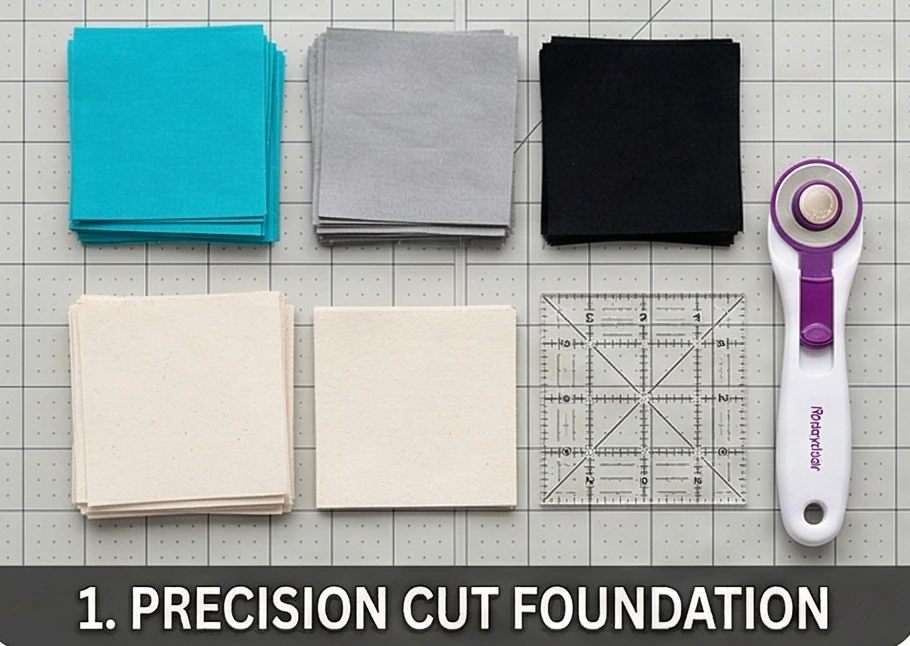
Step 2: Crafting the Miniature Terraces (HSTs)
Building the tiny, serrated borders.
- The Silver Pairing: Place your eight Cream Canvas squares right sides together with your eight Oxidized Silver squares. Draw a diagonal line across the back of the Canvas squares.
- The Stitch and Trim: Sew exactly 1/4 inch away from the drawn line on both sides. Slice down the drawn lines. Press the seams completely open to reduce bulk (crucial for tiny blocks).
- Square Up: Trim every single Half-Square Triangle (HST) to exactly 2″ x 2″. Repeat this exact process for the Deep Onyx squares to yield your outer ring.
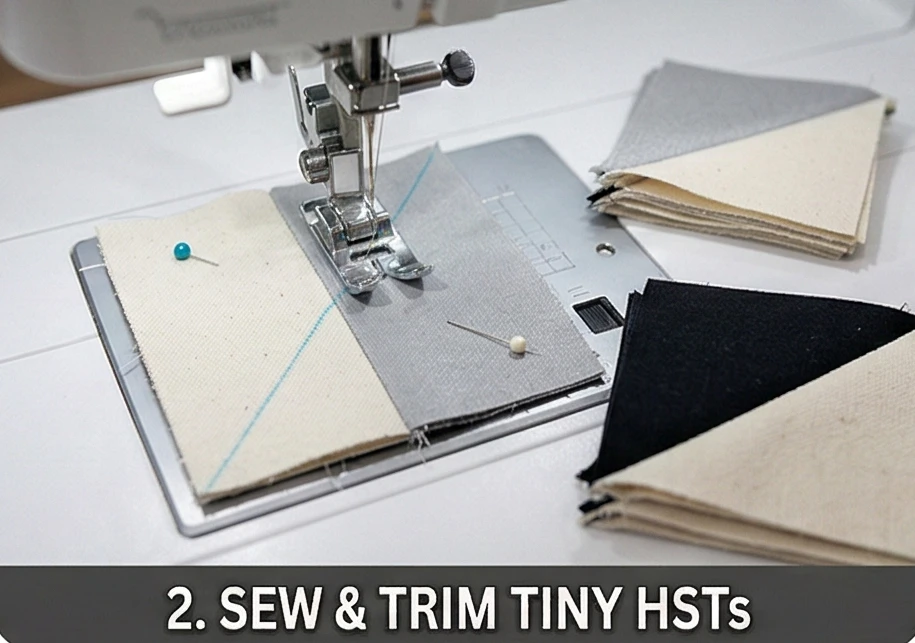
Step 3: Assembling the Handbag Medallion
Constructing the intricate desert diamond.
- The Inner Ring: Surround the 2.5-inch Turquoise core with the Silver/Cream HSTs. Rotate the HSTs so the Silver triangles point inward, and the Cream triangles point outward.
- The Outer Ring: Surround this unit with your Onyx/Cream HSTs, pointing the dark Onyx inward.
- The Final Block: Carefully nest the tiny seams and sew the rows together. The completed central geometric block will measure exactly 6.5″ x 6.5″.
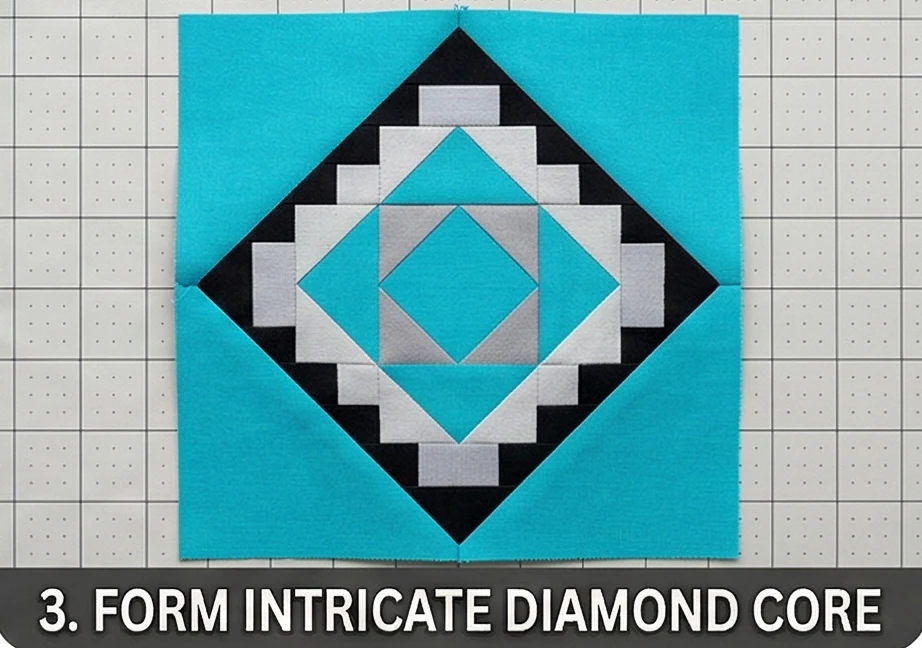
Step 4: Engineering the Structured Canvas Walls
Framing the medallion for the handbag shell.
- The Front Panel: From your Cream Canvas, cut two 3.25″ x 6.5″ strips and sew them to the sides of your medallion. Cut two strips, 12.5″ wide by 2.25″ tall, and sew them to the top and bottom. The pieced front panel now measures exactly 12.5″ wide by 10.5″ tall.
- The Back Panel: Cut a matching solid Cream Canvas rectangle measuring 12.5″ wide by 10.5″ tall for the back of the purse.
- Foam Basting and Quilting: Cut two pieces of foam stabilizer to perfectly match your front and back panels. Baste the canvas to the foam. Using a walking foot, quilt sleek, vertical lines spaced 1/2-inch apart across the Cream Canvas background, leaving the intricate geometric motif completely unquilted.
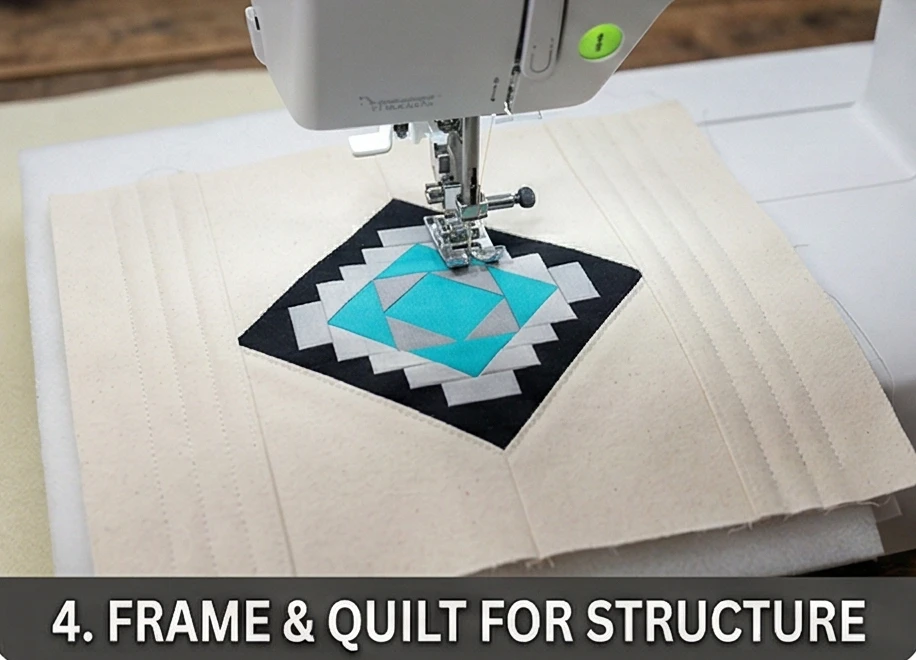
Step 5: Hardware Prep and 3D Assembly
Transforming the flat panels into a sophisticated vessel.
- The D-Ring Tabs: Cut two 2″ x 4″ strips of Deep Onyx cotton. Fold the long edges in, press, and topstitch to create 1-inch-wide straps. Slide your Antique Brass D-Rings onto these tabs, fold them in half, and baste them to the top edge of your side seams.
- Sew the Shell: Place the quilted Front and Back panels right sides together. Sew down the left, bottom, and right edges using a 1/2-inch seam.
- Box the Gusset: Flatten the bottom corners so the side seam aligns with the bottom seam. Measure exactly 2 inches down from the point, draw a 4-inch horizontal line, and sew across it. Trim the excess. This creates the sleek, flat 4-inch base. Fuse your ultra-firm Peltex strip to the inside bottom for extra rigidity.
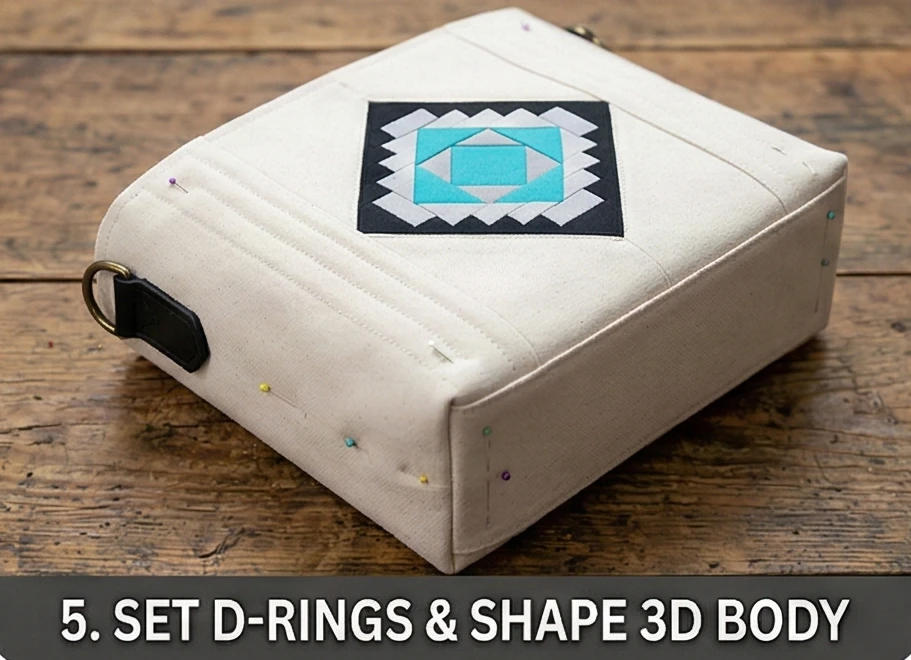
Step 6: Recessed Zipper and Final Topstitching
Adding high-end security to the handbag.
- The Zipper Panels: Cut two 11″ x 2″ strips of Cream Canvas. Fold the short ends in and press. Sandwich your metal zipper tape between these strips and topstitch. This creates a professional, “floating” recessed zipper closure.
- The Drop-In Lining: Repeat the 3D boxing process (Step 5) with your Deep Onyx lining, leaving a 5-inch gap in the bottom seam. Baste the recessed zipper panel to the top raw edge of the lining.
- The Final Turn: Drop the assembled exterior shell inside the lining (right sides together). Sew entirely around the top circular rim. Pull the heavy exterior shell right-side out through the gap in the lining. Stitch the lining gap closed.
- The Finish: Push the lining down into the bag. Topstitch 1/8 inch around the absolute top edge to secure the layers. Clip your leather crossbody strap to the D-rings.
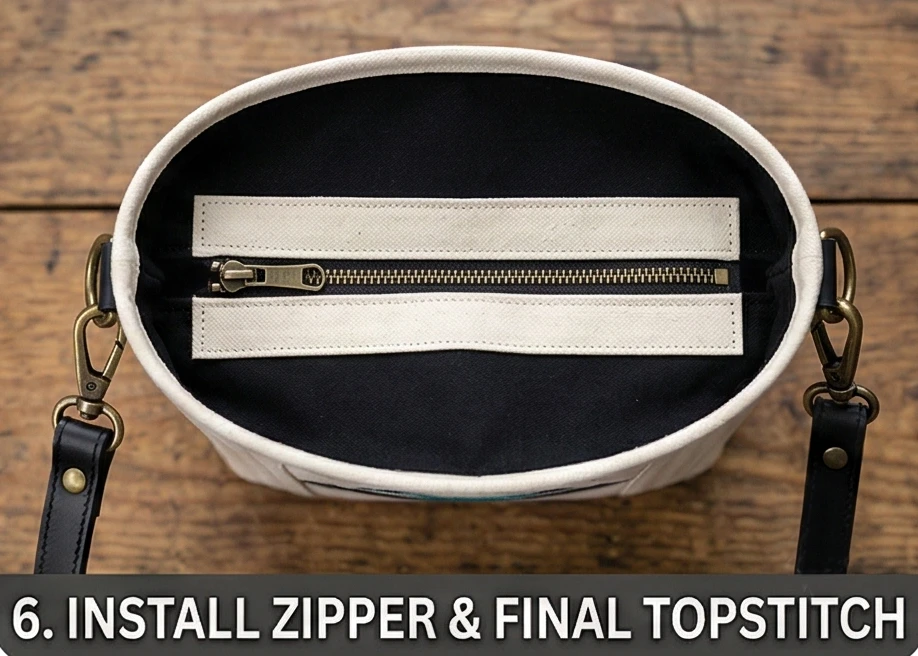
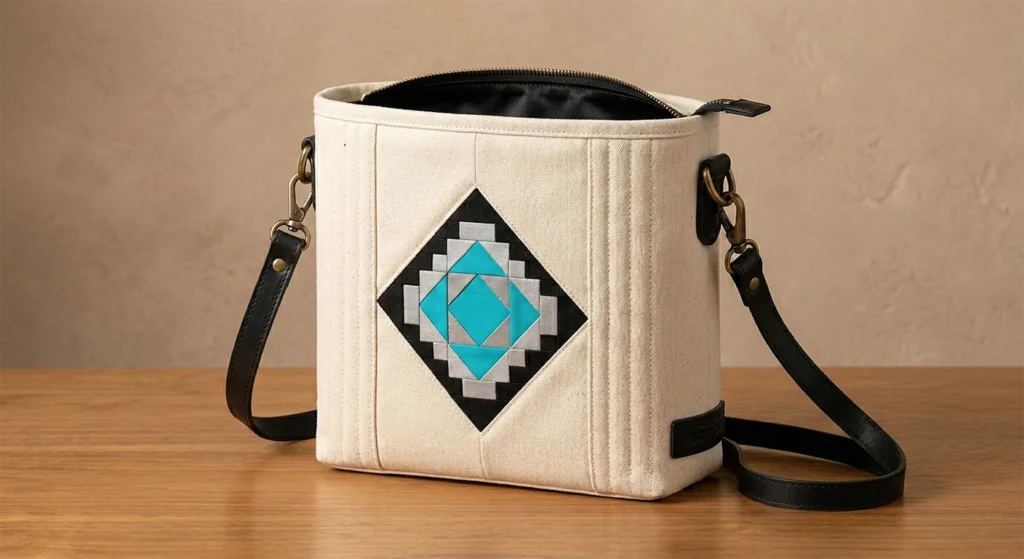
Usability Note: Because of the metal hardware and leather strap, this bag should not be machine-washed. To maintain the crisp Cream Canvas, pre-treat the exterior with a high-quality fabric protector spray (like Scotchgard) before your first use, and spot-clean any dirt with a gentle upholstery wipe.
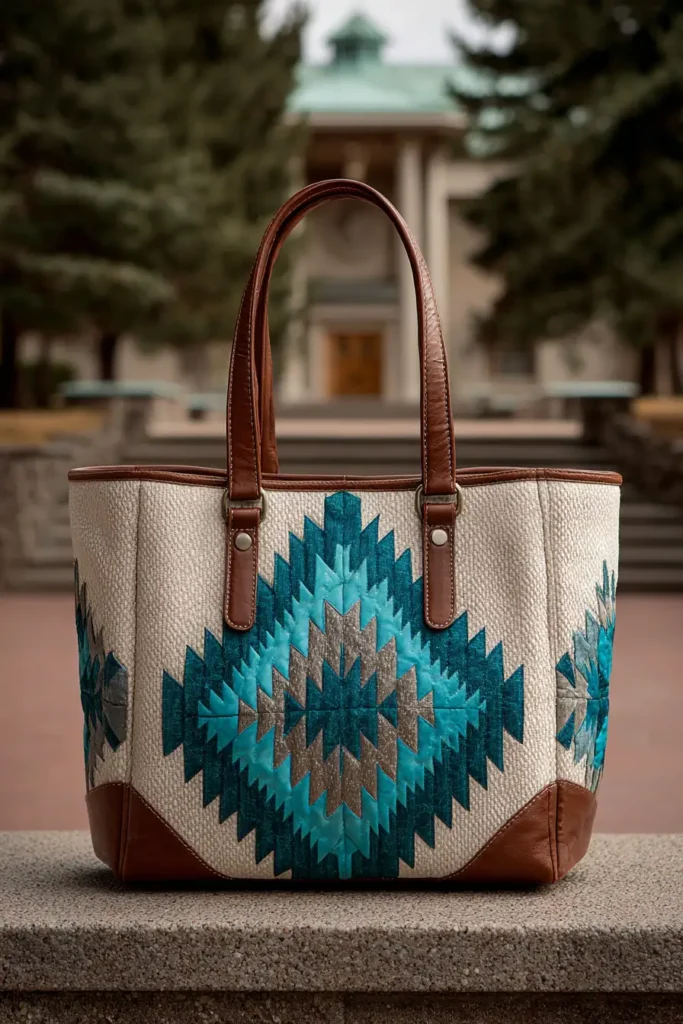
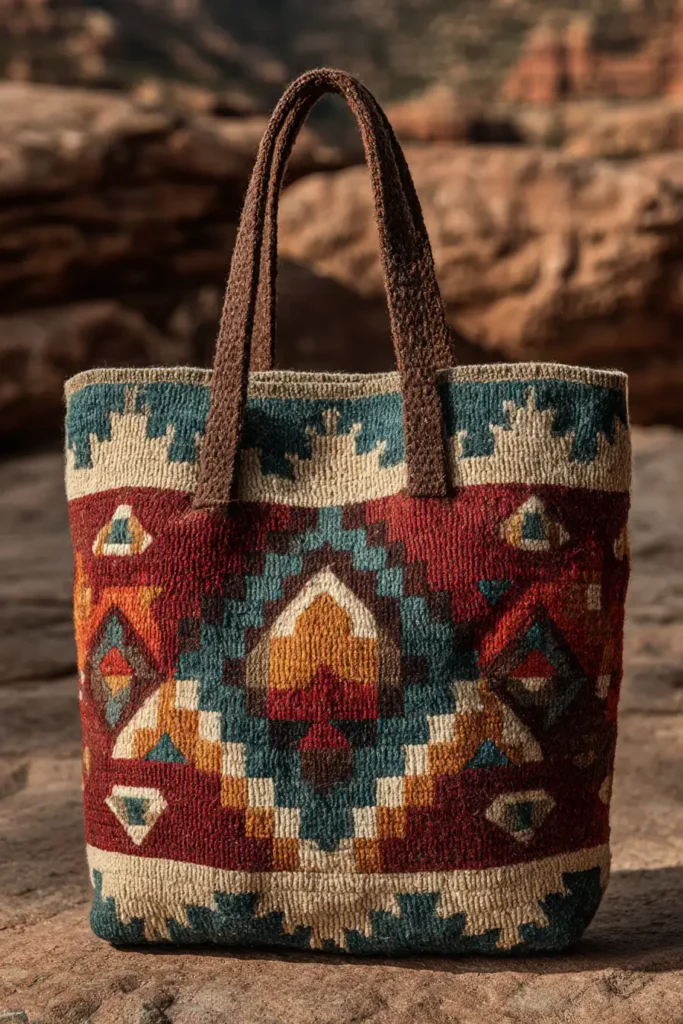
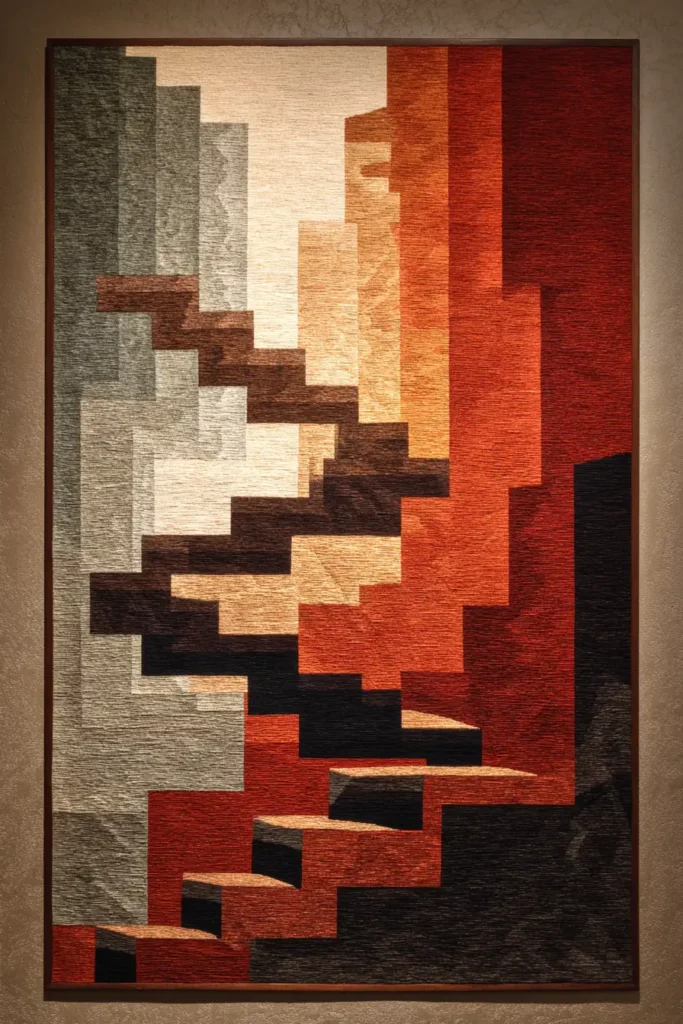
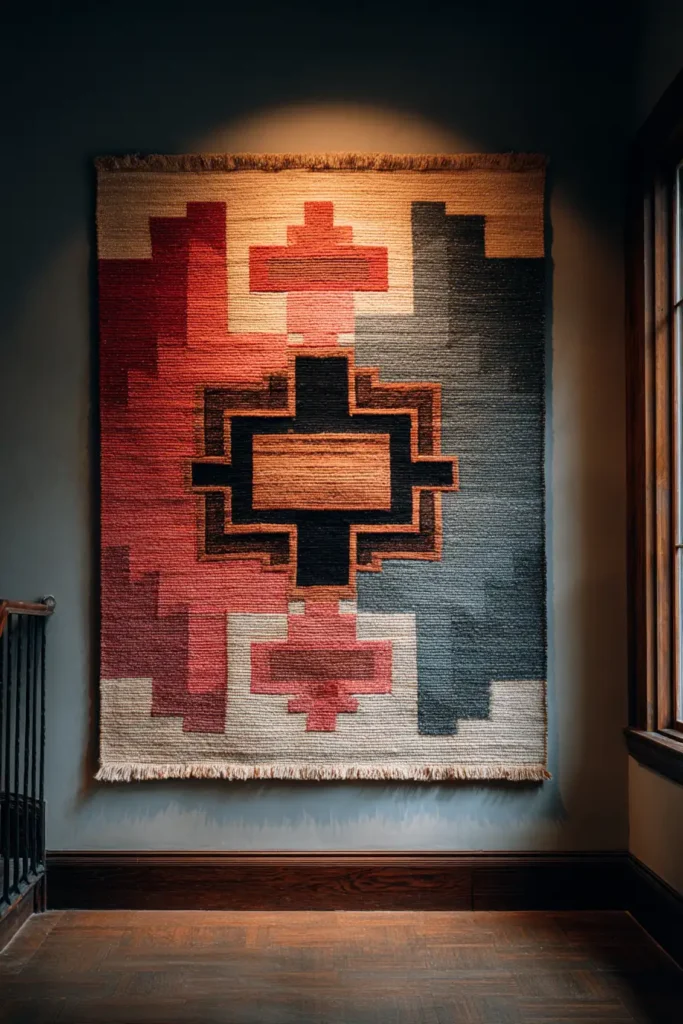
“The Canyon Wall” Acoustic Tapestry
A vast, blank wall in a grand entryway, dining room, or stairwell often makes a home feel cold and echoing. While traditional framed art is beautiful, introducing a monumental textile tapestry instantly transforms both the visual warmth and the acoustics of a room. “The Canyon Wall” scales the towering vertical geometry of classic Navajo weaving into a breathtaking framed gallery art piece. Featuring three imposing, stepped geometric columns in Canyon Red, Faded Sage, and Deep Onyx set against a vast Warm Sand background, this tapestry acts as a profound focal point. By utilizing dense wool batting, this piece goes beyond mere aesthetics to function as a high-end acoustic dampening panel, grounding the entire space in cultural elegance and serene quiet.
Finished Dimensions: Grand Wall Tapestry, 48″ wide x 72″ tall (Designed to command a large vertical expanse).
Materials Needed:
- The “Columns” (Motifs): 1.5 yards of Deep Onyx, 1 yard of Canyon Red, and 3/4 yard of Faded Sage solid cotton.
- The “Desert” (Background): 3 yards of solid Warm Sand cotton.
- Backing: 3.5 yards of sturdy Warm Sand Canvas or Cotton Twill.
- Why: A wall hanging of this magnitude will sag and distort if backed with standard, lightweight quilting cotton. Canvas or twill provides a highly structured, heavy foundation that ensures the tapestry hangs perfectly plumb and flat against the drywall for decades.
- Batting:100% Wool Batting (or a double layer of dense cotton).
- Why: Elegance must serve a purpose. Large, hard-surfaced rooms suffer from severe echoing. Wool batting is exceptionally dense and fibrous, acting as a natural acoustic dampener. It absorbs ambient sound waves beautifully while remaining light enough to hang securely.
- The Mounting: 1 yard of fabric for the hanging sleeve, plus a heavy-duty wooden or metal gallery rod (at least 52″ long).
- Thread: 50wt cotton thread in an invisible Taupe.
- Notions: A large acrylic ruler, a rotary cutter, and a heavy tailor’s clapper for pressing flat seams.
Cultural Backstory: In historical Diné (Navajo) architecture, the interior walls and doorways of a hogan were often lined with large woven textiles known as “dew cloths” or door covers. These were not just decorative; they were essential for managing drafts and softening the acoustics of the dwelling. They were masterfully woven with geometric designs—often featuring vertical, cascading elements representing falling rain or canyon walls. Hanging a massive, quilted homage to these textiles on a modern wall honors this ancient tradition, transforming a functional acoustic insulator into a magnificent canvas of storytelling.
Step 1: Scaling the Monumental Columns
A 72-inch tall tapestry requires large, impactful building blocks.
- The Solid Cores: Cut exactly thirty-six 6.5-inch squares of Deep Onyx. These form the dark, grounding center line of your three towering columns.
- The Stepped Edges: Cut exactly thirty-six 4-inch squares of Canyon Red, thirty-six 4-inch squares of Faded Sage, and seventy-two 4-inch squares of Warm Sand.
Step 2: Crafting the “Falling Rain” Terraces (HSTs)
Building the serrated, woven-style borders for the columns.
- The Red Pairing: Place thirty-six Warm Sand squares right-sides together with your thirty-six Canyon Red squares. Draw a diagonal line across the back of the Sand squares. Sew exactly 1/4 inch away from the drawn line on both sides.
- The Sage Pairing: Repeat this exact process pairing the remaining thirty-six Warm Sand squares with the thirty-six Faded Sage squares.
- Trim to Perfection: Slice directly down the drawn lines, press the seams open, and trim every single Half-Square Triangle (HST) to exactly 3.5″ x 3.5″. You will yield 72 Red/Sand HSTs and 72 Sage/Sand HSTs.
Step 3: Assembling the Towering Tapestry Panels
Stacking the blocks to create the vertical architecture.
- The Red Row: Take one 6.5-inch Deep Onyx core. Sew a Red/Sand HST to the left and right sides (rotating the HSTs so the Canyon Red points inward toward the Onyx).
- The Sage Row: For the next row, sew Sage/Sand HSTs to the left and right of an Onyx square (pointing the Faded Sage inward).
- Stack the Tower: Alternate these Red and Sage rows, stacking exactly twelve blocks vertically. The completed column will measure 12.5″ wide by 72.5″ tall. Repeat this process to build three identical, towering stepped columns.
Step 4: Setting the Vast Canvas
Spacing the columns to create the 48-inch expanse.
- The Warm Sand Bridges: From your Warm Sand yardage, cut two long sashing strips measuring 6.5″ wide by 72.5″ tall.
- Joining the Horizons: Sew the three towering columns together side-by-side, placing a 6.5-inch Warm Sand sashing strip between each one to give the bold geometry room to breathe.
- The Outer Borders: Cut two more strips measuring 3.5″ wide by 72.5″ tall and sew them to the far left and far right edges of the tapestry. Your pieced canvas now measures a flush 48.5″ x 72.5″.
Step 5: Acoustic Basting and Structural Quilting
Preparing the textile for permanent gallery suspension.
- The Heavy Baste: Sandwich the pieced top, the sound-dampening wool batting, and the structured Canvas backing. Baste very densely with safety pins to prevent the heavy fabrics from shifting.
- Architectural “Warp” Quilting: Using a walking foot, quilt continuous, perfectly straight vertical lines spanning from the very top of the tapestry to the very bottom. Space these lines strictly 1 inch apart.
- Why: This dense, linear quilting accentuates the monumental verticality of the columns, mimicking the heavy vertical warp threads of an upright loom. Crucially, it gives the tapestry incredible rigidity, ensuring it hangs perfectly flat against the wall without bowing or rippling over time.
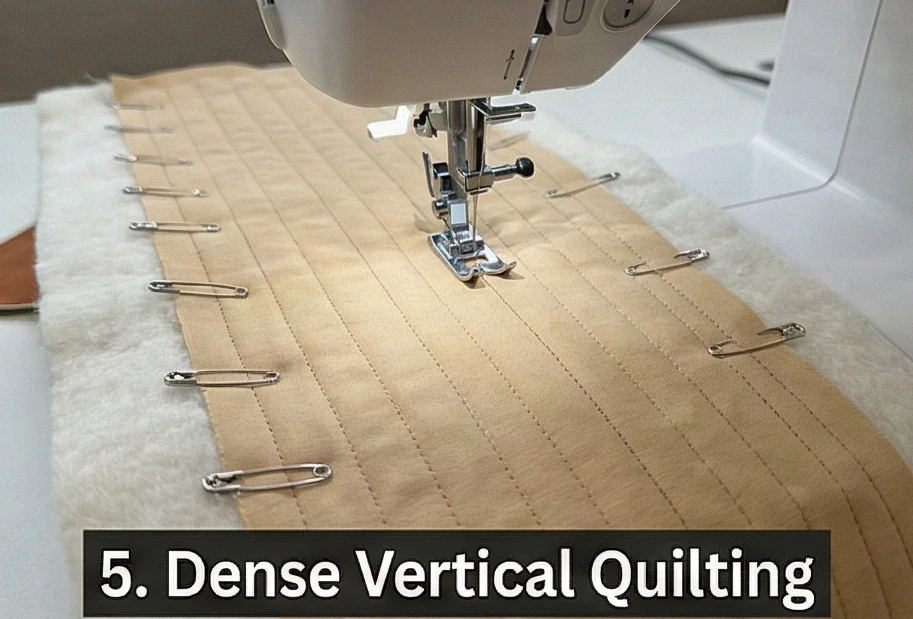
Step 6: The Gallery Hanging Sleeve and Tailored Finish
Engineering the invisible mount.
- The Hanging Sleeve: Cut an 8.5-inch wide strip of canvas that is 46 inches long. Hem the short ends. Fold it in half lengthwise (wrong sides together) to make a 4.25-inch wide tube. Before binding the quilt, baste the raw edges of this tube completely along the top back edge of your tapestry.
- The Tailored Frame: Trim the tapestry perfectly square. Bind the entire piece in solid Deep Onyx fabric. This dark, grounding frame sharply contains the artwork.
- Mounting: Slip your heavy-duty gallery rod through the hidden sleeve on the back, and mount the hardware directly to your wall studs to safely support the weight of the textile.
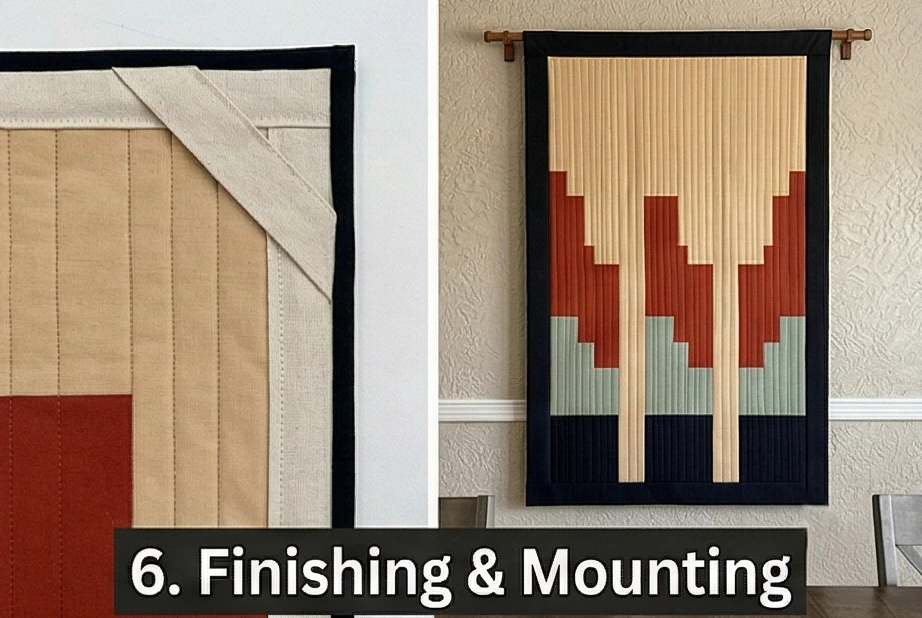
Usability Note: Unlike a bed throw, a wall tapestry rarely needs washing, but the dense wool and cotton will collect ambient dust over time. Protect the deep Reds and Onyx dyes by hanging the piece away from harsh, direct UV sunlight. Once a month, use a clean microfiber duster or the upholstery brush attachment on your vacuum to gently pull dust from the dense vertical quilting lines.
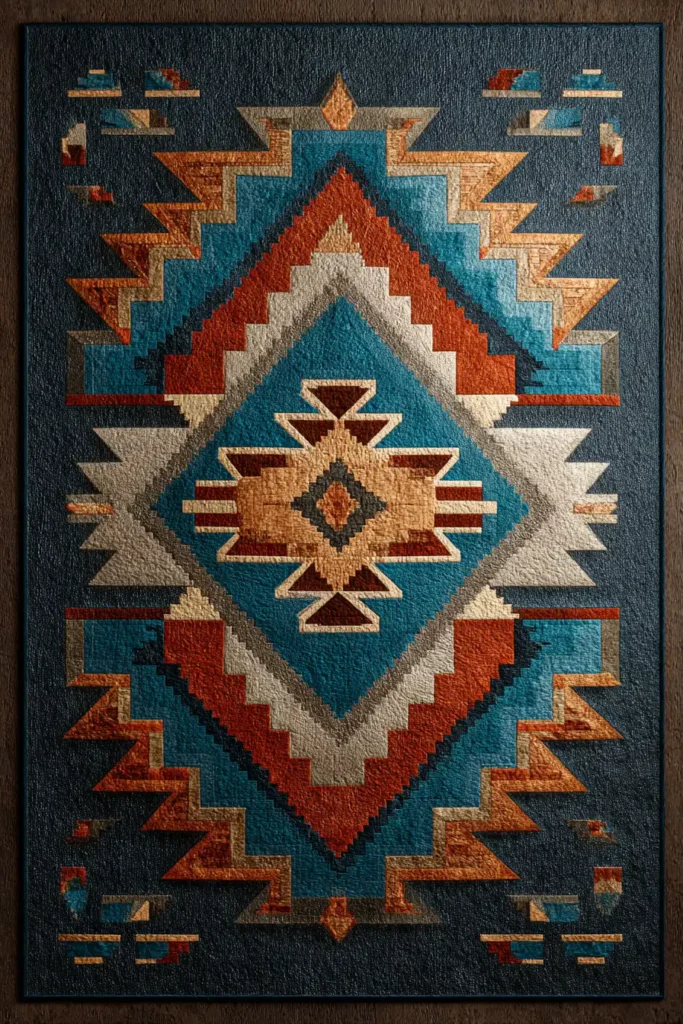
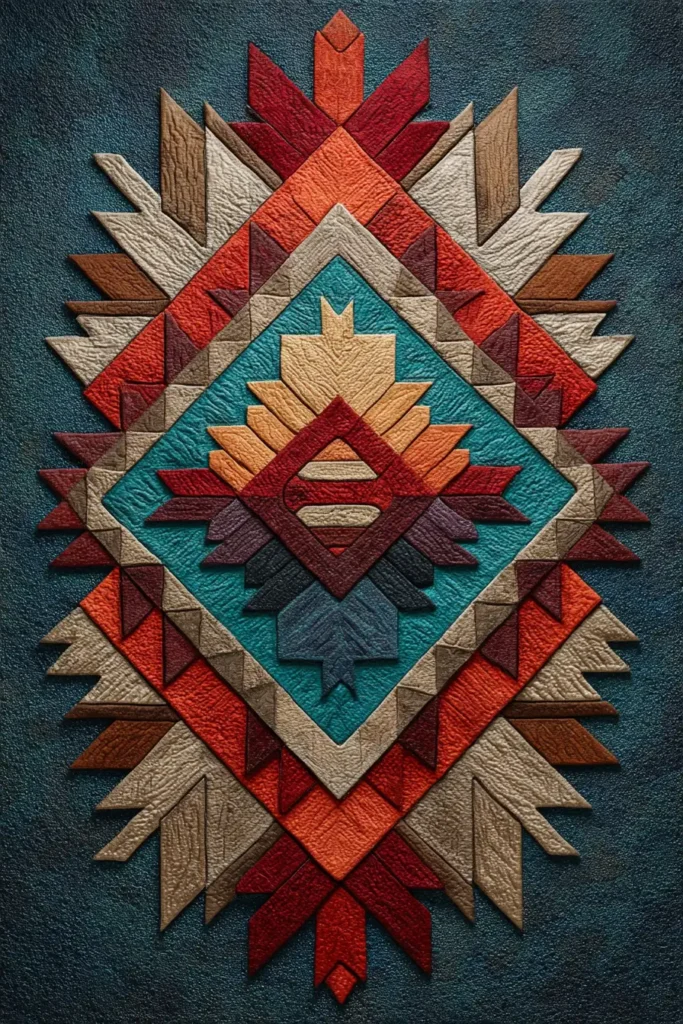
Conclusion
Embracing these bold, geometric designs is a transformative step toward curating a home that radiates sophisticated desert elegance. The true brilliance of these projects lies in their ability to seamlessly merge historical artistry with the practical requirements of modern living. By weaving rich earth tones and structured patterns throughout your rooms, you are actively creating an environment that feels both expansive and deeply comforting. This approach is highly useful for anyone looking to refresh their interior design, as the striking nature of Navajo motifs ensures that even a single, well-placed textile can completely redefine a room’s atmosphere.
The functional benefits of these textiles make them indispensable additions to your daily routine. Layering your sleep sanctuary with Soft Cotton Navajo Quilt Sets or adding a Warm Earth Tone Throw to a guest room ensures that every bed is optimized for maximum warmth and breathability. In communal areas, deploying Elegant Table Runners and Rustic Placemats is a highly effective way to protect your dining surfaces from heat and scratches while setting a beautiful, cohesive stage for family meals. By choosing designs that are as durable as they are beautiful, you create a living space that gracefully handles the rigors of everyday life while maintaining a flawless, high-end appearance.
Ultimately, incorporating these versatile pieces into your life elevates both your home organization and your personal style. Utilizing Sophisticated Handbags and Quilted Storage Totes proves that you do not have to sacrifice elegance for utility; these items brilliantly solve everyday carrying and storage needs with protective, padded grace. Elevating a stunning piece to your wall as a Striking Geometric Hanging provides the perfect finishing touch, infusing your sanctuary with texture and artistic soul. Let these ideas inspire you to start stitching pieces that bring enduring comfort and breathtaking style to your everyday surroundings.
