
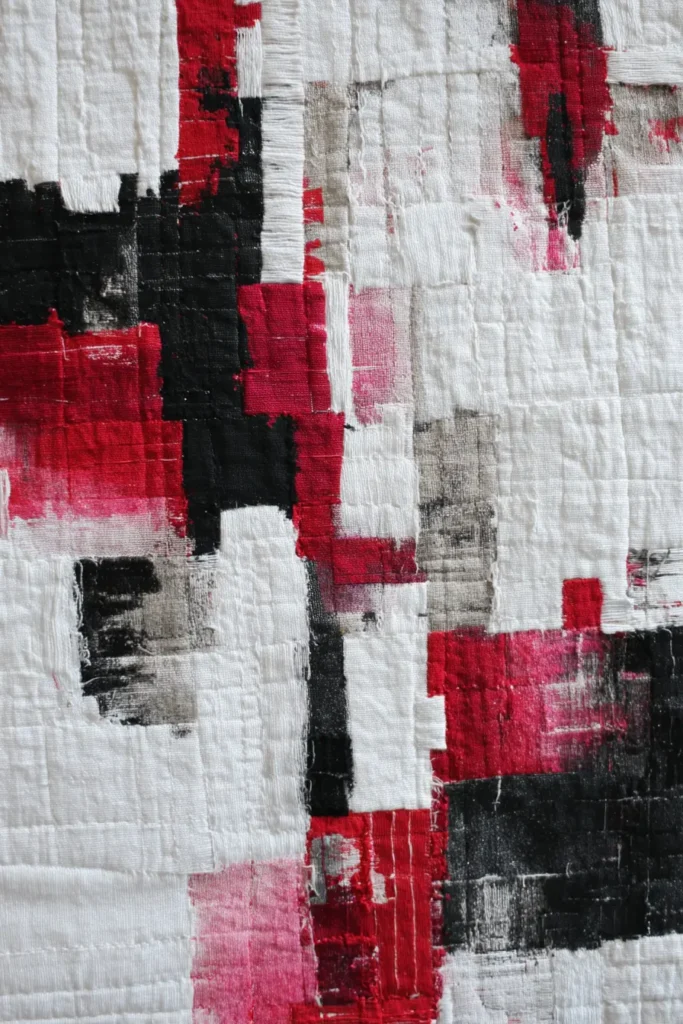
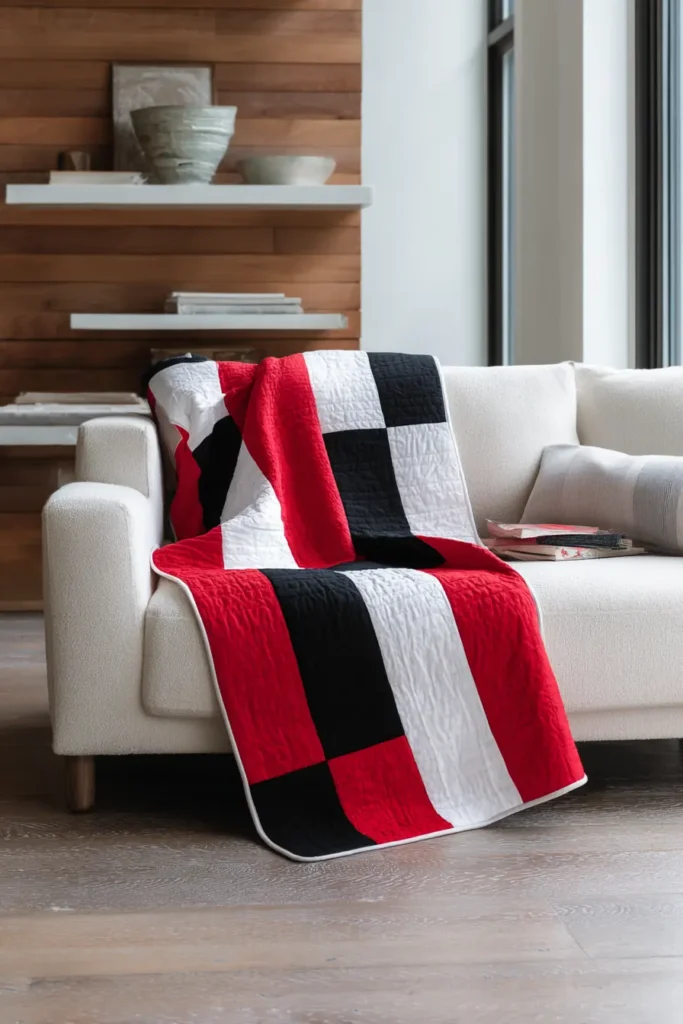
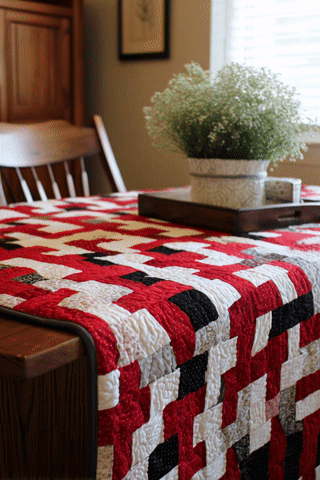
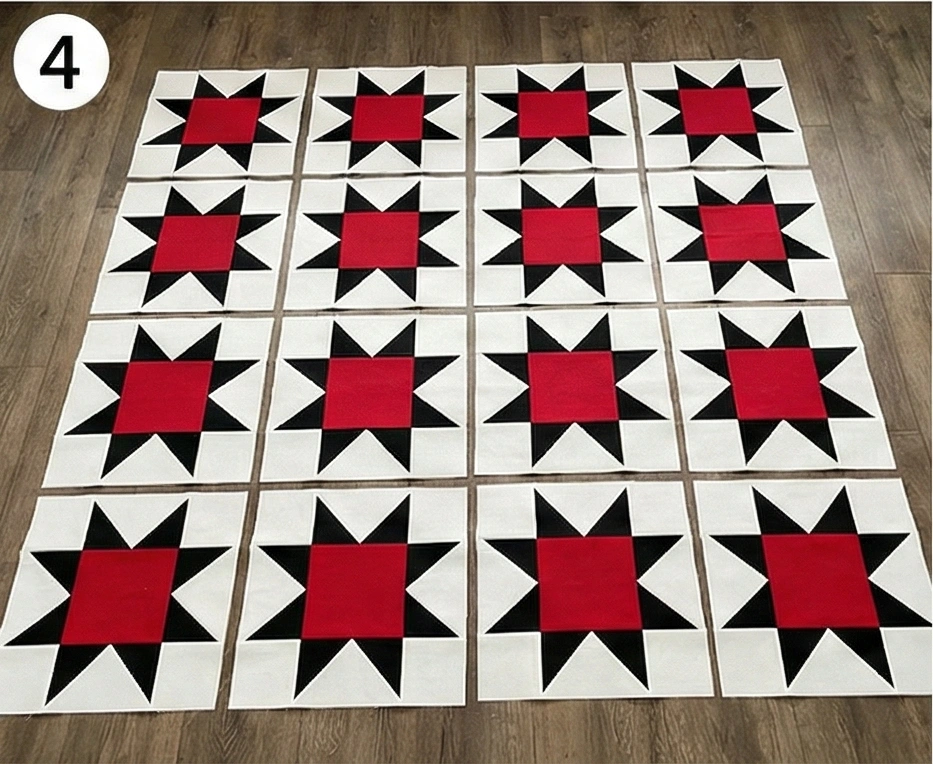
Stunning DIY Projects: 20 Red, Black, and White Quilt Ideas for Living Cum Dining Room
Red, Black, and White: A Palette That Does the Work for You
Some color combinations require careful management – you have to balance them, moderate them, make sure one shade does not overpower the others. Red, black, and white is not one of those combinations. Each color has a clear and distinct role, and they do not fight each other. Black grounds the room, giving it weight and definition. White opens it up, preventing the contrast from feeling heavy. Red does something neither of the others can: it adds warmth and energy without softening the palette. Together they create something that reads as bold without feeling aggressive – which is rarer in interior design than it sounds.
I have used this palette in shared living and dining spaces several times, and the consistent thing I notice is how much work it does with very little help. You do not need elaborate styling or much additional decor. When the color logic is consistent across the soft furnishings—a throw on the sofa, a runner on the dining table, quilted chair pads—the room reads as considered and intentional without any single piece having to carry too much weight.
The Open-Plan Problem This Palette Solves
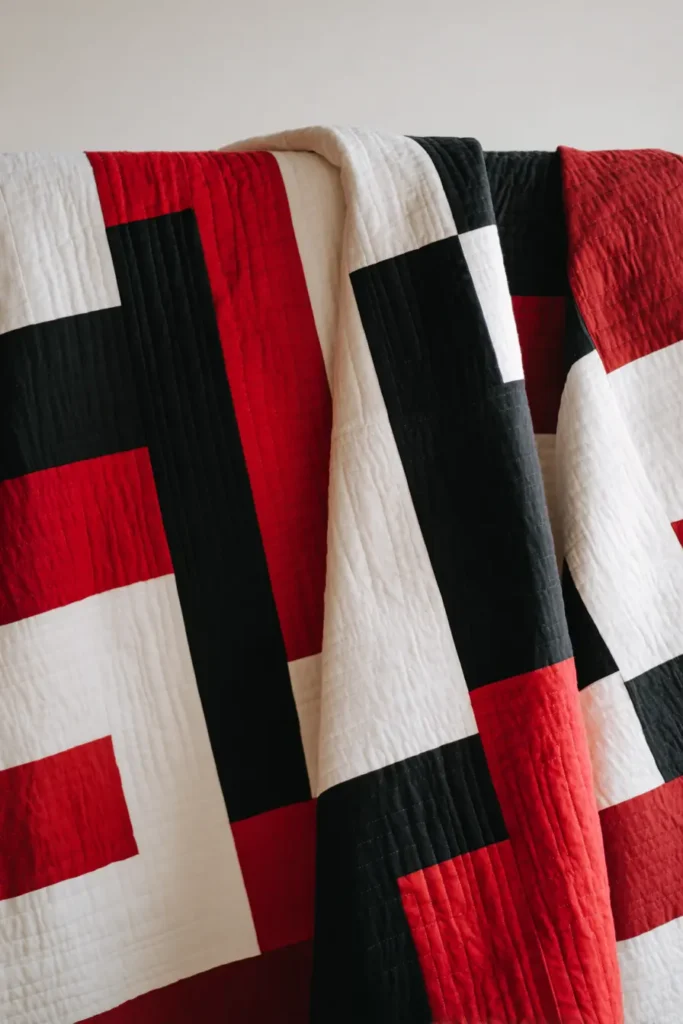
Designing a combined living and dining space is one of the more specific challenges in residential interior design. The two zones need to feel connected without being identical, distinct without feeling disconnected. A strong, consistent palette handles this better than almost any structural solution – it creates visual continuity across the space without requiring matching furniture or forced symmetry.
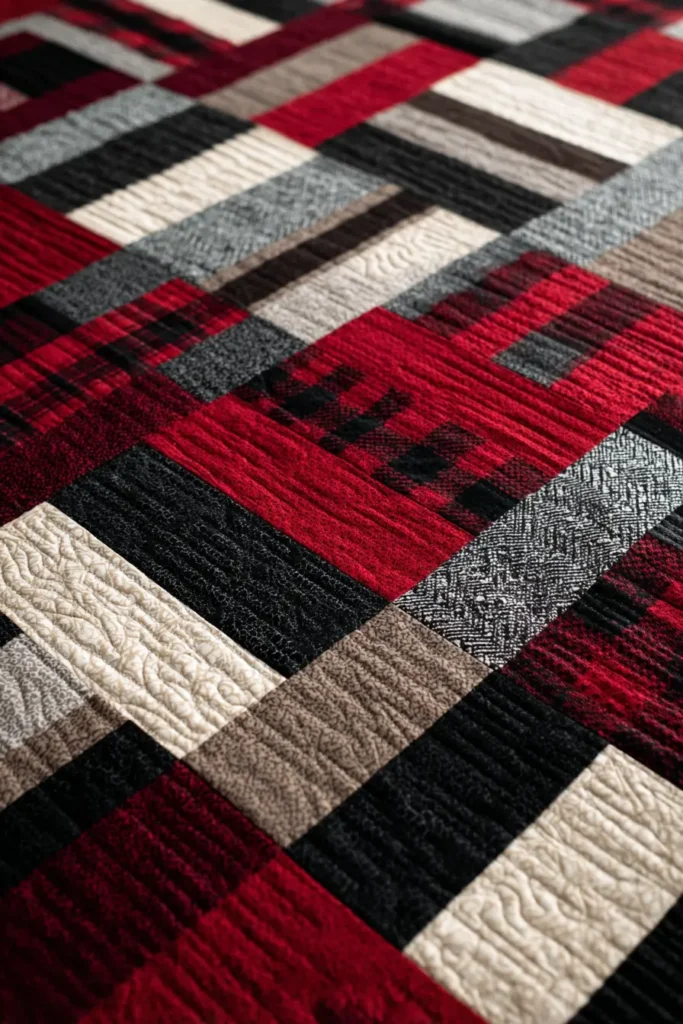
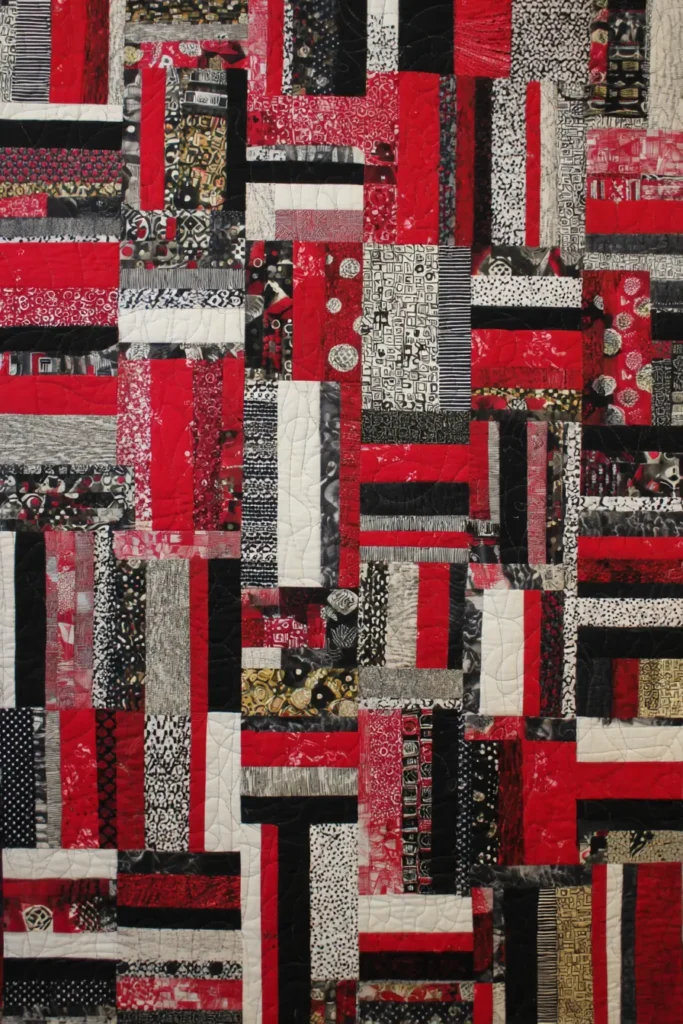
Quilts and textile pieces are particularly well-suited to this job because they repeat a visual language across different surfaces and functions. A geometric red-and-black throw on the sofa shares a color conversation with a striped table runner eight feet away, without the two pieces needing to match. The palette is the connection – the individual pieces can vary in pattern, scale, and construction, and the room still reads as cohesive. Small pieces contribute as much as large ones: a quilted coaster, a set of placemats, a patchwork cushion cover. The eye picks up the repeated colors and registers intention even when the items are modest.
Red, Black, and White Quilt Ideas
Contents
- 1 Red, Black, and White Quilt Ideas
- 2 1. Classic Red, Black, and White Patchwork Quilts for Living Cum Dining Rooms
- 2.1 The “Midnight Chain” Double Irish Chain Quilt
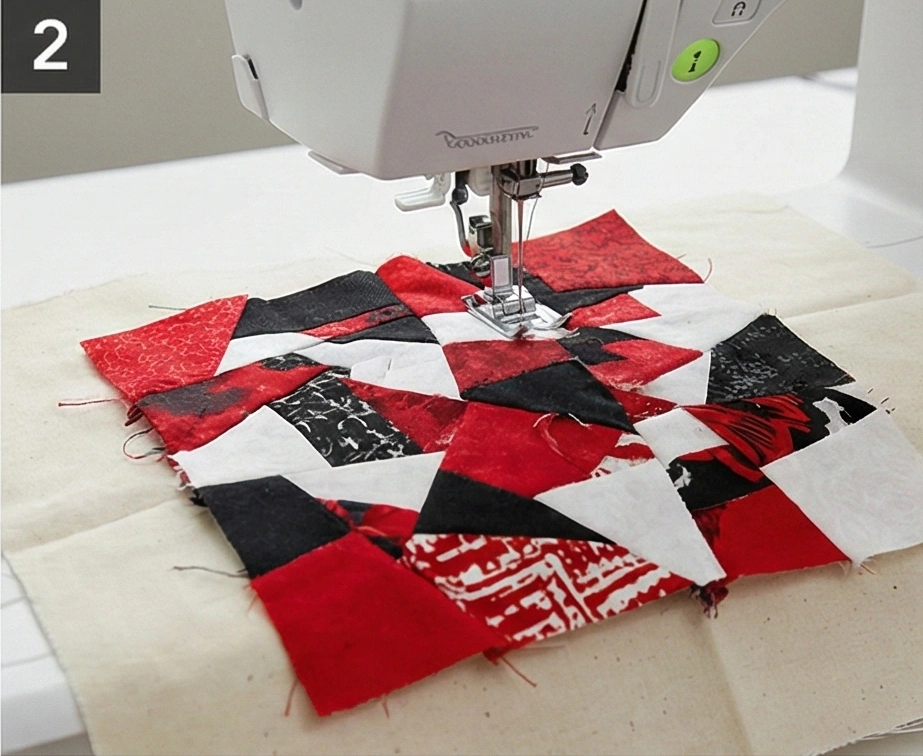
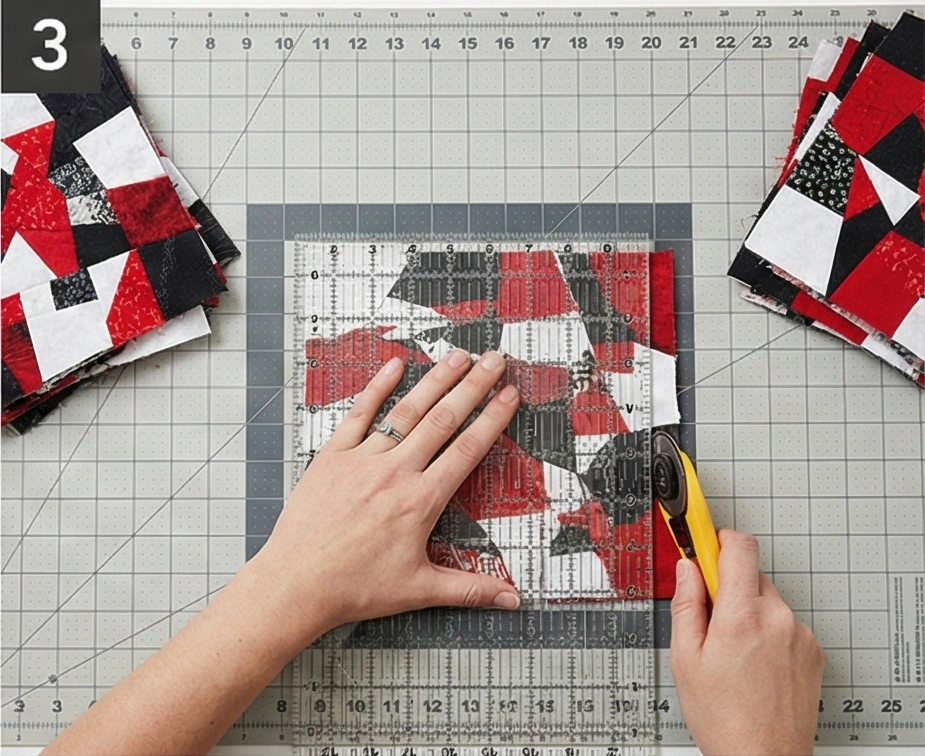
- 2.1.1 Step 1: Create Strip Sets (The Efficiency Hack)
- 2.1.2 Step 2: Sub-Cut into Segments
- 2.1.3 Step 3: Assemble Block Type 1 (The “X” Block)
- 2.1.4 Step 4: Assemble Block Type 2 (The Plain or “Link” Block)
- 2.1.5 Step 5: The Checkerboard Layout
- 2.1.6 Step 6: Assembly and Border
- 2.1.7 Step 7: “Cross-Hatch” Quilting
- 2.1 The “Midnight Chain” Double Irish Chain Quilt
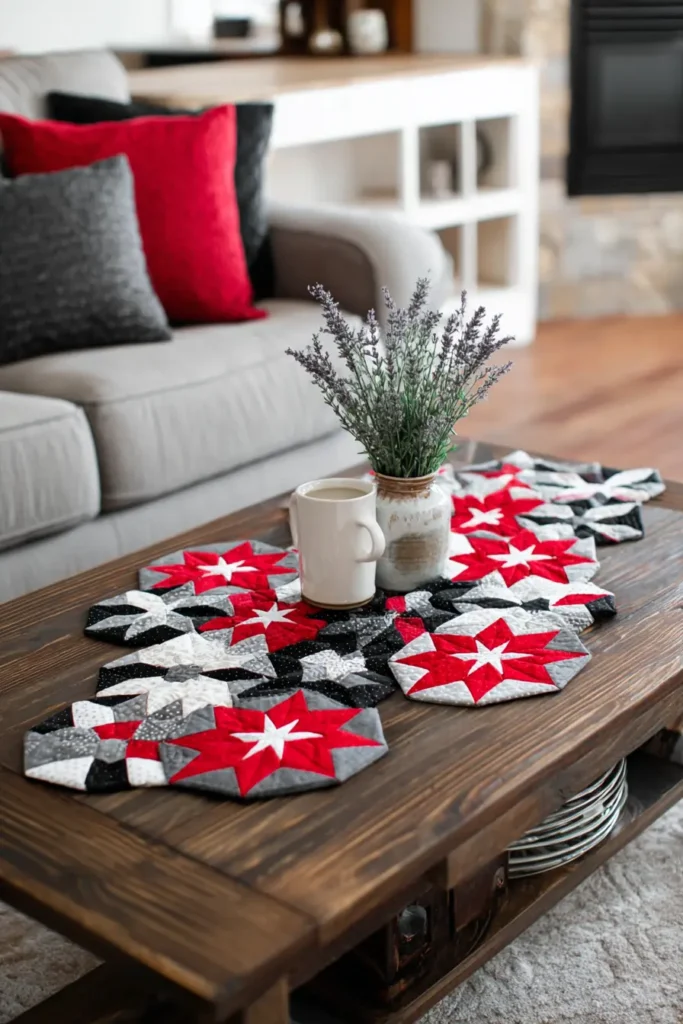
- 3 2. Cohesive Red, Black, and White Table Runner and Pillow Sets
- 4 3. Bold Buffalo Check Quilt Throw for Sofa in Living Cum Dining Room
- 5 4. Rustic Plaid Red and Black Quilt for Cozy Combined Spaces
- 6 5. Quilted Chair Pads for Comfortable Dining Seating
- 7 6. Abstract Textile Wall Art for Open Living Spaces
- 8 7. Log Cabin Quilt Pattern in Red, Black, and White for Floor Throw
- 9 8. Herringbone Pattern Quilt Runner for Sideboard in Dining
- 10 9. Flying Geese Red and Black Quilt for Dining Bench Cushion and Armchairs
- 11 10. Simple Color Block Quilt for Tying Both Spaces Together
- 12 11. Ombre Red to Black Quilt for Dramatic Sofa Drape in Combined Room
- 13 12. Basket Weave Red and Black Quilt for Dining Table Cover
- 14 13. Hexagon EPP Centerpieces for Shared Surfaces
- 15 14. Elegant Red, Black, and White Quilts for Formal Dining Rooms
- 16 15. Scrap-Friendly Quilt Pattern for Eclectic Wall Art
- 17 16. Farmhouse-Style Red, Black, and White Quilts for Open Living Dining Areas
- 18 17. Easy DIY Quilted Coasters and Placemats for a Coordinated Set
- 19 18. Gingham Red and White Quilt with Black Borders for Throw Blanket
- 20 19. Pinwheel Quilt Ideas in Red, Black, and White for Sofa Pillow
- 21 20. Upcycled Denim and Red Fabric Quilted Coasters
- 22 Conclusion
What This Collection Covers
These 20 projects are designed to work together across a shared space rather than function as individual showpieces. Larger anchor pieces – a buffalo check throw, a bold geometric quilt, a structured sofa cover – establish the palette in the living zone. Smaller dining pieces – table runners, placemats, chair pads, quilted coasters – carry the same color logic across to the dining side without replicating the same pattern.
Construction is kept practical throughout. These are usable pieces built for daily life – spills, regular washing, and the particular wear that comes from being genuinely used in a room where people actually eat and sit. Scrappy patchwork and precise geometric patterns both work here as long as the palette stays consistent.
The palette does most of the work. Your job is simply not to interrupt it.
See also: Bold Red, Black, and White quilts · Dramatic Bedroom quilts · Black and White quilt patterns
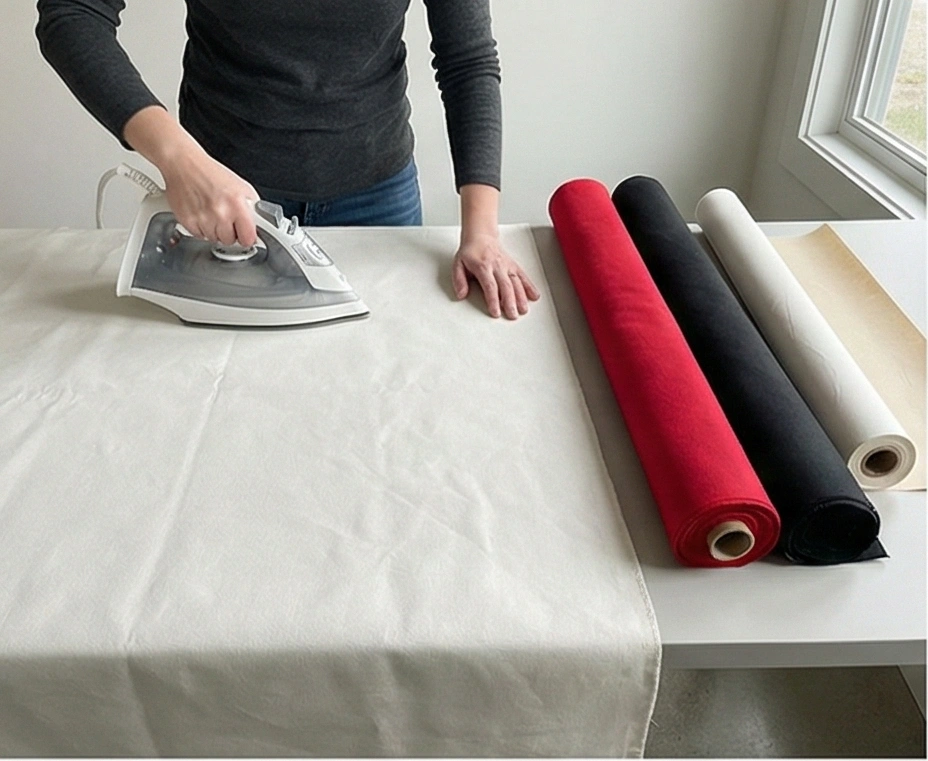
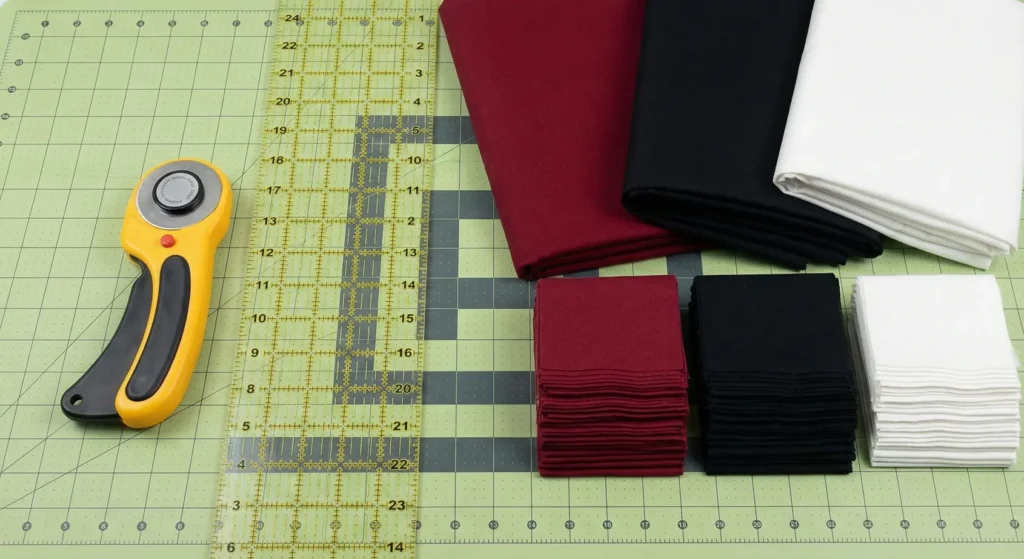
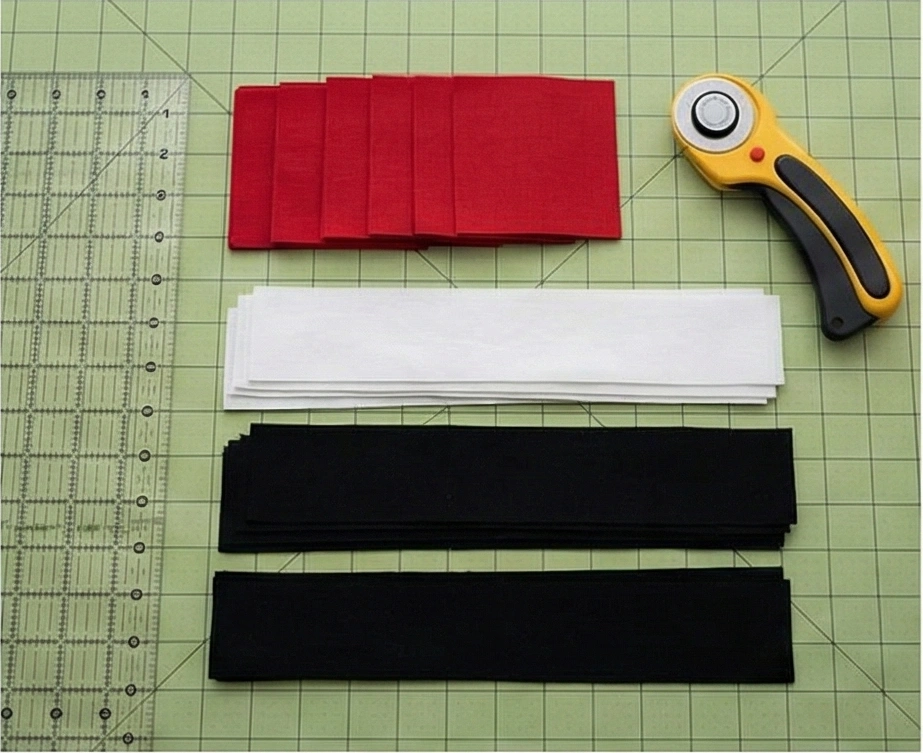
Recommended Supplies
“As an Amazon Associate, I earn from qualifying purchases.“
1. Classic Red, Black, and White Patchwork Quilts for Living Cum Dining Rooms


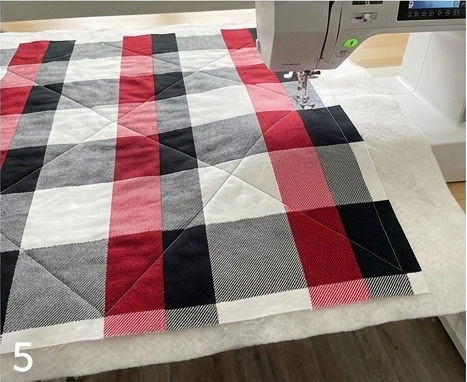
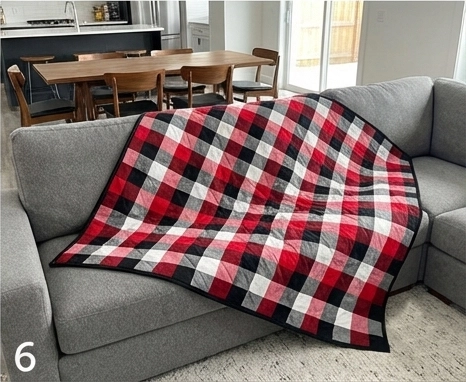
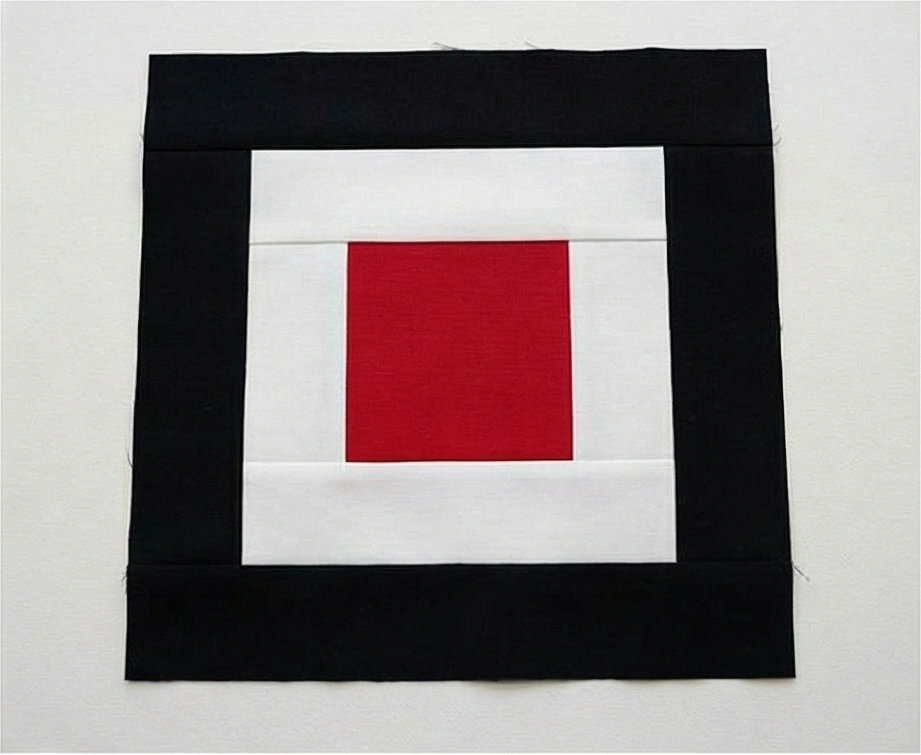
The “Midnight Chain” Double Irish Chain Quilt
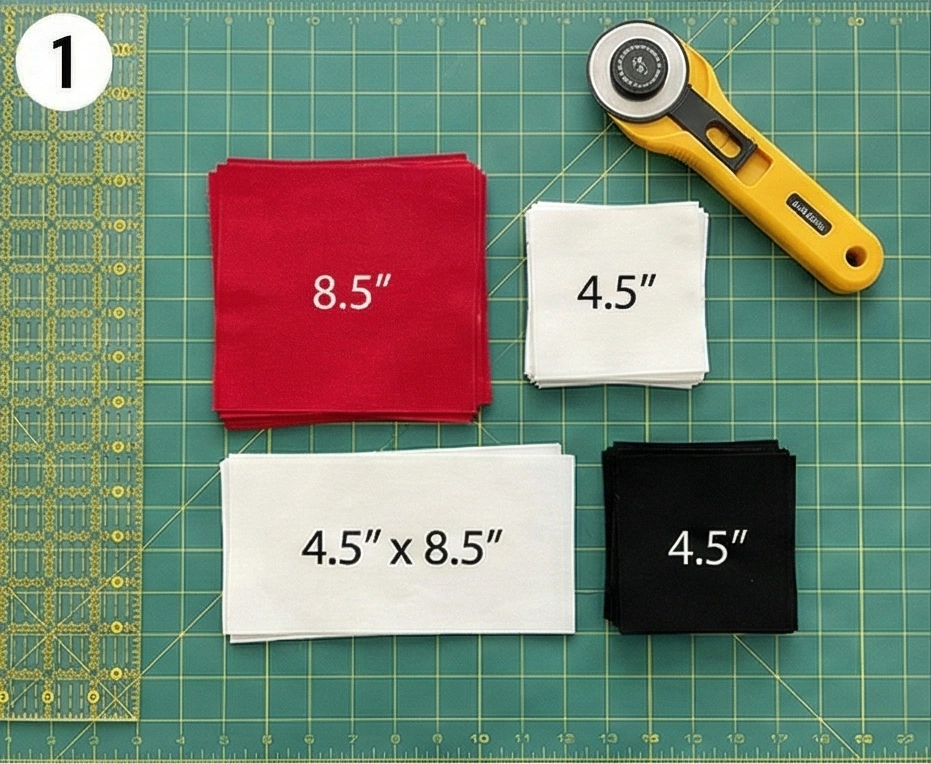
The Irish Chain is perhaps the most classic of all patchwork designs. It fits perfectly in a “Living Cum Dining” space because its structured, geometric nature feels formal enough for a dining area, while the soft cotton texture makes it cozy for the living area. This version uses a stark Black and White background with a “Double Chain” of Red running through it, creating a regal, sophisticated look that ties a multi-purpose room together.
Finished Dimensions: Large Throw / Table Cover, approximately 66″ x 66″.
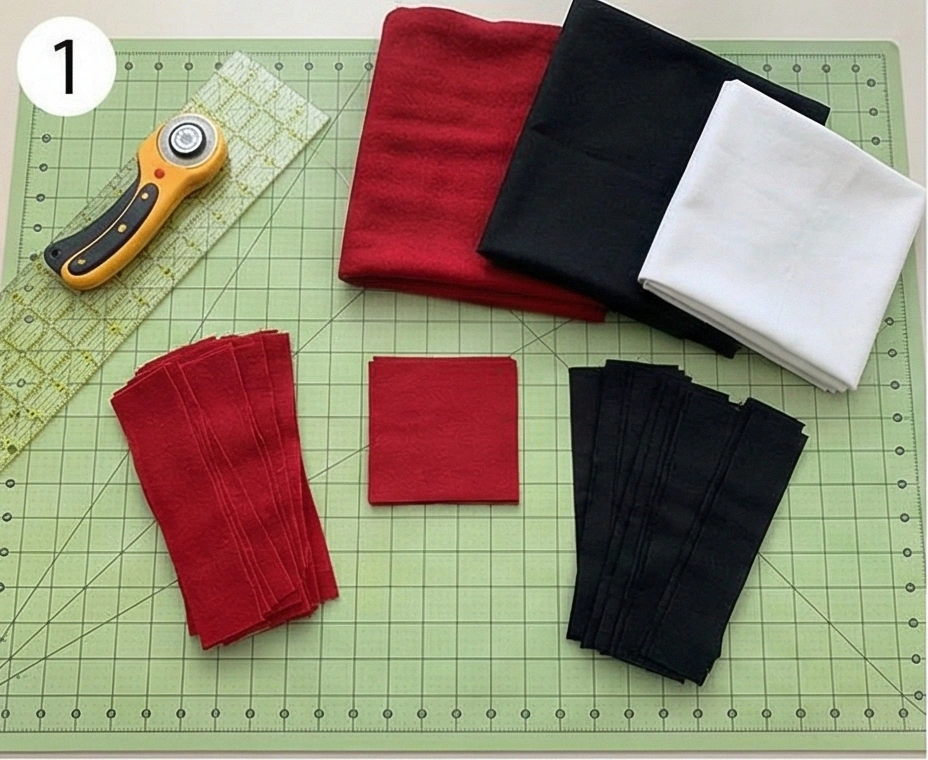
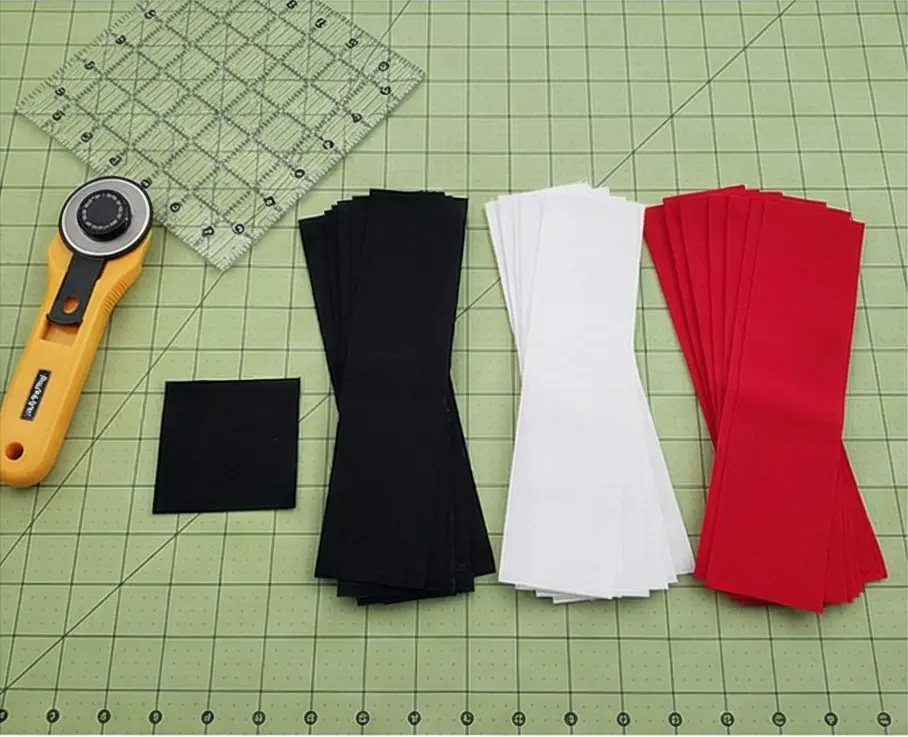
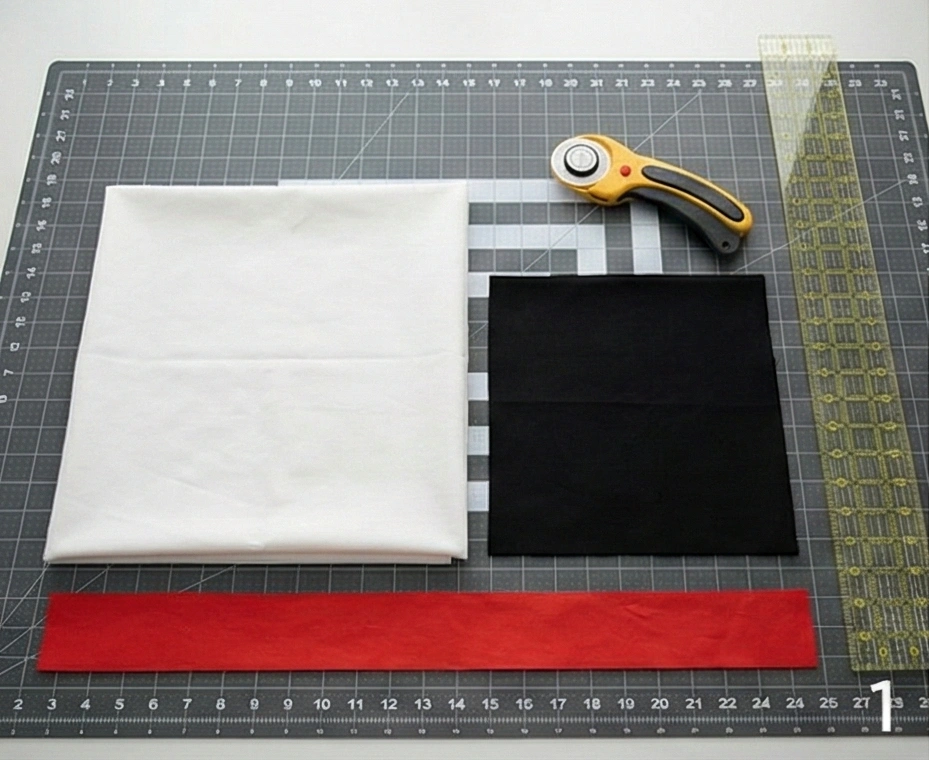
Materials Needed:
- Fabric A (Background/White): 3.5 yards of Solid White.
- Fabric B (Chain 1/Black): 1.5 yards of Solid Black.
- Fabric C (Chain 2/Red): 1 yard of Deep Crimson or Maroon.
- Backing Fabric: 4.5 yards.
- Batting: 70″ x 70″.
- Binding: 5/8 yard of Solid Black.
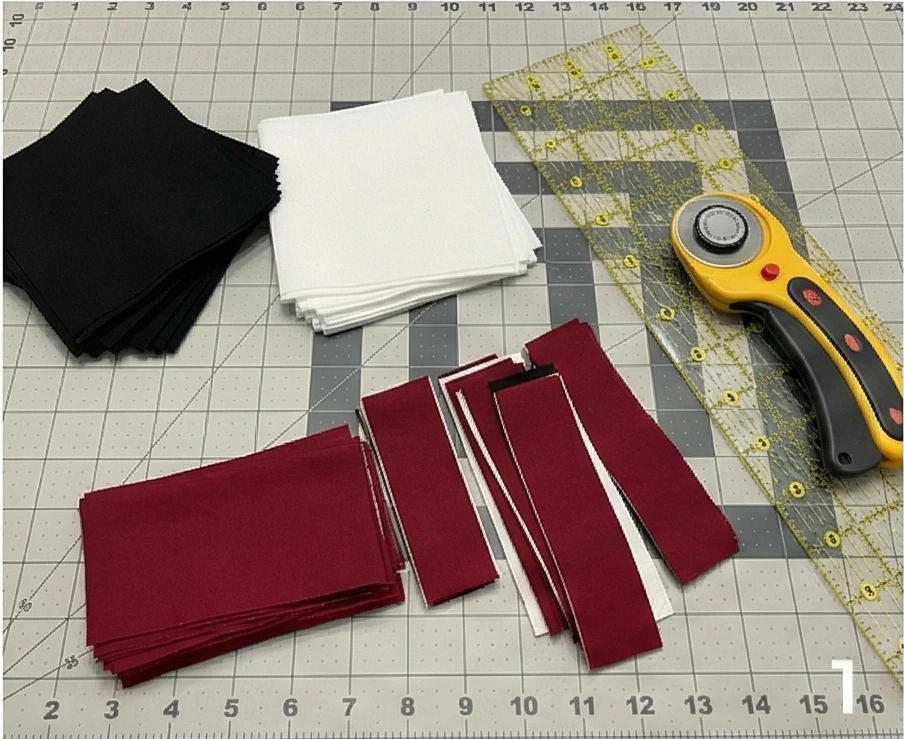
- Notions: Rotary cutter, 6.5″ x 24″ quilting ruler.
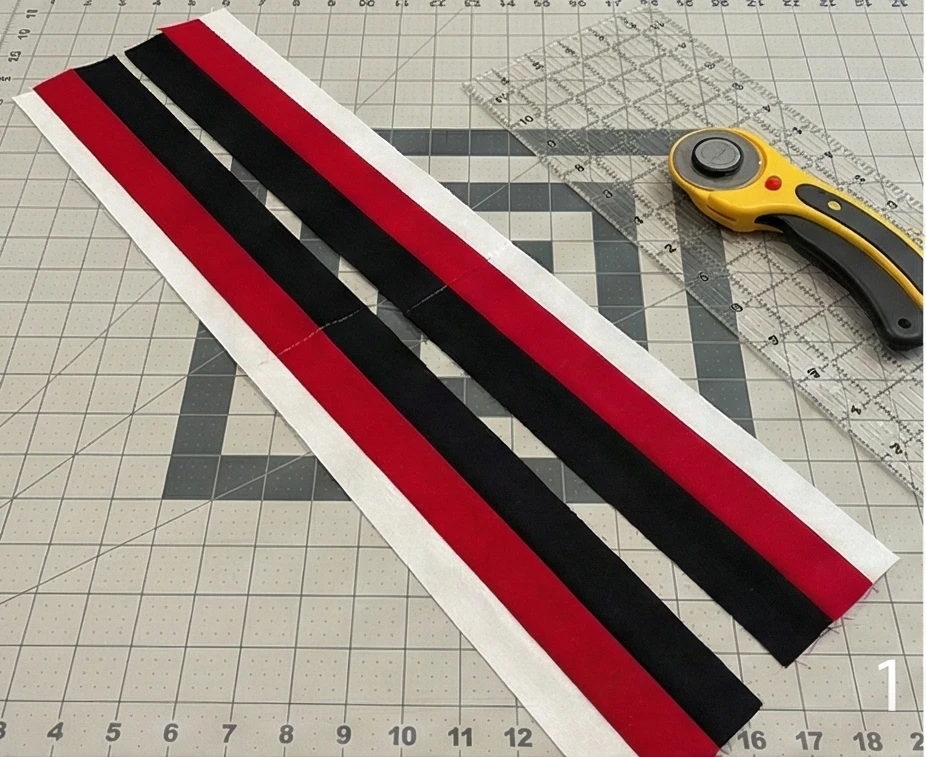
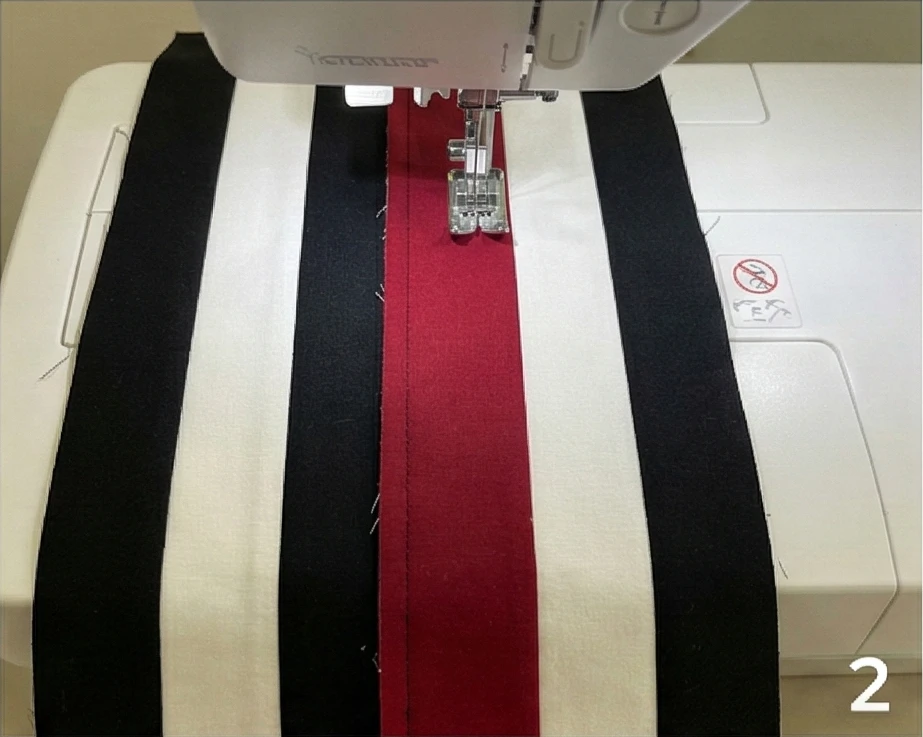
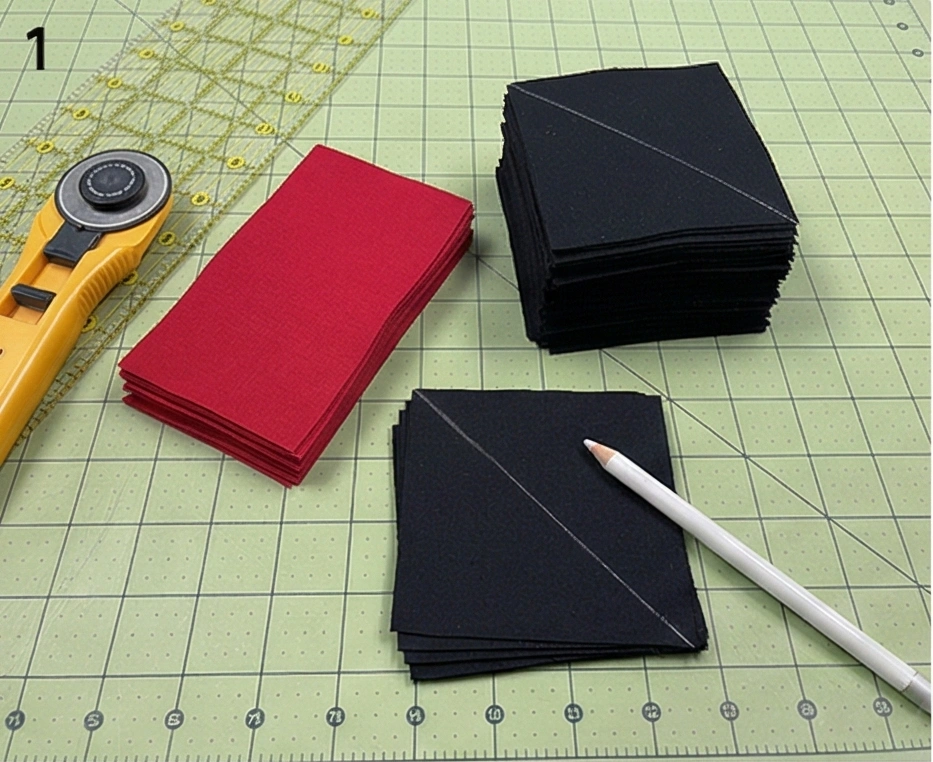
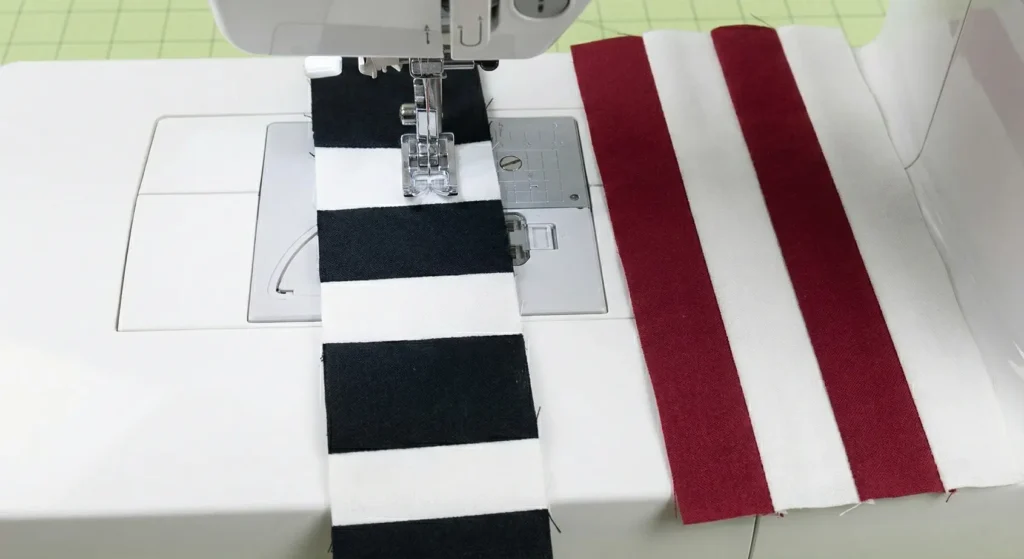
Step 1: Create Strip Sets (The Efficiency Hack)
Instead of cutting hundreds of tiny squares, we sew long strips together and chop them up. This ensures your patchwork corners match perfectly.
- Strip Set A: Sew a 2.5″ White strip, a 2.5″ Black strip, and a 2.5″ White strip together lengthwise.
- Make 5 of these sets.
- Strip Set B: Sew a 2.5″ Black strip, a 2.5″ Red strip, and a 2.5″ Black strip together lengthwise.
- Make 4 of these sets.
- Strip Set C: Sew a 2.5″ White strip, a 2.5″ Red strip, and a 2.5″ White strip together lengthwise.
- Make 2 of these sets.
- Press: Press all seams toward the darker fabrics.
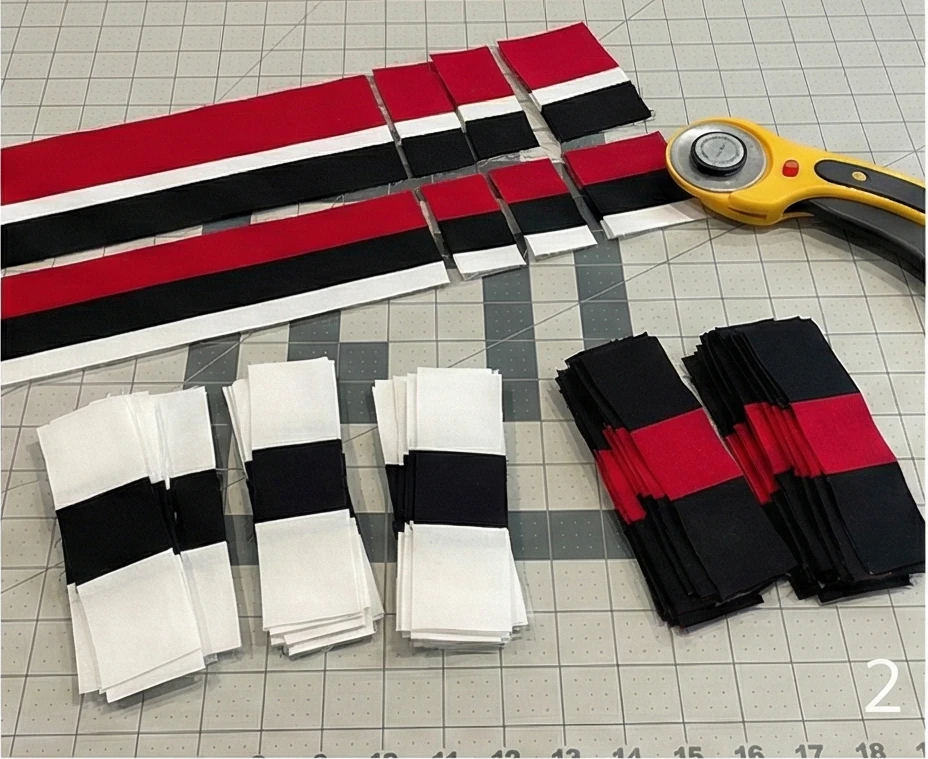
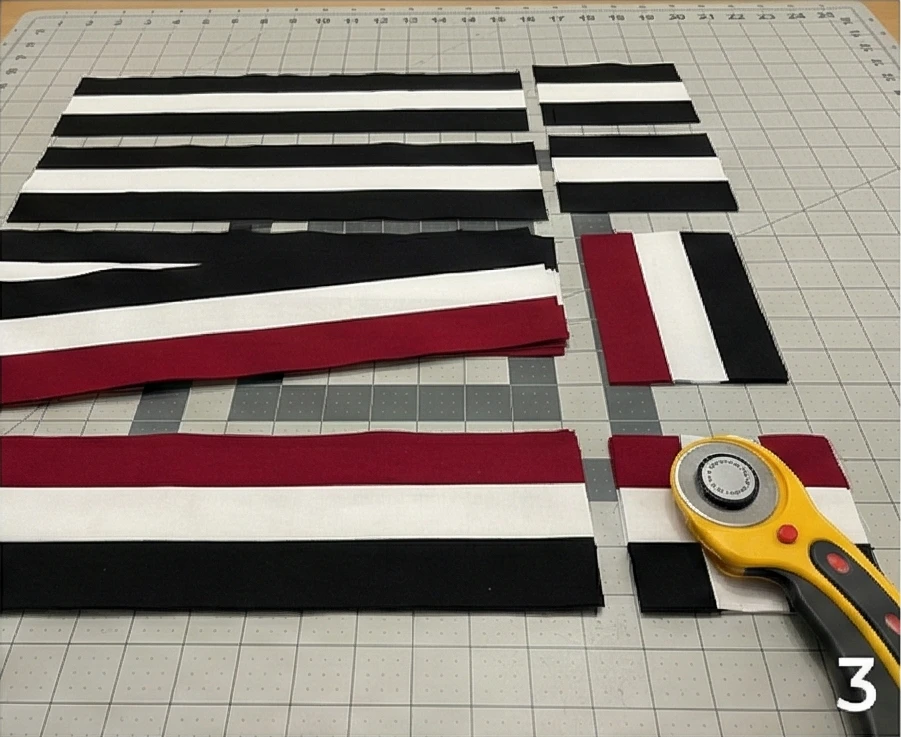
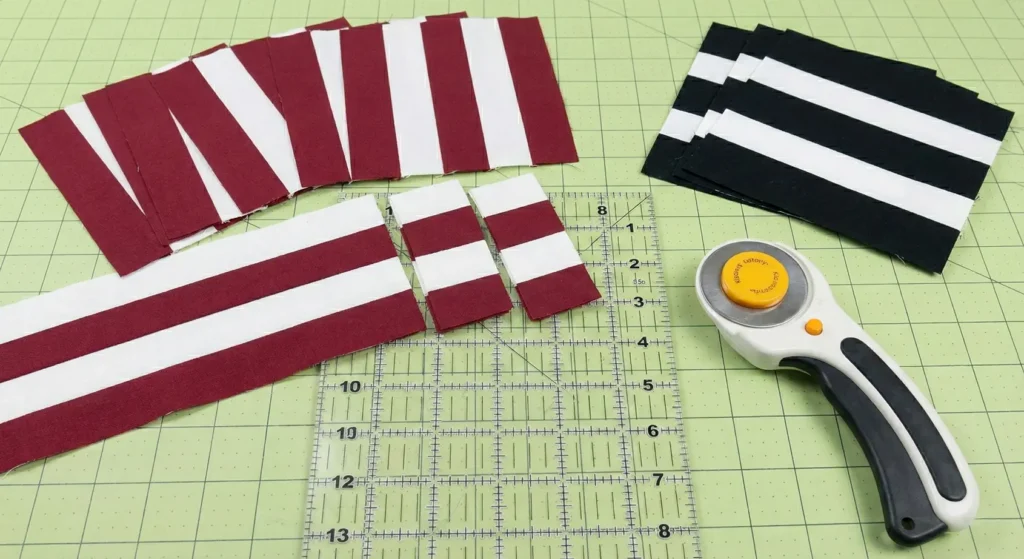
Step 2: Sub-Cut into Segments
Now we turn those long striped ribbons into instant checkerboards.
- Take your Strip Sets to the cutting mat.
- Cut: Cross-cut all the strip sets into segments that are 2.5″ wide.
- You are essentially creating little 3-patch bars.
- Keep the piles separate (Pile A, Pile B, Pile C).
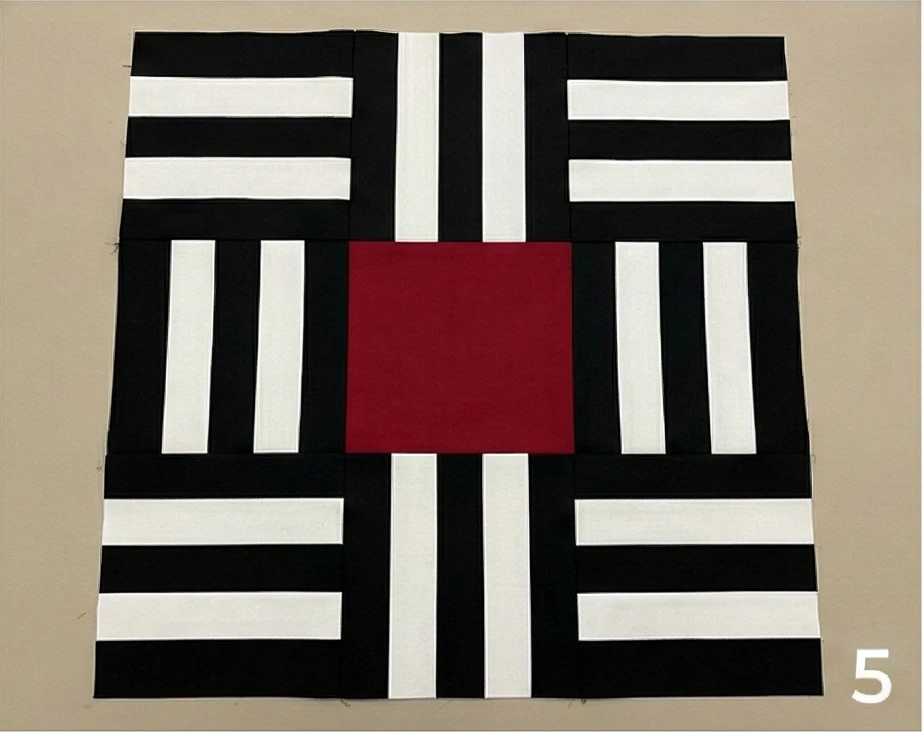
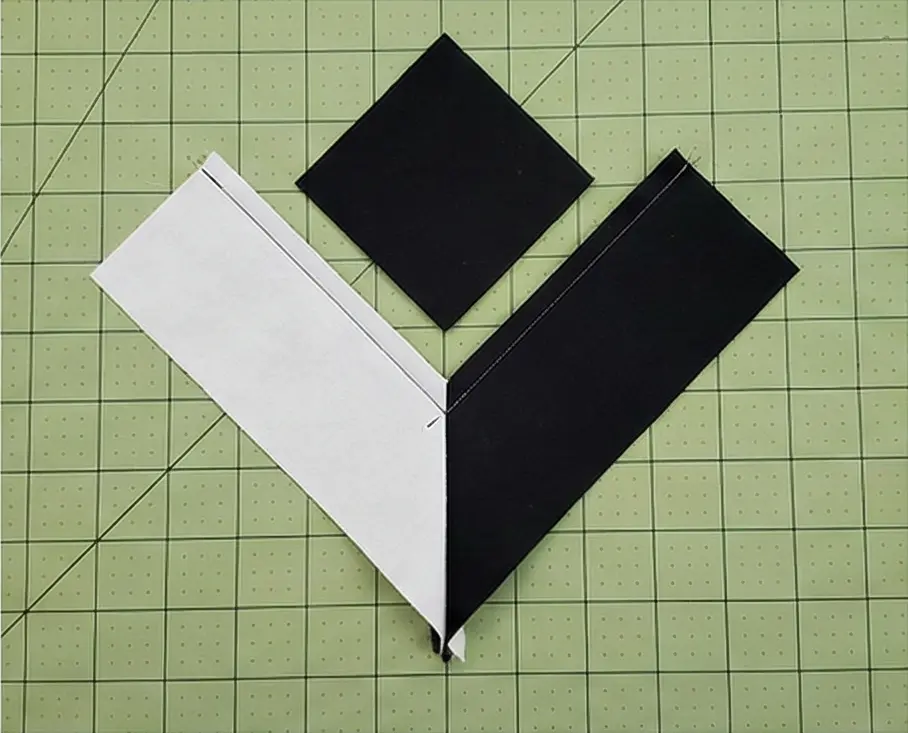
Step 3: Assemble Block Type 1 (The “X” Block)
This block forms the intersection of the chains.
- Layout:
- Row 1: Segment A (White-Black-White)
- Row 2: Segment B (Black-Red-Black)
- Row 3: Segment A (White-Black-White)
- Sew: Stitch the three segments together.
- Visual: You should see a Red center square surrounded by Black squares, with White corners.
- Make: Create 25 of these blocks. Square them up to 6.5″ x 6.5″.
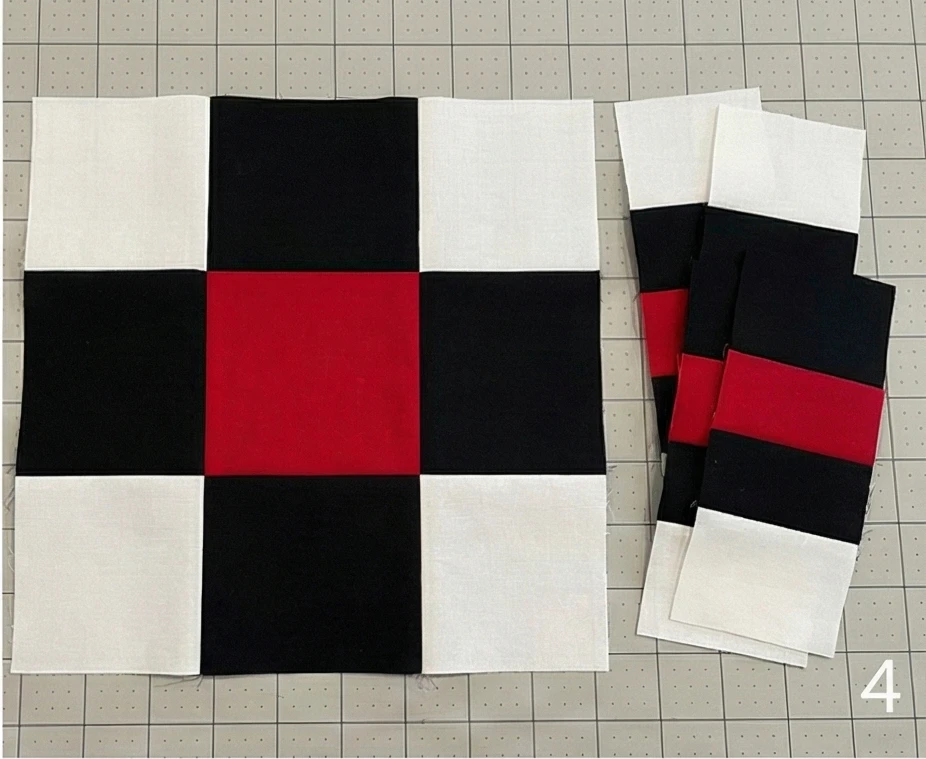
Step 4: Assemble Block Type 2 (The Plain or “Link” Block)
Traditional Irish Chains use a large plain block to let the eye rest. We will make this “plain” block slightly decorative to bridge the living/dining gap.
- Cut: From Fabric A (White), cut 24 squares measuring 6.5″ x 6.5″.
- Design Choice: If you want this to look more like a dining tablecloth, keep these plain white. If you want it cozier for the living room, you can substitute a Low-Volume text print here for visual interest.
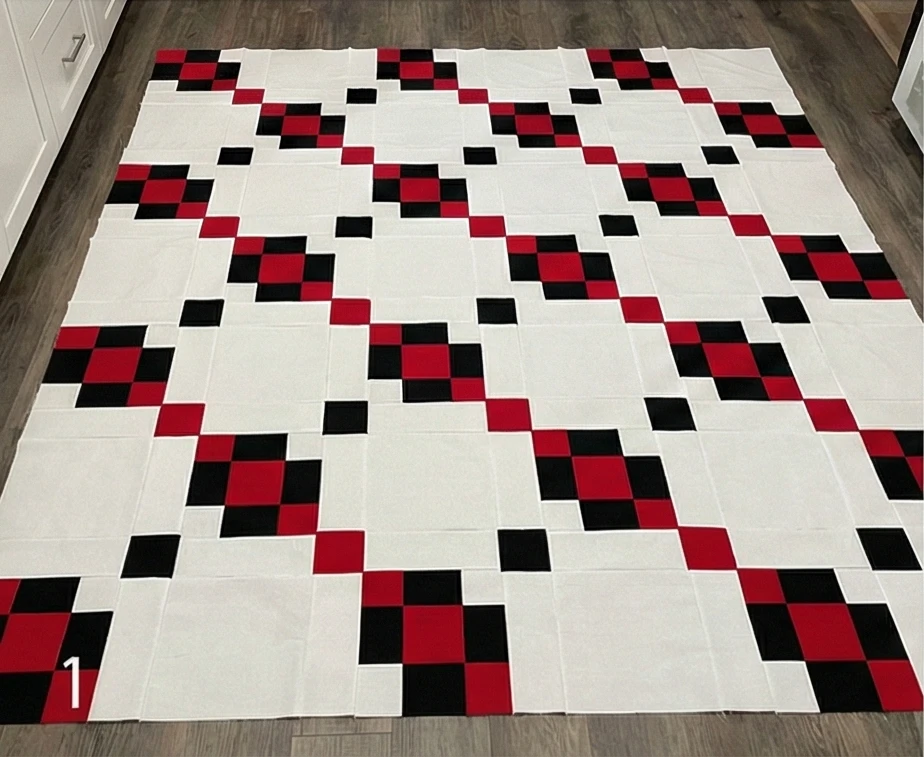
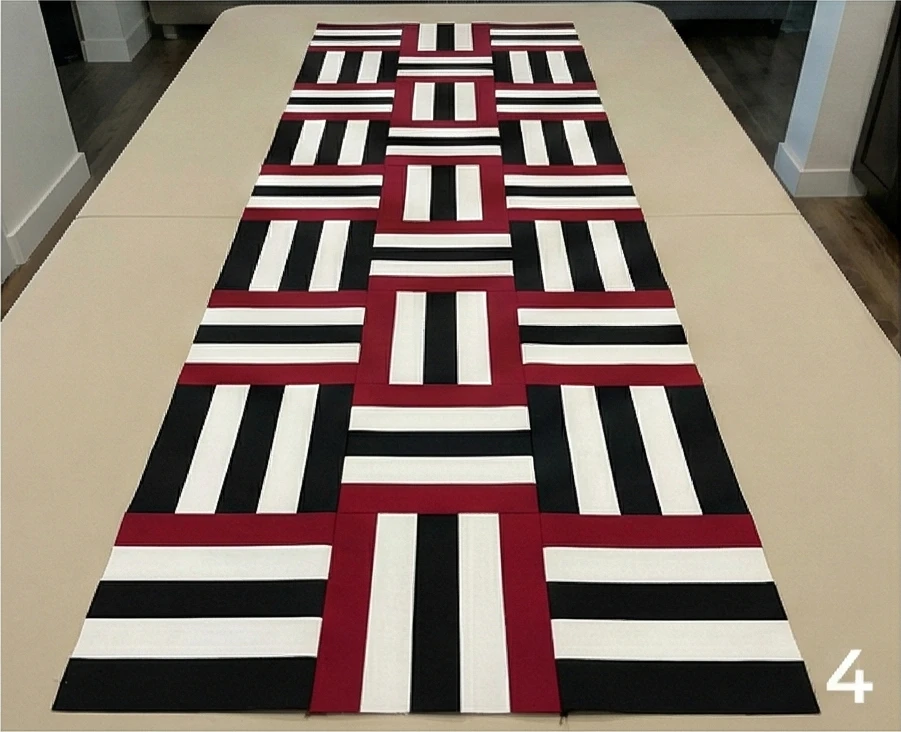
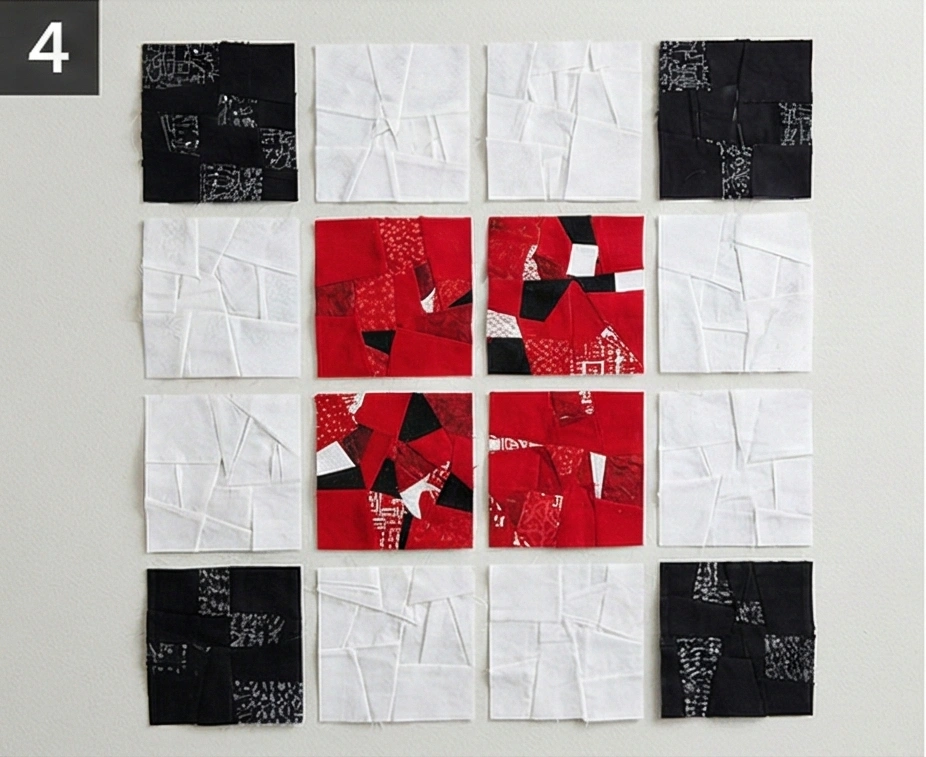
Step 5: The Checkerboard Layout
- Find a large floor space (7 blocks x 7 blocks grid).
- Pattern: Alternate the blocks.
- Row 1: Block 1 — Block 2 — Block 1 — Block 2 — Block 1 — Block 2 — Block 1.
- Row 2: Block 2 — Block 1 — Block 2 — Block 1 — Block 2 — Block 1 — Block 2.
- Repeat for all 7 rows.
- Visual Check: Step back. The Black and Red squares should visually connect to form diagonal “chains” or diamonds running across the white field.
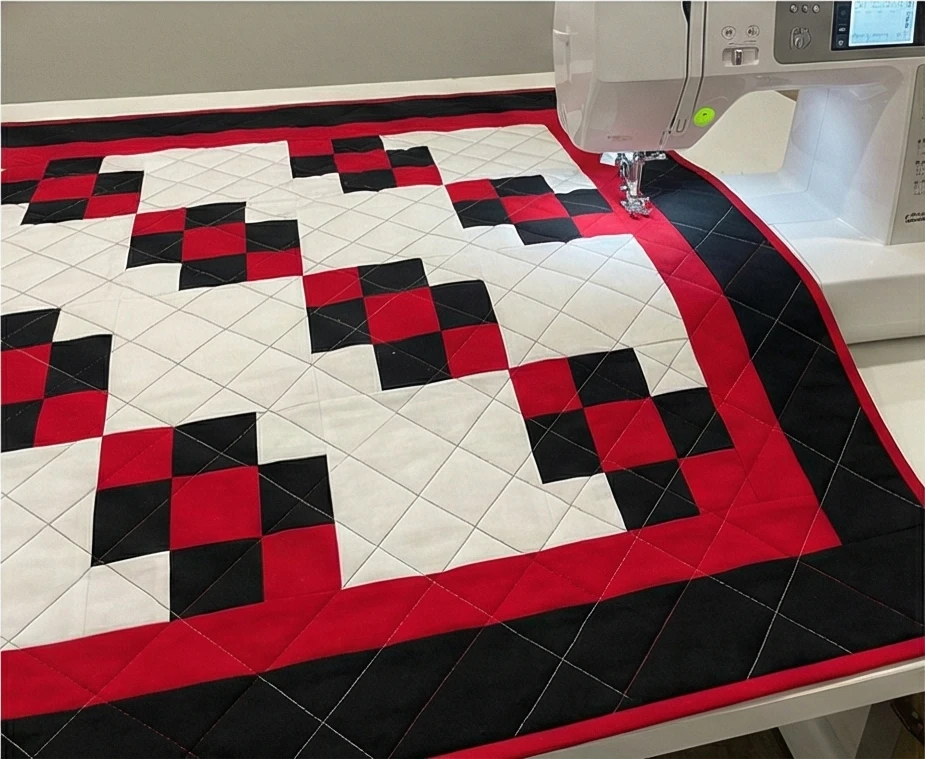
Step 6: Assembly and Border
- Sew: Stitch the blocks into rows, then sew the rows together.
- Border: To give it a finished, “framed” look suitable for a room centerpiece:
- Cut 2.5″ strips of Black. Sew them to the inner sides.
- Cut 4.5″ strips of Red. Sew them to the outside of the black border.
- Final Press: Press the entire top flat.
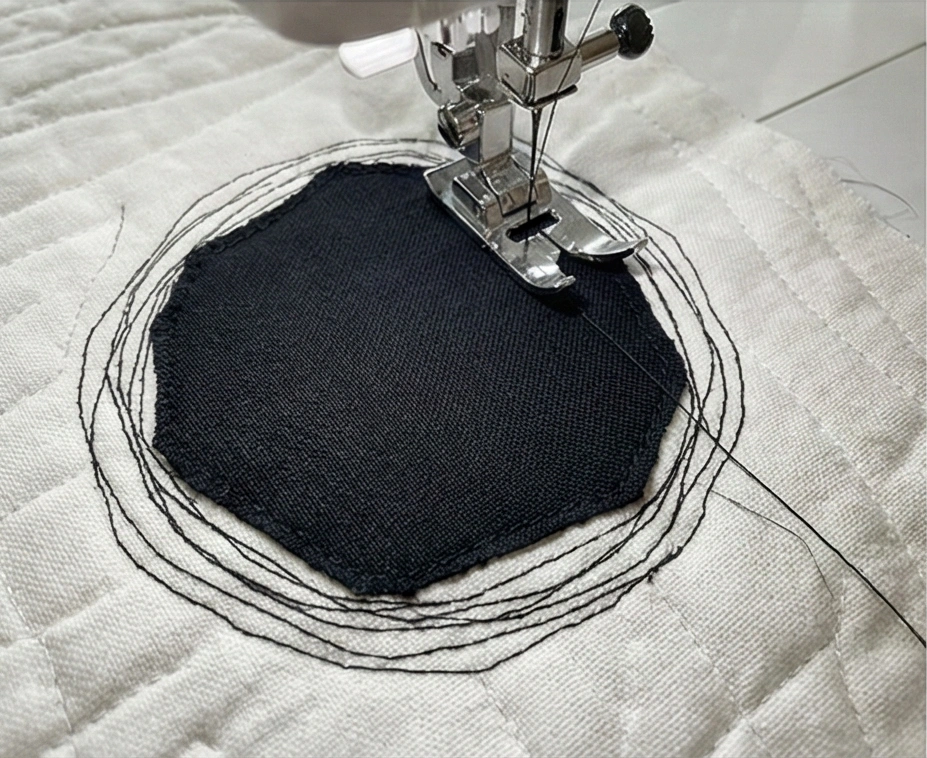
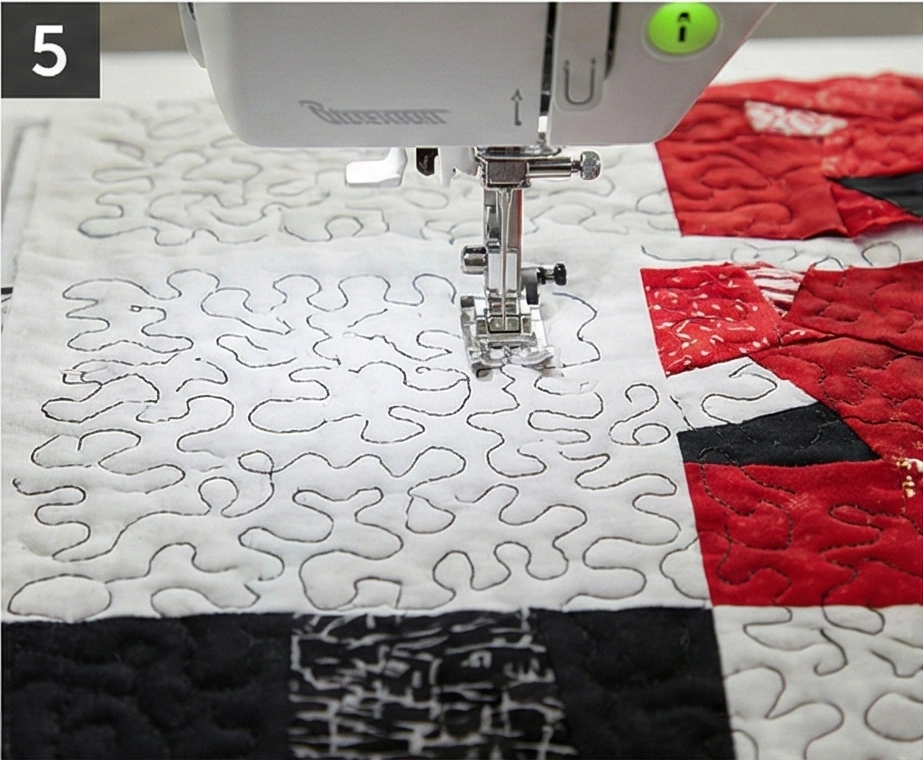
Step 7: “Cross-Hatch” Quilting
- Baste the sandwich.
- Quilting: Classic patchwork deserves classic quilting.
- Design: Quilt diagonal lines running through the center of the squares.
- Stitch a grid of diagonal lines spaced 2 inches apart.
- This “X” pattern reinforces the squares and prevents the batting from shifting if you wash the quilt frequently (which is likely in a dining area).
Pro Design Tip: Reversible Utility. For a Living/Dining combo, use Dark Grey Linen as the backing fabric. If you spill red wine on the patchwork side during dinner, you can instantly flip it over to the charcoal linen side, and it still looks chic and intentional until wash day.
Budget Consideration: Bedsheets for White. Since this pattern requires a large amount of white background fabric (Fabric A), buying high-quality quilting cotton can add up. Buy a King Size 100% Cotton White Flat Sheet. The fabric is wide (no seams needed for backing!) and provides ample material for all the white squares and strips at a fraction of the cost.
More Recommended Supplies
“As an Amazon Associate, I earn from qualifying purchases.“
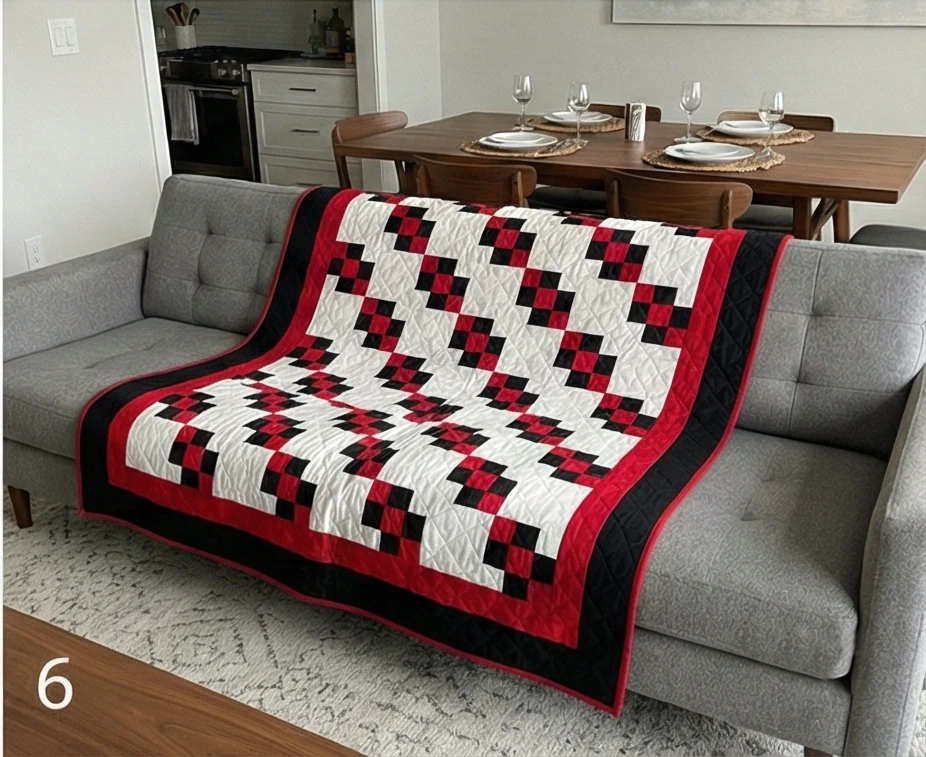
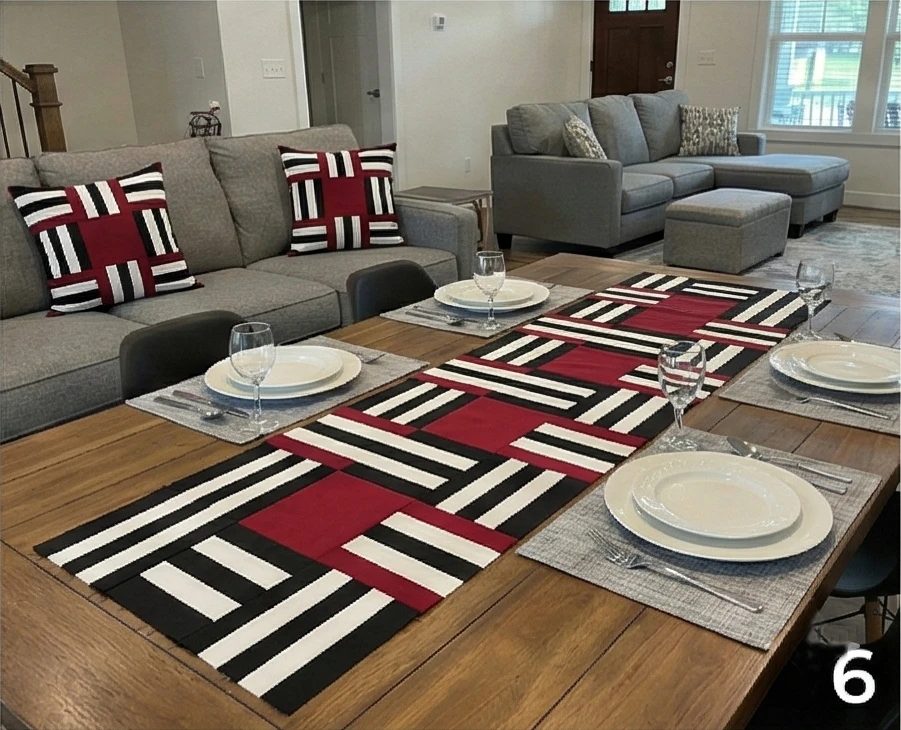
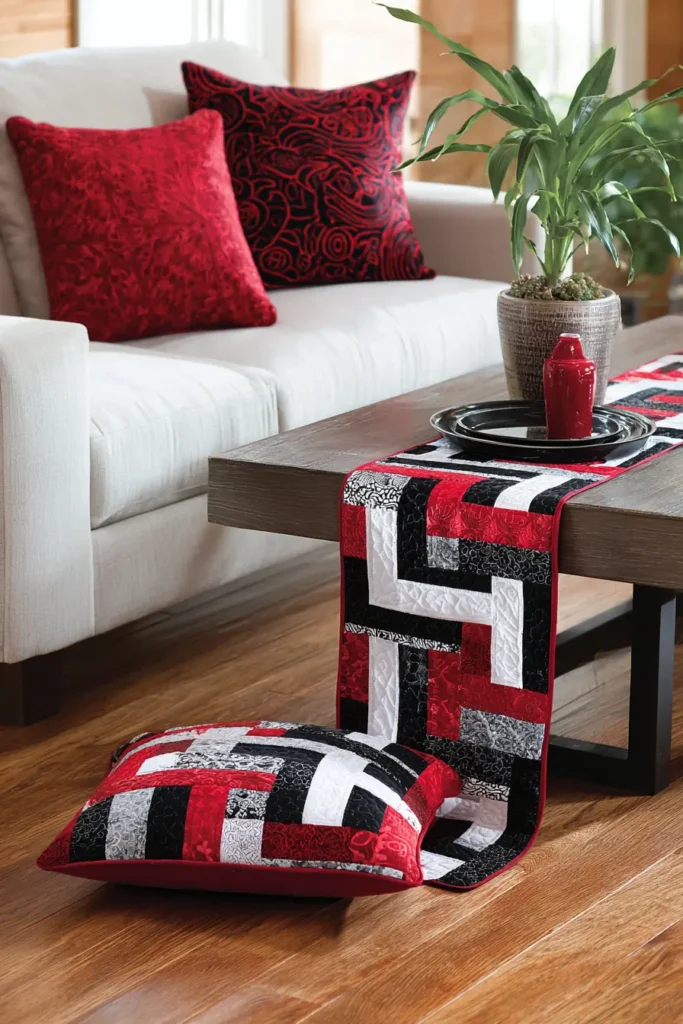
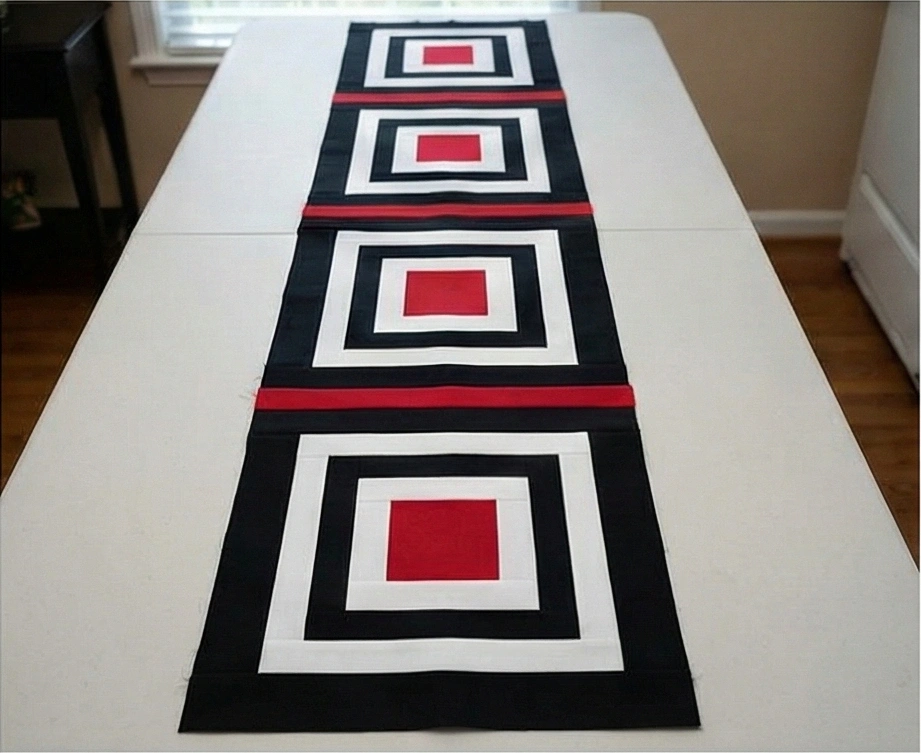
2. Cohesive Red, Black, and White Table Runner and Pillow Sets

The “Unity” Modern Rail Fence Set
When your living and dining areas share one open space, visual cohesion is vital. This project uses the “Rail Fence” block—a beginner-friendly pattern made of strips—to create a matching set. By rotating the blocks between vertical and horizontal orientations, you create a “woven” look that feels dynamic enough for the living room sofa but structured enough for the dining table.
Finished Dimensions:
- Table Runner: 12.5″ x 54″ (Adjustable).
- Pillows: Fits two 18″ x 18″ inserts.
Materials Needed (For the Full Set):
- Fabric A (Black): 1.5 yards of Solid Black (or subtle geometric print).
- Fabric B (White): 1.5 yards of Solid White (or low-volume grey).
- Fabric C (Red): 1 yard of Deep Red (Solid or Tone-on-Tone).
- Backing Fabric: 2 yards (enough for runner back and pillow envelopes).
- Batting: Small craft size or scraps (approx 20″ x 60″ for runner, two 20″ squares for pillows).
- Notions: Rotary cutter, 6.5″ square ruler.
Step 1: Cut the Strips (The Mass Production)
We are working with 2.5-inch strips. This is the standard size for “Jelly Rolls” if you want to skip cutting yardage.
- From Black: Cut 18 strips, measuring 2.5″ x Width of Fabric (WOF).
- From White: Cut 18 strips, measuring 2.5″ x WOF.
- From Red: Cut 9 strips, measuring 2.5″ x WOF.
Step 2: Create the Strip Sets
We will make 3-strip panels. We need two different color combinations to create depth.
- Combination A (High Contrast):
- Sew: Black Strip — White Strip — Black Strip.
- Make 6 of these sets.
- Press seams toward the Black.
- Combination B (The Accent):
- Sew: Red Strip — White Strip — Black Strip.
- Make 3 of these sets.
- Press seams toward the Black/Red.
- Math Check: 2.5″ + 2.5″ + 2.5″ = 7.5″. Minus seam allowances, these sets should measure 6.5″ wide.
Step 3: Cut the Blocks
Turn the long strip sets into perfect squares.
- Place a Strip Set on your cutting mat.
- Trim the selvage edge off the start.
- Sub-Cut: Cut the set into segments exactly 6.5″ wide.
- Since the strip set is also 6.5″ high, you now have perfect 6.5″ x 6.5″ squares.
- Yield: You need a total of 28 Blocks for the set.
- Cut 16 Blocks from Combination A (Black/White/Black).
- Cut 12 Blocks from Combination B (Red/White/Black).
Step 4: The Runner Layout (Linear Flow)
The runner uses 2 rows of 9 blocks.
- Grid: Arrange a grid of 2 blocks wide x 9 blocks long.
- The Pattern: Alternate the stripes’ orientation.
- Block 1: Vertical Stripes.
- Block 2: Horizontal Stripes.
- Checkerboard: Ensure a Black/White block is always touching a Red accent block for balance.
- Sew: Stitch the blocks into pairs, then sew the pairs into a long row.
- Finish: Layer with batting/backing, quilt simple straight lines, and bind with Red fabric for a pop of color on the table.
Step 5: The Pillow Layout (Square Grid)
The pillows use a 3×3 grid (9 blocks).
- Grid: Arrange a grid of 3 blocks wide x 3 blocks high.
- Center Focus: Place a Red/White/Black block in the dead center.
- Surround: Fill the remaining spots with alternating blocks, rotating the stripe direction every time (Vertical, Horizontal, Vertical…).
- Sew: Stitch into 3 rows, then join the rows.
- Repeat: Do this again for the second pillow top.
Step 6: Quilt the Pillow Tops
Don’t just make a pillowcase; quilt the front for that high-end look.
- Layer the pillow top with batting and a muslin scrap (you don’t need “real” backing fabric inside the pillow).
- Quilt: Stitch a large “X” through each square. This stabilizes the fabric layers so they don’t sag over time.
- Trim: Square up the quilted top to 18.5″ x 18.5″.
Step 7: Envelope Backing Assembly
- From your Backing Fabric, cut two rectangles measuring 18.5″ wide x 13″ tall.
- Hem one long edge of each rectangle.
- Place the Quilted Pillow Top face up.
- Place the backing rectangles face down, overlapping in the middle.
- Sew around the perimeter, turn inside out, and stuff with your pillow form.
- Result: You now have a dining table runner and living room pillows that share the exact same DNA, perfectly unifying the two zones.
Pro Design Tip: Texture Swap. To make the set feel more luxurious for a “Living/Dining” space, replace the White Cotton with White Linen and the Red Cotton with Red Velvet. The pattern remains simple, but the mix of rough linen and soft velvet under the dinner plates and behind your back on the sofa adds incredible sensory depth.
Budget Consideration: Canvas Drop Cloths. For the “White” strips and the backing, use Canvas Drop Cloths. They are heavy-duty (great for runners who need to lie flat) and extremely cheap. The “oatmeal” color of unbleached canvas looks sophisticated paired with stark Black and Red.
3. Bold Buffalo Check Quilt Throw for Sofa in Living Cum Dining Room
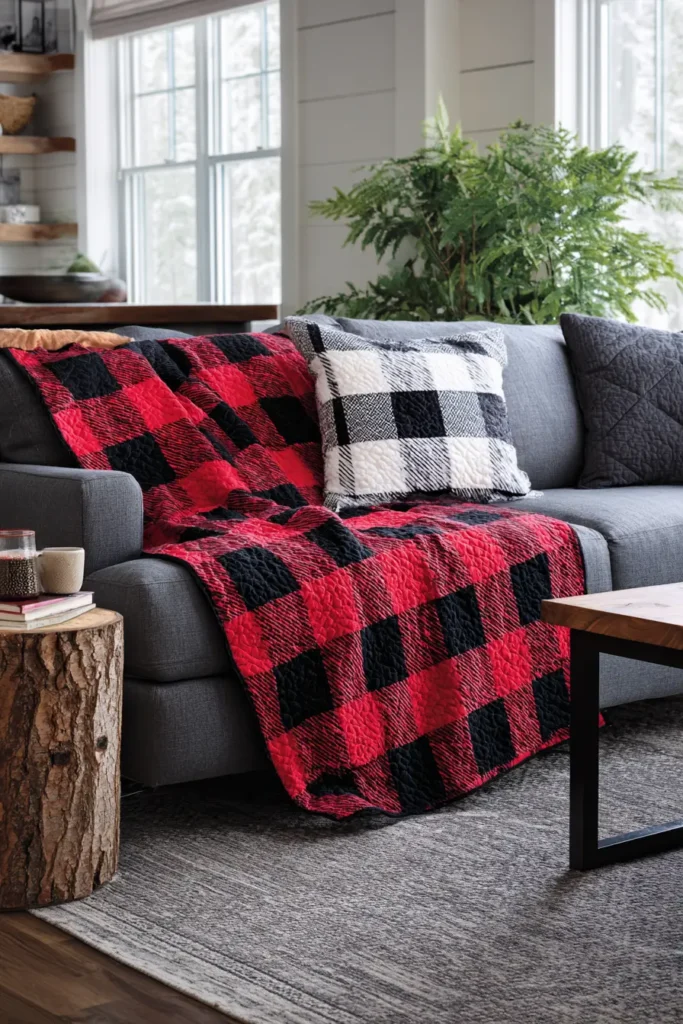
The “Cabin Chic” Giant Gingham Throw
Buffalo Check (or Gingham) is the ultimate pattern for bridging the gap between a cozy living area and a formal dining space. It feels rustic yet orderly. This design uses a smart “strip piecing” technique to create a perfect interlocking plaid pattern using Black, White, and Red. By using Red as the “medium” value between the Black and White, the eye blends them into a cohesive, stunning plaid.
Finished Dimensions: Large Sofa Throw, approximately 60″ x 72″.
Materials Needed:
- Fabric A (Dark/Black): 2 yards of Solid Black.
- Fabric B (Medium/Red): 3 yards of Bright Red (Solid).
- Fabric C (Light/White): 2 yards of Solid White.
- Backing Fabric: 4 yards (Black or Red Flannel is nice for coziness).
- Batting: Throw Size (64″ x 76″).
- Binding: 1/2 yard of Solid Black.
- Notions: Rotary cutter, 6.5″ x 24″ quilting ruler.
Step 1: Cut the Master Strips
The secret to a fast plaid quilt is sewing long strips rather than individual squares. We are making large 6-inch finished blocks for a bold, modern look.
- From Fabric A (Black): Cut 10 strips, measuring 6.5″ wide x Width of Fabric (WOF).
- From Fabric C (White): Cut 10 strips, measuring 6.5″ wide x WOF.
- From Fabric B (Red): Cut 20 strips, measuring 6.5″ wide x WOF.
- Note: You need double the amount of Red because it appears in both the “Dark Rows” and the “Light Rows.”
Step 2: Create the Strip Sets
We need to build two different types of striped fabric.
- Strip Set A ( The Dark Row):
- Take one Black strip and one Red strip.
- Sew them together lengthwise.
- Press the seam toward the Black fabric.
- Repeat to make 10 of these sets.
- Strip Set B (The Light Row):
- Take one Red strip and one White strip.
- Sew them together lengthwise.
- Press the seam toward the Red fabric.
- Repeat to make 10 of these sets.
- Check: Each strip set should measure 12.5″ wide.

Step 3: Sub-Cut into Segments
Now we chop these ribbons into pre-made block units.
- Take your Strip Set A (Black/Red).
- Cross-cut it into segments that are 6.5″ wide.
- Yield: You need 60 of these segments.
- Take your Strip Set B (Red/White).
- Cross-cut it into segments that are 6.5″ wide.
- Yield: You need 60 of these segments.
Step 4: Arrange the Gingham Pattern
The magic happens in the layout. We alternate the segments to trick the eye.
- Row Type 1 (Dark): Sew the Strip Set A (Black/Red) segments together end-to-end.
- Pattern: Black square – Red square – Black square – Red square…
- Ensure the Black squares are always on the left (or consistent).
- Use 10 segments per row. Make 6 of these rows.
- Row Type 2 (Light): Sew the Strip Set B (Red/White) segments together end-to-end.
- Pattern: Red square – White square – Red square – White square…
- Critical: Arrange it so the Red square sits under the Black square from the previous row.
- Use 10 segments per row. Make 6 of these rows.
Step 5: Assemble the Top
- Layout: Alternate the rows vertically.
- Row 1 (Dark)
- Row 2 (Light)
- Row 3 (Dark)
- Row 4 (Light)… continue until all 12 rows are placed.
- Visual Check: Look at the quilt.
- The Black squares should form diagonal lines.
- The White squares should form diagonal lines.
- The Red squares should connect everything.
- Sew: Stitch the long horizontal rows together. Pin carefully at every intersection to ensure perfectly square corners.
- Press: Press rows in alternating directions or open.
Step 6: “Grid” Quilting
- Baste the sandwich.
- Quilting: A geometric quilt needs geometric quilting.
- Design: Stitch a simple grid.
- Sew diagonal lines through the center of the Black squares.
- Sew diagonal lines through the center of the White squares.
- Result: A large “X” through every block keeps the batting secure and looks classic.
- Binding: Finish with Solid Black binding to frame the graphic pattern.
Pro Design Tip: Flannel Texture. For an authentic “Living/Dining” cozy vibe, use Flannel Fabric instead of standard quilting cotton. The fuzzy texture makes the buffalo check look authentic and feels incredibly warm for sofa snuggles.
Budget Consideration: Wide Backing. A 60″ wide throw is wider than standard fabric (42″). Buy 108″ Wide Quilt Backing (usually sold for King quilts). One yard of wide backing (36″ x 108″) isn’t enough length, but 2 yards gives you enough for two throws! Split the cost with a friend.
4. Rustic Plaid Red and Black Quilt for Cozy Combined Spaces
The “Woodsman’s Grid” Log Cabin Plaid Pillow
While the Buffalo Check (previous guide) is about uniform squares, a true “Rustic Plaid” or Tartan features concentric lines weaving over one another. This design uses the traditional Log Cabin technique to create a single, large block that mimics the look of a woven flannel shirt. It’s perfect for adding a touch of cozy texture to a dining chair or a living room armchair.
Finished Dimensions: Fits a standard 20″ x 20″ Pillow Insert (Oversized for rustic comfort).
Materials Needed:
- Fabric A (Center & Main/Red): 1/2 yard of Red Flannel or Plaid.
- Fabric B (The Grid/Black): 1/2 yard of Solid Black or Charcoal.
- Fabric C (The Highlight/White): 1/8 yard (or scraps) of Solid White.
- Backing Fabric: 3/4 yard of Black Canvas or Denim.
- Batting: 22″ x 22″ scrap.
- Notions: Rotary cutter, quilting ruler.
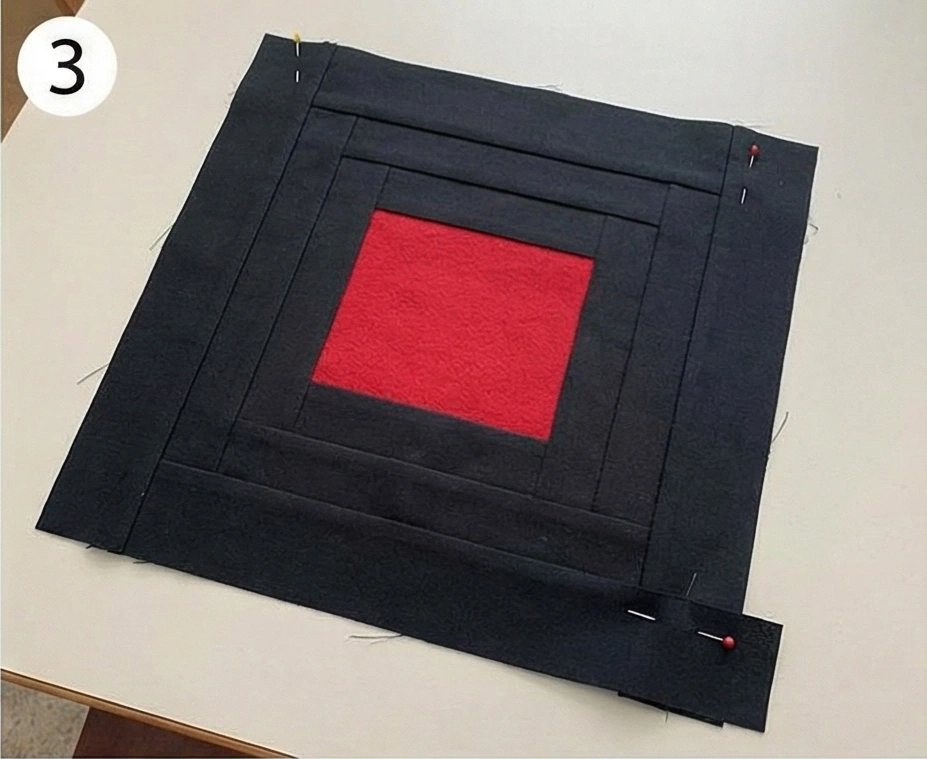
Step 1: Cut the “Logs”
Log Cabin blocks are built by adding strips around a center square. Precision cutting is key here.
- Center: From Fabric A (Red), cut 1 square measuring 4.5″ x 4.5″.
- Red Logs: Cut 2 strips measuring 2.5″ x WOF (Width of Fabric).
- Black Logs: Cut 2 strips measuring 2.5″ x WOF.
- White Pinstripes: Cut 2 strips measuring 1.5″ x WOF.
Step 2: Round 1 (The Red Core)
We start by extending the red center.
- Take your Red Center Square (4.5″).
- Sew a Red Strip to the Top. Trim to fit (4.5″). Press open.
- Sew a Red Strip to the Right. Trim to fit. Press open.
- Sew a Red Strip to the Bottom. Trim to fit.
- Sew a Red Strip to the Left. Trim to fit.
- Visual: You now have a larger Red square (approx 8.5″), but with seam lines that add texture.
Step 3: Round 2 (The Black Grid)
Now we add the heavy contrast.
- Sew a Black Strip to the Top of your red unit. Trim.
- Sew a Black Strip to the Right. Trim.
- Sew a Black Strip to the Bottom. Trim.
- Sew a Black Strip to the Left. Trim.
- Size Check: Your block is now approx 12.5″ square.
Step 4: Round 3 (The White Pinstripe)
Plaid always has a thin highlight line. This makes it look “woven.”
- Sew a White Strip (1.5″ wide) to the Top. Trim.
- Sew a White Strip to the Right. Trim.
- Sew a White Strip to the Bottom. Trim.
- Sew a White Strip to the Left. Trim.
- Note: These thin white lines break up the heavy colors and create that complex plaid look.
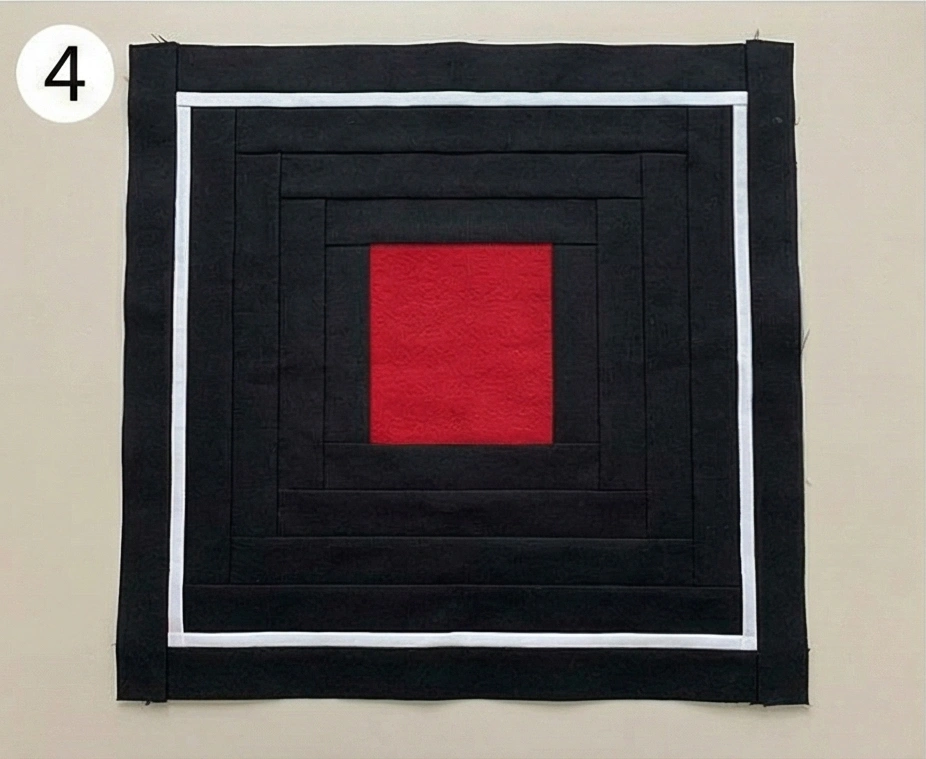
Step 5: Round 4 (The Final Frame)
Finish with a heavy border to reach the full 20-inch size.
- Switch back to Fabric B (Black).
- Add Black strips to the Top, Right, Bottom, and Left.
- Measure: The block should now be roughly 18.5″ to 19″.
- Adjustment: If you need it to reach 20.5″ (for seam allowance), add one final round of Red Strips.
Step 6: “X” Quilting and Finishing
- Layer: Muslin (bottom) + Batting + Plaid Top.
- Quilt:
- Stitch “in the ditch” between the Red and Black rounds.
- Then, stitch a large “X” from corner to corner across the whole pillow.
- Backing: Create a standard Envelope Back using the Black Canvas (cut two pieces 20.5″ x 15″, hem, overlap).
- Bind: For a true rustic finish, do not turn it inside out. Sew the front and back together (wrong sides touching) and bind the raw edges with Red Binding, just like a mini quilt.
Pro Design Tip: Frayed Flannel. If using flannel, you can use the “Rag Quilt” technique for the outer edge. Instead of binding, sew the front and back together with a 1-inch seam allowance. Snip the edges every 1/2 inch and wash/dry. The edges will fray into a soft, fuzzy fringe that looks incredibly cozy.
Budget Consideration: Upcycled Plaid Shirts. This pattern mimics a shirt, so why not use one? Visit a thrift store and buy an XXL Men’s Flannel Shirt. Use the back panel of the shirt as your pillow backing (keep the buttons for a functional closure!) and cut your Red strips from the sleeves.
5. Quilted Chair Pads for Comfortable Dining Seating
The “Bistro Square” Tufted Chair Pad
Dining chairs in a combined living/dining space often need to look good from the back (living room view) and feel good on the seat (dining view). This design features a durable Solid Black Center (to hide food spills) framed by a stylish Red and White Border. We use a thick foam insert and “tufting” stitches to create a plush, professional upholstery look.
Finished Dimensions: Standard 16″ x 16″ (Adjustable to your specific chair).
Materials Needed (For 4 Chair Pads):
- Fabric A (Center/Black): 1 yard of Heavy Black Canvas or Duck Cloth.
- Fabric B (Border/Red): 1 yard of Red Patterned Fabric (Geometric or Stripe).
- Backing Fabric: 2 yards of Non-Slip fabric or cheap black cotton.
- Insert: 1-inch thick High-Density Foam (sold at craft stores) OR 2 layers of extra-loft batting.
- Ties: 3 yards of Black Grosgrain Ribbon (or make your own ties).
- Binding: 1.5 yards of Solid Red.
- Notions: Paper (for template), heavy-duty needle.
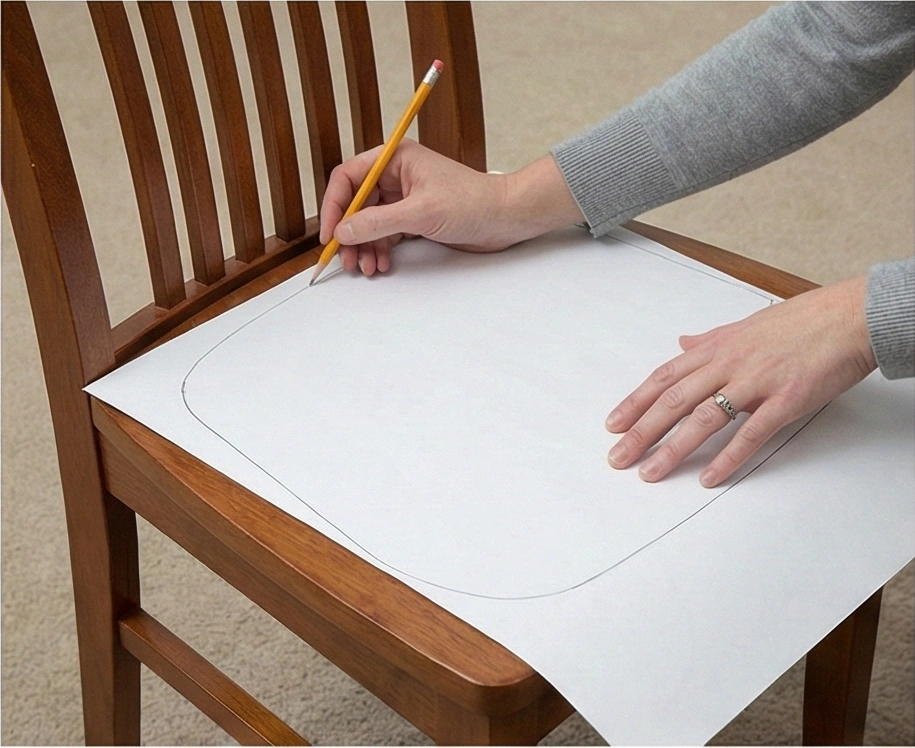
Step 1: Make Your Template
Chair seats are rarely perfect squares; they often taper toward the back.
- Place a large piece of paper (newspaper works) on your dining chair seat.
- Trace: Trace the shape of the seat.
- Adjust: Subtract 1/2 inch from the perimeter (you don’t want the pad hanging over the edge).
- Cut: Cut out your paper template. This is your master pattern.
Step 2: Create the Patchwork Top
We want a framed look.
- The Center: Measure your paper template. Subtract 3 inches from the width and height. Cut a piece of Black Canvas to this size.
- The Border: Cut 3.5″ wide strips of your Red Fabric.
- Sew: Sew the Red strips to the Top, Bottom, Left, and Right of the Black center square (Log Cabin style).
- Trim: Place your paper template over this patchwork block and cut it out. You now have a shaped top with a black center and red border.

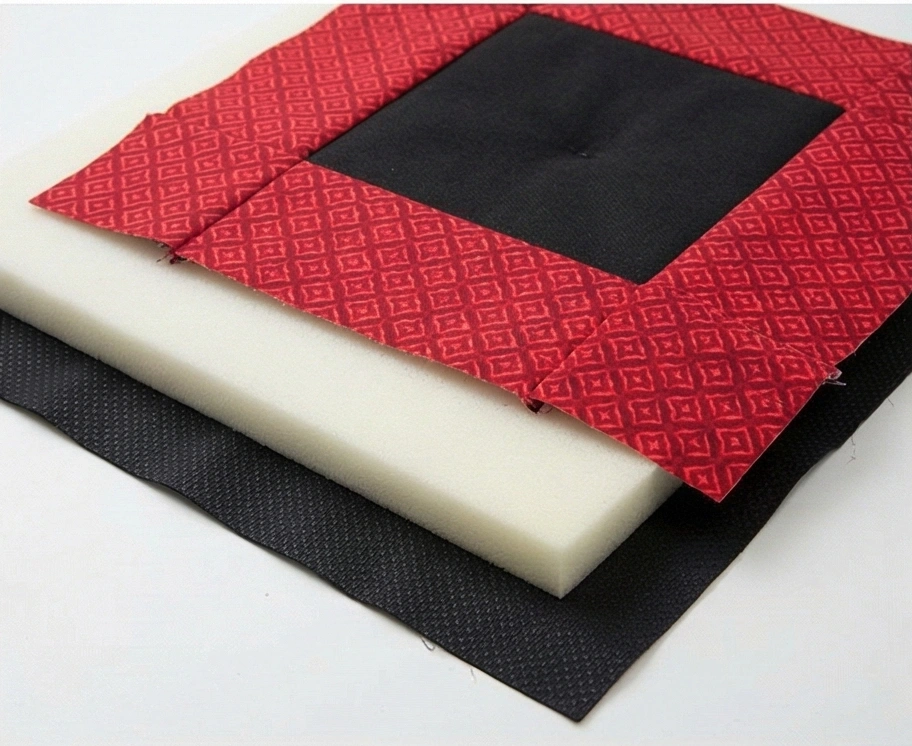
Step 3: Prepare the “Sandwich”
- Cut Foam: Use your template to cut the 1-inch Foam. Trim an extra 1/4 inch off the foam edges (so the foam doesn’t get caught in the binding seam).
- Layer:
- Bottom: Backing Fabric (Wrong side up).
- Middle: Foam Insert.
- Top: Patchwork Top (Right side up).
- Baste: Use a heavy spray of baste on both sides of the foam to adhere the fabric to it. Pins don’t work well with foam.
Step 4: “Bar Tack” Tufting
You can’t easily quilt through 1-inch foam with traditional quilting methods. Instead, we “tuft” it to hold the layers together.
- Mark: Mark 4 or 5 points in the center Black square (like the dots on a dice).
- Stitch: Set your machine to a wide Zig-Zag with a stitch length of 0 (a Bar Tack).
- Sew: Stitch a heavy bar tack at each marked point through all layers (Top, Foam, Backing).
- Alternative: If the foam is too thick for your machine, use a hand needle and heavy thread to tie a knot (like a comforter) at these points.
- This creates dimples that prevent the foam from shifting.

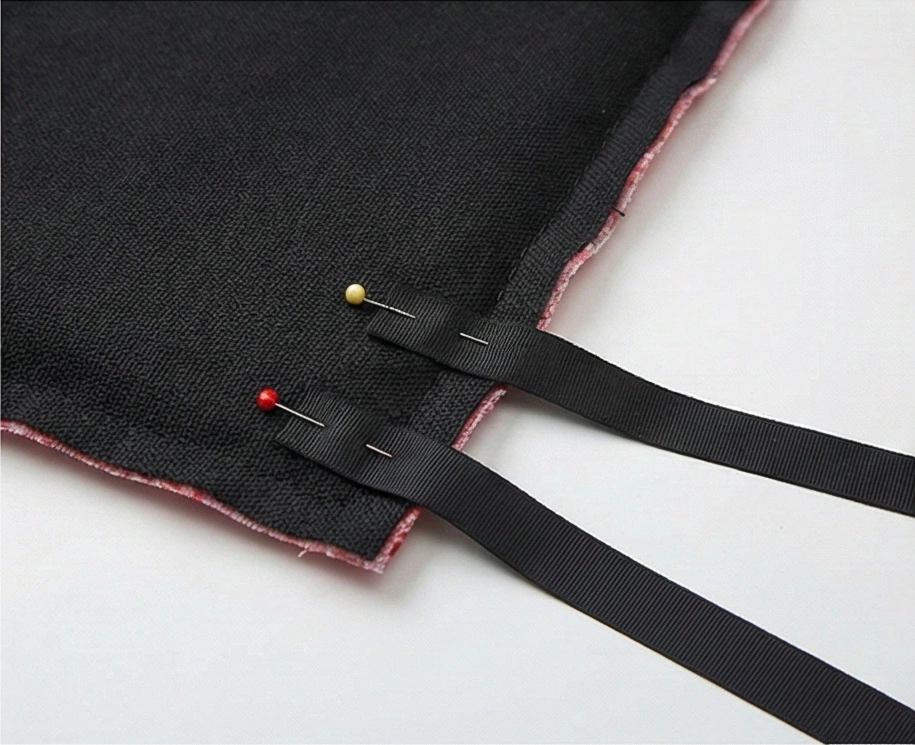
Step 5: Attach the Ties
- Cut your Black Ribbon into 24-inch lengths. (You need 2 ribbons per chair).
- Fold: Fold a ribbon in half to find the center.
- Position: Place the fold at the back corners of the chair pad (where the chair back meets the seat).
- Baste: Stitch the ribbon fold to the raw edge of the fabric (less than 1/4″ from the edge) to hold it in place.
Step 6: Bind the Edge
- Use 2.5″ wide Red Binding strips.
- Sew: Stitch the binding to the front of the pad.
- Careful: When you reach the corners with the ribbons, make sure the ribbons are tucked inward so you don’t sew over the loose ends. Keep the ribbon’s fold secured in the seam.
- Finish: Fold the binding to the back and hand-stitch or machine-stitch it down.
- Result: A plush, custom-fitted pad that ties securely to your chair.

Pro Design Tip: Non-Slip Bottom. If you don’t want to use ties (for a cleaner look), skip Step 5. Instead, use Shelf Liner (Rubber Mesh) as your backing fabric in Step 3. The rubber grip will keep the pad stuck to the wooden chair seat without needing ribbons.
Budget Consideration: Old Towels for Stuffing. Foam can be expensive. For a free alternative, take 3 or 4 old bath towels. Fold or cut them into the shape of your template. Layer them inside the pad instead of foam. They provide great cushion, are absorbent, and are 100% machine washable.
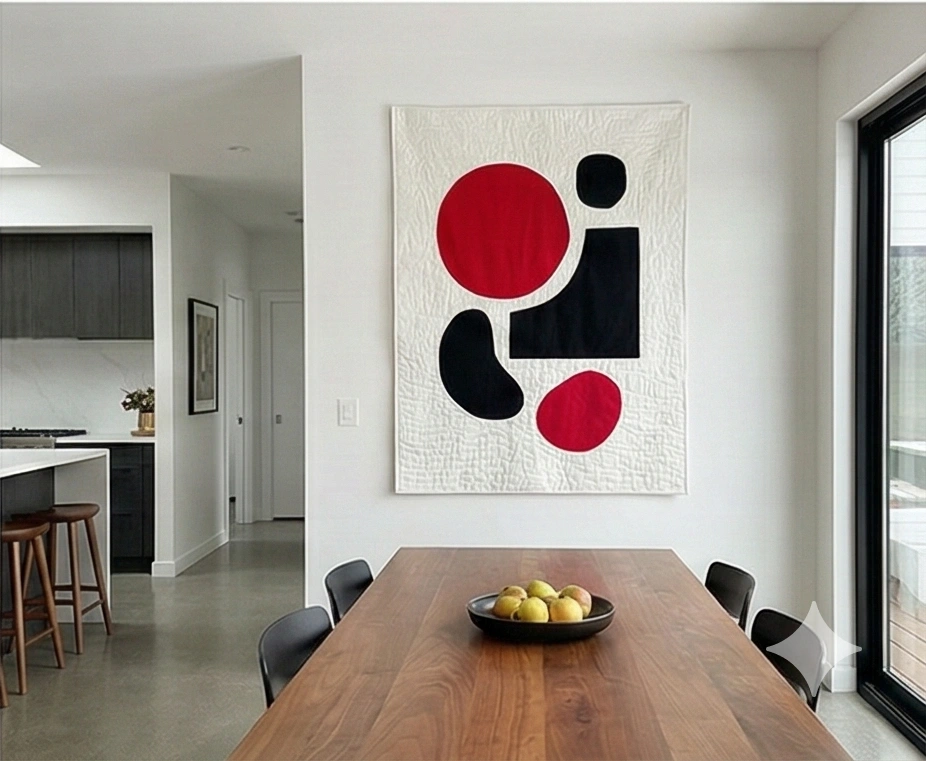
6. Abstract Textile Wall Art for Open Living Spaces
The “Eclipse” Abstract Wall Hanging
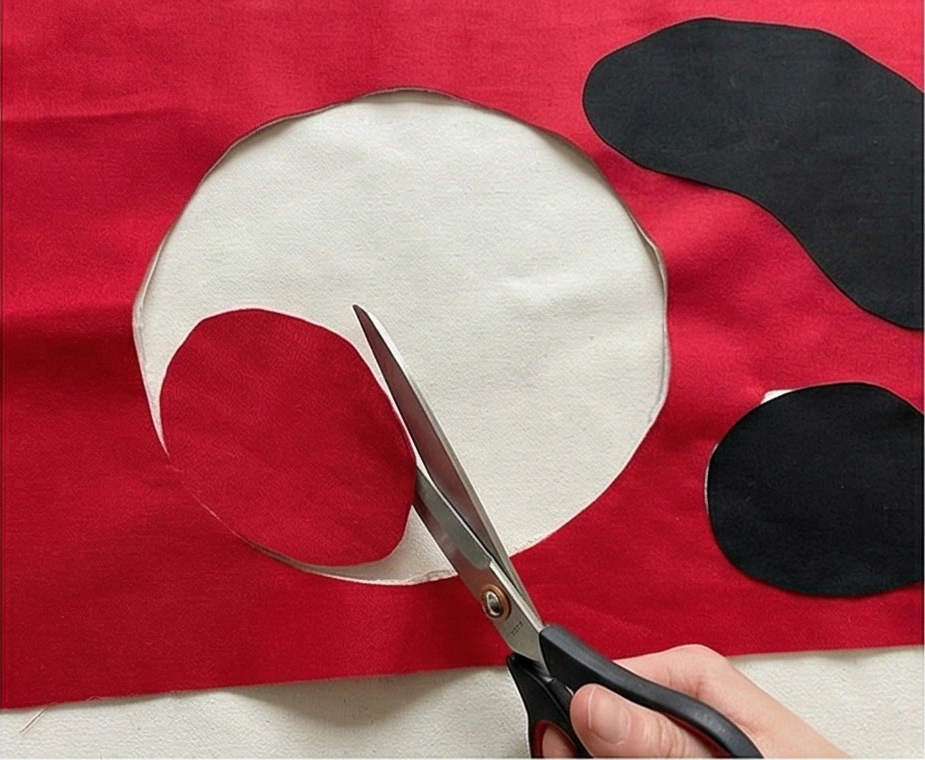
In a large “Living Cum Dining” room, walls can feel vast and empty. Instead of buying a generic print, create a fiber art piece that doubles as sound absorption (crucial for reducing echo in open-concept rooms). This design uses Raw Edge Appliqué to create bold, Mid-Century Modern shapes—floating Red and Black orbs against a stark White canvas. It looks like a painting but adds warmth and texture.
Finished Dimensions: Large Statement Piece, 36″ x 48″.
Materials Needed:
- Fabric A (Background/White): 1.5 yards of Heavy White Duck Cloth or Canvas (needs to be stiff).
- Fabric B (Shapes/Black): 1/2 yard of Solid Black.
- Fabric C (Shapes/Red): 1/2 yard of Bright Red.
- Fusible Web: 1 yard (e.g., Wonder-Under or HeatnBond Lite).
- Backing Fabric: 1.5 yards.
- Batting: Thin cotton batting (38″ x 50″).
- Hanging Hardware: A wooden dowel (34″ long) or a flat wooden slat.
- Notions: Iron, fabric scissors, black thread.
Step 1: Prepare the “Canvas”
We start with the background.
- Cut: Cut your White Duck Cloth to 38″ x 50″ (this allows 1 inch on all sides for shrinkage/squaring up).
- Press: Iron it perfectly flat. Use starch if necessary. This is your “gallery wall.”
Step 2: Create the Art Shapes
We will use heat-activated glue to turn fabric into stickers.
- Trace: On the paper side of your Fusible Web, draw your abstract shapes.
- Shape Ideas: A large off-center circle (The Eclipse), a tall, thin rectangle, a jagged lightning bolt, or three small pebbles.
- Fuse: Iron the fusible web onto the wrong side of your Red and Black fabrics.
- Cut: Cut out the fabric shapes along the lines you drew.
- Peel: Peel off the paper backing. You now have fabric shapes with glue on the back.
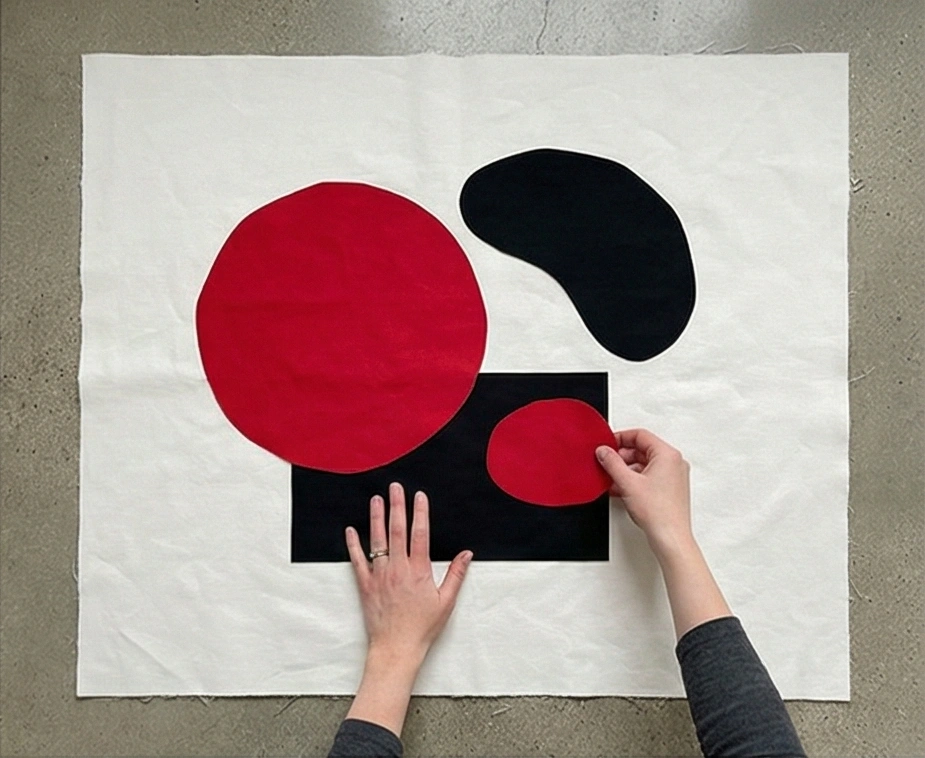
Step 3: Compose the Masterpiece
This is the artistic step.
- Lay your White Canvas on a hard surface (a floor or a table).
- Arrange: Place your Red and Black shapes on the white background.
- Composition Tip: Use the Rule of Thirds. Do not put the biggest shape in the dead center. Place it slightly to the top-left or bottom-right.
- Overlap: Try overlapping a small Red circle on top of a large Black rectangle for depth.
- Fuse: Once you love the layout, use your hot iron to press the shapes down, fusing them permanently to the background.
Step 4: “Sketch” with Thread
Now we turn it from a collage into a quilt.
- Make your sandwich (Backing + Batting + Fused Top). Baste well.
- Thread: Load your machine with Black Thread.
- Stitch: Lower the feed dogs (or use a darning foot) for Free Motion Quilting.
- Scribble: Stitch around the raw edges of your shapes.
- Style: Don’t try to be perfect. Go around the shapes 2 or 3 times in a messy, “sketchy” line. This adds an artistic, hand-drawn vibe to the sharp shapes.
Step 5: Texture the Negative Space
The white space shouldn’t be boring.
- Switch Thread: Change to White Thread (or light grey).
- Quilt: Stitch straight vertical lines (Matchstick Quilting) in the white background areas.
- Space them randomly (some 1/8″ apart, some 1/2″ apart).
- Function: This heavy quilting flattens the background, making the Red and Black shapes “pop” out in 3D relief.
Step 6: The “Invisible” Finish (Facing)
Wall art shouldn’t have a bulky binding frame. We use a “Facing” to hide the raw edges on the back.
- Trim: Square up the quilt to exactly 36″ x 48″.
- Cut Strips: Cut four 2.5″ strips of White fabric.
- Sew: Sew the strips to the front of the quilt (like binding).
- Flip: Turn the strips completely to the back of the quilt.
- Press & Stitch: Press flat to keep the edge crisp. Hand-stitch the strips to the backing.
- Result: The front has no border; the art extends to the edge.
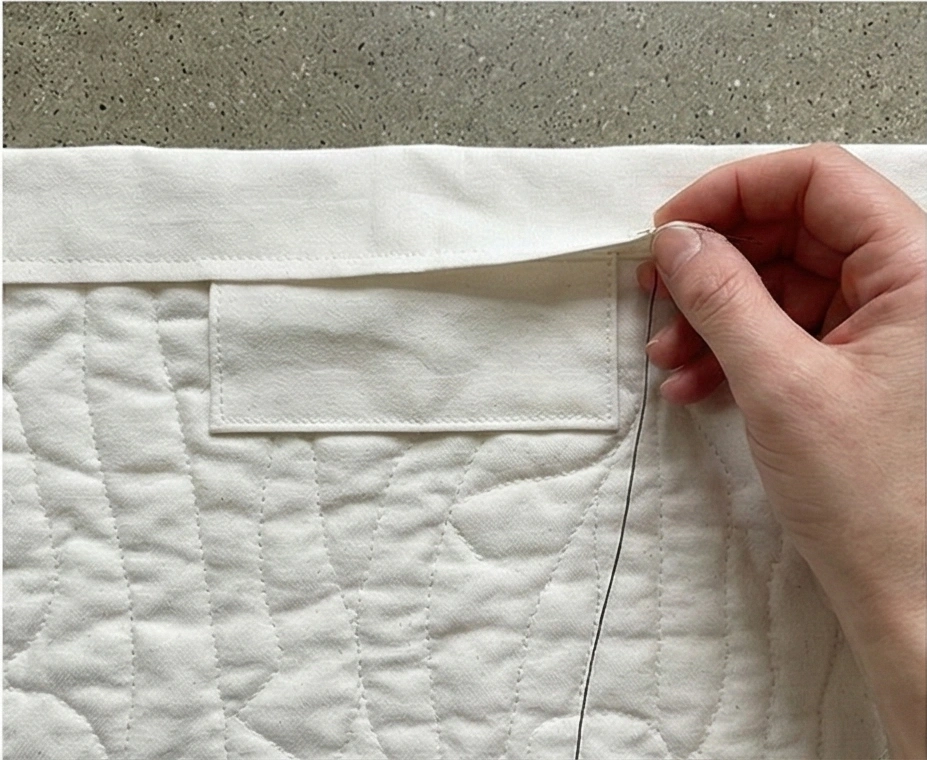
Step 7: Add the Hanging Sleeve
- Cut a rectangle of fabric 8.5″ x 34″.
- Fold short ends in and hem. Fold lengthwise (wrong sides together) and sew the raw edge to the top back of the quilt (just below the facing).
- Hand stitch the bottom fold of the sleeve to the backing.
- Insert: Slide your wooden dowel into the sleeve and hang it up!
Pro Design Tip: Acoustic Padding. If your Living/Dining room is very echoey (lots of tile or hardwood), use Wool Batting or even a layer of Felt inside the quilt instead of cotton batting. Wool absorbs sound waves significantly better, making your dinner conversations more straightforward.
Budget Consideration: Shower Curtain Liner. If purchasing 1.5 yards of heavy canvas is too pricey, buy a White Cotton Shower Curtain. The fabric is large, durable, usually hemmed (which you can use), and cheaper per yard than by the yard.
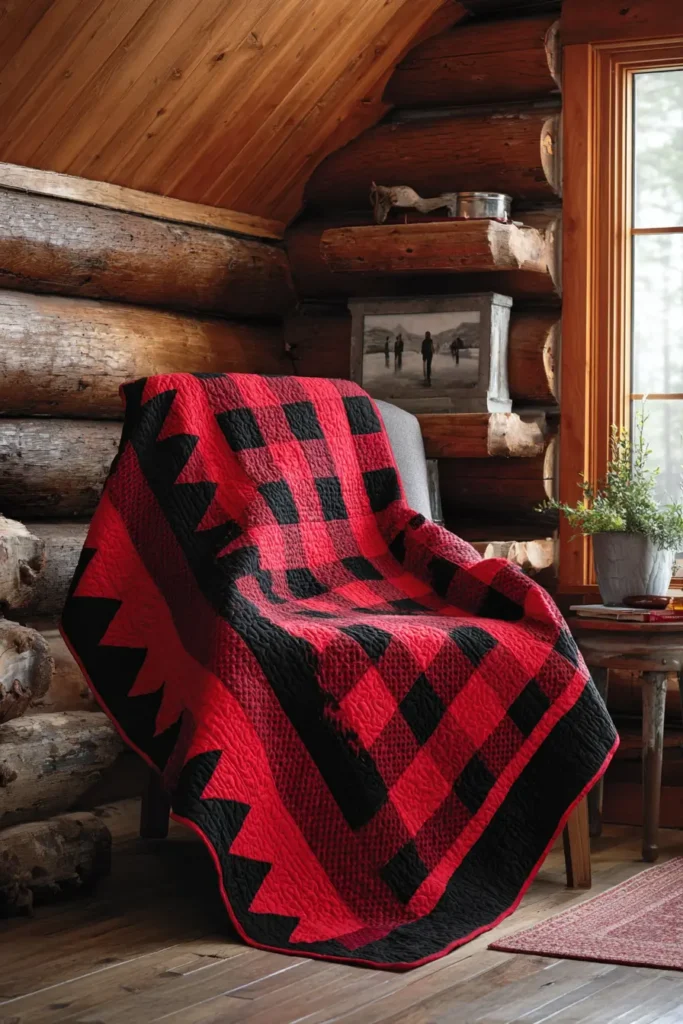
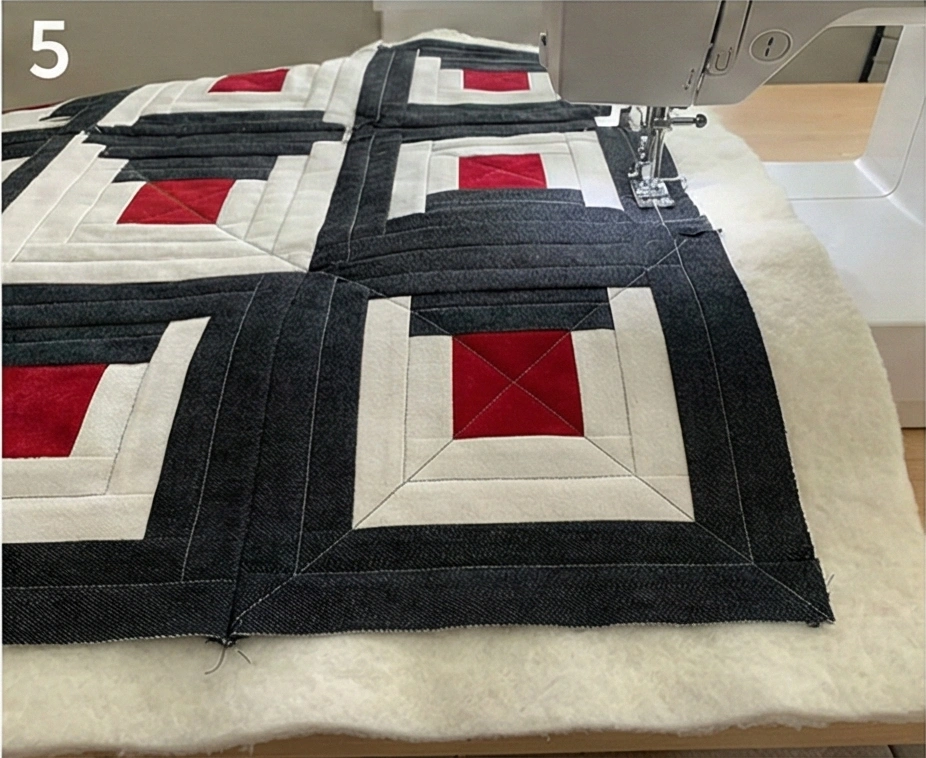
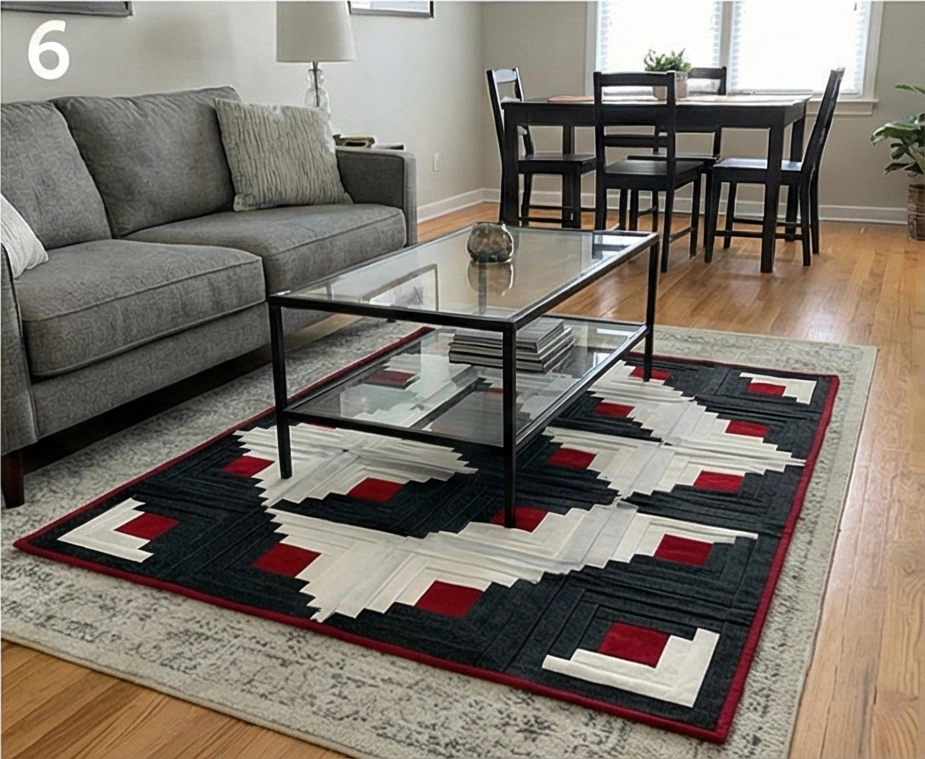
7. Log Cabin Quilt Pattern in Red, Black, and White for Floor Throw
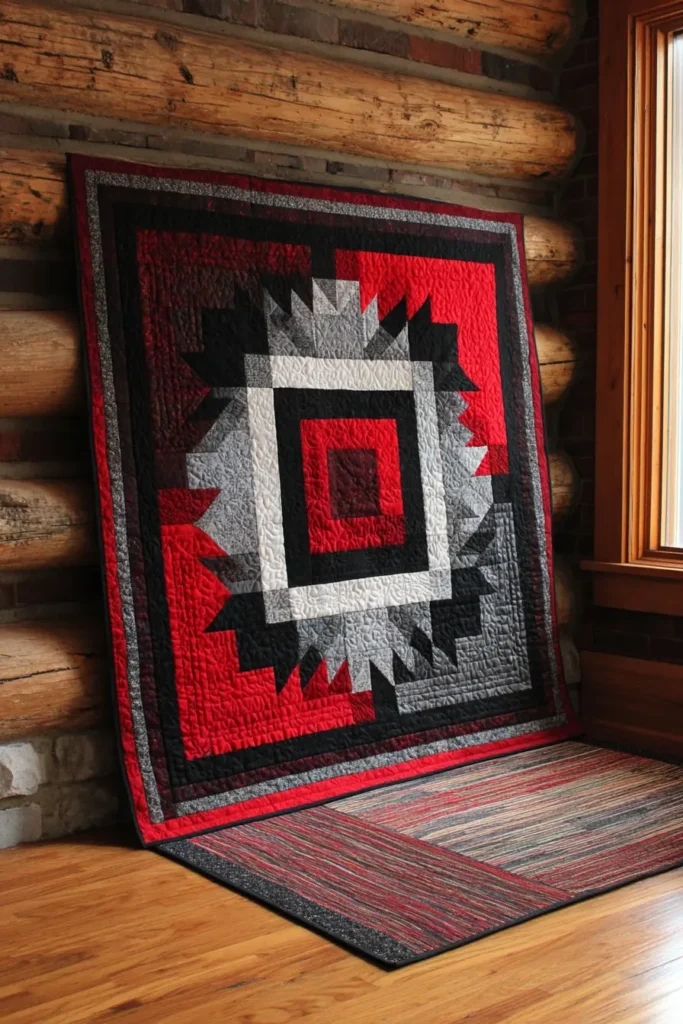
The “Hearth & Shadow” Log Cabin Floor Throw
The Log Cabin is a historical pattern traditionally symbolizing the hearth (center) and the light/shadow of a home. For a modern “Living Cum Dining” space, we update this classic by using heavyweight fabrics like Canvas, Denim, or Corduroy. This floor throw is designed to be tough enough for kids to play on or to place under a coffee table, yet stylish enough to act as a graphic rug.
Finished Dimensions: Large Square Throw/Rug, approximately 60″ x 60″.
Materials Needed:
- Fabric A (The Hearth/Red): 1/2 yard of Red Velvet or Heavy Cotton.
- Fabric B (The Shadow/Black): 2 yards of Black Denim or Canvas.
- Fabric C (The Sunshine/White): 2 yards of White Duck Cloth or Heavy Twill.
- Backing Fabric: 4 yards of Heavy Upholstery Fabric (or a drop cloth).
- Batting: 2 layers of Cotton Batting (for floor cushion) or a cheap wool blanket.
- Notions: Rotary cutter, large square ruler (12.5″ is ideal), heavy-duty needle (Size 100/16).
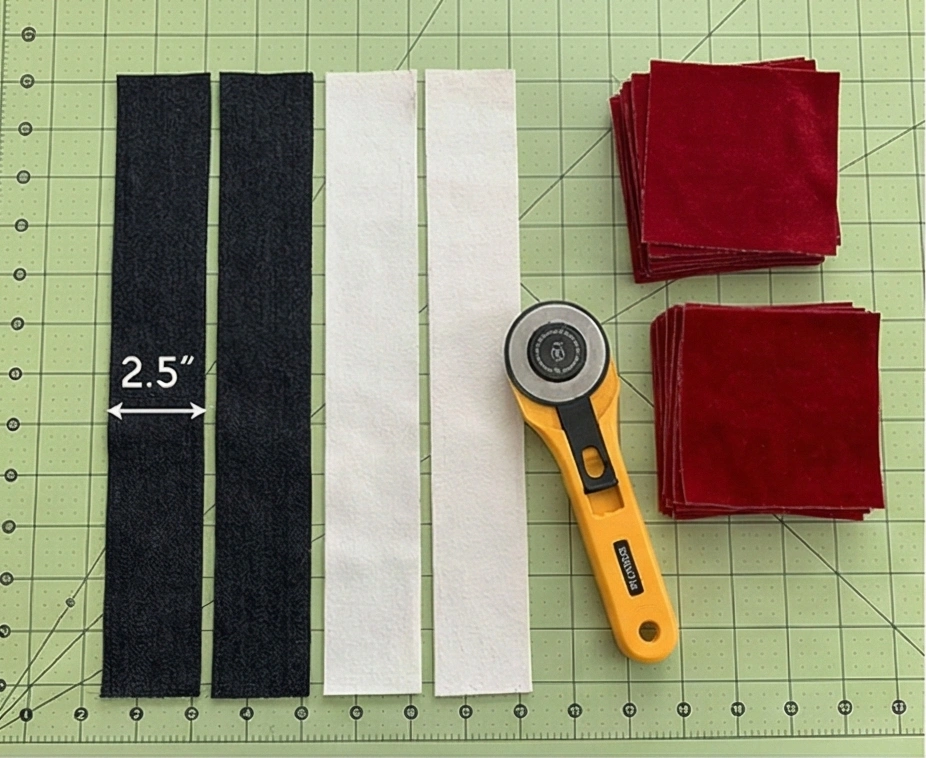
Step 1: Cut the “Logs” and Centers
We are making 25 Blocks. Each block will finish at 12 inches square.
- Centers (Red): Cut 25 squares measuring 4.5″ x 4.5″.
- Logs (Black & White): Cut the Black and White fabrics into many strips measuring 2.5″ wide.
- Tip: Leave them WOF (Width of Fabric) length for now; you will trim them as you sew.
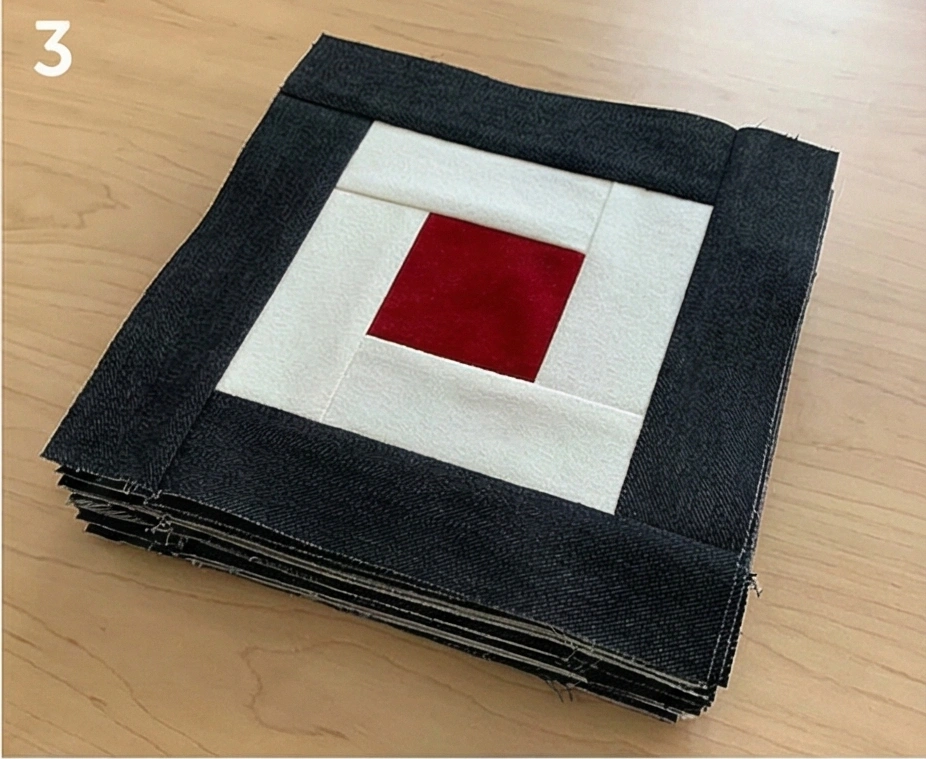
Step 2: Build the First Round (The Core)
The Log Cabin rule: Light on two sides, Dark on two sides.
- Take a Red Center Square.
- Log 1 (White): Sew a White strip to the Right side. Press open. Trim the excess strip even with the square.
- Log 2 (White): Sew a White strip to the Top. Press open. Trim.
- Log 3 (Black): Sew a Black strip to the Left. Press open. Trim.
- Log 4 (Black): Sew a Black strip to the Bottom. Press open. Trim.
- Result: A red square slightly off-center, bordered by white on the top/right and black on the bottom/left.

Step 3: Build Rounds 2 and 3 (Expansion)
Continue spiraling outward in the same Light/Light/Dark/Dark order.
- Round 2:
- Sew White to the Right.
- Sew White to the Top.
- Sew Black to the Left.
- Sew Black to the Bottom.
- Round 3: Repeat the sequence one last time.
- Square Up: Use your ruler to trim the finished block to exactly 12.5″ x 12.5″.
- Repeat until you have 25 finished blocks.
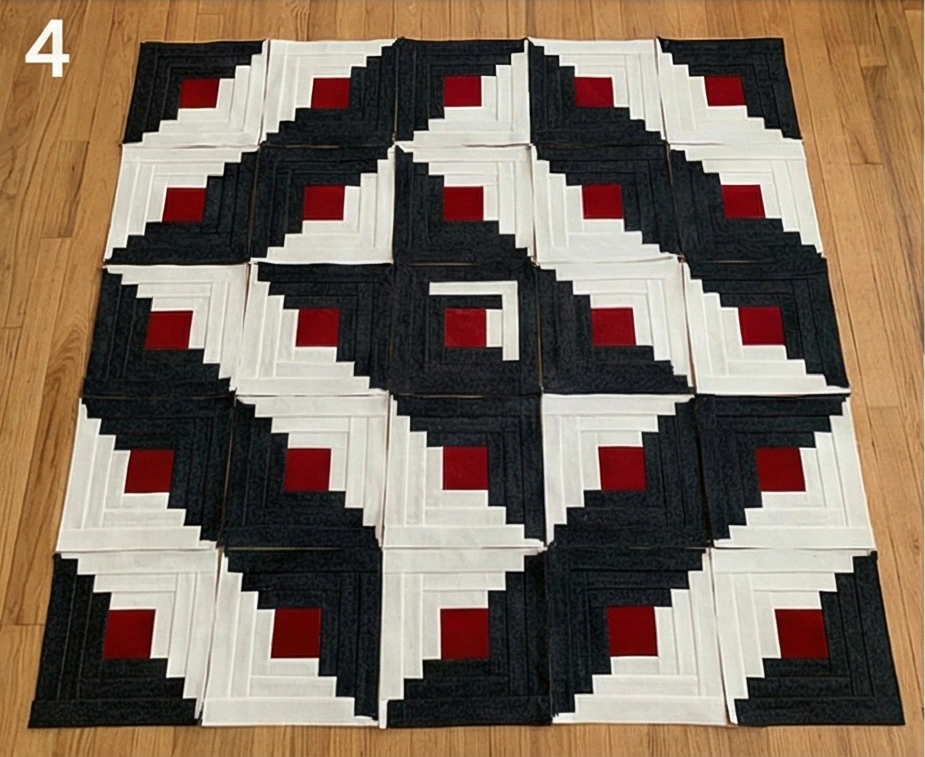
Step 4: The “Sunshine and Shadows” Layout
This is the specific arrangement that makes Log Cabins famous.
- Clear a floor space 5 blocks wide x 5 blocks tall.
- Orient the Blocks: Rotate the blocks so that the “Light Sides” touch other “Light Sides” and “Dark Sides” touch “Dark Sides.”
- Visual Effect: This will create large diagonal diamonds or zig-zags of Black and White across the quilt, with the Red squares pulsating in lines.
- Option: For a “Barn Raising” look, arrange them to form a large diamond in the center. For “Straight Furrows,” arrange them to create diagonal stripes.
Step 5: Heavy-Duty Assembly
- Sew Rows: Stitch the blocks into 5 horizontal rows.
- Important: Use a slightly longer stitch length (3.0mm) if using denim/canvas, as the seams can get thick.
- Press: Press all seams Open. This is crucial for a floor throw to lie flat and not hurt your feet when walking over lumps.
- Join Rows: Sew the 5 rows together to complete the 60″ x 60″ top.
Step 6: “In the Ditch” Quilting
For a floor throw, you want the quilting to disappear but hold tight.
- Sandwich your Top, Double Batting, and Backing. Baste with curved safety pins (spray baste may not hold heavy denim well).
- Thread: Use Grey Thread (blends with both black and white).
- Stitch: Sew directly in the seam lines (“in the ditch”) of every single log spiral.
- Start at the center Red square and spiral out, just like you sewed it.
- Bind: Finish with a wide Black binding (cut strips 3 inches wide instead of standard 2.5) to handle the thickness of the floor quilt.
Pro Design Tip: Non-Slip Backing. Since this is for the floor, skip the fabric backing entirely and use a Rubberized Rug Pad. You can actually quilt directly through the rubber mesh if you go slowly and use a leather needle. This guarantees the throw won’t slide on hardwood floors.
Budget Consideration: Denim Leg Harvest. Ask friends for their old, worn-out black jeans. The legs of jeans are perfect for cutting the 2.5″ black strips needed for this quilt. The varied fades of black/charcoal add a fantastic “distressed” industrial look that fits perfectly in a modern loft space.
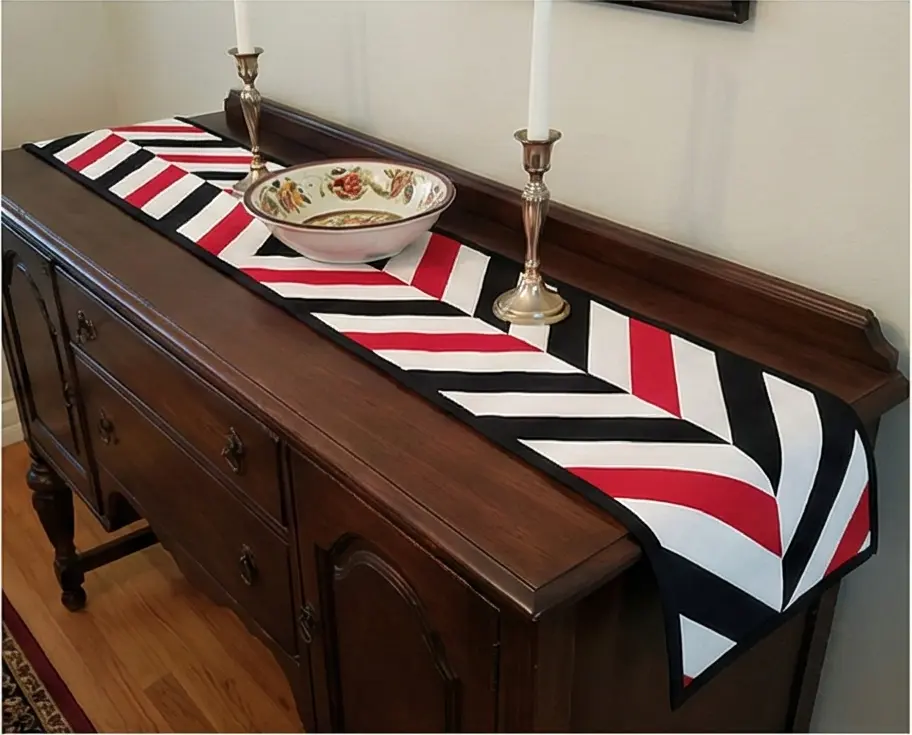
8. Herringbone Pattern Quilt Runner for Sideboard in Dining
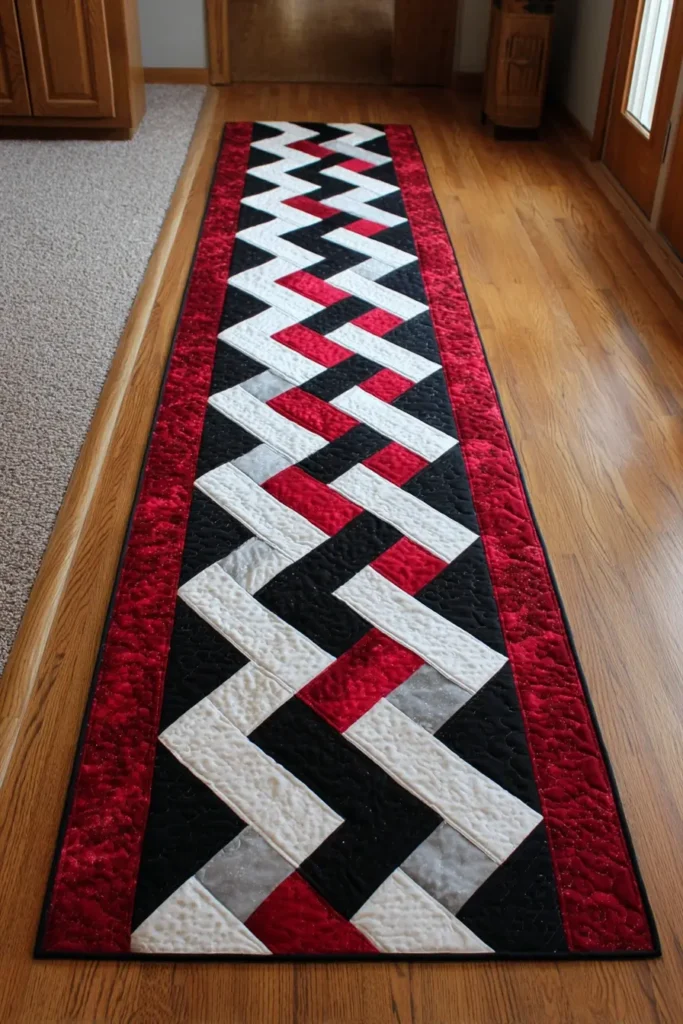
The “Zig-Zag Banquet” French Braid Runner
Sideboards and buffets are usually long and narrow, making them the perfect canvas for a “French Braid” quilt pattern. Unlike the block-based herringbone throw we made earlier, this runner is constructed as one continuous, woven strand. The interlocking Black and White strips create a sense of movement that draws the eye across the entire length of the dining room, while occasional Red strips add a rhythmic pulse to the design.
Finished Dimensions: Extra Long Runner, approximately 15″ x 72″ (Easily adjustable).
Materials Needed:
- Fabric A (Black): 1/2 yard of Solid Black.
- Fabric B (White): 1/2 yard of Solid White.
- Fabric C (Red): 1/4 yard of Bright Red.
- Backing Fabric: 3/4 yard (or a 20″ x 80″ strip).
- Batting: Fusible Fleece (best for flat runners) or thin cotton batting (18″ x 80″).
- Binding: 1/2 yard of Black.
- Notions: Rotary cutter, square quilting ruler (at least 8.5″).
Step 1: Cut the Braid Strands
The braid is built from uniform rectangular strips.
- From Black: Cut 25 strips, measuring 2.5″ x 8.5″.
- Also cut 1 square, measuring 2.5″ x 2.5″ (This is the starter piece).
- From White: Cut 25 strips, measuring 2.5″ x 8.5″.
- From Red: Cut 10 strips, measuring 2.5″ x 8.5″.
Step 2: Start the Braid (The V-Shape)
The braid starts at a corner and grows outward.
- Place the 2.5″ Black Starter Square on your table, rotated like a diamond.
- Strip 1 (Black): Sew a Black strip to the Right side of the square. Press seam away from the center.
- Strip 2 (White): Sew a White strip to the Left side of the square. Press seam away.
- Visual: You now have a small corner unit.
Step 3: Build the “Lacing”
Now we add strips to alternating sides. The rule is: Add to the side that has the “step” or the shorter edge.
- Strip 3 (Black): Place a Black strip on the Right edge. Align it with the bottom row edges. Sew and press.
- Strip 4 (White): Place a White strip on the Left edge. Align with the bottom row edges. Sew and press.
- Visual: You will see the “Herringbone” V-shape starting to form, pointing downward.
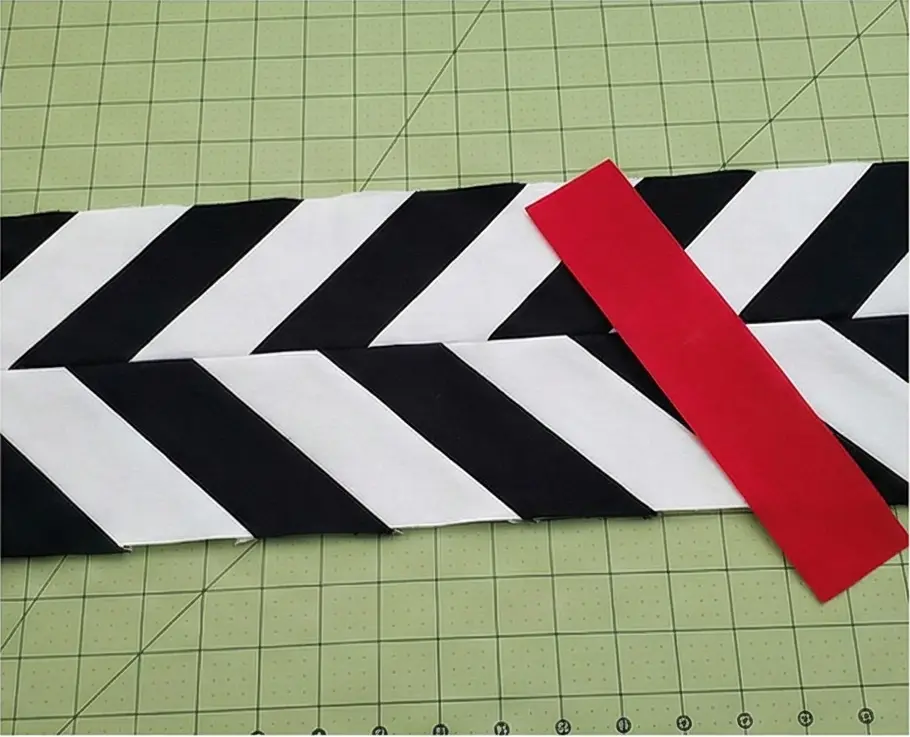
Step 4: Incorporate the Pattern
Don’t just do random colors; create a rhythm.
- The Sequence:
- 3 Black strips (Right side) / 3 White strips (Left side).
- Insert Red: On the 4th round, use a Red Strip on the Right and a Red Strip on the Left.
- Repeat: Go back to 3 rounds of Black/White, then 1 round of Red.
- Continue: Keep adding strips, alternating left and right, until the runner reaches your desired length (approx 72″).
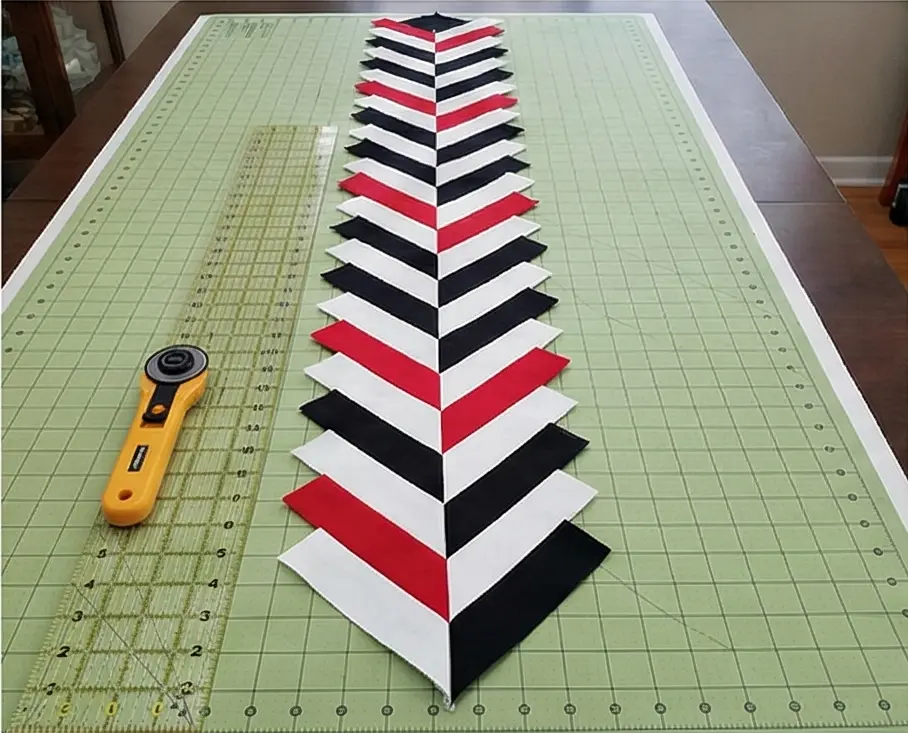
Step 5: Trim the Zig-Zags
Because we added rectangular strips at an angle, the long sides of your runner currently look like a jagged staircase (zigzag).
- Lay the runner flat on a cutting mat.
- Measure: We want a straight runner that is about 14-15 inches wide.
- Cut: Align your long ruler vertically. Trim off the jagged triangular points on the Left side to create a perfectly straight line.
- Repeat: Trim the Right side to create a parallel straight line.
- Ends: Trim the top and bottom points to make them straight (or leave them pointed for a chevron finish!).
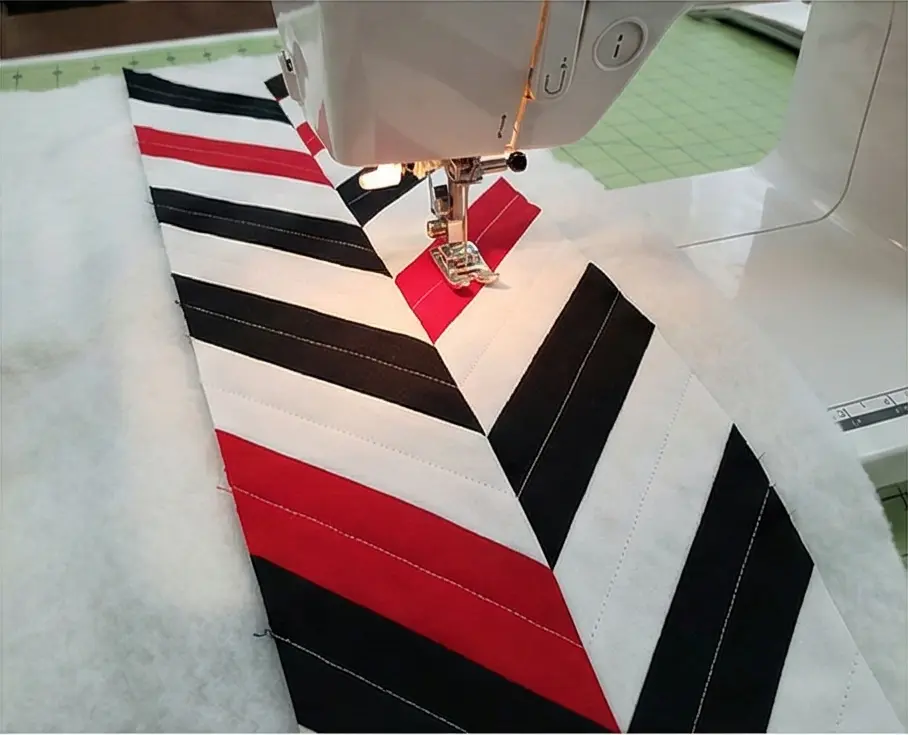
Step 6: Quilting and Binding
- Fuse: Iron the Fusible Fleece to the back of the braid top. (Fleece is better than batting for runners because it prevents “puckering” and helps wine glasses stand up straight).
- Quilt: Stitch “in the ditch” along the long diagonal seam lines of the braid. This accentuates the V-shape.
- Bind: Finish the edges with Solid Black Binding.
Pro Design Tip: Gradient Fade. Instead of alternating Black and White, try a gradient. Start the runner with All White strips at one end. Slowly introduce Grey strips in the middle, and finish with All Black strips at the far end. It looks incredibly modern and artistic on a long wooden sideboard.
Budget Consideration: Binding Scraps. Braided runners are famously good for using up “Jelly Roll” leftovers. If you have leftover 2.5″ binding strips from previous projects (the Red, Black, and White ones), use them here! You don’t need to buy new fabric; just cut your leftovers into 8.5″ lengths.
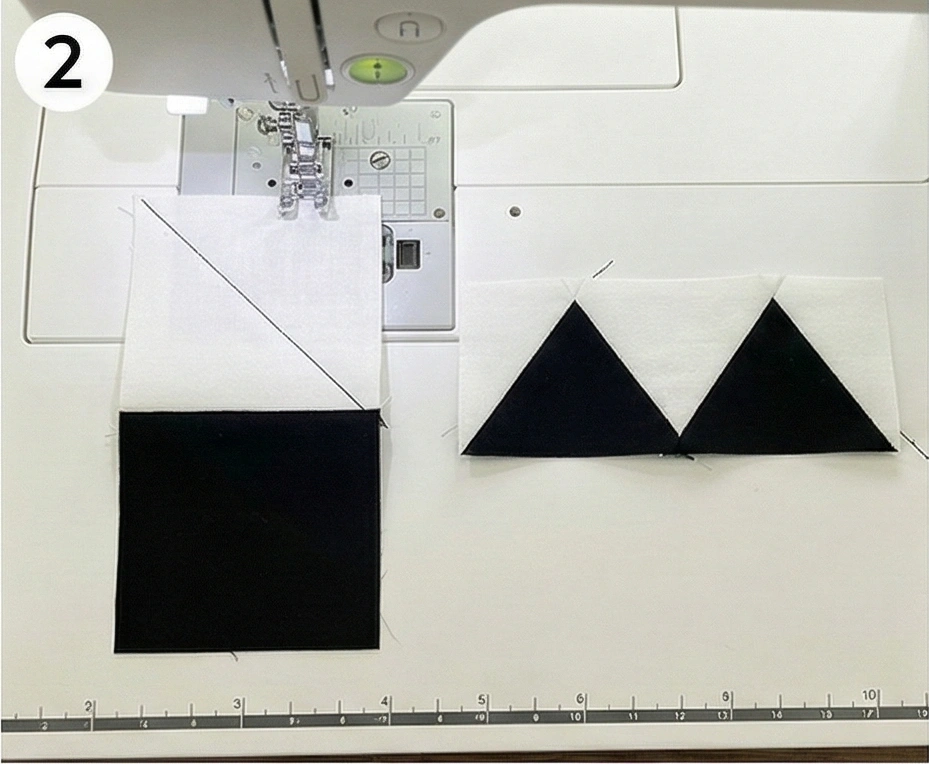
9. Flying Geese Red and Black Quilt for Dining Bench Cushion and Armchairs
The “V-Formation” Dining Bench Cushion
Dining benches are fantastic for saving space in a combined living/dining room, but they can be hard on the backside. This project turns a hard wooden bench into a stylish focal point. We will use the classic Flying Geese pattern to create a sense of directional movement. The triangles (Geese) will be Red, flying through a Black night sky, with subtle White accents to define the edges.
Finished Dimensions: Designed for a standard bench (14″ x 48″). Note: Measure your specific bench first!
Materials Needed:
- Fabric A (The Geese/Red): 3/4 yard of Solid Red or Red Texture.
- Fabric B (The Sky/Black): 1 yard of Solid Black.
- Fabric C (Accents/White): 1/4 yard (for binding or occasional white geese).
- Backing Fabric: 1 yard of non-slip fabric or heavy canvas.
- Insert: 1-inch or 2-inch thick High-Density Foam (cut to 14″ x 48″).
- Batting: 18″ x 52″ piece.
- Notions: Rotary cutter, marking pen/chalk, basting spray.
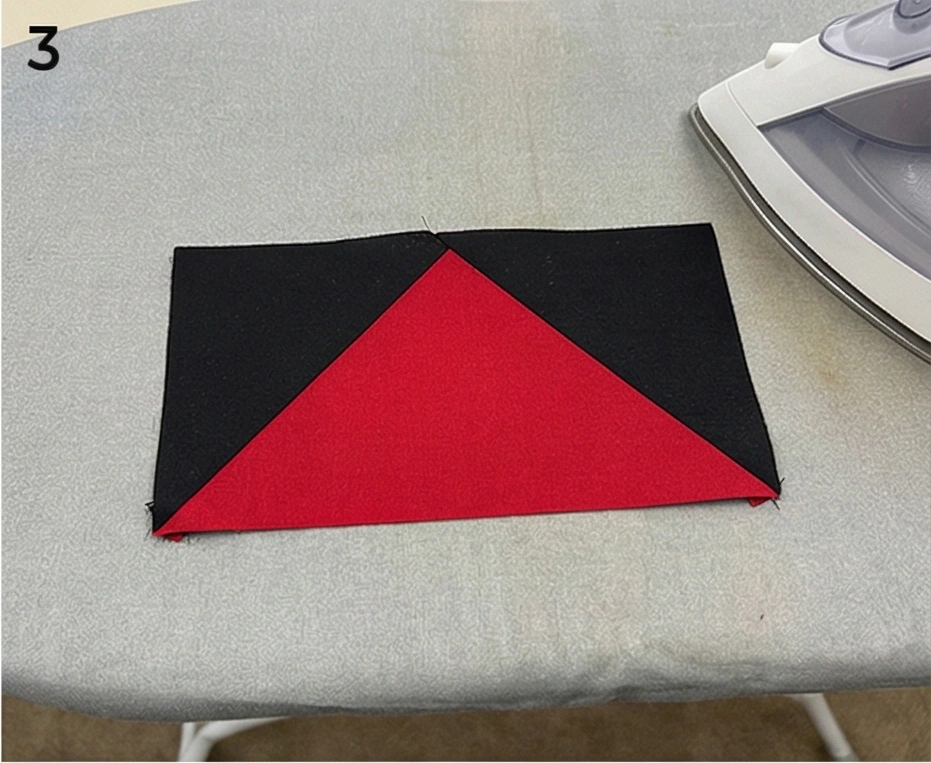
Step 1: Cut the “Stitch and Flip” Units
The easiest way to make precise Flying Geese without bias stretch is the “Rectangle and Two Squares” method. To make a 3″ x 6″ finished block, we need:
- From Fabric A (Red): Cut 24 rectangles measuring 3.5″ x 6.5″.
- From Fabric B (Black): Cut 48 squares measuring 3.5″ x 3.5″.
- Design Note: If you want a few “White Geese” for contrast, swap out 3 or 4 of the Red rectangles for White ones.
Step 2: Mark and Position
- Take your Black Squares. On the wrong side of every square, draw a diagonal line from corner to corner using a chalk pen or pencil.
- Take one Red Rectangle (Right Side Up).
- Place a Black Square (Right Side Down) on the left side of the rectangle. The drawn diagonal line should go from the bottom-left corner up to the center-top of the rectangle.
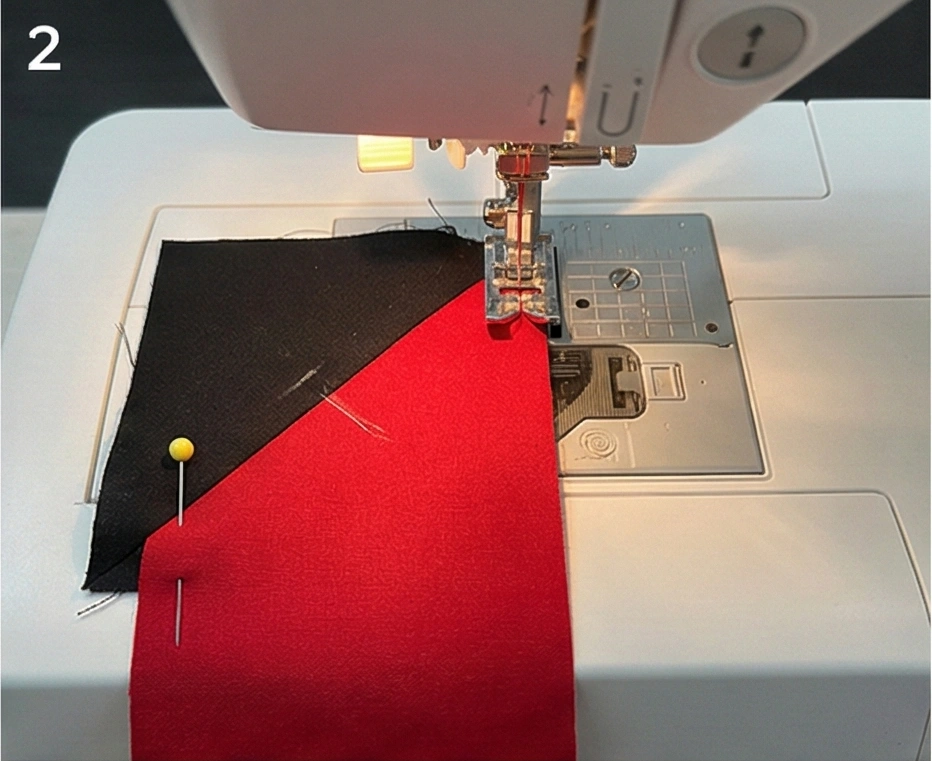
Step 3: Sew the Geese
- Stitch: Sew exactly on the drawn diagonal line.
- Trim: Cut off the excess corner fabric, leaving a 1/4″ seam allowance past your stitch line.
- Press: Flip the black triangle up and press flat.
- Repeat: Place a second Black Square on the right side of the rectangle. (The diagonal line should go from bottom-right to center-top).
- Stitch, Trim, Press: You now have a rectangular block with a Red triangle in the center and Black triangles in the top corners.
- Repeat this process until you have 24 Flying Geese Blocks.
Step 4: The “Migration” Layout
For a long bench, the layout dictates the room’s flow.
- Configuration: We will create 3 horizontal rows. Each row will have 8 Geese.
- Direction:
- Option A (The Flow): Have all geese pointing to the Right.
- Option B (The Center): Have the left half pointing Left and the right half pointing Right (diverging from the center).
- Sashing: To make the geese pop, cut 2 long strips of Black (1.5″ x 48.5″). Place these strips between the rows of geese to separate them.
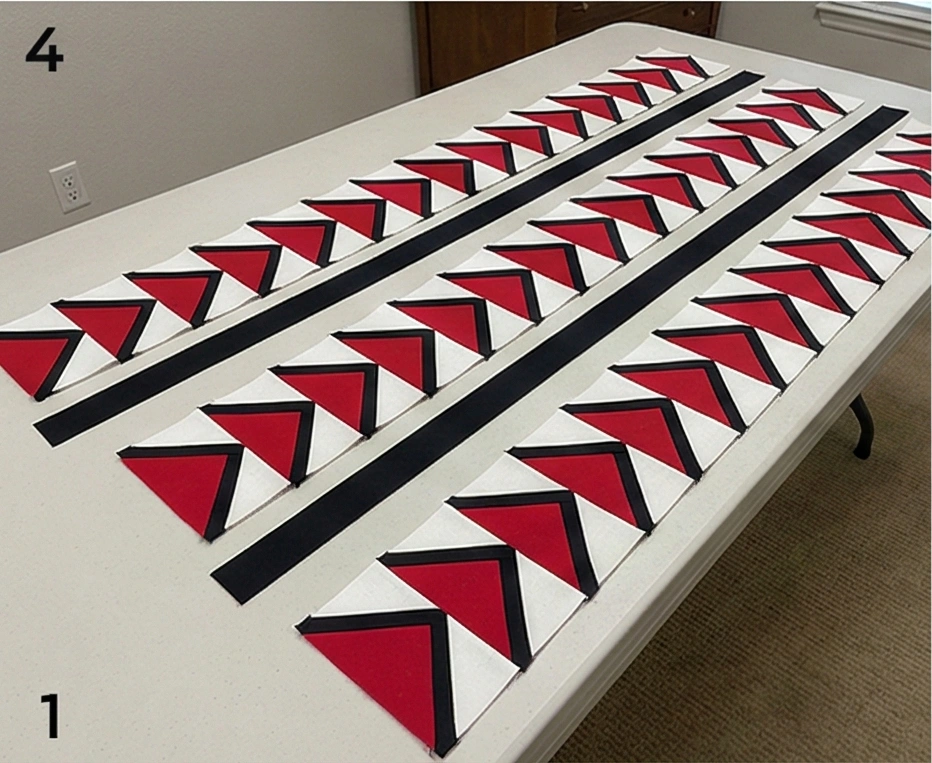
Step 5: Assembly and Sizing
- Sew the 8 geese together to form Row 1. Repeat for Row 2 and Row 3.
- Sew the Rows together with the Black Sashing strips in between.
- Add Borders:
- Measure the width. It should be roughly 10.5″. We need to get to 14″.
- Cut two Black Border strips measuring 2.5″ wide (or wider if needed). Sew them to the top and bottom.
- Result: You now have a bench-sized quilt top measuring approx 14.5″ x 48.5″.
Step 6: Tufted Finishing
We need to turn this quilt top into a cushion.
- Sandwich: Layer Backing + Foam + Batting + Quilt Top.
- Tip: Use Spray Baste liberally to stick the fabric to the foam.
- Quilt: Stitch “in the ditch” around the geese triangles to define the shapes.
- Tuft: Since you are sewing through foam, simple quilting might compress it too much. Instead, use a heavy needle and Black Pearl Cotton thread to tie small knots (tufts) at the corners of the blocks. This keeps the foam secure without flattening it.
- Bind: Finish the raw edges with White Binding for a crisp, modern frame.
- Ties: Sew lengths of black ribbon to the back corners to tie the cushion securely to the bench legs.

For the Armchairs: Make Mini-Matching Lumbar Pillows. Use the exact same method but make only One Row of 4 Geese. Border it heavily with Black fabric to reach a size of 12″ x 20″. Stuff with a pillow form. This visually links the armchairs to the dining bench.
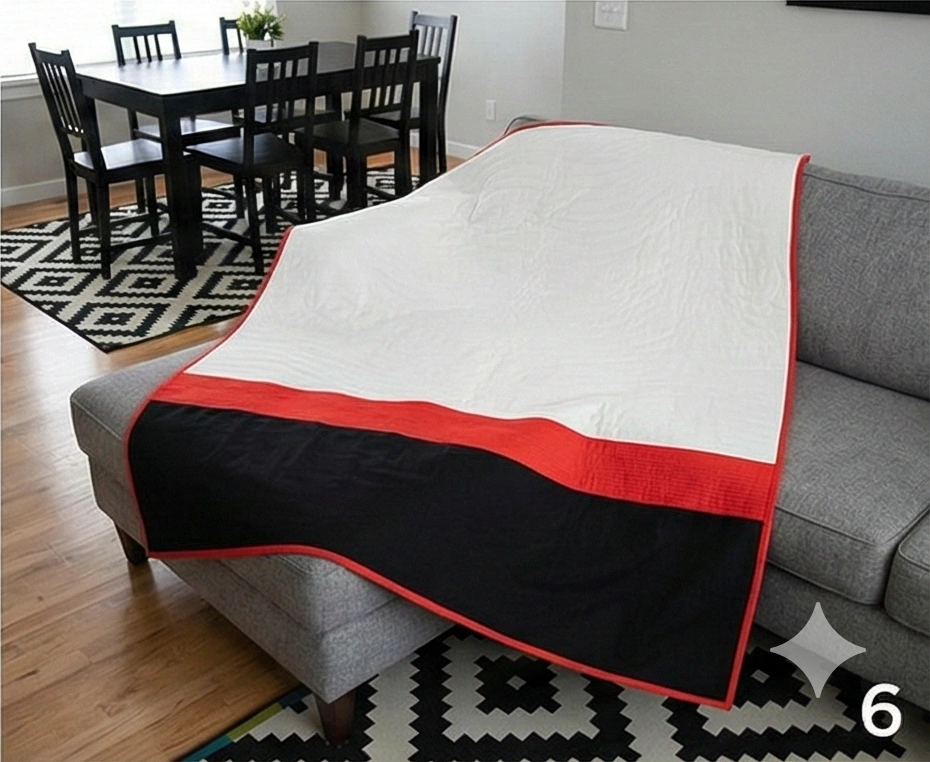
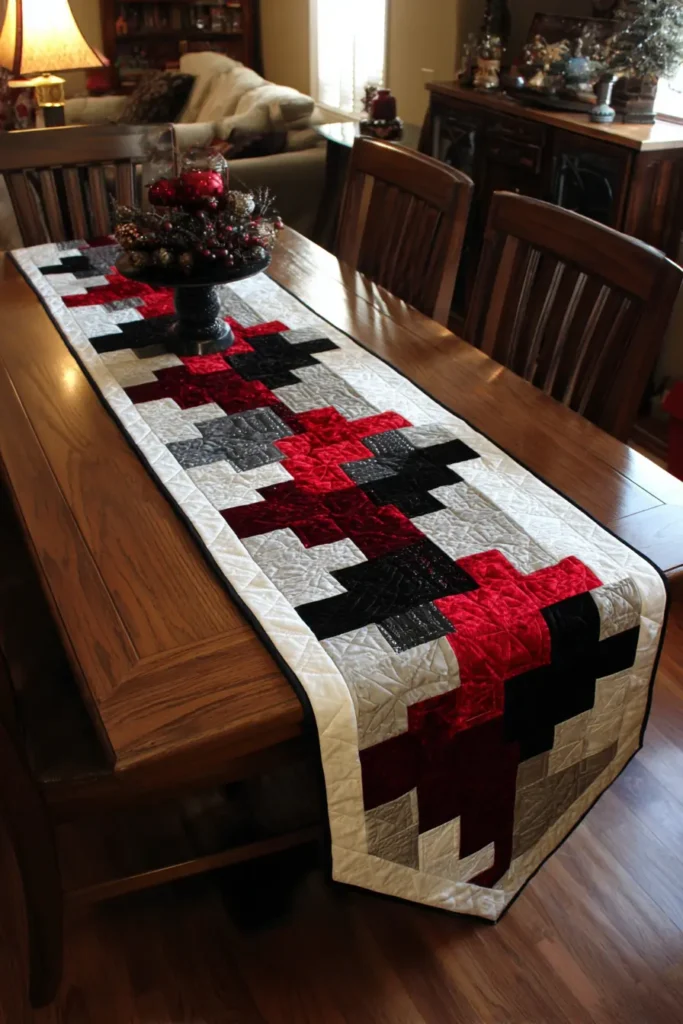
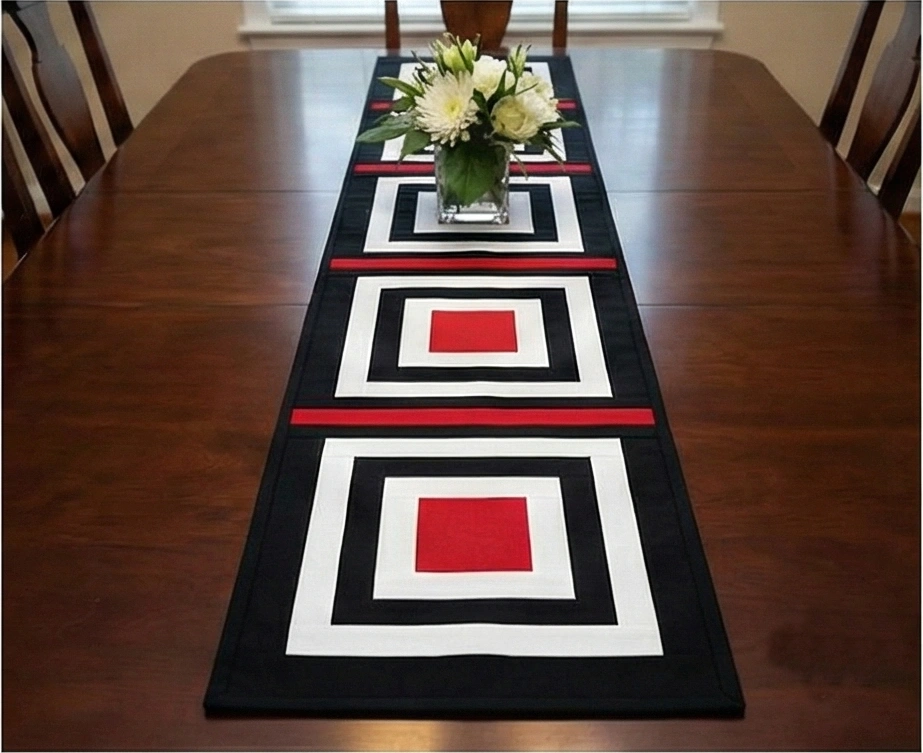
10. Simple Color Block Quilt for Tying Both Spaces Together
The “Common Ground” Modern Color Block Throw
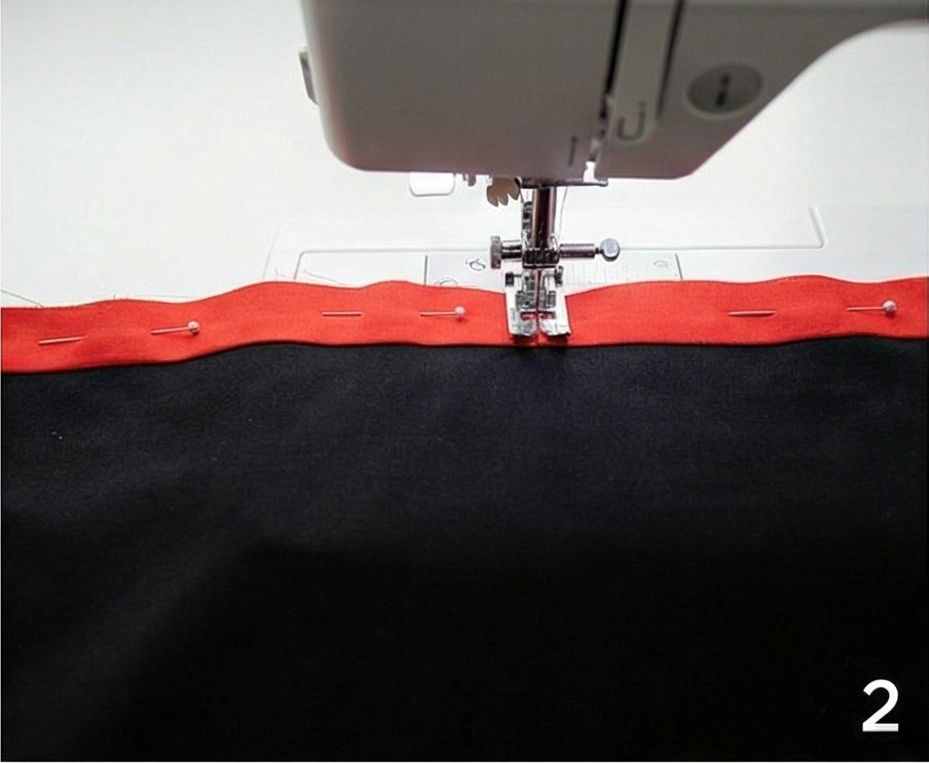
When you have a combined living and dining room (“Living Cum Dining”), you need one textile piece that acts as the “Peacekeeper.” It shouldn’t be too busy. This design uses massive blocks of solid color to anchor the room. The design is deliberately asymmetrical: a large field of White (airiness) meets a heavy base of Black (grounding), separated by a sharp, thin horizon line of Red (energy). It perfectly connects the black dining chairs to the white living room rug.
Finished Dimensions: Large Throw, approximately 60″ x 70″.
Materials Needed:
- Fabric A (The Air/White): 1.5 yards of Solid White (or heavy Linen).
- Fabric B (The Earth/Black): 1 yard of Solid Black (Velvet or Denim adds nice weight).
- Fabric C (The Energy/Red): 1/4 yard of Bright Poppy Red.
- Backing Fabric: 4 yards (Use a black and white geometric print to hide pet hair).
- Batting: Throw Size (64″ x 74″).
- Binding: 1/2 yard of Solid Black.
- Notions: Rotary cutter, 24″ quilting ruler.
Step 1: Cut the Massive Panels
Unlike other quilts, where we cut small pieces, here we use the full width of the fabric to create a minimalist statement.
- The Top Panel (White):
- From your White fabric, cut a large rectangle measuring 40.5″ tall x 60.5″ wide.
- Note: You will likely need to sew two widths of fabric together to get the 60.5″ width. Hide this vertical seam in the center; quilting will mask it later.
- The Bottom Panel (Black):
- From your Black fabric, cut a large rectangle measuring 28.5″ tall x 60.5″ wide.
- The Horizon Line (Red):
- From your Red fabric, cut 3 strips measuring 2.5″ wide x Width of Fabric.
- Sew them end-to-end to create one long strip, then trim it to 60.5″ long.
Step 2: Join the “Horizon”
This thin red line is the most important part of the quilt. It must be straight.
- Take your Red Strip and your Black Panel.
- Pin the Red strip to the top edge of the Black panel. Use lots of pins (every 4 inches) to prevent stretching.
- Sew: Stitch with a precise 1/4″ seam allowance.
- Press: Press the seam toward the Black fabric.
Step 3: Complete the Top
- Take your large White Panel.
- Pin it to the top edge of the Red/Black unit you just made.
- Sew: Stitch with a 1/4″ seam allowance.
- Press: Press the seam toward the White fabric (or open).
- Visual: You now have a huge 60″ x 70″ canvas: 2/3rds White on top, 1/3rd Black on bottom, divided by a Red stripe.
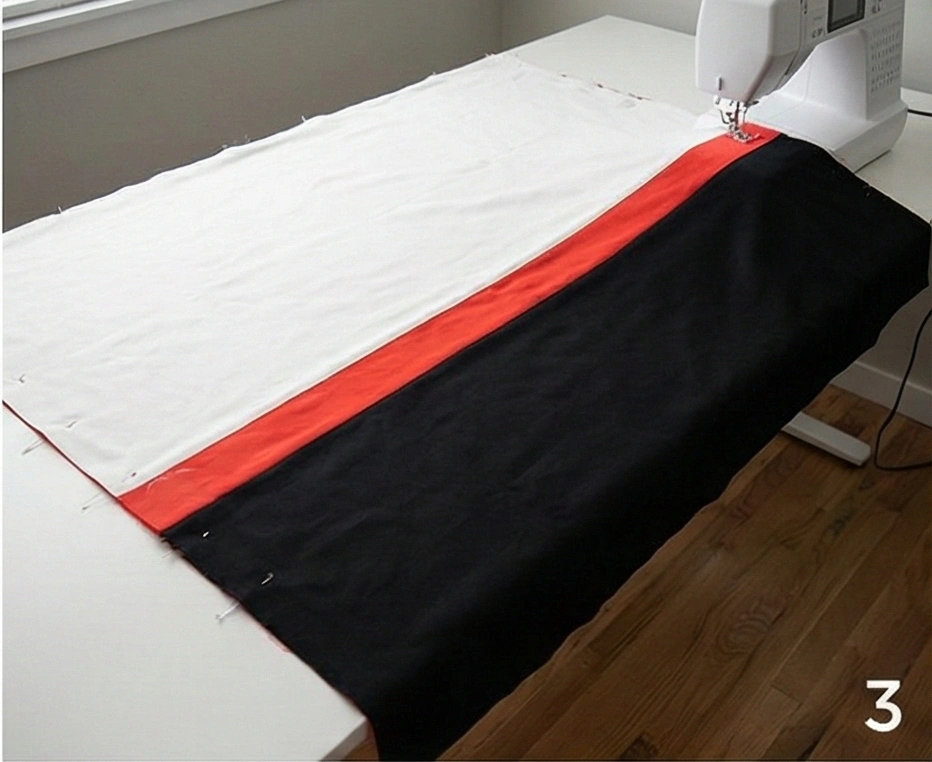
Step 4: “Matchstick” Feature Quilting
We will use different quilting densities to create texture.
- Baste your sandwich (Backing + Batting + Top).
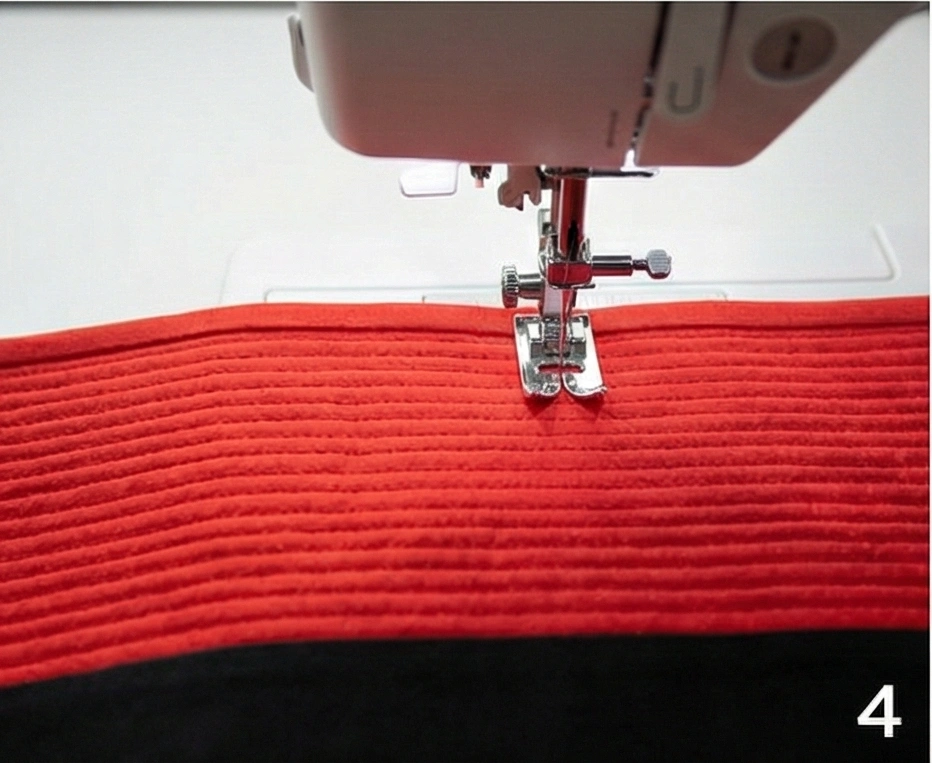
- The Red Zone:
- Load your machine with Red Thread.
- Quilt straight horizontal lines inside the Red strip.
- Make them dense—about 1/8″ apart (Matchstick Quilting).
- Effect: This makes the red line stiffer, higher, and more intensely colored.
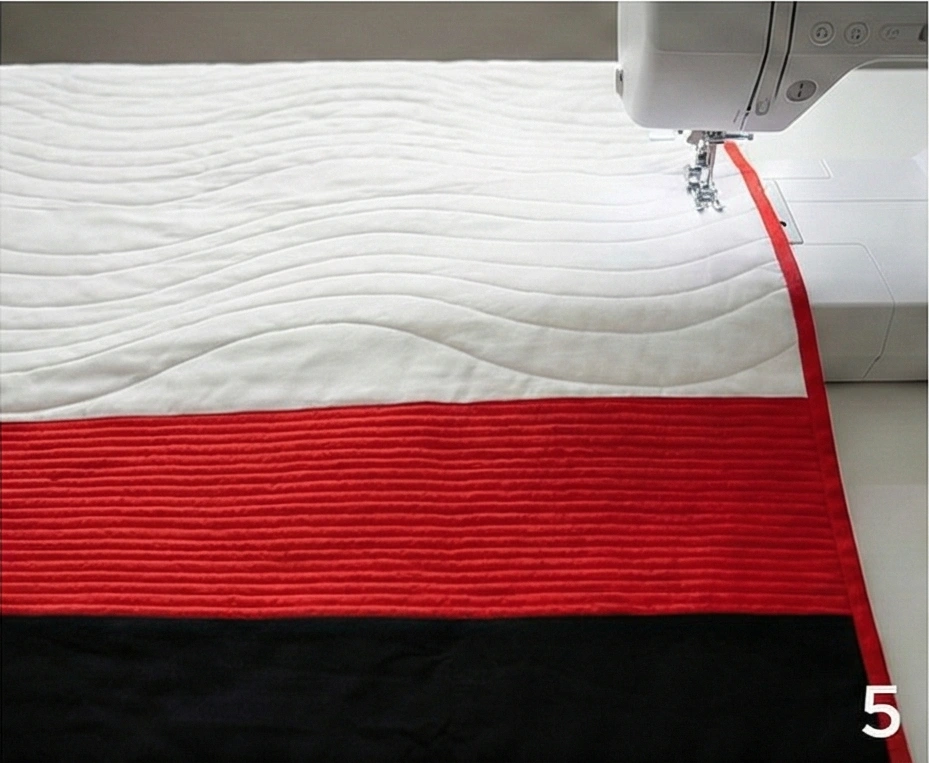
Step 5: “Wave” Quilting the Negative Space
Keep the large blocks soft.
- The White Zone:
- Switch to White Thread.
- Quilt large, gentle horizontal waves (like rolling hills) spaced 3 inches apart.
- The Black Zone:
- Switch to Black Thread.
- Quilt the same large waves spaced 3 inches apart.
- Why? The dense red stitching draws the eye, while the loose waves make the rest of the blanket soft and drapeable.
Step 6: The Invisible Finish
- Trim the edges square.
- Bind: Use the Solid Black binding strips.
- Design Choice: Since the bottom of the quilt is black, the binding will disappear there. When it travels up the white section, it will create a bold black frame. This framing effect emphasizes the quilt’s modern art look.
Pro Design Tip: The “Double-Sided” Bridge. Use the backing to further unify the room. If your Dining Room has a specific accent pattern (e.g., a houndstooth runner), use a Houndstooth Fabric for the entire backing of this throw. When you drape it over the living room sofa, fold the corner back to reveal the houndstooth, visually linking it to the dining table across the room.
Budget Consideration: Curtain Hack. Buying 60 inches of wide fabric can be tricky. Buy two plain grommet-top curtain panels (one White, one Black) from a home goods store like IKEA. They are usually 50-54 inches wide and hemmed! You can sew them together with a red strip in the middle. It is cheaper than yardage and the fabric is durable.
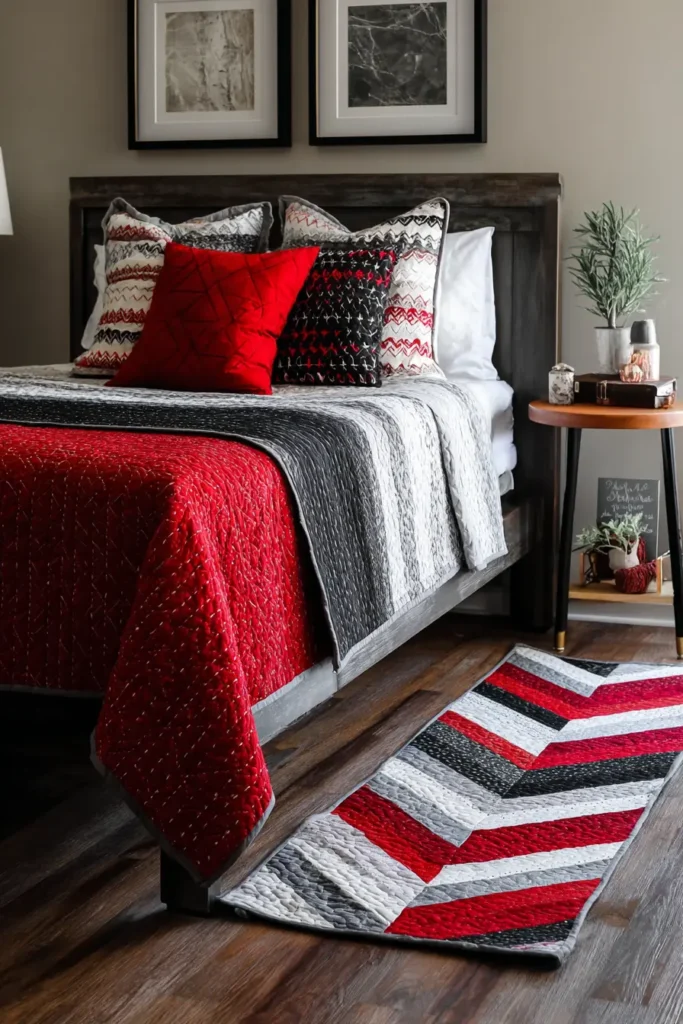
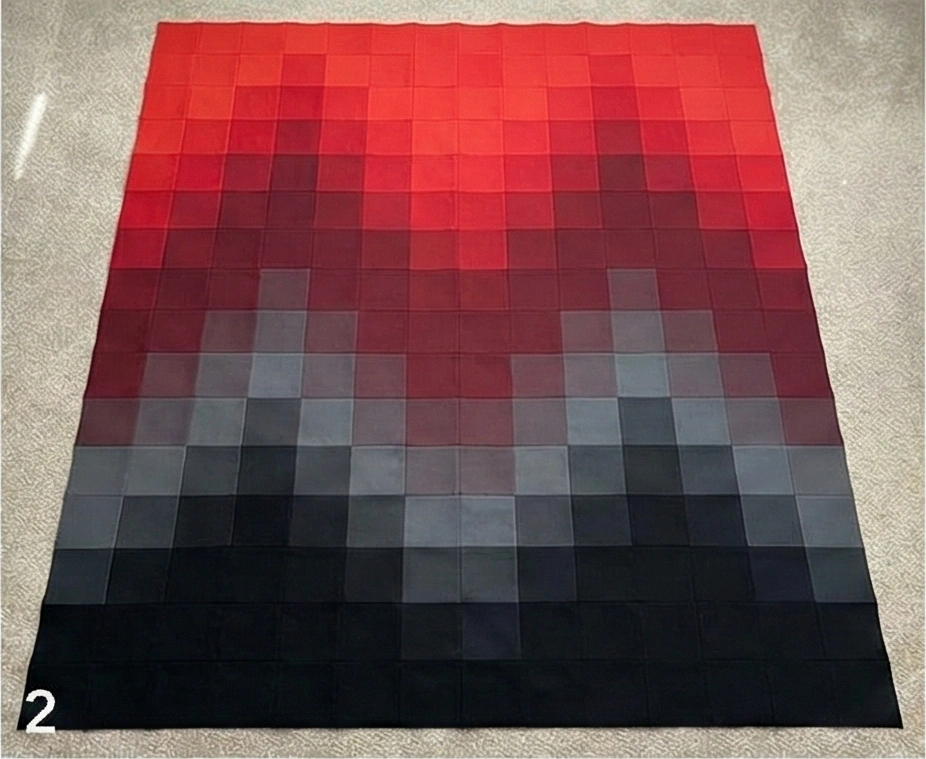
11. Ombre Red to Black Quilt for Dramatic Sofa Drape in Combined Room
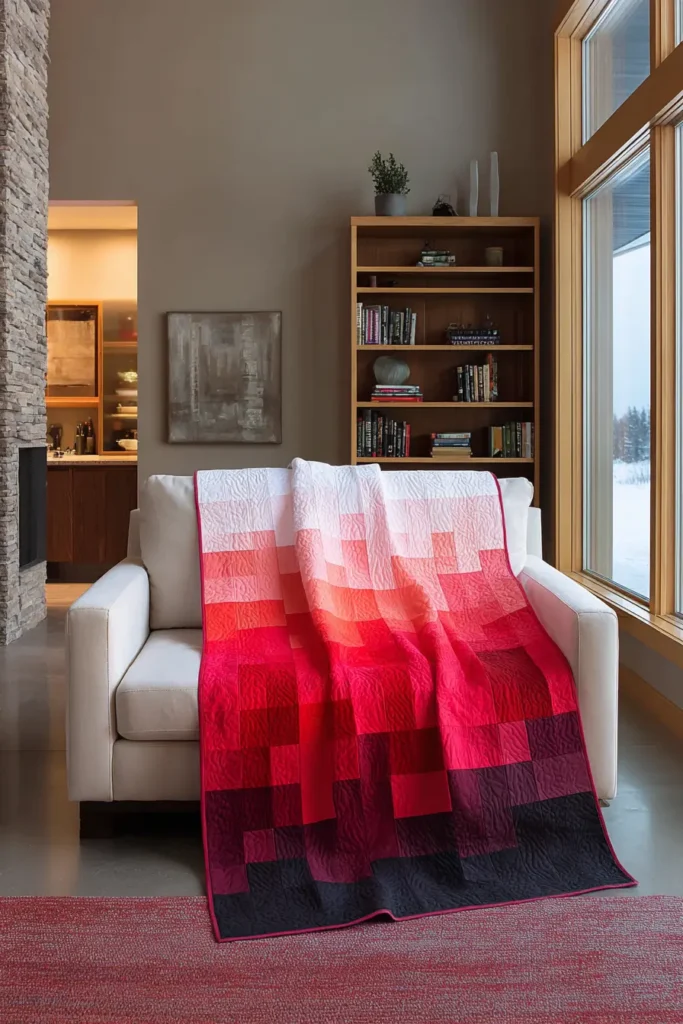
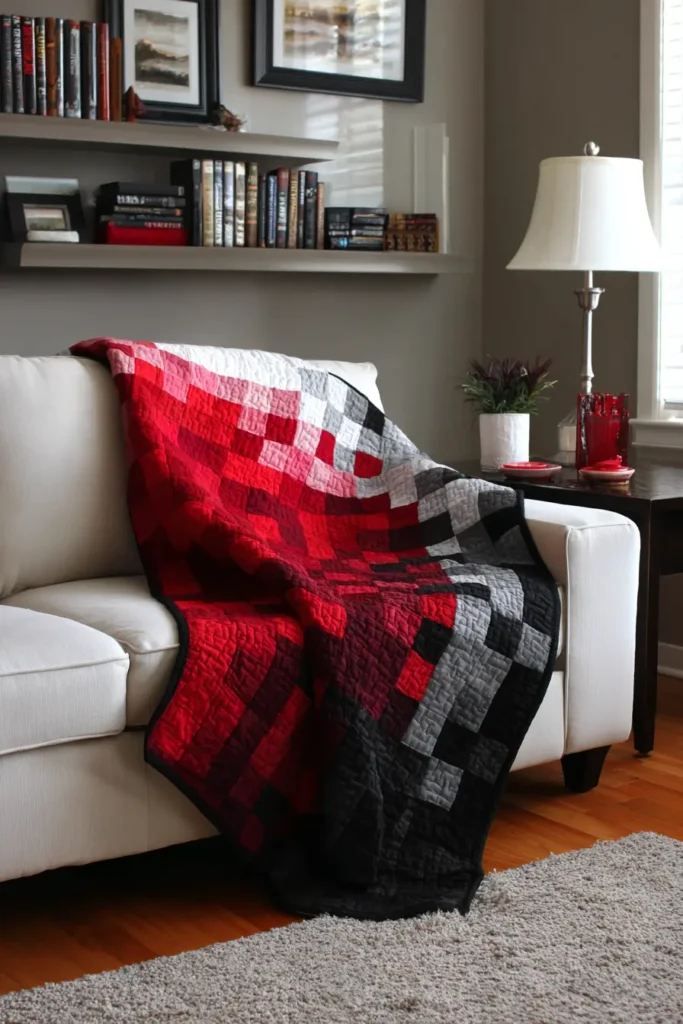
The “Crimson Fade” Pixelated Ombre Throw
In a combined Living/Dining space, you often want a piece of decor that draws the eye and bridges the gap between different zones. This “Ombre” (gradient) design creates a stunning visual waterfall, cascading from bright fiery Red at the top of the sofa down into a deep, grounding Black at the bottom. Using a “pixelated” layout (mixing squares rather than just solid stripes) makes the color transition look organic, modern, and high-end.
Finished Dimensions: Large Sofa Drape, approximately 56″ x 70″.
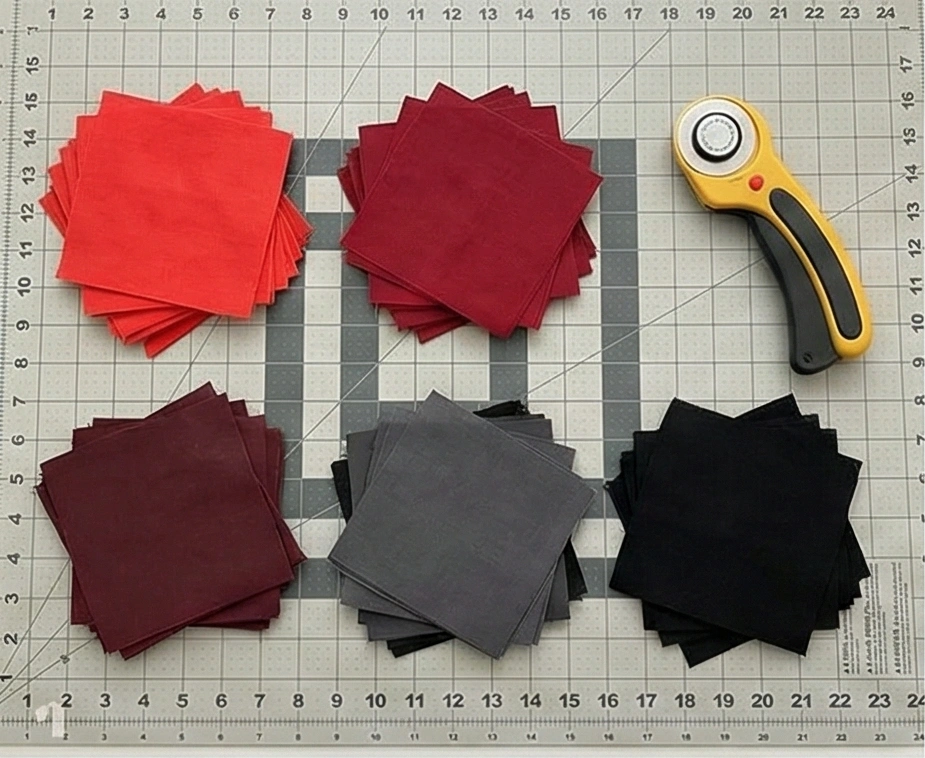
Materials Needed: To achieve a smooth gradient, you need 5 distinct shades ranging from light to dark.
- Fabric 1 (Brightest): 1/2 yard of Bright Poppy Red.
- Fabric 2 (Medium): 1/2 yard of Deep Cardinal Red.
- Fabric 3 (Bridge): 1/2 yard of Maroon or Wine.
- Fabric 4 (Dark): 1/2 yard of Charcoal Grey.
- Fabric 5 (Darkest): 1 yard of Solid Black (Need extra for the bottom anchor).
- Backing Fabric: 4 yards of a Black and White Geometric Print (ties the “White” theme of the room into the quilt).
- Batting: Throw size (60″ x 75″).
- Notions: Rotary cutter, design wall (or a clean floor).
Step 1: Cut the Pixels
We are working with uniform squares. Precision is key to the grid lining up.
- From Fabrics 1, 2, 3, and 4: Cut 4 strips each measuring 4.5″ wide. Sub-cut these strips into 4.5″ squares.
- Yield: Approx 32-35 squares per color.
- From Fabric 5 (Black): Cut 6 strips measuring 4.5″ wide. Sub-cut into 4.5″ squares.
- Yield: Approx 50 squares.
Step 2: The “Dithered” Layout
This is the artistic step. We arrange the squares in rows to create the fade. Clear a floor space. You need a grid of 14 squares wide x 18 squares tall.
- Zone 1 (Top – Bright Red): Rows 1-3. Use mostly Fabric 1. Mix in a few Fabric 2 squares in Row 3 to start the transition.
- Zone 2 (Transition Red): Rows 4-7. Mix Fabric 1 and Fabric 2 heavily. By Row 7, start introducing Fabric 3.
- Zone 3 (The Middle – Maroon): Rows 8-11. This is the dark red center. Mix Fabric 2 and Fabric 3. Start adding a few Fabric 4 (Charcoal) squares in Row 11.
- Zone 4 (Transition Dark): Rows 12-15. Mix Fabric 3 and Fabric 4. By Row 15, introduce Fabric 5 (Black).
- Zone 5 (Bottom – Black): Rows 16-18. Mostly Fabric 5. This creates a heavy, dark visual anchor at the bottom of the quilt.
Visual Check: Stand back and squint. Does the color look like it is “melting” from red to black? Rearrange squares until the flow looks smooth.
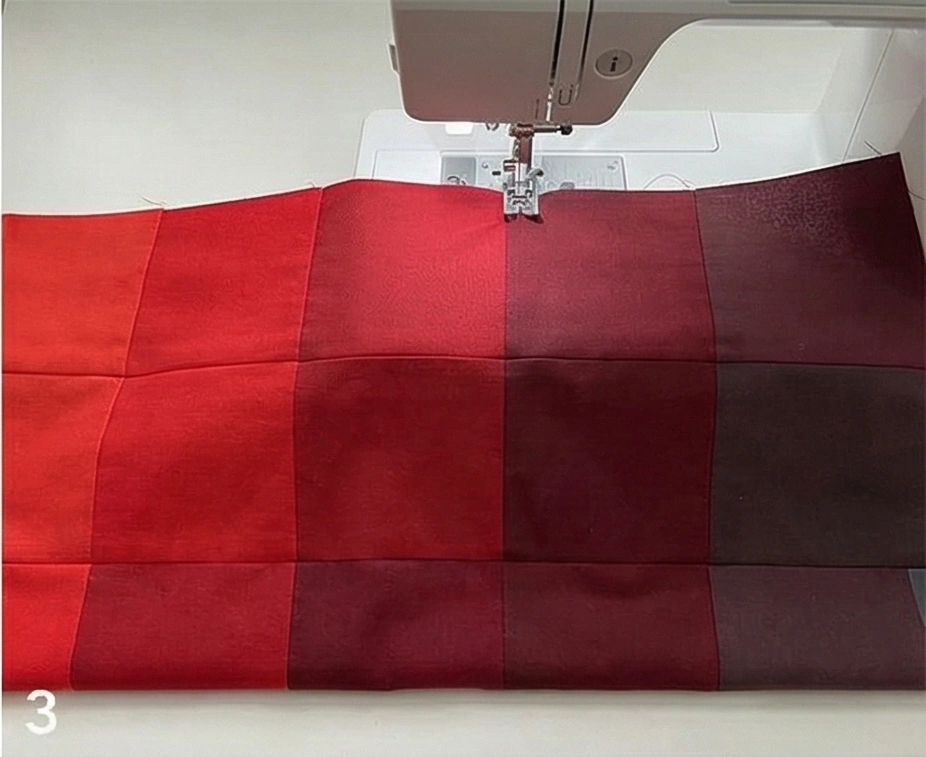
Step 3: Sew the Rows
- Stack: Stack your squares carefully by row (label them Row 1, Row 2, etc.) so you don’t lose your layout.
- Stitch: Sew the 14 squares of Row 1 together. Use a 1/4″ seam allowance.
- Press: Press the seams of Row 1 to the Left.
- Repeat: Sew Row 2. Press the seams of Row 2 to the Right.
- Why? Alternating the pressing direction allows the seams to “nest” (lock together) perfectly when you join the rows later.
Step 4: Assemble the Gradient Field
- Pin Row 1 to Row 2. Match the intersection seams carefully.
- Sew them together.
- Continue adding rows in order (1 to 18).
- Press: Press all the long horizontal seams Open or downward.
- Result: You now have a 56″ x 70″ top that looks like a digital waterfall.

Step 5: “Rainfall” Quilting
The quilting should enhance the downward flow.
- Baste your sandwich (Backing + Batting + Ombre Top).
- Thread: Use Dark Grey Thread (it blends decently with both red and black).
- Stitch: Quilt straight vertical lines from top to bottom.
- Do not space them evenly. Group 3 lines close together, leave a gap, then 2 lines. This “Barcode” or “Rainfall” texture reinforces the modern aesthetic.
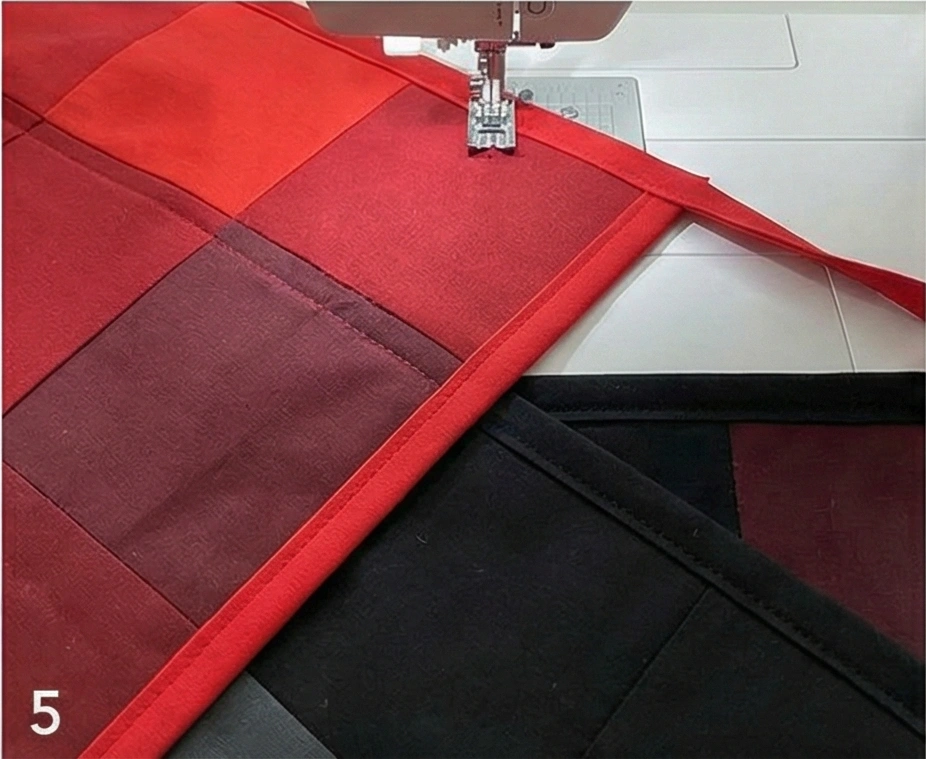
Step 6: The “Split” Binding
A solid color binding would ruin the gradient effect at one end. We will match the binding to the zone.
- Prepare Binding:
- Make enough Red Binding to cover the Top and top-sides.
- Make enough Black Binding to cover the Bottom and bottom sides.
- Attach:
- Sew the Red binding to the top half of the quilt.
- Sew the Black binding to the bottom half.
- Join: Where they meet in the middle (the maroon zone), stitch the red and black binding strips together diagonally for a seamless join.
- Effect: The quilt has no “frame”—the color just flows off the edge.

Pro Design Tip: The “White” Spark. To strictly adhere to the “Red, Black, and White” theme, replace 5 random squares in the very top row (Row 1) with Solid White squares. It looks like light reflecting off the top of the waterfall and ties in with white walls or white dining chairs.
Budget Consideration: Paint Chip Matching. Buying 5 different yards of red fabric can be tricky online. Go to a hardware store and pick up paint chips that form a perfect gradient. Take these chips to the fabric store. It is much easier to match fabric to a physical paint chip than to “guess” if a red is blue-based or orange-based under store lighting.
12. Basket Weave Red and Black Quilt for Dining Table Cover
The “Picnic Plait” Woven Table Cover
A “Basket Weave” pattern creates a stunning 3D optical illusion in which ribbons of fabric seem to pass over and under one another. For a dining table in a shared space, this structural design brings order and sophistication. By alternating Red/White blocks with Black/White blocks, we create a high-contrast lattice that looks complex but is built entirely from simple straight strips.
Finished Dimensions: Square Table Topper, approximately 54″ x 54″ (Fits most square, round, or rectangular tables as a diamond overlay).
Materials Needed:
- Fabric A (Black): 1.25 yards of Solid Black.
- Fabric B (Red): 1.25 yards of Deep Red.
- Fabric C (White): 1.25 yards of Solid White.
- Backing Fabric: 3 yards.
- Batting: Thin Cotton Batting or Fusible Fleece (Recommended for table covers as it lies flatter).
- Binding: 1/2 yard of Solid Black.
- Notions: Rotary cutter, 8.5″ square ruler.
Step 1: Cut the Master Strips
The basket weave relies on precise strip sets. We are using standard 2.5″ strips.
- From Fabric A (Black): Cut 16 strips, measuring 2.5″ x Width of Fabric (WOF).
- From Fabric B (Red): Cut 16 strips, measuring 2.5″ x WOF.
- From Fabric C (White): Cut 32 strips, measuring 2.5″ x WOF.
Step 2: Sew the “Ribbon” Sets
We need to make two types of striped fabric panels.
- Strip Set A (The Black Ribbon):
- Sew strips together in this order: Black – White – Black – White.
- Pressing: Press all seams toward the Black strips.
- Repeat to make 4 of these large strip sets.
- Check: Each set should measure 8.5″ wide.
- Strip Set B (The Red Ribbon):
- Sew strips together in this order: Red – White – Red – White.
- Pressing: Press all seams toward the Red strips.
- Repeat to make 4 of these large strip sets.
- Check: Each set should measure 8.5″ wide.
Step 3: Cut the Blocks
Turn the long striped panels into square blocks.
- Take your Strip Set A (Black/White) to the cutting mat.
- Trim the uneven end.
- Sub-Cut: Cut the panel into 8.5″ squares.
- You need 18 Black/White Squares.
- Take your Strip Set B (Red/White).
- Sub-Cut: Cut the panel into 8.5″ squares.
- You need 18 Red/White Squares.
Step 4: The “Over-Under” Layout
This arrangement creates the illusion.
- Clear a floor space or large table. Create a grid of 6 blocks wide x 6 blocks tall.
- The Rule: You must alternate Color AND Orientation.
- Row 1:
- Block 1: Red (Stripes Vertical).
- Block 2: Black (Stripes Horizontal).
- Block 3: Red (Vertical).
- Block 4: Black (Horizontal)…
- Row 2:
- Block 1: Black (Stripes Horizontal).
- Block 2: Red (Stripes Vertical).
- Wait! To make it look woven, you must alternate the starting block.
- Correction: Start Row 2 with Black (Horizontal).
- Visual Check: Look at where a Red Vertical block meets a Black Horizontal block. The white lines should intersect, creating a lattice-like pattern.
Step 5: Assembly
- Sew Rows: Stitch the blocks together into 6 rows.
- Nesting: Because you pressed seams toward the dark colors in Step 2, the seams should “nest” (lock together) perfectly when you sew a vertical block to a horizontal block. This creates nice flat intersections.
- Join Rows: Sew the 6 rows together.
- Border (Optional): The quilt is currently 48″ x 48″. To reach 54″, add a 3.5″ Black Border all the way around. This “contains” the weave.
Step 6: Flat Quilting
A table cover must be flat so wine glasses don’t tip over.
- Sandwich: Backing + Fusible Fleece + Top.
- Quilt: Do not do intricate swirls.
- Stitch a large Cross-Hatch (Diagonal Grid).
- Run diagonal lines from corner to corner through the blocks.
- Space the lines 3 to 4 inches apart.
- Bind: Finish with Solid Black Binding for a crisp edge.
Pro Design Tip: Waterproofing. If this is for a dining table that sees heavy use (and spills!), apply a layer of “Iron-On Vinyl” (like Pellon Vinyl Fuse) to the top of the finished quilt before you bind it. It makes the fabric wipeable and glossy, like a high-end oilcloth, while keeping the quilt’s softness.
Budget Consideration: Flat Sheets. For the backing of a dining table cover, you don’t need fancy quilting cotton. Buy a Twin-Size Black Flat Sheet. It is the perfect size for the backing, often cheaper than yardage, and usually has a tighter weave, which protects the table surface better.
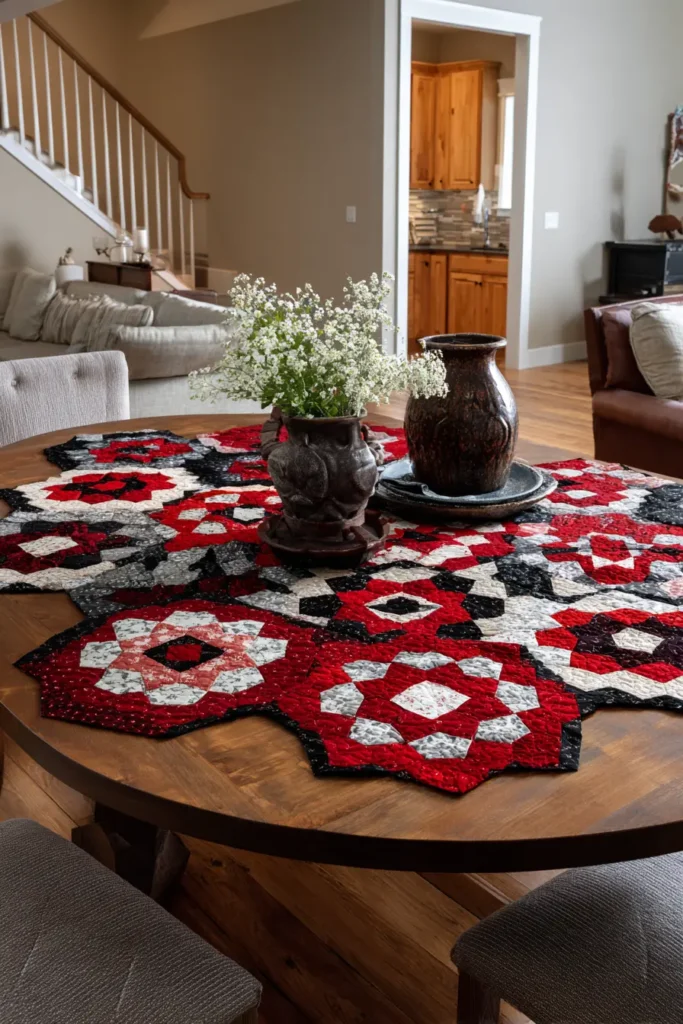
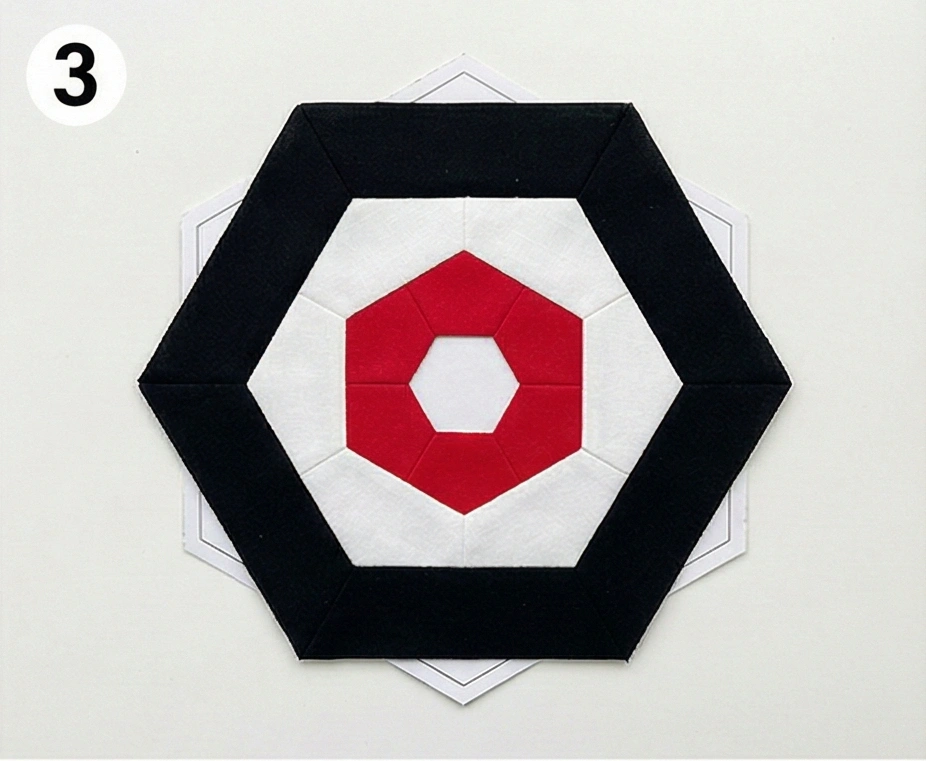
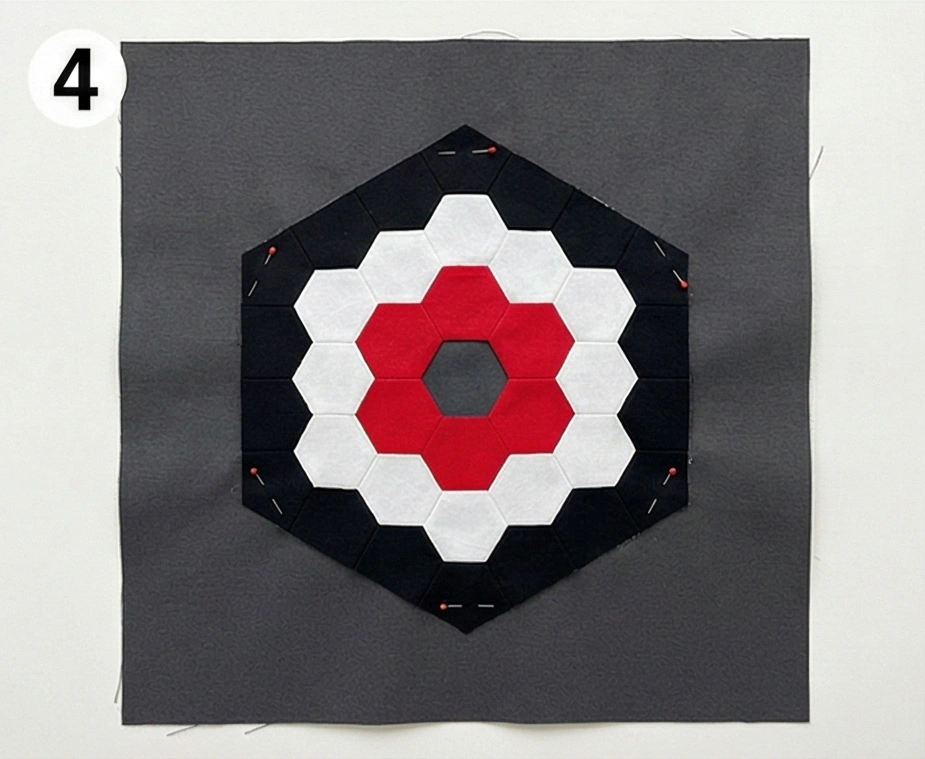
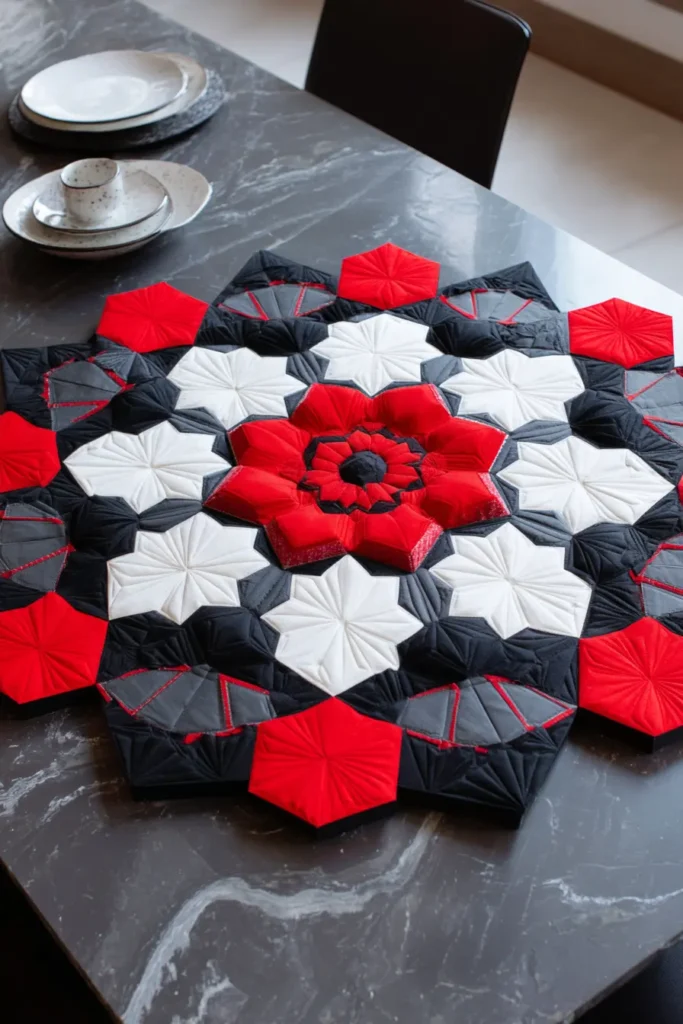
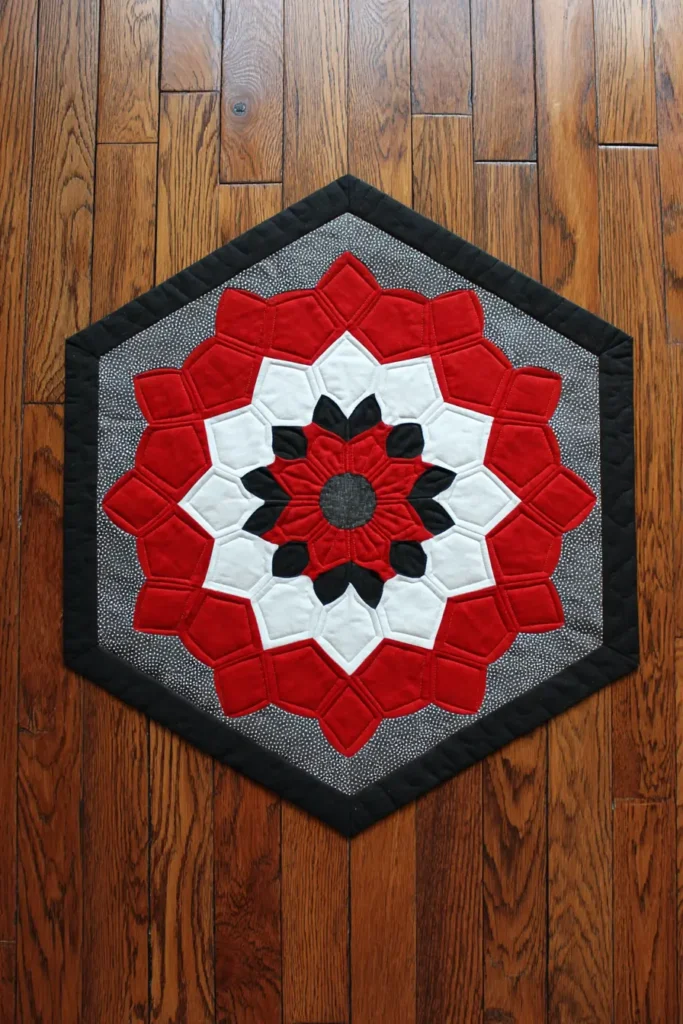
The “Atomic Hex” Modern EPP Topper
English Paper Piecing (EPP) is the ultimate “slow stitching” project. Unlike machine quilting, this is done entirely by hand, making it the perfect project to work on while sitting on your living room sofa watching TV. The result is a precise, geometric centerpiece that looks stunning on a coffee table or in the center of a dining table. This design features a radiating “Atomic” flower shape—a Red core, a White halo, and a Black outer rim—appliquéd onto a sleek background.
Finished Dimensions: Approximately 18″ x 18″ (Hexagon Flower mounted on a square).
Materials Needed:
- Fabric A (Center/Red): Scraps or 1 Fat Eighth of Bright Red.
- Fabric B (Halo/White): 1 Fat Quarter of Solid White.
- Fabric C (Rim/Black): 1 Fat Quarter of Solid Black.
- Background Fabric: 3/4 yard of Solid Charcoal or Black Canvas.
- Paper Templates: Pack of 1-inch Hexagon cardstock templates (or print and cut your own).
- Notions: Fabric glue stick (for basting), Milliners needle (Size 10 or 11), fine thread (60wt or 80wt in grey), small scissors.
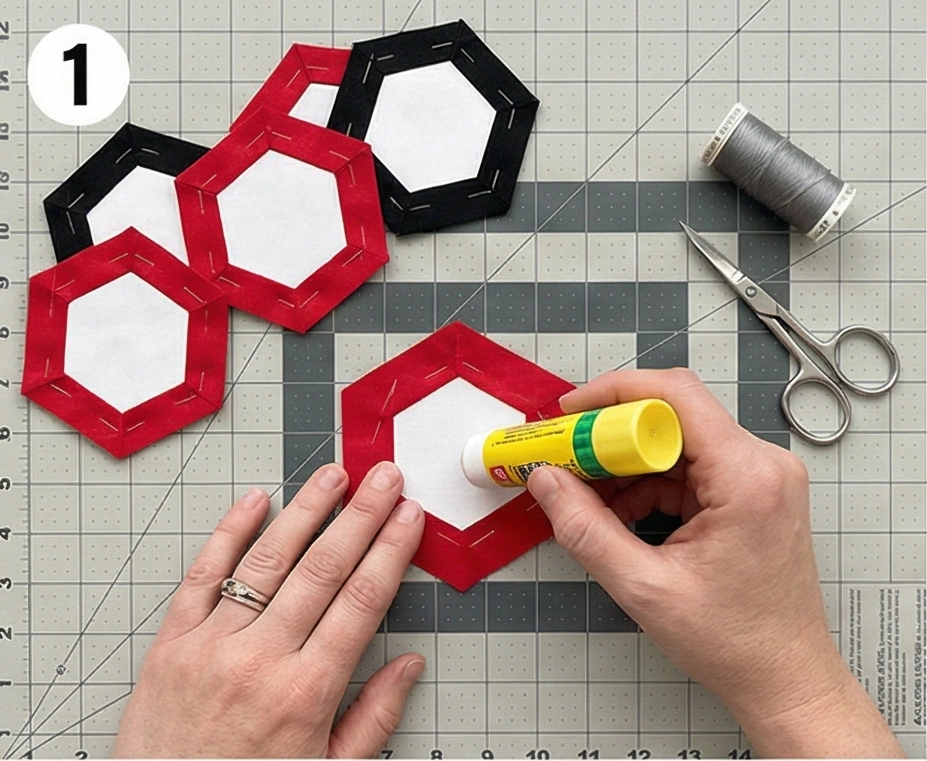
Step 1: Baste the Hexagons
EPP involves wrapping fabric around a paper shape to stabilize it.
- Cut Fabric: Cut fabric squares measuring 2.5″ x 2.5″.
- You need 7 Red, 12 White, and 18 Black.
- Glue Baste:
- Place a paper template in the center of the wrong side of a fabric square.
- Run a swipe of glue stick along the edge of the paper.
- Fold the fabric over the paper edge and press down.
- Repeat for all 6 sides until the paper is tightly wrapped.
- Yield: Prepare all 37 hexagons (7 Red, 12 White, 18 Black).
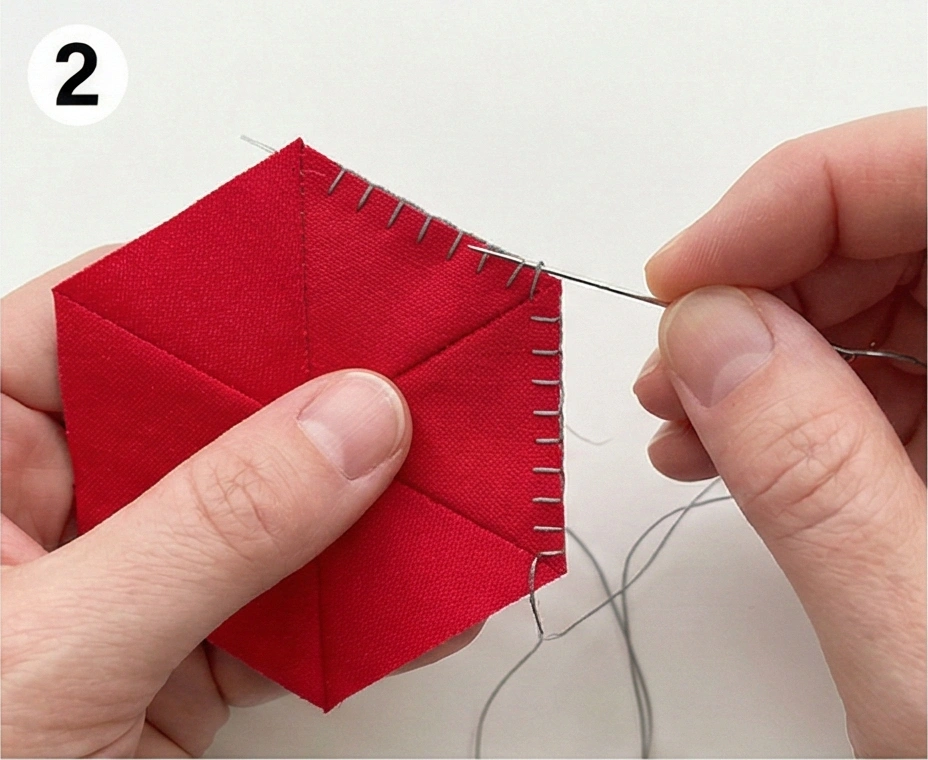
Step 2: Assemble the “Grandmother’s Flower”
We build the shape in rings from the center out.
- The Core: Take 1 Red Hexagon (Center) and sew 6 Red Hexagons around it.
- Technique: Place two hexagons Right Sides Together. Use a Whip Stitch (tiny overhand stitches) along one edge only. Catch just the fabric threads, not the paper.
- Ring 1 (White): Sew the 12 White Hexagons around the red flower.
- Stitch them into the “valleys” formed by the red hexies first, then stitch the sides together.
- Ring 2 (Black): Sew the 18 Black Hexagons around the white ring.
- Visual: You now have a large, three-color hexagon flower.
Step 3: Press and Starch
Before removing the paper, we need the fabric to remember its shape.
- Flip the flower over to the fabric side.
- Press: Use a hot iron (no steam yet) to press it perfectly flat.
- Starch: Spray heavily with starch. Press again. Let it cool completely.
Step 4: Remove the Papers
The satisfying “pop” moment.
- Flip to the back.
- Pop the fabric seams open slightly to release the glue tension.
- Remove: Pull the paper templates out.
- Press Again: Press the flower flat again. The edges should remain crisp and turned under.
Step 5: Appliqué to Background
Instead of binding it into a hexagonal shape (which is hard), we mount it on a square.
- Cut your Background Fabric (Charcoal/Black) into a 20″ x 20″ square.
- Fold the background in quarters to find the center point.
- Position: Place your Hexagon Flower exactly in the center of the background fabric. Pin or use fabric glue to hold it in place.
- Stitch Down:
- By Hand: Use a blind stitch to sew the flower’s perimeter to the background.
- By Machine: Use a narrow Zig-Zag or straight top-stitch (Edge Stitch) 1/8″ inside the hexagon edge.
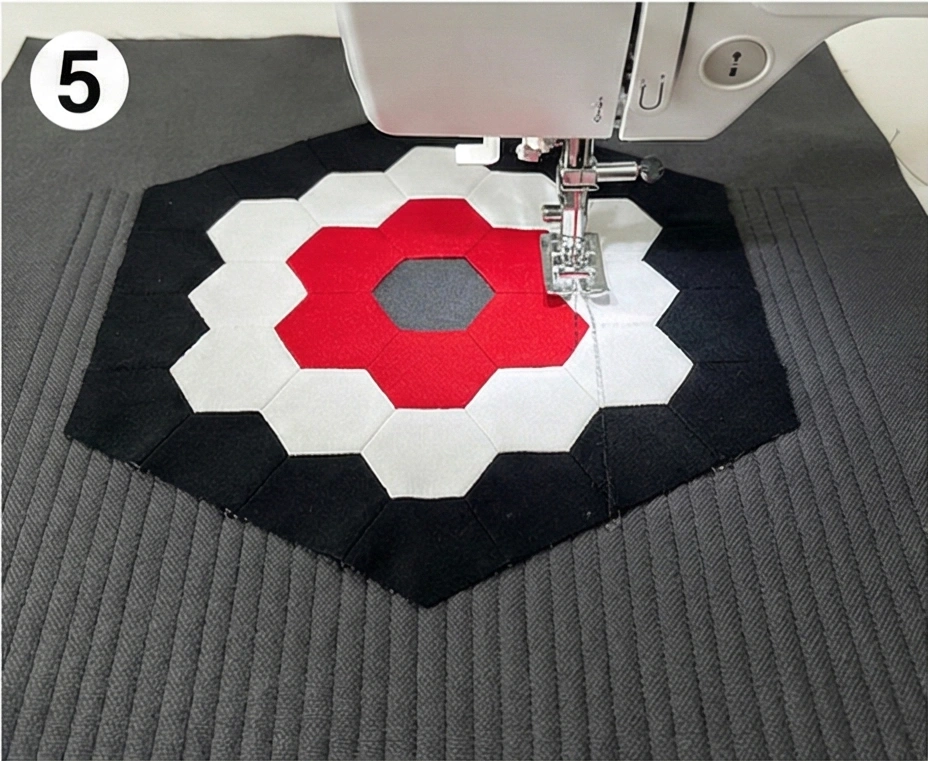
Step 6: Quilting and Finishing
- Layer: Make a sandwich with Batting and a Backing square (20″ x 20″).
- Quilt:
- Stitch inside the hexagon flower (echoing the hexagon shapes).
- In the background area, stitch dense straight lines or a grid to flatten the background and make the flower puff up (Trapunto effect).
- Trim: Trim the background square to 18.5″ x 18.5″.
- Bind: Finish with a Red Binding to frame the piece.
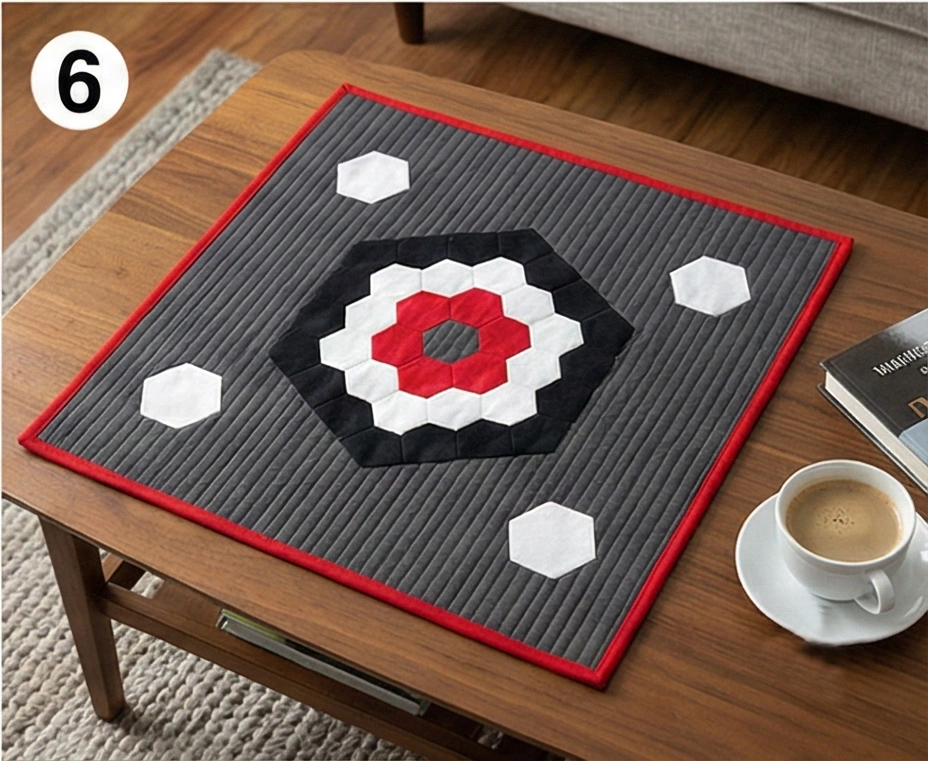
Pro Design Tip: The “Ghost” Hexies. To make the design feel more modern and less isolated, appliqué 3 or 4 single White Hexagons floating away from the main flower in the background negative space. It looks like petals drifting off in the wind, connecting the centerpiece to the rest of the table.
Budget Consideration: Cereal Box Templates. You don’t need to buy pre-cut EPP papers. Print a sheet of 1-inch hexagons from the internet, glue the paper to empty cereal boxes, and cut them out. The cardboard is stiff, reusable, and completely free.
14. Elegant Red, Black, and White Quilts for Formal Dining Rooms
The “Deco Tile” Art Deco Table Runner
For a formal dining space, a chaotic patchwork can sometimes feel too rustic. To achieve elegance, we look to the symmetry of Art Deco. This runner uses the “Court House Steps” block (a variation of the Log Cabin) to create precise, tile-like squares that look like a marble floor. The high contrast of Black framing White, with a jewel-like Red center, creates a sophisticated rhythm down the center of your table.
Finished Dimensions: Formal Runner, approximately 14″ x 70″ (Adjust length by adding/subtracting blocks).
Materials Needed:
- Fabric A (The Jewel/Red): 1/4 yard of Deep Red or Maroon (Silk or Sateen adds a formal sheen).
- Fabric B (The Light/White): 1/2 yard of Solid White.
- Fabric C (The Frame/Black): 3/4 yard of Solid Black.
- Backing Fabric: 1 yard of Black Cotton.
- Batting: Thin Fusible Fleece (essential for a flat, crisp runner).
- Binding: 1/4 yard of Black.
- Notions: Rotary cutter, square ruler.
Step 1: Cut the “Logs” and Centers
We are creating 5 large blocks, each finishing at 12 inches square. Precision cutting is vital for a formal look.
- Centers (Red): Cut 5 squares measuring 4.5″ x 4.5″.
- Inner Logs (White):
- Cut 10 strips measuring 2.5″ x 4.5″.
- Cut 10 strips measuring 2.5″ x 8.5″.
- Outer Logs (Black):
- Cut 10 strips measuring 2.5″ x 8.5″.
- Cut 10 strips measuring 2.5″ x 12.5″.
Step 2: Assemble the Inner “Light” Tier
Unlike a Log Cabin, which spirals, the courthouse steps are added in opposing pairs.
- Take a Red Center Square (4.5″).
- Sew short White Strips (4.5″) to the Top and Bottom of the red square. Press seams outward.
- Sew long White Strips (8.5″) to the Left and Right sides. Press seams outward.
- Visual: You now have a Red square floating in a White square.

Step 3: Assemble the Outer “Dark” Tier
Now we frame the light with the dark.
- Sew short Black Strips (8.5″) to the Top and Bottom of the white unit. Press seams outward.
- Sew long Black Strips (12.5″) to the Left and Right sides. Press seams outward.
- Visual: The block now looks like a nested geometric tile: Red center -> White Halo -> Black Frame.
- Repeat: Make 5 of these blocks.
Step 4: The Sashing Join
To keep it formal, we separate the blocks with a thin line to mimic grout lines in tile work.
- Cut Sashing: From your leftover Red Fabric, cut 4 strips measuring 1.5″ x 12.5″.
- Arrange: Lay the blocks in a row. Place a thin Red strip between each block.
- Block — Red Strip — Block — Red Strip — Block…
- Sew: Stitch the row together. Press seams toward the dark blocks.
Step 5: The “Formal Frame” Border
A formal runner needs a distinct edge.
- Cut 2 strips of Black measuring 1.5″ x 70″ (piece strips together if needed).
- Sew these to the long top and bottom edges of the runner.
- This thin black border creates a clean, finished edge that contains the design.
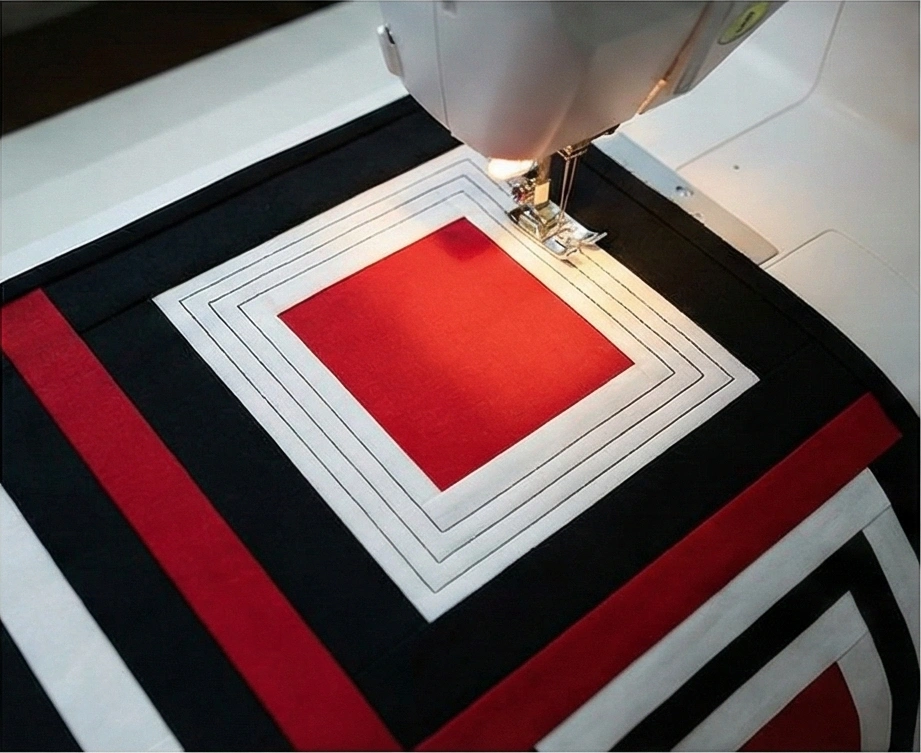
Step 6: “Echo” Quilting
- Fuse: Iron the Fusible Fleece to the back of the runner top. (Using fleece instead of puffy batting ensures your crystal wine glasses won’t tip over).
- Quilt: Use Black Thread.
- Design: Stitch straight lines that “echo” the squares.
- Stitch 1/4″ inside the Black frame.
- Stitch 1/4″ inside the White frame.
- Stitch 1/4″ inside the Red center.
- Effect: This emphasizes the Art Deco design’s stepped, architectural look.
- Bind: Finish with Solid Black Binding.
Pro Design Tip: Mitered Corners. If you want to elevate the skill level, apply the border (Step 5) to all four sides and use Mitered Corners (where the corners meet at a 45-degree angle, like a picture frame). It is a small detail that screams “high-end custom textile” to anyone sitting at your table.
Budget Consideration: Napkin Upcycling. High-quality formal fabric can be pricey. Check the clearance section for Cloth Napkins in Red or Black. They are often made of heavy, durable cotton or poly-blends that wash well. You can usually cut your center squares or short strips from a single pack of new napkins for cheaper than buying yardage.
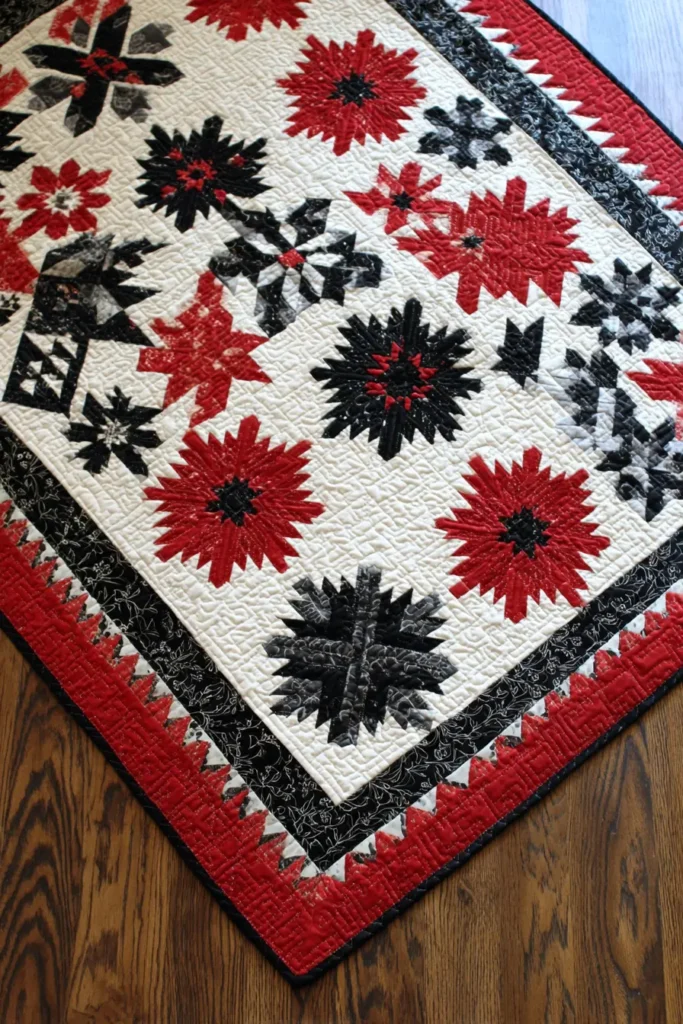
15. Scrap-Friendly Quilt Pattern for Eclectic Wall Art
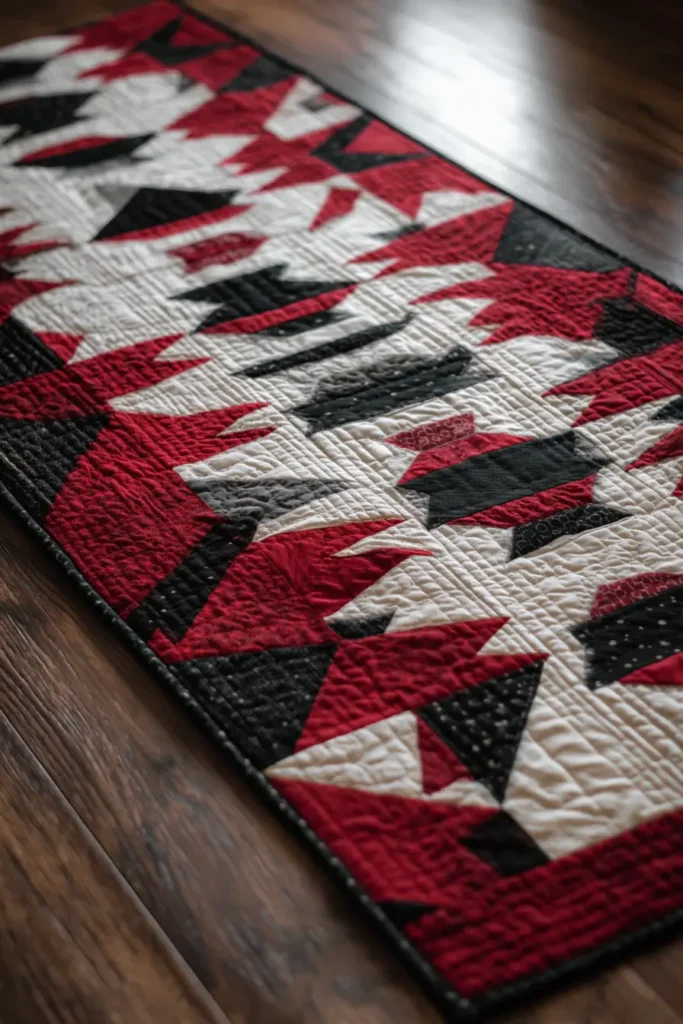
The “Urban Mosaic” Crumb Quilt Wall Hanging
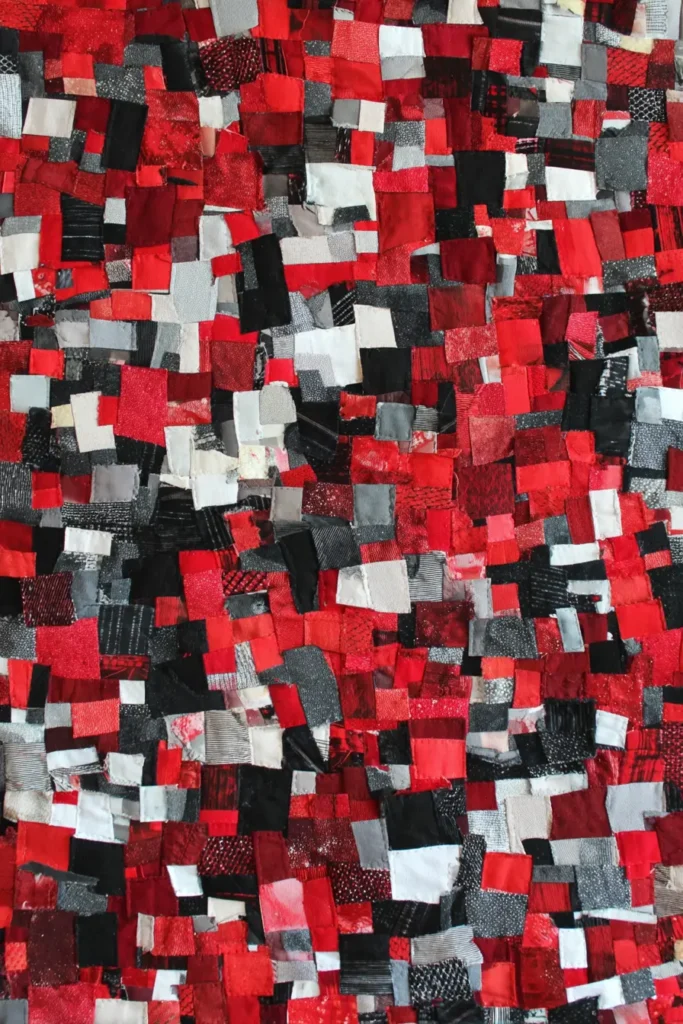
After making runners, throws, and pillows, you likely have a bin full of oddly shaped Red, Black, and White leftovers. Don’t throw them away! This “Crumb Quilt” turns those tiny waste bits into high-energy, eclectic modern art. The technique involves sewing small scraps into larger “slabs,” creating a chaotic, graffiti-like texture that looks incredible when framed on a dining room wall.
Finished Dimensions: Gallery Art Size, approximately 30″ x 30″ (or mount onto a standard canvas size).
Materials Needed:
- Scraps: A bin full of Red, Black, and White scraps (strips, triangles, tiny squares—anything goes).
- Foundation Fabric: 1 yard of inexpensive Muslin or scrap cotton (you won’t see it).
- Batting: Thin cotton batting (32″ x 32″).
- Backing: 1 yard of any fabric (it will face the wall).
- Mounting: A 28″ x 28″ Artist Canvas (wooden frame) and a staple gun.
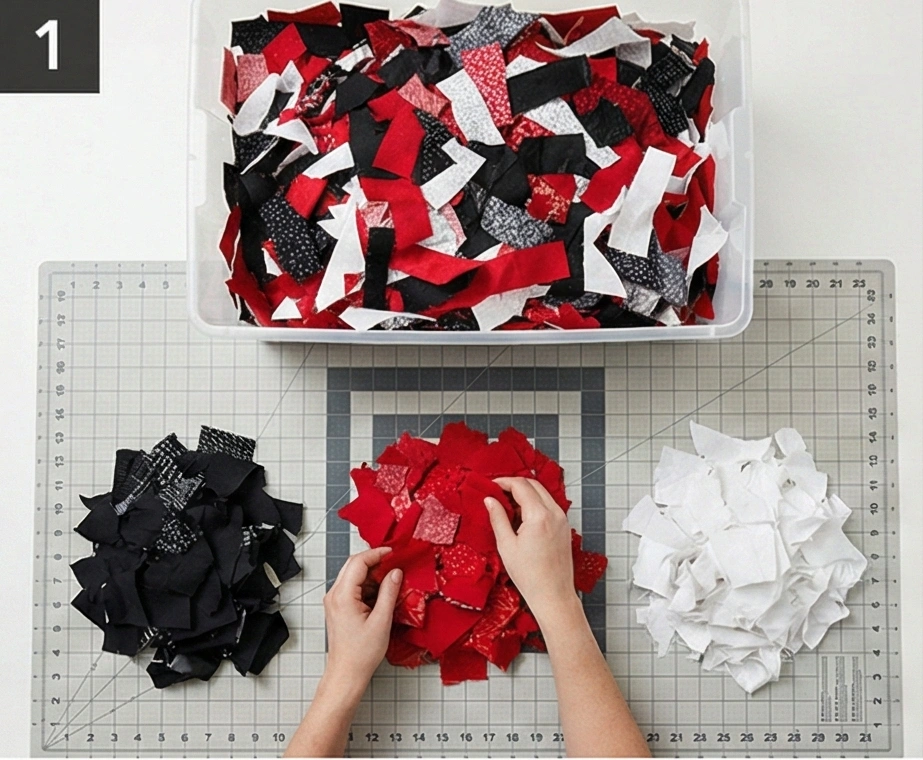
Step 1: Sort Your “Crumbs”
Chaos looks better when it has a few rules.
- Dump out your scrap bin.
- Sort the pieces into three piles:
- Pile A: Mostly Black prints/solids.
- Pile B: Mostly Red prints/solids.
- Pile C: Mostly White/Low-Volume prints.
- Iron the crinkled pieces flat. If a piece is smaller than 1 inch, toss it (too much bulk).
Step 2: Create “Slabs” (The Base Units)
We are making fabric out of fabric.
- Pick two random scraps from the Red Pile. Sew them together. Press the seam open.
- Pick a third scrap. Sew it to the side of the first two. Press.
- Continue: Keep adding pieces to this growing “blob” of fabric.
- Don’t worry about straight lines. If an edge is crooked, use your rotary cutter to slice it straight, then sew another piece onto it.
- Goal: Make 4 Red Slabs, 4 Black Slabs, and 8 White Slabs.
- Size: Keep adding scraps until each slab is roughly 8.5″ square.
Step 3: Square Up the Slabs
Turn the chaotic blobs into usable building blocks.
- Place your 8″ square ruler (or similar) over a Red Slab.
- Rotate the ruler until you like the angle of the scraps underneath.
- Cut: Trim the slab into a perfect square.
- Repeat for all 16 slabs.
- Result: You now have 16 perfect squares, each containing a unique mosaic of shredded fabric.
Step 4: The “Pixelated” Layout
We will arrange them to create a modern graphic.
- Arrange a grid of 4 blocks wide x 4 blocks tall.
- Design Idea: Try a “Cross” layout.
- Center 4 blocks: Red Slabs.
- Corners: Black Slabs.
- Top/Bottom/Side centers: White Slabs.
- Alternative: Do a gradient (Top row White, Second row Red, Bottom rows Black).
- Visual: The mix of tiny scraps creates a vibrating, energetic texture that solid fabric can’t achieve.
Step 5: Assembly
- Sew: Stitch the slabs into 4 rows.
- Join: Stitch the rows together.
- Press: Press seams open to reduce the bulk (there are a lot of seams in crumb quilting!).
Step 6: “Graffiti” Quilting & Mounting
- Quilt: Make your sandwich.
- Stitch: Do Dense Free-Motion Stippling (meandering squiggles) all over the quilt.
- Why? You need dense quilting to catch all the tiny raw edges of the scraps inside the blocks so they don’t fray.
- Mount: Instead of binding:
- Lay your finished quilt face down.
- Place the Wooden Canvas Frame on top.
- Pull the quilt edges tight around the wood frame to the back.
- Staple: Use a staple gun to secure the quilt to the wood frame.
- Result: A taut, gallery-wrapped textile art piece ready to hang.
Pro Design Tip: Text Inclusion. If you have selvage edges (the white edge of fabric with the manufacturer’s text), include them in your White Slabs. The random words and color dots add an industrial, pop-art vibe to the piece.
Budget Consideration: Zero Cost. This project should cost $0 if you have been making the other quilts in this series. Use an old sheet for the foundation and backing. Use leftover batting scraps (join them together with zigzag tape). Use an old, ugly canvas painting from a thrift store as your mounting frame.
16. Farmhouse-Style Red, Black, and White Quilts for Open Living Dining Areas
The “Barn Raiser” Modern Sawtooth Star
Nothing says “Farmhouse” quite like the classic Sawtooth Star. However, traditional farmhouse quilts can feel a bit cluttered in a modern open-concept space. This design updates the look by scaling the stars to massive proportions. The result is a clean, graphic, tile-like pattern that bridges the gap between a rustic dining table and a contemporary living room sofa.
Finished Dimensions: Large Square Throw, approximately 64″ x 64″.
Materials Needed:
- Fabric A (Background/White): 3 yards of Solid White or “Low Volume” print (white with tiny black text).
- Fabric B (Star Points/Black): 1.5 yards of Solid Black or Charcoal.
- Fabric C (Centers/Red): 1 yard of Red Gingham or Solid Red.
- Backing Fabric: 4 yards.
- Batting: Throw size (68″ x 68″).
- Binding: 5/8 yard of Black and White Gingham (essential for the farmhouse look).
- Notions: Rotary cutter, 8.5″ square ruler.
Step 1: Cut the Block Components
We are making 16 Large Blocks arranged in a 4×4 grid. Each block finishes at 16 inches square.
For ONE Block, you need:
- Center: One 8.5″ square (Fabric C – Red).
- Corners: Four 4.5″ squares (Fabric A – White).
- Flying Geese (Points):
- Four 4.5″ x 8.5″ rectangles (Fabric A – White).
- Eight 4.5″ squares (Fabric B – Black).
Total Cuts for 16 Blocks:
- Red: 16 squares (8.5″).
- White: 64 squares (4.5″) AND 64 rectangles (4.5″ x 8.5″).
- Black: 128 squares (4.5″).
Step 2: Make the Flying Geese Units
These units form the star points.
- Take a White Rectangle (4.5″ x 8.5″) and a Black Square (4.5″).
- Draw a diagonal line on the back of the black square.
- Place the square on the left side of the rectangle (Right Sides Together).
- Sew on the line. Trim excess corner (1/4″ seam). Press the black triangle up.
- Repeat on the right side with another black square.
- Result: A white rectangle with two black peaks.
- Quantity: Make 64 of these units.
Step 3: Assemble the Star Block
Lay it out like a Tic-Tac-Toe grid.
- Top Row: White Square — Flying Goose (Points pointing Up) — White Square.
- Middle Row: Flying Goose (Points pointing Left) — Red Center Square — Flying Goose (Points pointing Right).
- Bottom Row: White Square — Flying Goose (Points pointing Down) — White Square.
- Sew: Stitch the units into rows, then sew the rows together.
- Size: The unfinished block should measure 16.5″ x 16.5″.

Step 4: The “Barn Door” Layout
- Clear a floor space. Arrange the 16 blocks in a 4 x 4 grid.
- Orientation: Ensure all stars are “upright.”
- Visual Check: Because the corners of the blocks are white, when you sew the blocks together, the white corners will merge to form secondary white diamonds between the stars. This “secondary pattern” is what gives the quilt its open, airy feel.
Step 5: Assembly
- Sew Rows: Stitch the blocks together into 4 horizontal rows.
- Join: Stitch the 4 rows together.
- Tip: Match the points of the stars carefully. Use nesting seams (press one row’s seams to the left, the next to the right) to keep the intersections flat.
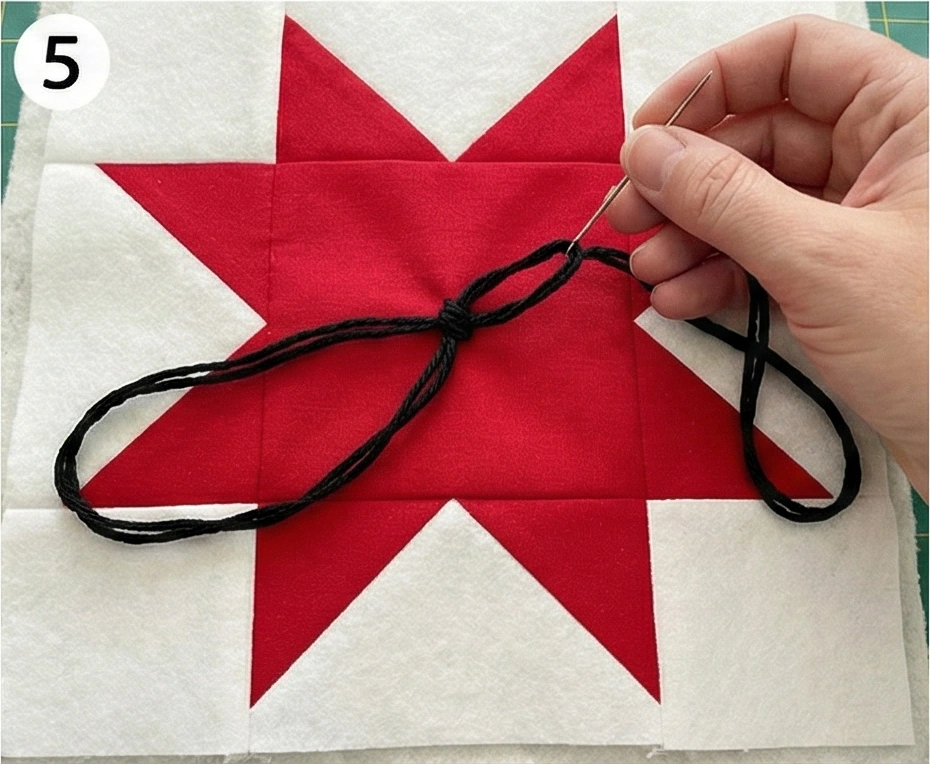
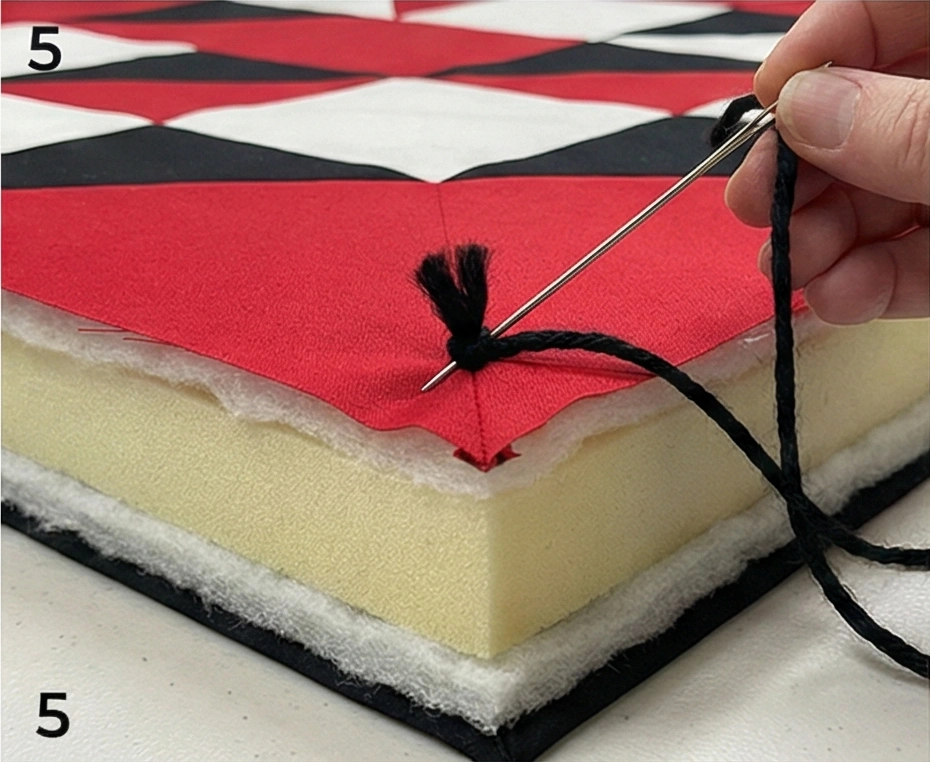
Step 6: Hand-Tied Finishing (The Farmhouse Touch)
Machine quilting can look too stiff for farmhouse style. Hand-tying adds rustic texture.
- Sandwich your Top, Batting, and Backing. Baste well.
- Thread: Use Black embroidery floss or pearl cotton.
- Tie: Using a sharp needle, insert the thread through all layers at the center of every star and the corners of every block.
- Knot: Tie a square knot on the top surface. Trim the thread ends to 1/2 inch.
- Bind: Finish with Black and White Gingham binding. The check pattern, contrasting with the stars, creates that quintessential “Chip and Joanna” farmhouse aesthetic.
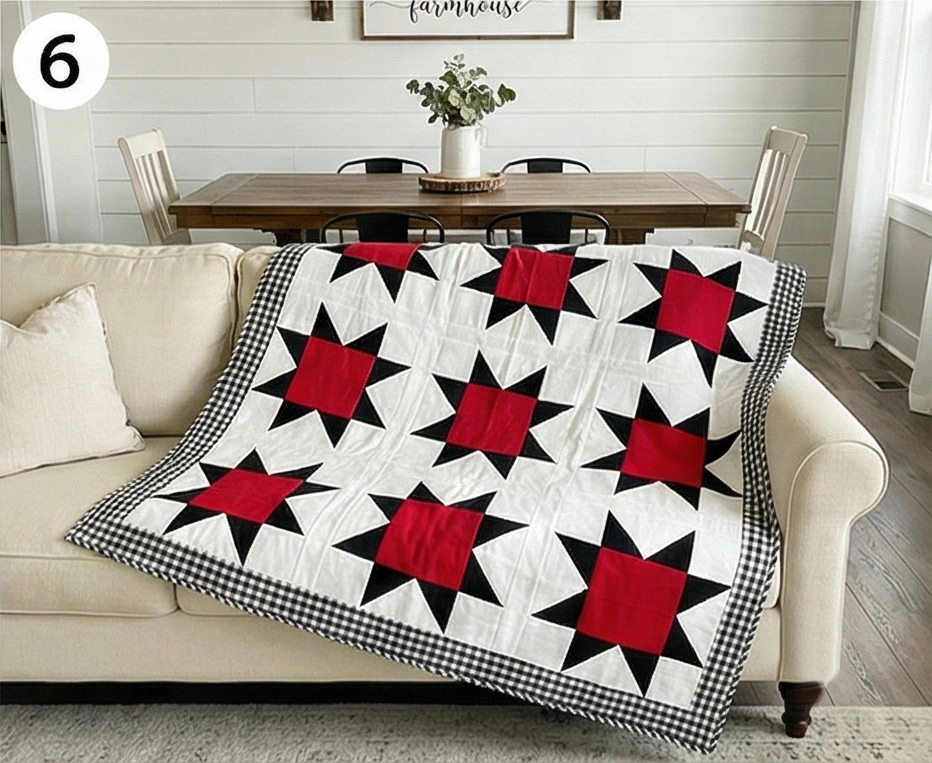
Pro Design Tip: The “Shiplap” Quilt. Instead of solid white fabric for the background (Fabric A), piece together 2.5″ strips of different shades of white and cream. This subtle striping mimics the look of white shiplap walls, adding texture without overwhelming the stars.
Budget Consideration: Painters Drop Cloth. For the background fabric (Fabric A), buy a Canvas Drop Cloth from a hardware store. Bleach it in your washing machine until it turns a soft, creamy white. It has a beautiful rustic texture, is incredibly durable for dining areas, and costs a fraction of quilting cotton.
17. Easy DIY Quilted Coasters and Placemats for a Coordinated Set
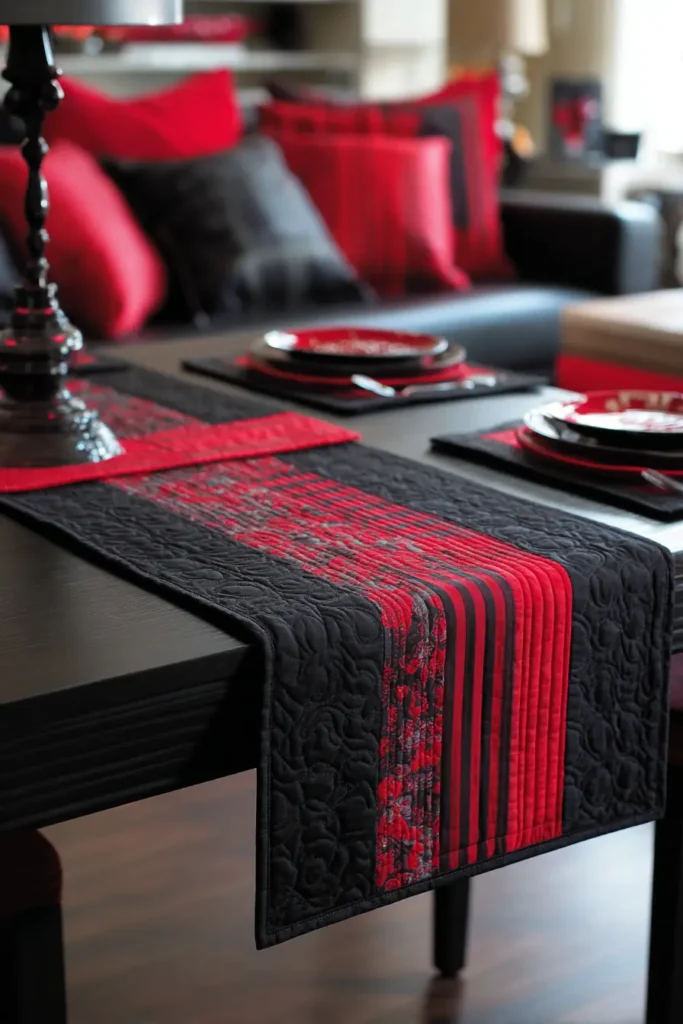
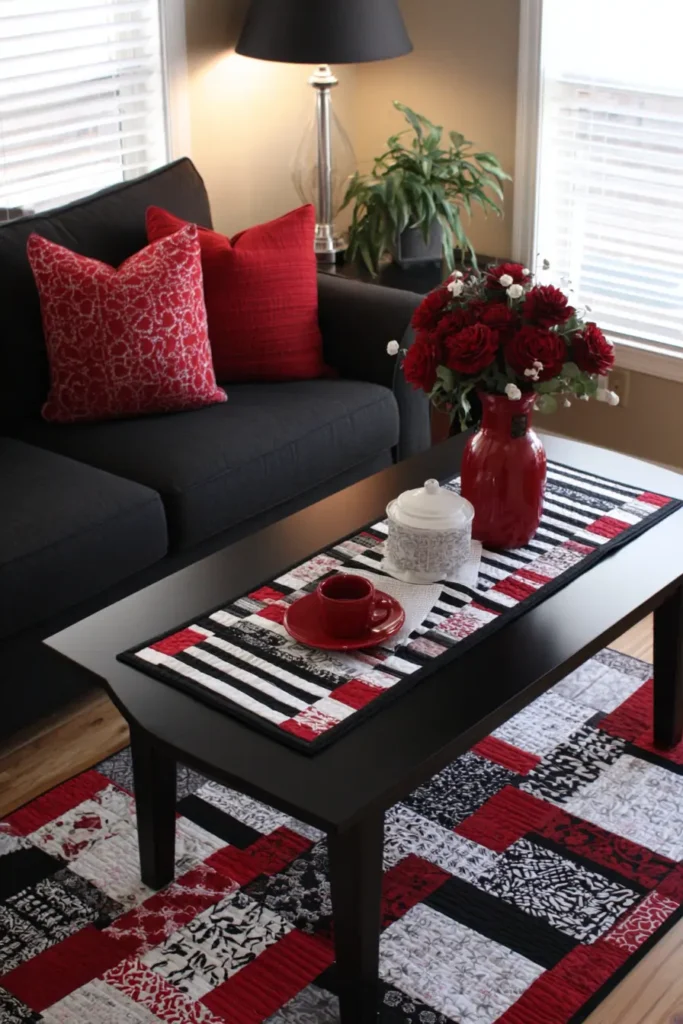
The “Sidebar” Modern Dining Set
Small accessories are the fastest way to tie a room together. If you have a black sofa in the living area and a white table in the dining area, this set bridges the gap. The design features a solid main field (for plates/cups) accented by a stylish vertical “Sidebar” of stripes on the right edge. It uses the “Envelope Method” (or Pillowcase Method), meaning zero binding is required, making it perfect for beginners.
Finished Dimensions:
- Placemat: 12″ x 18″.
- Coaster: 4.5″ x 4.5″.
Materials Needed (For a set of 4 Placemats + 4 Coasters):
- Fabric A (Main Body/Black): 1 yard of Solid Black or Linen.
- Fabric B (Sidebar/White): 1/2 yard of Solid White.
- Fabric C (Accent/Red): 1/4 yard of Bright Red.
- Backing Fabric: 1 yard of a fun print (Use a Red/Black geometric).
- Batting: 1 yard of Insul-Bright (Heat-resistant batting) OR thin cotton batting. Insul-Bright makes them heat-proof for hot plates.
- Notions: Rotary cutter, point turner (or a chopstick).
Step 1: Cut the “Sidebar” Strips
We will build the striped accent sections first.
- For Placemats:
- Cut 4 strips of White: 2.5″ x 12.5″.
- Cut 4 strips of Red: 1.5″ x 12.5″.
- For Coasters:
- Cut 4 strips of White: 1.5″ x 5″.
- Cut 4 strips of Red: 1.5″ x 5″.
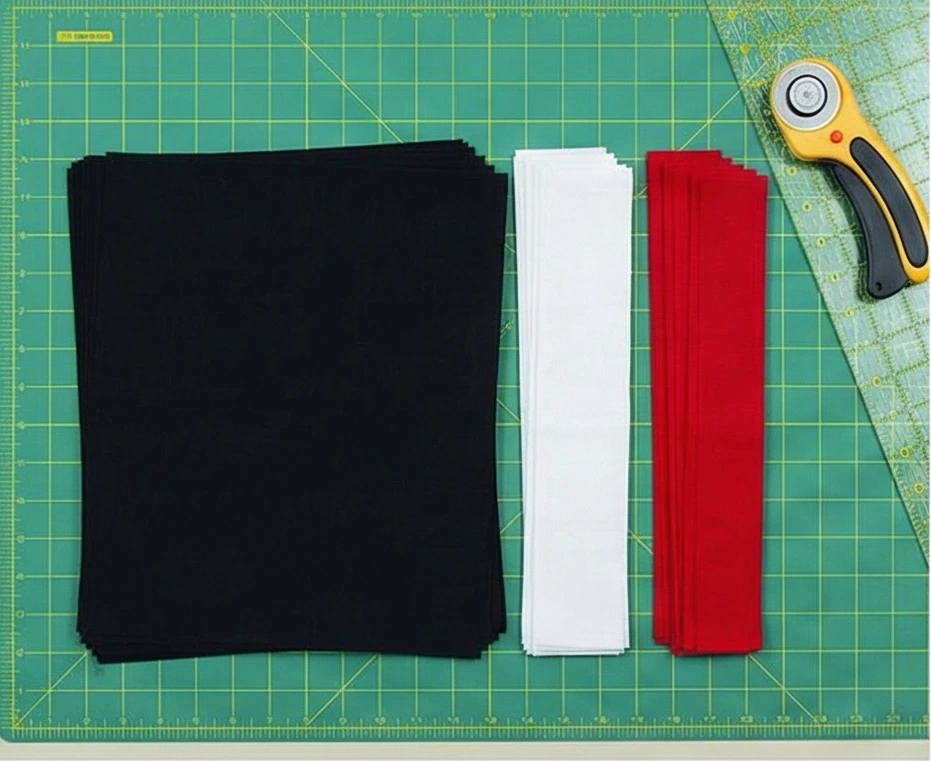
Step 2: Cut the Main Bodies
Now cut the large solid sections.
- For Placemats (Black):
- Cut 4 rectangles measuring 10.5″ x 12.5″.
- For Coasters (Black):
- Cut 4 rectangles measuring 3″ x 5″.
- Backing & Batting:
- Cut 4 Placemat-sized pieces (approx 13″ x 19″).
- Cut 4 Coaster-sized pieces (approx 5″ x 5″).
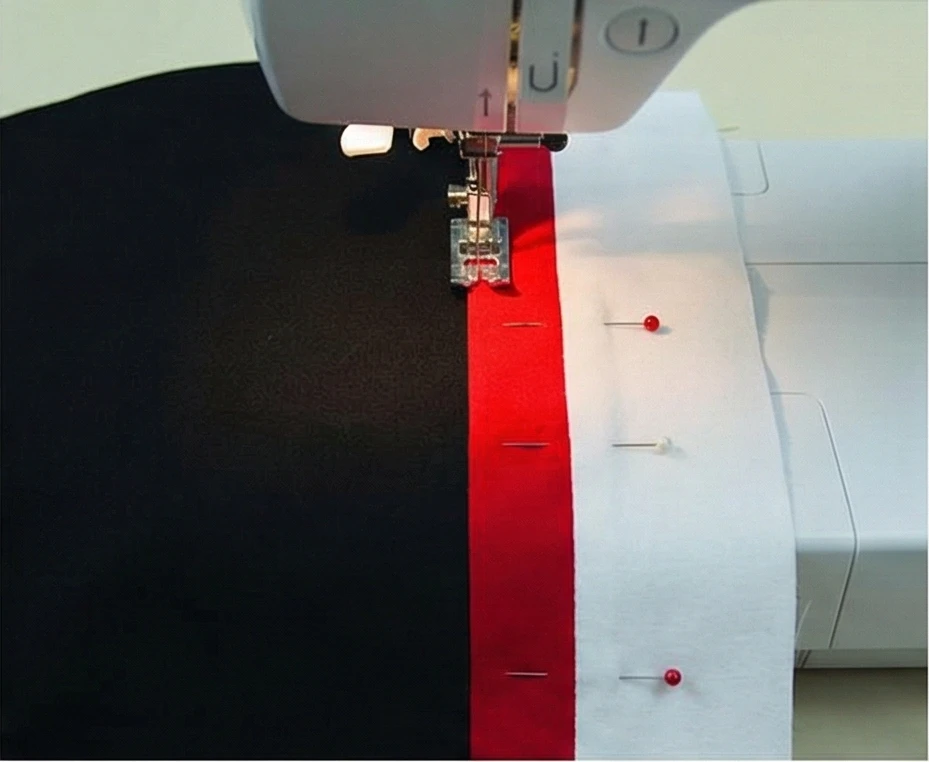
Step 3: Assemble the Tops
Sew the sidebars to the main bodies.
- Placemats:
- Sew the Red Strip to the right side of the Black Rectangle. Press seam toward Black.
- Sew the White Strip to the right side of the Red Strip. Press toward Red.
- Result: A 12.5″ x 18.5″ rectangle (Black body, thin Red line, White edge).
- Coasters:
- Sew the Red Strip to the Black Rectangle.
- Sew the White Strip to the Red Strip.
- Result: A 5″ x 5″ square.
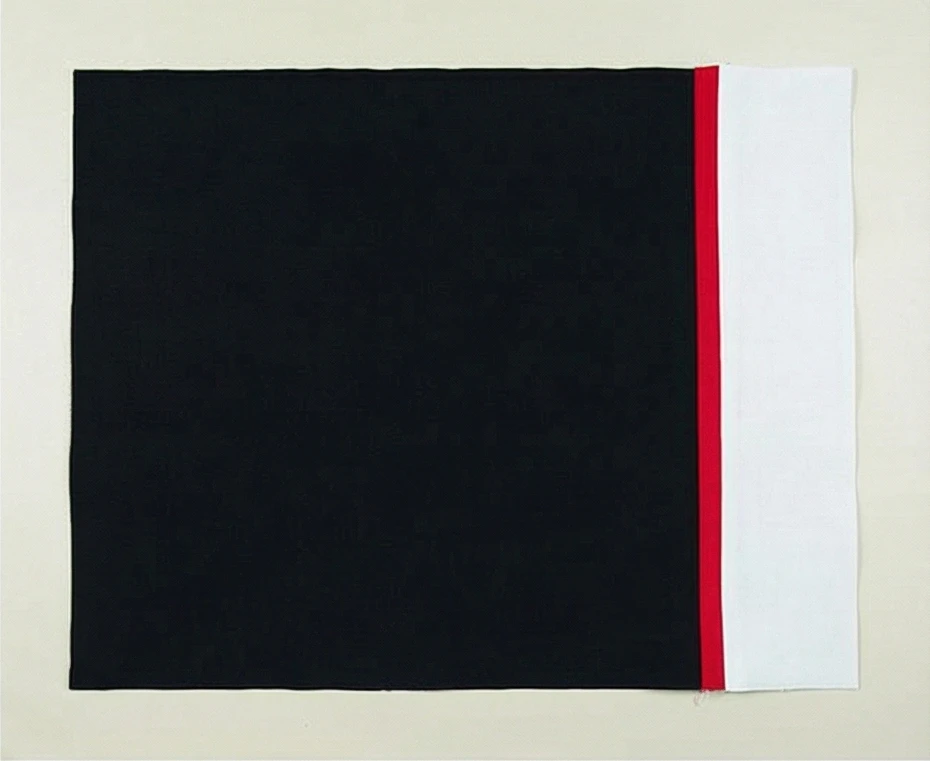
Step 4: The “Envelope” Assembly
Here is the trick to avoid binding.
- Place your Batting/Insul-Bright on the table.
- Place your Backing Fabric on top of the batting, Right Side Up.
- Place your Pieced Top on top of the backing, Right Side Down (Right sides together).
- Pin: Pin around the perimeter.
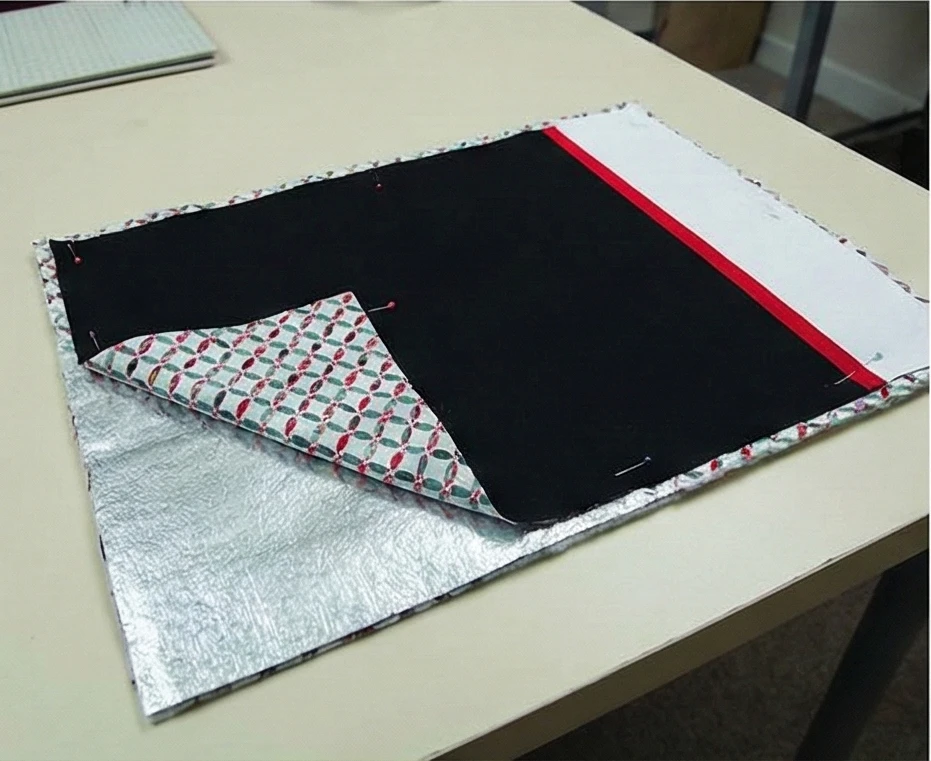
Step 5: Sew and Turn
- Sew: Stitch around the entire perimeter with a 1/4″ seam allowance.
- Crucial: Leave a 3-inch gap open on the bottom edge so you can turn it inside out.
- Clip Corners: Snip the four corners off (diagonally) close to the stitching. This reduces bulk.
- Turn: Reach through the gap and pull the placemat/coaster right side out.
- Press: Use a chopstick to poke the corners out so they are sharp. Iron the whole thing flat. Tuck the raw edges of the opening inside and press well.
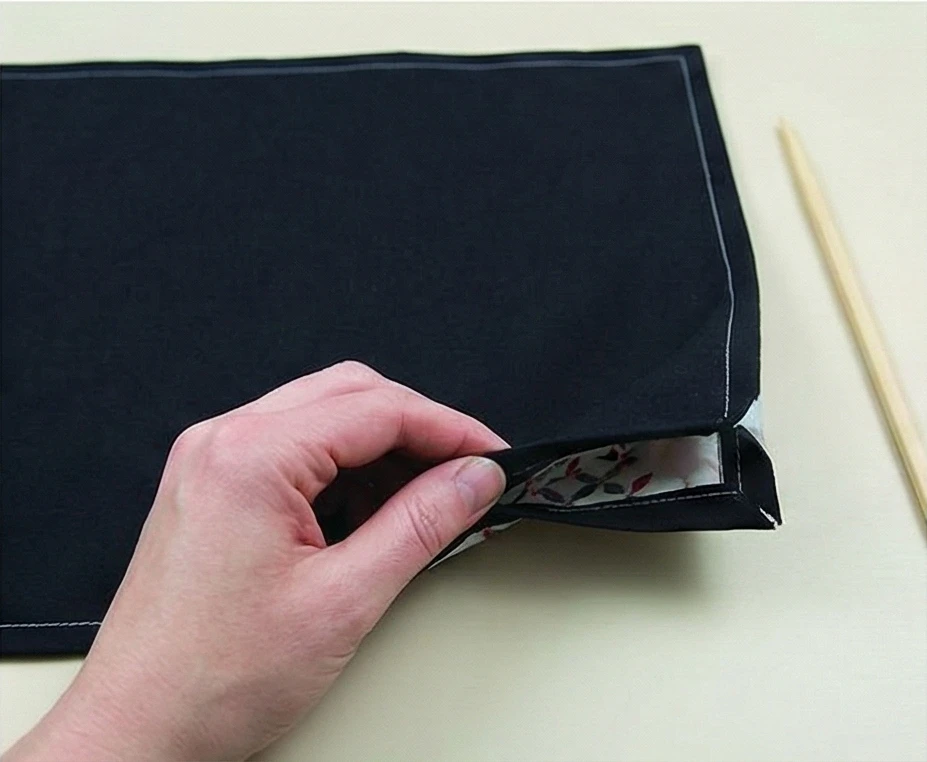
Step 6: Topstitch and Quilt
This closes the gap and adds a professional finish.
- Topstitch: Sew a straight line around the entire perimeter, about 1/8″ from the edge. This closes the turning hole permanently and gives it a crisp edge.
- Accent Quilt:
- Stitch a straight line “in the ditch” (in the seam) between the Black and Red fabric.
- Stitch another line between the Red and White fabric.
- Effect: This secures the layers and highlights the “Sidebar” design.
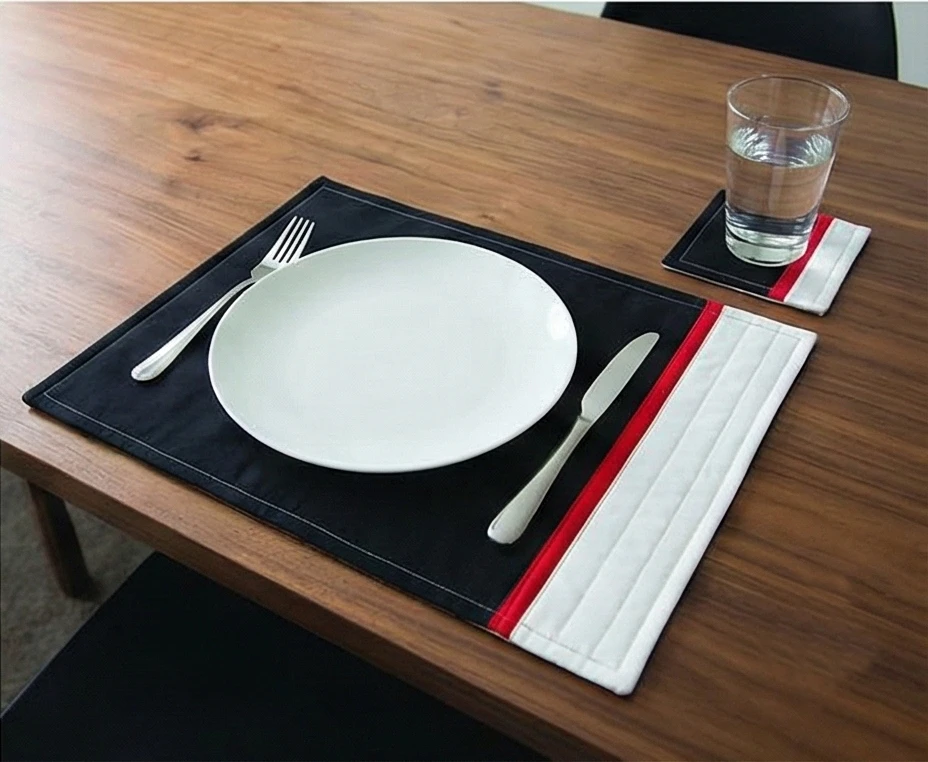
Pro Design Tip: The Cutlery Pocket. For the placemats, before Step 4, you can sew a small patch pocket onto the Black section. Use the Red fabric. This creates a dedicated spot to tuck a napkin and silverware, which looks very polished for a dinner party.
Budget Consideration: Old Jeans. Use Old Black Jeans for the main body of the placemats. Denim is heavy, heat-resistant, and washable. The fading on the denim seams adds a cool, casual texture that contrasts nicely with crisp white china.
18. Gingham Red and White Quilt with Black Borders for Throw Blanket

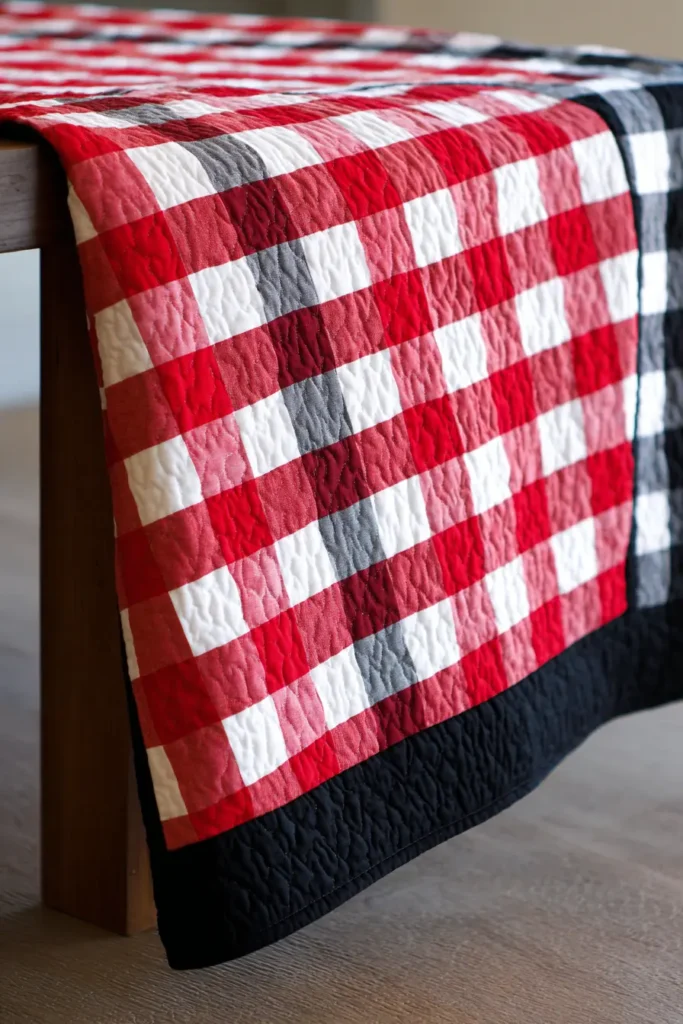
The “Bistro Check” Framed Gingham Throw
While true gingham usually requires a third “medium” color, this Bold Gingham Check relies on the high-contrast vibration between pure Red and White squares. It mimics the classic look of an Italian bistro tablecloth or a summer picnic, but the addition of a heavy, wide Black Border instantly modernizes it. The black acts like a gallery frame, turning a rustic pattern into a sharp, graphic statement piece for your living room sofa.
Finished Dimensions: Sofa Throw, approximately 58″ x 70″.
Materials Needed:
- Fabric A (White): 1.5 yards of Solid White.
- Fabric B (Red): 1.5 yards of Bright Cherry Red.
- Fabric C (Border/Black): 1.5 yards of Solid Black.
- Backing Fabric: 3.5 yards (Black cotton is best to hide the quilting starts/stops).
- Batting: Throw size (62″ x 74″).
- Binding: 1/2 yard of Black (to blend with the border) OR White (for a pop).
- Notions: Rotary cutter, 6″ x 24″ quilting ruler.
Step 1: Create the Strip Sets
We will use “Strip Piecing” to create the checkerboard. This is 10x faster than cutting individual squares.
- Cut White Strips: Cut 10 strips measuring 4.5″ wide x Width of Fabric (WOF).
- Cut Red Strips: Cut 10 strips measuring 4.5″ wide x WOF.
- Sew: Pair one Red strip with one White strip. Sew them together lengthwise with a 1/4″ seam.
- Repeat until you have 10 pairs.
- Note: You can sew four strips together (Red-White-Red-White) to speed it up, but working in pairs is easier for beginners.
- Press: Press all seams toward the Red fabric. This prevents the red thread from showing through the white fabric (shadowing).
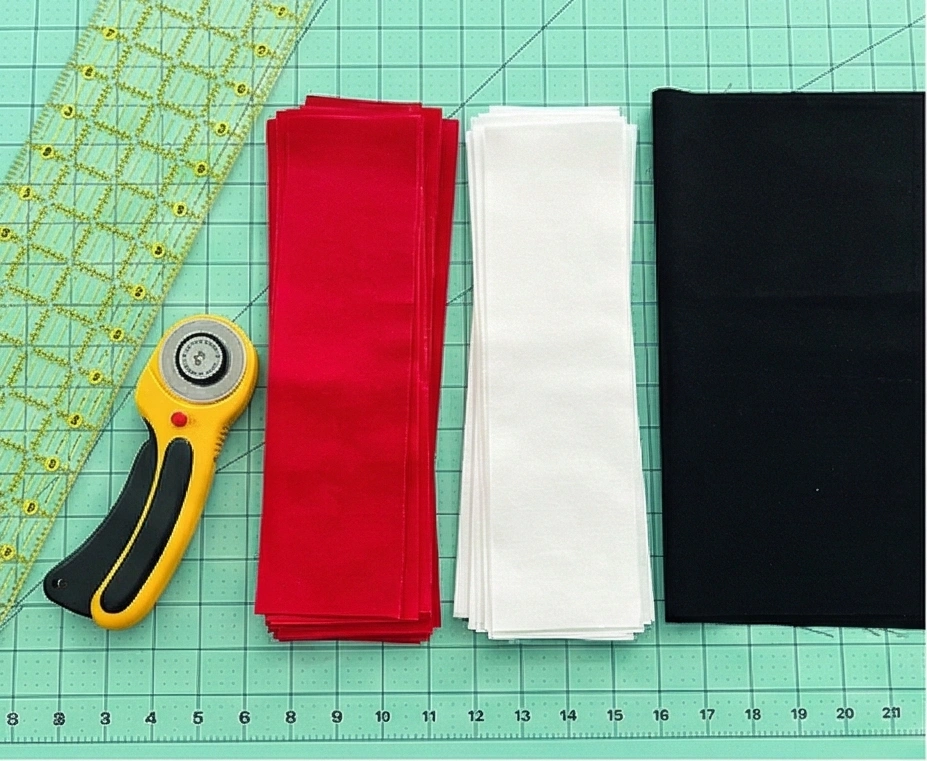
Step 2: Sub-Cut into Segments
Turn your long striped ribbons into pre-joined blocks.
- Take your Red/White strip sets to the cutting mat.
- Trim: Clean up the selvage end.
- Cut: Cross-cut the strip sets into segments measuring 4.5″ wide.
- You are creating units that are two squares (one red, one white) joined together.
- Yield: You need roughly 168 pairs (or enough to make a 12×14 grid of individual squares).
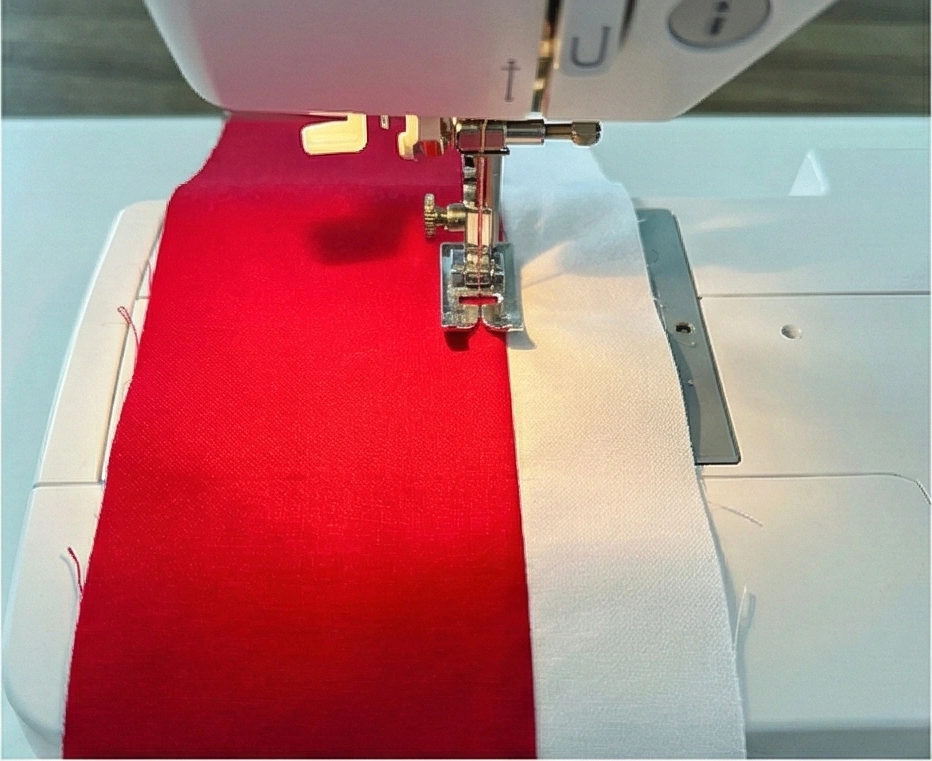
Step 3: Arrange the Checkerboard
- Clear a floor space. We are building a grid of 12 squares wide x 14 squares tall.
- Row 1: Lay out your 2-square segments.
- Red-White… Red-White… Red-White.
- Ensure you start with Red and end with White.
- Row 2: Lay out your segments but flip them.
- White-Red… White-Red… White-Red.
- Visual: Check the vertical columns. A Red square should always be sitting on top of a White square.
- Repeat: Alternate this pattern for all 14 rows.
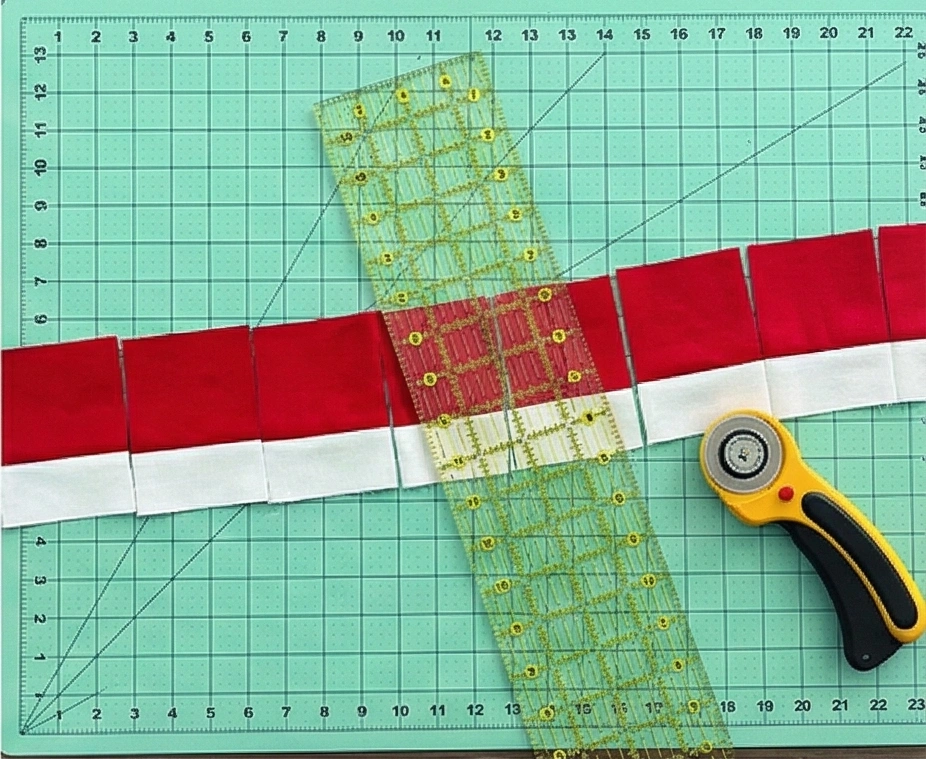
Step 4: Assemble the Center Field
- Sew Rows: Stitch the segments together to complete Row 1. Then stitch Row 2.
- Tip: Because you pressed seams toward the Red, the seams should “nest” (lock together) at every intersection, giving you perfect corners.
- Join Rows: Sew Row 1 to Row 2, Row 2 to Row 3, etc.
- Press: Press the horizontal seams open to reduce bulk.
- Status: You now have a Red/White checkerboard center measuring approx 48.5″ x 56.5″.

Step 5: Add the “Gallery Frame” Border
This is where the quilt transforms from “Picnic” to “Decor.”
- Cut Border Strips: From Fabric C (Black), cut 6 strips measuring 5.5″ wide.
- Sew the strips end-to-end to make long border lengths.
- Side Borders: Measure the vertical length of your quilt center (approx 56.5″). Cut two Black strips to this length.
- Sew them to the Left and Right sides. Press outward.
- Top/Bottom Borders: Measure the width of your quilt center (including the new side borders—approx 58.5″). Cut two Black strips to this length.
- Sew them to the Top and Bottom. Press outward.
Step 6: “On Point” Quilting
To mimic the texture of woven gingham, diagonal quilting is best.
- Baste: Sandwich the Top, Batting, and Backing.
- Mark: Use masking tape or a chalk marker to draw a diagonal line at a 45-degree angle across the quilt.
- Quilt: Stitch straight lines parallel to your mark.
- Space the lines 2 inches apart.
- Option: Do a “Cross-Hatch” by stitching diagonal lines in the other direction as well, forming diamond shapes over the squares.
- Bind: Finish with Solid Black Binding for a seamless, invisible edge that lets the border shine.
Pro Design Tip: The “Faux-Gingham” Texture. If you want the look of 3-color gingham without buying pink fabric, use a Striped Red-and-White Fabric for the “Medium” squares.
- Square 1: Solid Red.
- Square 2: Solid White.
- Square 3: Red/White Pinstripe.
- Arranging these correctly creates the optical illusion of transparency!
Budget Consideration: Flat Sheet for White. Since half the quilt center is white, you need a lot of it. A High-Thread-Count White Flat Sheet is often smoother and cheaper than a yard of quilting cotton. Just make sure to pre-wash it, as sheets shrink differently from bolt fabric.
19. Pinwheel Quilt Ideas in Red, Black, and White for Sofa Pillow
The “Turbo” Kinetic Pinwheel Pillow
Pinwheels are the ultimate “movement” block. In a static room, they deceive the eye, appearing to spin. For this high-energy pillow, we won’t stop at just one pinwheel. We will create a 3×3 grid of alternating Red and Black pinwheels. This creates a dizzying, kaleidoscopic effect that acts as a perfect “punctuation mark” on a solid grey or black sofa.
Finished Dimensions: Fits a standard 18″ x 18″ Pillow Insert (The cover will be approx 19″ to ensure a plump fit).
Materials Needed:
- Fabric A (White): 1/2 yard of Solid White.
- Fabric B (Red): 1/4 yard of Bright Red.
- Fabric C (Black): 1/4 yard of Solid Black.
- Backing Fabric: 1/2 yard (for envelope closure).
- Batting: 20″ x 20″ scrap.
- Pillow Form: 18″ square.
- Notions: Rotary cutter, square ruler (at least 3.5″).
Step 1: Cut the Squares (HST Method)
We need to make Half Square Triangles (HSTs) first. We will make 5 Red Pinwheels and 4 Black Pinwheels.
- For Red/White Units:
- Cut 10 squares of Red (4″ x 4″).
- Cut 10 squares of White (4″ x 4″).
- For Black/White Units:
- Cut 8 squares of Black (4″ x 4″).
- Cut 8 squares of White (4″ x 4″).
- Note: We cut them 4″ to give us room to trim them down perfectly later.
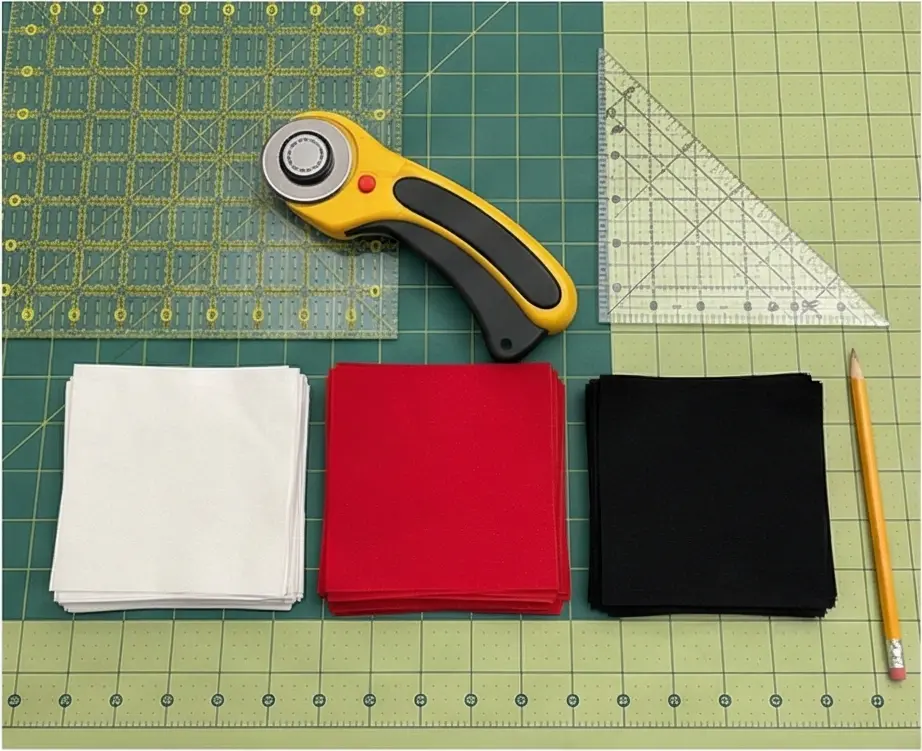
Step 2: Construct the HSTs
- Draw a diagonal line on the back of all White squares.
- Pair each White square with a colored square (Red or Black), Right Sides Together.
- Sew 1/4″ away from the drawn line on both sides.
- Cut directly on the drawn line.
- Press seams toward the dark fabric.
- Trim: This is critical! Trim every HST unit to exactly 3.5″ x 3.5″.
- Yield: 20 Red/White HSTs and 16 Black/White HSTs.
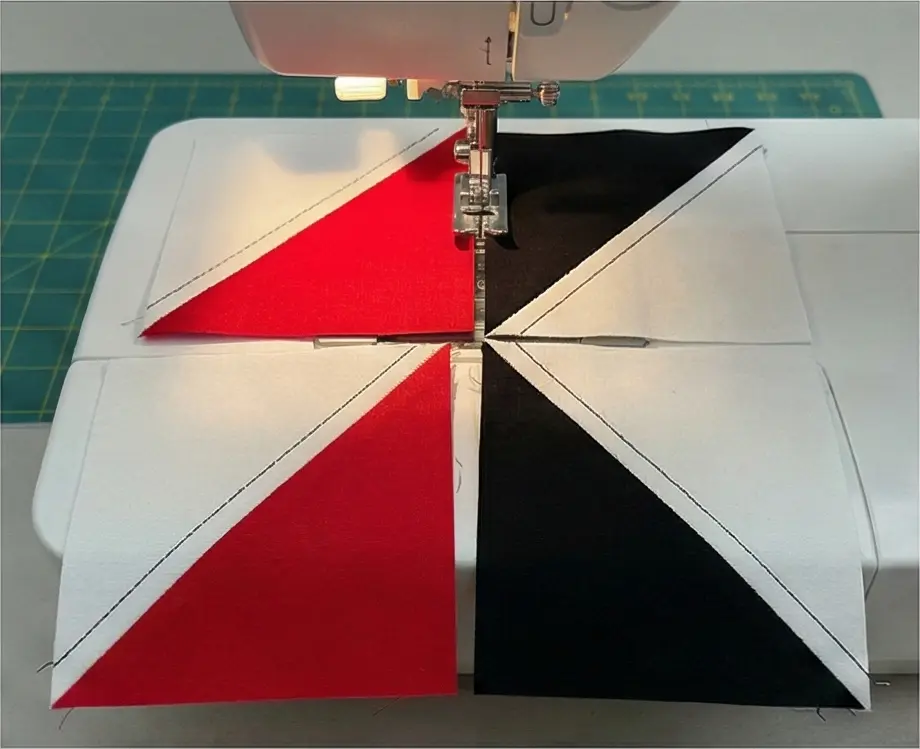
Step 3: Assemble the Pinwheel Blocks
A pinwheel is made of 4 HSTs. We need 9 blocks total.
- Layout: Arrange 4 HSTs in a square.
- Orient them so that the colored triangles all point inward, “chasing” each other clockwise.
- Sew: Stitch the top two HSTs together. Stitch the bottom two together. Then sew the rows together.
- Center Bulk: To reduce the lump in the middle, press the center seam open (or spin the seams).
- Repeat:
- Make 5 Red Pinwheels.
- Make 4 Black Pinwheels.
- Size Check: Each block should measure 6.5″ x 6.5″.
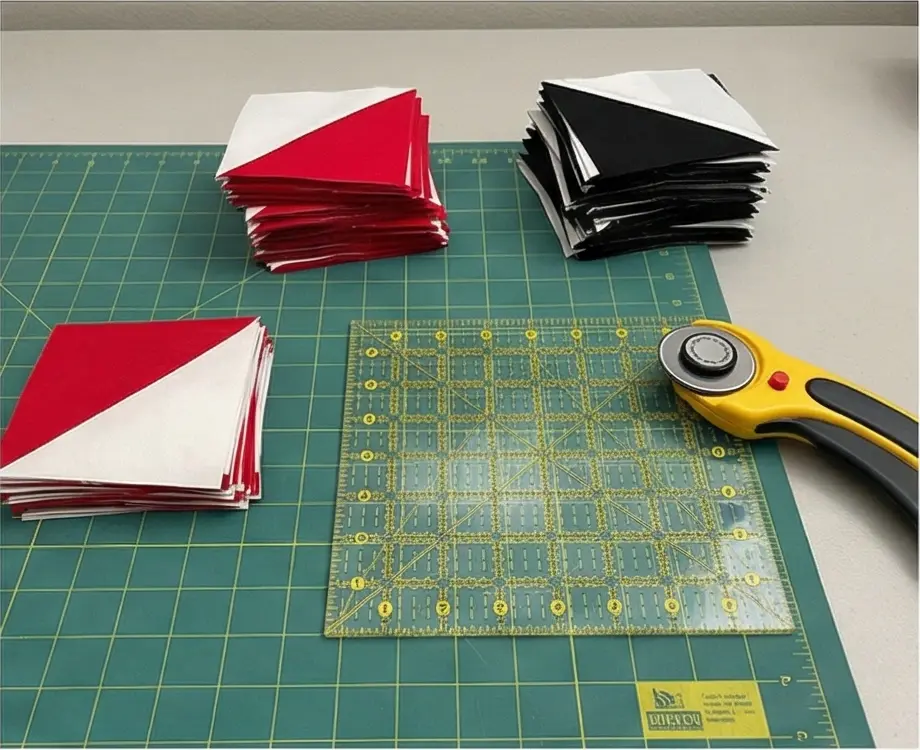
Step 4: The Checkerboard Layout
Now we join the blocks to make the pillow top.
- Arrange the blocks in 3 rows of 3.
- Row 1: Red — Black — Red.
- Row 2: Black — Red — Black.
- Row 3: Red — Black — Red.
- Check the Spin: Make sure all 9 pinwheels are spinning in the exact same direction (e.g., clockwise). If one is spinning counter-clockwise, it will ruin the optical illusion.
- Sew: Stitch blocks into rows, then join the rows.
- Result: You have an 18.5″ x 18.5″ pillow top.
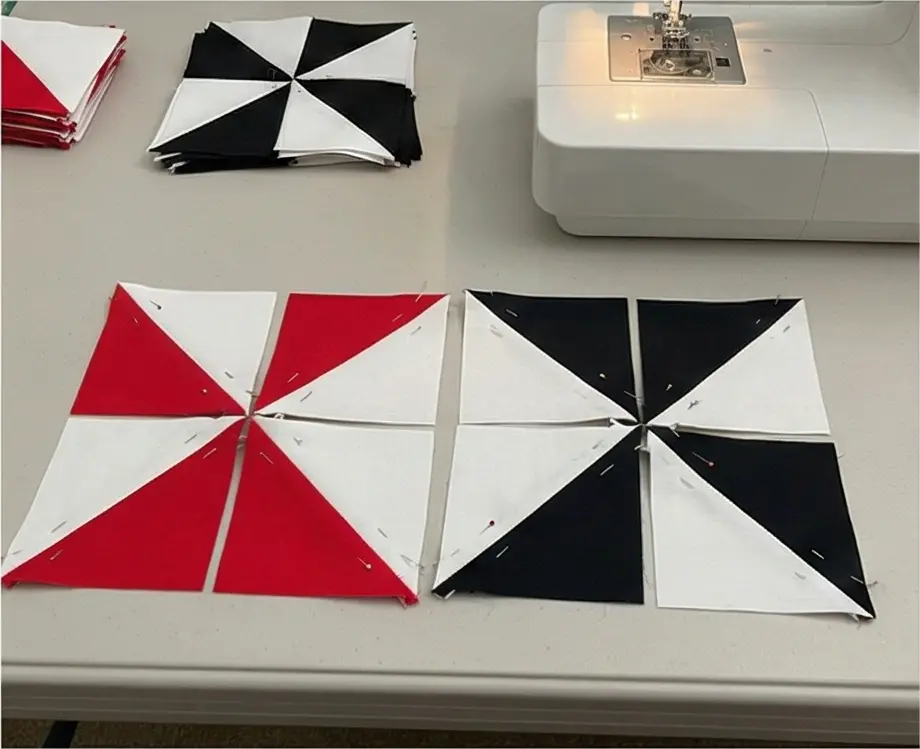
Step 5: “Spin” Quilting
Quilt it to hold the batting in place.
- Layer Top, Batting, and a Muslin scrap (you don’t need fancy backing inside a pillow).
- Quilt: Start in the center of a pinwheel. Stitch a spiral outward, or simply stitch “in the ditch” along the diagonal lines to accentuate the X shapes.
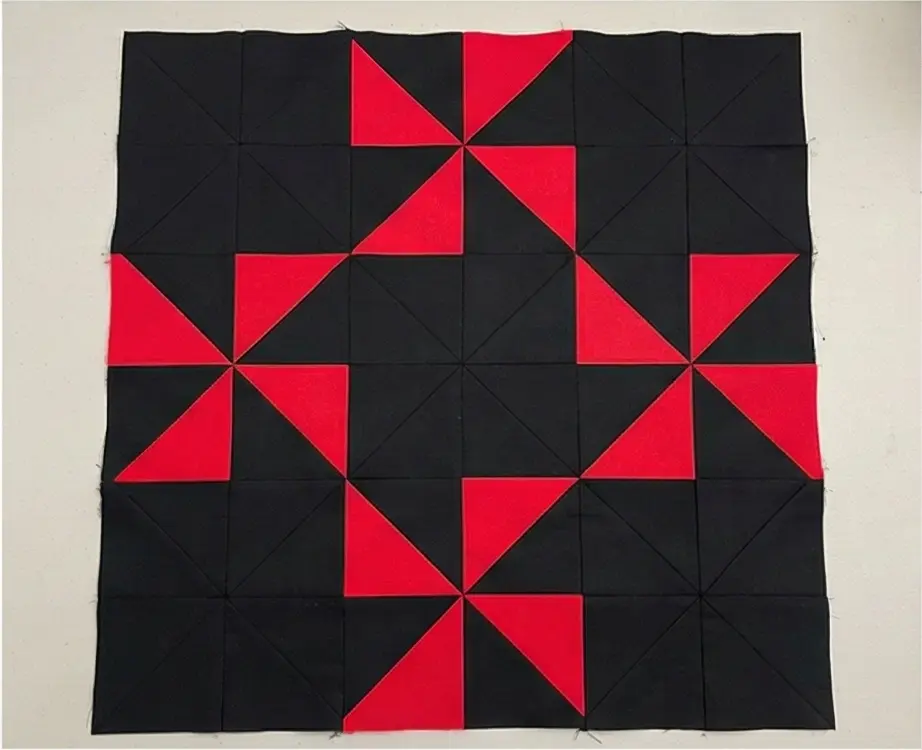
Step 6: Envelope Back Finishing
- Cut Backing: From your Backing Fabric (or leftover Black), cut two 18.5″ x 13″ rectangles.
- Hem: Fold one long edge of each rectangle over by 1/4″, press, fold again, and stitch to create a hem.
- Layer: Place the quilted top face up. Place backing rectangles face down, overlapping in the middle.
- Sew: Stitch around the entire perimeter (1/4″ seam). Backstitch at the stress points (where the envelope overlaps).
- Turn & Stuff: Turn right side out, poke corners, and insert your pillow form.
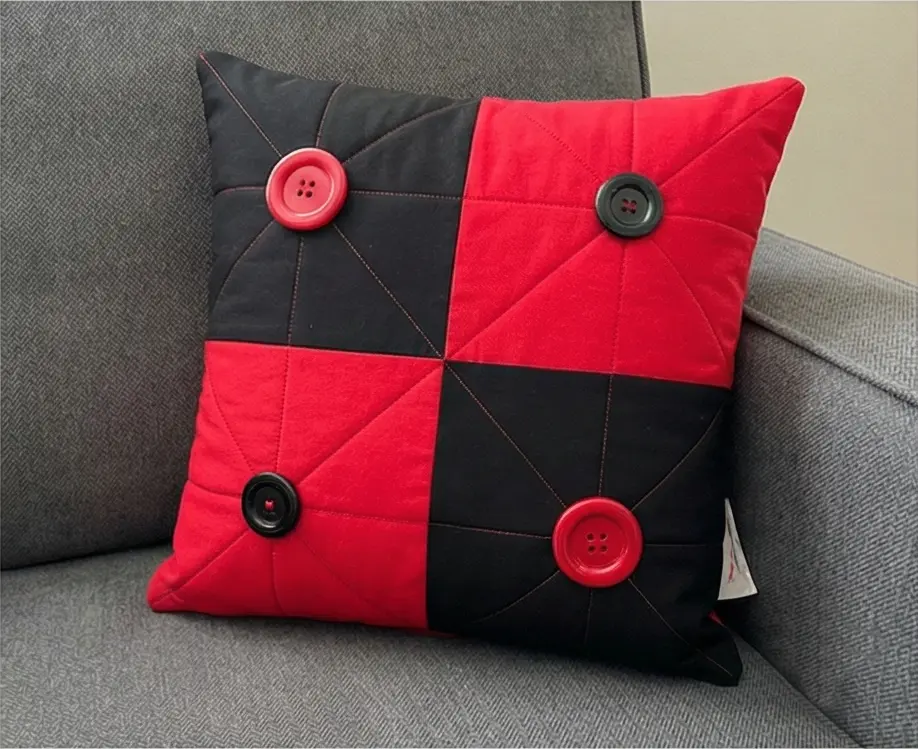
Pro Design Tip: The “Button” Center. Pinwheel blocks can sometimes have a messy center where 8 fabric layers meet. Hide this (and add a cute detail) by sewing a large Black Button in the center of the Red pinwheels, and a Red Button in the center of the Black pinwheels.
Budget Consideration: Clothing Scraps. Pinwheels are small. You can easily get the fabric for this project from old clothes. Use a White Dress Shirt, an old Black T-shirt (stabilize it with interfacing first!), and a Red Bandana.
20. Upcycled Denim and Red Fabric Quilted Coasters
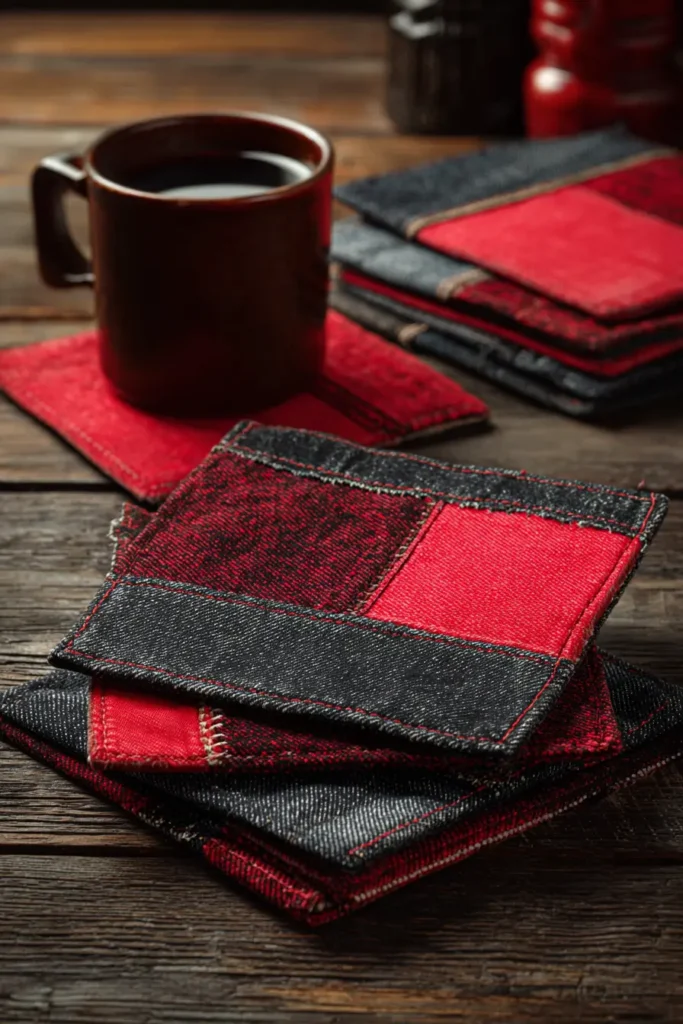

The “Rebel Rim” Upcycled Denim Coasters
Denim is the perfect material for coasters: it is absorbent, heat-resistant, and practically indestructible. To fit our “Red, Black, and White” theme, we will use Black Denim (from old jeans) paired with a striking slash of Red. Instead of standard machine quilting, we will use thick White Sashiko stitching (or heavy topstitching) to add a Japanese-inspired, handcrafted texture that looks sophisticated on any coffee table.
Finished Dimensions: Set of 4 Coasters, 4.5″ x 4.5″.
Materials Needed:
- Fabric A (Black Denim): 1 pair of old Black or Dark Grey Jeans (Legs are best).
- Fabric B (Red): Scraps of Bright Red cotton.
- Batting: Scraps of cotton batting or felt.
- Thread: Standard Black thread for construction; White Pearl Cotton (or embroidery floss) for the accents.
- Notions: Rotary cutter, heavy-duty needle (Size 100/16 or Jeans Needle).
Step 1: Harvest and Cut
First, we need to flatten the 3D pants.
- Prep Jeans: Cut the legs off the jeans. Cut up the inseam to open the leg into a flat sheet. Iron well.
- Cut Tops: Cut 4 squares measuring 5.5″ x 5.5″.
- Cut Backings: Cut 4 squares measuring 5.5″ x 5.5″ (Use the denim again for a non-slip back).
- Cut Batting: Cut 4 squares measuring 5.5″ x 5.5″.
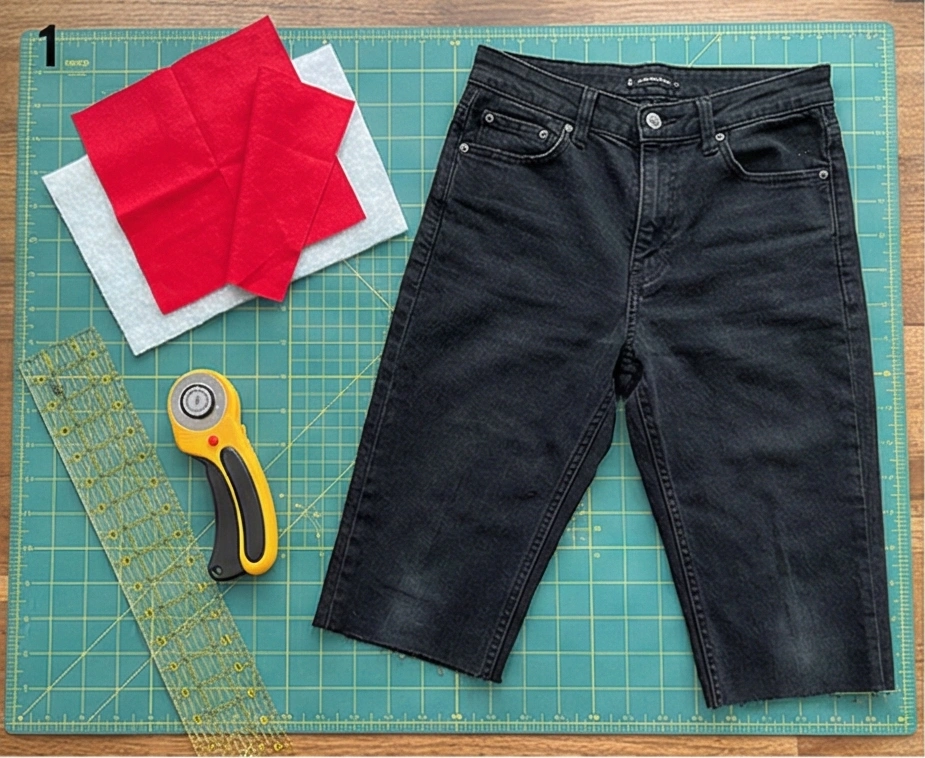
Step 2: The “Slash” Insertion
We will interrupt the solid denim with a flash of color.
- Take one Denim Top Square.
- Cut: Use your rotary cutter to slice it in half.
- Design Choice: You can cut it straight down the middle, or slightly off-center for a modern look.
- Prepare Strip: Cut a Red Strip measuring 1.5″ x 6″.
- Insert: Sew the Red strip between the two denim halves.
- Stitch Red to the left denim piece (1/4″ seam).
- Stitch Red to the right denim piece (1/4″ seam).
- Press: Press seams toward the red strip to reduce bulk (denim is thick!).
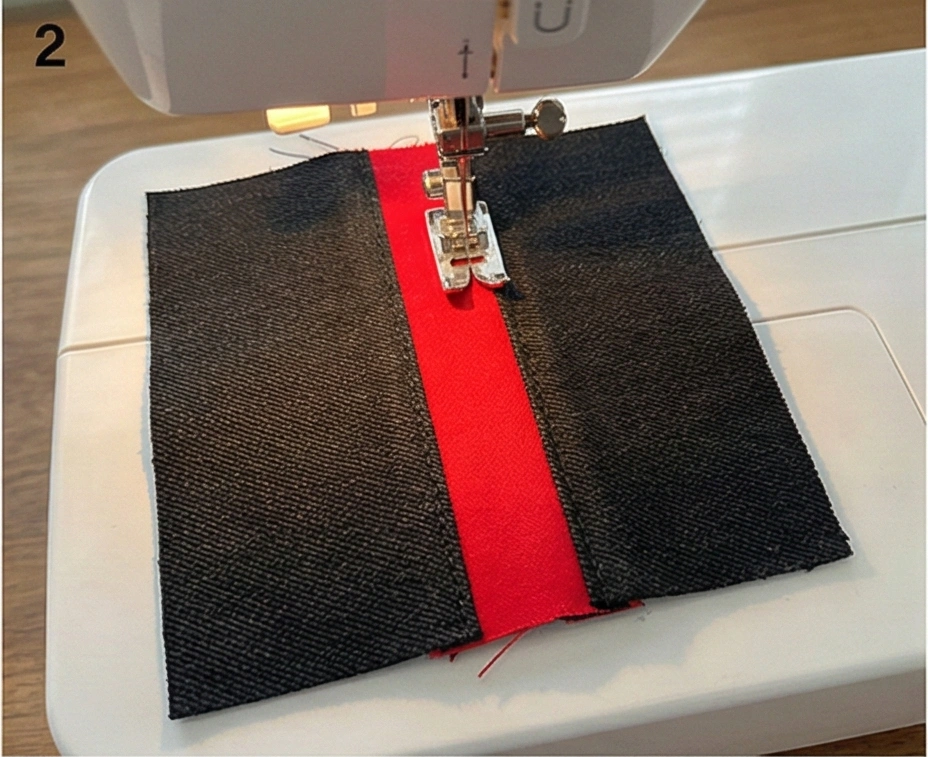
Step 3: Trim to Size
- The insertion of the strip has widened your block.
- Place your ruler over the block.
- Trim: Cut the block back down to exactly 5″ x 5″. Ensure the red strip is straight (or intentionally angled if you prefer).
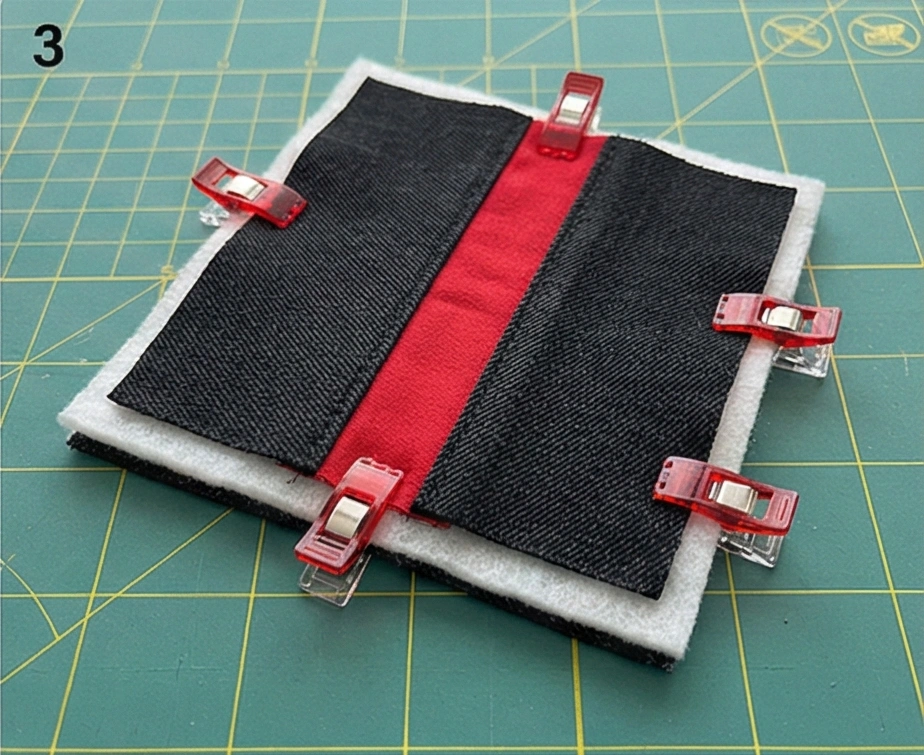
Step 4: The Bulk-Free Assembly
Denim is too thick for binding on tiny coasters. We will use the “Pillowcase” turn method.
- Stack:
- Bottom: Batting.
- Middle: Denim Backing (Right Side Up).
- Top: Pieced Denim Top (Right Side Down).
- Clip: Use Wonder Clips (pins bend in denim) to hold the sandwich together.
- Sew: Stitch around the perimeter with a 1/4″ seam.
- Important: Leave a 2-inch gap on one side for turning. Backstitch at the start and end of the gap.
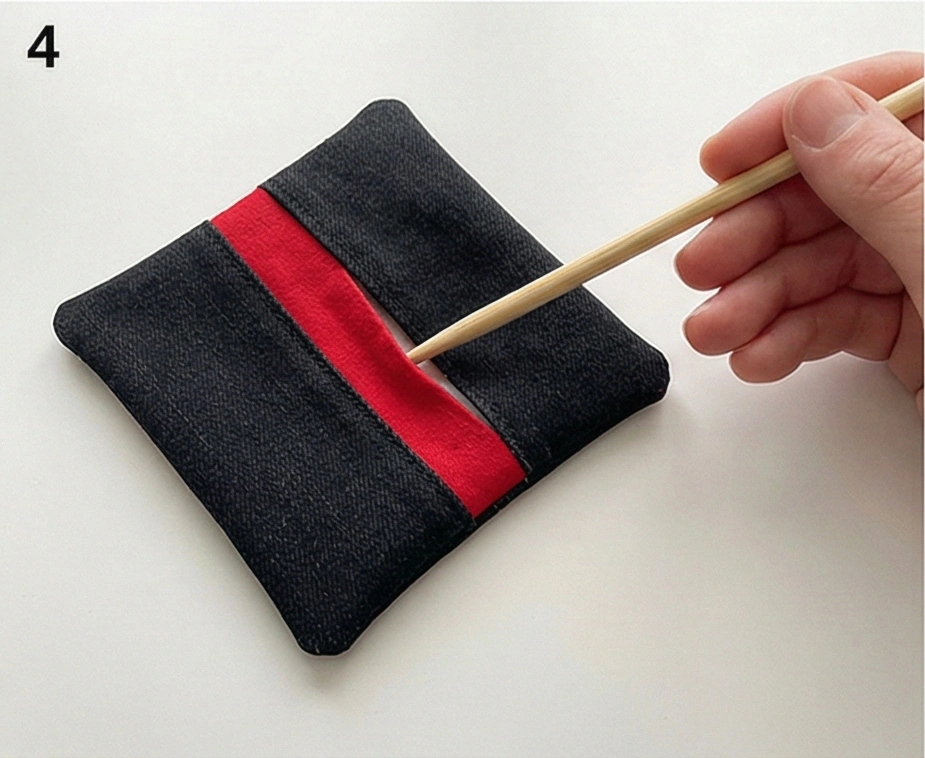
Step 5: Trim and Turn
- Clip Corners: Snip the four corners off diagonally (close to the stitches) to reduce bulk.
- Grading: Trim the batting layer down very close to the stitching (1/8″) so the edges aren’t puffy.
- Turn: Turn the coaster right side out through the gap.
- Press: Use a chopstick to poke the corners square. Steam iron the coaster flat. Tuck the raw edges of the gap inside.
Step 6: Sashiko Topstitching
This is the “White” element that ties the design together.
- Thread a hand needle with thick White Pearl Cotton thread.
- Stitch: Do a “Running Stitch” (up and down) around the perimeter, about 1/4″ from the edge.
- This closes the turning gap securely.
- The white dashes against the black denim look incredibly sharp.
- Accent: Add a few vertical stitches running parallel to the red strip to highlight the design.
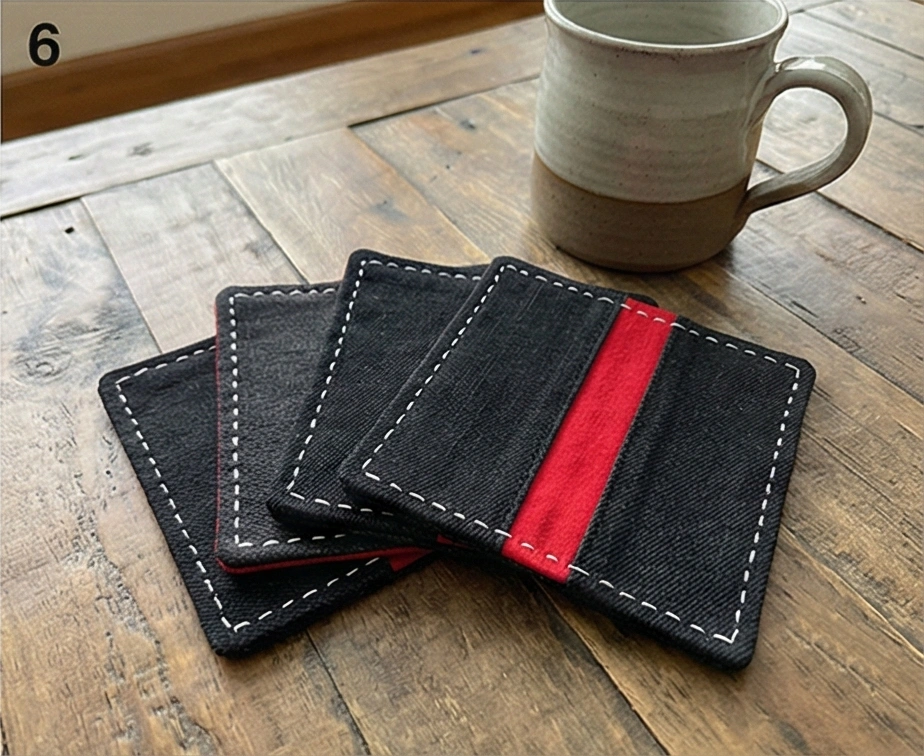
Pro Design Tip: Frayed Edge Option. If you want a more rustic “farmhouse” vibe, skip the turning method (Step 4). Instead, sandwich the layers (Back-Batting-Top) and sew a square 1/2 inch from the edge. Then, make small snips in the outer edge and wash the coasters. The denim will fray into a cool, soft fringe border.
Budget Consideration: Pockets. Don’t throw away the back pockets of the jeans! Cut the entire pocket out (including the back layer of the pant leg). Bind the edges with Red Bias Tape. Boom—you have instant “Silverware Pockets” for your dining table without doing any piecing!
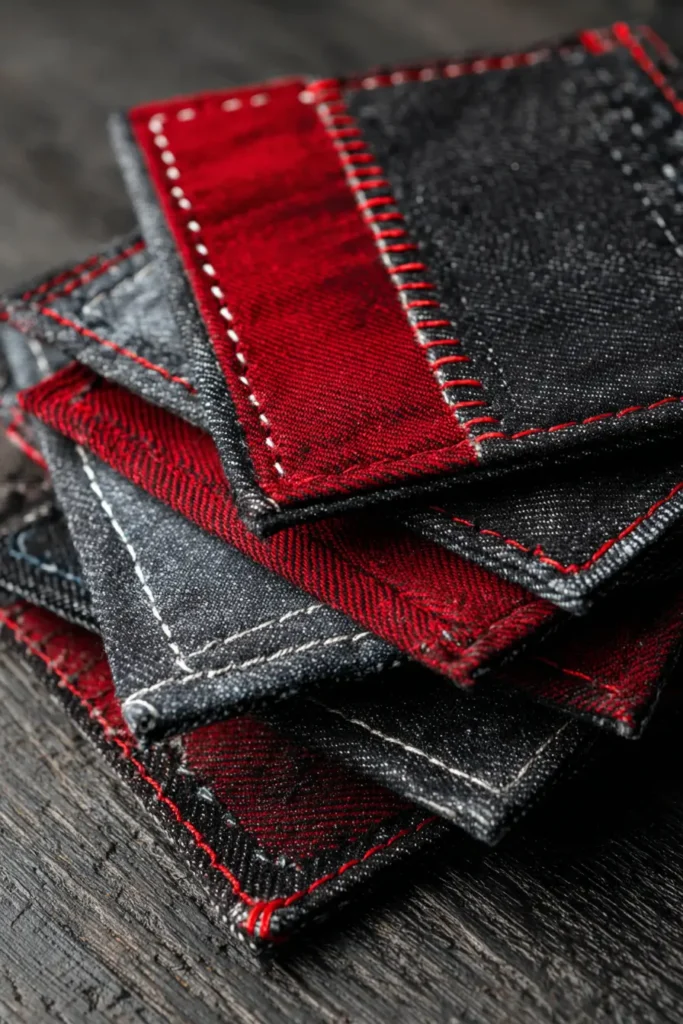
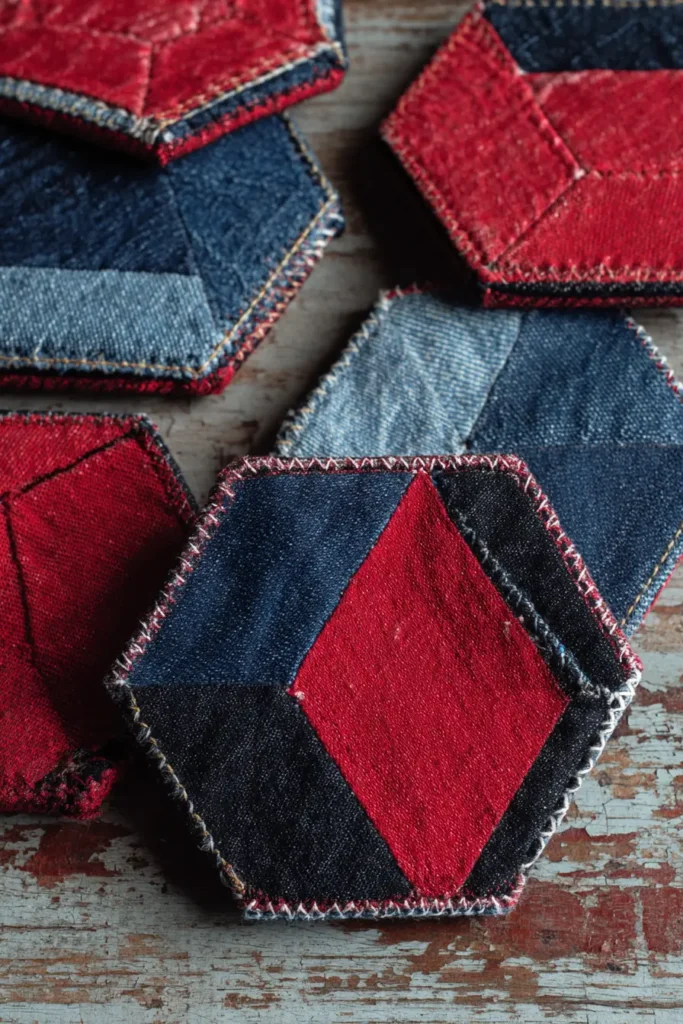
Conclusion
Exploring these 20 Red, Black, and White Quilt Ideas demonstrates just how robust a unified color scheme can be in bringing together a multi-functional space. By weaving this bold palette through everything from Classic Patchwork Quilts to functional Dining Bench Cushions, you create a visual rhythm that guides the eye effortlessly from the dining table to the sofa. These DIY projects prove that practical items like Table Covers or Placemats can be just as stylish as they are helpful, serving as essential components of your home’s overall design narrative rather than just utilitarian necessities.
The versatility of this collection ensures that there is a project to match every aesthetic preference within your combined room. For those who love a rustic vibe, the Farmhouse-Style designs and Rustic Plaid patterns add a layer of homespun warmth, making a large room feel intimate. Conversely, if your taste leans towards the contemporary, the Dramatic Ombre drapes and Simple Color Block concepts offer sleek, architectural lines that define the space without cluttering it. This balance of style and function allows you to customize the atmosphere of your living-cum-dining room to reflect your unique personality while maintaining a professional design flow.
Ultimately, the act of creating these pieces by hand adds a layer of sentimental value that store-bought decor cannot match. A Gingham Throw Blanket or a set of Upcycled Denim Coasters are not just accessories; they are expressions of creativity that make your house feel like a home. We hope this guide inspires you to pull out your sewing machine and experiment with these bold textures and colors. By implementing these coordinated DIY projects, you will not only solve the design challenge of an open floor plan but also create a cohesive, cozy, and stunningly beautiful environment for gathering and relaxing.
