
20 Black and White Quilt Pattern Ideas for Cozy Yet Modern Spaces
Black and White: The Most Useful Non-Color in Design
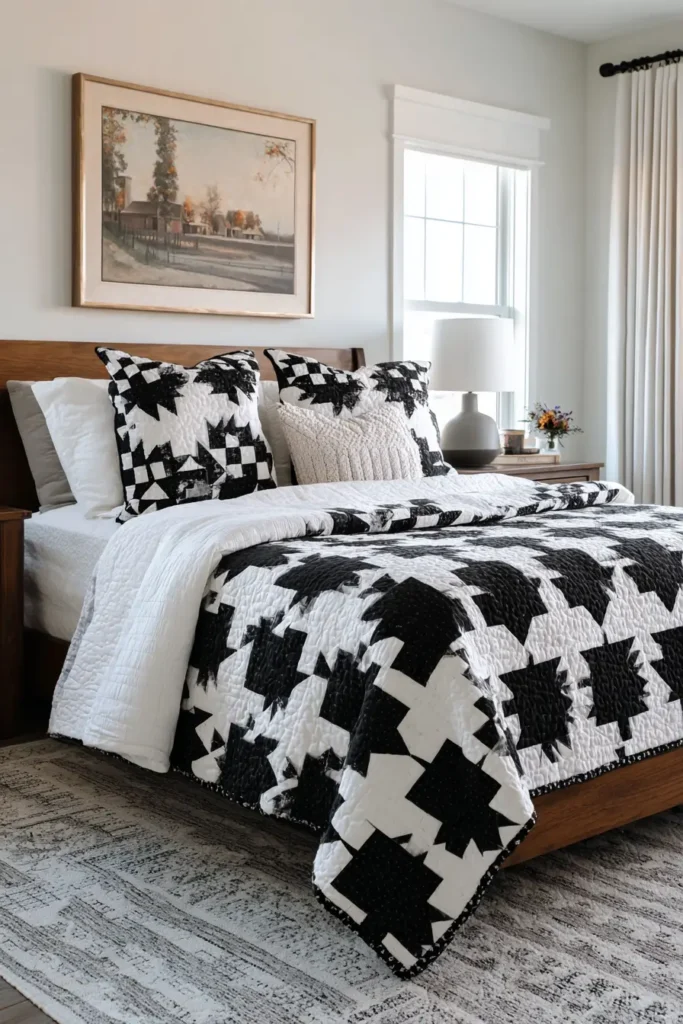
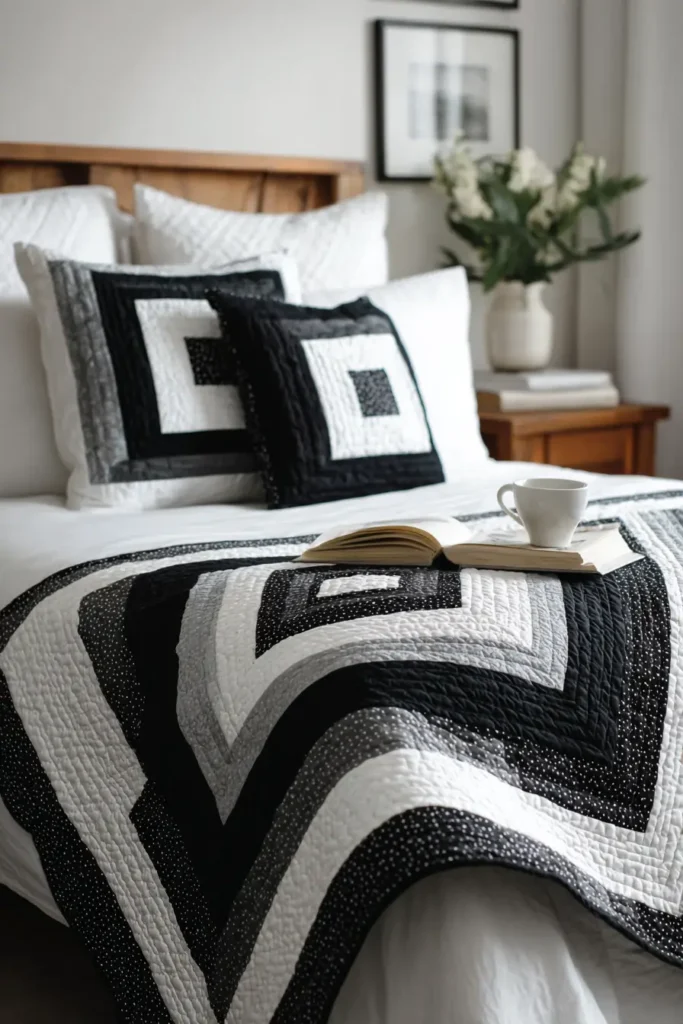
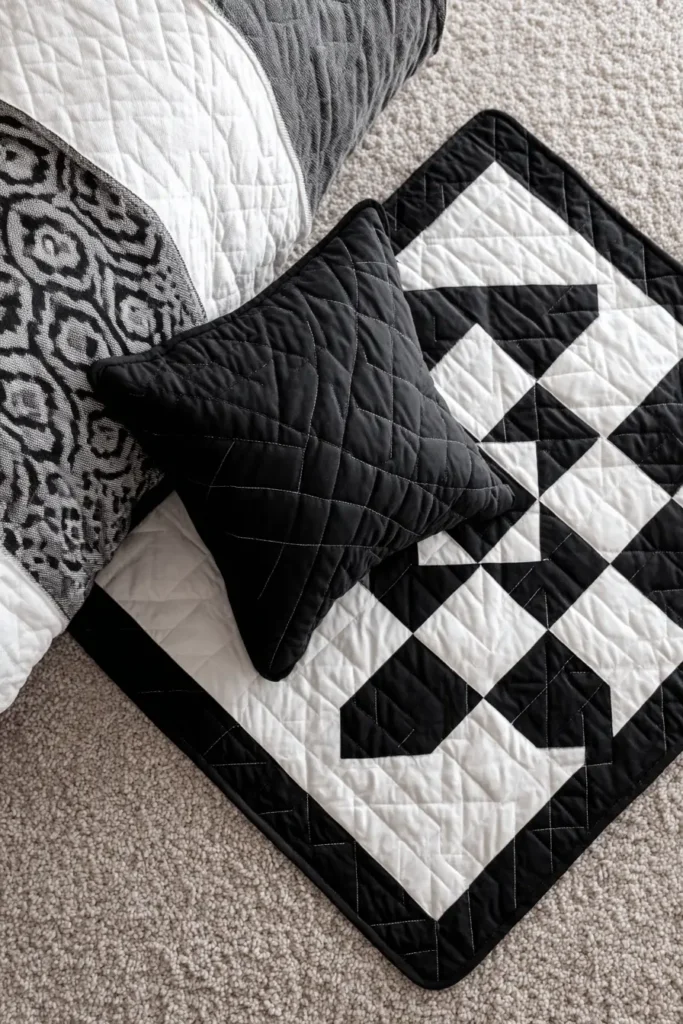
There is a reason black and white never goes out of style in interior design – and it is not because it is safe or neutral. It is because high contrast does something no color combination can replicate: it creates visual structure that holds a room together, regardless of what else is happening in it. A black-and-white quilt in a room full of color serves as an anchor. In a room that is already restrained, it becomes the focal point. It works in both directions, unlike almost nothing else in textile design.
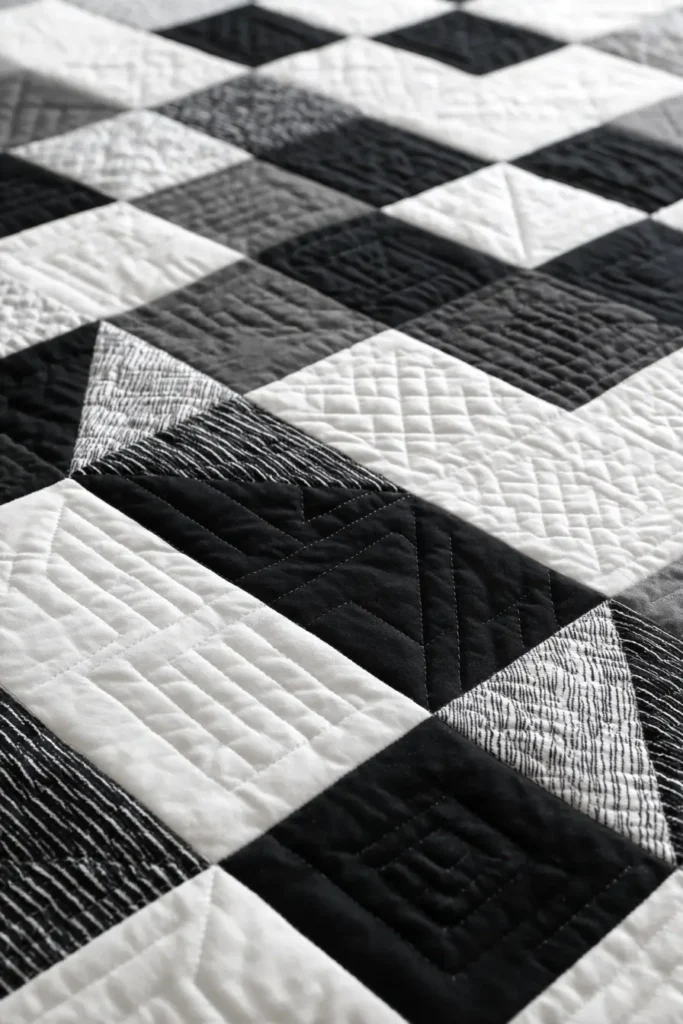
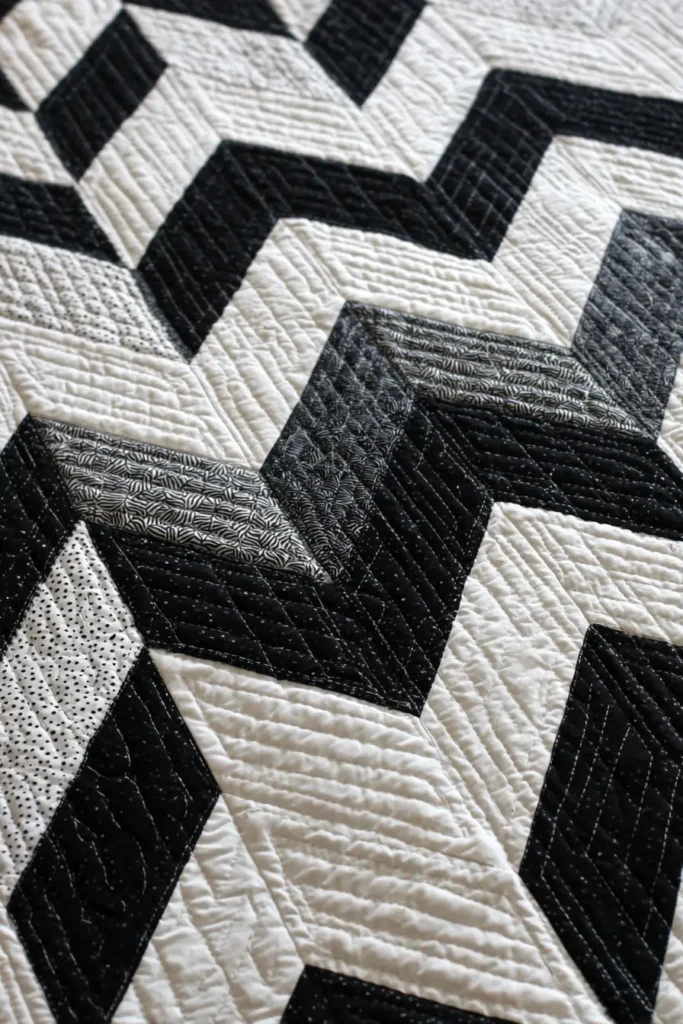
In quilting specifically, the monochrome palette has a particular power. Without color to carry the design, everything else has to work harder – the geometry, the contrast, the precision of the piecing, the texture of the quilting stitches themselves. A black and white quilt cannot hide imprecision behind a busy palette. What you see is the structure, plain and simple. That is demanding to make well, and unmistakable when it succeeds.
From a design perspective, I find black-and-white quilts the most versatile pieces to work with in a client’s room. A bold geometric – Geo Surprise, Radiant, a strong Celtic Crossing – functions almost as wall art, creating the kind of graphic impact that would usually require a painting or a statement piece of furniture. Patterns with secondary designs emerging from the contrast – the Knitted Star, the Plus Side – reward sustained attention in a way that simpler two-tone designs do not. And softer interpretations, where true black is replaced with charcoal or deep navy, and white gives way to ivory or off-white, bring warmth into the contrast without losing its defining quality.
What Black and White Does to a Room
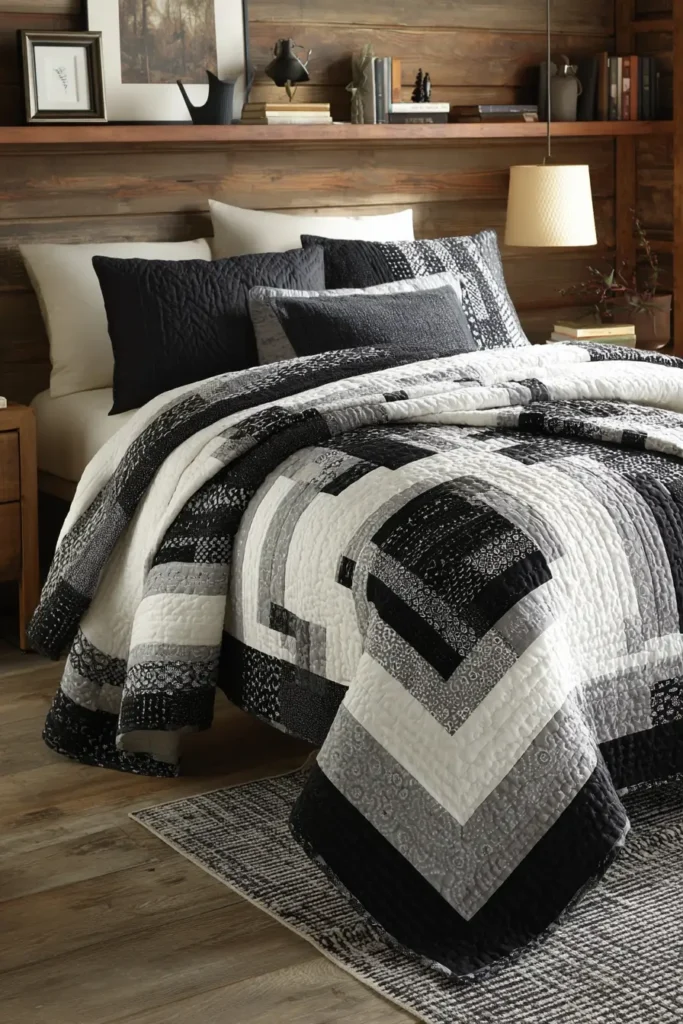
In a colorful room, a black and white quilt grounds everything around it – clean lines cutting through pattern and palette, giving the eye somewhere to rest. In a modern or minimalist space, it adds the graphic intensity those rooms often need to avoid feeling cold. In a traditional setting, off-white against deep charcoal softens the contrast enough to feel warm rather than stark. The same design principle – high contrast, geometric structure – reads differently depending on the values you choose within the black-and-white range. That adjustability is what makes this palette genuinely versatile rather than just striking.
Black and White Quilt Pattern
Contents
- 1 Black and White Quilt Pattern
- 2 1. Classic Black and White Patchwork Quilt for Beds and Guest Rooms
- 3 2. Bold Black and White Stripe Quilts for Contemporary Bedrooms
- 4 3. Scandinavian-Inspired Black and White Quilts for Cozy Modern Homes
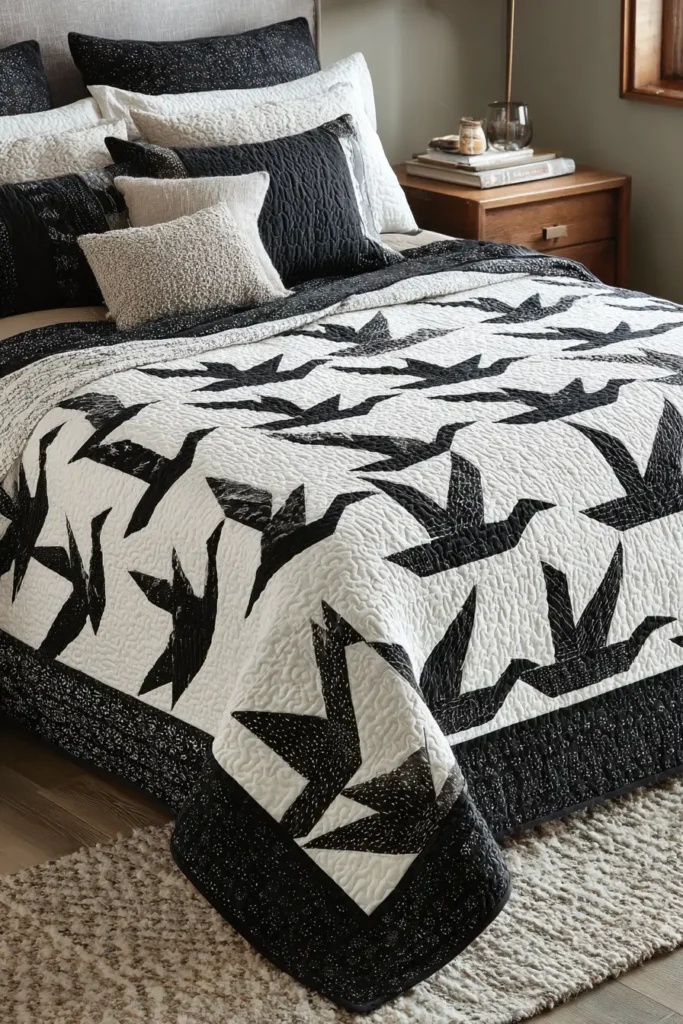
- 5 4. Black and White Star Quilt Patterns for Timeless Decor
- 6 5. Monochrome Floral Quilt Designs for Elegant Bedrooms
- 7 6. Black and White Checkered Quilt Patterns for Farmhouse Style
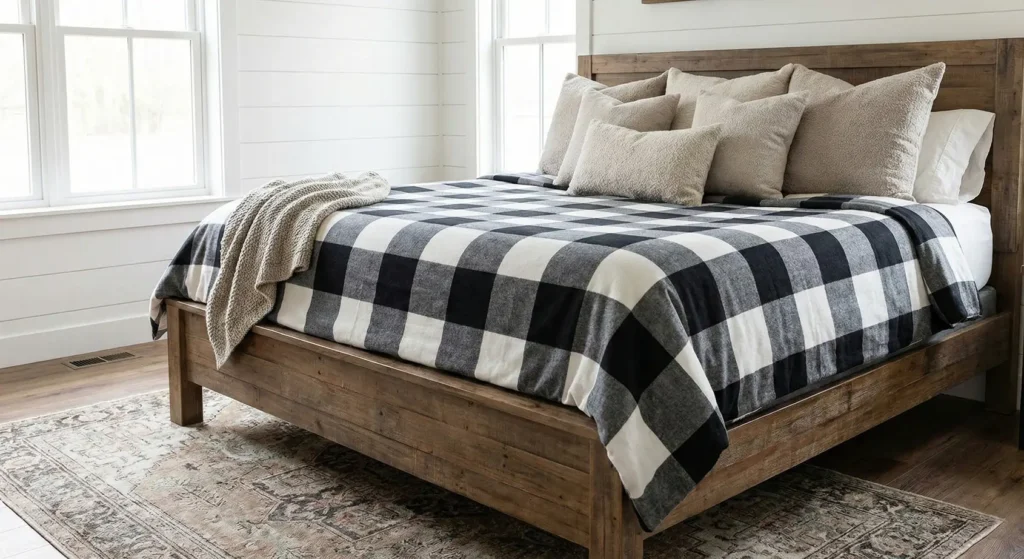
- 8 7. Classic Black and White Buffalo Check Bedspreads
- 9 8. Striking Flying Geese Patterns for Master Bedrooms
- 10 9. Sophisticated Black and White Log Cabin Quilt Designs with Modern Appeal
- 11 10. Gingham Black and White Picnic Quilt for Outdoor Use
- 12 11. Buffalo Check Black and White Throw Quilt for Sofa
- 13 12. Quilted Floor Pillows and Poufs in Monochrome
- 14 13. Monochrome Quilted Floor Mats and Area Quilts
- 15 14. Aztec and Tribal Print Black and White Quilts
- 16 15. Black and White Boho Quilt Patterns for Relaxed Living Spaces
- 17 16. Modern Black and White Quilted Table Runners and Table Covers
- 18 17. Herringbone Black and White Quilt for Floor Throw
- 19 18. Modern Geometric Black and White Quilt Patterns for Minimalist Spaces
- 20 19. Abstract Black and White Quilt Patterns for Artistic Wall Hangings
- 21 20. Layered Black and White Quilts for Cozy Yet Modern Rooms
- 22 Conclusion
This Collection
These 20 ideas move across that full range. Bed quilts with the graphic confidence to anchor a bedroom without additional decoration. Throws and sofa covers that bring monochrome structure into living spaces. Wall hangings that function as textile art. Floor cushions and layered pieces that add tactile depth. Outdoor quilts in buffalo check and gingham that carry the same color logic into less formal contexts.
Black and white is not an absence of color. It is a decision to let contrast, geometry, and texture do all the work – and in the right hands, that is more than enough.
See also: Modern quilt patterns · Contemporary quilts · Scandinavian quilt patterns
Recommended Supplies
“As an Amazon Associate, I earn from qualifying purchases.“
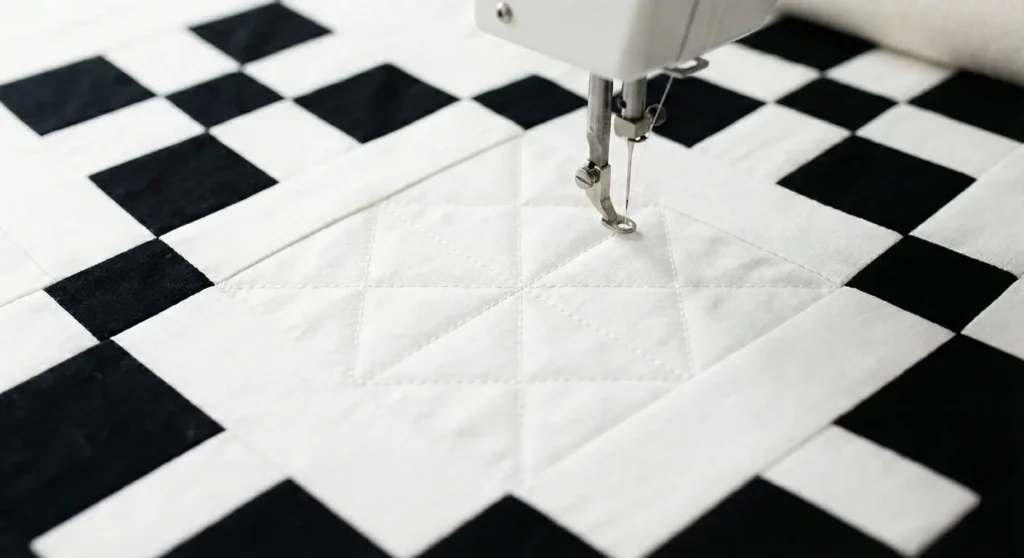
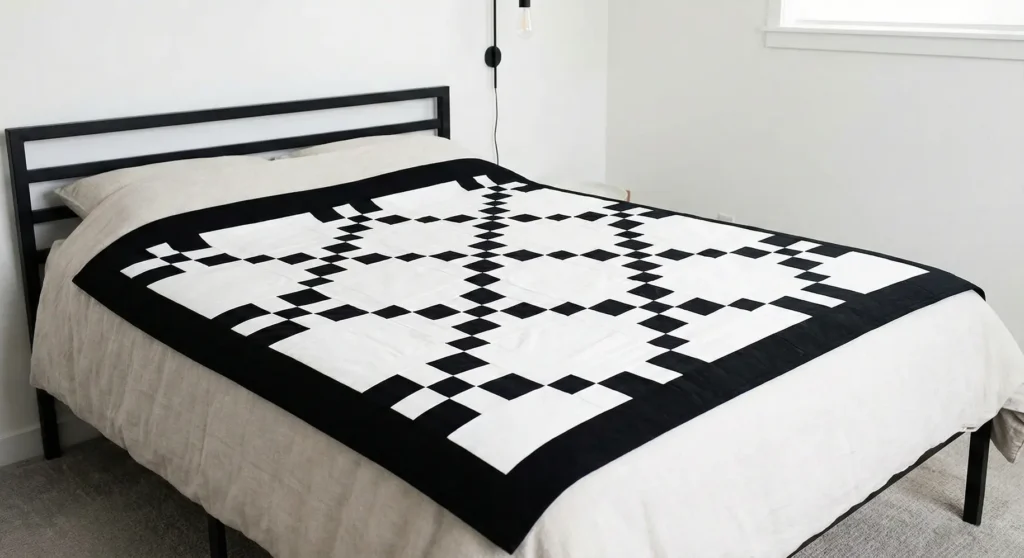
1. Classic Black and White Patchwork Quilt for Beds and Guest Rooms

Classic “Single Irish Chain” Patchwork Quilt
When people think of “classic patchwork,” they often picture the Irish Chain. In black and white, this pattern transforms from vintage country to striking modern geometry. It uses alternating blocks (a nine-patch block and a solid plain block) to create the illusion of diagonal chains running across the bed. It is elegant, timeless, and surprisingly simple to piece.
Finished Dimensions: Queen Size, approximately 82″ x 82″.
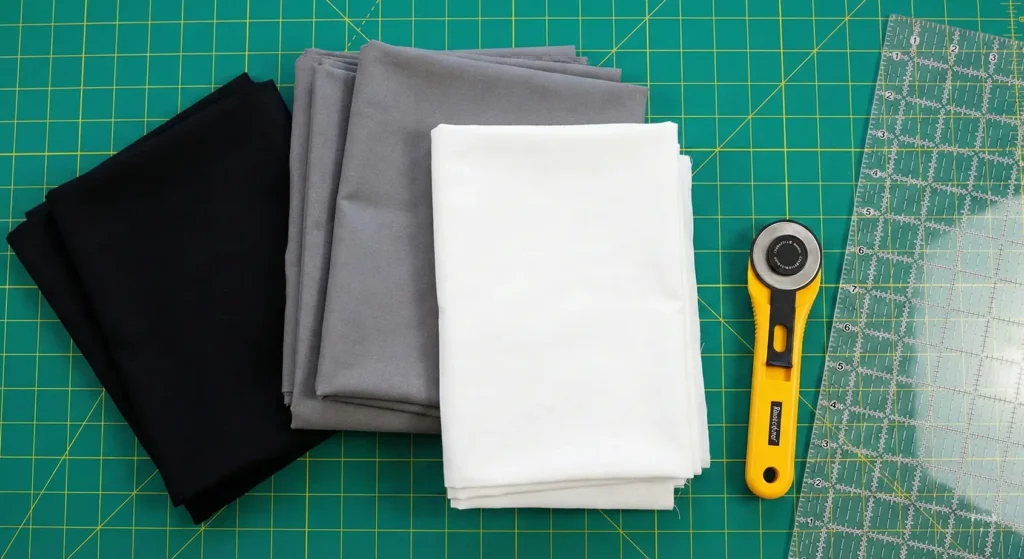
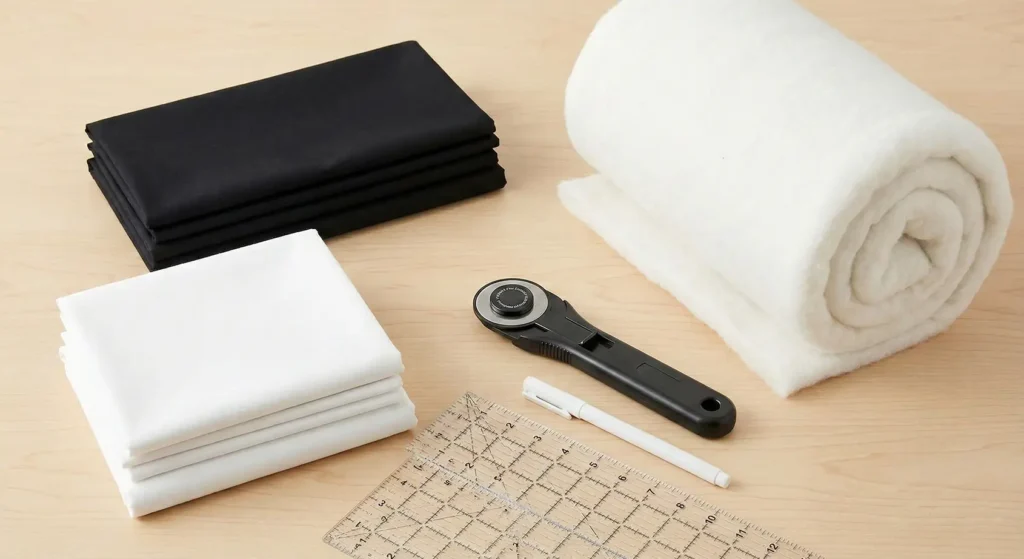
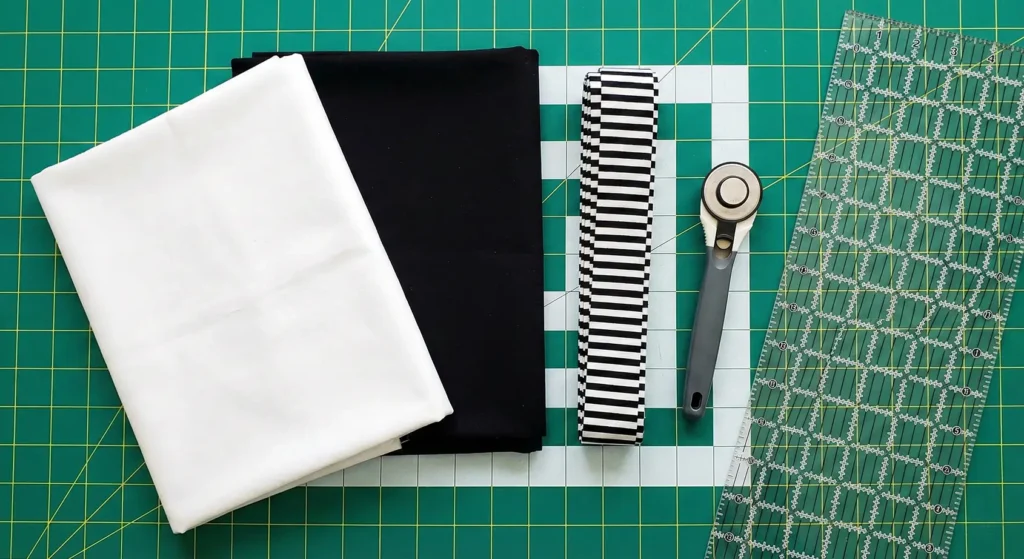
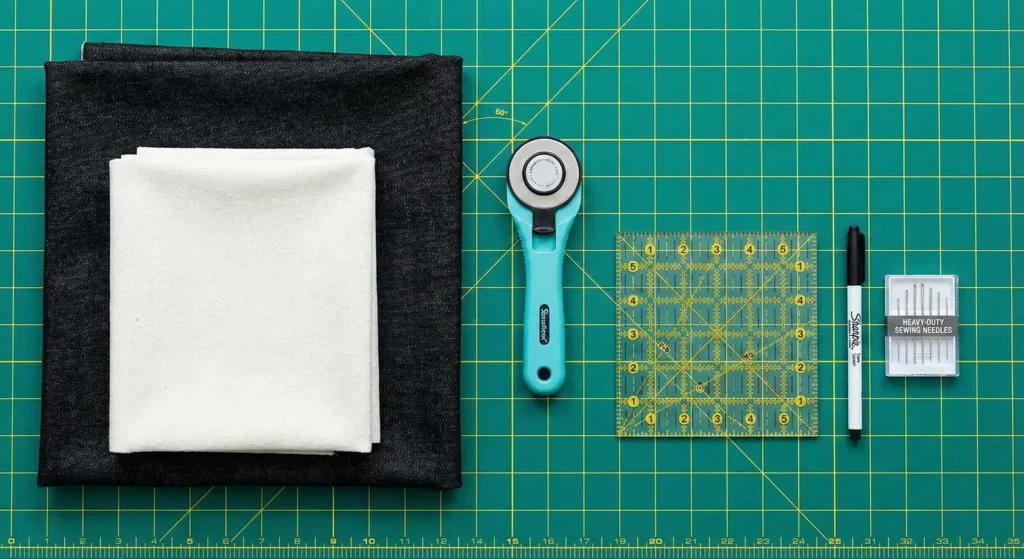
Materials Needed:
- Fabric A (Black/Dark): 2.5 yards of Solid Black or small-scale black print.
- Fabric B (White Background): 4.5 yards of Solid White.
- Backing Fabric: 7.5 yards.
- Batting: Queen Size (90″ x 108″).
- Binding: 3/4 yard (Black usually frames it best).
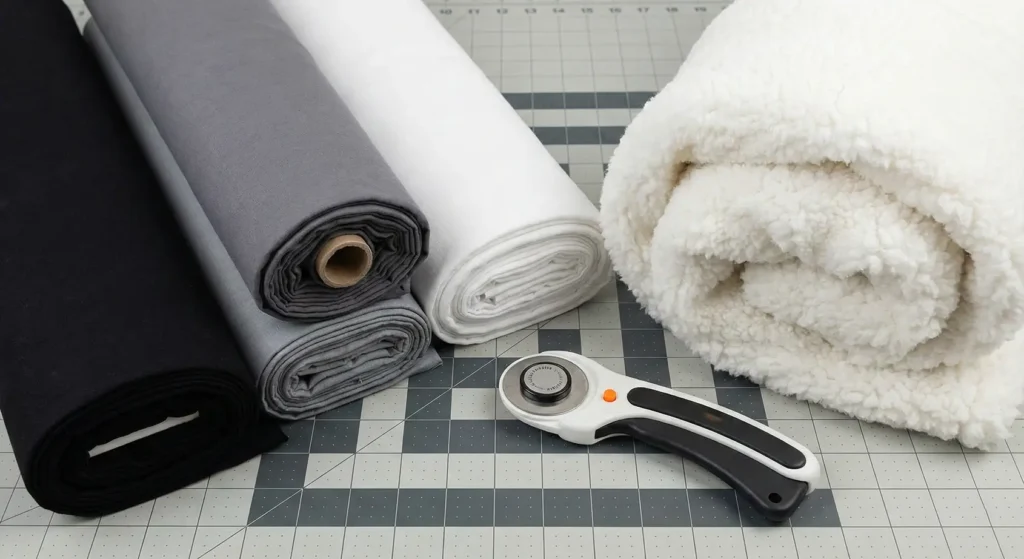
- Notions: Rotary cutter, 6.5″ x 24″ quilting ruler, neutral thread (white or light grey).
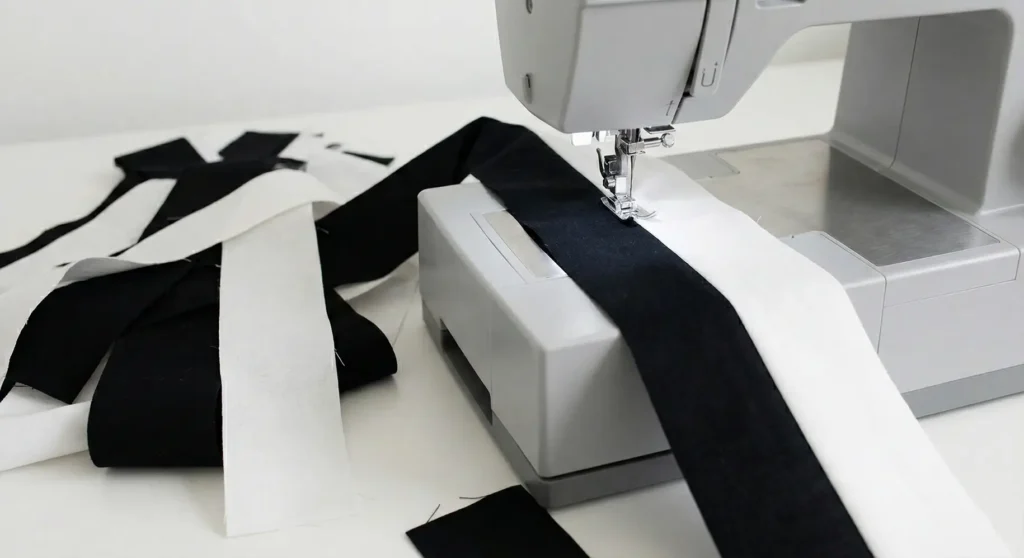
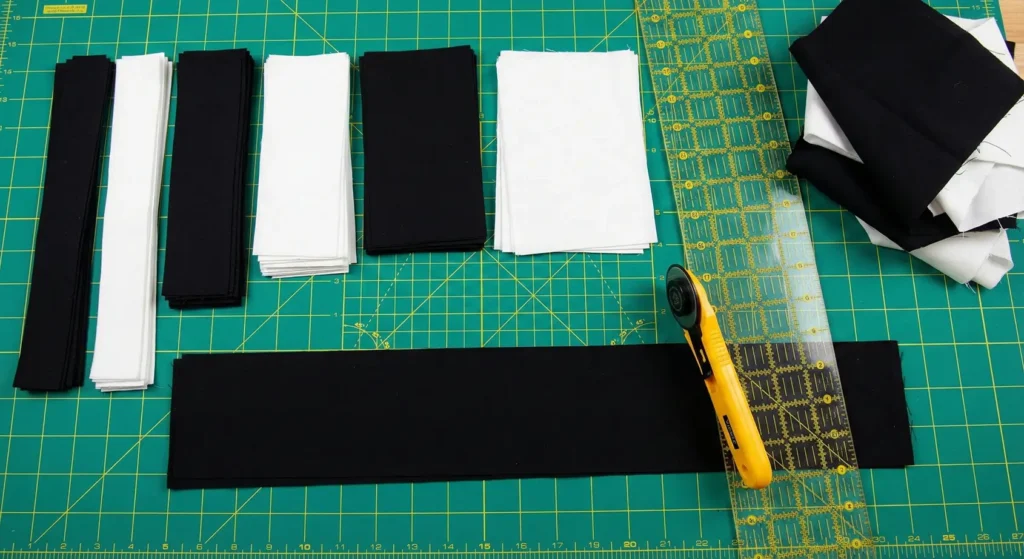
Step 1: Create Strip Sets (Speed Piecing)
Instead of cutting hundreds of tiny 2.5″ squares individually, we use “strip piecing.”
- Cut your Black Fabric and White Fabric into strips that are 2.5 inches wide by the Width of Fabric (WOF).
- Make Strip Set A (The “Black-Heavy” Strip): Sew three strips together lengthwise: Black, White, Black. Press seams toward the black. Make 15 of these sets.
- Make Strip Set B (The “White-Heavy” Strip): Sew three strips together lengthwise: White, Black, White. Press seams toward the black. Make 8 of these sets.
- Result: You now have long striped “ribbons” of fabric.
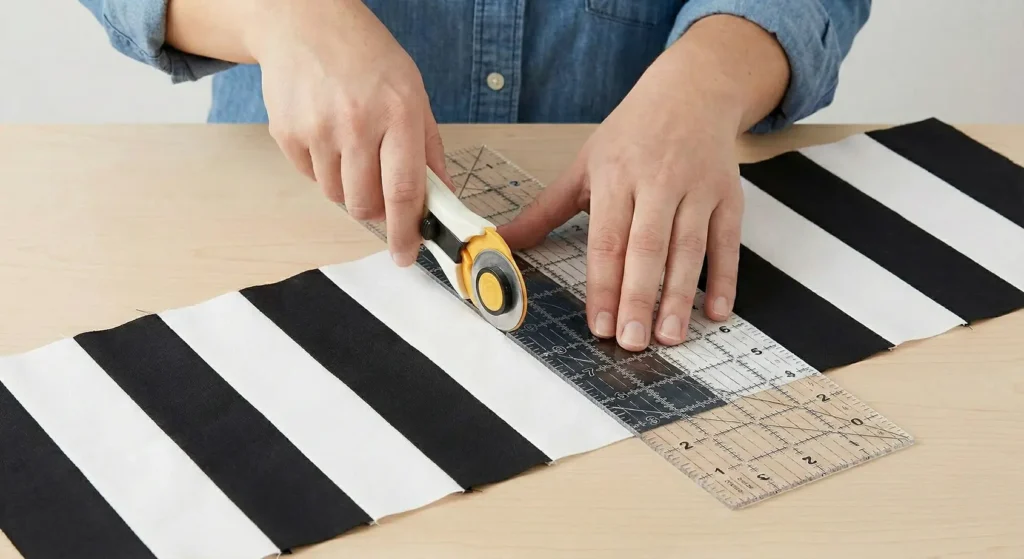
Step 2: Sub-Cut the Units
- Take your strip sets to the cutting mat. Trim the uneven selvage edge.
- Cross-cut the strip sets into segments that are 2.5 inches wide.
- From Strip Set A, you need 169 segments.
- From Strip Set B, you need 85 segments.
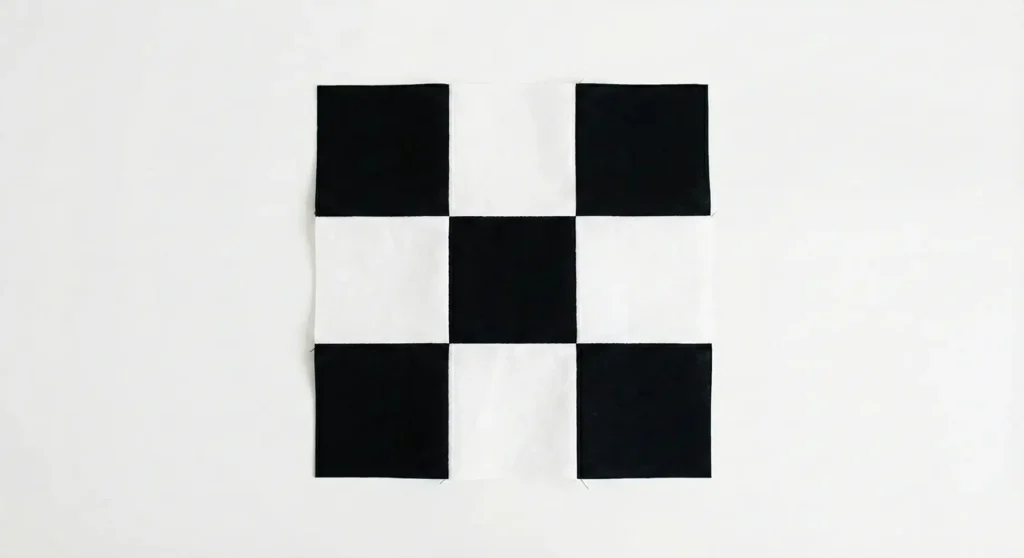
Step 3: Assemble the Nine-Patch Blocks
- We are building 9-patch blocks (3×3 grid).
- Take one Set B segment (White/Black/White) and sandwich it between two Set A segments (Black/White/Black).
- Nest the seams (they should lock together because you pressed toward the black).
- Sew them together to create a checkerboard block.
- Trim: The finished block should measure 6.5″ x 6.5″.
- Make 85 Nine-Patch Blocks total.
Step 4: Cut the Alternating Squares
- From your remaining White Fabric, cut 84 solid squares.
- Each square must measure exactly 6.5″ x 6.5″.
- These plain squares are the “negative space” that makes the black chains pop out.
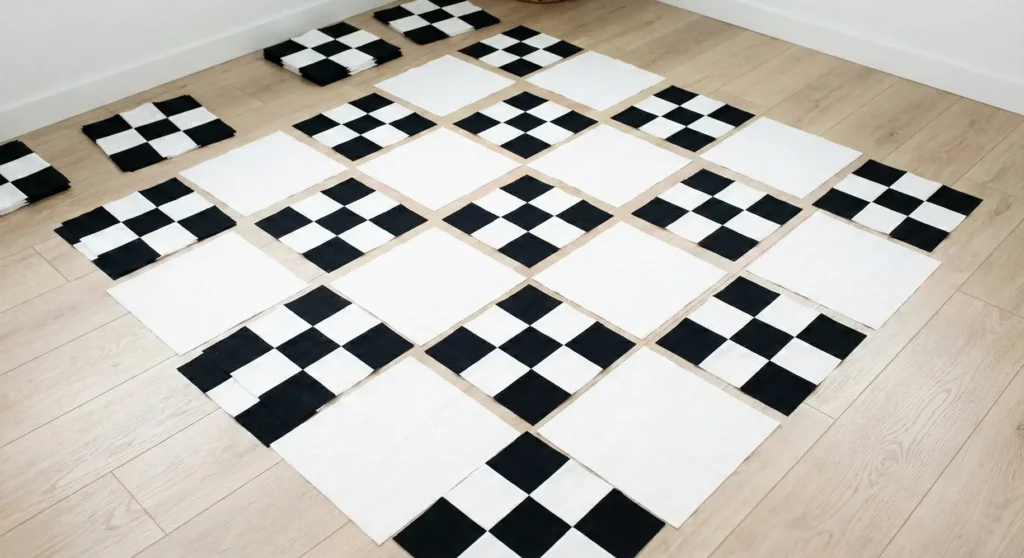
Step 5: Arrange the Layout (The Checkerboard)
- Find an ample floor space. Lay out a grid of 13 blocks by 13 blocks (Total 169 blocks).
- Pattern: Alternate the blocks like a checkerboard.
- Row 1: Nine-Patch, Solid, Nine-Patch, Solid… ending with Nine-Patch.
- Row 2: Solid, Nine-Patch, Solid, Nine-Patch… ending with Solid.
- Row 3: Repeat Row 1.
- Stand back and look. You should see diagonal lines of black squares connecting across the white background to form “chains.”
Step 6: Assemble and Finish
- Sew the blocks into horizontal rows using a 1/4″ seam allowance.
- Press the seams toward the Solid White Squares (this reduces bulk at the corners).
- Sew the 13 rows together to complete the top.
- Quilting:
- Baste the sandwich.
- Design: Use a Diagonal Cross-Hatch. Stitch continuous diagonal lines through the white squares. This emphasizes the diamond shape created by the chains.
- Bind with solid black fabric for a crisp, framed finish.
Pro Design Tip: The “Scrappy” Black. Instead of using one solid black fabric, use 20 different black-on-white or white-on-black prints (polka dots, stripes, gingham, text). As long as they all read as “dark” from a distance, the variation adds a rich, sophisticated texture that prevents the quilt from looking like a soccer ball.
Budget Consideration: Contrast Thread. If you can’t afford expensive long-arm quilting, do simple straight-line quilting on your home machine using Black Thread on the White background. This high-contrast stitching becomes a design element in itself, adding a modern graphical layer for the cost of a spool of thread.
More Recommended Supplies
“As an Amazon Associate, I earn from qualifying purchases.“
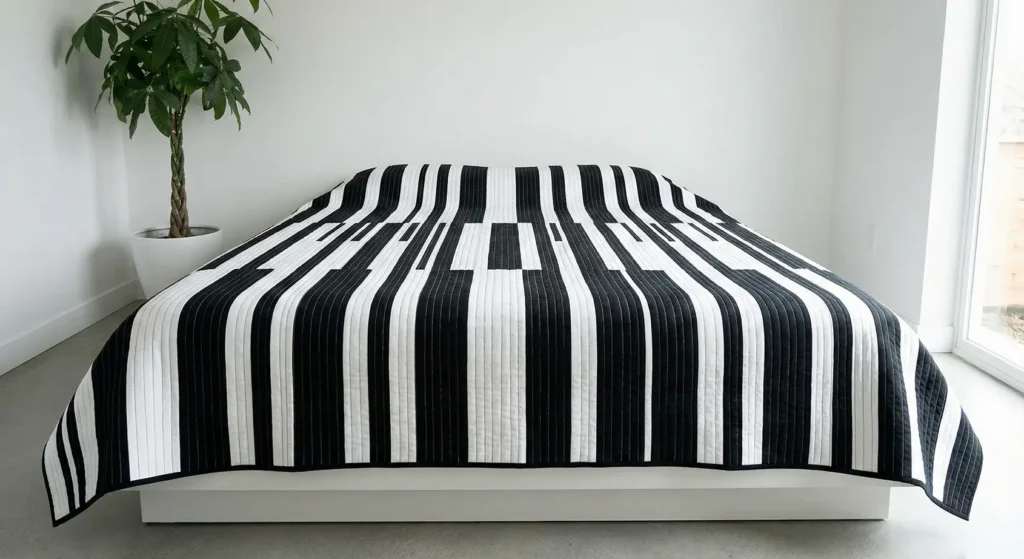
2. Bold Black and White Stripe Quilts for Contemporary Bedrooms
The “Barcode” Vertical Stripe Quilt
Nothing says contemporary quite like a bold, irregular stripe. This “Barcode” pattern moves away from perfect symmetry, using strips of varying widths to create a dynamic, vibrating visual effect. It elongates the bed’s look and feels like a piece of modern art.
Finished Dimensions: Queen Size, approximately 90″ x 94″.
Materials Needed:
- Fabric A (Black): 4.5 yards of Solid Black (or a mix of black-on-black prints for texture).
- Fabric B (White): 4.5 yards of Solid White (or white linen).
- Backing Fabric: 8.5 yards.
- Batting: Queen/King Size (100″ x 100″).
- Binding: 3/4 yard of Solid Black.
- Notions: Rotary cutter, long quilting ruler (24″), walking foot (crucial for long straight seams).
Step 1: Cut Variable-Width Strips
The beauty of the barcode design lies in its randomness. You need to cut WOF (Width of Fabric, approx 42″) strips in varied sizes from both the Black and White fabrics.
- Skinny Strips: Cut 10-12 strips at 2.5″ wide.
- Medium Strips: Cut 10-12 strips at 4.5″ wide.
- Wide Strips: Cut 8-10 strips at 6.5″ wide.
- Mega Strips: Cut 4-6 strips at 8.5″ wide.
Step 2: Extend the Length
Standard fabric is only ~42″ wide, but a Queen quilt needs to be ~94″ long.
- Take two matching strips (e.g., two 4.5″ Black strips).
- Sew them together end-to-end to create one long strip measuring approximately 84″ long.
- Note: To make it truly long enough (94″), you might need to add a third segment, or accept a slightly shorter coverlet length. For this guide, let’s target a 90″ length by adding a third piece if necessary or using wider backing fabric cut lengthwise.
Step 3: The Random Layout
- Find a large floor space.
- Start laying out your long strips vertically.
- The Rule: Alternate Black and White, but vary the widths.
- Example sequence: 2.5″ Black – 6.5″ White – 4.5″ Black – 2.5″ White – 8.5″ Black – 4.5″ White…
- Continue placing strips until the total width measures approximately 90 inches.
- Step back and check the balance. Ensure you don’t have all the thick black lines on one side. The asymmetry should feel balanced.

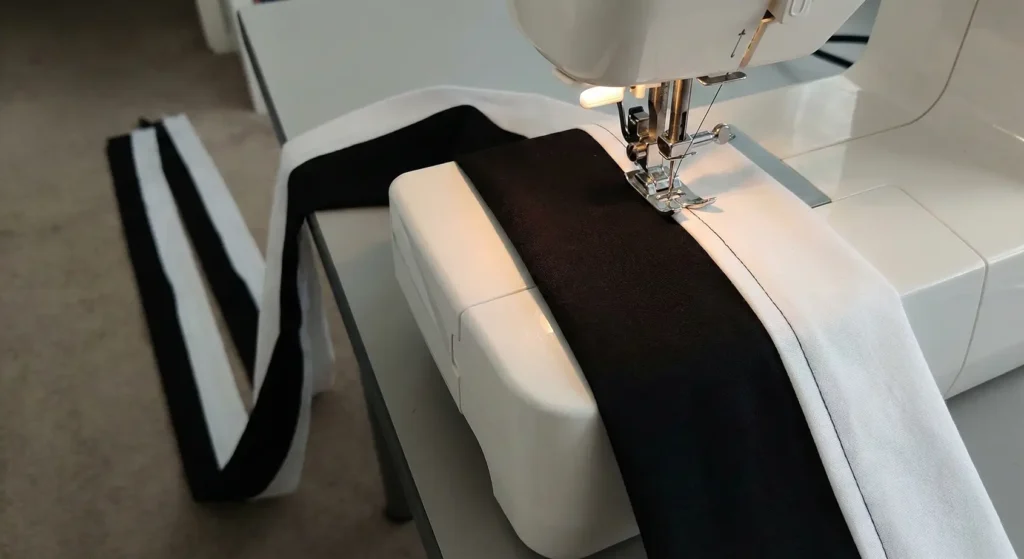
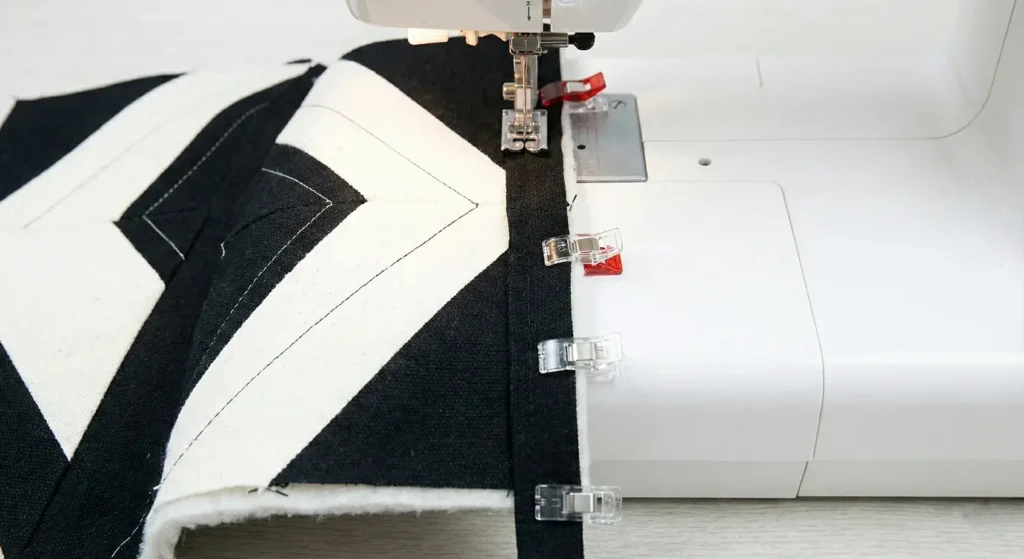
Step 4: Sew the Strips (The Anti-Bow Technique)
Sewing 90-inch-long seams can cause the fabric to warp or “bow” into a banana shape.
- Take the first two strips (Column 1 and Column 2).
- Sew them together from Top to Bottom.
- Take the next strip (Column 3). Sew it to the unit from Bottom to Top.
- Alternate the direction of your sewing for every single strip. This tension balance keeps the quilt perfectly straight and square.
- Press seams to the side (toward the Black strips).
Step 5: Square Up the Top
- Once all strips are sewn, the top and bottom edges will be jagged (because the strips weren’t all perfectly identical in length).
- Lay the quilt top flat.
- Use a large square ruler to trim the top and bottom edges straight, squaring up the final dimensions to roughly 90″ x 90″.
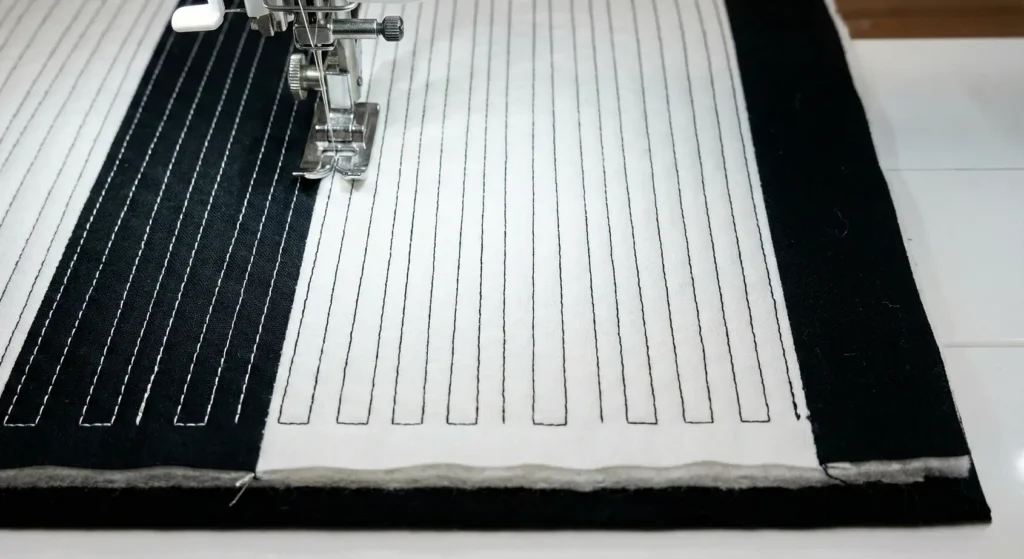
Step 6: “Matchstick” Quilting
- Baste the sandwich.
- Quilting: For a hyper-modern look, use Matchstick Quilting.
- Stitch straight vertical lines down the length of the quilt.
- Spacing: Very dense! About 1/8 inch to 1/4 inch apart.
- Alternative: If that is too much work, stitch lines 1/2 inch apart.
- This dense straight-line quilting stiffens the quilt slightly, giving it the structured, heavy drape of a high-end hotel coverlet.
Pro Design Tip: Insert a “Pop” Line. Break the monochrome slightly. Insert a single 1-inch wide strip of Metallic Gold or Neon Yellow somewhere in the offset third of the quilt. This tiny sliver of color amidst the black and white creates a designer “label” look.
Budget Consideration: Black and White Sheets. Since this pattern uses long, uncut fabric lengths, bed sheets are the most cost-effective option. Buy two King-sized flat sheets (one black, one white). You can cut 90-inch-long strips directly from the sheets without having to piece/join shorter WOF strips together.
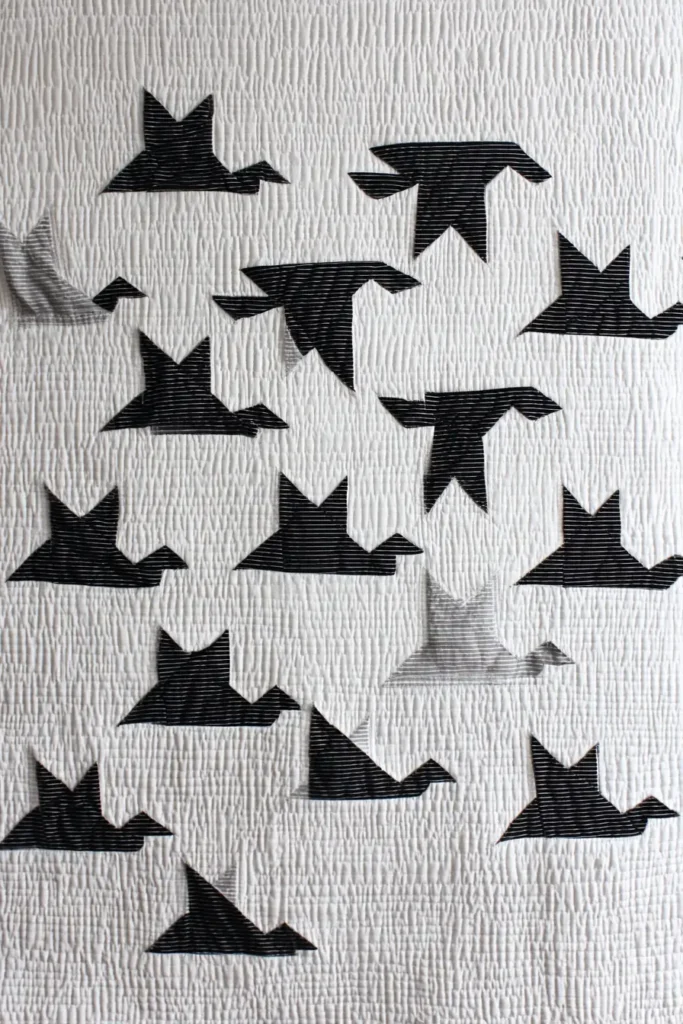
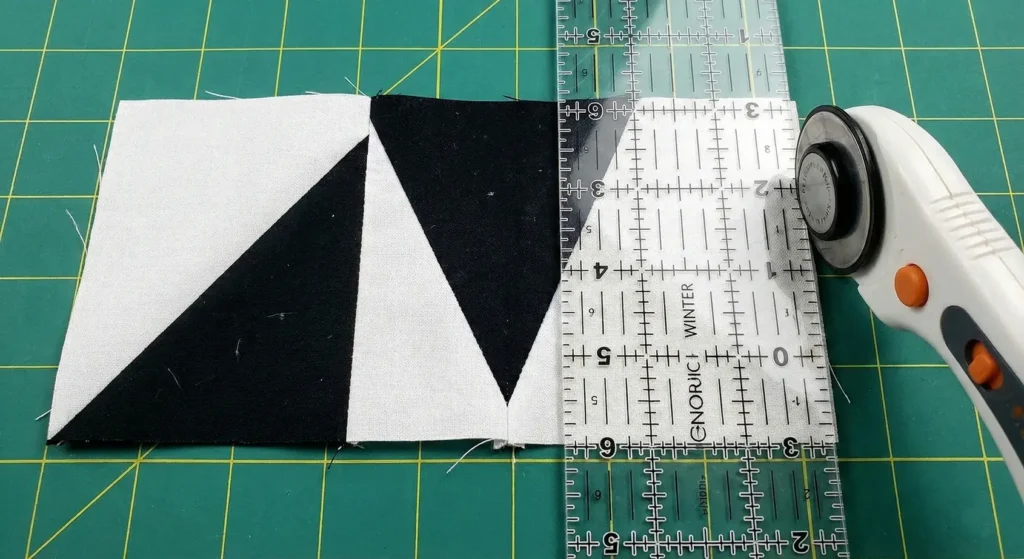
The “Nordic Winter” Flying Geese Quilt
This pattern embodies Scandinavian minimalism—clean lines, high contrast, and lots of negative space. It features rows of “Flying Geese” (triangles) migrating across a stark white background. The direction of the geese creates movement, making the quilt feel dynamic yet serene.
Finished Dimensions: Large Throw / Twin, approximately 60″ x 70″.
Materials Needed:
- Geese Fabric (Black): 1.5 yards of Solid Black or a charcoal linen-texture print.
- Background/Sky Fabric (White): 3.5 yards of Solid White (Kona Snow or White).
- Backing Fabric: 4 yards.
- Batting: Twin Size (72″ x 90″).
- Binding: 1/2 yard of Black and White diagonal stripe.
- Notions: Rotary cutter, ruler, marking pen (or “Wing Clipper” tool if you have one).
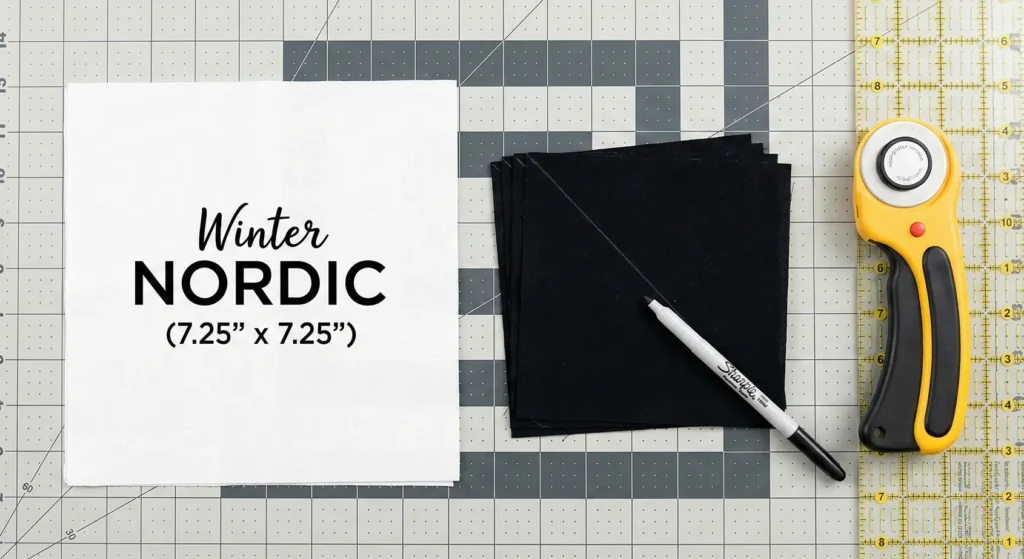
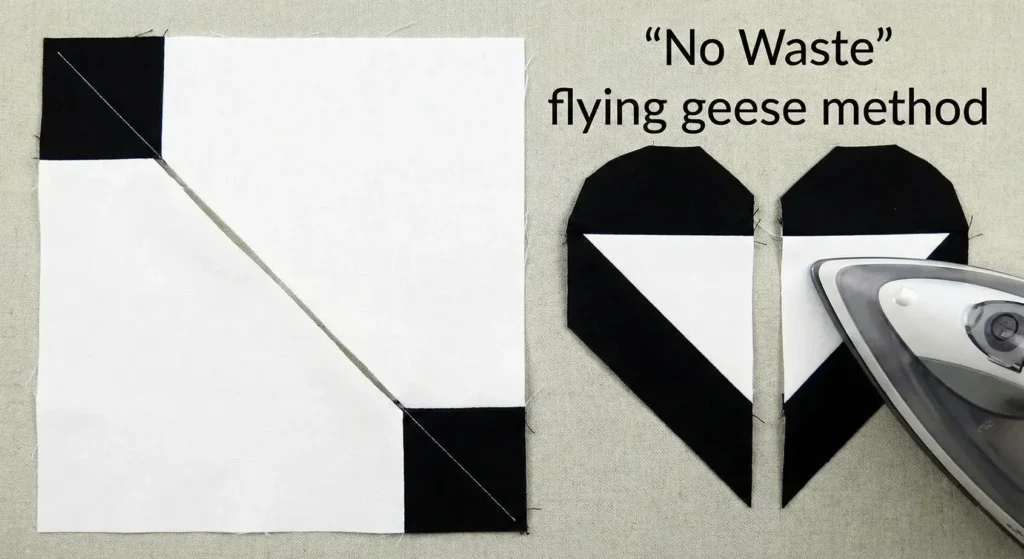
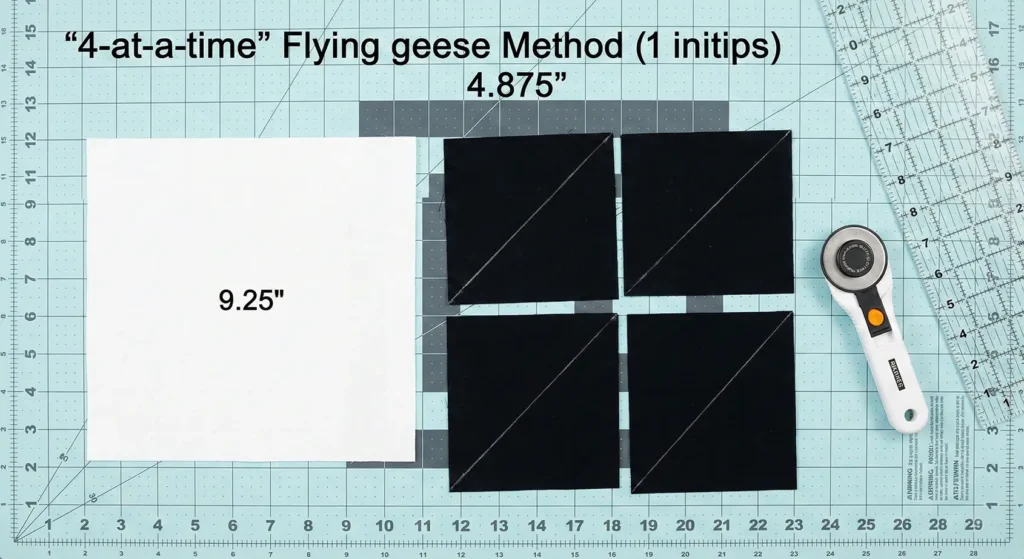
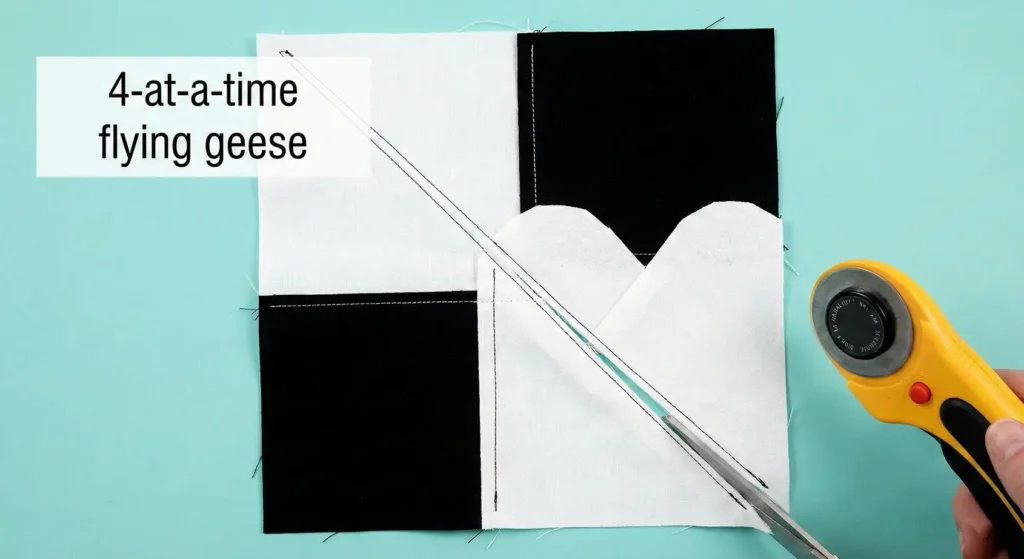
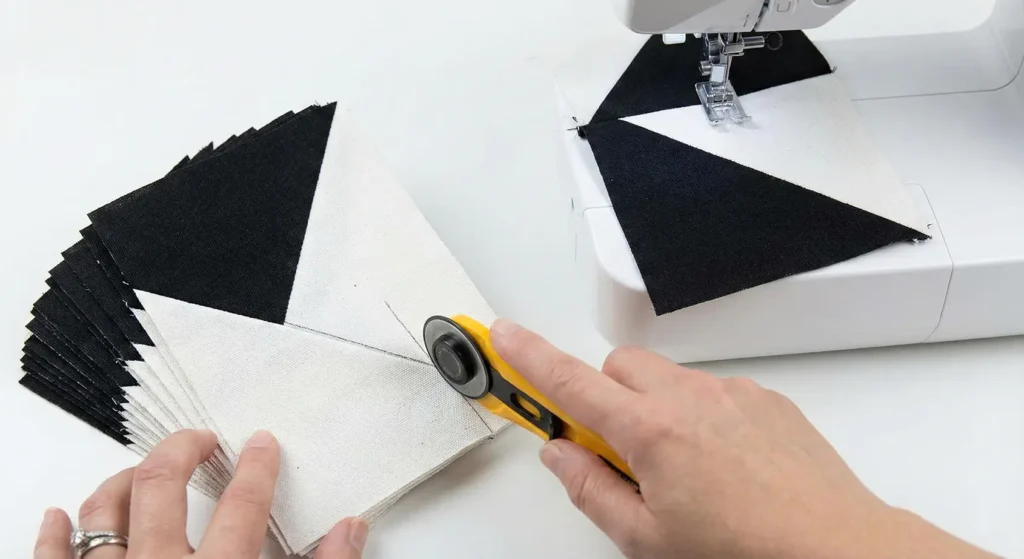
Step 1: The “No-Waste” Flying Geese Method
We will make 4 geese at a time to speed things up. To make 4 Geese (Finished size 3″ x 6″):
- Cut 1 Large Square (White Background): 7.25″ x 7.25″.
- Cut 4 Small Squares (Black Geese): 3.875″ x 3.875″ (often rounded to 3 7/8″).
- Draw a diagonal line on the back of all 4 Black squares.
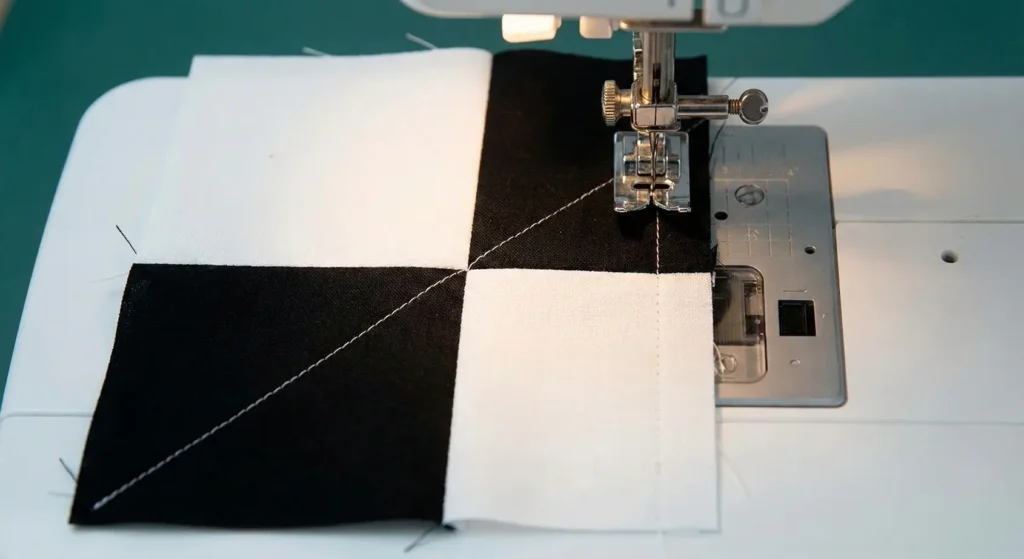
Step 2: Sew the First Diagonal
- Place the Large White Square face up.
- Place two Black squares in opposite corners (Right Sides Together), so the drawn lines connect to form one long diagonal across the white square. The black squares will overlap slightly in the middle.
- Sew a 1/4″ seam on both sides of the drawn line.
- Cut along the drawn line. You now have two weird-looking heart shapes—press seams toward the black triangles.
Step 3: Sew the Second Diagonal
- Take one of the heart shapes. Place a remaining Black square in the corner of the white “heart” (Right Sides Together).
- The drawn line should go from the peak of the black triangle down between the two black triangles sewn together.
- Sew a 1/4″ seam on both sides of the line.
- Cut along the line. Press open.
- Repeat for the other heart shape.
- Result: You have created 4 Flying Geese units.
- Trim: Trim each unit to exactly 3.5″ x 6.5″ (unfinished).
- Repeat: Make 80 Flying Geese total.
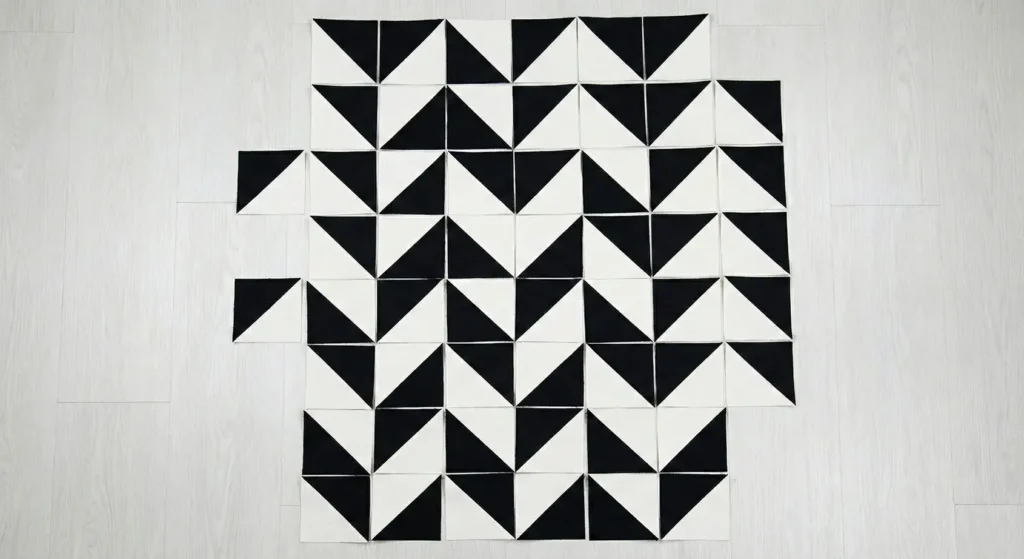
Step 4: Create the “Migration” Rows
We aren’t filling the whole quilt with geese; we are creating spaced-out rows for a minimalist look.
- Row Type A (The Geese): Sew 10 Flying Geese together end-to-end.
- Orientation: All pointing UP.
- Make 8 of these rows.
- Row Type B (The Spacer Strips): Cut strips of White Background fabric, 6.5″ wide x 60.5″ long.
- Make 9 of these strips.
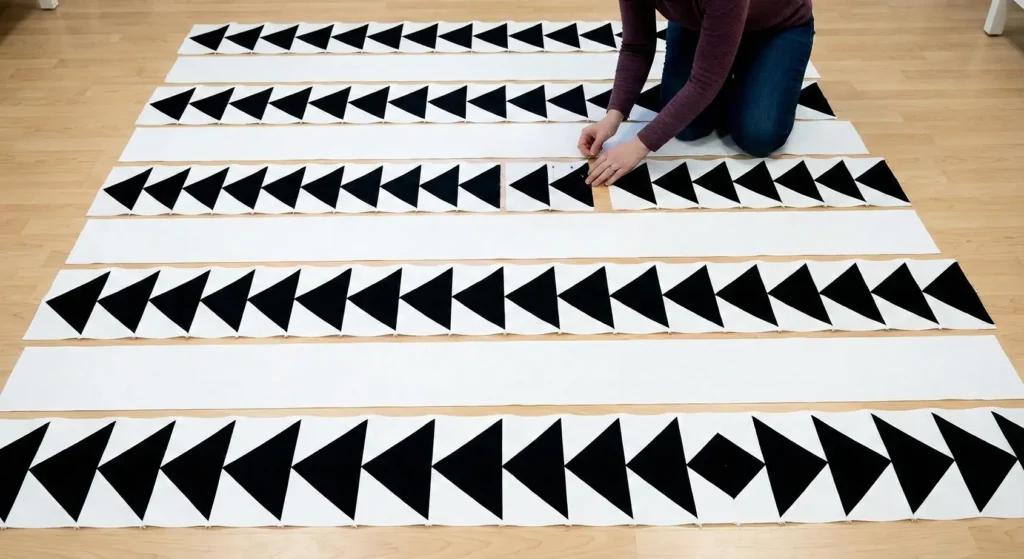
Step 5: Assemble the Quilt Top
- Lay out the rows on the floor.
- Pattern: Spacer – Geese Row – Spacer – Geese Row… ending with Spacer.
- Scandi Twist: Instead of aligning the Geese rows perfectly, you can stagger them slightly by adding spacer blocks at the ends, but for a clean look, align them straight.
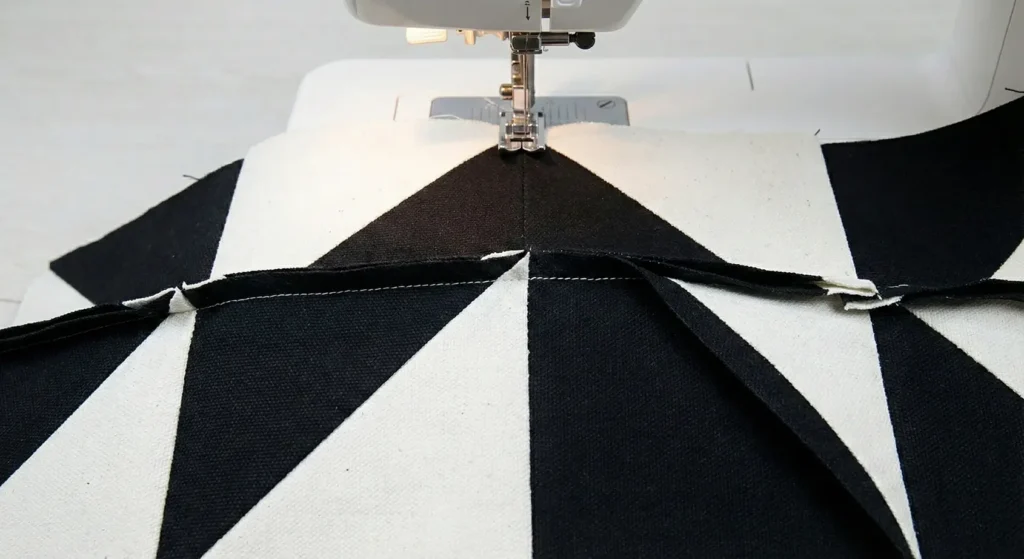
- Sew the long horizontal seams.
- Press seams toward the spacer strips.
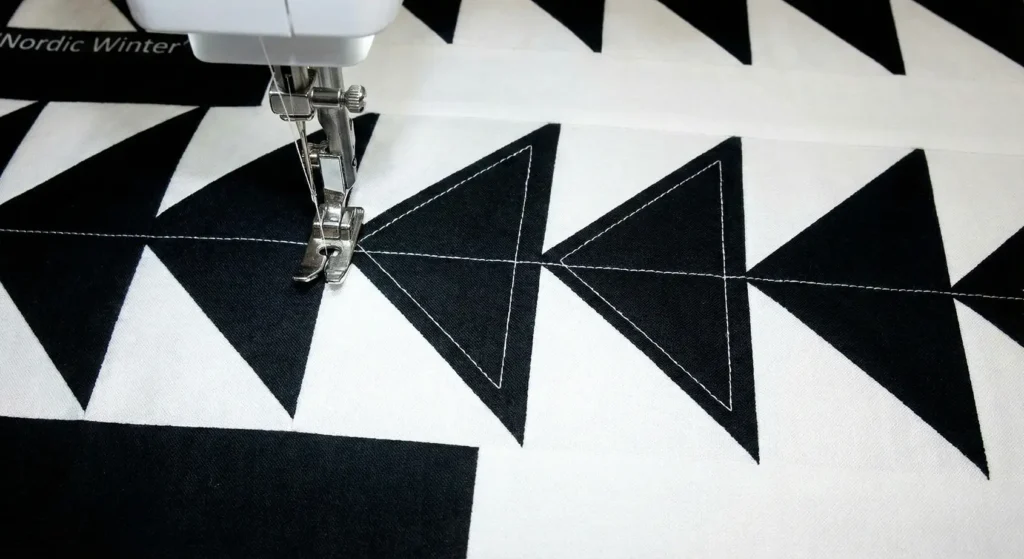
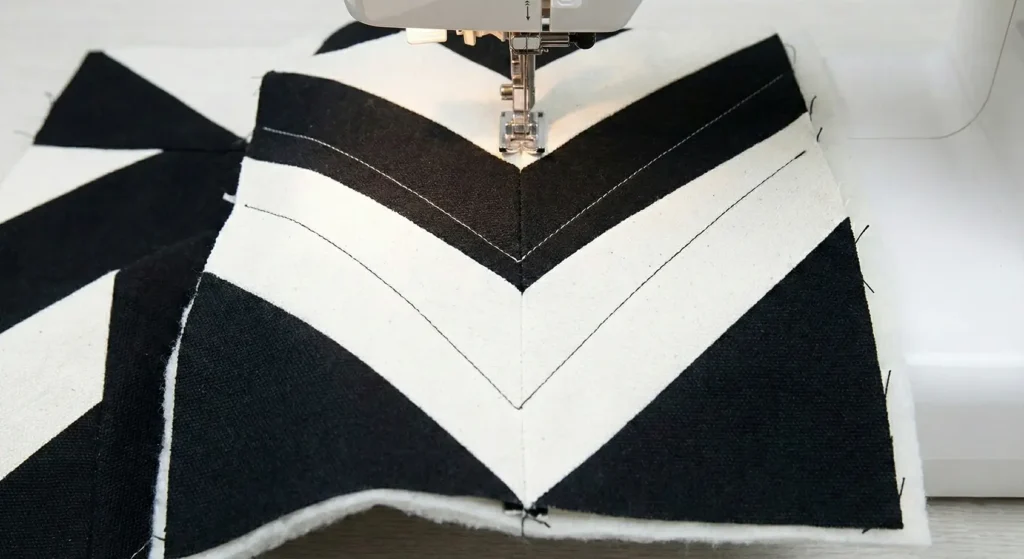
Step 6: Echo Quilting
- Baste your sandwich.
- Quilting: Use white thread.
- Quilt straight lines horizontally across the spacer strips (about 1 inch apart).
- When you get to the Geese rows, outline the triangles. Stitch 1/4″ inside the black triangle, or stitch “in the ditch” around them to make them puff out.
- This combination of straight lines and geometric shapes enhances the modern vibe.
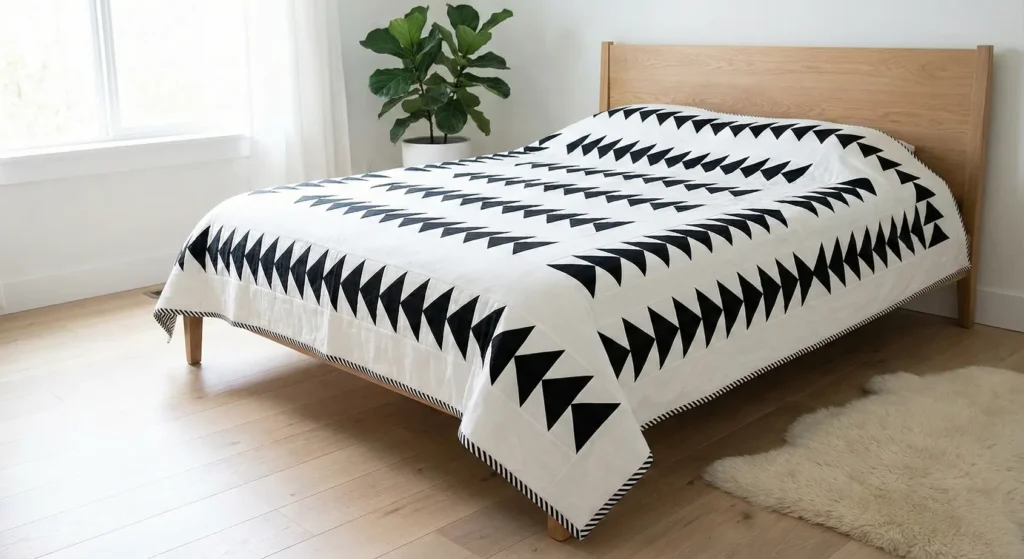
Pro Design Tip: Invert a Goose. In one of the rows, sew a single goose pointing DOWN while all the others point UP. This single “rebel goose” is a classic modern quilting trope that adds personality and a focal point to the design.
Budget Consideration: Canvas Drop Cloth. For the background, use a bleached canvas drop cloth. The heavyweight of the canvas, combined with the black triangles, makes the quilt feel like a weighted blanket or a heavy rug, perfect for cold Scandinavian winters, and it costs significantly less than yardage.
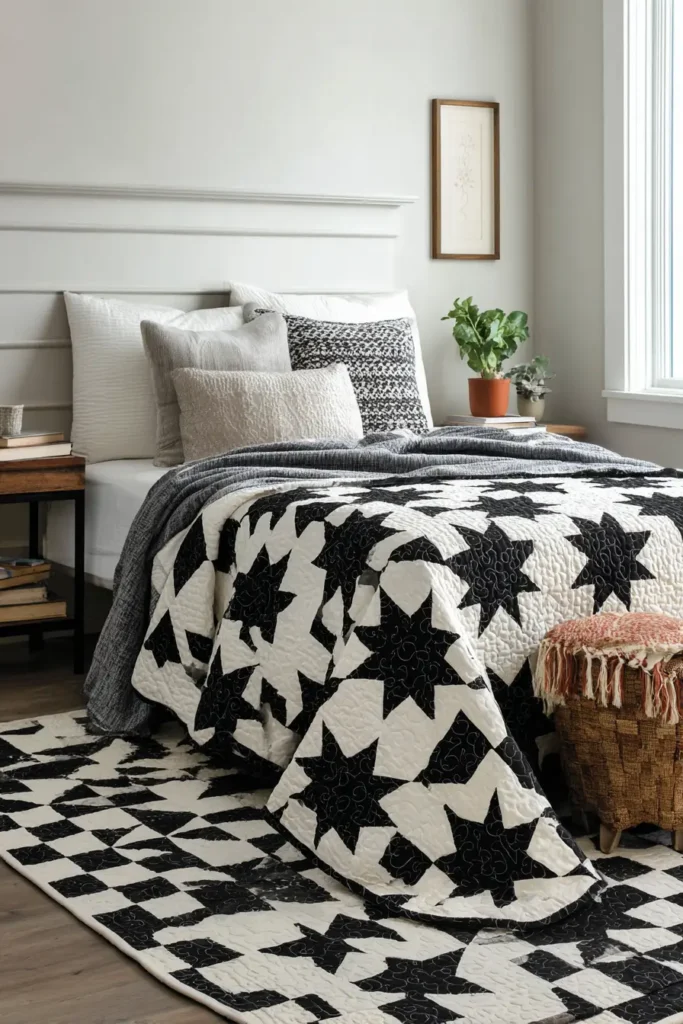
4. Black and White Star Quilt Patterns for Timeless Decor
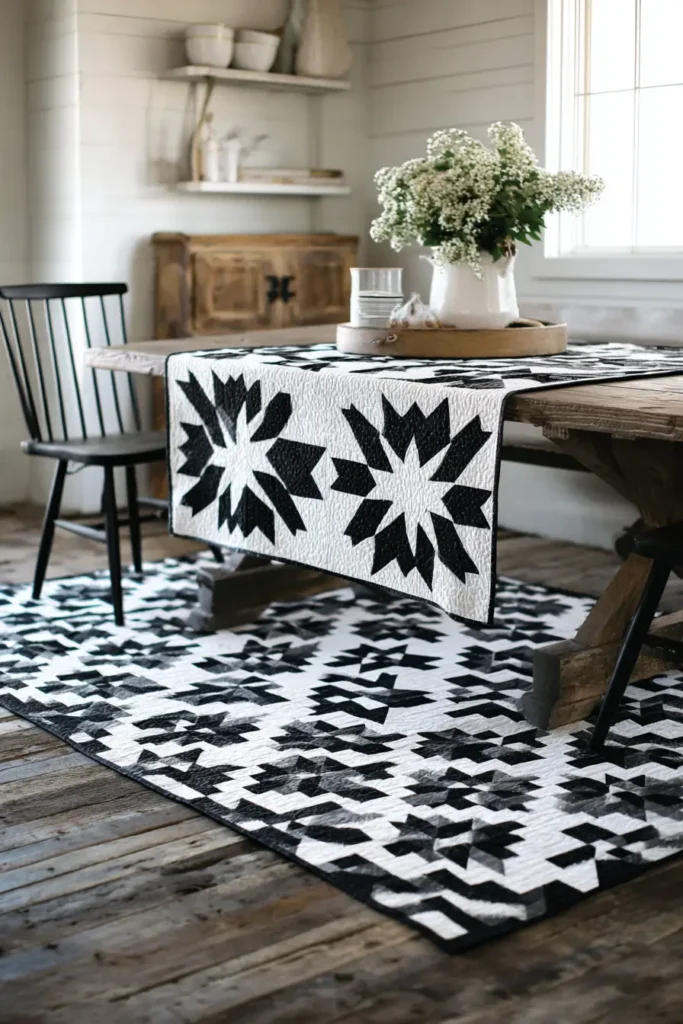
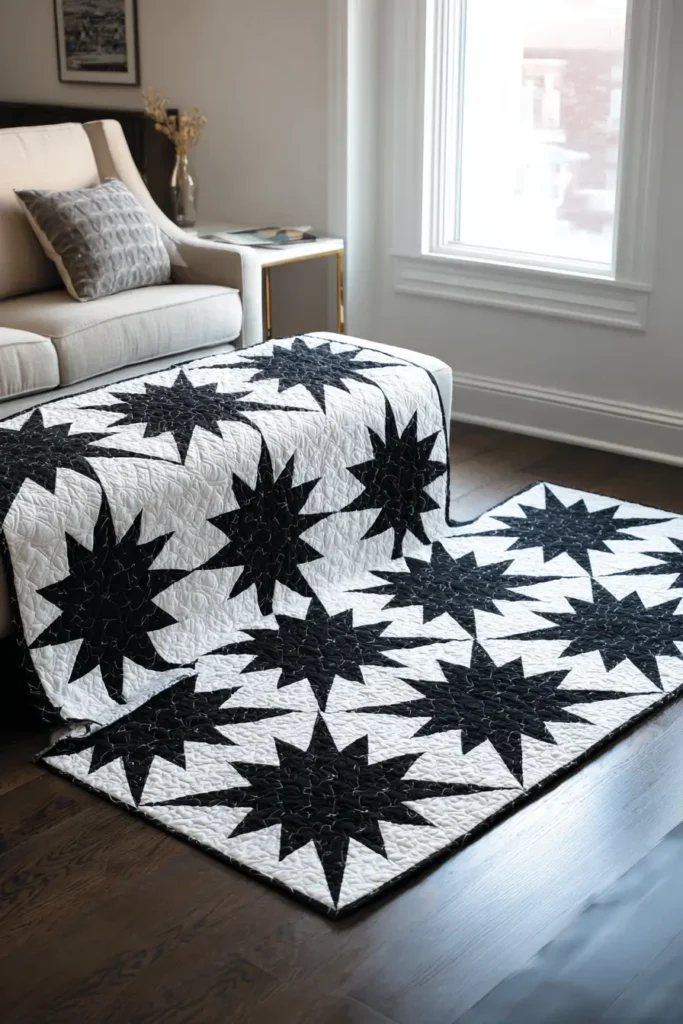
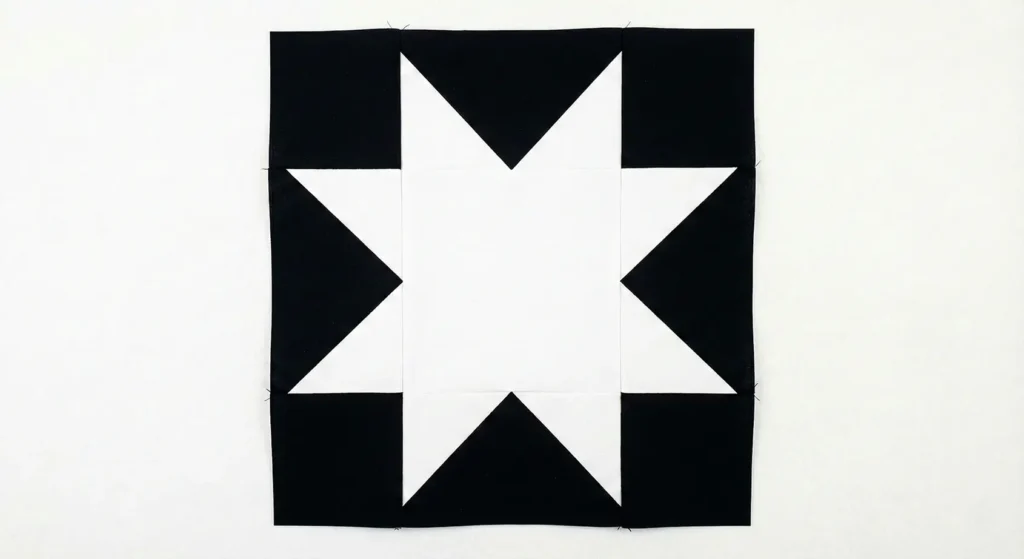
The “Night Sky” Inverted Sawtooth Star Quilt
The Sawtooth Star is a traditional block that dates back to the 1800s. To modernize it for a black-and-white palette, we will invert the colors: distinct bright white stars floating on a deep black background. This high-contrast look creates a “constellation” effect that is striking in both minimalist lofts and farmhouse bedrooms.
Finished Dimensions: Large Throw, approximately 60″ x 74″.
Materials Needed:
- Star Fabric (White): 1.5 yards of Solid White or “White on White” print.
- Background Fabric (Black): 3.5 yards of Solid Black or Charcoal.
- Backing Fabric: 4.5 yards.
- Batting: Twin Size (72″ x 90″).
- Binding: 1/2 yard of White (to create a halo frame).
- Notions: Rotary cutter, 6.5″ square ruler, marking pen (silver or white for marking on black fabric).
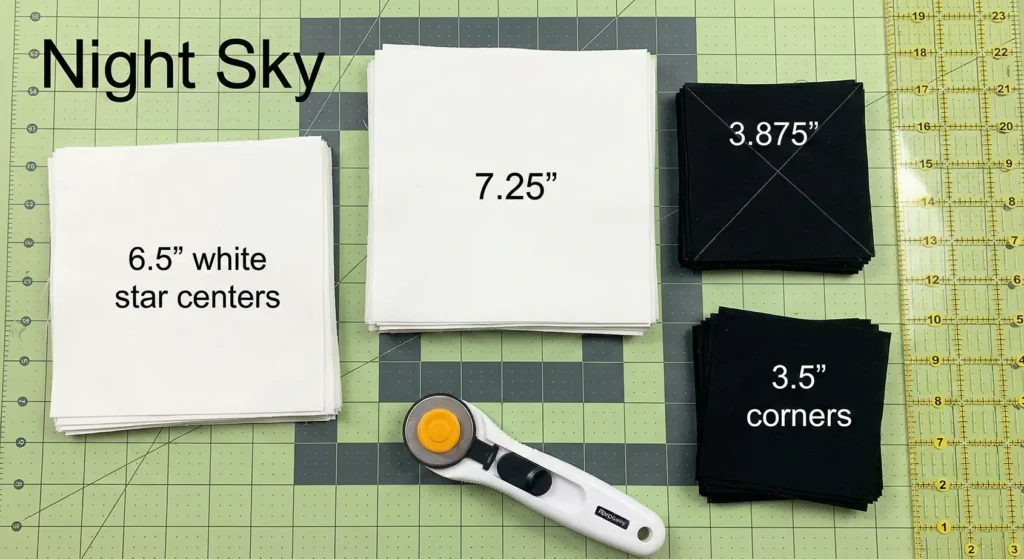
Step 1: Cutting the Components
We will make 20 Star Blocks (12″ finished size).
- From Star Fabric (White):
- Cut 20 squares measuring 6.5″ x 6.5″ (Star Centers).
- Cut 20 large squares measuring 7.25″ x 7.25″ (For the Flying Geese star points).
- From Background Fabric (Black):
- Cut 80 squares measuring 3.5″ x 3.5″ (Corner Squares).
- Cut 80 small squares measuring 3.875″ (approx 3 7/8″) (For the Flying Geese background).
- Sashing: Cut 31 strips measuring 2.5″ x 12.5″ (Vertical and Horizontal spacers).
- Cornerstones: Cut 12 squares measuring 2.5″ x 2.5″ (for sashing intersections). Correction: This layout needs more straightforward sashing math. Let’s do vertical sashing strips (12.5″) and long horizontal sashing rows.
Step 2: Make the Flying Geese (Star Points)
The star points are White, surrounded by a black background. We will use the “No Waste 4-at-a-time” method.
- Take 1 Large White Square (7.25″) and 4 Small Black Squares (3 7/8″).
- Draw a diagonal line on the back of all Black squares (use a white pencil).
- Place two Black squares on opposite corners of the White square (Right Sides Together). The lines should form one long diagonal.
- Sew a 1/4″ seam on both sides of the line. Cut on the line. Press toward the black.
- Place a remaining Black square on the corner of the resulting heart shapes. Sew 1/4″ on both sides of the line. Cut and press.
- Result: You now have 4 Flying Geese (White triangle, Black corners).
- Trim: Trim each unit to exactly 3.5″ x 6.5″. Repeat until you have 80 units.

Step 3: Arrange the Star Block
Lay out the pieces for one block (3 rows).
- Top Row: Black Square (3.5″) – Flying Goose (Point UP) – Black Square (3.5″).
- Middle Row: Flying Goose (Point LEFT) – White Center Square (6.5″) – Flying Goose (Point RIGHT).
- Bottom Row: Black Square (3.5″) – Flying Goose (Point DOWN) – Black Square (3.5″).
Step 4: Assemble the Blocks
- Sew the units in the Top Row together—press seams toward the Black Squares.
- Sew the Middle Row together. Press seams toward the Center Square.
- Sew the Bottom Row together. Press seams toward the Black Squares.
- Sew the three rows together to complete the block.
- The block should measure 12.5″ x 12.5″ (unfinished). Make 20 blocks.
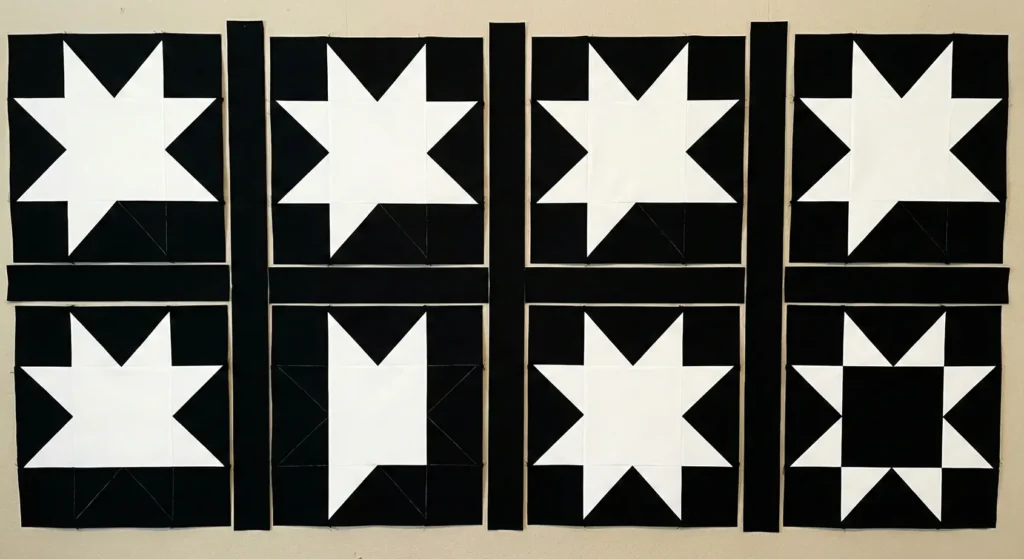
Step 5: Sashing and Layout
To give the stars breathing room, we separate them with black sashing.
- Layout: Arrange blocks in a grid of 4 blocks wide x 5 blocks tall.
- Vertical Sashing: Sew a 2.5″ x 12.5″ Black strip between the blocks in each row. (Block – Sashing – Block – Sashing – Block – Sashing – Block).
- Horizontal Sashing: Cut long Black strips measuring 2.5″ x 58.5″ (or piece them together to get this length).
- Sew a long sashing strip between each row of blocks.
- This creates a clean grid where the white stars float in a “night sky.”
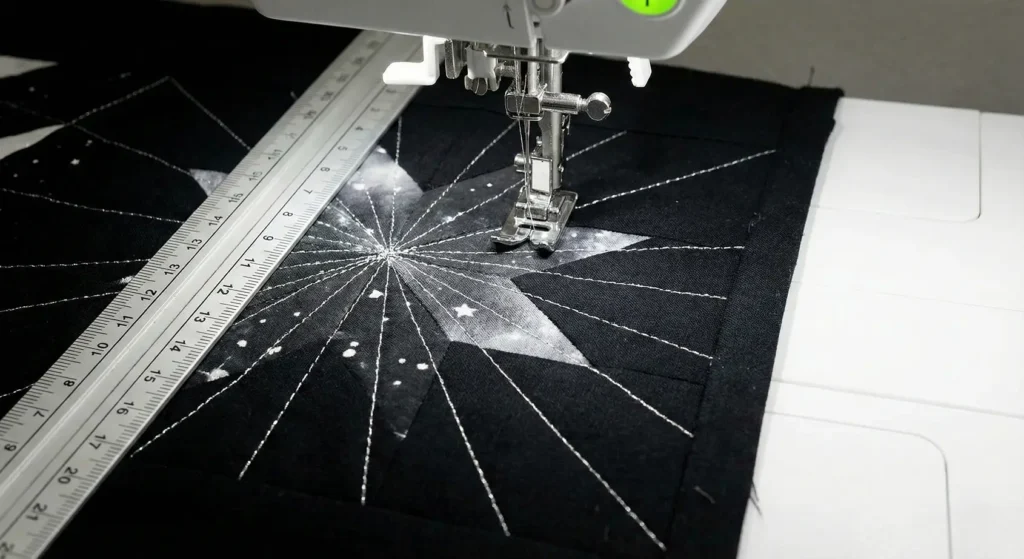
Step 6: “Starlight” Quilting
- Baste your quilt sandwich.
- Quilting Design: To enhance the star theme, use a Straight Line Radiation pattern.
- Start from the center of a specific star (or the center of the quilt). Use a long ruler to mark rays extending outward to the edges of the quilt.
- Quilt along these rays using Silver or Grey thread.
- The radiating lines look like twinkling beams of light.
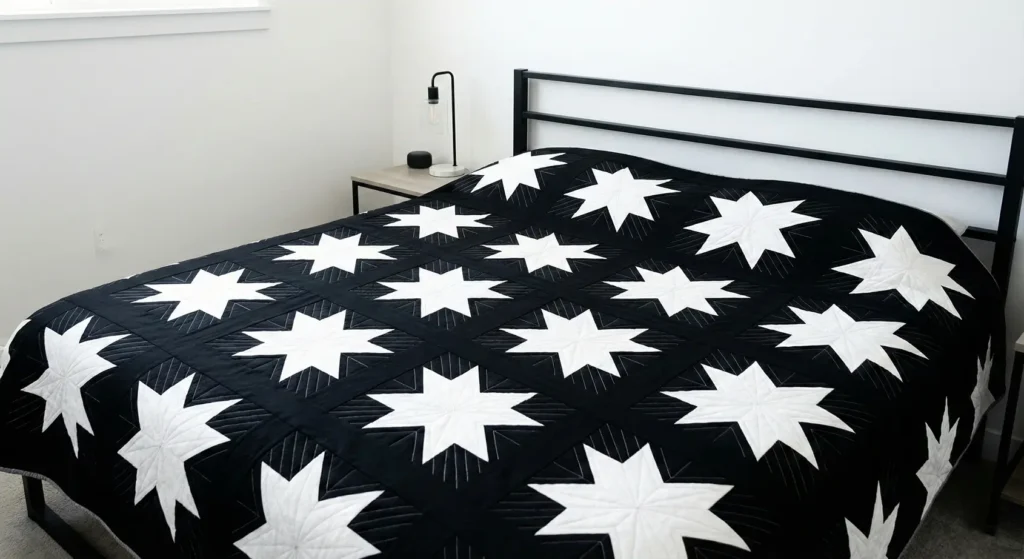
Pro Design Tip: The “North Star” Accent. Make 19 of the stars white, but make one single star in a Metallic Gold or a bright Mustard Yellow. Please place it in the upper third of the quilt (off-center). This “North Star” draws the eye and makes the quilt feel custom and artistic.
Budget Consideration: Use Old Clothes. This is an excellent project for upcycling. The white stars can be cut from old white dress shirts (the cotton is crisp and distinct), and the black background can be cut from old black t-shirts (if you use stabilizer) or black denim/chinos. The mix of textures adds depth to the monochrome palette.
5. Monochrome Floral Quilt Designs for Elegant Bedrooms
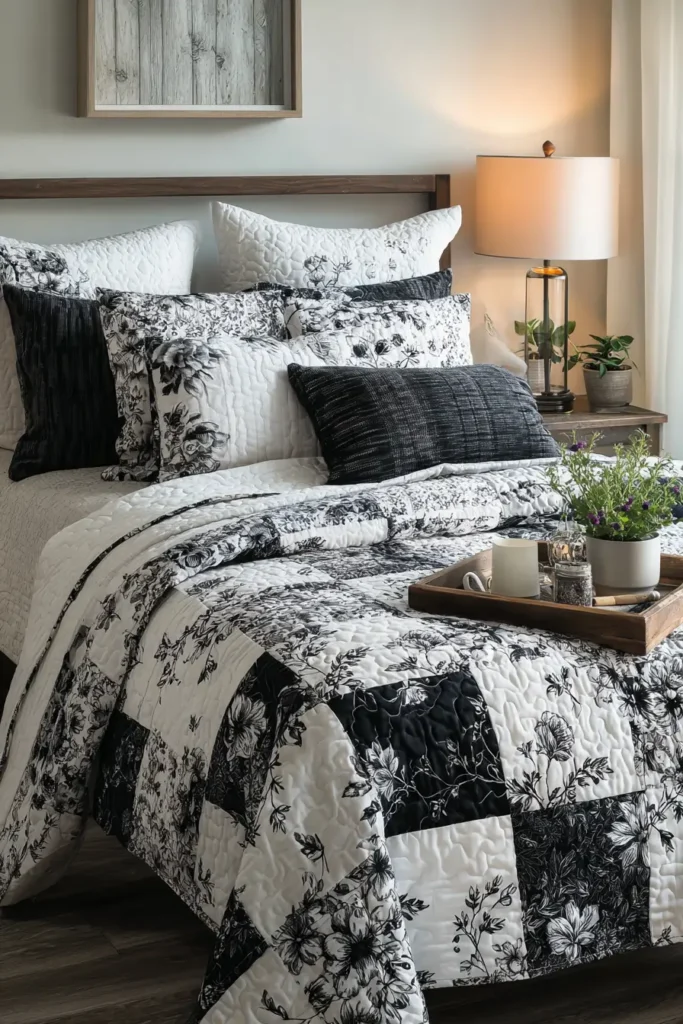
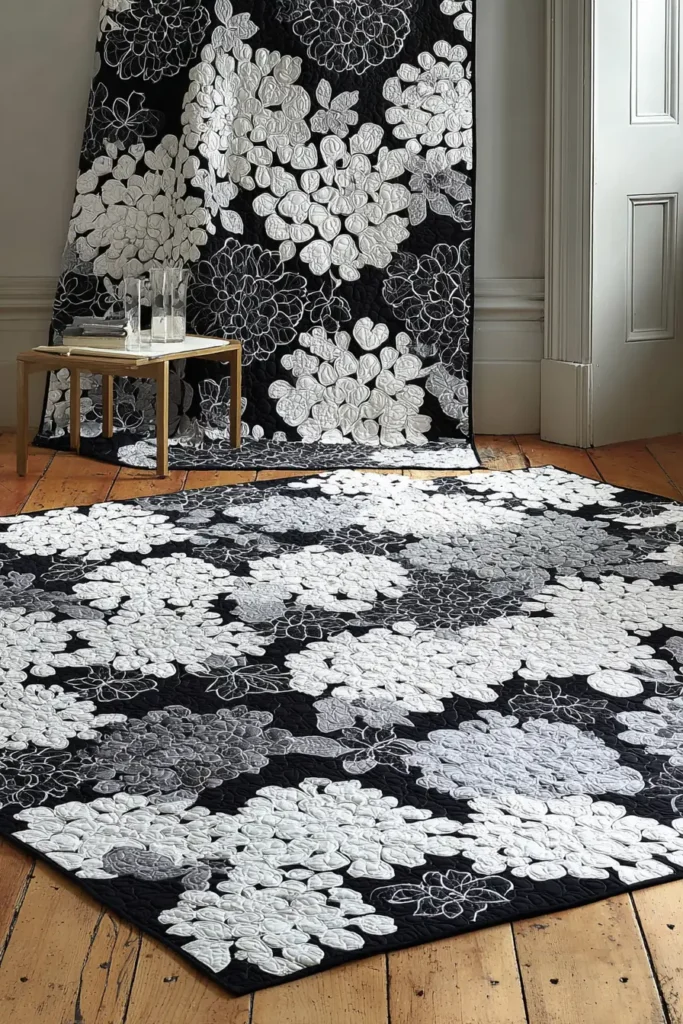
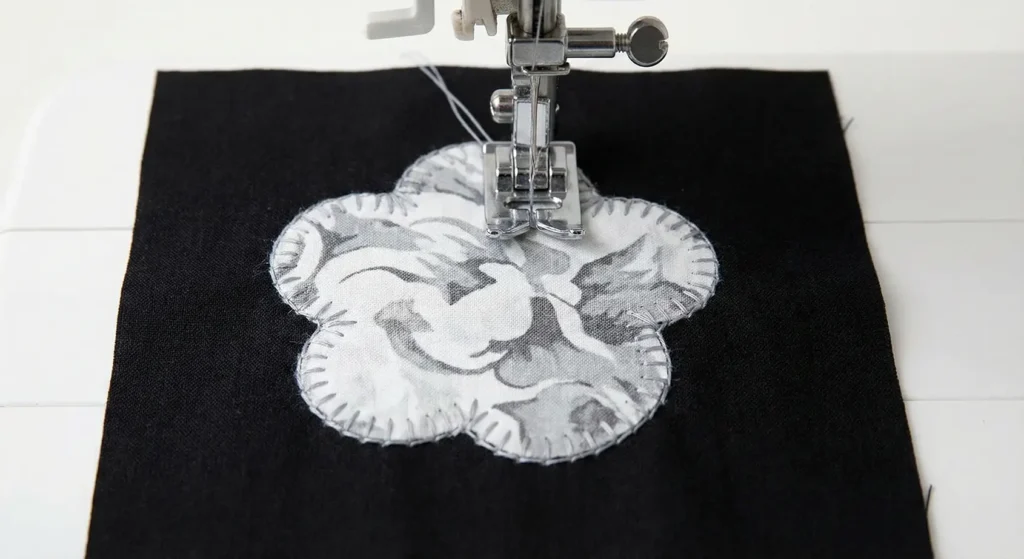
The “Midnight Garden” Appliqué Quilt
While most black-and-white quilts rely on geometry, this design brings softness to the bedroom with large-scale floral appliqué. The concept is dramatic: oversized white and grey floral silhouettes appliquéd onto a deep black background. It mimics the look of a high-end toile or damask wallpaper but with the coziness of a quilt.
Finished Dimensions: Full/Queen Size, approximately 80″ x 80″.
Materials Needed:
- Background Fabric: 5 yards of Solid Black or Charcoal.
- Floral Fabric: 3 yards total of large-scale Black & White floral prints (look for prints with clearly defined flowers you can cut out, or solid white/grey for silhouettes).
- Fusible Web: 3 yards of lightweight fusible web (like HeatnBond Lite).
- Backing Fabric: 7.5 yards.
- Batting: Queen Size (90″ x 90″).
- Thread: Black (for background) and White/Grey (for appliqué).
- Notions: Sharp fabric scissors (small tip for detail cutting), iron.
Step 1: Prepare the Background Blocks
Instead of wrestling with one giant piece of black fabric, we will work in blocks.
- From the Solid Black Fabric, cut 16 large squares, each measuring 20.5″ x 20.5″.
- These large negative spaces will be the canvas for your floral arrangements.
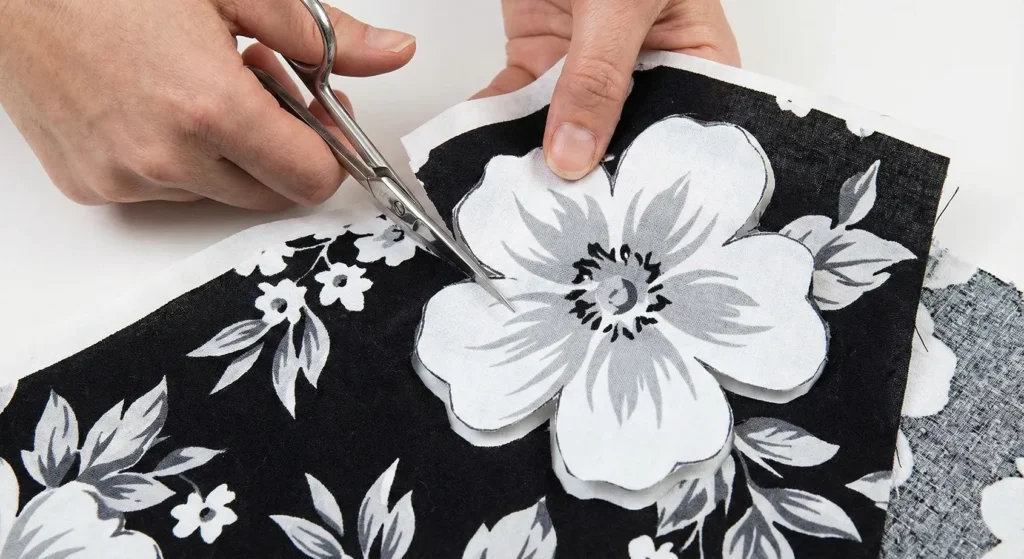
Step 2: “Fussy Cut” the Florals
This is the artistic part. You aren’t cutting squares; you are cutting shapes.
- Take your Floral Prints. Look for large clusters of flowers, vines, or leaves.
- Apply Fusible Web: Iron the fusible web (paper side up) onto the wrong side of the floral fabric sections you plan to use.
- Cut: Carefully cut out the floral shapes through both the fabric and the fused web. Cut right along the edge of the printed flower petals.
- Goal: You need enough floral clusters to fill the center of 9 blocks, or to create a wreath shape on 4 blocks. For this design, let’s make a Center Medallion layout: 4 heavily flowered blocks in the center, fading to fewer flowers on the outer blocks.
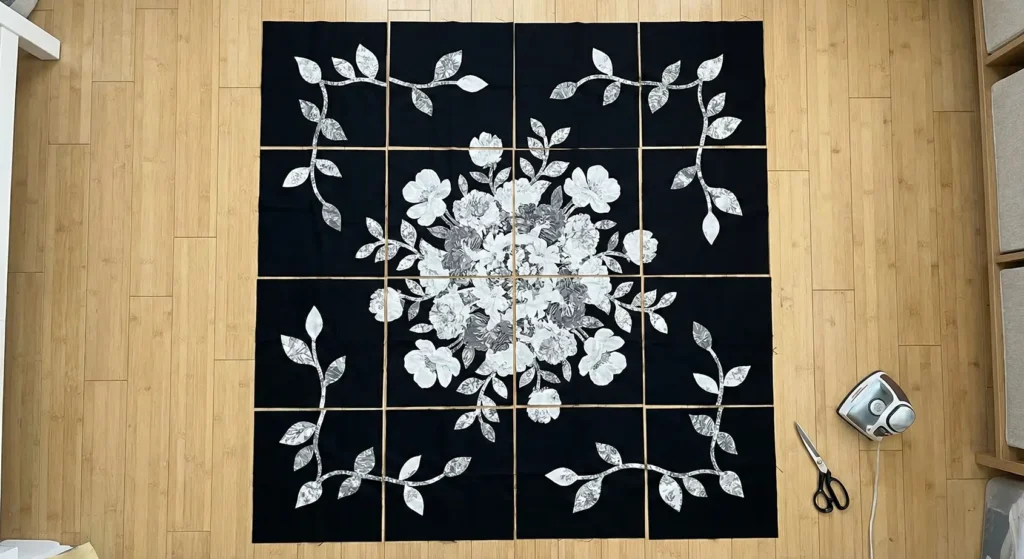
Step 3: Arrange the Garden
- Peel the paper backing off your floral cut-outs.
- Place your 16 Black Blocks on a design wall or floor in a 4 x 4 grid.
- Layout:
- Center 4 Blocks: Arrange large, dense floral bouquets in the center where these 4 blocks meet.
- Outer Blocks: Place trailing vines or single leaves drifting outward toward the edges of the quilt.
- Once you like the arrangement, press it with a hot iron to permanently fuse the flowers to the black background.
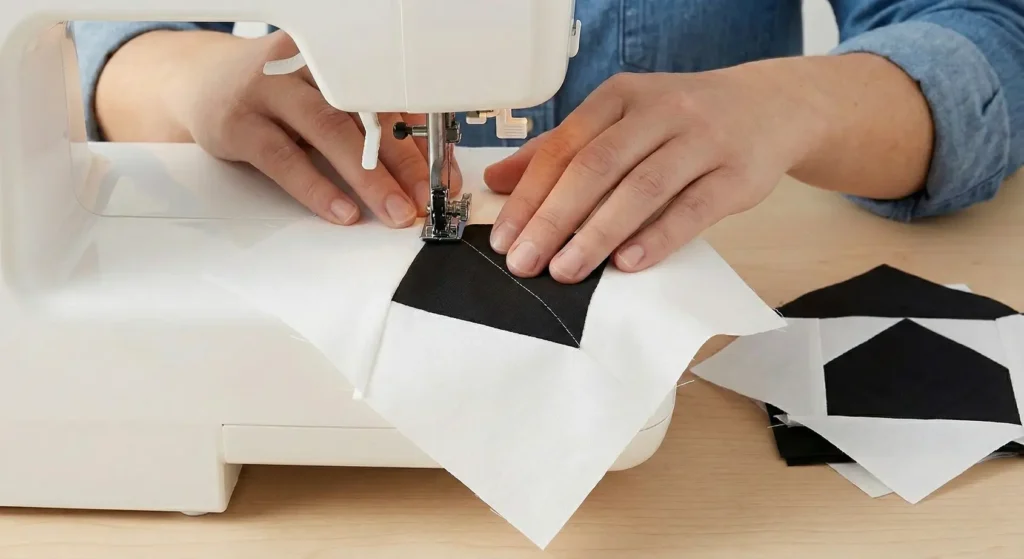
Step 4: Secure the Appliqué (The Stitch Down)
- Set your sewing machine to a Blanket Stitch or a tight Zig-Zag Stitch.
- Use a thread that matches the flower edges (White or Grey).
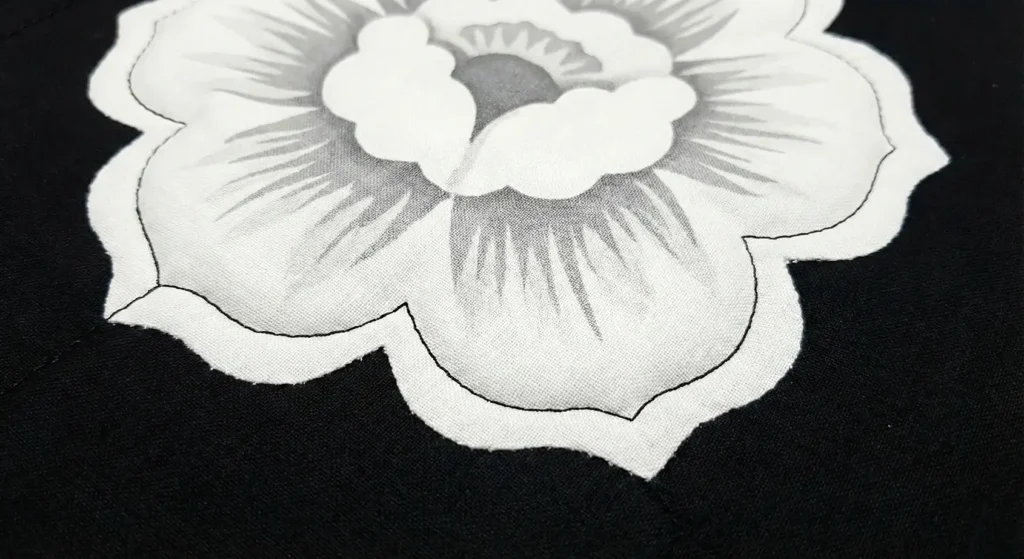
- Stitch around the raw edges of every appliquéd flower. This prevents fraying and makes the flowers look embroidered.
- Tip: If you want a raw-edge “sketchy” look, use a straight stitch about 1/8″ inside the edge and let the very rim fray slightly over time.
Step 5: Assemble the Quilt Top
- Now that the blocks are appliquéd, sew them together.
- Sew the 4 blocks of Row 1 together. Repeat for Rows 2, 3, and 4.
- Sew the rows together.
- Crucial: Match the corners carefully. If your floral design flows across two blocks (e.g., a vine crossing a seam), make sure the vine lines up visually.
Step 6: “Echo” Quilting
- Baste the sandwich.
- Quilting: Use Black Thread.
- Quilt around the floral shapes in the black background.
- Start right next to a flower and stitch an outline. Then stitch another outline 1/2″ away (echoing).
- Fill the remaining black negative space with dense meandering or swirls to flatten the background. This makes the un-quilted (or lightly quilted) flowers puff up (trapunto effect), creating a rich 3D texture.

Pro Design Tip: The “Negative” Block. For a stunning modern twist, swap the colors for half the quilt. Make the top half Black Background with White Flowers, and the bottom half White Background with Black Flowers. The high-contrast “dip dye” effect is incredibly chic.
Budget Consideration: Shower Curtains. Large-scale black-and-white floral fabric can be $12+/yard. However, you can often find fabric shower curtains with massive black and white floral prints at discount stores (Ross, Marshalls) for $15. One shower curtain provides a large amount of pre-printed floral material to cut up for appliqué.
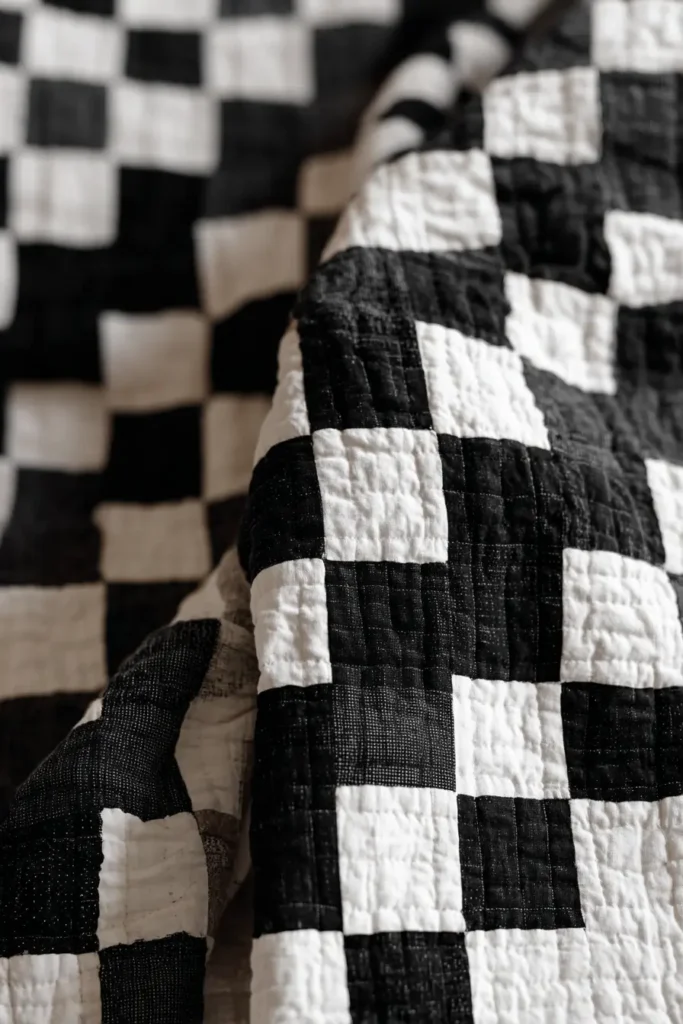
6. Black and White Checkered Quilt Patterns for Farmhouse Style
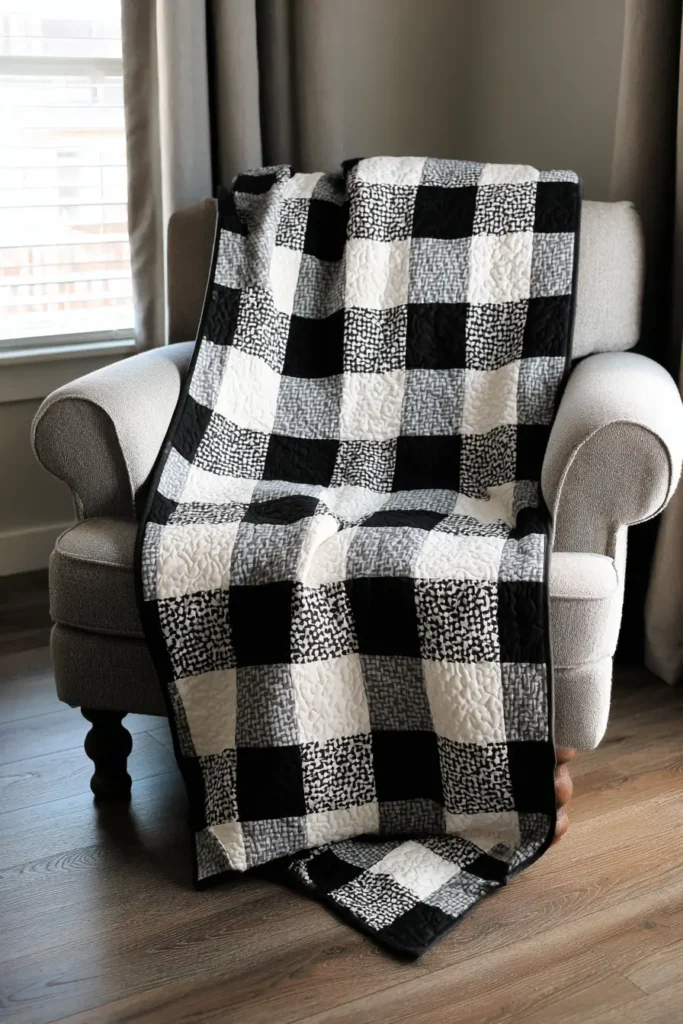

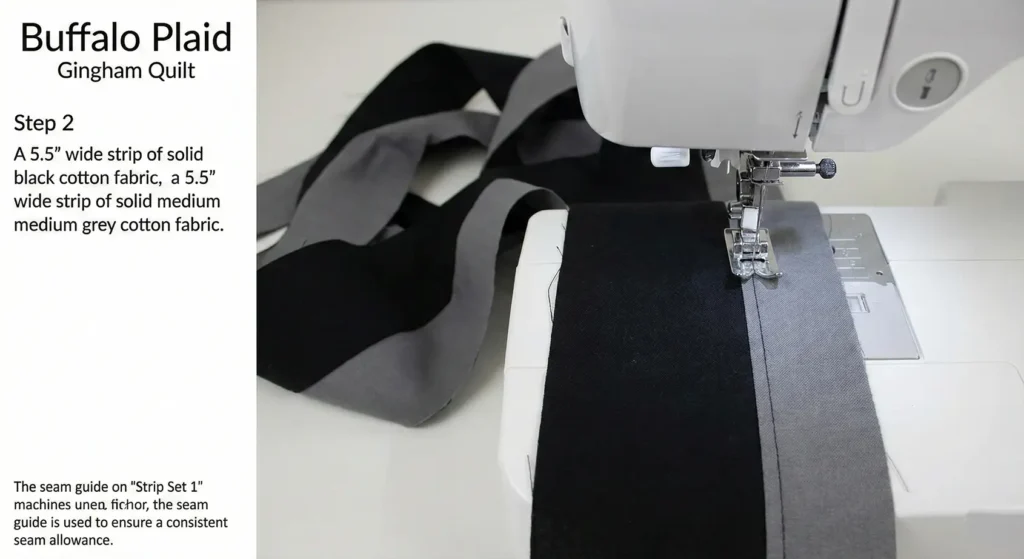
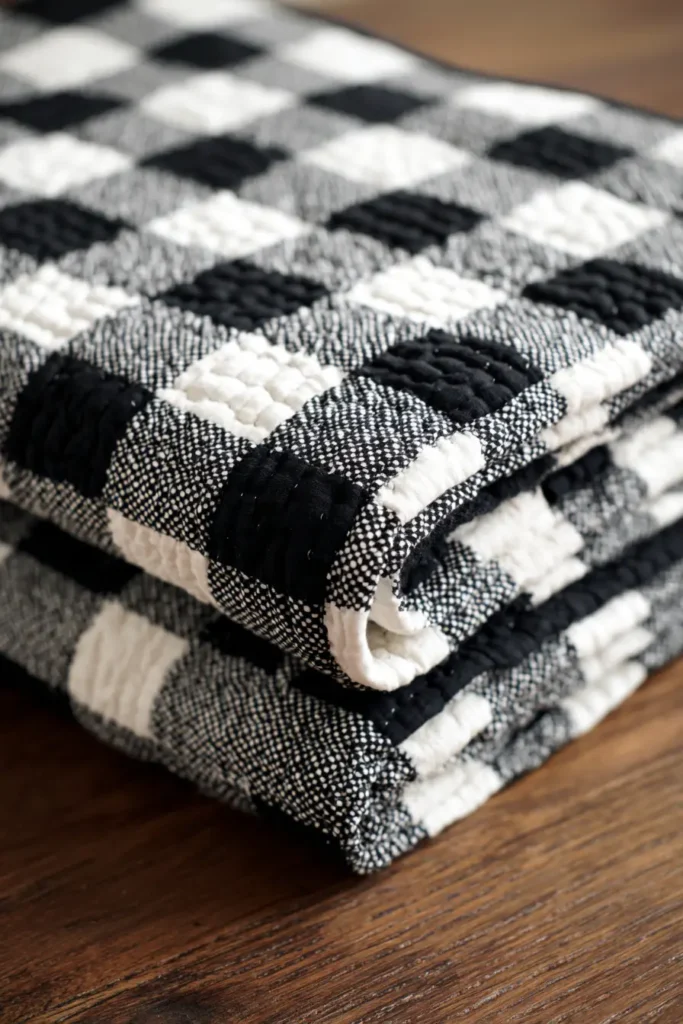
The “Buffalo Plaid” Gingham Quilt
The Buffalo Check (or Gingham) is the holy grail of farmhouse patterns. While it looks like a complex woven fabric, it is actually a simple optical illusion created with three shades: Dark (Black), Light (White), and Medium (Grey). The Grey acts as the “overlap” where the black and white stripes would theoretically cross, creating that cozy, lumberjack-chic aesthetic.
Finished Dimensions: Large Throw, approximately 60″ x 70″.
Materials Needed:
- Fabric A (Dark): 1.5 yards of Solid Black.
- Fabric B (Medium): 2.5 yards of Solid Medium Grey (Crucial: This grey must look like a 50/50 blend of the black and white).
- Fabric C (Light): 1.5 yards of Solid White.
- Backing Fabric: 4 yards.
- Batting: Twin Size (72″ x 90″).
- Binding: 5/8 yard of Solid Black.
- Notions: Rotary cutter, quilting ruler, neutral grey thread.
Step 1: Cut the Strips
Efficiency Tip: Do not cut individual squares. We will use strip piecing.
- From Fabric A (Black): Cut 10 strips, each 5.5″ wide x WOF (Width of Fabric).
- From Fabric B (Grey): Cut 18 strips, each 5.5″ wide x WOF.
- From Fabric C (White): Cut 8 strips, each 5.5″ wide x WOF.
Step 2: Create “Strip Set 1” (The Dark Row)
This set defines the rows in which the Black checks appear.
- Take 1 Black strip and 1 Grey strip.
- Sew them together lengthwise (long edge to long edge).
- Repeat this pattern: Black – Grey – Black – Grey… until you have sewn 6 strips together. Correction for speed: Sew one Black strip to one Grey strip to make a pair.
- Better Method: Sew a Black Strip to a Grey Strip. Make 9 of these paired sets. Press seams toward the Black.
- Width check: Each pair should measure approximately 10.5″ wide.
Step 3: Create “Strip Set 2” (The Light Row)
This set creates the rows where the White checks appear.
- Take 1 Grey strip and 1 White strip.
- Sew them together lengthwise.
- Make 8 of these paired sets. Press seams toward the Grey.
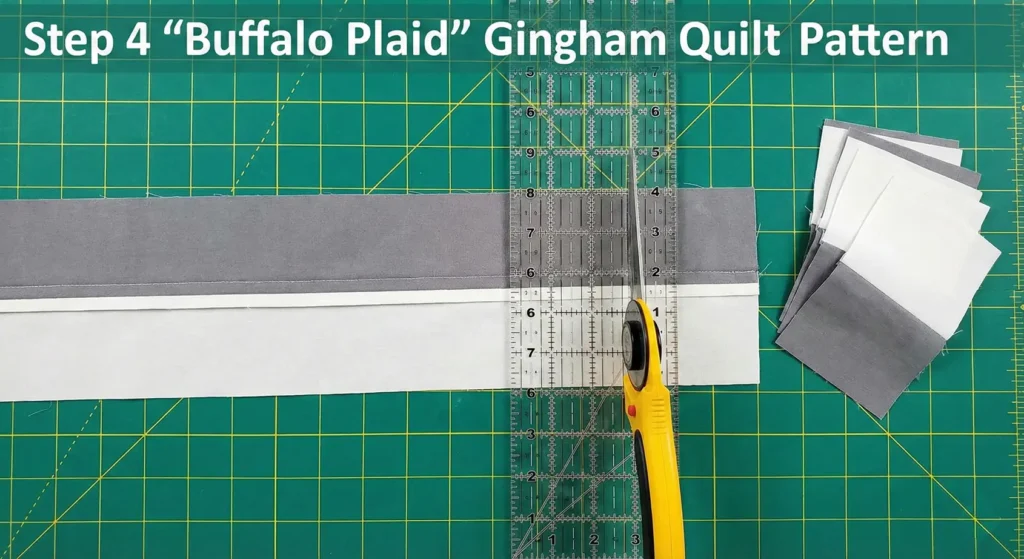
Step 4: Sub-Cut the Segments
- Take your “Strip Set 1” (Black/Grey panels) to the cutting mat.
- Cross-cut them into vertical segments that are 5.5″ wide.
- You are creating units that look like a 2-block column (Black top, Grey bottom).
- You need 60 of these units.
- Take your “Strip Set 2” (Grey/White panels).
- Cross-cut them into vertical segments that are 5.5″ wide.
- You need 54 of these units.
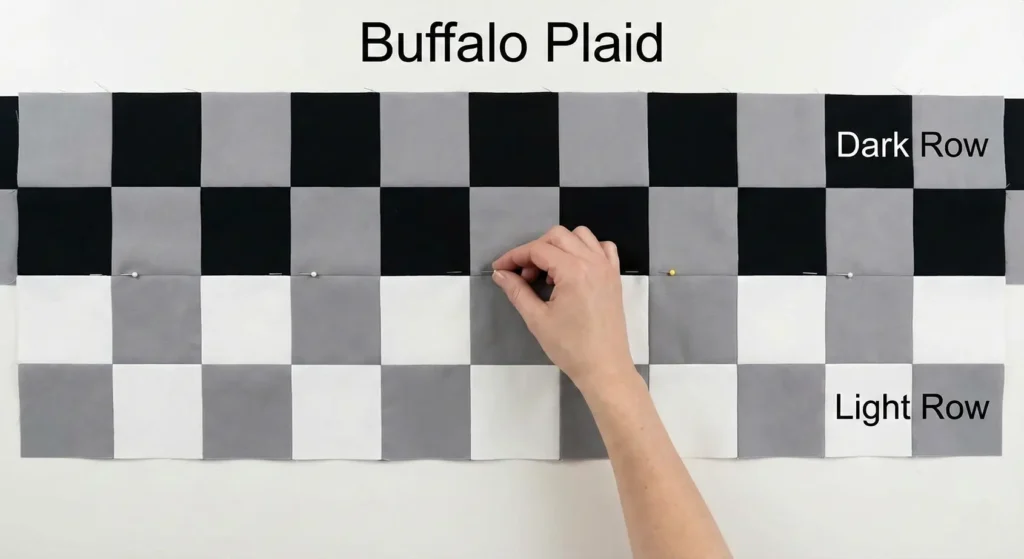
Step 5: Arrange the “Check” Layout
This works like a checkerboard, but with specific color placement to form the plaid.
- Row Type A: Arrange the “Strip Set 1” units side-by-side.
- Pattern: Black/Grey Unit + Black/Grey Unit…
- Actually, to get the plaid effect, you need to alternate the units differently. Let’s simplify the row assembly for clarity:
- Row 1 (Dark Row): Alternate Black Square – Grey Square – Black Square… (Ending with Grey).
- Row 2 (Light Row): Alternate Grey Square – White Square – Grey Square… (Ending with White).
- Assembly:
- Sew your sub-cut units together to form these alternating rows.
- Make 6 rows that look like Row 1 (Black/Grey).
- Make 6 rows that look like Row 2 (Grey/White).
Step 6: Join the Rows
- Lay out the quilt top on the floor.
- Alternate the Rows: Place Row 1 (Dark), then Row 2 (Light), then Row 1 (Dark), then Row 2 (Light).
- Visual Check: You should see the “Grey” blocks forming diagonal lines, and the “Black” blocks forming squares that look distinct from the “White” squares.
- Pin carefully at every intersection. In a checkerboard quilt, matching corners is critical for the effect to look crisp.
- Sew the rows together.
Step 7: “Woven” Quilting
- Baste the sandwich.
- Quilting: Simple straight lines are best here.
- Quilt straight vertical lines through the center of every column.
- Quilt straight horizontal lines through the center of every row.
- This creates a “grid” of quilting that mimics the weave of flannel fabric.
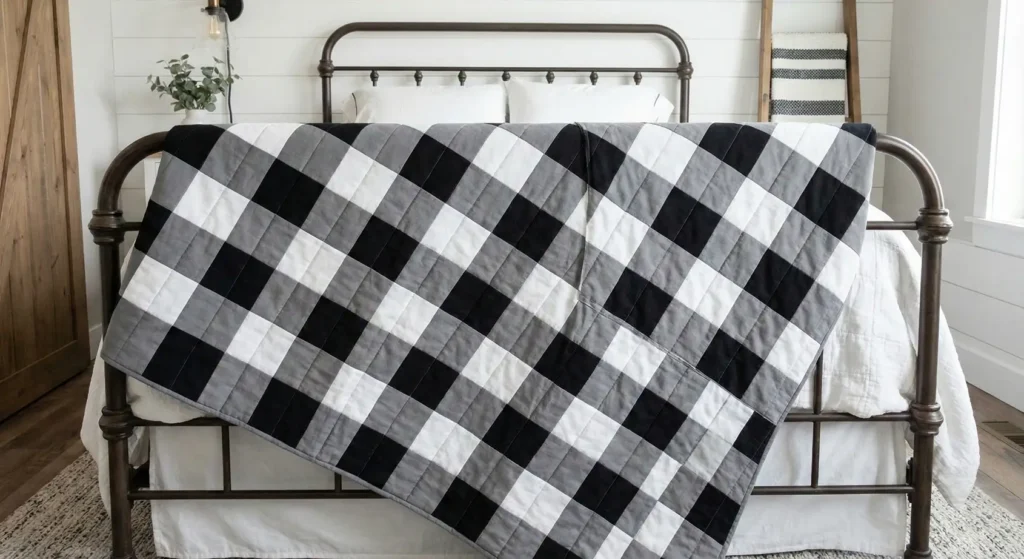
Pro Design Tip: Texture Variation. For a truly high-end look, use different textures for the colors, not just plain cotton. Use Black Velvet for the dark squares, Grey Wool/Flannel for the medium squares, and White Cotton for the light squares. The difference in light reflection makes the plaid look 3D and incredibly cozy.
Budget Consideration: Flannel Sheets. Since Buffalo Plaid is a huge trend, you can often find King-size Grey Flannel Sheets on clearance after winter. Use the grey sheet for your “Fabric B” (Medium). It’s softer than quilting cotton and much cheaper per yard, giving your quilt that authentic soft flannel feel.
7. Classic Black and White Buffalo Check Bedspreads


The “Giant Lumberjack” Oversized Flannel Bedspread
While the previous gingham guide focused on a throw size using strip piecing, a true bedspread requires a different approach. To cover a Queen or King bed without looking busy or dizzying, you should scale up the pattern significantly. This guide uses Giant 12-inch blocks made from soft cotton flannel. The sheer size of the checks makes the room feel larger and more modern, while the flannel makes it heavy and warm.
Finished Dimensions: Queen/King Bedspread, approximately 96″ x 96″.
Materials Needed:
- Fabric A (Dark): 3 yards of Solid Black Flannel.
- Fabric B (Medium): 5.5 yards of Solid Charcoal/Medium Grey Flannel (Must be a visual midpoint between the black and white).
- Fabric C (Light): 3 yards of Solid White Flannel.
- Backing Fabric: 9 yards of flannel (or a King-size flannel sheet).
- Batting: King Size (120″ x 120″).
- Binding: 1 yard of Black Flannel.
- Notions: Rotary cutter, 12.5″ square ruler, walking foot (essential for thick flannel).
Step 1: Cut the Giant Squares
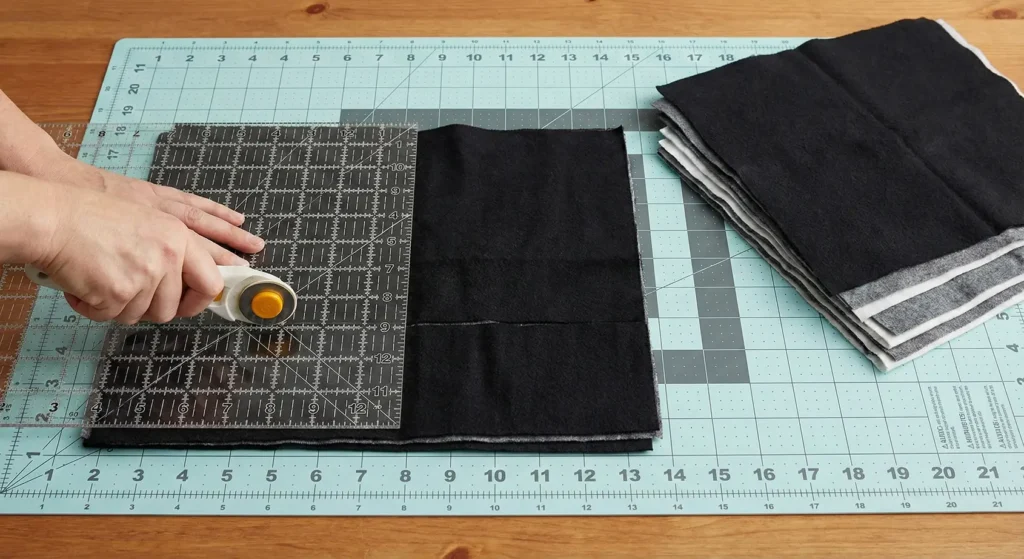
Because the blocks are so large (12.5″), we will cut individual squares rather than using strip piecing. This ensures the grain line stays straight on the large pieces.
- From Fabric A (Black): Cut 16 squares, measuring 12.5″ x 12.5″.
- From Fabric B (Grey): Cut 32 squares, measuring 12.5″ x 12.5″.
- From Fabric C (White): Cut 16 squares, measuring 12.5″ x 12.5″.
- Total: 64 Squares (8 x 8 grid).
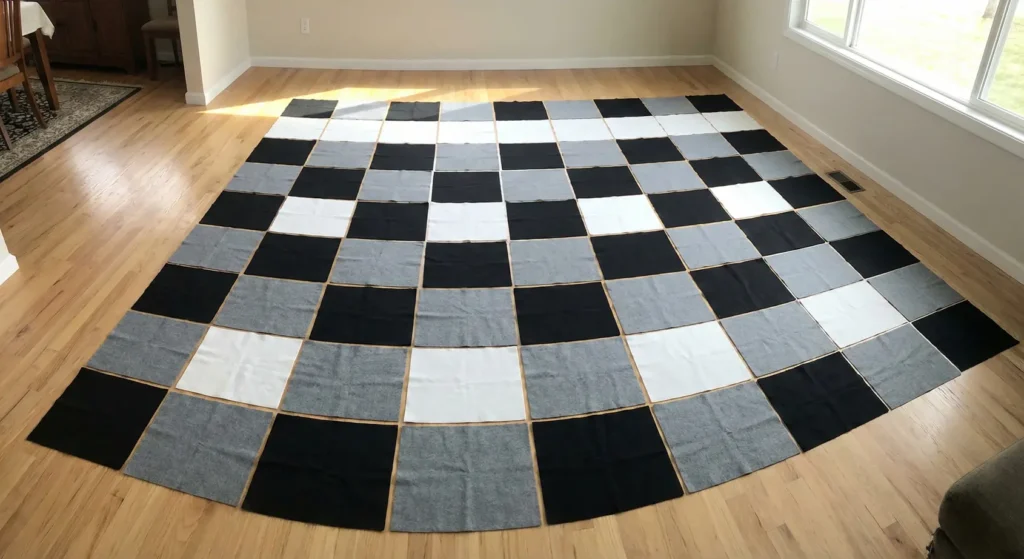
Step 2: The Transparency Layout
The secret to Buffalo Check is the placement. It must look like transparent stripes crossing.
- Find a large floor space. Lay out an 8 x 8 grid.
- Odd Rows (1, 3, 5, 7): Alternate Black and Grey.
- Sequence: Black – Grey – Black – Grey – Black – Grey – Black – Grey.
- Even Rows (2, 4, 6, 8): Alternate Grey and White.
- Sequence: Grey – White – Grey – White – Grey – White – Grey – White.
- Visual Check: Step back. You should see vertical columns of “Black/Grey” alternating with vertical columns of “Grey/White”.
Step 3: Pin and Sew Rows
- Stack the blocks for Row 1.
- Sew them together using a 1/2″ seam allowance.
- Note: Flannel is looser than quilting cotton. A slightly wider 1/2″ seam is more durable for a heavy bedspread than the standard 1/4″.
- Repeat for all 8 rows.
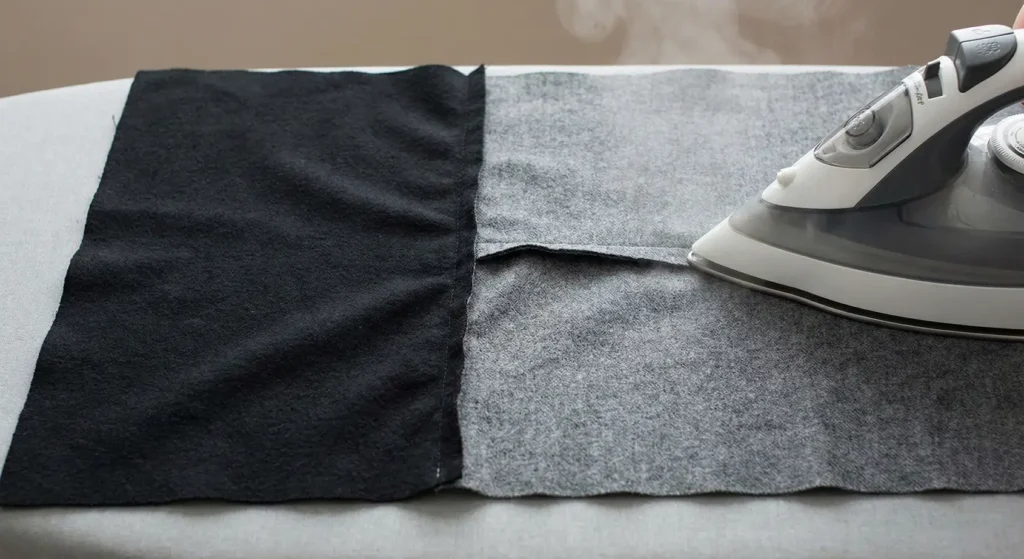
Step 4: Manage the Bulk (Pressing)
Flannel is thick. If you press seams to the side, you will have lumps.
- Press Open: Press every single seam allowance open flat.
- Use a hot steam iron (flannel loves steam).
- This will make your intersections much smoother when you join the rows.
Step 5: Join the Rows
- Pin Row 1 to Row 2. Use plenty of pins, especially at the intersections where the block corners meet.
- Sew with a 1/2″ seam.
- Press this long seam open as well.
- Continue until the huge 96″ x 96″ top is assembled.
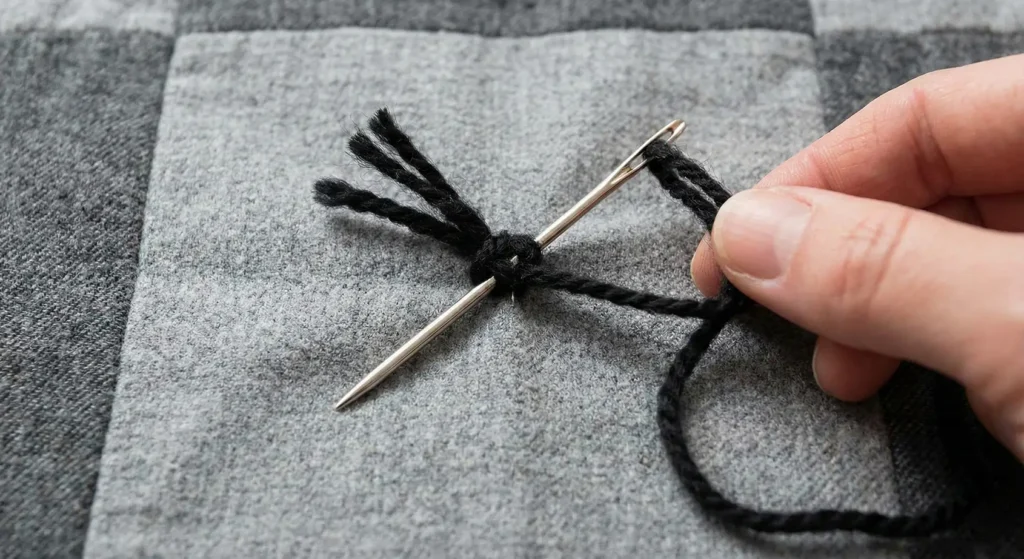
Step 6: “Tufted” Yarn Tying
Machine quilting a King-size flannel beast is complex on a home machine. The classic farmhouse way to finish a heavy bedspread is “Tying” (Tufting).
- Baste your sandwich (Backing, Batting, Top).
- Thread a sharp needle with Black or Grey Wool Yarn (or heavy embroidery floss).
- The Tie: At the center of every square (or at every intersection), take a stitch through all three layers. Bring the needle back up, leave a tail, and tie a square knot.
- Trim the yarn tails to 1 inch.
- These little tufts of yarn add to the rustic, cozy vibe and hold the heavy layers together securely without stiffening the quilt.
Pro Design Tip: Bias Binding. For the binding, cut your strips on the bias (diagonal). Flannel tends to warp on straight-grain bindings over time. A bias binding is tighter, more durable, and wraps around the thick edges of a flannel quilt much more smoothly.
Budget Consideration: Wool Blankets as Batting. For a truly vintage farmhouse weight, skip the polyester batting. Go to a thrift store/military surplus store and buy 2-3 old wool blankets. Stitch them together loosely to form the middle layer. It creates a bedspread that is incredibly heavy, breathable, and warm—perfect for unheated farmhouse bedrooms.
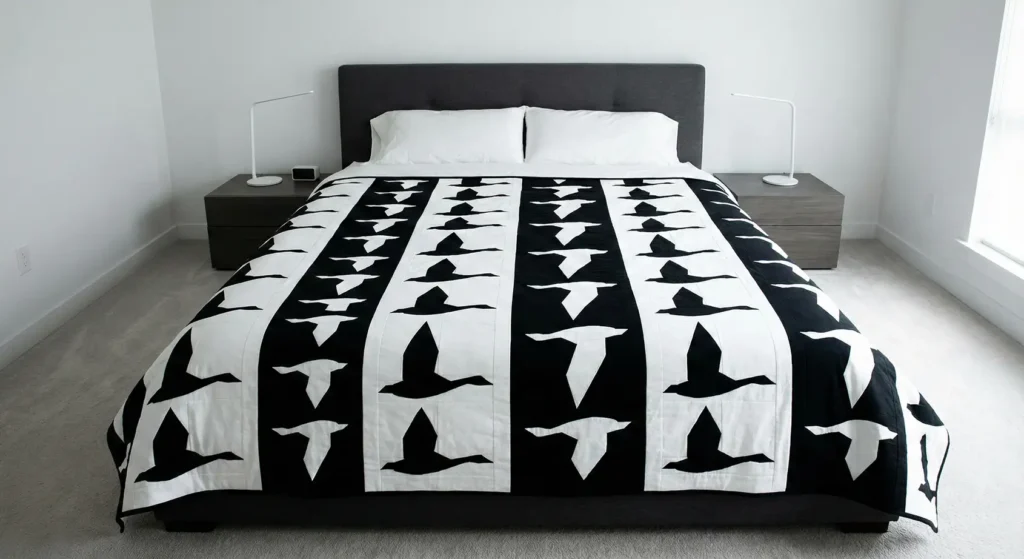
8. Striking Flying Geese Patterns for Master Bedrooms
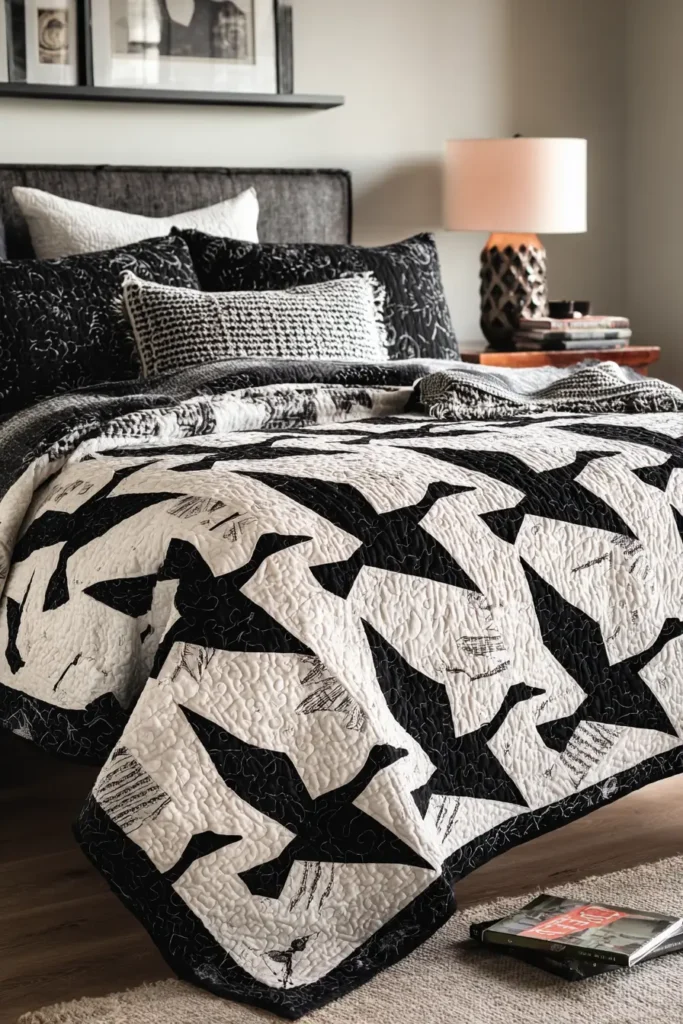
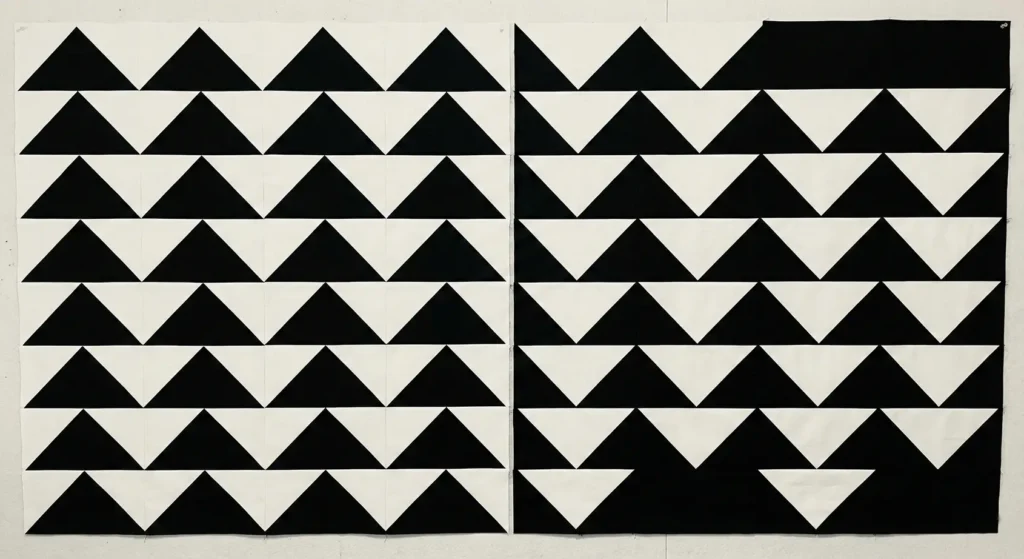
The “Opposing Forces” Vertical Geese Quilt
For a master bedroom, you want high drama and scale. This pattern creates a stunning optical illusion by alternating vertical columns of “Positive” and “Negative” Flying Geese. One column features black geese on a white background, and the following column features white geese on a black background. The result is a sophisticated, vibrating vertical stripe that adds height and grandeur to the room.
Finished Dimensions: Queen/King Coverlet, approximately 96″ x 96″.
Materials Needed:
- Fabric A (Solid Black): 5 yards.
- Fabric B (Solid White): 5 yards.
- Backing Fabric: 9 yards.
- Batting: King Size (120″ x 120″).
- Binding: 1 yard of Solid Black.
- Notions: Rotary cutter, 6″ x 12″ ruler, “Wing Clipper” tool (optional but helpful for trimming), marking pen (white for black fabric).
Step 1: Cutting for the “4-at-a-Time” Method
We are making large, impact-sized geese (4″ x 8″ finished). You need 192 Geese total (96 Black, 96 White).
- For Column Type A (Black Geese on White):
- Background: Cut 24 White squares, measuring 9.25″ x 9.25″.
- Geese: Cut 96 Black squares, measuring 4.875″ (4 7/8″).
- For Column Type B (White Geese on Black):
- Background: Cut 24 Black squares, measuring 9.25″ x 9.25″.
- Geese: Cut 96 White squares, measuring 4.875″ (4 7/8″).
Step 2: Construct the Geese (Batch Processing)
Perform this step for both colorways simultaneously.
- Draw a diagonal line on the back of all small squares (White pencil for black fabric, standard pencil for white).
- Take one Large Background Square (e.g., White). Place two Small Geese Squares (Black) on opposite corners, right sides together. The diagonal lines should connect.
- Sew a 1/4″ seam on both sides of the drawn line.
- Cut along the center drawn line. Press seams toward the small triangles (the geese). You now have two heart-shaped units.
- Place another Small Geese Square (Black) on the remaining corner of the white “heart.”
- Sew 1/4″ on both sides of the line. Cut and press.
- Trim: This is critical. Trim every unit to exactly 4.5″ x 8.5″.
- Repeat until you have 96 Black-on-White geese and 96 White-on-Black geese.
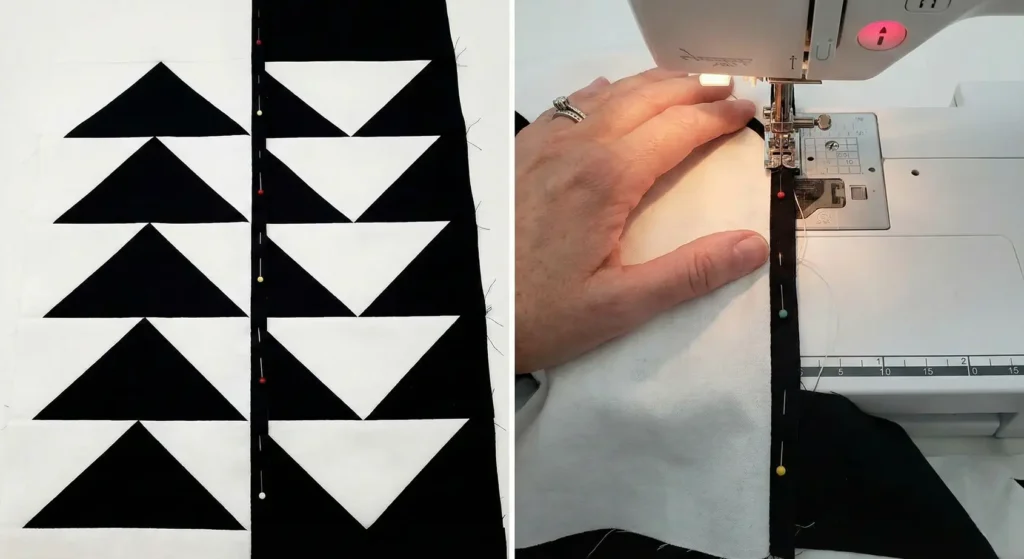
Step 3: Assemble the Vertical Columns
We are building 12 tall columns. Each column contains 16 geese.
- Make 6 “Positive” Columns: Sew 16 Black-on-White geese together, one on top of the other. Ensure all geese point UP.
- Make 6 “Negative” Columns: Sew 16 White-on-Black geese together, one on top of the other. Ensure all geese point UP.
- Pressing: Press seams open to reduce bulk, or push toward the points of the geese.
Step 4: The “Opposing” Layout
- Find an ample floor space.
- Arrange the columns side-by-side.
- Alternate: Positive Column – Negative Column – Positive Column – Negative Column.
- Orientation Twist: To make it truly striking, flip the direction of the “Negative” columns.
- Black Geese Columns: Point UP.
- White Geese Columns: Point DOWN.
- This creates a “zipper” effect that is visually mesmerizing.
Step 5: Join the Columns
- Pin Column 1 to Column 2. Match the intersections carefully (where the geese’s points align with the base of the neighbor).
- Sew with a 1/4″ seam.
- Repeat until all 12 columns are joined.
- Press vertical seams open or to the side.
Step 6: “Chevron” Quilting
- Baste the sandwich.
- Quilting: Follow the angles.
- Quilt straight lines that mimic the “V” shape of the geese.
- Stitch 1/4″ inside each goose triangle.
- Alternatively, stitch straight vertical lines through the center of the columns to bisect the geese (a very modern, minimalist finish).
Pro Design Tip: The Gradient Fade. For a true showstopper, don’t use just solid black for the “Black” geese. Use a gradient of fabrics from Light Grey to Charcoal to Pitch Black. Assemble the columns so the geese get darker as they move up the bed. This “Ombré” effect adds a luxurious, designer touch to the master suite.
Budget Consideration: Solid Kona Cotton. Because this pattern relies entirely on geometry and contrast, you don’t need expensive designer prints. Basic Kona Cotton Solids (in Jet Black and Snow) are affordable, durable, and provide the crispest points for Flying Geese.
9. Sophisticated Black and White Log Cabin Quilt Designs with Modern Appeal
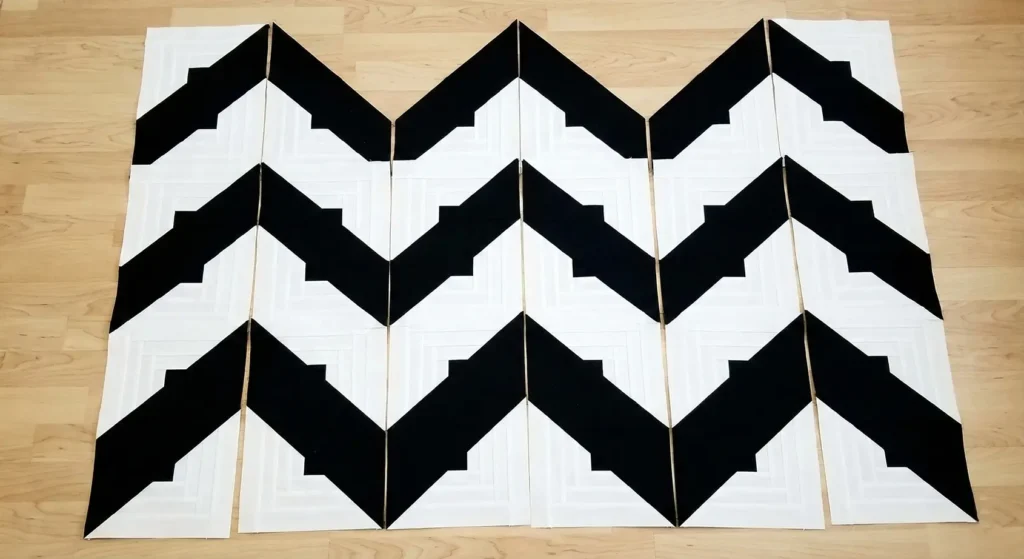
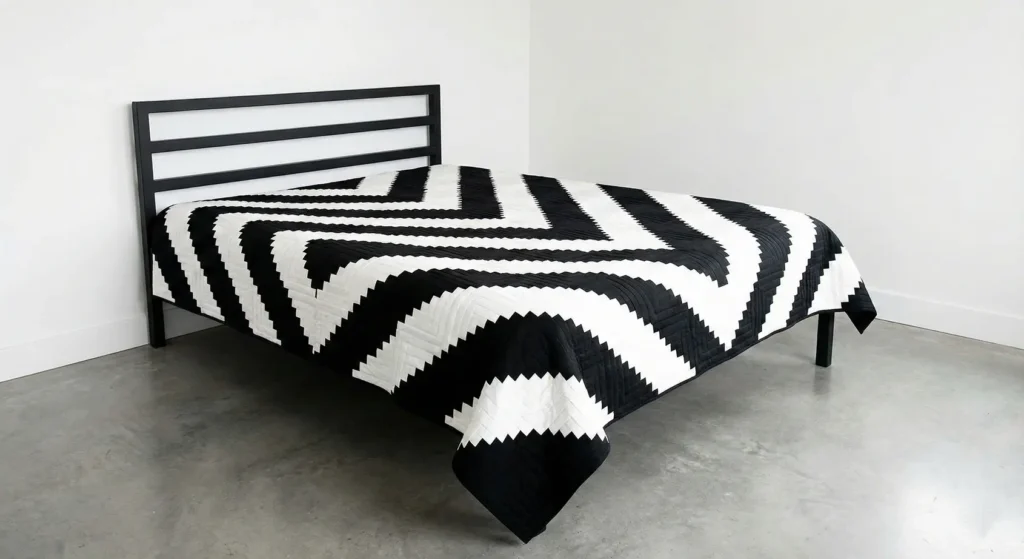
The “Noir Chevron” Log Cabin Quilt
The traditional Log Cabin block is versatile, but when you strip away the color and leave only high-contrast Black and White, it becomes architectural. By arranging the blocks in a specific rotation, we create a massive, striking Chevron (zigzag) pattern that looks like a modern floor tile installation.
Finished Dimensions: Queen Size, approximately 80″ x 80″.
Materials Needed:
- Center Squares: 1/2 yard of Solid Black (or a textured Charcoal).
- “Light” Strips: 2.5 yards of Solid White (or low-volume white prints).
- “Dark” Strips: 2.5 yards of Solid Black (or black-on-black prints).
- Backing Fabric: 7.5 yards.
- Batting: Queen Size (90″ x 90″).
- Binding: 3/4 yard of Solid Black.
- Notions: Rotary cutter, 12.5″ square ruler, neutral thread.
Step 1: Prepare the “Logs”
Log Cabins are built from strips. You can use pre-cut “Jelly Rolls” (2.5″ strips) to save time.
- Center Squares: Cut 64 squares, measuring 2.5″ x 2.5″.
- Strips: Cut your White and Black fabrics into 2.5″ wide strips.
- Efficiency: Leave them as long WOF (Width of Fabric) strips. We will use the “Chain Piecing” method, where you sew, trim, and sew again, rather than pre-cutting every tiny segment length.
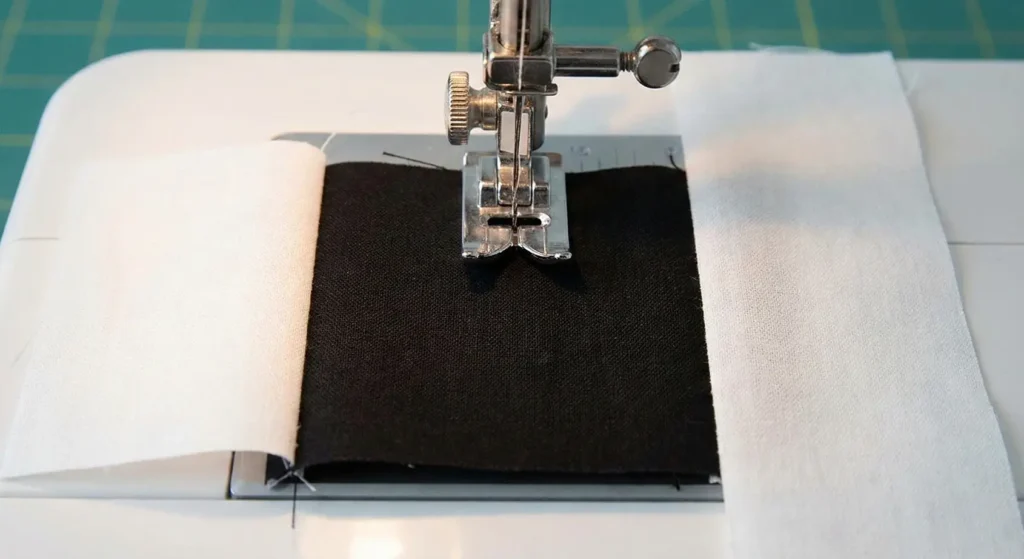
Step 2: Build the Block Center (Round 1)
Rule: Half the block is Light, Half is Dark.
- Take a Center Square (Black).
- Log 1 (Light): Sew a White strip to the Top of the center square. Trim it flush. Press seam out.
- Log 2 (Light): Sew a White strip to the Right side. Trim flush. Press out.
- Log 3 (Dark): Sew a Black strip to the Bottom. Trim flush. Press out.
- Log 4 (Dark): Sew a Black strip to the Left side. Trim flush. Press out.
- Result: A center square bordered by Lights on Top/Right and Darks on Bottom/Left.
Step 3: Expand the Block (Rounds 2 & 3)
Continue the spiral in the same direction (Clockwise or Counter-Clockwise), maintaining the Light/Dark sides.
- Round 2:
- Add White Strip to Top.
- Add a white strip to the right.
- Add a black strip to the bottom.
- Add Black Strip to Left.
- Round 3: Repeat the sequence.
- Finish: Continue until you have added 3 complete rounds of logs.
- Square Up: The block should measure 10.5″ x 10.5″. Make 64 Blocks.
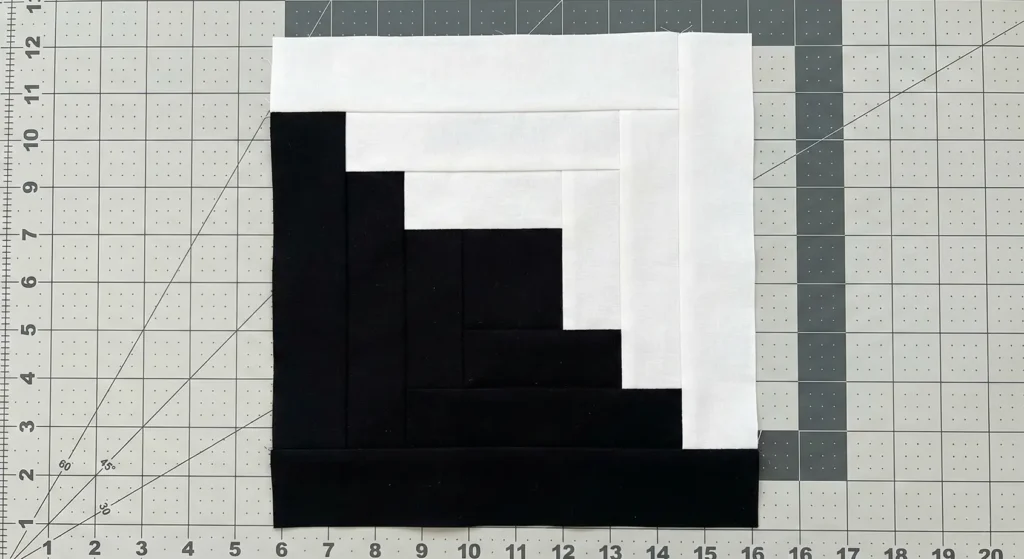
Step 4: The Chevron Layout
The magic is in the rotation. We aren’t doing the standard concentric diamond layout.
- Lay out the blocks in an 8 x 8 grid.
- Row 1: Place blocks so the diagonal seam (dividing light and dark halves) forms a “V” shape with the neighbor.
- Block 1: Dark half at Bottom-Left.
- Block 2: Dark half at Bottom-Right.
- Block 3: Dark half at Bottom-Left.
- Block 4: Dark half at Bottom-Right.
- Row 2: Invert the “V” to match the lines above.
- Block 1: Dark half at Top-Left (Matching the dark bottom of the block above).
- Block 2: Dark half at Top-Right.
- Visual Check: Step back. You should see distinct, thick Zig-Zag stripes running vertically or horizontally across the quilt. The high contrast will make the chevrons pop.
Step 5: Web Piecing Assembly
- Leave the blocks on the floor.
- Pick up Row 1, Block 1 and sew it to Row 1, Block 2.
- Please return them to the floor to ensure you didn’t accidentally rotate them (it’s very easy to get confused with Log Cabins).
- Sew the complete rows together.
- Press seams open to reduce the bulk where the many strips intersect.
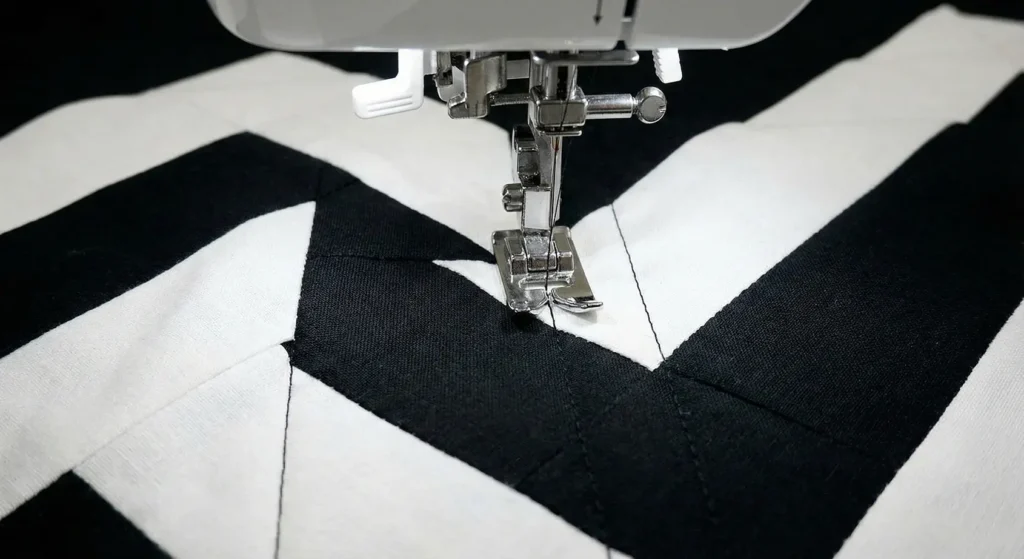
Step 6: “In the Ditch” Geometric Quilting
- Baste the sandwich.
- Quilting: Keep it sharp. Stitch “in the ditch” (directly in the seam lines) along the main diagonal lines of the chevrons.
- Then, stitch in the ditch between every individual log strip.
- This hides the quilting stitches but creates a textured “step” effect that emphasizes the block’s architectural construction.
Pro Design Tip: The “Off-Center” Variation. For a more avant-garde modern look, vary the width of your strips. Use 1.5″ strips for the White side and 3.5″ strips for the Black side. This pushes the center square off into the corner and makes the chevrons look curved and organic, like a topographic map.
Budget Consideration: Jelly Rolls. This pattern produces very little waste if you buy pre-cut strips. You need roughly 2 Black Jelly Rolls and 2 White Jelly Rolls to complete a Queen-size top without cutting anything other than trimming the lengths.
10. Gingham Black and White Picnic Quilt for Outdoor Use
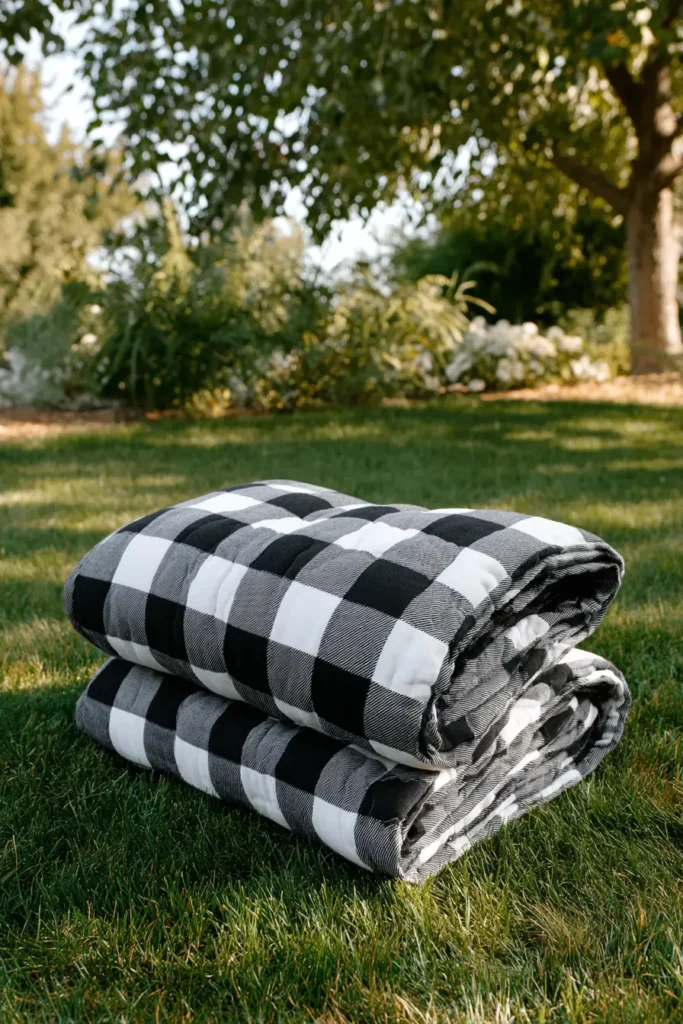
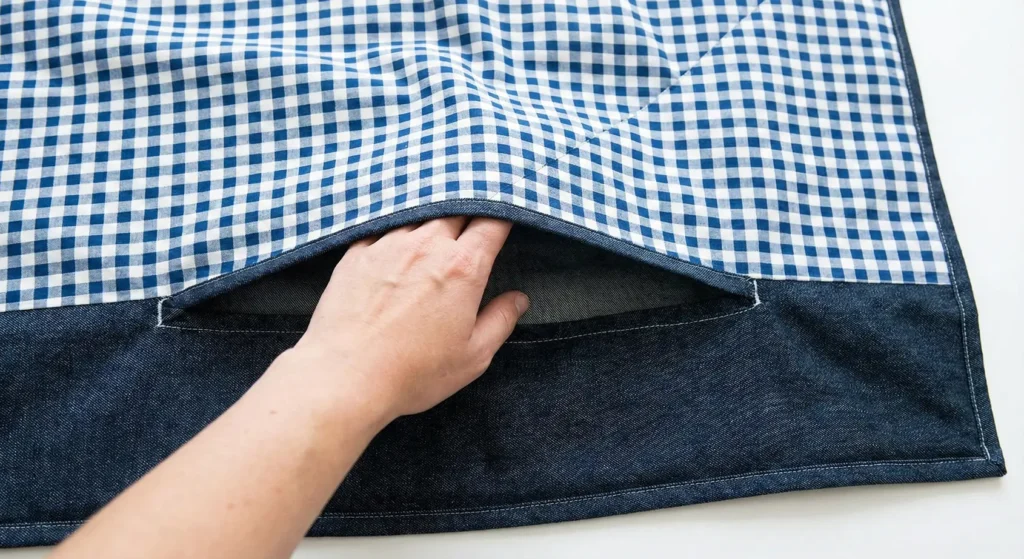
The “Heavy-Duty” Gingham Picnic Blanket
A picnic quilt needs to be tougher than a bedroom quilt. It faces grass stains, spilled lemonade, and rough ground. This guide adapts the classic Gingham (Buffalo Check) pattern using larger blocks for speed and creates a “self-binding” finish with durable denim backing. The result is a stylish, waterproof-friendly blanket that rolls up perfectly for the park.
Finished Dimensions: Large Picnic Size, approximately 64″ x 80″.
Materials Needed:
- Fabric A (Dark): 1.5 yards of Solid Black Cotton.
- Fabric B (Medium): 2.5 yards of a Black-and-White small geometric print (dots or hash marks). Note: Using a print instead of solid grey hides stains better.
- Fabric C (Light): 1.5 yards of Solid White (or unbleached muslin for less stain worry).
- Backing Fabric: 2.5 yards of 60-inch wide Denim or Duck Canvas (Black or Dark Grey).
- Why: Denim provides weight so the wind doesn’t blow it away, and it resists moisture.
- Batting: Thin cotton batting (optional—often the denim is heavy enough on its own).
- Notions: Jeans needle (Size 100/16), heavy-duty thread, safety pins.
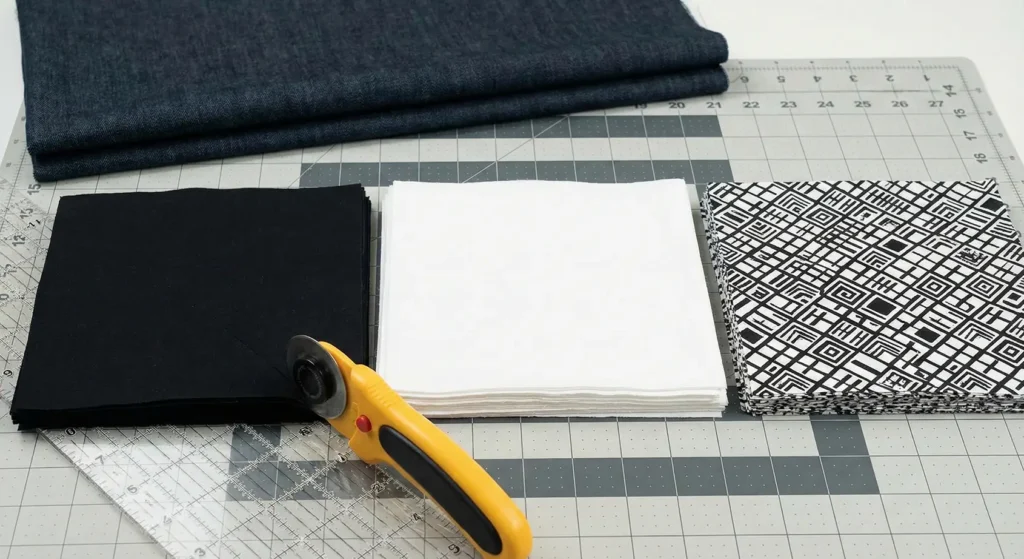
Step 1: Cut Large Squares
We use chunky 8-inch finished blocks for a quick finish.
- From Fabric A (Black): Cut 20 squares, measuring 8.5″ x 8.5″.
- From Fabric B (Print/Medium): Cut 40 squares, measuring 8.5″ x 8.5″.
- From Fabric C (White): Cut 20 squares, measuring 8.5″ x 8.5″.
- Total: 80 Squares (Grid of 8 x 10).
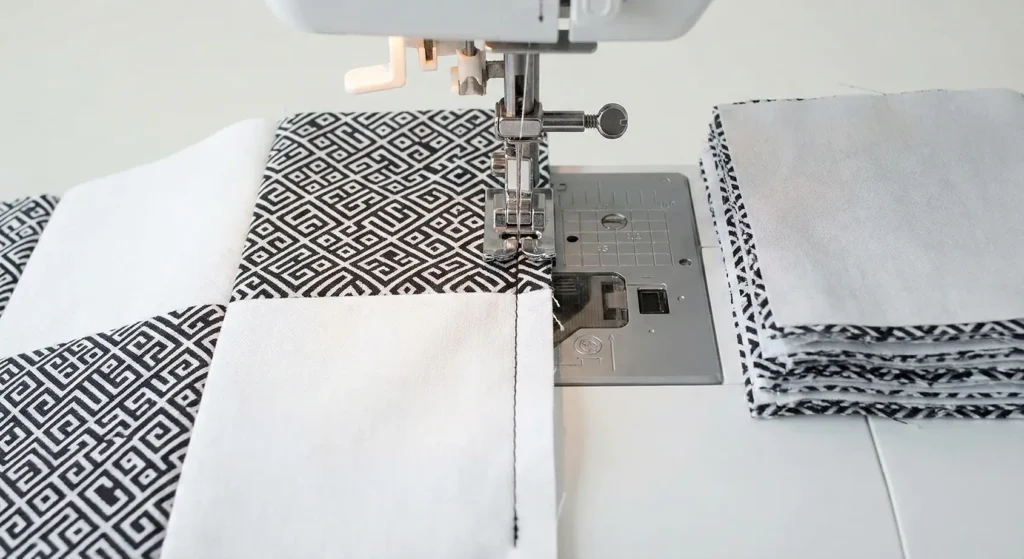
Step 2: Assemble “Row Type 1” (The Light Row)
- Gather 4 White squares and 4 Print (Medium) squares.
- Sew them together in an alternating line:
- Sequence: White – Print – White – Print – White – Print – White – Print.
- Press seams toward the Print fabric.
- Make 5 of these rows.
Step 3: Assemble “Row Type 2” (The Dark Row)
- Gather 4 Print (Medium) squares and 4 Black squares.
- Sew them together in an alternating line:
- Sequence: Print – Black – Print – Black – Print – Black – Print – Black.
- Press seams toward the Black fabric.
- Make 5 of these rows.
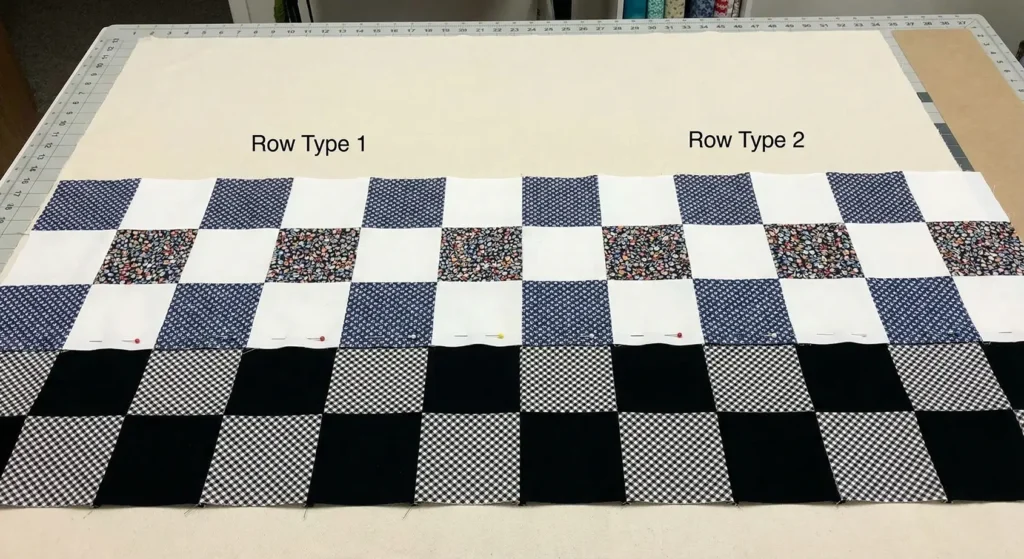
Step 4: Join the Rows
- Lay out the quilt top on the floor.
- Alternate the rows: Row 1 (Light) – Row 2 (Dark) – Row 1 – Row 2…
- Visual Check: You should see the “Print” blocks connecting diagonally to form the transparent overlap effect of gingham.
- Pin tightly at the seams.
- Sew the rows together to complete the top. Press seams open to reduce bulk.
Step 5: The “Pillowcase” Finish (No Binding)
Binding thick denim is difficult. This method is cleaner and faster.
- Lay your Denim Backing on the floor, Right Side UP.
- Lay your Quilt Top directly on top of it, Right Side DOWN (Right Sides Together).
- Optional: If using batting, place it under the Denim (so the stack is Batting – Denim – Top).
- Pin around the entire perimeter.
- Sew: Stitch around the entire outside edge with a 1/2″ seam allowance, leaving a 10-inch gap open on one side for turning.
- Turn: Reach through the hole and turn the blanket right-side out. Poke the corners out with a chopstick to make them sharp.
- Press the edges flat and topstitch the gap closed.
Step 6: Durable “X” Quilting
- Do not do intricate quilting; it will stiffen the blanket too much.
- Topstitch: Sew a straight line around the entire perimeter, 1/2″ from the edge.
- The “X”: Sew a large “X” from corner to corner across every single block (or every other block).
- This secures the heavy denim to the top and prevents shifting during wash cycles.
- Use a sturdy, darker thread so dirt doesn’t show on the quilting lines.
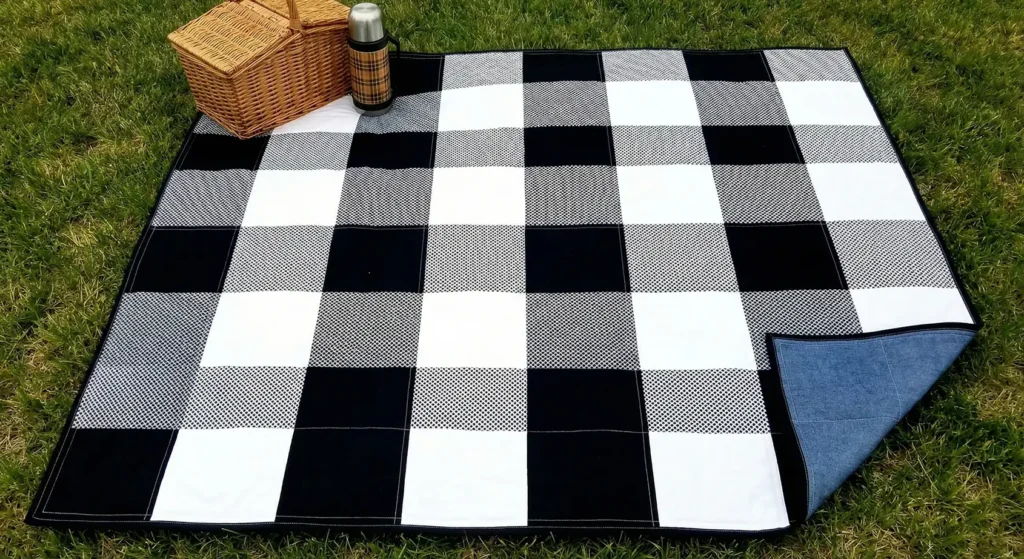
Pro Design Tip: Corner Pockets. Before you sew the backing and top together (Step 5), baste a triangular piece of fabric onto the four corners of the backing. When you turn the quilt right side out, these create little pockets on the underside. You can put rocks or weights in these pockets on windy days to hold the blanket down!
Budget Consideration: Painters’ Drop Cloths. If denim is too expensive ($15+/yard), use Canvas Drop Cloths from the hardware store for the backing. They are incredibly durable, machine washable, and cost about $15 for a massive 9×12 foot sheet. Dye the drop cloth black or grey in a bucket (using RIT dye) before sewing to hide grass stains.
11. Buffalo Check Black and White Throw Quilt for Sofa
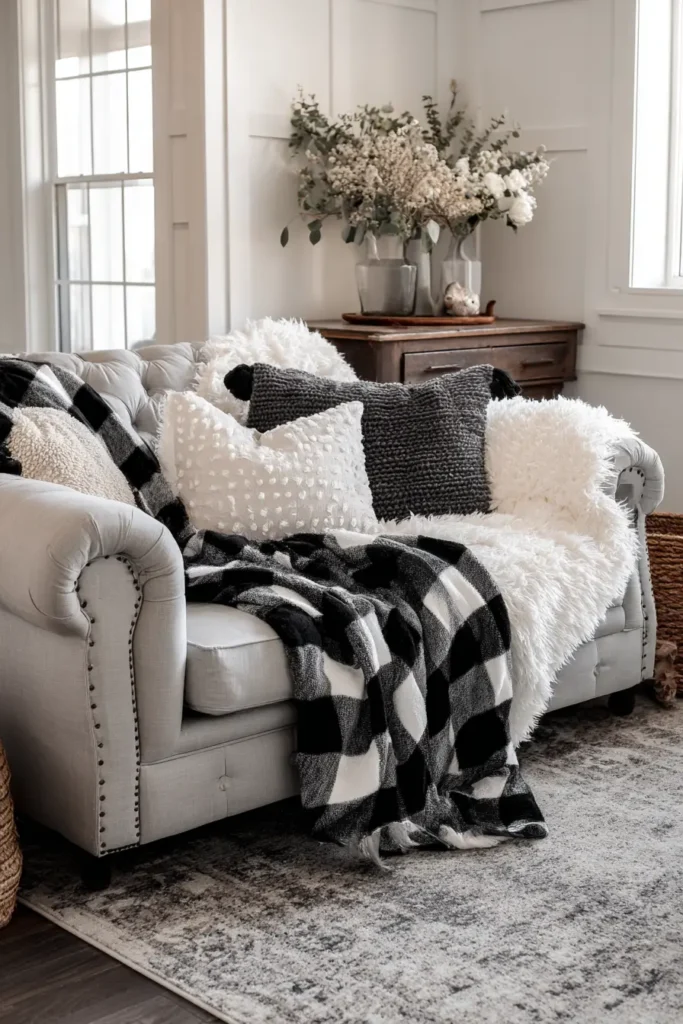
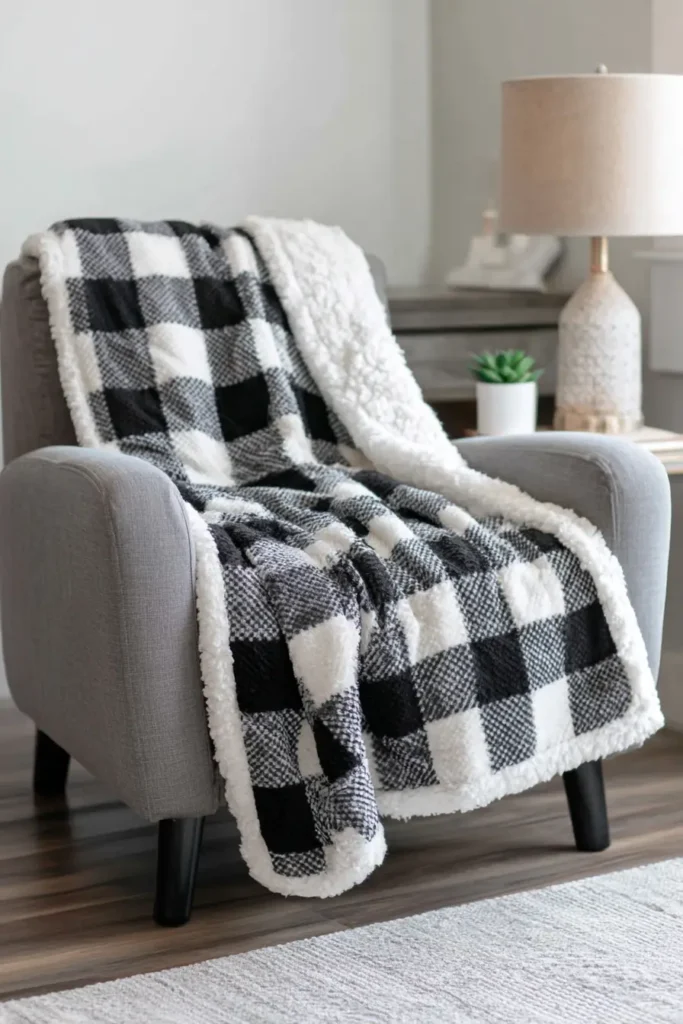
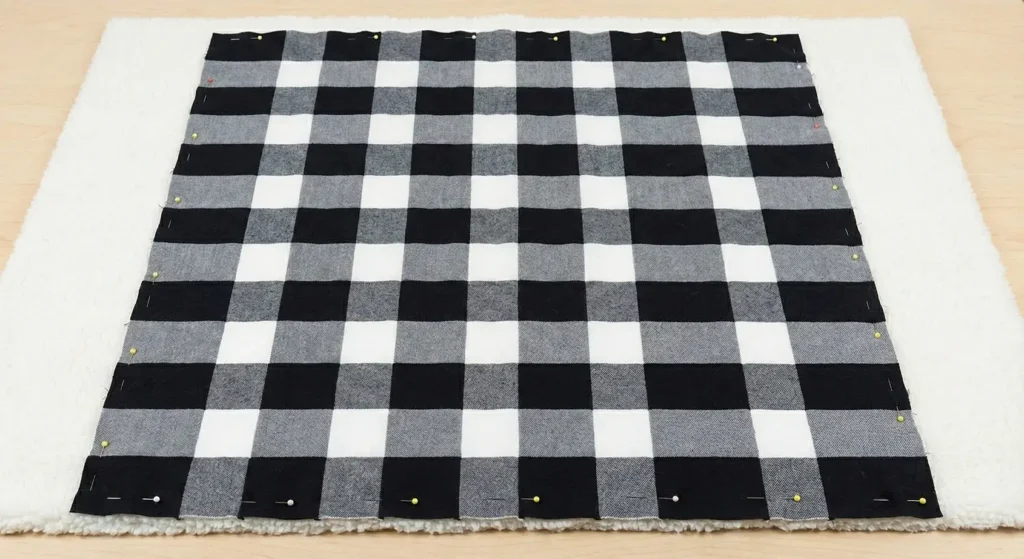
The “Cozy Cabin” Sherpa-Backed Buffalo Check Throw
A sofa throw serves a different purpose than a bed quilt—it needs to be softer, drapier, and warmer for movie nights. This version of the classic Buffalo Check skips the traditional batting and cotton backing. Instead, it is backed with luxurious White Sherpa or Minky fleece. This makes it incredibly snuggly and eliminates the need for complicated binding, as the fuzzy backing is forgiving and self-finishing.
Finished Dimensions: Standard Throw, approximately 55″ x 65″.
Materials Needed:
- Fabric A (Black): 1 yard of Solid Black Cotton or Flannel.
- Fabric B (Grey): 1.75 yards of Medium Grey Cotton or Flannel (Must be the visual “average” of black and white).
- Fabric C (White): 1 yard of Solid White Cotton or Flannel.
- Backing Fabric: 2 yards of White Sherpa Fleece or Minky (60″ wide).
- Batting: None! (The Sherpa is warm enough).
- Notions: Rotary cutter, walking foot (essential for sewing fleece), heavy-duty thread.
Step 1: Cut the Strips
We will use 5-inch finished blocks. Strip piecing makes this fast.
- From Fabric A (Black): Cut 6 strips, measuring 5.5″ x WOF (Width of Fabric).
- From Fabric B (Grey): Cut 11 strips, measuring 5.5″ x WOF.
- From Fabric C (White): Cut 5 strips, measuring 5.5″ x WOF.
Step 2: Make “Strip Set A” (Dark Rows)
These sets will form the rows that contain Black and Grey blocks.
- Sew 1 Black Strip to 1 Grey Strip lengthwise.
- Repeat to make 6 sets.
- Press seams toward the Black fabric.
- Sub-Cut: Cross-cut these sets into segments measuring 5.5″ wide.
- You are creating pairs of Black/Grey.
- You need 33 segments total.
Step 3: Make “Strip Set B” (Light Rows)
These sets will form the rows that contain Grey and White blocks.
- Sew 1 Grey Strip to 1 White Strip lengthwise.
- Repeat to make 5 sets.
- Press seams toward the Grey fabric.
- Sub-Cut: Cross-cut these sets into segments measuring 5.5″ wide.
- You are creating pairs of Grey/White.
- You need 30 segments total.

Step 4: Assemble the Rows
We need a grid that is 11 blocks wide by 13 rows tall. Since our segments are pairs (2 blocks), we need to sew them together to make long rows.
- Row Type 1 (Dark): Sew 3 “Black/Grey” segments together. Add one single Black square to the end?
- Correction for simplicity: Just alternate single blocks if the pair math gets confusing, OR simply sew the pair-segments together:
- Dark Row: (Black/Grey) + (Black/Grey) + (Black/Grey) + (Black/Grey) + (Black/Grey) + Single Black Square. (11 blocks wide). Make 7 of these rows.
- Light Row: (Grey/White) + (Grey/White) + (Grey/White) + (Grey/White) + (Grey/White) + Single Grey Square. (11 blocks wide). Make 6 of these rows.
Step 5: Join the Rows
- Lay out the rows on the floor.
- Sequence: Dark Row – Light Row – Dark Row – Light Row… ending with a Dark Row.
- Visual Check: Ensure the “Grey” blocks create diagonal lines across the quilt.
- Sew the rows together.
- Press seams open. You now have a completed quilt top (approx 55″ x 65″).

Step 6: The “Pillowcase” Finish (Sherpa Method)
Sherpa is too thick to bind with a standard fabric strip. We will use the “Birthing” method.
- Lay the Sherpa Backing on the floor, Right Side UP (fuzzy side up).
- Lay the Quilt Top on top of it, Right Side DOWN (Right Sides Together).
- Pin heavily around the edges. Sherpa stretches, so use a pin every 2 inches.
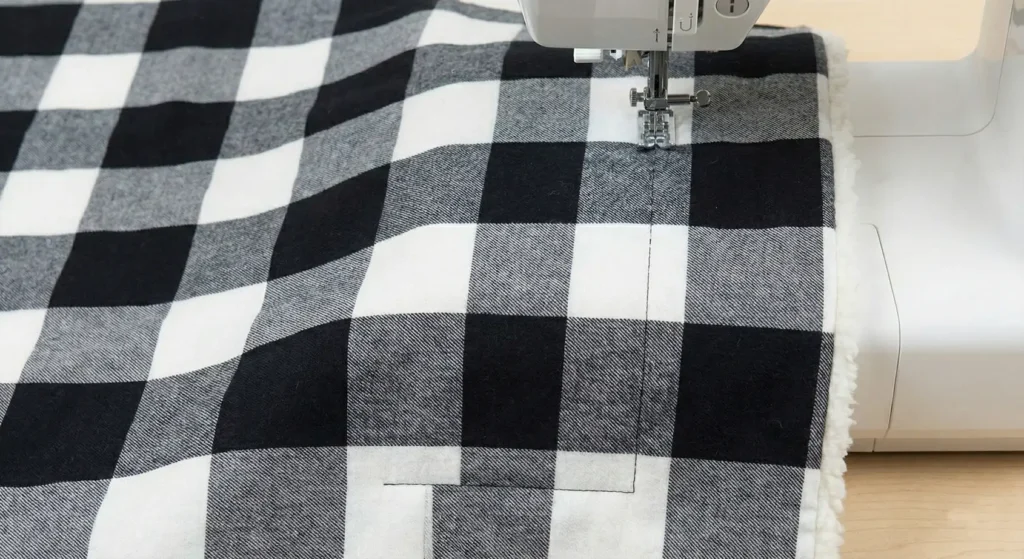
- Sew: Stitch around the entire perimeter with a 1/2″ seam allowance, leaving a 12-inch gap at the bottom.
- Turn: Reach through the gap and turn the blanket right-side out.
- Topstitch: Poke the corners out. Press the edges (carefully—don’t melt the Sherpa!). Topstitch around the entire edge 1/2″ from the side to close the gap and secure the layers.
Step 7: “Tack” Quilting
- Do not densely quilt this! Dense stitching ruins the fluffiness of the Sherpa.
- Tacking: Set your machine to a simple “Bar Tack” or a small zigzag stitch (stitch length 0, width 3).
- Place a tack at the intersection of every 4 blocks.
- This invisible tack holds the layers together without compressing the fleece, keeping the throw incredibly soft and drapey.
Pro Design Tip: The Gradient Check. Instead of a solid grey, use a Grey Heathered Flannel or a “Cross-Weave” fabric. These fabrics have a texture that resembles woven wool, making the Buffalo Check illusion much more convincing and high-end than using flat, solid grey cotton.
Budget Consideration: Fleece Blankets. Buying Sherpa yardage can be expensive ($15/yard). It is often cheaper to buy two large, ready-made white fleece throws from a discount store ($5-10 each) and stitch them together to make your backing.
12. Quilted Floor Pillows and Poufs in Monochrome
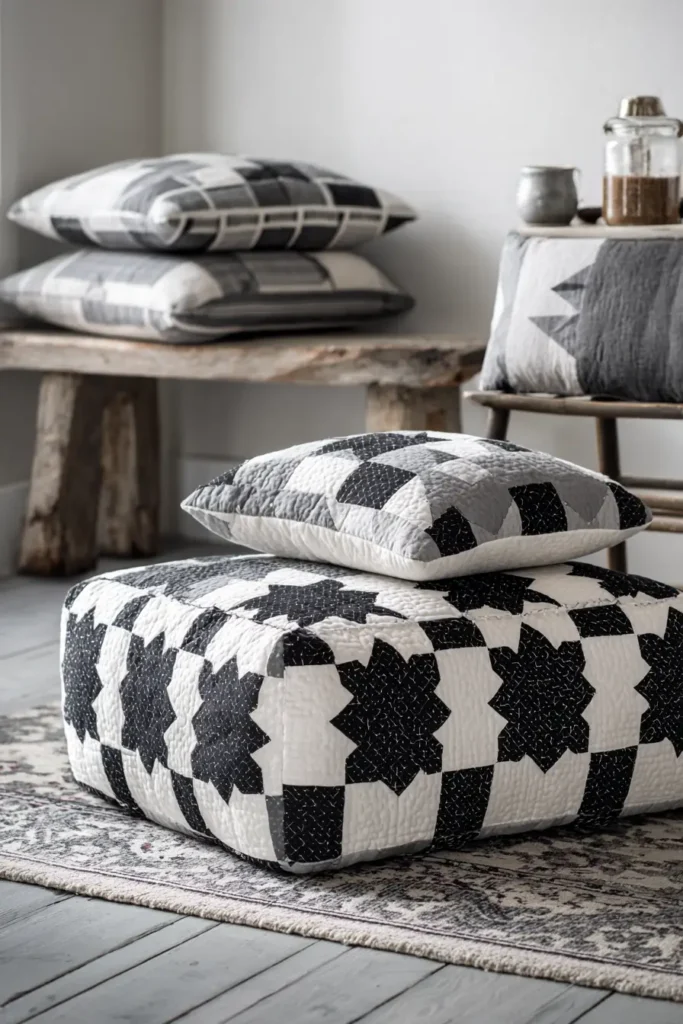
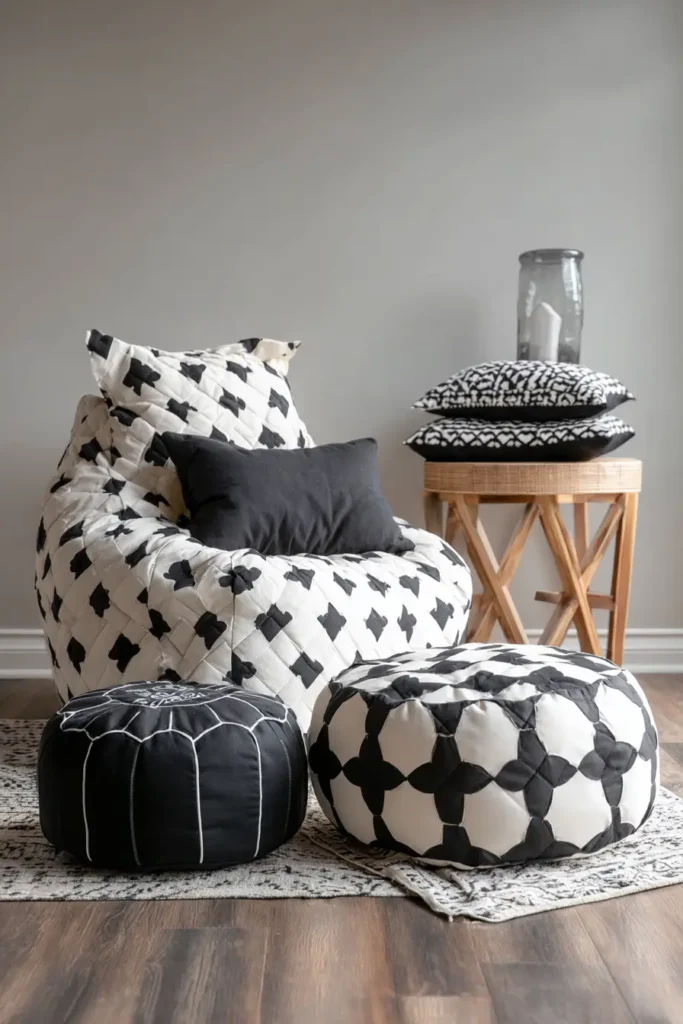
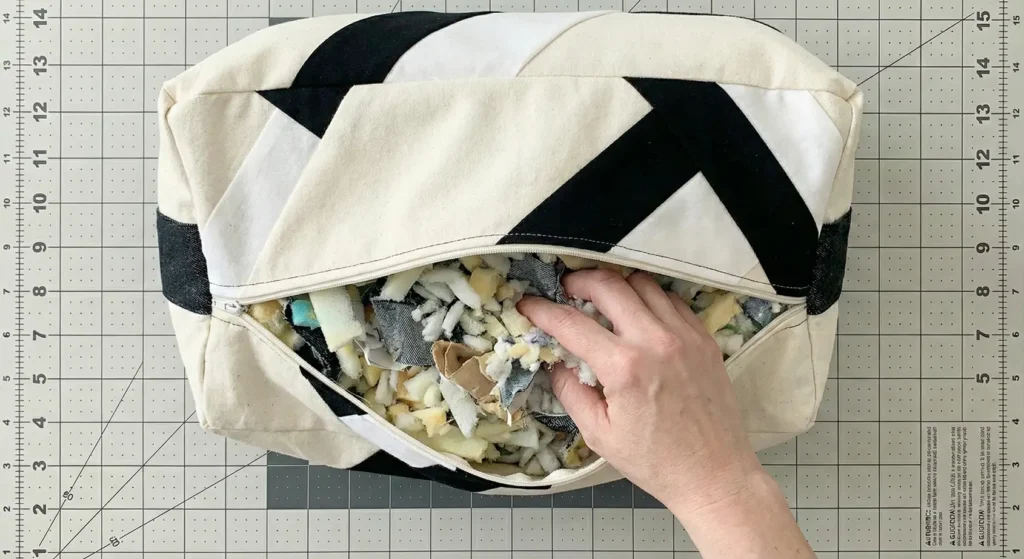
The “Scrappy String” Boxy Floor Pouf
Floor poufs are perfect for modern living rooms, acting as extra seating or a footrest. This design turns your black-and-white fabric scraps into a durable, structured furniture piece. We use a “String Quilting” technique (sewing strips onto a foundation) to create thick, heavy panels that can withstand being sat on.
Finished Dimensions: Approximately 18″ wide x 18″ deep x 12″ tall.
Materials Needed:
- Scraps: A large bag of Black and White fabric strips (varying widths from 1″ to 3″).
- Foundation Fabric: 2 yards of inexpensive Muslin or old sheeting (won’t be seen).
- Batting: Scraps of batting or 1 yard of fusible fleece (for structure).
- Backing Fabric: 1 yard of sturdy black denim or canvas (for the bottom panel).
- Filling: Polystyrene beanbag beads, or (better for the environment) shredded memory foam or old towels/clothes.
- Zipper: One 22-inch heavy-duty zipper (or longer).
- Notions: Heavy-duty needle (Jeans size), rotary cutter.
Step 1: Cut the Foundation Panels
You need a base to sew your scraps onto. This ensures the pouf stays square.
- Top Panel Foundation: Cut 1 square of Muslin measuring 19″ x 19″.
- Side Panel Foundations: Cut 4 rectangles of Muslin measuring 19″ wide x 13″ tall.
- Batting: Cut batting pieces identical to the 5 foundation shapes shown.
- Spray Baste: Spray baste the batting to the back of the Muslin panels. You now have 5 “quilt sandwiches” ready to be covered.
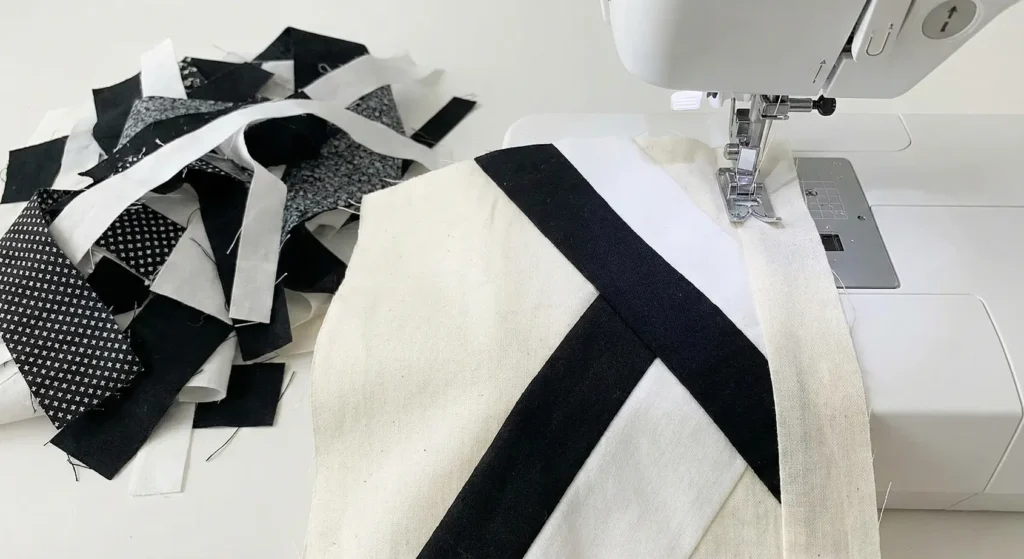
Step 2: “String Quilt” the Panels
This is an improvisational method. No measuring strips!
- Take the Top Panel (Muslin side up).
- Place one Black/White strip diagonally across the center, Right Side Up.
- Place a second strip on top of it, Right Side Down (aligned with the edge).
- Sew a 1/4″ seam along the edge. Flip the second strip open and press.
- Continue adding strips on both sides—Black, White, Print, Solid—until the entire muslin foundation is covered.
- Repeat this process for the 4 Side Panels.
- Quilting: Sewing the strips counts as quilting! But for extra durability, sew straight lines perpendicular to the strips (cross-hatching) to secure everything tightly.
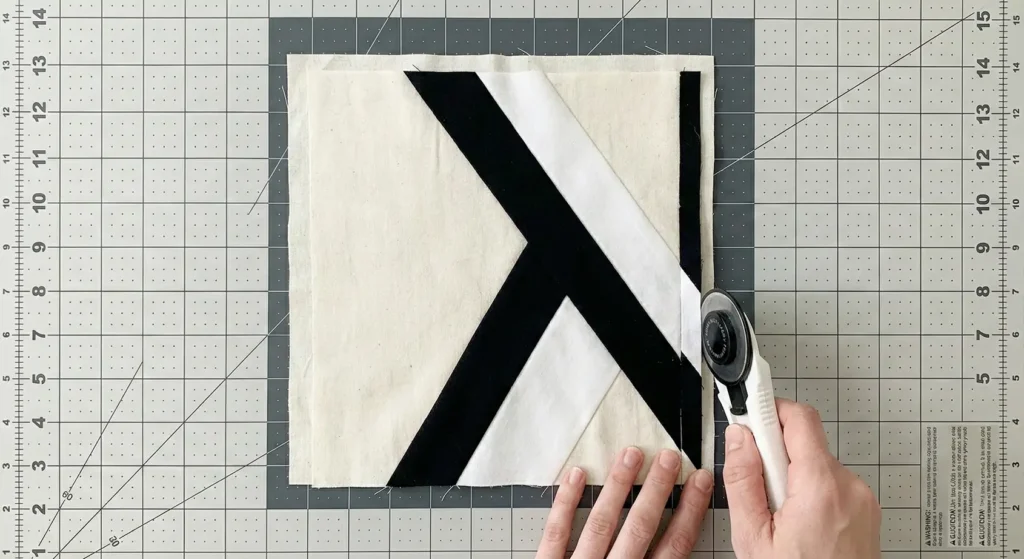
Step 3: Square Up and Trim
- Flip the panels over to see the muslin foundation on the back.
- Use your rotary cutter to trim off the messy hanging fabric ends, using the muslin square as your template.
- You should now have 5 perfectly clean, thick quilted panels (One 19″x19″, four 19″x13″).
Step 4: Assemble the Cube Sides
- Take two Side Panels. Place them Right Sides Together.
- Sew the short (13″) edge with a 1/2″ seam allowance.
- Repeat until all 4 side panels are sewn into a loop/square tube.
- Corner Reinforcement: Sew over the corners a second time or zigzag stitch the seam allowance. Poufs take a lot of pressure!
Step 5: Attach the Top
- Pin the Quilted Top Panel (19″x19″) to the top edge of your Side Loop.
- Match the corners of the top square to the seams of the side panels.
- Sew around the perimeter with a 1/2″ seam. Pivot carefully at the corners.
- Turn the cube right-side out to check that your corners are sharp. Turn it back wrong-side out.
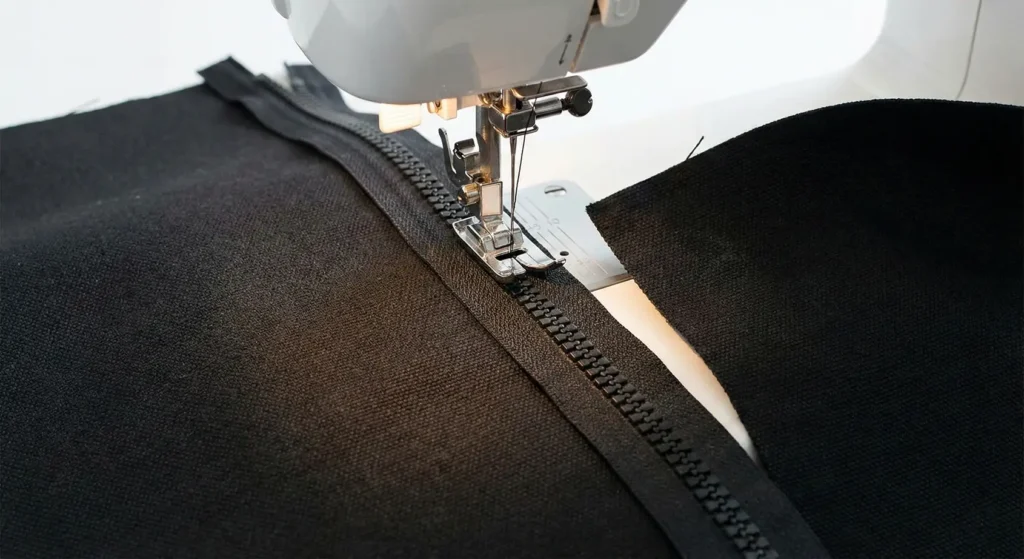
Step 6: The Bottom & Zipper
The bottom needs to open so you can stuff it.
- Cut your Black Canvas (Backing) into two 19″ x 10″ rectangles.
- Sew the zipper between these two rectangles along the long edge. You now have a 19″ x ~19″ square with a zipper in the middle.
- Unzip the zipper halfway (IMPORTANT! Or you can’t turn it).
- Sew this bottom panel to the bottom edge of your side loop.
- Turn the pouf right-side out through the zipper.
- Stuff It: Fill firmly. If using bean bag beads, put them in a separate mesh bag first so they don’t leak. If using old towels/clothes (the heaviest, firmest option), fold them flat and stack them inside to maintain the square shape.
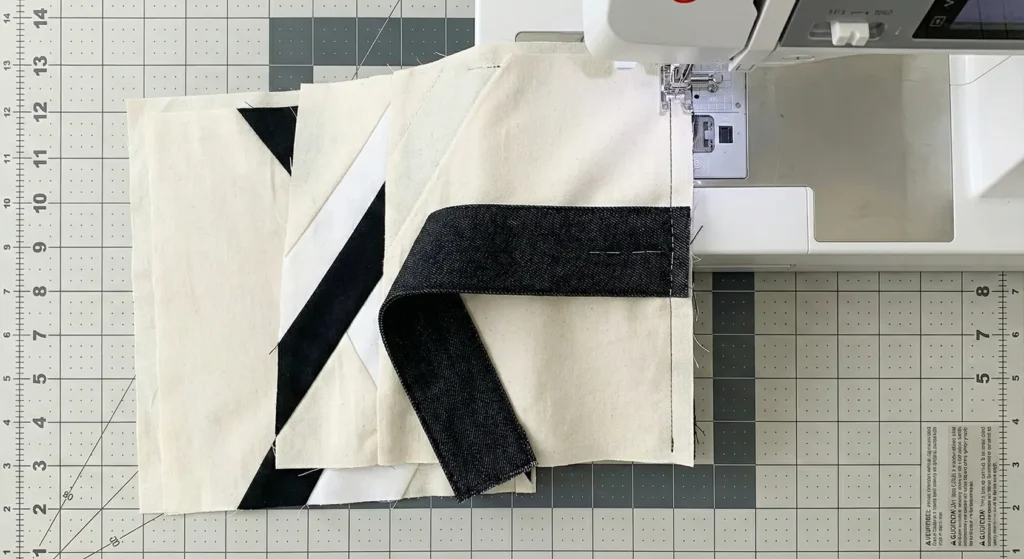
Pro Design Tip: The Handle. Before sewing the side panels together (Step 4), make a simple strap from a strip of black denim (2″ wide x 6″ long). Baste it to the center of one side panel. This handle makes it easy to drag the heavy pouf around the living room.
Budget Consideration: Stuffing with “Uglies”. As a quilter, you have “ugly fabric” or batting scraps you will never use. Please do not throw them away! Shred them into smaller pieces and use them to stuff this pouf. It takes a massive amount of material to fill a pouf, making it the ultimate “scrap eater.”
13. Monochrome Quilted Floor Mats and Area Quilts
The “Urban Chevron” Canvas Floor Runner
Floor quilts (or “soft rugs”) are a massive trend in modern interiors. They add pattern to a kitchen or bathroom floor but are machine washable—unlike traditional rugs. For this project, we swap delicate quilting cotton for Heavyweight Duck Canvas. The pattern is a high-contrast Chevron (Zig-Zag) that mimics a tiled floor, and we use a non-slip backing to make it functional.
Finished Dimensions: Kitchen Runner, approximately 24″ x 60″.
Materials Needed:
- Fabric A (Black): 1.5 yards of Black Duck Canvas or Heavy Denim.
- Fabric B (White): 1.5 yards of Natural/White Duck Canvas.
- Batting: 1 yard of Fusible Fleece (Pellon 987F) PLUS 1 yard of standard cotton batting. (Floor mats need double thickness/stiffness).
- Backing Fabric: 1 yard of Rubberized Non-Slip Fabric (often sold for pajama feet) OR heavy canvas coated later with Rug Grip spray.
- Binding: 1/2 yard of Black Canvas.
- Notions: Heavy-duty Needle (Size 100/16 or 110/18), clips (pins will bend in canvas).
Step 1: Create Canvas HSTs (Half Square Triangles)
We are using the “2-at-a-time” method, but handling stiff canvas requires patience.
- Cut Squares:
- From Black Canvas: Cut 20 squares, measuring 7″ x 7″.
- From White Canvas: Cut 20 squares, measuring 7″ x 7″.
- Mark: Draw a diagonal line on the back of the White squares.
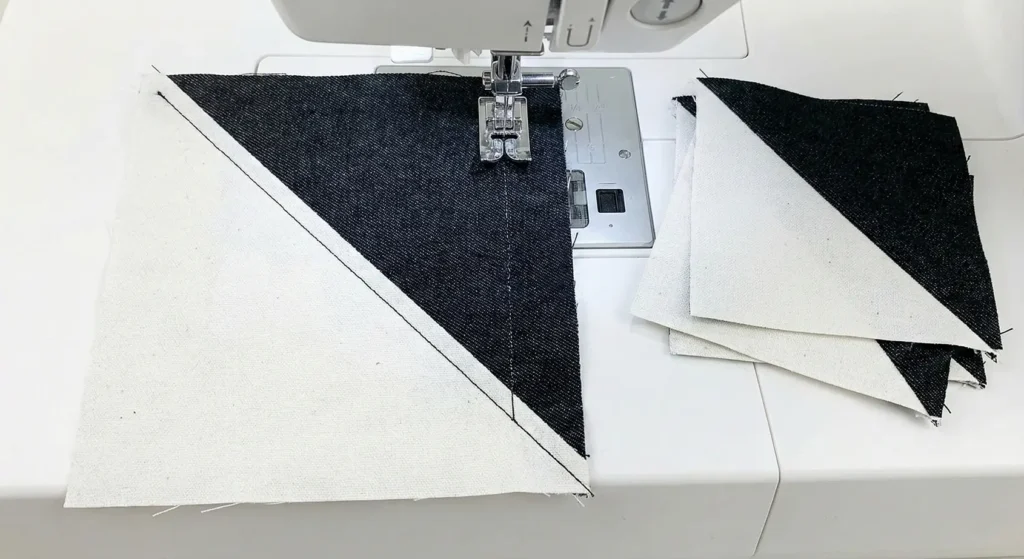
- Sew: Place a Black and White square Right Sides Together. Sew a 1/4″ seam on both sides of the line.
- Cut & Press: Cut on the line. Press seams OPEN. (Canvas is too bulky to press to the side; you must press open to get it to lay flat).
- Trim: Square up your units to exactly 6.5″ x 6.5″. You need 40 HST units.
Step 2: Assemble the “V” Layout
- Find a floor space. Arrange a grid that is 4 blocks wide x 10 blocks long.
- The Chevron Pattern:
- Column 1: Orient HSTs so the diagonal goes “Up/Right”. (Black on top, White on bottom).
- Column 2: Orient HSTs so the diagonal goes “Up/Left”. (Mirroring Col 1).
- Column 3: Same as Column 1.
- Column 4: Same as Column 2.
- Visual Check: The Black triangles should touch to form large “V” shapes (Chevrons) pointing down the runner.
Step 3: Sew the Rows
- Sew the 4 blocks of Row 1 together.
- Repeat for all 10 rows.
- Pressing: Press all vertical seams OPEN. Use a clapper or a hammer (gently!) to flatten the thick intersections if needed.
Step 4: Double Batting “Sandwich”
A floor mat needs to be stiff, not floppy.
- Lay your Backing Fabric face down.
- Layer 1: Place the Standard Cotton Batting.
- Layer 2: Place the Fusible Fleece (rough side UP).
- Top: Place your Canvas Quilt Top on the fleece.
- Fuse: Iron the top heavily to fuse it to the fleece layer. This glue prevents the mat from shifting underfoot.
- Baste the whole sandwich with safety pins or spray baste.
Step 5: “Tread” Quilting
- Use a Walking Foot. Increase your stitch length to 3.5mm.
- Quilting: Stitch straight lines following the Chevron “V” shape.
- Stitch 1/4″ away from the seam lines on both sides.
- Then stitch a second echo line 1 inch away.
- This dense, V-shaped quilting reinforces the fabric’s bias edges and creates “treads” for grip.
Step 6: Heavy Duty Binding
- Cut your Black Canvas binding strips 2.5″ wide.
- Sew onto the front of the quilt as usual.
- Finish: Because canvas is hard to hand-sew, wrap the binding to the back and Machine Stitch it down from the front (“Stitch in the Ditch”) or use a decorative zigzag stitch to secure it.
- Safety Finish: If you didn’t use non-slip backing fabric, take the finished mat outside and spray the underside with Plasti-Dip or silicone “Rug Stop” spray to prevent slipping.
Pro Design Tip: The “Mud Cloth” Look. Before sewing, take your White Canvas squares and use a black fabric marker or fabric paint to draw simple tribal lines, dots, or “plus signs” on them. Once sewn into the chevron pattern, the painted canvas looks like an expensive, authentic African Mud Cloth rug.
Budget Consideration: Painters’ Drop Cloths. Once again, Heavy Duty Drop Cloths are the hero here. A “10oz” or “12oz” drop cloth is essentially the same as crafting canvas, but costs $20 for a huge sheet. It is durable enough to handle muddy boots and can be bleached white or dyed black in a bucket.
14. Aztec and Tribal Print Black and White Quilts
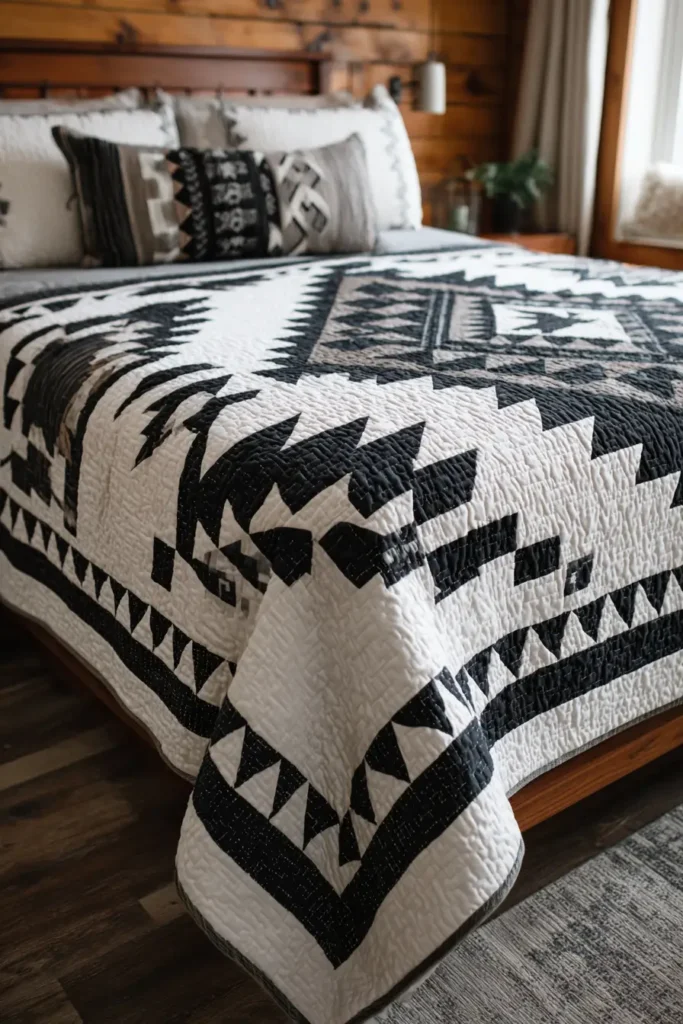
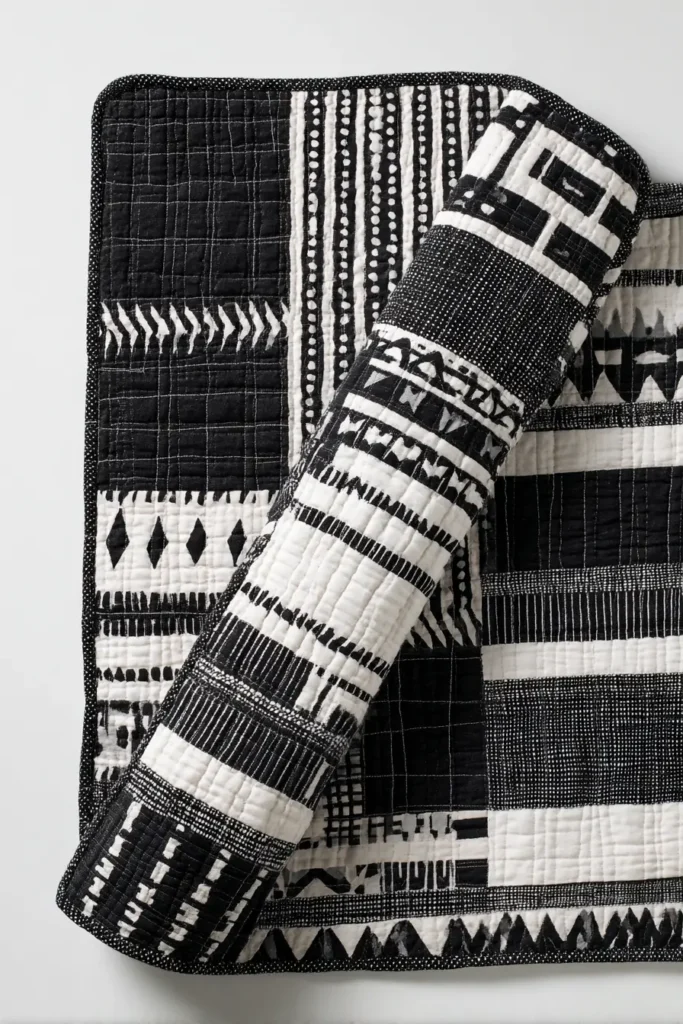
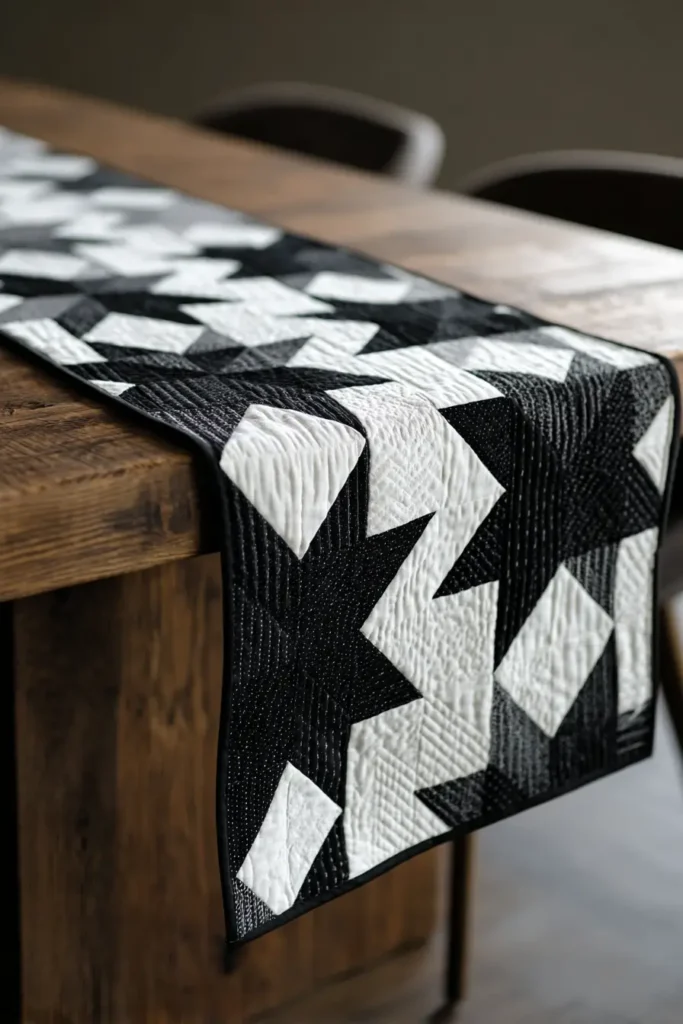
The “Desert Horizon” Tribal Row Quilt
Aztec and tribal-inspired quilts often mimic the look of woven Pendleton blankets or Southwest rugs. The easiest way to achieve this complex look is with a “Row Quilt.” Instead of making identical square blocks, you build the quilt in horizontal bands, stacking different geometric motifs (triangles, diamonds, steps) to create a striking totem-pole effect.
Finished Dimensions: Large Throw, approximately 64″ x 76″.
Materials Needed:
- Fabric A (Black): 3 yards of Solid Black.
- Fabric B (White): 3 yards of Solid White.
- Backing Fabric: 5 yards.
- Batting: Twin Size (72″ x 90″).
- Binding: 5/8 yard of Solid Black.
- Notions: Rotary cutter, quilting ruler, marking pen.
Step 1: Construct the “Mountains” (Flying Geese Rows)
These rows represent the peaks often seen in Aztec designs.
- We need 3 rows of Flying Geese. Each row is 64″ wide.
- If using 4″ x 8″ finished geese, you need 8 geese per row? No, 64 / 8 = 8. That’s too few. Let’s use smaller geese or more of them. Let’s do 16 geese measuring 4″ wide x 2″ high. (Total width 64″).
- Cut (for 48 Geese total):
- White Rectangles: 48 pieces (2.5″ x 4.5″).
- Black Squares: 96 pieces (2.5″ x 2.5″).
- Stitch and Flip Method:
- Place a Black square on the corner of a White rectangle. Sew diagonally. Trim and press.
- Repeat on the other corner.
- Assemble: Sew 16 geese together end-to-end to make one long row. Make 3 rows.
Step 2: Construct the “Eyes” (Diamond-in-Square Rows)
These rows create the central focal points.
- We need 2 rows of Diamond blocks.
- Cut:
- White Centers: 16 squares (4.5″ x 4.5″).
- Black Corners: 64 squares (2.5″ x 2.5″).
- Snowball Method:
- Place a Black square on each of the 4 corners of the White square.
- Sew diagonally across the black squares. Trim excess and press.
- Result: A White diamond floating in a Black square.
- Assemble: Sew 8 blocks together to make a row (8 blocks x 8″ wide = 64″). Make 2 rows.
Step 3: Construct the “Steps” (Strip Pieced Rows)
The “stair step” is a classic Southwest motif.
- Cut Strips: Cut 4 Black strips and 4 White strips (2.5″ x WOF).
- Sew Strip Sets: Sew a Black strip to a White strip. Make 4 sets.
- Sub-Cut: Cut these sets into 2.5″ segments. You now have “Two-Patch” units (Black/White).
- Assemble: Sew these units together to form a checkered row.
- Make 4 rows that are 64″ long.
Step 4: The Separator Strips
To make the design legible, you need negative space between the busy rows.
- From Solid Black: Cut 8 strips, measuring 2.5″ x 64.5″ (You will need to piece WOF strips together to get the length).
- From Solid White: Cut 4 strips, measuring 1.5″ x 64.5″.
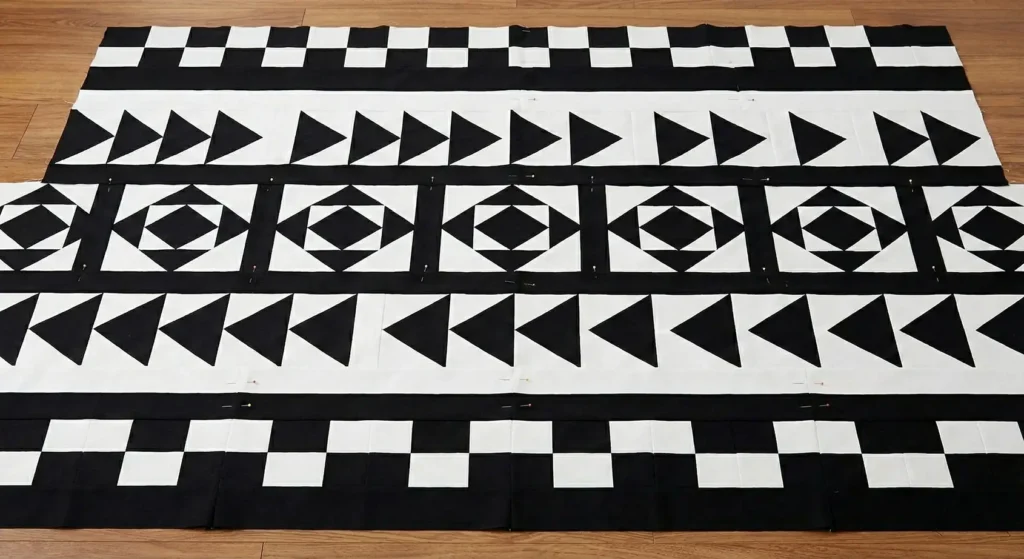
Step 5: The Totem Layout
Arrange the rows symmetrically from the center out.
- Find a large floor space.
- Center: Start with a Diamond Row.
- Outward from Center (Top and Bottom):
- Black Separator Strip.
- Flying Geese Row (Points pointing OUT away from the center).
- White Separator Strip.
- Checkerboard Step Row.
- Black Separator Strip.
- Flying Geese Row (Points pointing IN toward center).
- Repeat the pattern until you reach your desired length. Symmetry is key for the “Rug” look.
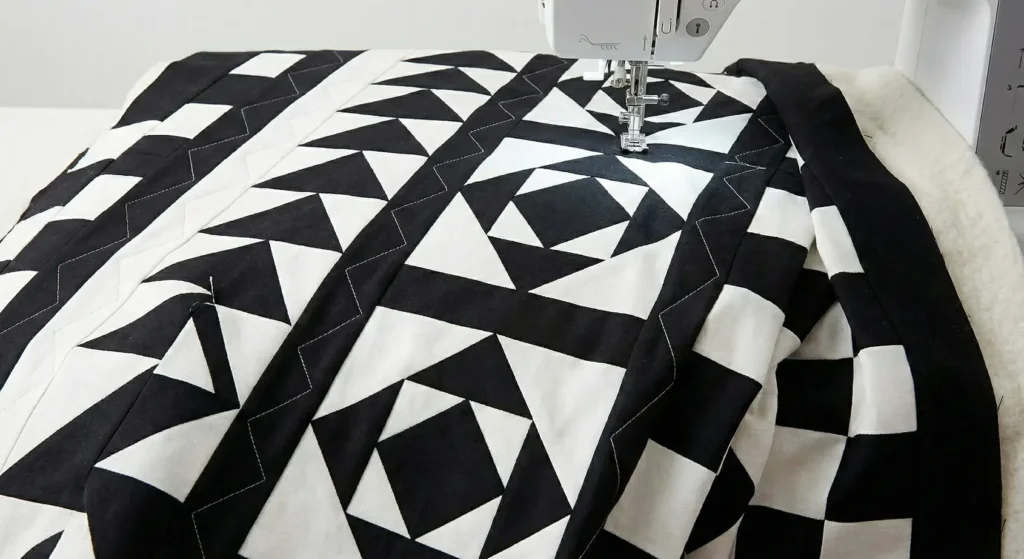
Step 6: “Zig-Zag” Quilting
- Baste the sandwich.
- Quilting: Do not quilt straight lines. Use a Zig-Zag or Chevron pattern.
- Follow the angles of the Flying Geese.
- Quilt parallel zig-zag lines across the entire quilt, spaced 1 inch apart. This reinforces the design’s tribal angularity.
Pro Design Tip: The “Pop” Row. If you want a hint of color without breaking the monochrome theme, use Dark Charcoal or Slate Grey only for the “Mountain” (Geese) rows. It adds a subtle depth that makes the black and white pop even more.
Budget Consideration: Black Denim. For a rugged, authentic “blanket” weight, use Black Denim for the separator strips instead of quilting cotton. It adds weight and structure, making the quilt feel like a heavy wool weaving.
15. Black and White Boho Quilt Patterns for Relaxed Living Spaces
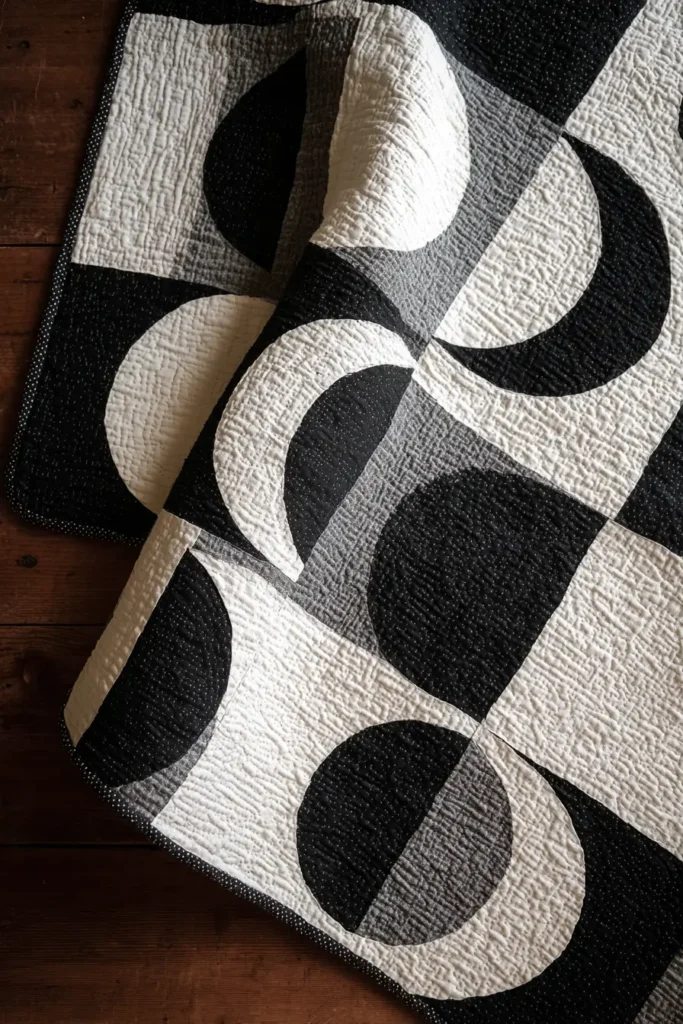
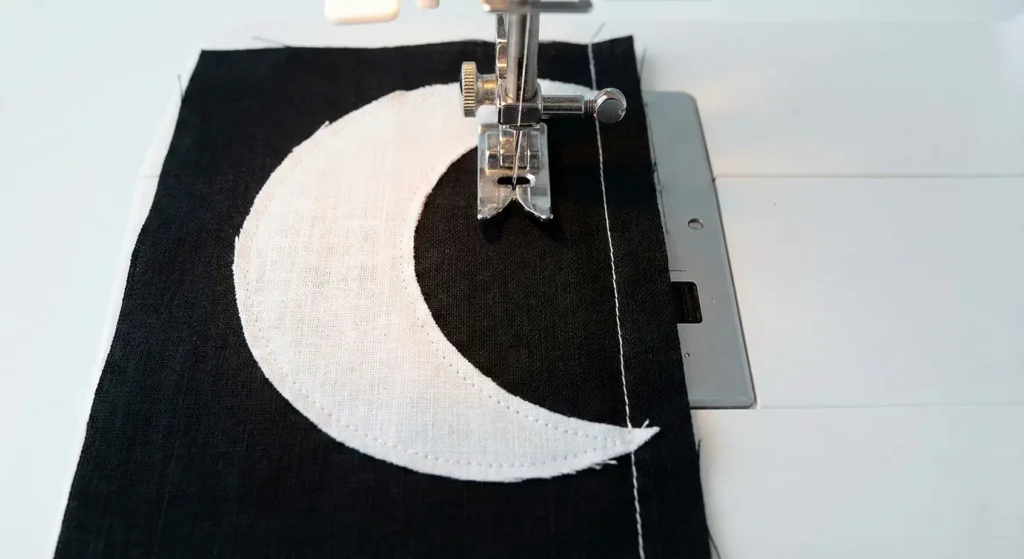
The “Moon Phase” Raw-Edge Appliqué Quilt
Boho style is all about organic shapes, texture, and a “perfectly imperfect” handmade look. This quilt abandons rigid geometry for curves and circles (Moons) applied with a raw edge that will fray and soften over time. Using linen fabric and “Big Stitch” hand quilting gives it that earthy, global-market vibe.
Finished Dimensions: Throw Size, approximately 60″ x 70″.
Materials Needed:
- Background Fabric: 4 yards of Black Linen or Linen-Cotton Blend (The texture is key!).
- Moon Fabric: 2 yards of White/Cream Linen or textured woven cotton.
- Backing Fabric: 4 yards.
- Batting: Twin Size (72″ x 90″).
- Fusible Web: 2 yards (e.g., HeatnBond Lite).
- Thread: White Sashiko Thread or Size 8 Perle Cotton (for high-contrast visible stitching).
- Notions: 8-inch circular object (plate or bowl) to trace, embroidery needle.
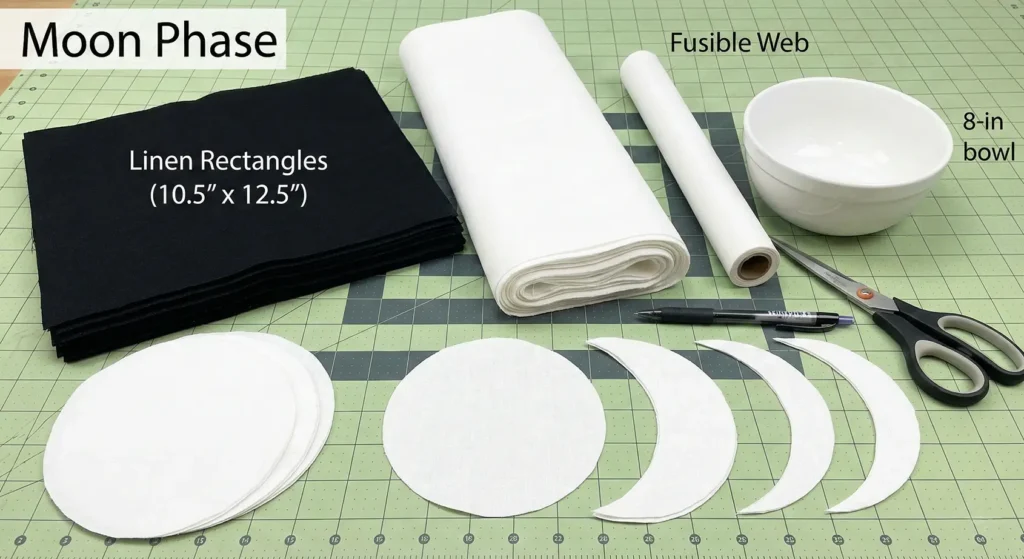
Step 1: Prepare the Background Blocks
Instead of one giant piece of fabric, we work in blocks to make the appliqué easier.
- From the Black Linen, cut 35 rectangles.
- Dimensions: 10.5″ wide x 12.5″ tall.
- This rectangular shape gives the moons “breathing room” and looks more modern than a square.
Step 2: Create the Moons (The Appliqué Shapes)
- Trace: Trace roughly 35 circles onto the paper side of your fusible web using your 8-inch bowl.
- Iron: Iron the fusible web circles onto the wrong side of your White Linen.
- Cut: Cut out the circles.
- Create Phases: You don’t just want full moons!
- Leave 10 circles whole (Full Moon).
- Cut 10 circles in half (Half Moon).
- Cut 10 circles into crescents (Crescent Moon).
- Leave the rest as backups or variations.
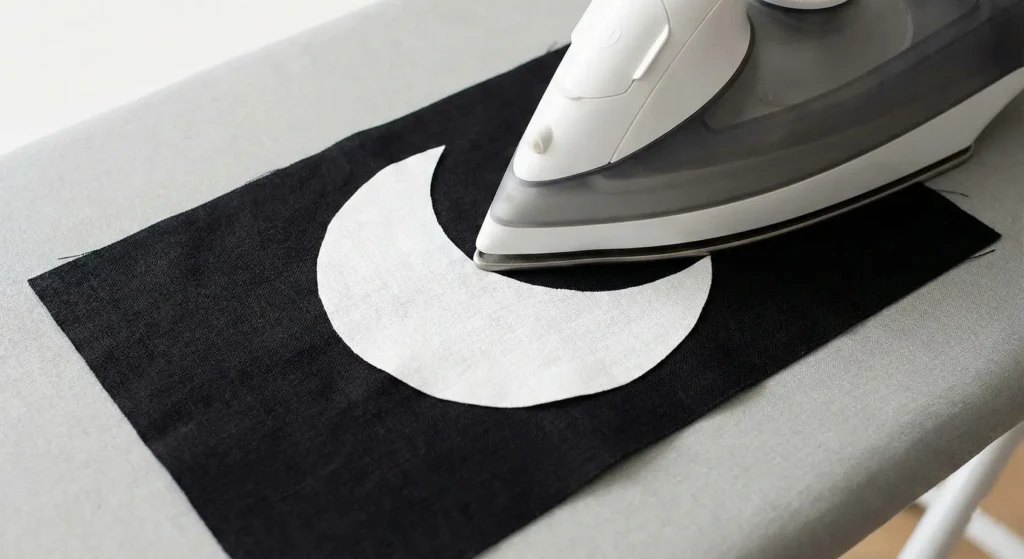
Step 3: Fuse the Appliqué
- Peel the paper backing off a white moon shape.
- Place it onto a black background rectangle.
- Placement: Don’t center them perfectly! Place some high, some low, some rotated. This irregularity gives rise to the “Boho” movement.
- Fuse: Iron it in place.
Step 4: Raw Edge Security Stitch
We are not turning the edges under. We want them to fray slightly.
- Use your sewing machine with regular white thread.
- Sew a straight stitch about 1/8 inch inside the edge of the white moon.
- Go around the shape twice for a “sketchy,” artistic look.
- Note: After the first wash, the edge will fray up to this stitch line, creating a soft, fuzzy fringe.
Step 5: Assemble the Quilt Top
- Lay out your blocks in a grid of 5 blocks wide x 7 blocks tall.
- Arrange: Mix up the phases.
- Option A: Arrange them logically (Waxing to Waning) for a scientific look.
- Option B (Boho): Scatter them randomly so the eye dances around the quilt.
- Sew the blocks together. Press seams open (linen is bulky).
Step 6: “Sashiko” Big Stitch Quilting
This is the most critical step for the boho aesthetic.
- Baste the sandwich.
- Thread a sharp embroidery needle with thick White Sashiko Thread.
- Quilting: Hand stitch large, visible running stitches (dash-dash-dash).
- Echo: Stitch concentric circles around the moons, rippling out into the black background like water.
- Spacing: Keep the lines about 1 inch apart. The contrast of the thick white thread against the black linen is stunning.

Pro Design Tip: Add Tassels. A true boho throw isn’t complete without tassels. Buy or make Chunky Black or Cream Tassels (yarn or leather) and hand-sew one to each of the four corners of the finished quilt.
Budget Consideration: Painters’ Drop Cloth (Again!). Since linen is expensive ($20/yard), use Canvas Drop Cloth for the background. Dye it black in a bucket or bathtub. The texture of dyed canvas is almost identical to heavy linen but costs a fraction of the price.
16. Modern Black and White Quilted Table Runners and Table Covers
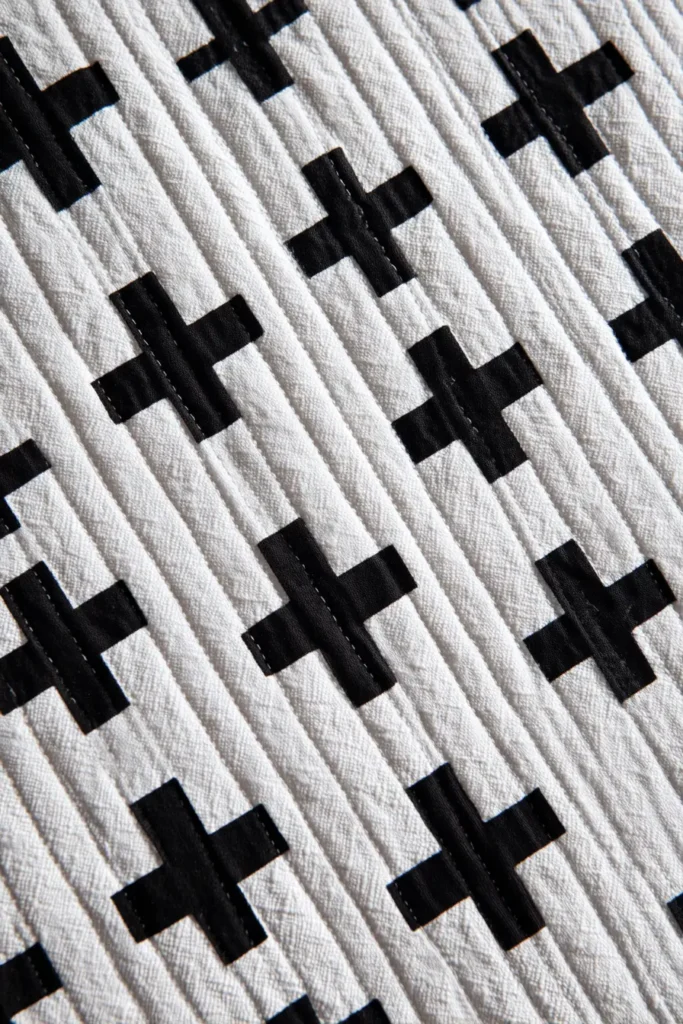
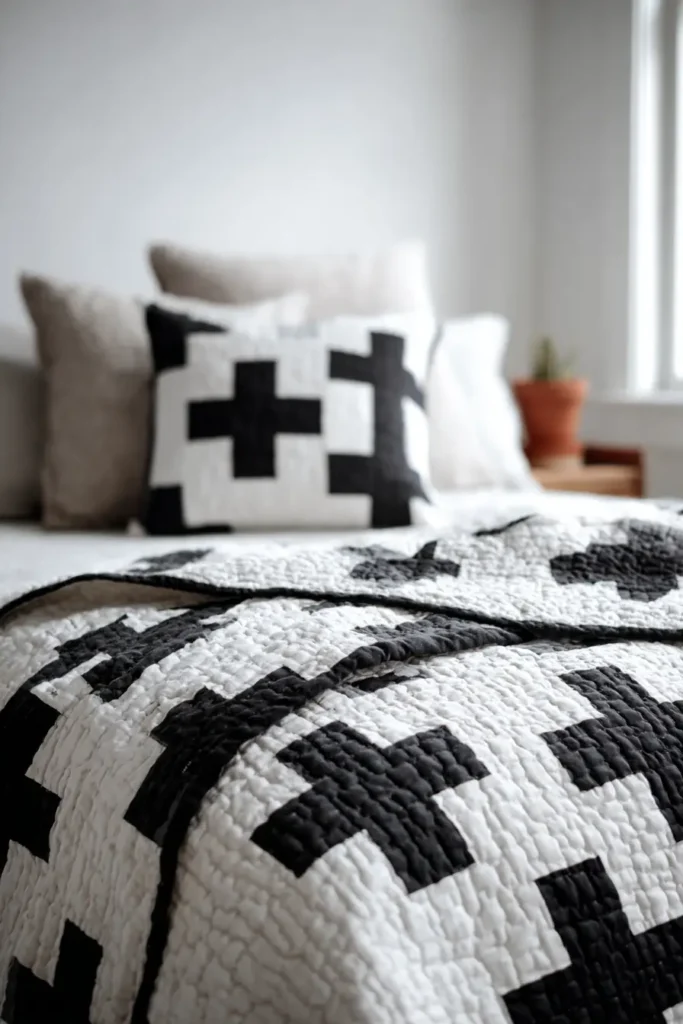
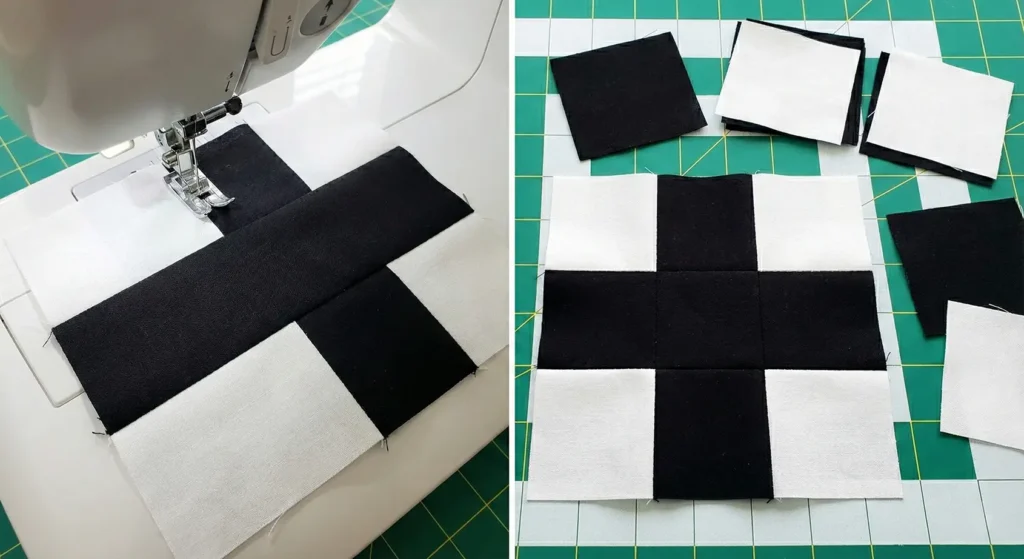
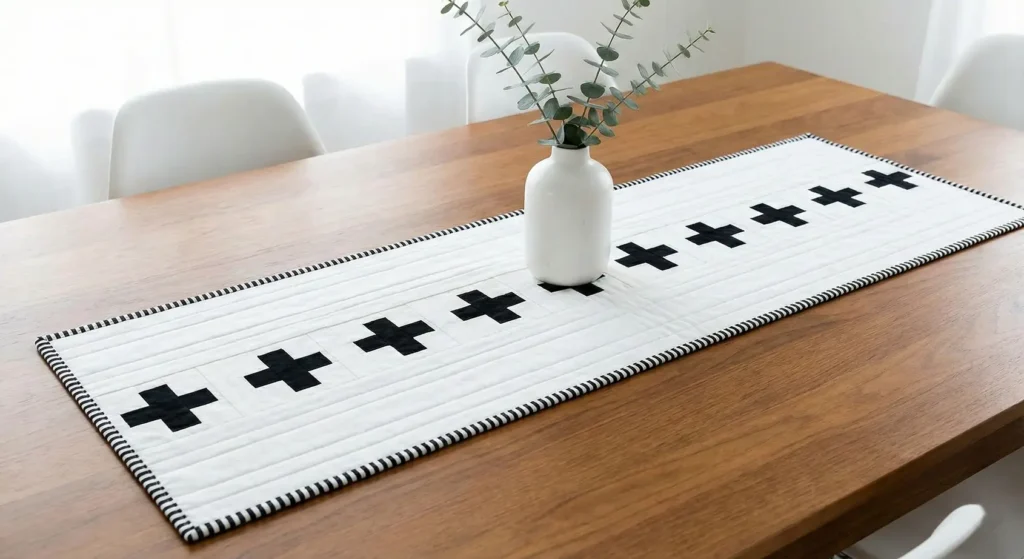
The “Scandi Plus” Minimalist Table Runner
The “Plus Sign” (or Swiss Cross) is a hallmark of modern Scandinavian design. This table runner features a clean row of bold black crosses floating on a crisp white background. It is geometric, simple to piece together, and instantly updates a dining room table.
Finished Dimensions: 14″ x 64″ (Adjustable length).
Materials Needed:
- Fabric A (Crosses): 1/2 yard of Solid Black (or black-on-black print).
- Fabric B (Background): 1 yard of Solid White or Linen.
- Backing Fabric: 1 yard.
- Batting: Scrap size (18″ x 70″).
- Binding: 1/4 yard of Black and White stripe.
- Notions: Rotary cutter, quilting ruler.
Step 1: Cut the Squares (The Pixel Method)
The entire runner is built from one simple unit: the 2.5″ square.
- From Fabric A (Black): Cut 35 squares, measuring 2.5″ x 2.5″.
- From Fabric B (White):
- Cut 28 squares, measuring 2.5″ x 2.5″ (Block Corners).
- Cut 8 strips, measuring 2.5″ x 6.5″ (Vertical Sashing).
- Cut 2 strips, measuring 2.5″ x 14.5″ (End Borders). Correction: Wait, let’s piece the blocks first, then sash.
Step 2: Assemble the “Plus” Blocks
Each block is a 9-patch grid (3×3 squares).
- Layout for ONE Block:
- Row 1: White Square – Black Square – White Square.
- Row 2: Black Square – Black Square – Black Square.
- Row 3: White Square – Black Square – White Square.
- Sew:
- Sew Row 1 together. Press seams toward the Black.
- Sew Row 2 together. Press seams toward the Black.
- Sew Row 3 together. Press seams toward the Black.
- Join: Sew the three rows together to form the Cross.
- Size: The finished block should measure 6.5″ x 6.5″.
- Repeat: Make 7 Blocks.
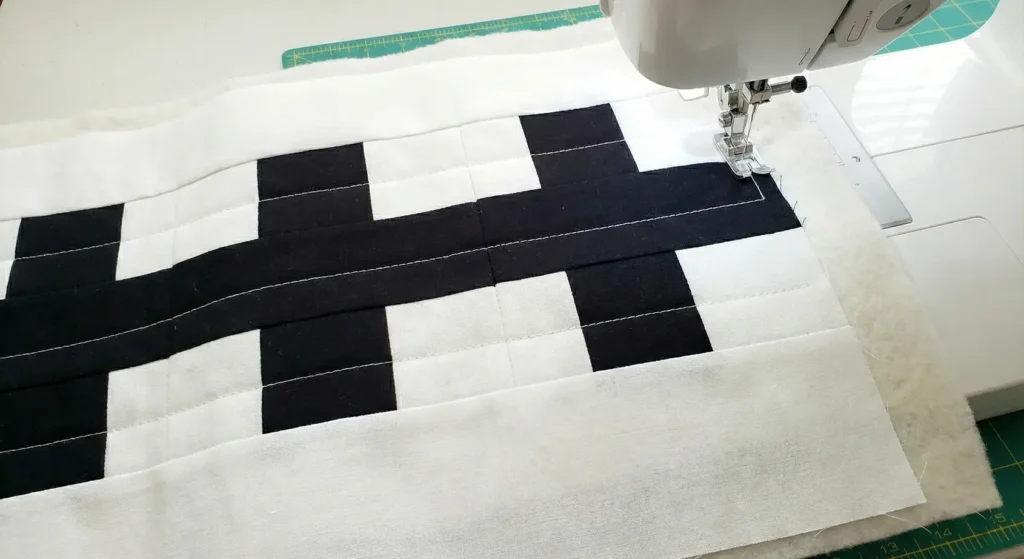
Step 3: Add Sashing (The Spacers)
To separate the crosses so they don’t touch, we add vertical sashing.
- Take your 7 Cross Blocks.
- Take 6 White Sashing Strips (2.5″ x 6.5″).
- Sequence: Block – Sash – Block – Sash – Block…
- Sew them together in one long row.
- Result: You have a row of crosses separated by white bars.
Step 4: Add Top and Bottom Borders
Now we widen the runner to make it substantial.
- Measure: Your runner strip should be 6.5″ wide x approx 60″ long.
- Cut Borders: Cut 2 long strips of White Fabric measuring 4.5″ wide x 60″ long (Piece strips together if needed).
- Sew: Sew one border strip to the Top of the runner and one to the Bottom.
- Press: Press seams toward the white borders.
- Final Width: The runner is now approx 14.5″ wide.

Step 5: “Grid” Quilting
- Sandwich the top, batting, and backing.
- Quilting: Keep it minimal.
- Quilt straight horizontal lines running the full length of the runner.
- Space them 1 inch apart.
- Use White Thread over the white sections and Black Thread over the black sections (or just use Grey for everything).
- The horizontal lines exaggerate the table’s length.
Step 6: Binding
- Trim the sandwich square.
- Bind with the Black and White Striped fabric.
- Design Note: A diagonal stripe binding adds a “zesty” finish that contrasts beautifully with the square blocks.
Pro Design Tip: The “Reversible” Runner. Since table runners are small, you can make them double-sided! Use the Leftover Scraps to make a “Piano Key” (striped) pattern on the back. If you spill gravy on the Cross side during dinner, just flip it over to the Striped side for dessert!
Budget Consideration: Linen Napkins. Check the clearance section of home goods stores for Black Linen Napkins. A standard dinner napkin is often 20″ x 20″. You can cut your black squares from 2-3 cheap napkins, which often costs less than buying yardage of high-quality linen fabric.
17. Herringbone Black and White Quilt for Floor Throw
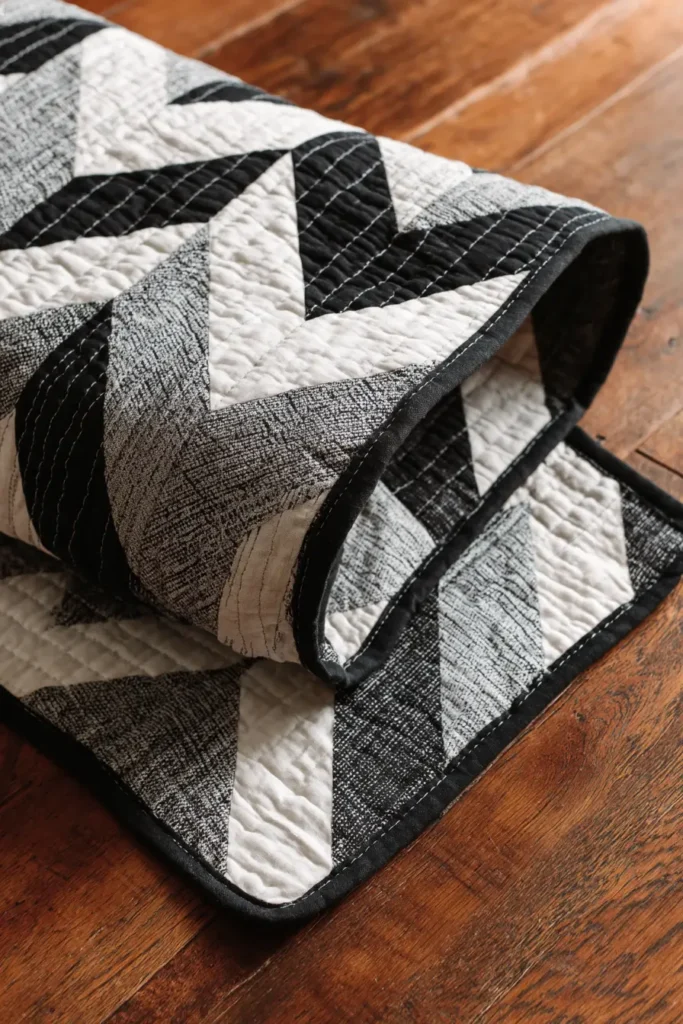
The “Urban Pavement” Herringbone Floor Throw
The Herringbone pattern is a classic for floors—usually found in wood parquetry or brick pathways. Translating this into a quilt creates a sophisticated, directional movement that draws the eye across the room. Since this is a “Floor Throw” (intended for picnics, play mats, or draping over a rug), we will use larger blocks and durable construction methods.
Finished Dimensions: Large Throw, approximately 60″ x 72″.
Materials Needed:
- Fabric A (Black): 3 yards of Black Denim, Canvas, or Heavy Cotton.
- Fabric B (White): 3 yards of White Denim, Canvas, or Heavy Cotton.
- Backing Fabric: 4 yards of heavy canvas or home decor-weight fabric.
- Batting: 1 yard of Fusible Fleece (for stiffness) OR two layers of cotton batting.
- Binding: 5/8 yard of Solid Black.
- Notions: Rotary cutter, 6.5″ square ruler, heavy-duty needle (Size 90/14 or 100/16).
Step 1: Mass Produce HSTs (Half Square Triangles)
The herringbone effect is created entirely by how you rotate simple half-square triangles. We need 120 HST units (6″ finished size).
- Cut Squares:
- From Black Fabric: Cut 60 squares, measuring 7″ x 7″.
- From White Fabric: Cut 60 squares, measuring 7″ x 7″.
- Mark: Draw a diagonal line on the back of all White squares.
Step 2: Sew and Slice
- Place a White square and a Black square Right Sides Together.
- Stitch: Sew a 1/4″ seam on both sides of the drawn diagonal line.
- Cut: Cut along the drawn line.
- Press: Open the units and press the seam toward the Black fabric.
- Trim: This is the most crucial step for herringbone precision. Trim every single unit to exactly 6.5″ x 6.5″.
- Result: You now have 120 Black/White HSTs.
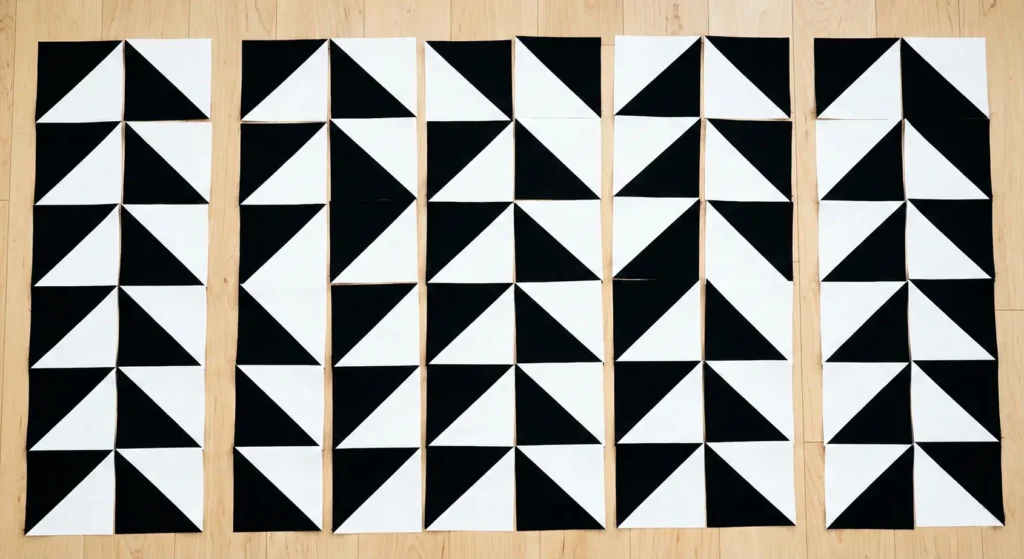
Step 3: The Herringbone Layout
The layout relies on alternating column directions to create the “V” shape.
- Find a large floor space. You need a grid of 10 columns x 12 rows.
- Column 1: Orient all HSTs so the diagonal line goes from Bottom-Left to Top-Right ( / ).
- Placement: Ensure the Black triangle is always on the Top-Left side (or consistent).
- Column 2: Orient all HSTs so the diagonal line goes from Top-Left to Bottom-Right ( \ ).
- Placement: Mirror Column 1.
- Column 3: Repeat Column 1 orientation ( / ).
- Column 4: Repeat Column 2 orientation ( \ ).
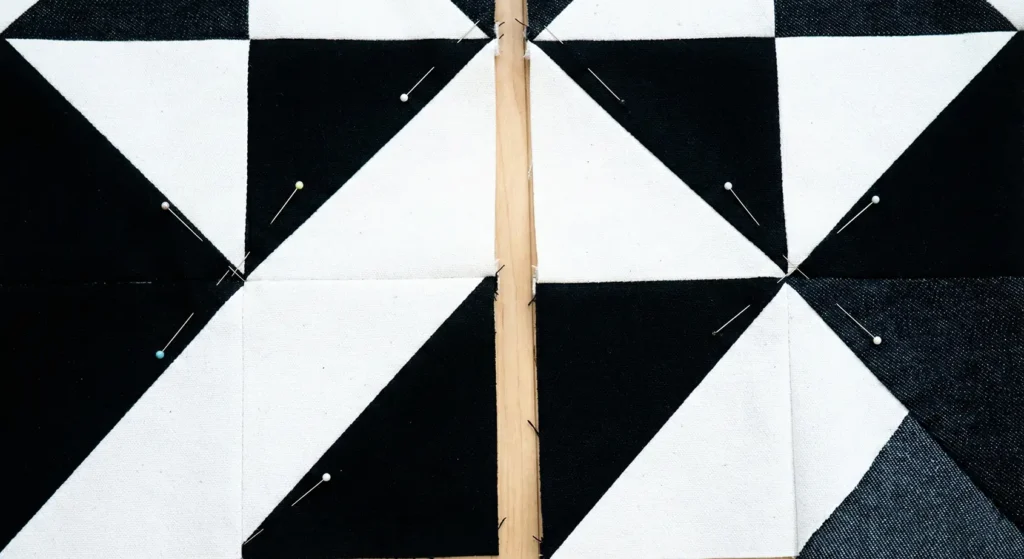
- Visual Check: When you look at two adjacent columns (1 and 2), the black triangles should meet to form a large “V” shape (chevron) pointing up (or down).
Step 4: Vertical Column Assembly
Usually, we sew horizontal rows. For Herringbone, sewing vertical columns is often less confusing, keeping the pattern straight.
- Sew the 12 blocks of Column 1 together.
- Sew the 12 blocks of Column 2 together.
- Repeat for all 10 columns.
- Label them! Use sticky notes to mark “Col 1”, “Col 2”, etc., so you don’t flip them by accident.
Step 5: Join the Columns
- Pin Column 1 to Column 2.
- Match Points: The most critical match point is where the diagonal seams meet at the corners. Pin these intersections securely.
- Sew the columns together.
- Press seams open to reduce bulk (especially if using denim/canvas).
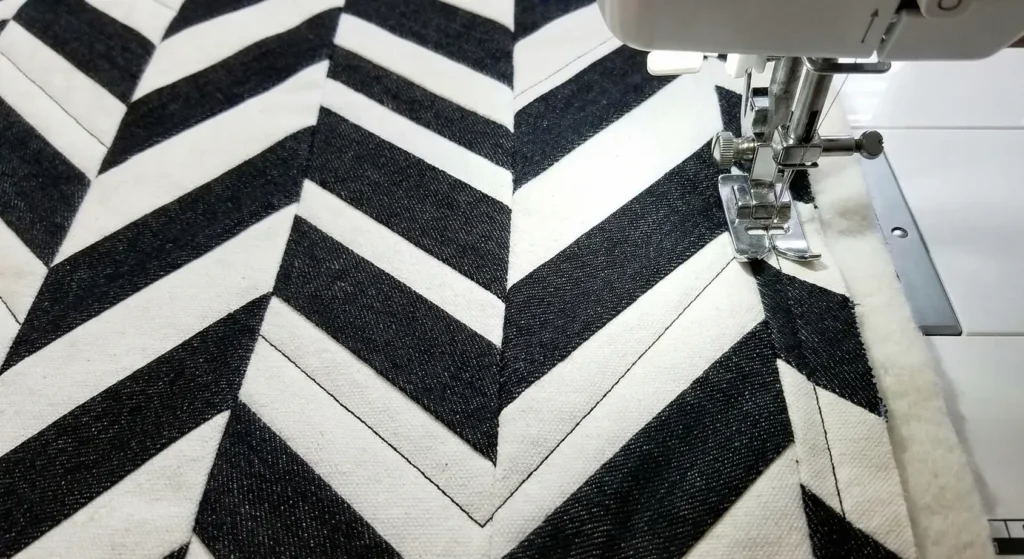
Step 6: Heavy-Duty Quilting
- Sandwich the Top, Batting (or Fleece), and Backing.
- Quilting: Use a walking foot.
- Design: Stitch straight lines following the “V” shape of the herringbone pattern.
- Stitch 1/4″ away from the seam lines on both the black and white sides.
- This double-line quilting reinforces the seams, which is vital for a quilt that might be walked on or used on the floor.
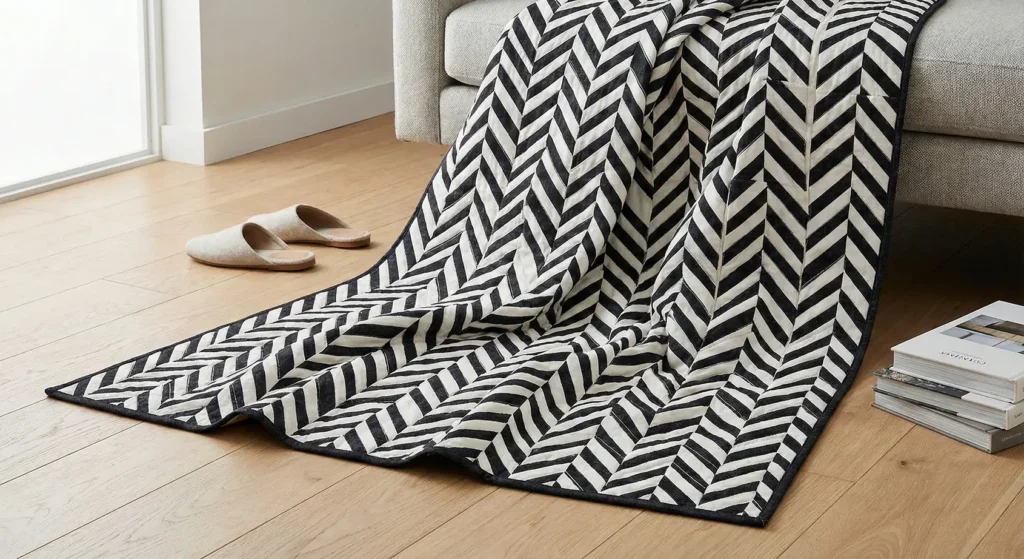
Pro Design Tip: The “Broken” Herringbone. To make it look more modern and less like a parquet floor, randomise the color placement in just one column. Swap the Black/White orientation for 3 or 4 blocks in Column 5. This “glitch” in the matrix creates a focal point and adds a contemporary, deconstructed vibe.
Budget Consideration: Upcycled Jeans. This is the perfect project for old jeans. Use old black jeans for the dark triangles and old white/light grey jeans for the light triangles. The denim is virtually indestructible for a floor throw, and the varying black fades add incredible texture.
18. Modern Geometric Black and White Quilt Patterns for Minimalist Spaces
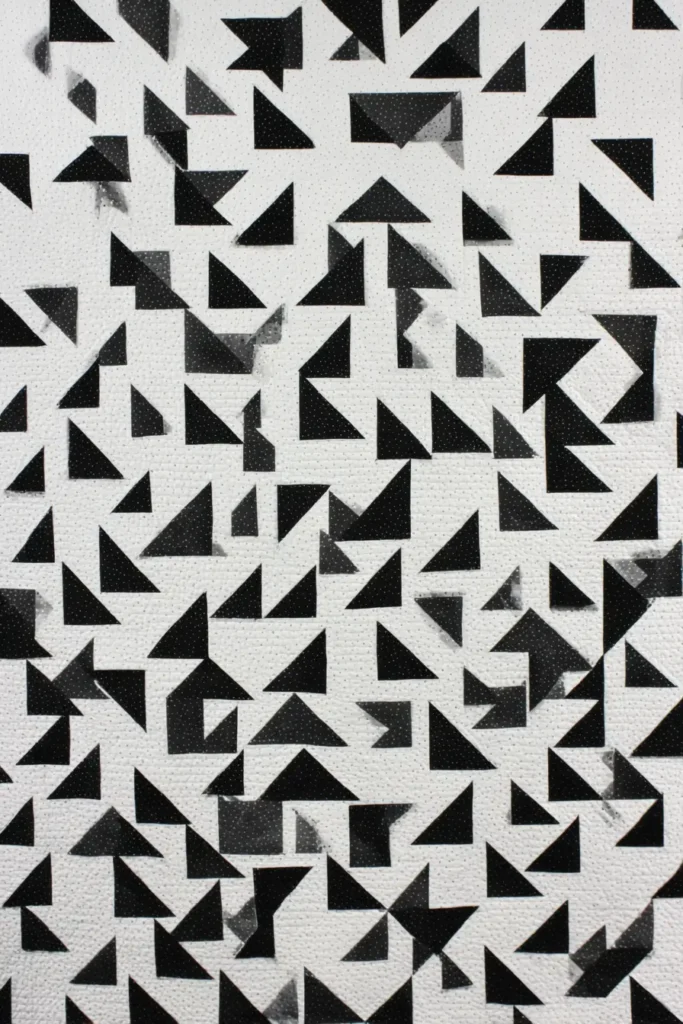
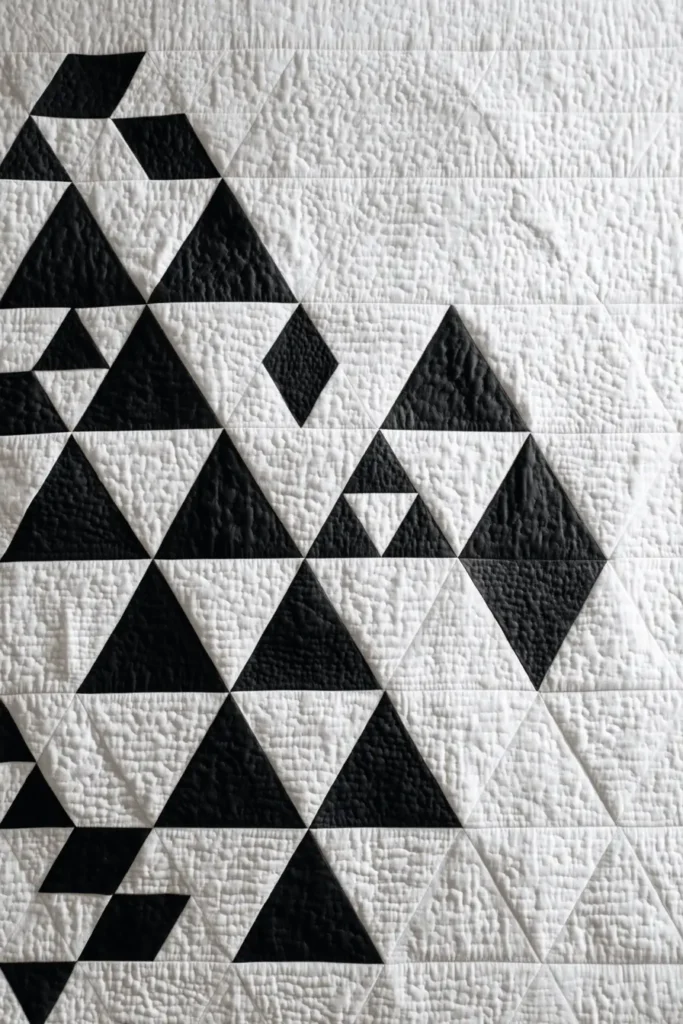
The “Nordic Peak” Equilateral Triangle Quilt
While squares and rectangles are standard, the Equilateral Triangle (where all three sides are equal) creates a dynamic, honeycomb-like geometry that feels distinctly modern. This pattern uses a high-contrast scatter of black triangles floating on a white background, evoking jagged mountain peaks or shattered glass.
Finished Dimensions: Large Throw, approximately 60″ x 70″.
Materials Needed:
- Fabric A (Black): 2 yards of Solid Black.
- Fabric B (White): 3 yards of Solid White.
- Backing Fabric: 4 yards.
- Batting: Twin Size (72″ x 90″).
- Binding: 5/8 yard of Solid Black.
- Notions: Rotary cutter, 60-degree Triangle Ruler (or a standard ruler with a 60-degree line).
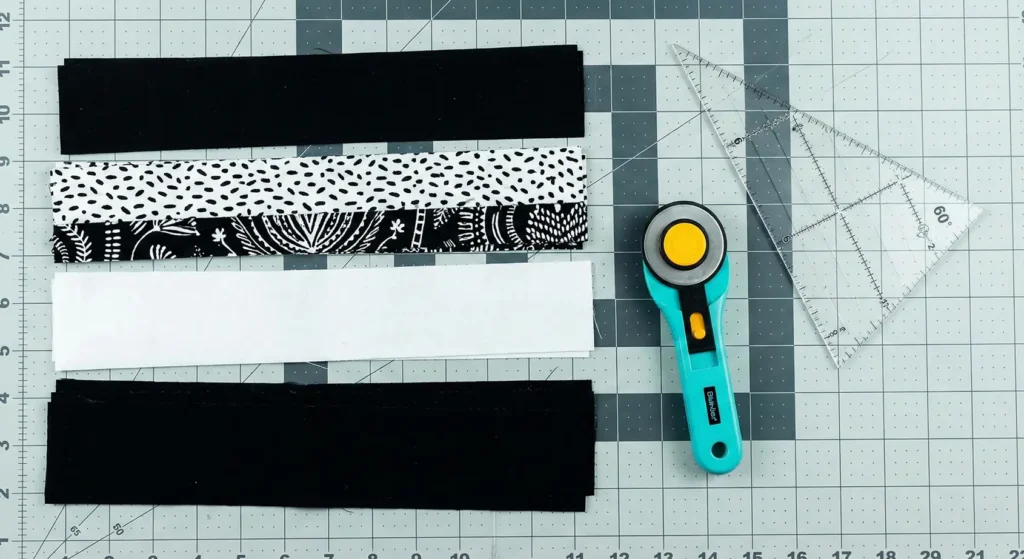
Step 1: Cut Fabric Strips
The height of your strip determines the size of your triangle.
- Cut Strips: Cut 6.5″ wide strips from both your Black and White fabrics.
- Cut 8 Black strips.
- Cut 12 White strips.
Step 2: Cut the 60-Degree Triangles
- Place a strip horizontally on your cutting mat.
- Using a 60-Degree Ruler: Align the bottom edge of the ruler with the bottom of the fabric strip. Cut along the angled side.
- Flip: Flip the ruler (or rotate the fabric) to cut the next triangle upside down.
- Repeat: Continue cutting alternating “Up” and “Down” triangles along the whole strip.
- Yield: You need roughly 180 triangles total (approx 70 Black, 110 White).
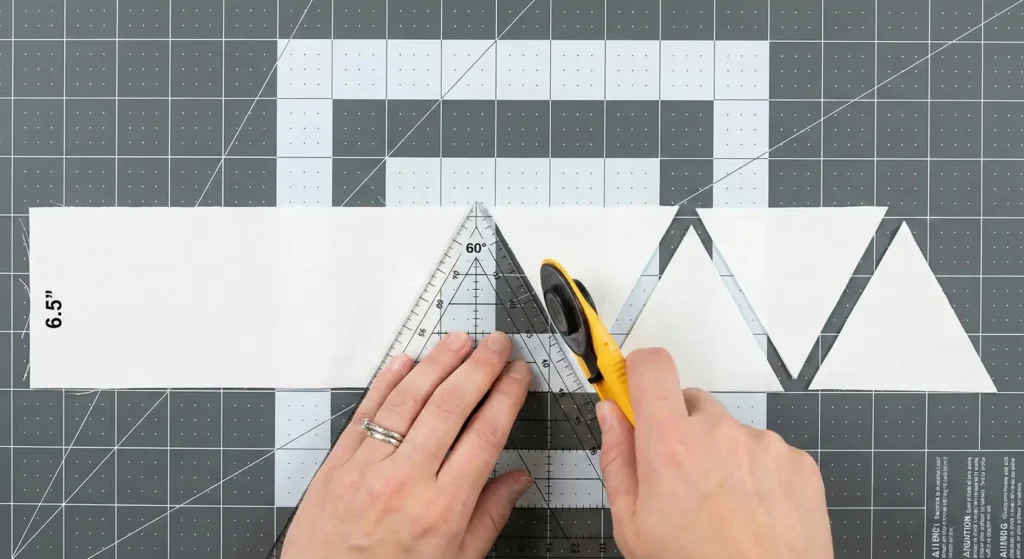
Step 3: The “Scattered” Layout
This is where the artistry happens. We want an asymmetrical, “falling” design rather than a rigid pattern.
- Find a floor space.
- Row Construction: Triangles are sewn in horizontal rows.
- Layout: Arrange the triangles in rows (alternating point-up / point-down).
- Top 3 Rows: Mostly White triangles with 1 or 2 Black “flakes.”
- Middle Rows: A mix of Black and White (50/50).
- Bottom 3 Rows: Mostly Black triangles (the “heavy” bottom).
- Visual Check: Step back. The black triangles should appear to cascade down the quilt.
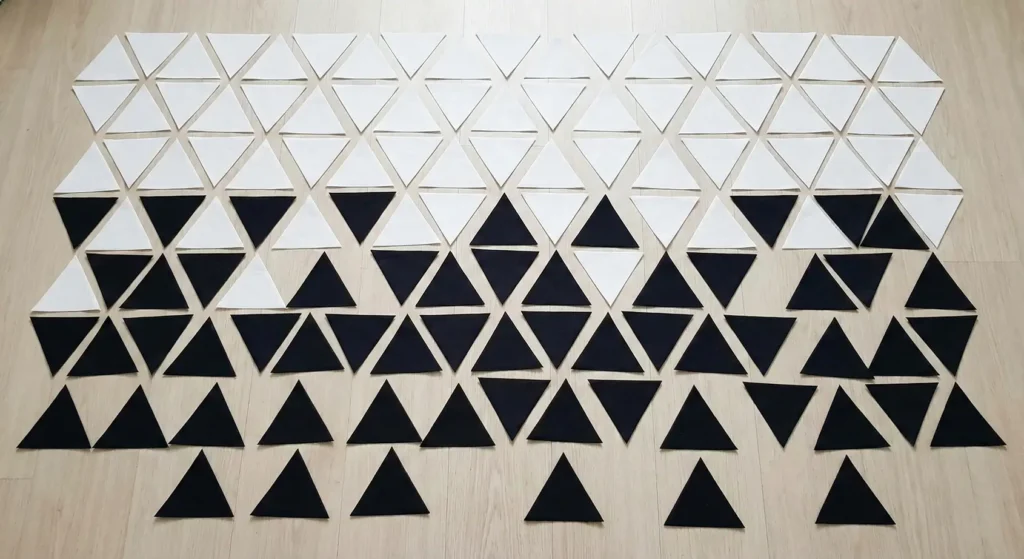
Step 4: Sew the Triangles into Rows
- Take the first two triangles of Row 1.
- Alignment: Place them Right Sides Together.
- Crucial Tip: The tips will not line up perfectly. You must offset the sharp points by about 1/4 inch so that the seam lines cross exactly at the 1/4″ sewing line. (You should see little “dog ears” sticking out).
- Sew with a 1/4″ seam.
- Continue adding triangles until the row is complete.
- Pressing: Press seams open to reduce bulk at the points.
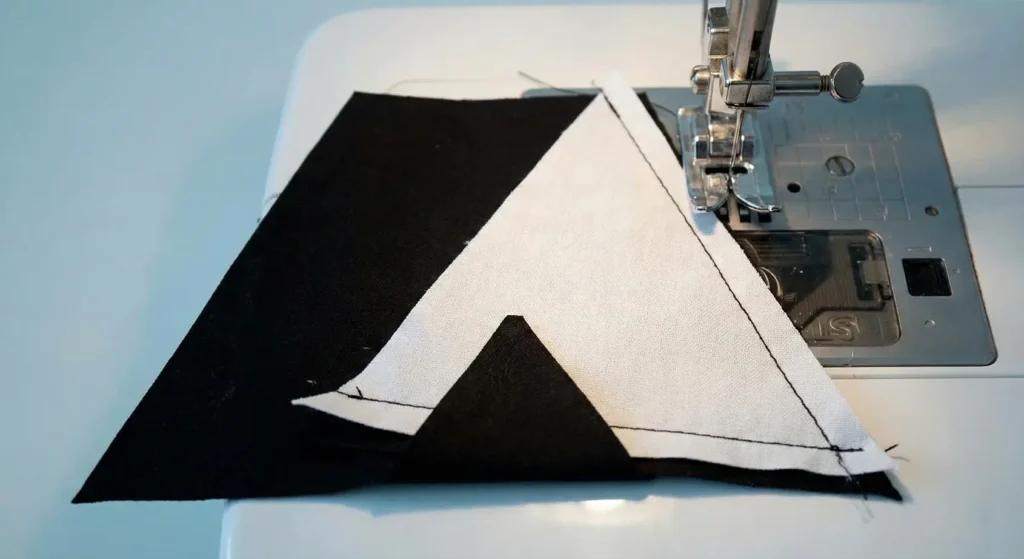
Step 5: Join the Rows
- Pin Row 1 to Row 2.
- Match Points: The points of the triangles in Row 1 should meet the flat bases of the triangles in Row 2 perfectly. Pin at every single intersection.
- Sew the rows together.
- Tip: Sew carefully over the points. If you sew too deeply, you will chop the sharp tips off your triangles. Aim to sew exactly through the “V” where the threads cross.
- Repeat until the top is assembled.
Step 6: Trim and Quilt
- Trim Edges: Because the rows are made of triangles, the left and right sides of the quilt top will be jagged (zigzagged). Use a long ruler to trim the sides straight, cutting off the triangle tips to make a rectangular quilt top.
- Quilting: Use a Geometric Diamond pattern.
- Stitch diagonal lines that follow the angles of the triangles (60 degrees).
- Stitch lines in the opposite direction to cross them.
- This creates a diamond grid that perfectly complements the triangle shapes.
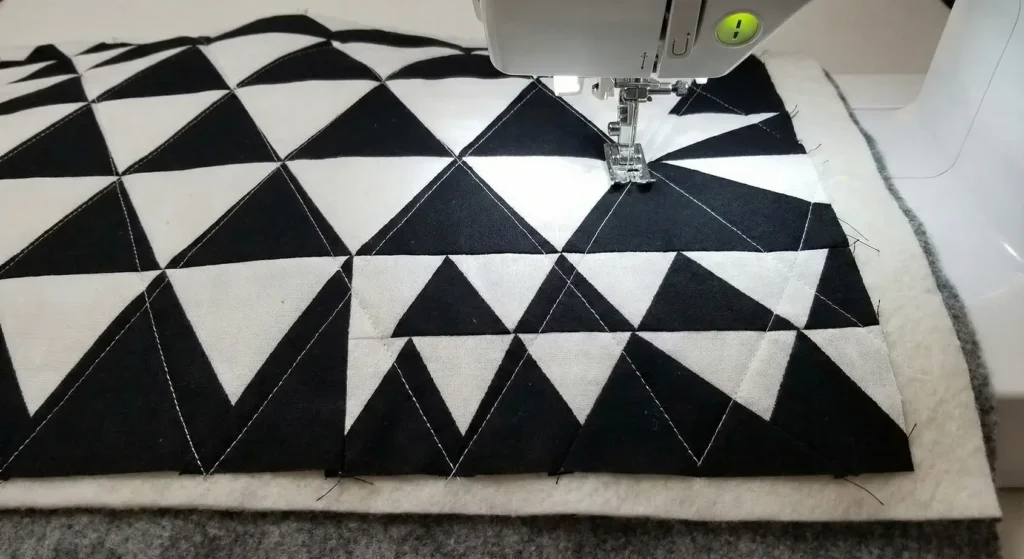
Pro Design Tip: The “Gold” Tip. Minimalist black and white loves a metallic accent. Replace 3 random Black triangles with a Metallic Gold or Copper fabric. These shiny accents catch the light and make the quilt look like a high-end designer piece.
Budget Consideration: Thrift Store Sheets. Geometric quilts rely on solids, not prints. High-thread-count White Flat Sheets from thrift stores are excellent sources of fabric for the white triangles. A King-size sheet provides yards of fabric for just a few dollars, and the high thread count feels crisp and modern.
19. Abstract Black and White Quilt Patterns for Artistic Wall Hangings
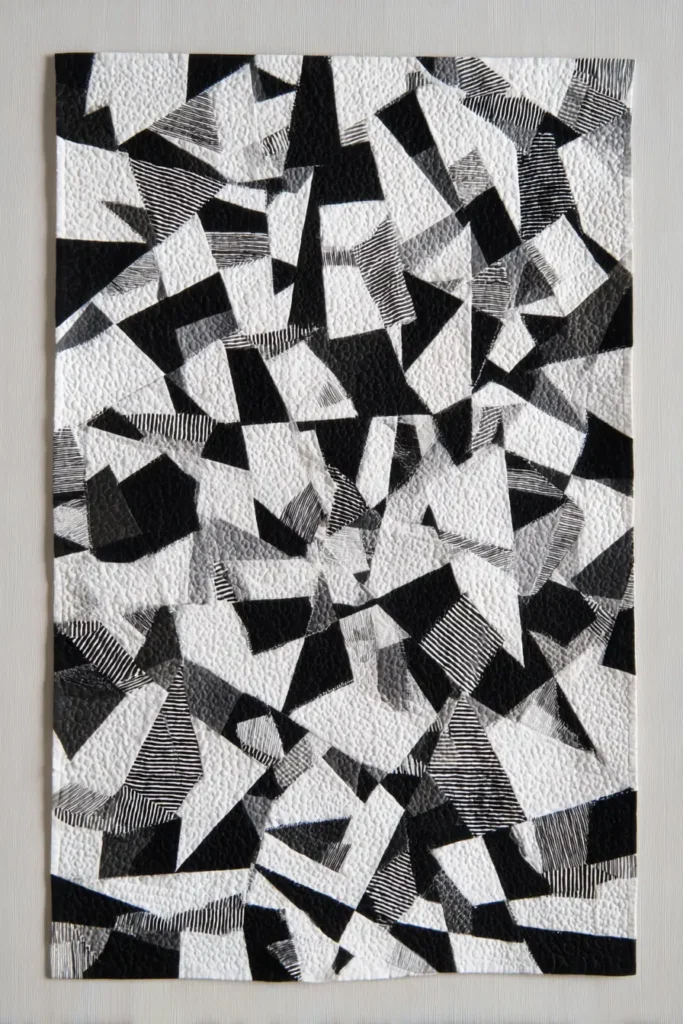
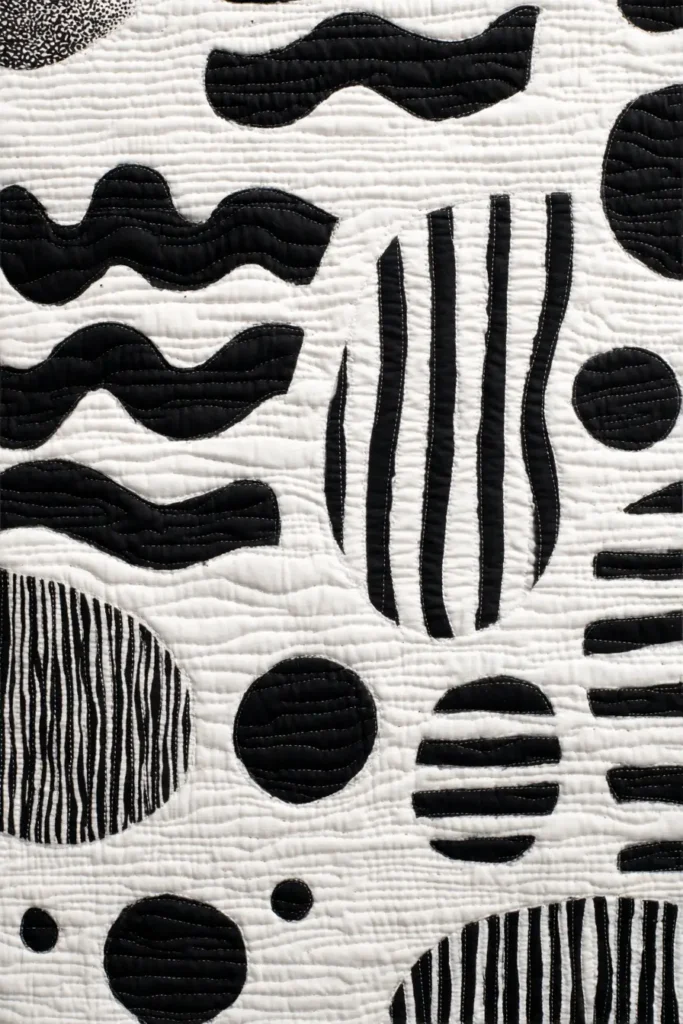
The “Shattered Glass” Improv Wall Hanging
This pattern moves entirely away from traditional blocks and grids. It uses a technique called “Slash and Sew” (or improvisational piecing) to create a chaotic, energetic design resembling shattered glass or abstract expressionist art. Because there are no rules or precise measurements for the angles, every quilt is 100% unique.
Finished Dimensions: Wall Art Size, approximately 40″ x 50″.
Materials Needed:
- Fabric A (White): 1.5 yards of Solid White.
- Fabric B (Black): 1 yard of Solid Black.
- Fabric C (Accents): Scraps of Black/White striped or polka dot fabric (optional, for texture).
- Backing Fabric: 1.5 yards.
- Batting: Craft Size (45″ x 60″).
- Binding: None (We will use a “Facing” for a gallery-style finish).
- Notions: Rotary cutter (with a sharp blade), long ruler.
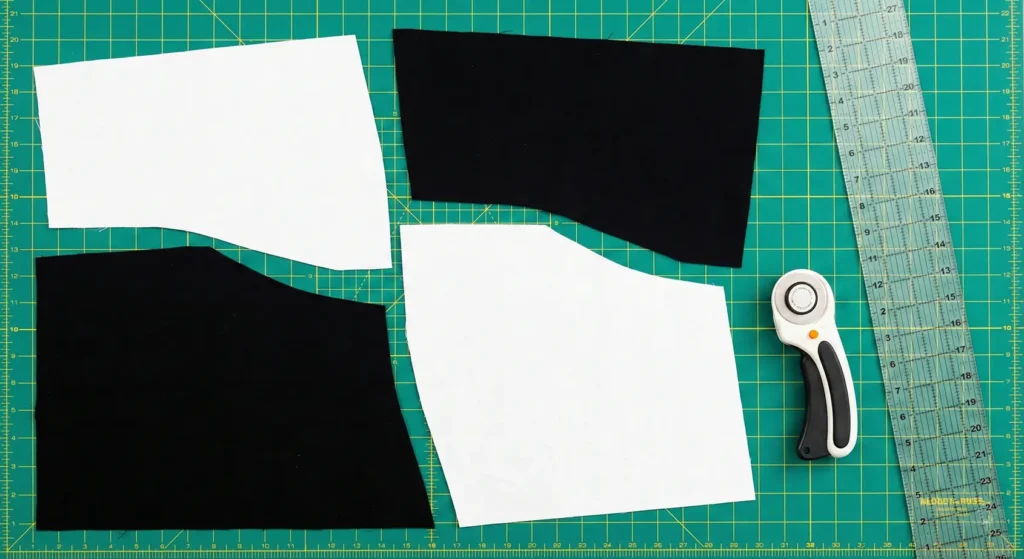
Step 1: Create the Base “Slabs”
Instead of cutting small pieces, we start with large chunks of fabric.
- Cut a large piece of White Fabric roughly 20″ x 22″.
- Cut a large piece of Black Fabric roughly 15″ x 20″.
- Cut 2-3 other large irregular rectangles from your remaining fabric.
- Lay them out on the floor so they roughly form a rectangle shape (about 40″ x 50″). They don’t need to fit perfectly yet.
Step 2: The “Slash” (Insertions)
This is the improv technique.
- Take one of your large White Rectangles.
- Slash: Take your rotary cutter and make a random, angled cut straight through the middle of the fabric. Separation anxiety? Don’t worry!
- Insert: Take a strip of Black Fabric (cut to approx 1.5″ or 2″ wide).
- Sew: Sew the black strip between the two white pieces you just cut apart.
- Press: Press seams open.
- Result: You now have a white panel with a sharp black line running through it.
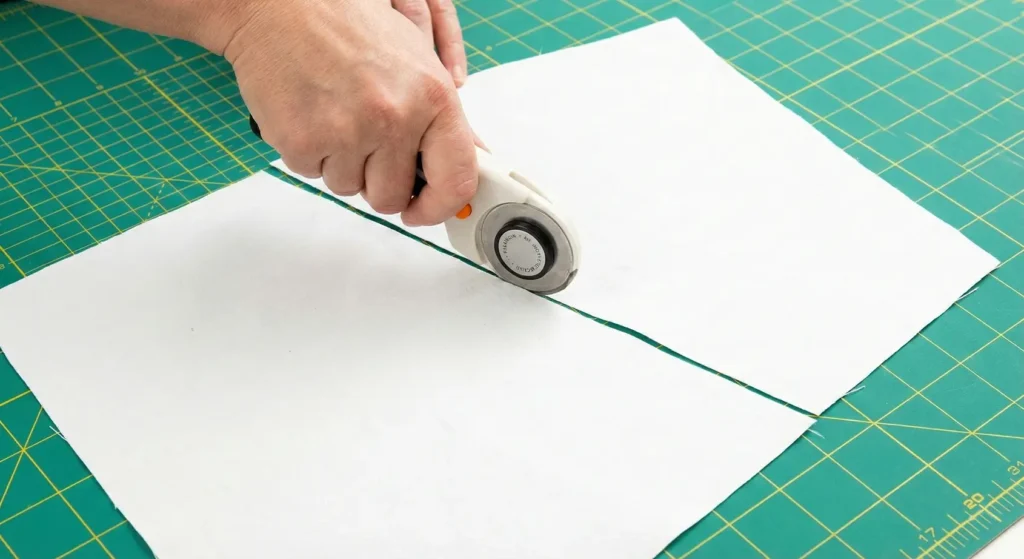
Step 3: Repeat and Complicate
- Rotate the panel 90 degrees.
- Slash again, crossing over the black line you just sewed.
- Insert again: This time, insert a Striped Fabric strip or a White Strip (if the panel is black).
- Repeat this process on all your base panels.
- Make some lines thick (3″ strips) and some lines thin (1″ strips).
- Make some lines parallel and some cross at sharp angles.
- Keep going until your panels look complex and “shattered.”

Step 4: Assemble the Puzzle
- Place your modified panels back on the floor.
- Arrange them into the final composition.
- Design Tip: Try to balance the “heaviness.” If one corner is very dark and busy, balance it with a large area of white negative space in the opposite corner.
- Join: Sew the large panels together to form the final quilt top. You may need to trim edges straight to make them fit.
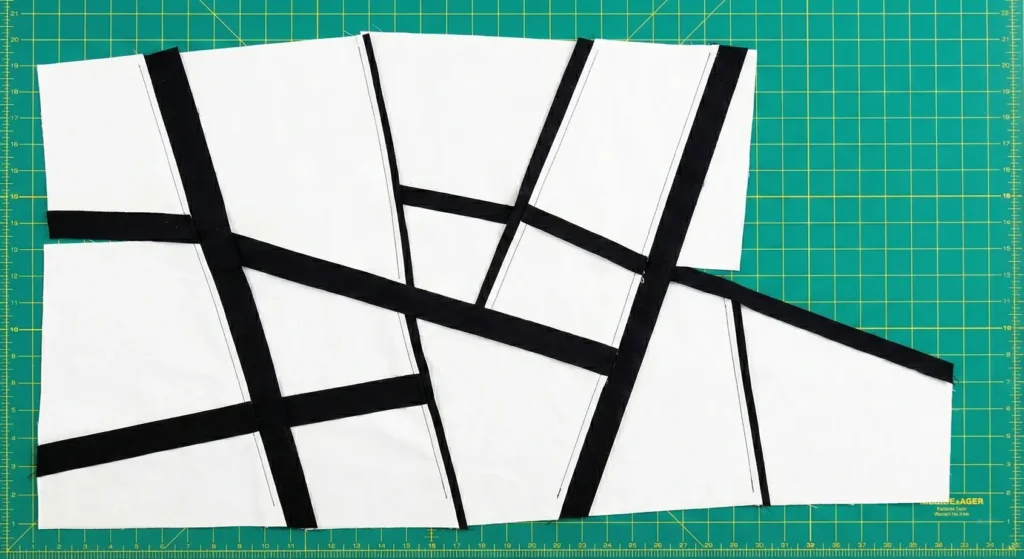
Step 5: “Graffiti” Quilting
- Baste the sandwich.
- Quilting: Treat this like a drawing.
- Use Black Thread.
- Stitch dense scribbles, spirals, or jagged lines in the white negative spaces.
- Switch to White Thread and do the same in the black areas.
- The quilting should be dense and visible, adding another layer of chaos to the art.
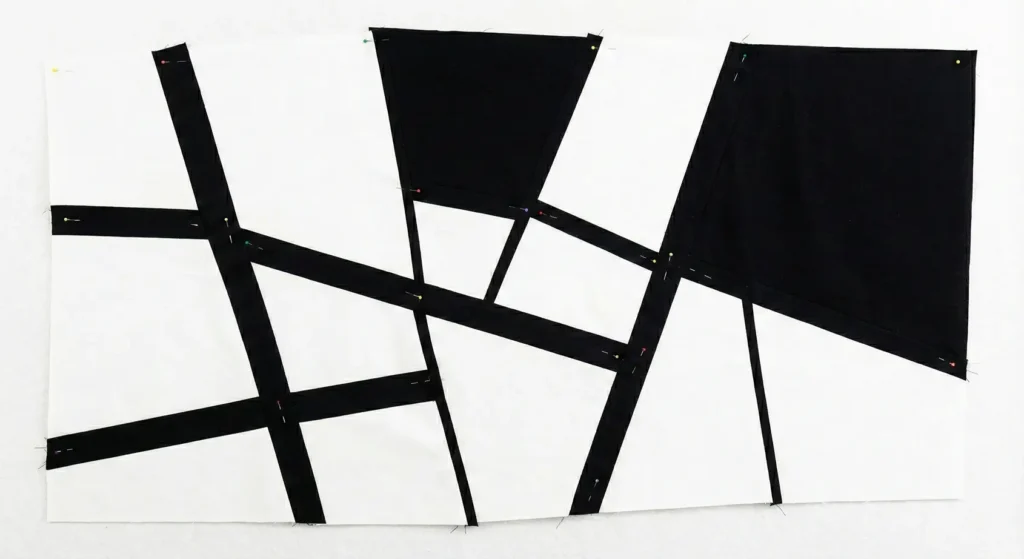
Step 6: The “Facing” Finish (Invisible Binding)
Wall hangings look best without a visible binding frame. We use a “Facing” to wrap the raw edge to the back.
- Cut 4 strips of fabric, 2.5″ wide.
- Sew them to the front of the quilt edges (Right Sides Together), just like binding.
- Flip: Instead of folding it over to show on the edge, flip the entire strip completely to the back of the quilt.
- Press: Press the edge firmly so no binding shows from the front.
- Hand Stitch: Hand sew the facing down on the back side.
- Sleeve: Don’t forget to hand-sew a “hanging sleeve” (a tube of fabric) near the top back edge so you can insert a dowel rod to hang it on the wall.

Pro Design Tip: The “Bleed” Effect. When slashing and inserting strips, let one or two black strips run all the way off the edge of the quilt. It makes the design feel expansive, as if the art extends beyond the fabric’s borders.
Budget Consideration: Canvas Drop Cloths. For wall hangings, you don’t need soft cotton. Painters Canvas is stiff, hangs perfectly flat on a wall without sagging, and holds the heavy thread of “graffiti quilting” beautifully. It is the cheapest way to get an extensive “white” background.
20. Layered Black and White Quilts for Cozy Yet Modern Rooms
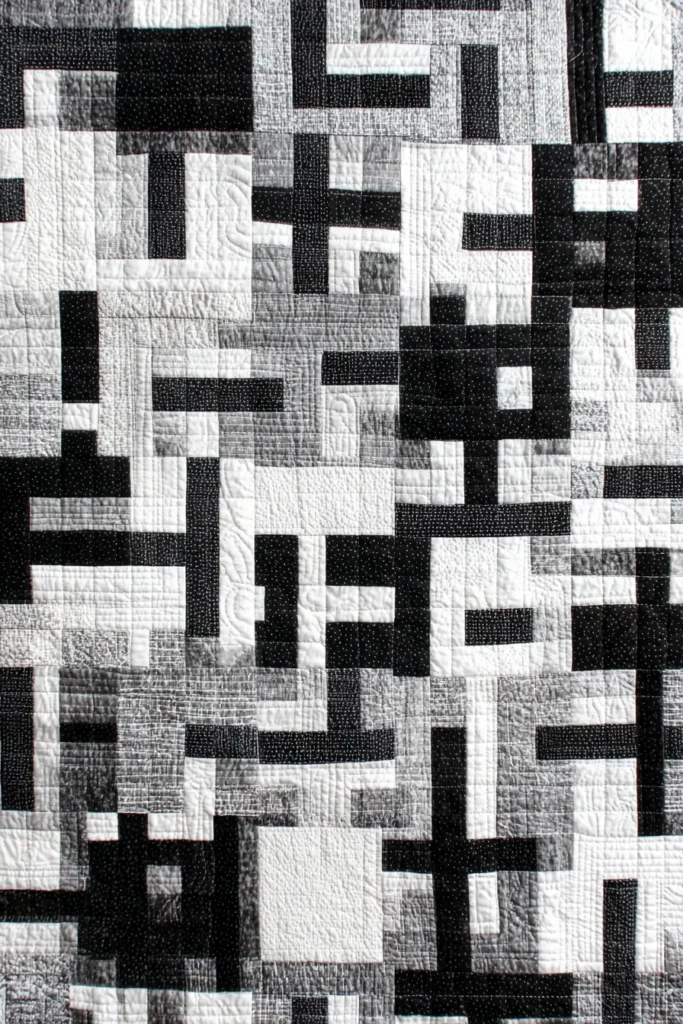
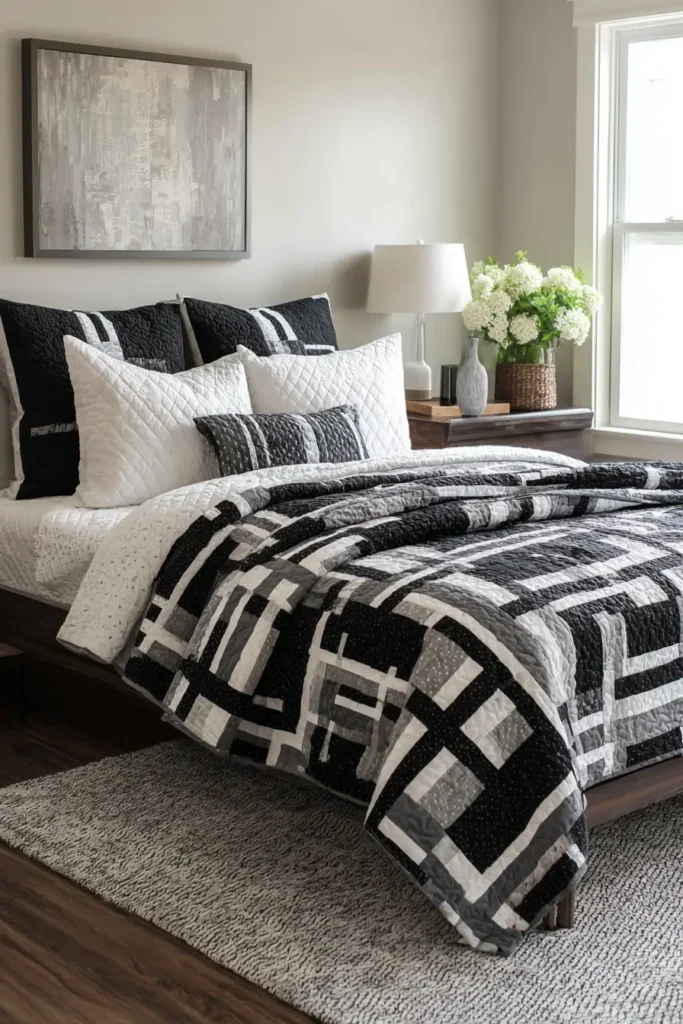
The “Yin & Yang” Reversible Kantha Quilt
To achieve that cozy, layered look without adding heavy bulk, we look to the Indian tradition of “Kantha” (running stitch) quilts. This project is a Whole Cloth Quilt, meaning there is no piecing of blocks. The design comes entirely from the texture of the hand-stitching and the fabric’s reversible nature—Solid Black on one side, Solid White on the other. It is designed to be folded back at the top of the bed to show both layers simultaneously.
Finished Dimensions: Throw/Twin Size, approximately 60″ x 80″.
Materials Needed:
- Side A (Black): 2.5 yards of Black Linen, Double Gauze, or Soft Cotton.
- Side B (White): 2.5 yards of White Linen, Double Gauze, or Soft Cotton.
- Batting: 1 yard of thin cotton batting (or flannel sheet for a lighter drape).
- Thread: White Pearl Cotton (Size 8) for the Black side, and Black Pearl Cotton for the White side.
- Notions: Long embroidery needle, safety pins (lots of them), painter’s tape.
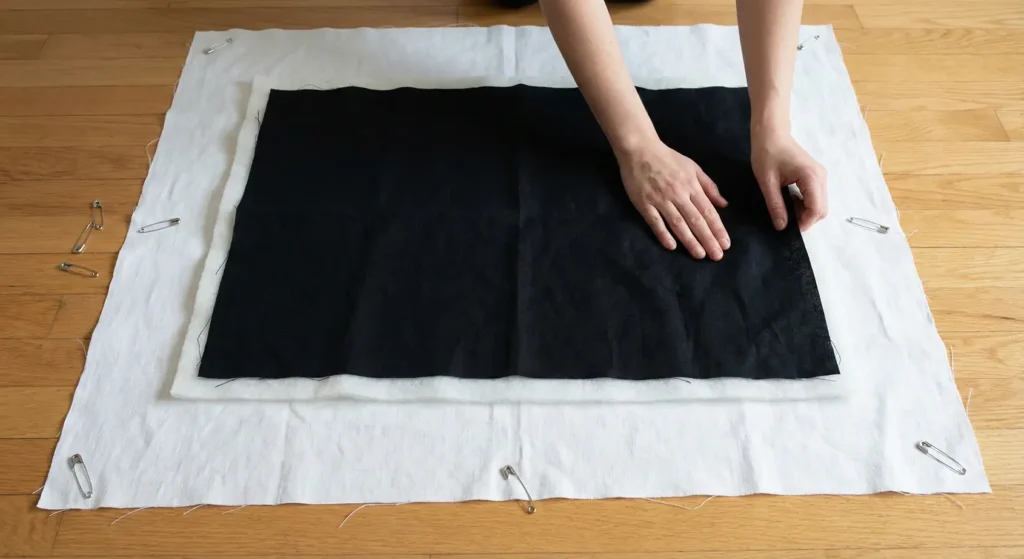
Step 1: Prepare the “Whole Cloth” Sandwich
Since we aren’t cutting up blocks, prep is fast.
- Iron both pieces of fabric perfectly flat.
- Lay the White Fabric face down on the floor (taped taut).
- Lay the Batting on top.
- Lay the Black Fabric face up on top.
- Baste: This is crucial for whole cloth quilts. Pin every 4-6 inches with safety pins. If the layers shift, you get wrinkles that you can’t hide in seams.
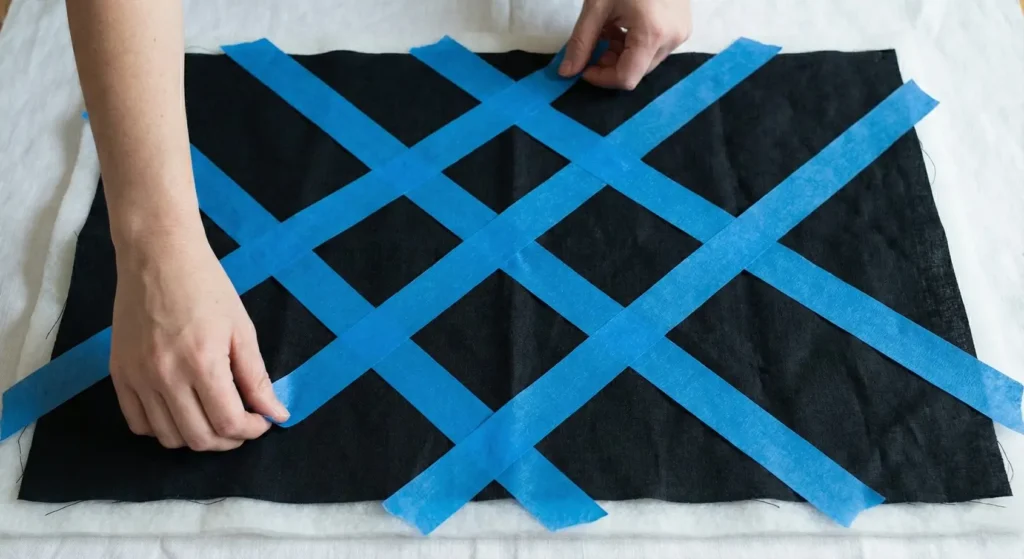
Step 2: Mark the “Guide” Lines
We want a modern, geometric look, not random wandering stitches.
- Use Painter’s Tape (Blue or Green tape).
- Create a large Diamond Grid or Chevrons directly on the Black fabric.
- Method: Lay long strips of tape diagonally across the quilt, spaced about 3 inches apart.
- You don’t need to mark the whole quilt at once; you can move the tape as you go.
Step 3: The Contrast Stitching (Side A)
- Thread your needle with White Pearl Cotton.
- Stitch: Sew a “Running Stitch” (simple up-down-up-down dash) right alongside the edge of the painter’s tape.
- Stitch Length: Aim for stitches that are about 1/4″ long. Consistency is more important than smallness.
- The stark white thread against the black fabric creates a stunning “chalkboard” effect.
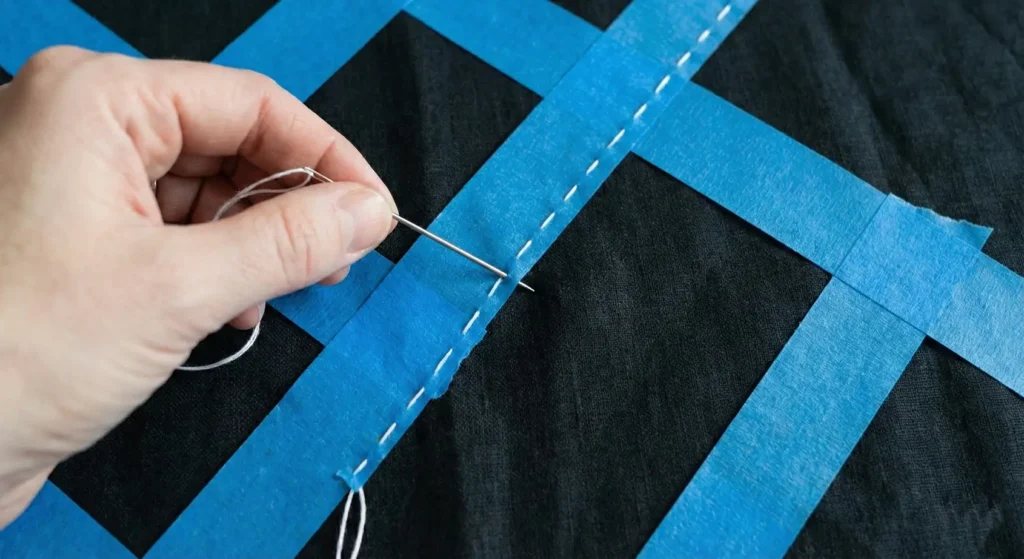
Step 4: The Reverse Stitching (Side B)
This is the magic of the reversible quilt.
- When you stitch from the black side, the white thread will show up on the white back, which is subtle (white-on-white texture).
- Optional Pop: If you want high contrast on both sides, you can use a variegated thread (black and white twisted) or alternate rows. However, the classic modern look is high contrast on top (White thread on Black) and subtle texture on the bottom.
Step 5: Dense Texture Filling
- Once your main guidelines (the 3-inch grid) are stitched, you can stop for a loose, airy quilt.
- For maximum “Cozy” factor: Add more lines between the guide lines.
- Use the edge of your sewing foot or free-hand it (wobbly lines are very boho-chic).
- Fill the quilt until the lines are about 1/2 inch apart. This makes the quilt pucker and drape like a heavy blanket.
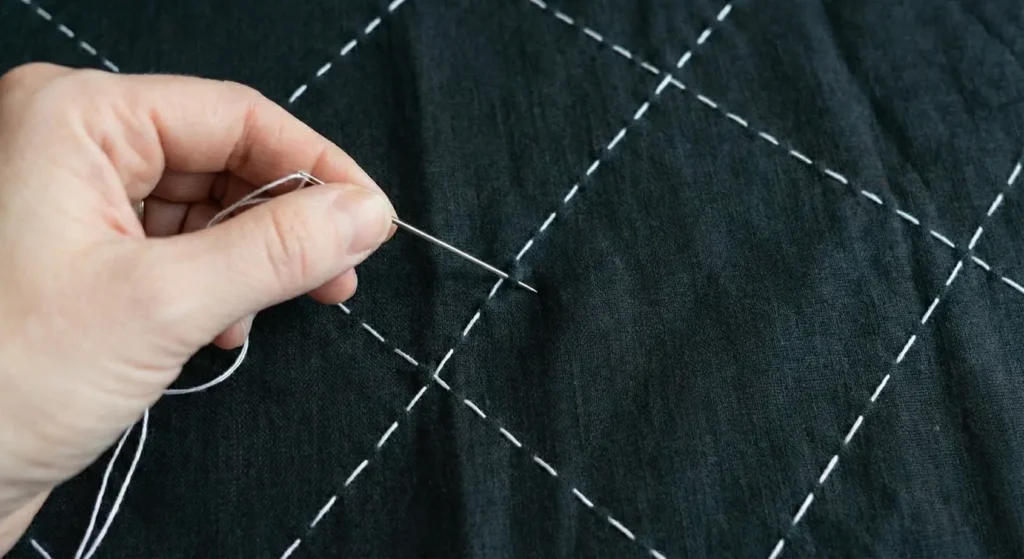
Step 6: The “Faux Piped” Binding
We want a clean edge that highlights the layers.
- Trim the edges square.
- Cut 2.5″ strips of the Black Fabric.
- Sew the binding to the White Side (Back) first.
- Fold it over to the Black Side (Front).
- Machine Stitch: Stitch it down.
- Result: The black binding disappears into the black front while boldly framing the white back.
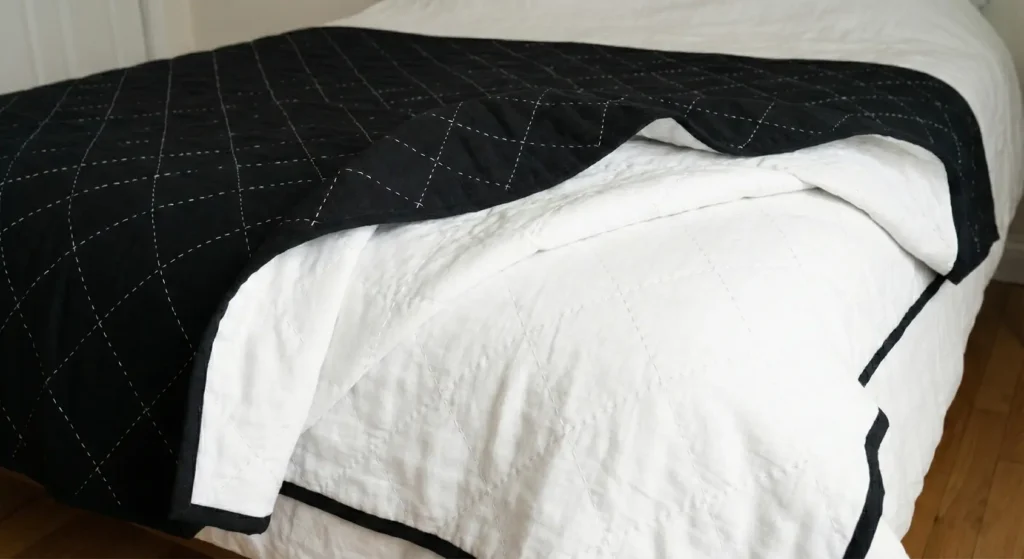
Pro Design Tip: The “Peekaboo” Fold. When styling this on a bed, always fold the top 1/3 down. The stark contrast between the Black top and the White underside creates that “layered” designer look instantly, even if it’s the only quilt on the bed.
Budget Consideration: IKEA Duvet Covers. Buying 5 yards of linen is pricey ($100+). Instead, buy a Black/White Duvet Cover Set from IKEA (often $30-40). Cut it open. You instantly have a huge piece of black fabric, often with a patterned or white reverse side, and it’s already hemmed on some sides!
Conclusion
Exploring these 20 Black-and-White Quilt Pattern Ideas reveals the incredible scope and adaptability of monochrome design in crafting spaces that are both restful and refined. From the foundational statement of a Bold Black-and-White Stripe Quilt on the bed to the subtle accents of a Monochrome Quilted Table Runner, each pattern serves as a versatile tool for layering texture and visual interest. This journey through classic checks, modern geometries, and artistic abstracts proves that limiting your palette to black and white does not limit your creativity; instead, it focuses it, allowing form, pattern, and contrast to tell a compelling story in every room.
The collection underscores a central design principle: cohesion without monotony. A Herringbone Black-and-White Quilt as a Floor Throw can beautifully complement a Flying Geese Pattern on the Master Bedroom wall, creating a dialogue of shapes across the space. Similarly, the Boho Quilt Patterns for Relaxed Living Spaces demonstrate how the same core colors can evoke a completely different feeling than the Striking Graphic Quilts for Contemporary Bedrooms, offering endless possibilities for personalization. This versatility ensures that your home reflects a curated, intentional style that is seamlessly integrated.
In embracing these ideas, you move beyond mere decoration to create an environment with emotional resonance. The Scandinavian-Inspired quilts offer serene comfort, while the Timeless Star Quilt Patterns pay homage to heritage and craft. The tactile pleasure of Layered Quilts and the functional art of Quilted Floor Mats show that these pieces are designed not just to be seen, but to be lived with and enjoyed, adding layers of comfort and character to your daily life.
Therefore, let this guide inspire you to experiment with the powerful elegance of black and white. Whether you choose to craft a single focal point or weave a monochrome theme throughout your home, these quilt patterns provide the blueprint for a space that is effortlessly stylish, intensely cozy, and authentically modern. Embrace the contrast, play with scale and pattern, and transform your living areas into a harmonious sanctuary defined by timeless sophistication and warm, welcoming charm.
