
20 Modern Quilt Pattern Ideas: Sleek & Sophisticated Designs for Stylish, Cozy, and Contemporary Homes
Modern quilting has revolutionized the craft, shifting away from busy traditional blocks toward clean lines, high contrast, and bold simplicity. If you are looking to refresh your home with textiles that feel curated rather than cluttered, this collection of Modern Quilt Pattern Ideas is your ultimate guide. We focus on designs that champion a “Sleek & Sophisticated” aesthetic, demonstrating that warmth and minimalism can coexist beautifully. These patterns are designed for makers who appreciate the intersection of art and utility, offering projects that are as effortless to style as they are satisfying to stitch.
Modern Quilt Pattern Ideas
Contents
- 1 Modern Quilt Pattern Ideas
- 2 1. Minimalist Geometric Modern Quilt Patterns for Serene Master Suites
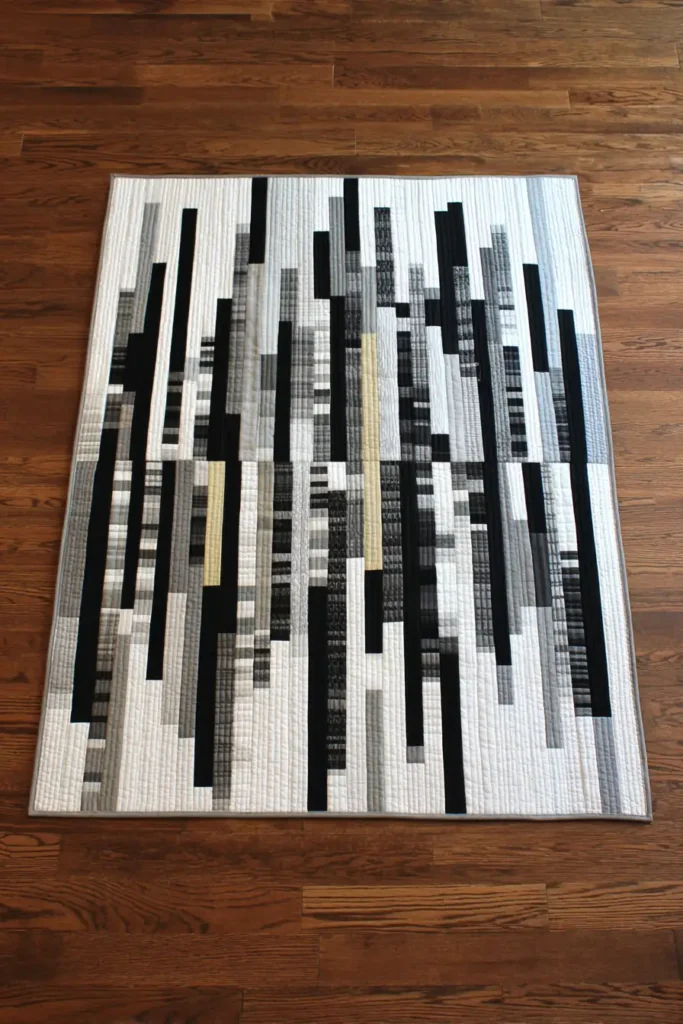
- 3 2. Monochrome Black and White Modern Quilts for Elegant Bedrooms
- 4 3. Soft Textured Modern Bed Covers with Channel Stitching
- 5 4. Contemporary Ombre Gradient Bed Quilt Designs
- 6 5. Negative Space Modern Quilt Ideas for Airy Bedrooms
- 7 6. Mid-Century Modern Inspired Bed Runners for Retro Style
- 8 7. Sleek Solid Color Whole Cloth Quilts for Zen Decor
- 9 8. Large-Scale Block Patterns for Bold Statement Bedding
- 10 9. Modern Triangle Patchwork Pillow Shams for Edgy Accents
- 11 10. Architectural Graphic Quilt Throws for Stylish Living Rooms
- 12 11. Scandi-Style Quilted Sofa Throws for Cozy Hygge Vibes
- 13 12. High-Contrast Modern Cushion Covers for Chic Decor
- 14 13. Minimalist Quilted Table Runners for Elegant Dining
- 15 14. Modern Hexagon Patchwork Placemats for Trendy Tables
- 16 15. Asymmetrical Strip Quilt Designs for Unique Table Toppers
- 17 16. Durable Denim Modern Quilt Covers for Family Living
- 18 17. Abstract Art-Inspired Chair Pads for Comfortable Seating
- 19 18. Contemporary Log Cabin Variations for Modern Sofas
- 20 19. Improv Piecing Quilt Patterns for Unique Wall Hangings
- 21 20. Framed Minimalist Line Art Quilt Designs for Gallery Walls
- 22 Conclusion
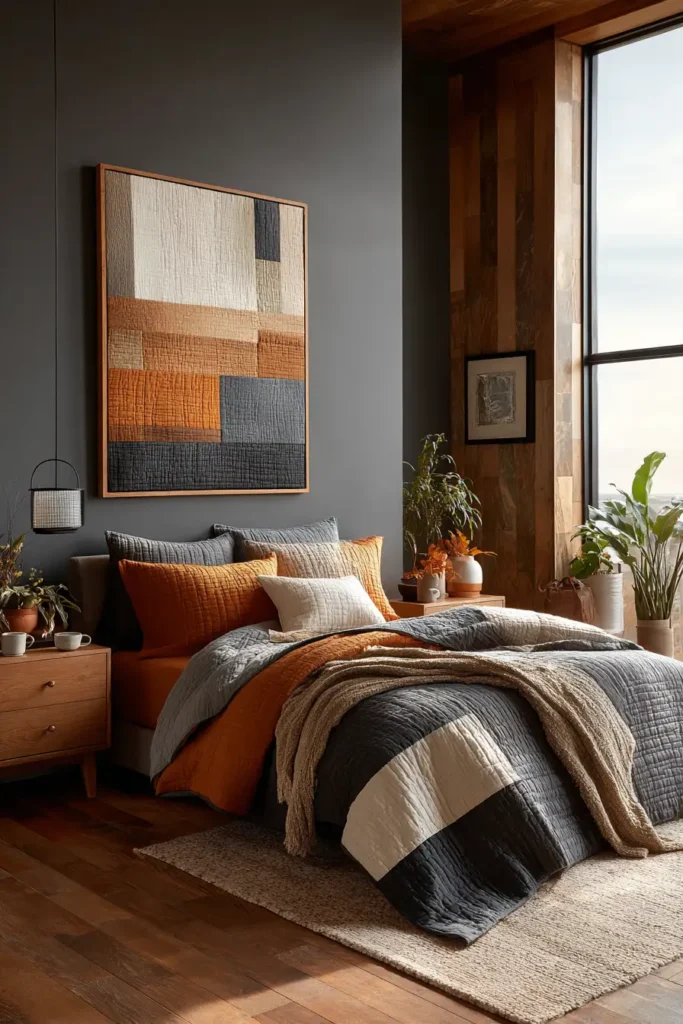
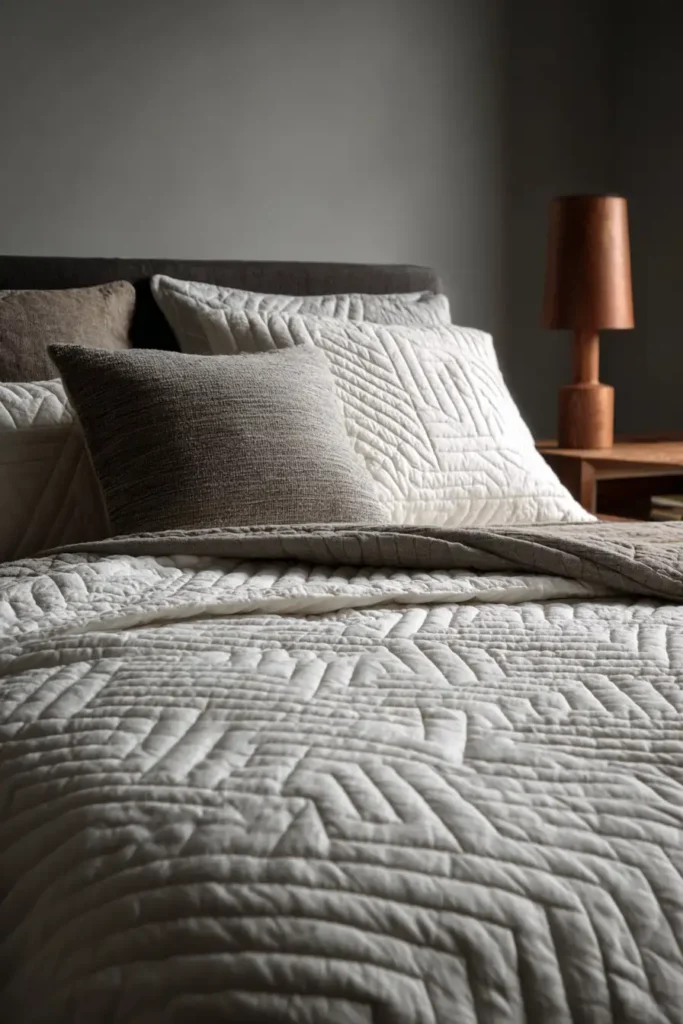
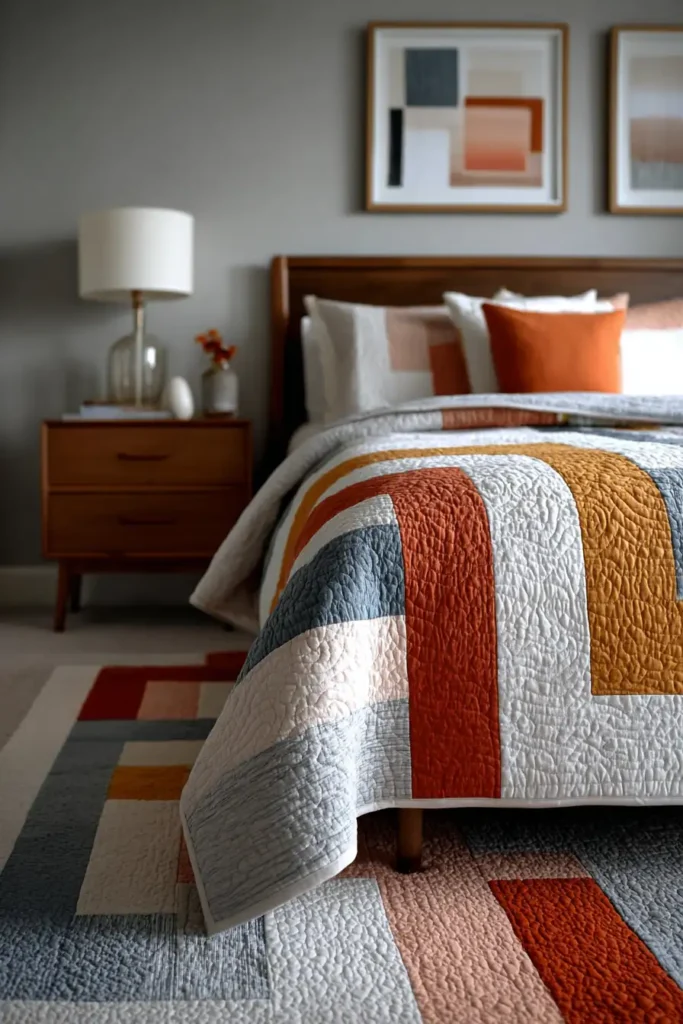
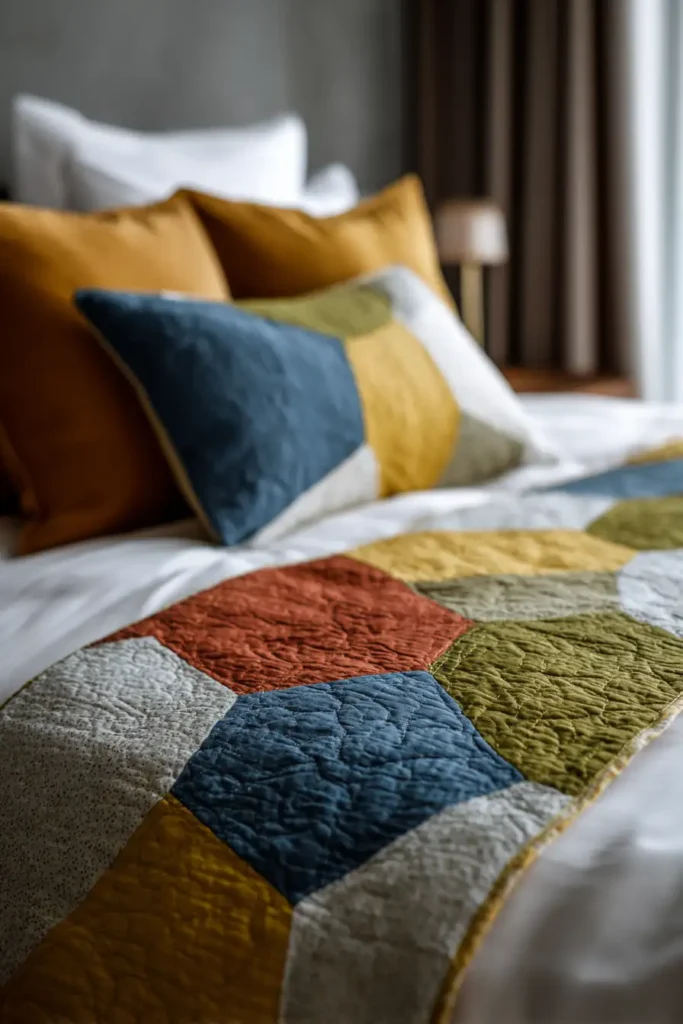
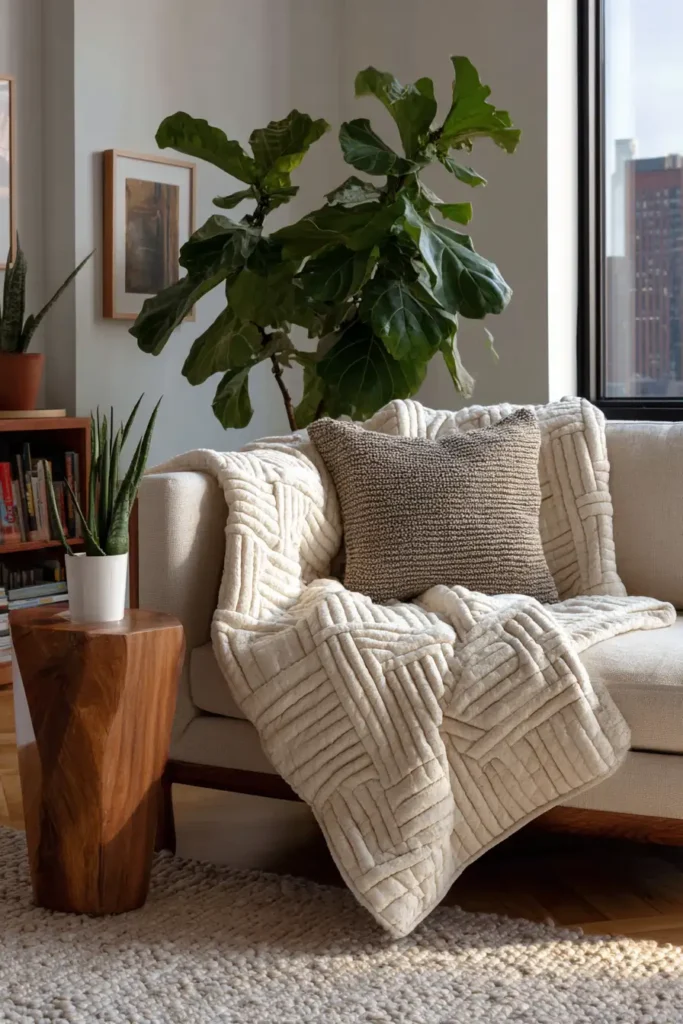
The bedroom is the perfect canvas for these contemporary styles, where the goal is often to minimize visual noise. We explore how Minimalist Geometric shapes and generous use of Negative Space can create a serene, airy master suite that feels like a high-end hotel. Whether you prefer the dramatic impact of Monochrome Black and White designs or the subtle, tactile luxury of Soft Textured Channel Stitching, these bed covers prioritize visual calm. We also delve into Mid-Century Modern Inspired runners and Ombre Gradient techniques that add a splash of retro or artistic flair without overwhelming the space.
But modern quilting is not just for sleep; it is a lifestyle statement for the entire home. From Scandi-Style Sofa Throws that bring essential “hygge” vibes to your living room, to Architectural Graphic designs that act as functional art, these projects elevate everyday spaces. We extend this sophisticated look to the dining room with Minimalist Table Runners and Hexagon Placemats, and even up to the walls with Framed Minimalist Line Art. This guide ensures that every corner of your home, from the sofa to the gallery wall, reflects a cohesive, stylish, and comfortable contemporary vision.
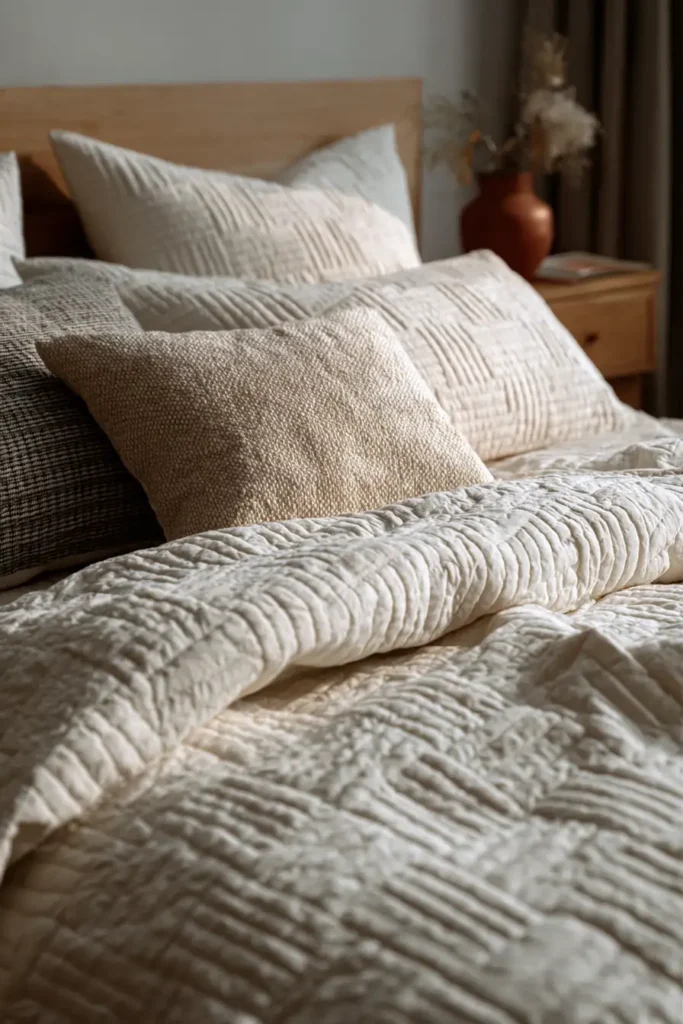
1. Minimalist Geometric Modern Quilt Patterns for Serene Master Suites
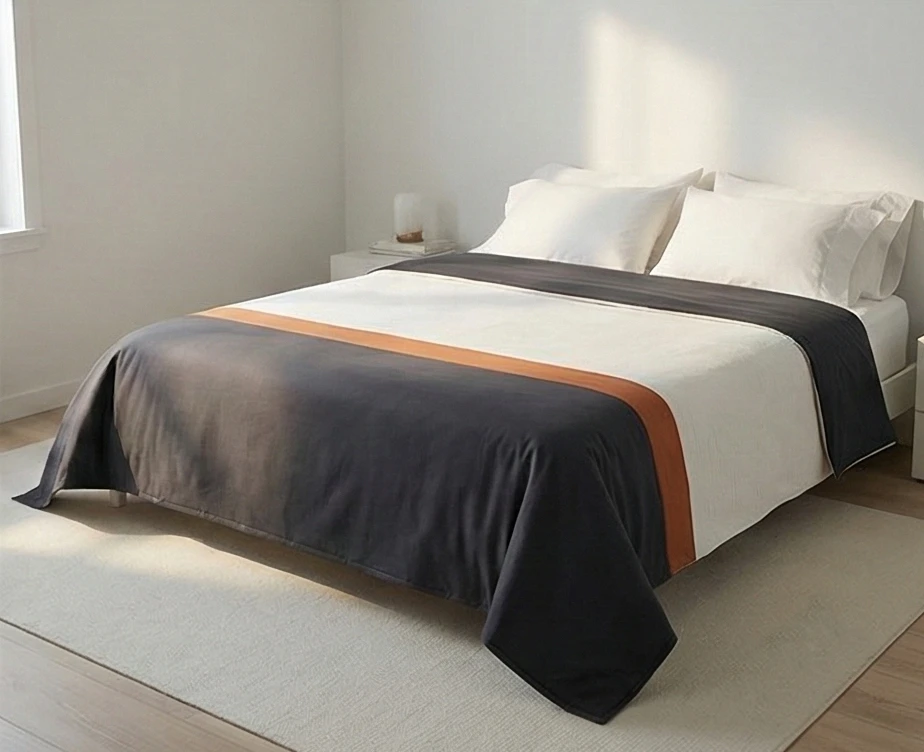
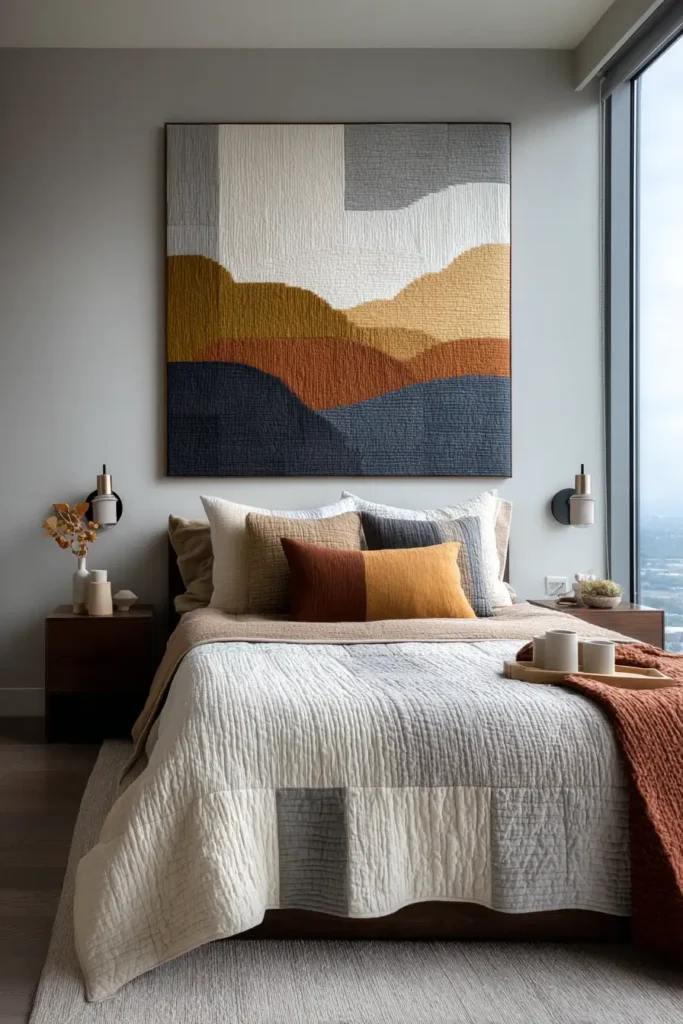
“The Quiet Horizon” Asymmetrical Color Block Quilt
Modern minimalism isn’t about emptiness; it’s about the intentional use of space. “The Quiet Horizon” uses color blocking and the Rule of Thirds to create a landscape-like composition that feels expansive and calming. By using huge swathes of solid fabric (negative space) broken by a single, sharp “horizon line” of a contrasting color, this quilt turns the bed into a piece of abstract art. It is designed to quiet the mind before sleep.
Finished Dimensions: King/Queen Coverlet, 90″ x 100″ (Extra length for a modern tuck).
Materials Needed:
- Fabric A (The Ground/Bottom): 3 yards of Charcoal, Slate Blue, or Deep Olive (Solid Cotton Couture or Kona).
- Fabric B (The Horizon/Accent): 1/2 yard of Copper, Mustard, or Metallic Gold.
- Fabric C (The Sky/Top): 4 yards of Arctic White, Oyster, or Pale Grey.
- Backing: 8.5 yards of a high-thread-count wide-back sateen (for a silky feel against the skin).
- Batting: Bamboo Blend (50/50).
- Why: Bamboo is heavier than cotton but drapes like silk. It allows large fabric blocks to puddle elegantly rather than puffing up stiffly.
- Notions: A long acrylic ruler (6″ x 24″), masking tape.
Cultural Backstory: The Modern Quilt Movement, formalized around 2009 with the founding of the Modern Quilt Guild in Los Angeles, rebelled against the complex, busy patterns of traditional quilting. Influenced by Mid-Century Modern graphic design and Bauhaus architecture, modern quilters prioritize “Negative Space”—areas of the quilt where the eye can rest—over intricate patchwork.
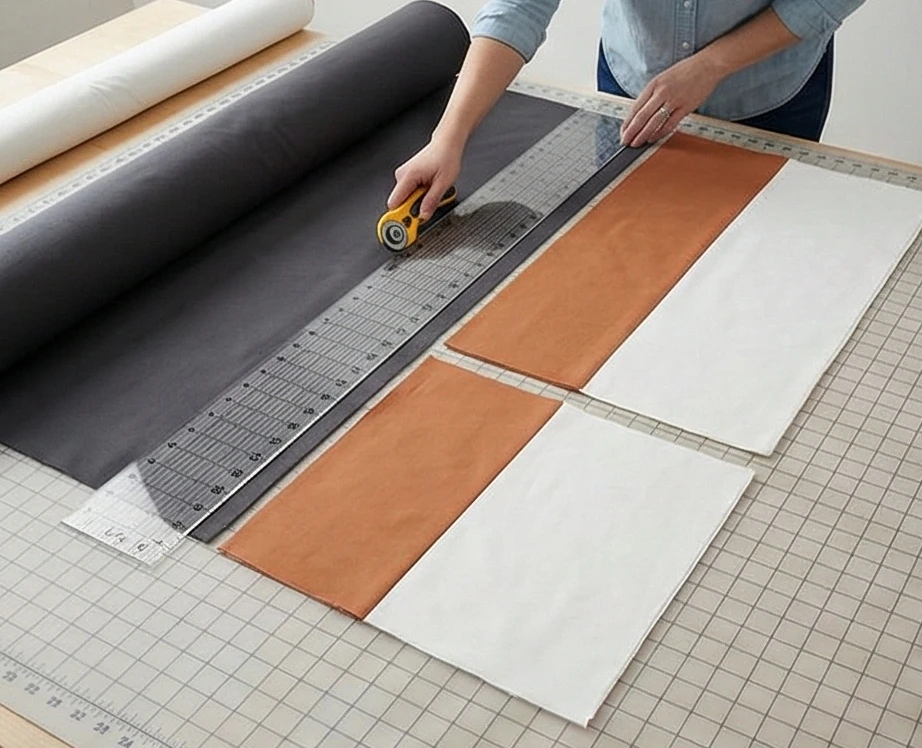
Step 1: The “Golden Ratio” Cut
Minimalism relies on proportion. If the lines are in the wrong place, it looks accidental. If they are placed mathematically, it looks designed.
- The Bottom (Ground): Cut a panel measuring 90″ wide x 35″ tall. (You will likely need to piece two widths of fabric together; hide the vertical seam carefully or embrace it).
- The Stripe (Horizon): Cut a strip measuring 90″ wide x 4″ tall.
- The Top (Sky): Cut a panel measuring 90″ wide x 61″ tall.
- Note: The “Horizon” is placed slightly below the center line (at the 35-inch mark of a 100-inch quilt), which feels more grounded and stable than a perfectly centered line.
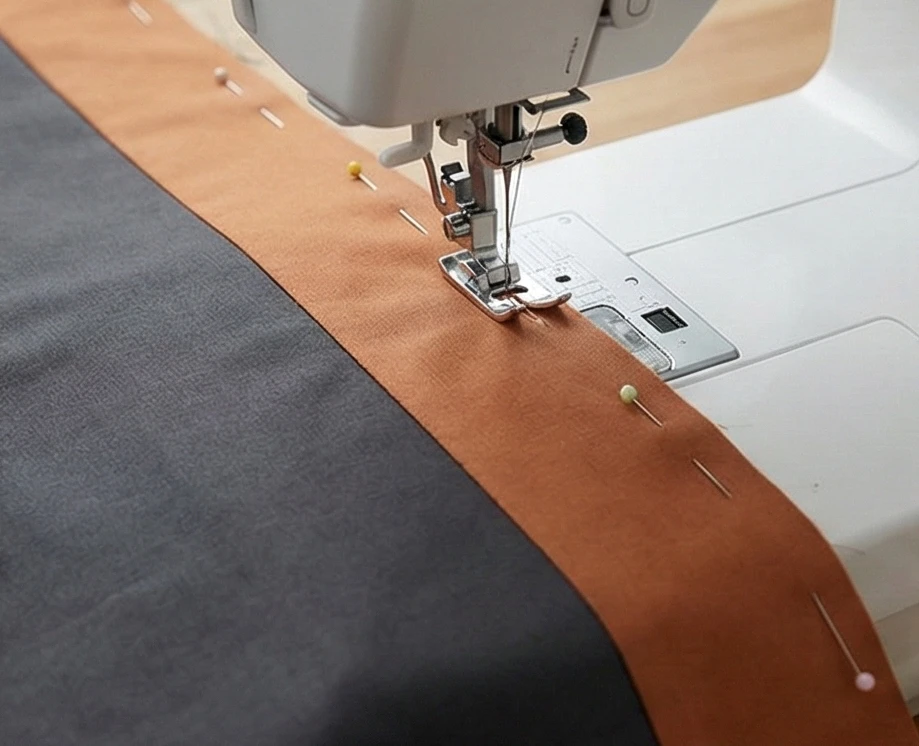
Step 2: Seaming the Expenses
Sewing long seams without puckering requires patience.
- Pinning: Place the Horizon Strip (B) Right Sides Together with the top edge of the Ground Panel (A).
- Technique: Pin every 4 inches. Do not stretch the fabric.
- Stitch: Sew with a standard 1/4″ seam.
- Press: Press the seam toward the darker fabric.
- Add the Sky: Pin the bottom edge of the Sky Panel (C) to the top edge of the Horizon Strip. Sew and press.
- Result: You now have a massive 90″ x 100″ top with a single strike of color running across the lower third.
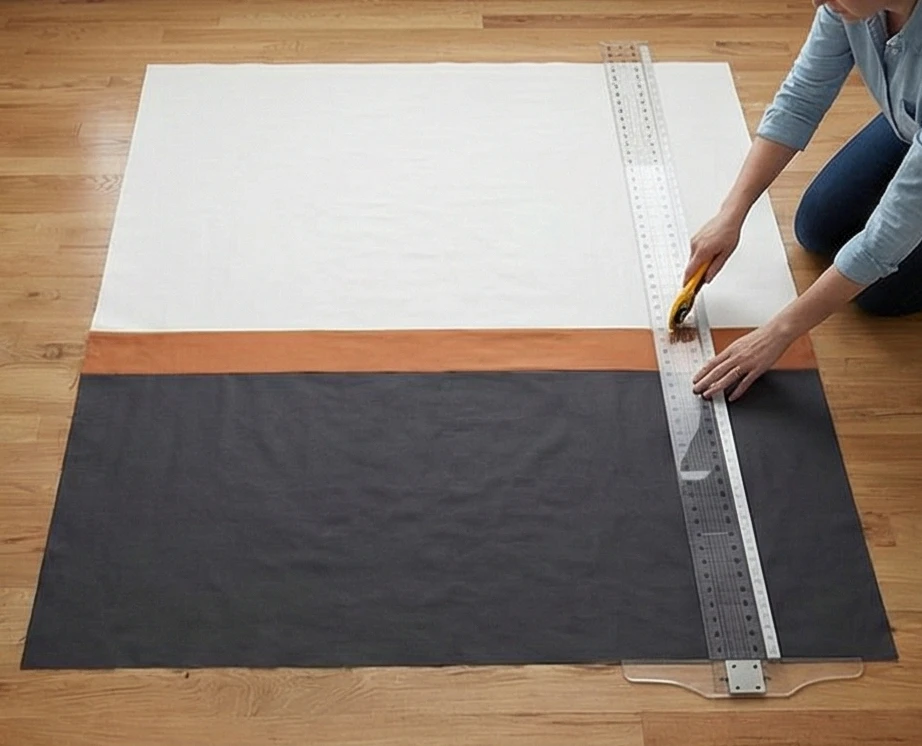
Step 3: Squaring the Canvas
Large pieces of fabric can warp on the bias.
- Layout: Lay the quilt top on a hard floor (tape it down if necessary).
- Measure: Measure the width at the top, middle, and bottom. They must be identical (90″). If the middle is wider, you have stretched the seam.
- Trim: Use a large T-square or ruler to trim the side edges to a perfect straight line. A minimalist quilt shows every error, so squareness is vital.
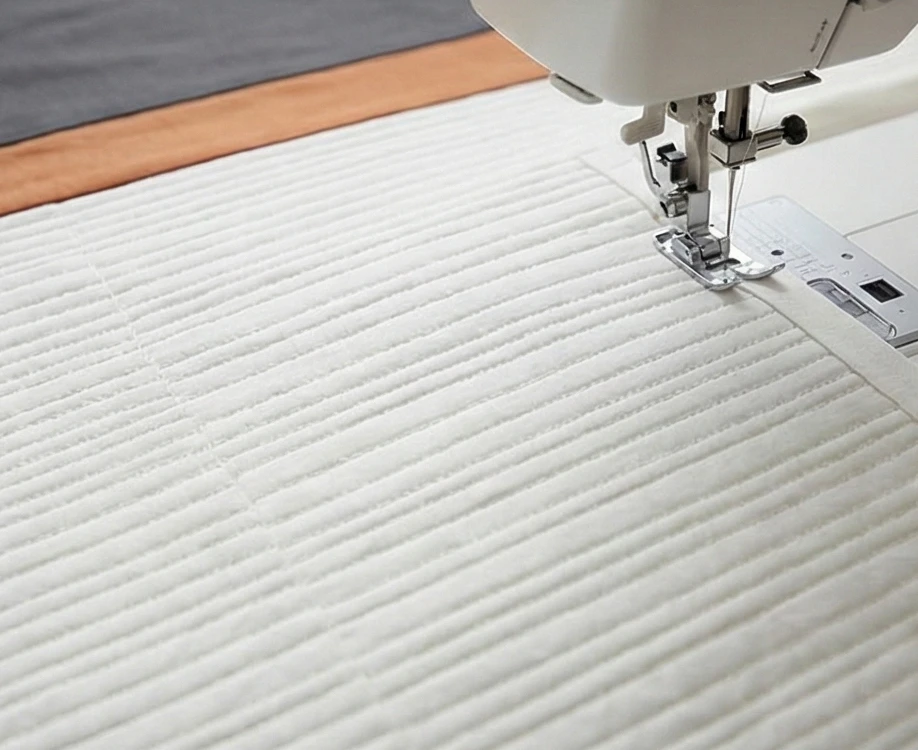
Step 4: “Matchstick” Quilting (The Texture)
In modern quilting, the texture is the pattern.
- Baste: Sandwich the quilt. Spray basting is highly recommended for large negative spaces to prevent ripples.
- Thread: Use a thread that blends into the background (e.g., White on the white section, Grey on the grey section). Alternatively, use Light Grey across the entire quilt for a subtle contrast.
- The Stitch: Sew straight horizontal lines across the entire width of the quilt.
- Spacing: Keep lines tight—about 1/4 inch to 1/2 inch apart.
- Effect: This is called “Matchstick Quilting.” It slightly stiffens the fabric, giving it a textured, woven look. It creates a sleek, modern finish that doesn’t look “puffy.”
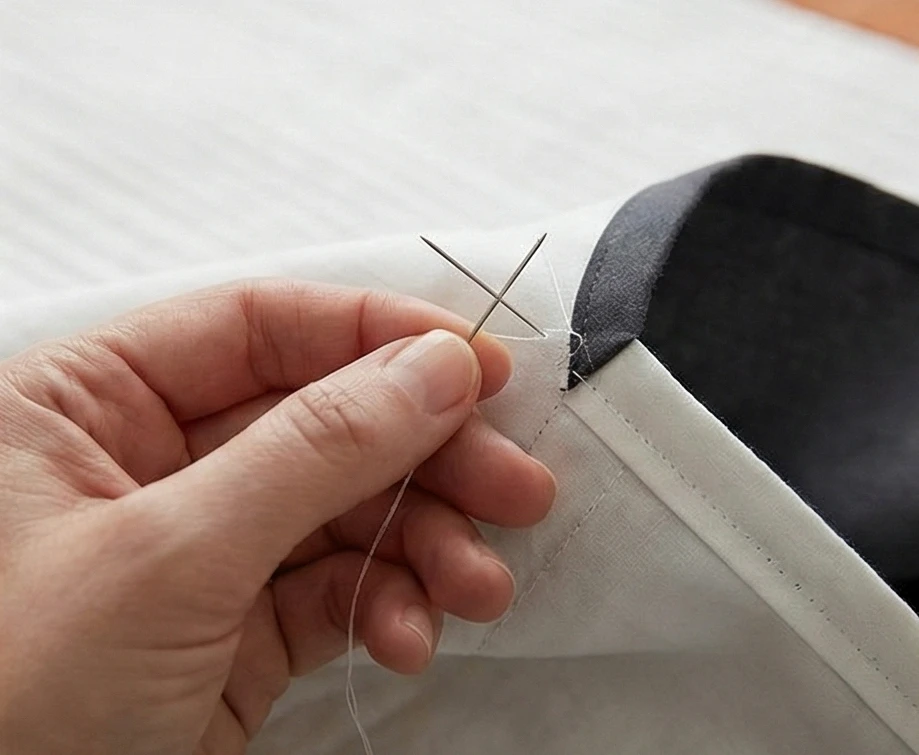
Step 5: The “Facing” Finish (Frameless)
A traditional binding creates a rim. A facing makes the quilt look like an infinity pool.
- Cut Facings: Cut 4 strips of the Sky Fabric (C) measuring 3 inches wide.
- Sew to Front: Sew these strips to the front of the quilt edges (Right Sides Together).
- Understitch: Press the facing strip away from the quilt and stitch very close to the seam on the facing side. This helps it roll back cleanly.
- Turn: Turn the facing strips completely to the back of the quilt.
- Secure: Hand stitch the facing to the backing fabric.
- Visual: When viewed from the front, the quilt has no border. The design runs continuously to the edge and disappears.
Step 6: The “Drop” Styling
How to use it.
- Placement: Place the quilt on the bed so the Horizon Line sits just below the pillows, or fold it at the foot of the bed so the color stripe is the feature.
- Pairing: Because the quilt is minimal, pair it with textured, non-patterned shams (such as the Macramé sham from Pattern #217) to keep the room serene yet interesting.
Usability Note: Solids show stains more than prints. For a Master Suite that sees morning coffee or pets, consider using “Shot Cottons” (where the warp and weft are different colors) or “Peppered Cottons”. These have a slightly heathered texture that hides lint and small spots much better than flat, solid cotton.
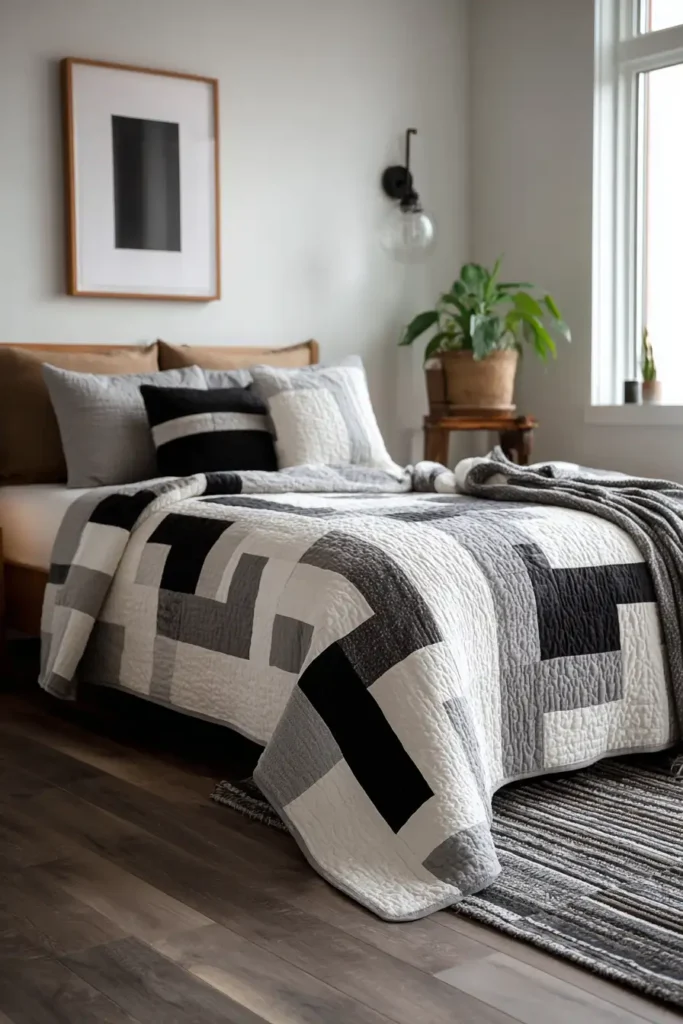
2. Monochrome Black and White Modern Quilts for Elegant Bedrooms
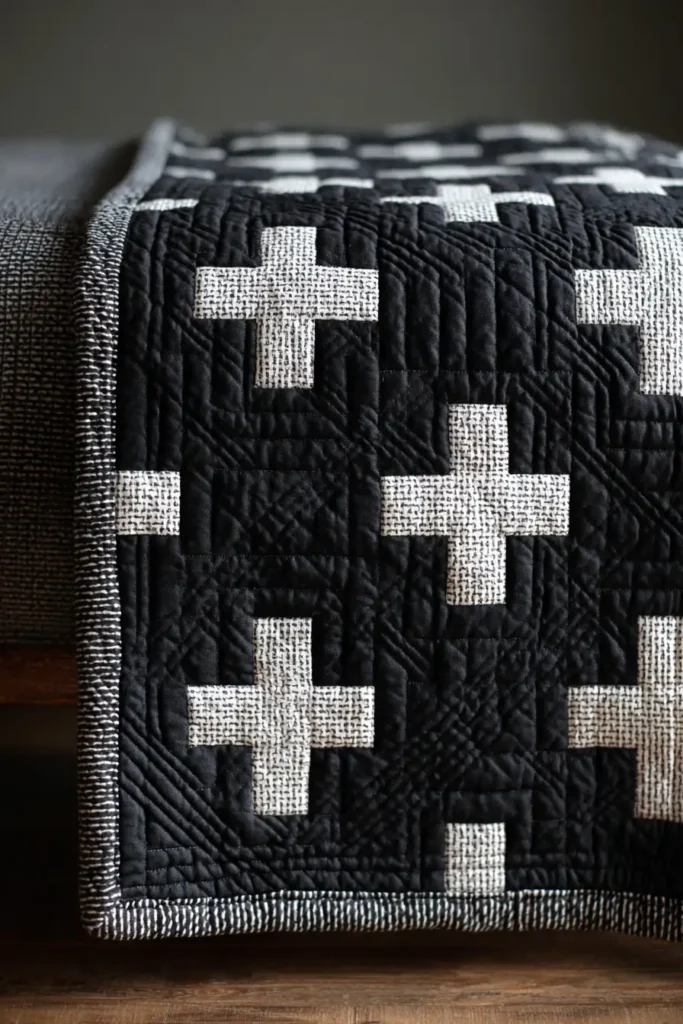
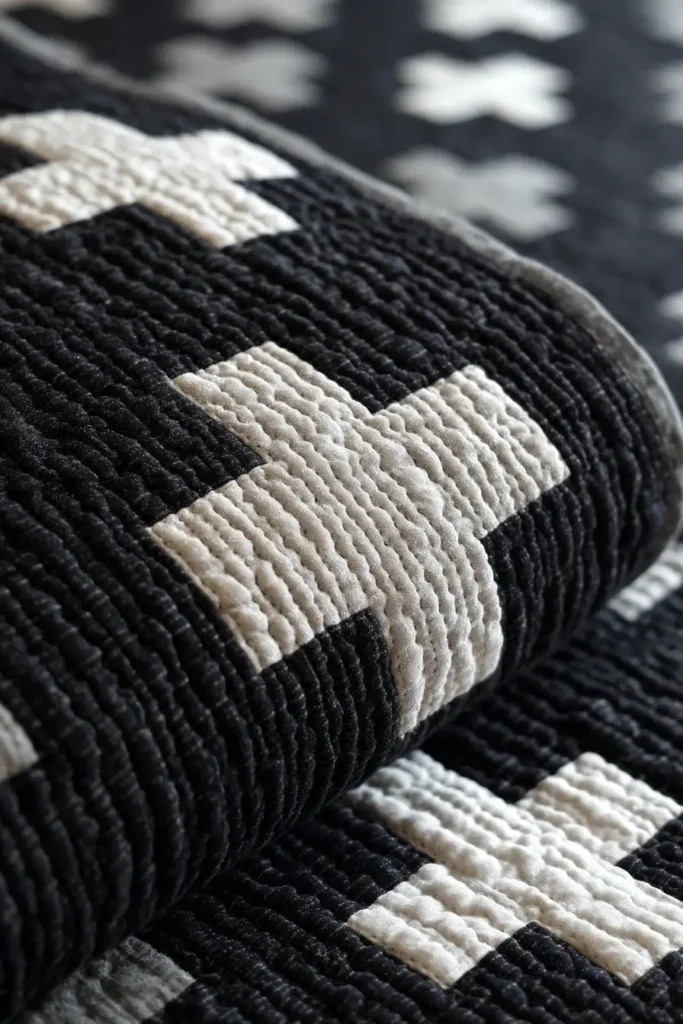
“The Obsidian Cross” Inverted Swiss Cross Quilt
There is no color combination more timeless or sophisticated than Black and White. It is the tuxedo of the quilting world. “The Obsidian Cross” takes the iconic Swiss Cross—a staple of minimalist graphic design—and inverts its traditional palette. By placing crisp White Crosses against a vast, deep Jet Black background, the quilt creates a dramatic, moody focal point that feels more like a modern art installation than a bedspread.
Finished Dimensions: Queen / King Coverlet, 92″ x 92″.
Materials Needed:
- Fabric A (The Background/Black): 6 yards of Kona Cotton “Jet Black” or a high-quality Black Sateen (for a slight sheen).
- Fabric B (The Crosses/White): 2 yards of Kona “Snow” or “White”.
- Backing: 8.5 yards of a B&W Geometric Print (e.g., a large-scale grid or houndstooth).
- Batting: Black Batting (This is crucial! If you use white batting and it beards through the black fabric, it will look like lint).
- Notions: Rotary cutter, clear acrylic ruler, Color Catchers (for washing).
Cultural Backstory: The Swiss Cross design originated in the flag of Switzerland (a white cross on red), which was adopted in the 14th century. However, in the mid-20th century, the “International Typographic Style” (Swiss Style) of design popularized grids, sans-serif fonts (such as Helvetica), and high-contrast symbols. This quilt pays homage to that era of clean, functional modernism.
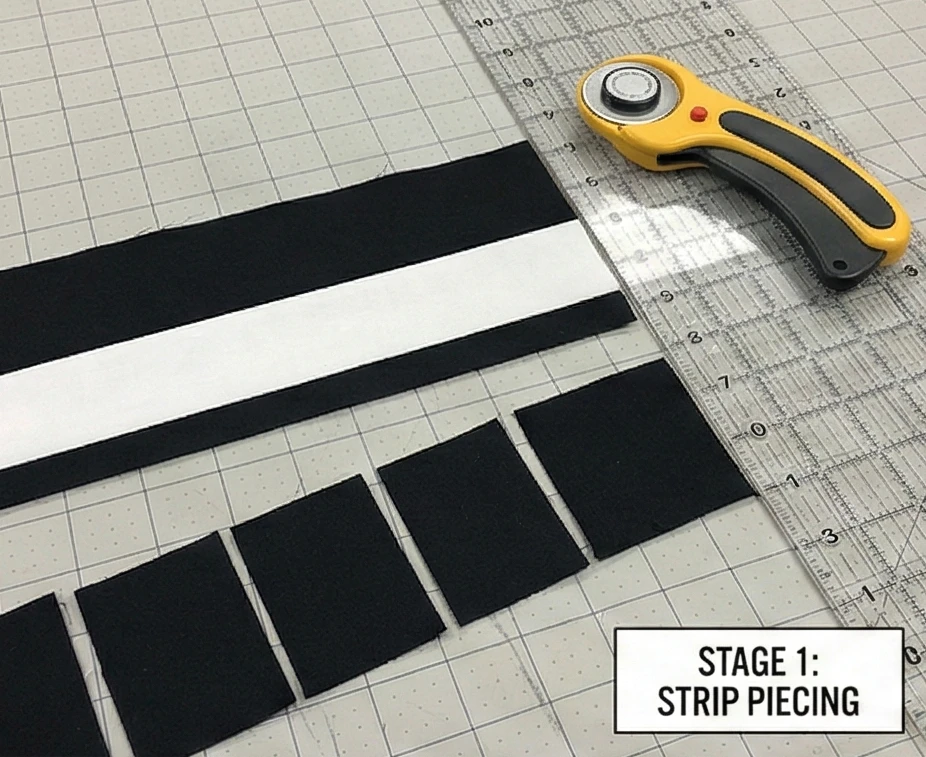
Step 1: Cutting with Efficiency (Strip Piecing)
We will not cut thousands of individual squares. We will make strip sets.
- Cut Strips:
- From Fabric A (Black): Cut 18 strips measuring 4.5″ x WOF (Width of Fabric). Also cut 30 strips measuring 4.5″ x WOF for the spacer rows.
- From Fabric B (White): Cut 9 strips measuring 4.5″ x WOF.
- The “Cross Bar” Set:
- Sew a Black strip to the left of a White strip. Sew another Black strip to the right of the White strip.
- Result: A strip set that looks like Black-White-Black.
- Make 9 of these sets. Press seams toward the black.
- Sub-Cut: Cross-cut these strip sets into 4.5-inch wide units. You now have units that look like a black square, a white square, and a black square stitched together.
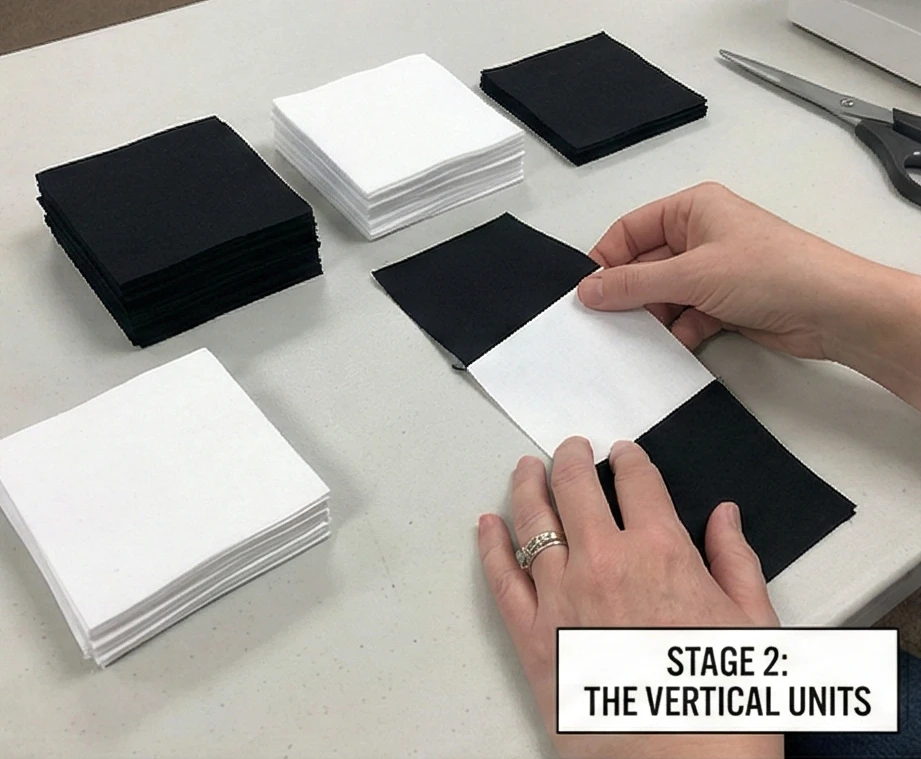
Step 2: The “Vertical” Units
The top and bottom of the cross.
- Cut Squares: From your remaining Black fabric, cut strips into 4.5″ squares.
- Cut White Squares: From your remaining White fabric, cut strips into 4.5″ squares.
- Assembly: You need to construct the vertical arms.
- This is often easiest done by assembling the quilt in Rows rather than Blocks.
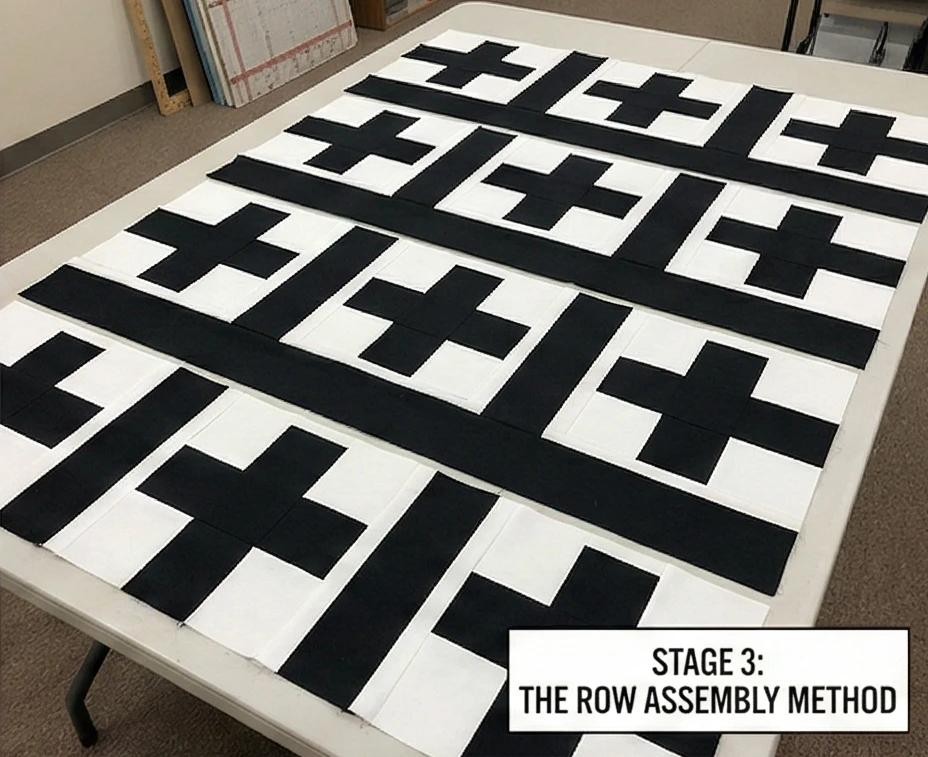
Step 3: The Row Assembly Method
Think of the quilt as horizontal lines of code.
- Row Type A (The Arms):
- [Black Spacer] – [White Square] – [Black Spacer] – [Black Spacer] – [White Square]…
- Ratio: You want roughly 5 or 7 crosses across the width of the bed. Calculate the black spacing to ensure they float evenly (e.g., 3 black squares between every white square).
- Row Type B (The Center Bar):
- [Black Spacer] – [White-Black-White Strip Unit?? No, wait.]
- Correction: A Swiss Cross is 5 squares.
- Better Method: Just sew a row that corresponds to the middle of the cross: [Black Spacer] – [White Square] – [White Square] – [White Square] – [Black Spacer].
- The Single Cross Block is the easiest: a 5-grid block.
- Top Row: Black – White – Black
- Middle Row: White – White – White
- Bottom Row: Black – White – Black
- Layout: Arrange these “Cross Blocks” in a grid, separated by wide sashing of solid Black to make them “float.”
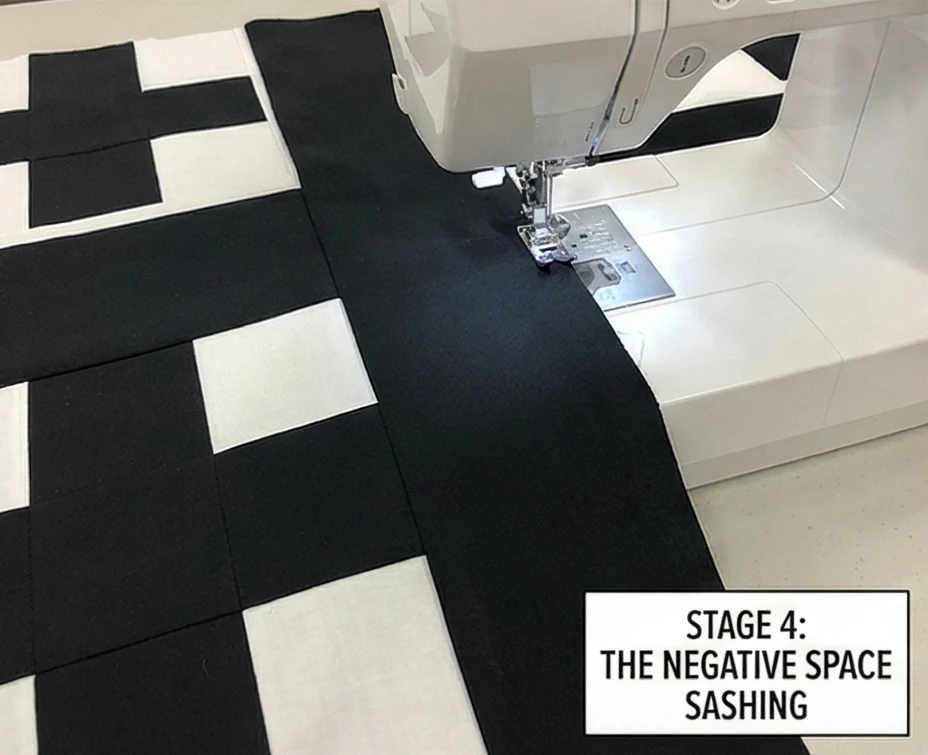
Step 4: The Negative Space Sashing
To make the crosses look modern, they must have room to breathe.
- Make Blocks: Assemble 25 Cross Blocks (5 rows of 5). Each block should finish at 12.5″ x 12.5″.
- Cut Sashing: Cut solid Black sashing strips measuring 4.5″ x 12.5″.
- Sew Rows: Sew [Block] – [Sashing] – [Block]…
- Horizontal Sashing: Cut long Black strips to separate the rows.
- Design Choice: Make the sashing irregular widths (some narrow, some wide) to create an asymmetrical, “randomized” scattering of crosses, rather than a rigid military grid.
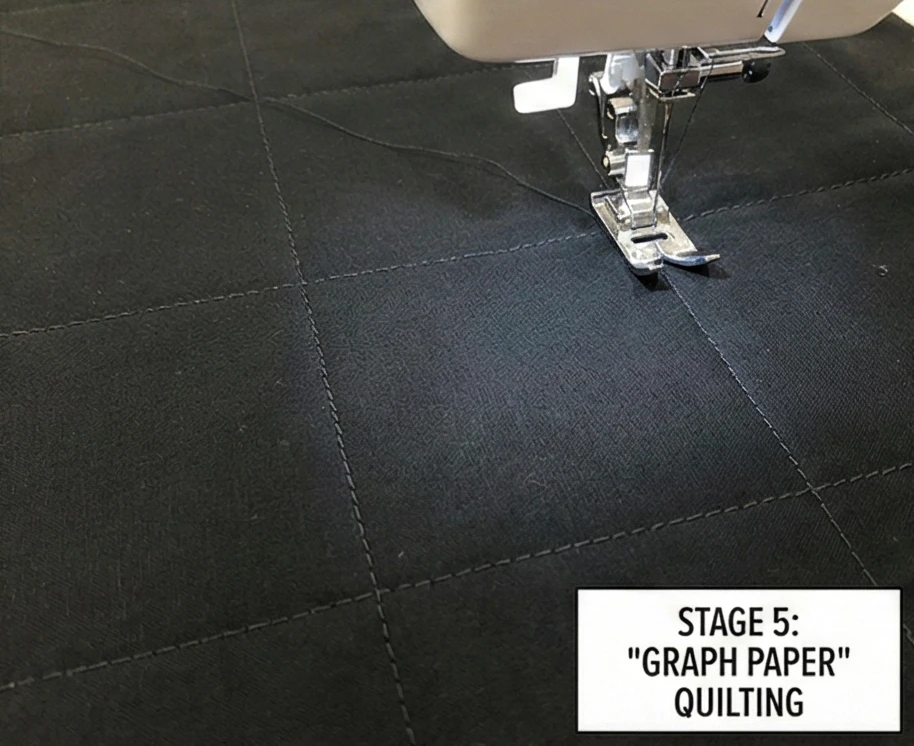
Step 5: “Graph Paper” Quilting
The quilting should enhance the grid.
- Marking: Use a Hera marker (creasing tool) to mark a perfect grid across the quilt.
- Stitch: Quilt straight vertical and horizontal lines spaced 2 inches apart.
- Thread Color: Use Dark Grey or Black thread. White thread on the black background will show every wobble and imperfection. Dark thread adds texture without visual noise.
- Texture: This dense grid quilting creates a “graph paper” look that reinforces the design’s mathematical precision.
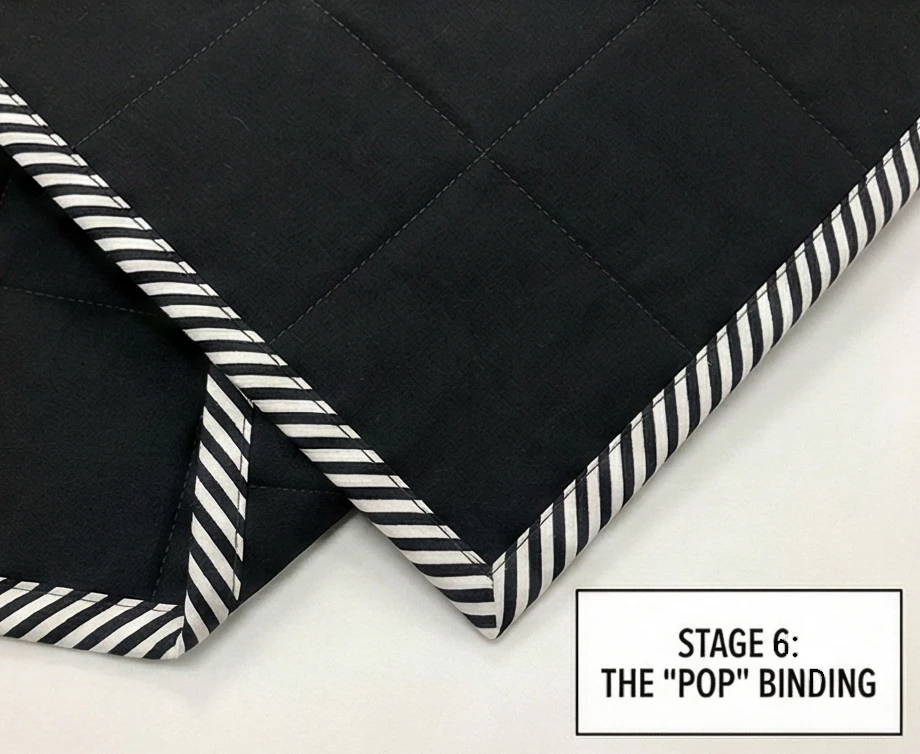
Step 6: The “Pop” Binding
A monochromatic quilt needs a distinct edge.
- Material: Use a Black and White Diagonal Stripe fabric.
- Attach: Bind the quilt using machine binding for a clean, sharp finish.
- Visual: The diagonal stripes on the binding contrast beautifully with the straight lines of the crosses and grid quilting, creating a vibrating frame for the art.
Usability Note (The Lint Factor): Black fabric is sleek, but it shows every speck of dust, pet hair, and lint. To keep this quilt elegant:
- Store it in a closed cupboard, not on an open rack.
- Keep a sticky lint roller in your bedside drawer.
- Wash with Shout Color Catchers! Even high-quality black dye can bleed onto the white crosses during the first wash, turning them grey. The color catchers will absorb the loose dye.
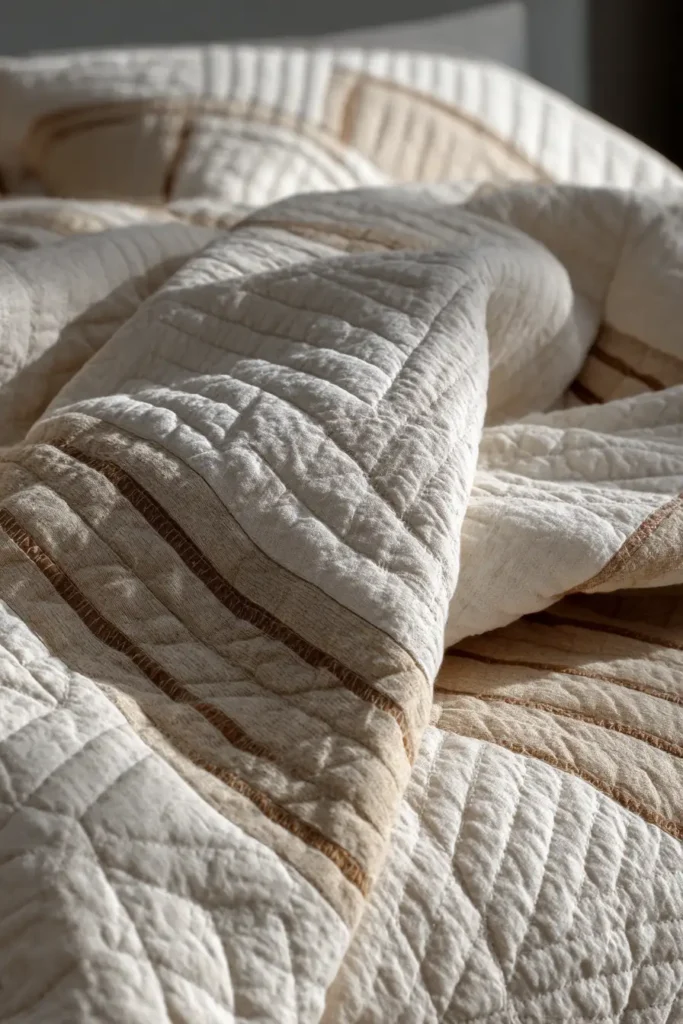
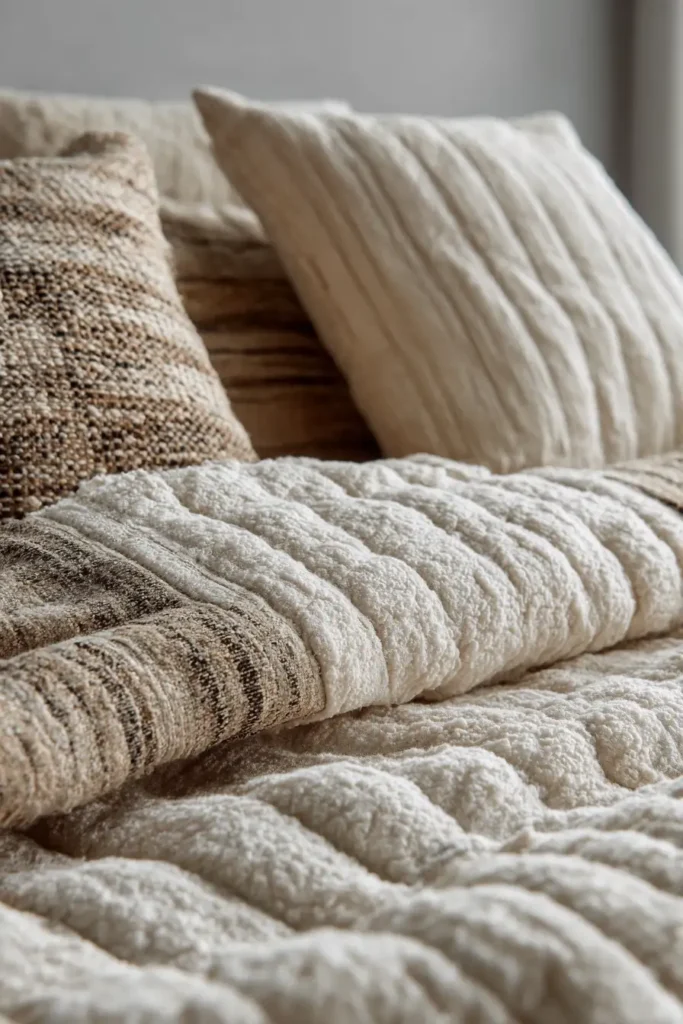
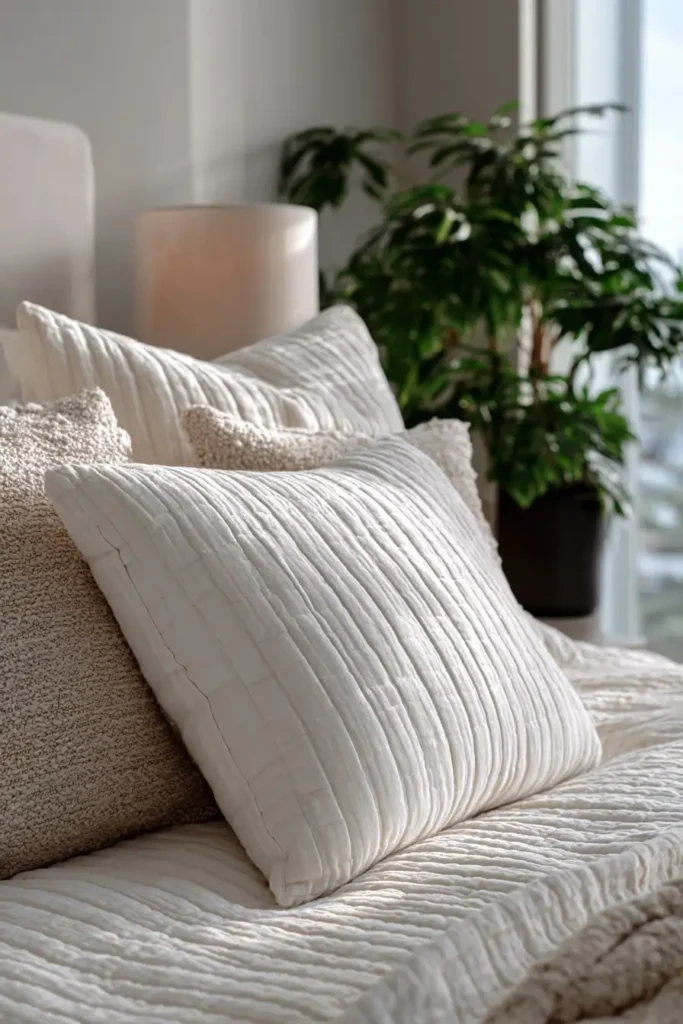
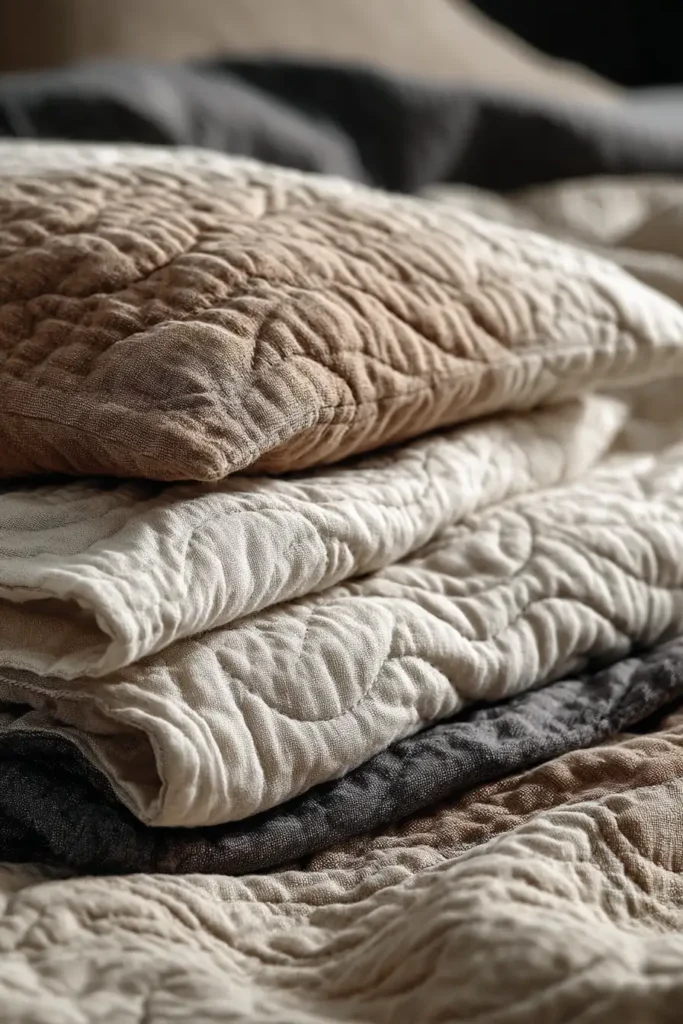
3. Soft Textured Modern Bed Covers with Channel Stitching
“The Linen Ripples” Wholecloth Channel Quilt
Modern design often favors texture over pattern. “The Linen Ripples” is a “wholecloth” quilt, meaning the top is made from a single piece of fabric (or large panels joined invisibly) rather than pieced blocks. The design comes entirely from the quilting itself: dense, parallel lines of Channel Stitching. This technique transforms simple, breathable linen into a structured, architectural textile that feels like a corrugated roof or a raked Zen garden. It is the epitome of “quiet luxury.”
Finished Dimensions: King/Queen Coverlet, 94″ x 96″.
Materials Needed:
- Top Fabric: 6 yards of Washed Linen or Linen/Cotton Blend (Oatmeal, Slate, or White).
- Why Linen: Linen wrinkles beautifully. The channel stitching traps these micro-wrinkles, creating a “lived-in” elegance that cotton cannot achieve.
- Backing: 6 yards of Cotton Voile or High-Thread-Count Sateen (soft against the skin).
- Batting: Wool Batting or Bamboo Blend.
- Loft is Key: You need a batting with some “puff” (loft) so the channels stand out. Wool is best because it is breathable and springs back after washing.
- Thread: 5-6 large spools of 50wt Cotton Thread in a matching color. (You will use a lot of thread).
- Notions: A Walking Foot (absolutely essential), masking tape, quilting gloves.
Cultural Backstory: Channel quilting (or “Straight Line Quilting”) became a hallmark of the Modern Quilt Movement in the 2010s, but its roots trace back to mid-century utilitarianism. Designers like Ray Eames and Florence Knoll used similar parallel stitching on leather furniture to prevent stretching and sagging. In bedding, it mimics the “Boutis” or Provençal quilting of France, where texture was used to display wealth and craftsmanship.
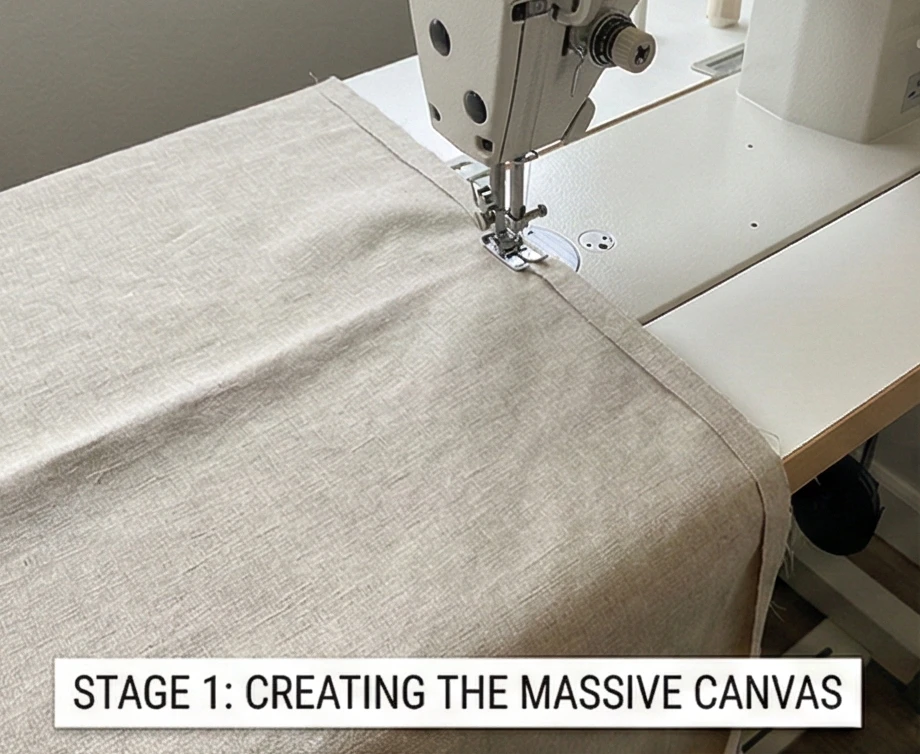
Step 1: Creating the Massive Canvas
Most linen is only 54″ wide, so you must seam it.
- Cut: Cut your linen into two lengths of 100 inches.
- Seam: Sew the two lengths together along the long edge.
- The “invisible” seam: Press the seam open. When quilting later, you will stitch in the ditch of this seam to hide it, or stitch parallel to it so it blends into the channels.
- Trim: Trim the resulting large panel to 96″ x 98″ (allowing 2 inches for shrinkage during quilting).
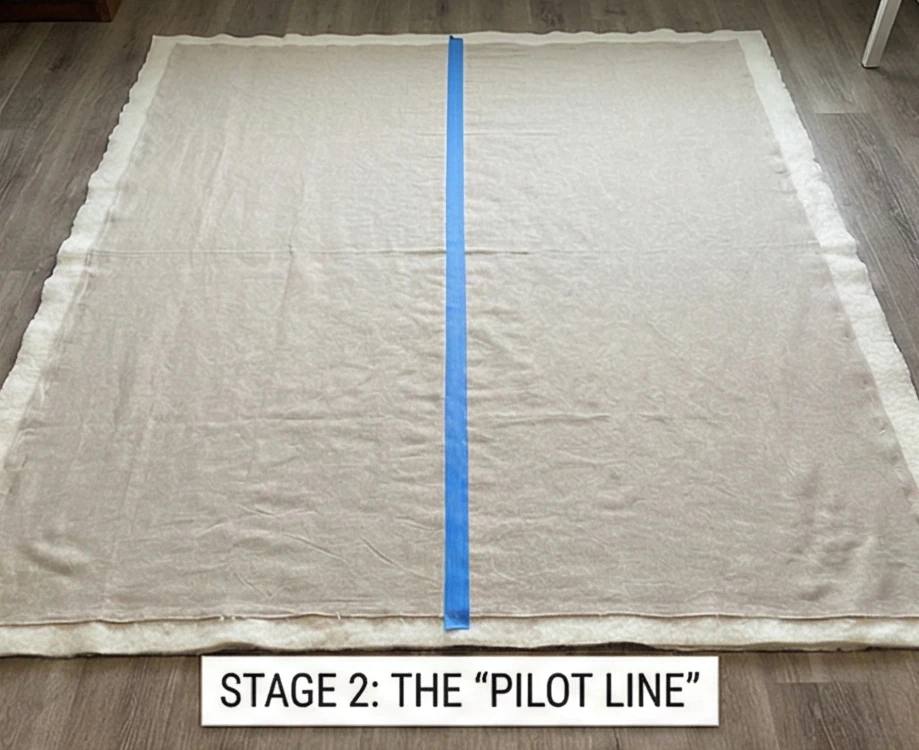
Step 2: The “Pilot Line” (The Most Important Step)
If the first line is crooked, the whole quilt will be crooked.
- Baste: Sandwich your Top, Batting, and Backing. Spray baste heavily to prevent shifting.
- Mark: Use a long strip of Painter’s Tape or Masking Tape to mark a single straight line down the exact center of the quilt.
- Don’t rely on fabric edges: they warp. Measure from the center out.
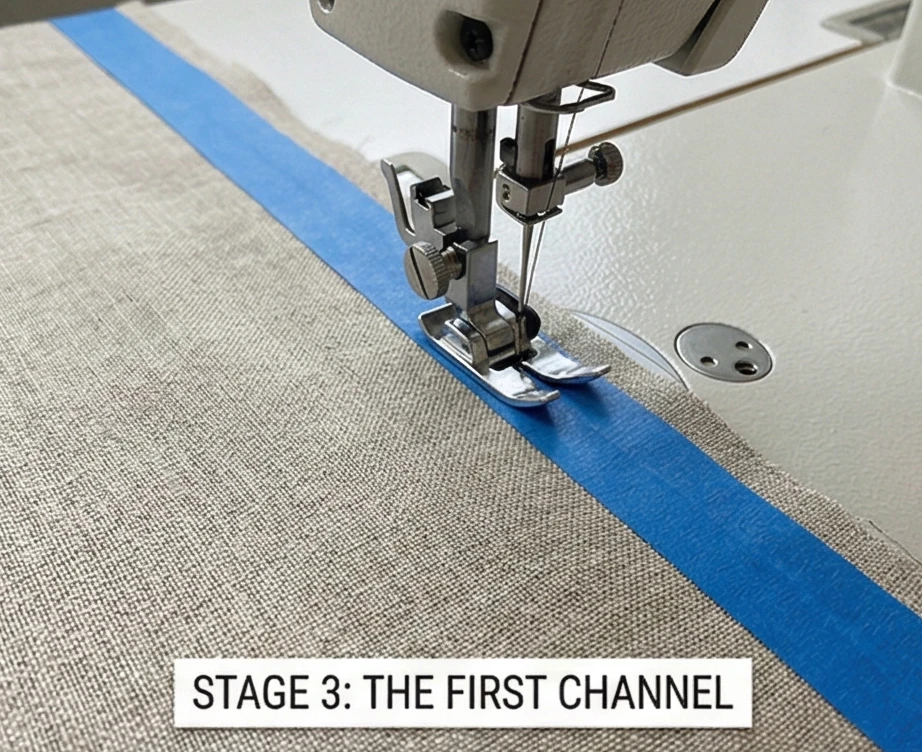
Step 3: The First Channel
Anchor the quilt.
- Setup: Install your Walking Foot. Set stitch length to 3.0mm (slightly longer stitches look more elegant on linen).
- Sew: Stitch directly along the edge of your painter’s tape.
- Direction: Sew from top to bottom.
- Remove Tape: Peel off the tape. You now have your “Pilot Line.”
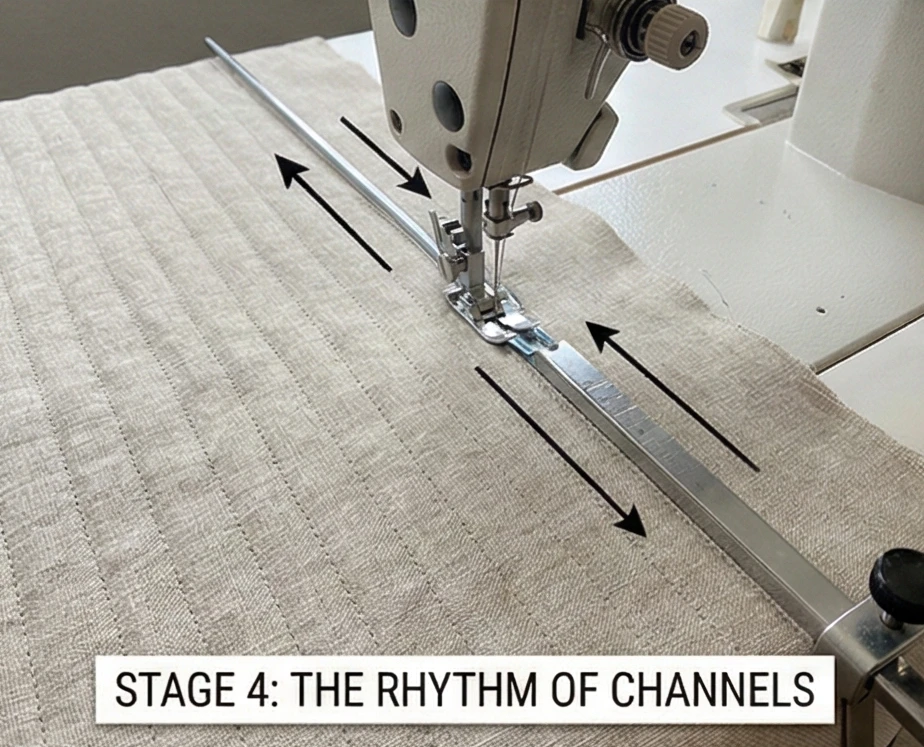
Step 4: The Rhythm of Channels
This is the meditative part.
- The Guide: Most walking feet have a “guide bar” attachment. Insert it and set the width to 1 inch or 3/4 inch.
- Aesthetic Choice:
- 1/2 inch: Very stiff, coat-like structure.
- 1 inch: The “sweet spot” for bedding—drapey but textured.
- 2 inches: Puffy and duvet-like.
- Aesthetic Choice:
- Stitch: Place the guide bar on your previous stitch line and sew the next line.
- Direction: Alternate directions!
- Crucial: If you sew every line top-to-bottom, the quilt will distort into a parallelogram. Sew Line 1 (North-South), Line 2 (South-North), Line 3 (North-South), etc.
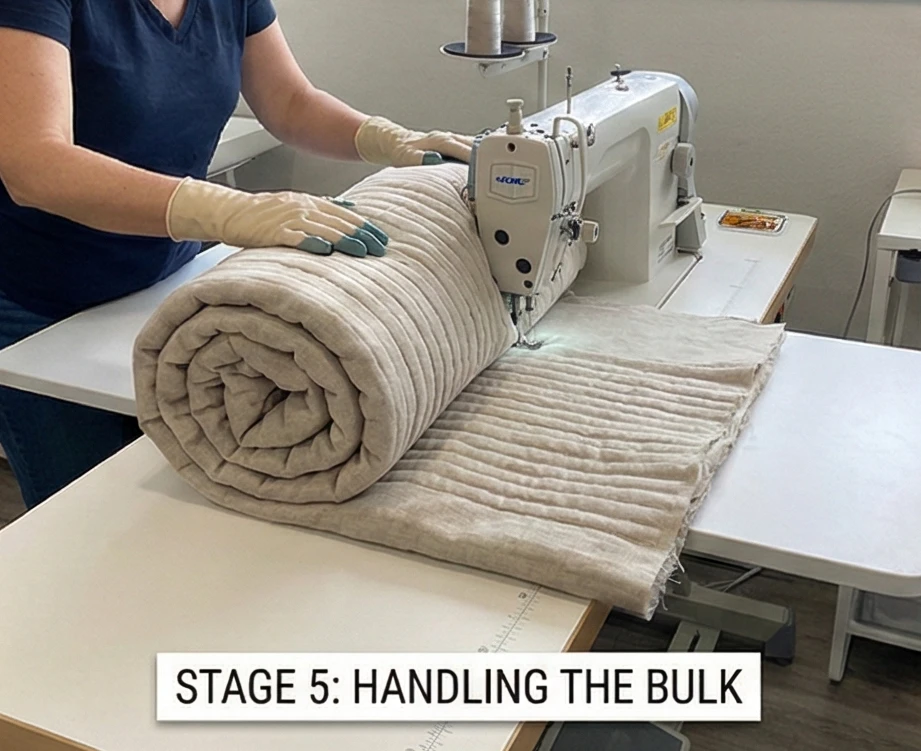
Step 5: Handling the Bulk
Wrestling a King quilt is a workout.
- Roll: Roll the sides of the quilt tightly so it fits through the throat of your machine.
- Gloves: Wear Quilting Gloves (rubber-tipped). They give you grip to move the heavy linen without straining your shoulders.
- Support: Put a table to the left and behind your machine to support the weight. If the quilt hangs off the table, the drag will cause tiny, ugly stitches.
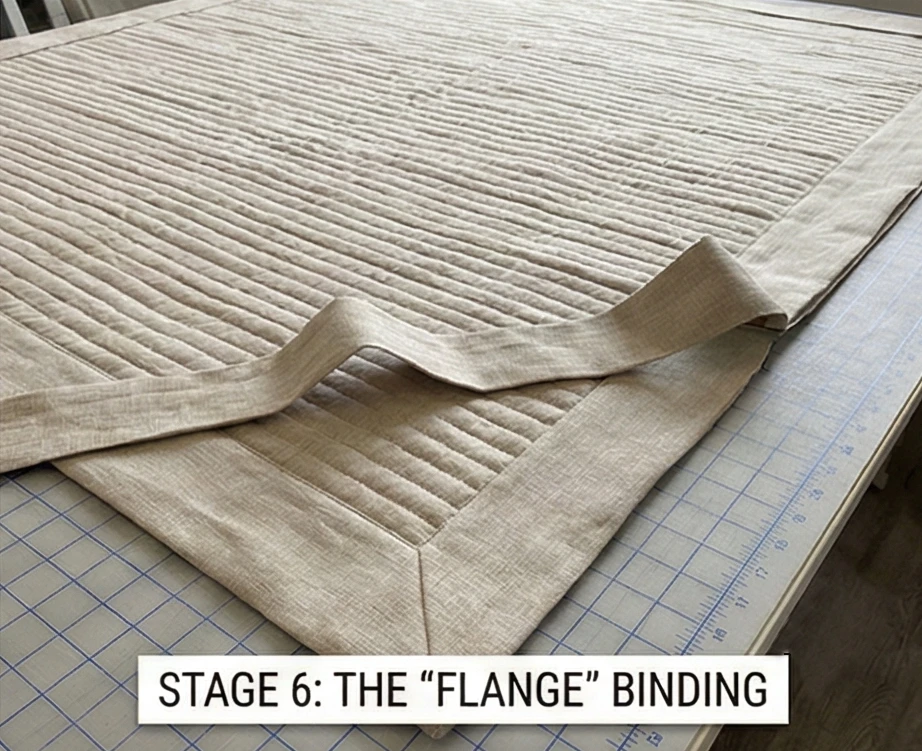
Step 6: The “Flange” Binding
A modern edge for a modern quilt.
- Trim: Once the entire surface is channeled, trim the quilt square. (It will have shrunk inward; this is normal).
- Binding: Instead of a tight binding, consider a Faced Edge (see Pattern #229) or a wide 2-inch Binding.
- Method: Cut 5-inch strips. Fold in half. Sew to the front with a 1/2″ seam. Hand stitch to back.
- Why: A wide binding matches the scale of the wide channel quilting.
Usability Note: Linen produces a lot of lint. After the first wash and dry, empty your dryer’s lint trap immediately. The quilt will come out looking “puckered” and soft—this is the desired “Antique Wash” look. Do not iron it flat! The texture is the point.
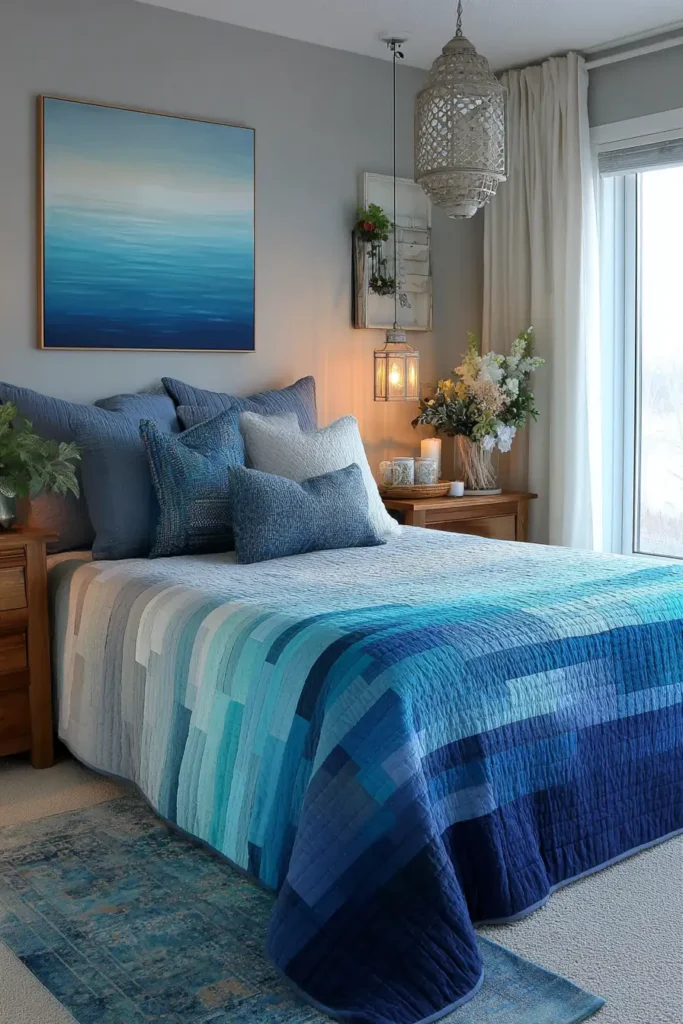
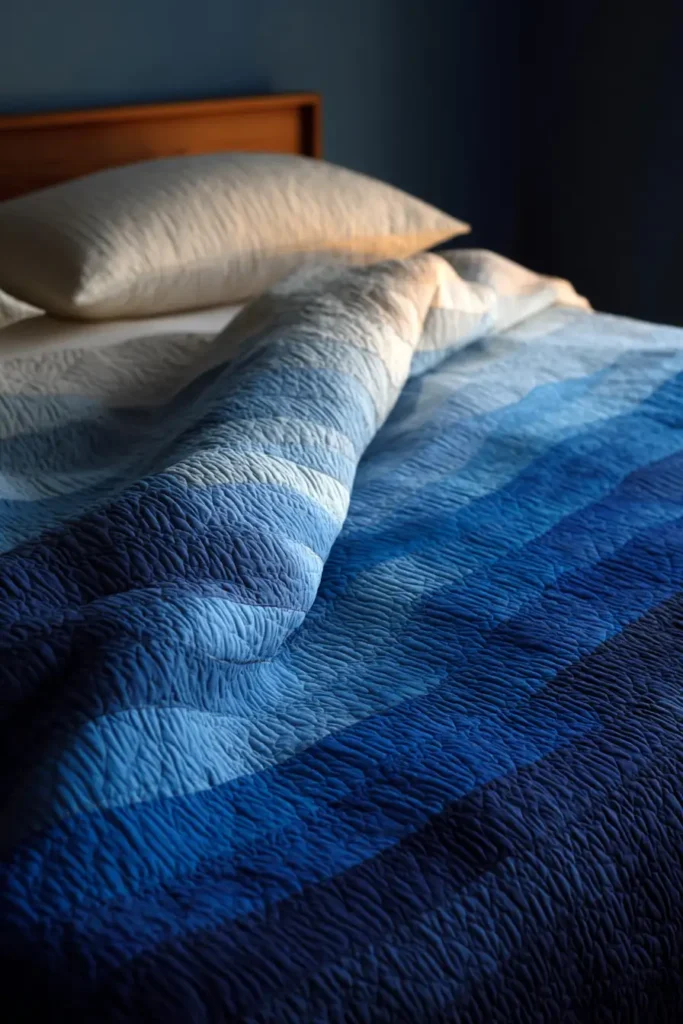
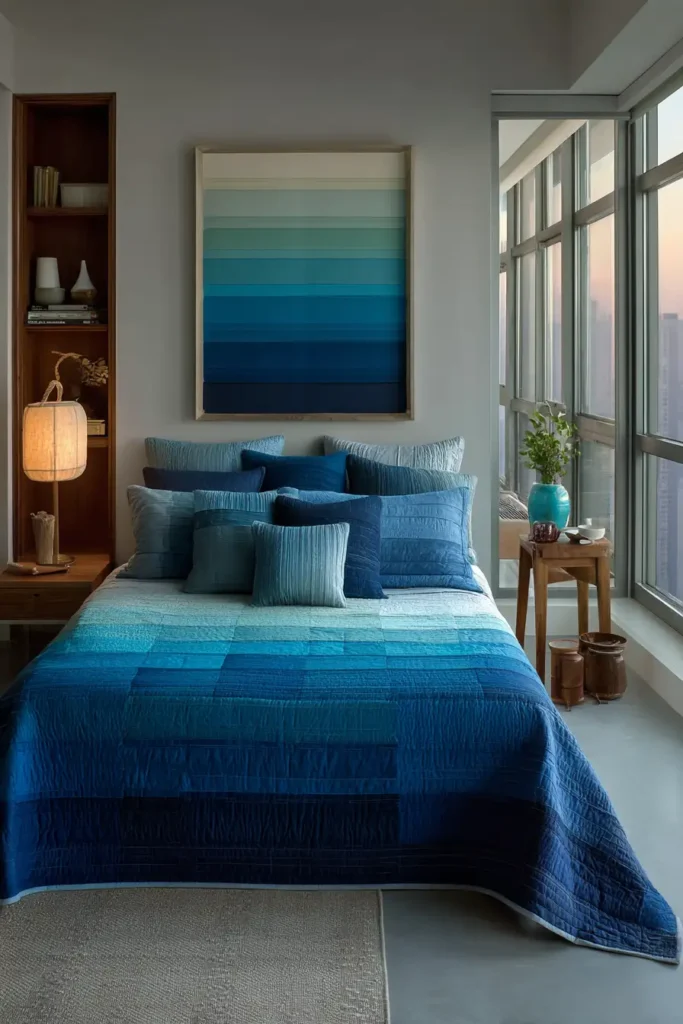
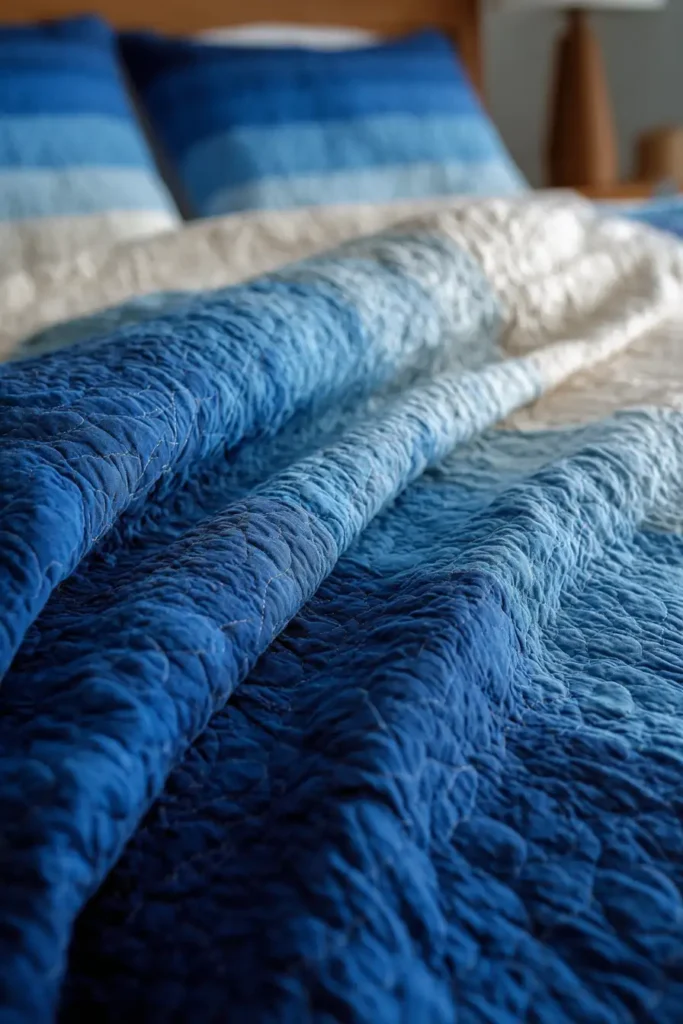
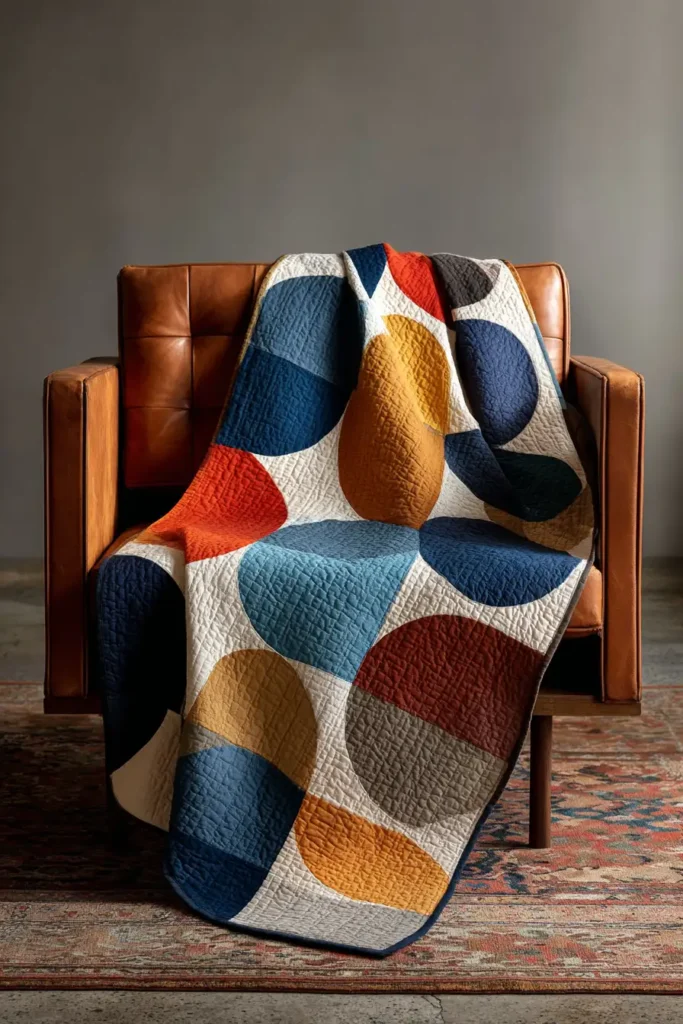
4. Contemporary Ombre Gradient Bed Quilt Designs
“The Luminous Drift” Ombre Strip Quilt
There is perhaps no design more serene than a perfect gradient. “The Luminous Drift” captures the ethereal quality of a sunrise or deep ocean water by transitioning smoothly from a saturated dark hue to a whisper-light tint. By using Solid Fabrics in a strictly ordered value scale, this pattern creates a glowing “Color Field” effect reminiscent of Mark Rothko’s paintings. It draws the eye upward, making ceilings feel higher and bedrooms feel airier.
Finished Dimensions: Queen Bed Size, 90″ x 96″.
Materials Needed:
- The Gradient: You need 12 Fabrics in the same color family (e.g., Indigo, Navy, Royal, Denim, Cornflower, Sky, Powder, Ice, White).
- Quantity: 3/4 yard of each fabric.
- Crucial: Do not guess the order. You need a distinct step-down in “Value” (lightness/darkness) for each fabric.
- Backing: 8.5 yards of a neutral Grey or a wide-back print.
- Batting: Cotton/Bamboo Blend (for a fluid drape).
- Binding: 3/4 yard of the Darkest Fabric (to frame the bottom) or a split binding.
- Notions: Design wall or a clean floor space, smartphone camera.
Cultural Backstory: The word “Ombré” comes from the French for “shaded.” While gradient dyeing has existed for centuries, the linear gradient became a hallmark of the Digital Age and Modernist design in the 21st century. It represents transition, change, and the blurring of hard boundaries—a perfect metaphor for drifting off to sleep.
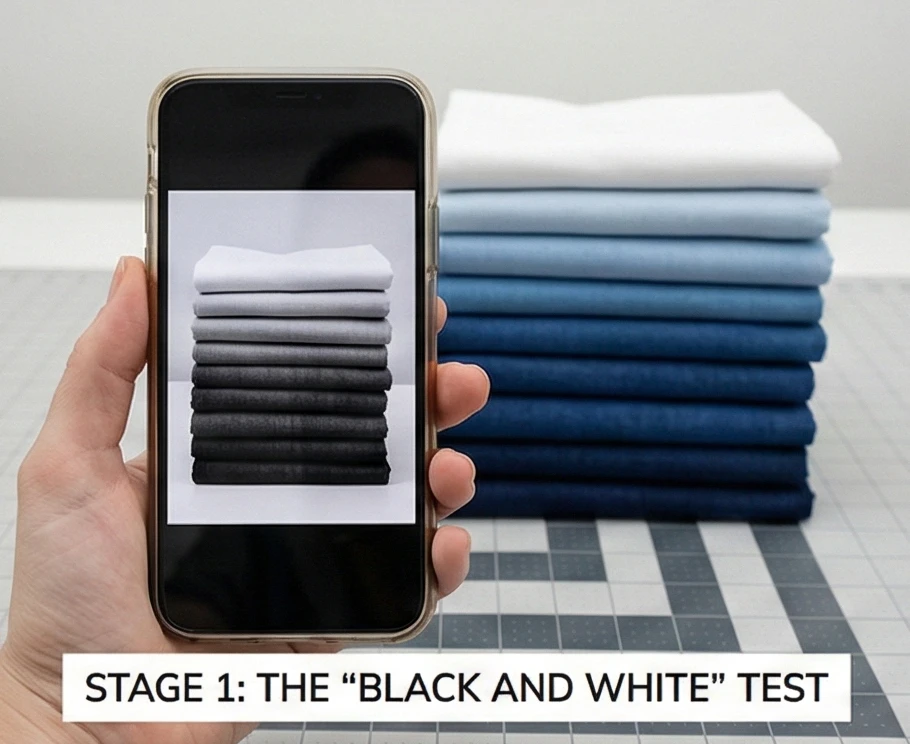
Step 1: The “Black and White” Test
The human eye can be tricked by color saturation. Use technology to verify the gradient.
- Layout: Lay your 12 fabrics in what you think is the correct order from Dark to Light.
- The Trick: Take a photo of the stack with your smartphone.
- Edit: Change the photo filter to Mono/Black & White.
- Verify: Look at the grey tones. Do they step down evenly? If two fabrics appear identical in black-and-white, they lack sufficient contrast. Swap one out or rearrange them until the grey scale is smooth.
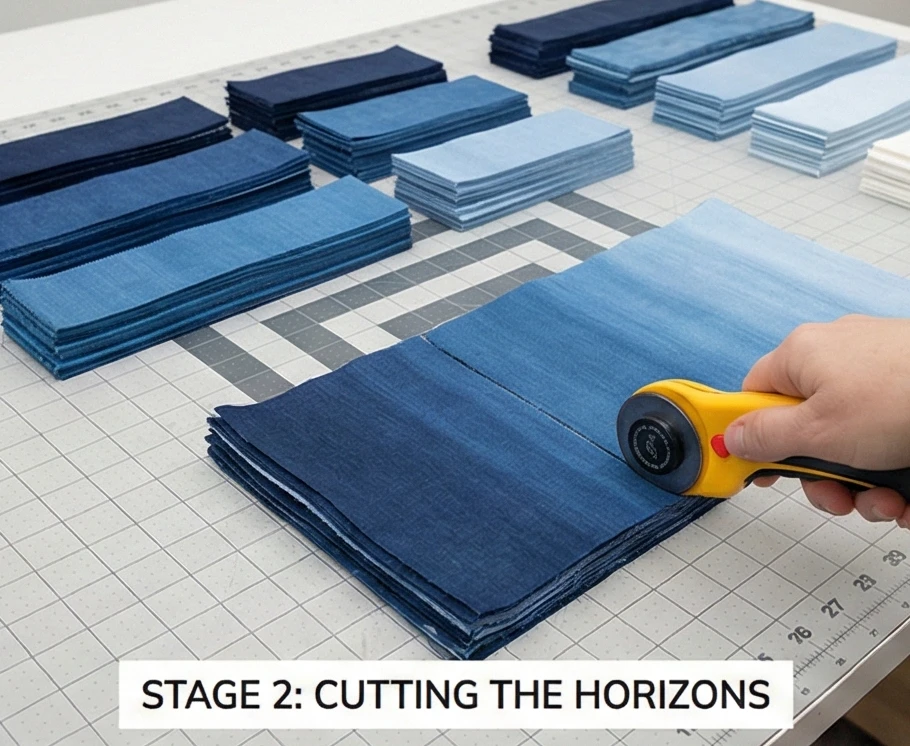
Step 2: Cutting the Horizons
We keep the strips uniform to let the color do the work.
- Press: Iron all fabrics perfectly flat. Starch is desired for crisp seams.
- Cut: From each of the 12 fabrics, cut two strips measuring 8.5″ x Width of Fabric (WOF).
- Note: Most quilting cotton is 40-42″ wide. You need two strips sewn end-to-end to span the width of a Queen bed (90″).
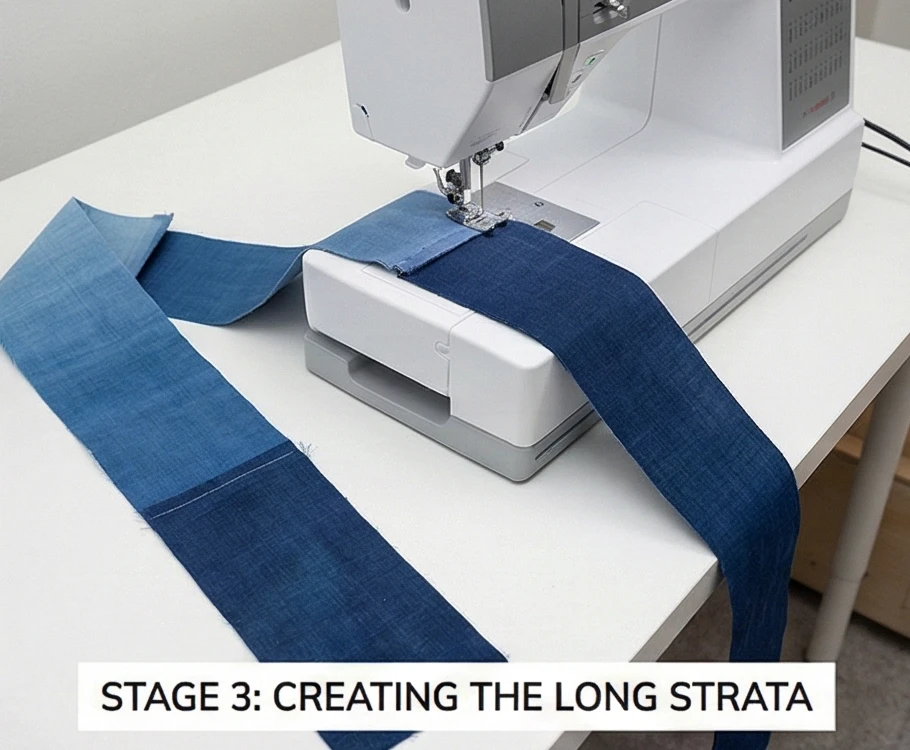
Step 3: Creating the Long Strata
- Join Widths: Take the two 8.5″ strips of Fabric 1 (Darkest). Sew them short-end to short-end to make one long strip (approx. 80 inches).
- Tip: Press the seam open to reduce bulk.
- Repeat: Do this for all 12 colors. You now have 12 very long strips.
- Trim: Trim all 12 long strips to exactly 90.5 inches long.
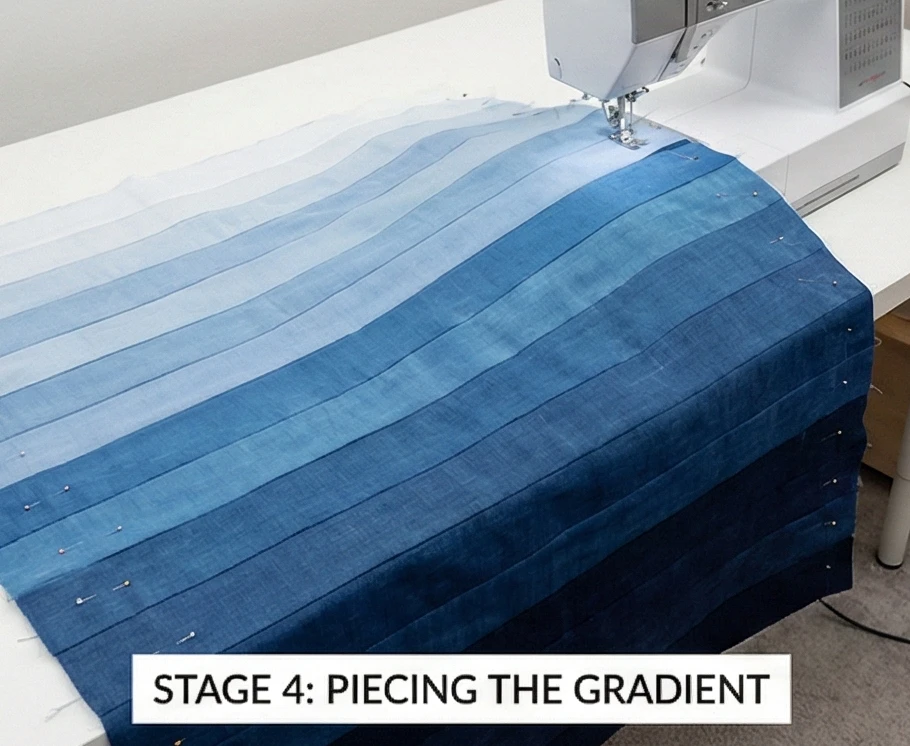
Step 4: Piecing the Gradient
Assembly is fast, but precision is key.
- Pin: Place Strip 1 (Darkest) Right Sides Together with Strip 2.
- Pinning: Pin at the start, end, and center. Then pin every 10 inches. Long strips can stretch and warp if you just “sew and go.”
- Sew: Stitch with a 1/4″ seam allowance.
- Press: Press the seam toward the darker fabric.
- Continue: Add Strip 3 to Strip 2. Then Strip 4, Strip 5, etc., working your way up to the lightest color.
- Result: A massive strata of color that fades upward.
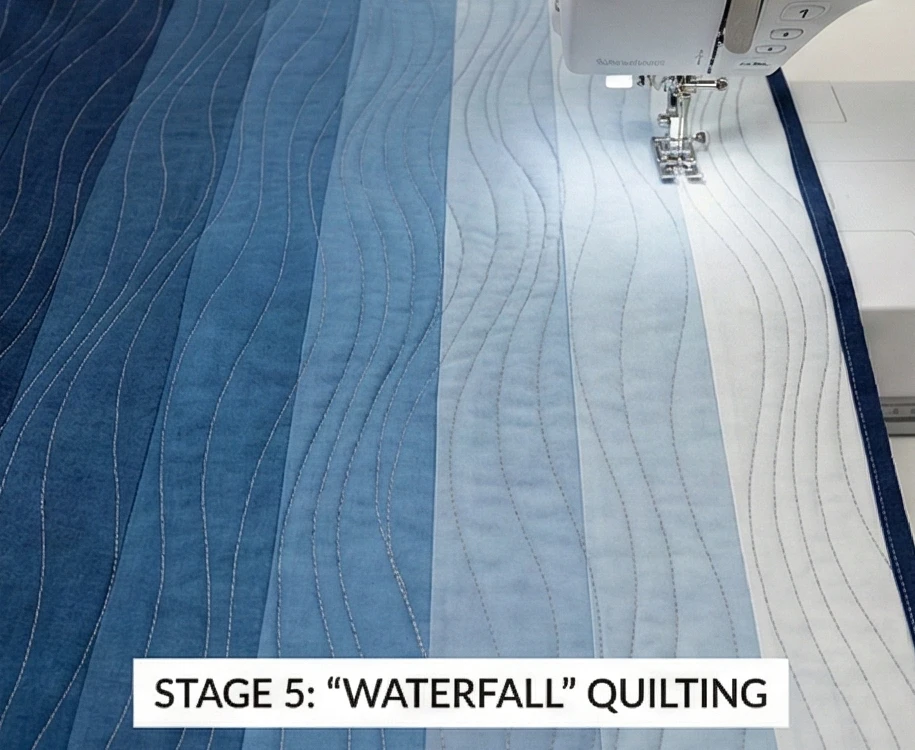
Step 5: “Waterfall” Quilting
The quilting should enhance the vertical movement.
- Baste: Sandwich the quilt. Ensure the backing is taped down tight; large solids show wrinkles easily.
- Thread:
- Option A (Invisible): Use Monofilament (Clear) thread.
- Option B (Variegated): Use a thread that changes color from dark to light (tricky to match).
- Option C (Grey): Use a medium Dove Grey thread. It blends well with both dark and light tones.
- Stitch: Quilt gently wavy, vertical lines from top to bottom.
- Spacing: Vary the space between lines (1 inch to 3 inches).
- Effect: The wavy lines resemble trickling water or rising heat, adding dynamic movement to the static horizontal stripes.
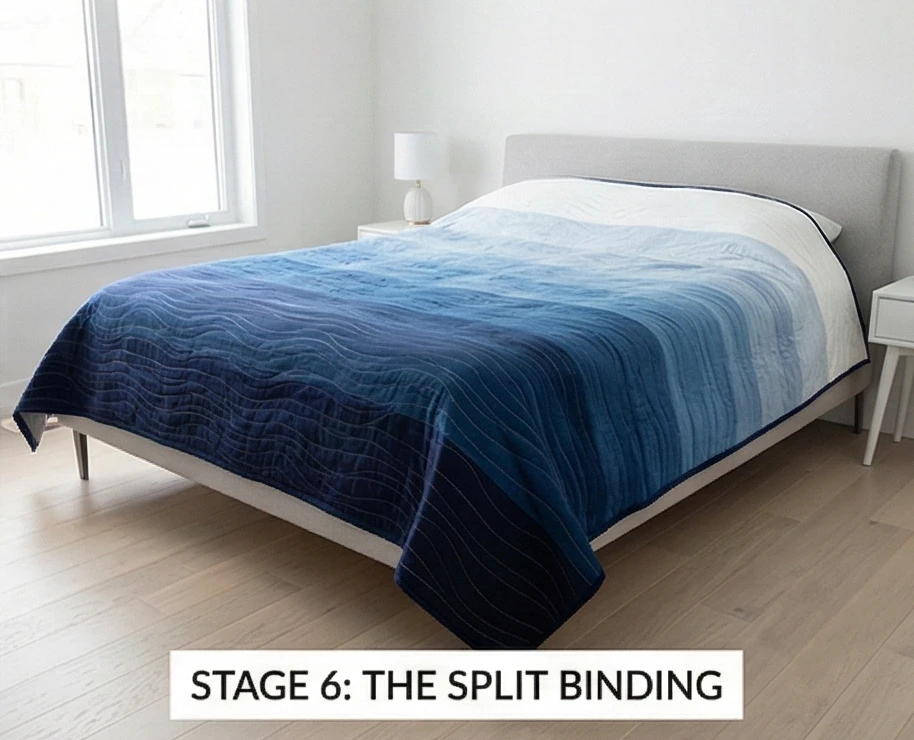
Step 6: The Split Binding (Optional Elegance)
Why frame the light top with a heavy dark line?
- The Dark Side: Make binding strips from your Darkest Fabric. Sew them to the bottom edge and the bottom half of the sides.
- The Light Side: Make binding strips from your Lightest Fabric. Sew them to the top edge and the top half of the sides.
- Join: Join them where the colors shift on the quilt top.
- Result: The binding disappears into the gradient, maintaining the design’s “infinity” look.
Usability Note: Solid-colored quilts show pet hair and lint more prominently. If you have a white cat, do not put the darkest color at the bottom of the bed (where the cat sleeps). Invert the design so the Lightest color is at the foot of the bed and the Darkest is near the pillows. Design for your life!
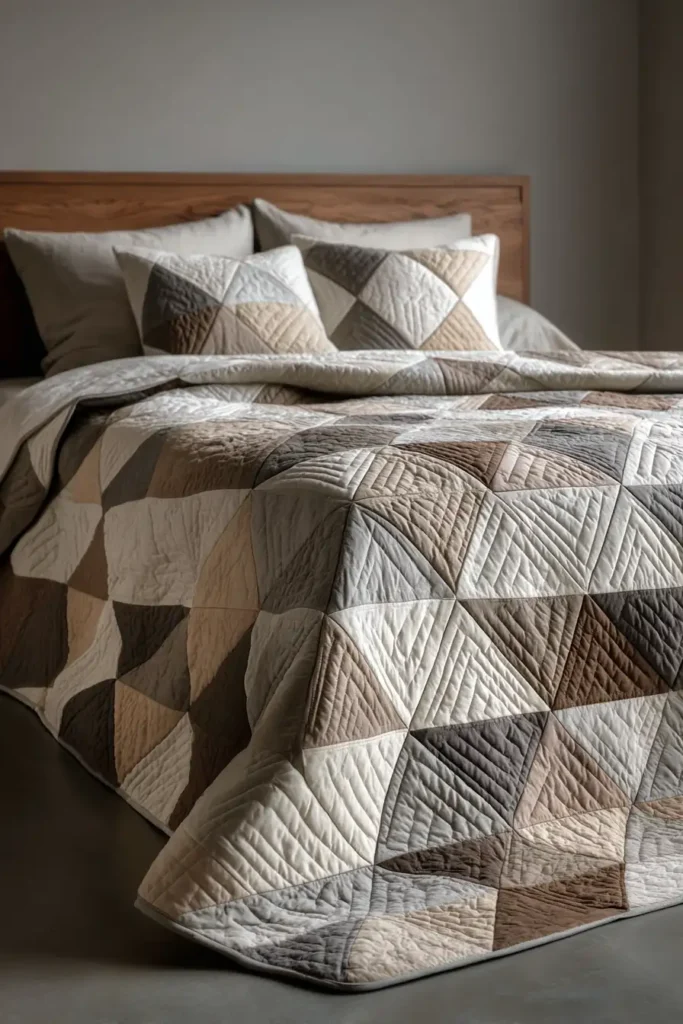
5. Negative Space Modern Quilt Ideas for Airy Bedrooms
“The Floating Prism” Off-Center Medallion
In traditional quilting, the design fills every inch of the fabric. In modern quilting, the empty space is the design. “The Floating Prism” features vast expanses of white or pale grey “Negative Space” that allows the eye to rest. A single, complex geometric block (the Prism) is placed asymmetrically—typically in the bottom-right or top-left third—creating tension and balance that feels like a piece of framed modern art. This “breathable” design makes small bedrooms feel larger and airier.
Finished Dimensions: Queen/King Coverlet, 90″ x 90″.
Materials Needed:
- The Negative Space (Background): 6 yards of Solid White, Pale Silver, or Unbleached Linen. (Quality matters here; cheap solids are see-through).
- The Prism (Focal Point): Small scraps (Fat Eighths) of 4-5 high-contrast colors (e.g., Teal, Mustard, Charcoal, Coral).
- Backing: 5.5 yards of a modern geometric print (to hide lint and pet hair).
- Batting: Bright White Cotton Batting (essential to keep the white background bright).
- Notions: A large square ruler (12.5″), marking pen.
Cultural Backstory: The concept of “Ma” (negative space) in Japanese art refers to the interval or emptiness between objects. It suggests that the space around a thing gives it meaning. Modern quilters adopted this in the 21st century, moving away from “busy” patchwork to designs in which 80% of the quilt is an open background, highlighting the intricate quilting stitches.
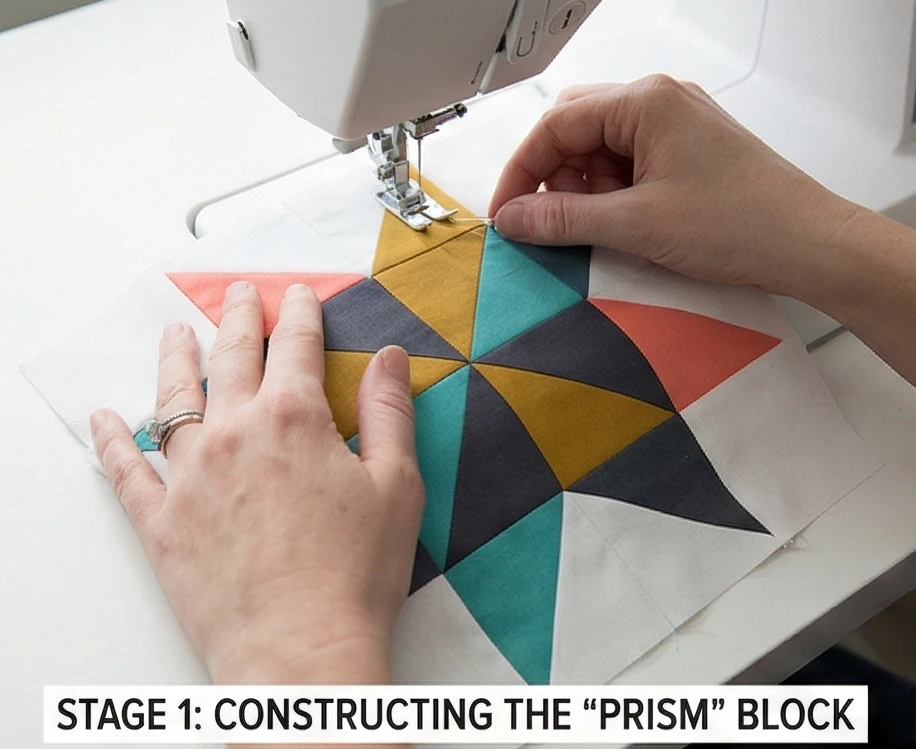
Step 1: Constructing the “Prism” Block
This single block carries the weight of the entire quilt.
- Pattern Choice: Choose a complex, 12-inch or 18-inch block pattern. An “Economy Block” (Square-in-a-Square), a “Lone Star”, or a “Pineapple” block works best.
- Piecing:
- Cut your high-contrast scraps.
- Sew the block with precision. Press seams open to keep it perfectly flat.
- Scale: The block should measure roughly 18.5″ x 18.5″ unfinished. It needs to be large enough to be noticed but small enough to float.
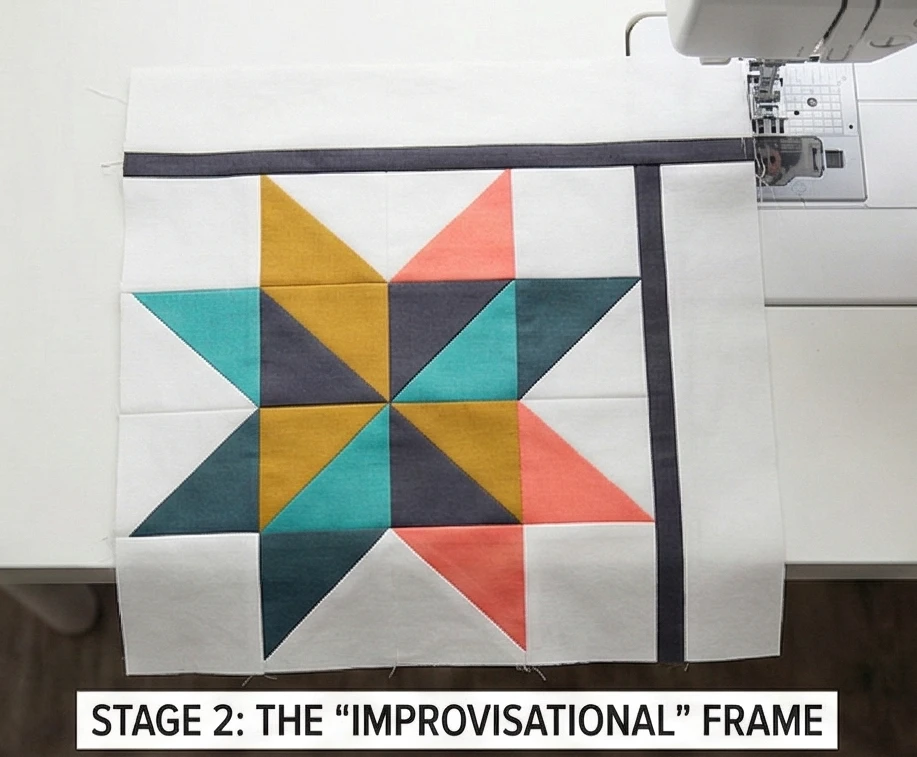
Step 2: The “Improvisational” Frame
The prism shouldn’t look like it was just plopped there. It needs to interact with the space.
- Cut Strips: Cut irregular strips of your background fabric (e.g., one 3-inch strip, one 5-inch strip).
- Add a “Ray”: Insert a very thin (1/2 inch finished) strip of Charcoal or Gold fabric into one of the white background strips.
- Attach: Sew these framed strips to only two sides of your Prism Block (e.g., Top and Right).
- Result: The colorful block now has asymmetrical “lines” radiating from it into the white space.
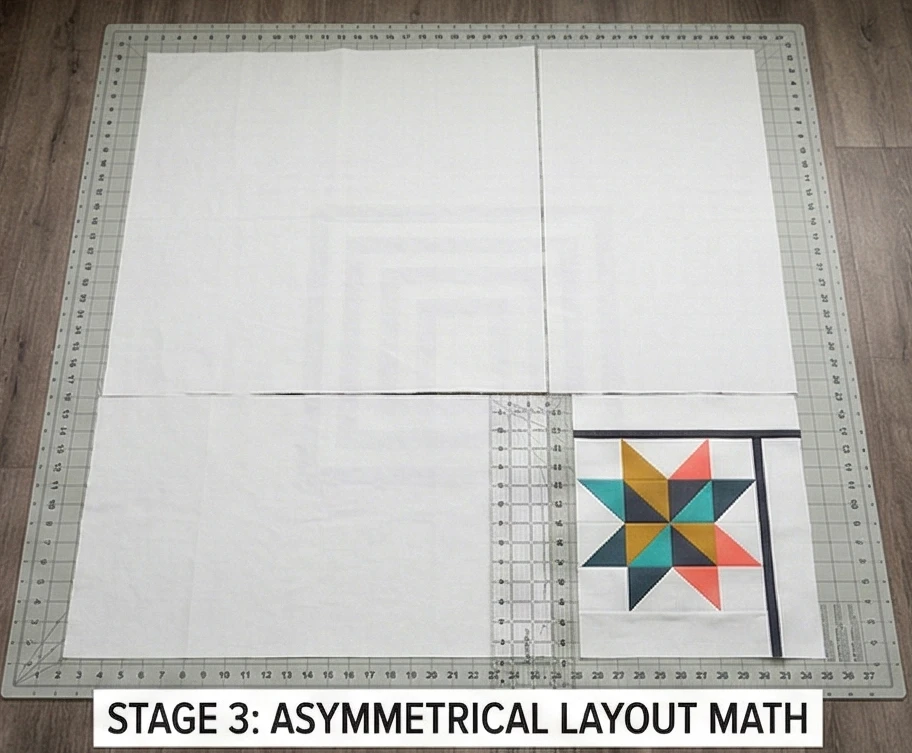
Step 3: Asymmetrical Layout Math
Don’t center it. The “Rule of Thirds” applies here.
- The Grid: Imagine your 90″ quilt divided into a tic-tac-toe board.
- Placement: The center of your Prism Block should land at one of the intersections of these lines (e.g., the bottom-right intersection).
- Measuring Background:
- Top Section: Cut a background panel approx. 60″ x 90″.
- Bottom Left: Cut a panel approx. 30″ x 60″.
- The Prism Area: Your block (plus framing) fills the remaining 30″ x 30″ corner.
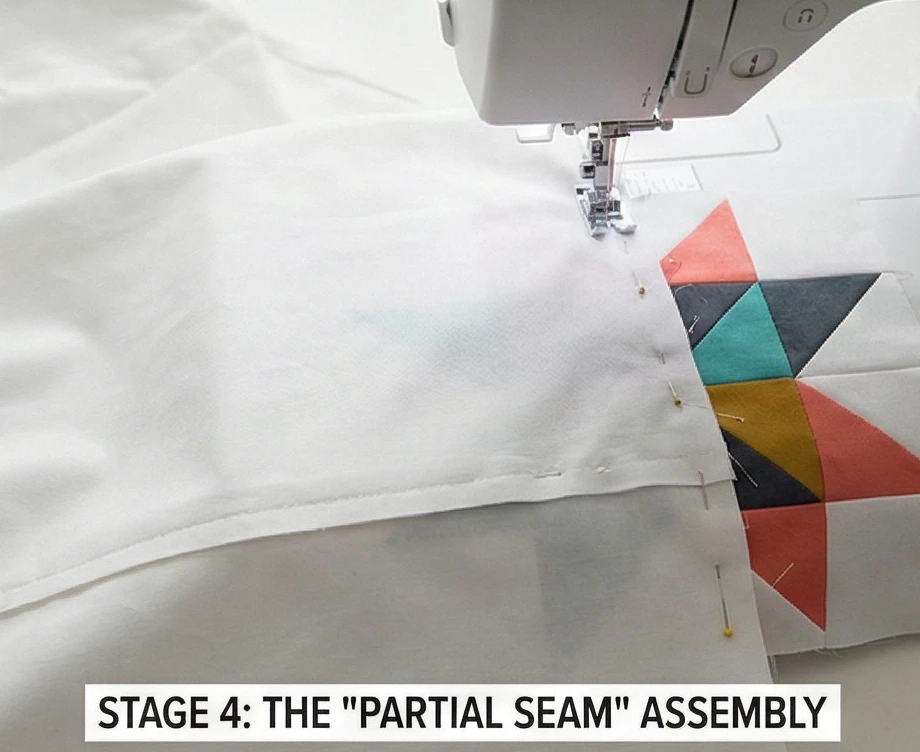
Step 4: The “Partial Seam” Assembly
How to inset a block into a solid field without a long seam line ruining the look.
- Sew: Sew the Bottom-Left background panel to the left side of the Prism Block unit.
- Join: Sew that combined strip to the bottom of the large Top Background panel.
- Tip: Use plenty of starch. Large pieces of bias-cut fabric can stretch and warp. Keep the grain straight.
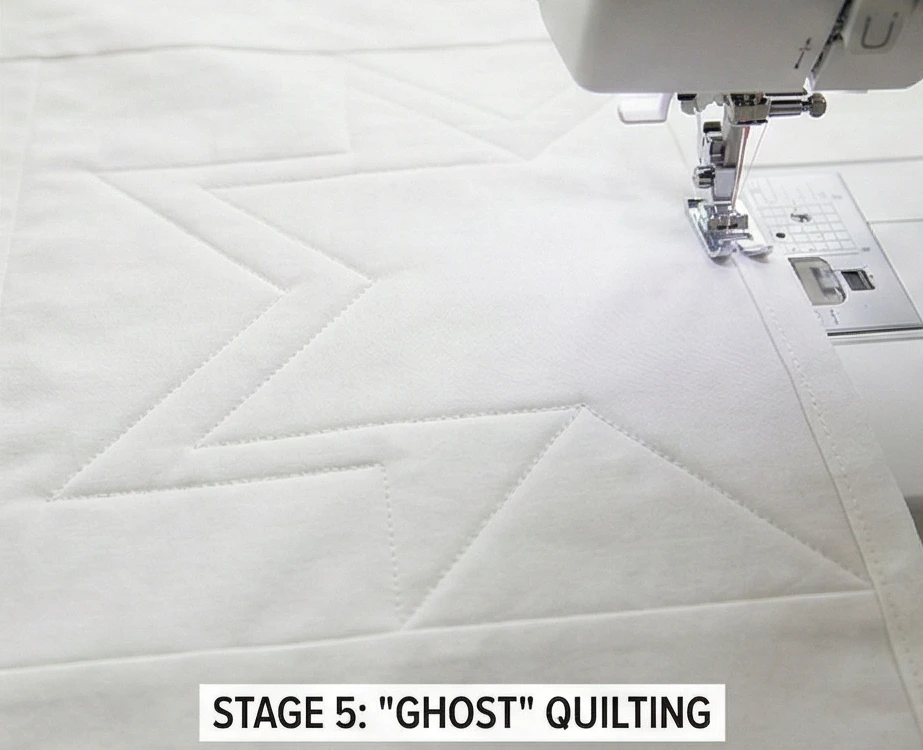
Step 5: “Ghost” Quilting
The quilting tells the story the fabric doesn’t.
- Marking: Use a long acrylic ruler to mark lines radiating out from the Prism Block.
- Echoing: Start quilting inside the Prism Block to anchor it.
- The Ghost Lines: Continue the geometric lines of the block out into the negative space.
- Example: If your block is a Star, quilt large, expanding star shapes that ripple out all the way to the edges of the white background.
- Effect: The quilting thread (use White or Silver) creates a “ghost” of the pattern that is only visible when the light hits it. This adds texture without color.
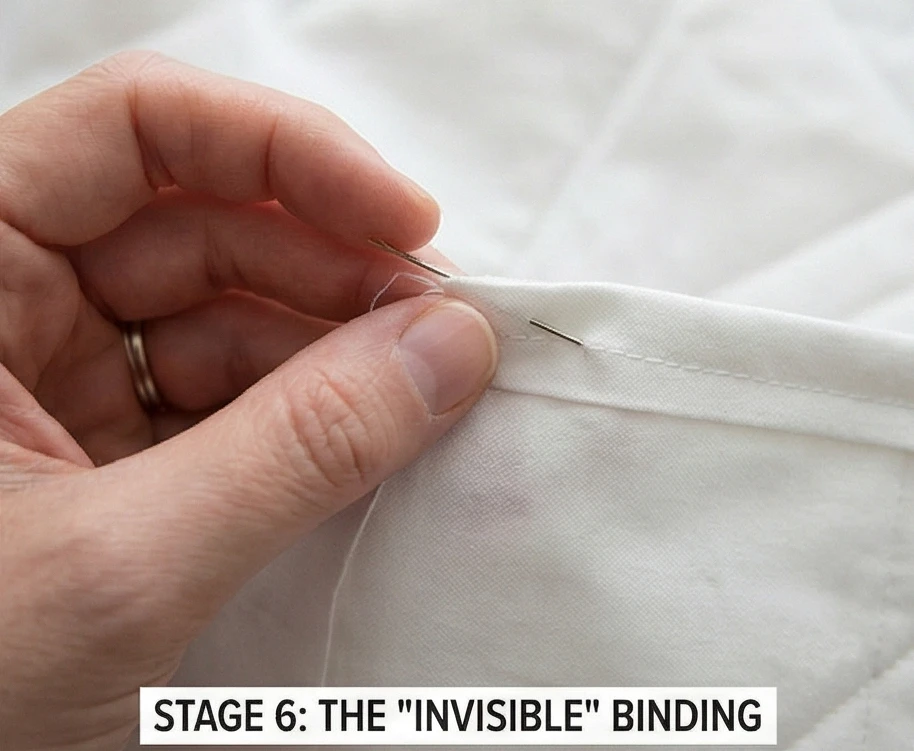
Step 6: The “Invisible” Binding
A heavy binding would trap the design. We want it to float off the edge.
- Match perfectly: Use the exact same White fabric for the binding as you used for the background.
- Attach: Sew it on with a standard 1/4″ seam.
- Hand Finish: Whip stitch the back for a seamless finish.
- Visual: The white field appears to go on forever, making the quilt feel lighter and more modern.
Usability Note: A white quilt is a bold choice for real life. If you have children or eat in bed, consider swapping the White background for a “Low Volume” print (white fabric with a faint grey text or dot pattern). It still reads as “negative space” from a distance, but hides small stains much better than solid white.

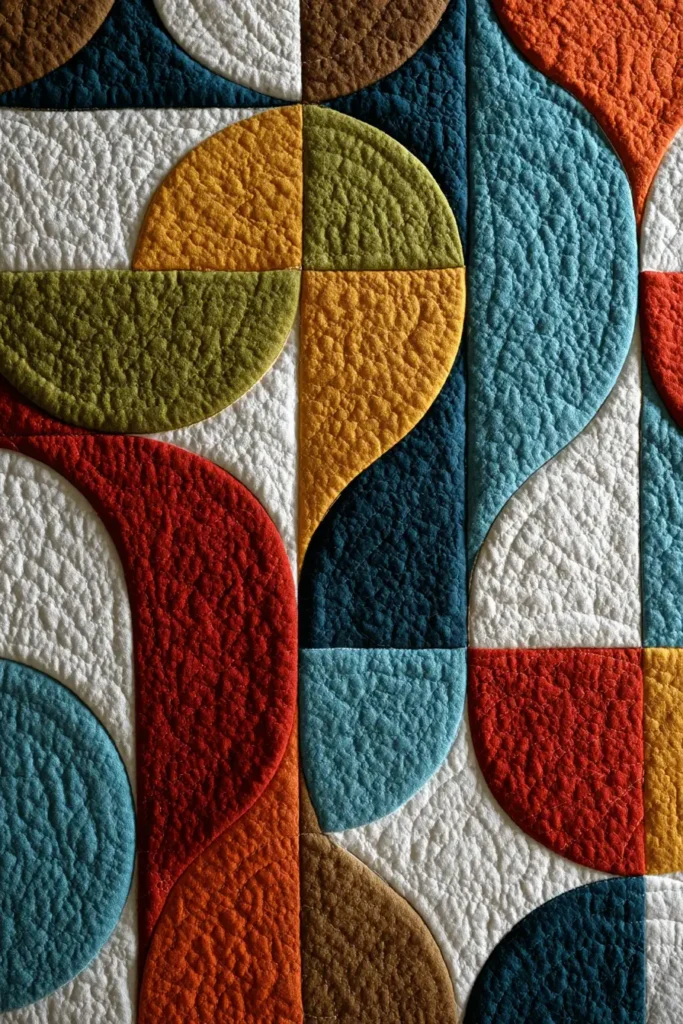
6. Mid-Century Modern Inspired Bed Runners for Retro Style
“The Palm Springs Loop” Atomic Era Bed Runner
Mid-Century Modern (MCM) design, born in the 1950s and 60s, rebelled against the rigid squares of the past in favor of organic shapes, boomerangs, and playful curves inspired by the Space Age. “The Palm Springs Loop” brings this retro vibe to the bedroom using the classic Drunkard’s Path block. By arranging these curved blocks in a specific undulating sequence, we create a “mod” chain-link effect. Rendered in quintessential MCM colors—Mustard Gold, Teal, and Walnut Brown—this runner adds a splash of vintage cool to a plain white duvet.
Finished Dimensions: King/Queen Bed Runner, 24″ x 90″.
Materials Needed:
- Fabric A (Background): 2 yards of Crisp White, Pebble Grey, or Chartreuse (if you are bold).
- Fabric B (The Loops): 1/2 yard each of 3 retro colors (e.g., Mustard, Teal, Burnt Orange).
- Backing: 2.5 yards of a geometric “Atomic Starburst” print.
- Batting: Thin Cotton Batting (runners should lie flat).
- Templates: A 4-inch Drunkard’s Path acrylic template set (or download and print a paper template).
- Notions: 28mm Rotary Cutter (smaller blades cut curves better), pins.
Cultural Backstory: In the 1950s, the world was obsessed with the future. The “Atomic Age” introduced the Sputnik satellite and nuclear power, which significantly influenced design. Furniture became kidney-shaped, clocks looked like starbursts, and fabric patterns featured floating orbs and boomerangs. This runner mimics the “Googie” architecture of roadside diners and the famous breeze blocks of Palm Springs homes.
Step 1: Cutting the Curves (The “L” and the “Pie”)
Don’t fear the curve. The template does the work.
- The Background (The “L”): Use the L-shaped template to cut 40 units from your Background Fabric (A).
- The Loops (The “Pie”): Use the Quarter-Circle (Pie) template to cut 40 units from your assorted colored fabrics (B).
- Grainline: Try to cut with the straight edges aligned with the fabric grain to prevent stretching.
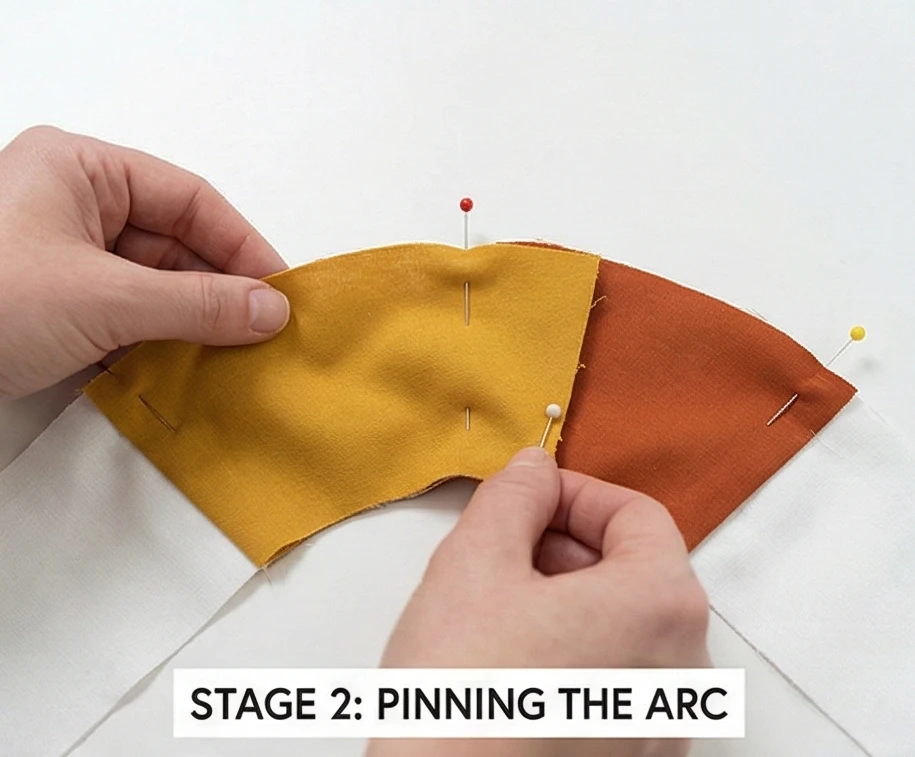
Step 2: Pinning the Arc
The secret to a puck-free curve is three pins.
- Find Centers: Fold the curved edge of the “L” piece in half and crease to find the center. Do the same for the “Pie” piece.
- Match: Place the “Pie” on top of the “L” (Right Sides Together).
- Pin 1: Match the center creases.
- Pin 2 & 3: Match the straight ends.
- Ease: The fabric will bunch up in the middle. This is normal. Gently ease the extra fabric into the curve with your fingers.
Step 3: Sewing the Drunkard’s Path
- Stitch: Sew slowly with a scant 1/4″ seam allowance.
- Technique: Keep the “L” piece on the bottom and the “Pie” piece on top. Your machine’s feed dogs will help ease the bottom layer in.
- Press: Press the seam toward the “Pie” (the darker fabric).
- Square Up: Trim your blocks to exactly 4.5″ x 4.5″. You need 40 blocks.

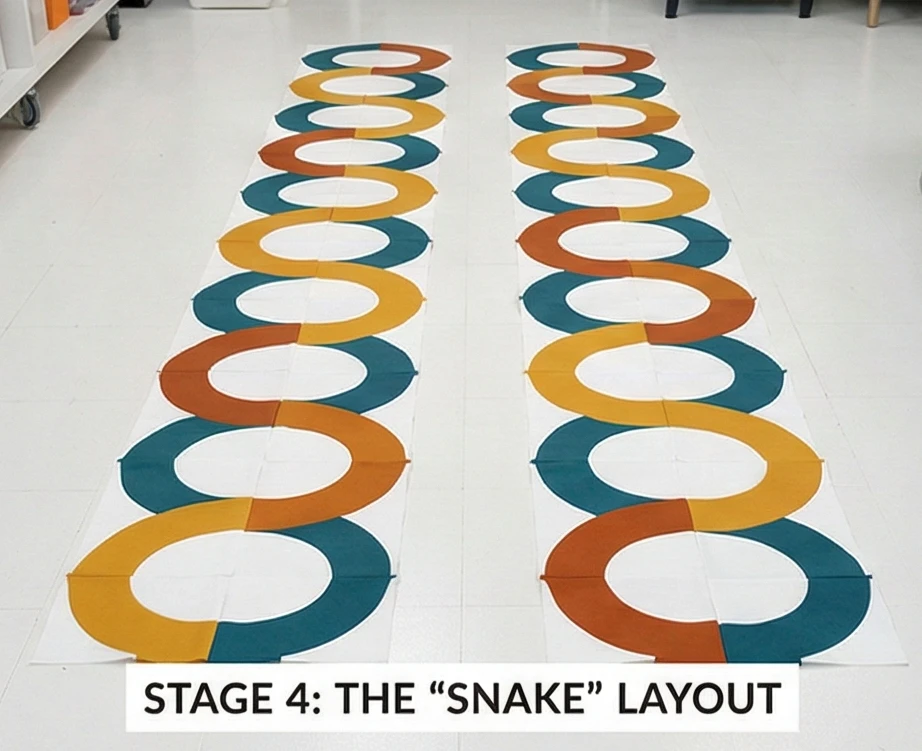
Step 4: The “Snake” Layout
Rotation creates the pattern.
- Arrange: Lay out your blocks in 2 rows of 20.
- Row 1 Orientation: Rotate the blocks so the colored curves form a “hump” shape (Rainbow).
- Row 2 Orientation: Rotate the blocks so the colored curves form a “bowl” shape (Smile).
- The Visual: When you place Row 1 on top of Row 2, the “Rainbow” and the “Smile” should meet to form a complete Circle or Ovoid.
- Variation: Offset them to create a continuous sine wave or “snake” winding down the bed.
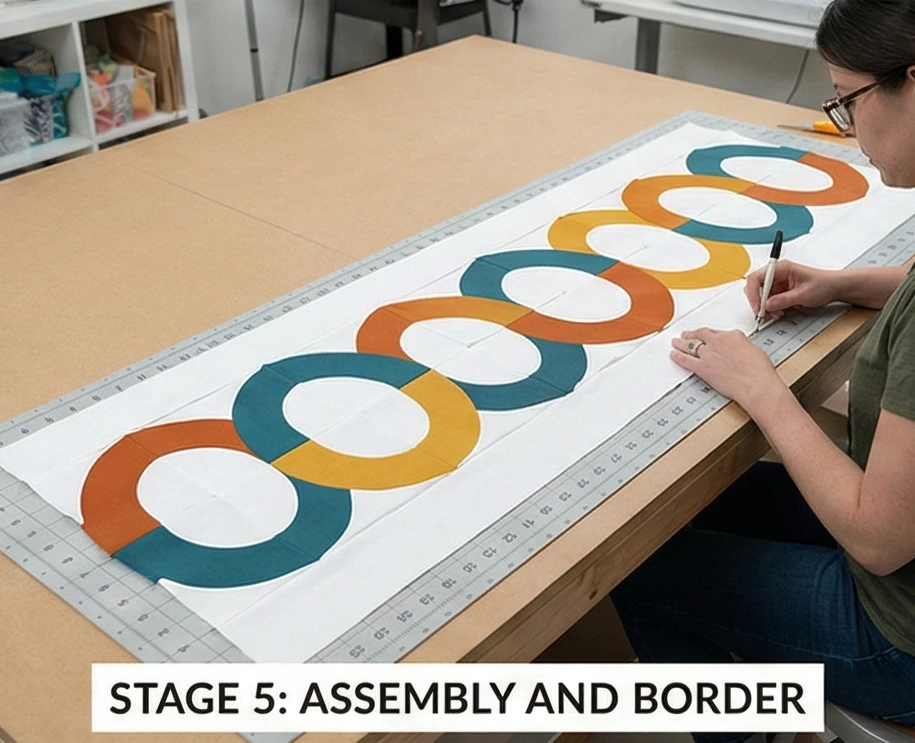
Step 5: Assembly and Border
- Sew Blocks: Stitch the blocks into vertical pairs first (making the full circles), then sew the pairs together into a long row.
- The Floating Border: Cut 3-inch wide strips of your Background Fabric (A).
- Sew to the top and bottom of the runner.
- Sew to the short ends.
- Why: This “floats” the colorful circles in the center of the runner, giving it that airy, minimalist MCM look.
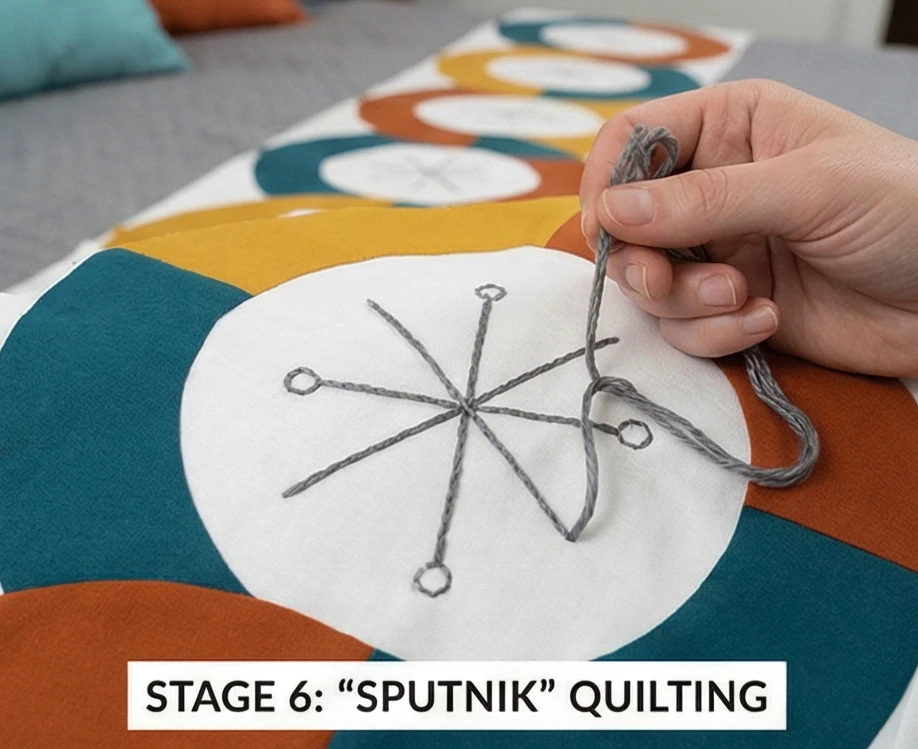
Step 6: “Sputnik” Quilting
Hand-stitching adds the retro flair.
- Machine Quilt: Stitch “in the ditch” (between the blocks) to secure the layers.
- Hand Embellish: Thread a needle with thick Dark Grey or Silver embroidery floss.
- The Starburst: In the negative white space (inside the circles or between them), hand-stitch large Asterisks (*) or “starbursts” with 6 or 8 radiating lines.
- Scale: Make them about 2 inches wide.
- Effect: This mimics the iconic “Atomic Star” motif seen on vintage Pyrex and Formica tables.
Usability Note: Bed runners are the secret weapon of high-end hotels. They protect the pristine white duvet from suitcase wheels, shoe scuffs, and pets who jump on the foot of the bed. Because this runner is small (compared to a quilt), it’s easy to wash frequently without stripping the whole bed.
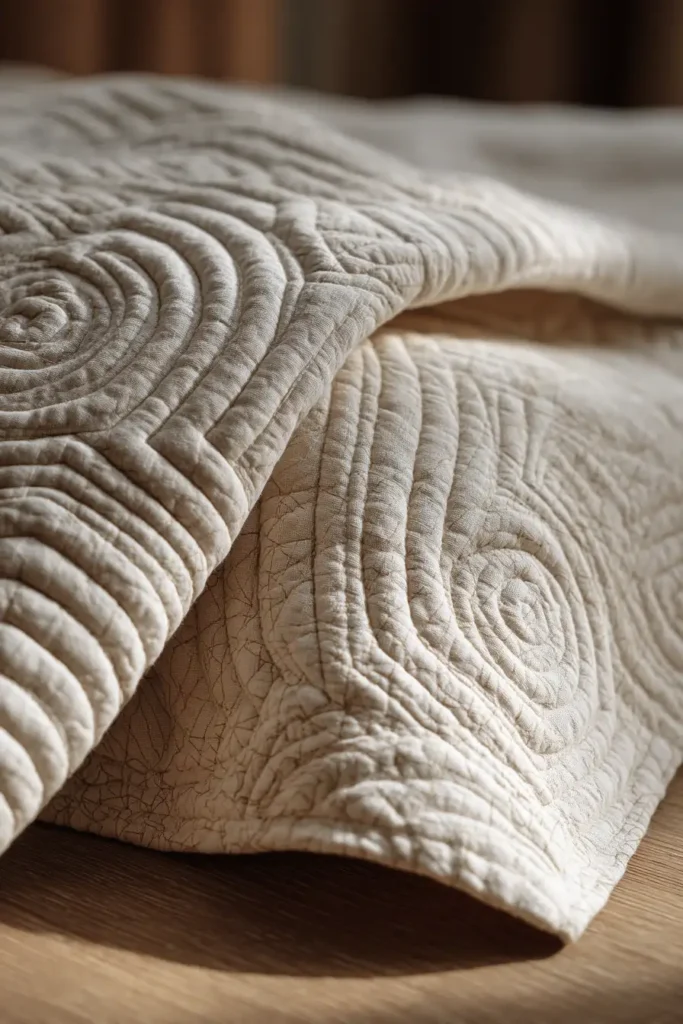
7. Sleek Solid Color Whole Cloth Quilts for Zen Decor
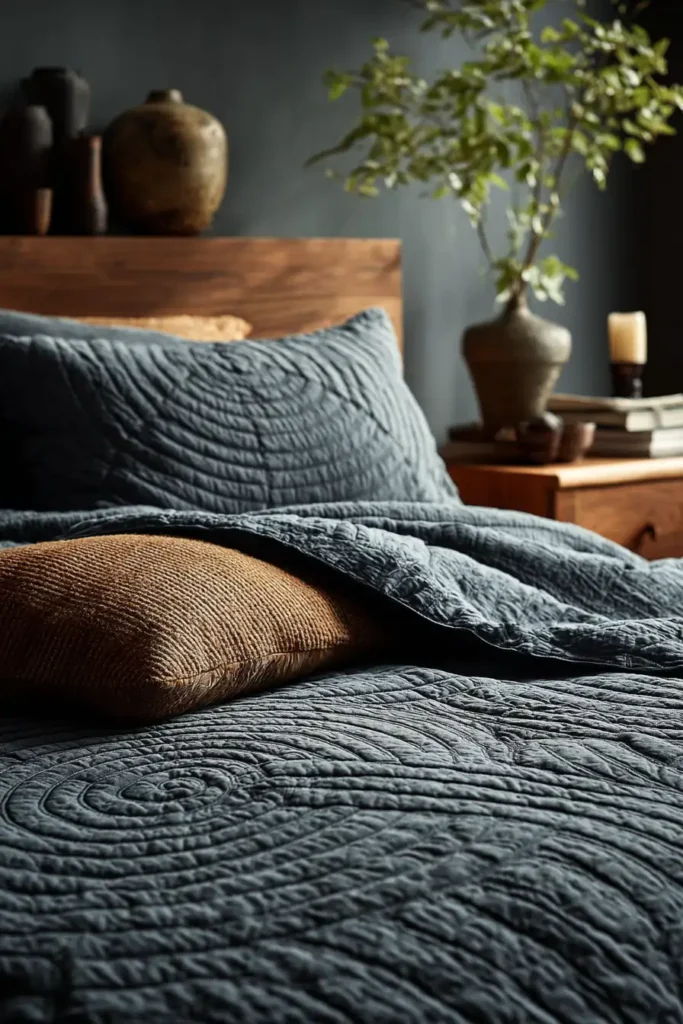

“The Kyoto Stone” Wholecloth Grid Quilt
In Zen philosophy, the karesansui (dry landscape garden) uses raked gravel to represent rippling water and carefully placed stones to represent islands of stability. “The Kyoto Stone” quilt brings this meditative aesthetic to the bedroom. It is a “Wholecloth” quilt, meaning the top is a single, uninterrupted span of fabric. Without patchwork seams to break the eye, the focus shifts entirely to the quality of the material—typically a Linen or Double Gauze—and the texture of the quilting stitches.
Finished Dimensions: Queen Coverlet, 90″ x 94″.
Materials Needed:
- The Top: 6 yards of Washed Linen, Cotton/Linen Blend, or Double Gauze in a stone tone (Dove Grey, Charcoal, or Sand).
- Note: Most fashion fabrics are only 54″ wide, so you will likely need to seam two lengths together.
- Backing: 6 yards of Cotton Sateen (for a cool, smooth feel) or Voile.
- Batting: Bamboo/Cotton Blend (50/50).
- Why: Bamboo has a magnificent drape. It hangs heavy and limp like water, whereas polyester puffs up stiffly.
- Thread: 4 large spools of 50wt Cotton Thread in a color that matches the fabric exactly.
- Notions: A Hera Marker (creasing tool) or masking tape, Walking Foot.
Cultural Backstory: Wholecloth quilting has historically been a sign of wealth—showcasing expensive imported fabric without cutting it up. However, in the modern minimalist context, it references the Japanese concepts of “Ma” (negative space) and “Wabi-Sabi” (imperfection). A washed linen quilt that is slightly wrinkled and textured is considered more luxurious than a perfectly pressed, stiff comforter.
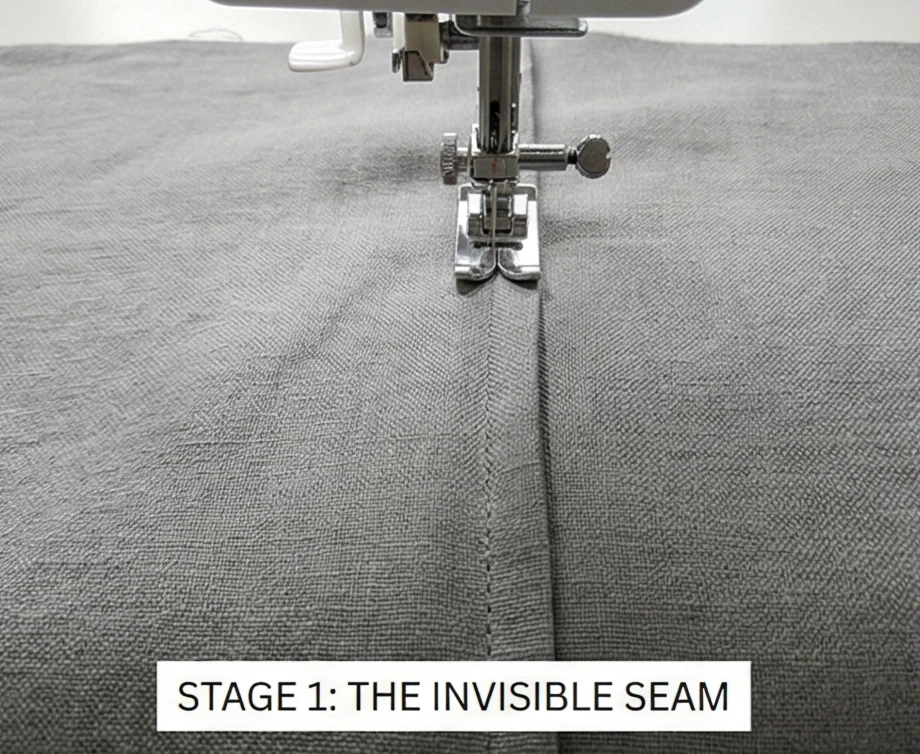
Step 1: The Invisible Seam
Since the fabric isn’t wide enough, we must join it creatively.
- Cut: Cut your fabric into two 96-inch lengths.
- Join: Sew them together along the long (selvage) edge.
- Option A (The Hide): Use a standard 1/2″ seam and press it open. Later, you will quilt a grid line directly over this seam to hide it.
- Option B (The Feature): Use a Flat Felled Seam (like on jeans) to create a deliberate, structural spine down the center of the bed. This looks architectural and intentional.
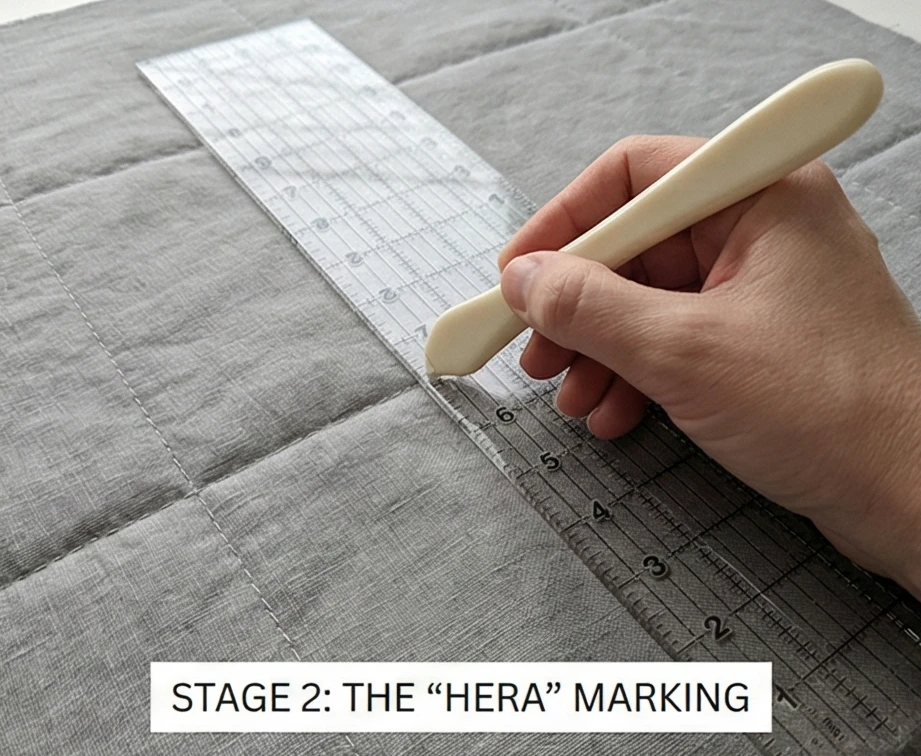
Step 2: The “Hera” Marking
Ink can be hard to remove from solids. Creasing is safer.
- Baste: Sandwich the Top, Batting, and Backing. Spray-baste thoroughly to prevent the layers from shifting.
- Mark: Use a Hera Marker (a dull plastic knife tool) and a long acrylic ruler.
- Action: Press hard to draw lines directly onto the fabric. The tool leaves a shiny crease (like a fold mark) that guides your sewing but disappears after the first wash.
- The Grid: Mark a 2-inch square grid across the entire quilt. Start from the center seam and work outward.
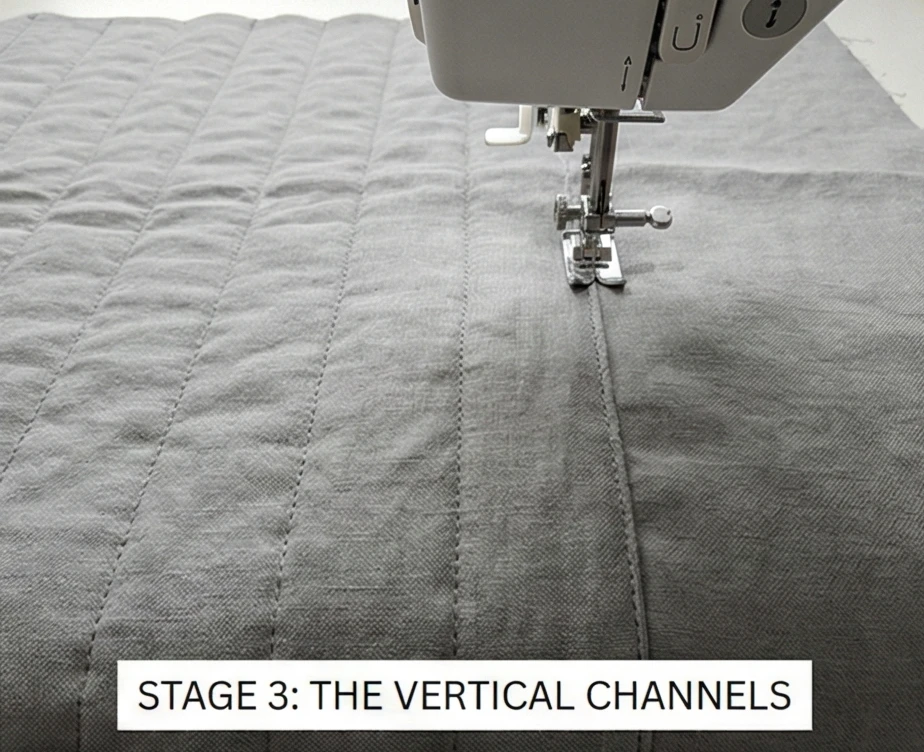
Step 3: The Vertical Channels
Quilt in one direction first.
- Setup: Install your Walking Foot and set stitch length to 3.0mm.
- Stitch: Sew down all the vertical crease lines.
- Direction: Remember to alternate your direction (North-South, then South-North) for every other line to prevent the quilt from warping into a parallelogram.
Step 4: The Horizontal Cross-Hatch
Creating the squares.
- Rotate: Turn the quilt 90 degrees.
- Stitch: Sew across all the horizontal crease lines.
- The Intersection: As you cross the vertical lines, try to keep the fabric flat. The walking foot should hop over the bumps.
- Result: You will see a field of puffed 2-inch squares, giving the flat fabric a rich, architectural texture.

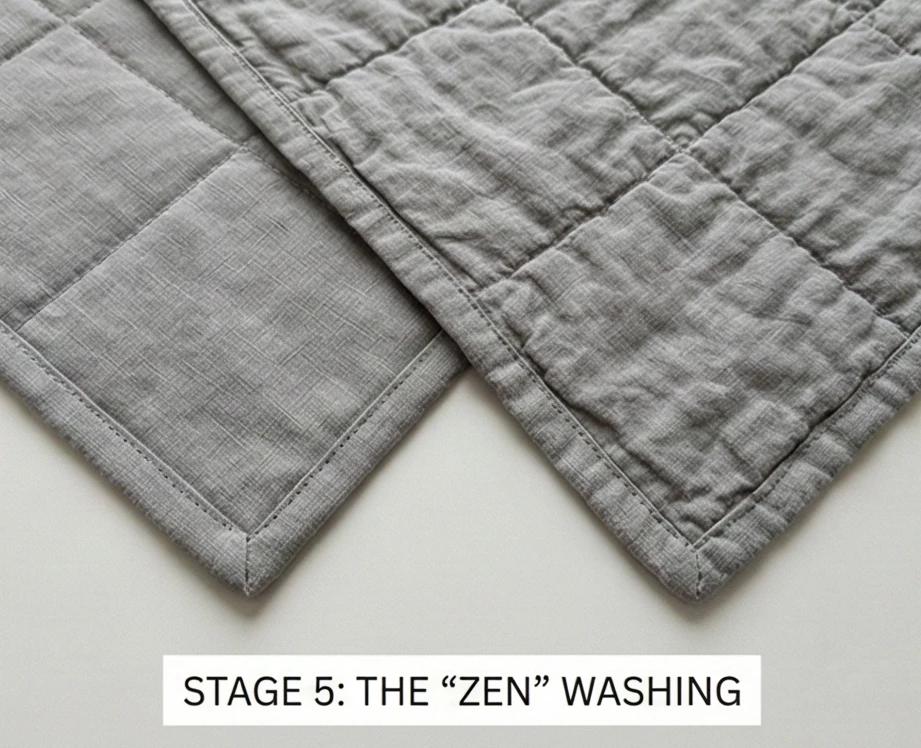
Step 5: The “Zen” Washing
The texture doesn’t appear until the water hits it.
- Finish Edges: Trim the quilt square.
- Wash: Throw the stiff, flat quilt into the washing machine on Warm/Gentle.
- Dry: Tumble dry on Medium.
- The Transformation: The cotton/bamboo batting will shrink slightly (about 3-5%). The linen will crinkle around the stitch lines. The result is a soft, rumpled texture that feels ancient and cozy, like a well-loved stone smoothed by the river.
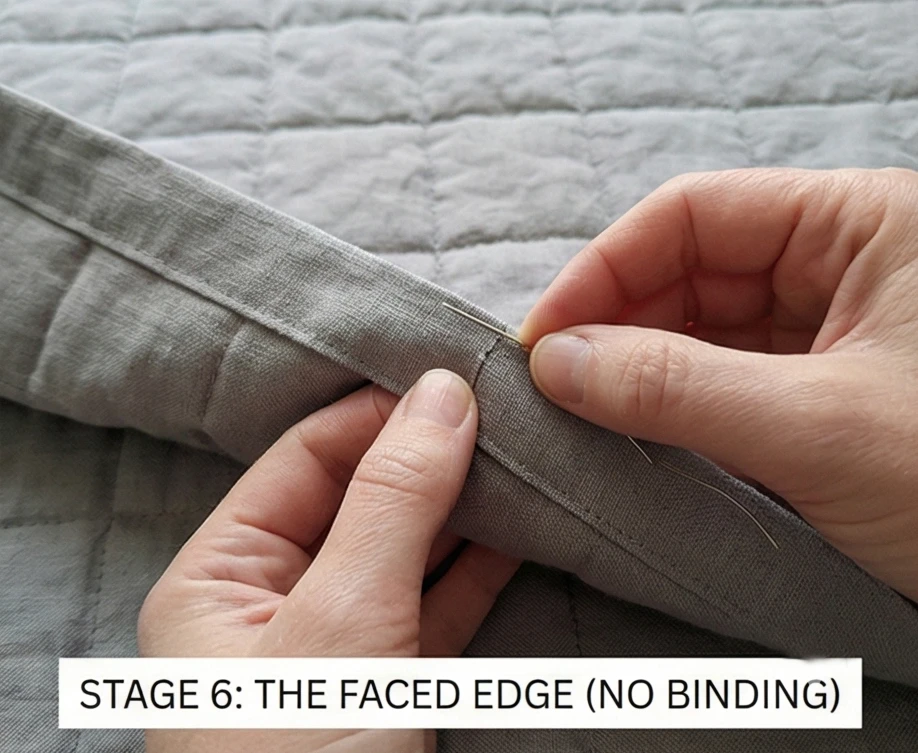
Step 6: The Faced Edge (No Binding)
A binding creates a frame. We want the “water” to flow off the edge.
- Cut Facings: Cut 4 strips of the matching fabric, 2.5 inches wide.
- Attach: Sew strips to the front of the quilt edges (Right Sides Together).
- Turn: Turn the strips completely to the back of the quilt.
- Finish: Hand stitch the facing down on the back.
- Visual: The grid pattern extends to the edge and vanishes, reinforcing the minimalist “infinity” look.
Usability Note: Linen gets softer and stronger with use. While it may feel slightly scratchy or stiff right out of the package, the quilting process breaks the fibers. By the tenth wash, this will likely be the softest thing in your house. It is also naturally thermoregulating—cool in summer, warm in winter.
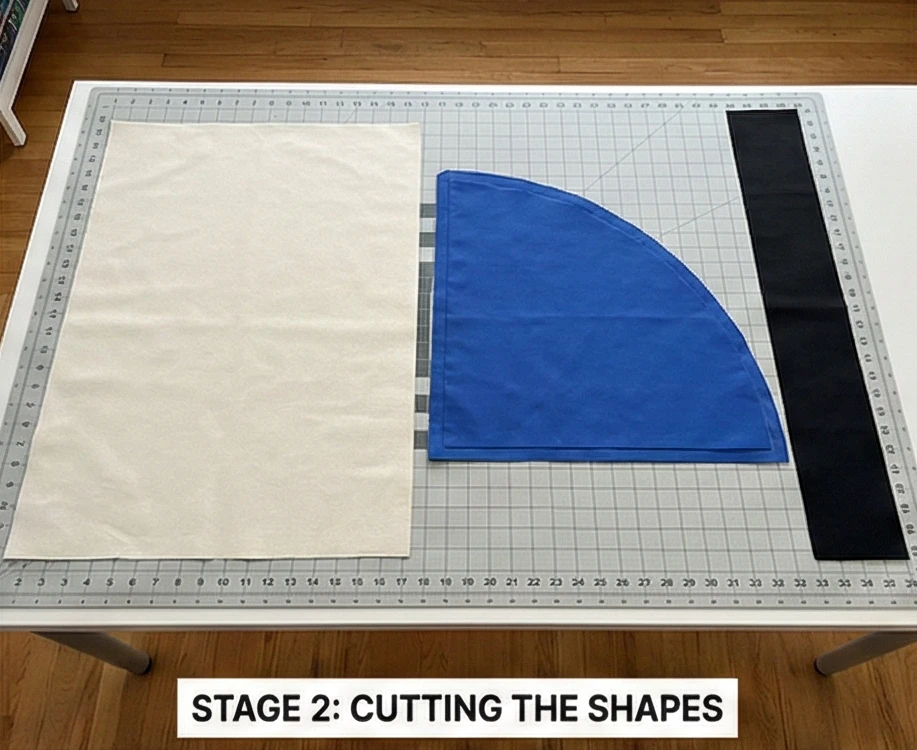
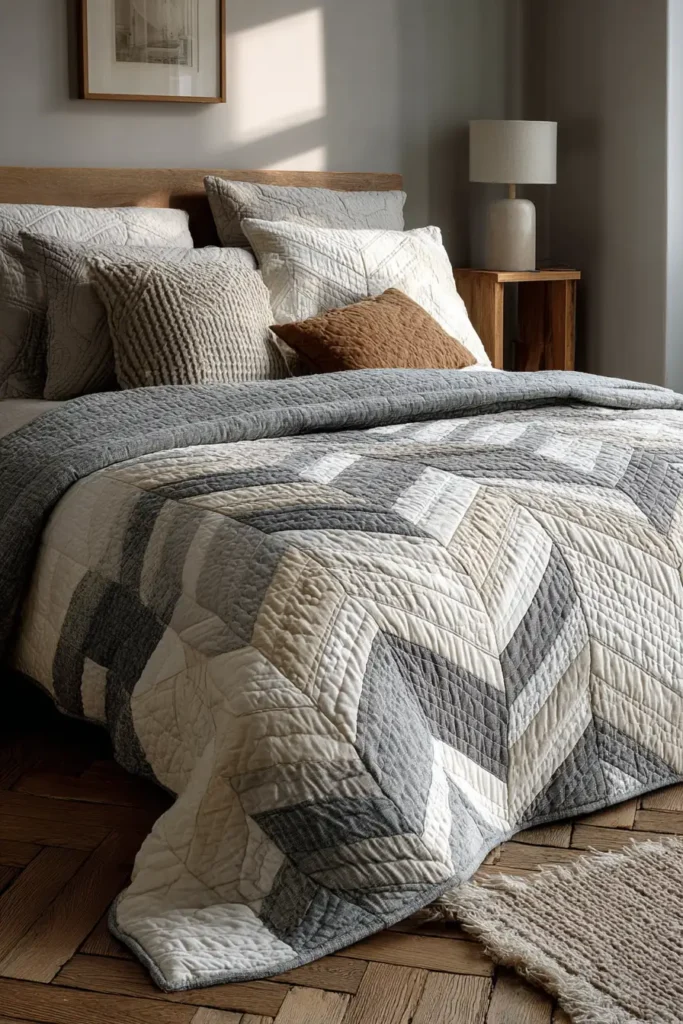
8. Large-Scale Block Patterns for Bold Statement Bedding
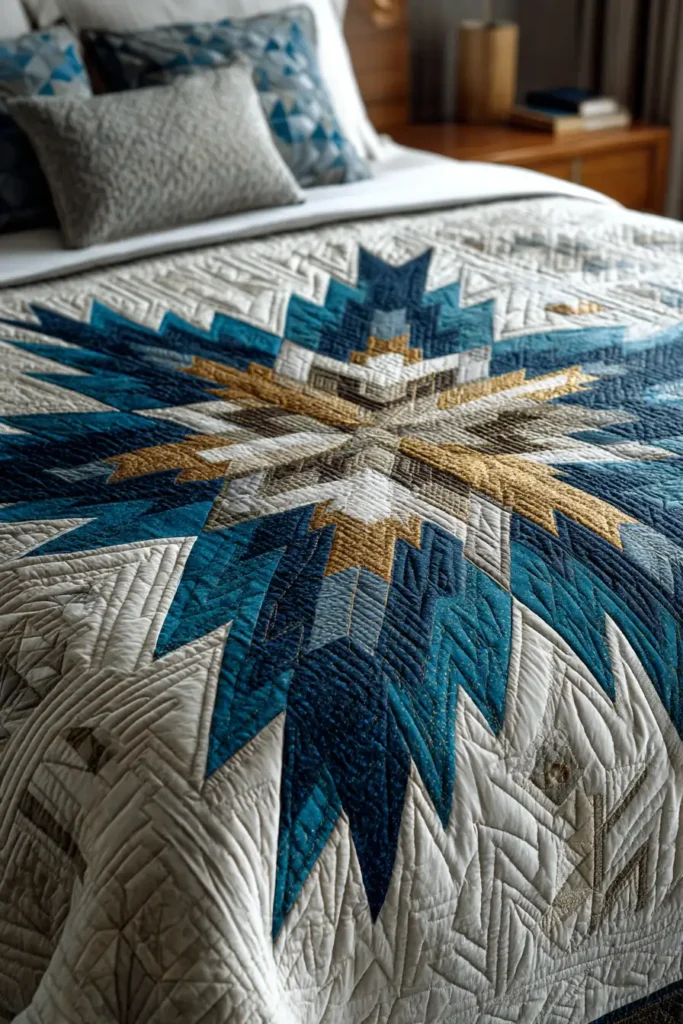
“The Arctic Star” Super-Sized Quilt
One of the defining characteristics of Modern Quilting is “Scale.” By taking a traditional block—like the Sawtooth Star or Ohio Star—and enlarging it until a single block spans the entire bed, you transform a humble patchwork design into a graphic masterpiece. “The Arctic Star” is exactly that: one massive, explosive star set against a sea of negative space. Because the pieces are large (some over 20 inches), this quilt comes together quickly yet looks expensive and custom-made.
Finished Dimensions: King/Queen Coverlet, 96″ x 96″.
Materials Needed:
- Fabric A (The Background): 6 yards of Solid White, Ice Blue, or Pale Grey.
- Fabric B (The Star Points): 2 yards of Navy, Charcoal, or Emerald Green.
- Fabric C (The Center): 1 yard of a contrasting Metallic Gold or Patterned Text fabric.
- Backing: 9 yards of wide-back cotton.
- Batting: Medium Loft Cotton/Poly Blend (to give the star some structure).
- Notions: A 24-inch quilting ruler (essential for long cuts), spray starch.
Cultural Backstory: The “Super-Sizing” trend in quilting parallels the Pop Art movement of the 1960s, where everyday objects were blown up to monumental proportions (think Claes Oldenburg). In the context of bedding, a single giant block functions as a mural for the mattress, immediately drawing the eye to the center of the room and grounding the space.
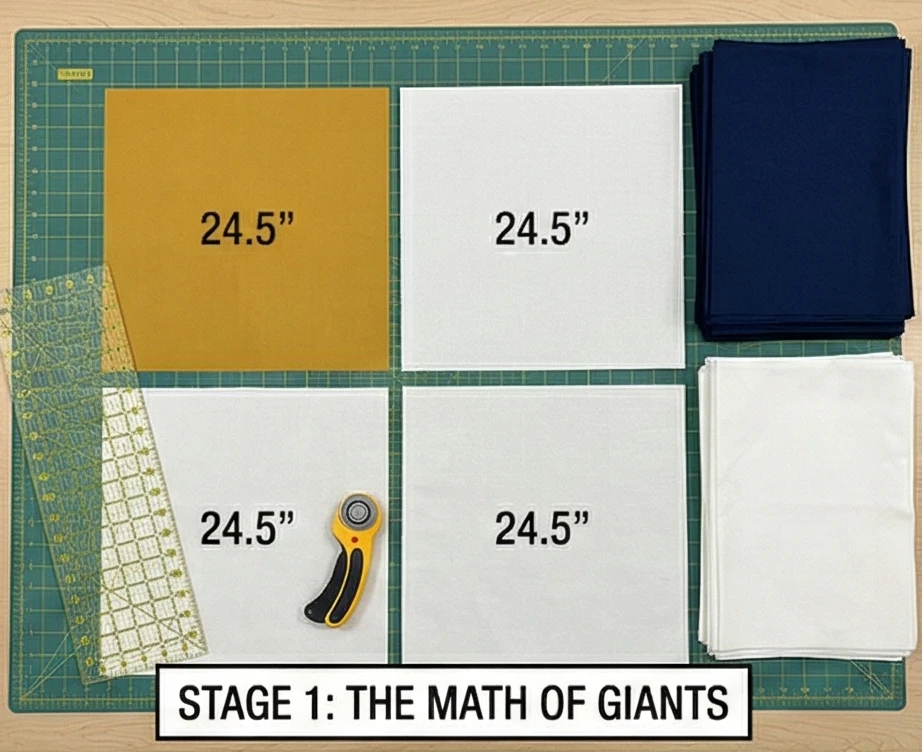
Step 1: The Math of Giants
Forget 2-inch squares. We are cutting massive panels.
- The Center Square: Cut one square of Fabric C (Center) measuring 24.5″ x 24.5″.
- The Corner Squares: Cut four squares of Fabric A (Background) measuring 24.5″ x 24.5″.
- The “Flying Geese” Units:
- The “Sky” (Background): Cut four rectangles of Fabric A measuring 24.5″ x 48.5″.
- The “Geese” (Points): Cut eight squares of Fabric B measuring 24.5″ x 24.5″.
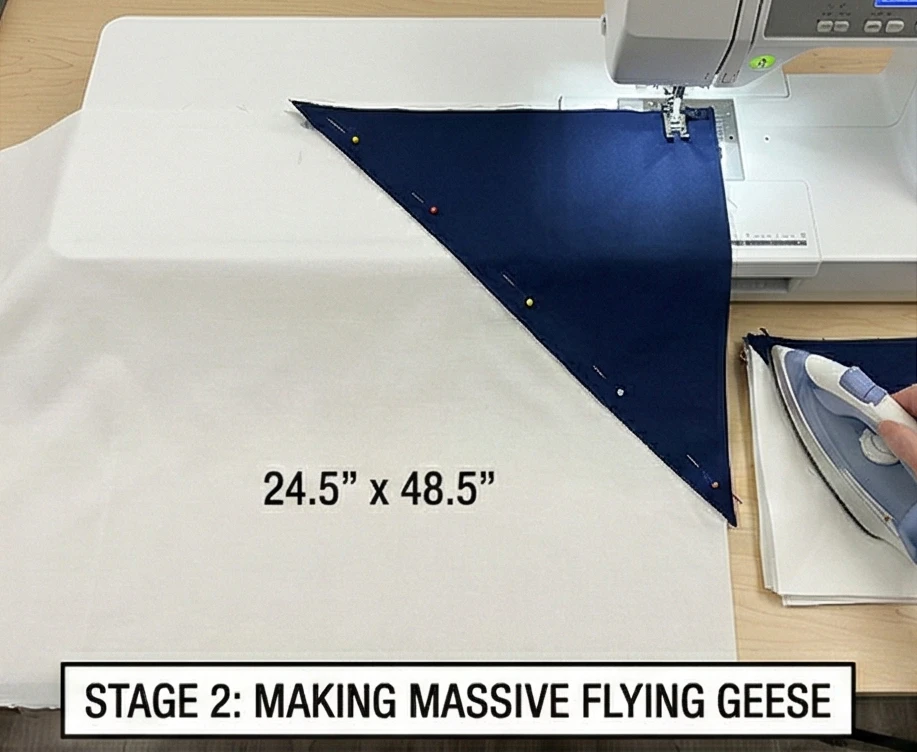
Step 2: Making Massive Flying Geese (Stitch-and-Flip)
Handling fabric this large requires floor space.
- Mark: Draw a diagonal line on the back of all eight Fabric B (Star Point) squares.
- Left Side:
- Lay a large rectangle of fabric (24.5″ x 48.5″) flat.
- Place a Fabric B square on the left side, aligning the corners. (Right Sides Together).
- Pin: Pin aggressively. Large fabric pieces are heavy and prone to stretching along the bias.
- Sew: Stitch directly on the drawn diagonal line.
- Trim: Cut off the excess corner fabric, leaving a 1/4″ seam allowance. Press the star point open.
- Right Side:
- Place another Fabric B square on the right side of the rectangle.
- Sew on the diagonal line. Trim and press.
- Result: You now have a massive rectangular unit (24.5″ x 48.5″) with a large Navy “V” in the center. Make 4 of these units.
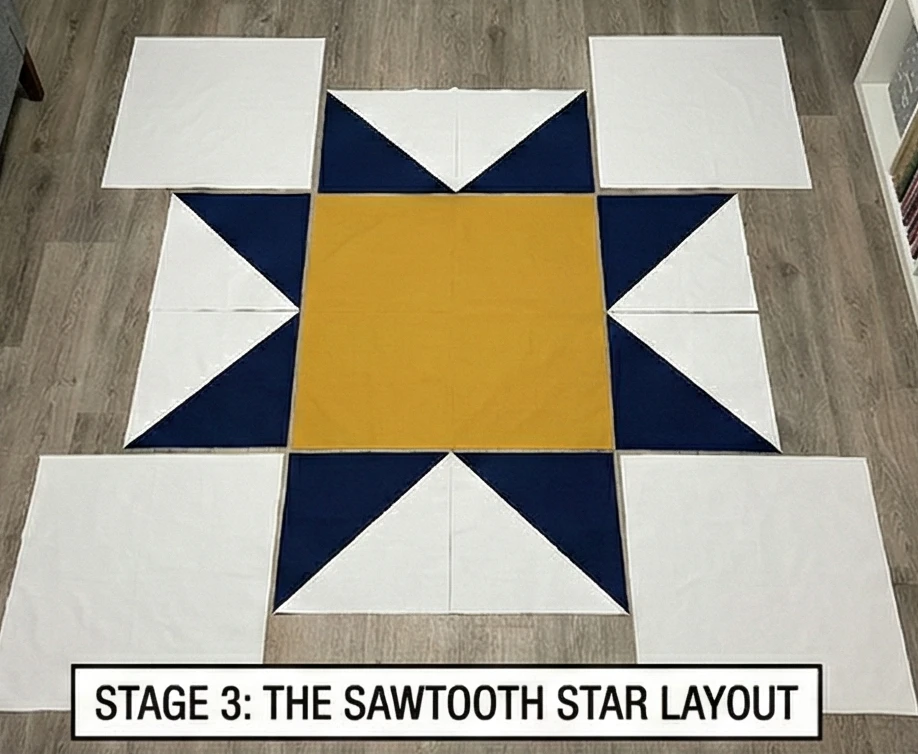
Step 3: The Nine-Patch Layout
The assembly is simple, but the weight is real.
- Row 1 (Top): Sew [Corner Square] + [Flying Geese Unit] + [Corner Square].
- Row 2 (Middle): Sew [Flying Geese Unit] + [Center Square] + [Flying Geese Unit].
- Row 3 (Bottom): Sew [Corner Square] + [Flying Geese Unit] + [Corner Square].
- Pressing: Press seams open to distribute the bulk.
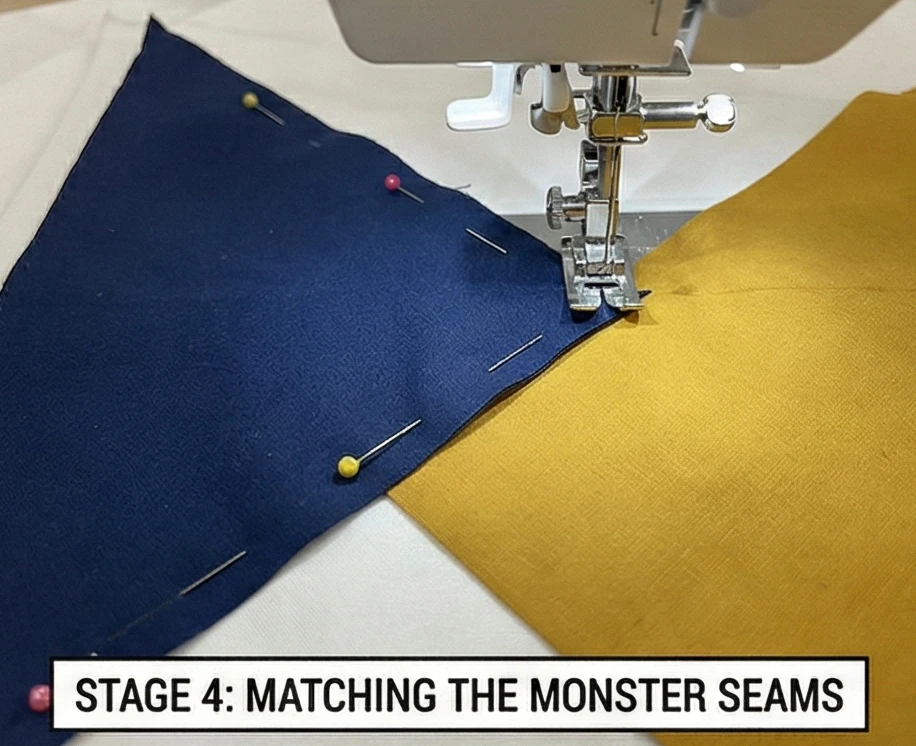
Step 4: Matching the Monster Seams
Intersection points are critical.
- Pinning: When joining Row 1 to Row 2, the points of the star (from the Flying Geese) must match the corners of the Center Square perfectly.
- The “Pin Prick” Trick: Stick a pin straight through the point of your “V” and then straight through the corner of the center square to align them vertically. Leave the pin upright while you place side pins to hold it.
- Sew: Stitch carefully over these intersections. If you are 1mm off on a 2-inch block, it’s fine. If you are 1mm off on a 24-inch block, the eye will notice the distortion across the room.
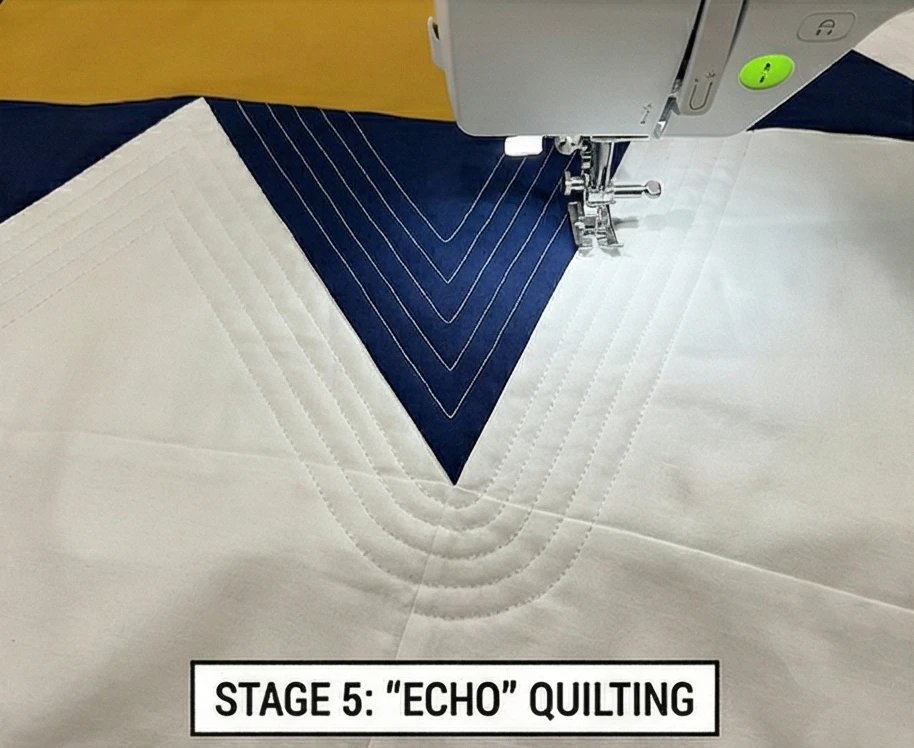
Step 5: “Echo” Quilting
Use the quilting to ripple the design outward.
- Baste: Sandwich the quilt.
- The Path: Start quilting inside the Star Points.
- Stitch a line 1/4 inch inside the perimeter of the star.
- Stitch another line 1/2 inch inside that.
- The Background: Continue this “echoing” into the white background.
- Effect: The quilting lines look like ripples in a pond radiating from the massive star, creating movement in the large negative spaces.
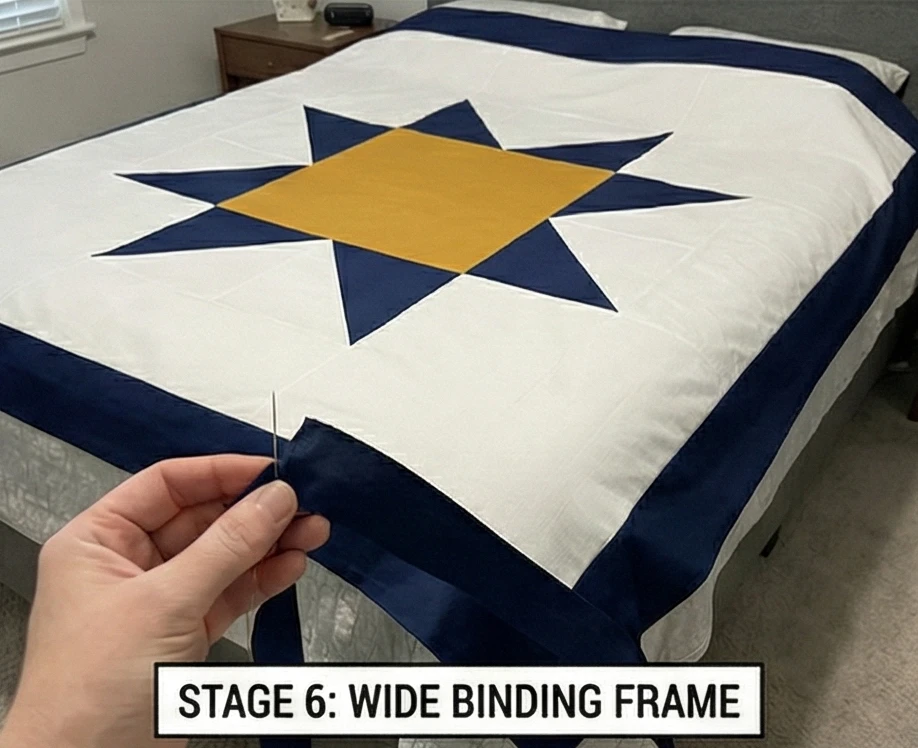
Step 6: Wide Binding Frame
A bold quilt needs a bold edge.
- Cut: Cut binding strips 3 inches wide (instead of the standard 2.5″).
- Fabric: Use the same Navy fabric as the Star Points.
- Attach: Sew with a slightly wider seam allowance (3/8″).
- Visual: This creates a thick, dark frame that contains the explosive energy of the star and defines the edges of the bed.
Usability Note: Because the pieces are so large, the “bias” edges (diagonal cuts) are very long and stretchy. Starch your fabric heavily before cutting. If the bias edges stretch, your square quilt will turn into a rhombus and won’t hang straight on the bed.
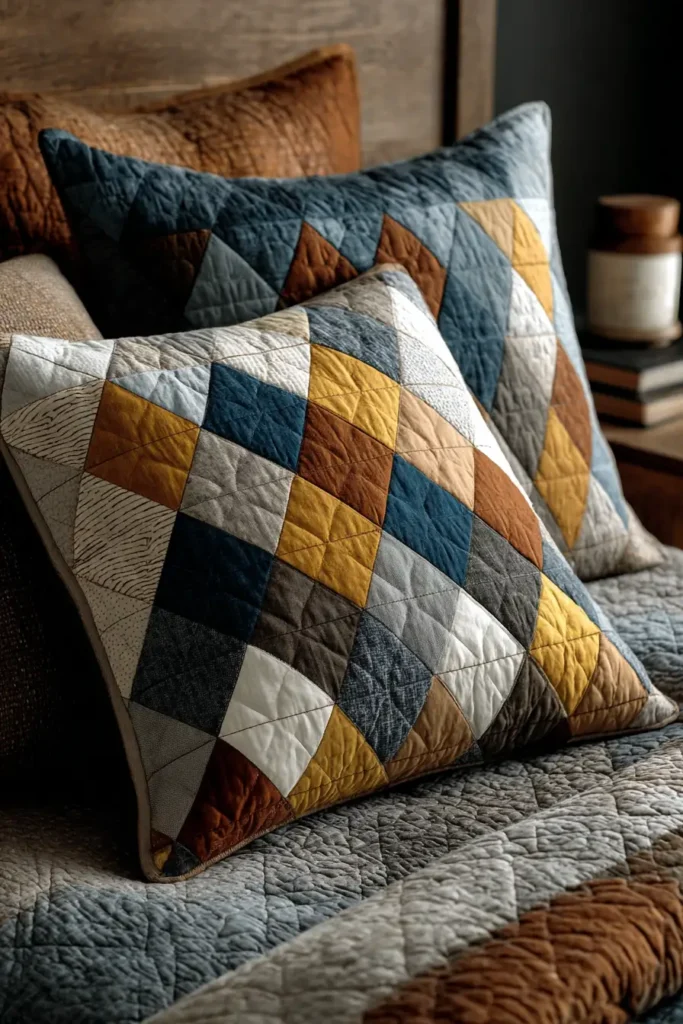
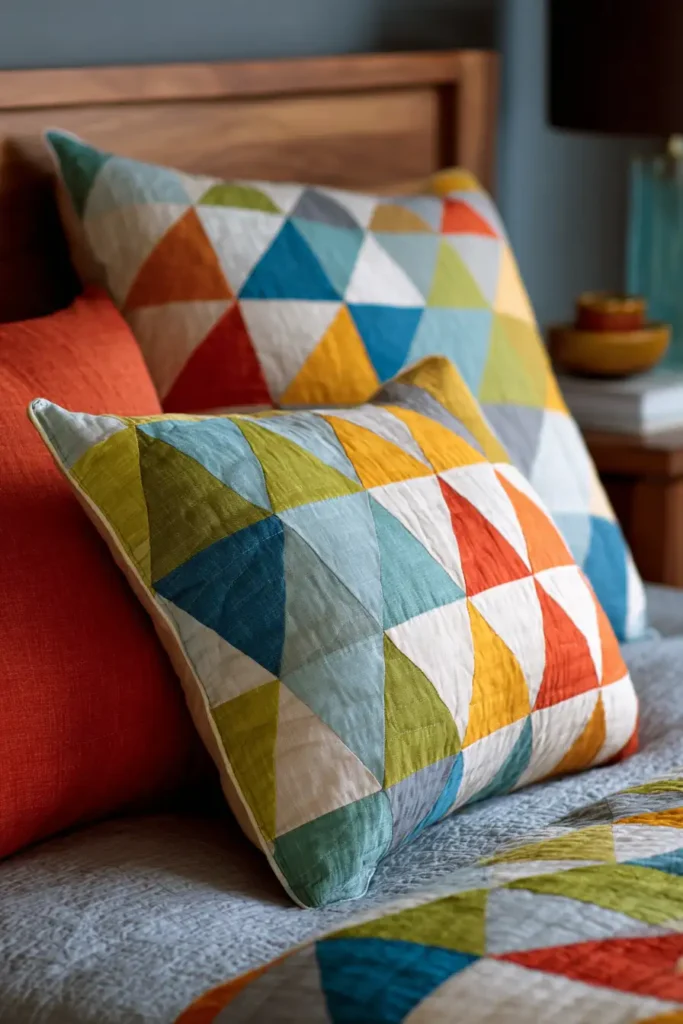
9. Modern Triangle Patchwork Pillow Shams for Edgy Accents
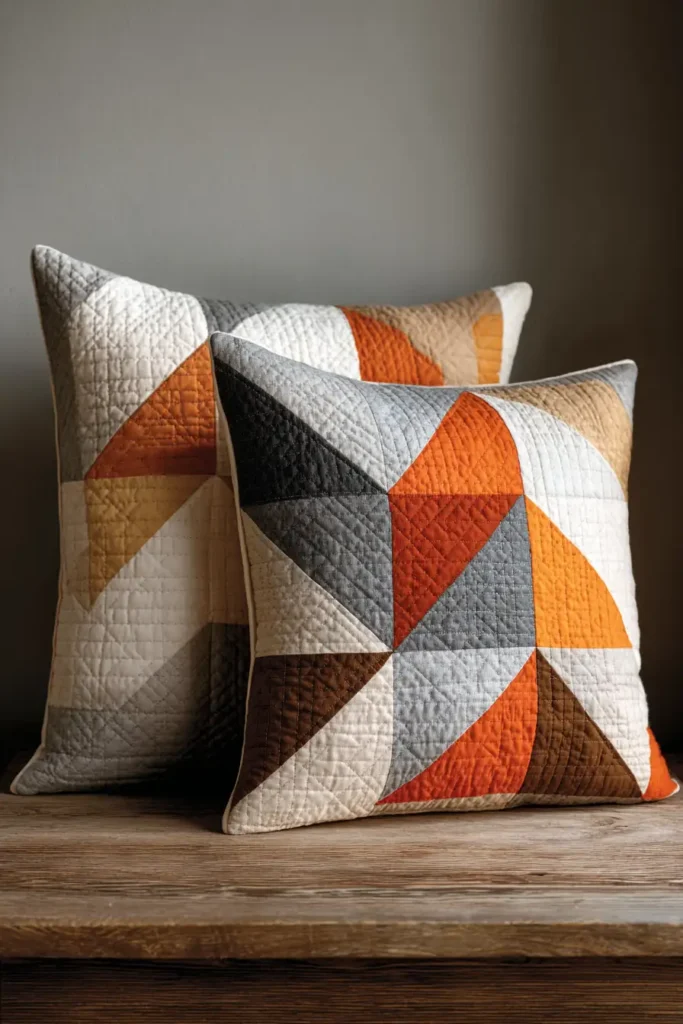

“The Faceted Peak” Equilateral Triangle Sham
Modern design loves a triangle. Whether referencing the geodesic domes of Buckminster Fuller or the faceted polygons of digital art, the Equilateral Triangle (where all three sides are equal) creates a dynamic, vibrating energy that squares simply cannot match. “The Faceted Peak” sham uses a mix of Solids and Low-Volume Prints to create a jagged, mountain-range aesthetic. It adds an “edgy” geometric accent to a bed that might otherwise feel too soft or plain.
Finished Dimensions: Standard Pillow Sham, 20″ x 26″.
Materials Needed:
- Fabric A (Dark/Mountain): 1/2 yard of Charcoal, Navy, or Forest Green.
- Fabric B (Light/Sky): 1/2 yard of Crisp White, Silver, or a quiet text print.
- Fabric C (Accent): Scraps of Metallic Gold or Citron.
- Backing: 1 yard of solid cotton.
- Batting: Thin Cotton Batting (essential for keeping the points sharp).
- Notions: A 60-Degree Triangle Ruler (or a template made from cardboard), starch.
Cultural Backstory: The 60-degree triangle became a staple of “Mid-Century Modern” textile design in the 1950s, appearing on everything from curtains to Formica tables. Unlike the 45-degree triangle (used in traditional Half-Square Triangles), the 60-degree shape feels sharper, faster, and more aggressive—perfect for a contemporary “edge.”
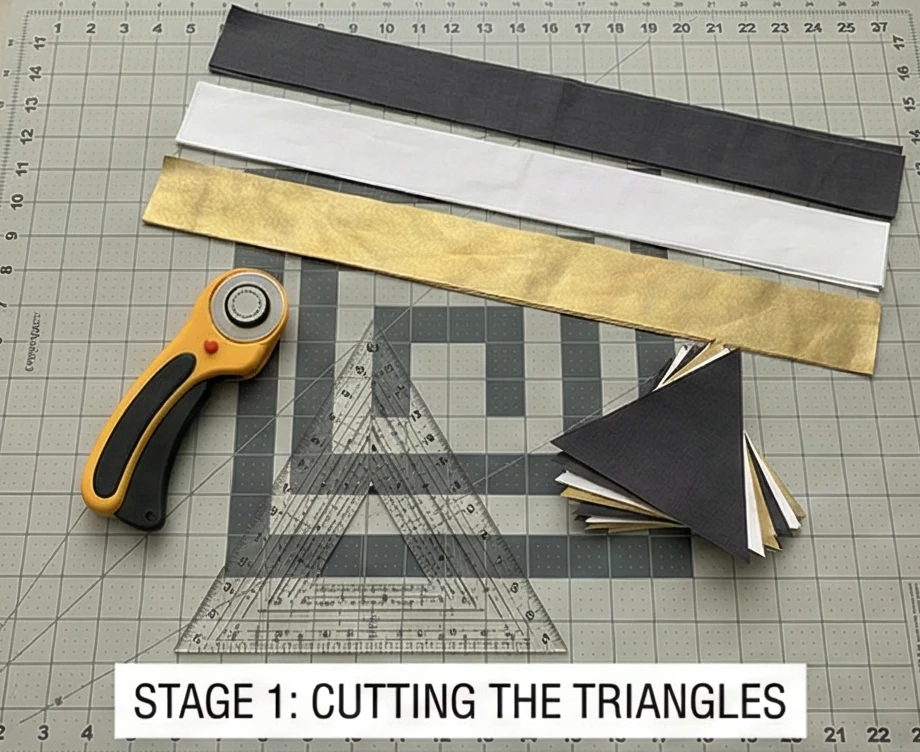
Step 1: Cutting the Triangles
Accuracy is everything here. If your angles are off, the rows won’t fit.
- Cut Strips: Cut 3.5-inch-wide strips from all your fabrics.
- Starch: Heavily starch these strips before cutting triangles. Triangles have bias edges (stretchy), and starch stabilizes them.
- Cut Triangles:
- Using your 60-degree ruler, place the flat bottom of the ruler on the bottom edge of the strip. Cut the side angles.
- Flip the ruler upside down to cut the next triangle.
- Quantity: You need about 50 triangles total for one sham side (approx. 25 Dark, 20 Light, 5 Accent).
- The “Blunted” Tip: If your ruler has a flat tip, use it! Having a flat top on the triangle makes matching points later much easier.
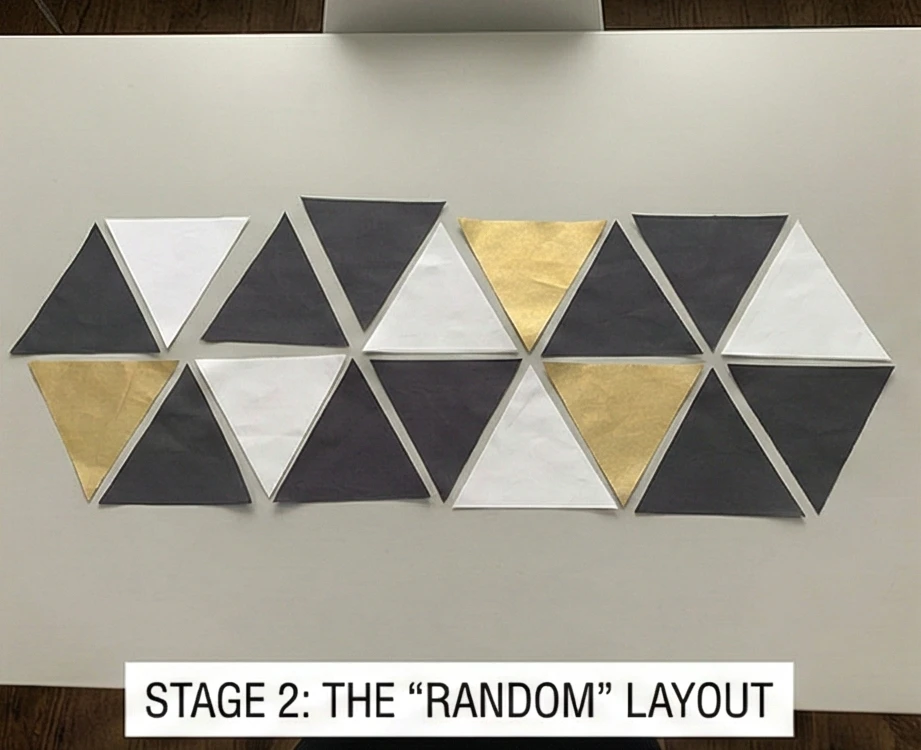
Step 2: The “Random” Layout
Organized chaos looks best.
- Arrange: Lay out the triangles in horizontal rows on a table.
- Pattern: Create “peaks” by placing dark triangles pointing up and light triangles pointing down.
- Asymmetry: Don’t make a perfect checkerboard. Cluster the darks in one corner or create a jagged line of Accents running diagonally.
- Rows: You will need 5 or 6 rows to cover the height of the sham (20″).
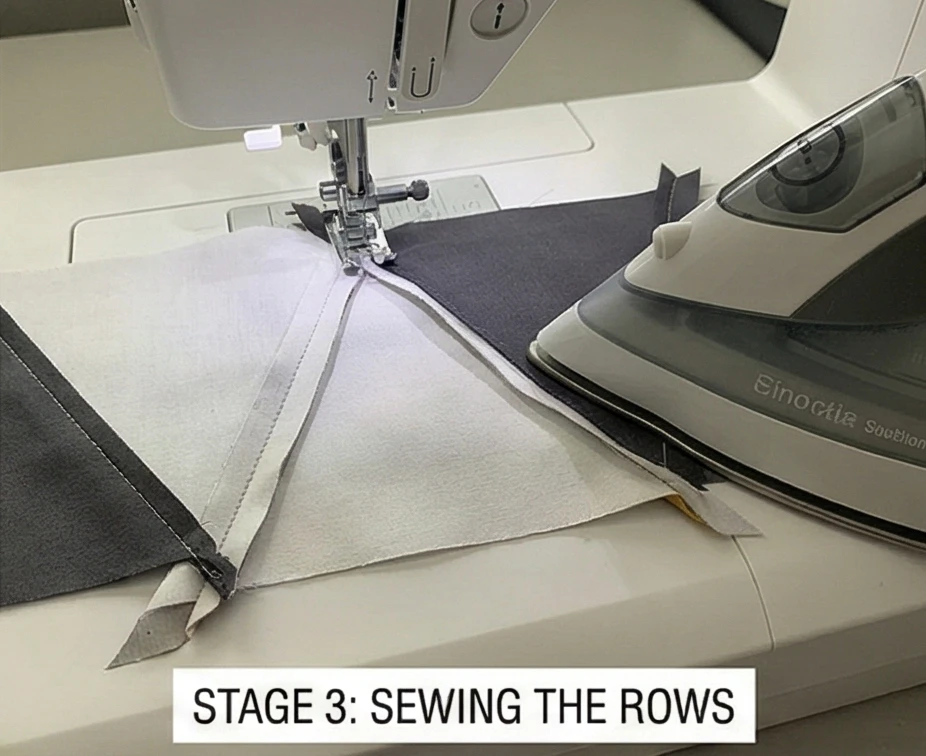
Step 3: Sewing the Rows
The trick to sharp points.
- Pairing: Sew two triangles together along their angled side.
- Placement: When you place two triangles Right Sides Together, the tips should not match perfectly. They should offset slightly so that the “dog ears” (little triangle tails) stick out about 1/4 inch at both ends.
- Stitch: Sew with an exact 1/4″ seam.
- Chain Piecing: Sew all triangles into long horizontal rows.
- Pressing: Press seams open. This is crucial! Open seams reduce bulk at the points where the 6 triangles meet.
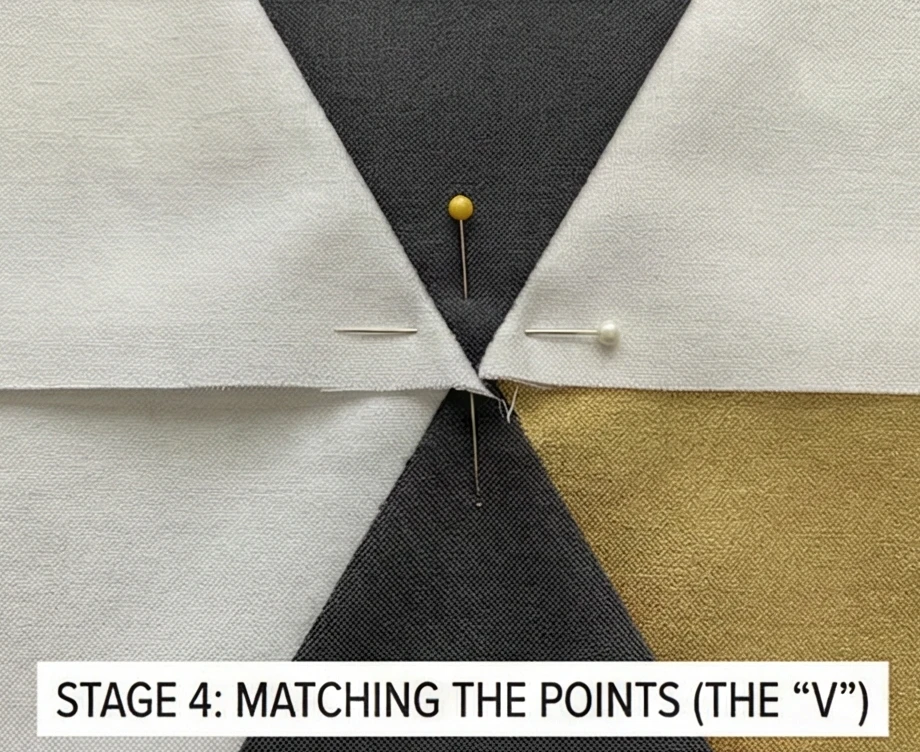
Step 4: Matching the Points (The “V”)
Joining the rows is the hardest part.
- Pinning: Place Row 1 on top of Row 2 (Right Sides Together).
- The Intersection: Match the points where the triangles meet. Stick a pin straight through the point of the “V” in the top row and into the corresponding point in the bottom row.
- Sew: Stitch slowly. Do not pull the fabric (it stretches!).
- Result: If you matched correctly, the points of your triangles will touch exactly, without getting chopped off in the seam allowance.
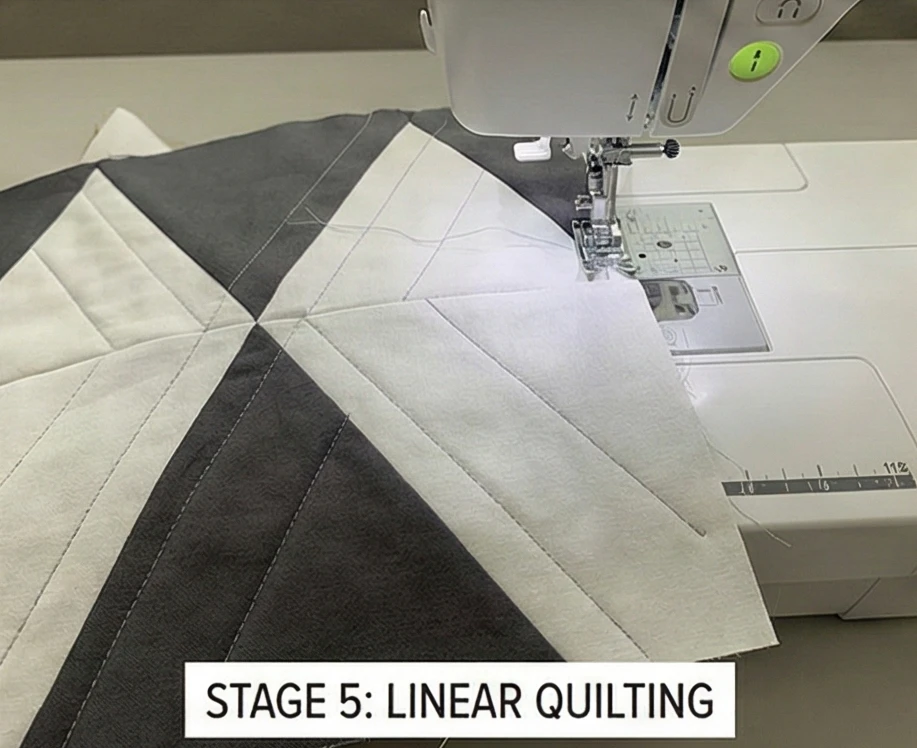
Step 5: Linear Quilting
Use the geometry to guide the needle.
- Baste: Sandwich the sham top with batting and a muslin scrap.
- Stitch: Quilt straight lines following the angles of the triangles.
- Echo: Stitch 1/4 inch away from the seam lines on both sides. This creates a “channel” around each triangle, making the shapes pop up slightly.
- Thread: Use a Light Grey thread that blends into both dark and light fabrics.
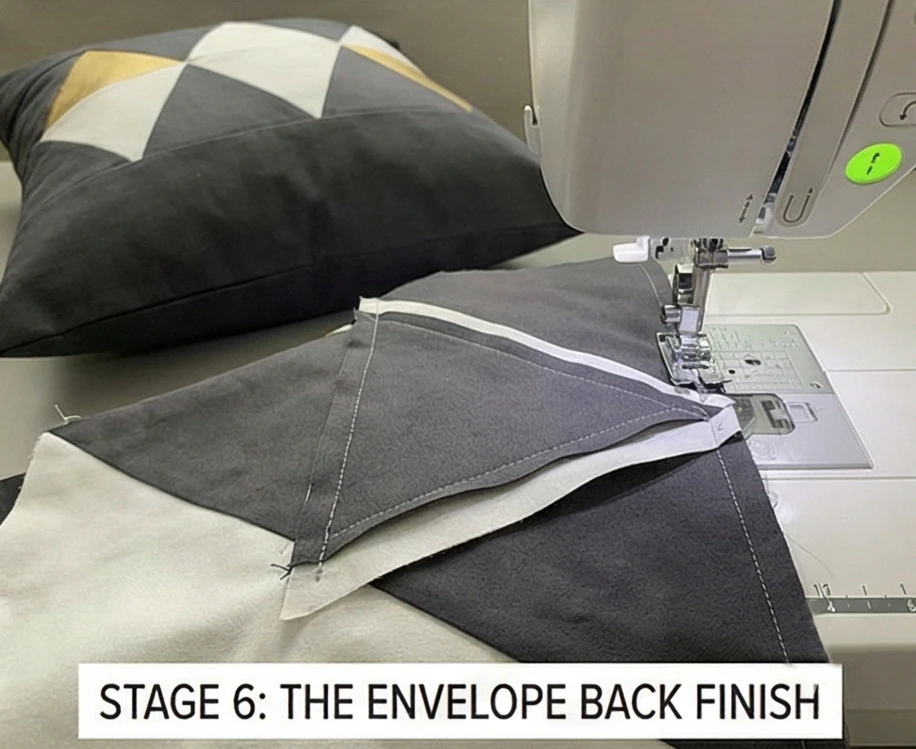
Step 6: The Envelope Back Finish
- Cut Backing: Cut two pieces of backing fabric: 20.5″ x 20″ and 20.5″ x 14″.
- Hem: Hem one long edge of each piece.
- Assemble:
- Place the quilted top right side up.
- Place Backing pieces right-side down, overlapping the hemmed edges.
- Sew: Stitch around the perimeter. Clip corners. Turn the right side out.
- Result: A sleek, sharp-edged pillow that looks custom-designed.
Usability Note: Due to the many bias seams, this sham may distort during a heavy wash cycle. Always wash in a Mesh Laundry Bag to prevent it from twisting or stretching out of shape.
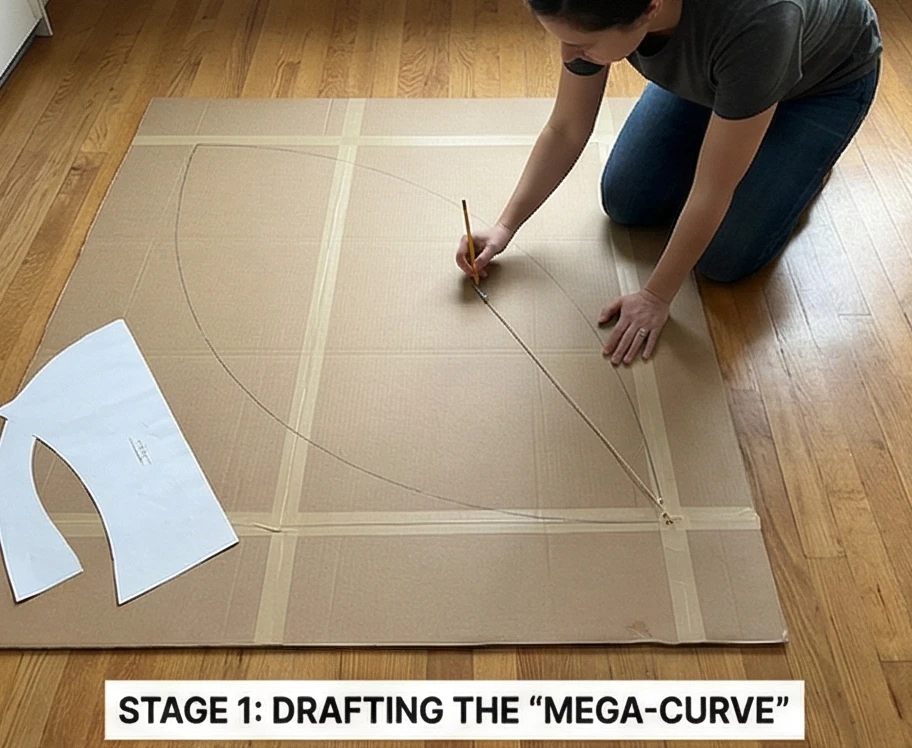
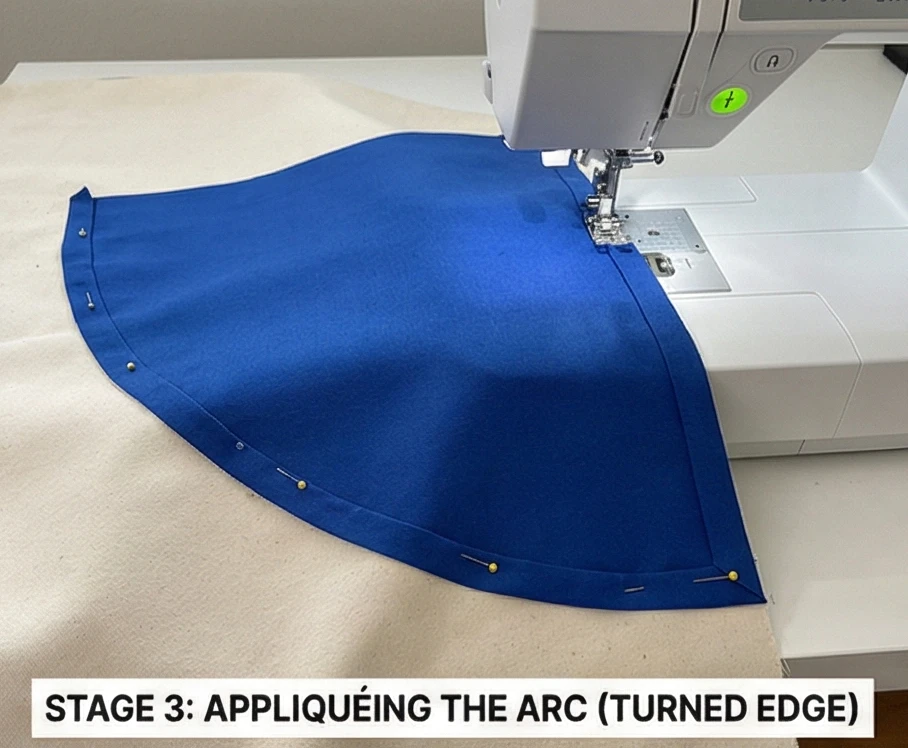
10. Architectural Graphic Quilt Throws for Stylish Living Rooms
“The Bauhaus Arc” Geometric Statement Throw
Modern design is deeply indebted to the Bauhaus school (1919-1933), which taught that form follows function, and that art should be accessible to everyone. “The Bauhaus Arc” is a throw quilt inspired directly by the posters and weavings of Anni Albers and László Moholy-Nagy. It combines Rigid Rectangles with Large-Scale Curves in a palette of Primary Colors (Red, Blue, Yellow) or Monochromatic Greys to create a textile architecture piece. It’s bold, intellectual, and undeniably cool, draped over a leather sofa.
Finished Dimensions: Large Sofa Throw, 60″ x 70″.
Materials Needed:
- Fabric A (Background): 3 yards of Off-White, Cream, or Black Canvas.
- Fabric B (The Arc/Curve): 1 yard of Cobalt Blue, Ochre, or Terracotta.
- Fabric C (The Rectangle/Anchor): 1/2 yard of Black, Charcoal, or Navy.
- Backing: 4 yards of a simple grid print.
- Batting: Low-loft cotton (Bauhaus design is flat, not puffy).
- Template: A large sheet of cardboard or freezer paper for drawing the curve.
Cultural Backstory: The Bauhaus movement revolutionized design by stripping away ornamentation and focusing on geometric purity. Quilts from this era (or inspired by it) often look like paintings by Piet Mondrian or Kandinsky. The “Arc” motif represents the bridge between the mechanical (straight lines) and the human (curved lines).
Step 1: Drafting the “Mega-Curve”
We are not using small templates. We are drawing a giant shape.
- Prepare Template: Tape sheets of paper or cardboard together to make a square roughly 30″ x 30″.
- Draw Arc: Use a string tied to a pencil (radius of 25 inches) to draw a quarter-circle arc from one corner to the other. *
- Cut: Cut out this quarter-circle shape. This is your template for the colored curve.
Step 2: Cutting the Shapes
Precision cutting is key for graphic impact.
- The Background: Cut your background fabric into a large panel, approx 40″ x 60″ (this will be the main field).
- The Arc: Use your template to cut the quarter-circle from Fabric B (Blue/Ochre).
- Add Seam Allowance: Remember to add 1/4 inch to the curved edge if your template didn’t include it.
- The Anchor Rectangle: Cut a sharp rectangle from Fabric C (Black) measuring 10″ x 40″.
Step 3: Appliquéing the Arc (Raw Edge or Turned)
Inset curves are hard. Appliqué is smarter for this scale.
- Placement: Place the colored Arc in a corner of the Background panel (e.g., top right).
- Design: Let it “float” slightly off the edge or align perfectly with the corner.
- Method:
- Raw Edge (Edgy): Use fusible web to iron the arc down. Stitch 1/8″ from the edge with black thread for a sketched look.
- Turned Edge (Clean): Press the curved edge under by 1/4 inch (use starch and heat). Pin heavily. Topstitch down with matching thread.
Step 4: The “Floating” Rectangle
The rectangle should interact with the arc.
- Placement: Place the long Black Rectangle vertically or horizontally so it intersects with or balances the Arc.
- Composition: Step back. Does it look balanced? Does it look like a poster? Move it until it feels right.
- Attach: Appliqué this rectangle down using the same method as the arc.
- Result: You now have a large negative space with two bold geometric interactions.

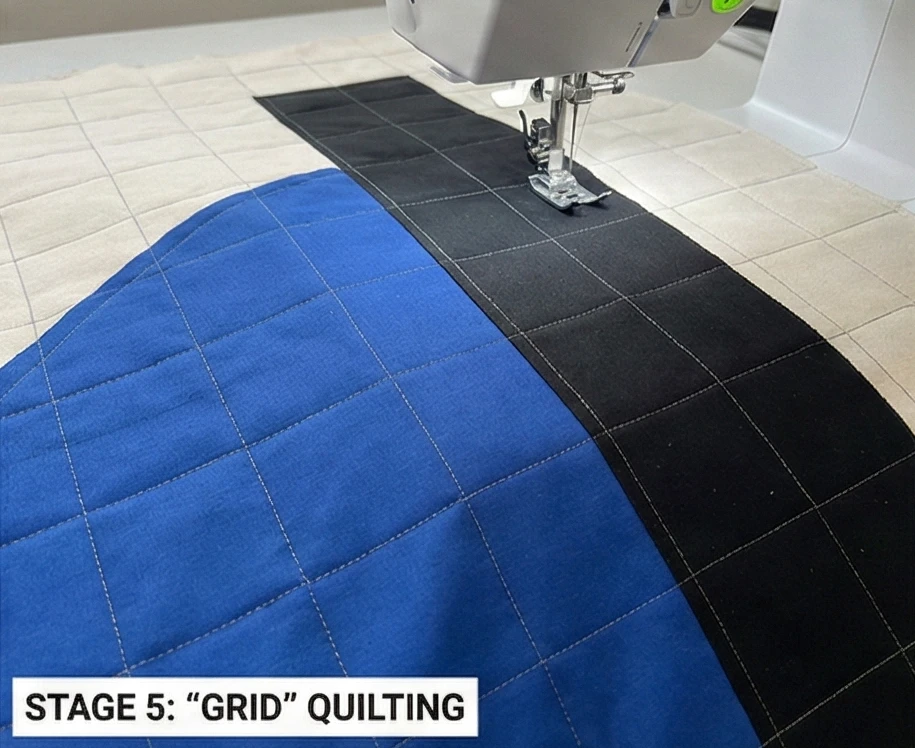
Step 5: “Grid” Quilting
Bauhaus loved grids.
- Mark: Mark a 2-inch square grid across the entire quilt surface (background and shapes).
- Stitch: Quilt straight vertical and horizontal lines.
- Thread: Use a thread that contrasts slightly (e.g., Grey thread on White background).
- Why: The grid unifies the disparate shapes. It pushes the bold colors back into the “plane” of the fabric, making the quilt feel like one cohesive printed textile rather than patches sewn together.
Step 6: The “Architectural” Binding
A standard binding is too soft.
- The Facing Method: Instead of a visible binding, use a Facing (strips sewn to the front and flipped to the back) to give the quilt a crisp, canvas-like edge.
- Corners: Ensure the corners are poked out to a perfect 90-degree angle. Sharp corners are essential for the architectural look.

Usability Note: Graphic quilts like this often become “Wall Art” rather than bedding. If you plan to hang it, add a Hanging Sleeve (a 4-inch-wide fabric tube) to the back top during the finishing stage. This allows you to insert a rod and hang it flat without damaging the fabric with clips or nails.
11. Scandi-Style Quilted Sofa Throws for Cozy Hygge Vibes
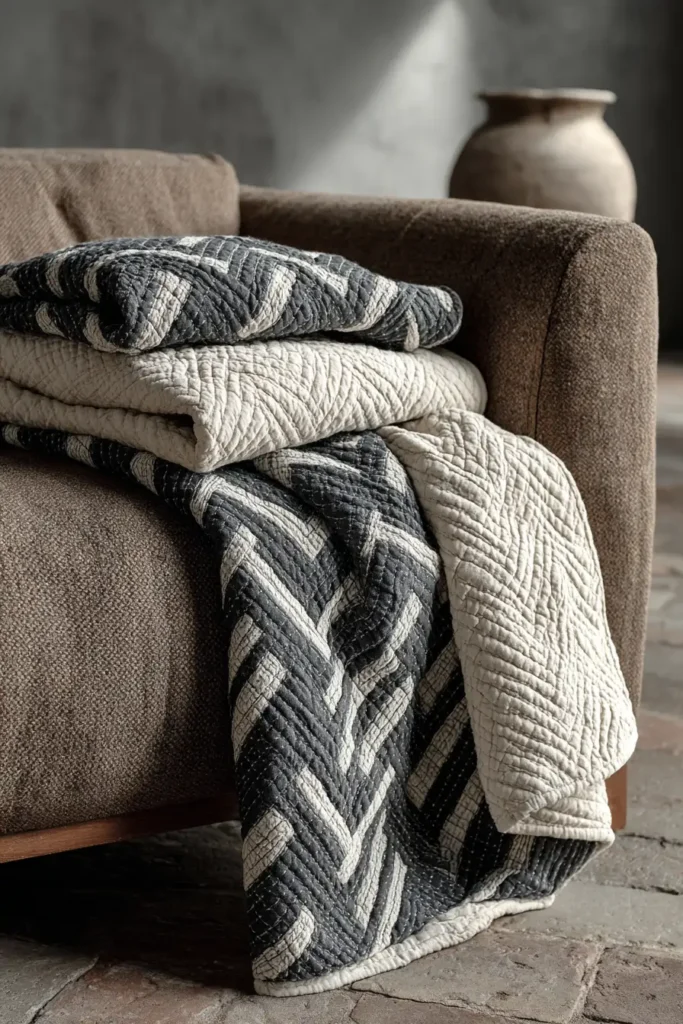
“The Broken Herringbone” Deconstructed Chevron Throw
Scandinavian design relies on two pillars: Functional Minimalism and Hygge (the Danish concept of cozy contentment). “The Broken Herringbone” marries these ideas by taking the classic parquet floor pattern—the Herringbone—and “breaking” it apart with vertical negative space. By separating the zig-zag columns with strips of white or pale grey, the pattern feels lighter, more modern, and less dizzying. Using Textured Linen or Brushed Cotton ensures the quilt is warm to the touch, embodying the spirit of Hygge.
Finished Dimensions: Large Sofa Throw, 60″ x 72″.
Materials Needed:
- Fabric A (The Pattern/Dark): 2 yards of Charcoal, Slate, or Dove Grey (Linen or Essex Linen Blend adds texture).
- Fabric B (The Background/Light): 3 yards of Crisp White or Oatmeal.
- Backing: 4 yards of Flannel (essential for the “cozy factor”).
- Batting: Wool Batting.
- Why: Wool is the warmest, most breathable batting. It has a high “loft” (puffiness) that allows the quilting stitches to sink in deeply, creating the crucial texture.
- Thread: Perle Cotton #8 in a contrasting color (e.g., White thread on Grey fabric) for hand quilting.
- Notions: A large square ruler, masking tape.
Cultural Backstory: The Herringbone pattern is named after the skeletal structure of the herring fish—a staple of the Nordic diet for centuries. In woodworking and textiles, it represents stability and interlocking strength. In the modern “Scandi” aesthetic, deconstructing this pattern represents a break from tradition, favoring airiness and light (a precious commodity during Nordic winters).
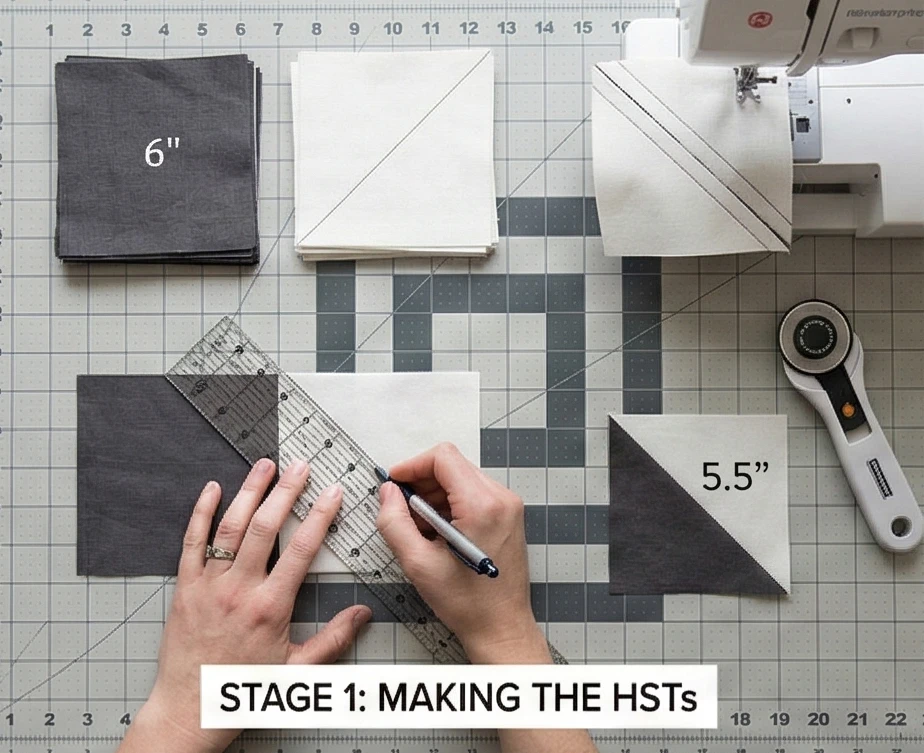
Step 1: Making the Half-Square Triangles (HSTs)
The herringbone is essentially a stack of triangles.
- Cut Squares:
- Cut 40 squares of Fabric A (Grey) measuring 6″ x 6″.
- Cut 40 squares of Fabric B (White) measuring 6″ x 6″.
- Mark & Sew:
- Draw a diagonal line on the back of every White square.
- Place a White square on a Grey square (Right Sides Together).
- Sew a scant 1/4″ away from both sides of the line.
- Cut & Press:
- Cut directly on the drawn line.
- Press seams toward the Dark (Grey) fabric.
- Trim: Square up all HST units to exactly 5.5″ x 5.5″.
- Yield: You now have 80 HSTs.
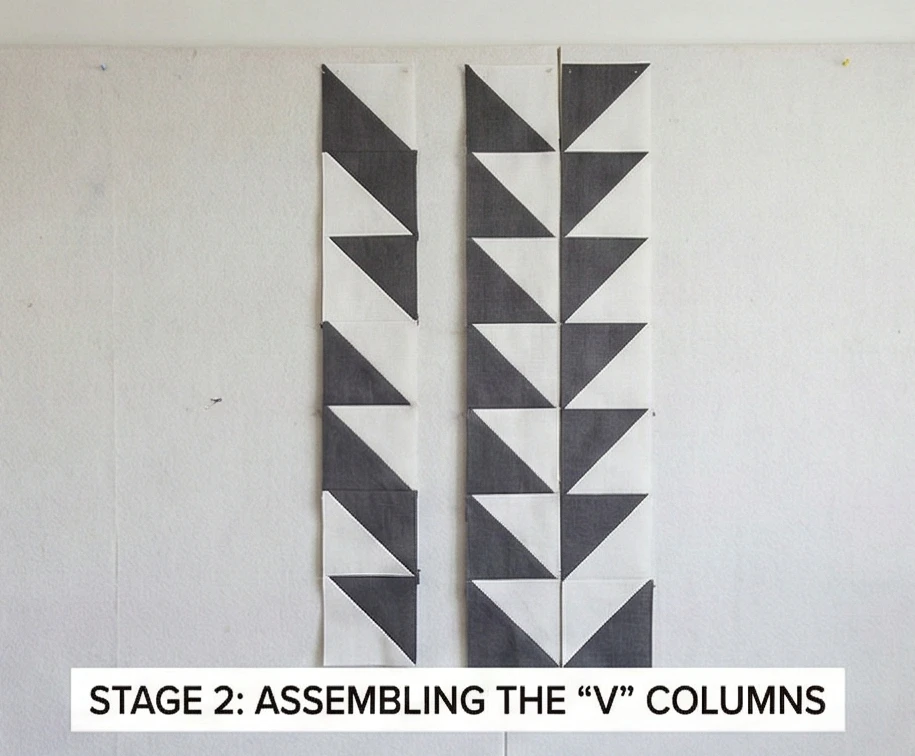
Step 2: Assembling the “V” Columns
We build vertical columns first.
- Sort: Separate your HSTs into two piles.
- Column A (Left-Leaning): Arrange HSTs vertically so the Grey triangle points Up and to the Left. Sew them together into a column of 12 blocks.
- Column B (Right-Leaning): Arrange HSTs vertically so the Grey triangle points Up and to the Right. Sew them together into a column of 12 blocks.
- The Chevron: When you place Column A next to Column B, the grey triangles should meet in the middle to form a “V” shape.
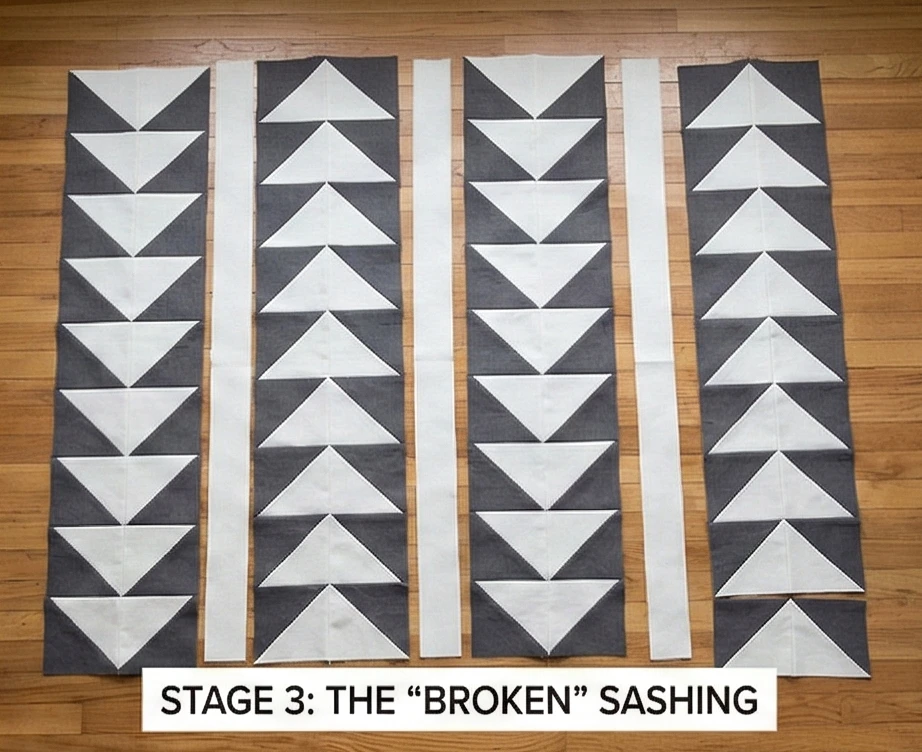
Step 3: The “Broken” Sashing
This is the modern twist. Instead of sewing the V’s together, we push them apart.
- Cut Sashing: Cut vertical strips of Fabric B (White) measuring 2.5″ x 66.5″ (the length of your columns).
- Layout: Arrange your columns on the floor:
- Column A (Left)
- Column B (Right) -> Forms a V
- Sashing Strip -> Breaks the pattern
- Column A (Left)
- Column B (Right) -> Forms a V
- Sashing Strip
- Repeat: Continue until you have used all columns.
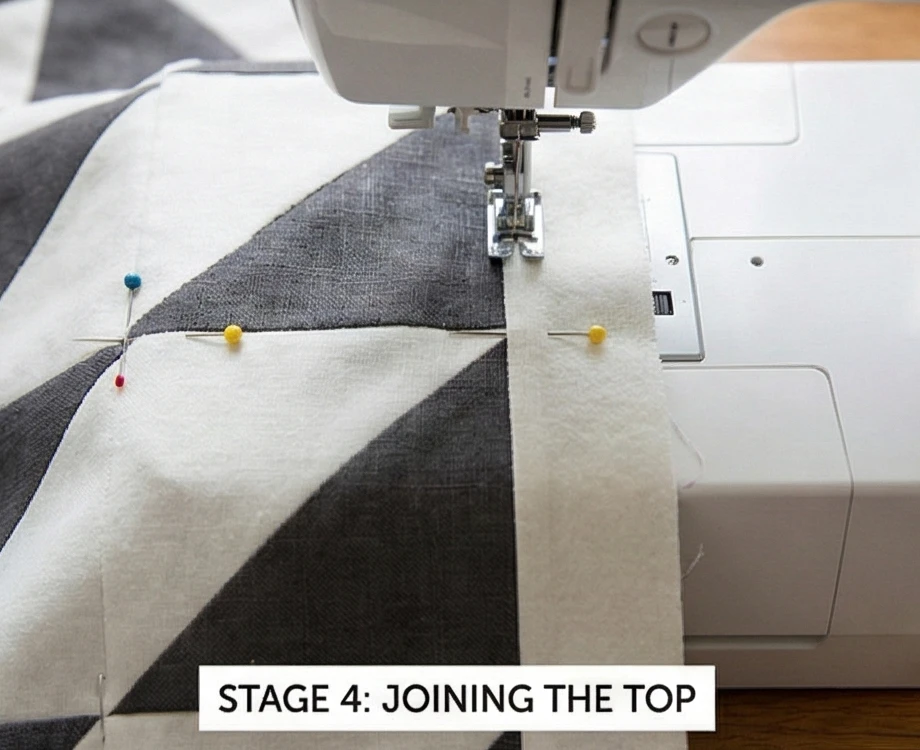
Step 4: Joining the Top
Keep the V points aligned across the gap.
- Pinning: When sewing the columns to the sashing strips, pin carefully at the horizontal seam intersections. Even though there is a white strip between the chevrons, your eye will notice if the “V” on the left is higher than the “V” on the right.
- Pressing: Press all seams toward the sashing strips (toward the flat cotton) to reduce bulk.
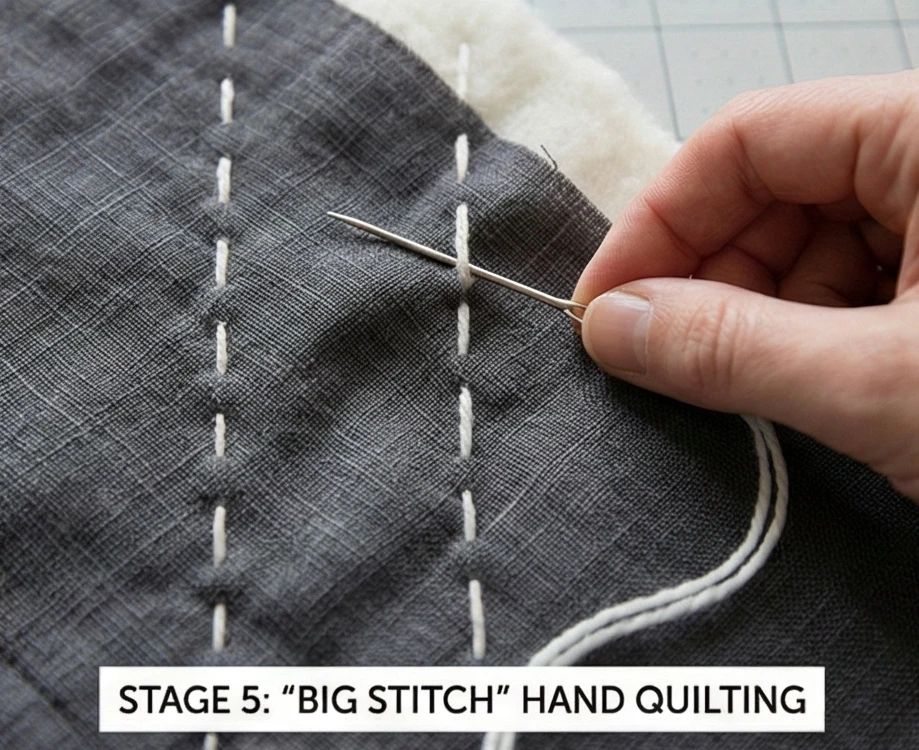
Step 5: “Big Stitch” Hand Quilting
Machine quilting looks too industrial for Hygge. Hand stitching adds soul.
- Baste: Sandwich the quilt with the Wool Batting.
- Thread Up: Use your thick Perle Cotton thread and a large-eye needle (Size 4 or 5 embroidery needle).
- The Stitch: Quilt large, visible running stitches (approx. 1/4 inch long).
- Design: Stitch distinct vertical lines 1 inch apart down the entire length of the quilt.
- Why: Vertical lines contrast with the diagonal angles of the herringbone, creating a modern grid texture. The thick thread against the linen creates a tactile surface that invites touch.
Step 6: The Wool Tie Finish (Optional)
For maximum coziness.
- Corners: Instead of a traditional label, sew a small loop of Leather or a Wool Tassel to one corner of the binding.
- Binding: Use the same Grey fabric (Fabric A) for the binding to “contain” the design.
- Technique: Sew the binding to the front by machine, then fold over and stitch to the back by hand for a soft, pliable edge that doesn’t feel stiff.
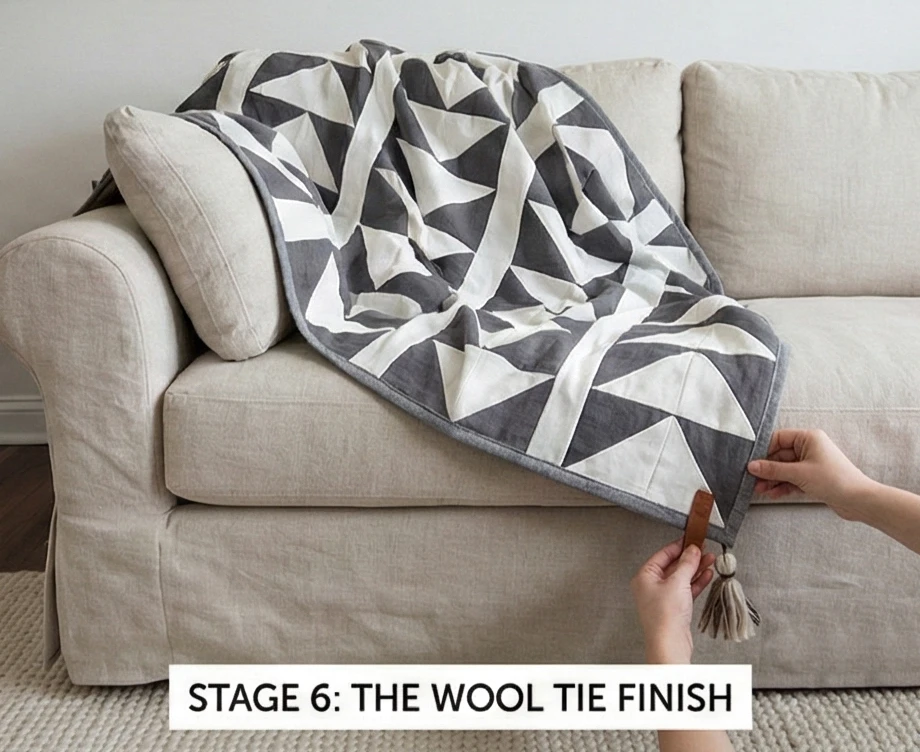
Usability Note: Wool batting requires care. Do not wash this quilt in hot water or dry it on high heat, or the wool will felt (shrink and harden). Wash on Cold/Wool Cycle and lay flat to dry. This creates a quilt that is heavy and warm, and that drapes beautifully over the body.
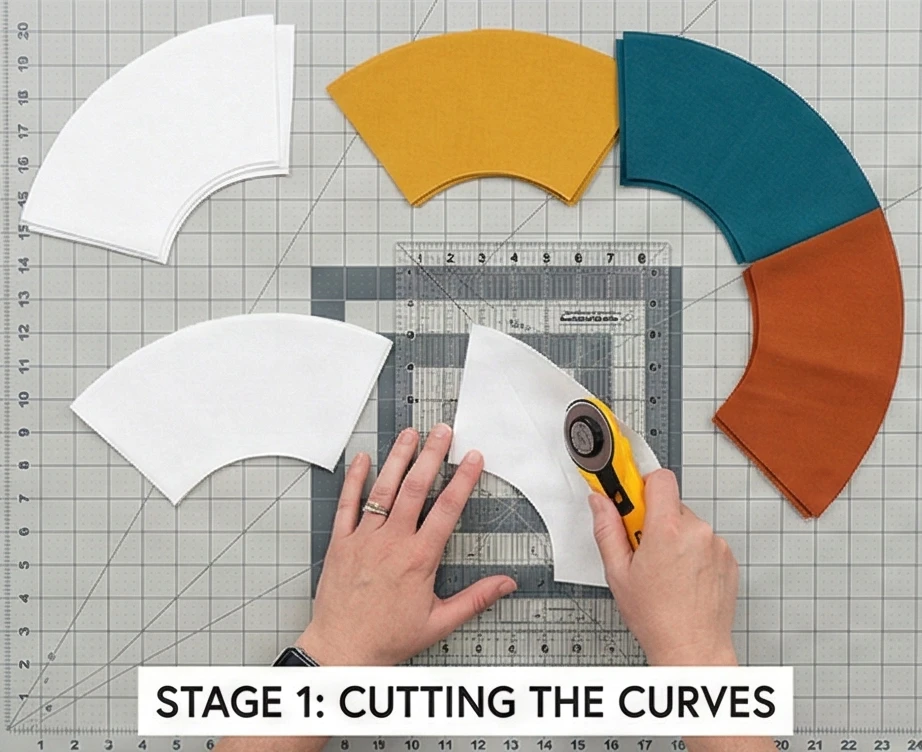
12. High-Contrast Modern Cushion Covers for Chic Decor
“The Mod Arc” Minimalist Curve Cushion
Nothing defines modern chic quite like the tension between a sharp square and a perfect curve. “The Mod Arc” uses a single, massive Drunkard’s Path block (a quarter-circle set into a square) to create a bold graphic statement. By using high-contrast Black and White heavyweight canvas or linen, this cushion becomes a piece of sculpture on your sofa. The design is deceptive: it appears to be a complex print, but it is actually two pieces of fabric joined by a single precision curve.
Finished Dimensions: Large Decorator Square, 22″ x 22″.
Materials Needed:
- Fabric A (The Curve/Black): 1/2 yard of Black Canvas, Velvet, or Heavy Linen.
- Fabric B (The Background/White): 1/2 yard of Natural Canvas, Wool, or Bouclé (texture adds luxury).
- Backing: 1/2 yard of solid black cotton.
- Insert: A 24″ down-feather insert (always size up 2 inches for a plump, high-end look).
- Piping (Optional): 2.5 yards of neon or metallic piping for a pop.
- Template: A large piece of cardboard or poster board (at least 20″ x 20″).
- Notions: 20-inch invisible zipper, fabric glue stick.
Cultural Backstory: The “Super-Graphic” style emerged in the late 1960s and 70s, moving away from small, fussy florals toward massive geometric shapes that filled entire walls or textiles. Designers like Barbara Stauffacher Solomon used these bold curves to disrupt the rigid lines of modern architecture. This cushion introduces the same architectural disruption to a sofa’s straight lines.
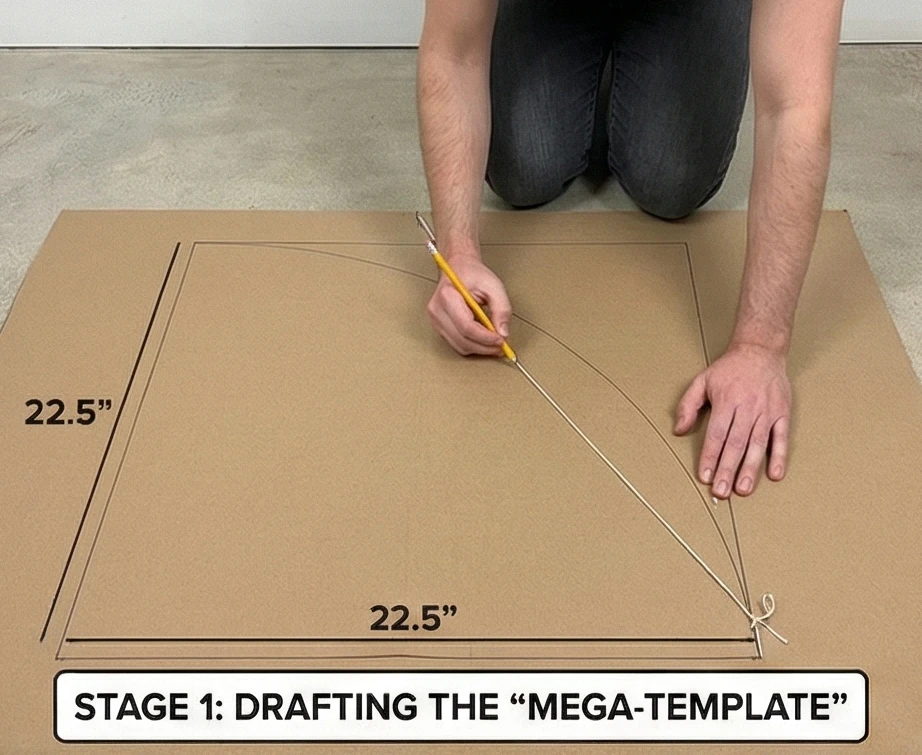
Step 1: Drafting the “Mega-Template”
Most quilt templates are 4 inches. We need one that is 22 inches.
- The Box: On your cardboard, draw a square measuring 22.5″ x 22.5″.
- The Arc: Tie a string to a pencil (measure the string to 16 inches).
- Hold the string end at the bottom-left corner of the cardboard.
- Draw an arc from the left side to the bottom side.
- The Cut: Cut along the curved line.
- Piece 1 (The corner shape) is your “L” (Background).
- Piece 2 (The quarter-circle) is your “Pie” (Curve).
- Seam Allowance: Crucial Step: Trace these shapes onto new cardboard, adding 1/4 inch to the curved edge of both pieces. (If you don’t add this, your square will shrink when sewn).
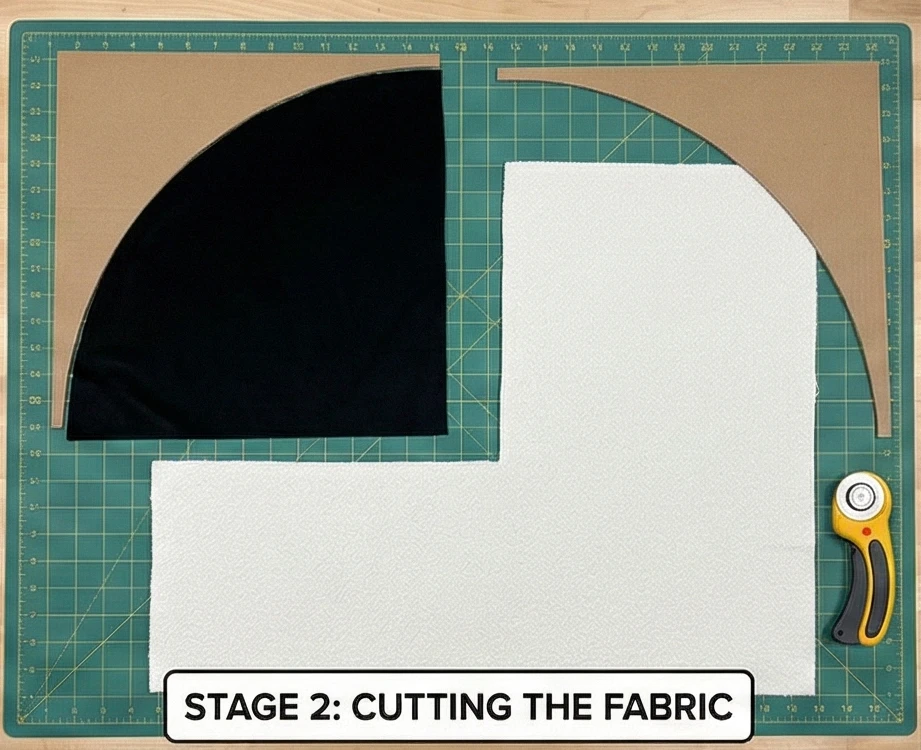
Step 2: Cutting the Fabric
Use texture to elevate the simple shape.
- The Background (“L”): Cut one from Fabric B (White/Bouclé).
- The Curve (“Pie”): Cut one from Fabric A (Black Canvas/Velvet).
- Tip: Mark the center of the curved edge on both pieces with a small notch or chalk mark.
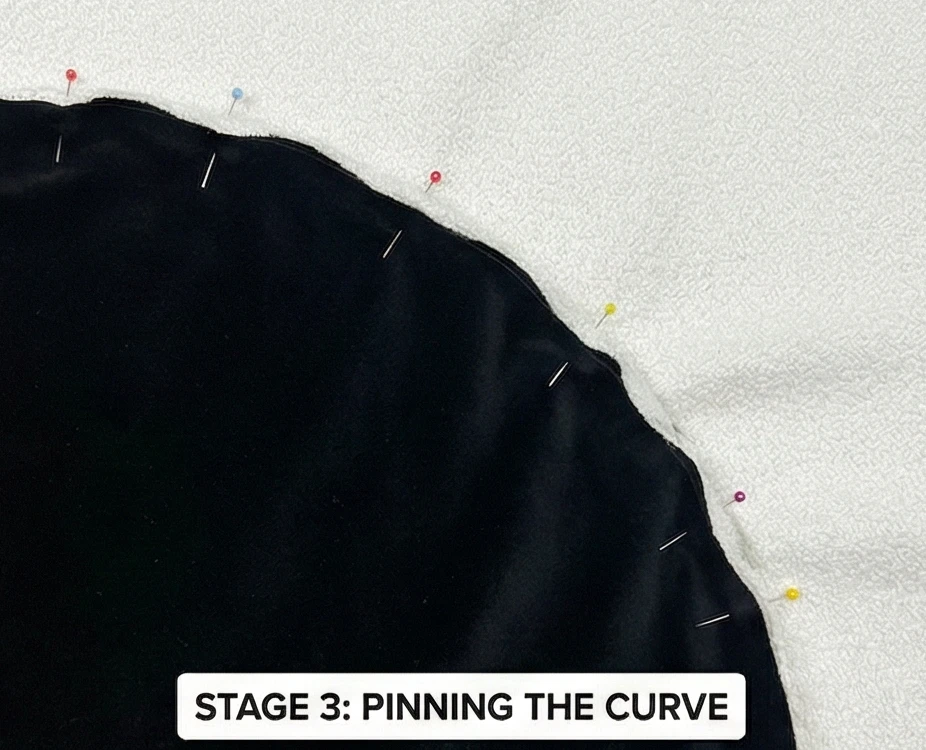
Step 3: Pinning the Curve (The “Three-Pin” Rule)
Don’t try to wing it. Curves need anchors.
- Match Centers: Fold the “L” and the “Pie” in half to find their distinct centers. Place them Right Sides Together and pin the centers.
- Match Ends: Pin the two ends of the curve together.
- Ease: The “L” piece will appear to have too much fabric. Gently ease the fabric between the pins. Use roughly 10-15 pins for a curve this large.
- Gluestick Hack: If pinning is frustrating, use a swipe of water-soluble glue stick along the seam allowance to hold the curve in place.
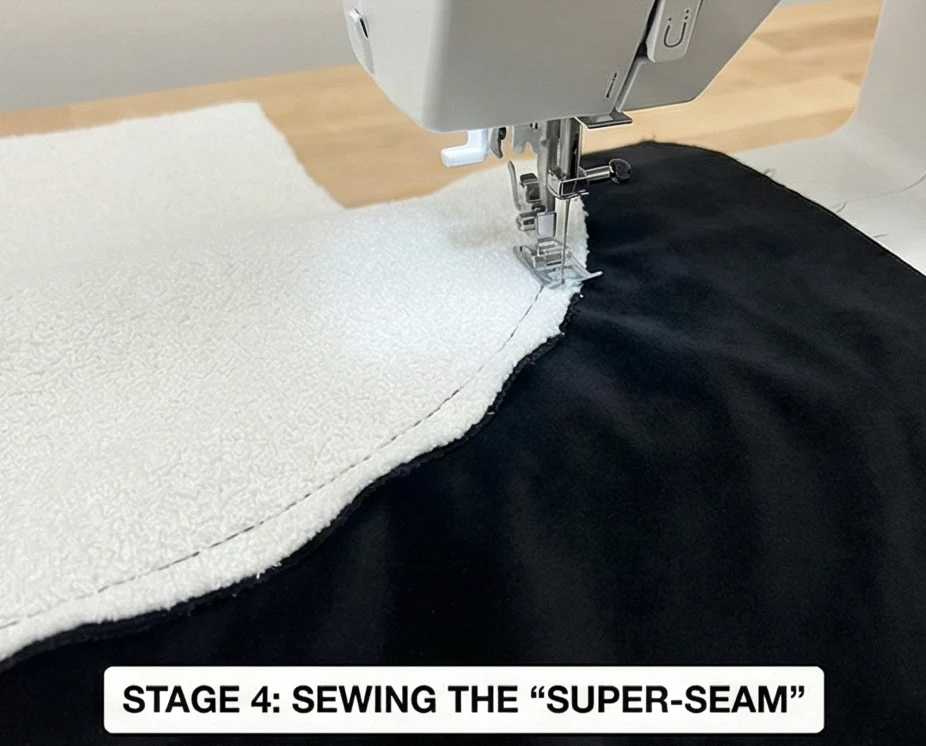
Step 4: Sewing the “Super-Seam”
Slow and steady.
- Stitch: Sew with a 1/4 inch seam allowance.
- Needle Down: Stop frequently with the needle down to lift the presser foot and pivot/smooth the fabric.
- Press: Press the seam toward the Dark (Curve) fabric.
- Result: You should have a perfect 22.5″ square with a smooth, dramatic arc in one corner.
Step 5: “Echo” Quilting
Quilting reinforces the graphic shape.
- Baste: Layer the top with thin batting and a muslin scrap.
- Stitch: Quilt curved lines that echo the seam line.
- Spacing: Stitch lines 1/2 inch apart.
- Effect: Start in the Black curve and ripple outward into the White background. This makes the design look like a sonic wave or a ripple in water.

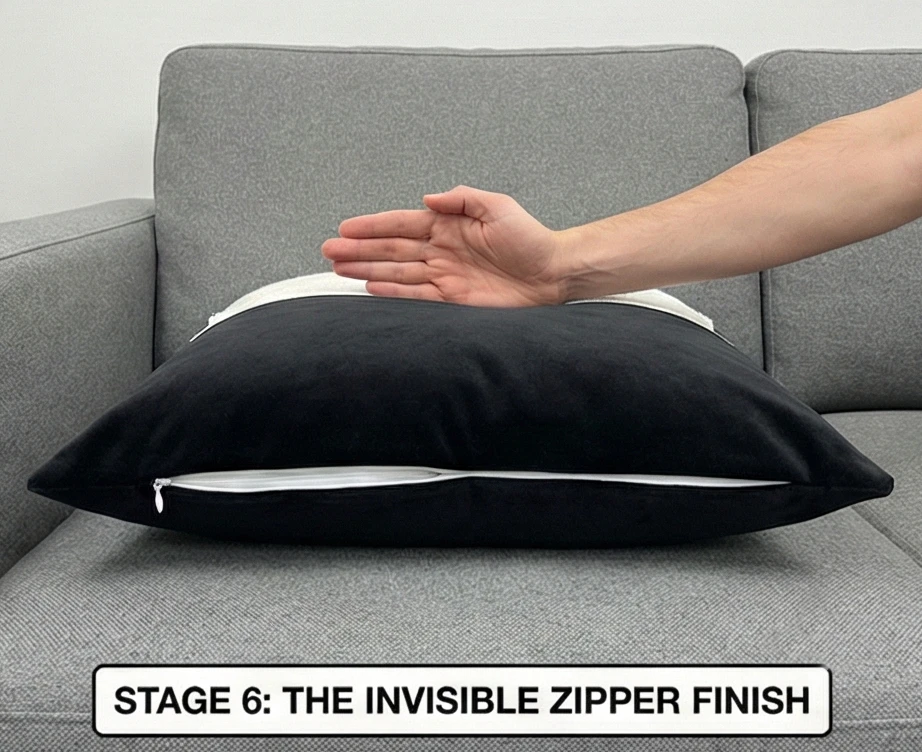
Step 6: The Invisible Zipper Finish
An envelope back looks amateur on a modern pillow. A zipper is sleek.
- Prep Bottom Edge: Serge or zigzag the bottom edge of your Quilted Top and your Backing fabric.
- Install Zipper: Sew the invisible zipper to the bottom edges using a zipper foot.
- Finish: Open the zipper halfway. Place the top and the back right sides together. Sew the remaining three sides. Turn the right side out.
- Chop: Insert the pillow form and give it the “karate chop” in the middle to prove it’s down-filled.
Usability Note: If using Velvet for the black curve, be aware that velvet has a “nap” (direction). Ensure the nap runs down so the black looks deep and rich. If the nap runs up, it will look dusty grey and catch lint.
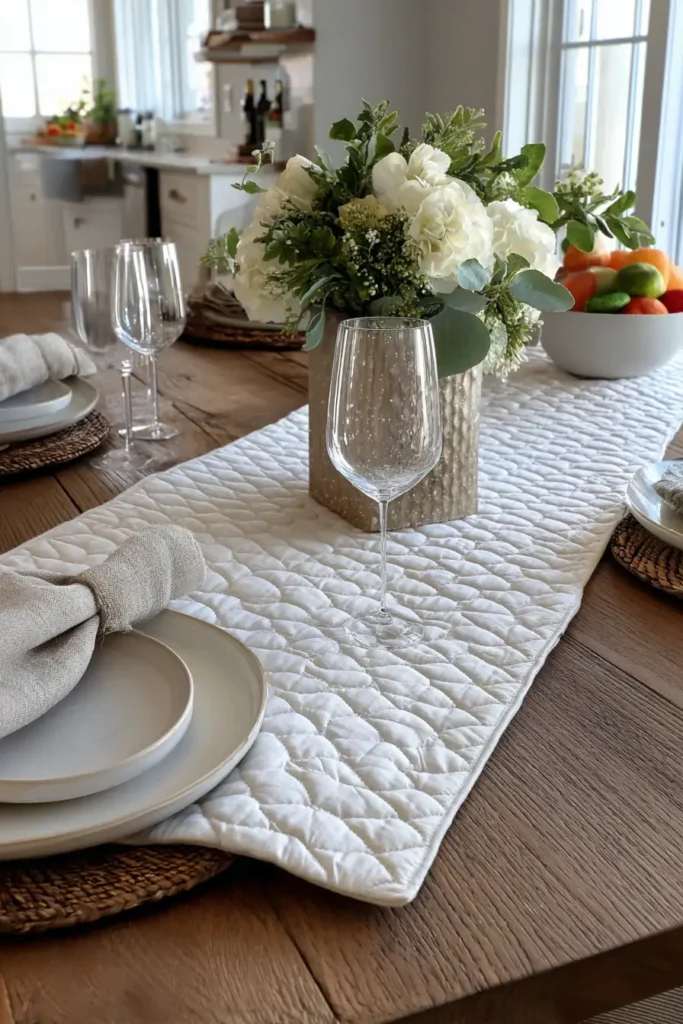
13. Minimalist Quilted Table Runners for Elegant Dining
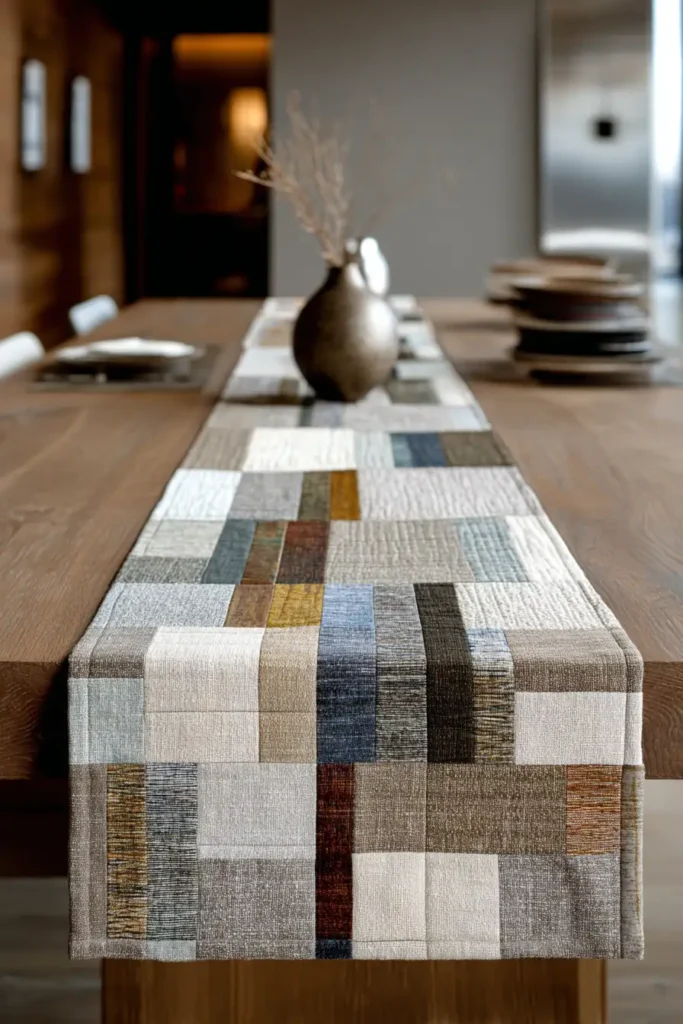
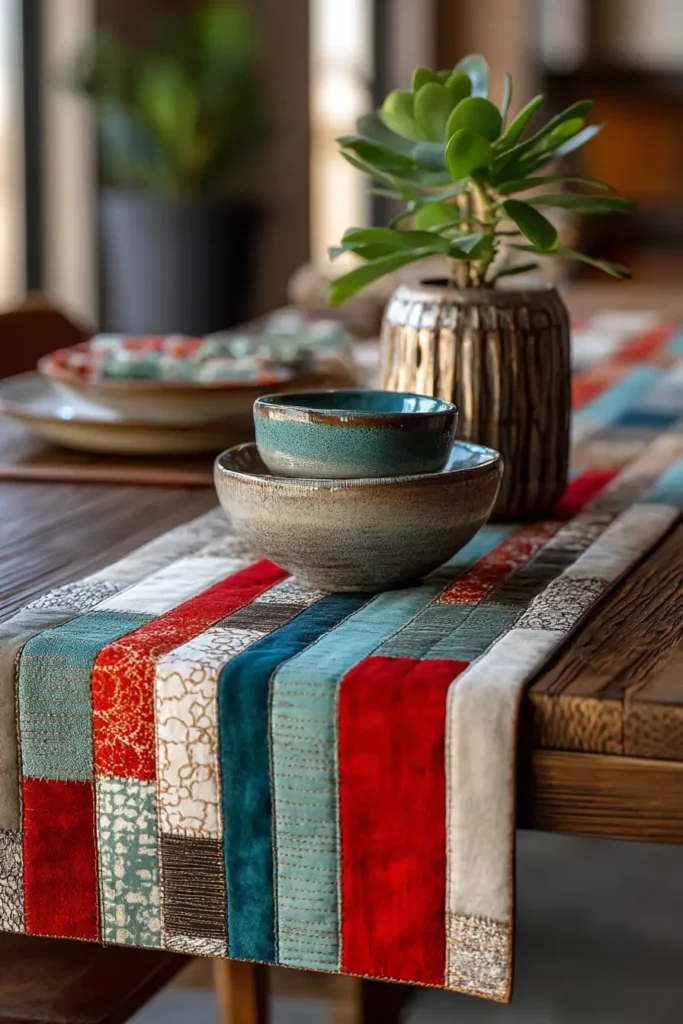
“The Zen Pathway” Asymmetrical Strip Runner
In modern dining, the table runner serves two purposes: it protects the surface from heat and scratches, and it visually anchors the centerpiece without cluttering the view. “The Zen Pathway” is an exercise in restraint. It features a long, uninterrupted field of Linen or Chambray (representing the ground) broken by a single, thin “Improv” Stripe of pieced scraps (representing the path). The asymmetry of the design—placing the stripe off-center—is a hallmark of modern minimalism, creating tension and interest.
Finished Dimensions: Extra Long Runner, 14″ x 90″ (Designed to drape over the ends of a standard 6-8 person table).
Materials Needed:
- Fabric A (The Ground): 1.5 yards of Heavyweight Linen in Charcoal, Oatmeal, or Indigo.
- Texture: Linen has a natural “slub” texture that looks expensive and hides crumbs better than flat cotton.
- Fabric B (The Path Scraps): A small handful of strips (1 to 2 inches wide) in a monochromatic palette (e.g., Black, White, Grey, Silver).
- Backing: 1.5 yards of matching cotton (to make it reversible).
- Batting: Insul-Bright (Heat-resistant metallic fleece) AND thin cotton batting.
- Function: This double-layer protects your wooden table from hot serving dishes.
- Thread: Matchstick Grey or Invisible Monofilament.
Cultural Backstory: The concept of the “Runner” dates back to the medieval era, when tablecloths were large and difficult to launder. A narrow strip of fabric was placed on top to catch spills, saving the main cloth. In modern Japanese-inspired design, the runner functions like an “Obi” (sash), cinching the table and guiding the eye along the length of the room.
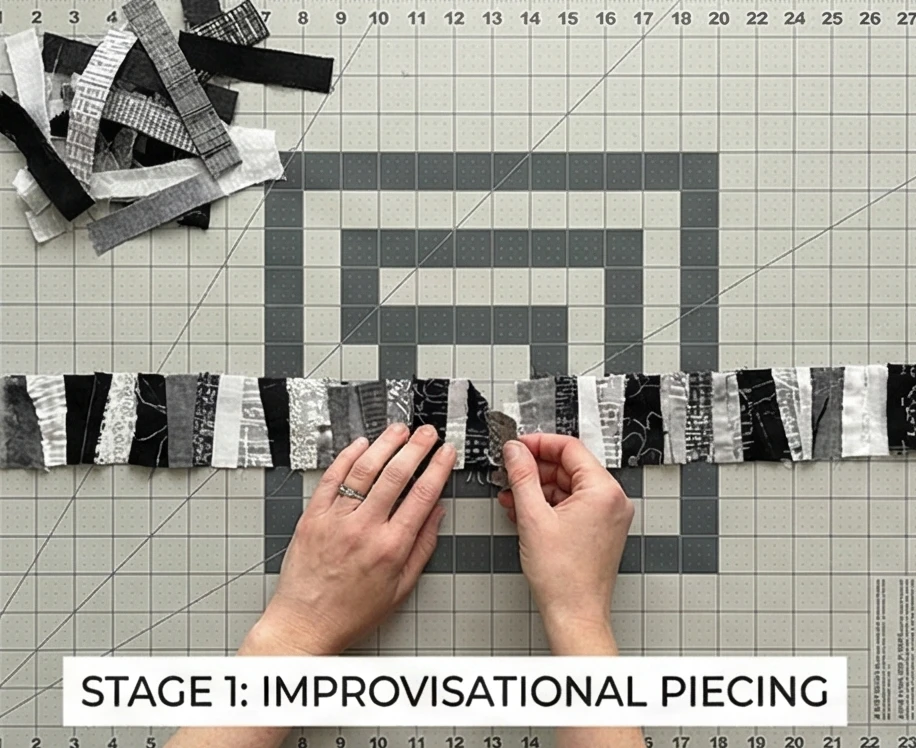
Step 1: Improvisational Piecing (The “Path”)
We want the stripe to look organic, not perfect.
- Cut Scraps: Take your black, white, and grey scraps. Cut them into strips of varying lengths (3″ to 10″) and widths (1″ to 2.5″).
- Join: Sew them together end-to-end to create one very long, skinny “snake” of patchwork.
- Angle: Don’t just sew straight seams. Cut some ends at a 45-degree angle before sewing to create diagonal joins.
- Trim: Press the long strip flat. Trim the sides so the strip is a consistent 1.5 inches wide along its length. Length should be 95 inches.
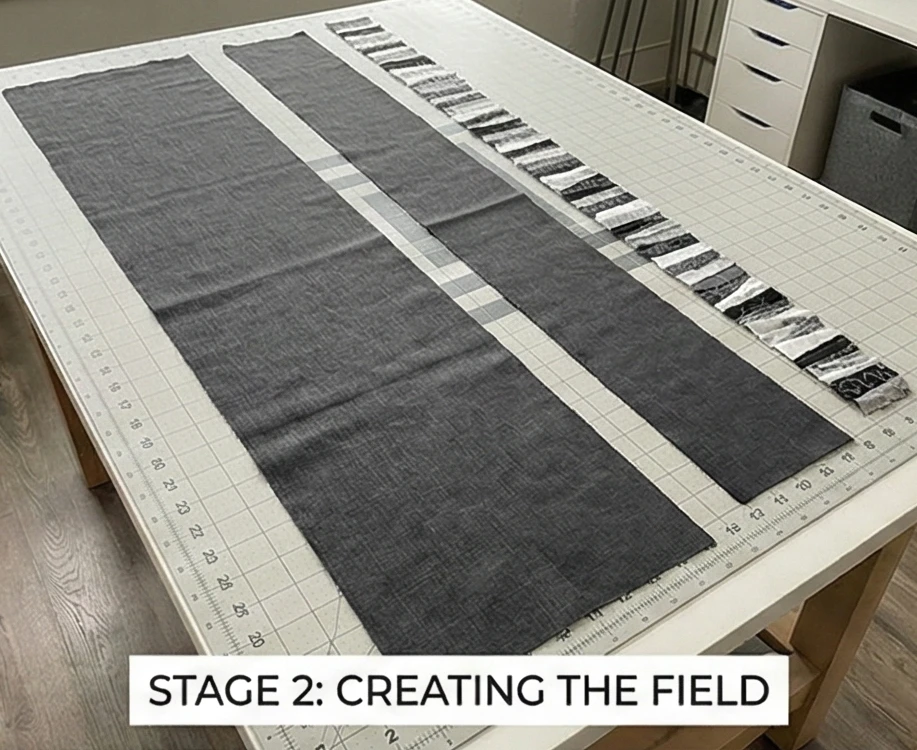
Step 2: Creating the Field
The background is split to insert the path.
- Cut Linen: Cut two long strips of your main Linen fabric:
- Strip 1 (Wide Side): 10.5″ x 95″.
- Strip 2 (Narrow Side): 4.5″ x 95″.
- Note: You will likely need to piece fabric lengths together to reach 95 inches. Use a diagonal seam to reduce the visibility of the join.
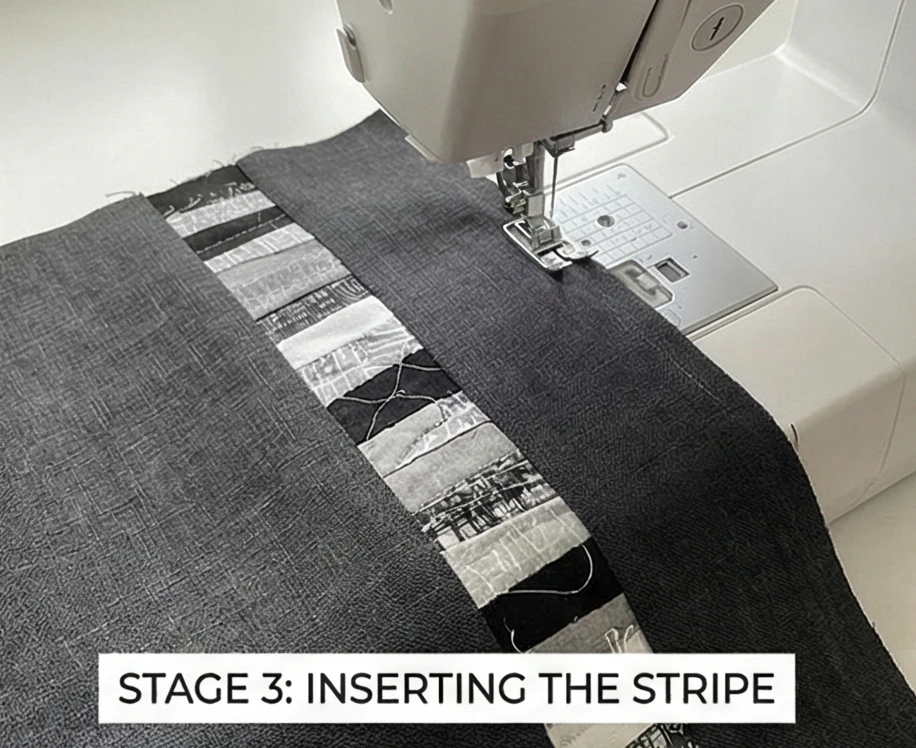
Step 3: Inserting the Stripe
The “Off-Center” look is key.
- Pin: Pin the Improv Stripe to the long edge of the Wide Linen Strip. Sew and press towards the linen.
- Attach Narrow Side: Pin the Narrow Linen Strip to the other side of the Improv Stripe. Sew and press.
- Result: You now have a 14-inch-wide runner with a skinny, scrappy line running down the right-hand third.
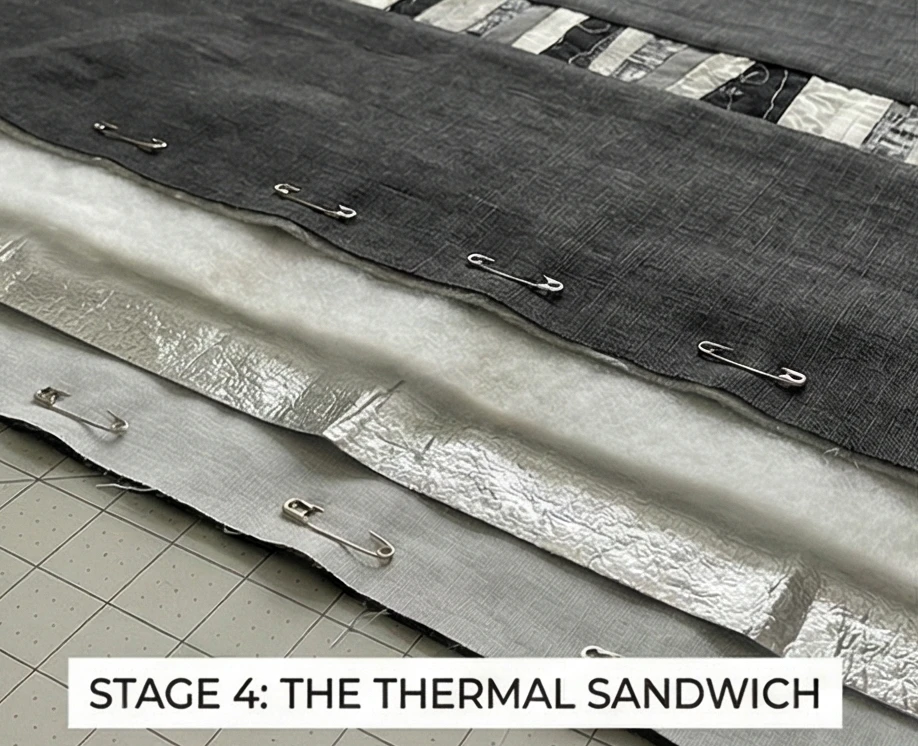
Step 4: The Thermal Sandwich
Protect the table.
- Layering:
- Place Backing face down.
- Place Insul-Bright (shiny side up).
- Place Cotton Batting (absorbs moisture/condensation).
- Place Runner Top face up.
- Baste: Spray-baste or safety-pin every 4 inches.
Step 5: “Matchstick” Quilting
Texture over pattern.
- Direction: Quilt straight lines running the length of the runner (parallel to the stripe).
- Density:
- On the Linen: Stitch lines 1/2 inch apart. This flattens the linen and improves durability.
- On the Stripe: Stitch heavily—1/8 inch apart (Matchstick Quilting). This causes the stripe to recede and stiffen, like a ribbon.
- Thread Color: Use a thread that blends into the linen. The texture should be felt, not seen.

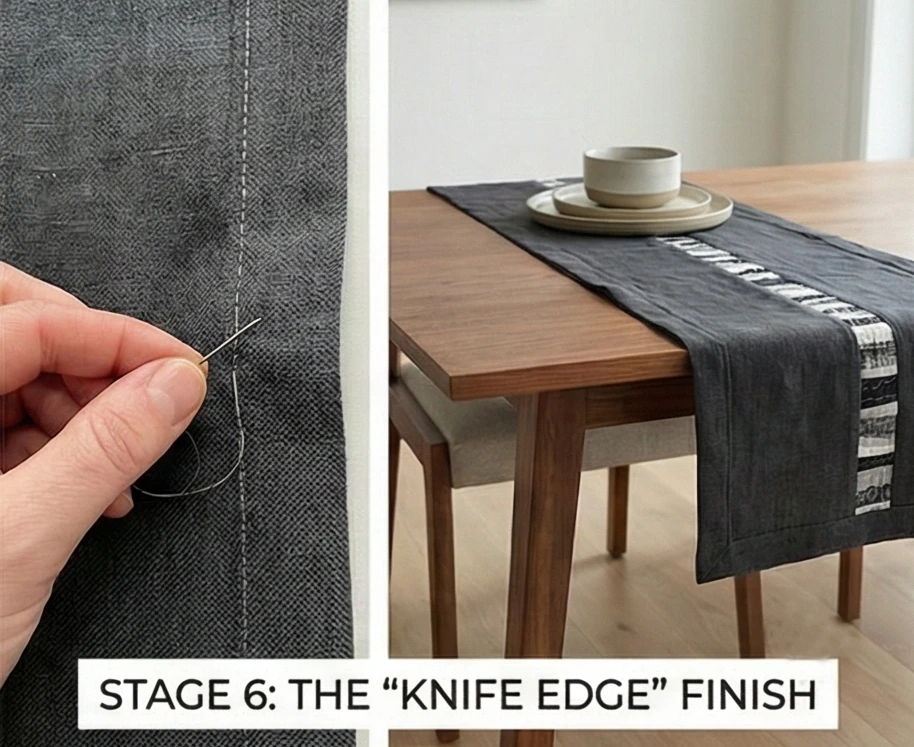
Step 6: The “Knife Edge” Finish (No Binding)
A binding adds bulk. A knife-edge is sleek.
- Trim: Trim the quilted runner to exactly 14″ x 90″.
- Facing: Cut 2.5-inch strips of the linen. Sew them to the front edges (Right Sides Together).
- Turn: Flip the facing completely to the back.
- Press: Press the edge firmly. It should look like a sharp fold with no visible stitching on the front.
- Hand Stitch: Whip stitch the facing to the backing fabric.
Usability Note: Linen wrinkles. It just does. embrace it. However, if you want a crisp look for a dinner party, iron the runner while it is slightly damp. Heat and moisture will flatten linen fibers more effectively than ironing them while dry.
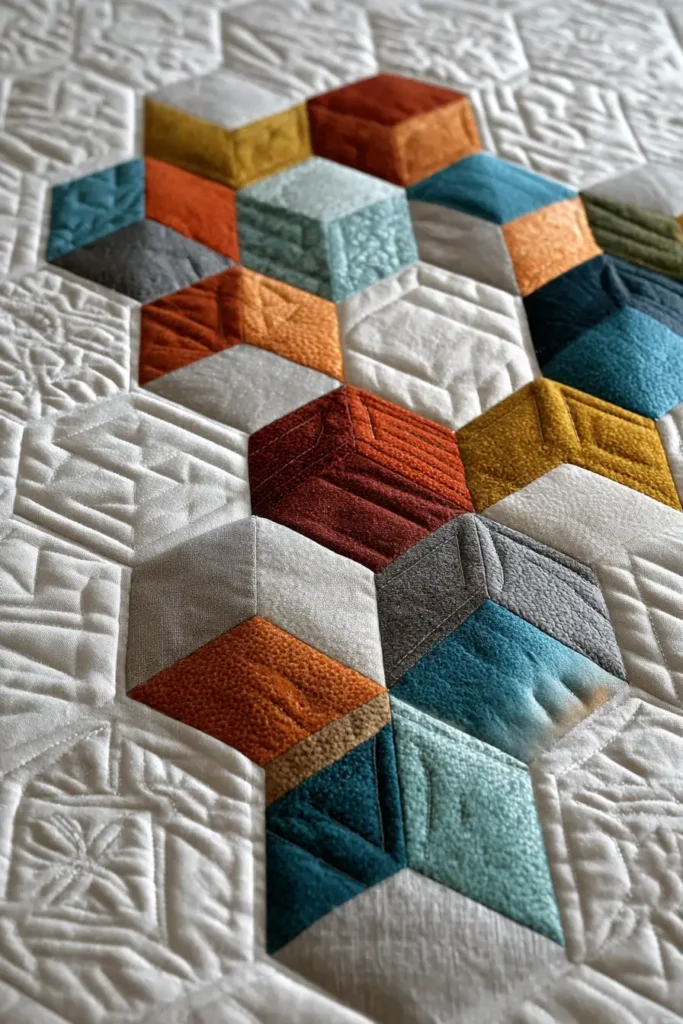
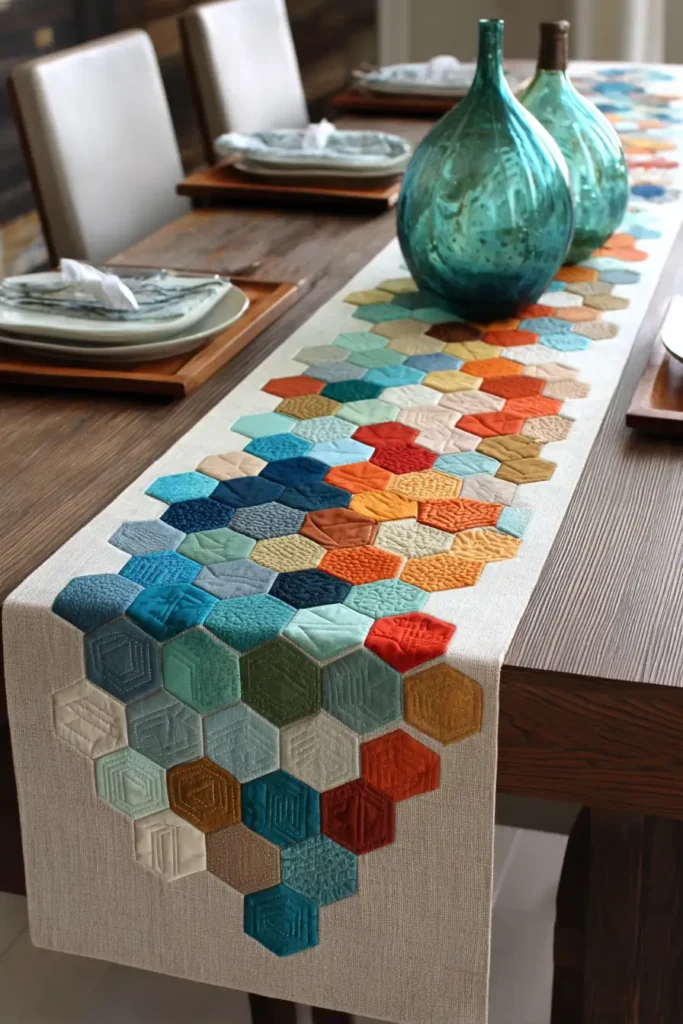
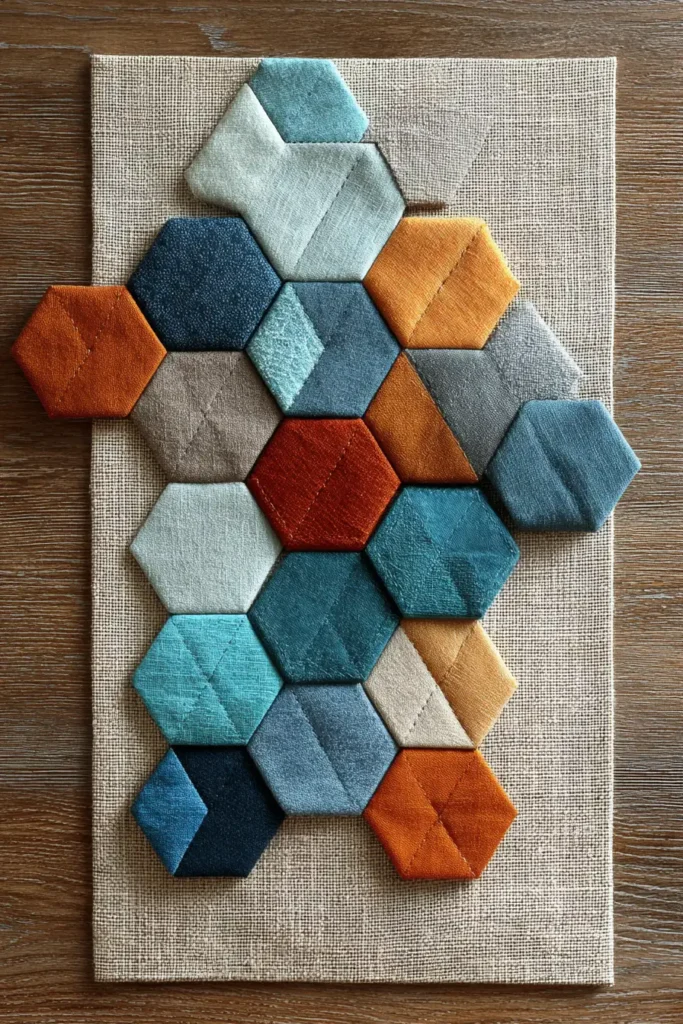
14. Modern Hexagon Patchwork Placemats for Trendy Tables
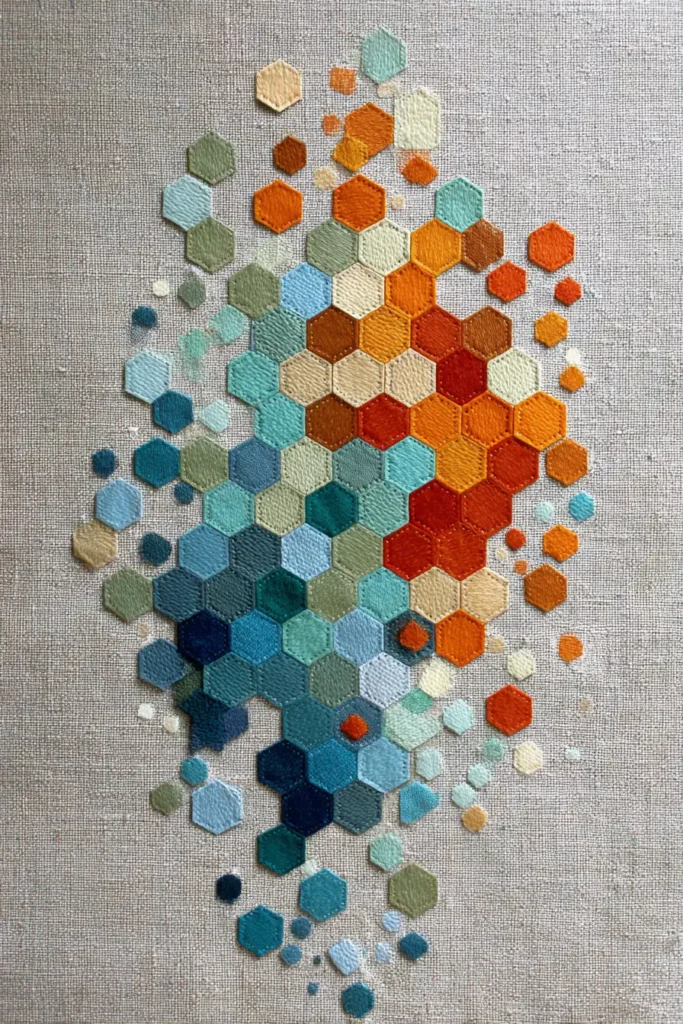
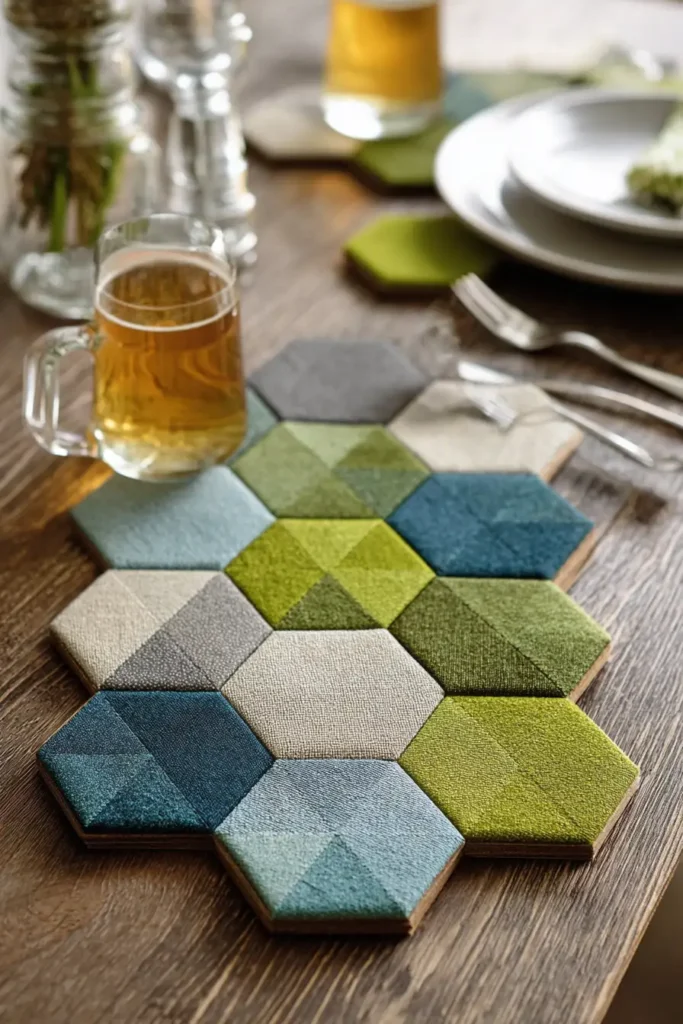
“The Honeycomb Drift” Floating Hexagon Placemats
Hexagons (“Hexies”) are the darling of the modern quilting world, dominating Instagram and Pinterest feeds. While traditional “Grandmother’s Flower Garden” quilts pack thousands of hexies together, the modern aesthetic uses Negative Space to let them breathe. “The Honeycomb Drift” features a cascading cluster of 1-inch Hexagons appliquéed onto a solid linen background. They look like a honeycomb dissolving or confetti falling, creating an asymmetrical, artistic frame for your dinner plates.
Finished Dimensions: Large Rectangle Placemat, 13″ x 19″.
Materials Needed:
- Fabric A (Background): 1 yard of Essex Linen, Chambray, or Solid Grey. (Linen adds texture that hides food stains better than flat cotton).
- Fabric B (The Hexies): Scraps of 10-15 different fabrics in a coordinated palette (e.g., Teal, Mint, Navy, or Terracotta, Peach, Rust).
- Backing: 1 yard of a fun geometric print.
- Batting: Insul-Bright (Heat-resistant) plus thin cotton batting.
- Why: Placemats need to protect the table from hot plates.
- Notions: 1-inch Hexagon Paper Templates (Cardstock), fabric glue pen, invisible thread.
Cultural Backstory: The hexagon is nature’s perfect shape—mathematically efficient and structurally strong (think beehives and basalt columns). In English Paper Piecing (EPP), fabric is wrapped around paper templates to create crisp shapes without heavy machinery. This slow, hand-sewn technique saw a massive revival in the 2010s as a “mindful” antidote to fast fashion and digital burnout.
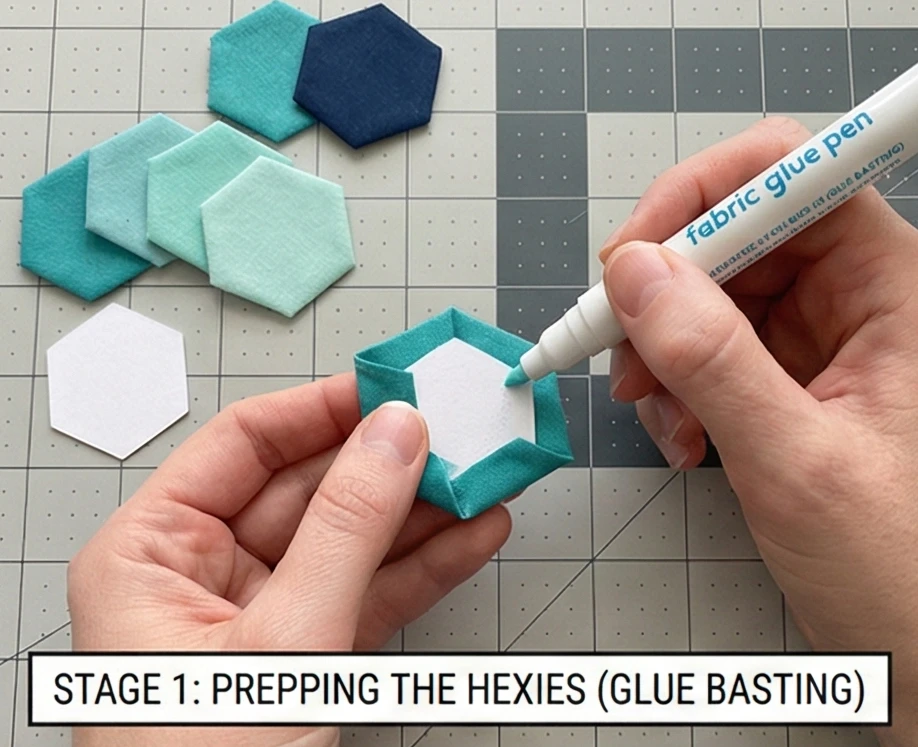
Step 1: Prepping the “Hexies” (Glue Basting)
We use the modern, fast EPP method.
- Cut: Cut fabric squares roughly 2.5″ x 2.5″ from your scraps.
- Glue: Place a 1-inch Paper Template in the center of the wrong side of a fabric square.
- Fold: Run a line of fabric glue along the edge of the paper. Fold the fabric over tightly.
- Repeat: Do this for all 6 sides.
- Yield: Approximately 15-20 hexies per placemat.
- Press: Iron them hot to set the crisp edges.
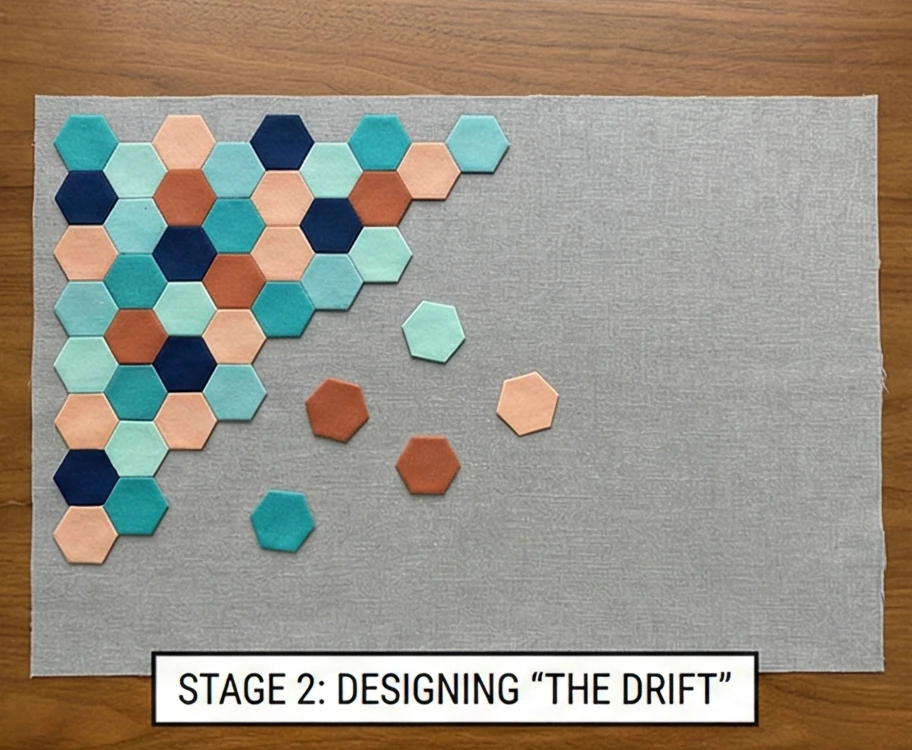
Step 2: Designing “The Drift”
Asymmetry is the key to modern design.
- Cut Background: Cut your Linen background into a rectangle 14″ x 20″.
- Layout: Arrange your hexies on the background fabric.
- The Cluster: Start with a dense cluster of 7-8 hexies in the top-left corner or bottom-right corner.
- The Drift: Let a few “loose” hexies float away from the main cluster towards the center, as if they are blowing away.
- Negative Space: Leave the center of the placemat (where the plate goes) mostly empty so the design isn’t obscured by the dinner plate.
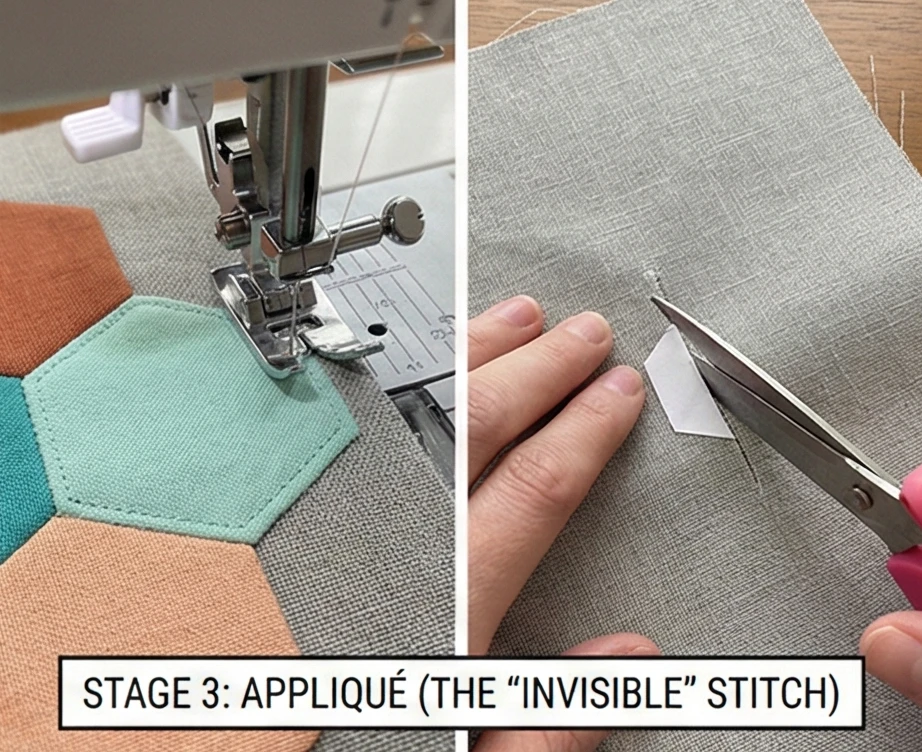
Step 3: Appliqué (The “Invisible” Stitch)
We are sewing the hexies to the background, not to each other.
- Secure: Use a dab of fabric glue to stick the hexies exactly where you want them on the background.
- Stitch:
- Machine: Use a Blind Hem Foot and invisible monofilament thread. Stitch a tiny zigzag around the perimeter of each hexie.
- Hand: Use a whip stitch to sew the hexie edges down.
- Remove Papers: Wait! If you machine wash these, the papers must go.
- Method: Cut a small slit in the background fabric behind each hexie. Pop the paper template out through the back. (Or, use water-soluble paper that dissolves in the wash).
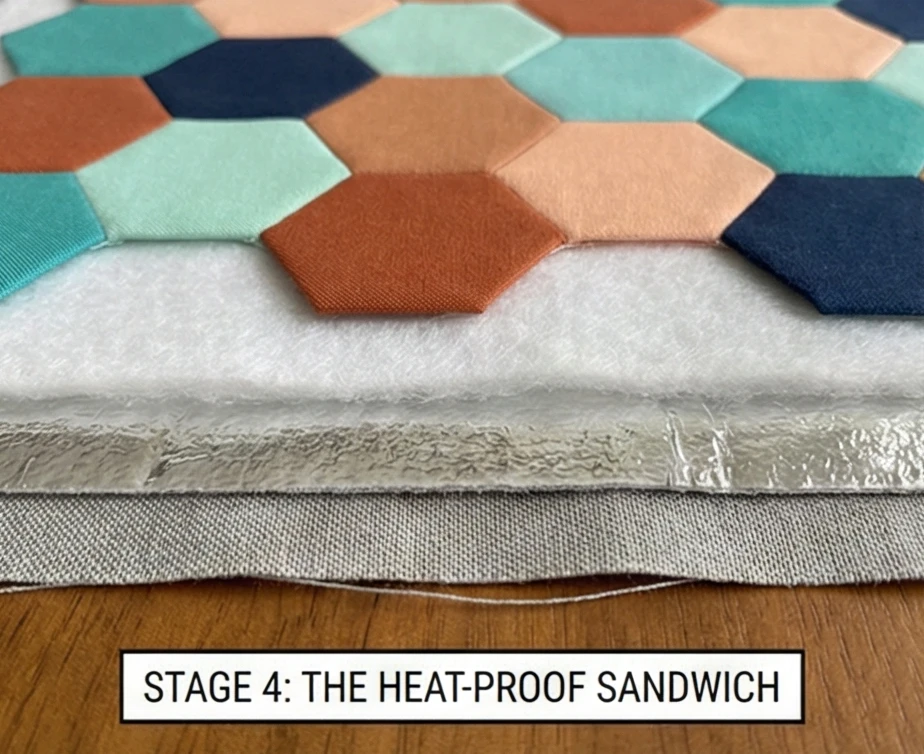
Step 4: The Heat-Proof Sandwich
Functionality first.
- Layering:
- Place Backing face down.
- Place Insul-Bright (shiny side up) – reflects heat.
- Place Cotton Batting – absorbs condensation.
- Place Appliqué Top face up.
- Baste: Spray baste well.
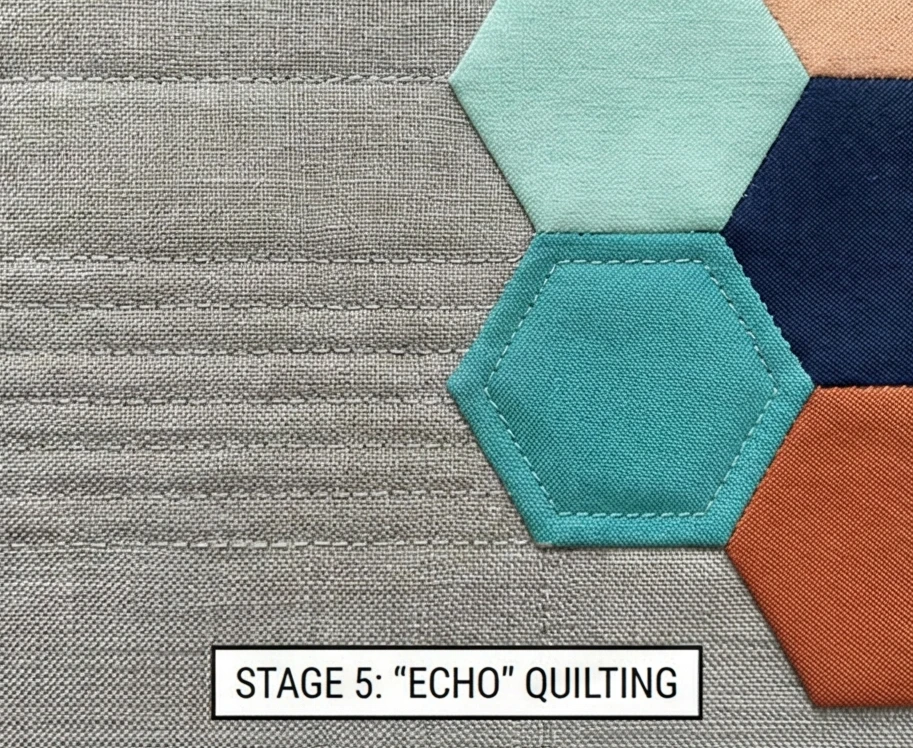
Step 5: “Echo” Quilting
Highlight the shapes.
- Hexie Quilting: Stitch inside each hexagon, about 1/4 inch from the edge, to secure the layers.
- Background Quilting: Stitch straight horizontal lines across the linen background.
- Stop & Start: When you hit a hexie, stop, break the thread, and restart on the other side. Do not quilt over your beautiful appliqué.
- Texture: These straight lines make the linen lay flat and rigid, while the hexies pop up slightly.
Step 6: Bias Binding
Hexagons make binding tricky unless you simply trim them.
- Trim: Trim the placemat to 13″ x 19″.
- Design Choice: If a hexie hangs off the edge, cut it right off! This “cropped” look makes the pattern feel infinite and modern.
- Bind: Use a Solid Dark Color (like Navy or Charcoal) for the binding to frame the piece like a picture.
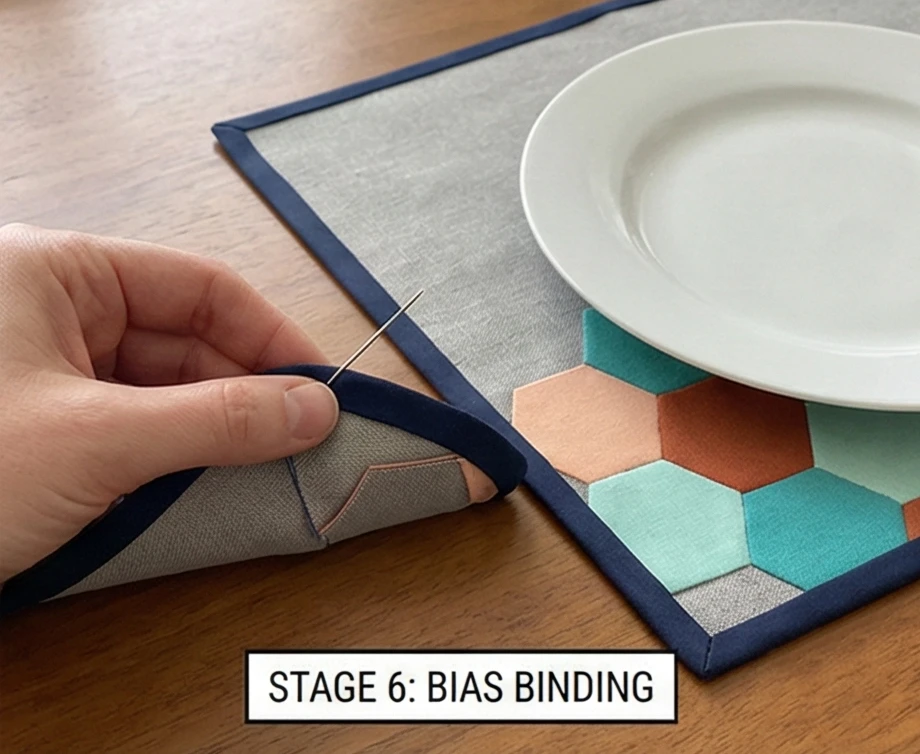
Usability Note: If you use standard cardstock for EPP, you MUST remove it before washing. If you forget, the paper will disintegrate into mush inside your quilt layers and ruin the placemat. Double-check every single hexie through the back slits before basting.
15. Asymmetrical Strip Quilt Designs for Unique Table Toppers
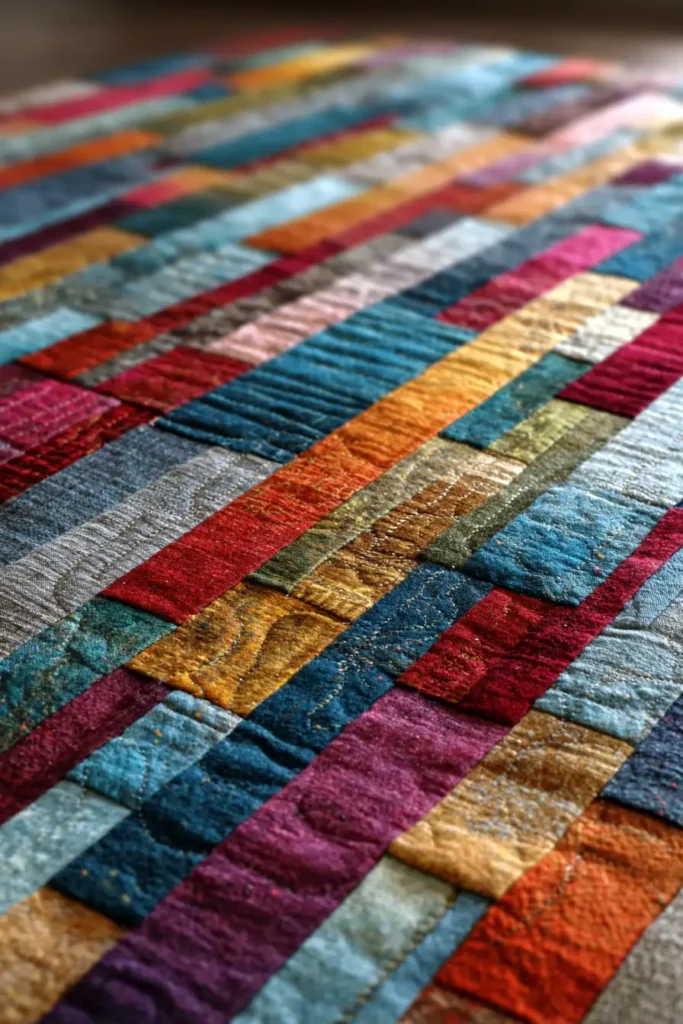
“The Glitch Code” Asymmetrical Bar Topper
Modern design often finds beauty in the digital error—the pixel sort, the screen tear, the glitch. “The Glitch Code” table topper replicates this aesthetic using Vertical Strip Piecing. By creating a “Barcode” of black, white, and grey stripes of varying widths and then slicing and shifting the panel horizontally, you achieve a fractured, vibrating effect. This topper is strictly geometric and serves as a sophisticated, flat surface for a vase of architectural flowers or a stack of art books.
Finished Dimensions: Square Table Topper, 36″ x 36″ (Perfect for a round coffee table or square dining table).
Materials Needed:
- Fabric A (Dark): 1 yard of Solid Black or Charcoal.
- Fabric B (Light): 1 yard of Solid White, Bone, or Silver.
- Fabric C (The “Glitch” Pop): A small scrap (2″ x 40″) of Neon Yellow, Cyan, or Hot Pink.
- Backing: 1.25 yards of a modern text print.
- Batting: Fusible Fleece or very thin cotton batting.
- Why: Table toppers need to lie perfectly flat so wine glasses don’t tip over. Puffy batting is the enemy here.
- Notions: A rotary cutter with a fresh blade (for cutting through multiple layers).
Cultural Backstory: The “Barcode” aesthetic rose to prominence in the 1980s and 90s as a symbol of consumerism and the digital age. In textile art, the “Glitch” movement (recreating digital distortion in analog media) challenges the perfection of traditional patchwork, suggesting that a “broken” pattern is more interesting than a perfect one.
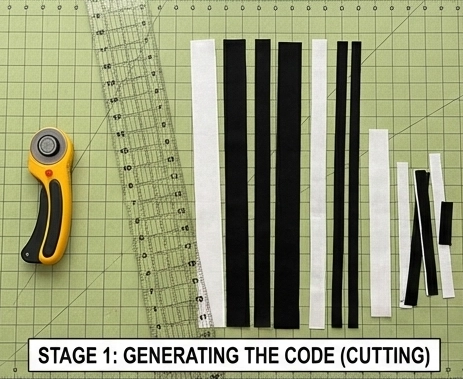
Step 1: Generating the Code (Cutting)
Randomness is harder than it looks. Avoid repeating patterns.
- Cut Strips: From Fabrics A and B (Black and White), cut strips across the width of the fabric (WOF) in varying sizes:
- Narrow: 1.5 inches.
- Medium: 2.5 inches.
- Wide: 3.5 inches.
- Quantity: You need enough strips to cover about 40 inches of width when sewn together.
- Shuffle: Mix the strips up. Do not alternate strictly (B-W-B-W). Place two blacks together, then a thin white, then a wide black, etc. Create a rhythm that looks like a UPC code.
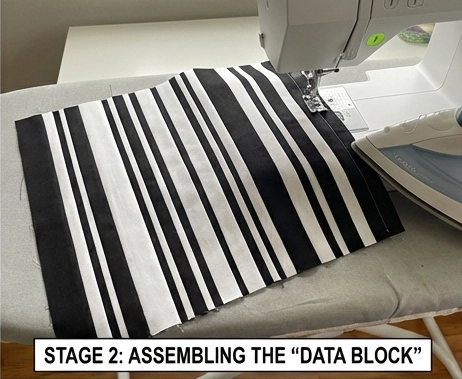
Step 2: Assembling the “Data Block”
Building the main panel.
- Sew: Stitch the strips together vertically along the long edges.
- Press: Press all seams in one direction (usually towards the dark fabric).
- Square Up: You now have a panel that is roughly 40″ wide x 42″ tall (strips are usually 42″ long). Trim this panel into a perfect 36.5″ x 36.5″ square.
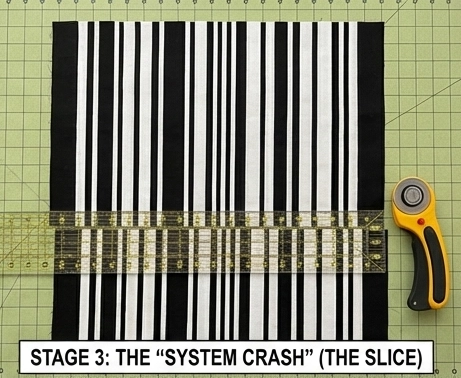
Step 3: The “System Crash” (The Slice)
Here is where we break the pattern.
- Measure: Lay your square panel flat. Measure 12 inches up from the bottom edge.
- Cut: Using a long ruler, slice horizontally across the entire width of the panel.
- Result: You now have a large top piece (24.5″ tall) and a smaller bottom piece (12″ tall).
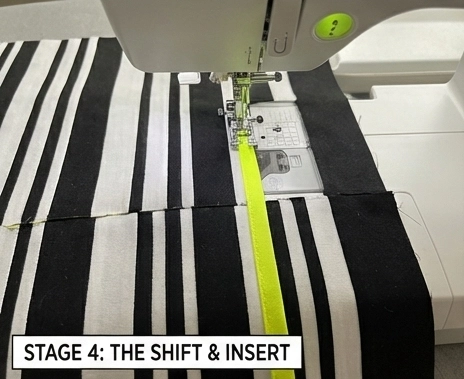
Step 4: The Shift & Insert
Creating the misalignment.
- The Pop Line: Take your Neon/Cyan strip (Fabric C). Cut it to 1 inch wide x 40 inches long.
- Insert: Sew this thin neon strip to the bottom edge of the Top Piece.
- The Shift: Now, pin the Bottom Piece to the other side of the neon strip, BUT…
- Slide it: Shift the Bottom Piece to the right by 1.5 inches.
- Visual: The black vertical stripes on the top will almost align with the bottom, but will be slightly offset, creating a “jagged” broken look.
- Sew & Trim: Stitch the layers together. Trim off the excess fabric hanging off the sides to return to a square shape.
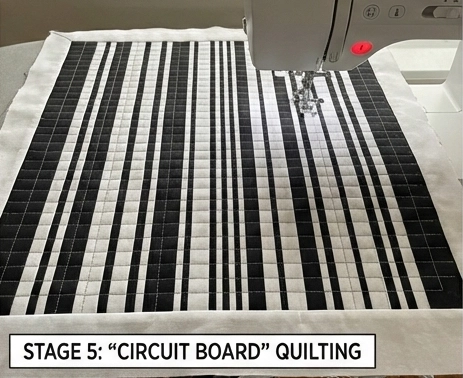
Step 5: “Circuit Board” Quilting
Geometric quilting enhances the tech vibe.
- Baste: Sandwich the topper between Fusible Fleece (ironed on) and Backing.
- Marking: Mark straight vertical lines.
- Stitch:
- Ditch Stitch: Stitch in the ditch of every seam between the black and white strips.
- The Grid: Quilt horizontal lines spaced 2 inches apart across the whole topper.
- Thread: Use Grey thread (blends with both black and white).
- Texture: The result is a dense grid that makes the topper stiff and durable, like a placemat.
Step 6: The Facing Finish (Square Edges)
Bindings are curved. Facings are sharp.
- Cut Facing: Cut 2.5-inch strips of the Black fabric.
- Sew: Sew to the front of the quilt.
- Turn & Press: Flip the facing to the back. Roll the seam slightly so no black shows on the front.
- Corners: Poke the corners out to be razor-sharp 90-degree angles.
- Usage: This “frameless” look makes the topper appear like a modern artwork floating on your table.
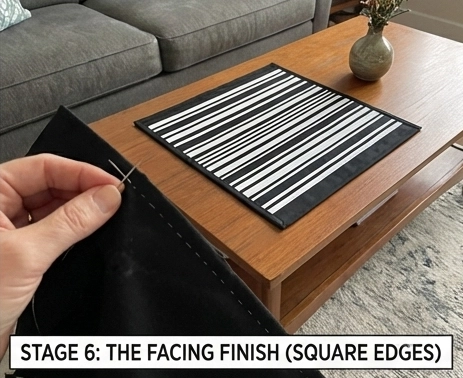
Usability Note: High-contrast quilts (Black & White) are notorious for bleeding. Before you sew, pre-wash your Red/Black fabrics or test them in a bowl of hot water. If the water turns pink/grey, wash the fabric with Synthrapol or a Color Catcher until the water runs clear. You don’t want your crisp white “data” strips turning grey in the first wash.
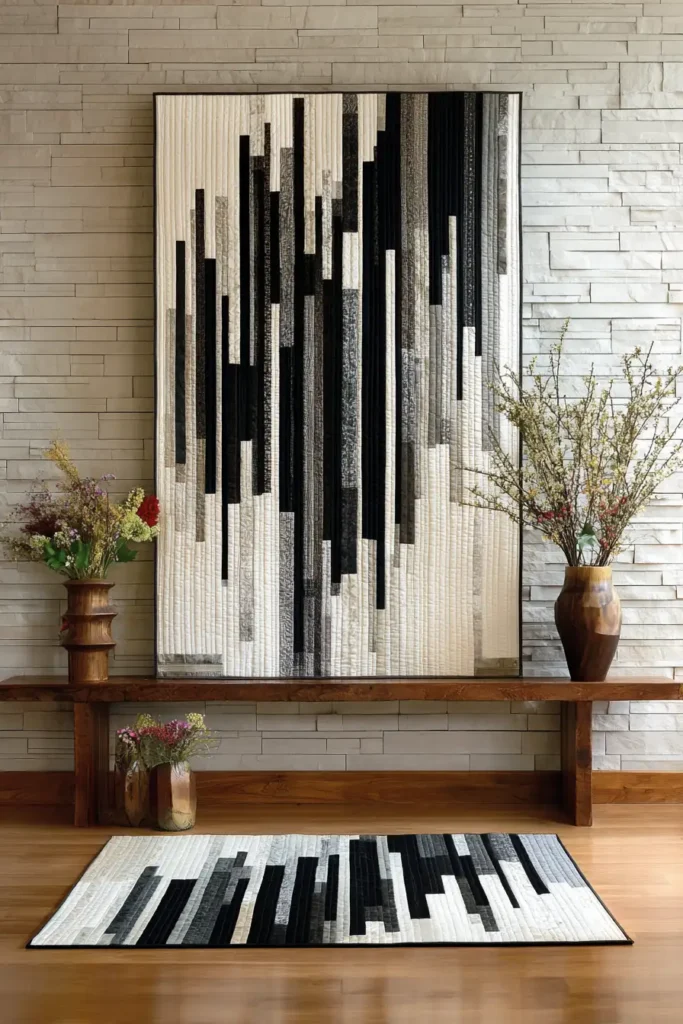
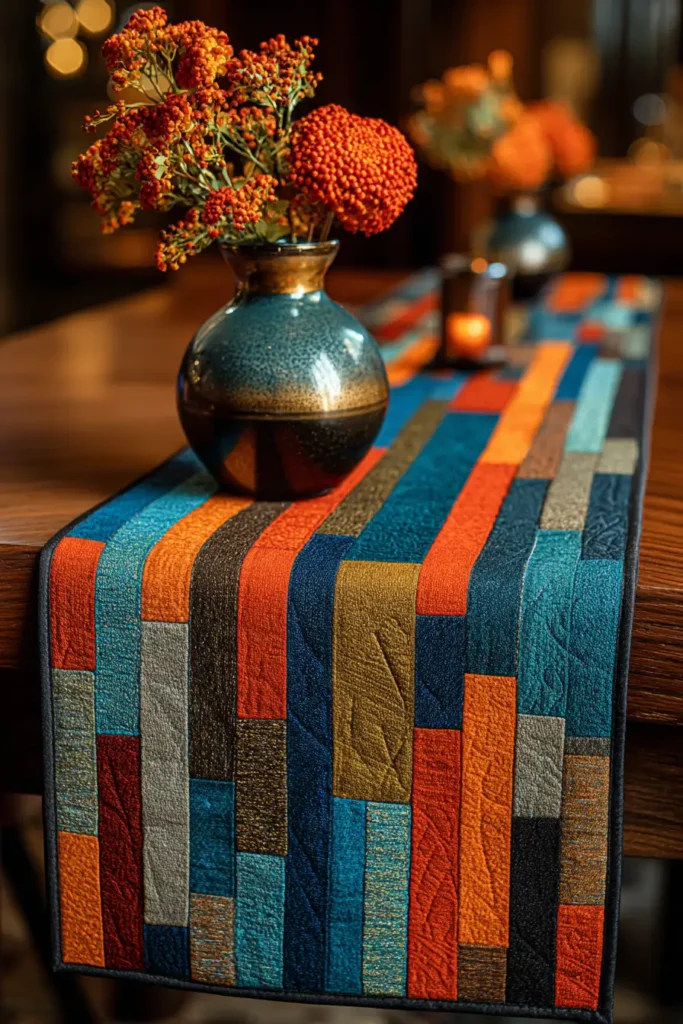
16. Durable Denim Modern Quilt Covers for Family Living
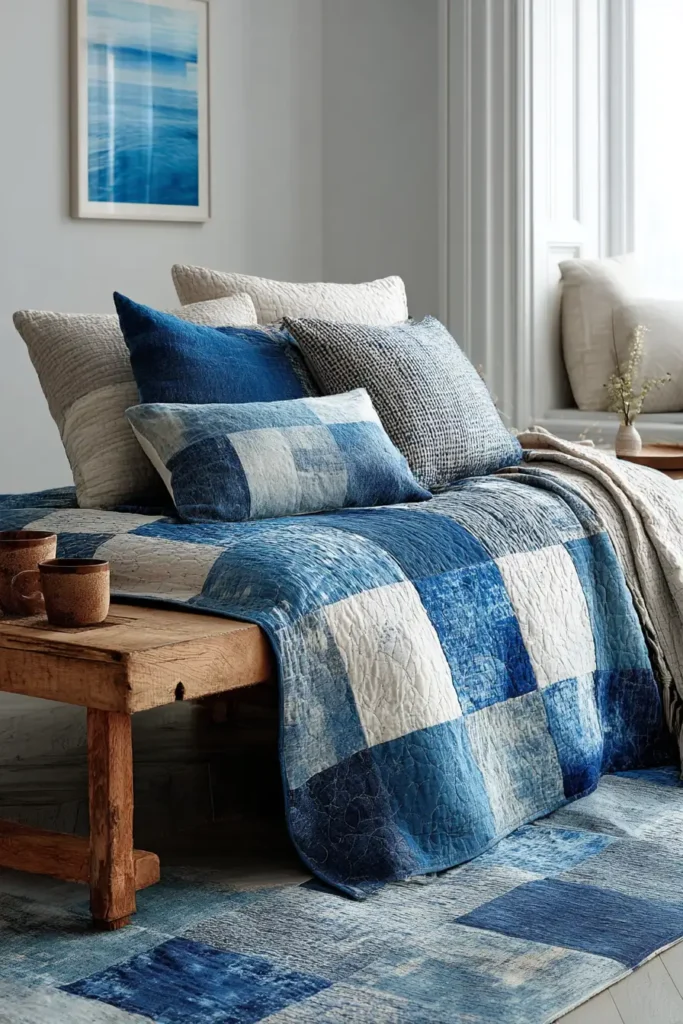
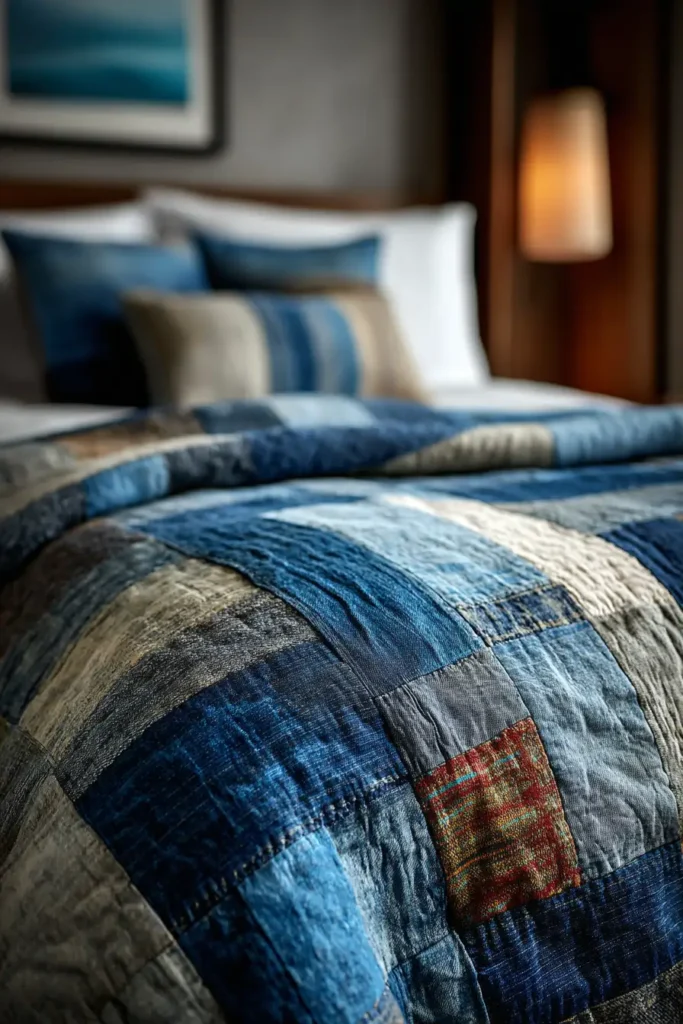
“The Indigo Gradient” Modern Utility Quilt
Denim is the most democratic fabric on earth—durable, comfortable, and timeless. While often associated with rustic “rag quilts,” denim can be incredibly sleek when treated with a modern eye. “The Indigo Gradient” ignores the chaotic patchwork of the past in favor of a structured, calming Ombré effect. By arranging strips of denim from Deep Raw Indigo to Bleached Sky Blue and finally White, you create a cover that is virtually indestructible (perfect for pets and kids) but looks like a high-end designer textile.
Finished Dimensions: Heavy Queen Coverlet, 90″ x 96″.
Materials Needed:
- The Denim (Top):
- You need about 15 pairs of old jeans OR 6 yards of denim yardage.
- The Gradient: Sort your denim into 4 distinct groups: Dark Indigo (Raw), Medium Blue (Stonewash), Light Blue (Acid Wash/Bleached), and White/Cream denim or canvas.
- Backing: 6 yards of Flannel or Brushed Cotton.
- Why: Denim is cool and stiff; flannel makes the quilt snuggly and warm against the skin.
- Batting: Thin Cotton or None.
- Weight: Denim is heavy. If you live in a warm climate, the denim-and-flannel backing is warm enough without batting. If you want a “weighted blanket” feel, add thin batting.
- Thread: Gold Topstitching Thread (the classic “Jeans Gold” color).
- Notions: Jeans Needles (Size 100/16 or 110/18) are non-negotiable. A standard needle will break.
Cultural Backstory: The word “Denim” comes from the French phrase “serge de Nîmes” (fabric from Nîmes). Originally a workwear fabric for miners and cowboys because of its diagonal-weave durability, it became a symbol of rebellion in the 1950s and of high fashion in the 1980s. A denim quilt brings that history of hard work and cool style into the home.
Step 1: The “Harvest” (Cutting the Bricks)
If using old jeans, you must deconstruct them first.
- Prep: Cut the legs off the jeans. Cut open the inner leg seam to create flat panels. Avoid the thick side seams (save them for handles or rugs).
- Cut Bricks: Cut uniform rectangles measuring 6.5″ x 12.5″.
- Sorting: As you cut, throw them into piles based on their shade (Dark, Medium, Light, White).
- Quantity: You need roughly 120 bricks total (30 of each shade).
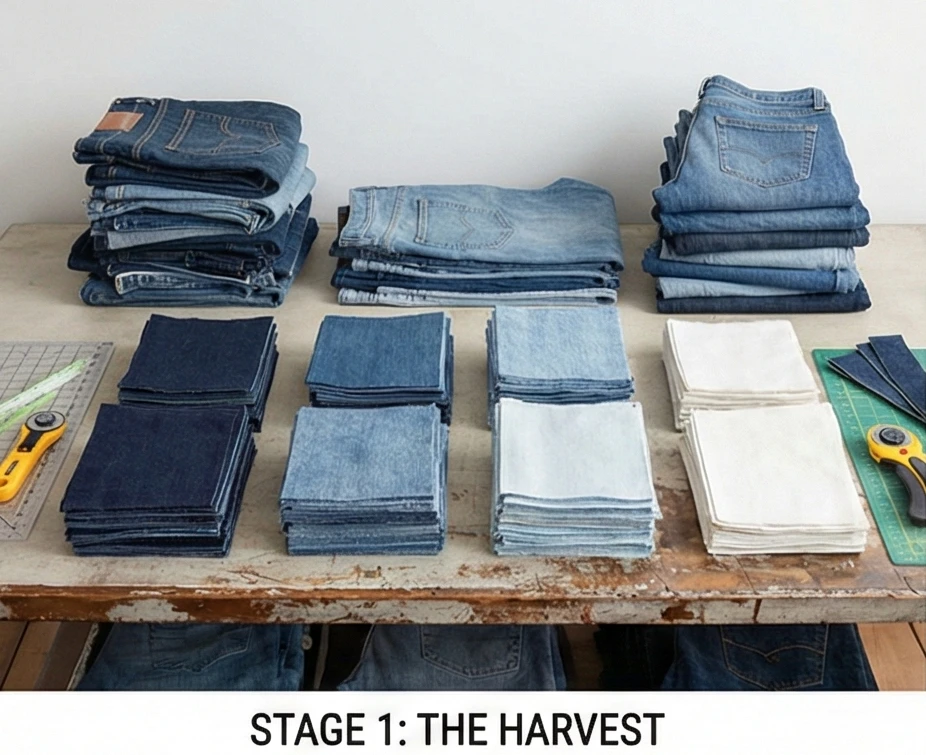
Step 2: The Layout (Value Study)
The gradient makes it modern.
- Floor Work: Find a large space. Lay out the bricks in horizontal rows.
- The Fade:
- Rows 1-4: All Dark Indigo.
- Rows 5-8: Medium Stonewash.
- Rows 9-12: Light Bleach.
- Rows 13-15: White/Cream.
- Refine: Stand back and squint. If a “Medium” brick looks too dark, move it up. If a “Light” brick appears too grey, replace it. The transition should be smooth, like a sunset (or sunrise).
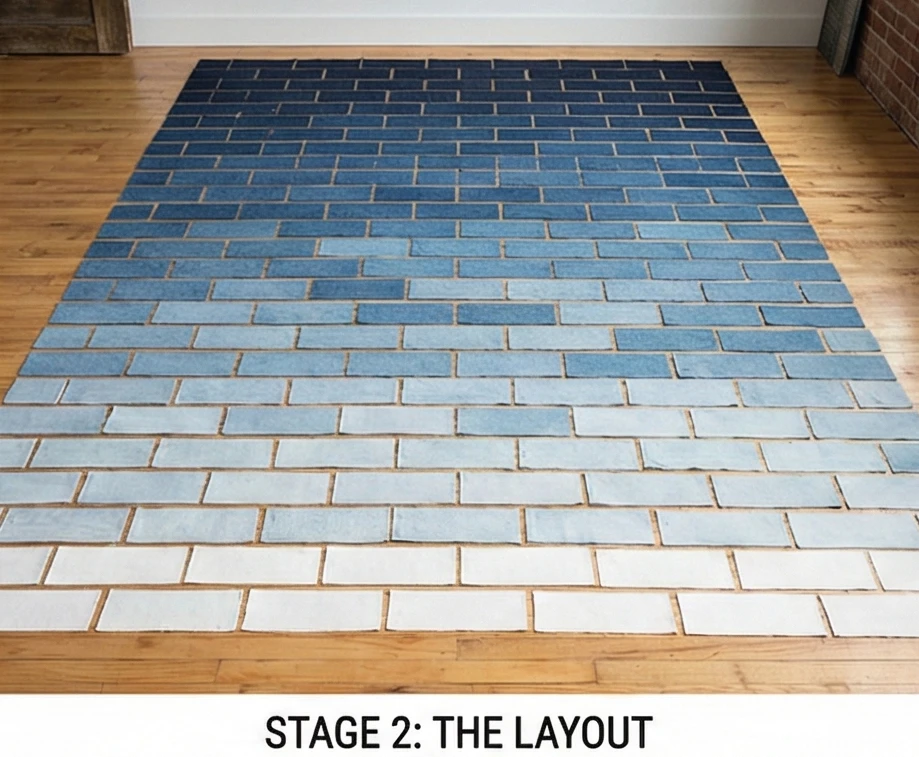
Step 3: Chain Piecing the Rows
Denim is thick. Pressing is vital.
- Sew: Stitch the bricks together into long horizontal rows using a 1/2 inch seam allowance. (Denim frays; a standard 1/4″ seam is too risky).
- Press: Press all seams Open.
- Tip: Use steam and a “Clapper” (a piece of wood) to pound the seams flat. If the seams are bulky, the quilt will be uncomfortable.
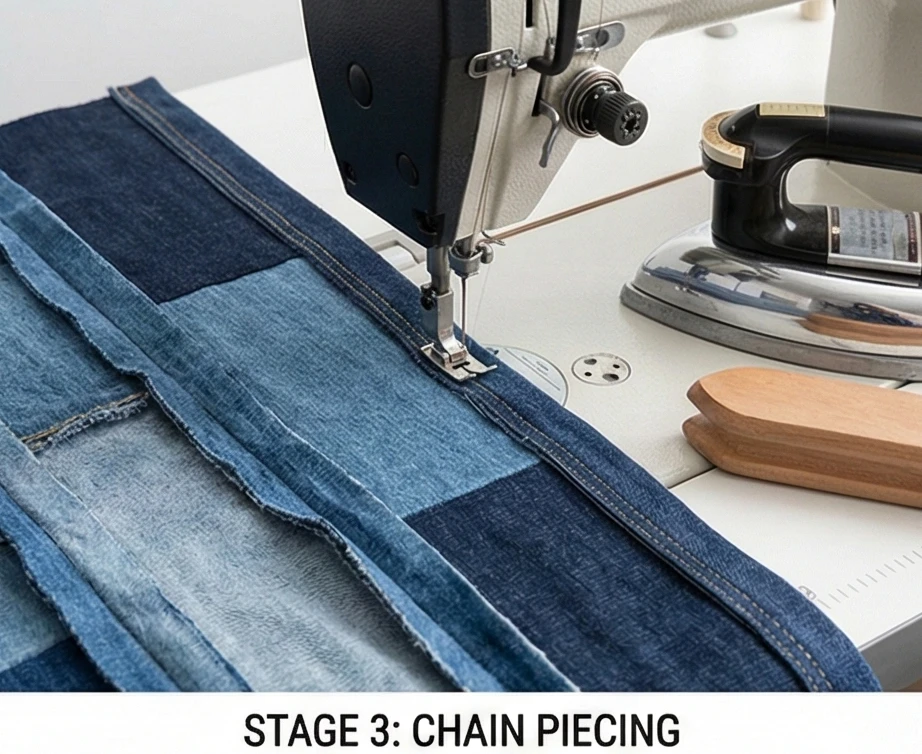
Step 4: The Flat-Felled Seam (Optional for Durability)
If you want this to last 100 years like a pair of Levis.
- The Method: When joining the long rows together, instead of a normal seam, sew a Flat-Felled Seam.
- Sew the rows wrong sides together.
- Trim one seam allowance down.
- Fold the wider seam allowance over the trimmed one.
- Topstitch it down from the front.
- The Look: This creates the classic “double stitch” line seen along the sides of jeans. It creates a visible grid of gold stitching on the front of the quilt and encases all raw edges.
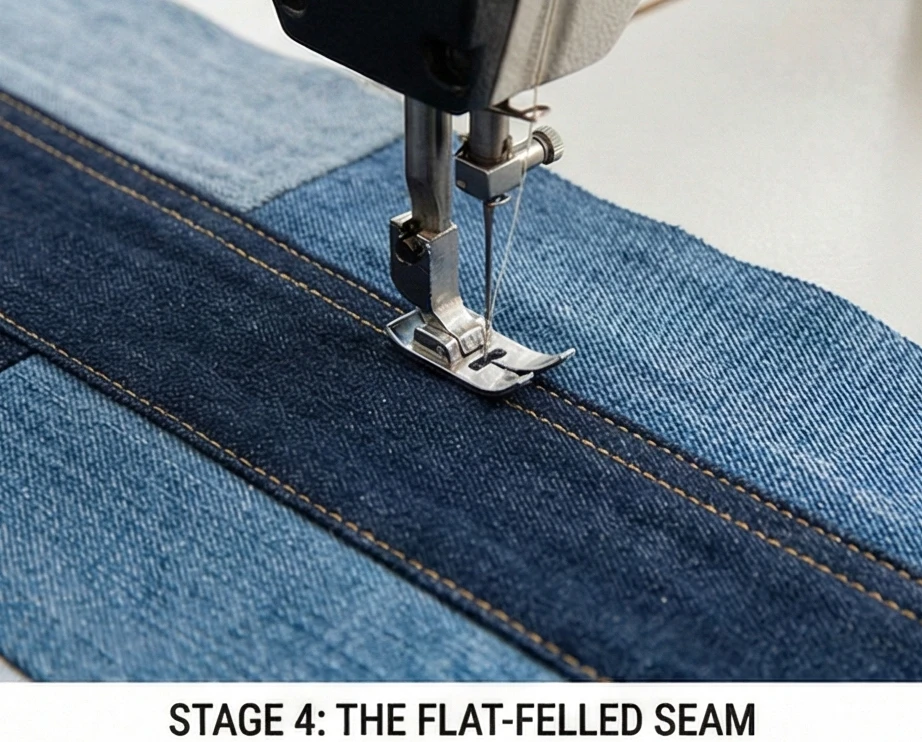
Step 5: “Sashiko” Utility Quilting
Machine quilting heavy denim is hard on a home machine. Hand stitching is easier and more aesthetically pleasing.
- Baste: Sandwich the layers (Top, Batting, Flannel). Use safety pins every 3 inches (spray baste struggles with denim weight).
- Thread: Use thick White Sashiko Thread or Perle Cotton #8.
- Stitch: Quilt large, visible running stitches vertically down the quilt.
- Design: “Big Stitch” quilting suits the rustic-modern vibe. Stitch lines 2 inches apart. The white thread against the dark indigo looks striking (a nod to Japanese Boro textiles).
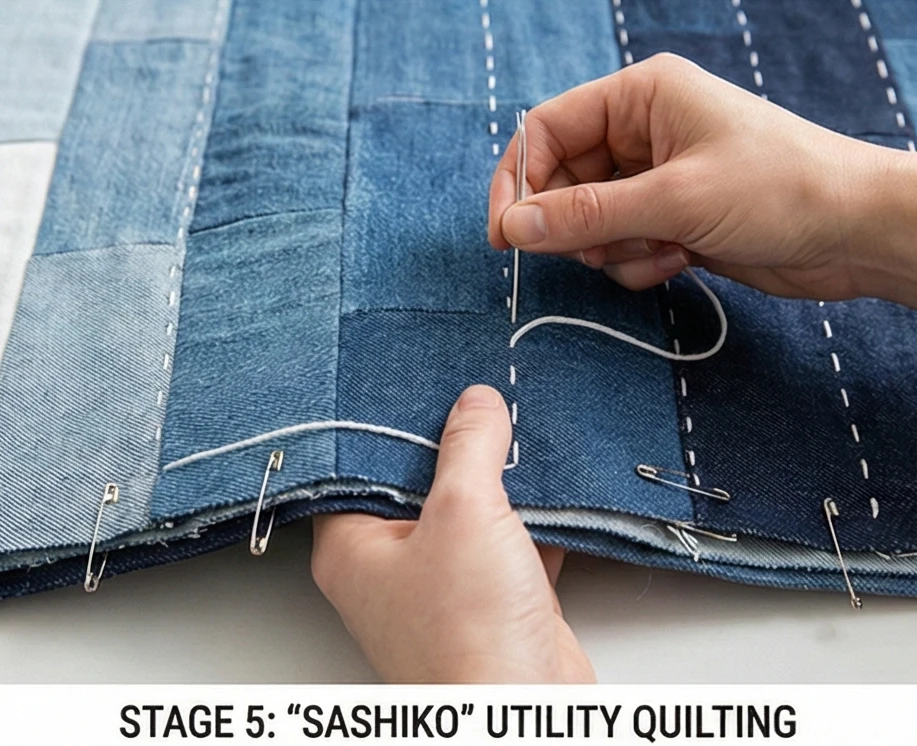
Step 6: The “Jeans Hem” Binding
Use the fabric’s own structure.
- Cut Binding: Cut 2.5-inch strips of your Darkest Indigo denim (or buy lightweight denim chambray for easier sewing).
- Machine Sew: Sew to the front of the quilt.
- Fold & Topstitch: Fold over to the back. Instead of hand-sewing, machine stitch it down from the front using a straight stitch.
- Aesthetic: It should look like the hem of a pant leg—clean, industrial, and sturdy.
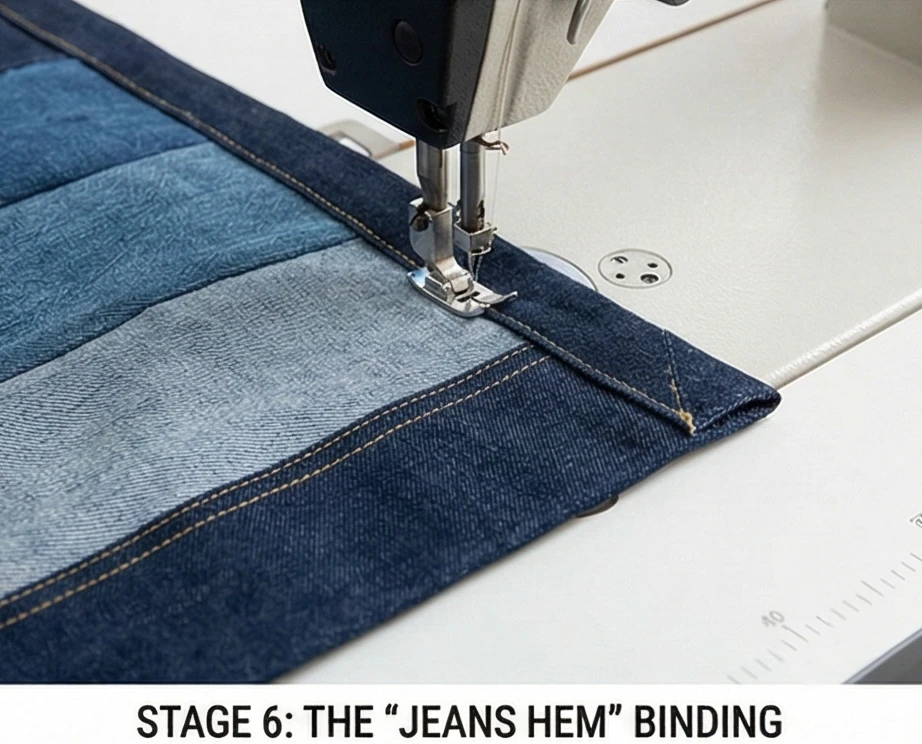
Usability Note: A denim quilt is HEAVY. It acts as a natural weighted blanket, which is great for anxiety and sleep. However, it takes a long time to dry. When washing, use a commercial machine at a laundromat if possible, and dry on medium heat with wool dryer balls to fluff the fibers.
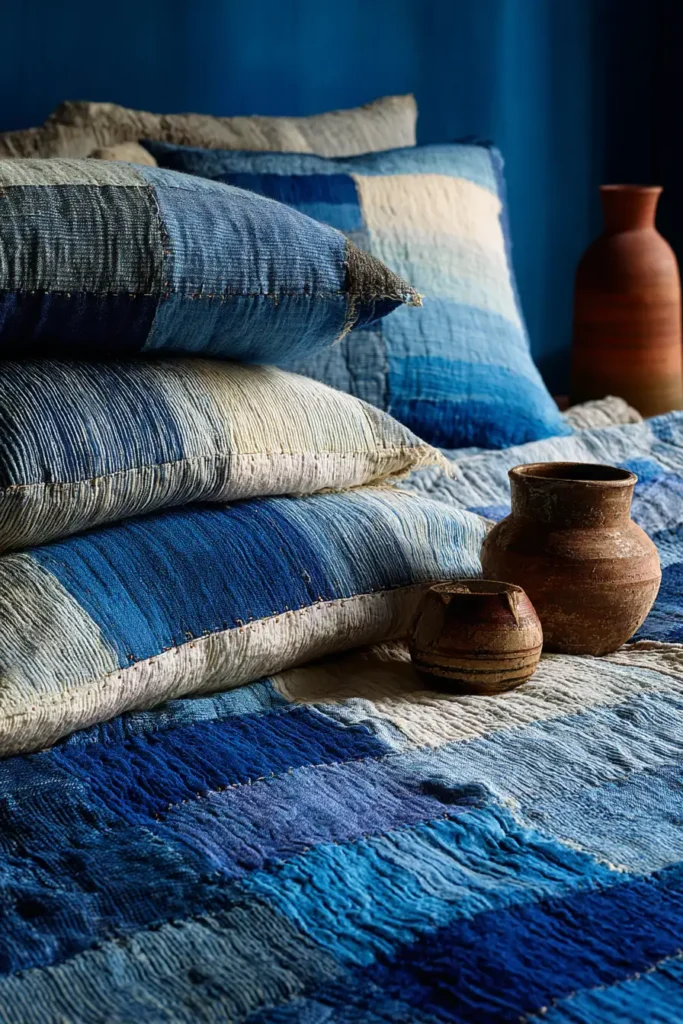
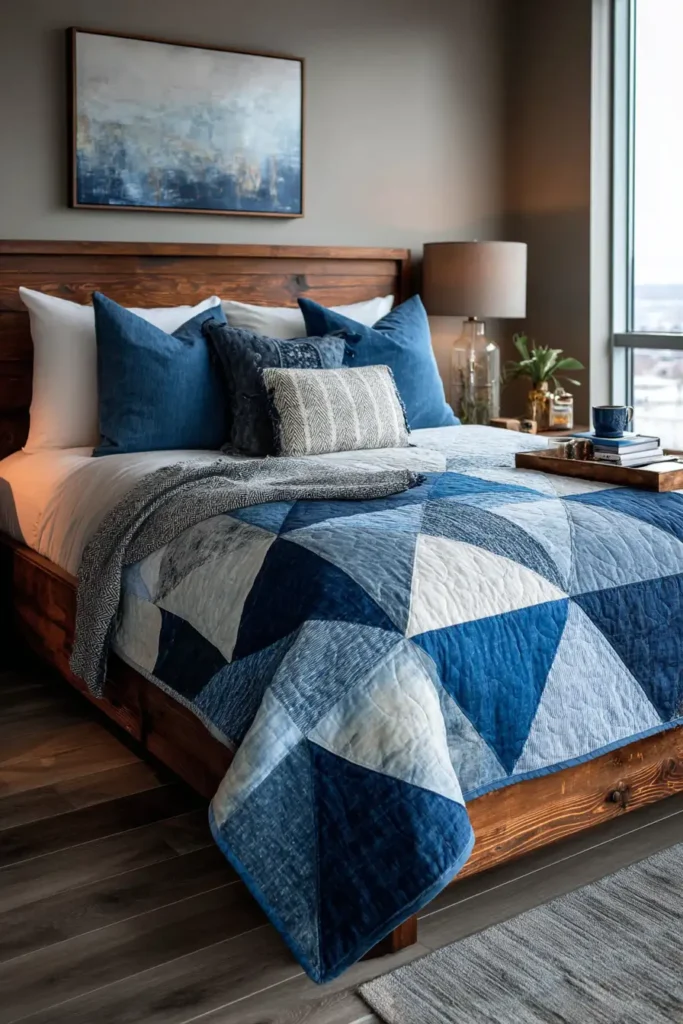
17. Abstract Art-Inspired Chair Pads for Comfortable Seating
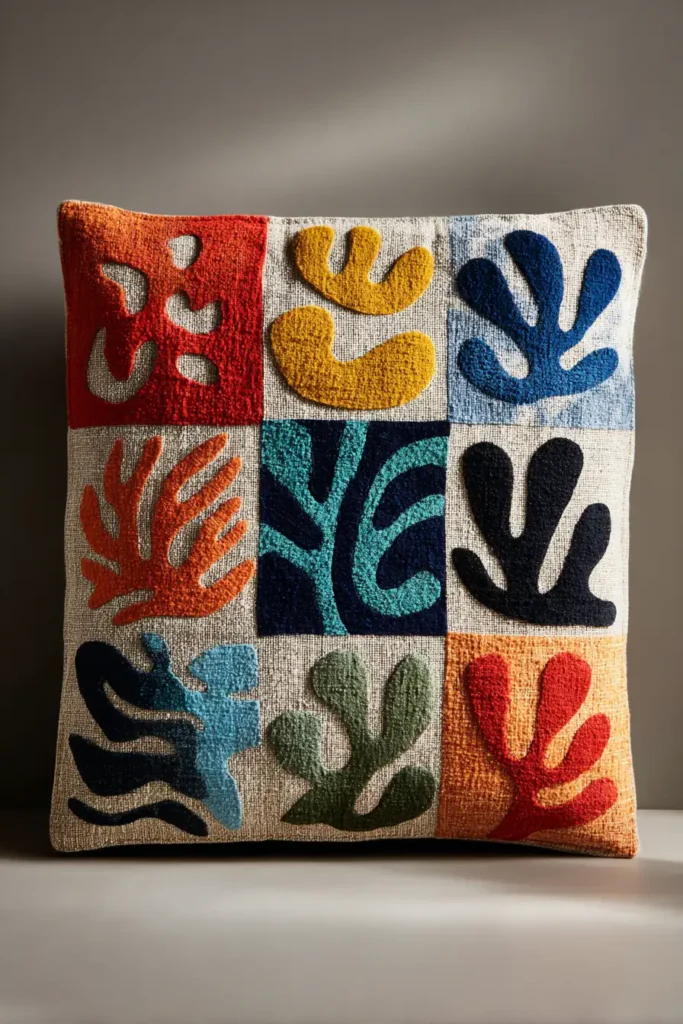
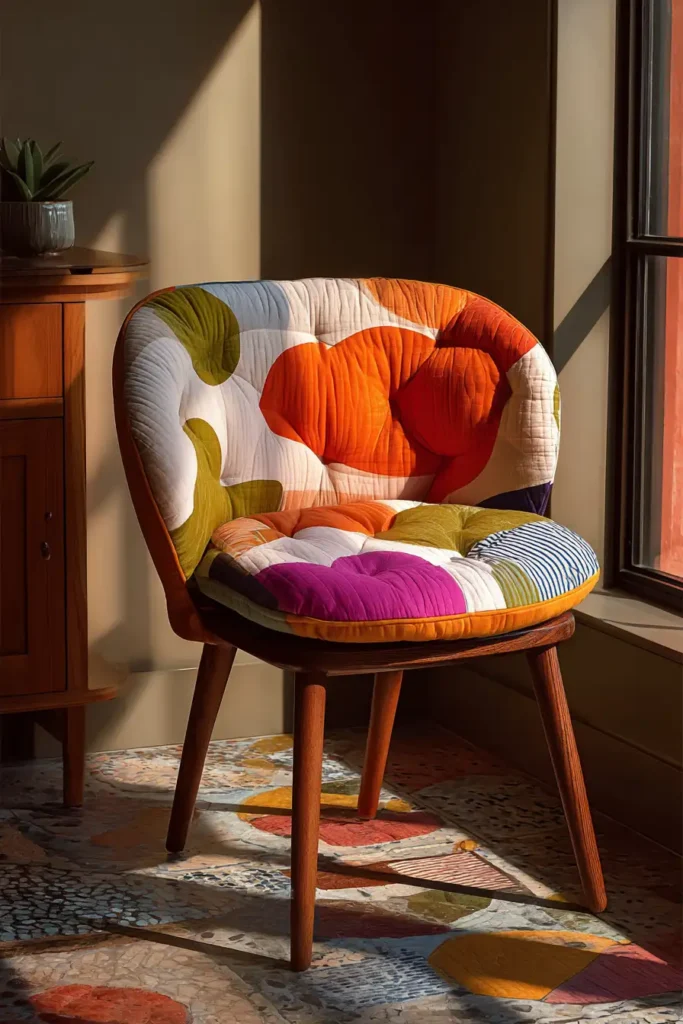
“The Matisse Cutout” Organic Shape Chair Pad
Modern art isn’t just for walls; it can bring life to the most utilitarian furniture in the house—the dining chair. “The Matisse Cutout” chair pad draws inspiration from the late-career “cut-outs” of Henri Matisse and the playful shapes of the 1980s Memphis Group. By appliquéing Organic Blobs, Arches, and Squiggles of solid color onto a neutral canvas background, you create a mini art installation that also saves your guests from hard wooden seats.
Finished Dimensions: Standard Square Seat, 16″ x 16″ x 2″ (Fits most dining chairs).
Materials Needed:
- Fabric A (Canvas Background): 1 yard of Natural Canvas, Drop Cloth, or Heavy Linen (Must be durable).
- Fabric B (The Shapes): Scraps of bold solids (e.g., Cobalt Blue, Terracotta, Mustard, Sage).
- Insert: A 16″ x 16″ x 2″ High-Density Foam slab. (Don’t use poly-fil; it lumps).
- Adhesive: Double-sided fusible web (e.g., HeatnBond Lite).
- Ties: 2 yards of Cotton Twill Tape or matching bias binding.
- Notions: A zipper (14-inch) for removing the cover to wash.
Cultural Backstory: When Henri Matisse became too ill to paint in his final years, he began “painting with scissors,” cutting bright paper into organic shapes and pinning them to his walls. This technique—focusing on pure color and form without outline—revolutionized modern design. These pads bring that same joyous, improvisational spirit to the dining room.
Step 1: “Painting with Scissors” (Improv Design)
Put away the ruler. Use your intuition.
- Fuse: Iron the Fusible Web onto the back of your colored scraps (Fabric B).
- Cut: Using sharp scissors, cut free-form shapes:
- The Blob: An asymmetrical kidney bean shape.
- The Leaf: A long, simple oval.
- The Squiggle: A worm-like line.
- Scale: Keep them large (4-6 inches). Tiny pieces look messy on a chair pad.
- Arrange: Cut two 17″ x 17″ squares from your Canvas (Fabric A). Peel the paper backing off your shapes and arrange them on one of the squares.
- Composition: Off-center is best. Let a shape “fall” off the edge (you will trim it later).
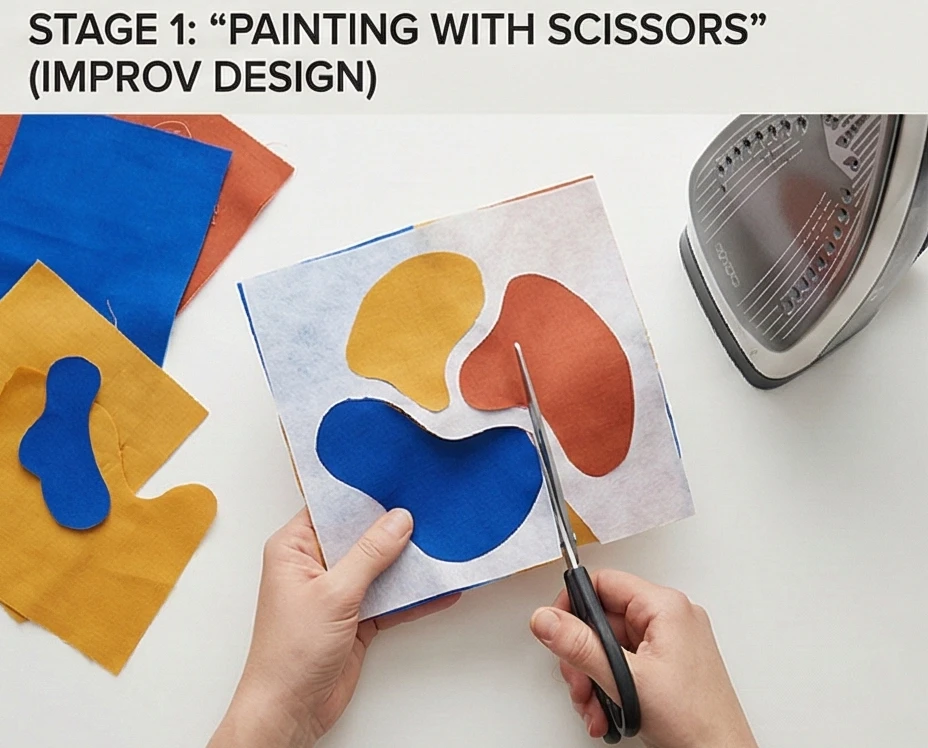
Step 2: Raw Edge Appliqué
Embrace the texture.
- Iron: Once you like the layout, press with a hot iron to fuse the shapes permanently to the background.
- Stitch:
- The Sketch: Use a straight stitch in Black Thread. Sew about 1/8 inch inside the edge of the colored shapes.
- Go Around Twice: Stitch around the shape a second time, deliberately wobbling the line slightly. This gives it a “sketched” or “doodled” look that feels artistic rather than manufactured.
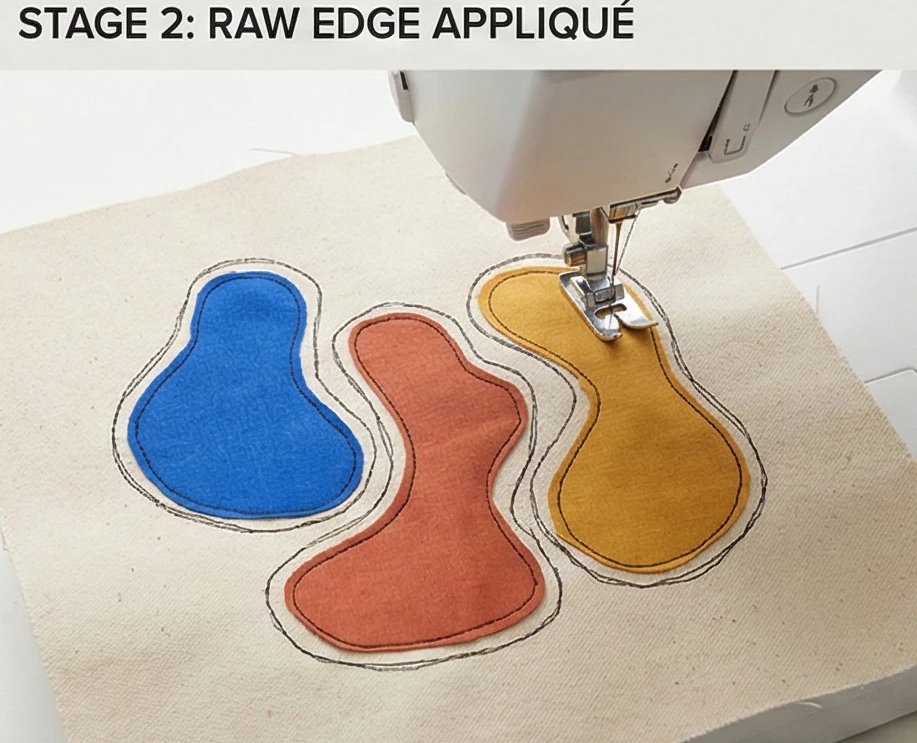
Step 3: The “Doodle” Quilting
The background needs texture, too.
- Sandwich: Place the Appliqué Top on a piece of thin batting (no backing needed yet).
- Free Motion: Drop your feed dogs (or use a walking foot with gentle curves).
- Stitch: Quilt large, meandering loops or “stippling” all over the negative space of the canvas.
- Why: This stiffens the fabric, making it a durable upholstery weight that won’t wrinkle when sat upon.
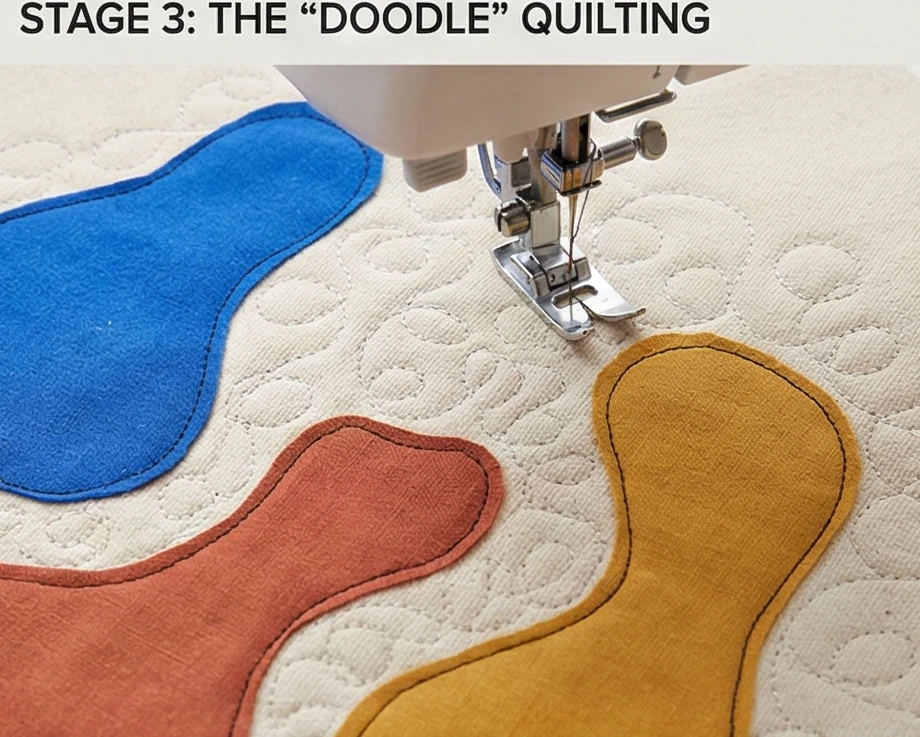
Step 4: The Boxed Corners (The 3D Shape)
A flat pad slides off. A boxed pad grips the foam.
- Cut Corners: Cut a 1-inch square out of all four corners of your Quilted Top and your plain Canvas Bottom.
- Install Zipper: Sew the zipper to the back edge of the Top and Bottom pieces (Right Sides Together).
- Sew Sides: Open the zipper halfway! Sew the other three sides of the pad together (Right Sides Together).
- Box: Pinch the cut corners so the side seam meets the bottom seam. Sew across this straight line. This creates the “depth” for the 2-inch foam.
Step 5: Attaching the Ties
Functionality is key.
- Cut Ties: Cut two pieces of Twill Tape, each 30 inches long.
- Placement: Fold the tape in half to find the center. Pin the center of the tape to the back corners of the chair pad (at the seam line).
- Secure: Stitch back and forth over the tape multiple times (bar tack) to secure it. Guests pull hard on these ties!
Step 6: The Stuffing & Styling
- Turn: Turn the cover right side out through the zipper.
- Stuff: Squeeze your foam slab into a “taco” shape to insert it, then let it expand inside the corners.
- Result: A firm, gallery-worthy seat cushion that looks like a piece of framed art.
Usability Note: Canvas and foam are washable, but foam takes days to dry. Always remove the foam insert before washing the cover. Wash the cover on Cold/Gentle and air-dry to prevent the canvas from shrinking and becoming too tight on the foam.

18. Contemporary Log Cabin Variations for Modern Sofas
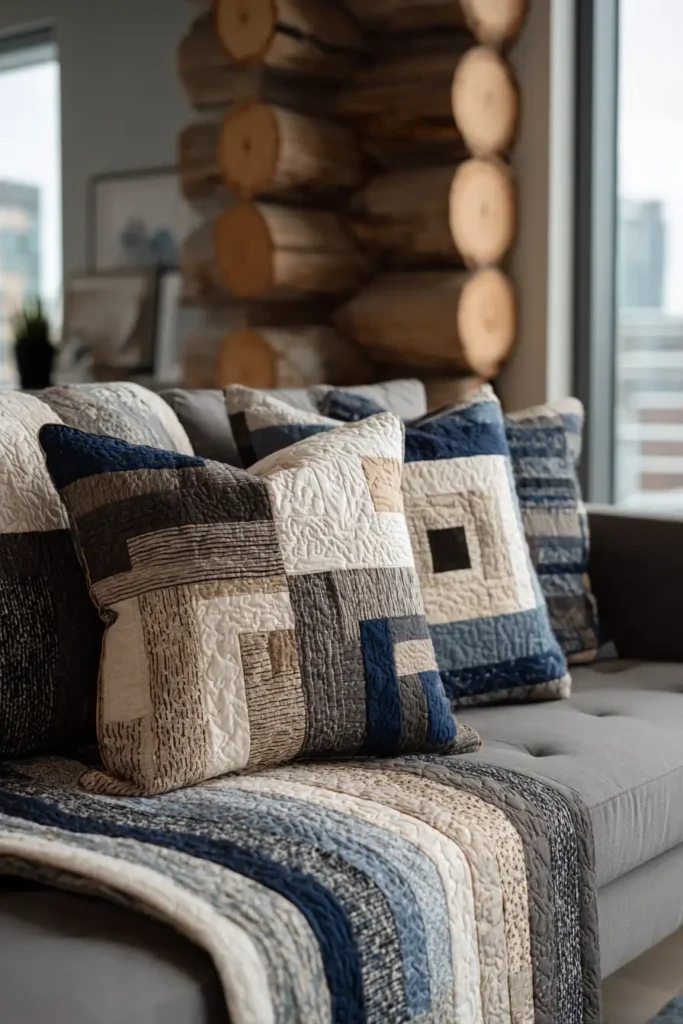
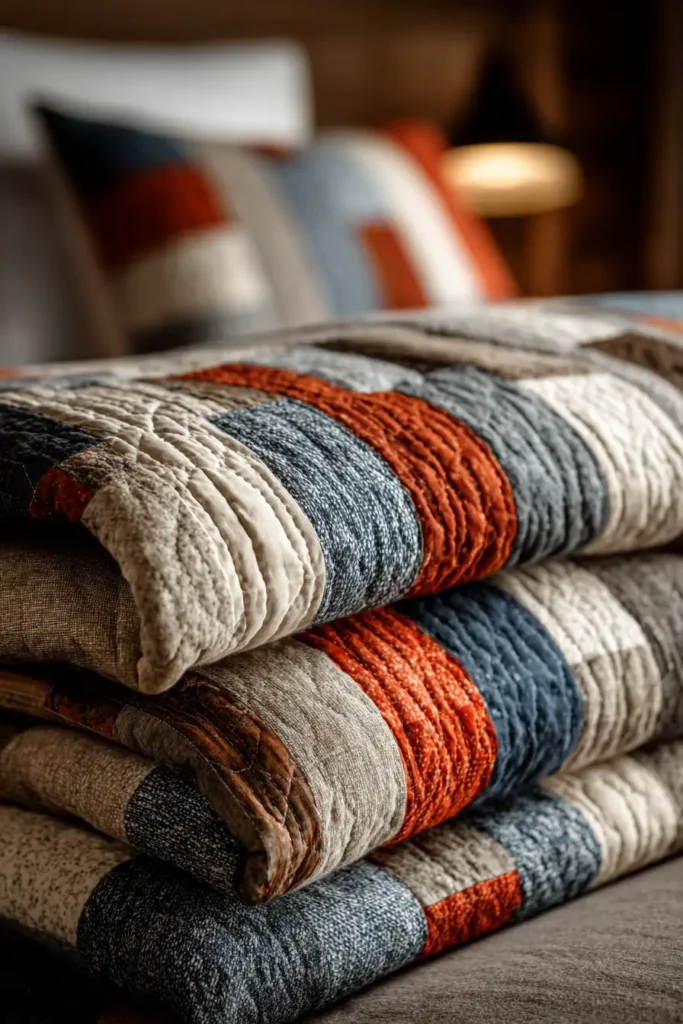
“The Urban Grid” Asymmetrical Log Cabin Throw
The Log Cabin is arguably the most recognizable quilt block in history, traditionally symbolizing the hearth of a pioneer home. “The Urban Grid” takes this ancient structure and modernizes it by disrupting the symmetry. By using “Logs” of different widths (e.g., skinny strips on two sides and wide strips on the other two), the center square is pushed off-balance, creating a dynamic sense of movement. When these off-center blocks are rotated and joined, they create sophisticated secondary patterns—chevrons, diamonds, or chaotic cityscapes—perfect for a contemporary living room.
Finished Dimensions: Large Sofa Throw, 64″ x 76″.
Materials Needed:
- Fabric A (Light/Background): 2.5 yards of Solid White, Silver, or Oatmeal Linen.
- Fabric B (Dark/Structure): 2.5 yards of Charcoal, Navy, or Black.
- Fabric C (The “Hearth” Center): 1/4 yard of a bright accent like Mustard, Copper, or Cyan.
- Backing: 4.5 yards of a bold, wide-stripe print.
- Batting: Cotton/Bamboo Blend (for a sleek, heavy drape).
- Notions: Design wall (or a clean floor), rotary cutter.
Cultural Backstory: While the Log Cabin block became a staple of American quilting during the Civil War (with the red center representing the hearth fire), specimens have been found in Egyptian mummies and English patchwork predating 1800. The “Modern” version often references the architectural grids of city skylines rather than rural cabins.
Step 1: Cutting the “Logs” (The Asymmetry)
We are abandoning the standard 2.5-inch strip.
- The Centers (Hearth): Cut 20 squares of Fabric C measuring 3.5″ x 3.5″.
- The Skinny Logs (Light): Cut your Fabric A into strips measuring 1.5 inches wide.
- The Wide Logs (Dark): Cut your Fabric B into strips measuring 3.5 inches wide.
- Note: You can mix this up! Try making the lights wide and the darks skinny, or mix widths within the colors for a true “improv” look.
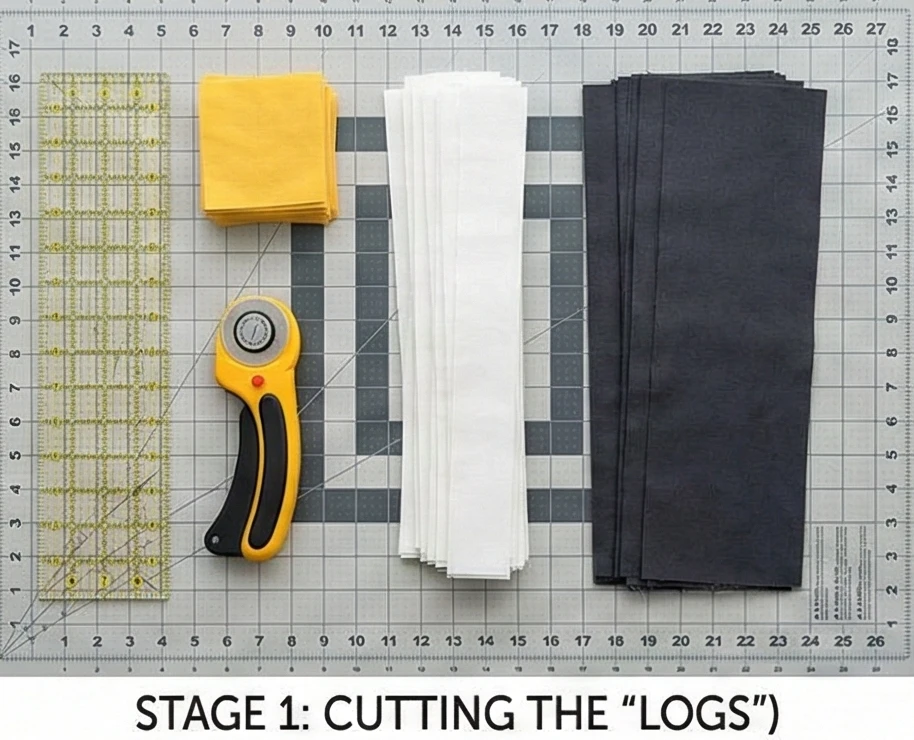
Step 2: Building the Block (Round 1)
The construction technique is standard; the math is not.
- Log 1 (Right): Sew a Skinny Light strip to the right side of the Center Square. Trim to fit. Press outward.
- Log 2 (Top): Sew a Skinny Light strip to the top. Trim and press.
- Log 3 (Left): Sew a Wide Dark strip to the left side. Trim and press.
- Log 4 (Bottom): Sew a Wide Dark strip to the bottom. Trim and press.
- Result: Your center square is no longer in the center. It is pushed up into the top-right corner.
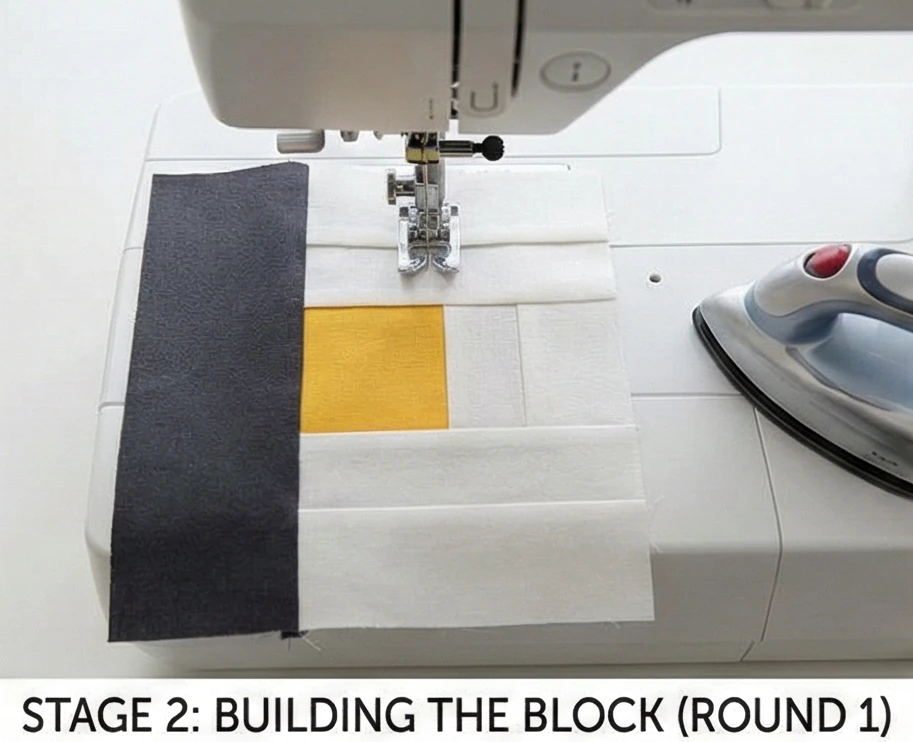
Step 3: Expanding the Grid (Rounds 2 & 3)
Continue the pattern to grow the block.
- Round 2:
- Add Skinny Light strips to the Right and Top.
- Add Wide Dark strips to the Left and Bottom.
- Round 3: Repeat.
- Size Check: Continue adding rounds until the block measures 16.5″ x 16.5″ unfinished.
- Quantity: Make 20 Blocks.
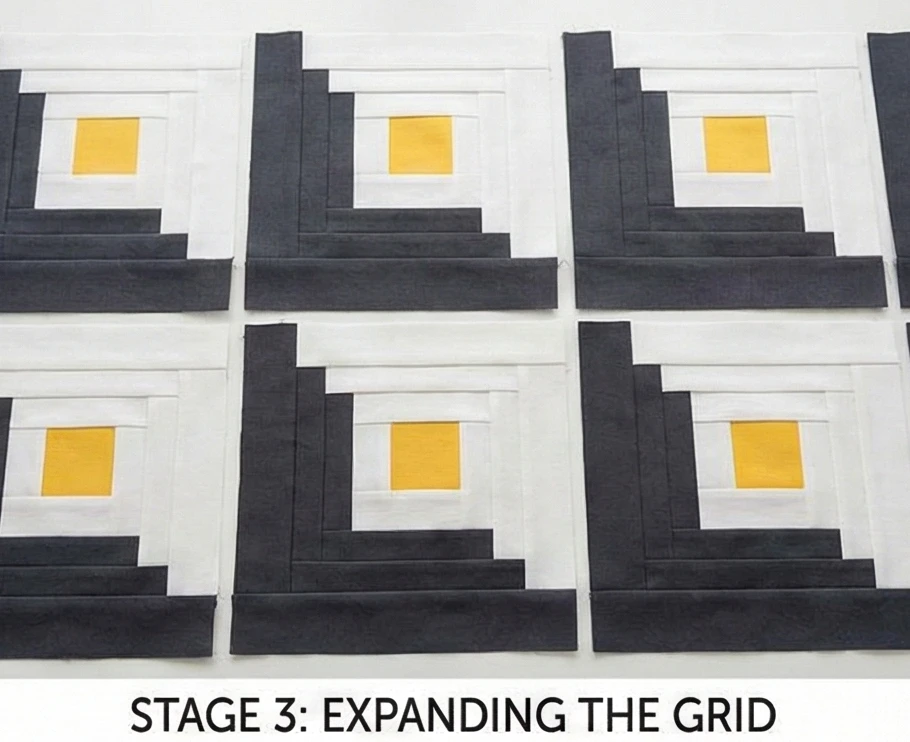
Step 4: The “Cityscape” Layout
Rotation creates the design.
- The Barn Raising (Modernized): Arrange the blocks so all the Dark corners point toward the center. This creates a massive diamond or “X” shape.
- The Fields (Furrows): Arrange the blocks so all the Dark halves run diagonally in the same direction. This creates bold, thick stripes across the quilt.
- The Chaos: Rotate blocks randomly 90 degrees. This creates a “glitch” effect where lines stop and start abruptly—very modern.
- Recommendation: Use the “Fields” layout for a sleek, lengthening look on a modern sofa.
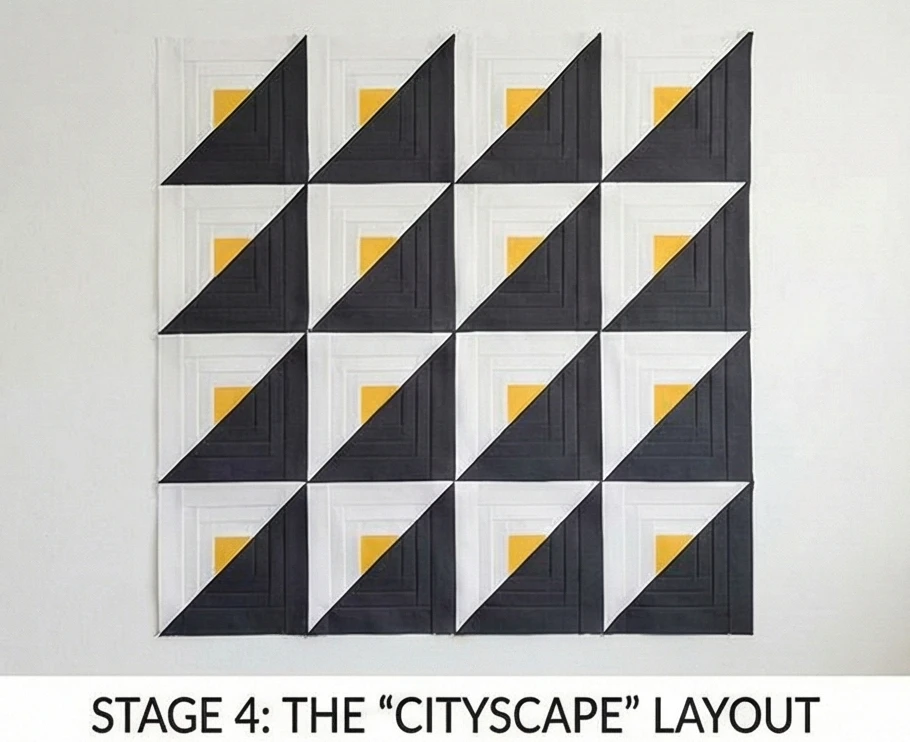
Step 5: Joining and Squaring
Thick seams require care.
- Join Rows: Sew the blocks into 4 rows of 5 blocks.
- Pressing: Press the block seams Open. Log cabins have many layers of fabric at the intersections; pressing them open significantly reduces the “lump” factor.
- Join Rows: Sew the 4 rows together.
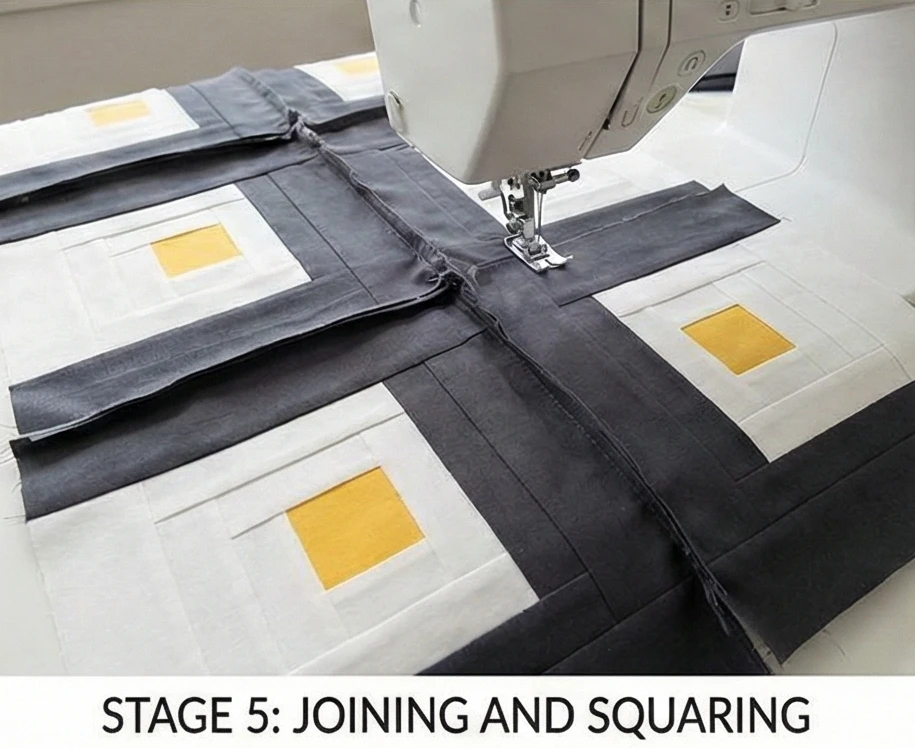
Step 6: “Ghost Grid” Quilting
Use the quilting to impose order on the asymmetry.
- Baste: Sandwich the quilt.
- Mark: Ignore the seam lines of the blocks. Mark a perfect 3-inch grid across the entire quilt surface.
- Stitch: Quilt straight lines following your marked grid, not the piecing.
- Effect: The quilting acts as a “top layer” of design that floats over the patchwork, unifying the skinny and wide logs into one cohesive textile.
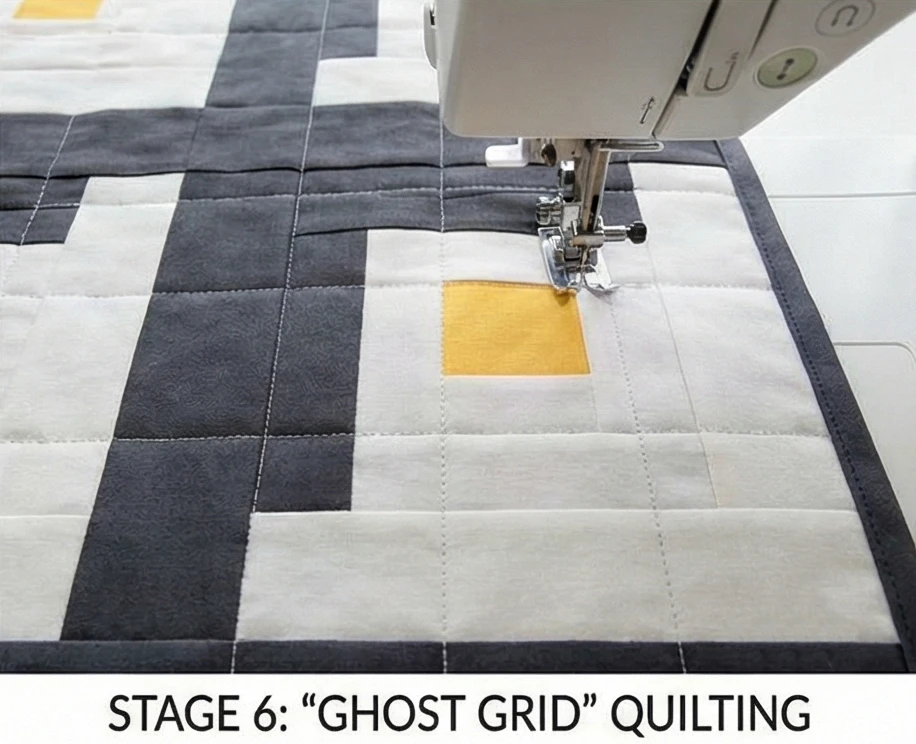
Usability Note: Log Cabins have many seams, which create a stiff, warm quilt. This is perfect for a winter throw, but it can be heavy. To keep it draping well, use a 50wt thread (thinner) for piecing and quilting, and avoid dense batting.
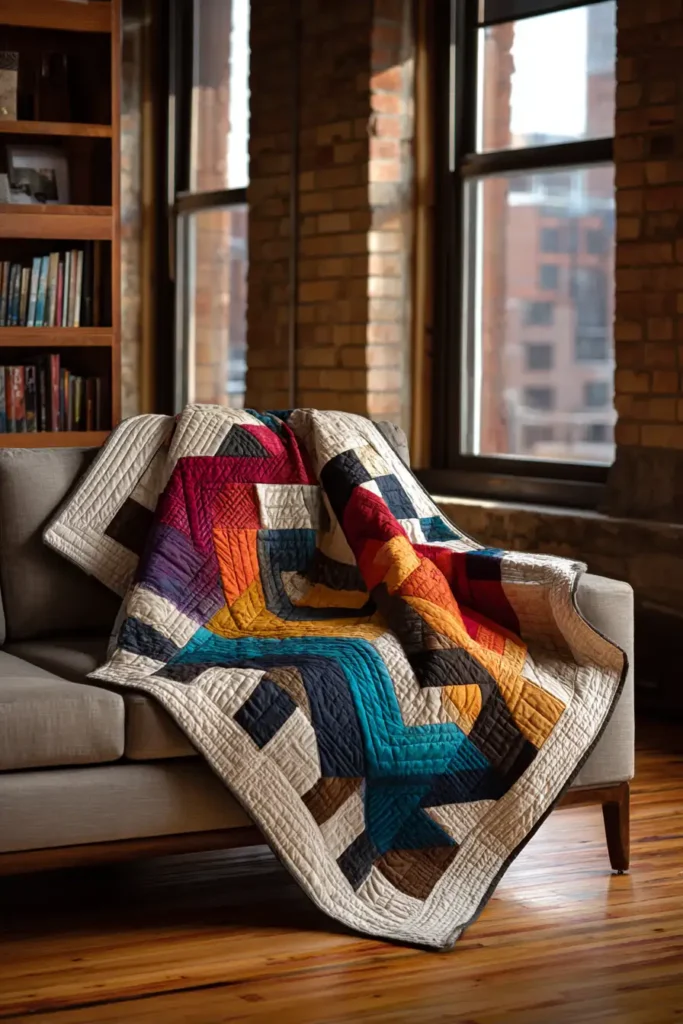
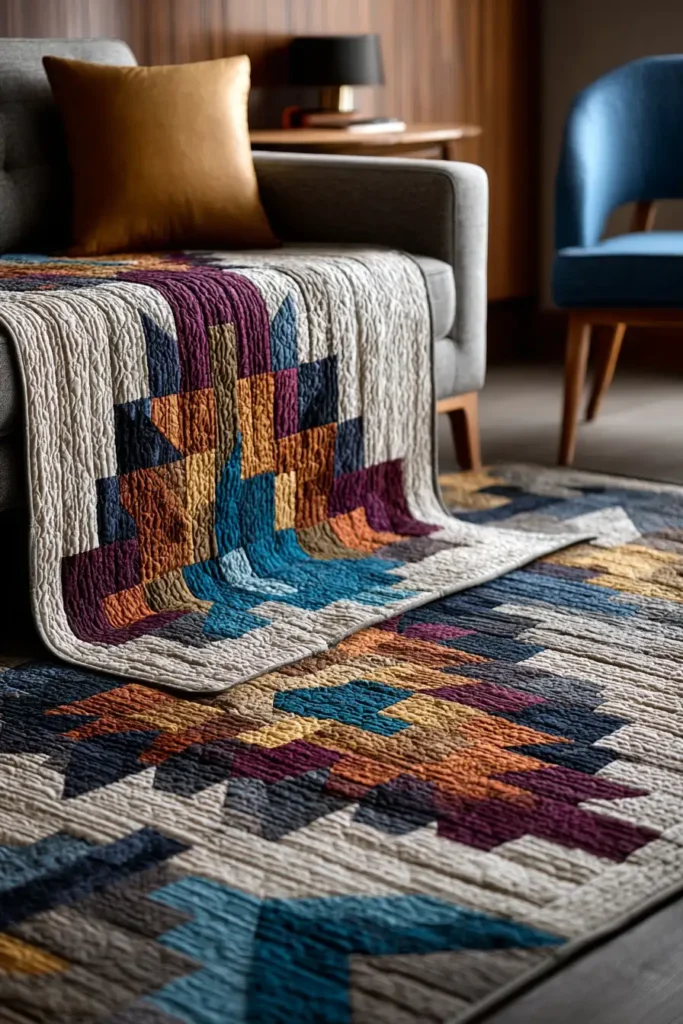
19. Improv Piecing Quilt Patterns for Unique Wall Hangings
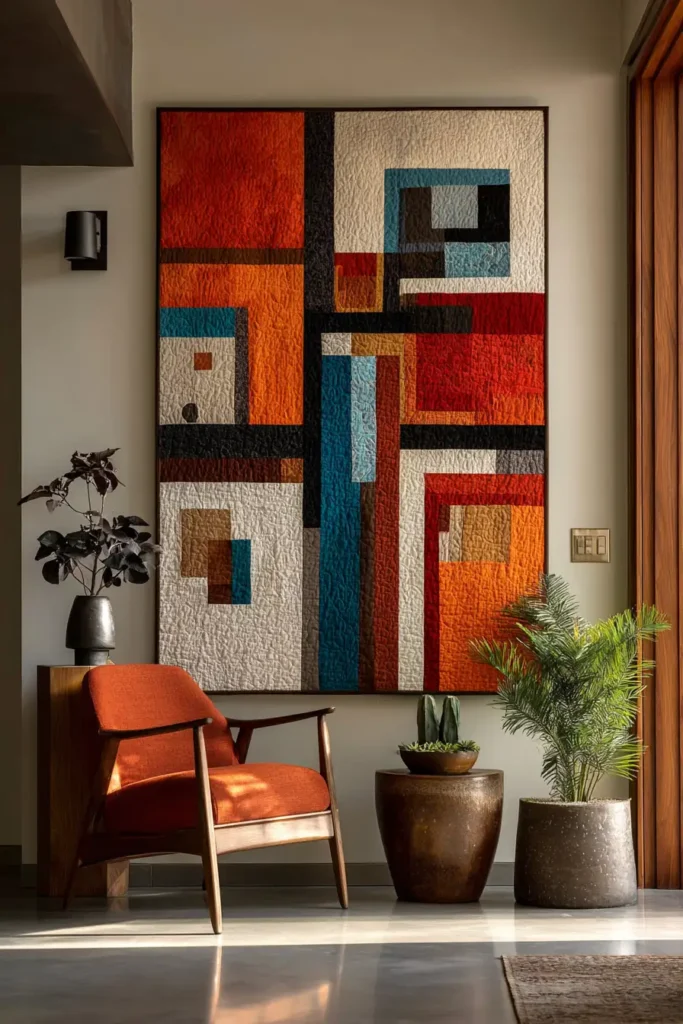
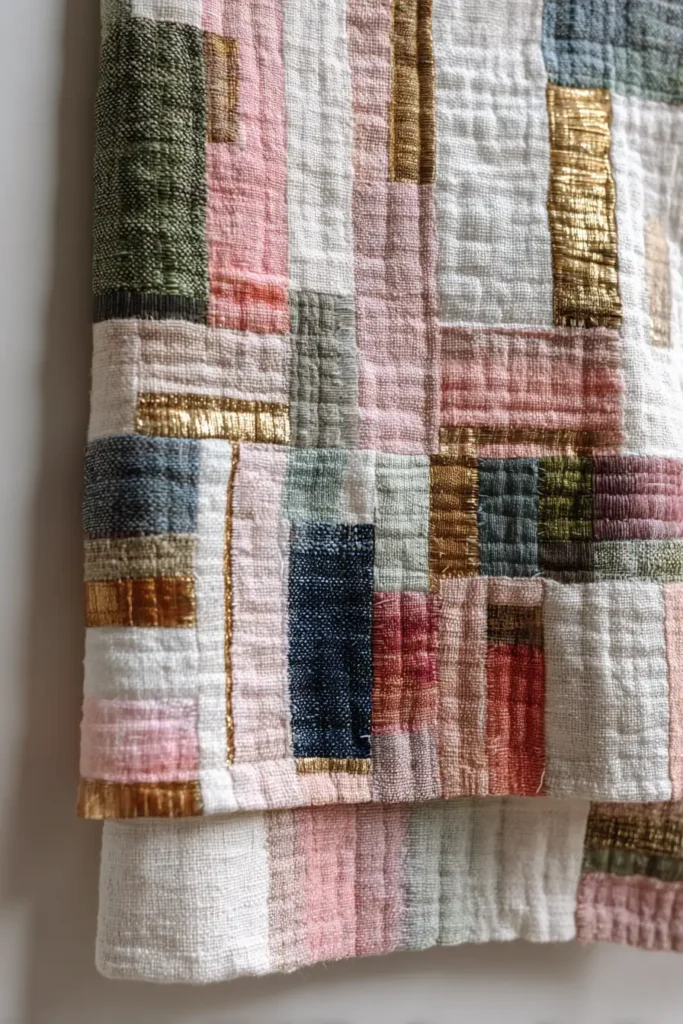
“The Jazz Rhythm” Abstract Improv Wall Quilt
Improvisational (“Improv”) piecing is the jazz of the quilting world. There are no patterns, no precise measurements, and no mistakes—only “design choices.” “The Jazz Rhythm” wall hanging uses the Slash-and-Insert technique to create a composition of floating bars, crooked lines, and suspended blocks. Set against a calm Linen or Solid background, these bursts of color look like a modern painting. It turns your fabric scraps into high art for your hallway or living room.
Finished Dimensions: Statement Wall Art, 30″ x 40″.
Materials Needed:
- Fabric A (The Background): 1.5 yards of Solid White, Charcoal, or Natural Linen.
- Fabric B (The Rhythm/Color): A curated bag of scraps.
- Palette: Choose 3-4 colors (e.g., Rust, Mustard, Slate, Cream).
- Shapes: Strips, small squares, and wonky triangles.
- Backing: 1 yard of muslin.
- Batting: Stiff Cotton Batting or Fusible Fleece (Wall hangings need rigidity to hang flat).
- Notions: A rotary cutter (you will use it like a paintbrush), a design wall (or a piece of flannel taped to the wall).
Cultural Backstory: While “Modern Improv” is a trend today, its roots are deep in the African American quilting tradition, most famously the quilters of Gee’s Bend, Alabama. For generations, these women created masterpieces from old work clothes, ignoring the rigid geometric rules of European quilting in favor of intuitive, expressive, and syncopated rhythms that mirrored jazz and gospel music.
Step 1: The “Slash and Insert” Technique
This is the core move of improv quilting.
- Start Big: Cut a chunk of your Background fabric (e.g., 10″ x 10″).
- Slash: Take your rotary cutter and slice freely through the fabric.
- Angle: Don’t cut straight. Cut a gentle curve or a sharp diagonal.
- Insert: Take a strip of colored fabric (Fabric B). Sew it between the two cut pieces of background.
- Press: Press the seams open or toward the dark fabric.
- Result: You now have a solid block interrupted by a “wonky” line of color.
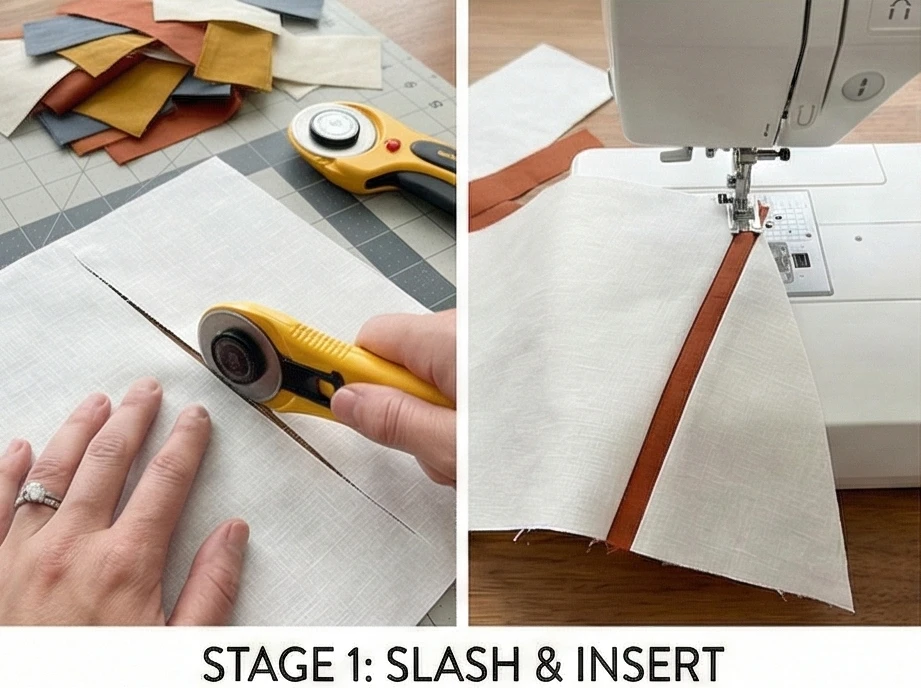
Step 2: Building the “Components”
Create the vocabulary of your quilt.
- Make 5-7 Units: Repeat the Slash-and-Insert technique to create different-sized units.
- The Stack: Sew several colored strips together to make a striped block, then slash it into a background piece.
- The Floating Square: Sew a small colored square onto a larger background piece using a “wonky log cabin” method (adding strips to sides randomly).
- Trim: Square up these units into rectangles. They do not need to be the same size. One might be 4″ x 8″, another 10″ x 10″.
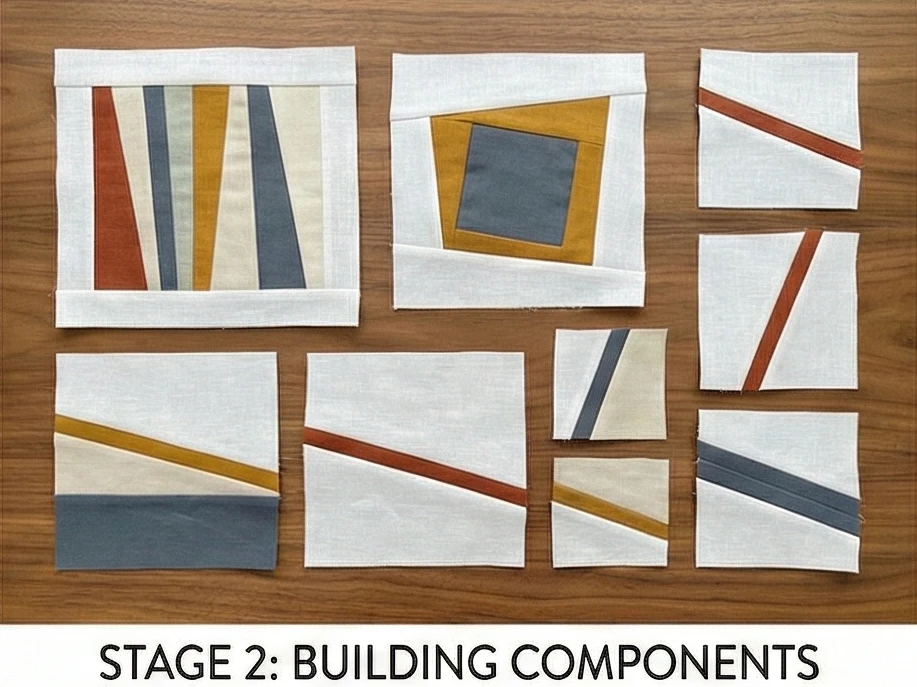
Step 3: Composition on the Wall
This is where the art happens.
- Pin Up: Pin your units onto your design wall.
- Step Back: Look at the negative space.
- Balance: Do you have too much orange on the left? Move a piece to the right.
- Flow: Do the lines lead the eye across the quilt?
- The “Rest”: Ensure there is enough empty background fabric to let the colorful moments breathe. Improv can easily get cluttered.
- Fill the Gaps: Measure the spaces between your units. Cut solid pieces of Background fabric to fill those gaps.
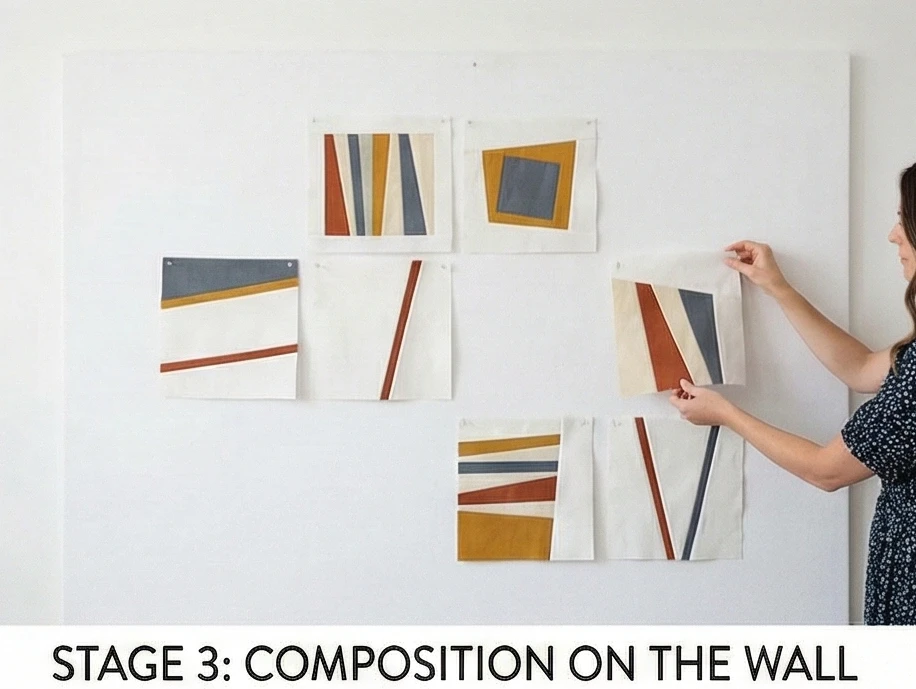
Step 4: Puzzle Assembly
Putting it together requires logic.
- Sectioning: You cannot sew a random scattering of blocks together in one go. Group them into “zones” (e.g., Top Left Quadrant, Bottom Strip).
- Sewing:
- Sew Unit A to a Filler Strip.
- Sew that combined piece to Unit B.
- Tip: If edges don’t match perfectly, just trim them straight! That is the freedom of improv.
- Final Join: Assemble your zones into the final 30″ x 40″ rectangle.
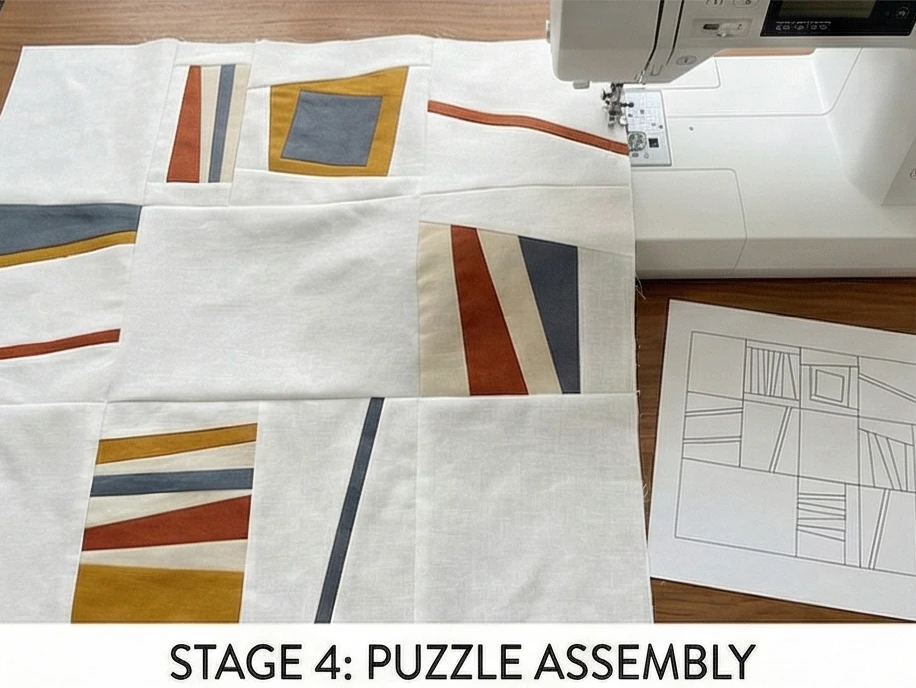
Step 5: “Matchstick” or “Big Stitch” Quilting
The texture should unify the chaotic design.
- Dense Machine Lines: Use a walking foot to quilt straight lines vertically, spaced 1/8 inch apart (Matchstick).
- Why: This makes the wall hanging very stiff and canvas-like, making it ideal for mounting.
- Hand Accents: Alternatively, use thick Perle Cotton thread to hand-stitch a few strategic circles or “X” marks over the colored areas to draw the eye.
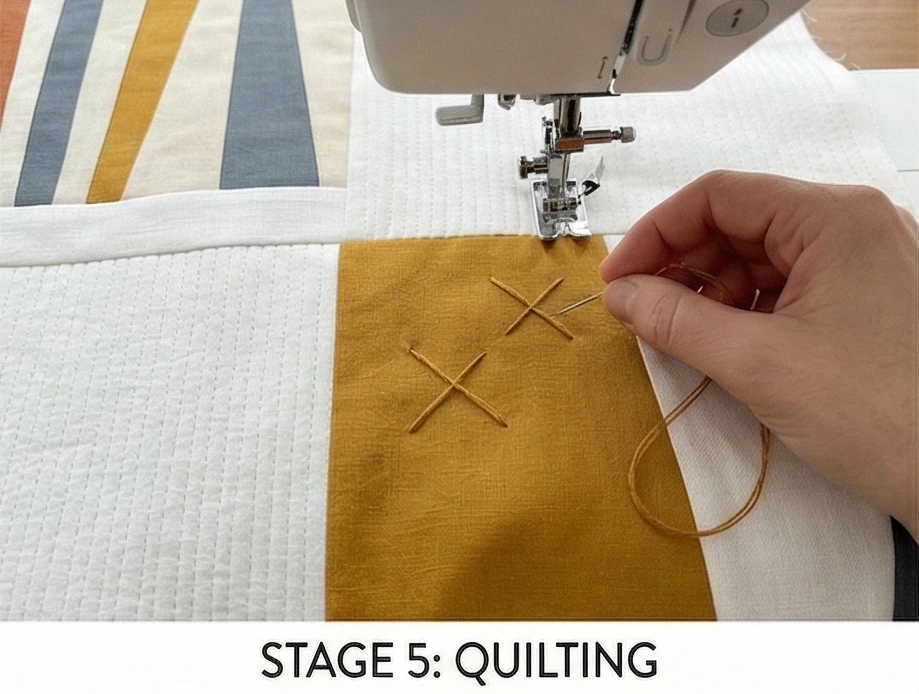
Step 6: The Facing Finish (Museum Style)
A binding creates a frame. Art should have a clean edge.
- Cut Facings: Cut four strips of background fabric, 2.5 inches wide.
- Sew to Front: Sew strips to the top, bottom, and sides of the quilt front (Right Sides Together).
- Flip: Turn the strips completely to the back of the quilt.
- Press: Roll the edge slightly so the facing doesn’t peek out.
- Hanging Sleeve: Before hand-stitching the facing down, insert a 4-inch fabric tube under the top facing strip. This holds the wooden dowel for hanging.
- Result: The quilt looks like a stretched canvas floating on the wall.
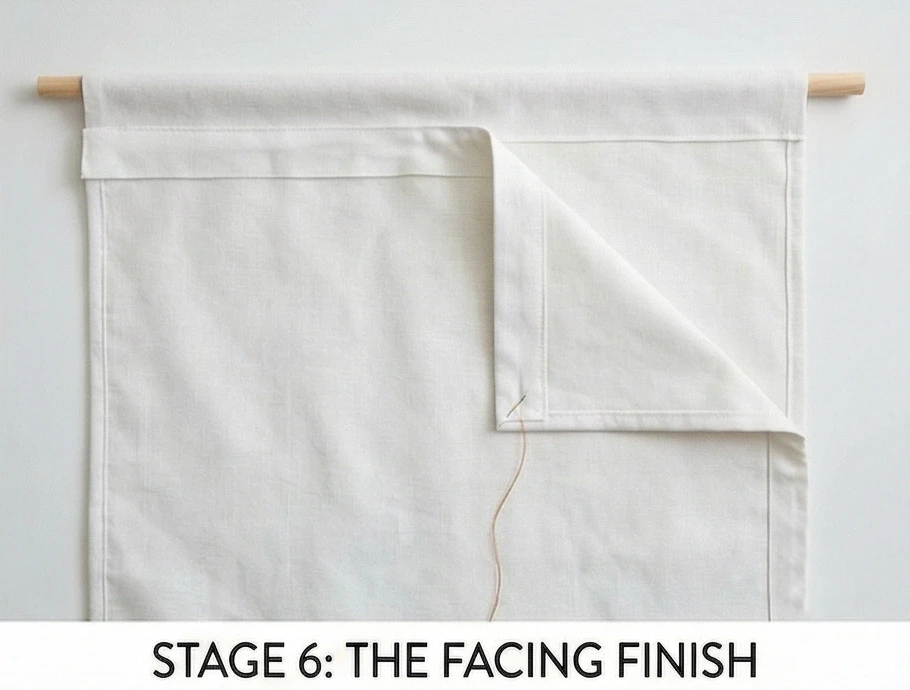
Usability Note: Improv quilting generates significant scraps. Keep a “crumb bucket” next to your machine. Even a 1-inch strip of bright orange can be the perfect “Zing” in your next improv block. Nothing is a waste.

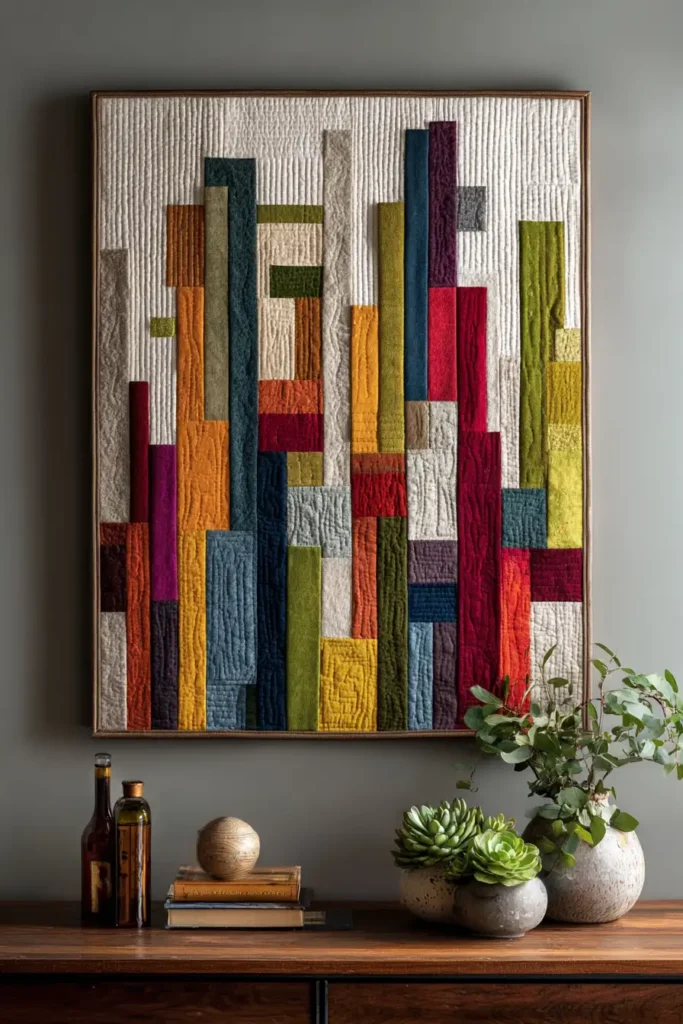
20. Framed Minimalist Line Art Quilt Designs for Gallery Walls
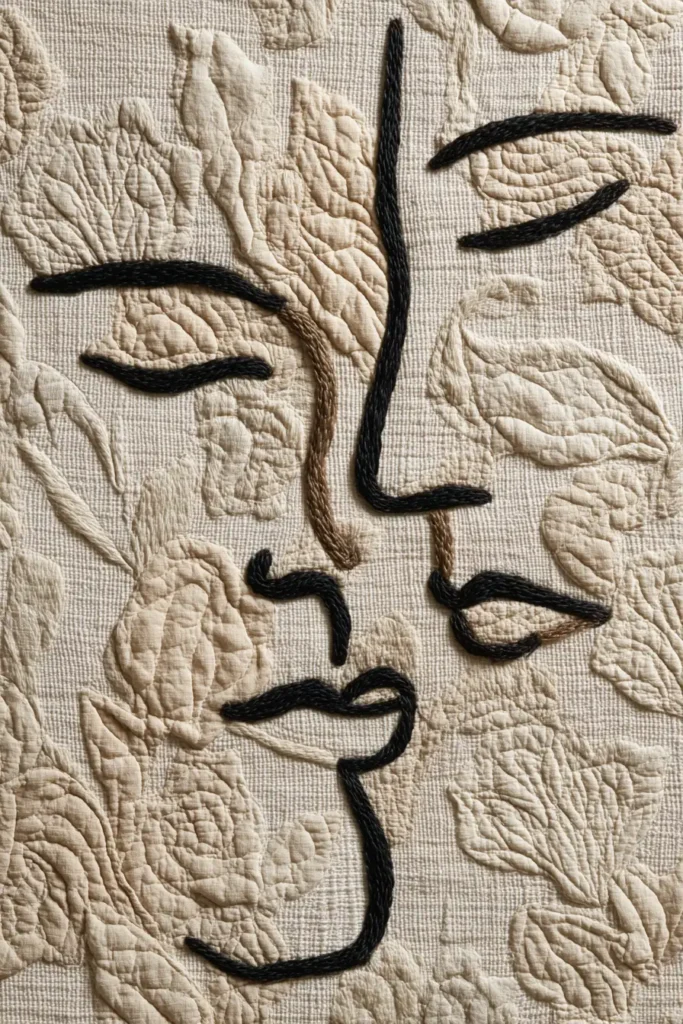
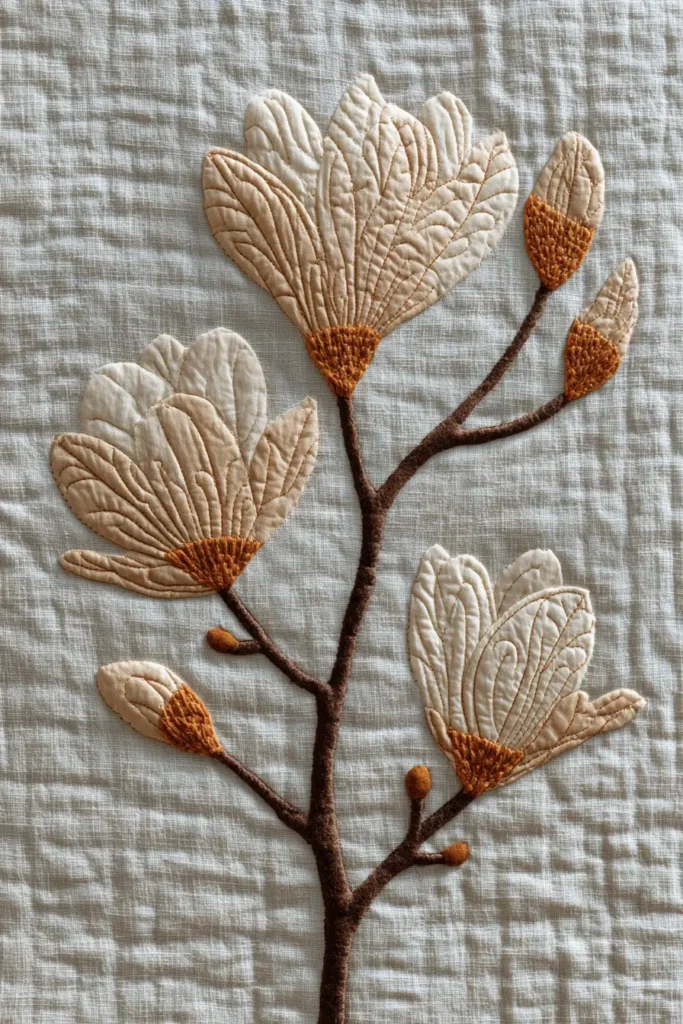
“The Contour Line” Wire Art Quilt
One of the most elegant trends in modern art is the “Single Line Drawing”—a continuous, fluid sketch that forms a face, a flower, or a figure without the pen ever leaving the paper (made famous by artists like Picasso and Matisse). “The Contour Line” translates this aesthetic into fiber art using a technique called Couching. Instead of drawing with ink, you “draw” with a thick Black Cord or Yarn stitched onto a pristine Canvas or Linen background. The result is a tactile, 3D “wire sculpture” that hangs softly on the wall.
Finished Dimensions: Gallery Wall Size, 18″ x 24″ (Fits standard poster frames).
Materials Needed:
- Fabric A (Canvas): 1 yard of Heavy White Cotton Duck, Natural Linen, or Drop Cloth. (Needs structure to support the cord).
- The “Ink” (Cord): 3 yards of Black Macramé Cord (3mm), Chunky Wool Yarn, or Black Bias Tape (1/4 inch).
- Choice: Cord creates a raised, 3D texture. Bias tape looks flatter, like bold marker ink.
- Stabilizer: Tear-Away Stabilizer (placed behind the canvas to prevent puckering).
- Thread: Black Thread (to match the cord) and invisible thread.
- Mounting: An 18″ x 24″ Artist’s Canvas Stretcher Frame (wooden bars).
Cultural Backstory: The “Continuous Line” exercise is a staple of art school, designed to force the artist to look at the subject rather than the paper. In the mid-20th century, wire sculptures by Alexander Calder brought this concept into 3D space. This quilt pattern mimics that “wire in air” look, adding a sophisticated, gallery-quality vibe to a fabric wall hanging.
Step 1: Drafting the “One Line”
You are the artist. Keep it simple.
- Sketch: On a large piece of paper (or newspaper cut to size), draw your continuous line design.
- Ideas: A silhouette of a face, a single large Monstera leaf, or an abstract loop-de-loop.
- Rule: The lines should never cross over themselves too thickly, and curves should be gentle enough to sew.
- Refine: Go over your final line with a thick marker to see how it looks.
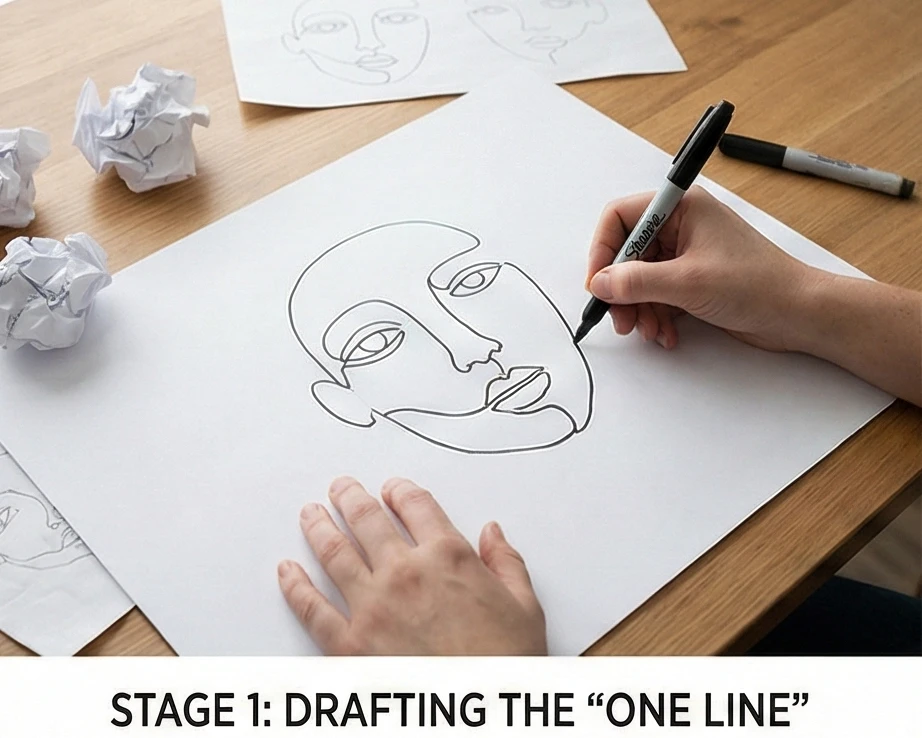
Step 2: Transferring the Ghost Line
You need a guide to stitch on.
- Light Box Method: Tape your drawing to a bright window. Tape your Canvas fabric over it.
- Trace: Use a Water-Soluble Pen or Chalk Pencil to lightly trace the line onto the fabric.
- Tip: Do not use a permanent marker! If your cord shifts, the line will show.
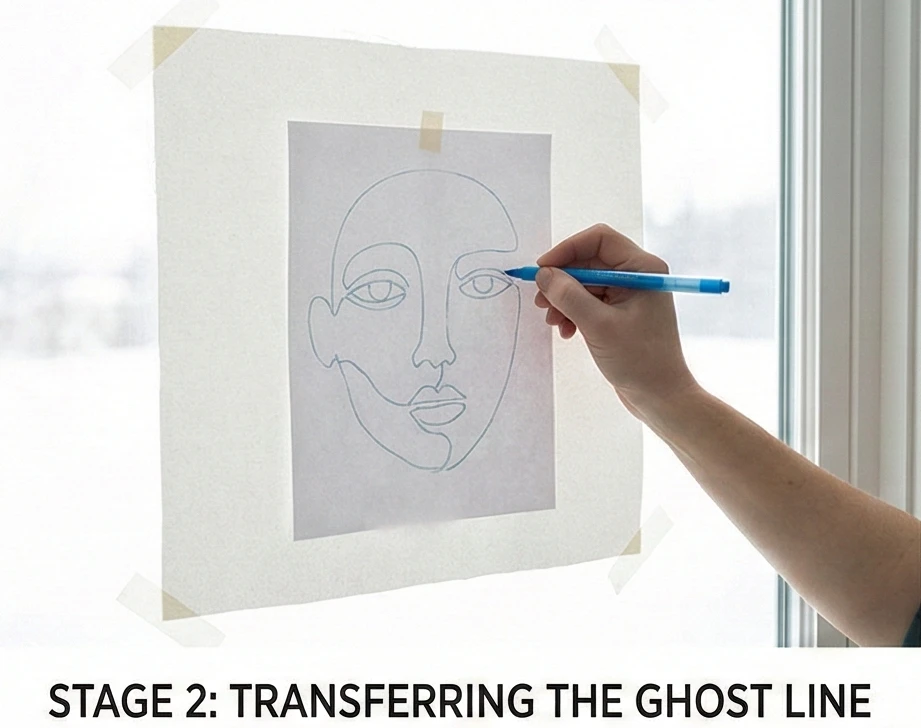
Step 3: Setting Up for Couching
Couching is the process of sewing a cord onto the surface of fabric.
- Stabilize: Pin a layer of Tear-Away Stabilizer to the back of your canvas, directly behind the design area. This prevents the heavy cord from tunneling or puckering the fabric.
- Machine Setup:
- Foot: Use a Couching Foot (if you have one), an Open Toe Foot, or a Zipper Foot.
- Stitch: Set your machine to a Zigzag Stitch.
- Width: The width of the zigzag must be slightly wider than your cord (e.g., 3.5mm for a 3mm cord).
- Thread: Load Black Thread in the top and bobbin.

Step 4: Drawing with Thread
The slow, meditative part.
- Start: Poke the end of your black cord through to the back of the canvas using a large needle (or leave a tail to bury later).
- Stitch: Place the cord over your traced line. Zigzag stitch over the cord.
- Technique: The needle should swing left (into the fabric), jump over the cord, and swing right (into the fabric). It encases the cord without piercing it.
- Curves: When you hit a curve, stop with the needle down (on the outside of the curve), lift the presser foot, pivot the fabric slightly, and continue. Go slow!
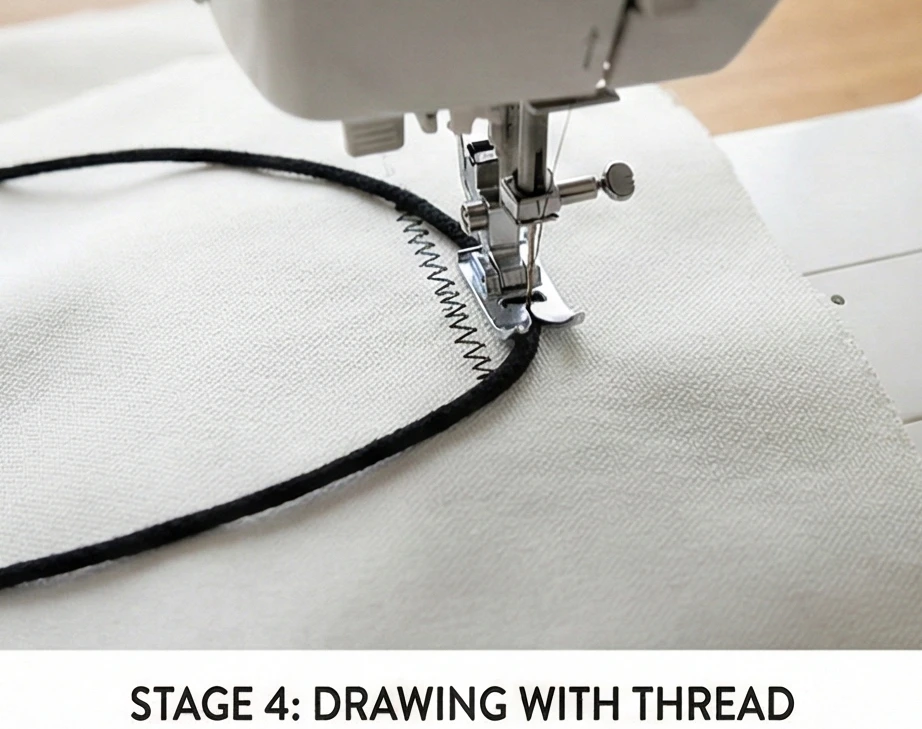
Step 5: Burrying the Ends
Clean starts and stops are essential.
- Finish: When you reach the end of the line, stop stitching.
- Bury: Thread the tail of the cord onto a large tapestry needle. Poke it through to the back of the canvas.
- Secure: On the back, knot the cord tails securely or stitch them down flat to prevent a lump.
- Clean Up: Tear away the stabilizer from the back. Dab the front with water to remove the blue tracing pen marks.
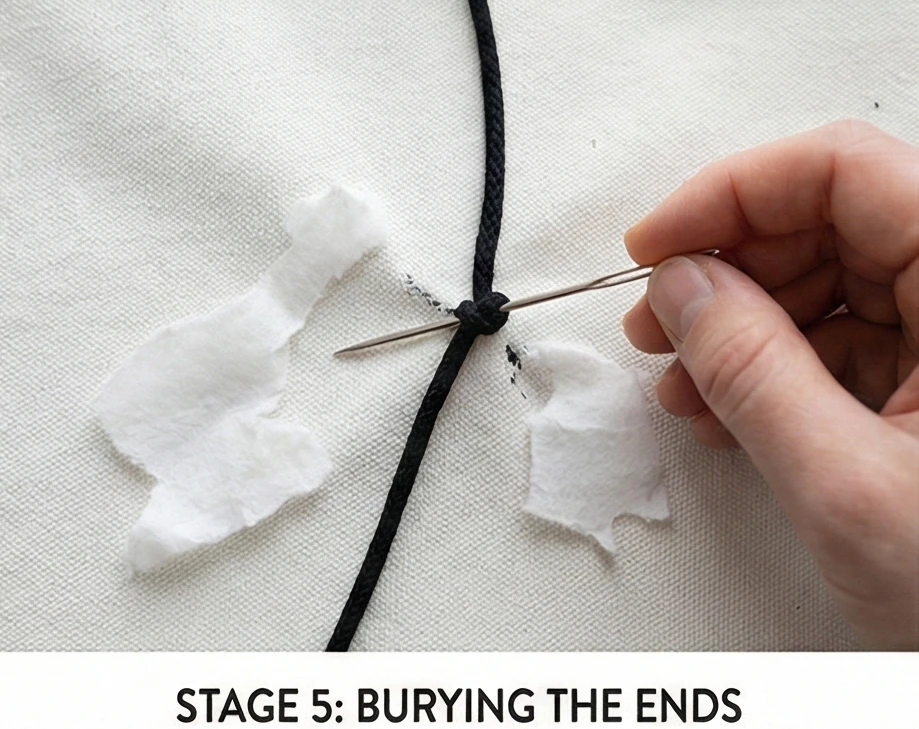
Step 6: The “Gallery Wrap” Mounting
Do not bind this quilt. It looks best stretched.
- Stretcher Bars: Buy a standard wooden canvas frame (18″ x 24″) from an art supply store.
- Stretch: Lay your fabric face down. Place the wooden frame on top.
- Staple: Pull the fabric taut around the wood bars and staple it to the back (as if stretching a painting).
- Corners: Fold corners neatly (hospital corners) to achieve a sharp edge.
- Result: A taut, modern textile art piece that pops off the wall, with no distracting frame or binding.
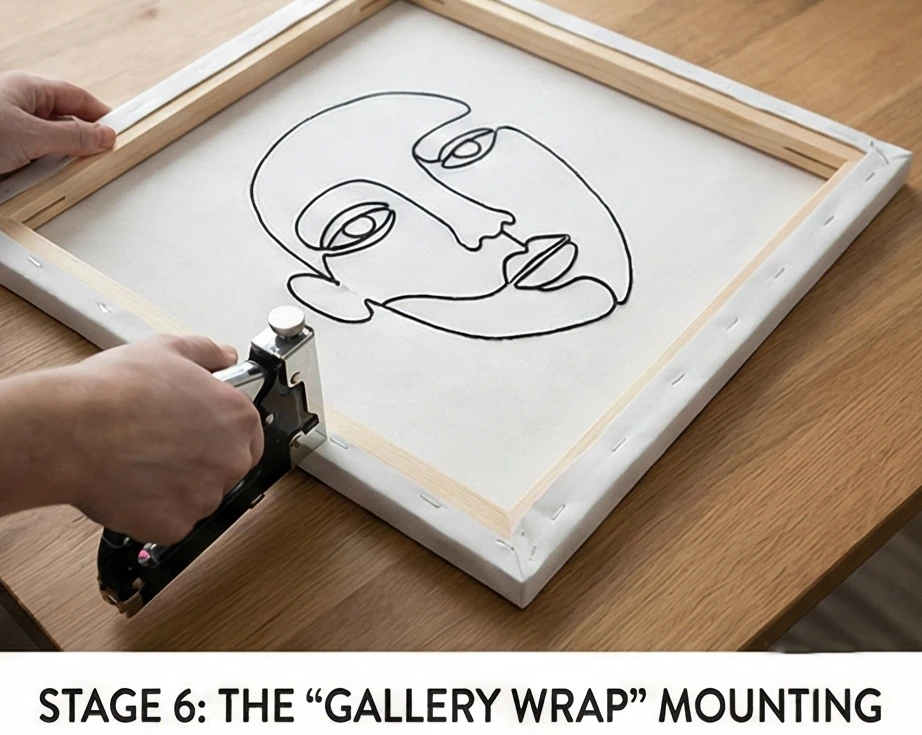
Usability Note: If you don’t want to use a wooden frame, you can quilt this normally (add batting and backing, quilt the negative space with white thread) and bind it. However, the heavy cord creates significant drag, so a “stretched canvas” mount usually hangs straighter and appears more high-end.
Conclusion
Embracing these 20 Modern Quilt Pattern Ideas allows you to curate a home that is visually striking yet deeply inviting. By choosing designs like Contemporary Log Cabin Variations or Asymmetrical Strip Table Toppers, you are breaking the rules of tradition to suit a lifestyle that values both form and function. These pieces bridge stark modern architecture with the need for soft, livable warmth, demonstrating that a High-Contrast Cushion Cover or a Sleek Solid Color Whole Cloth Quilt can completely transform a room’s mood.
The true beauty of this collection lies in its versatility and the creative freedom it offers. Whether you are stitching a Large-Scale Block Pattern for a quick weekend finish or meticulously planning an Improv Piecing Wall Hanging, modern quilting encourages you to play with structure and color. It demonstrates that you don’t need complex, intricate seams to make a statement; often, the power lies in bold choices, such as using Abstract Art Inspired Chair Pads to modernize a dining set or Durable Denim for a family-friendly throw that doesn’t sacrifice style.
Ultimately, a modern home should never feel cold or sterile. By layering these handmade textiles throughout your space, you infuse personality and tactile comfort into every room. Let these patterns inspire you to sew with a fresh perspective, creating a sanctuary that is not only “Sleek & Sophisticated” but also a true reflection of your unique, contemporary spirit. These are not just quilts; they are soft, stylish anchors for a life well-lived.
