
20 Outdoor Christmas Lighting Ideas: Illuminate Your Home’s Exterior with Magic
Outdoor Christmas Lighting Ideas are the ultimate way to turn your home into a breathtaking holiday beacon that stops neighbors in their tracks and fills every evening with pure seasonal magic. From classic warm-white rooflines to dazzling meteor showers and animated reindeer displays, the right lights transform ordinary exteriors into glowing winter wonderlands that spread joy from the driveway to the rooftop. In 2025, searches for stunning outdoor Christmas lights are skyrocketing as families compete to create the season’s most magical curb appeal.
Nothing captures the spirit of Christmas quite like a house wrapped in twinkling lights. Whether you love timeless C9 bulbs, modern bright color-changing LEDs, or whimsical laser snowflake projectors, these ideas blend tradition with trending styles to suit every home—from cozy cottages to contemporary estates. Picture your trees sparkling like starlit forests, your pathway lined with candy canes, and your roof dripping with cascading icicles—these are the displays that make memories and become neighborhood legends.
This collection of 20 outdoor Christmas lighting ideas brings together the year’s most popular, highly pinned, and most-searched trends. Easy to install, energy-efficient, and designed for maximum wow-factor, they’ll help you illuminate your home with festive grandeur while keeping safety and style in mind. Get ready to make your house the brightest (and most beautiful) on the block this holiday season!
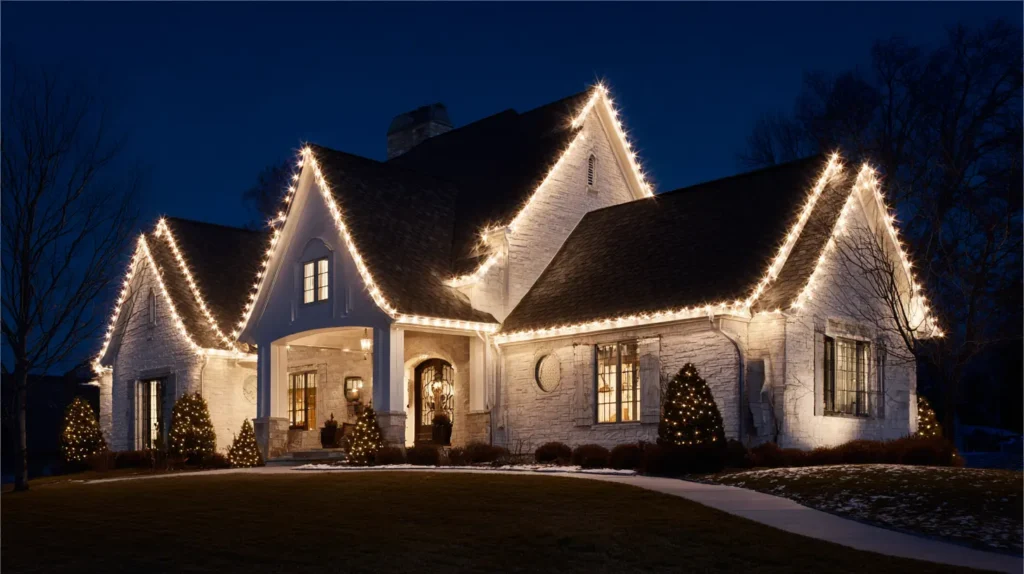
1. Classic Warm White C9 Roofline Lights for a Timeless Glow
Contents
- 1 1. Classic Warm White C9 Roofline Lights for a Timeless Glow
- 2 2. Dazzling Multicolor LED Roofline and Net Light Displays
- 3 3. Meteor Shower and Cascading Icicle Lights for Gutters and Roof Edges
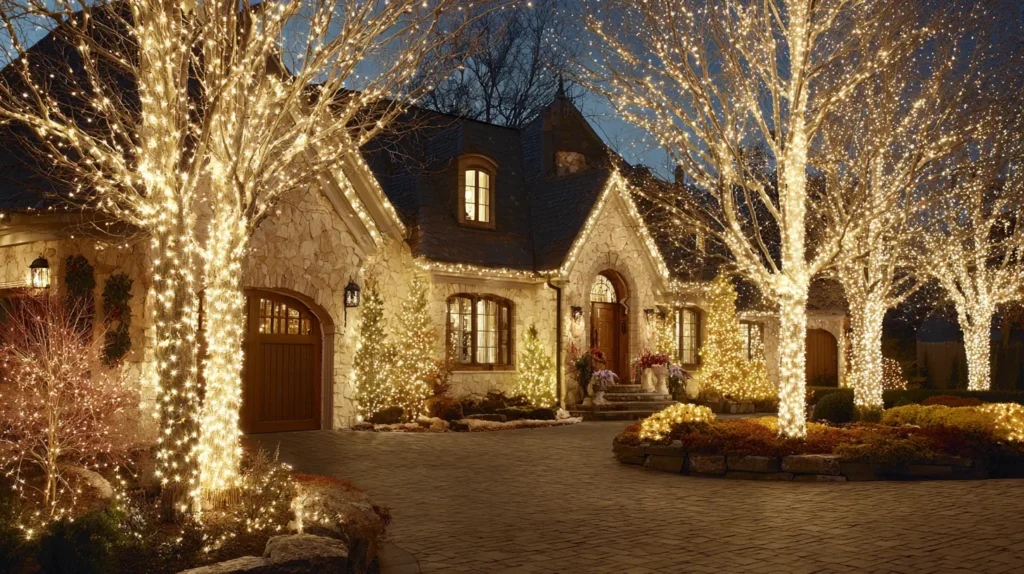
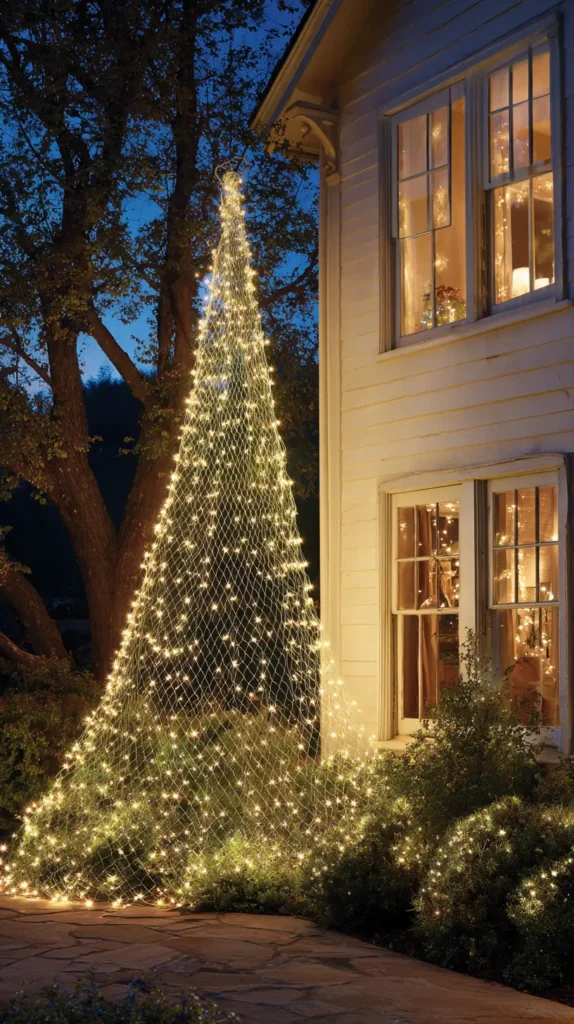
- 4 4. Wrapped Tree Trunks and Branch Lighting for Outdoor Trees
- 5 5. Laser or Projector Snowflake Light Show for Instant Outdoor Magic
- 6 6. Elegant Pathway Lighting with Starburst and Candle Effect Stakes
- 7 7. Lighted Garland Archways for Entryways and Driveways
- 8 8. Outlining Windows and Doors with Sparkling String Lights
- 9 9. Smart Color-Changing LED Lights for Modern Christmas Displays
- 10 10. Animated Lighted Reindeer, Santa, and Sleigh Yard Figures
- 11 11. Pathway Lanterns and Candle-Style Outdoor Lighting for Cozy Warmth
- 12 12. Retro Multicolor C9 or Ceramic Bulb Strands for Nostalgic Charm
- 13 13. Easy Net Lights for Bushes, Hedges, and Garden Shrubs
- 14 14. Architectural Uplighting for Columns, Bushes, and Home Features
- 15 15. Starburst, Firework, and Sparkler-Style Outdoor Christmas Lights
- 16 16. Outdoor Nativity and Religious Light Displays for Traditional Charm
- 17 17. Dramatic Curtain Lights for Windows and Porch Walls
- 18 18. Candy Cane or Red-and-White Pathway Lights for Holiday Walkways
- 19 19. Illuminated Christmas Wreaths or Giant Lit Bows on Doors and Windows
- 20 20. Modern Farmhouse Lighting with Edison Bulbs and Black Wire
- 21 Conclusion
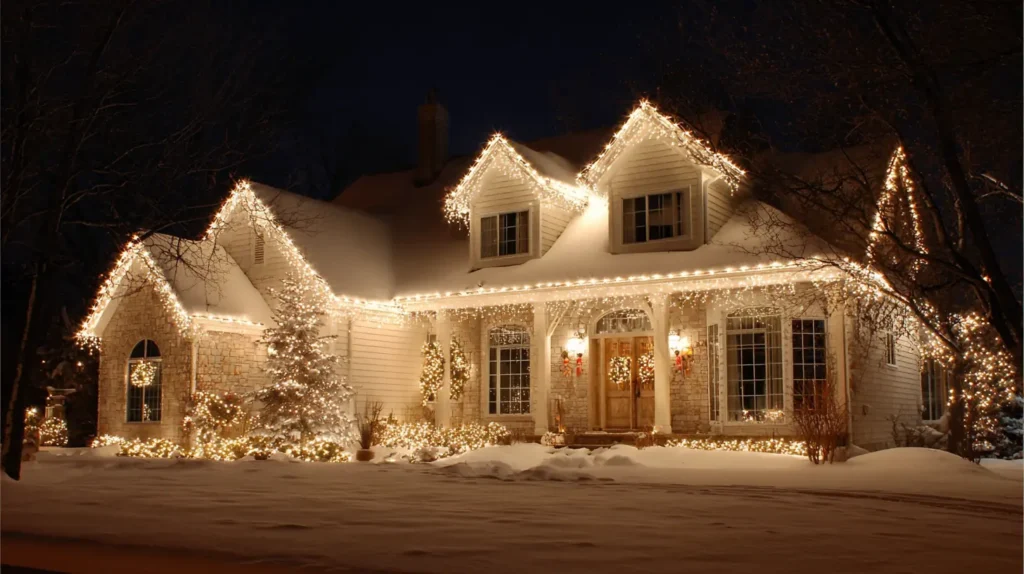
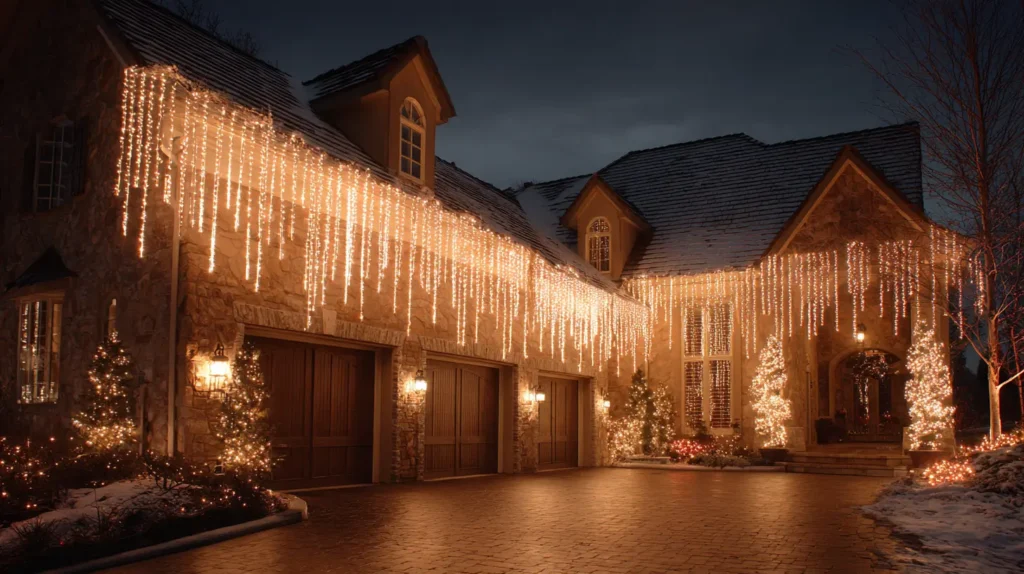
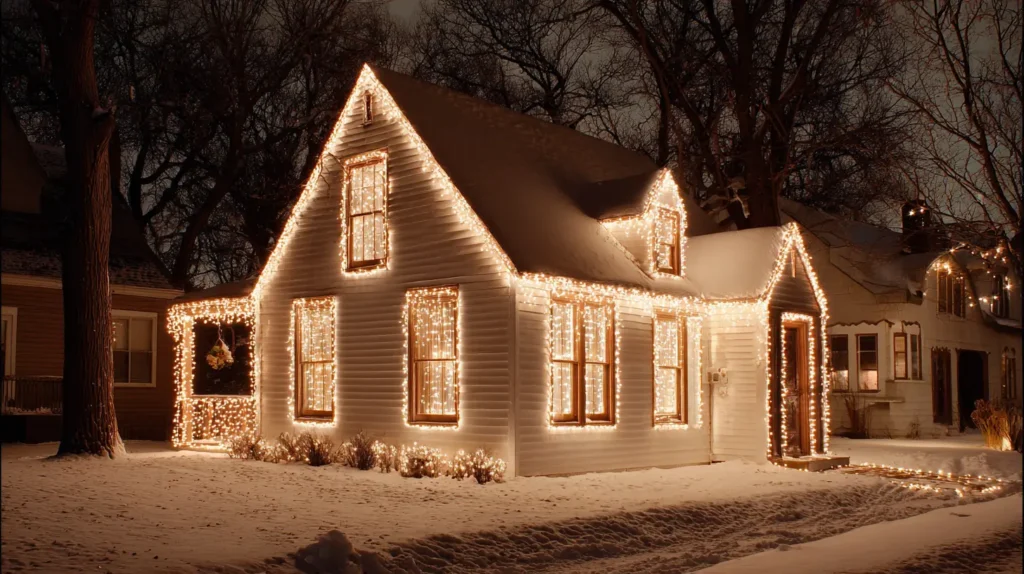
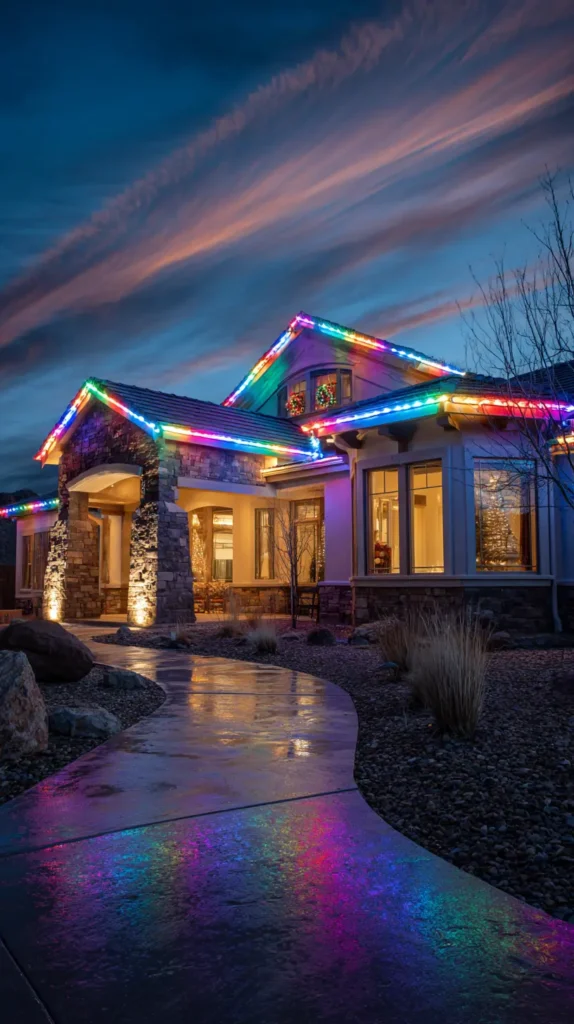
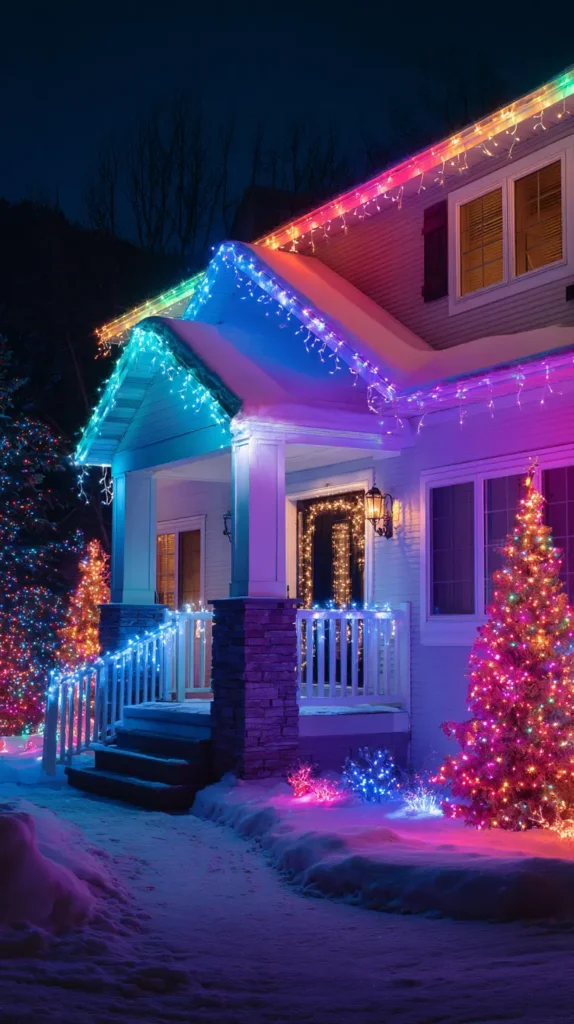
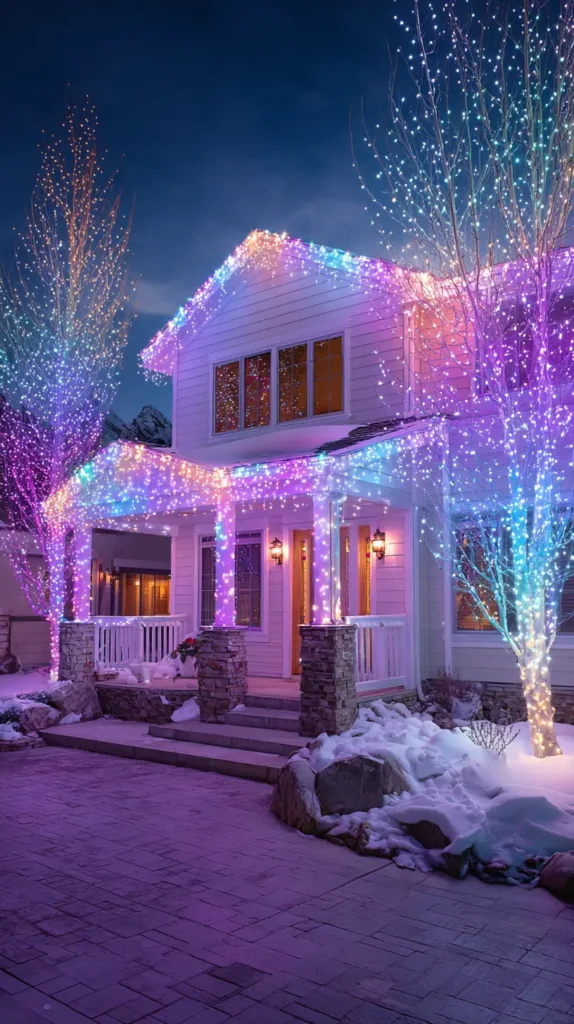
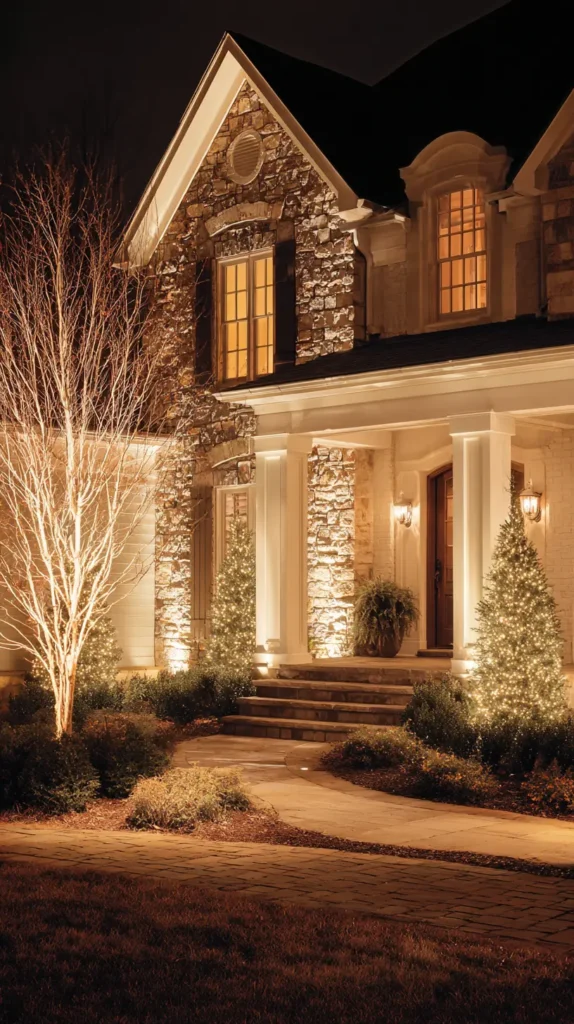
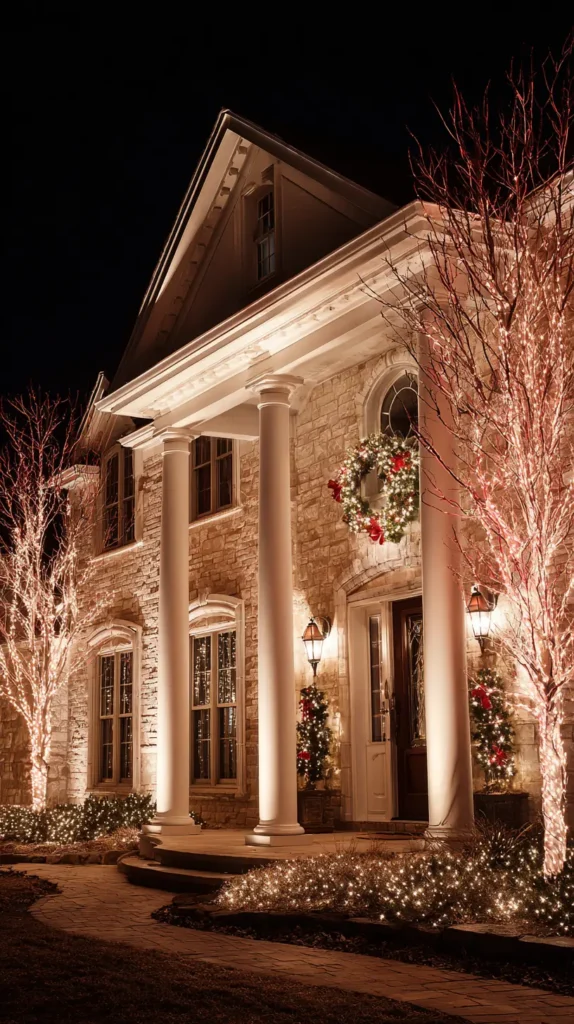
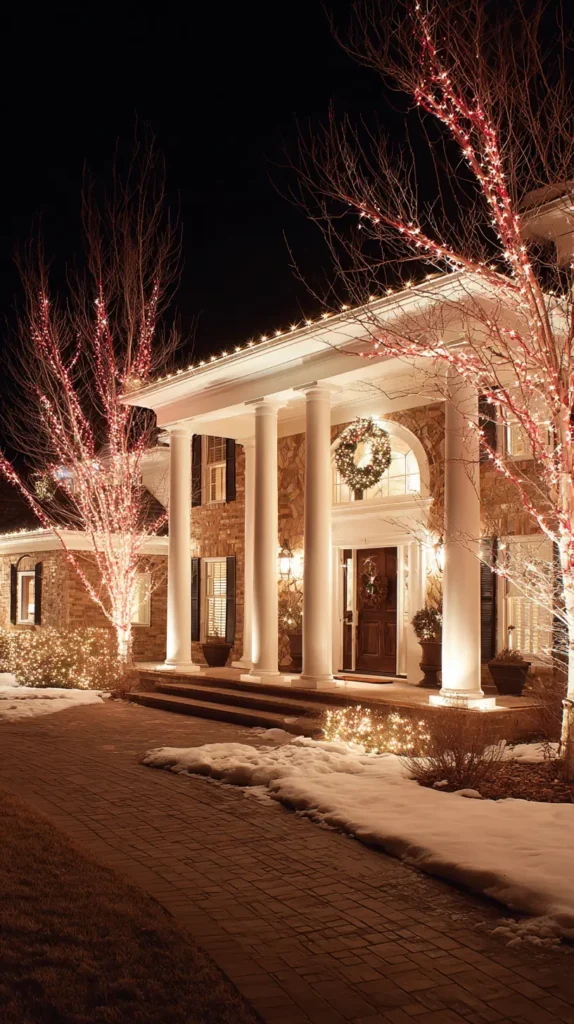
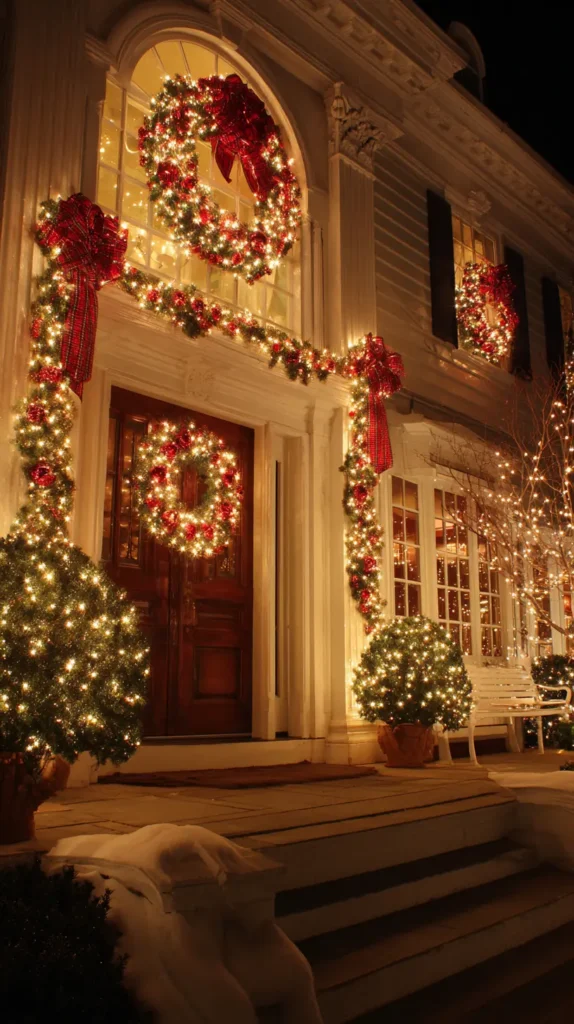
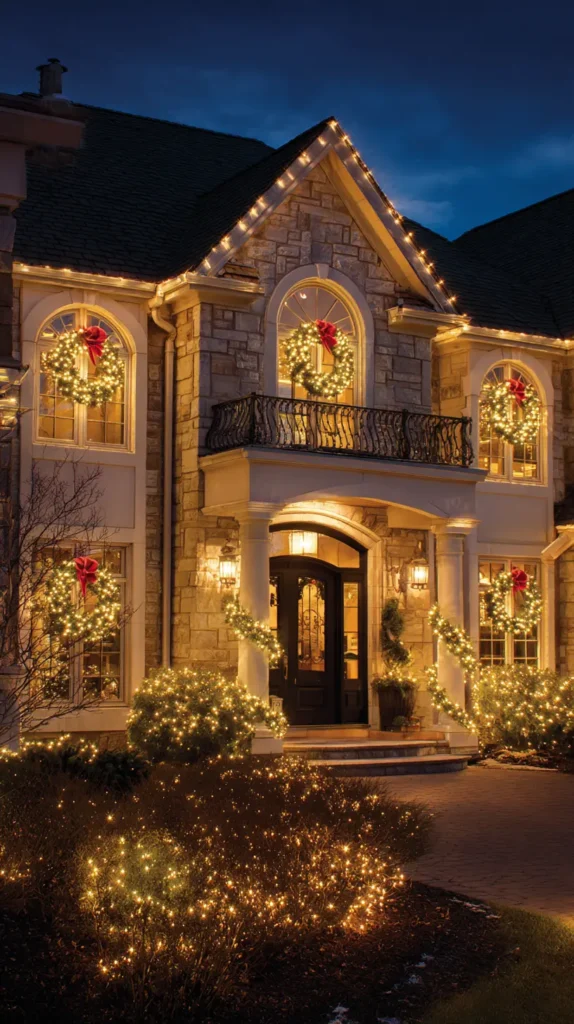
Achieve the quintessential “gingerbread house” look by outlining your home’s architecture with large, nostalgic C9 bulbs. Imagine driving down a dark street and seeing a home defined by crisp, clean lines of light that trace every peak, gable, and gutter. Unlike the tiny “twinkle” lights used on trees, these bulbous, oversized lights cast a substantial, warm amber glow that reads clearly from a distance. The aesthetic is orderly, elegant, and instantly comforting, recalling the traditional holiday displays of the mid-20th century but updated with modern energy efficiency.
- The “Sun Warm” LED: To get that vintage glass look without the heat or energy bill, choose LEDs labeled “Warm White” or “Sun Warm” (2700K). Avoid “Cool White,” which looks blue and icy.
- Precision Clips: Use plastic shingle tabs or gutter clips to ensure every single bulb points in the exact same direction (usually straight up or straight out). This uniformity is the secret to a professional look.
- 12-Inch Spacing: For rooflines, buy strands with bulbs spaced 12 inches apart. This prevents the display from looking cluttered and highlights the architecture perfectly.
- Outline Everything: Don’t just do the gutters. Trace the peaks (the triangle parts of the roof) and the sides of the house to create a complete frame.
- Timer Control: Use an outdoor smart plug to automate the schedule so your house lights up exactly at sunset every day.
Pro Design Tip: Extend the symmetry to the ground. Use “light stakes” to line your walkway or driveway with the exact same C9 warm white bulbs used on the roof. This creates a mirrored “runway” effect that guides guests to your door and balances the roof’s brightness.
Budget Consideration: C9 strands can be an investment. To save money, focus only on the peaks and the front-facing rooflines. You can skip the sides of the house or the back gutters that aren’t visible from the street, and the display will still look full and complete from the curb.
Other Related Interesting Ideas …
Lighting is the jewelry of your home’s exterior. It is the most critical element for highlighting your 20 Front Porch Christmas Decor Ideas: Welcoming Holiday Entryways for Guests and ensuring safety. Good lighting creates a warm atmosphere for 20 Patio Christmas Decor Ideas to Create a Winter Wonderland Outdoors. It also allows your neighbors to appreciate your 20 Christmas Window Decoration Ideas: Captivating Ideas for Inside and Out from the street. Whether you are wrapping trees or lining pathways, these lights are the foundation of all 20 Outdoor Christmas Decor Ideas: Holiday Gatherings with Charm.
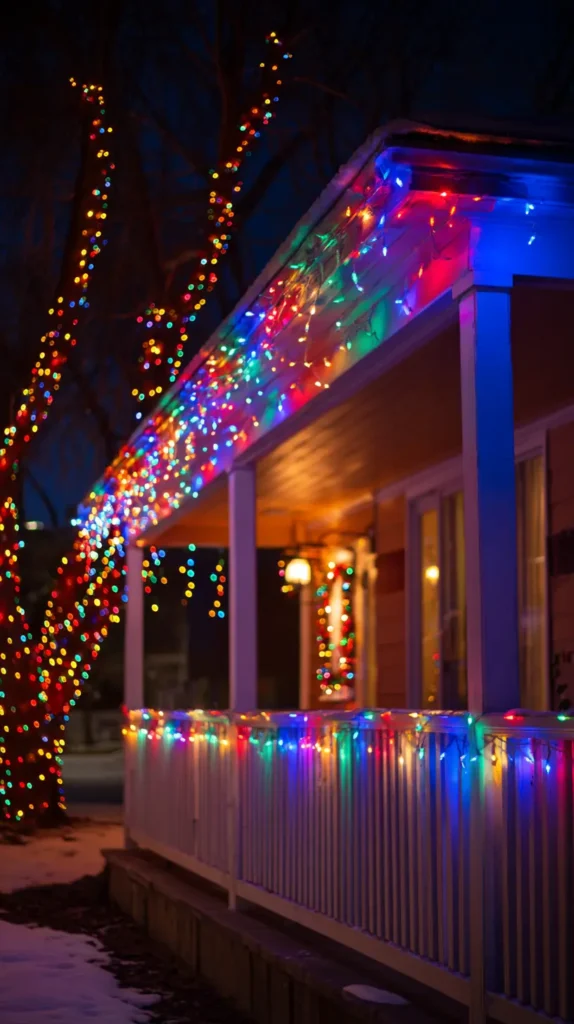
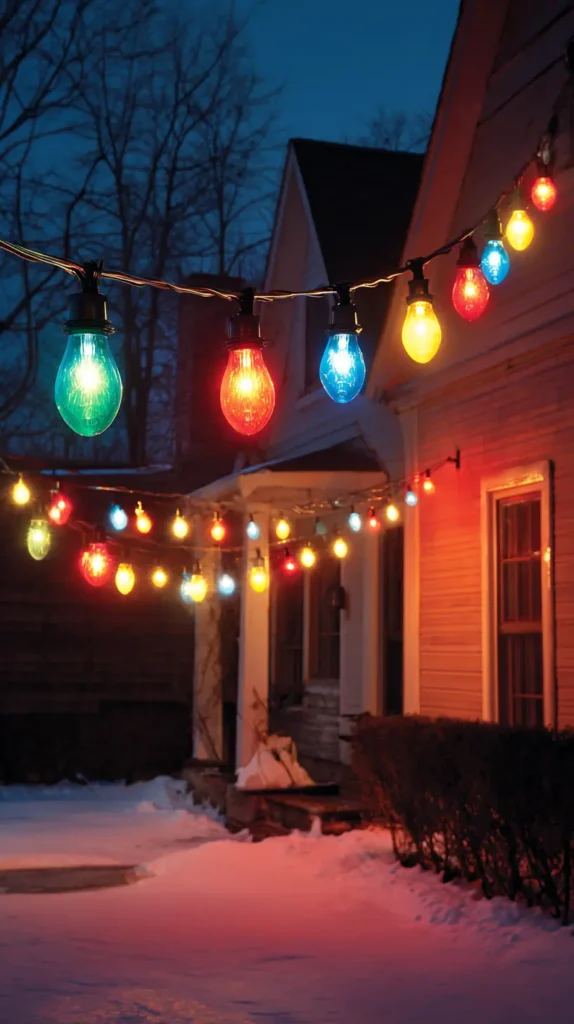
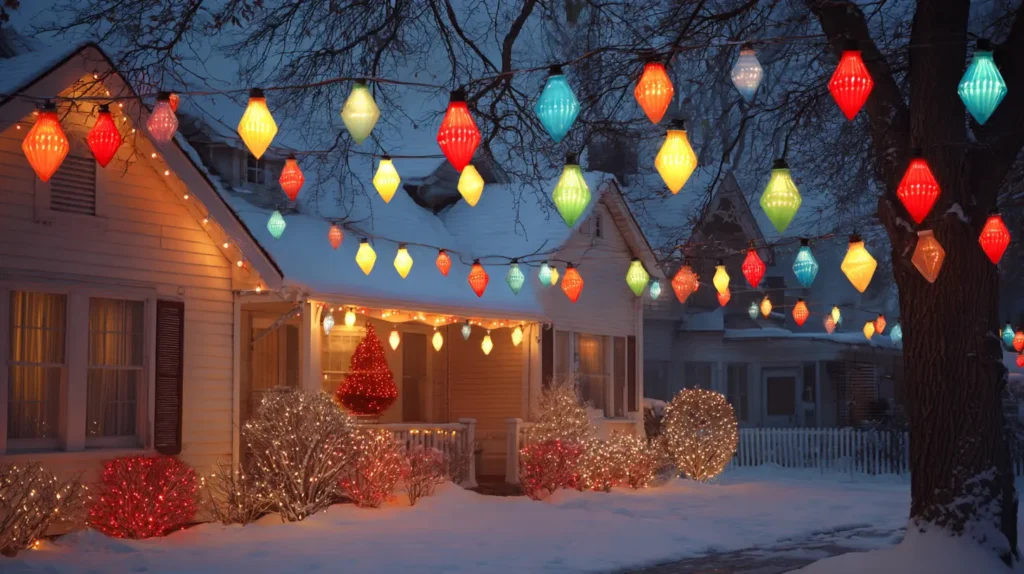
2. Dazzling Multicolor LED Roofline and Net Light Displays
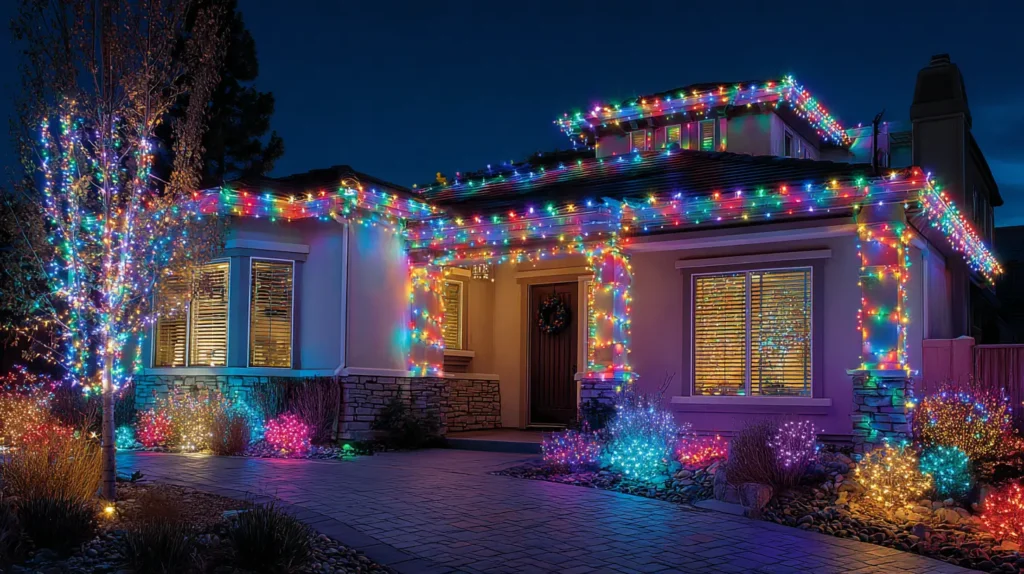
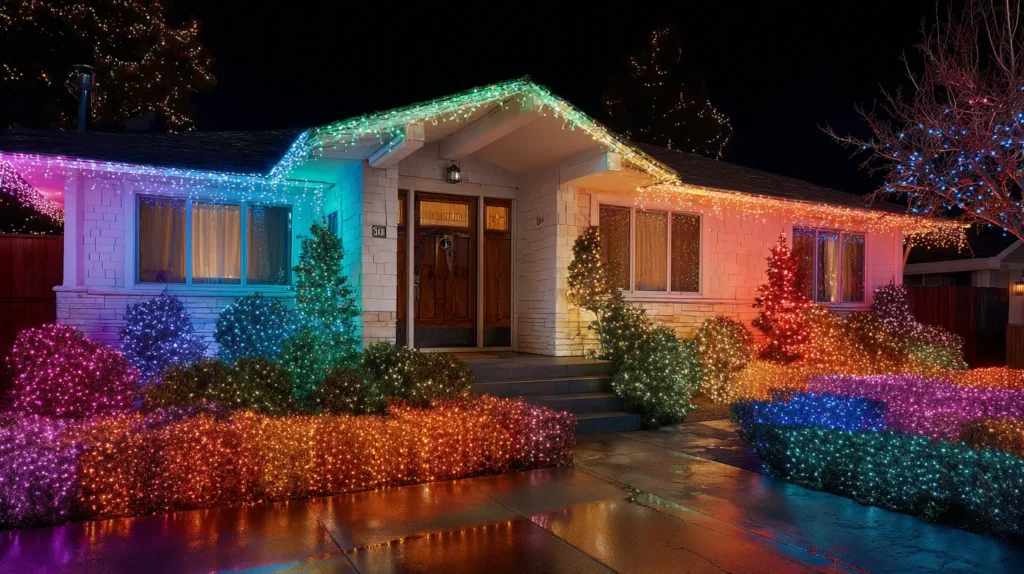
Inject a massive dose of childhood joy and Technicolor vibrancy into your neighborhood with a bold, multicolored lighting scheme. Imagine your roofline traced in oversized, faceted C9 bulbs glowing in saturated jewel tones of ruby red, sapphire blue, emerald green, and bright orange. Below, the landscaping joins the party: your hedges and shrubs are draped in matching multicolor net lights, creating a perfectly uniform “blanket” of color that eliminates dark spots. This high-energy aesthetic is unapologetically festive, turning your home into a kaleidoscopic beacon of cheer that captures the season’s fun, playful spirit better than any white-light display ever could.
- The Grid Advantage: Net lights are the secret to professional-looking bushes. They provide a perfect grid pattern, ensuring lights are evenly spaced without the hassle of wrapping individual branches.
- Match the Bulb Style: If you use faceted (diamond-cut) bulbs on the roof, ensure your net lights also have faceted bulbs. This consistency makes the lights sparkle in the same way.
- Connect the Levels: Use the same color palette for the roof and the ground. If your roof has pink/purple/teal, ensure your bushes do too, tying the house and garden together visually.
- Measure Twice: Measure your bushes before buying nets (e.g., 4×6 feet). You want the net to drape over the sides of the bush, not just sit flat on top.
- LED Vibrancy: Choose LEDs over incandescent. LED colors are pure and saturated (true blue, not pale blue), and they won’t burn out your bushes or spike your electric bill.
Pro Design Tip: Add a controller box or smart plug with “effects.” Set your roofline and net lights to a slow “fade” or “twinkle” setting. The gentle movement of the colors creates a mesmerizing, living light show that feels much more magical than a static display.
Budget Consideration: Net lights are a huge money- and time-saver. One standard net light set instantly covers a large bush. Trying to achieve the same light density by wrapping the bush with standard string lights would require 3–4 individual strands and an hour of labor.
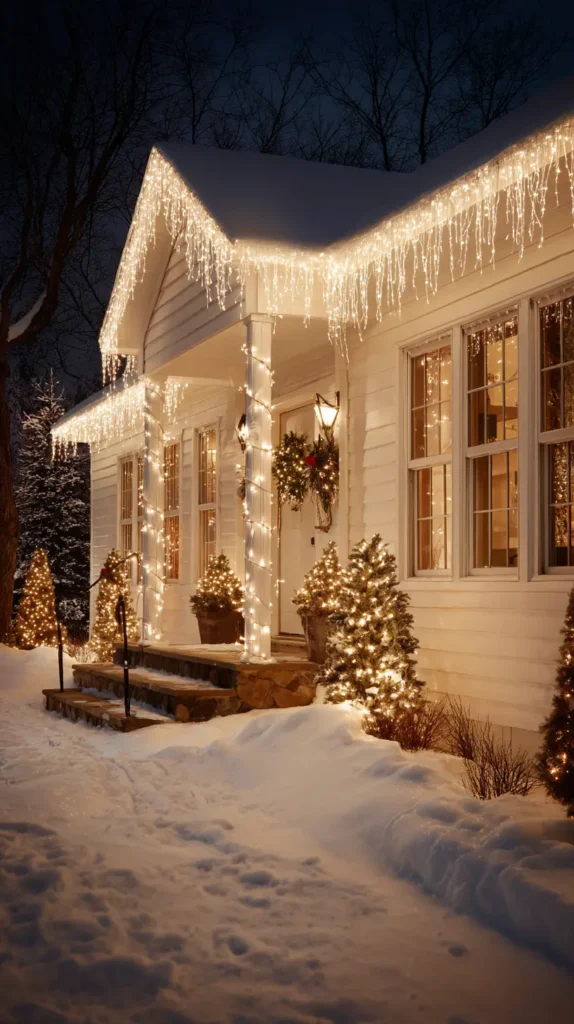
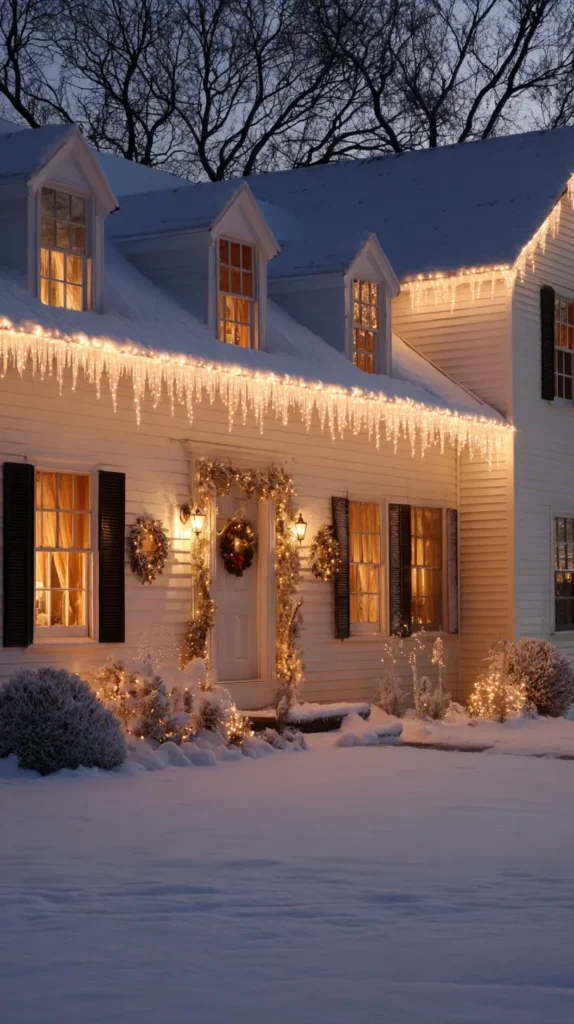
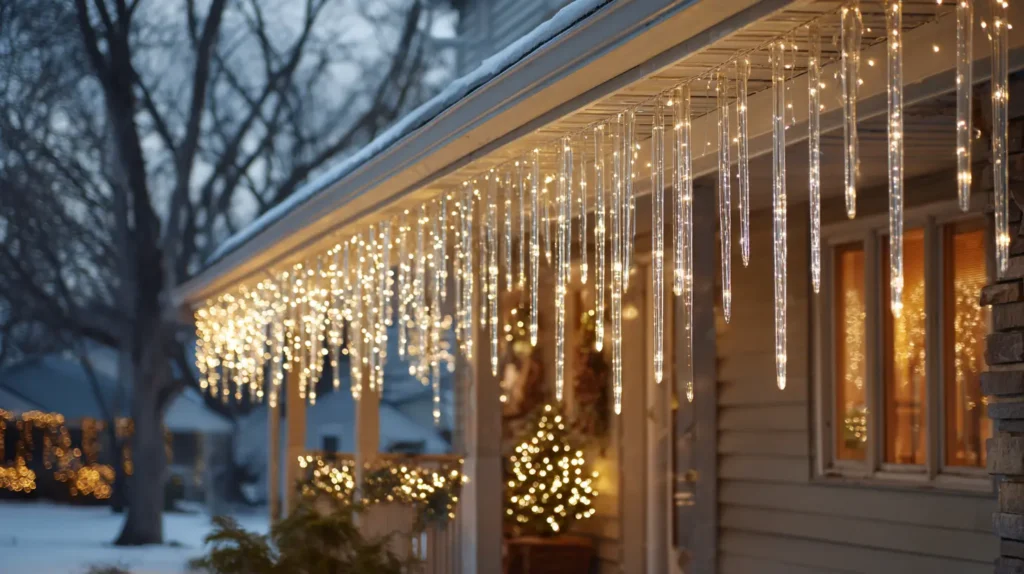
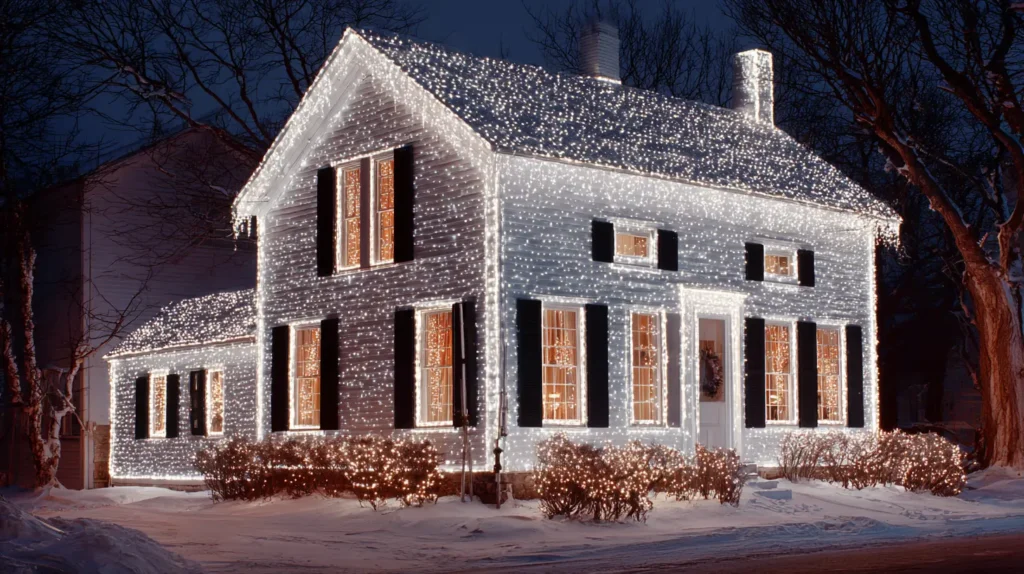
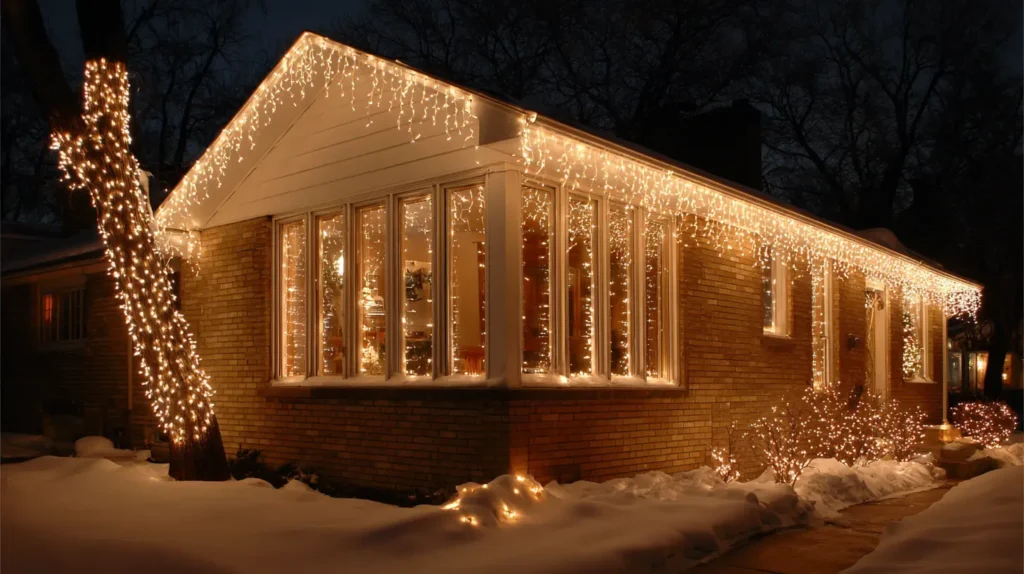
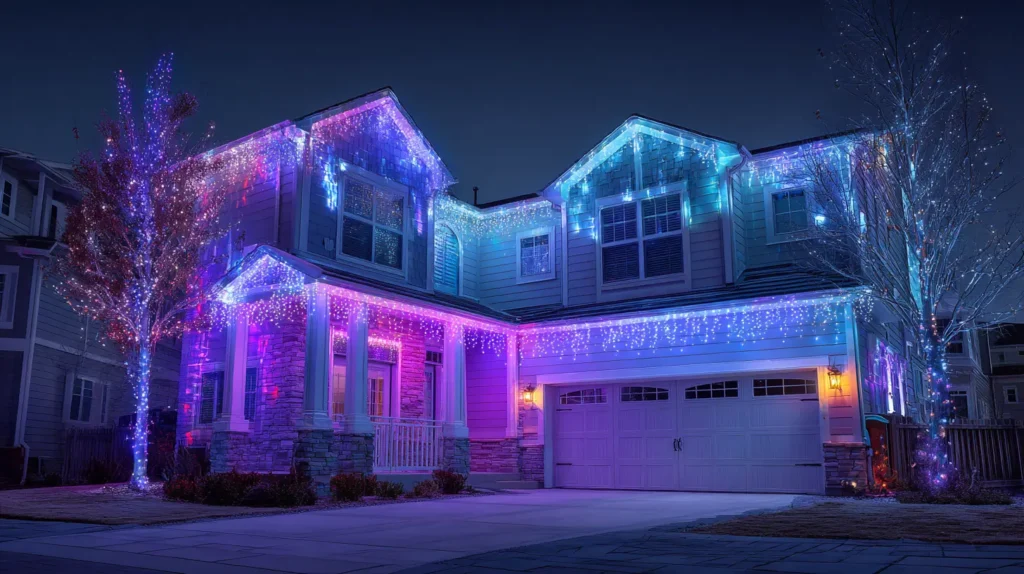
3. Meteor Shower and Cascading Icicle Lights for Gutters and Roof Edges

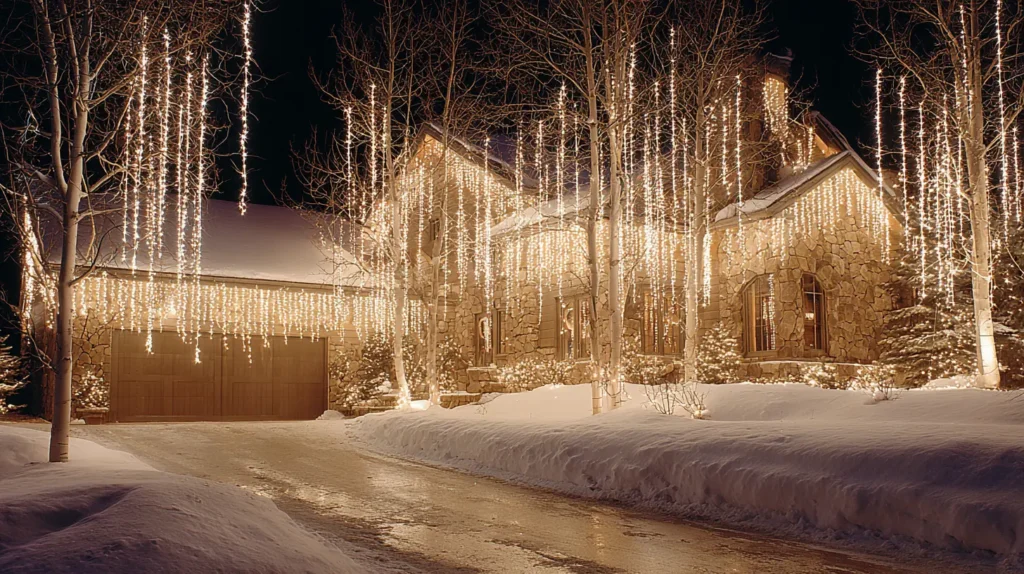
Transform your static roofline into a mesmerizing, kinetic display that captures the magic of a falling snowstorm. Imagine your gutters lined with dense strands of traditional icicle lights, their jagged drops creating a frozen, glowing fringe that defines the architecture. Interspersed among them—or suspended from the branches of a nearby tree—are “meteor shower” tubes. These cylindrical lights feature LEDs that sequence rapidly downward, creating the illusion of dripping water, falling snow, or shooting stars. This combination of static and dynamic lighting adds a hypnotic rhythm to your display, turning your home’s exterior into a living winter wonderland that demands attention from every passerby.
- The “Straight” Rule: When hanging icicle lights, take them out of the box early and hang them up indoors or lay them flat in the sun to relax the kinks. “Curly” icicles look messy; straight drops look professional.
- Meteor Spacing: Don’t cluster meteor tubes too closely. Space them 18–24 inches apart in a tree or along a roofline to allow the “falling” effect to stand out against the darkness.
- Cool vs. Warm: For a true “ice” look, opt for Cool White LEDs. Their blueish tint more closely mimics the temperature of real snow and ice than warm white.
- Tree Suspension: Hanging meteor tubes vertically from high tree branches creates a stunning “weeping willow” effect of light that extends the height of your display.
- Clip it Right: Use gutter clips that have a secondary hook for icicle lights. This keeps the main wire straight along the gutter lip while allowing the “drops” to hang freely.
Pro Design Tip: The magic of meteor lights lies in randomization. When you first plug them in, they might fall in sync (like a marching band). Leave them running; good quality sets will naturally drift out of sync over a few minutes, creating a natural, chaotic “rainfall” pattern that is far more beautiful and organic than a synchronized pulse.
Budget Consideration: Meteor shower tubes are more expensive per foot than standard lights. To save money, use them as a focal point only. Hang 5-10 tubes in a single focal tree in the front yard, and use standard, inexpensive string lights for the rest of the house. The tree will become the “wow” moment without breaking the bank on the roofline.
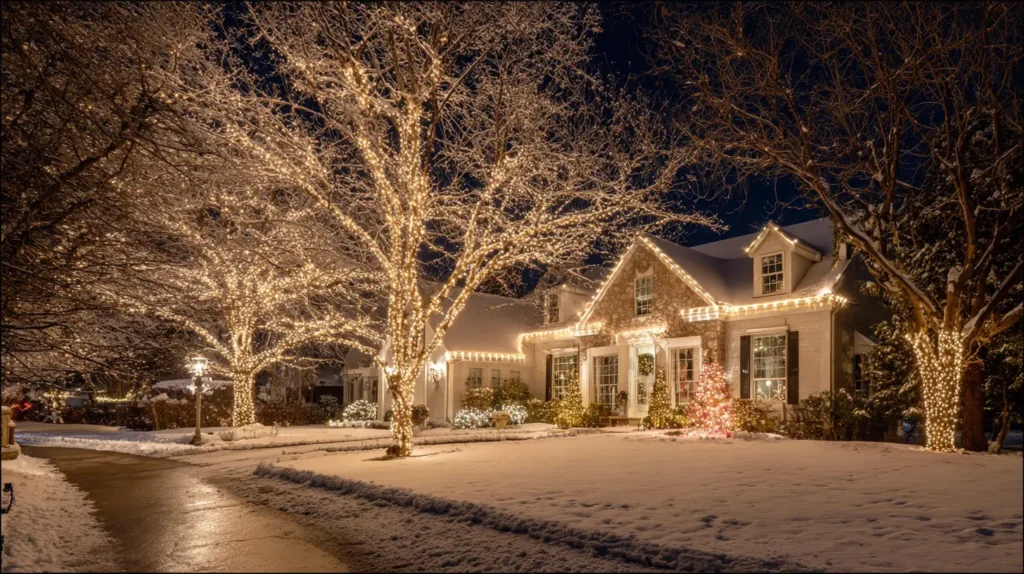
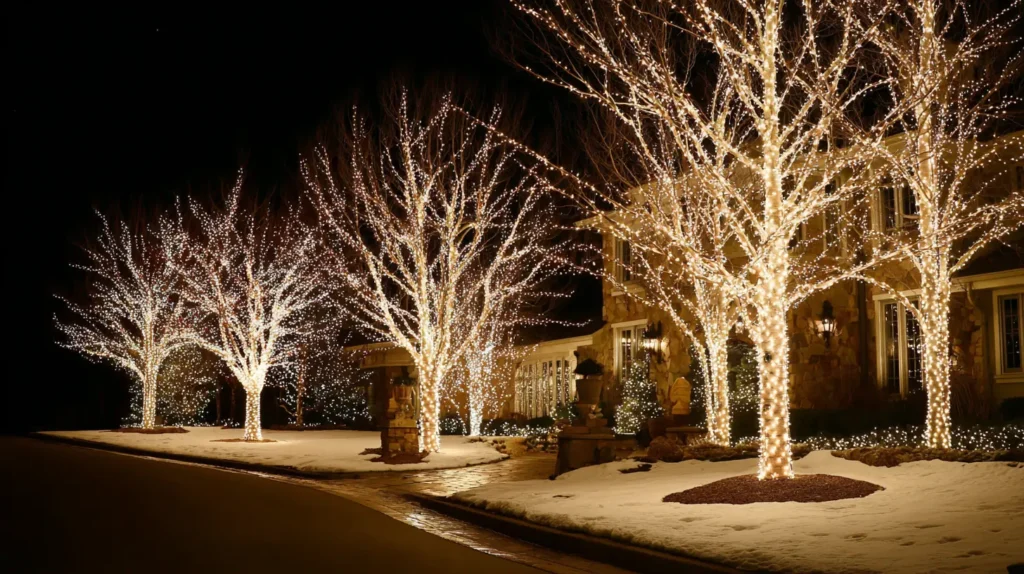
4. Wrapped Tree Trunks and Branch Lighting for Outdoor Trees
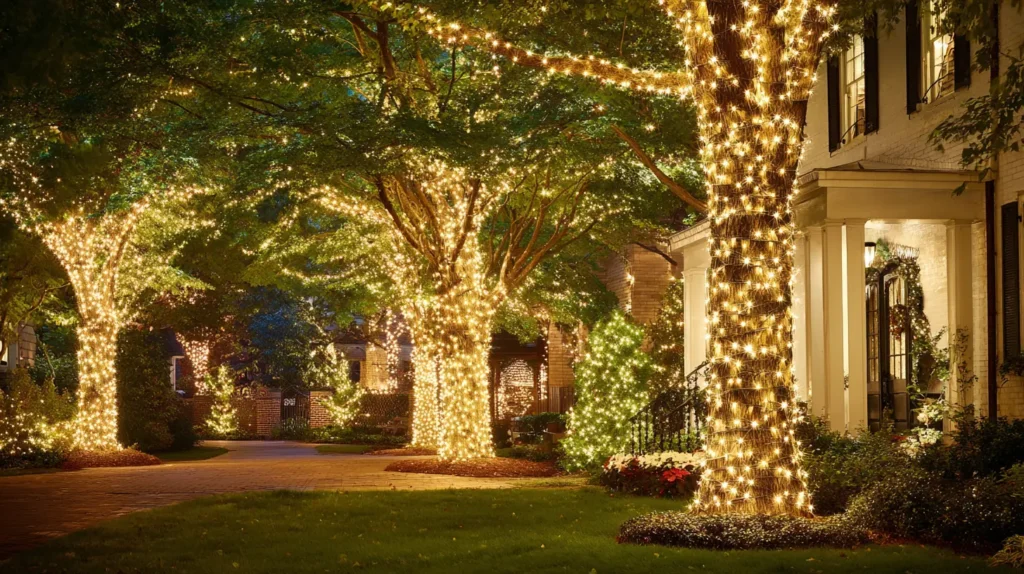
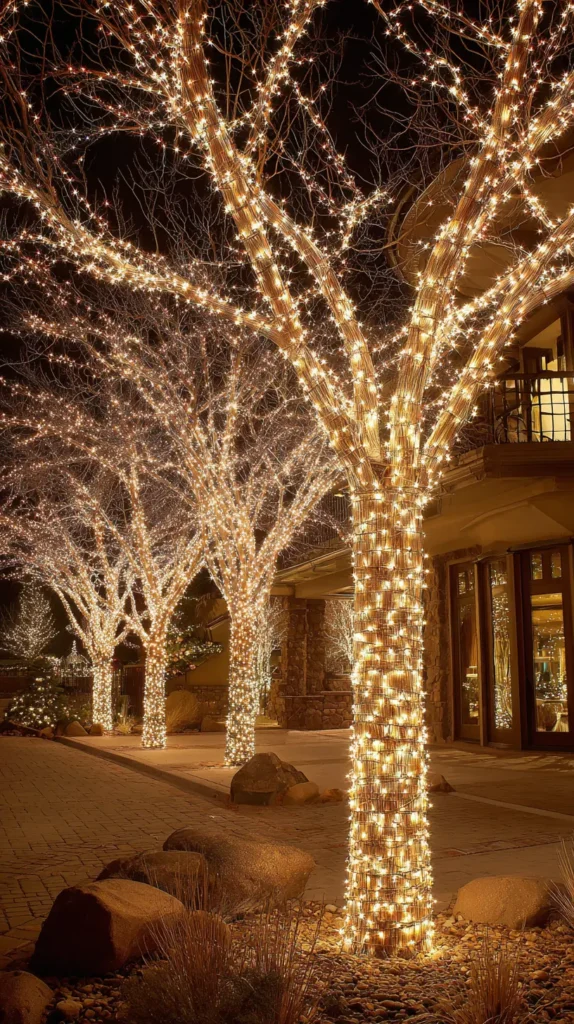
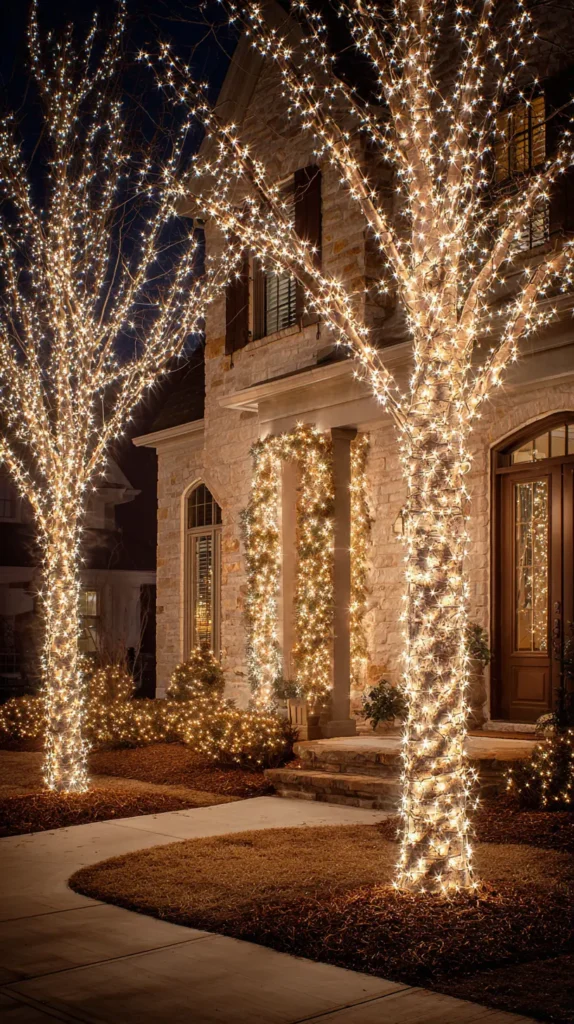
Turn the dormant deciduous trees in your front yard into breathtaking, glowing sculptures that rival a botanical garden display. Imagine the dark, invisible trunks of your oak or maple trees wrapped tightly in thousands of warm-white mini lights, creating pillars of luminescence that rise from the snow. As the lights trace the “Y”- shaped splits of the major branches, the tree’s skeletal architecture is revealed in stunning, graphic detail against the night sky. This technique adds immense depth to your yard, drawing the eye upward and creating a vertical “ceiling” of light that makes your property feel grand and established.
- The “Ball” Technique: Do not walk around the tree with the whole strand. Roll your light string into a tight ball (like yarn) first. It is much easier to pass the ball around the trunk and branches than to drag a tangled wire.
- Spacing is Key: For a professional, high-density look, space the wraps 2 to 3 inches apart. If you want a looser, more casual look, space them 4 to 6 inches apart.
- Bulb Choice: Use 5mm Wide Angle Conical LEDs. These tiny bulbs are virtually unbreakable, made of plastic, stay cool, and disperse light 360 degrees, making them the industry standard for tree wrapping.
- Follow the Structure: Don’t just wrap the trunk. Follow the main trunk up to the first major split, then wrap up one branch and down the other to keep the lines clean and continuous.
- Uniform Height: If wrapping multiple trees along a driveway or sidewalk, stop the lights at the same height on every trunk to create a cohesive “allee” effect.
Pro Design Tip: Use the “Candy Cane” method for removal ease. Instead of wrapping the lights individually around the bark, first secure a vertical strip of wood or a bungee cord to the trunk, then wrap the lights over it. When it’s time to take them down, you remove the strip, and the coil of lights slackens and falls off instantly, saving you hours of unwrapping.
Budget Consideration: Wrapping trees consumes a massive amount of light footage (a large oak can take 20+ strands). To save money, create one “Hero Tree.” Put 80% of your lights into wrapping one spectacular tree perfectly, and leave the others bare or spotlight them with floodlights. One masterpiece looks better than five sparse, poorly lit trees.
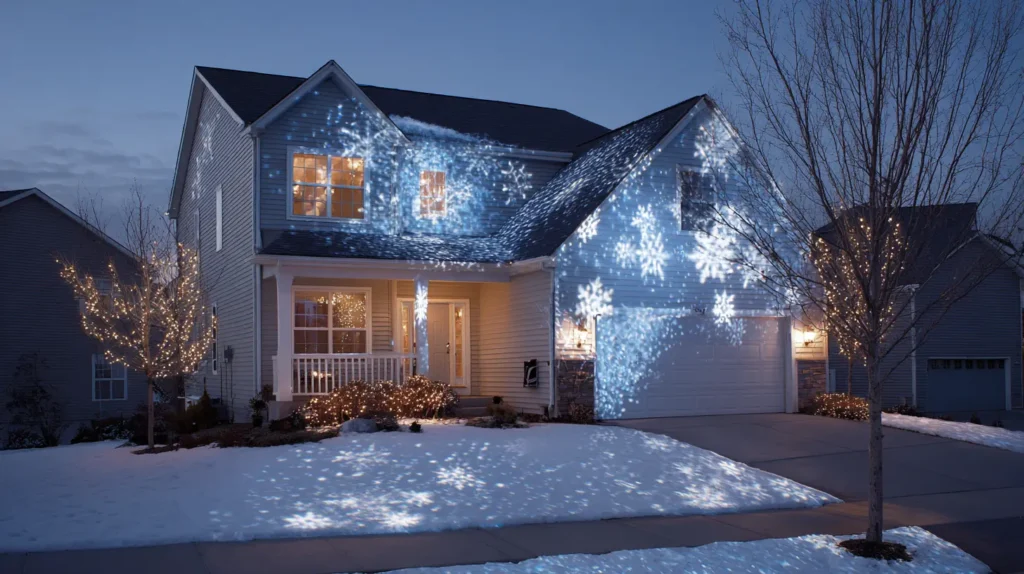
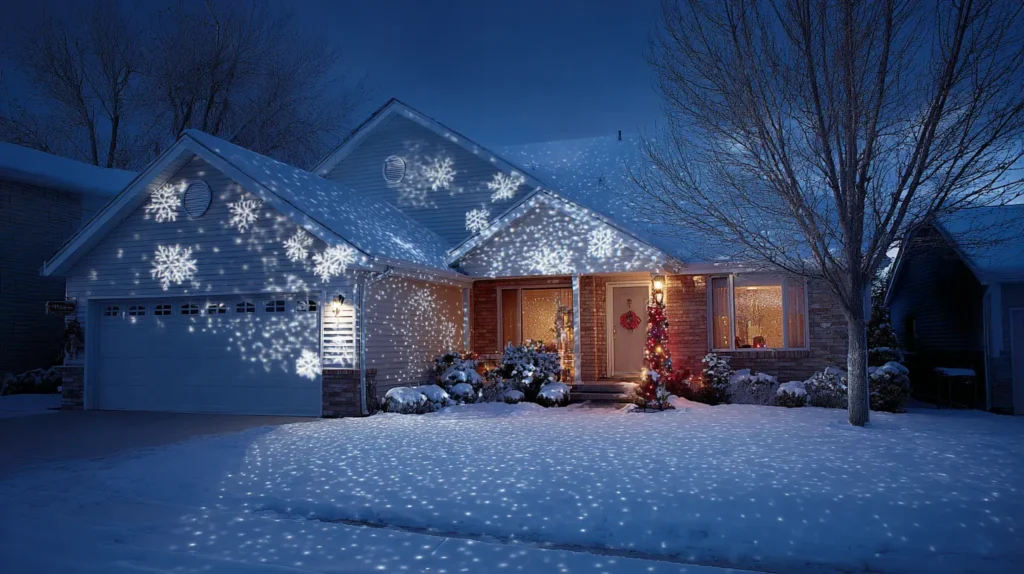
5. Laser or Projector Snowflake Light Show for Instant Outdoor Magic
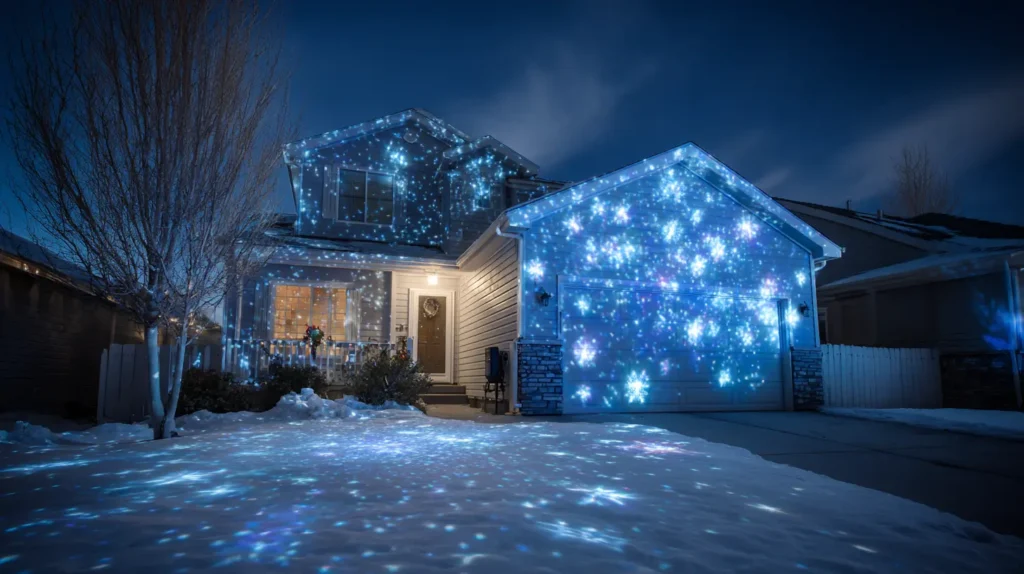
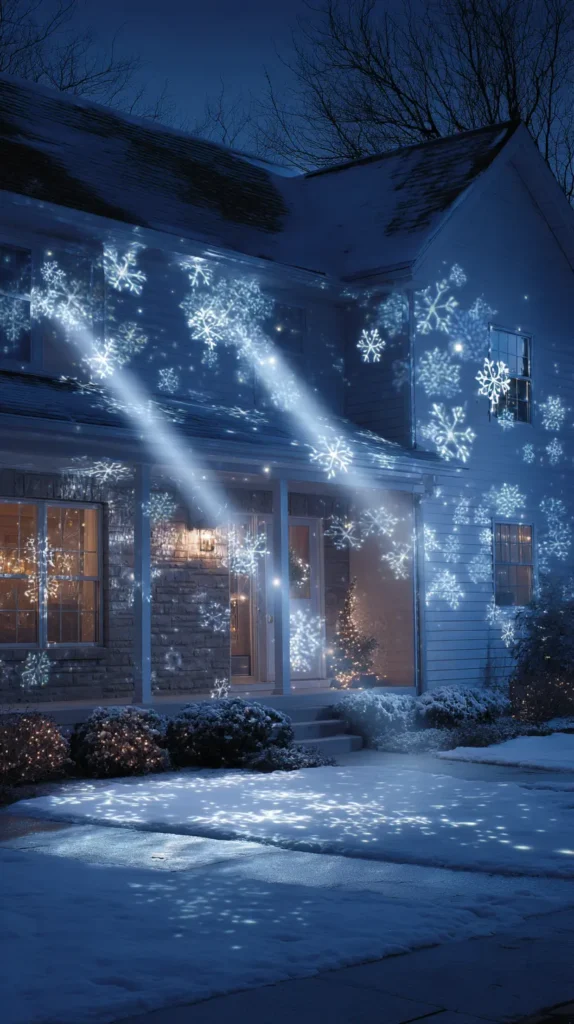
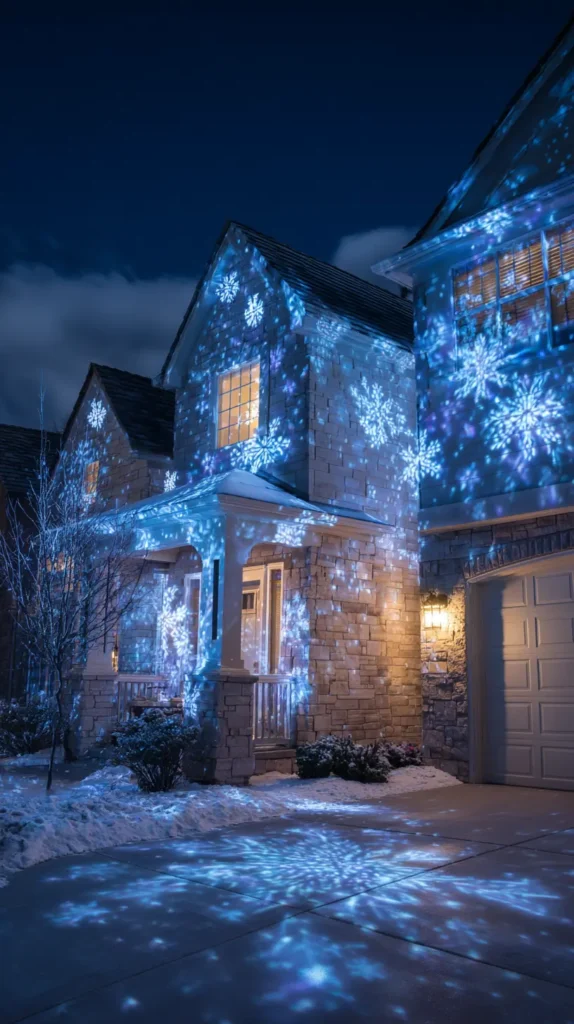
Achieve maximum impact with minimum effort by blanketing your home in a mesmerizing, digital blizzard. Imagine plugging in a single device staked in your front lawn and watching your entire house facade instantly transform into a swirling canvas of crisp white snowflakes or dancing red and green dots. This technology allows you to cover hard-to-reach peaks and vast brick walls with dynamic light without ever climbing a ladder. Whether you choose a gentle, drifting snow effect or a high-energy laser show, projectors add movement and depth to your display, filling the “dark voids” on your siding that string lights can’t reach.
- Distance = Size: The further back you place the projector, the larger the display area becomes, though the image may get fainter. Experiment to find the “sweet spot” for brightness and coverage.
- The “Dark Canvas” Rule: Projectors work best on dark surfaces. Aim them at garage doors, brick walls, or dense evergreen trees; they will wash out on well-lit windows or pale siding near streetlights.
- Combine, Don’t Replace: Use projectors as a layer, not the whole show. They look best when framed by static roofline lights, which provide structure while the projector adds texture.
- Hide the Source: Place the projector unit behind a bush or a decorative rock so the magic appears to come from nowhere, rather than from a plastic box on a stake.
- Remote Control: Opt for a model with a remote that lets you adjust the snowfall speed or set a timer from the warmth of your living room.
Pro Design Tip: Use a “dual-head” projector. These units have two lenses that can be aimed in slightly different directions. This allows you to cover a corner house or a wraparound porch with a single plug, wrapping the moving light around the architecture for a 3D effect.
Budget Consideration: A high-quality laser projector costs roughly the same as 3–4 strands of C9 lights ($30–$50) but covers 10 times the surface area. It is the single most cost-effective way to decorate a large two-story home if you are on a tight budget or limited on time.
6. Elegant Pathway Lighting with Starburst and Candle Effect Stakes
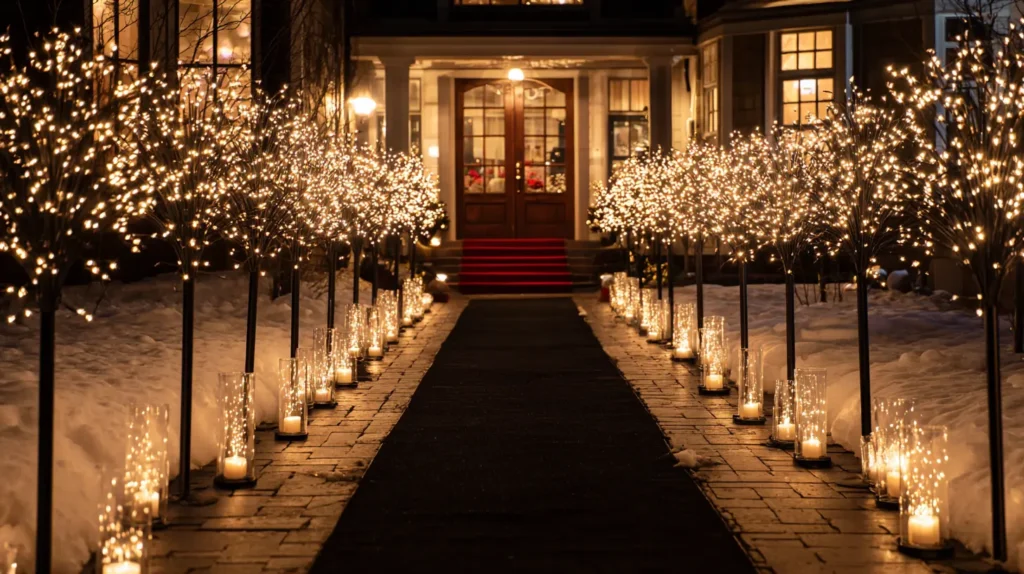
Transform the walk to your front door into a magical, VIP runway experience. Imagine lining your driveway or sidewalk with “starburst” stakes—flexible copper wires exploding outward with tiny LEDs that look like frozen fireworks or dandelion puffs hovering just above the snow. Alternating with these modern shapes are classic candle-effect stakes, featuring oversized C9 bulbs or flickering flame-effect tips that cast a warm, nostalgic amber glow. This combination of the dynamic, spiky starbursts and the steady, traditional candles creates a textured, rhythmic border of light that guides guests safely to your door while adding a layer of sophisticated ground-level drama to your yard.
- Spacing Strategy: Avoid crowding. Space your stakes 12 to 18 inches apart to allow each individual “starburst” or “candle” to be appreciated without appearing cluttered.
- The “Runway” Effect: Ensure the lights are set into the ground at a uniform height and a consistent distance from the pavement edge for a clean, professional look.
- Solar vs. Wired: For a hassle-free setup, choose high-quality solar stakes (ensure they get full sun). For guaranteed brightness on cloudy days, opt for low-voltage wired landscaping lights or plug-in stakes.
- Starburst Styling: Gently fan out the wires of the starburst stakes into perfect spheres. If they are flat or clumped, they lose their “exploding firework” magic.
- Height Variation: If possible, choose stakes of slightly different heights, or push some deeper into the ground, to create a sense of movement and organic flow along the path.
Pro Design Tip: Don’t just line the straight parts of the walkway. Place starburst stakes in the center of your flower pots or urns near the front door. It creates a cohesive look that lifts the “pathway” lighting up to eye level, framing the entrance with exploding spheres of light.
Budget Consideration: You don’t need expensive specialty stakes. Buy a pack of universal light stakes (simple plastic spikes with a clip on top) for about $10. Clip your standard C9 roofline bulbs into them and line the walk. It creates a bold, classic “vintage runway” look using the same strings of lights you already use on your house.

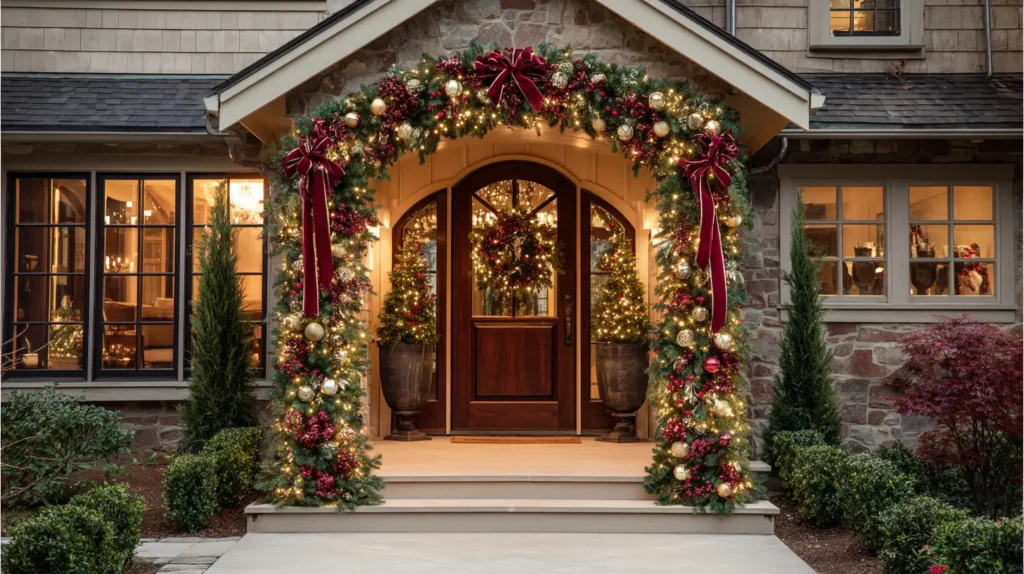
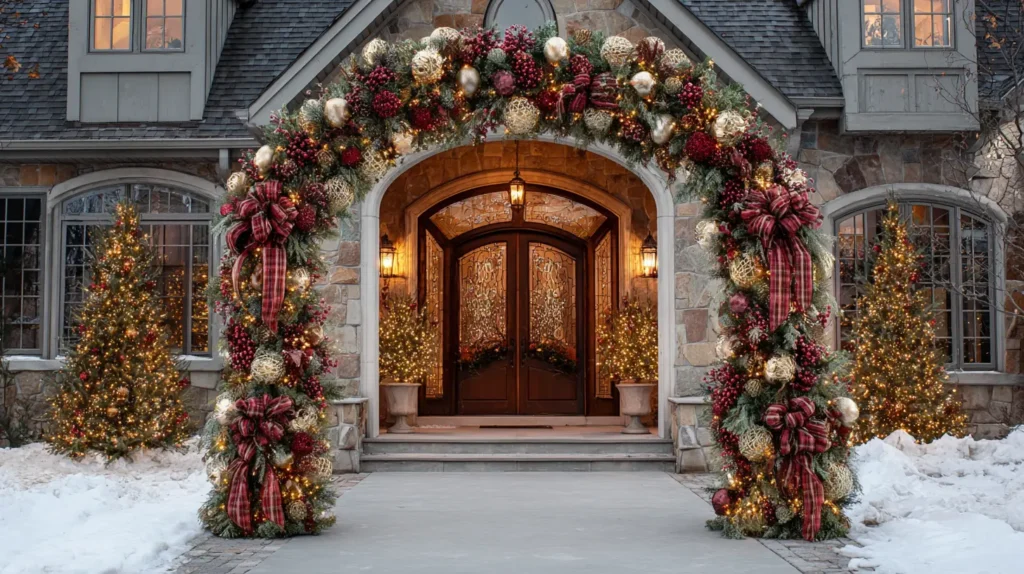
7. Lighted Garland Archways for Entryways and Driveways
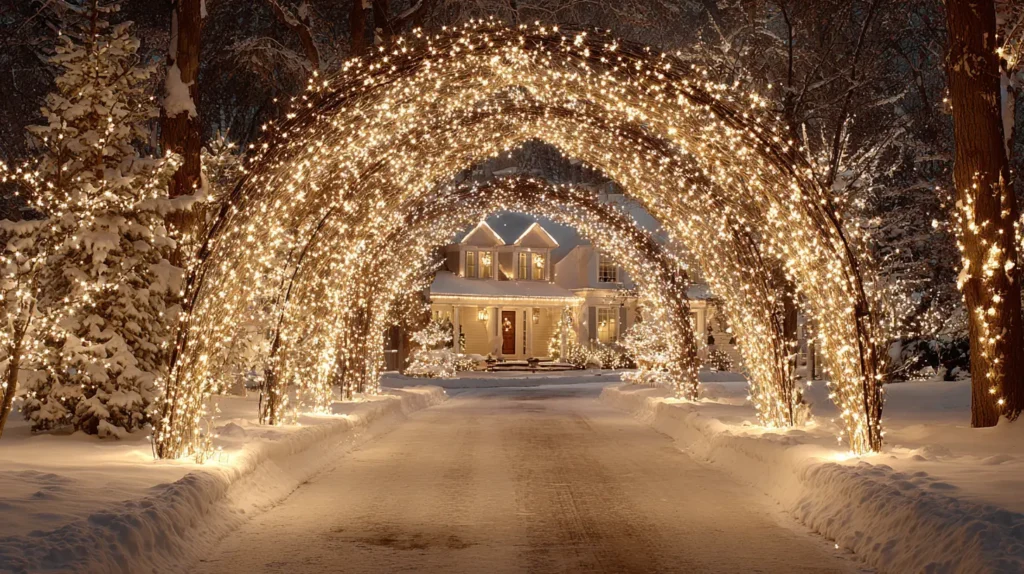
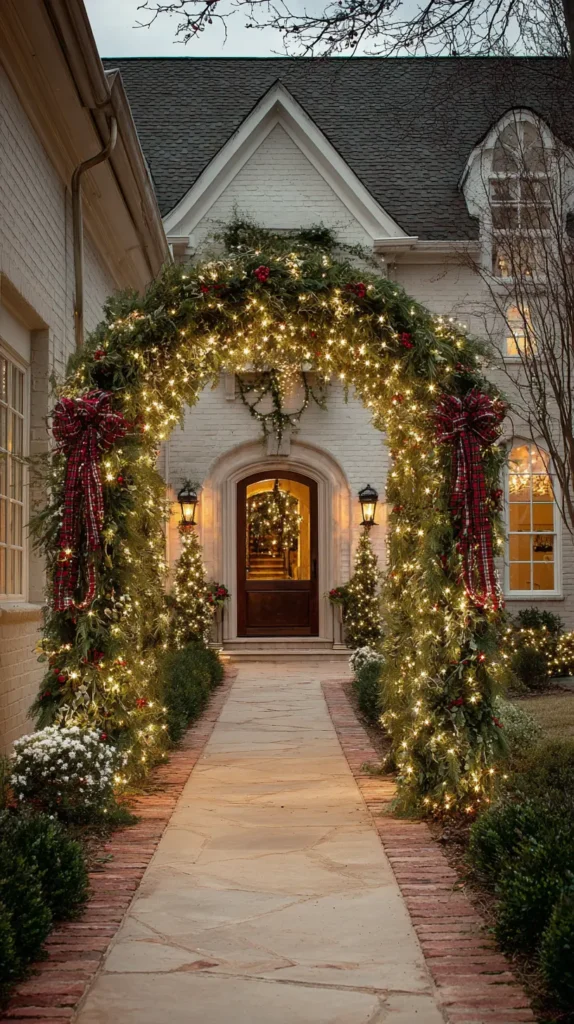
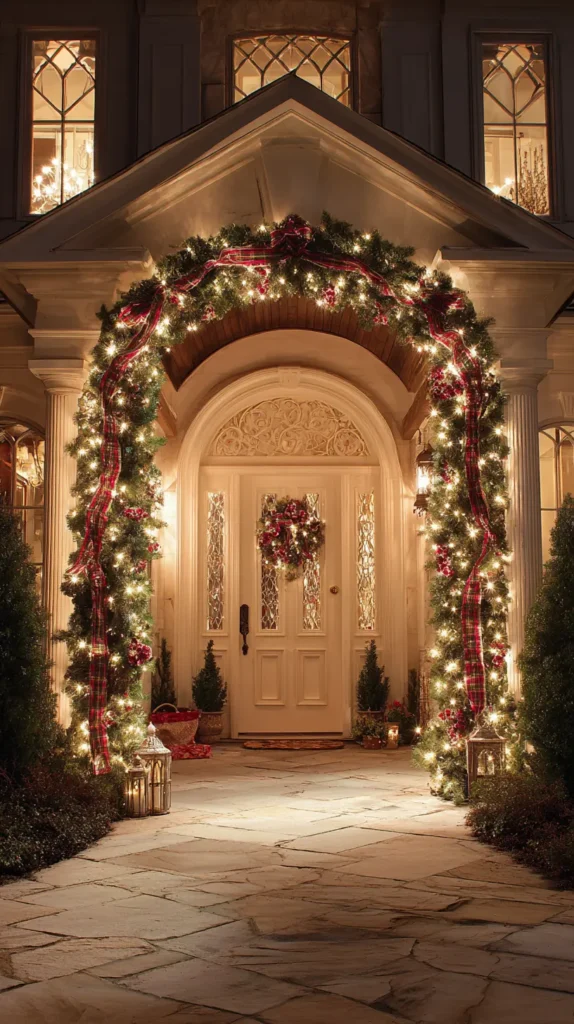
Create a breathtaking portal that transitions your guests from the dark winter night into your festive sanctuary. Imagine driving up to your home and passing beneath a monumental archway spanning the driveway, wrapped in thick, lush evergreen garland and thousands of twinkling lights. Or, picture walking to the front door through a series of lighted metal arbors lining the path, creating a literal “tunnel of light.” This architectural lighting technique adds immense drama and verticality to your yard, framing your home like a holiday postcard and offering an immersive experience that feels grand, welcoming, and magical.
- The Structure: For driveways, build a simple arch using PVC pipe anchored in buckets of concrete or sand. For walkways, use ready-made metal garden arbors.
- Garland Density: Don’t skimp. Wrap the structure heavily with evergreen garland to hide the pipe or metal. You want it to look like a living hedge, not a wire frame.
- Light Volume: Use “cluster lights” or wrap mini-lights very tightly (100 lights per foot of arch) to achieve that solid, glowing tunnel effect.
- Anchor It: Winter winds are strong. Ensure your arch bases are weighted heavily (with sandbags or concrete) or staked deeply into the frozen ground to prevent tipping.
- Daytime Appeal: Add large red velvet bows or oversized outdoor ornaments to the corners of the arch to make it just as festive during the day as at night.
Pro Design Tip: Create a “Double Arch” effect. Place one arch at the start of your walkway and a second one right at the porch steps. Connect them visually by lining the ground between them with matching lighted stakes. This creates a cohesive “journey” to the door rather than just a standalone decoration.
Budget Consideration: A professional metal lighted arch can cost hundreds. The PVC DIY is the classic budget hack: Use two lengths of flexible PVC pipe, bend them into an arch, and secure them into two heavy planter pots filled with quick-set concrete or rocks. Wrap with cheap garland and lights, and you have a massive driveway arch for under $50.
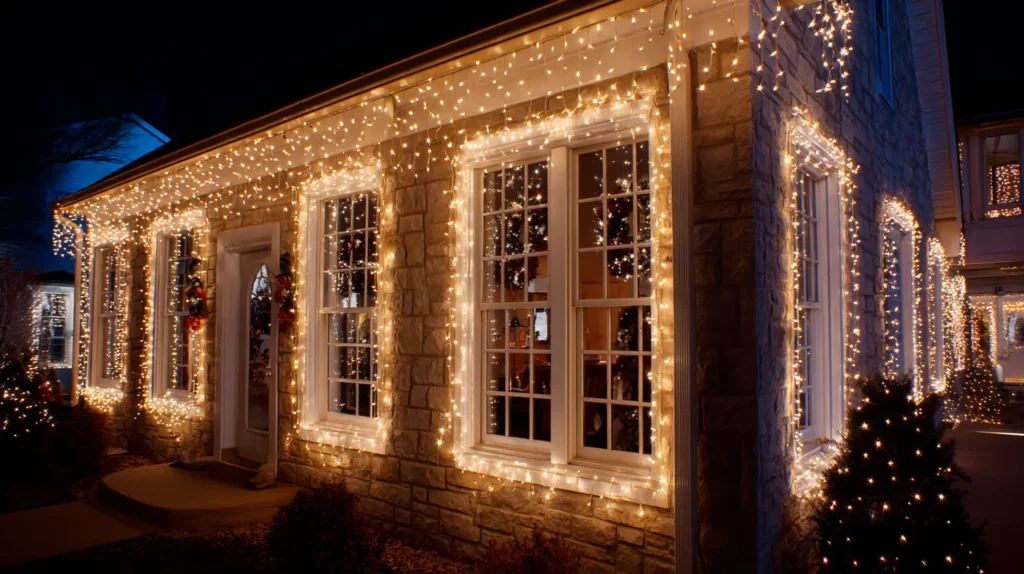
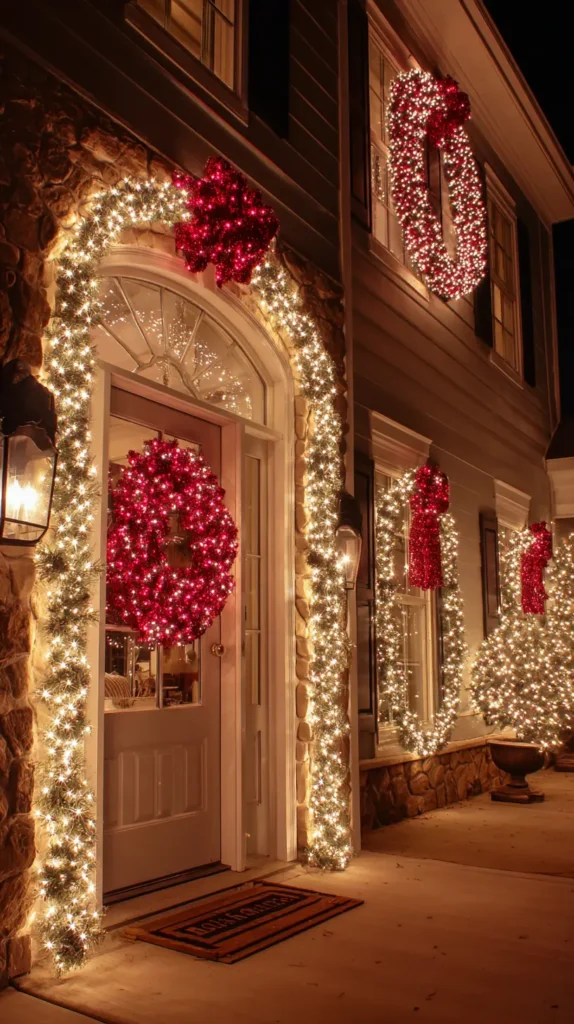
8. Outlining Windows and Doors with Sparkling String Lights
Give your home the crisp, illustrative quality of a storybook gingerbread house by meticulously outlining your architectural features. Imagine driving up to see every window and doorframe traced in precise lines of bright light, creating glowing geometric shapes against the dark siding. This technique emphasizes the symmetry and balance of your home, turning the windows into “eyes” that beam warmth into the night. Whether you choose classic incandescent mini-lights for a soft, traditional look or faceted LED bulbs for a diamond-like sparkle, this detailing adds a layer of refinement and polish that makes your display look professionally installed.
- Choose the Right Clip: Never staple wires directly. Use “all-in-one” clips or adhesive clips that slide under the window trim or stick to the frame, keeping the lines straight and taut without damaging the wood.
- Hide the Jumps: When moving from one window to the next, don’t let the light strand dangle diagonally across the wall. Use “blackout caps” on the bulbs in between, or run an unlit extension cord along the siding to keep the look clean.
- The Door Frame: Pay special attention to the front door. Outline the frame in lights to create a lit “portal” that draws guests toward the entrance.
- Color Temperature: Ensure the window lights match your roofline. Mixing cool-white windows with warm-white gutters creates a disjointed, messy look.
- Mini vs. C6: Mini lights create a delicate, fine line, while larger C6 bulbs create a bolder, chunkier outline. Choose based on how far your house sits from the road.
Pro Design Tip: For rough surfaces like brick or stucco where clips won’t stick, use the “Hot Glue Hack.” Apply a dab of hot glue to the socket (not the bulb) of the light and press it onto the brick. It holds through rain and wind but pops off cleanly with a putty knife at the end of the season without leaving a mark.
Budget Consideration: Extension cords can cost more than the lights themselves for this project. To save money and avoid a spiderweb of green wires on your house, use battery-operated light strands with built-in timers for the windows. You can tape the small battery pack invisibly into the corner of the windowsill.
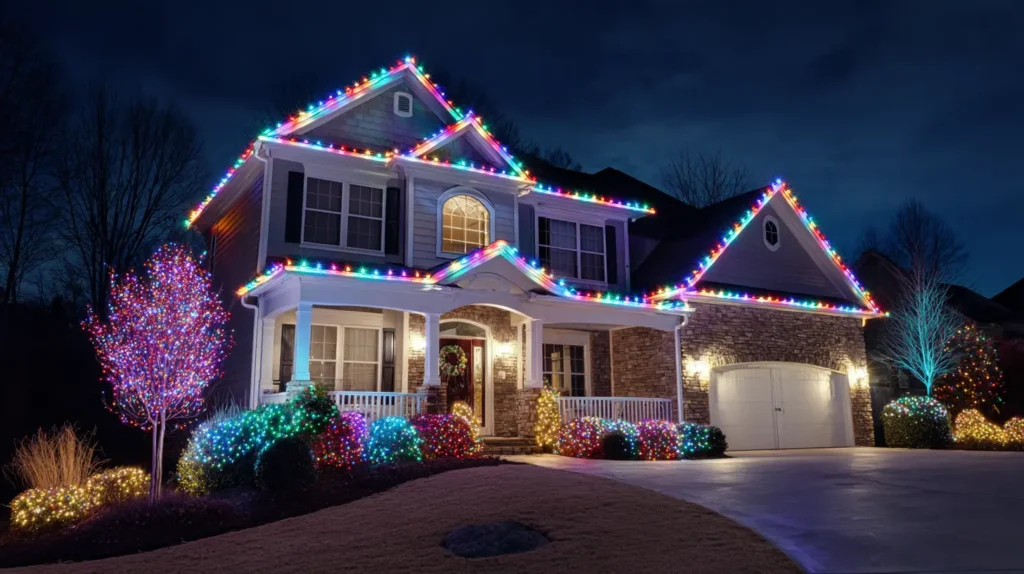
9. Smart Color-Changing LED Lights for Modern Christmas Displays
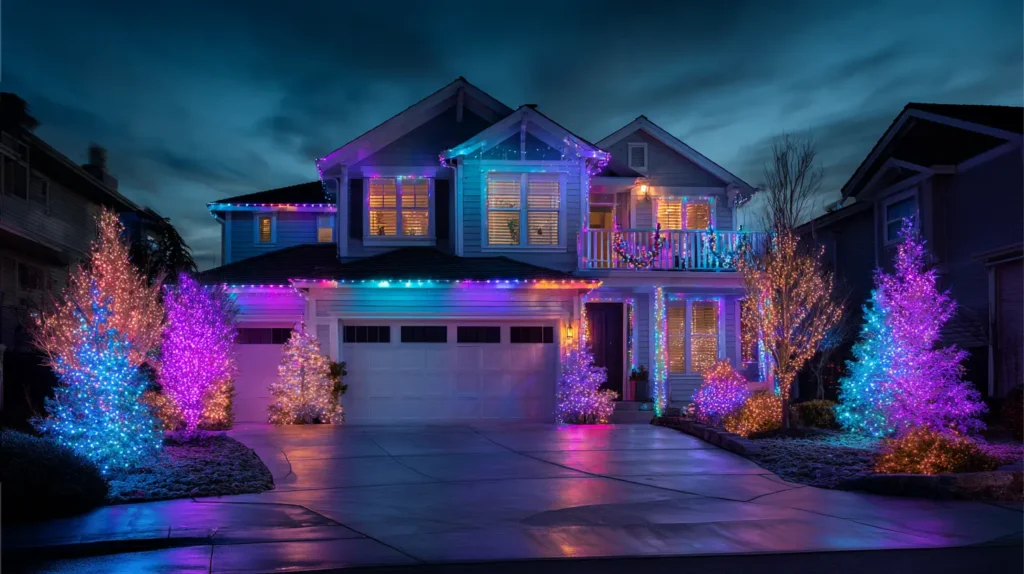
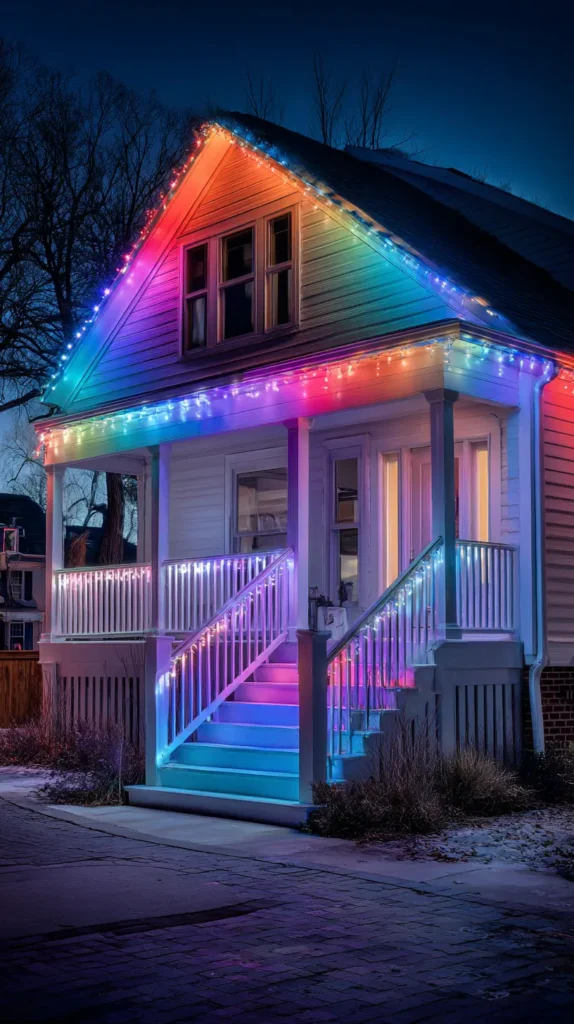
Step into the future of holiday decorating with a lighting system that allows you to “paint” your home in millions of colors with a single swipe on your smartphone. Imagine a roofline that doesn’t just sit there; it breathes with a slow, pulsating gradient of “Northern Lights” greens and purples, then snaps instantly to a candy-cane red-and-white stripe for a party. These brilliant RGB (Red, Green, Blue) LEDs allow you to map your house digitally, creating complex patterns—like chasing colors or falling snow effects—that move seamlessly across your architecture. It’s the ultimate tool for the indecisive decorator, letting you change your entire outdoor aesthetic from classic warm white to vibrant technicolor in seconds.
- Total Control: Use a dedicated app to schedule on/off times, adjust brightness, and select specific color palettes without ever stepping foot outside in the cold.
- Music Sync: Many innovative systems have built-in microphones or software that syncs the light pulses to your holiday playlist, creating a literal neighborhood dance party.
- Permanent Installation: Look for “permanent” track lighting options (like Govee or Trimlight) that install under the soffits. They are invisible during the day but provide architectural lighting year-round (orange for Halloween, red/white/blue for July 4th).
- Zone Control: Divide your house into zones. Make the roofline green, the windows red, and the pillars gold, all from the exact string of lights.
- Wi-Fi Check: Ensure your outdoor Wi-Fi signal is strong enough to reach the controller box, or the lights may lag or fail to connect to the app.
Pro Design Tip: Utilize the “Mapping” feature found in high-end sets (like Twinkly). You use your phone camera to scan the lights after hanging them. The app then “knows” exactly where each bulb is located in 3D space, allowing you to display complex images—like a waving Santa or a scrolling “Merry Christmas” message—perfectly across the geometry of your house.
Budget Consideration: Smart string lights are an investment. A cheaper alternative is Smart RGB Floodlights. Two or three Wi-Fi-enabled floodlights staked in the lawn can wash your entire home’s façade in changing colors. It provides 80% of the “color-changing house” impact for about 10% of the cost of wrapping the whole roofline.
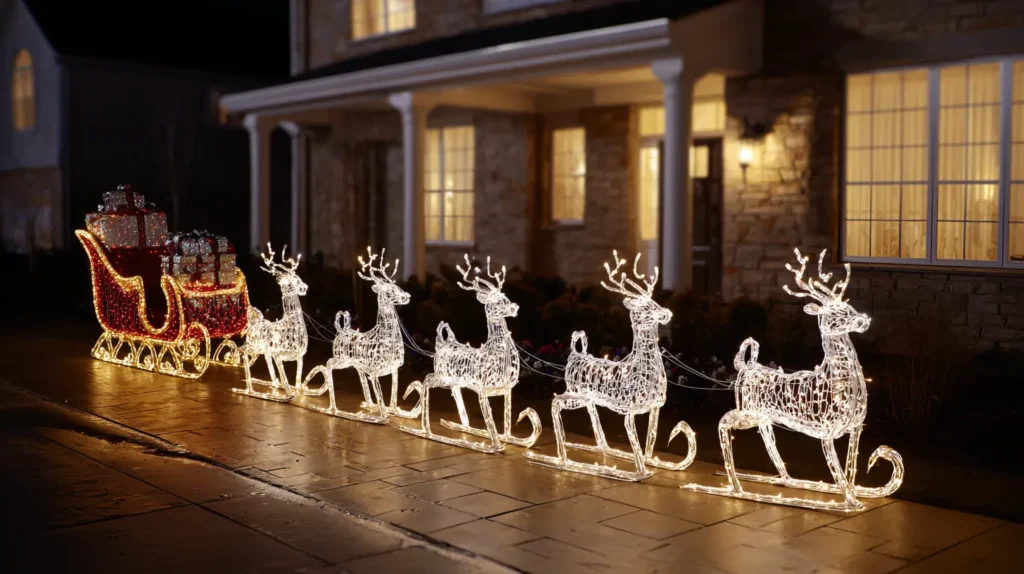
10. Animated Lighted Reindeer, Santa, and Sleigh Yard Figures
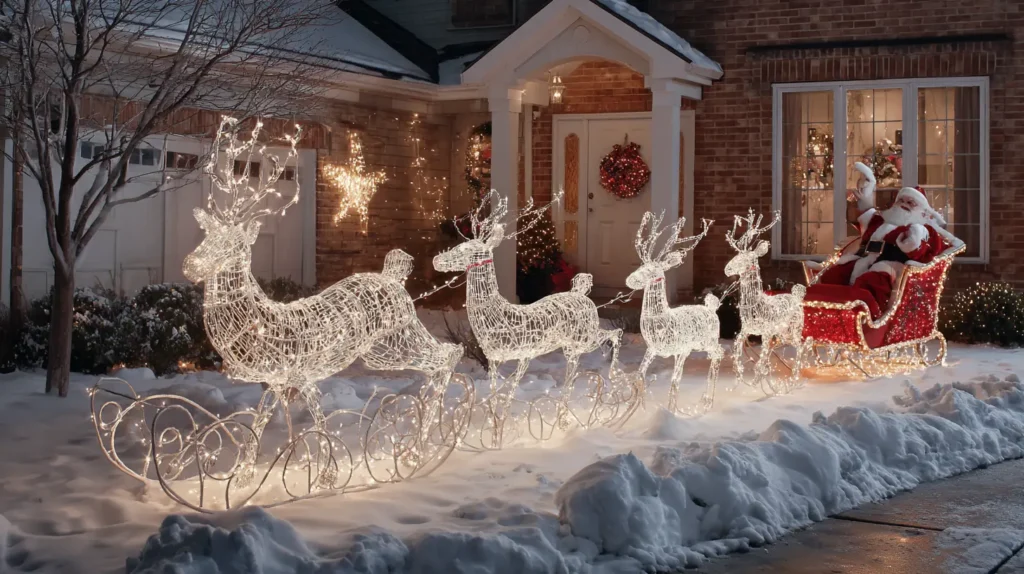
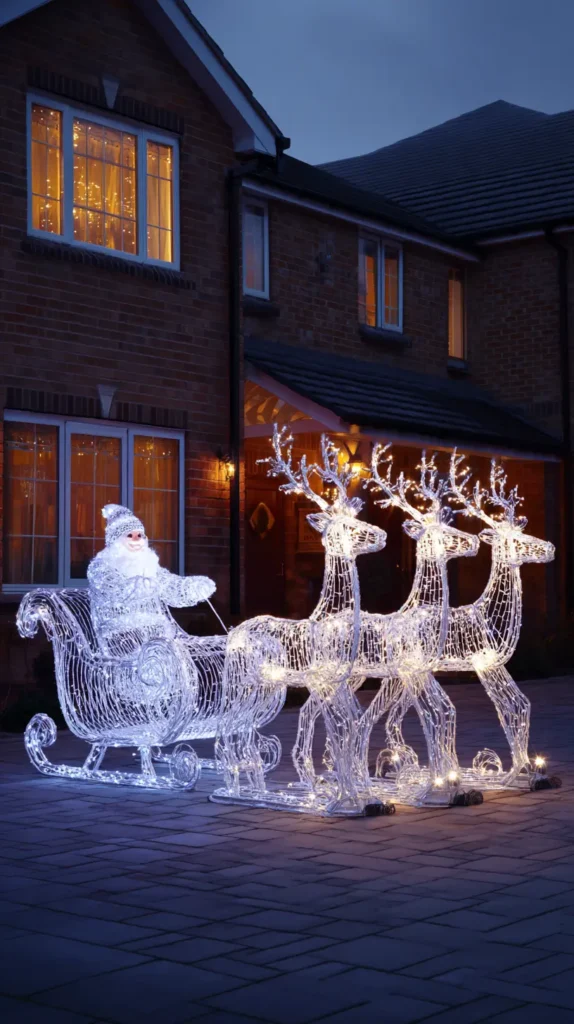
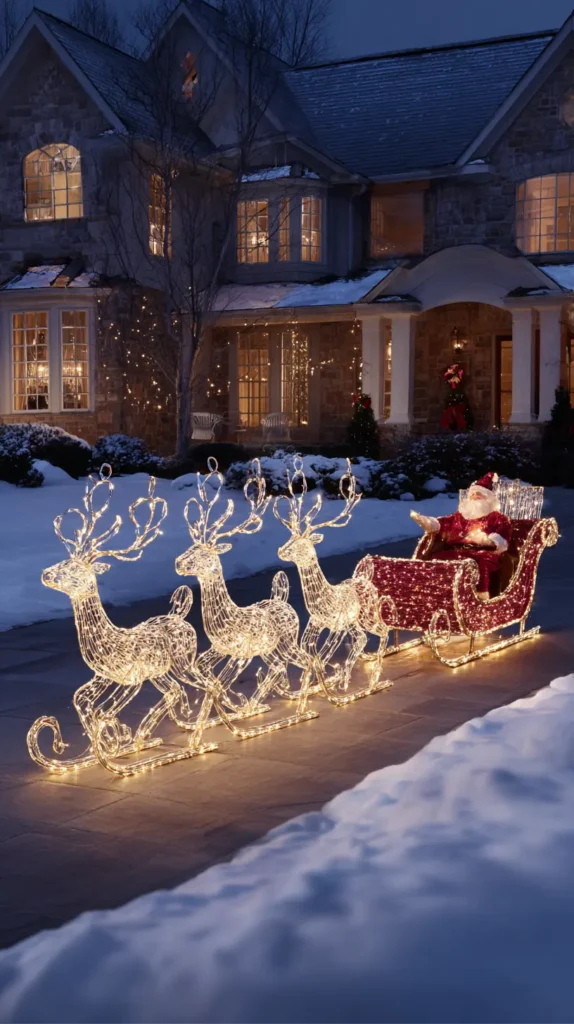
Transform your front lawn into a living storybook page with figures that bring kinetic energy to your display. Imagine a wireframe Santa sitting in a majestic sleigh, his arm raising in a perpetual wave to passersby, pulled by a team of reindeer. These aren’t just static statues; the reindeer lower their heads to “graze” or kick their legs in a galloping sequence, creating a delightful illusion of movement. Wrapped in thousands of rope lights or covered in shimmering, holographic mesh fabric that sparkles even during the day, these animated scenes become the neighborhood’s focal point, captivating children and adding a sense of life and narrative to your winter landscape.
- Check the Animation Speed: Ensure the movement is smooth and rhythmic. Some controllers allow you to adjust the speed from a frantic gallop to a gentle trot.
- Daytime Appeal: Choose figures covered in “crystal” mesh, tinsel, or holographic fabric. This ensures they look colorful and substantial during the day, rather than just looking like weird white wire cages on the grass.
- Anchor Securely: Animated figures are often top-heavy and act like sails in the wind. Use heavy-duty U-stakes or tent pegs to secure every hoof and runner to the ground.
- Power Management: These displays often have multiple plugs (one for the motor, one for the lights). Use a multi-outlet outdoor power stake with a rain cover to keep cords tidy.
- Create a Scene: Don’t just plop them in the middle of the yard. Position them angling toward the roof or driveway to suggest they are landing or taking off.
Pro Design Tip: Create the illusion of flight. Instead of placing the entire sleigh team flat on the grass, create a ramp using plywood (painted black or covered in a snow blanket) or use varying heights of sturdy boxes hidden under snow. Angle the lead reindeer upward so it looks like the team is lifting off into the night sky.
Budget Consideration: Animated figures are pricey and prone to motor failure. A great budget hack is to buy vintage or non-working animated figures from yard sales. Even if the motor is dead, the frame and lights are usually acceptable. You can set them up as static displays for a fraction of the cost, or strip the old lights and re-wrap the frame with new, vibrant LED strings.

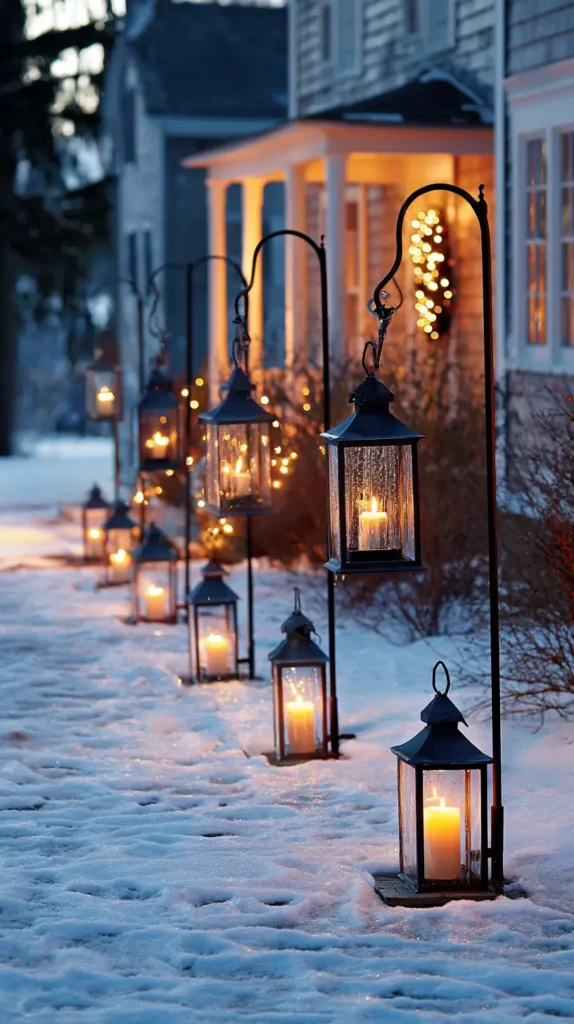
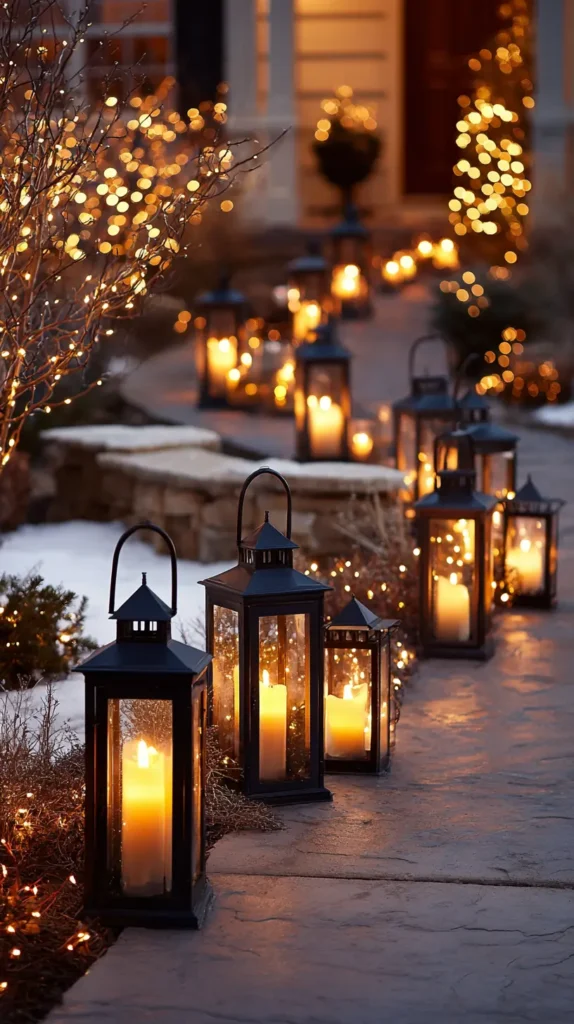
11. Pathway Lanterns and Candle-Style Outdoor Lighting for Cozy Warmth
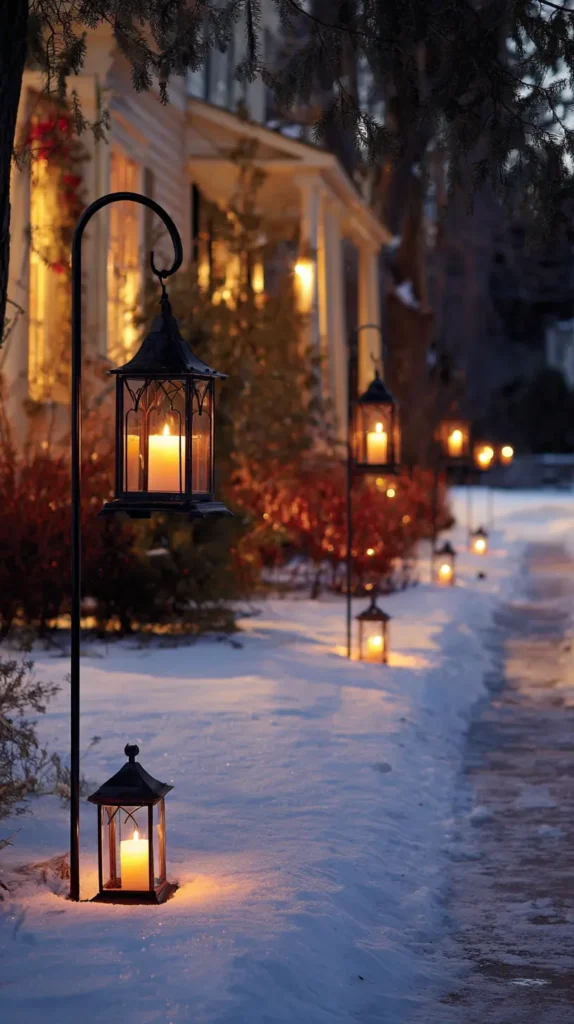
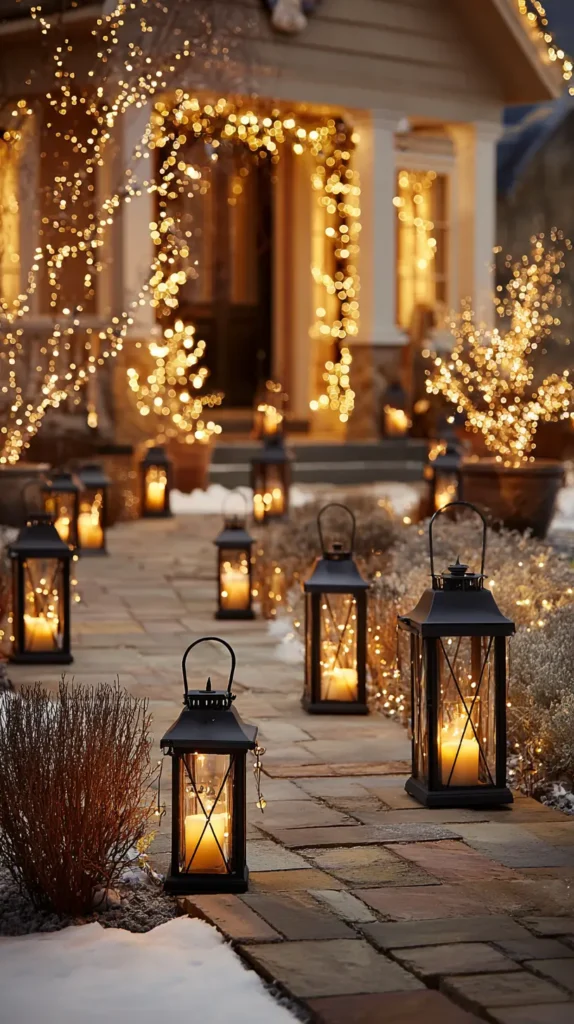
Guide your guests to the front door with a lighting scheme that feels straight out of a Charles Dickens novel. Imagine your walkway lined with sturdy iron shepherd’s hooks, each suspending a classic black metal lantern housing a realistic, flickering battery-operated candle. The soft, amber oscillation of the “flame” casts dancing shadows across the snow, creating a sense of quiet intimacy and old-world charm that harsh floodlights cannot match. This approach treats the exterior walkway like a hallway, decorating it with substantial fixtures that look beautiful during the day and act as glowing beacons of hospitality at night.
- Elevation is Key: Hanging lanterns on shepherd’s hooks keeps them above the snow line and prevents them from being kicked over, while casting a wider pool of light on the path.
- The “Wreath” Base: Slip a small, inexpensive candle ring or wreath over the base of the lantern (or the stake in the ground) to add a collar of greenery and berries that looks polished in the daytime.
- Timer Candles: Essential for outdoor use. Choose outdoor-rated resin pillar candles with built-in timers so your path lights up automatically at dusk without you having to go out in the cold to switch them on.
- Scale Up: Avoid tiny tea-light lanterns. Choose substantial lanterns (12-18 inches tall) so they have a visual presence from the street and don’t look like clutter.
- Step Clusters: Don’t stop at the path. Cluster three lanterns of varying heights on the corners of your porch steps to create a seamless transition from the walkway to the door.
Pro Design Tip: For a magical “floating” effect, skip the hooks and place the lanterns directly on the snow or grass, but create a “runway” by spacing them perfectly evenly (e.g., every 3 feet). The repetition creates a strong architectural line that draws the eye straight to the focal point: your front door.
Budget Consideration: You don’t need expensive metal lanterns. Save your glass spaghetti and pickle jars. Clean them, wrap the neck with a piece of wire to create a handle, and insert a solar-powered tea light or a handful of solar fairy lights. Hang them from simple garden stakes for a rustic, “mason jar luminary” look that costs pennies.
12. Retro Multicolor C9 or Ceramic Bulb Strands for Nostalgic Charm
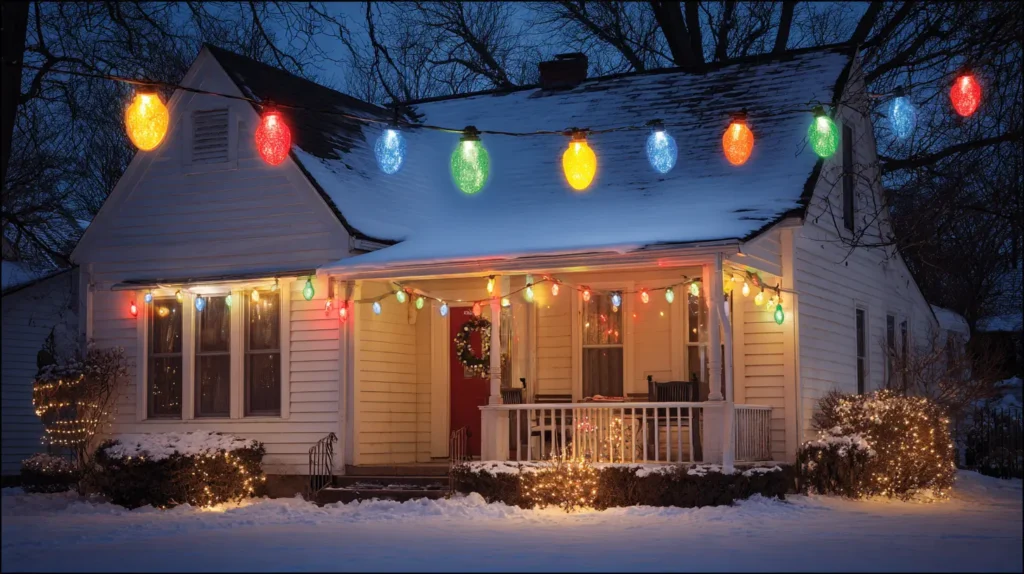
Transport your neighborhood back to the golden age of Christmas with a lighting display that glows like a string of giant, illuminated gumdrops. Imagine your roofline traced with oversized, opaque ceramic bulbs in the classic vintage palette: cherry red, cobalt blue, sun-yellow, orange, and emerald green. Unlike modern faceted LEDs that pierce the darkness with sharp points of light, these smooth, painted bulbs cast a soft, diffused halo that feels warm and incredibly nostalgic. It’s the visual equivalent of a vinyl record or a handwritten letter—a comforting, retro statement that stands out boldly against the snow and evokes the simple, colorful joy of a 1950s holiday.
- The “Ceramic” Finish: To get the authentic vintage look, ensure you buy bulbs labeled “opaque,” “ceramic,” or “smooth.” Avoid “faceted” or “diamond cut” bulbs, which look too modern and sparkly.
- Go Big with C9s: For rooflines, size matters. Use C9 bulbs (about 3 inches tall); they are large enough to be seen clearly from the street. Use the smaller C7 bulbs for wrapping trees or lining pathways.
- Spacing Strategy: Traditional displays weren’t cluttered. Look for strands with 12-inch spacing between bulbs. This allows each color to stand out rather than blurring into a continuous line.
- Clip Correctly: Use shingle tabs or parapet clips to ensure every bulb points upright and stands tall, creating that disciplined, military-row effect that defined mid-century displays.
- LED Upgrades: You can now buy “filament” or “SMD” LEDs inside ceramic housings. They look exactly like hot, glass incandescent bulbs but use 90% less energy and won’t shatter if dropped on the driveway.
Pro Design Tip: For the ultimate retro vibe, line your walkway with these bulbs using ground stakes. The repetition of the big, colorful lights on the ground mirroring the roofline creates a “runway” of nostalgia that welcomes guests with a warm, colorful embrace.
Budget Consideration: C9 strands can be an investment. If you want the retro look for less, skip the roofline and buy a single 25-foot strand of multicolor C7s. Drape them casually around your front door frame or porch railing. The impact of the vintage colors is strong enough that even a small amount effectively sets the mood.
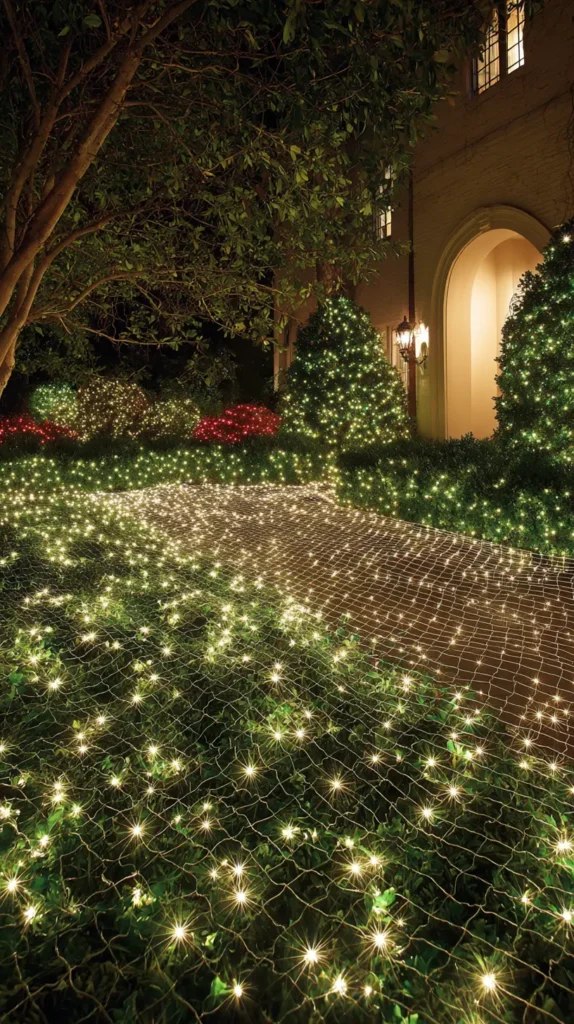
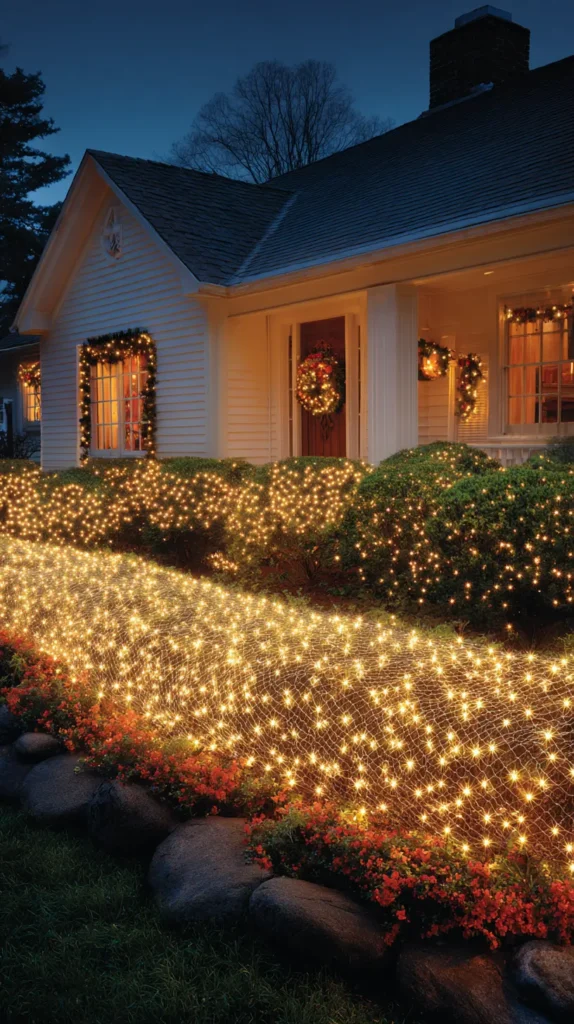
13. Easy Net Lights for Bushes, Hedges, and Garden Shrubs
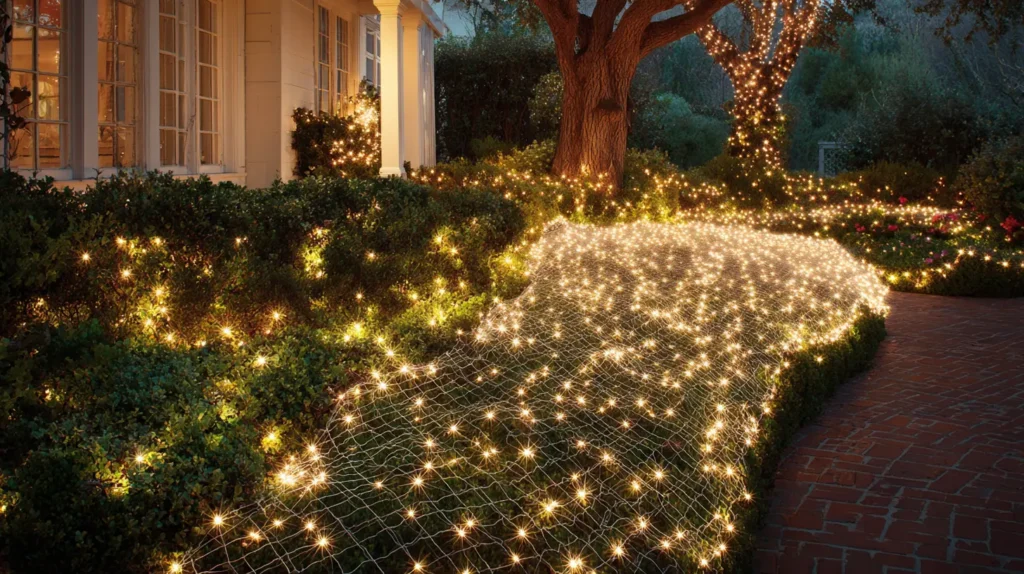
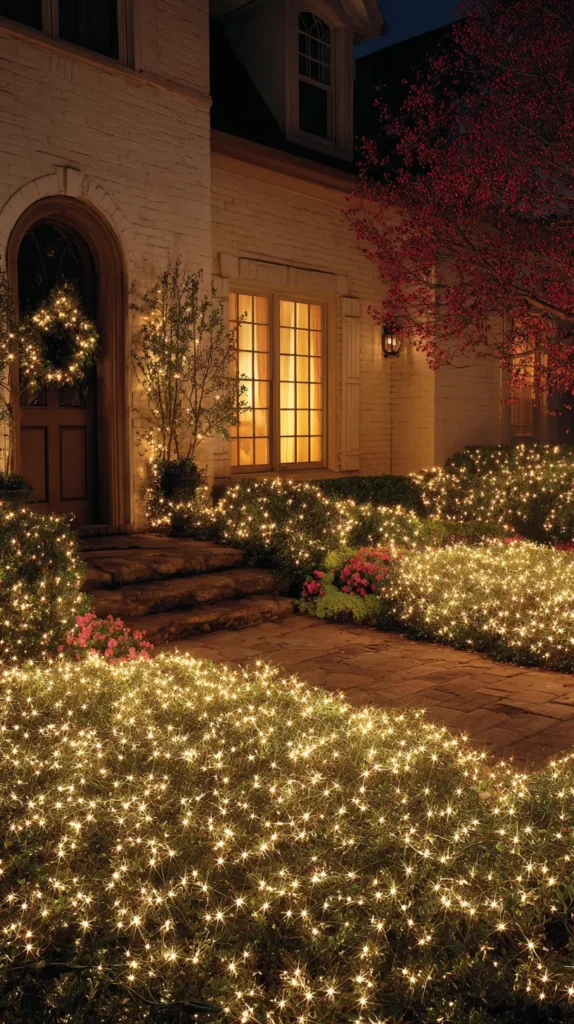
Banish the frustration of wrestling with tangled string lights and embrace the “throw-and-go” magic of net lights. Imagine walking out to your garden, tossing a literal blanket of illumination over your hedges, and plugging it in to reveal a perfectly spaced, uniform grid of sparkling light. There are no dark patches or uneven swoops; just a crisp, professional-looking “wall” of brightness that defines the geometry of your landscaping. Whether you choose warm white for a classic topiary look or multicolor for a festive explosion, net lights turn your shrubbery into glowing sculptures in seconds, providing the foundational “ground level” lighting that anchors your entire display.
- Measure First: Bushes are bigger than they look. Measure the height and width of your hedge to ensure you buy enough nets (e.g., 4×6 feet) to drape over the sides, not just sit like a toupee on top.
- Hide the Grid: Don’t just lay the net on the surface. Gently push the wires deep into the foliage. This hides the ugly green grid during the day and makes the light appear to emanate from within the plant at night.
- Connectability: Look for LED nets that allow you to connect up to 20 sets end-to-end. This minimizes the number of extension cords running across your lawn.
- Shape Shifting: If you have round bushes, don’t worry about the square net. Wrap the excess corners around the back or use zip ties to cinch the net into a spherical shape.
- Tree Trunk Wrap: Net lights aren’t just for bushes. Wrap a long, narrow net (often sold as “trunk wrap”) around the base of a large tree for immediate vertical impact.
Pro Design Tip: For a truly professional look, don’t stop the lights halfway down the bush. Ensure the net reaches all the way to the snow line or mulch. If one net isn’t big enough, zip-tie two together. A “floating” top-half display looks unfinished, while complete coverage looks high-end and structural.
Budget Consideration: While a box of net lights costs more upfront than a single string, it is a significant money saver in volume. One net light set covers the same surface area as 4-5 standard strings, and takes 5 minutes to install versus an hour of wrapping, saving you both cash and frostbitten fingers.

14. Architectural Uplighting for Columns, Bushes, and Home Features
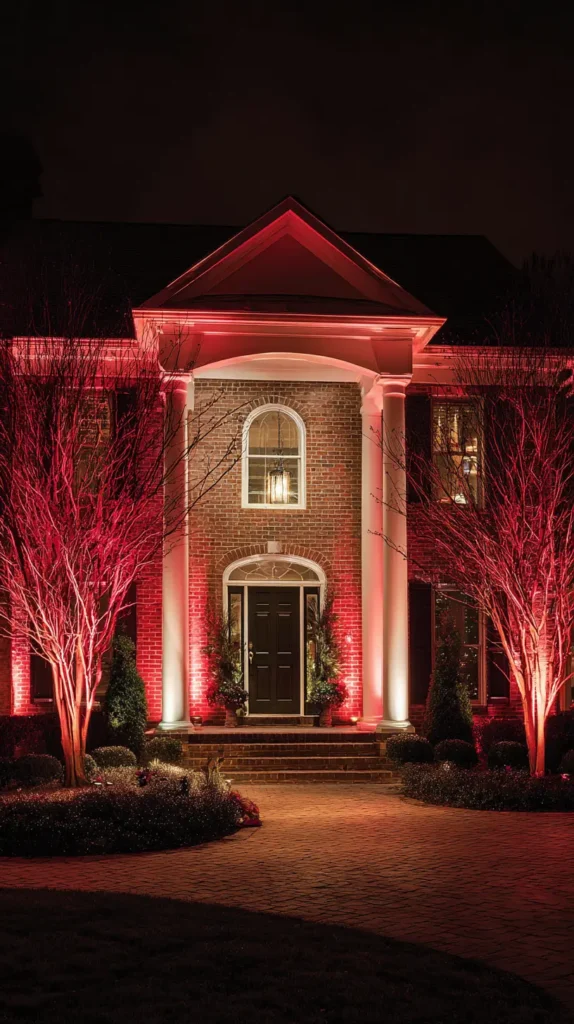
Elevate your curb appeal from “decorated” to “architecturally designed” by using the power of uplighting. Instead of just outlining the roof, imagine “washing” your home’s façade in rich, saturated color. Place powerful LED floodlights at the base of your porch columns to turn them into glowing pillars of white or candy-cane red. Position spotlights beneath your trees to illuminate the canopy from below, casting dramatic, intricate shadows of branches against the walls of your house. This technique adds immense depth and drama, transforming the flat darkness of night into a textured, three-dimensional stage that makes your home look grander and more substantial.
- The “Wall Wash”: Place floodlights about 1-2 feet away from your exterior walls, angled upward. This bathes the brick, stone, or siding in a soft glow (red, green, or warm white) that acts as a backdrop for your other lights.
- Column Definition: Position a narrow-beam spotlight directly at the base of each porch column or pillar. This emphasizes the vertical lines of your architecture and creates a stately entrance.
- Tree Silhouettes: Aim a light up into the center of a large deciduous tree. The light catches the bare branches, creating a stunning, skeletal sculpture against the night sky.
- RGB Versatility: Invest in “RGB” (Red, Green, Blue) bright floodlights. You can change your house from a classic warm-white “estate” look to a festive red-and-green party mode with a tap in an app.
- Hide the Source: Conceal the light fixtures behind small bushes or rocks so the viewer sees only the magical glow, not the hardware.
Pro Design Tip: Create a “Candy Cane” architecture effect. If you have multiple columns or spaces between windows, alternate the color of your uplights. Make the first column red, the second white, the third red, and so on. It creates a bold, vertical stripe pattern that turns the house itself into a massive holiday decoration.
Budget Consideration: You don’t need a professional hardwired landscape system. You can buy plug-in LED stake floodlights (often sold in packs of 2 or 4) for under $40 online. They plug into your existing outdoor extension cords and provide the same high-power “wall wash” effect as expensive permanent fixtures.
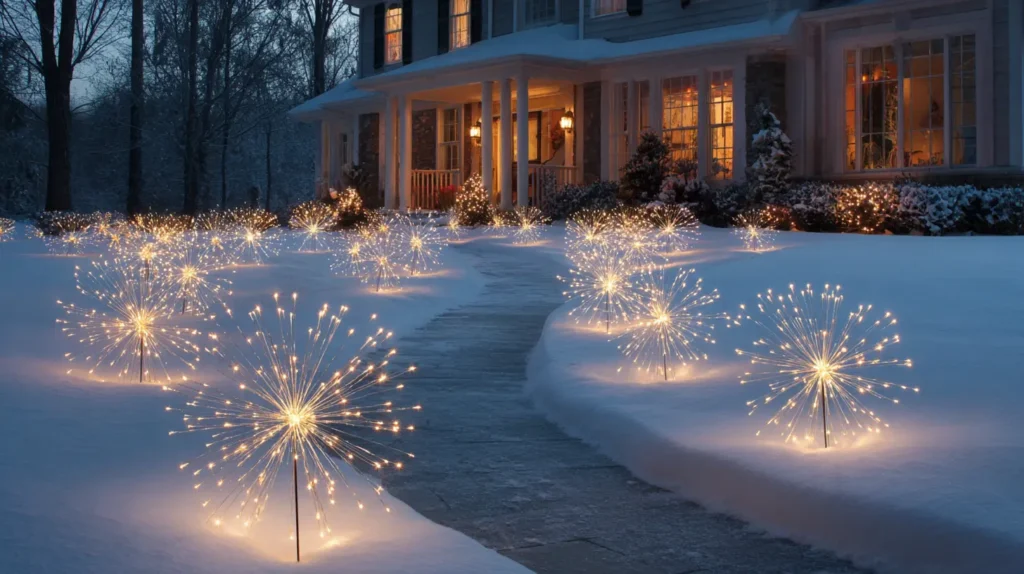
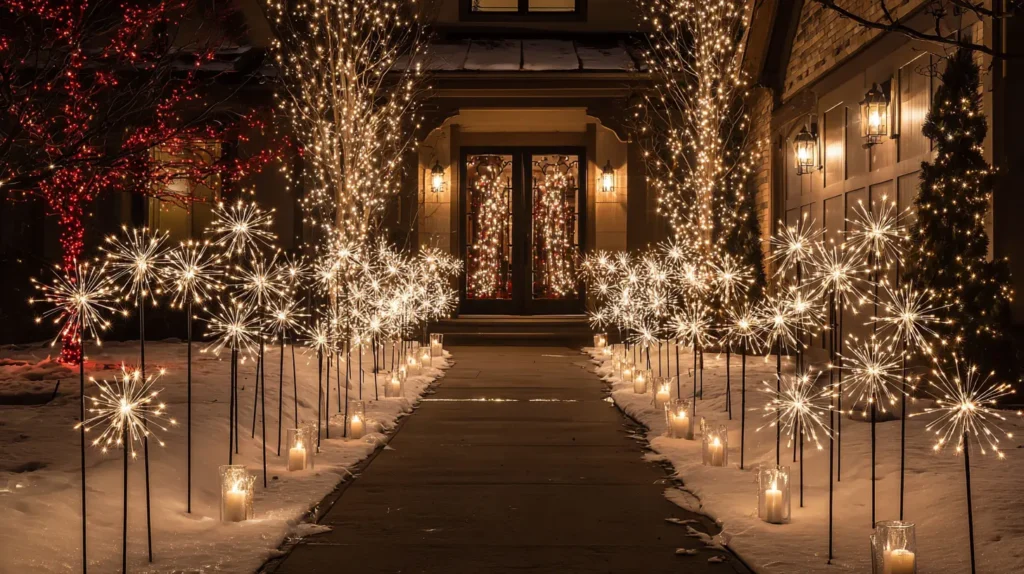
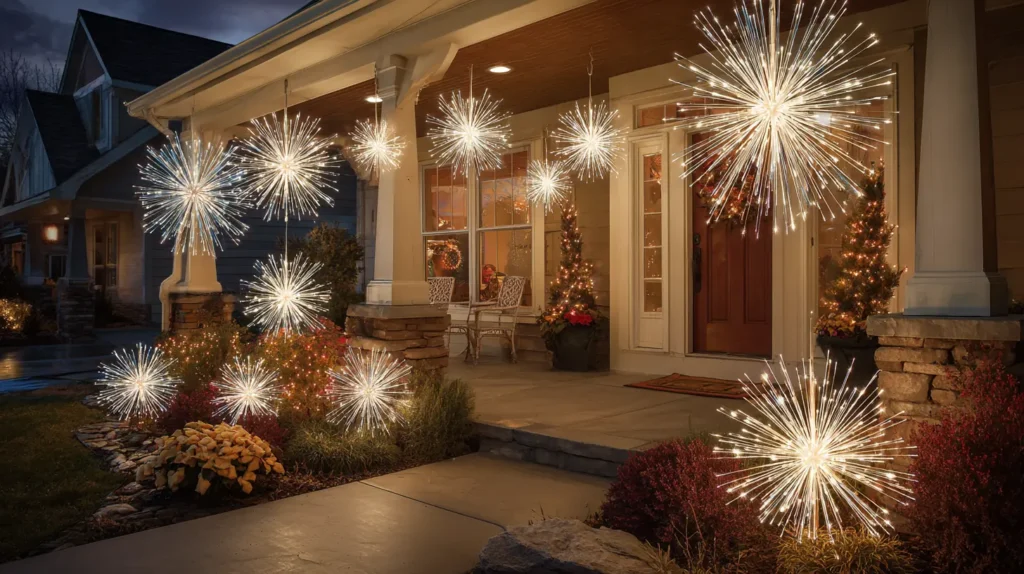
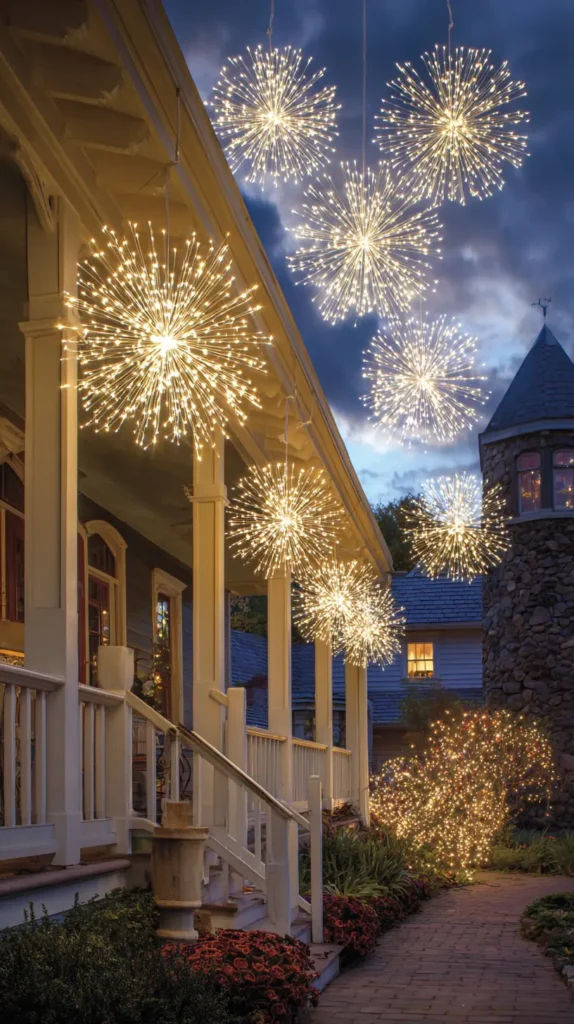
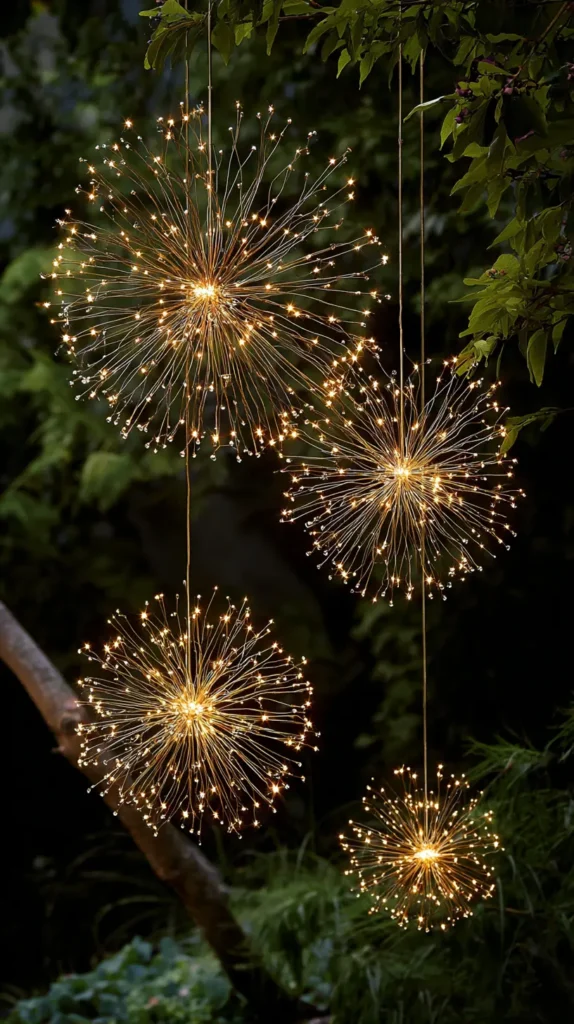
15. Starburst, Firework, and Sparkler-Style Outdoor Christmas Lights
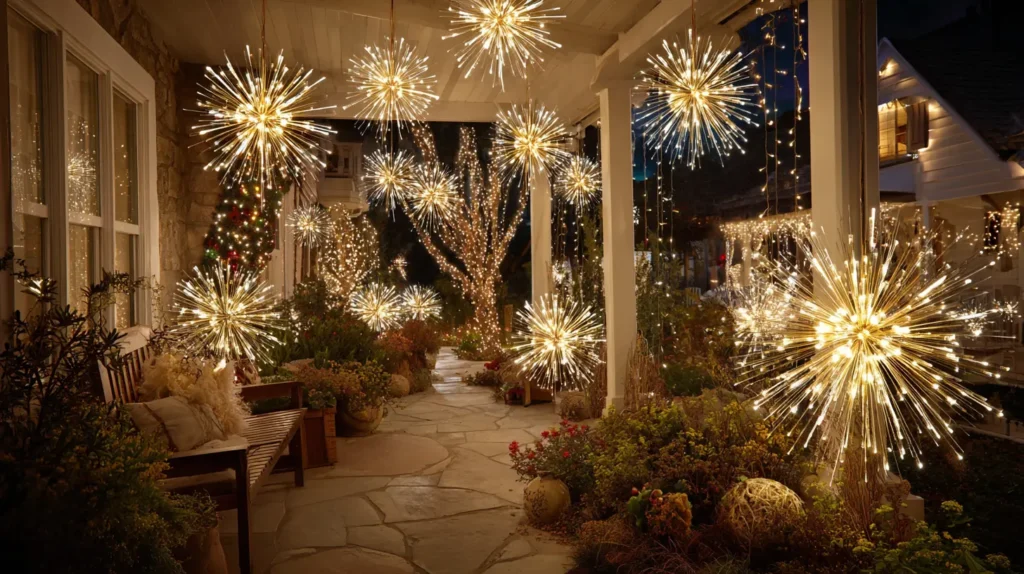

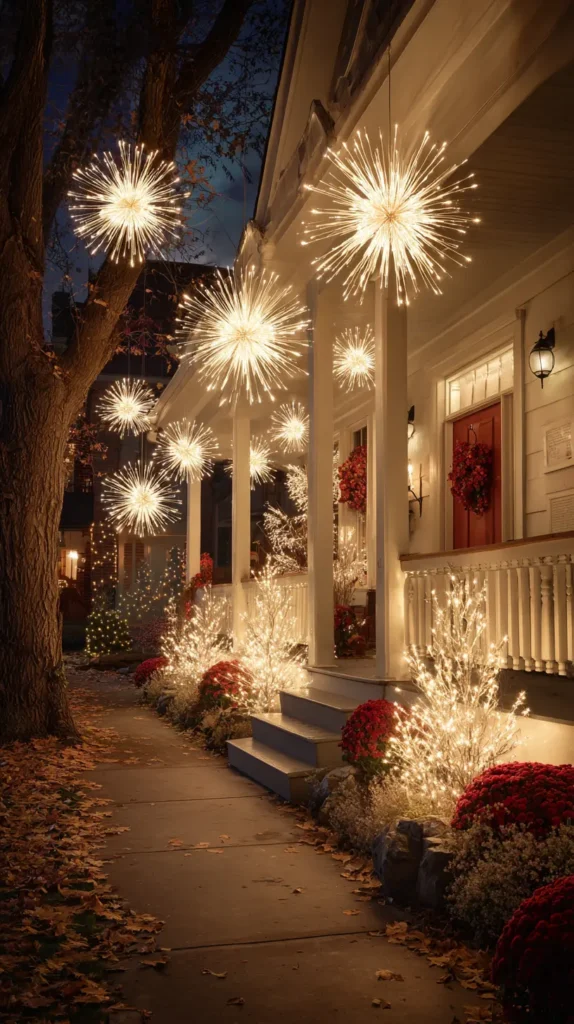
Inject a dose of celestial drama into your yard with lights that look like frozen fireworks caught mid-explosion. Imagine walking under a canopy of “starburst” or “sputnik” lights suspended from your tree branches or porch eaves. These three-dimensional spheres are formed by hundreds of flexible copper wires radiating from a center point, each tipped with a tiny micro-LED. They appear to float in the darkness, swaying gently with the wind. Whether set to a steady, radiant glow or a rapid “sparkler” animation that shimmers like a lit fuse, these lights add a modern, high-energy focal point that fills the empty voids of darkness in your yard with bursts of pure magic.
- Shape Shifting: The beauty of these lights is their flexibility. You can fan the wires out into a perfect sphere, flatten them into a fan shape against a wall, or bend them into a “weeping willow” shape.
- The “Galaxy” Tree: Hang clusters of 3 to 5 starbursts at varying heights within a large deciduous tree. It creates the illusion of planets or giant stars caught in the branches.
- Porch Pendants: Use them as temporary outdoor chandeliers. Hang one ample starburst light directly over your front door or porch seating area for a stunning, modern alternative to a traditional lantern.
- Animation Modes: Utilize the “twinkle” or “flash” settings. Because the LEDs are on the tips of wires, the flashing effect looks remarkably like a burning sparkler or a firework fading out.
- Cordless Freedom: Many starburst lights are battery-operated or solar-powered, allowing you to hang them in distant trees or along fences where running an extension cord is impossible.
Pro Design Tip: Create a “Dandelion Field”. Instead of hanging them, attach the starburst lights to thin green garden stakes or dowels and plant them in your garden beds or window boxes. At night, the wires disappear, and it looks like your garden is blooming with giant, glowing dandelion puffs.
Budget Consideration: You don’t need to buy the expensive, large-scale commercial versions. Look for “solar garden starburst stakes” (often sold in packs of 2 or 4). They are smaller but create the same “exploding light” effect for a fraction of the price, and because they are solar, they add zero cost to your electricity bill.
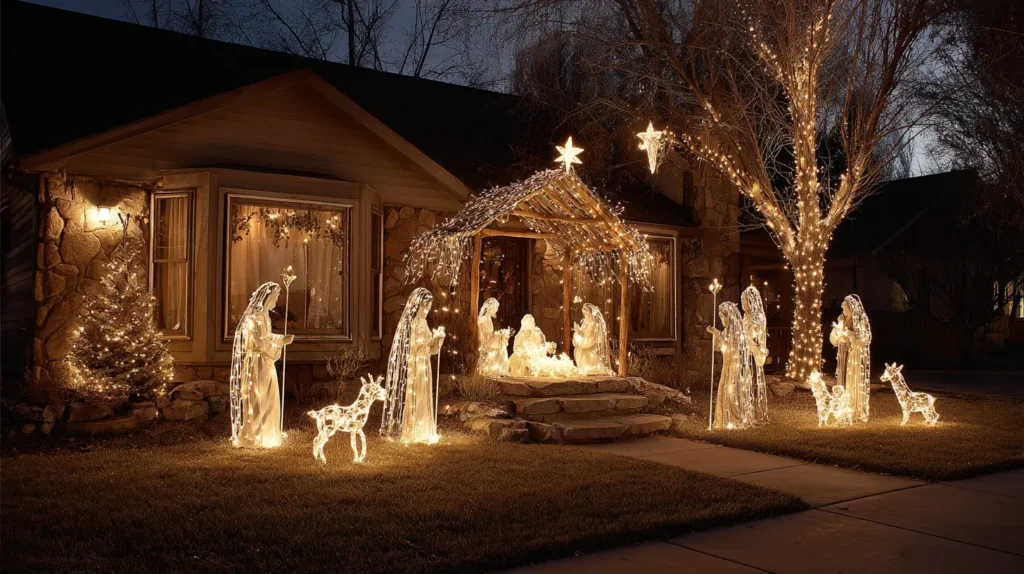
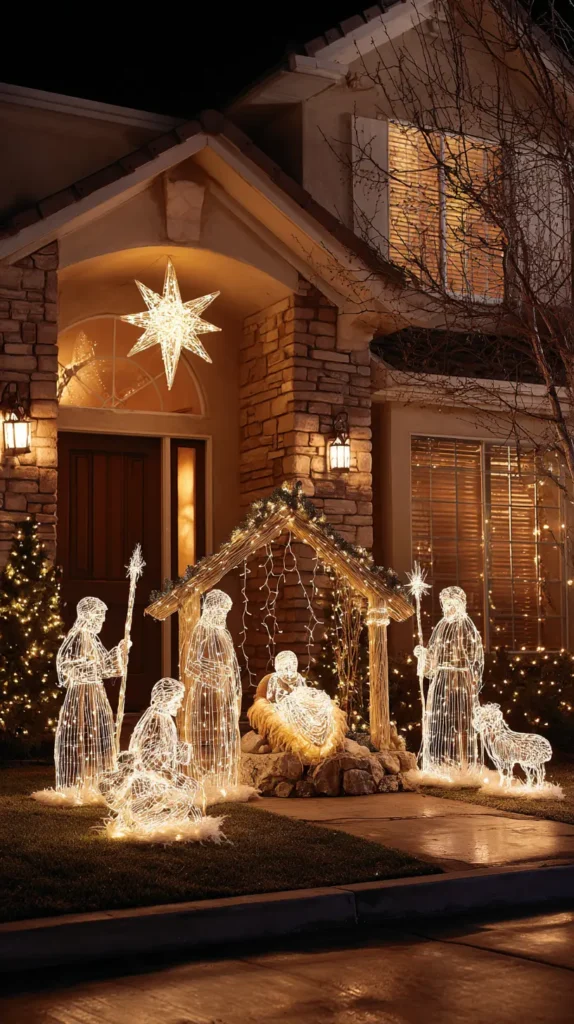
16. Outdoor Nativity and Religious Light Displays for Traditional Charm
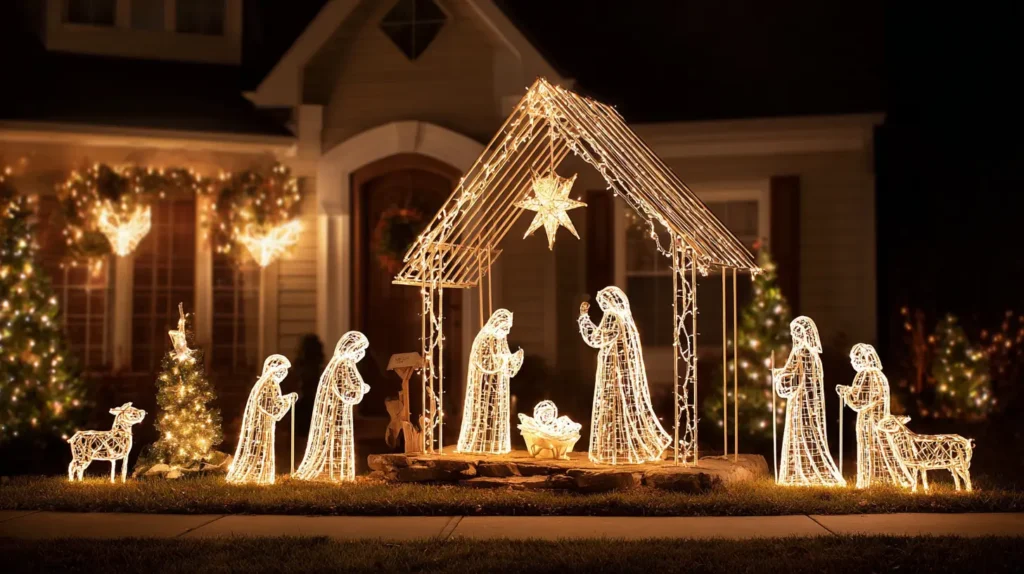
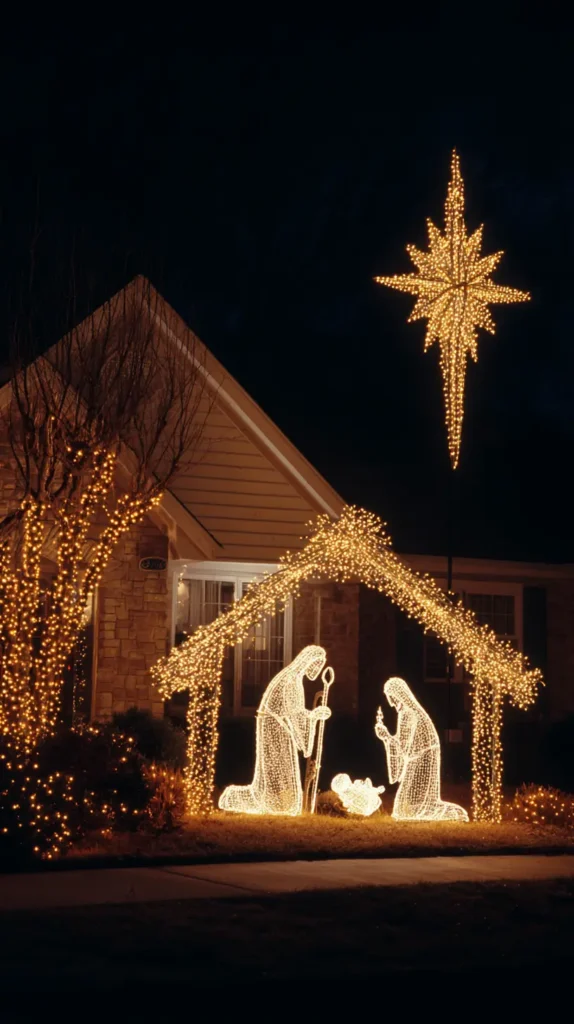
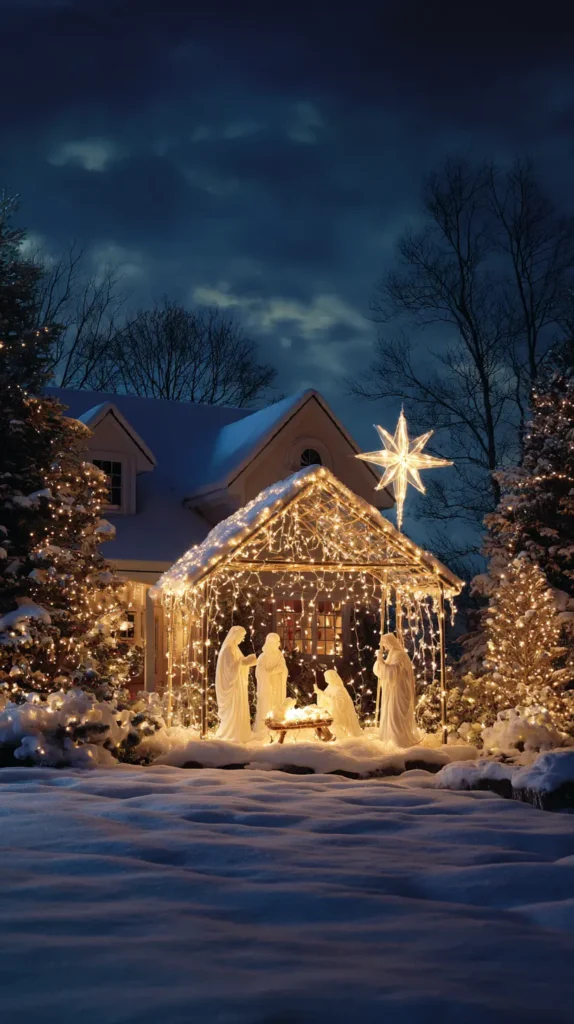
Bring the true meaning of the season to your front lawn with a display that radiates peace and reverence. Imagine a serene, illuminated silhouette of the Holy Family—Joseph, Mary, and the manger—glowingly outlined against the dark winter night. Whether it is a classic white wireframe sculpture wrapped in thousands of tiny lights or a solid wooden cutout spotlighted from below, this focal point creates a hush of reflection amidst the busy holiday season. Positioned beneath a “Star of Bethlehem” motif hung high in a tree or on the gable of your home, the scene captures the quiet majesty of that first Christmas night, offering a message of hope and tradition to everyone who passes by.
- The Focal Point: Center the Nativity scene in a prominent spot on the lawn, away from chaotic flashing lights or inflatable cartoon characters, to maintain a respectful and peaceful aesthetic.
- Silhouette Style: Solid white wooden silhouettes illuminated by a single floodlight create a stark, beautiful contrast that is often more readable from the road than detailed 3D plastic figures.
- The Star: No Nativity is complete without the Star. Hang an ample, bright star light (preferably brighter than the rest of your display) directly above the manger to draw the eye upward.
- Angelic Frame: Flank the manger scene with two illuminated wireframe angels blowing trumpets. This frames the Holy Family and adds width and grandeur to the display.
- Lighting Temperature: Stick strictly to Warm White or Gold lighting. Cool white or blue lights can feel too modern and icy for a scene meant to convey warmth and humility.
Pro Design Tip: Create a “Heavenly Backdrop.” Place a blue LED floodlight behind the Nativity figures, aiming it at the wall of your house or a dense group of trees behind them. This creates a deep blue “night sky” background that makes the white or gold figures in the foreground pop with incredible definition and spiritual drama.
Budget Consideration: Large commercial Nativity sets cost hundreds. The classic DIY Plywood Silhouette is the budget champion here. A single sheet of plywood, a jigsaw, and a gallon of white exterior paint can create a life-size Holy Family. Illuminate it with a $15 landscape spotlight, and you have a stunning, custom display for under $50.
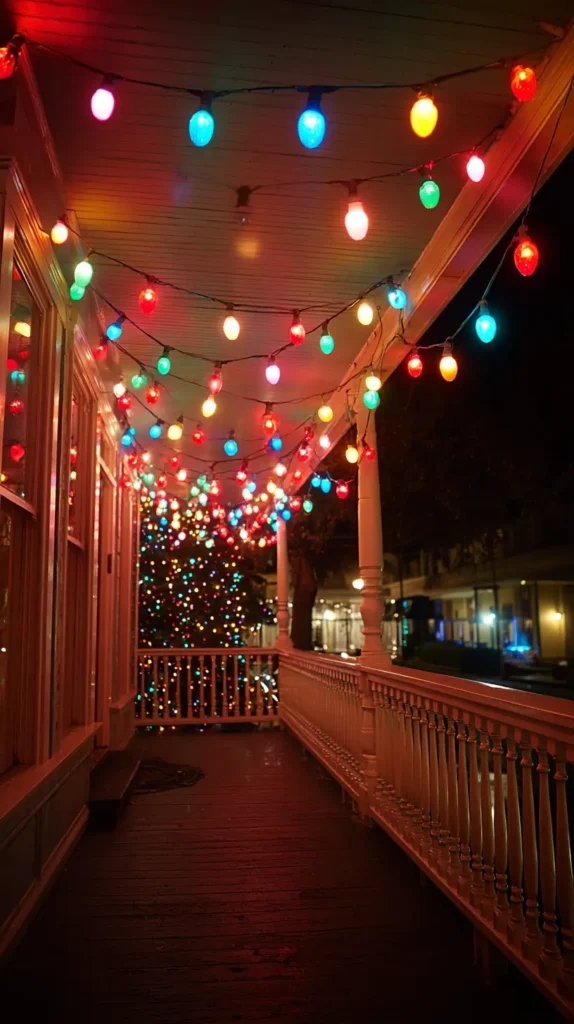
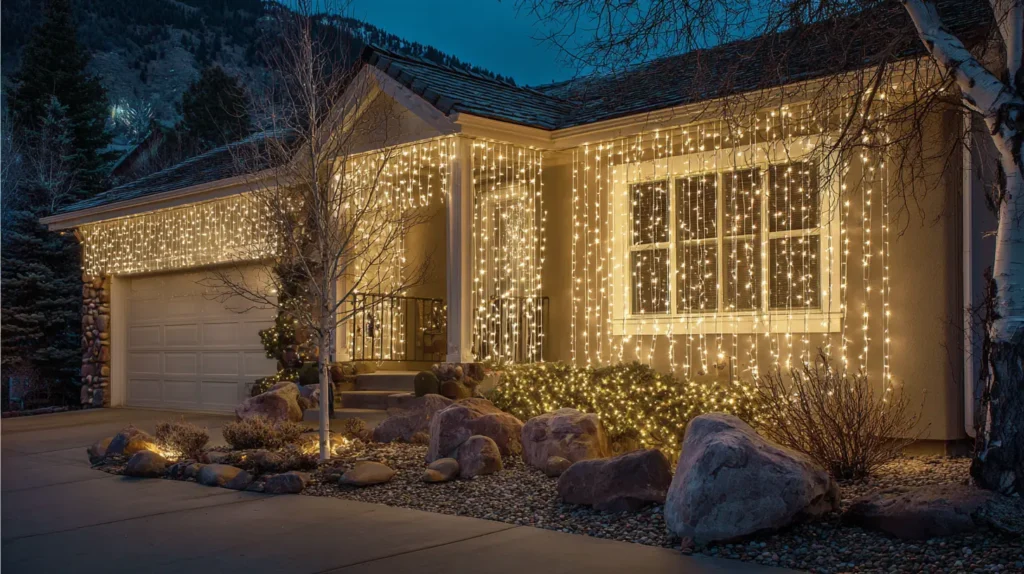
17. Dramatic Curtain Lights for Windows and Porch Walls
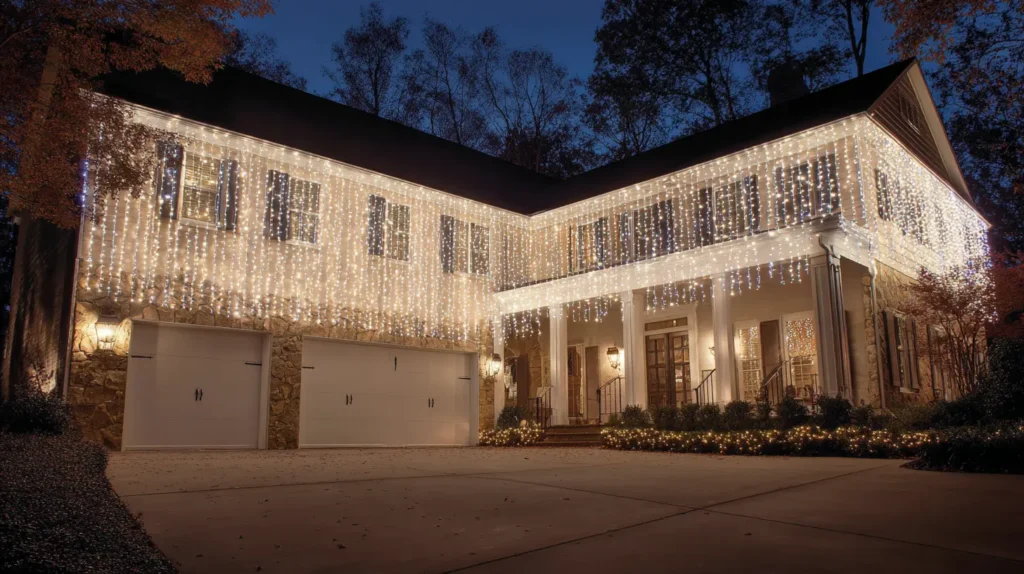
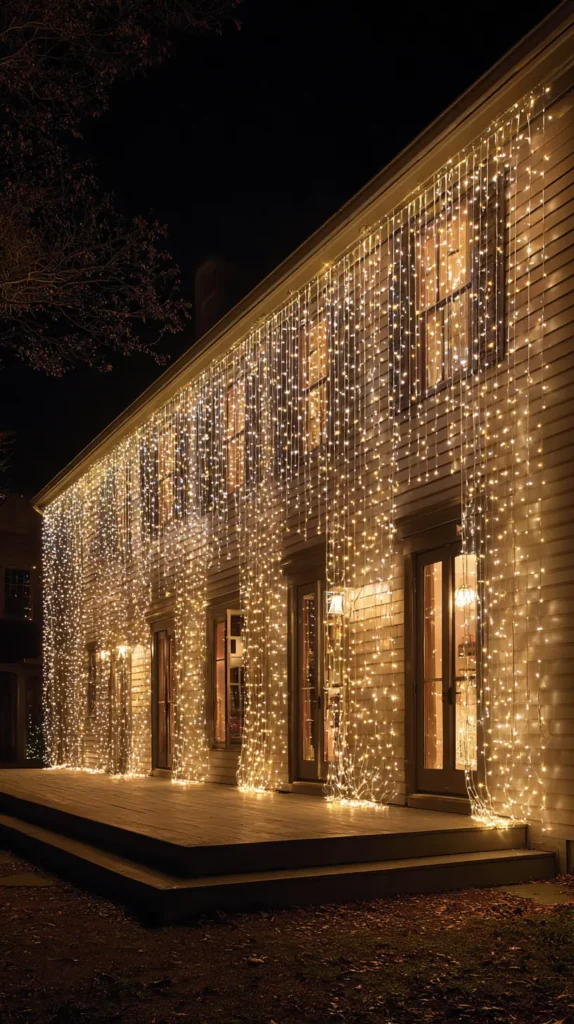
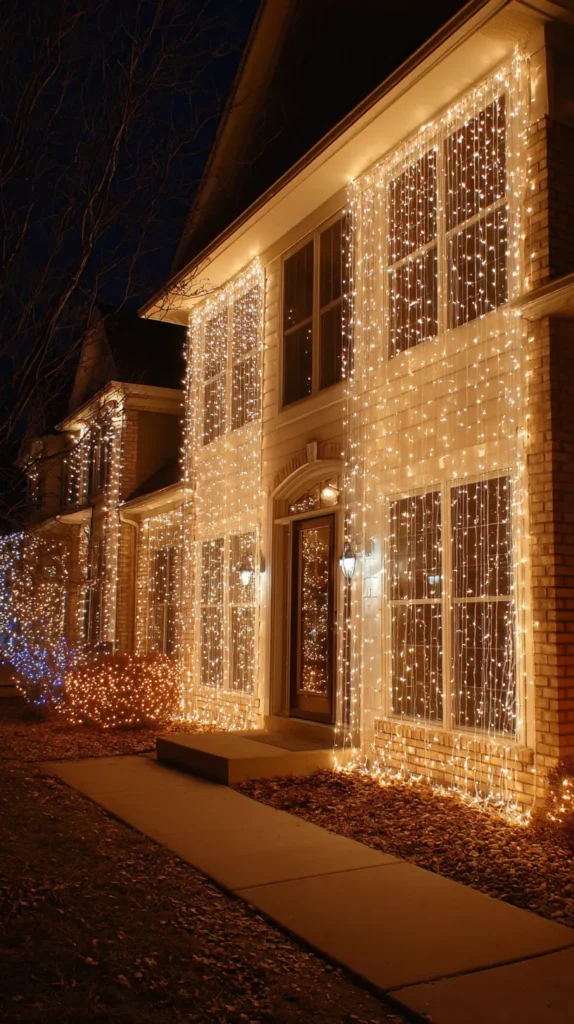
Turn a blank wall or a large window into a shimmering backdrop of pure magic. Imagine a literal wall of light cascading down from your porch eaves or covering a bay window, creating a dense, glowing veil that mimics falling snow or a starry night sky. Unlike standard string lights that just outline a shape, curtain lights (which feature multiple vertical drops hanging from a central horizontal wire) fill the entire negative space with thousands of tiny LEDs. This creates a high-impact, modern “event” look, transforming a dark, empty porch into a radiant stage that creates a stunning silhouette for anyone standing in front of it.
- The “Wall” Effect: Use curtain lights to cover large, boring surfaces like a garage door or a blank side wall. It instantly turns a “dead zone” into a feature wall.
- Window Backdrops: Hang them inside a large picture window. The glass reflects the lights, creating an infinity effect that looks like a dense blizzard of light from the street.
- Porch Privacy: Hang them along the perimeter of your porch ceiling. They act as a translucent, glowing privacy screen that makes the porch feel like a cozy, enclosed room.
- Wire Management: Curtain lights can be prone to tangling. Do not untie the individual vertical bundles until the primary horizontal wire is entirely hung and secured.
- Density Control: For a fuller look, don’t stretch the primary wire to its max. Bunch them slightly closer together to increase the density of the vertical drops.
Pro Design Tip: Create a dramatic silhouette effect. Hang a wall of curtain lights behind your porch swing or rocking chairs. When the lights are on, the furniture (and anyone sitting in it) will appear as crisp, dark silhouettes against the glowing background, creating a cinematic, cozy visual.
Budget Consideration: Curtain lights are surprisingly cost-effective for the coverage they provide. A single set (often 10×10 feet) covers 100 square feet of space with hundreds of bulbs using only one plug. Achieving that same density with standard string lights would require buying 10 separate boxes and managing a nightmare of extension cords.
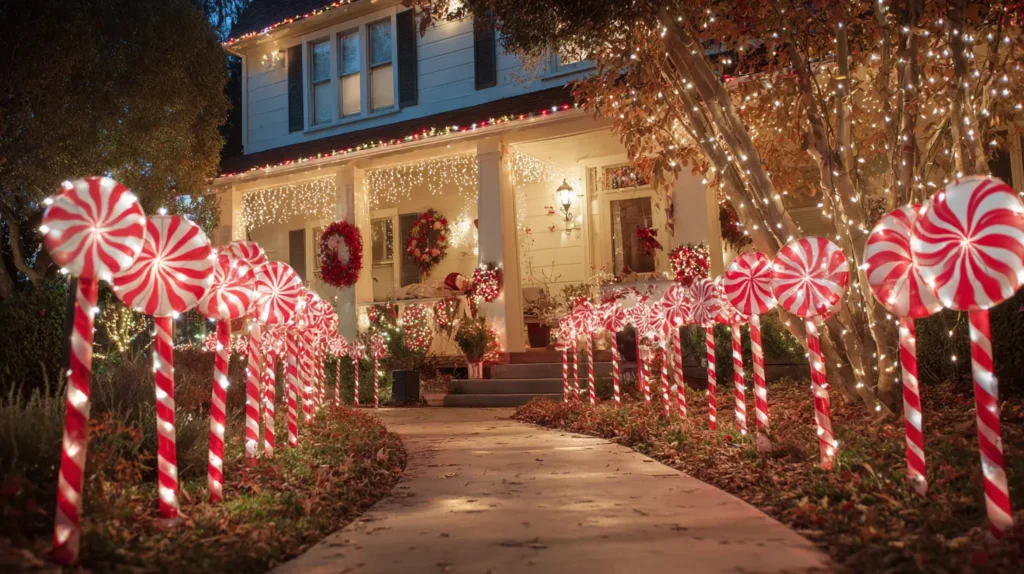
18. Candy Cane or Red-and-White Pathway Lights for Holiday Walkways

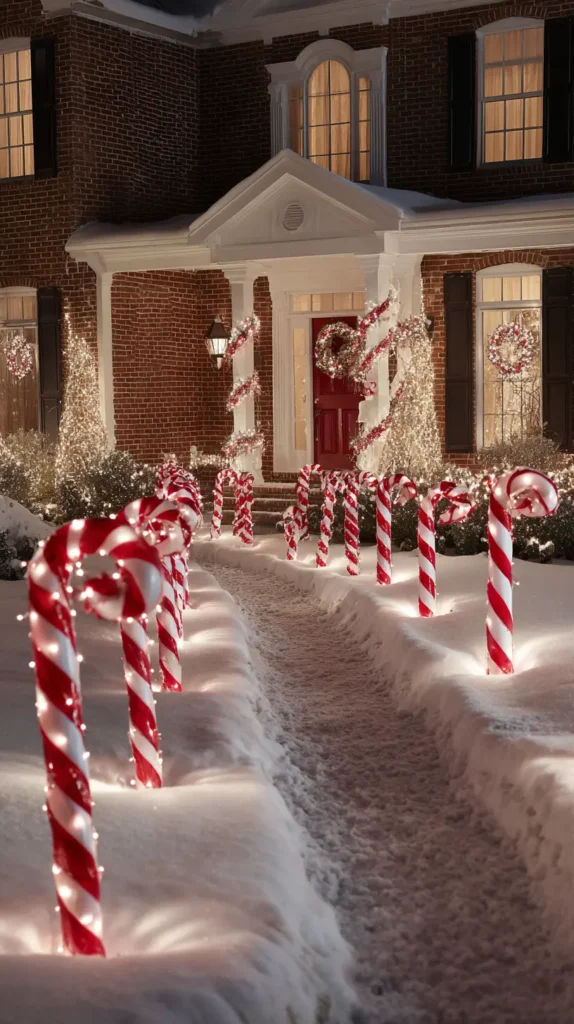

Transform your front walkway into a whimsical “Peppermint Lane” that leads straight to the North Pole (or your front door). Imagine a neat row of glowing red-and-white markers cutting through the darkness, creating a crisp, high-contrast border against the snow or lawn. Whether you choose literal illuminated plastic candy cane shapes or a more sophisticated pattern of alternating red and white C9 bulbs clipped to ground stakes, this lighting scheme injects a burst of sugary, nostalgic joy into your curb appeal. It creates a defined “runway” for guests, signaling that your home is a place of fun, warmth, and sweet holiday traditions.
- The Pattern: If using individual bulbs, alternate them strictly (Red, White, Red, White) to create that iconic candy-cane rhythm.
- Spacing Consistency: Place your stakes exactly 12 to 15 inches apart. Consistency is what makes this look like a professional installation rather than a random scattering.
- Bulb Choice: Use Cool White bulbs paired with Red. Cool white is crisp and snowy, creating a sharper contrast with the red than the yellowy tone of warm white.
- The “Candy Cane” Arch: Look for lighted candy cane markers that are tall enough (24+ inches) to peek over snowdrifts or tall grass.
- Daytime Visibility: Unlike standard bulbs, which disappear during the day, plastic candy cane markers provide festive color and shape even when the lights are off.
Pro Design Tip: Don’t just line the straight part of the path. If you have a curved flower bed or walkway, ensure the lights follow the curve precisely. This “drawing with light” technique highlights the landscaping architecture and guides the eye fluidly to the entrance.
Budget Consideration: You don’t need to buy specific “pathway light kits.” Buy a standard pack of universal light stakes (about $8 for 25) and clip your existing roofline lights into them along the ground. Swap every other bulb for a red one (replacement bulbs are cheap) to achieve the candy-cane look for a fraction of the cost.
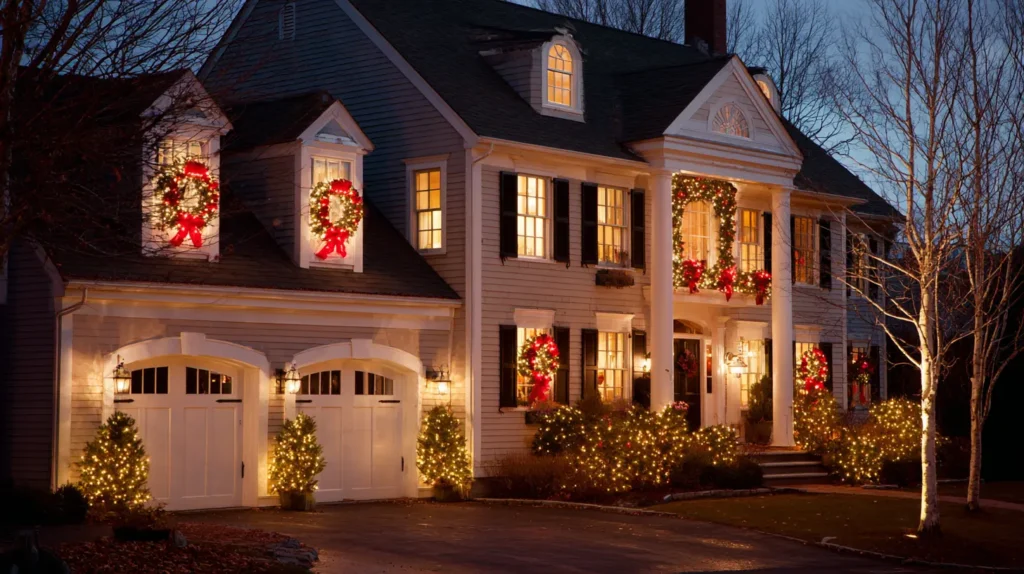
19. Illuminated Christmas Wreaths or Giant Lit Bows on Doors and Windows
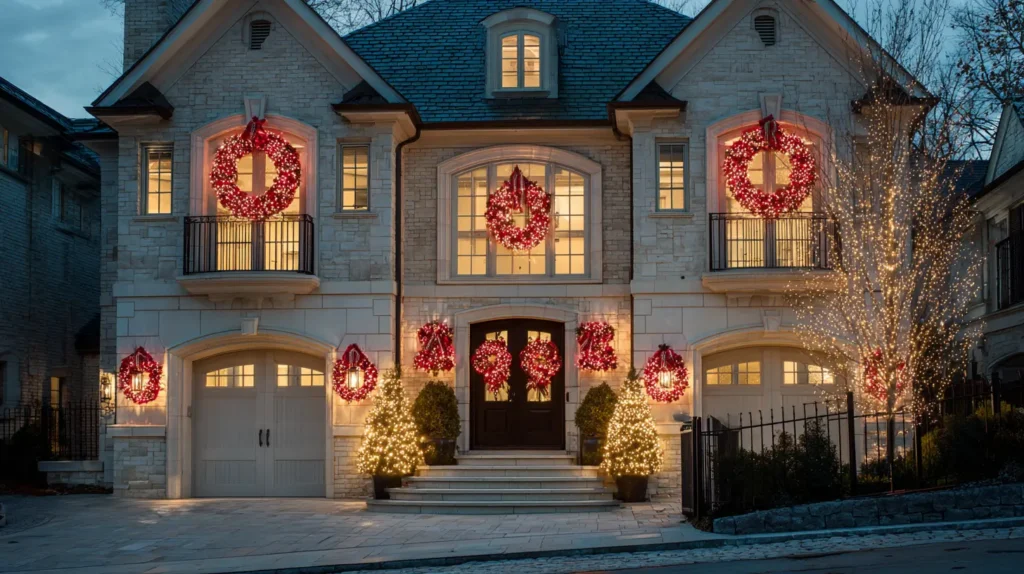
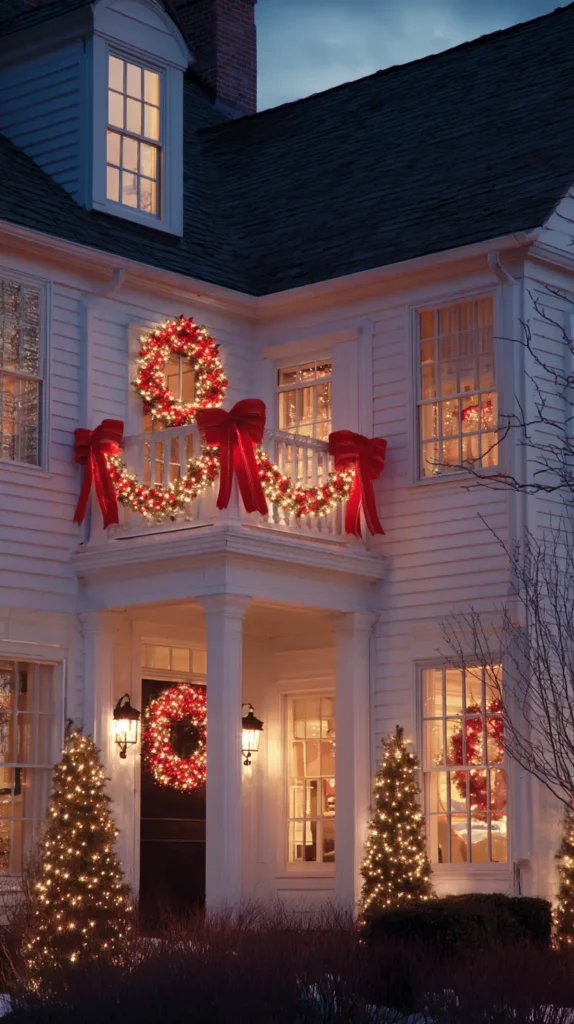
Give your home the polished, symmetrical curb appeal of a luxury hotel or a classic holiday card. Imagine driving up to see a lush, pre-lit evergreen wreath centered perfectly in every single window of your house, casting a soft, circular halo of warm light against the glass. Alternatively, picture massive, structural red bows wrapped in rope lights attached to your garage doors or balcony railings. These oversized, glowing accents act as “jewelry” for your home’s exterior, breaking up the dark expanses of brick or siding with distinct focal points that feel traditional, welcoming, and incredibly high-end.
- The Window Grid: For the most impactful look, place a matching lit wreath in every street-facing window. The repetition creates a sense of order and grandeur.
- Battery is Best: Avoid the nightmare of extension cords running through your house. Use battery-operated wreaths with built-in timers that turn on automatically at dusk.
- Scale Up: Windows on the second story look smaller from the street. Choose wreaths that are at least 24–30 inches wide so they don’t look like tiny dots from the sidewalk.
- The Garage Bow: A giant, lighted wireframe bow is the perfect solution for a wide garage door. It fills the negative space and adds festive cheer to a utilitarian part of the house.
- Hanging Hacks: Use strong magnetic hooks (for single-pane glass) or open the top sash of double-hung windows to loop a ribbon over the top for a secure, nail-free hold.
Pro Design Tip: Don’t let the bow disappear in the dark. If you have a wreath with a red velvet bow, the bow often turns into a black shadow at night against the bright lights. Weave a short strand of micro-LED wire lights into the loops of the ribbon itself so the red fabric glows and remains visible after sunset.
Budget Consideration: Buying 10 pre-lit outdoor wreaths can be costly. Buy plain, unlit artificial wreaths in bulk (often under $5 each). Then, buy a bulk pack of battery-operated fairy lights. Wrap them yourself. You will save hundreds of dollars and usually get a better light density than the store-bought versions.
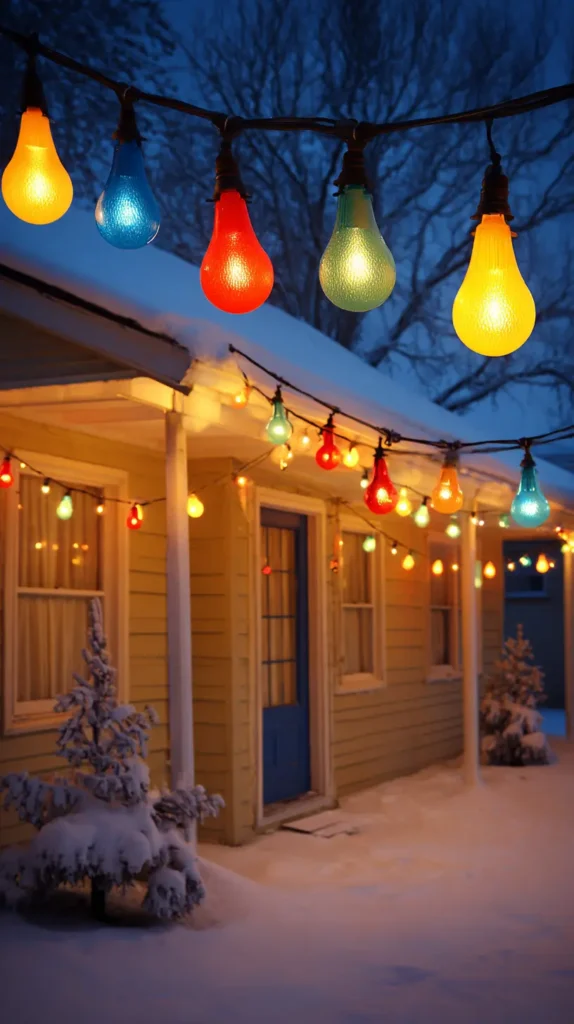
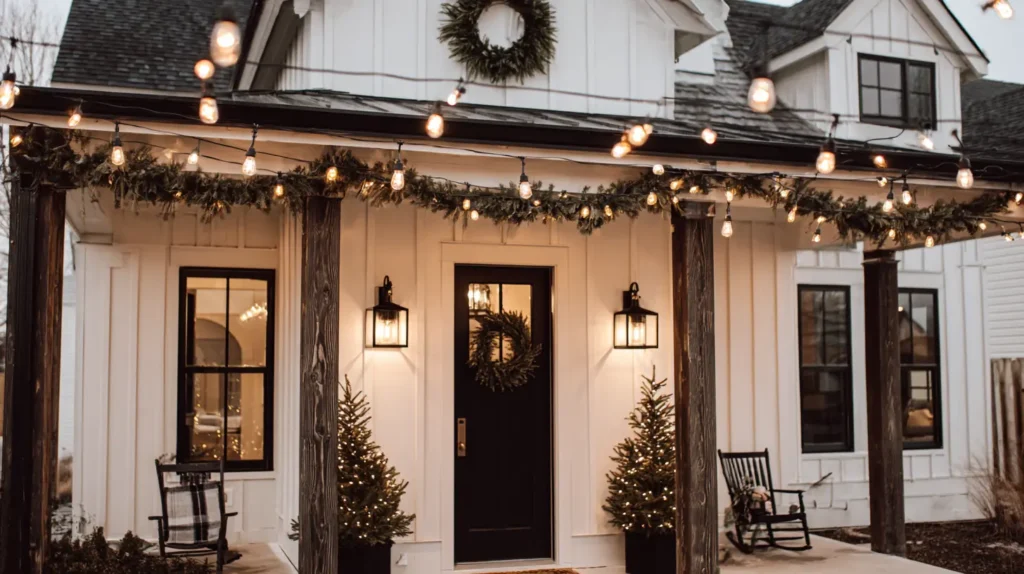
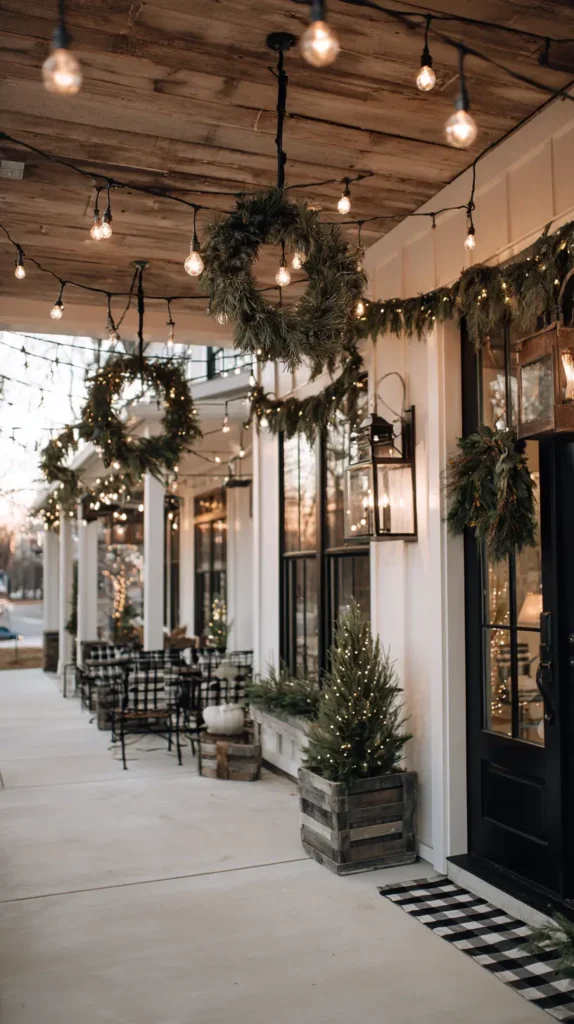
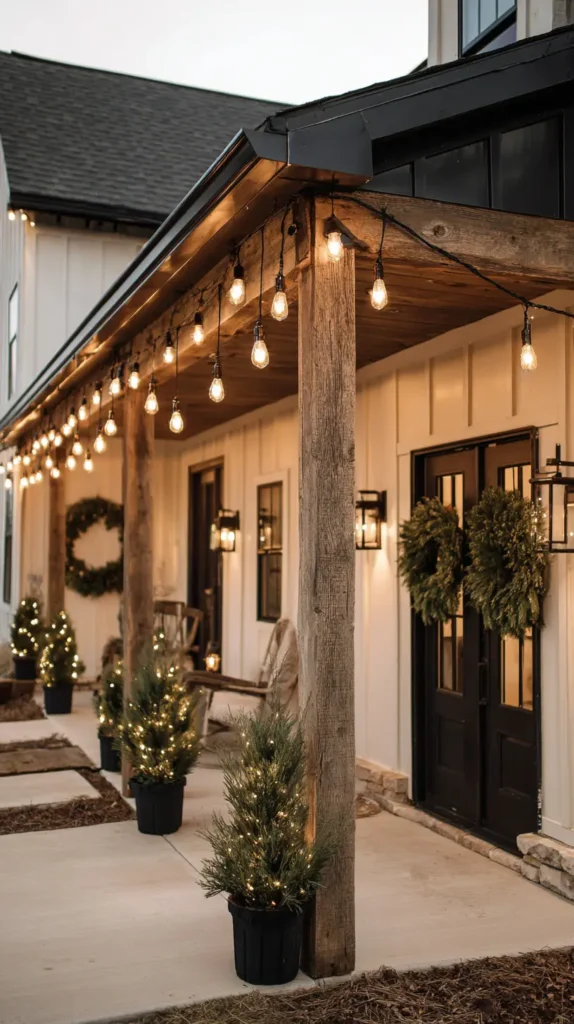
20. Modern Farmhouse Lighting with Edison Bulbs and Black Wire
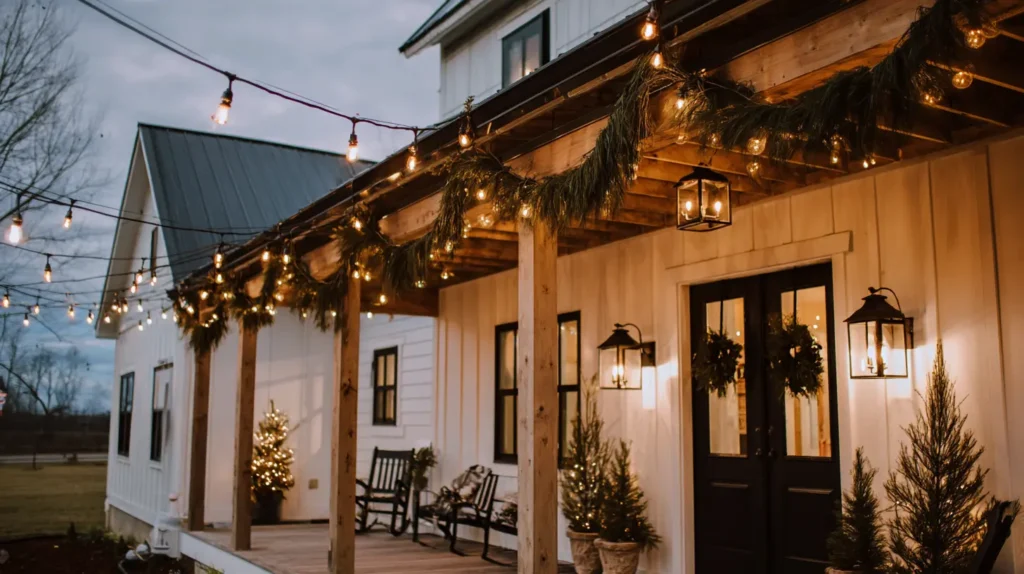
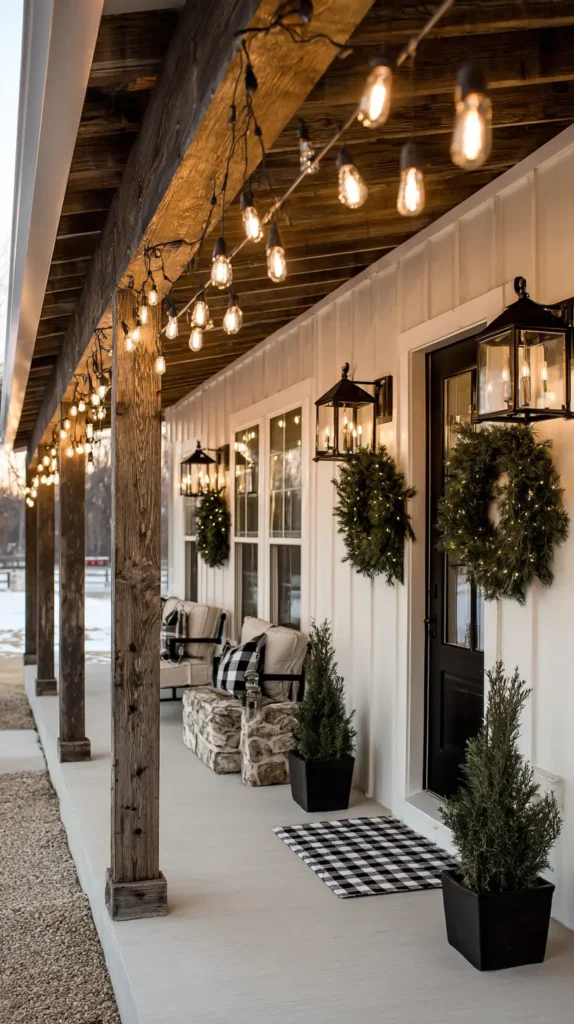
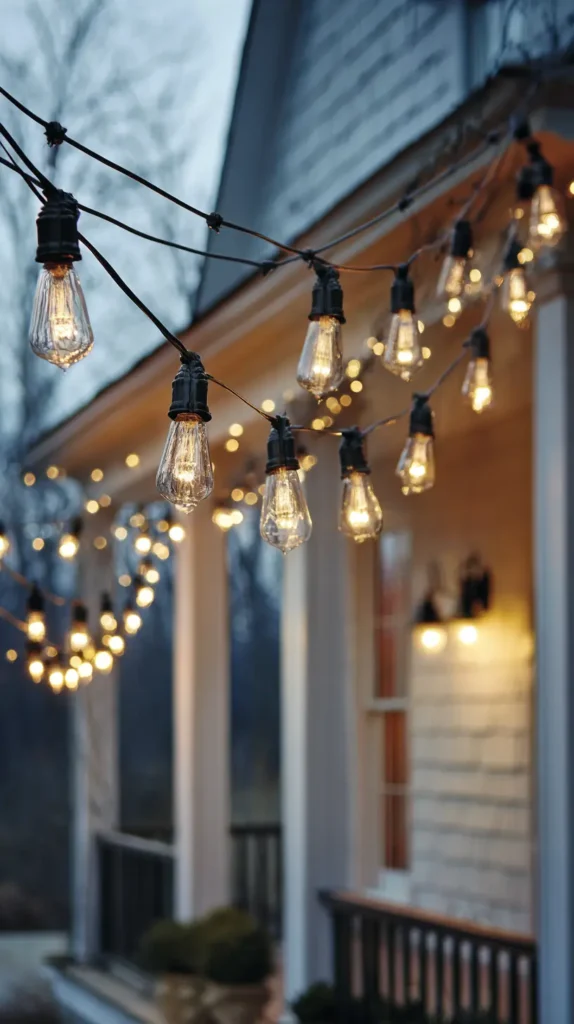
Trade the traditional green-wire mini lights for a bold, industrial, and undeniably trendy look. Imagine your porch or roofline draped in heavy-duty, commercial-grade strands featuring thick black wiring and oversized, clear glass “Edison” bulbs (style S14). Unlike the sharp twinkle of standard Christmas LEDs, these bulbs reveal a glowing filament that casts a warm, buttery-amber light, reminiscent of a vintage 1920s bistro or a cozy barn wedding. The stark contrast between the black wire and the white farmhouse siding or rustic wood beams serves as a graphic outline, creating a display that feels substantial, architectural, and incredibly stylish—a sophisticated departure from the usual holiday glitter.
- The Black Wire Advantage: Don’t hide the wire; celebrate it. The black cord creates a crisp, graphic line that complements black window trim, gutters, and hardware, which are standard in modern farmhouse design.
- The “Swag” Technique: Instead of pulling them tight like military lines, let these strands hang with a gentle, natural swoop (catenary curve) between clips. This relaxed drape feels casual and welcoming.
- Visible Filaments: Choose LED bulbs designed to look like vintage incandescent filaments. You get the nostalgic “loop” look inside the glass without the heat or energy cost.
- Year-Round Appeal: This style bridges the gap between seasons. While festive for Christmas, these lights are neutral enough to leave up through the New Year and even into summer for patio dining.
- Pair with Greenery: The warm, industrial glow pairs perfectly with fresh cedar garland. The black wire disappears into the deep greens, leaving just the glowing bulbs to highlight the texture of the leaves.
Pro Design Tip: Create a “Light Ceiling” for your porch. Instead of just outlining the edge, zig-zag these strands back and forth across the ceiling of your covered porch or pergola. It creates a canopy of warm light that turns your outdoor entry into a cozy, open-air room.
Budget Consideration: Commercial-grade Edison strands are more expensive upfront than big-box Christmas lights. However, they are built to last for years (often weather-rated for permanent installation). To save money, buy the strings and bulbs separately online. You can customize the length, and replacement bulbs are cheaper than replacing an entire integrated strand if one burns out.
Conclusion
With these 20 outdoor Christmas lighting ideas, your home’s exterior becomes a dazzling celebration of the season—radiating warmth, wonder, and that unmistakable holiday glow that makes December feel truly magical. From elegant roofline classics to playful animated figures and cutting-edge projectors, each idea turns your yard, porch, and façade into a stunning showpiece that delights family, friends, and everyone who passes by.
As the nights grow longer and the air turns crisp, your lights will become more than decoration—they’ll be a beacon of joy, a signal of togetherness, and a reminder of the simple beauty of the holidays. Whether you go all-out with synchronized displays or keep it cozy with warm white elegance, your illuminated home will create memories that last long after the season ends.
Here’s to a brilliantly lit Christmas—may your home shine bright, your heart stay warm, and your holidays be filled with light, love, and plenty of magic! ✨🏡🎄
