
20 Elegant Japanese Quilt Ideas: Embracing Zen Style and Ultimate Comfort
Japanese quilting embodies a serene design philosophy where Zen principles meet masterful textile art, creating spaces of profound calm and refined beauty. Exploring Elegant Japanese Quilt Ideas reveals how techniques such as the mindful repetition of Sashiko stitching, the deep, tranquil shades of Indigo dyeing, and the precise geometries of Shonai and Hishizashi patterns translate into home decor that offers both ultimate comfort and timeless style.
These pieces are far more than bedding or throws; they are tactile manifestations of wabi-sabi (the beauty in imperfection) and shibui (subtle elegance), designed to cultivate order and tranquility. This collection demonstrates how these ancient arts can anchor a modern home, proving that true sophistication is achieved through simplicity, intention, and a deep reverence for natural materials and craftsmanship.
Elegant Japanese Quilt Ideas
Contents
- 1 Elegant Japanese Quilt Ideas
- 2 1. Traditional Sashiko Stitch Patterns for Zen Bed Covers and Throws
- 3 2. Deep Indigo Dyed Quilt Throws for Cozy Sofas
- 4 3. Japanese Kasuri Fabric Sofa Covers for Textured Comfort
- 5 4. Indigo Dyed Japanese Quilt Bed Covers for Calm Sleeping Spaces
- 6 5. Refined Hishizashi Indigo Quilt Patterns for Elegant Table Runners
- 6.1 The “Diamond Mist” Hishizashi Table Runner
- 6.2 Materials Needed
- 6.3 Cultural Backstory
- 6.4 Step 1: Cutting and Preparing the Fabric
- 6.5 Step 2: Marking the Diamond Grid
- 6.6 Step 3: Building the Flat Sandwich
- 6.7 Step 4: Stitching the Diamond Lines
- 6.8 Step 5: Order and Clean Intersections
- 6.9 Step 6: Finishing the Edges
- 6.10 Usability and Comfort Notes
- 7 6. Soft Cotton Japanese Quilts for Ultimate Everyday Comfort
- 8 7. Elegant Sashiko Stitched Pillow Covers for Sofa Accents
- 9 8. Modern Kogin Embroidery Patterns on Cozy Quilted Throws
- 10 9. Minimalist Shonai Quilt for Couch Cover Comfort
- 11 10. Japanese Garden-Inspired Quilts for Wall Decor and Serenity
- 12 11. Mountains and Mist Quilt Patterns for Calming Wall Hangings
- 13 12. Serene Sashiko Quilt Ideas for Reading Nooks
- 14 13. Handcrafted Japanese Quilt Table Runners wih Zen Aesthetics
- 15 14. Kogin-Zashi Inspired Quilt Blocks for Modern Throw Pillows
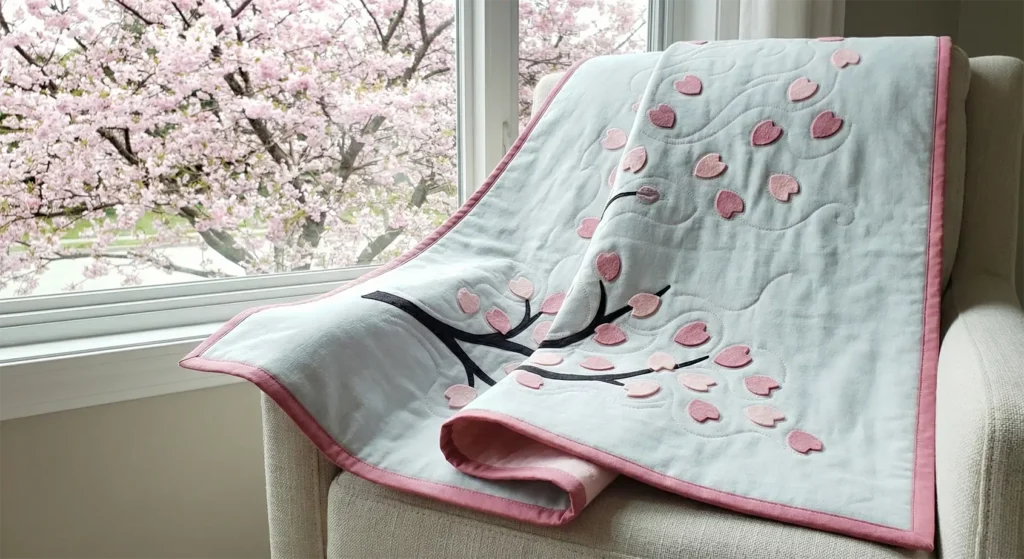
- 16 15. Cherry Blossom Sakura Appliqué Quilts for Spring Elegance
- 17 16. Ocean Wave Seigaiha Patterns for Relaxing Bedroom Decor
- 18 17. Sashiko Quilted Floor Throws for Cozy Minimal Living Areas
- 19 18. Comfortable Shonai Quilt Design for Lounge Chairs
- 20 19. Refined Shonai Quilt Patterns for Ottoman Covers
- 21 20. Zen Hishizashi Quilt Ideas for Pillow Covers
- 22 Conclusion
The versatility of this tradition allows it to enhance every corner of your living environment with intentional comfort. A Deep Indigo Dyed Throw transforms a sofa into a haven of cozy serenity, while Refined Hishizashi Patterns bring quiet sophistication to a dining table as elegant runners.
The aesthetic seamlessly applies to various elements: the durable texture of a Japanese Kasuri Fabric Sofa Cover, the focused calm of Sashiko Quilts for Reading Nooks, and the artistic statement of Mountains and Mist Wall Hangings. Whether through the rustic charm of Kogin Embroidery on a throw or the poetic seasonal touch of Cherry Blossom Appliqué, each design encourages a more mindful and appreciative engagement with our daily spaces, elevating functional items into sources of daily meditation.
Ultimately, integrating these ideas is about curating a personal atmosphere of mindful refuge. The meditative, rhythmic process of hand-stitching is inherent in the finished object—be it a Minimalist Shonai Couch Cover or a Zen Hishizashi Pillow Cover. Each offers a unique visual rhythm and texture that actively soothes the mind. This guide illustrates how deliberate choices, like a Handcrafted Table Runner with Zen Aesthetics or a Sashiko Quilted Floor Throw, can infuse a home with tranquility, order, and an understated elegance that is both deeply comforting and visually cohesive.
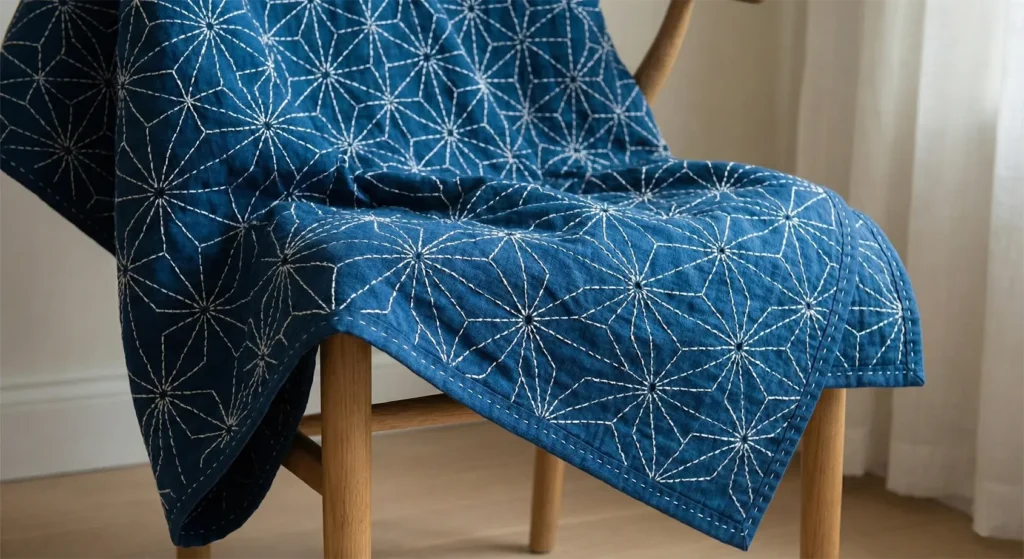
1. Traditional Sashiko Stitch Patterns for Zen Bed Covers and Throws
The “Zen Asanoha” Indigo Sashiko Wholecloth Quilt
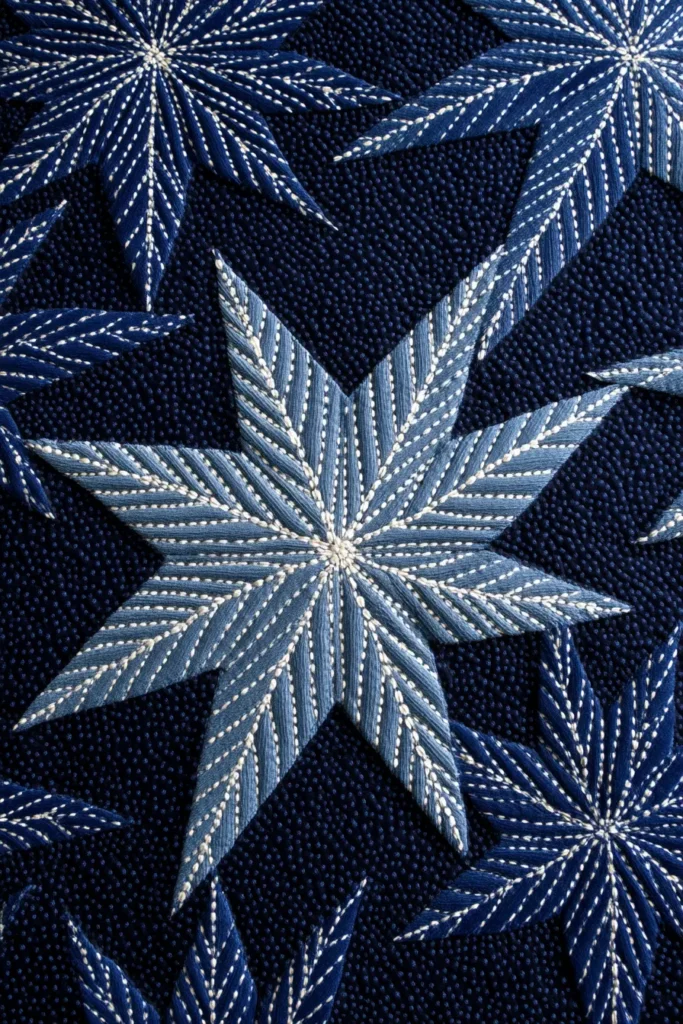
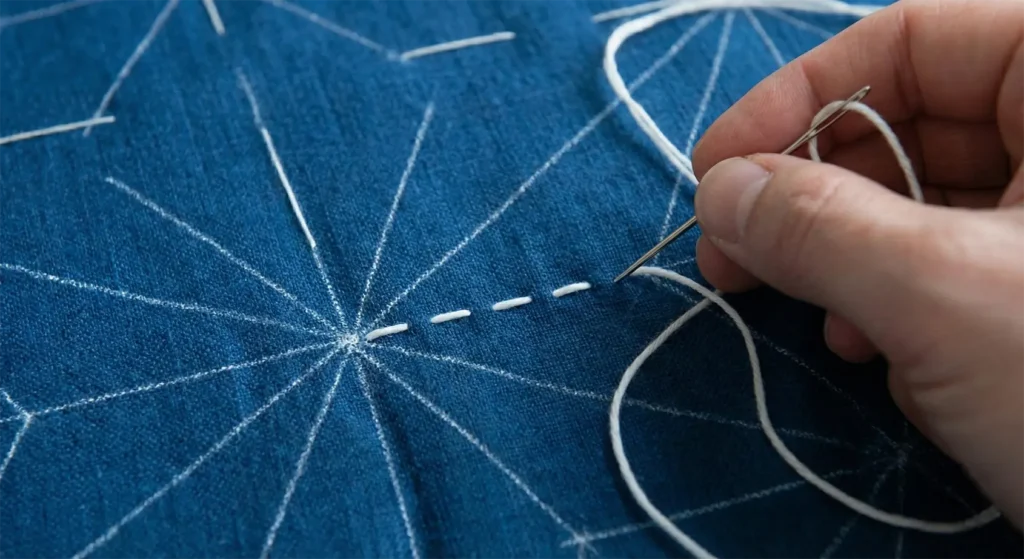
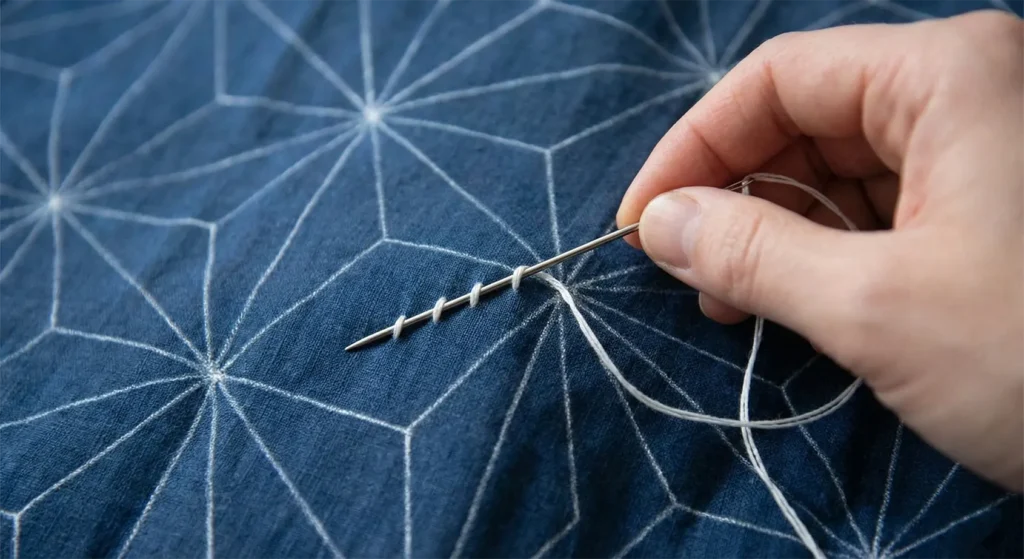
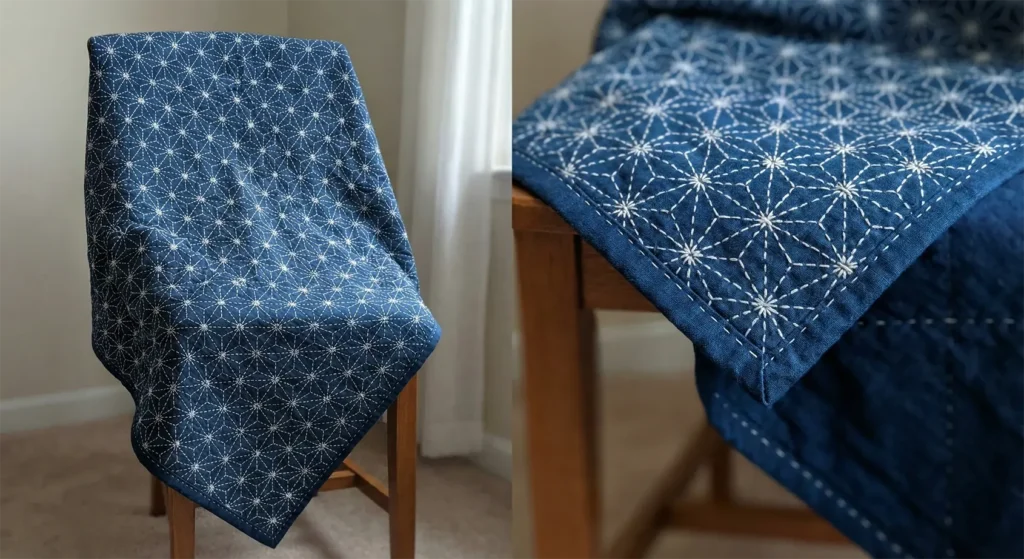
Sashiko (literally “little stabs”) began in Edo-era Japan as a functional reinforcement for worn-out clothes. It has evolved into an art form of exquisite geometric precision. This design features the Asanoha (Hemp Leaf) pattern. Because hemp grows straight and strong with little care, this pattern is traditionally used to promote good health and vigorous growth. Using deep Indigo fabric with stark white stitching creates a high-contrast, minimalist aesthetic that embodies Zen simplicity.
Finished Dimensions: Queen Size Bed Cover, approximately 90″ x 90″.
Materials Needed:
- Fabric A (Top): 5 yards of Dark Indigo Linen or Navy Cotton Shot Cotton. (Linen offers a texture that ages beautifully, embracing the philosophy of Wabi-Sabi).
- Fabric B (Backing): 5 yards of coordinating cotton (perhaps a lighter blue).
- Batting: Thin Cotton Batting or a layer of Cotton Flannel. (Traditional Sashiko is not puffy; it is flat and drapeable. Heavy batting makes the precise stitching difficult).
- Thread: White Sashiko Thread (Heavyweight cotton). Do not use regular sewing thread; it is too thin to stand out against the indigo.
- Needles: Sashiko Needles (Long and stiff, designed to load many stitches at once).
- Notions: Grid stencil or ruler, white chalk pencil (Chaco liner), leather thimble (palm thimble).
Cultural Backstory: Sashiko relies on “Ma”—the concept of negative space. Unlike Western embroidery, which fills a space, Sashiko defines the space with lines. The rhythm of the white stitches against the dark blue represents falling snow on the roof of a farmhouse, invoking a sense of quiet winter isolation and peace.
Step 1: The Infinite Grid
Sashiko is geometry. You must mark the grid before you stitch.
- Prep: Lay your Indigo Top Fabric flat (tape it to the floor if necessary).
- Marking: Using your white chalk pencil and a long ruler, draw a 2-inch grid across the entire surface of the fabric.
- Draw horizontal lines spaced 2 inches apart.
- Draw vertical lines spaced 2 inches apart.
- Result: You should have a field of perfect 2-inch squares.
Step 2: Drafting the Hemp Leaf (Asanoha)
We turn squares into stars.
- Diagonals: Draw diagonal lines connecting the corners of every square (creating an “X” in each box).
- The Vertical Cross: Draw a vertical line through the center of every “X”.
- The Diamond: Connect the center point of the top of a square to the center points of the sides.
- Alternative: For a large project like a Queen quilt, consider buying a Sashiko Stencil for the Asanoha pattern. Tracing a stencil is much faster and ensures consistency over 90 inches of fabric.
Step 3: The Flat Sandwich
- Layer: Tape Backing (face down) -> Batting -> Top (Marked side up).
- Baste: You must baste incredibly well.
- Use Thread Basting in a grid pattern every 4 inches.
- Why? Safety pins get in the way of the long sashiko needle. Thread basting keeps the layers flat and secure.

Step 4: The “Grain of Rice” Stitch
Sashiko is not sewn one stitch at a time. It is “loaded.”
- Load the Needle: Push the needle through the fabric, taking 3, 4, or 5 stitches onto the needle shaft at once.
- Ratio: The stitch on top (white) should be the size of a grain of rice. The space between stitches (blue) should be 1/3 the size of the stitch.
- Pull: Push the needle through and pull the thread gently. Do not pull tight.
- Smooth: After every pull, smooth the fabric with your hand to prevent puckering.
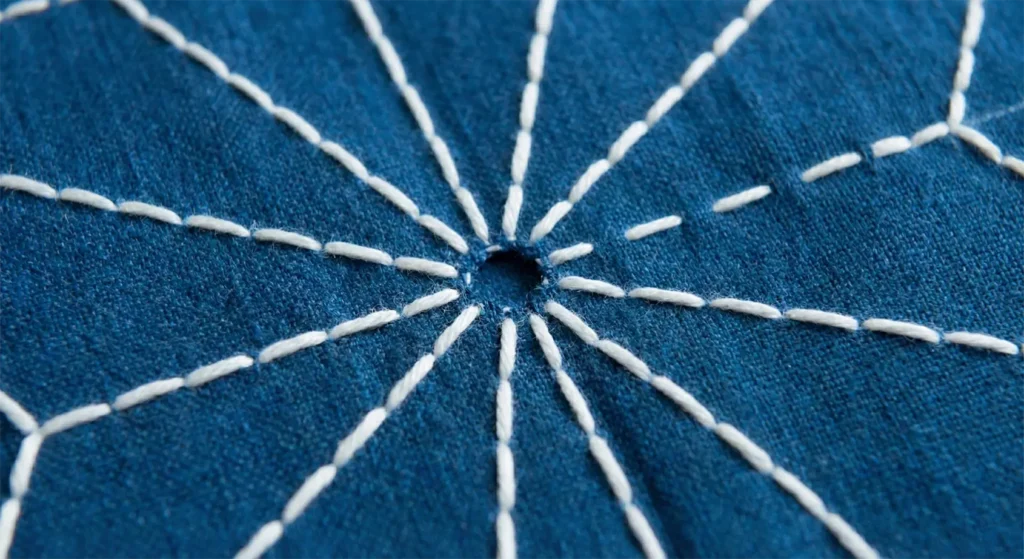
Step 5: The Path of Efficiency
To keep the back neat and the tension even, stitch in a specific order.
- Horizontals First: Stitch ALL horizontal lines across the entire quilt. Do not turn corners. Just go straight across.
- Verticals Second: Stitch ALL vertical lines.
- Diagonals Last: Stitch the diagonal lines.
- The Intersection Rule: The stitches must never cross at the intersection. There should be an open space (a tiny blue hole) where the lines meet. This keeps the center of the star clean and flat, rather than a bulky knot of thread.
Step 6: The “Furoshiki” Binding
Instead of a separate binding strip, use a traditional Japanese hem.
- Trim: Trim the batting and backing to the exact size of the quilt top.
- Fold: Fold the Indigo Top fabric (which should be cut 1 inch larger than the rest) over the edge to the back.
- Fold Again: Tuck the raw edge under to create a clean hem on the back.
- Stitch: Hand stitch the hem down using the same white Sashiko thread and a running stitch. This frames the quilt in a solid band of Indigo.
Comfort Note: Because this quilt uses minimal batting and heavy thread, it has a weight and drape similar to a weighted blanket but with much more breathability. It is exceptionally grounding and calming to sleep under.
2. Deep Indigo Dyed Quilt Throws for Cozy Sofas
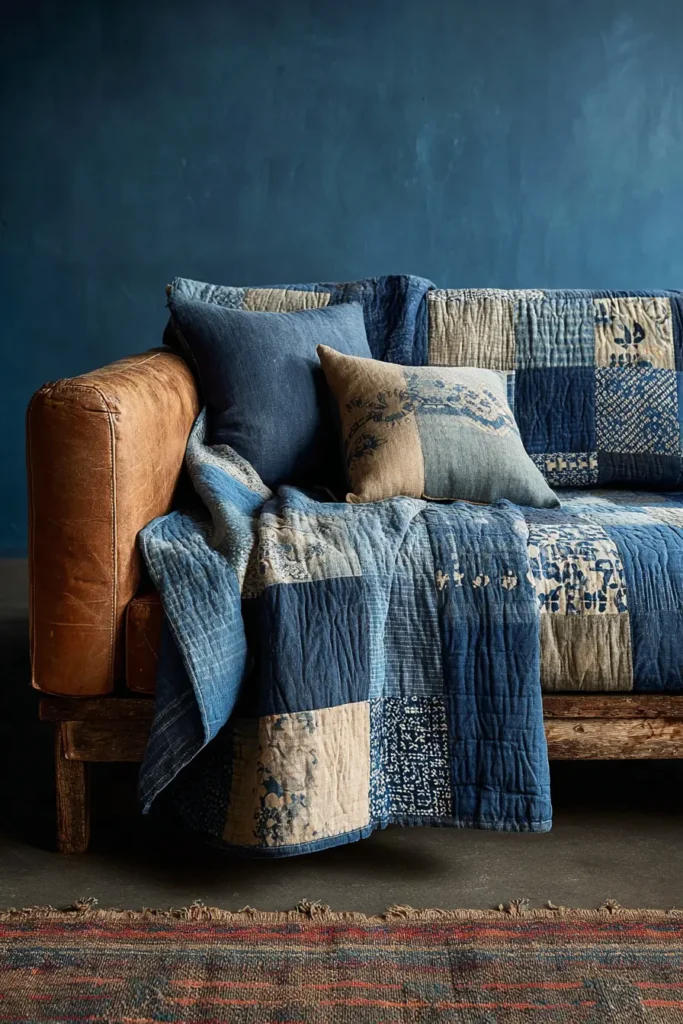
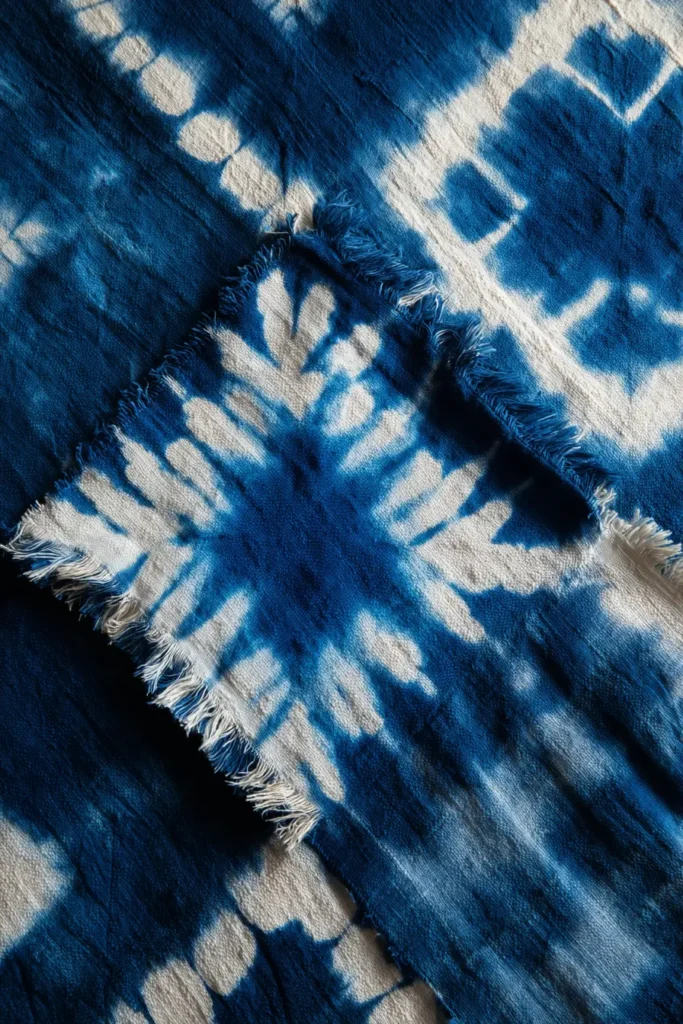
The “Shibori Tides” Indigo Dyed Throw
Shibori is the ancient Japanese art of resist dyeing. Unlike tie-dye, which can be chaotic, Shibori is controlled and geometric. This project creates a Kumo (Spiderweb) or Arashi (Storm) pattern using real Indigo dye. The result is a sophisticated, organic throw that brings the deep, calming blue of the ocean into your living room. Because real Indigo is a natural dye, it has a unique depth of color that chemical dyes cannot match, and the cotton becomes softer with every wash.
Finished Dimensions: Cozy Sofa Throw, approximately 50″ x 70″.
Materials Needed:
- Fabric: 4 yards of Prepared-for-Dyeing (PFD) White Cotton or Linen. (You need enough for the Top and the Backing; linen dyes beautifully.)
- Dye Kit: Natural Indigo Dye Kit (containing pre-reduced Indigo crystals, Soda Ash, and Thiox).
- Resist Tools: Strong rubber bands, wood blocks, or PVC pipe (depending on the pattern).
- Batting: Bamboo Batting. (Bamboo has a silky drape that matches the elegance of Shibori).
- Thread: Navy Blue cotton thread.
- Safety Gear: Rubber gloves, face mask (for mixing powder), large 5-gallon bucket.
Cultural Backstory: Indigo (Ai) was historically the dye of the common people in Japan because it repelled insects and strengthened the fabric. Samurai wore Indigo under their armor to prevent infection from wounds. Today, “Japan Blue” is celebrated for its ability to fade beautifully, much like a favorite pair of jeans, embodying the Zen appreciation for the passage of time.
Step 1: The “Resist” Fold
The pattern is created by preventing the dye from reaching certain parts of the fabric.
- Option A: Kumo (Spiderweb):
- Pinch a small section of the white fabric.
- Bind it tightly with a rubber band near the base.
- Repeat this random pinching and binding all over the fabric.
- Result: Circular bursts of white against a blue background.
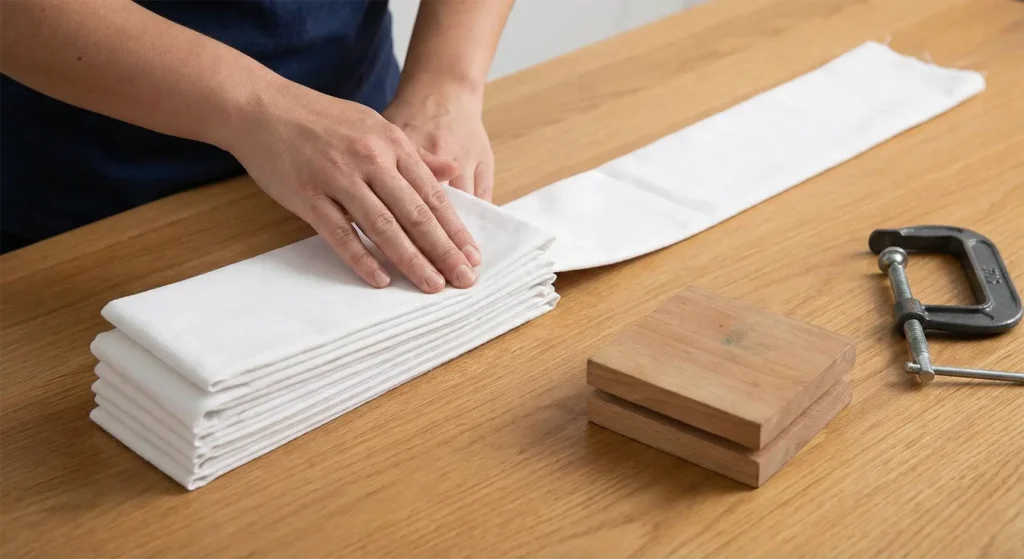
- Option B: Itajime (Geometric squares):
- Accordion-fold the fabric into a long strip (about 4 inches wide).
- Accordion-fold the strip into a square stack.
- Sandwich the stack between two square wooden blocks. Clamp tightly.
- Result: A grid of blue and white squares.
Step 2: The Indigo Vat
Indigo is not like other dyes; it needs to oxidize.
- Mix: Fill a 5-gallon bucket with warm water. Add the Indigo, Soda Ash, and Thiox according to your kit’s instructions.
- Stir: Stir gently in a circular motion. Do not splash! Introducing oxygen now will ruin the dye.
- Wait: Let the vat sit for 20-30 minutes until a “flower” (coppery scum) forms on top and the liquid looks yellow-green (not blue).
Step 3: The Dip
- Soak: Wet your bound fabric bundle in plain water first. Squeeze out excess air.
- Submerge: Lower the bundle gently into the dye vat.
- Massage: Keep it submerged for 3 to 5 minutes, gently massaging the dye into the folds. Do not let it touch the bottom sludge.
- Remove: Lift it out slowly.
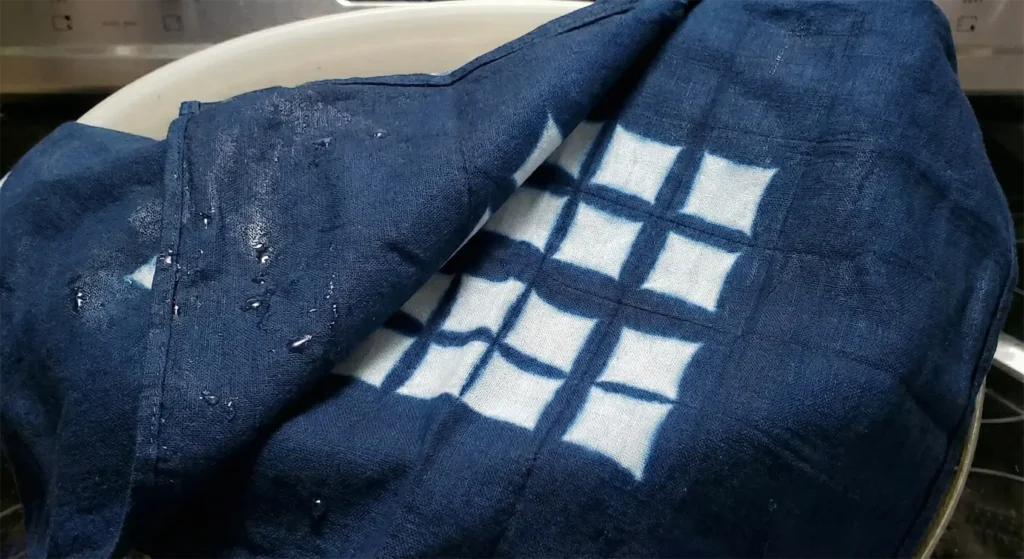
Step 4: The Oxidation Magic
This is the most exciting part.
- Observe: When you pull the fabric out, it will be distinctively Green.
- Air: Let it sit in the air for 20 minutes. As oxygen hits the dye molecules, they bond to the fiber and turn from Green to Deep Blue.
- Repeat: For a darker Navy, dip and air again. (3 dips are usually perfect for a rich color).
Step 5: Rinse and Unbind
- Rinse: Rinse the bundle in cold water until the water runs clear.
- Unbind: Cut the rubber bands or remove the clamps.
- Wash: Use a mild detergent (Synthrapol is best) to remove excess, loose dye. Dry and iron.
- Note: You now have a custom, hand-dyed fabric for your quilt top.
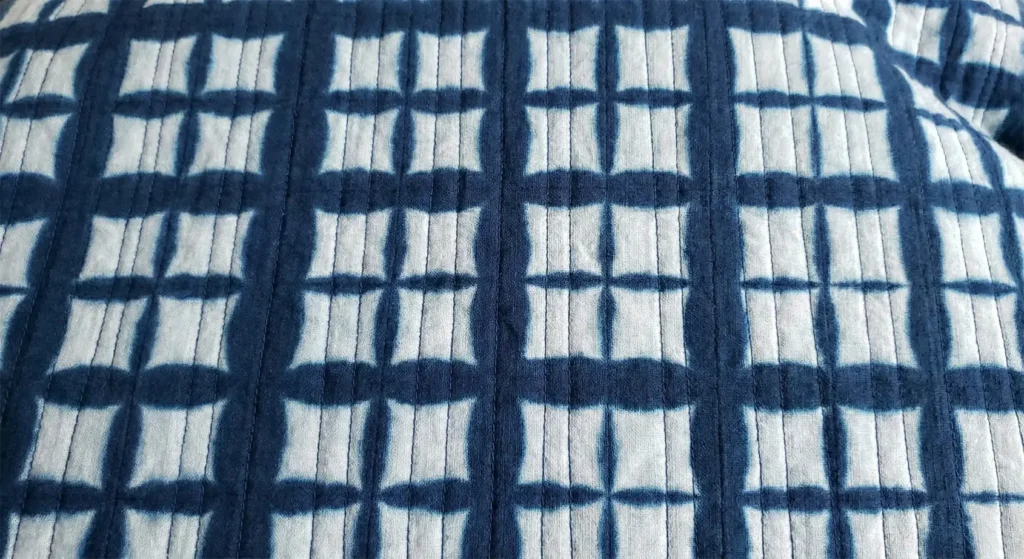
Step 6: “Rain” Quilting
Let the dye pattern be the star; keep the quilting simple.
- Sandwich: Dyed Backing + Bamboo Batting + Dyed Top.
- Thread: Use Navy Thread to blend in.
- Stitch: Quilt straight vertical lines spaced randomly (Variegated Spacing).
- Some lines 1/2 inch apart, some 2 inches apart.
- Effect: This looks like falling rain (Same) and complements the organic nature of the dye without fighting the pattern.
Step 7: The “Facing” Finish
A traditional binding might distract from the dye pattern. A facing creates a frameless edge.
- Cut Strips: Cut 2.5-inch strips of the dyed fabric.
- Sew to Front: Sew to the front edges of the quilt.
- Turn to the Back: Flip the strips entirely to the back and hand-stitch down.
- Result: The indigo pattern flows seamlessly off the edge of the quilt, looking like a piece of modern art draped over your sofa.
Usability Note: Real Indigo will “crock” (rub off) slightly at first, just like new denim. Wash the finished quilt twice before putting it on a white sofa. The color is “living” and will develop a stunning patina over the years of use.
3. Japanese Kasuri Fabric Sofa Covers for Textured Comfort
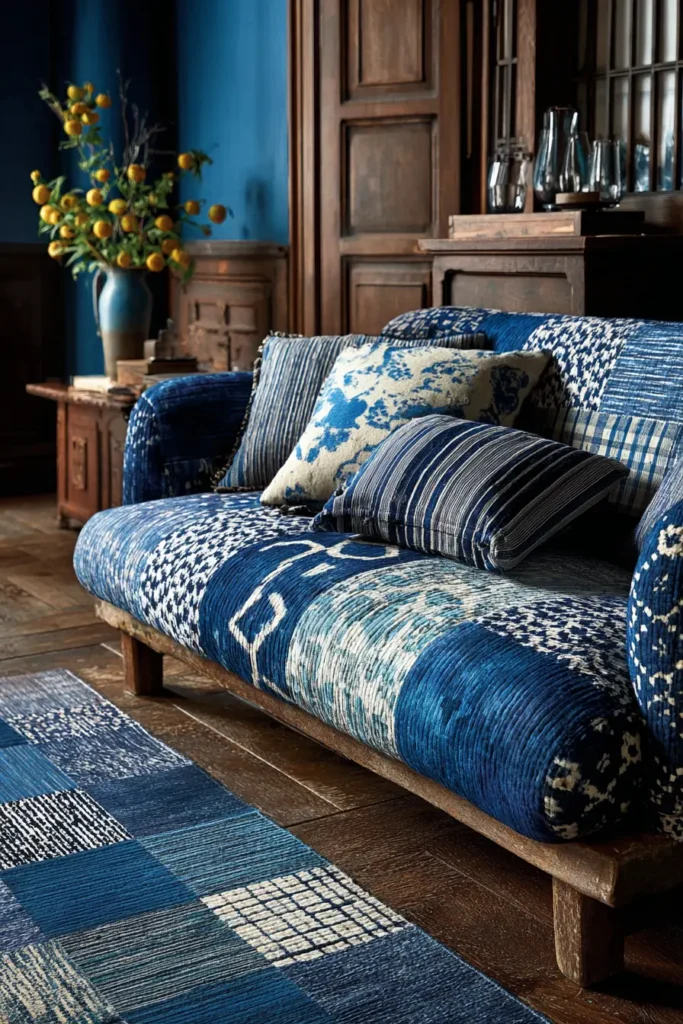
The “Kasuri Patchwork” Textured Sofa Seat Runner
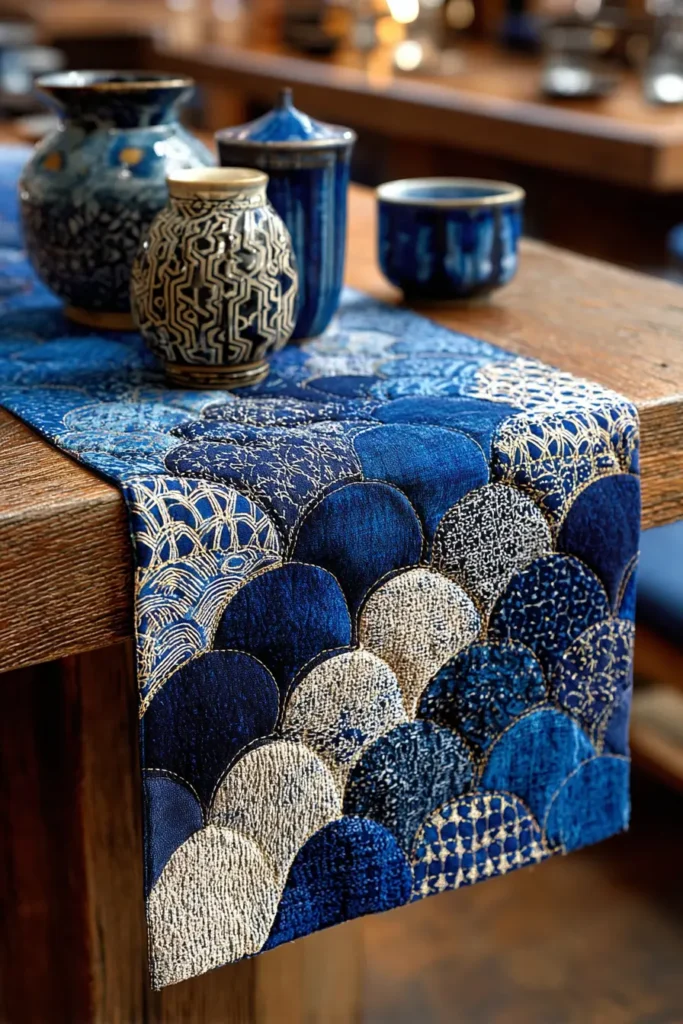
Kasuri is the Japanese term for Ikat weaving, where threads are tie-dyed before they are woven. This creates patterns with distinctive, soft, blurry edges (the word comes from kasureru, meaning “to blur”). Historically used for farm clothing and futon covers, Kasuri fabric is incredibly durable and hides wear, making it perfect for a high-traffic area like a sofa. This project uses a curated patchwork of Indigo Kasuri prints—checks, stripes, and splashes—to create a “Boro-Chic” aesthetic that is both rustic and refined.
Finished Dimensions: Sofa Seat Runner, approximately 24″ x 72″ (Fits the seat of a standard 3-seater sofa).
Materials Needed:
- Fabric A (Kasuri Assortment): 2 yards total of Japanese Yarn-Dyed Cotton (or Kasuri reproduction prints). Look for a mix of:
- Geometric “Splash” patterns (white on blue).
- Fine Stripes (Shima).
- Windowpane Checks (Koshi).
- Fabric B (Backing): 2 yards of Heavy Navy Canvas or Denim. (Weight is important to keep the cover from sliding).
- Batting: Low-Loft Cotton Batting. (You want a flat, dense feel like a traditional futon pad).
- Thread: Cream Sashiko Thread or heavy topstitching thread.
- Notions: Rotary cutter, non-slip rug pad material (optional strips).
Cultural Backstory: In Edo Japan, sumptuary laws often forbade commoners from wearing bright colors or silk. They turned to Indigo and cotton, developing incredible weaving techniques like Kasuri to add beauty within the restrictions. A patchwork Kasuri quilt pays homage to the philosophy of “Mottainai” (waste nothing), creating luxury from humble, durable roots.
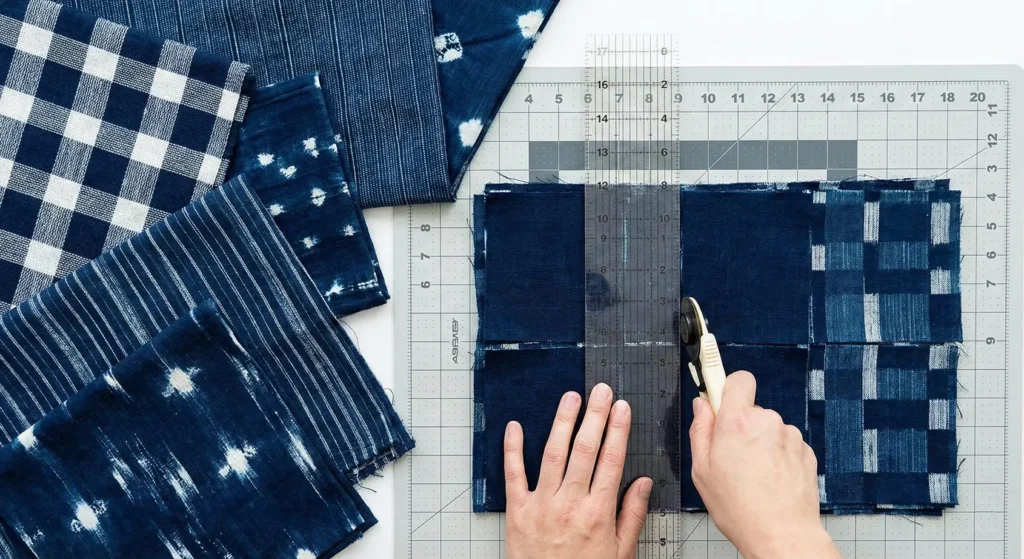
Step 1: The Curated Cut
The key to patchwork elegance is uniformity in size but variety in pattern.
- Select: Choose 4 to 5 different Kasuri patterns. Ensure they all share the same Deep Indigo background tone for cohesion.
- Cut: Cut uniform squares measuring 6.5″ x 6.5″.
- Calculation: For a 24″ x 72″ runner, you need a grid of 4 squares wide by 12 squares long.
- Total: You need 48 squares.
Step 2: The “Balanced Chaos” Layout
- Arrange: Lay the squares out on the floor in a 4×12 grid.
- Balance: Do not place two identical prints next to each other.
- Scatter the “heavy” white patterns (splashes) evenly among the “quiet” patterns (stripes).
- Zen Check: Squint your eyes. If one area looks too bright or too dark, swap the squares until the visual weight is evenly distributed.

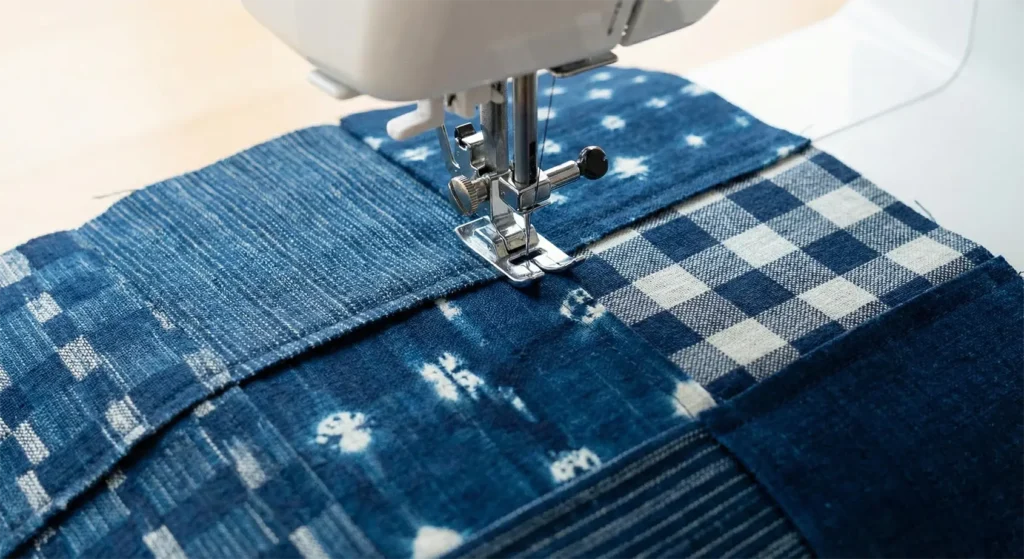
Step 3: Precision Piecing
- Rows: Sew the squares into horizontal rows of 4. Use a 1/4 inch seam allowance.
- Press: Press the seams of Row 1 to the left. Press the seams of Row 2 to the right.
- Why? This allows the seams to “nest” perfectly flat when you join the rows.
- Join: Sew the 12 rows together to create the long runner top. Press all long seams open.
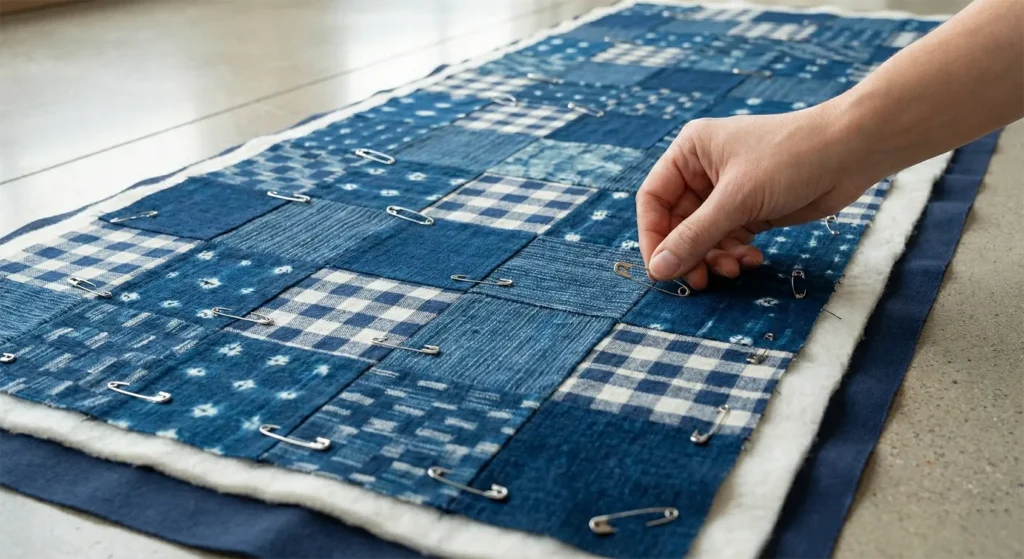
Step 4: The Heavy Sandwich
- Layer: Tape the Canvas Backing to the floor (face down). Place the Batting on top. Center the Kasuri Top (face up).
- Baste: Use curved safety pins or thread basting. Baste every single square to prevent shifting.
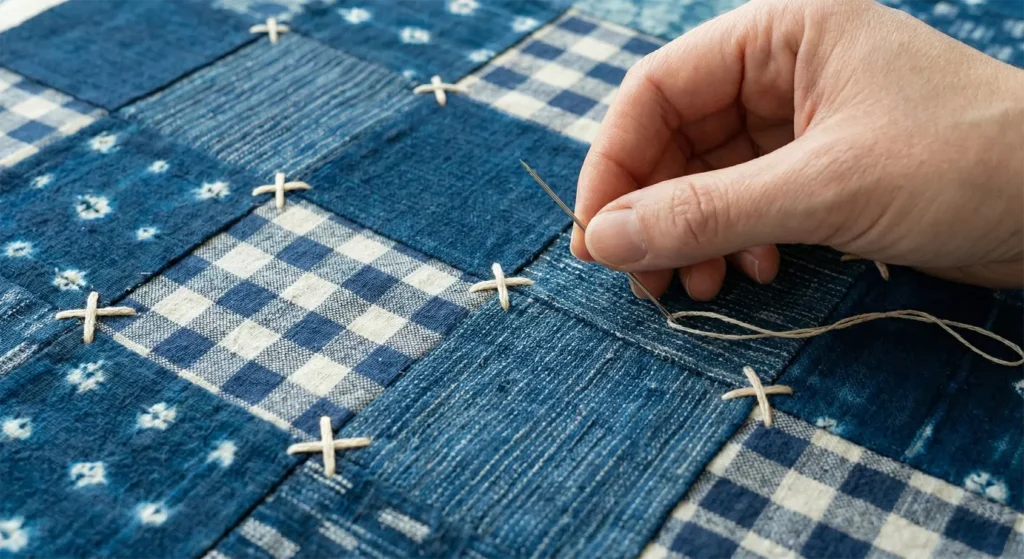
Step 5: “Hitomezashi” (One-Stitch) Quilting
Instead of hiding the quilting, we use it to add another layer of geometric texture.
- Thread: Load a needle with Cream Sashiko Thread.
- The “Plus” Pattern:
- Stitch “In the Ditch” (in the seam lines) between every square.
- The Detail: At every intersection where four squares meet, stitch a small “X” or “+” over the seam junction.
- Effect: This reinforces the quilt’s weakest point and adds a traditional “Hitomezashi” decorative touch.
Step 6: The Canvas Binding
A durable edge for a durable cover.
- Cut: Cut 2.5-inch strips of the Navy Canvas (Backing fabric).
- Machine Sew: Sew the binding to the front of the quilt. Canvas is thick, so use a heavy-duty needle (Size 90/14) and a longer stitch length (3.0mm).
- Hand Finish: Fold the binding to the back and hand-stitch it down for a clean finish.
Usability Note: Kasuri cottons are yarn-dyed, meaning the color goes all the way through the thread. This makes them much more resistant to fading from sunlight than surface-printed fabrics. This sofa cover will likely outlast the sofa itself.
4. Indigo Dyed Japanese Quilt Bed Covers for Calm Sleeping Spaces


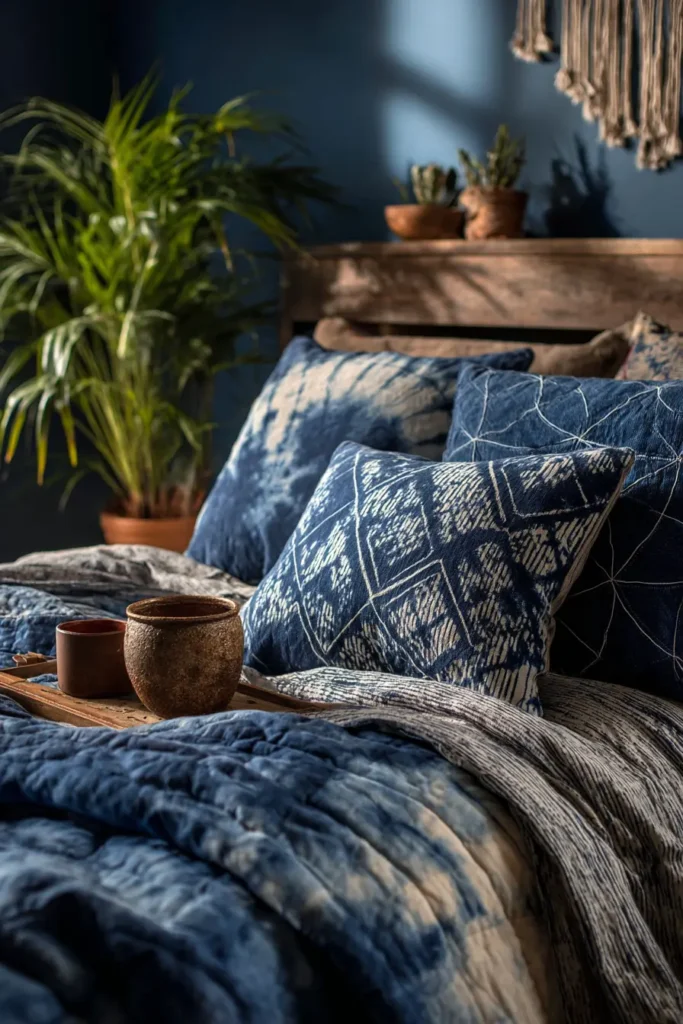
The “Aizome” Gradient Moon Bed Cover
This quilt is a masterpiece of subtlety, designed to look like the night sky transitioning from dusk to deep midnight. It utilizes the Japanese technique of Ombré Dyeing (Dandara-zome) combined with a minimalist Boro repair aesthetic. Instead of a single piece of fabric, this bed cover is constructed from wide linen panels dyed in varying shades of Indigo, stitched together with visible running stitches. It transforms the bed into a landscape of calm, promoting deep, restful sleep.
Finished Dimensions: King Size Bed Cover, approximately 100″ x 100″.
Materials Needed:
- Fabric: 10 yards of Natural White Linen (medium weight). Linen regulates body temperature better than cotton, making it the ultimate material for sleep.
- Dye: Natural Indigo Dye Kit (Indigo, Soda Ash, Thiox/Reducing Agent).
- Batting: Wool Batting. (Wool breathes and wicks moisture, essential for a “calm sleeping space”).
- Thread: White Sashiko Thread (for contrast) and Navy Cotton Thread (for construction).
- Notions: 5-gallon bucket for dyeing, gloves, and long sashiko needles.
Cultural Backstory: In Japan, Aizome (Indigo dyeing) is believed to possess calming properties. The smell of natural indigo is said to soothe the human spirit, and the color blue has been shown to lower heart rate. Sleeping under Indigo is considered a way to wrap oneself in tranquility.
Step 1: Cutting the “Sky” Panels
We will build the gradient by dyeing panels separately.
- Cut: Cut the white linen into 5 long panels, each measuring 22″ x 105″ (extra length for shrinkage).
- Label: Mark the corners of the panels with a permanent marker: 1 (Lightest), 2, 3, 4, 5 (Darkest).
Step 2: The Progressive Dip (Dandara-zome)
Prepare your Indigo vat according to the kit instructions.
- Panel 1 (Mist): Dip quickly (1 minute). Remove, oxidize (turn blue), rinse. Result: Pale Blue.
- Panel 2 (Sky): Dip twice (3 minutes each). Result: Medium Blue.
- Panel 3 (Ocean): Dip 3-4 times. Result: Rich True Blue.
- Panel 4 (Dusk): Dip 5-6 times. Result: Deep Navy.
- Panel 5 (Midnight): Dip 8+ times. Result: Almost Black/Purple-Blue.
- Oxidation Note: Always let the fabric rest in the air for 20 minutes between dips. This is when the color sets.
Step 3: The “Flat Felled” Assembly
We want the seams to be strong and decorative.
- Arrange: Lay the panels in order (1 to 5) on the floor.
- Sew: Sew Panel 1 to Panel 2 using a Flat Felled Seam.
- How: Sew wrong sides together. Trim one seam allowance. Fold the wider allowance over the trimmed one and press flat. Topstitch it down.
- Repeat: Join all panels until you have a massive gradient sheet (Light to Dark).
Step 4: The “Boro” Repair (Intentional Texture)
Zen beauty embraces imperfection. We will add texture before quilting.
- Patches: Cut small squares (4″ x 4″) from the leftover scraps of the different blue panels.
- Placement: Scatter a few patches randomly across the quilt top—perhaps a dark patch on the light panel, or a light patch on the dark panel.
- Appliqué: Hand-stitch these patches down using White Sashiko Thread and a simple running stitch. Leave the edges raw to fray slightly over time. This mimics Boro (repaired cloth), symbolizing that the quilt is loved and used.
Step 5: “Running Water” Quilting
The quilting should flow across the gradient.
- Sandwich: Backing + Wool Batting + Gradient Top.
- Direction: Quilt lines running horizontally across the panels (perpendicular to the vertical seams).
- Spacing:
- On the Light Panel (Top of bed), space the lines far apart (3 inches).
- As you move to the Dark Panel (Foot of bed), make the lines closer together (1/2 inch).
- Visual: This creates a “gravity” effect, making the foot of the quilt feel heavier and grounding, while the top near your face feels light and airy.

Step 6: The Canvas Binding
- Cut: Cut 3-inch strips of Undyed (Natural) Linen.
- Bind: Bind the edges of the quilt.
- Contrast: The natural linen color frames the blue gradient beautifully, acting like a mat board on a painting.
- Wash: Wash and dry the finished quilt. The linen will crinkle and soften, and the Indigo may fade slightly at the folds, creating a stunning, living texture.
Comfort Note: Wool batting inside Linen is the “Holy Grail” of bedding. It keeps you warm in winter and cool in summer. This quilt is heavy enough to feel secure but breathable enough for restorative sleep.
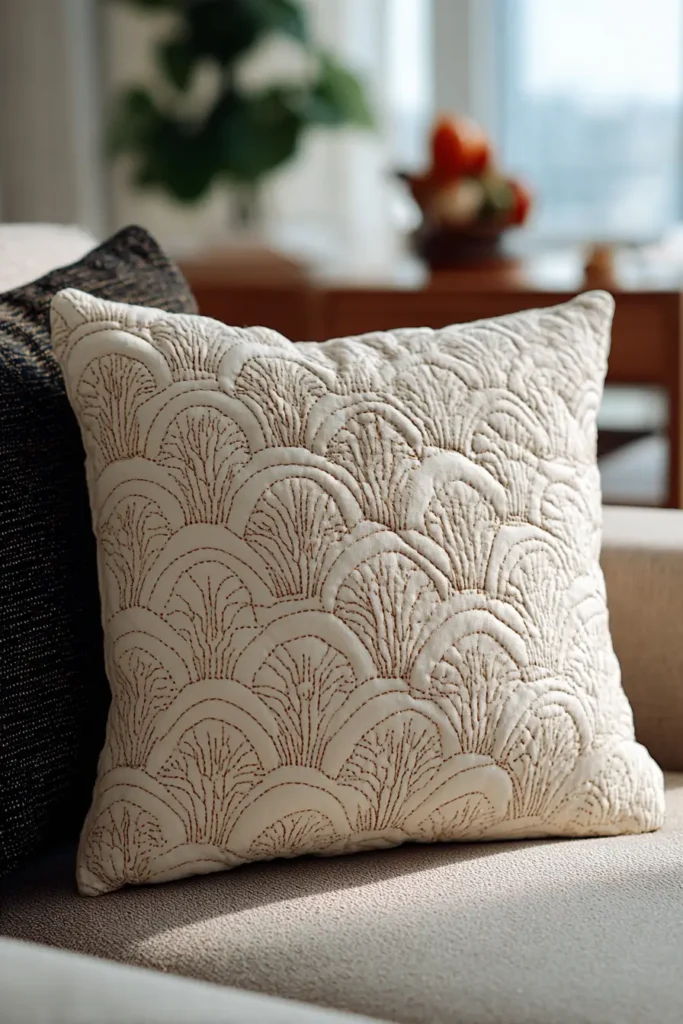
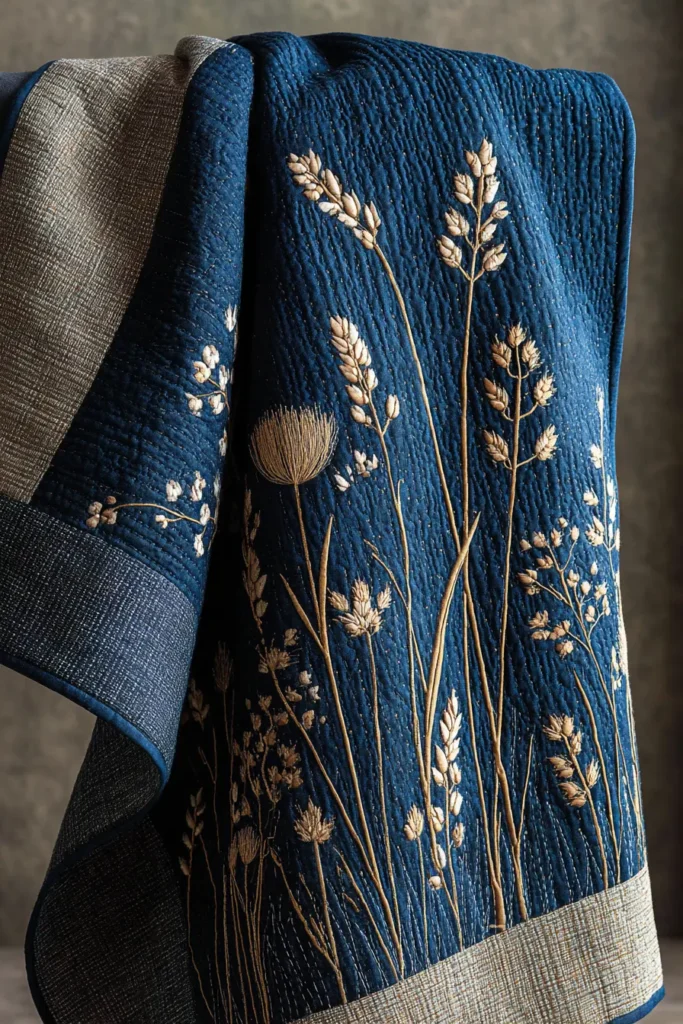
5. Refined Hishizashi Indigo Quilt Patterns for Elegant Table Runners
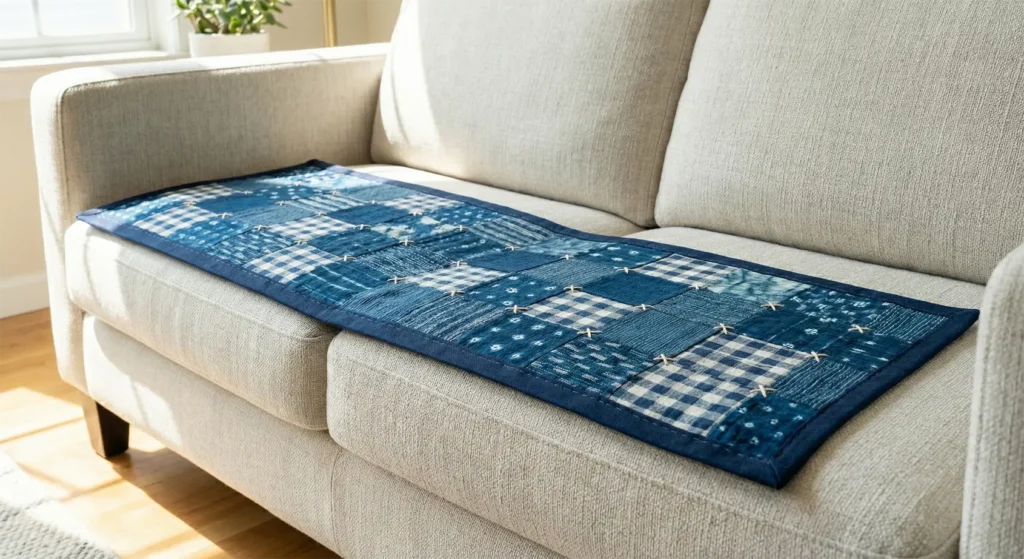
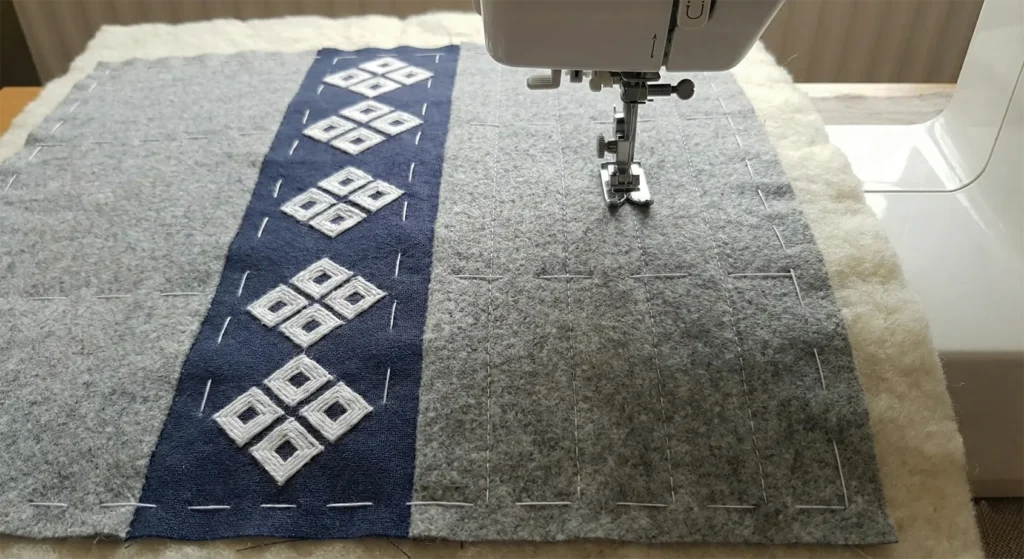
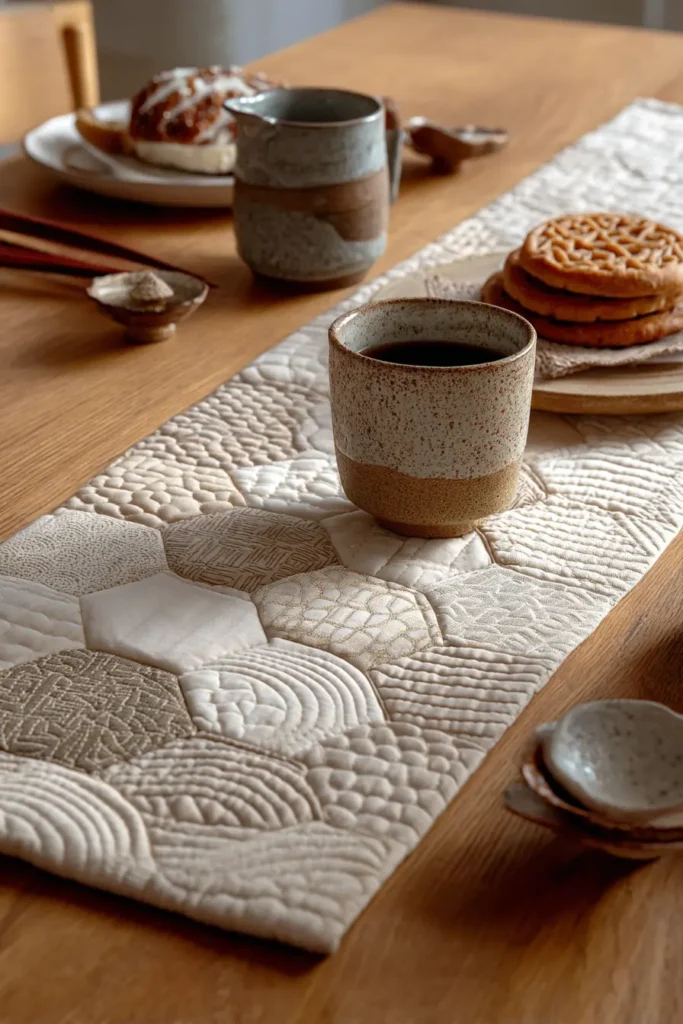
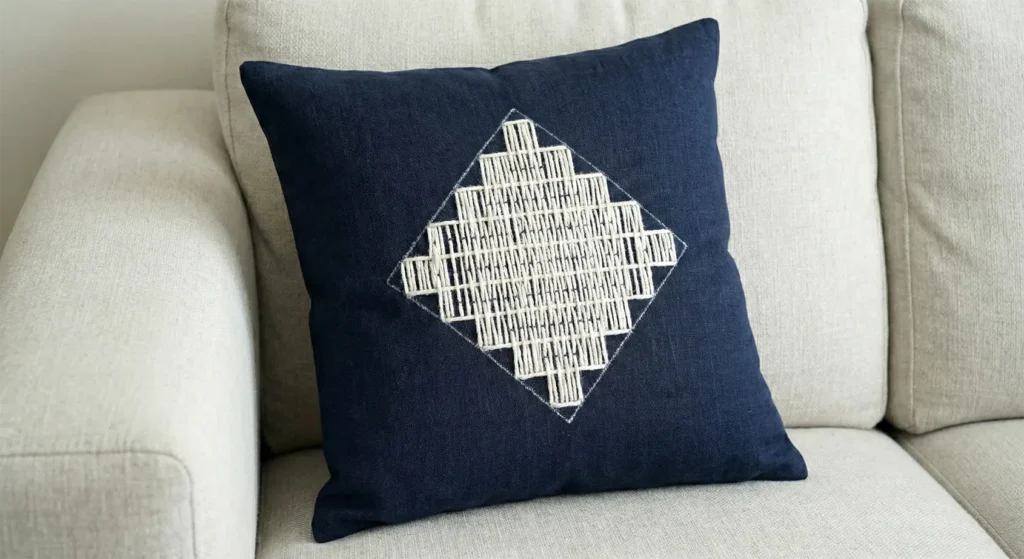
The “Diamond Mist” Hishizashi Table Runner
Hishizashi is a lesser-known branch of Sashiko, but it’s deeply refined. The word comes from hishi, meaning diamond. These sharp, repeating shapes were once used to strengthen household textiles. Over time, they became symbols of order, balance, and quiet beauty. That makes them perfect for Zen-inspired table runners.
A quilted table runner may sound fancy, but it’s very practical. It protects the table, softens the room, and adds texture without clutter. Hishizashi does all that with grace. The pattern feels structured yet calm, like stones carefully placed in a garden.
Finished Dimensions:
Standard Zen Table Runner: approximately 14″ x 72″
(Adjust length to match your table. Width stays best between 12″–15″.)
Materials Needed
Fabric A (Top):
½ yard of deep indigo cotton or lightweight linen. Choose tightly woven fabric for clean diamonds.
Fabric B (Backing):
½ yard of soft cotton in a muted neutral tone.
Batting:
Thin cotton batting or cotton flannel, no thicker than 1/8 inch.
Thread:
White or off-white Sashiko thread. One strand only.
Needles:
Long Sashiko needles.
Notions:
Ruler, chalk or water-soluble marker, diamond (hishi) stencil or grid ruler, palm thimble, basting thread.
Cultural Backstory
Hishizashi patterns were common on household items such as placemats and wrapping cloths. The diamond shape symbolized protection and clarity. In Japanese aesthetics, repeating geometric forms brings mental order. That’s why these patterns feel so composed on a dining table. They quietly guide the eye.
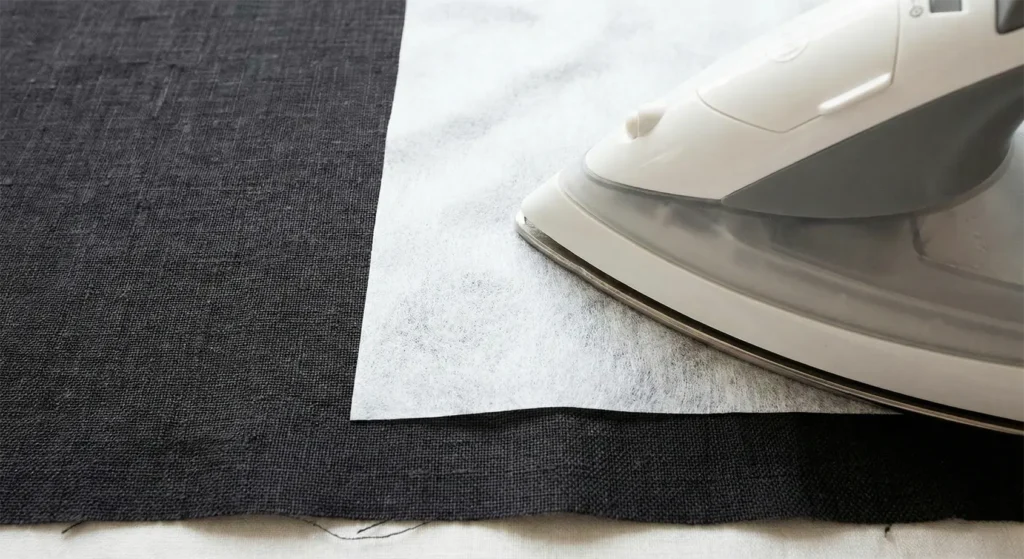
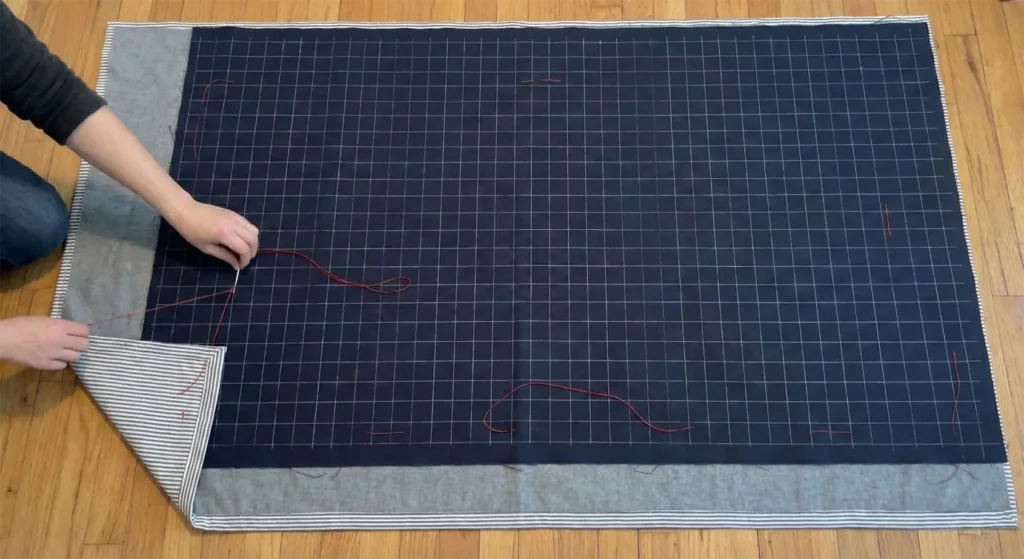
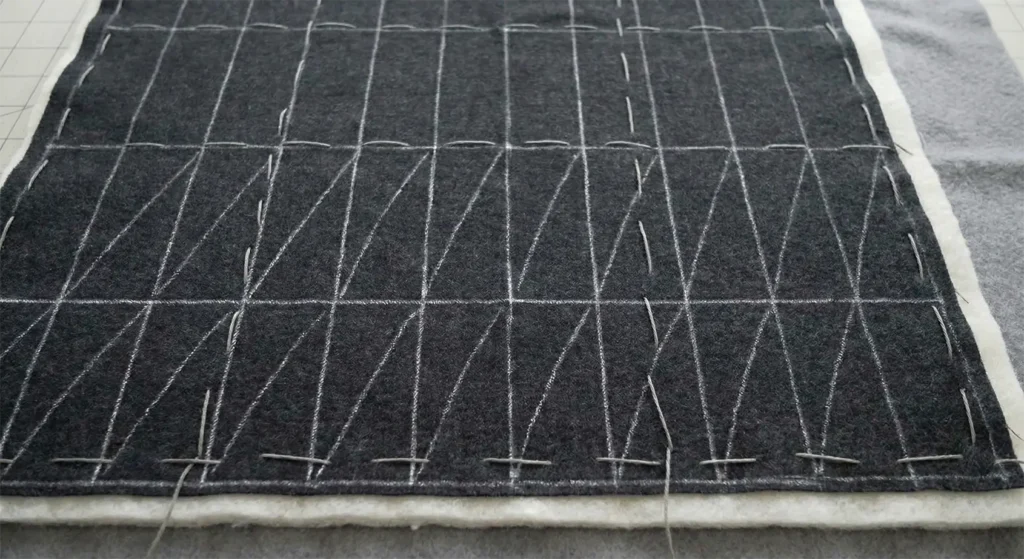
Step 1: Cutting and Preparing the Fabric
Cut the top fabric to 15″ x 73″. This extra inch allows for clean edges later.
Cut the backing and batting to 14″ x 72″. Wash, dry, and press all pieces. Smooth fabric is essential for precise geometry.
Lay the top fabric flat with the right side facing up.
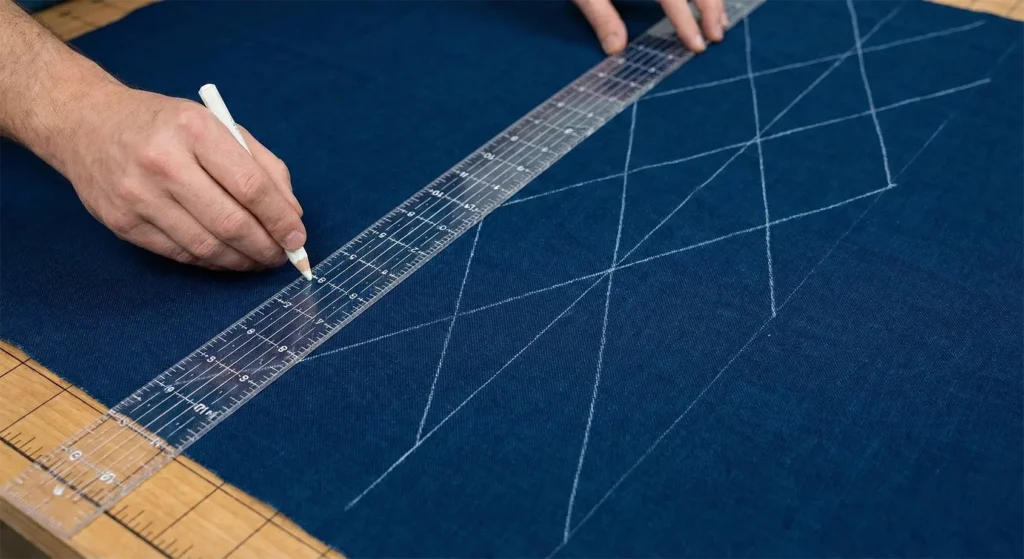
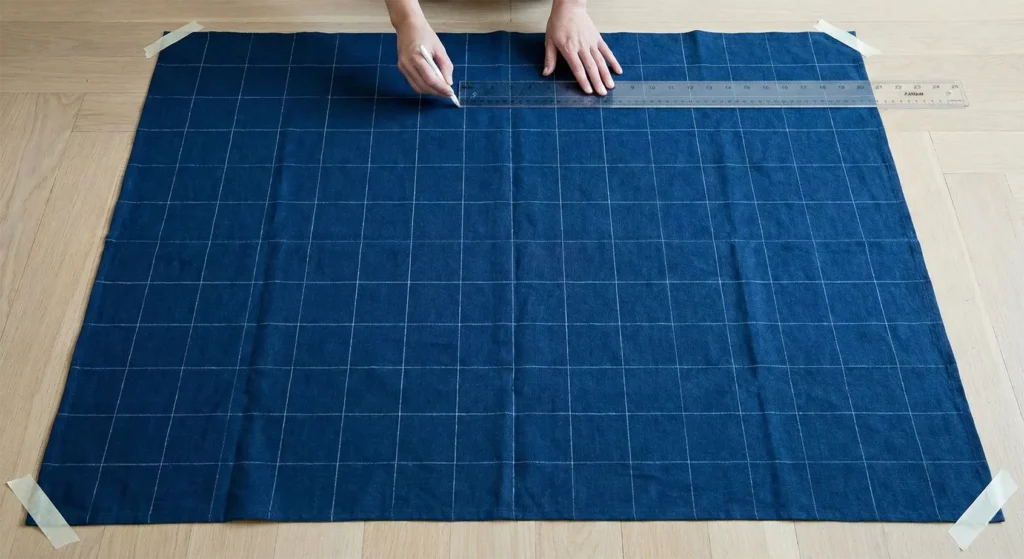
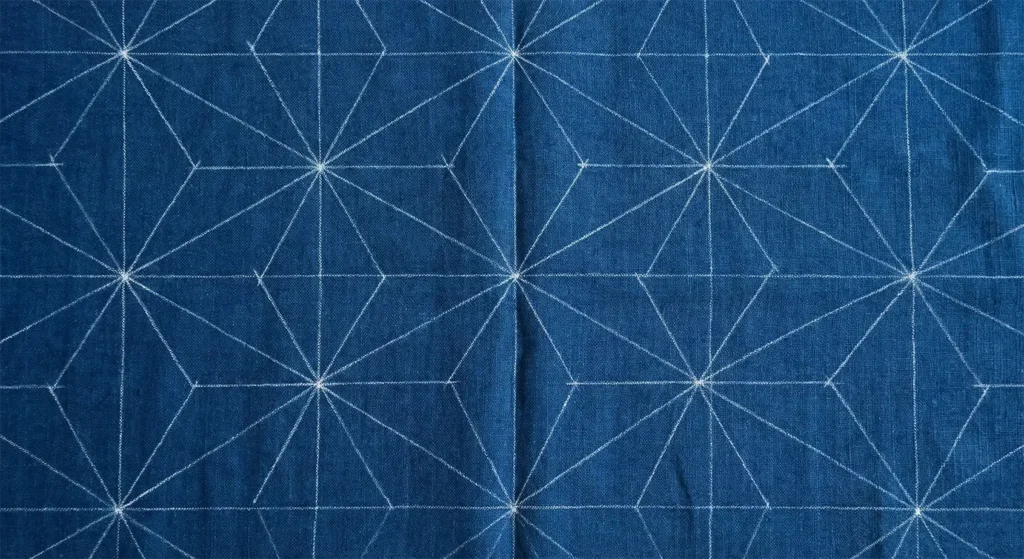
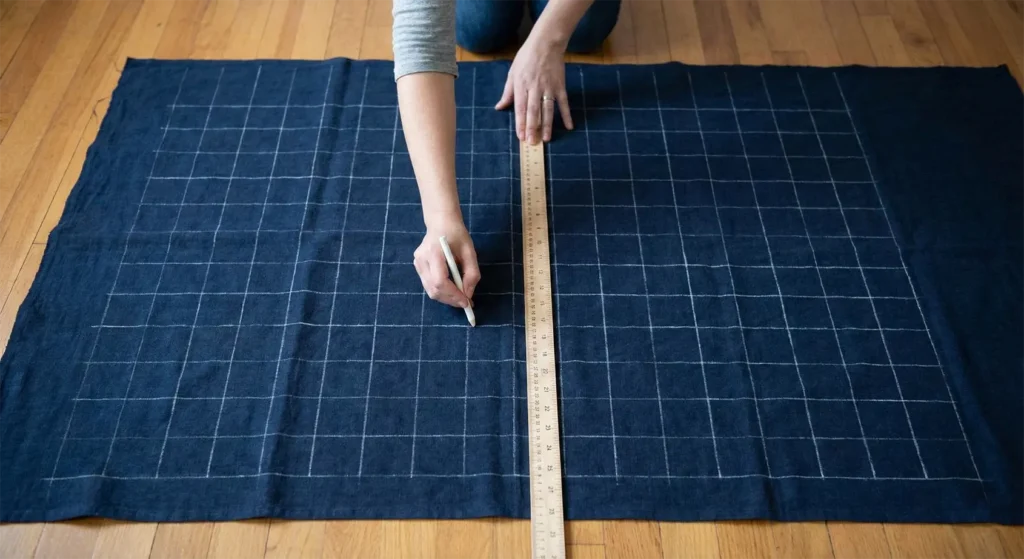
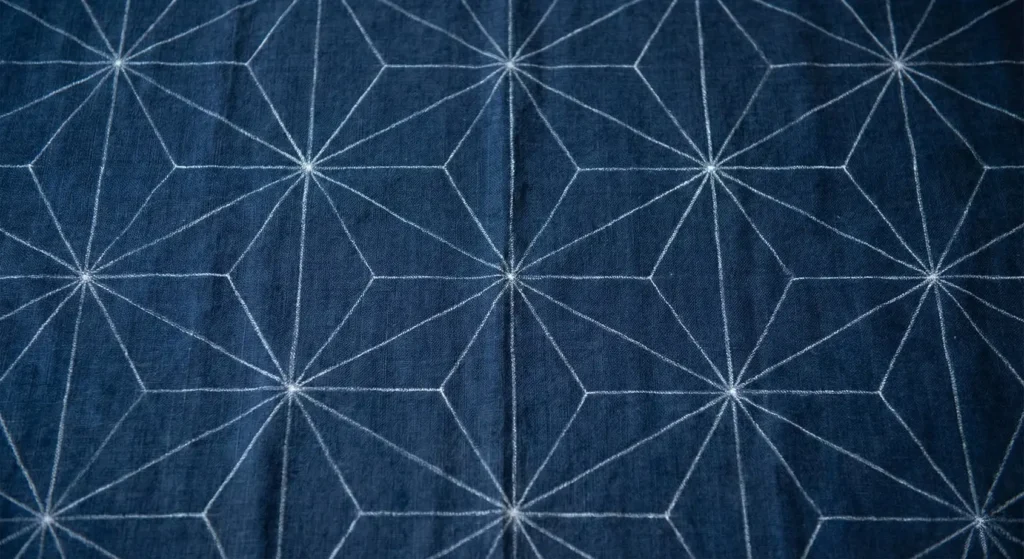
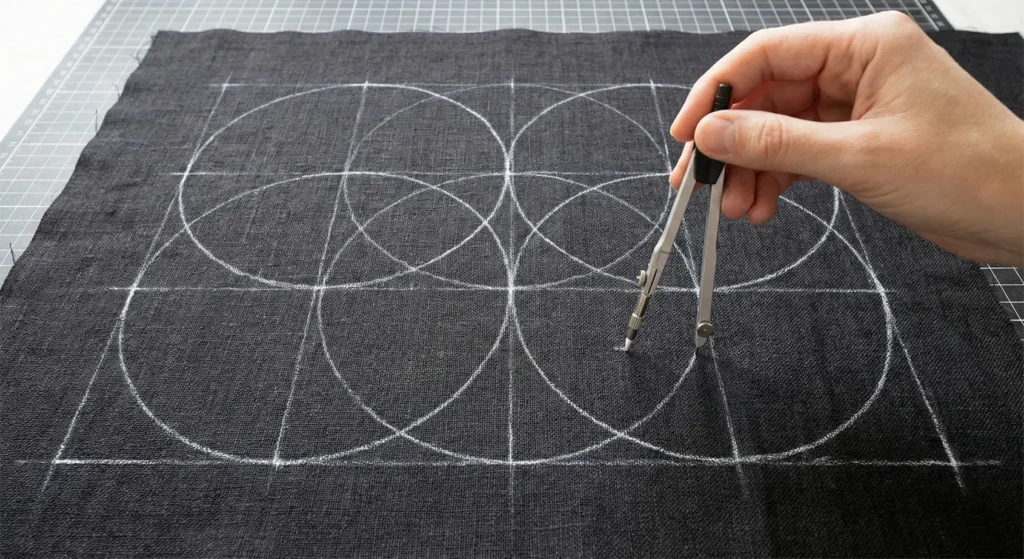
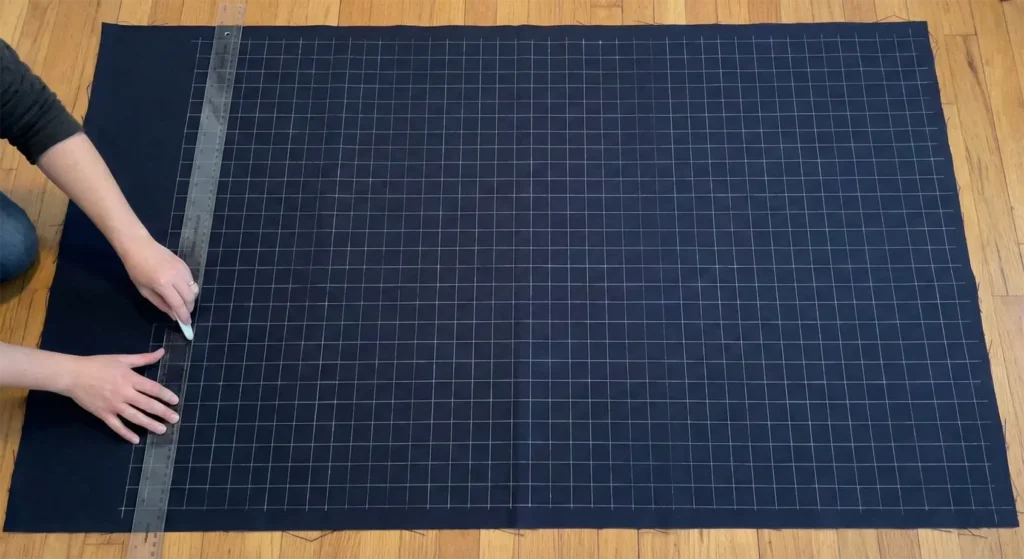
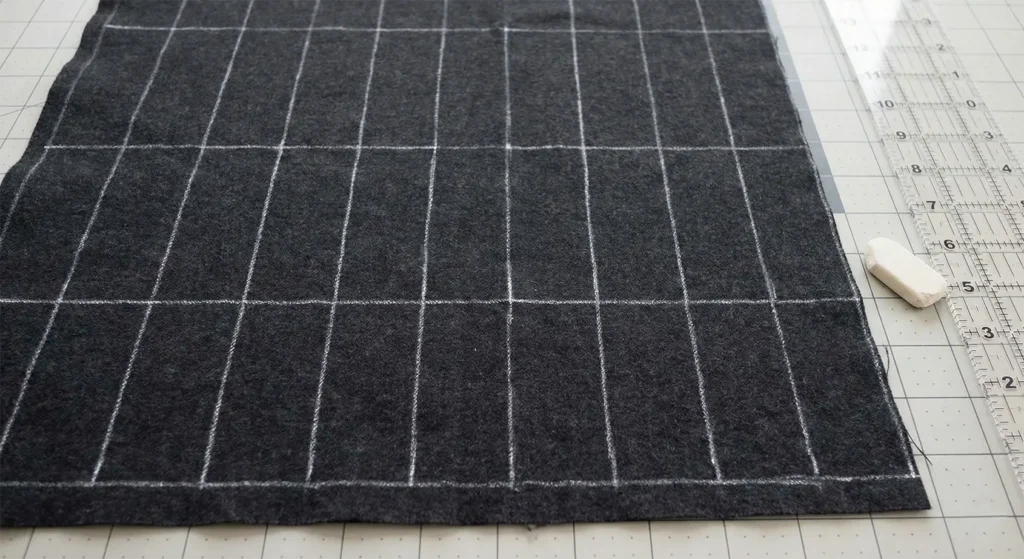
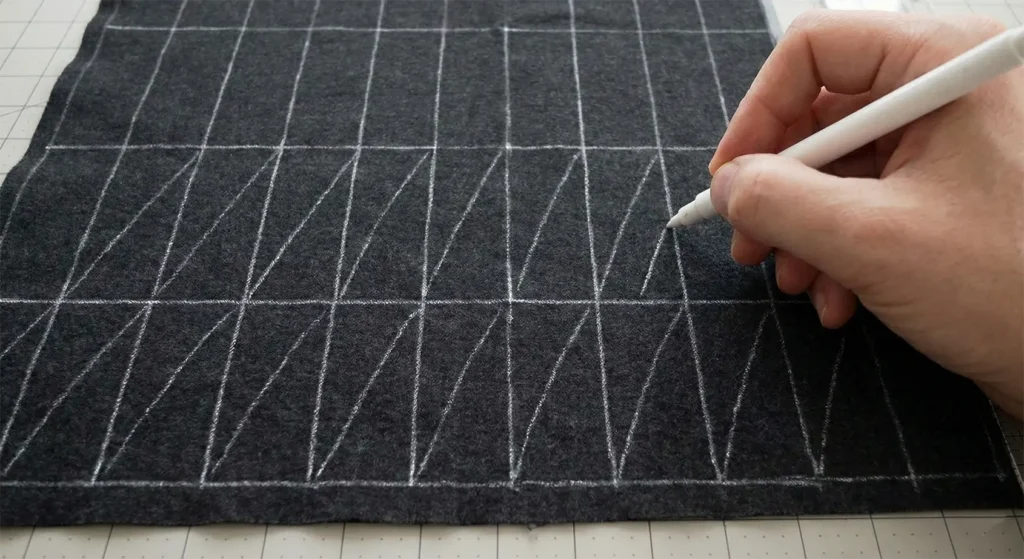
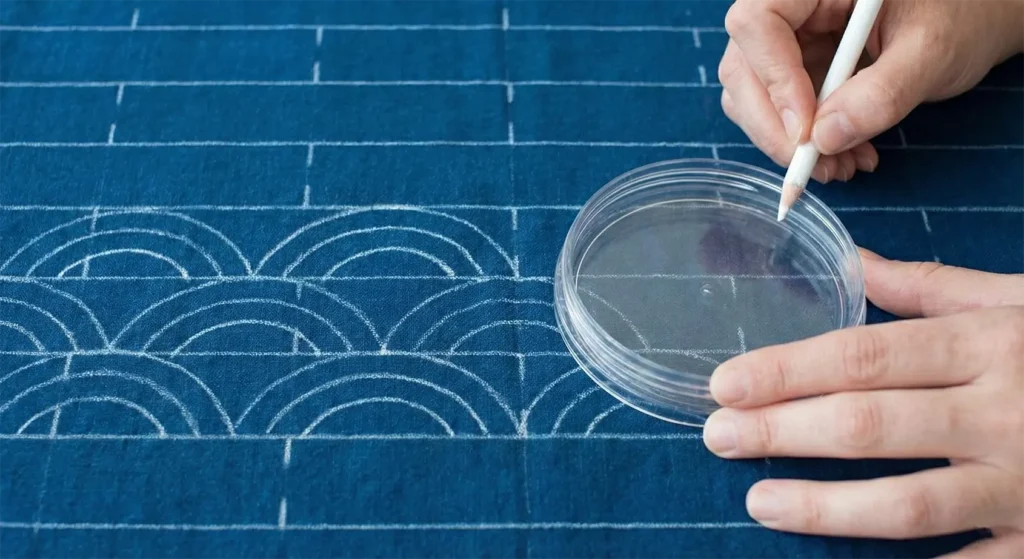
Step 2: Marking the Diamond Grid
Hishizashi depends on accuracy.
Using a ruler, draw parallel diagonal lines at a 45-degree angle, spaced 1½ inches apart. Then draw diagonal lines in the opposite direction, with the same spacing. This creates a field of diamonds.
Keep lines light. They are guides, not decoration.
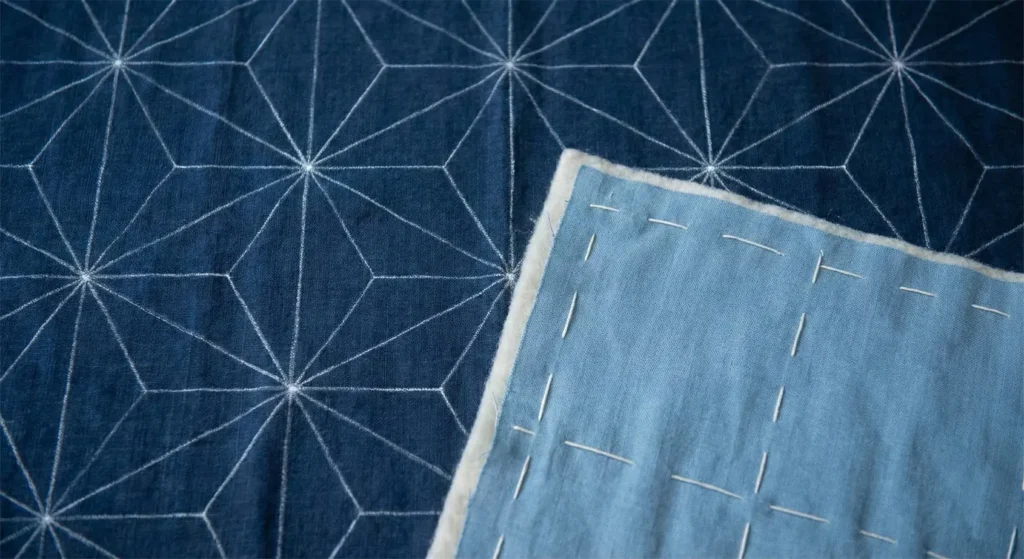
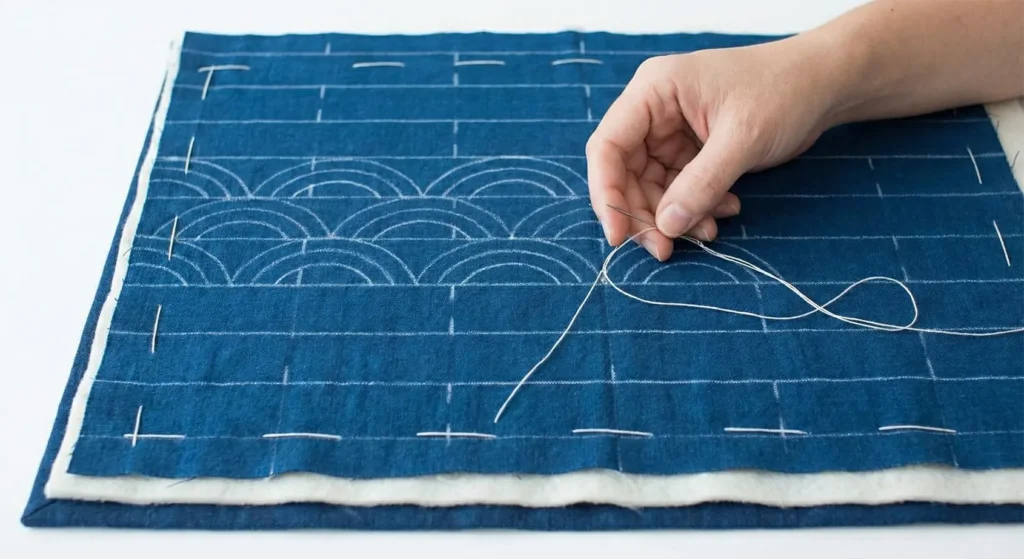
Step 3: Building the Flat Sandwich
Place the backing fabric face down. Lay the batting on top.
Center the marked top fabric over the layers, face up. Smooth everything with your hands.
Thread-baste across the width at 4-inch intervals. This keeps the runner flat and prevents shifting.

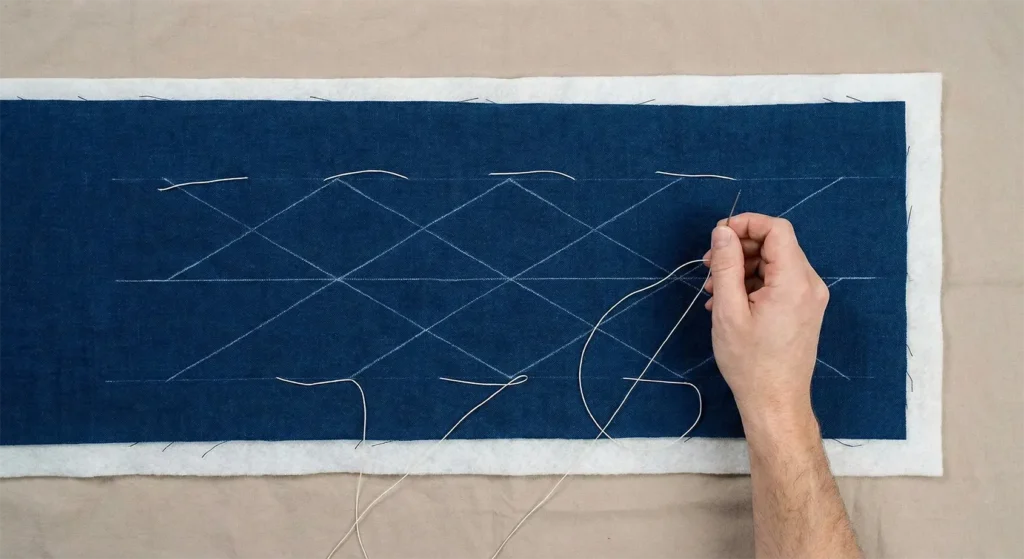
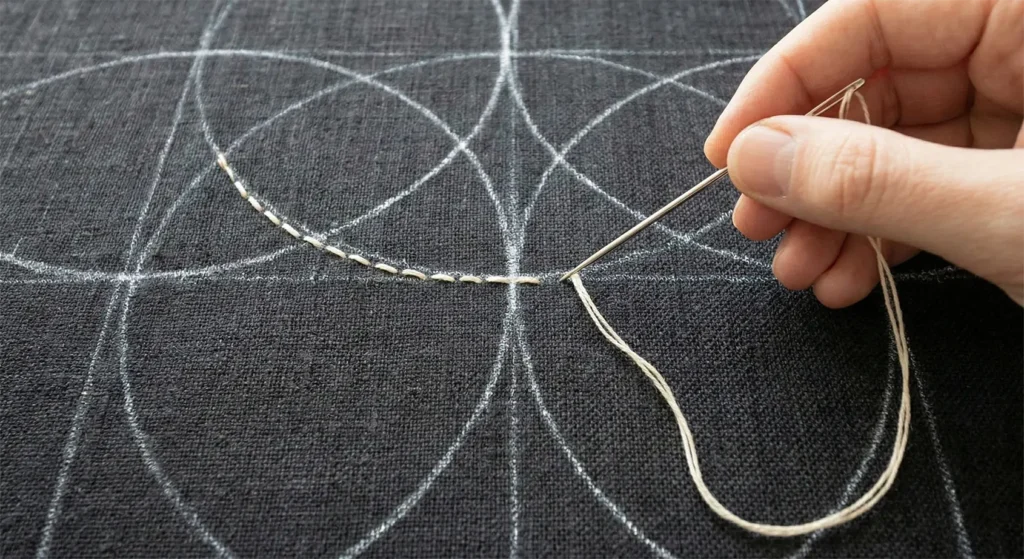
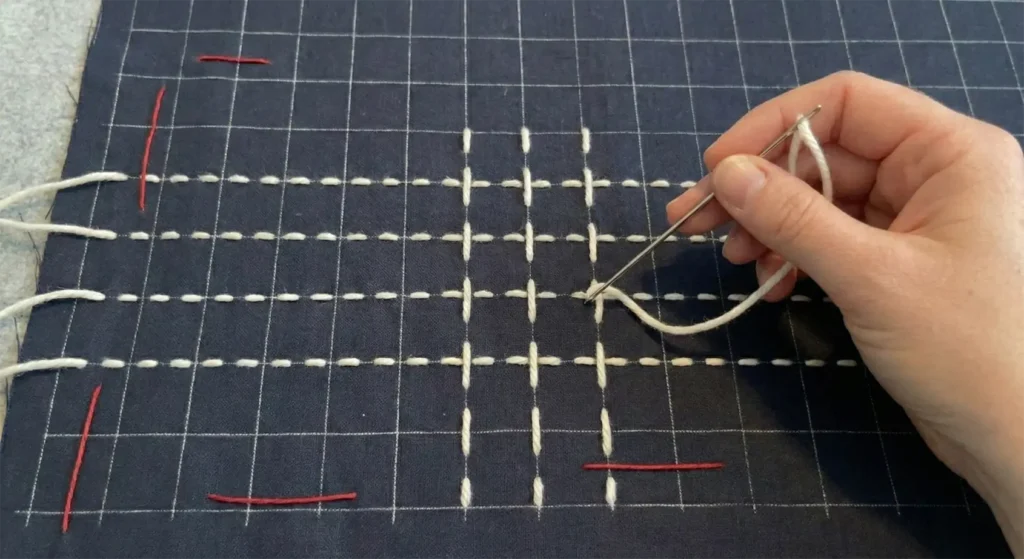
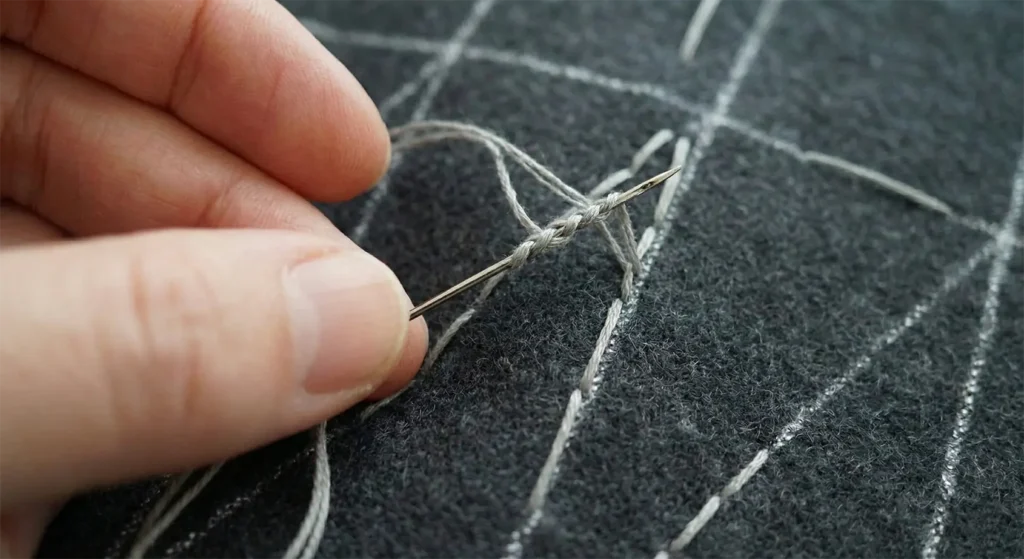
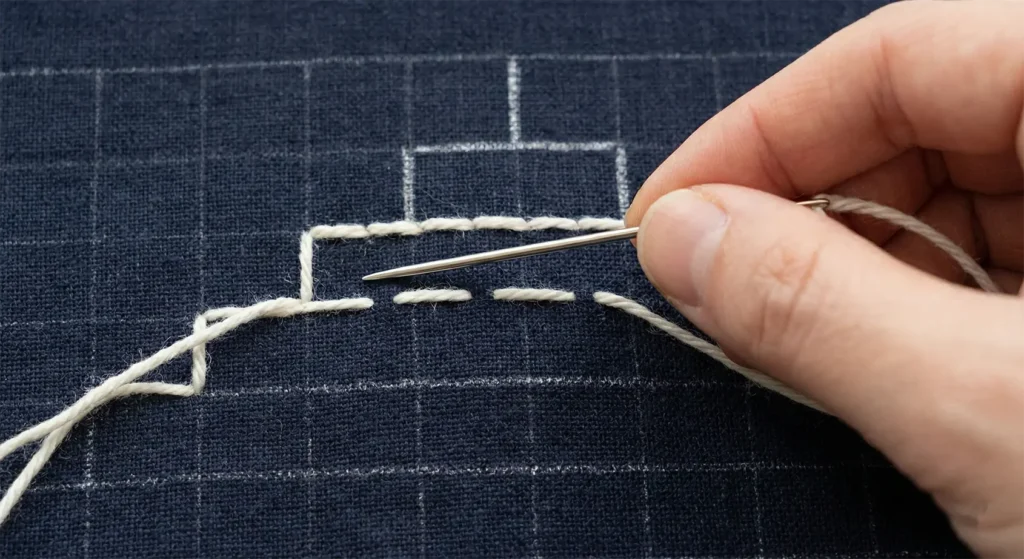
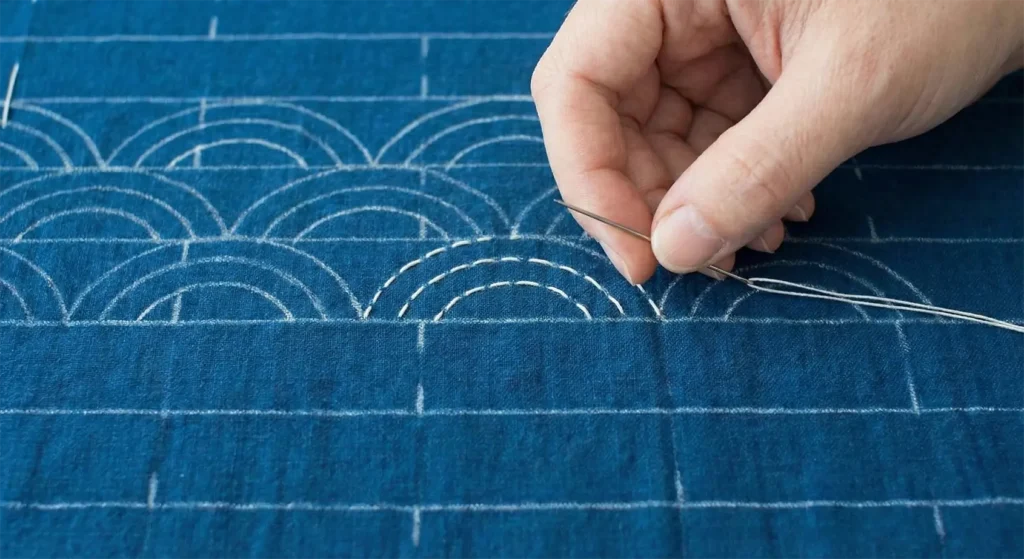
Step 4: Stitching the Diamond Lines
Thread your needle with about 18–20 inches of Sashiko thread.
Load 3 to 5 stitches at once along one diagonal line. Each stitch should be about ¼ inch long. Leave slightly smaller gaps between stitches.
Pull the thread through gently. Never tighten. The surface should remain relaxed and flat.
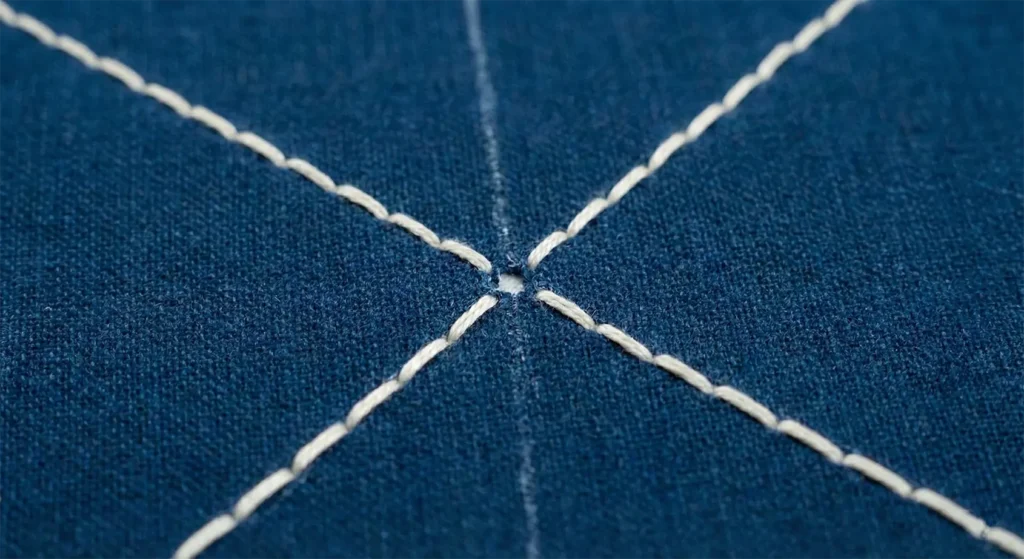
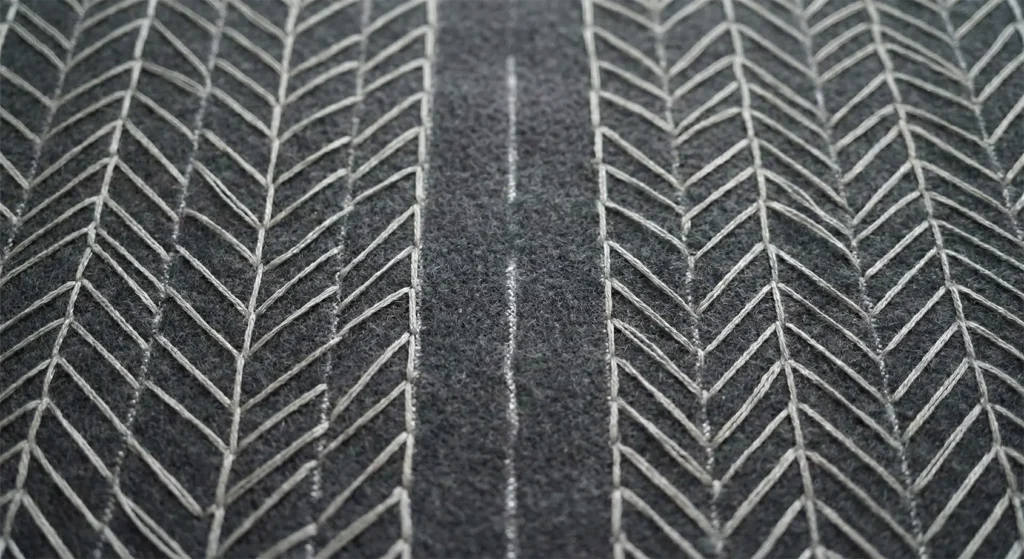
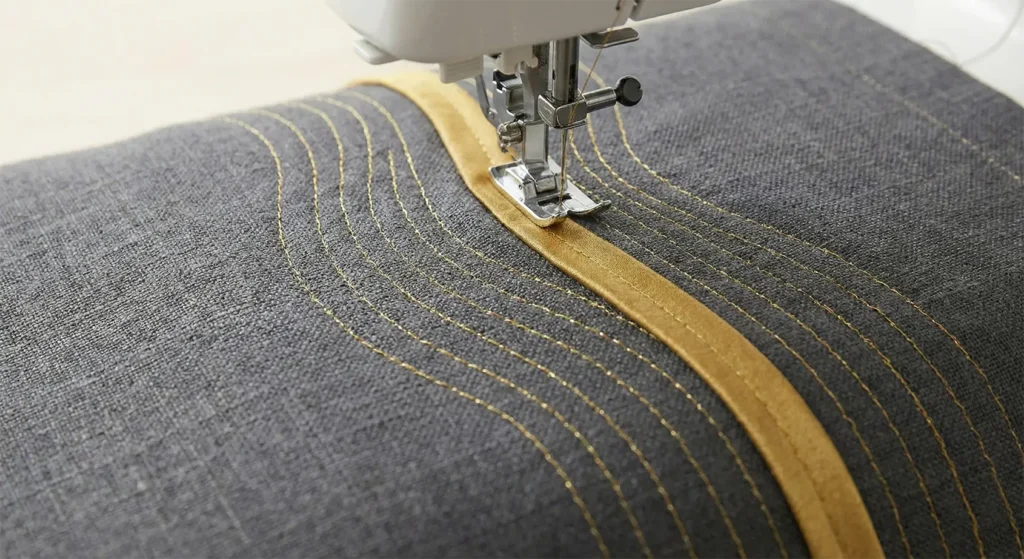
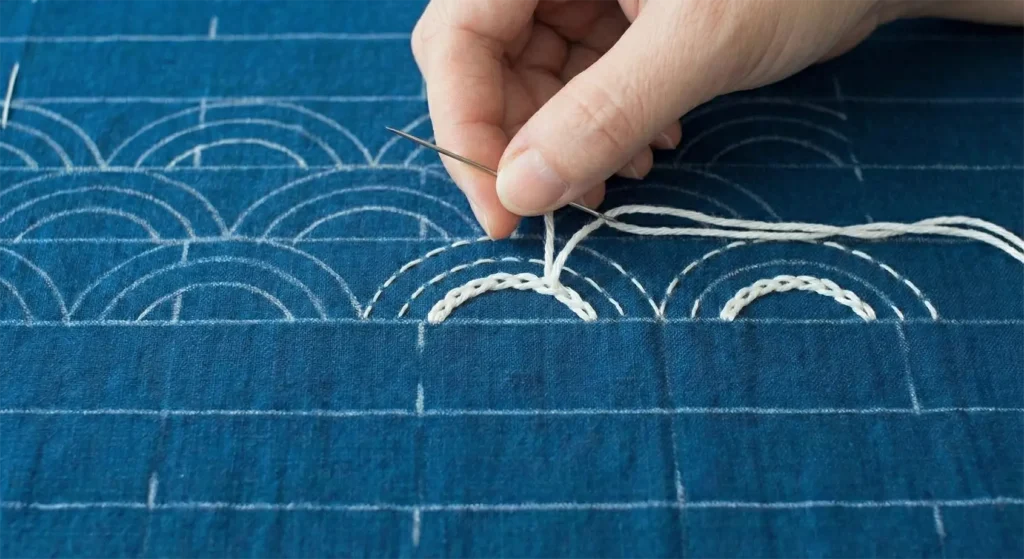
Step 5: Order and Clean Intersections
Stitch all lines in one diagonal direction first. Complete the entire runner this way.
Then stitch the opposing diagonal lines. At intersections, stitches must never cross. Leave a tiny gap where the lines meet. This prevents bulk and keeps the diamonds crisp.
This small detail makes the piece feel refined rather than heavy.
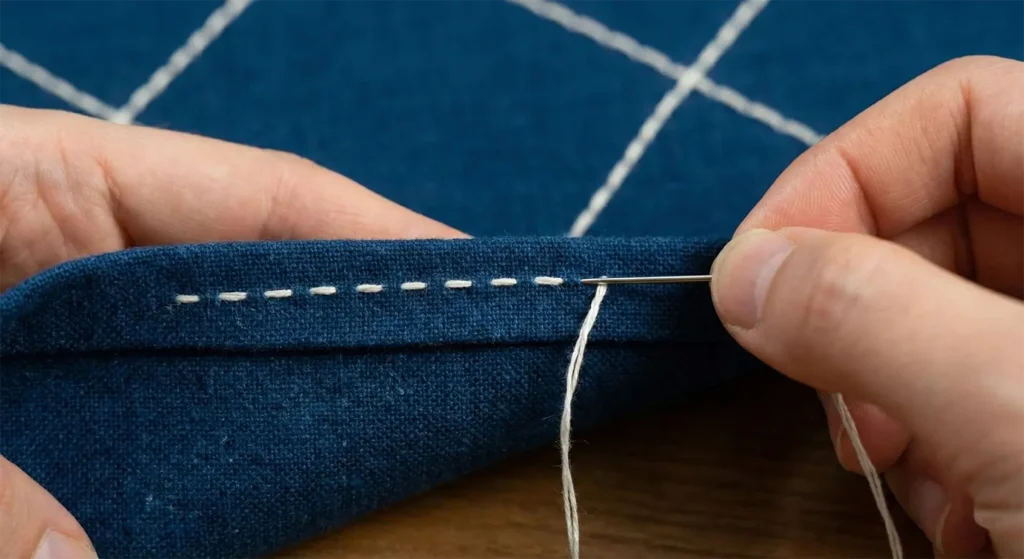
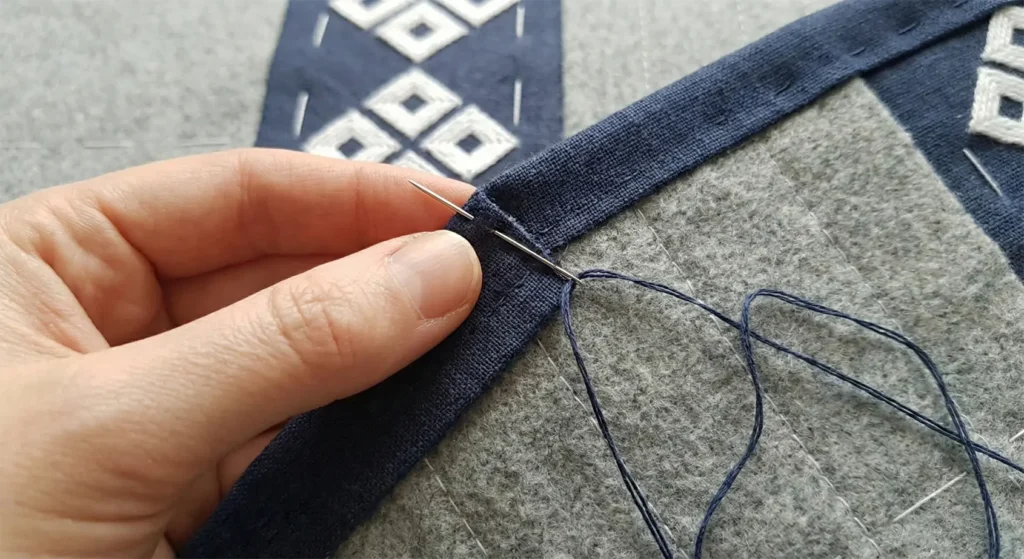
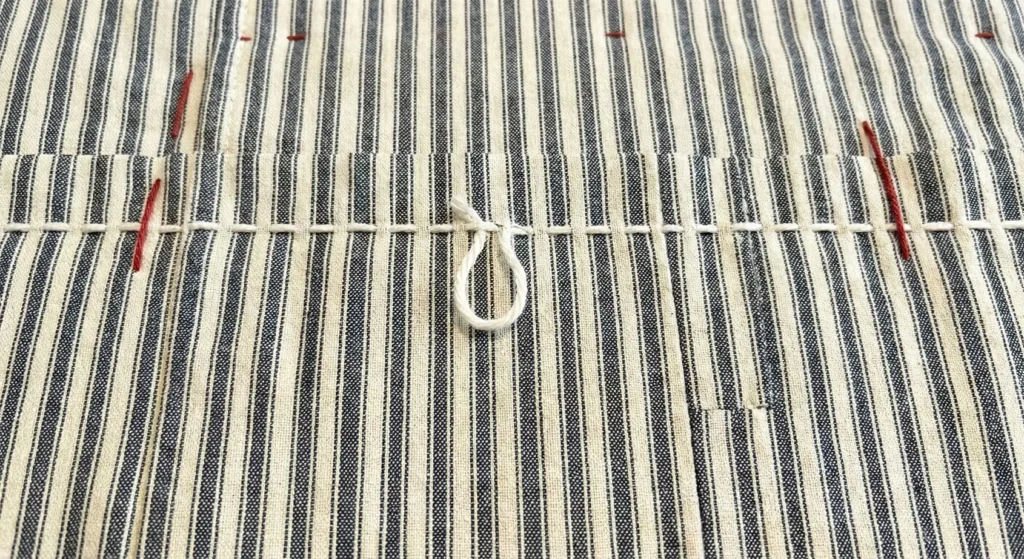
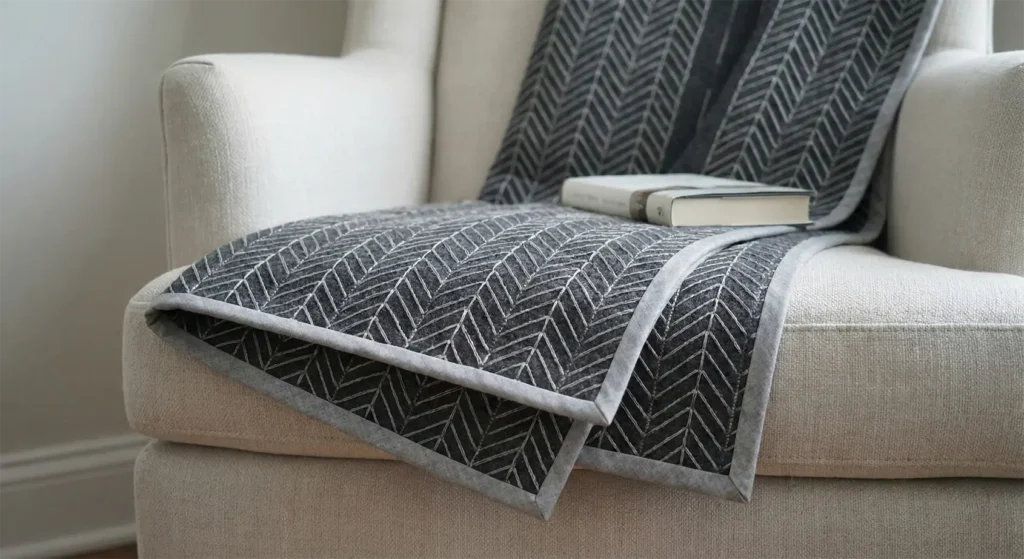
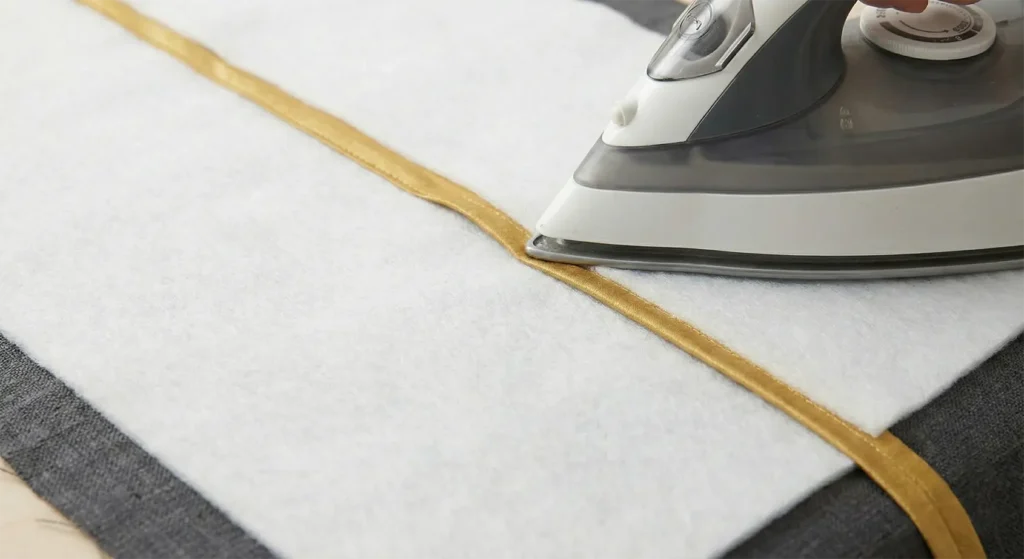
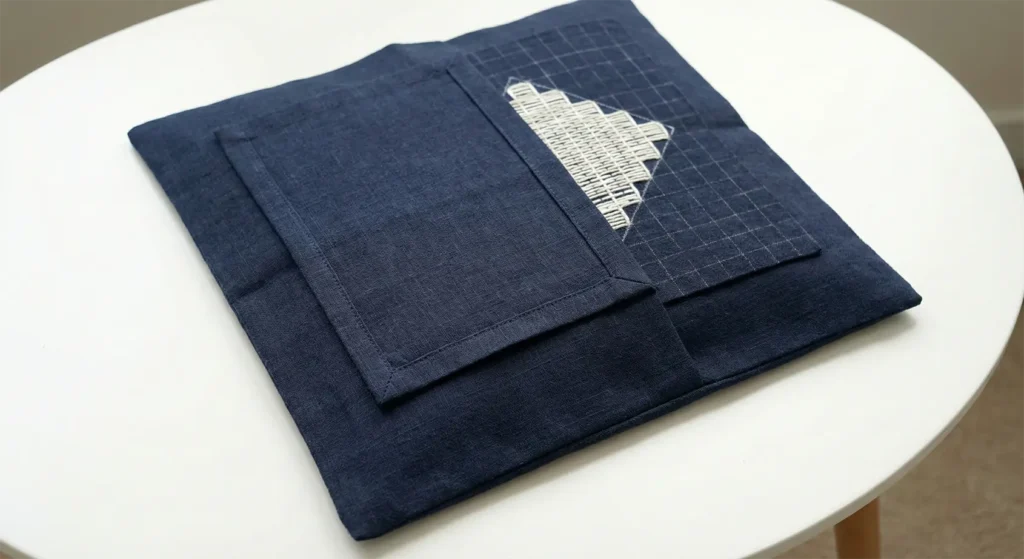
Step 6: Finishing the Edges
Trim the batting and backing flush with the top fabric.
Fold the top fabric over the edge by ½ inch, then fold again to hide the raw edge. Press lightly.
Hand-stitch the hem on the back using a running stitch. Keep spacing even for a calm finish.

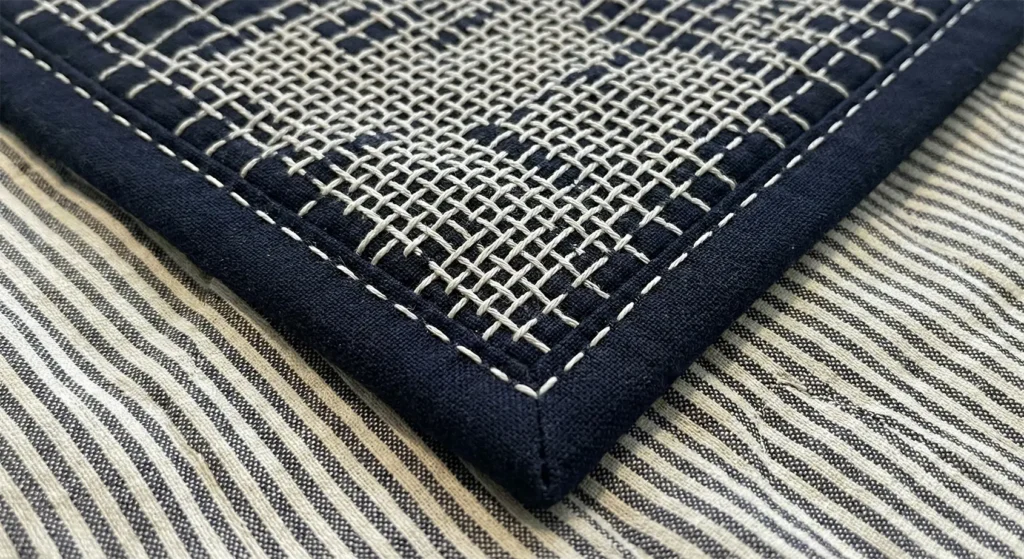
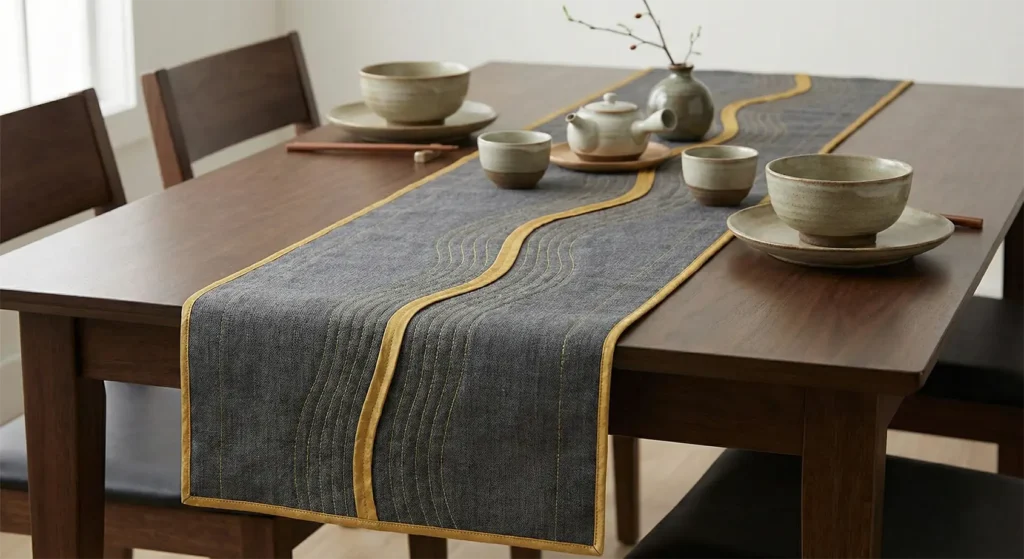
Usability and Comfort Notes
This quilted runner lies flat and stays in place. The thin batting protects the table without making dishes wobble. The stitched texture adds grip, which helps plates feel secure.
Visually, the diamonds bring structure to the table. Comfort comes from softness. Elegance comes from restraint. That balance is exactly what Hishizashi was meant to offer.
6. Soft Cotton Japanese Quilts for Ultimate Everyday Comfort


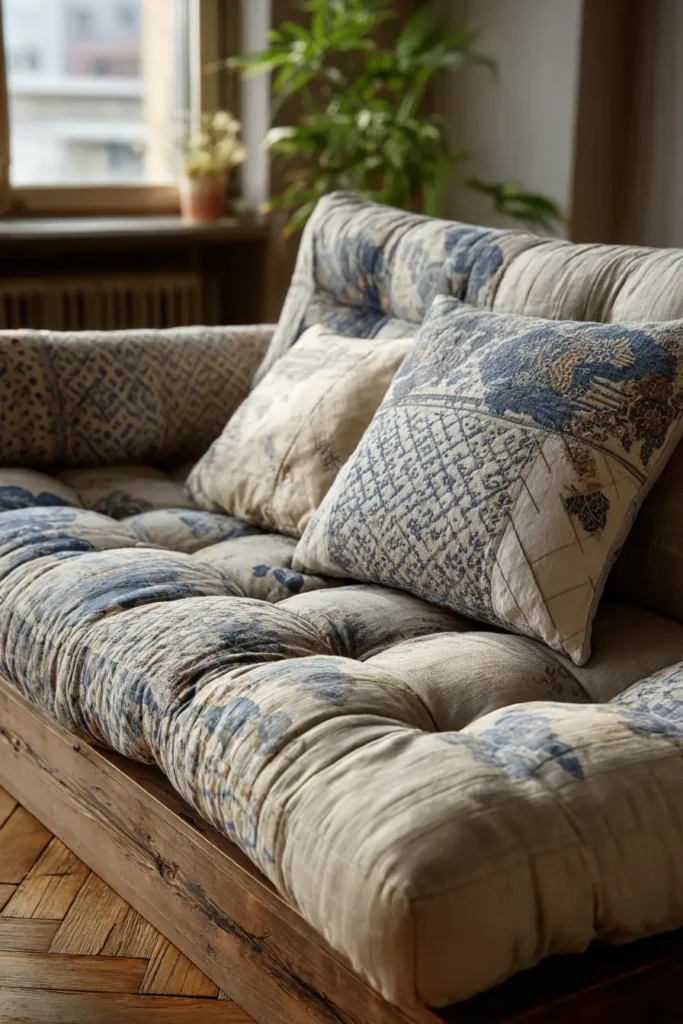
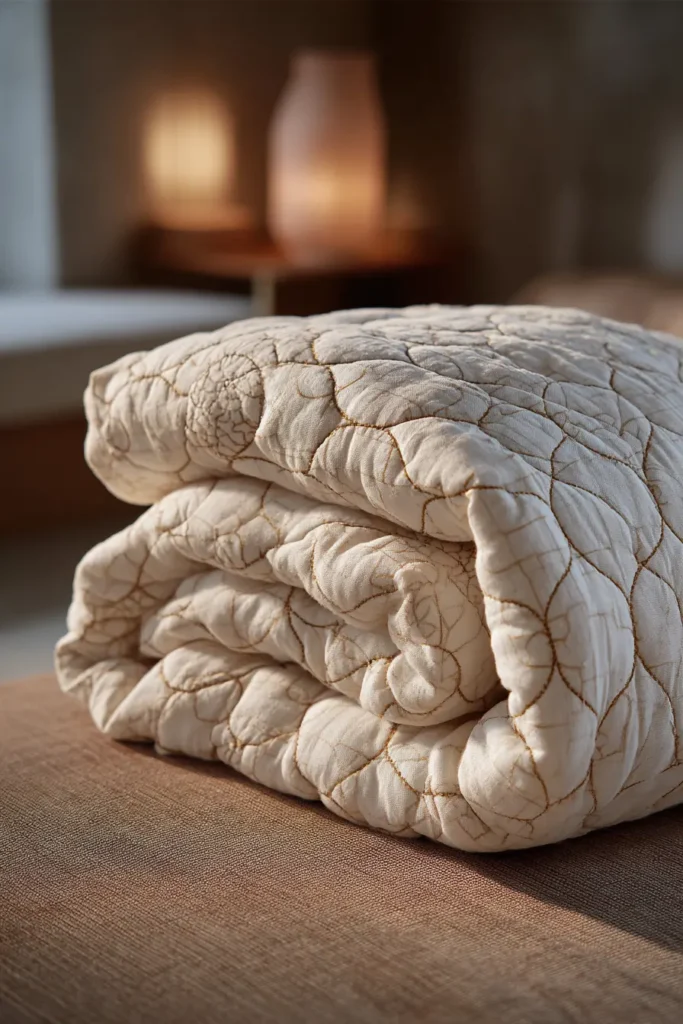
The “Niju-Ryo” Double Gauze Cloud Quilt
In the realm of Japanese textiles, few fabrics are as prized for comfort as Double Gauze (Niju-Ryo). It consists of two layers of extremely fine, loosely woven cotton that are tacked together at tiny intervals. It is breathable, airy, and becomes softer with every wash. This quilt uses the traditional Ichimatsu (Checkerboard) pattern—symbolizing prosperity and continuity—constructed entirely from double gauze. The result is a quilt that feels like a marshmallow or a soft cloud, perfect for napping or a baby’s play mat.
Finished Dimensions: Large Nap Throw, approximately 54″ x 72″.
Materials Needed:
- Fabric A (Light): 2 yards of Unbleached/Natural Double Gauze. (The natural specs of cotton husk add a wabi-sabi aesthetic).
- Fabric B (Color): 2 yards of Sage Green, Pale Indigo, or Charcoal Double Gauze.
- Backing Fabric: 3.5 yards of a coordinating Double Gauze (or a soft Cotton Lawn).
- Batting: Bamboo Batting or Silk Batting. (These drapes are much better than cotton or poly; they feel like liquid inside the gauze).
- Thread: 50wt Cotton Thread (Standard sewing thread).
- Notions: Walking foot (essential for sewing gauze), pins.
Cultural Backstory: The Ichimatsu pattern is named after Sanogawa Ichimatsu, a famous Kabuki actor in the 18th century who wore this checkerboard pattern on his hakama (trousers). It became a craze in Edo Japan and remains a symbol of timeless style. Combining this rigid geometry with the softness of gauze creates a uniquely modern “Zen” balance.
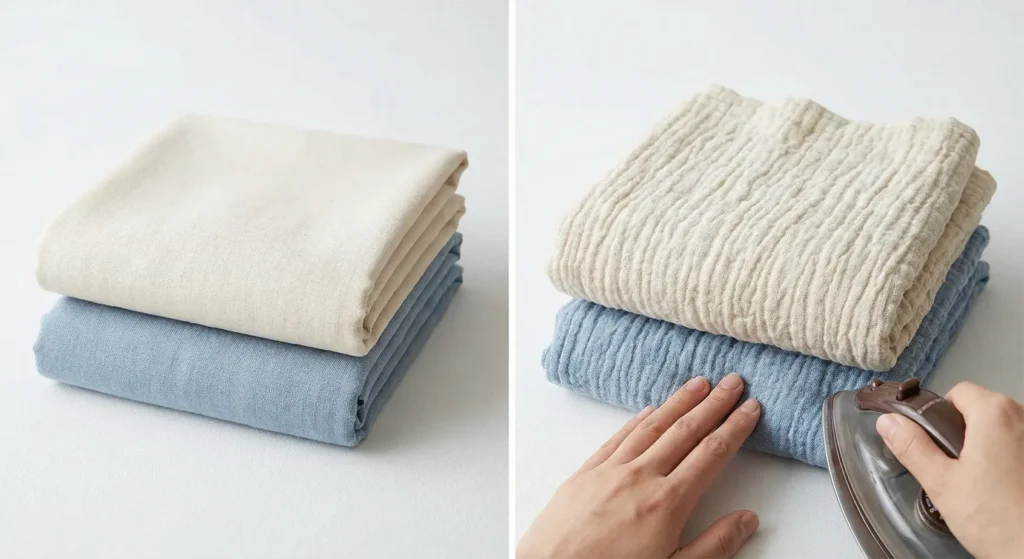
Step 1: The “Crinkle” Pre-Wash (Crucial Step)
Double gauze shrinks significantly and crinkles. You must embrace this texture before you sew.
- Wash: Machine wash and dry all your gauze fabrics before cutting. Do not use fabric softener.
- Press (Gently): Iron the fabric flat, but don’t pull it taut. You want to preserve the natural loft/air between the two layers.
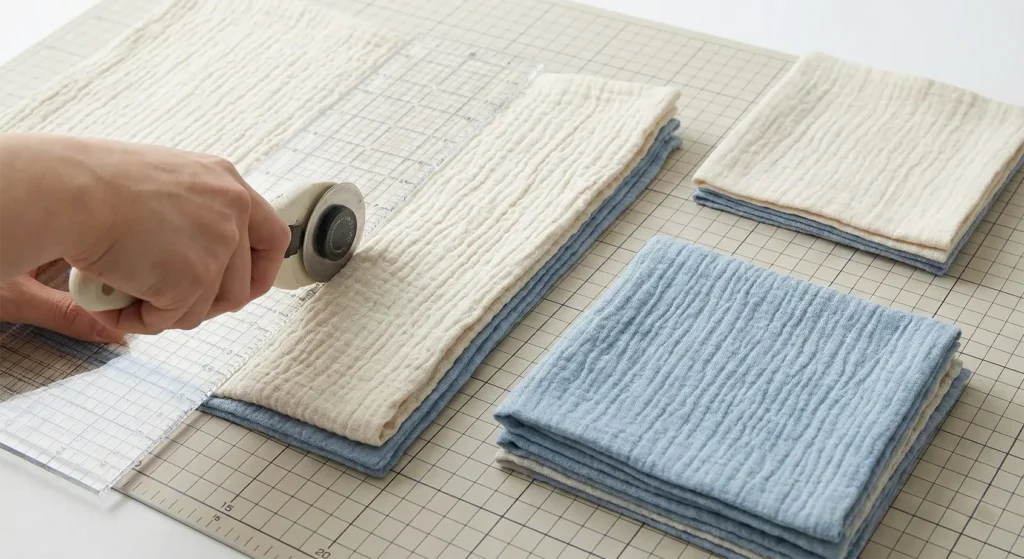
Step 2: Cutting the Ichimatsu Grid
- Cut Strips: Cut the fabric into strips 6.5 inches wide.
- Sub-Cut: Cut the strips into 6.5 inch squares.
- Calculation: For a 54″ x 72″ quilt, you need a grid of 9 squares wide by 12 squares long (Total 108 squares).
- Quantity: Cut 54 squares of Fabric A and 54 squares of Fabric B.
Step 3: The “Soft Touch” Assembly
Gauze can shift and warp. Handle it gently.
- Layout: Arrange the squares in an alternating checkerboard pattern.
- Sewing: Sew the squares into horizontal rows, using a 1/4-inch seam allowance.
- Tip: Use a Walking Foot on your machine. This evenly feeds the top and bottom layers, preventing the gauze from stretching or rippling.
- Pressing: Press seams open. This reduces bulk at the intersections, keeping the quilt soft and flat.
- Join: Sew the rows together to complete the top.

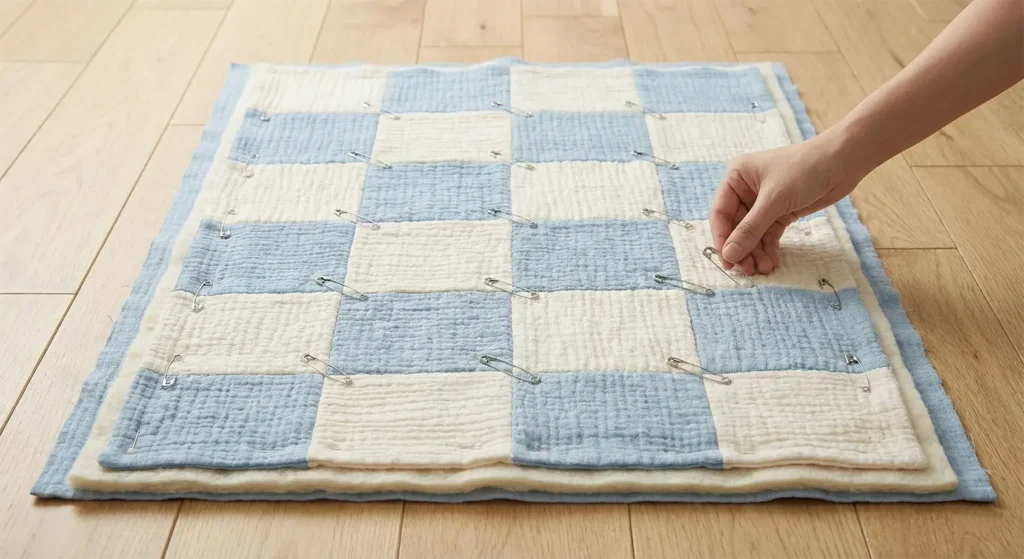
Step 4: The Cloud Sandwich
- Layer: Backing (face down) + Bamboo Batting + Top (face up).
- Baste: Use Safety Pins spaced every 4 inches. Spray baste is not recommended for gauze as it can gum up the open weave.
Step 5: “Koushi” (Lattice) Quilting
Dense quilting will make gauze stiff. Keep it loose.
- Design: Quilt simple diagonal lines through the squares.
- Option A: An “X” through every square.
- Option B: A single diagonal line through the light squares only.
- Stitch: Increase your stitch length to 3.0mm or 3.5mm. A longer stitch looks better on the textured gauze and keeps the quilt pliable.

Step 6: The “Puffy” Binding
A hard edge ruins the softness. We use self-binding or bias-binding.
- Cut Binding: Cut 2.5 inch strips of the Fabric B (Color) Double Gauze.
- Apply: Sew the binding to the front with a walking foot.
- Finish: Hand-stitch the binding to the back.
- Result: Because the binding is also gauze, the edge of the quilt is soft enough to rub against your face without scratching.

Comfort Note: This is arguably the most physically comfortable quilt in the entire collection. It regulates temperature exceptionally well and feels like a well-worn favorite t-shirt from day one.
7. Elegant Sashiko Stitched Pillow Covers for Sofa Accents
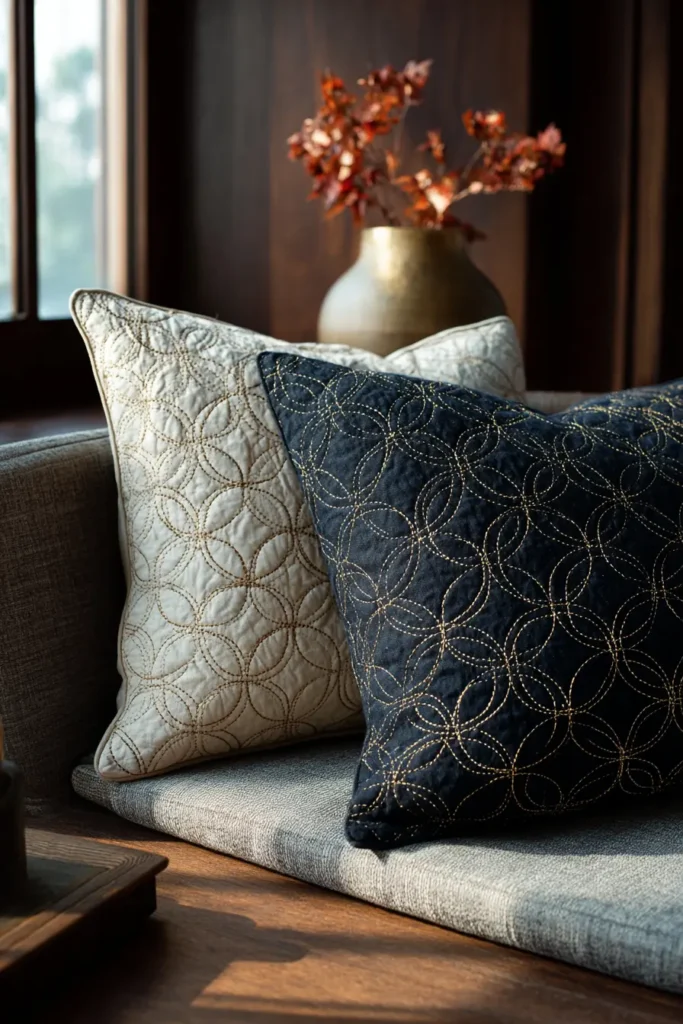
The “Seven Treasures” (Shippo) Sashiko Pillow
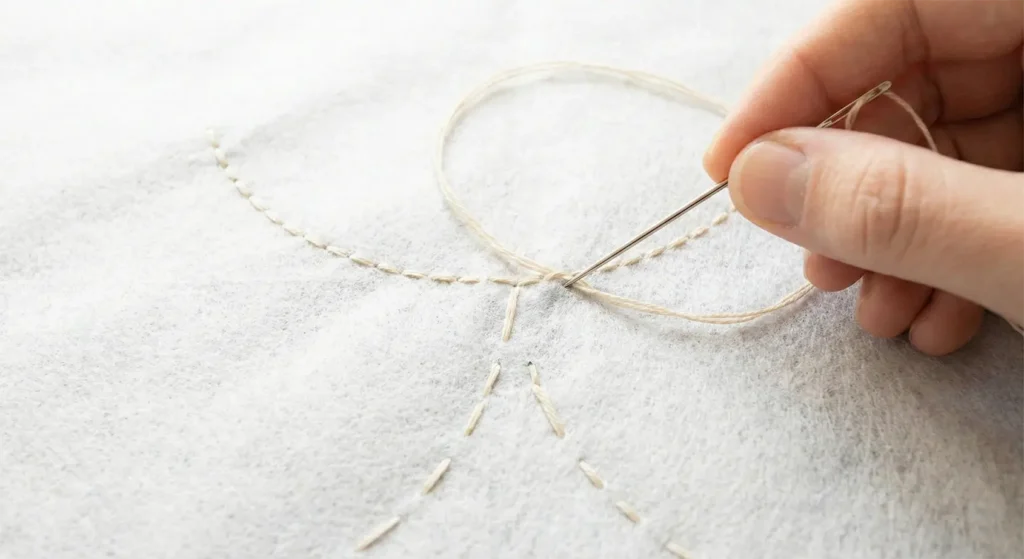
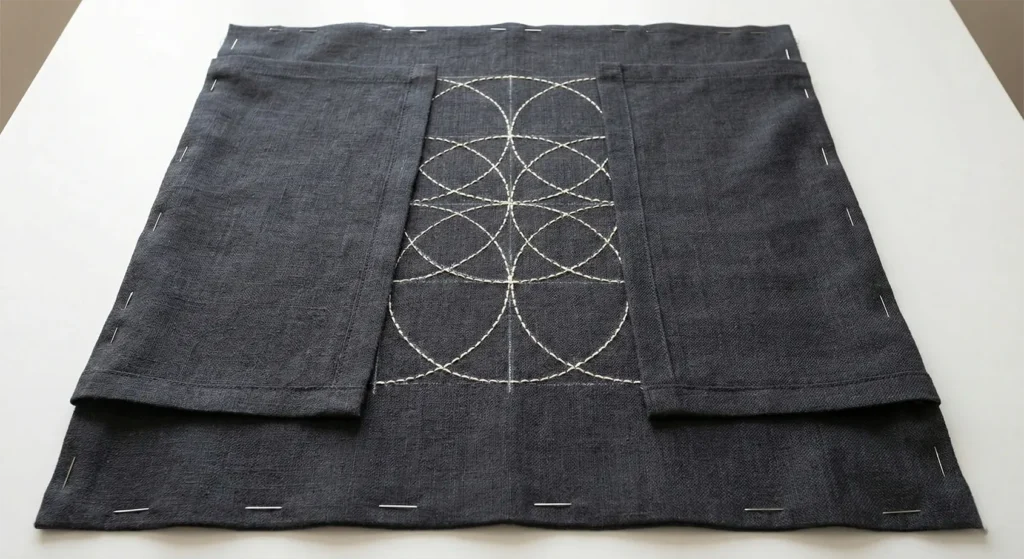
While bed quilts are a major commitment, a pillow cover is the perfect canvas for intricate Sashiko work. This design features the Shippo-Tsunagi (Seven Treasures) pattern, interlocking circles that symbolize endless harmony and peace. Stitched in cream thread on a dark charcoal or indigo linen background, this pillow acts as a piece of “soft architecture” for your sofa, adding a refined, Zen focal point that is durable enough to lean on every day.
Finished Dimensions: Standard Square Throw Pillow, 18″ x 18″ or 20″ x 20″.
Materials Needed:
- Fabric A (Front): 3/4 yard of Dark Charcoal Linen or Indigo Cotton Canvas.
- Fabric B (Back): 3/4 yard of matching linen (for envelope closure).
- Interfacing: Lightweight Fusible Interfacing (to stabilize the weave while stitching).
- Thread: Cream or Gold Sashiko Thread. (Gold adds a touch of “Kintsugi” elegance—repairing with gold).
- Needles: Sashiko Needle (long and rigid).
- Notions: Circle template (or a compass), white chalk pencil, 18″ pillow insert.
Cultural Backstory: The Shippo pattern (Seven Treasures) originates from Buddhist scripture, representing the seven precious gems (gold, silver, lapis, etc.). However, in Japanese textile art, the “treasure” is not material wealth, but the infinite interconnection of circles, symbolizing harmonious relationships between people.
Step 1: The Stabilized Foundation
Linen can be wiggly. Stabilize it first.
- Cut: Cut the Front Fabric to 20″ x 20″ (for an 18″ finished pillow—this gives room for shrinkage during stitching).
- Fuse: Iron the lightweight interfacing to the wrong side of the front panel.
- Why? This prevents the linen threads from distorting when you pull the sashiko thread through, ensuring your circles stay perfectly round.
Step 2: The Grid of Treasures
Shippo looks complex, but it is just a grid of circles.
- Mark a Grid: On the right side of the fabric, use your chalk pencil to draw a 2-inch grid (2″ squares).
- Mark Centers: Mark the exact center point of every square.
- Draw Circles: Use a compass or circle template. Place the point on the intersection of the grid lines. Draw a circle with a 1-inch radius (2-inch diameter).
- Result: The edges of the circles should touch perfectly.
- Repeat: Draw circles at every intersection. The overlapping lines create the “petal” or “star” shapes in the middle.
Step 3: The “Small Stabs”
Sashiko relies on consistency.
- Thread: Cut a manageable length of Sashiko thread (about 18 inches). Do not knot the end; leave a tail.
- The Path: Stitch all the Horizontal curves first (the top and bottom arcs of the circles).
- Jump from one arc to the next across the fabric.
- The Vertical: Then stitch all the Vertical curves.
- The Rule: Leave a small gap (the “Ma” or space) where lines intersect. Do not cross threads; it makes the pillow lumpy.
Step 4: Finishing the Thread Ends
Because a pillow gets tossed around, knots can come undone. We weave the ends.
- Turn Over: Flip to the back (interfacing side).
- Weave: Thread the tails through the backs of the existing stitches for about 1 inch.
- Trim: Snip the excess. This secures the thread without creating a hard knot that you might feel when resting your head.
Step 5: The Envelope Assembly
No zippers to scratch your face. The envelope closure is classic and soft.
- Cut Backing: Cut two rectangles:
- Piece A: 20″ x 14″
- Piece B: 20″ x 10″
- Hem: Hem one long edge of each rectangle (fold over 1/2 inch twice and stitch).
- Layer:
- Lay the Sashiko Top face up.
- Place Piece A face down, aligning with the top raw edge.
- Place Piece B face down, aligning with the bottom raw edge (it will overlap Piece A).
- Sew: Stitch around the entire perimeter with a 1/2 inch seam allowance.
Step 6: The “Knife Edge” Finish
- Trim: Clip the corners to reduce bulk.
- Turn: Turn the pillow cover right side out. Use a chopstick to push the corners out squarely.
- Press: Press the edges flat.
- Insert: Stuff with a feather or down-alternative insert. (Use an insert 1 inch larger than the cover for a plump, luxurious look).
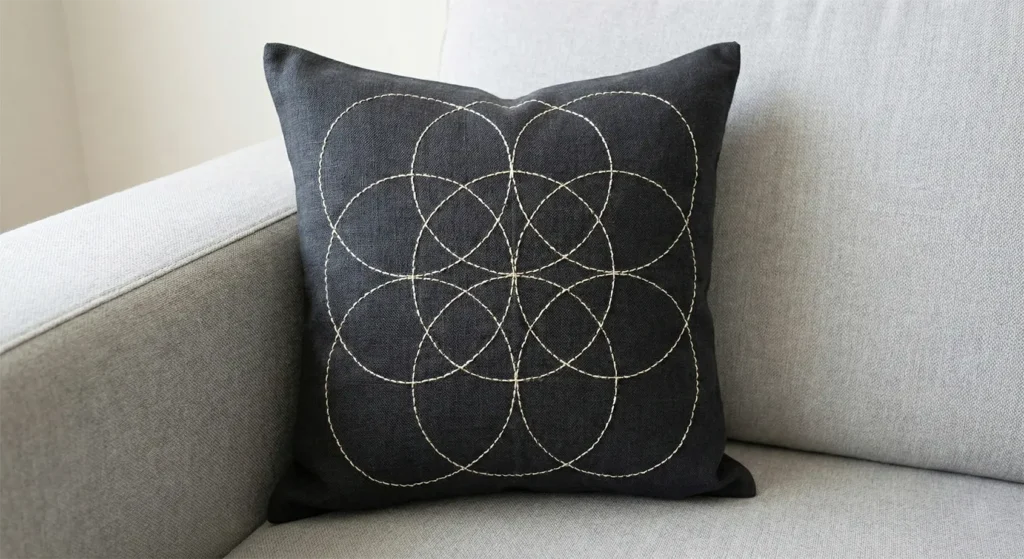
Elegance Note: The contrast of the geometric, mathematical circles against the organic, slubby texture of the linen creates a sophisticated “Perfectly Imperfect” look that defines Japanese elegance.
8. Modern Kogin Embroidery Patterns on Cozy Quilted Throws

The “Tsugaru Snowfall” Kogin-Zashi Throw
Kogin-zashi is a counted-thread embroidery technique originating in the Tsugaru region of northern Japan. Unlike Sashiko, which uses running stitches, Kogin creates dense, geometric diamond patterns by weaving thick threads over and under the fabric weave. Historically used to reinforce fabric against the harsh northern winters, it is incredibly warm and durable. This modern interpretation features a wide vertical band of Kogin embroidery set into a soft, brushed flannel or wool body—combining the elegance of traditional handwork with the ultimate coziness of a winter blanket.
Finished Dimensions: Large Sofa Throw, approximately 55″ x 70″.
Materials Needed:
- Fabric A (Embroidery Panel): 1/2 yard of Navy Even-Weave Linen (or Monk’s Cloth). Critical: You must be able to count the threads (approx 18-20 count is good for beginners).
- Fabric B (Main Body): 3 yards of Soft Grey Wool Flannel or Brushed Cotton. (This provides the “cozy” factor).
- Backing Fabric: 3.5 yards of matching cotton or flannel.
- Batting: Wool Batting. (Lightweight, breathable, and warm).
- Thread: Thick White Cotton Thread (Kogin thread or Matte Embroidery Floss).
- Needle: Tapestry Needle (blunt tip).
- Notions: Masking tape, embroidery hoop (optional, but hand-holding is traditional).
Cultural Backstory: Kogin was born from necessity. In the Edo period, peasants in the snowy north were forbidden from wearing cotton. They had to wear open-weave hemp, which was freezing cold. To survive, women stitched thick cotton threads into the hemp to fill the gaps, trapping air and creating a fabric that was warm, windproof, and beautiful. It is a true art form of survival.
Step 1: Preparing the “Modoko” (Motif) Band
We will create a 10-inch-wide embroidery panel to run down the center.
- Cut: Cut your Even-Weave Linen to 12″ x 72″.
- Seal: Zig-zag stitch the raw edges to prevent fraying.
- Center: Fold in half lengthwise and widthwise to find the exact center point. Mark it with a pin.

Step 2: Counting the “Uroko” (Scales)
Kogin is counted. The rule is strictly odd numbers (1, 3, 5).
- Thread: Use a long length of white thread. Do not knot; leave a tail to weave in later.
- The Center Motif: Start at the center pin. Stitch a single diamond motif (Modoko).
- Row 1: Over 1 thread, Under 1.
- Row 2: Over 3, Under 1.
- Row 3: Over 5 (center of diamond), Under 1.
- Row 4: Over 3, Under 1.
- Row 5: Over 1.
- Repeat: Continue stitching these diamonds outward from the center until you have filled the panel, leaving a 1-inch border on all sides.
- Visual: The white diamonds should look like heavy snowflakes falling on the navy linen.

Step 3: Piecing the Modern Throw
Now we frame the hard work with soft fabric.
- Cut Body Fabric: Cut your Grey Flannel into two large panels, each measuring 23″ x 72″.
- Join: Sew one flannel panel to the left side of the Kogin Band. Sew the other flannel panel to the right side.
- Seam Allowance: Use a 1/2 inch seam allowance.
- Press: Press seams toward the flannel (away from the bulky embroidery).

Step 4: The “Invisible” Baste
Wool batting can be slippery.
- Sandwich: Backing + Wool Batting + Pieced Top.
- Grid Baste: Use thread basting in a 4-inch grid across the flannel sections.
- Secure Kogin: Baste around the perimeter of the Kogin band to keep it straight.

Step 5: “Echo” Quilting
Do not quilt over the Kogin embroidery; it is too thick.
- The Flannel Sections: Quilt simple, straight vertical lines spaced 2 inches apart. This modern minimalism contrasts with the complex diamonds in the center.
- The Kogin Band: “Stitch in the Ditch” along the seams where the linen meets the flannel.
- Optional: If the band feels loose, add a few tiny “tie tacks” (knot stitches) in the navy spaces between diamonds to secure it to the batting.
Step 6: The Weighted Binding
- Cut Binding: Cut 2.5-inch strips of the Navy Linen (Fabric A).
- Bind: Attach the binding by machine to the front and hand-stitch to the back.
- Texture: The linen binding ties the design together, framing the soft grey flannel with the same crisp texture as the center band.
Usability Note: The combination of textures is what makes this throw elegant. The wool/flannel body is soft against the skin, while the Kogin band adds structure and visual weight, making it drape beautifully over the back of a sofa.
9. Minimalist Shonai Quilt for Couch Cover Comfort

The “Shonai Solitude” Hitasashi Grid Cover
Shonai Sashiko originates from the Shonai plain in Yamagata Prefecture, a region known for harsh, snowy winters and excellent rice. Unlike the decorative patterns of other regions, Shonai stitching was often strictly utilitarian—dense rows of running stitches designed to pack layers of fabric together for maximum warmth and durability. This design uses the Hitasashi (One-Stitch) technique: a simple, repetitive grid of small white dashes on a dark indigo background. The result is a texture that looks like grains of rice, providing a “grippy” yet soft surface that stays put on leather or fabric sofas.
Finished Dimensions: Large Sofa Throw / Cover, approximately 60″ x 80″.
Materials Needed:
- Fabric A (Top): 4 yards of Dark Navy Canvas or heavyweight Indigo Cotton. (A heavier weight is better for sofa covers to prevent wrinkling.)
- Fabric B (Backing): 4 yards of striped Japanese cotton (adds a hidden pop of pattern).
- Batting: Cotton Flannel Sheet. (Traditional Shonai quilting rarely uses thick batting. Using a layer of flannel instead of high-loft batting makes the quilt heavy, dense, and drapeable—perfect for sitting on).
- Thread: White Sashiko Thread (Medium weight).
- Notions: Grid ruler, white Chaco-liner (chalk), long sashiko needles, leather thimble.
Cultural Backstory: In the Shonai region, cloth was precious. The “Hitasashi” stitch was developed not just for decoration, but to trap warm air between layers of old hemp and cotton. The density of the stitching made the fabric nearly windproof and incredibly strong, symbolizing the people’s resilience (Gaman) against the winter elements.
Step 1: The “Rice Field” Grid
Zen quilting requires preparation. The grid must be perfect.
- Prep: Tape your Top Fabric to a hard surface.
- Mark: Using your chalk liner and ruler, draw a 1/2 inch (1 cm) grid over the entire surface of the fabric.
- This sounds tedious, but in Shonai quilting, the marking is part of the meditation. You will have thousands of small squares.
- Alternative: Use a pre-printed Sashiko fabric (grid wash-away) to save hours.
Step 2: The Flannel Core
We replace puffy batting with dense flannel for a sleek, modern look.
- Layer: Backing (Face Down) + Flannel Sheet + Top (Face Up).
- Baste: Thread baste securely. Do not use safety pins, as they distort the grid. Use long basting stitches in a contrasting color (like red) every 4 inches so you can remove them later.
Step 3: The Horizontal Flow
Sashiko is about the efficiency of movement.
- Stitch Logic: You will not stitch every square. You will stitch “Over One, Under One.”
- Action: Load your needle with multiple stitches.
- Stitch a dash (length of one grid square).
- Go under the fabric (length of one grid square).
- Stitch a dash.
- The Row: Continue this pattern all the way across the row.
- The Next Row: For the second row, shift the pattern. If the specific column had a stitch in Row 1, it should have a space in Row 2.
- Result: You are creating a “Brickwork” pattern of horizontal dashes.

Step 4: The Vertical Interlock
Now we turn the fabric 90 degrees.
- Stitch Logic: Repeat the “Over One, Under One” pattern vertically.
- The Junction: Where a vertical stitch meets a horizontal stitch, they should never cross on top of each other. They should abut, creating a small “L” or “+” shape depending on the specific Hitasashi variation.
- Standard Minimalist: Keep the vertical stitches in the spaces left by the horizontal rows.
- Visual: When finished, the dashes will look like a woven basket or a field of rice grains.
Step 5: Managing Tension (The “Smile”)
If you pull tight, the grid will pucker.
- Smooth: After every few inches of stitching, lay the fabric flat and smooth it with your palm.
- The Loop: When you turn a corner at the edge of the quilt to start a new row, leave a small loop of thread (about 1/2 inch) hanging loose on the back. This is called the “thread reserve.” It allows the quilt to stretch and shrink over time without snapping the thread.
Step 6: The “Mimi” (Selvedge) Finish
Traditional Japanese textiles utilize the selvedge (edge).
- Trim: Trim the flannel and backing to match the top size.
- Fold: Fold the Top fabric over the raw edge of the backing (like a self-binding).
- Stitch: Secure the hem with a running stitch using the same white thread.
- The Corner: Fold the corners into a neat miter.
- Wash: Wash the quilt in warm water to dissolve the chalk grid. The cotton fibers will bloom and “puff” slightly around the stitches, locking the thread in place.
Usability Note: The density of the Shonai stitching makes this quilt stiff at first, but incredibly durable. It is ideal for pet owners or busy households because the dense stitching prevents dog claws or zippers from snagging the fabric weave.
10. Japanese Garden-Inspired Quilts for Wall Decor and Serenity
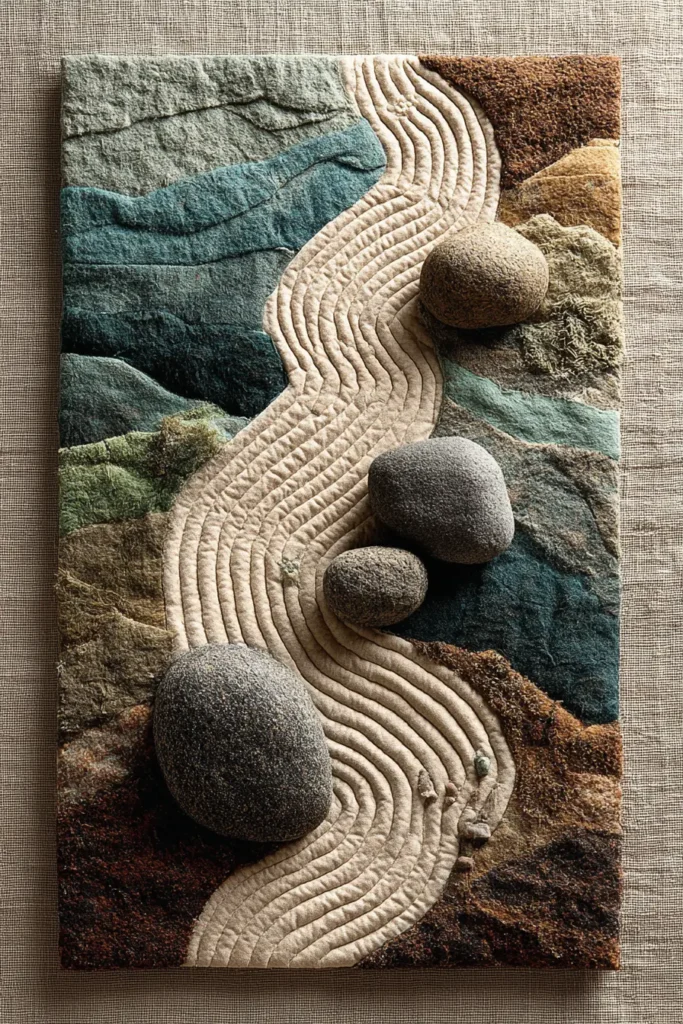
The “Karesansui Silence” Dry Garden Wall Quilt
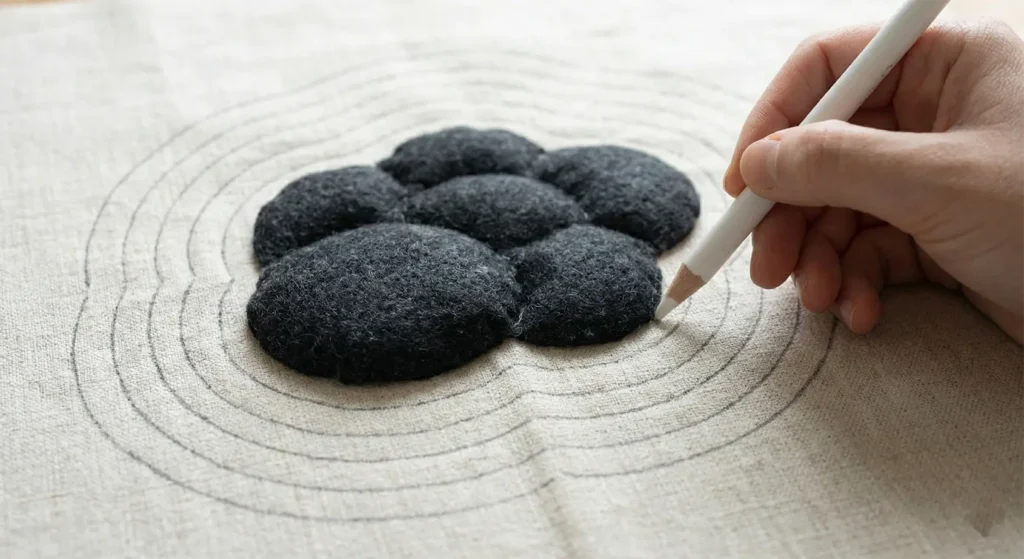
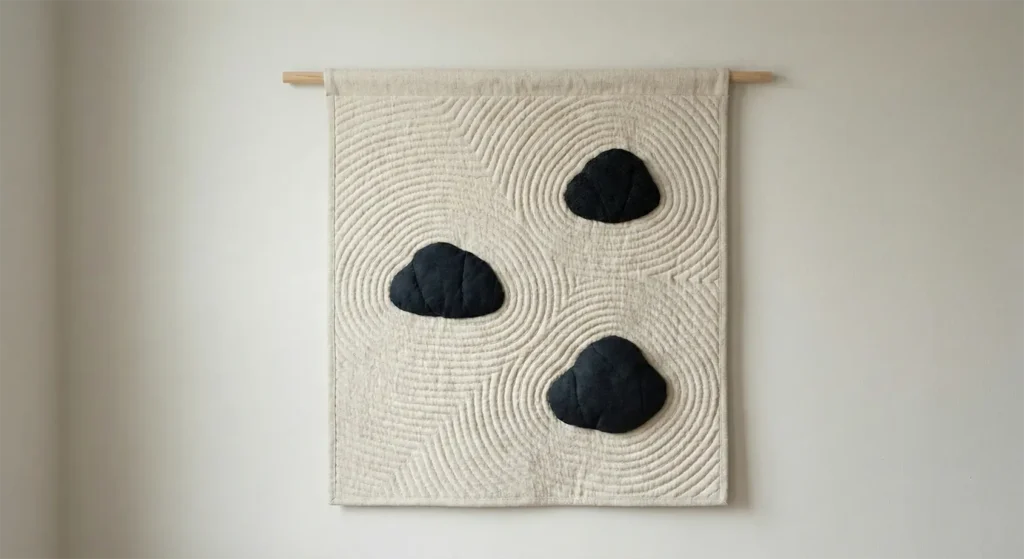
The Karesansui (Dry Landscape Garden) is the pinnacle of Zen aesthetics. These gardens use rocks and raked gravel to represent islands and the ocean, designed solely for meditation. This wall quilt mimics that tranquility by using texture instead of color. It features asymmetrical “rock” appliqués set against a background of dense, concentric quilting lines that look exactly like raked sand. Hanging this piece in a home office or hallway brings the stillness of a Kyoto temple into your daily life.
Finished Dimensions: Vertical or Horizontal Wall Panel, approximately 40″ x 60″.
Materials Needed:
- Fabric A (Sand Background): 2 yards of Unbleached Linen or Textured Cream Cotton. (Avoid bright white; natural linen looks like gravel).
- Fabric B (Rocks): Scraps of Charcoal Wool, Slate Grey Silk, or Textured Tweeds. (Mixing fabrics gives the rocks realistic weight and roughness).
- Batting: Stiff Cotton Batting or two layers of standard batting. (Wall hangings need structure to hang flat without curling).
- Thread: Heavyweight Topstitching Thread in Cream (for the raked sand effect).
- Notions: Hanging sleeve fabric, wooden dowel.
Cultural Backstory: In a Zen garden, raking the gravel (Samu) is a form of moving meditation. The ripples are often raked to mimic water rippling outward from the stones. In this quilt, the act of stitching the ripples serves the same purpose—a meditative, repetitive process that clears the mind.
Step 1: The Principle of “Yohaku” (Empty Space)
Japanese design relies on asymmetry. Do not center your rocks.
- Layout: Lay your background fabric flat.
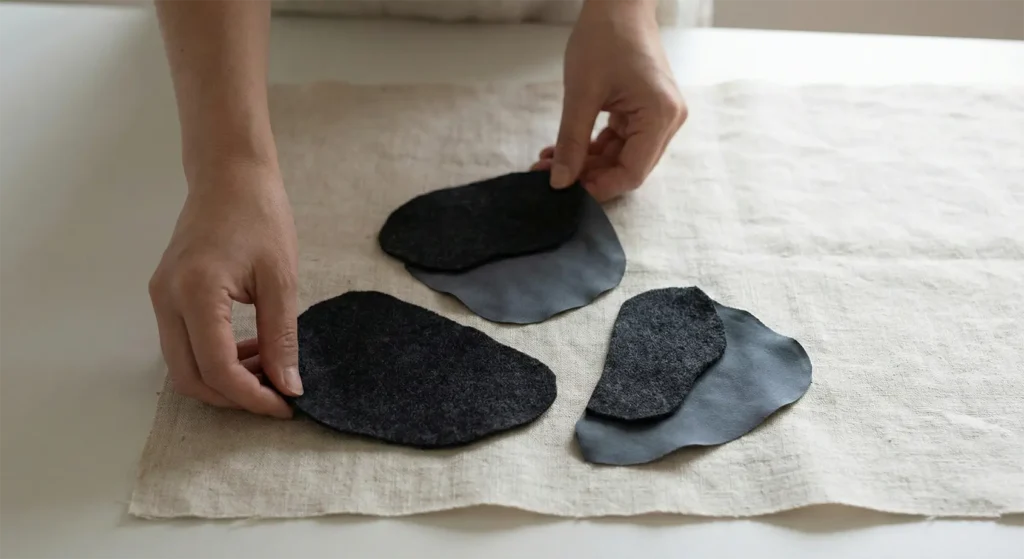
- The Rocks: Cut 3 or 5 uneven, organic shapes from your dark fabrics (Fabric B).
- Rule of Odd Numbers: Always use odd numbers (3, 5, 7). Even numbers create symmetry, which stops the eye movement. Odd numbers keep the gaze moving.
- Placement: Group the rocks slightly off-center.
- Create a “Triad”: One large rock (The Father/Mountain), one medium, and one small, placed in a loose triangle constellation in the bottom third or top third of the quilt.
Step 2: Trapunto “Rock” Appliqué
We want the rocks to bulge out slightly, creating 3D relief.
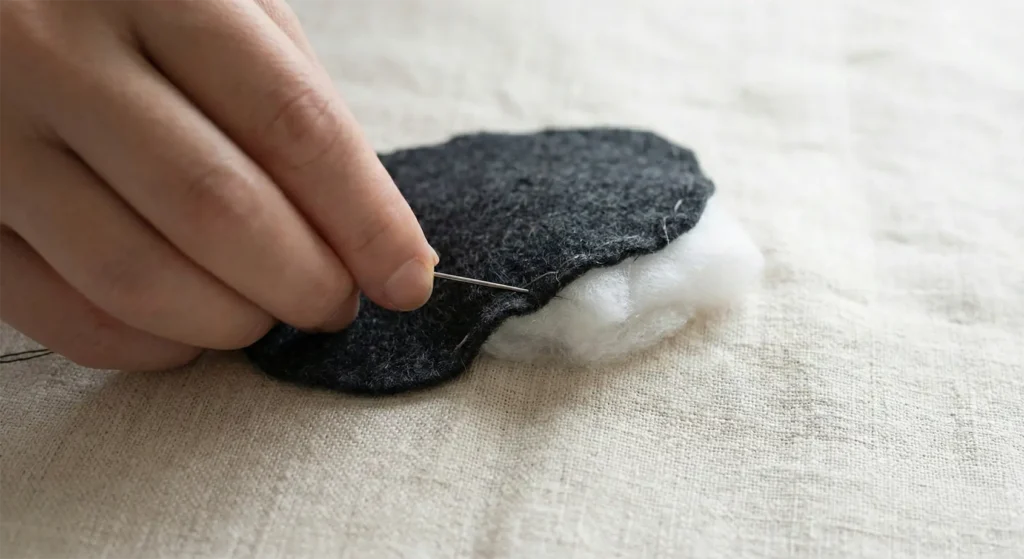
- Stuffing: Before sewing the rocks down, place a small scrap of extra batting underneath each rock shape.
- Appliqué: Stitch the rocks to the background using a Raw Edge Appliqué or a Needle-Turn technique.
- Texture: If using wool, a raw edge adds to the mossy/rocky texture.
- Result: The extra batting makes the rocks puffy, contrasting with the flat “sand.”
Step 3: Marking the “Samon” (Ripples)
This is the most critical step. The quilting lines ARE the design.
- Echo Lines: Mark lines echoing around the base of the rock cluster.
- Space them 1/2 inch apart.
- These lines should look like ripples spreading outward when a stone is dropped into a pond.
- The Stream: Once the ripples move about 5 inches away from the rocks, transition the lines into straight, horizontal, or gently waving lines that run off the edges of the quilt.
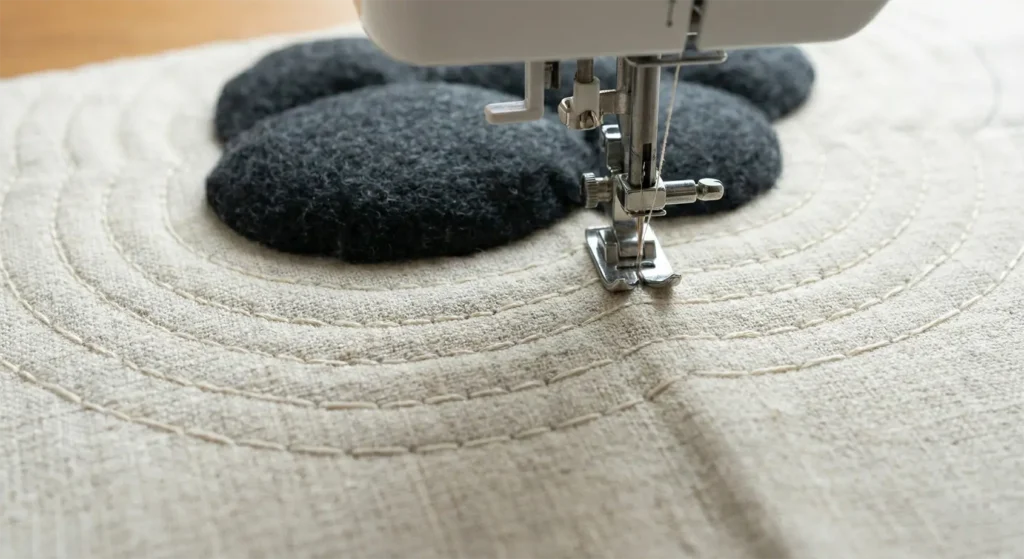
Step 4: The Meditative Quilting
- Thread: Load your machine with the thick Cream Thread. (Or hand quilt for a softer look).
- Stitch: Quilt exactly on your marked lines.
- Tension: Keep the tension slightly tight to create deep valleys in the batting.
- Shadow: The heavy thread and the shadows created by the quilting channels will visually mimic the ridges of raked gravel.
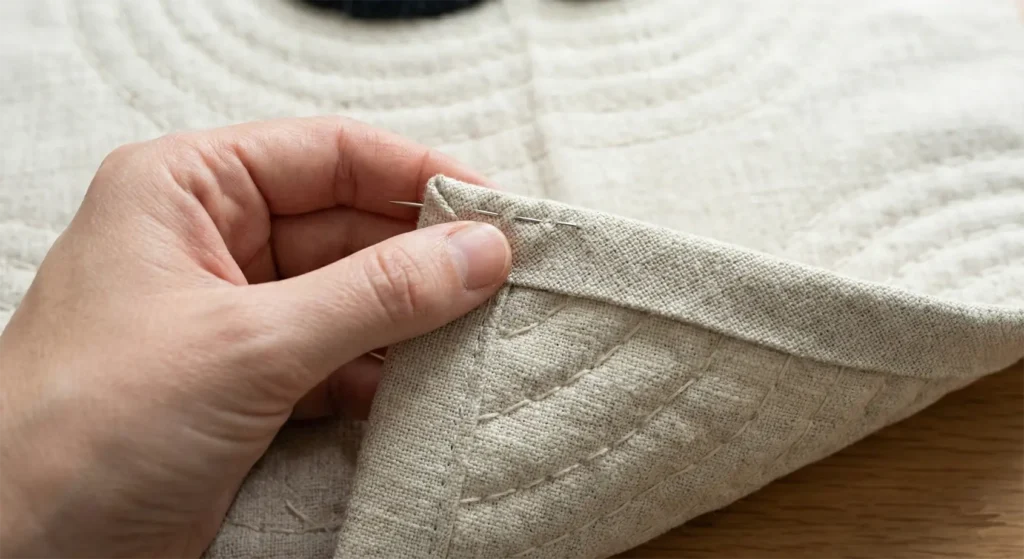
Step 5: The “Invisible” Edge
A heavy binding can trap the energy. A facing is better for landscapes.
- Cut Strips: Cut 2.5-inch strips of the Background Linen.
- Face: Sew the strips to the front, flip them entirely to the back, and stitch down.
- Effect: The “sand” ripples appear to continue off the edge of the quilt into infinity, rather than stopping at a border frame.
Step 6: The Hanging Sleeve
To ensure the quilt hangs like a painting, not a blanket.
- Sleeve: Sew a 4-inch wide tube of fabric.
- Attach: Hand-stitch this tube to the top back of the quilt.
- Slack: Leave a little slack in the tube so the dowel fits without bulging the quilt’s front.
- Hang: Insert a flat wooden slat or a bamboo pole and hang it on the wall.
Usability Note: While intended for the wall, this quilt can function as a “Lap Weight” for meditation. The stiff batting and heavy thread give it a comforting, grounding weight when placed on the lap while sitting.
11. Mountains and Mist Quilt Patterns for Calming Wall Hangings
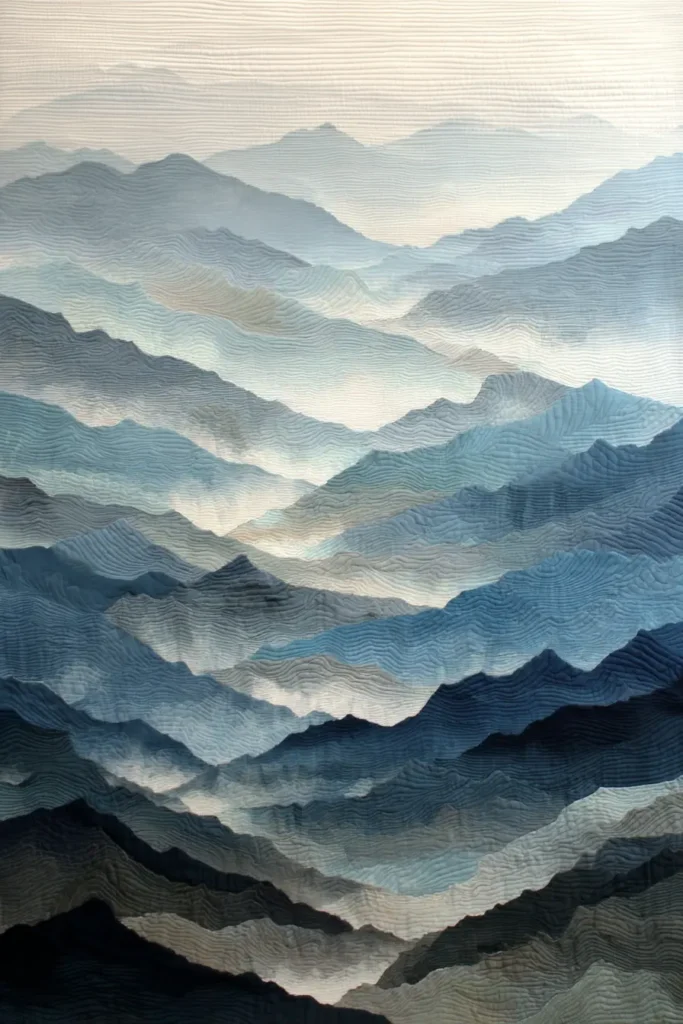
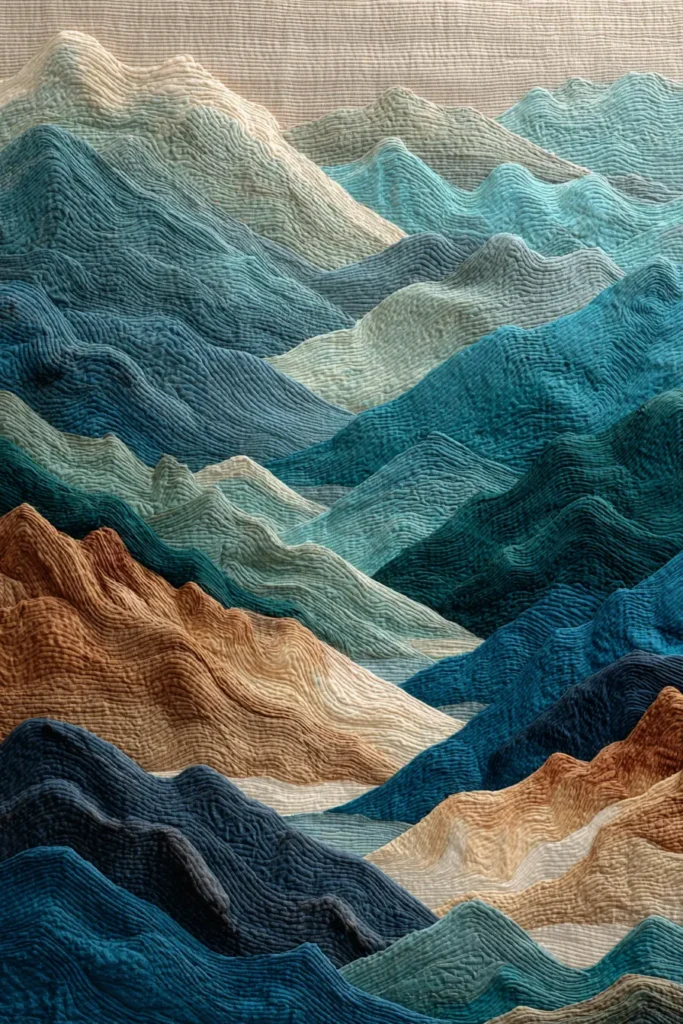
The “Sansui Mist” Layered Landscape Quilt
This wall hanging is inspired by Sumi-e (Japanese ink wash painting) and the concept of Sansui (Mountain-Water) landscapes. The goal is to capture the feeling of Yūgen—a Japanese aesthetic term referring to a profound, mysterious sense of the beauty of the universe. By layering varying shades of grey and blue with sheer fabrics (such as tulle or organza), this quilt creates an “Atmospheric Perspective” in which distant mountains fade into the fog. It is less of a quilt and more of a textile painting, designed to bring a deep, meditative silence to a room.
Finished Dimensions: Vertical Art Panel, approximately 30″ x 50″ (Resembling a hanging scroll).
Materials Needed:
- Fabric A (Sky): 1 yard of Pale Mist Grey or White.
- Fabric B, C, D (Mountains): 1/2 yard each of three distinct shades: Light Grey, Medium Slate, and Dark Charcoal/Black.
- Fabric E (The Mist): 1 yard of White Silk Organza or Grey Tulle. (This sheer layer is the secret ingredient that blurs the lines between mountains).
- Backing: 1.5 yards of solid cotton.
- Batting: Stiff Cotton Batting (to hang flat).
- Notions: Fabric glue stick, rotary cutter (with a wave blade if available), wooden dowel for hanging.
Cultural Backstory: In traditional Japanese landscape art, the empty space (Ma) is just as important as the painted subject. The mist that obscures the base of the mountains represents the unknown and the spiritual void, inviting the viewer to fill in the details with their own imagination.
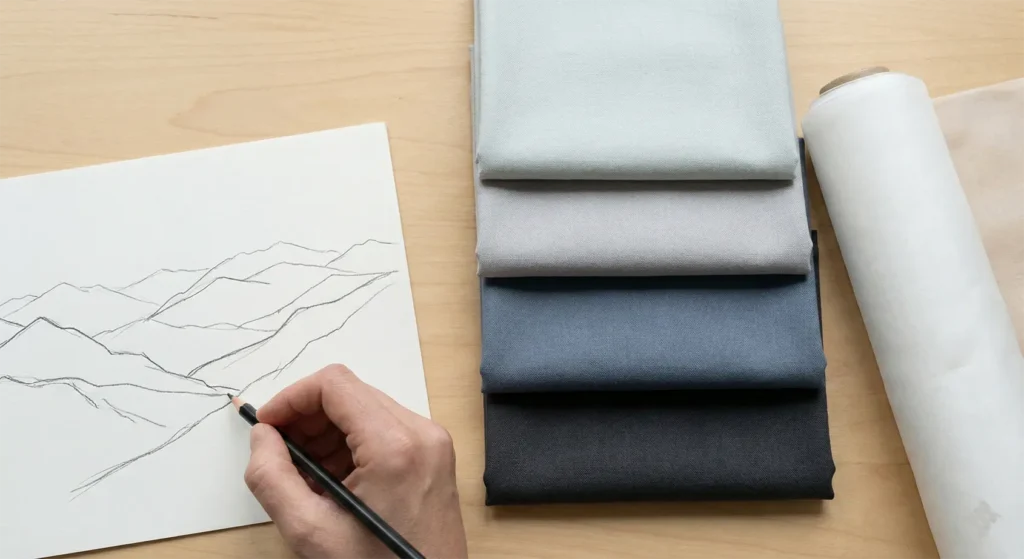
Step 1: The “Atmospheric” Sketch
You must plan the recession of depth. Dark colors come forward; light colors recede.
- Draft: On a piece of paper, sketch 3 or 4 overlapping mountain ranges.
- Foreground: Large, steep peaks (Darkest Color).
- Mid-Ground: Rolling hills (Medium Color).
- Background: Faint, distant peaks (Lightest Color).
- Sky: The top 1/3 of the quilt (Pale/White).
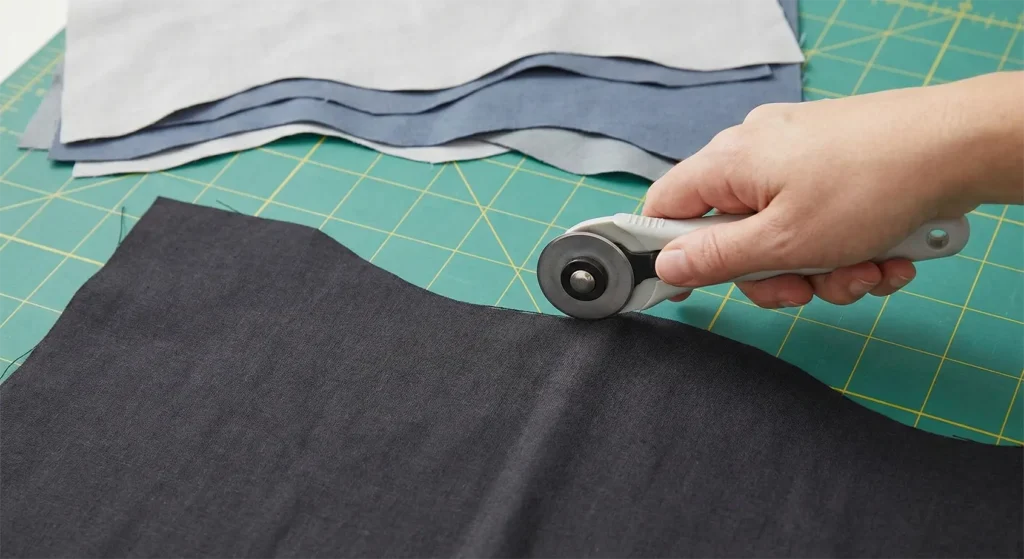
Step 2: Cutting the “Ridgelines”
- Freehand Cutting: Do not use a ruler. Use a rotary cutter to slice gentle, organic curves across the width of your mountain fabrics.
- Tip: Vary the slopes. Some should be steep crags, others gentle slopes.
- Layer Check: Lay the pieces on the floor, stacking them from Top (Sky) to Bottom (Foreground), ensuring they overlap correctly and cover the 30×50 area.
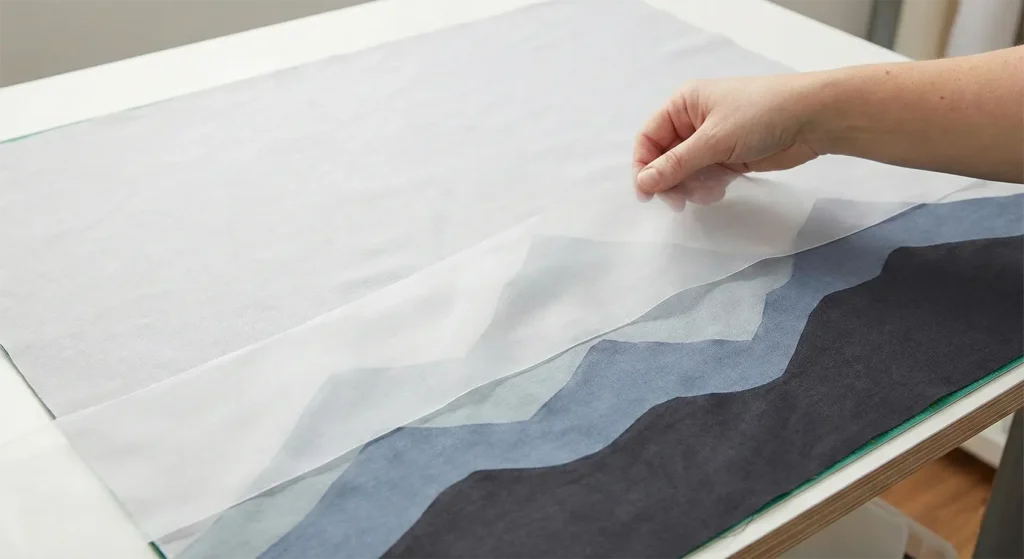
Step 3: The “Mist” Overlay
This creates the foggy effect.
- Cut Organza: Cut strips of the White Organza or Tulle that match the width of your mountain layers.
- Layering: Place a strip of organza between the Background Mountain and the Mid-Ground Mountain.
- Effect: This mutes the color of the distant mountain, making it look farther away.
- Optional: Add a second layer of organza over the very top mountain peaks to make them look like they are piercing the clouds.
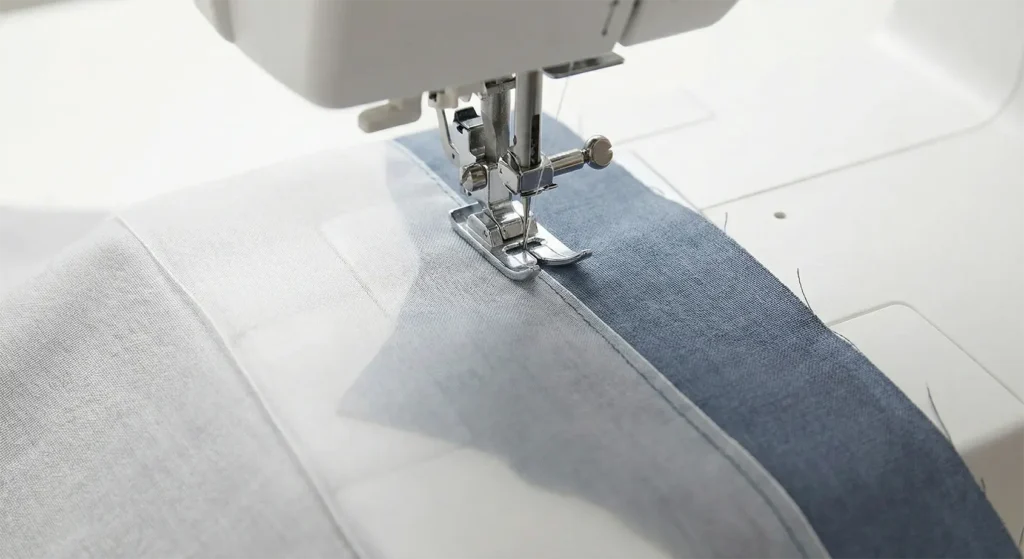
Step 4: Raw-Edge Construction
Turning edges adds too much bulk. Raw edge appliqué mimics the texture of rough stone.
- Assembly: Start from the top. Place the Sky fabric down.
- Glue Baste: Use a glue stick to tack the Lightest Mountain onto the bottom of the sky fabric.
- Stitch: Stitch along the ridgeline using a straight stitch or a “sketchy” free-motion stitch in a matching thread.
- Repeat: Add the Mid-Ground mountain (overlapping the bottom of the light one), then the Dark Foreground mountain.
- Note: The raw edges will fray slightly over time, adding to the wabi-sabi (imperfect beauty) of the piece.
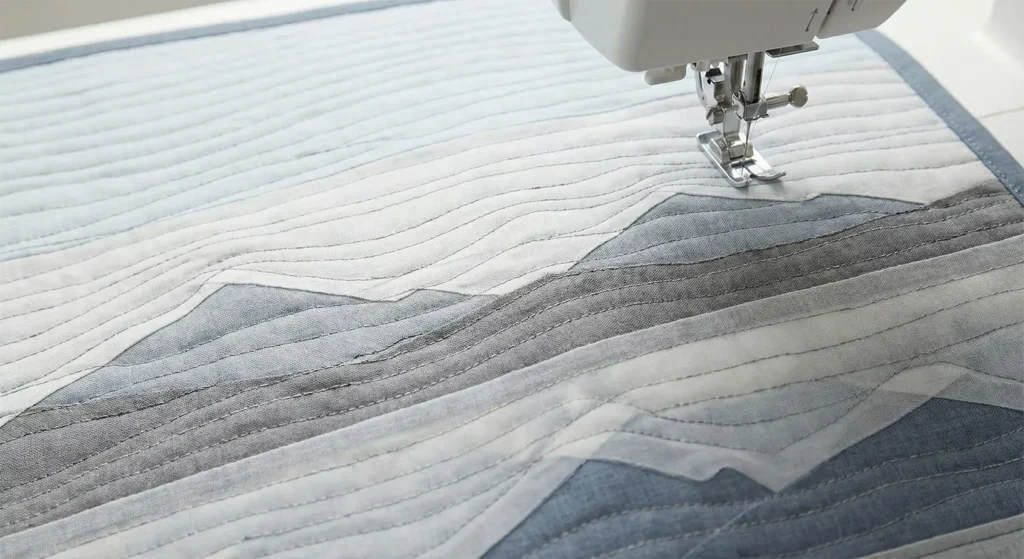
Step 5: “Fog” Quilting
The quilting lines should emphasize the horizontal stillness.
- Sandwich: Backing + Stiff Batting + Top.
- Thread: Use a Variegated Grey Thread.
- Design: Quilt horizontal, slightly wavy lines across the entire surface.
- Density: Quilt the “Sky” and “Mist” areas densely (lines 1/4 inch apart) to flatten them. Quilt the “Mountains” sparsely (lines 1 inch apart) so they puff out slightly in relief.
Step 6: The “Scroll” Finish
A binding frame distracts from the view. Use a facing.
- Face: Use the facing method (sewing strips to the front, flipping to the back) to finish the edges cleanly without a visible border.
- Sleeve: Add a hanging sleeve to the top.
- Weight: Add a small wooden slat or metal rod into a sleeve at the bottom hem as well.
- Why? This weight pulls the quilt taut, removing wrinkles and ensuring it hangs perfectly straight like a paper scroll.
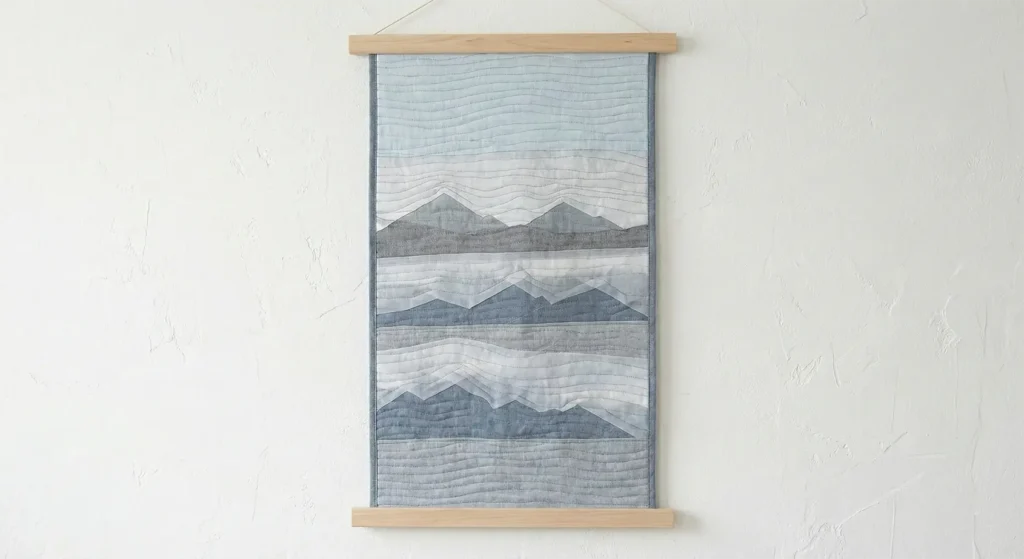
Elegance Note: Hang this quilt in a space with indirect lighting. The shadows cast by the fabric’s raw edges and the sheen of the organza mist will change throughout the day, making the landscape feel alive.
12. Serene Sashiko Quilt Ideas for Reading Nooks
The “Nowaki Breeze” Reading Lap Quilt
A reading nook requires a quilt that is warm but not heavy, and visually quiet enough not to distract from the book in your hand. This design uses the traditional Nowaki (Grasses) Sashiko pattern. It depicts tall grasses bending under the autumn wind. Unlike rigid geometric patterns, Nowaki has a directional flow that mimics the turning of pages or the gentle passage of time. Stitched in Tone-on-Tone (e.g., Light Grey thread on Charcoal fabric), it offers a sophisticated, textural experience that feels like wrapping yourself in a shadow.
Finished Dimensions: Lap Quilt, approximately 50″ x 60″ (Perfect size for tucking around legs in an armchair).
Materials Needed:
- Fabric A (Top): 2 yards of Charcoal Grey or Slate Blue Brushed Cotton or Linen. (Brushed cotton feels like flannel but looks more refined).
- Fabric B (Backing): 2 yards of a soft, coordinating solid.
- Batting: Bamboo Batting. (Bamboo has a heavy drape and regulates temperature perfectly for indoor reading).
- Thread: Silver Grey Sashiko Thread. (Using a thread only slightly lighter than the fabric creates a subtle, shimmering effect).
- Notions: Grid ruler, Hera marker (creasing tool) or chalk, Sashiko needles.
Cultural Backstory: In Japanese poetry (Haiku), “Nowaki” refers to the strong windstorms of autumn. The pattern captures the resilience of nature—the grass bends low to survive the storm, only to rise again. It is a poetic metaphor for getting lost in a story, letting the “wind” of the narrative blow through you.
Step 1: The “Vertical” Grid
Nowaki looks organic, but it relies on a strict grid to stay elegant.
- Prep: Lay your Top Fabric flat.
- Marking: Draw vertical lines spaced 1.5 inches apart across the entire width of the quilt.
- Horizontal Guides: Draw horizontal lines spaced 3 inches apart.
- Note: You now have a grid of tall rectangles (1.5″ x 3″).
Step 2: Drafting the Wind
We will fill these rectangles with diagonal “grass” strokes.
- The Angle: In the first column of rectangles, draw three diagonal lines in each box, slanting from Top-Right to Bottom-Left.
- These lines represent the grass stalks bending left.
- The Shift: In the second column, you can either repeat the direction (for a strong wind effect) or mirror it (for a herringbone effect).
- Recommendation for Zen: Repeat the same angle across the whole quilt. A singular direction is more calming to the eye.
- Variation: Make the lines within the box slightly different lengths to mimic natural grass.
Step 3: Basting for Handwork
Sashiko shifts layers. Basting is non-negotiable.
- Sandwich: Backing + Bamboo Batting + Top.
- Grid Basting: Use a contrasting thread to baste a 4-inch grid across the entire quilt.
- Tip: Do not use spray baste when hand-stitching; it can gum up the needle over time.
Step 4: The Meditative Stitch
Sashiko is about rhythm.
- Load the Needle: Thread your Sashiko needle with a single strand of the Silver thread.
- Stitch: Stitch the diagonal grass lines.
- Technique: Load 3 or 4 stitches onto the needle at once before pulling through.
- The “Grain”: Make your stitches slightly longer on top (the visible silver part) and tiny on the bottom.
Step 5: The “Empty” Rows
To prevent the quilt from becoming too stiff, we leave space.
- Design Choice: You do not need to stitch every single rectangle.
- Randomness: Leave every 5th or 6th vertical column empty (unstitched).
- Effect: This negative space breaks up the pattern, making the quilt drape better. It looks like a break in the field where the wind has paused.
Step 6: The “Soft Edge” Binding
A reading quilt touches your neck and chin. The edge must be soft.
- Cut Binding: Cut 2.5-inch strips of the Backing Fabric (not the top fabric).
- Bias Cut: Cut the strips on the bias (45 degrees). Bias binding stretches and curves, creating a softer, rounder edge than straight-grain binding.
- Finish: Sew to the front and hand-stitch to the back.
- Usability: When you pull this quilt up to your chin while reading, the soft bias edge feels gentle against your skin.
Elegance Note: By using a thread color that blends rather than contrasts (Grey on Charcoal), the pattern becomes tactile. You see it more with your fingertips than your eyes, which is perfect for a relaxing, low-stimulation environment.
13. Handcrafted Japanese Quilt Table Runners wih Zen Aesthetics
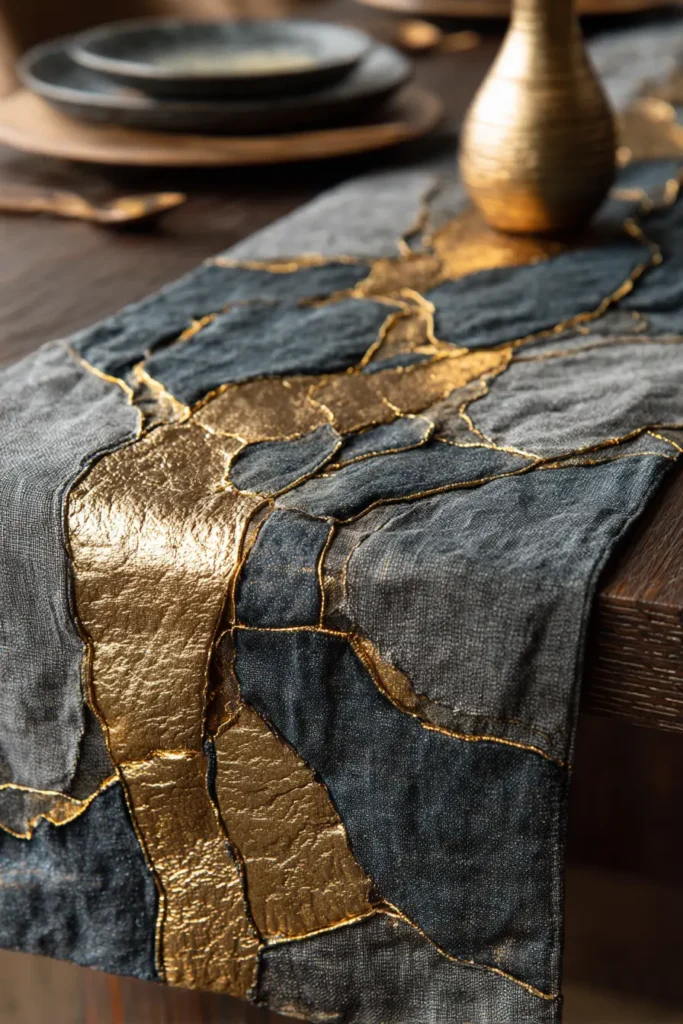
The “Golden Rift” (Kintsugi) Table Runner
Kintsugi (“Golden Joinery”) is the Japanese art of repairing broken pottery with lacquer dusted with powdered gold. The philosophy is profound: treat breakage and repair as part of an object’s history, rather than something to disguise. The “scars” become the most beautiful part. This table runner interprets that philosophy into textiles. It features a dark, solid linen field “fractured” by irregular, organic veins of gold silk. It is a stunning conversation piece for a dining table, symbolizing resilience and the beauty of imperfection (Wabi-Sabi).
Finished Dimensions: Dining Table Runner, approximately 15″ x 72″.
Materials Needed:
- Fabric A (The Stone): 1 yard of Charcoal Grey, Slate, or Deep Indigo Linen. (Linen has a texture that mimics stone or clay).
- Fabric B (The Gold): 1/4 yard of Gold Silk Dupioni, Gold Lame, or Mustard Yellow Cotton. (Silk creates the most realistic metallic shine).
- Backing Fabric: 1 yard of matching dark cotton.
- Batting: Fusible Fleece or very thin Cotton Batting. (Needs to be flat for stability).
- Thread: Dark Grey (for construction) and Metallic Gold Thread (for quilting).
- Notions: Rotary cutter, ruler, and iron.
Cultural Backstory: Legend has it that Kintsugi originated in the 15th century, when a Shogun sent a damaged tea bowl back to China for repair. It returned with ugly metal staples. Displeased, Japanese craftsmen sought a more aesthetic means of repair, filling the crack with gold lacquer and turning the damage into art.
Step 1: The “Fracture” (Intentional Breaking)
To repair the fabric, you must first break it. Do not use a ruler for this step.
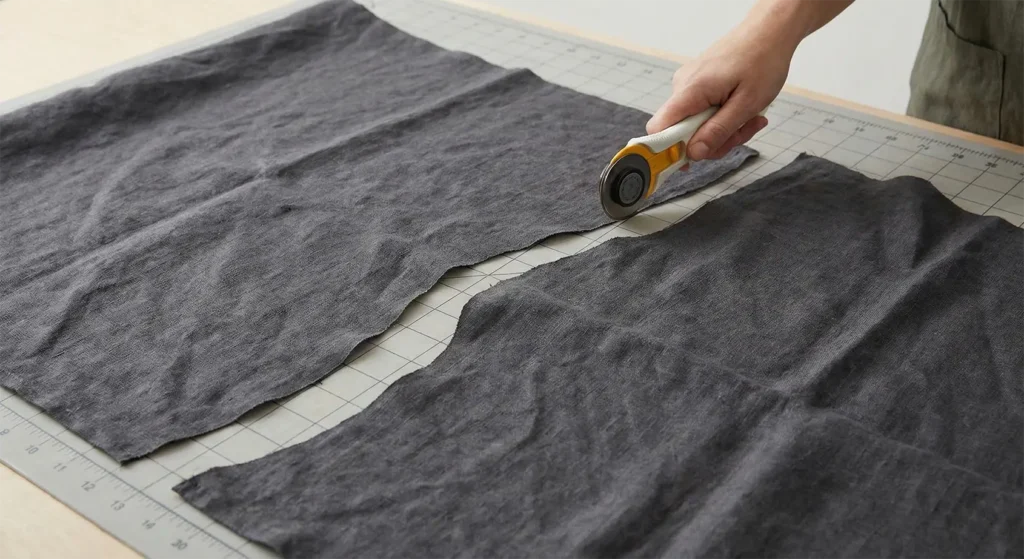
- Cut: Cut your Charcoal Linen into a strip 18″ x 75″ (slightly larger than finished size).
- Slice: Using your rotary cutter, make 3 or 4 random, wavy slices across the width or diagonal of the fabric.
- The Look: Make the lines jagged or curved, not straight. Imagine a crack running through a stone.
- Separation: You now have several separate, oddly shaped pieces of linen.
Step 2: Preparing the Gold Veins
We will insert gold into these cracks.
- Cut Strips: Cut strips of your Gold Silk measuring 1.5 inches wide.
- Bias: Ideally, cut these on the bias (at a 45-degree angle) so they curve easily along your wavy cuts.
- Press: Fold the gold strips in half lengthwise (wrong sides together) and press. They are now 3/4-inch-wide folded strips.

Step 3: The Golden Joinery (Piecing)
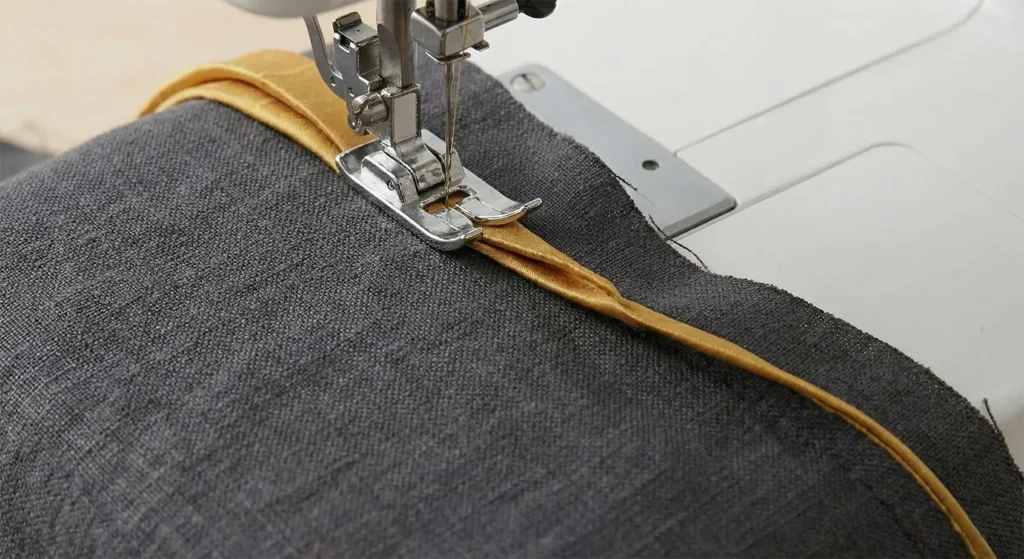
- Insert: Take two adjacent pieces of your “broken” linen. Place the folded Gold Strip between them (matching raw edges).
- Sandwich: Linen Piece 1 (Right Side Up) + Gold Strip (Raw edges aligned with linen cut) + Linen Piece 2 (Right Side Down).
- Sew: Stitch along the curve with a 1/4 inch seam allowance.
- Press: Press the linen pieces open. The Gold Strip should peek through as a thin, wandering line of gold about 1/4 inch thick.
- Repeat: Repeat for all the “cracks” you made until the runner is one solid piece again.
Step 4: Stabilizing the Scar
Linen and silk can shift.
- Fuse: Iron the Fusible Fleece to the back of your pieced top.
- Why? This stabilizes the bias curves of the gold and prevents the runner from rippling.
- Trim: Trim the runner down to a clean rectangular shape (15″ x 72″), squaring up the edges.
Step 5: “Echo” Gold Quilting
Highlight the repair.
- Thread: Load your machine with Metallic Gold Thread (use a Topstitch needle).
- The Scar: Stitch “in the ditch” on both sides of the gold insert.
- The Echo: Stitch wavy lines that roughly follow the path of the gold fracture, radiating out into the grey linen.
- Spacing: Keep the echo lines random—some close, some far apart. This mimics the ripples of energy radiating from the impact point.
Step 6: The “Invisible” Facing
A heavy border would ruin the illusion of a slab of stone.
- Cut Facings: Cut 2.5-inch strips of the Charcoal Linen.
- Sew: Sew the strips to the front perimeter of the runner.
- Turn: Flip the strips over entirely.
- Finish: Hand stitch the facing to the backing.
- Result: The grey “stone” surface runs right to the edge, creating a sleek, modern finish where the gold fractures take center stage.
Usability Note: Because this runner is flat and stabilized with fleece, it is perfectly safe for wine glasses and candlesticks. The linen hides food stains well, and the gold silk adds a festive sparkle suitable for both daily dinners and holiday gatherings.
14. Kogin-Zashi Inspired Quilt Blocks for Modern Throw Pillows

The “Tsugaru Diamond” Modern Kogin Pillow
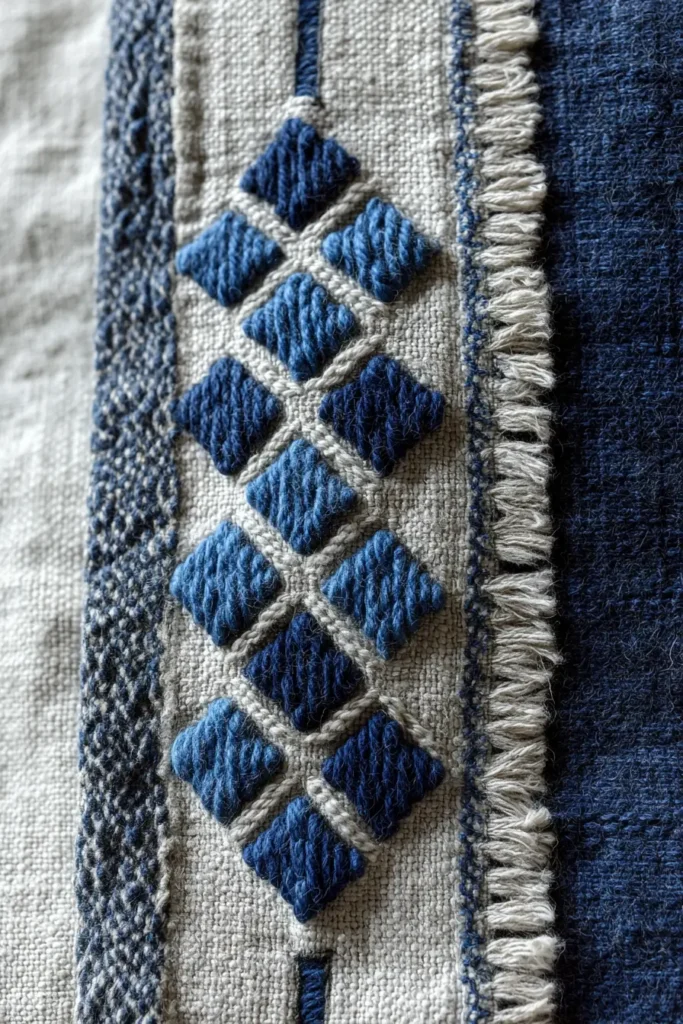
Kogin-zashi (or simply Kogin) is often called “snow country sashiko.” Originating in the snowy Tsugaru region of northern Japan, it differs from standard sashiko in that it uses horizontal running stitches exclusively to create dense, stepped geometric diamond patterns (Modoko). This design adapts the traditional “Hishigata” (Diamond) motif into a modern, oversized block for a throw pillow. The dense white stitching on dark indigo creates a texture that is both visually striking and incredibly durable—perfect for a sofa accent that invites touch.
Finished Dimensions: Square Throw Pillow, 18″ x 18″.
Materials Needed:
- Fabric A (Face): 3/4 yard of Dark Navy Linen or Indigo Cotton Canvas. (A loose weave is helpful for counting, but not strictly necessary if you mark a grid).
- Fabric B (Backing): 3/4 yard of matching Navy fabric.
- Thread: Matte White Cotton Thread (Size 8 Perle Cotton or thick Sashiko thread). Key: Kogin thread is thicker and fluffier than standard thread, filling the space.
- Needle: Long Tapestry Needle (blunt tip is best if working on even-weave; sharp if marking lines).
- Interfacing: Lightweight fusible woven interfacing (to stabilize the linen).
- Notions: White chalk pencil, ruler, 18″ pillow insert.
Cultural Backstory: Kogin was born under strict sumptuary laws in the Edo period that forbade peasants from wearing cotton. They could only wear open-weave hemp, which was freezing in winter. Women discovered that by weaving thick cotton threads into the hemp in dense patterns, they could trap air, making the fabric warmer and stronger. Thus, a survival technique became a stunning art form.
Step 1: Stabilize and Mark the Grid
Kogin is pixel art. You need a grid to keep the diamonds symmetrical.
- Cut: Cut your Navy Linen face fabric to 20″ x 20″.
- Fuse: Iron the lightweight interfacing to the wrong side. This supports the heavy stitching.
- Mark: On the right side, use your chalk pencil to draw a 1/4 inch grid centered on the fabric.
- Mark a 14″ x 14″ area in the center. (Leave the borders plain).
- Note: Traditional Kogin counts threads, but for a modern “inspired” pillow, a marked grid is faster and easier on the eyes.

Step 2: Drafting the “Modoko” (Motif)
The fundamental shape of Kogin is the stepped diamond.
- Center Point: Find the exact center square of your grid.
- The Pattern Logic: Kogin stitches are always Horizontal and usually span an Odd Number of units (1, 3, 5).
- Drafting:
- Row 1 (Center): Mark a stitch spanning 5 units.
- Row 2 (Above & Below): Mark a stitch spanning 3 units, centered above the previous one.
- Row 3 (Above & Below): Mark a stitch spanning 1 unit.
- Result: You have created a small diamond. Repeat this logic to scale the diamond up or create a cluster of 4 diamonds.

Step 3: The “Weaving” Stitch
Unlike quilting, where you go up and down, Kogin is a running stitch.
- Load the Needle: Thread a long strand of white thread. Knot the end (pillows take abuse, knots are safer than weaving tails here).
- Stitch: Insert the needle at the start of your marked line.
- Take the needle under the fabric for the “space” and over the fabric for the “stitch.”
- Load the entire row onto your needle before pulling the thread through.
- Tension: Pull gently. The thread should lie flat on top of the fabric, looking like a little dash of white paint.
Step 4: Building the Texture
- Fill the Grid: Continue stitching row by row.
- The “Railroad” Effect: Because all stitches are horizontal, the vertical columns between the stitches will recede, creating a beautiful ribbed texture.
- Density: The more stitches you add, the stiffer and more durable the fabric becomes. For a pillow, a medium density (leaving some navy background visible) is softer.

Step 5: The “Oxford” Border Construction
To give the pillow a modern, tailored look, we will add a flange.
- Trim: Trim the stitched top to a perfect 19″ x 19″ square.
- Envelope Back:
- Cut two pieces of backing fabric: 19″ x 14″ and 19″ x 10″.
- Hem one long edge of each piece.
- Overlap them to create a 19″ x 19″ square.
- Sew: Place the Stitched Top and Backing Right Sides Together. Sew around the perimeter with a 1/2 inch seam allowance.
- Turn: Turn right side out and press the corners sharply.
Step 6: The Finishing Topstitch
- Insert: Stuff the pillow form into the pillow.
- The Flange (Optional): If you want a flange (border), sew the front and back together (wrong sides together) with a 2-inch border before inserting the pillow. For this thick Kogin design, a simple knife-edge or piping looks cleanest.
- Close: If not using an envelope, hand-stitch the bottom closed.
Usability Note: The thick thread used in Kogin gives the pillow a “nubby” texture similar to boucle or wool, making it tactile and comforting to hold. It also provides excellent friction, so the pillow won’t slide off a leather couch.
15. Cherry Blossom Sakura Appliqué Quilts for Spring Elegance
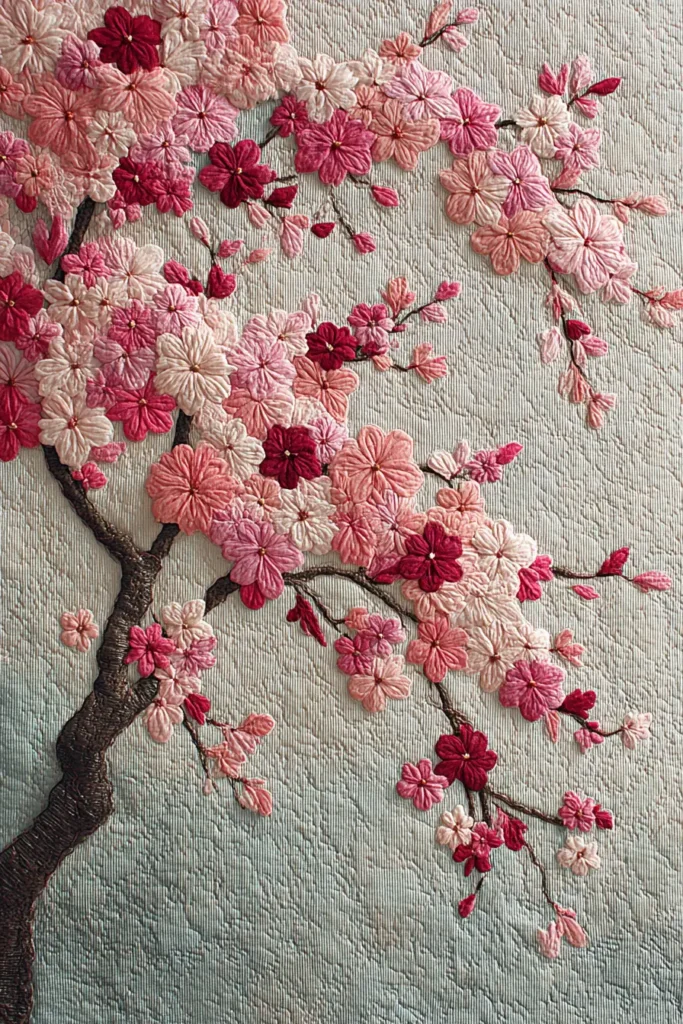
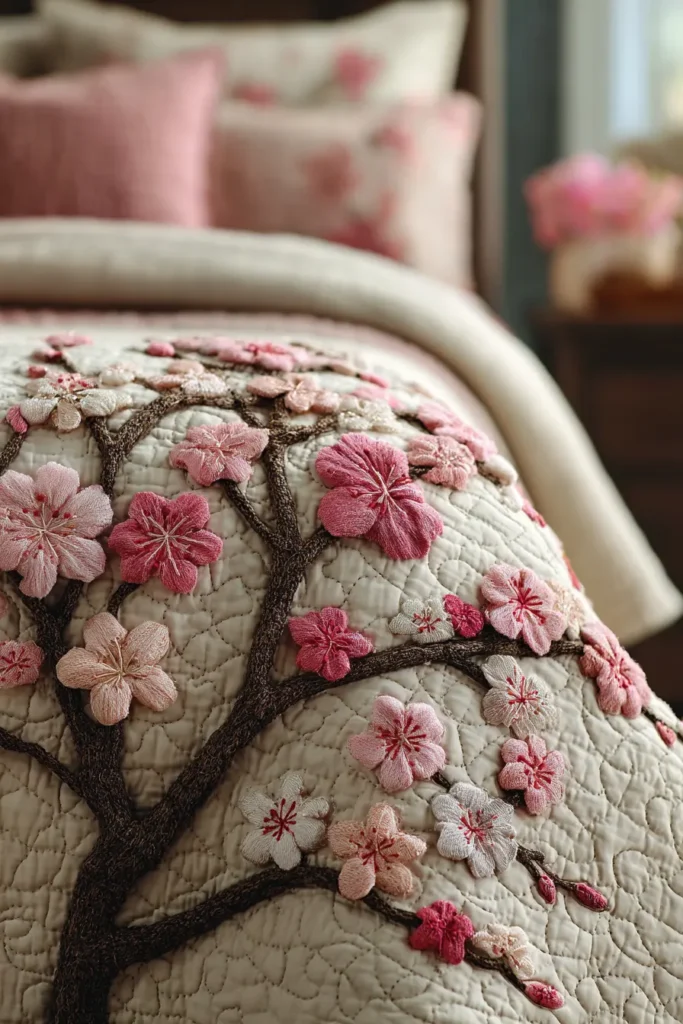
The “Hanafubuki” (Blossom Blizzard) Lap Quilt
Hanafubuki refers to the specific moment when cherry blossom petals fall from the trees like snow. This quilt captures that fleeting, poetic moment. Unlike busy floral quilts, this design utilizes Negative Space (Ma). A single, gnarled branch enters from the top left corner, and the rest of the quilt is filled with a cascade of drifting pink petals. It creates a sense of movement and lightness, perfect for draping over a chair in springtime to invite the season indoors.
Finished Dimensions: Lap Quilt / Wall Throw, approximately 50″ x 60″.
Materials Needed:
- Fabric A (Background): 2 yards of Pale Mist Grey or Soft White Cotton Sateen. (A subtle sheen mimics the spring sky).
- Fabric B (Branch): 1/4 yard of Charcoal Grey or Dark Brown textured cotton (like bark).
- Fabric C (Blossoms): Scraps of 3 or 4 different shades of Pink (from Blush to Magenta). Using multiple shades adds depth.
- Backing Fabric: 3 yards of matching fabric.
- Batting: Lightweight Bamboo or Silk Batting. (Silk batting is the ultimate luxury for a quilt like this; it is warm but incredibly light).
- Notions: Freezer paper for templates, appliqué pins, pink silk thread.
Cultural Backstory: The Cherry Blossom (Sakura) is the most enduring symbol of Japan. It represents the concept of “Mono no Aware”—the pathos of things, or the bittersweet awareness that beauty is impermanent. A Sakura quilt reminds us to cherish the present moment because, like the bloom, it will soon pass.
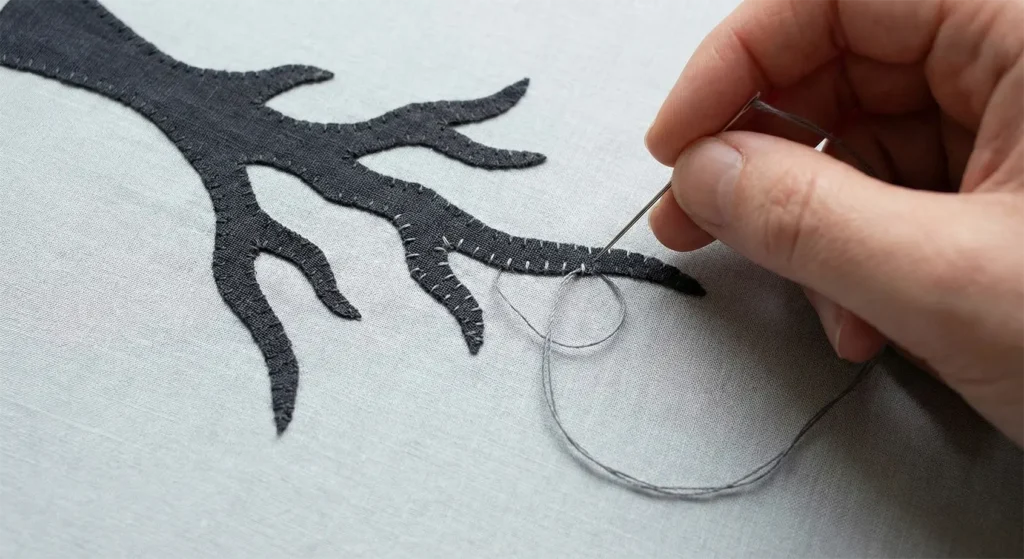
Step 1: The Branch Silhouette
The branch anchors the floating petals.
- Sketch: On a large piece of paper (or directly on the fabric with chalk), draw a gnarled branch entering from the Top Left Corner and reaching about 1/3 of the way into the quilt.
- Style: Keep the branch jagged and angular (old plum/cherry tree style), not smooth and curvy.
- Appliqué: Cut the branch shape from your Charcoal fabric. Appliqué it to the background using the Needle-Turn method for a clean, sharp look, or use fusible web for a quicker finish.
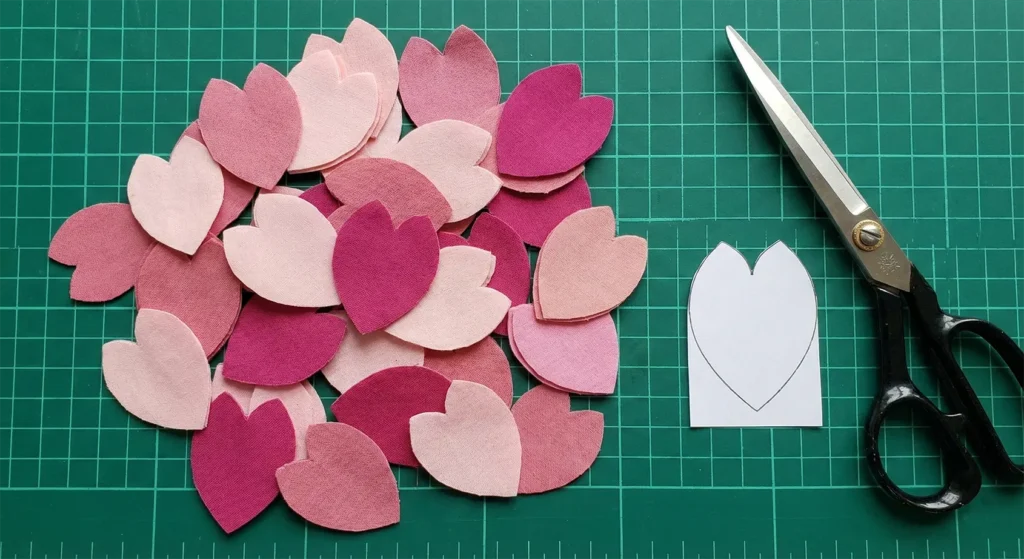
Step 2: The “Heart” Petal Template
Sakura petals are distinguished by the notch at their tips.
- Drafting: Draw a small oval shape, about 1.5 inches long.
- The Notch: Add a tiny “V” notch at the top (like a heart, but narrower).
- Cutting: Cut about 50 to 70 petals from your varying pink fabrics.
- Tip: Don’t make them all identical. Cut some slightly curved, as if they are twisting in the wind.
Step 3: The “Blizzard” Layout
This is the artistic step. Avoid symmetry.
- Clusters: Group 5 petals together to form full flowers on the branch itself.
- The Drift: Arrange the remaining loose petals cascading diagonally from the branch toward the Bottom Right Corner.
- Density: Place them thickly near the branch, and let them scatter and thin out as they reach the bottom corner.
- Rotation: Rotate the petals randomly. They should look like they are tumbling in the breeze, not marching in a line.

Step 4: Invisible Appliqué
- Placement: Once you like the arrangement, use tiny drops of fabric glue or pins to secure them.
- Stitch: Use Silk Thread in a matching pink shade.
- Stitch the petals down using tiny, invisible stitches.
- Texture: If you want a 3D effect, only stitch the center of the loose petals, leaving the edges free to flutter (though this is less durable for a lap quilt). For durability, stitch the entire perimeter.

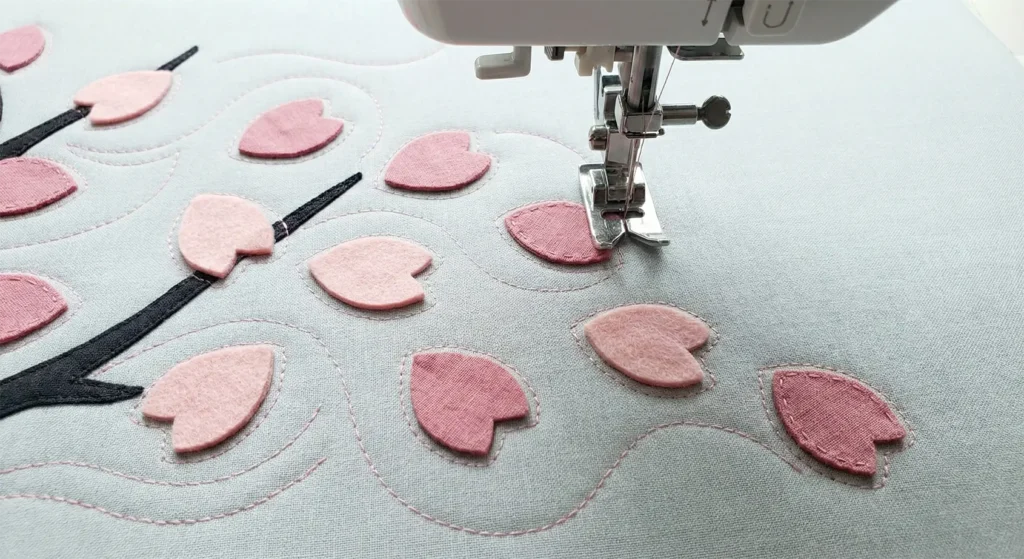
Step 5: “Spring Breeze” Quilting
The quilting lines will simulate the wind carrying the petals.
- Marking: Draw gentle, swirling wind lines moving diagonally across the quilt (following the direction of the falling petals).
- Thread: Use a Pale Pink or White thread that blends into the background.
- Stitch: Quilt along these wind lines.
- Detail: When you reach a petal, quilt around it (echo it), do not stitch through it. This makes the petals puff up slightly, enhancing the illusion that they are floating on top of the wind.
Step 6: The Delicate Binding
- Cut: Cut 2.5-inch strips of the Pink fabric (medium shade).
- Bind: Attach the binding.
- Aesthetic: A pink frame contains the scene, giving it the feeling of looking through a window at a garden in full bloom.
Usability Note: If using Silk Batting, wash this quilt by hand or on a very delicate cycle with cold water. Silk fibers can be beard (poked through) if agitated too roughly, but the drape is unmatched for elegance.
16. Ocean Wave Seigaiha Patterns for Relaxing Bedroom Decor
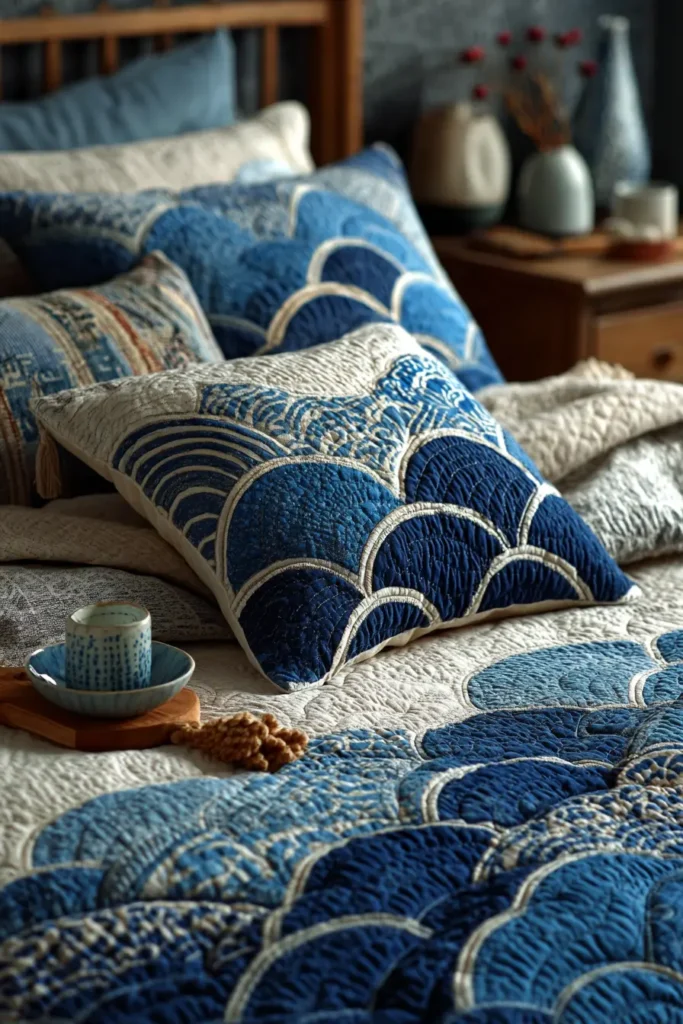
The “Eternal Tide” Seigaiha Bed Runner
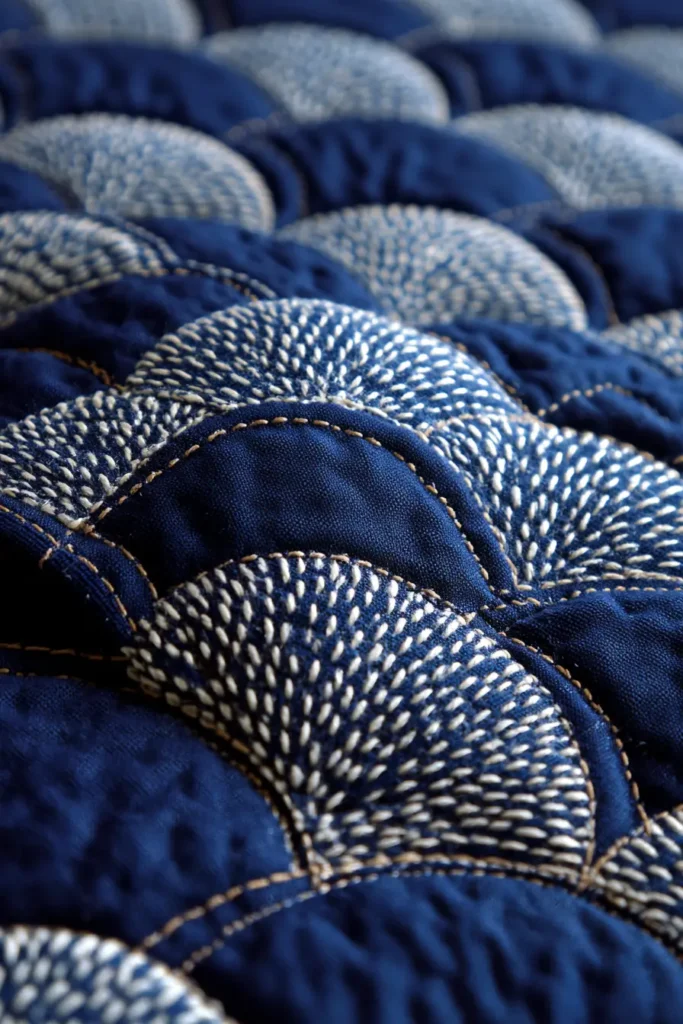
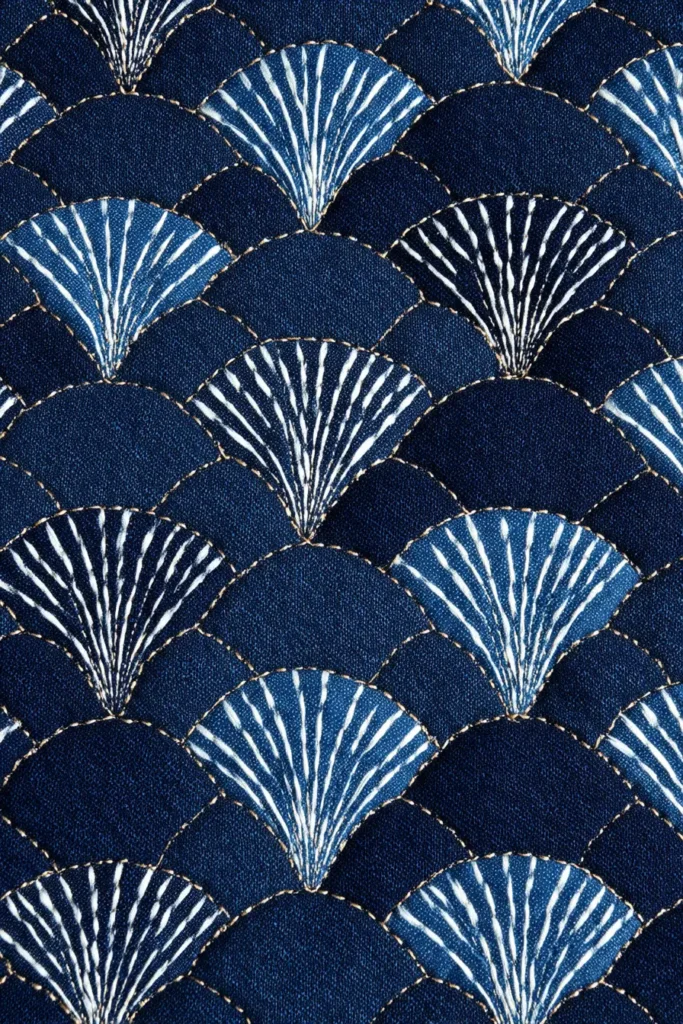
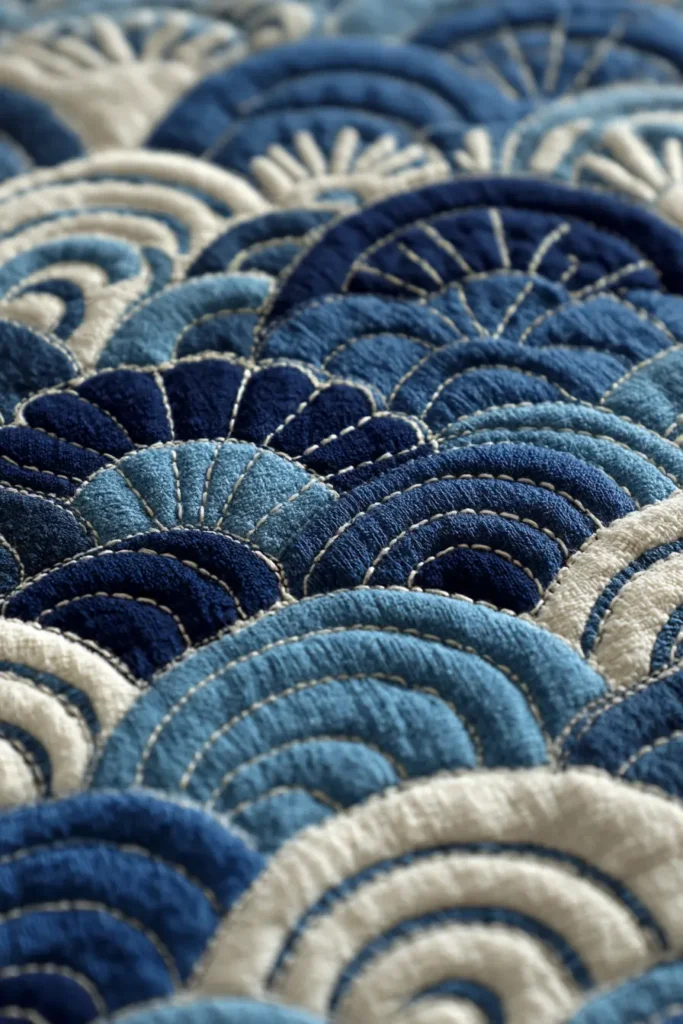
The Seigaiha (Blue Sea Wave) pattern is one of Japan’s most iconic motifs. It consists of concentric circles overlapping in a scale-like formation, representing the endless ocean and surges of good luck. In a bedroom, a full quilt of this pattern can feel visually busy, but a Bed Runner at the foot of the bed creates a focused, hypnotic strip of calm. This project uses Sashiko stitching on soft indigo cotton to create a rippling-water texture, perfect for grounding the room’s energy.
Finished Dimensions: King/Queen Bed Runner, approximately 25″ x 90″.
Materials Needed:
- Fabric A (Top): 2.5 yards of Soft Indigo Cotton or Navy Linen-Blend. (Avoid stiff canvas; you want it to drape over the bed).
- Fabric B (Backing): 2.5 yards of matching solid cotton.
- Batting: Thin Cotton Batting or Bamboo Batting. (High loft batting makes the waves look distorted; thin is best).
- Thread: White Sashiko Thread (Standard weight).
- Notions: Circle template (plastic lid or compass), white chalk pencil, grid ruler.
Cultural Backstory: The Seigaiha pattern originated in Japan in the 6th century, appearing first on terracotta haniwa figures. It became famous during the Heian period as a design on the costumes of a court dance called “Seigaiha.” It symbolizes peace, resilience, and the wish for quiet happiness to continue forever like the waves of the sea.
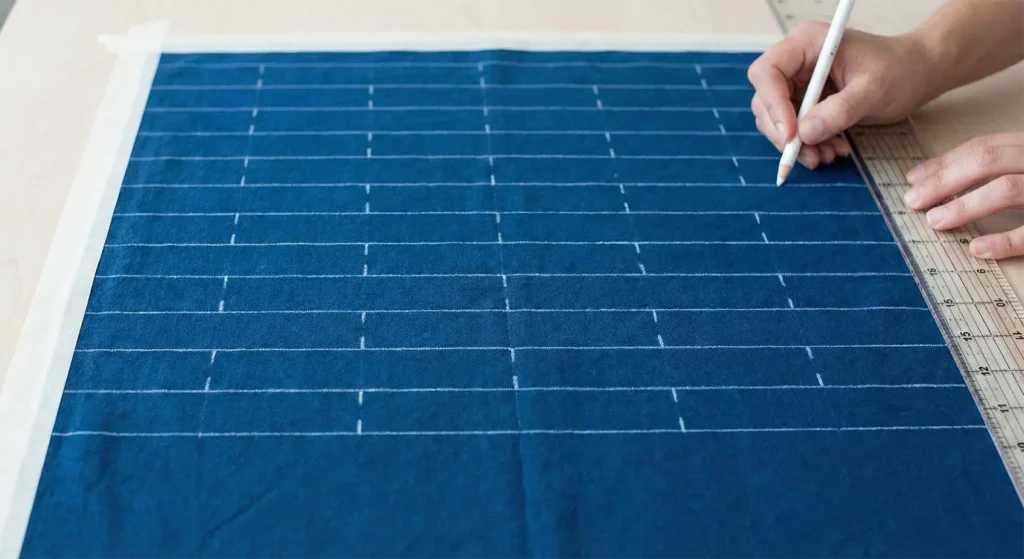
Step 1: The “Scale” Grid
Seigaiha is geometrically precise. You must mark a grid first.
- Prep: Lay your Top Fabric flat and tape it down.
- Horizontal Lines: Draw horizontal lines across the full length of the runner, spaced 1.5 inches apart.
- Vertical Marks: On the first horizontal line, make a mark every 3 inches.
- On the second horizontal line, shift the marks so they sit exactly between the marks above (staggered like bricks).
- Repeat this staggered marking all the way down.
Step 2: Drafting the Arcs
Now we connect the dots to make waves.
- Template: Find a circular object (like a jar lid) that has a 3-inch diameter.
- Drawing: Place the center of your circle on the vertical marks you made.
- Draw the top half of the circle (the arc) connecting to the line above it.
- Concentric Echoes:
- To make the traditional wave look, you need inner arches.
- Draw 2 or 3 smaller arches inside every main arch.
- Tip: A Seigaiha Stencil is highly recommended for a project this size to save hours of drawing time.
Step 3: Basting the Layers
- Sandwich: Backing + Batting + Top.
- Secure: Baste securely. The concentric circles involve a lot of stitching, which pushes the fabric around. A grid of thread basting every 4 inches is safer than pins.
Step 4: The “Continuous Wave” Stitch
Sashiko efficiency relies on finding the continuous path.
- Thread: Load your needle with a long strand of white thread.
- The Path: Do not stitch one single wave arch at a time.
- Instead, look for the undulating line. Stitch a continuous “S” curve or serpentine line across the width of the quilt, connecting the tops of one row of waves.
- Then move down and stitch the next serpentine row.
- Result: This method is faster and creates smoother curves than stopping and starting at every peak.
Step 5: The “Foam” Texture (Optional Detail)
To add depth, we can vary the thread.
- Accent: If you want a more textured, artistic look, stitch the innermost small arch of every wave using a Thicker Thread or a Double Strand.
- Effect: This makes the wave crest appear whiter and brighter, simulating sea foam at the peak of a swell.
Step 6: The Knife-Edge Finish
A border stops the flow of the water. A knife-edge allows it to “spill” over.
- Trim: Trim the batting and backing flush with the top.
- Facing: Cut 2.5-inch strips of the Indigo Fabric.
- Sew: Sew the strips to the front perimeter.
- Flip: Flip the strips entirely to the back and hand-stitch down.
- Visual: The waves run right to the edge and seem to continue off the runner, creating a sense of an infinite ocean.
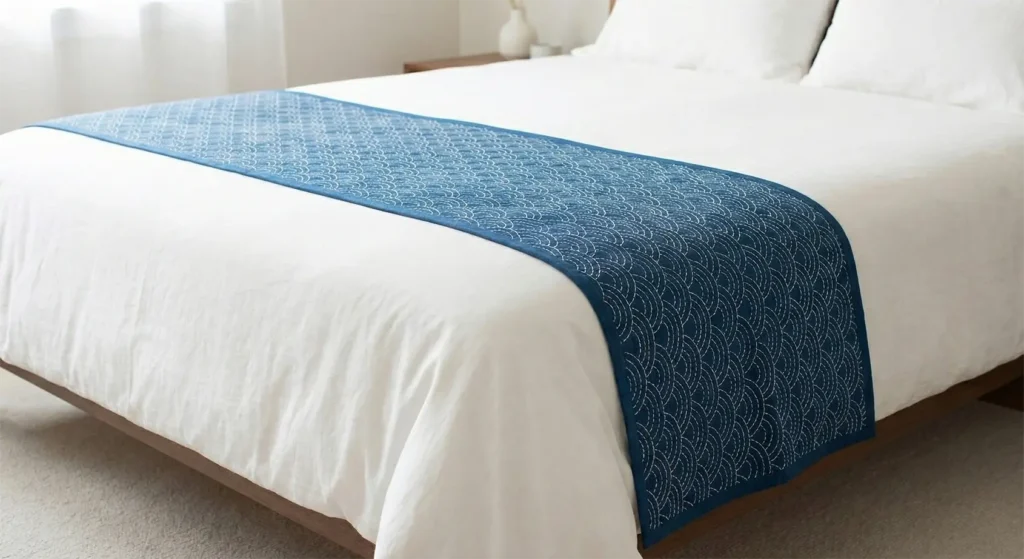
Usability Note: Because of the dense stitching, this runner is heavy and durable. It protects the foot of the bed from luggage or pets while providing a calming visual anchor for the room.
17. Sashiko Quilted Floor Throws for Cozy Minimal Living Areas
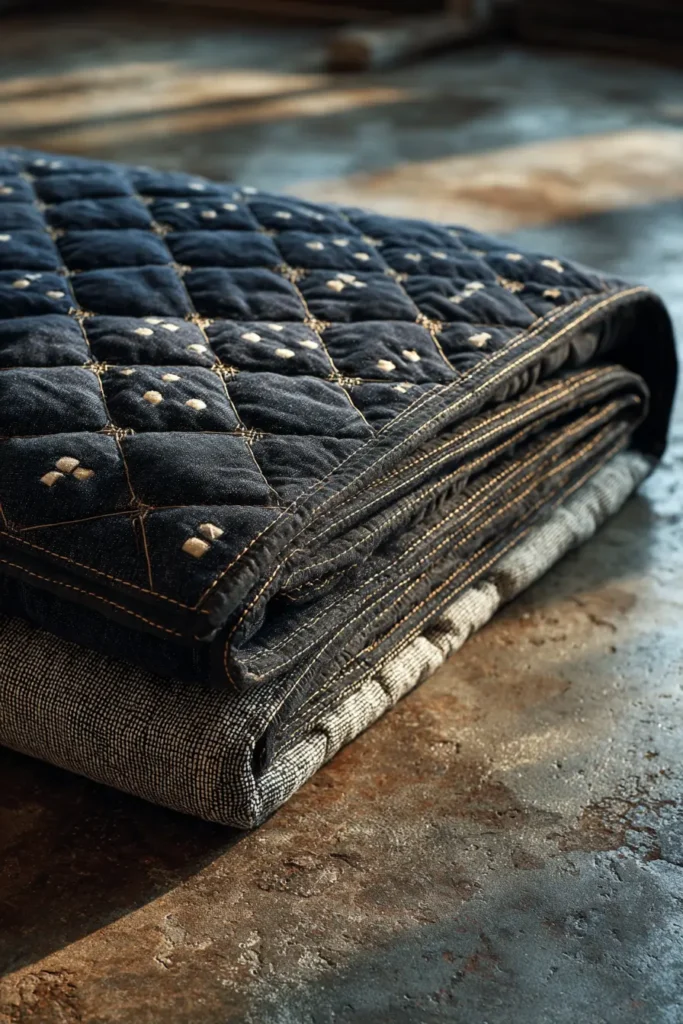
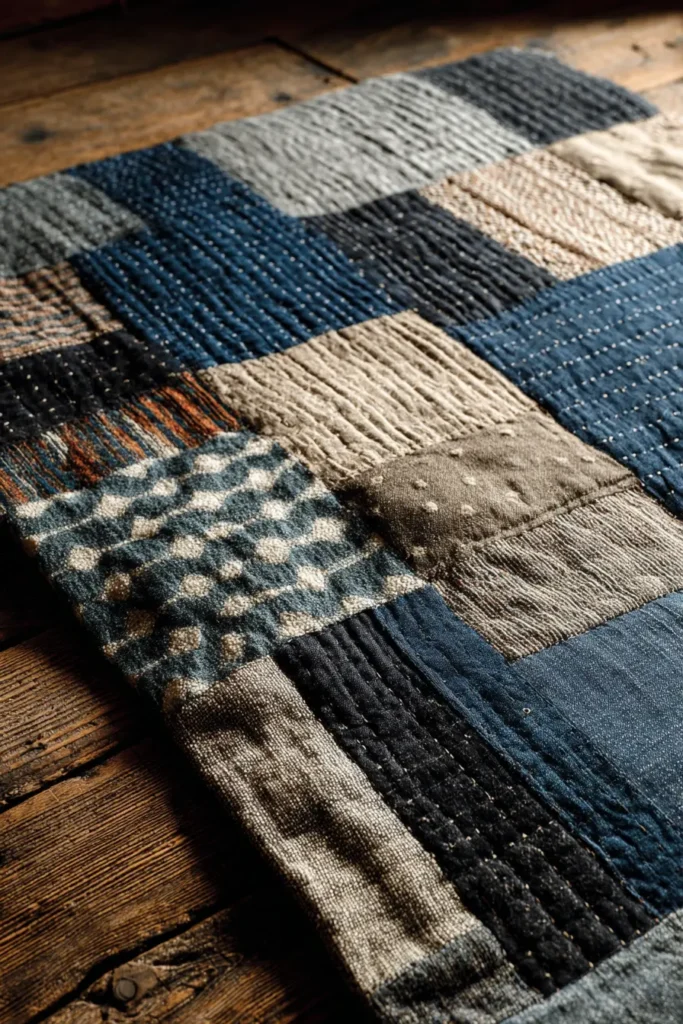
The “Crossroads” (Jujizashi) Heavy Floor Quilt
In traditional Japanese homes, life happens on the floor. A floor throw is not just a blanket; it is a mobile rug, a cushion, and a designated space for rest. This design uses the Jujizashi (“10” or Cross) pattern. The character for “10” in Japanese resembles a cross (+). This is one of the densest Sashiko patterns, creating a heavy, armored texture that is incredibly durable. It is perfect for laying over a tatami mat, a rug, or even a polished concrete floor to create a soft island of comfort.
Finished Dimensions: Square Floor Throw, approximately 55″ x 55″.
Materials Needed:
- Fabric A (Top): 3 yards of Heavyweight Canvas, Duck Cloth, or Denim in Charcoal or Dark Olive. (Standard cotton is too thin for floor use).
- Fabric B (Backing): 3 yards of durable upholstery-weight cotton.
- Batting: Double Layer of Cotton Batting or a single layer of Wool Felt. (You need density to cushion the body against the hard floor).
- Thread: Thick Sashiko Thread (Cream or Ecru).
- Notions: Long ruler, chalk marker, thimble.
Cultural Backstory: Jujizashi was originally used on the sleeves and shoulders of firemen’s coats and farmers’ workwear. The dense crossing threads reinforced the fabric so effectively that it became resistant to sparks, thorns, and heavy friction. Using it on a floor quilt ensures it will withstand years of sitting, kneeling, and foot traffic.
Step 1: The “Macro” Grid
Because the fabric is heavy, we scale up the pattern slightly for elegance.
- Prep: Tape the heavy top fabric to a hard floor.
- Marking: Draw a 1-inch grid over the entire surface.
- Precision: Ensure the lines are perfectly perpendicular. A skewed grid will make the crosses look messy.
- The Pattern Logic: You will be stitching crosses (+) at specific intersections to build the design.
Step 2: The Horizontal Pass
Sashiko is always stitched in continuous lines, not individual crosses.
- Stitch: Stitch horizontal running stitches across the quilt.
- The Rhythm: Stitch over 1 inch, under a tiny bit, over 1 inch.
- Spacing: Leave a 1-inch gap between the stitch lines.
- Visual: You will have horizontal dashes covering the quilt like a dashed highway line.
Step 3: The Vertical Pass
- Turn: Rotate the quilt 90 degrees.
- Stitch: Stitch vertical running stitches that cross over the horizontal ones at the intersections.
- The Cross: Ensure the vertical stitch crosses the horizontal stitch exactly in the center, forming a plus sign (+).
Step 4: The “Rice Field” Variation (Optional)
To add density and durability.
- Diagonals: If you want an even heavier quilt, you can stitch diagonal lines connecting the corners of the crosses.
- Effect: This turns the simple crosses into starbursts or complex diamonds. It effectively doubles the surface thread count, making it as thick as a rug.
Step 5: Heavy-Duty Basting
Because we are using double batting, shifting is a major risk.
- Sandwich: Backing + Batting Layer 1 + Batting Layer 2 + Top.
- Baste: Use Curved Safety Pins every 3 inches. Do not skimp on basting. The thick canvas will try to push the batting around as you stitch.
Step 6: The “Rug” Binding
A standard quilt binding will wear out quickly on the floor.
- Cut Binding: Cut 3-inch wide strips of the Canvas (Top fabric).
- Machine Sew: Sew the binding to the front with a wider seam allowance (1/2 inch).
- Finish: Fold to the back. Instead of hand-stitching, Machine Topstitch the binding down from the front. This creates a sturdy, industrial finish that can handle being dragged across the floor.
Usability Note: This quilt is heavy—likely weighing 5-8 pounds depending on the canvas. This weight provides “Deep Pressure Therapy,” making it exceptionally calming to lie under or sit upon during meditation or reading.
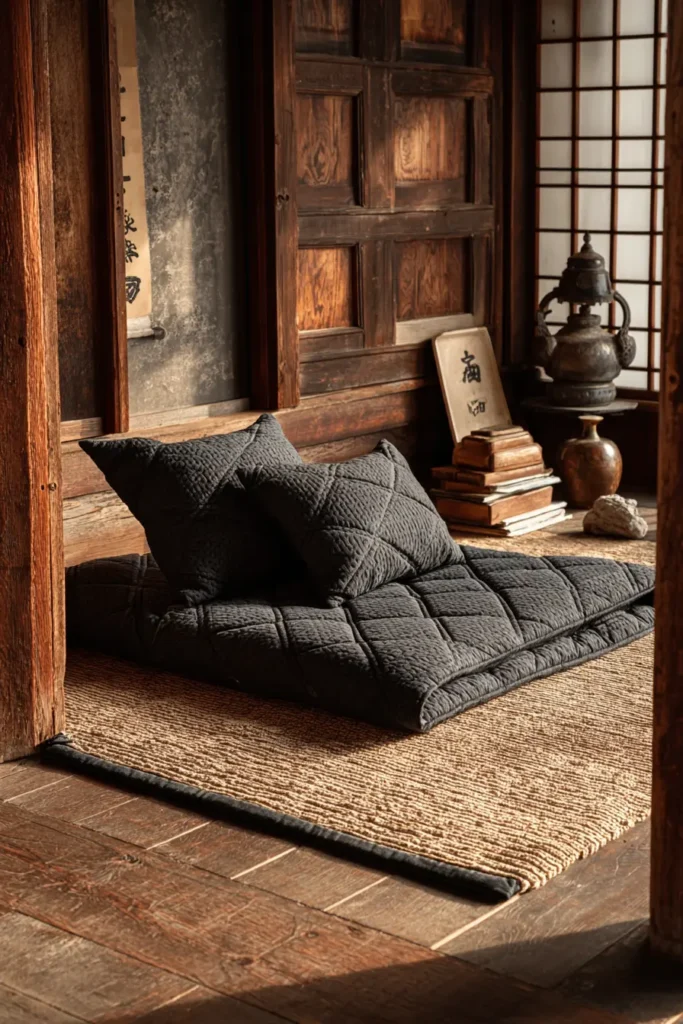
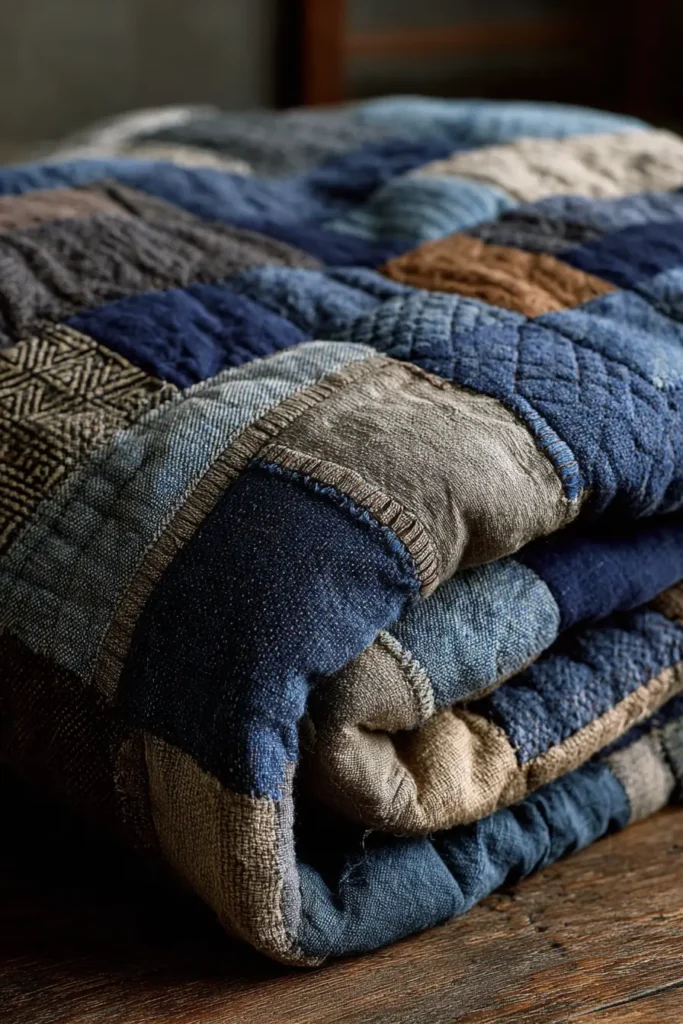
18. Comfortable Shonai Quilt Design for Lounge Chairs
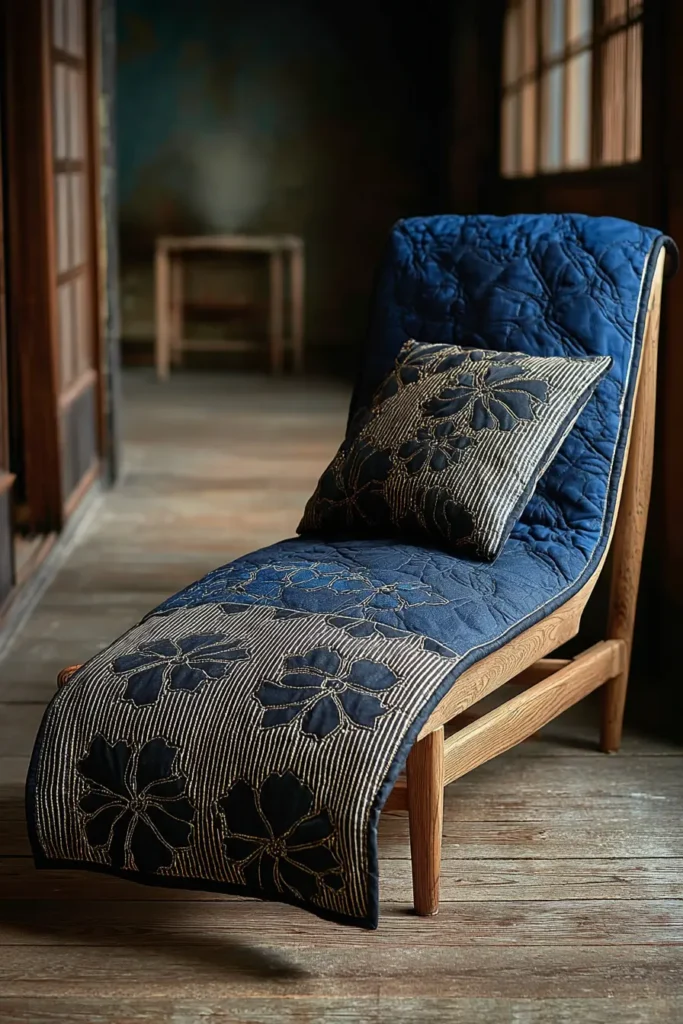
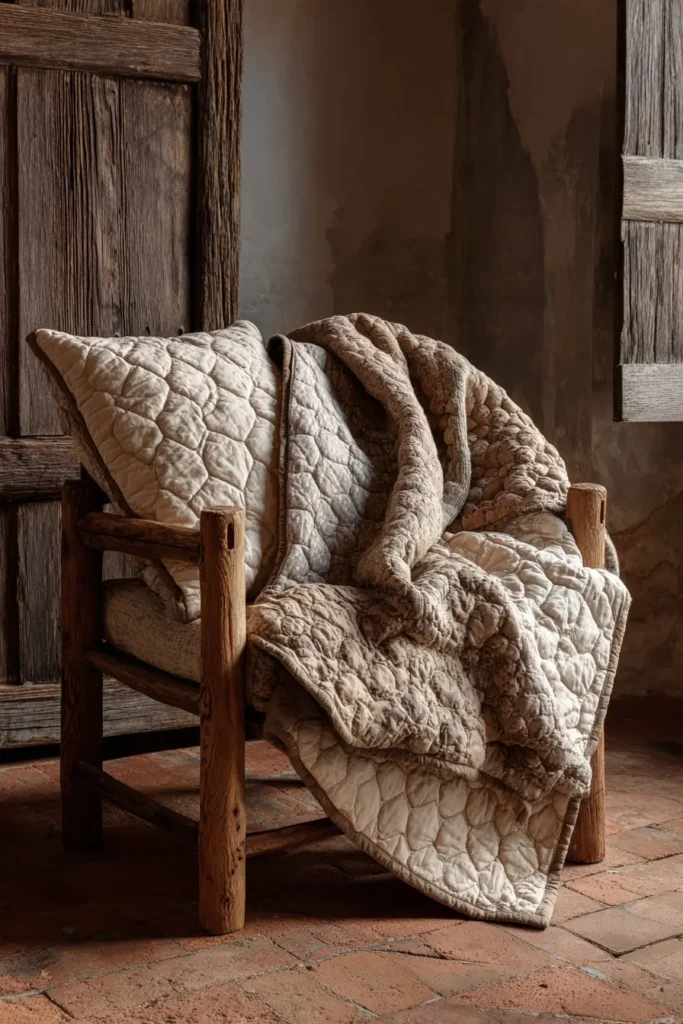
The “Persimmon Flower” (Kakinohan) Lounge Drape
Shonai Sashiko is famous for its “One-Stitch” (Hitomezashi) technique, in which patterns are built not by drawing complex shapes but by stitching a strict grid of horizontal and vertical lines. This design features the Kakinohan (Persimmon Flower) pattern. It creates a stunning, pixelated floral texture that looks modern and architectural. Designed specifically for a lounge chair, this quilt is long and narrow, weighted at the bottom to stay in place, and offers a layer of handcrafted warmth for leather or wood furniture.
Finished Dimensions: Lounge Chair Runner, approximately 24″ x 75″ (Fits a standard chaise or recliner).
Materials Needed:
- Fabric A (Top): 2.5 yards of Dark Navy Canvas or Heavy Indigo Linen. (Durability is key for upholstery covers).
- Fabric B (Backing): 2.5 yards of soft, brushed cotton or flannel in a coordinating dark blue.
- Batting: Wool Batting. (Wool has “memory” and springs back after being sat on, unlike cotton, which can compress and stay flat).
- Thread: Off-White Sashiko Thread (Heavy matte cotton).
- Notions: Grid ruler, white chalk marker, leather thimble.
Cultural Backstory: The Kakinohan pattern is named after the tiny, four-petaled flower of the persimmon fruit. In the Shonai region, persimmons were a vital food source, and the flower motif represented a prayer for a fruitful harvest. The pattern is incredibly dense, originally designed to stiffen fabric to make it windproof for winter coats.
Step 1: The “Hitomezashi” Grid
The pattern is mathematically generated from a simple grid.
- Prep: Tape your Top Fabric (cut to 26″ x 77″) to a hard surface.
- Mark: Draw a 1/4 inch (0.5 cm) grid over the entire surface.
- Note: Yes, this is dense. The beauty of Shonai sashiko comes from this density. If you want a faster project, use a 1/2 inch grid, but the flower effect will be chunkier.
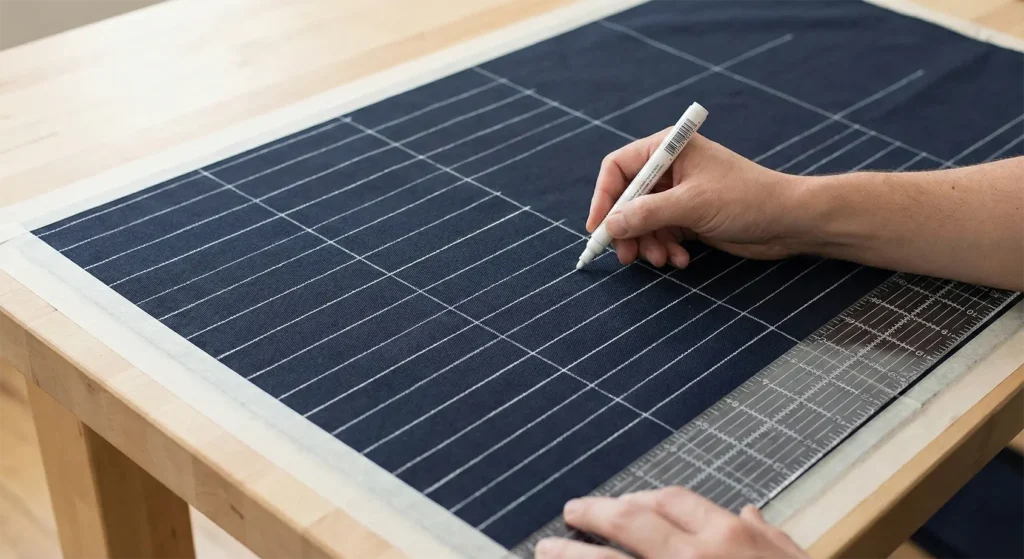
Step 2: The Horizontal Logic
You stitch row by row, skipping specific intervals.
- The Pattern: You will stitch “Over 3 units, Under 1 unit”.
- Row 1: Stitch Over 3 grid squares, Under 1. Repeat across.
- Row 2: Shift the start point. The “Under 1” space should sit exactly in the middle of the “Over 3” stitch from the row above.
- Result: This creates a brick-laying effect.
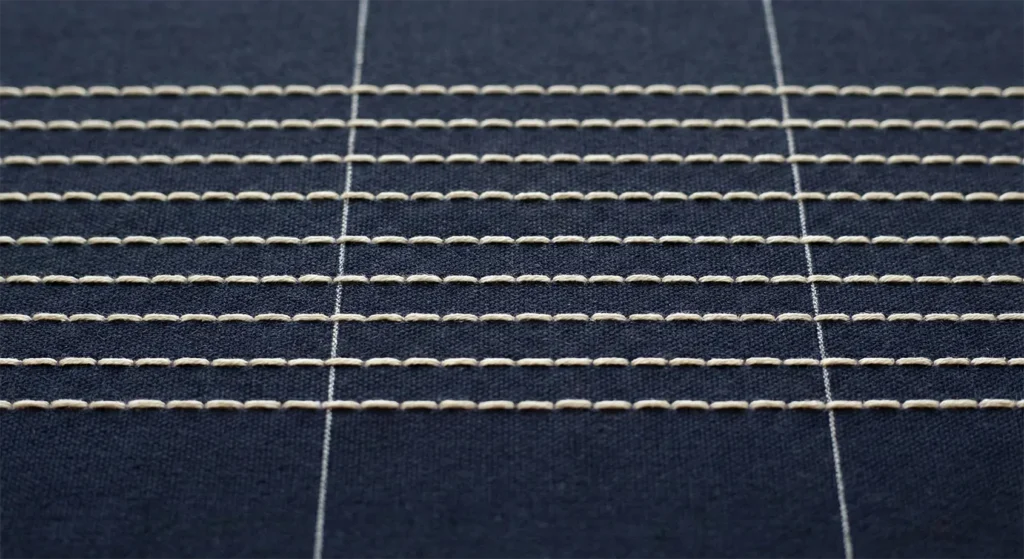
Step 3: The Vertical Logic
Now the flowers appear.
- Rotate: Turn the fabric 90 degrees.
- The Pattern: Repeat the “Over 3, Under 1” pattern vertically.
- The Intersection: You must coordinate the vertical stitches, so they cross the horizontal ones in a specific way to form empty square boxes (the “flowers”) surrounded by thread.
- Check: If your grid marking is accurate, the pattern reveals itself automatically as you stitch.
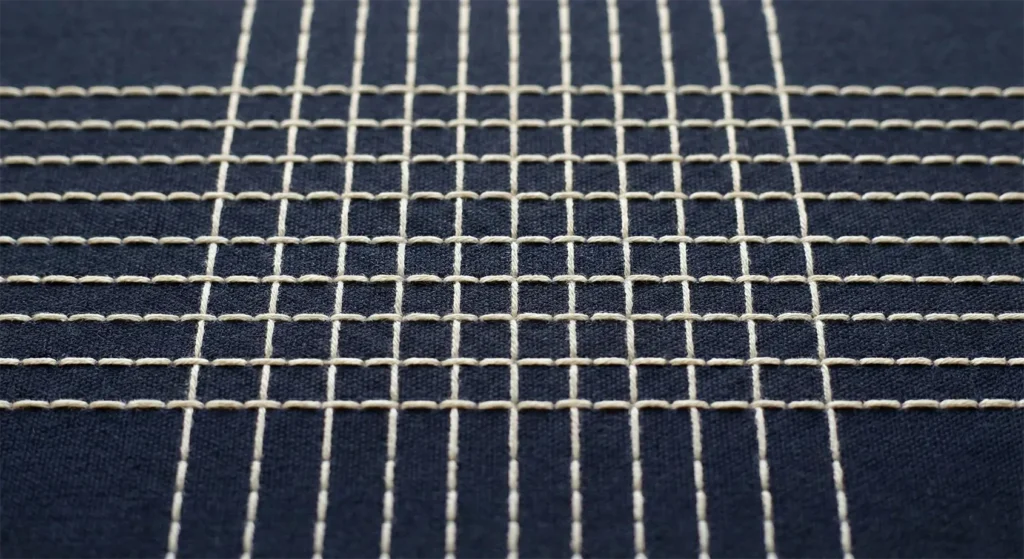
Step 4: The Weighted Foot
Lounge chair covers often slip down. We add a counterweight.
- Pocket: On the Backing Fabric, sew a small sleeve or pocket at the very bottom edge (the foot end).
- Weight: Insert a flat metal bar, a wooden slat, or a small bag of rice/beans into this pocket before quilting.
- Function: This weight hangs over the foot of the chair, keeping the quilt taut and preventing it from sliding down behind your back when you sit.

Step 5: Tufted Assembly
Because the Kakinohan pattern is so dense, traditional quilting through it is difficult.
- Sandwich: Backing (with weight) + Wool Batting + Top (Stitched).
- Baste: Baste securely.
- Tie: Instead of quilting lines, use Micro-Ties.
- Take a tiny stitch through all layers at the center of every 10th “flower” (about every 4-5 inches).
- Tie a knot on the back or hide it between layers. This keeps the batting secure without disrupting the beautiful surface pattern.
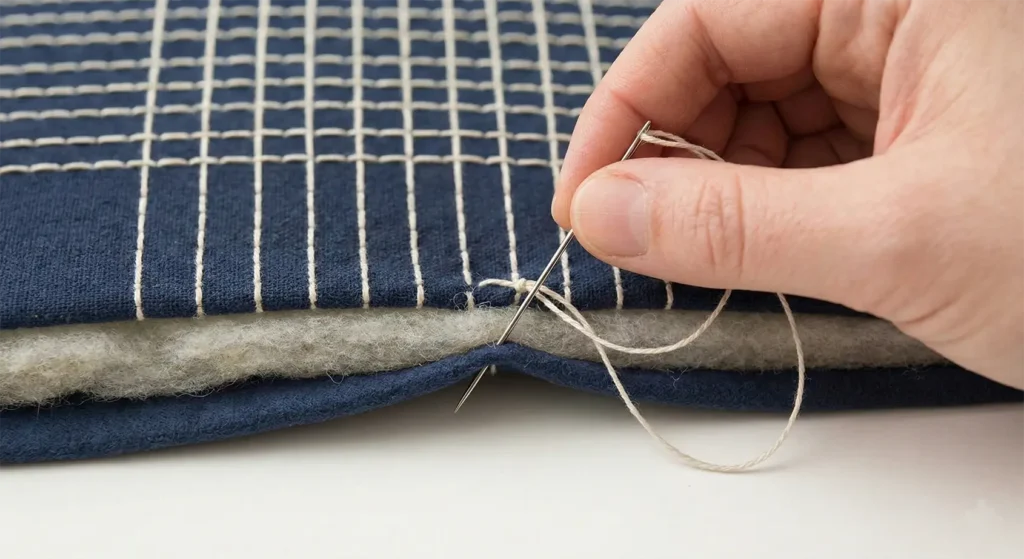
Step 6: The “Furoshiki” Hem
A bulky binding is uncomfortable to sit on.
- Trim: Trim the batting to the exact finished size.
- Fold: Fold the Top Fabric (which should be 1 inch larger) over the edge to the back.
- Fold Again: Tuck the raw edge under to create a clean hem on the back.
- Stitch: Hand-stitch the hem down using a “Blind Hem Stitch” so it is invisible from the front.
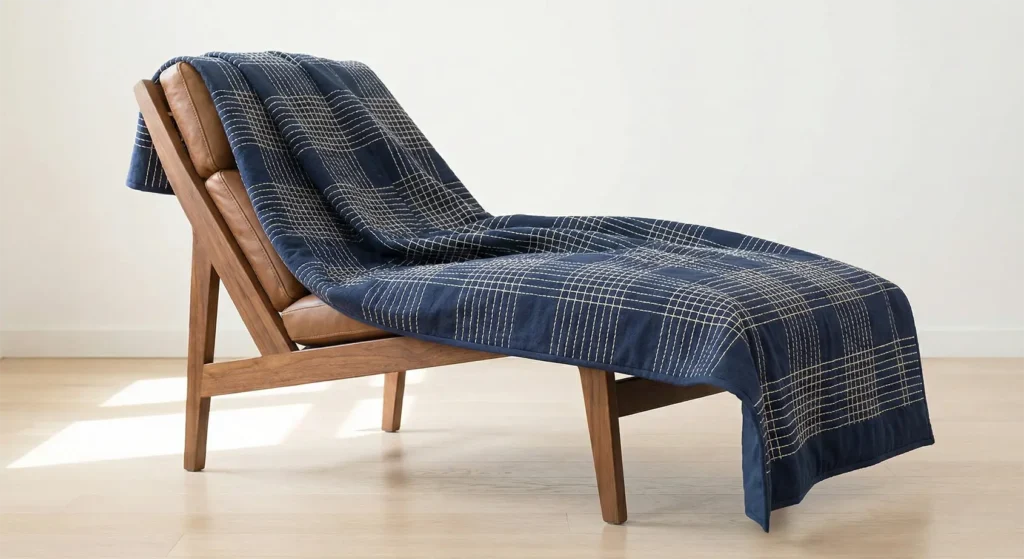
Usability Note: The texture of Kakinohan is “grippy.” This is a massive advantage for a lounge chair cover, as it provides friction that keeps you from sliding down leather seats, while the wool batting provides breathable, temperature-regulating comfort.
19. Refined Shonai Quilt Patterns for Ottoman Covers
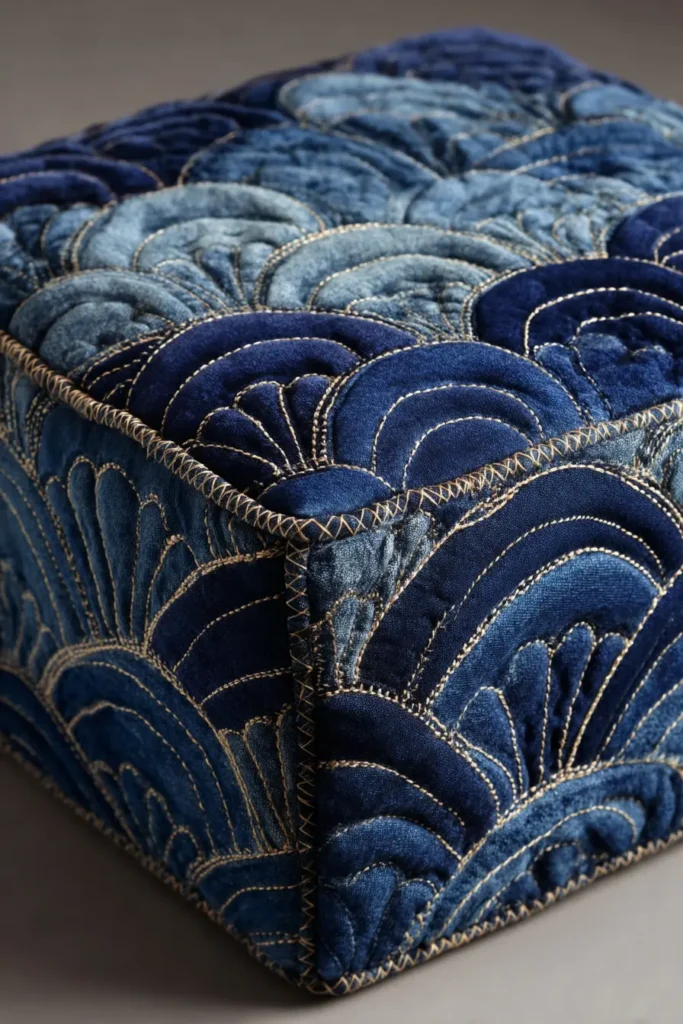
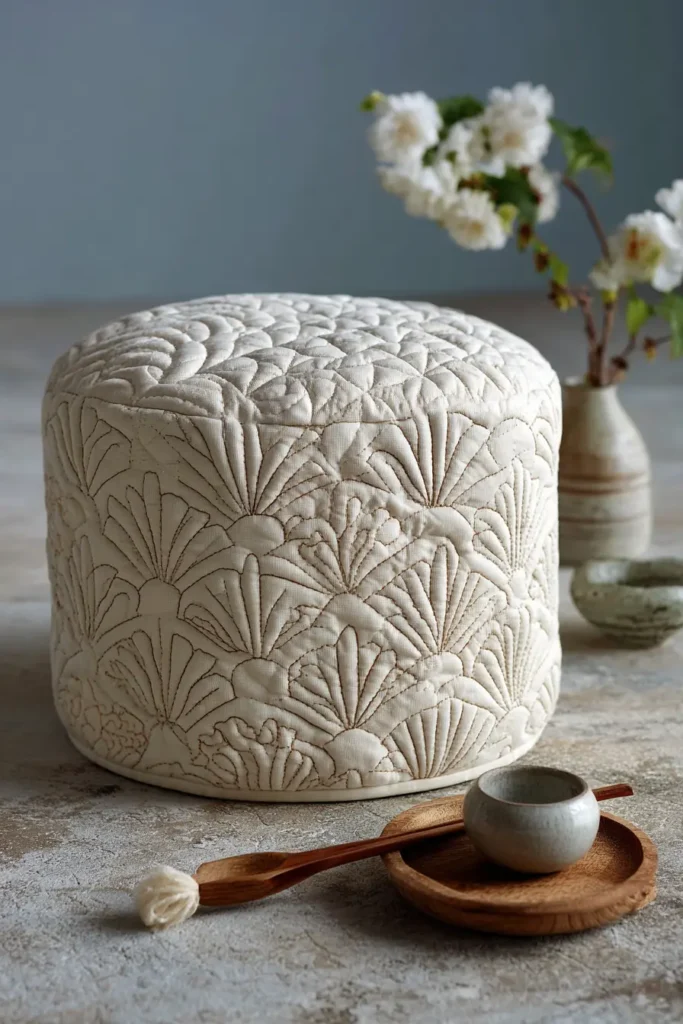
The “Uroko” (Fish Scale) Shonai Ottoman Cap
In traditional Shonai stitching, patterns often served as talismans. The Uroko (Fish Scale/Triangle) pattern is particularly powerful; it represents the scales of a dragon or snake and is believed to protect against evil and bad luck. For a modern home, this geometric triangle pattern creates a sophisticated, structured look perfect for an ottoman cover. Unlike a loose throw, this “Cap” style is fitted with elastic or ties, turning a plain footstool into a piece of indigo art that can withstand feet, trays, and daily use.
Finished Dimensions: Custom Fit (Example: 24″ x 24″ Square Ottoman).
Materials Needed:
- Fabric A (Top): 1.5 yards of Heavy Indigo Canvas or Denim. (Must be sturdy).
- Fabric B (Side Panels): 1.5 yards of matching Indigo fabric.
- Lining: 2 yards of muslin or cotton sheeting.
- Batting: Thin Cotton Batting. (You want structure, but not too much puffiness, or the tray will wobble).
- Thread: Cream Sashiko Thread (Heavy matte cotton).
- Notions: 1/2 inch elastic, safety pin, chalk marker, grid ruler.
Cultural Backstory: The Uroko pattern is strongly associated with female protection. Historically, women would stitch this pattern into their husbands’ undergarments to protect them from harm while traveling, or onto children’s clothes to ward off illness. It is a pattern of fortification.
Step 1: Measuring the “Foundation”
Ottomans vary in size. You must measure first.
- Top: Measure the top surface (Length x Width). Add 1 inch to both for seam allowance.
- Drop (Sides): Measure how far down you want the cover to hang (e.g., 6 inches). Add 2 inches for the hem/casing.
- Cut: Cut your Top Panel and your Side Panel strip (Long enough to wrap around the entire perimeter).
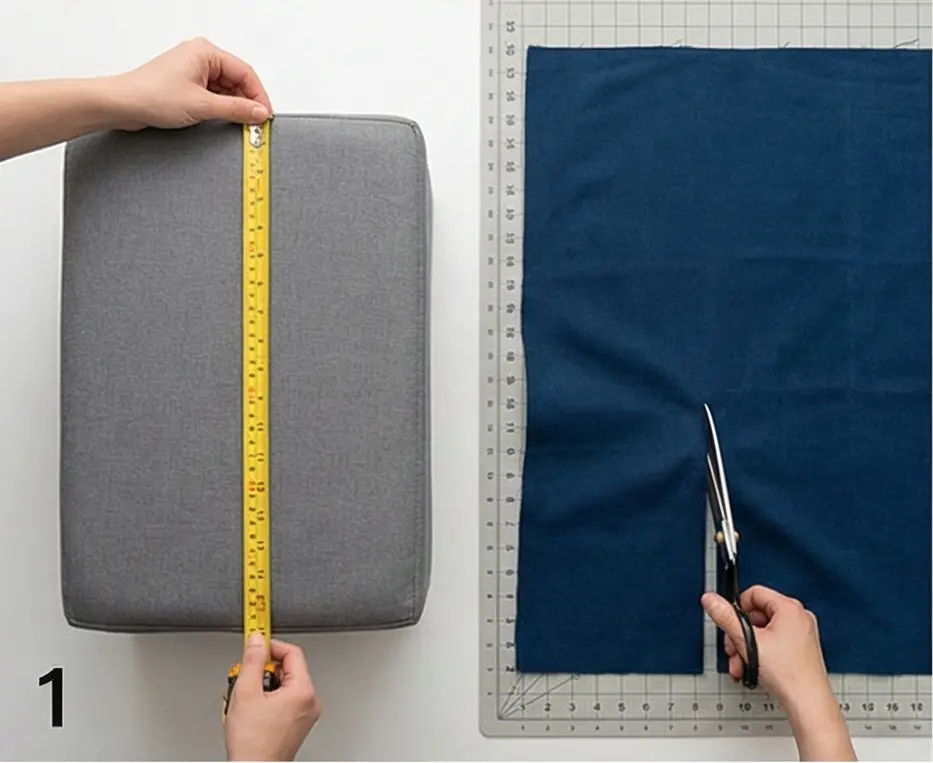
Step 2: Marking the Triangle Grid
Shonai patterns start with a grid.
- Mark: On the Top Panel, draw a 1-inch grid.
- Diagonals: Draw diagonal lines cutting through the squares to form triangles.
- Pattern: Draw a diagonal from bottom-left to top-right in every square.
- Result: You should have a field of uniform right-angle triangles.
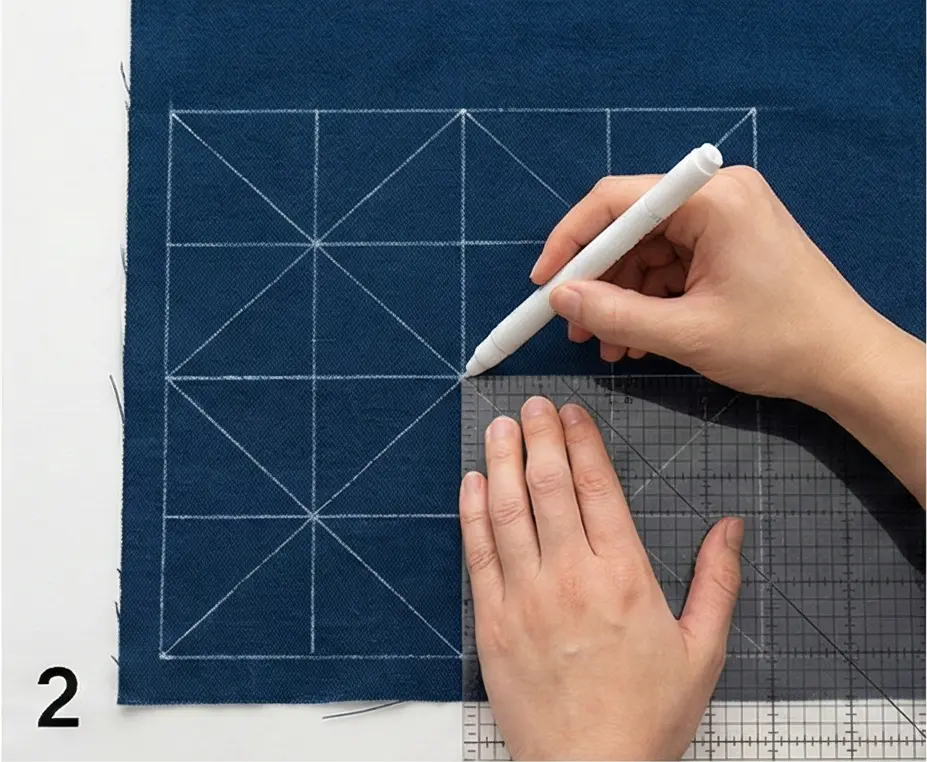
Step 3: The “Uroko” Stitching
We will stitch the triangles in a specific order.
- Horizontals: Stitch all the horizontal lines of the grid first.
- Verticals: Stitch all the vertical lines.
- Result: You now have a grid of squares.
- Diagonals: Stitch the diagonal lines last.
- The Gap: Where the three lines meet at a corner, try to leave a tiny “Ma” (gap) so the threads don’t pile up into a knot. This keeps the surface smooth for resting your feet.
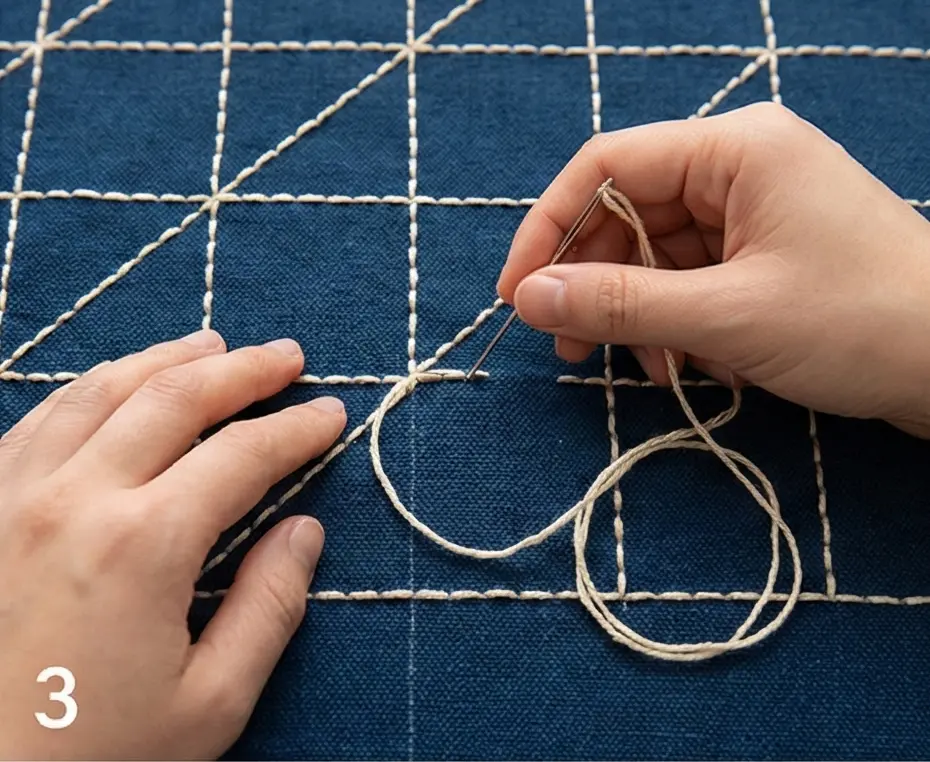
Step 4: Constructing the “Box”
- Loop: Sew the short ends of your Side Panel strip together to form a loop (check that it fits snugly around the ottoman).
- Join: Pin the Side Loop to the Top Panel (Right Sides Together).
- Corners: Pivot carefully at the corners to keep them square.
- Sew: Stitch with a 1/2 inch seam allowance.
- Reinforce: Stitch over the corners a second time for durability.
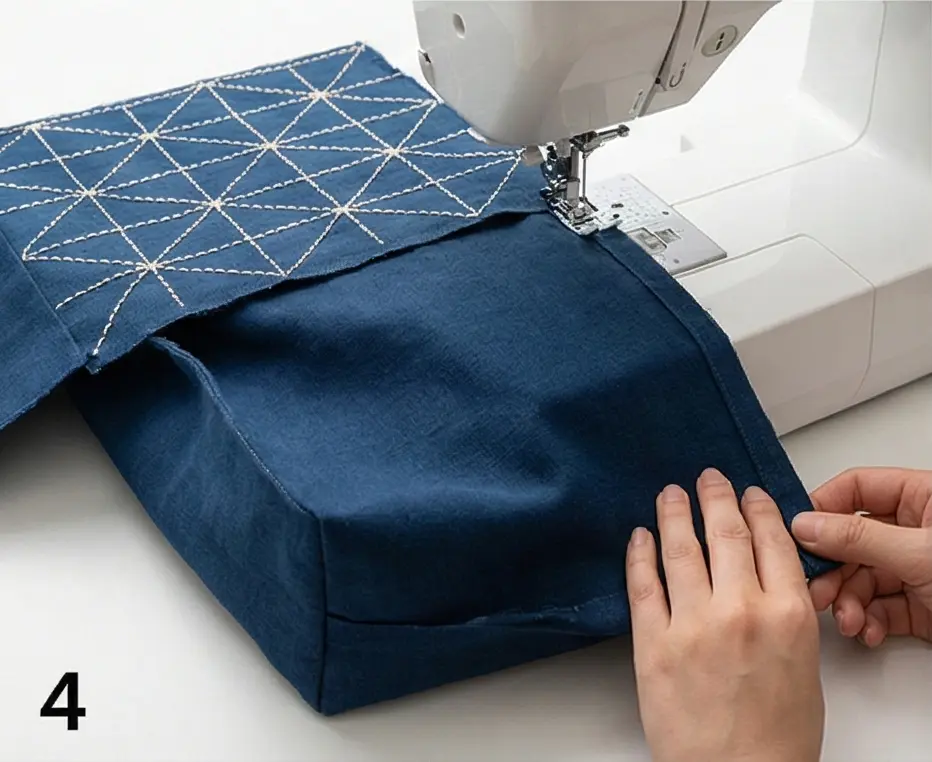
Step 5: The “Casing” Finish
A fitted cover needs to grip.
- Hem: Fold the bottom raw edge of the Side Panel up by 1/4 inch, then again by 3/4 inch. Press.
- Sew: Stitch the hem down, leaving a 2-inch opening.
- Elastic: Thread the 1/2 inch elastic through the casing using a safety pin.
- Tighten: Pull the elastic until the cover hugs the ottoman tightly but can still be removed. Sew the elastic ends together and close the gap.
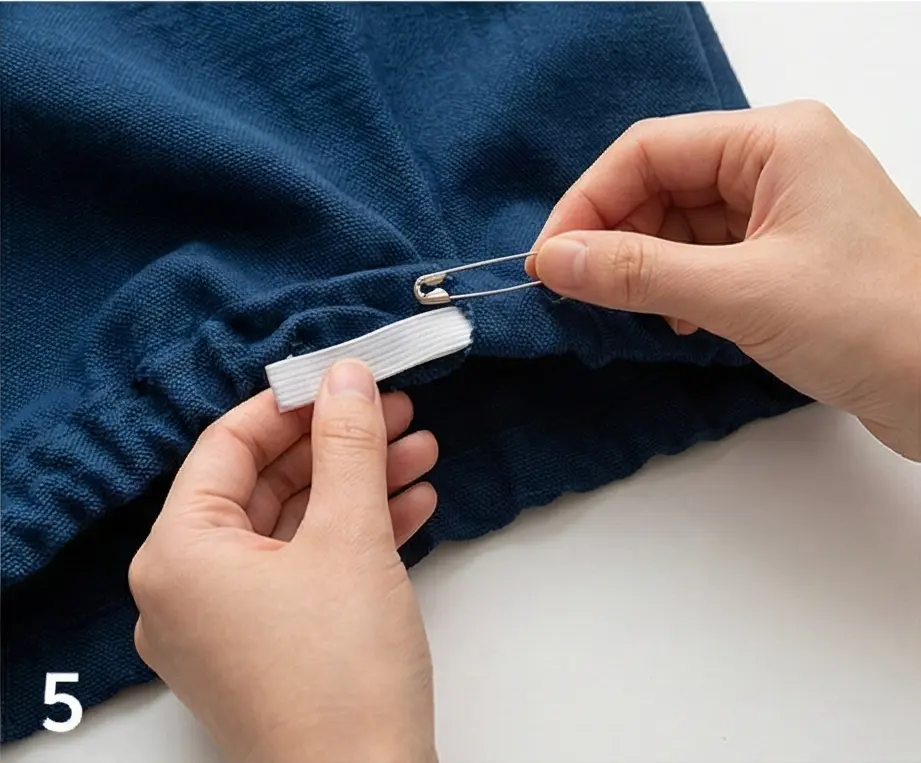
Step 6: The “Tassel” Corner (Optional Elegance)
To elevate the look from “slipcover” to “furniture.”
- Make Tassels: Make 4 small tassels using the leftover Cream Sashiko thread.
- Attach: Hand-sew one tassel to each of the four top corners of the ottoman cover.
- Aesthetic: The cream tassels tie in with the stitching and add a traditional Japanese touch.

Usability Note: This cover is machine-washable (cold water, air-dry). The dense Uroko stitching effectively reinforces the denim, preventing the fabric from stretching out or “bagging” in the middle even after years of use as a footrest.
20. Zen Hishizashi Quilt Ideas for Pillow Covers
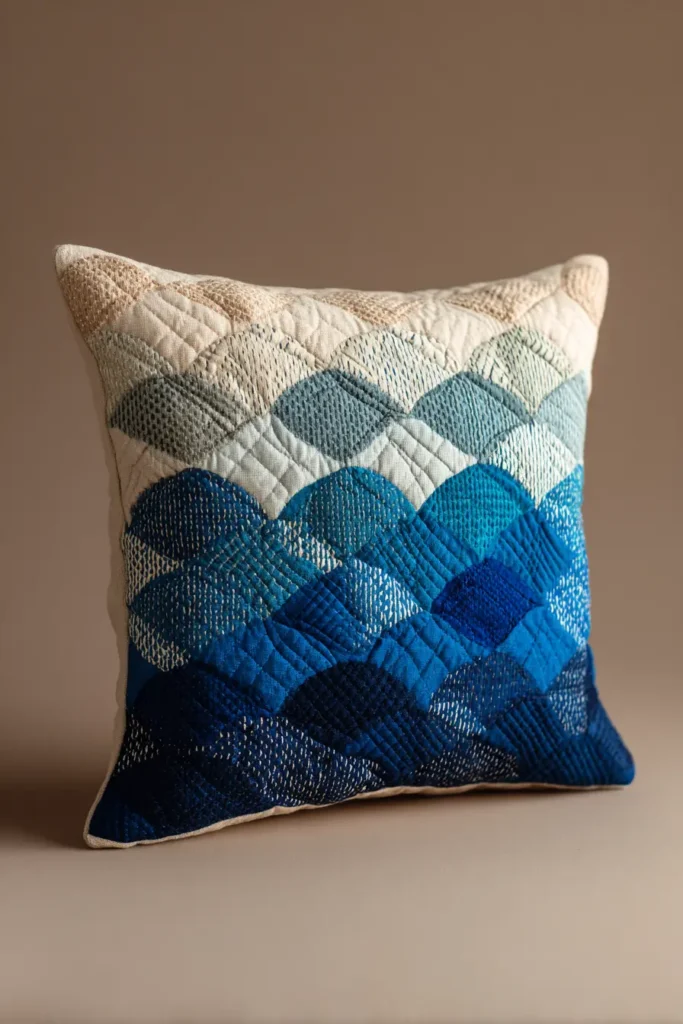

The “Nanbu Harmony” Gradient Lumbar Pillow
Hishizashi (Diamond Stitch) is a counted-thread embroidery technique from the Nanbu district of Aomori Prefecture. While similar to Kogin, Hishizashi patterns are often more intricate and colorful, traditionally stitched on hemp to create warmth. This project adapts the technique for a modern Lumbar Support Pillow. By using a variegated thread that shifts slowly from pale blue to deep navy, you create a “breathing” gradient effect that is visually soothing and physically supportive for your lower back.
Finished Dimensions: Lumbar Pillow, 12″ x 24″.
Materials Needed:
- Fabric A (Front): 1/2 yard of Natural Linen or Even-Weave Hemp. (You must be able to see the weave grid clearly to count threads).
- Fabric B (Backing): 1/2 yard of matching linen.
- Thread: Variegated Sashiko Thread (Blue spectrum) or three separate skeins of light, medium, and dark blue.
- Needle: Blunt-tip Tapestry Needle (Size 20 or 22).
- Notions: 12″ x 24″ Pillow Insert, interfacing, masking tape.
Cultural Backstory: Hishizashi was developed by farm women who needed to reinforce their clothing against the freezing northern winters. Unlike the strict vertical/horizontal limits of other styles, Hishizashi allows for more fluid diamond shapes. The repetitive act of counting threads was considered a form of “Mushin” (no-mind), a meditative state where the hands work while the mind clears.
Step 1: Framing the Canvas
We will stitch a central band, leaving negative space on the sides.
- Cut: Cut the Front Linen panel to 14″ x 26″.
- Seal: Zig-zag stitch or serge the edges immediately to prevent unraveling.
- Fuse: Apply a lightweight fusible interfacing to the back. This is crucial for Hishizashi, as counting threads on loose linen can distort the fabric without stabilizer.
- Mask: Use masking tape to mark a 6-inch wide band vertically in the center of the panel. You will only stitch inside this band.
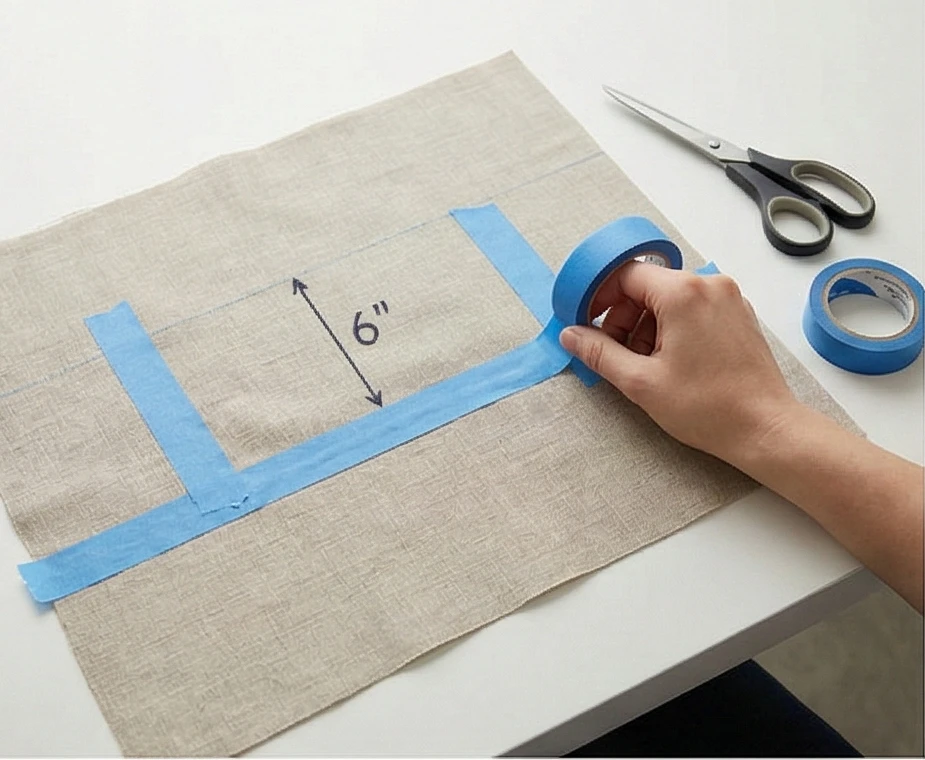
Step 2: The “Diamond” (Hishi) Count
Hishizashi relies on counting warp threads (vertical threads).
- The Basic Unit: A typical diamond is built by stepping stitches up and down.
- Row 1 (Center): Find the center of your taped band. Stitch a horizontal line spanning over 2 threads, under 2 threads.
- Row 2: Shift one thread to the right. Stitch over 2, under 2.
- Row 3: Shift back one thread to the left.
- Result: By shifting the starting point of the “Over 2” stitch on every row, diagonal lines will form, creating a grid of small diamonds.
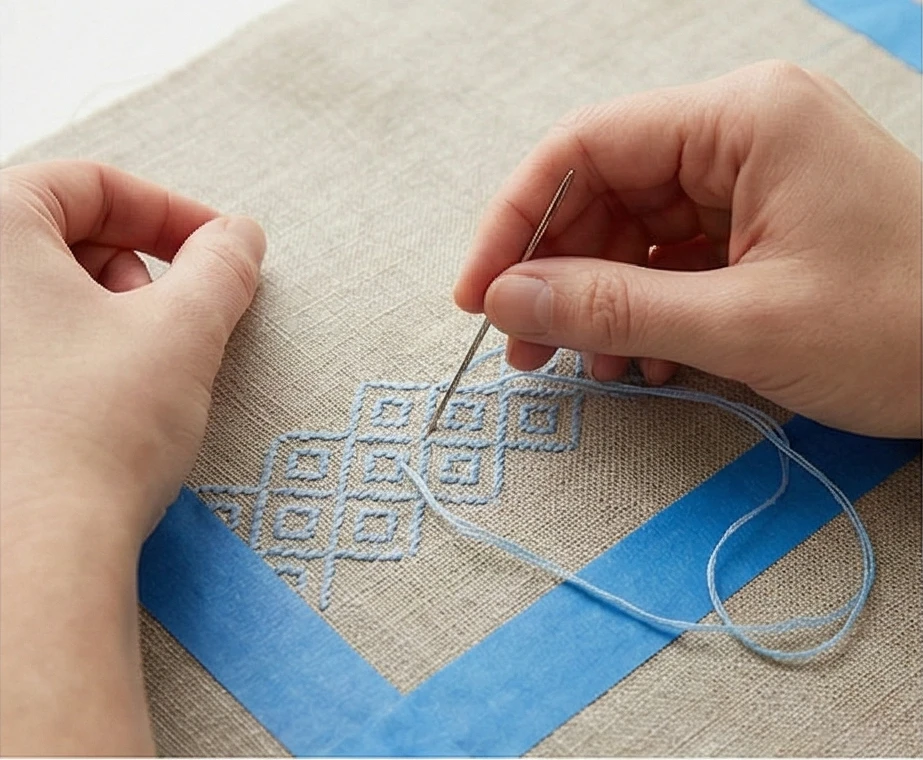
Step 3: Creating the Gradient
The color shift represents the transition from day to night.
- Top Third: Thread your needle with the Lightest Blue thread. Stitch the top 4 inches of the band.
- Middle Third: Switch to the Medium Blue thread. Stitch the middle 4 inches.
- Bottom Third: Switch to the Dark Navy thread. Stitch the bottom 4 inches.
- Visual: The diamonds remain the same size, but the color deepens, grounding the pillow visually.
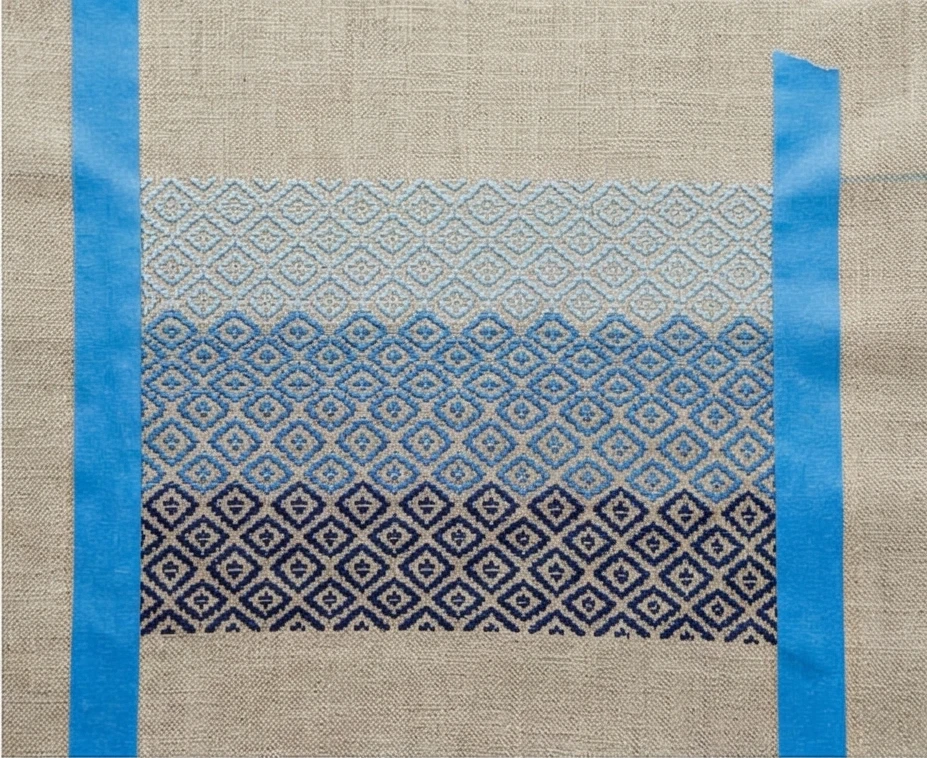
Step 4: Smoothing the Texture
- Tension Check: Hishizashi can pucker if pulled tight. Every few rows, gently tug the fabric diagonally and horizontally to relax the stitches.
- The “Ribs”: Run your finger over the stitching. It should feel like a textured ribbing or a woven basket. This texture provides a nice grip against your back.
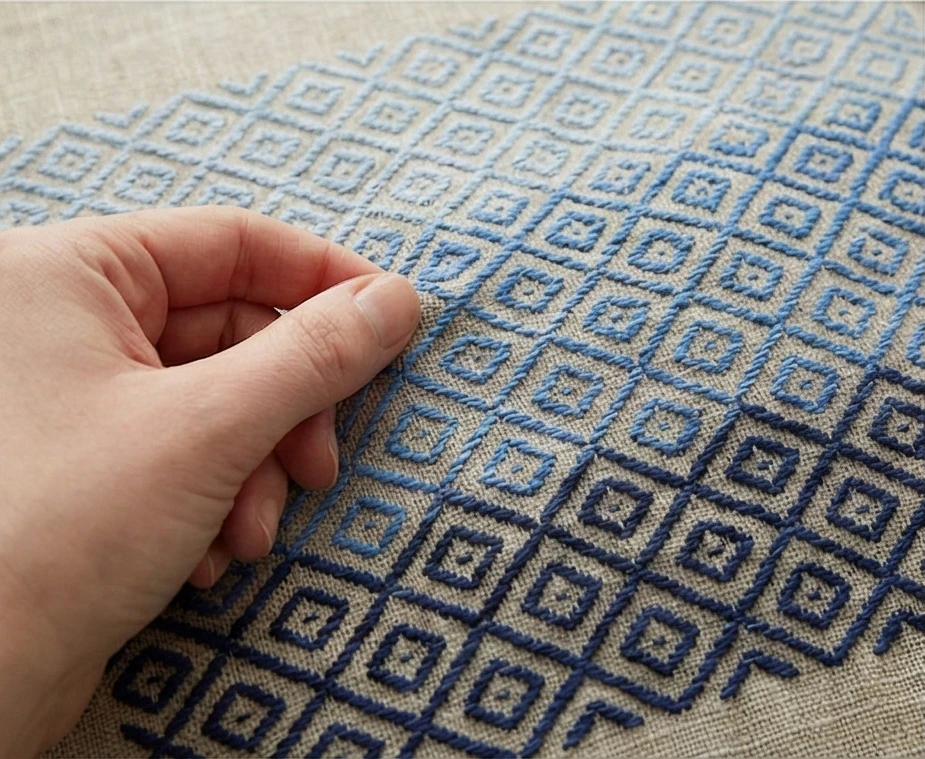
Step 5: The “Clean” Assembly
A zipper is best for lumbar pillows so you can wash the cover.
- Trim: Trim the embroidered front panel to exactly 13″ x 25″.
- Backing: Cut the backing linen to the same size.
- Install Zipper: Install an invisible zipper along the bottom long edge (25″ side).
- Alternative: If you dislike zippers, use an envelope closure with a deep 6-inch overlap to prevent gaping.
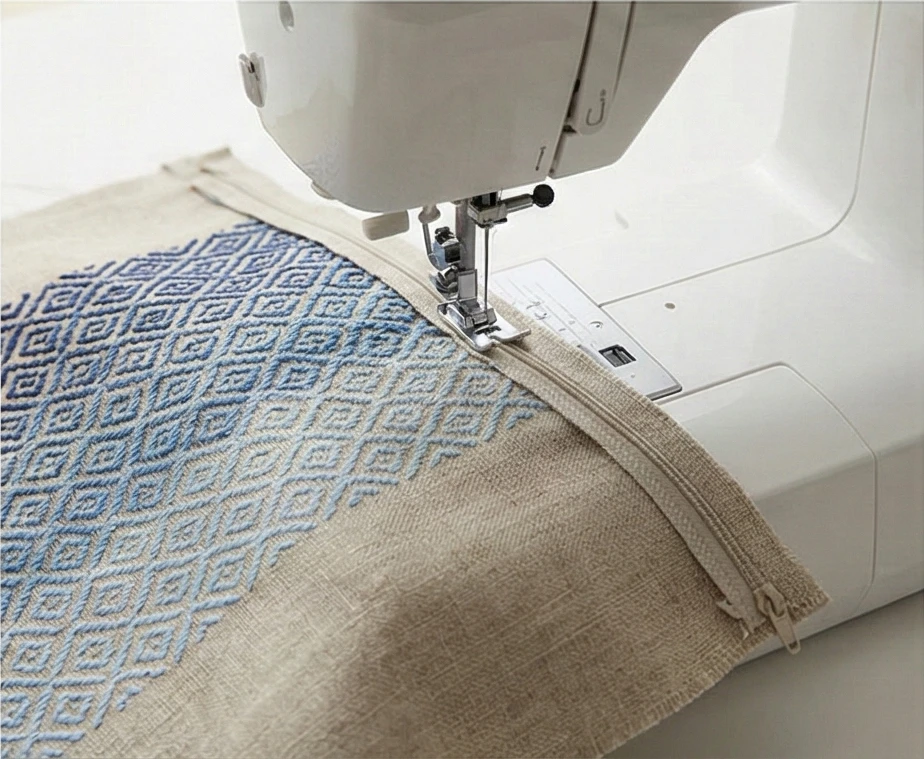
Step 6: The Knife-Edge Finish
- Sew: Open the zipper halfway (important!). Pin the front and back Right Sides Together.
- Stitch: Sew the remaining three sides with a 1/2 inch seam allowance.
- Corners: Clip the corners diagonally to reduce bulk.
- Turn: Turn right side out through the zipper. Use a point turner to make the corners crisp.
- Insert: Stuff with the pillow form. Massaging the corners ensures the insert fills the cover completely.

Usability Note: The dense thread coverage of Hishizashi makes this pillow incredibly durable. It resists pilling and wear better than a printed fabric, making it ideal for daily use on a sofa or reading chair.
Conclusion
Incorporating these Elegant Japanese Quilt Ideas into your home results in an environment where Zen philosophy and daily comfort exist in perfect, harmonious balance. Each piece, from Traditional Sashiko Bed Covers that promise restorative sleep to Modern Kogin Throws that invite cozy relaxation, stands as a testament to a design ethos that prizes intention, natural beauty, and impeccable craftsmanship. The journey through indigo hues, precise stitching, and motifs inspired by gardens and oceans shows that our living spaces can be thoughtfully curated to nourish the spirit, transforming ordinary rooms into sanctuaries of calm and refined style.
The unifying power of these concepts lies in their purposeful simplicity and tangible warmth. Ocean Wave Seigaiha Patterns bring nature’s serene rhythm into the bedroom, while a Comfortable Shonai Quilt for a Lounge Chair ensures every moment of repose is enveloped in understated style. These textiles teach that elegance is not about opulence, but about clarity, integrity of material, and the quiet confidence of perfect placement. They become anchors of tranquility, offering a visual and physical retreat that is both grounding and uplifting in its simplicity.
Let this exploration inspire you to surround yourself with objects that speak of patience and artistry. By choosing a Japanese Garden Inspired Quilt for your wall or a Refined Shonai Pattern for an Ottoman, you engage in more than decoration—you cultivate an atmosphere. Your home becomes a reflection of a mindful aesthetic, where every chosen textile contributes to a living space that is not only stylish and cohesive but also a true sanctuary of peace, inspired by the enduring wisdom of Japanese craft.
