
20 Christmas Window Decoration Ideas: Captivating Ideas for Inside and Out
Christmas Window Decoration Ideas turn your home’s windows into the ultimate holiday canvas, blending inside warmth with outside curb appeal to create captivating seasonal magic that delights passersby and welcomes guests. From classic wreaths with velvet bows to twinkling fairy-light curtains and outdoor lighted villages, decorating your windows is one of the most visible and joyful ways to celebrate the season. Whether you prefer timeless red-and-green elegance or soft pastel whimsy, these ideas help you craft displays that sparkle day and night, instantly boosting festive spirit for everyone who sees them.
Inside, windows become cozy focal points with suspended ornaments, candlelit silhouettes, and garland-framed views that make your living spaces feel like a holiday storybook. Outside, wreaths, lighted planters, and backlit silhouettes transform your home’s façade into a glowing beacon of Christmas cheer that stands out in the neighborhood. The best part? Many of these ideas work beautifully in apartments, small homes, or large estates—there’s a style for every window and every budget.
This collection of 20 Christmas window decoration ideas offers something for every taste: traditional, modern, minimalist, vintage, and whimsical. Easy to install and remove, they let you refresh your look year after year while spreading joy from both sides of the glass. Get ready to make your windows the star of the season!
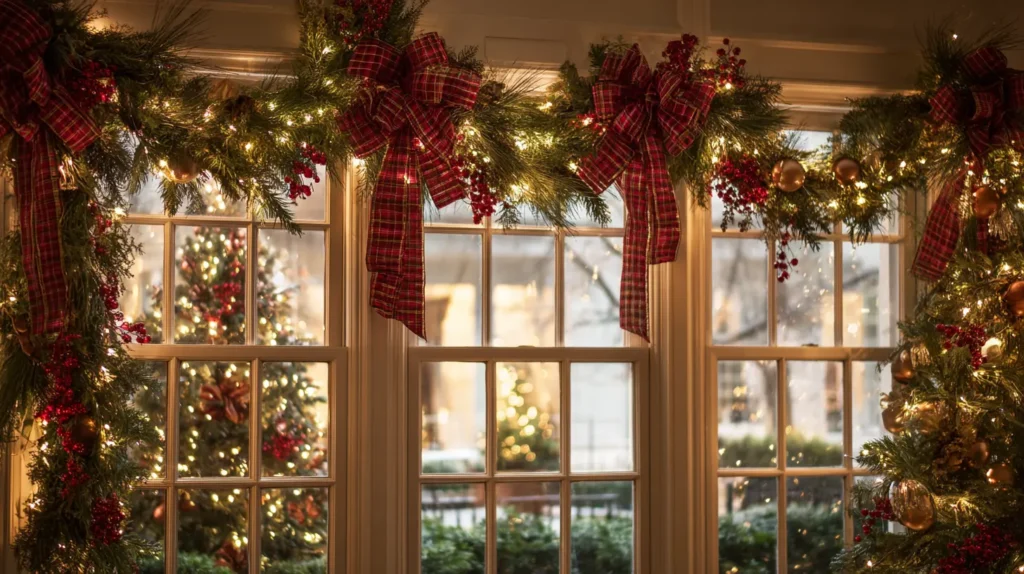
1. Hanging Classic Green Wreaths with Red Velvet Bows and Red Berries
Contents
- 1 1. Hanging Classic Green Wreaths with Red Velvet Bows and Red Berries
- 2 2. Festive Window Garland Ideas for a Classic Christmas Look
- 3 3. Hanging Ornament Layered Curtains String Lights for a Warm Glow with Holiday Ribbon Ties
- 4 4. DIY Faux Snow Spray Art and Stencils
- 5 5. Suspended Ornament Baubles on Satin Ribbons
- 6 6. Lush Pine Garlands Framing the Window with Bows
- 7 7. Candlelit Window Displays for Warm Holiday Glow
- 8 8. Festive Outdoor Window Box Planters with Evergreens
- 9 9. Handmade 3D Paper Snowflakes and Star Mobiles
- 10 10. Peeking Santa and Reindeer Silhouettes
- 11 11. Backlit Holiday Silhouettes for Nighttime Curb Appeal
- 12 12. Scandinavian Minimalist Branch and Birch Decor
- 13 13. Whimsical Candy Cane and Peppermint Themes
- 14 14. Lighted Christmas Village Displays on the Windowsill
- 15 15. Stunning Outdoor Wreaths with Window Frame Lighting
- 16 16. Vintage Glass Ornament Valances
- 17 17. Pastel Christmas Window Ideas for Soft and Cozy Appeal
- 18 18. Sparkling Tinsel Window Decor for Retro Holiday Fun
- 19 19. Hanging Advent Calendars in the Window
- 20 20. Window-Mounted Mini Christmas Trees
- 21 Conclusion
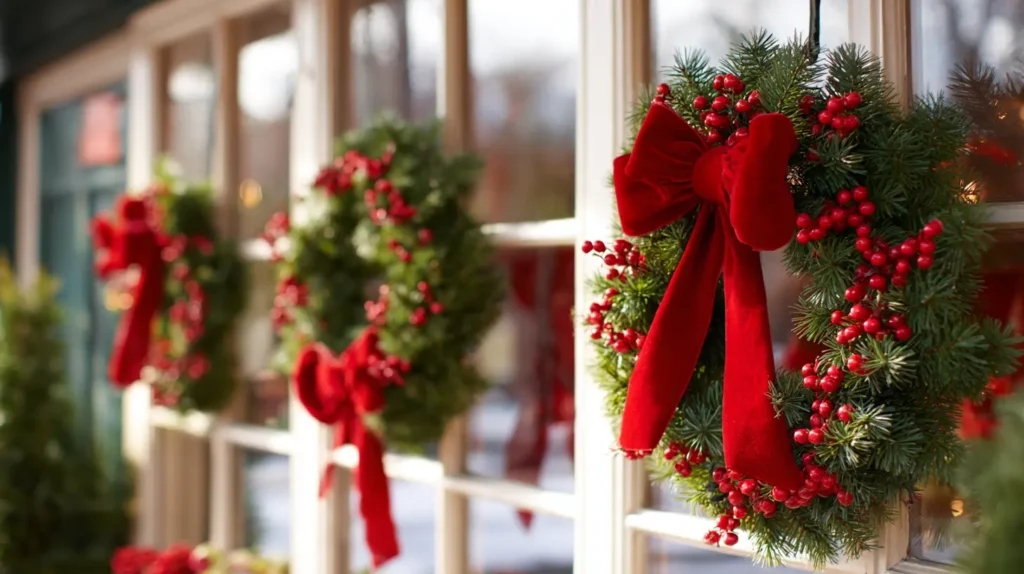
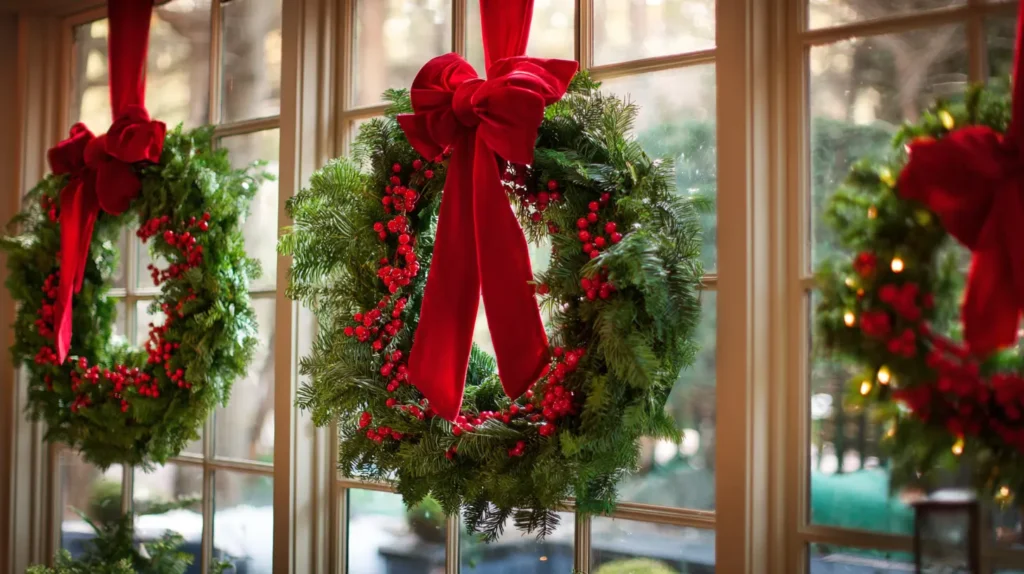
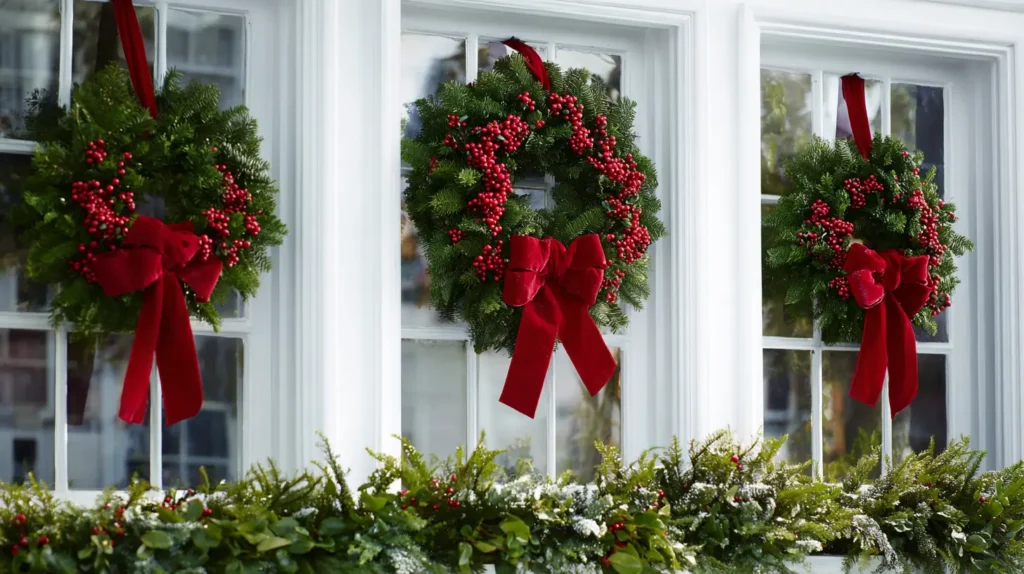
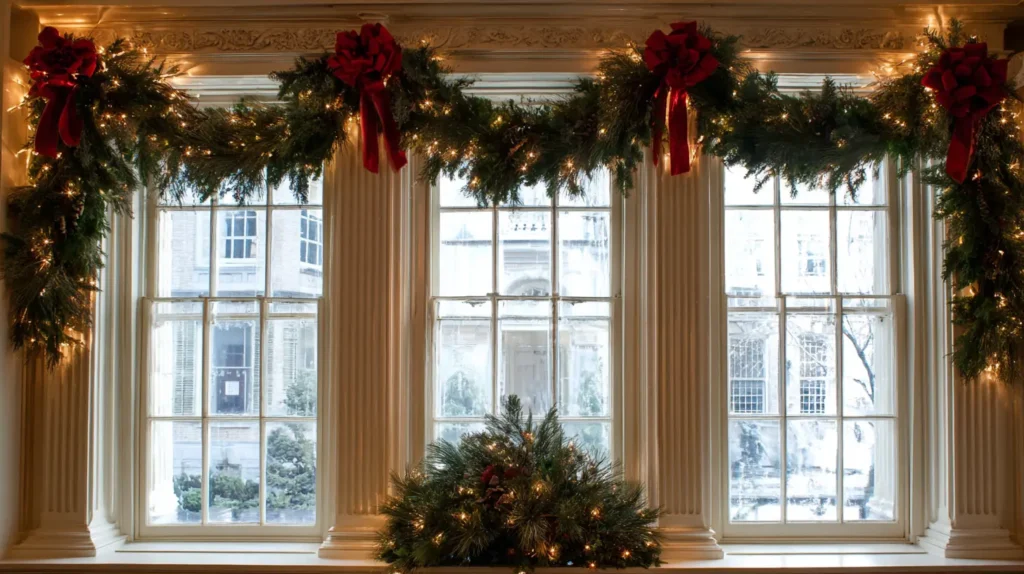
Capture the quintessential spirit of the holidays with a window display that defines traditional elegance. Imagine looking at your home from the street and seeing a perfect row of lush, verdant evergreen wreaths centered in every window. Each wreath is a circle of deep green pine or balsam, accented by clusters of bright, glossy red winterberries that pop against the dark needles. Anchoring the design is a wide, sumptuous bow made of deep crimson velvet, its tails trailing elegantly down the glass. This look provides instant curb appeal, creating a cohesive, storybook appearance that feels warm, welcoming, and timelessly sophisticated.
- Consistency is Key: For maximum impact, ensure every wreath is the exact same size and hung at the exact same height in each window to create a polished, symmetrical look.
- The Velvet Touch: Choose a “wired” velvet ribbon. The wire allows you to shape the loops of the bow into perfect, voluminous puffs that hold their shape against winter winds or indoor drafts.
- Pop of Color: Ensure the berry clusters are large and bright red. They provide a necessary texture contrast to the soft velvet and prickly pine, making the wreath readable from a distance.
- Inside or Out: If hanging outdoors, ensure the materials are weather-resistant. If indoors, the velvet stays pristine while you enjoy the greenery from your sofa.
- Hanging Mechanics: Avoid unreliable suction cups. Suspend the wreaths from the top of the window frame using a matching red ribbon or clear fishing line for a secure, floating effect.
Pro Design Tip: Open the top sash of your window (if it’s a double-hung window), loop the hanging ribbon over the top edge of the sash, and close the window to lock the ribbon in place. This avoids nails or sticky residue and ensures the wreath hangs perfectly flat against the glass.
Budget Consideration: You don’t need expensive, pre-decorated wreaths. Buy the simplest, plainest artificial pine wreaths you can find (often under $5). Then, buy a roll of high-quality velvet ribbon and a few stems of faux berries from a craft store. By adding the “jewelry” yourself, you get a high-end designer look for a fraction of the cost of a store-bought finished wreath.
Other Related Interesting Ideas …
Windows serve as the bridge between your interior comfort and the winter world outside. Dressing them up complements your 20 Outdoor Christmas Lighting Ideas: Illuminate Your Home’s Exterior with Magic while providing a festive border for those looking out. Window decor is essential for enhancing curb appeal alongside your 20 Front Porch Christmas Decor Ideas: Welcoming Holiday Entryways for Guests. Inside, well-decorated windows can add a romantic touch to 20 Bedroom Christmas Decor Ideas: Serene and Festive Holiday Retreats or serve as a backdrop for your 20 Living Room Christmas Decor Ideas: Festive and Cozy Holiday Transformations.
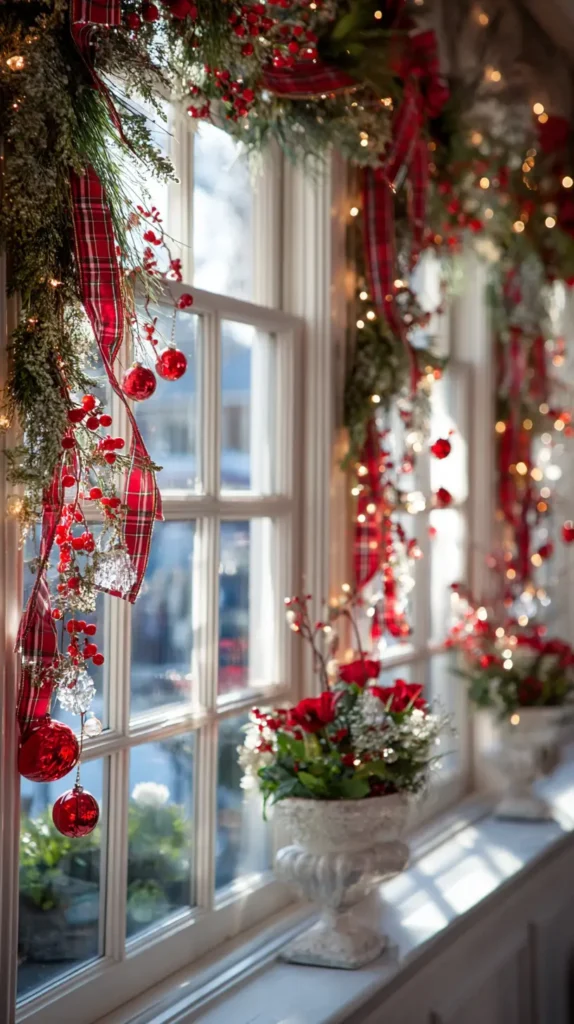
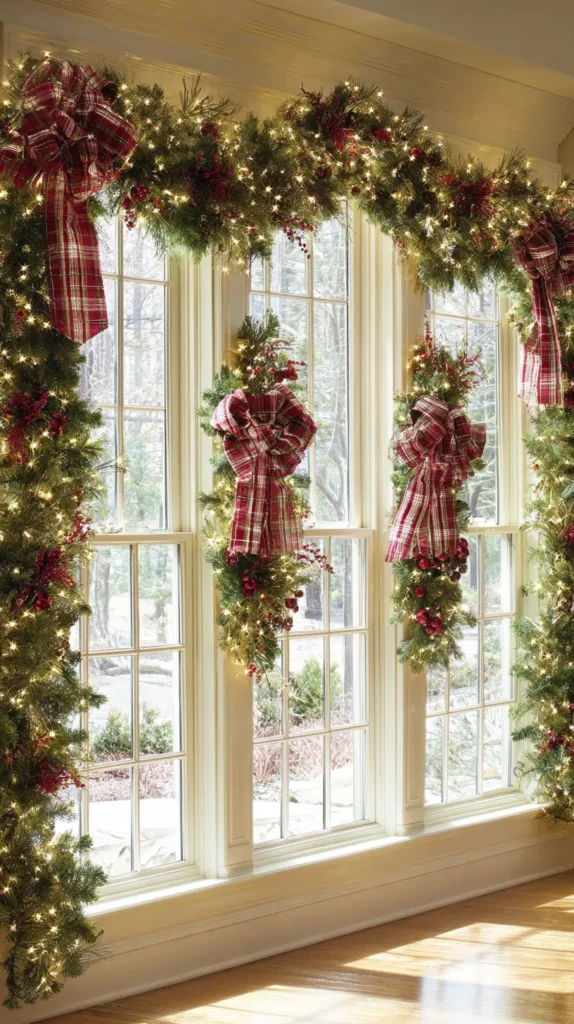
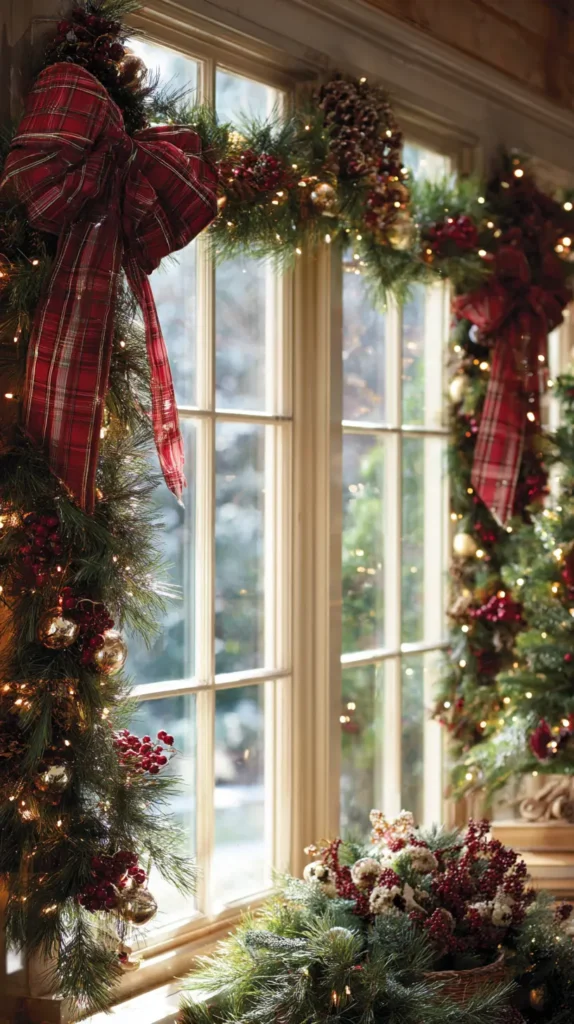
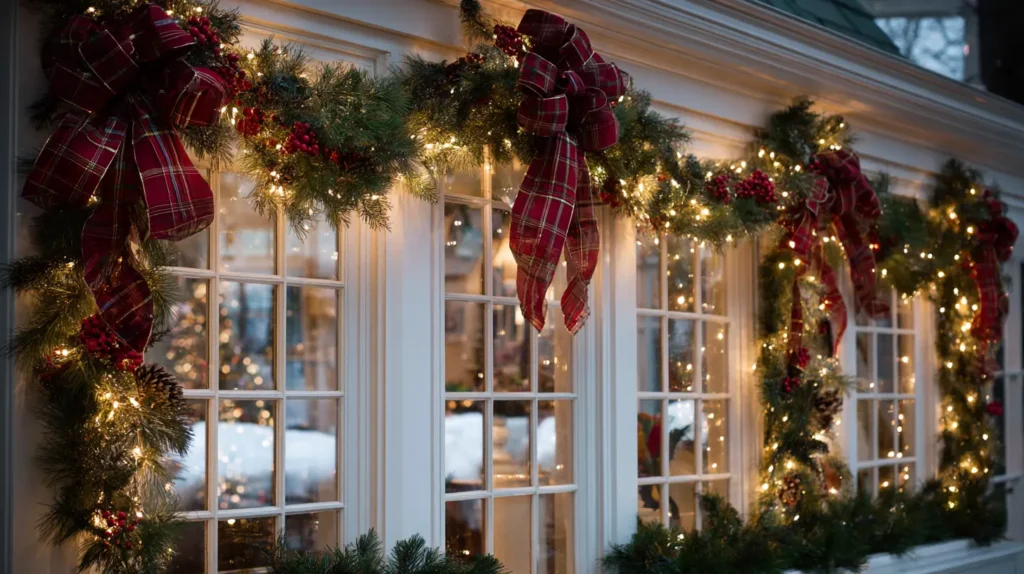
2. Festive Window Garland Ideas for a Classic Christmas Look
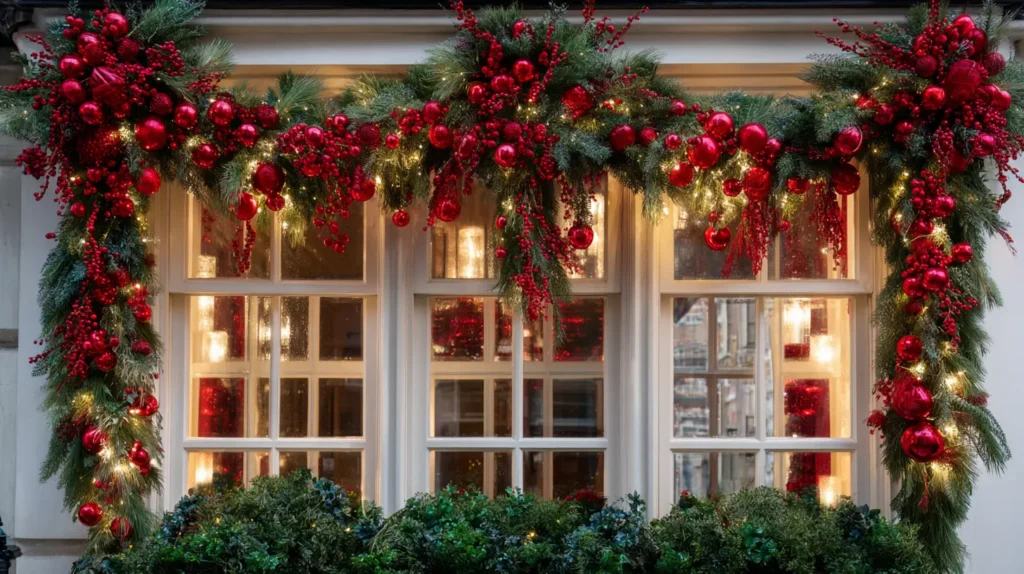
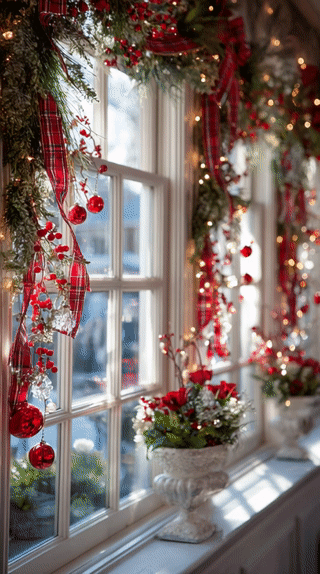
Frame your view of the winter world with the timeless elegance of a traditional holiday garland. Imagine a thick, lush rope of mixed evergreen—pine, cedar, and spruce—draped casually over the top of your window frame, cascading down the sides. Nestled deep within the green boughs are sprays of glossy crimson holly berries, adding a vibrant pop of nature’s candy. To elevate the look, you have wired in clusters of miniature glass ornaments in a heritage palette: ruby red, emerald green, and shimmering silver. These tiny metallic spheres catch the light from your indoor lamps and streetlights, creating a sparkling, jeweled border that feels warm, nostalgic, and inviting from both inside and out.
- Cluster the Color: Don’t space the ornaments out individually. Wire three or four small balls (mix the red, green, and silver) together into a bunch before attaching them to the garland for a professional, high-impact look.
- Berry Brightness: Use sprays of “iced” or glossy red berries. They provide a necessary contrast in texture to the smooth glass ornaments and the prickly pine needles.
- Scale Matters: Stick to small-scale ornaments (1.5 to 2 inches in diameter). Large tree ornaments can look bulky on a window garland and may block too much natural light.
- Secure Suspension: Use a tension rod placed inside the window frame to hang the garland without damaging your trim, or use heavy-duty clear Command hooks on the corners of the molding.
- Light the Frame: Weave a strand of warm-white copper wire lights through the greenery to make the glass balls sparkle and glow against the dark window pane at night.
Pro Design Tip: For a truly “classic” look, add a symmetrical element. Place a single, medium-sized red velvet bow at the top center of the window frame, or two matching bows at the top corners where the garland begins to drape down. This anchors the design and adds a soft, luxurious textile element.
Budget Consideration: You don’t need expensive vintage glass ornaments. Buy a bulk tube of “mini shatterproof ornaments” from a discount store. Since they are small and mixed in with greenery, no one will be able to tell they are plastic, and they are much safer if the garland accidentally falls.

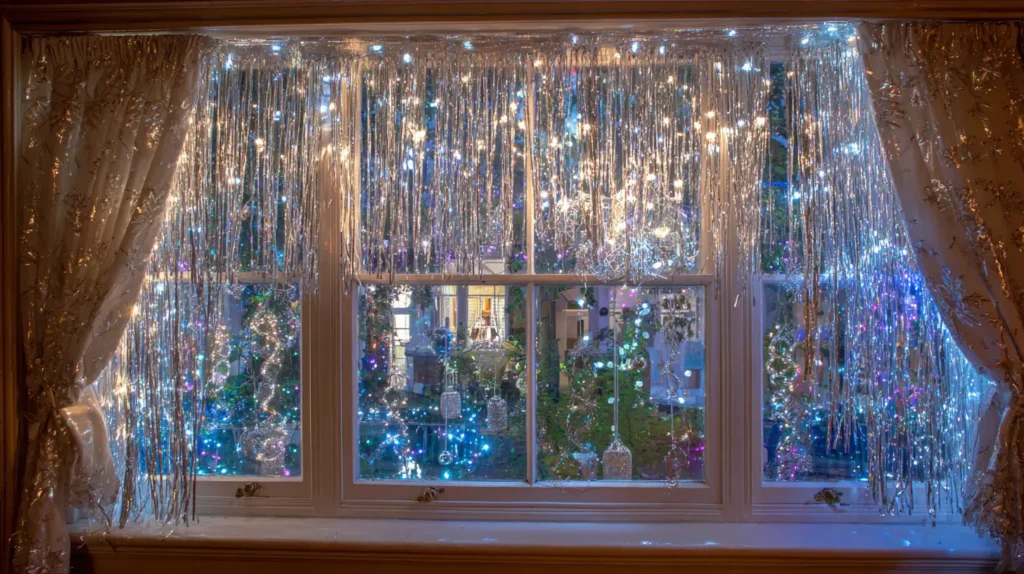
3. Hanging Ornament Layered Curtains String Lights for a Warm Glow with Holiday Ribbon Ties
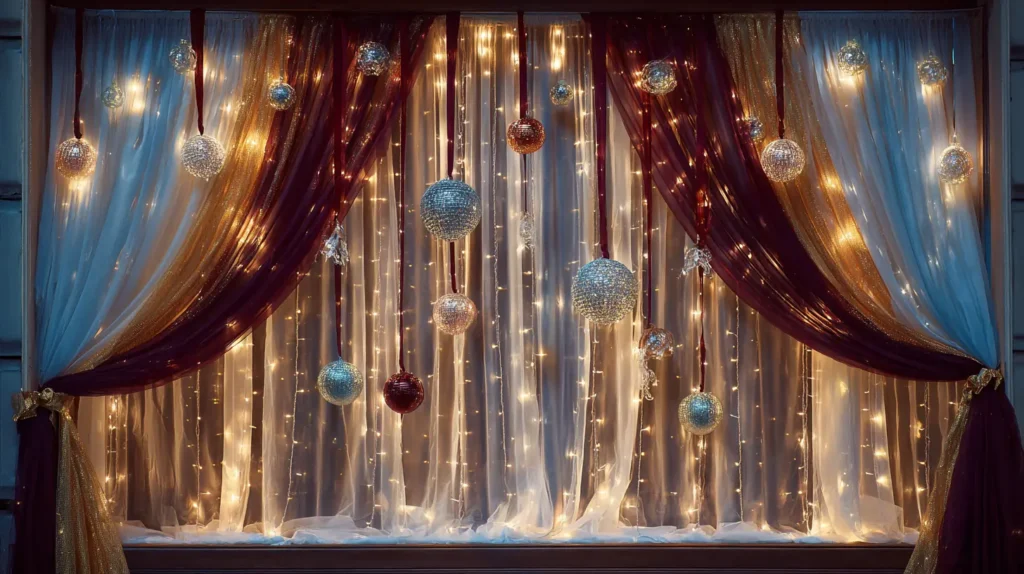
Transform your window into a glowing, theatrical stage that radiates holiday warmth from the inside out. Imagine a backdrop of soft, sheer white curtains that appear to shimmer from within, thanks to vertical strands of warm-white fairy lights draped behind the fabric. The voile diffuses the lights, creating a dreamy, ethereal haze rather than harsh points of light. To frame this glowing canvas, the curtains are swept back and secured with luscious, wide ribbons in deep burgundy velvet or shimmering gold satin. Suspended in the center of the open window frame, a collection of glass ornaments dangles at varying lengths, catching the soft backlight and sparkling like floating jewels against the night sky.
- The Layering Order: For the best depth, place the lights closest to the glass, then the sheer curtains, then the hanging ornaments in the front.
- Curtain Lights: Use a specific “curtain light” set (a main wire with vertical drops) for uniform coverage, rather than trying to drape a single string back and forth.
- Ribbon Tie-Backs: Replace your standard curtain hooks or ropes with festive ribbon. Tie large, floppy bows to hold the drapes open, adding a soft textile element that matches your tree decor.
- Ornament Suspension: Hang the ornaments from the curtain rod using matching thin ribbon or invisible fishing line. Stagger the heights to create a “falling snow” effect.
- Warmth is Key: Ensure the LED lights are “warm white.” Cool white lights behind sheer fabric can look icy and blue, whereas warm white creates that cozy “candlelit” gold tone.
Pro Design Tip: Coordinate your ornaments with your ribbon. If you use a rich red velvet ribbon to tie back the curtains, hang red-and-gold ornaments in the center. If you use a silver satin ribbon, stick to mercury glass and clear crystal ornaments for an “Ice Queen” aesthetic.
Budget Consideration: You don’t need expensive curtain hardware. If you don’t have tie-back hooks installed, simply use the ribbon to tie the curtain to itself (in a knot) or use a safety pin hidden behind the fabric to secure the “swoop” shape. For the lights, copper wire fairy lights are extremely affordable and lightweight enough to safety-pin directly to the back of the curtain fabric.

4. DIY Faux Snow Spray Art and Stencils
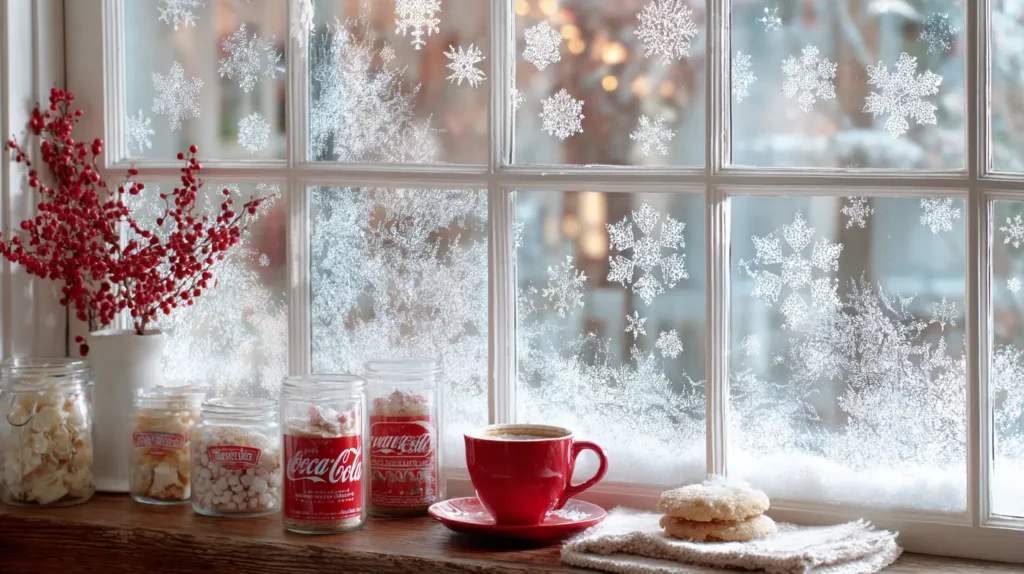
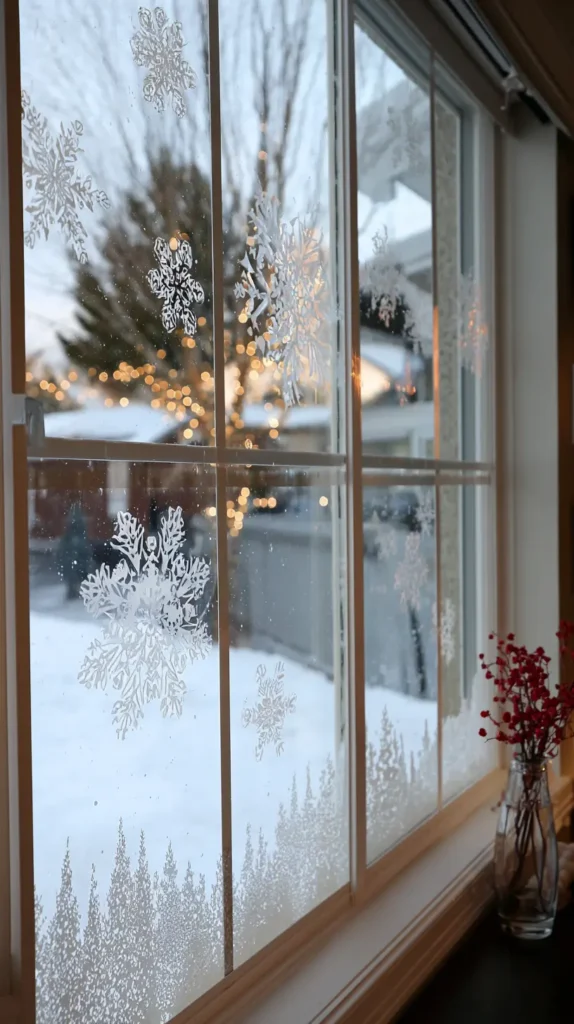
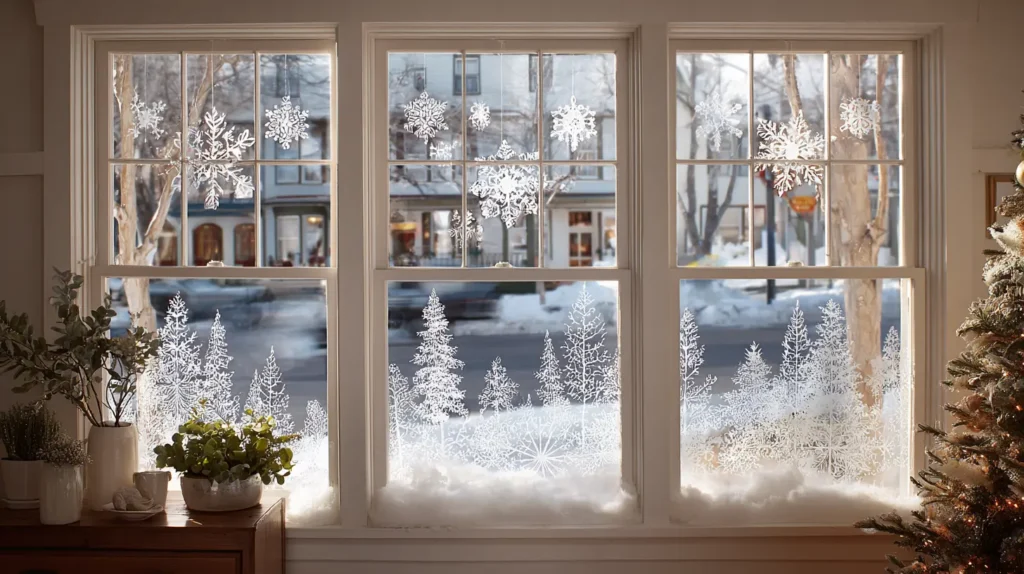
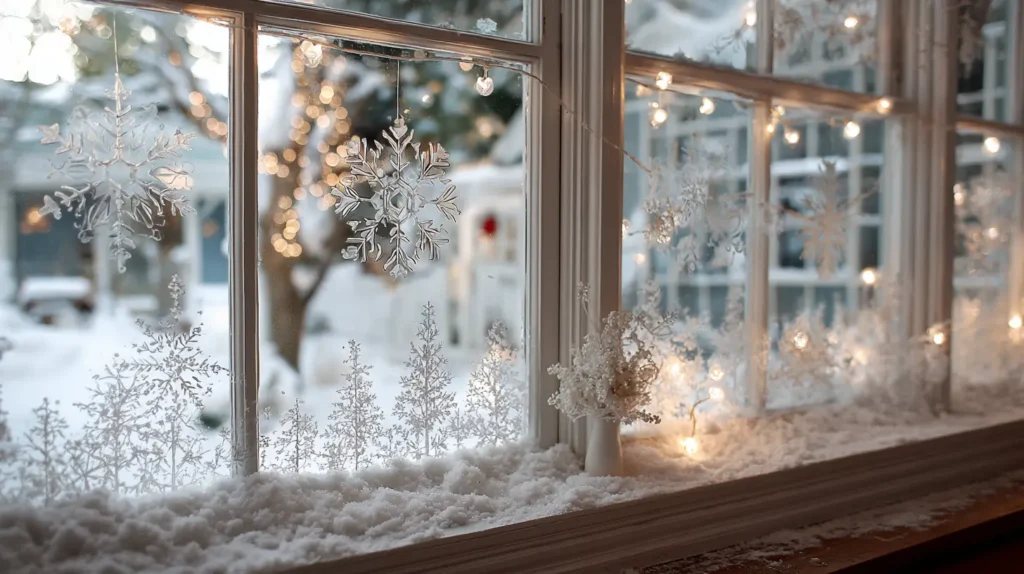
Turn your glass panes into a magical, frosted canvas that blurs the line between indoors and outdoors. Imagine a dusting of artificial snow clinging to the corners of the window, framing a winter forest silhouette or a flurry of intricate snowflakes. Whether you use crisp stencils for clean, graphic shapes or freehand shading to create a “blizzard” effect, this technique adds texture and privacy. At night, the streetlights filter through the white frost, creating a soft, diffused glow that makes the room feel incredibly cozy and enclosed against the cold, regardless of the actual weather outside.
- Clean First: Ensure the glass is completely clean and dry; grease or condensation will cause the spray to slide or look patchy.
- Stencil Magic: Use lace doilies, paper snowflakes, or store-bought plastic stencils. Tape them lightly to the glass, spray over them, and peel away to reveal the clear design.
- The “Drift” Effect: Concentrate the heaviest spray at the bottom corners of the window and fade it out as you move up, mimicking how real snow piles up on a sill.
- Layering: Spray in short, light bursts from 12 inches away. It’s better to do two light coats than one heavy, dripping coat.
- Easy Cleanup: Don’t worry about the mess; high-quality snow spray washes off easily with warm, soapy water and a glass scraper after the holidays.
Pro Design Tip: Create a “reverse” landscape. Cut out a silhouette of a village or a row of pine trees from paper. Tape it to the bottom of the window. Spray the entire window with a light dusting of snow, then peel off the paper. You are left with a clear view of the outdoors in the shape of a town, surrounded by a frosty white sky.
Budget Consideration: A can of snow spray costs about $5 and covers multiple windows. For stencils, don’t buy plastic ones—fold standard printer paper and cut out your own snowflakes (just like in school) for free, unique designs.
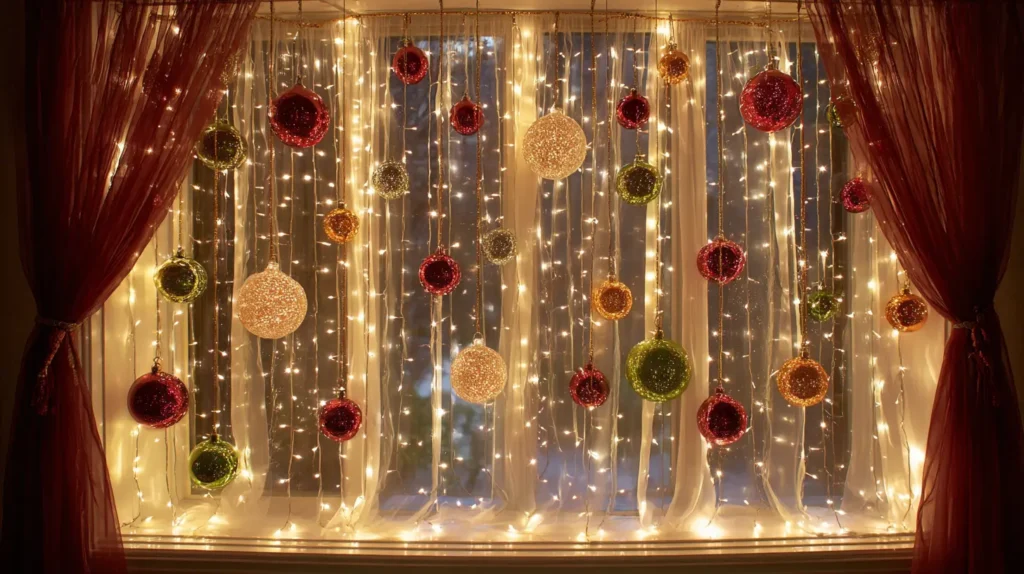
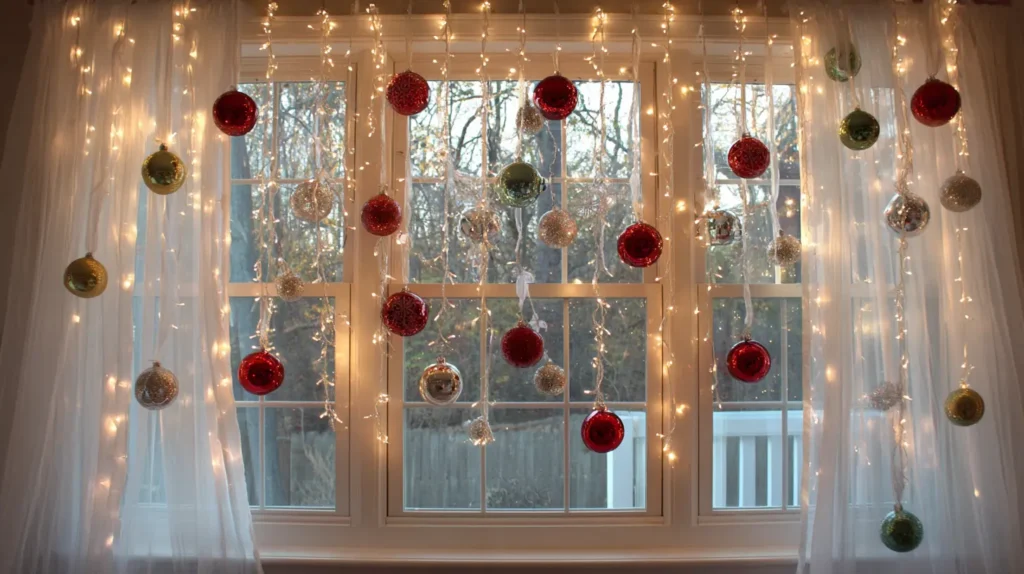
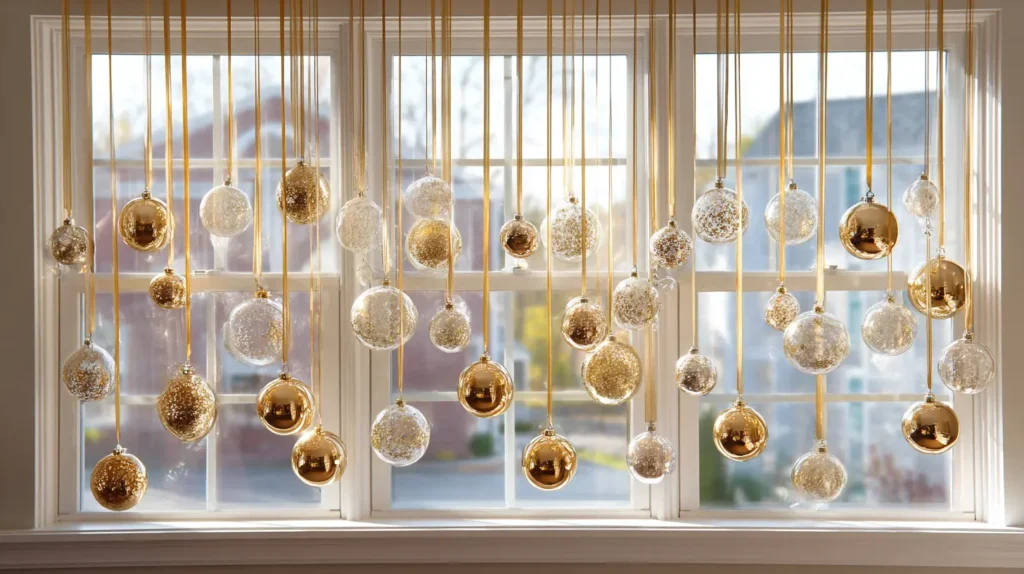
5. Suspended Ornament Baubles on Satin Ribbons
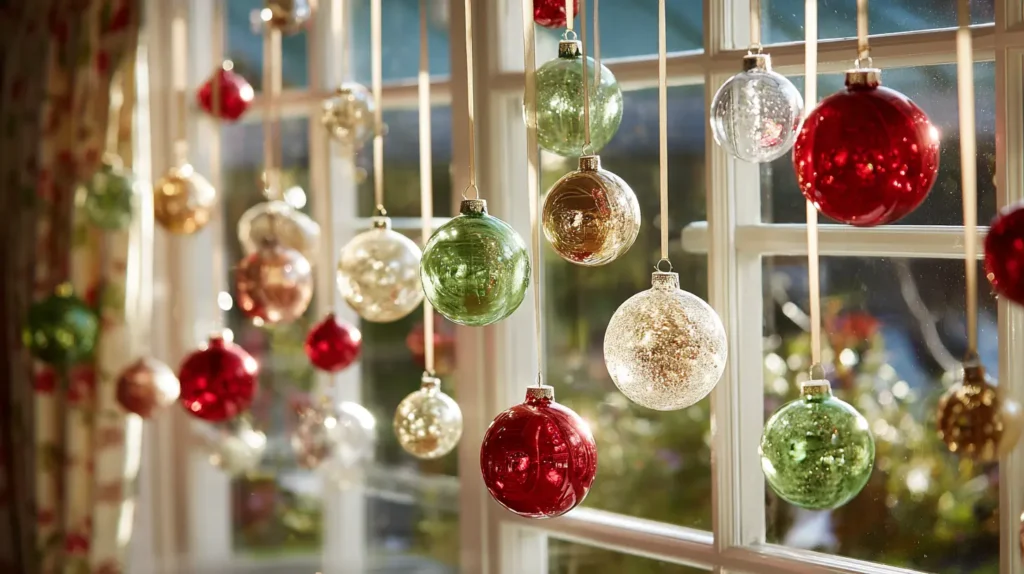
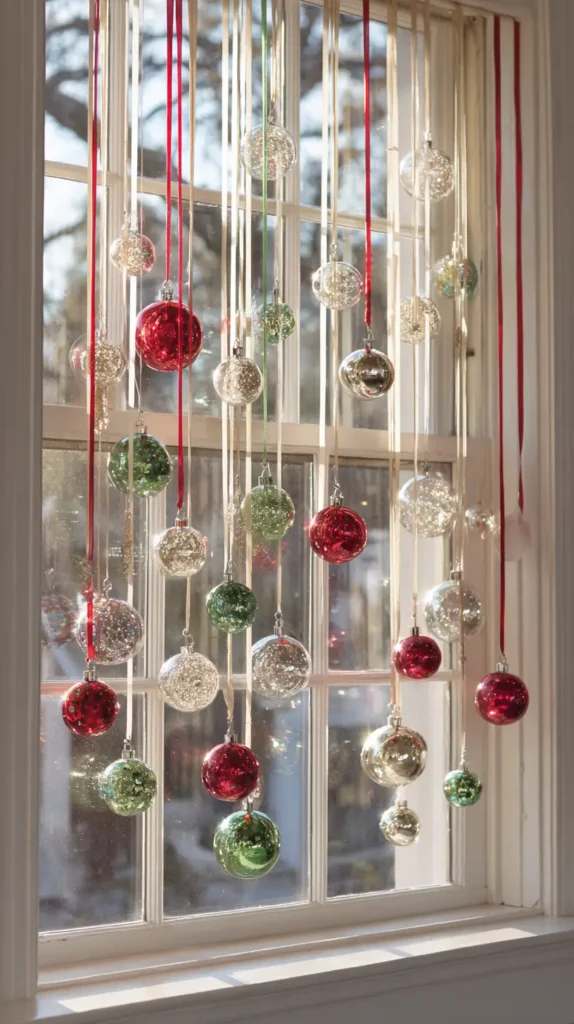
Turn your window into a floating jewelry display with this simple yet high-impact decorating technique. Imagine a cascade of shimmering glass baubles suspended in mid-air, each hanging from a luxurious length of double-faced satin ribbon. By cutting the ribbons to varying lengths, you create a dynamic, staggered arrangement that fills the window frame with color and sparkle without blocking the view. Whether you choose a monochromatic look with all-gold ornaments on cream ribbon, or a playful mix of red and green, the sunlight streaming through the glass creates a dazzling, backlit effect during the day, while indoor lighting makes them glow like gems at night.
- Vary the Drop: Avoid a straight line. Hang the ornaments at different heights—some high near the top, some dipping low towards the sill—to create a cascading “waterfall” visual.
- Ribbon Quality: Use “double-faced” satin ribbon (shiny on both sides). Since the ornaments will spin slightly in the air, you want the ribbon to look beautiful from every angle, inside and out.
- Secure Attachment: Tie the ribbons directly to your curtain rod, or, for a cleaner look, use small, clear tacks or tape to secure them to the top of the window frame molding.
- Color Coordination: Match the ribbon color to the ornament for a seamless look (e.g., red ribbon on red ball), or use a contrasting color (e.g., gold ribbon on red ball) for a festive pop.
- Scale: Mix baubles of different sizes. A combination of large, medium, and small spheres adds visual texture and keeps the display from looking rigid.
Pro Design Tip: To hide the point where the ribbons attach to the window frame, drape a simple garland of faux cedar or pine across the top of the window. The greenery acts as a “valance,” making it look as if the ornaments are naturally dropping from the boughs.
Budget Consideration: This is a great way to use “orphan” ornaments—the ones left over after decorating the tree that don’t quite fit. You don’t need a matching set; an eclectic mix of vintage or mismatched baubles looks incredibly charming and bohemian when tied together by a uniform ribbon color.
6. Lush Pine Garlands Framing the Window with Bows
Turn your window into a grand architectural focal point by treating it like a framed holiday portrait. Imagine a thick, voluminous garland of realistic pine or cedar draping heavily over the top of the window and cascading down the sides. Rather than just sitting on the trim, the greenery serves as luxurious drapery, softening the room’s hard lines. At the upper corners—or perhaps at the center—sits a statement bow made of stiff velvet or satin ribbon in a rich holiday hue like scarlet, emerald, or gold. This traditional styling adds instant height and drama to the room, creating a cozy, enclosed feeling that beautifully frames the view outside.
- Create Volume: Don’t settle for a skinny strand. Twist two inexpensive garlands together or fluff the branches aggressively to create a thick, high-end look that stands out against the wall.
- The Corner Anchor: Place your largest bows at the top two corners of the window frame. This highlights the architecture and hides the hooks or nails used to secure the greenery.
- Let it Hang: Allow the garland to drape down the sides of the window at least a third of the way, rather than just resting on the top header. This creates a “curtain” effect that feels more substantial.
- Light the Greenery: Pre-lit garlands are best, but if adding your own, use copper wire lights. They disappear into the needles during the day, leaving a magical outline of the window at night.
- Ribbon Quality: Use wired ribbon for your bows. This allows you to shape the loops into perfect, perky puffs that won’t droop over time.
Pro Design Tip: If you have a deep window sill, let the garland trails go all the way down to the sill and “puddle” slightly at the bottom corners. Nest a few pinecones or a heavy brass candlestick into the puddled greenery to anchor the look and connect the vertical frame to the horizontal surface.
Budget Consideration: To get the look of a $100 lush garland for $15, buy the cheapest, thinnest wire garland you can find to use as a structural base. Then, go outside and clip real branches from pine or cedar trees (or ask for free clippings at a Christmas tree lot) and wire them into the fake base. It adds real texture and scent for free, making the cheap base look incredibly expensive.
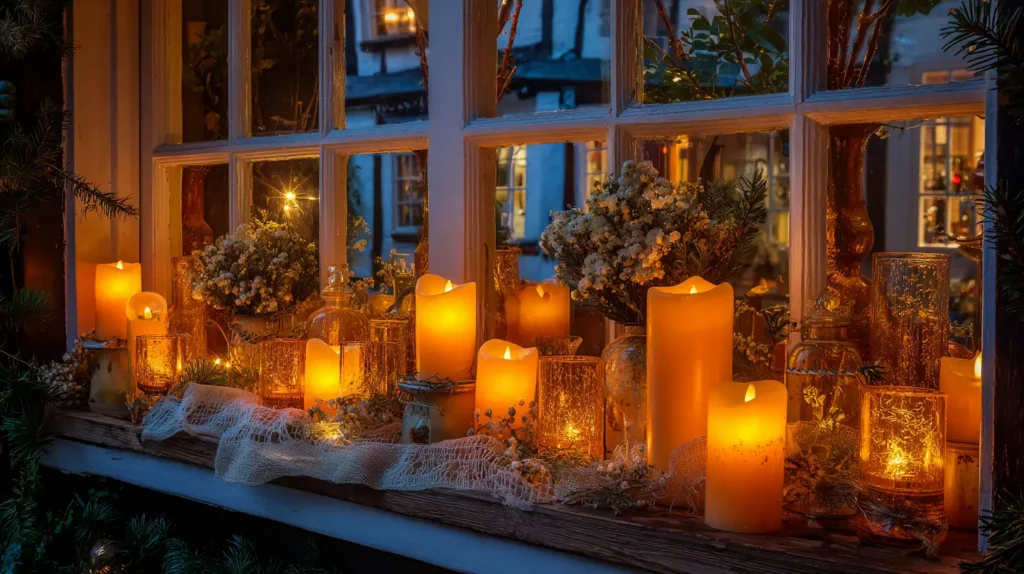
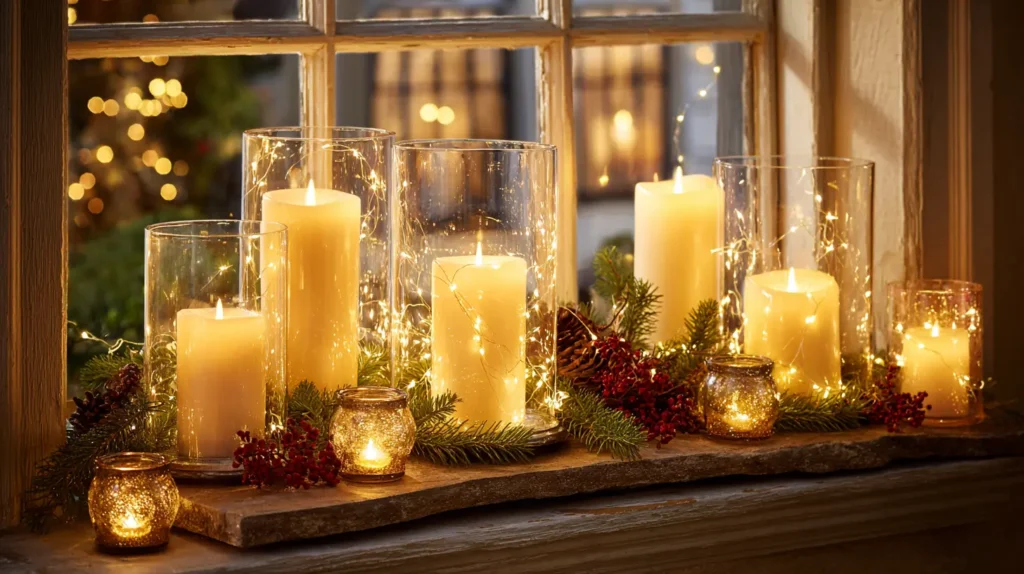
7. Candlelit Window Displays for Warm Holiday Glow
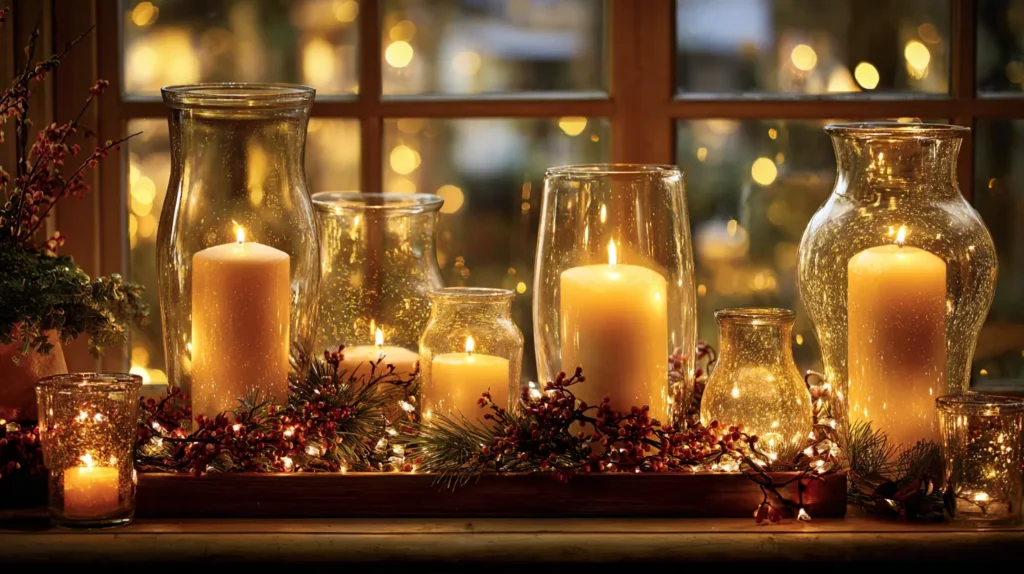
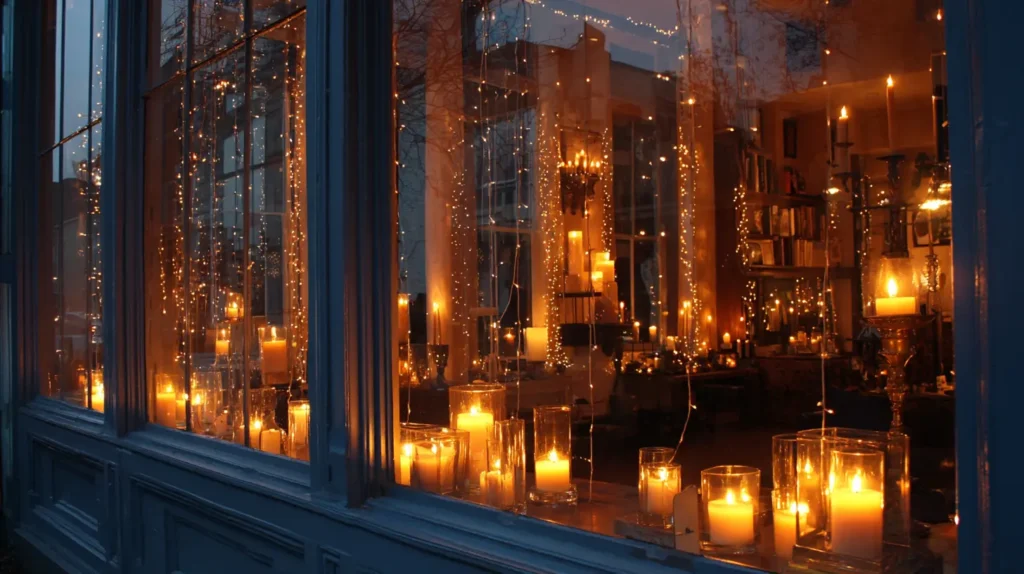
Evoke the timeless, nostalgic spirit of a colonial Christmas with the simple, powerful imagery of a candle in the window. Imagine approaching your home at twilight to see every window pane framing a single, flickering flame. This golden light acts as a beacon of warmth against the cold, blue winter evening, signaling welcome and safety. Inside, the effect is just as magical; the soft amber glow reflects against the dark glass, creating a “mirror” effect that doubles the coziness. Whether you use sleek, modern tapers or rustic pillar candles, this display strips away the noise of colorful flashing lights, replacing it with a serene, silent reverence that feels incredibly peaceful.
- Go Flameless: For safety and ease, use battery-operated LED taper candles. They mimic the flicker of real fire without the risk of burning your curtains or the hassle of melted wax.
- Uniformity is Key: For maximum curb appeal, ensure every candle is identical in height and style, and placed in the exact center of each window sill.
- Timer Function: Invest in candles with built-in 6-hour timers. They will turn on automatically at sunset and off at bedtime, ensuring your windows are lit every night without you having to lift a finger.
- Base Styling: Choose a base that matches your hardware—antique brass for a traditional look, matte black for a modern farmhouse vibe, or clear glass for a minimalist vibe.
- Vary the Height: If you have large picture windows, a single candle might look lost. Instead, group three pillar candles of varying heights on a tray for a more substantial, centerpiece-like display.
Pro Design Tip: Soften the look by placing a small “candle wreath” or a faux eucalyptus or boxwood ring around the base of the candle holder. This hides the plastic base of the electric candle and adds a touch of greenery that looks beautiful from inside the room during the day.
Budget Consideration: You don’t need expensive “window candle” kits. Buy a bulk pack of simple white pillar candles from a dollar store and place them inside empty, clean glass jars (like recycled pickle or salsa jars). The glass protects the flame (if real) or reflects the LED light, creating a rustic, “lantern” look for pennies.
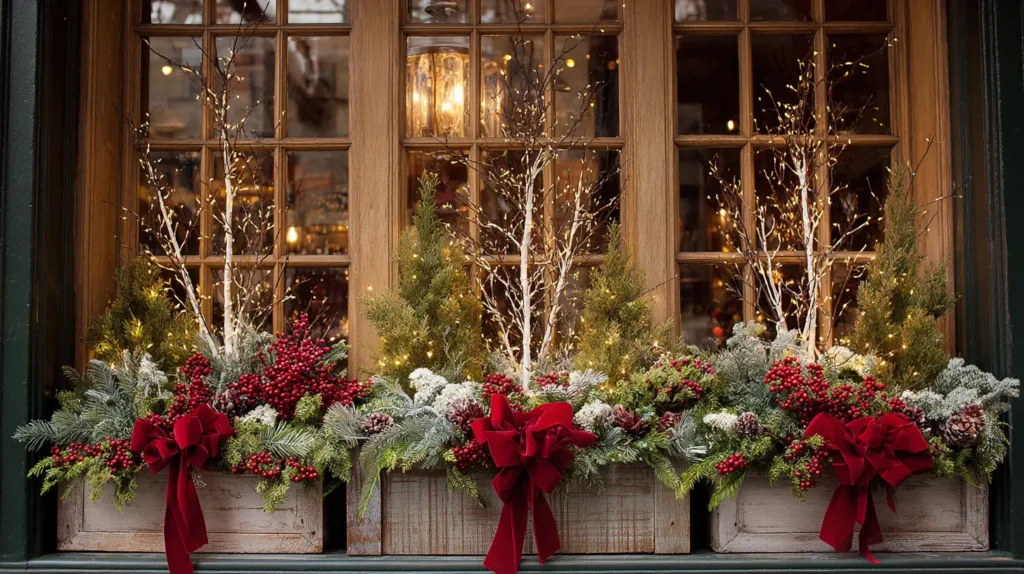
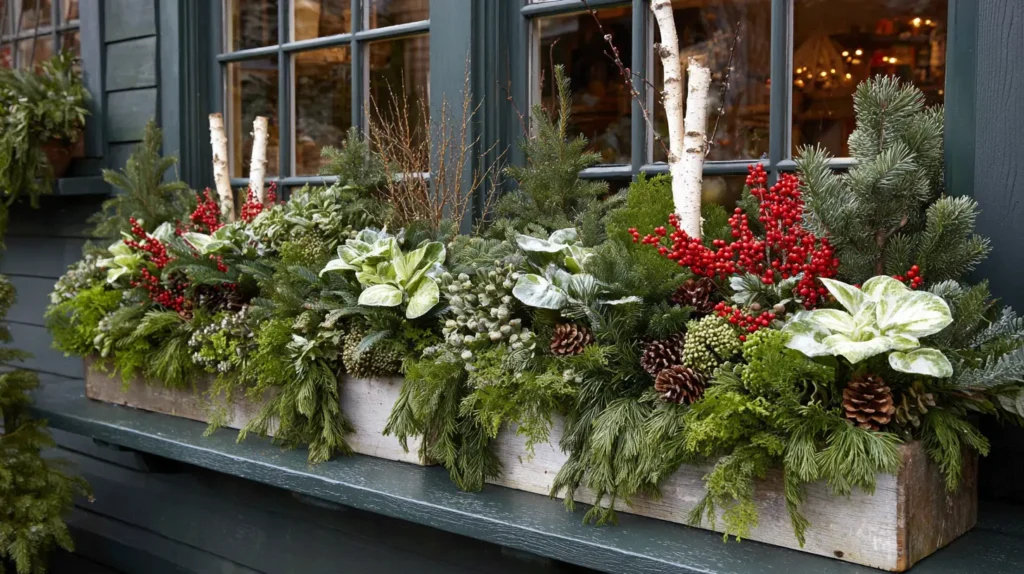
8. Festive Outdoor Window Box Planters with Evergreens
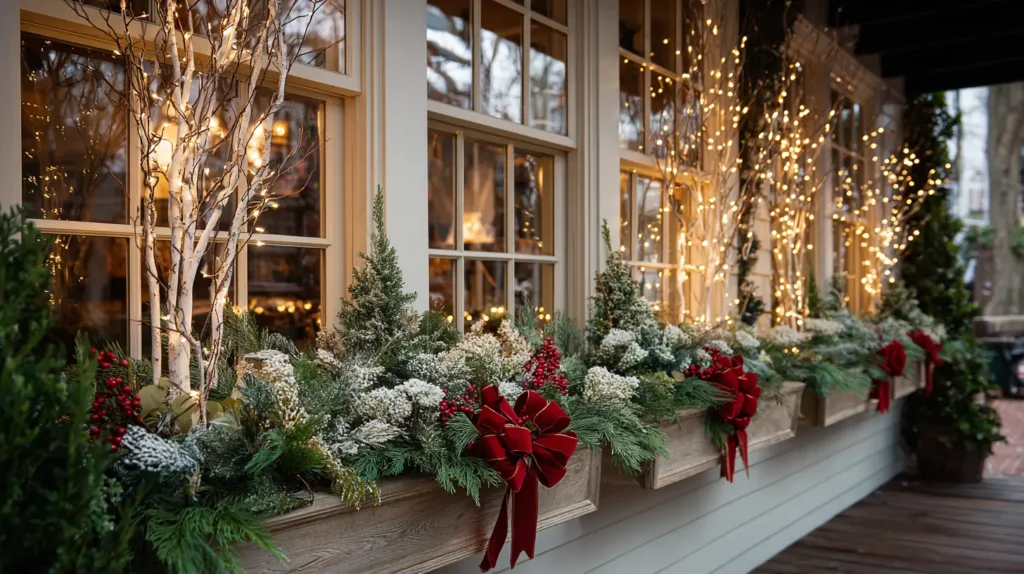
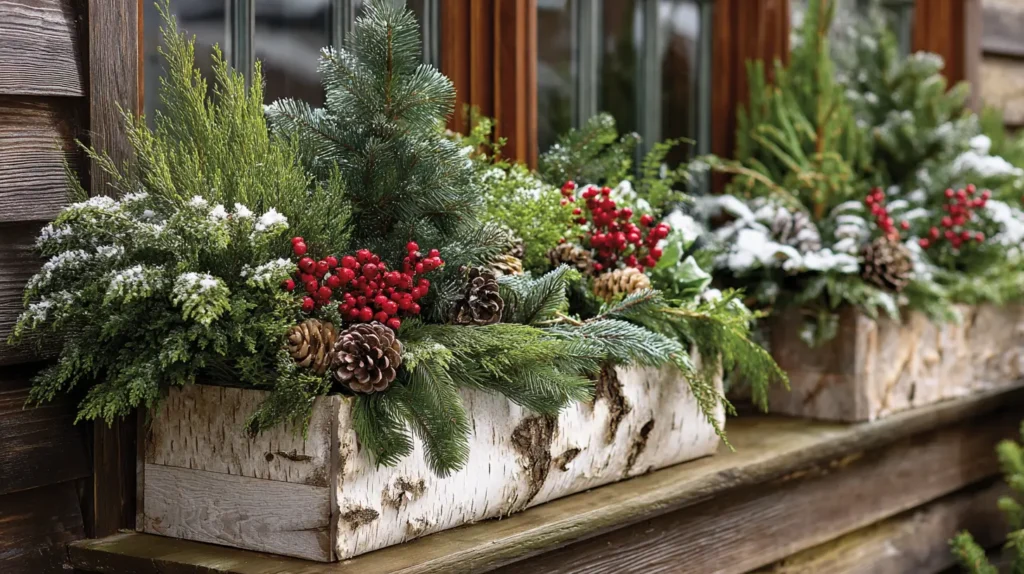
Don’t let your window boxes sit empty and barren during the winter months. Instead, transform them into overflowing displays of abundance that rival your summer blooms. Imagine the boxes packed tight with a lush variety of evergreens—spiky spruce, soft white pine, and textured cedar—spilling over the edges in a verdant cascade. Interspersed among the boughs are striking natural accents: upright white birch logs adding height, oversized sugar pinecones adding texture, and sprays of bright red winterberries providing a pop of color against the grey sky. These mini-gardens add architectural interest to your home’s exterior, ensuring your house looks vibrant and lived-in even in the depths of winter.
- Pack it Tight: Since winter greens don’t grow, you must pack the box densely from day one. If you think it looks full, add another layer to ensure there are no gaps.
- The Freeze Lock: Insert your branches deep into the existing soil before the hard freeze hits. Once the soil freezes around the stems, they will be locked in rock-steady against strong winter winds.
- Mix Your Greens: Combine different textures—long-needle pine, flat cedar, and glossy magnolia leaves—to create visual depth and richness.
- Add “Jewelry”: Wire in large, shatterproof outdoor ornaments in gold or red. They catch the sunlight and ensure the arrangement is colorful and visible from the street.
- Drape the Front: Use “weeping” greens like incense cedar or ivy at the very front of the box. Let them trail down over the facade to soften the hard lines of the planter.
Pro Design Tip: Thread a strand of battery-operated outdoor lights (with a timer) through the greens. At night, the lights will illuminate the texture of the branches and the snow, turning your window boxes into glowing, floating gardens.
Budget Consideration: You rarely need to buy expensive bundles of greens. Visit a local Christmas tree lot and ask if you can have the “bottom trimmings” (the branches they cut off trees for customers). They are often free or very cheap and provide a sturdy base for filling large window boxes.
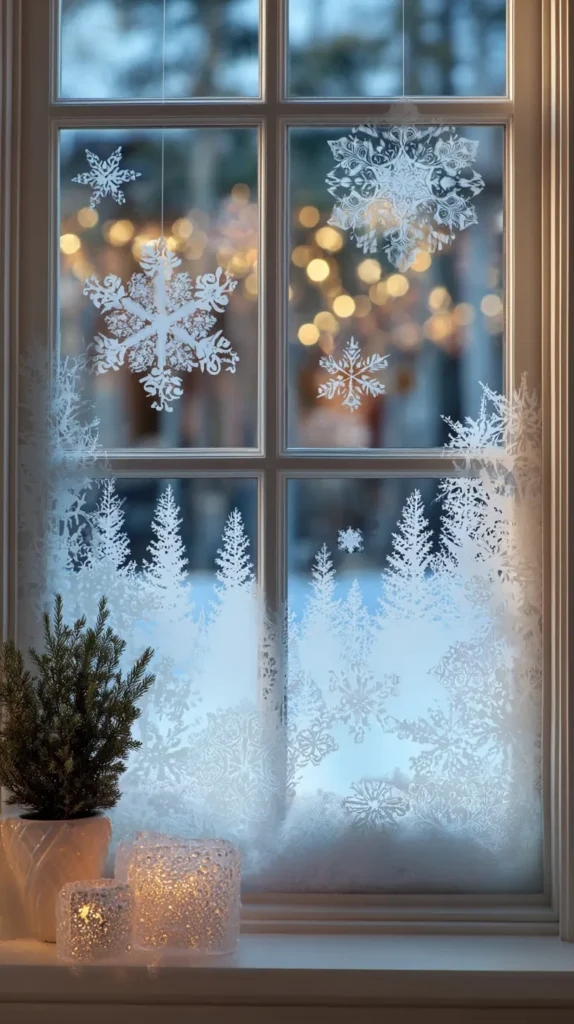
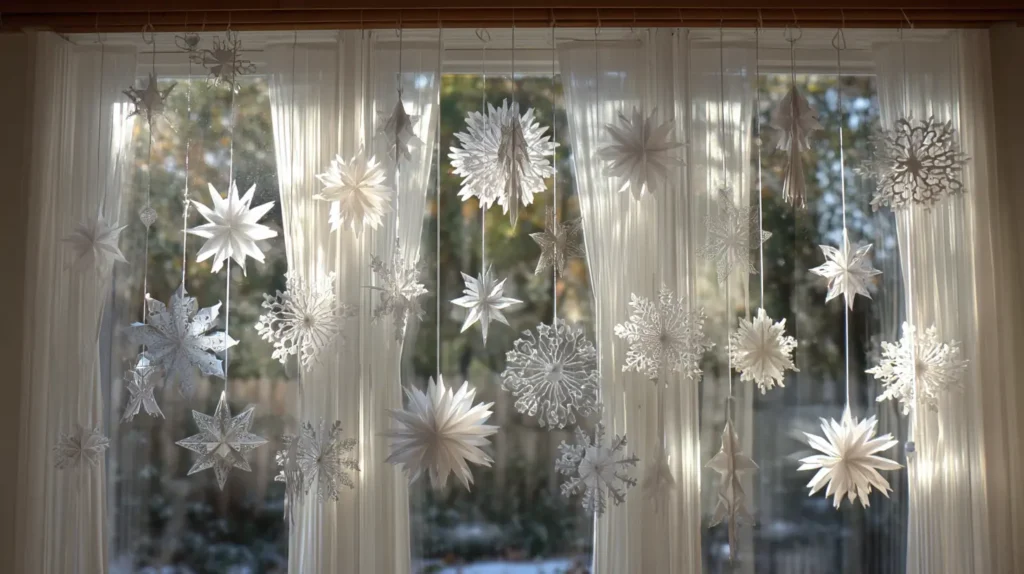
9. Handmade 3D Paper Snowflakes and Star Mobiles

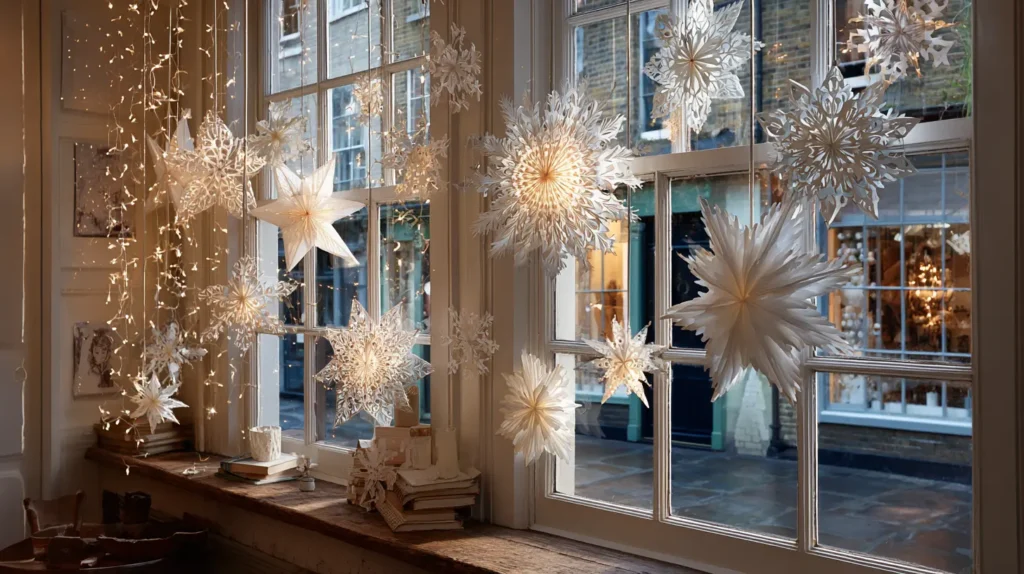
Turn your window into a mesmerizing, floating art installation that mimics a frozen winter sky. Imagine a collection of oversized, intricate 3D paper stars and delicate snowflakes suspended at varying heights against the glass. As the heat from the radiator rises, these lightweight sculptures gently spin and drift, creating a dynamic, calming movement. Whether crafted from crisp white cardstock for a modern Scandinavian look or from vintage book pages for a nostalgic vibe, these shapes filter the daylight beautifully. At night, they stand out in stark, bright contrast against the dark window pane, creating a “snow globe” effect that feels magical from both the sofa and the sidewalk.
- Invisible Suspension: Use clear monofilament (fishing line) to hang the shapes. It catches no light, making the stars appear to float by magic.
- Play with Scale: Don’t stick to one size. Mix massive 12-inch 3D stars with tiny 4-inch snowflakes. The contrast in scale creates depth and drama.
- The “Paper Bag” Hack: Create stunning, voluminous stars by gluing 7–9 paper lunch bags together, cutting a pattern into the top, and unfolding them (the viral DIY). They look substantial but weigh almost nothing.
- Cluster for Impact: Instead of spacing them out evenly like soldiers, group them in clusters of three or five at different heights to create a more organic, drifting cloud effect.
- Material Choice: Use vellum or tracing paper for some of the stars. These semi-translucent materials allow the light to glow through the paper, adding a lantern-like quality.
Pro Design Tip: Intermingle the paper shapes with a few strands of “dew drop” fairy lights hanging vertically. The warm LED lights will reflect off the white paper, creating a soft, ethereal glow that highlights the intricate cuts and folds of your artwork.
Budget Consideration: This is the ultimate high-impact, low-cost decor. A pack of white paper lunch bags costs about $2 and can make a window full of giant stars. Standard printer paper creates beautiful snowflakes. You are trading a small amount of crafting time for a display that looks like high-end boutique merchandising.
10. Peeking Santa and Reindeer Silhouettes
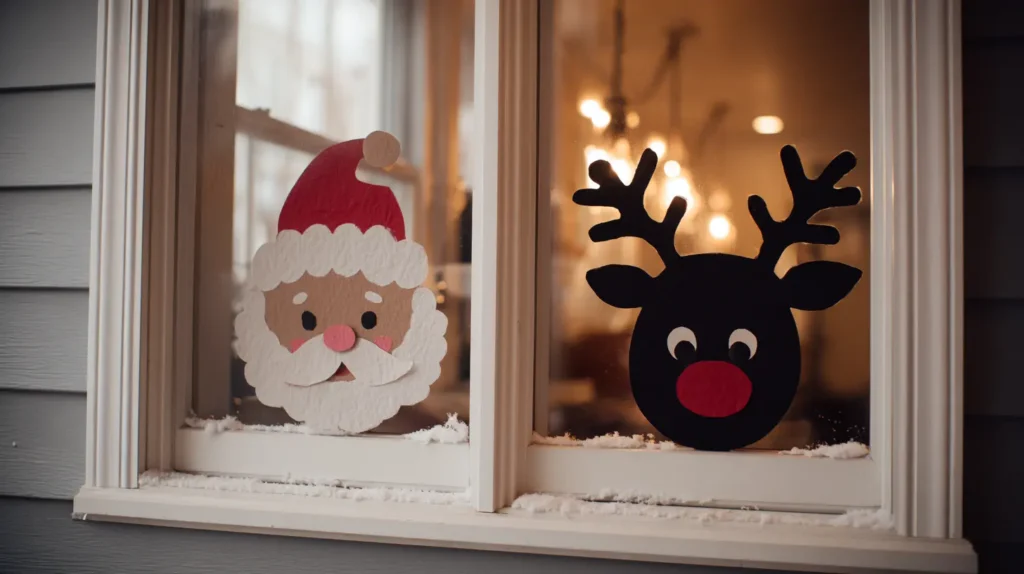
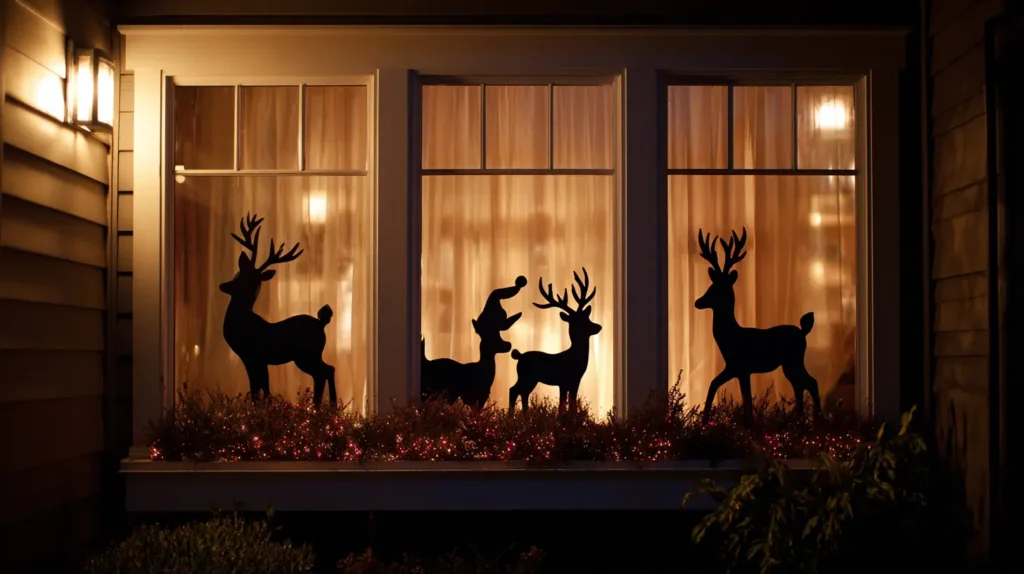
Add a touch of playful narrative and childhood magic to your windows with shadow art. Imagine walking past your house at night and seeing the distinct, shadowy outline of Santa’s hat or a reindeer’s antlers “peeking” over the bottom of the windowsill. Created using black cardstock or vinyl cutouts placed directly against the glass, these silhouettes rely on the warm light from inside your home to back-light them. From the street, they appear as sharp, crisp characters checking to see if you’ve been naughty or nice. It’s a whimsical, storybook decoration that delights neighbors and makes your home look like the setting of a classic holiday cartoon.
- The Silhouette Effect: Use rigid black poster board or matte vinyl. The material must be completely opaque (blocking all light) to create a sharp, recognizable shadow against the bright window.
- Placement Strategy: Position the figures at the very bottom corners of the window pane, angled slightly inward as if they are pulling themselves up to look inside.
- Backlighting is Vital: This decoration only “works” at night when the room lights are on, and it is dark outside. Ensure the curtains or blinds behind the cutouts remain open so light shines through.
- Character Cast: Mix it up! Have Santa peeking in one window, a reindeer in the next, and perhaps a stack of presents or an elf in a third to tell a whole story across the front of your house.
- Kid-Friendly: This is a fantastic project for children. They can help cut out the shapes (or choose the characters) and tape them to the glass.
Pro Design Tip: Add a layer of dimension by using translucent colored tissue paper. Cut out the “eyes” or “nose” of the reindeer silhouette and tape red tissue paper over the hole. When the indoor light hits it, Rudolph’s nose will actually glow red to the outside world, while the rest of the body remains a black shadow.
Budget Consideration: You don’t need to buy pre-made vinyl decals. Search online for “free Christmas silhouette templates,” print them out, and trace them onto a sheet of black poster board (less than $1). Cut them out with scissors or a craft knife for a custom display that costs pennies.
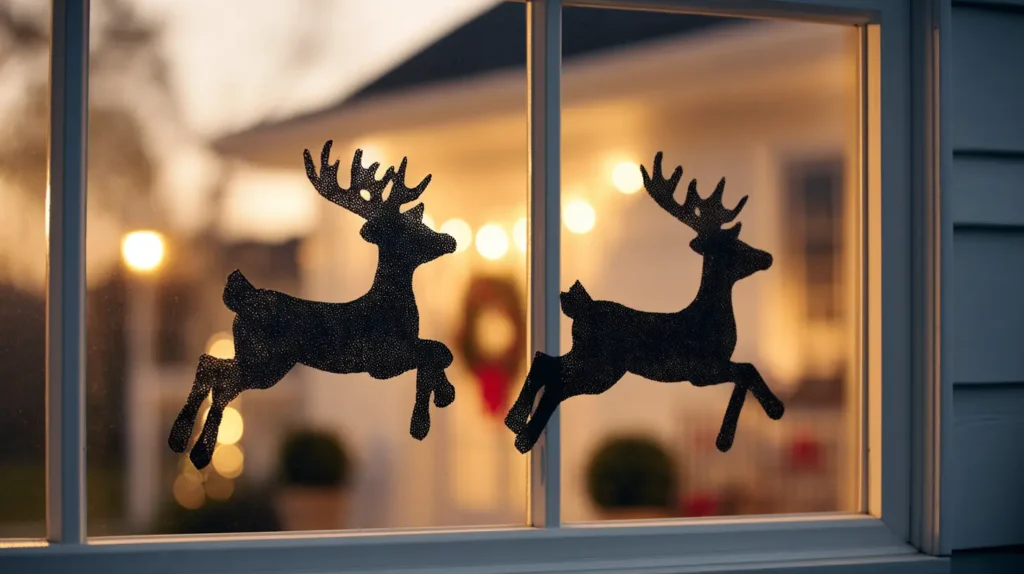
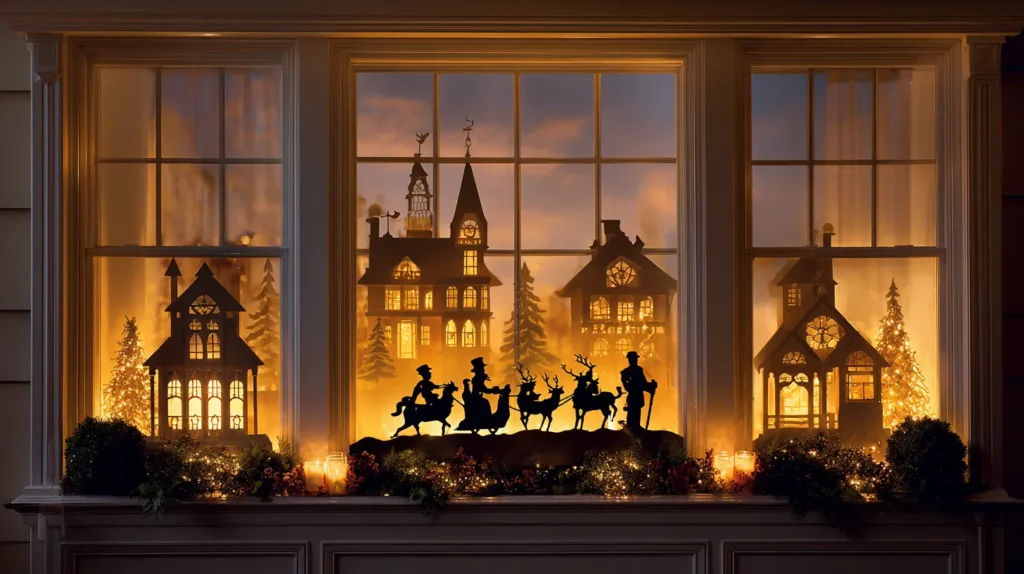
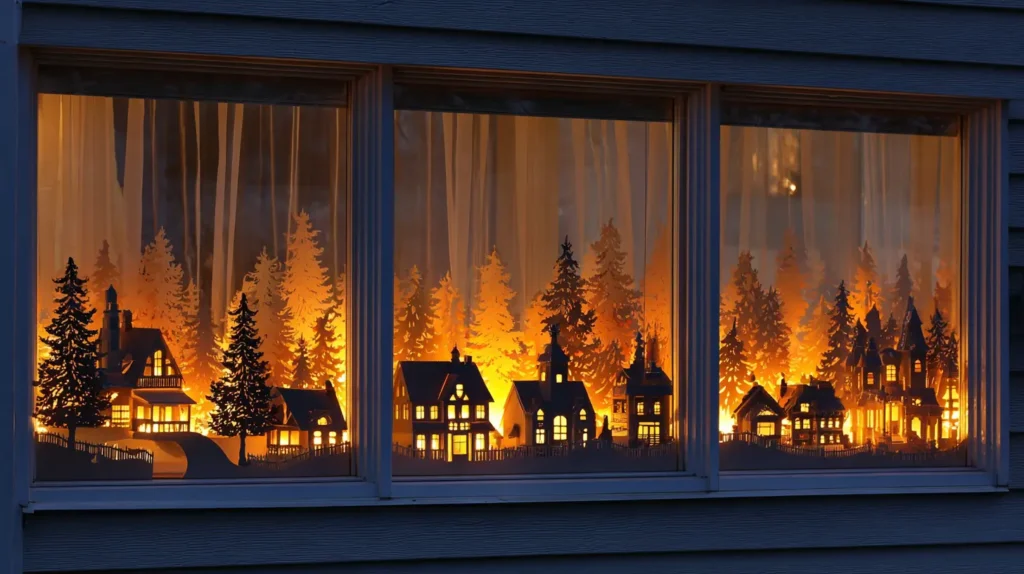
11. Backlit Holiday Silhouettes for Nighttime Curb Appeal
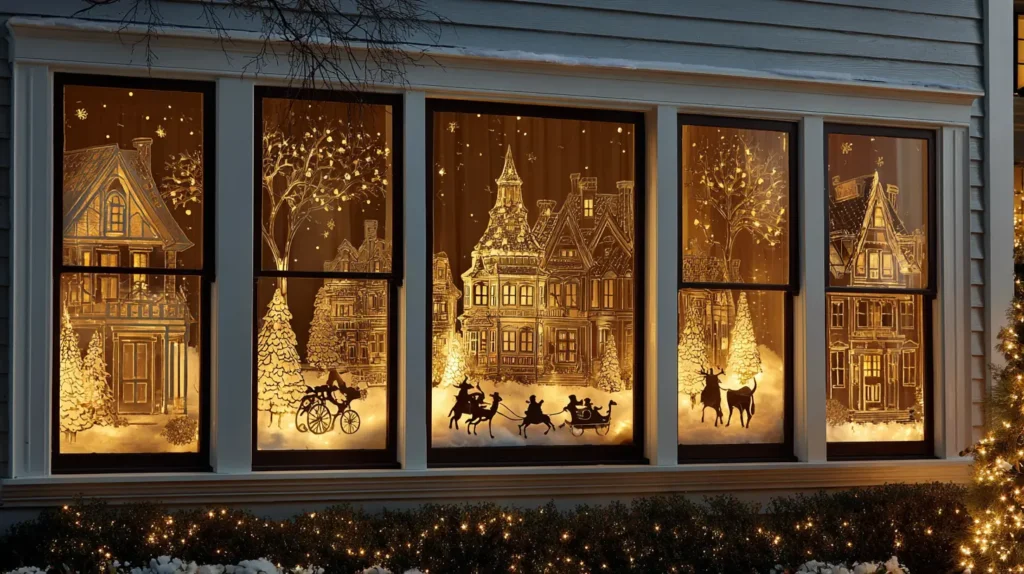
Turn your windows into glowing, cinematic shadow boxes that captivate passersby. Imagine a continuous, black paper skyline running along the bottom of your window frame—perhaps a cozy row of cottages with smoking chimneys, a dense forest of pine trees, or a serene Nativity scene. By day, it looks like a crisp, graphic border. By night, when the room lights are on, these shapes transform into striking, high-contrast silhouettes against the golden glow of the window. This technique turns your entire home into a living lantern, creating a dramatic, storybook visual that is arguably even more beautiful from the street than it is from the sofa.
- The Shadow Box Effect: Use thick black poster board or opaque matte vinyl. The material must block 100% of light to create the sharp, crisp edge needed for a professional silhouette.
- Scene Continuity: Create a panorama that spans multiple windows. For example, have a “forest” start in the left window, continue through the middle, and end in the right window for a cohesive, house-wide display.
- Backlighting is Essential: Keep your blinds or curtains open behind the silhouette and ensure a lamp is on in the room. The contrast between the dark paper and the bright room is what makes the magic happen.
- Theme Ideas: Popular choices include a winter village, a sleigh flying over rooftops, a forest of deer, or the Bethlehem skyline.
- Hide the Tape: Use small rolled pieces of tape or double-sided adhesive on the back of the paper so no sticky residue or tape lines are visible from the street.
Pro Design Tip: Add “glowing windows” to your silhouette houses. Cut tiny squares from the black paper where the cottages’ windows would be, and tape a small piece of yellow or orange tissue paper over the hole on the back. When the indoor light hits it, the little houses will appear to have their own warm lights on inside.
Budget Consideration: This is one of the cheapest ways to decorate large picture windows. You don’t need to buy expensive vinyl decals. Simply tape together sheets of black construction paper or poster board, draw your design (like a jagged mountain range), and cut it out. It costs less than $5 to do an entire bay window.

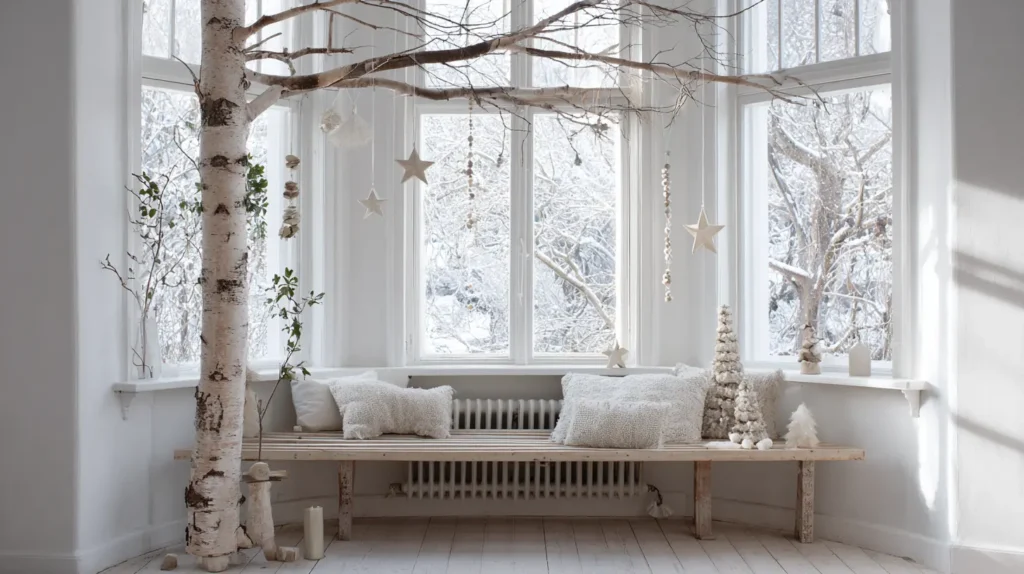
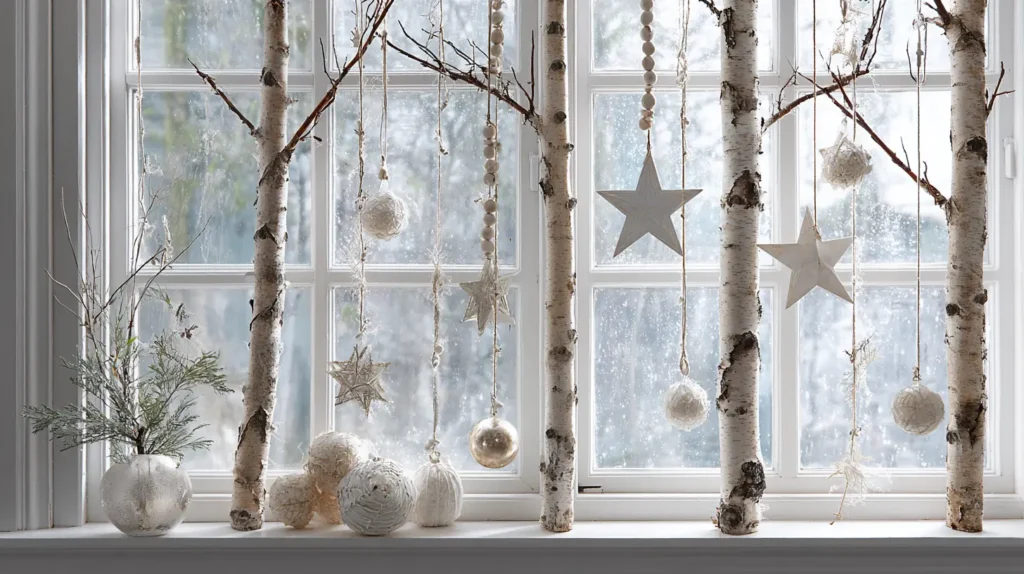
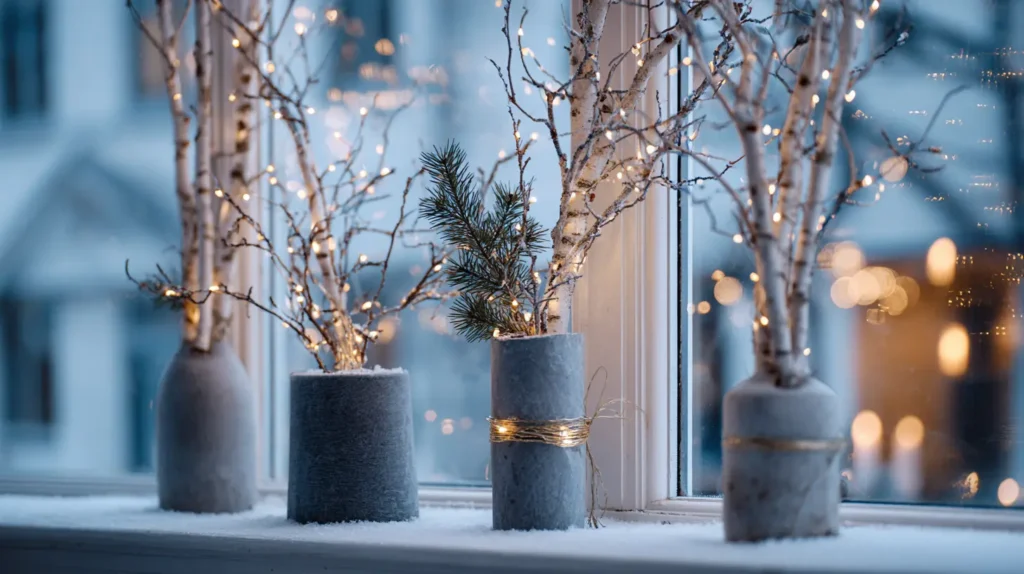
Quiet the visual noise of the holidays with a window display that celebrates the sculptural, stripped-back beauty of the Nordic winter. Instead of heavy, bushy garlands, imagine a single, elegant white birch pole standing vertically in the corner of the window frame, or a gnarly, bare branch suspended horizontally across the top. This aesthetic focuses on clean lines, negative space, and natural textures. Adorned sparingly with a few matte white ceramic stars, raw wooden beads, or simple geometric paper ornaments, this look frames the view outside without blocking the light. It captures the serene, peaceful essence of a snow-covered forest, proving that holiday decor can be breathable and modern.
- The Horizontal Hang: Suspend a long, interesting branch (birch or driftwood) horizontally from the top of the window frame using fishing line. Use this natural “rod” to hang your ornaments.
- Vertical Birch: Lean tall, white birch logs in the corners of your deep window sills. Their bright, paper-like bark adds texture that contrasts beautifully with the smooth glass.
- Neutral Palette: Stick to the Scandi triad: White, Wood, and Black. Avoid bright colors to maintain that calm, high-end minimalist vibe.
- Light the Wood: Wrap thin copper wire fairy lights tightly around the branches. The warm glow against the textured wood creates a cozy, organic feature at night.
- Paper Accents: Hang oversized white paper snowflakes or 3D stars from the branch at varying heights. The light filtering through the paper creates a soft, lantern-like effect.
Pro Design Tip: Create a “Branch Curtain.” Instead of just one branch, hang three or four thinner branches vertically (like prison bars, but rustic) across the window. Hang a single, high-quality ornament in the center of each branch. It creates a modern, architectural screen that offers privacy while letting in light.
Budget Consideration: This is the ultimate free decor. Go for a walk in the woods or your backyard after a windy day, and forage for fallen branches with interesting shapes or lichen-covered branches. If you can’t find white birch, simply take a standard brown branch and give it a messy, dry-brush coat of white acrylic paint to mimic the snowy, birch look.
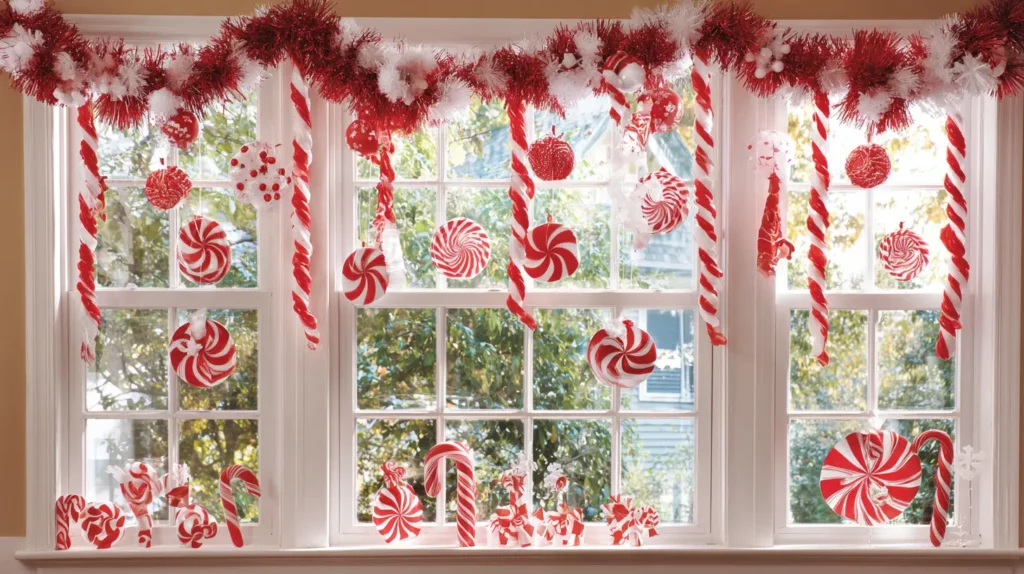
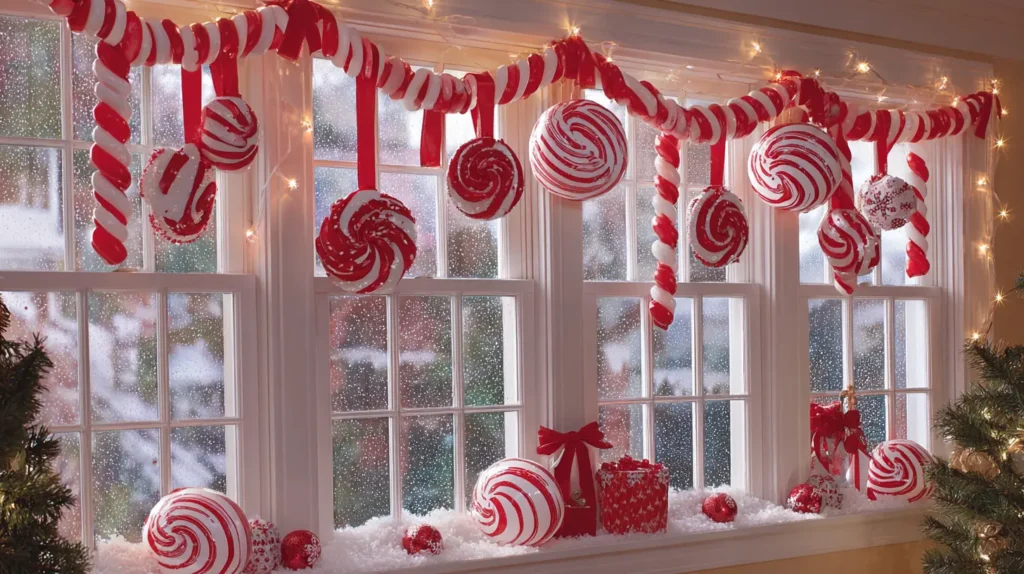
13. Whimsical Candy Cane and Peppermint Themes

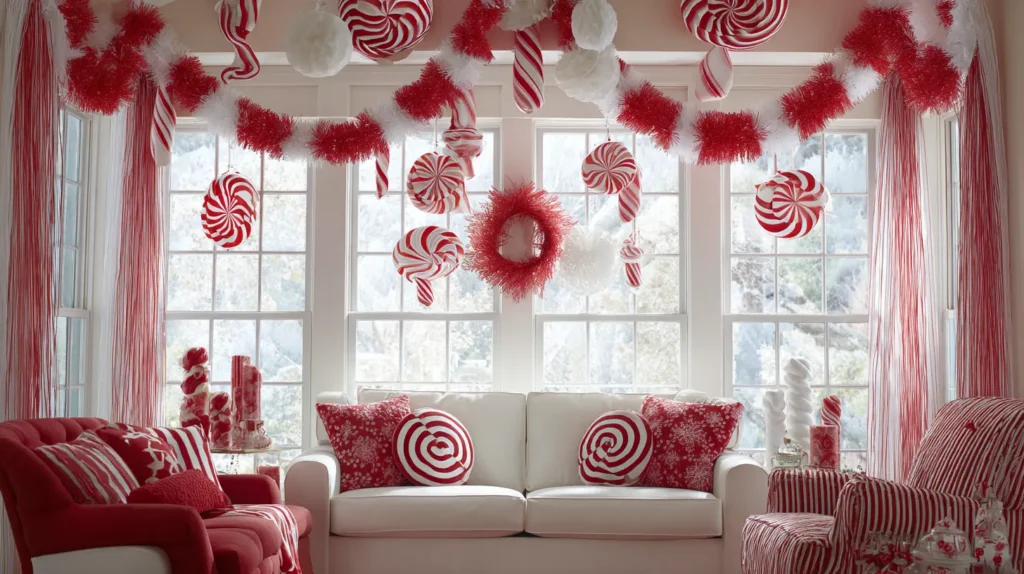
Transform your window into a sugary sweet spectacle straight out of the North Pole’s candy kitchen. Imagine a playful explosion of crisp red and white stripes that instantly energizes the room. A garland of red and white deco-mesh or faux peppermint swirls frames the glass, while oversized plastic candy canes dangle from the curtain rod at varying heights, catching the light like spun sugar. This theme is unapologetically fun and youthful, replacing serious tradition with the bright, crisp joy of peppermint. From the street, your home looks like a gingerbread cottage come to life, delighting neighborhood kids and bringing a smile to anyone walking by.
- Strict Palette: Commit fully to the Red and White color scheme. Adding green can dilute the specific “candy” look; stick to snowy white and bright cherry red for maximum pop.
- Deco-Mesh Garland: Use red-and-white striped deco-mesh to create a fluffy, voluminous garland around the window frame. It mimics the look of a giant twisted marshmallow rope.
- Oversized Props: Hang large plastic candy canes or peppermint discs using fishing line. The larger scale makes them visible from the street and adds a touch of “Alice in Wonderland” whimsy.
- Ribbon Accents: Tie back your white curtains with thick, red-and-white striped grosgrain ribbon to turn the window treatments themselves into part of the theme.
- Window Clings: Add peppermint swirl window gel clings or decals to the glass corners for detail that looks great up close.
Pro Design Tip: Create “Giant Hard Candies” to hang in the window. Take two white paper plates, glue them rim-to-rim (to make a puffy disc shape), wrap them in clear cellophane, and tie off the ends with red ribbon. They look exactly like massive, individually wrapped peppermints, but weigh almost nothing.
Budget Consideration: The viral “Pool Noodle Candy Cane” hack is perfect here. Buy cheap red pool noodles, wrap them diagonally with white duct tape to create the stripes, and insert a wire coat hanger inside to bend the top into a hook. You now have giant, weather-resistant candy canes to frame your outdoor window sills for under $3 each.
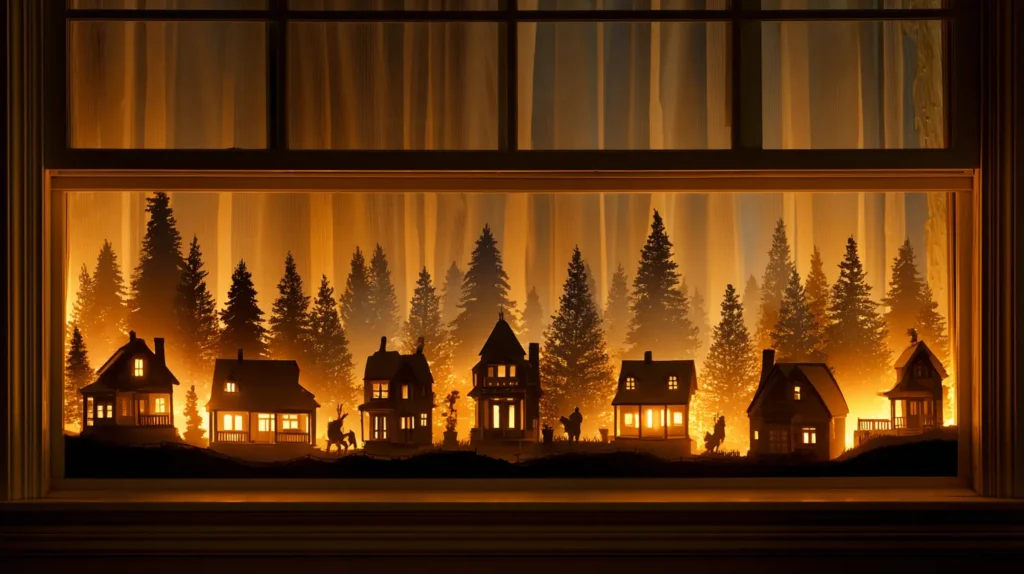
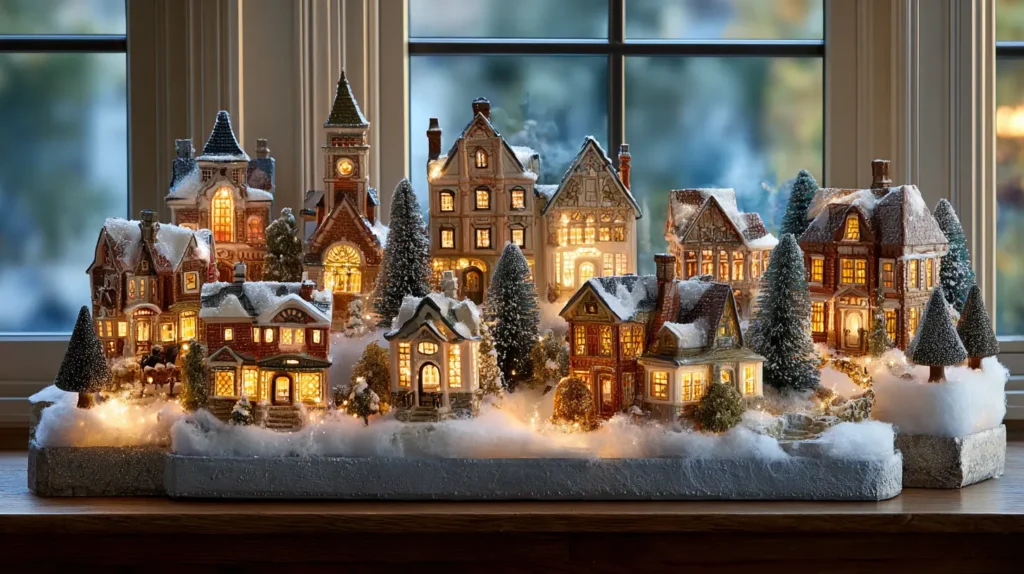
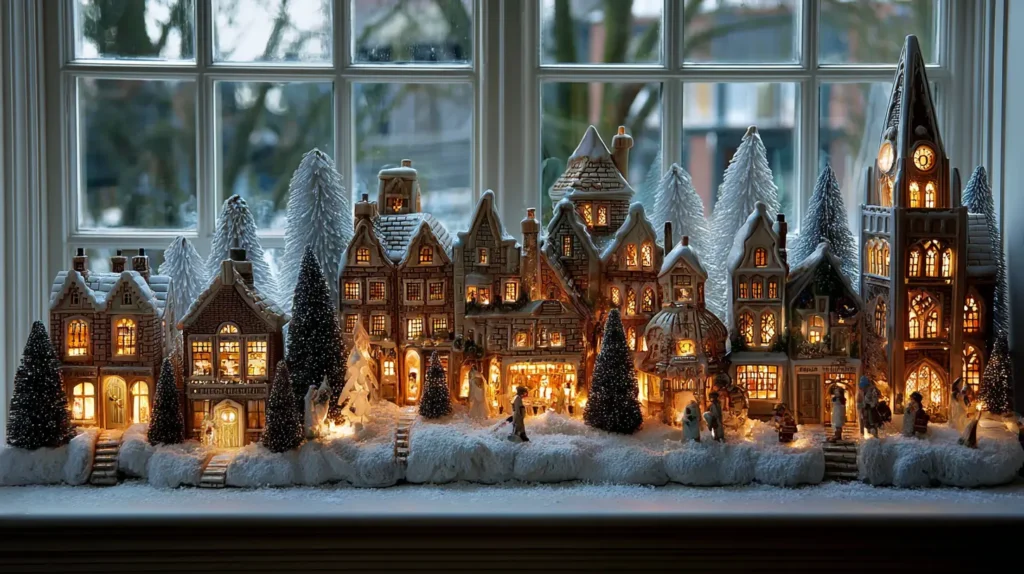
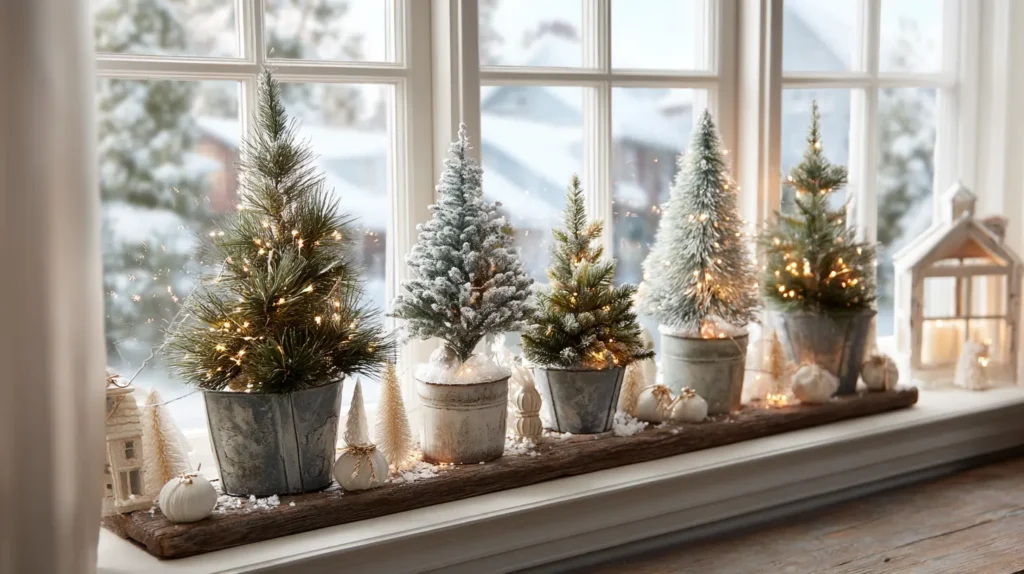
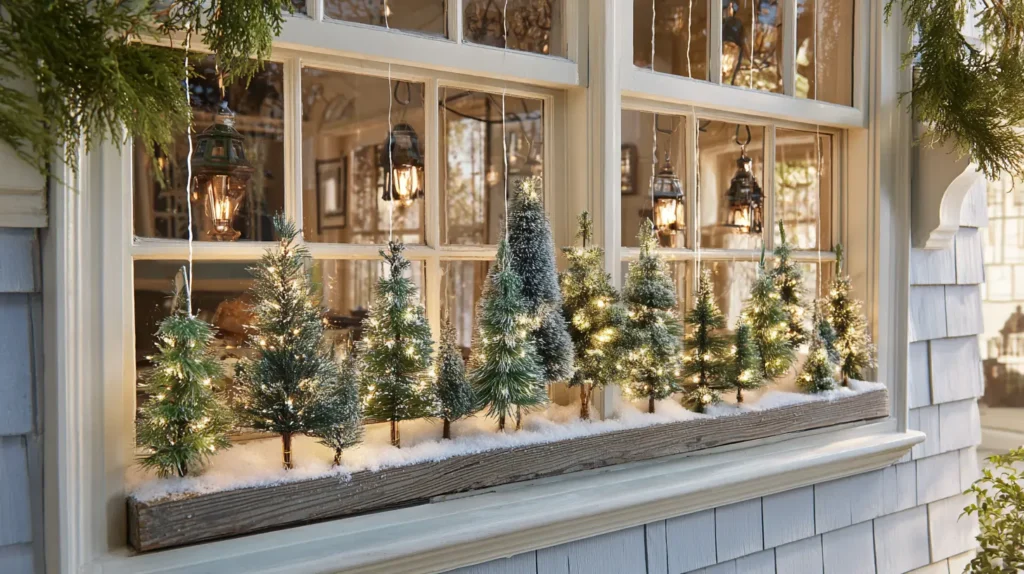
14. Lighted Christmas Village Displays on the Windowsill
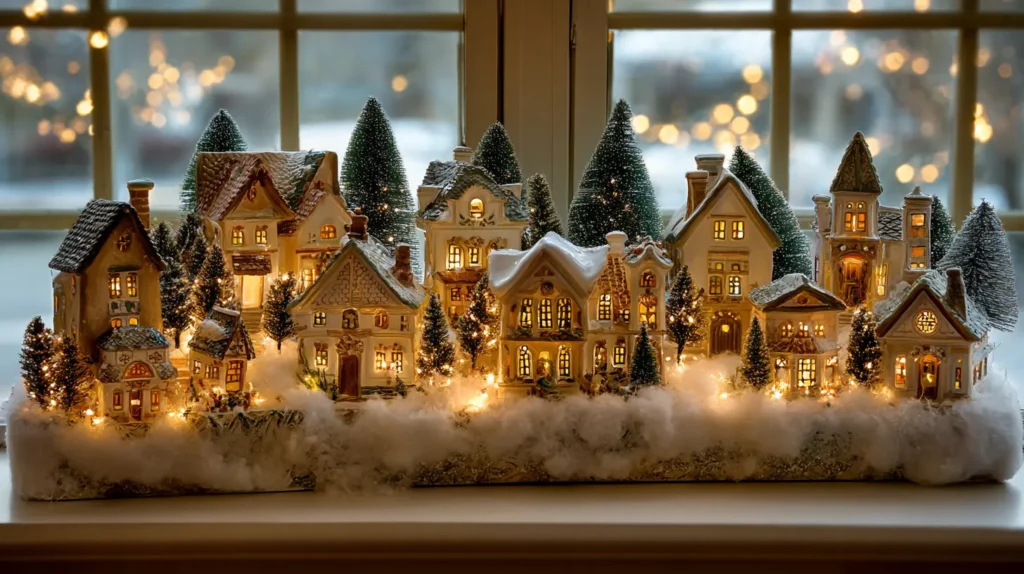
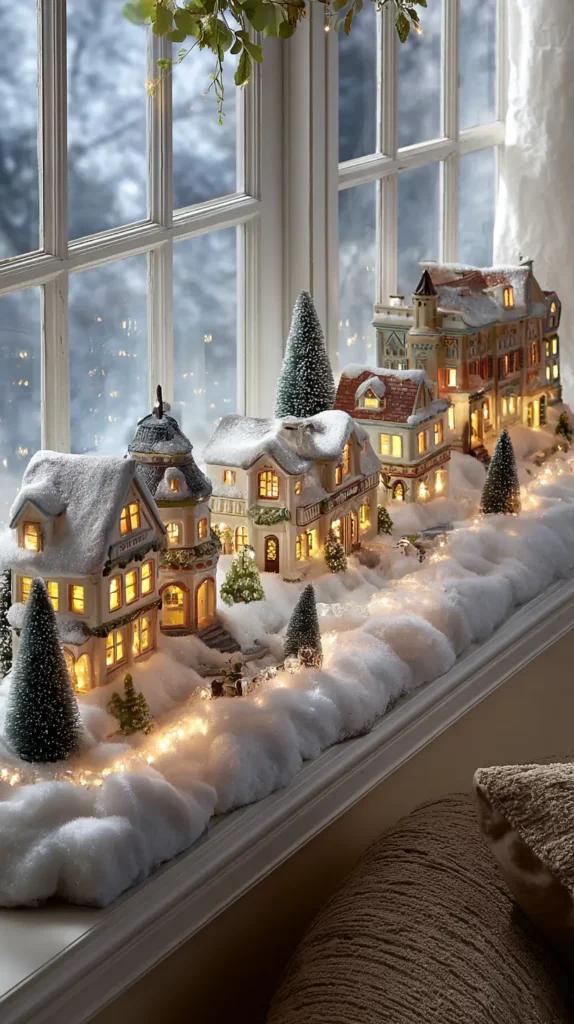

Transform your window ledge into a bustling, miniature metropolis covered in fresh snow. Imagine a charming row of ceramic cottages, steepled churches, and tiny toy shops lining the glass, creating a linear storybook world. As the sun sets, the tiny windows of the village emit a warm, inviting amber glow that reflects against the window pane, doubling the magical effect. Flanked by frosted bottle brush trees and tiny figurines, this display turns a flat, unused surface into a three-dimensional winter wonderland. It serves a dual purpose: providing a cozy, detailed view for you inside, and offering a glowing, intriguing silhouette of a town to neighbors walking by outside.
- Cord Control: Windowsills are narrow, so messy wires are a dealbreaker. Opt for battery-operated ceramic houses or use simple LED tea lights placed inside hollow structures to keep the display clean.
- Create Topography: Don’t line them up in a flat row. Place small books or blocks of wood under the snow blanket to raise some houses higher than others, creating the illusion of a village built on a rolling hillside.
- The Snowy Base: Use a roll of “buffalo snow” or a fluffy white table runner to act as the ground. This hides the house’s foundations and softens the hard lines of the sill.
- Double-Sided Appeal: If you want the display to look good from the street, angle the houses slightly outward, or place them parallel to the glass so the light shines through to the outdoors.
- Scale Management: Since sills are shallow, choose “flat-back” houses or smaller scale N-gauge buildings to ensure they don’t overhang the edge and risk falling.
Pro Design Tip: Enhance the depth of your village by taping a silhouette of pine trees (cut from black paper) to the bottom few inches of the window glass behind the village. This provides a dark background that makes the lighted houses pop, even if the view outside is a bright streetlamp or a neighbor’s wall.
Budget Consideration: You don’t need expensive Department 56 collectibles. Hunt for mismatched, brightly colored ceramic houses at thrift stores or the dollar store. Spray paint them all a uniform matte white. This instantly unifies them into a chic, modern “Nordic” village set that looks high-end for just a few dollars.
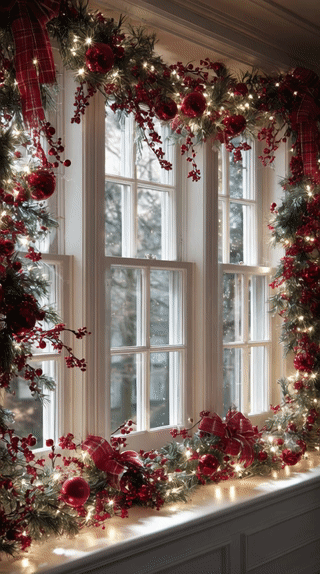
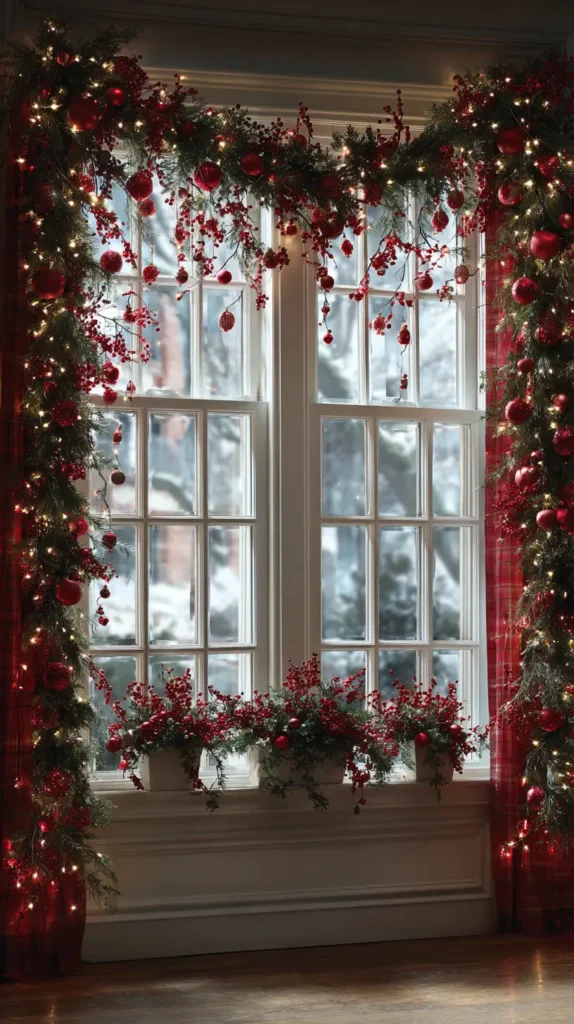
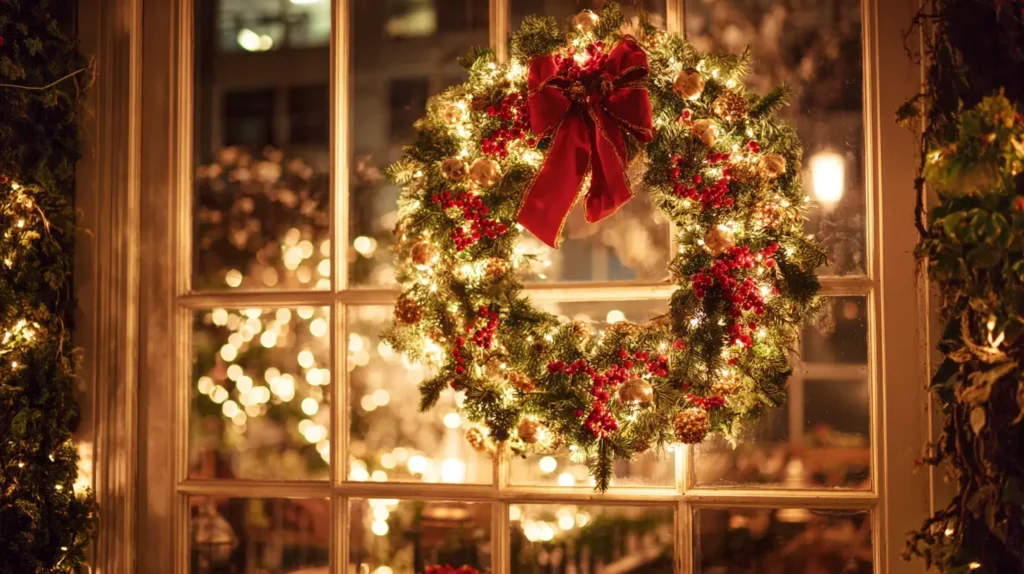
15. Stunning Outdoor Wreaths with Window Frame Lighting


This stunning outdoor wreaths with window frame lighting idea turns every window into a glowing Christmas jewel box that shines brightest after dark, where a lush, full evergreen wreath (24–36 inches) hangs perfectly centered on the outside of each pane, its fresh pine or cedar branches loaded with weatherproof red berries, gold pinecones, and a generous hand-tied velvet bow in crimson or champagne.
Around the entire window frame, warm-white micro-LED rope lights or fairy-light strands outline the trim like a delicate picture frame of light, wrapping the wreath in a soft halo that makes the glass sparkle like frosted ice from the street. Battery or solar-powered with timers, the lights switch on automatically at dusk, while the wreath’s fragrance drifts in every time you crack the window—creating the most elegant, welcoming curb appeal imaginable that says “Christmas lives here” from blocks away.
- Use one large wreath per window or pane—size it about ⅔ the width of the glass for perfect proportion.
- Choose outdoor-rated pre-lit wreaths or add your own weatherproof fairy lights tucked deep in the branches.
- Frame the window with rope light or flexible fairy-light strands secured with clear outdoor command clips—no damage, easy removal.
- Pick battery/solar lights with built-in timers (dusk-to-dawn or 6–8 hours), so they’re completely hands-free.
- Add a quick coat of wilt-pruf spray on fresh wreaths to keep them lush through freezing nights.
Pro Design Tip: Run the frame lights in one continuous line (top → sides → bottom) and let them meet the wreath at the four cardinal points—the perfect “cross” of light makes the wreath look like it’s floating in a glowing frame and doubles the nighttime impact from every angle.
Budget Consideration: 30-inch outdoor wreath $40–$80, weatherproof fairy/rope lights per window $20–$40, velvet ribbon & berries $15—complete one show-stopping lighted wreath window for under $160 while delivering $500+ worth of nighttime curb appeal.
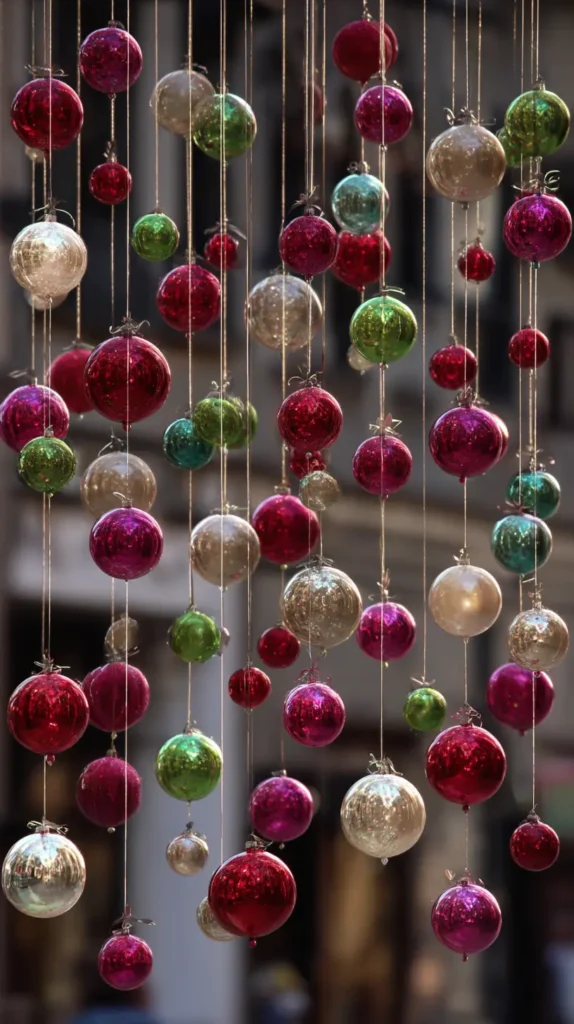
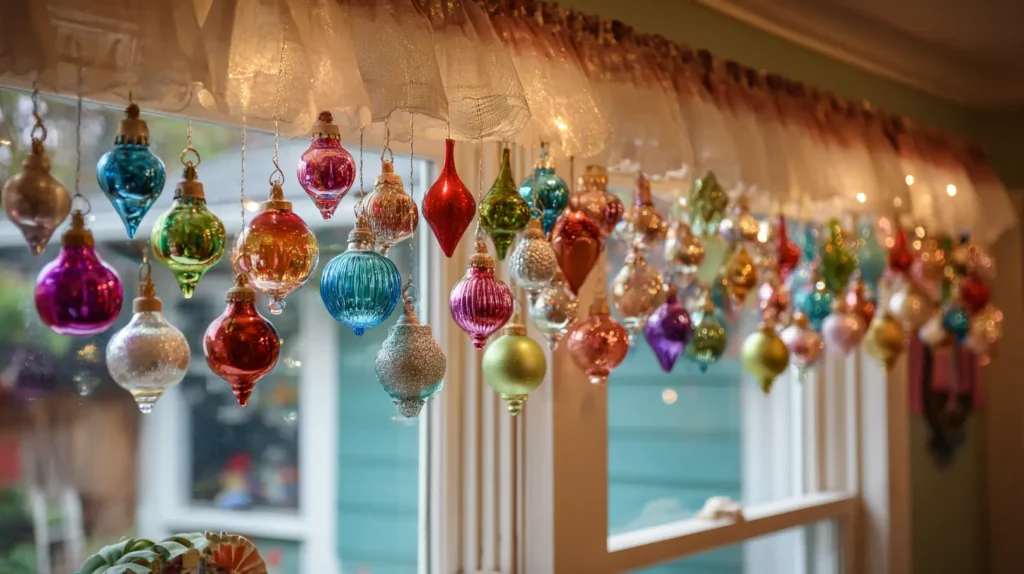
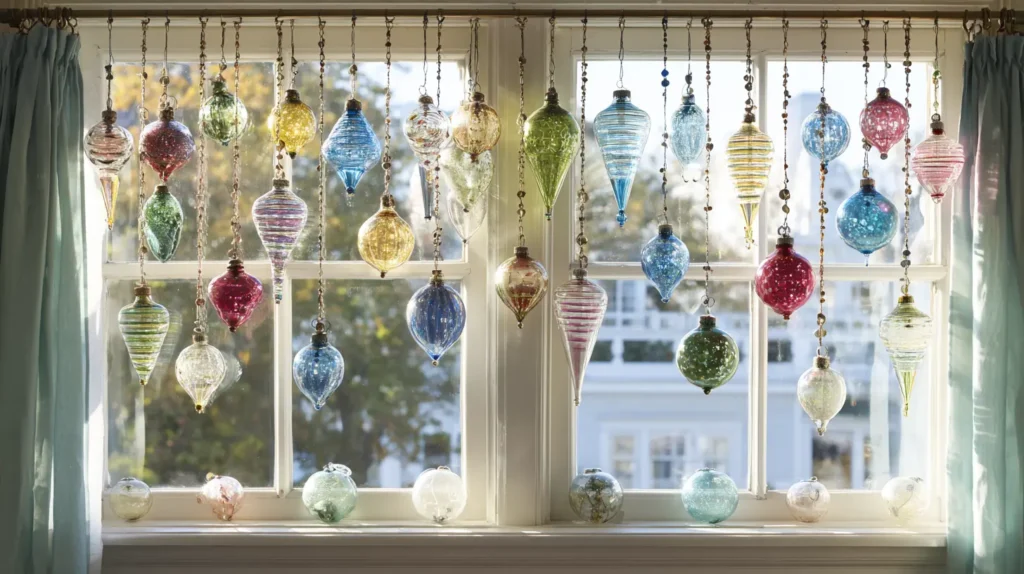
16. Vintage Glass Ornament Valances
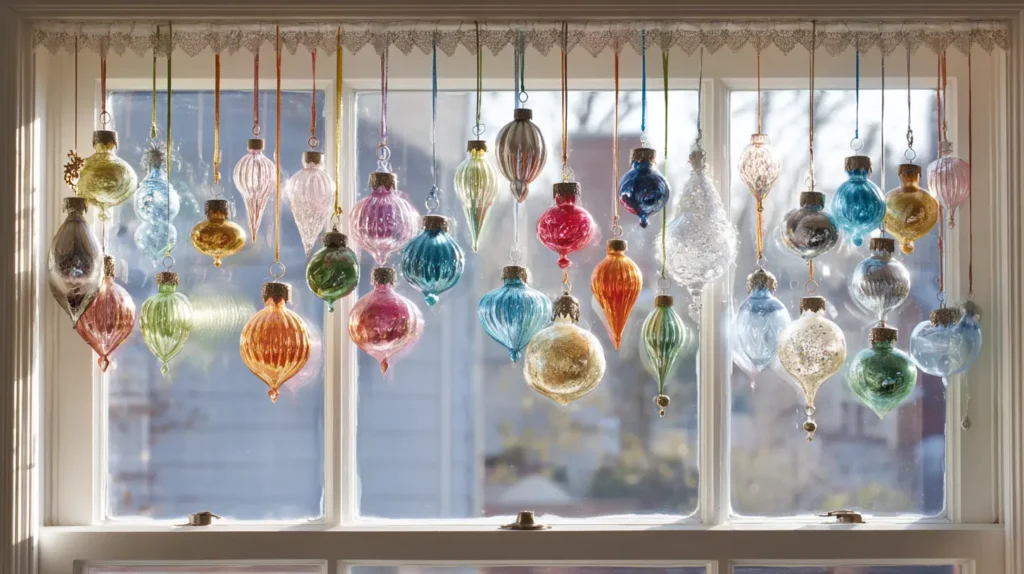
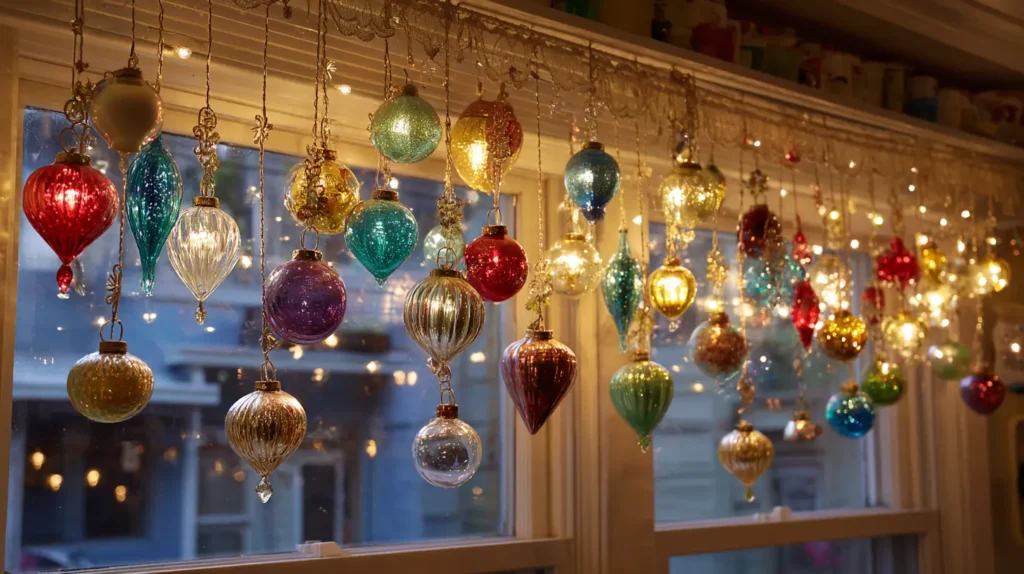
Replace your standard fabric window treatments with a shimmering curtain of nostalgia. Imagine a dazzling display where the top of your window is draped not with heavy curtains, but with a glittering array of antique mercury-glass ornaments. Picture “Shiny Brite” baubles with their signature indents, teardrop finials, and hand-painted stripes hanging at varying lengths across the top third of the window. As the winter sun streams through, the silvered interiors of the ornaments catch the light, casting rainbow reflections across the room like a disco ball. This look creates a retro, jewelry-box aesthetic that frames the view in color and history, perfect for mid-century modern or eclectic homes.
- Create the Structure: Install a simple tension rod inside the window frame, positioned as high as possible, to serve as the anchor for your display.
- Vary the Heights: To create a “valance” shape, hang the ornaments in a wave pattern—shorter on the ends and dipping slightly lower in the middle, or varied randomly for a clustered look.
- Material Mix: Combine round bulbs with elongated finials and reflectors to add visual texture and interest to the silhouette.
- Ribbon vs. String: Use thin velvet ribbon for a rich, textured look, or invisible fishing line if you want the ornaments to appear as if they are floating in the air.
- Fragility Warning: Vintage glass is incredibly thin and fragile. Ensure the rod is secure and place a soft rug or cushion on the sill below during installation, just in case one slips.
Pro Design Tip: Hide the tension rod by weaving a thin, sparse garland of tinsel or faux cedar around it. This conceals the hardware and the knot points where the ribbons attach, making the ornaments look like they are dripping naturally from the greenery.
Budget Consideration: Authentic vintage “Shiny Brites” can be expensive and heartbreaking if broken. To get this look for less (and with less anxiety), buy a box of “vintage-inspired” shatterproof ornaments. Many brands now make plastic bulbs with the same retro shapes and indented reflectors that look convincing from a distance but bounce if they hit the floor.
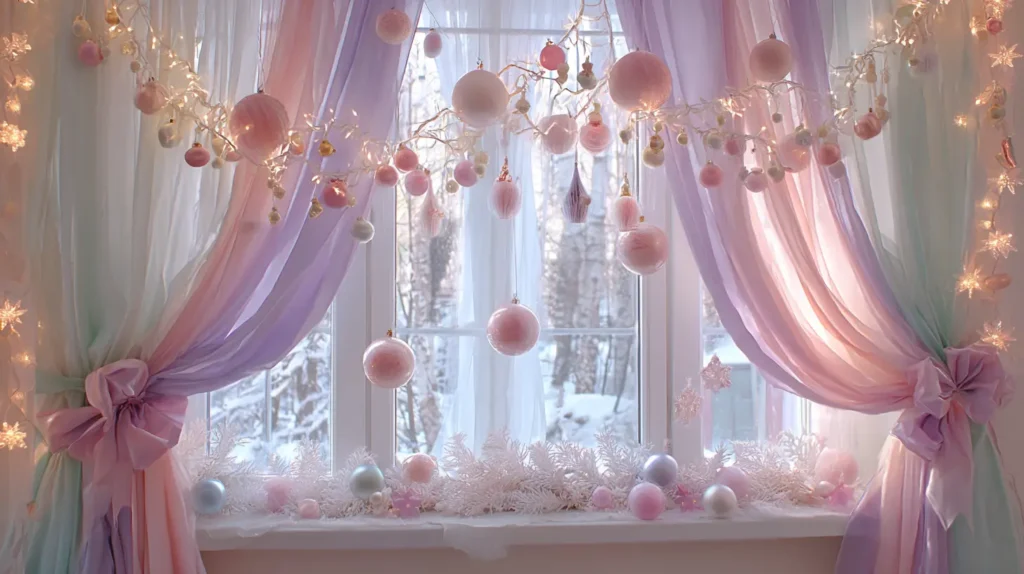
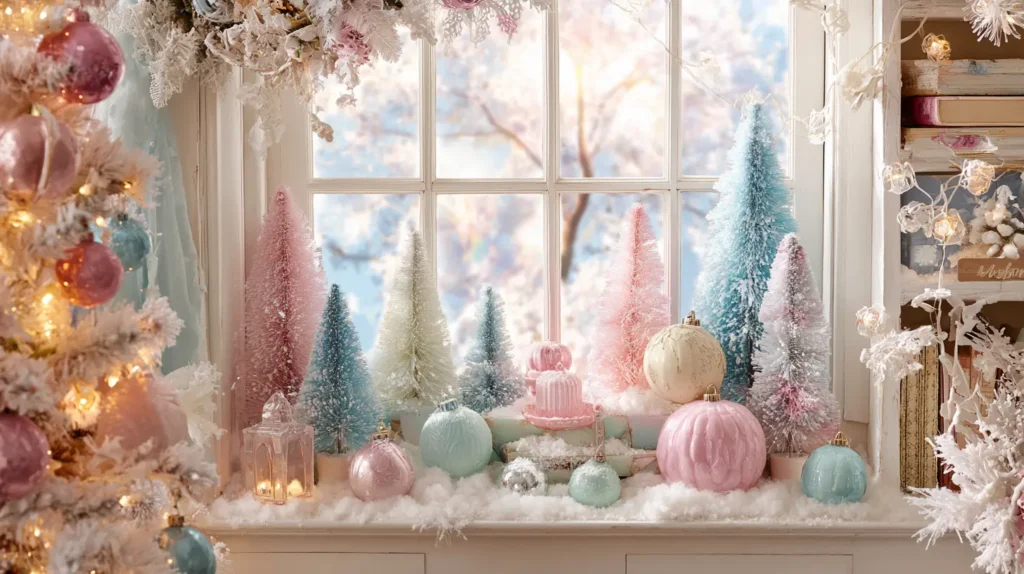
17. Pastel Christmas Window Ideas for Soft and Cozy Appeal
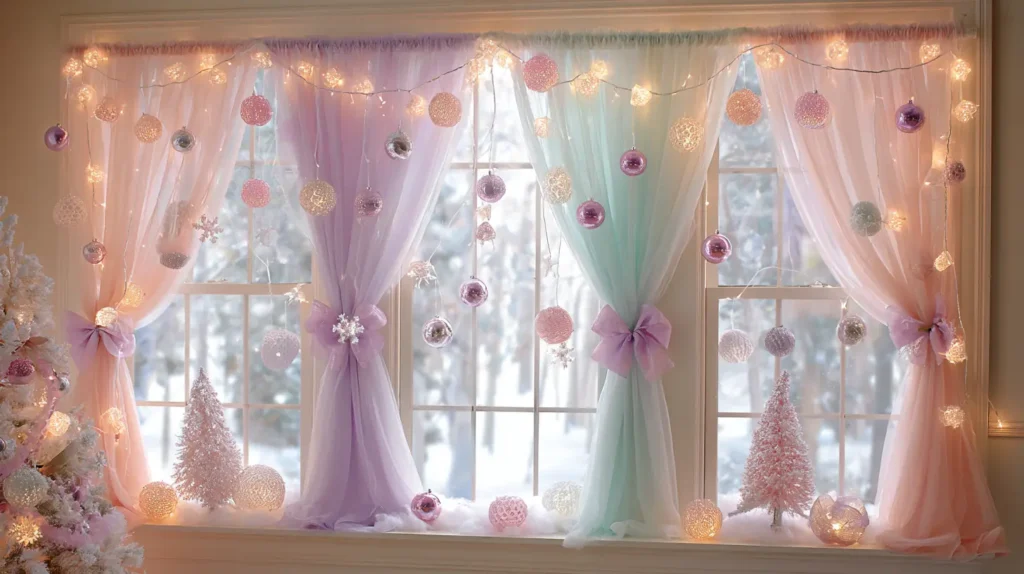

Step away from the traditional bold reds and greens and embrace a whimsical, sugar-coated winter dream. Imagine your window framed not by dark pine, but by a frosted, flocked garland dotted with ornaments in soft shades of blush pink, icy blue, mint green, and champagne gold. On the windowsill, a forest of pastel bottle-brush trees stands in a bed of faux snow, looking like a scene from a vintage Candyland. The light filtering through the window catches the soft hues, creating a romantic, airy glow that feels like the inside of a French patisserie. This aesthetic is gentle, nostalgic, and incredibly cozy, offering a lighthearted escape from the heavy winter colors.
- The Palette: Focus on “sherbet” shades—baby pink, lavender, pistachio, and cream—anchored by plenty of white to keep the look fresh and wintry.
- Flocking is Essential: Use a heavy hand with faux snow (flocking) on your garlands and wreaths. The white base makes pastel colors pop, whereas dark green can make them look muddy.
- Vintage Vibes: Incorporate retro-style ornaments, such as “Shiny Brite” glass balls or teardrops, which often feature these soft, mid-century color combinations.
- Soft Textiles: Drape a plush, white faux-fur runner across the windowsill to serve as a snowy base for your display and add tactile warmth.
- Ribbon Choice: Swap stiff red velvet for soft, satin ribbons in dusty rose or sage green to tie back your curtains or hang your wreaths.
Pro Design Tip: To ensure your pastel window reads “Christmas” rather than “Easter,” mix in plenty of metallics. Add sparkling silver icicles, gold glitter stars, or mercury glass candle holders. The sparkle grounds the pastel colors in the holiday season and adds a sophisticated layer of glamour.
Budget Consideration: You don’t need to hunt for niche pastel holiday decor. Buy a pack of inexpensive, generic plastic ball ornaments from the dollar store and a few cans of spray paint in your desired pastel shades. Skewer the ornaments on a stick and spray them for a custom, matte-finish set that costs pennies.
18. Sparkling Tinsel Window Decor for Retro Holiday Fun

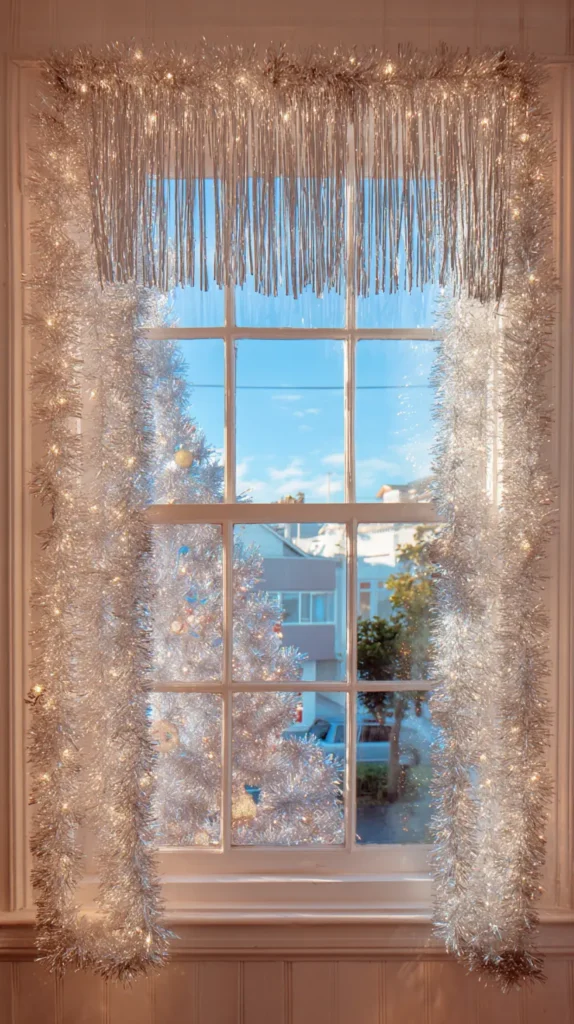

Transport your home back to the golden age of holiday kitsch with a tinsel takeover that screams mid-century joy. Imagine framing your window not with greenery, but with thick, fluffy garlands of metallic silver or gold tinsel that shimmer with every subtle breeze. Or picture a curtain of vintage-style “icicle” tinsel strands (lametta) hanging from the top header, creating a shimmering waterfall that slightly obscures the view while catching every beam of streetlight from outside. This look is unapologetically nostalgic, turning your window into a glittering disco ball of reflection. It captures the optimism and fun of a 1950s Christmas, ensuring your home sparkles brighter than any other on the block.
- Silver is King: For the ultimate retro look, stick to classic silver tinsel. It acts as a mirror, reflecting the colors of your other decorations and lights.
- The Tinsel Curtain: Hang individual strands of silver “rain” or tinsel fringing from the top of the window frame to create a sparkling backdrop for your indoor tree.
- Shape It Up: Wrap tinsel around simple wire forms—like stars, bells, or oversized candy canes—and hang them in the center of the window for a fun, graphic pop.
- Color Pop: If silver isn’t your vibe, opt for bright, saturated colors like teal, hot pink, or lime green to channel a fun, “Atomic Age” aesthetic.
- Movement: One of the best features of tinsel is its movement. Place it near a heat vent or a drafty window so it constantly shimmers and dances.
Pro Design Tip: Pair silver tinsel with multicolored ceramic-style lights (C7 or C9 bulbs). The way the silver foil reflects the saturated red, blue, green, and orange light creates that specific, magical glow found in old Technicolor holiday movies.
Budget Consideration: Tinsel is one of the most affordable decor items available. You can frame an entire large picture window for under $5 using standard garlands from the dollar store. To make cheap tinsel look thicker and more luxe, twist two strands together before hanging them.
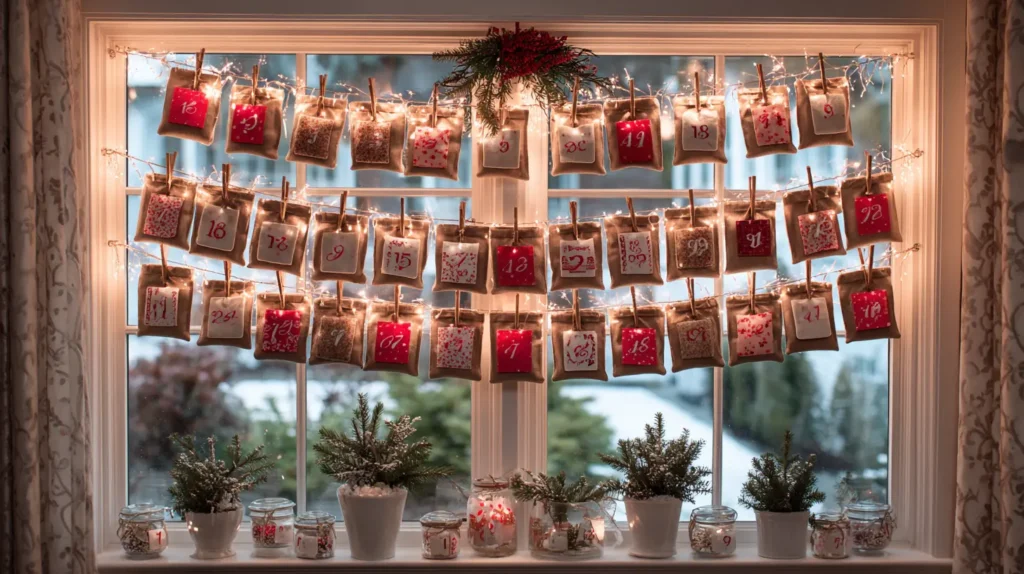
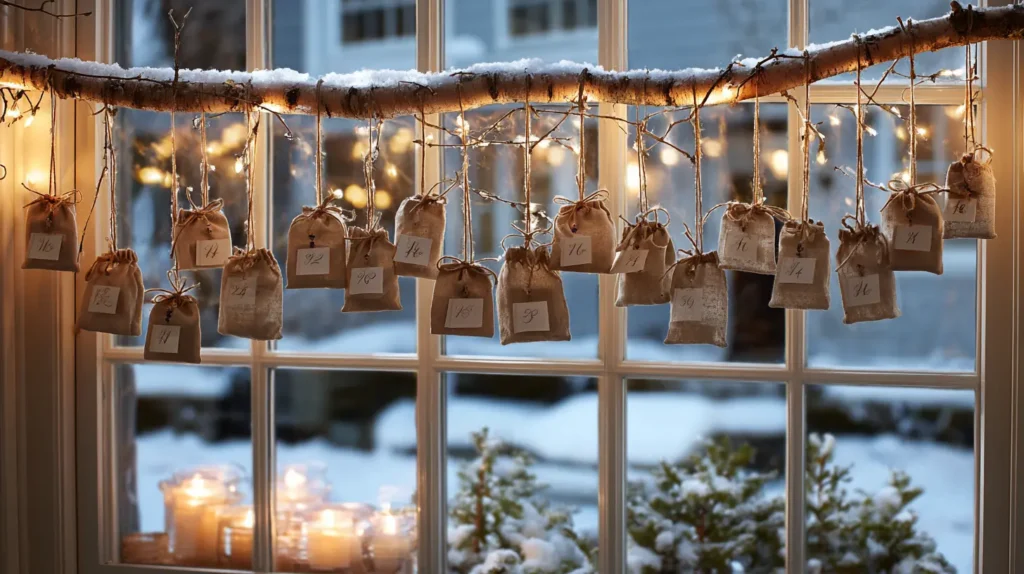
19. Hanging Advent Calendars in the Window
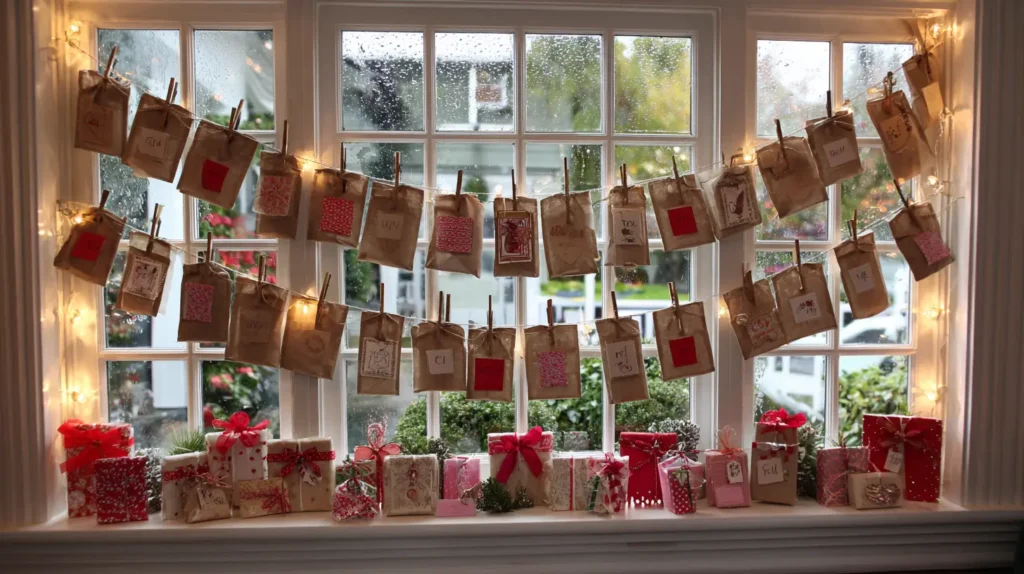
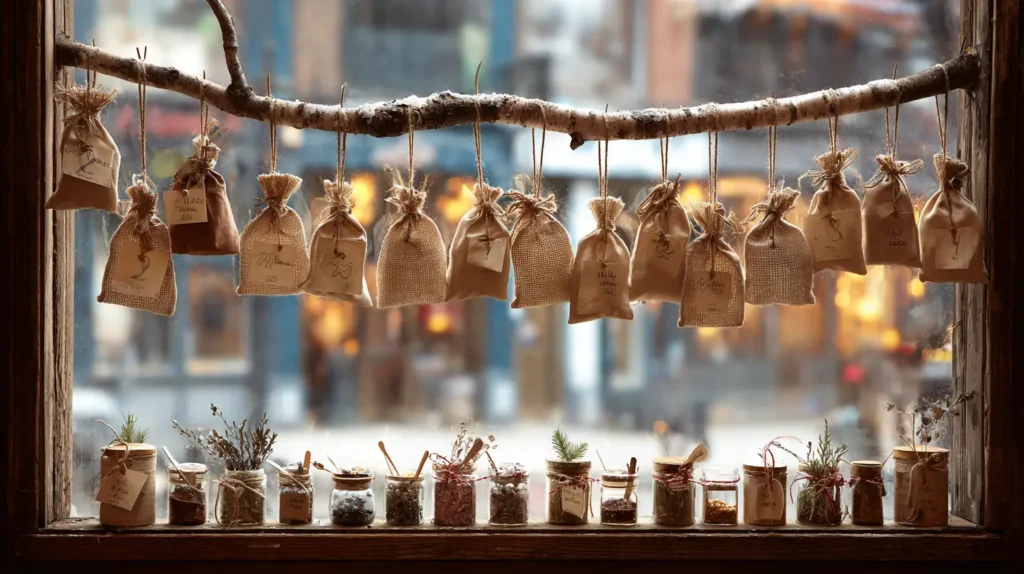
Turn the anticipation of Christmas into a daily interactive display by moving your Advent calendar off the wall and into the window. Imagine a series of 24 small, numbered muslin bags, kraft paper envelopes, or tiny tin buckets suspended in rows across the glass. Hung from a rustic birch branch or a sleek tension rod, these little vessels gently sway in the warmth of the room. Backlit by the winter sun during the day and the glow of streetlights at night, the calendar becomes a functional art installation. Each day, reaching up to the window to unclip a treat or a handwritten activity note becomes a cherished morning ritual that literally highlights the passing of time until the big day.
- Suspension Method: Use a tension rod inside the frame or suspend a piece of driftwood from the top molding to act as the main support rail.
- The Vessels: Choose lightweight containers like linen sachets, paper envelopes, or mini stockings. Avoid heavy boxes that might weigh down the line.
- Visual Rhythm: Hang the items at staggered lengths or in precise rows (4 rows of 6) to create a clean, organized grid that looks pleasing from the street.
- Double-Sided: Remember that the bags’ backs will be visible on the outside. Ensure they are neat, or choose identical double-sided containers.
- Fill Lightly: Since they are hanging, fill them with lightweight items such as chocolates, scripture verses, scavenger-hunt clues, or Lego minifigures rather than heavy toys.
Pro Design Tip: Intertwine a strand of battery-operated copper wire lights with the string or ribbon holding the bags. This way, the entire calendar sparkles, and the light helps reveal the treat’s silhouette, adding to the excitement for children.
Budget Consideration: This is a perfect DIY project. Use standard brown lunch bags (cut down to size) or coin envelopes. Use a marker to write the numbers and hang them with simple wooden clothespins on a piece of twine. It’s a trendy, rustic-minimalist look that costs less than $5 to assemble.
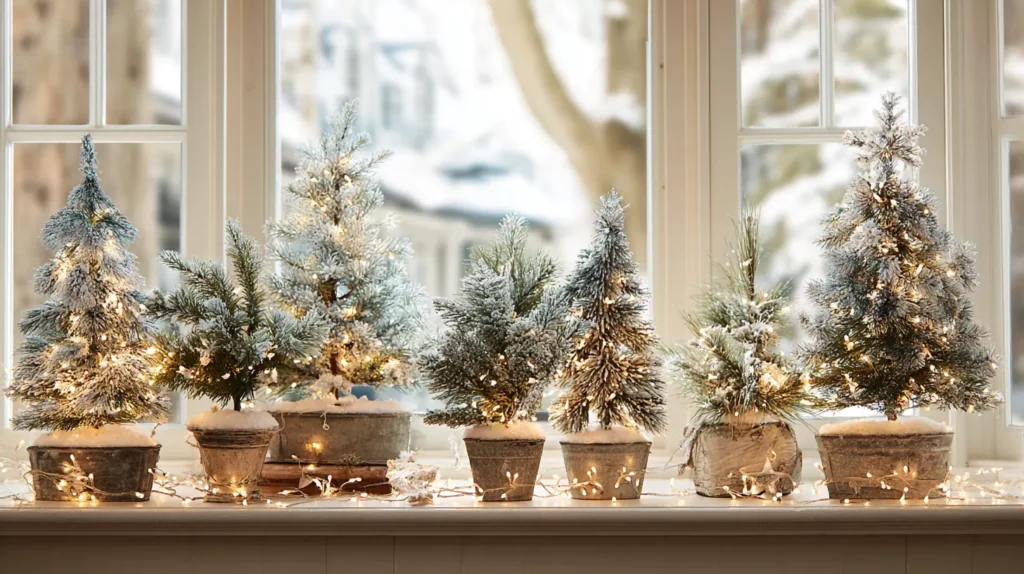
20. Window-Mounted Mini Christmas Trees
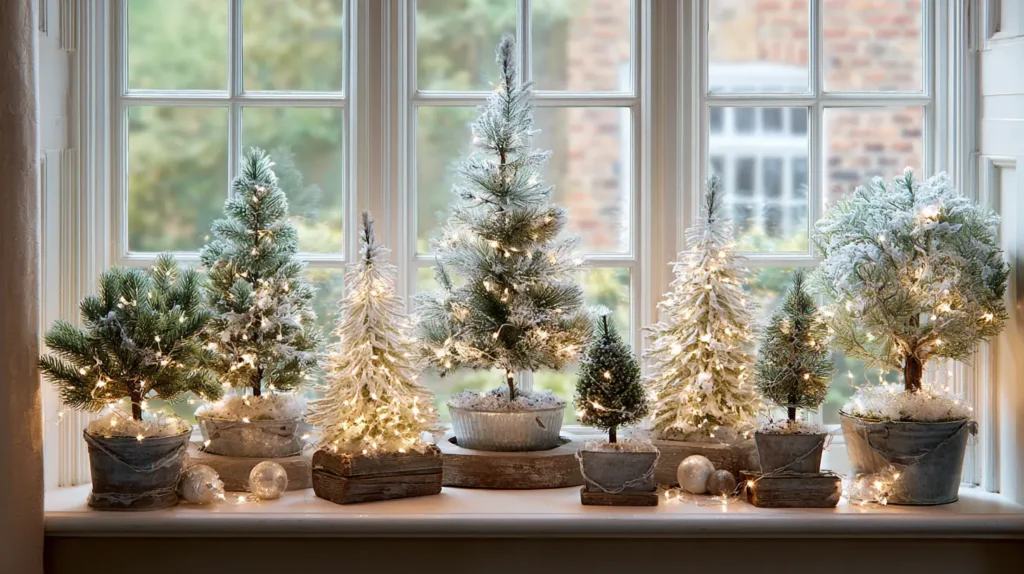
Defy gravity and create a magical, floating forest directly on your glass panes. Imagine looking out your window to see a series of miniature evergreen trees suspended in mid-air, silhouetted against the winter sky. By securing lightweight, flat-backed trees to the glass using heavy-duty suction cups, you create a stunning visual layer that doesn’t require a windowsill or table. From the street, your home appears to be filled with levitating greenery, glowing warmly with battery-operated lights. This unique display maximizes vertical space and brings the texture of the Christmas tree right to eye level, blurring the boundary between the cozy indoors and the snowy outdoors.
- The “Half-Tree” Secret: Look for “wall-mounted” or “flat-back” artificial trees. These are cut in half vertically, allowing them to sit flush against the window pane for a seamless look.
- Suction Power: Use high-quality, outdoor-rated suction cups with hooks. Clean the glass thoroughly with rubbing alcohol before applying to ensure a freeze-proof, strong bond.
- Cordless Glow: Use battery-operated fairy lights with a built-in timer. Hide the small battery pack inside the branches or tape it to the back of the tree so no wires dangle down the wall.
- Grid Pattern: For large picture windows, mount four small trees in a grid (2×2) to create a striking, modern architectural display.
- Lightweight Decor: Decorate sparingly with shatterproof plastic ornaments or simple ribbon bows to keep the weight down and prevent the suction cups from failing.
Pro Design Tip: If you can’t find flat-back trees, use evergreen “swags” (teardrop-shaped greenery usually meant for doors). Turn them upside down so the widest part is at the bottom. They mimic the shape of a Christmas tree perfectly, but are much lighter and flatter against the glass.
Budget Consideration: You can make your own floating trees for pennies. Buy a cheap, wire-based green garland (9 feet). Cut it into graduated lengths (small to large) and wire them onto a central stick or coat hanger in a triangular shape. It creates a 2D “tree” that is feather-light and easy to suction-cup to the window.
Conclusion
With these 20 Christmas window decoration ideas, your home will radiate holiday magic from every angle, turning ordinary panes into breathtaking displays that capture the wonder of the season. Whether you choose lush garlands with velvet bows, glowing candlelit silhouettes, or playful peppermint themes, each idea adds charm, warmth, and curb appeal that make your house feel like the heart of the holidays.
As the lights twinkle and snowflakes dance across your windows, you’ll create memories for family, friends, and neighbors alike—because nothing says “Merry Christmas” quite like a beautifully decorated window glowing against the winter night. Here’s to a season filled with light, joy, and windows that welcome the world to your holiday home!
