
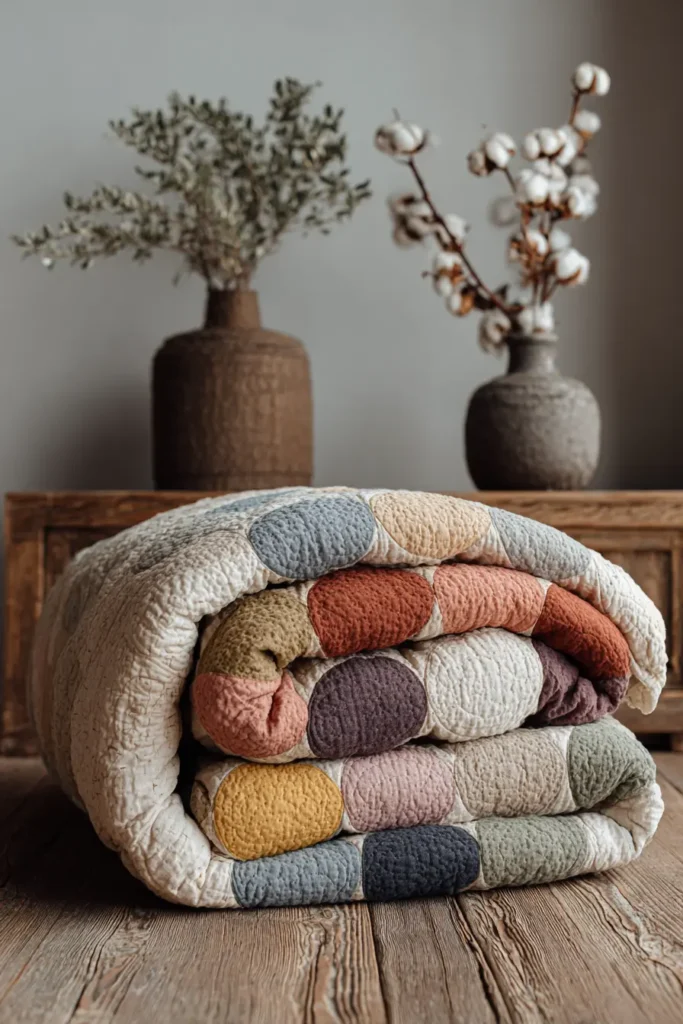
Nordic Serenity: 20 Scandinavian Quilt Pattern Ideas for a Cozy, Stylish Home
Exploring Scandinavian Quilt Pattern Ideas is an invitation to embrace a design philosophy that champions light, simplicity, and functional beauty. At its core, a Scandinavian quilt pattern is defined by its clean, geometric lines, a restrained color palette of cool neutrals and soft pastels, and a reliance on negative space to create a sense of airiness. Unlike more ornate traditional styles, these designs focus on high-contrast minimalism and the integrity of natural materials like linen and organic cotton, reflecting the Nordic deep appreciation for nature and light. This guide explores how these understated aesthetics can transform your home into a sanctuary of “Nordic Serenity,” proving that true elegance often lies in the quietest details.
Contents
- 1 Scandinavian Quilt Pattern Ideas
- 2 1. Minimalist Monochrome Scandinavian Quilt Patterns for Serene Bedrooms
- 3 2. Cozy Hygge-Inspired Quilt Patterns for Warm Sofa Throws
- 4 3. Scandinavian Cross Quilt Designs for Minimalist Bed Covers
- 5 4. Elegant Whole Cloth Quilts with Hand-Stitched Texture
- 6 5. Rustic Nordic Log Cabin Patterns for Stylish Couch Protection
- 7 6. Modern Triangles Scandi Quilt for Contemporary Sofa Covers
- 8 7. Simple Channel-Quilted Bed Runners for Serene Style
- 9 8. Textured Scandi-Style Quilted Pillow Covers for Living Rooms
- 10 9. Traditional Nordic Star Quilt for Table Runners
- 11 10. Nordic Pine Tree and Forest Motif Quilts for Wall Decor
- 12 11. Quilted Wall Hangings with Abstract Nordic Landscapes
- 13 12. Scandinavian Quilted Table Runners in Cream and Charcoal
- 14 13. Soft Pastel Scandi Nursery Quilts for Cozy Baby Rooms
- 15 14. Eco-Friendly Organic Cotton Quilt Patterns for Sustainable Living
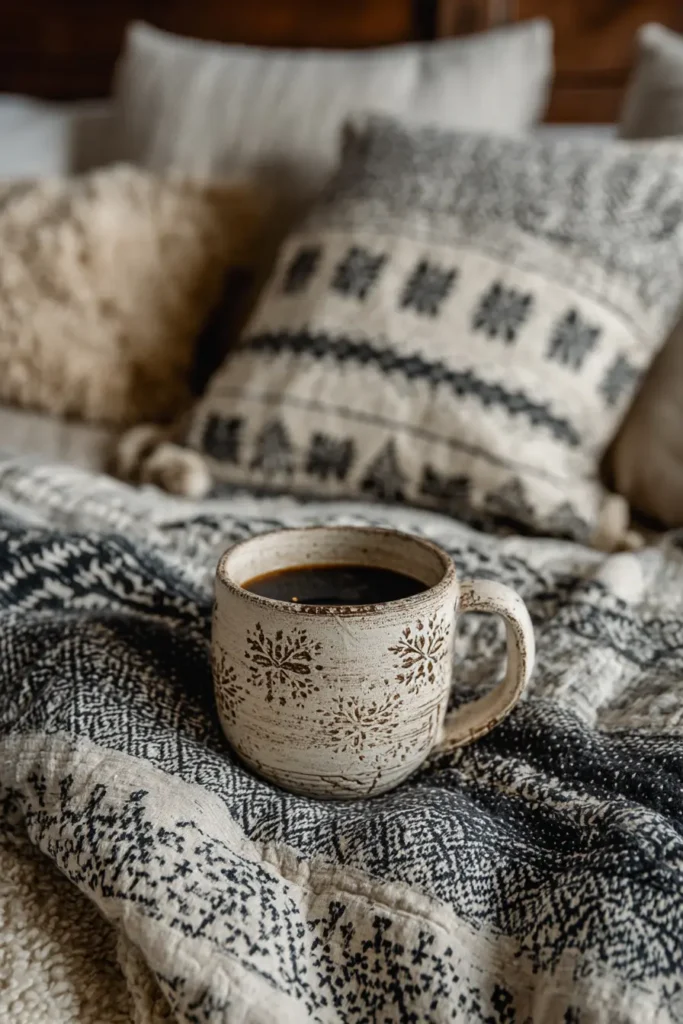
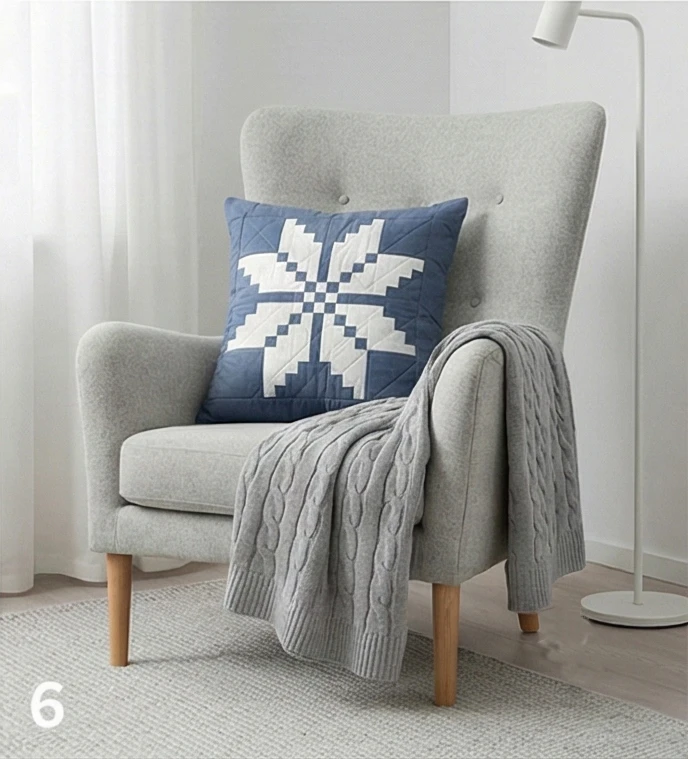
- 16 15. Elegant Snowflake Quilt Blocks for Winter Pillow Covers
- 17 16. Scandi-Boho Fringed Quilt Throws for Texture and Comfort
- 18 17. Cozy Scandinavian Plaid Quilt Design for Bed Runners
- 19 18. Danish Modern Quilt Designs with Clean Lines and Comfort
- 20 19. Simple Scandinavian Diamond Quilt for Dining Table Runners
- 21 20. Modern Nordic Cross Quilt Ideas for Living Room Accents
- 22 Conclusion
The allure of this style lies in its ability to balance modern sophistication with the deep, soulful concept of hygge—a feeling of cozy contentment and well-being. Whether you are layering a Cozy Hygge-Inspired Quilt Pattern over a sofa or dressing a bed with a Minimalist Monochrome cover, these textiles offer a tactile comfort that warms the home without cluttering it visually. We explore the versatility of these designs, from the structural boldness of Modern Triangles Scandi Quilts to the rustic charm of Nordic Log Cabin Patterns. Each piece serves a dual purpose: to provide physical warmth during long winters and to maintain a crisp, stylish visual order that calms the mind.
In this curated collection, we traverse the full spectrum of Nordic textile art, moving from functional bedding to expressive wall decor. We look at how Nordic Pine Tree and Forest Motif Quilts can bring the tranquility of the outdoors inside, and how Simple Channel-Quilted Bed Runners add a layer of texture that feels both architectural and soft. Whether you are drawn to the playful geometry of Danish Modern Quilt Designs or the sustainable appeal of Eco-Friendly Organic Cotton Patterns, these ideas provide a roadmap for creating a living space that feels intentionally curated, deeply comfortable, and effortlessly stylish.
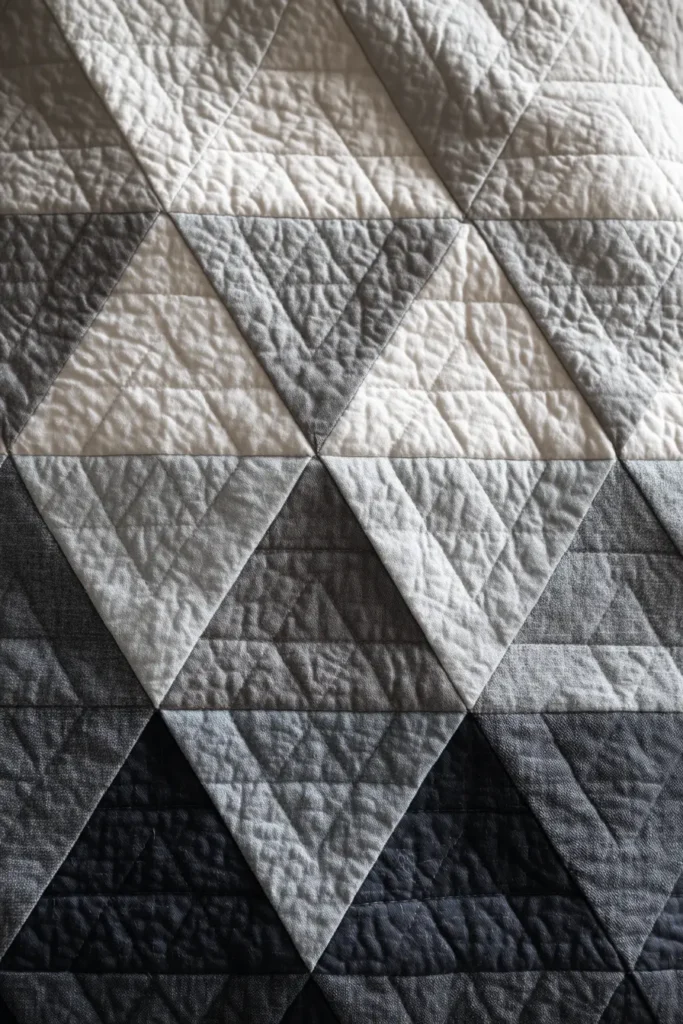
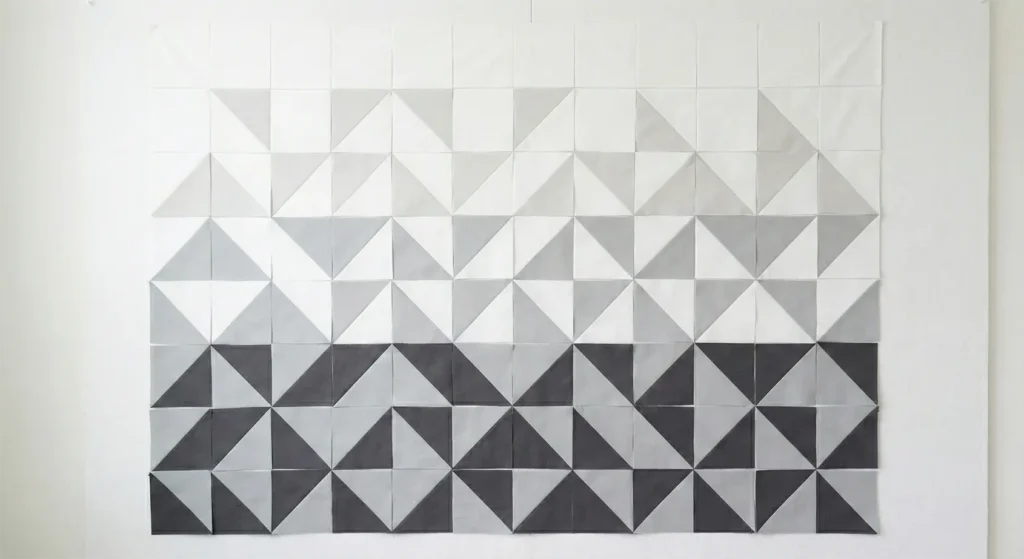
The “Stockholm Mist” Gradient Triangle Quilt
Scandinavian design is defined by functionality, simplicity, and a connection to the natural environment. This “Stockholm Mist” pattern utilizes a monochromatic palette—shifting from charcoal to soft grey to crisp white—to evoke the feeling of fog lifting over a winter harbor. By using Half-Square Triangles (HSTs) and abundant negative space, the quilt feels open and airy, promoting deep sleep and mental clarity.
Finished Dimensions: Queen Size Bed Cover, approximately 80″ x 88″.
Materials Needed:
- Fabric A (Deep Shadow): 1 yard of Charcoal Grey solid cotton.
- Fabric B (Morning Fog): 1 yard of Medium Silver Grey solid cotton.
- Fabric C (Pale Light): 1 yard of Very Pale/Oyster Grey solid cotton.
- Fabric D (Background): 4 yards of Crisp White or Snow White cotton. (Scandi design relies heavily on white to maximize light during long winters).
- Backing: 5 yards of a grey-and-white geometric print (like a grid or cross pattern).
- Batting: Wool Batting. (Wool is breathable and has a high “loft” or puffiness, making the quilt look like a cloud).
- Thread: Light Grey Cotton Thread (50wt).
- Notions: Rotary cutter, 24-inch quilting ruler, masking tape.
Cultural Backstory: This design is rooted in the concept of “Lagom”—a Swedish word meaning “not too little, not too much, just right.” The quilt isn’t plain white (too little), nor is it a riot of color (too much). It sits in the balanced middle, providing visual interest without clutter.
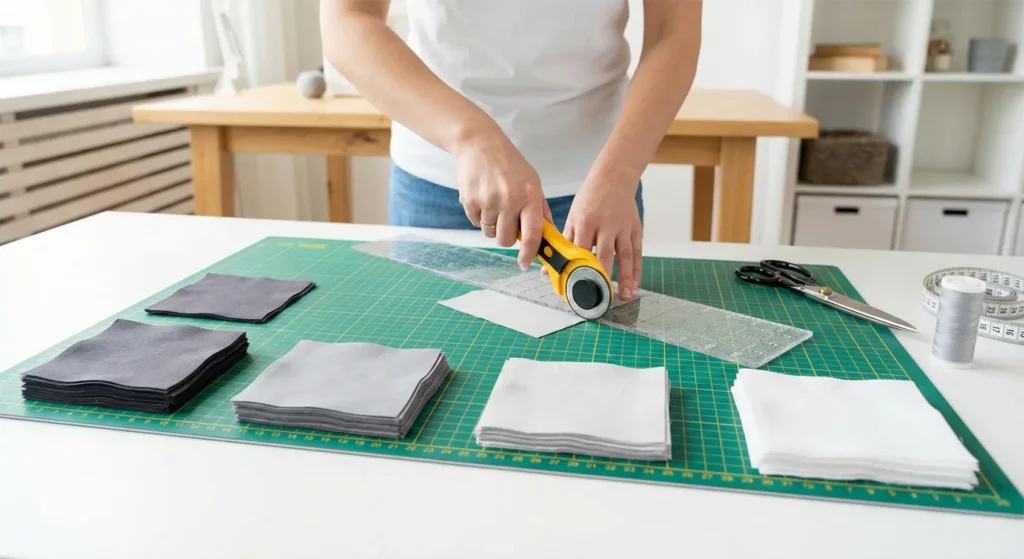
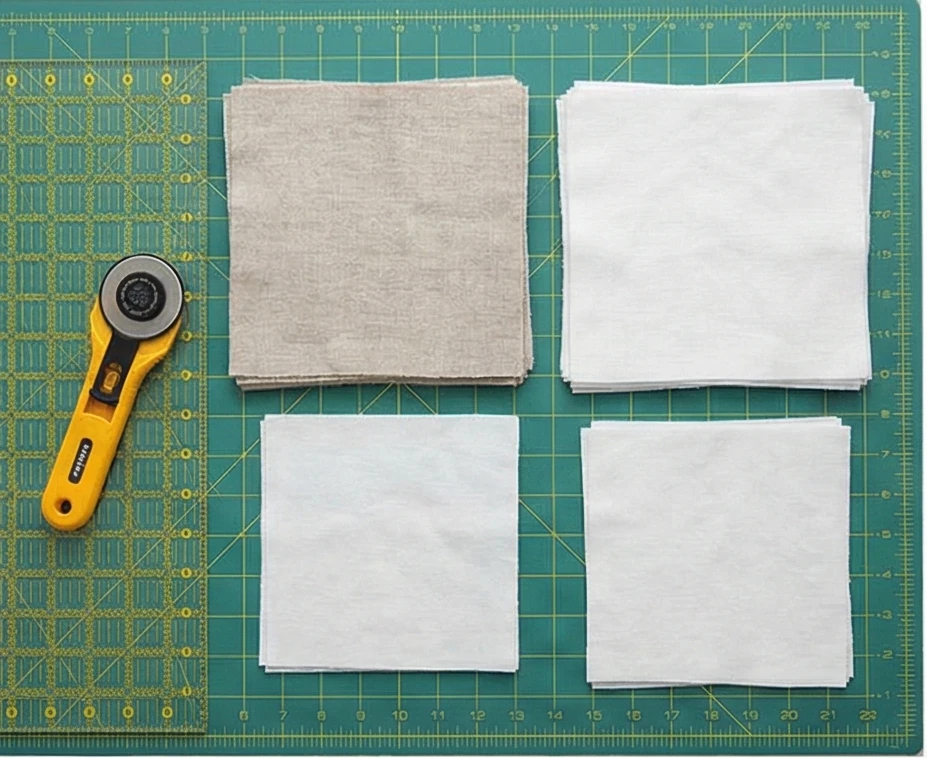
Step 1: Cutting the Large Squares
We are making large, bold blocks to keep the look modern and minimize seams.
- Colored Fabrics (A, B, C): Cut 10 squares from each grey fabric measuring 9 inches x 9 inches. (Total 30 squares).
- Background Fabric (D):
- Cut 30 squares measuring 9 inches x 9 inches (to pair with the greys).
- Cut 40 squares measuring 8.5 inches x 8.5 inches (these will be plain white blocks for negative space).
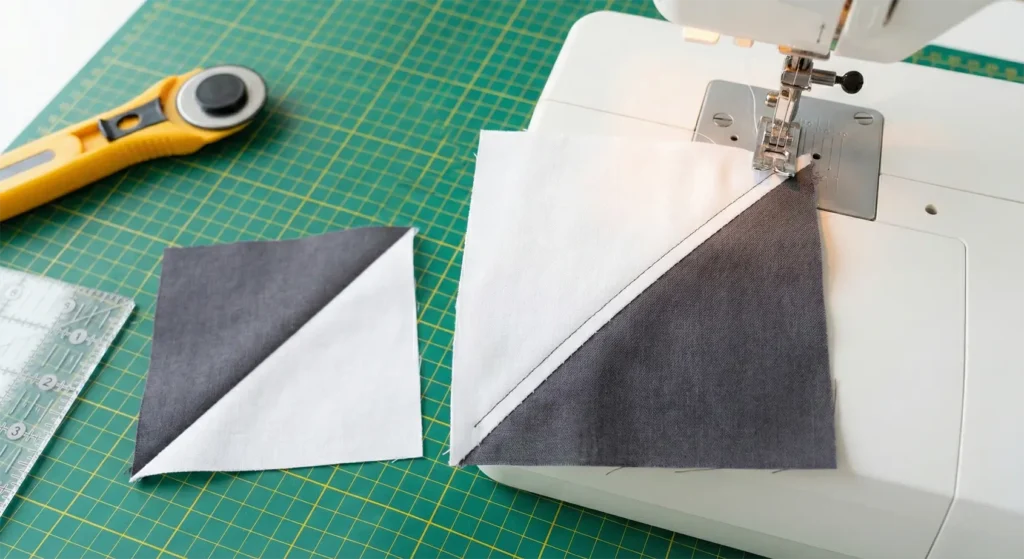
Step 2: Creating the Half-Square Triangles (HSTs)
- Pair: Place one Grey square (9″) and one White square (9″) Right Sides Together.
- Mark: Draw a diagonal line from corner to corner on the back of the white square.
- Stitch: Sew a straight line 1/4 inch away from the center line on both sides.
- Cut & Press: Cut along the drawn center line. Open the blocks and press the seam toward the grey side.
- Trim: Trim these blocks down to perfect 8.5 inch squares.
- Yield: You now have 60 HST blocks (20 Charcoal, 20 Silver, 20 Pale).
Step 3: The “Falling Snow” Layout
Do not arrange them in a rigid pattern. Create a gradient.
- Grid: You are building a grid of 10 blocks wide by 11 rows long.
- Bottom Rows (10-11): Use mostly Charcoal HSTs mixed with a few Silver HSTs. Point the triangles in random directions (up, down, left) to create jagged “mountain” shapes.
- Middle Rows (5-9): Transition to Silver HSTs mixed with Pale Grey HSTs and some plain White squares.
- Top Rows (1-4): Use mostly Pale Grey HSTs and fill the rest with the Plain White squares.
- Visual Effect: The quilt should look visually “heavy” at the bottom and fade into pure white “mist” at the top near the pillows.
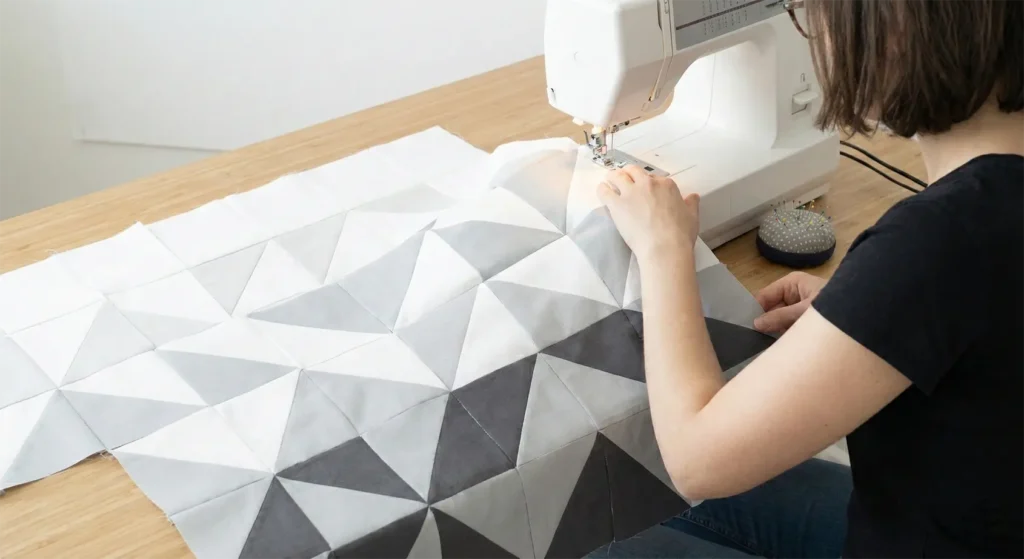
Step 4: Minimalist Assembly
- Join: Sew the blocks into horizontal rows using a 1/4 inch seam.
- Press: Press seams open to ensure the quilt lies perfectly flat.
- Join Rows: Sew the rows together.
- Tip: Use pins at every intersection to ensure the corners of your triangles match up perfectly. Sharp points are the hallmark of good craftsmanship.
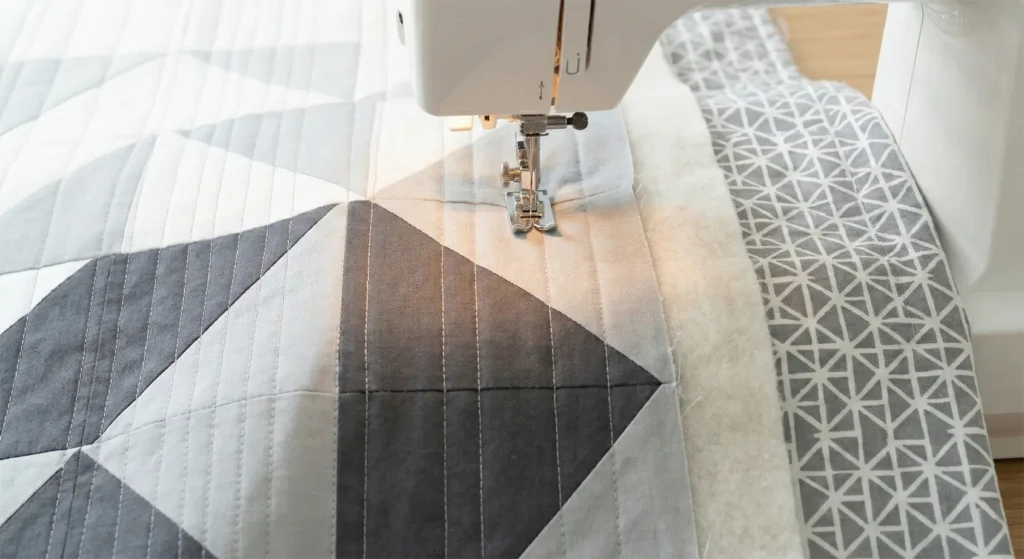
Step 5: “Matchstick” Quilting
The quilting texture is the star of monochrome quilts.
- Baste: Sandwich the backing, wool batting, and top. Baste well.
- Design: You will quilt Straight Vertical Lines from top to bottom.
- Spacing: Scandi style often uses “Matchstick” quilting—lines spaced very closely together (1/8 inch to 1/2 inch).
- Modification: For a softer drape, space the lines 1 inch apart.
- Execution: Use a walking foot. Start in the center and work outward. The vertical lines contrast with the triangles’ diagonal angles.
Step 6: The High-Contrast Binding
A crisp edge defines the shape.
- Cut: Cut 2.5-inch strips of the Charcoal Fabric A.
- Bind: Attach the binding to the quilt.
- Effect: Even though the top of the quilt fades to white, the dark charcoal binding frames the entire piece like a modern art print, giving it a graphic, finished look.
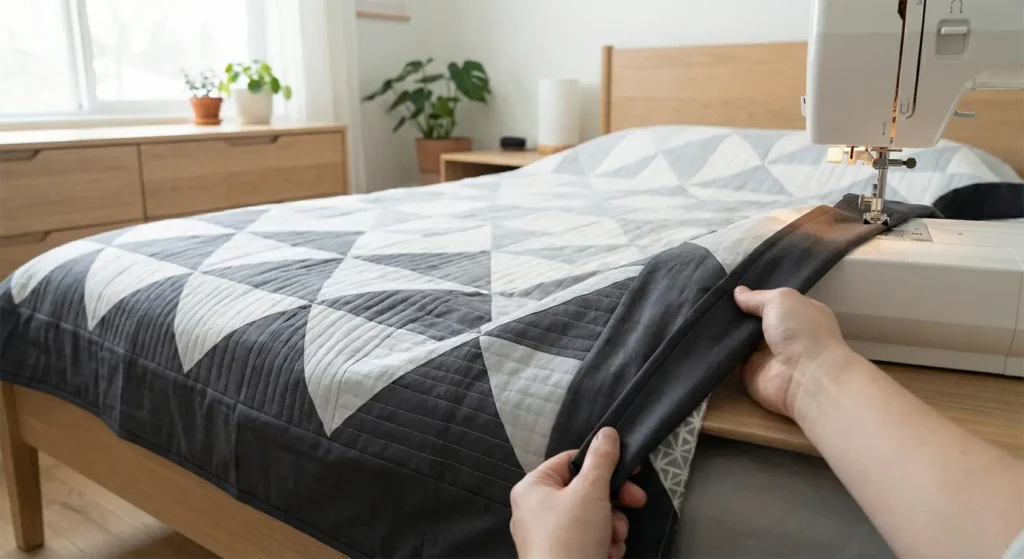
Usability Note: Wool batting makes this quilt exceptionally warm yet lightweight. It regulates body temperature well, adhering to the Nordic necessity of warmth without the suffocating weight of heavy blankets.
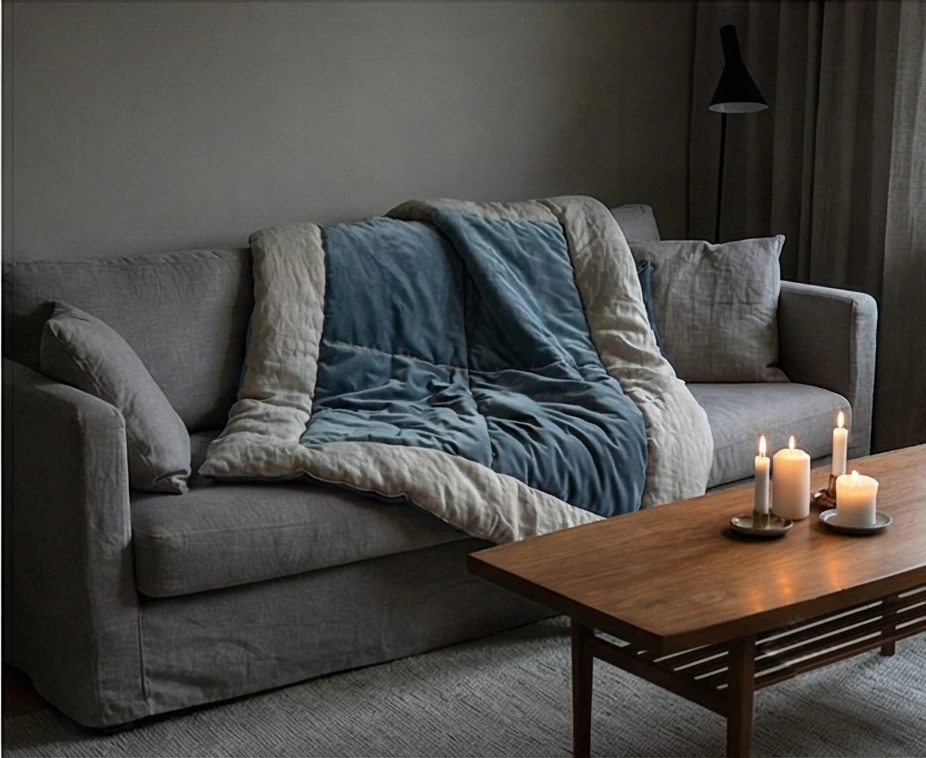
2. Cozy Hygge-Inspired Quilt Patterns for Warm Sofa Throws
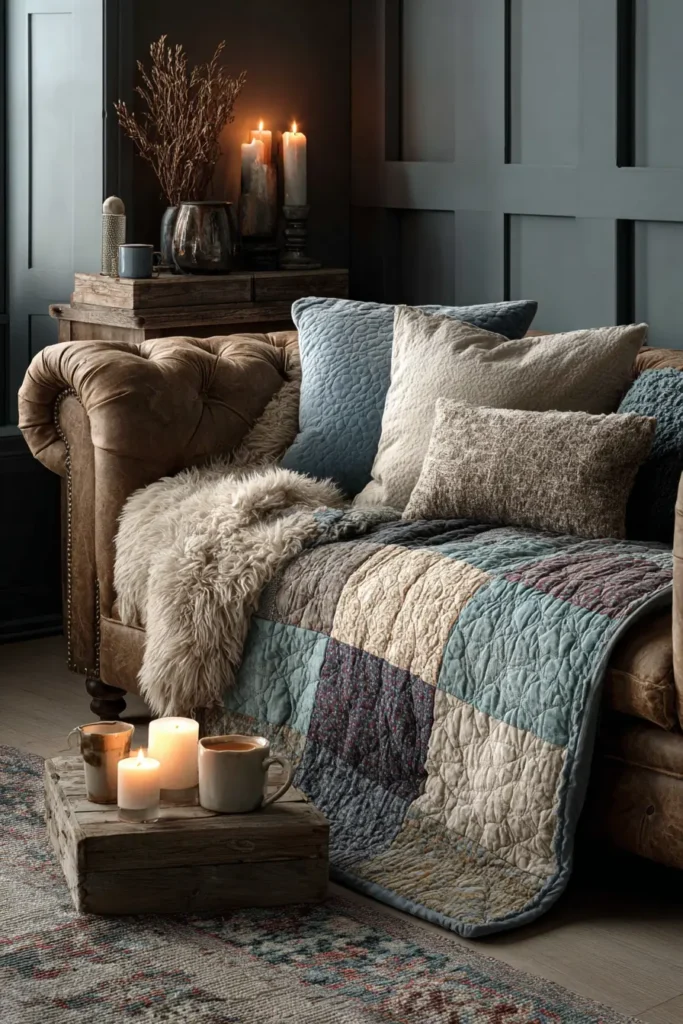
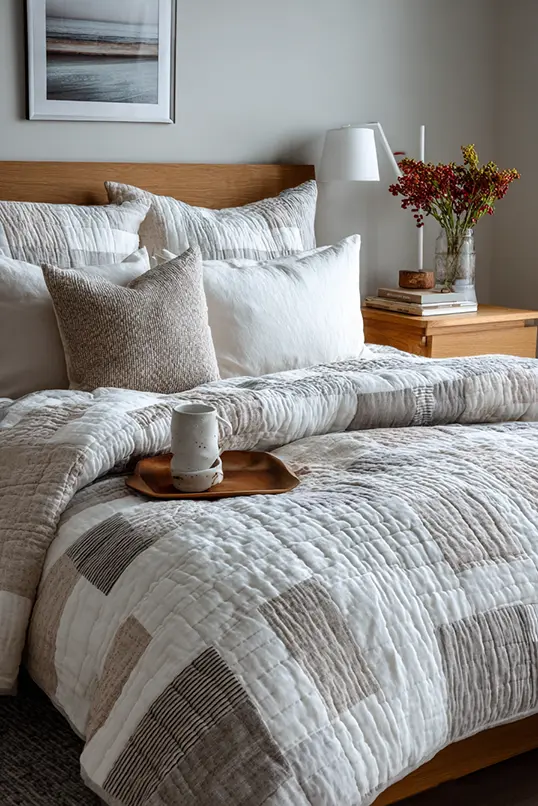
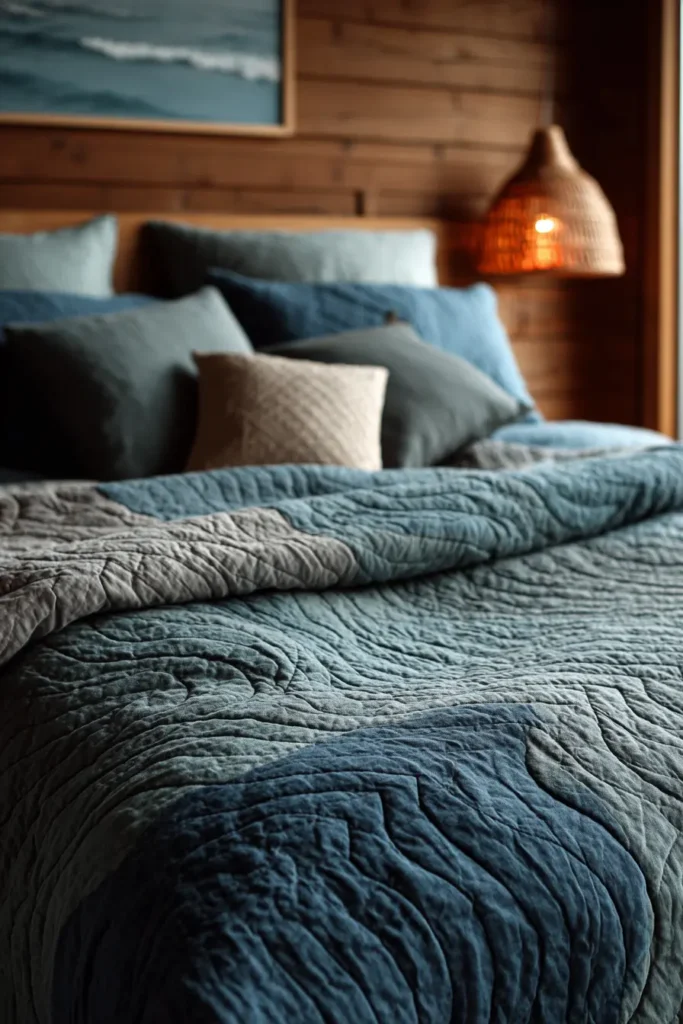
The “Copenhagen Hearth” Textured Strip Quilt
Hygge (pronounced “hoo-ga”) is the defining Danish concept of coziness, wellness, and contentment. It isn’t about grand gestures, but about enjoying simple pleasures—like curling up with a cup of tea by candlelight. This quilt embodies Hygge by prioritizing tactile texture over complex patterns. It features wide, vertical panels of Washed Linen and Cotton Velvet. The lack of tiny seams allows your hand to glide over the fabric, creating a soft, warm, and luxuriously heavy sensory experience.
Finished Dimensions: Large Sofa Throw, approximately 55″ x 70″.
Materials Needed:
- Fabric A (Texture 1): 2 yards of Cotton Velvet in a dusty tone (Slate Blue, Sage Green, or Dusty Rose). Velvet catches the candlelight beautifully.
- Fabric B (Texture 2): 2 yards of Heavyweight Washed Linen in Oatmeal or Natural Flax. (Linen softens with use and provides a rustic contrast to the plush velvet).
- Backing: 4 yards of Brushed Cotton Flannel (for ultimate skin contact comfort).
- Batting: High-Loft Wool Batting. (Wool is essential here—it is puffy, breathable, and warm, giving the quilt a “duvet-like” feel).
- Thread: Perle Cotton (Size 8) in Cream for hand quilting.
- Notions: Walking foot for sewing machine, embroidery needle.
Cultural Backstory: Danes burn more candles per capita than any other nation in Europe to combat the “Mørketid” (dark time) of winter. A Hygge quilt is designed for use in low light; its beauty comes from how the velvet reflects the flickering glow of a fire or candle, creating a sense of safety and intimacy.
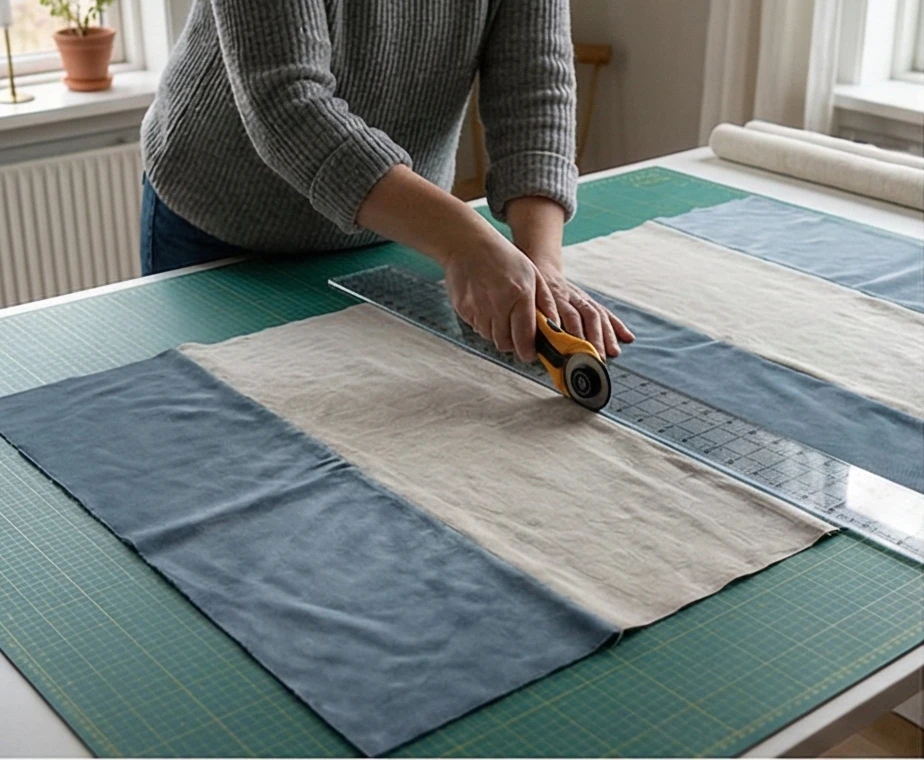
Step 1: The Minimalist Panel Cut
We use wide panels to let the fabric breathe.
- Velvet (Center): Cut one large panel measuring 20 inches x 72 inches.
- Tip: Check the “nap” of the velvet. Run your hand down it. Make sure it feels smooth in the direction you want (usually smooth brushing downwards).
- Linen (Sides): Cut two panels measuring 18 inches x 72 inches.
Step 2: Joining the Textures
Velvet can be slippery (“creep”). Take care here.
- Pinning: Pin the long edge of a Linen panel to the long edge of the Velvet panel (Right Sides Together). Use a lot of pins—every 2 inches.
- Stitch: Sew with a 1/2 inch seam allowance.
- Tool: Use a Walking Foot on your machine. This feeds the top and bottom layers evenly so the velvet doesn’t stretch.
- Repeat: Attach the second Linen panel to the other side of the Velvet.
- Result: You have a 3-panel top: Linen – Velvet – Linen.

Step 3: The “Finger Press”
Do not put a hot iron directly on velvet; it will crush the pile.
- Pressing: Use your fingers to open the seams on the back.
- Steam: Hover your steam iron about an inch above the seam (from the back side) and apply steam, then press down with a wooden clapper or your hand. This sets the seam without flattening the velvet’s fluff.

Step 4: Wool Batting Sandwich
- Layer: Lay out the Backing (face down) + Wool Batting + Top (face up).
- Baste: Baste securely. The high-loft wool is puffy, so things can shift. Safety pins every 4 inches are recommended.
Step 5: “Big Stitch” Hand Quilting
Machine quilting looks too stiff for Hygge. We want a handmade, rustic look.
- Thread: Thread your embroidery needle with the thick Perle Cotton.
- The Stitch: Hand quilt a simple running stitch.
- Size: Make the stitches large—about 1/4 inch long.
- Spacing: Leave 1/4 inch between stitches.
- Pattern: Stitch vertical lines down the Linen panels, spaced about 3 inches apart.
- The Velvet: You can skip quilting the velvet to leave it plush, or stitch just two lines down the center to secure it. The visible, chunky thread adds a “home-spun” charm.

Step 6: The “Pillowcase” Finish
A binding can feel rigid. This method keeps the edges soft.
Note: If you have already made a sandwich in Step 4, you would bind it as usual. For the “Pillowcase” method, you assemble differently:
- Stack: Place Batting on the bottom. Place Backing (Face Up) on batting. Place Top (Face Down) on backing.
- Sew: Stitch around the entire perimeter, leaving a 10-inch gap for turning.
- Turn: Turn the whole quilt right-side out through the gap. Poke corners out.
- Topstitch: Hand-stitch the gap closed. Then, quilt the layers together (Step 5 happens after this assembly in this specific soft-edge method).
- Result: The edge is puffy and soft, like a duvet, rather than stiffened by a binding strip.
Usability Note: This throw is heavy. The combination of velvet, linen, and wool gives it a physical weight that helps calm the nervous system, making it the perfect companion for a Sunday afternoon nap.
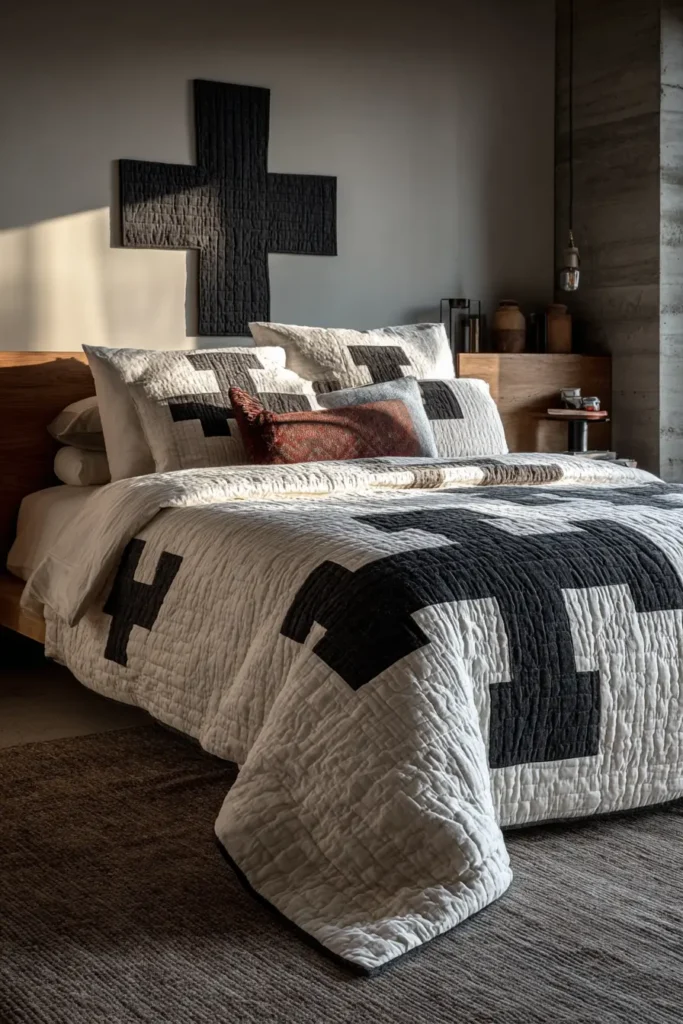
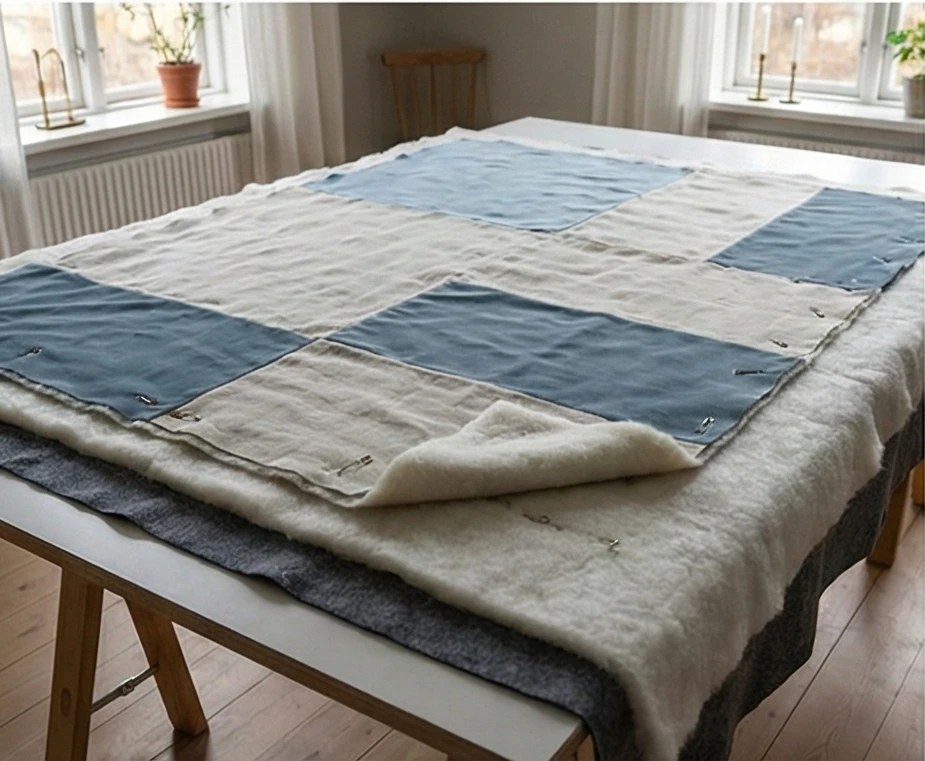
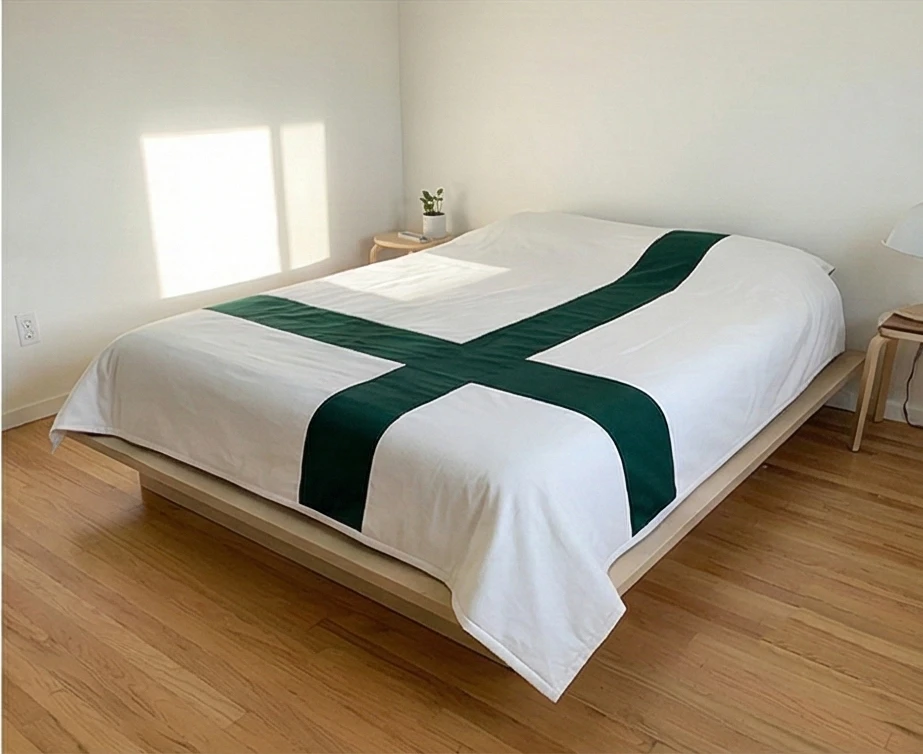
The “Helsinki Cross” Off-Center Modern Bed Cover
The Nordic Cross (found on the flags of Denmark, Sweden, Norway, Finland, and Iceland) is the quintessential symbol of Scandinavia. In modern design, this off-center cross represents asymmetry and balance. This quilt takes that bold graphic symbol and scales it up to cover an entire bed. Unlike busy patchwork, this design relies on vast expanses of negative space and crisp lines. It transforms the bed into a piece of modern art—clean, graphic, and undeniably cool.
Finished Dimensions: Queen Size Bed Cover, approximately 84″ x 90″.
Materials Needed:
- Fabric A (Background): 5 yards of Crisp White Cotton Sateen or Arctic White Linen. (Sateen has a slight sheen that looks very high-end).
- Fabric B (The Cross): 2 yards of Matte Black, Slate Grey, or Deep Forest Green. (High contrast is key).
- Backing: 6 yards of wide-width cotton sheeting (or pieced fabric).
- Batting: Bamboo Batting. (It hangs heavily and flat, perfect for the modern aesthetic, and isn’t too puffy).
- Thread: White for quilting, matching color for the cross assembly.
- Notions: 6-inch x 24-inch quilting ruler, masking tape.
Cultural Backstory: The Nordic Cross design originated with the Danish flag (“Dannebrog”) in the 13th century. Legend says it fell from the sky during a battle. The intersection of the cross is shifted toward the hoist (the left side) rather than centered. In design terms, this shift creates dynamic tension—it feels more active and modern than a perfectly centered “plus sign.”
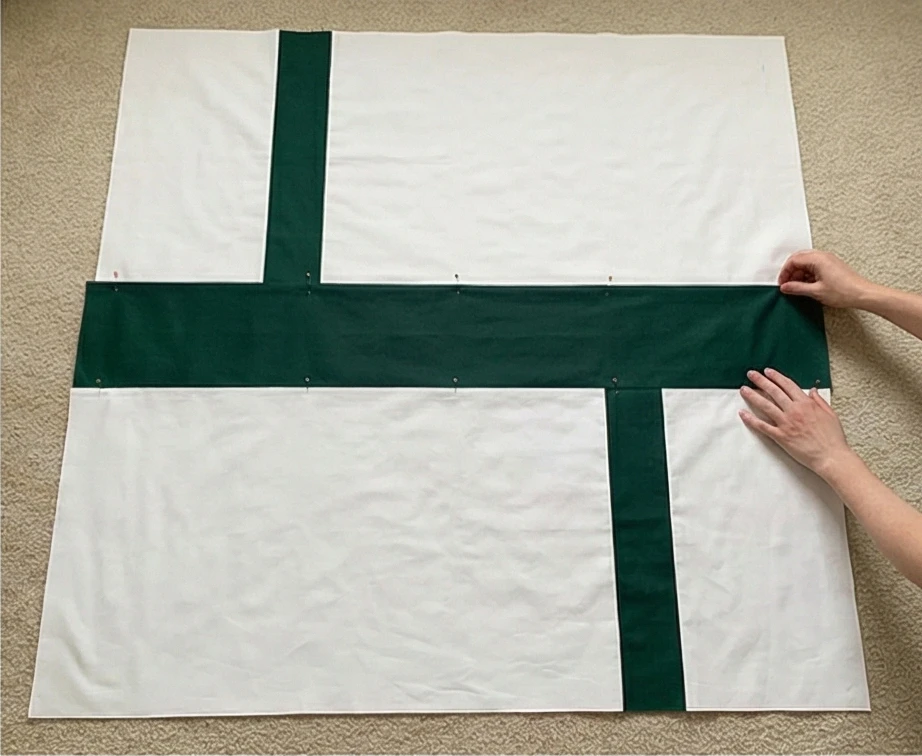
Step 1: The Mathematics of Asymmetry
To get the “flag” look, we divide the background into four unequal quadrants separated by a 10-inch-wide cross.
- The Cross Width: 10 inches (finished).
- Top Quadrants (Height): 30 inches.
- Bottom Quadrants (Height): 50 inches.
- Left Quadrants (Width): 24 inches.
- Right Quadrants (Width): 50 inches.
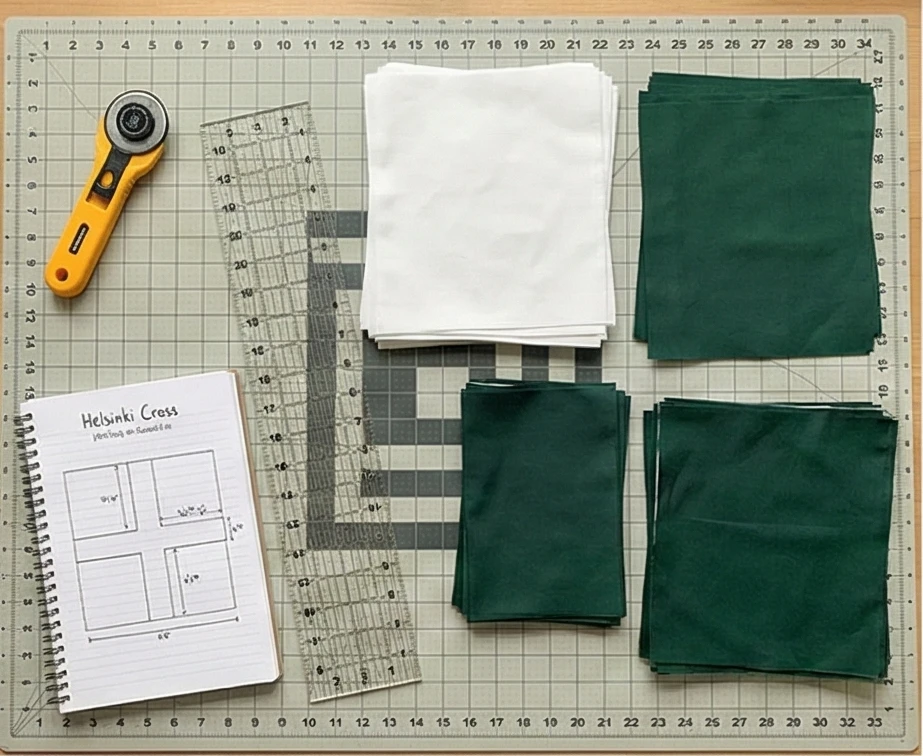
Step 2: Cutting the Panels
Precision cutting is vital here because there are no busy patterns to hide crooked lines.
- Fabric A (Background):
- Top Left: Cut one piece 24.5″ x 30.5″.
- Top Right: Cut one piece 50.5″ x 30.5″.
- Bottom Left: Cut one piece 24.5″ x 50.5″.
- Bottom Right: Cut one piece 50.5″ x 50.5″.
- Fabric B (The Cross):
- Vertical Strip: Cut one strip 10.5″ x 30.5″ (Top Vertical) and one strip 10.5″ x 50.5″ (Bottom Vertical).
- Horizontal Bar: Cut one long strip 84.5″ x 10.5″ (This runs the full width of the quilt). Note: You will likely need to piece two strips together to get the 84.5″ length. Hide the seam.
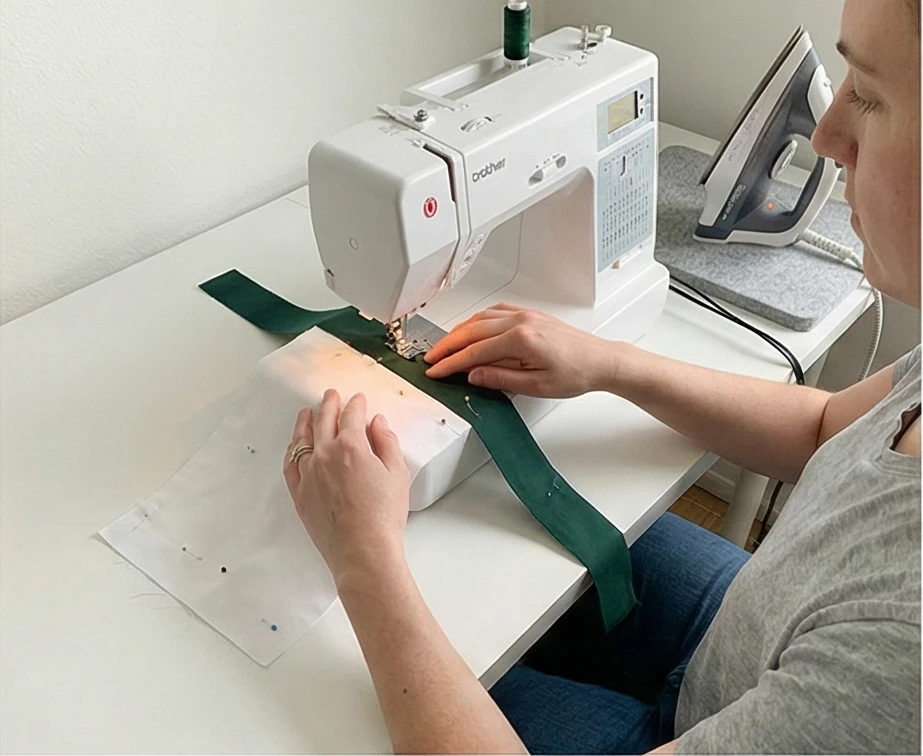
Step 3: Constructing the Top and Bottom Rows
We build the quilt in three horizontal sections: The Top, The Crossbar, and The Bottom.
- Top Row Assembly:
- Sew: [Top Left Block] + [Top Vertical Cross Strip] + [Top Right Block].
- Press: Press seams toward the dark cross strip.
- Bottom Row Assembly:
- Sew: [Bottom Left Block] + [Bottom Vertical Cross Strip] + [Bottom Right Block].
- Press: Press seams toward the dark cross strip.
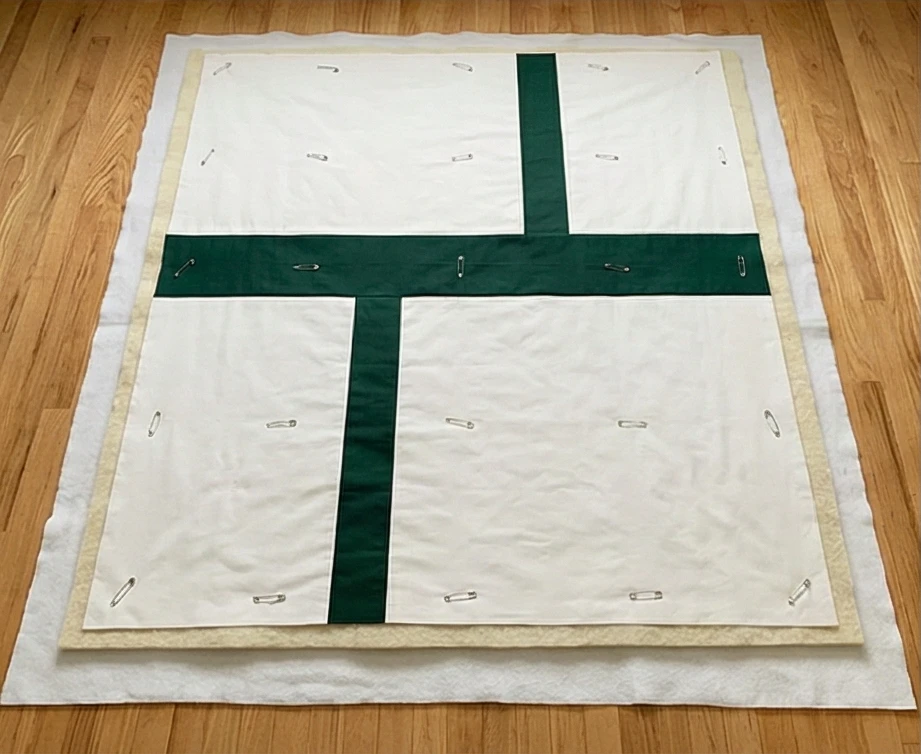
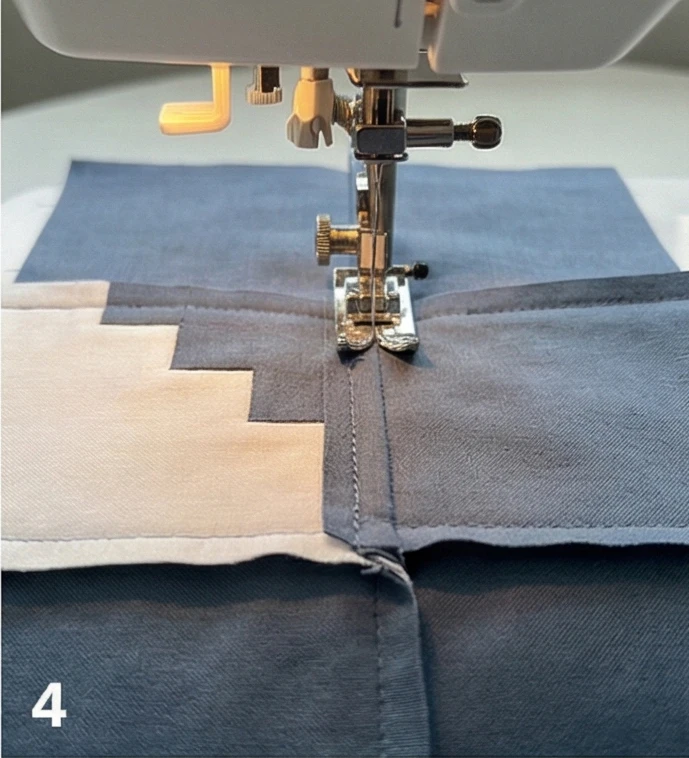
Step 4: The Great Intersection
Now we join the top and bottom with the horizontal bar.
- Pinning: Pin the Horizontal Cross Bar to the bottom edge of your Top Row Assembly.
- Critical Alignment: Ensure the vertical cross strip in the Top Row aligns perfectly with the vertical cross strip in the Bottom Row. Even a 1/4 inch misalignment will be very obvious in such a minimalist design.
- Sew: Stitch the Top Row to the Cross Bar. Then stitch the Bottom Row to the other side of the Cross Bar.
- Result: You now have a giant white field bisected by a stark cross.
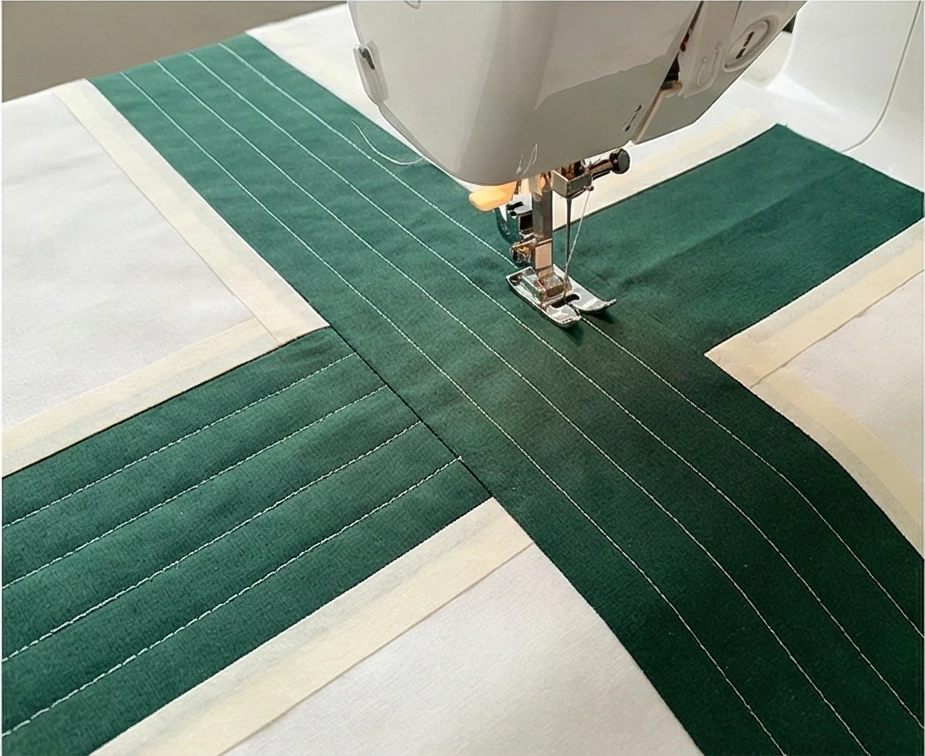
Step 5: “Echo” Quilting
Do not do swirls or flowers. The quilting must respect the geometry.
- Baste: Sandwich the layers (Backing + Bamboo Batting + Top).
- Mark: Use masking tape or a long ruler to mark lines.
- Quilt: Start quilting inside the cross itself.
- Quilt straight lines 1 inch apart inside the colored cross fabric.
- Echo: Move into the white background.
- Quilt distinct lines 2 inches apart, running parallel to the cross and radiating outward to the edges of the quilt.
- Visual: It looks like ripples of energy moving out from the central structure.
Step 6: The “Infinity” Binding
A contrasting binding frames the art; a matching binding makes it feel expansive.
- Choice: For a pure minimalist look, choose the White fabric for binding.
- Attach: Bind the quilt using a standard double-fold binding.
- Detail: When the white binding crosses the dark cross fabric at the edges, it creates a clean “cut” visual that is very sharp and modern.
Usability Note: This quilt is designed for visual impact. Because of the large solid areas, any spills will show. However, with high-quality Cotton Sateen, the fabric has a tight weave that resists dust and pet hair better than standard quilting cotton, keeping the crisp “hotel bed” look longer.
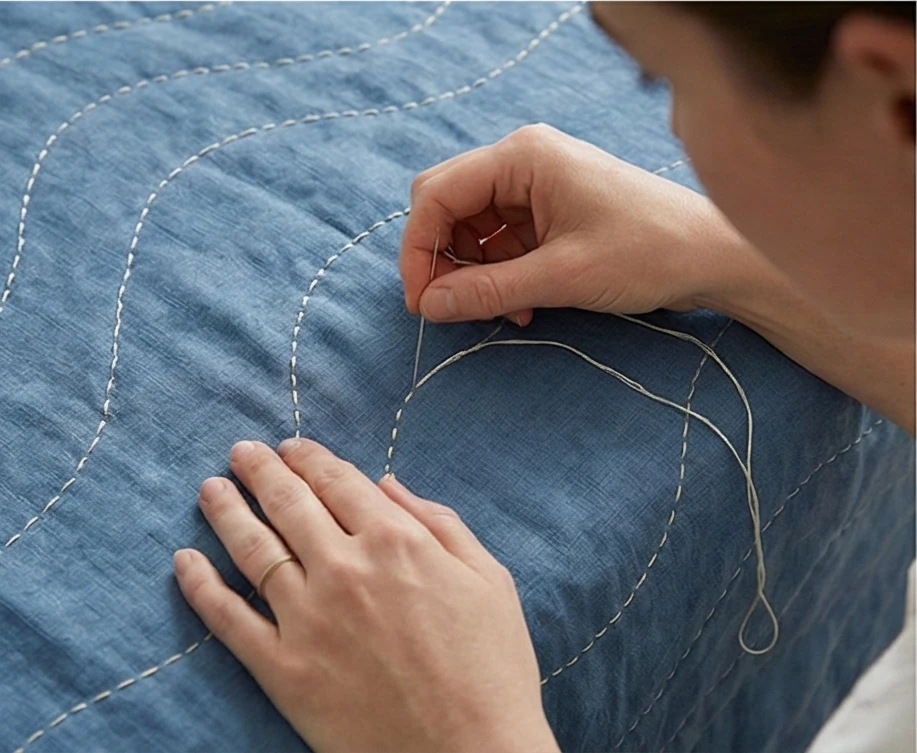
4. Elegant Whole Cloth Quilts with Hand-Stitched Texture
The “Fjord Ripple” Whole Cloth Linen Quilt
In the minimalist Nordic tradition, “Whole Cloth” quilts epitomize elegance. There is no patchwork, no piecing, and no distraction. The beauty lies entirely in the fabric’s quality and the texture of the quilting stitches. This design features a single, vast expanse of high-quality European Linen in a moody slate blue or deep teal, quilted with organic, wavy lines that mimic the water of a Norwegian fjord. It is sophisticated, timeless, and incredibly soft.
Finished Dimensions: Queen/King Duvet Coverlet, approximately 90″ x 90″.
Materials Needed:
- Fabric A (Top): 3 yards of Wide-Width (108″ or 120″) European Linen.
- Note: Using extra-wide fabric avoids a center seam, which is crucial for the “whole cloth” look. If you can’t find wide linen, sew two lengths together and hide the seam with a decorative stitch, but wide is best.
- Color: “Fjord Blue,” “Storm Grey,” or “Moss Green.”
- Backing: 3 yards of Wide-Width Cotton Sateen (smooth against the skin).
- Batting: Silk/Wool Blend Batting. (This luxury blend is lightweight but warm, drapes like water, and allows the needle to glide through effortlessly).
- Thread: Sashiko Thread (Cream or Light Grey) or Perle Cotton #12.
- Notions: Water-soluble marking pen, curved safety pins, thimble.
Cultural Backstory: Whole cloth quilting has a long history in coastal communities. Historically, “whitework” quilts were prized wedding gifts. In Scandinavia, where the light is precious, texture plays a huge role in interior design. The undulation of the quilting catches the low winter sun, creating shadows that make the single color feel alive and dynamic.
Step 1: Preparing the Canvas
Linen shrinks. You must prepare it.
- Wash & Dry: Wash your linen and backing fabric in hot water and tumble dry. Linen has a distinct “crinkle” texture that you want to encourage before you quilt.
- Press: Iron the fabric well.
- Square Up: Lay the fabric flat and trim the edges to create a perfect 92″ x 92″ square.

Step 2: Marking the “Fjord” Lines
We want organic, flowing water lines, not rigid stripes.
- The Guide: Do not use a ruler.
- Marking: Use a water-soluble pen. Start at one edge. Draw a gently waving line across the fabric to the other side.
- Spacing: Draw the next line about 1.5 inches away.
- Variation: Occasionally let the lines drift apart (2 inches) or come closer together (1 inch), just like real ripples on water.
- Tip: If you are nervous about freehand drawing, use masking tape as a guide, but let the tape curve gently.
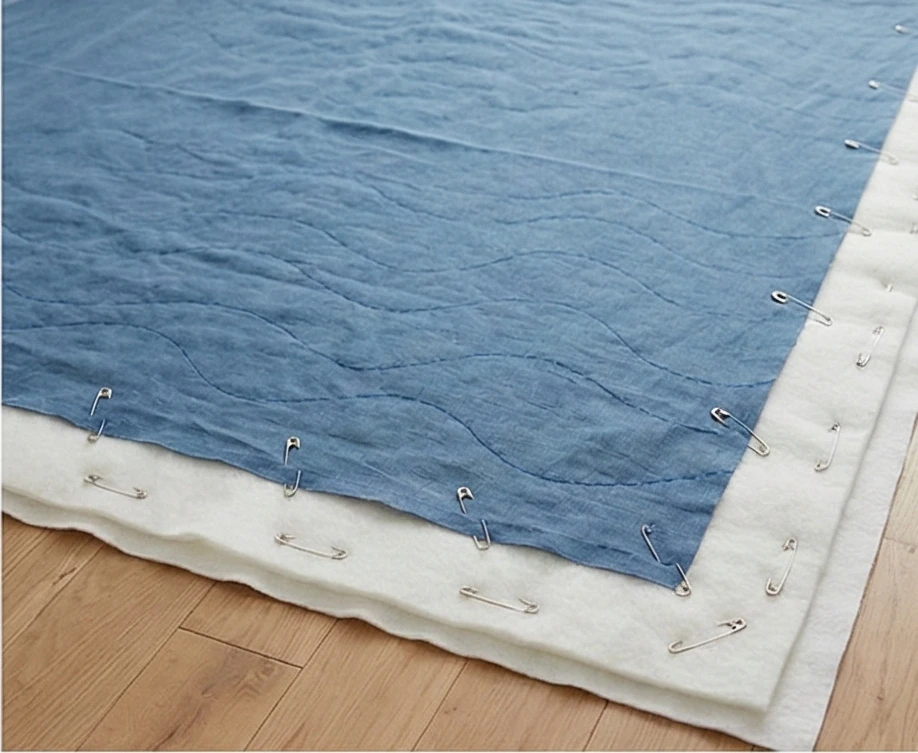
Step 3: The Luxury Sandwich
Silk batting is delicate.
- Layer: Tape the backing to the floor (face down). Lay the silk/wool batting on top. Smooth the linen top (face up) over the batting.
- Baste: Baste aggressively. Linen is heavy and slippery. Use curved safety pins every 4 inches.
- Check: Ensure there are absolutely no puckers on the back.
Step 4: The “Running Water” Hand Stitch
This is a slow, meditative process. Enjoy the “Hygee.”
- Thread: Load your needle with a single strand of the thicker thread (Sashiko or Perle).
- Stitch: Quilt along your marked lines using a Big Stitch (Running Stitch).
- Stitch Length: Aim for stitches that are about 1/4 inch long.
- Consistency: Try to keep the stitch length and the gap length even.
- Knotting: Hide your knots in the batting layer (pop the knot through the top fabric).
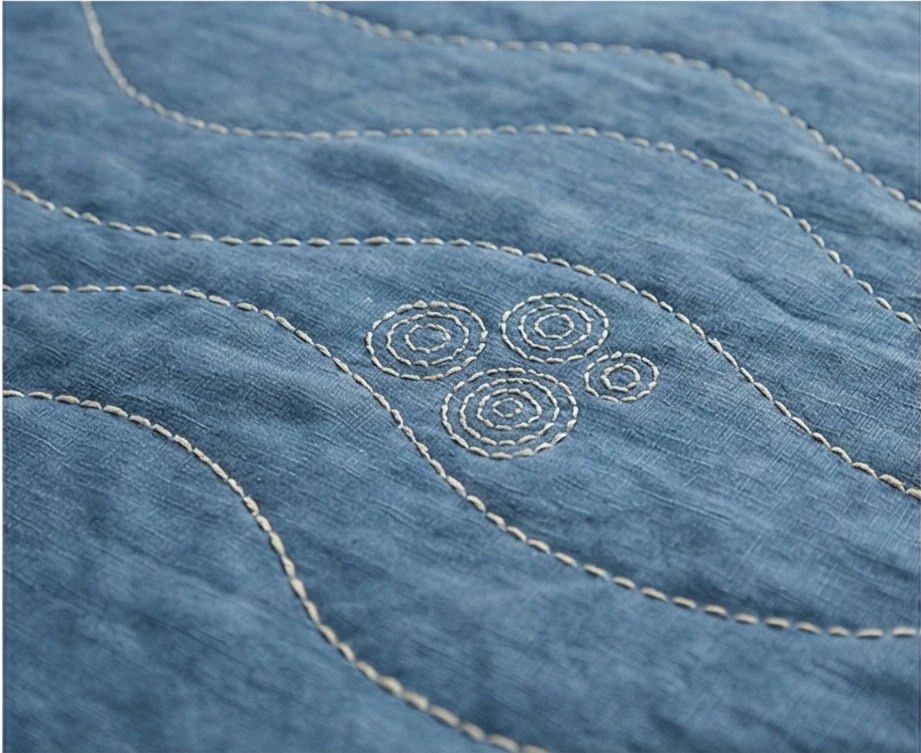
Step 5: The “Pebble” Texture (Optional)
To create areas of visual interest.
- Select Spots: Pick 3 or 5 random areas on the quilt (perhaps near the corners or off-center).
- Cluster: Instead of wavy lines, quilt a small cluster of concentric circles or “stones” in these spots.
- Effect: It looks like rain hitting the water surface, disturbing the ripples. This asymmetric detail is very Scandinavian.
Step 6: The “Self-Bound” Edge
A separate binding adds bulk. A self-binding is sleek.
- Trim: Trim the batting and backing so they are 1 inch smaller than the linen top on all sides.
- Fold: Fold the excess linen from the top over the edge to the back (1/2 inch, then another 1/2 inch).
- Stitch: Hand-stitch this hem down on the back side.
- Result: The linen wraps around the edges, giving a clean, uninterrupted finish that showcases the fabric’s weave.
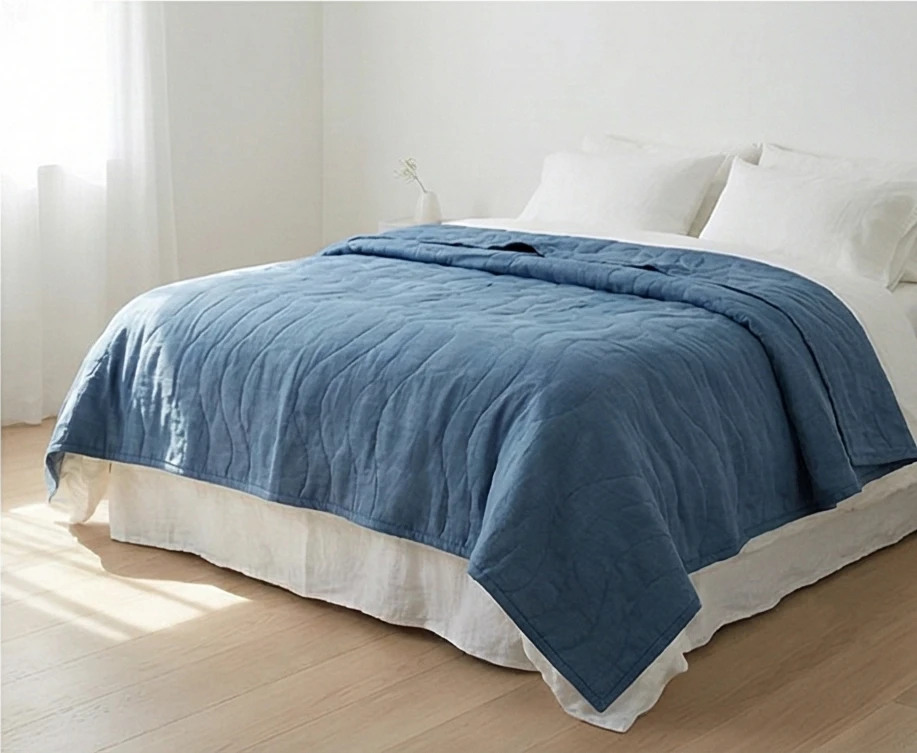
Usability Note: Linen is thermo-regulating. It feels cool to the touch in summer but traps warmth in winter. This quilt will get softer with every single wash, eventually becoming a “heritage” piece that feels like a heavy, comforting hug.
5. Rustic Nordic Log Cabin Patterns for Stylish Couch Protection
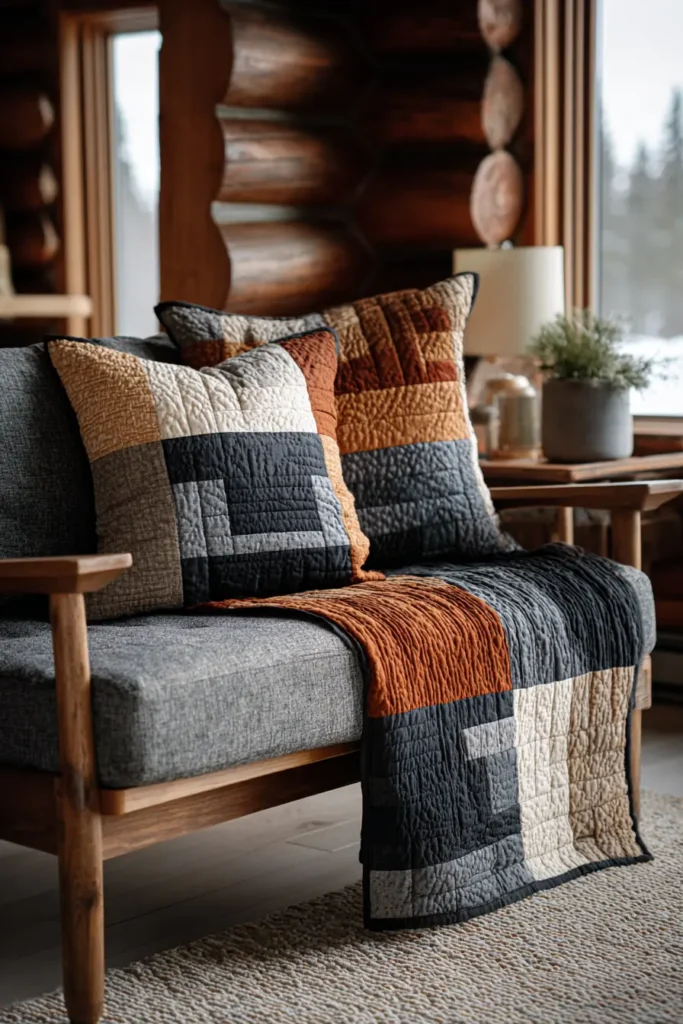
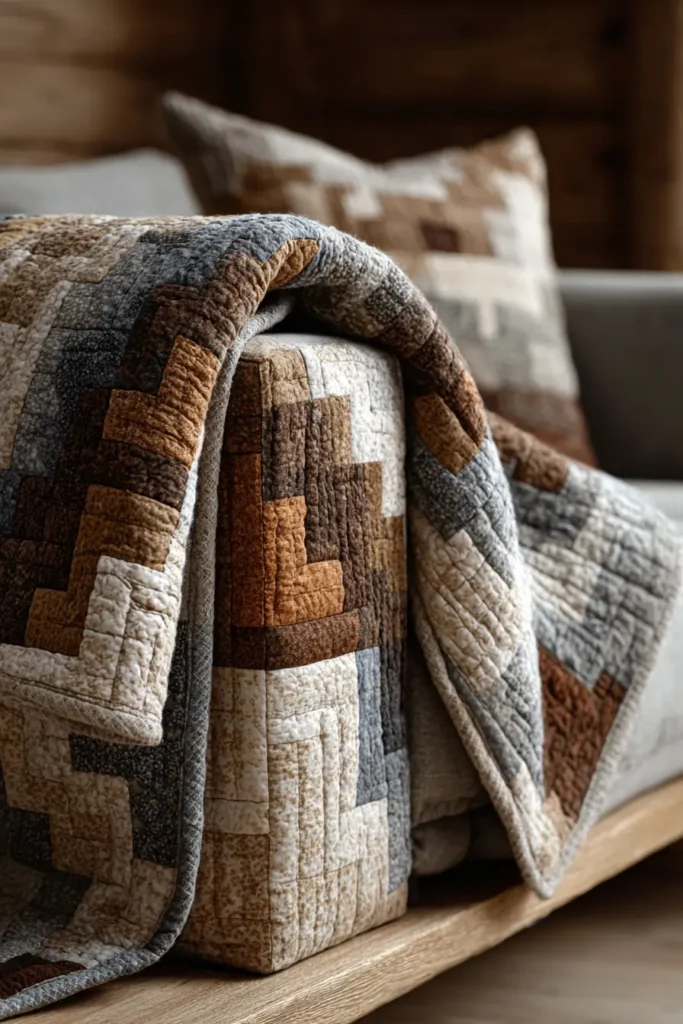
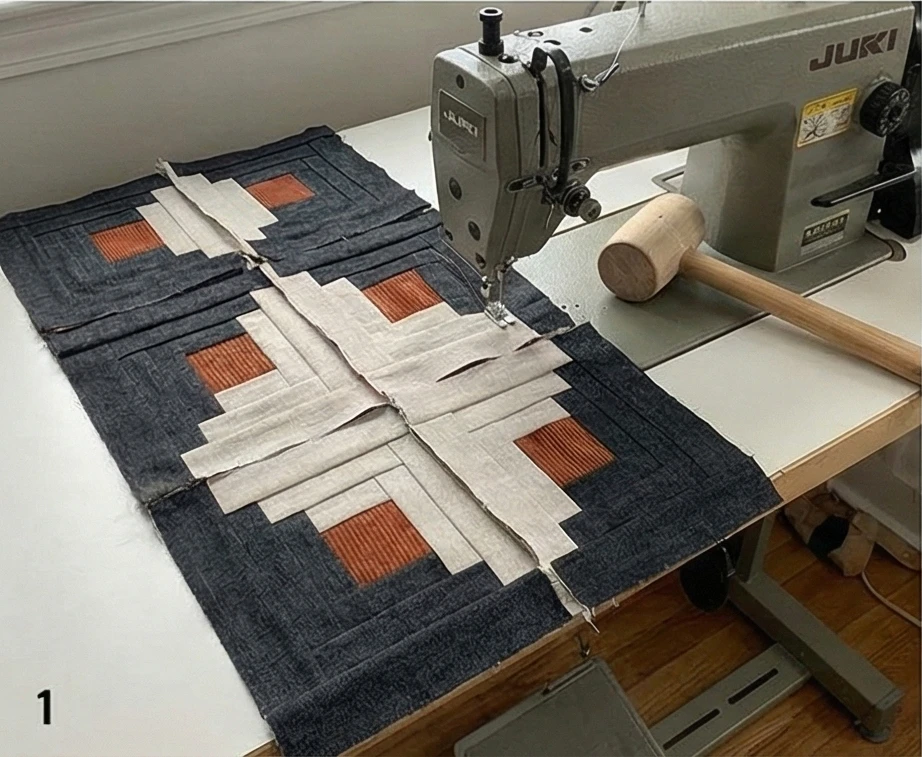
The “Vinterhytte” (Winter Cabin) Modern Log Cabin Throw
While the Log Cabin block is a global quilting staple, the Nordic interpretation strips away the scrappy chaos in favor of clean lines and high contrast. This design, the “Vinterhytte,” uses the traditional “Barn Raising” layout but limits the palette to Raw Linen, Black, and Warm Wood tones (rust/tan). Designed as a heavy-duty sofa protector, it features durable fabrics and a specific size that drapes over the back and seat of a couch, staying put thanks to its weight.
Finished Dimensions: Sofa Protector Throw, approximately 60″ x 70″.
Materials Needed:
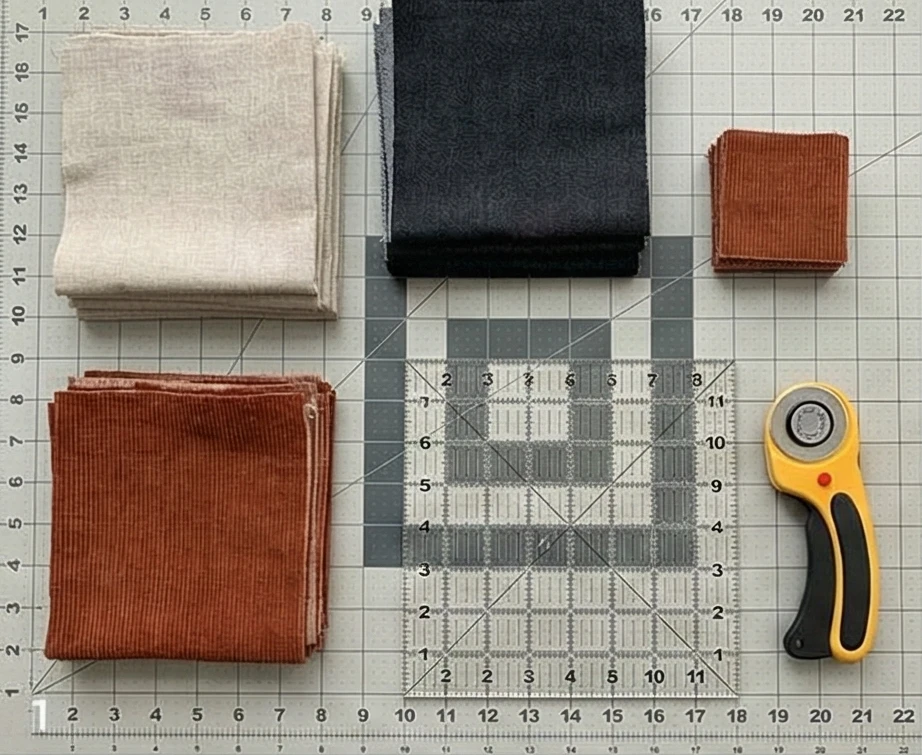
- Fabric A (Light): 2 yards of Heavy Natural Linen or Drop Cloth canvas.
- Fabric B (Dark): 2 yards of Black Denim or Canvas.
- Fabric C (Warmth): 1 yard of Rust/Cognac colored Corduroy or heavy cotton. (This adds the tactile “wood” element).
- Backing: 4 yards of heavy flannel or Sherpa fleece (for grip and warmth).
- Batting: Thin Cotton Batting. (You want density, not loft, so it lies flat on the furniture).
- Thread: Heavy-duty thread in Neutral Beige.
- Notions: Rotary cutter, 12.5″ square ruler.
Cultural Backstory: In Scandinavia, the “Hytte” (cabin) culture is sacred. It is a place to escape modernity and return to basics—wood, fire, and stone. The Log Cabin pattern is a literal representation of this structure. The center square of the block traditionally represents the hearth fire (the rust corduroy), while the light and dark strips represent the sun hitting the cabin walls and the shadows cast by the forest.
Step 1: Cutting the “Logs”
Consistency is key for a modern look. We use wider logs for a bolder graphic.
- Center Squares (Hearth): Cut 30 squares from Fabric C (Rust Corduroy) measuring 2.5 inches x 2.5 inches.
- Strips (Logs): Cut all your Linen (Light) and Black Denim (Dark) into strips measuring 2.5 inches wide.
- Tip: Keep them long (fabric width) for now; you will cut them to length as you sew.
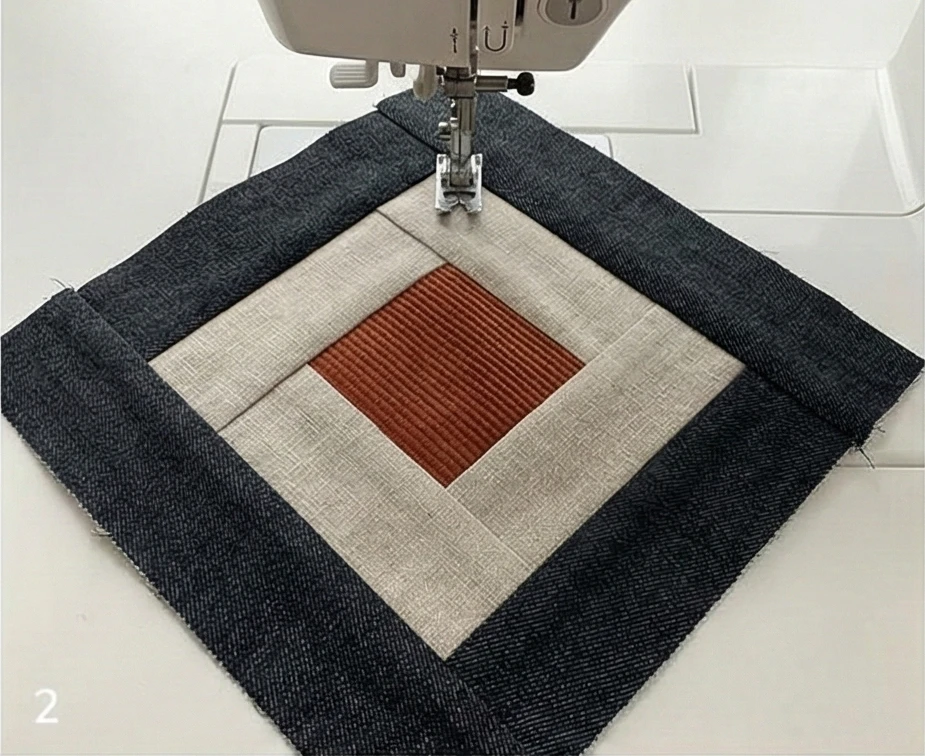
Step 2: Building the Block (The Spiral)
You will make 30 identical blocks.
- Round 1: Take a Rust Center Square. Sew a Light Linen strip to the top edge. Trim to fit. Sew a Light Linen strip to the right edge. Trim.
- Transition: Sew a Black Denim strip to the bottom edge. Trim. Sew a Black Denim strip to the left edge. Trim.
- Result: You have a center square surrounded by light on two sides and dark on the other two.
- Round 2: Repeat the spiral. Add Light strips to the Top and Right. Add Dark strips to the Bottom and Left.
- Round 3: Repeat one final time.
- Finish: Your block should measure 12.5 inches square. Make 30 of these.
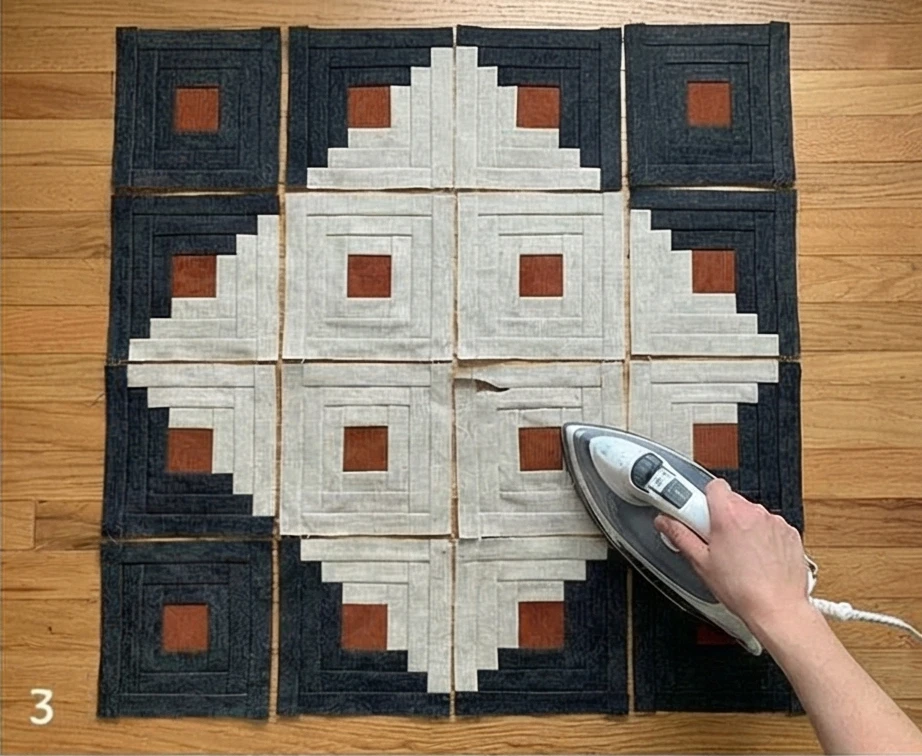
Step 3: The “Diamond” Layout
This arrangement turns simple squares into a sophisticated graphic.
- Grid: Arrange the blocks in a 5-by-6 grid.
- Orientation: Rotate the blocks so that the Light halves of the blocks all face toward the center of the quilt.
- Visual: This creates a large, central “Light Diamond” or “X” shape, with the heavy Black Denim corners anchoring the outside. This layout draws the eye inward and looks stunning when draped over a sofa back.
Step 4: Heavy-Duty Assembly
Denim and Corduroy are thick. Manage your seams.
- Sew Rows: Stitch the blocks together into rows.
- Pressing: Press all seams open.
- Why? If you press to the side, the corners where 4 logs meet will be incredibly thick and hard to quilt. Pressing open flattens the intersection.
- Hammer: If a seam is very bulky, gently tap it with a wooden mallet or hammer to flatten the fibers before sewing the next seam.
Step 5: “Echo” Quilting
Simple straight lines enhance the geometric drama.
- Baste: Sandwich the Backing + Batting + Top. Baste securely.
- Quilt: Stitch “In the Ditch” (right inside the seam lines) around every spiral of the logs.
- X-Pattern: Quilt a large “X” through the center of every rust square to secure the corduroy.
- Effect: This quilting is invisible but structural, ensuring the layers don’t shift when you sit on them.

Step 6: The “Envelope” Finish
A binding is hard to apply to thick denim. An envelope finish is cleaner.
- Trim: Trim batting equal to the top. Trim the Backing fabric exactly to the size of the top.
- Sew: Place the Quilted Top and the Backing Right Sides Together.
- Stitch: Sew around the entire perimeter with a 1/2 inch seam allowance, leaving a 12-inch gap at the bottom.
- Turn: Turn the quilt right side out through the gap. Poke corners sharply.
- Topstitch: Press the edges flat. Topstitch around the entire quilt 1/4 inch from the edge. This closes the gap and gives the throw a crisp, finished rim.
Usability Note: The combination of Corduroy, Denim, and Linen makes this throw extremely tactile. The “grain” of the corduroy and the weave of the linen provide a satisfying sensory experience (friction) that prevents the quilt from sliding off leather or smooth upholstery.
6. Modern Triangles Scandi Quilt for Contemporary Sofa Covers


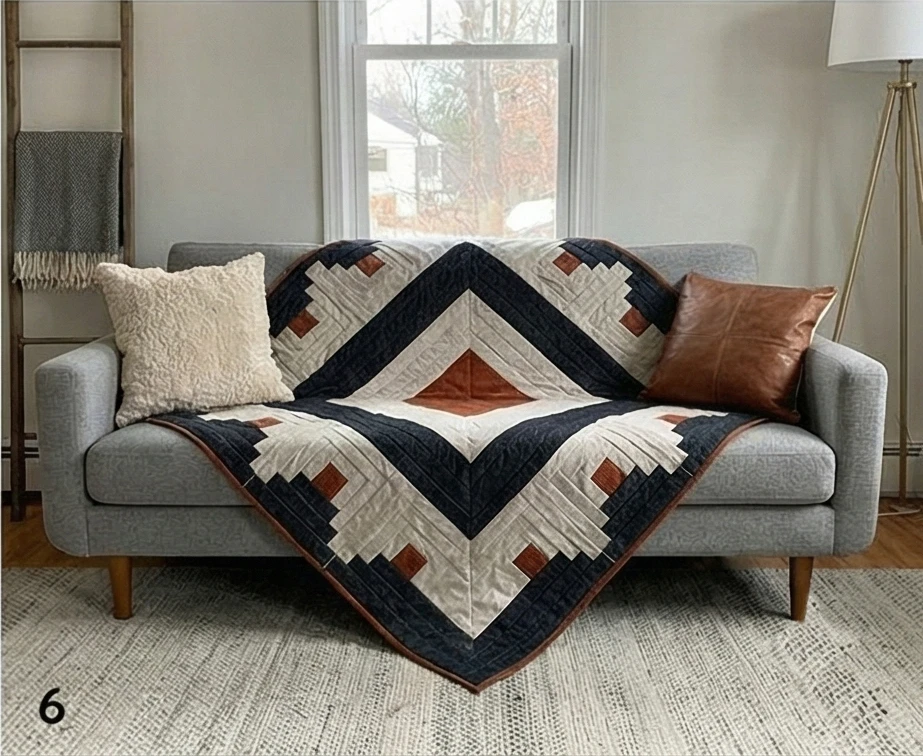
The “Tromsø Peaks” Equilateral Triangle Sofa Cover
Scandinavian modernism often employs geometric shapes to create a rhythmic design without clutter. This design utilizes the 60-degree Equilateral Triangle to create a jagged, mountain-like horizon across your sofa. Unlike traditional “Thousand Pyramid” quilts, which can be scrappy, this version uses a strict three-color palette (Ice Blue, Slate Grey, and White) to evoke the glacial landscapes of Tromsø, Norway. It is designed as a “tuck-in” cover, meaning it is oversized to drape fully over the back and arms of a contemporary sofa.
Finished Dimensions: Large Sofa Cover, approximately 70″ x 90″.
Materials Needed:
- Fabric A (Ice): 2 yards of Pale Blue-Grey solid cotton.
- Fabric B (Stone): 2 yards of Slate Grey or Charcoal solid cotton.
- Fabric C (Snow): 2 yards of Bright White cotton.
- Backing: 5.5 yards of durable cotton canvas or twill (adds weight to keep it in place).
- Batting: Thin Cotton/Poly Blend. (You want a flat, dense look, not a puffy duvet look).
- Thread: Light Grey (50wt).
- Notions: 60-degree Triangle Ruler (or a template), starch spray.
Cultural Backstory: The triangle is a recurring motif in Nordic design, symbolizing both pine forests and mountain peaks. In the mid-century modern era, Scandinavian designers like Arne Jacobsen used these geometric forms to bring order and mathematical beauty to textiles, contrasting with the organic curves of the furniture itself.
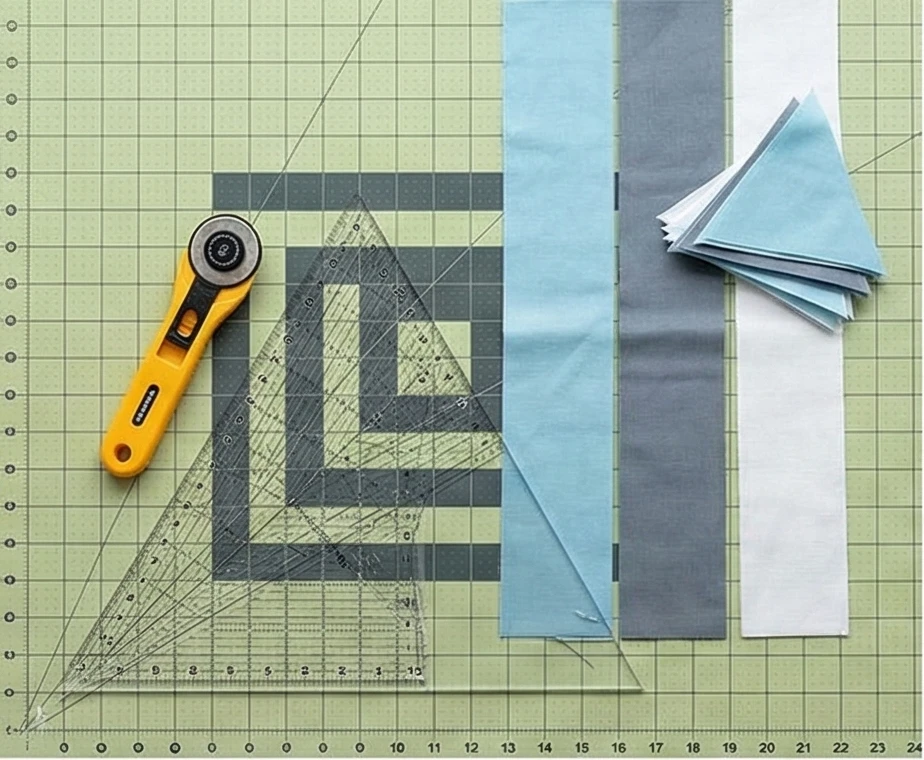
Step 1: Cutting the Triangles
Accuracy is vital with biased edges. Starch your fabric before cutting to stiffen it.
- Strip Cutting: Cut your fabrics into 6.5-inch-wide strips.
- Triangle Cutting: Use your 60-degree ruler on the strip.
- Align the ruler’s bottom with the strip’s bottom. Cut up the side.
- Flip the ruler. Cut down the side.
- Yield: Continue flipping and cutting. You need roughly 200 triangles total (mix of A, B, and C).
- Note: The side edges of these triangles are on the “bias” (stretchy). Handle them gently.
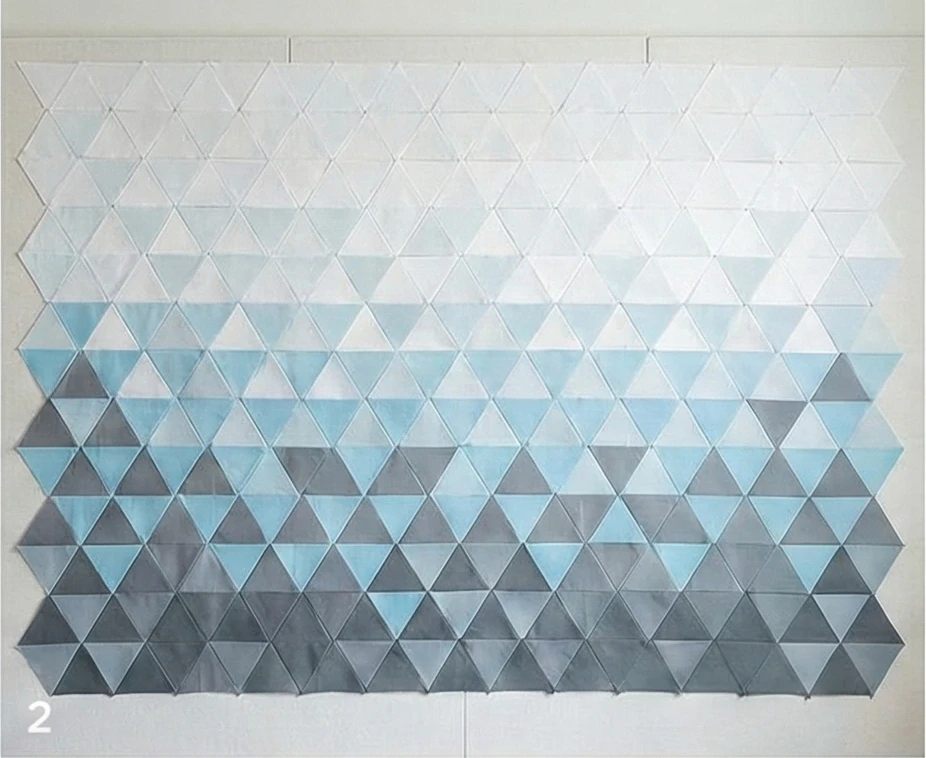
Step 2: The “Glacier” Layout
Randomness within order.
- Design Wall: Lay out your triangles on the floor or a design wall.
- Formation: Arrange them in horizontal rows.
- Alternating: Point Up, Point Down, Point Up, Point Down.
- Palette Strategy: Do not create distinct shapes (like diamonds). Instead, scatter the colors to create a “shimmering” effect.
- Focus: Try to concentrate the Slate Grey (Dark) triangles near the bottom rows (grounding) and the White (Light) triangles near the top rows (sky).
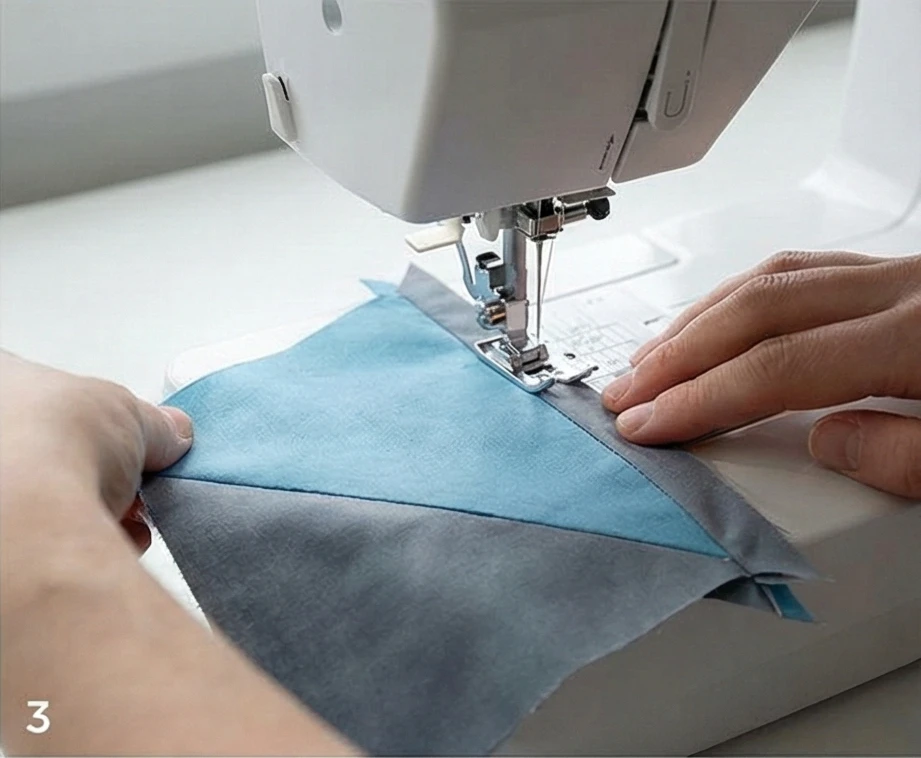
Step 3: Sewing the Rows
Sewing triangles requires specific pinning.
- Pairs: Sew triangles together in pairs first.
- The “Dog Ear”: When you align two triangles (Right Sides Together), the points will not match up perfectly. You must offset them so that the stitching line (1/4 inch down) passes exactly through the “V” where the fabrics cross. You should see small triangle tips (“dog ears”) at the start and end.
- Chain Piecing: Sew all pairs, then join pairs into long rows.
- Pressing: Press all seams Open. This reduces the bulk at the points where 3 or 6 triangles will eventually meet.
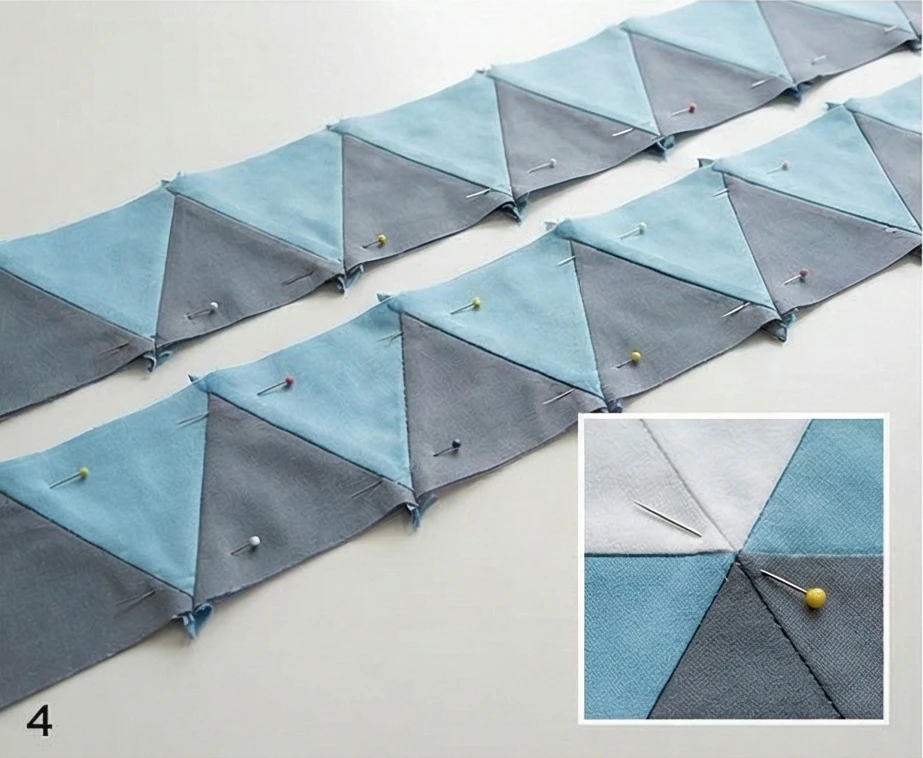
Step 4: Joining the Peaks
- Pinning: Place Row 1 and Row 2 Right Sides Together.
- Match Points: Pin at every single intersection where the points meet.
- Tip: Stick a pin straight through the point of the top triangle and ensure it comes out exactly at the point of the bottom triangle. This guarantees sharp points on the front.
- Sew: Stitch the rows together. Repeat until the top is complete.
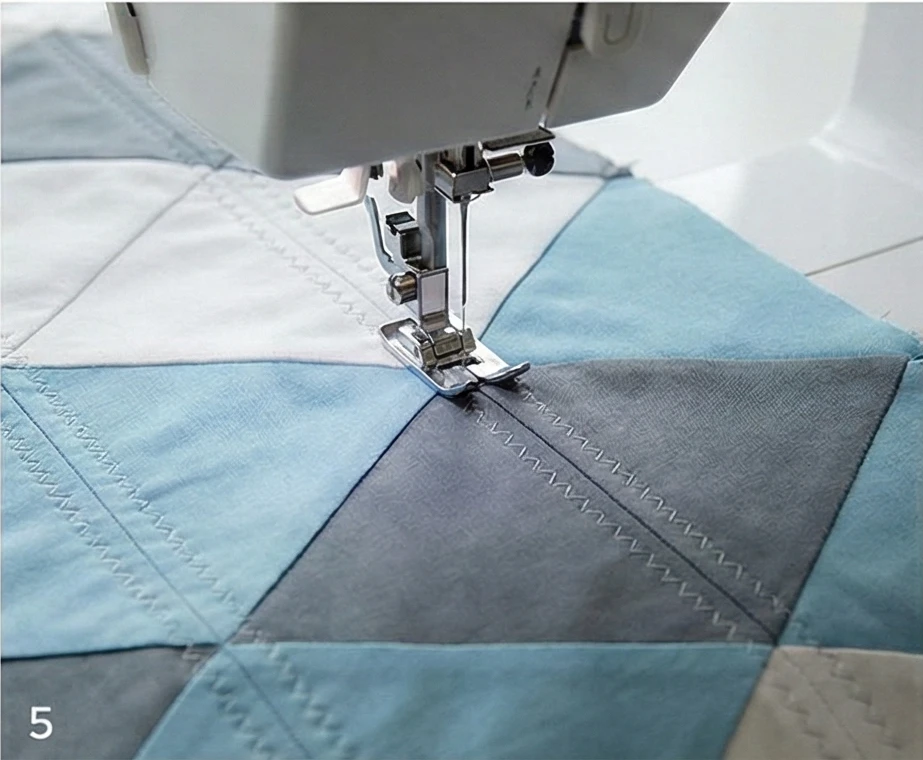
Step 5: “Zig-Zag” Echo Quilting
Quilt with the shape, not against it.
- Baste: Sandwich Backing + Batting + Top.
- Quilt Path: Using a walking foot, stitch straight lines that echo the zig-zag seams.
- Stitch 1/4 inch away from the seam line on both sides of every diagonal seam.
- Effect: This creates a “channel” around every triangle, making the shapes pop and adding durability to the bias seams.
Step 6: The “Weighted” Hem
Sofa covers need to stay put.
- Trim: Square up the jagged edges of the quilt (cutting off the triangle tips) to make a perfect rectangle.
- Binding: Apply a durable double-fold binding in Slate Grey.
- Optional Weight: If you have leather furniture (slippery), sew small pockets into the corners of the binding and insert flat drapery weights or heavy washers before closing the binding. This gravity anchor keeps the “mountains” from sliding down the “slope” of your couch.
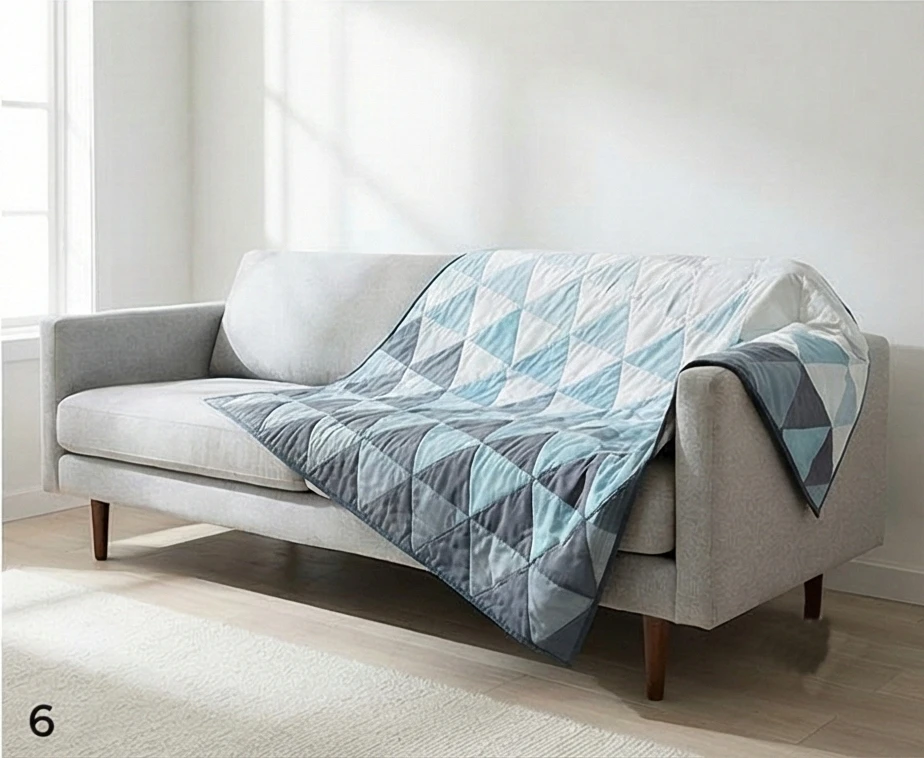
Usability Note: The 60-degree angles create a flexible bias drape. This allows the quilt to mold slightly over the arms and cushions of the sofa better than a square-grid quilt, which tends to tent or stand stiffly.
7. Simple Channel-Quilted Bed Runners for Serene Style

The “Malmö Lines” Linen Channel Runner
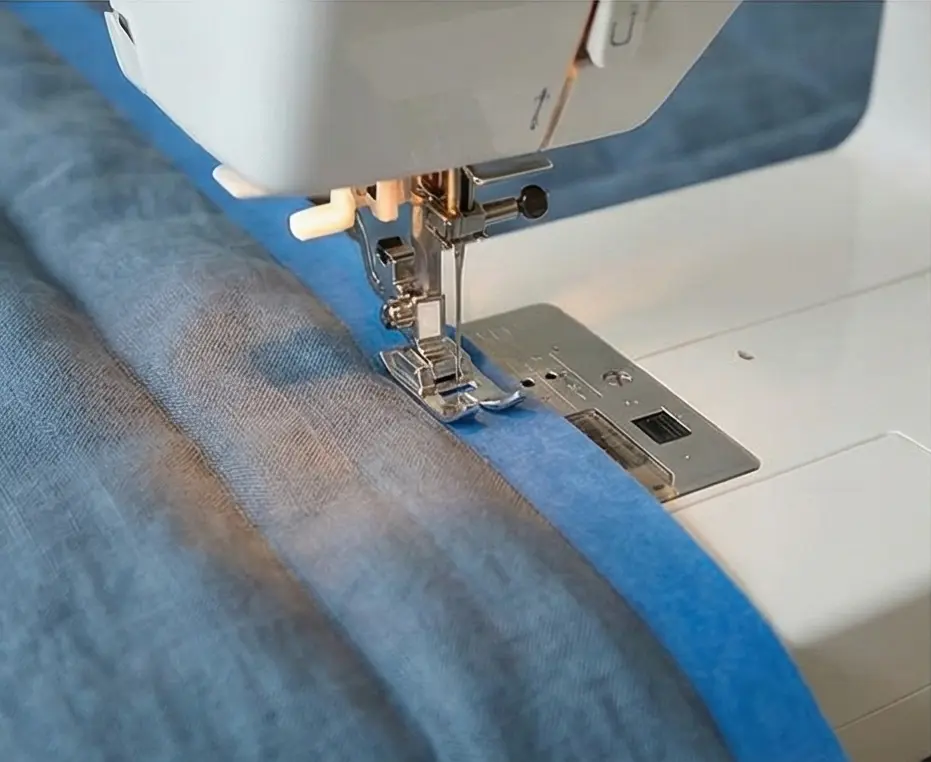
In Scandinavian interior design, “Channel Quilting” (parallel straight-line stitching) is a favorite technique because it adds texture and structure without introducing chaotic patterns. This bed runner is designed to lie across the foot of a white duvet, adding a stripe of sophisticated color and warmth. The “Malmö Lines” design features wide, puffy channels that look like a modern puffer coat or a ribbed sweater, bringing immediate visual comfort to the bedroom.
Finished Dimensions: Queen Bed Runner, approximately 24″ x 90″.
Materials Needed:
- Fabric A (Top): 2.5 yards of Heavy Washed Linen in a muted tone (Dusty Blue, Sage, or Charcoal).
- Fabric B (Backing): 2.5 yards of matching cotton or linen.
- Batting: High-Loft Polyester or Double Layer of Wool Batting. (The key to this look is “puff.” You need thick batting to make the channels stand out).
- Thread: Matching or slightly darker thread (40wt for visibility).
- Notions: Painter’s tape (1-inch or 1.5-inch width), walking foot.
Cultural Backstory: Channel quilting has roots in utilitarian garments worn by fishermen in the North Sea. The trapped air in the channels provided insulation against the freezing wind. Modern design adopted this functional technique, turning the “ribbed” look into a symbol of cozy, protected warmth.
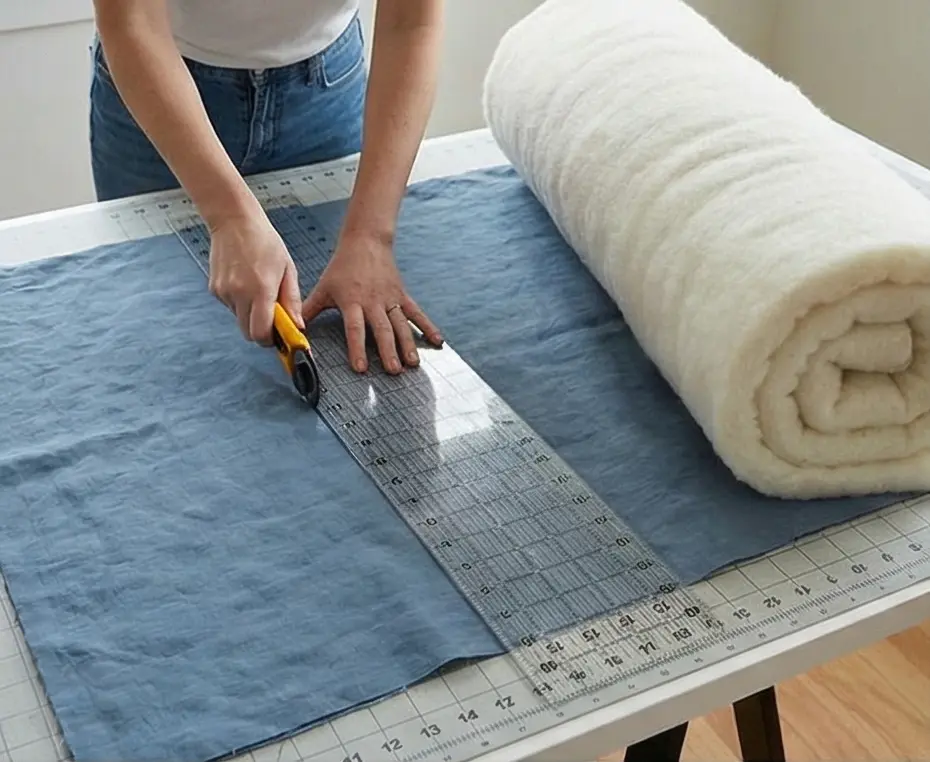
Step 1: The “Oversized” Cut
Quilting shrinks fabric. Especially deep channel quilting.
- Cut Top & Backing: Cut your linen top and backing fabric to 28″ x 96″.
- Why? We are aiming for a finished size of 24″ x 90″, but the dense quilting will pull the fabric in by several inches. It is safer to trim it down after quilting.
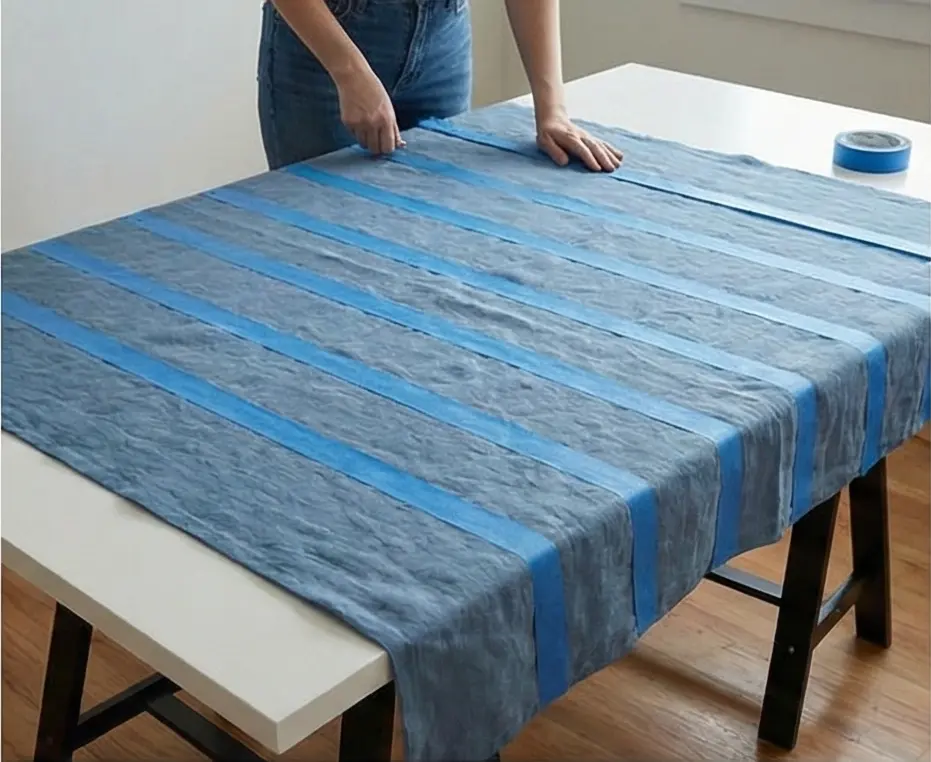
Step 2: Marking the Channels
Do not draw lines. Use tape.
- Tape Guide: Instead of marking with chalk (which rubs off), apply strips of Painter’s Tape across the width of the fabric (the 28″ side).
- Spacing:
- Place a strip of tape.
- Leave a 2-inch gap (use a ruler spacer).
- Place the next strip of tape.
- Alternative: If you want the channels to be exactly the width of the tape, just lay rows of tape with gaps in between equal to the tape width.
- Goal: You want distinct horizontal lines across the runner’s short width.
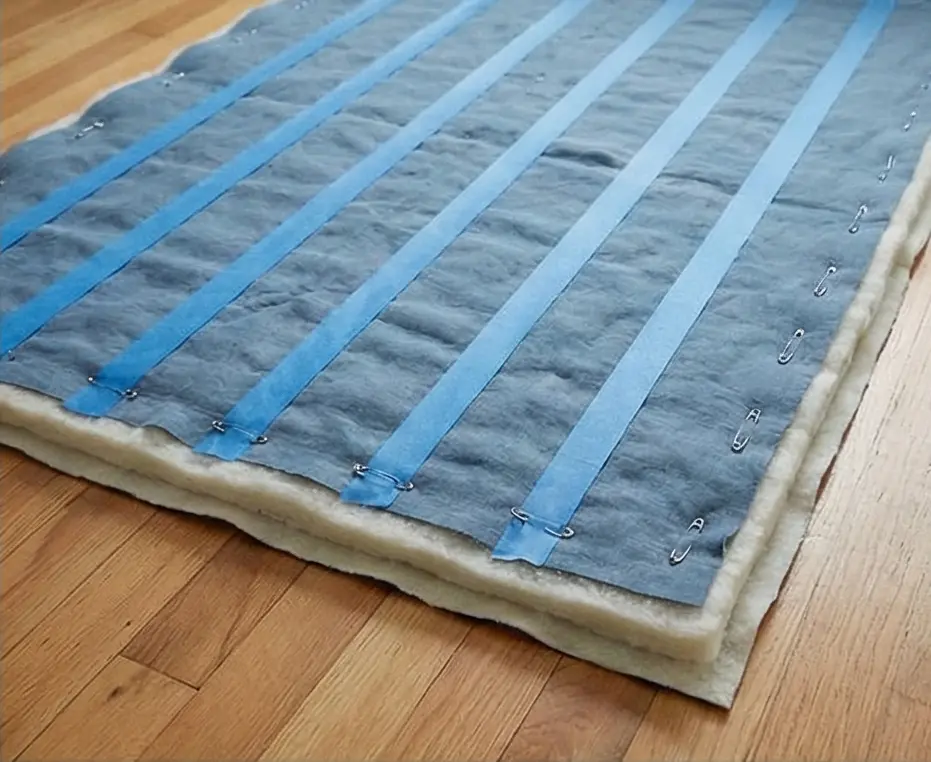
Step 3: The High-Loft Sandwich
- Layer: Tape the backing to the floor. Lay the thick batting (or two layers) on top. Smooth the linen top over it.
- Baste: Use Safety Pins.
- Placement: Pin in the center of the future channels (the gaps between your tape lines). Do not pin where you plan to stitch.
Step 4: Directional Stitching
If you stitch back and forth, the fabric will warp.
- Walking Foot: Install your walking foot. Lengthen stitch to 3.5mm.
- The Rule: Sew all lines in the SAME direction (e.g., Top to Bottom).
- Sew down one line.
- Cut thread.
- Go back to the top and sew the next line.
- Why? If you sew down, then turn and sew up, the heavy batting will shift in opposite directions, creating a “bowing” or “S” shape in your runner.
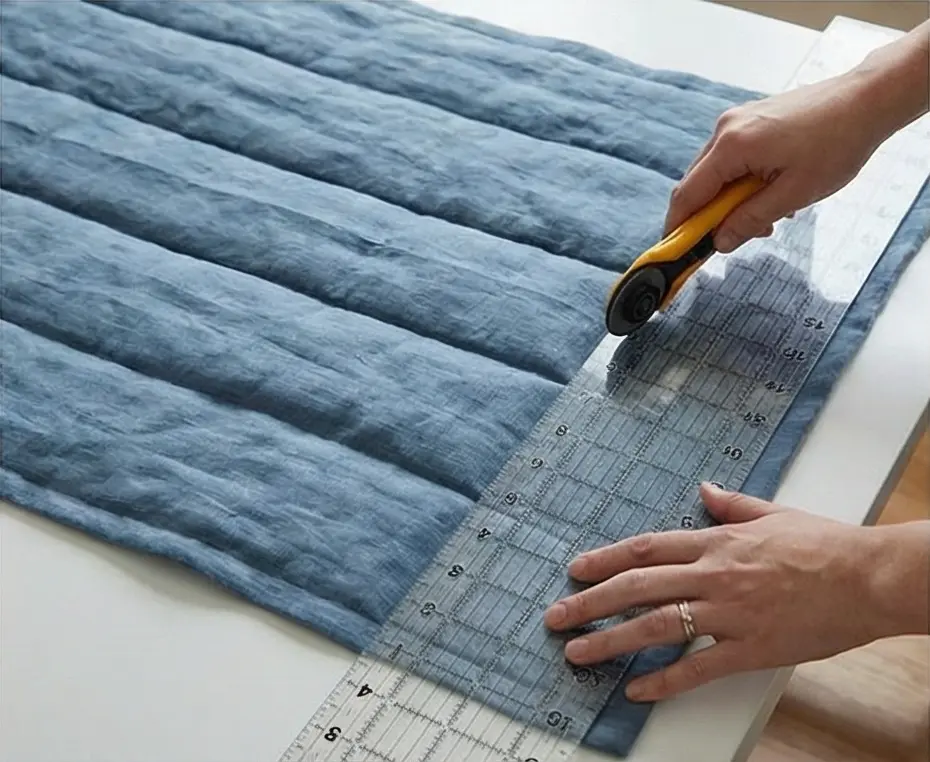
Step 5: The “Puff” Check
- Remove Tape: Peel off the painter’s tape.
- Inspect: The lines of stitching should sink deep into the batting, causing the unstitched linen between them to puff up like fresh bread loaves.
- Trim: Now that the quilting is done, use your long ruler to square up the runner to the final dimensions (24″ x 90″), trimming off the frayed edges and uneven ends.
Step 6: The “Invisible” Finish
A binding adds a rim. A facing keeps it seamless.
- Facing Strips: Cut 2.5-inch strips of the linen.
- Sew: Sew the strips to the front of the runner (sides first, then ends).
- Turn: Flip the strips entirely to the back of the runner.
- Press: Roll the seam slightly so the facing doesn’t show from the front.
- Hand Stitch: Blind stitch the facing to the backing.
- Result: The puffy channels run right off the edge of the runner, giving it a sleek, modern, architectural look.
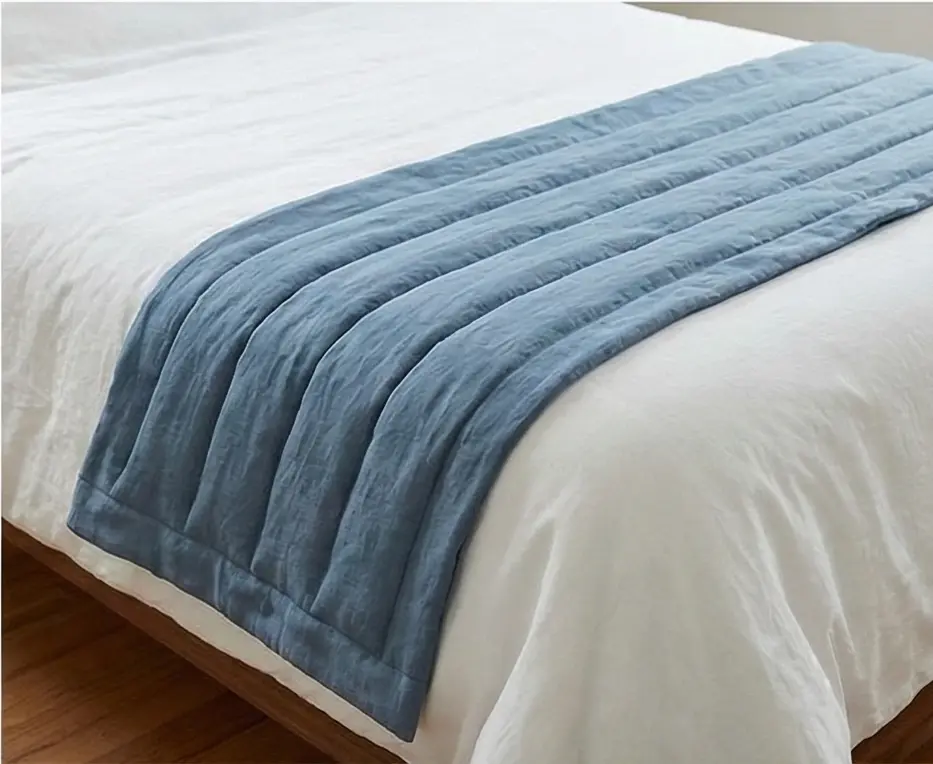
Usability Note: This runner serves a double purpose. Visually, it breaks up the large expanse of a white duvet. Functionally, it protects the foot of the bed from luggage, pets, or cold feet, adding targeted warmth exactly where you need it.
8. Textured Scandi-Style Quilted Pillow Covers for Living Rooms
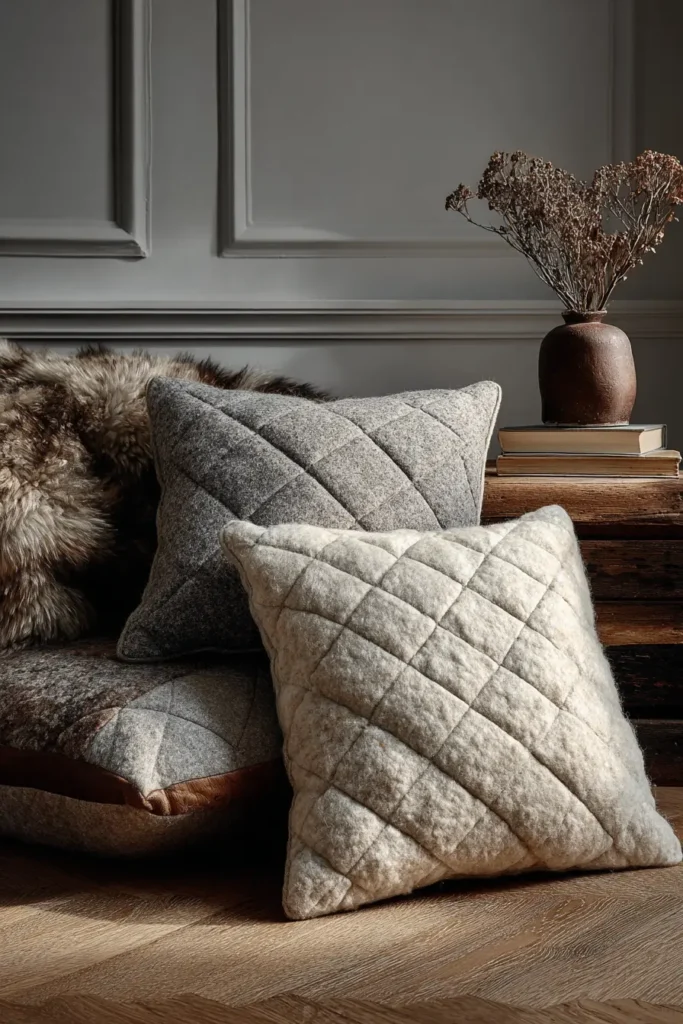
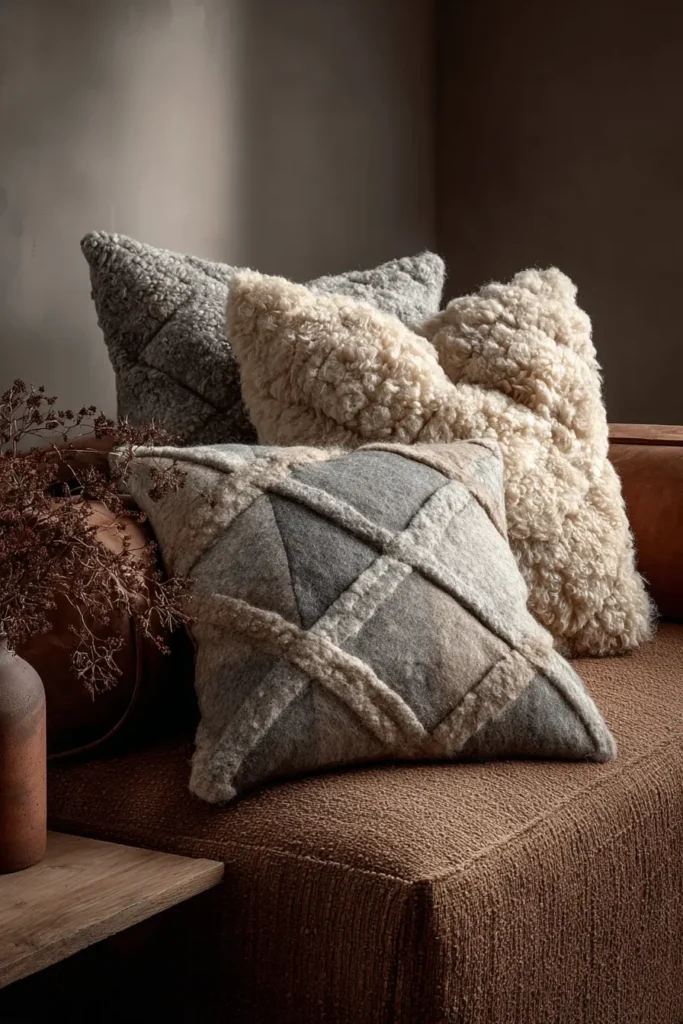
The “Oslo Felt” Grid-Tufted Pillow
In Scandinavian design, when color is removed, texture becomes King. This pillow cover relies on the natural, fuzzy warmth of Boiled Wool or Wool Felt. Instead of piecing fabric together, we create a 3D texture by quilting a dense diagonal grid into the thick wool. The result mimics the look of a quilted mattress or a luxury winter coat, adding an immediate sense of “Hygge” (cozy contentment) to a modern leather sofa or linen armchair.
Finished Dimensions: Standard Square Throw Pillow, 20″ x 20″.
Materials Needed:
- Fabric A (Front): 3/4 yard of Light Grey Boiled Wool, Wool Felt, or heavy Wool Flannel. (Synthetic felt is too stiff; look for a wool blend that is soft).
- Fabric B (Backing): 3/4 yard of matching grey cotton or linen (for the envelope back).
- Batting: High-Loft Polyester Batting. (You need significant puffiness to make the grid pop).
- Muslin: 22″ x 22″ square (interior stabilizer).
- Thread: Cream Perle Cotton (Size 8) for a visible hand-stitched look, or matching grey thread for machine stitching.
- Notions: Masking tape, heavy-duty needle (90/14).
Cultural Backstory: Wool has been the lifeblood of Nordic survival for centuries. “Vadmal” is a traditional Scandinavian spun wool fabric that was felted (shrunk and thickened) to make it windproof and waterproof. This pillow pays homage to those utilitarian textiles, transforming a rough material into a soft, domestic luxury.
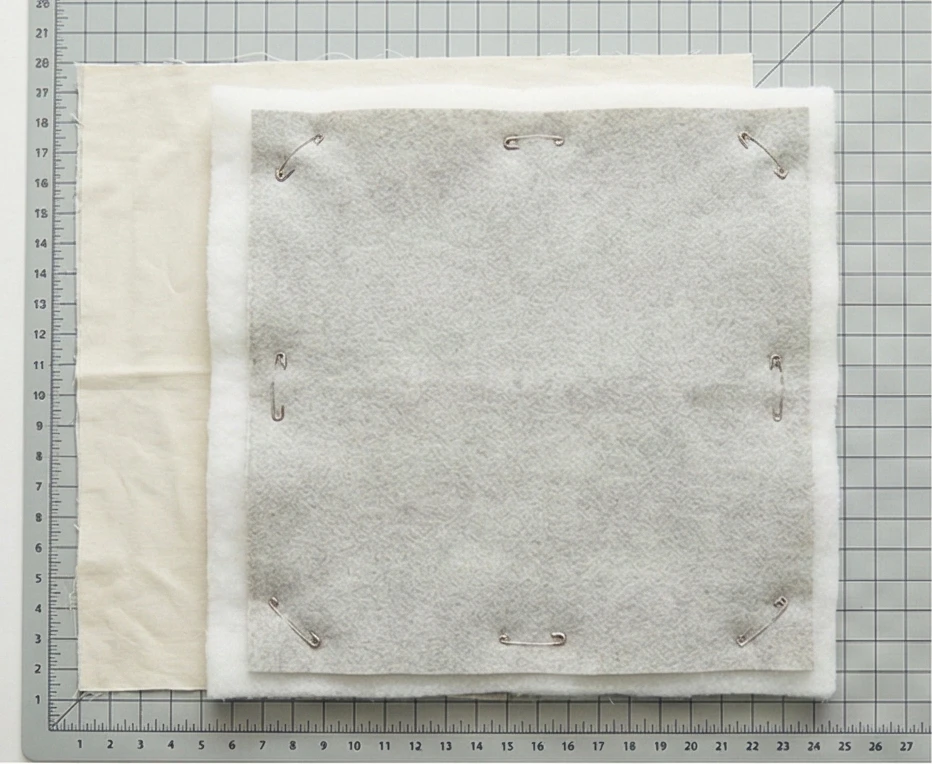
Step 1: The “Oversized” Sandwich
Quilting with wool significantly shrinks the dimensions.
- Cut: Cut the Wool Front, Batting, and Muslin stabilizer to 22″ x 22″.
- Note: We will trim it down to 20″ later.
- Layer: Place Muslin on the bottom, Batting in the middle, Wool on top.
- Baste: Spray baste or pin baste thoroughly. Wool is heavy and can shift.
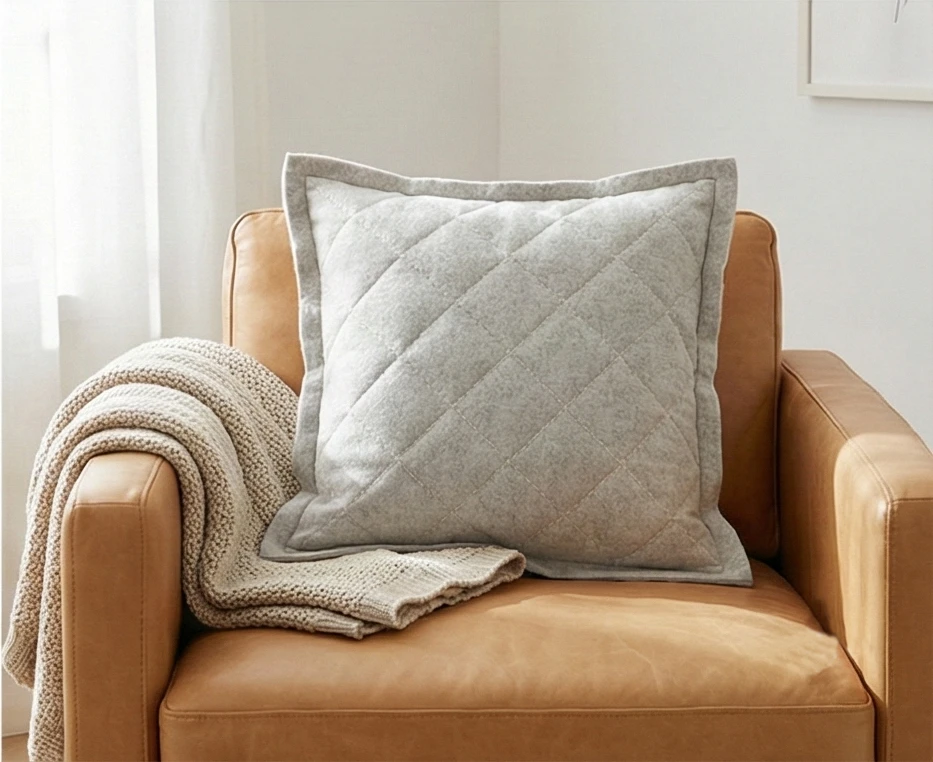
Step 2: Marking the “Diamond” Grid
A diagonal grid feels more dynamic than a square one.
- First Line: Use a long ruler to mark a diagonal line from corner to corner (45 degrees). Use a Hera marker (creasing tool) or Masking Tape.
- The Grid: Mark parallel lines 2 inches apart across the whole pillow.
- Cross Lines: Repeat the process in the opposite direction to create a grid of 2-inch diamonds.

Step 3: The “Tuft” Quilting
You want deep grooves.
- Machine Option: Use a walking foot and a long stitch length (3.5mm). Stitch along every marked line. Increase your top tension slightly to pull the thread down into the wool.
- Hand Option (Recommended for Hygge): Use the thick Cream Perle Cotton. Stitch large running stitches along the lines. The contrast of the cream thread against the grey wool is classic Scandi style.
- Result: The unstitched diamond centers should puff up, creating a rich, tactile surface.

Step 4: Trimming and Squaring
- Press: Steam the quilted top lightly (hover the iron; don’t press down on the wool).
- Trim: Using your square ruler, trim the quilted piece down to exactly 20.5″ x 20.5″.

Step 5: The “Wool Flange” (Optional Elegance)
A simple edge looks unfinished on thick wool. A flange adds sophistication.
- Cut Strips: Cut 4 strips of wool, 2 inches x 20.5 inches.
- Attach: Fold strips in half lengthwise (wrong sides together) to make a 1-inch loop. Baste these loops to the four edges of your quilted top (raw edges aligned).
- Effect: This creates a piped or flanged edge that frames the pillow, eliminating the need for a tricky piping cord.

Step 6: The Envelope Finish
- Backing: Cut two pieces of the cotton backing fabric: 20.5″ x 16″.
- Hem: Hem one long edge of each piece.
- Assemble: Place the quilted top face up. Place the backing pieces face down, overlapping in the middle.
- Sew: Stitch around the perimeter with a 1/2 inch seam allowance.
- Corner Tip: Clip the corners diagonally to reduce bulk.
- Turn: Turn right side out through the envelope gap. Push out corners. Insert a 20″ (or 22″ for extra plumpness) pillow form.
Usability Note: Wool is naturally dirt-repellent. You rarely need to wash this cover; simply airing it outside on a cold, dry day (a traditional Nordic cleaning method) refreshes the fibers and removes odors.
9. Traditional Nordic Star Quilt for Table Runners
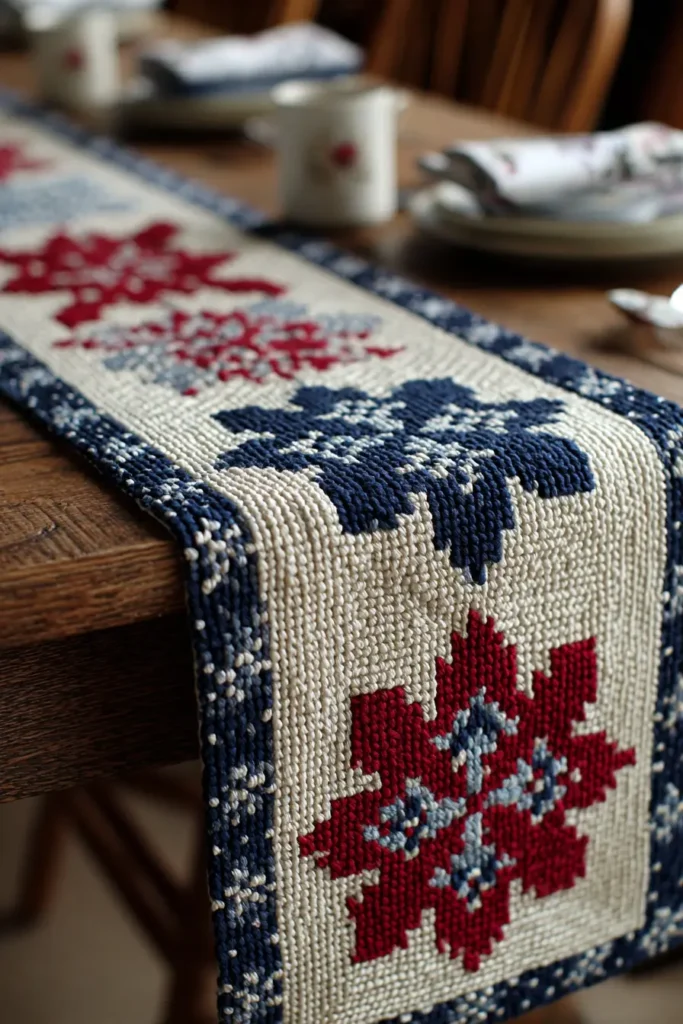
The “Selbu Winter” Star Table Runner
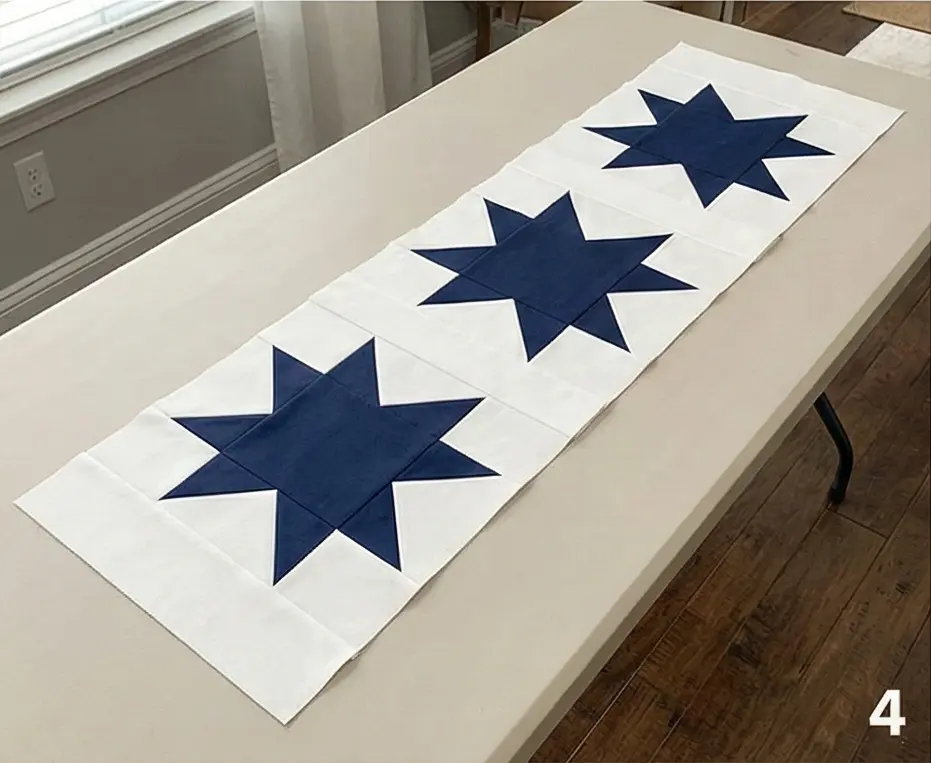
The Selburose (Selbu Rose) is the most iconic knitting pattern in Norway. Originating in the small municipality of Selbu in the 1850s, this eight-pointed star (octagram) became a symbol of Norwegian identity. While traditionally knitted into mittens and sweaters, this pattern translates beautifully into quilting. This table runner features three large, crisp “Selbu Stars” in deep Navy against a snowy White background. It is a striking centerpiece that brings geometric order and a touch of winter heritage to your dining table.
Finished Dimensions: Table Runner, approximately 16″ x 64″.
Materials Needed:
- Fabric A (Background): 1.5 yards of Snow White Cotton or Bleached Linen.
- Fabric B (Stars): 1/2 yard of Midnight Navy or Deep Red solid cotton.
- Backing: 1 yard of a coordinating print (e.g., ticking stripe).
- Batting: Thin Cotton Batting (Bamboo is also good for a flat finish).
- Thread: White for piecing, Navy (or matching star color) for quilting.
- Notions: Rotary cutter, 6″ x 24″ ruler.
Cultural Backstory: The Selburose was created by a teenage girl named Marit Emstad in 1857. She knitted three pairs of mittens with this star design and wore them to church. They caused a sensation. Today, the Selburose is protected as a national symbol, representing the warmth of wool and the beauty of the Nordic winter.
Step 1: Cutting the Components (For 1 Block)
We will make 3 Stars. Each star is a 12-inch “Sawtooth Star” variant.
For ONE Star Block (Repeat 3 times):
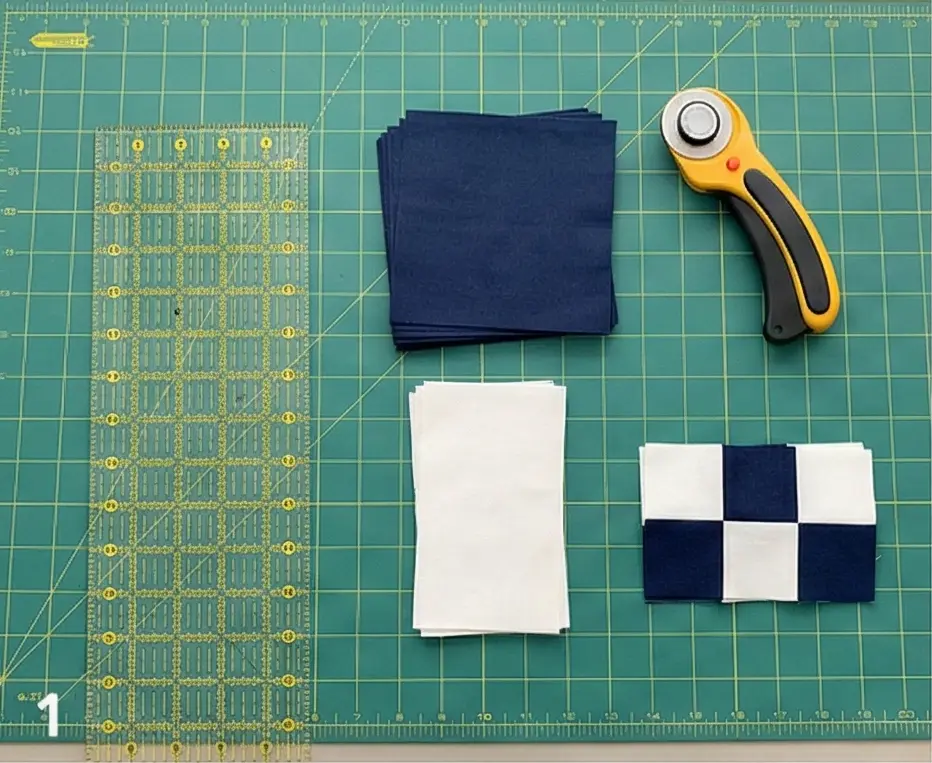
- Star Center: Cut 1 square of Fabric B (Navy) measuring 6.5″ x 6.5″.
- Star Points (Flying Geese):
- Cut 4 rectangles of Fabric A (White) measuring 3.5″ x 6.5″.
- Cut 8 squares of Fabric B (Navy) measuring 3.5″ x 3.5″.
- Background Corners: Cut 4 squares of Fabric A (White) measuring 3.5″ x 3.5″.
For the Sashing & Borders:
- Sashing strips: Cut 2 strips of Fabric A (White) measuring 12.5″ x 4″ (to go between the stars).
- End Borders: Cut 2 strips of Fabric A measuring 12.5″ x 4″ (for the ends).
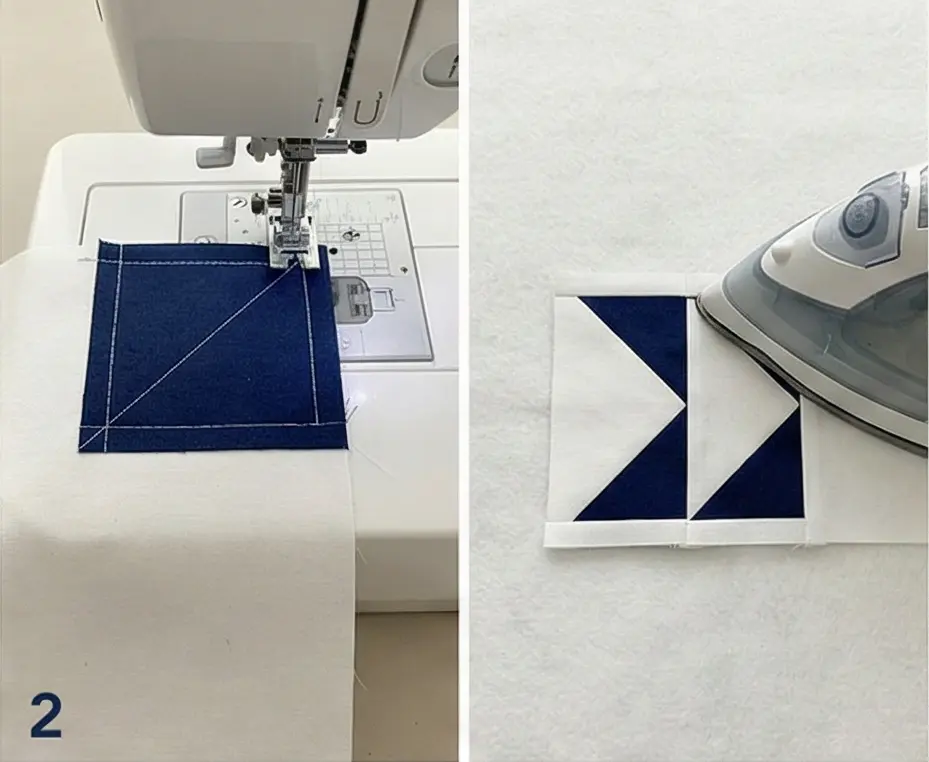
Step 2: Making the Star Points (Flying Geese)
This creates the star’s sharp points.
- Mark: Draw a diagonal line on the back of all 8 small Navy squares.
- Sew Side 1: Place a Navy square on the right side of a White rectangle (Right Sides Together). Sew on the drawn line. Trim the corner, leaving a 1/4″ seam allowance. Press open.
- Sew Side 2: Place another Navy square on the left side of the same White rectangle. Sew on the line. Trim and press.
- Result: You have a White rectangle with two Navy triangles forming a large “V”. This is a “Flying Goose” unit.
- Repeat: Make 4 Flying Geese units for each star block.
Step 3: Assembling the Star Block
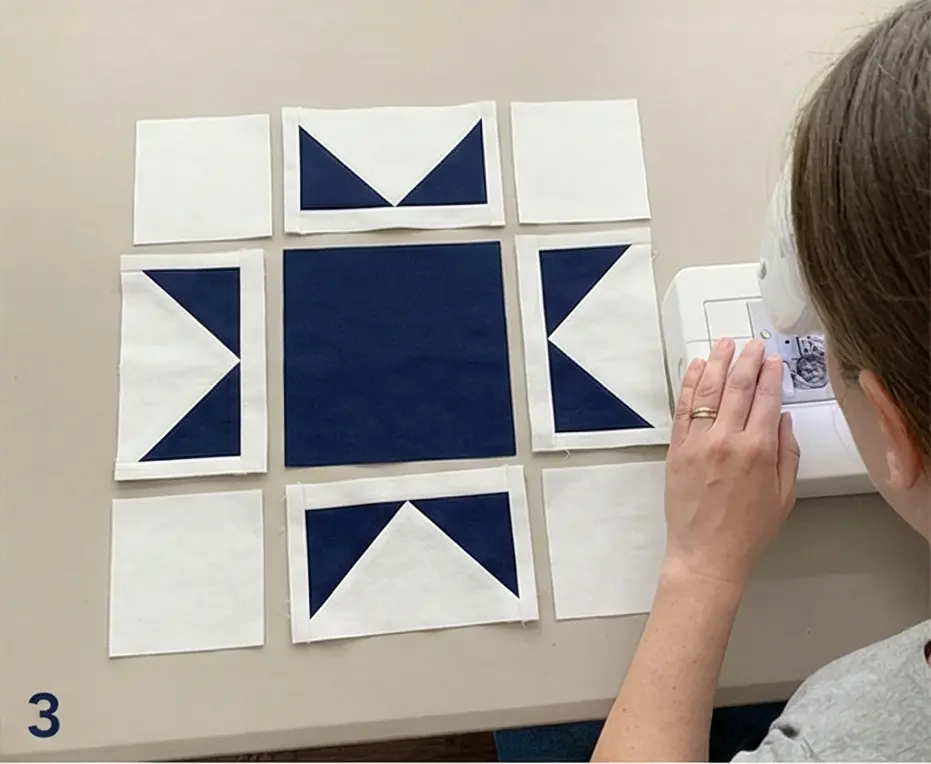
Think of it as a Tic-Tac-Toe grid.
- Top Row: Sew [White Corner Square] + [Flying Goose (point up)] + [White Corner Square].
- Middle Row: Sew [Flying Goose (point left)] + [Navy Center Square] + [Flying Goose (point right)].
- Bottom Row: Sew [White Corner Square] + [Flying Goose (point down)] + [White Corner Square].
- Join: Sew the three rows together.
- Press: Press seams toward the bulky center to reduce stress on the star points.
- Size: Your block should measure 12.5″ x 12.5″ unfinished.
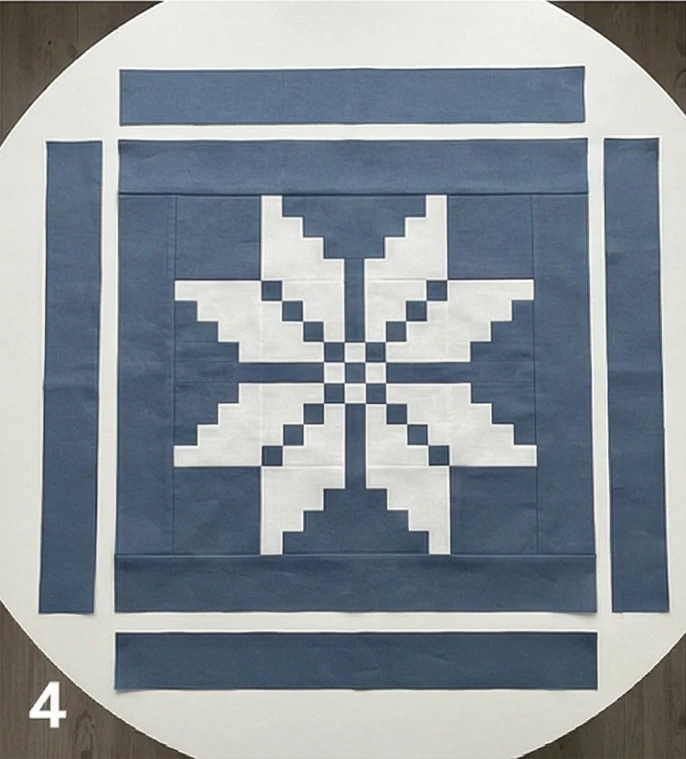
Step 4: The Runner Assembly
Giving the stars room to breathe.
- Layout: Arrange your pieces: [Border] – [Star 1] – [Sashing] – [Star 2] – [Sashing] – [Star 3] – [Border].
- Sew: Stitch the vertical seams joining the stars and sashing strips.
- Alignment: Pin carefully so the top and bottom edges stay perfectly straight.
- Side Borders (Optional): If you want a wider runner (16″), cut two long strips of White fabric (2.5″ x 64″) and sew them to the long top and bottom edges of the runner.
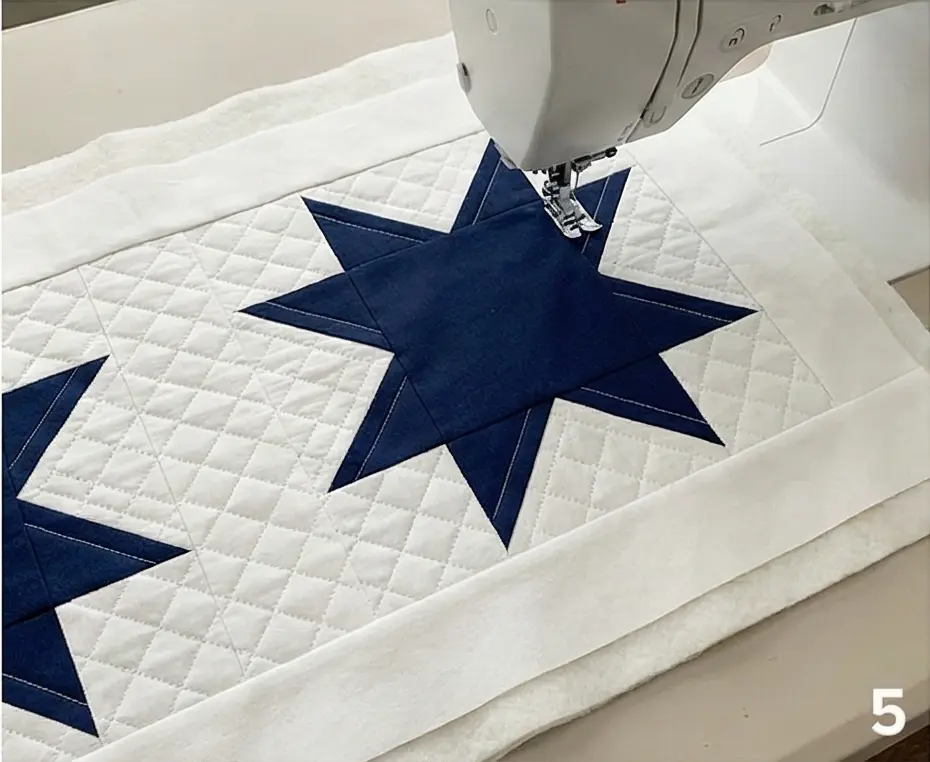
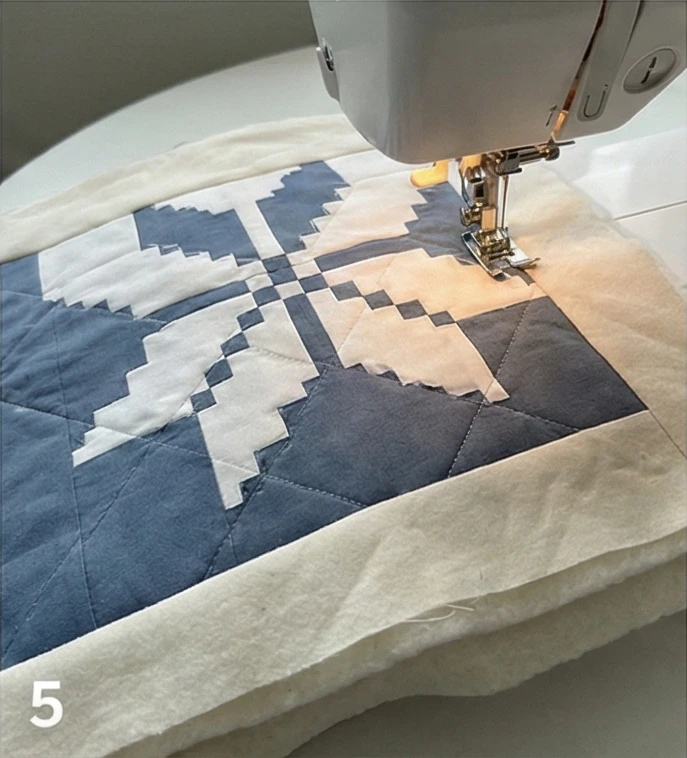
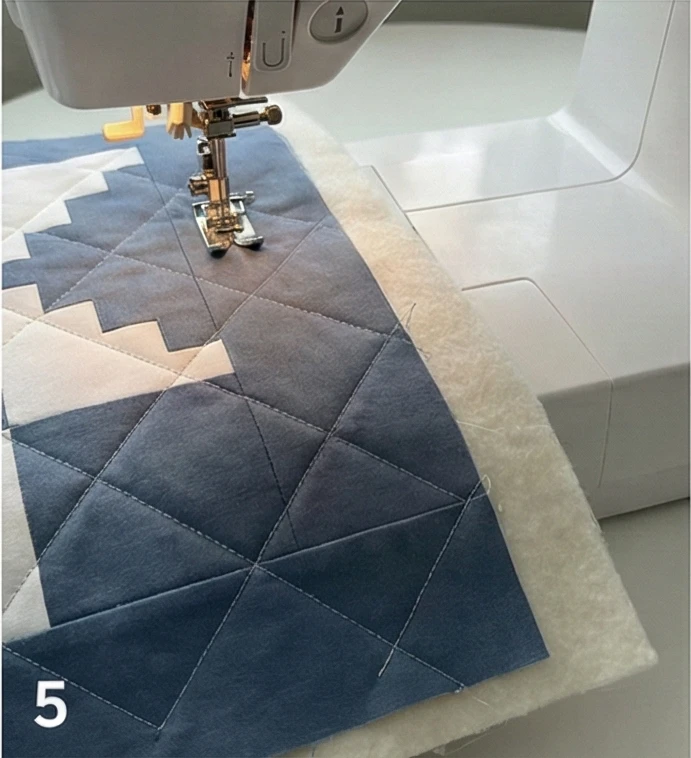
Step 5: “Snowflake” Quilting
Use the quilting to add the intricate detail found in the knitting.
- Baste: Sandwich the Runner (Backing + Batting + Top).
- The Star: Quilt “in the ditch” (inside the seams) around the Navy Star to make it pop.
- The Background: In the solid Navy center squares and the White background spaces, quilt an Eight-Pointed Starburst or simple “X” shapes.
- Design Choice: For a truly authentic Scandi look, quilt a simple grid of diamonds (cross-hatching) over the white background areas to mimic the texture of the knitted grid.
Step 6: The Crisp Contrast Binding
- Choice: Use Fabric B (Navy) for the binding.
- Bind: Attach a double-fold binding.
- Effect: The dark navy rim creates a sharp, graphic frame around the snowy white runner, echoing the high contrast of traditional Norwegian mittens.
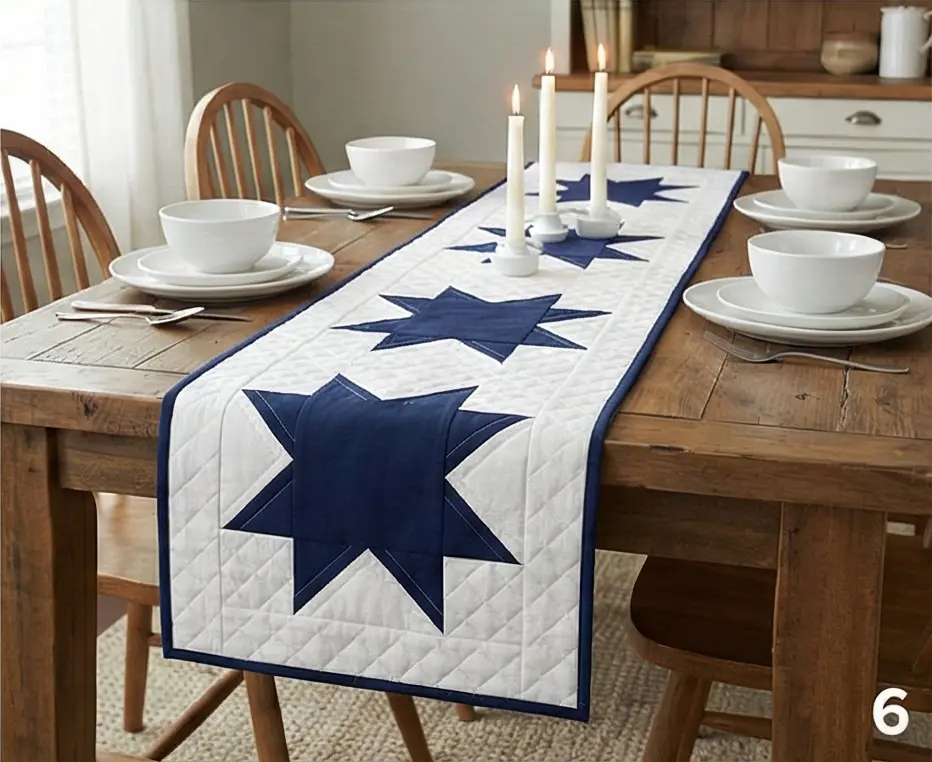
Usability Note: Cotton batting is recommended for table runners because it lies flat. Avoid high-loft poly, or your wine glasses might tip over on the “puffy” surface. This runner is machine washable and looks even better slightly rumpled, like vintage linen.
10. Nordic Pine Tree and Forest Motif Quilts for Wall Decor


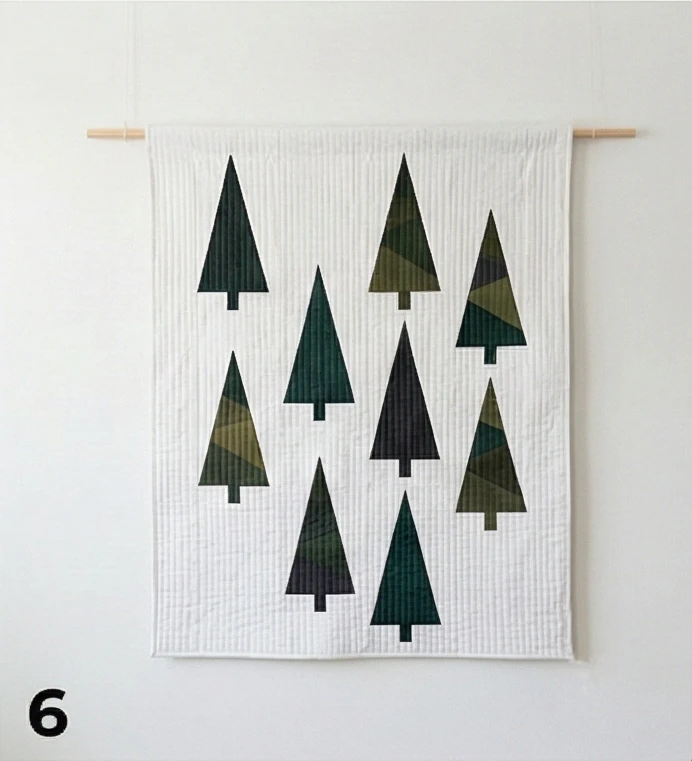
The “Taiga Silence” Minimalist Forest Wall Hanging
The Taiga (Boreal Forest) is the world’s largest land biome, wrapping around the entire Nordic region. It is defined by endless rhythms of Spruce, Pine, and Larch. This wall hanging captures that silent rhythm. Instead of literal, detailed trees, we use Tall Isosceles Triangles in varying shades of forest green, charcoal, and grey against a stark white background. The design is abstract and graphic, bringing the stillness of a snowy Scandinavian forest into your home.
Finished Dimensions: Vertical Wall Panel, approximately 24″ x 40″.
Materials Needed:
- Fabric A (Trees): Scraps or Fat Eighths of 5 different shades of Dark Green, Olive, Charcoal, and Slate Blue.
- Fabric B (Background): 1.5 yards of Snow White or Pale Silver cotton.
- Fabric C (Trunks): Small scrap of Dark Brown or Black cotton.
- Backing: 1 yard of neutral cotton.
- Batting: Fusible Fleece or stiff cotton batting (wall hangings need stiffness to hang flat).
- Thread: White and Dark Green.
- Notions: A ruler with a 60-degree line or a tall triangle template.
Cultural Backstory: In Nordic folklore, the forest is a liminal space—beautiful but dangerous. The “Skogen” (forest) represents the unknown. Bringing the tree motif indoors, especially the evergreen, symbolizes life persisting through the dark winter (“Mørketid”). Modern Scandi prints often reduce the tree to a simple triangle, emphasizing form over detail.
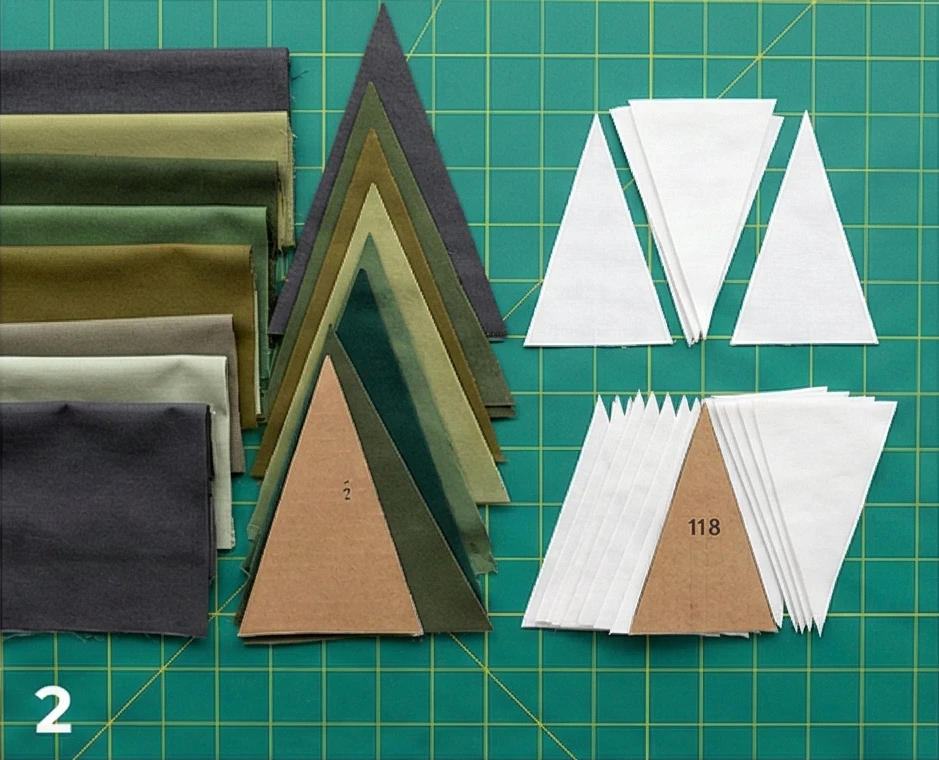
Step 1: Making the Template
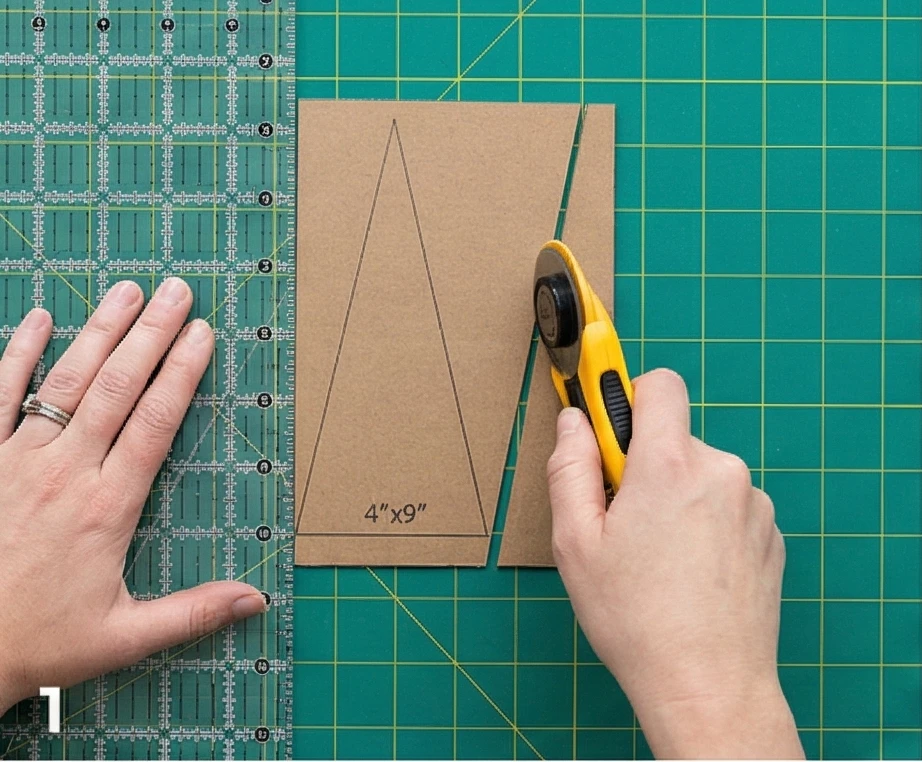
We want tall, slender trees, not equilateral pyramids.
- On a piece of cardboard or a plastic template, draw a rectangle 4 inches wide by 9 inches tall.
- Mark: Mark the center point of the top edge (2 inches in).
- Draw: Draw lines from the top center point down to the bottom left and bottom right corners.
- Cut: Cut out this tall triangle. This is your Tree Template.
Step 2: Cutting the “Grove”
- Trees: Use your template to cut 9 Trees from your assorted green/grey fabrics (Fabric A).
- Background Wedges: You need to fill the space around the trees.
- Place your template on the Background Fabric (Fabric B), but flip it upside down.
- Add a 1/4 inch seam allowance to the long sides.
- Cut 18 of these “Background Wedges.”
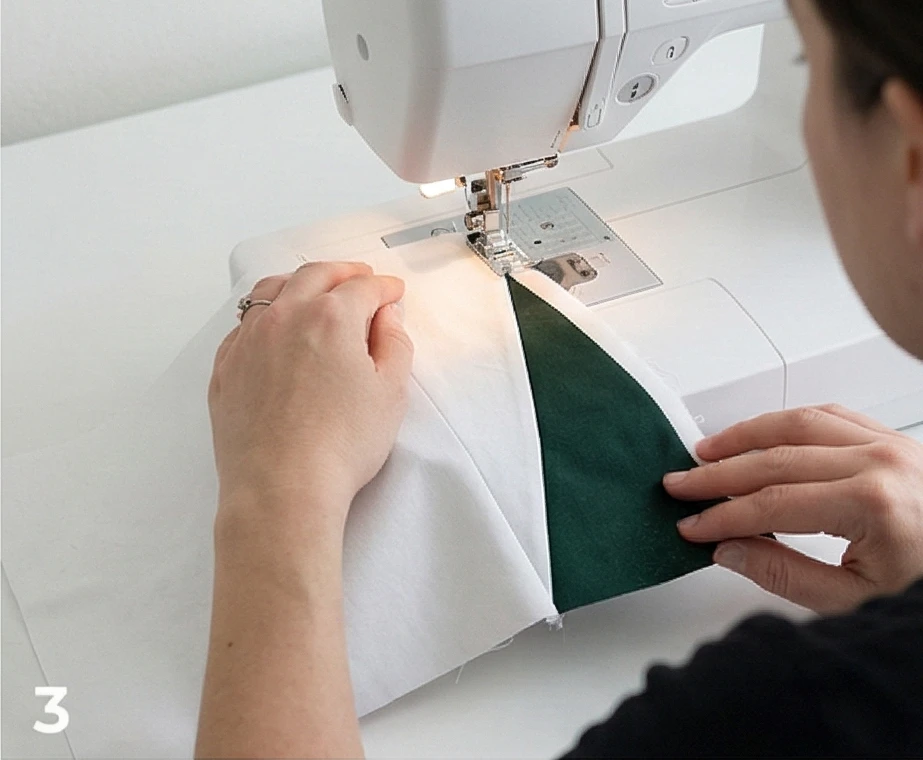
Step 3: Piecing the Tree Blocks
This technique creates a rectangular block with a floating triangle.
- Sew: Place a Background Wedge on the right side of a Tree Triangle (Right Sides Together).
- Alignment: The background wedge is upside down (with the wide part at the top). Align the raw edges. The point of the background wedge will stick out slightly at the bottom.
- Stitch with a 1/4 inch seam. Press the seam toward the background.
- Repeat: Sew a second Background Wedge to the left side of the Tree Triangle.
- Result: You now have a rectangular block containing one tree.
- Trunks:
- Cut a tiny strip of Fabric C (1″ x 1.5″).
- Slice the center of the tree block bottom, insert the trunk strip, and sew it back together (or simply appliqué a small rectangle of brown over the base of the tree raw edge before adding the next row). Simpler Method: Just let the triangle float without a trunk for a more modern abstract look.
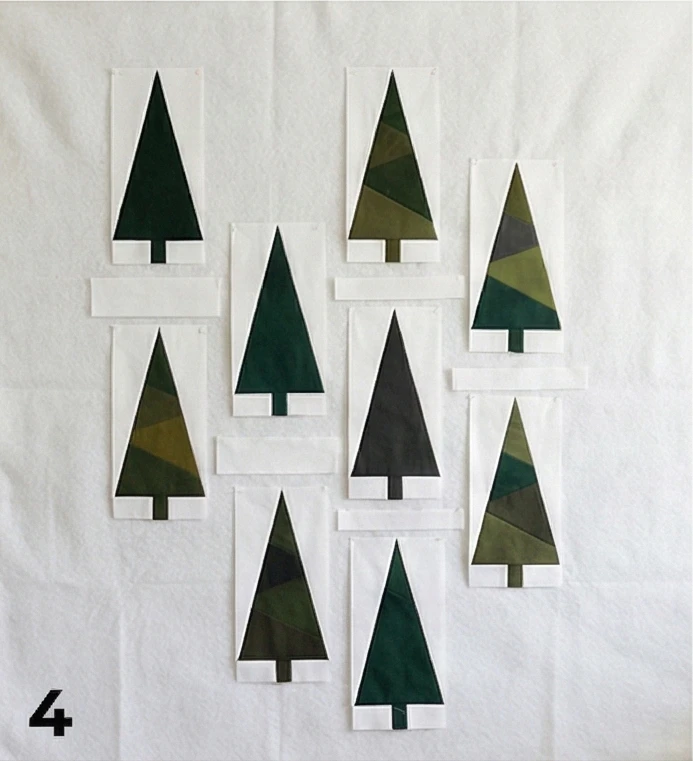
Step 4: The “Staggered” Layout
A real forest isn’t a straight line.
- Design Wall: Arrange your 9 blocks into 3 vertical columns.
- Column 1: 3 Trees.
- Column 2: 3 Trees.
- Column 3: 3 Trees.
- Spacing: Cut varying lengths of White Background Fabric strips (4.5 inches wide) to place vertically between the tree blocks.
- Example: In Column 1, put a 2-inch white spacer between trees. In Column 2, put a 5-inch spacer.
- Goal: Shift the trees up and down so they don’t align horizontally. This creates a natural, organic distribution.
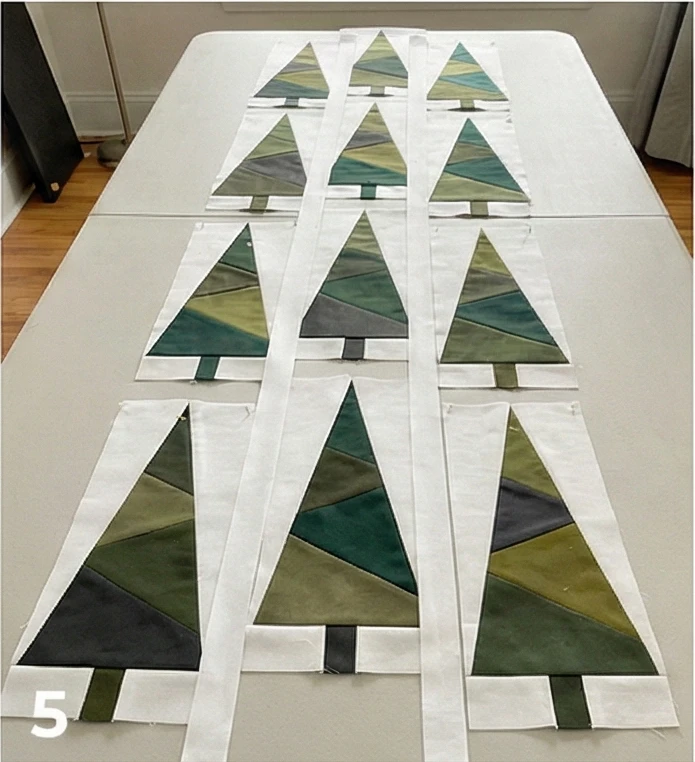
Step 5: Assembly and Sashing
- Columns: Sew the pieces of each column together. You now have three long vertical strips.
- Sashing: Cut 2 vertical strips of White Background Fabric (2 inches wide x 40 inches long).
- Join: Sew the columns together with the sashing strips in between them to separate the rows of trees.
- Sew: Column 1 + Sashing + Column 2 + Sashing + Column 3.
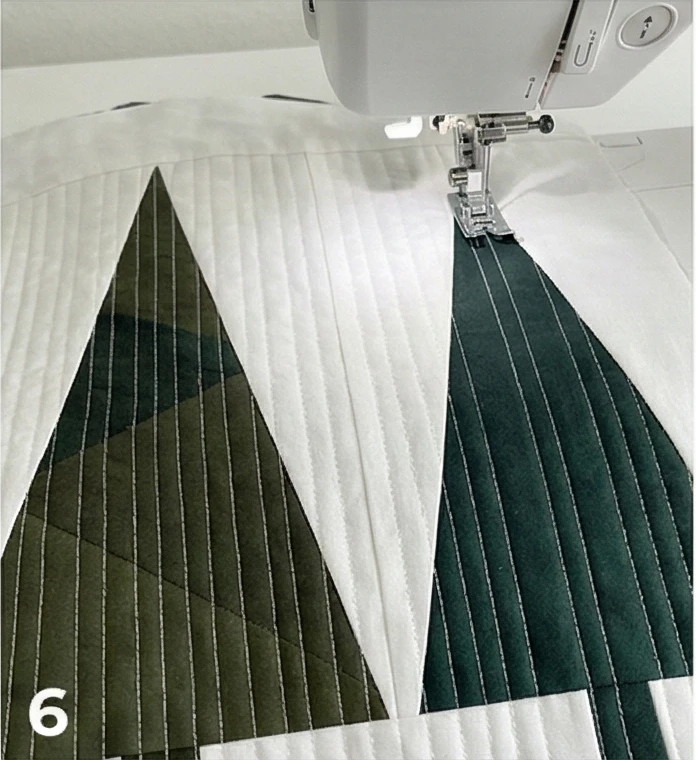
Step 6: “Falling Snow” Quilting
- Layer: Backing + Fusible Fleece + Top. Fuse the fleece to the top to prevent shifting.
- Quilt: Use White Thread.
- Quilt straight vertical lines from the very top to the very bottom.
- Spacing: Vary the spacing. Some lines close together, some far apart.
- Effect: The white vertical lines over the dark trees look like heavy snow falling in front of the forest, softening the colors and adding texture.
Step 7: The “Invisible” Hanging Finish
Wall art shouldn’t have a bulky binding.
- Facing: Instead of binding, sew 2-inch-wide fabric strips to the front edges.
- Flip: Flip them completely to the back and hand-stitch down. This creates a crisp, “faceless” edge.
- Sleeve: Hand-sew a fabric tube (sleeve) to the top back of the quilt.
- Hang: Insert a flat wooden slat or dowel into the sleeve and hang from a single nail for a clean, floating appearance.
Usability Note: The vertical layout of this quilt draws the eye upward, making ceilings feel higher. The batting’s acoustic-damping properties also help reduce echo in minimalist rooms with hard floors.
11. Quilted Wall Hangings with Abstract Nordic Landscapes

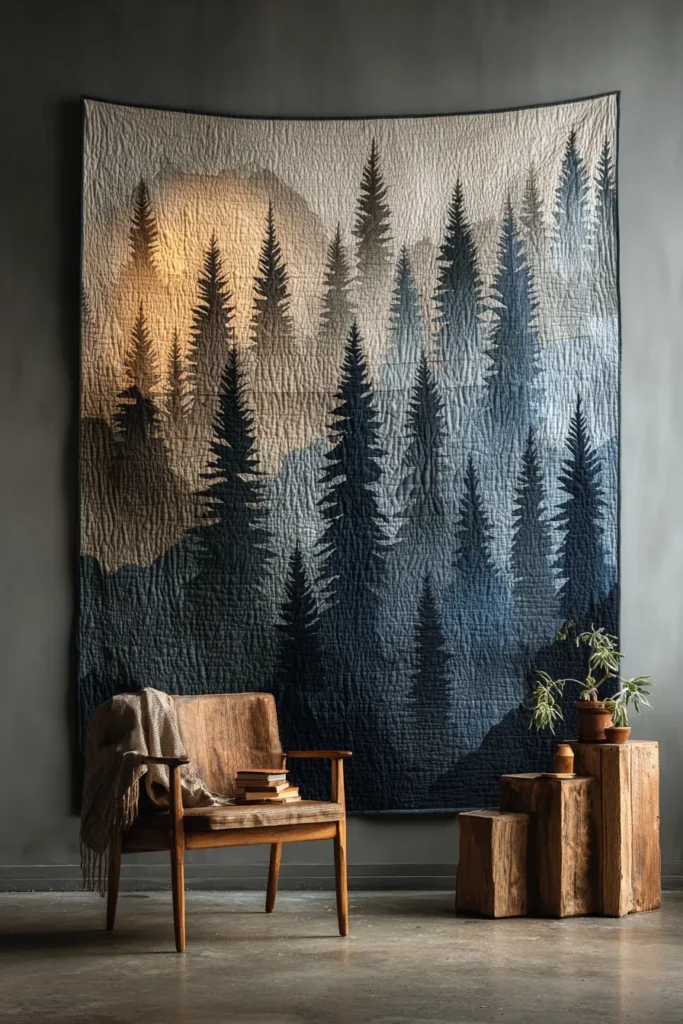
The “Aurora Borealis” Improvisational Curve Wall Quilt
While classic patchwork relies on straight lines, the Nordic landscape is defined by organic curves—the winding fjords, the rolling snowdrifts, and the dancing Northern Lights. This abstract wall hanging uses Improvisational Curve Piecing to capture that movement. Instead of rigid templates, you will cut fluid, gentle waves freehand. The result is a one-of-a-kind textile art piece that mimics the shifting ribbons of green and teal light in a dark winter sky.
Finished Dimensions: Vertical Wall Art, approximately 30″ x 45″.
Materials Needed:
- Fabric A (Night Sky): 1/2 yard of Deep Navy or Charcoal solid cotton.
- Fabric B (The Lights): Scraps or fat quarters of Teal, Aqua, Lime Green, and Pale Mint. (Solids work best for a modern look).
- Fabric C (The Ground): 1/2 yard of White or Cool Grey cotton.
- Backing: 1.5 yards of solid cotton.
- Batting: Fusible Fleece or stiff cotton batting (to ensure it hangs flat).
- Thread: Navy (for blending) or Silver (for sparkle).
- Notions: Rotary cutter (45mm or smaller is easier for curves), cutting mat.
Cultural Backstory: The Aurora Borealis has many names in Nordic folklore. In Finnish, it is “Revontulet” (Fox Fires), believed to be sparks flying from the tail of a mystical fox running across the snow. This quilt captures that sense of magic and motion, using the “Improv” technique to ensure no two curves are ever alike, just like the lights themselves.
Step 1: The “Layer Cake” Stack
Improvisational curves are cut through multiple layers at once to ensure they fit together.
- Prep: Press all fabrics.
- Stacking: Lay a rectangle of your Sky Fabric (Navy) on the cutting mat (approx 10″ x 32″). Lay a rectangle of your Light Fabric (Teal) on top of it, right side up.
- Note: Overlap them by about 4 inches where you want the “horizon” line to be.
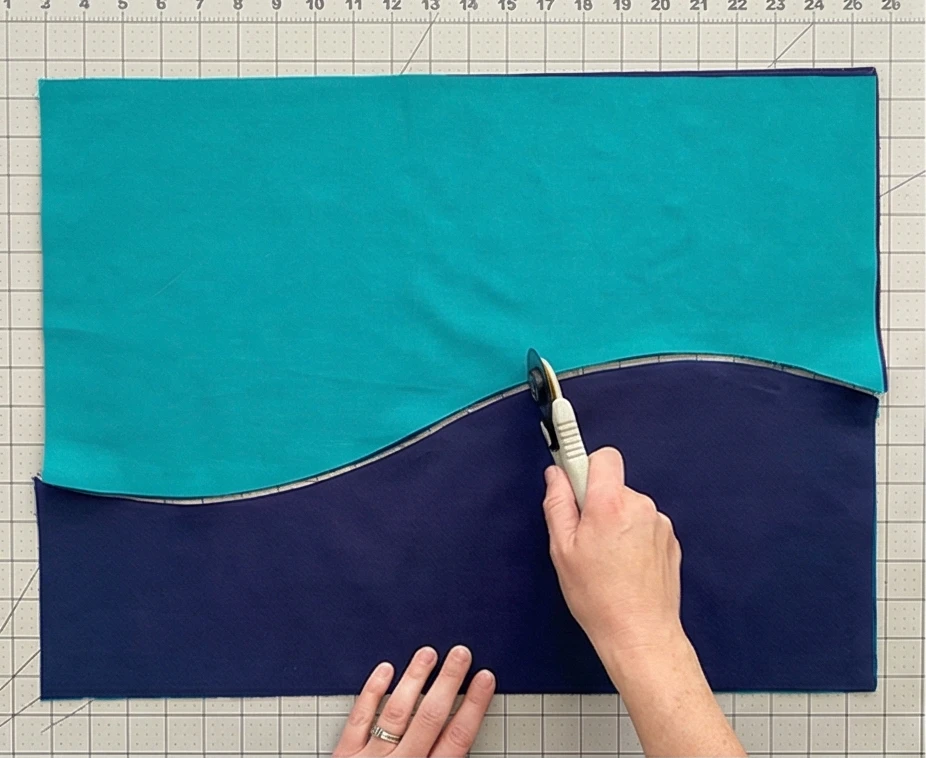
Step 2: Cutting the Curve
Be brave. No rulers allowed.
- The Cut: Use your rotary cutter to slice a gentle, wavy line through both layers of fabric where they overlap.
- Tip: Keep the curves gentle. Deep, tight valleys are hard to sew. Think “rolling hills,” not “jagged peaks.”
- Separate: Remove the excess scrap pieces. You now have a Navy piece and a Teal piece that have mirror-image curves.
Step 3: Sewing the “Impossible” Seam
Sewing curves is easier than it looks if you don’t pull.
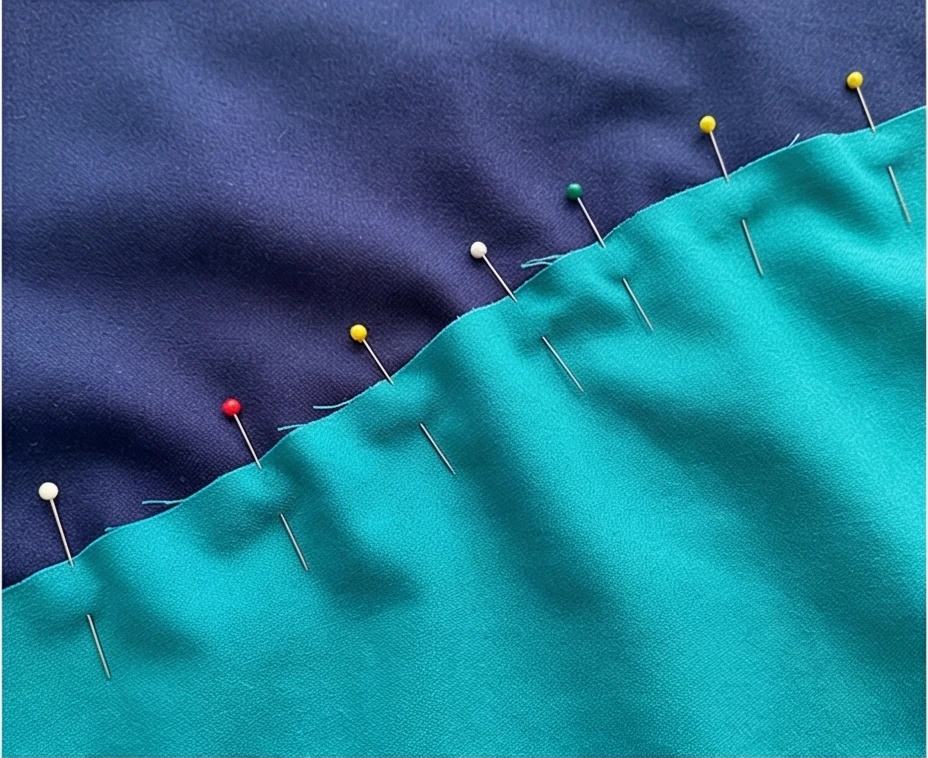
- Pinning: Place the two curved edges Right Sides Together.
- Pin the Center first.
- Pin the two Ends.
- Ease the rest of the fabric in and pin every inch. The fabric will ruffle and look messy—this is normal.
- Stitch: Sew with a 1/4 inch seam allowance. Go slowly. Use your fingers to smooth out wrinkles just before they hit the needle.
- Press: Press the seam toward the darker fabric. The curve should lie flat.
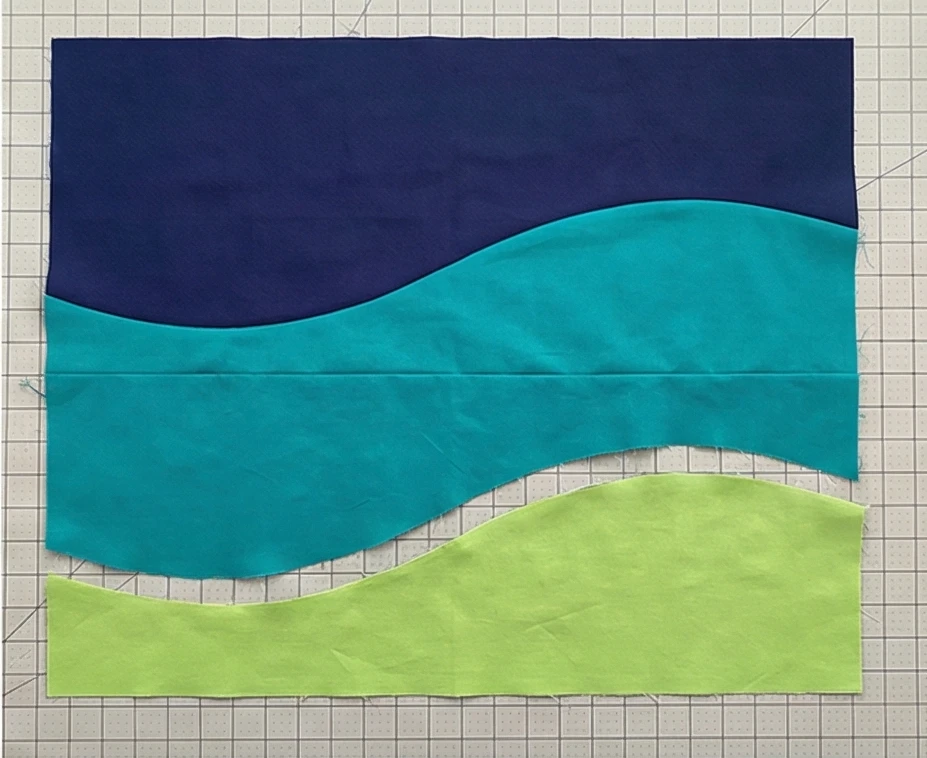
Step 4: Building the “Strata”
We build the landscape from the top down.
- Add More Lights: Repeat the process. Lay a strip of Lime Green over the bottom edge of your newly sewn Teal/Navy piece. Cut a new curve through both. Sew them together.
- Add the Ground: Finally, add the White/Grey fabric at the very bottom using the same curve technique.
- Composition: Aim for a balance: 2/3 Sky and Lights, 1/3 Snowy Ground.
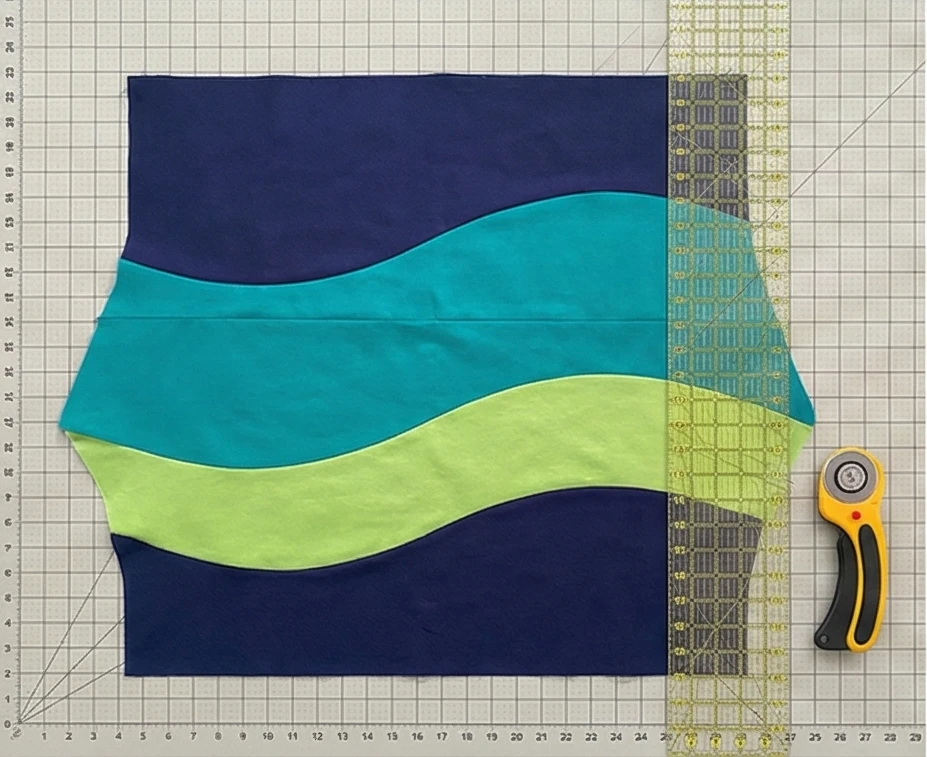
Step 5: Squaring Up the Abstract
Improv piecing results in wonky edges.
- Assess: Lay the pieced top on your table. It will likely be crooked.
- Crop: Use a large square ruler or long straight edge to crop the piece into a perfect rectangle (30″ x 45″).
- Artistic Choice: You can tilt the ruler to change the angle of the horizon line before you cut.
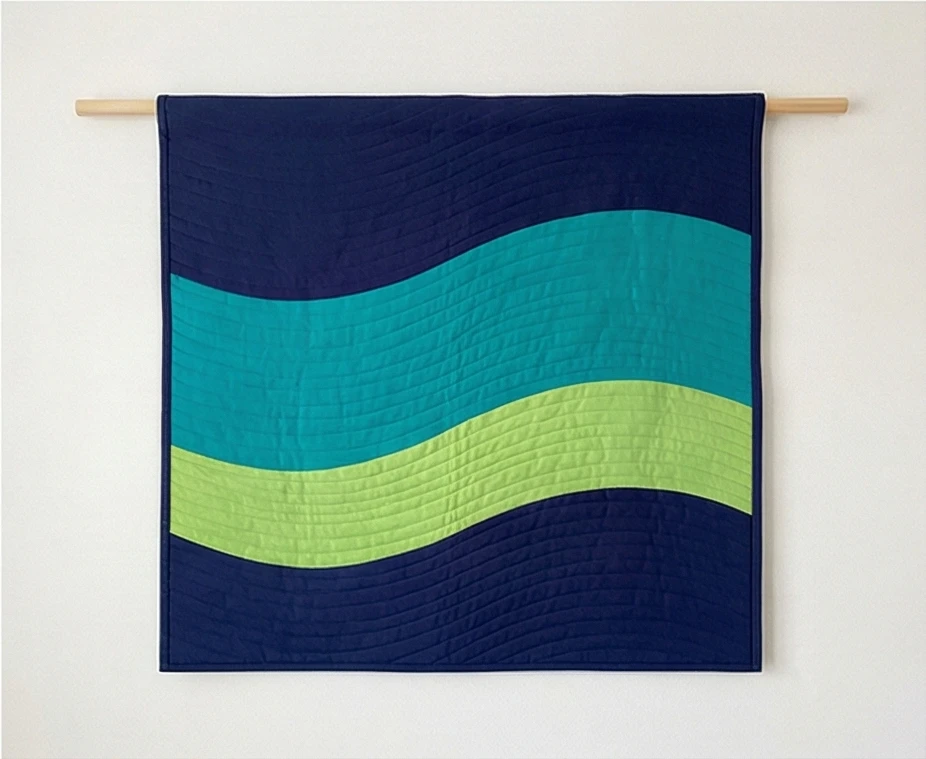
Step 6: “Wind” Quilting
The quilting adds the movement of the wind.
- Fuse: Iron the top to the Fusible Fleece. (Wall hangings don’t need backing for this step if you are binding later, but adding backing now is safer).
- Quilt: Use a walking foot.
- Start at the top. Quilt wavy horizontal lines that mimic the curves of your piecing.
- Spacing: Keep lines organic—sometimes close together, sometimes drifting apart.
- Thread: Using a variegated thread (blue to green) can add a stunning, subtle detail.

Step 7: The “Gallery” Facing
A binding distracts from the art. Use a facing.
- Strips: Cut 2.5-inch strips of the Navy fabric.
- Sew: Sew along the perimeter of the quilt.
- Flip: Turn the strips completely over and press. Secure with hand stitching or fabric glue.
- Hang: Attach a hanging sleeve or corner pockets for a dowel rod.
Usability Note: Textile art is excellent for acoustic dampening. Hanging this piece in a minimalist room with hard floors (wood/tile) will help absorb echo and soften the room’s sound, adding to the sense of “Nordic Serenity.”
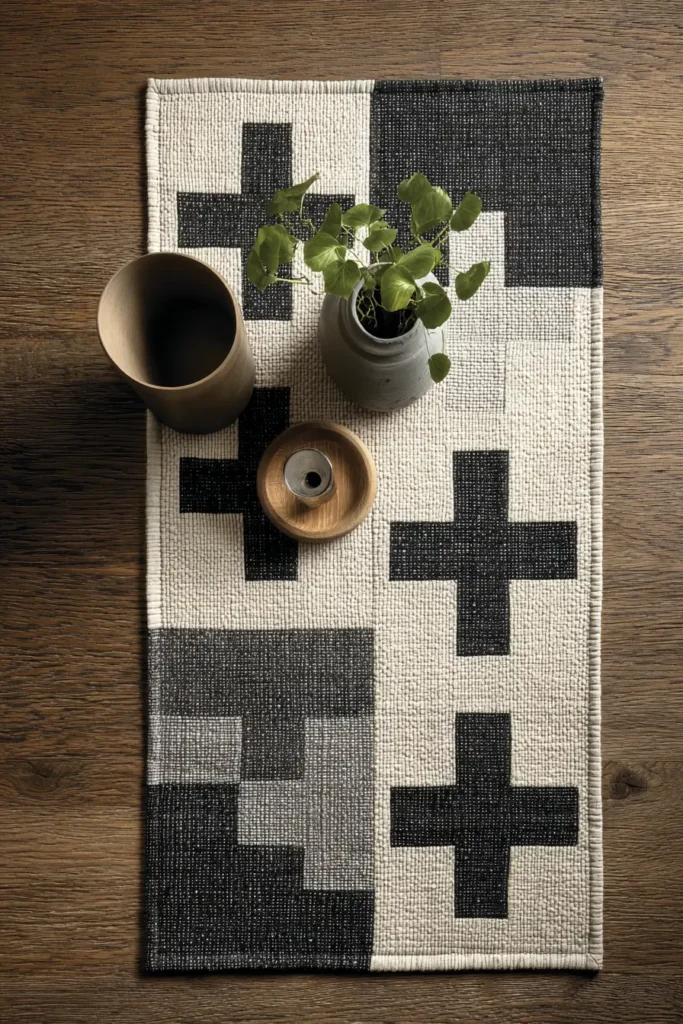
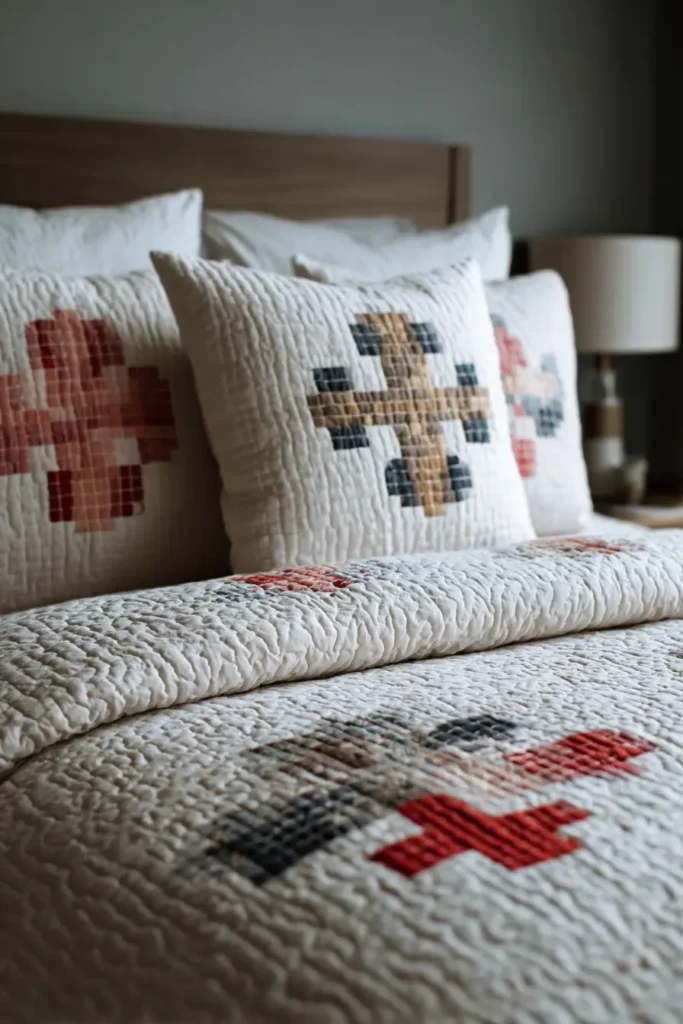
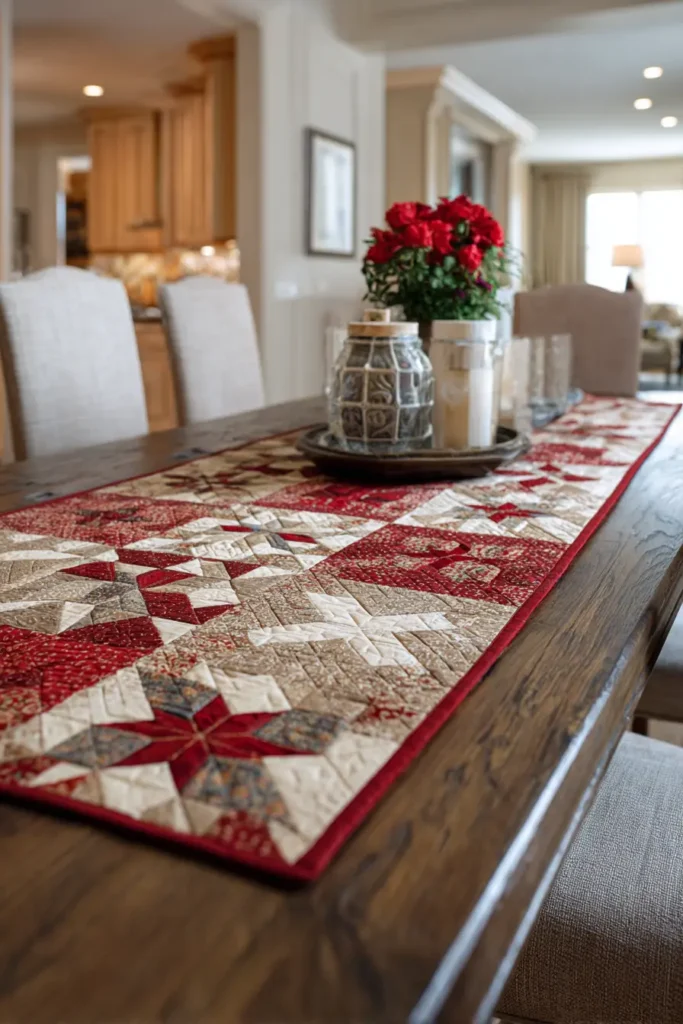
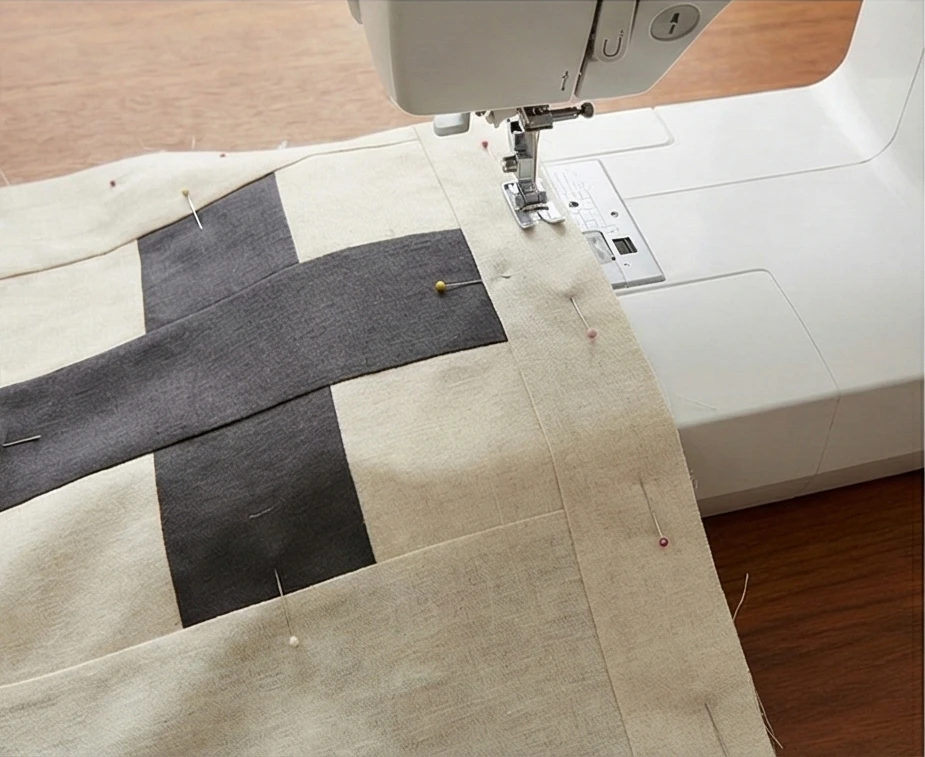
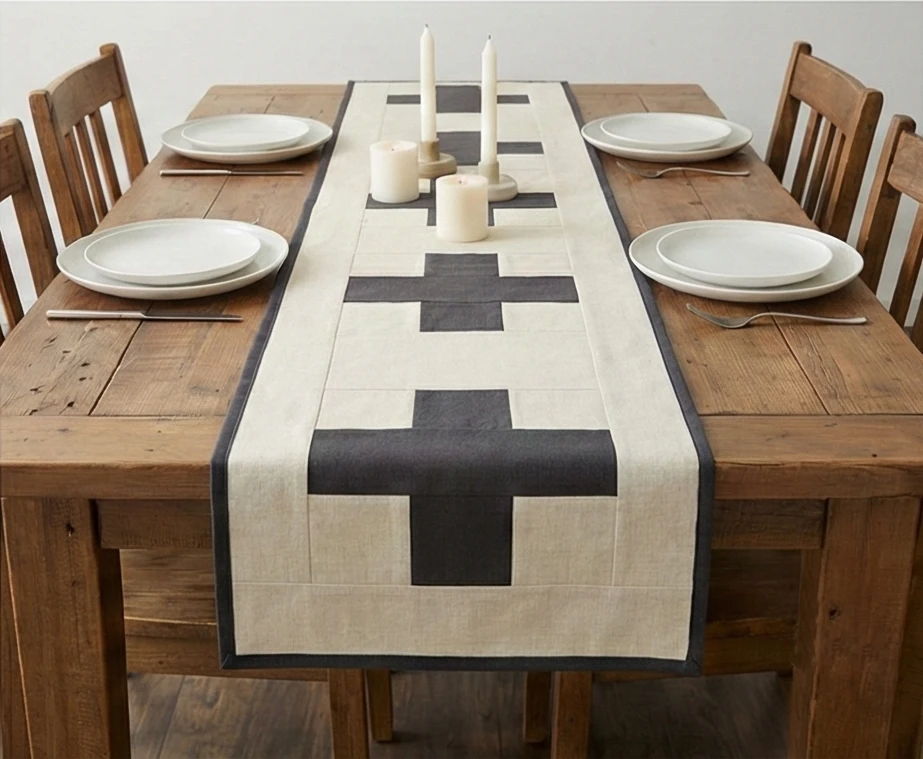
The “Uppsala Geometry” Plus Sign Runner
The “Plus Sign” (or Swiss Cross) is a staple of minimalist Scandinavian graphic design. It represents balance and positivity. While often seen in black and white, this version softens the contrast by using Unbleached Cream Linen and Charcoal Grey Cotton. The linen’s texture adds a rustic, farmhouse warmth, preventing the stark geometric pattern from feeling too clinical. This runner brings a modern, organized rhythm to a dining table without overwhelming the place settings.
Finished Dimensions: Dining Table Runner, approximately 14″ x 72″.
Materials Needed:
- Fabric A (Background): 1 yard of Heavy Cream Linen or “Oatmeal” Cotton.
- Fabric B (The Crosses): 1/2 yard of Charcoal Grey or Soft Black solid cotton.
- Backing: 1 yard of a charcoal/cream stripe print.
- Batting: Fusible Fleece or very thin cotton batting. (Table runners need to lie flat so wine glasses don’t tip; fleece provides stiffness without puff).
- Thread: Charcoal Grey (for piecing) and Cream (for quilting).
- Notions: Rotary cutter, square ruler.
Cultural Backstory: In the long, dark Nordic winters, interior design focuses on maximizing light. High-contrast patterns like this help define spaces in low-light conditions. The “Plus” motif is also a nod to the flags of the Nordic Council nations, stripping the symbol down to its most basic geometric form.
Step 1: Cutting the “Pixels”
This pattern relies on a grid of uniform squares.
- Charcoal Fabric: Cut 5 strips that are 2.5 inches wide. Sub-cut these strips into 2.5-inch squares.
- Quantity: You need 45 charcoal squares total (for 9 crosses).
- Cream Linen: Cut 6 strips that are 2.5 inches wide. Sub-cut into 2.5-inch squares.
- Quantity: You need 36 cream squares.
- Cream Side Panels: Cut 4 large rectangles of Cream Linen measuring 3.5″ x 12.5″ (these will frame the blocks).
- Cream End Panels: Cut 2 large rectangles measuring 12.5″ x 4.5″ (for the ends of the runner).

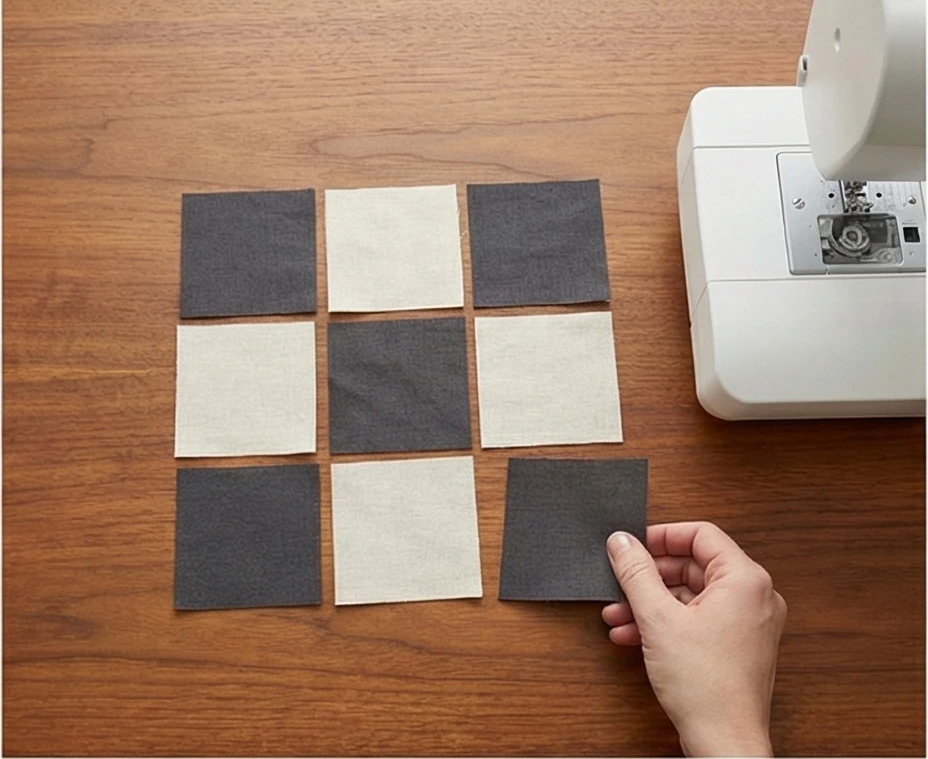
Step 2: Constructing the “Plus” Block
Each block is a standard 9-patch grid.
- Layout: Arrange a 3×3 grid for one block:
- Top Row: Cream – Charcoal – Cream
- Middle Row: Charcoal – Charcoal – Charcoal
- Bottom Row: Cream – Charcoal – Cream
- Sew: Stitch the squares into rows using a 1/4 inch seam. Press seams toward the Charcoal (dark) fabric to prevent shadowing.
- Join: Sew the three rows together to form the Plus block.
- Size: The unfinished block should measure 6.5″ x 6.5″.
- Repeat: Make 9 Blocks.
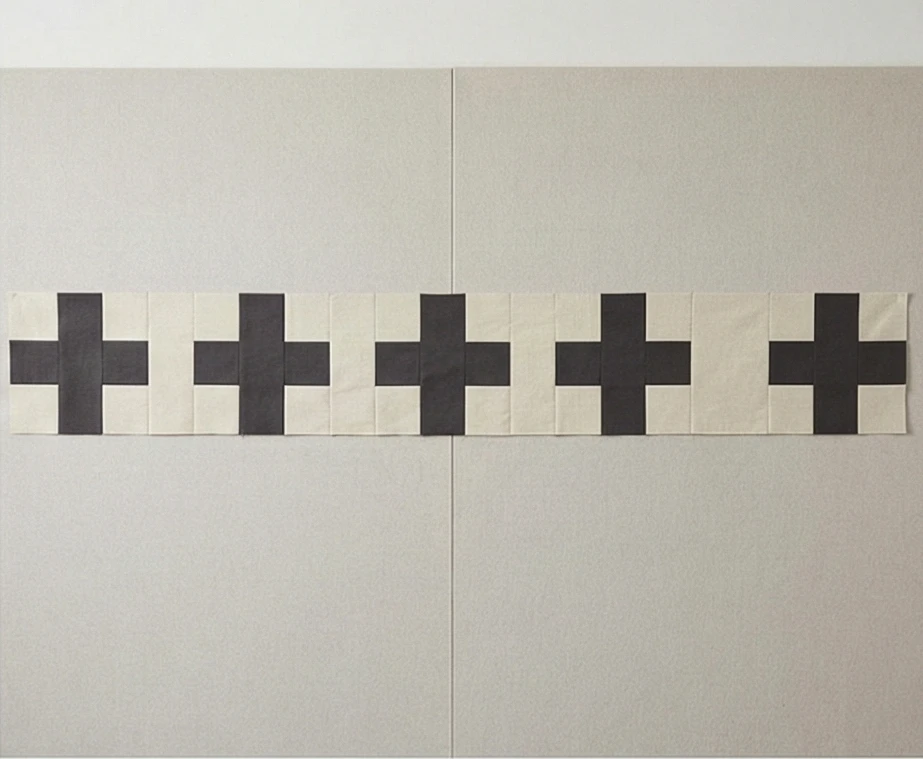
Step 3: The “Negative Space” Assembly
To make it look modern, we separate the crosses with solid blocks.
- Solid Blocks: Cut 8 squares of Cream Linen measuring 6.5″ x 6.5″.
- The Pattern: You will alternate the Plus Blocks with the Solid Cream blocks.
- Layout: Plus – Solid – Plus – Solid… etc.
- Arrangement: Create a single long row of 17 blocks (9 Plus, 8 Solid).
- Sew: Stitch them together into one long strip.
- Press: Press seams open to reduce bulk.
Step 4: Framing the Runner
Adding borders increases the width and creates a “floating” effect.
- Sides: Sew the Cream Side Panels (cut in Step 1) to the long sides of your pieced strip. (You may need to piece strips together to get the full 72″ length).
- Why: This adds negative space around the crosses so they don’t fall off the edge of the table.
- Ends: Sew the Cream End Panels to the short ends of the runner.
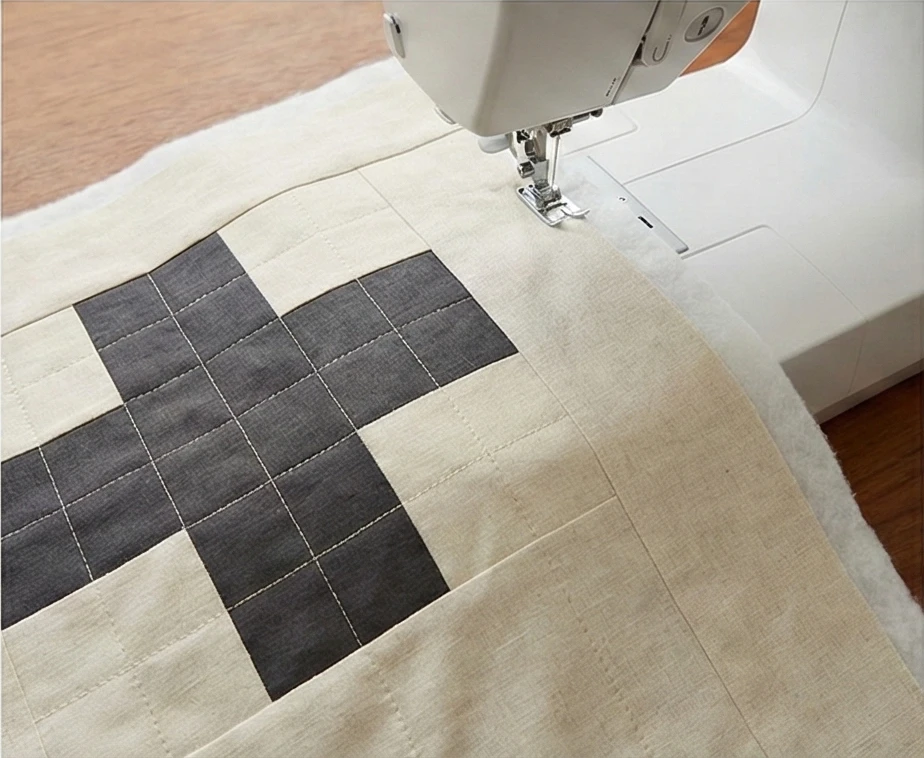
Step 5: “Grid” Quilting
Keep the quilting simple to let the geometry shine.
- Baste the fleece to the runner top (or spray-baste with batting).
- Mark: Use masking tape to mark a grid.
- Quilt: Stitch straight lines running through the center of the squares, both vertically and horizontally.
- Spacing: Lines should be roughly 2.5 inches apart (following the grid of your piecing).
- Thread: Use Cream thread over the entire runner. When it crosses the charcoal plus signs, it creates a subtle, modern contrast.
Step 6: The Charcoal Binding
A dark frame creates a crisp finish.
- Prepare: Cut 2.5-inch strips of the Charcoal Fabric.
- Bind: Attach the binding using machine or hand stitching.
- Corner Detail: Miter the corners sharply. A square runner demands perfect 90-degree corners.
Usability Note: Linen is highly absorbent and durable, making it an excellent choice for dining tables. Spills wash out easily, and the “crinkled” texture of washed linen means you don’t have to iron this runner perfectly flat—the texture is part of the charm.
13. Soft Pastel Scandi Nursery Quilts for Cozy Baby Rooms
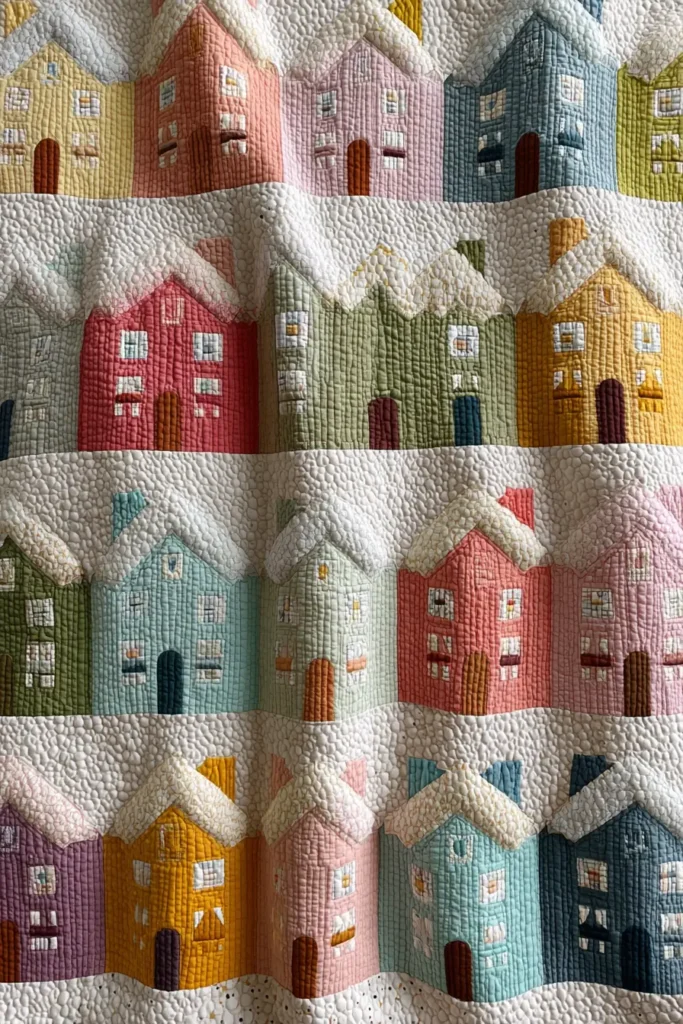
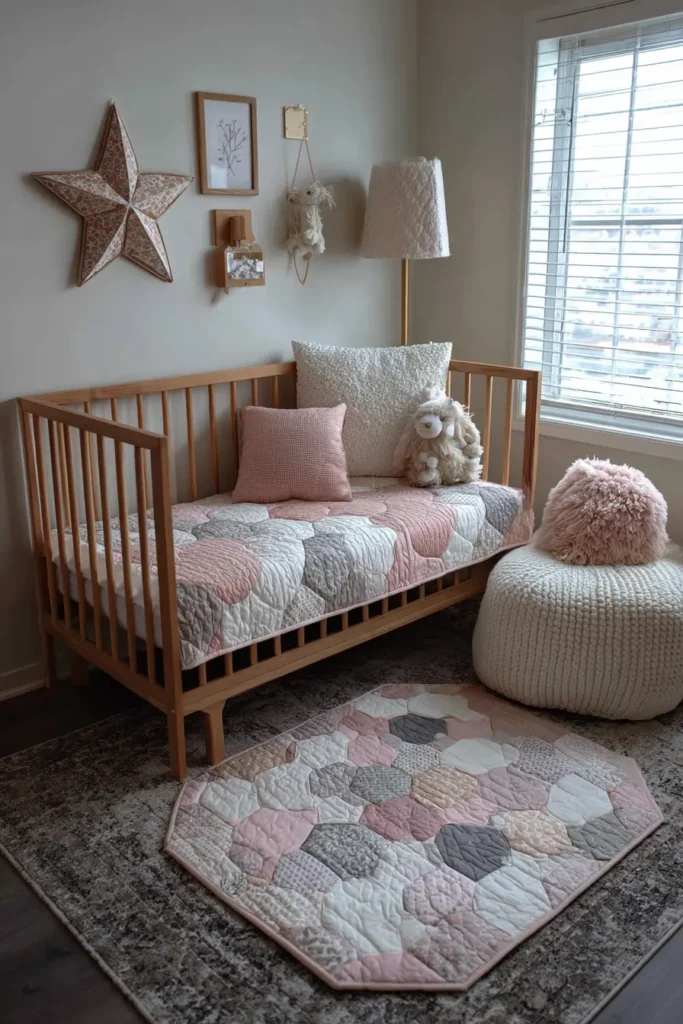
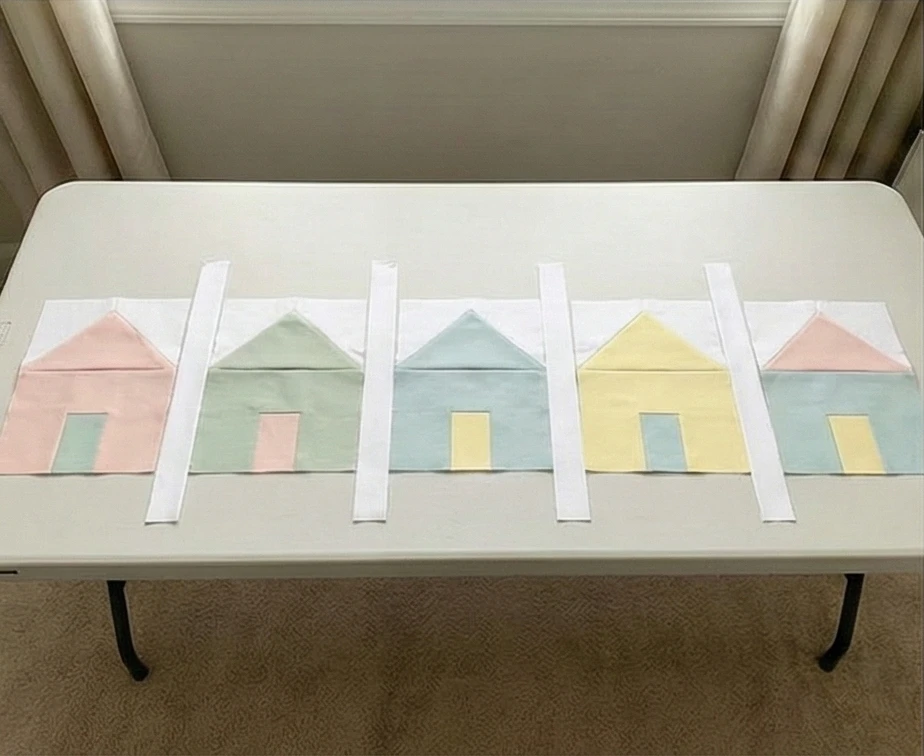
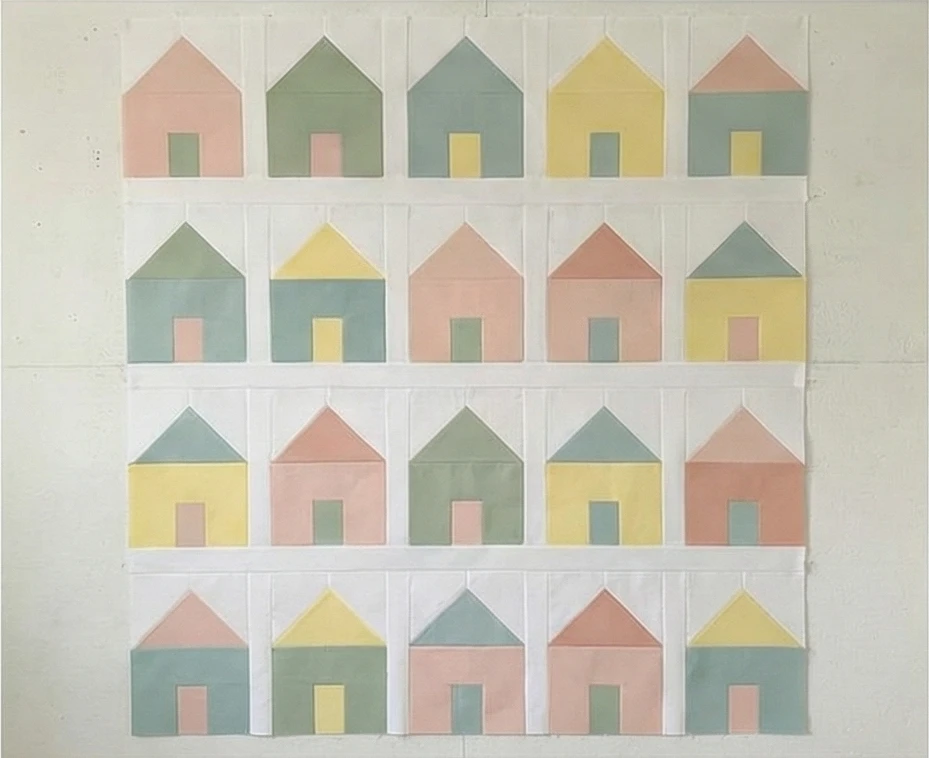
The “Ålesund Village” Pastel Row Quilt
One of the most charming sights in Scandinavia is the colorful waterfront of Ålesund, Norway, or the “Nyhavn” harbor in Copenhagen. This nursery quilt captures that whimsy by featuring rows of simple, geometric houses in soft, muted pastels—Blush Pink, Sage Green, Duck Egg Blue, and Lemon Chiffon. The design symbolizes “Home” and “Community,” creating a safe, loving village to surround the new baby.
Finished Dimensions: Crib/Cot Size, approximately 40″ x 50″.
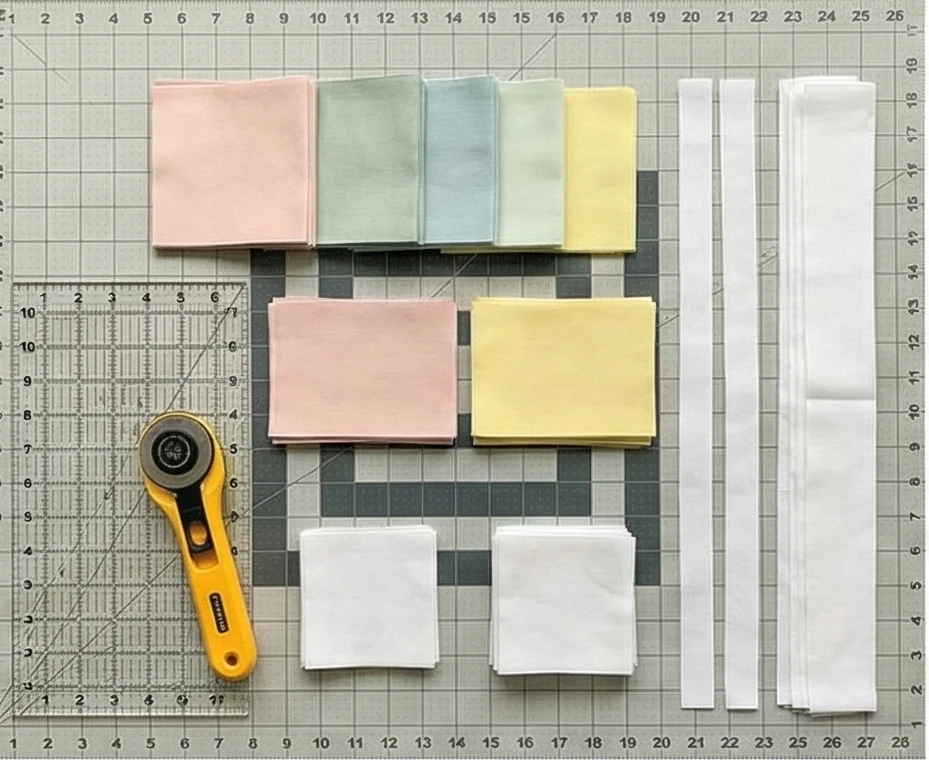
Materials Needed:
- Fabric A (House Bodies): 5 Fat Quarters of assorted Pastel Solids or tiny geometric prints.
- Fabric B (Background/Sky): 2 yards of Bright White cotton.
- Backing: 2.5 yards of a soft, busy print (like tiny clouds or sheep) to hide stains.
- Batting: 100% Cotton Batting (Must be breathable for babies; avoid polyester, which traps heat).
- Thread: White cotton.
- Notions: Rotary cutter, square ruler, soluble marking pen.
Cultural Backstory: The “House” block is a quilting classic, but in Scandinavia, it takes on a specific meaning of “Hygge” (sanctuary). Brightly painted wooden houses were traditionally used in the North to combat the visual greyness of the long winters. Using pastels adapts this tradition for a soothing, sleep-inducing nursery environment.
Step 1: Cutting the “Lumber”
We are building 20 Houses.
- House Bodies: From your Pastel fabrics, cut 20 squares measuring 5.5″ x 5.5″.
- Roofs: From the same pastels (mix and match), cut 20 rectangles measuring 5.5″ x 3.5″.
- Sky (Roof Corners): From the White Background fabric, cut 40 squares measuring 3.5″ x 3.5″.
- Sashing (Separators):
- Vertical Sashing (between houses): Cut 16 strips measuring 2.5″ x 8.5″.
- Horizontal Sashing (between rows): Cut 4 strips measuring 2.5″ x 40.5″.
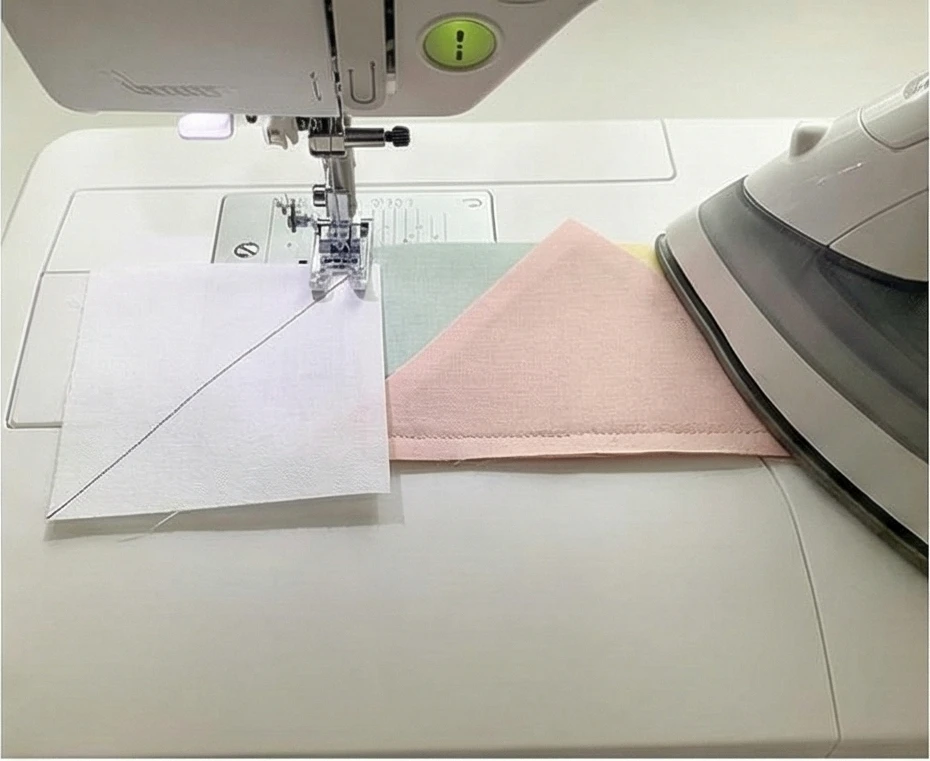
Step 2: Raising the Roof (Stitch and Flip Method)
This technique creates a triangle roof without cutting bias triangles.
- Prep: Draw a diagonal line on the back of all the small White “Sky” squares (corner to corner).
- Placement: Place a White square on the left side of a Pastel Roof rectangle (Right Sides Together). Align the corners.
- Orientation: The diagonal line should go from the bottom-left corner up toward the center.
- Sew: Stitch exactly on the drawn line.
- Trim: Cut off the excess corner fabric, leaving a 1/4 inch seam allowance. Flip the white triangle open and press.
- Repeat: Place another White square on the right side. Stitch, trim, and press.
- Result: You now have a pastel trapezoid (roof) surrounded by white sky.
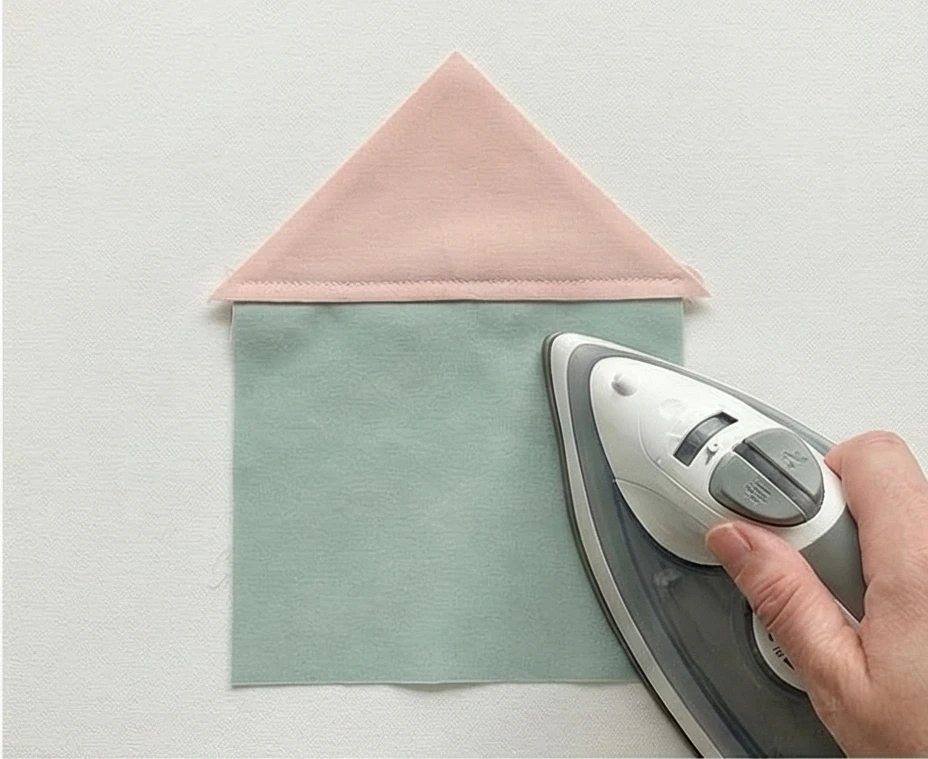
Step 3: Assembling the House Block
- Join: Sew the Roof Unit to the top of the House Body Square.
- Seam: Use a 1/4 inch seam.
- Press: Press the seam downward toward the house body.
- Size Check: Your unfinished house block should measure 5.5″ wide x 8.5″ tall.
Step 4: Building the Village Rows
We will make 4 rows of 5 houses each.
- Layout: Arrange 5 houses in a row. Play with the color order (e.g., Pink, Blue, Green, Yellow, Pink).
- Spacing: Place a Vertical Sashing Strip (2.5″ x 8.5″) between each house.
- Sequence: House – Sash – House – Sash – House – Sash – House – Sash – House.
- Sew: Stitch the row together.
- Repeat: Make 4 rows.
Step 5: The “Street” Assembly
- Join Rows: Sew the Horizontal Sashing Strips between the house rows.
- Top & Bottom: Add a border of white to the very top and very bottom if desired, or just let the village float.
- Press: Press all sashing seams toward the sashing strips.
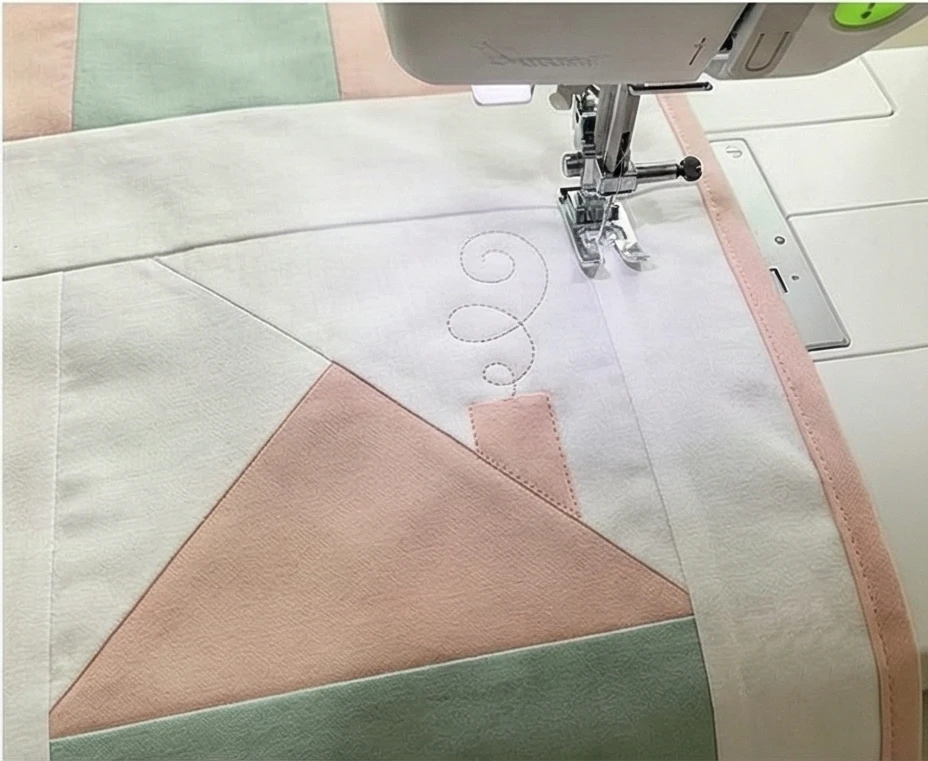
Step 6: “Smoke Ring” Quilting
Machine quilting that adds a whimsical touch.
- Baste: Sandwich the Backing + Cotton Batting + Top. Baste well with safety pins (babies will pull on loose threads, so machine quilting is safer than hand tying).
- Design:
- The Houses: Stitch “in the ditch” (along the seams) around the outline of each house to make them pop.
- The Sky: Starting from the peak of each roof, quilt a loopy, swirling line rising up into the white sash above it. This looks like smoke rising from the chimney. It adds movement and softness to the geometric grid.
Usability Note: Cotton batting is non-negotiable for nurseries. It breathes, preventing the baby from overheating, and gets softer with every wash. This quilt is designed to be washed frequently (hot water, tumble dry) without losing its shape.
14. Eco-Friendly Organic Cotton Quilt Patterns for Sustainable Living
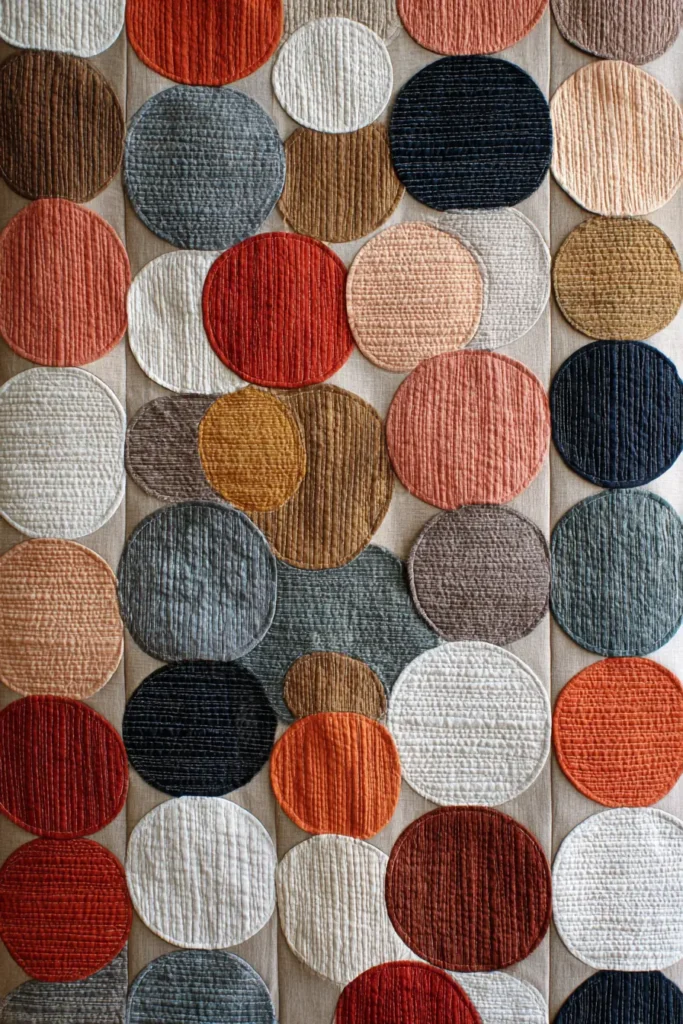
The “Omtanke” (Care) Zero-Waste Organic Coin Quilt
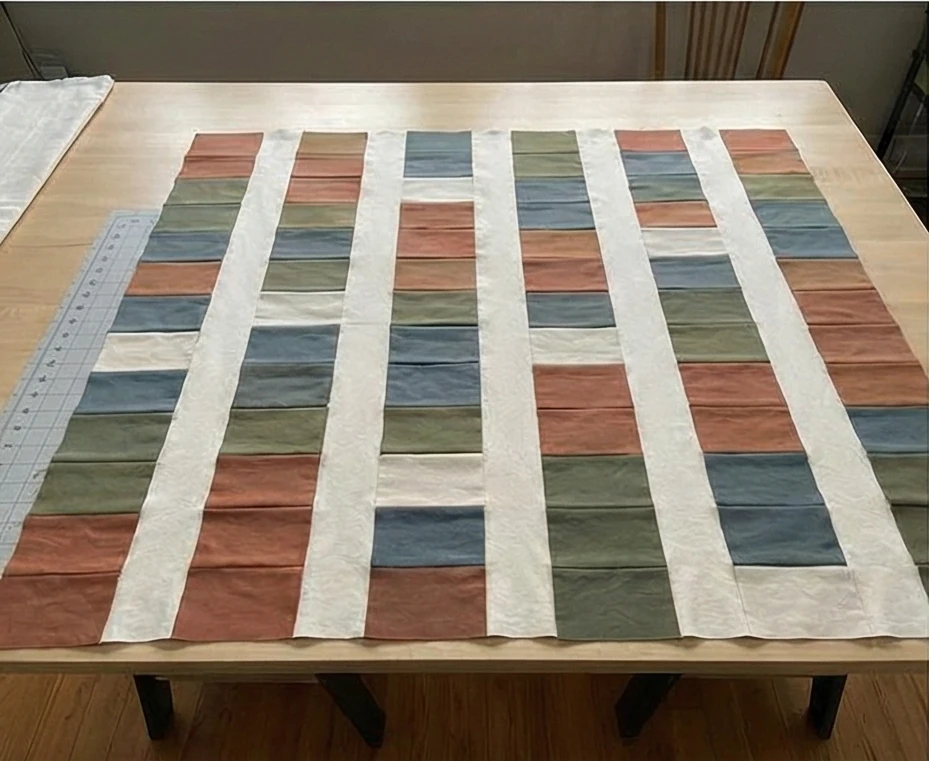
In Scandinavia, sustainability isn’t just a trend; it’s a way of life, often summarized by the Swedish word Omtanke (meaning “care,” “consideration,” or “thoughtfulness”). This quilt pattern embodies that philosophy. It is designed as a Zero-Waste project, utilizing the full width of the fabric to ensure no scraps end up in the landfill. Using strictly GOTS-Certified Organic Cotton and natural dyes (such as madder root, indigo, or unbleached cotton), this “Chinese Coins” style layout resembles stacked firewood or river stones, bringing the calming, rhythmic beauty of nature indoors.
Finished Dimensions: Sustainable Lap Throw, approximately 50″ x 65″.
Materials Needed:
- Fabric A (Coins): 6 to 8 half-yards of various Organic Cotton Prints/Solids in earth tones (Terracotta, Moss, Clay, Slate).
- Fabric B (Background/Sashing): 2 yards of Unbleached Organic Cotton or Hemp/Cotton Blend.
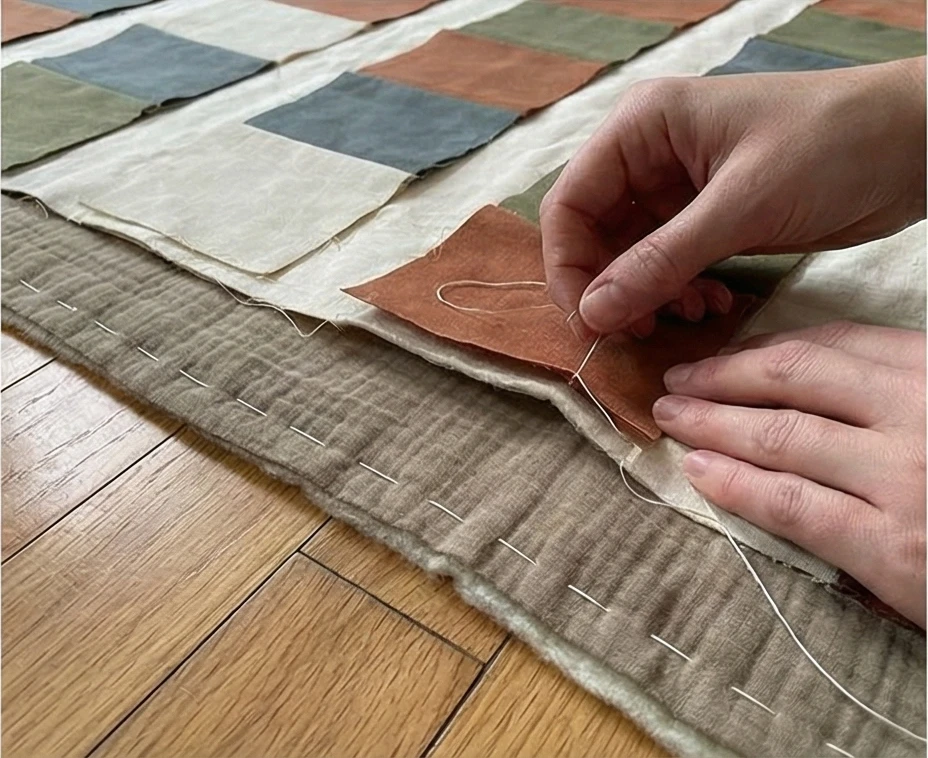
- Backing: 3.5 yards of Organic Double Gauze (for an incredibly soft, crinkled texture).
- Batting: 100% Organic Bamboo or Soy Batting. (These are naturally antibacterial, drape beautifully, and are biodegradable).
- Thread: Organic Cotton Thread (polyester thread creates microplastics; stick to cotton).
- Notions: Rotary cutter, mat.
Cultural Backstory: The Nordic region leads the world in sustainable fashion and textiles. This pattern draws on the concept of “Cradle to Cradle” design—creating a product that is safe for the earth from its creation to its eventual disposal. By using natural fibers and threads, this entire quilt is theoretically compostable at the end of its very long life.
Step 1: The “Zero-Waste” Cut
We cut the fabric based on its manufacturing width to avoid waste.
- Preparation: Wash and dry all organic fabrics. Organic cotton shrinks more than chemically treated cotton.
- Coin Strips: Take your colored fabrics (Fabric A). Cut them into strips of varying heights: 2.5 inches, 3.5 inches, and 4.5 inches.
- Length: Cut them across the full Width of Fabric (WOF) (usually 42-44 inches).
- Sub-cutting: Cut these long strips into rectangles that are exactly 8.5 inches wide. (You can typically get 5 pieces per WOF strip with almost zero waste).
- Sashing Strips: From the Unbleached Fabric (Fabric B), cut 5 long vertical strips measuring 4.5 inches x 65 inches. (You will need to piece WOF strips together to get the 65″ length).
Step 2: Stacking the “Coins”
We are building vertical columns of stacked rectangles.
- Sorting: Shuffle your 8.5″ wide rectangles into a random pile.
- Layout: Lay out a single column on the floor. Stack the rectangles one on top of another until the column reaches 65 inches tall.
- Design: Mix the heights (2.5, 3.5, 4.5) to create a random, organic rhythm.
- Repeat: Create 6 separate columns.
Step 3: Sewing the Columns
- Stitch: Sew the rectangles in each column together along their long (8.5″) edges.
- Seam Allowance: Use a standard 1/4-inch seam allowance.
- Press: Press all seams in one direction (e.g., all downward). This makes the column lie flat and mimics the overlapping nature of roof shingles or stones.
Step 4: The “River” Assembly
Separating the busy columns with calm sashing.
- Arrangement: Lay out your 6 Coin Columns. Place a Sashing Strip (Fabric B) between each column.
- Sequence: Coin – Sash – Coin – Sash – Coin – Sash – Coin – Sash – Coin – Sash – Coin.
- Join: Sew the vertical seams to join the columns and sashing strips.
- Press: Press seams toward the Sashing strips.
Step 5: The “Eco” Sandwich
Bamboo batting is distinct from cotton.
- Layer: Tape the Double Gauze backing to the floor (face down). Double gauze is stretchy, so do not pull it tight; just smooth it out.
- Batting: Lay the Bamboo batting on top. (Note: Bamboo has a silky feel and drapes heavier than cotton).
- Top: Smooth the pieced top over the batting.
- Baste: Use cotton basting thread to hand-baste the layers (tacking), or use safety pins. Avoid spray baste (aerosols are not eco-friendly).
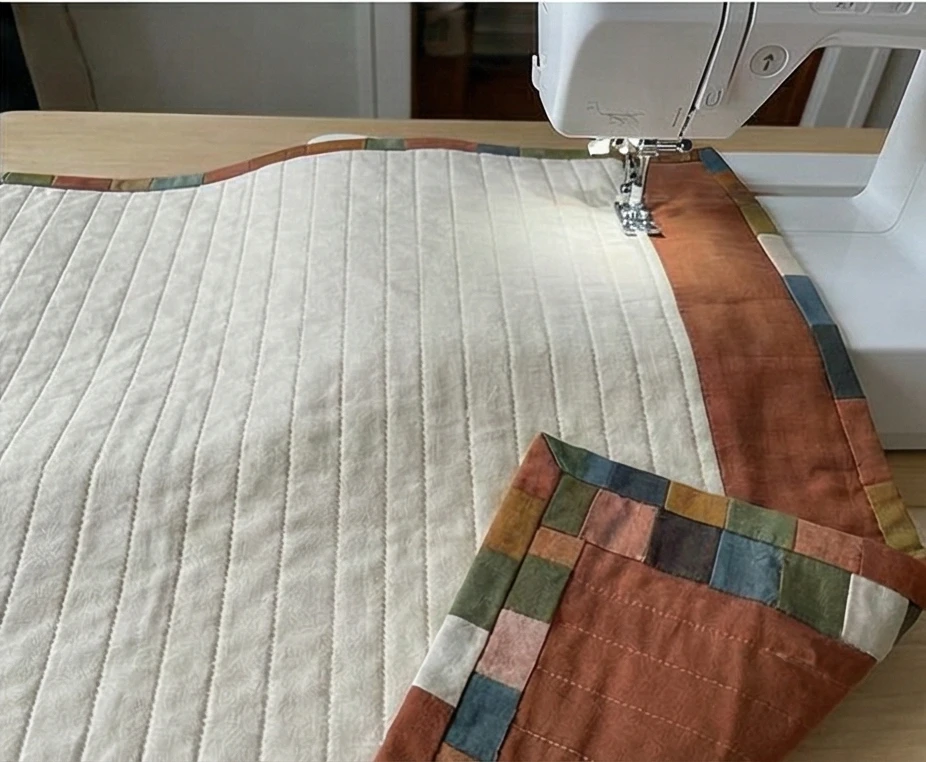
Step 6: “Rain” Quilting
Simple vertical lines enhance the sustainability theme.
- Thread: Use the Organic Cotton thread.
- Path: Stitch straight vertical lines from top to bottom.
- The Coins: Stitch 2 lines through each coin column (approx 3 inches apart).
- The Sashing: Stitch 1 line directly down the center of each sashing strip.
- Aesthetic: The vertical lines look like gentle rain falling over the “stones” (coins).
Step 7: The Scrappy Binding
Use what is left.
- Collect Scraps: Gather the small leftover ends from cutting your coin strips.
- Join: Sew them together end-to-end to create a scrappy, multi-colored binding strip.
- Bind: Attach to the quilt edges.
- Symbolism: The scrappy binding frames the organized interior, reminding the user that “waste” can be beautiful and functional.
Usability Note: The combination of organic cotton, double gauze backing, and bamboo batting makes this the breathable champion of quilts. It is hypoallergenic and perfect for sensitive skin or those with allergies to synthetic dyes and finishes.
15. Elegant Snowflake Quilt Blocks for Winter Pillow Covers


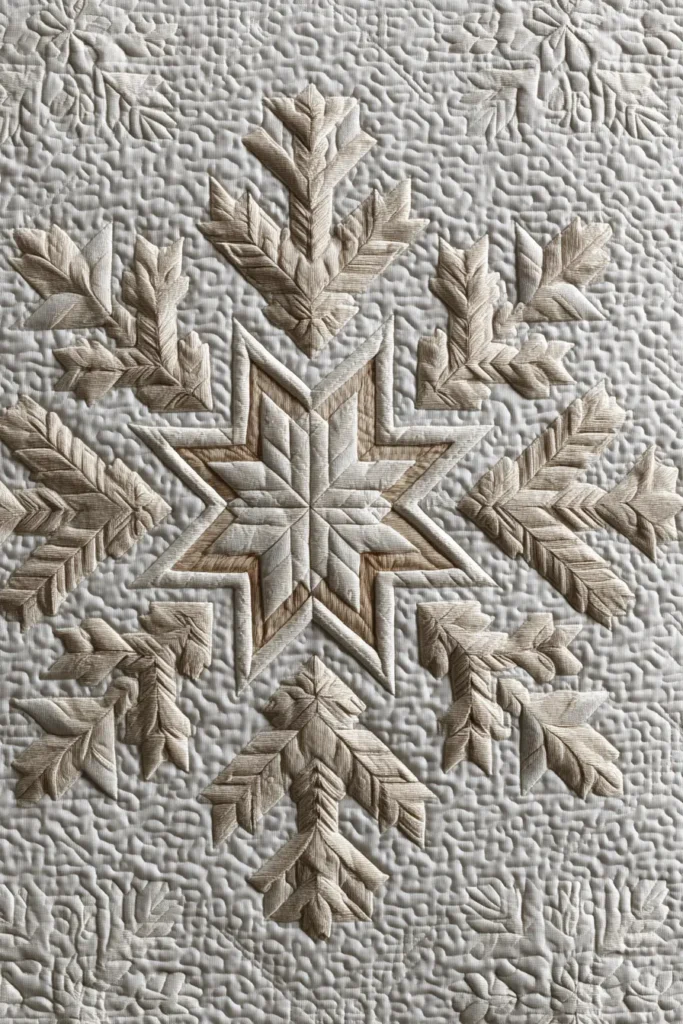
The “Snöflinga” (Snowflake) Pixelated Knit Pillow
This final pattern celebrates the cozy intersection of two great Nordic crafts: Quilting and Knitting. Traditional Scandinavian sweaters (Lusekofte) feature intricate snowflake motifs built from a grid of knit stitches. This pillow pattern mimics that “pixelated” look using simple patchwork squares. By using a grid of 2.5-inch squares, you create a block that looks like a giant, zoomed-in knitting chart. The result is a graphic, modern, and undeniably cozy winter accent for your armchair.
Finished Dimensions: Large Throw Pillow, 20″ x 20″.
Materials Needed:
- Fabric A (Background/Main Color): 1/2 yard of Slate Blue or Cranberry Red solid cotton.
- Fabric B (Snowflake/Contrast): 1/4 yard of Snow White solid cotton.
- Backing: 1/2 yard of flannel (for a cozy back).
- Batting: 22″ square of cotton batting.
- Thread: Neutral grey or white.
- Notions: Rotary cutter, 2.5-inch square ruler (optional but helpful), design wall/floor space.
Cultural Backstory: In the Nordic region, there are hundreds of words for snow, describing everything from “wet snow” to “crusty snow.” The snowflake motif (“Snöflinga”) serves as a reminder of the unique beauty found in nature’s geometry. In traditional Setesdal sweater designs, these star-like flakes were believed to protect the wearer from evil spirits during the dark winter nights.
Step 1: Cutting the “Pixels”
We are creating a 9 x 9 grid. Precision in cutting is key for the seams to match.
- Background (Fabric A): Cut 60 squares measuring 2.5 inches x 2.5 inches.
- Snowflake (Fabric B): Cut 21 squares measuring 2.5 inches x 2.5 inches.
- Total: You have 81 squares.
- Note: This creates an 18-inch finished block. We will add borders later to reach 20 inches.
Step 2: The “Knitting Chart” Layout
Arrange the squares on the floor to form the crystal pattern.
- Row 1, 2, 8, 9 (Top & Bottom Edges):
- Place 1 White square in the exact center (column 5). The rest are Blue.
- Row 3 & 7:
- Place 3 White squares centered (columns 4, 5, 6). The rest are Blue.
- Row 4 & 6:
- Place 1 White square in columns 2, 5, and 8. (The tips of the side arms).
- Row 5 (Center Equator):
- Place 5 White squares centered (columns 3, 4, 5, 6, 7).
- Check: Step back. You should see a distinct cross/star shape formed by the white pixels against the blue field.


Step 3: Web Piecing (or Row-by-Row)
To keep the pixels organized, sew them into rows first.
- Sew Rows: Stitch the 9 squares of Row 1 together.
- Seam: Use a scant 1/4 inch seam.
- Repeat: Stitch all 9 rows individually. Keep them in order (label them 1-9 with sticky notes).
Step 4: Nesting the Seams
This is the secret to perfect “pixel” corners.
- Pressing Strategy:
- Odd Rows (1, 3, 5…): Press all seam allowances to the Left.
- Even Rows (2, 4, 6…): Press all seam allowances to the Right.
- Join Rows: When you pin Row 1 to Row 2, the seams will “nest” (lock together) because they are pressed in opposite directions. This reduces bulk and ensures your corners align perfectly like a checkerboard.
Step 5: The Frame Border
The pixel block is 18.5″ raw. We need to bring it to 20.5″ for the pillow.
- Cut Borders: From the Background Fabric (A), cut two strips 1.5″ x 18.5″ and two strips 1.5″ x 20.5″.
- Attach: Sew the short strips to the sides. Sew the long strips to the top/bottom.
- Result: Your pillow front is now exactly 20.5″ x 20.5″.
Step 6: “Sweater” Quilting
Quilt to mimic the texture of wool.
- Baste: Sandwich the Top + Batting + Muslin scrap (interior lining).
- Design: Quilt a Diagonal Cross-Hatch grid.
- Stitch diagonal lines through the center of every square (corner to corner).
- Repeat in the opposite direction.
- Effect: This creates an “X” in every pixel, making the cotton fabric look textured and lofty, like a knit stitch.
Step 7: Envelope Finish
- Backing: Create a standard envelope back using the flannel fabric.
- Bind: For a premium finish, add a binding around the pillow edge in White to frame the snowflake like a picture.
Usability Note: Unlike pillows with buttons or zippers, the patchwork front is smooth and soft. The dense cross-hatch quilting makes the pillow very durable, allowing it to be tossed in the washing machine after family movie nights.
16. Scandi-Boho Fringed Quilt Throws for Texture and Comfort

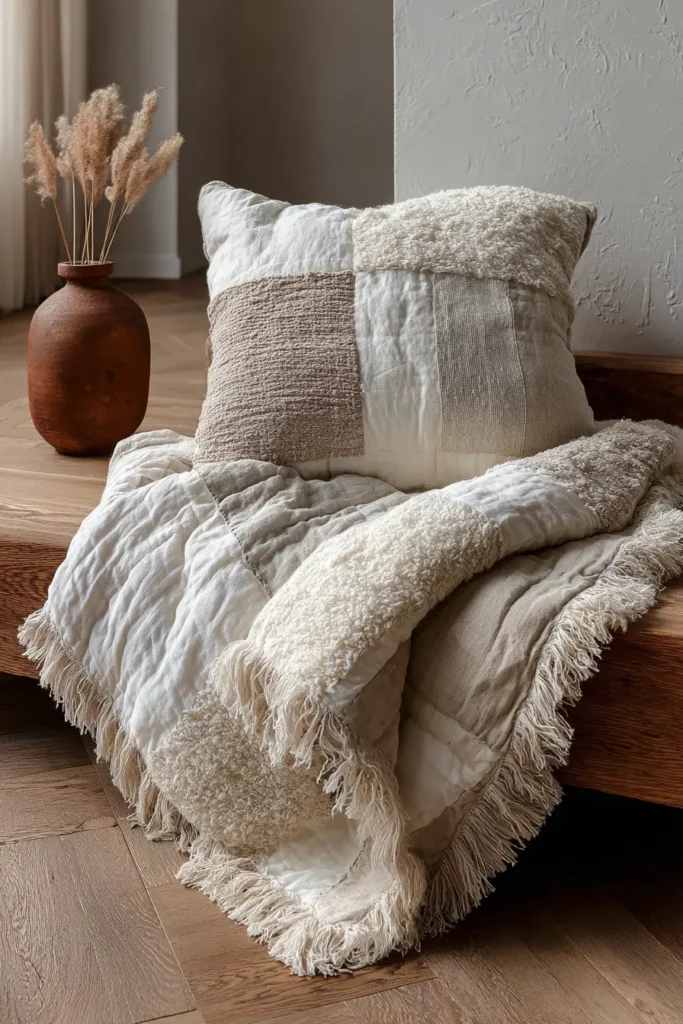
The “Gothenburg Fringe” Raw-Edge Linen Throw
Scandi-Boho style blends the clean lines of Nordic design with the warm, tactile looseness of Bohemian decor. This quilt achieves that balance by using the Exposed Seam (or “Rag Quilt”) technique, but elevating it with high-quality Washed Linen. Instead of the messy look of traditional cotton rag quilts, linen frays into soft, elegant “eyelashes.” This throw features a grid of large squares, with the seams on the outside, creating a geometric grid of soft fringe that begs to be touched.
Finished Dimensions: Textured Sofa Throw, approximately 54″ x 72″.
Materials Needed:
- Fabric A (Top): 3 yards of Oatmeal or Flax heavyweight linen.
- Fabric B (Backing): 3 yards of White or Ivory linen (for a subtle two-tone effect).
- Batting:100% Cotton Flannel (used as the core instead of traditional batting).
- Why? Traditional batting creates messy lint when exposed. Flannel frays cleanly and provides just enough weight for a drape-y boho feel.
- Thread: Cream or Natural.
- Notions: Rotary cutter, walking foot, spring-loaded rag quilting snips (optional but saves your hands).
Cultural Backstory: In Gothenburg and other coastal Swedish cities, the “Boho” influence often comes from a connection to the sea—unbleached ropes, raw canvas, and weathered textiles. This quilt mimics the texture of frayed sailcloth or worn fishing nets, celebrating the beauty of imperfection (Wabi-Sabi) within a structured grid.
Step 1: Cutting the Sandwich Squares
This quilt is assembled “block by block” rather than whole rows.
- Top Fabric (Flax Linen): Cut 48 squares measuring 10 inches x 10 inches.
- Backing Fabric (White Linen): Cut 48 squares measuring 10 inches x 10 inches.
- Core (Flannel): Cut 48 squares measuring 8 inches x 8 inches.
- Note: The core is smaller to reduce bulk in the fringe seams.
Step 2: Making the “Biscuits”
You will prepare 48 individual mini-quilts.
- Stack: Place a Backing square face down. Center a Flannel square on top. Place a Top square face up.
- Alignment: The flannel should be 1 inch away from the edge on all sides.
- Quilt: Stitch a simple “X” from corner to corner through the stack.
- Purpose: This holds the layers together. You don’t need complex quilting because the fringe is the main design element.
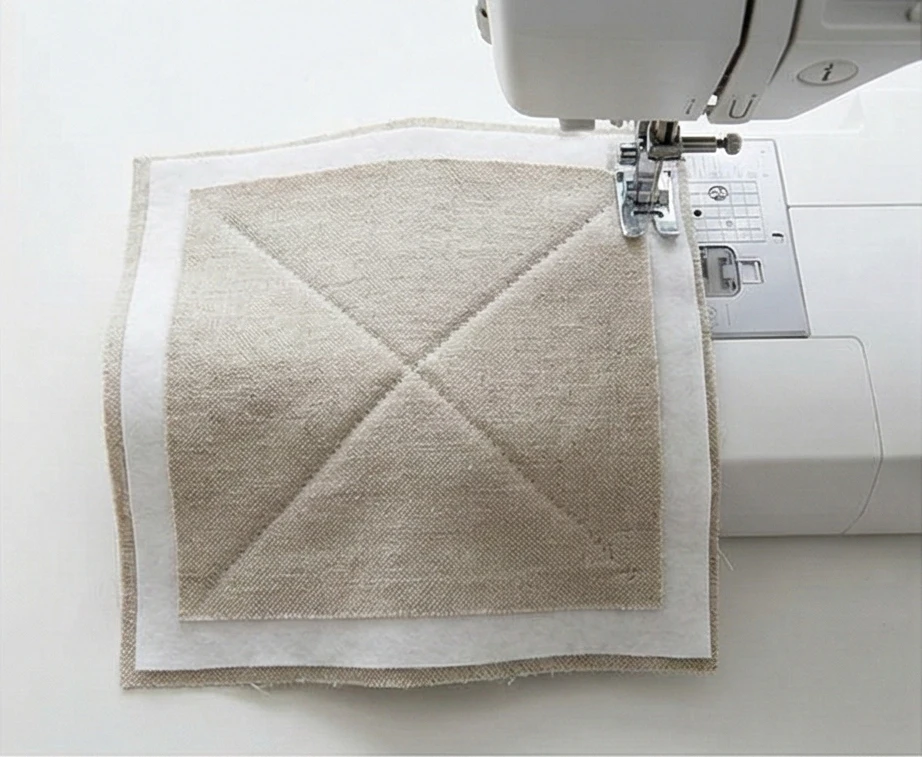
Step 3: Sewing with Exposed Seams
This feels “wrong” at first, but trust the process.
- Pairing: Place two blocks Wrong Sides Together (Backings touching).
- Stitch: Sew them together with a 1-inch seam allowance.
- Result: The raw edges of the seam will be standing up on the front (Top) side of the quilt.
- Rows: Sew blocks into pairs, then into rows of 6 blocks wide. (You will have 8 rows total).
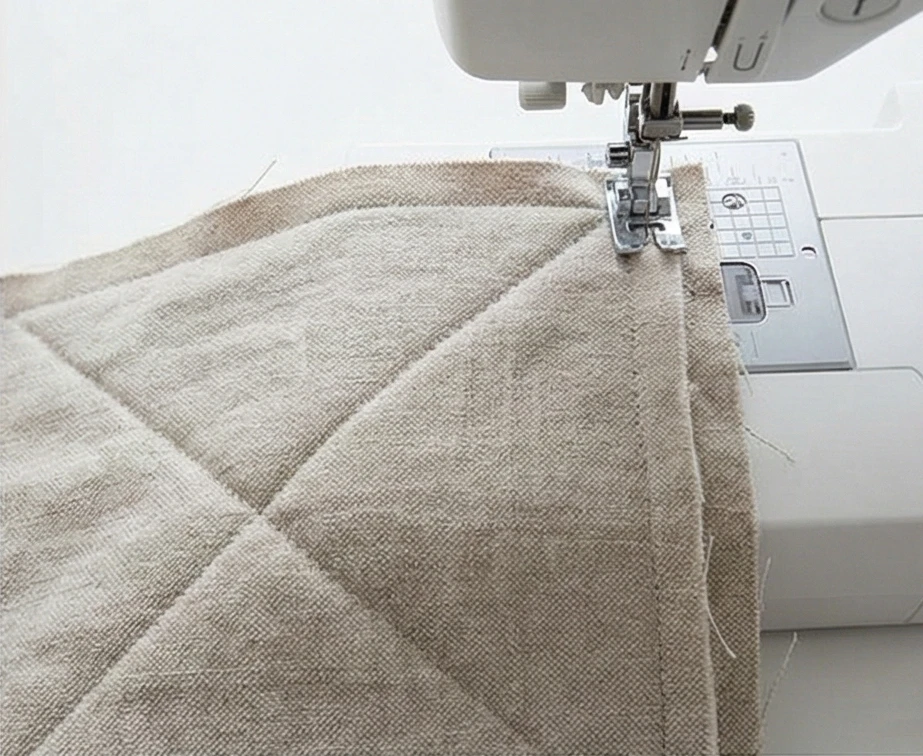
Step 4: Joining the Rows
- Join: Sew the long rows together, again placing them Wrong Sides Together so the long horizontal seams are standing up on the front.
- Intersection: When you hit a vertical seam intersection, press the seam allowances open (flat) so you can sew over them smoothly.
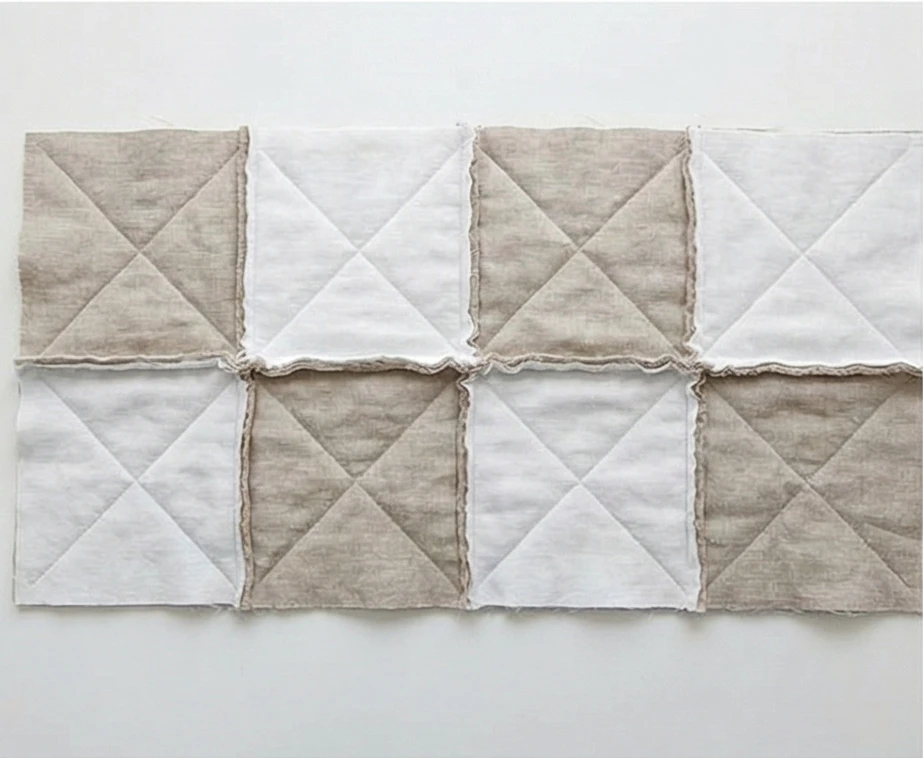
Step 5: The “Fringing” Cut
This creates the boho texture.
- Snip: Using sharp scissors or snips, make cuts perpendicular to the seam through the standing seam allowances.
- Spacing: Make cuts every 1/4 inch to 1/2 inch.
- Caution: Do not cut through the stitch line! Stop about 1/8 inch before the thread.
- Perimeter: Sew a stay-stitch line 1 inch from the outer edge of the entire quilt. Snip the outer edges as well to create a fringed border.
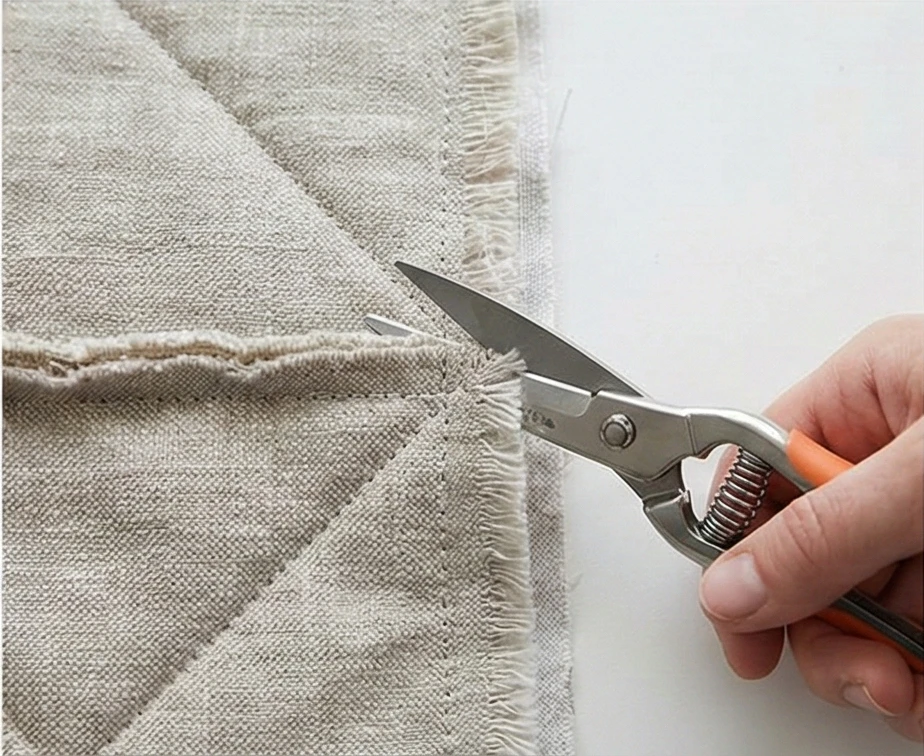
Step 6: The “Bloom” Wash
The quilt looks messy and stiff until this step.
- Wash: Throw the quilt in the washing machine on a cold cycle with a heavy pair of jeans (the friction helps fraying) and a lot of color catcher sheets if you used different colors.
- Dry: Tumble dry on medium heat. Empty the lint trap halfway through (there will be a lot of lint).
- Result: The clipped linen edges will fray into soft, feathery tufts. The flannel core inside will shrink slightly, giving the blocks a crinkled, antique texture.
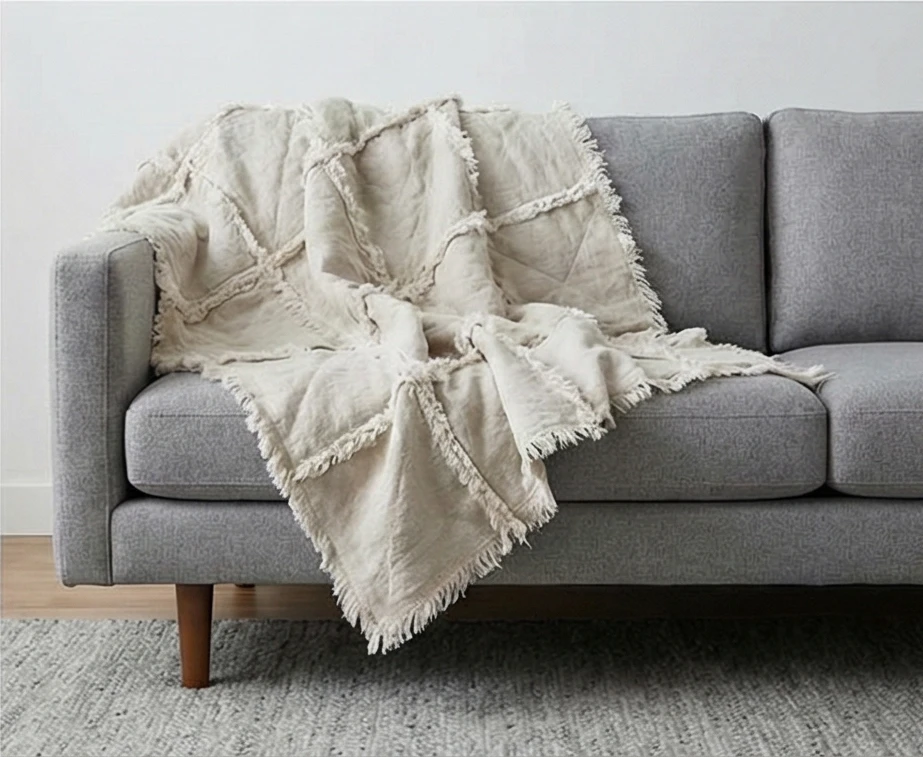
Usability Note: Linen is 30% stronger than cotton and gets softer the more you handle it. The tactile fringe on this throw makes it an excellent “fidget” texture for relaxation while reading or watching TV.
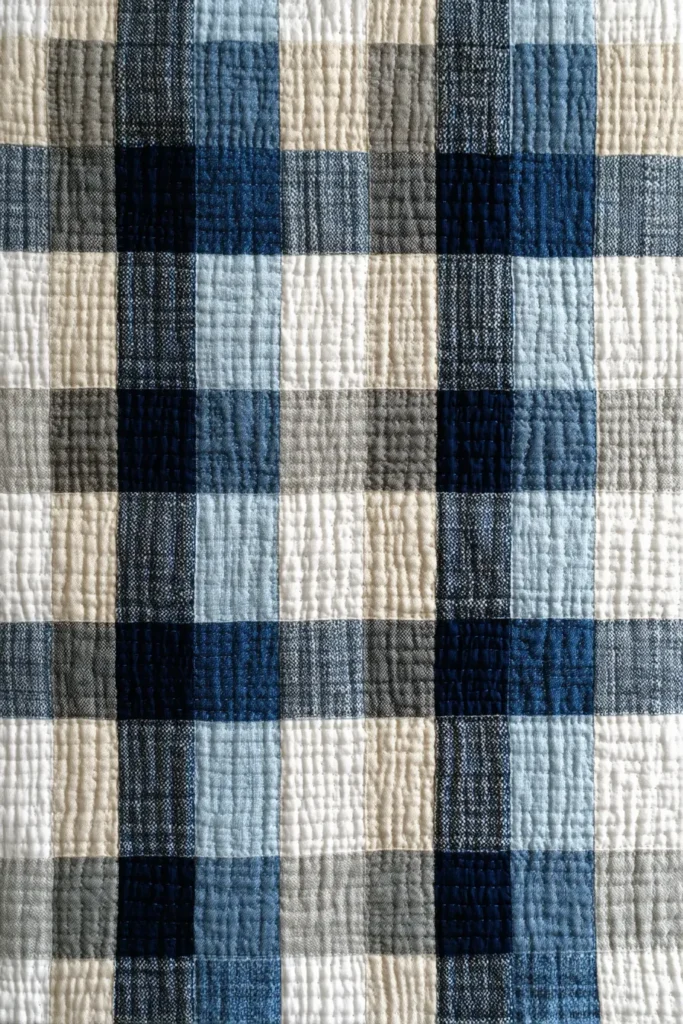
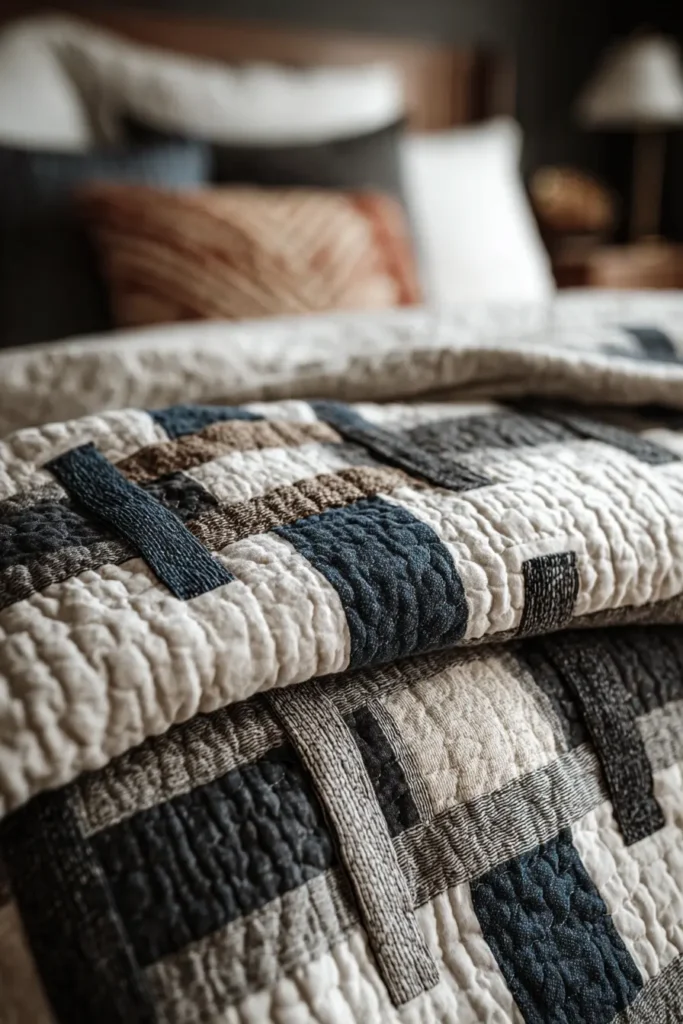
The “Lund Check” Transparency Plaid Runner
While tartan is Scottish, the Scandinavian version of plaid is often simpler, cleaner, and rooted in the tradition of Vävning (floor loom weaving). This pattern uses a clever patchwork technique called “Transparency” or “Gingham” piecing. By using three specific values of fabric—Light, Medium, and Dark—you create the optical illusion of transparent ribbons crossing over each other. It looks complex and woven, but is made entirely of simple squares. This runner adds a structured, masculine elegance to the foot of a fluffy white duvet.
Finished Dimensions: Queen Bed Runner, approximately 24″ x 84″.
Materials Needed:
- Fabric A (The Dark Intersection): 0.5 yard of Charcoal or Deep Navy solid cotton.
- Fabric B (The Bars): 1 yard of Medium Silver Grey or Chambray Blue. (This must be distinctly lighter than A, but darker than C).
- Fabric C (The Background): 1 yard of White or Oatmeal solid.
- Backing: 2.5 yards of brushed cotton.
- Batting: Thin cotton or bamboo batting.
- Thread: Grey (blends with everything).
- Notions: Rotary cutter, 6″ x 24″ ruler.
Cultural Backstory: The check pattern in Nordic textiles represents order and home. In the city of Lund and the surrounding Skåne regions, traditional “rölakan” (flatweave) rugs often featured geometric checks. This pattern mimics that flatweave structure, bringing a sense of historic craftsmanship to a modern bedroom.
Step 1: Cutting the Components
The math relies on 4.5-inch finished squares.
- Fabric A (Dark): Cut 3 strips measuring 5 inches x Width of Fabric (WOF).
- Fabric B (Medium): Cut 6 strips measuring 5 inches x WOF.
- Fabric C (Light): Cut 3 strips measuring 5 inches x WOF.
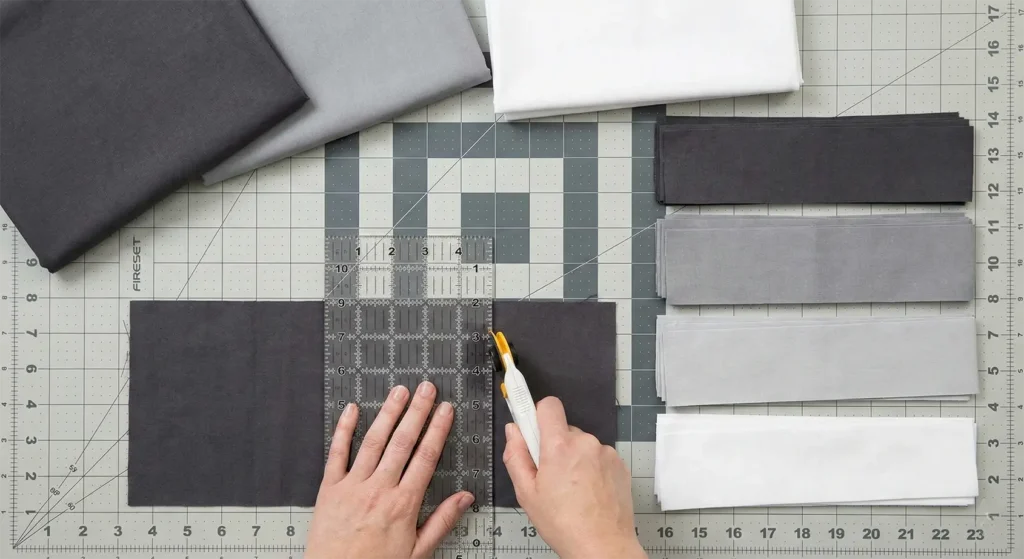
Step 2: Creating Strip Set 1 (The “Dark” Row)
We strip-piece to save time.
- Sew: Sew one Fabric A (Dark) strip to one Fabric B (Medium) strip lengthwise.
- Repeat: Make 3 sets of these.
- Press: Press the seam toward the Dark fabric.
- Sub-Cut: Cross-cut these long strip sets into 5-inch-wide segments.
- Result: You now have two-patch units (Dark + Medium). Let’s call this Unit X.
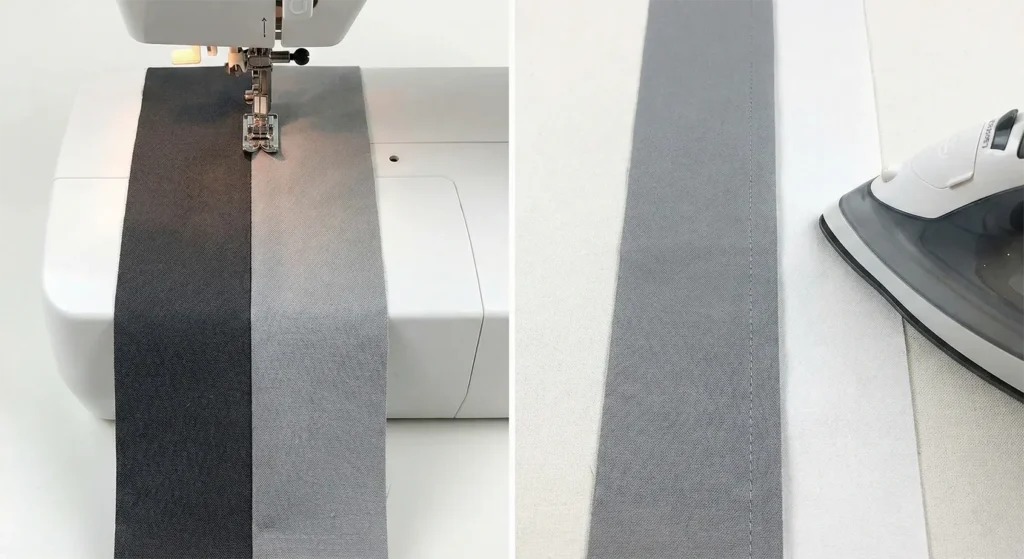
Step 3: Creating Strip Set 2 (The “Light” Row)
- Sew: Sew one Fabric B (Medium) strip to one Fabric C (Light) strip lengthwise.
- Repeat: Make 3 sets of these.
- Press: Press the seam toward the Medium fabric.
- Sub-Cut: Cross-cut into segments 5 inches wide.
- Result: You now have two-patch units (Medium + Light). Let’s call this Unit Y.

Step 4: The Checkerboard Layout
The transparency illusion happens here.
- Arrangement: You will build the runner in horizontal rows (5 squares high by 17 squares wide approx). But to keep it simple, we construct it in vertical columns first.
- Column Type 1: Sew Unit X on top of Unit Y.
- Visual: Dark/Medium on top of Medium/Light.
- The Illusion: The “Dark” square appears to be where two “Medium” bars cross.
- Column Type 2: Sew Unit Y on top of Unit X (flipped).
- Layout: Arrange your units to form a large Gingham check across the runner (5 blocks high).
- Pattern: Dark blocks should always connect diagonally. Light blocks should connect diagonally.
Step 5: Assembly and Border
- Join: Sew your columns together to reach the length of 84 inches (approx 17 columns).
- Press: Press seams open to reduce bulk at the intersections.
- Border (Optional): If you want a wider runner, add a 2.5-inch border of Fabric A (Dark) around the entire perimeter to frame the check.
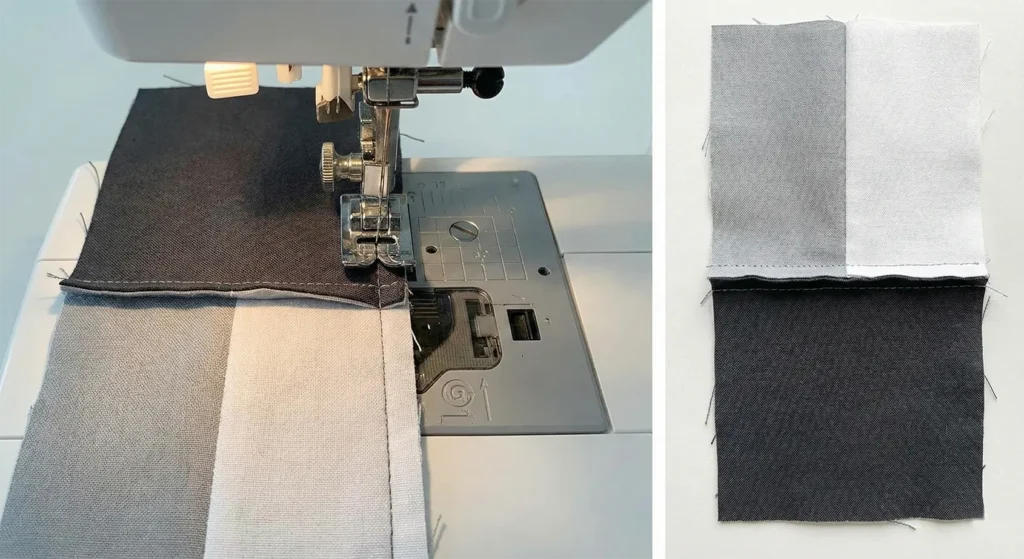
Step 6: “Warp and Weft” Quilting
Quilt to emphasize the woven look.
- Baste: Sandwich the runner.
- Marking: You don’t need to mark; use the seam lines.
- Quilt: Stitch straight lines:
- Stitch 1/4 inch away from every vertical seam line (both sides).
- Stitch 1/4 inch away from every horizontal seam line (both sides).
- Effect: This creates a grid of quilting lines that reinforces the “woven” visual, making the patchwork look like heavy woven wool.

Step 7: The Seamless Binding
- Material: Use Fabric B (Medium) for the binding.
- Why? A medium-tone binding softens the edge, whereas a dark one creates a hard stop.
- Attach: Bind using a standard double-fold method.

Usability Note: The geometric nature of this runner makes it reversible if you choose a solid backing fabric in a coordinating color (like the Medium Grey). It acts as a shield for the foot of the bed, protecting delicate duvets from suitcase wheels or pets.
18. Danish Modern Quilt Designs with Clean Lines and Comfort


The “Aarhus Mod” Retro Circle Quilt
Danish Modern design (centered around the 1940s–1960s) is famous for marrying functionalism with organic forms—think of the curves of an Arne Jacobsen “Egg Chair” against the straight lines of a teak cabinet. This quilt captures that mid-century aesthetic. It features large, bold circles in muted retro tones (Mustard, Teal, Olive) floating asymmetrically on a cool grey background. It is graphic, architectural, and undeniably stylish.
Finished Dimensions: Modern Square Throw, approximately 60″ x 60″.
Materials Needed:
- Fabric A (Background): 3 yards of Dove Grey or Graphite solid cotton. (Grey provides the neutral “concrete” canvas typical of modernism).
- Fabric B (The Orbs): 6 Fat Quarters of Mid-Century Solids: Ochre (Mustard), Teal, Olive Green, Burnt Orange, and Cream.
- Backing: 4 yards of a geometric atomic print or simple white sheeting.
- Batting: Low-loft Cotton/Bamboo blend (keeps the quilt flat and modern).
- Notions: Paper-Backed Fusible Web (e.g., Wonder-Under), Compass or Circle Templates (dinner plates work too).
Cultural Backstory: Aarhus, Denmark’s second-largest city, is a hub of architecture and design. This pattern pays homage to the “Golden Age” of Danish design, where designers like Verner Panton broke away from traditional wood to experiment with colorful plastics and fluid shapes. The circle represents this break from the rigid grid of the past.
Step 1: Cutting the Canvas
We use large blocks to maintain a minimalist look.
- Background Squares: Cut 25 squares from your Grey fabric, measuring 12.5 inches x 12.5 inches.
- Layout: The quilt will be a 5 x 5 grid.
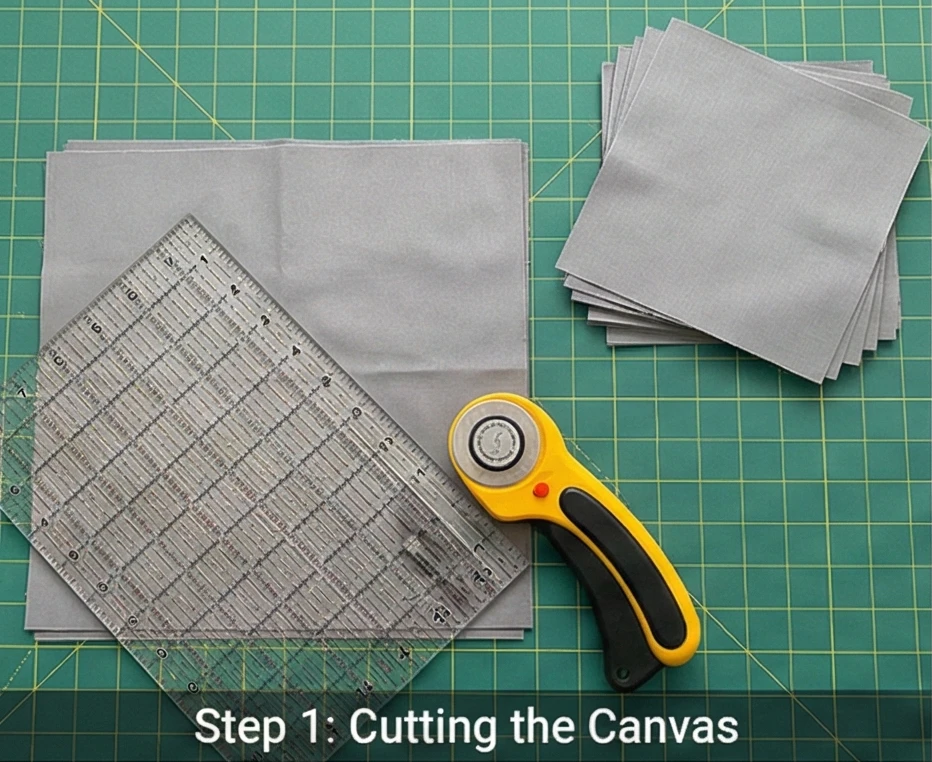
Step 2: Preparing the “Mod” Orbs
Uniformity is the enemy of the organic. We want different sizes.
- Fuse: Iron the Fusible Web to the wrong side of your colored Fat Quarters.
- Trace: Draw circles on the paper backing.
- Large Orbs: 8-inch diameter (Draw 10).
- Medium Orbs: 6-inch diameter (Draw 10).
- Small Orbs: 4-inch diameter (Draw 5).
- Cut: Cut out the circles carefully along the drawn lines. Peel off the paper backing.
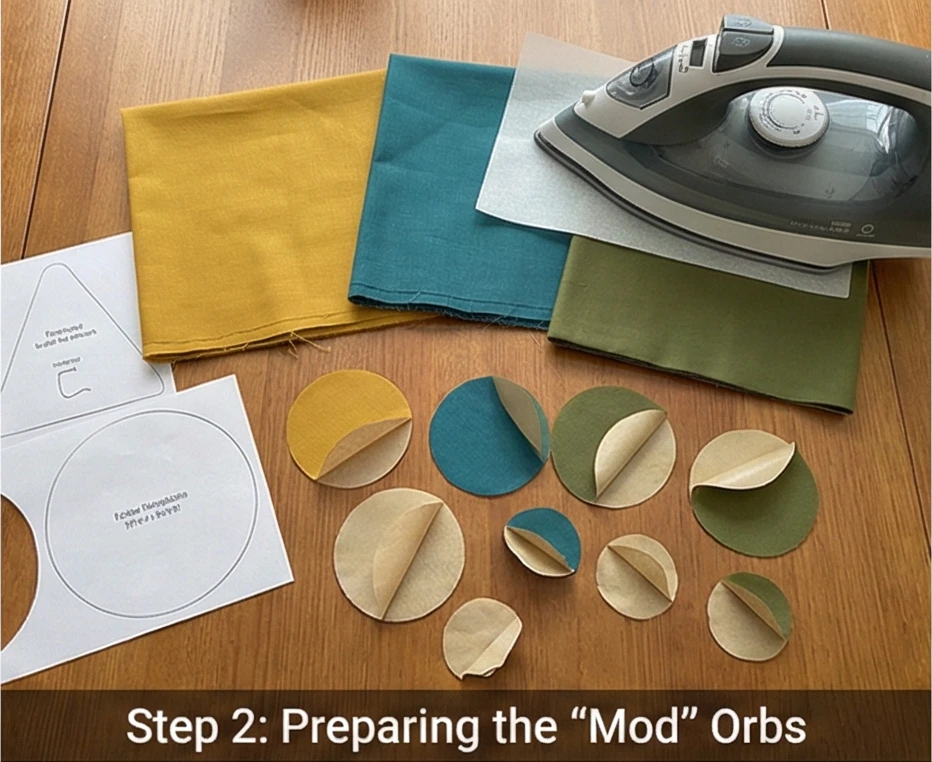
Step 3: Asymmetrical Composition
The “Danish” look comes from the placement. Do NOT center the circles.
- Placement: Place one colored circle on each Grey square.
- The Shift:
- Place some circles in the top-left corner.
- Place others floating near the bottom-right.
- Allow a few to be somewhat centered but slightly off-kilter.
- Rule: Keep the circle at least 1.5 inches away from the raw edge of the square (so it doesn’t get caught in the seam later).
- Fuse: Once you like the composition of a block, press with a hot iron to fuse the circle in place.
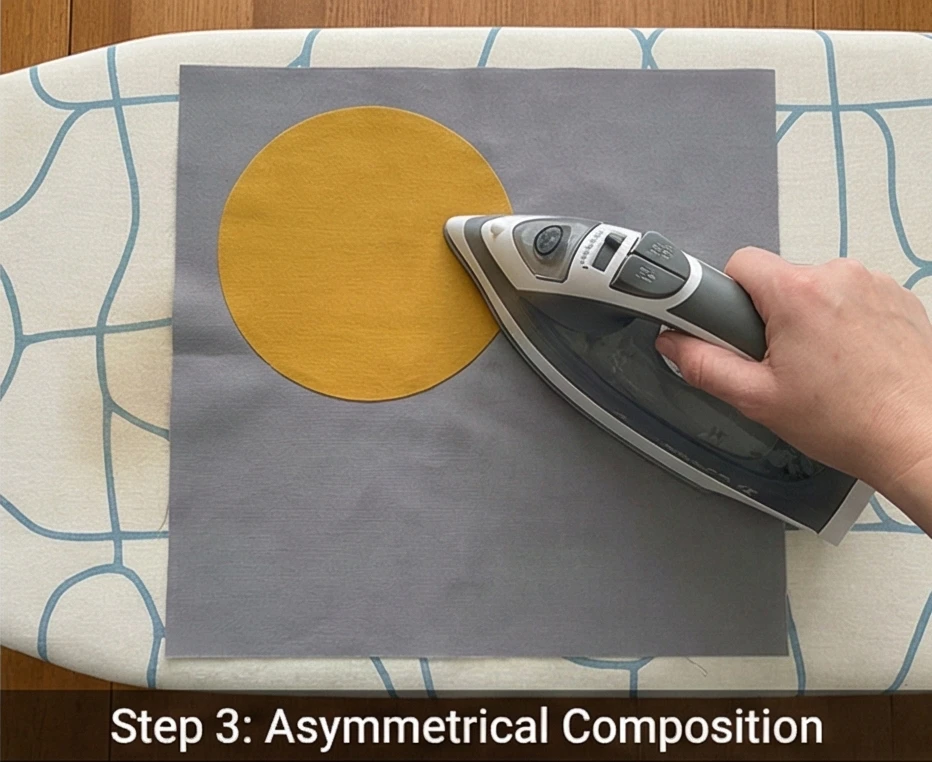
Step 4: The “Architectural” Stitch
Satin stitch is too heavy. We want a clean line.
- Thread: Use a contrasting thread (like Dark Charcoal) or a matching thread.
- Stitch: Sew a straight Topstitch roughly 1/8 inch inside the edge of the circle.
- Alternative: Use a “Blanket Stitch” for a slightly softer, more textured edge.
- Precision: Go slowly around the curves. If you stop, leave the needle down in the fabric, lift the presser foot, pivot slightly, and continue.
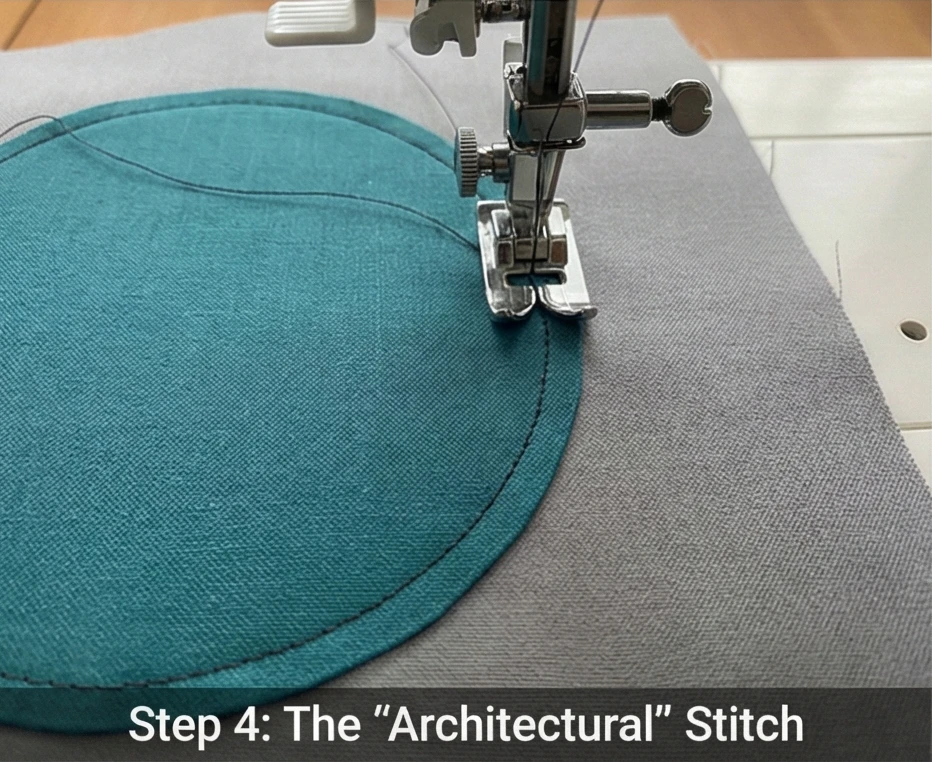
Step 5: Assembly
- Rows: Sew the blocks together into 5 rows of 5 blocks each.
- Design Wall: Lay them out first to avoid too many “Mustard” circles clustered in one spot.
- Join: Sew the rows together.
- Press: Press seams open to ensure the quilt top is perfectly flat.
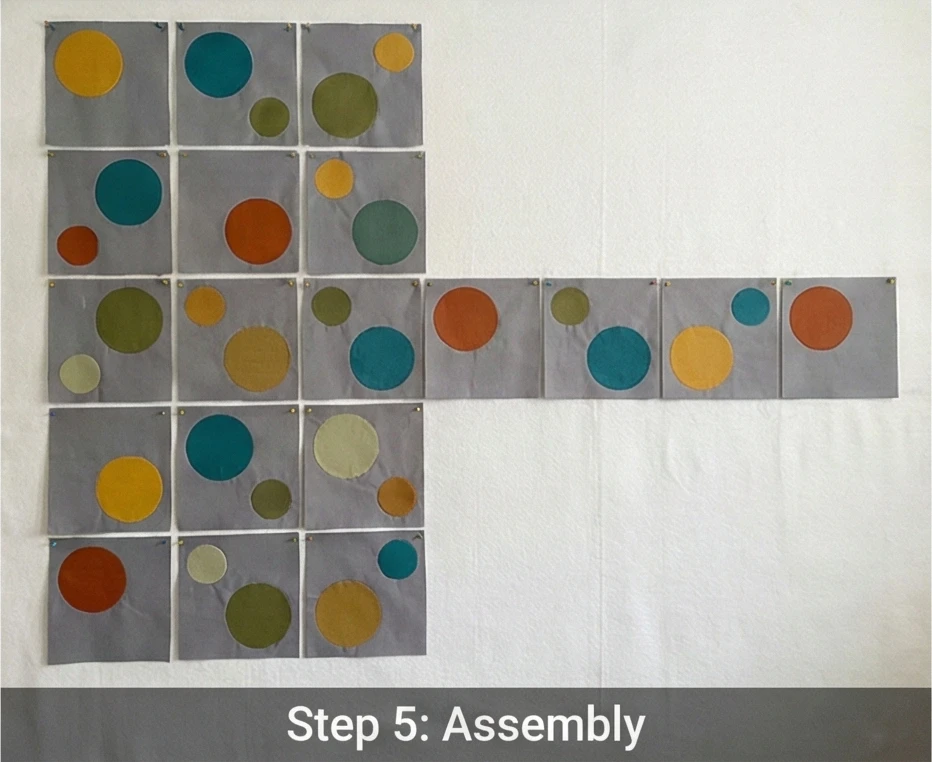
Step 6: “Ripple” Quilting
Quilting should emphasize the organic shape.
- Baste: Sandwich the quilt.
- The Spiral: Starting from the center of a few select circles, quilt a continuous spiral outward.
- The Grid: Alternatively, use a walking foot to quilt straight horizontal lines spaced 1 inch apart across the whole quilt. This juxtaposition of straight quilting lines over round fabric shapes is the definition of Mid-Century Modern tension.
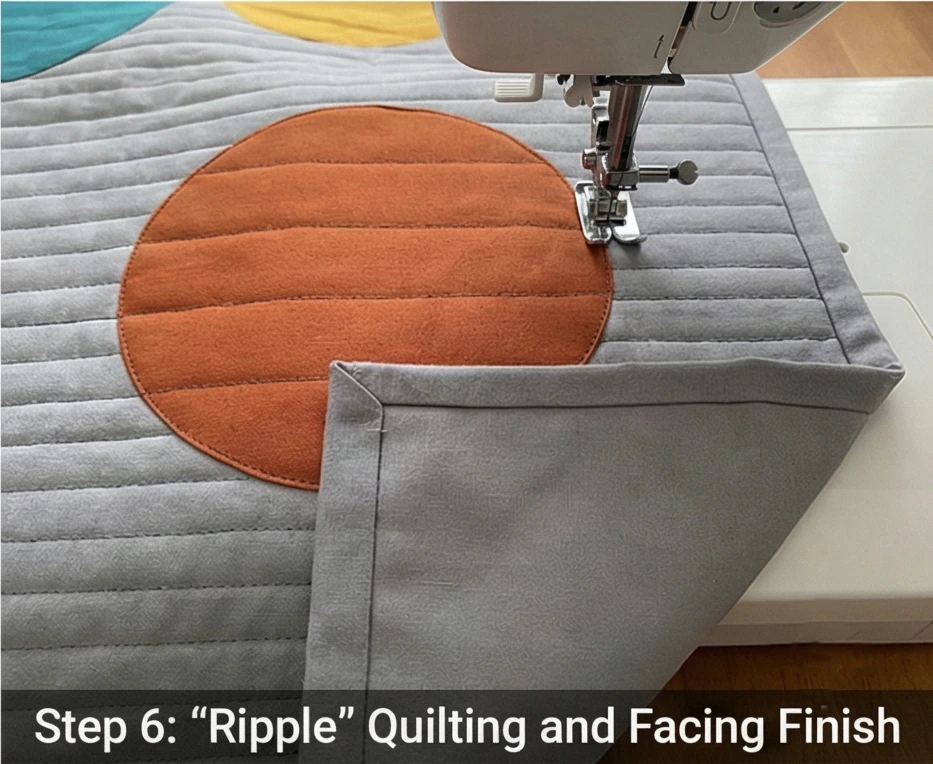
Step 7: The Facing Finish
Danish design is often about what isn’t there. A borderless look is best.
- Facing: Instead of a visible binding strip, use a Facing (strips sewn to the front and flipped completely to the back).
- Effect: The grey background extends to the edges and wraps around, making the quilt look like a stretched-canvas art piece.
Usability Note: The large blocks and lack of complex piecing make this quilt come together very quickly. It is an excellent project for showcasing bold, high-quality fabrics that might be too overwhelming in small patchwork pieces.
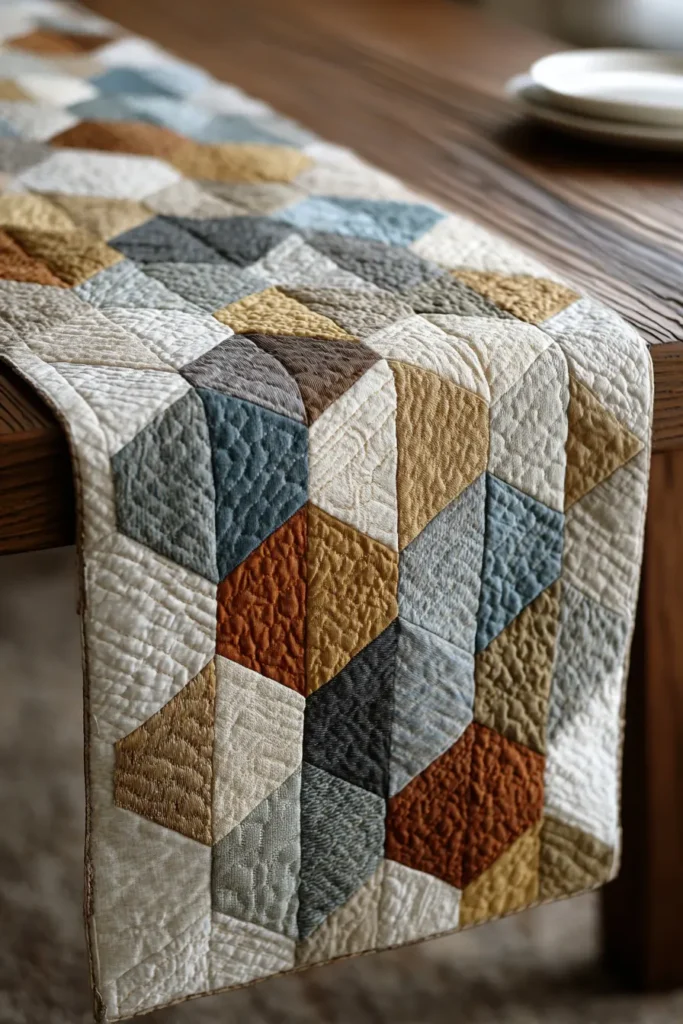
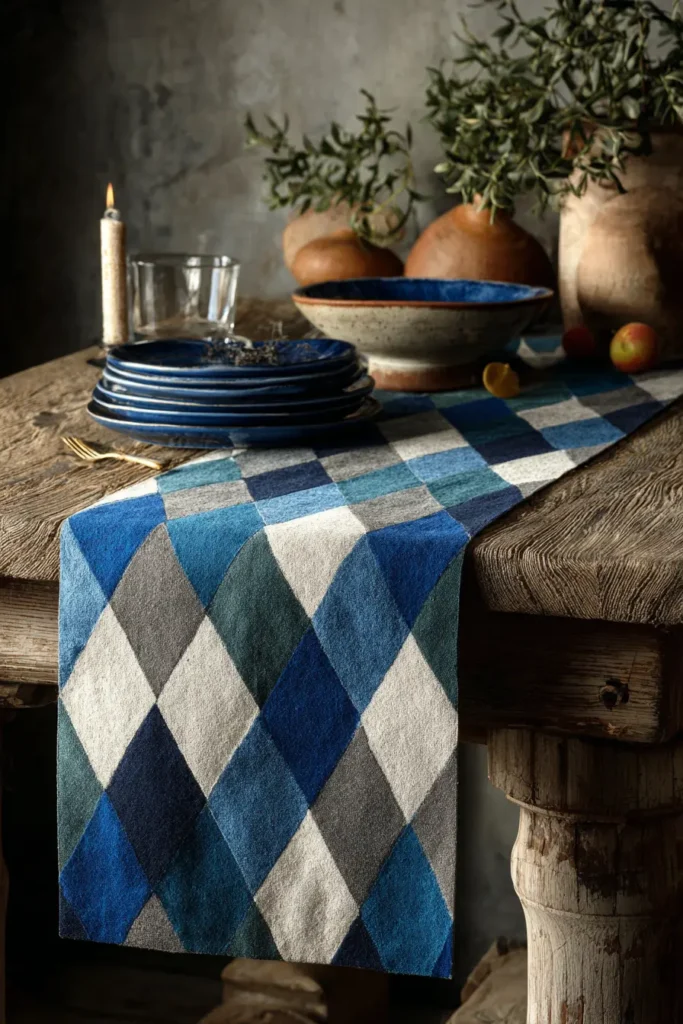
The “Bergen Harlequin” Diamond Runner
The Harlequin (diamond) pattern is a staple of Gustavian style—an 18th-century Swedish design movement that blended French elegance with Nordic practicality. Historically, Swedes would paint diamond patterns on wooden floors to mimic the look of expensive marble tiles. This table runner brings that classic “painted floor” aesthetic to your tabletop. Using the “Square-in-a-Square” technique, we create a row of floating colored diamonds set in crisp white, offering a look that is both geometric and softly traditional.
Finished Dimensions: Dining Table Runner, approximately 18″ x 72″.
Materials Needed:
- Fabric A (The Diamonds): 1/2 yard of Dusty Blue, Sage, or Pearl Grey linen/cotton blend.
- Fabric B (The Background): 1 yard of Crisp White cotton.
- Backing: 1 yard of a coordinating print.
- Batting: Thin cotton batting (keeps the runner flat for dishes).
- Thread: White.
- Notions: Rotary cutter, 6.5″ square ruler (or larger).
Cultural Backstory: In the coastal city of Bergen and throughout Scandinavia, the diamond shape represents stability and balance. In textile arts, it was often used in “Åkle” (traditional Norwegian tapestries). This simplified version isolates the shape, creating a clean, modern focal point.
Step 1: Cutting the Components
We will make 16 blocks. Each block consists of a colored center square surrounded by white triangles.
- Fabric A (Diamonds): Cut 16 squares measuring 4.75 inches x 4.75 inches.
- Precision: Be exact here; this is your center “jewel.”
- Fabric B (Background):
- Cut 32 squares measuring 4 inches x 4 inches.
- Sub-Cut: Cut each of these 4-inch squares in half diagonally (corner to corner).
- Yield: You now have 64 triangles.
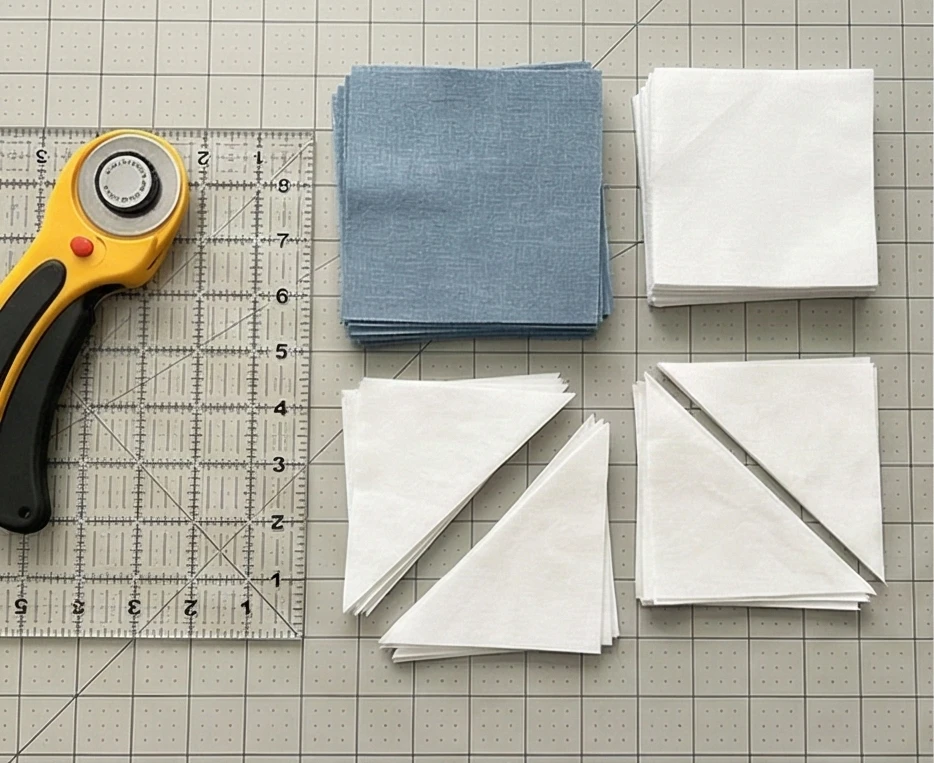
Step 2: Adding the First Corners
We turn the square on its point by adding corners.
- Sew: Take one Fabric A (Colored) square. Match the long side of a Fabric B (White) triangle to the top edge of the square. Center it.
- Stitch: Sew with a 1/4 inch seam.
- Opposite Side: Repeat on the bottom edge of the square.
- Press: Press the seams outward toward the white triangles. You now have a square with white triangles on the top and bottom.
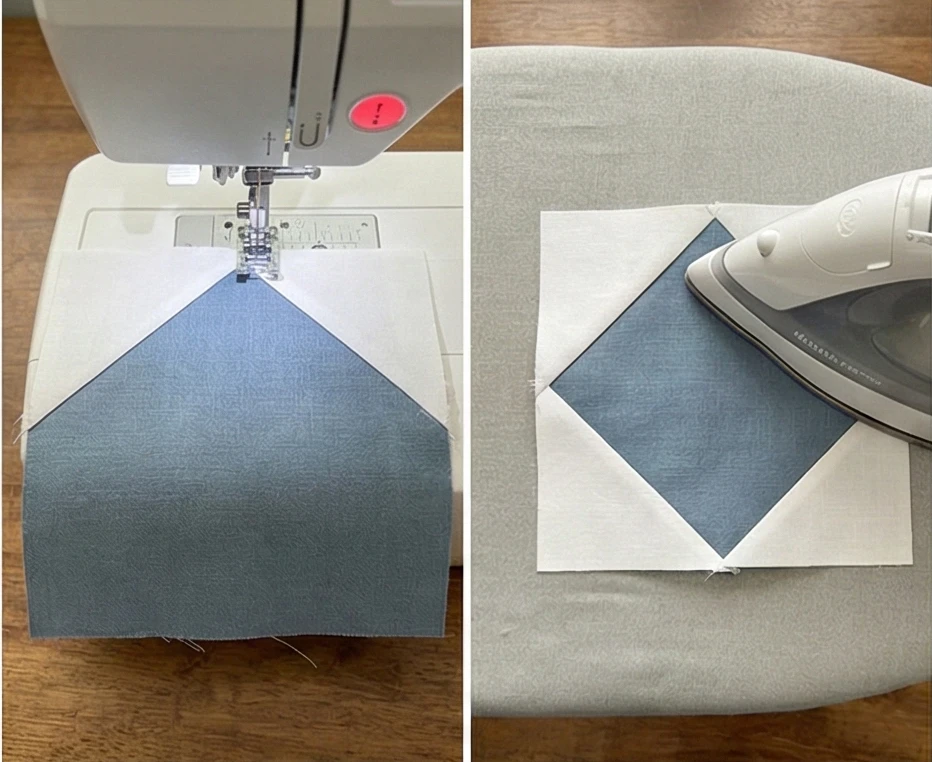
Step 3: Completing the Square
- Sew: Take two more Fabric B triangles. Sew them to the remaining two sides (Left and Right) of the center square.
- Press: Press seams outward again.
- Result: You now have a larger square block (approx 6.5 inches) with a colored diamond floating in the center.
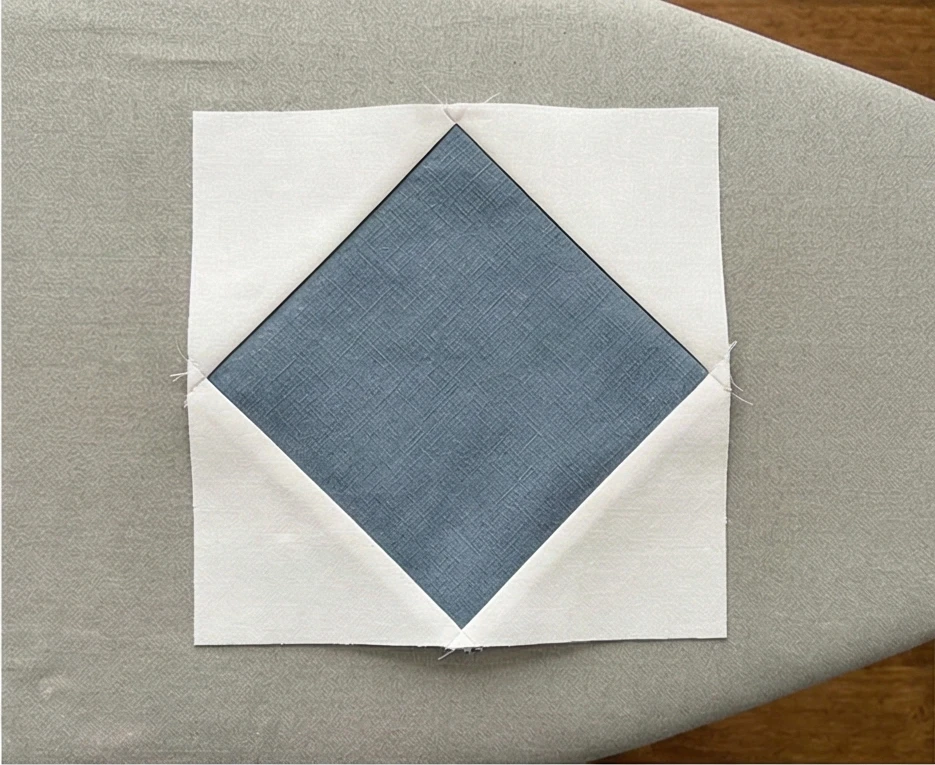
Step 4: Trimming the Blocks (Crucial Step)
To ensure the runner is straight, you must square up the blocks.
- Align: Place your square ruler over the block. Ensure that exactly 1/4 inch of white fabric extends beyond the points of the colored diamond on all four sides.
- Why? You need this 1/4 inch so that when you sew the blocks together, you don’t chop off the points of your diamonds.
- Trim: Trim the block to exactly 6.5 inches x 6.5 inches. Repeat for all 16 blocks.
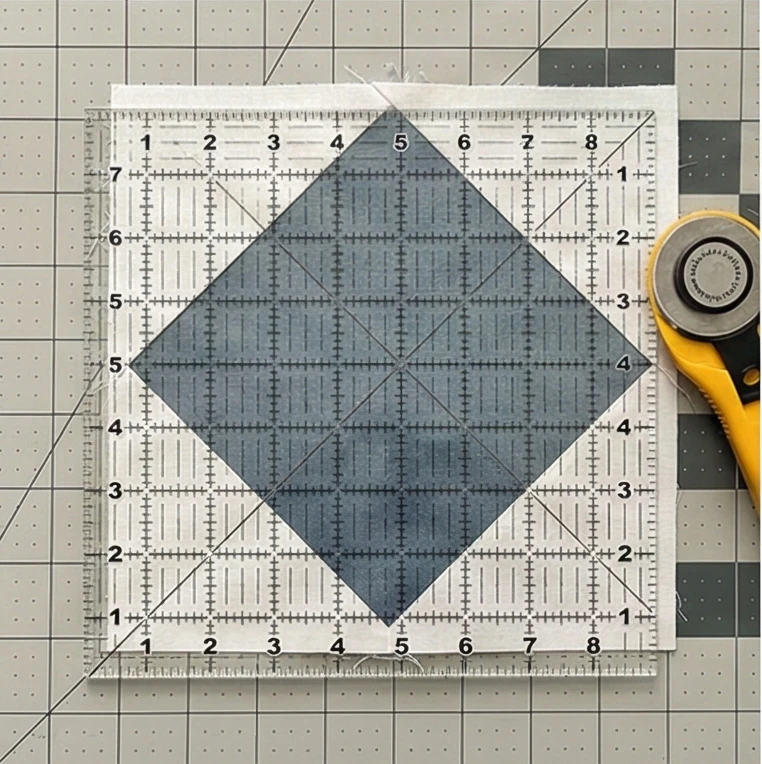
Step 5: The “Two-by-Eight” Assembly
- Pairs: Sew the blocks together into pairs (2 blocks wide).
- Make: 8 pairs.
- Width: This creates a runner roughly 12.5 inches wide (unfinished). Note: If you want a wider runner (18″), make 3 columns instead of 2.
- Rows: Sew the 8 pairs together into a long column.
- Borders: To reach the 18″ width and frame the diamonds:
- Cut 2 strips of Fabric B (White) measuring 3.5″ x 72″.
- Sew these to the long sides of the diamond assembly.
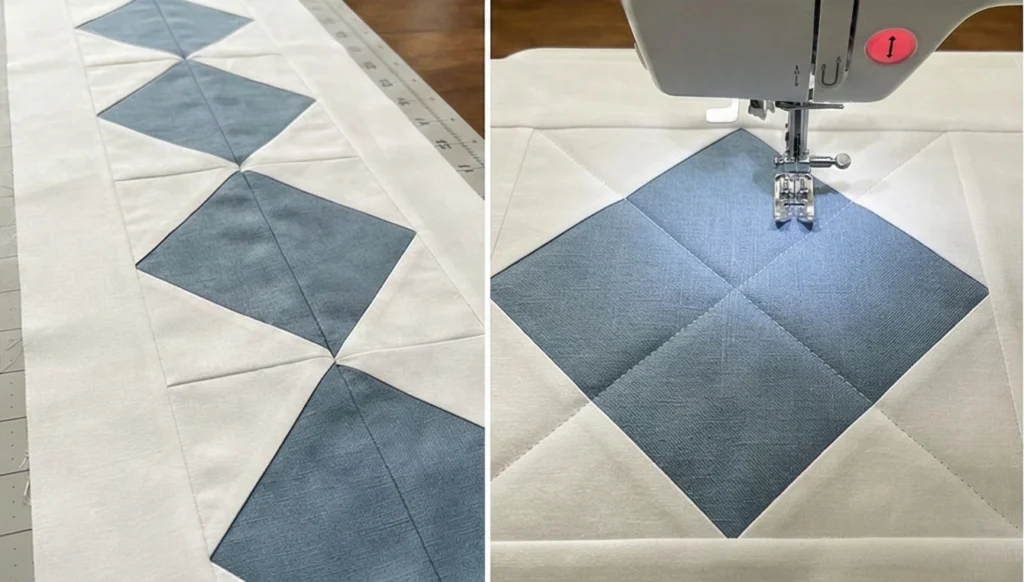
Step 6: “X” Quilting
Keep the quilting minimal to let the diamonds shine.
- Baste: Sandwich Backing + Batting + Top.
- Quilt: Stitch straight diagonal lines through the blocks.
- Stitch from corner to corner through the colored diamonds.
- Effect: This creates a large “X” through each diamond, reinforcing the Harlequin geometry.
- Bind: Finish with a binding in Fabric A (the diamond color) to visually tie the design together.
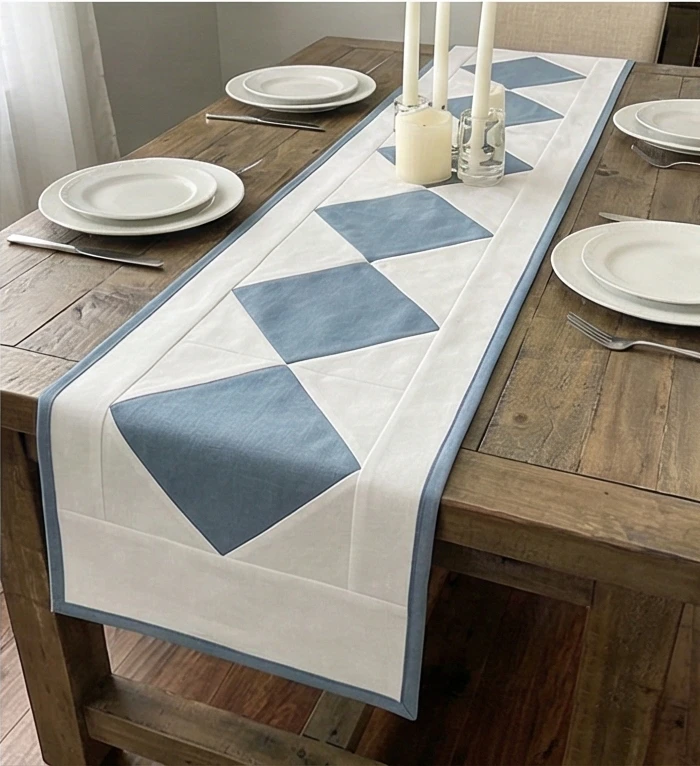
Usability Note: Because this pattern uses a “Square-in-a-Square” technique rather than bias edges on the outside, the runner is very stable and resists stretching or warping when washed—perfect for a table linen that sees frequent use.
20. Modern Nordic Cross Quilt Ideas for Living Room Accents
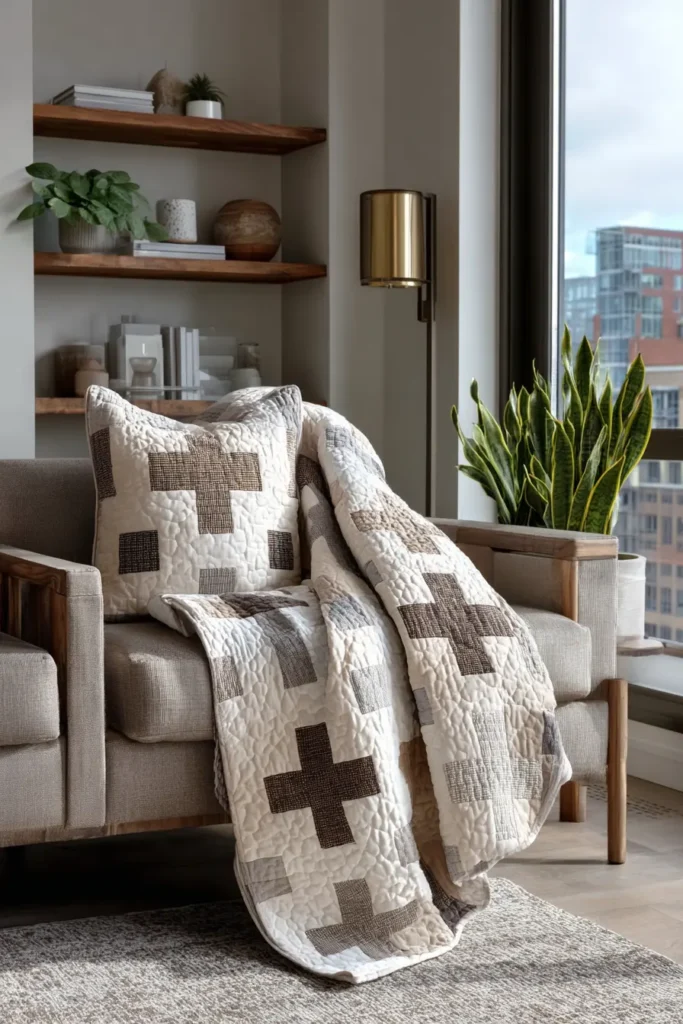

The “Odense Graphic” Monochrome Plus Throw
While the Nordic Cross flag is asymmetrical, modern Scandinavian interior design often utilizes the symmetrical “Swiss Cross” or “Plus Sign” as a graphic element. This pattern epitomizes high-contrast minimalism. It features bold Black Plus Signs floating on a Stark White background. The key to keeping it elegant rather than chaotic is Negative Space—using wide white blocks between the crosses to let the eye rest. It is a striking accent piece draped over a grey sofa or a leather armchair.
Finished Dimensions: Modern Lap Throw, approximately 54″ x 66″.
Materials Needed:
- Fabric A (Crosses): 1.5 yards of Jet Black or Charcoal solid cotton.
- Fabric B (Background): 3 yards of Snow White solid cotton.
- Backing: 3.5 yards of a black-and-white geometric print (e.g., stripes or grid).
- Batting: Bamboo/Cotton Blend. (Bamboo adds a heavy, luxurious drape that feels expensive).
- Thread: Black (for piecing crosses) and White (for assembly/quilting).
- Notions: Rotary cutter, 6.5″ square ruler.
Cultural Backstory: Odense is one of Denmark’s oldest cities and the birthplace of Hans Christian Andersen. Modern Danish design, however, moved away from fairytales toward functionalism. This “Plus” motif became popular in the 1960s as designers sought symbols that were universal, positive, and mathematically balanced.
Step 1: Cutting the Components
The Plus Sign is simply a 9-patch block made of 5 black squares and 4 white squares.
- Black Fabric (Fabric A): Cut 9 strips measuring 4.5 inches wide. Sub-cut into 4.5-inch squares.
- Quantity: You need 85 Black squares total.
- White Fabric (Fabric B):
- For the Blocks: Cut 7 strips measuring 4.5 inches wide. Sub-cut into 4.5-inch squares. (Need 68 White squares).
- For the Negative Space: Cut 17 squares measuring 12.5 inches x 12.5 inches. (These are the large plain white blocks that separate the crosses).
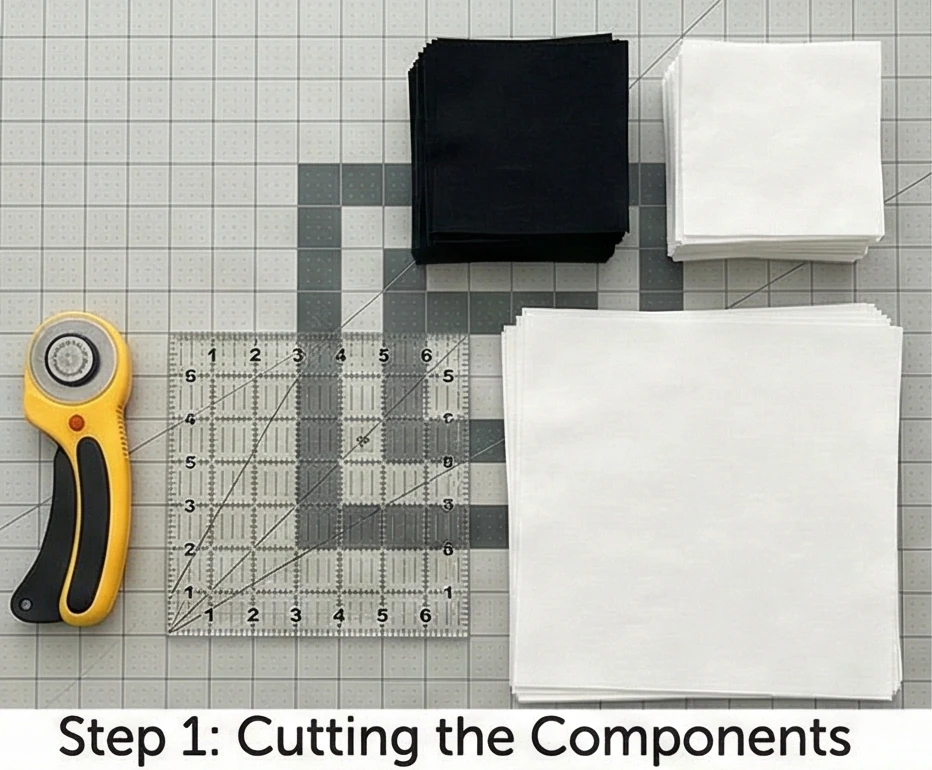
Step 2: Constructing the Plus Block
We are making 17 Plus Blocks.
- Layout: Arrange a 3×3 grid for one block:
- Top Row: White – Black – White
- Middle Row: Black – Black – Black
- Bottom Row: White – Black – White
- Sew: Stitch the squares into rows using a 1/4 inch seam.
- Press:
- Press the Top and Bottom row seams toward the White.
- Press the Middle row seams toward the Black.
- Why? This allows the seams to “nest” perfectly when you join the rows.
- Join: Sew the three rows together.
- Size: The unfinished block should measure 12.5″ x 12.5″.
- Repeat: Make 17 Blocks.

Step 3: The “Checkerboard” Layout
We alternate the Plus Blocks with the solid White Blocks.
- Arrangement: Lay out the blocks in a 5-by-7 grid.
- Row 1: Plus – Solid – Plus – Solid – Plus
- Row 2: Solid – Plus – Solid – Plus – Solid
- Row 3: Plus – Solid – Plus – Solid – Plus
- …Continue alternating.
- Visual Check: Ensure the crosses look staggered. This “on-point” arrangement prevents the quilt from looking like a graveyard of crosses and makes it look like a graphic pattern.
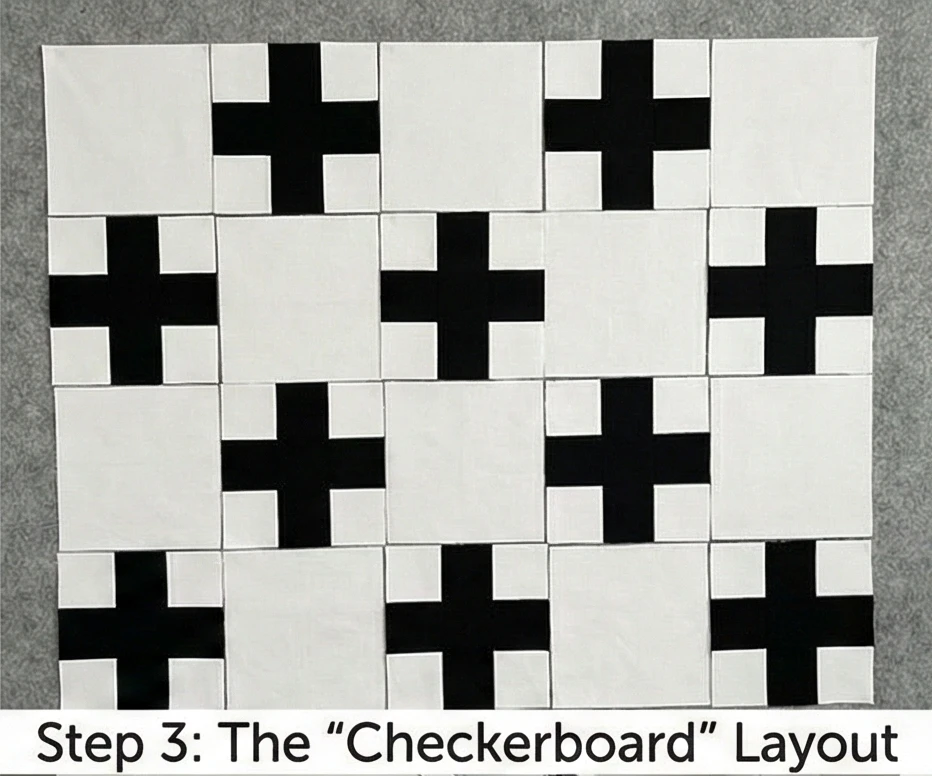
Step 4: Web Assembly
- Sew Rows: Stitch the blocks together into horizontal rows.
- Press: Press seams toward the Solid White Blocks (away from the bulky seams of the Plus blocks).
- Join Rows: Sew the 7 rows together to complete the top.
- Precision: Pin carefully at the intersections to ensure the blocks’ corners meet perfectly.

Step 5: “Echo” Quilting
Quilting inside the white space makes the black crosses pop.
- Baste: Sandwich the Backing + Bamboo Batting + Top.
- Quilt: Use White Thread.
- Quilt a square spiral inside the large, solid white blocks.
- Quilt straight lines through the white corners of the Plus blocks.
- Avoid: Do not quilt over the Black crosses. Leave them unquilted (or “in the ditch” only). This causes the black fabric to puff slightly, creating a tactile 3D effect.

Step 6: The High-Contrast Binding
A frame defines the graphic art.
- Prepare: Cut 2.5-inch strips of the Black Fabric.
- Bind: Attach the binding.
- Effect: The black binding “contains” the white background, giving the quilt a sharp, poster-like finish suitable for a modern living room.
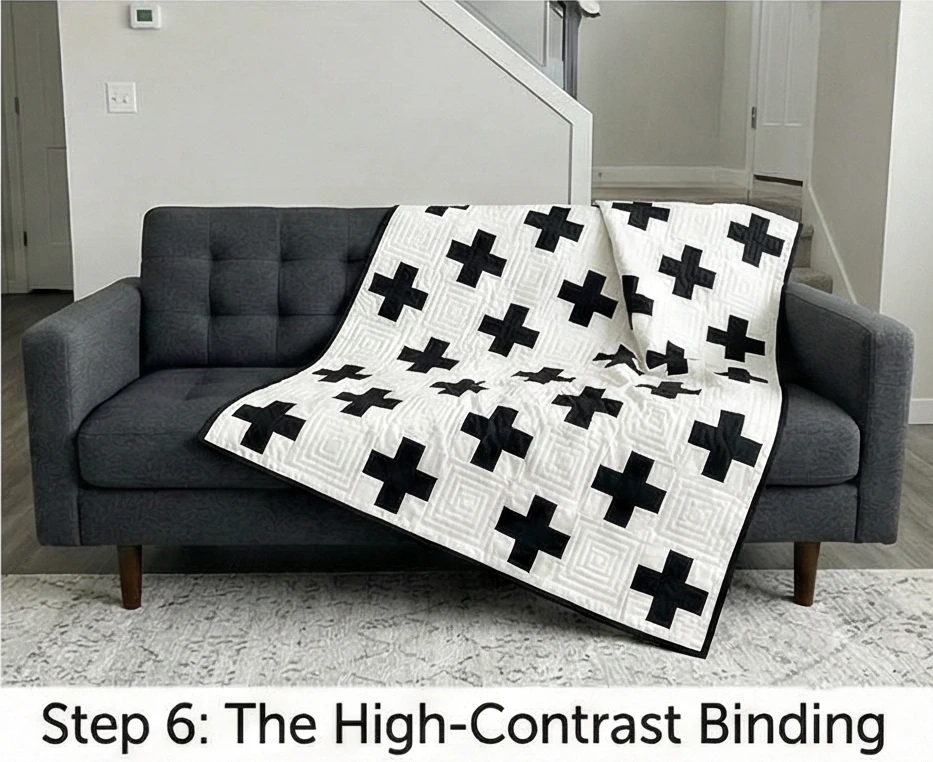
Usability Note: Bamboo batting is naturally cooler to the touch than polyester, making this an excellent “summer throw” for movie nights when you want weight but not stifling heat.
Conclusion
Incorporating these 20 Scandinavian Quilt Pattern Ideas into your life is about more than just following a trend; it is about adopting a lifestyle that values quality, sustainability, and peace. We have seen how the simplicity of a Scandinavian Cross Quilt Design can anchor a bedroom in calm, and how the texture of Scandi-Boho Fringed Throws invites you to slow down and rest. These designs prove that you do not need bright colors or complex borders to make a statement; often, the quiet confidence of a Cream and Charcoal Table Runner or the subtle gradient of an Abstract Nordic Landscape wall hanging speaks volumes about refined taste and a love for home.
The impact of these quilts on your living environment is transformative, fostering an atmosphere of “Lagom”—not too little, not too much, but just right. The inclusion of seasonal elements, such as Elegant Snowflake Quilt Blocks or Soft Pastel Nursery Quilts, allows your home to evolve with the seasons while maintaining a cohesive thread of elegance. By choosing materials and patterns that reflect the natural world—like the Nordic Pine Tree motifs or Organic Cotton fabrics—you create a space that feels grounded and authentic, offering a retreat from the noise of the outside world.
Ultimately, let this exploration inspire you to pick up your needle and thread with intention. Whether you decide to craft a Simple Scandinavian Diamond Runner for your dining table or commit to a Hand-Stitched Whole Cloth Quilt for the master suite, you are building a home that prioritizes well-being and beauty. We hope these ideas empower you to embrace the clean lines and cozy warmth of the North, ensuring your home remains a stylish, serene, and inviting haven for years to come.
