
Timeless Stellar Style: 20 Elegant Star Quilt Pattern Ideas for Year-Round Comfort
Star Quilts: Why the Oldest Pattern in Quilting Still Works
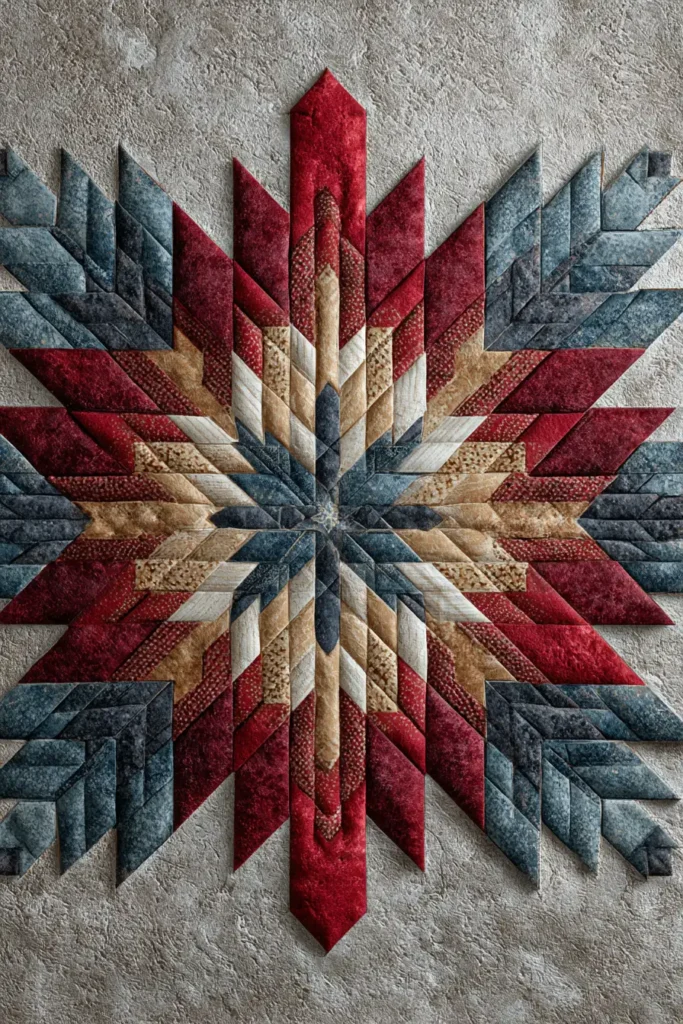
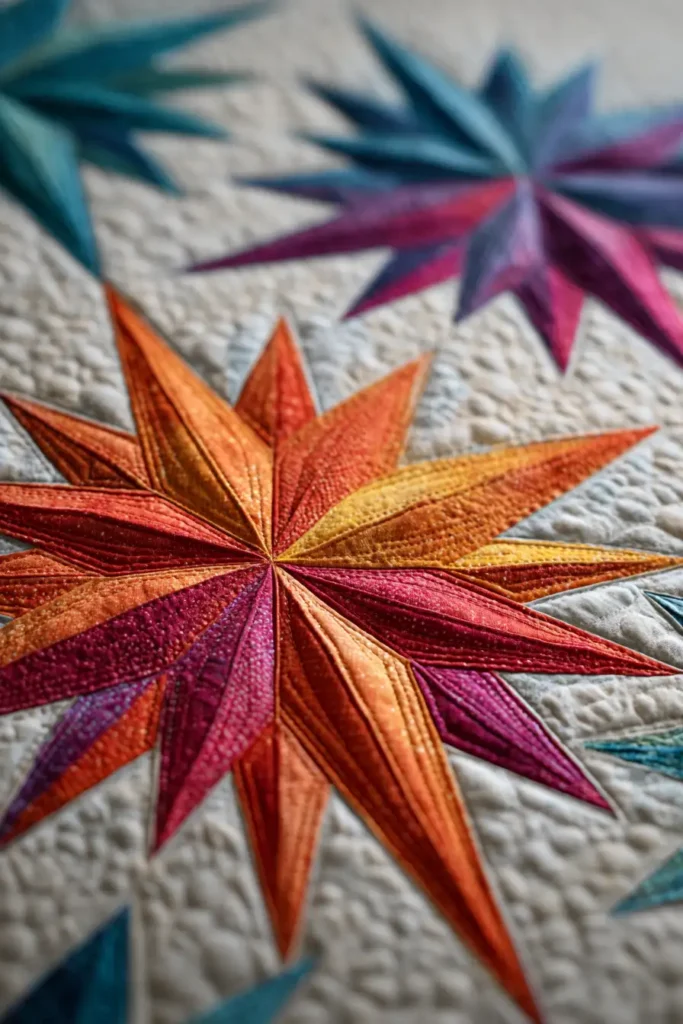
Star quilt patterns have been made continuously since the earliest days of American quilting, and the reason is not nostalgia. It is geometry. The eight-pointed star, the Ohio Star, the Lone Star, the Sawtooth – these designs create a visual effect that flat, grid-based patterns cannot replicate: movement. The sharp points and radiating structure make the eye travel across the surface rather than settle on it, which gives a star quilt an energy that reads differently from across the room than up close. Very few quilt patterns do both things well at the same time.
The construction demands that the effects be real. Star blocks rely on precise diamond piecing, accurate angle cutting, and – in more complex designs like the Lone Star—Y-seams that intimidate even experienced quilters. When the piecing is slightly off, the points blunt, and the radiant quality collapses. When it is right, the points seem to shift with the light. I have always found that particular sensitivity to execution fascinating – the way a few degrees of inaccuracy changes everything, and the way careful color placement can make the same block glow or flatten entirely.
More Than Geometry
Part of what gives star quilts their staying power is the meaning that has accumulated around them across different cultures. The star as a symbol of guidance, hope, and direction is not a quilting invention – it predates the craft entirely. In Lakota tradition, the Morning Star carries specific ceremonial weight, expressed through quilts given at births, graduations, and funerals. In early American quilting, star patterns were among the most common choices for special-occasion quilts – the ones made to mark a moment rather than just provide warmth.
That accumulated meaning does not disappear when a star quilt is used in a purely contemporary context. It settles into the background, adding a quiet depth that purely decorative patterns rarely carry. You do not need to know the history for it to register.
Star Quilt Pattern Ideas
Contents
- 1 Star Quilt Pattern Ideas
- 2 1. Classic Ohio Star Quilt Patterns for Elegant Master Bedrooms
- 3 2. Luxurious Lone Star Quilt Designs for a Statement Bedspread
- 4 3. Cozy Sawtooth Star Bed Runners for a Splash of Style
- 5 4. Sophisticated LeMoyne Star Pillow Shams for Comfort
- 6 5. Minimalist Carpenter’s Star Quilt Ideas for Modern Beds
- 7 6. Scrappy Friendship Star Quilt Patterns for a Charming Guest Room
- 8 7. Elegant Hunter’s Star Bed Quilts for All-Season Warmth
- 9 8. Sophisticated Star Duvet Cover Patterns for Year-Round Warmth
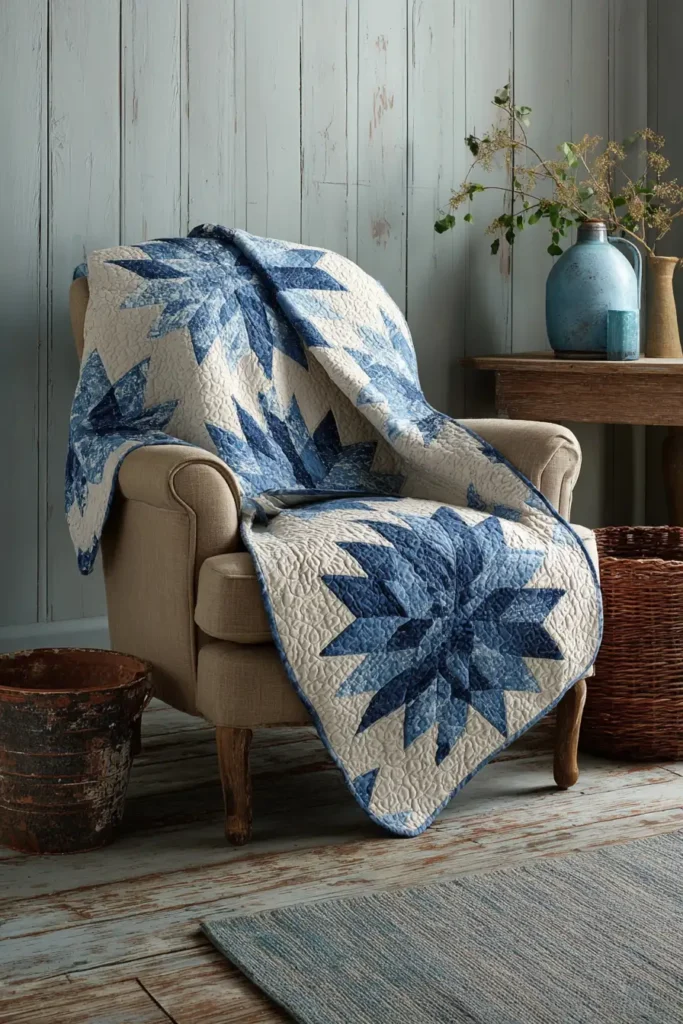
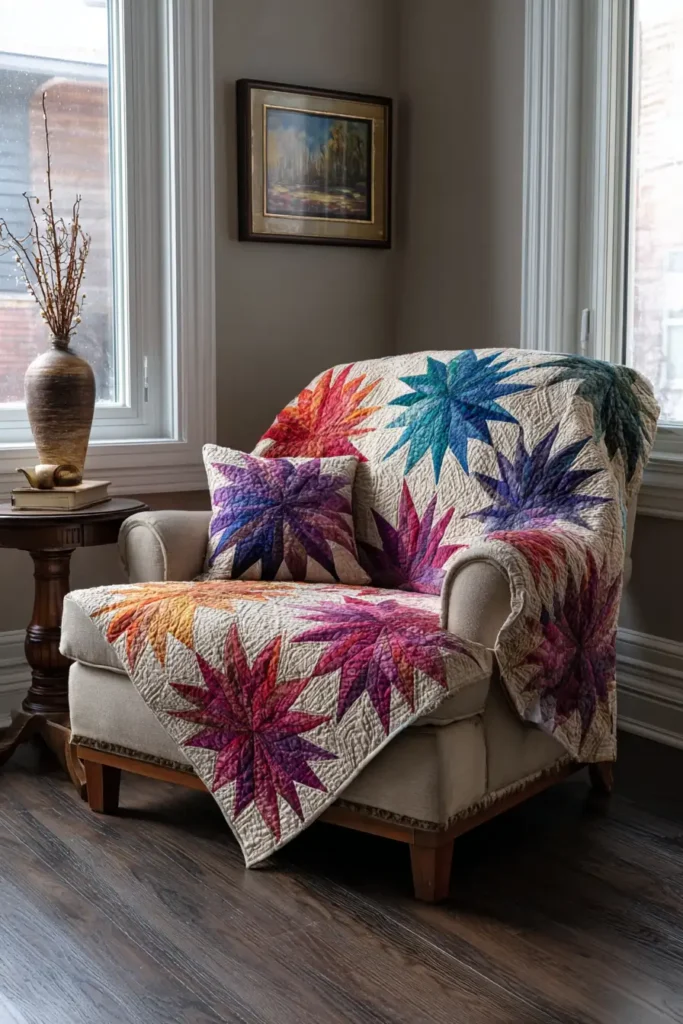
- 10 9. Elegant Star Quilted Sofa Throws for Year-Round Coziness
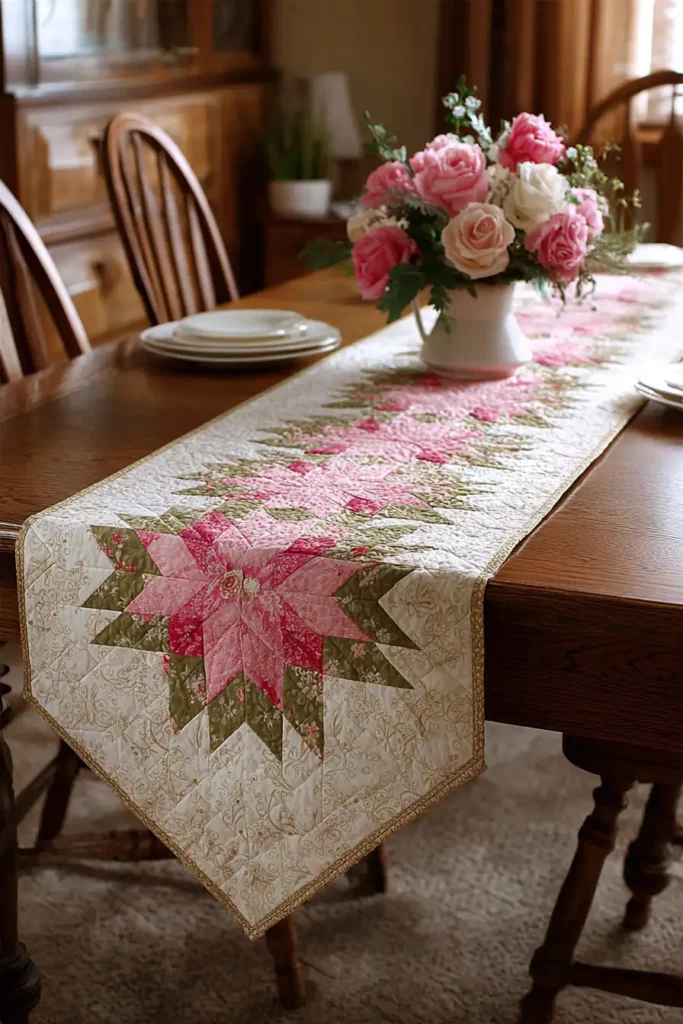
- 11 10. Timeless Star Quilt Table Runners for Dining Room Charm
- 12 11. Chic Star Couch Cover Ideas for Stylish Living Rooms
- 13 12. Mosaic Star Quilt Ideas for Stylish Dining Table Centerpieces
- 14 13. Folded Star Quilted Cushion Covers for Textured Decor
- 15 14. Reversible Star Quilt Designs for Versatile Living Room Throws
- 16 15. Starburst Quilt Patterns for Vibrant Armchair Covers
- 17 16. Scrappy Star Quilt Throws for Rustic Living Room Comfort
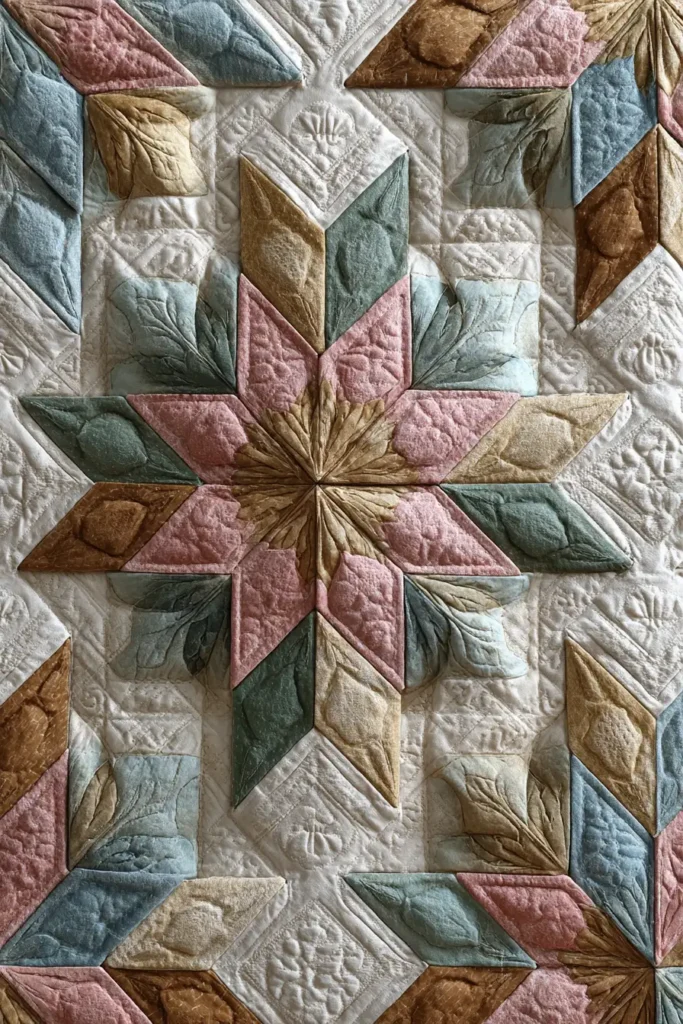
- 18 17. Dramatic Feathered Star Wall Hangings for Statement Art
- 18.1 The “Onyx Majesty” Feathered Star Medallion
- 18.1.1 Step 1: The Strategy (Foundation Paper Piecing)
- 18.1.2 Step 2: Constructing the 8 Feathered Arms
- 18.1.3 Step 3: The Center LeMoyne Star
- 18.1.4 Step 4: Assembling the “Octagon”
- 18.1.5 Step 5: The “Y-Seam” Assembly
- 18.1.6 Step 6: Negative Space Borders
- 18.1.7 Step 7: “Trapunto” Micro-Quilting
- 18.1.8 Step 8: The Museum Finish (Hanging Sleeve)
- 18.1 The “Onyx Majesty” Feathered Star Medallion
- 19 18. Radiant Sunburst Star Quilt Medallions for Hallway Decor
- 20 19. Miniature Seven Sisters Star Quilts for Shelf Styling
- 21 20. Vintage-Inspired Star Quilt Art Designs for Gallery Walls
- 22 Conclusion
Why Star Quilts Work Across Any Room
The versatility of star patterns is genuine rather than claimed. A single large star – a Lone Star or Carpenter’s Star scaled to a full bed – acts as a focal point strong enough to anchor a room without additional decoration. Repeating smaller stars creates a softer, more continuous rhythm that suits rooms where the quilt is one element among several rather than the defining piece. The same block reads as bold or restrained depending almost entirely on fabric choice and scale – I have seen the same basic Ohio Star pattern look completely different in high-contrast solids versus low-volume prints.
In the bedroom, minimalist star quilts bring structure and calm. More intricate designs – Feathered Star, Variable Star variations – add visible craftsmanship that rewards close attention. In living spaces, star throws and table runners introduce warmth without demanding the room reorganize itself around them.
These 20 patterns cover the full range: clean and modern at one end, scrappy and lived-in at the other, with the same underlying geometry holding it all together.
See also: Lakota Star quilts · Nine Patch quilts · Other Classic Quilt Patterns
Recommended Supplies
“As an Amazon Associate, I earn from qualifying purchases.“
1. Classic Ohio Star Quilt Patterns for Elegant Master Bedrooms

Here is the guide for Classic Ohio Star Quilt Patterns for Elegant Master Bedrooms.
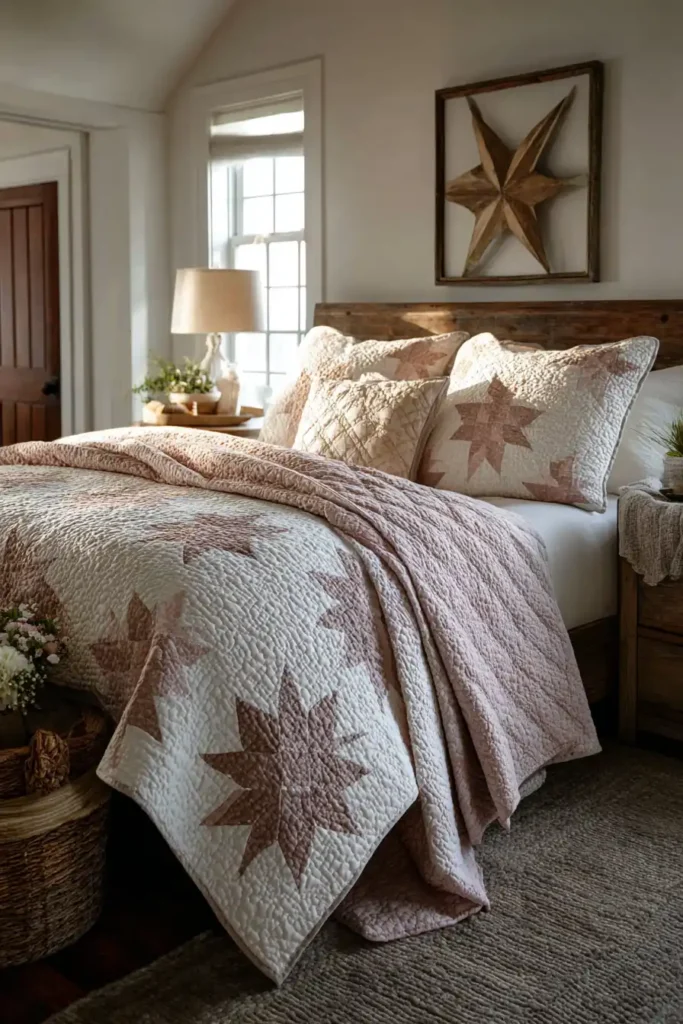
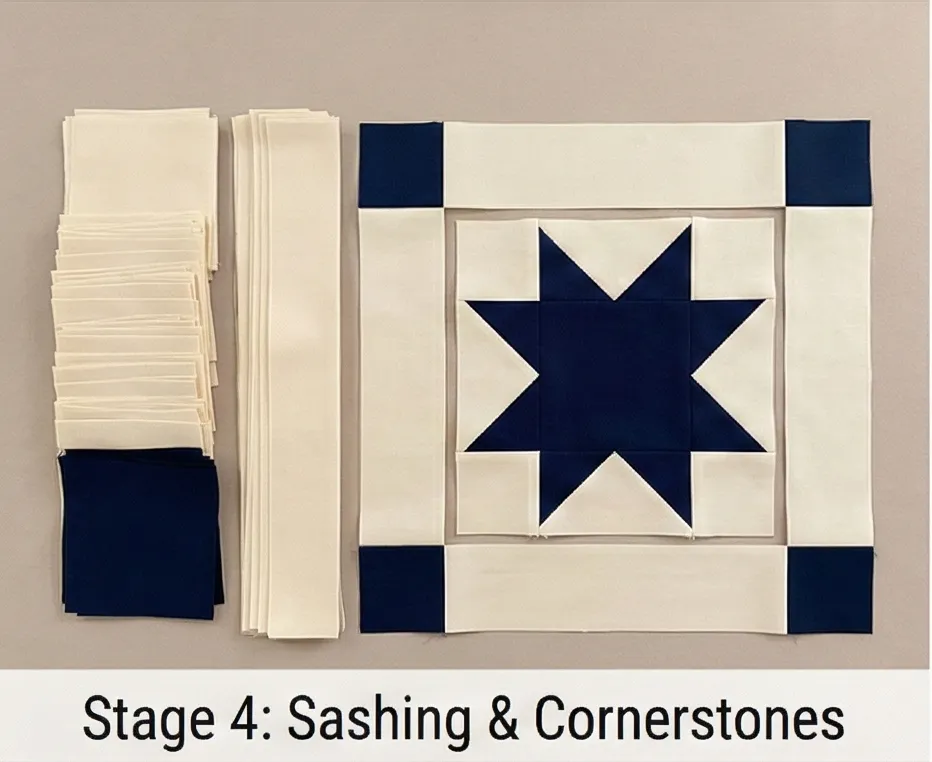
The Ohio Star is one of the most recognizable and beloved blocks in American quilting history. While it can look rustic in scrappy fabrics, it transforms into a symbol of refined elegance when executed in a two-tone palette. This version, the “Heritage Navy,” uses deep Midnight Navy Sateen and Rich Cream, evoking the formality of a tailored suit or fine china. The layout utilizes wide sashing to let each star float independently, creating a calm, uncrowded visual perfect for a master suite.
Finished Dimensions: Queen Size Bed Cover, approximately 90″ x 90″.
Materials Needed:
- Fabric A (Background/Cream): 5 yards of Cotton Sateen or High-Count Cotton (Cream or Ivory).
- Fabric B (Stars/Navy): 3 yards of Dark Navy Blue or Charcoal solid.
- Backing: 8 yards of matching wide-width sheeting.
- Batting: Wool/Silk Blend or High-Loft Poly (for a puffy, duvet-like feel).
- Thread: Cream for piecing; Navy or Gold for quilting.
- Notions: Rotary cutter, 6.5″ and 12.5″ square rulers, starch spray (essential for sharp star points).
Cultural Backstory: The Ohio Star pattern rose to prominence in the mid-19th century, particularly around Oberlin, Ohio. It was often used in quilts made for soldiers during the Civil War. Its geometric durability has kept it popular for over 150 years. In the 1930s, during the Depression, it was a way to use small scraps, but here we treat it as a minimalist masterpiece.
Step 1: The Quarter-Square Triangle (QST) Math
The Ohio Star is a 9-patch block. The trickiest parts are the 4 “Hourglass” blocks that form the star points.
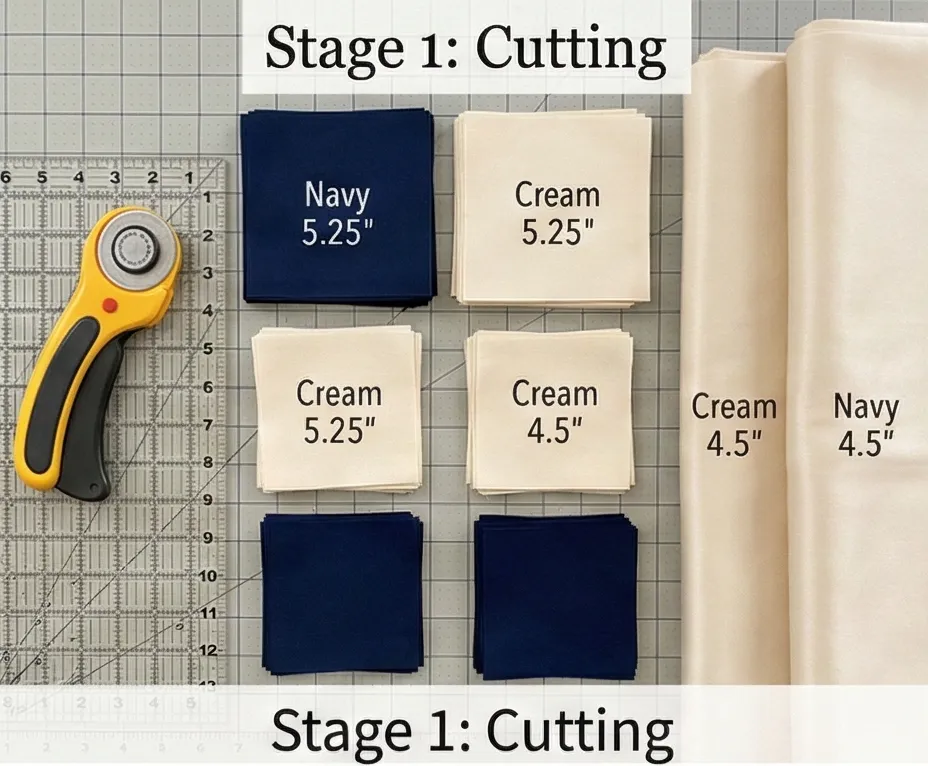
To make ONE 12-inch finished block (Make 16 blocks total):
- For the Hourglass Units (Star Points):
- Cut 1 square of Navy (Fabric B) measuring 5.25 inches.
- Cut 1 square of Cream (Fabric A) measuring 5.25 inches.
- Why 5.25? This allows for seams and trimming down to exactly 4.5 inches.
- For the Corners:
- Cut 4 squares of Cream (Fabric A) measuring 4.5 inches x 4.5 inches.
- For the Center:
- Cut 1 square of Navy (Fabric B) measuring 4.5 inches x 4.5 inches.
(Repeat cutting for 16 blocks).
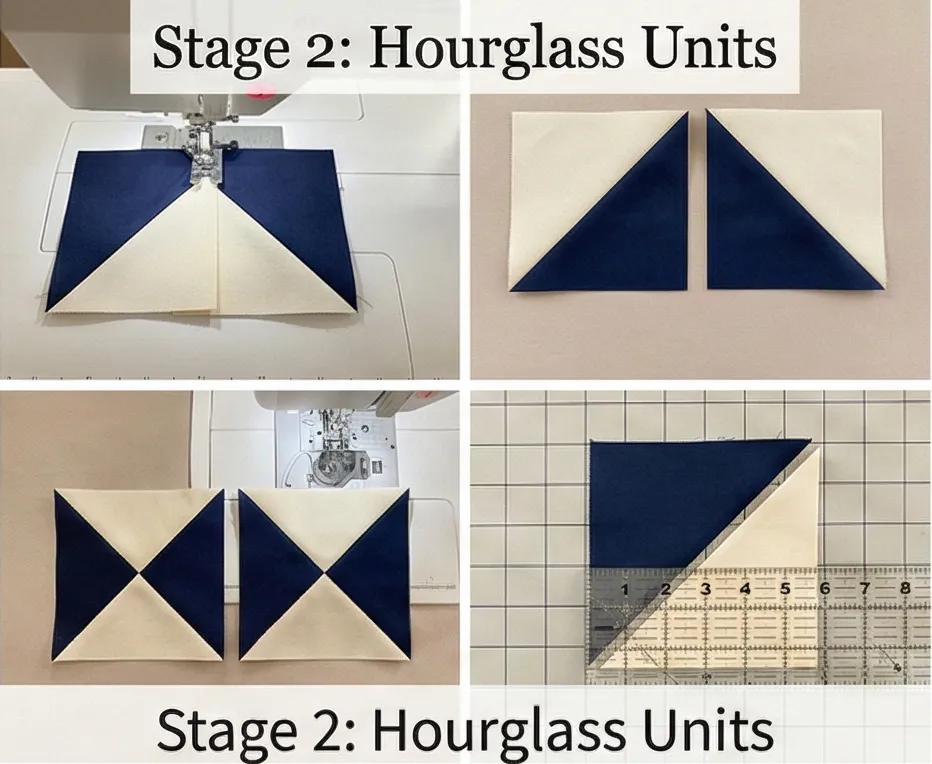
Step 2: Constructing the Hourglass Units
This method creates the star points without first cutting bias triangles.
- Make HSTs: Place the 5.25″ Navy square and the Cream square Right Sides Together (RST).
- Draw a diagonal line on the back of the Cream square.
- Sew 1/4 inch away from the line on both sides.
- Cut on the center line. Press seams toward the Navy.
- Result: Two Half-Square Triangles (HSTs).
- Make QSTs: Place these two HSTs Right Sides Together again.
- Opposites Match: Place them so the Navy triangle of the top unit faces the Cream triangle of the bottom unit. The seams should “nest” or lock together in the middle.
- Draw a diagonal line (perpendicular to the seam).
- Sew 1/4 inch away from the line on both sides.
- Cut on the center line.
- Result: Two “Hourglass” blocks (Cream top/bottom, Navy sides).
- Trim: Using your square ruler, trim these units to exactly 4.5 inches on a side. Ensure the “X” intersection is exactly in the center (2.25 inches).
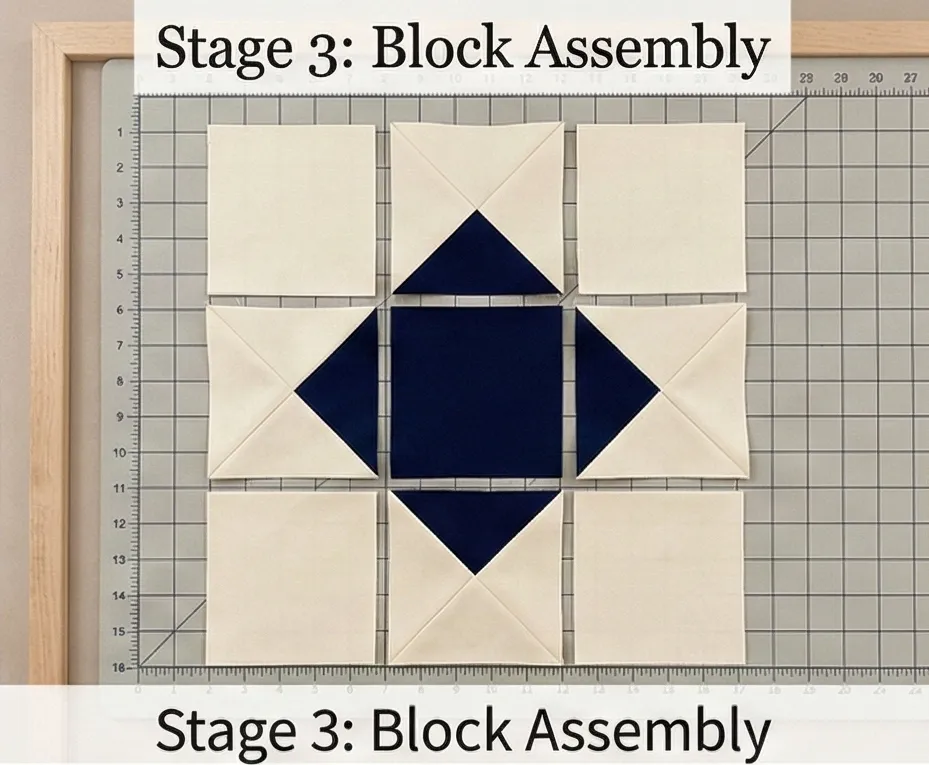
Step 3: Assembling the 9-Patch Block
Now it’s just a Tic-Tac-Toe grid.
- Top Row: Cream Square – Hourglass (Navy points touching center) – Cream Square.
- Middle Row: Hourglass – Navy Center Square – Hourglass.
- Bottom Row: Cream Square – Hourglass – Cream Square.
- Sew: Stitch the squares into rows. Press seams away from the Hourglass units (toward the plain squares) to reduce bulk.
- Join: Sew the three rows together.
- Result: One 12.5-inch (unfinished) Ohio Star Block.
Step 4: Sashing and Cornerstones
Sashing separates the stars, making the quilt larger and more elegant.
- Cut Sashing: Cut 40 strips of Cream fabric measuring 12.5″ x 4.5″.
- Cut Cornerstones: Cut 25 squares of Navy fabric measuring 4.5″ x 4.5″.
- Layout: Arrange your 16 Star Blocks in a 4 x 4 grid.
- Place a Sashing strip between every block vertically.
- Place a Sashing strip horizontally between every block.
- Place a Navy Cornerstone at every intersection of the sashing strips.
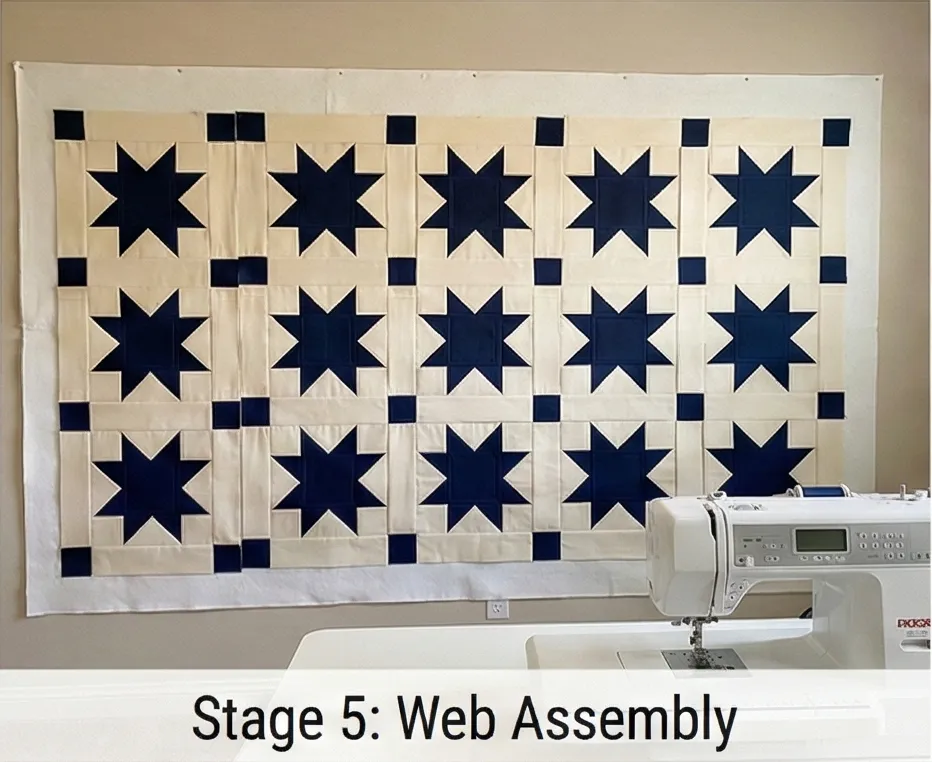
Step 5: Web Assembly
- Block Rows: Sew a row: Sashing – Star – Sashing – Star – Sashing – Star – Sashing – Star – Sashing.
- Sashing Rows: Sew a row: Cornerstone – Sashing – Cornerstone – Sashing… etc.
- Join: Alternate Block Rows and Sashing Rows to complete the quilt top.
- Press: Press seams toward the sashing strips.
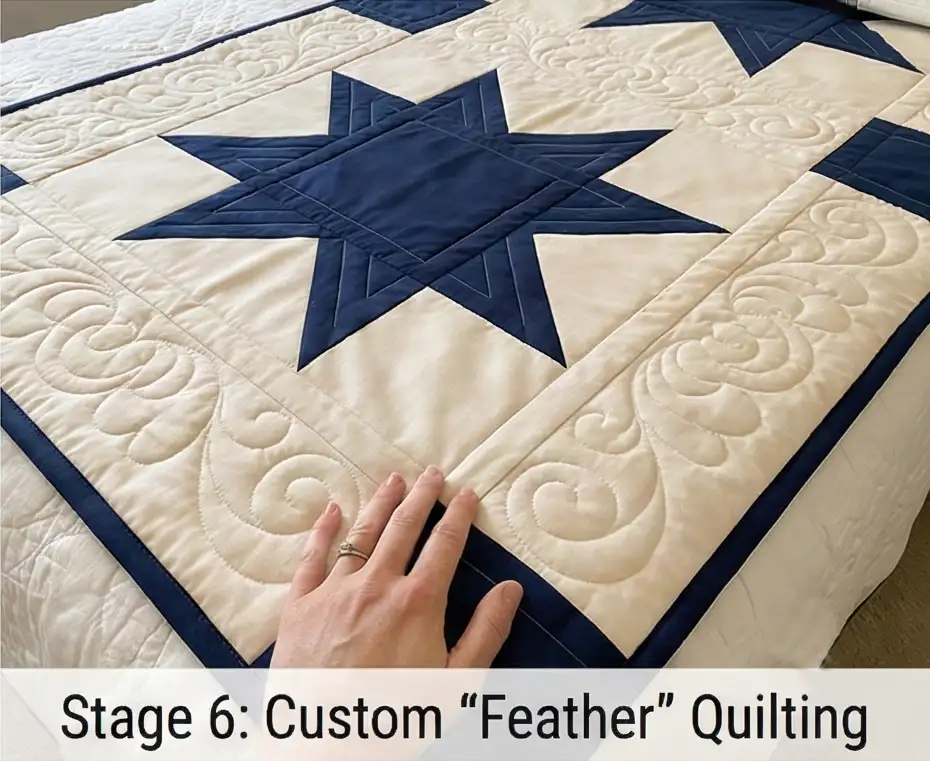
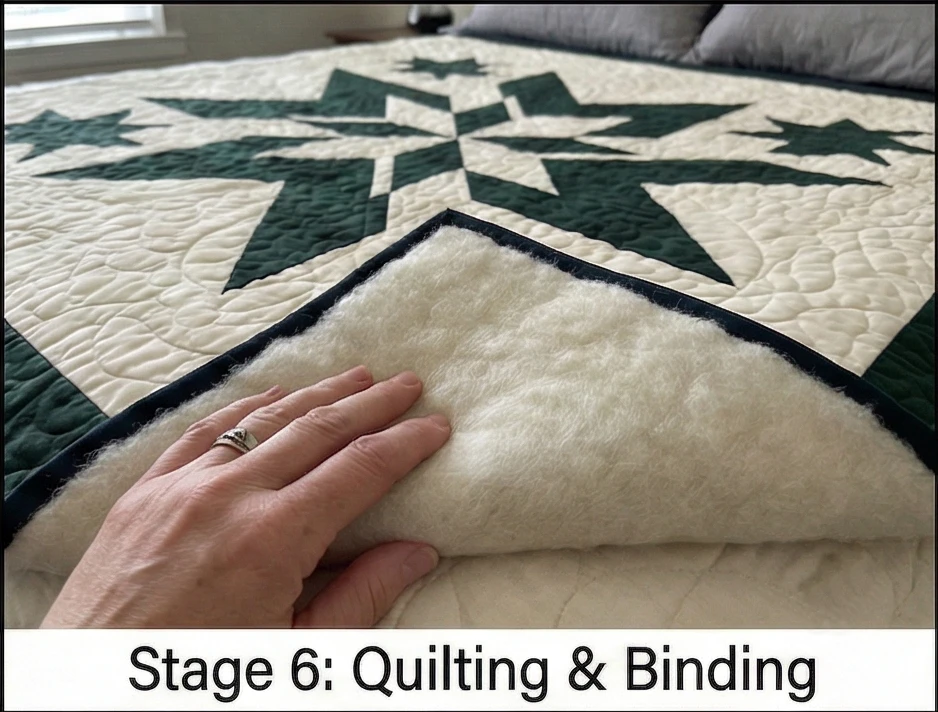
Step 6: Custom “Feather” Quilting
This is where the elegance truly shines.
- Baste: Sandwich the Sateen Top + Wool Batting + Backing.
- Quilt Design:
- Inside the Navy Stars: Quilt a simple “X” or geometric lines to flatten them.
- In the Cream Sashing/Corners: This is the showstopper area. Quilt Traditional Feathers or intricate scrollwork in the negative space. The puffiness of the wool batting will make the feathers rise up (“trapunto” effect), contrasting with the flat stars.
- Binding: Finish with a Navy binding for a crisp, dark frame.
Usability Note: Cotton Sateen has a slight sheen that catches bedroom lighting beautifully, but it can be slippery to sew. Use plenty of pins and a walking foot to prevent shifting.
More Recommended Supplies
“As an Amazon Associate, I earn from qualifying purchases.“
2. Luxurious Lone Star Quilt Designs for a Statement Bedspread
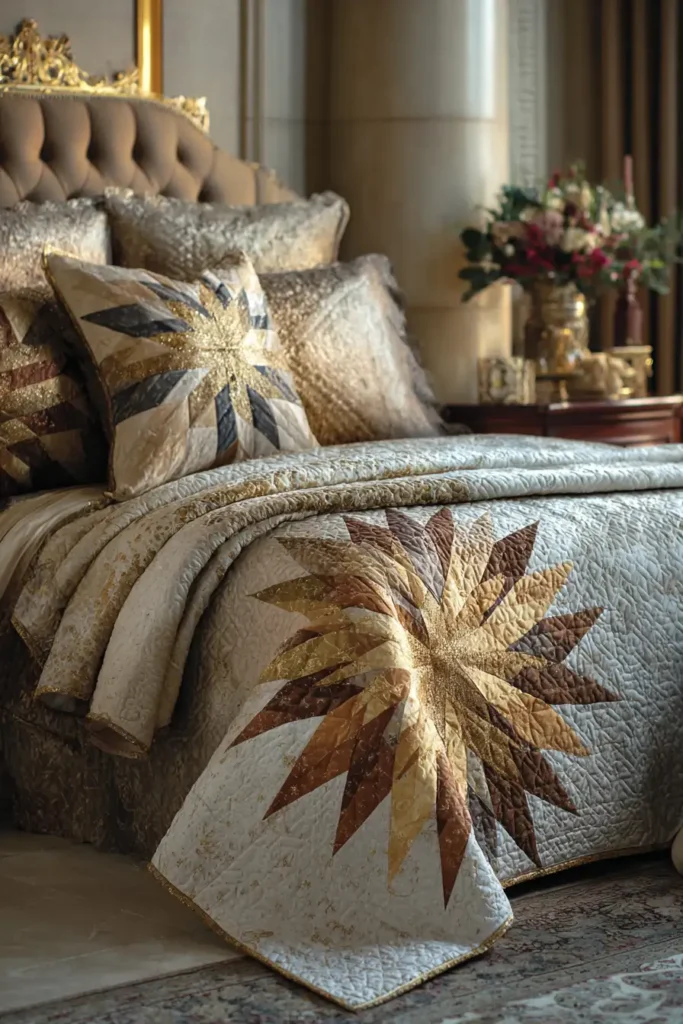
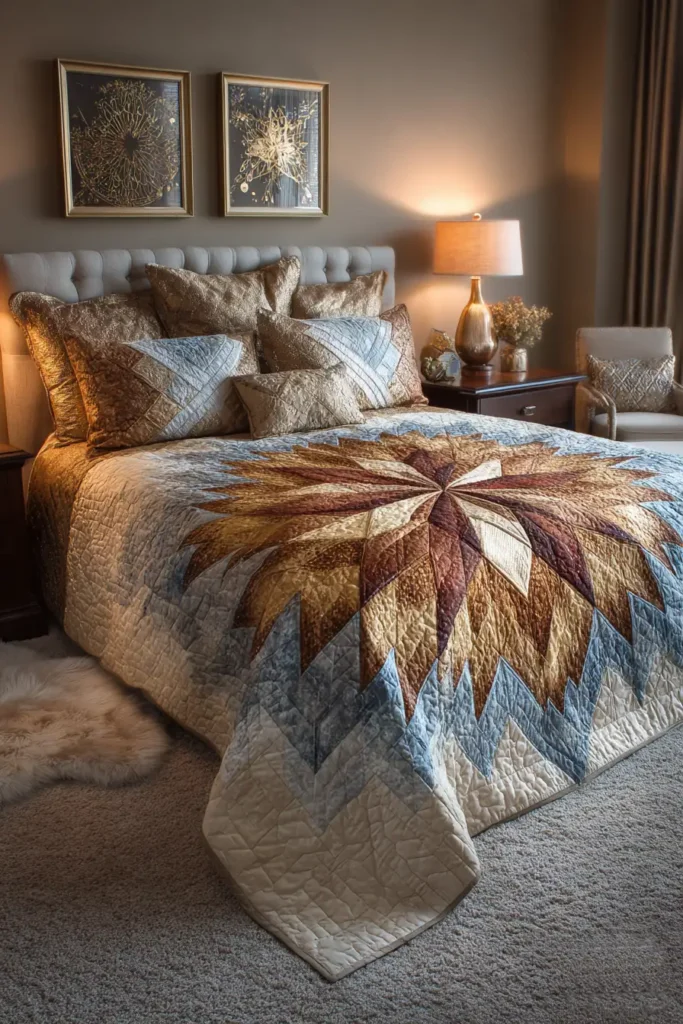
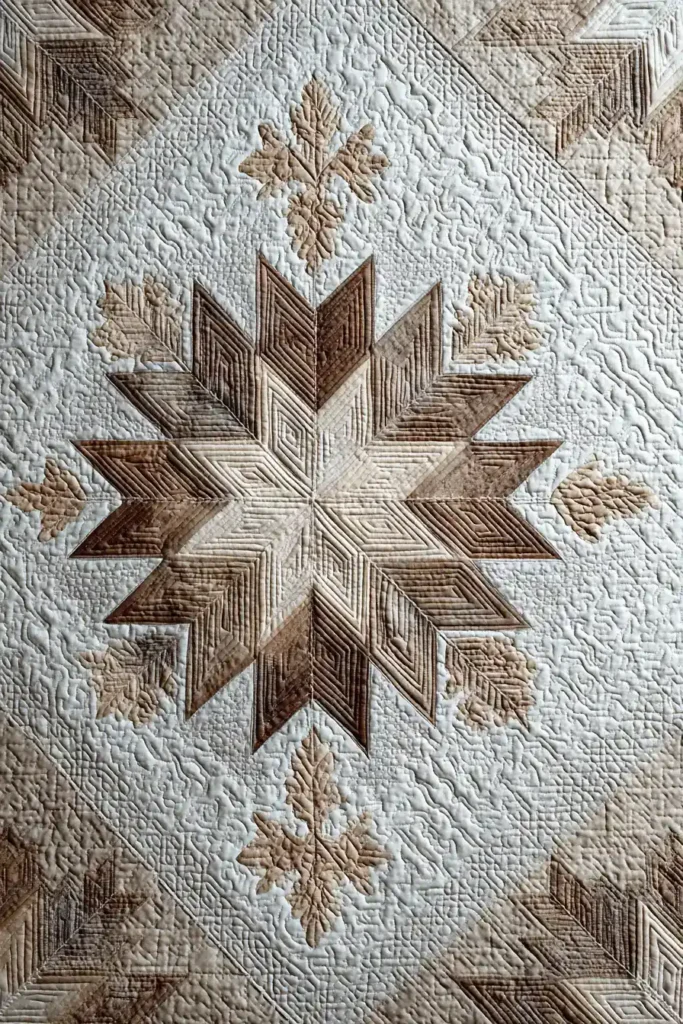
The “Champagne Supernova” Radiant Lone Star
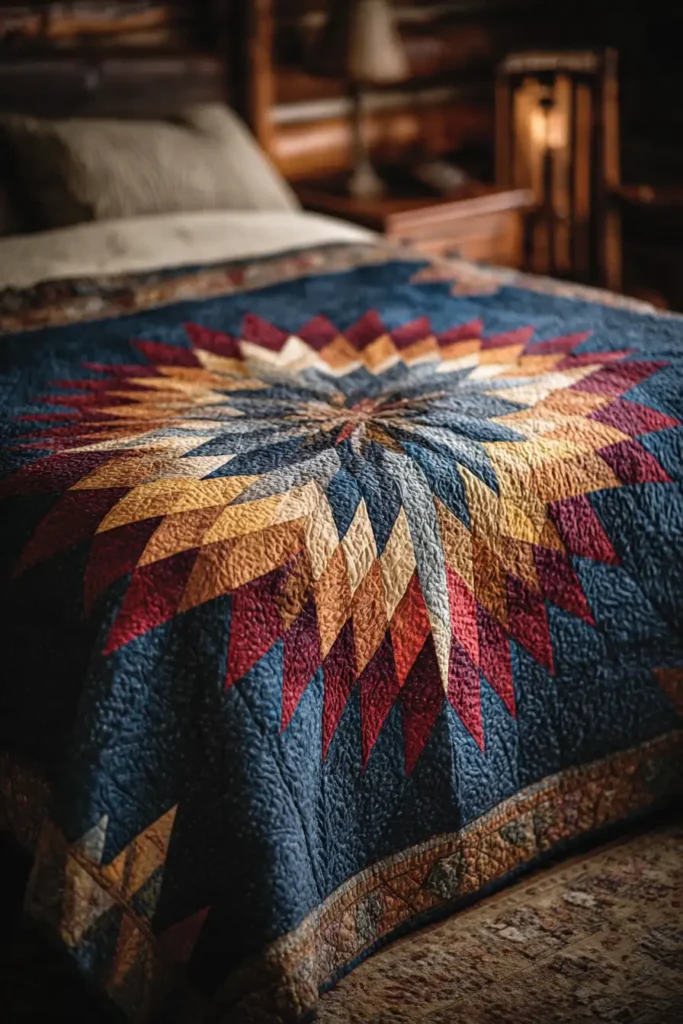
The Lone Star (also known as the “Star of Bethlehem”) is widely considered the crown jewel of American patchwork. It features a single, massive 8-pointed star that explodes from the center of the bed to the edges. While it looks incredibly complex, modern strip-piecing techniques make it manageable. This “Champagne Supernova” version creates a sophisticated ombré effect, radiating from Deep Bronze in the center, through Gold and Taupe, fading to Pearl Cream at the tips, set against a luxurious Ivory Sateen background.
Finished Dimensions: King Size Bedspread, approximately 100″ x 100″.
Materials Needed:
- Fabric (The Star): You need 6 different fabrics for the diamond rings (Gradient Palette).
- 1 yard each of 6 fabrics (Darkest Bronze to Lightest Cream).
- Fabric (Background & Corners): 5 yards of Ivory Cotton Sateen. (The sheen of sateen adds to the “stellar” luxury).
- Backing: 9 yards of wide-width fabric.
- Batting: Wool Batting. (Essential for a Lone Star. The high loft fills in the seams and makes the quilting design sculptural).
- Thread: Beige or Metallic Gold (for quilting).
- Notions: Rotary cutter, 6″ x 24″ ruler with a 45-degree line, heavy starch.
Cultural Backstory: The Lone Star design has deep significance in Native American quilting traditions, particularly among the Lakota/Sioux and Assiniboine tribes, where it is known as the “Morning Star.” It is often created for “giveaways” to honor veterans or celebrate births, symbolizing a new beginning and guidance. It is a quilt meant to be displayed with pride.
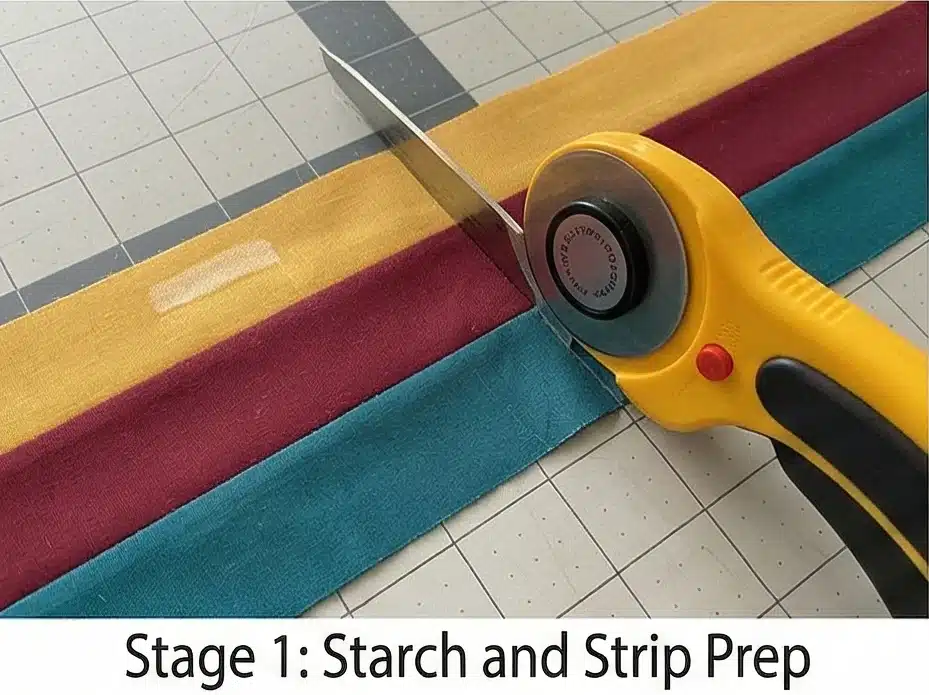
Step 1: Starching and Strip Piecing
Do not cut individual diamonds. We make “Strip Sets” to ensure accuracy.
- Starch: Heavily starch all your fabrics before cutting. The Lone Star relies on “bias” edges (stretchy diagonal cuts). Starch stiffens the fabric, like paper, preventing it from warping.
- Cut Strips: Cut 2.5-inch wide strips from all 6 of your Star Fabrics (WOF – Width of Fabric).
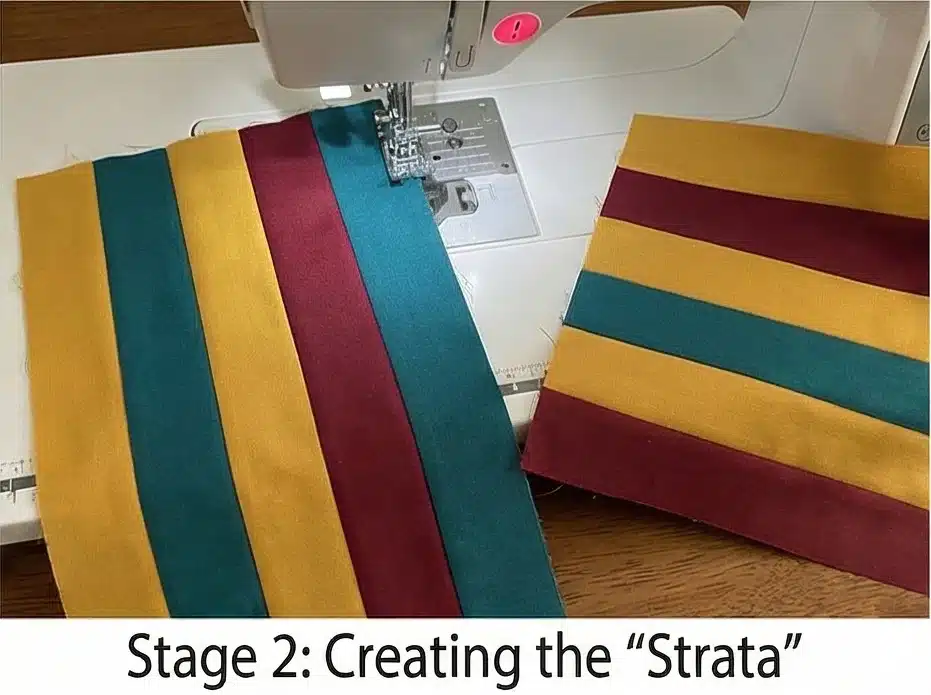
- Sew Sets: Sew these strips together lengthwise into a “Strata” (Strip Set).
- Offset: Stagger the strips like a staircase (don’t align the ends perfectly).
- Seam: Use a precise 1/4 inch seam. Press all seams open to reduce bulk.
- Make: You need multiple strip sets depending on the specific pattern layout (usually staggered sequences).

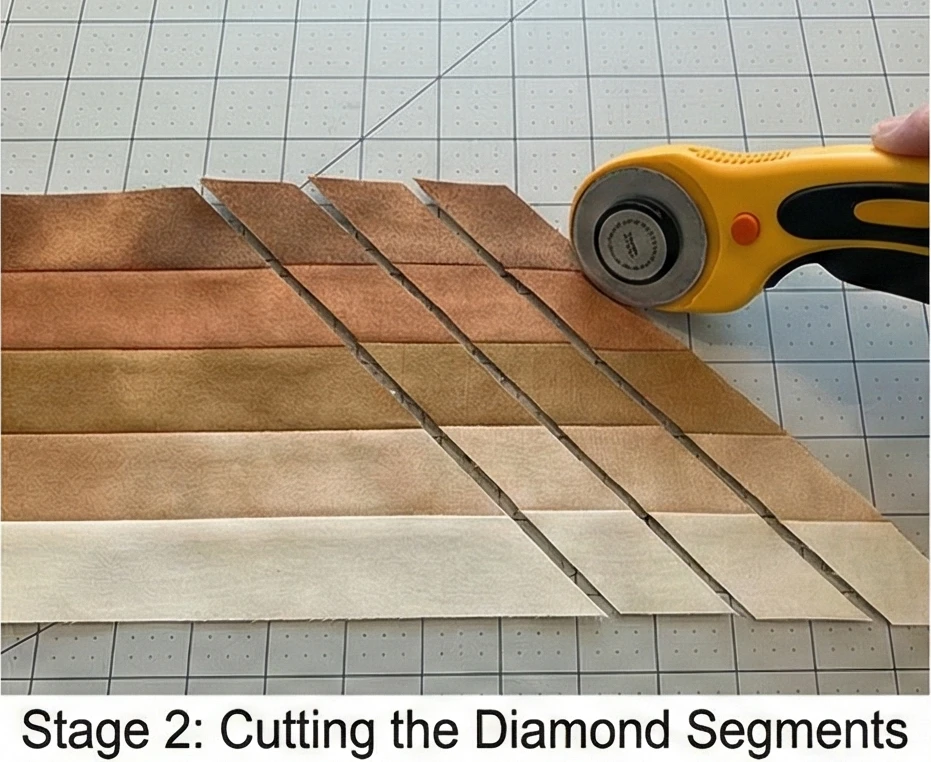
Step 2: Cutting the Diamond Segments
Here is where the geometry happens.
- 45-Degree Angle: Align the 45-degree line of your ruler with the bottom edge of your Strip Set.
- Cut: Slice across the strip set at this 45-degree angle.
- Sub-Cut: Move the ruler over 2.5 inches and cut again.
- Result: You will produce angled strips composed of 6 small diamonds already sewn together.
- Yield: Continue cutting until you have enough strips to build 8 large diamond blades.
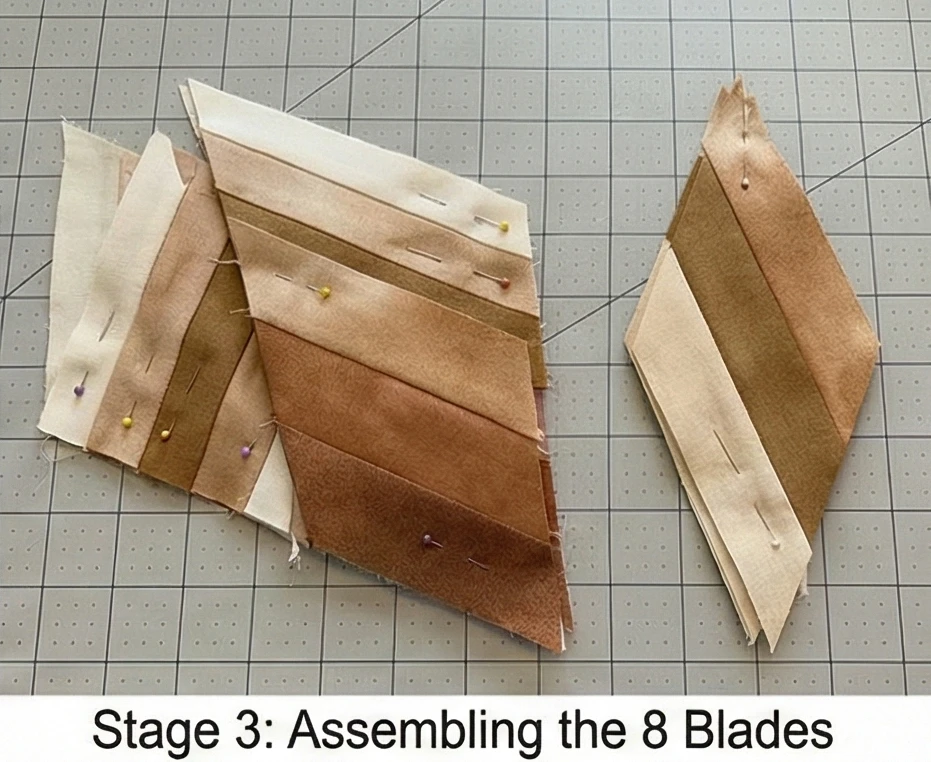
Step 3: Assembling the 8 Blades
The Lone Star is made of 8 large diamond “blades.”
- Layout: Arrange your cut strips on a design wall to form a large diamond shape. You will need to match the colors diagonally to create the chevron/radiating effect.
- Pinning: This is the most critical step. Place two strips Right Sides Together.
- Nesting: You must match the seams exactly. Stick a pin straight through the intersection of the seams to ensure they align.
- Sew: Stitch the strips together. Start and stop exactly 1/4 inch from the ends if you plan to do Y-seams (though strip piecing often allows end-to-end sewing).
- Press: Press well. You should now have 8 identical large diamond units.
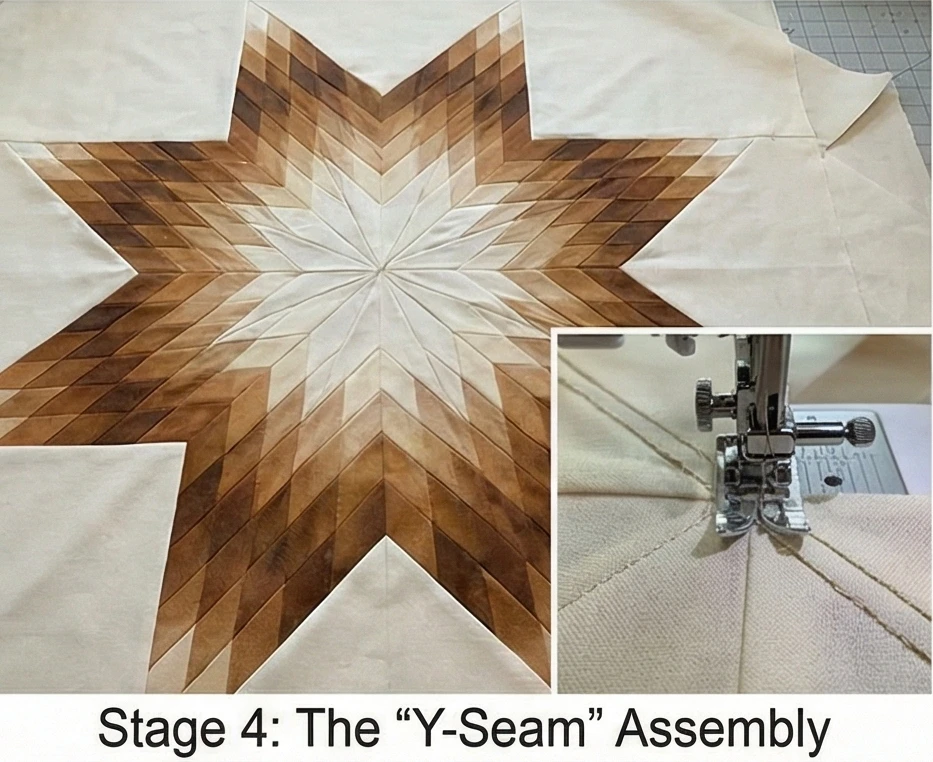
Step 4: The “Y-Seam” Assembly
You must insert the background squares and triangles between the star points.
- Cut Background: Cut 4 large squares (approx 30″ x 30″) for the corners and 4 large triangles (Side Setting Triangles) for the spaces between the star points.
- Sewing the Star: Sew the 8 diamond blades together in pairs, then fours, then join the two halves.
- The Center: The center point where all 8 blades meet is thick. Press seams open to fan them out (the “spin the center” technique) so your needle doesn’t break.
- Setting: Sew the background squares and triangles into the “V” gaps of the star.
- Stop Point: Sew from the outside edge toward the inner corner of the star, stopping 1/4 inch before you hit the seam allowance of the star point. Backstitch. This allows the fabric to pivot flat.
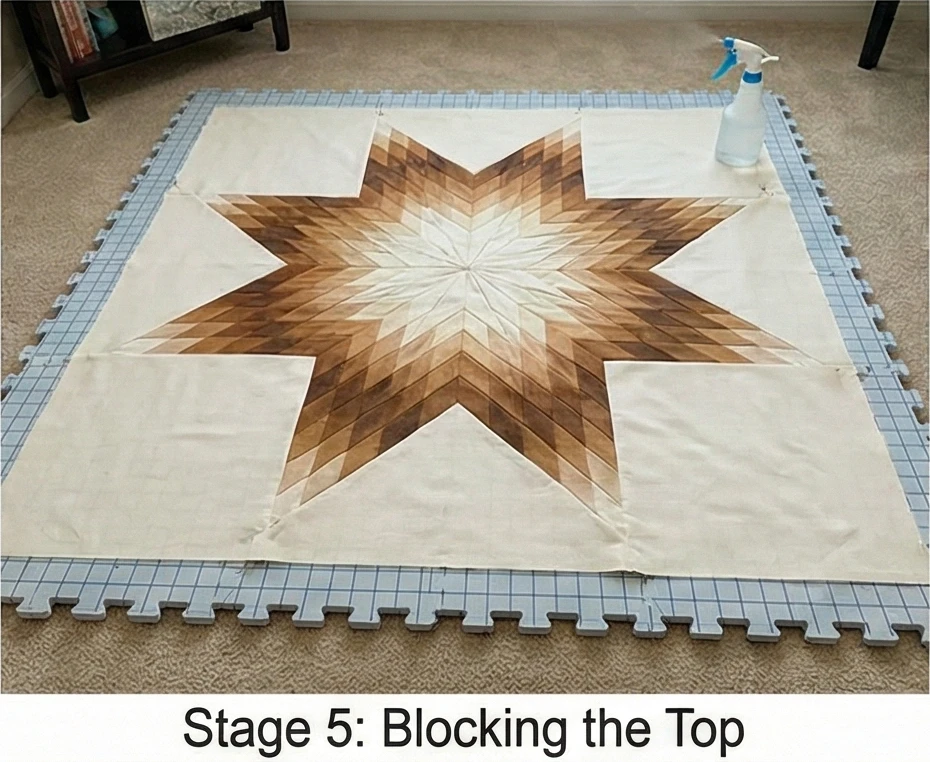
Step 5: Blocking the Top
Lone Stars are notorious for having a “volcano” center (bubbling) if the bias is stretched.
- Wet: Lay the finished top on a carpet or blocking mats. Mist it heavily with water.
- Stretch: Gently pull and pin the edges until the quilt is perfectly square and the center lies flat.
- Dry: Let it dry completely in this position. This “resets” the bias fibers and ensures a flat finish.
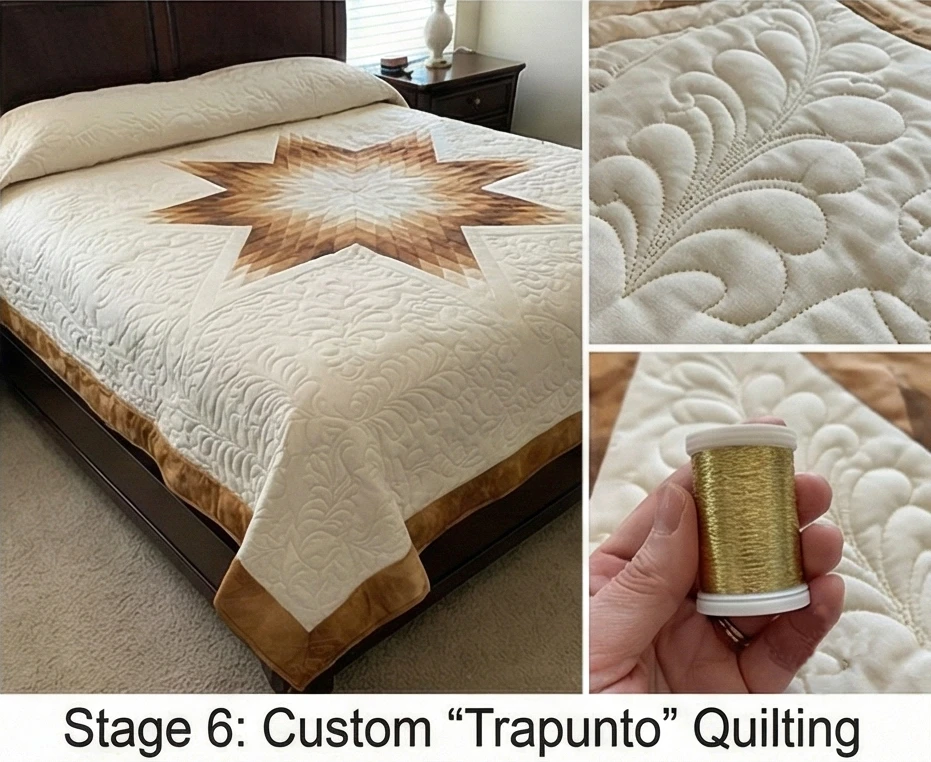
Step 6: Custom “Trapunto” Quilting
- The Star: Quilt “in the ditch” (along the seam lines) of the star diamonds to stabilize them.
- The Background: In the large Ivory corners, mark a Feathered Wreath or heavy scrollwork.
- Because you used Wool Batting, the un-quilted areas of the feathers will puff up significantly (Trapunto effect), making the quilting look like carved marble.
Step 7: The “Endless” Binding
- Bias Binding: If the quilt edges are on the bias (from how you trimmed the corners), use Bias Binding (fabric strips cut at a 45-degree angle). It creates a smoother, stronger edge that won’t ripple.
- Color: Use the Dark Bronze fabric for the binding to create a strong visual stop to the star’s radiating energy.
Usability Note: While stunning, a Lone Star quilt is heavy due to the thousands of seams. It is best used as a “Top of Bed” coverlet (removed for sleeping) or a winter duvet, as it provides substantial weight and warmth.
3. Cozy Sawtooth Star Bed Runners for a Splash of Style


The “Evening Embers” Sawtooth Runner
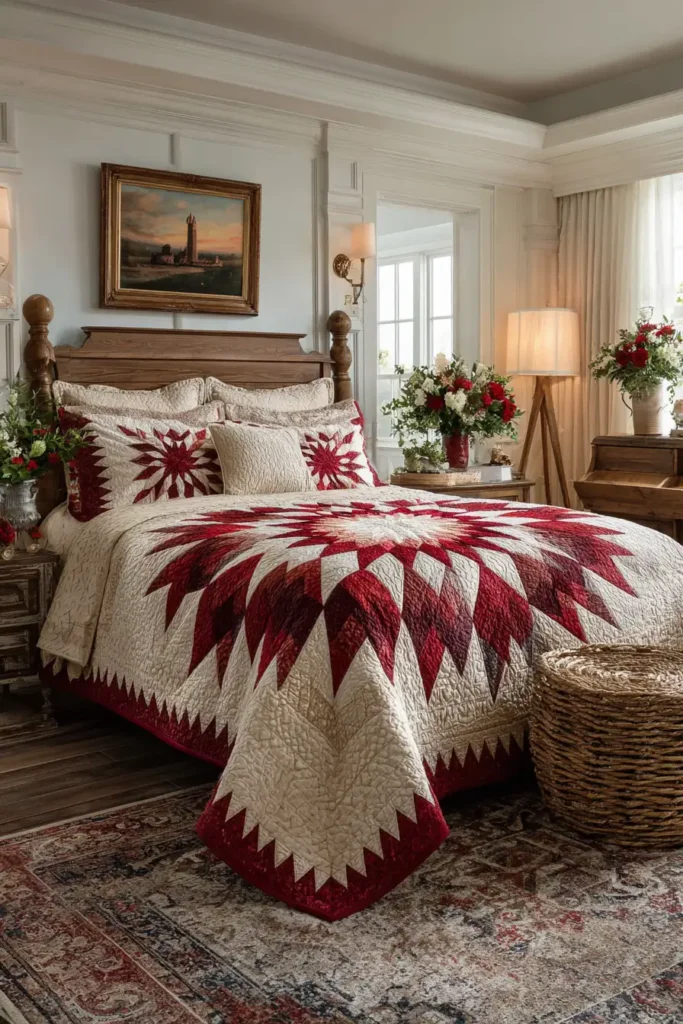
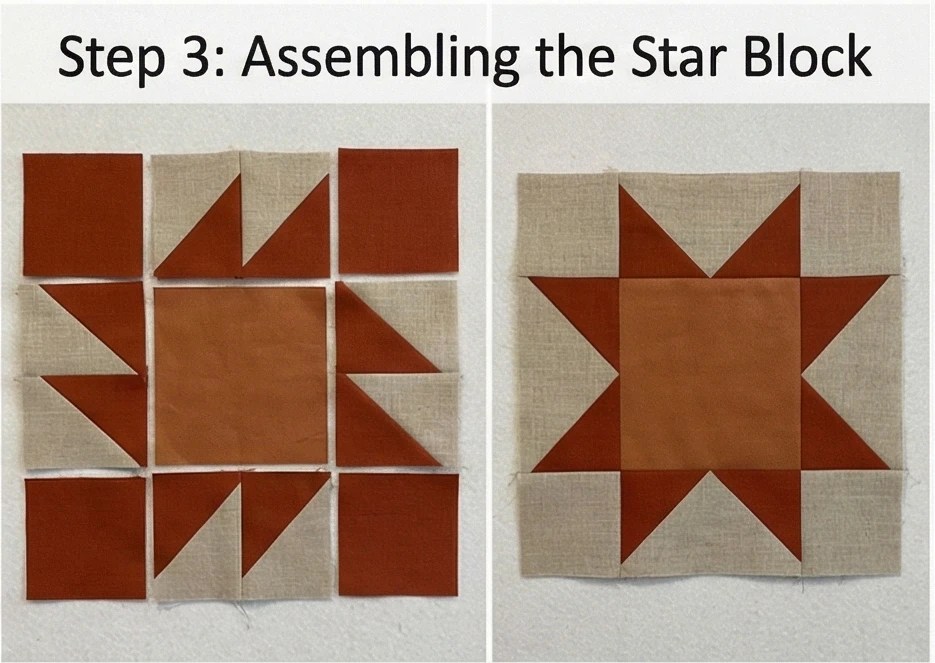
The Sawtooth Star is arguably the most “classic” star block—simple, sharp, and highly versatile. Unlike the complex Lone Star or the multi-seamed Ohio Star, the Sawtooth relies on a single “Variable Star” unit made of Flying Geese. This bed runner adds a warm, glowing accent to the foot of a neutral bed. By using a palette of Burnt Orange, Rust, and Terracotta against a Warm Linen background, it mimics the look of dying embers in a fireplace—cozy, inviting, and sophisticated.
Finished Dimensions: Queen Bed Runner, approximately 20″ x 84″.
Materials Needed:
- Fabric A (Background): 1.5 yards of Natural Linen or Oatmeal Cotton.
- Fabric B (Stars): 1/2 yard of Deep Rust or Dark Terracotta.
- Fabric C (Centers): 1/4 yard of Copper or Gold tonal print (for the center of the stars to make them glow).
- Backing: 2.5 yards of cozy flannel.
- Batting: Cotton/Bamboo Blend (drapes well over the edge of the bed).
- Thread: Beige/Neutral.
- Notions: Rotary cutter, 6.5″ x 24″ ruler.
Cultural Backstory: The Sawtooth Star pattern dates back to at least 1884. It is often associated with the American West and pioneer quilting, representing the jagged peaks of mountain ranges or the morning star guiding travelers. Its enduring popularity comes from its bold geometry—the points float freely, creating a sensation of twinkling movement.
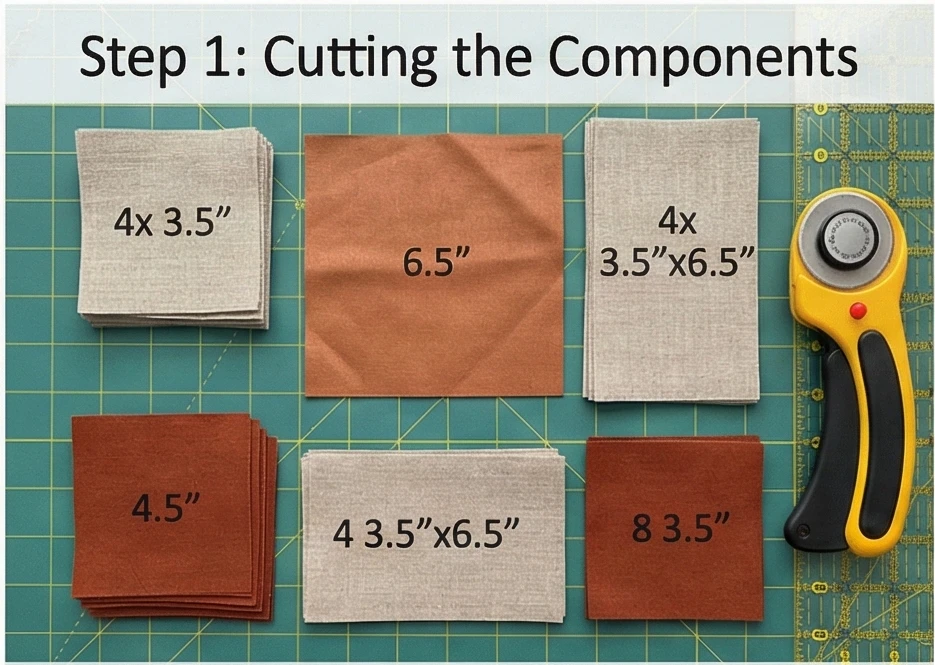
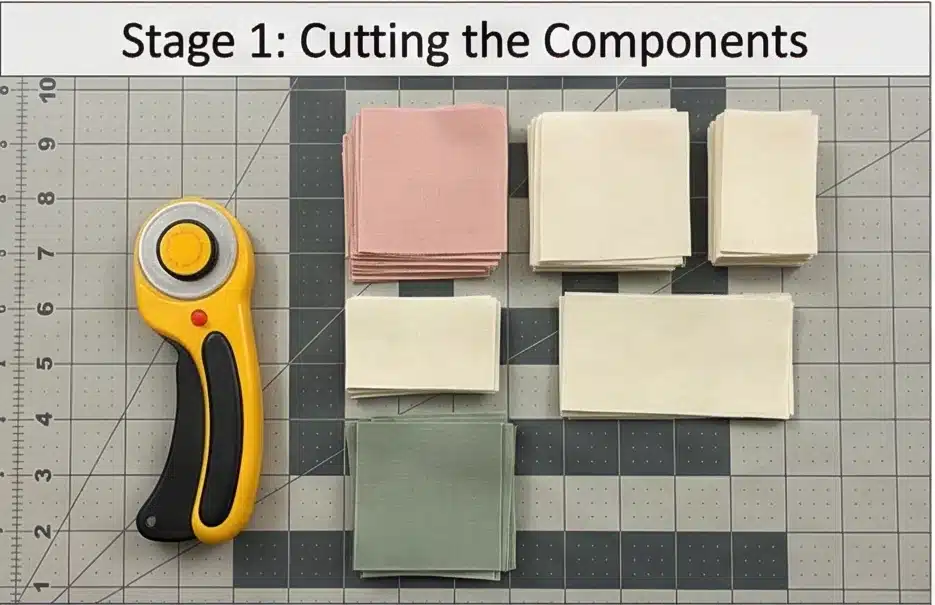
Step 1: Cutting the Components
We will make 5 Large Star Blocks. Each block finishes at 12 inches.
For ONE Block (Repeat 5 times):
- Star Points (Flying Geese):
- Cut 4 rectangles of Background (Fabric A) measuring 3.5″ x 6.5″.
- Cut 8 squares of Star Points (Fabric B) measuring 3.5″ x 3.5″.
- Star Center:
- Cut 1 square of Center (Fabric C) measuring 6.5″ x 6.5″.
- Corner Squares:
- Cut 4 squares of Background (Fabric A) measuring 3.5″ x 3.5″.
For the Setting/Sashing:
- Sashing Strips: Cut 6 strips of Background (Fabric A) measuring 12.5″ x 3.5″. (These go between the stars).
- Border (Optional): Cut strips 2.5″ wide for the outer perimeter if you want more width.
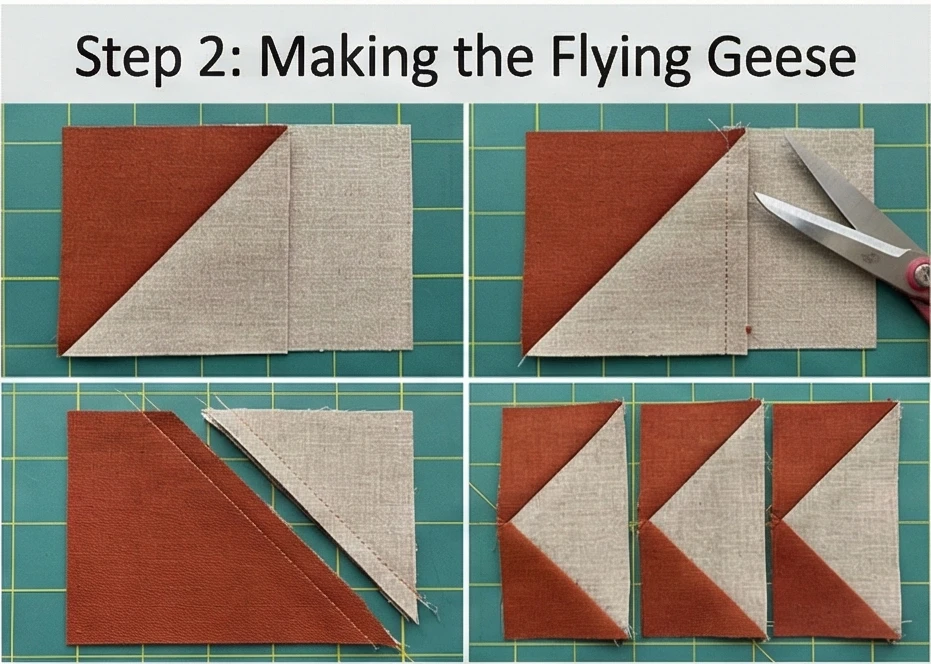
Step 2: Making the Flying Geese (The Points)
The “Goose” unit forms the triangular points of the star.
- Mark: Draw a diagonal line on the back of all the small Rust (Fabric B) squares.
- Sew Side 1: Place a Rust square on the right side of a Background rectangle (Right Sides Together).
- Stitch: Sew exactly on the drawn diagonal line.
- Trim: Cut off the excess corner, leaving a 1/4 inch seam allowance.
- Press: Press the Rust triangle up/out.
- Sew Side 2: Repeat on the left side of the rectangle.
- Result: You have a rectangle with a large rust “V” in the middle.
- Repeat: Make 4 of these units for each star block.
Step 3: Assembling the Star Block
Arrange the pieces like a 9-patch grid.
- Top Row: Background Square – Flying Goose (point facing up) – Background Square.
- Middle Row: Flying Goose (point facing left) – Copper Center Square – Flying Goose (point facing right).
- Bottom Row: Background Square – Flying Goose (point facing down) – Background Square.
- Join: Sew the squares into rows.
- Pressing: Press seams toward the center for the middle row, and away from the center for the top/bottom rows. This ensures seams nest.
- Finish: Sew the rows together. Your block should measure 12.5″ x 12.5″ unfinished.
Step 4: Runner Assembly
Floating the stars.
- Layout: Arrange your 5 Star Blocks in a horizontal line.
- Sashing: Place a 3.5″ wide Sashing Strip between each star block, and one at each end of the runner.
- Sequence: Sash – Star – Sash – Star – Sash – Star – Sash – Star – Sash – Star – Sash.
- Sew: Stitch the long row together.
- Press: Press seams toward the sashing strips.

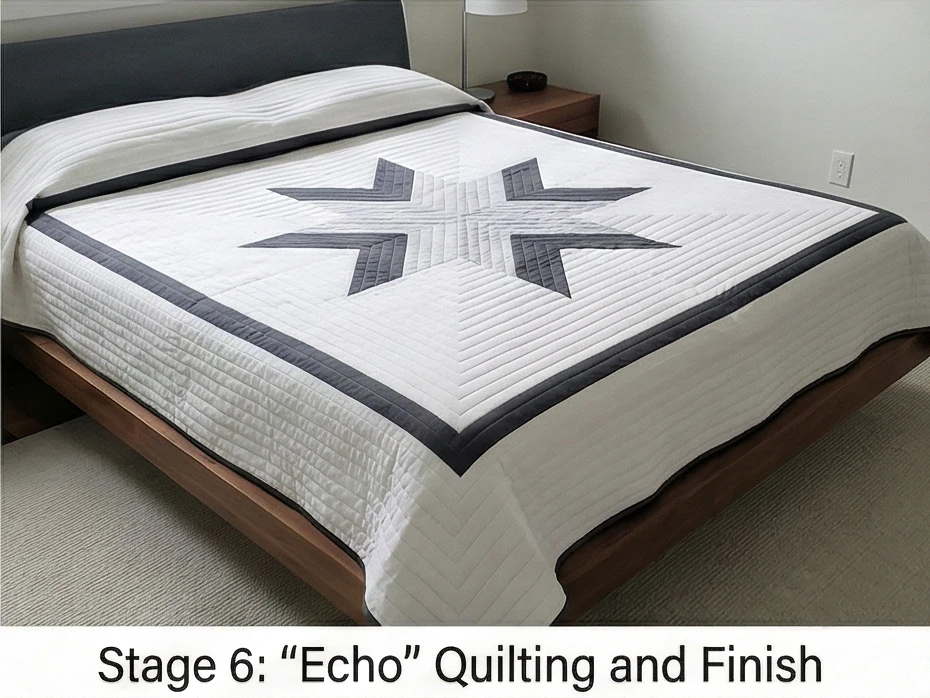
Step 5: “Echo” Quilting
Use the quilting to amplify the star shape.
- Baste: Sandwich the Backing + Batting + Top.
- The Star: Quilt “in the ditch” around the rust star points to define the shape.
- The Echo: Move 1/2 inch inside the star center and quilt a square. Move 1/2 inch outside the star points into the background and quilt an outline of the star.
- Effect: It looks like ripples radiating from the glowing center.

Step 6: The “Faux-Binding” (Optional)
For a modern, sleek look, skip the traditional binding.
- Cut: Trim the backing and batting to exactly the size of the top.
- Facing: Cut 2.5-inch strips of the Background Linen. Sew them to the perimeter of the quilt.
- Flip: Turn the strips completely to the back of the runner, then hand-stitch them down.
- Visual: This creates a “knife-edge” finish, with the design extending to the edge without a distracting colored rim.
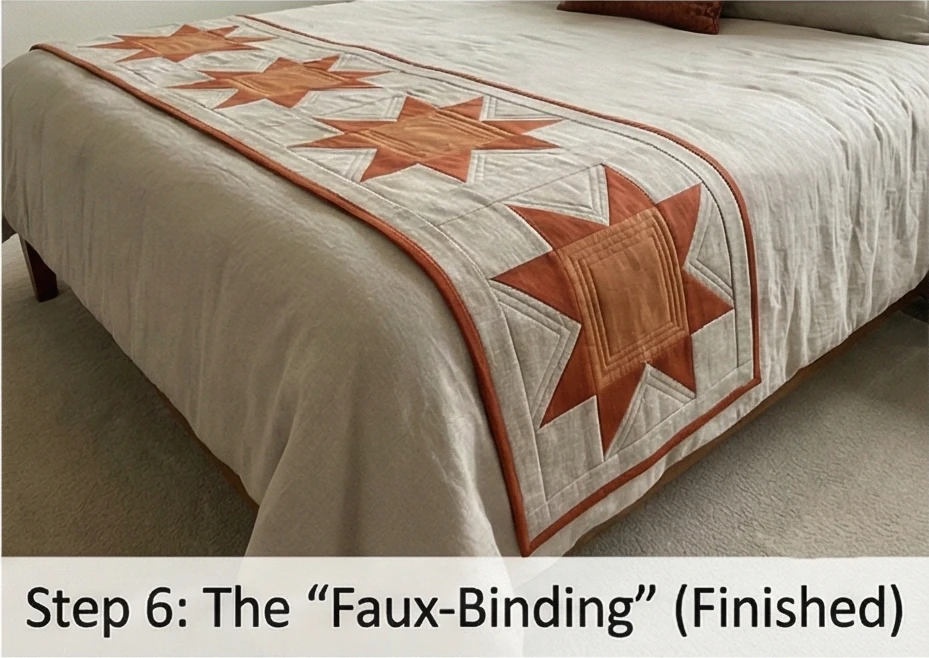
Usability Note: Sawtooth Star runners are excellent scrap-busters. If you want a “boho” look, make each star a different color (Mustard, Sage, Rose, Rust) while keeping the background consistent. This ties eclectic decor together.
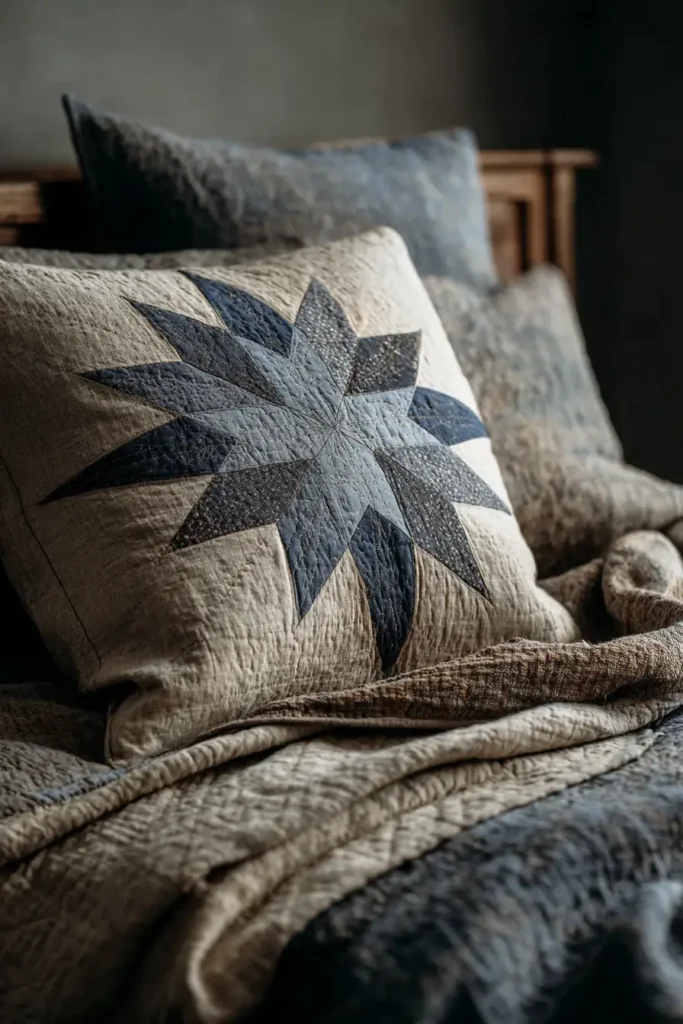
4. Sophisticated LeMoyne Star Pillow Shams for Comfort
The “Midnight Sapphire” LeMoyne Star Euro Sham
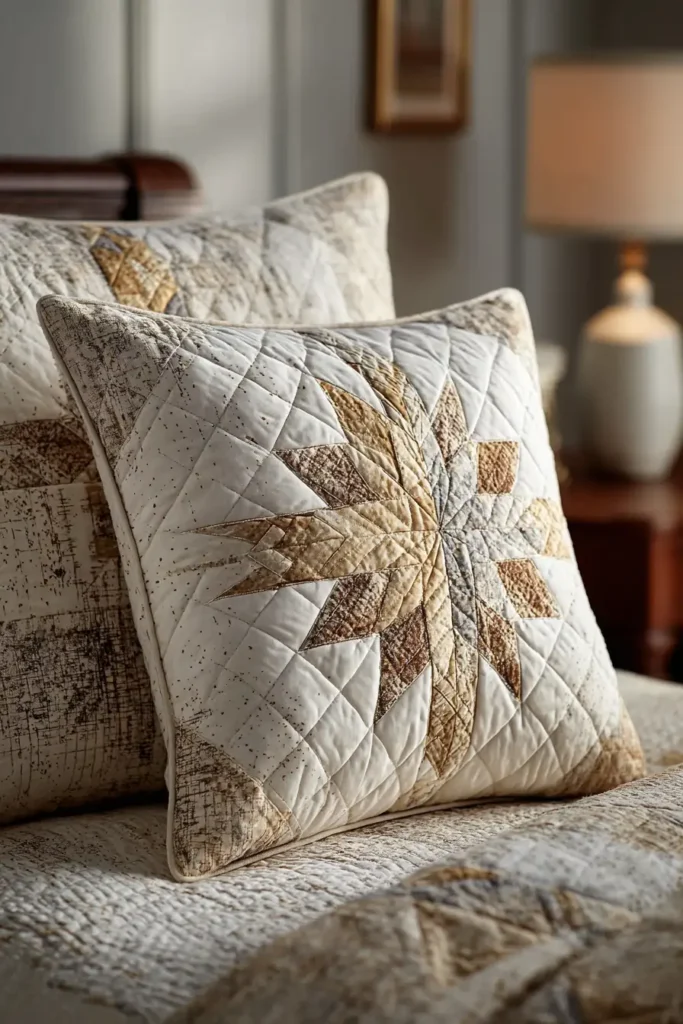
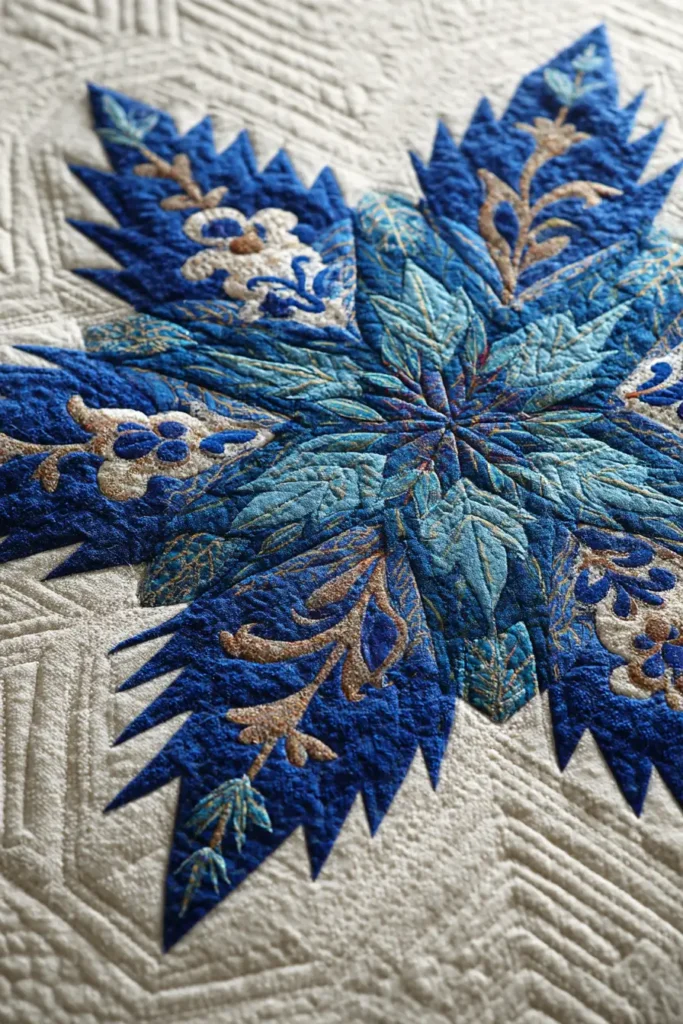
The LeMoyne Star is the “litmus test” of an expert quilter. Unlike the Sawtooth or Ohio stars, which use 90-degree angles, the LeMoyne is an 8-pointed star built from 45-degree diamonds. This geometry creates a star that looks like a flower opening or a compass rose. For this pillow sham, we lean into pure luxury by using Sapphire Blue Cotton Velvet for the star against a Cool White Linen background. The contrast of textures—matte linen vs. shimmering velvet—makes this a jewel for your bed.
Finished Dimensions: Euro Sham, 26″ x 26″.
Materials Needed:
- Fabric A (The Star): 1/2 yard of Sapphire Blue or Emerald Green Cotton Velvet (or high-sheen Sateen).
- Fabric B (Background): 1 yard of Heavy White Linen.
- Backing: 1 yard of matching linen.
- Batting: High-loft wool or poly (to make the velvet puff).
- Notions: Rotary cutter, 45-Degree Diamond Ruler (or template plastic), marking pen.
Cultural Backstory: Named after the LeMoyne brothers who founded New Orleans in the early 1700s, this block is technically difficult because it traditionally requires “Y-Seams” (inset seams). While many modern patterns try to “cheat” the shape with extra seams, the traditional method produces a seamless, spinning center that is the hallmark of true craftsmanship.
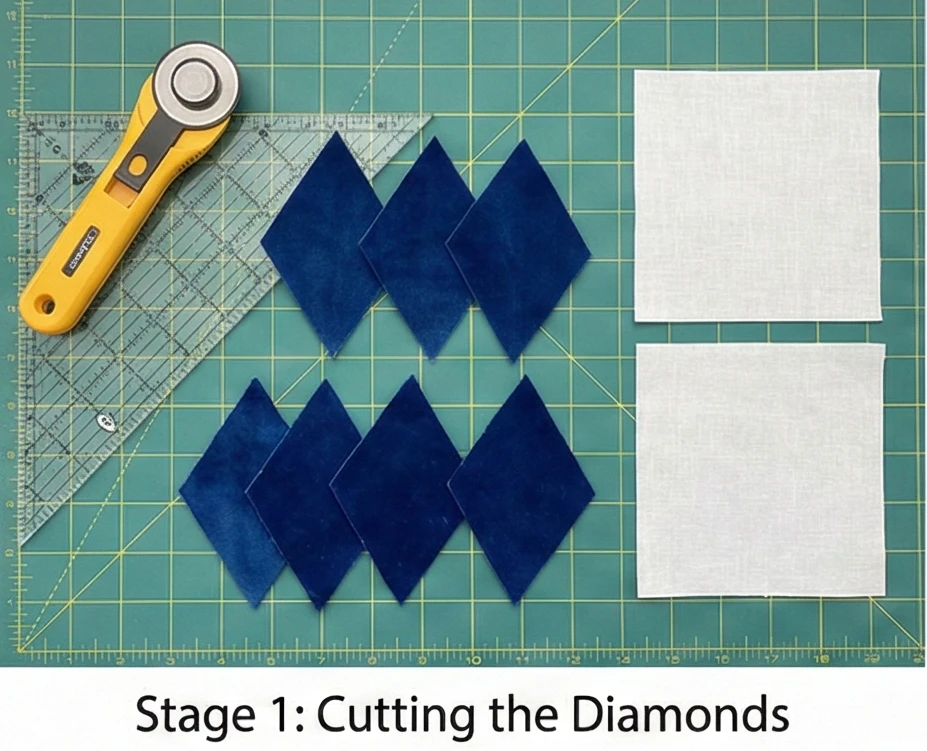
Step 1: Cutting the Diamonds (Precision is Everything)
We are building one large star block that finishes at approx 16-18 inches, then bordering it.
- The Star (Fabric A): Cut a strip 3.5 inches wide. Using your 45-degree ruler, cut 8 Diamonds.
- Tip: If using velvet, cut single layers (not folded) to prevent slipping. Ensure the “nap” (fuzz direction) runs the same way on all diamonds so they reflect light equally.
- The Background (Fabric B):
- Squares: Cut 4 squares measuring 3.5 inches. (These go in the corners).
- Triangles: Cut 4 Quarter-Square Triangles (cut a larger square diagonally twice) to fill the gaps along the sides. Math shortcut: Start with a 5.5-inch square, cut it diagonally twice to get the triangles, then trim them later.
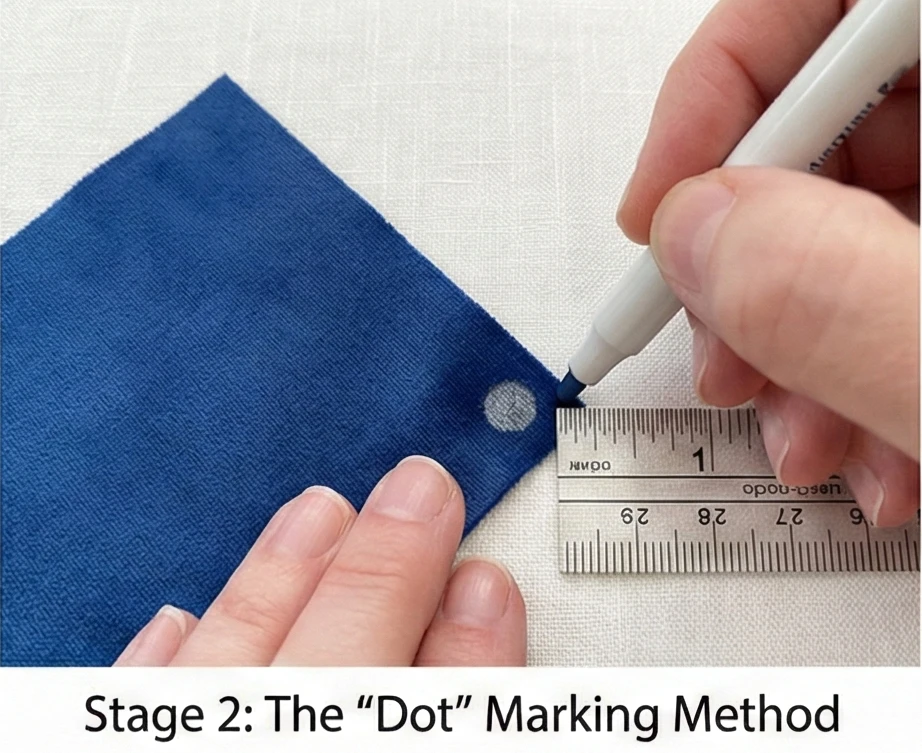
Step 2: The “Dot” Marking Method
The secret to Y-seams is knowing exactly where to stop sewing.
- Mark: On the wrong side of every single diamond, square, and triangle piece, mark a dot exactly 1/4 inch in from each corner.
- Rule: You will never sew past these dots. You sew from dot to dot. This leaves the seam allowances free to flap open, which is critical for the pieces to fit together.
Step 3: Assembling the Star Center
We build the star in halves.
- Pairs: Place two Velvet Diamonds Right Sides Together.
- Sew: Stitch from the top dot to the bottom dot. Backstitch at both dots to lock the thread. Do not sew into the seam allowance!
- Make: 4 pairs.
- Quads: Sew two pairs together to make a half-star (4 diamonds). Again, sew dot-to-dot.
- Join: Sew the two halves together.
- The Center: When you join the halves, press the center seam open and “swirl” the seam allowances so they lay flat like a pinwheel. This prevents a hard lump in the middle.

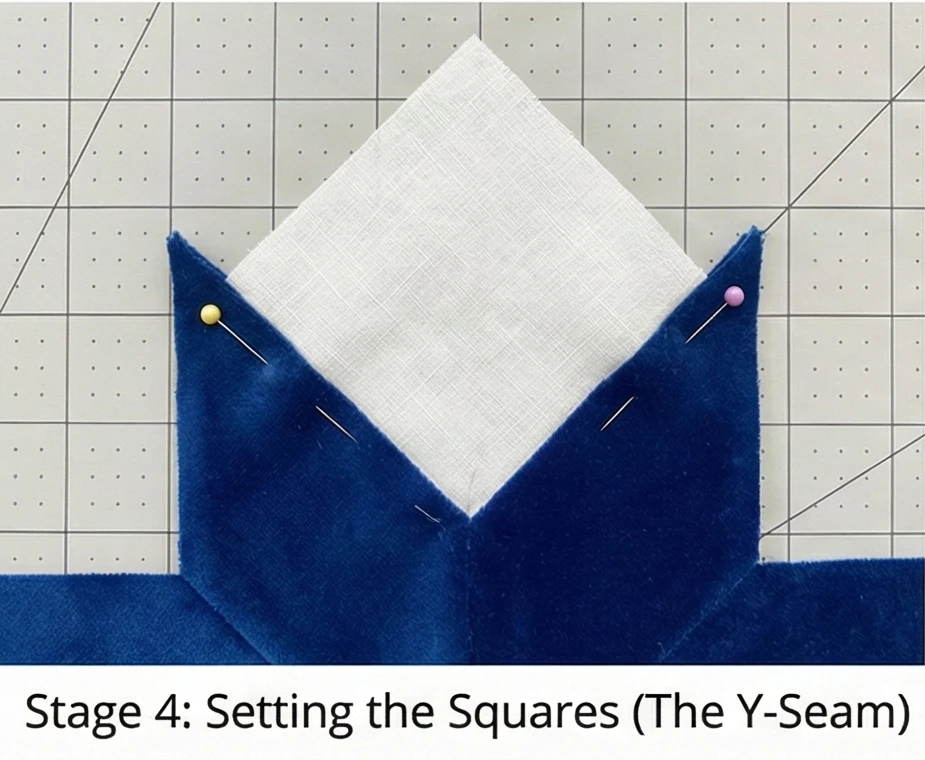
Step 4: Setting the Squares (The Y-Seam)
Now we fill the “V” spaces between star points.
- Pinning: Place a Background Square into the “V” between two star points. Pin the square to the right side of the V first.
- Side 1: Sew from the outer edge inward, stopping exactly at the center dot (the crotch of the V). Backstitch and trim thread.
- Pivot: Rotate the pieces. Fold the star fabric out of the way so you can align the square with the left side of the V.
- Side 2: Insert the needle exactly into the center dot (where you just stopped) and sew outward to the edge.
- Result: The square is perfectly set without puckering. Repeat for all 4 corners and 4 side triangles.
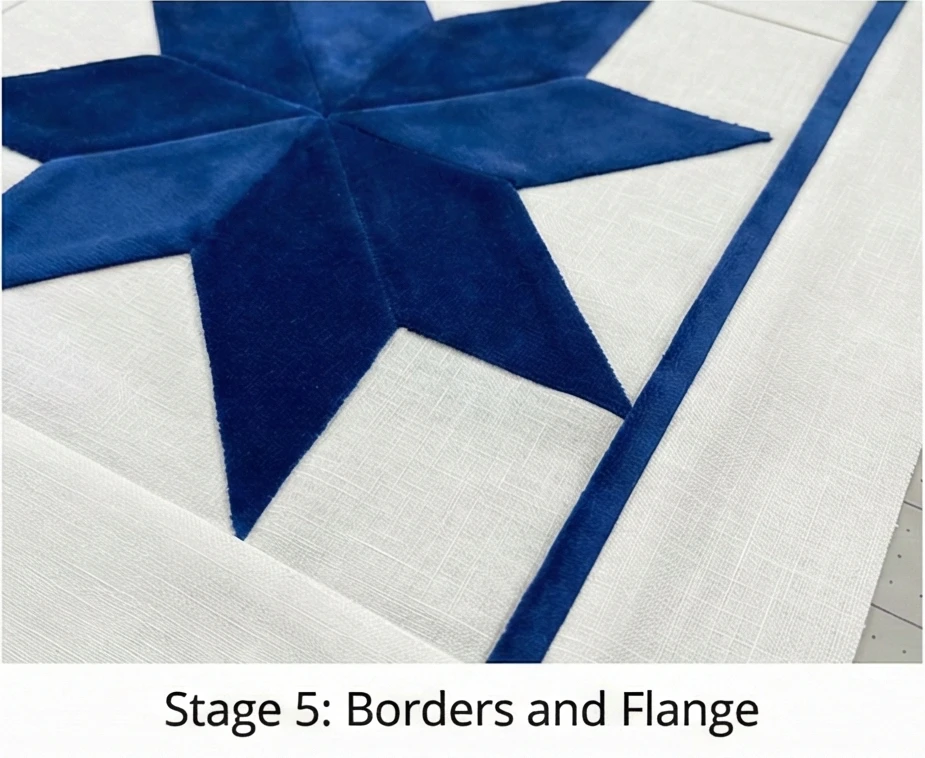
Step 5: Borders and Flange
Bring the block up to Euro size (26″).
- Border: Measure your star block (it should be roughly 14-16 inches). Add wide strips of White Linen to all four sides to bring the total size to 26.5″ x 26.5″.
- The Flange (Optional): To add a touch of elegance, insert a thin, 1-inch-wide folded strip of Sapphire fabric into the border seam. This creates a thin, blue piping-like frame floating in the white field.
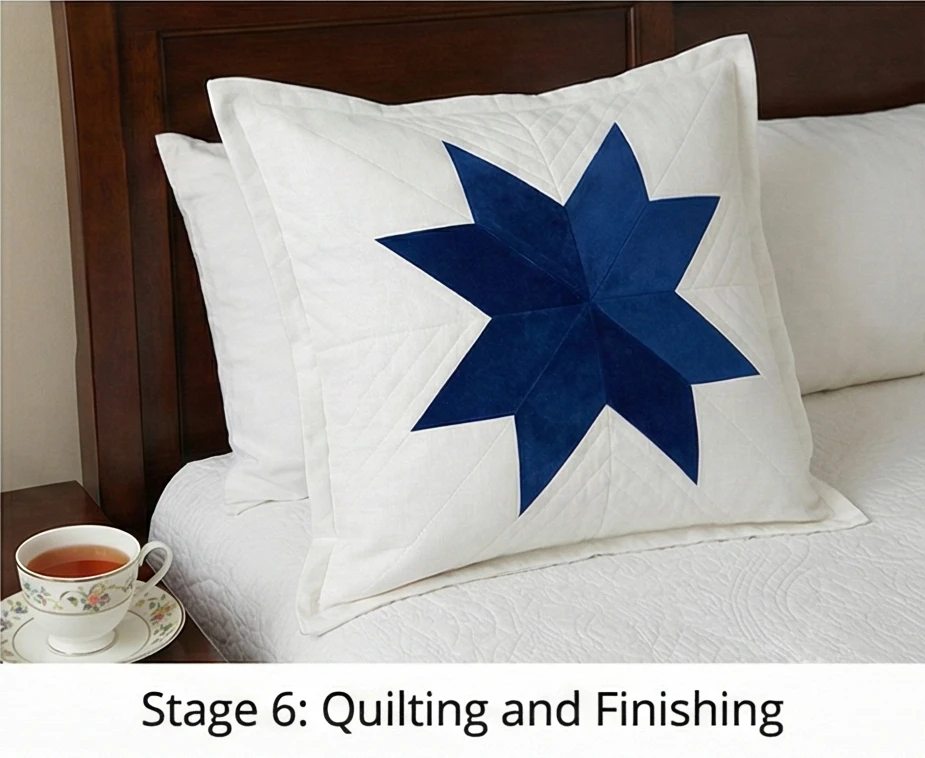
Step 6: Quilting and Finishing
- Quilt: Keep it simple.
- In the Velvet: Do not quilt heavily; it crushes the pile. A simple “In the Ditch” outline is best.
- In the Background: Quilt dense McTavishing (swirling texture) or simple cross-hatching to make the linen recede, forcing the velvet star to pop out in high relief.
- Envelope Back: Create a standard envelope backing using the Linen.
- Stuff: Insert a 28-inch Euro pillow insert. (Always use an insert 2 inches larger than the sham for a plump, luxurious look).
Usability Note: Cotton velvet is durable but collects lint. Keep a lint roller handy. If you want a lower-maintenance option that still shimmers, use a high-quality Cotton Sateen or a Silk Radiance blend.
5. Minimalist Carpenter’s Star Quilt Ideas for Modern Beds
The “Urban Carpenter” Monochrome Star Quilt
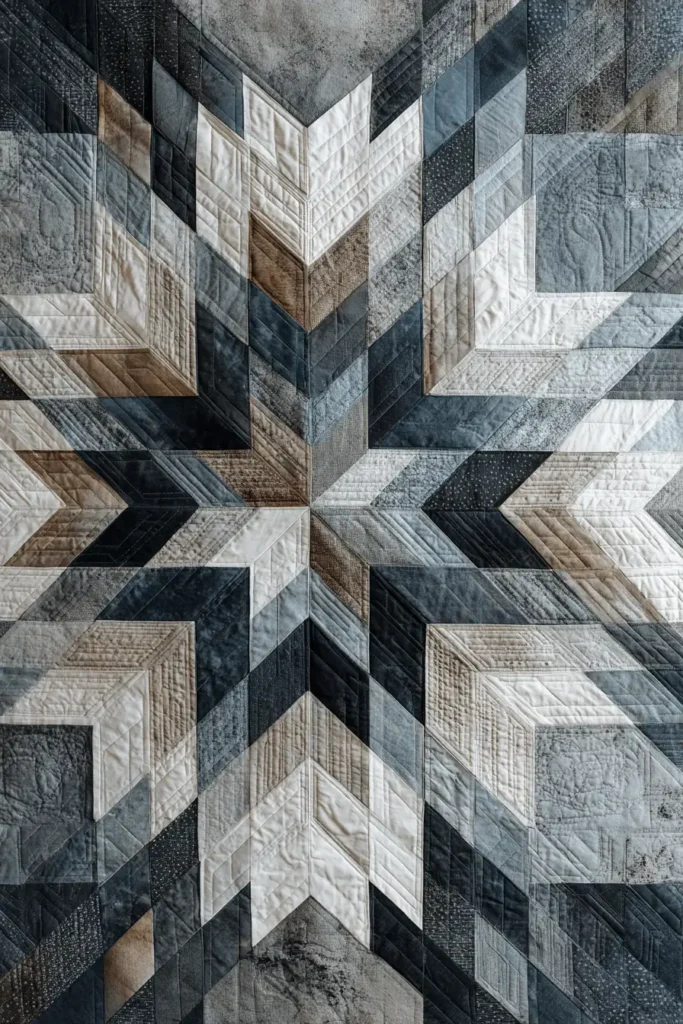
The Carpenter’s Star (also known as the Carpenter’s Wheel) is a traditional pattern that looks deceptively complex. It appears to be made of difficult diamonds and Y-seams, but it is actually constructed entirely from simple Half-Square Triangles (HSTs) and squares. For this modern minimalist version, we scale the block up to massive proportions. By using a strictly monochromatic palette—Crisp White, Silver Grey, and Charcoal—the design transforms from a busy scrap quilt into a bold, architectural statement piece that anchors a modern bedroom.
Finished Dimensions: Large Square Throw, approximately 72″ x 72″ (can be expanded to Queen by adding borders).
Materials Needed:
- Fabric A (Background/White): 2.5 yards of solid white cotton.
- Fabric B (Star Light/Silver): 1.5 yards of light grey solid.
- Fabric C (Star Dark/Charcoal): 1.5 yards of dark charcoal solid.
- Backing: 4.5 yards of wide-width sheeting.
- Batting: Cotton/Bamboo blend (for a flat, modern drape).
- Notions: Rotary cutter, 24″ quilting ruler, marking pen.
Cultural Backstory: The Carpenter’s Star is often cited in folklore as a tribute to the carpentry trade or a biblical reference to Joseph the Carpenter. Unlike the “Lone Star” which radiates from a central point, the Carpenter’s Star is built on a grid, representing structural integrity. In the 19th century, this pattern was a way to show off precise geometry without the headache of difficult angles.
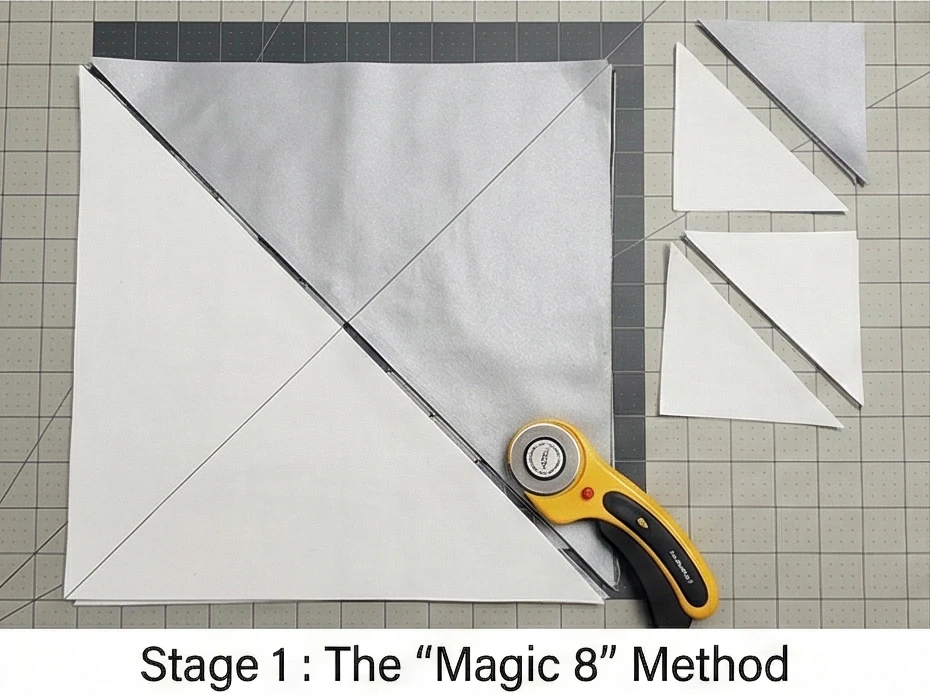
Step 1: The “Magic 8” Method (Efficiency Strategy)
We need a lot of Half-Square Triangles (HSTs). Making them in batches of 8 saves hours.
- Cut Large Squares:
- From White and Silver: Cut 2 squares measuring 10 inches each.
- From White and Charcoal: Cut 2 squares measuring 10 inches each.
- From Silver and Charcoal: Cut 4 squares measuring 10 inches each.
- Mark: Draw two diagonal lines (an X) on the back of the lighter squares.
- Sew: Place pairs Right Sides Together (e.g., White + Silver). Sew a straight line 1/4 inch on both sides of both diagonal lines.
- Cut:
- Cut the square in half vertically.
- Cut in half horizontally.
- Cut along both diagonal lines.
- Yield: Each pair produces 8 HSTs.
- Trim: Trim all resulting HST units to exactly 4.5 inches square.
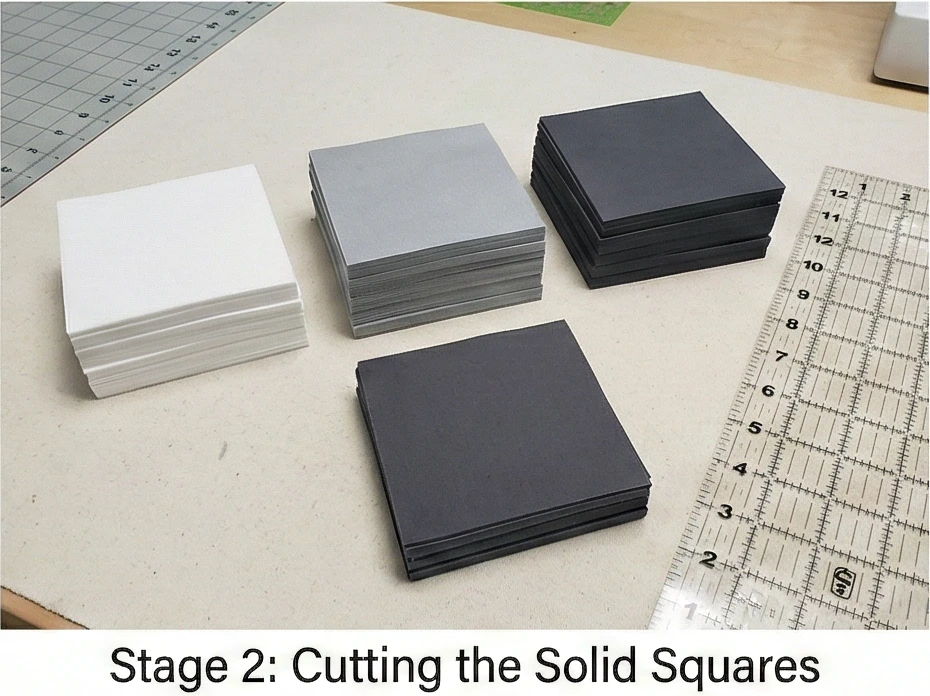
Step 2: Cutting the Solid Squares
The rest of the quilt is plain squares.
- White: Cut 24 squares measuring 4.5 inches.
- Silver: Cut 8 squares measuring 4.5 inches.
- Charcoal: Cut 8 squares measuring 4.5 inches.
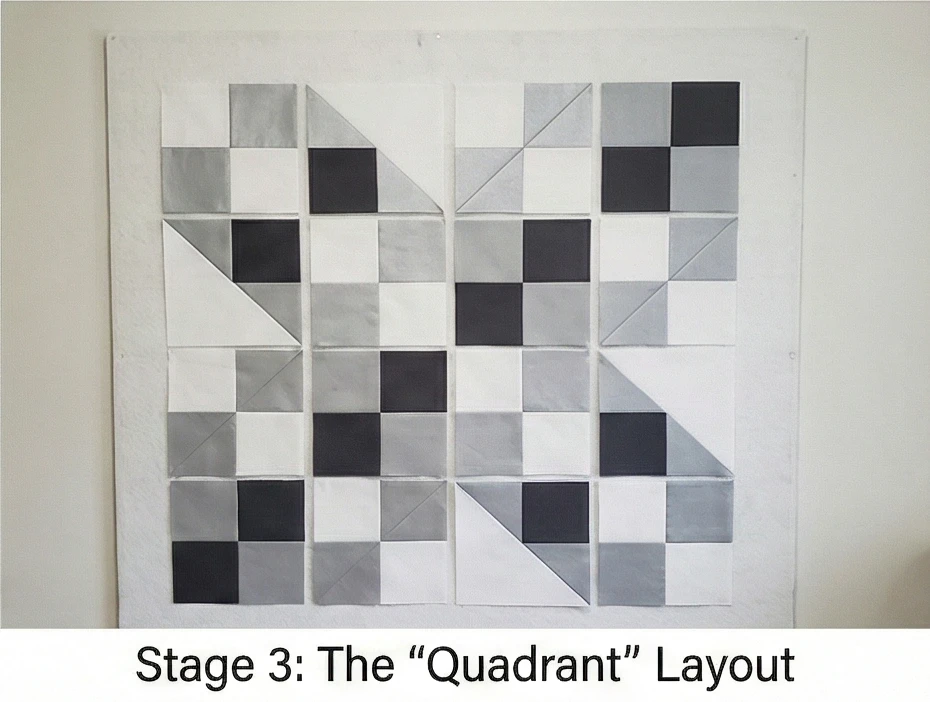
Step 3: The “Quadrant” Layout
A Carpenter’s Star is a giant 8×8 grid. It is easier to build it as four 4×4 quadrants.
To build the Top-Left Quadrant (4 rows of 4 blocks):
- Row 1: White Square – White Square – White/Silver HST – White/Charcoal HST.
- Row 2: White Square – White/Silver HST – Silver/Charcoal HST – Charcoal Square.
- Row 3: White/Silver HST – Silver/Charcoal HST – Silver Square – Silver/Charcoal HST.
- Row 4: White/Charcoal HST – Charcoal Square – Silver/Charcoal HST – Charcoal/White HST.
- Note on Orientation: You must rotate the HSTs so the colors form the diamond points. Refer to a visual diagram of a Carpenter’s Star. The “Charcoal” creates the large central star points, and the “Silver” creates the outer frame points.
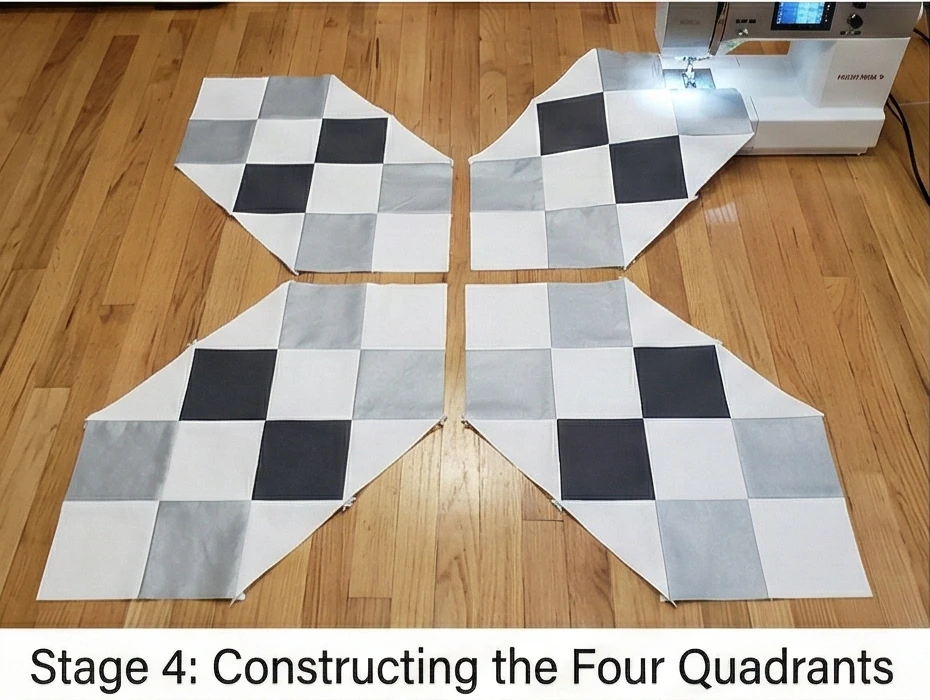
Step 4: Constructing the Four Quadrants
- Assemble: Stitch the rows of the Top-Left Quadrant together.
- Repeat: Build the other three quadrants.
- Top-Right: Mirror image of Top-Left horizontally.
- Bottom-Left: Mirror image of Top-Left vertically.
- Bottom-Right: Mirror image of Top-Left diagonally.
- Visual Check: Lay all four quadrants on the floor. You should see a massive 8-pointed star exploding from the center. If a point appears “broken,” rotate the corresponding HST.
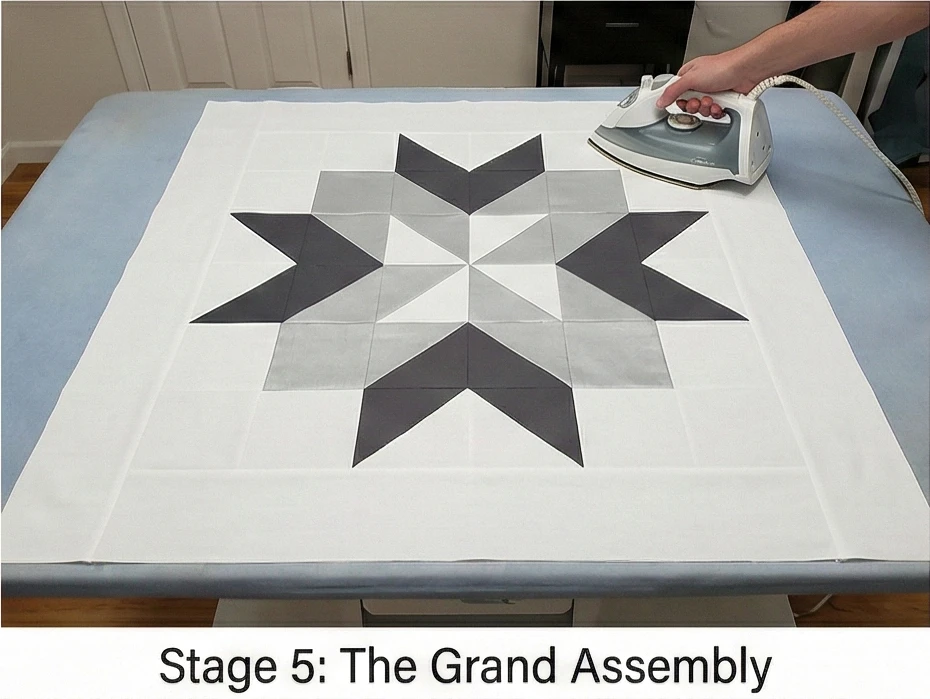
Step 5: The Grand Assembly
- Join Halves: Sew the Top-Left and Top-Right quadrants together. Press seam open. Repeat for the bottom halves.
- Join Top and Bottom: Sew the top half to the bottom half.
- The Center: This intersection is bulky. Pin heavily. If you pressed your seams open, the center point should lie flat.
- Borders (Optional): Add a 6-inch border of White Fabric around the entire star to let it “float” in negative space. This increases the size to approx 84″ (Queen) and enhances the modern minimalist look.
Step 6: “Echo” Quilting
Modern quilting usually avoids complex feathers.
- Baste: Sandwich the quilt layers.
- Design: Quilt straight lines that mimic the angles of the star.
- Start at the center and quilt a diamond outline 1/2 inch inside the star shape.
- Continue radiating outward, quilting concentric diamonds every 2 inches until you reach the edge of the quilt.
- Effect: This emphasizes the star design’s explosive energy.
Step 7: The Charcoal Frame
- Binding: Use the Charcoal (Fabric C) for the binding.
- Finish: A dark binding on a white-bordered quilt acts like a picture frame, containing the energy of the star and giving it a graphic, poster-like finish.
Usability Note: Because this quilt relies on large 4.5-inch patches, there are relatively few seams compared to intricate stars. This makes the quilt softer and more drapable, perfect for wrapping up in while reading.

6. Scrappy Friendship Star Quilt Patterns for a Charming Guest Room

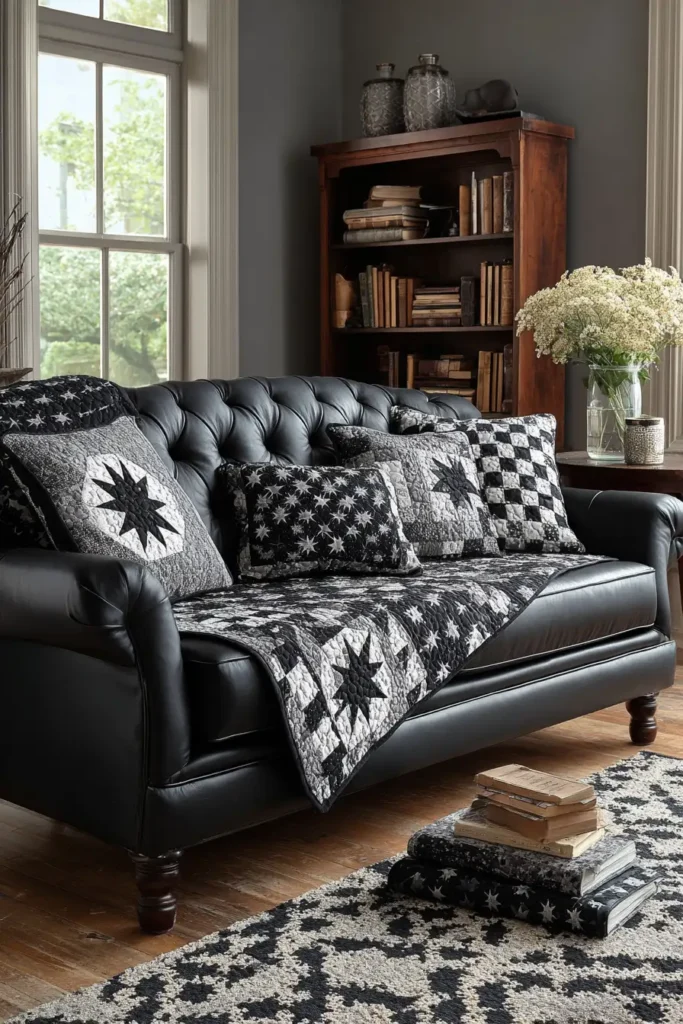
The “Welcome Home” Scrappy Friendship Star Quilt
The Friendship Star is one of the simplest and most beloved star blocks in quilting history. Historically, it was a “signature block”—friends would sign the center square in ink or embroidery, and the blocks would be sewn together as a farewell gift for someone moving West. This pattern embraces that scrappy, communal history but updates it for a modern guest room. By using a “Low Volume” background (white fabrics with tiny, subtle prints) and a riot of colorful scraps for the stars, the quilt feels like a warm, cheerful hug for anyone visiting your home.
Finished Dimensions: Guest Queen Coverlet, approximately 84″ x 84″.
Materials Needed:
- Fabric A (The Stars): A large collection of scraps! You need enough to cut (360) 2.5-inch squares. Aim for bright, happy colors (coral, teal, mustard, berry).
- Fabric B (The Background): 5 yards of assorted “Low Volume” prints (white/cream fabrics with faint text, dots, or grids). Using a mix of backgrounds makes it look vintage and expensive.
- Backing: 8 yards of a soft floral voile or cotton.
- Batting: Cotton/Poly Blend (80/20) for durability and washability.
- Thread: Cream or Light Grey (Aurifil 50wt is ideal).
- Notions: Rotary cutter, 2.5-inch square ruler (optional but helpful).
Cultural Backstory: In the 19th century, Pioneer women often had very little fabric to spare. The Friendship Star was efficient because it uses simple squares and triangles, wasting almost nothing. It symbolizes connection—the points of the stars are said to represent hands reaching out to hold one another.
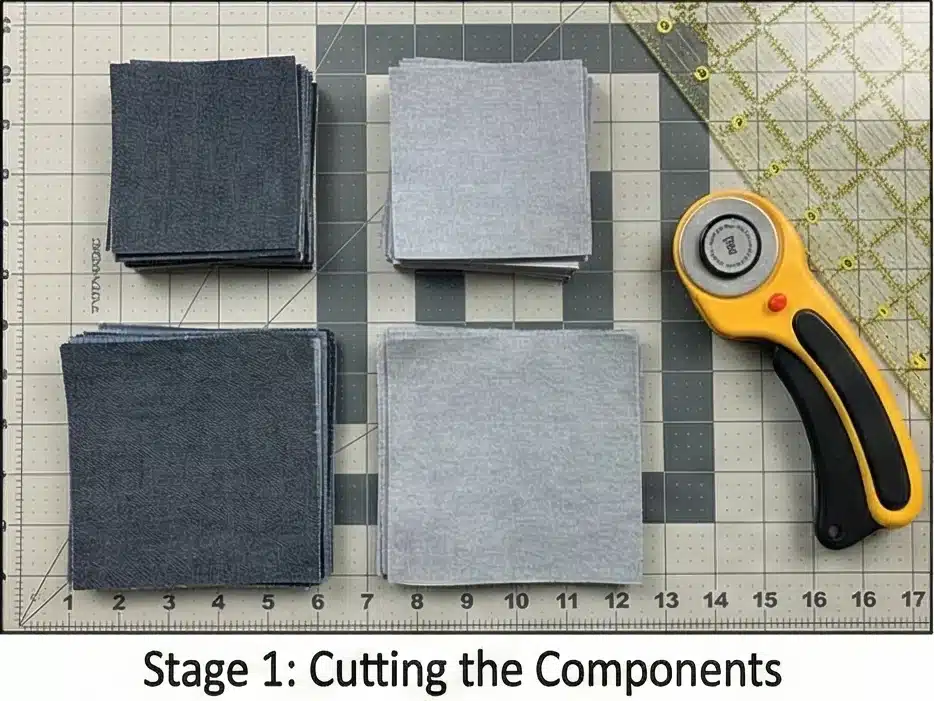
Step 1: Cutting the Scrap Harvest
We are making 36 Blocks (set 6 x 6), but to make it a Queen, we add borders later. Each finished block is 9 inches.
For ONE Block:
- Star Fabric (Color):
- Cut 1 square measuring 3.5″ x 3.5″ (Center).
- Cut 2 squares measuring 4″ x 4″ (For the points).
- Background Fabric (Low Volume):
- Cut 4 squares measuring 3.5″ x 3.5″ (Corners).
- Cut 2 squares measuring 4″ x 4″ (For the points).
(Multiply this by 36 for the full quilt).

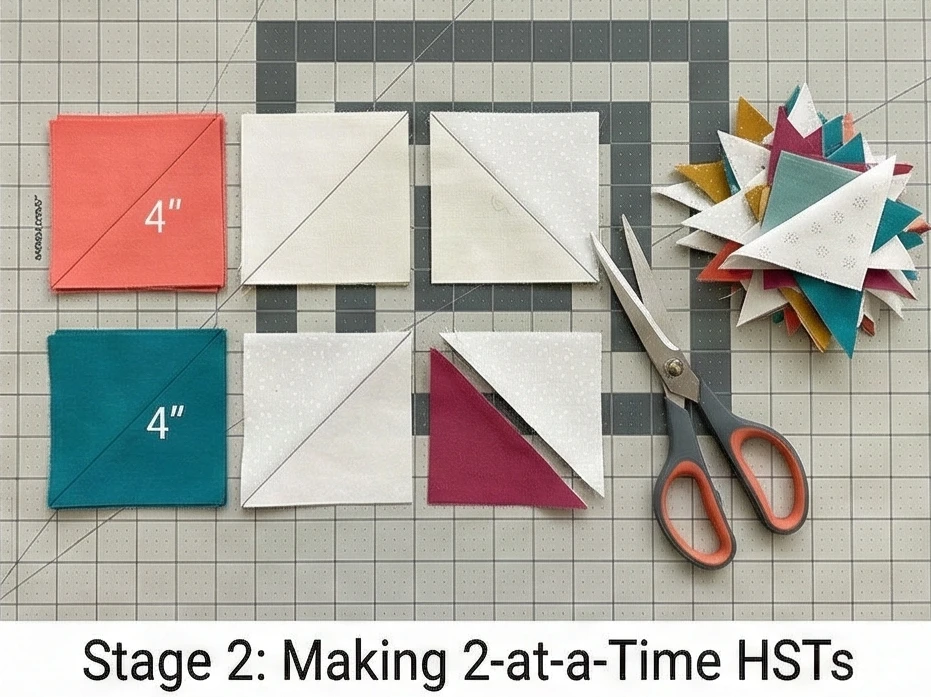
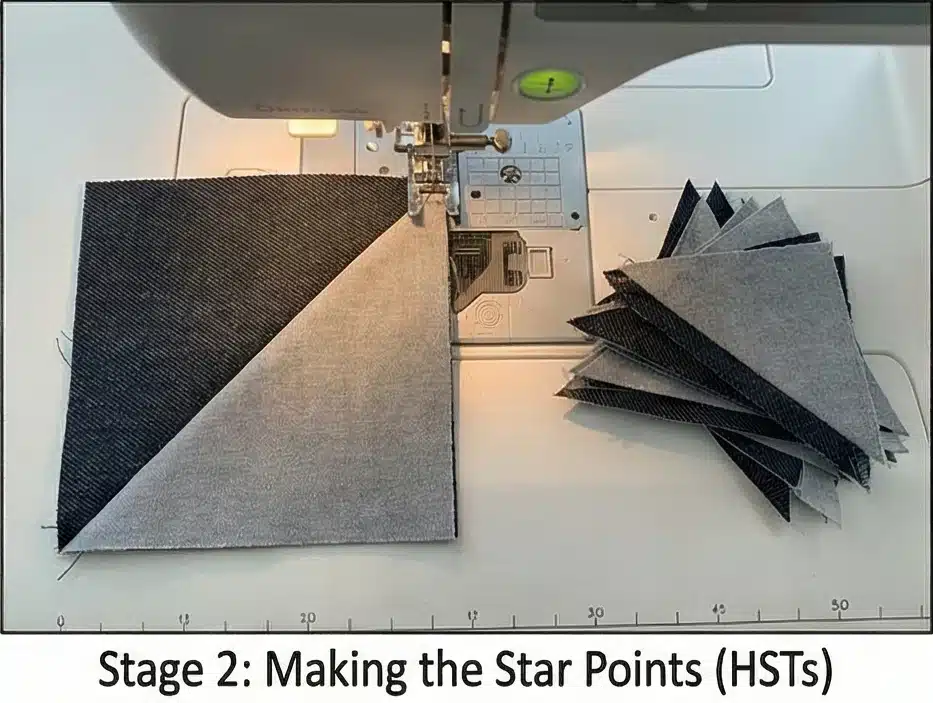
Step 2: Making 8-at-a-Time Half-Square Triangles (HSTs)
Wait—usually, we make 2 at a time. But for a scrappy quilt, doing the “Magic 8” method with larger squares is faster? Actually, for this specific pattern size, the 2-at-a-time method with the 4″ squares is safer for beginners to get perfect points.
The 2-at-a-Time Method:
- Pair: Take a 4″ Color square and a 4″ Background square. Place them Right Sides Together.
- Mark: Draw a diagonal line on the back of the lighter square.
- Sew: Stitch 1/4 inch away from the line on both sides.
- Cut: Cut along the drawn center line.
- Press: Press seams toward the dark fabric.
- Trim: Trim these units down to exactly 3.5″ x 3.5″.
- Yield: You get 2 HST units per pair. You need 4 HSTs per block.
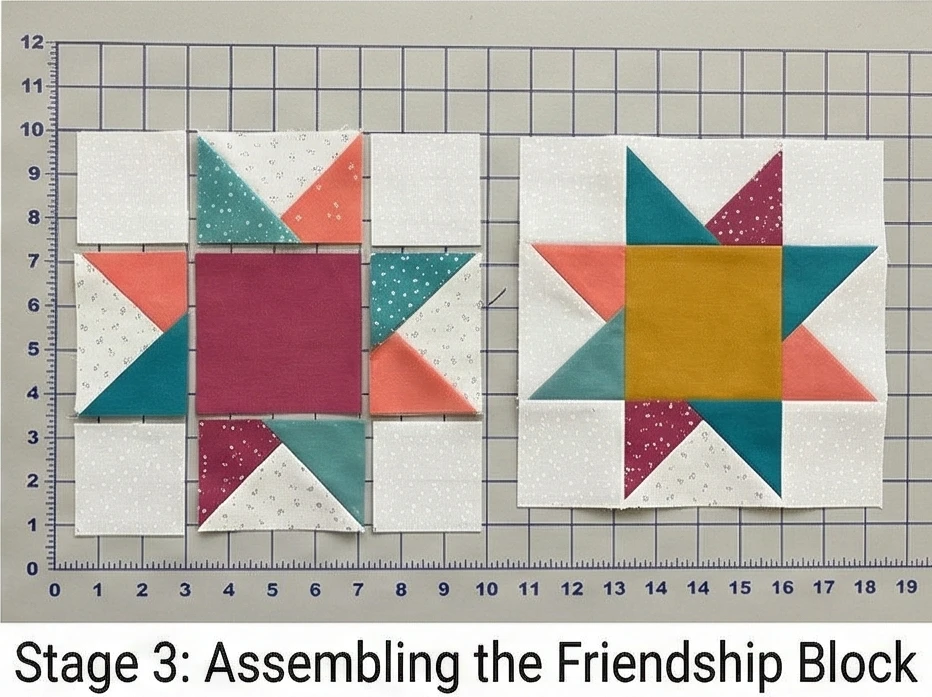
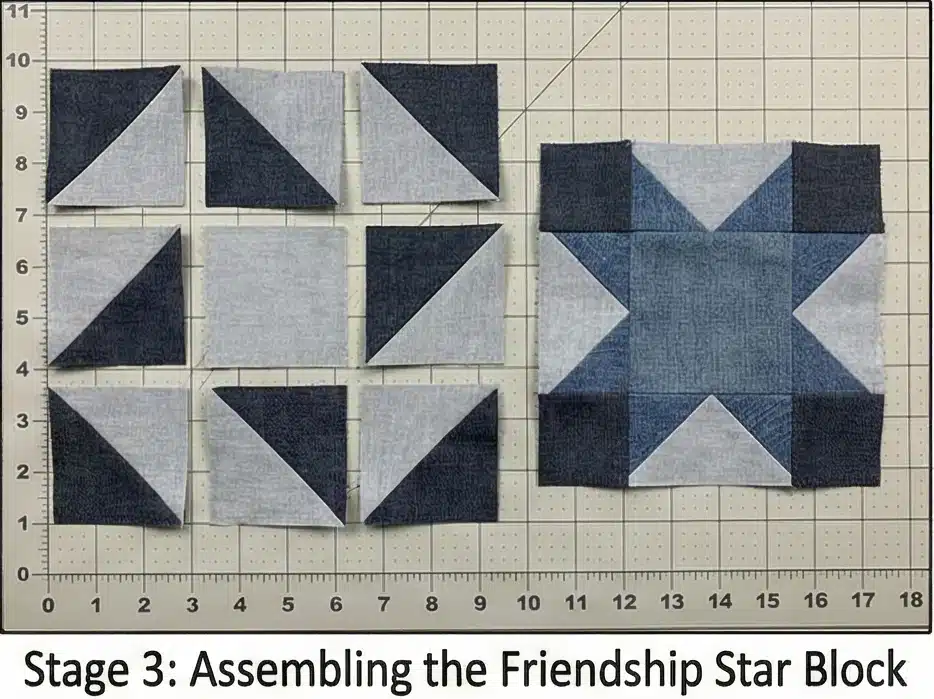
Step 3: Assembling the Friendship Block
It’s a simple 9-Patch grid.
- Top Row: Background Square – HST (Color point touching center) – Background Square.
- Middle Row: HST (Color point touching center) – Solid Color Square – HST (Color point touching center).
- Bottom Row: Background Square – HST (Color point touching center) – Background Square.
- Sew: Stitch the rows together.
- Pressing: Press the top/bottom row seams outward. Press the middle row seams inward. This makes the seams “nest” perfectly at the corners so your star points are sharp.
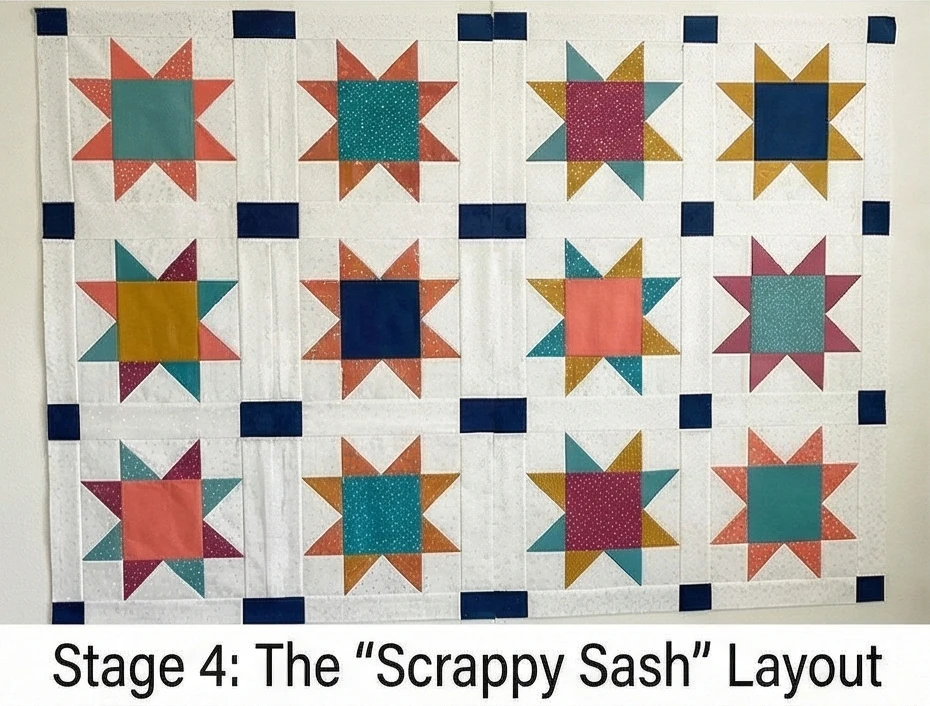
Step 4: The “Scrappy Sash” Layout
Sashing prevents the stars from crashing into each other.
- Cut Sashing: Cut 84 strips of your Low Volume background fabric measuring 9.5″ x 2.5″.
- Cut Cornerstones: Cut 49 squares of a consistent accent color (like Navy or Grey) measuring 2.5″ x 2.5″.
- Layout: Arrange your 36 stars in a 6×6 grid. Place a sashing strip vertically and horizontally between them. Place a cornerstone at every intersection.
Step 5: Web Construction
- Row Assembly: Sew a row of: Cornerstone – Sash – Cornerstone – Sash… etc.
- Block Row Assembly: Sew a row of: Sash – Star Block – Sash – Star Block… etc.
- Join: Alternate the Sashing Rows and Block Rows to build the full top.
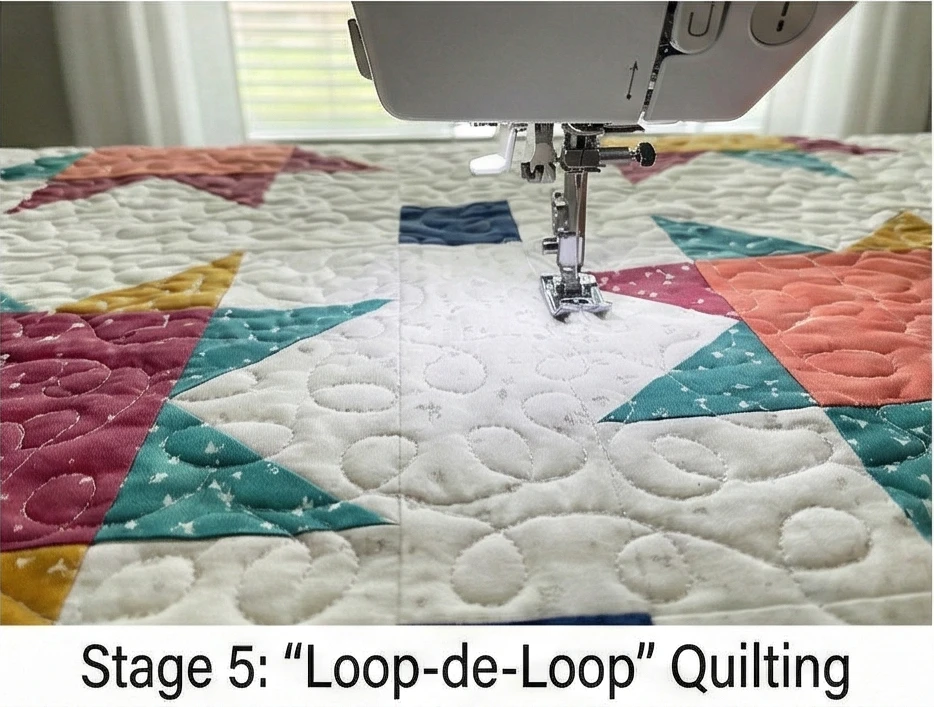
Step 6: “Loop-de-Loop” Quilting
Formal quilting feels too stiff for a Friendship quilt. Go playful.
- Baste: Sandwich the quilt layers.
- Quilt: Use a Free-Motion foot (or send to a longarmer) to do an all-over Loopy Meander.
- Why: The curves soften the sharp triangles of the stars and give the quilt a crinkly, vintage texture when washed.
- Binding: Use a Scrappy Binding (sew leftover colored strips together) to finish the edges with a final pop of joy.
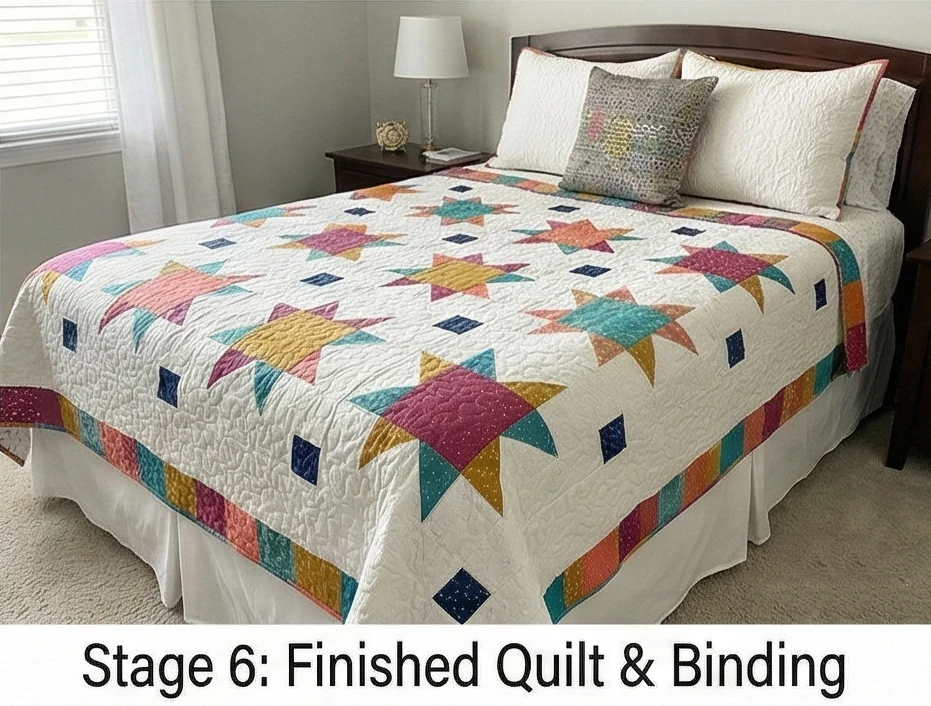
Usability Note: Because this quilt uses “Low Volume” prints (which hide stains better than pure white) and busy scraps, it is the ultimate “usable” quilt. It hides pet hair, tea spills, and wrinkles, making it perfect for a guest room where you want visitors to feel relaxed, not terrified of ruining the bedding.

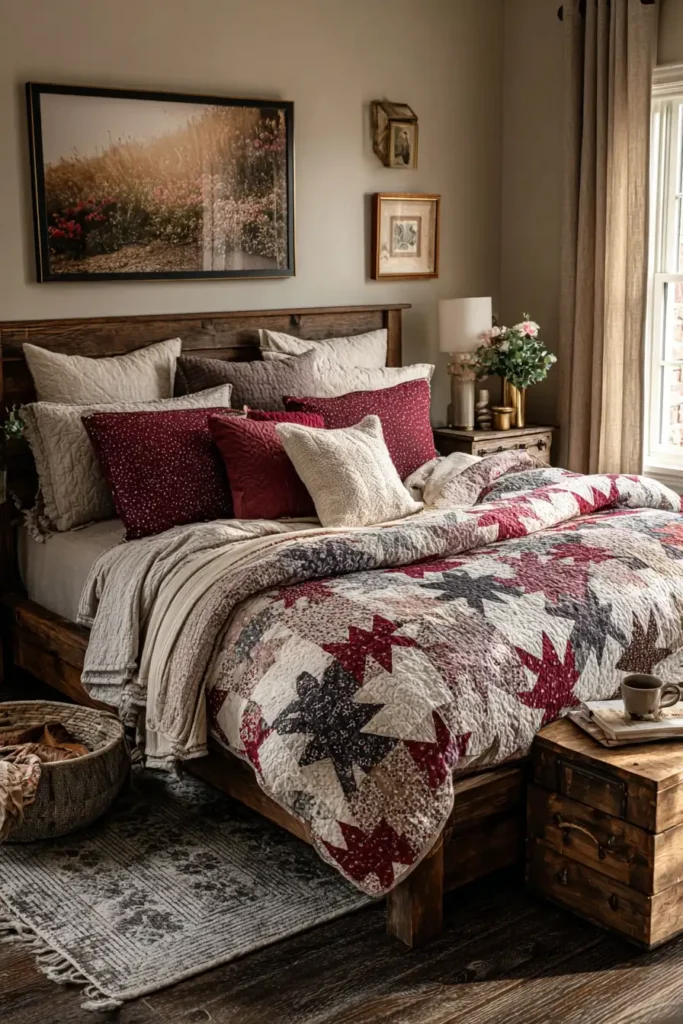
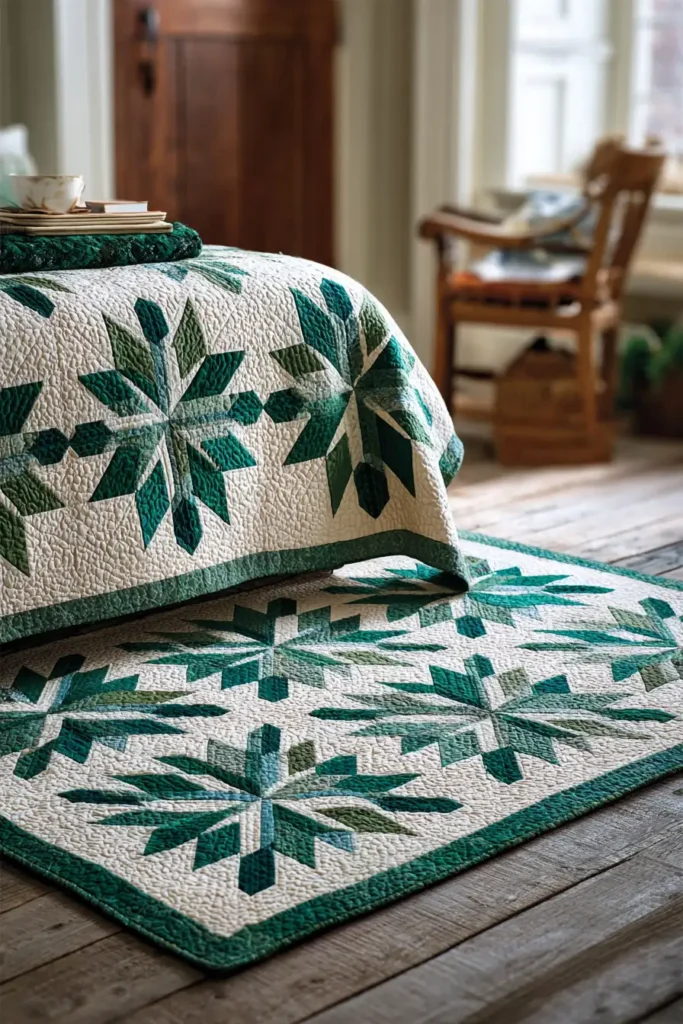
7. Elegant Hunter’s Star Bed Quilts for All-Season Warmth
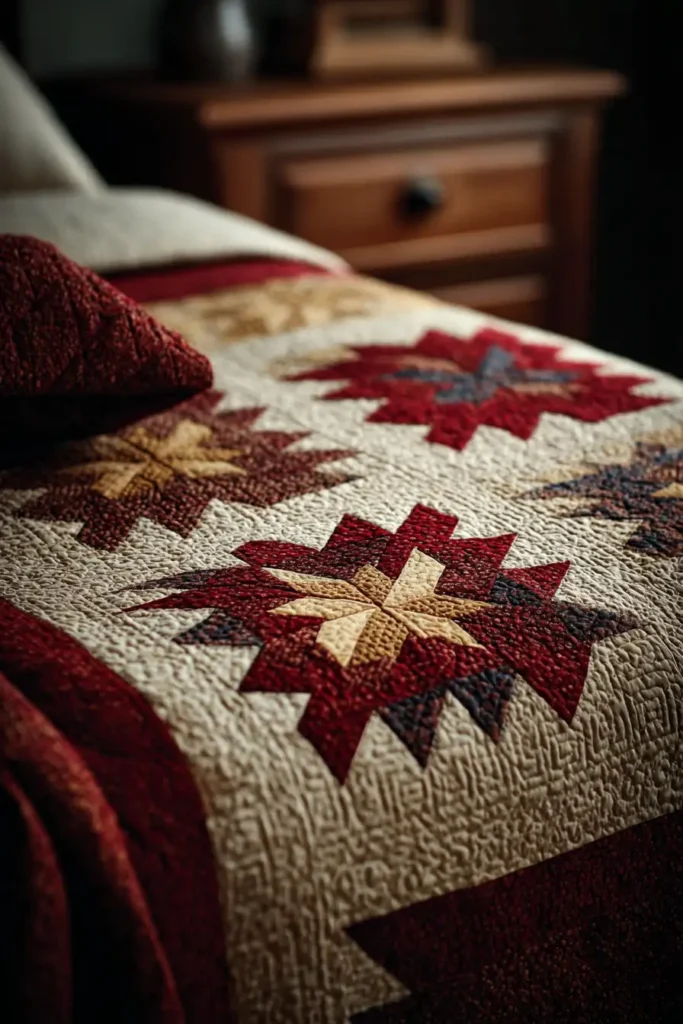
The “Midnight Forest” Two-Tone Hunter’s Star
The Hunter’s Star is a “bucket list” quilt for many sewists. It is famous for its intricate, interlocking design, in which large and small stars seem to emerge magically from a two-color grid. While traditional methods require difficult Y-seams, modern construction uses a four-patch block system that creates the illusion of continuous diamonds without the headache. For this elegant version, we use a high-contrast palette of Forest Green and Antique Cream. The result is a sophisticated, gender-neutral masterpiece that looks as good in a summer cabin as it does in a winter lodge.
Finished Dimensions: Queen Size Bed Cover, approximately 90″ x 90″.
Materials Needed:
- Fabric A (Dark/Forest): 4 yards of high-quality cotton solid.
- Fabric B (Light/Cream): 4 yards of high-quality cotton solid.
- Backing: 8 yards of wide-width sheeting.
- Batting: Wool Batting (This pattern has many seams; wool hides the bulk better than cotton, helping the quilt feel less stiff).
- Thread: Neutral Cream.
- Notions: Rotary cutter, Hunter’s Star Ruler (Highly recommended, e.g., “Rapid Fire” or “Petite Star”). Note: The guide below describes the standard template method if you don’t have a specialty ruler.
Cultural Backstory: The Hunter’s Star pattern first appeared in the mid-19th century in the American South. It was originally known as a “puzzle” quilt because, to the untrained eye, it is impossible to see where one block ends and the next begins. The interlocking geometry symbolizes the interconnectedness of nature—or the path of a hunter through the woods.
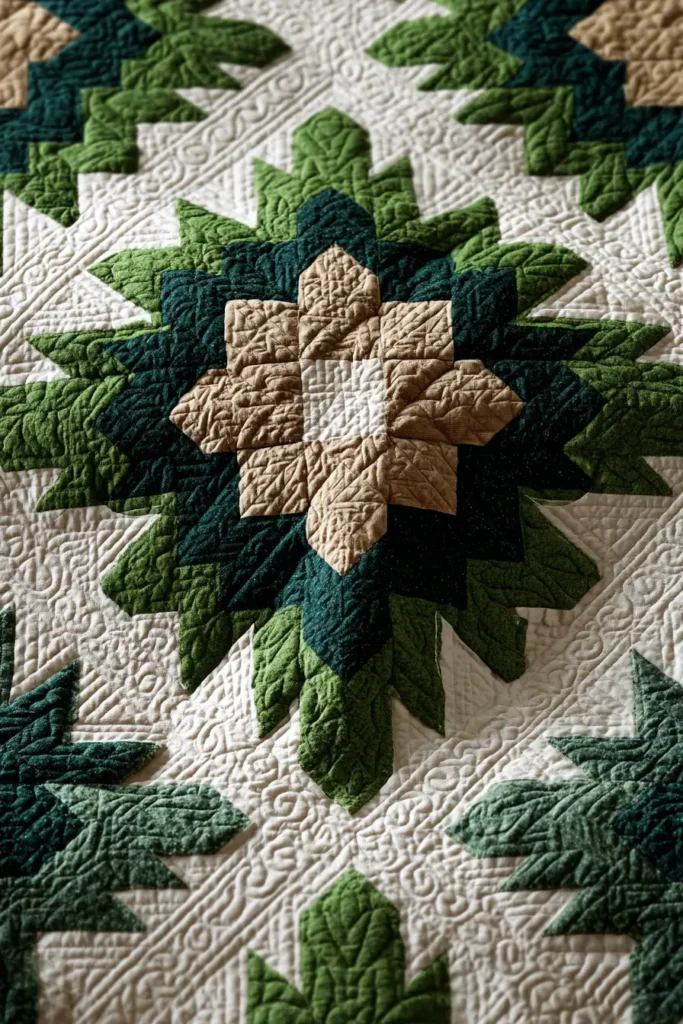
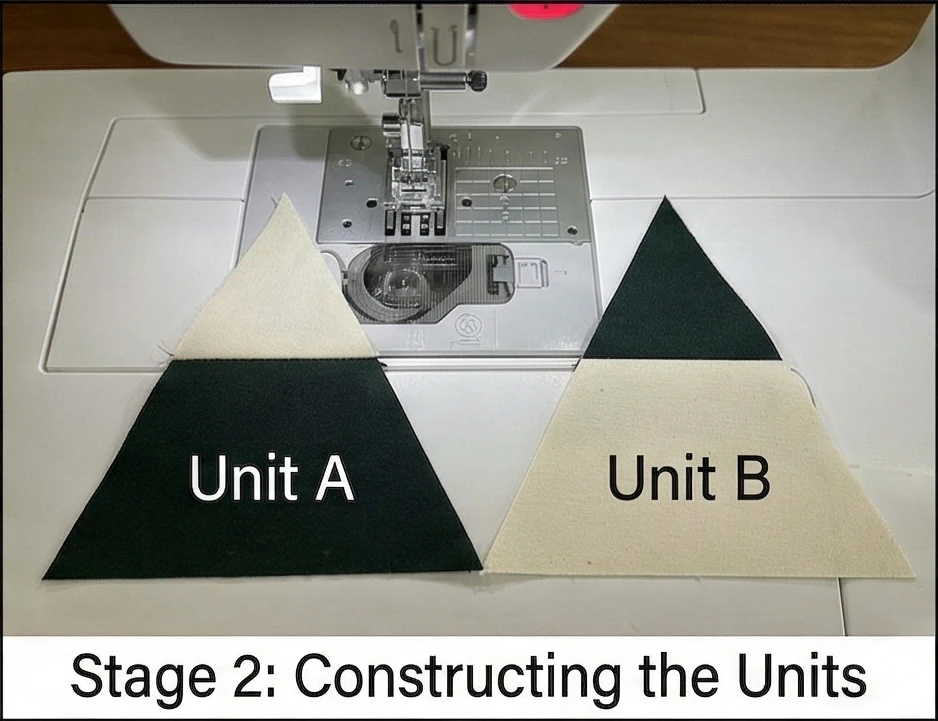
Step 1: Understanding the Block Geometry
The Hunter’s Star is NOT sewn as individual stars. It is composed of identical square blocks that are rotated.
Each Block consists of four units:
- Dark Trapezoid with a Light Triangle tip.
- Light Trapezoid with a Dark Triangle tip.
- (Repeated to form a 4-patch).
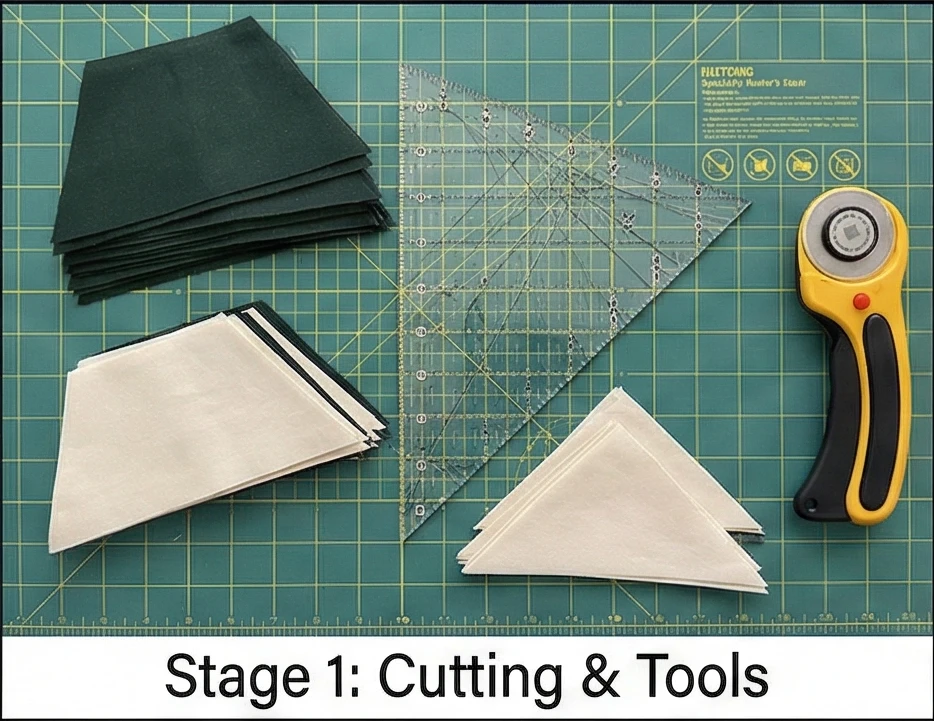
Cutting (for a 12″ finished block – Make 64 blocks):
- Trapezoids: You will need to cut trapezoids from both fabrics. (Top width: 6.5″, Bottom width: 2.5″, Height: 4.5″).
- Star Points (Diamonds/Triangles): Cut matching diamonds/triangles to fit the slope of the trapezoid.
- Pro Tip: Seriously, for a Hunter’s Star, buy a specialty ruler or download a paper-piecing template. It ensures the mathematical angles (which are not standard 45-degrees) fit perfectly.
Step 2: Constructing the Units
- Unit A (Dark Base): Sew a small Light Triangle to the angled side of a Dark Trapezoid.
- Press: Press toward the dark fabric.
- Result: This looks like half of a large diamond.
- Unit B (Light Base): Sew a small Dark Triangle to the angled side of a Light Trapezoid.
- Press: Press toward the dark fabric.
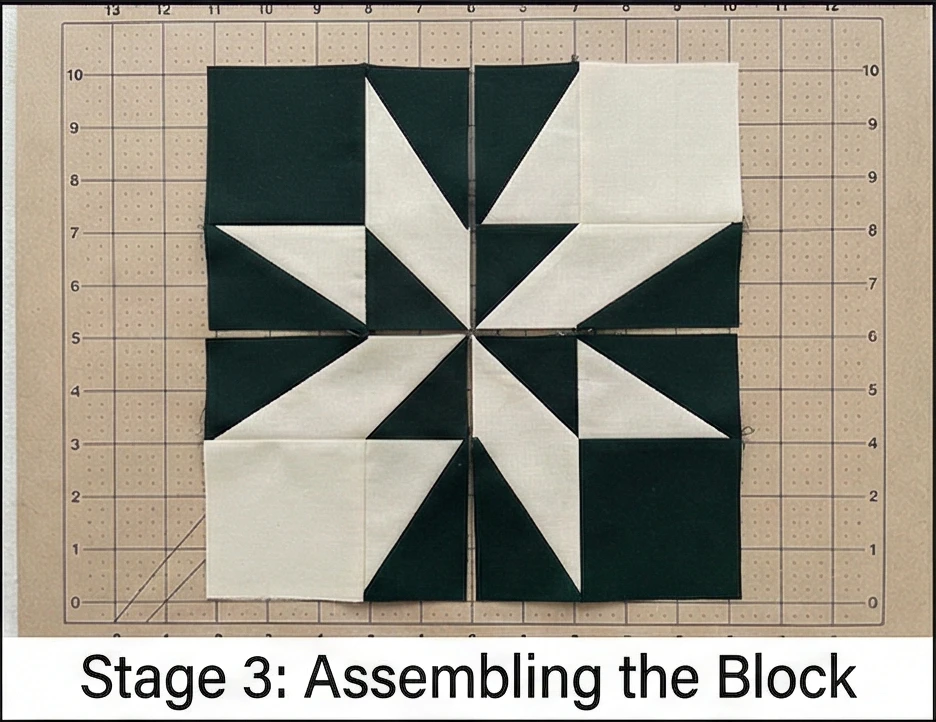
Step 3: Assembling the Block (The 4-Patch)
Every block in the quilt is exactly the same.
- Layout: Arrange 4 units in a square:
- Top Left: Unit A
- Top Right: Unit B
- Bottom Left: Unit B
- Bottom Right: Unit A
- Orientation: Rotate them so the small triangles meet at the center to form a “pinwheel” star.
- Sew: Stitch the top pair together and the bottom pair together.
- Join: Sew the two rows together.
- Center: You must “nest” the center seam perfectly to get sharp star points.
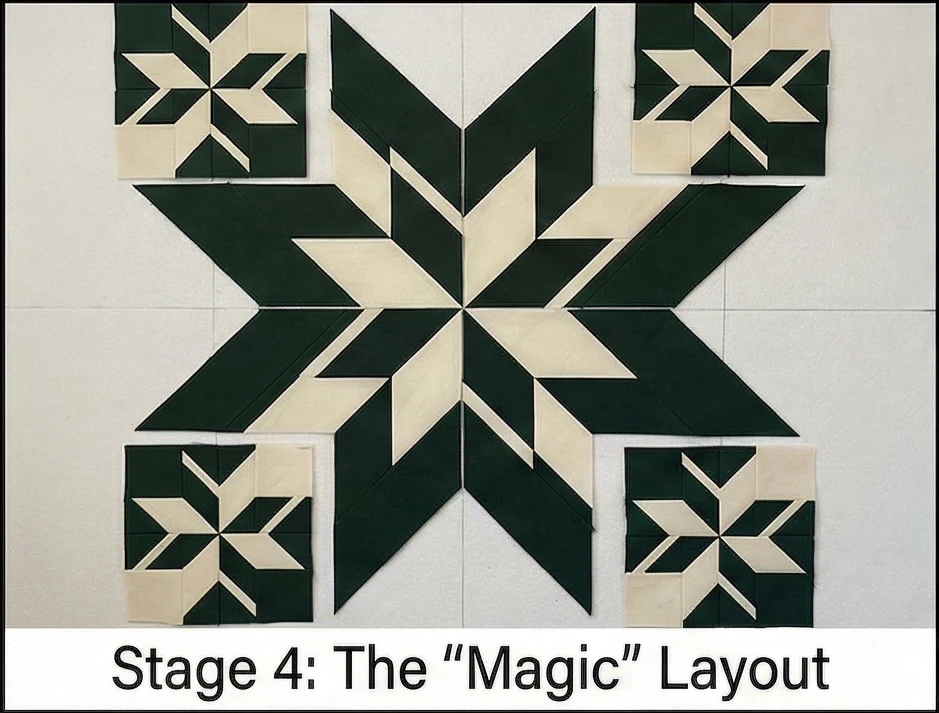
Step 4: The “Magic” Layout
This is where the stars appear.
- Grid: Arrange your 64 blocks in an 8 x 8 grid.
- Rotation: You do not rotate the blocks. You simply sew them together side-by-side.
- Visual: Because of how the blocks are constructed, the large trapezoids on the edge of Block 1 will touch the large trapezoids on the edge of Block 2, instantly forming the large 8-pointed stars.
- Check: Stand back. You should see alternating large Dark Stars and large Light Stars emerging from the grid.
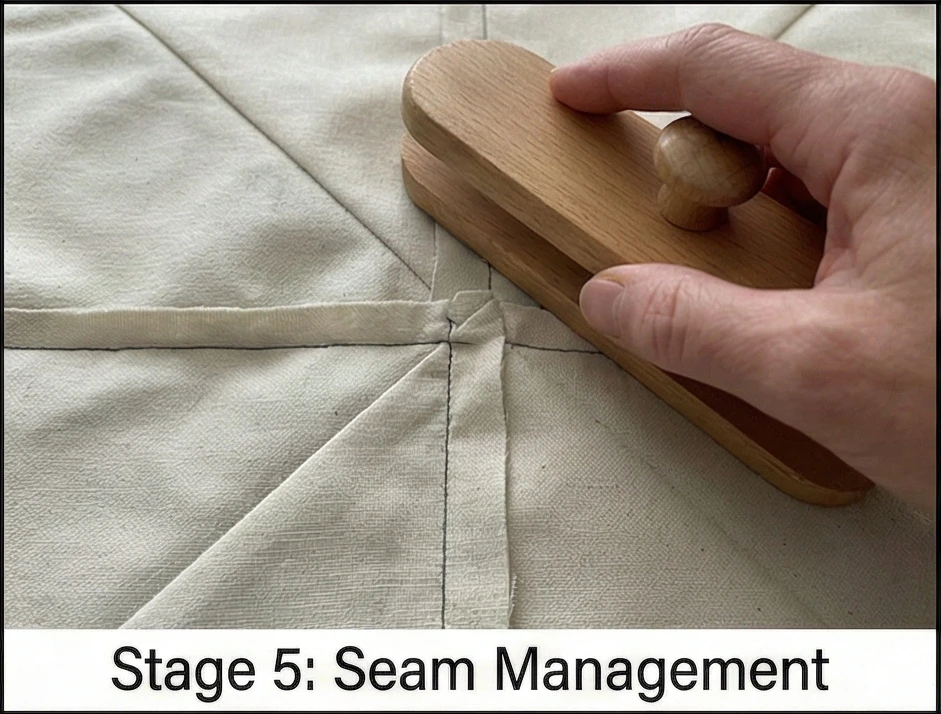
Step 5: Seam Management (Crucial)
Hunter’s Stars have bulky intersections.
- Pressing: Press all seams. Open if possible.
- Mallet Trick: If the intersections where 8 points meet (the secondary stars) feel like a rock, gently tap them with a wooden tailor’s clapper or a rubber mallet. This breaks the fibers slightly and flattens the lump, making it easier to quilt over.
Step 6: “Continuous Curve” Quilting
Don’t distract from the geometry.
- Baste: Sandwich the quilt with Wool Batting.
- Path: Use a walking foot or free-motion foot.
- Quilt a continuous curve (orange peel shape) through the diamonds.
- Start at one tip of a star point, curve gently to the next tip, and keep going.
- Effect: This softens the rigid straight lines of the stars and creates a beautiful floral texture on the back.
Step 7: The “Invisible” Binding
A heavy binding frame can chop off the star points.
- Match: Use the Dark (Forest Green) fabric for the binding.
- Technique: Apply a narrow single-fold binding or a facing.
- Visual: This allows the dark stars at the edge of the quilt to blend into the edge, keeping the “infinite galaxy” look intact.
Usability Note: The Wool Batting is key here. A cotton batting with this many seams can result in a stiff, board-like quilt. Wool has “memory” and springs back, hiding the seam allowances and resulting in a quilt that drapes softly around the body.
8. Sophisticated Star Duvet Cover Patterns for Year-Round Warmth

The “Polaris Linen” Offset Star Duvet Cover
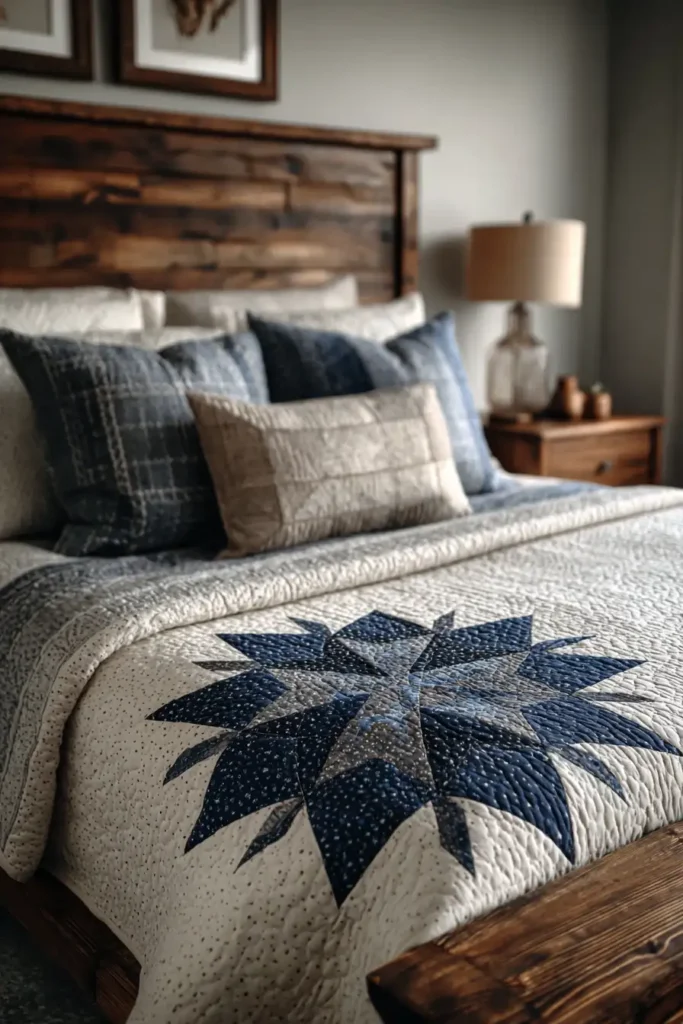
A quilt is a layered sandwich; a duvet cover is an elegant envelope. This pattern bridges the gap, creating a removable, washable cover that features one massive, sophisticated star block. The design places a single, oversized 36-inch Sawtooth Star off-center on the duvet (the “Rule of Thirds”), floating in a sea of French Flax Linen. It mimics the solitude of the North Star (Polaris) in a vast night sky. By using unbleached linen and a soft charcoal star, you achieve a “Quiet Luxury” look that is breathable in summer and cozy in winter.
Finished Dimensions: Queen Size Duvet Cover, approximately 90″ x 90″.
Materials Needed:
- Fabric A (Background): 6 yards of Natural/Oatmeal Linen (54″ wide or wider).
- Fabric B (Star): 1.5 yards of Charcoal or Slate Blue soft linen.
- Backing: 5 yards of high-thread-count cotton sheeting (wide width) or matching linen.
- Closure: 8 large wooden buttons or a 90-inch zipper.
- Ties: 4 yards of twill tape (for corner ties).
- Notions: Rotary cutter, 24″ quilting ruler, fray check (optional).
Cultural Backstory: Polaris, the North Star, has guided travelers and sailors for millennia because it sits almost motionless while the rest of the northern sky rotates around it. In interior design, a single, fixed focal point—like this star—provides a similar sense of grounding and stillness in a bedroom.
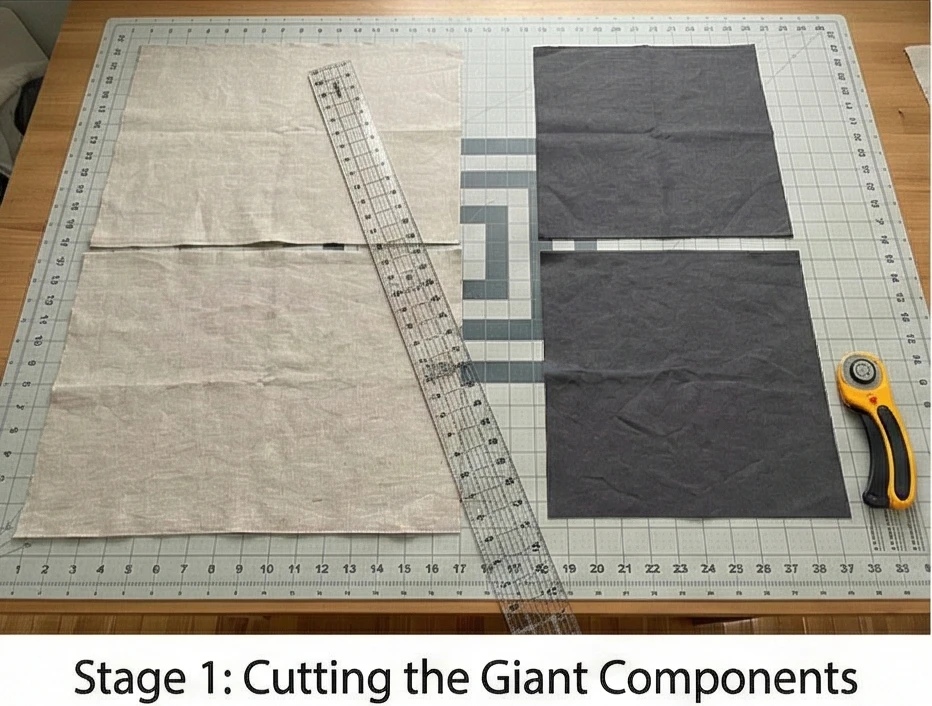
Step 1: Cutting the “Giant” Components
Standard quilt blocks are 12 inches. This one is 36 inches. We are working big.
- The Star Center: Cut 1 square of Fabric B (Charcoal) measuring 18.5″ x 18.5″.
- The Star Points (Flying Geese):
- Cut 4 rectangles of Fabric A (Linen) measuring 9.5″ x 18.5″.
- Cut 8 squares of Fabric B (Charcoal) measuring 9.5″ x 9.5″.
- The Star Corners: Cut 4 squares of Fabric A (Linen) measuring 9.5″ x 9.5″.
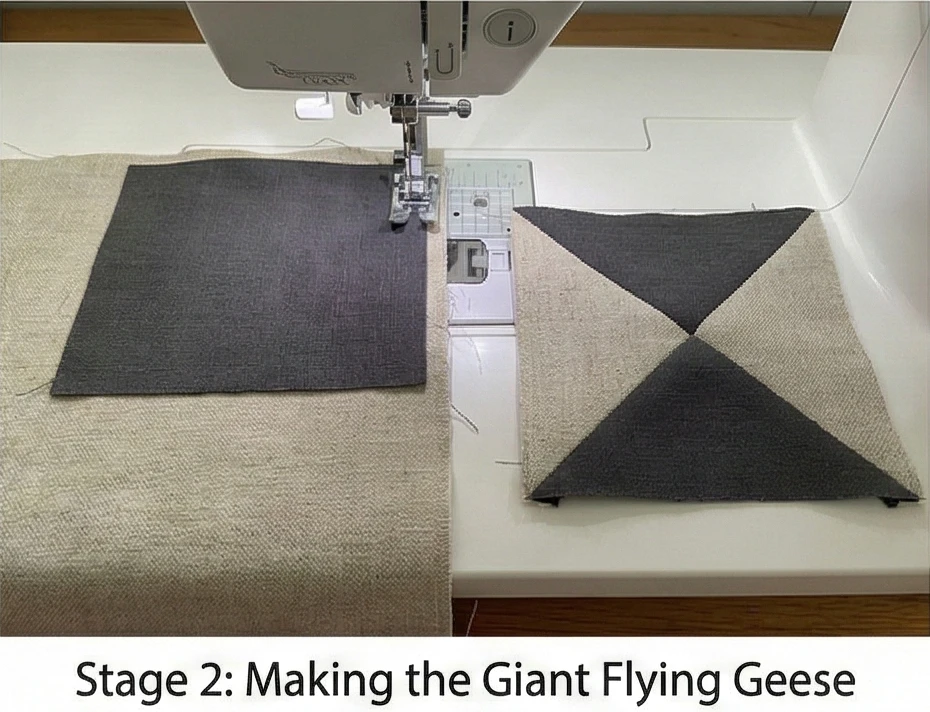
Step 2: Making the Giant Flying Geese
The points of the star.
- Mark: Draw a diagonal line on the back of all 8 small Charcoal squares.
- Sew Side 1: Place a Charcoal square on the right side of a Linen rectangle (Right Sides Together). Sew on the line. Trim excess corner (1/4″ seam). Press the charcoal triangle out.
- Sew Side 2: Repeat on the left side.
- Result: You have a 9.5″ x 18.5″ rectangle with a large grey “V”.
- Repeat: Make 4 units.
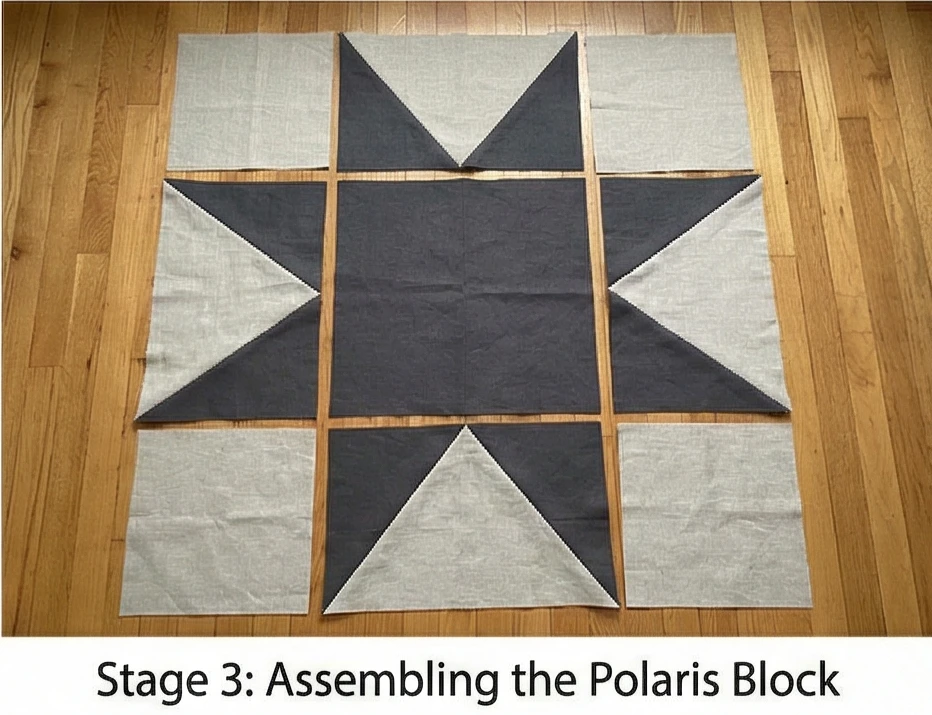
Step 3: Assembling the Polaris Block
Assemble like a standard 9-patch.
- Top Row: Linen Corner – Flying Goose (Point Up) – Linen Corner.
- Middle Row: Flying Goose (Point Left) – Big Center Square – Flying Goose (Point Right).
- Bottom Row: Linen Corner – Flying Goose (Point Down) – Linen Corner.
- Join: Stitch rows together.
- Unfinished Size: The block should measure 36.5″ x 36.5″.
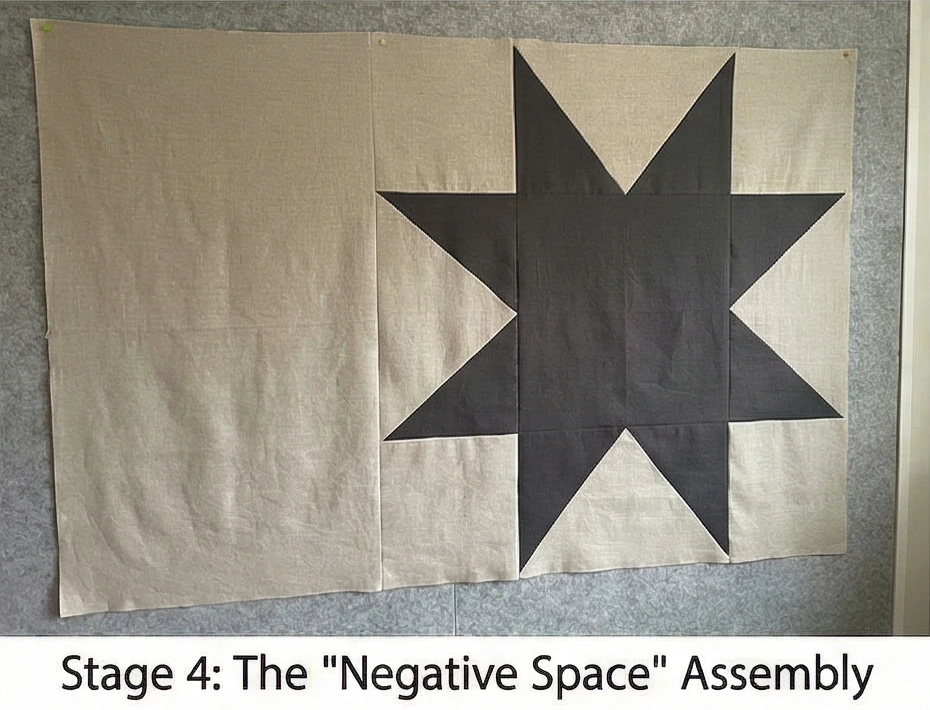
Step 4: The “Negative Space” Assembly
We need to frame the star to reach 90″ x 90″. We will offset the star.
- Top Panel: Cut a Linen piece 20″ x 36.5″. Sew to the top of the star block.
- Bottom Panel: Cut a Linen piece 34.5″ x 36.5″. Sew to the bottom of the star block.
- Result: You now have a vertical column approx 90″ tall.
- Side Panels:
- Cut a Linen panel 20″ x 90.5″. Sew to the left side.
- Cut a Linen panel 34.5″ x 90.5″. Sew to the right side.
- Design Note: This places the star slightly up and to the left, rather than dead center.
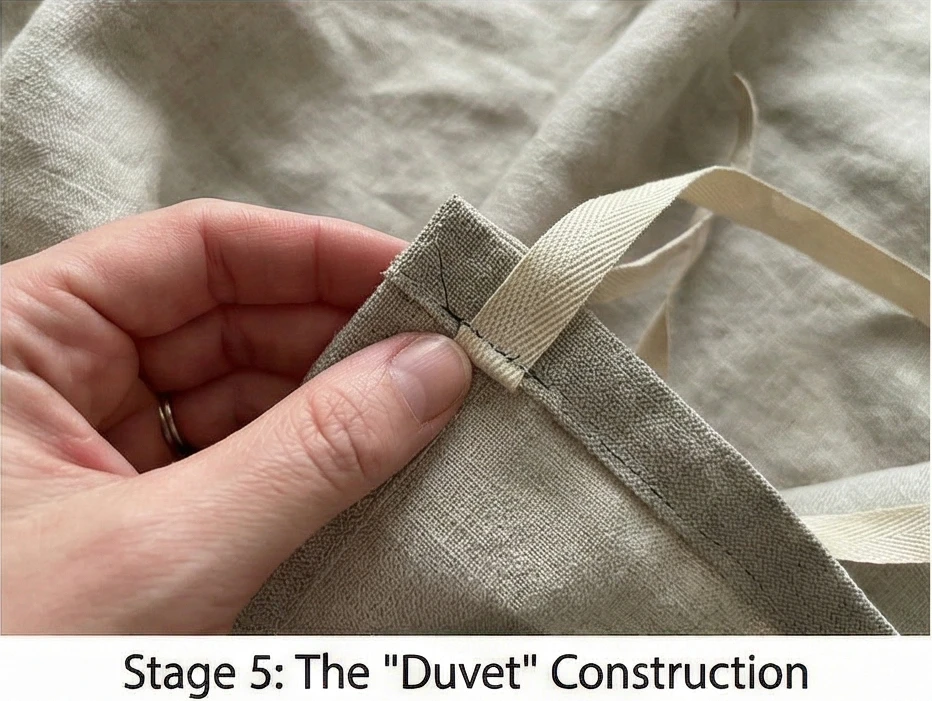
Step 5: The “Duvet” Construction (The Sack)
Unlike a quilt, we don’t use batting here.
- Backing: Create a backing sheet from your cotton/linen that measures 90.5″ x 90.5″.
- Ties: Sew 6-inch pieces of twill tape to the four inside corners of the Top and the Backing. (These will tie to your duvet insert to keep it from bunching up inside).
- Assembly: Place the Top and Backing Right Sides Together.
- Sew: Stitch around the perimeter with a 1/2 inch seam, leaving the entire bottom edge open.
- Finish: Serge or zig-zag the raw edges to prevent the linen from fraying in the wash.
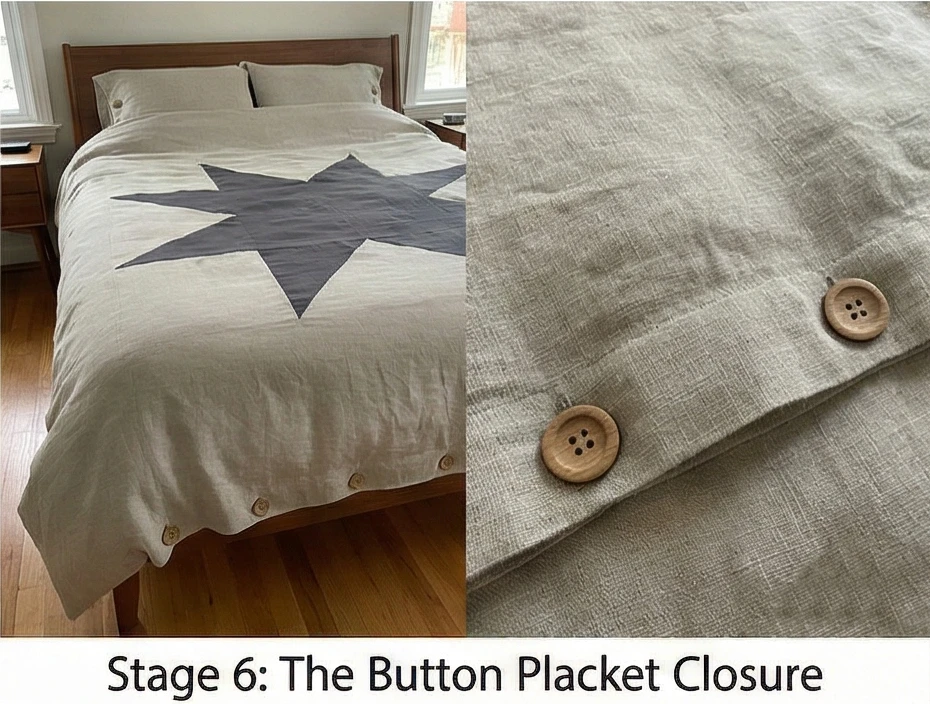
Step 6: The Button Placket Closure
The bottom edge needs to be closed.
- Hem: Fold the raw bottom edges of both the Top and the Backing under by 1 inch, then another 1 inch (double-fold). Stitch down to create a clean hem.
- Buttonholes: On the Top hem, sew 8 evenly spaced buttonholes.
- Buttons: On the Backing hem, sew the 8 wooden buttons.
- Turn: Turn the duvet cover right side out. Poke out the corners. Press crisp. Tie in your duvet insert and button it up.
Usability Note: Linen is the ultimate thermoregulator—it wicks moisture in summer and traps heat in winter. Because this design has no batting or complex quilting lines, it gets softer and drapier with every wash, eventually developing that coveted “lived-in” luxury look.
9. Elegant Star Quilted Sofa Throws for Year-Round Coziness
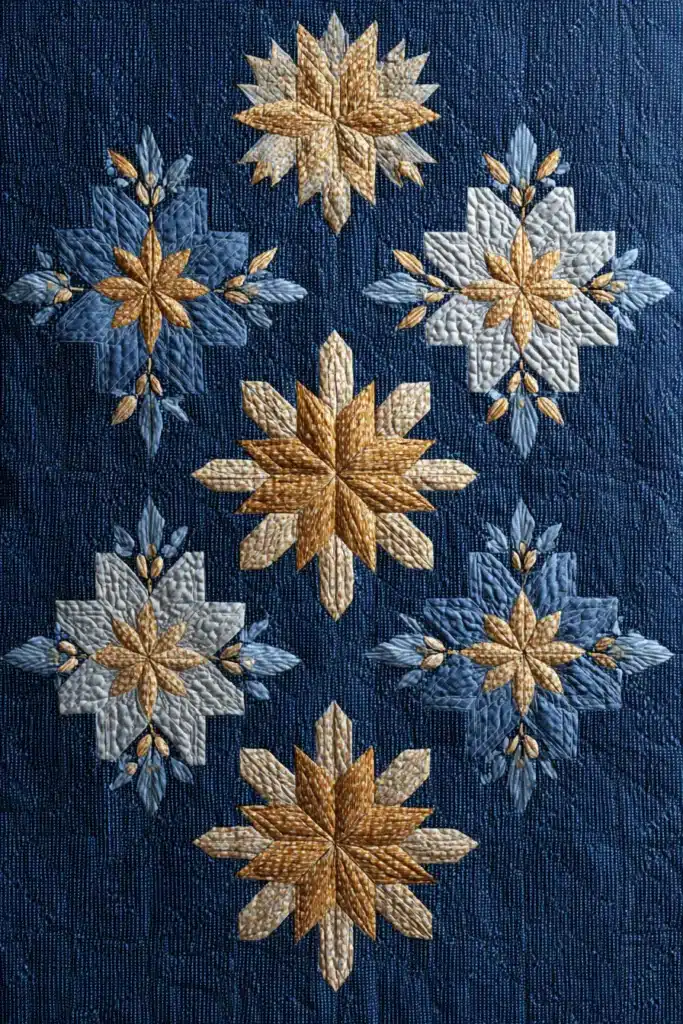
The “Pleiades” Seven Sisters Throw
The “Seven Sisters” pattern is a traditional marvel that historically represents the Pleiades star cluster. In Greek mythology, the Pleiades were the seven daughters of Atlas who were transformed into stars to save them from Orion’s pursuit. Traditionally, this block is difficult to piece by machine due to complex “Y-seams.” However, this guide uses a modern Appliqué Method. We will create seven distinct hexagonal star clusters and appliqué them onto a solid background. This technique eliminates the headache of inset seams and creates a clean, floating “constellation” look perfect for a sophisticated sofa drape.
Finished Dimensions: Large Sofa Throw, approximately 50″ x 70″.
Materials Needed:
- Fabric A (Background): 2.5 yards of Midnight Navy or Deep Indigo linen/cotton blend. (Linen adds texture and weight for draping).
- Fabric B (The Stars): 1/2 yard total of Shimmering Gold, Silver, or Champagne silk or lawn. (You can use scraps of 7 different low-volume prints for a “Liberty” look).
- Backing: 3.5 yards of cotton velveteen or flannel (for maximum coziness).
- Batting: High-loft Wool or Silk blend.
- Notions: Paper Hexagon Templates (1-inch sides), Fabric Glue Pen, Milliners Needles (for hand sewing) or Sewing Machine with blind hem stitch.
Cultural Backstory: The Pleiades cluster is significant in almost every ancient culture. In Norse mythology, they were Freyja’s hens; in Aboriginal Australia, they are part of Dreamtime stories. In quilting, the Seven Sisters block was historically a test of skill, often reserved for “Sunday Best” quilts.
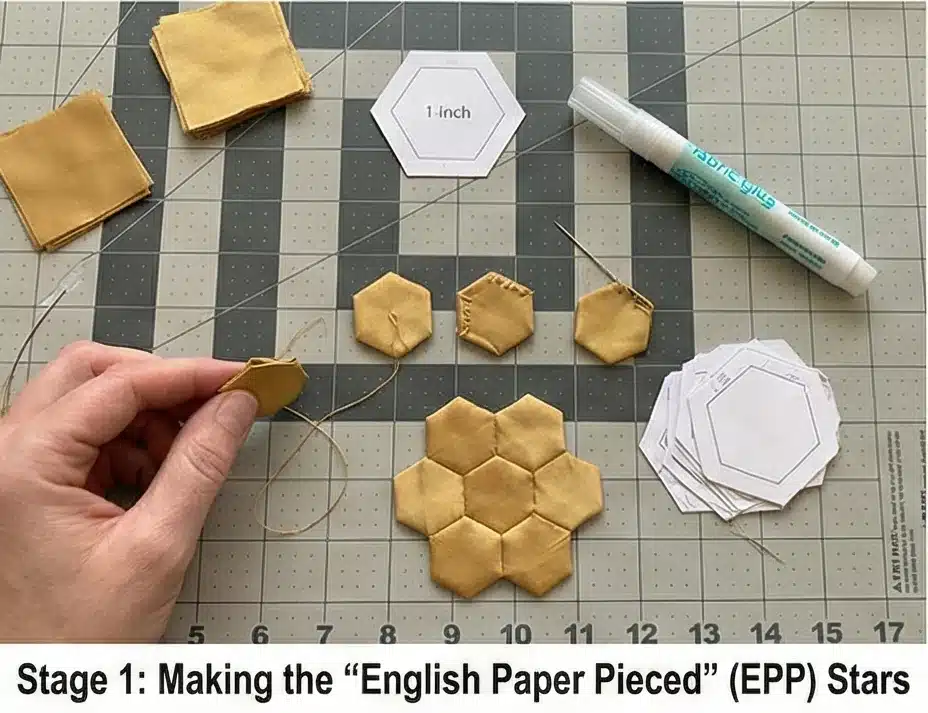
Step 1: Making the “English Paper Pieced” (EPP) Stars
We are making 7 Star Rosettes. This part is portable—perfect for doing while sitting on the sofa.
- Baste: Cut your Star Fabric into squares slightly larger than your paper templates.
- Place the 1-inch hexagon paper template on the back of the fabric.
- Use the glue pen to glue the fabric edges over the paper.
- Quantity: You need 7 hexagons to make 1 Star Rosette. (Total: 49 hexagons).
- Sew: Place two hexagons Right Sides Together. Whipstitch along one edge by hand using fine thread.
- The Rosette: Sew 6 hexagons around 1 center hexagon.
- Result: You now have a 6-pointed flower/star shape. Make 7 Rosettes.
- Press: Press the rosettes with a hot iron. Remove the paper templates carefully. Press again to ensure the edges stay turned under.
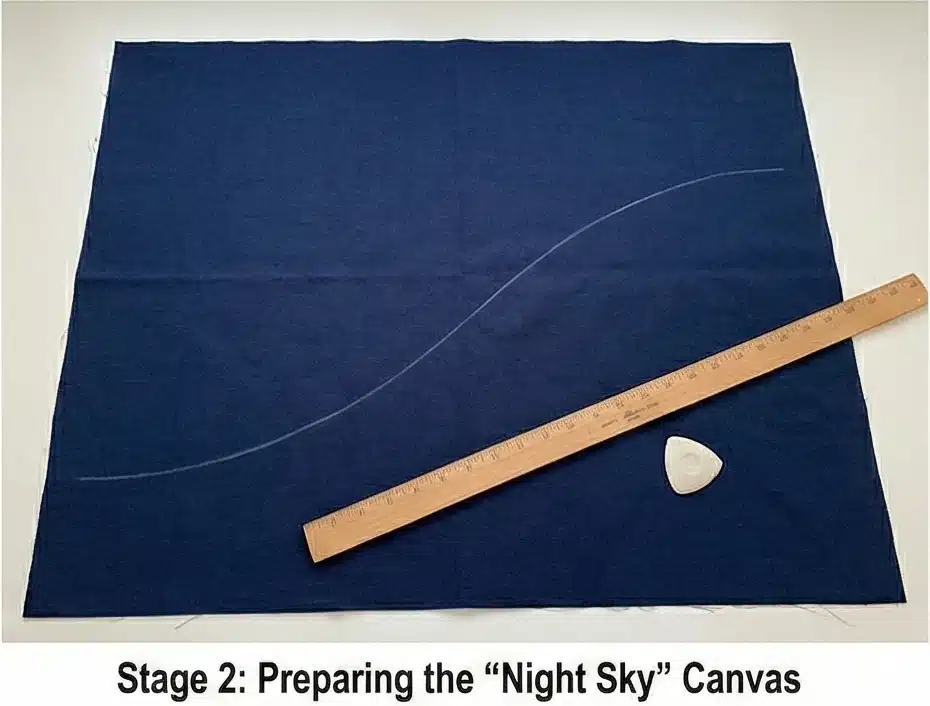
Step 2: Preparing the “Night Sky” Canvas
A single piece of fabric serves as the galaxy.
- Cut: Trim your Midnight Navy (Fabric A) background fabric to 50″ x 70″.
- Note: If your fabric isn’t wide enough, sew two lengths together and press the seam open. The appliqué will likely cover the seam.
- Marking: Fold the background fabric in quarters to find the center.
- Using chalk, lightly mark a diagonal line or a gentle “S” curve across the fabric to guide your placement.
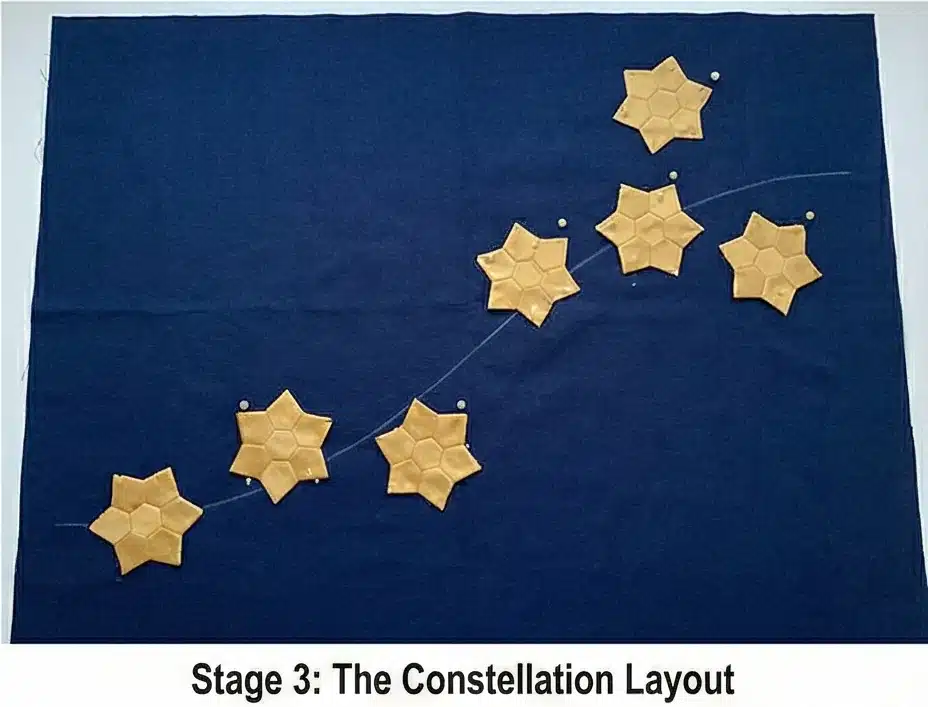
Step 3: The Constellation Layout
Arranging the stars for elegance.
- Placement: Lay the background on the floor. Arrange the 7 Star Rosettes on the fabric.
- Classic: Cluster them in the center (one in the middle, six surrounding it).
- Modern: Scatter them in a diagonal drift from the top-left to the bottom-right, mimicking the Milky Way.
- Pin/Glue: Once you’re happy with the arrangement, use the fabric glue pen (or pins) to secure the stars to the background so they don’t shift.
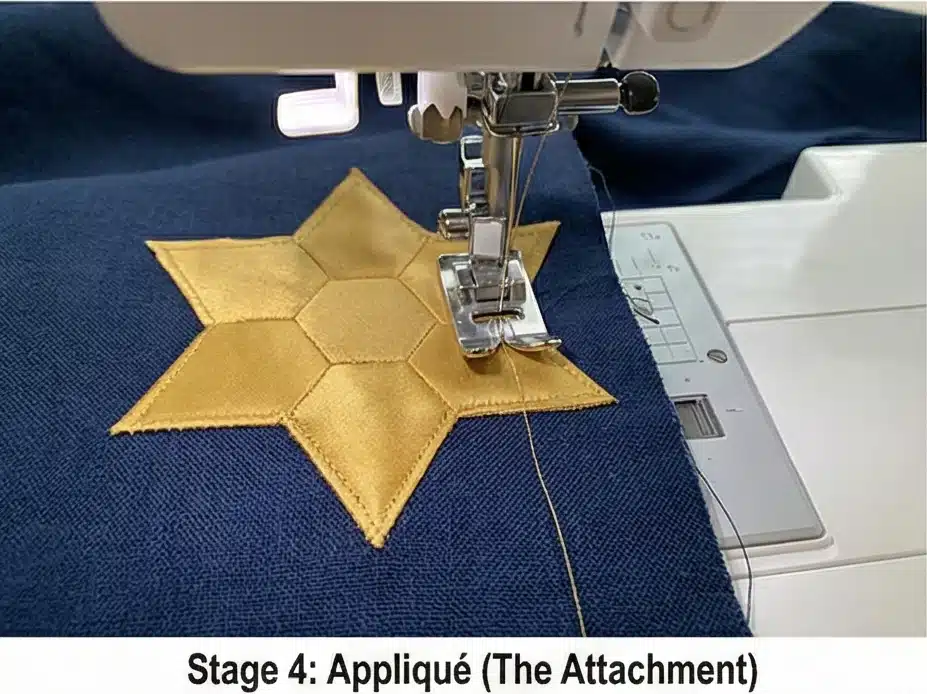
Step 4: Appliqué (The Attachment)
You can do this by hand or machine.
- Hand Option (Most Elegant): Use a blind stitch to sew the perimeter of each Star Rosette to the background. The stitches should be invisible.
- Machine Option (Most Durable): Set your machine to a very narrow Zig-Zag or Blind Hem stitch. Use a thread that matches the Star fabric perfectly. Stitch around the outer edges of the stars.
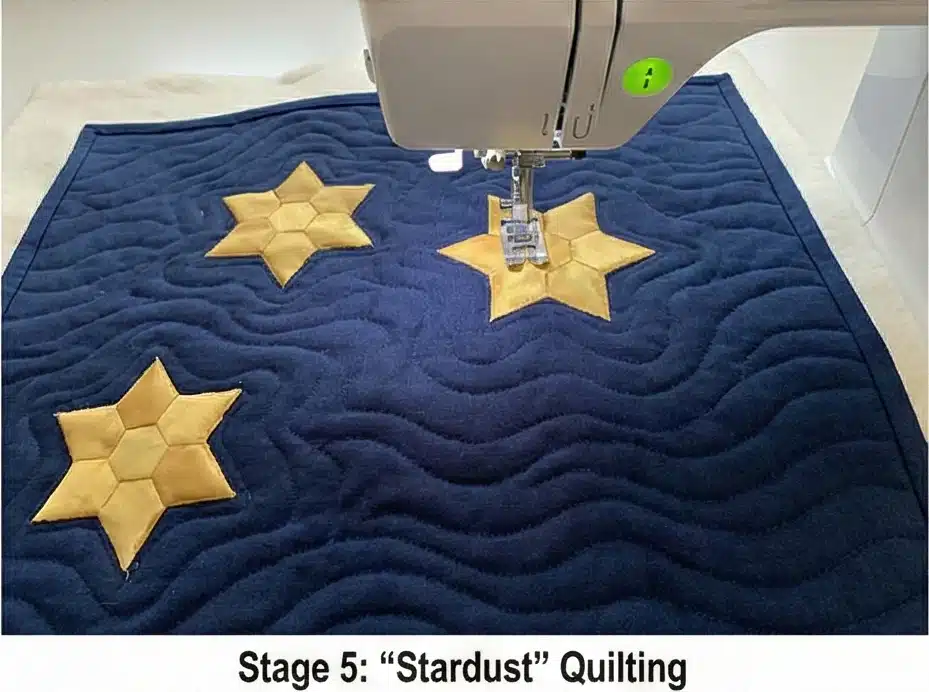
Step 5: “Stardust” Quilting
The quilting integrates the appliqué into the background.
- Baste: Sandwich the Backing + Batting + Top.
- Quilt:
- Inside the Stars: Quilt a small spiral or dot in the center hexagon of each star.
- The Sky: Quilt wavy, organic lines horizontally across the navy background. This mimics wind or “cosmic waves.” Avoid quilting over the stars themselves (except the center anchor); let them puff up.
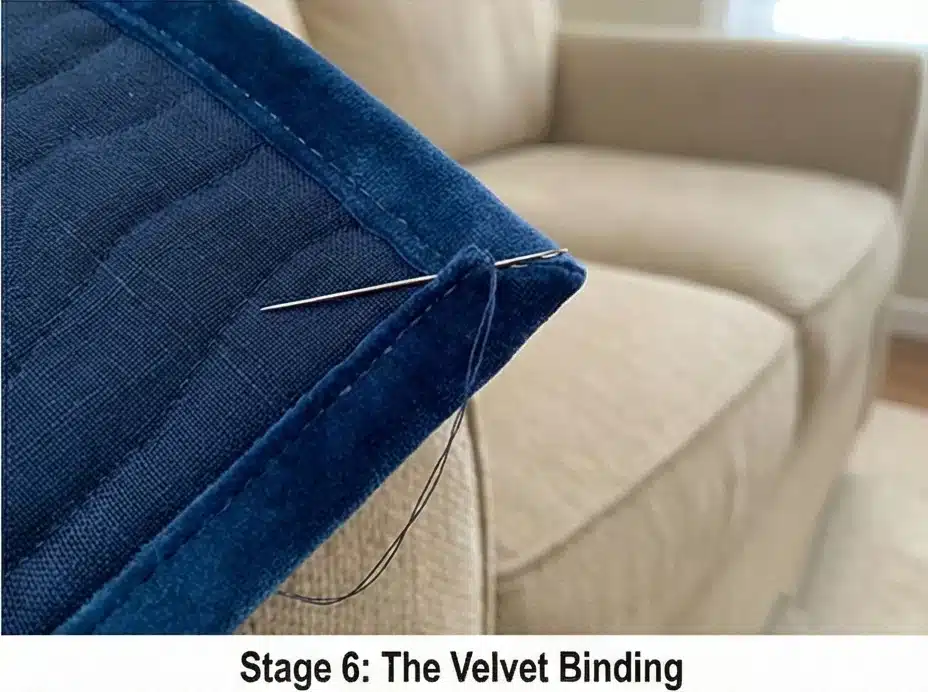
Step 6: The Velvet Binding
A tactile finish for a sofa throw.
- Cut: Cut 2.5-inch strips from the Backing Fabric (if using velveteen or flannel) or use a satin binding.
- Bind: Attach the binding.
- Touch: A velvet or satin edge gives the throw a luxurious, tactile finish that feels soothing against the skin when pulled up to the chin.
Usability Note: Using the appliqué method avoids the thousands of tiny seams found in a traditional Seven Sisters block. This makes the quilt significantly lighter and more durable for everyday use on a sofa.
10. Timeless Star Quilt Table Runners for Dining Room Charm
The “Double Aster” Star-in-a-Star Runner
The word “Aster” comes from the ancient Greek word for “Star.” In the garden, Asters are late-blooming flowers with dense layers of petals; in quilting, the “Double Aster” (or Double Sawtooth) block captures that layered beauty by placing a small star inside a larger one. This table runner uses this concentric design to create a stunning focal point. By using Sage Green for the outer star, Blush Pink for the inner star, and Cream for the background, you create a floral centerpiece that never wilts—perfect for elegant dining room tablescapes.
Finished Dimensions: Dining Table Runner, approximately 16″ x 64″.
Materials Needed:
- Fabric A (Background): 1 yard of Cream or Ivory Linen.
- Fabric B (Outer Star/Sage): 1/2 yard of Soft Sage Green.
- Fabric C (Inner Star/Blush): 1/4 yard of Dusty Rose or Gold.
- Backing: 1 yard of coordinating floral print.
- Batting: Thin Cotton Batting (Keep it thin so wine glasses sit flat).
- Notions: Rotary cutter, square ruler.
Cultural Backstory: In the Victorian “Language of Flowers,” the Aster symbolized patience and elegance. Quilters often used this “Star within a Star” motif to represent protection—the outer star guarding the inner light. It is a timeless design that bridges the gap between floral and geometric decor.
Step 1: Cutting the Components (For 1 Block)
We will make 4 Blocks. Each block is a 12-inch square containing two layers of stars.
For ONE Block (Repeat 4 times):
- The Center (Inner Star):
- Cut 1 square of Fabric C (Blush) measuring 3.5″ x 3.5″.
- Cut 4 squares of Fabric A (Background) measuring 2″ x 2″.
- Cut 4 squares of Fabric C (Blush) measuring 2″ x 2″.
- The Middle Frame:
- Cut 4 rectangles of Fabric A (Background) measuring 2″ x 3.5″.
- Cut 4 squares of Fabric A (Background) measuring 3.5″ x 3.5″ (Corners).
- The Outer Star Points:
- Cut 4 rectangles of Fabric A (Background) measuring 3.5″ x 6.5″.
- Cut 8 squares of Fabric B (Sage) measuring 3.5″ x 3.5″.
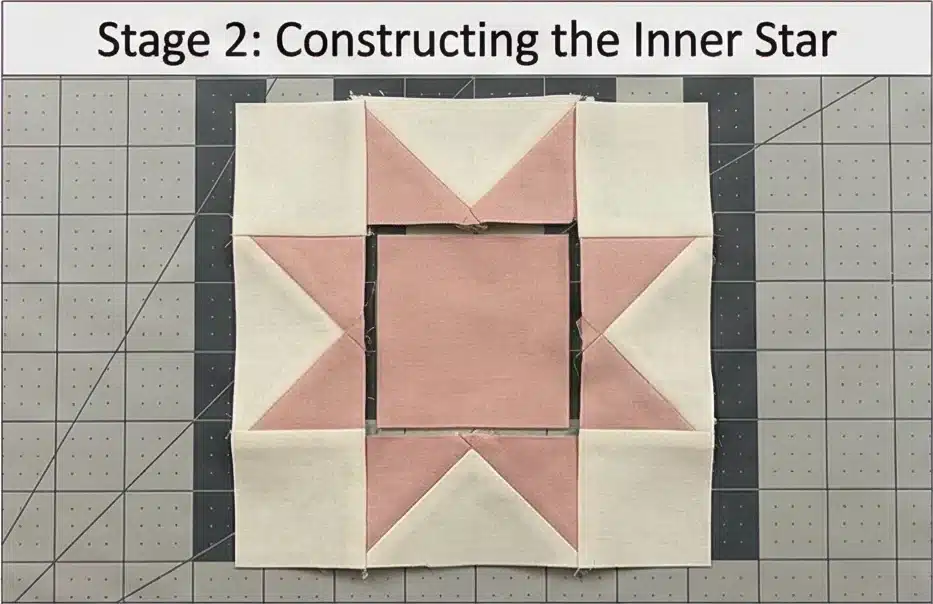
Step 2: Constructing the Inner Star (Small Sawtooth)
This is the “baby” star in the middle.
- Flying Geese: Use the 4 small Blush Squares (2″) and 4 small Background Rectangles (2″ x 3.5″).
- Technique: Use the “Stitch and Flip” method (place a square on a rectangle corner, sew a diagonal, trim, flip) to make 4 small Flying Geese units. Wait—Dimension check: For a 2×3.5 rectangle, squares should be 2″. Actually, usually, it’s 2×3.5 for a 3.5 center. Let’s adjust sizes for standard Flying Geese math.
- Correction for Standard Math: Let’s use a standard 3-inch finished inner star to fit inside.
- Revised Inner Star: Center Square 3.5″. Flying Geese: Background 2″ x 3.5″, Blush Squares 2″.
- Wait, 2″ square on 2″ x 3.5″ rectangle makes a 1.5″ x 3″ finished goose.
- Let’s stick to the simplest “Star in a Star” math:
- Inner Unit: 6.5″ unfinished.
- Center: 3.5″ Square.
- Inner Points: 4 Flying Geese (3.5″ x 2″ unfinished). Use 2″ squares on 2″ x 3.5″ rectangles.
- Inner Corners: 2″ Squares.
- Assembly: Sew the Inner Star as a 9-patch.
- Result: You have a 6.5″ x 6.5″ square block featuring the Blush Star.
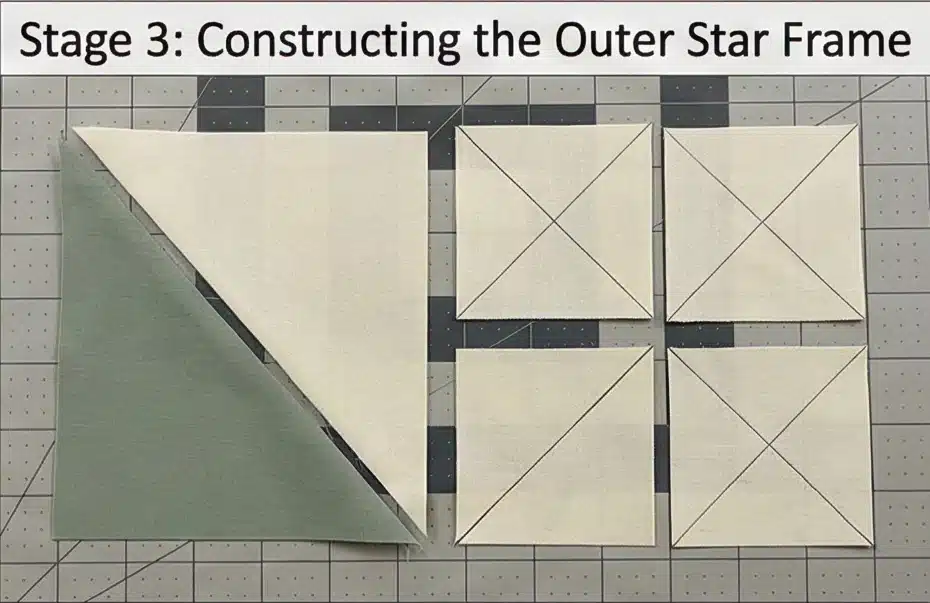
Step 3: Constructing the Outer Star Frame
Now we treat the entire Inner Star block as the “Center Square” for a bigger star.
- Large Flying Geese: Use the Sage Squares (3.5″) and Background Rectangles (3.5″ x 6.5″).
- Mark diagonal lines on the Sage squares.
- Sew one to the left side of the rectangle, trim, and press. Sew one to the right side.
- Result: 4 Large Sage Flying Geese units (measuring 3.5″ x 6.5″).
- Corner Squares: You already cut the 4 Background Squares (3.5″).
Step 4: The Final Block Assembly
- Top Row: Background Square – Large Sage Goose – Background Square.
- Middle Row: Large Sage Goose – [The Completed Inner Star Block] – Large Sage Goose.
- Bottom Row: Background Square – Large Sage Goose – Background Square.
- Sew: Stitch the rows together.
- Unfinished Size: 12.5″ x 12.5″.

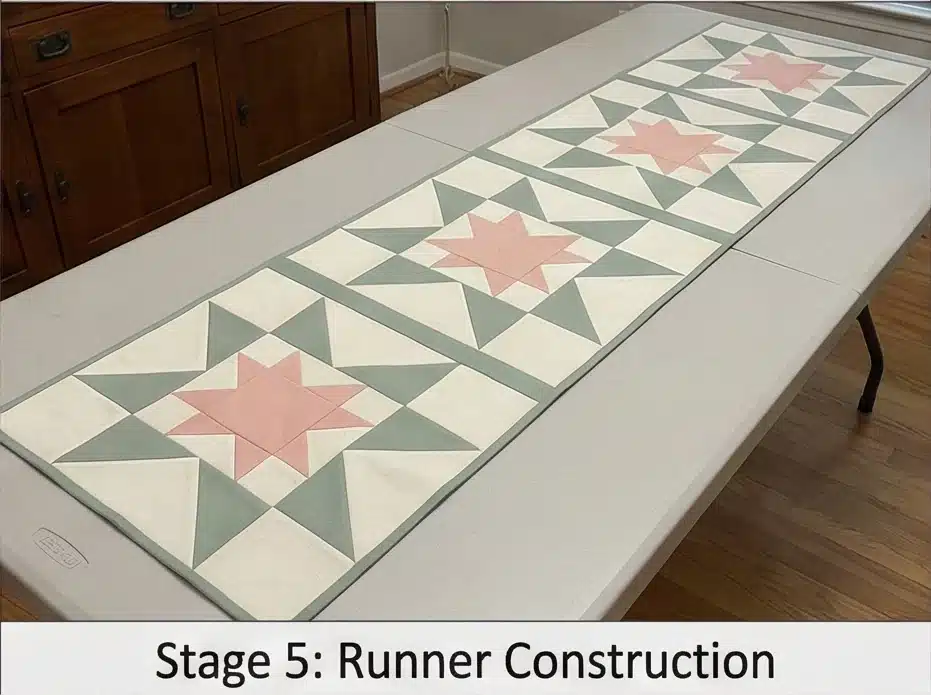
Step 5: Runner Construction
- Layout: Arrange your 4 blocks in a row.
- Option: Rotate them? No, keep them straight for a uniform floral look.
- Sashing (Optional): To extend the length and separate the blooms, cut 5 strips of Fabric B (Sage) measuring 12.5″ x 2″. Sew one between each block and on the ends.
- Border: Add a 2.5-inch border of Fabric A (Cream) around the entire runner to float the stars.
Step 6: “Petal” Quilting
- Baste: Sandwich the runner.
- Quilt:
- Inner Star: Quilt a small circle in the very center.
- Outer Star: Quilt straight lines radiating outward from the center, following the angles of the star points.
- Background: Quilt small loops or “stippling” to flatten the background and make the stars puff up (Trapunto effect).
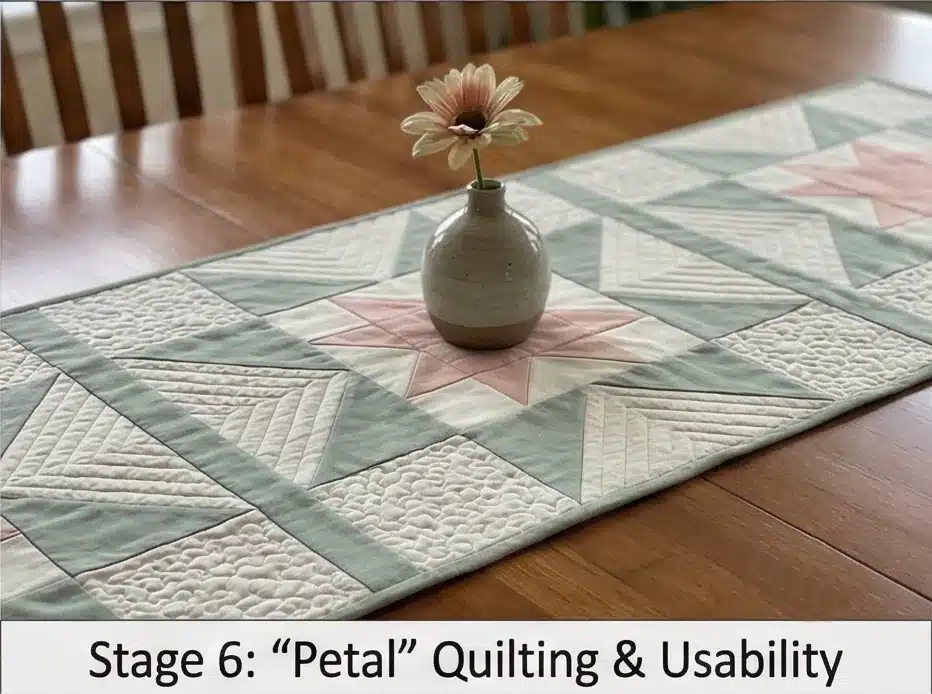
Usability Note: Because the center of this block is a flat 3.5″ square, it is the perfect spot to place a candlestick or a small vase. The design frames your table decor rather than making it wobble.
11. Chic Star Couch Cover Ideas for Stylish Living Rooms
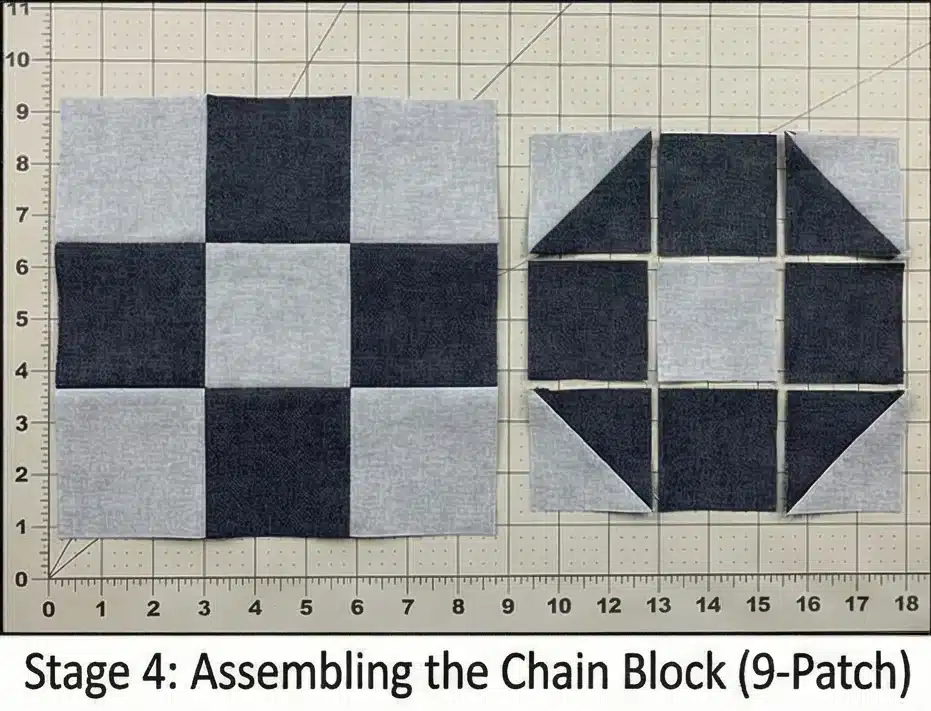
The “Milky Way” Monochrome Chain Cover
A standard quilt can slip off a leather or velvet sofa, but a “Couch Cover” is designed with weight and structure to stay put. This design uses the “Milky Way” pattern, which alternates Friendship Star blocks with Nine-Patch blocks. When pieced together, the stars appear to be linked by a diagonal chain, creating a sense of movement that mimics the galaxy. Using a monochromatic palette of Slate Grey, Charcoal, and Silver (perhaps in durable Denim or Chambray) makes it chic, modern, and sturdy enough to protect your furniture from pets and spills.
Finished Dimensions: Extra-Long Sofa Protector, approximately 70″ x 100″. (This length allows you to tuck the quilt deep into the cushions and drape it over the back).
Materials Needed:
- Fabric A (Dark/Background): 4 yards of Slate Blue Denim or Heavy Cotton Canvas.
- Fabric B (Light/Stars & Chains): 3 yards of Silver/Light Grey Chambray.
- Backing: 6 yards of Flannel (The friction of flannel helps the cover grip the sofa fabric so it doesn’t slide off).
- Batting: Low-loft Cotton (heavy but flat).
- Thread: Dove Grey.
- Notions: Rotary cutter, 6″ x 24″ ruler.
Cultural Backstory: The “Milky Way” (Via Lactea) has inspired makers for centuries. In quilting lore, “Chain” quilts represented continuity and the path of life. By linking the stars together, this pattern suggests that no star shines alone—a fitting sentiment for a living room where family gathers.
Step 1: Cutting the Components
We will make 35 Star Blocks and 35 Chain Blocks (Set 7 wide x 10 long).
For the Star Blocks (Friendship Stars):
- From Fabric A (Dark): Cut 140 squares (3.5″). Cut 70 squares (4″).
- From Fabric B (Light): Cut 35 squares (3.5″). Cut 70 squares (4″).
For the Chain Blocks (9-Patches):
- From Fabric A (Dark): Cut 140 squares (3.5″).
- From Fabric B (Light): Cut 175 squares (3.5″).
Step 2: Making the Star Points (HSTs)
The points of the Friendship Star.
- Pair: Take the 4″ Dark squares and 4″ Light squares. Place them Right Sides Together.
- Mark & Sew: Draw a diagonal line. Sew 1/4 inch on both sides. Cut. Press toward Dark.
- Trim: Trim all Half-Square Triangles (HSTs) to 3.5″ x 3.5″.
- Quantity: You need 140 HSTs.
Step 3: Assembling the Friendship Star Block
- Top Row: Dark Square – HST (Light point in) – Dark Square.
- Middle Row: HST (Light point in) – Light Square (Center) – HST (Light point in).
- Bottom Row: Dark Square – HST (Light point in) – Dark Square.
- Sew: Join rows.
- Result: A dark block with a silver star. Unfinished size 9.5″.
Step 4: Assembling the Chain Block (9-Patch)
This block connects the stars diagonally.
- Layout: Arrange a 3×3 grid of 3.5″ squares.
- Corners: Light Squares.
- Center: Light Square.
- Mids: Dark Squares.
- Visual: It looks like a Light “X” or cross on a Dark background.
- Sew: Stitch into rows and join.
- Result: A 9-Patch block. Unfinished size 9.5″.
Step 5: The “Diagonal Path” Layout
Placement creates the illusion.
- Row 1: Star – Chain – Star – Chain – Star – Chain – Star.
- Row 2: Chain – Star – Chain – Star – Chain – Star – Chain.
- Repeat: Alternate these rows for all 10 rows.
- Effect: Because the corners of the Chain block match the points of the Star block, a diagonal “river” of silver light will emerge, connecting all the stars.

Step 6: Heavy-Duty Construction
- Borders: Add a wide 5-inch border of the Dark Denim fabric around the entire perimeter. This adds weight to the edges, helping the cover hang straight.
- Baste: Sandwich with the Flannel backing.
- Utility Quilting: For a couch cover, durability is key. Quilt a Diagonal Grid (Cross-Hatch) across the entire quilt, spaced 2 inches apart.
- Why: Dense quilting stiffens the fabric slightly, making it look more like upholstery and less like a blanket.

Usability Note: The choice of Denim and Flannel serves a dual purpose. The Denim side is tough enough for dog paws and jean rivets, while the Flannel side provides a non-slip grip on leather or velvet upholstery. It is machine washable and virtually indestructible.
12. Mosaic Star Quilt Ideas for Stylish Dining Table Centerpieces
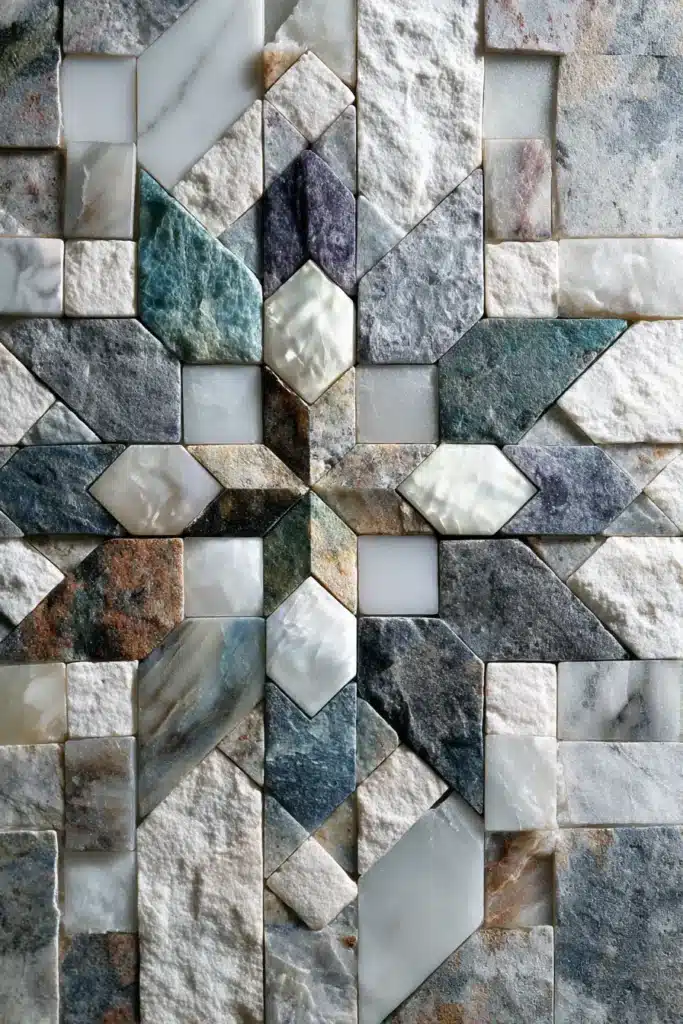
The “Ravenna Mosaic” Octagonal Star Centerpiece
In the Byzantine city of Ravenna, Italy, ancient basilicas are adorned with breathtaking mosaics composed of thousands of tiny glass tiles (tesserae). This centerpiece quilt captures that intricate, jewel-like beauty. It features a radiating Eight-Pointed Star (similar to a Lone Star but smaller) composed of small diamonds in rich, gemstone colors—Garnet, Gold, and Teal—bordered by a dark outline. The octagonal shape breaks away from the standard rectangular runner, making it a perfect geometric anchor for a round or square dining table.
Finished Dimensions: Octagonal Centerpiece, approximately 24″ diameter.
Materials Needed:
- Fabric A (Center Star/Gold): 1/4 yard of Metallic Gold or Ochre.
- Fabric B (Middle Ring/Garnet): 1/4 yard of Deep Red or Ruby.
- Fabric C (Outer Ring/Teal): 1/4 yard of Dark Teal or Peacock Blue.
- Fabric D (Background/Binding): 1/2 yard of Charcoal or Black (to mimic the grout lines of a mosaic).
- Backing: 1 yard of coordinating cotton.
- Batting: Very thin cotton or fusible fleece (table toppers must lie perfectly flat).
- Notions: Rotary cutter, ruler with 45-degree markings, starch.
Cultural Backstory: The eight-pointed star is a universal symbol found in Islamic tile work, Christian iconography, and Hindu geometry (the Star of Lakshmi). In mosaic art, this shape represents balance and regeneration. Using high-contrast “grout” lines (dark fabric) between bright colors is a technique called “glazing” in stained glass, which makes the colors vibrate.
Step 1: Starch and Strip Prep
To create the mosaic look without cutting hundreds of tiny diamonds individually, we use strip piecing.
- Starch: Heavily starch all fabrics until they are stiff. This is non-negotiable for diamond piecing.
- Cut Strips: Cut 1.5-inch wide strips from Fabrics A, B, and C.
- Note: Using 1.5″ strips will result in small, delicate diamonds (approx 1″ finished), creating a true mosaic effect.
Step 2: Creating the “Strata”
We are building the color gradation.
- Sew: Sew the strips together lengthwise in the following order:
- Strip 1: Fabric A (Gold)
- Strip 2: Fabric B (Garnet)
- Strip 3: Fabric C (Teal)
- Offset: When sewing, stagger the strips by about 1.5 inches (like stairs).
- Press: Press all seams open to reduce bulk. You now have a striped panel called a “Strata.”
Step 3: Cutting the Diamond Segments
Geometry creates the star blades.
- Trim: Lay your ruler on the Strata. Align the ruler’s 45-degree line with the bottom edge of the strip set. Trim off the selvage end at this angle.
- Cut: Moving in parallel to that first cut, cut segments 1.5 inches wide.
- Result: You will get angled strips made of 3 diamonds (Gold-Garnet-Teal).
- Quantity: You need 8 segments to make the star.

Step 4: Assembling the 8 Blades
- Layout: Arrange the 8 segments in a circle on your table with the Gold diamonds meeting in the center.
- The Points: You need to add triangular corners to turn these strips into diamonds.
- Cut 8 squares (2.5″) of Fabric D (Charcoal). Cut them in half diagonally.
- Sew these dark triangles to the corners of your diamond segments to square off the outer edges.
- Check: You should now have 8 wedge-shaped pieces (Blades).
Step 5: Joining the Star
The “Spinning Center” technique prevents a lump in the middle.
- Pairs: Sew the blades together into pairs. (Make 4 pairs).
- Match: Pin at every seam intersection to ensure the mosaic “tiles” align perfectly.
- Halves: Sew pairs together to make two half-stars.
- The Center: Sew the two halves together.
- Stop: Stop sewing exactly 1/4 inch from the center point.
- Press: Press the final seam open. Fan out the seam allowances on the back (they will look like a tiny pinwheel). This makes the center lie perfectly flat—crucial for a table centerpiece holding a vase.

Step 6: Finishing the Octagon
- Layer: Backing (face down) + Batting + Star Top (face up).
- Quilt: Keep it minimal. Stitch “in the ditch” (along the seam lines) around the star rings.
- Optional: Quilt straight lines radiating from the center to the tips.
- Bind: Use Fabric D (Charcoal).
- Since this is an octagon, the angles are 135 degrees (wide), not 90 degrees.
- Technique: Sew the binding to the front. When you reach a corner, stop 1/4 inch away, pivot, fold the binding back (miter), and continue. It is easier than a square corner because the angle is gentler!

Usability Note: Unlike a placemat, a centerpiece is purely decorative. However, with a dark background (Charcoal), this quilt is forgiving of candle wax drips or pollen from flower arrangements. The dense cotton weave protects the wood table underneath from hot dishes.
13. Folded Star Quilted Cushion Covers for Textured Decor
The “Somerset Star” 3D Folded Pillow
This pattern departs from flat patchwork. Also known as “Somerset Patchwork,” this technique involves folding fabric strips into triangles (prairie points) and layering them foundation-style to create a dense, three-dimensional starburst. The result is a thick, architectural textile that looks more like a sculpture than a cushion. Because of its thickness, it creates an incredibly supportive lumbar pillow, and the gradient layers offer a stunning “optical illusion” centerpiece for a neutral sofa.
Finished Dimensions: Textured Throw Pillow, 18″ x 18″.
Materials Needed:
- Foundation Fabric: 1 fat quarter of sturdy muslin or cotton canvas (this will be hidden inside).
- Fabric A (Center): 1 small scrap (4″ square).
- Fabric B, C, D, E (The Layers): 1/2 yard each of 4 gradient colors (e.g., Cream, Pale Pink, Rose, Burgundy).
- Note: You need lightweight cotton; heavy fabrics are too hard to fold.
- Backing: 1/2 yard for the envelope back.
- Notions: Fabric glue stick (essential!), ruler, iron, marking pen.
Cultural Backstory: While similar techniques appear in Asian “kanzashi” (folded flower) arts, Somerset Patchwork became popular in Victorian England. It was originally used to decorate the tops of keepsake boxes or footstools. Because it requires no batting (the folded fabric provides the padding), it was a clever way to create luxury items from small scraps of ribbon and silk.
Step 1: Preparing the Foundation Grid
Precision is key. If your grid is off, your star will be lopsided.
- Cut: Cut your Foundation Fabric (Muslin) to 19″ x 19″.
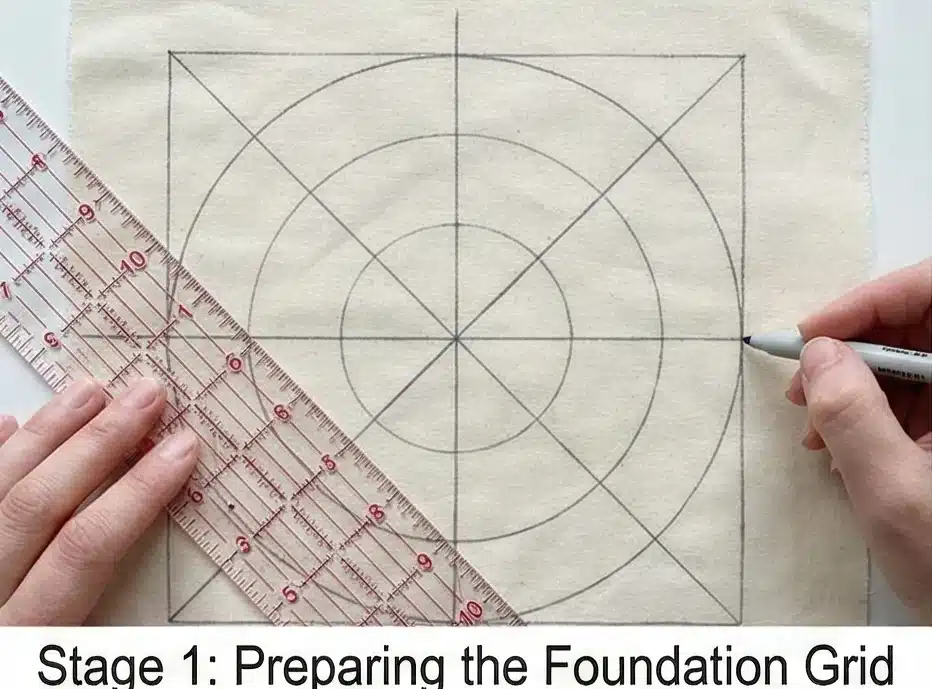
- Mark: Draw a horizontal and vertical line through the center to form a cross.
- Mark Diagonals: Draw diagonal lines from corner to corner to form an “X”. (You now have 8 radiating spokes).
- Concentric Rings: Starting from the center, use a compass or ruler to mark square or circular guidelines at 1-inch intervals, radiating outward. These lines tell you where to place the tips of your triangles.
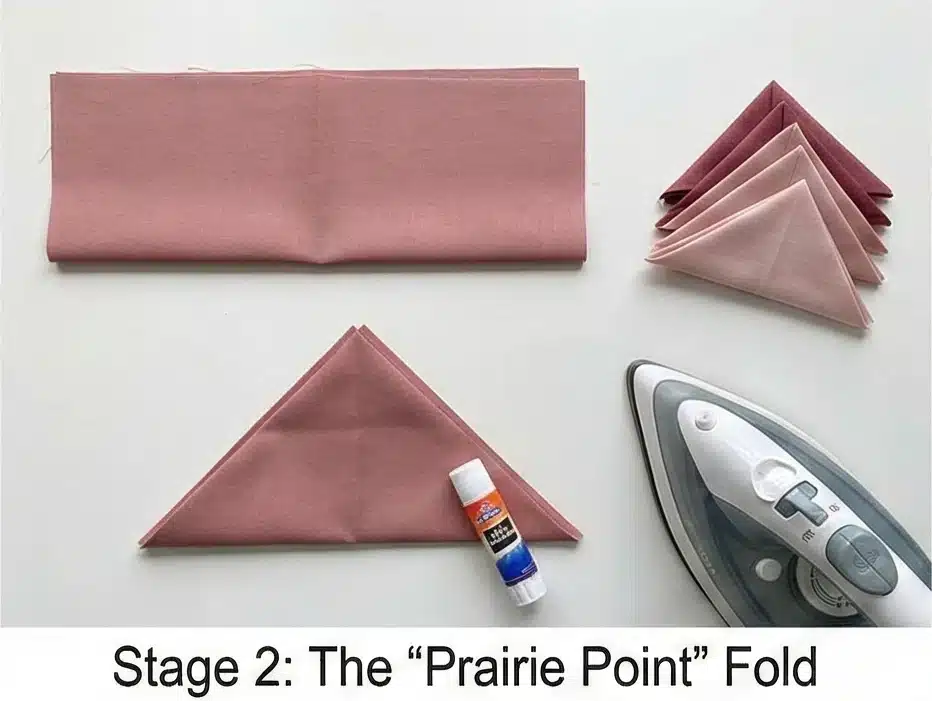
Step 2: The “Prairie Point” Fold
You will need to make roughly 40-50 folded triangles. Do this while watching a movie!
- Cut Rectangles: Cut your gradient fabrics into 2.5″ x 4.5″ rectangles.
- First Fold: Fold the rectangle in half width-wise (to create a 2.5″ x 2.25″ rectangle). Press. Open it back up.
- Triangle Fold: Fold the top left corner down to the center crease. Fold the top right corner down to the center crease.
- Result: You have a triangle shape with a raw edge at the bottom (like a paper airplane).
- Press: Press firmly. Use a dab of glue stick on the underside of the flaps to keep them closed.
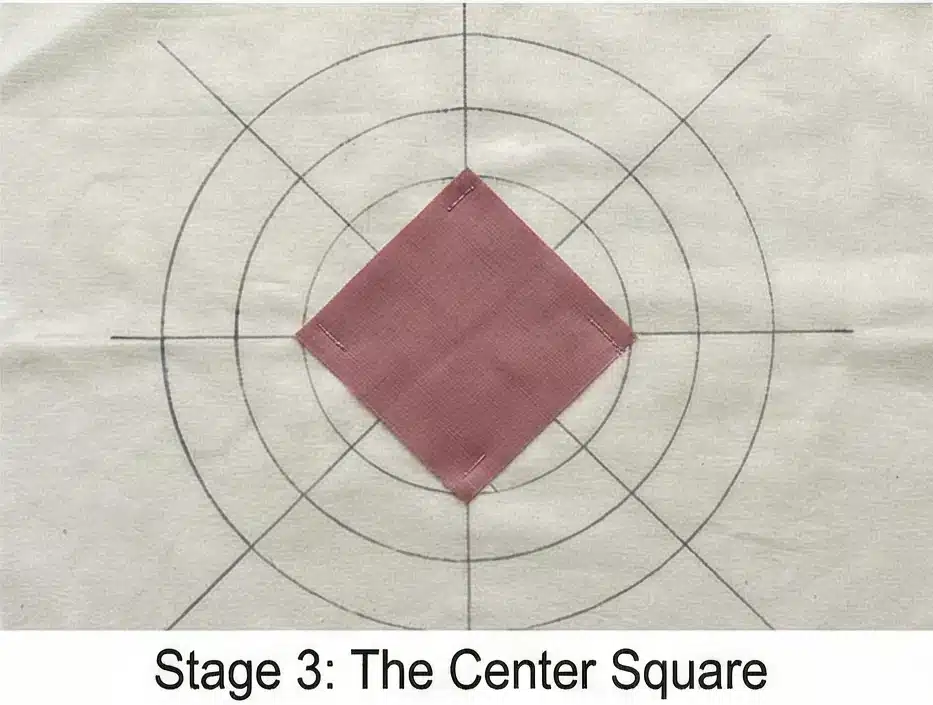
Step 3: The Center Square
- Cut: Cut a 4.5″ square from Fabric A.
- Press: Fold it in half twice to find the center.
- Place: Match the center of the square to the center of your Foundation Muslin.
- Orientation: Rotate it so the corners align with your diagonal grid lines (on point).
- Secure: Glue or stitch the edges down.
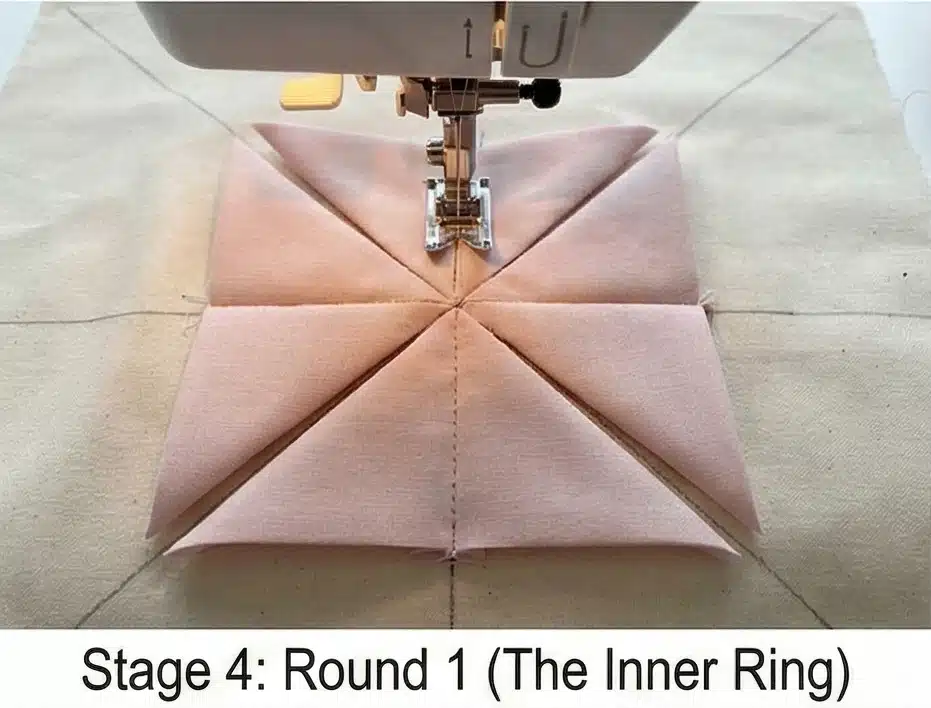
Step 4: Round 1 (The Inner Ring)
- Placement: Take 4 folded triangles of Fabric B.
- Align: Place the tips of the 4 triangles in the center of the square, aligned with the vertical and horizontal grid lines (N, S, E, W).
- Spacing: The tips should all meet perfectly in the middle.
- Stitch: Machine stitch across the raw bottom edge of the triangles (about 1/8 inch from the edge) to secure them to the foundation.
Step 5: Round 2 (The Corners)
- Placement: Take 4 more triangles of Fabric B.
- Align: Place these in the corners between the first four (NE, SE, SW, NW).
- Spacing: Move them slightly outward (about 3/4 inch from the center) so the tips of Round 1 are visible.
- Stitch: Stitch across the bottom raw edges.
- Check: You now have an 8-pointed star shape forming.
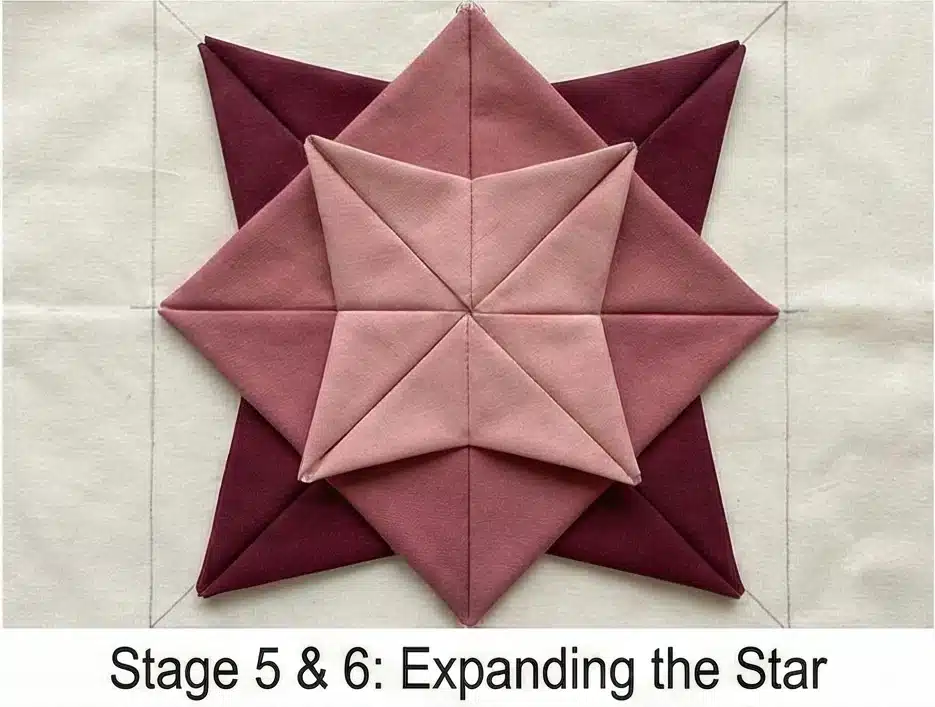
Step 6: Expanding the Star
Now we switch colors and move outward.
- Round 3: Switch to Fabric C. Place 8 triangles.
- Align the tips roughly 1 inch away from the previous row’s tips. Use your marked guidelines to keep the circle even.
- Rounds 4, 5, 6: Continue adding rounds, switching colors (Fabric D, E) as you move outward.
- Density: Placing rows closer together (1/2 inch spacing) creates a dense, spiky star. Placing them further apart (1 inch) creates a flatter, more open flower.
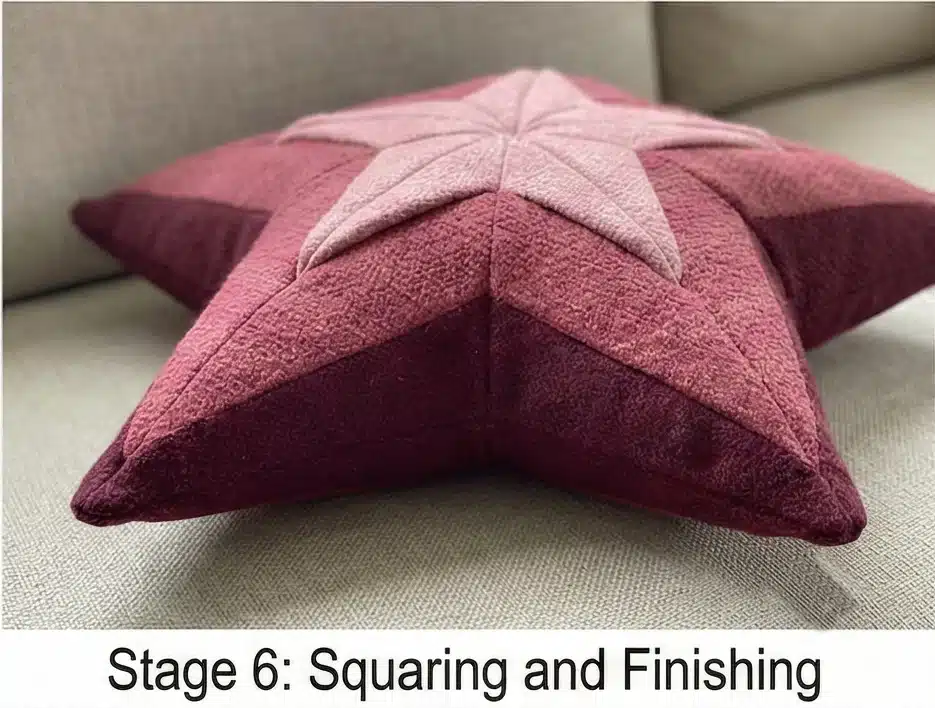
Step 7: Squaring and Finishing
- Stop: Stop layering when the star points reach about 2 inches from the edge of the muslin foundation.
- Baste: Sew a line around the perimeter of the foundation to flatten the raw edges of the final row.
- Trim: Trim the foundation square to 18.5″ x 18.5″.
- Finish: Sew a simple envelope backing to the cushion front. (Because the front is so thick, you do not need batting or quilting).
Usability Note: This cushion is surprisingly durable. The multiple layers of folded fabric create a dense, firm surface that resists sagging. However, because of the “pockets” created by the folds, it’s best to shake it out regularly to remove dust.
14. Reversible Star Quilt Designs for Versatile Living Room Throws

The “Gemini” Reversible Variable Star Throw
A true reversible quilt (or “double-sided” quilt) works twice as hard for your decor. It lets you change the room’s mood by flipping the blanket. Side A features the classic Variable Star pattern in a high-contrast layout (perfect for a traditional or farmhouse look), while Side B features a modern Horizontal Bar design using the same fabrics (ideal for a minimalist or contemporary vibe). Using high-quality Washed Linen on both sides makes the quilt heavy, drapey, and incredibly luxurious.
Finished Dimensions: Square Throw, 60″ x 60″.
Materials Needed:
- Fabric A (Dark/Navy): 4 yards of Midnight Navy Linen.
- Fabric B (Light/Oatmeal): 4 yards of Natural Oatmeal Linen.
- Batting: Bamboo Blend (Bamboo has a heavy drape and resists bearding, which is crucial when dark and light fabrics are mixed).
- Thread: Dark Navy (or a neutral Taupe that blends with both).
- Notions: Rotary cutter, 6.5″ x 24″ ruler.
Cultural Backstory: The Variable Star is one of the oldest block patterns, dating back to early American quilting (sometimes called “Martha Washington’s Star”). Its name comes from its adaptability—by simply swapping the placement of light and dark fabrics, the star can look completely different. This “Gemini” version embraces that duality by offering two distinct personalities in one quilt.
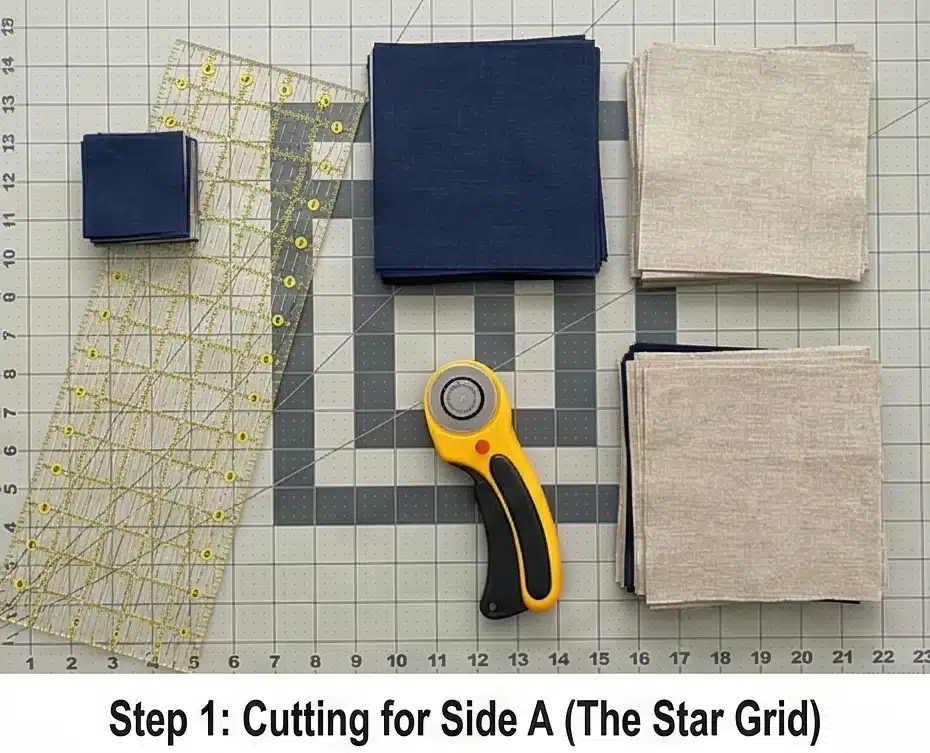
Step 1: Cutting for Side A (The Star Grid)
Side A consists of 9 Large Star Blocks arranged in a 3×3 grid. Each block finishes at 20 inches.
For 9 Star Blocks:
- From Fabric A (Navy – The Stars):
- Cut 36 squares measuring 5.5″ x 5.5″ (Star Points/Flying Geese).
- Cut 9 squares measuring 10.5″ x 10.5″ (Centers).
- From Fabric B (Oatmeal – The Background):
- Cut 36 squares measuring 5.5″ x 5.5″ (Star Points/Flying Geese).
- Cut 36 squares measuring 5.5″ x 5.5″ (Corners).
- Cut 36 rectangles measuring 5.5″ x 10.5″ (Flying Geese bases).
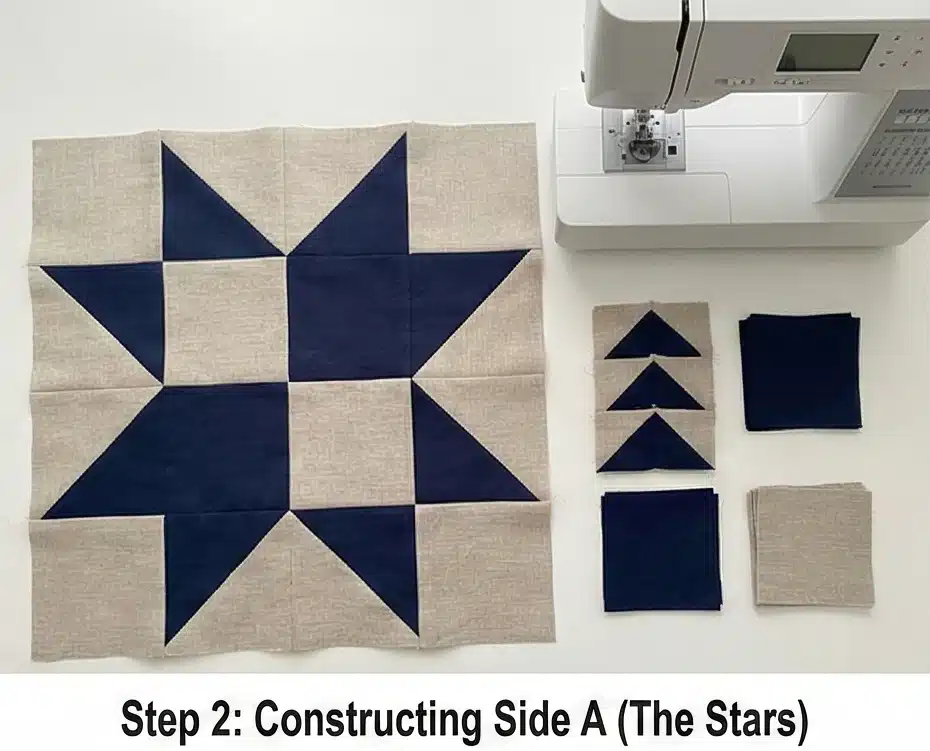
Step 2: Constructing Side A (The Stars)
We built 9 massive blocks.
- Make Flying Geese:
- Take the Fabric A (Navy) 5.5″ squares and Fabric B (Oatmeal) rectangles.
- Use the “Stitch and Flip” method to sew Navy triangles onto the corners of the Oatmeal rectangles.
- Yield: You need 36 Flying Geese units (Oatmeal background with Navy points).
- Assemble the Block (9-Patch Style):
- Row 1: Oatmeal Corner – Goose (Point Down) – Oatmeal Corner.
- Row 2: Goose (Point Right) – Navy Center Square – Goose (Point Left).
- Row 3: Oatmeal Corner – Goose (Point Up) – Oatmeal Corner.
- Join: Stitch the rows together. Make 9 Blocks.
- Top Assembly: Sew the 9 blocks together into a 3×3 grid.
- Result: Side A is complete (approx 60.5″ square).
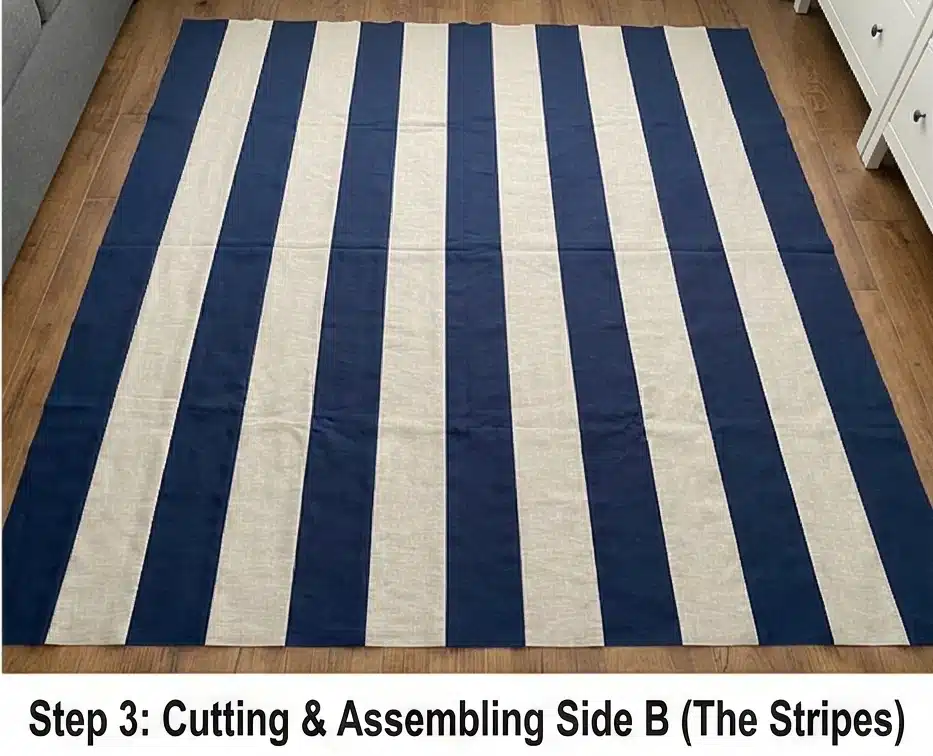
Step 3: Cutting & Assembling Side B (The Stripes)
Side B uses the remaining fabric to create a modern, graphic look.
- Cut Strips:
- From the remaining Navy Linen, cut 5 strips measuring 6.5″ x 60.5″.
- From the remaining Oatmeal Linen, cut 5 strips measuring 6.5″ x 60.5″. (You may need to piece WOF strips together to get the 60.5″ length).
- Assembly: Sew the strips together lengthwise, alternating colors (Navy-Oatmeal-Navy-Oatmeal).
- Result: A bold, striped “Whole Cloth” backing that looks like a modern rug.
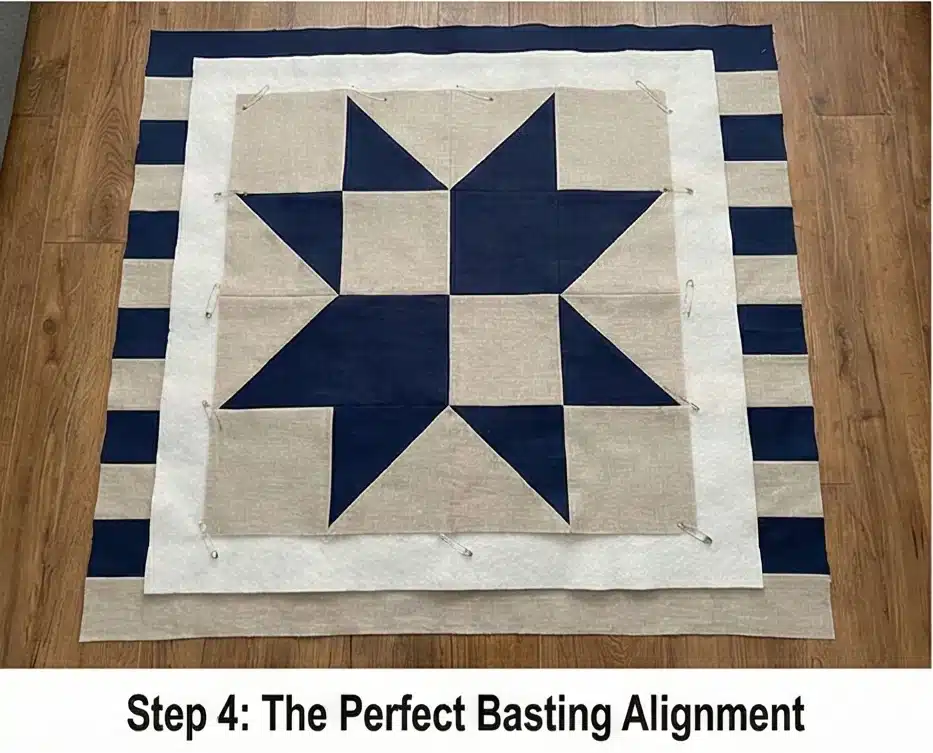
Step 4: The Perfect Basting Alignment
Since both sides have geometric lines, alignment is tricky.
- Tape: Tape Side B (Stripes) face down on the floor. Keep the lines perfectly straight.
- Layer: Add Batting.
- Top: Lay Side A (Stars) on top.
- Alignment Trick: Try to align the center star of Side A with the center stripe of Side B. Use many safety pins to prevent shifting.
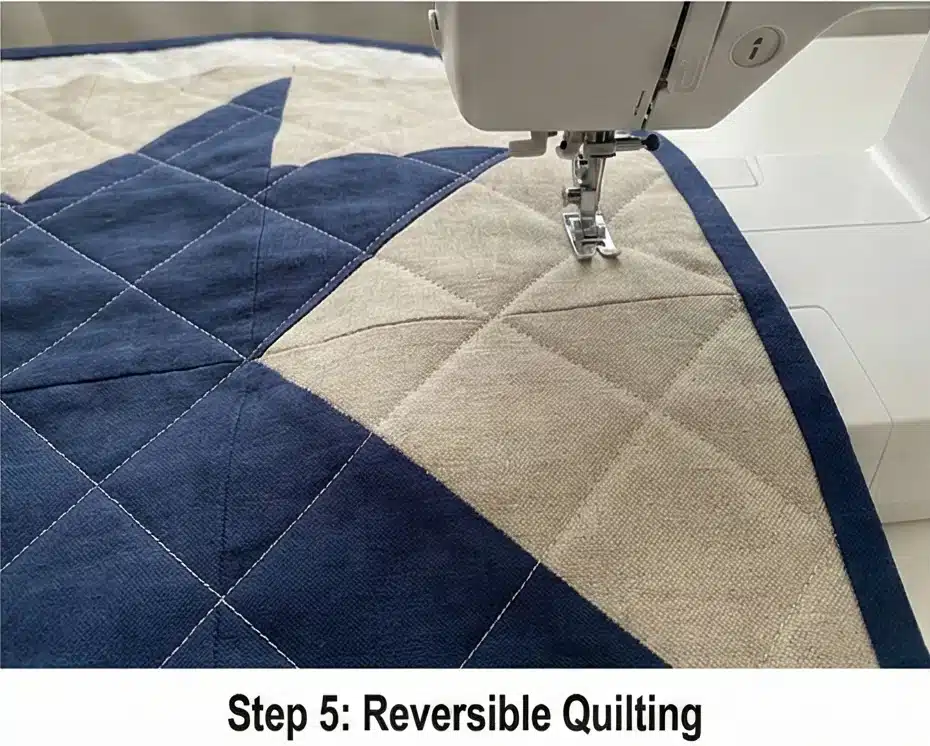
Step 5: Reversible Quilting
You need a quilting pattern that looks good on stars AND stripes.
- The Pattern: Choose a large Diamond Grid (Cross-Hatch).
- Execution: Quilt diagonal lines spaced 3 to 4 inches apart.
- Why: On Side A, the diagonal lines will cut through the stars, enhancing their points. On Side B, the diagonals will contrast beautifully against the horizontal stripes, adding dynamic tension.
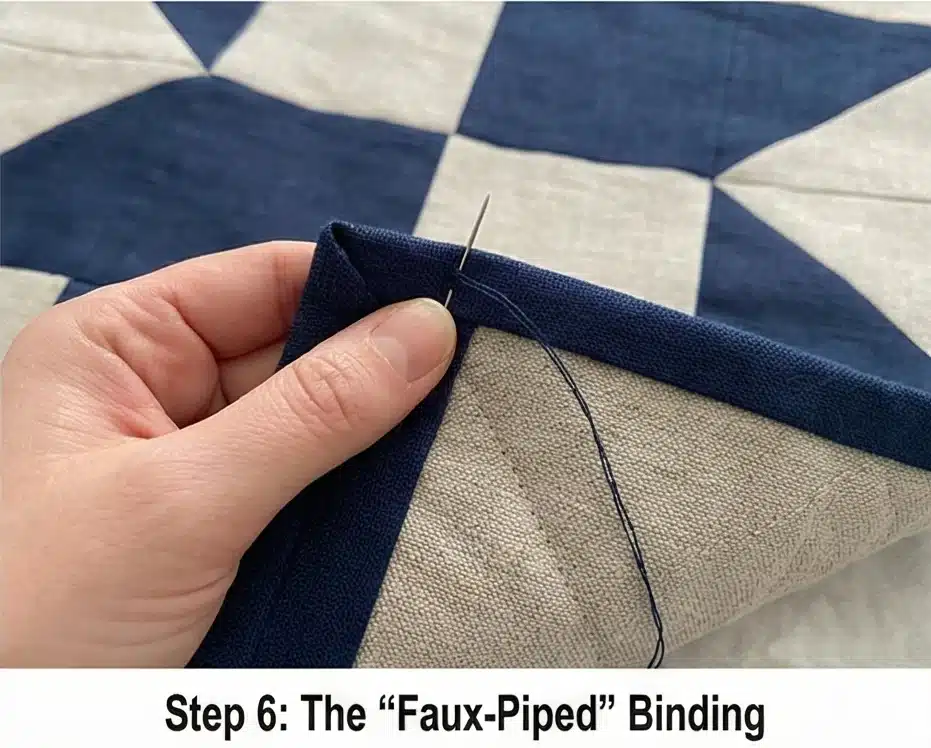
Step 6: The “Faux-Piped” Binding
A reversible quilt needs a binding that frames both sides.
- Cut: Cut 2.5-inch strips of Fabric A (Navy).
- Bind: Attach the binding to the Side B (Stripe) side first by machine.
- Finish: Fold it over to Side A (Star) and hand-stitch it down.
- Visual: This creates a solid Navy frame. On the Star side, it blends with the star points. On the Stripe side, it cleanly caps the ends of the stripes.
Usability Note: Linen is heavier than quilting cotton. This throw will have significant “weighted blanket” properties (approx 4-5 lbs), making it exceptional for anxiety relief or cozy winter napping.
15. Starburst Quilt Patterns for Vibrant Armchair Covers
The “Solaris” String-Pieced Starburst Throw
An armchair cover needs to be both durable enough to sit on and beautiful enough to serve as decor. The “Solaris” pattern achieves both by using Foundation String Piecing. This technique involves sewing thin strips of vibrant fabric onto a muslin base. The result is a heavy, stable quilt block with “rays” of color exploding from the center like a supernova. It is the perfect way to use up bright scraps (silks, velvets, or cottons) to create a jewel-toned accent for a neutral reading chair.
Finished Dimensions: Armchair Throw / Small Lap Quilt, 50″ x 50″.
Materials Needed:
- Fabric A (The Rays): A large bag of vibrant 2-inch wide strips. (Mix textures: cotton, silk, velvet, linen in jewel tones like Ruby, Amethyst, Emerald, and Gold).
- Fabric B (Background Corners): 1.5 yards of Charcoal or Black (to make the colors pop).
- Foundation: 2 yards of inexpensive muslin or thin cotton (this stays inside the quilt).
- Backing: 2 yards of cotton.
- Batting: Thin cotton (the top is already thick due to the foundation).
- Notions: Rotary cutter, large square ruler, 60-degree triangle ruler (or template plastic).
Cultural Backstory: “String Quilts” were born of necessity in the 1930s Depression era, using the tiniest slivers of fabric too narrow for standard patchwork. However, by arranging these scrappy strips into a Starburst (or Spiderweb) layout, the humble scraps are transformed into a kaleidoscope of light, proving that creativity thrives even in scarcity.
Step 1: Creating the Foundation Wedges
We are building a large hexagon-shaped star made of 6 large triangles.
- Template: Cut a large 60-degree equilateral triangle from your Muslin foundation fabric.
- Size: The sides of the triangle should measure 18 inches.
- Quantity: Cut 6 Muslin Triangles.
- Center Line: Fold each muslin triangle in half vertically and crease it to find the center line. This is your guide.
Step 2: The “Ray” Construction
This is basically “paint by numbers” with fabric.
- The Central Ray: Place a strip of your brightest color (e.g., Gold) right side up along the center crease of the muslin triangle. Pin it in place.
- Adding Strips: Place a second strip (e.g., Ruby) right side down on top of the Gold strip.
- Sew: Stitch along the edge with a short stitch length (1.5mm).
- Flip: Open the Ruby strip and press it flat.
- Repeat: Continue adding strips to both sides of the center ray, working outward to the edges of the triangle.
- Variety: Vary the width of the strips for a dynamic “burst” look.
- Cover: Ensure the fabric strips extend past the edges of the muslin triangle.
Step 3: Trimming the Wedges
- Flip: Turn the pieced triangle over so the muslin side is facing up.
- Trim: Using the muslin as your guide, trim off all the excess fabric tails hanging off the edges.
- Result: You now have 6 perfect 60-degree triangles that look like colorful striped wedges.
Step 4: Assembling the Starburst
Watch the explosion happen.
- Layout: Arrange the 6 wedges in a circle (hexagon) on the floor.
- Orientation: The points of the triangles (where the strips started) should all meet in the center.
- Halves: Sew the triangles together into two halves (3 triangles each).
- Pressing: Press seams open to reduce the bulk at the center point.
- The Center: Sew the two halves together.
- Tip: This center intersection is thick (6 layers of foundation + fabric). Use a “Hammer” or mallet to gently tap the center seam flat before sewing. Go slowly!
Step 5: Squaring the Throw
Currently, you have a hexagon. We need a square throw.
- Corner Triangles: You need to fill the 6 corners of the hexagon to make a rectangle/square.
- Cut: Cut Half-Hexagon or Large Triangle shapes from your Charcoal Background (Fabric B) to fill the gaps around the star.
- Sew: Attach these background pieces to the sides of the starburst.
- Trim: Square the entire quilt top to 50″ x 50″.
Step 6: “Supernova” Quilting
Use the quilting to emphasize the speed and light of the design.
- Baste: Sandwich the heavy top with thin batting and backing.
- Quilt:
- The Rays: Stitch “in the ditch” between every 3rd or 4th strip. You don’t need to quilt every strip because the foundation holds it together.
- The Center: Quilt a spiral in the very center to flatten the bulky intersection.
- Bind: Finish with a Bias Binding in the same Charcoal color as the background, for the “floating star” effect.
Usability Note: This quilt is heavy. The foundation layer adds significant weight and stability, making it drape beautifully over the arm or back of a chair without sliding off. It acts almost like upholstery, protecting the chair beneath it.
16. Scrappy Star Quilt Throws for Rustic Living Room Comfort
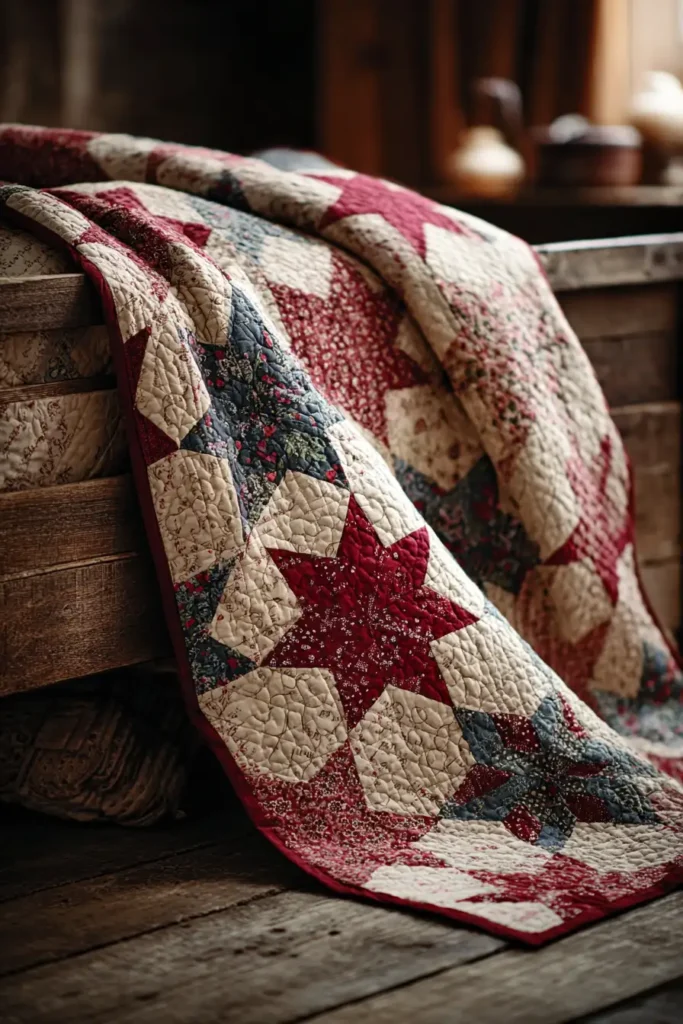
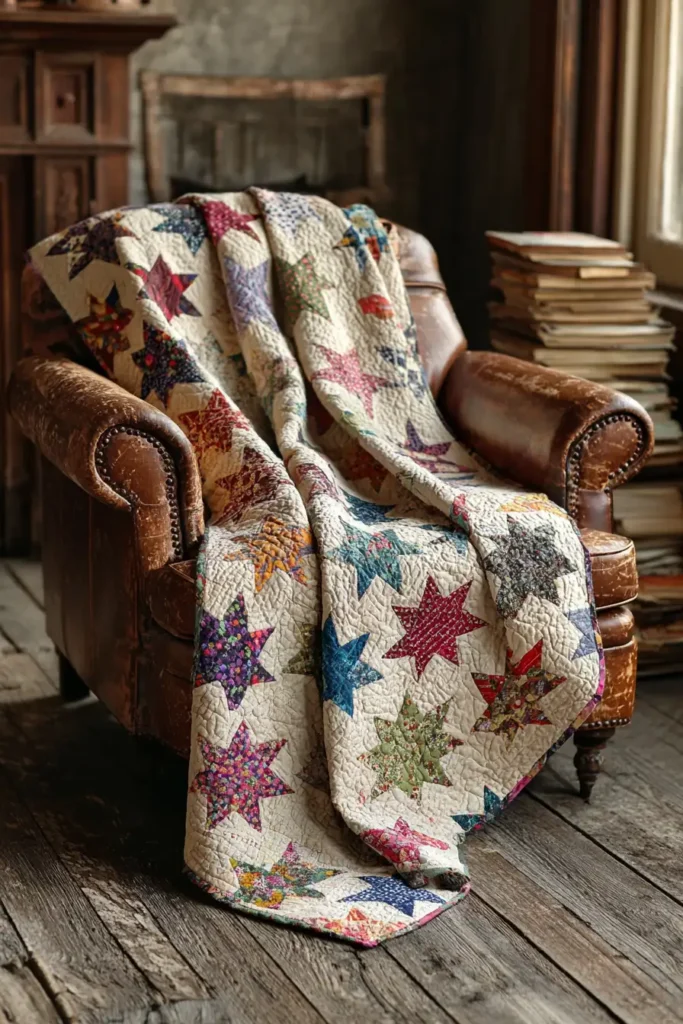
The “Homestead Hearth” Scrappy Variable Star Throw
The Variable Star (also known as the “Sawtooth Star”) is the ultimate scrap-buster pattern. It embraces the chaotic beauty of a “make-do” aesthetic found in rustic cabins and farmhouses. By using a unified background color (like Unbleached Muslin or Flax Linen) but allowing the stars themselves to be made from hundreds of different scraps—flannels, shirtings, florals, and plaids—you create a quilt that feels inherited, warm, and deeply comforting. It’s perfect for draping over a worn leather armchair near a wood stove.
Finished Dimensions: Large Lap Throw, approximately 60″ x 72″.
Materials Needed:
- Fabric A (The Background): 3.5 yards of Natural Unbleached Muslin or Tan Linen.
- Fabric B (The Scraps): A large bin of scraps! You need enough to cut:
- (30) 4.5″ squares (for centers).
- (240) 2.5″ squares (for star points).
- Backing: 4 yards of cozy Brushed Cotton or Flannel in a plaid print.
- Batting: Cotton/Wool Blend (for warmth and loft).
- Thread: Beige or Cream.
- Notions: Rotary cutter, 2.5″ and 4.5″ square rulers.
Cultural Backstory: In the 19th-century American West, fabric was a precious commodity. Nothing was thrown away. “Scrap quilts” were a visual diary of a family’s life—pieces of a father’s work shirt, a daughter’s Sunday dress, or a baby’s blanket would all end up stitched together. The Variable Star was a favorite pattern because its simple geometry allowed these disparate fabrics to shine without clashing.
Step 1: Sorting and Cutting the Scraps
We are making 30 Blocks arranged in a 5 x 6 grid. Each block finishes at 12 inches.
For ONE Block (Repeat 30 times with different scraps):
- Star Center: Cut 1 square of a scrap fabric measuring 4.5″ x 4.5″. (This is a great spot for “fussy cutting” a special motif like a flower or animal).
- Star Points (Flying Geese):
- Cut 8 squares of scrap fabric (same as the center or different) measuring 2.5″ x 2.5″.
- Note on Color: For a “controlled scrappy” look, make all 8 points in one block the same color (e.g., all red). For a “wild” look, mix them up!
- Background (Fabric A):
- Cut 4 rectangles measuring 2.5″ x 4.5″ (for Flying Geese bases).
- Cut 4 squares measuring 2.5″ x 2.5″ (for Corners).
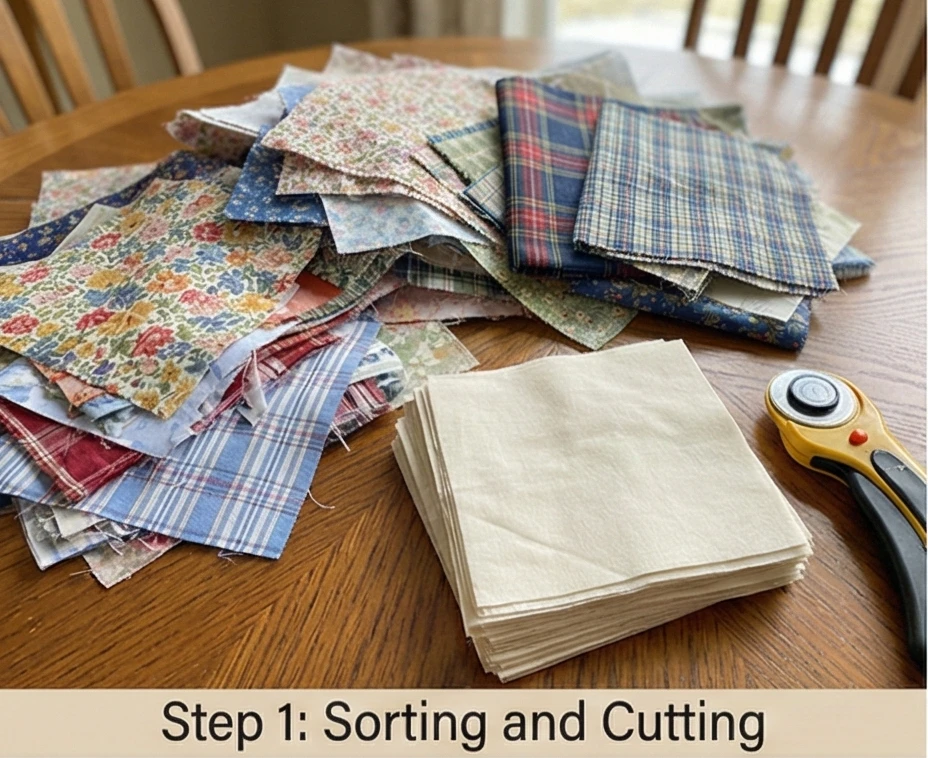
Step 2: Making the Flying Geese Units
The star points are the engine of this block.
- Mark: Draw a diagonal line on the back of all 240 scrap squares (2.5″).
- Sew Side 1: Place a scrap square on the right side of a Background Rectangle (2.5″ x 4.5″).
- Sew on the diagonal line.
- Trim the corner, leaving a 1/4″ seam. Press the triangle out.
- Sew Side 2: Repeat on the left side of the rectangle.
- Result: You have a 2.5″ x 4.5″ rectangle with a colorful “V” in the center.
- Quantity: You need 120 Flying Geese units total (4 per block).
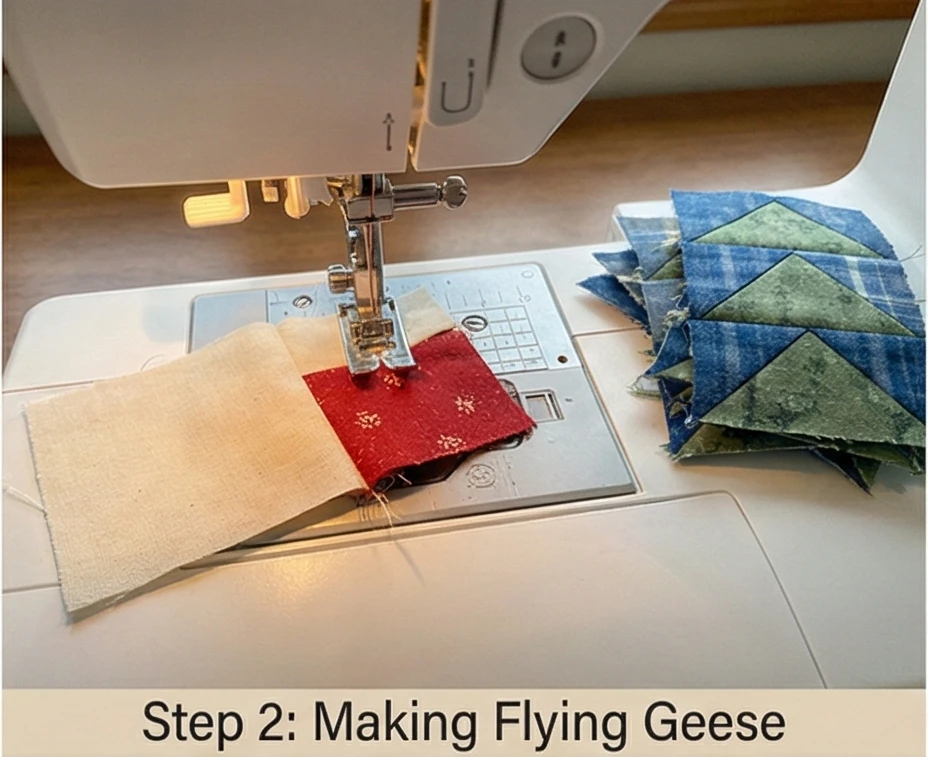
Step 3: Assembling the Rustic Block
Standard 9-Patch Assembly.
- Top Row: Background Corner – Flying Goose (Point Up) – Background Corner.
- Middle Row: Flying Goose (Point Left) – Scrap Center Square – Flying Goose (Point Right).
- Bottom Row: Background Corner – Flying Goose (Point Down) – Background Corner.
- Sew: Stitch rows together. Press seams open to reduce bulk.
- Unfinished Size: 12.5″ x 12.5″.
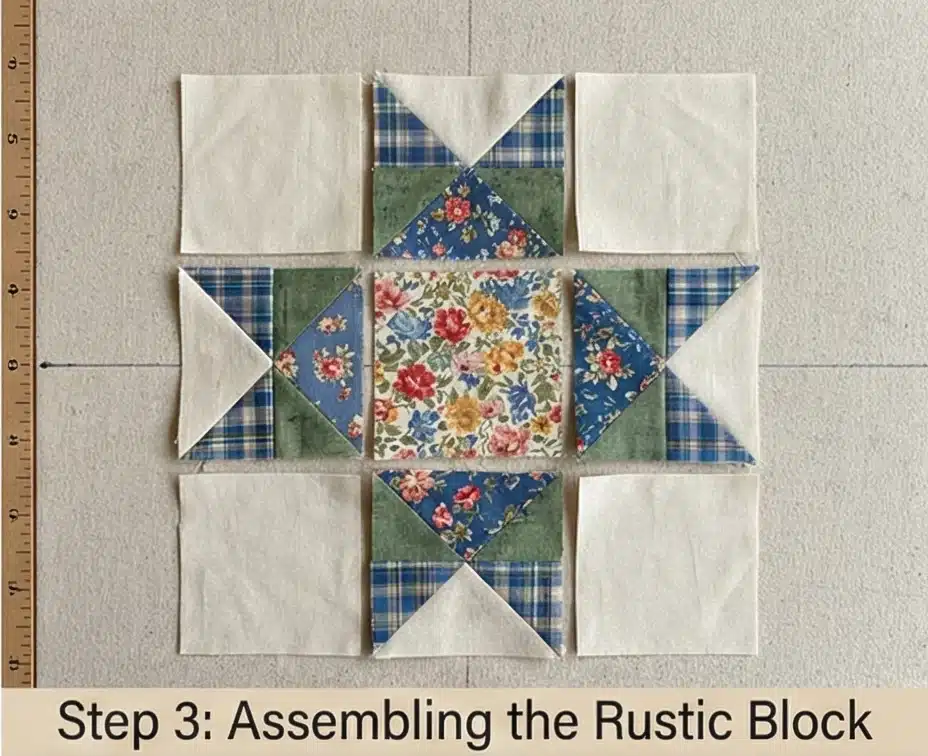
Step 4: The “Sashed” Layout
Sashing helps calm down the busy scraps.
- Cut Sashing: Cut 71 strips of Background Fabric measuring 12.5″ x 2.5″.
- Cut Cornerstones: Cut 42 squares of a dark accent scrap (like Navy or Brown) measuring 2.5″ x 2.5″.
- Arrange: Lay out the blocks in 6 rows of 5 blocks. Place sashing strips between them. Place cornerstones at the intersections.
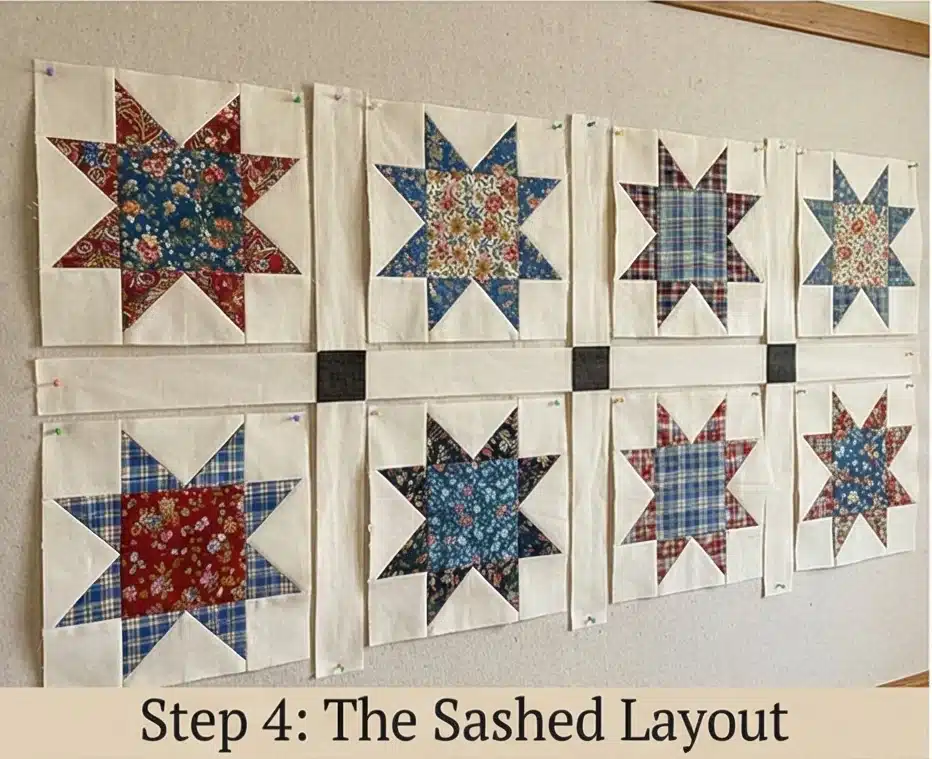
Step 5: Web Assembly
- Join: Sew the blocks into rows with sashing between them.
- Join: Sew the sashing strips and cornerstones into long horizontal rows.
- Final: Alternate Block Rows and Sashing Rows to complete the top.
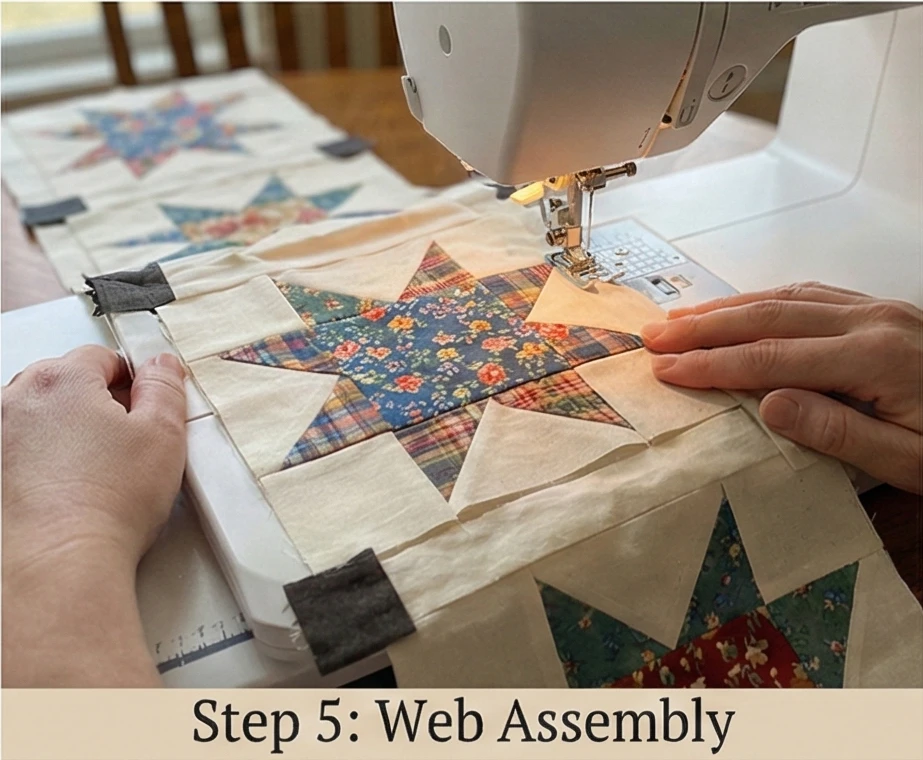
Step 6: “Big Stitch” Hand Quilting
Machine quilting looks too stiff for this rustic throw. Hand quilting adds soul.
- Baste: Sandwich the Top + Wool/Cotton Batting + Flannel Backing.
- Thread: Use a heavy-weight thread like Perle Cotton Size 8 in a contrasting color (like Red or Navy).
- Stitch: Quilt a simple running stitch approx 1/4 inch inside the outline of each star.
- Texture: The large stitches combined with the flannel backing make the quilt feel incredibly soft and pliable, like a well-loved antique.
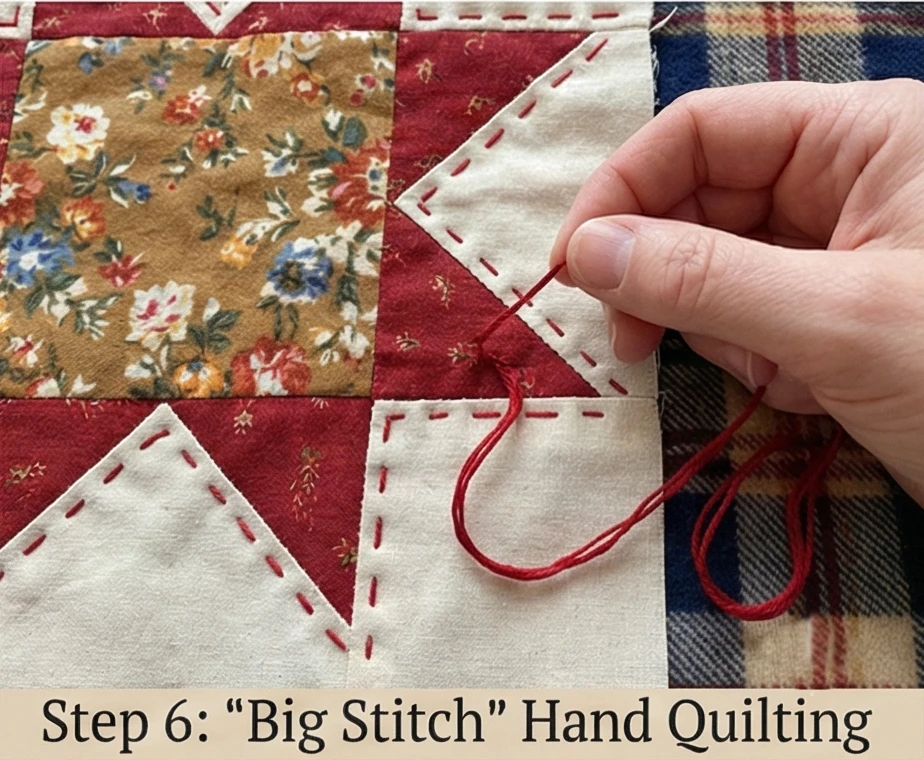
Usability Note: The flannel backing makes this throw heavier and warmer than standard quilts. It serves as an excellent draft-blocker. If the quilt gets dirty, the scrappy nature means stains blend in, and the cotton/linen construction gets softer with every wash.
17. Dramatic Feathered Star Wall Hangings for Statement Art
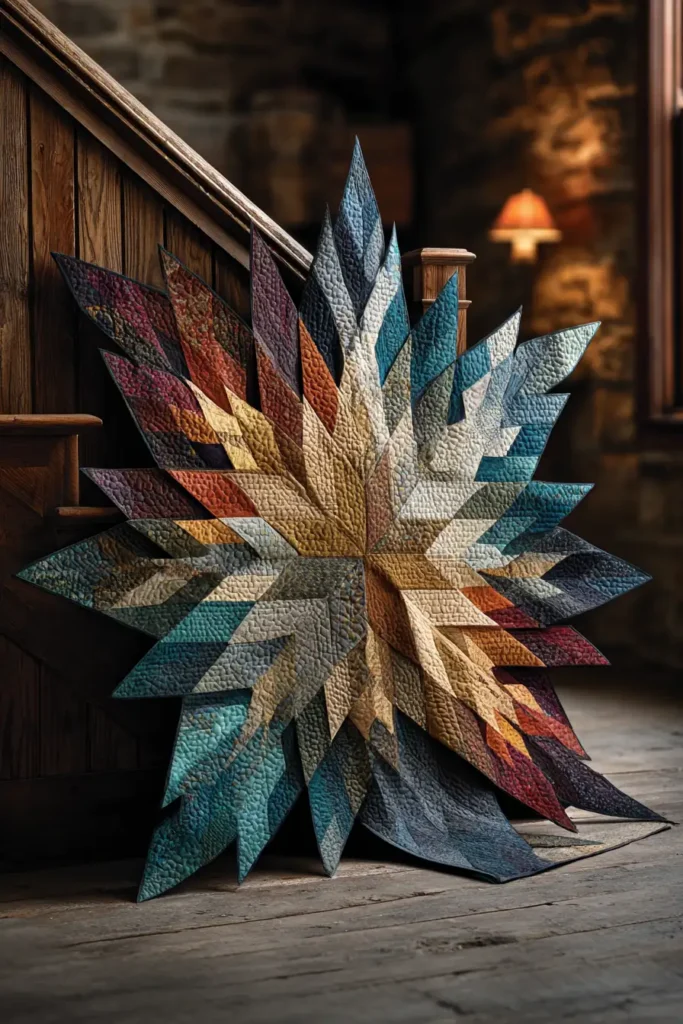
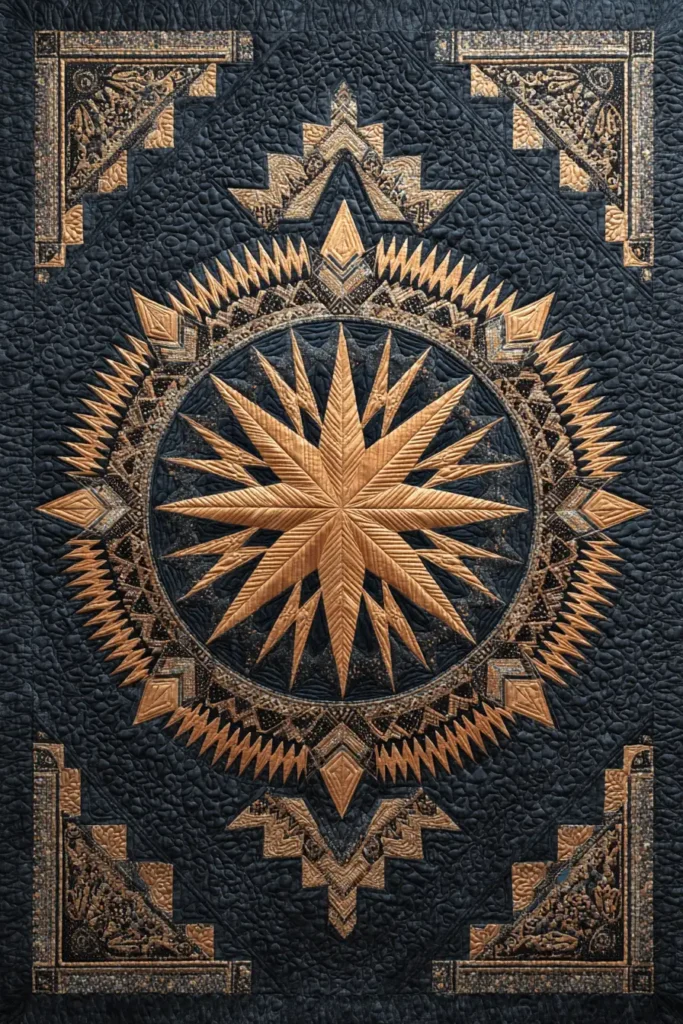
The “Onyx Majesty” Feathered Star Medallion
The Feathered Star is widely considered the “Mount Everest” of quilt blocks. It consists of a central star surrounded by serrated borders of tiny triangles (“feathers”) that create a vibrating, radiant energy. For a dramatic wall hanging, we strip away the distraction of multiple colors and use a high-contrast palette of Jet Black and Metallic Gold (or Ivory). This creates a piece of textile art that looks less like a quilt and more like a wrought-iron gate or a celestial map.
Finished Dimensions: Statement Wall Hanging, 45″ x 45″.
Materials Needed:
- Fabric A (Background/Onyx): 2.5 yards of Solid Black Cotton or Silk Radiance. (Silk adds a museum-quality sheen).
- Fabric B (Feathers/Gold): 1.5 yards of Metallic Gold or Champagne solid.
- Backing: 2 yards of black cotton.
- Batting: Wool Batting. (Crucial for wall hangings; wool doesn’t crease when folded and allows the quilting to look sculpted).
- Thread: Black (background) and Gold (star).
- Notions: Rotary cutter, Foundation Paper Piecing (FPP) Paper (highly recommended for precision), or a very accurate 1/8″ ruler.
Cultural Backstory: The Feathered Star appeared in the early 19th century and was often used as a “test of skill” for advanced seamstresses. Because it requires hundreds of tiny triangles to match perfectly, possessing a Feathered Star quilt was a status symbol, indicating that the maker had infinite patience and precision. It represents the sun’s rays or divine guidance radiating outward.
Step 1: The Strategy (Foundation Paper Piecing)
Attempting to cut hundreds of tiny triangles with a rotary ruler is a recipe for frustration. We will use the Foundation Paper Piecing (FPP) method, where you sew fabric directly onto a paper template to ensure perfect points.
- Print/Draw: You will need to print or draw 8 “Feather Arm” templates.
- Each arm is a long trapezoid containing a row of small triangles.
- Dimensions: If your center star is 10″, your feather arms should be roughly 10″ long. The triangles (feathers) should finish at about 1.5″ wide.
- Rough Cut: Cut your Gold and Black fabrics into scraps that are slightly larger than the shapes on your paper template. Generosity with fabric saves time here.
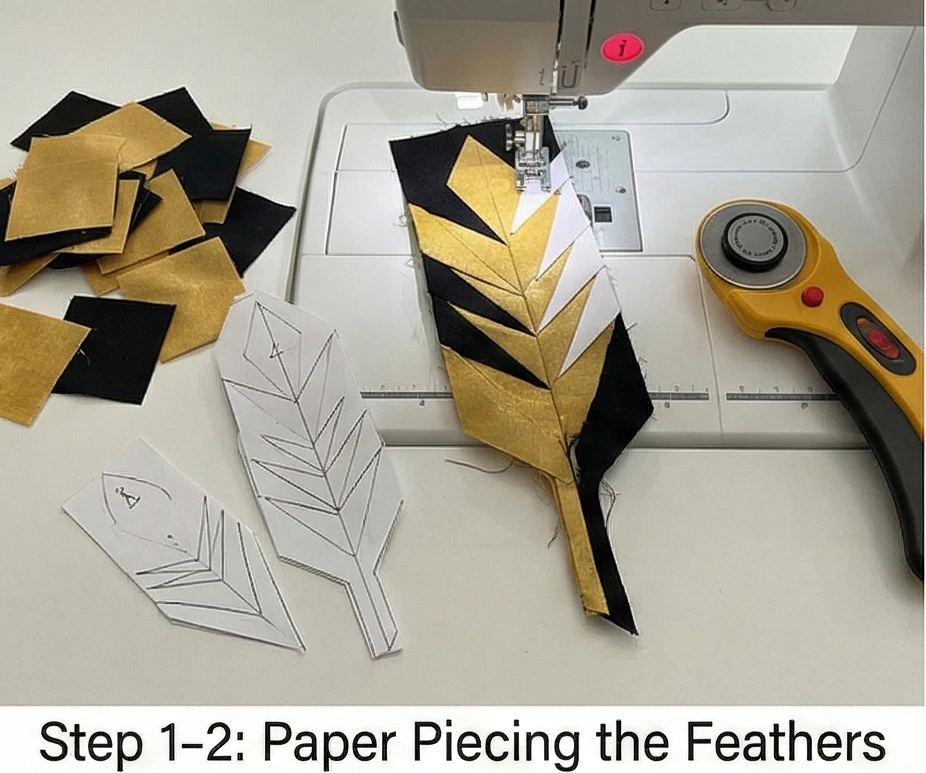
Step 2: Constructing the 8 Feathered Arms
These are the serrated borders that frame the center star.
- Sew: Using a short stitch length (1.5mm), sew the Gold and Black scraps onto the paper templates following the numerical order (usually zigzagging back and forth to create the triangles).
- Trim: Once the paper is filled, trim the unit to the exact seam allowance line on the paper.
- Result: You will have 8 identical trapezoids that look like saw blades. Do not remove the paper yet; it stabilizes the bias edges.
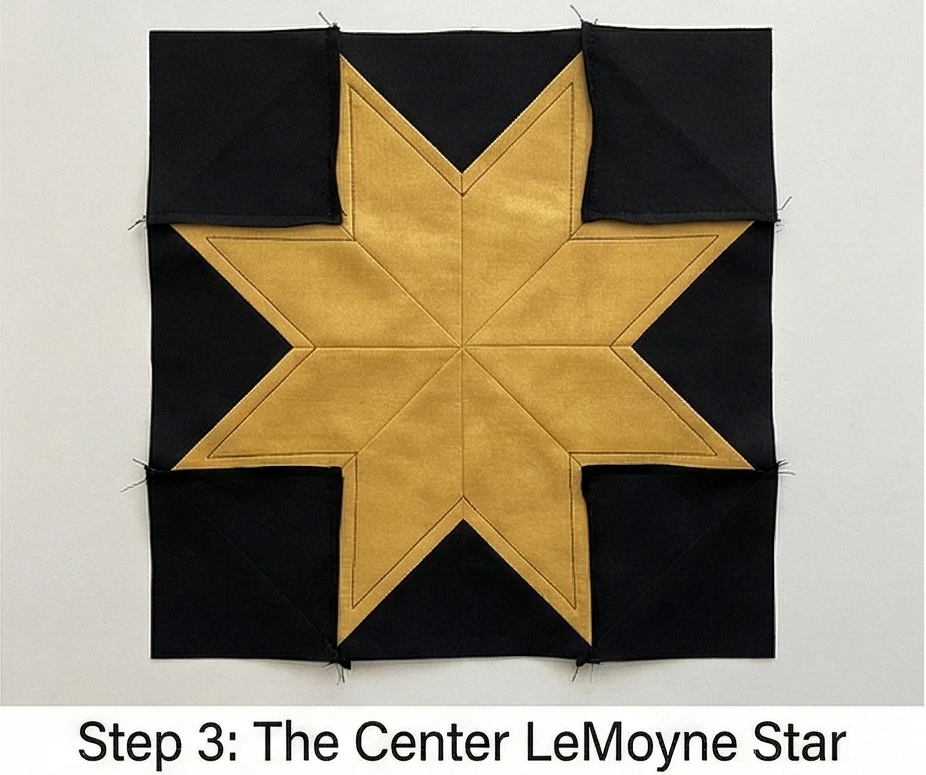
Step 3: The Center LeMoyne Star
The heart of the design.
- Cut: Using the 45-degree diamond method (or FPP), create a simple 8-pointed LeMoyne Star using the Gold fabric for the points and Black for the background triangles.
- Size: This center unit needs to match the width of your feather arms (e.g., a 10″ square).
- Press: Press seams open to reduce the bulk in the center “spin.”
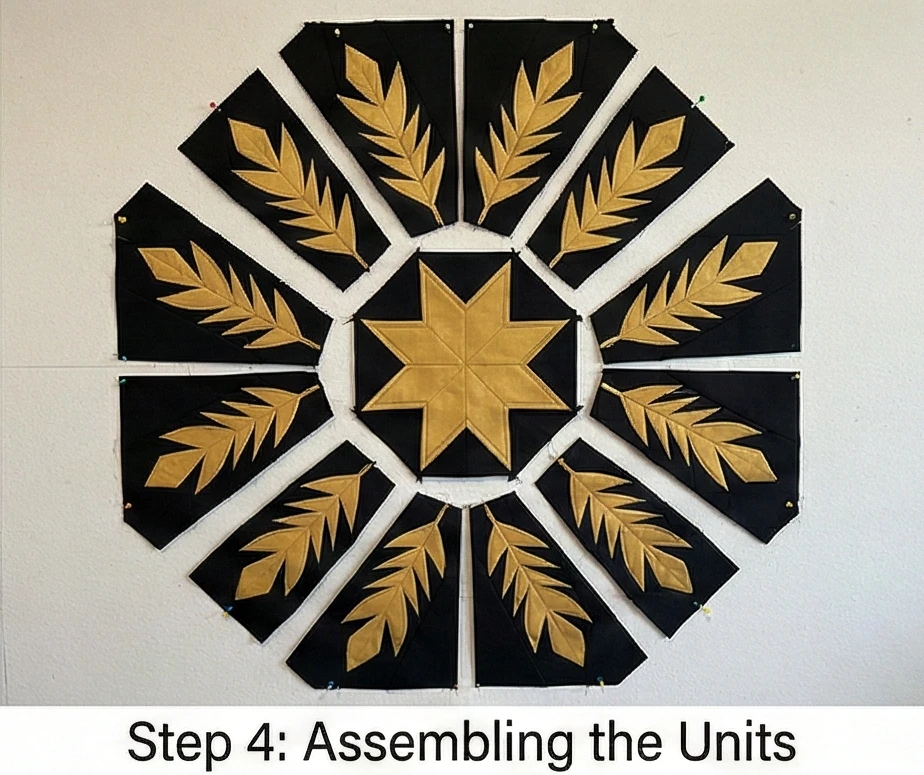
Step 4: Assembling the “Octagon”
The Feathered Star is essentially a giant 9-patch with corner squares.
- Corner Squares: Cut 4 squares of Black Fabric A measuring the same size as your center star (e.g., 10.5″ unfinished).
- Side Triangles: Cut 4 large Quarter-Square Triangles of Black Fabric to fill the spaces between the star points.
- Join:
- Sew a Feather Arm to each side of the Center Star.
- Sew a Feather Arm to each of the 4 Corner Squares.
- Precision: This is where the paper helps. Match the corners perfectly.

Step 5: The “Y-Seam” Assembly
To put it all together, we treat it like a puzzle.
- Layout: Lay the units on the design wall. You have the Center (with arms attached) and the Corners (with arms attached).
- Inset Seams: You will need to sew the Corner Units into the “V” created by the Center Unit.
- Technique: Sew from the outside edge inward. Stop exactly 1/4 inch from the inside corner. Backstitch. Pivot the fabric, match the next side, and sew out.
- Note: If Y-seams are too daunting, look for a “Square-Set” Feathered Star pattern, which adds extra background seams to turn the diagonal lines into straight grid lines.

Step 6: Negative Space Borders
A wall hanging needs “breathing room” to look like art.
- Cut Borders: Cut 6-inch wide strips of Black Fabric A.
- Attach: Sew these borders to all four sides of the star block.
- Effect: This isolates the star in a field of black, making the gold vibrate visually. It essentially “mattes” the artwork.
Step 7: “Trapunto” Micro-Quilting
This step transforms the quilt into a sculpture.
- Batting: Use Wool Batting (high loft).
- The Star: Stitch “in the ditch” around every gold feather. Do not quilt inside the gold feathers. Let them puff up.
- The Background: In the black negative space, quilt heavily. Use Micro-Stippling (tiny wandering lines) or dense straight lines (matchstick quilting) using black thread.
- The Magic: The dense quilting mashes the black background down flat, while the un-quilted gold star pops out in 3D relief (Trapunto effect).
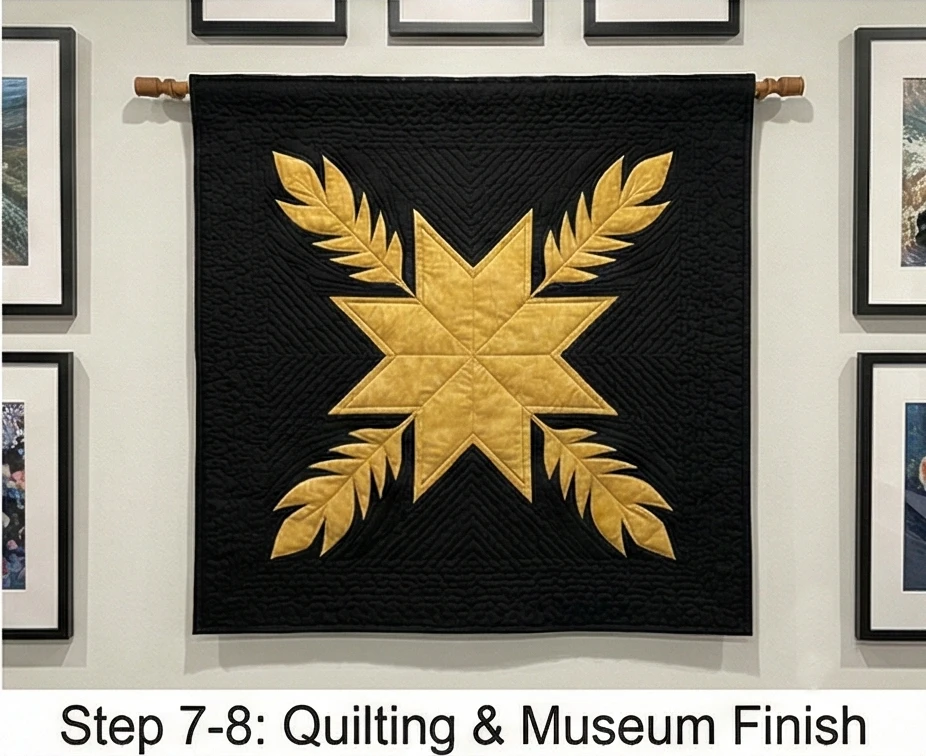
Step 8: The Museum Finish (Hanging Sleeve)
- Sleeve: Before binding, sew a 4-inch-wide tube of fabric to the top back of the quilt.
- Binding: Finish with a Black Binding.
- Hang: Insert a wooden slat or curtain rod into the sleeve. This ensures the quilt hangs perfectly square and flat on the wall, without sagging at the corners.
Usability Note: Unlike a bed quilt, a wall hanging doesn’t need to drape. You can use starch, stiffer interfacing, or even a second layer of batting to ensure the star points remain razor-sharp and the hanging looks rigid and architectural.
18. Radiant Sunburst Star Quilt Medallions for Hallway Decor
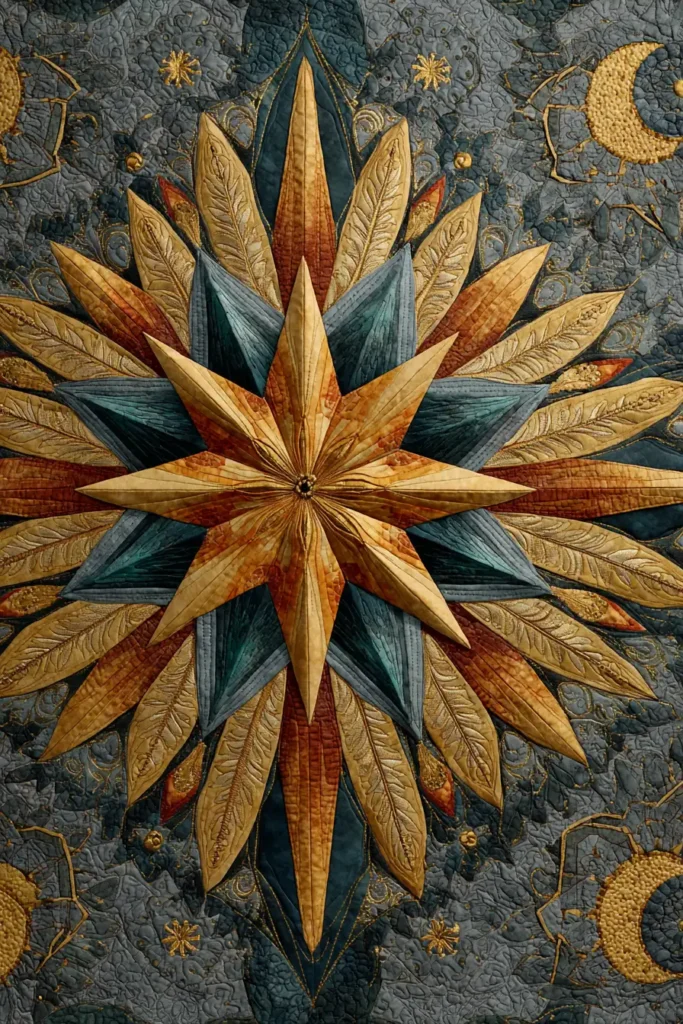
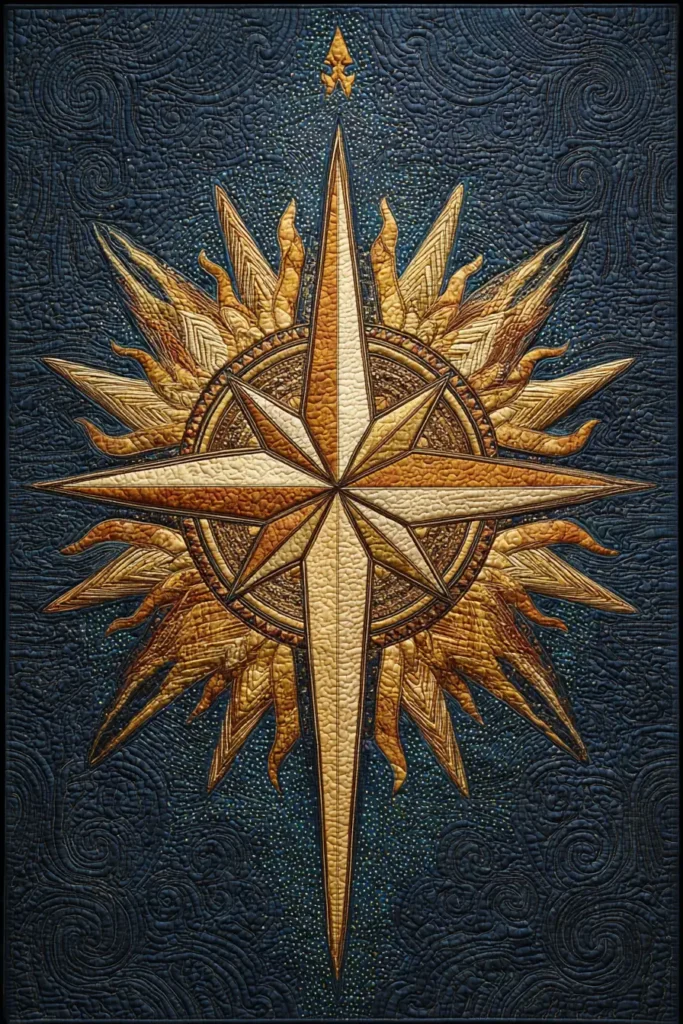
The “Solstice Beacon” Mariner’s Medallion Runner
Hallways are often dark, transitional spaces that are difficult to decorate. A vertical “Medallion” quilt serves as a beacon, drawing the eye down the corridor. This pattern utilizes the Mariner’s Compass motif—a radiating sunburst star that floats in a circle. By setting this complex circular star against a tall, narrow background of Navy Blue or Charcoal, and using Metallic Golds and Ambers for the points, you create a shimmering focal point that resembles a textile-stained-glass window.
Finished Dimensions: Vertical Wall Banner, 24″ x 50″.
Materials Needed:
- Fabric A (Background): 1.5 yards of Midnight Navy or Deep Charcoal cotton.
- Fabric B (Star Points – The Sun): 1/2 yard of Gold, Mustard, or Saffron (mix textures like silk or batik for radiance).
- Fabric C (Star Shadows): 1/4 yard of a lighter neutral (Cream or Pale Grey) to add depth to the points.
- Backing: 1.5 yards of coordinating fabric.
- Batting: Wool Batting (essential for wall hangings to prevent fold lines).
- Notions: Freezer Paper or Foundation Paper Piecing (FPP) templates, fabric glue pen, invisible thread.
Cultural Backstory: The Mariner’s Compass pattern dates back to the earliest days of navigation, appearing on maps long before it appeared on quilts. The oldest known quilt using this pattern was made in England in 1726. It symbolizes guidance, direction, and the safety of returning home—a perfect sentiment for a hallway entrance.
Step 1: Foundation Paper Piecing (The Strategy)
A Mariner’s Compass requires needle-sharp points that are nearly impossible to achieve with standard rotary cutting. We will use Foundation Paper Piecing (FPP).
- Templates: Download or draw a 16-Point Mariner’s Compass template (approx 16-18 inches in diameter).
- The circle is usually divided into 4 Quadrants or 8 Wedges for easier sewing.
- Tip: Print on thin newsprint paper so it tears away easily later.
- Rough Cut: Cut your Gold (Fabric B) and Shadow (Fabric C) fabrics into rectangles slightly larger than the shapes on the paper template.
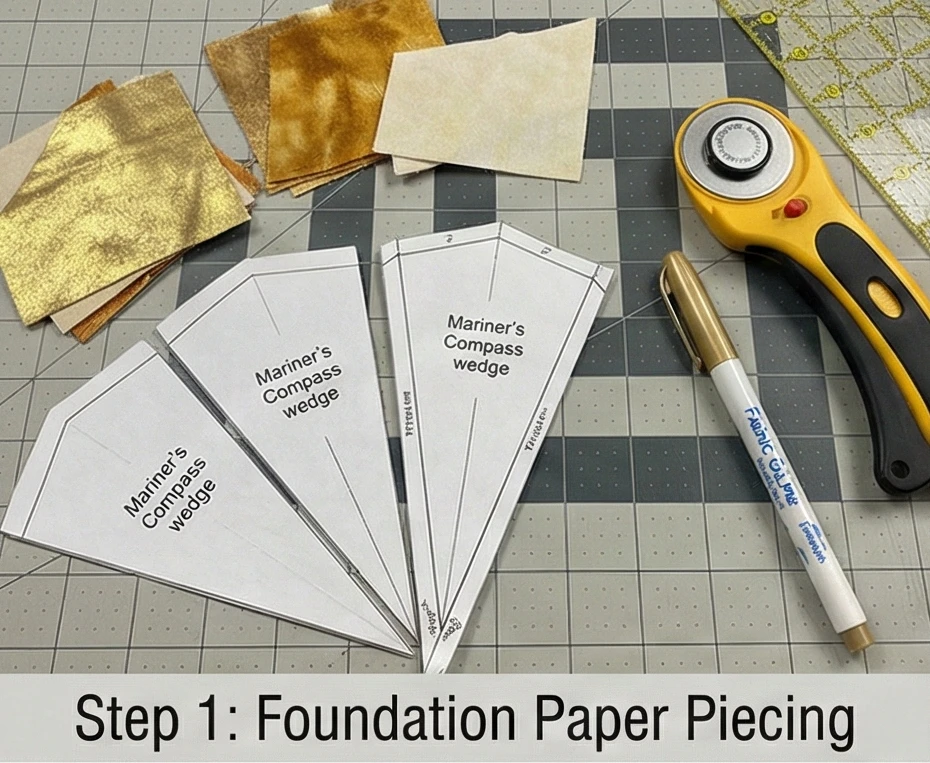
Step 2: Constructing the Wedges
- Sew: Place your fabric over the “Zone 1” on the paper (right side up). Place the next fabric piece right side down.
- Stitch: Sew directly on the printed line of the paper using a very short stitch length (1.2mm).
- Flip & Trim: Fold the paper back, trim the seam allowance to 1/4 inch, flip the fabric open, and press.
- Repeat: Continue adding fabrics until one wedge (usually 1/8th of the circle) is complete.
- Clean Up: Trim the wedge to the exact outer dotted line of the paper template. Make 8 wedges.
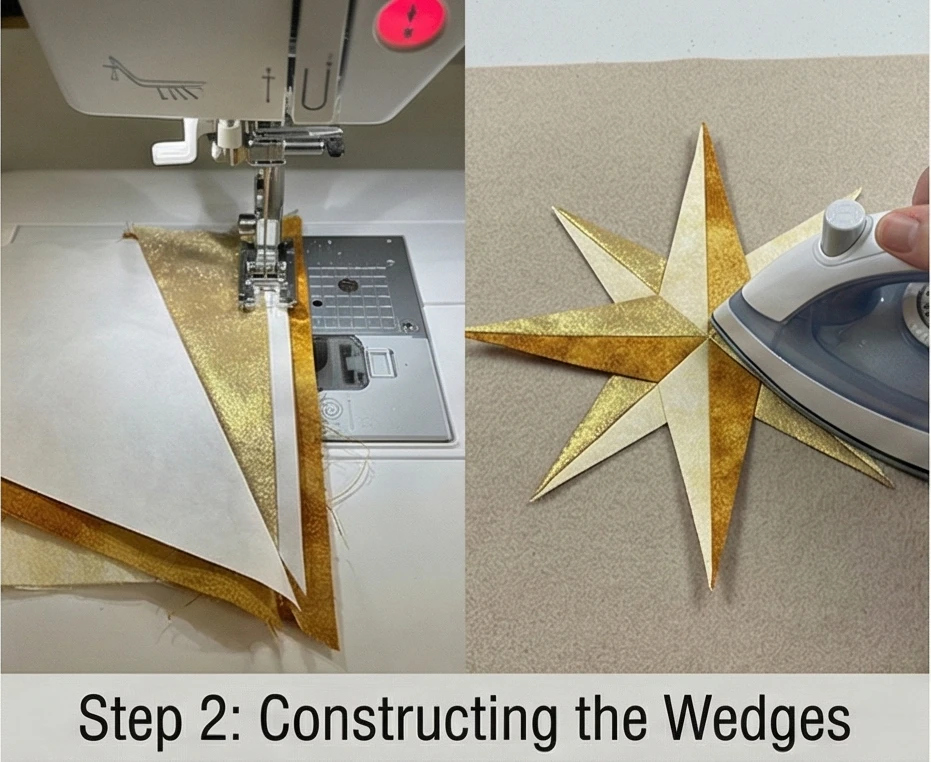
Step 3: Assembling the Compass Circle
- Join Wedges: Sew the 8 wedges together to form the complete circle.
- Critical: The center point where all 16 rays meet is bulky. Press seams open. Use a dab of starch to flatten the center “volcano.”
- Center Appliqué: If the center point is messy (it happens to the best of us!), appliqué a small 2-inch circle of Fabric A (Navy) over the very center. This is historically accurate and hides the raw points.
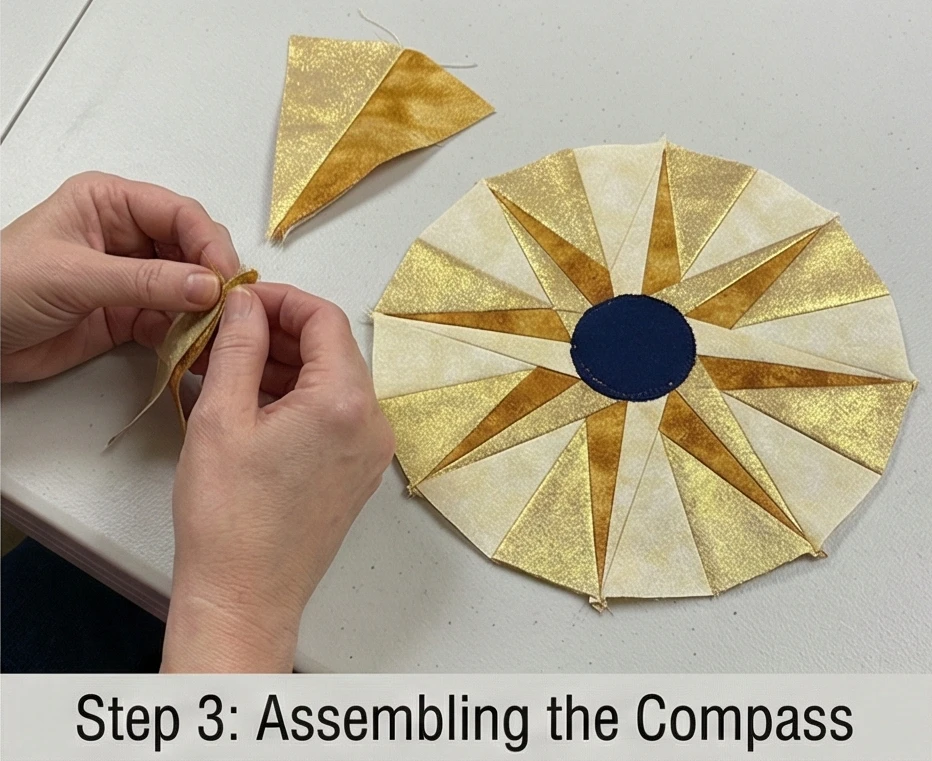
Step 4: Appliqué to the Background
The Compass is round; the quilt is rectangular. We must mount it.
- Prepare Background: Cut your Fabric A (Navy) into a rectangle measuring 24.5″ x 50.5″.
- Placement: Fold the background in half to find the vertical center.
- Place the Compass medallion near the top third of the banner (about 6-8 inches down from the top edge). This mimics the composition of a grandfather clock or a mirror.
- Attach: Pin or glue the compass in place.
- Sew: Use a zigzag stitch or a blind hem stitch (with invisible thread) to appliqué the outer circle of the compass onto the background.
- Alternative: If you are advanced, you can set the compass into a square using curved piecing, but appliqué is elegant and easier.
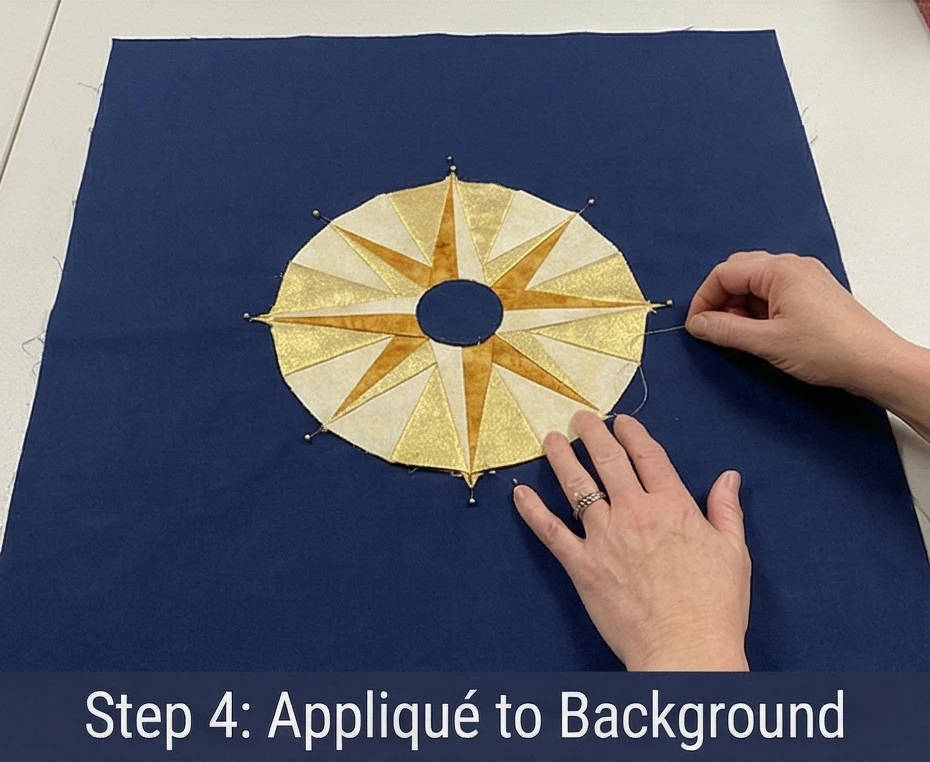
Step 5: Adding Vertical Interest (The Tail)
To balance the heavy star at the top, add a detail at the bottom.
- Flying Geese: Create a vertical column of 5 Flying Geese (pointing up) using the Gold fabric.
- Appliqué: Appliqué this strip near the bottom of the banner, aligned with the center of the star above. This guides the eye downward and creates visual balance.
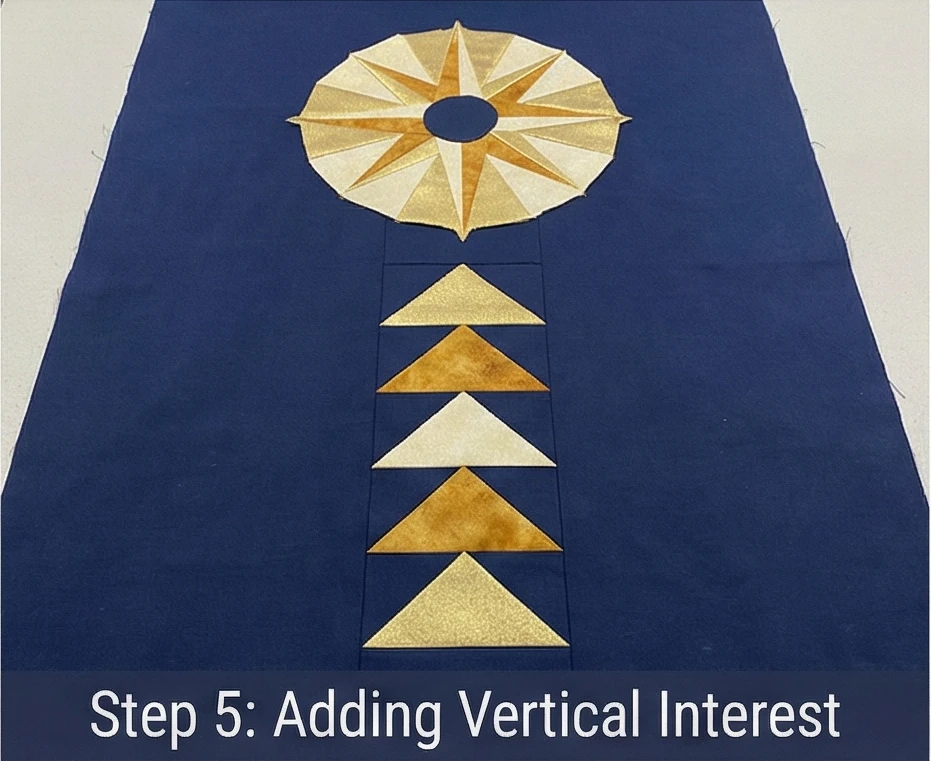
Step 6: “Radiant” Quilting
- Baste: Sandwich the quilt layers.
- The Compass: Stitch in the ditch around the star points.
- The Background: Use a marking pen to draw straight lines radiating from the center of the star all the way to the edges of the quilt (like sunbeams).
- Quilt these lines using a matching Navy thread. The texture will look like rays of light cutting through the darkness.
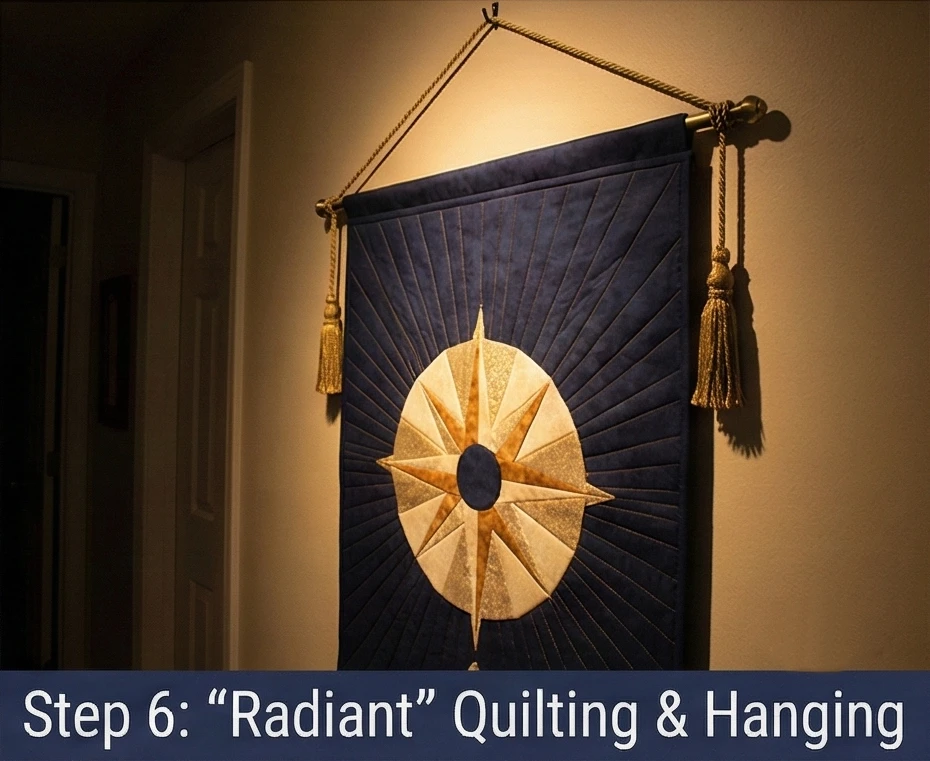
Step 7: The Hanging Sleeve
- Sleeve: Sew a 4-inch tube of fabric to the top back of the quilt.
- Rod: Insert a brass or wooden dowel.
- Decor Tip: Use a decorative cord with tassels to hang it from a single hook if your hallway is narrow.
Usability Note: Because this is a “Look, Don’t Touch” item, you can use delicate materials like Silk Dupioni for the star points. The shimmer of silk in a dimly lit hallway reflects light beautifully, acting almost like a mirror.
19. Miniature Seven Sisters Star Quilts for Shelf Styling
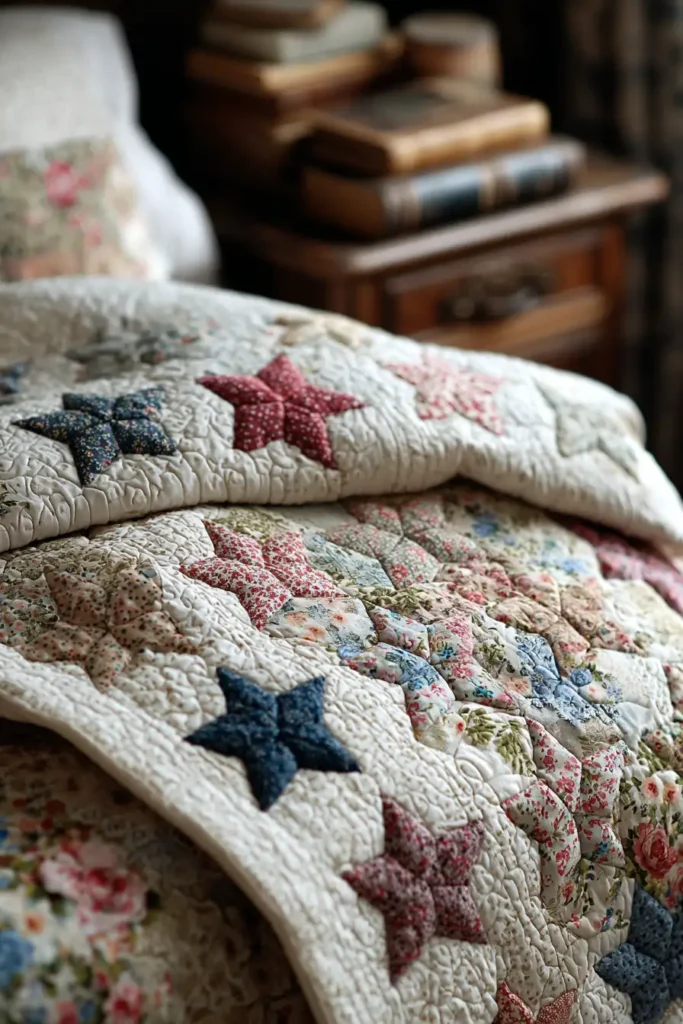
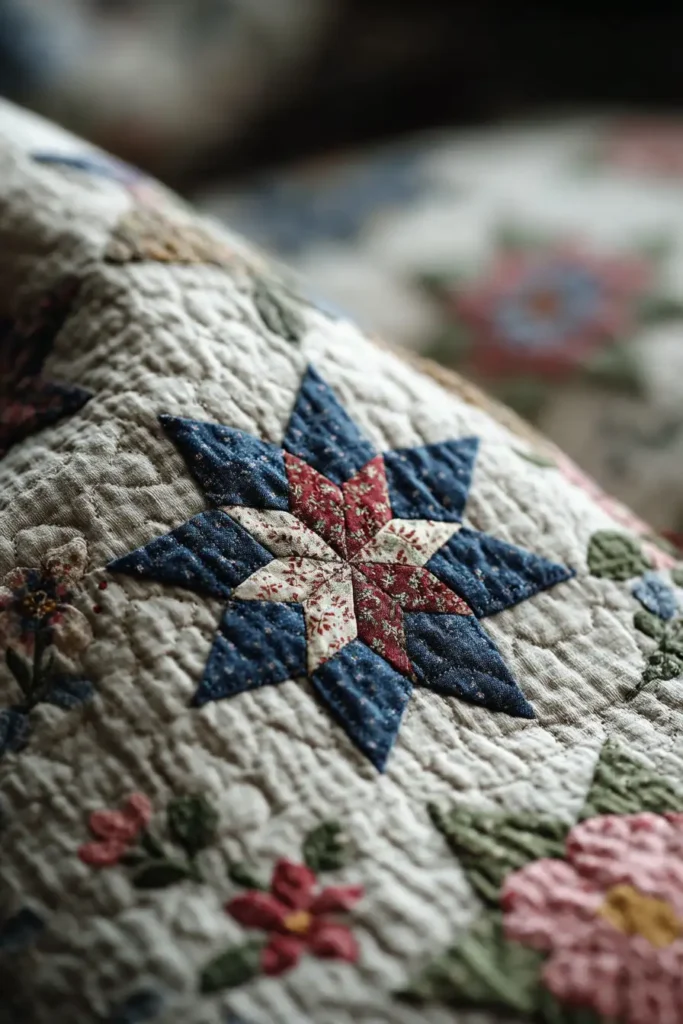
The “Petite Pleiades” Miniature Shelf Quilt
Miniature quilts are the unsung heroes of interior styling. Too small for a bed, they are perfect for layering behind books on a shelf, draping over a stack of antique journals, or hanging inside a glass cabinet to add texture to a hard surface. This pattern shrinks the traditional Seven Sisters design down to a precious scale using English Paper Piecing (EPP). The tiny hand-pieced stars, made from scraps of Liberty Tana Lawn or soft florals, act like textile jewelry for your home.
Finished Dimensions: Miniature Display Quilt, approximately 12″ x 14″.
Materials Needed:
- Fabric A (The Stars): Scraps of 7 different small-scale floral or solid prints (needs to be thin fabric like cotton lawn).
- Fabric B (Background): 1 Fat Quarter of Cream or Soft Grey Linen.
- Backing: 1 Fat Quarter of coordinating cotton.
- Batting: Flannel (Standard batting is too puffy for a mini; flannel keeps it flat and drapeable).
- Notions: 1/2-inch Hexagon Paper Templates (you need 49), fabric glue pen, milliner’s needle, fine thread (50wt or 80wt).
Cultural Backstory: In the 19th century, miniature quilts were often “teaching quilts” made by young girls learning to sew. The Seven Sisters pattern, representing the Pleiades star cluster, was a favorite for these samplers because it taught the difficult skill of “Y-seams” (inset seams). Today, we use the paper-piecing method to achieve perfect points without tears.
Step 1: The “Basting” Prep
We are making 7 Star Rosettes. This is perfect “sofa sewing.”
- Cut Fabrics: Cut your star fabrics into squares roughly 1.5 inches wide.
- Glue Baste:
- Place a 1/2-inch paper hexagon on the wrong side of the fabric.
- Run a line of glue along the edge of the paper.
- Fold the fabric over the paper and press down.
- Quantity: Make 7 hexagons for each star. (Total 49 hexagons).
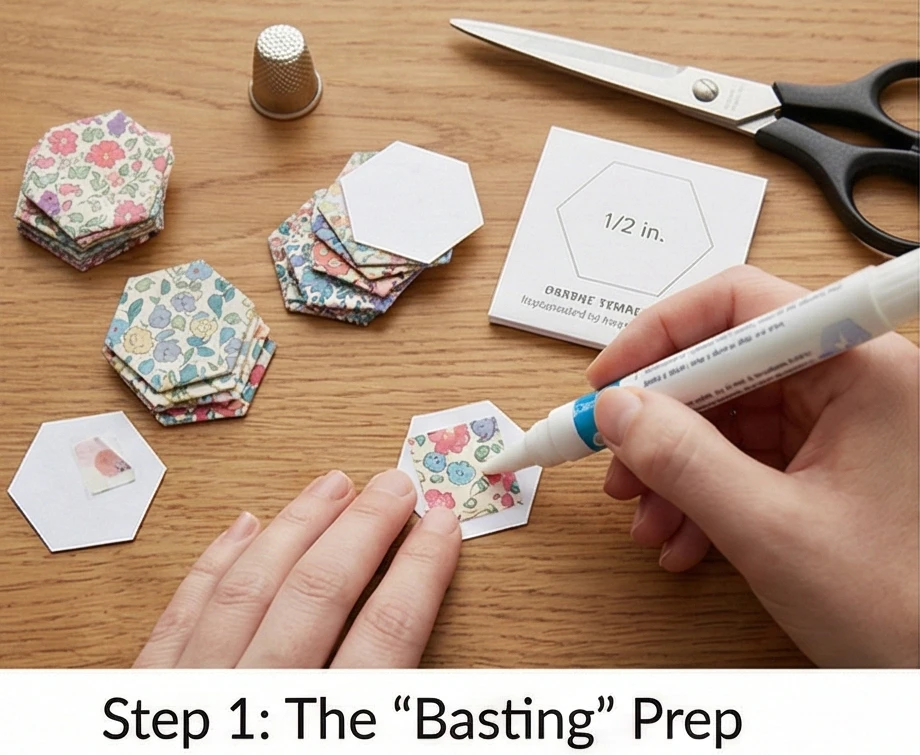
Step 2: Assembling the Rosettes
A rosette is simply a flower shape made of hexagons.
- The Center: Take one hexagon (the center). Take a second hexagon (a petal). Place them Right Sides Together.
- Whipstitch: Using a fine needle, whipstitch along one flat edge. Catch only a few threads of the fabric; do not sew through the paper.
- Surround: Continue sewing hexagons around the center until you have a 6-pointed flower/star shape.
- Make: Create 7 Rosettes.
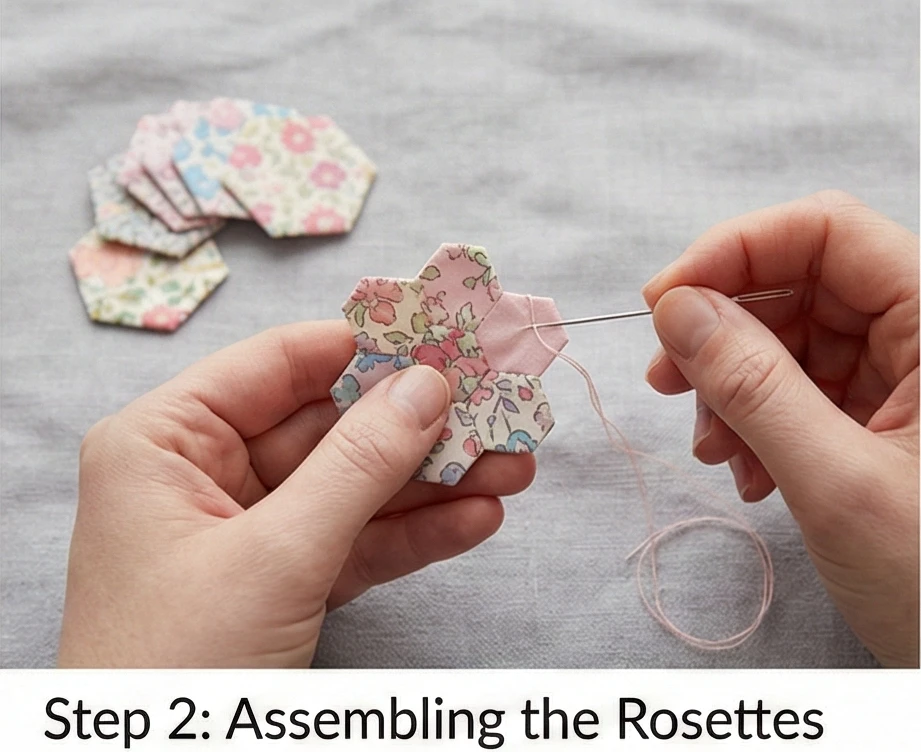
Step 3: Joining the Sisters
Now we join the 7 stars into one large cluster.
- Layout: Place one rosette in the center and arrange the other 6 around it.
- Join: Sew the rosettes together where they touch.
- Tip: Because they are hexagons, they will nest perfectly together like a honeycomb.
- Result: You now have a large, bumpy hexagonal cluster of stars.
- Press & Remove: Press the cluster with a hot iron. Carefully peel the paper templates from the back. Press again.
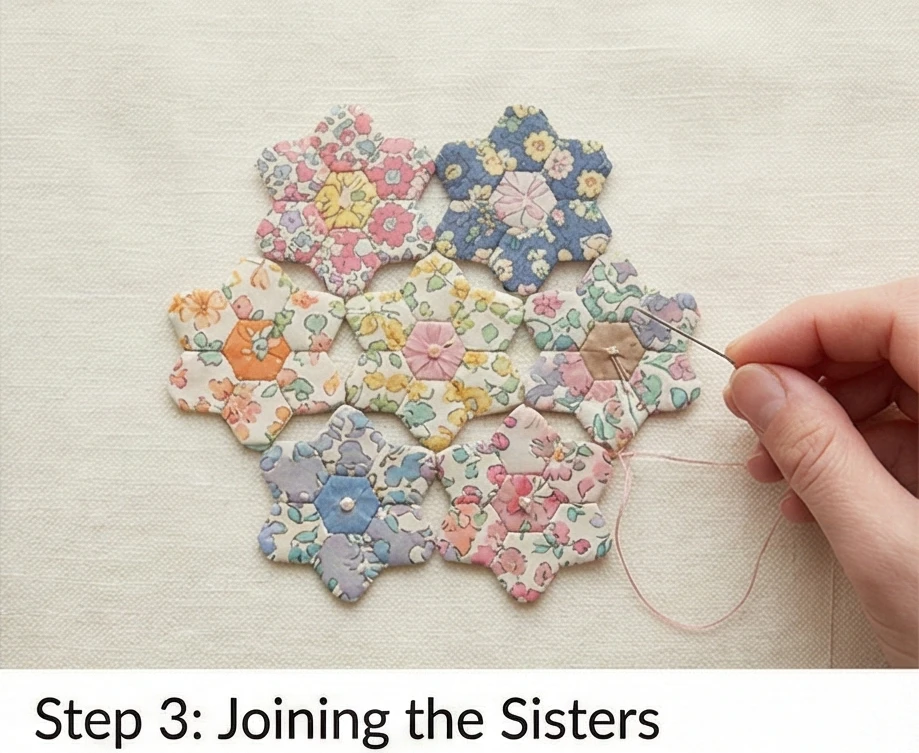
Step 4: The Background Appliqué
Trying to piece a background around this complex shape is a nightmare. Appliqué is the elegant solution.
- Prepare Canvas: Cut your Background Linen to 13″ x 15″.
- Position: Center the Seven Sisters cluster on the linen.
- Design Choice: For a “Shelf Styler,” consider placing the cluster slightly below the center so, if you lean the quilt against a wall, the design isn’t hidden by the shelf above.
- Appliqué: Pin or glue-baste the cluster in place. Using a blind stitch (tiny bites of fabric), hand-sew the outer perimeter of the cluster to the background.

Step 5: “Micro” Quilting
Mini quilts require tiny stitches.
- Sandwich: Layer Backing + Flannel + Top.
- Quilt:
- In the Stars: Quilt a tiny “X” or a French knot in the center of each star.
- The Background: Hand quilt straight vertical lines spaced 1/2 inch apart across the linen background. Do not quilt over the stars; skip over them. This creates a vertical texture that looks lovely when the quilt is draped.
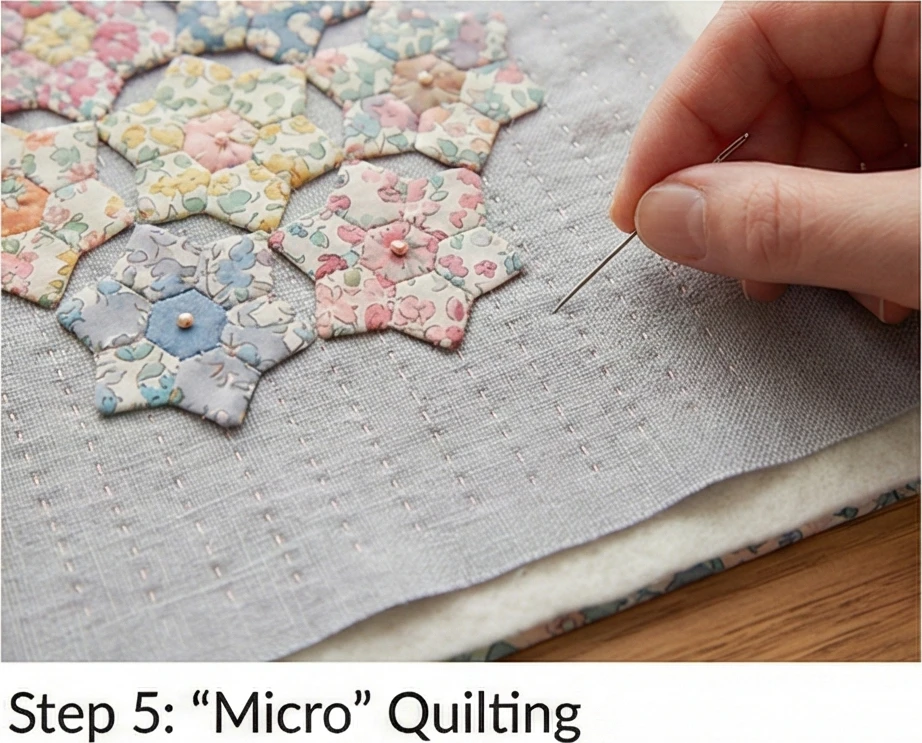
Step 6: The Single-Fold Binding
Standard binding is too bulky for a mini.
- Cut: Cut a strip of fabric 1.25 inches wide.
- Attach: Sew to the front with a scant 1/4 inch seam.
- Finish: Fold the raw edge to the back once (don’t double-fold) and hand-stitch it down. This creates a delicate, hairline frame for your tiny masterpiece.
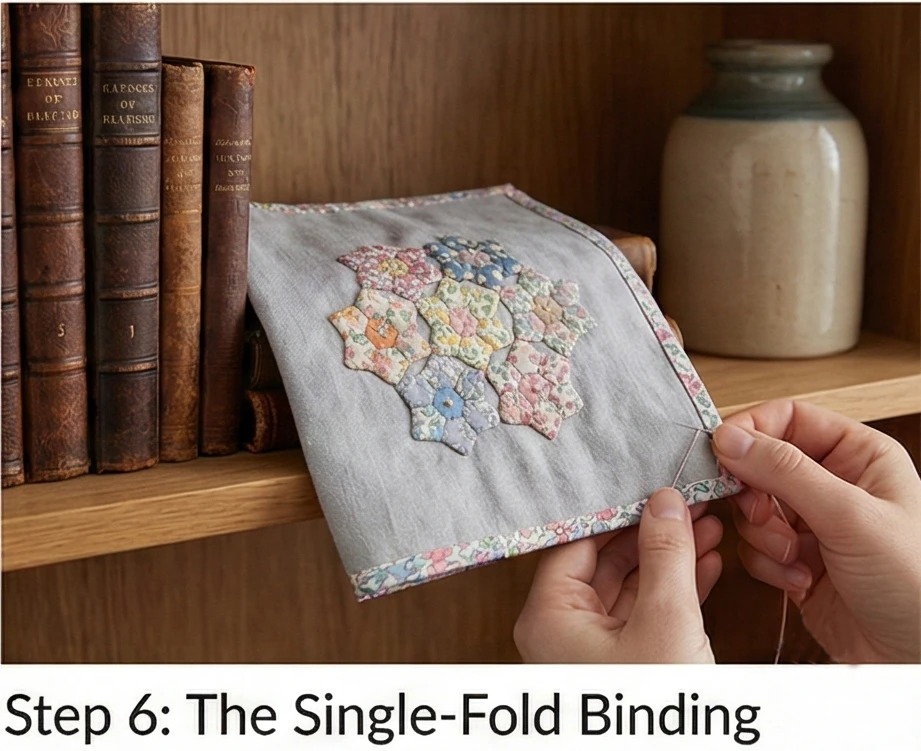
Usability Note: To style this on a shelf: Fold it in thirds and drape it over the spine of a boring binder to hide it, or tack it to the back wall of a bookshelf to create a pop of color behind a white ceramic vase.
20. Vintage-Inspired Star Quilt Art Designs for Gallery Walls
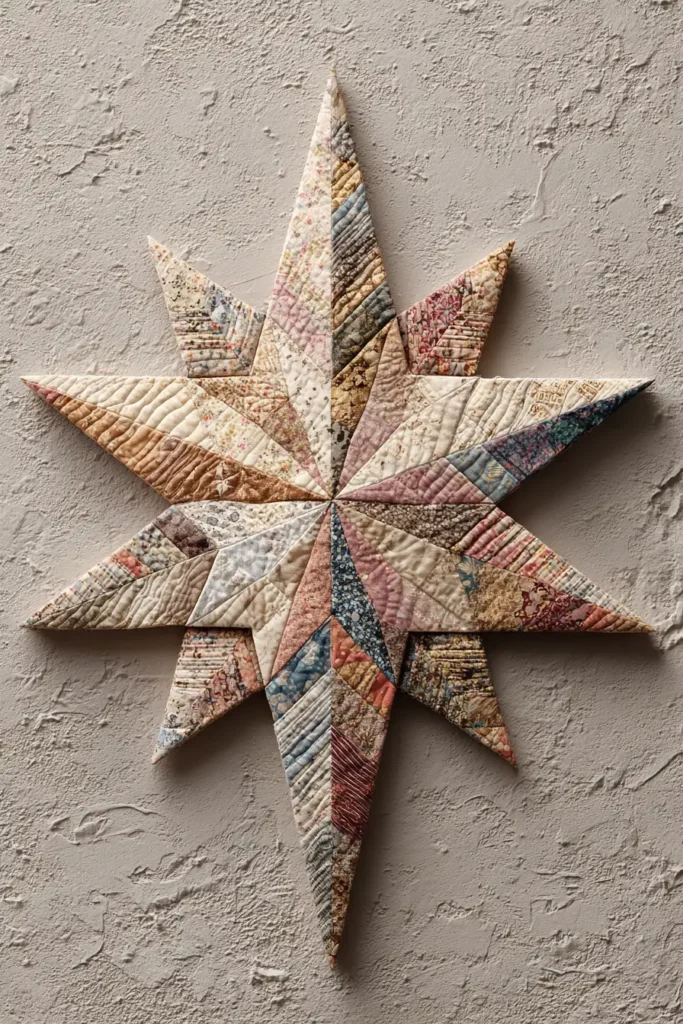
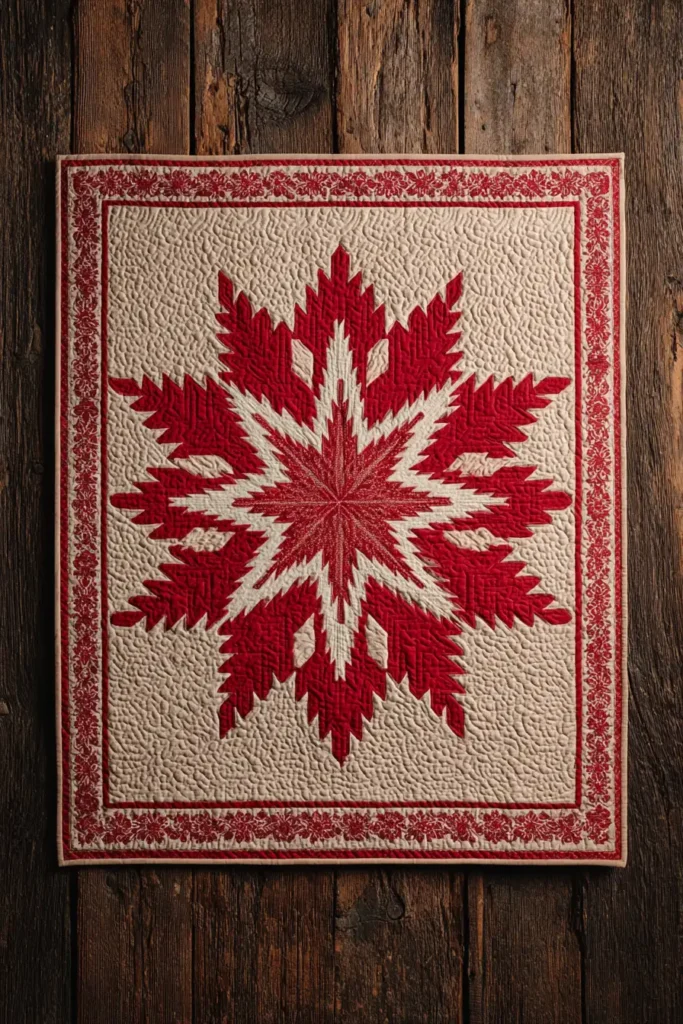
The “Heritage Rose” Blazing Star Art Quilt
Nothing screams “vintage Americana” quite like a classic Red and White quilt. In the mid-19th century and again in the early 20th century, two-color red-and-white quilts were a major trend, driven by the invention of a colorfast red dye (Turkey Red) that wouldn’t bleed into the white background. This pattern creates a Blazing Star—a smaller, sharper cousin of the Lone Star—designed specifically to be framed or mounted on a canvas as a piece of high-impact textile art for a gallery wall.
Finished Dimensions: Framed Wall Art, 20″ x 20″.
Materials Needed:
- Fabric A (The Star/Red): 1/2 yard of Turkey Red, Cranberry, or a red-on-white toile print.
- Fabric B (Background/Cream): 1/2 yard of Antique Cream or Tea-Stained Muslin.
- Backing: 1 Fat Quarter (won’t be seen if framed, but good for structure).
- Batting: Very low loft cotton (or flannel) to keep it flat inside a frame.
- Notions: Foundation Paper Piecing (FPP) Paper, rotary cutter, 20″ x 20″ wooden canvas stretcher or a shadow box frame.
Cultural Backstory: The “Blazing Star” (often conflated with the Star of Bethlehem) is a pattern that radiates intense energy. In 1911, the Infinite Variety exhibition in New York showcased hundreds of red-and-white quilts, cementing this color combination as the gold standard of antique quilt collecting. Framing a single block elevates the humble craft to the status of graphic art.
Step 1: Foundation Paper Piecing (The Secret to Sharpness)
For a gallery piece, “close enough” isn’t good enough. The points must be needle-sharp. We will use FPP.
- Print: Print 8 copies of a “Lemoyne Star” or “Blazing Star” diamond wedge template (sized so the final circle fits within a 20-inch square).
- Geometry: Each template will look like a 45-degree wedge containing diamond segments.
- Prep: Cut your Red and Cream fabrics into rough rectangles slightly larger than the sections on your paper template.
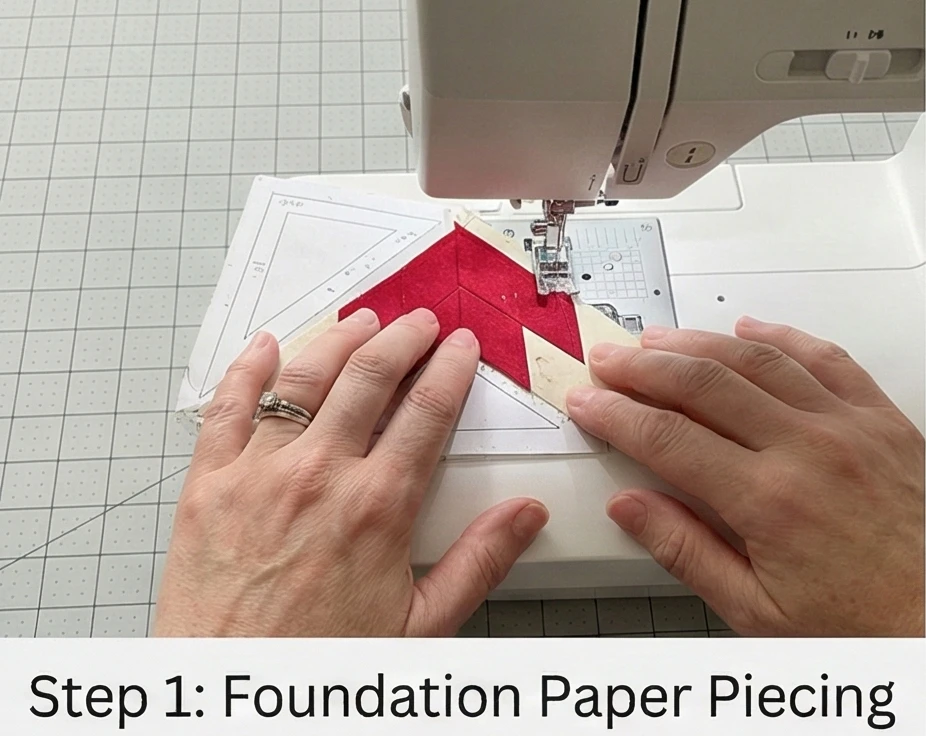
Step 2: Piecing the Diamonds (The Wedges)
- Stitch: Use a very short stitch length (1.5mm) to sew the fabric to the paper templates.
- Pattern: Alternate Red and Cream diamonds to create concentric rings (e.g., Center Red, Ring 1 Cream, Ring 2 Red, Tips Cream).
- Trim: Once a wedge is sewn, trim the edges exactly to the 1/4 inch seam allowance line on the paper.
- Repeat: Create 8 identical wedges.
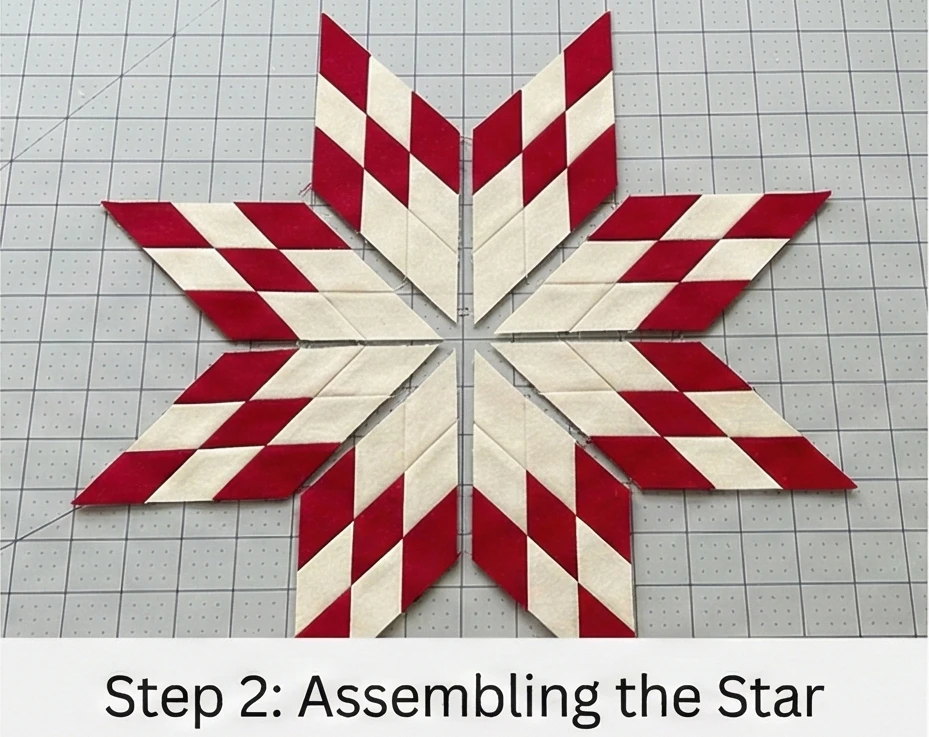
Step 3: Assembling the Star
Joining the wedges requires precision.
- Pairs: Place two paper-pieced wedges Right Sides Together.
- Pin: Stick a pin through the matching points on the seam line to align them perfectly.
- Sew: Stitch carefully along the line.
- Quads: Join pairs to make 4 quarters.
- Halves: Join quarters to make two halves.
- The Center: Sew the two halves together.
- Press: Press the center seam open. Remove the paper from the seam allowance only to reduce bulk, but keep the rest of the paper in for now to stabilize the bias edges.
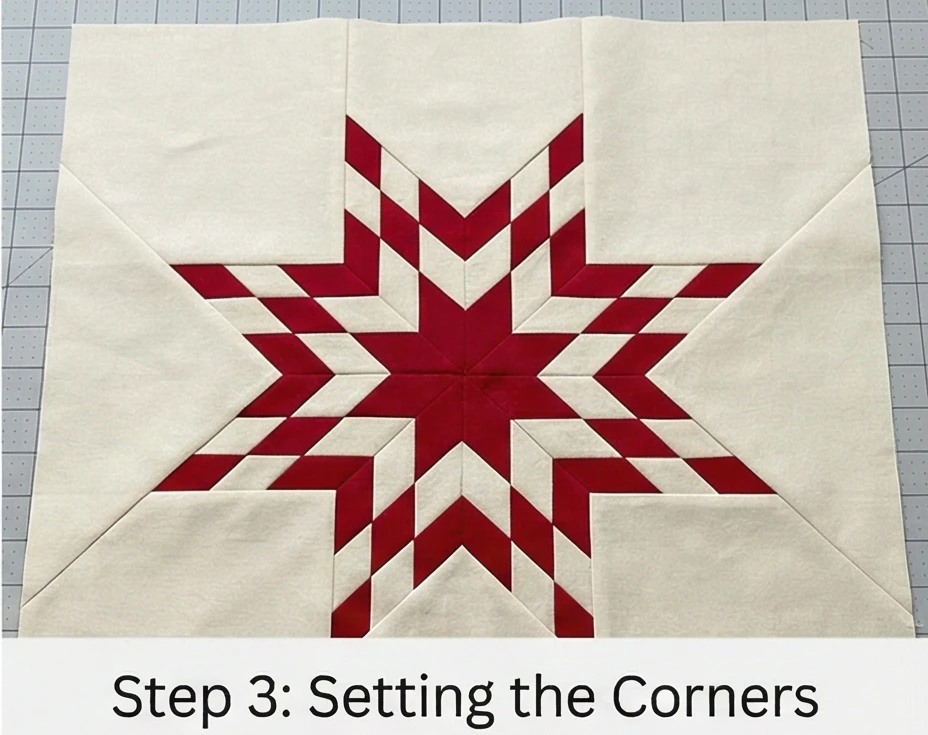
Step 4: Setting the Corners (Square it Up)
The star is currently an octagon or circle. We need a square.
- Cut: Cut 4 large squares of Fabric B (Cream) measuring 6 inches (or sized to fit your specific star scale). Cut 4 large triangles for the side setting pieces.
- Y-Seams: This pattern typically requires setting seams.
- Alternate Method (Appliqué): If Y-seams are too difficult for a small art piece, simply Appliqué the finished star onto a solid 21″ x 21″ square of Cream background fabric. Use a blind stitch to secure the outer edges. This is often cleaner for wall art.
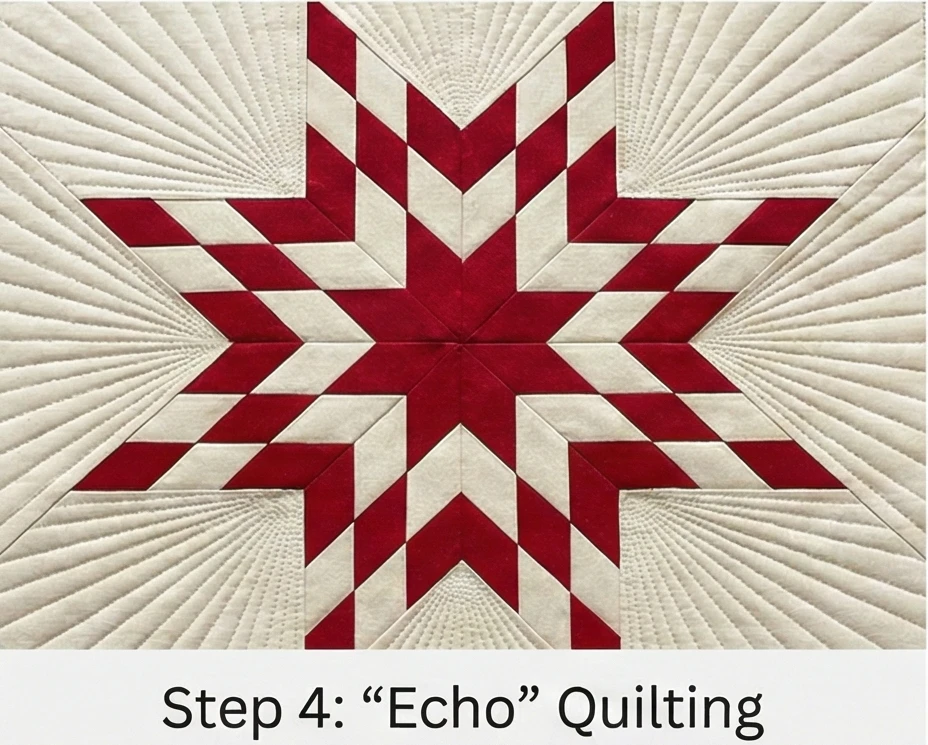
Step 5: “Echo” Quilting for Texture
Quilting adds the “crinkle” that identifies it as a vintage object.
- Sandwich: Remove all remaining paper. Layer Backing + Flannel + Top.
- Quilt:
- Echo: Using Cream Thread, quilt lines 1/4 inch apart radiating from the center, following the shape of the star points.
- Effect: The dense quilting lines look like ripples in water, adding significant texture that catches the light when hung on a wall.
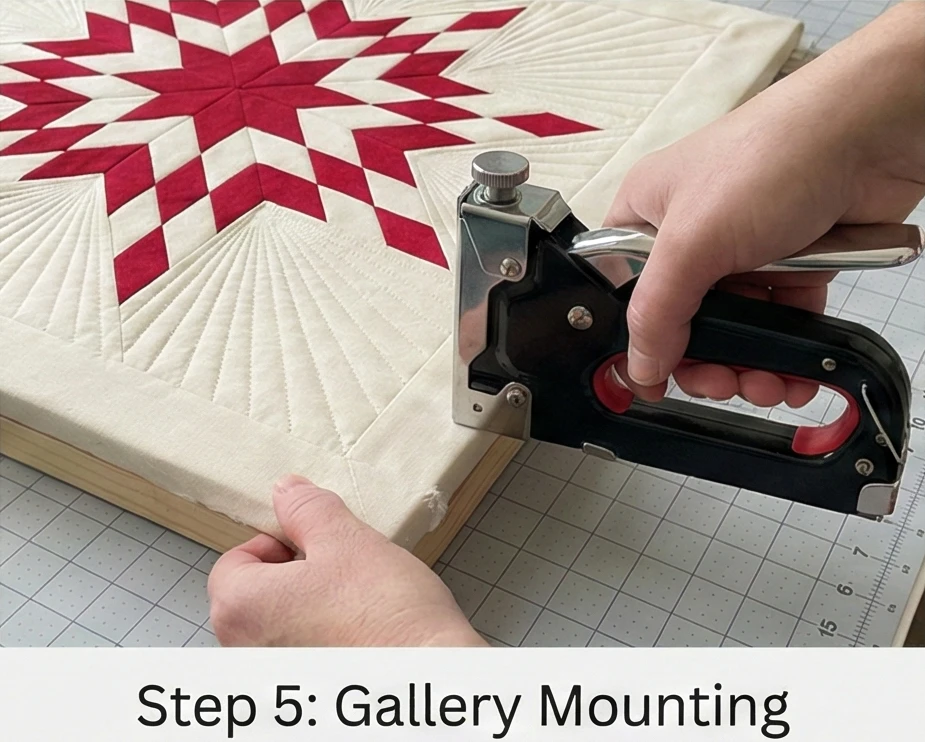
Step 6: Gallery Mounting
Skip the binding. We are treating this like a canvas.
- Stretch: Buy a 20″ x 20″ wooden canvas stretcher bar (from an art supply store).
- Wrap: Center the quilt over the wooden frame. Wrap the excess fabric around to the back of the wood bars (like stretching a painting).
- Staple: Staple the fabric to the back of the frame, pulling tightly to ensure the quilt is taut and square.
- Hang: The quilt is now a “floating” textile block. It looks modern and clean, highlighting the vintage red/white geometry without the visual clutter of a binding.
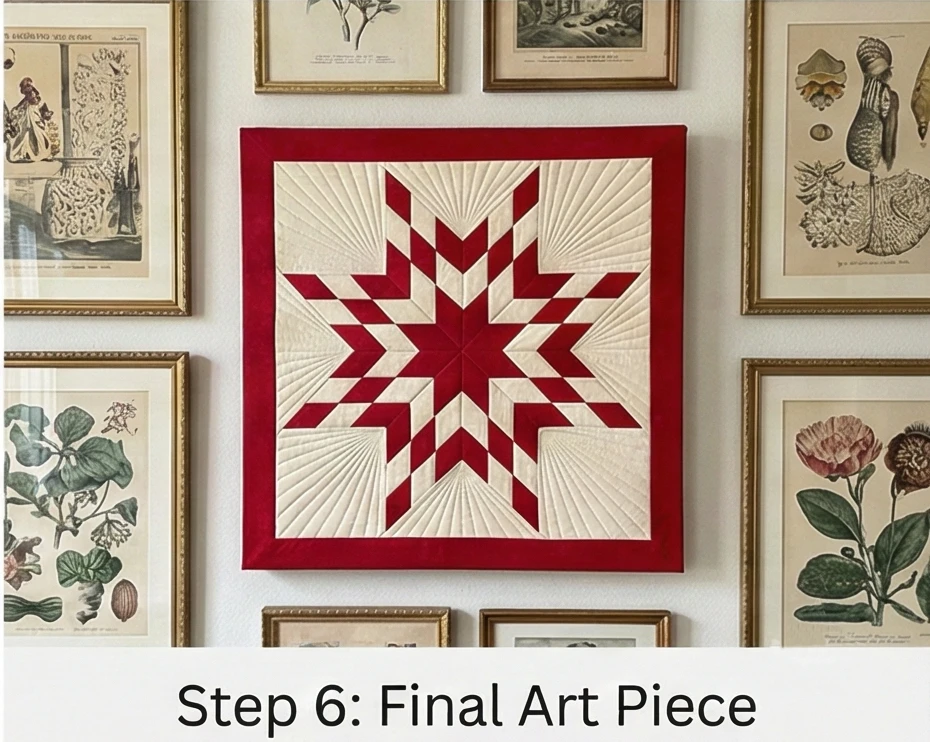
Usability Note: Mounting a quilt on a canvas stretcher is lighter than using a glass frame and prevents moisture from getting trapped against the fabric. It also allows the viewer to see the texture of the quilting stitches without the glare of glass.
Conclusion
Embracing these 20 Elegant Star Quilt Pattern Ideas is an investment in a home environment that balances visual drama with tactile luxury. We have journeyed through the quiet grandeur of Classic Ohio Star Master Bedrooms and the inviting warmth of Chic Star Couch Covers, seeing how these geometric forms can redefine a room’s character. These designs prove that the star motif is not just a traditional relic, but a versatile design element capable of sophisticated evolution. By choosing pieces like the Reversible Star Quilt Designs or the intricate Hunter’s Star Bed Quilts, you are selecting decor that offers both functional warmth and a lasting aesthetic appeal that defies the changing seasons.
The impact of these stellar designs is found in the daily rhythm of life they enhance. A Folded Star Cushion offers a textured spot to rest your head, while a Timeless Star Table Runner sets the stage for memorable gatherings. The presence of these patterns—specifically the Vintage-Inspired Star Art Designs or Miniature Seven Sisters on a shelf—adds a layer of narrative and craftsmanship to your interiors. They act as visual anchors, grounding the space in history while projecting a modern sense of elegance and comfort that makes a house feel truly like a home.
Let this exploration inspire you to welcome the timeless beauty of the stars into your daily surroundings. Whether you are crafting a Scrappy Star Throw for rustic comfort or commissioning a Statement Feathered Star Wall Hanging, you are engaging in a tradition of beauty that brings light and order to your personal space. These quilts serve as daily reminders of creativity and warmth, ensuring that your home remains a sanctuary of “Timeless Stellar Style”—a place where elegance and comfort shine brightly all year round.
