
20 Fun and Kid-Friendly Monster Mash on the Front Porch: Halloween Deck Decorations
Halloween doesn’t have to be all about heart-pounding frights and things that go bump in the night. For many of us, especially those with young children, the true spirit of the season is found in bright colors, goofy grins, and the pure joy of make-believe. I remember wanting my own little ones to experience the delight of a decorated home without the terror, transforming our porch into a place of wonder, not nightmares. Your deck or front porch is the perfect stage for a festive, friendly celebration that welcomes trick-or-treaters of all ages.
This is where the concept of a “Monster Mash” truly shines—a vibrant party of silly, smiling monsters and whimsical spooks who are more interested in candy than scares. By focusing on color, creativity, and a touch of goofiness, you can craft an enchanting Halloween display that is all treats and no tricks. Forget the gore and gloom; it’s time for a celebration that sparkles with fun.
This guide is designed to spark your imagination with 20 Fun and Kid-Friendly Monster Mash: Halloween deck decorations that won’t scare the little ones. Let’s get ready to build a monster-friendly party zone!
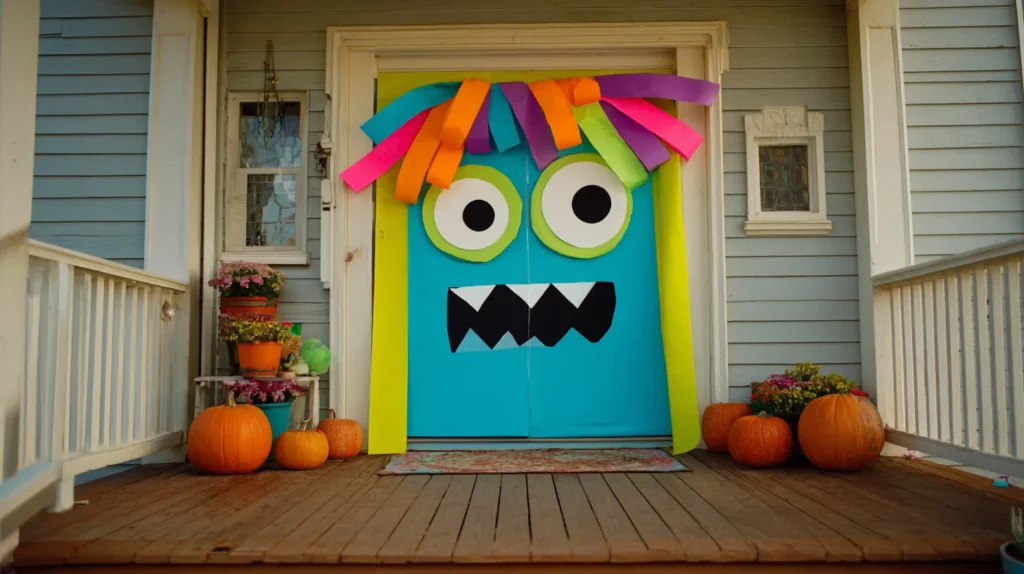
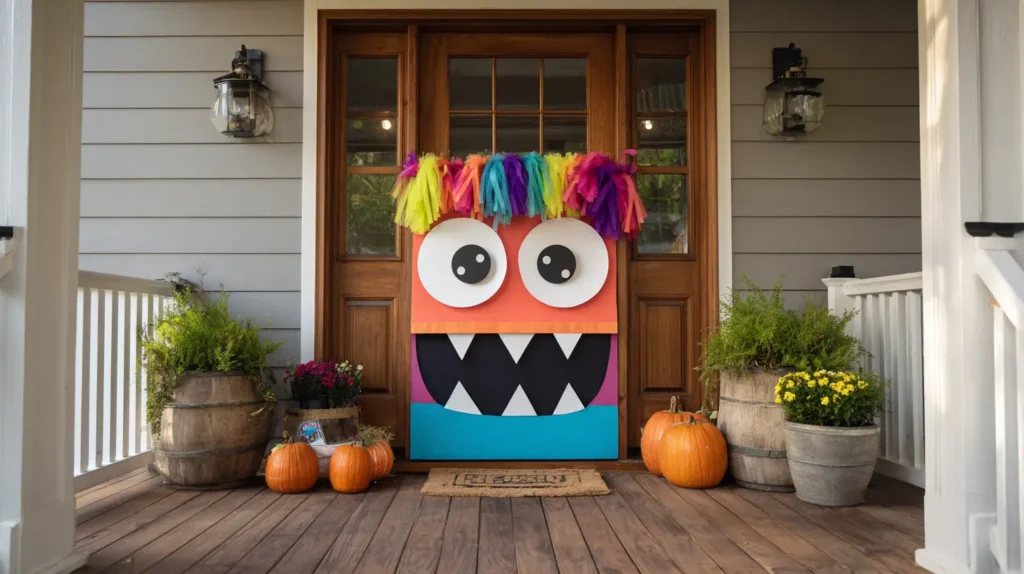
1. The Goofy Monster Door Guardian
Contents
- 0.1 1. The Goofy Monster Door Guardian
- 0.2 2. A Silly, Smiling Pumpkin Patch
- 0.3 3. Friendly Mummy-Wrapped Porch Columns
- 0.4 4. The Colorful Yarn Spiderweb Corner
- 0.5 5. A Cheerful Ghostly Greeting Line
- 0.6 6. Candy Corn Pathway to Fun
- 0.7 7. The Googly Eye Takeover
- 0.8 8. Frankenstein’s Friendly Welcome Sign
- 0.9 9. Witch’s Sweet Spell & Candy Station
- 0.10 10. Playful Monster Footprints
- 0.11 11. A Swarm of Silly, Smiling Bats
- 0.12 12. The Interactive Candy Monster
- 0.13 13. A Bubbling Cauldron of Magic
- 0.14 14. Hay Bale Monster Family
- 0.15 15. The “Spooktacular” Balloon Arch
- 0.16 16. Whimsical Wreath of Monsters
- 0.17 17. Glow Stick Magic Jars
- 0.18 18. Silly Scarecrow’s Sunny Perch
- 0.19 19. Ghostly Gourds and Painted Phantoms
- 0.20 20. Festive Music & Light Show
- 1 FAQs
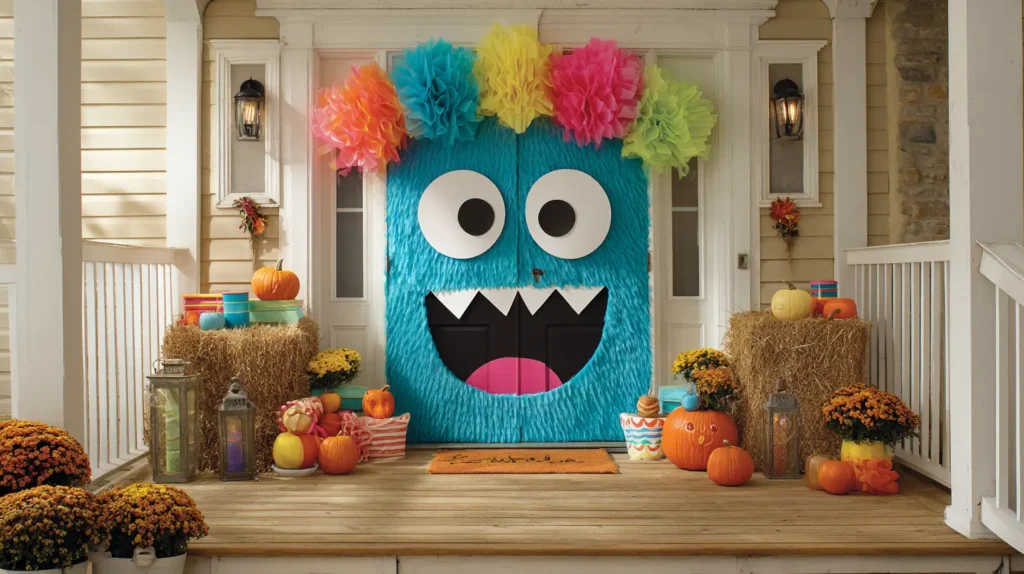
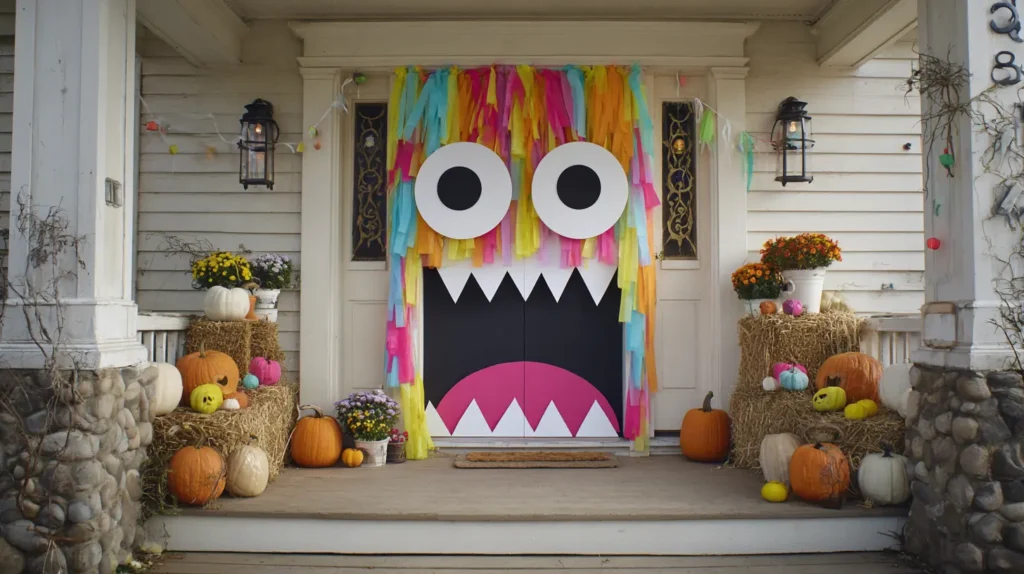
Transform your front door into the main character of your monster party! Imagine your door itself becoming a giant, goofy monster face, offering a cheerful welcome to every visitor. Use two large paper plates or white vinyl circles for giant, friendly eyes with big, black pupils looking in a silly direction. Above the eyes, attach colorful streamers or cut paper for a wild mane of monster hair. For the mouth, a long, black strip of paper cut in a zig-zag or wavy pattern creates a huge, toothy grin rather than a scary snarl. This simple transformation is an absolute delight for children, making the act of walking up to the door feel like meeting a friendly giant. It sets a playful tone for your entire porch and is a fantastic photo opportunity for trick-or-treaters.
- Use painter’s tape or removable adhesive hooks to attach your decorations without damaging your door’s paint.
- Get your kids involved in creating the monster’s features; let them choose the hair color and draw the silly eyes.
- Match the monster’s “hair” color to your other decorations, like your pumpkins or wreath, for a cohesive look.
- Consider using a different color for your door monster each year to keep the tradition fresh and exciting.
- If you have a storm door, you can create the monster on the inner door, protecting it from the elements.
Pro Design Tip: Add some three-dimensional elements to your monster door. Use painted foam cones for silly horns at the top or a pool noodle cut in half for big, puffy monster eyebrows.
Budget Consideration: This is one of the most budget-friendly ideas! All you need are basic craft supplies like construction paper, streamers, and paper plates, most of which you may already have at home.
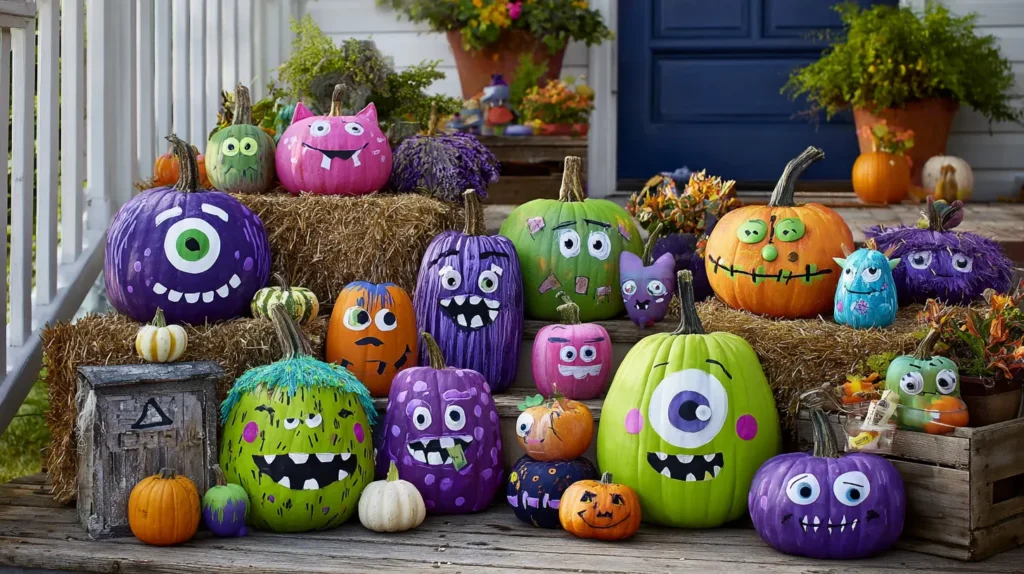
2. A Silly, Smiling Pumpkin Patch

Reimagine the traditional jack-o’-lantern and create a cheerful pumpkin patch populated by a host of silly, smiling monsters. Instead of carving scary faces, grab your paintbrushes and let your creativity run wild. Picture a short, stout pumpkin painted bright purple with one giant googly eye and a wide, happy grin. Next to it, a tall, thin pumpkin painted green could have three eyes and a silly, stitched mouth. Use a variety of pumpkin shapes and sizes to create a diverse monster family. These painted pumpkins are completely kid-safe (no carving required!) and allow for endless personality. Arrange them in clusters on your porch steps or nestled in a hay bale corner to create a vibrant and welcoming patch of monster friends.
- Use acrylic craft paint for the best coverage and durability on pumpkin surfaces.
- Attach craft accessories like googly eyes, pipe cleaner antennae, or felt hats to give your monsters more character.
- Let your kids paint their own small pumpkins to add to the patch; embrace the charmingly imperfect results!
- Consider a “monster theme” for your patch, like all one-eyed monsters or monsters with funny hats.
- Apply a clear acrylic sealant spray over your finished pumpkins to protect them from light rain and morning dew.
Pro Design Tip: Create a “vampire” monster pumpkin by painting it white, adding a black widow’s peak hairline, and attaching plastic vampire fangs to its goofy grin. It’s more delightful than dreadful.
Budget Consideration: Painting is much cheaper than buying elaborate carving kits. You can also use inexpensive gourds and squashes to add a variety of shapes and sizes to your silly monster family.
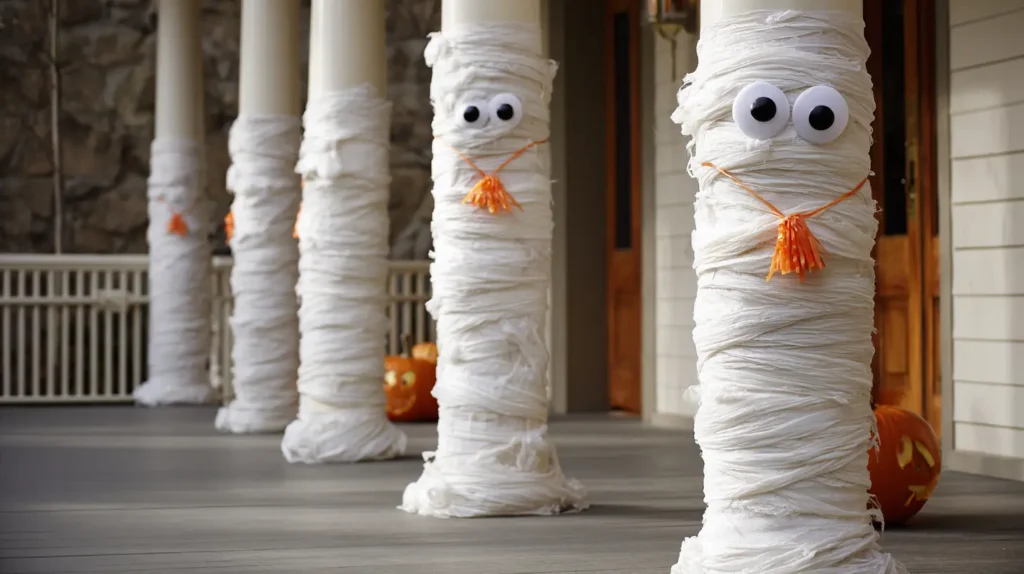
3. Friendly Mummy-Wrapped Porch Columns
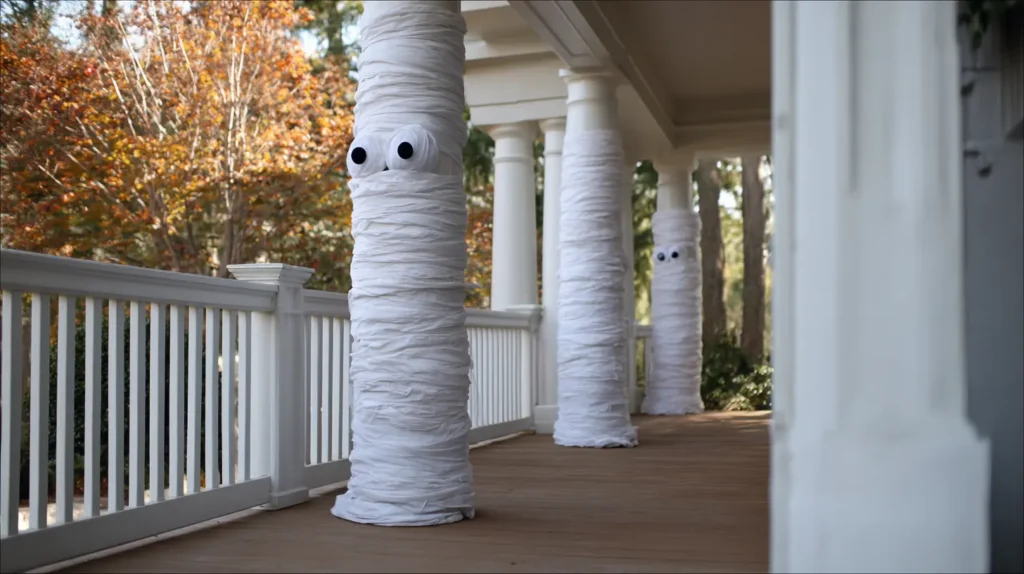
If your porch has columns or posts, you have the perfect canvas to create some friendly, life-sized mummy friends. Imagine your porch columns wrapped from top to bottom in white streamers or torn strips of an old white sheet, creating a classic mummy look. About halfway up, leave a small gap in the wrapping and attach a pair of giant, silly googly eyes to make it look like a goofy mummy is peeking out. The effect is charmingly clumsy, as if the mummy had wrapped itself poorly. It’s a large-scale decoration that has a huge visual impact but is completely devoid of scares. These gentle giants will stand guard over your porch, offering a playful and slightly goofy welcome.
- Use wide medical gauze or cheesecloth for a more textured, authentic mummy look that still feels soft and not scary.
- Secure the beginning and end of your wrapping material with clear packing tape or a few discreet staples.
- Make the googly eyes oversized for a more comical, cartoonish effect.
- Don’t wrap the material too tightly or perfectly; a slightly messy, uneven wrap looks more charming.
- Consider adding a festive orange or purple bow tie to one of your mummies for an extra touch of fun.
Pro Design Tip: For a pop of color at night, tuck a string of purple or orange LED lights underneath the final layer of wrapping. This will give your mummies a magical, internal glow after dark.
Budget Consideration: White crepe paper streamers are incredibly inexpensive, and you can get a lot of coverage from a single roll. Old bedsheets from a thrift store can also be torn into strips for a more fabric-like texture.
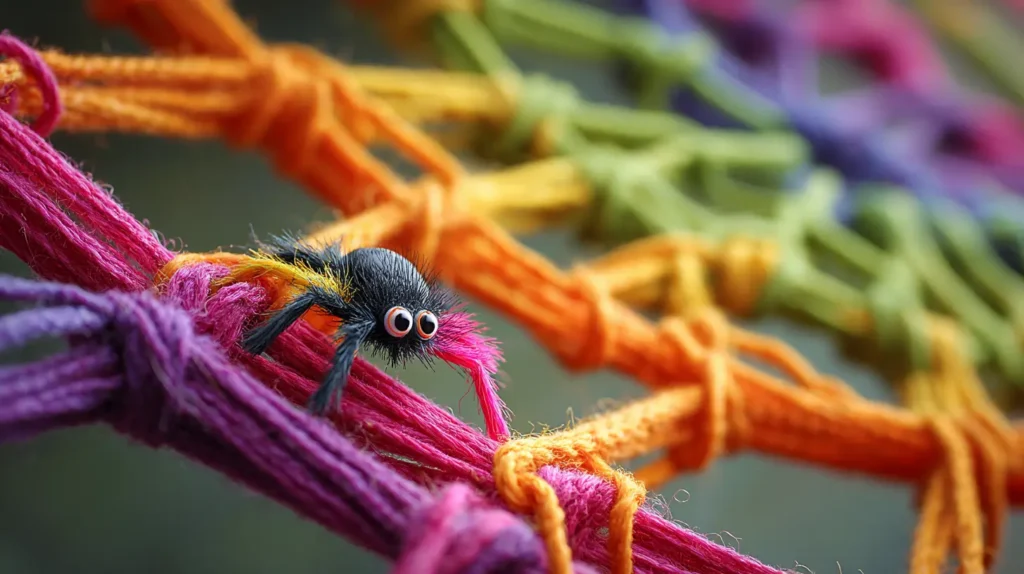
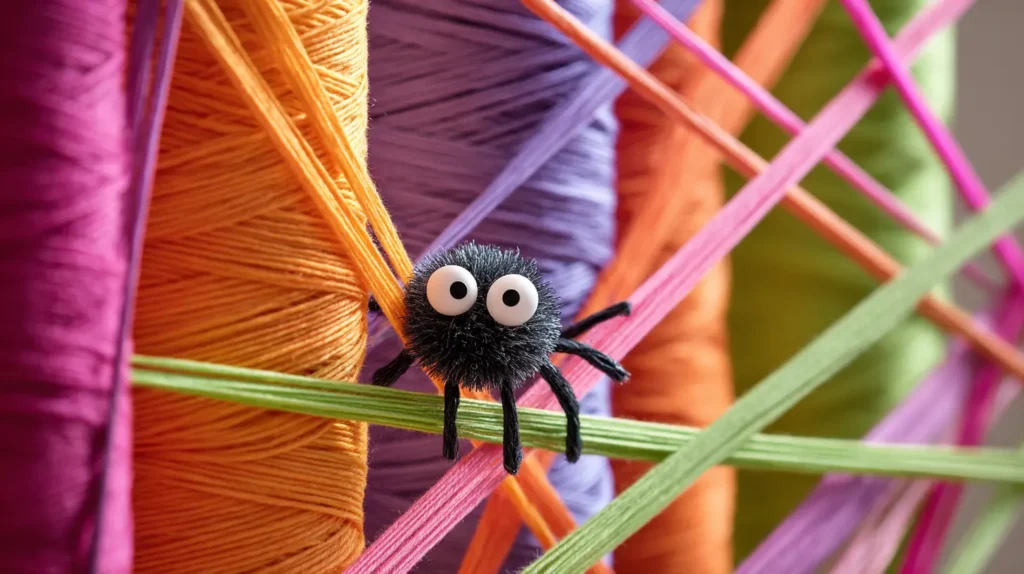
4. The Colorful Yarn Spiderweb Corner
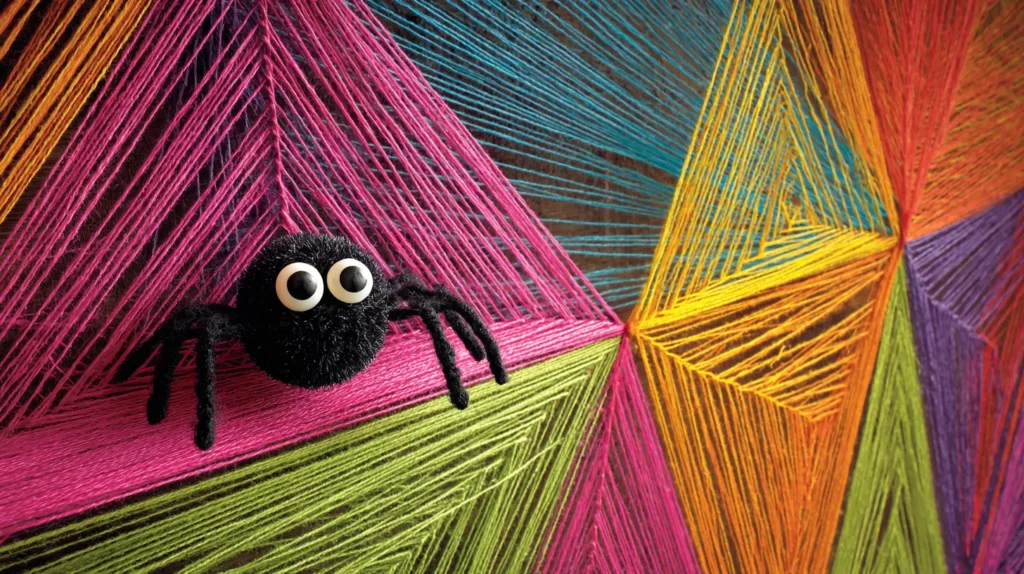
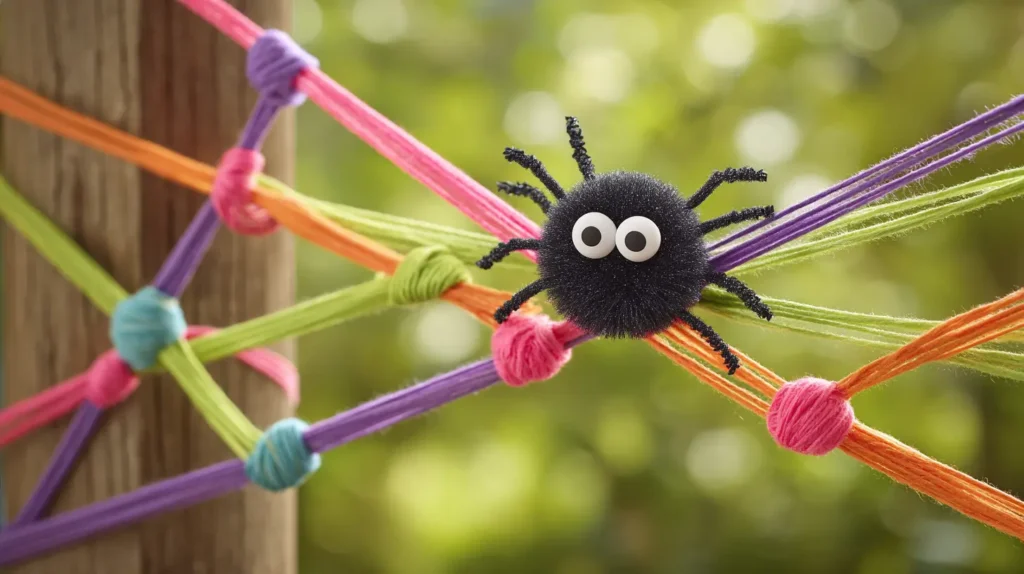
Spiders don’t have to be scary! Reimagine the classic spiderweb by creating a vibrant, colorful web in a corner of your porch. Instead of sticky, fake white webbing, use thick, colorful yarn in bright oranges, purples, greens, and pinks. Weave a large, geometric web between a porch column and the wall, or in the corner of a railing. The bright colors immediately signal that this is a place for fun. At the center of the web, place a friendly, homemade spider. Craft a spider from a fuzzy black pom-pom, give it some colorful pipe cleaner legs, and most importantly, glue on a pair of big, silly googly eyes. This arachnid is clearly more interested in partying than pouncing.
- Use removable adhesive hooks as anchor points for your yarn web to avoid damaging your walls or railings.
- Let the kids help weave the web; it’s a fun and easy motor skills activity.
- Create several small, colorful webs in different corners for a more immersive effect.
- Hang small, lightweight plastic balls wrapped in yarn from the web to look like colorful spider egg sacs.
- Match the yarn colors to the rest of your porch decor for a polished, cohesive theme.
Pro Design Tip: For extra sparkle, use a glittery or metallic yarn for some of the web’s strands. When the porch light hits it at night, the web will shimmer and shine.
Budget Consideration: Yarn and pipe cleaners are very affordable craft supplies. This is a fantastic way to use up leftover yarn from other projects to create a high-impact decoration for pennies.
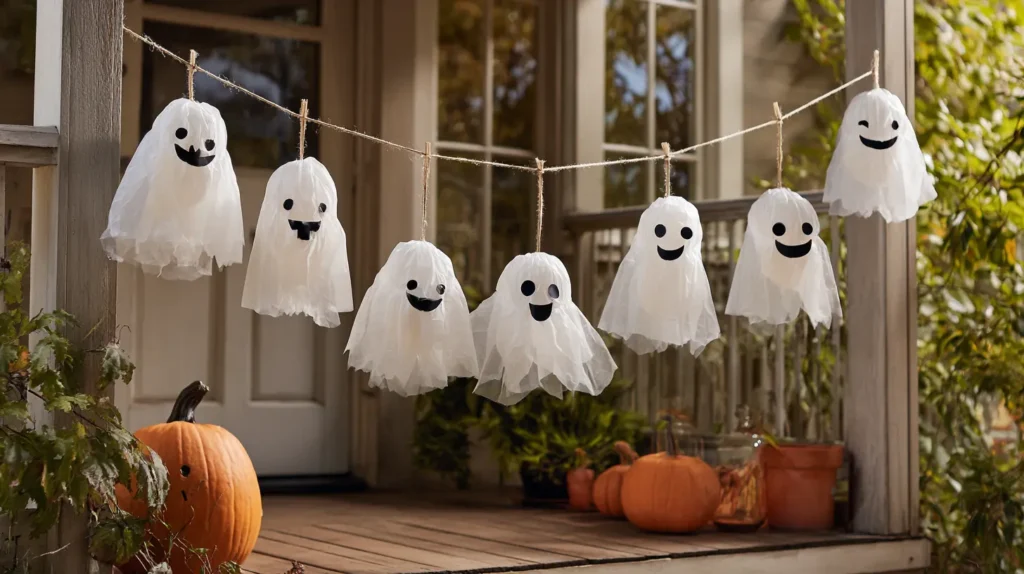
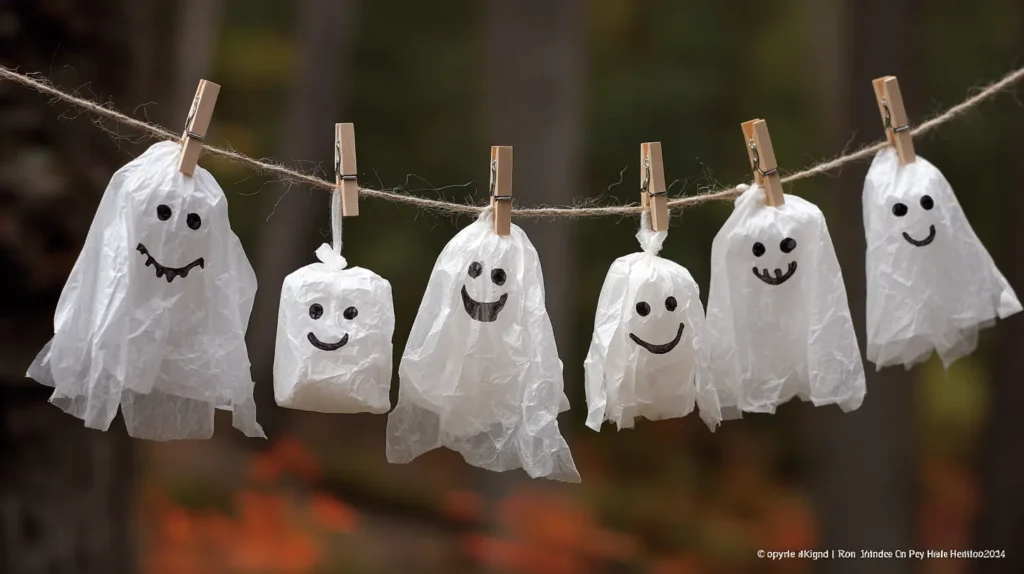
5. A Cheerful Ghostly Greeting Line
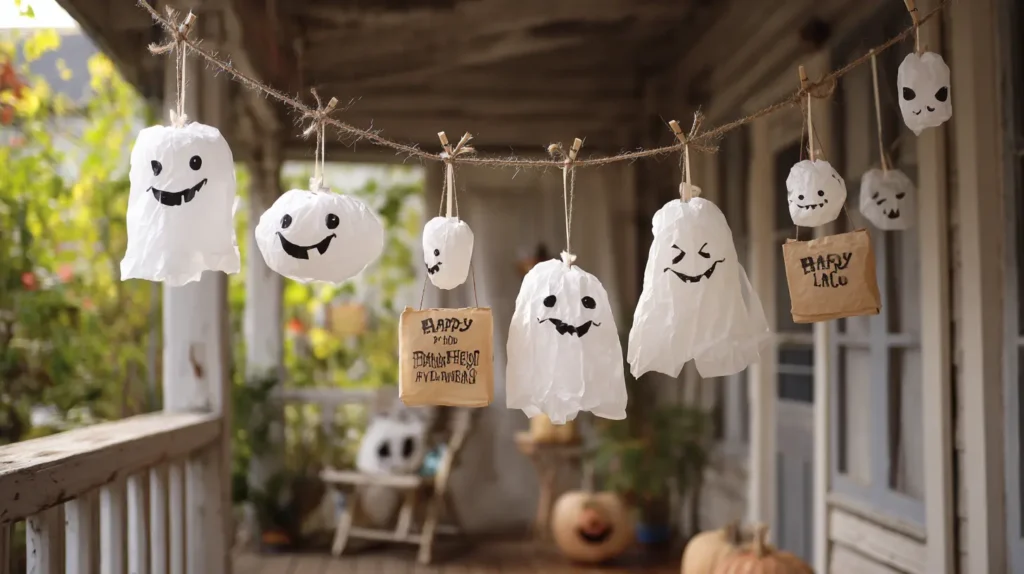
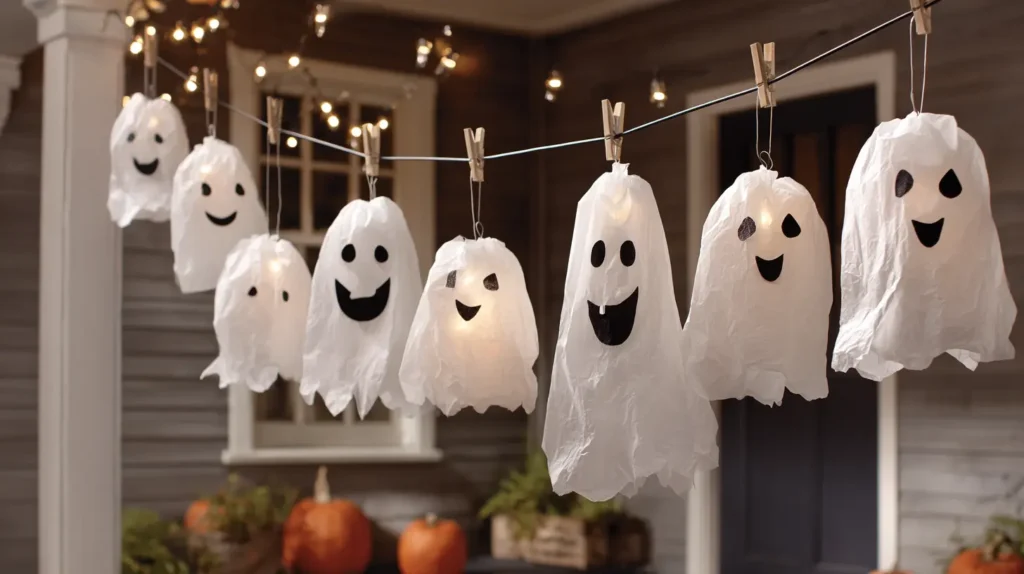
Banish the scary specters and invite a lineup of cheerful, friendly ghosts to float on your porch. Picture a clothesline strung across your deck, from which several small, smiling ghosts hang, swaying gently in the breeze. These aren’t your typical tattered phantoms; they are crafted from simple white plastic bags, balloons, or even lollipops, all draped in tissue paper. Use a black permanent marker to draw big, happy smiles and friendly, round eyes on each one. They can be hung from your porch ceiling, a railing, or a string stretched between two points. Their gentle, bobbing movement is hypnotic and sweet, creating an atmosphere of gentle, Casper-like fun rather than a haunting.
- Create ghosts of varying sizes for a more dynamic, interesting display.
- For a simple ghost, drape a white tissue or fabric square over a lollipop and tie a ribbon around the “neck.”
- Use battery-operated balloon lights inside white balloon ghosts to make them glow softly at night.
- Hang your ghosts at varying heights to make them look like they are floating and dancing.
- Write friendly messages like “Boo!” or “Welcome!” on the ghosts in a playful font.
Pro Design Tip: Create a “ghost family” by making a large “parent” ghost from a white pillowcase and several smaller “baby” ghosts from tissues to hang alongside it.
Budget Consideration: This idea is incredibly cheap. Lollipops, tissues, plastic bags, and markers are all you need to create a whole host of happy haunts to greet your visitors.
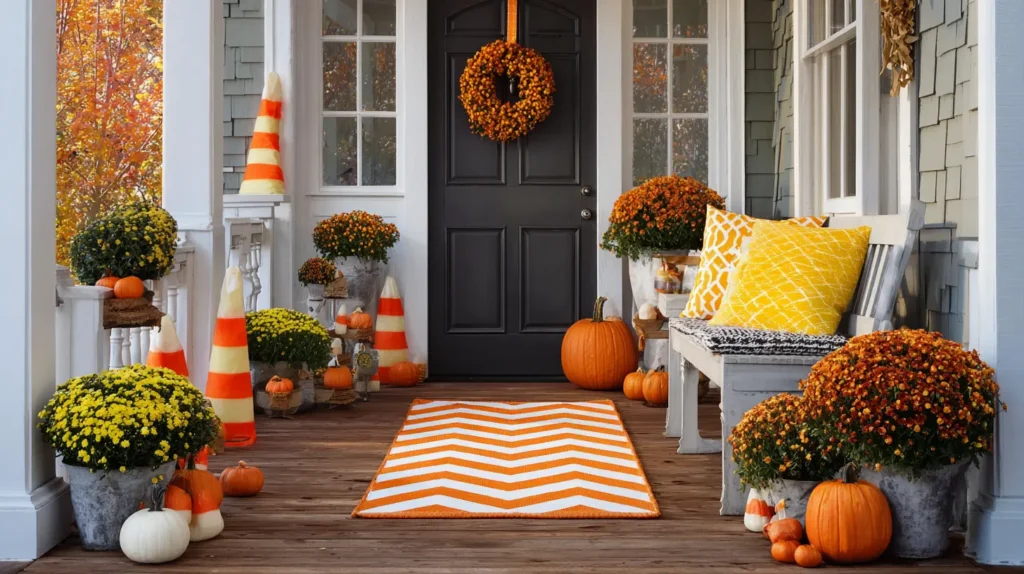
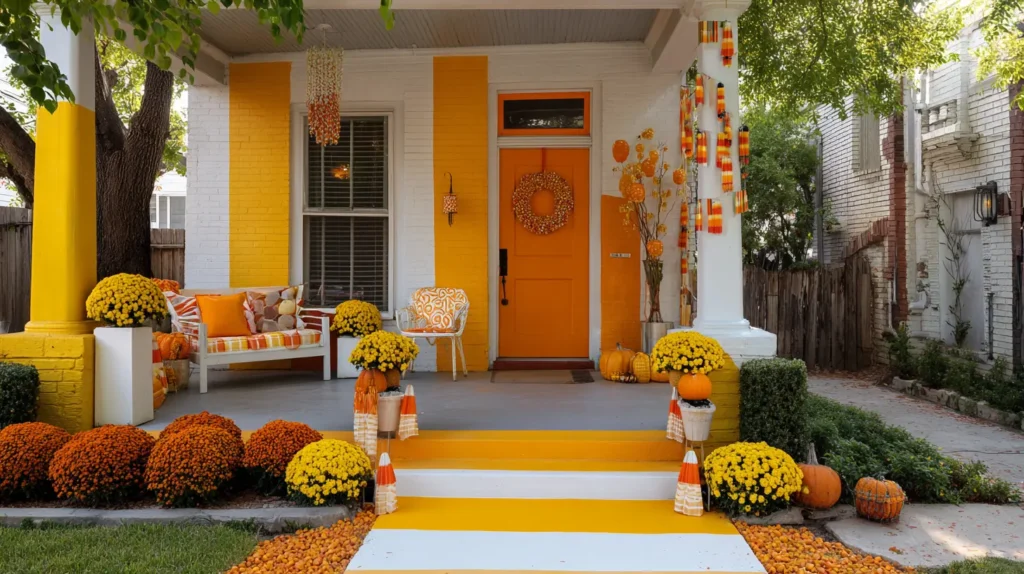
6. Candy Corn Pathway to Fun
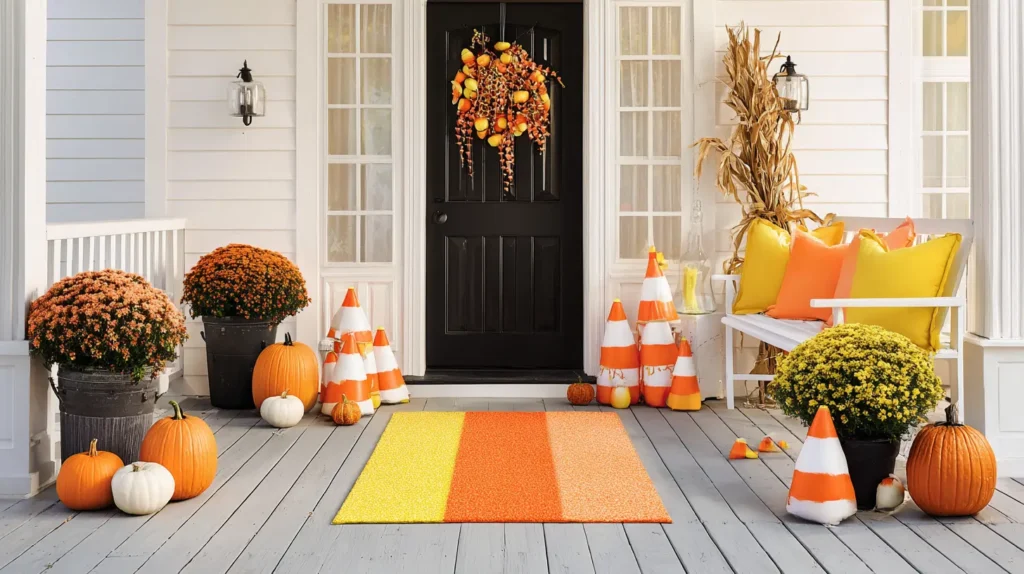
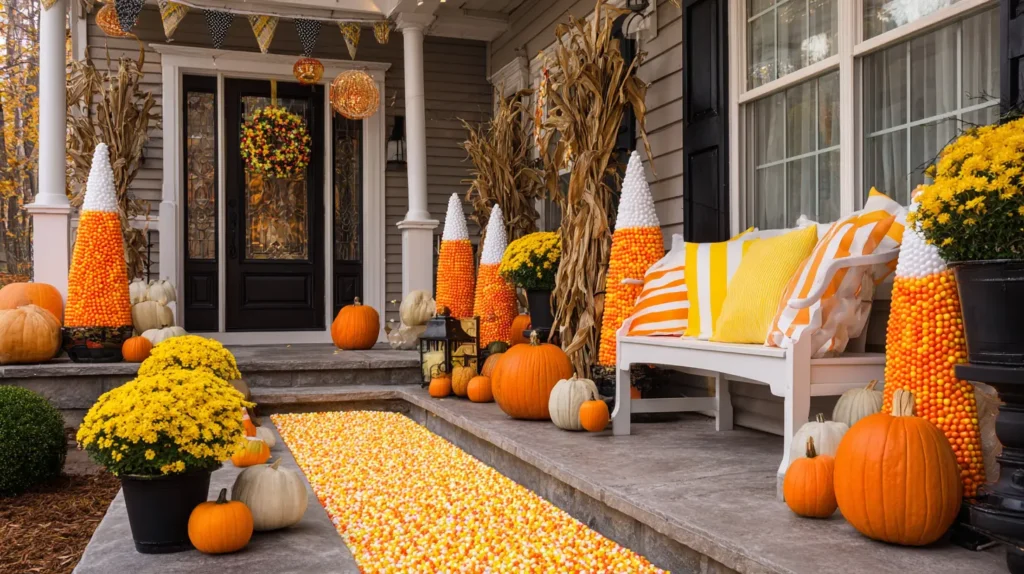
Guide your little ghouls and goblins to your door along a pathway that looks good enough to eat! Imagine your walkway lined with giant, oversized candy corns, standing like cheerful, colorful cones. These can be crafted from orange safety cones turned upside down and painted with yellow and white stripes, or made from large sheets of rolled poster board. Their bright, iconic colors—sunny yellow, vibrant orange, and clean white—create a magical, candy-land entrance. This decoration is pure, sweet fun and transforms the simple act of walking to your door into a joyful journey through a Halloween wonderland.
- Use weather-resistant paint to ensure your candy corns can withstand a bit of autumn dew.
- Place small battery-operated lights or glow sticks inside the cones to light up the path at night.
- Arrange the candy corns in a slightly whimsical, zig-zag pattern rather than a straight line for a more playful look.
- Make sure they are placed to the side of the walkway, leaving plenty of room for little ones to walk safely.
- You can also create smaller versions to line the edges of your porch steps.
Pro Design Tip: Add a touch of sparkle by sprinkling a fine layer of yellow or orange glitter over the paint while it’s still slightly tacky. The glitter will catch the light, adding an extra touch of magic.
Budget Consideration: Create your candy corn markers by cutting large triangle shapes from white foam board or cardboard, painting them with the classic stripes, and attaching them to small garden stakes.
7. The Googly Eye Takeover
Unleash a dose of pure silliness by making it seem as if your entire porch has sprung to life! This idea is simple yet brilliantly effective: place pairs of googly eyes on everything. Imagine your porch bushes staring back with wide, wobbly eyes. Picture the door knocker, your mailbox, and even your flower pots suddenly able to watch your guests with comical curiosity. The unexpected animation of these everyday objects is guaranteed to bring giggles. Use a variety of sizes —from tiny eyes on a single leaf to giant ones on your front door —to create the feeling of a whole host of hidden, friendly creatures peeking out from every nook and cranny.
- Use self-adhesive googly eyes for easy application on smooth surfaces.
- For plants and bushes, use a dab of non-toxic, removable craft glue to attach the eyes without harming the foliage.
- Create a “peek-a-boo” effect by placing eyes just inside a mailbox slot or behind a porch column.
- Place a pair of extra-large googly eyes on your main welcome wreath for an instant funny face.
- Let your kids take the lead on this one; their imaginative placement of the eyes will add to the fun.
Pro Design Tip: For a huge impact, purchase giant googly eyes (a foot wide or more) and place them on a large bush or even on the garage door. The oversized silliness is guaranteed to elicit a laugh.
Budget Consideration: Googly eyes are incredibly cheap and can be bought in large, multi-size packs at any craft store or dollar store, making this a very low-cost, high-reward decoration.
8. Frankenstein’s Friendly Welcome Sign
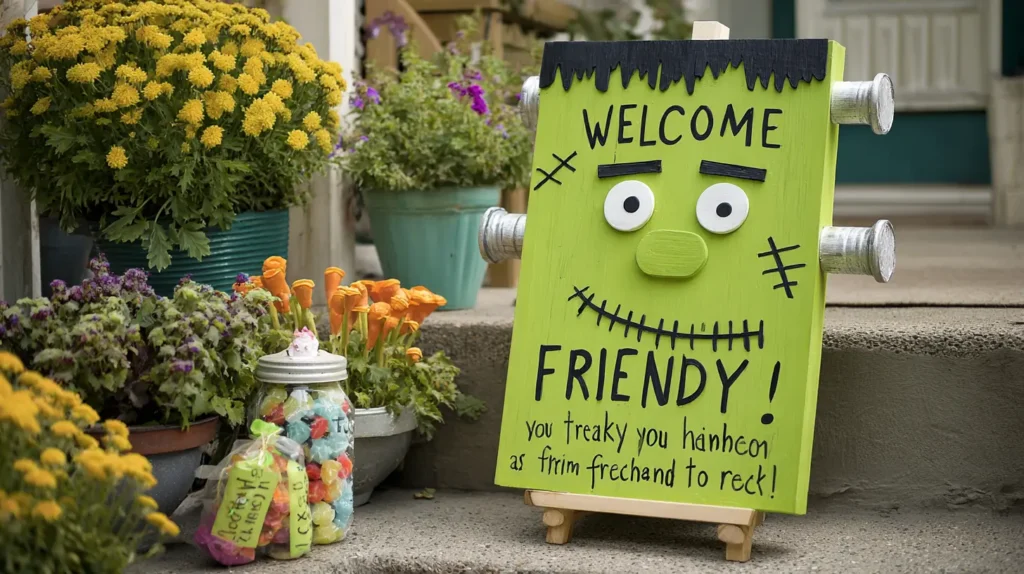
Welcome guests with a familiar monster who’s clearly more friend than fiend. Craft a large, life-sized welcome sign in the shape of Frankenstein’s monster’s head. Picture a big, green, rectangular head made from painted wood or sturdy cardboard. Give him some sleepy, half-closed eyes, a goofy, stitched-together grin, and a few haphazard black stitches drawn on with a marker. A tuft of black yarn or craft fur for his hair and two silver-painted bottle caps or corks for his neck bolts complete the look. You can write a cheerful “Welcome, Ghouls and Goblins!” or “Trick-or-Treat!” across his forehead. This friendly giant offers a classic Halloween character in a completely non-threatening, lovable way.
- Prop the sign up on a small easel or lean it against a porch railing near the entrance.
- Use bright lime-green paint to keep the monster feeling fun and not too ghoulish.
- Add a single, charming felt flower tucked behind one of his neck bolts for a touch of unexpected sweetness.
- Make the sign interactive by leaving a space for writing the day’s “candy forecast.”
- Get the kids to help paint his silly face and glue on his hair.
Pro Design Tip: Create a three-dimensional effect by making the neck bolts from painted styrofoam cups cut in half and glued to the sides of the sign.
Budget Consideration: A large cardboard box from an appliance or piece of furniture is the perfect free material for creating this sign. Craft paint and yarn are also very affordable.
9. Witch’s Sweet Spell & Candy Station
Transform a small table into a friendly witch’s candy station, where the only spells being cast are sweet ones! Imagine a table draped in a purple or orange tablecloth, centered around a “cauldron” (a simple black bucket or bowl will do), overflowing with candy. Next to it, place a sparkly, pointed witch hat and a whimsical broom made from a painted stick and some straw. Create fun, handwritten signs for the candy jars, labeling them “Giggle Potion” (Skittles), “Warts-Be-Gone” (gumballs), or “Sweet Dreams Elixir” (chocolates). This setup is not just a decoration but a fun, interactive way to present your treats, making it feel like a magical candy shop.
- Use a variety of glass jars and bowls in different shapes and sizes for your candy “potions.”
- Drape some battery-operated purple or orange string lights around the table for a magical glow.
- Add a few friendly props, like a plush black cat or a smiling plastic frog.
- Create a fun backdrop with a sign that reads, “The Witch is in… for candy!”
- For a non-food option, fill the cauldron with small toys, glow sticks, or bubbles.
Pro Design Tip: For a safe but magical “bubbling” cauldron effect, place a small bowl of water with a few pieces of dry ice inside your main candy cauldron. The fog will swirl around the candy, creating an enchanting effect.
Budget Consideration: Use a plastic cauldron or paint a large plastic planter black. The candy labels can be printed for free online or handwritten on simple tags for a rustic look.
10. Playful Monster Footprints
Create a sense of playful mystery by having a set of giant, colorful monster footprints leading up your walkway and onto your porch. Imagine oversized, cartoonish footprints with three big toes, cut from colorful craft foam or construction paper. You could have a set of purple footprints leading to the left, and a set of green ones leading to the right, as if two silly monsters just had a race to your door. The trail creates a fun narrative for kids to follow, building anticipation and excitement as they approach. It’s a simple decoration that transforms your walkway into an interactive part of the Halloween fun.
- Use double-sided outdoor tape to secure the footprints to your walkway so they don’t blow away.
- Choose bright, non-scary colors like orange, purple, lime green, or even sparkly glitter paper.
- Create a winding, silly path rather than a straight line to make the trail more fun to follow.
- Let the footprints lead to a specific spot, like your friendly monster door or the candy bowl.
- If you’re feeling adventurous, have the last few footprints go right up the side of your house!
Pro Design Tip: Use sidewalk chalk to draw the monster footprints directly onto your concrete walkway. You can create more detailed, textured prints this way, and they wash away easily after Halloween.
Budget Consideration: Construction paper or craft foam is very inexpensive. You can find a monster footprint template online to print and trace for free, ensuring all your prints are perfectly uniform.
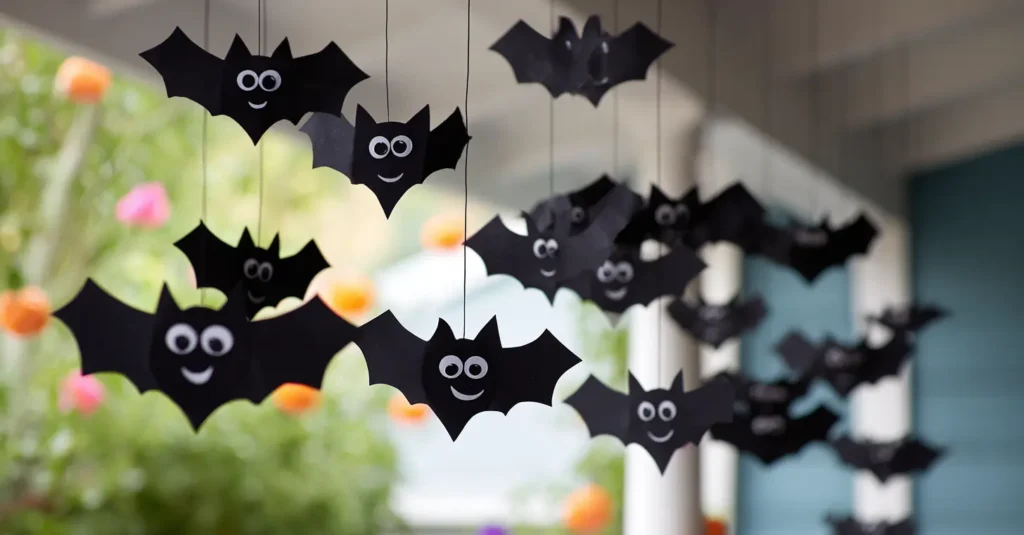
11. A Swarm of Silly, Smiling Bats
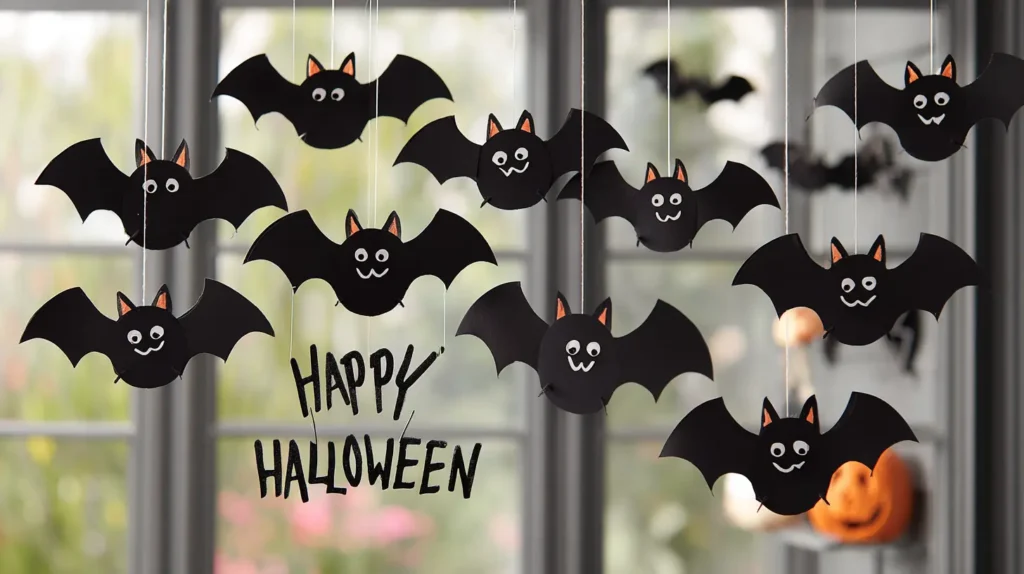
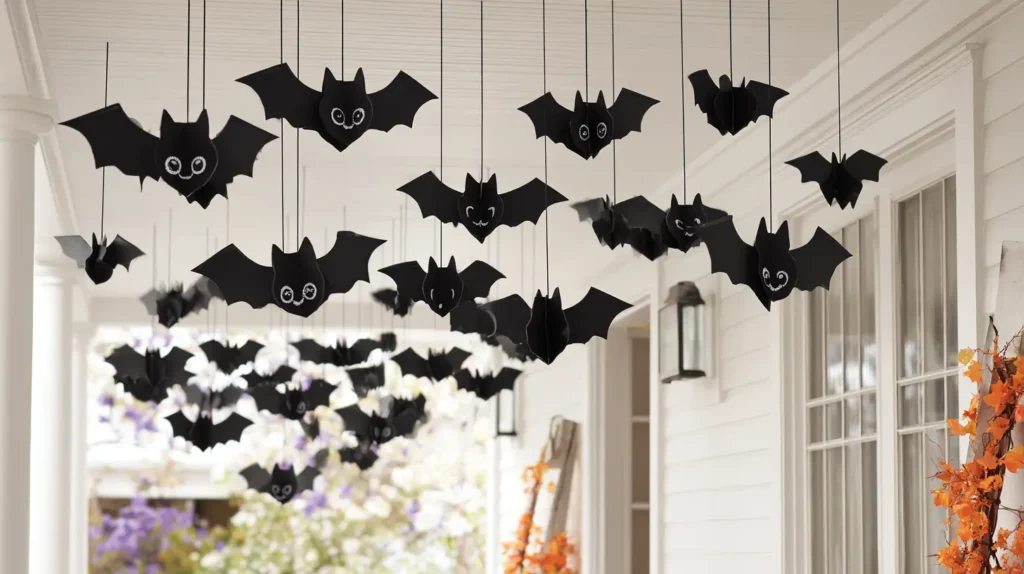
Fill the air with a friendly flock of bats that are all smiles! Instead of menacing silhouettes, picture dozens of black paper bats with big, white cartoon eyes and cheerful little grins. Cut bat shapes from black cardstock and use a white paint pen or chalk marker to give each one a unique, happy expression. Suspend them with clear fishing line from your porch ceiling or awning at varying heights, so they appear to be fluttering in a happy, swirling cloud. Their gentle spinning in the breeze will create a sense of whimsical movement, turning a typically spooky creature into a delightful part of your Monster Mash.
- Fold the wings of the bats slightly to give them a more three-dimensional, in-flight appearance.
- Hang some bats individually and others in small clusters of two or three.
- For a pop of color, make a few bats from purple or orange paper instead of black.
- Use removable adhesive dots or painter’s tape to stick some bats directly to your porch walls or windows.
- Involve the kids in drawing the silly faces on each bat before you hang them up.
Pro Design Tip: Create a “bat chandelier” by hanging the bats in a spiral pattern from an old embroidery hoop or wire wreath frame suspended from the center of your porch ceiling.
Budget Consideration: Black cardstock is very affordable, and fishing line is nearly invisible and cheap. This is a high-impact visual that costs very little to create.

12. The Interactive Candy Monster
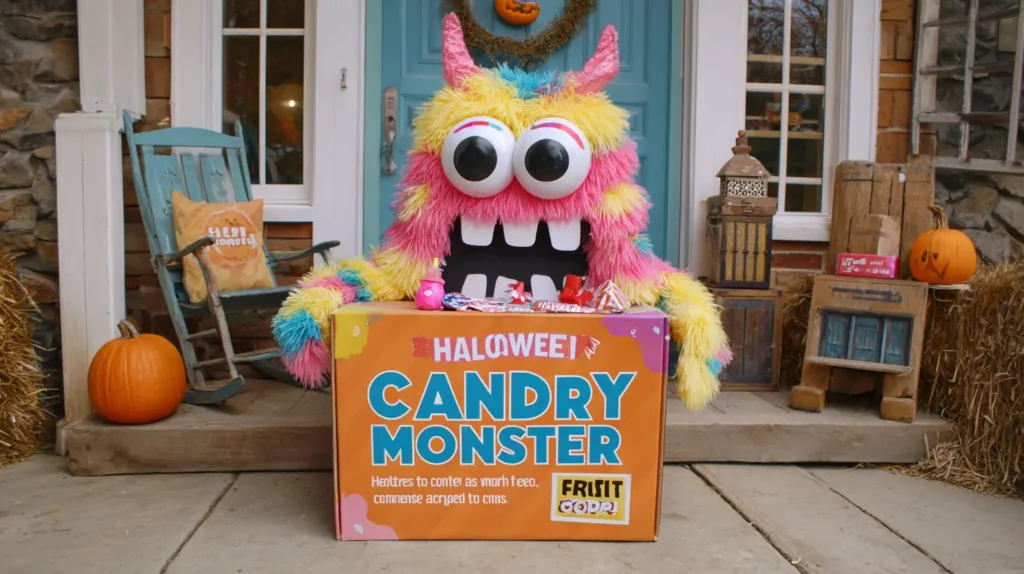
Make getting candy an adventure with an interactive candy monster! Imagine a large, colorfully painted cardboard box transformed into a friendly monster. Give it big, goofy eyes, silly yarn hair, and a huge, open mouth. Inside the box, you or another family member can sit, hidden from view, and hand out candy through the monster’s mouth as trick-or-treaters approach. The surprise and delight on a child’s face when a friendly hand emerges from the monster’s mouth with a treat is priceless. It turns a simple candy exchange into a memorable, personal, and completely fun interaction.
- Cut a comfortable-sized hole for the mouth, ensuring there are no sharp cardboard edges.
- Paint the monster in bright, cheerful colors and add fun textures like pom-pom warts or felt spots.
- Place a comfy stool inside the box for the candy-giver.
- Add a friendly sign next to the monster that says, “Feed me candy wrappers!” or “I’m hungry for trick-or-treaters!”
- Ensure the person inside can see out, perhaps through small eye holes hidden in the design.
Pro Design Tip: Rig a small bell on a string that passes through a hole in the box. Place a sign that says “Ring for Treats!” so kids can announce their arrival to the hidden monster.
Budget Consideration: This is the ultimate recycling project! A large appliance box is the perfect free starting point. The rest can be decorated with leftover paint and craft supplies.
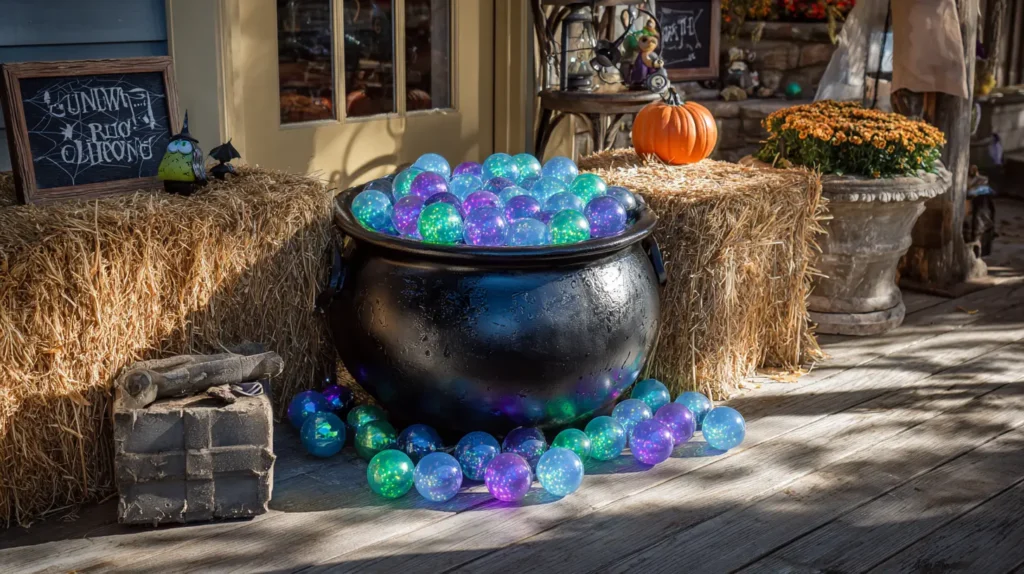
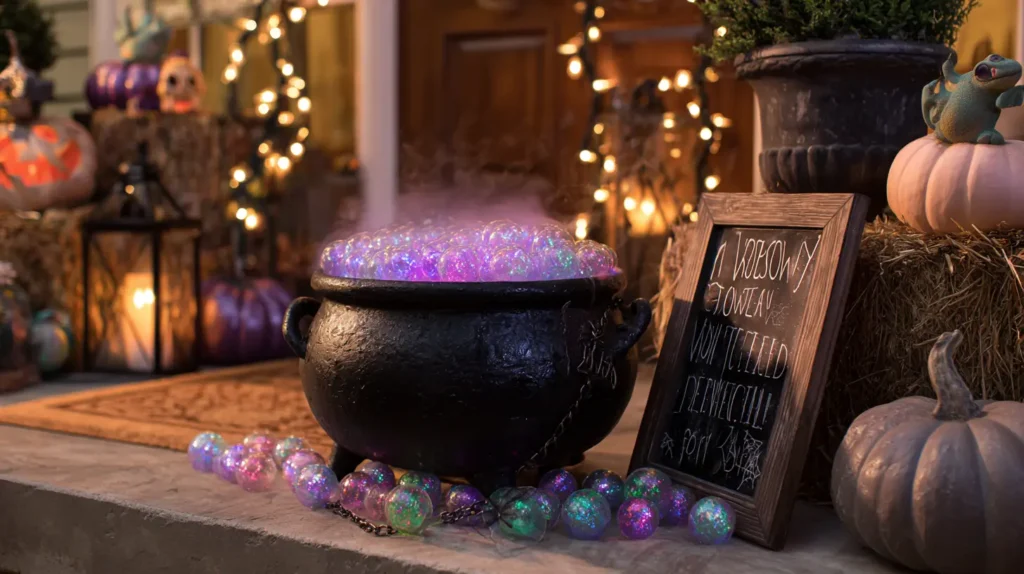
13. A Bubbling Cauldron of Magic
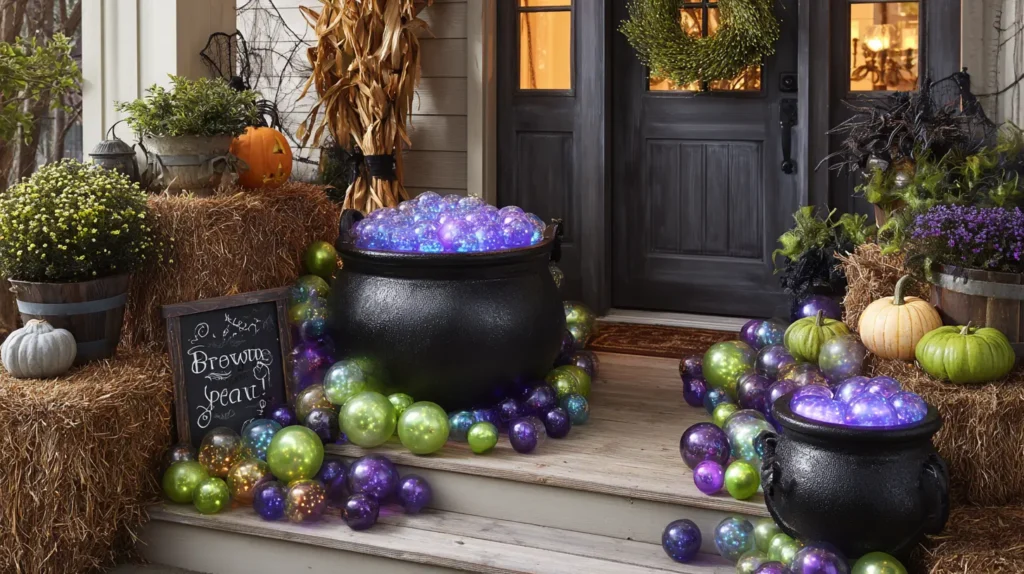
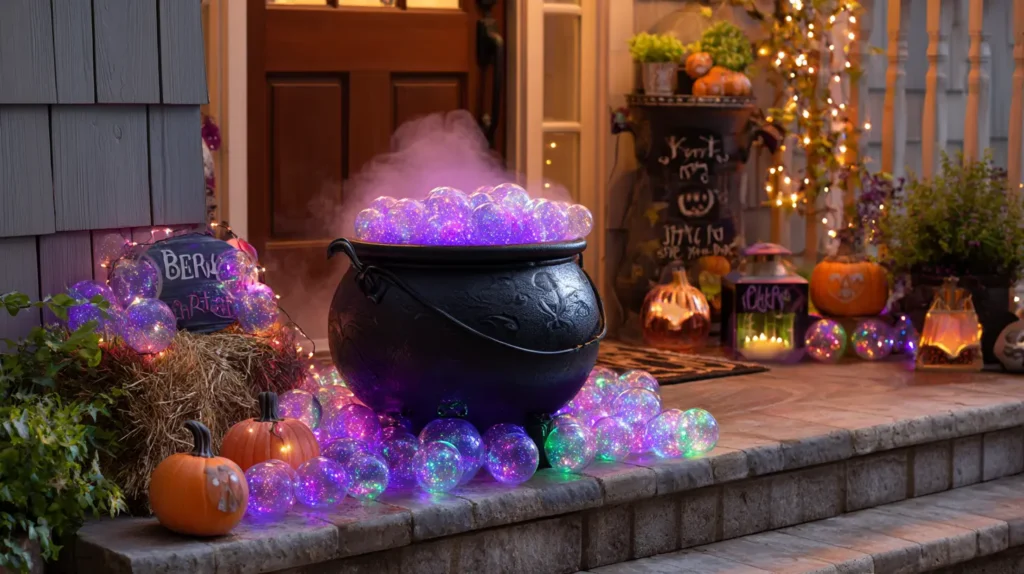
Create an enchanting centerpiece with a cauldron that bubbles with magic, not toil and trouble. Find a large black plastic cauldron and fill it with clear plastic ball pit balls or iridescent Christmas ornaments to create the look of shimmering, magical bubbles. Weave strings of green or purple LED lights throughout the balls to make the whole concoction glow from within. For an extra touch of safe, magical smoke, place a small bowl of water with dry ice inside, or even a small, cool-mist humidifier. Surround the cauldron with colorfully painted “spell ingredient” rocks and friendly plush bats or frogs. This is a witch’s brew, all sparkle and no scare.
- Place the cauldron on a stand or a small hay bale to give it more prominence.
- Use a variety of clear ball sizes to make the “bubbles” look more dynamic.
- Add a whimsical, oversized spoon or ladle protruding from the cauldron.
- Create a sign that says, “Brewing Up Some Fun!”
- Ensure any electrical elements, like lights, are rated for outdoor use.
Pro Design Tip: Use a bubble machine hidden behind the cauldron. The machine will send a steady stream of real, shimmering bubbles floating up from the “brew,” creating a truly magical and interactive effect.
Budget Consideration: Plastic cauldrons are inexpensive and widely available around Halloween. Clear plastic ornaments can be found cheaply at dollar stores or craft outlets after the holiday season.
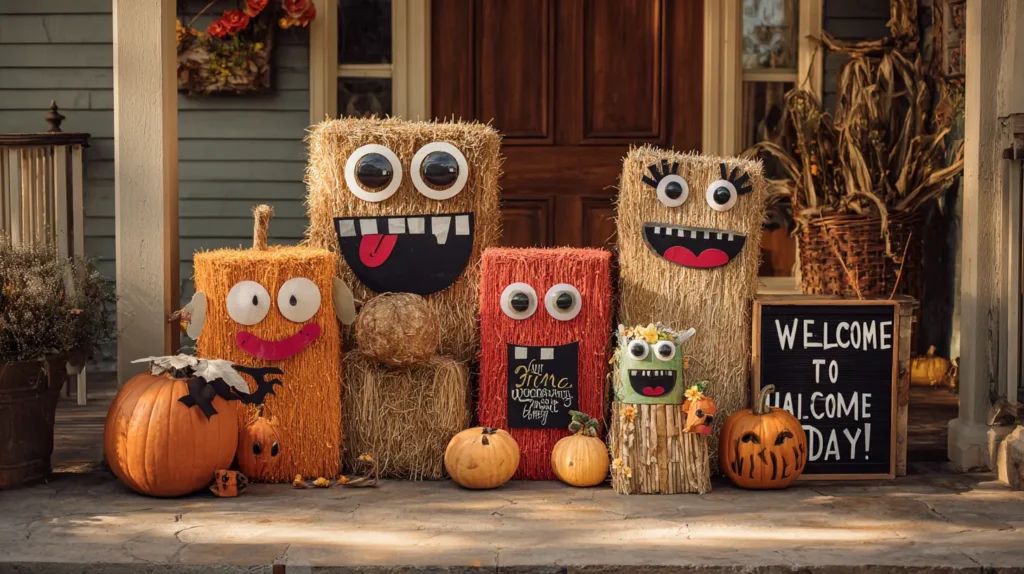
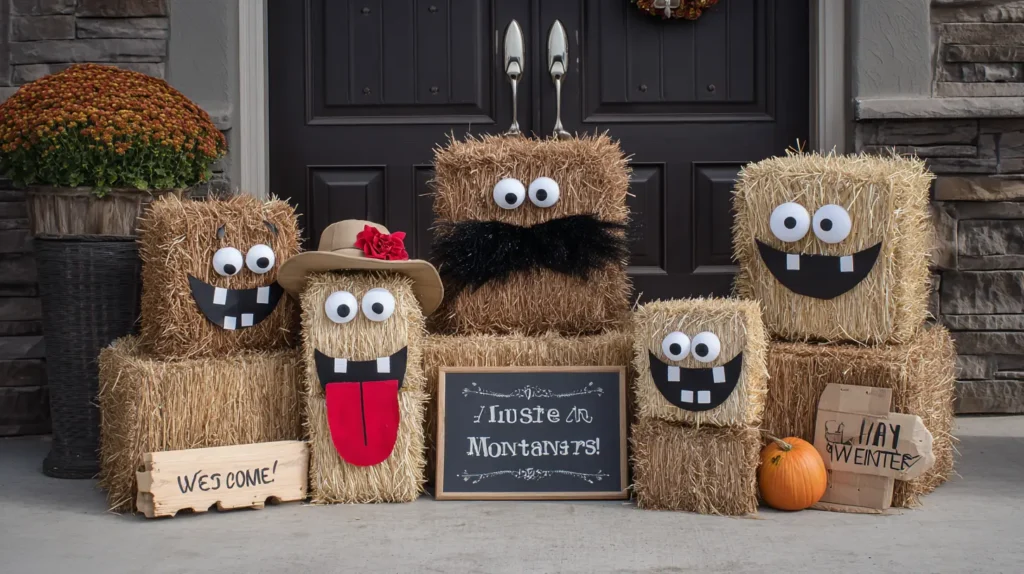
14. Hay Bale Monster Family
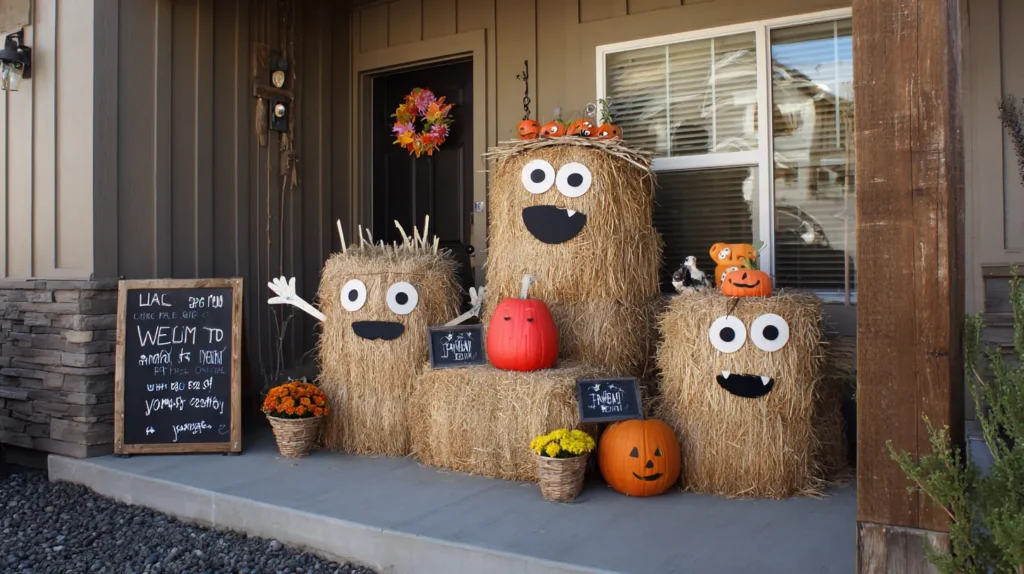
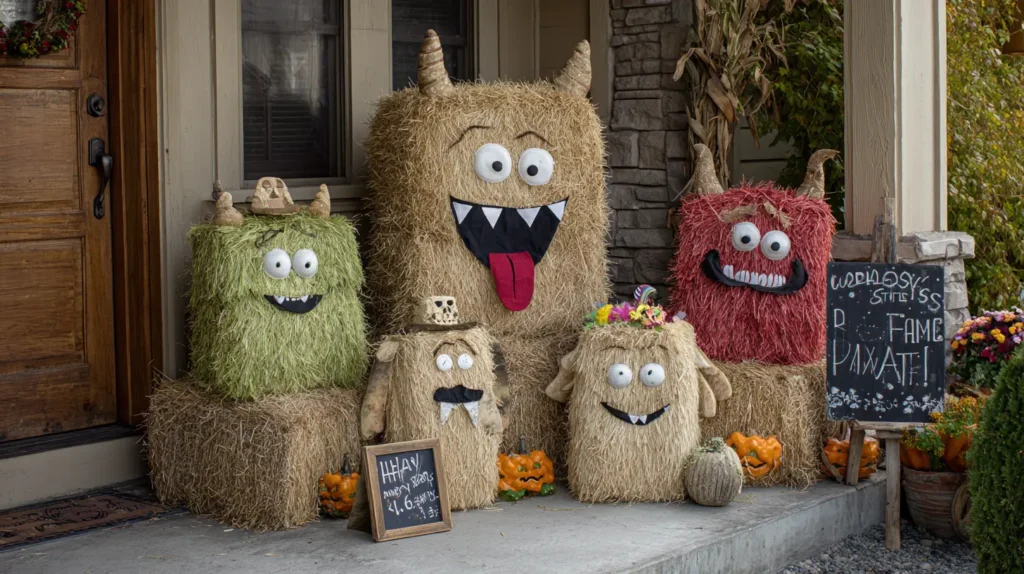
Use classic autumn decor to build your very own friendly monster family. Imagine a few hay bales of different sizes arranged on your porch. The largest can be the “parent” monster, and the smaller ones the “kids.” Give each hay bale monster a unique personality using simple, oversized craft supplies. Use large painted wood circles for eyes, a cut-up black welcome mat for a fuzzy unibrow, and a red felt cutout for a big, happy mouth. You can add arms made from sticks and hands from old garden gloves. This charming family brings a rustic, harvest-festival feel to your Monster Mash.
- Secure the features to the hay bales using floral wire or wooden skewers.
- Give each monster a fun accessory, like a bow tie, a flower, or a silly hat.
- Arrange the hay bale family as if they are posing for a group photo.
- Place a small, painted sign in front of them that says, “The Hay Monster Family Welcomes You!”
- Make sure the hay bales are placed in a spot that will keep them relatively dry.
Pro Design Tip: Hollow out a small section in one of the hay bales and place a small, friendly-looking pumpkin inside, as if it’s a “hay monster baby” in a bassinet.
Budget Consideration: Hay bales can often be purchased for a very reasonable price from local farms or garden centers. The decorations can be made from scrap wood, felt, and other household items.
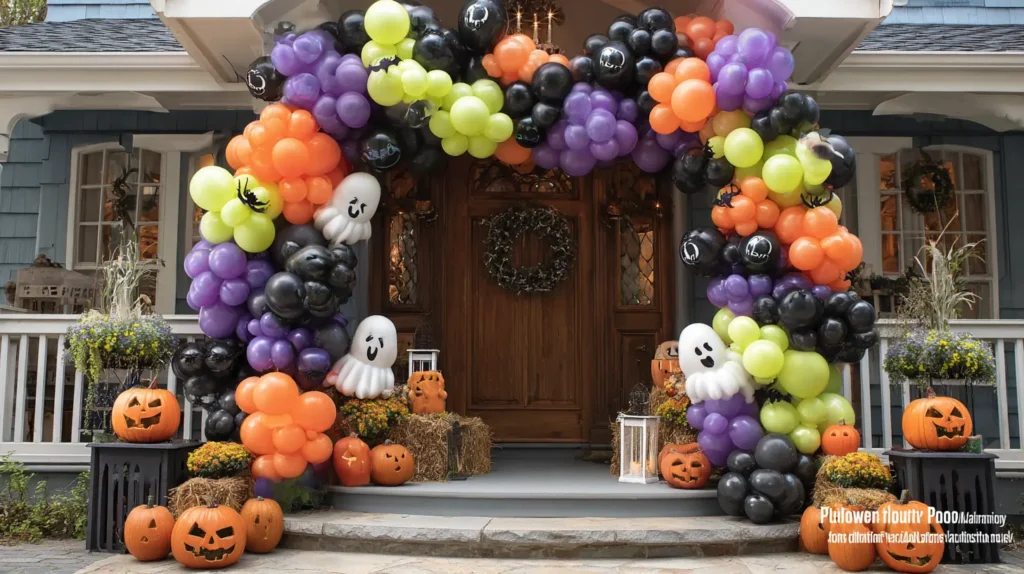
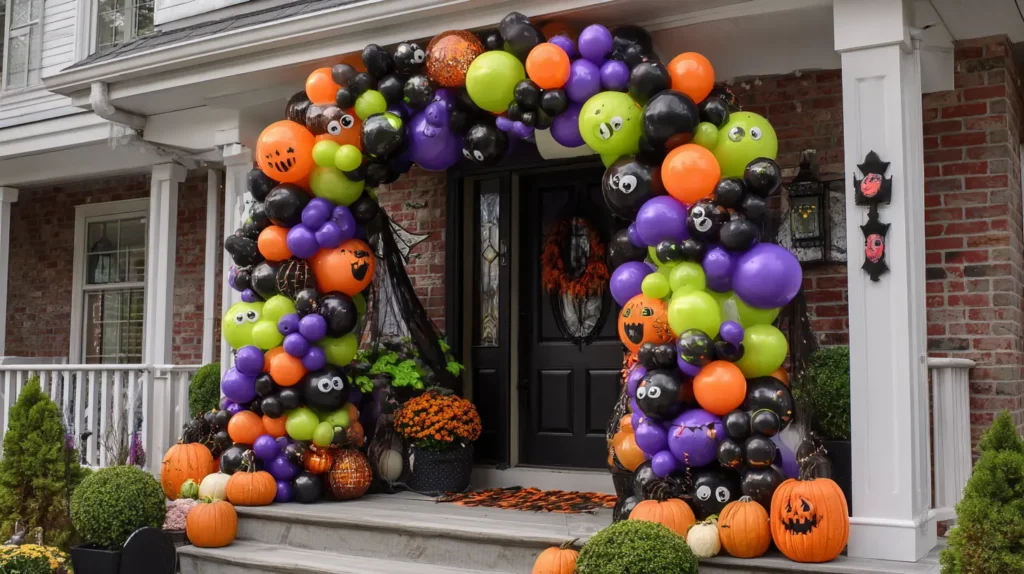
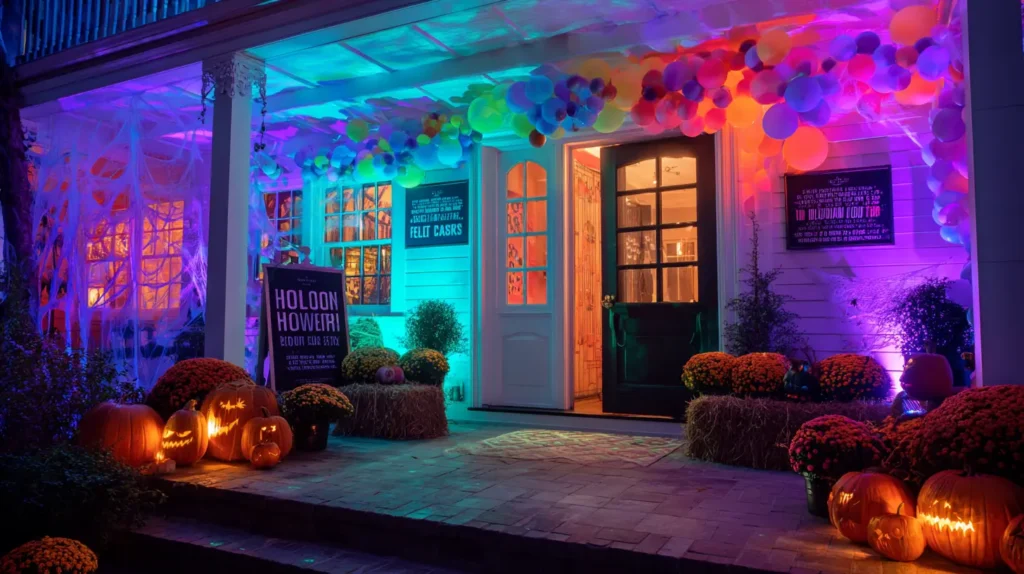
15. The “Spooktacular” Balloon Arch
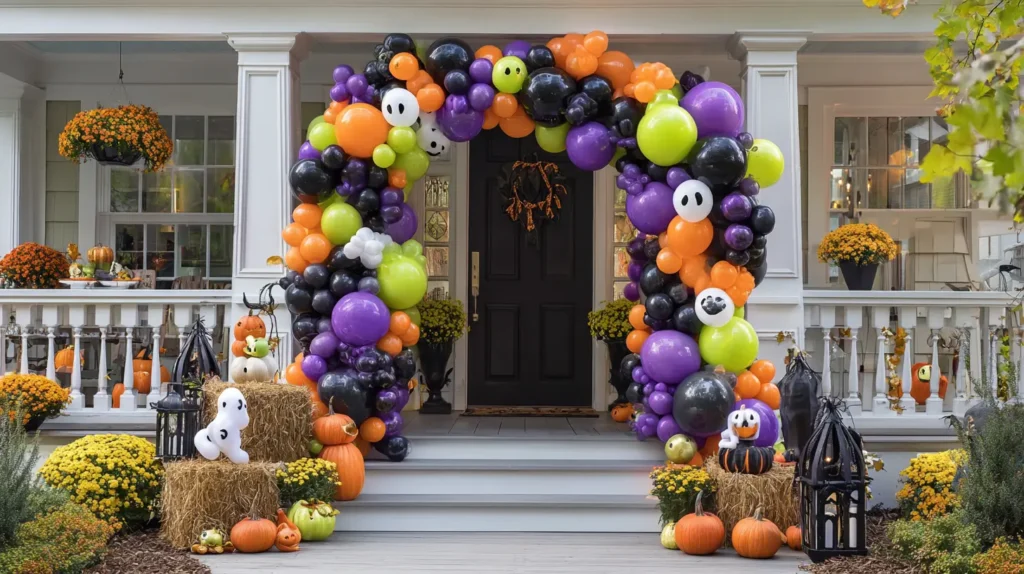

Frame your front door with a spectacular and festive balloon arch in a classic Halloween color palette. Imagine a grand archway made of black, orange, purple, and lime green balloons, welcoming trick-or-treaters with a burst of party-ready color. This high-impact decoration instantly signals a fun, celebratory atmosphere. You can weave in a few specialty balloons, like those shaped like friendly ghosts or smiling pumpkins. The arch serves as a perfect photo backdrop for families showing off their costumes, making your house the most festive and inviting on the block.
- Use a balloon arch kit, which comes with a flexible strip to easily attach the balloons.
- Inflate balloons to slightly different sizes to create a more organic and professional look.
- Intersperse a few “eyeball” balloons (white balloons with a black dot drawn on them) throughout the arch for a monstrous touch.
- Use strong, weather-resistant tape or hooks to securely attach the arch to your doorframe.
- For added fun, have a few helium-filled monster balloons tethered near the arch.
Pro Design Tip: Create small “monster clusters” by taping three or four balloons together and drawing a single, giant googly eye across the center. Attach these clusters at various points along the arch.
Budget Consideration: A DIY balloon arch is much cheaper than a professionally made one. Buying multi-color balloon packs and using a simple balloon strip is a very affordable way to create this grand entrance.
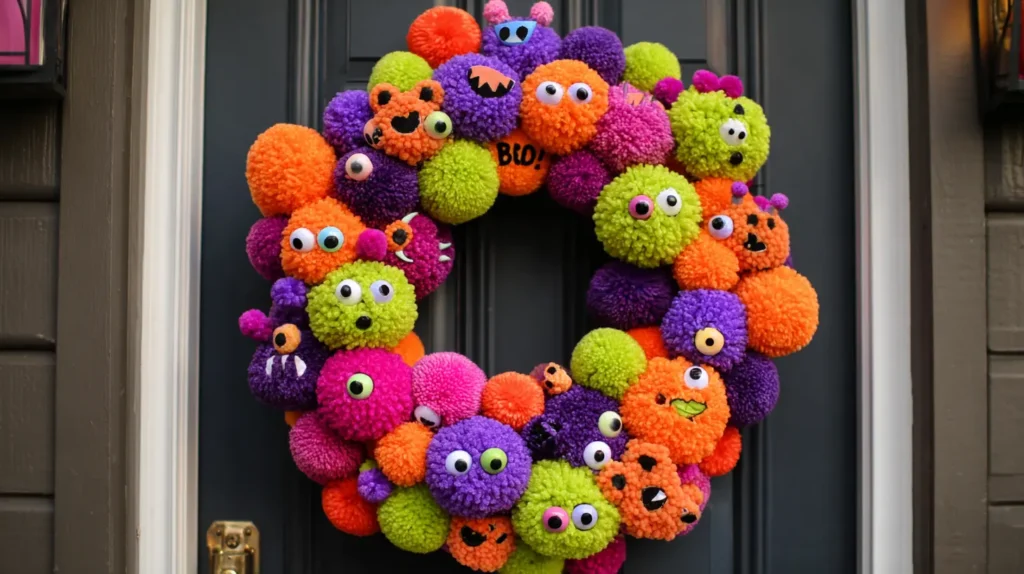
16. Whimsical Wreath of Monsters
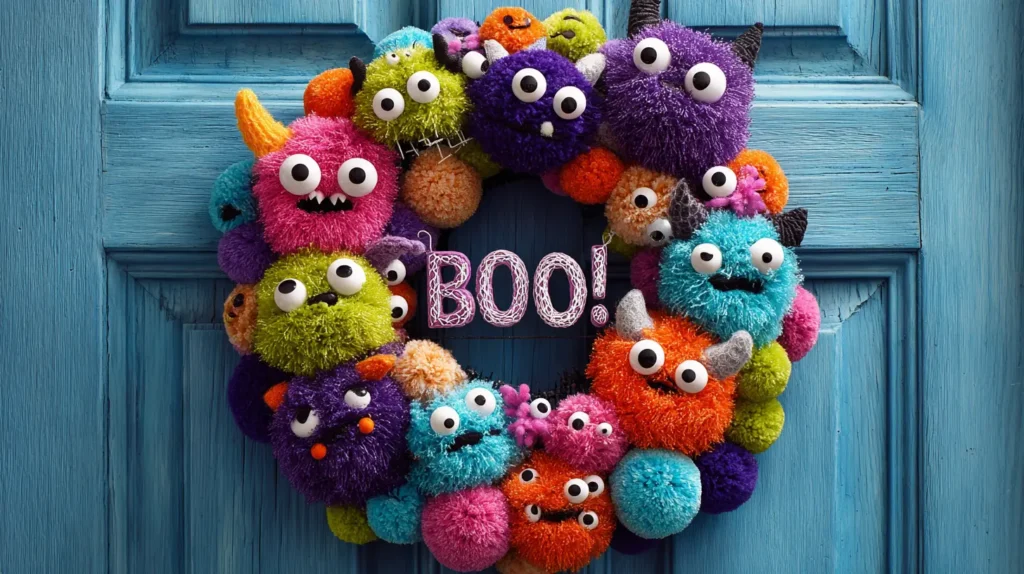
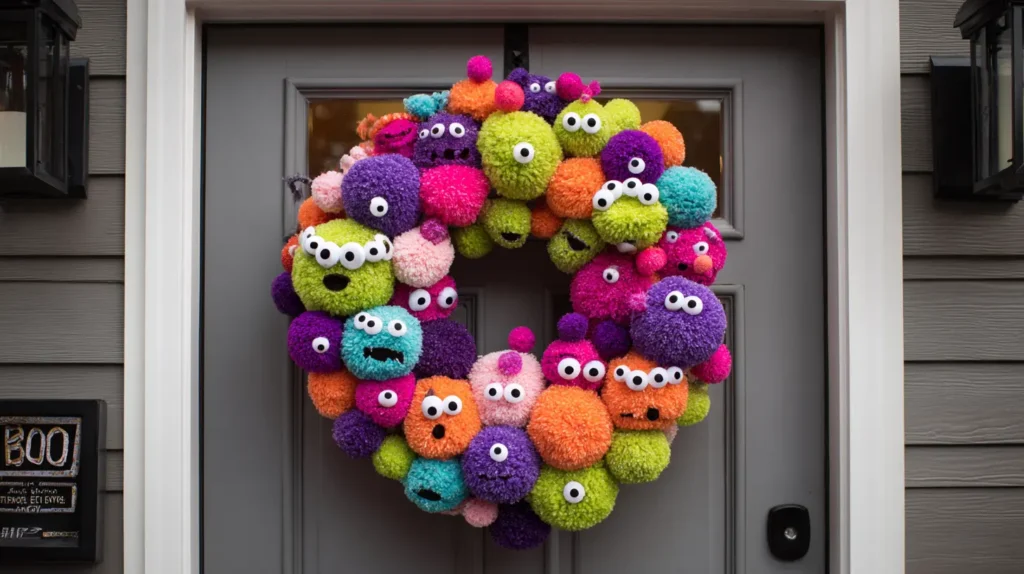
Greet your guests with a wreath that’s teeming with tiny, friendly monsters. Picture a standard grapevine or foam wreath form, completely covered in colorful pom-poms of all sizes. Tucked in amongst the pom-poms are dozens of googly eyes, making it seem as if a whole tribe of fuzzy, colorful monsters is peeking out. This wreath is all about texture, color, and silliness. You can add a few pipe-cleaner antennae or tiny felt horns for extra character. A simple ribbon at the bottom with the word “BOO!” in a friendly font completes this adorable and welcoming door decoration.
- Use a hot glue gun to securely attach the pom-poms and googly eyes to the wreath form.
- Create a color scheme for your wreath, perhaps using only purple, green, and orange pom-poms.
- For a different texture, use colorful tulle or mesh ribbon as the base for your wreath.
- Make it a family craft project; kids will love gluing on the “monster” pom-poms.
- Ensure the finished wreath is light enough to hang from your door and a standard wreath hanger.
Pro Design Tip: Create one “main monster” on your wreath by using two extra-large pom-poms for the body and head, then surround it with a crowd of smaller pom-pom monsters.
Budget Consideration: Wreath forms, pom-poms, and googly eyes are all inexpensive items found at any craft store. This is a very budget-friendly project with a high-end, custom look.
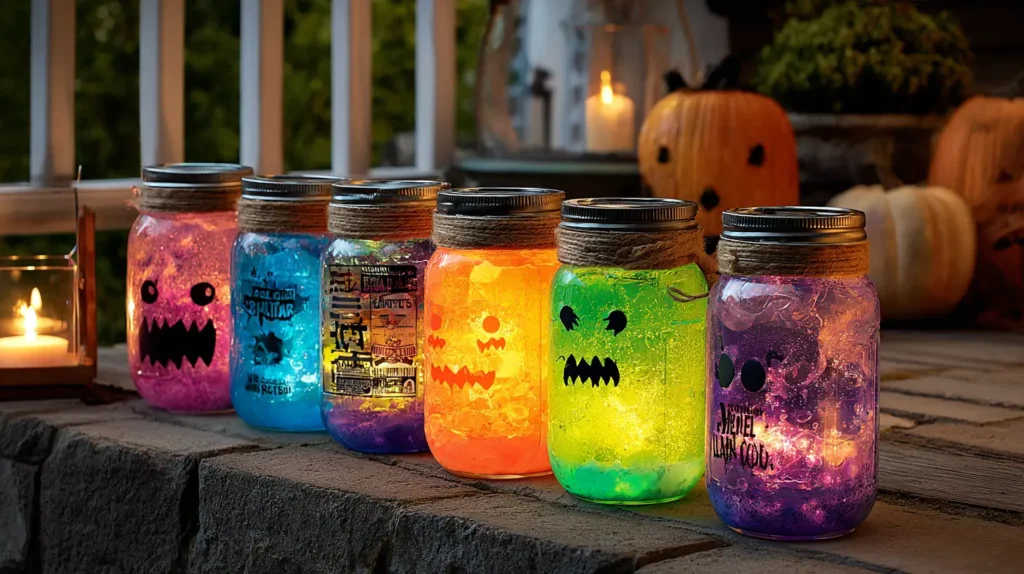
17. Glow Stick Magic Jars
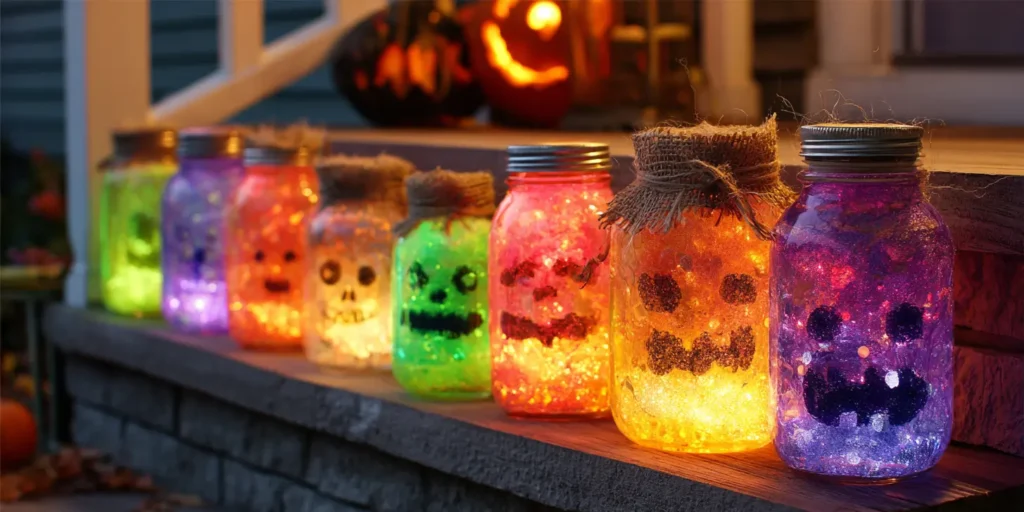
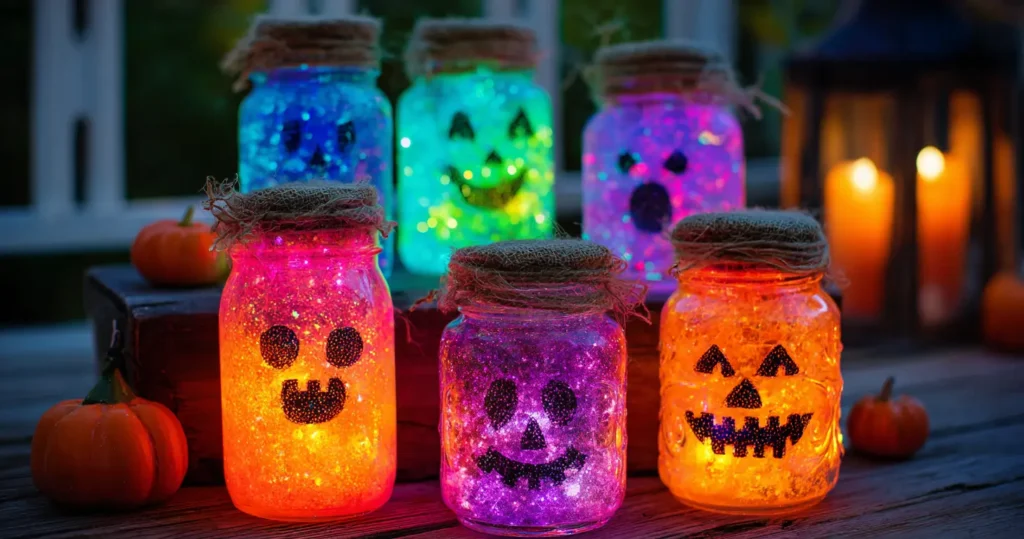
Light up your porch with the safe, magical glow of monster magic jars. Imagine several glass mason jars filled with a mysterious, colorful light. To create this effect, simply activate a few glow sticks (the thick, 8-hour kind work best) and place them inside the jars. You can add water and a sprinkle of glitter to create a swirling, lava-lamp effect. Draw silly monster faces on the outside of the jars with a black permanent marker. These glowing jars can be used to line your porch steps or clustered on a table, casting a soft, enchanting, and colorful light that is completely flame-free and safe for little ones.
- Use different colored glow sticks—green for “monster slime,” purple for “witch’s brew,” orange for “pumpkin potion.”
- For a frosted look that diffuses the light beautifully, coat the inside of the jar with a thin layer of white glue and let it dry before adding the glow stick.
- Tie a festive ribbon or some rustic twine around the rim of each jar.
- Activate the glow sticks just before dusk to ensure they last all evening.
- These make a fantastic, non-candy treat for trick-or-treaters with allergies.
Pro Design Tip: For a really cool effect, carefully cut open a (non-toxic) glow stick and pour the contents into a jar with a lid, add some glitter, and shake. The inside of the jar will be splattered with glowing liquid, looking like captured fireflies (adult supervision required).
Budget Consideration: Glow sticks can be purchased in bulk very cheaply at dollar stores or party supply stores, making this a very affordable way to add a lot of magical light to your porch.
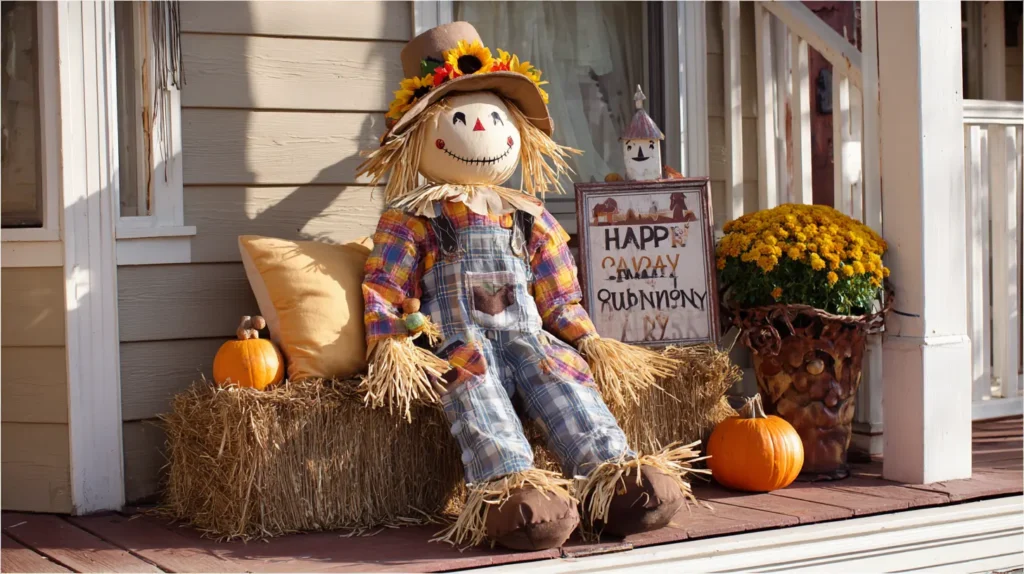
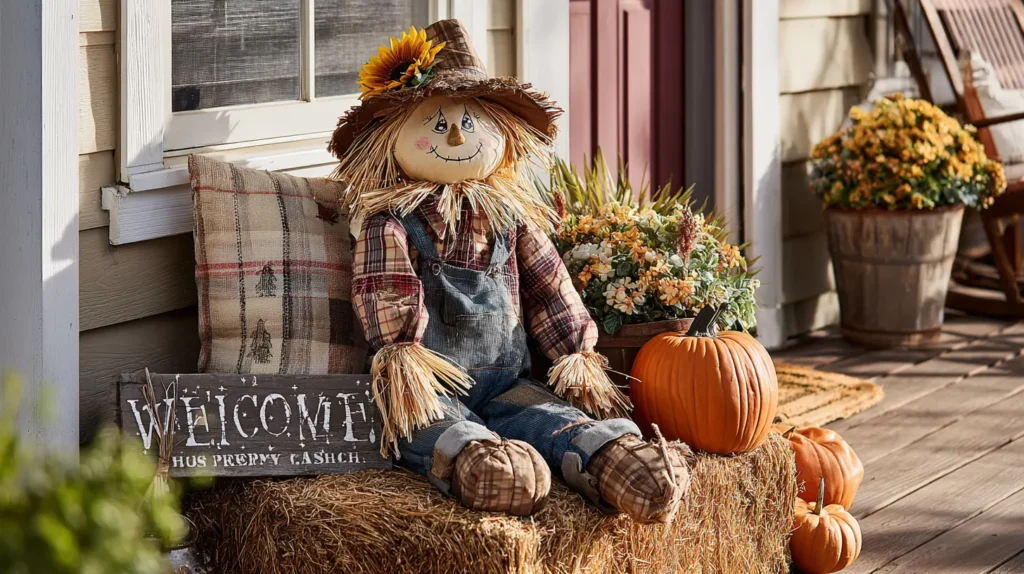
18. Silly Scarecrow’s Sunny Perch
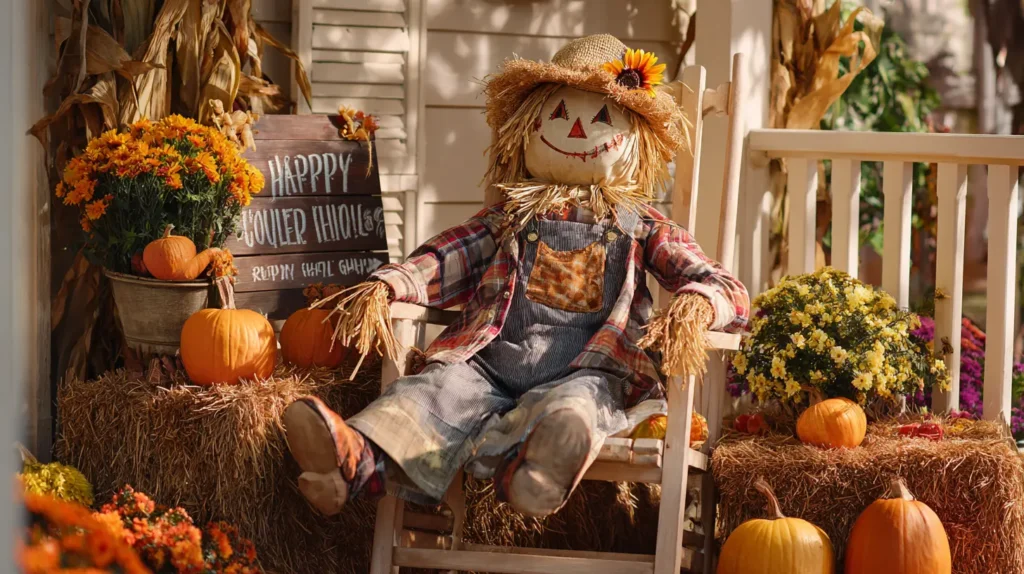
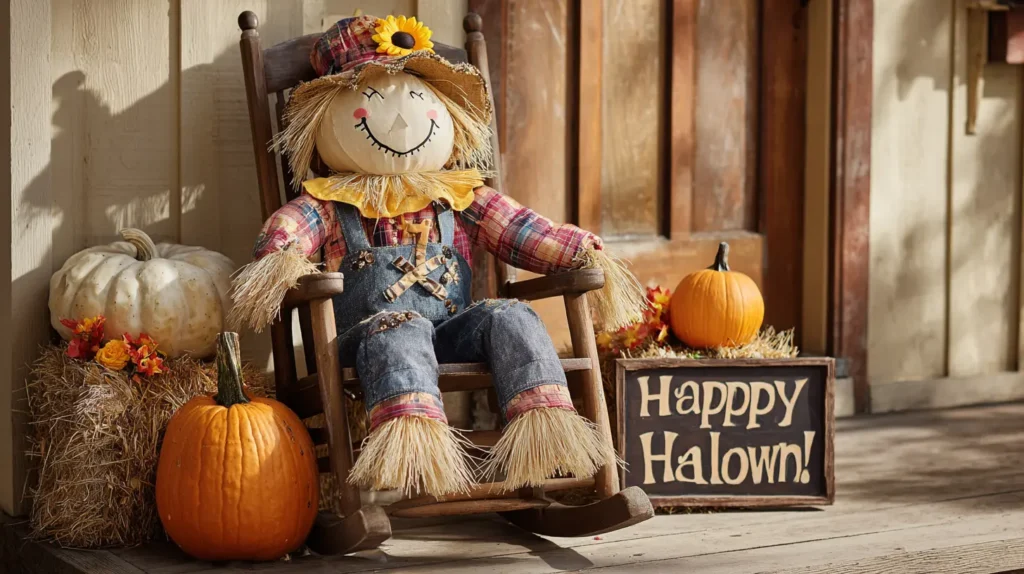
Instead of a scary scarecrow designed to frighten birds, create a silly, friendly one to welcome your guests. Picture a scarecrow slumped cheerfully in a rocking chair or on a hay bale, dressed in brightly colored plaid and patched-up overalls. Give him a big, stitched smile and rosy cheeks on his burlap sack head, and top him off with a jaunty hat with a sunflower tucked in the band. His job is clearly not to scare, but to smile. You can even have him holding a sign that says “Happy Harvest!” or “Candy This Way!” He brings a warm, friendly, autumn harvest vibe to your Halloween decor.
- Use an old pair of jeans and a flannel shirt stuffed with newspaper or straw to create the body.
- Have his stuffing comically spilling out of a few tears in his clothes.
- Sit him in a relaxed, friendly pose, perhaps with one leg crossed over the other.
- Place a friendly-looking plastic crow or a small pumpkin on his lap.
- Make sure he is well-supported so he doesn’t slump over too much during the evening.
Pro Design Tip: Give your scarecrow a fun job to do. Prop a rake in his hands and surround him with a pile of colorful autumn leaves, as if he’s just taken a break from his work to greet visitors.
Budget Consideration: This is a classic upcycling project. Use old clothes, leftover straw from other decorations, and a burlap bag (available cheaply at garden centers) to build your scarecrow for very little cost.
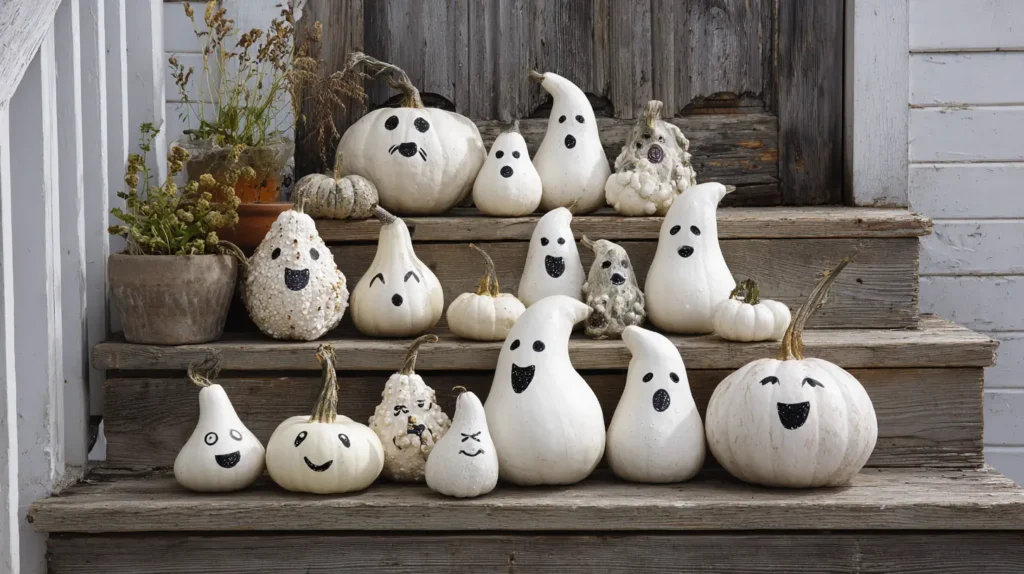
19. Ghostly Gourds and Painted Phantoms

Use the weird and wonderful shapes of autumn gourds to create a family of quirky little ghosts. Imagine a collection of white and light-green gourds, especially the ones with long, curving necks. Simply paint them all white, let them dry, and then use a black marker to draw on friendly, cartoonish ghost faces. Some can have a classic “O” mouth as if saying “Boo!” in a friendly way, while others can have wide, happy smiles. Group these ghostly gourds together on your porch steps or in a window box. Their varied, natural shapes give each phantom a unique, charming personality.
- Choose gourds with interesting, “ghostly” shapes at your local farm stand or grocery store.
- Apply two coats of white acrylic paint for a solid, opaque finish.
- Give each ghost a different facial expression: happy, surprised, sleepy, or winking.
- For a bit of sparkle, you can apply a thin coat of glitter spray over the white paint.
- Cluster them around the base of your larger, smiling monster pumpkins for a multi-layered display.
Pro Design Tip: Create a “flying ghost” by drilling a small, careful hole in the top of a lightweight gourd, threading some fishing line through it, and hanging it from your porch ceiling so it appears to float in mid-air.
Budget Consideration: Gourds are typically very inexpensive, especially after the peak of the fall season. This is a much cheaper alternative to buying large pumpkins and offers a wider range of unique shapes.
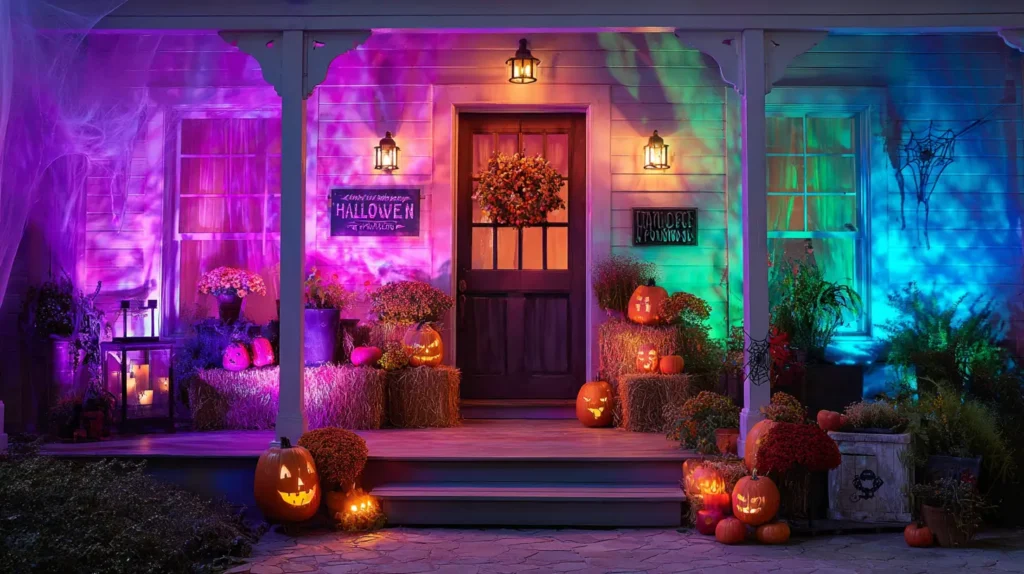
20. Festive Music & Light Show
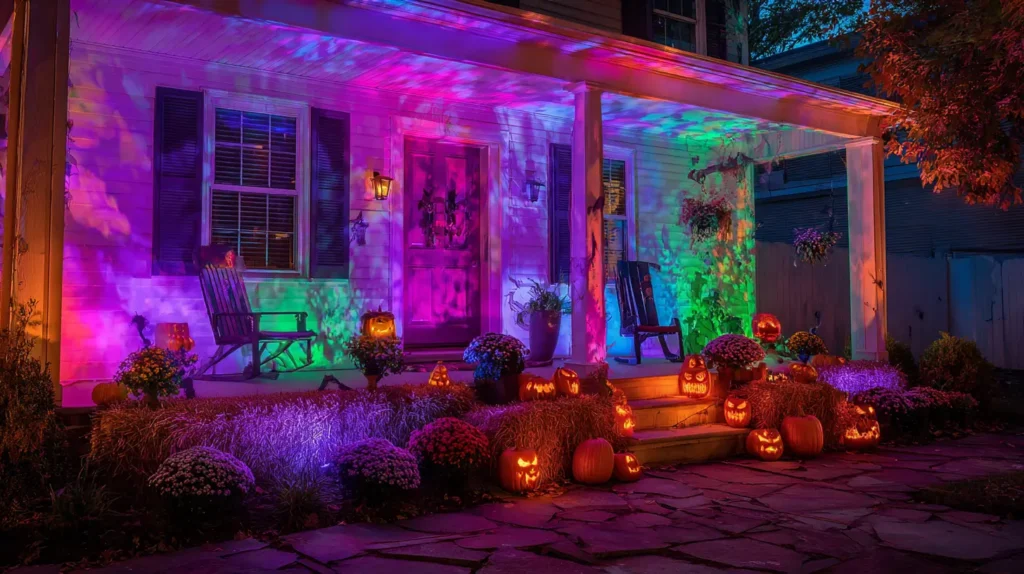

Bring your Monster Mash to life with a fun, festive atmosphere of music and lights. This final layer transforms your porch from a static display into a living, breathing party. Hide a small, weather-resistant Bluetooth speaker in a planter or behind a hay bale and play a continuous loop of fun, upbeat, kid-friendly Halloween songs (think “Monster Mash,” “Purple People Eater,” and movie themes). At the same time, use colorful spotlights or projector lights to wash your porch in shifting hues of purple, green, and orange. Some projectors even have fun, swirling patterns of friendly ghosts or pumpkins. The combination of cheerful music and dancing lights creates an energetic and celebratory environment that is pure fun.
- Create a Halloween playlist ahead of time so it can run uninterrupted.
- Ensure the music volume is at a neighbor-friendly level.
- Use outdoor-rated extension cords and plug everything into a GFCI outlet for safety.
- Point spotlights upwards at your decorations to create dramatic, colorful shadows.
- Choose a light projector with slow-moving, gentle patterns rather than fast, startling strobes.
Pro Design Tip: For a truly integrated show, use smart plugs and smart lights that can be programmed to change color or pattern in time with the music, creating a mini “dance party” on your porch.
Budget Consideration: A simple Bluetooth speaker and a single inexpensive color-changing LED spotlight or projector can create a significant atmospheric impact without a big investment.
In conclusion, creating a festive and fun front porch for Halloween is all about embracing the playful side of the season. By focusing on bright colors, silly faces, and creative crafts, you can design a space that is brimming with joy and excitement for even the youngest trick-or-treaters. Each of these 20 fun, kid-friendly Halloween deck decorations is a starting point for turning your home into a welcoming stop on the neighborhood candy trail.
The best part of a Monster Mash on the Front Porch is that it invites participation, creativity, and laughter. So grab your paint, your googly eyes, and your silliest ideas, and get ready to turn your outdoor space into a spooky-fun haven that won’t scare the little ones.
What are your favorite ways to decorate for a kid-friendly Halloween? Share your best ideas in the comments below!
FAQs
- How do I make Halloween porch decor kid-friendly? Use bright colors, friendly faces, and soft lighting to avoid scares.
- What are budget-friendly Halloween decor ideas? DIY painted pumpkins, felt bunting, or thrifted planters save costs.
- How can I keep porch decor weather-resistant? Use UV-resistant materials, weatherproof fabrics, and secure items against wind.
- What lighting works best for a kid-friendly porch? LED candles, string lights, and glowing lanterns create a warm, safe glow.
- Where can I shop for Halloween porch decor? Try Target, Walmart, or Etsy for playful pieces.
