
20 Patio Christmas Decor Ideas to Create a Winter Wonderland Outdoors
As winter’s chill settles in, our patios are often the first spaces to be forgotten, left to face the elements alone. But what if that cold, empty space was a blank canvas? Imagine stepping out your back door, not onto a deserted patio, but into a private, magical winter wonderland. I’ve always believed the magic of Christmas shouldn’t stop at the windowpane; it should spill outdoors, creating a cozy, twinkling haven that beckons you to come outside.
Transforming your patio is about creating an experience. It’s about the warm glow of light against a frosty evening, the smell of pine in the air, and the cozy-safe feeling of being wrapped in a blanket by a fire. You don’t need a professional’s budget—you just need a vision.
This guide explores 20 Patio Christmas Decor Ideas designed to help you create a winter wonderland outdoors. Let’s turn that cold-weather-forgotten space into the coziest corner of your home.
1. The Enchanted Evergreen Canopy (Garland & Wreaths)
Contents
- 1 1. The Enchanted Evergreen Canopy (Garland & Wreaths)
- 2 2. A Cascading Waterfall of Icicle Lights
- 3 3. The Icy Blue & Silver Color Palette
- 4 4. The “Heart of Winter” Cozy Fire Pit
- 5 5. A Magical Miniature Evergreen Forest
- 6 6. The Glowing Garden: Pathway & Orb Lights
- 7 7. The Nostalgic Vintage Sled Display
- 8 8. The Warm-Up Station: A Hot Cocoa Bar Cart
- 9 9. A “Frozen” Hanging Snowflake Chandelier
- 10 10. The Realistic Snow-Dusted Scene
- 11 11. Festive Winter Planter “Bouquets”
- 12 12. A Glowing Tower of Illuminated Gift Boxes
- 13 13. Scandinavian Chic: Birch Logs & White Decor
- 14 14. The “Northern Lights” Projector Show
- 15 15. The Layered & Festive Welcome Mat
- 16 16. Plush Faux Fur Throws on Seating
- 17 17. The Whimsical Giant Candy Cane Pathway
- 18 18. A Majestic, Grazing Reindeer Figure
- 19 19. The Soundtrack: Hidden Outdoor Speakers
- 20 20. Oversized “Bauble” Ornaments
- 21 Conclusion


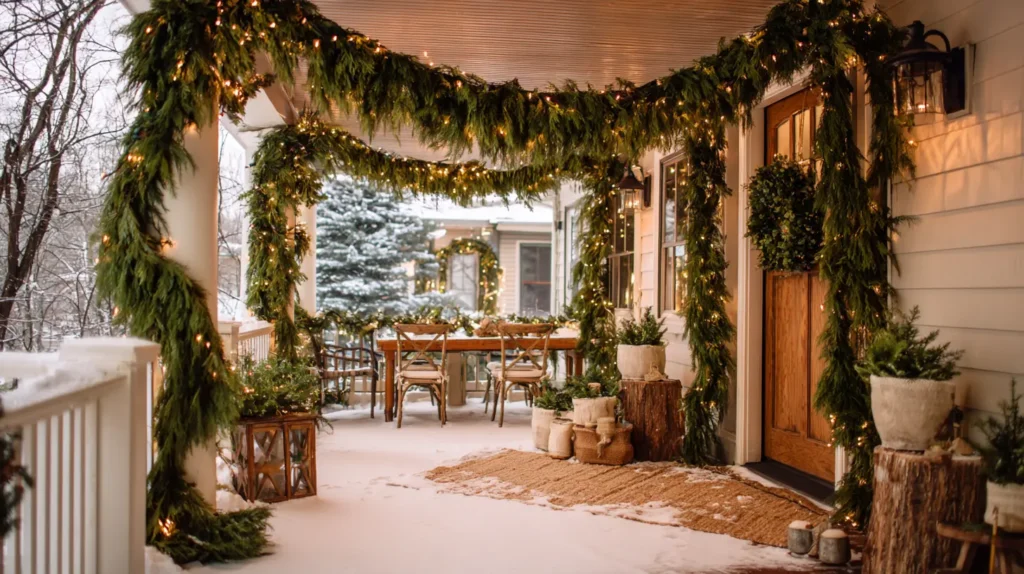
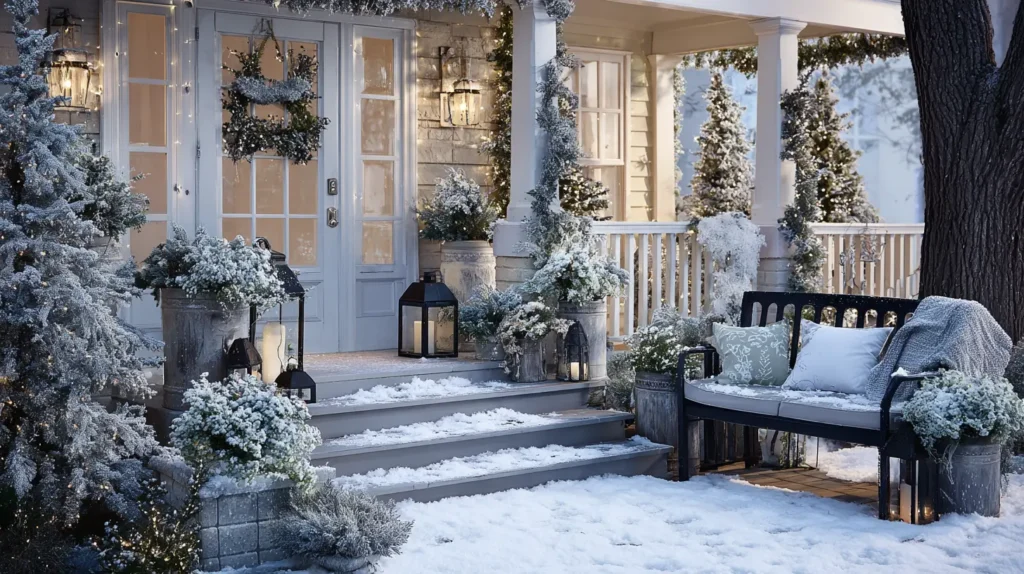
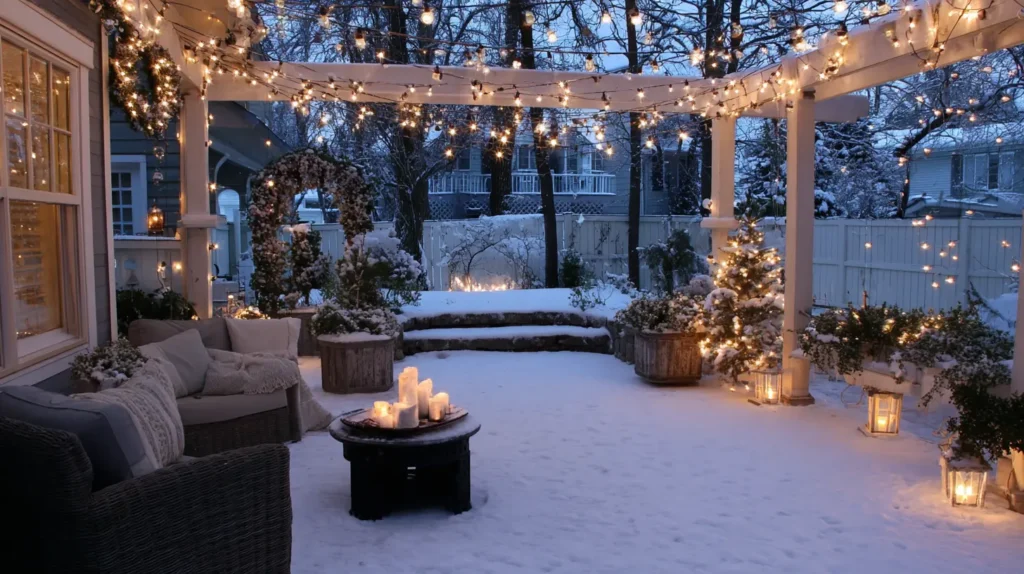
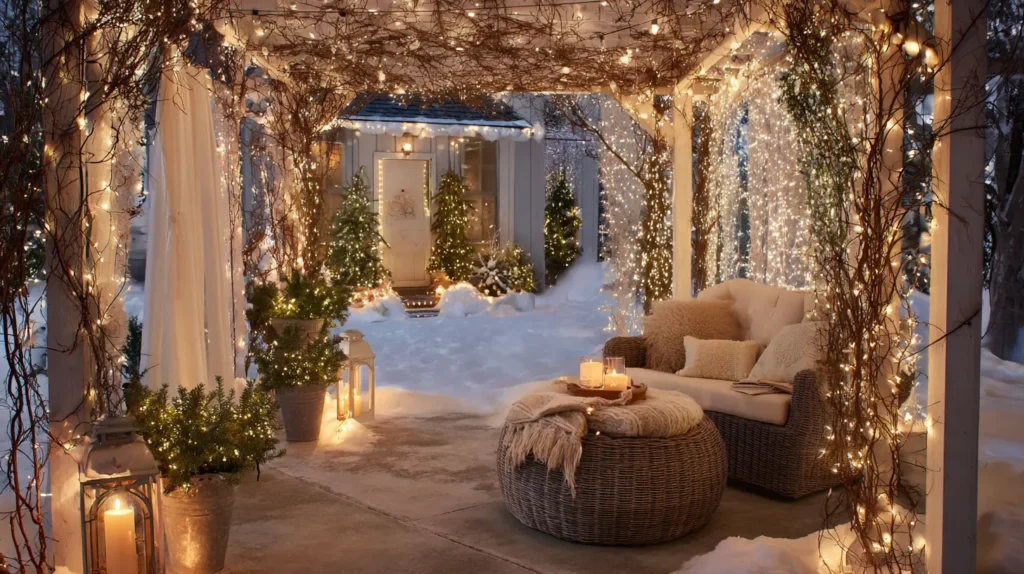
This is the essential foundation for your outdoor wonderland. Imagine thick, aromatic pine or cedar garland, not just strung, but draped luxuriously over your patio door, wrapped around porch columns, or lining the railings. Picture the deep forest green, punctuated by the soft, golden glow of warm white micro-lights woven throughout. On the door itself, a large, matching wreath, adorned with pinecones and a simple, elegant bow, serves as the classic, nostalgic welcome. This isn’t just greenery; it’s the scent and embrace of the holiday, instantly making the cold space feel like a woodland retreat.
- Choose high-quality, realistic faux garlands rated for outdoor use to reuse year after year.
- Weave two different types of garland (like pine and eucalyptus) together for a richer, more professional texture.
- Add natural elements like pinecones, dried orange slices, or bundles of cinnamon sticks tied with twine.
- Secure garlands firmly with zip ties or floral wire to protect them from winter winds.
- A matching wreath on the patio door creates a perfect, cohesive “bookend” to the design.
Pro Design Tip: For a truly lush look, use two garlands together. Wrap them around each other or lay one on top of the other; this small change makes the greenery look incredibly full and expensive.
Budget Consideration: Forage for your own pinecones, acorns, and sturdy twigs. A light dusting of white or silver spray paint can make them look magical and tie them into your theme for pennies.

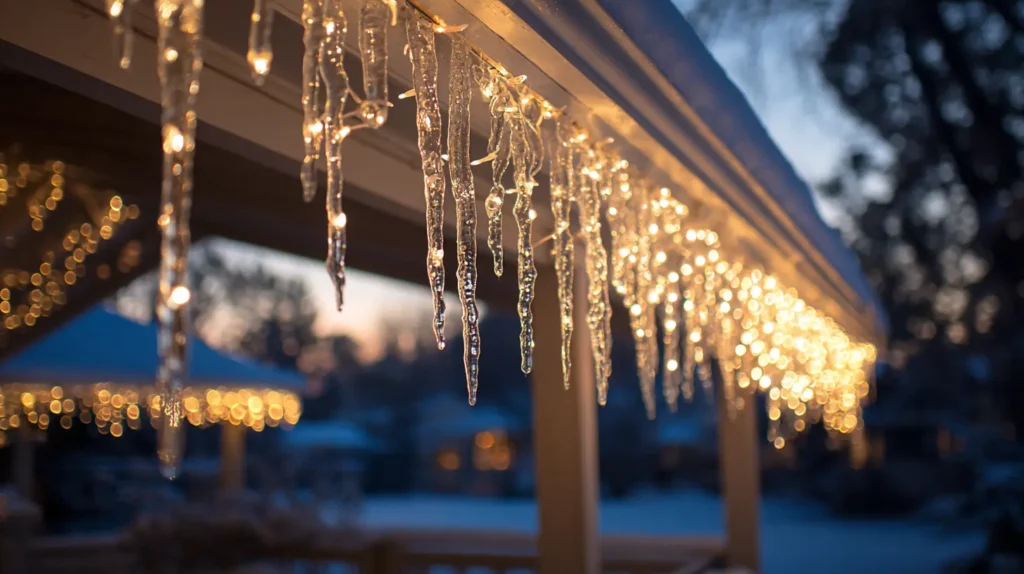
2. A Cascading Waterfall of Icicle Lights
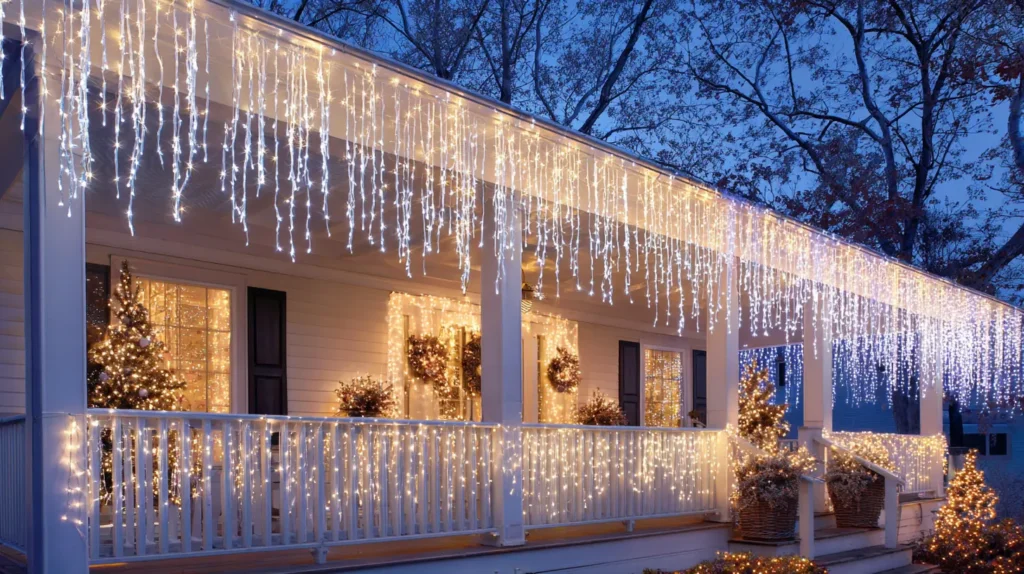
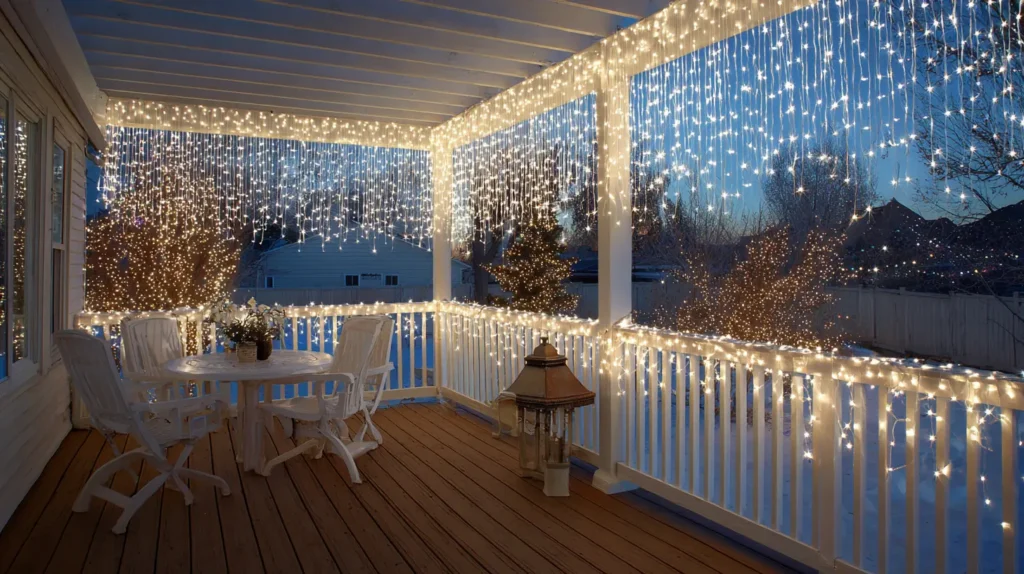
To instantly create a “winter wonderland” feel, you need the illusion of ice. Imagine the entire edge of your patio roof, pergola, or the top of your railing draped in a brilliant, cascading curtain of icicle lights. As dusk falls, they flicker to life, not as individual bulbs, but as a shimmering, unified waterfall of frozen light. The varied lengths of the strands create a natural, organic look, as if real icicles have formed and been magically illuminated. This single, high-impact element is the essence of a frosty, magical wonderland.
- Measure the length of your roofline or railing before you buy to ensure you have enough strands.
- Choose a light color that sets your theme: “cool white” or “blue” creates a very icy, frosty look, while “warm white” feels more golden and cozy.
- Use outdoor-rated light clips that match your gutter or railing color for a clean, invisible installation.
- Ensure all your connections are secure and off the ground, using an outdoor-rated extension cord.
- Look for “random sparkle” or “fading” light functions to add a subtle, elegant sense of movement.
Pro Design Tip: Layer your icicle lights with a sheer, outdoor-safe fabric (like tulle) draped behind them. This diffuses the light, creating a softer, more ethereal, and snowy glow.
Budget Consideration: The absolute best time to buy expensive outdoor lights is in the post-Christmas clearance sales. Buy them at a 70% discount and store them for next year.
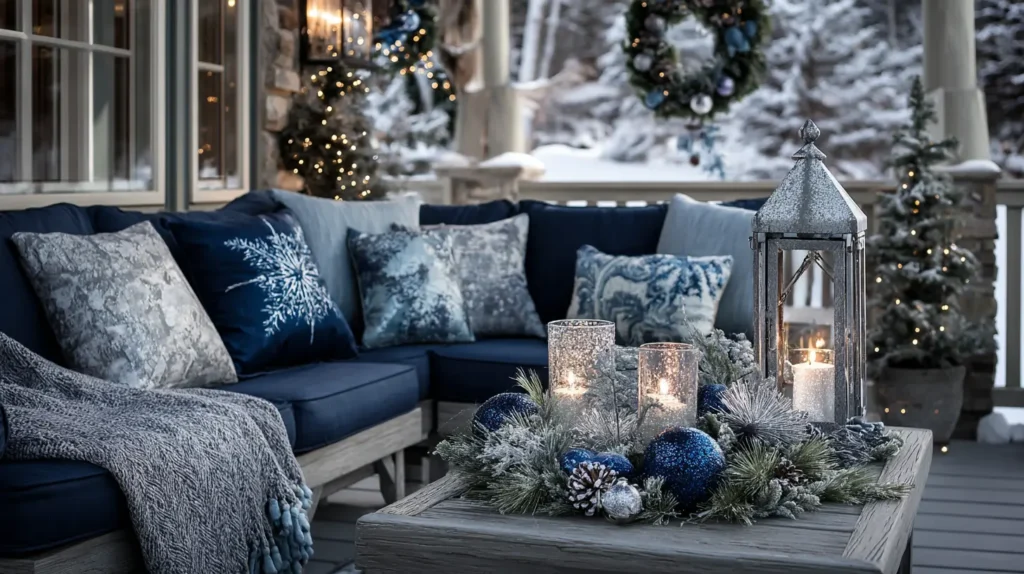
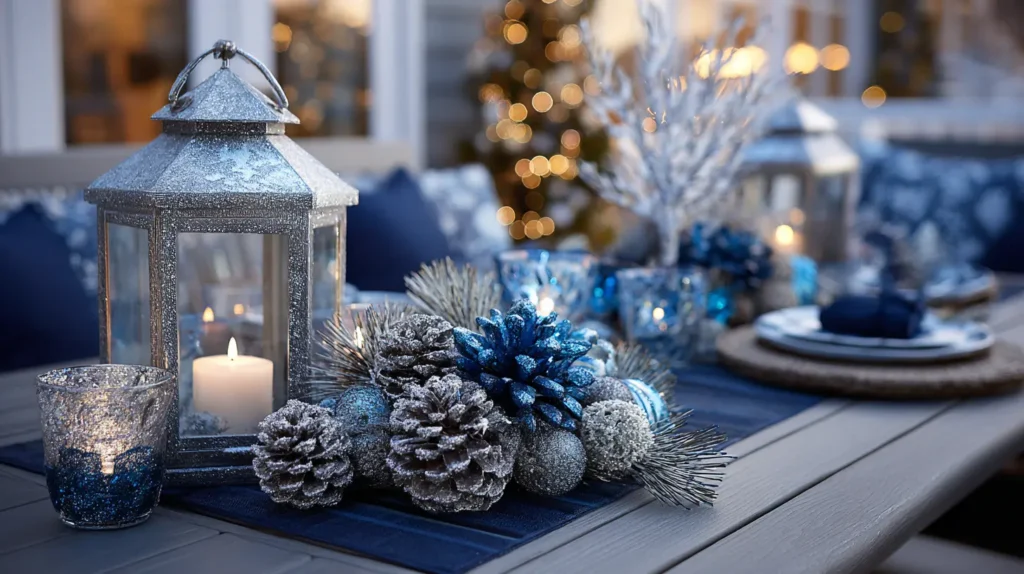
3. The Icy Blue & Silver Color Palette
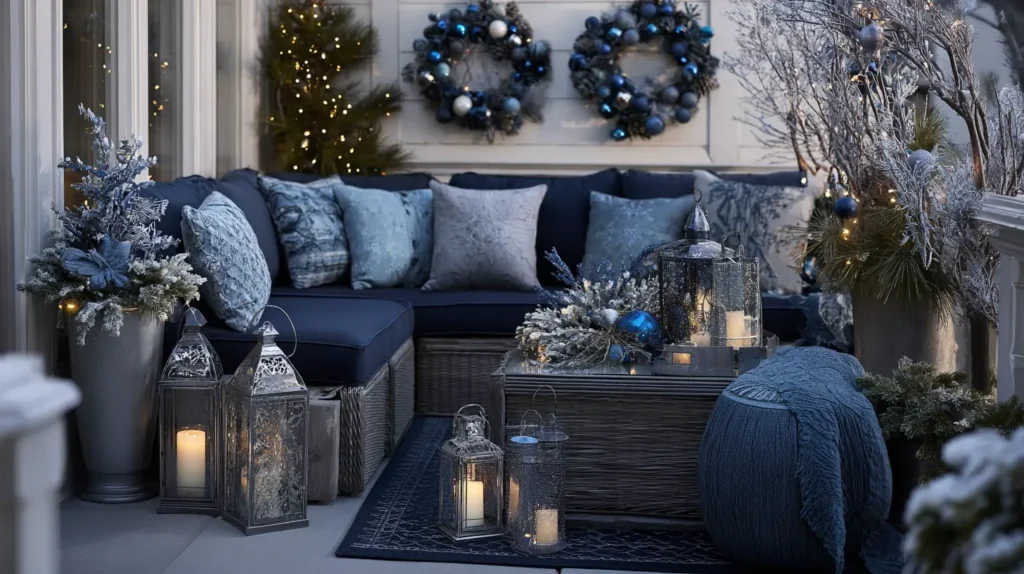
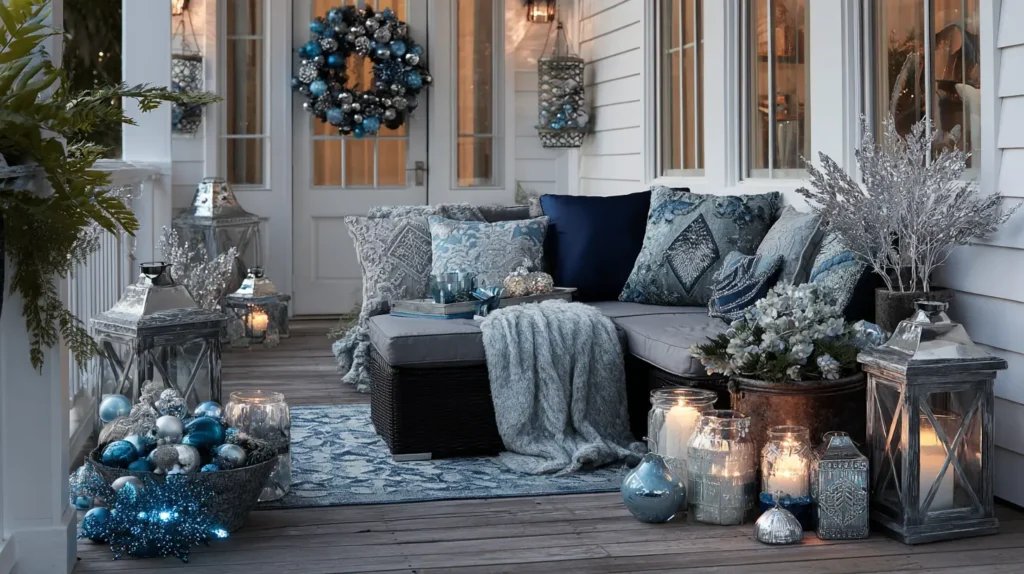
This is how you commit to the “winter” in Wonderland. Step away from traditional red and green and embrace the frosty elegance of an icy blue and silver palette. Picture your evergreen wreath and garlands adorned not with red berries, but with glittering silver-painted pinecones and frosty blue ribbon. Your patio cushions are swapped for deep navy blue, and your throw blankets are a shimmery silver-grey. This theme feels sophisticated, modern, and perfectly mimics the serene, cool beauty of a snowy landscape at twilight.
- Use blue and cool white LED lights exclusively to wash the entire patio in a frosty glow.
- Spray paint a few gnarled branches from your yard a bright, metallic silver and place them in your planters.
- Fill lanterns with a mix of silver and blue shatterproof ornaments instead of candles.
- Choose a patio doormat with a simple snowflake or star pattern in blue and white.
- Incorporate glass or mirrored elements, like a small mirrored tray on your table, to reflect the cool light.
Pro Design Tip: Add a touch of deep, dark blue (like navy) to your decor. This “anchor” color will make the icy blues and silvers pop even more, creating a sense of depth and luxury.
Budget Consideration: Buy metallic silver spray paint. It’s your best tool for this theme. You can transform cheap plastic ornaments, old planters, and dried branches into chic, coordinated decor.
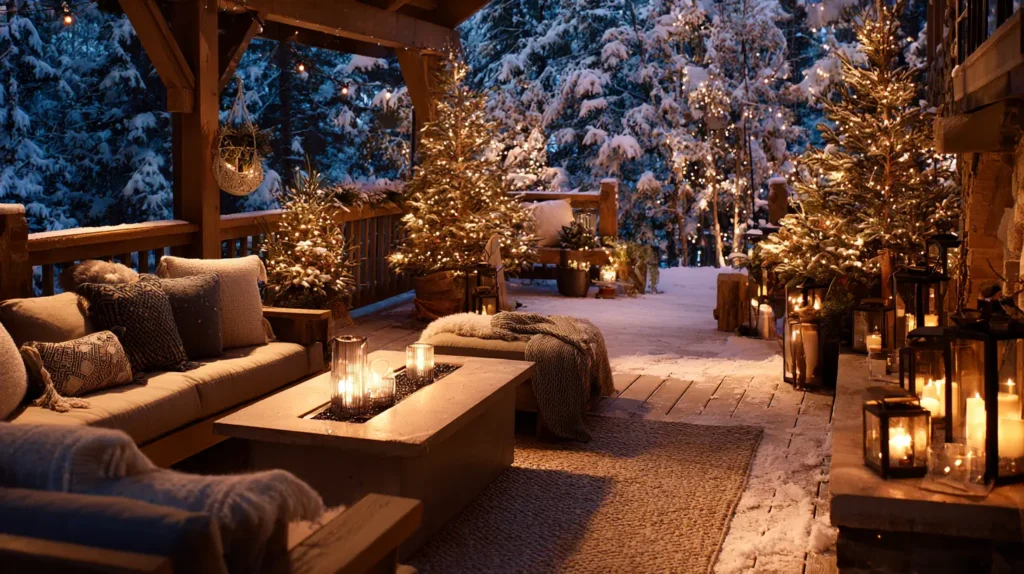
4. The “Heart of Winter” Cozy Fire Pit

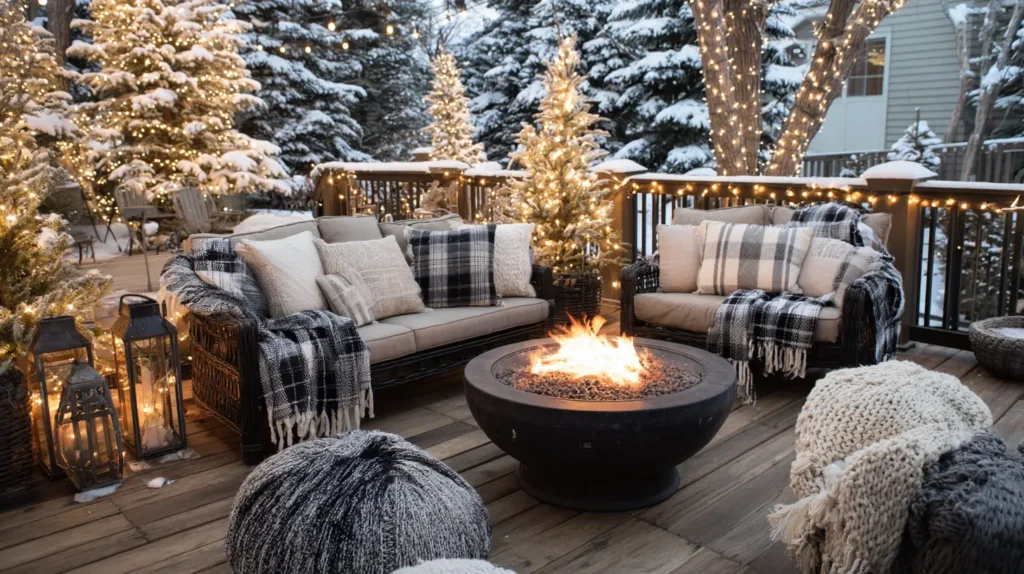
What’s a winter wonderland without warmth? This is the heart of your patio, the element that makes it usable and inviting. Imagine a roaring fire in your pit, the flames casting a dancing, golden light on your seating area. Surrounding it are cozy chairs, draped in thick plaid blankets. This isn’t just a decoration; it’s a multi-sensory experience. It’s the crackle of the wood, the smell of smoke, and the pocket of warmth that invites guests to come outside, grab a blanket, and stay for a while.
- Safety first: Ensure your fire pit is on a non-flammable surface and a safe distance from your home and any decor.
- Place a beautiful, waterproof basket next to the seating area, filled with rolled-up, cozy throw blankets (plaid is a classic!).
- A small side table with a s’mores kit (chocolate, marshmallows, and graham crackers) is an irresistible touch.
- If you have a gas fire pit, fill the bowl with festive “fire glass” in a reflective color.
- Stack firewood in a stylish, rustic log holder nearby to incorporate it into the decor.
Pro Design Tip: For a magical scent, toss a few “scented pinecones” (you can buy them or make them with essential oils) into the edges of the fire (not directly into the flames) or simply place them in a nearby bowl.
Budget Consideration: If you don’t have a built-in fire pit, a simple, portable metal fire bowl is very affordable. Or, create a DIY pit using concrete retaining wall stones from a hardware store.

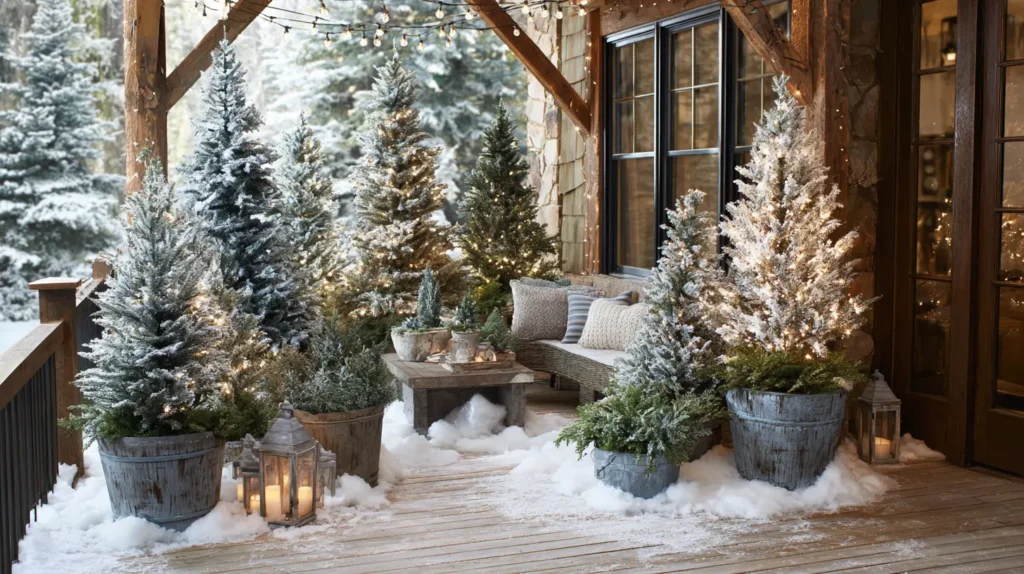
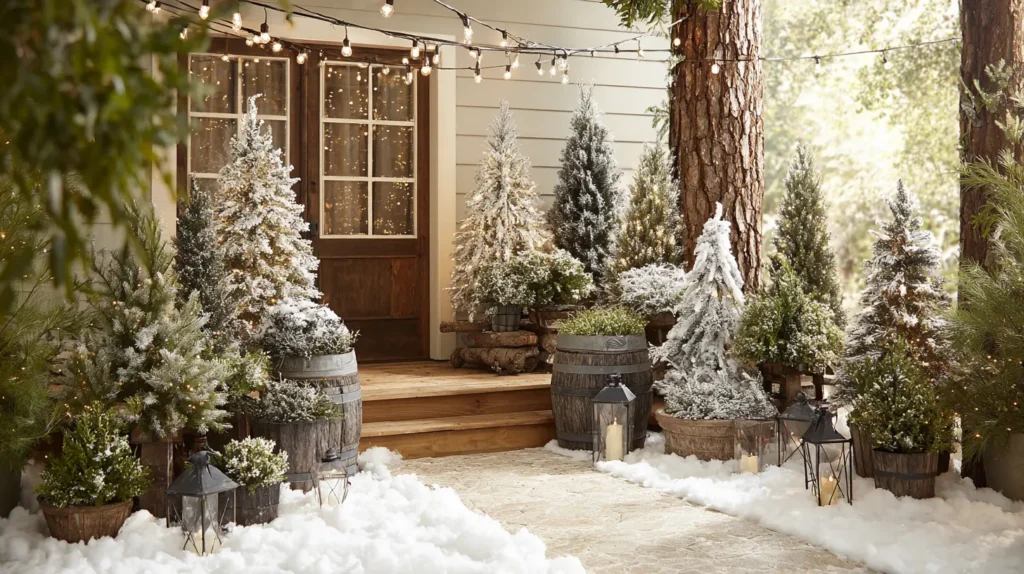
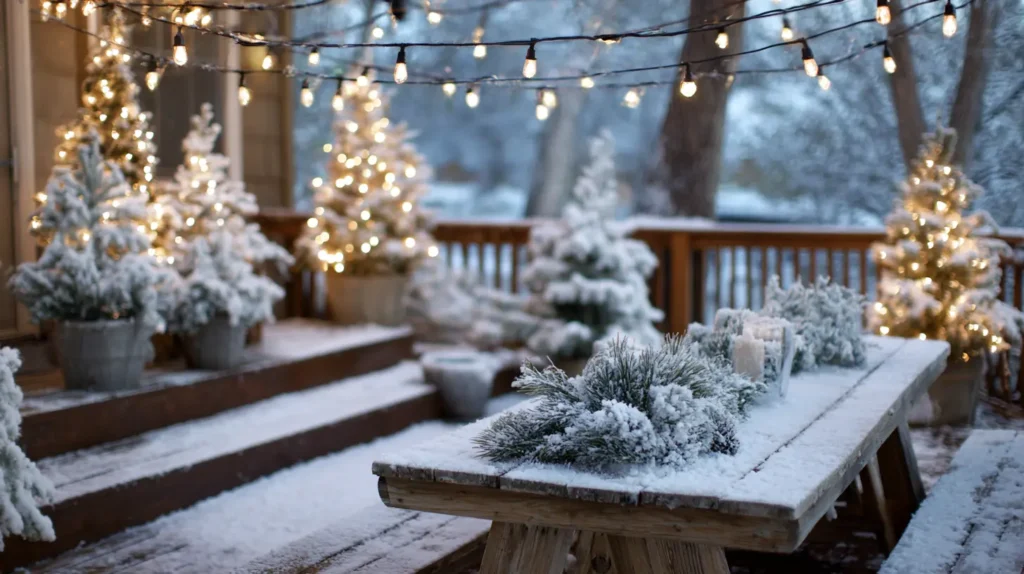
5. A Magical Miniature Evergreen Forest
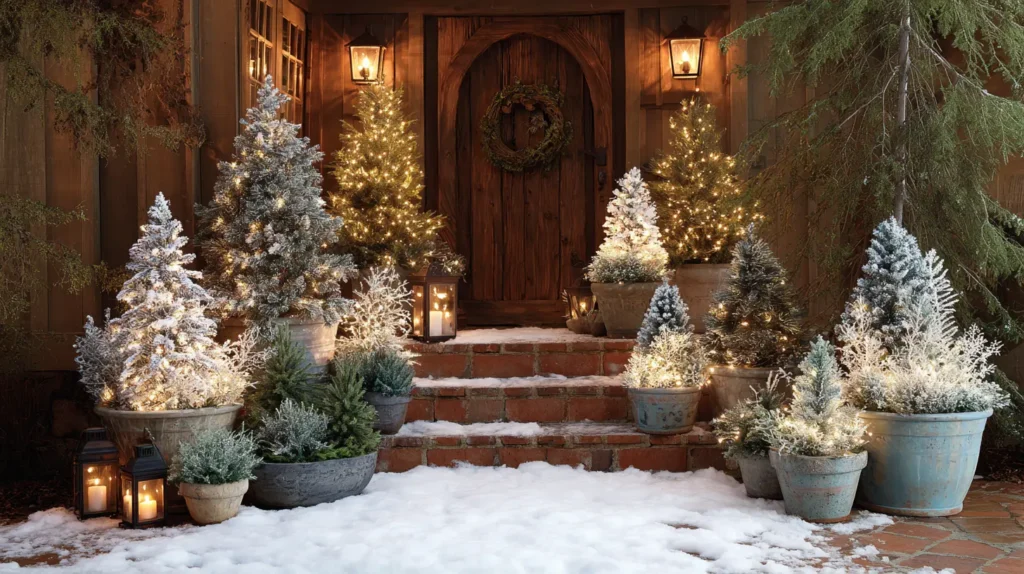
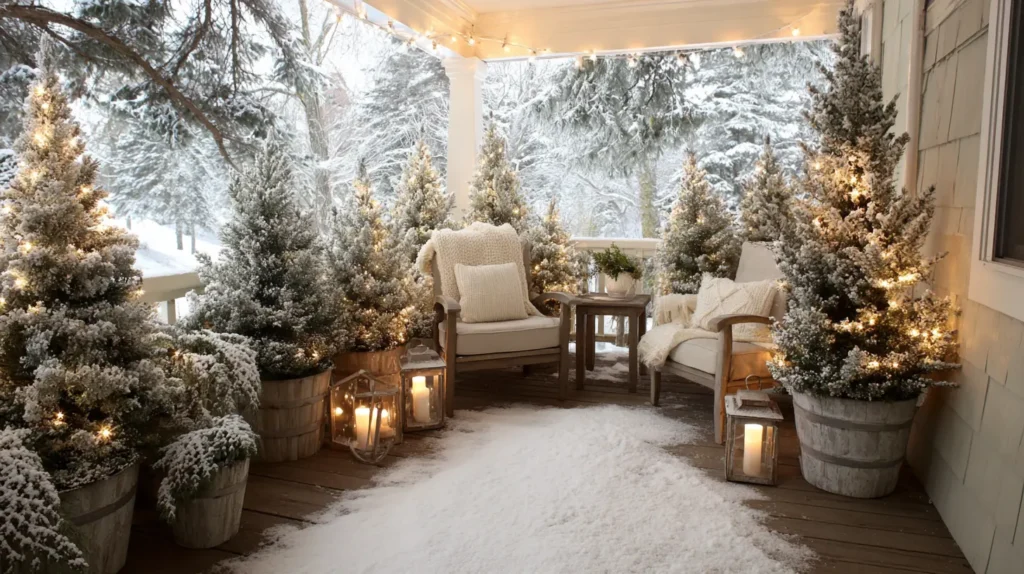
Create the enchanting illusion that your patio is nestled deep in a snowy alpine forest. Imagine a cluster of small evergreen trees (live or faux) in various sizes, transforming a corner into a dense, magical woods. Picture small, 2-foot-tall spruces in pots, medium 4-foot trees flanking the doorway, and a larger 6-foot tree as a stunning focal point. You can leave them bare and dusted with faux snow for a natural look, or wrap them in simple, warm white lights for a uniform glow. This grouping of trees creates a powerful sense of immersion and smells absolutely incredible if you use real ones.
- Use an odd number of trees (like 3, 5, or 7) for a more natural, aesthetically pleasing cluster.
- Vary the heights significantly to create a realistic, layered forest canopy.
- Place the trees in simple, rustic containers like woven baskets, metal buckets, or terracotta pots.
- If you use faux trees, be sure to buy ones specifically rated for outdoor use so they don’t fade or rust.
- “Flocked” (snow-covered) trees are a perfect choice for this theme.
Pro Design Tip: Hide the plastic pots or stands of your trees by placing them in larger baskets and covering the base with burlap “tree skirts” or a generous layer of pinecones.
Budget Consideration: Many nurseries sell small, live “Charlie Brown” trees at very low prices. You can decorate them for the season and then plant them in your yard after Christmas.
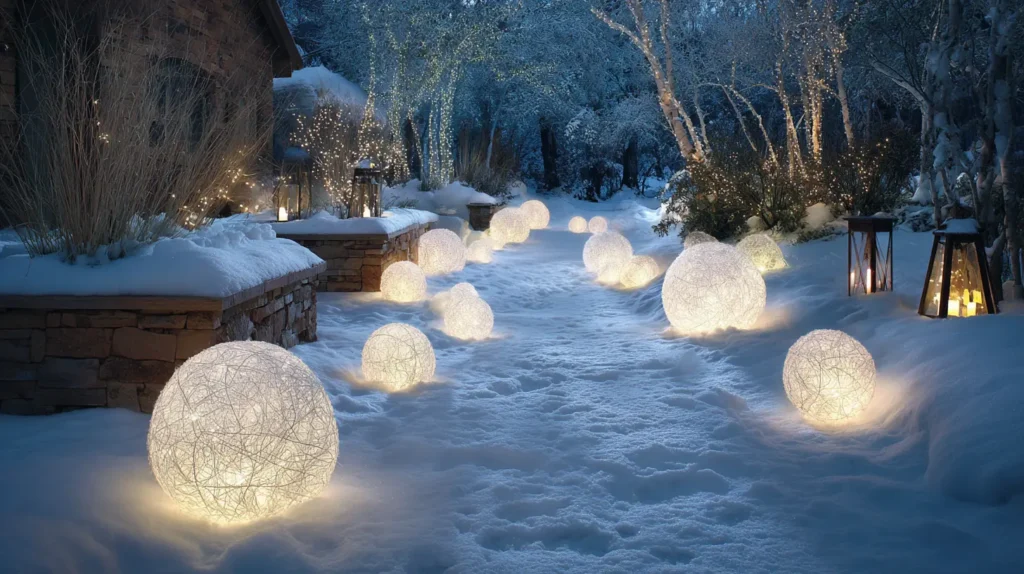
6. The Glowing Garden: Pathway & Orb Lights
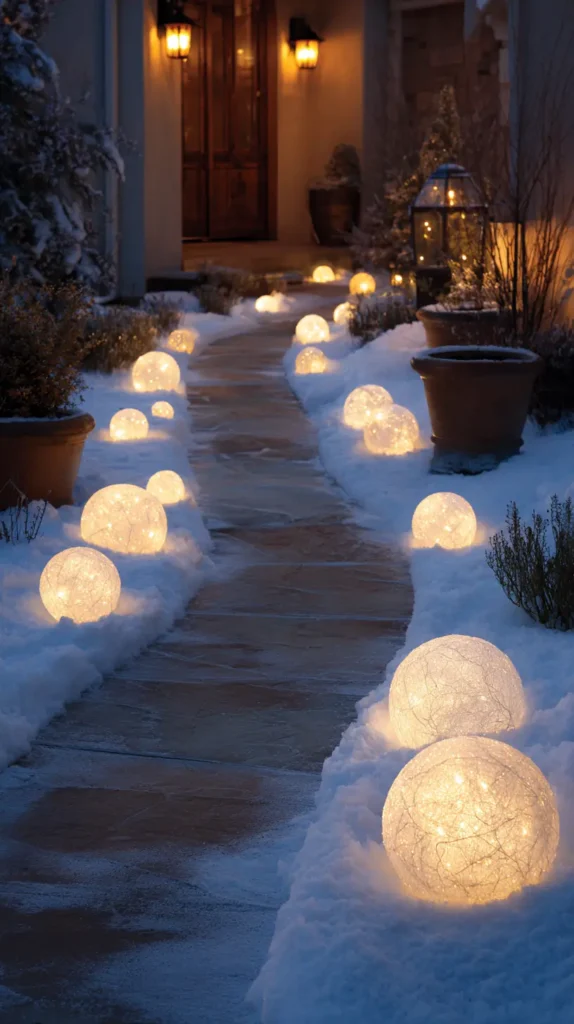
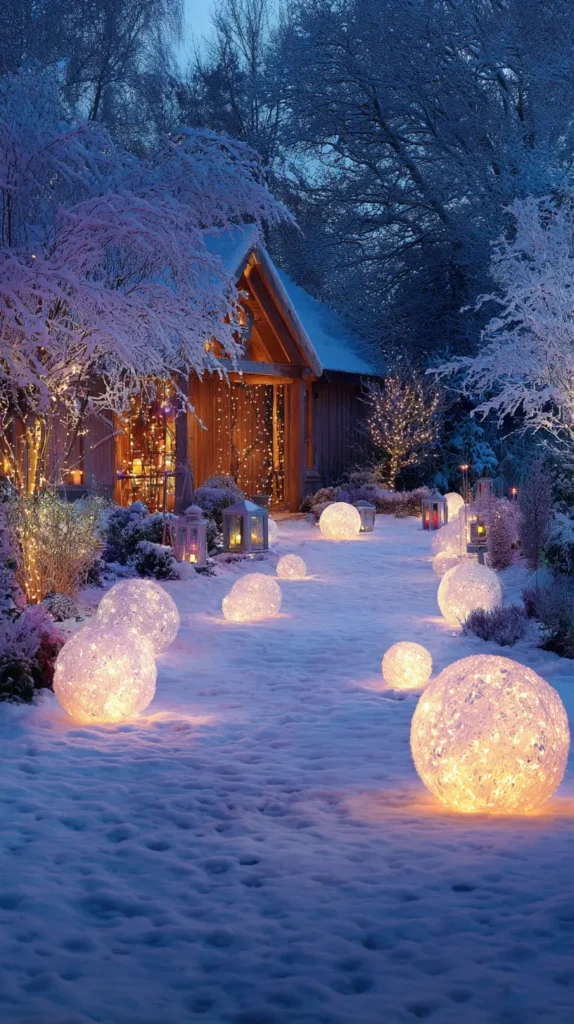
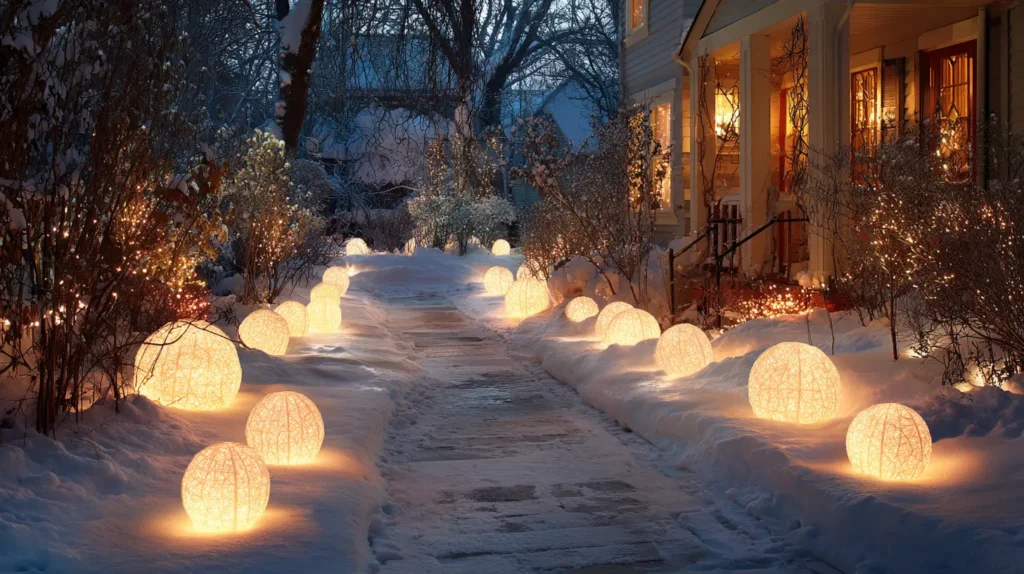
Your wonderland needs a guiding light. This idea is about illuminating the path to your patio with a soft, magical glow. Forget the standard, harsh solar stakes. Imagine a pathway lined with oversized, glowing orbs (like illuminated “snowballs”) nestled in the snow or on the grass. Or, picture rustic, lantern-style path markers, each with a flickering, battery-operated candle inside, casting a warm, welcoming light. This creates a safe and enchanting walkway, guiding your guests from the cold darkness into your cozy, lit patio area.
- Use stake lights, but choose ones with a “starburst” or “firefly” effect for a more magical feel.
- Large, illuminated spheres (orb lights) are incredibly modern and look just like giant, glowing snowballs.
- Fill a series of identical, simple lanterns with battery-operated fairy lights and line your path.
- For a simple, DIY look, line your path with brown paper bags (a “luminaria”), each weighted with sand and holding an LED tea light.
- Ensure the lights are just bright enough to guide the way, not so bright that they create glare.
Pro Design Tip: For a truly integrated look, use “net lights” draped over the bushes and shrubs that line your patio. This makes the entire landscape glow from within.
Budget Consideration: Save your glass food jars (like pasta sauce or jam jars). Wrap the rims with twine, add a handful of Epsom salt for “snow,” and place an LED tea light inside for a beautiful, rustic, and nearly free lantern.

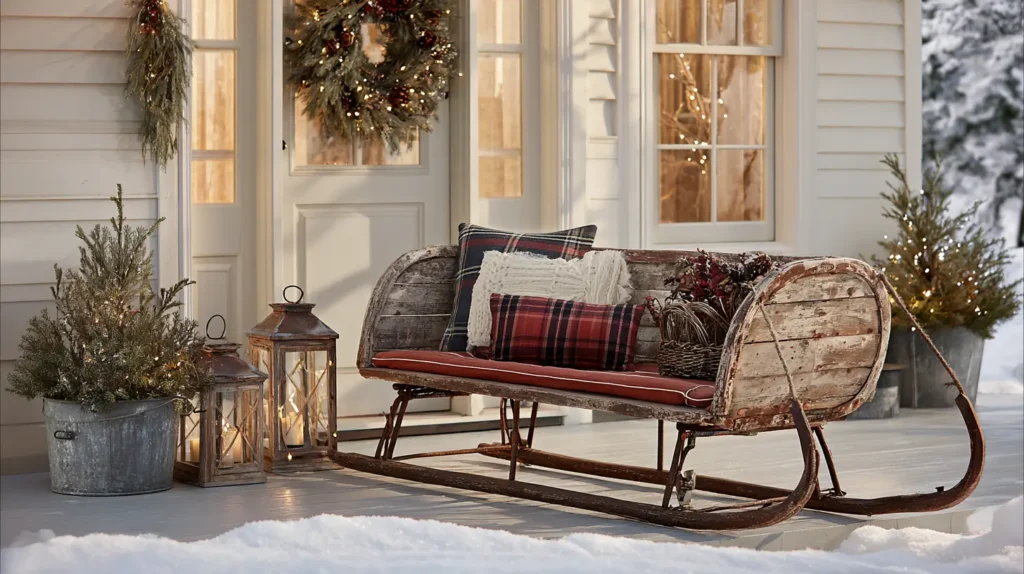
7. The Nostalgic Vintage Sled Display


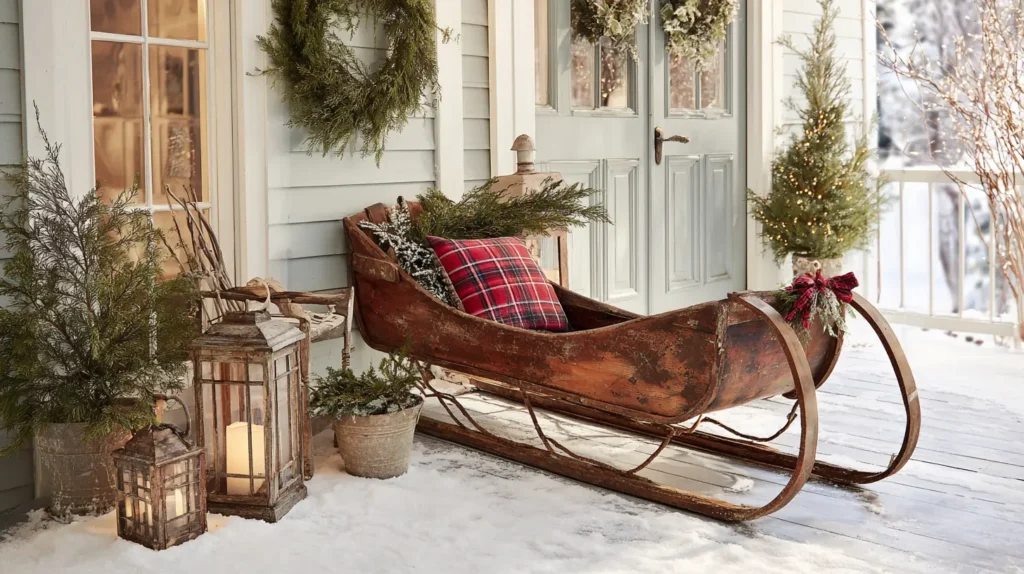
Tap into the classic, nostalgic charm of a bygone era with a beautifully styled vintage sled. Imagine an old wooden sled, its runners beautifully rusted, propped casually against the wall next to your patio door. It’s not just a sled; it’s a canvas. Picture it adorned with a simple evergreen wreath, a pair of antique ice skates tied with plaid ribbon, or a cozy lantern resting on its seat. This single piece tells a story, evoking childhood memories of snowy hills and creating a warm, “Currier & Ives” print-worthy focal point.
- Lean the sled against a wall or use it as a “table” to display other decor.
- A simple, elegant plaid bow tied to the steering bar is often all it needs.
- For a more rustic look, wrap the sled’s rungs with a short strand of battery-operated fairy lights.
- Pair the sled with other rustic elements, such as a metal watering can filled with birch branches or a small wooden crate.
- This is a perfect, contained vignette for a small patio or balcony.
Pro Design Tip: Create a “welcome” sign by painting a festive word (like “JOY,” “NOEL,” or “WELCOME”) vertically down the main plank of the sled in elegant white script.
Budget Consideration: You don’t need a real antique. Thrift stores and craft stores sell inexpensive, new wooden sleds that are designed for decoration. A little distressing with sandpaper and stain can make it look ancient.


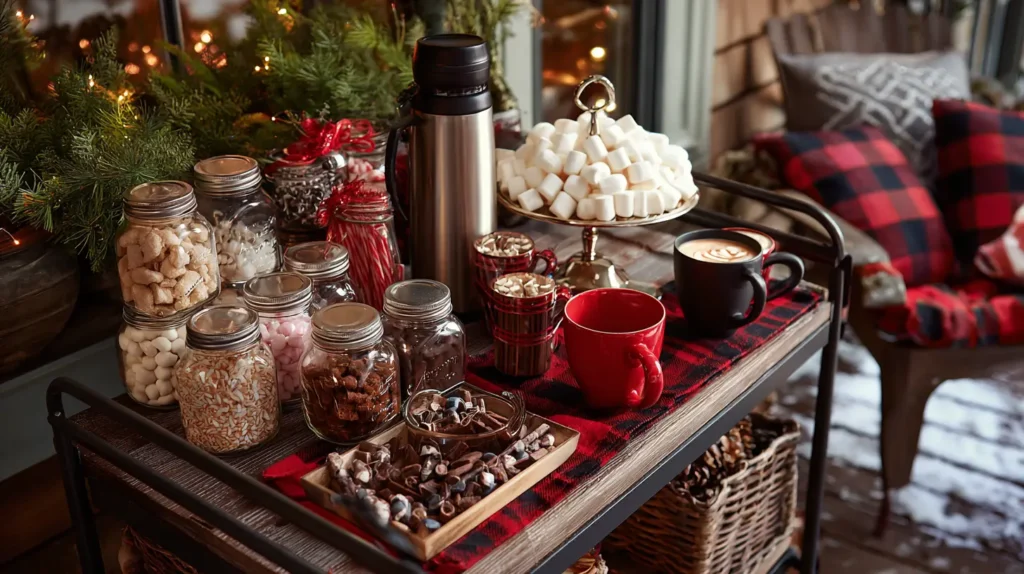
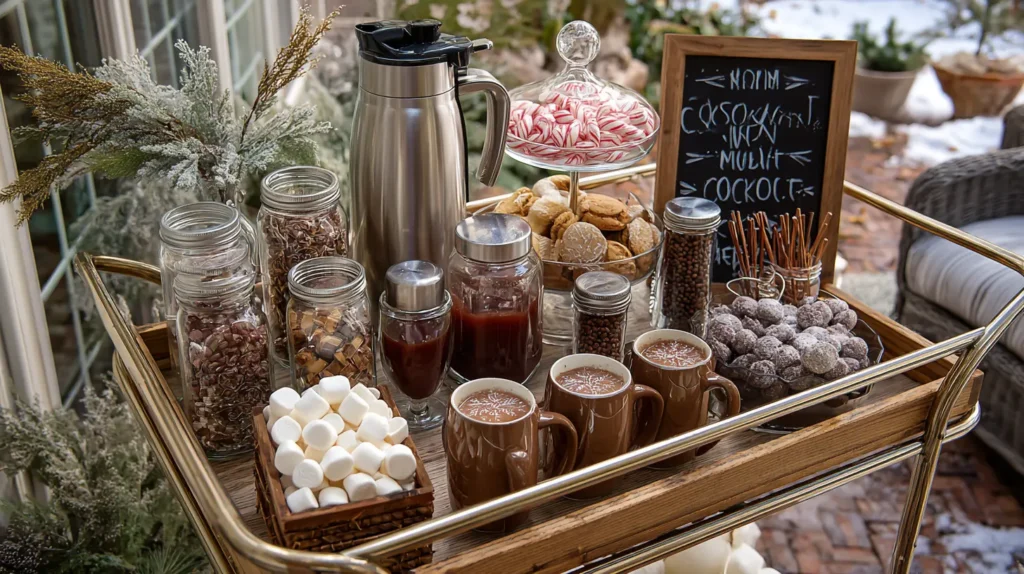
8. The Warm-Up Station: A Hot Cocoa Bar Cart

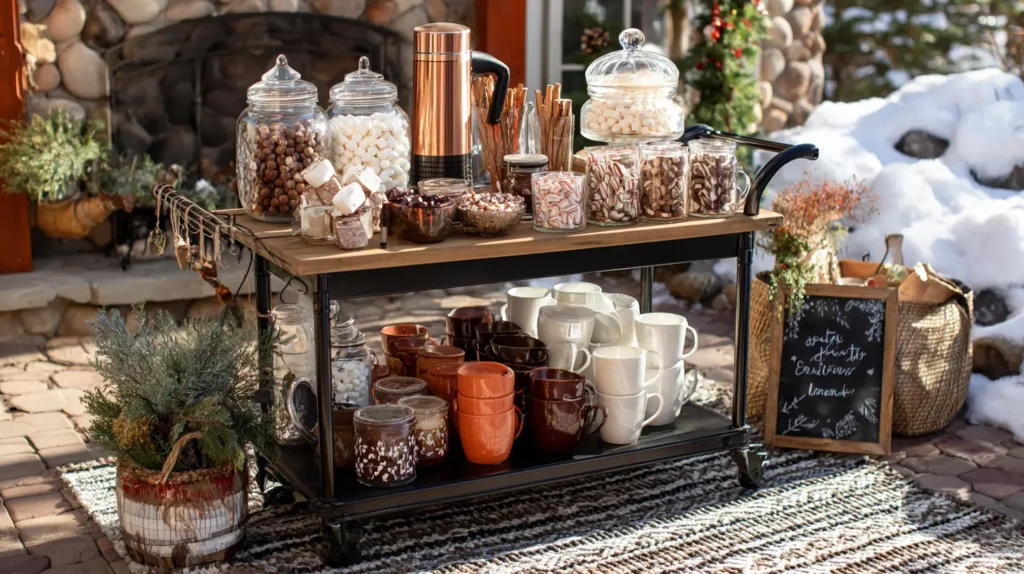
Turn your patio into the ultimate destination for holiday get-togethers with a fully-stocked hot cocoa bar. Imagine a small, rustic bar cart or a side table rolled against the wall, styled for a winter party. On top, a festive thermos holds steaming hot chocolate. A three-tiered tray displays all the fixings: jars filled with marshmallows, peppermint sticks, chocolate shavings, and cinnamon. A stack of cheerful holiday mugs invites guests to serve themselves. This isn’t just decor; it’s an interactive, memory-making experience that adds warmth, delicious smells, and a ton of fun to your winter wonderland.
- Use a bar cart, a potting bench, or even a small bookshelf as your “station.”
- Fill clear glass apothecary jars with toppings so guests can see what’s inside.
- Use a small chalkboard or letter board to write a fun “Hot Cocoa” menu.
- Add a small basket with hand warmers for an extra-cozy touch.
- Don’t forget the “adult” options: a few bottles of peppermint schnapps or Baileys for grown-up gatherings.
Pro Design Tip: Get a large, insulated beverage dispenser with a spigot. This keeps the cocoa (or hot apple cider) warm for hours and makes self-serving clean and easy.
Budget Consideration: Repurpose your indoor bar cart for the season. Use simple mason jars for all the toppings, and print your own cute labels on craft paper.
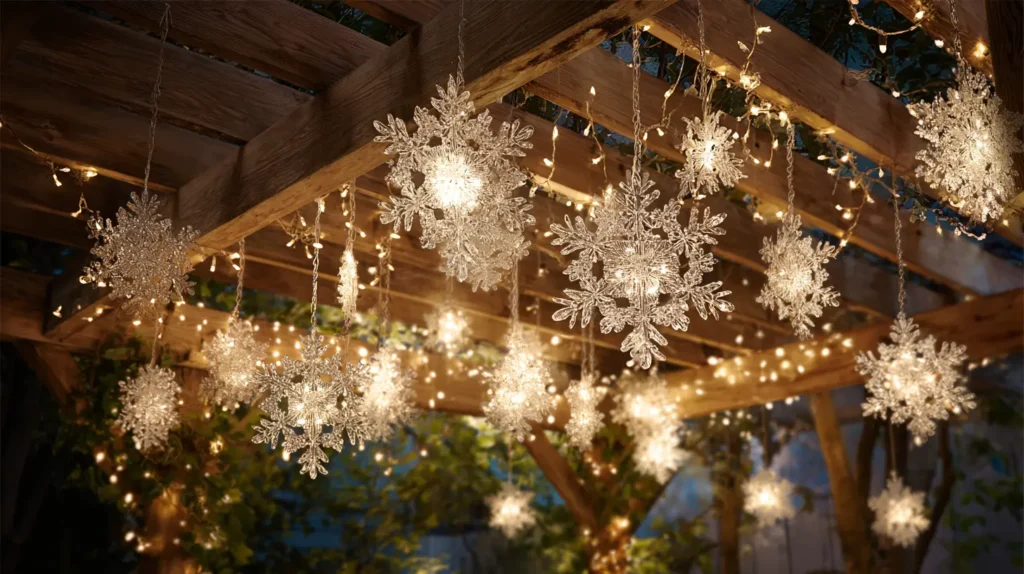
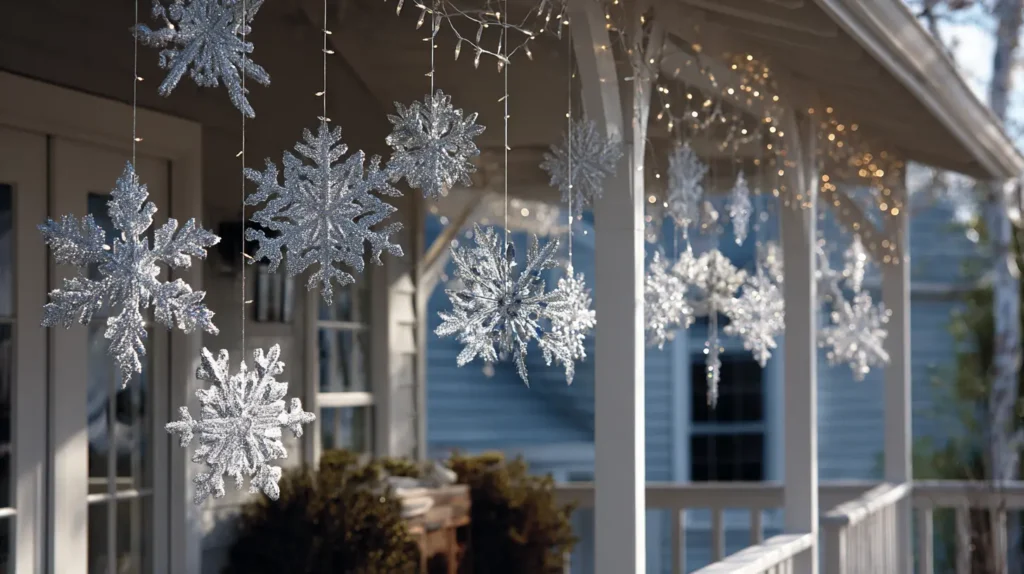
9. A “Frozen” Hanging Snowflake Chandelier
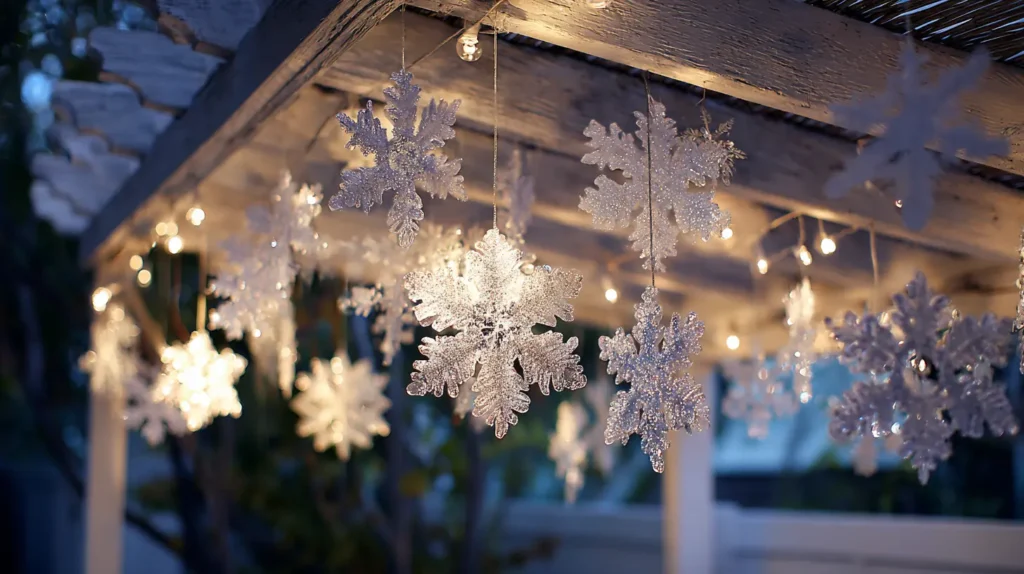
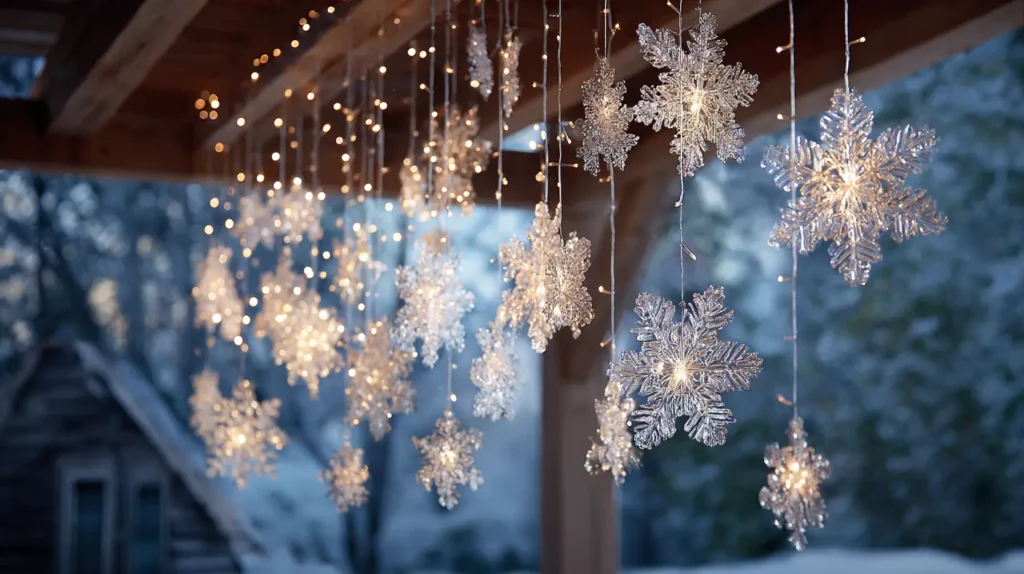
Create a stunning, magical focal point that floats above your patio. Imagine a “chandelier” made of dozens of glittering, oversized snowflakes, all suspended at different lengths from your pergola, gazebo, or a large tree branch. Picture these snowflakes—some glittery white, some shimmery silver—gently spinning and catching the light. During the day, they’ll sparkle in the sun. At night, a single, well-aimed spotlight (or your existing string lights) will make them glitter and cast intricate shadows, as if you’ve captured a magical flurry in mid-air.
- Use clear fishing line to hang the snowflakes for a truly “floating” illusion.
- Hang them at varying heights to create a deep, layered effect.
- Use a large embroidery hoop, a hula hoop, or a simple wire wreath frame as the “base” for your chandelier.
- Choose snowflakes made of plastic, wood, or metal so they can withstand winter weather.
- A mix of 3D snowflakes and flat ones will add the most visual interest.
Pro Design Tip: Weave a single strand of battery-operated micro fairy lights (the ones on a thin wire) around the hoop and down a few of the fishing lines. This will add a tiny, magical point of light from within the flurry.
Budget Consideration: Buy simple, flat white or silver plastic snowflakes in bulk from a dollar store. The magic comes from the quantity and the way you hang them, not the cost of each one.
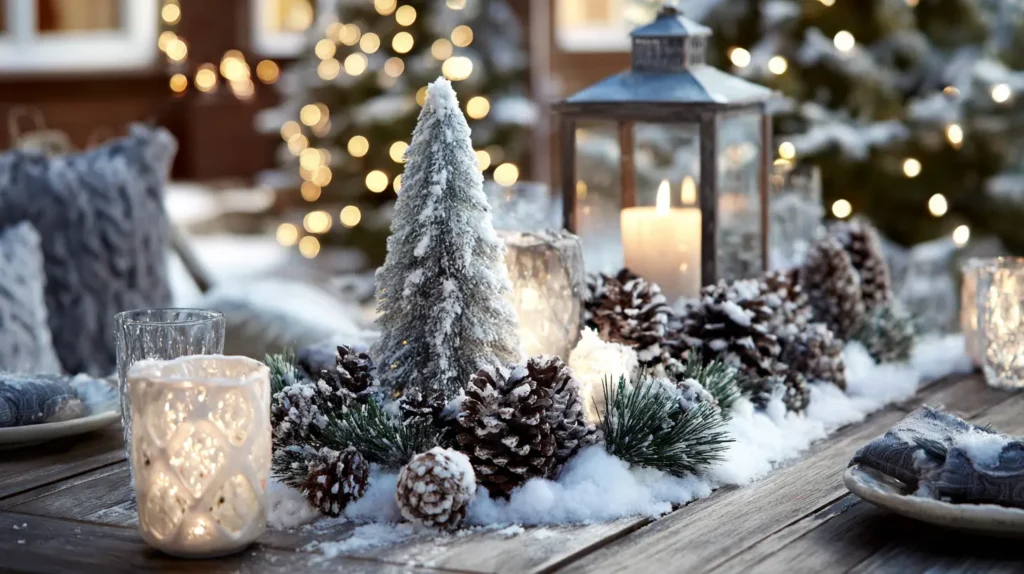
10. The Realistic Snow-Dusted Scene
If you live in a climate where real snow is just a dream, create your own! This is about adding a convincing, frosty topcoat to your entire patio scene. Imagine a light, sparkling “snow” dusting the tops of your evergreen garlands, settling in the crevices of your pinecones, and clinging to the branches of your mini trees. This isn’t a blizzard; it’s a delicate, magical frost that makes everything look softer and more unified. A light spray of faux snow or a roll of fluffy snow-batting can transform your decor from “Christmas in the suburbs” to “a quiet cabin in the Arctic.”
- Use a “flocking” spray (canned snow) to lightly dust your wreaths, garlands, and the tips of your mini trees.
- Lay a sheet of fluffy, white “snow batting” (like you’d use for a Christmas village) on your tables or at the base of your tree cluster.
- For a sparkling, icy effect, sprinkle Epsom salt or clear craft glitter on surfaces.
- A little goes a long way—you want a “dusting,” not a heavy, clumpy covering.
- Place this “snow” in areas where it would naturally collect.
Pro Design Tip: For a “freshly fallen snow” look on your planters, mix white paint with a bit of sand or baking soda to create a thick, textured paint. Dab it onto the edges of your pots and branches.
Budget Consideration: A can of snow spray is very inexpensive and can cover a lot of ground. A bag of fluffy polyester batting (pillow stuffing) from a craft store is a cheap way to create ground snow.
11. Festive Winter Planter “Bouquets”

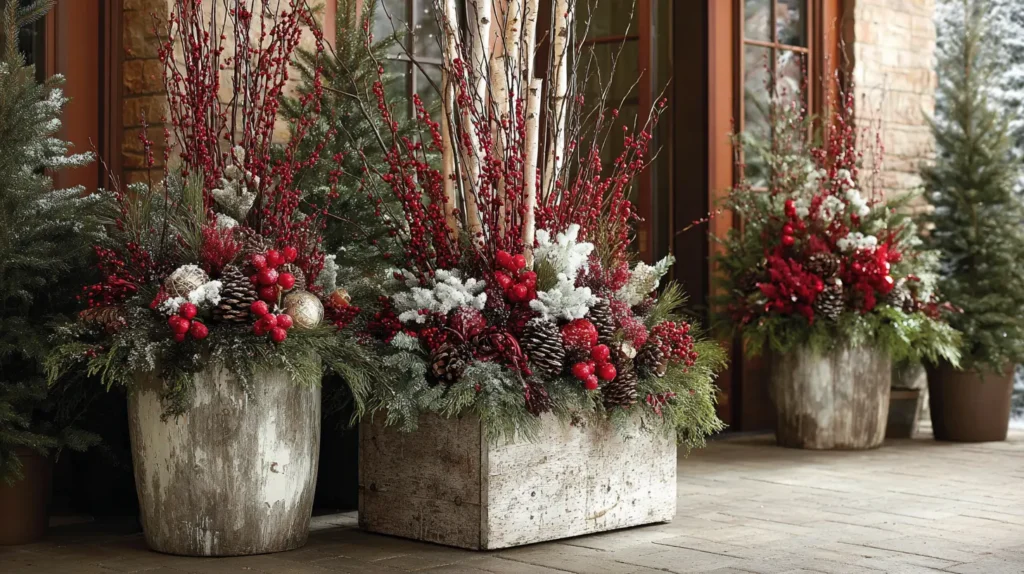
Don’t let your summer planters sit empty and sad all winter. Transform them into stunning, festive “bouquets” that flank your patio door. Imagine your large planters, now filled with a lush arrangement of wintery elements. Picture a tall centerpiece of birch logs or red-painted branches, surrounded by a base of hardy evergreen boughs (like pine, cedar, and fir). Add flourishes like large, glittering pinecones, bright red dogwood twigs, and clusters of faux red berries for a pop of color. This is an elegant, professional-looking way to bring life to your patio.
- Start with a sturdy base, such as floral foam or packed soil, in your pot.
- Place your tallest elements (the “thriller”), like birch logs or branches, in the center.
- Fill in the base with your “filler” greenery, like pine and cedar boughs.
- Add your “spiller” element—a trailing ivy or a weeping evergreen bed—to drape over the edge.
- Finish with your “bling”—the pinecones, berries, or even a few shatterproof ornaments.
Pro Design Tip: Add a string of battery-operated fairy lights (with a timer) to each planter. Tucked into the greenery, they create a magical, self-contained glow.
Budget Consideration: Ask your local Christmas tree lot for their discarded “trim” branches. They will often give you heaps of beautiful, fresh evergreen boughs for free.


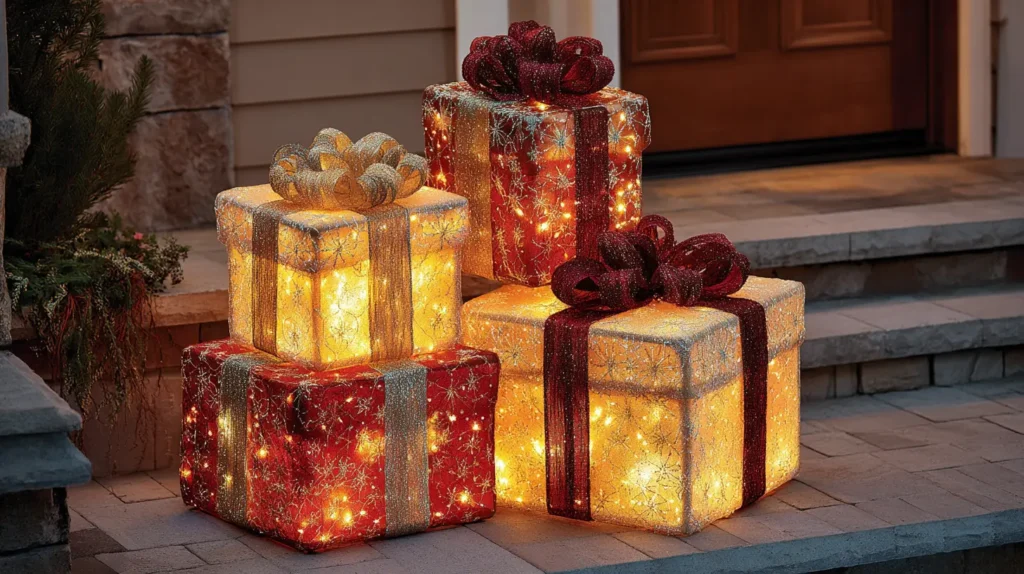
12. A Glowing Tower of Illuminated Gift Boxes
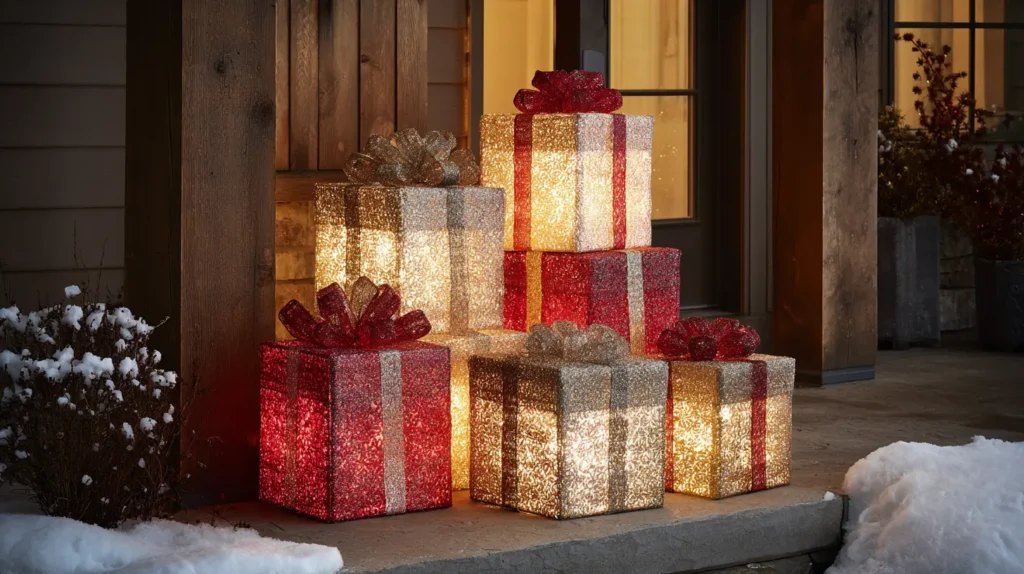
Bring the cheer from under the tree to the outside of your home. Imagine a stack of three or five beautifully wrapped gift boxes, sitting by your door, glowing warmly from within. These aren’t just props; they are lanterns. Picture boxes wrapped in weather-resistant, shimmering red and gold fabric, tied with extravagant bows, and lit from the inside to create a stunning, festive welcome. They add a touch of whimsy and bright, concentrated color, making your patio feel like the entrance to Santa’s workshop.
- You can buy pre-lit, outdoor-rated gift box sets, which are the easiest option.
- Stack them in a slightly jaunty, offset pile for a more playful, less rigid look.
- Place them in a prominent spot, like on your top step, right next to the door.
- Choose colors that match your overall theme (e.g., silver and blue for a wonderland, or red and gold for a classic look).
- Ensure the cord and plug are rated for outdoor use and plugged into a GFCI outlet.
Pro Design Tip: Create your own! Use old cardboard boxes, wrap them in outdoor-safe plastic or vinyl tablecloths, and tie them with wide, wired outdoor ribbon. Place a bright, battery-operated LED puck light inside each one before “wrapping.”
Budget Consideration: Collect boxes of different sizes. Wrap them in heavy-duty foil or plastic wrapping paper and use a ton of clear packing tape to “weatherproof” them.
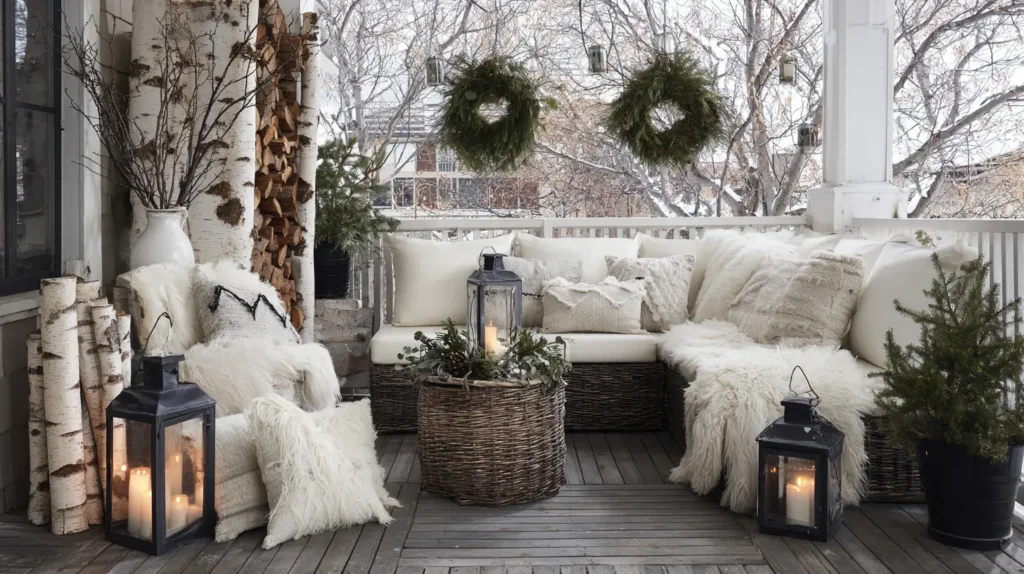
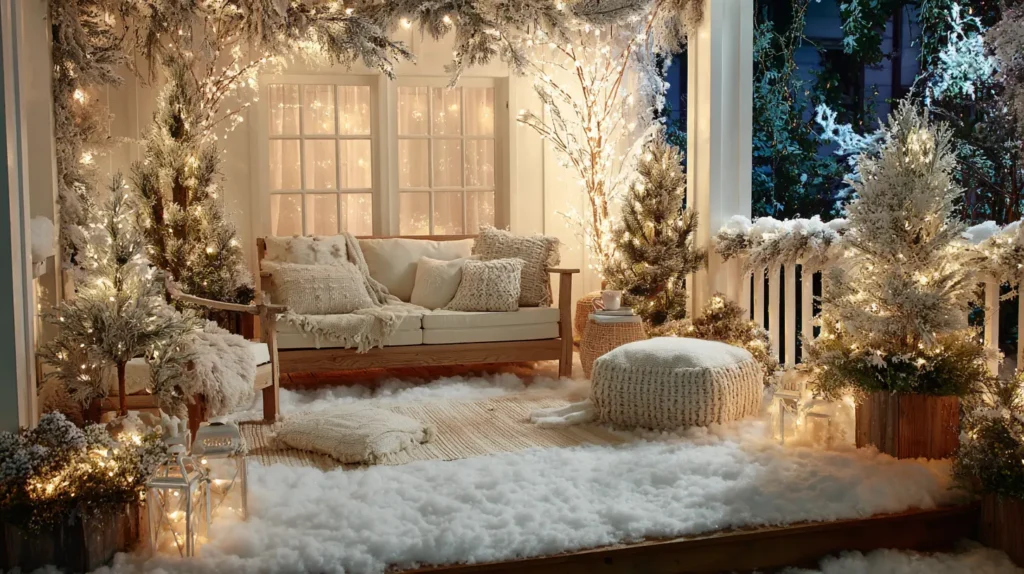
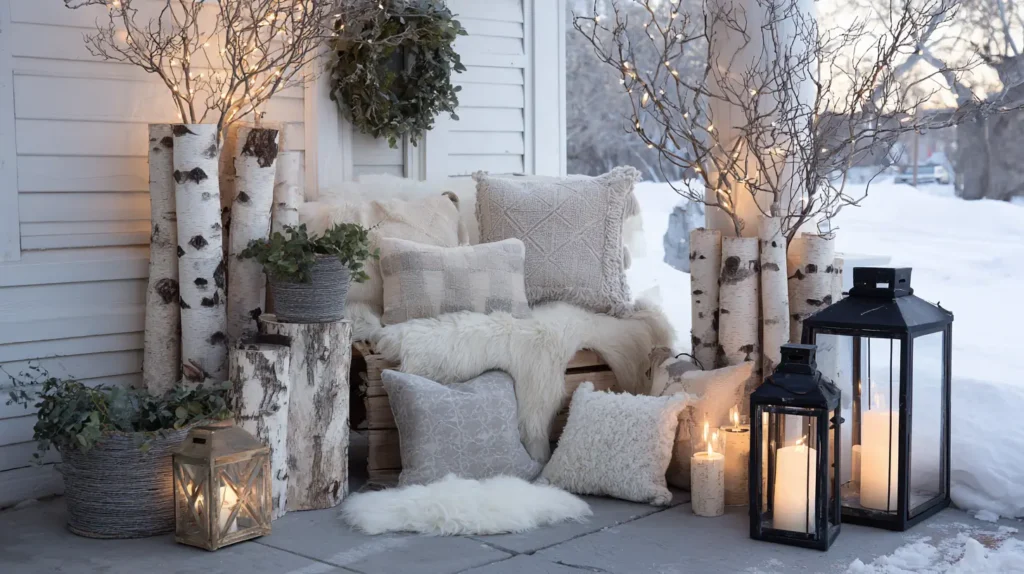
If your style is more minimalist and modern, embrace the clean, cozy aesthetic of a Scandinavian winter. This look is all about simplicity, natural textures, and a serene, all-white palette. Imagine a bundle of beautiful, white birch logs propped in a corner, their papery bark adding a rustic yet clean element. Your seating is draped in soft, white faux fur or knit blankets. The only greenery is a simple, unadorned pine wreath, and the only light comes from warm white lanterns and the fire. This is a calm, sophisticated, and utterly cozy take on the winter wonderland.
- Fill a large, dark-colored metal or wicker basket with a bundle of birch logs (real or faux).
- Stick to a strict color palette: white, cream, and the natural wood and green tones.
- Use simple, geometric lanterns (like black or brass) with warm white pillar candles (LED).
- A simple, unlit wreath made of eucalyptus or fir adds an organic, minimalist touch.
- This style is about “hygge”—the feeling of coziness. Focus on soft, plush textiles.
Pro Design Tip: Place a few faux sheepskin rugs directly on your patio chairs. It’s an instant invitation for guests to sit down and get comfortable, and it looks incredibly chic.
Budget Consideration: Collect interesting branches from your yard and spray paint them matte white. Grouped together in a tall vase, they create a very similar “birch” effect for free.

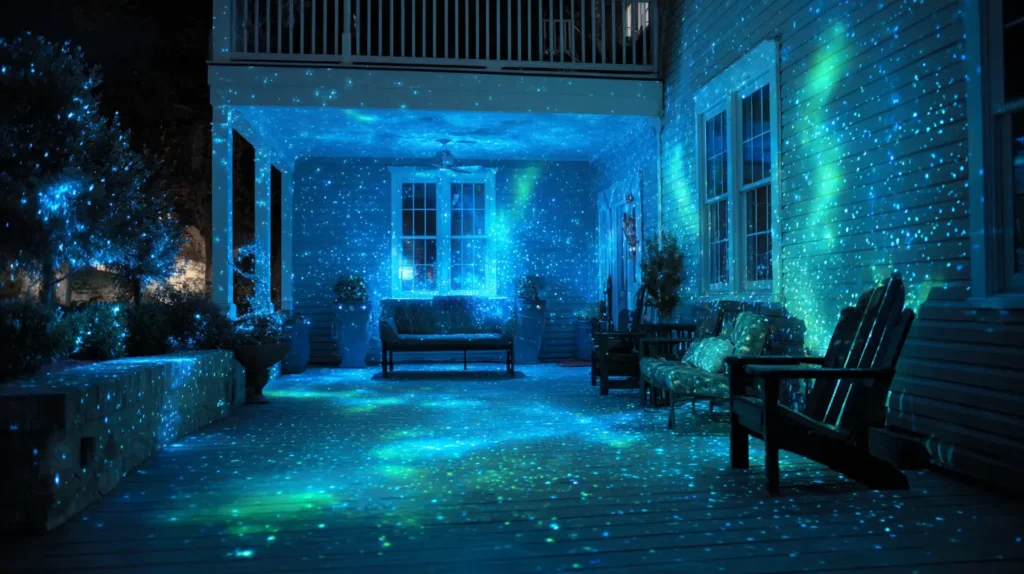
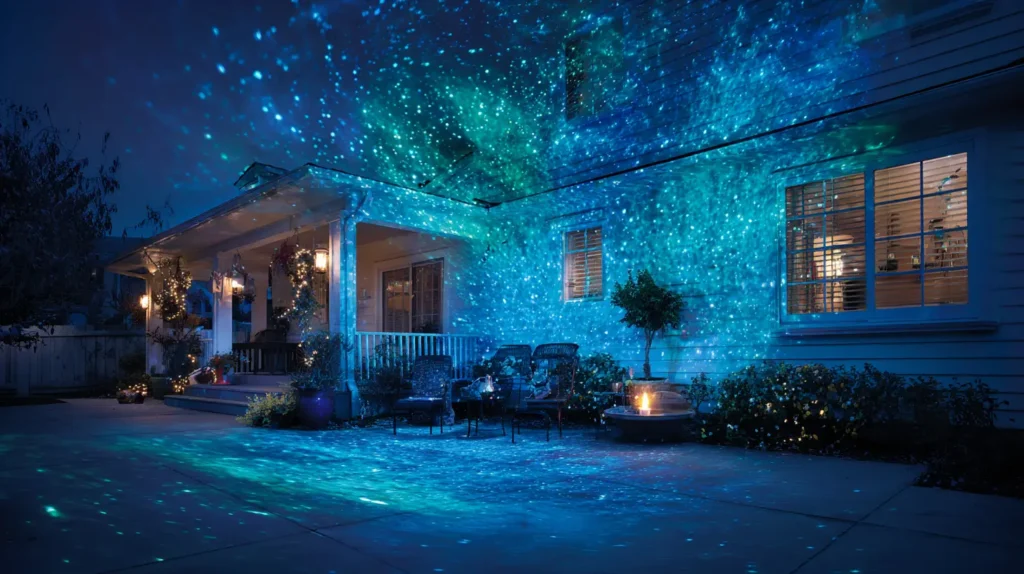
14. The “Northern Lights” Projector Show
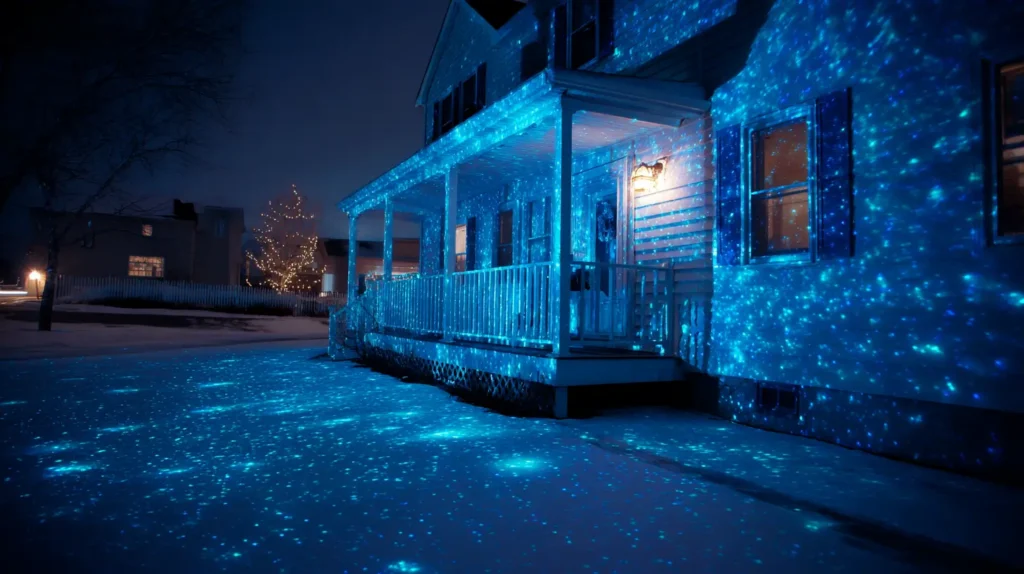
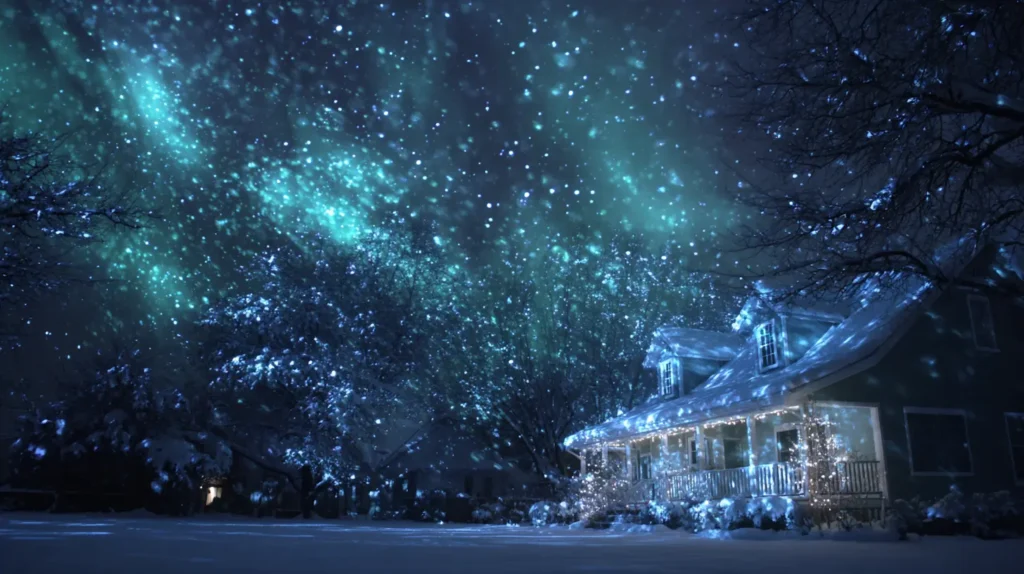
This is the ultimate high-impact, low-effort way to create a magical wonderland. Imagine your home’s exterior wall, the one bordering your patio, transformed into a canvas of moving light. Picture a laser or LED projector casting a swirling, mesmerizing display of green and blue light, mimicking the Aurora Borealis. Or, visualize a constant, gentle flurry of snowflakes, drifting silently across your house and patio furniture, with no shoveling required. This single device can cover your entire space in moving, magical light, instantly setting a fantastical tone.
- Choose a projector with “motion” effects, not just static dots, for the most dynamic look.
- Common themes are “falling snow,” “starry night,” or “swirling aurora.”
- Position the projector in your yard, aimed at your house or a large, flat surface for the biggest impact.
- This is a great base layer; you can add other decor, and the projector light will make it all feel more magical.
- Make sure to buy a high-quality, weather-resistant projector.
Pro Design Tip: Layer two projectors. Use a “falling snow” projector as your base, and aim a second “swirling blue/green” projector onto the same surface. The combination is breathtaking.
Budget Consideration: A projector can seem like an investment, but it’s often cheaper (and infinitely easier) than stringing thousands of individual lights, and you’ll use it every single year.
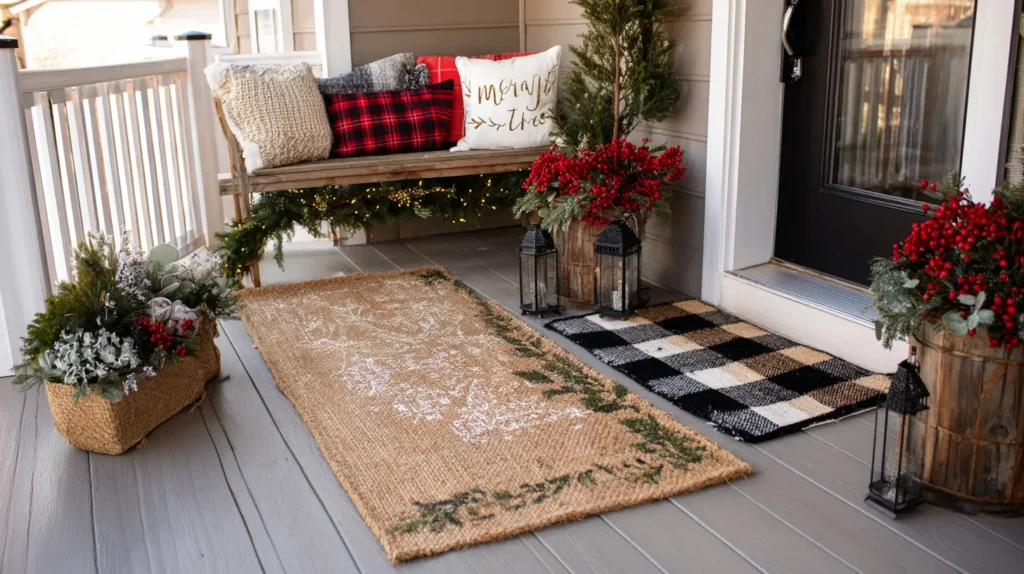
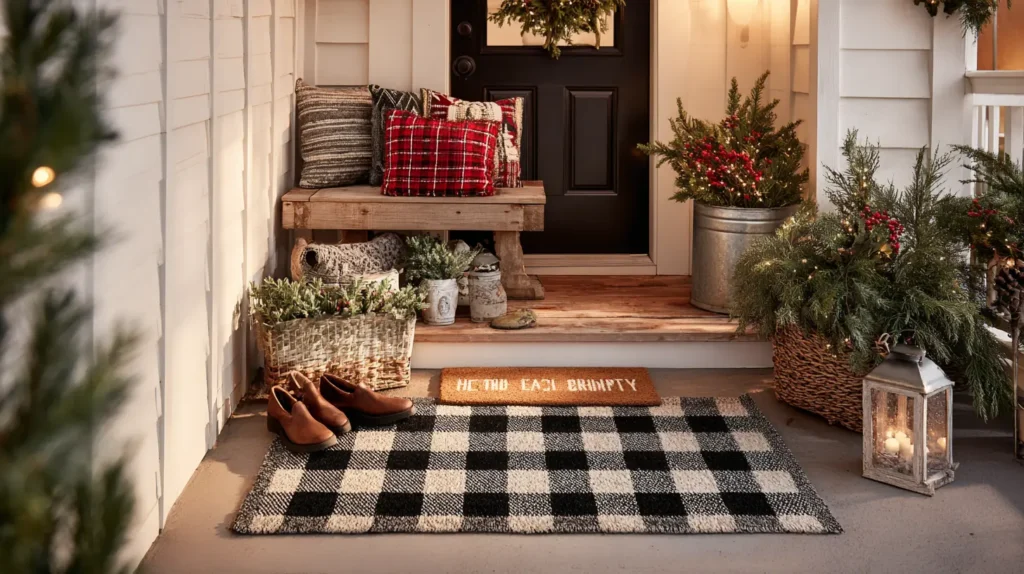
15. The Layered & Festive Welcome Mat
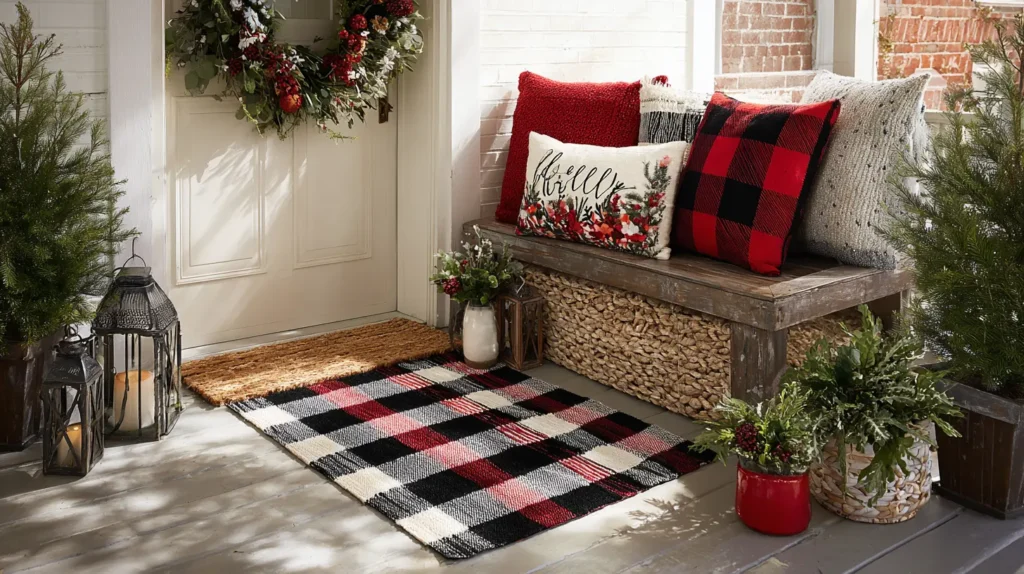
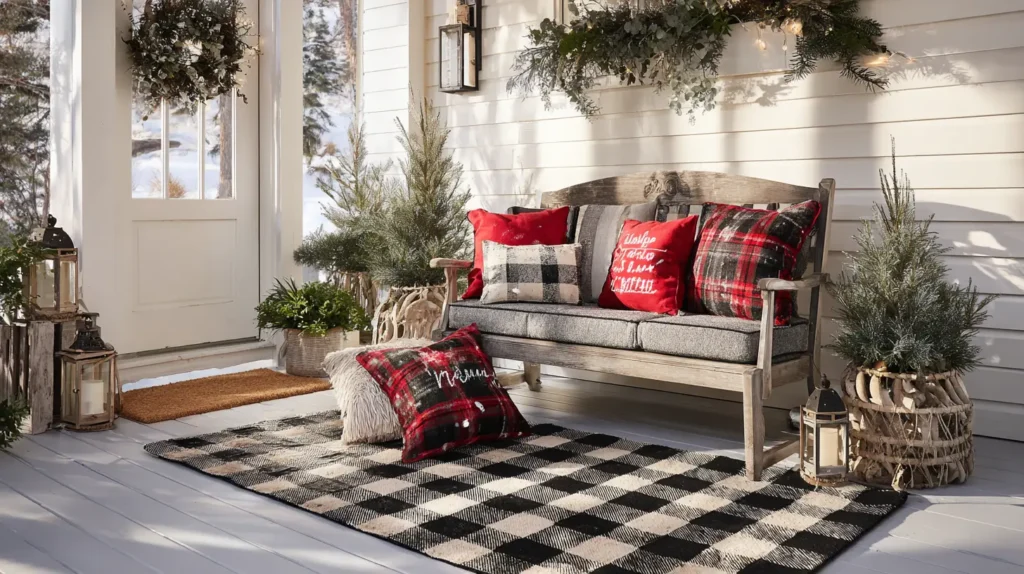
Don’t neglect the very first thing your guests step on! This small detail sets the tone for your entire patio. Imagine a boring, plain doormat… and then replace it with a festive, layered creation. Picture a large, flat-woven outdoor rug with a bold buffalo-check or plaid pattern as its base. On top of that, place a smaller, coir-fiber doormat with a cheerful holiday message, like “Merry & Bright” or a simple, elegant “Welcome.” This simple layering technique adds color, texture, and a custom, designer feel to your entryway.
- The bottom rug should be larger (around 2′ x 3′), and the top mat should be a standard 18″ x 30″.
- Choose a durable, outdoor-rated bottom rug that can get wet.
- A black-and-white buffalo check pattern is a classic, versatile base that works with any color scheme.
- Pair the mat with a festive planter or a small, welcoming sign.
- It’s an easy way to add a pop of personality right at the door.
Pro Design Tip: Flank your layered mat with a pair of matching, miniature evergreen trees in small pots. The symmetry is incredibly pleasing and creates a grand, hotel-like entrance.
Budget Consideration: You can DIY the top mat. Buy a plain coir mat, use a stencil, and outdoor-rated paint to create your own custom holiday message.
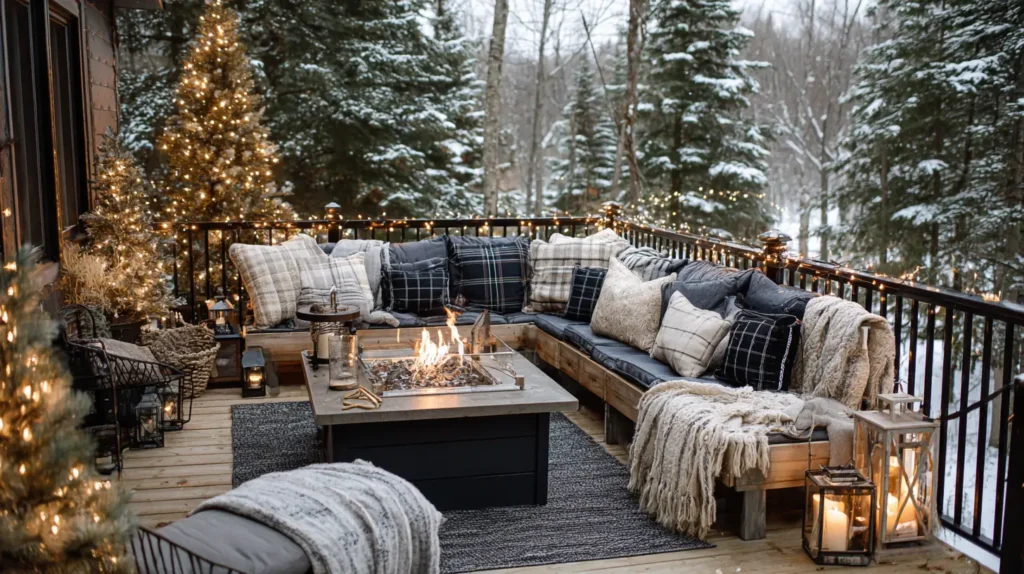
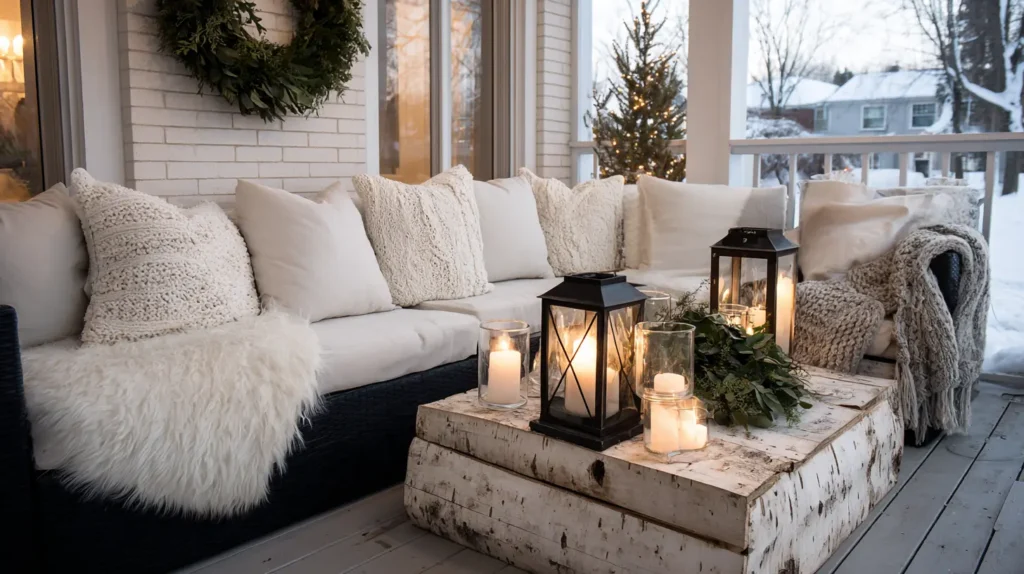
16. Plush Faux Fur Throws on Seating
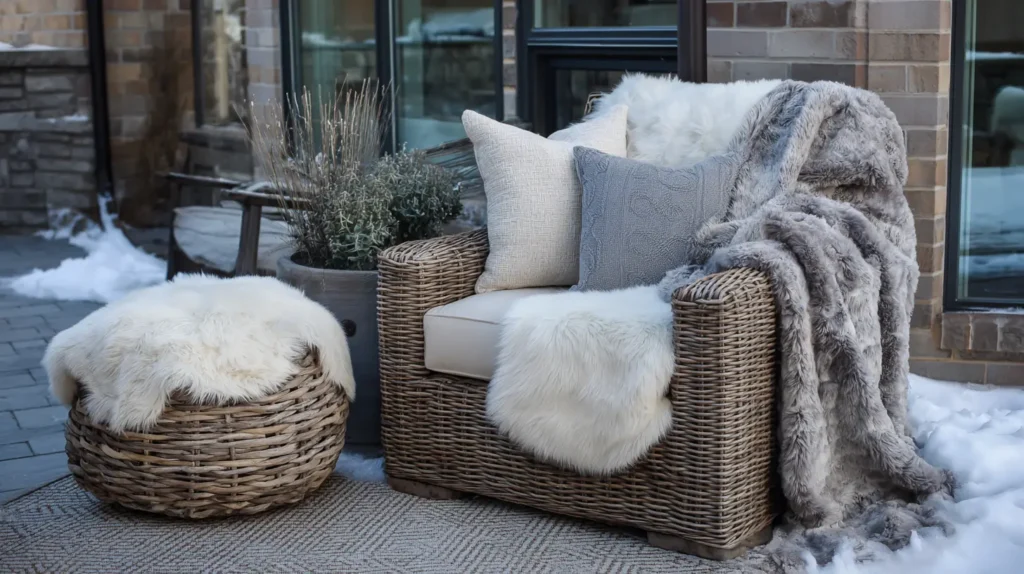
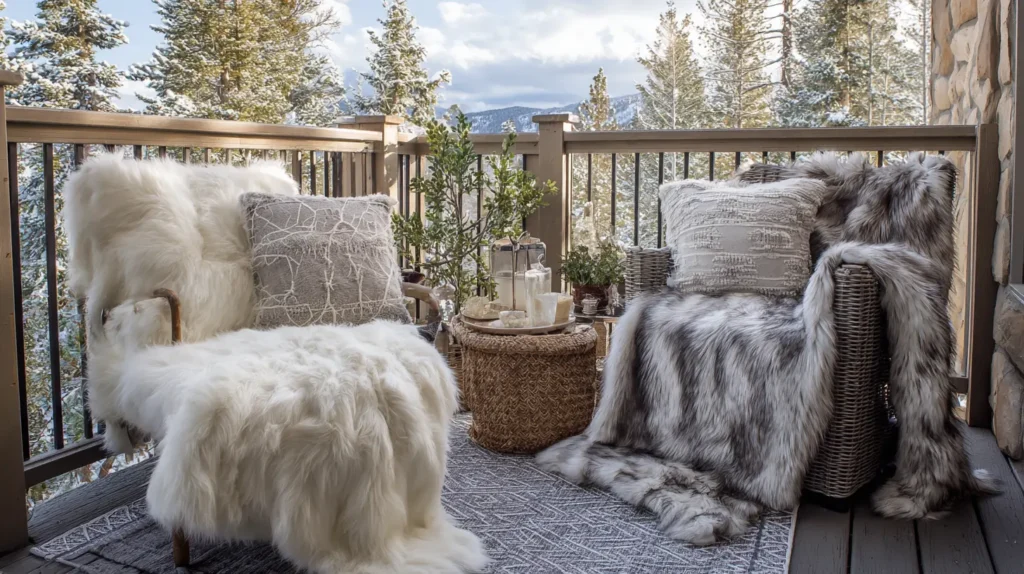
How do you make cold outdoor furniture look irresistibly cozy? With plush, luxurious texture. Imagine your metal or wicker patio chairs, which can look cold and uninviting in winter, draped in thick, soft faux-fur throws. Picture a white or grey fur throw tossed casually over the back of a chair, or a small faux sheepskin rug used as a seat cover. This not only looks incredibly glamorous and luxurious (like a mountain ski lodge), but it also provides real, practical warmth for anyone who sits down.
- Choose faux furs in neutral, “wintry” colors like white, cream, or grey.
- Faux sheepskin rugs are inexpensive and perfectly sized for use as chair pads.
- Drape them casually; they look best when they’re not perfectly folded.
- Be sure to bring the throws indoors when not in use or during heavy snow or rain.
- The contrast of the soft fur against hard wood or metal furniture is visually stunning.
Pro Design Tip: Look for outdoor-specific cushion covers made from fuzzy, “teddy bear”- or sherpa fleece. They give a similar cozy texture but are designed to be more weather-resistant.
Budget Consideration: You don’t need full-sized blankets. Look for small, inexpensive faux-fur “accent” throws or even bath mats (which often have a faux-fur texture) to drape over chairs.


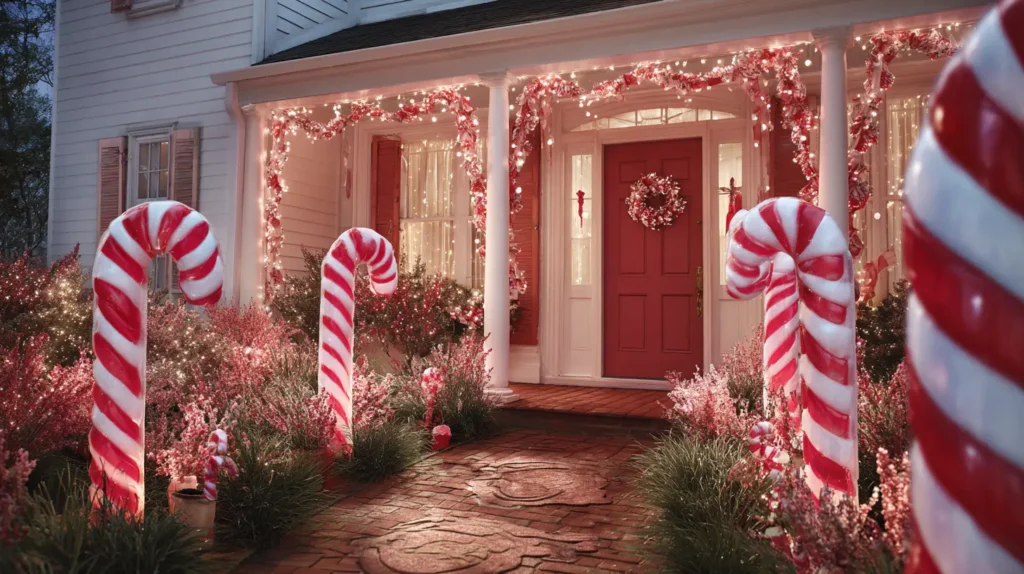
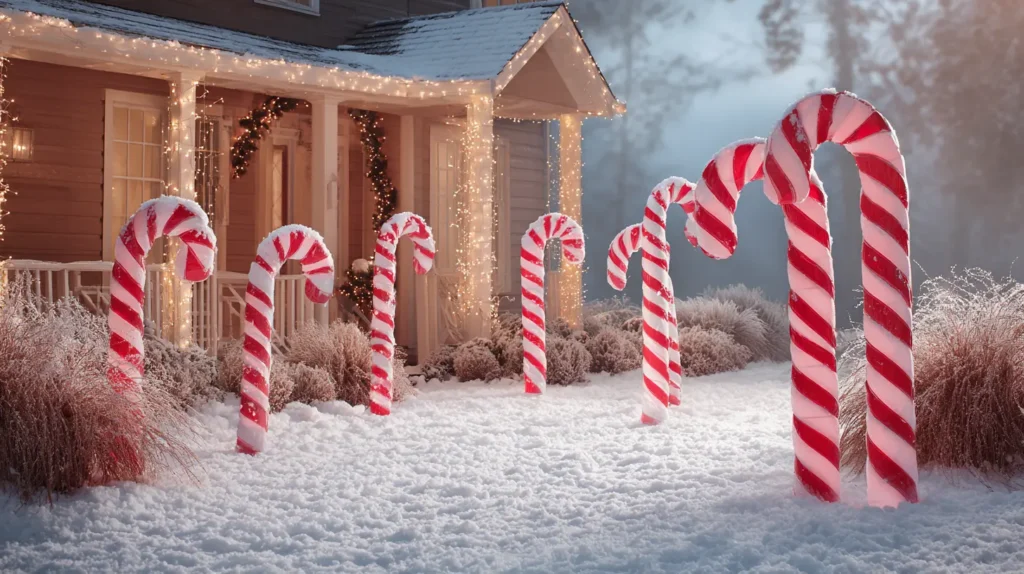
17. The Whimsical Giant Candy Cane Pathway
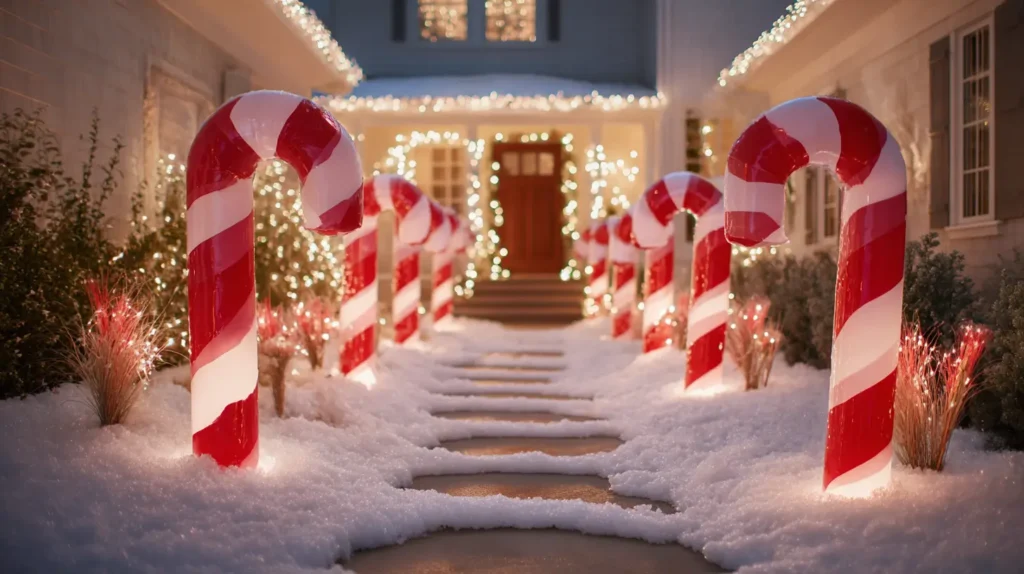
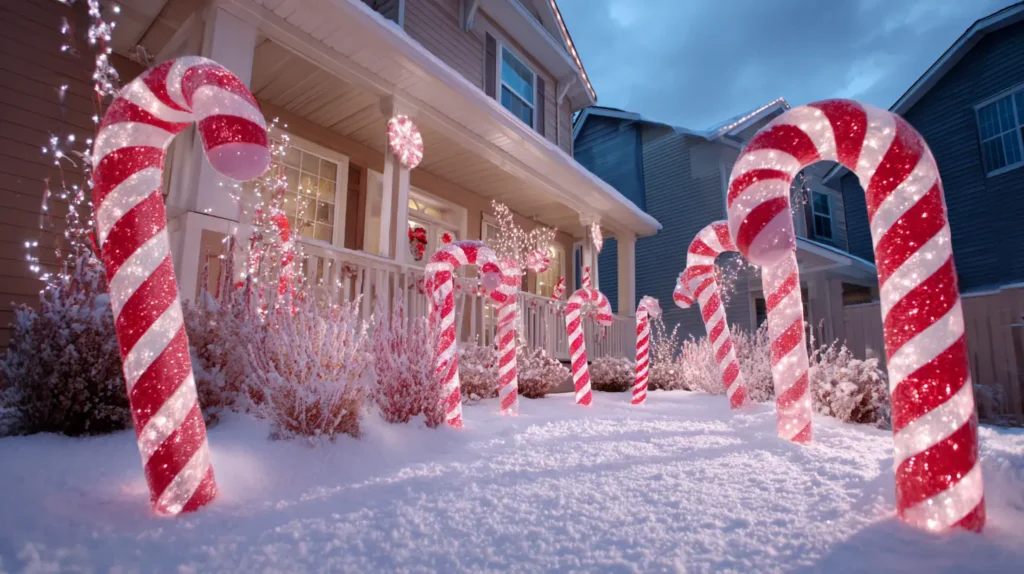
If your winter wonderland has a playful, “North Pole” vibe, line your pathway with a sweet treat. Imagine the walk to your patio transformed into a whimsical candy land, flanked by oversized, glowing candy canes. Picture classic red-and-white striped canes, about 3 feet tall, staked into the ground or in your planters, their curved tops all pointing inward to create a cheerful, welcoming archway. At night, they glow from within, lighting the path with a fun, festive, and pure Christmas spirit.
- Use these to line a walkway, or cluster them in groups of three in your planters.
- Choose pre-lit canes for the easiest setup.
- Space them evenly, about 2-3 feet apart, for a clean, uniform look.
- This is a very kid-friendly and nostalgic decoration that brings a smile to everyone’s face.
- Pair them with red and white string lights on your house for a coordinated theme.
Pro Design Tip: For a DIY version, create your own giant candy canes from white PVC pipe. Use a heat gun (carefully) to bend the top, then wrap the entire thing in red electrical or duct tape to create the stripes.
Budget Consideration: Inexpensive, unlit plastic candy canes can be bought in sets. Create your own “glow” by tightly wrapping a string of red or white battery-operated micro-lights around each one.
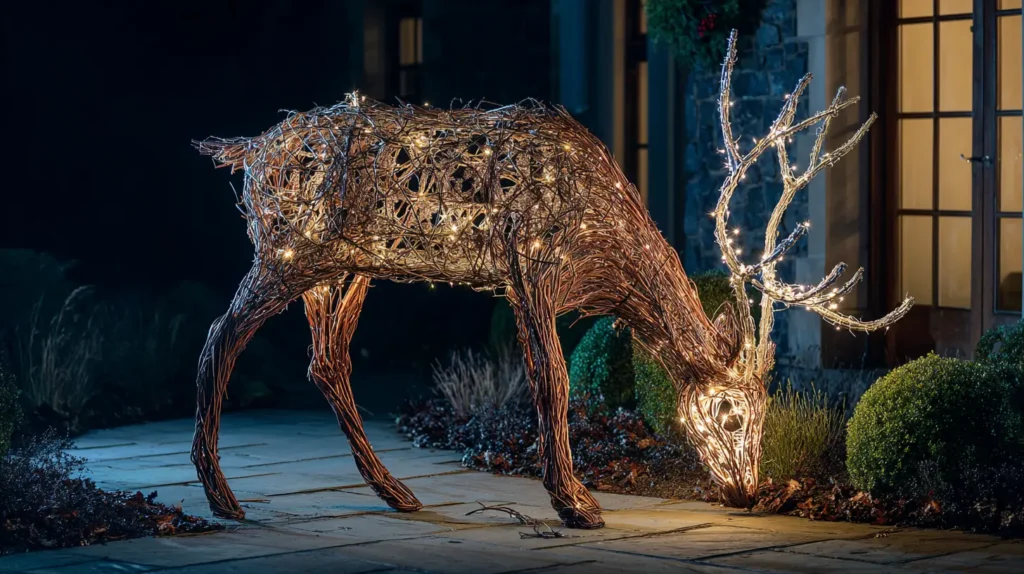
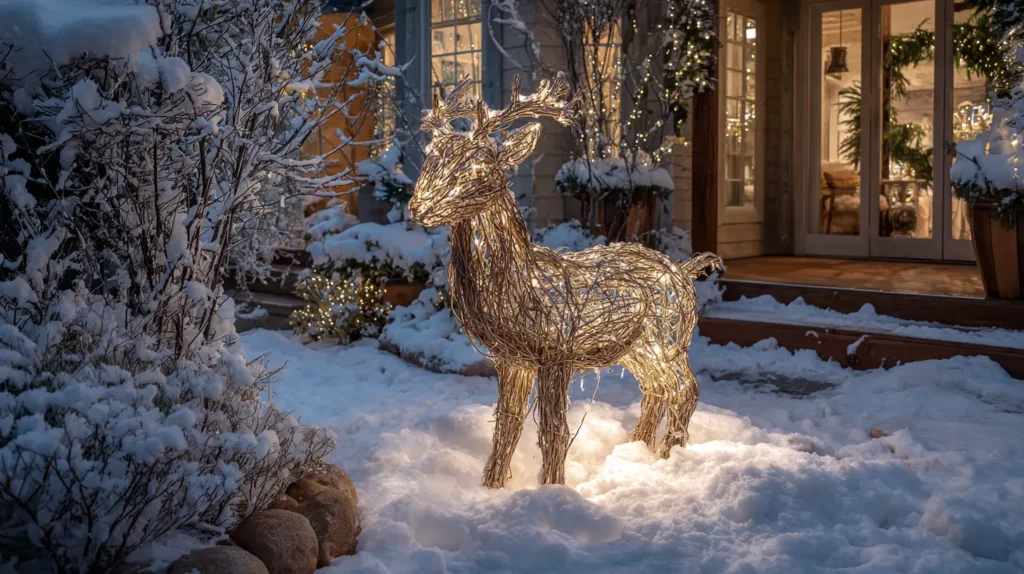
18. A Majestic, Grazing Reindeer Figure
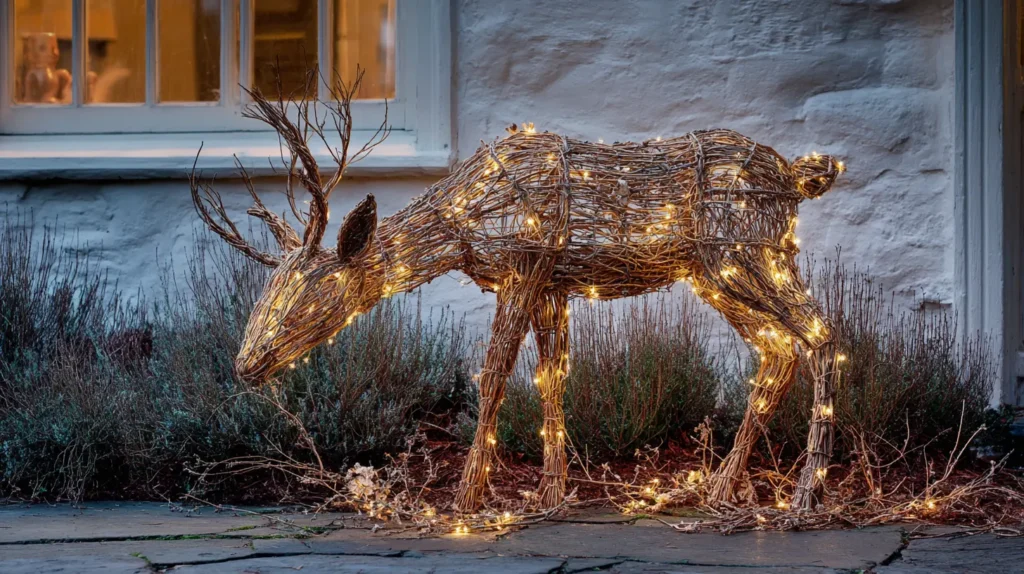
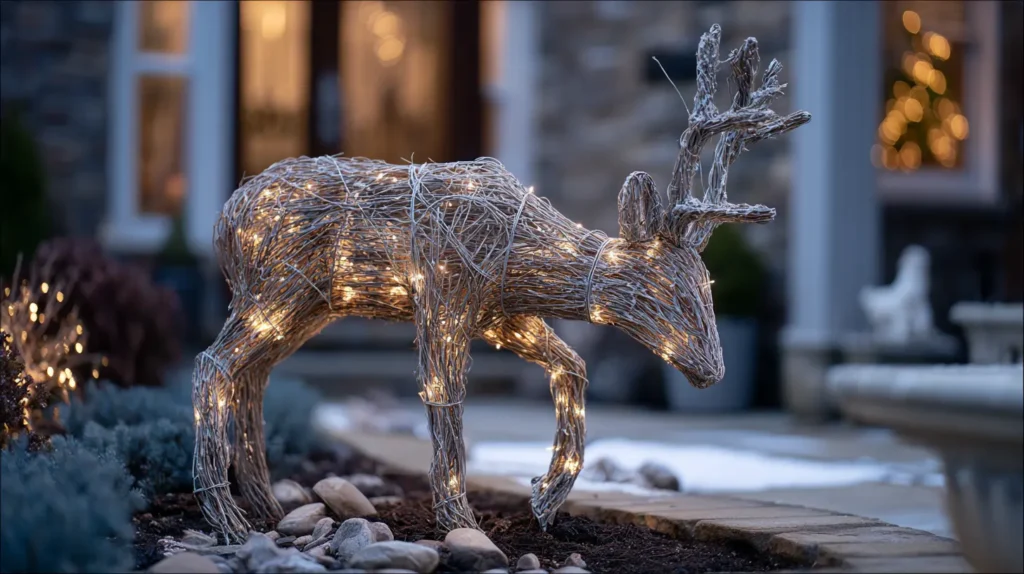
Your winter forest needs some wildlife. Add a touch of magic and majesty with a beautiful reindeer figure. Imagine a life-sized (or slightly smaller) reindeer, seemingly frozen in time, grazing peacefully in a corner of your patio or on the adjacent lawn. Picture one made of natural grapevine and twigs, wrapped in warm white lights, giving it a rustic, organic feel. Or, visualize a sleek, modern reindeer made of glittering silver or gold wire, its form illuminated from within. This single, elegant figure evokes all the magic of Santa’s sleigh and the quiet beauty of the Arctic.
- Choose a style that matches your theme: rustic grapevine, modern wire-frame, or classic plastic.
- A “grazing” reindeer (head down) often looks more natural and peaceful than a “leaping” one.
- Place it in a “scene”—nestle it among your cluster of mini trees or have it “drinking” from a birdbath.
- Use a spotlight to make it a hero piece, or let its own internal lights be the main glow.
- A pair—a larger stag and a smaller doe—can create a beautiful family scene.
Pro Design Tip: Create a “magic trail” for your reindeer by scattering a small amount of silver or iridescent glitter on the ground near its feet, as if it’s leaving a trail of frost.
Budget Consideration: A grapevine reindeer (unlit) is often cheaper than a pre-lit wire one. You can easily wrap it in your own string lights, which you likely already have.
19. The Soundtrack: Hidden Outdoor Speakers
A winter wonderland shouldn’t just be seen; it should be felt and heard. This idea is purely atmospheric. Imagine your guests stepping onto your patio, taking in the twinkling lights and cozy fire, and being enveloped in the faint, beautiful sound of instrumental Christmas carols or classical winter music (like Vivaldi’s “Winter”). The sound isn’t blasting; it’s subtle, seeming to come from the air itself. Hiding a small, weather-resistant Bluetooth speaker in a planter or under a chair transforms your patio from a display into an experience.
- Choose instrumental or classical holiday music for a more elegant, serene, and sophisticated atmosphere.
- Hide the speaker out of sight, but don’t muffle it (e.g., in a basket, behind a planter).
- Keep the volume low. It should be “background music,” not “party music,” to add to the magic.
- Create a long playlist so you can “set it and forget it” for the entire evening.
- Ensure your speaker is rated for outdoor use or is in a protected, dry location.
Pro Design Tip: Coordinate your music with your lights. If you have “smart” lights, you can often find apps that will sync their twinkling or fading to the rhythm of the music.
Budget Consideration: You don’t need a high-end sound system. A small, inexpensive, portable Bluetooth speaker is all you need, and you can bring it back inside when you’re done.

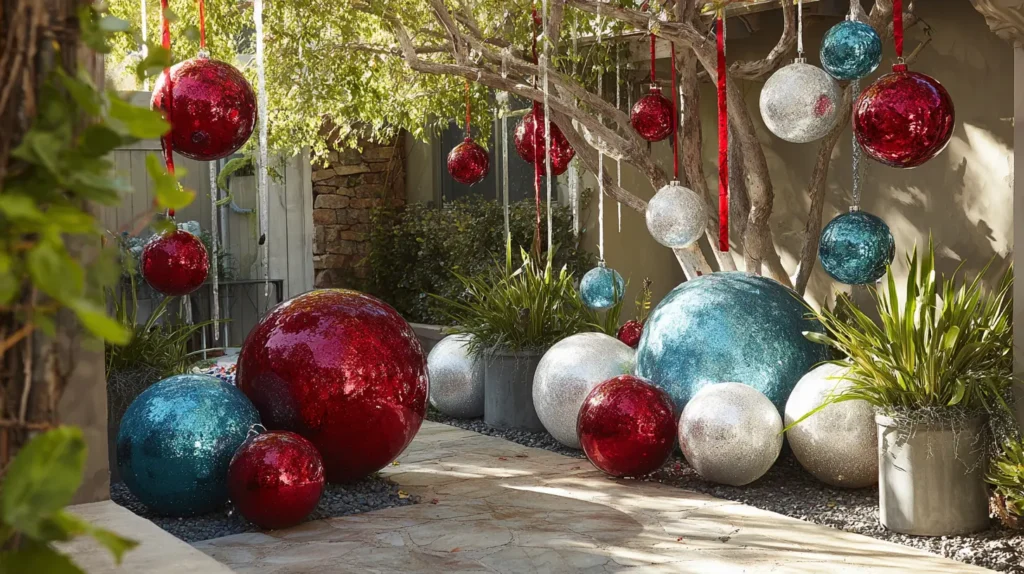
20. Oversized “Bauble” Ornaments
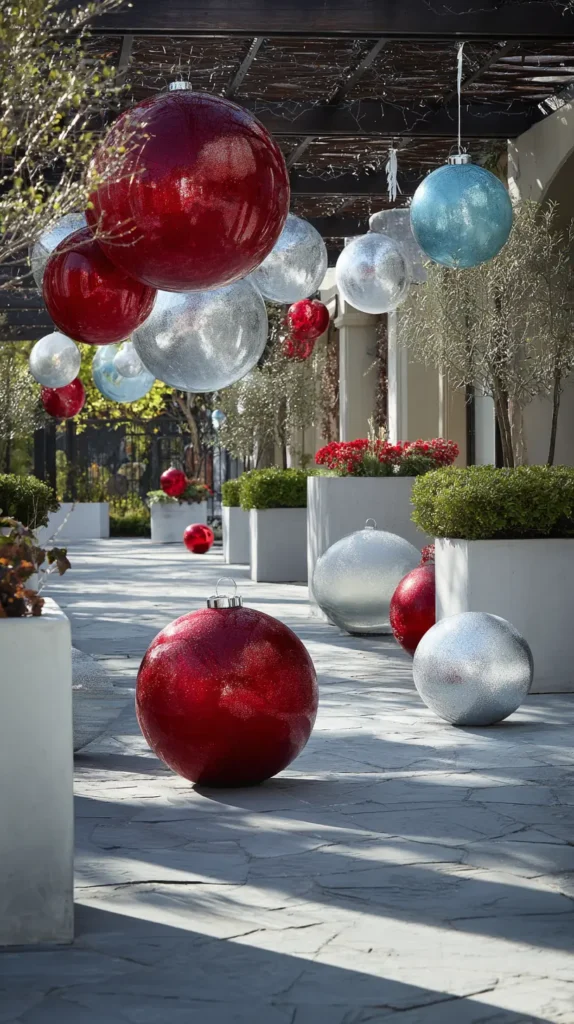
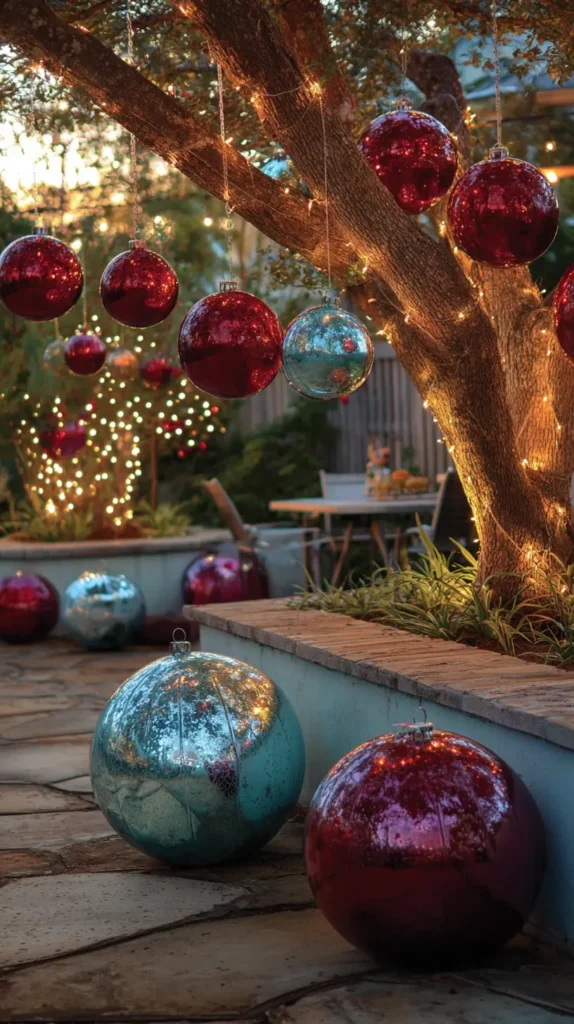

Add a touch of modern whimsy and playful scale to your patio. Imagine giant, oversized Christmas ball ornaments—some as big as bowling balls or even beach balls—that look as if they’ve fallen from a giant’s Christmas tree. Picture them in shimmery silver, deep red, and icy blue, nestled in your empty planters, clustered in a corner, or even hanging from a sturdy tree branch. These large-scale baubles are a fun, contemporary way to add color and shine, and their reflective surfaces will beautifully mirror all the other lights on your patio.
- Choose shatterproof, plastic ornaments, as glass will not survive outdoors.
- Cluster them in groups of three or five, in varying sizes, for the best visual effect.
- Place them in an empty planter, birdbath, or a large metal bucket.
- For a “floating” look, hang them from a pergola or tree branch at different heights using wide, satin ribbon.
- Look for “finial” shaped ornaments (the long, pointy ones) to add variety to the round globes.
Pro Design Tip: Create your own glowing oversized ornaments. Buy large, translucent plastic balls (like playground balls), drill a small hole, and thread a string of battery-operated fairy lights through it.
Budget Consideration: This is a great DIY. Buy inexpensive, large plastic balls from a toy store and spray them with metallic spray paint to transform them into elegant, oversized ornaments.

Conclusion
Your patio is a true extension of your home, and with a little imagination, it can become the most magical part of your holiday display. As you can see, creating a winter wonderland isn’t about one single, expensive item; it’s about layering light, texture, and cozy elements to build an immersive atmosphere.
From the sparkle of icicle lights and the scent of fresh pine to the essential warmth of a fire pit, each of these 20 patio Christmas decor ideas is a puzzle piece. By combining them, you can craft a stunning, personal, and utterly enchanting outdoor haven that will invite you and your guests to enjoy the magic of the season, even on the chilliest of nights.
Which of these ideas are you planning to use for your patio this year? Do you have a favorite outdoor decorating tip? Share your thoughts in the comments below!
