
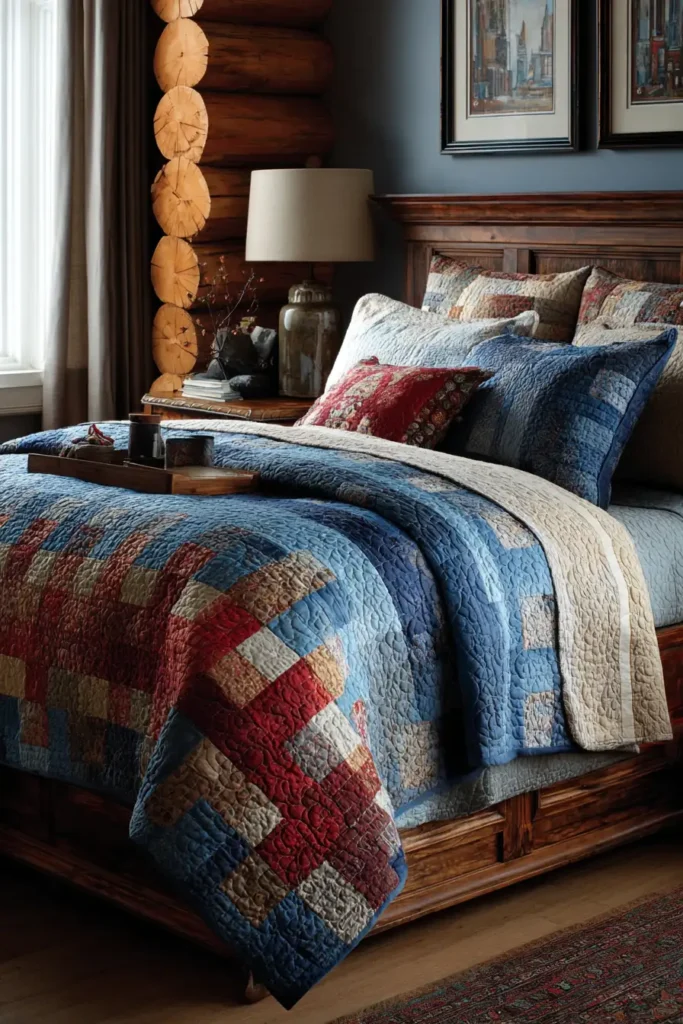
Timeless & Elegant: 20 Log Cabin Quilt Pattern Ideas for a Cozy, Stylish, and Comfortable Living
The Log Cabin block is perhaps the most recognizable symbol in the quilting world, representing the heart of the home, warmth, and enduring tradition. However, this collection moves beyond the rustic associations of the past to showcase how these designs can be transformed into Timeless & Elegant masterpieces for modern living. A well-crafted Log Cabin quilt is a study in contrast—light and dark, structure and fluidity—making it the perfect medium for creating a sophisticated atmosphere. Whether you are looking to dress a Master Suite with refined textiles or add a touch of “everyday comfort” to a busy living room, these patterns bridge the gap between historical artistry and contemporary interior design.
Log Cabin Quilt Pattern Ideas
Contents
- 1 Log Cabin Quilt Pattern Ideas
- 2 1. Classic Log Cabin Quilt Pattern for Cozy Bedroom Beds
- 3 2. Elegant Log Cabin Bed Covers for a Sophisticated Master Suite
- 4 3. Log Cabin Quilted Bedspreads for Ultimate Comfort and Style
- 5 4. DIY Log Cabin Quilted Pillow Covers for a Cozy Bed
- 6 5. Log Cabin Bed Runner Ideas to Elevate Your Bedroom Decor
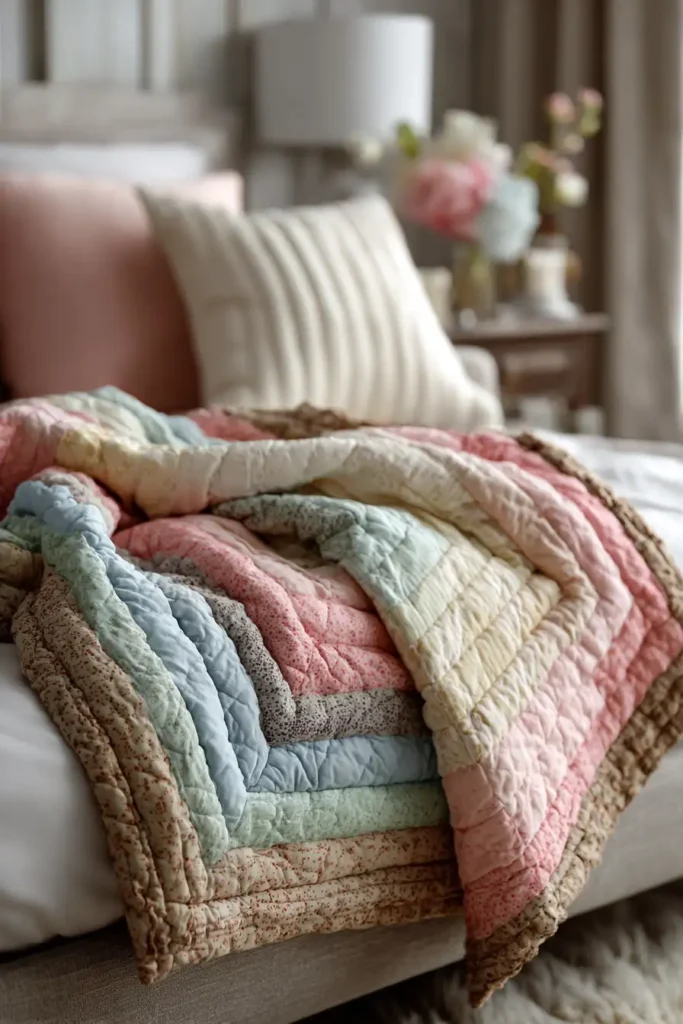
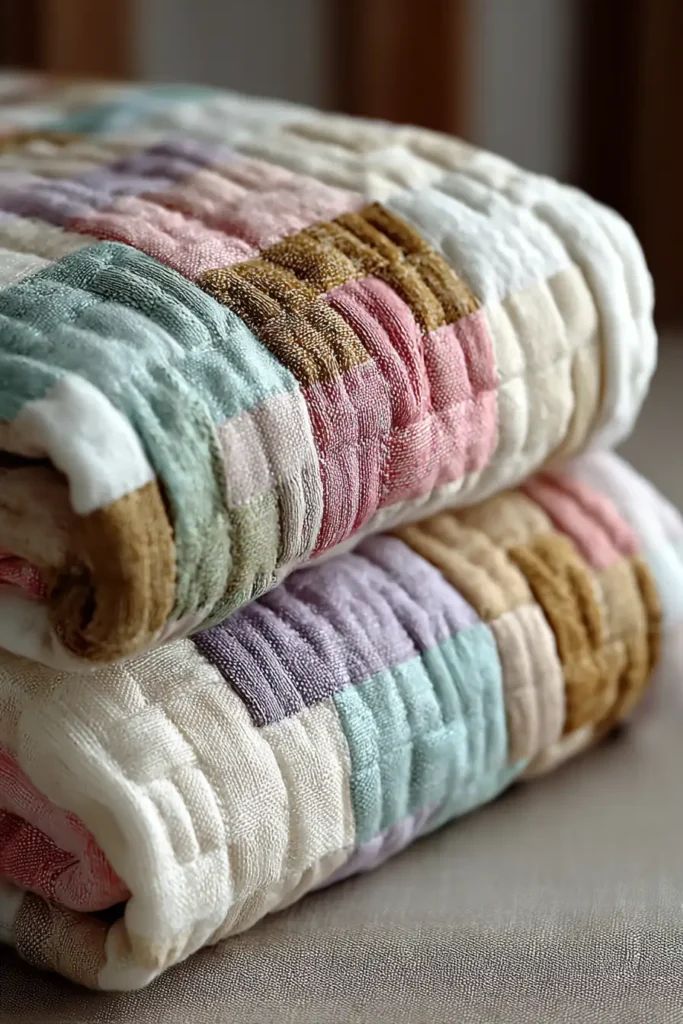
- 7 6. Gentle Pastel Log Cabin Quilts for Serene Nursery Decor
- 8 7. Modern Off-Center Log Cabin Duvet Covers for Stylish Comfort
- 9 8. White-on-White Log Cabin Bedding for Minimalist Luxury
- 10 9. Stylish Log Cabin Quilted Sofa Covers for Protection and Panache
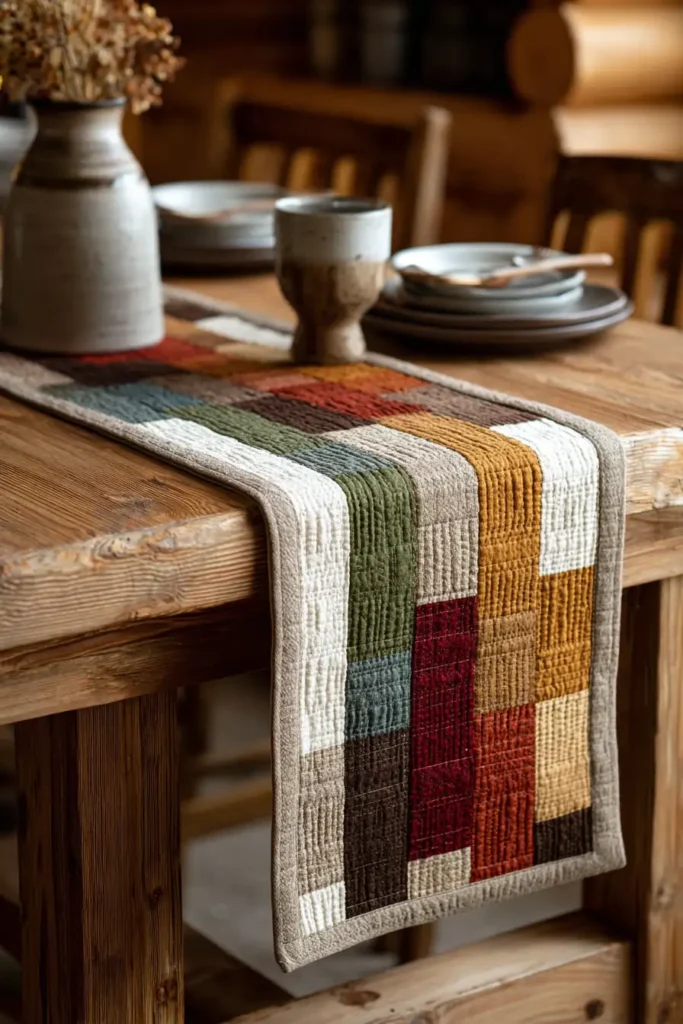
- 11 10. Log Cabin Quilted Table Runners for Elegant Dining Room Decor
- 12 11. Pineapple Block Log Cabin Cushion Covers for Elegant Sofa Accents
- 13 12. Scrappy Log Cabin Sofa Throws for Everyday Family Comfort
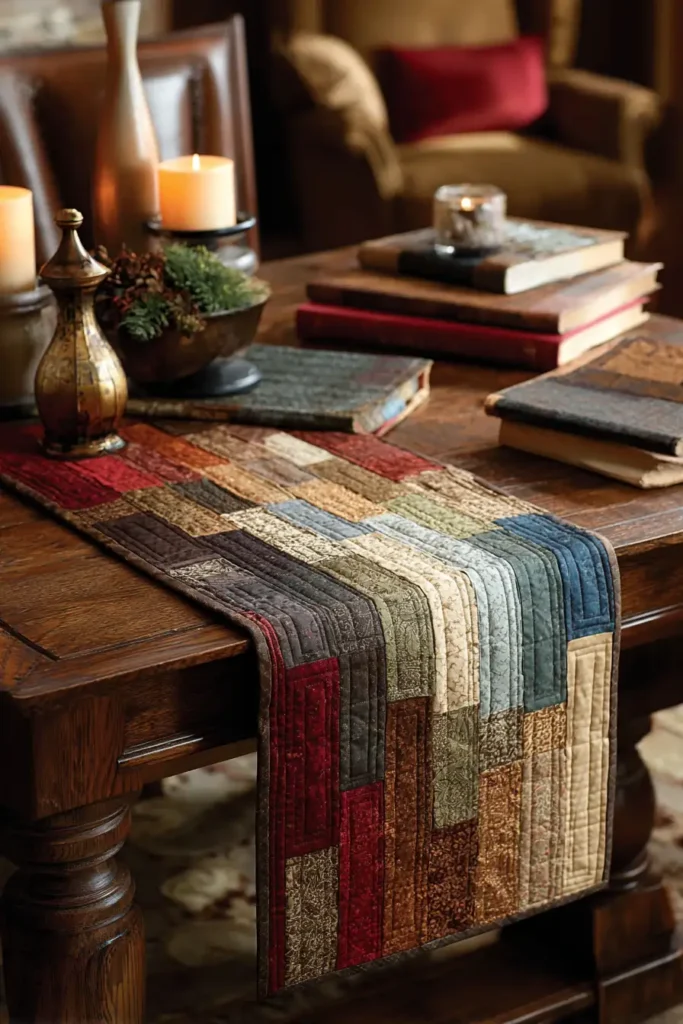
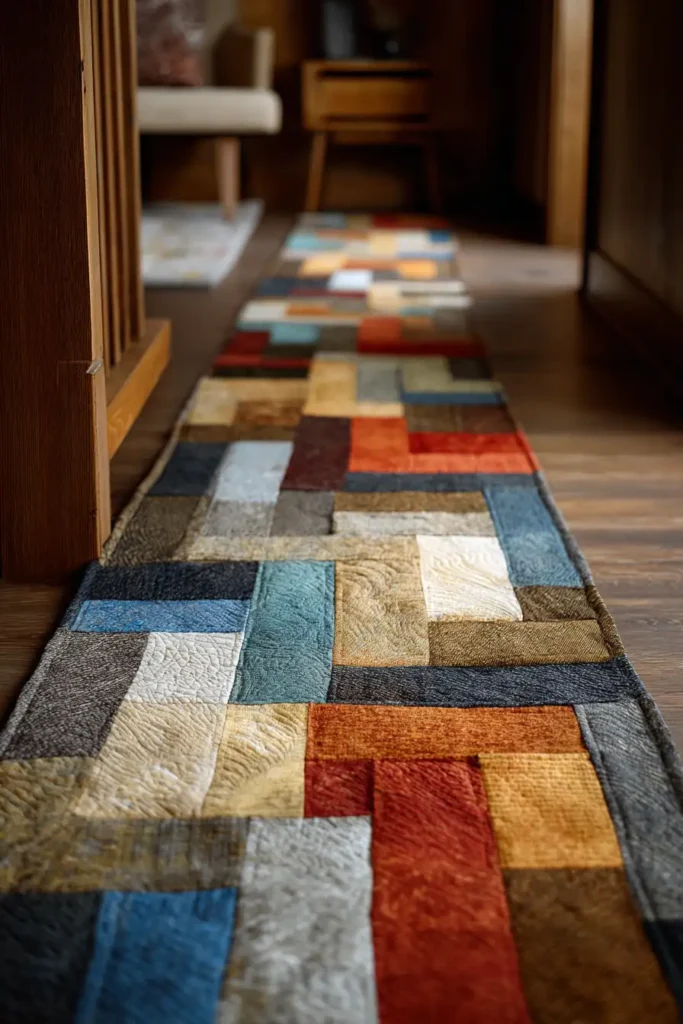
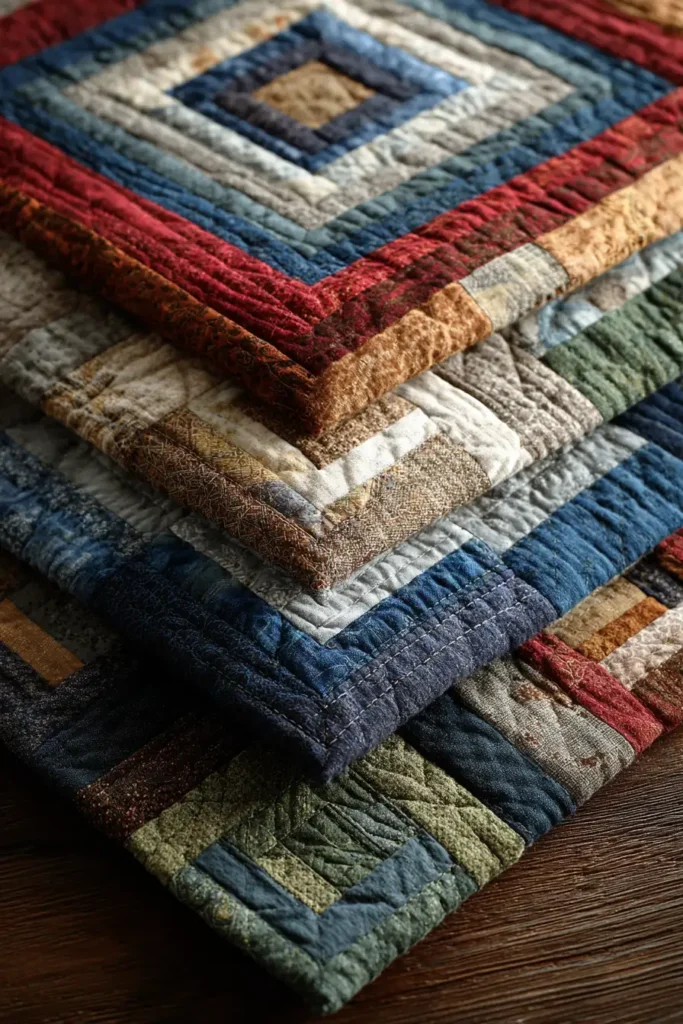
- 14 13. Rustic Log Cabin Table Runners for Farmhouse Dining Style
- 15 14. Sophisticated Log Cabin Placemats for Dining Table Decor
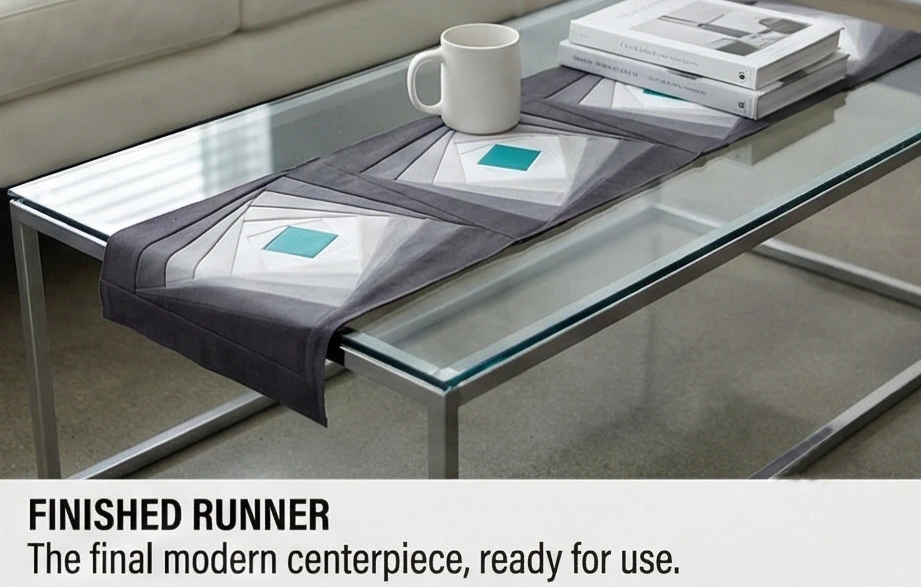
- 16 15. Twisted Log Cabin Runners for Modern Coffee Tables
- 17 16. Log Cabin Pattern Tea Cozies and Kitchen Linens for a Cohesive Home
- 18 17. Abstract Log Cabin Quilt Pattern for Artistic Wall Hangings
- 19 18. Modern Log Cabin Quilt Ideas for Decorative Wall Decor
- 20 19. Decorative Log Cabin Quilt Panels for Accent Walls
- 21 20. Festive Log Cabin Quilted Christmas Stockings for Holiday Charm
- 22 Conclusion
The versatility of the Log Cabin block allows it to adapt to any room in the house, providing both protection for your furniture and a touch of panache to your decor. In the bedroom, White-on-White Bedding or Gentle Pastel tones can create a serene, spa-like sanctuary, while the living and dining areas benefit from the bold geometry of Twisted Log Cabin Runners and Pineapple Cushion Covers. These textiles do more than just cover surfaces; they add layers of texture and color that make a house feel like a home. The strategic placement of a Scrappy Sofa Throw or a set of Sophisticated Placemats immediately elevates a room’s aesthetic, demonstrating that practical items can be incredibly stylish.
In this guide, we explore 20 distinct Log Cabin Quilt Pattern Ideas designed to enhance the cozy, stylish, and comfortable nature of your living space. We delve into specific projects, ranging from expansive Bedspreads for Ultimate Comfort to smaller, detailed accents such as Festive Christmas Stockings and Abstract Wall Hangings. Each idea is selected to inspire you to view this traditional block through a fresh lens, encouraging you to mix fabrics and layouts to suit your personal taste. Whether you are a traditionalist who loves the Classic Barn Raising look or a modern decorator seeking Off-Center Duvet Covers, there is a pattern here to bring timeless elegance into your daily life.
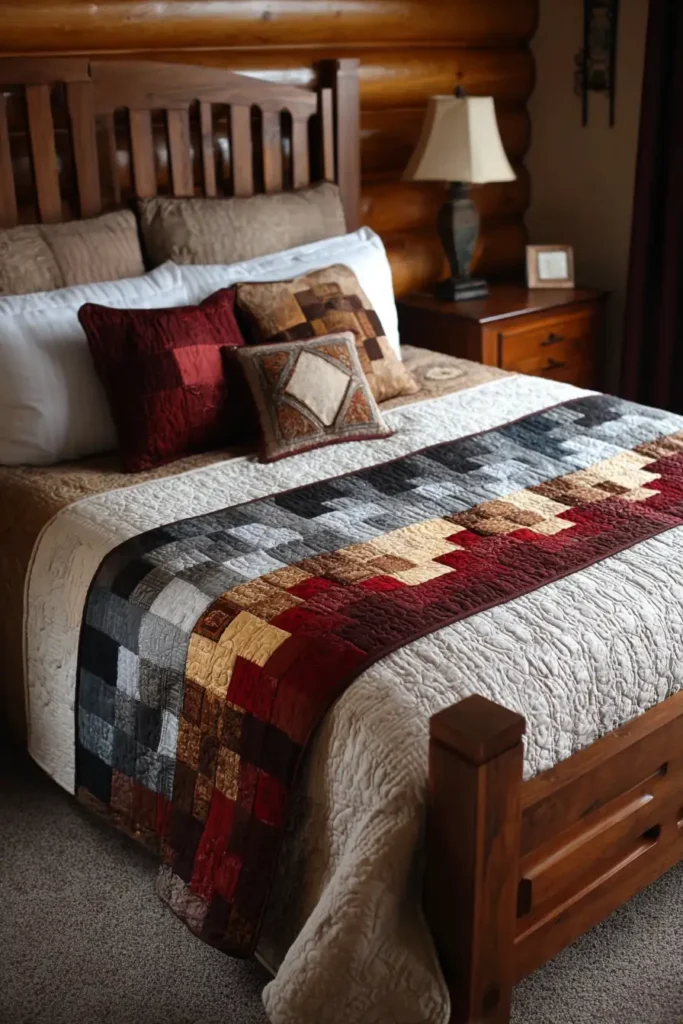
1. Classic Log Cabin Quilt Pattern for Cozy Bedroom Beds
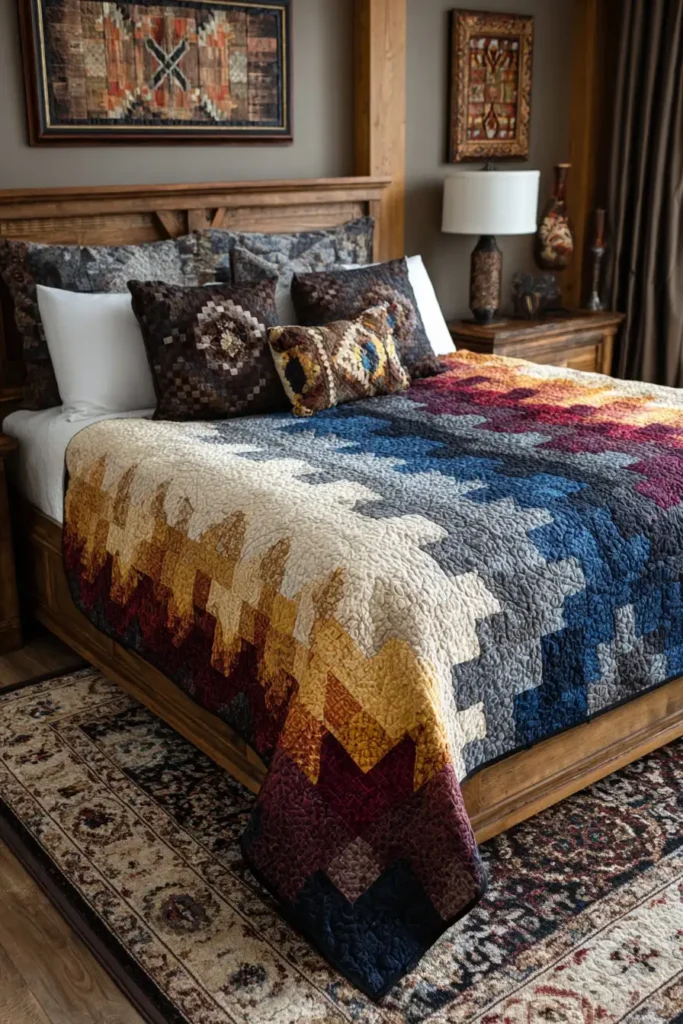
“The Heritage Hearth” Classic Log Cabin Quilt
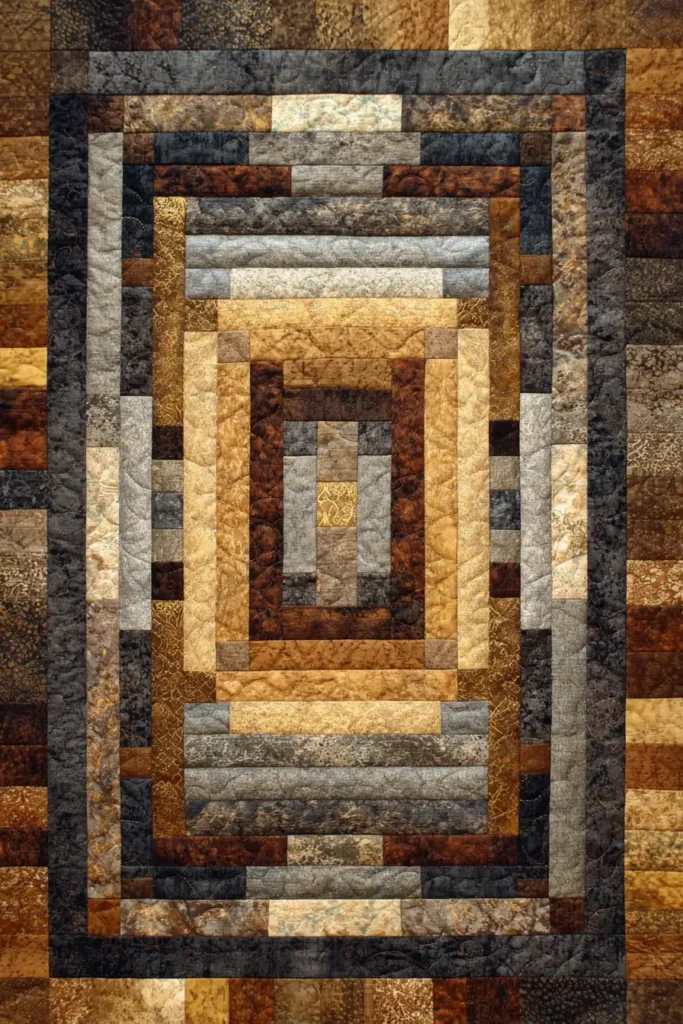
The Log Cabin is arguably the most recognizable and beloved quilt pattern in history. It is the “Little Black Dress” of bedding—effortlessly elegant, structurally sound, and adaptable to any era of decor. The “Heritage Hearth” design utilizes the traditional Light-and-Dark contrast method. By dividing each block diagonally into a “Sunshine” side (Creams/Whites) and a “Shadow” side (Navy/Burgundy/Brown), you can arrange the blocks to create stunning optical illusions like diamonds, zig-zags, or furrows.
Finished Dimensions: Queen Bed Size, 90″ x 90″.
Materials Needed:
- Fabric A (The Hearth Centers): 1/2 yard of Deep Red or Mustard Yellow.
- Fabric Group B (The Lights): 4.5 yards total of various Creams, Beiges, and Low-Volume Prints. (Scrappy looks best).
- Fabric Group C (The Darks): 4.5 yards total of various Navy Blues, Chocolates, or Charcoal Greys.
- Backing: 8.5 yards of a wide tonal floral or muslin.
- Batting: Warm & Natural Cotton (Log cabins are heavy; cotton keeps them breathable).
- Notions: Rotary cutter, 2.5″ ruler (or a standard 6×24″ ruler).
Cultural Backstory: The Log Cabin pattern rose to prominence in the United States during the Civil War era (1860s). Traditionally, the center square was Red to represent the “hearth” (the fire at the center of the home) or Yellow to represent a light in the window. The strip arrangement—light on one side, dark on the other—symbolized the sun’s movement over the house, or metaphorically, the joys (light) and sorrows (dark) of family life.
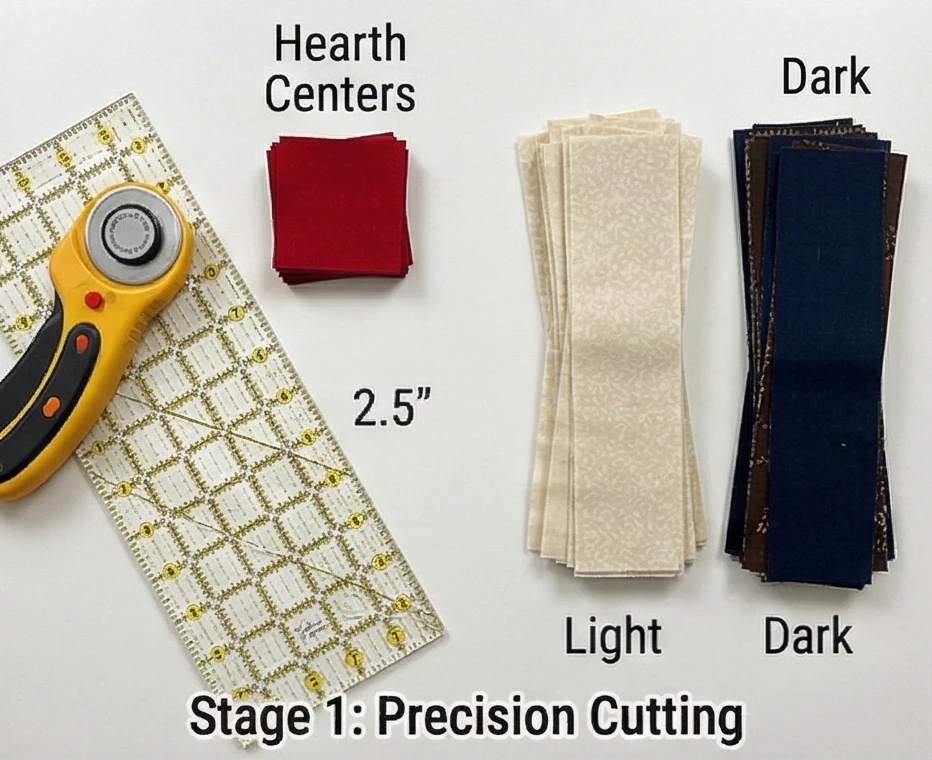
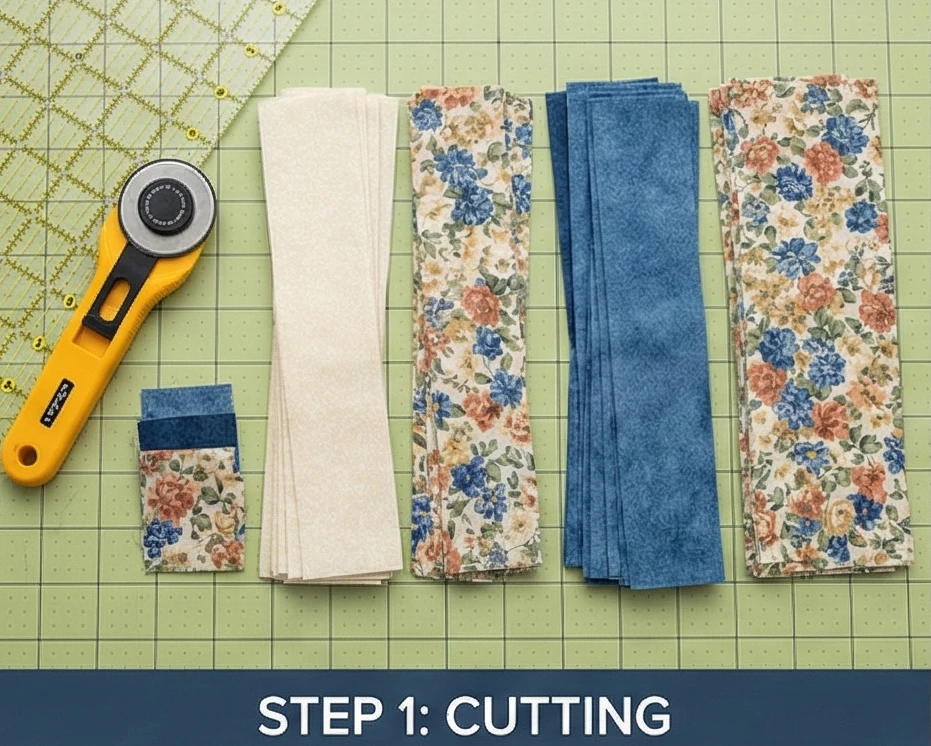
Step 1: Cutting the “Logs”
Precision is non-negotiable here. If your strips are off, the blocks will bow.
- The Centers: Cut 81 squares of Fabric A (Red) measuring 2.5″ x 2.5″.
- The Strips: Cut all your Light and Dark fabrics into 2.5-inch-wide strips.
- Note: You can cut them to exact lengths as you go, or keep them long and trim them after sewing (this guide uses the “trim after” method for accuracy).
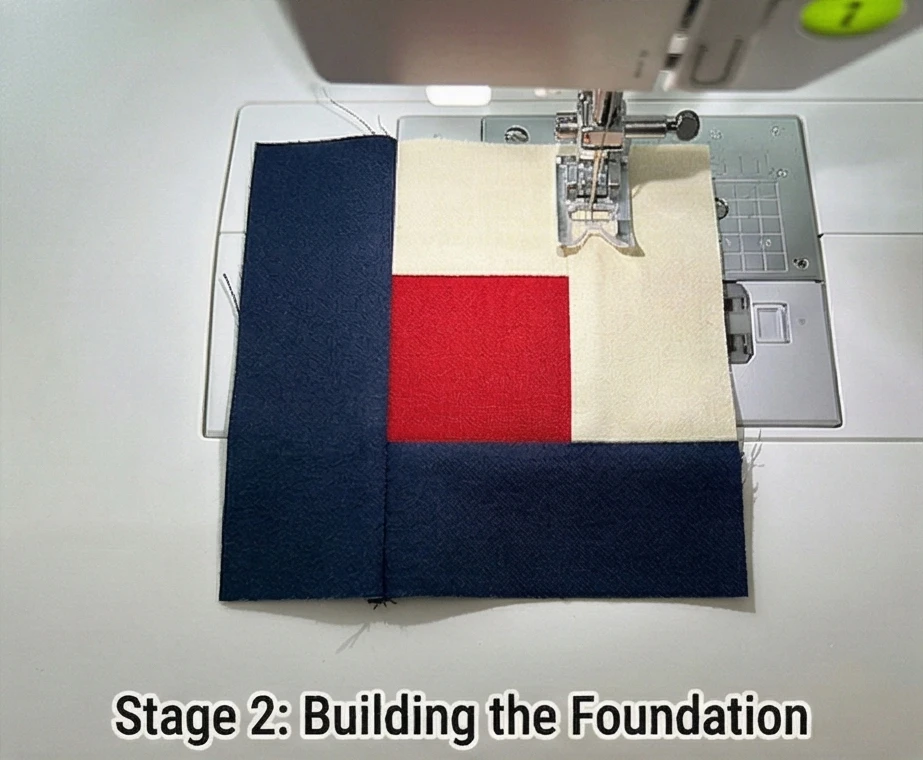
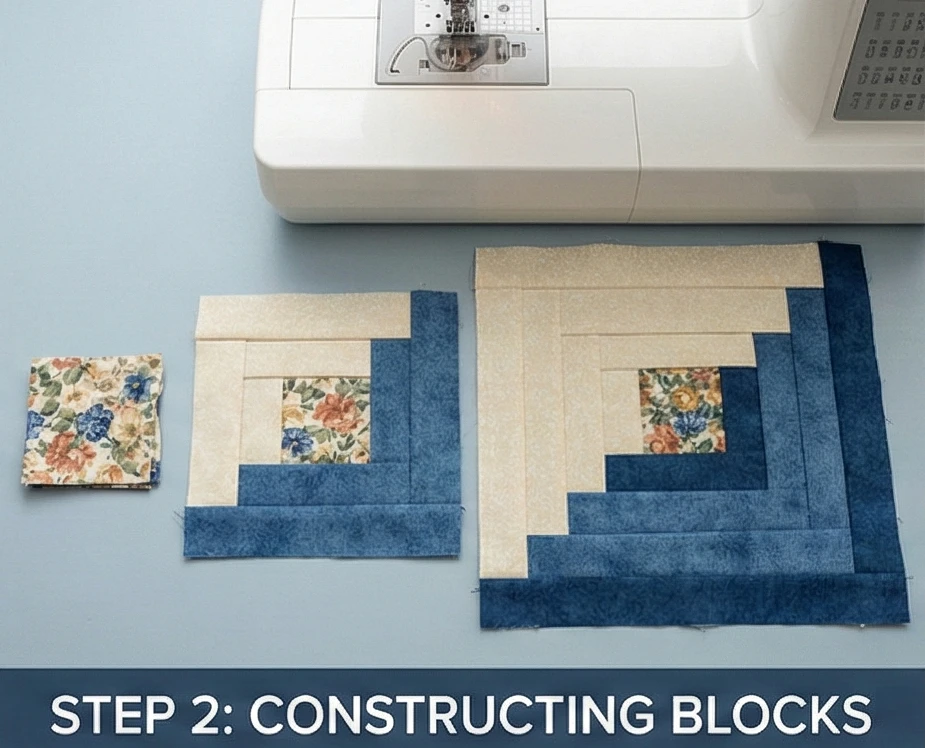
Step 2: The First Round (The Hearth)
Building the foundation.
- Log 1 (Light): Sew a Light Strip to the right side of a Red Center Square. Trim the strip to match the square (2.5″). Press seam out.
- Log 2 (Light): Sew a Light Strip to the top of the unit. Trim to match the width (4.5″). Press out.
- Log 3 (Dark): Sew a Dark Strip to the left side of the unit. Trim. Press out.
- Log 4 (Dark): Sew a Dark Strip to the bottom of the unit. Trim. Press out.
- Result: You have a square with a Red center, Lights on the Top/Right, and Darks on the Bottom/Left.
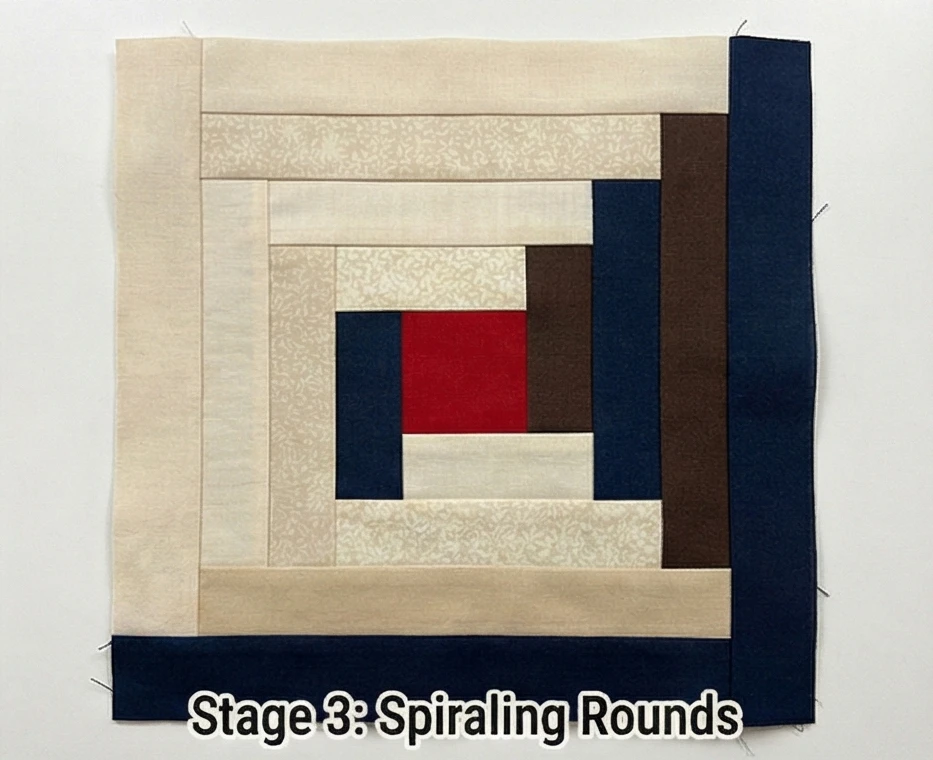
Step 3: Spiraling Outward (Rounds 2 & 3)
Maintain the clockwise spiral and the Light/Dark distinct sides.
- Round 2:
- Add Light to the right.
- Add Light to Top.
- Add Dark to Left.
- Add Dark to Bottom.
- Round 3: Repeat the sequence.
- Sizing: Continue adding logs until the block measures 10.5″ x 10.5″ (This usually requires 2 or 3 rounds, depending on your seam allowance).
- Quantity: Make 81 Blocks.
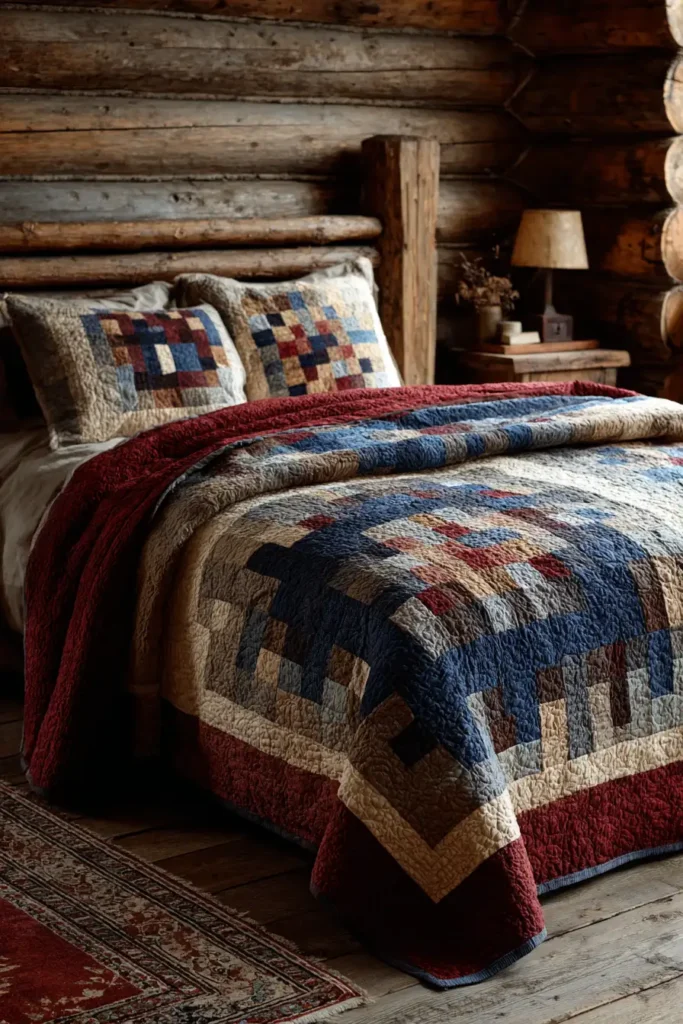
Step 4: The “Barn Raising” Layout
This is the most elegant and traditional arrangement.
- Concept: You are creating concentric diamonds. The center of the bed will be Light, radiating out to Dark, then Light again.
- Center Block: Place one block in the exact center of the floor layout.
- Ring 1: Arrange 8 blocks around the center so their “Light” sides touch the “Light” sides of the center block.
- Expansion: Continue building rings outward. Orient the blocks so the Light strips form diamonds and the Dark strips form the background corners.
- Visual: It should look like a giant “X” or diamond rippling out from the middle of the quilt.

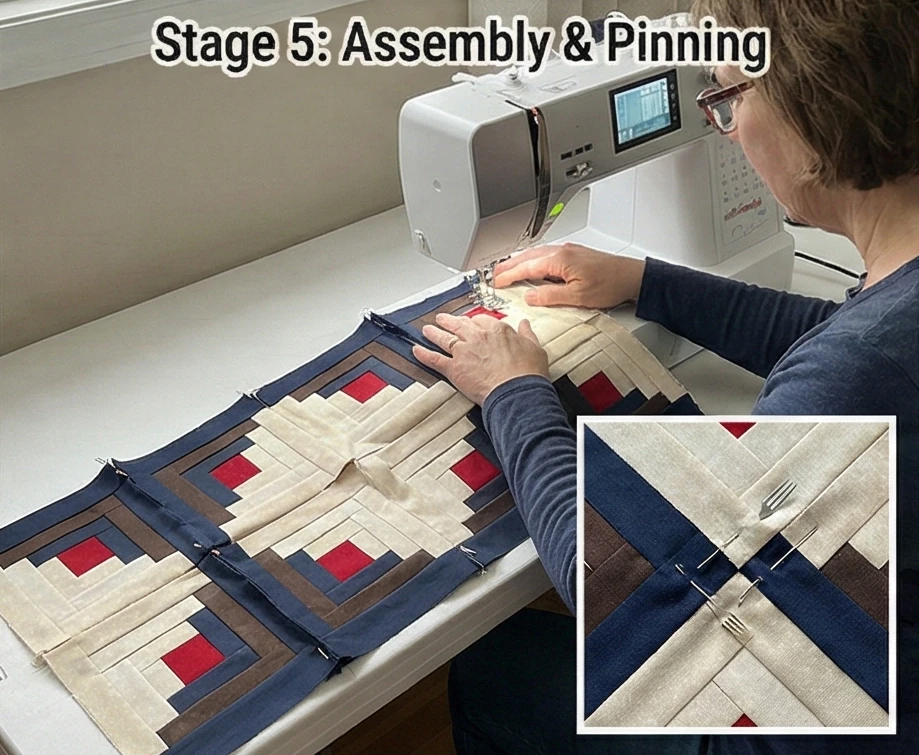
Step 5: Assembly
- Grid: Your layout is 9 blocks wide by 9 blocks long.
- Rows: Sew the blocks into horizontal rows.
- Pinning: Use “fork pins” or double pins at every seam intersection to ensure the “logs” line up straight. If they don’t align, the geometric illusion will be crooked.
- Join: Sew the rows together.
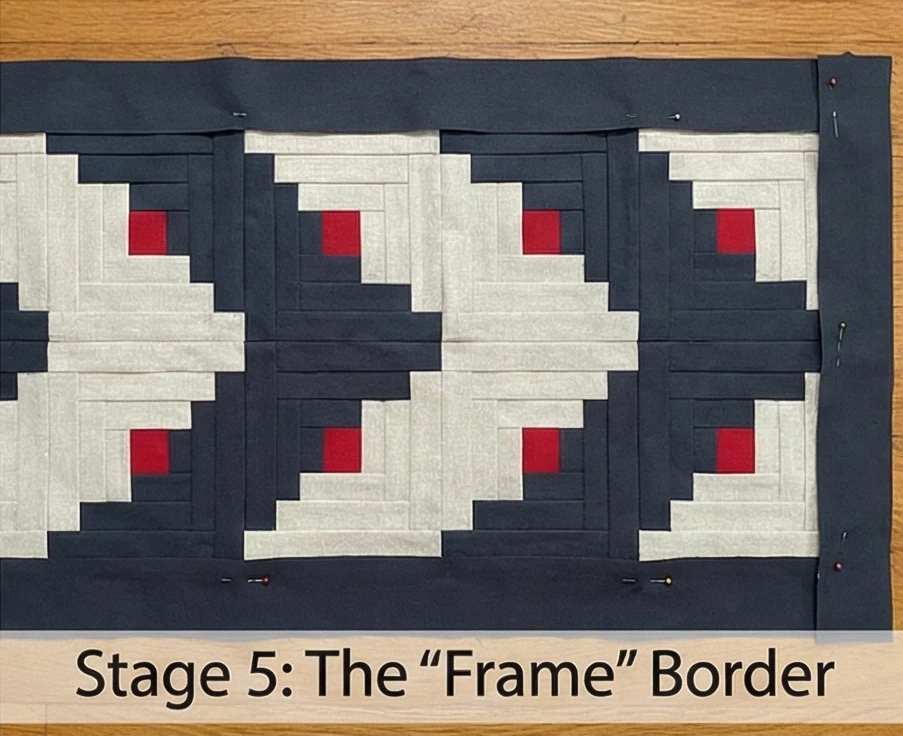
Step 6: The “Border” Effect
Log Cabins don’t always need borders, but for elegance, we bind in dark.
- Binding: Bind the quilt using your darkest Fabric C (Navy or Black).
- Effect: This acts like a picture frame, containing the energy of the expanding diamonds and giving the eye a solid boundary.
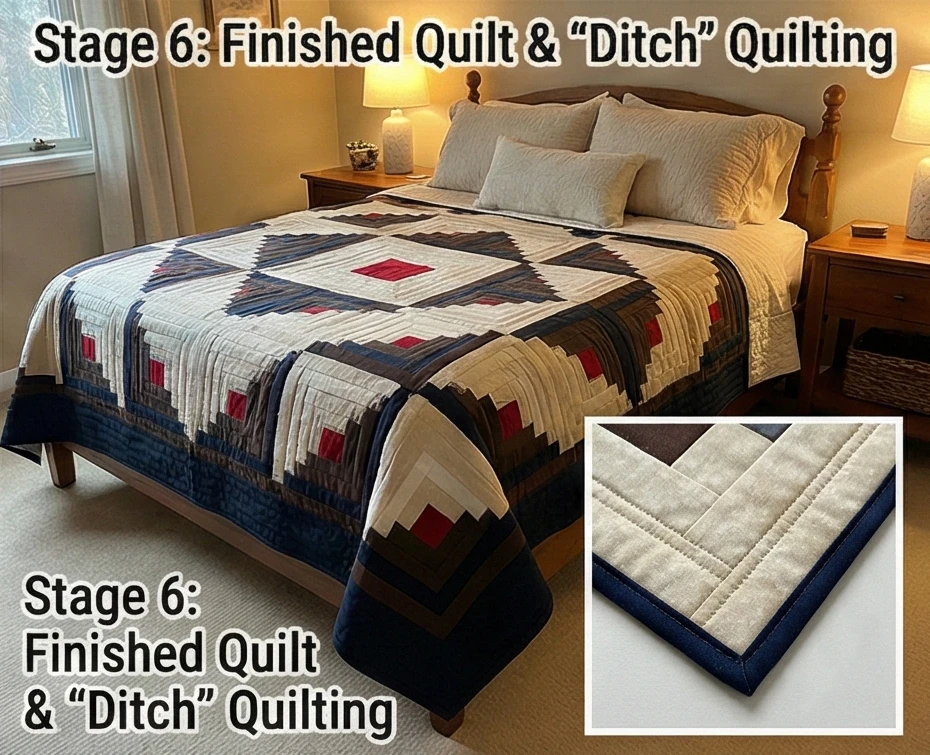
Step 7: “Ditch” Quilting
Let the piecing shine.
- Baste: Sandwich layers.
- Quilt: Stitch “in the ditch” (directly in the seam lines) of the spiral logs.
- Why: A Log Cabin has twice as many seams as a normal quilt. This makes it heavy and warm. Heavy quilting isn’t needed to hold the batting; stitching in the ditch is sufficient and keeps the quilt from becoming stiff as a board.
Usability Note: Because of the high density of seams (fabric overlapping fabric), a Log Cabin quilt is significantly heavier and warmer than a simple patchwork quilt. It is the ultimate “Winter Quilt” for drafty bedrooms, providing a comforting, weighted feeling without needing synthetic pellets.

2. Elegant Log Cabin Bed Covers for a Sophisticated Master Suite

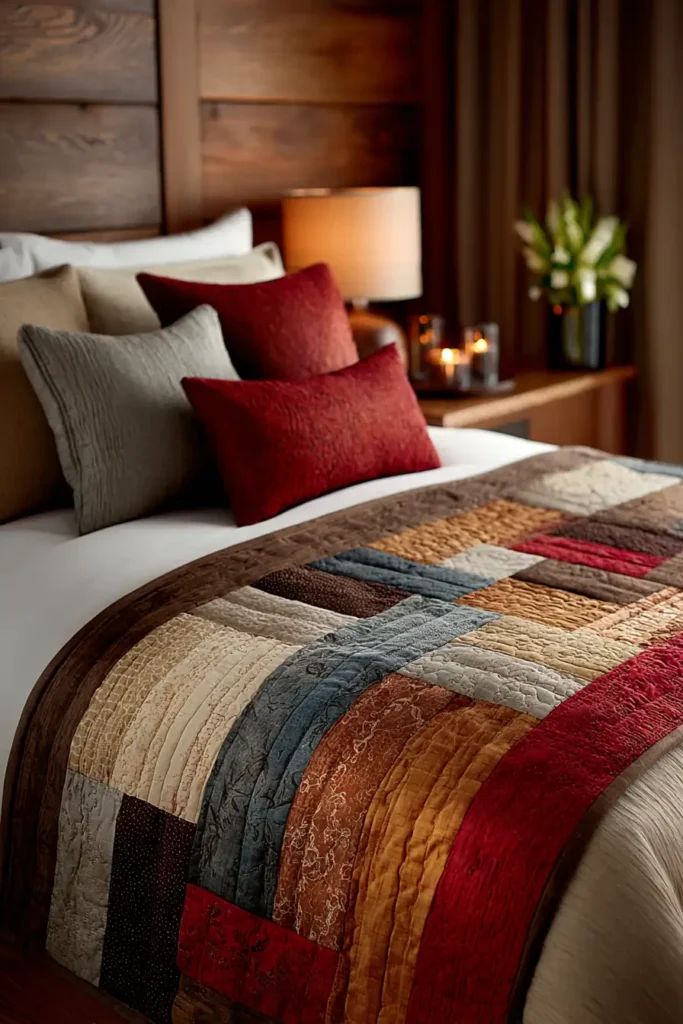
“The Manor House” Courthouse Steps Quilt
While the traditional Log Cabin spirals outward, the Courthouse Steps variation builds in parallel layers: strips are added to the top and bottom, then to the sides. This creates a balanced, architectural geometry that feels more formal and structured than the rustic spiral. For a master suite, the “Manor House” design uses a refined palette of Oyster, Taupe, and Slate Grey (or Champagne and White) to create a bed cover that rivals the elegance of a five-star hotel.
Finished Dimensions: King Bed Size, 104″ x 104″.
Materials Needed:
- Fabric A (Centers): 3/4 yard of Textured Gold or Silk-Cotton Blend (for a touch of luxury).
- Fabric Group B (The Steps/Darks): 5 yards total of varied Taupes, Greys, and Charcoals.
- Fabric Group C (The Sides/Lights): 5 yards total of varied Creams, Ivories, and White-on-White prints.
- Backing: 9.5 yards of high-thread-count sateen or voile.
- Batting: Wool or Bamboo (for superior drape and breathability in a master suite).
- Notions: Rotary cutter, 2.5″ ruler.
Cultural Backstory: The “Courthouse Steps” pattern emerged in the mid-19th century alongside the standard Log Cabin. Its name comes from the visual effect of the strips: because you add two strips to opposite sides (top and bottom) before moving to the other sides, it creates a tiered effect resembling the grand staircases of county courthouses in the American South and Midwest.
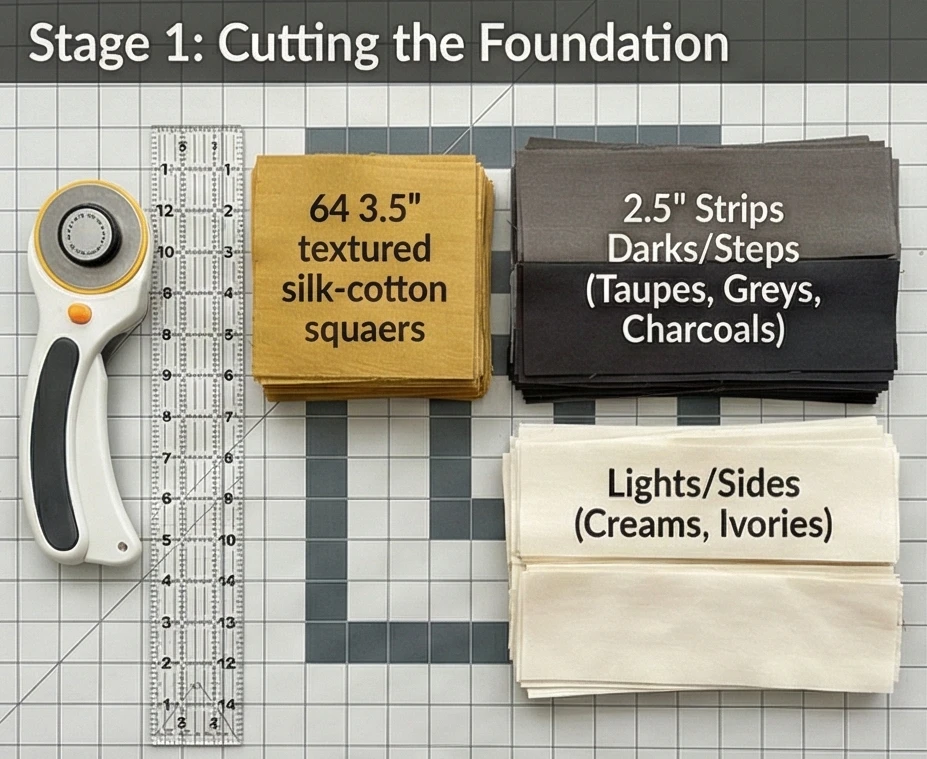
Step 1: Cutting the Foundation
For a king-size, we need large, impactful blocks.
- The Centers: Cut 64 squares of Fabric A (Gold) measuring 3.5″ x 3.5″.
- Note: Using a slightly larger center adds emphasis to the geometry.
- The Strips: Cut all Fabrics B and C into 2.5-inch wide strips.
- Efficiency: Keep your Light strips and Dark strips in separate bins to avoid confusion during sewing.
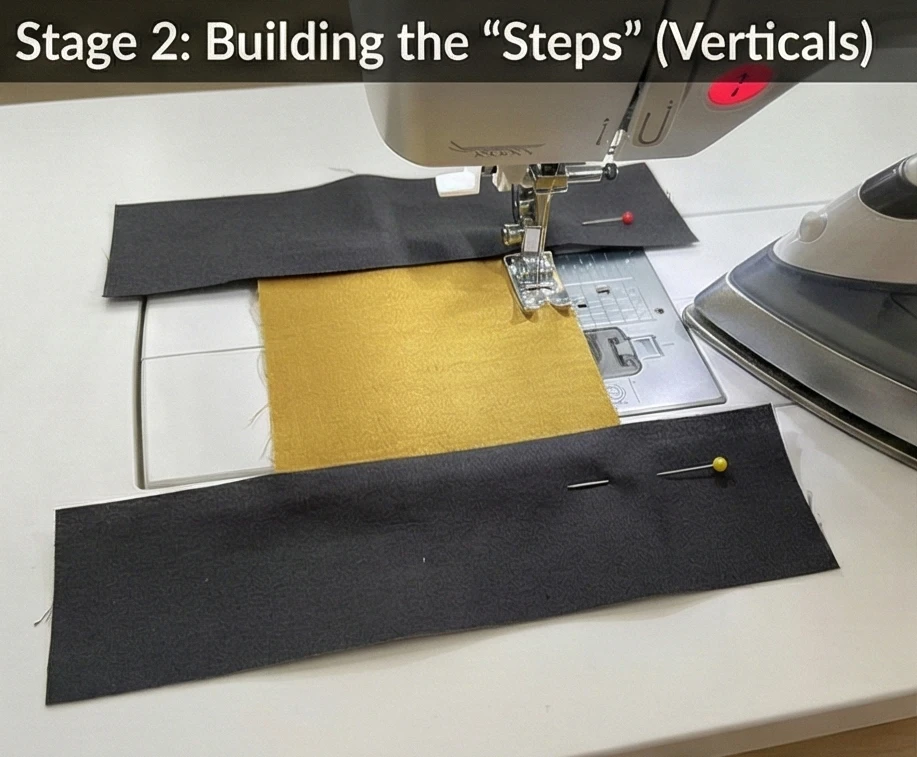
Step 2: Building the “Steps” (Verticals)
In this pattern, we work in pairs.
- Round 1 (Darks/Steps): Take a Center Square. Sew a Dark Strip to the top and a Dark Strip to the bottom.
- Press: Press seams outward toward the dark fabric.
- Trim: Trim the strips to be flush with the center square.
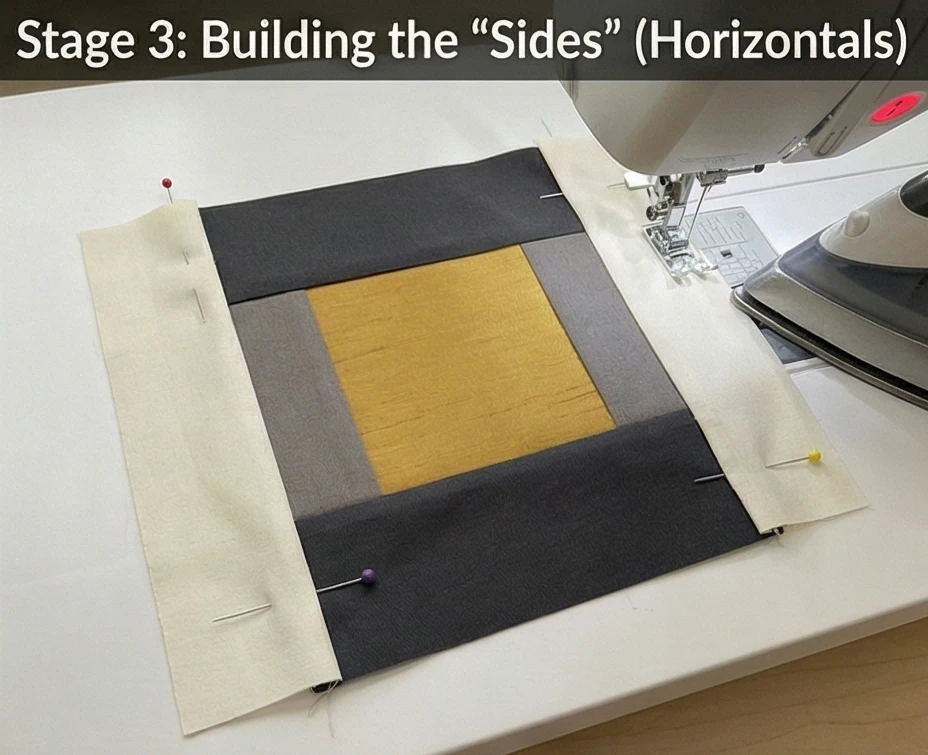
Step 3: Building the “Sides” (Horizontals)
- Round 1 (Lights/Sides): Sew a Light Strip to the left side and a Light Strip to the right side of the unit.
- Press: Press seams outward.
- Trim: Square up the block.
- Result: You now have a square with a horizontal band of “Light” running through a “Dark” center column.
Step 4: Expanding the Block
Continue adding pairs.
- Round 2 (Darks): Add Dark strips to the Top and Bottom.
- Round 2 (Lights): Add Light strips to the Left and Right.
- Repeat: Continue this sequence for 4 or 5 Rounds until the block measures 13.5″ x 13.5″.
- Quantity: Make 64 Blocks.

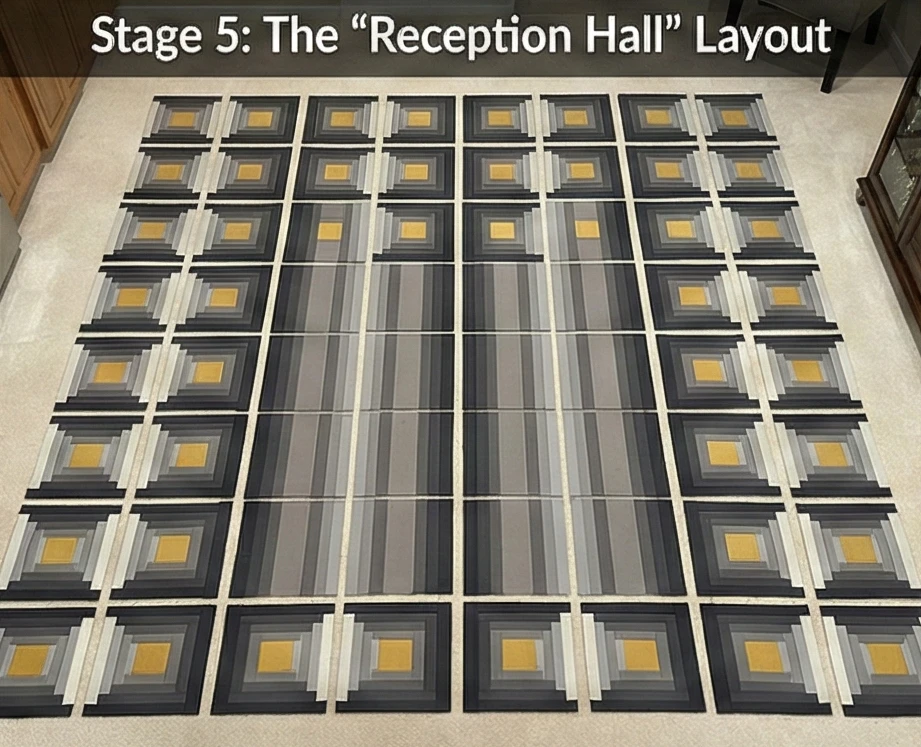
Step 5: The “Reception Hall” Layout
Symmetry is the key to elegance.
- Grid: Arrange blocks in an 8 x 8 grid.
- Orientation: There are two main ways to set this:
- The Optical Illusion: Arrange blocks so the Dark “steps” meet to form large hourglass shapes or interconnected squares.
- The Tiling: Alternate the orientation (horizontal vs. vertical) to create a woven, basket-weave effect.
- Recommendation: For a Master Suite, align all blocks the same way (Dark’s top/bottom). This creates sleek, uninterrupted vertical columns of color that make the bed look longer and grander.
Step 6: Assembly and Border
- Join: Sew blocks into rows, then sew rows together.
- Border: Add a 4-inch wide border of the Darkest Fabric (Charcoal/Slate) around the entire perimeter. This “grounds” the design and prevents the light edges from blending into the sheets.
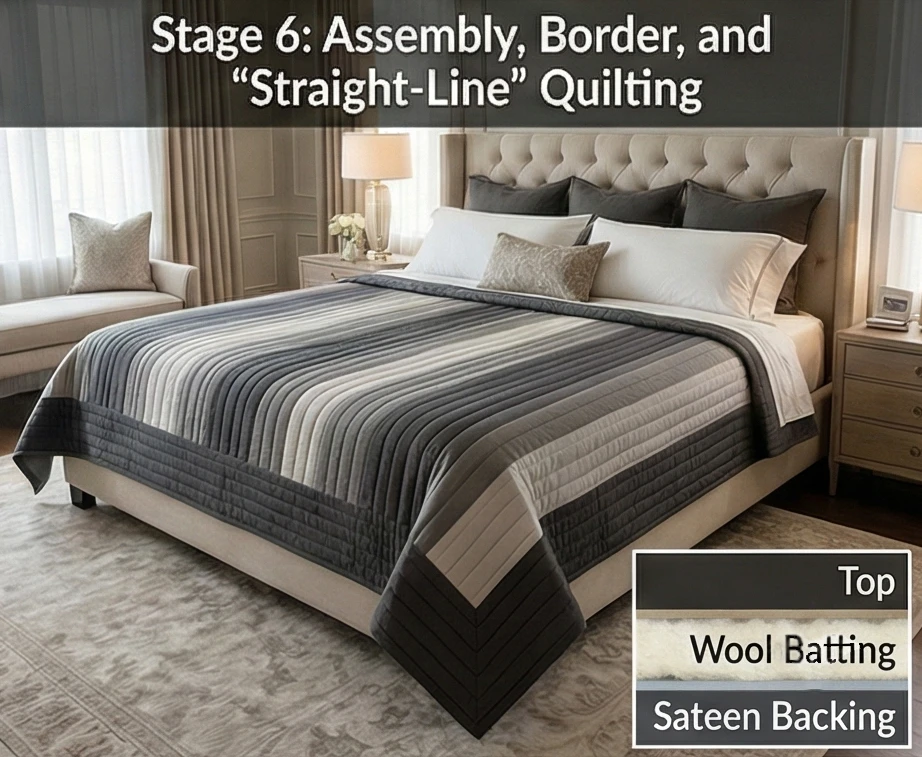
Step 7: “Straight-Line” Quilting
Minimalism complements the architecture.
- Baste: Sandwich layers.
- Quilt: Use a walking foot to stitch straight lines following the layout of the strips.
- Technique: Stitch 1/4 inch away from every seam line. This emphasizes the “stepped” nature of the pattern and creates a texture similar to pleated fabric.
Usability Note: Using Wool Batting is the secret to a “luxury hotel” feel. Unlike polyester (which can trap sweat) or heavy cotton (which can feel stiff), wool breathes exceptionally well, regulating temperature for two sleepers, and has a lofty “puff” that showcases the quilting beautifully.
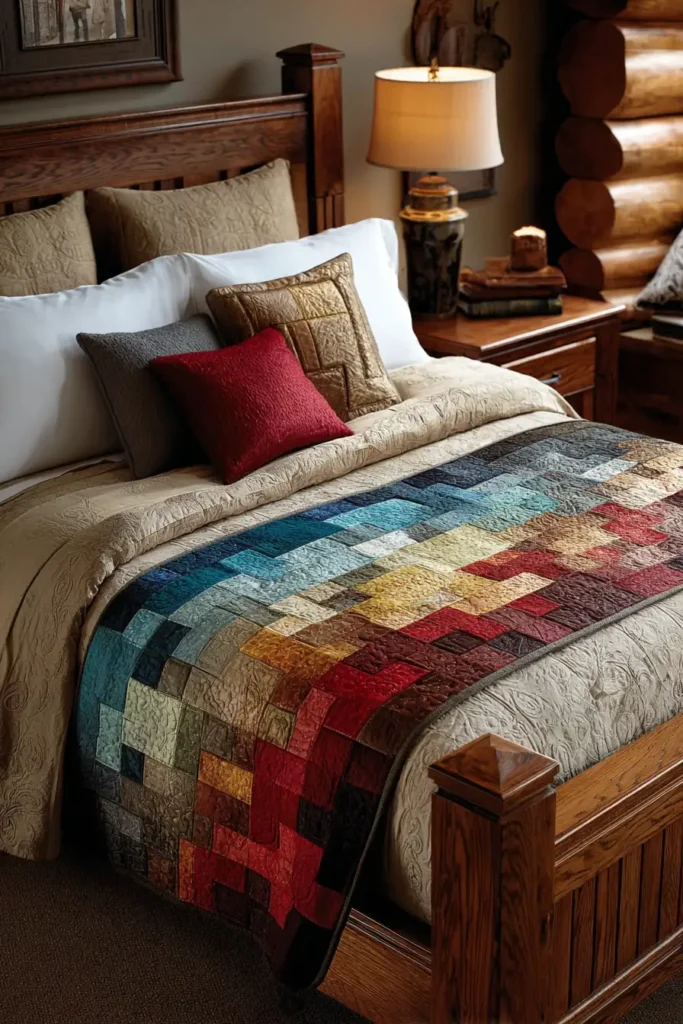
3. Log Cabin Quilted Bedspreads for Ultimate Comfort and Style
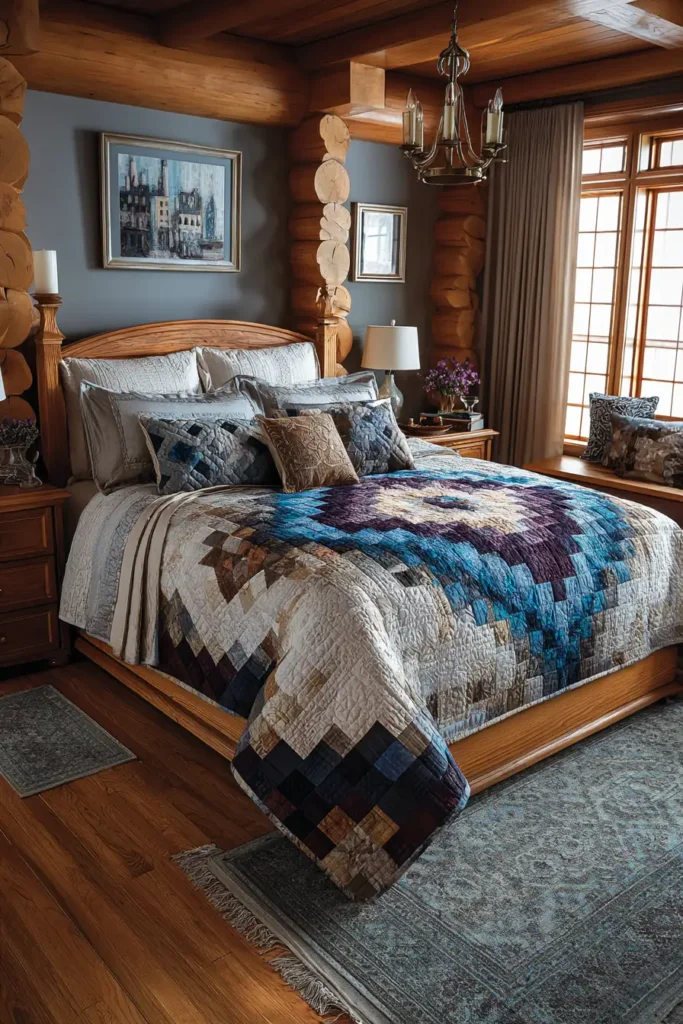

“The Pine Grove” Off-Center Log Cabin Bedspread
For a bedspread—which is designed to drape all the way to the floor and tuck over pillows—you need a pattern with dynamic movement that doesn’t look repetitive over a large surface area. The “Pine Grove” pattern uses the Off-Center Log Cabin technique. By using narrow strips on two sides of the block and wide strips on the other two, the center square is pushed into a corner. When these blocks are arranged together, straight lines magically transform into sweeping Curves and Circles. It creates a sophisticated “wreath” effect that looks custom-made for the master bedroom.
Finished Dimensions: King Bedspread Size, 110″ x 110″ (Floor-length coverage).
Materials Needed:
- Fabric A (The Centers): 1 yard of Velvet or Sateen in a rich accent color (Emerald, Gold, or Plum). Using a distinct texture here adds luxury.
- Fabric Group B (Narrow Strips – Light): 6 yards of varied Creams, Ivories, and Pale Greys.
- Fabric Group C (Wide Strips – Dark/Medium): 8 yards of Sage Green, Pine, Slate, or Espresso.
- Backing: 10 yards of extra-wide sheeting.
- Batting: A medium-loft wool or poly-blend (needs to be light enough not to drag the bedspread down, but puffy enough to show the curves).
- Notions: Rotary cutter, two rulers (one for narrow cuts, one for wide).
Cultural Backstory: The “Off-Center” Log Cabin became popular during the Great Depression. Quilters realized that by varying strip widths, they could create the illusion of curved shapes (like fans or wheels) without actually having to sew difficult curved seams. It is a brilliant example of “patchwork engineering”—using geometry to fool the eye.
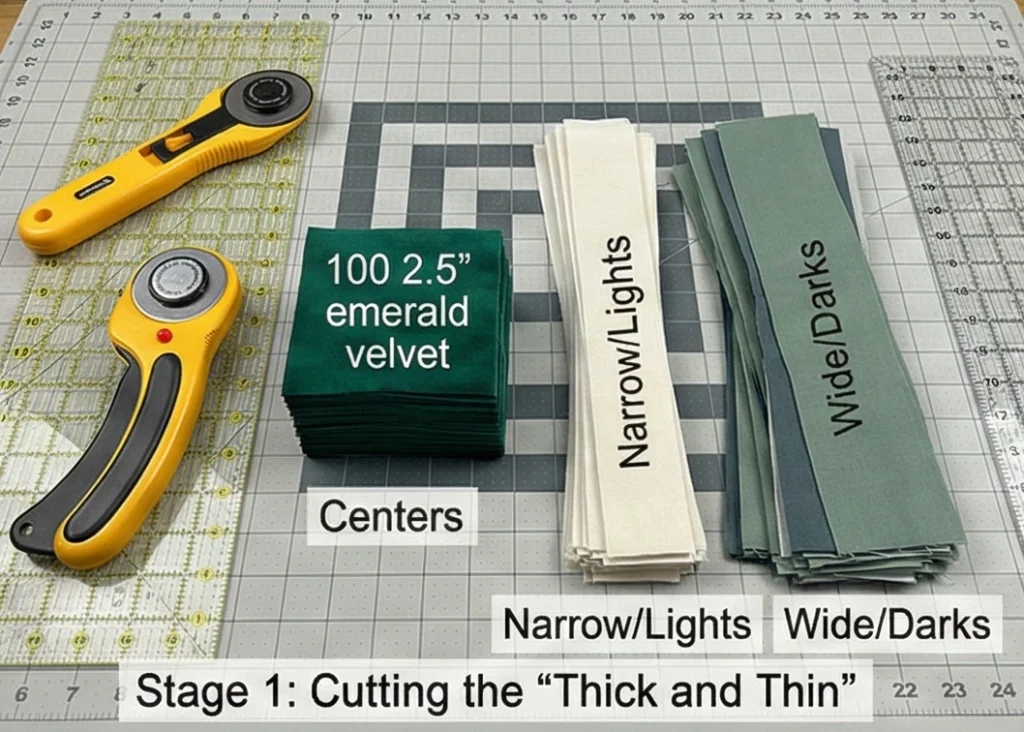
Step 1: Cutting the “Thick and Thin”
The magic lies in the difference between the strip widths.
- The Centers: Cut 100 squares of Fabric A (Velvet) measuring 2.5″ x 2.5″.
- The Narrow Strips (Lights): Cut your Fabric B into strips measuring 1.5 inches wide.
- The Wide Strips (Darks): Cut your Fabric C into strips measuring 2.5 inches wide.
- Organization: Keep these in strictly separate bins. If you mix up a narrow and wide strip, the “curve” will break.
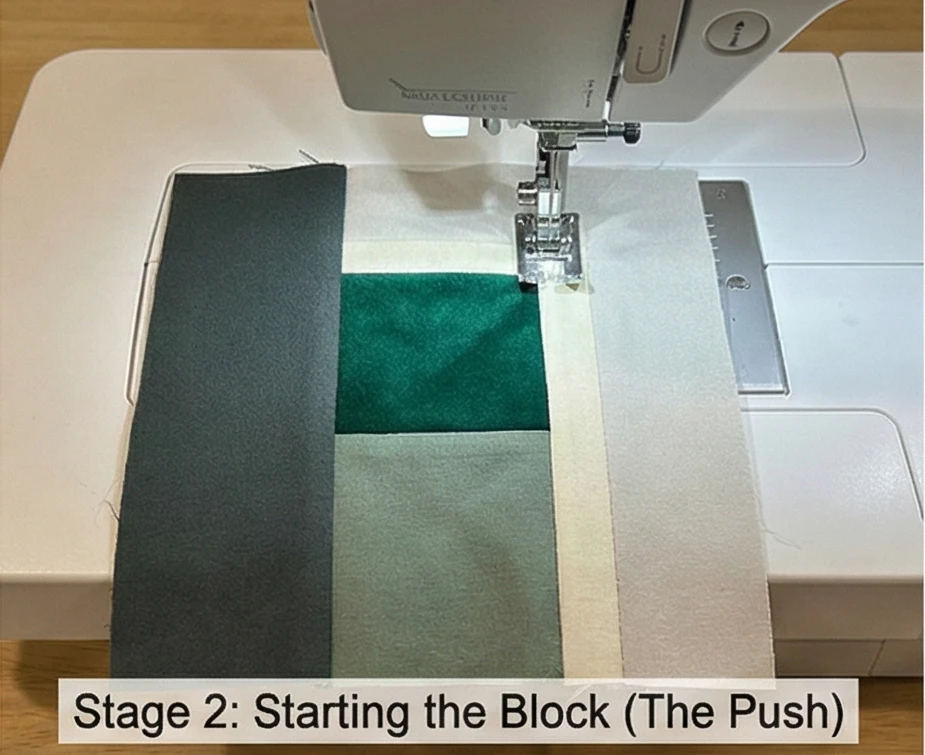
Step 2: Starting the Block (The Push)
We are pushing the center into the corner.
- Log 1 (Narrow): Sew a Narrow Light strip to the Right side of the Center square. Trim. Press outward.
- Log 2 (Narrow): Sew a Narrow Light strip to the Top of the unit. Trim. Press outward.
- Log 3 (Wide): Sew a Wide Dark strip to the Left side of the unit. Trim. Press outward.
- Log 4 (Wide): Sew a Wide Dark strip to the Bottom of the unit. Trim. Press outward.
- Result: The Red center is no longer in the middle; it is huddled in the Top-Right corner.
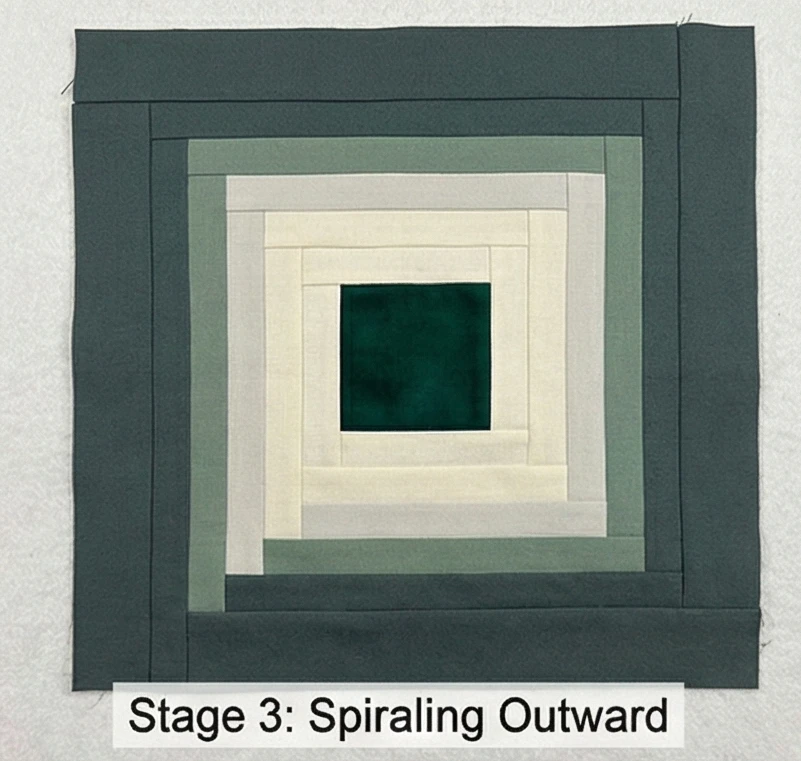
Step 3: Spiraling Outward
Maintain the rhythm: Narrow, Narrow, Wide, Wide.
- Round 2:
- Add Narrow to Right.
- Add Narrow to Top.
- Add Wide to Left.
- Add Wide to Bottom.
- Continue: Repeat this sequence for 5 or 6 rounds.
- Goal: The block should measure roughly 11.5″ x 11.5″ (or your desired size). The “Narrow” side will look tightly packed, while the “Wide” side will look expansive.
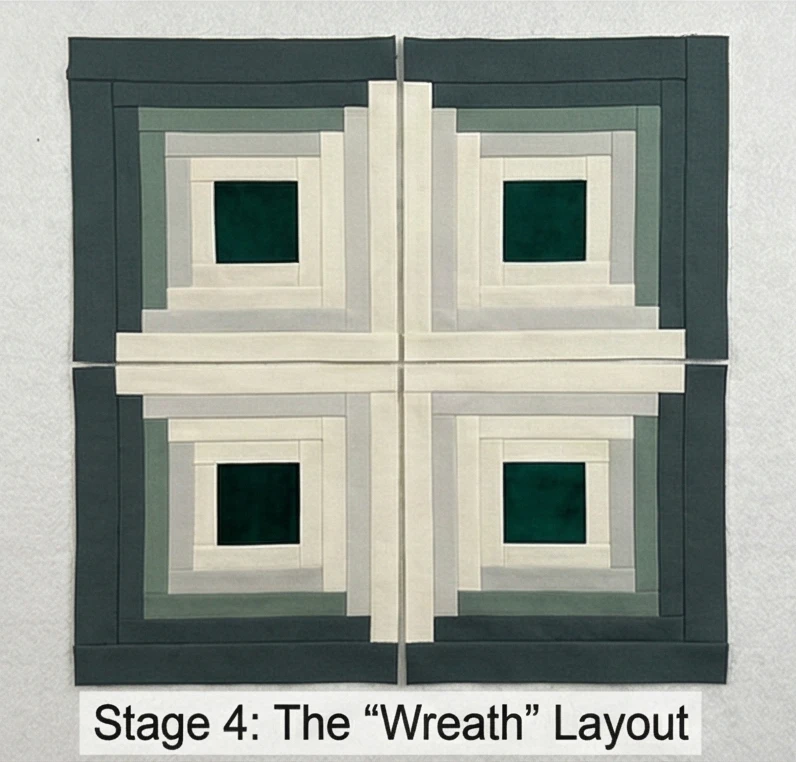
Step 4: The “Wreath” Layout
This is where the circles appear.
- Group of 4: Take 4 blocks. Arrange them so their “Narrow/Light” corners all point toward the center where the four blocks meet.
- Visual: This creates a small, tight circle of light in the middle, surrounded by sweeping dark curves.
- The Grid: Your bedspread is a 10 x 10 grid (100 blocks).
- Arrangement: Continue arranging groups of 4 to create a field of concentric circles or “wreaths” across the bed.
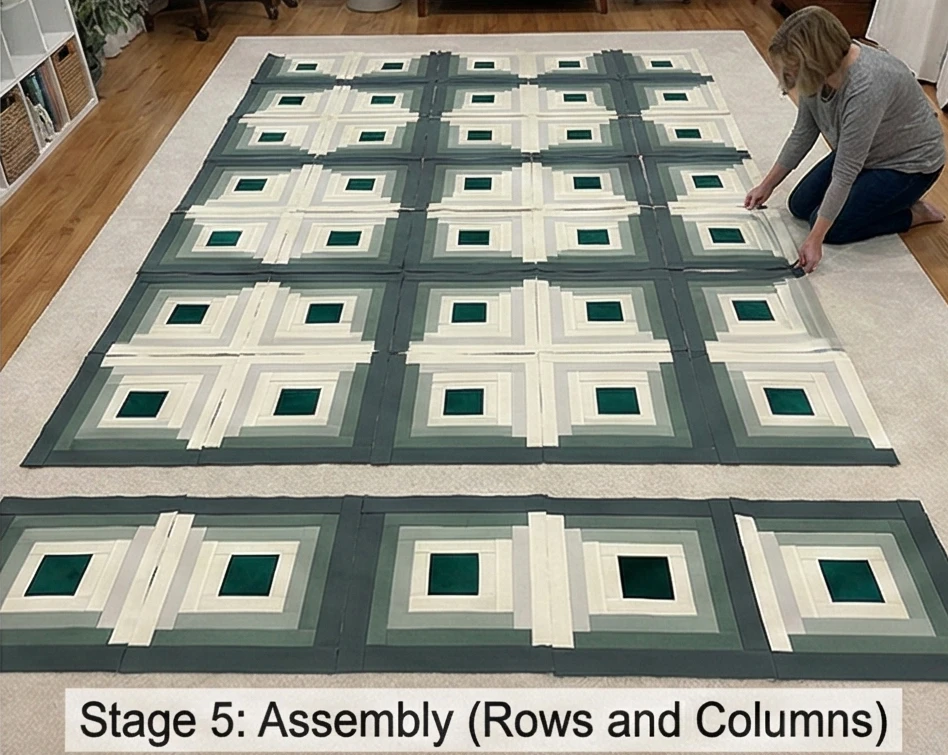
Step 5: Assembly (Rows and Columns)
- Sew Rows: Stitch the blocks into horizontal rows of 10.
- Critical: Watch the orientation! It is very easy to accidentally rotate a block 90 degrees, which ruins the circle. Double-check the layout before sewing every seam.
- Join Rows: Sew the 10 rows together. The result is a massive, heavy top that flows like water.
Step 6: “Spiral” Quilting
Enhance the illusion.
- Baste: Sandwich the layers of the huge bedspread. (You may need to do this on the floor or send it to a long-arm quilter).
- Quilt: Start a continuous spiral stitch in the center of one of the “Wreaths.” Spiral outward, following the curve of the logs.
- Alternative: If using a standard machine, stitch gently curved lines across the diagonal of the bedspread to soften the straight seams.
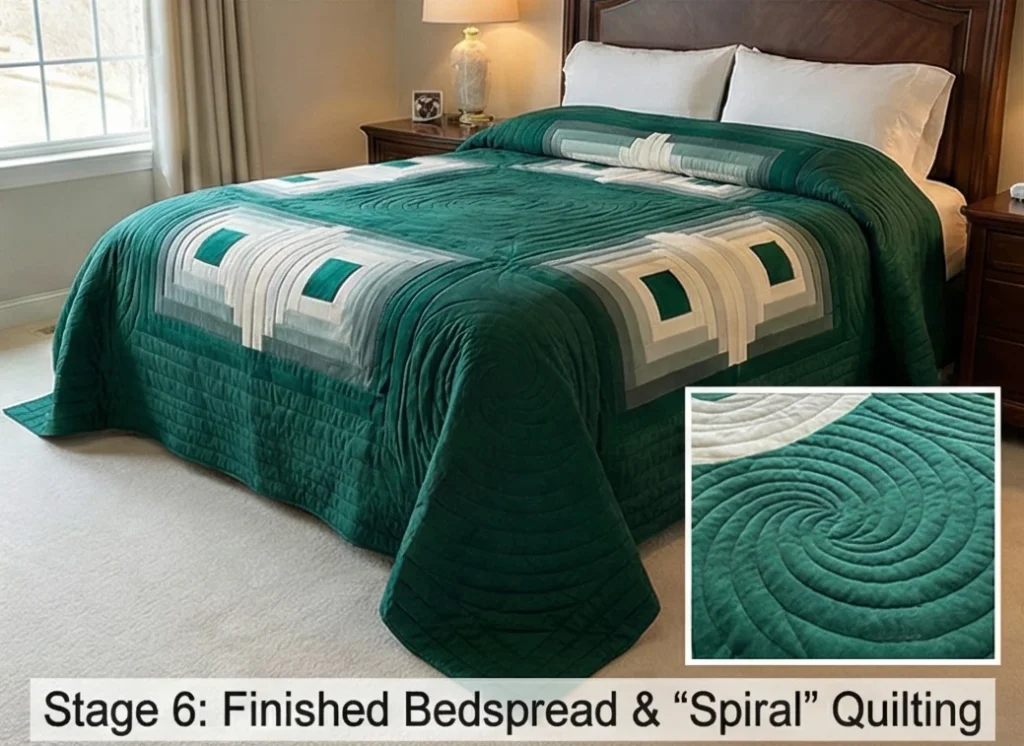
Usability Note: A Bedspread is different from a Quilt. It is meant to cover the pillows (the “pillow tuck”). Because of this extra length, avoid using heavy denim or canvas fabrics. Stick to high-quality quilting cottons or lawns so the bedspread doesn’t become too heavy to lift when making the bed.

4. DIY Log Cabin Quilted Pillow Covers for a Cozy Bed

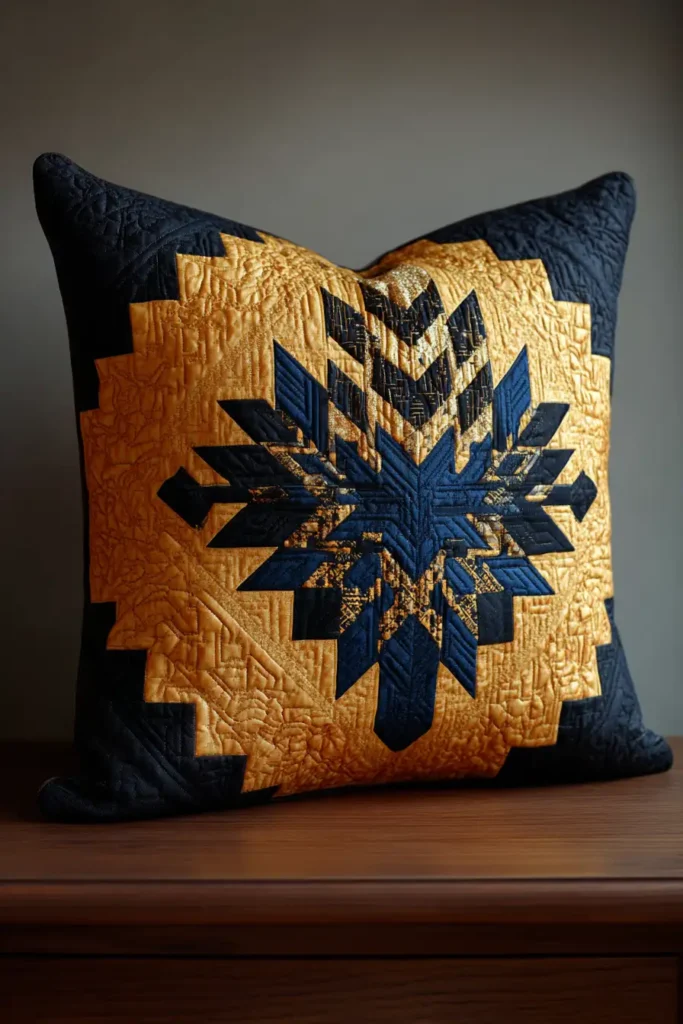
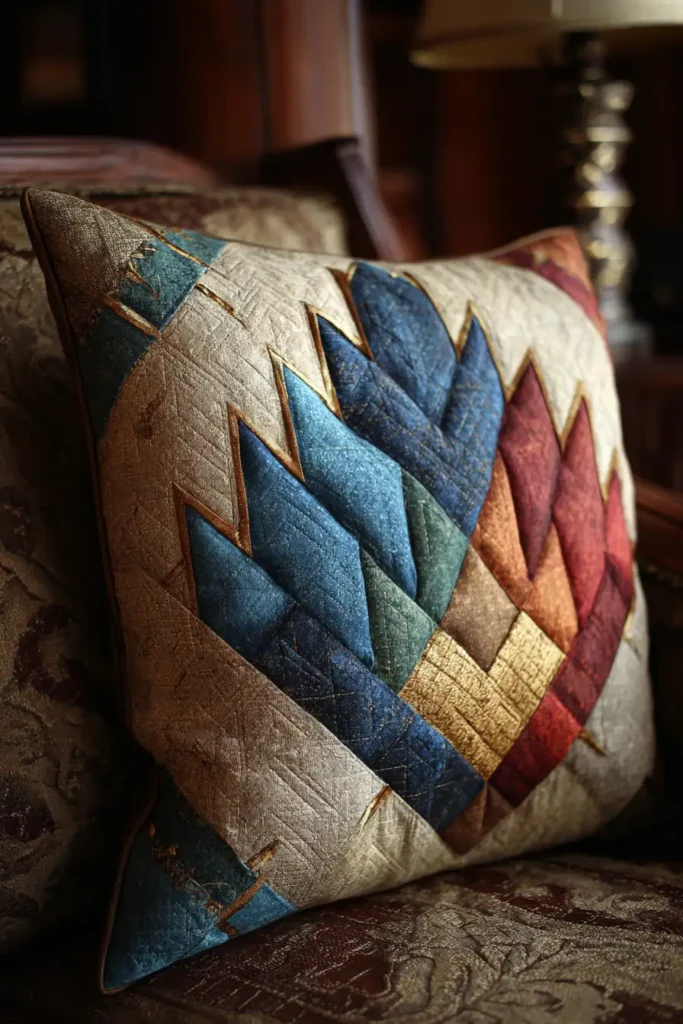
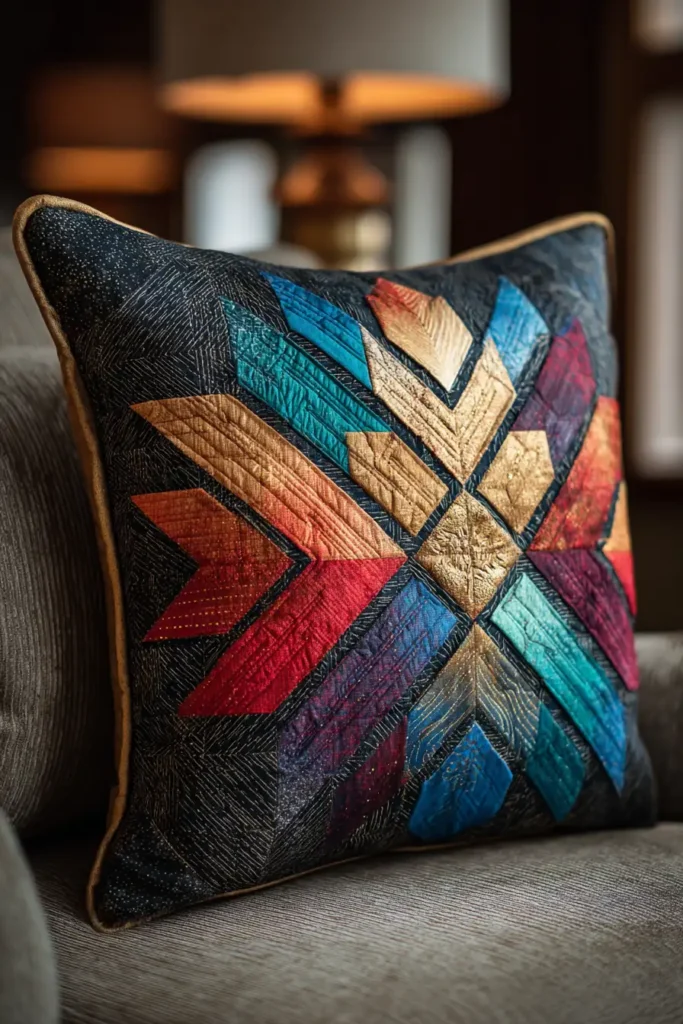
“The Welcome” Pineapple Log Cabin Pillow
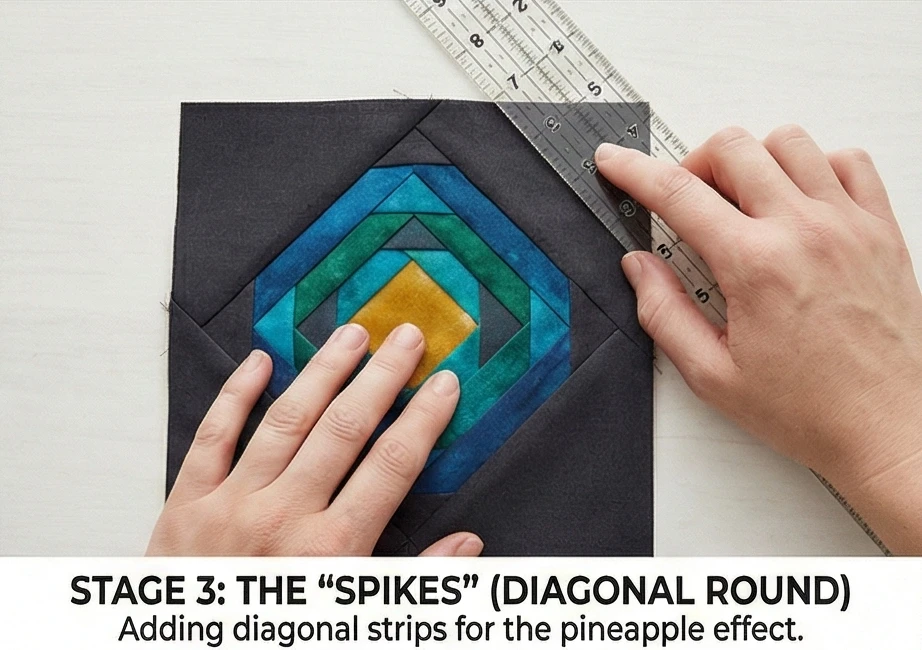
If the Log Cabin is the “Little Black Dress” of quilting, the Pineapple Variation is the diamond necklace. It is the most intricate, dazzling, and elegant version of the block. Unlike the standard square spiral, the Pineapple block adds strips at 45-degree angles, creating a spiky, radiating starburst effect. Because it requires precision, it is well-suited to a smaller canvas such as a pillow cover. Placing a Pineapple pillow on a guest bed is a traditional symbol of hospitality.
Finished Dimensions: Large Decorator Pillow, 20″ x 20″.
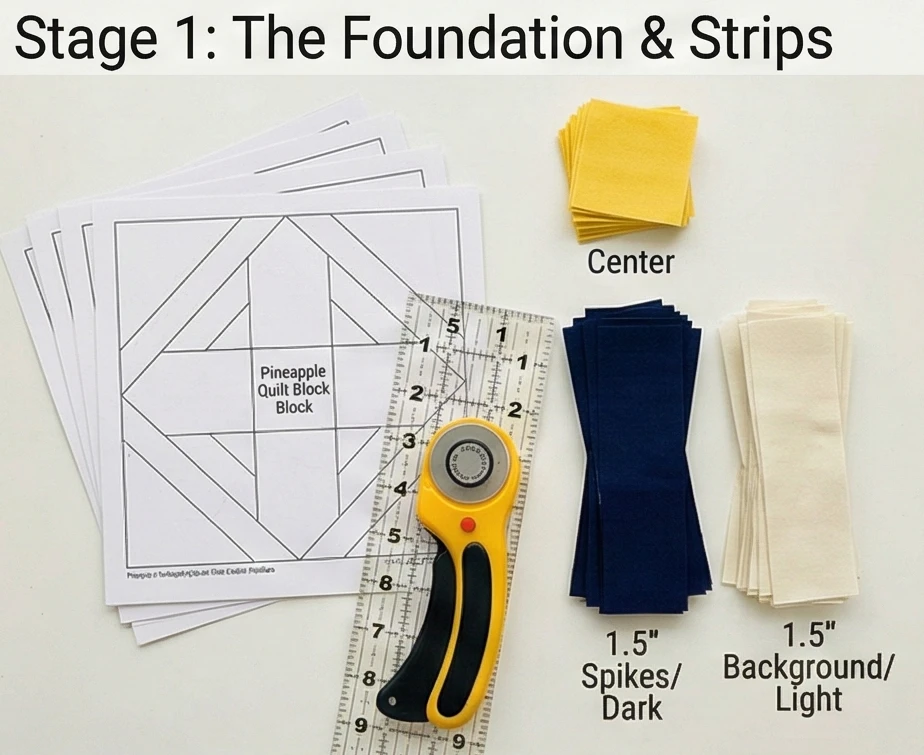
Materials Needed:
- Fabric A (Center): Scraps of Yellow or Gold (traditional symbol of the fruit’s core).
- Fabric B (The Spikes/Dark): 1/2 yard of Black, Navy, or Deep Teal.
- Fabric C (The Background/Light): 1/2 yard of White, Cream, or Low-Volume Print.
- Foundation Paper: Special “Pineapple Quilt Block” paper piecing paper (or lightweight copy paper).
- Backing: 1/2 yard of coordinating heavy cotton or velvet.
- Pillow Insert: 20″ or 22″ square feather insert (go larger for a plumper look).
Cultural Backstory: In Colonial America, sea captains would spear a fresh pineapple on their gatepost upon returning from the Caribbean to signal that they were home and receiving guests. The motif quickly migrated to architecture (bedposts, door lintels) and textiles. A Pineapple quilt was, and remains, the ultimate gesture of “Welcome.”
Step 1: The Foundation (Paper Piecing)
Because of the complex angles, we use a paper template to ensure accuracy.
- Print: Download or draw a 10-inch Pineapple Block pattern. You will need 4 copies (as we will make four 10-inch blocks to create one 20-inch pillow).
- Shorten Stitch: Set your sewing machine stitch length to 1.5mm. (Small stitches perforate the paper, making it easier to tear away later).
- Cut Strips: Cut your Light and Dark fabrics into 1.5-inch-wide strips. Precision isn’t crucial here as they will be trimmed, but 1.5″ is a good working width.
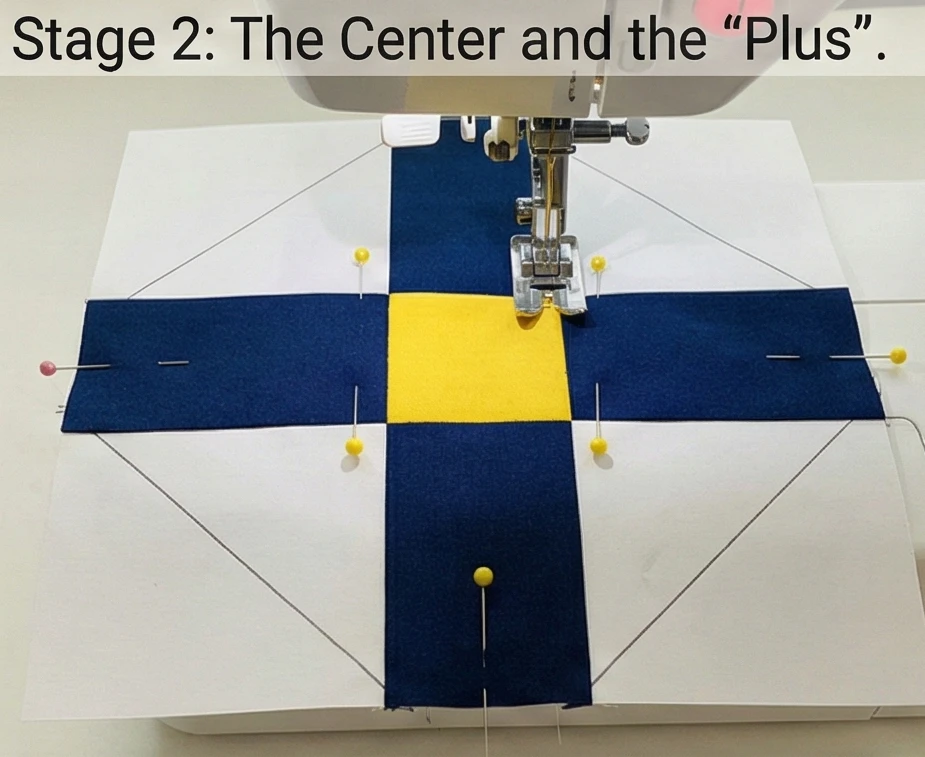
Step 2: The Center and the “Plus”
- Placement: Pin your Yellow Center square to the unprinted side of the paper, centered over section #1.
- Round 1 (The Plus):
- Place a Dark strip along the top edge of the center (Right Sides Together). Sew on the line of the paper. Trim excess seam. Open and press.
- Repeat for the bottom, left, and right sides.
- Result: You have a square center framed by a Dark “Plus” sign.
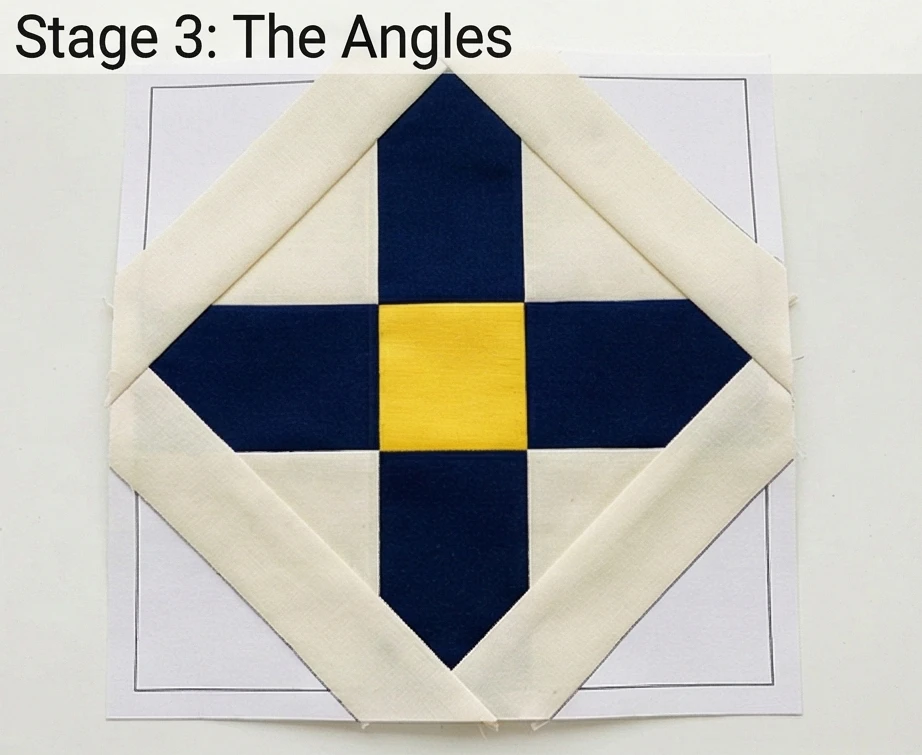
Step 3: The Angles (The Pineapple Magic)
This is where it differs from a normal log cabin.
- Round 2 (The X):
- You will now sew Light strips across the corners of the previous square.
- Align a Light strip diagonally across one corner. Sew on the line. Trim. Press.
- Repeat for all 4 corners.
- Result: You have a square rotated 90 degrees clockwise (a diamond).
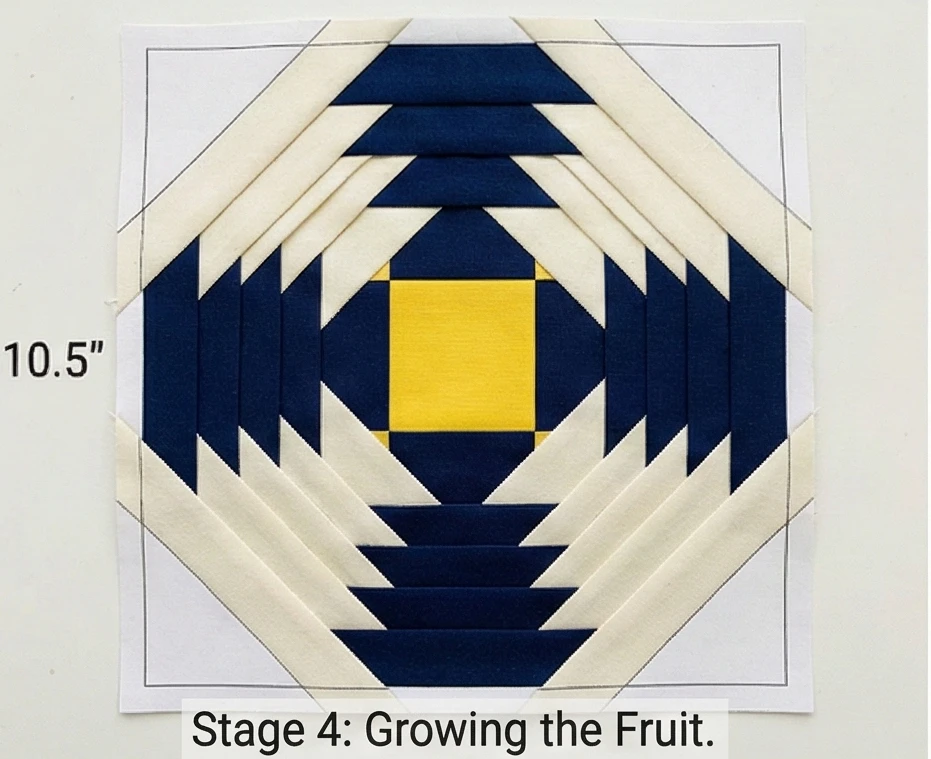
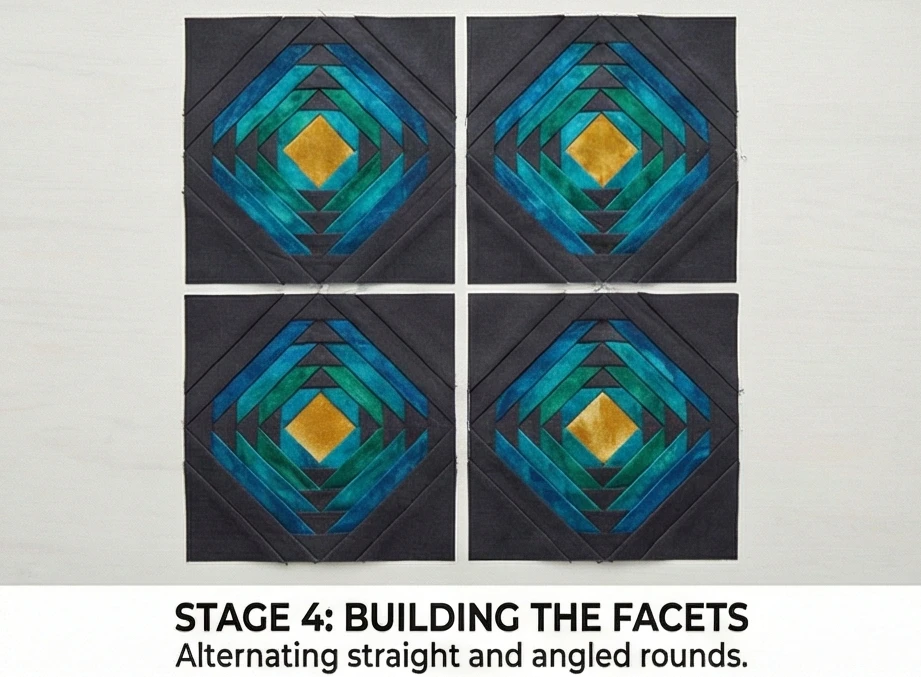
Step 4: Growing the Fruit
Alternate between flat sides and angled corners.
- Round 3 (Dark): Add Dark strips to the flat sides of the Light diamond.
- Round 4 (Light): Add Light strips to the angled corners of the Dark unit.
- Repeat: Continue this rhythm (Straight/Dark, Angled/Light) until the paper template is filled. The result is a spiky, sunburst-like geometry.
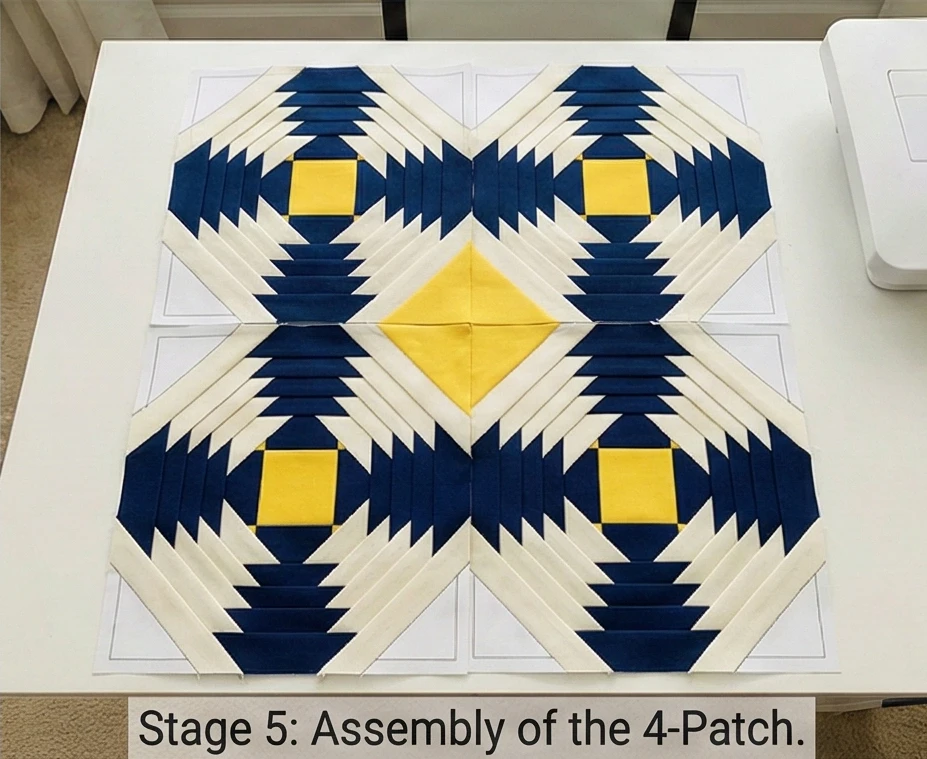
Step 5: Assembly of the 4-Patch
Combining the blocks.
- Clean Up: Trim the blocks to exactly 10.5″ x 10.5″ (including seam allowance) using the outer line of the paper template.
- Remove Paper: Gently tear away the paper foundation from the back.
- Join:
- Sew the top two blocks together.
- Sew the bottom two blocks together.
- Sew the top row to the bottom row.
- Center Match: Ensure the points in the absolute center meet perfectly. This creates a secondary “Kaleidoscope” pattern in the middle of the pillow.
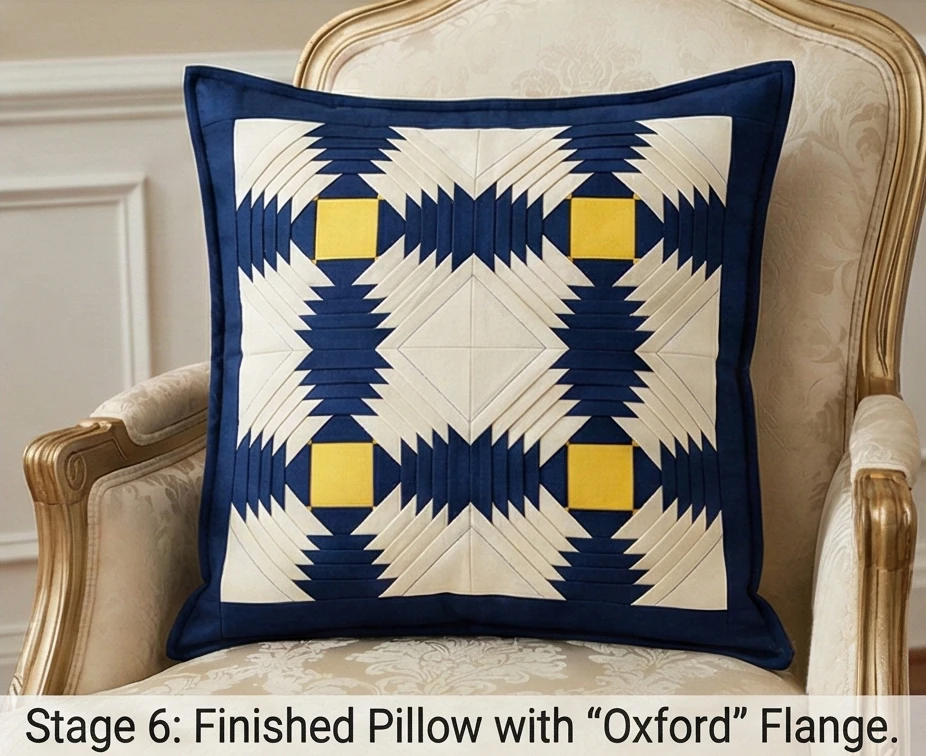
Step 6: The “Oxford” Flange Finish (Optional but Elegant)
A flange adds a professional “department store” border.
- Border: Before adding the back, sew a 2-inch wide border of Fabric B (Dark) around the entire pillow top.
- Quilt: Layer with batting and muslin. Quilt simple straight lines following the spikes.
- Envelope Back: Construct a standard envelope back (as detailed in previous patterns).
- The Flange Stitch: After turning the pillow right side out and pressing, stitch a straight line around the perimeter, exactly 2 inches in from the edge (in the ditch of the border seam).
- Effect: This creates a flat “flange” or rim around the puffy center where the pillow insert sits.
Usability Note: Pineapple blocks have multiple seams converging at the center. To avoid a hard lump in the middle of the pillow (which is uncomfortable to lean against), press your seams open whenever possible, or use a hammer/mallet to gently pound the center intersection flat before quilting.

5. Log Cabin Bed Runner Ideas to Elevate Your Bedroom Decor
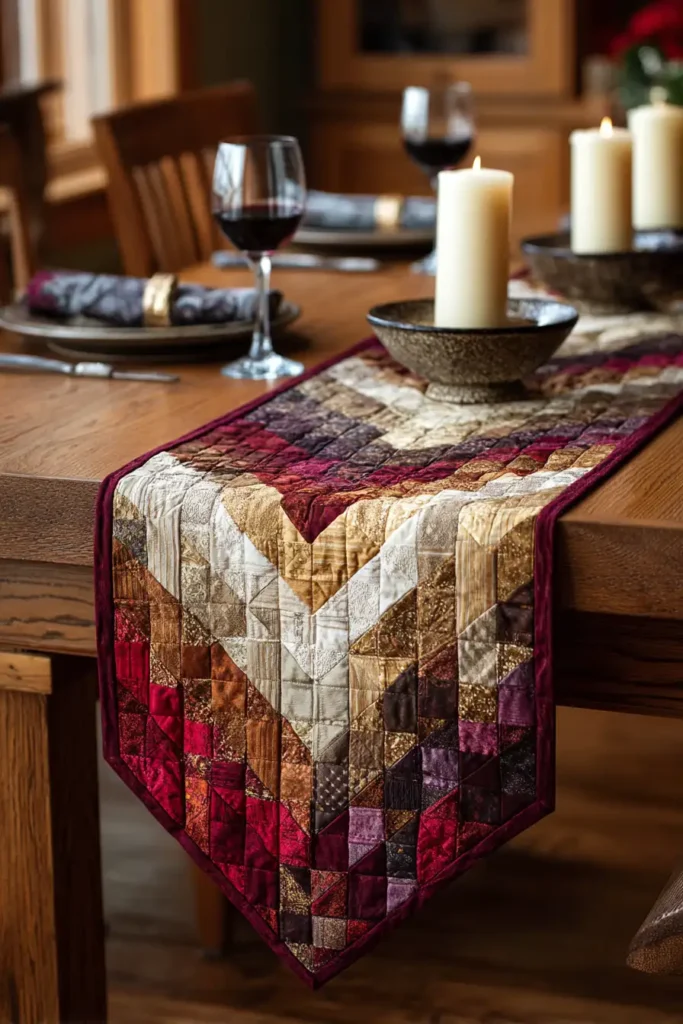
“The Fireside Path” Chevron Log Cabin Runner
A Bed Runner is the secret weapon of high-end interior designers. It adds a splash of color, texture, and protection to the foot of the bed (perfect for luggage or pets) without the bulk or expense of a full quilt. The “Fireside Path” uses the classic Log Cabin block but arranges them in a Chevron (Zig-Zag) layout. This dynamic, directional pattern draws the eye across the bed, making the room feel wider and more composed.
Finished Dimensions: Queen/King Bed Runner, 24″ x 90″.
Materials Needed:
- Fabric A (Centers): 1/4 yard of Deep Red or Metallic Copper (The “Spark”).
- Fabric Group B (Lights): 1.5 yards of assorted Creams, Linens, and Taupes.
- Fabric Group C (Darks): 1.5 yards of assorted Charcoal, Navy, or Espresso.
- Backing: 2 yards of a soft flannel or wide-back cotton.
- Batting: Thin cotton batting (runners should lie flat and drape well).
- Notions: Rotary cutter, 6×24″ ruler.
Cultural Backstory: While the Log Cabin block symbolizes the stability of home, the “Chevron” or Zig-Zag setting represents the “peaks and valleys” of life. In the 1970s, fashion house Missoni popularized the chevron in textiles, proving that this ancient geometric motif could be sleek, modern, and sophisticated.
Step 1: Cutting the Logs
We are making 22 blocks total.
- The Centers: Cut 22 squares of Fabric A (Red/Copper) measuring 2.5″ x 2.5″.
- The Strips: Cut your Light and Dark fabrics into 2.5-inch-wide strips.
- Tip: For an elegant “Scrappy” look, use 4-5 different dark fabrics and 4-5 different light fabrics rather than just one of each.

Step 2: Constructing the Block
Standard Light/Dark Log Cabin construction.
- Round 1:
- Sew a Light strip to the right of the center.
- Sew a Light strip to the top.
- Sew a Dark strip to the left.
- Sew a Dark strip to the bottom.
- Rounds 2 & 3: Continue spiraling outward, adding lights to the Light sides and darks to the Dark sides.
- Finish Size: Keep adding logs until the block measures 10.5″ x 10.5″.
- Quantity: You need 22 identical blocks.

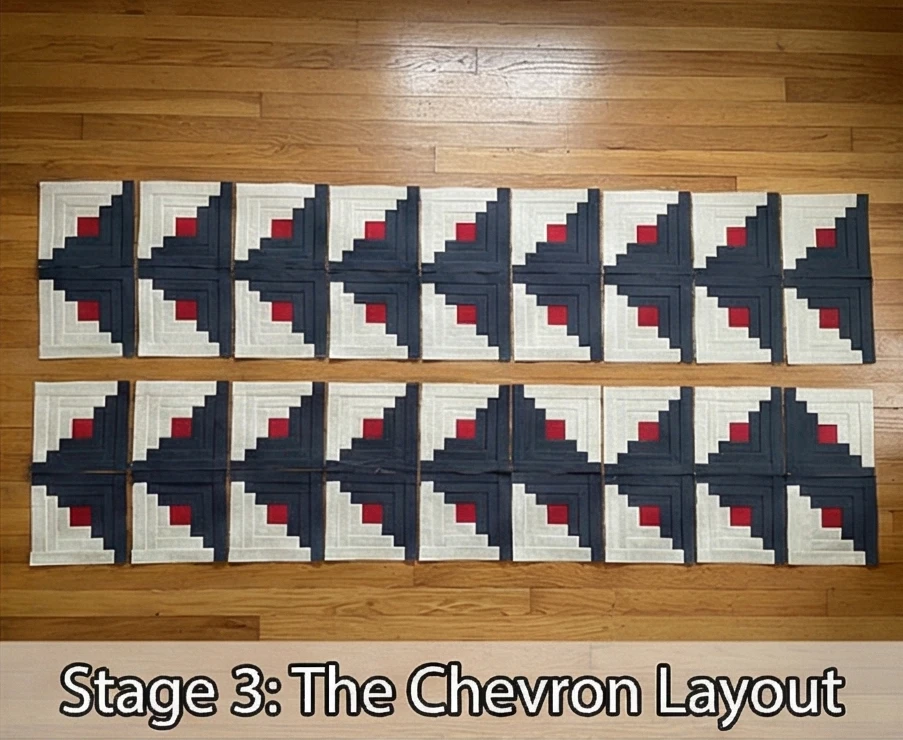
Step 3: The Chevron Layout
The orientation is the magic trick.
- The “V” Shape: Place two blocks side-by-side.
- Block 1 (Left): Rotate so the Dark Half is in the Bottom-Left.
- Block 2 (Right): Rotate so the Dark Half is in the Bottom-Right.
- Result: The dark strips meet in the middle and angle downwards, forming a “V” shape.
- The Runner Layout: Arrange your blocks in 2 rows of 11 blocks.
- Row 1 (Top): Orient all blocks so the Dark corner points Up-Right.
- Row 2 (Bottom): Orient all blocks so the Dark corner points Down-Right.
- Visual Check: When you look at the two rows together, the darks should form a continuous zig-zag or lightning bolt running the length of the runner.
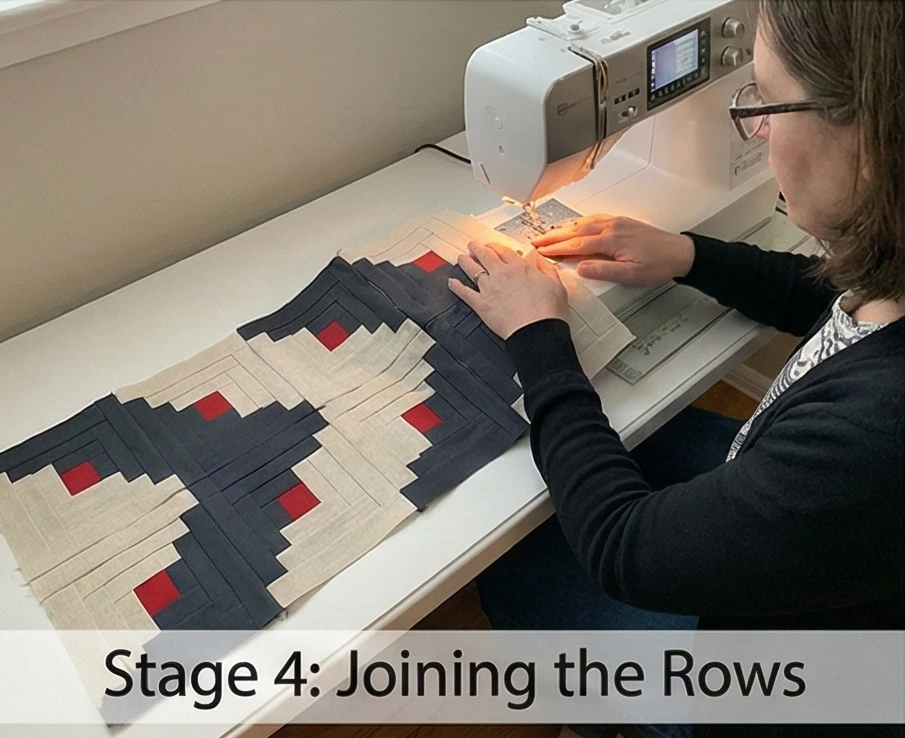
Step 4: Joining the Rows
- Sew Vertical: Sew the 11 blocks of Row 1 together side-by-side. Then sew the 11 blocks of Row 2 together.
- Sew Horizontal: Pin Row 1 to Row 2 along the long horizontal center seam.
- Intersection: Pay close attention to where the diagonal lines of the chevrons meet. Pin these intersections so the “V” points are sharp, not offset.
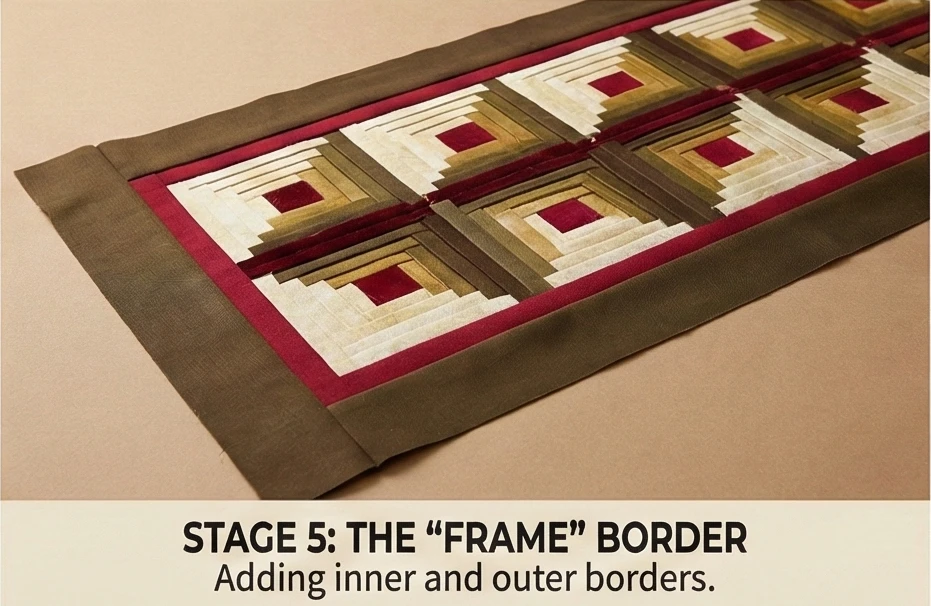
Step 5: The “Frame” Border
A runner needs a solid edge to look finished.
- Cut Borders: Cut 3.5-inch wide strips of your darkest Fabric C.
- Sew: Add borders to the top, bottom, and sides.
- Why: This frames the zig-zag pattern and brings the runner to the final 24-inch width, which is substantial enough to sit at the end of a duvet without sliding off.
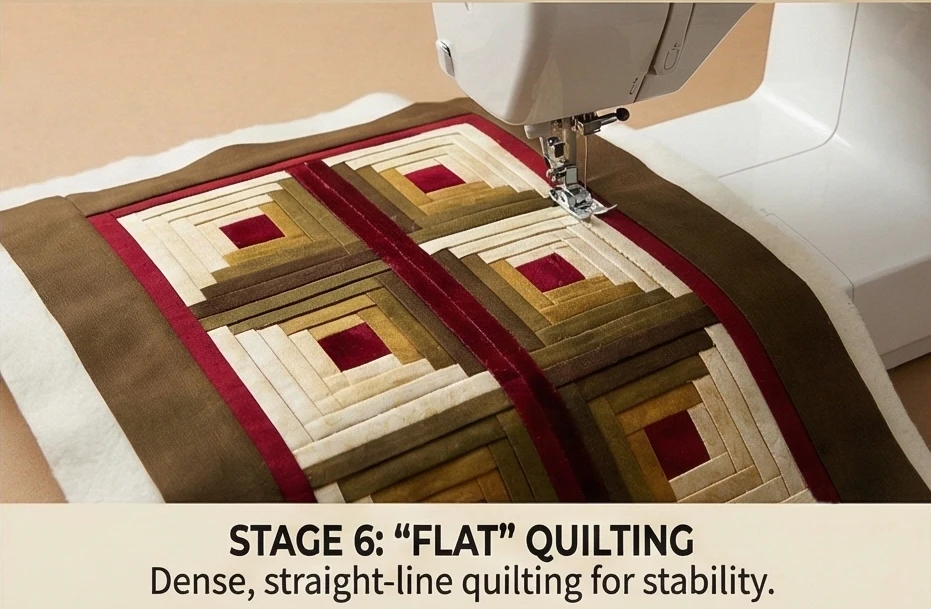
Step 6: “Echo” Quilting
Follow the path.
- Baste: Sandwich the runner.
- Quilt: Use a walking foot to quilt zig-zag lines that echo the pattern of the blocks.
- Spacing: Stitch lines about 1 inch apart following the “V” shapes.
- Effect: This emphasizes the directional movement and makes the runner feel modern and architectural.

Usability Note: Bed runners are “high traffic” items—people sit on them, suitcases are placed on them. Use a Double Binding (two layers of fabric folded over) for the edge, and ensure your quilting is dense enough (lines 1-2 inches apart) so the batting doesn’t shift or bunch up under heavy use.
6. Gentle Pastel Log Cabin Quilts for Serene Nursery Decor
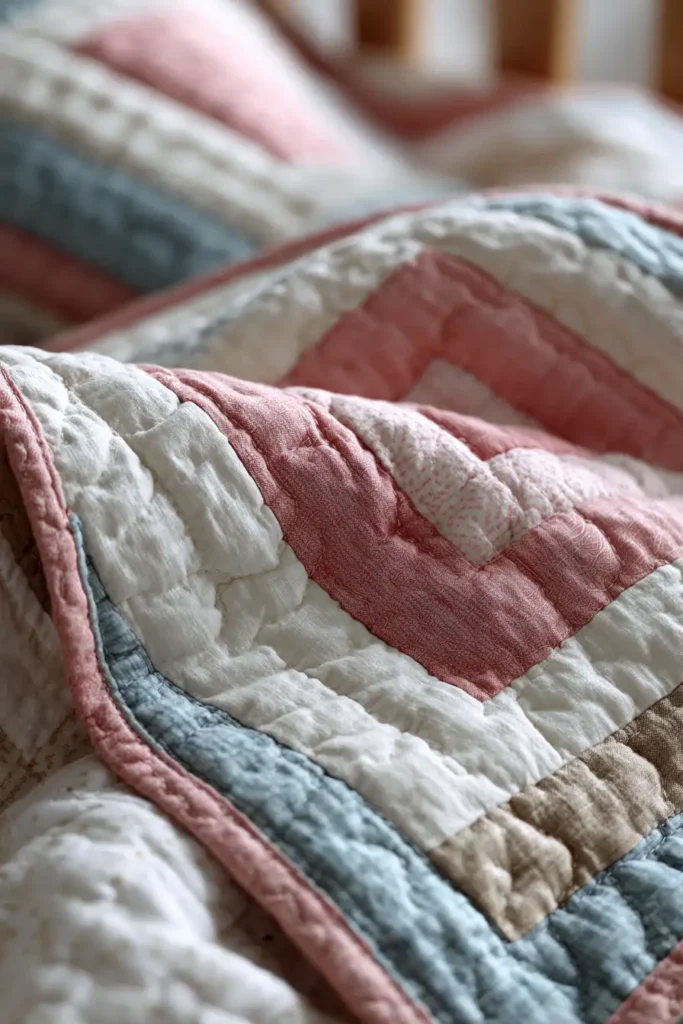
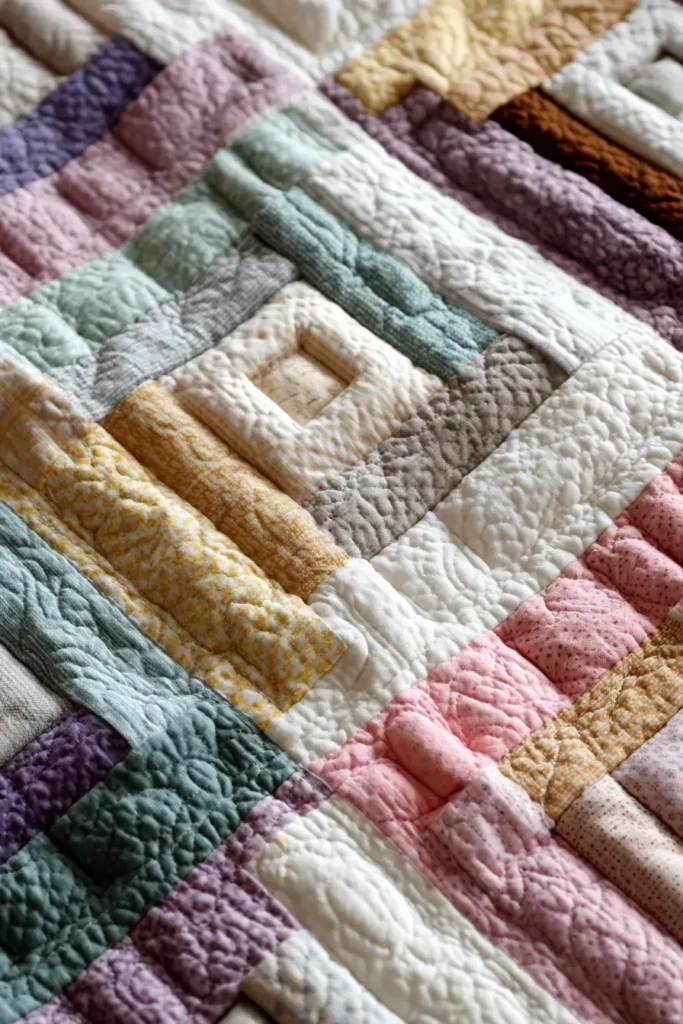
“The Lullaby Lattice” White-Washed Log Cabin Quilt
A nursery quilt must be two things: soothing to look at and durable enough for endless washing. The “Lullaby Lattice” pattern takes the traditional Log Cabin block and softens it by using a “White-Washed” palette. Instead of high-contrast darks and lights, it pairs Pure White strips with soft Pastels (Mint, Blush, Lavender, Buttercup). When arranged, the white strips link together to form a trellis or lattice effect, making the crib look like a secret garden.
Finished Dimensions: Crib/Toddler Bed Size, 40″ x 50″.
Materials Needed:
- Fabric A (The Centers): 1/4 yard of Pale Grey or a soft animal novelty print (bunnies/lambs).
- Fabric Group B (The Trellis/White): 1.5 yards of Solid White or White-on-White Dot.
- Fabric Group C (The Pastels): 1.5 yards total of mixed pastel scraps (at least 6 different soft colors).
- Backing: 2.5 yards of soft flannel (Minky is too heavy for a newborn; flannel is safer and breathable).
- Batting: High-quality cotton (100% natural fibers are best for baby temperature regulation).
- Notions: Rotary cutter, 2.5″ ruler.
Cultural Backstory: In the late 19th century, “Pastel” quilts became fashionable for babies as synthetic dyes improved. Before this, baby clothes and bedding were almost exclusively white, so they could be boiled to clean them. The introduction of soft pinks and blues allowed mothers to add personality to the nursery while maintaining an innocent, clean look.
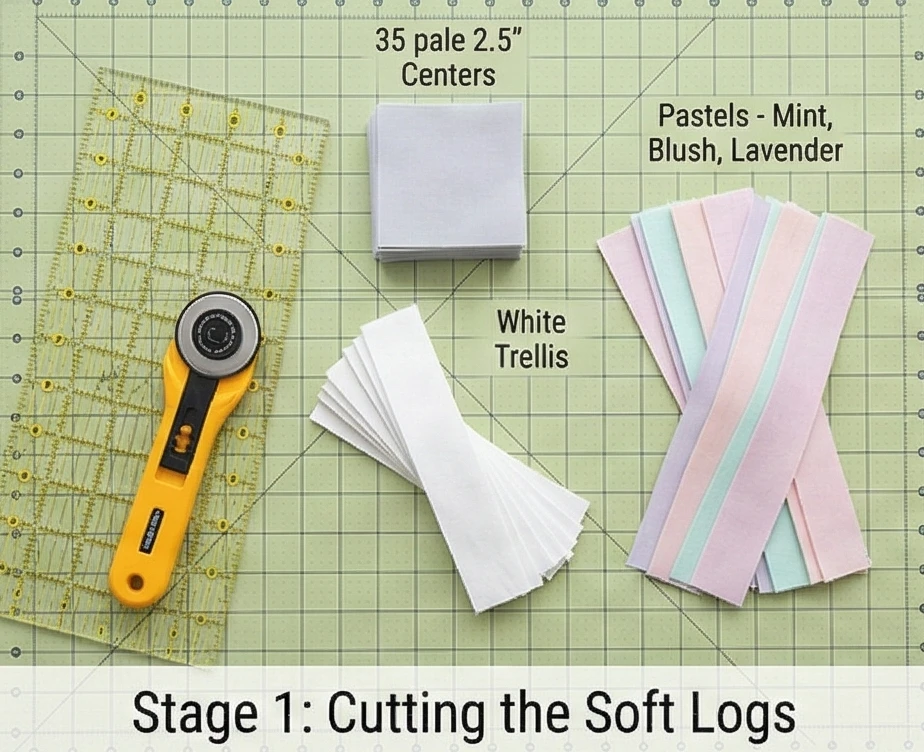
Step 1: Cutting the Soft Logs
We are making smaller blocks for a smaller bed.
- The Centers: Cut 35 squares of Fabric A (Grey/Novelty) measuring 2.5″ x 2.5″.
- The White Strips: Cut your Fabric B (White) into strips measuring 1.5 inches wide.
- Note: Using narrow strips makes the quilt look more delicate and intricate, perfect for a baby.
- The Pastel Strips: Cut your Fabric C (Pastels) into strips measuring 1.5 inches wide.
Step 2: Constructing the Block
Standard Light/Dark construction, but “Light” is White and “Dark” is Pastel.
- Round 1:
- Sew a White strip to the Right.
- Sew a White strip to the Top.
- Sew a Pastel strip to the Left.
- Sew a Pastel strip to the Bottom.
- Rounds 2 & 3: Continue spiraling outward.
- Rule: Always keep the Whites on the Top/Right and the Pastels on the Bottom/Left.
- Size: Continue until the block measures 8.5″ x 8.5″.
- Quantity: Make 35 Blocks.

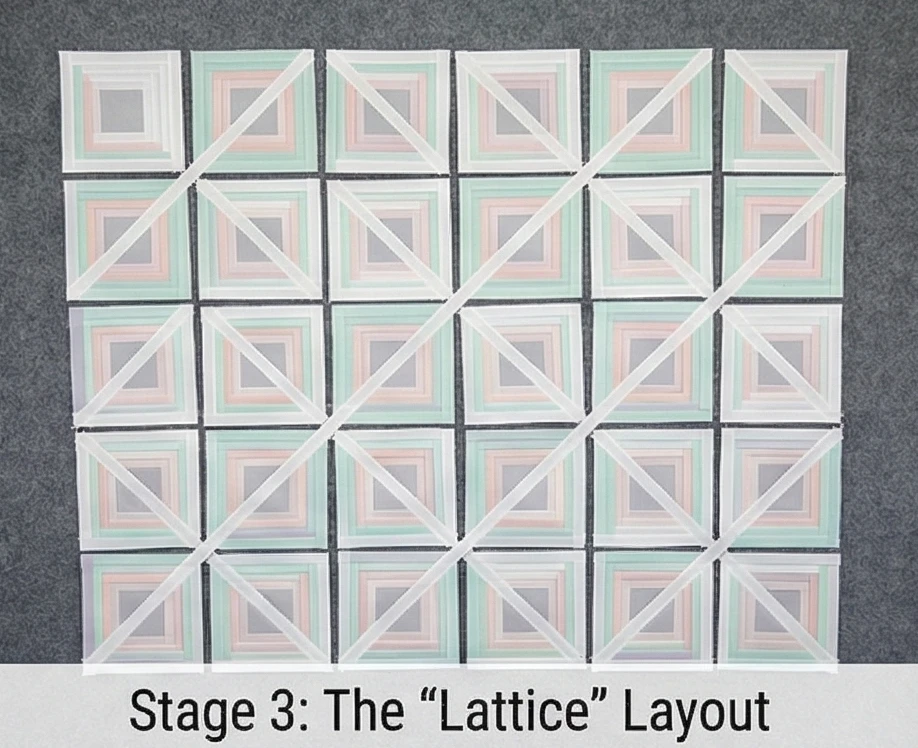
Step 3: The “Lattice” Layout
We want the white strips to connect.
- Grid: Arrange the blocks in a 5 x 7 grid.
- Orientation: Orient every single block exactly the same way (e.g., White corner in the Top-Right).
- Visual Effect: Because the blocks are identical, the diagonal lines of white will connect across the quilt, creating straight diagonal sashes (like rain or sunbeams).
- Alternative: Rotate every other block 90 degrees to create a diamond “lattice” where the white strips form enclosed squares. This is the “Barn Raising” look, but in soft, white tones.
Step 4: Sashing (Optional Breathability)
Adding space between blocks makes the quilt lighter.
- Cut Sashing: Cut strips of Solid White measuring 1.5″ x 8.5″.
- Insert: Sew a sashing strip between every block in the rows.
- Why: This breaks up the pattern slightly and adds more negative space, making the quilt feel less “heavy” visually.

Step 5: The Soft Border
- Cut: Cut 3.5-inch wide strips of your favorite Pastel fabric (e.g., a soft Mint Green).
- Sew: Add borders to all four sides.
- Frame: This contains the energy of the diagonal lines and gives you a nice, clear edge to bind.

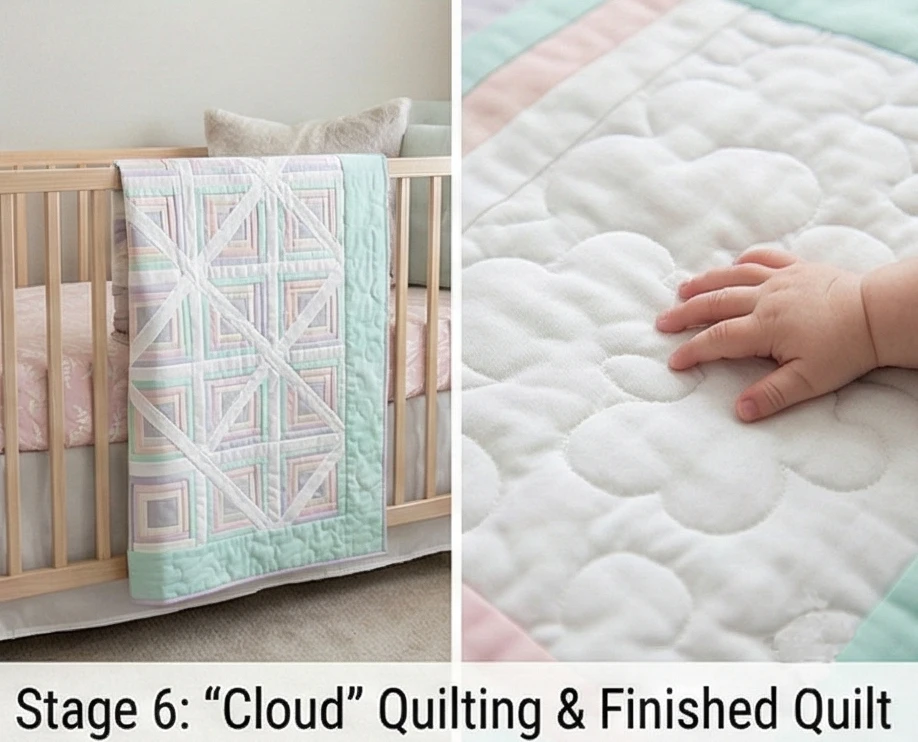
Step 6: “Cloud” Quilting
Keep it lofty.
- Baste: Sandwich the layers (Top + Cotton Batting + Flannel Back).
- Quilt: Do not quilt densely. A stiff quilt is not cuddly.
- Pattern: Stitch a large, lazy Meander (stipple) or simple loopy swirls over the entire surface.
- Scale: Keep quilting lines 2-3 inches apart. This preserves the air pockets in the batting, making the quilt warm but lightweight.
Usability Note: Safety is paramount for nursery bedding. Ensure all loose threads are buried (little fingers can get caught in loops). Pre-wash all fabrics with a hypoallergenic detergent before sewing to shrink cotton and prevent dye bleeding. Never use buttons or beads on a baby quilt—stick to fabric piecing only.
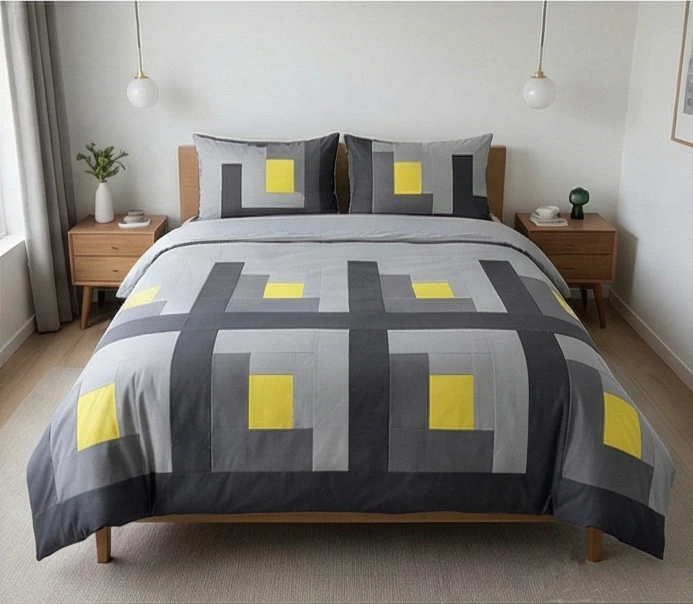
7. Modern Off-Center Log Cabin Duvet Covers for Stylish Comfort
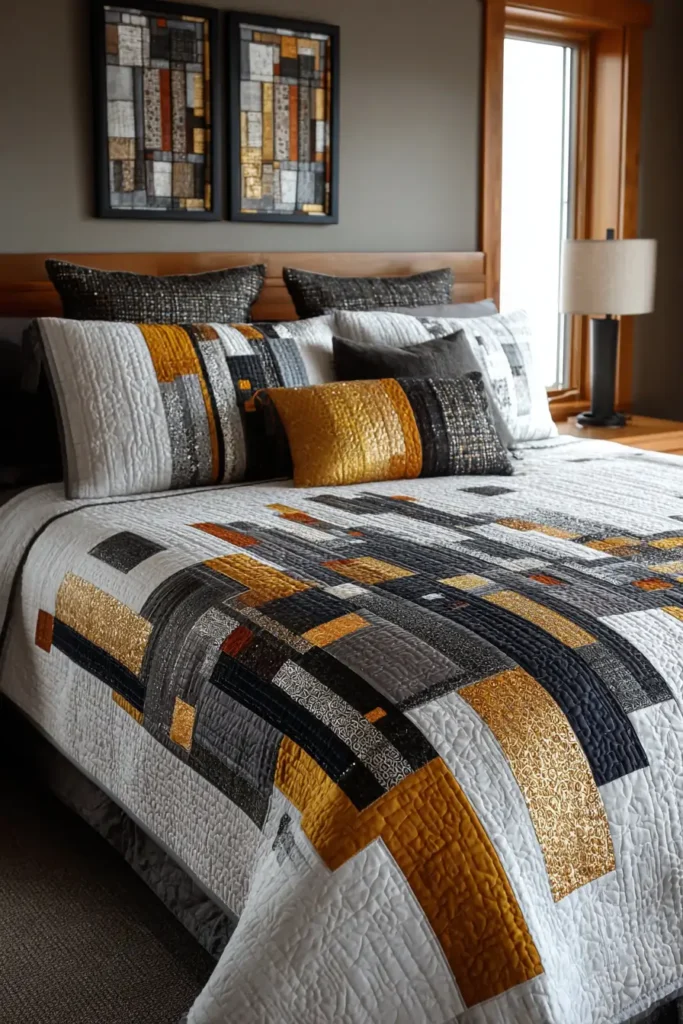
“The City Skyline” Asymmetrical Log Cabin Duvet
A duvet cover offers the elegance of a quilt without the heavyweight, making it perfect for modern living or warmer climates. The “City Skyline” design uses the Off-Center Log Cabin block (sometimes called the “Curved Log Cabin”), but scales it up dramatically. By using extra-wide strips on two sides and thin strips on the others, the blocks look like towering skyscrapers or abstract architecture. This pattern works beautifully in monochrome—think shades of slate, mist, and charcoal—for a sleek, urban aesthetic.
Finished Dimensions: Full/Queen Duvet Cover, 88″ x 88″.
Materials Needed:
- Fabric A (The “Window” Centers): 1 yard of Bright Citron or Metallic Gold (small pop of color).
- Fabric Group B (Thin Strips – Sky): 3 yards of Light Grey or White.
- Fabric Group C (Wide Strips – Building): 5 yards of Charcoal, Navy, or Black.
- Backing: 5 yards of wide sheeting or high-thread-count cotton percale (this will be the underside of the duvet).
- Closure: 10 buttons or a long zipper (80″).
- Notions: Rotary cutter, 24″ ruler.
Cultural Backstory: The “Modern Quilt” movement, which gained traction in the early 2000s, often takes traditional blocks like the Log Cabin and distorts them using “Negative Space” and asymmetry. This mimics the irregular, organic growth of modern cities, breaking the rigid grid of traditional patchwork to create something that feels alive and moving.
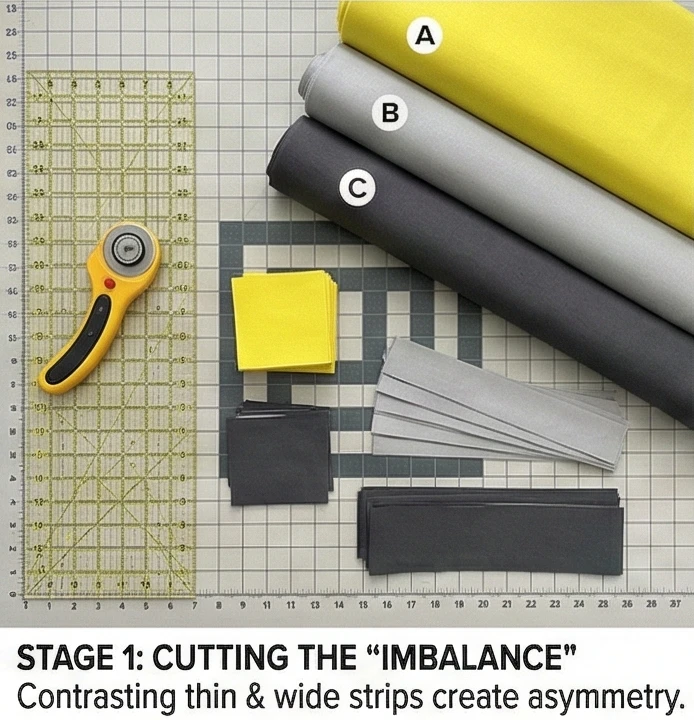
Step 1: Cutting the “Imbalance”
To create the modern look, we exaggerate the difference between the sides.
- The Centers: Cut 16 large squares of Fabric A measuring 4.5″ x 4.5″.
- Scale: We are making huge blocks (22″ finished), so we start big.
- The Thin Strips (Fabric B): Cut strips measuring 2.5 inches wide.
- The Wide Strips (Fabric C): Cut strips measuring 4.5 inches wide.
- Contrast: The 2-inch difference creates a dramatic “swoop” in the final block.
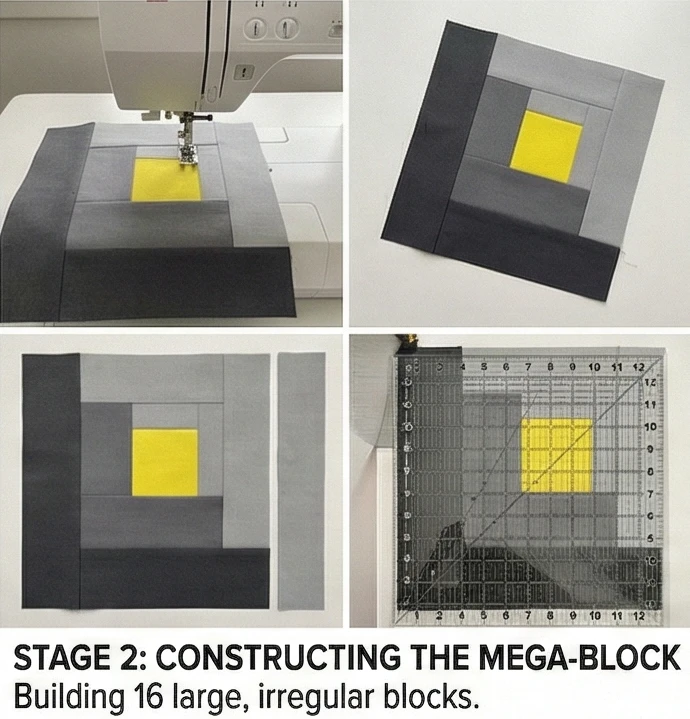
Step 2: Constructing the Mega-Block
We are building 16 giant blocks.
- Round 1:
- Sew a Thin strip to the Right. Press out.
- Sew a Thin strip to the Top. Press out.
- Sew a Wide strip to the Left. Press out.
- Sew a Wide strip to the Bottom. Press out.
- Round 2: Repeat the sequence (Thin/Right, Thin/Top, Wide/Left, Wide/Bottom).
- Round 3: Repeat again.
- Trim: Square up the block to exactly 22.5″ x 22.5″.
- Visual: The yellow center should be pushed far into the top-right corner, looking like a lit window in a dark tower.
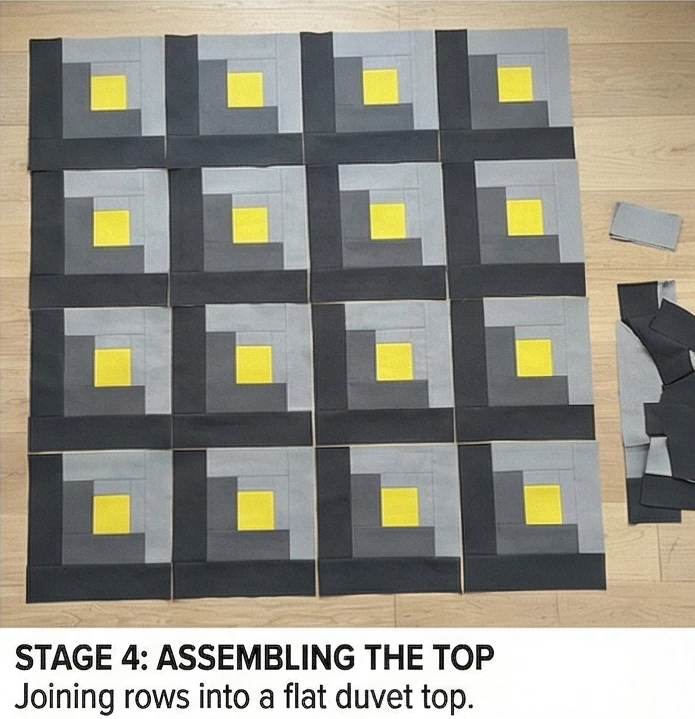
Step 3: The “Architecture” Layout
How you rotate the blocks determines the design.
- Grid: Lay out the 16 blocks in a 4 x 4 grid.
- Orientation:
- Option A (The Swirl): Rotate blocks so the wide dark strips always form the outer curve. This creates 4 giant circles across the bed.
- Option B (The Skyline – Recommended): Orient all blocks exactly the same way (Darks on bottom/left). This creates a jagged, stepped effect that looks like a silhouette of city buildings against a pale sky.

Step 4: Assembling the Top
- Sew: Stitch the blocks into 4 rows.
- Join: Sew the 4 rows together.
- Result: You now have a top sheet measuring approx 88.5″ x 88.5″.
- Pressing: Press all seams open to reduce bulk, as this will be a duvet cover, not a thick quilt.
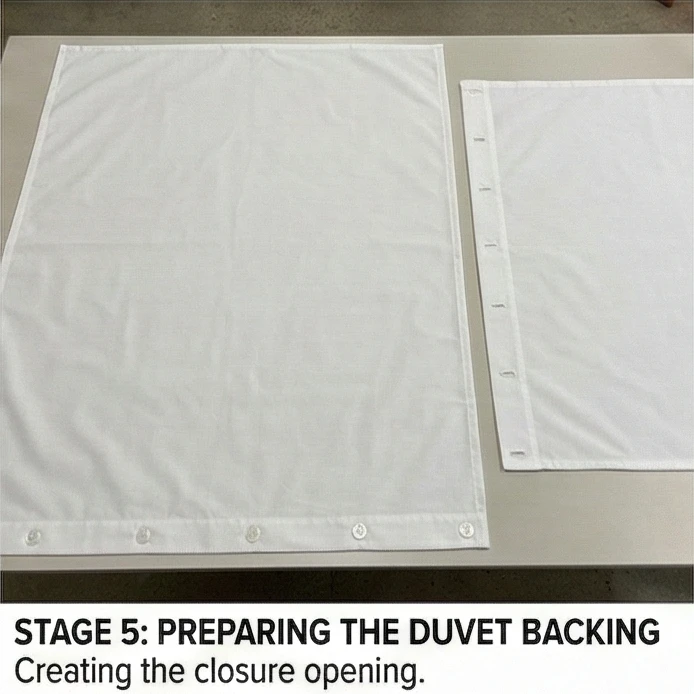
Step 5: Preparing the Duvet Backing
Duvet covers need an opening.
- Cut: Cut your backing fabric into two large panels:
- Panel 1: 88.5″ x 80″.
- Panel 2: 88.5″ x 12″.
- Hem: Hem one long edge of both panels (fold 1″, press, fold 1″, stitch).
- Fasteners:
- Buttonholes: Sew buttonholes along the hem of Panel 2 and sew buttons onto the hem of Panel 1.
- Zipper: Alternatively, insert a long zipper between the two hemmed edges.
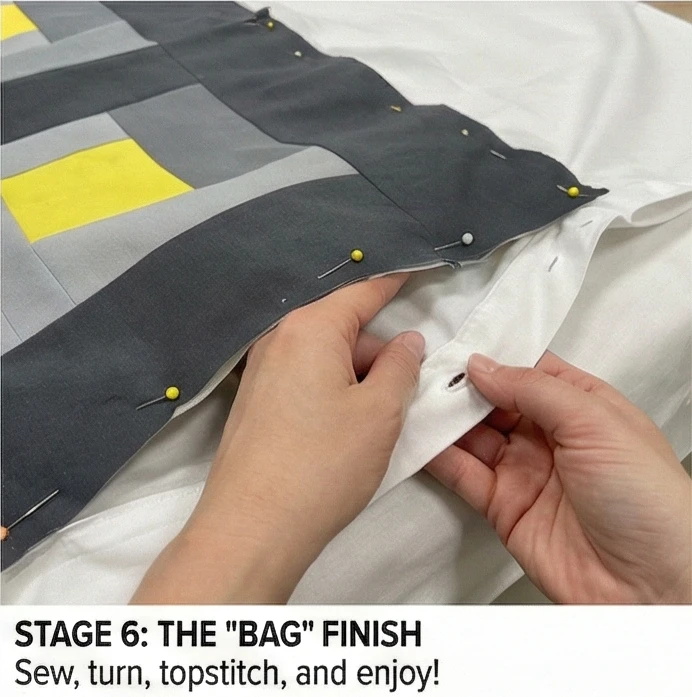
Step 6: The “Bag” Finish
No binding needed!
- Layer: Place the Patchwork Top Right Side Up.
- Overlay: Place the Backing Panels Right Side Down on top.
- Overlap: Ensure the button/closure section is buttoned/zipped shut and lying flat.
- Sew: Stitch around the entire perimeter of the square using a 1/2 inch seam.
- Reinforce: Backstitch over the corners.
- Turn: Turn the duvet cover right-side out through the button opening. Poke out corners.
- Topstitch: Press the edge flat and topstitch 1/4″ from the edge around the whole duvet to keep the layers crisp.
Usability Note: Because this is a duvet cover, it will be washed more frequently than a quilt. Serge or Zig-Zag all raw seams inside the patchwork top before assembling. If you don’t, the fraying threads will cause damage inside the cover after a few cycles in the washing machine.
8. White-on-White Log Cabin Bedding for Minimalist Luxury
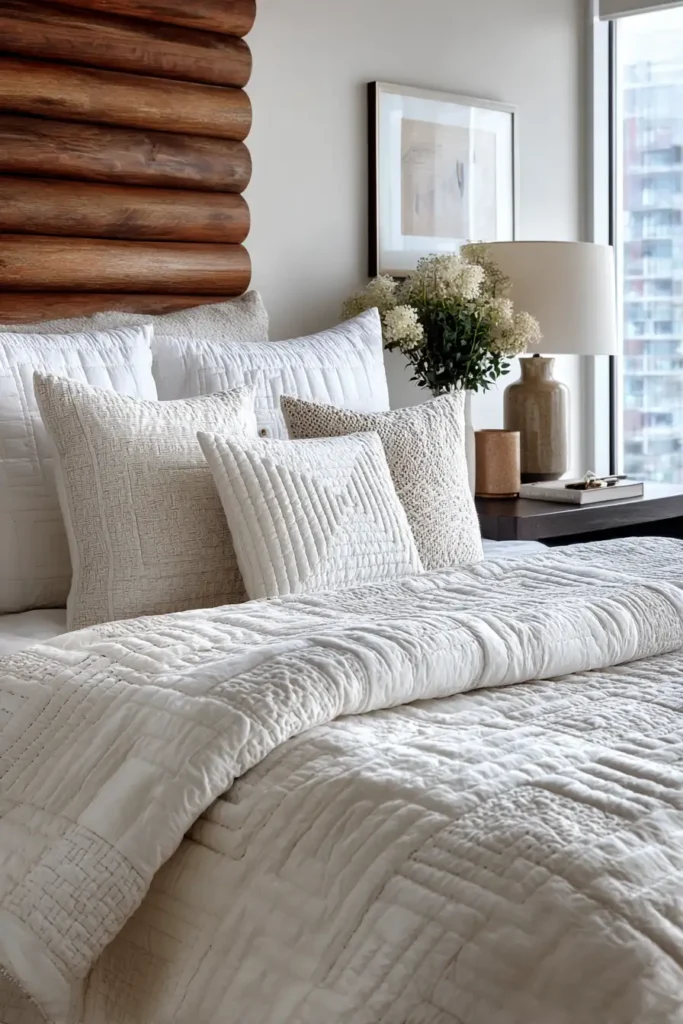
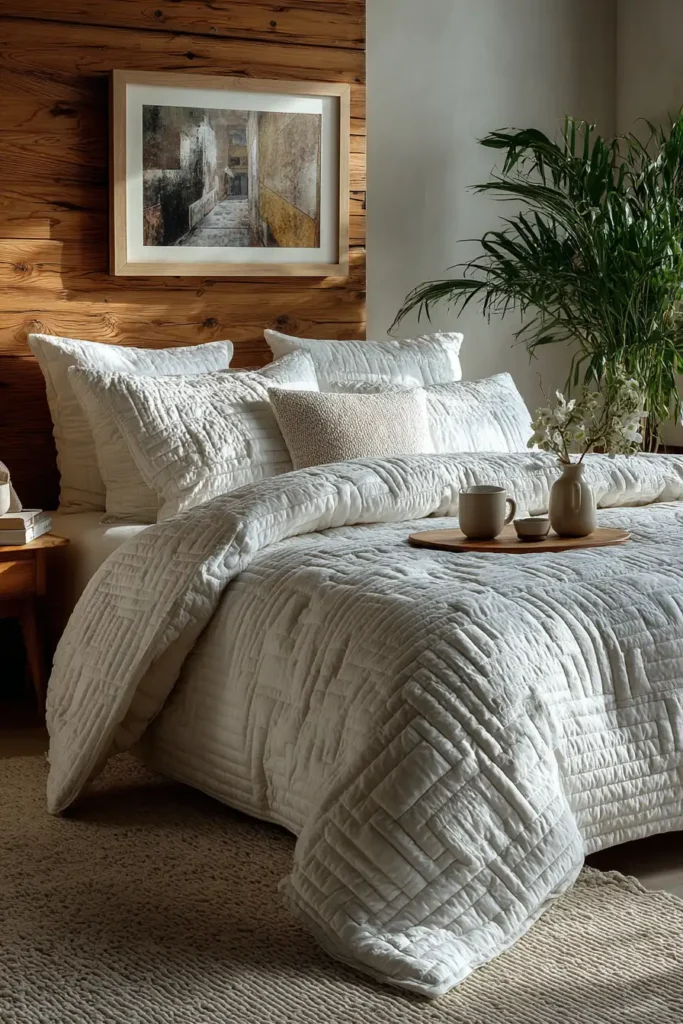
“The Arctic Solstice” Textured White-on-White Quilt
True minimalism isn’t about the absence of design; it is about the elevation of texture. The “Arctic Solstice” quilt is a masterpiece of subtle elegance, featuring a White-on-White palette. Instead of relying on color contrast, this design relies on sheen contrast. By alternating between Matte Cotton (standard quilting cotton or linen) and Lustrous Sateen (or mercerized cotton), the Log Cabin pattern only becomes visible when the light hits the bed at an angle. It is the ultimate choice for a serene, spa-like master bedroom.
Finished Dimensions: King Bed Size, 96″ x 96″.
Materials Needed:
- Fabric A (Matte/Background): 6 yards of High-Quality White Linen or Kona Cotton (Snow).
- Fabric B (Lustrous/Accent): 6 yards of White Cotton Sateen, Polished Cotton, or a White-on-White geometric print.
- Center Squares: 1 yard of White Velvet or Chenille (for tactile softness).
- Backing: 9 yards of white voile.
- Batting: High-loft Wool or Polyester. Crucial: You need “puff” (loft) to create shadows; the pattern will disappear.
- Notions: Rotary cutter, quilting ruler, white thread (50wt cotton).
Cultural Backstory: Whitework quilting (historically known as “Marseille Work” or “Boutis”) originated in 17th-century France. These all-white wholecloth quilts were symbols of extreme wealth because keeping white fabric pristine required immense labor and resources. They were traditionally used as bridal quilts, symbolizing purity and a fresh start.
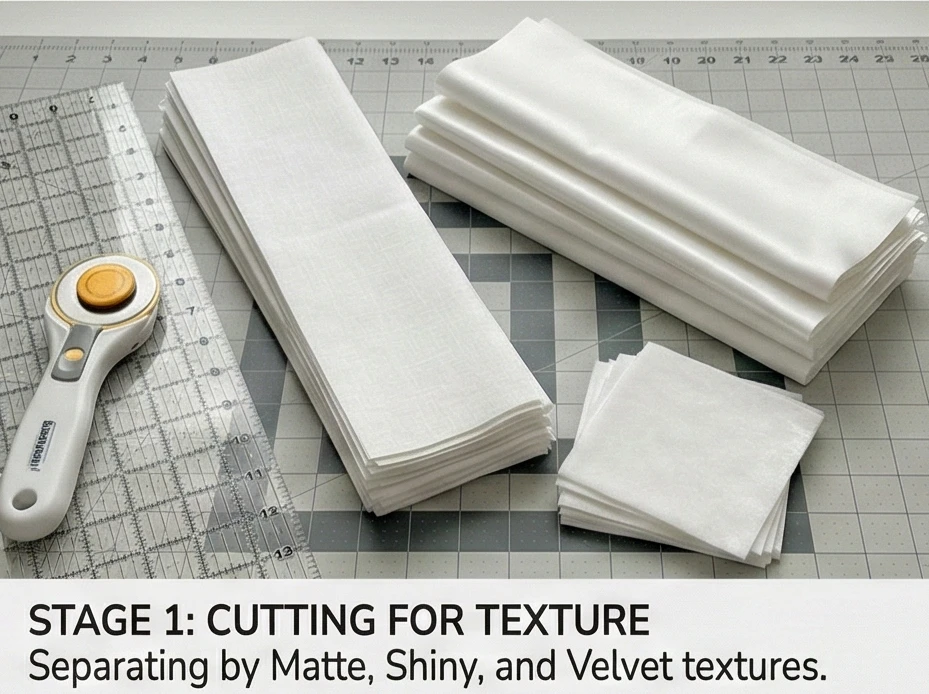
Step 1: Cutting for Texture
Organize your strips by “Matte” and “Shiny” rather than Dark and Light.
- The Centers: Cut 64 squares of White Velvet/Chenille measuring 3.5″ x 3.5″.
- The Matte Strips: Cut Fabric A (Linen/Cotton) into strips measuring 2.5 inches wide.
- The Shiny Strips: Cut Fabric B (Sateen/Print) into strips measuring 2.5 inches wide.
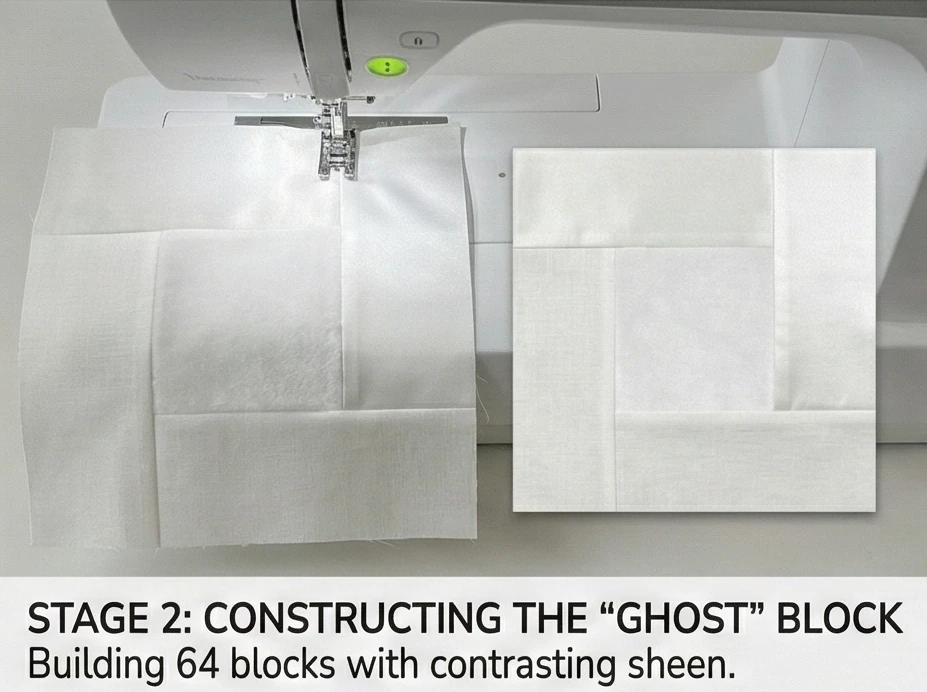
Step 2: Constructing the “Ghost” Block
We will use the traditional layout but with subtle contrast.
- Round 1:
- Sew a Shiny strip to the Right of the Velvet Center.
- Sew a Shiny strip to the Top.
- Sew a Matte strip to the Left.
- Sew a Matte strip to the Bottom.
- Pressing: Press seams toward the Matte fabric (it is usually stiffer and hides the seam allowance better).
- Rounds 2-5: Continue spiraling outward, maintaining the Shiny/Matte orientation.
- Goal: Build the block to 12.5″ x 12.5″.
- Quantity: Make 64 Blocks.
Step 3: The “Light Catching” Layout
Barn Raising is the best layout for this.
- Center: Place 4 blocks in the center of your floor space.
- Orientation: Arrange them so the Shiny sides form a diamond in the middle.
- Effect: Because the sateen reflects light and the linen absorbs it, this diamond will “glow” differently depending on the time of day.
- Expansion: Continue building rings outward, matching Shiny-to-Shiny and Matte-to-Matte. *
- Visual: The result is a rippling water effect that is felt more than seen.

Step 4: Assembly
- Sew: Stitch the blocks into an 8 x 8 grid.
- Borders: Add a 6-inch wide Matte Linen border. This acts as a calm frame around the active center.

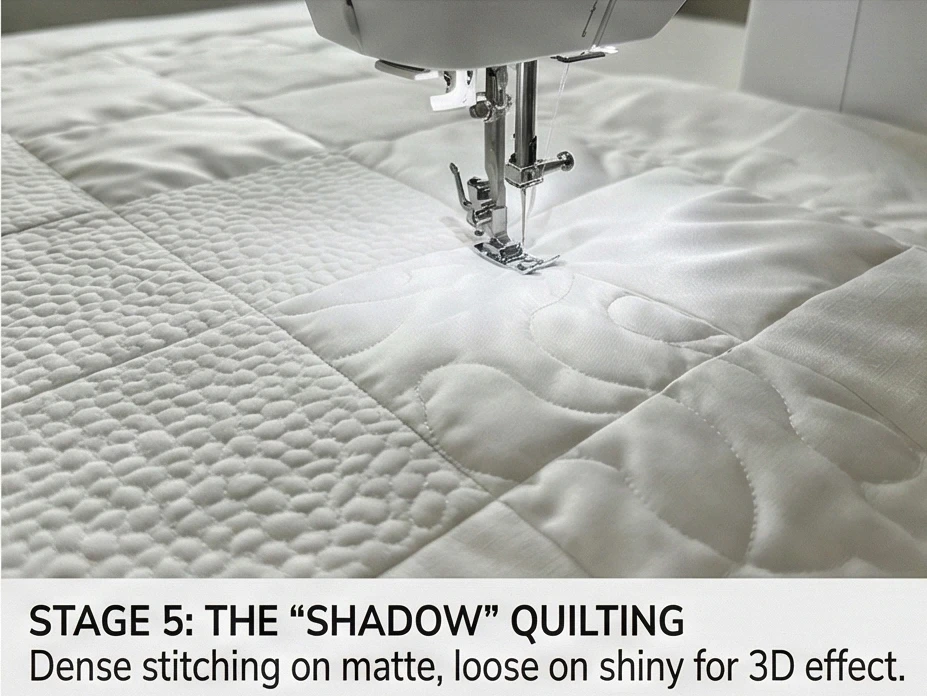
Step 5: The “Shadow” Quilting (The Most Important Step)
In a white quilt, the quilting stitches provide the only real lines.
- Thread Choice: Use a slightly shiny thread (such as trilobal polyester or a silk-finished cotton) in pure white.
- Design:
- In the Matte Logs: Quilt dense motifs like pebbles or micro-stippling. This flattens the matte fabric, making it recede.
- In the Shiny Logs: Leave them largely unquilted or do a simple, loose curve. This allows the batting to puff up, catching the light and enhancing the sheen.
- Result: This technique, called “Trapunto” effect, creates a sculpted, 3D surface.
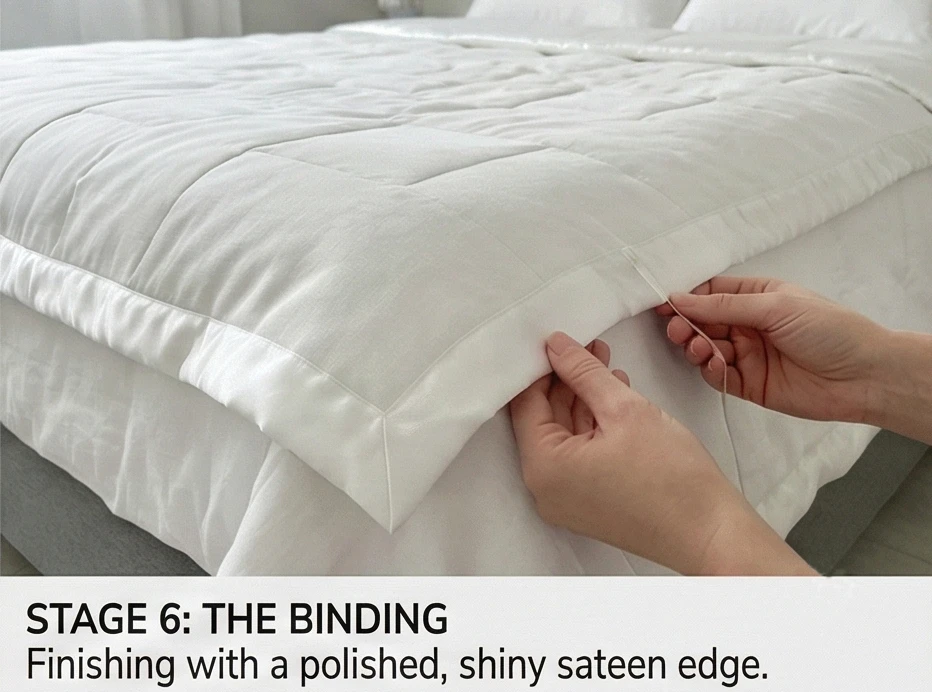
Step 6: The Binding
- Finish: Bind with the Shiny Sateen fabric.
- Why: A shiny edge catches the eye and gives the quilt a polished, finished perimeter, distinct from the matte border.
Usability Note: The greatest advantage of an all-white cotton quilt is that it is bleachable. Unlike colored heirloom quilts, which fade, this quilt can be washed in hot water with non-chlorine bleach (or gentle chlorine bleach if 100% cotton) to keep it looking crisp and hotel-fresh for decades.
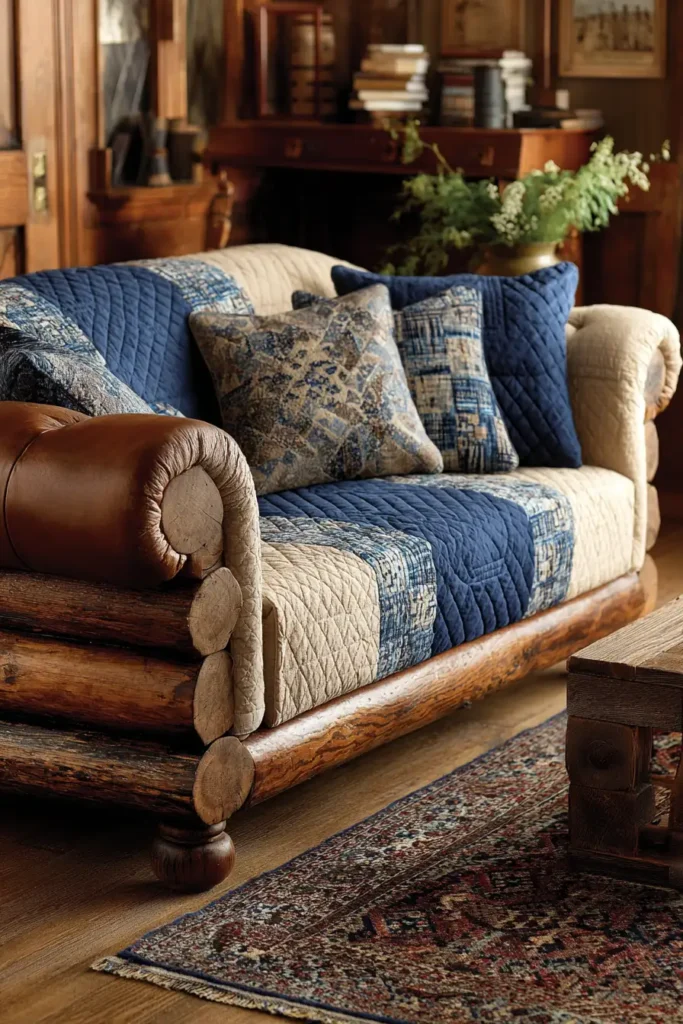
9. Stylish Log Cabin Quilted Sofa Covers for Protection and Panache
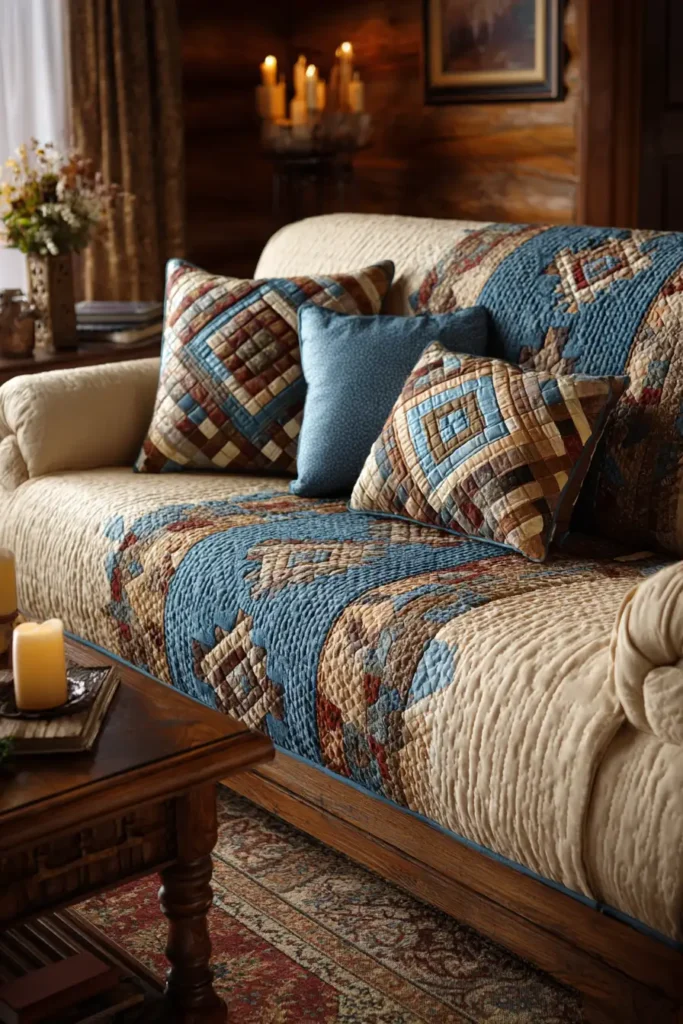
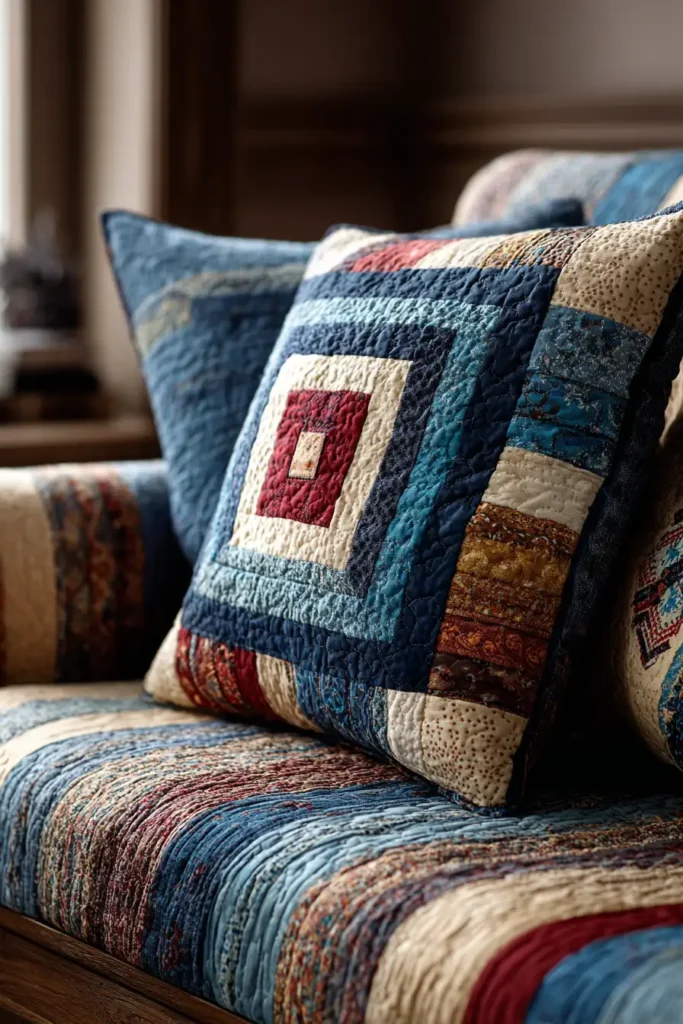
“The Parlor Guard” Fitted Log Cabin Sofa Cover
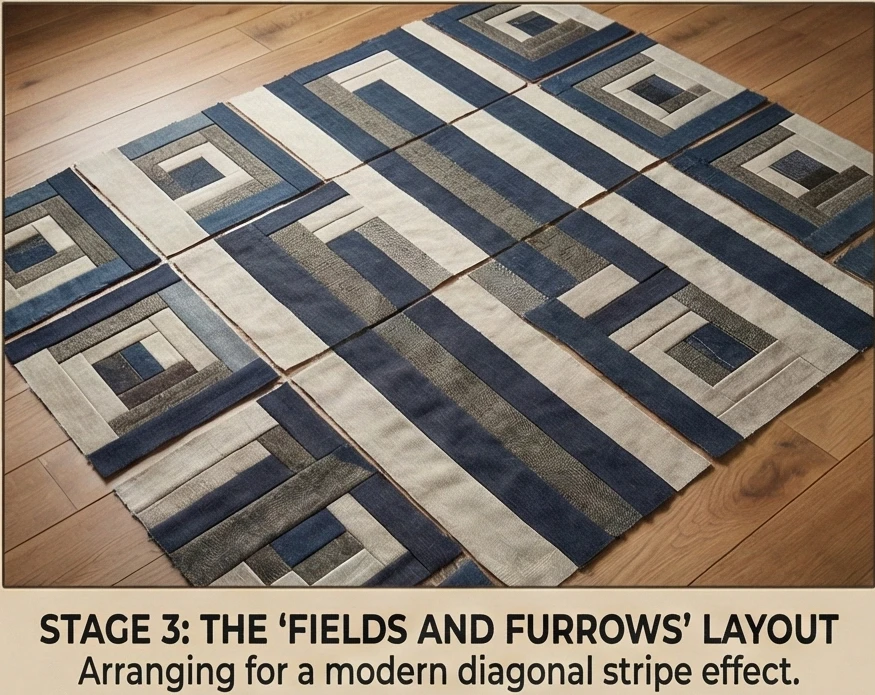
A sofa cover often looks like a messy sheet thrown over furniture. The “Parlor Guard” pattern elevates this concept by transforming the cover into a tailored, quilted decorative piece. Using the “Fields and Furrows” Log Cabin setting (straight diagonal lines), this cover is constructed in three separate panels: a Seat/Back runner and two Armrest protectors. By adding Weighted Ends or ties, it stays in place, protecting your upholstery from pets and spills while adding a layer of heritage charm to the living room.
Finished Dimensions: Customizable (Standard Sofa Seat Panel: 70″ x 36″; Arm Panels: 14″ x 24″).
Materials Needed:
- Fabric A (Centers): 1/2 yard of Deep Indigo or Rust Canvas.
- Fabric Group B (Lights): 2 yards of Oatmeal Linen or heavy cotton.
- Fabric Group C (Darks): 2 yards of Tweed, Wool, or Denim (durable heavyweights).
- Backing: 3 yards of Non-Slip Grip Fabric or heavy canvas.
- Batting: Thin, dense cotton batting (you want it flat, not puffy).
- Notions: Rotary cutter, sewing clips (better than pins for heavy fabric).
Cultural Backstory: In Victorian parlors, “Antimacassars” were small crocheted cloths placed on the backs of chairs to protect the fabric from Macassar oil, a popular hair grooming product for men. This quilted sofa cover is the modern evolution of that concept—designed to protect expensive furniture from the oils, fur, and claws of modern life (mostly dogs and cats).
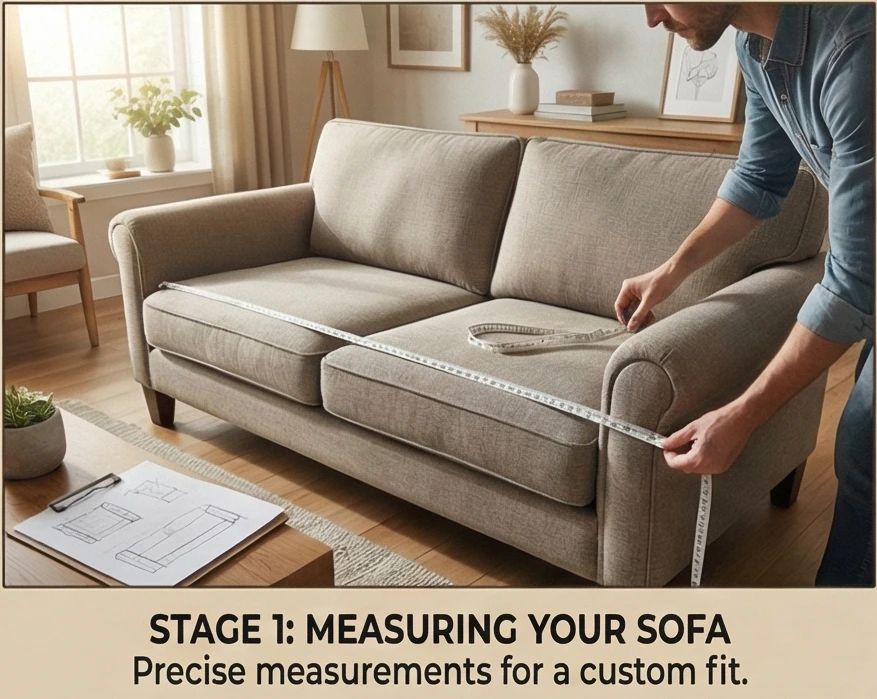
Step 1: Measuring Your Sofa
Fit is everything.
- Seat Width: Measure the width of the seating area (inside arm to inside arm). Example: 68 inches. Add 2 inches.
- Depth: Measure from the front edge of the seat, all the way back, and up over the top of the sofa back. Example: 24″ seat + 24″ back + 12″ drop over the back = 60 inches.
- Arms: Measure the width and length of the armrests.
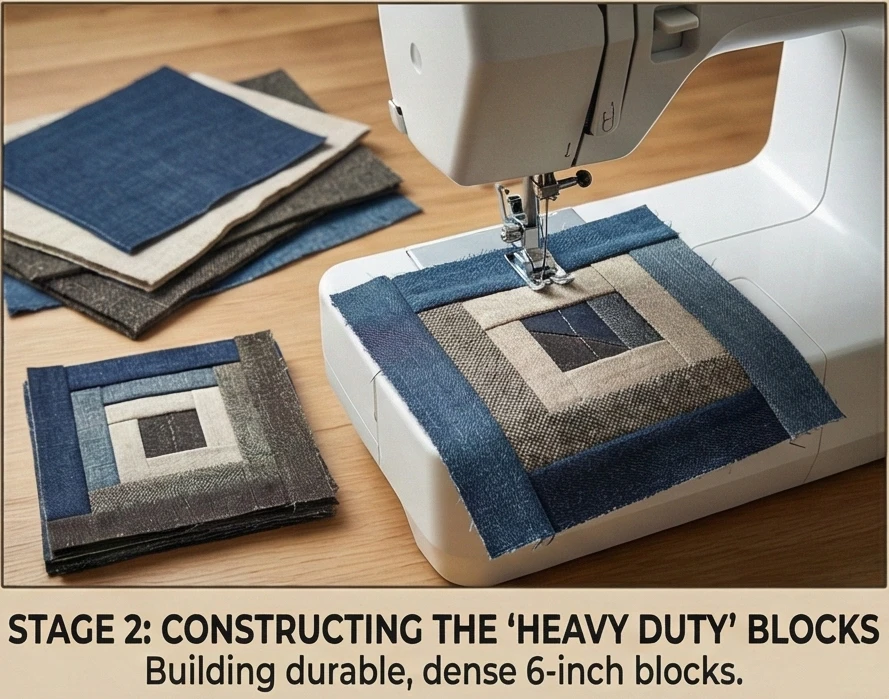
Step 2: Constructing the “Heavy Duty” Blocks
We are using a smaller 6-inch block for better flexibility.
- Centers: Cut squares of Fabric A measuring 2.5″ x 2.5″.
- Strips: Cut Fabrics B and C into 1.5-inch strips. (Thinner strips create a denser, more durable weave).
- Assembly: Build standard Log Cabin blocks (Light/Dark halves).
- Target: Continue adding rounds until the block measures 6.5″ x 6.5″.
- Quantity: Calculate based on your measurements. For a 70″ x 60″ runner, you need roughly 110 blocks (11 wide x 10 high).
Step 3: The “Fields and Furrows” Layout
This layout creates diagonal stripes.
- Orientation: Arrange the blocks so the diagonal seam (between the light and dark halves) runs in the same direction for every block.
- Visual: This creates bold diagonal stripes of Light and Dark across the sofa. It is slimming and modern, avoiding the busy “patchwork” look.
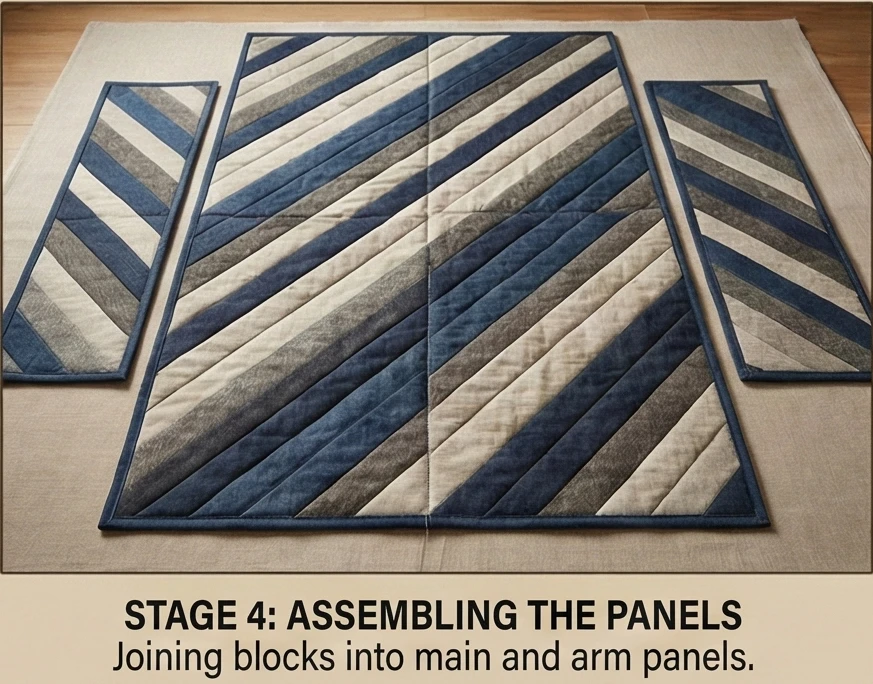
Step 4: Assembling the Panels
- Main Runner: Sew the blocks into rows, then join the rows to create the main body panel (Seat + Back).
- Arm Covers: Construct two smaller rectangular panels for the arms (e.g., 2 blocks wide x 4 blocks long).
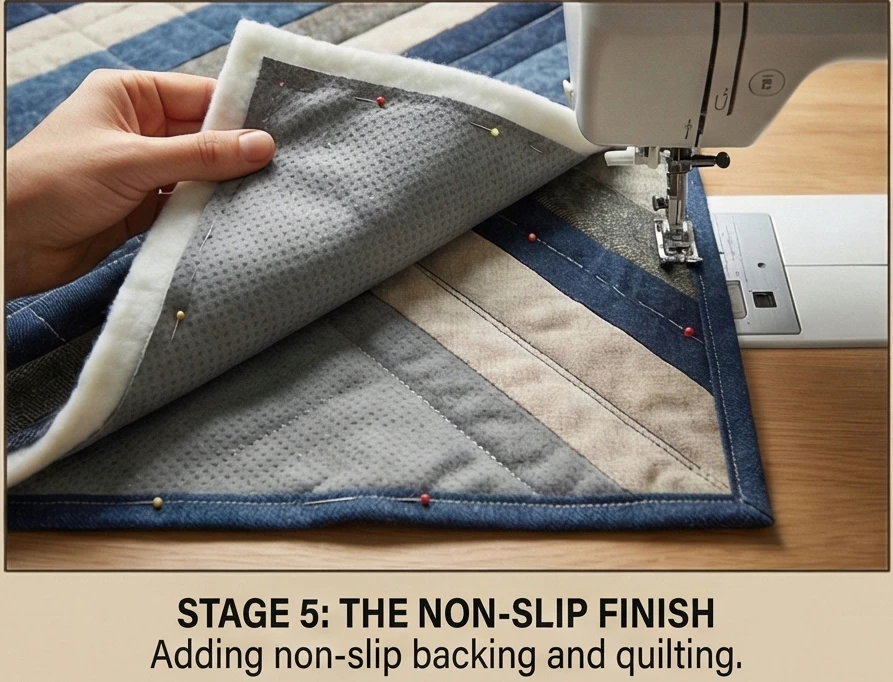
Step 5: The Non-Slip Finish
The secret to a usable cover.
- Layering: Place the Non-Slip Backing face down. Place batting on top. Place the Quilted Top face up.
- Quilt: Stitch “in the ditch” of every diagonal seam.
- Why: This dense quilting locks the layers together so the cover withstands a dog jumping on it without bunching up.
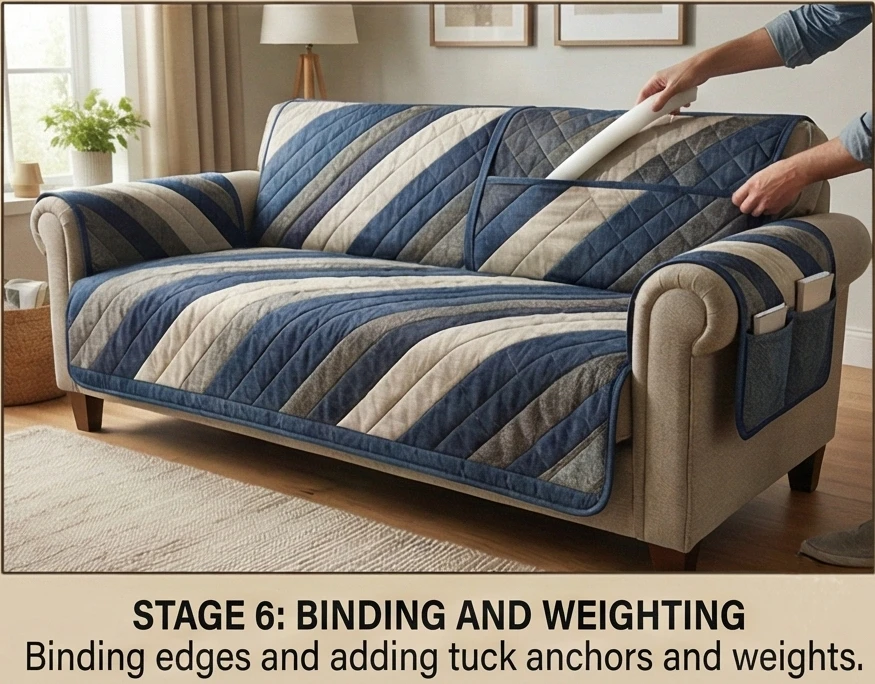
Step 6: Binding and Weighting
- Edges: Bind all edges with a durable bias tape or denim strip.
- The Tuck Anchor (Optional): Sew a long tube of fabric to the back of the cover where the seat meets the backrest. Stuff it with a pool noodle or dowel. When you push this into the sofa crevice, it locks the cover in place so it doesn’t slide forward.
- Arm Weights: Sew small pockets into the hanging ends of the arm covers and insert drapery weights or heavy washers. This keeps them hanging straight.
Usability Note: Choose your fabrics based on your lifestyle. If you have cats, avoid loose-weave tweeds that snag claws; stick to tight denim or canvas. If you have kids, choose a dark, busy pattern for the “Seat” area to hide juice stains, and lighter colors for the “Back” area.
10. Log Cabin Quilted Table Runners for Elegant Dining Room Decor
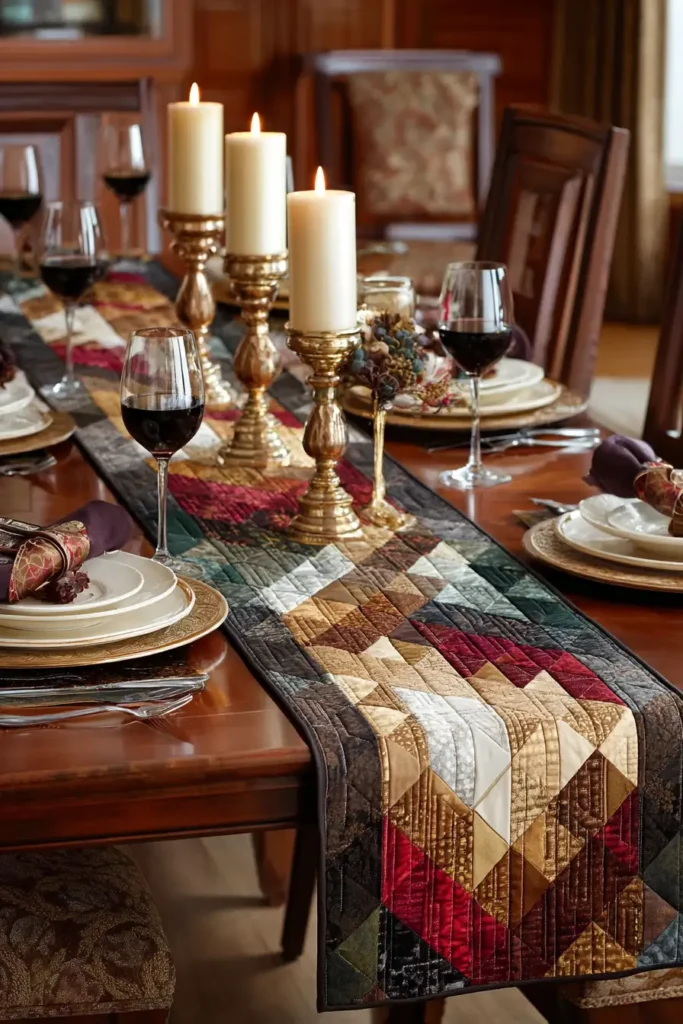
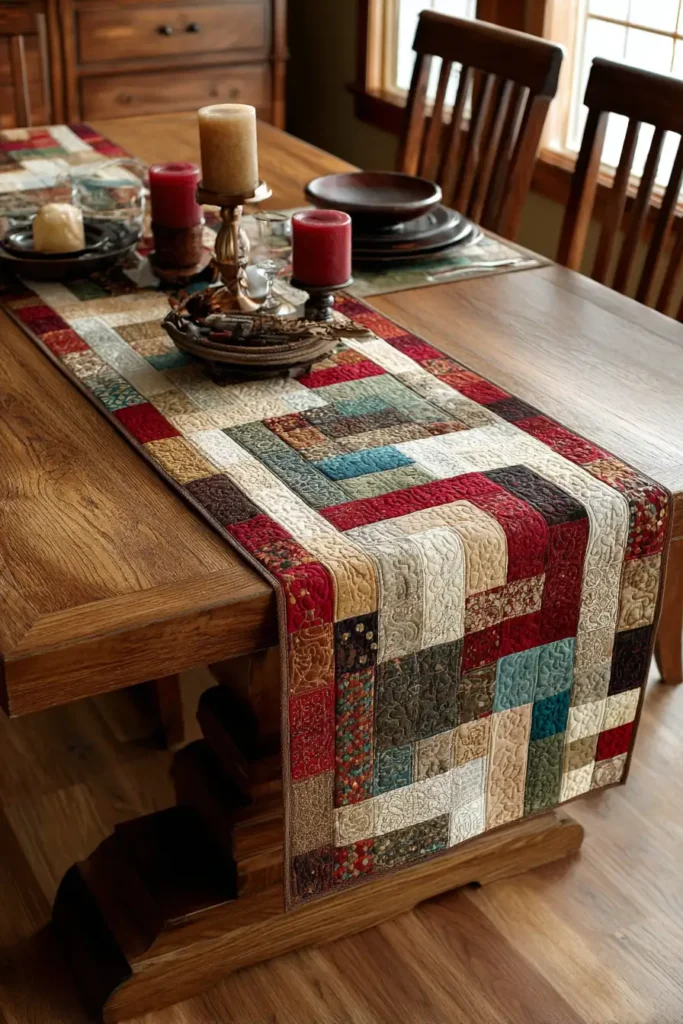
“The Harvest Table” Barn Raising Runner
A table runner is the perfect way to introduce the warmth of a quilt into a formal dining setting without the commitment of a full tablecloth. The “Harvest Table” runner creates a long, slender centerpiece using miniature Log Cabin blocks arranged in a Barn Raising diamonds pattern. The graduating colors—from a rich Burgundy or Gold center outward to Cream—draw the eye toward the center of the table, making it the ideal base for candlesticks or a floral arrangement.
Finished Dimensions: Dining Table Runner, 14″ x 72″.
Materials Needed:
- Fabric A (Centers): 1/8 yard of Deep Crimson or Chocolate Brown (Velvet adds a nice holiday touch).
- Fabric Group B (Lights): 3/4 yard of mixed Ivories, Champagnes, and Golds.
- Fabric Group C (Darks): 3/4 yard of mixed Olives, Russets, and Bronzes.
- Backing: 1 yard of a coordinating tonal print.
- Batting: Thin, fusible fleece or flannel (you want the runner to sit flat so wine glasses don’t tip over).
- Notions: Rotary cutter, 6×24″ ruler.
Cultural Backstory: The dining table has always been the heart of the home, second only to the hearth. In early American homes, the “best” quilts were often displayed not on beds, but draped over tables when guests arrived. The “Barn Raising” arrangement suggests community and coming together—fitting themes for a shared meal.
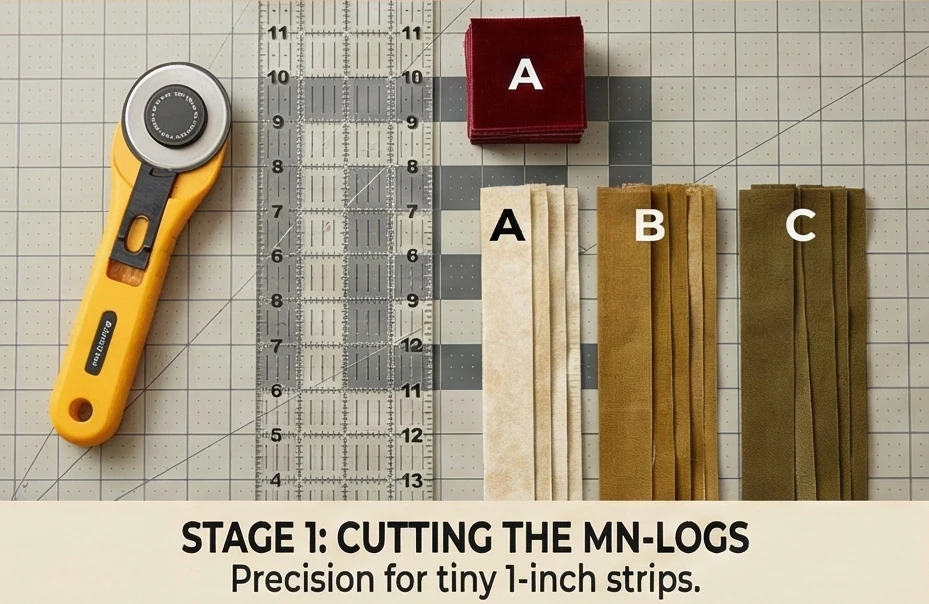
Step 1: Cutting the Mini-Logs
We are working small for elegance. Accuracy is key.
- The Centers: Cut 24 squares of Fabric A (Crimson) measuring 1.5″ x 1.5″.
- The Strips: Cut your Light and Dark fabrics into 1-inch-wide strips.
- Note: Yes, these are tiny! They will finish at 0.5 inches wide. This fine scale is what makes the runner look like a delicate textile rather than a chunky blanket.
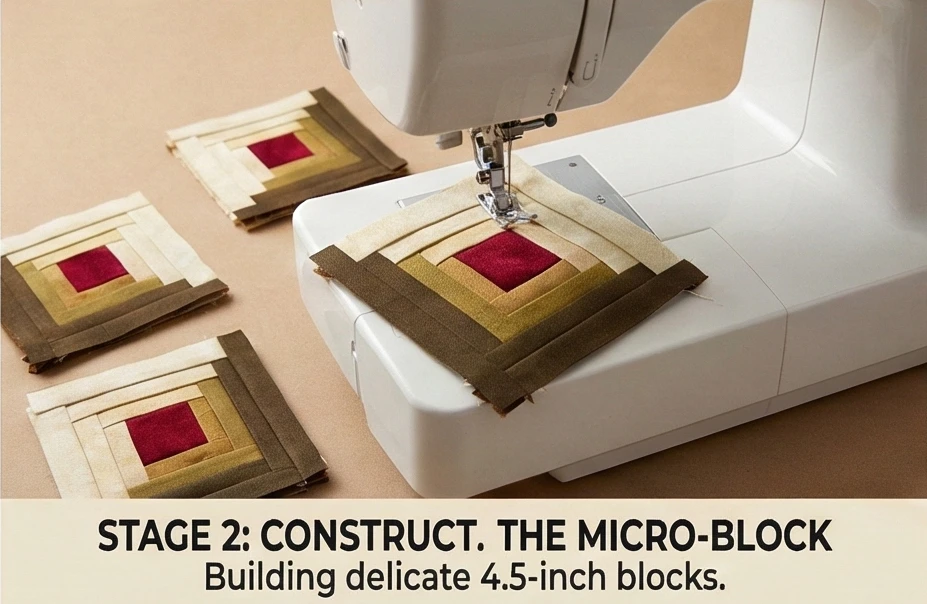
Step 2: Constructing the Micro-Block
Patience is required for miniature piecing.
- Round 1:
- Sew a Light strip to the right (1.5″ long).
- Sew a Light strip to the top.
- Sew a Dark strip to the left.
- Sew a Dark strip to the bottom.
- Rounds 2 & 3: Continue spiraling outward.
- Pressing: Press seams open if possible to reduce bulk, or firmly toward the dark.
- Finish Size: Continue until the block measures 4.5″ x 4.5″.
- Quantity: Make 24 Blocks.
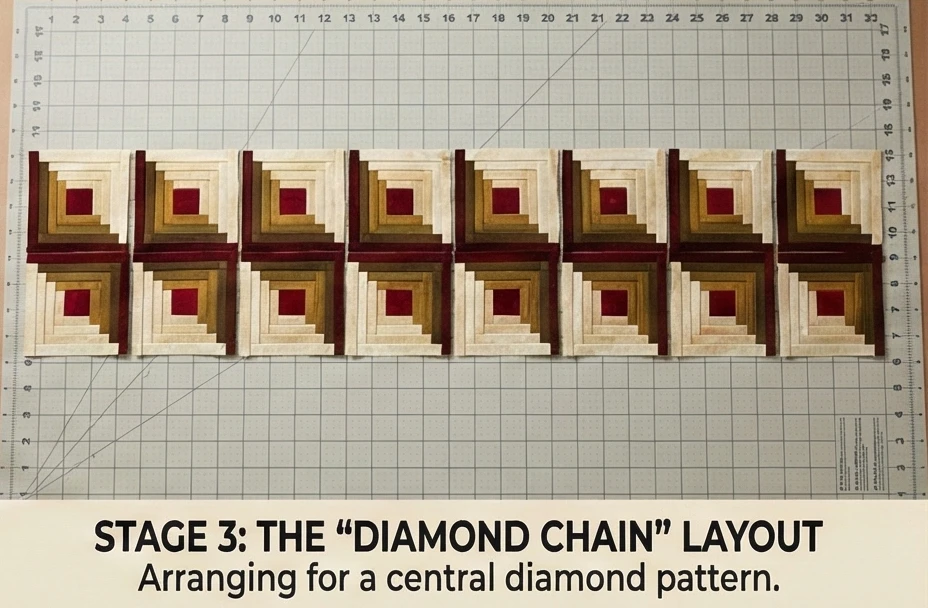
Step 3: The “Diamond Chain” Layout
We want a row of connected diamonds.
- Grid: Arrange the blocks in a 2 x 12 grid.
- The Pattern:
- Row 1: Arrange blocks so the Dark halves form the top of a diamond (^) and the Light halves point down.
- Row 2: Arrange blocks so the Dark halves form the bottom of a diamond (v).
- Visual: When placed together, the darks should form a series of large X’s or Diamonds running down the center of the runner.
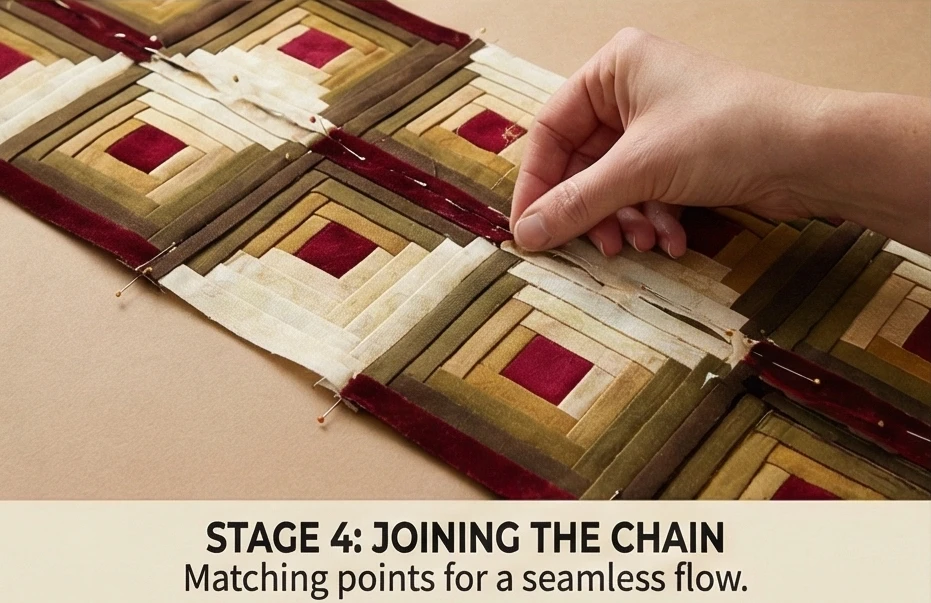
Step 4: Joining the Chain
- Sew Vertical: Sew the 12 blocks of Row 1 together side-by-side. Sew the 12 blocks of Row 2 together.
- Sew Horizontal: Pin Row 1 to Row 2 along the long center seam.
- Precision Check: Ensure the diamond points align perfectly at the center seam. Use plenty of pins.
Step 5: The “Frame” Border
A runner needs a solid edge to ground the busy center.
- Inner Border (Optional): Add a slim 1-inch strip of the Center Color (Crimson) to outline the blocks.
- Outer Border: Add a 2.5-inch-wide border of your darkest Fabric C.
- Why: This frames the delicate patchwork and protects the edges from plate spills.
Step 6: “Flat” Quilting
Function over fluff.
- Baste: Sandwich the runner with thin batting.
- Quilt: Stitch straight lines parallel to the diamond shapes.
- Density: Quilt fairly densely (lines 0.5 inch apart) to flatten the runner. A flat runner ensures that salt shakers and wine glasses stand stable and don’t wobble on puffy batting.
Usability Note: If you plan to use this runner for actual dining (not just display), consider applying a Scotchgard spray treatment to the finished fabric to repel wine and gravy stains. Alternatively, make the runner machine-washable by pre-washing all fabrics thoroughly before sewing.
11. Pineapple Block Log Cabin Cushion Covers for Elegant Sofa Accents
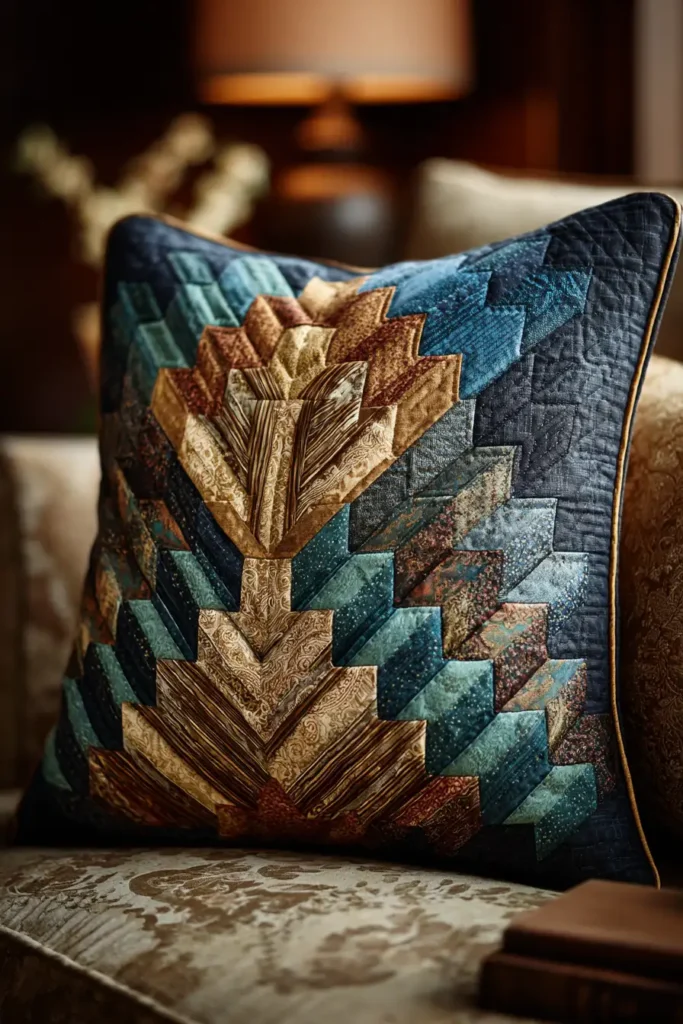
“The Jewel Box” Pineapple Block Log Cabin Cushion
While the standard Log Cabin is rustic, the Pineapple Variation is regal. Its complex geometry features angled strips that radiate outward like a faceted gemstone or a sunburst. For a sofa accent that screams “elegance,” the “Jewel Box” pattern uses a palette of Sapphire, Emerald, or Amethyst set against Dark Charcoal. We will finish this cushion with Piping, a tailored detail that distinguishes high-end living room decor from standard bedroom pillows.
Finished Dimensions: Decorator Square, 20″ x 20″.
Materials Needed:
- Fabric A (The Center): A scrap of Gold Silk or Velvet (The “gem”).
- Fabric Group B (The Spikes/Gem Color): 1/2 yard of Jewel Tone prints or solids.
- Fabric Group C (The Background/Contrast): 1/2 yard of Black or Charcoal Grey.
- Backing: 3/4 yard of matching velvet or heavy cotton.
- Piping Cord: 2.5 yards of pre-made piping (gold or black) or cord to make your own.
- Foundation Paper: Printable Pineapple Block paper templates (essential for sharp points).
- Notions: Rotary cutter, add-a-quarter ruler (helpful for paper piecing).
Cultural Backstory: The Pineapple block is often confused with the Log Cabin, but they are structurally different. While Log Cabins add strips to the sides of a square, Pineapple blocks add strips to the sides and the corners alternately. This creates a mesmerizing swirl without curved piecing. In the 1800s, because of the fabric waste from cutting angles, a Pineapple quilt was a sign of wealth and abundance.
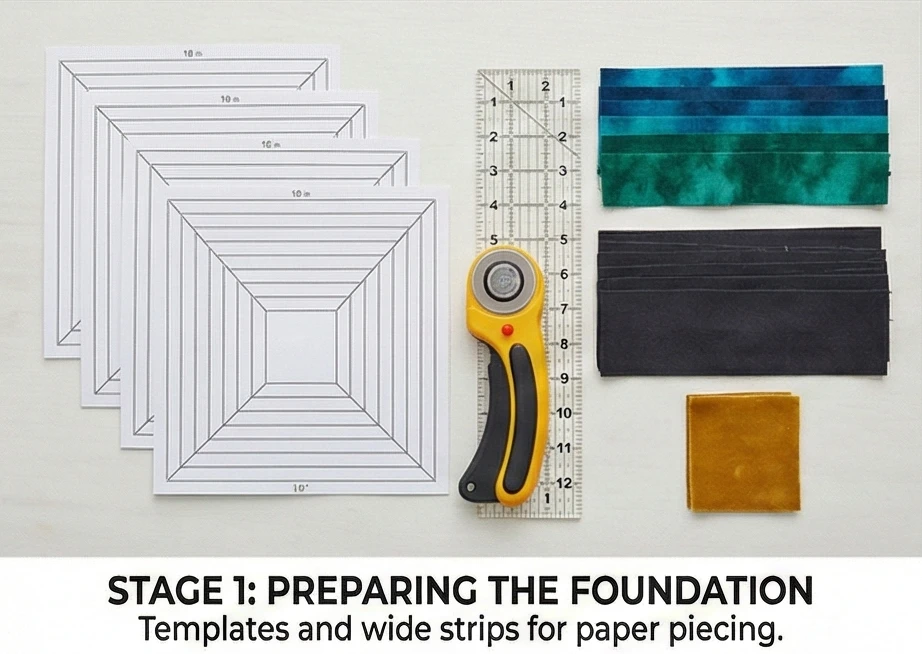
Step 1: Preparing the Foundation
Precision is beauty.
- Print: Print four copies of a 10-inch Pineapple Block template. (We will join four 10-inch blocks to make one 20-inch cushion).
- Cut Strips: Cut your fabrics into strips roughly 1.75 inches wide.
- Note: In paper piecing, you use wider strips than necessary and trim them down. This margin of error makes it stress-free.
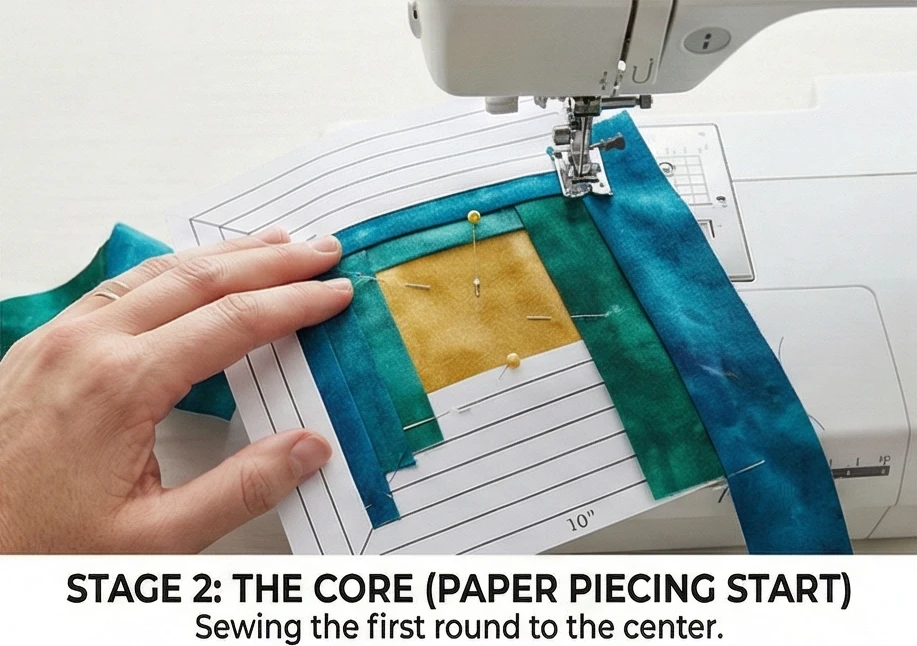
Step 2: The Core (Paper Piecing Start)
- Placement: Place the Gold Center square over “Section 1” on the unprinted side of the paper. Pin in place.
- Round 1 (Orthogonal):
- Place a Fabric B (Jewel) strip face down on the center square.
- Sew along the line on the paper between Sec 1 and Sec 2.
- Fold the fabric back and press.
- Repeat for all four flat sides of the center square.
Step 3: The “Spikes” (Diagonal Round)
This is the defining Pineapple step.
- Trim: Use a ruler to trim the excess fabric from the corners, following the printed diagonal lines.
- Sew: Place a Fabric C (Dark Background) strip across the corner.
- Sew on the diagonal line.
- Fold back and press.
- Repeat for all four corners.
- Result: The center square is now a diamond floating in a dark background.
Step 4: Building the Facets
Rhythm: Straight, Angle, Straight, Angle.
- Continue: Alternate adding Jewel strips to the straight sides and Dark strips to the angled corners.
- Visualize: As the block grows, the Jewel strips will look like spikes radiating from the center, and the Dark strips will recede into the background.
- Finish: Continue until you fill the 10-inch block. Trim the block to 10.5″ x 10.5″ (including seam allowance). Make 4 blocks.
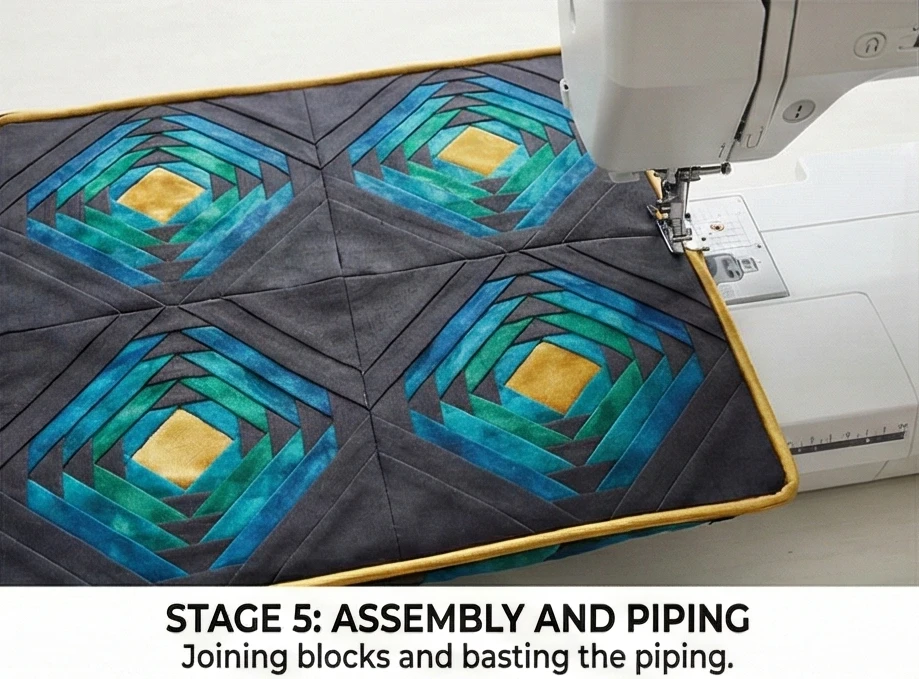
Step 5: Assembly and Piping
Piping frames the art.
- Join Blocks: Sew the four blocks together into a 2×2 grid.
- Pattern: Rotate them so the Gold Centers are at the outer corners (creating an “X” in the middle) or gather them in the center.
- Baste Piping: Pin your piping cord around the perimeter of the front of the cushion top (raw edges matching).
- Sew: Baste the piping in place using a zipper foot or piping foot.
- Corners: Clip the piping flange at the corners to achieve a sharp 90-degree turn.
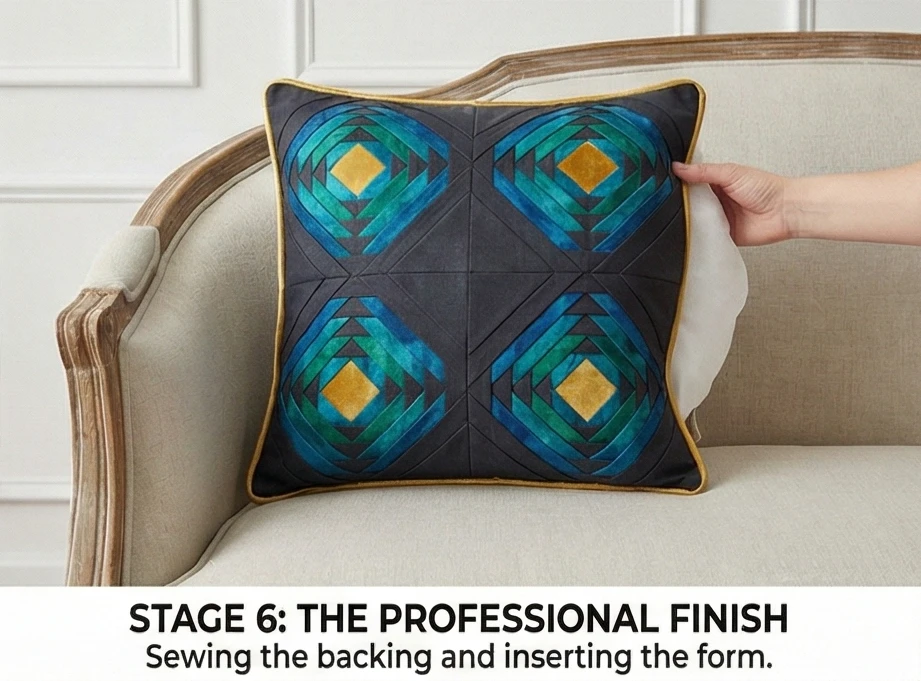
Step 6: The Professional Finish
- Backing: Create a simple envelope back or install a zipper in the backing fabric.
- Join: Place the Backing Right Side Down onto the Cushion Top (Right Side Up).
- Note: Sandwich the piping between the layers.
- Sew: Stitch around the perimeter, crowding your needle as close to the piping cord as possible (feel the cord’s bump through the fabric).
- Turn: Turn right side out through the opening. The piping should emerge as a crisp, tailored edge.
Usability Note: Pineapple blocks can become very thick in the center where all the points meet. To make the cushion comfortable to lean against, ask your machine to “hammer” the thick seams (or use a wooden clapper/mallet) to flatten them before putting the cover on the insert. This prevents a hard lump in the middle of the pillow.
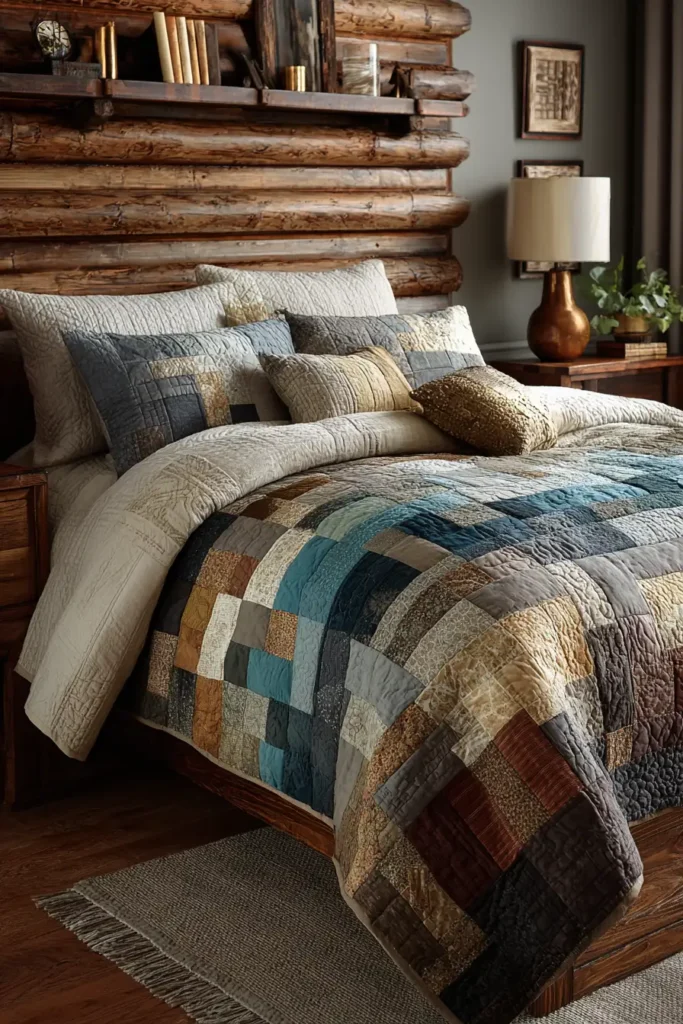
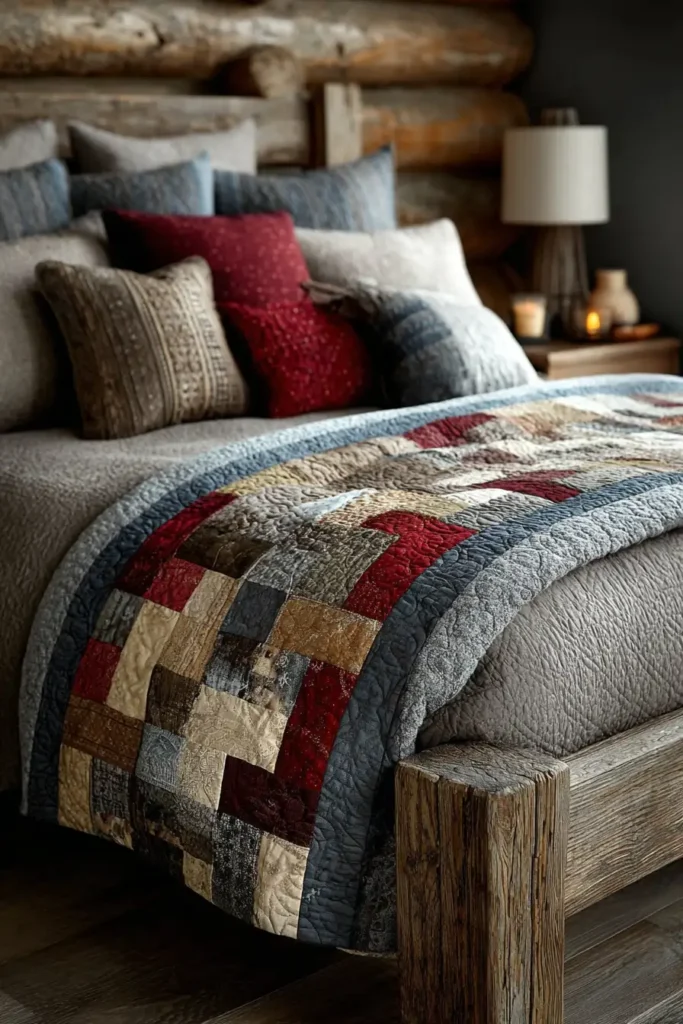
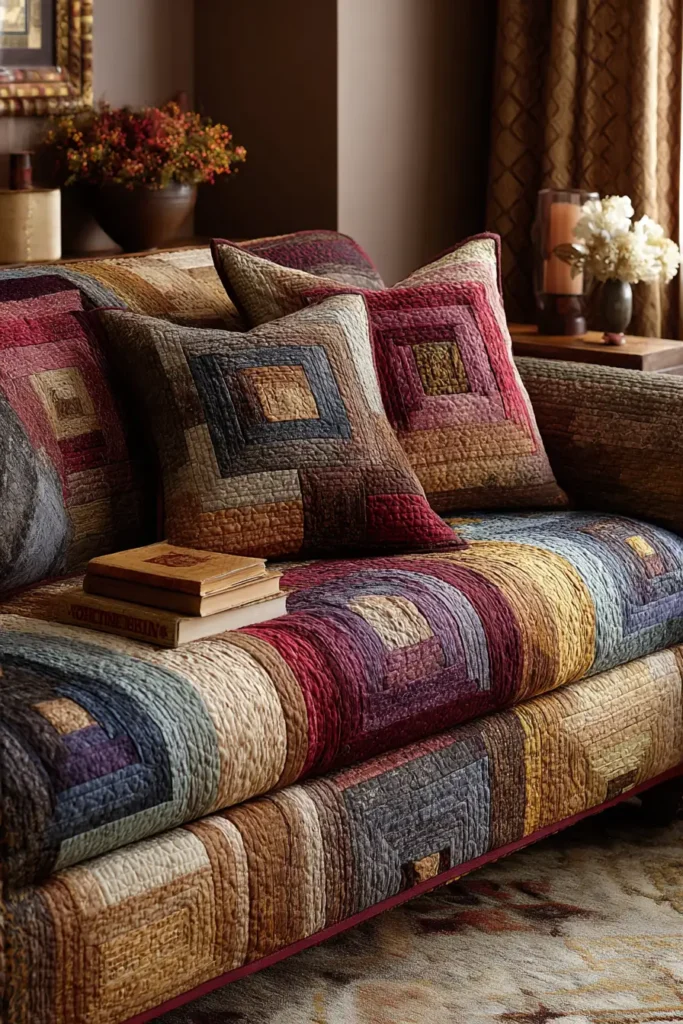
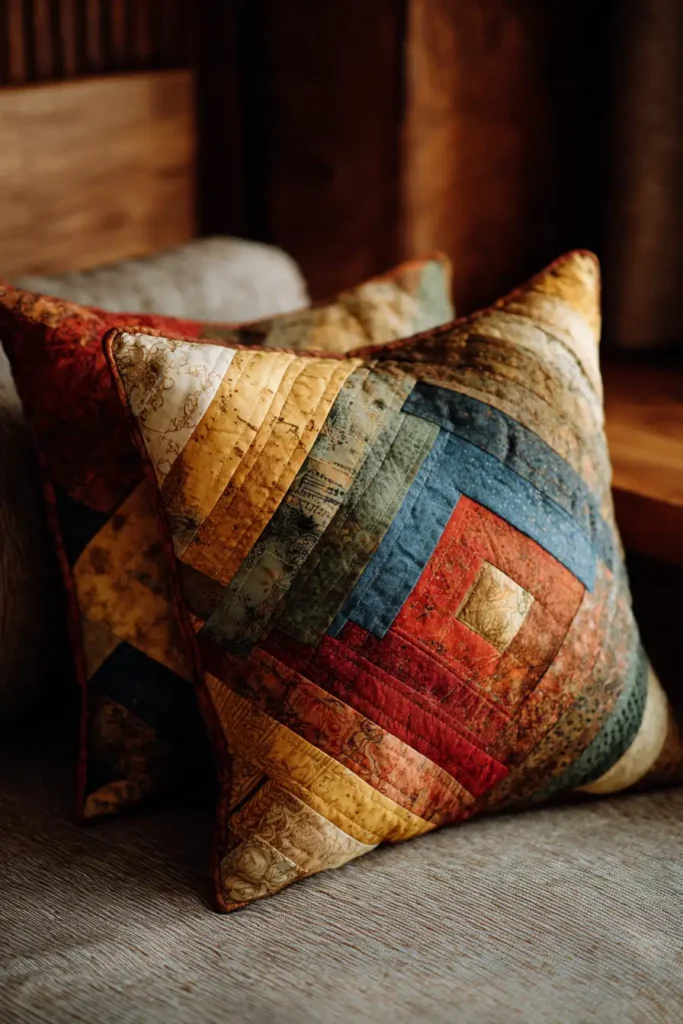
12. Scrappy Log Cabin Sofa Throws for Everyday Family Comfort
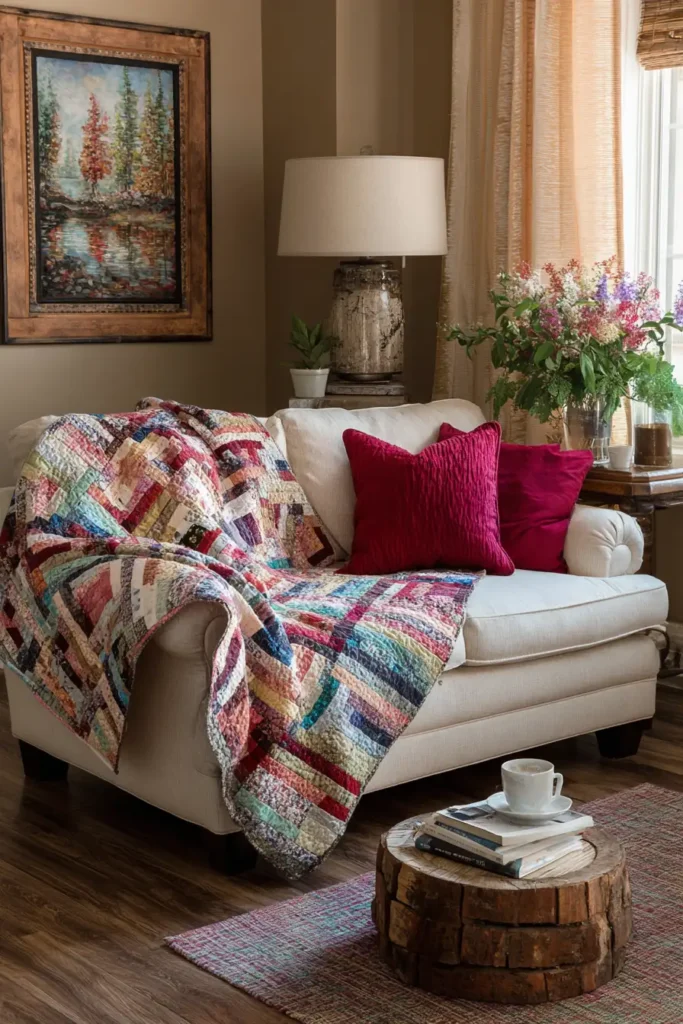

“The Gathering” Scrappy Log Cabin Throw
The “Scrappy” Log Cabin is the ultimate family quilt. It tells a story by using leftover fabrics from clothes, curtains, or previous projects, creating a tapestry of memories. For a living room throw, this style is practical genius: the busy, multi-colored pattern completely hides stains, chocolate smudges, and pet hair. By keeping the strip widths uniform (even if the colors are bold), you maintain a sense of elegance amid the chaos, creating a piece that feels curated rather than cluttered.
Finished Dimensions: Large Sofa Throw, 60″ x 72″.
Materials Needed:
- The Scraps: A large bin of fabric strips! You need roughly 4-5 pounds of cotton scraps.
- Organization: Sort them into two piles: Lights (Low Volume, Pastels, Creams) and Darks (Navy, Red, Black, saturated Brights).
- Fabric A (Centers): 1/4 yard of Red (traditional hearth) or Black (modern anchor).
- Backing: 4 yards of Cotton Flannel or Minky. (Since this is for snuggling on the sofa, skip the stiff cotton backing and go straight for the fuzzy stuff).
- Batting: Optional. If using Minky backing, you can skip batting for a drapier throw. If using Flannel, use a medium-loft cotton batting.
- Notions: Rotary cutter, 2.5″ ruler.
Cultural Backstory: The Scrappy Log Cabin is the embodiment of the phrase “Make do and mend.” During the Great Depression and the World Wars, buying new fabric was a luxury. Quilters salvaged usable parts of worn-out work shirts, feed sacks, and dresses. These “Utility Quilts” were often used until they fell apart, which is why surviving antique specimens are so treasured today.
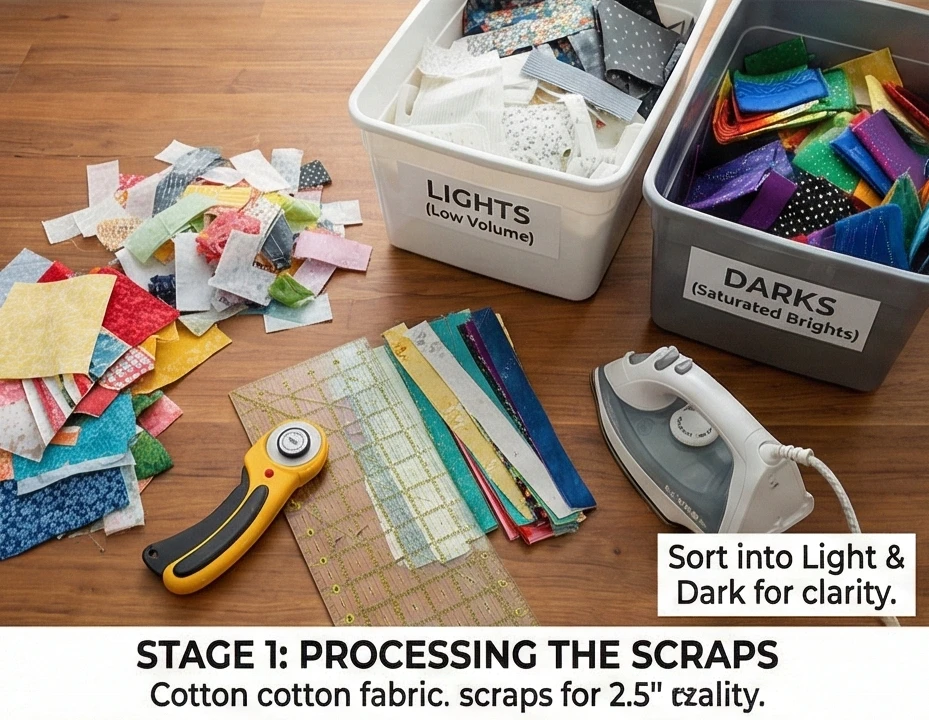
Step 1: Processing the Scraps
Uniformity creates order from chaos.
- Press: Iron your scraps flat.
- Cut: Cut all scraps into strips measuring 2.5 inches wide. Length doesn’t matter yet.
- Sort: Be ruthless. Throw the strips into a “Light Bin” and a “Dark Bin.” If a fabric is “medium” and you can’t decide, leave it out—contrast is what makes the pattern visible.
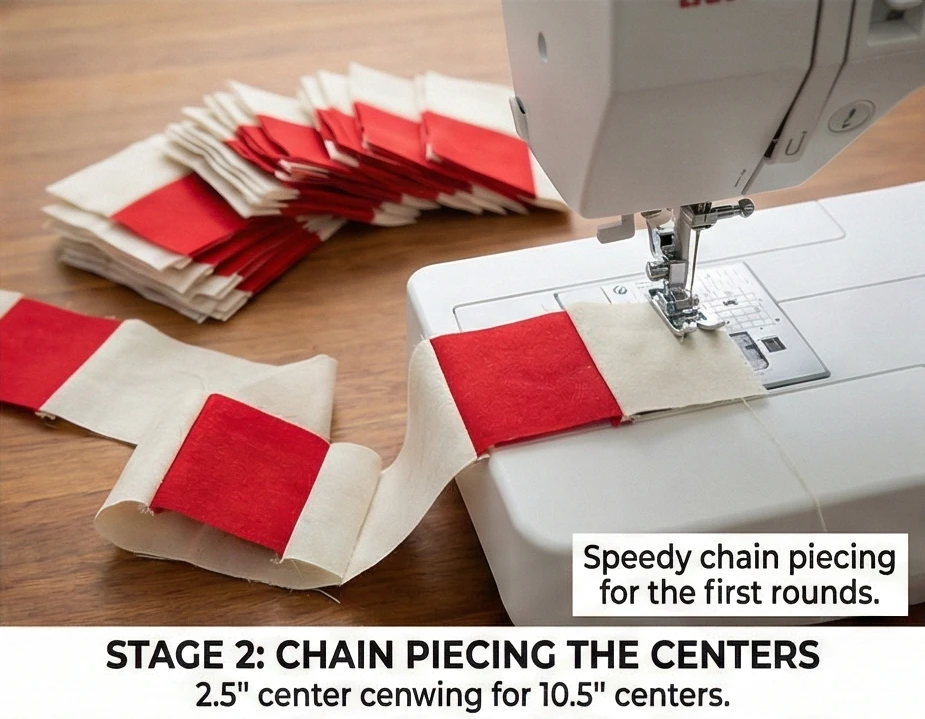
Step 2: Chain Piecing the Centers
Speed is the name of the game here.
- Cut Centers: Cut 35 squares of Fabric A (Red/Black) measuring 2.5″ x 2.5″.
- Round 1:
- Take a random Light strip. Sew it to the right side of a center square. Do not cut the thread; feed the next center square in. (This is “Chain Piecing”). Clip them apart and trim the strip even with the square.
- Sew a Light strip to the top.
- Sew a Dark strip to the left.
- Sew a Dark strip to the bottom.
Step 3: Building the Blocks
- The Rule: Keep Lights on the Light sides and Darks on the Dark sides.
- Randomize: Do not overthink the colors. Pick a strip blindly from the bin. As long as the value is correct (Light or Dark), it will work.
- Tip: If you run out of a strip length halfway through a log, sew another strip to it and continue. The extra seam adds character.
- Size: Keep adding rounds until the block measures 10.5″ x 10.5″.
- Quantity: Make 35 Blocks.

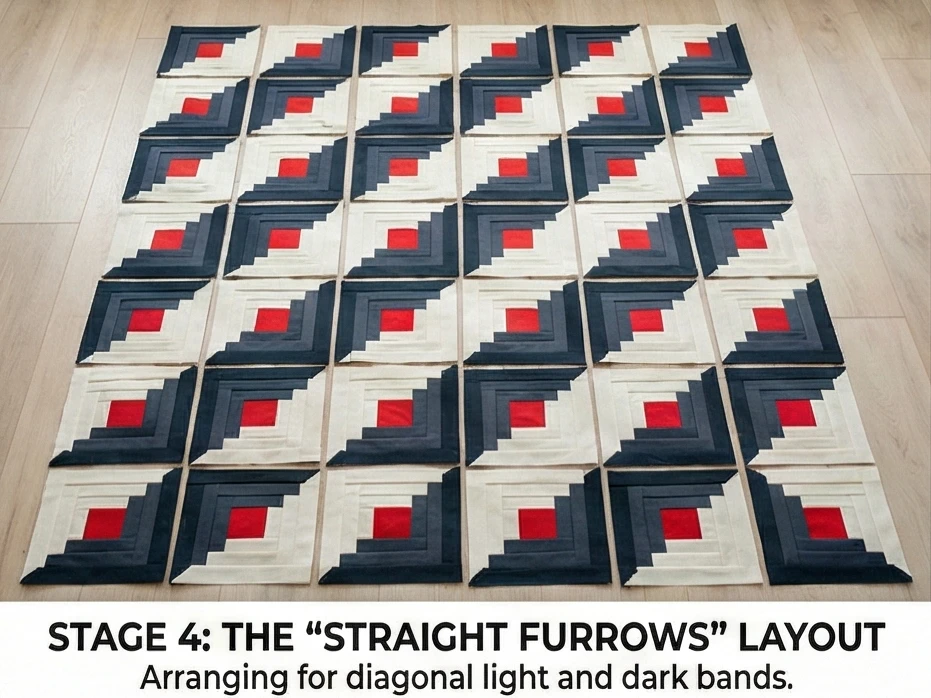
Step 4: The “Straight Furrows” Layout
This layout creates diagonal stripes, which look great draped over the back of a sofa.
- Grid: Arrange blocks in a 5 x 7 grid.
- Orientation: Orient every block so the diagonal line (dividing Light and Dark) runs from Bottom-Left to Top-Right.
- Effect: The dark halves will link up to form thick diagonal bands of color, and the light halves will form bands of brightness. It looks like a plowed field or heavy rain.
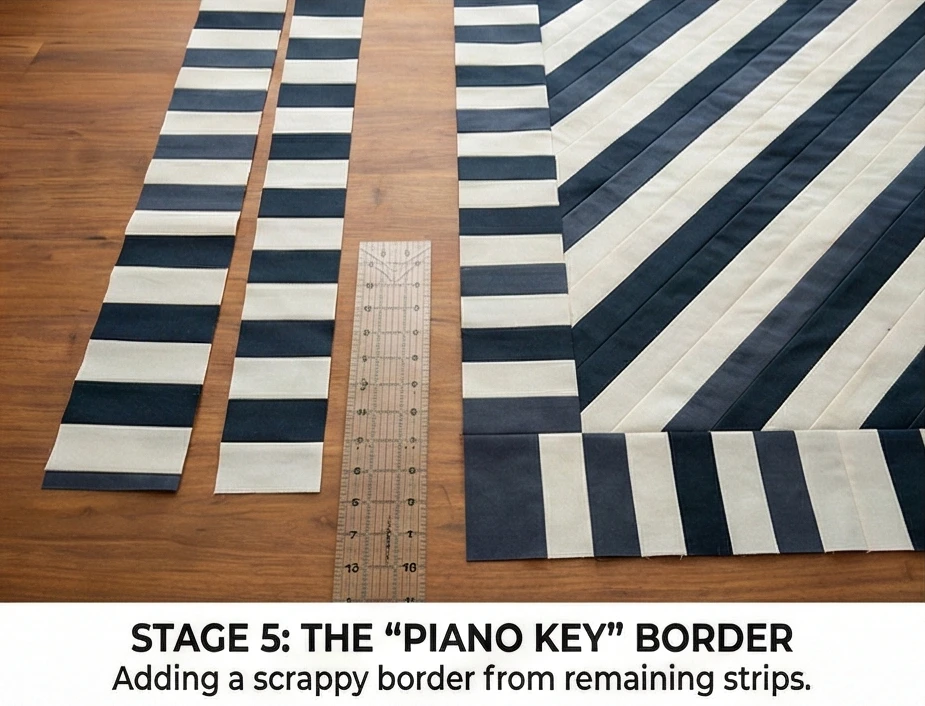
Step 5: The “Piano Key” Border
Use up the rest of your scraps.
- Join Strips: Sew your remaining 2.5″ strips together side-by-side (alternating Light and Dark) to make long striped bands.
- Cut: Cut these bands into 6.5-inch tall segments.
- Sew Border: Sew these segments around the perimeter of the quilt. The vertical lines of the border contrast beautifully with the diagonal lines of the center.
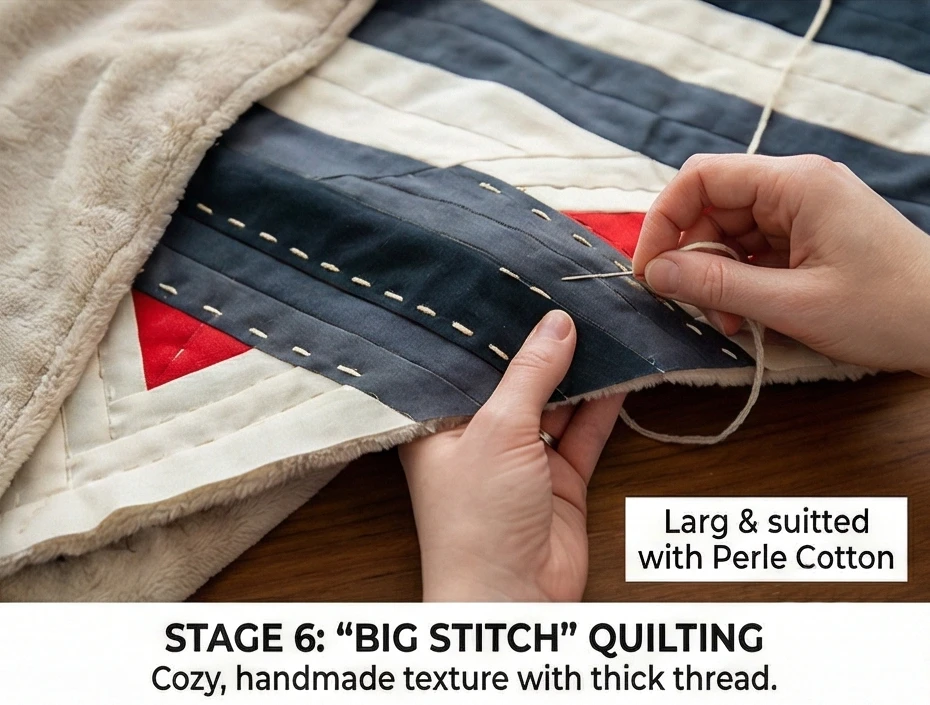
Step 6: “Big Stitch” Quilting
For a sofa throw, you want maximum pliability.
- Baste: Sandwich the layers.
- Quilt: Use a thick thread (Perle Cotton #8) and a large needle to hand quilt.
- Stitch: Do a simple running stitch along the diagonal seams.
- Why: “Big Stitch” quilting is faster than traditional hand quilting and adds a primitive, cozy texture that feels handmade and welcoming.
Usability Note: If this quilt is for a house with pets, avoid loosely woven fabrics in your scrap pile (like loose linen or tweeds), as dog claws will snag them. Stick to standard quilting cottons or flannel scraps for longevity.
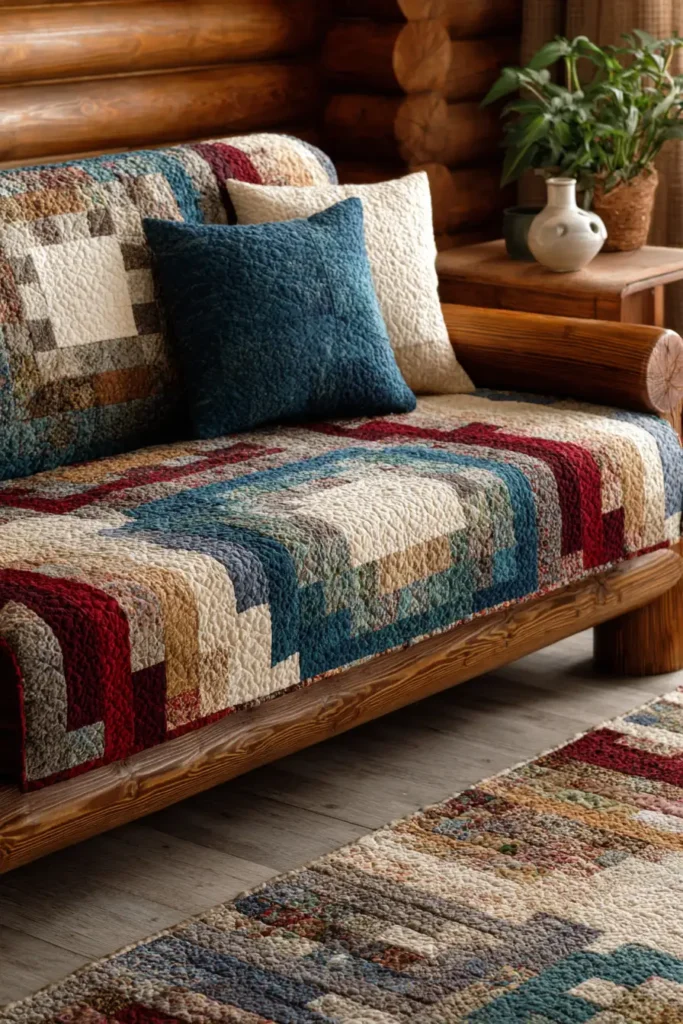

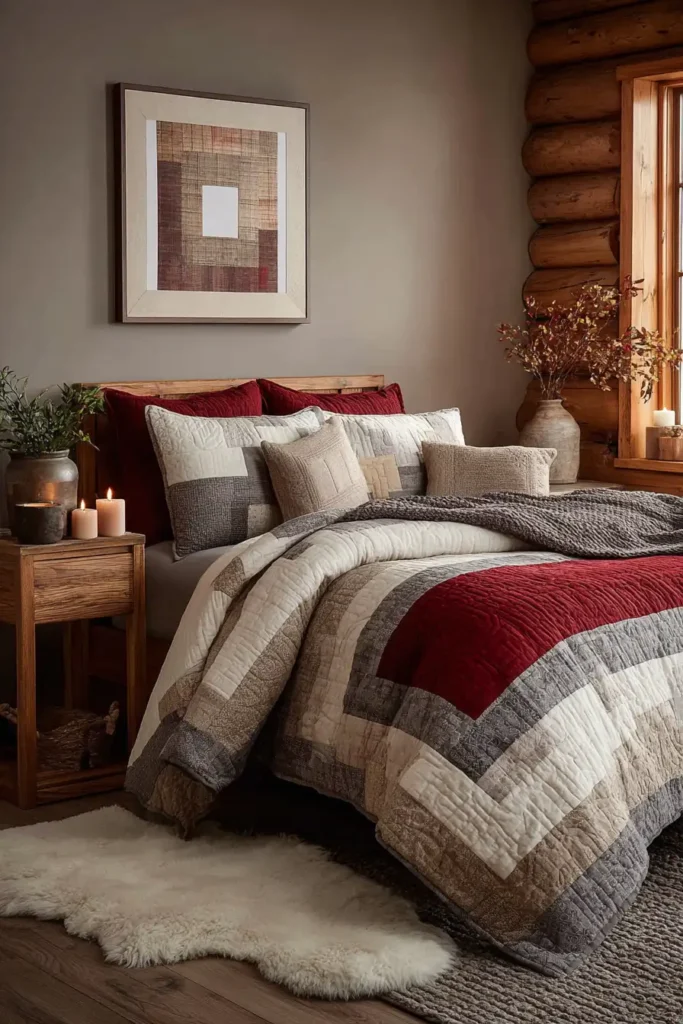
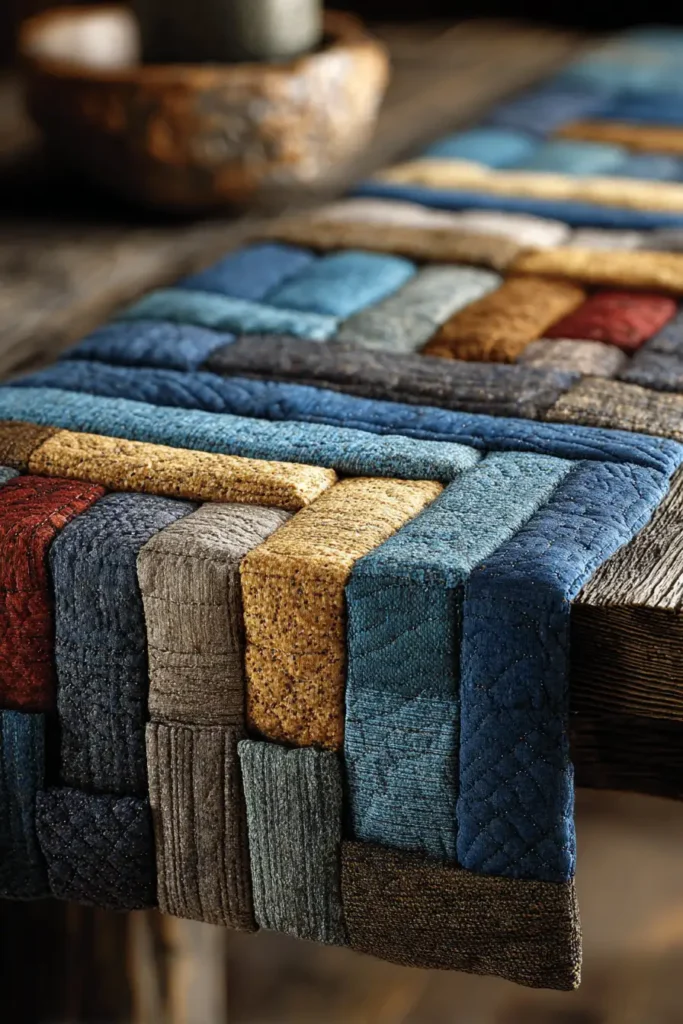
13. Rustic Log Cabin Table Runners for Farmhouse Dining Style

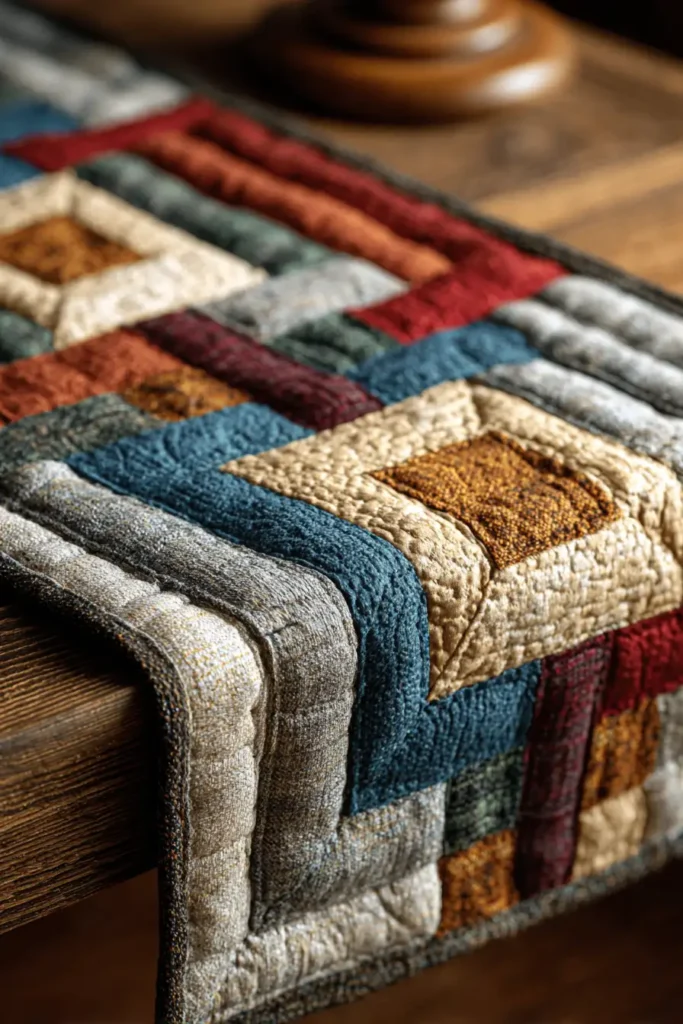
“The Homestead” Plaid Log Cabin Runner
The modern Farmhouse aesthetic is defined by a blend of rugged utility and soft comfort. “The Homestead” runner captures this by swapping standard quilting cottons for Woven Homespuns and Brushed Flannels. These fabrics feature a visible weave and a soft, matte texture that complements a wooden dining table. The pattern utilizes a “Sunshine and Shadow” contrast using warm earth tones—Rust, Moss, Mustard, and Oatmeal—to bring the colors of the harvest indoors.
Finished Dimensions: Farmhouse Table Runner, 16″ x 80″ (Extra long for large farmhouse tables).
Materials Needed:
- Fabric A (Centers): 1/4 yard of Mustard Yellow or Deep Red Flannel.
- Fabric Group B (Lights): 1 yard of Oatmeal Linen, Cream Muslin, or Beige Gingham.
- Fabric Group C (Darks): 1 yard of assorted Plaid Homespuns (Rust, Olive, Brown, Navy).
- Backing: 1.5 yards of Burlap-look cotton or a heavy ticking stripe.
- Batting: Thin cotton batting (keeps it flat for serving dishes).
- Notions: Rotary cutter, 6×24″ ruler.
Cultural Backstory: Homespun fabric was originally woven at home (hence the name) by pioneer women. Because the thread was dyed before weaving, the pattern (usually plaid or check) appears on both sides of the fabric. Using homespun in a Log Cabin quilt connects the piece directly to the self-reliant history of the American frontier.
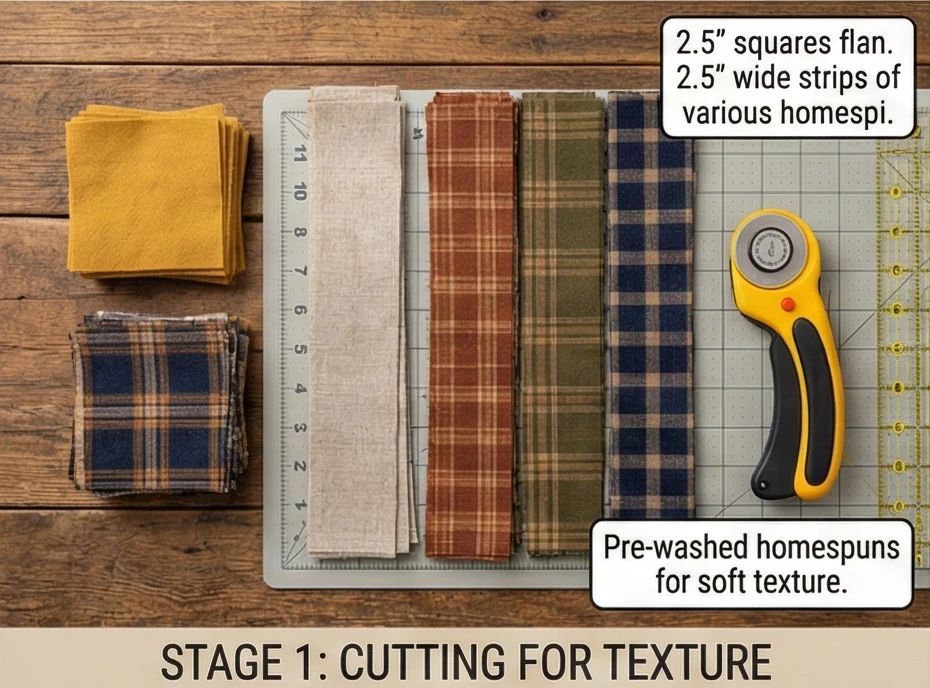
Step 1: Cutting for Texture
Homespun is looser than standard cotton; cut carefully.
- The Centers: Cut 22 squares of Fabric A (Mustard/Red) measuring 2.5″ x 2.5″.
- The Strips: Cut your Light and Dark fabrics into 2.5-inch-wide strips.
- Tip: If using plaids, cut “on the grain” (along the plaid’s lines) so your strips look straight and neat.
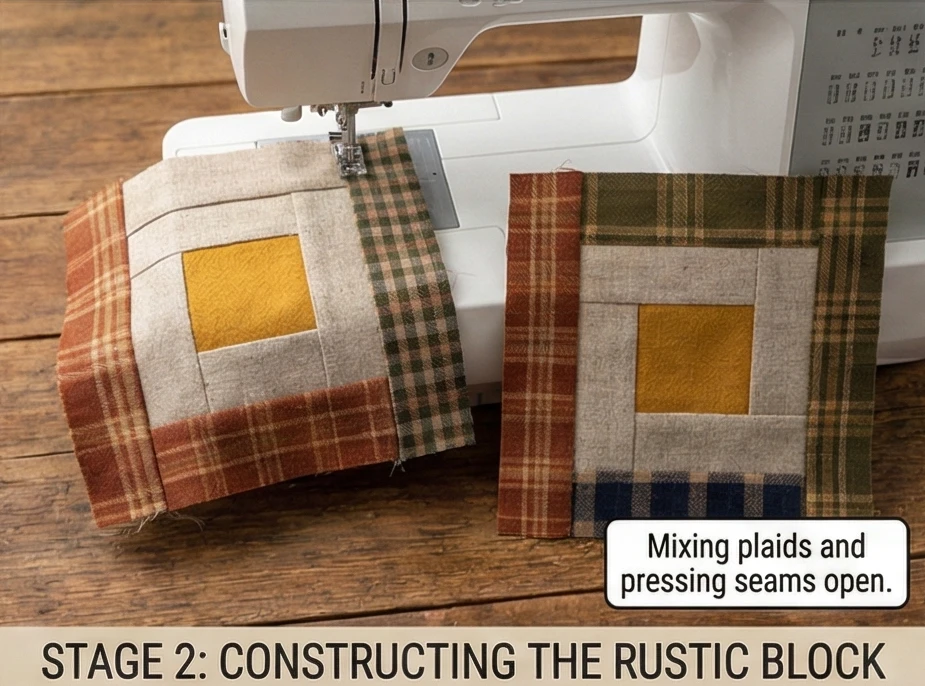
Step 2: Constructing the Rustic Block
- Round 1:
- Sew a Light strip to the Right.
- Sew a Light strip to the Top.
- Sew a Dark (Plaid) strip to the Left.
- Sew a Dark (Plaid) strip to the Bottom.
- Press seams open to reduce bulk, as homespun fabrics are thicker than regular cotton.
- Rounds 2 & 3: Continue spiraling outward.
- Texture Check: Mix up your plaids! Use a tight check for one round and a large buffalo check for the next. This variety adds depth.
- Finish Size: Build the block to 10.5″ x 10.5″.
- Quantity: Make 16 Blocks.
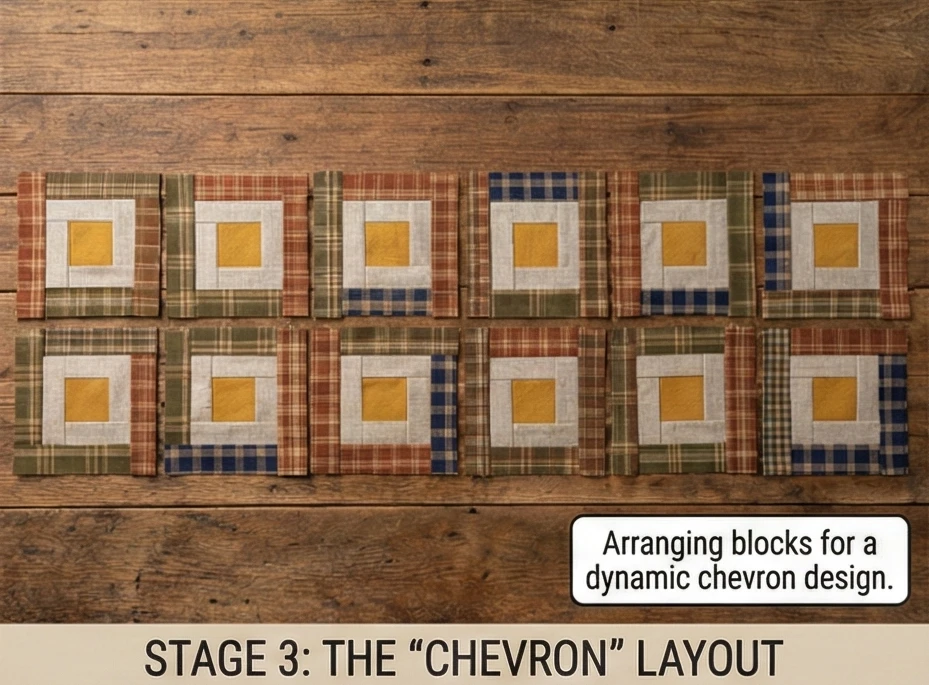
Step 3: The “Chevron” Layout
A directional layout that points to the head of the table.
- Orientation:
- Arrange the blocks in 2 rows of 8.
- Rotate the blocks so the “Dark” halves form a series of V-shapes (Chevrons) running down the length of the runner.
- Visual: This creates a dynamic, moving pattern resembling wheat stalks or arrowheads.
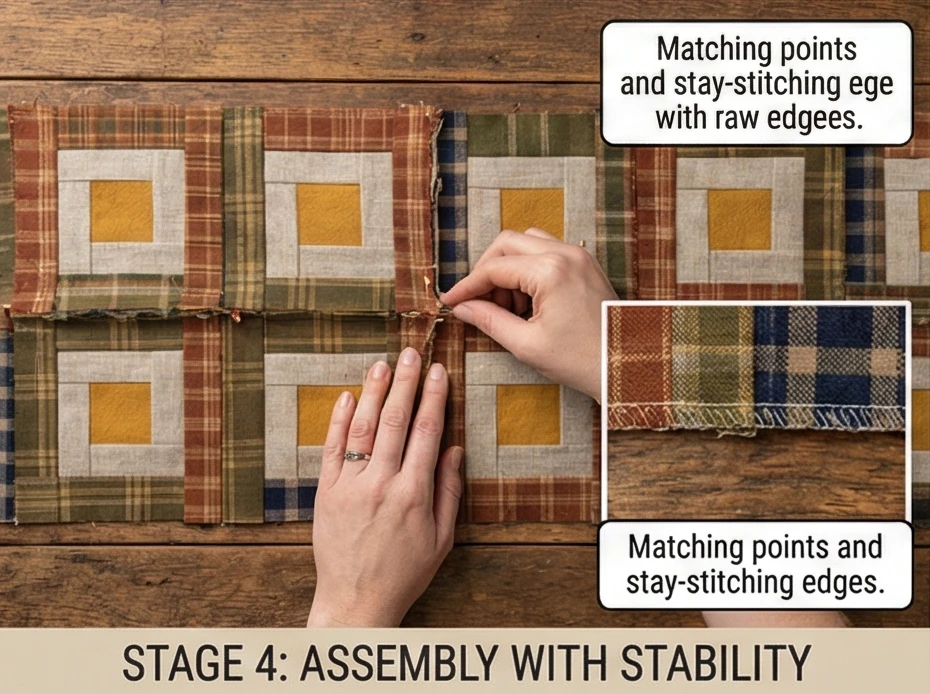
Step 4: Assembly with Stability
- Sew Rows: Stitch the 8 blocks of Row 1 together. Stitch the 8 blocks of Row 2 together.
- Join: Pin the two long rows together.
- Critical: Match the center intersections carefully so the “V” shapes are sharp.
- Stay-Stitch: Because homespuns fray easily, stitch a line 1/8″ from the edge around the entire perimeter of the runner top immediately after assembly. This secures the threads before quilting.
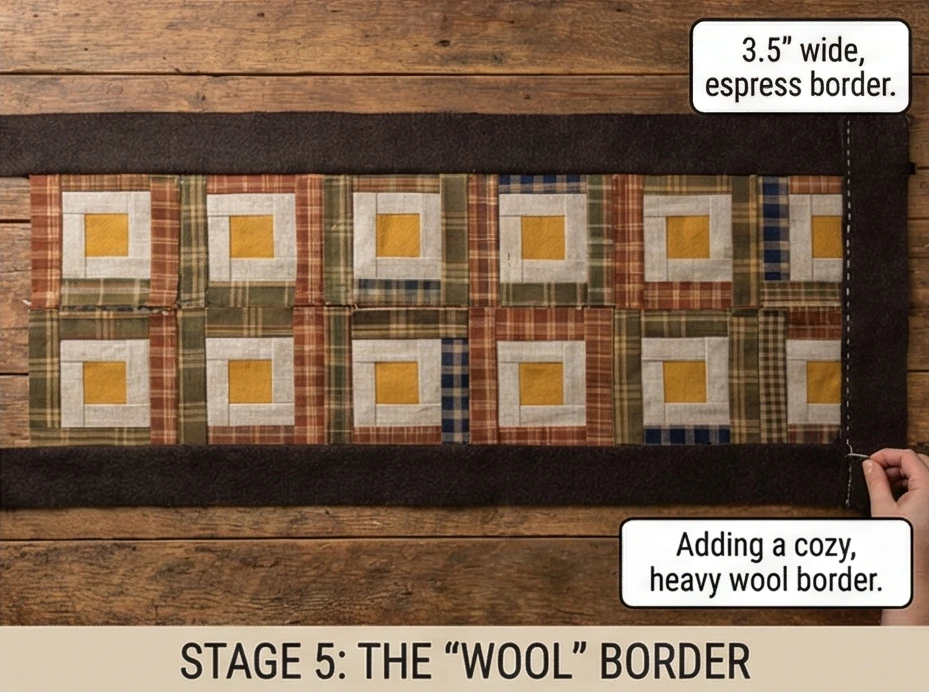
Step 5: The “Wool” Border (Optional but Recommended)
Adds a premium, cozy touch.
- Cut: Cut 3.5-inch wide strips of a solid, dark wool or heavy brushed cotton (Charcoal or Espresso).
- Sew: Add borders to all four sides. This heavy frame grounds the busy plaid center and protects the edges.
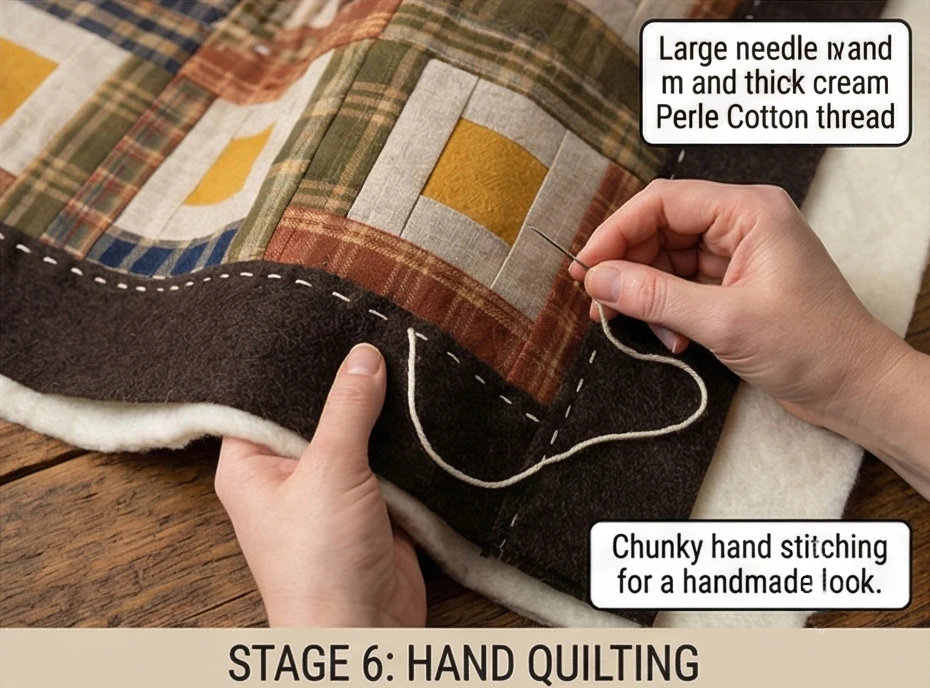
Step 6: Hand Quilting
Machine quilting looks too stiff for this style.
- Baste: Sandwich the runner.
- Thread: Use a Chunky Thread (Size 8 Perle Cotton or Embroidery Floss) in a Cream color.
- Stitch: Using a large needle, sew a simple running stitch (big stitches) about 1/4 inch away from the seam lines.
- Aesthetic: The visible, hand-stitched details enhance the rustic, handmade aesthetic essential to farmhouse decor.
Usability Note: Homespun fabrics shrink more than standard cottons. You MUST pre-wash and dry all your fabrics before cutting. If you don’t, the first time you wash the finished runner, it will shrink unevenly and distort into a puckered mess.
14. Sophisticated Log Cabin Placemats for Dining Table Decor


“The Evening Setting” Rectangular Log Cabin Placemats
Dining tables have evolved from being covered by heavy linens to showcasing the beauty of natural wood or stone. A Log Cabin Placemat offers the best of both worlds: it protects the surface from heat and scratches while acting as a “frame” for your dinnerware. The “Evening Setting” pattern modifies the traditional square block into a Rectangle. By using a large central field (perfect for resting a plate) surrounded by graduating borders of Linen and Woven Cotton, you create a structured, architectural look that feels like a high-end restaurant setting.
Finished Dimensions: Standard Placemat, 13″ x 19″.
Materials Needed (For a Set of 4):
- Fabric A (The Plate Center): 1 yard of a subtle print or solid texture (e.g., Slubby Linen in Oatmeal or Dove Grey).
- Fabric B (Inner Frame): 1/2 yard of a high-contrast accent (e.g., Charcoal or Metallic Silver).
- Fabric C (Outer Frame): 1 yard of a durable dark solid (e.g., Navy Canvas or Black Denim).
- Backing: 1.5 yards of coordinating cotton.
- Batting: Insul-Bright (heat-resistant metallic fleece) OR thin cotton batting. Crucial for protecting the table from hot plates.
- Notions: Rotary cutter, 6×24″ ruler.
Cultural Backstory: The widespread use of placemats is a relatively modern phenomenon, gaining popularity in the mid-20th century. As “informal dining” became fashionable and dining tables began to be made with durable, lacquered finishes rather than raw wood requiring a full tablecloth, the placemat emerged as a way to define individual personal space at the table while showing off the furniture underneath.
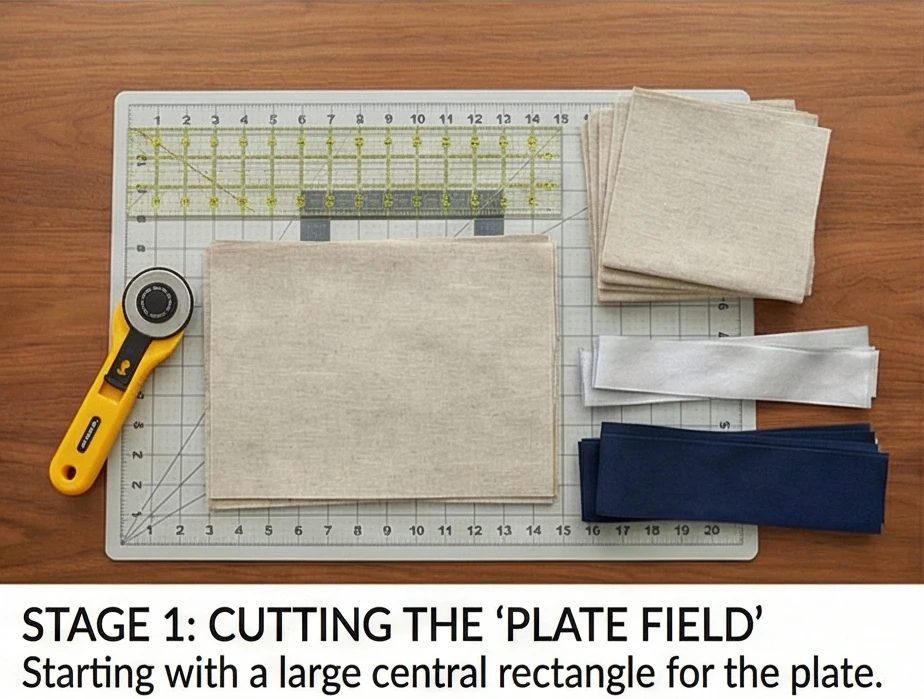
Step 1: Cutting the “Plate Field”
Unlike a quilt block which starts small, a placemat starts with a large center to accommodate the dinner plate.
- The Centers: Cut 4 rectangles of Fabric A (Linen) measuring 8.5″ x 6.5″.
- The Strips:
- Cut Fabric B (Accent) into strips measuring 1.5 inches wide.
- Cut Fabric C (Outer Frame) into strips measuring 2.5 inches wide.
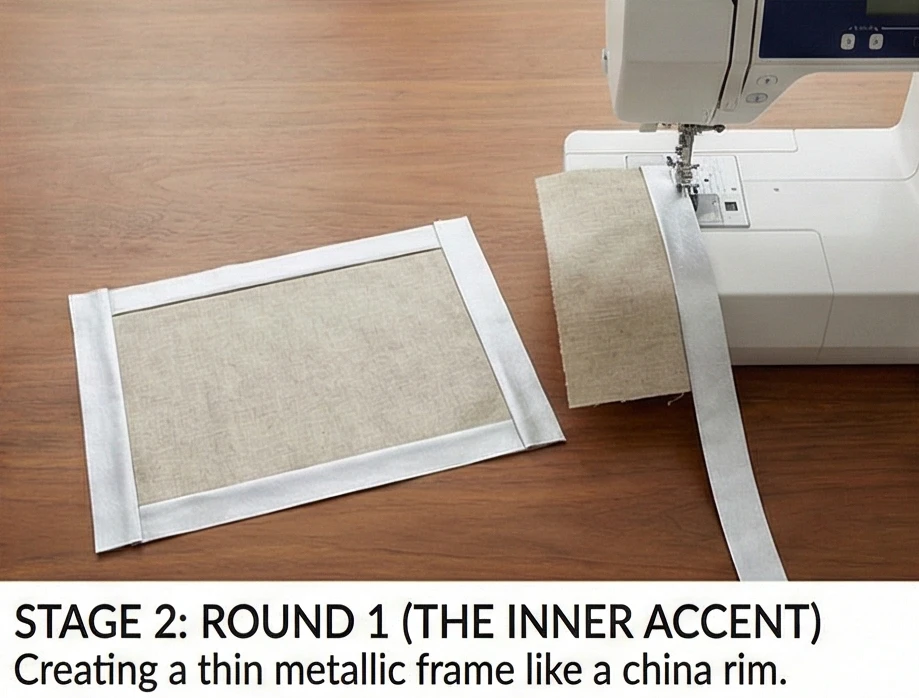
Step 2: Round 1 (The Inner Accent)
This thin line acts like the gold rim on fine china.
- Sides: Sew a Fabric B strip to the Left and Right sides of the center rectangle. Press outward. Trim ends even.
- Top/Bottom: Sew a Fabric B strip to the Top and Bottom. Press outward. Trim.
- Result: Your rectangle is framed in a thin border.
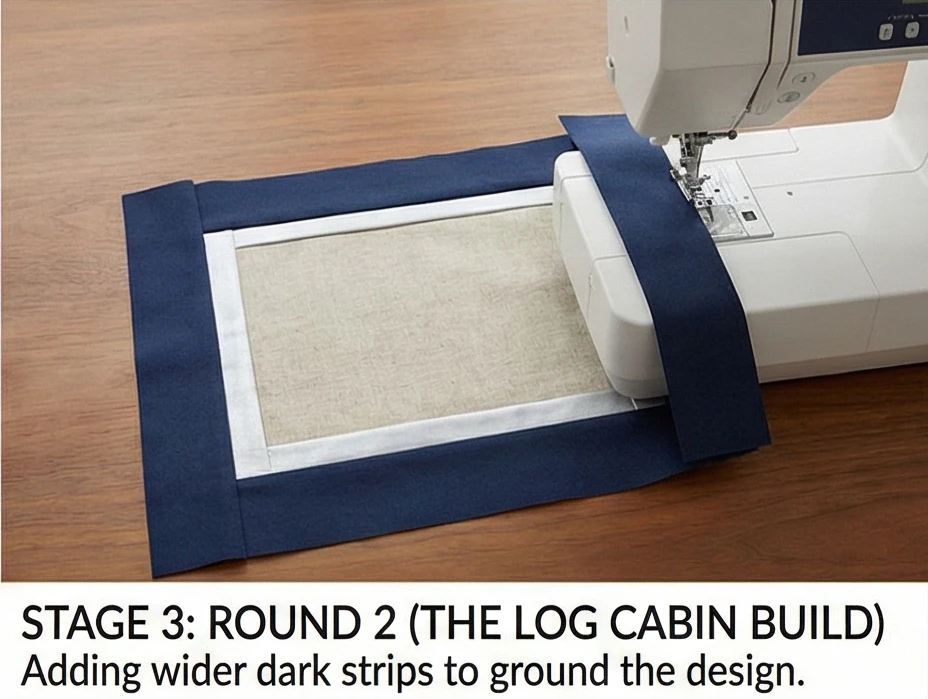
Step 3: Round 2 (The Log Cabin Build)
We now switch to the wider, darker fabric to ground the design.
- Sides: Sew a Fabric C (Wide) strip to the Left and Right sides. Press outward.
- Top/Bottom: Sew a Fabric C strip to the Top and Bottom. Press outward.
- Sizing: Check the size. It should be roughly 12.5″ x 14.5″ at this stage.
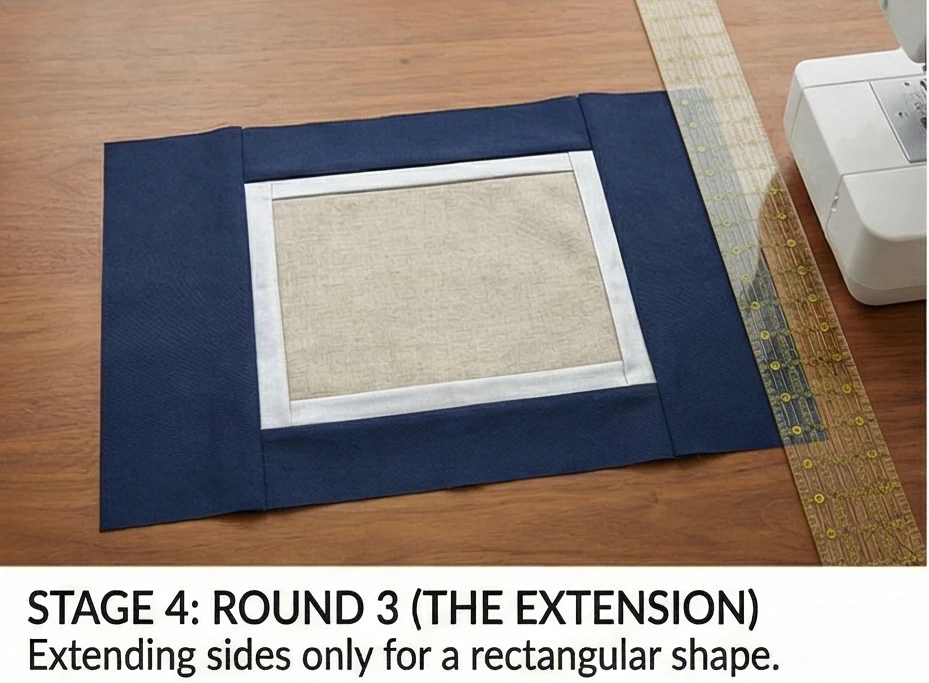
Step 4: Round 3 (The Extension)
To reach the standard 19-inch width needed for silverware, we extend the sides only.
- Sides Only: Sew another wide strip of Fabric C (or a different coordinating fabric) to the Left and Right sides ONLY.
- Why: Placemats need to be wider than they are tall. Adding strips only to the sides transforms the block from a square-ish shape into a long rectangle.
- Final Trim: Trim the placemat to exactly 13″ x 19″.
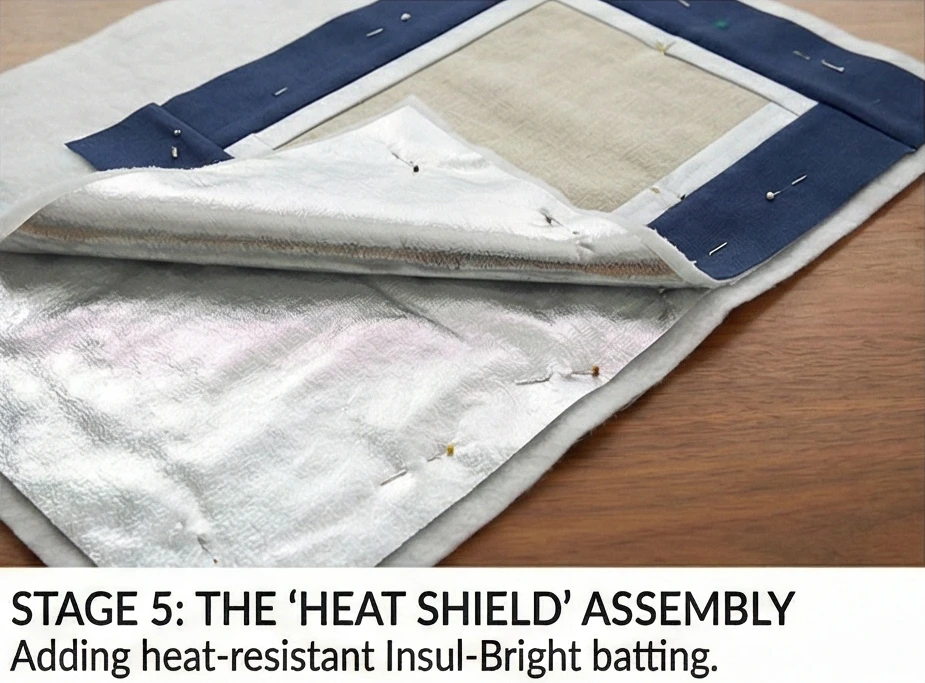
Step 5: The “Heat Shield” Assembly
Functionality is key for table protection.
- Sandwich: Lay your Backing fabric face down. Place a layer of Insul-Bright (shiny side up) or cotton batting on top. Place your Placemat Top face up.
- Baste: Use spray baste or pins. Insul-Bright is slippery, so pin well.
- Note: If using Insul-Bright, do not put it in the microwave. It contains metal.
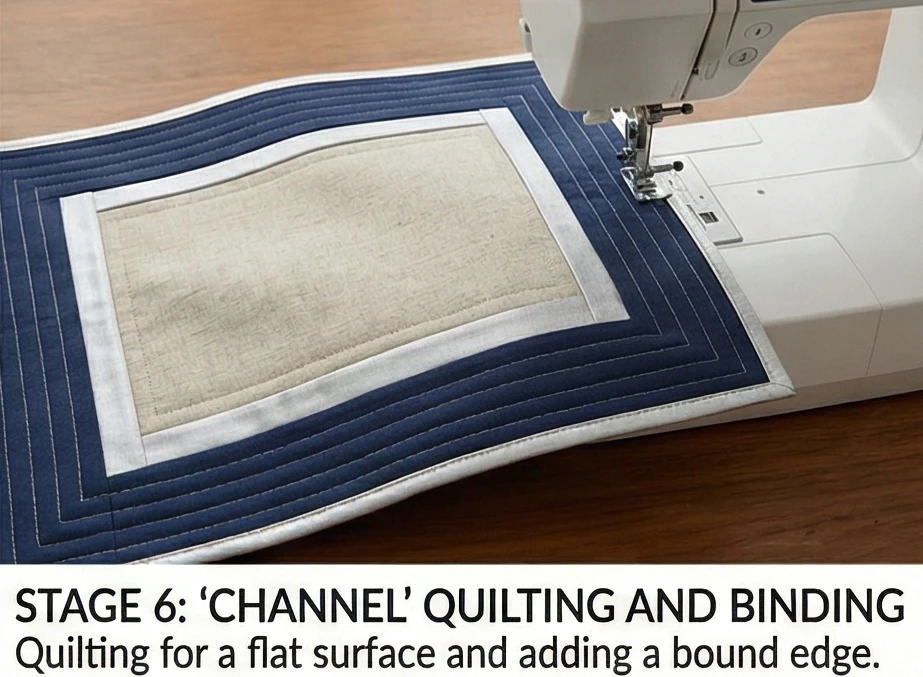
Step 6: “Channel” Quilting and Binding
- Quilt: Use a walking foot to stitch straight lines.
- Design: Stitch “in the ditch” (in the seam lines) between the frames. Then, stitch concentric rectangles inside the central linen field. This keeps the fabric flat so wine glasses don’t tip over.
- Bind: Bind the edges with Fabric B (the thin accent color) to tie the whole design together.
- Finish: Machine binding is recommended for placemats as they will be washed frequently.
Usability Note: Food spills are inevitable. Pre-wash all fabrics before sewing to prevent shrinking later. For the most durable placemats, apply a layer of Matte Iron-On Vinyl (like Odicoat) to the finished fabric top before binding. This creates a wipe-clean, water-resistant surface that still looks like fabric but acts like oilcloth.
15. Twisted Log Cabin Runners for Modern Coffee Tables

“The Espresso Swirl” Twisted Log Cabin Runner
Modern coffee tables often feature glass, metal, or sleek mid-century wood. A traditional country quilt can look out of place on these surfaces. The “Twisted Log Cabin” is the perfect solution. By using a paper-piecing technique where the “logs” are slightly tapered (trapezoids rather than rectangles), the straight lines appear to curve and swirl into a vortex. The “Espresso Swirl” pattern uses a monochrome palette (Black, Grey, White) to create an optical illusion that resembles a modern artwork rather than a blanket.
Finished Dimensions: Modern Coffee Table Size, 14″ x 42″.
Materials Needed:
- Fabric A (Center): Scraps of a bright pop color (e.g., Teal or Mustard) or Jet Black.
- Fabric Group B (The Swirl): 1/2 yard each of White, Light Grey, Medium Grey, and Charcoal. (Gradation is key for the 3D effect).
- Backing: 1/2 yard of a solid cotton.
- Batting: Very thin cotton or fusible fleece (Must be flat for coasters and mugs).
- Foundation Paper: Printable “Twisted Log Cabin” templates (available online or drawable).
- Notions: Add-a-quarter ruler, rotary cutter, cardstock (for folding paper).
Cultural Backstory: The “Twisted” Log Cabin pattern is a relatively recent development in quilting, emerging prominently in the 1990s with the rise of foundation paper piecing. It reflects the era’s fascination with fractals and computer-generated geometry, transforming the rigid 19th-century block into a dynamic, kinetic form.
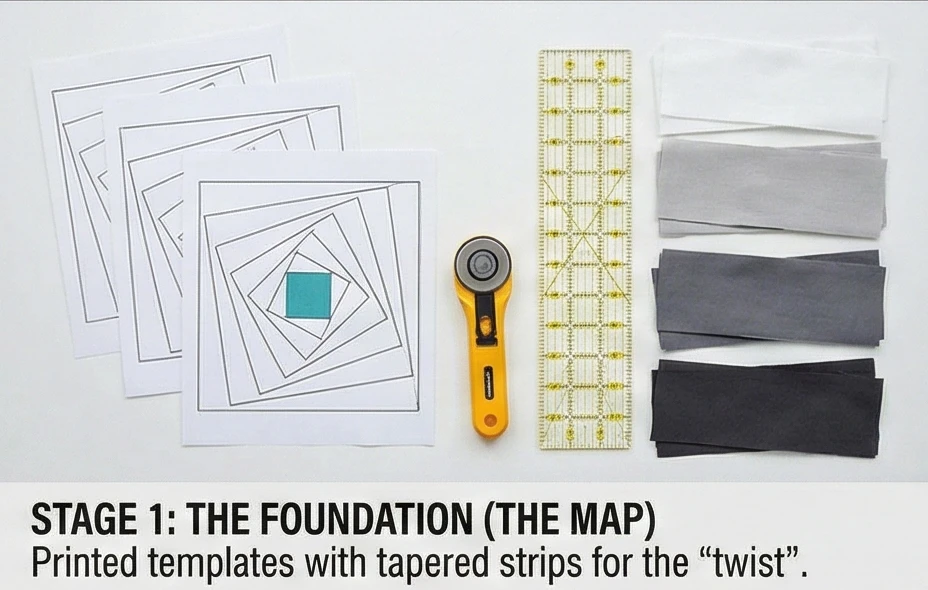
Step 1: The Foundation (The Map)
The twist happens on paper, not by guessing with a ruler.
- Print: Print 3 copies of a 10-inch “Twisted Log Cabin” paper piecing template.
- The Secret: In the template, the strips are not perfect rectangles; they are slightly wider at one end than the other. This angle forces the visual “twist.”
- Prepare: Shorten your stitch length to 1.5mm. This makes perforating the paper easier later.
- Cut: Rough-cut your fabric strips to about 2 inches wide (wider than the printed sections to allow for angled coverage).
Step 2: The Eye of the Storm
- Placement: Place a small square of Fabric A (Center color) over “Section 1” on the unprinted side of the paper. Use a dab of glue stick to hold it.
- Hold to Light: Hold the paper up to a light source to ensure the fabric covers the entire Section 1 box plus 1/4 inch on all sides.
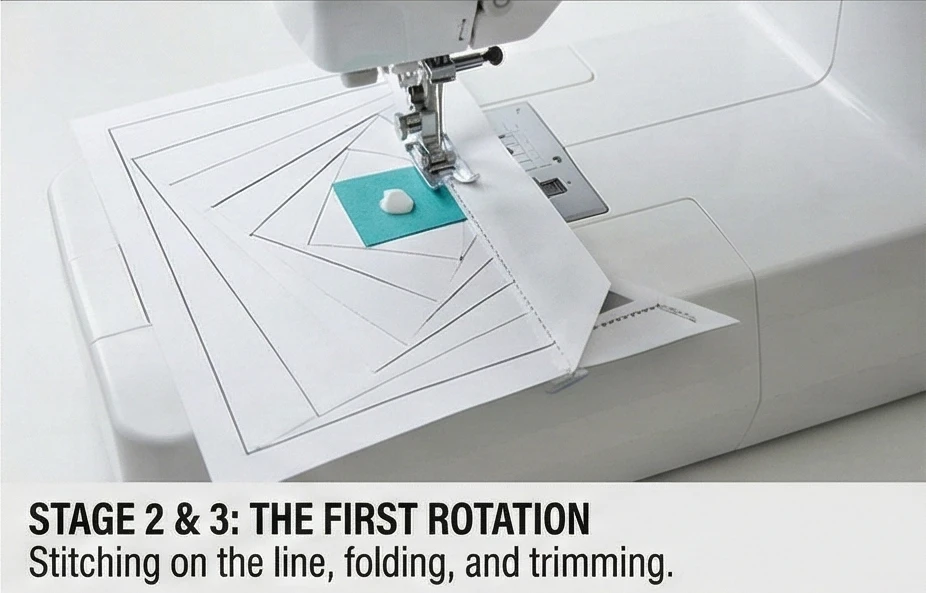
Step 3: The First Rotation
- Sew: Place your first strip (White) Right Side Down on top of the center square. Align it with the line between Sections 1 and 2.
- Stitch: Flip the paper over and stitch exactly on the printed line.
- Trim & Press: Fold the paper back, trim the seam allowance to 1/4 inch, and press the fabric open.
- Repeat: Continue counter-clockwise around the center.
- The Twist: You will notice that as you add strips, the center square appears to “tilt.” Trust the process.
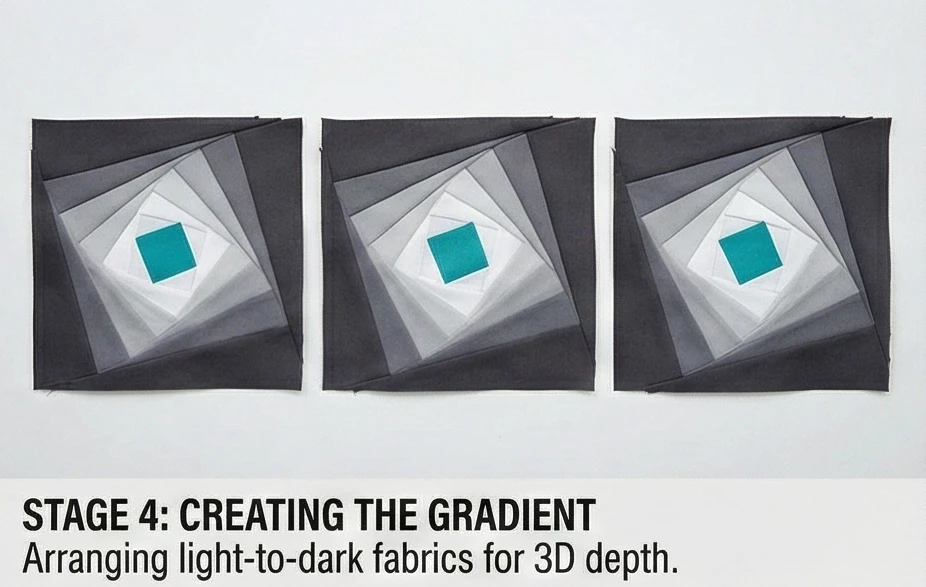
Step 4: Creating the Gradient
Color placement creates the depth.
- Sequence: As you spiral outward, change your fabric colors from Light to Dark.
- Rounds 1-3: White/Light Grey.
- Rounds 4-6: Medium Grey.
- Rounds 7-9: Charcoal.
- Effect: This gradation makes it look like the runner is a tunnel or a whirlpool sinking into the table.
- Quantity: Complete 3 large blocks.
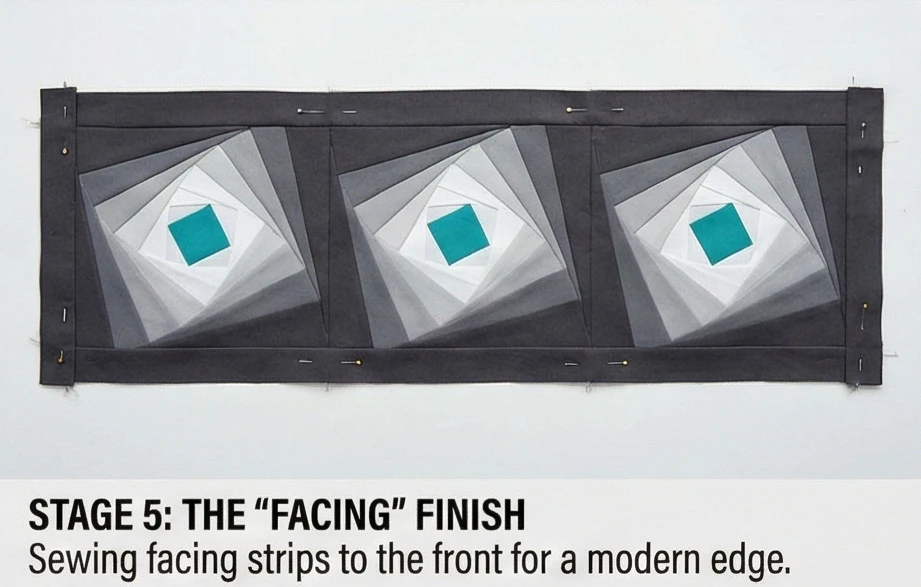
Step 5: The “Facing” Finish (The Modern Edge)
A traditional binding creates a bumpy rim. A “Facing” creates a sleek, invisible edge.
- Join: Sew the 3 blocks together in a row.
- Quilt: Stitch “in the ditch” of the spiral lines to secure the layers.
- Face: Instead of binding, sew 2-inch strips to the front of the quilt (Right Sides Together) around the perimeter.
- Turn: Flip the strips completely to the back of the runner and press flat. Hand stitch them down on the back.
- Result: From the top, the runner has no visible border. The pattern extends to the “cliff edge,” which appears very contemporary.
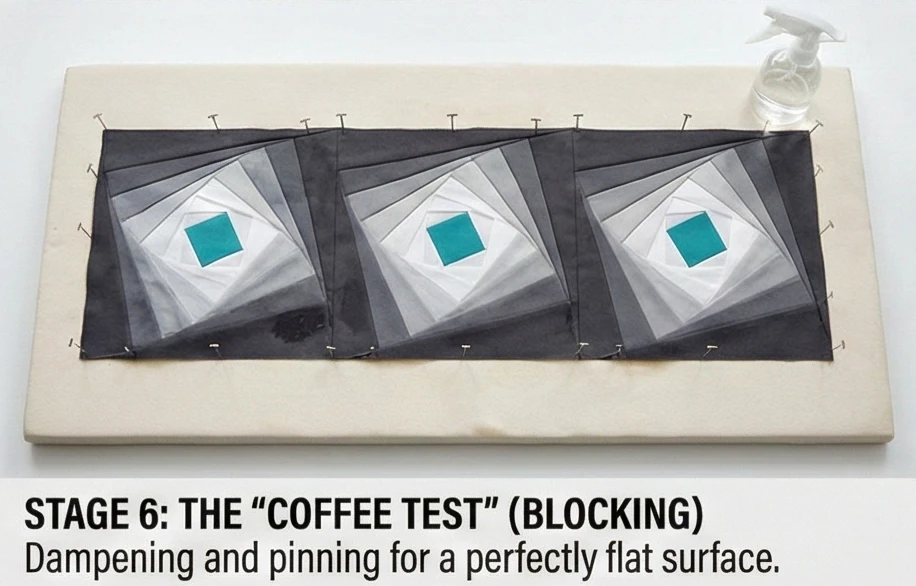
Step 6: The “Coffee Test” (Blocking)
Coffee tables require perfectly flat surfaces.
- Wet: Spray the finished runner with water until damp.
- Pin: Pin it aggressively to a blocking board or carpet, stretching it so it is perfectly rectangular and taut.
- Dry: Let it dry completely before unpinning.
- Why: Paper piecing can sometimes distort the grain. Blocking ensures the runner lies dead flat, so when you set down a wine glass, it doesn’t wobble.
Usability Note: For coffee table runners, avoid high-loft polyester batting. It is too puffy and makes items unstable. Use Fusible Fleece or even a layer of heavy Canvas as the middle layer instead of batting. This provides weight and protection without the “puffy quilt” instability.
16. Log Cabin Pattern Tea Cozies and Kitchen Linens for a Cohesive Home

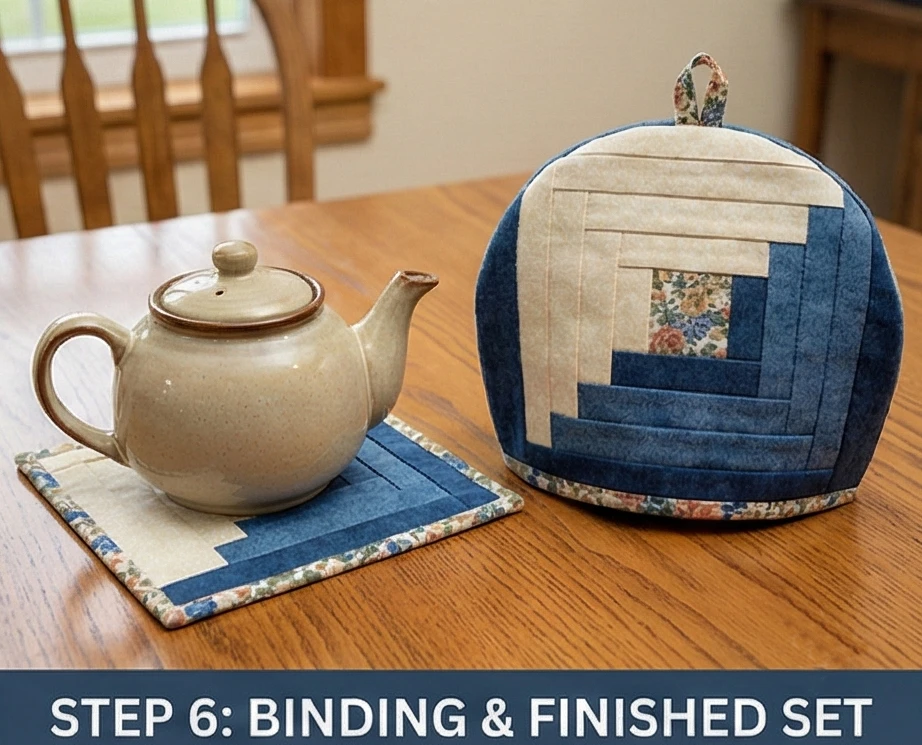
“The Hearth & Home” Tea Cozy and Trivet Set
A kitchen is functional, but it should also be soft and welcoming. The “Hearth & Home” set brings the architectural beauty of the Log Cabin block to the breakfast table. This set includes a Domed Tea Cozy (lined with thermal batting to keep tea piping hot) and a matching Square Trivet (to protect the table). Using a palette of Warm Spices (Cinnamon, Nutmeg, Cream) or Cool Ceramics (Delft Blue and White), these linens turn a simple tea break into an elegant ritual.
Finished Dimensions:
- Tea Cozy: 10″ tall x 13″ wide (Fits a standard 4-6 cup teapot).
- Trivet: 10″ x 10″ square.
Materials Needed:
- Fabric A (Centers): Scraps of a focal print (e.g., small florals or a teapot motif).
- Fabric Group B (Lights): 1/2 yard of Cream or Linen.
- Fabric Group C (Darks): 1/2 yard of Blue, Red, or Sage.
- Lining: 1/2 yard of solid cotton (hidden inside the cozy).
- Batting: Insul-Bright (Thermal metallic fleece) AND standard cotton batting.
- Why: Insul-Bright reflects heat back into the pot, while cotton batting absorbs moisture.
- Notions: Bias binding tape, rotary cutter, cardstock (for template).
Cultural Backstory: The tea cozy became a staple of Victorian British life in the mid-19th century, roughly the same time the Log Cabin quilt block became popular in America. Combining these two icons creates a “Transatlantic” symbol of domestic warmth. Historically, a “Log Cabin” center was red to represent the hearth; on a tea cozy, it represents the warmth of the tea.
Step 1: Cutting the “Kitchen Scale” Logs
We are making smaller blocks suitable for small items.
- The Centers: Cut 3 squares of Fabric A measuring 2.5″ x 2.5″ (One for the trivet, two for the cozy sides).
- The Strips: Cut your Light and Dark fabrics into 1.5-inch-wide strips.
- Note: These will finish at 1 inch wide, creating a refined, delicate look appropriate for table linens.
Step 2: Constructing the Blocks
You need to build three identical blocks.
- Assembly: Use the standard Log Cabin method:
- Sew Light to Right, Light to Top.
- Sew Dark to Left, Dark to Bottom.
- Expansion: Continue adding rounds until the blocks measure roughly 12.5″ x 12.5″.
- Check: Ensure the blocks are flat. Press well after every seam.
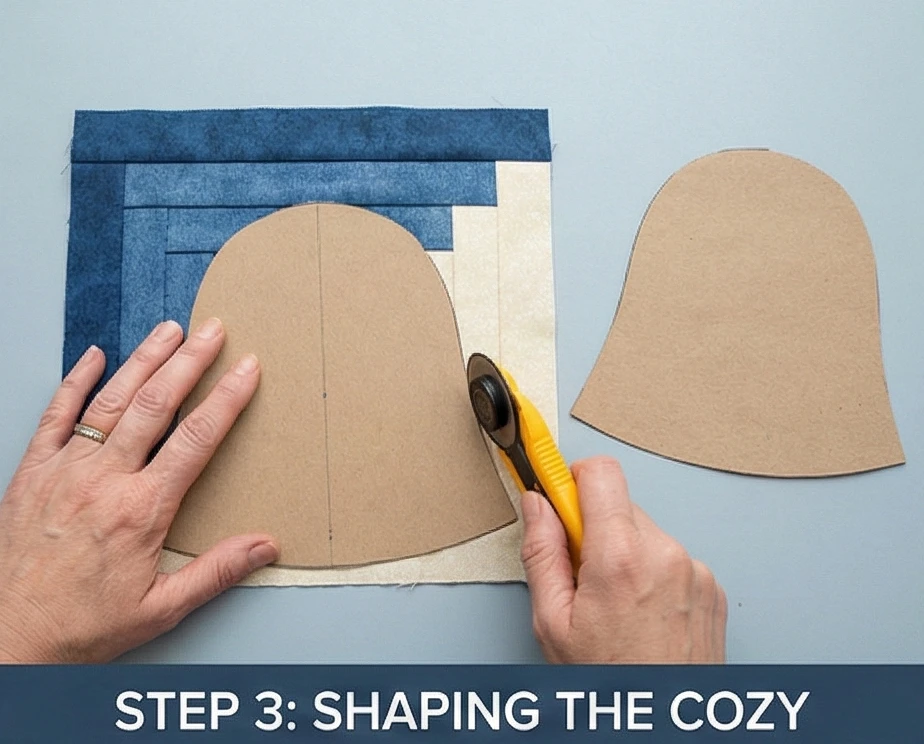
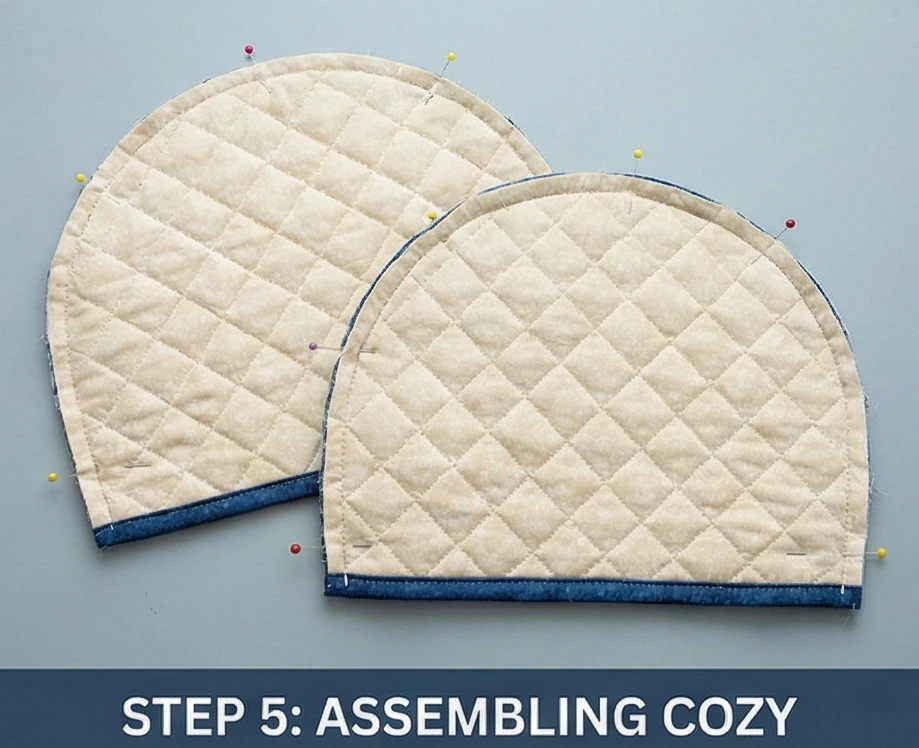
Step 3: Shaping the Tea Cozy (The Dome)
A teapot is round, so the cozy must be too.
- Template: Take a piece of cardstock (13″ wide). Draw a “Bell” or “Dome” shape (flat bottom, curved sides meeting at a rounded top).
- Cut:
- Take 2 of your Log Cabin blocks.
- Place the template over the block. Center it so the Red Center square is in the middle of the dome.
- Trace and cut out the shape.
- Lining/Batting: Use the same template to cut 2 pieces of Lining, 2 pieces of Insul-Bright, and 2 pieces of Cotton Batting.
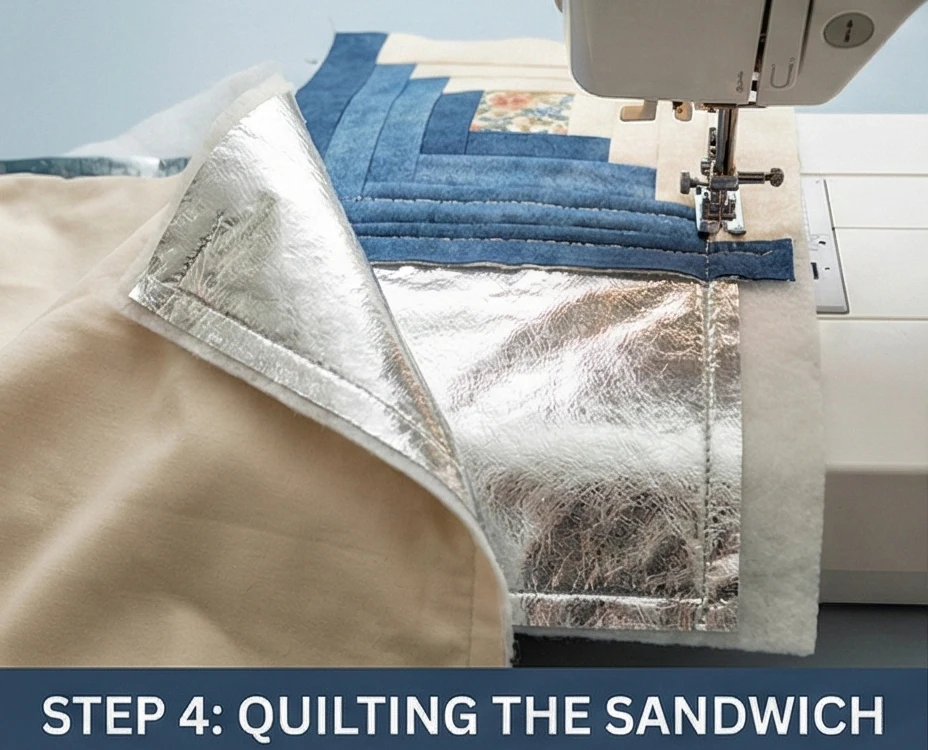
Step 4: Quilting the Components (Thermal Sandwich)
This is where the functionality happens.
- Layer Stack: Place Lining (face down) -> Insul-Bright -> Cotton Batting -> Log Cabin Top (face up).
- Quilt: Stitch simple lines following the square “logs” of the pattern.
- Why: You must quilt the layers before sewing the cozy halves together. This secures the thermal batting so it doesn’t bunch up in the wash.
- The Trivet: Repeat this sandwiching process for the remaining square block (Trivet), but do not cut it into a shape. Just quilt the 10″ square.
Step 5: Assembling the Cozy
- Join Halves: Place the two Quilted Cozy shapes Right Sides Together.
- Sew: Stitch around the curved arch using a 1/4 inch seam. Do not sew the flat bottom shut.
- Reinforce: Backstitch at the start and end of the curve (the stress points).
- Finish Seams: Zig-zag or serge the raw curved edge inside to prevent fraying.
- Turn: Turn the cozy right side out. Push the curve out with your fingers.
Step 6: Binding the Edges
- The Cozy Bottom: The bottom edge is currently raw. Open it up and sew Bias Binding around the entire circular opening.
- The Trivet: Bind the four edges of the square trivet with matching binding.
- The Loop (Optional): Add a small fabric loop to the top of the tea cozy for easy lifting.
Usability Note: Safety Warning: Insul-Bright contains metal fibers. While it is effective at keeping tea hot, it cannot be microwaved. If you want a microwave-safe version (e.g., for reheating a bowl), use 100% cotton batting only (two layers).
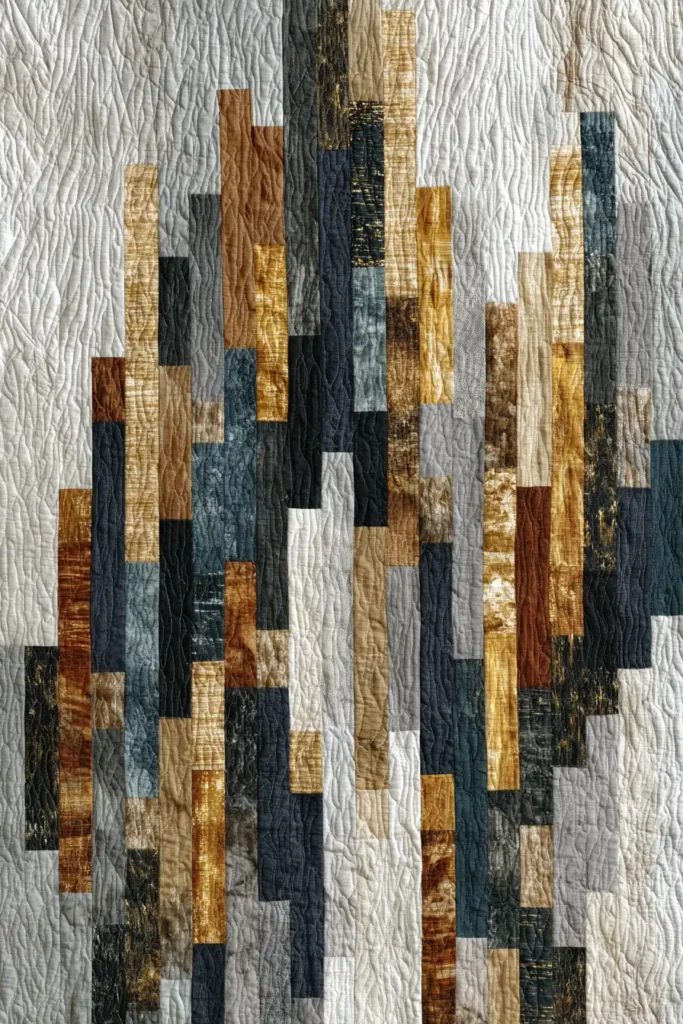
17. Abstract Log Cabin Quilt Pattern for Artistic Wall Hangings
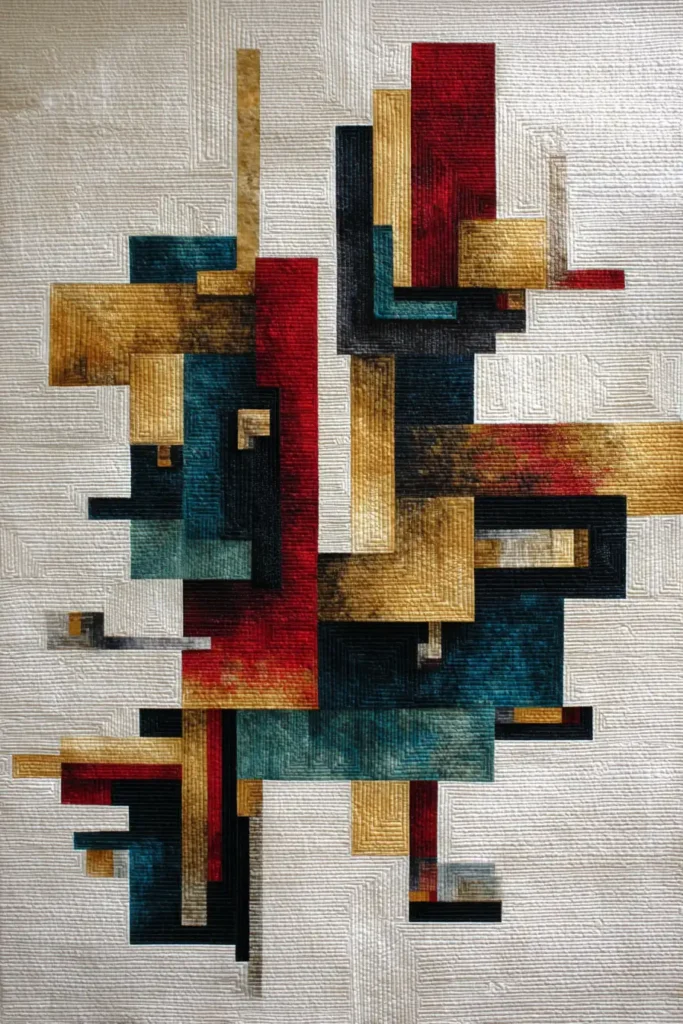
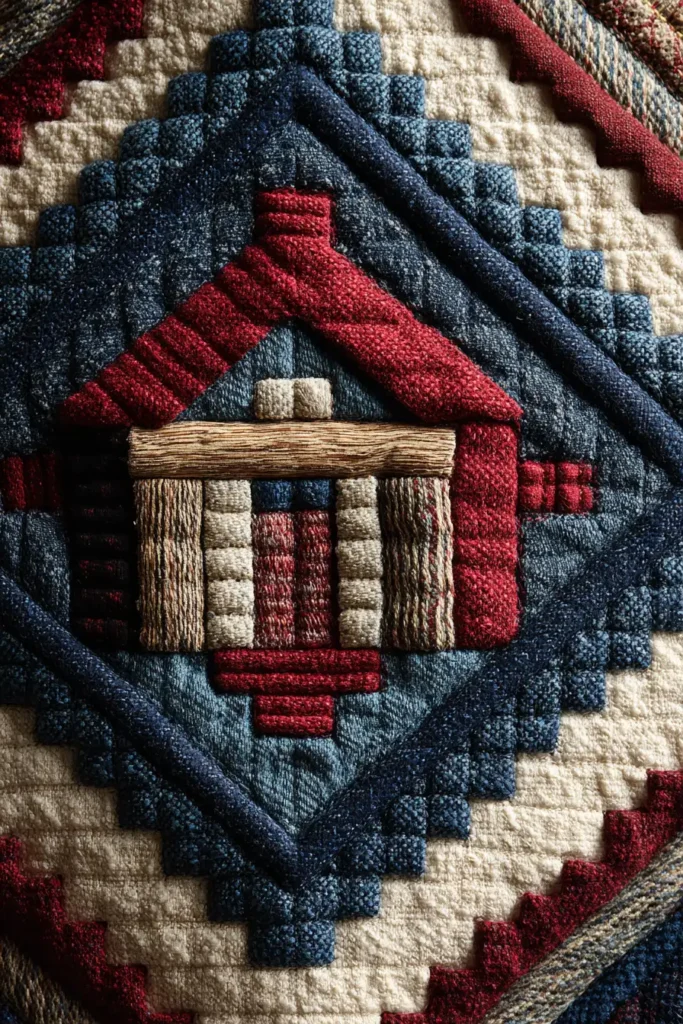
“The Gallery Gaze” Deconstructed Log Cabin Art Quilt
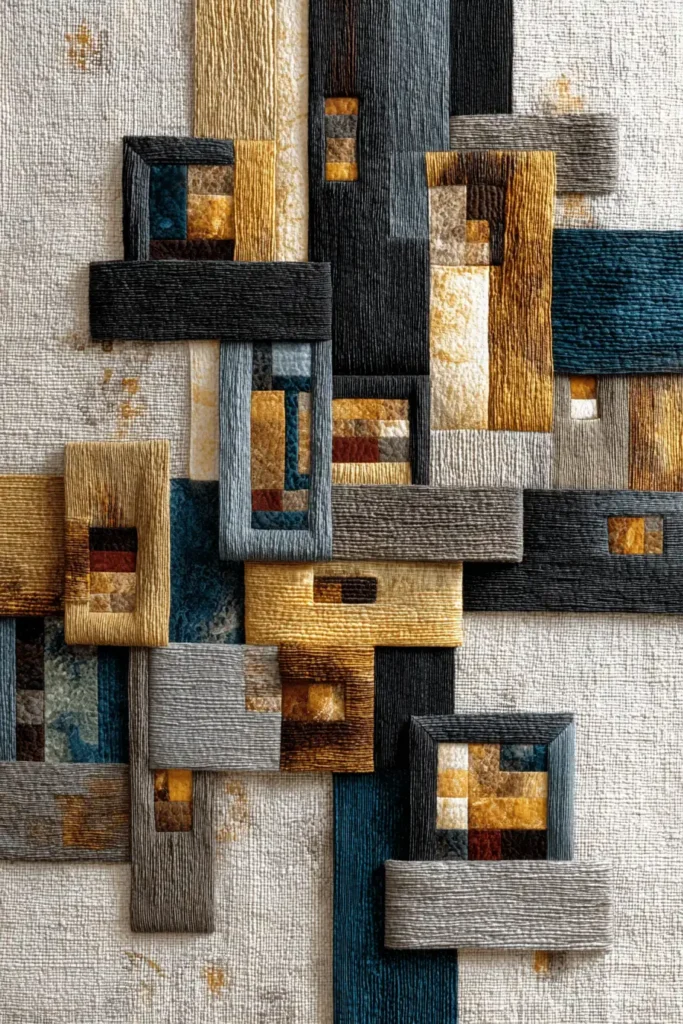
A wall hanging is not constrained by the need to drape over a body or withstand a washing machine, which allows for pure artistic expression. The “Gallery Gaze” pattern takes the rigid Log Cabin block and “deconstructs” it. Instead of spiraling around a center square, the “logs” are placed irregularly—some thick, some thin, some stopping halfway. This creates a floating, architectural composition reminiscent of a Mondrian painting or a cityscape map. It turns your wall into a focal point of modern elegance.
Finished Dimensions: Large Wall Art, 40″ x 60″ (Portrait or Landscape).
Materials Needed:
- Fabric A (The Negative Space): 2 yards of Solid White, Charcoal, or Natural Linen. (This background is crucial for the “floating” effect).
- Fabric Group B (The Lines/Logs): 1 yard total of Solid Black or Dark Navy (for high contrast).
- Fabric Group C (The Accents): Scraps of Metallic Gold, Rust, or Teal.
- Backing: 2 yards of muslin.
- Batting: Stiff cotton or felt (wall hangings need structure to hang flat).
- Notions: Rotary cutter, design wall (or a clean floor/bedsheet to lay out pieces), hanging sleeve material.
Cultural Backstory: Abstract quilting, often called “Improvisational Piecing,” gained massive popularity in the 21st century with the Modern Quilt Guild movement. Artists like the women of Gee’s Bend have long used intuitive, irregular geometry, but the “Modern Log Cabin” specifically plays with the viewer’s expectation of order—breaking the traditional grid to represent the chaos and beauty of modern life.
Step 1: Cutting “Free-Form” Logs
Put away the ruler for a moment. We want variety.
- The Background strips: Cut your background fabric (Fabric A) into strips of varying widths: 1.5″, 2.5″, 3.5″, and 5″.
- The Line strips: Cut your dark fabric (Fabric B) into skinny strips: 1 inch and 1.5 inches.
- The Accents: Cut small squares or short rectangles of your accent colors (Fabric C).
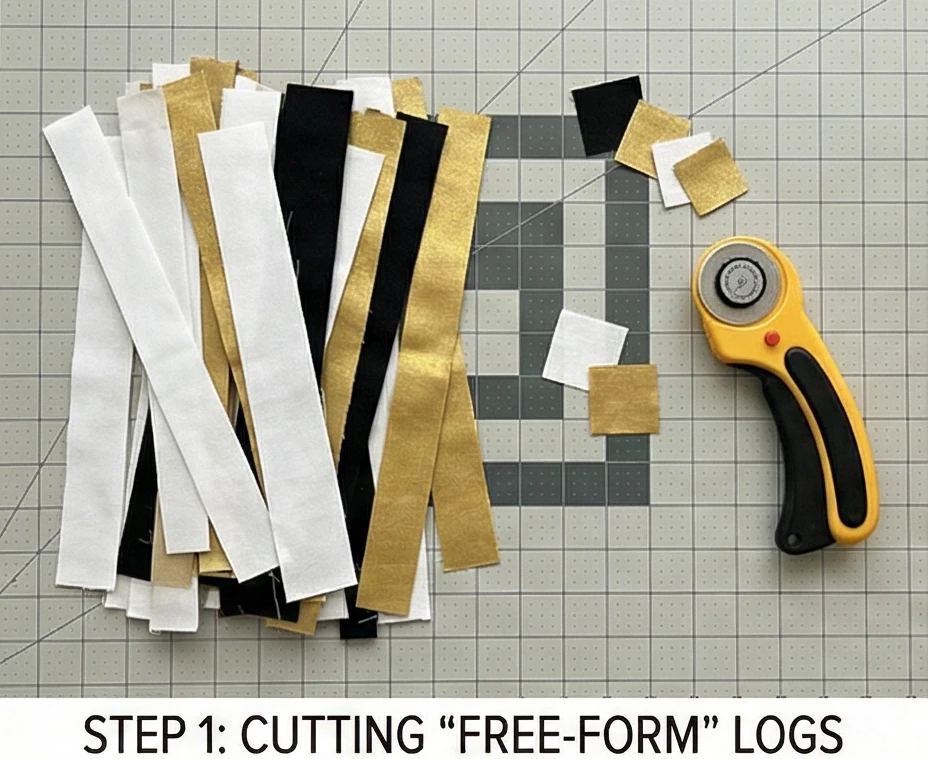
Step 2: Building “Wonky” Blocks
We are not aiming for perfect squares.
- Start: Take an Accent square (Fabric C).
- Log 1: Sew a Background strip to one side. Trim it.
- Log 2: Sew a Dark Line strip to another side. Trim it.
- Log 3: Sew a very wide Background strip to the third side.
- Variation: Instead of spiraling evenly, add strips only to two sides for a while, then switch. Add a “partial seam” where a dark line stops in the middle of a white field.
- Goal: Create 6 to 8 large, irregular rectangular sections (panels) rather than uniform blocks.
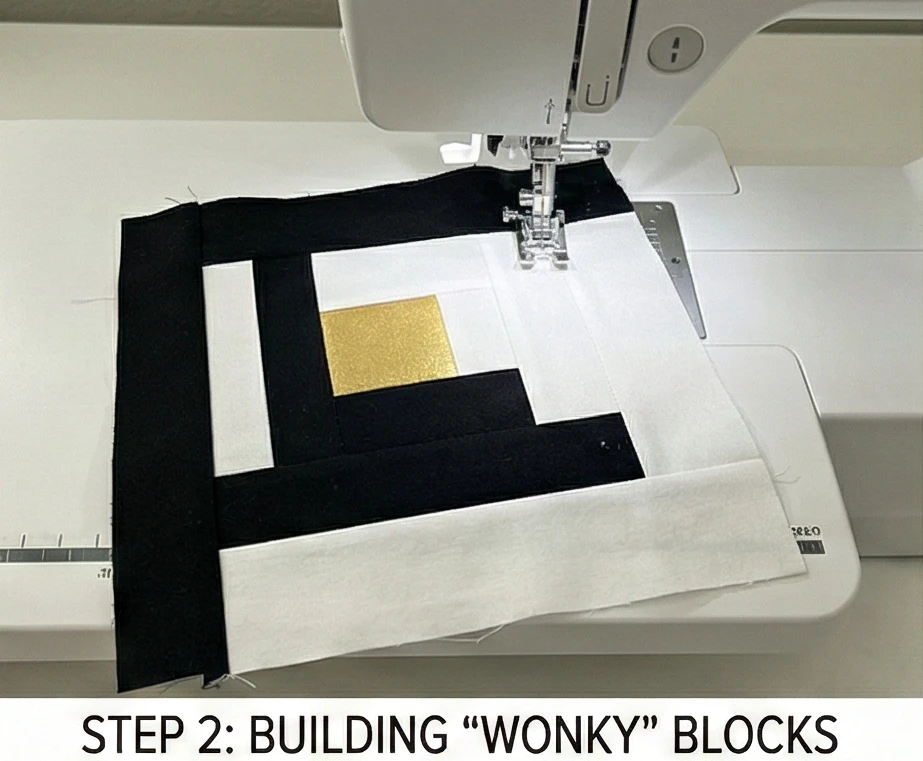
Step 3: The Composition (Design Wall)
This is the artistic phase.
- Pin Up: Pin your irregular panels onto a design wall or lay them on the floor.
- Interrupters: Cut long vertical or horizontal strips of the Solid Black fabric.
- Arrange: Place these black strips between your panels. Do you want a grid? Or do you prefer asymmetrical lines that resemble street intersections?
- Balance: Ensure your “Accent” pops of color are distributed in a pleasing way (e.g., the “Rule of Thirds”).
- Fillers: If there are gaps, cut large rectangles of solid Background fabric to fill them. This “Negative Space” gives the eye a place to rest.
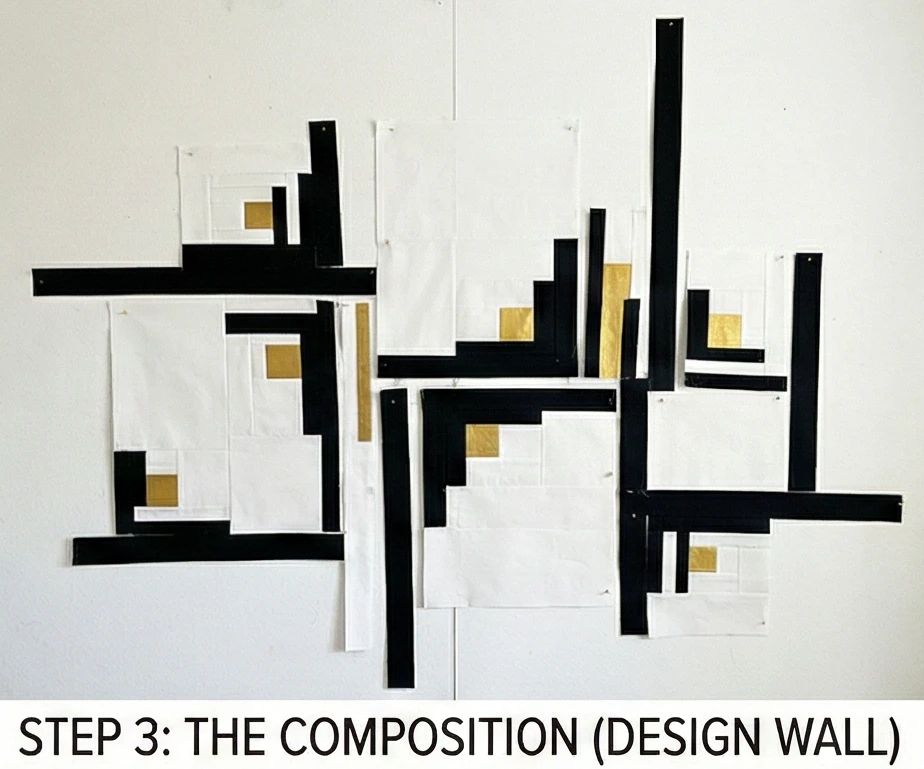
Step 4: Panel Assembly
Joining the puzzle.
- Sew Sections: Sew your arranged components together.
- Tip: Because the pieces are irregular, you may need to trim edges straight before joining them. Use a long ruler to square up sub-sections before sewing them to neighbors.
- Pressing: Press all seams open to ensure the wall hanging lies perfectly flat against the wall.
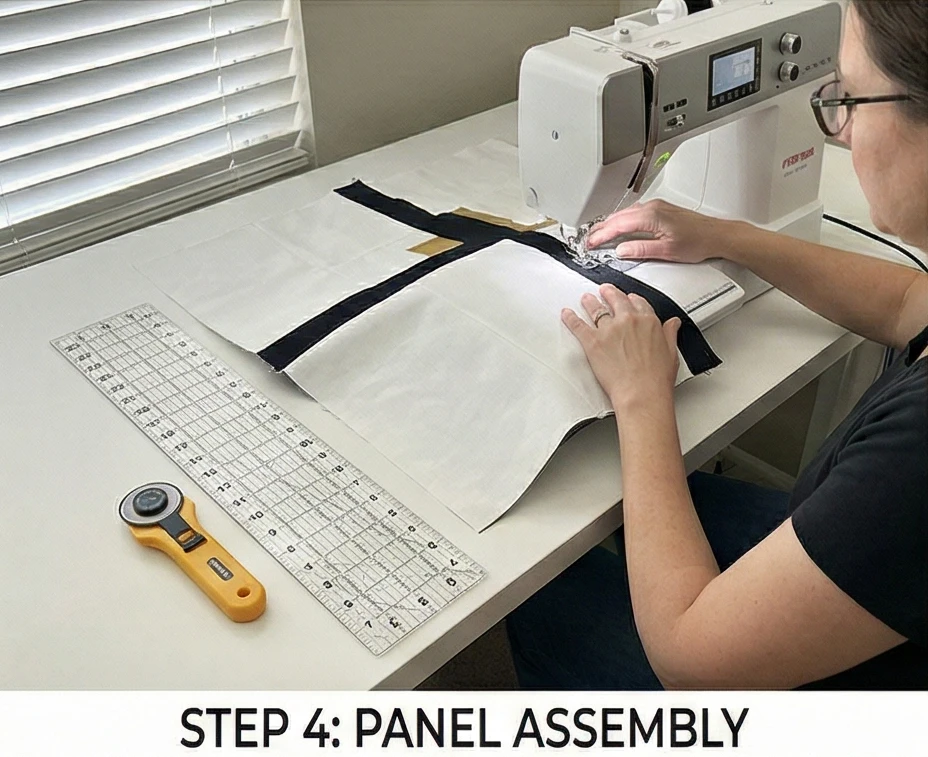
Step 5: “Matchstick” Quilting
Texture that creates stiffness.
- Baste: Sandwich the quilt.
- Quilt: Use a walking foot to stitch straight lines across the entire width of the quilt.
- Density: Stitch the lines very close together (1/8 inch to 1/4 inch apart).
- Effect: This is called “Matchstick Quilting.” It creates a stiff, canvas-like texture that prevents the wall hanging from sagging or rippling over time. It looks incredibly modern and high-end.
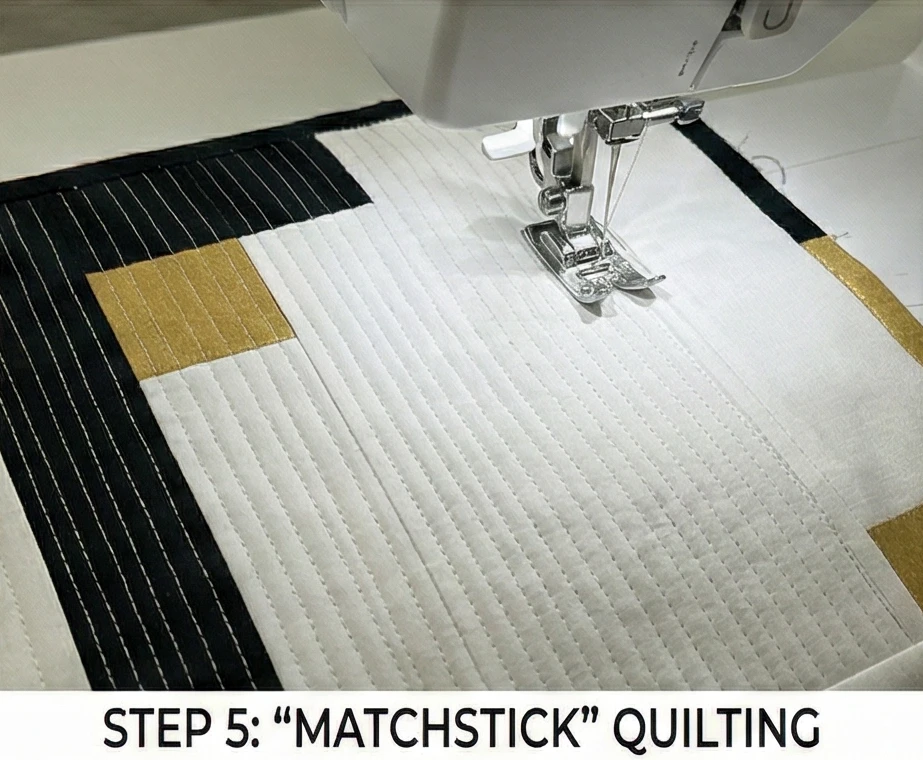
Step 6: The Hanging Sleeve
The hidden hardware.
- Tube: Cut a strip of backing fabric 8.5 inches wide by the width of the quilt (40″). Fold ends in and hem. Fold lengthwise (wrong sides together) and sew the raw edge to the top back edge of the quilt during the binding process.
- Hand Stitch: Hand stitch the bottom fold of the tube to the quilt backing.
- Usage: Slide a wooden dowel or metal rod through this sleeve to hang the quilt evenly without using clips or nails that might damage the fabric.
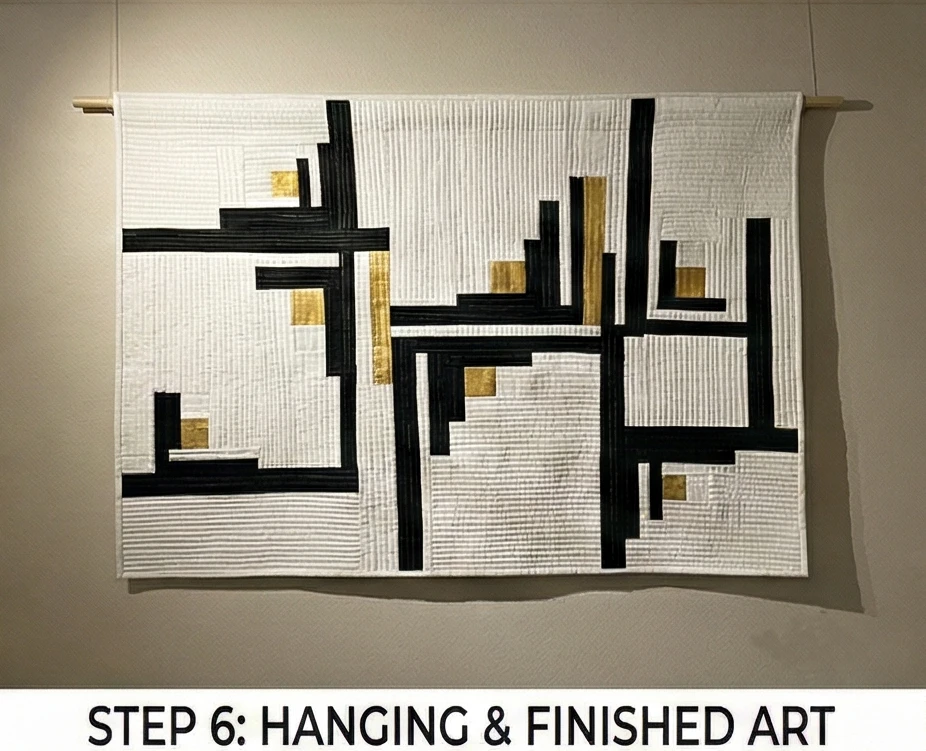
Usability Note: Lighting is key for wall hangings. If you used matchstick quilting, try to hang the piece where light hits it from the side (raking light). This will highlight the dense stitching’s texture, adding a 3D element to your abstract art.
18. Modern Log Cabin Quilt Ideas for Decorative Wall Decor
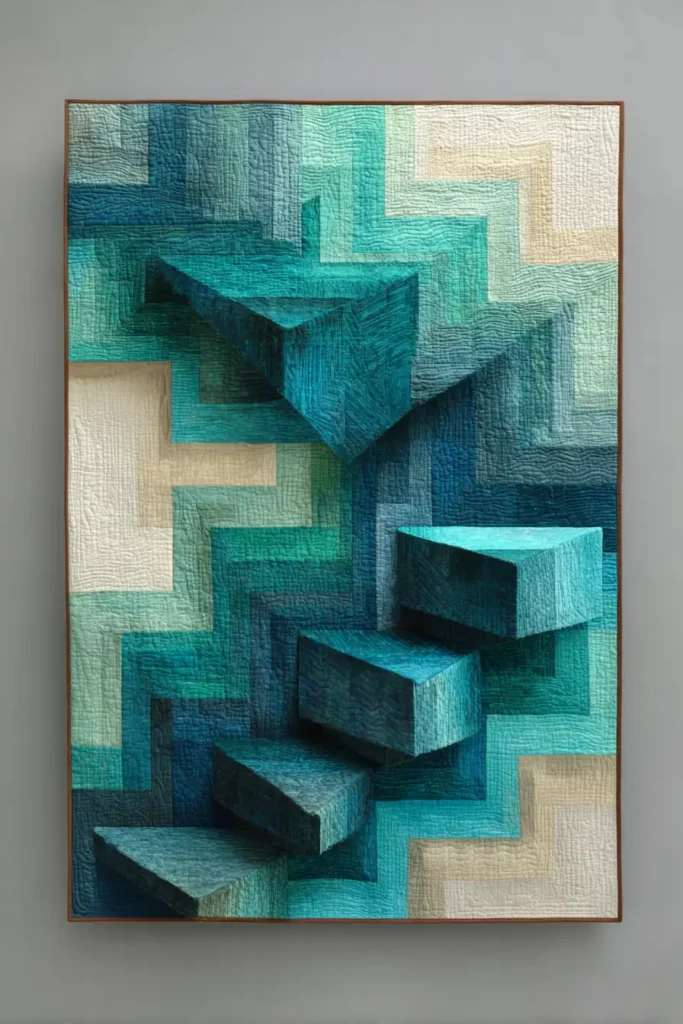
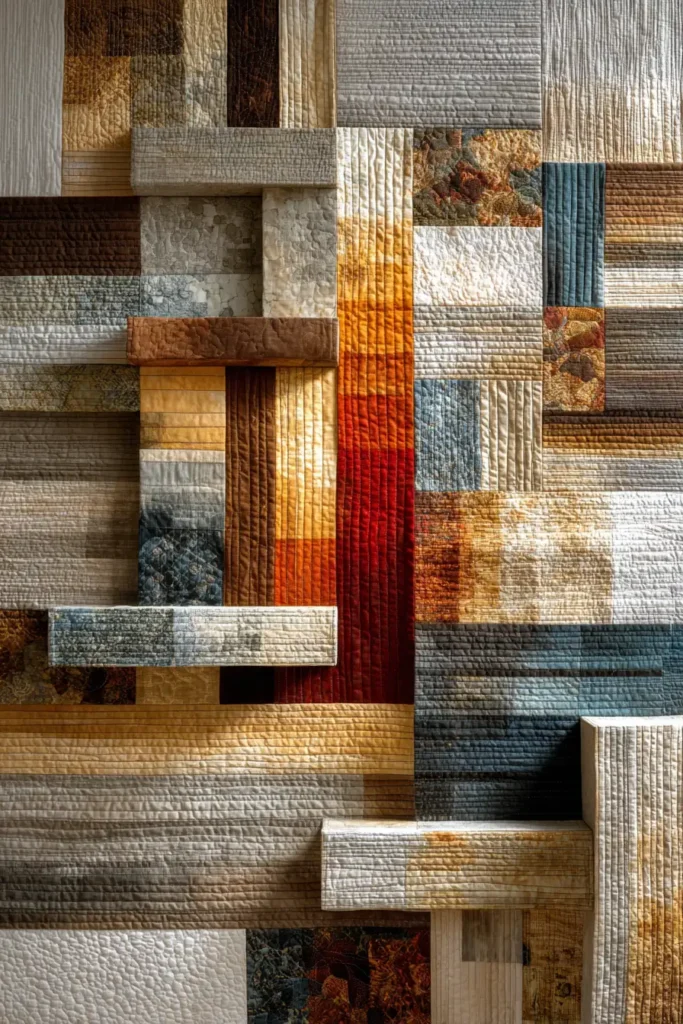
“The Prism” Transparency Log Cabin Wall Hanging
Modern wall decor often mimics the effects of light and glass. “The Prism” pattern uses a technique called Transparency or Value gradation. By carefully selecting three shades of a single color (e.g., Dark Teal, Medium Teal, Light Teal) and pairing them with a neutral background, the Log Cabin blocks appear to overlap and glow, creating a 3D optical illusion of depth. It is more like a geometric fine art piece than a quilt, perfect for hanging above a console table or in a hallway.
Finished Dimensions: Statement Wall Piece, 40″ x 40″.
Materials Needed:
- Fabric A (The “Light” Source): 1/2 yard of Pale Aqua or Mint.
- Fabric B (The Mid-Tone): 1/2 yard of Medium Turquoise.
- Fabric C (The Shadow): 1/2 yard of Deep Peacock Blue.
- Fabric D (Background): 1.5 yards of Charcoal Grey or Graphite (Dark backgrounds make the colors “glow” brighter).
- Backing: 1.5 yards of solid cotton.
- Batting: Stiff cotton or a layer of felt (for wall structure).
- Notions: Rotary cutter, design wall.
Cultural Backstory: The “Transparency” trend in modern quilting draws heavily on the Bauhaus art school and Josef Albers’s color theory. Albers demonstrated that colors change depending on what they sit next to. By placing a medium color between a light and a dark one, quilters can trick the eye into seeing sheer layers of fabric where none exist.
Step 1: The Gradient Cut
The illusion relies on the strict separation of the three color values.
- Cut Strips: Cut Fabrics A, B, and C (your colors) into strips measuring 2.5 inches wide.
- Cut Background: Cut Fabric D (Charcoal) into strips measuring 2.5 inches wide.
- The Center: Cut 16 squares of Fabric A (The Lightest color) measuring 2.5″ x 2.5″.
- Note: Starting with the lightest color at the center makes the block appear lit from within.
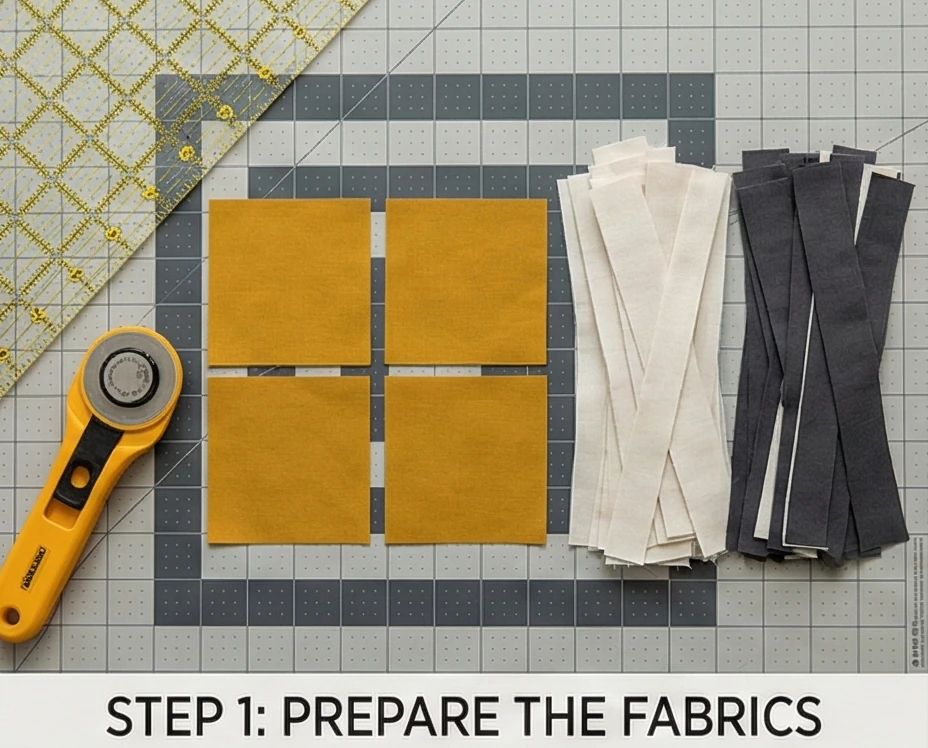
Step 2: Building the “Glow” Block
We will construct a “Half-Log Cabin” with color on only two sides.
- Round 1 (Mediums):
- Sew a Medium (B) strip to the Right.
- Sew a Medium (B) strip to the Top.
- Sew a Background (D) strip to the Left.
- Sew a Background (D) strip to the Bottom.
- Round 2 (Darks):
- Sew a Dark (C) strip to the Right.
- Sew a Dark (C) strip to the Top.
- Sew a Background (D) strip to the Left.
- Sew a Background (D) strip to the Bottom.
- Result: You have a block that bursts from Light -> Medium -> Dark in one corner, floating in a sea of Charcoal.
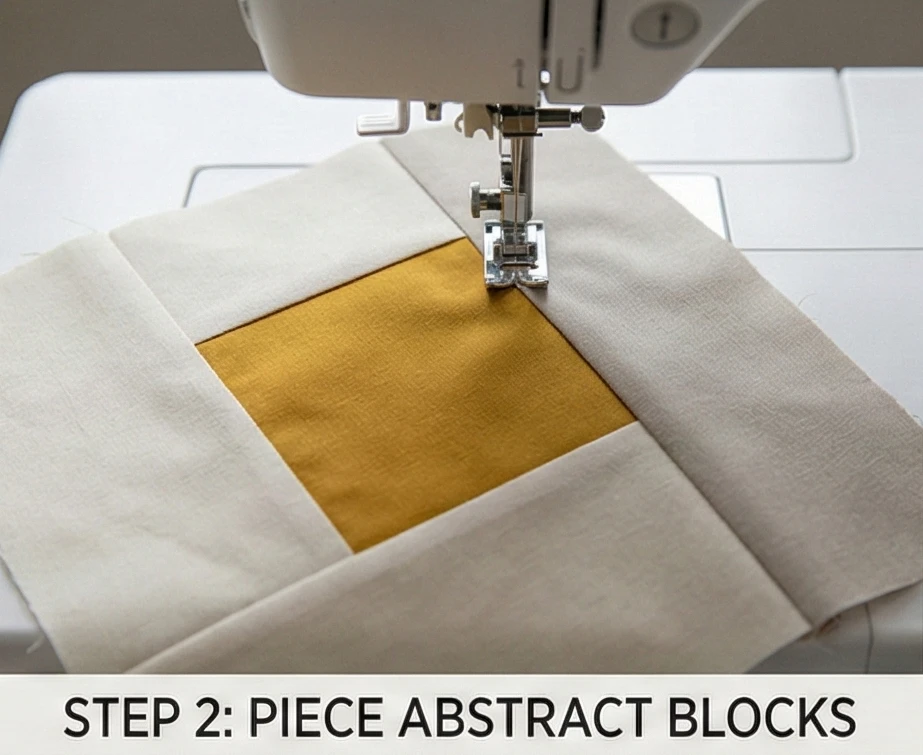
Step 3: The “Floating Diamond” Layout
This arrangement creates the overlapping effect.
- Grid: Lay out the 16 blocks in a 4 x 4 grid.
- Rotation: Rotate the blocks so that the colored corners all point inward toward the center of the quilt.
- Visual: The 4 central blocks will form a bright diamond. The surrounding blocks will frame it.
- Refinement: Experiment with rotating them to form an “X” shape. The dark background strips will merge, creating negative space that makes the colored sections appear to hover off the wall.
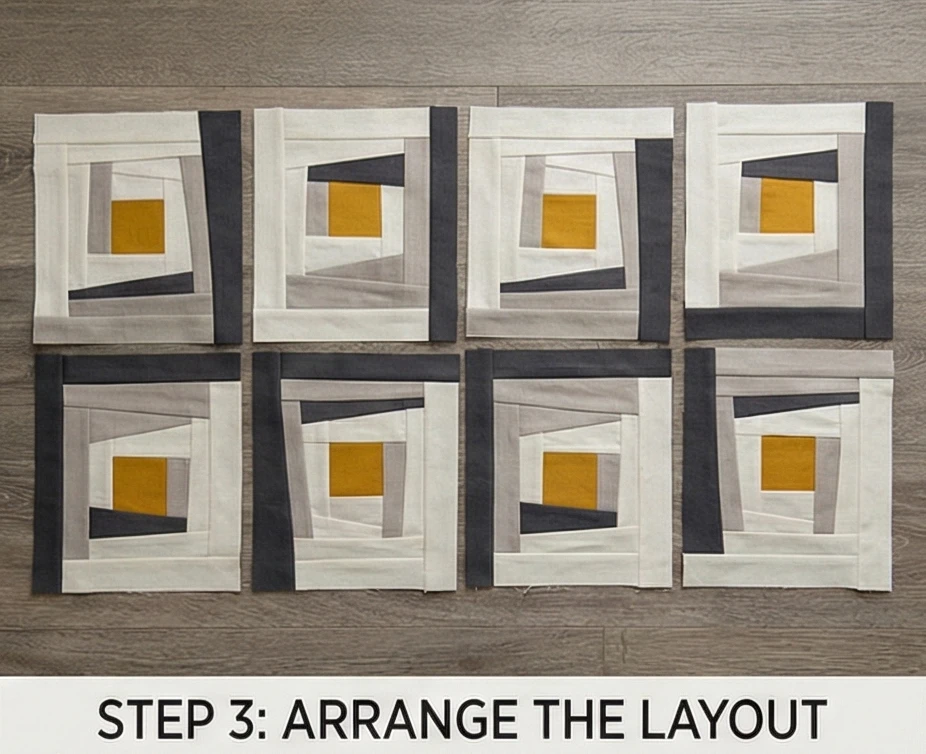
Step 4: Precise Assembly
- Sew Rows: Stitch the blocks into rows.
- Critical: Because you are creating a geometric shape (a diamond or X), the seams where the colors meet must align perfectly. Use pins at every intersection.
- Pressing: Press all seams Open.
- Why: For wall hangings, flat seams are better than side-pressed seams because they create fewer shadows when lit by gallery lighting.
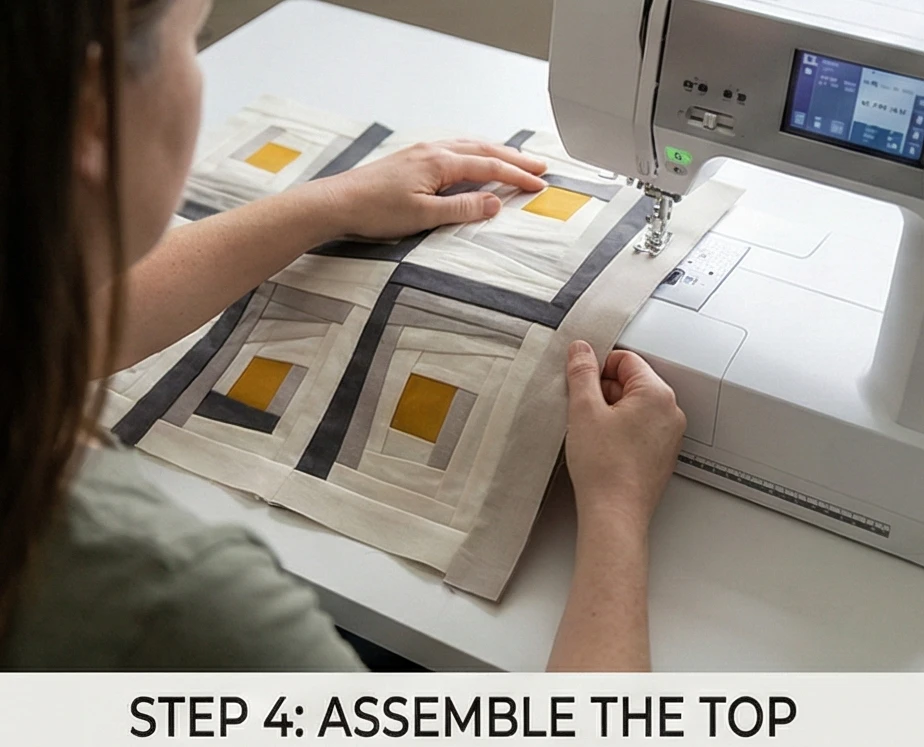
Step 5: The “Invisible” Facing Finish
A traditional binding creates a frame, but modern art looks better frameless.
- The Facing: Instead of binding strips, cut 4 strips of the Background fabric (2.5″ wide).
- Sew: Sew these strips to the Front of the quilt (Right Sides Together) along the edges.
- Turn: Flip the strips completely to the Back of the quilt.
- Secure: Stitch them down by hand or machine on the back.
- Effect: The quilt edge looks clean and sharp, like a stretched canvas, with the design running all the way to the precipice.
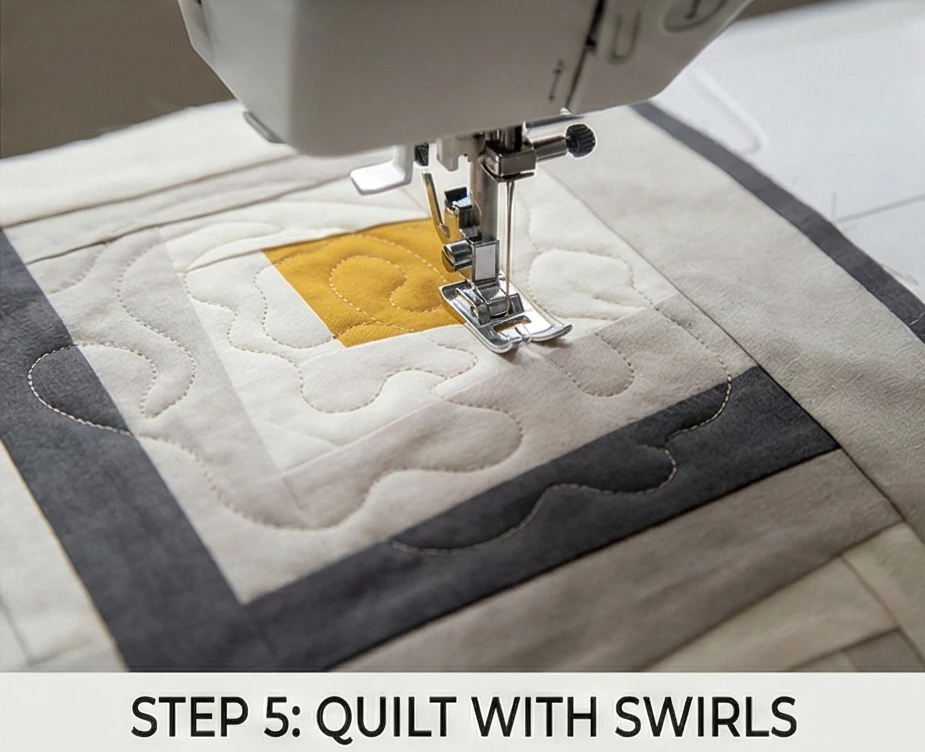
Step 6: “Echo” Quilting
Use a thread to enhance the light’s vibration.
- Thread: Use a thread color that matches the Background (Charcoal).
- Quilt: Stitch straight lines that echo the diamond shape of the colored blocks.
- Spacing: Keep lines 1 inch apart.
- Texture: This linear quilting enhances the architectural feel and helps prevent the batting from sagging over the years when the quilt hangs vertically.
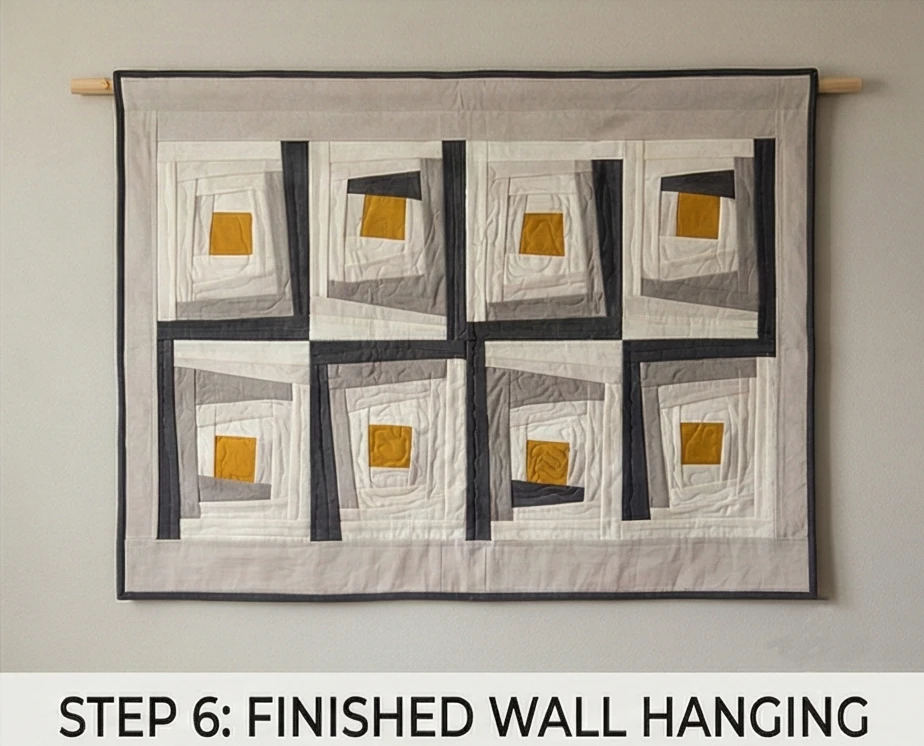
Usability Note (Acoustics): Textile art is functional! A quilted wall hanging acts as a sound dampener. If you have a modern living room with hard floors and echo-prone minimalism, hanging a dense log-cabin quilt like this will significantly soften the room’s acoustics, making conversation more comfortable.
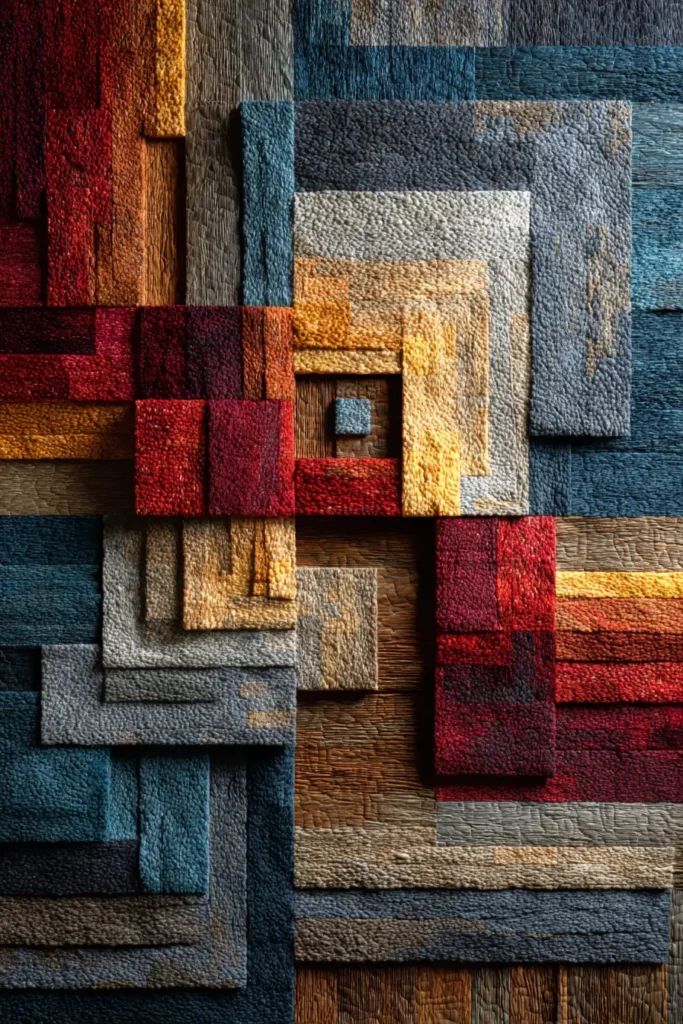
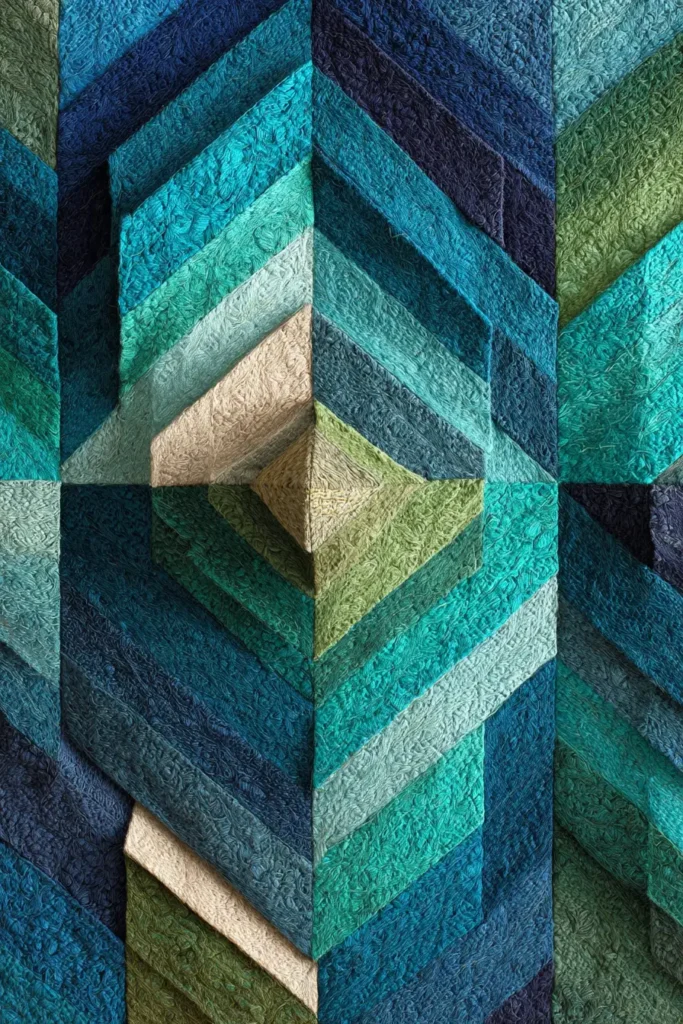
19. Decorative Log Cabin Quilt Panels for Accent Walls
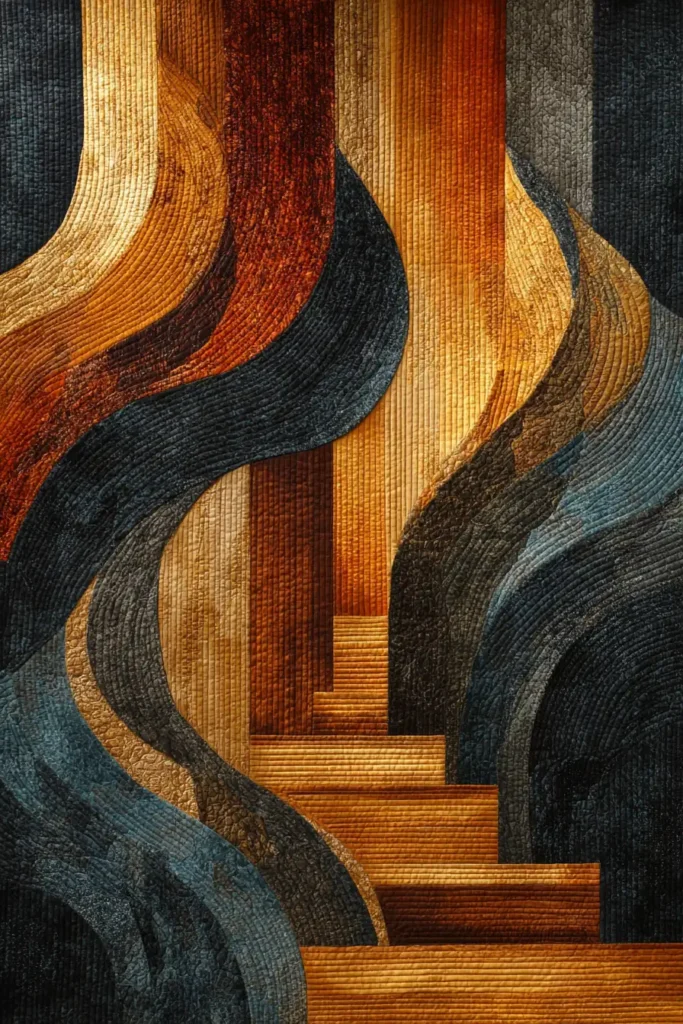
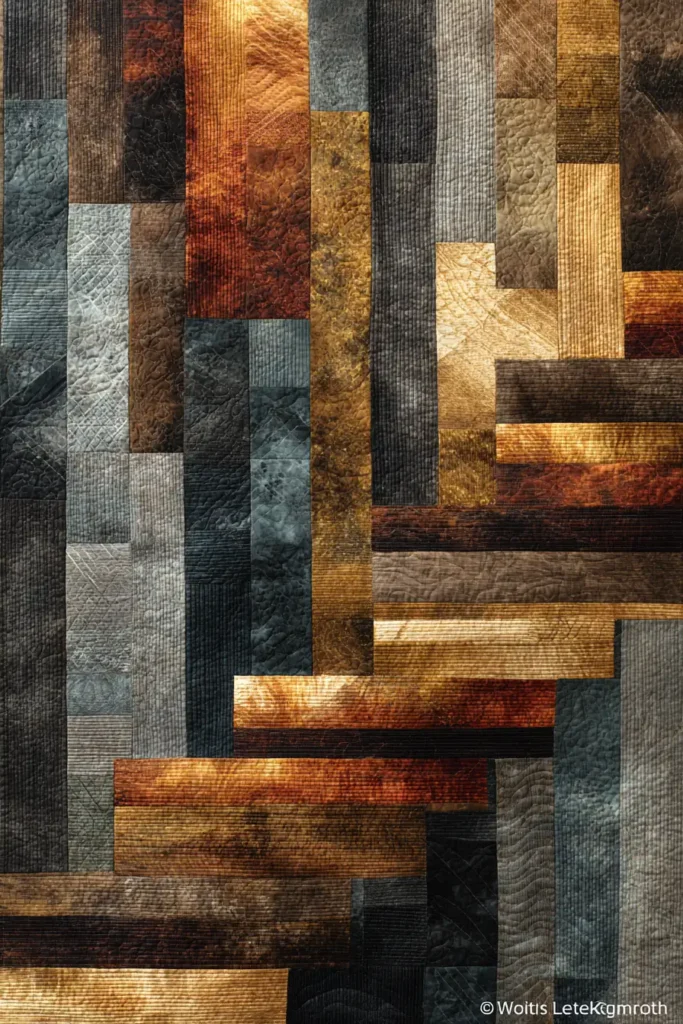
“The Onyx Column” Curved Log Cabin Panel
Accent walls are usually created with paint or wallpaper, but a textile panel adds texture, warmth, and sound-dampening that flat pigment cannot achieve. The “Onyx Column” is a tall, narrow quilted tapestry designed to hang vertically—perfect for flanking a doorway, a bed, or filling a narrow hallway wall. It utilizes the Curved Log Cabin technique. By varying the width of the strips (thin on two sides, wide on two sides), the straight lines create an optical illusion of a sweeping curve. When stacked vertically, these curves look like a spiraling architectural pillar or a wisp of smoke.
Finished Dimensions: Tall Vertical Panel, 22″ x 66″. (Make two for a flanking set).
Materials Needed:
- Fabric A (Centers): 1/4 yard of Metallic Gold or Copper (The “Spark”).
- Fabric Group B (The “Inside” Curve): 1 yard of Light Grey or Cream.
- Fabric Group C (The “Outside” Curve): 1.5 yards of Black or Deep Charcoal.
- Backing: 2 yards of black cotton.
- Batting: Stiff cotton or even a layer of canvas. Wall panels need rigidity, not fluff.
- Notions: Rotary cutter, 12″ square ruler, wooden dowel for hanging.
Cultural Backstory: The “Curved” Log Cabin illusion gained popularity during the Art Deco movement of the 1920s and 30s. Designers loved that they could create the organic, sweeping curves of the Art Nouveau style using the rigid, industrial geometry of the Machine Age. It is a perfect marriage of softness and structure.
Step 1: Cutting for the Illusion
The curve is created by the math: Thin + Wide = Curve.
- The Centers: Cut 6 squares of Fabric A (Gold) measuring 3.5″ x 3.5″.
- The Thin Strips (Inner Curve): Cut Fabric B (Light) into strips measuring 1.5 inches wide.
- The Wide Strips (Outer Curve): Cut Fabric C (Dark) into strips measuring 2.5 inches wide.
- Note: The 1-inch difference in width is what forces the block to look lopsided and curved.
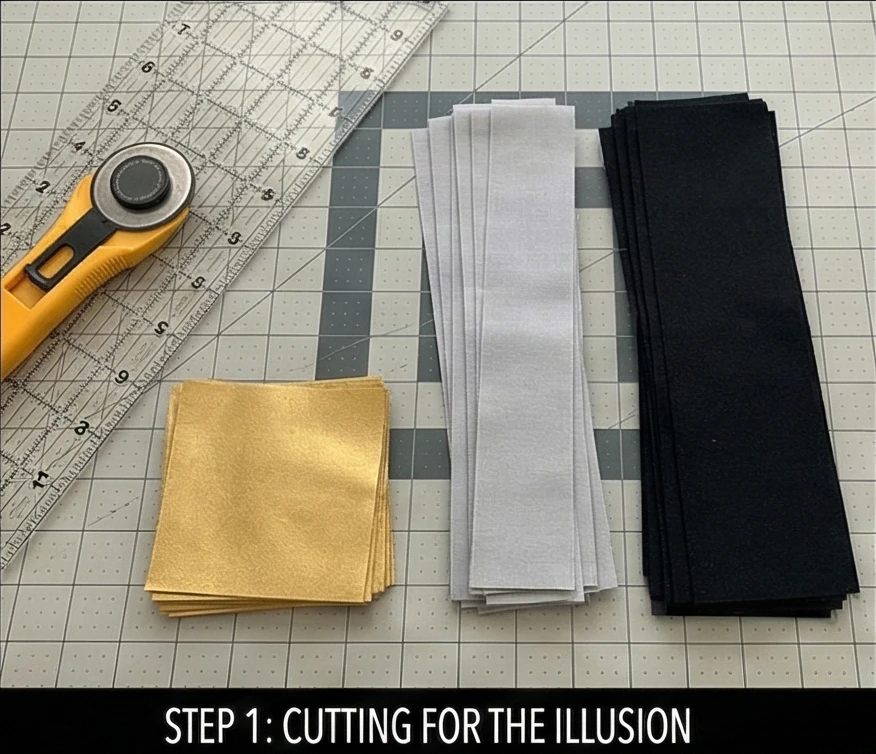
Step 2: Constructing the Curved Block
We are building 6 large blocks.
- Round 1:
- Sew a Thin (Light) strip to the Right. Press outward.
- Sew a Thin (Light) strip to the Top. Press outward.
- Sew a Wide (Dark) strip to the Left. Press outward.
- Sew a Wide (Dark) strip to the Bottom. Press outward.
- Rounds 2 & 3: Continue spiraling outward, maintaining the pattern: Thin/Right, Thin/Top, Wide/Left, Wide/Bottom.
- Finish: Continue until the block measures roughly 11.5″ x 11.5″.
- Visual: The Gold center should appear pushed high into the Top-Right corner.
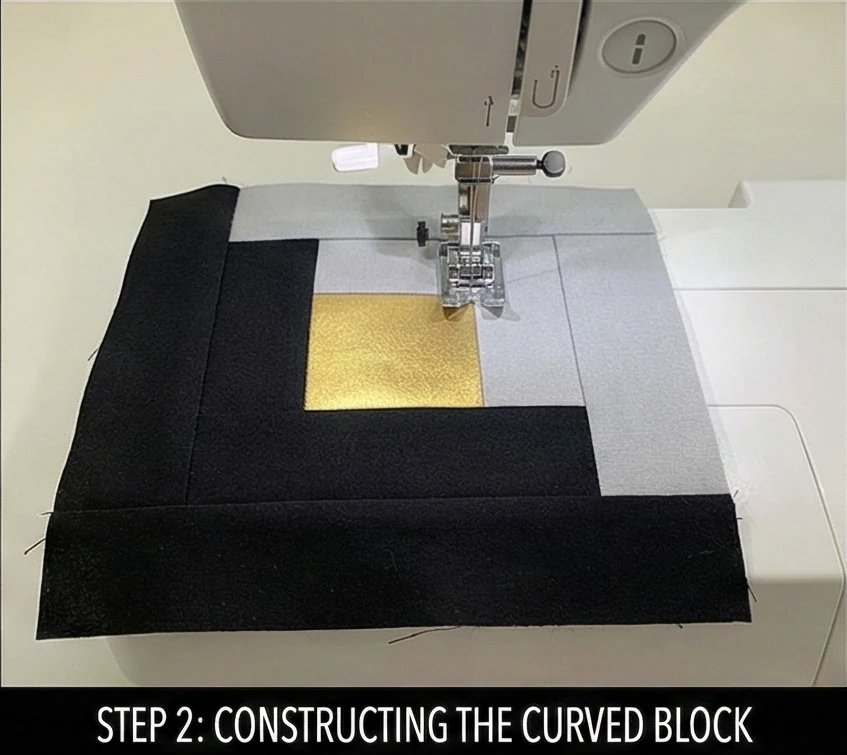
Step 3: The “Totem” Layout
Vertical stacking is key for an accent panel.
- Layout: Arrange the 6 blocks in a single vertical column (1 block wide x 6 blocks high).
- Rotation: Orient every block exactly the same way (e.g., Wide curves at the bottom-left).
- Effect: The dark, wide strips will connect to form a continuous, wave-like spiral that runs from the floor to the ceiling. It looks like a twisted wrought-iron column.
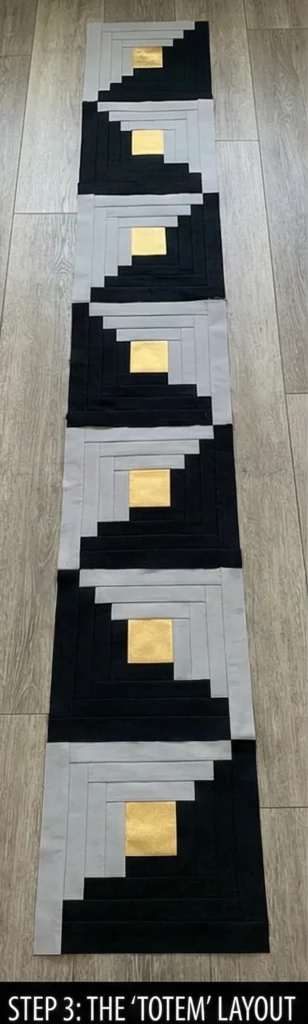
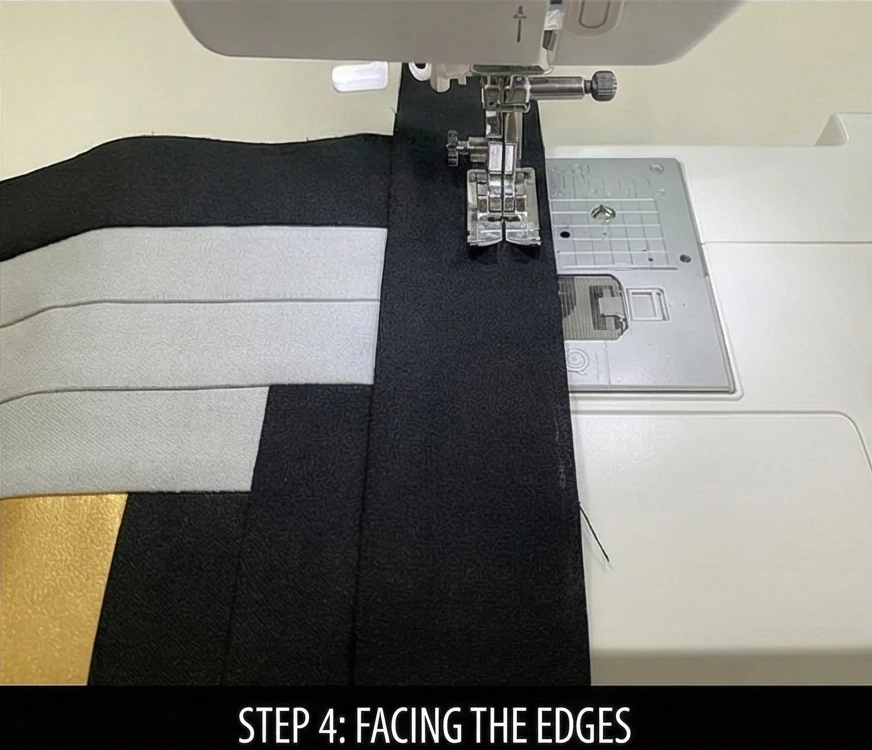
Step 4: Facing the Edges (Frameless Finish)
A binding strip looks too “quilty.” We want a clean art edge.
- Assembly: Sew the 6 blocks together into a long strip. Press seams open.
- The Facing: Cut 2.5-inch strips of the Black fabric. Sew them to the front of the panel edges (Right Sides Together).
- Turn: Flip the facing strips completely to the back of the panel and press.
- Result: The edge is crisp and clean, and the curve pattern runs right to the edge of the panel.
Step 5: “Structure” Quilting
Wall panels must hang straight.
- Baste: Sandwich the layers (Top, Batting, Backing).
- Quilt: Stitch straight vertical lines through the entire panel.
- Spacing: Stitch lines about 1/2 inch apart.
- Why: Vertical quilting acts like the grain in wood—it provides structural integrity so the panel doesn’t stretch or warp under its own weight while hanging.
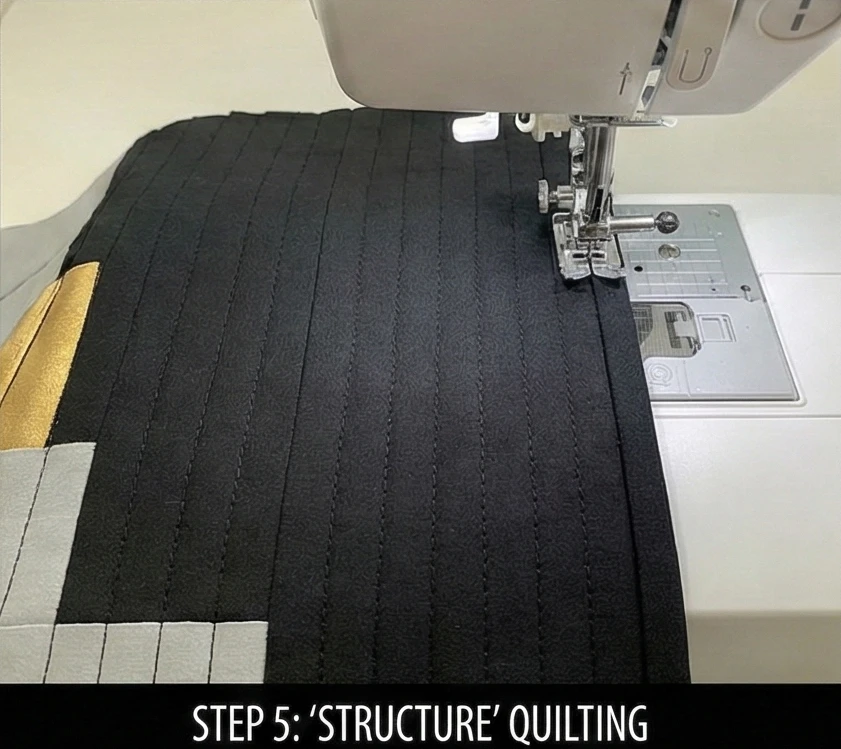
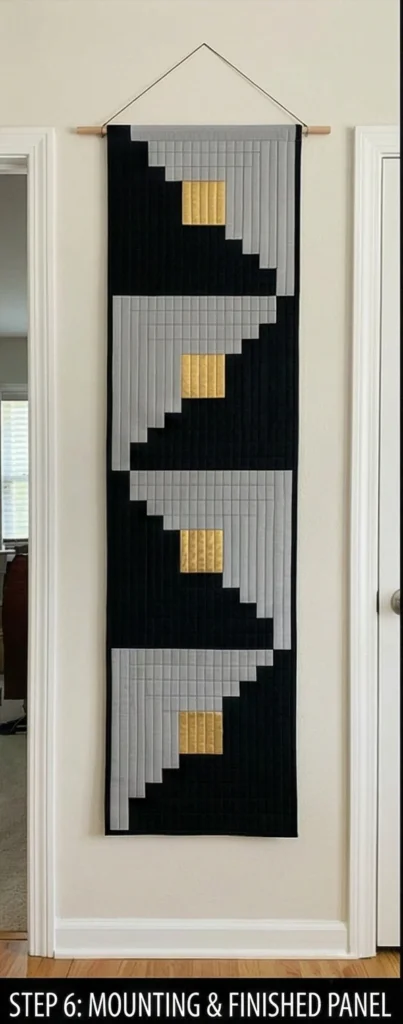
Step 6: The Mounting System
- Sleeve: Hand-sew a 4-inch wide fabric tube (sleeve) to the top back of the panel.
- Dowel: Insert a flat wooden slat or a round dowel cut to 21 inches.
- Hang: Attach a cord to the dowel ends, or drill two holes in the slat for nails.
- Pro Tip: Add a second sleeve and a heavy metal rod at the bottom of the panel. This weight pulls the panel taut, ensuring it hangs perfectly flat against the wall like a tapestry.
Usability Note: Textile wall panels are excellent for “softening” modern rooms with hard surfaces (tile floors, glass windows). They absorb echo and make a room feel quieter and more intimate, combining the function of acoustic foam with the beauty of fiber art.
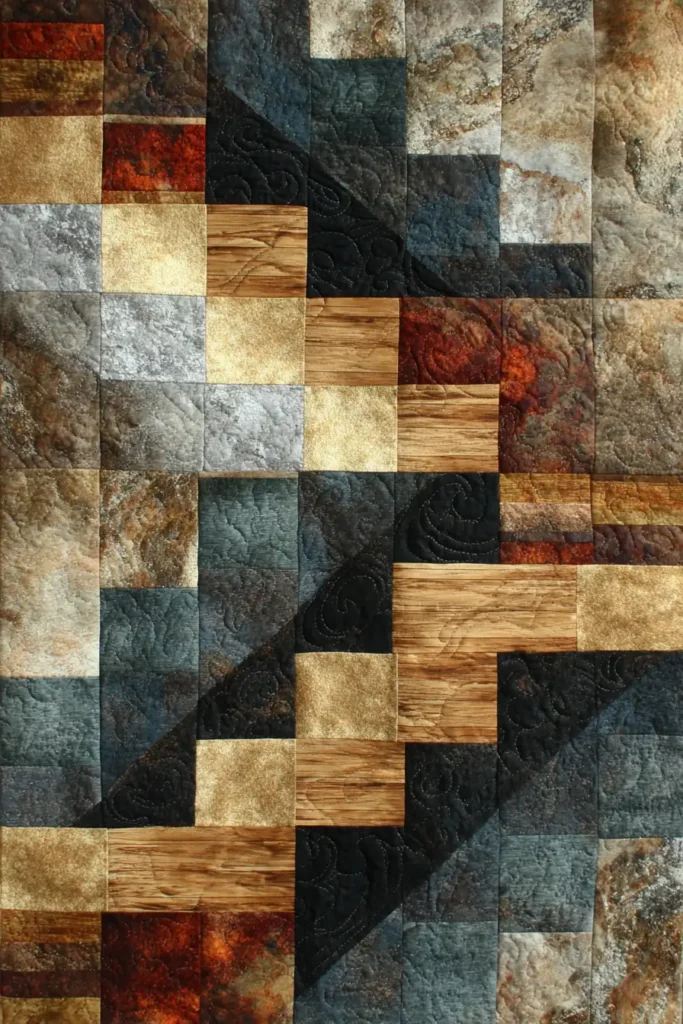
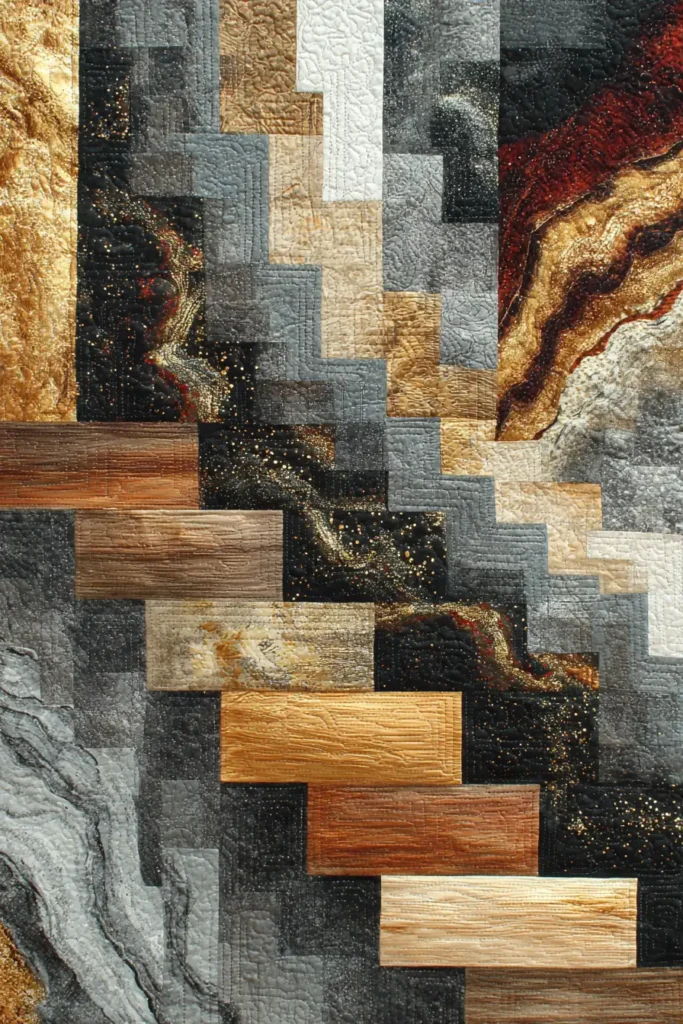
20. Festive Log Cabin Quilted Christmas Stockings for Holiday Charm
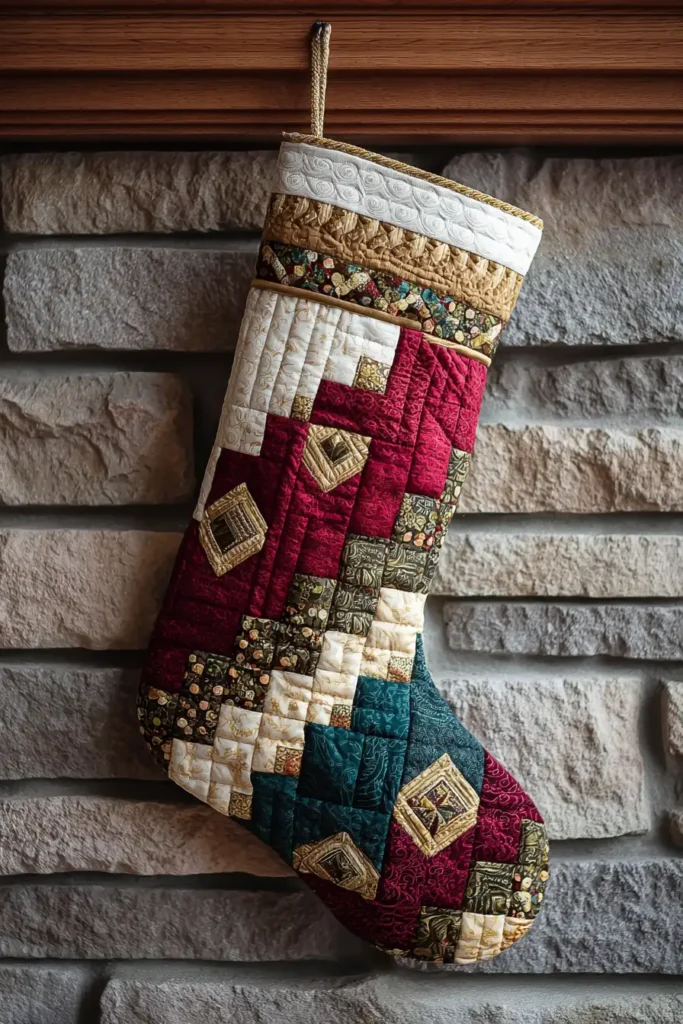
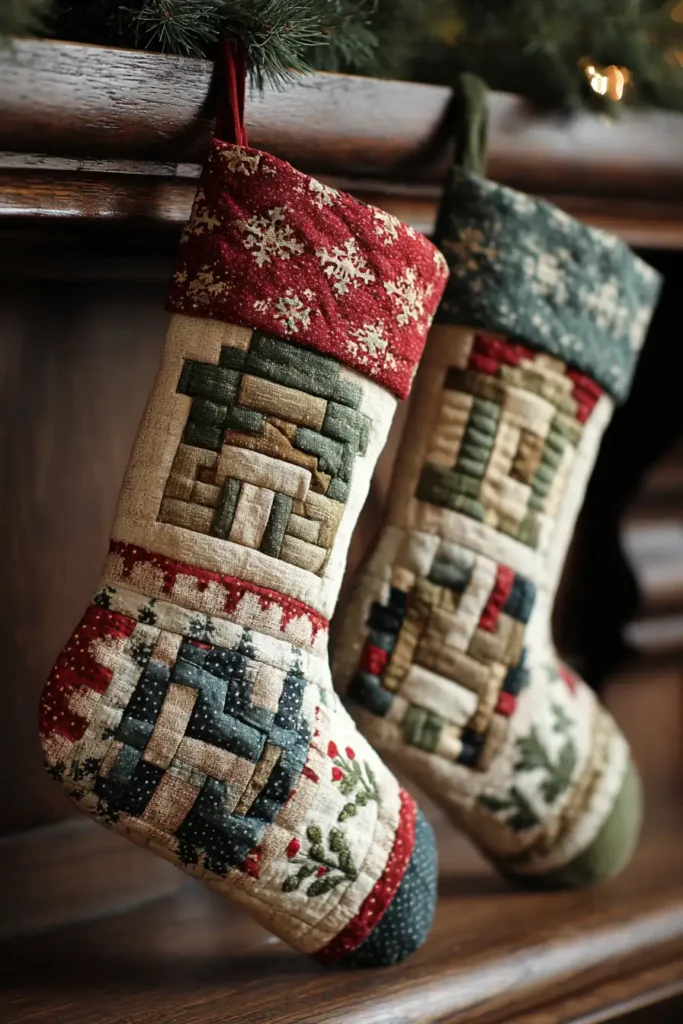
“The Yuletide Hearth” Log Cabin Stocking
A Christmas stocking is more than a gift bag; it is a decoration that hangs for weeks, signaling the season’s anticipation. The “Yuletide Hearth” stocking transforms the humble Log Cabin block into a luxurious holiday heirloom. By rotating the block 45 degrees, the central square becomes a diamond, perfectly centered on the “cuff” or the main body of the boot. We will use a Velvet Cuff and Metallic Gold Piping to elevate the patchwork into something worthy of the mantelpiece.
Finished Dimensions: Large Stocking, 20″ tall x 8″ wide (at the opening).
Materials Needed:
- Fabric A (The Center Star): Scraps of Gold Lamé or Yellow Silk.
- Fabric Group B (Lights): 1/4 yard of Cream with Gold Stars or White-on-White Snowflake.
- Fabric Group C (Darks): 1/4 yard of Deep Crimson, Burgundy, or Forest Green.
- Cuff Fabric: 1/8 yard of White Faux Fur or Green Velvet.
- Lining: 1/2 yard of basic cotton (red or green).
- Batting: Fusible Fleece (gives the stocking body so it doesn’t droop when empty).
- Notions: Gold piping (optional), ribbon for the loop, stocking template (paper).
Cultural Backstory: The tradition of hanging stockings dates back to the legend of Saint Nicholas. As the story goes, he dropped three bags of gold down the chimney of a poor man’s house, and they landed in the girls’ stockings, which were drying by the fire. The Log Cabin block, with its central red square representing the hearth fire, is poetic—it literally places the “fire” on the stocking that hangs by the fire.
Step 1: Making the “Diamond” Block
We need one main block for the stocking body.
- Center: Cut a 2.5″ square of Fabric A (Gold).
- Strips: Cut Light and Dark strips 1.5 inches wide.
- Construct: Build a standard Log Cabin block (Lights on top/right, Darks on bottom/left).
- Size: Keep adding rounds until the block measures roughly 10.5″ x 10.5″.
- Visual: This square block will be rotated to look like a diamond on the finished stocking.
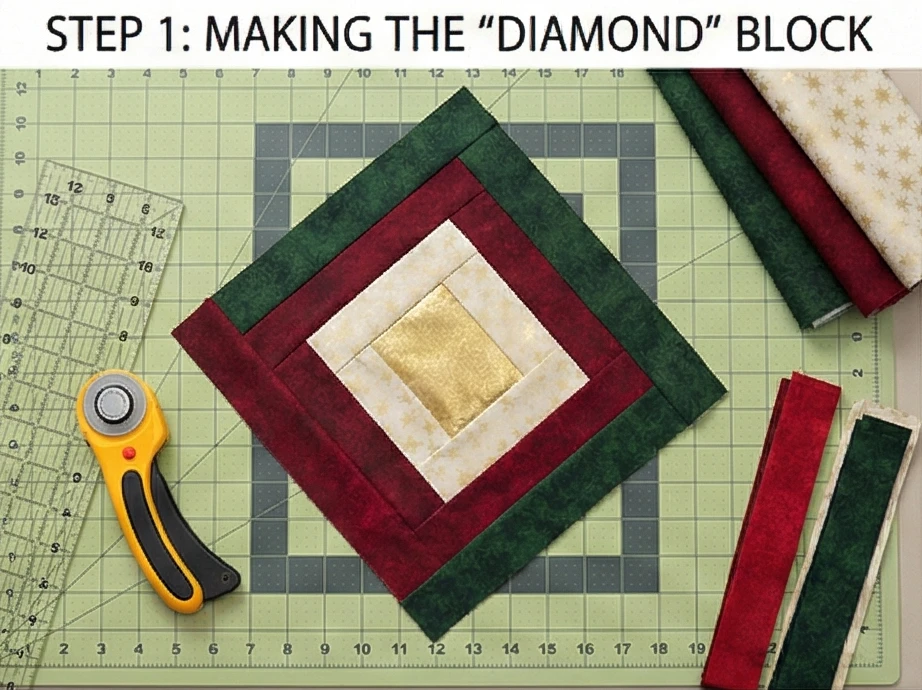
Step 2: The Stocking Template
Don’t guess the shape.
- Draft: Draw a stocking shape on paper (or download a template). It should be about 20 inches tall.
- Placement: Place the template over your Log Cabin block.
- Position: Position the block diagonally so the Gold Center is right in the middle of the “Boot” section (the widest part).
- Fillers: The block likely won’t cover the entire stocking shape (the toe and top might be empty).
- Patching: Sew extra strips of Red or Green fabric to the edges of your block until it is large enough to cover the entire paper template.
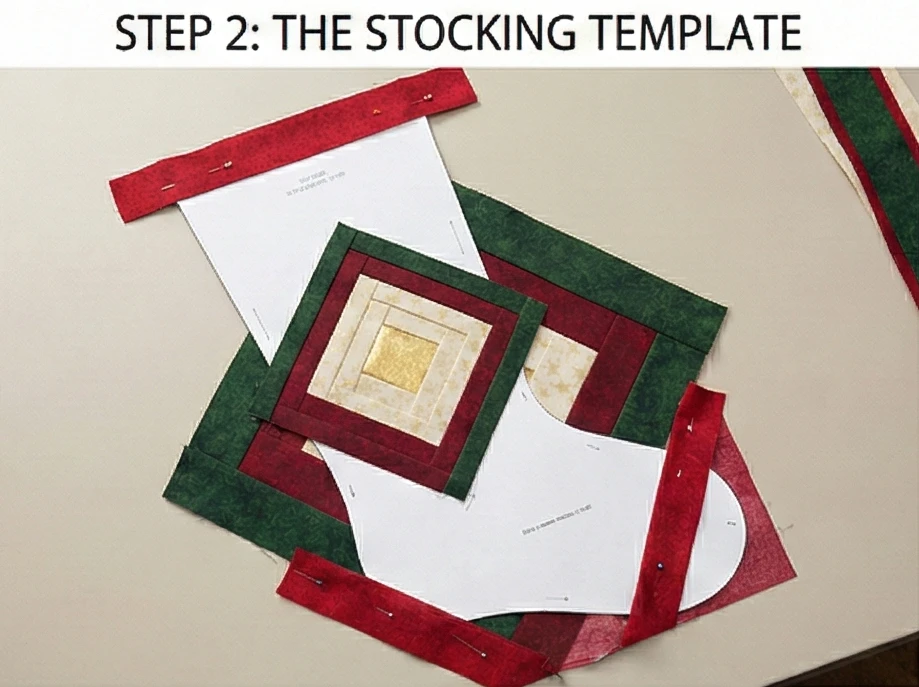
Step 3: Quilting the “Boot”
Quilting adds structure so the stocking holds its shape.
- Fuse: Iron the Fusible Fleece to the wrong side of your patchwork top.
- Quilt: Stitch “in the ditch” around the spiral logs.
- Glitter: For extra festive flair, use Gold Metallic Thread for the quilting.
- Cut: Now, lay your template on the quilted fabric and cut out the stocking shape.
- Backing: Cut a matching stocking shape from a solid fabric (e.g., Red Velvet) for the back of the stocking.
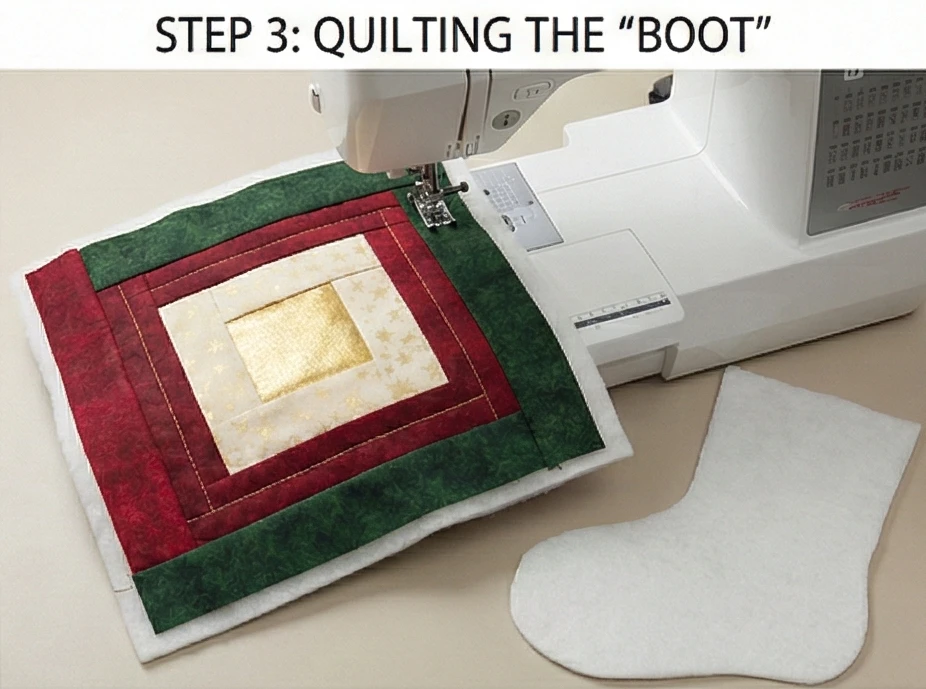
Step 4: Assembly
- The Loop: Fold a 6-inch piece of ribbon in half. Baste it to the top-left corner (the heel side) of the stocking back.
- Sew Body: Place the Quilted Front and the Velvet Back Right Sides Together.
- Stitch: Sew around the perimeter (sides, toe, heel). Leave the top open.
- Turn: Turn right side out and press carefully.
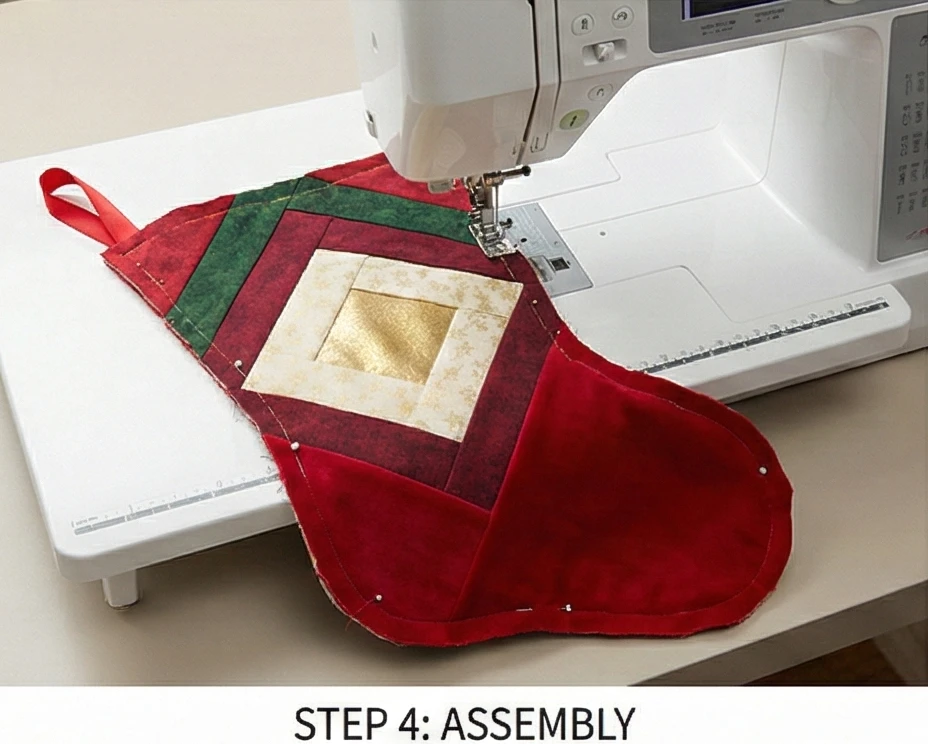
Step 5: The Lining
A lined stocking feels finished and expensive.
- Cut: Cut two stocking shapes from your Lining fabric.
- Sew: Place them Right Sides Together and sew around the perimeter. Leave the top open. Do not turn right side out.
- Insert: Slip the Lining inside the outer stocking. (Wrong sides will be touching). Baste the top raw edges together.
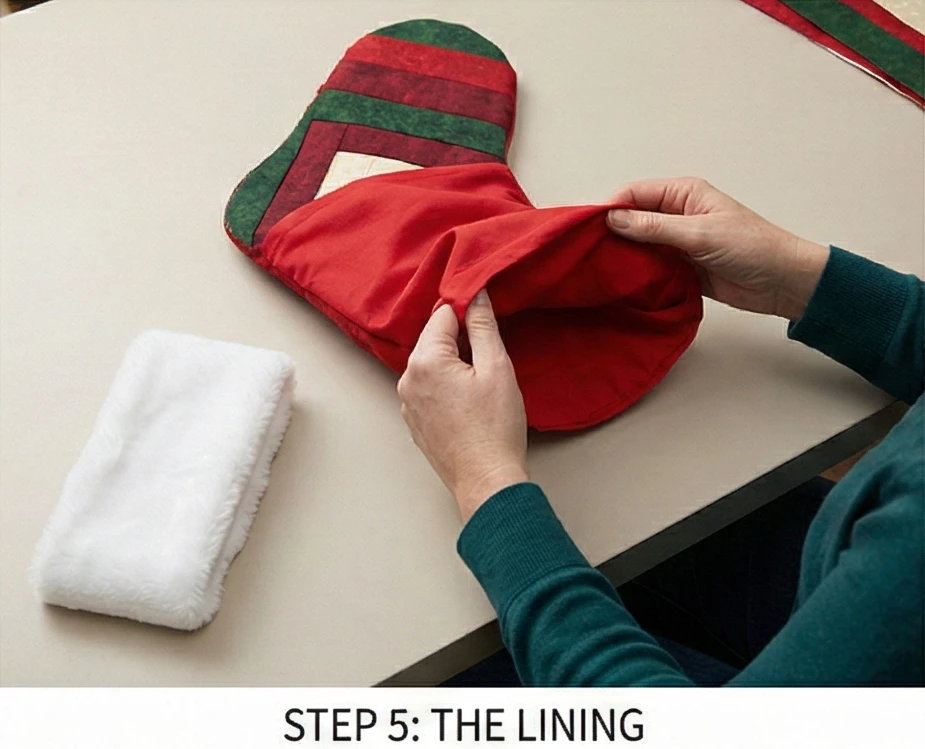
Step 6: The Luxe Cuff
The crowning glory.
- Cut Cuff: Cut a rectangle of Faux Fur or Velvet measuring 9″ x 13″ (adjust width to match your stocking opening + 1 inch seam allowance).
- Sew Loop: Sew the short ends together to make a tube.
- Attach:
- Slip the tube inside the stocking (Right side of cuff touching the Lining side of stocking).
- Sew around the top rim.
- Flip: Pull the cuff out and fold it down over the front of the stocking.
- Result: The raw seam is hidden inside the fold, and you have a fluffy, luxurious cuff topping off your quilted masterpiece.

Usability Note: If you use Faux Fur, it will shed “hair” everywhere when you cut it. Tip: Use a razor blade or craft knife to cut only the backing fabric of the fur from the back side. Do not use scissors to snip through the fur itself. This keeps the long fibers intact for a fluffy finish.

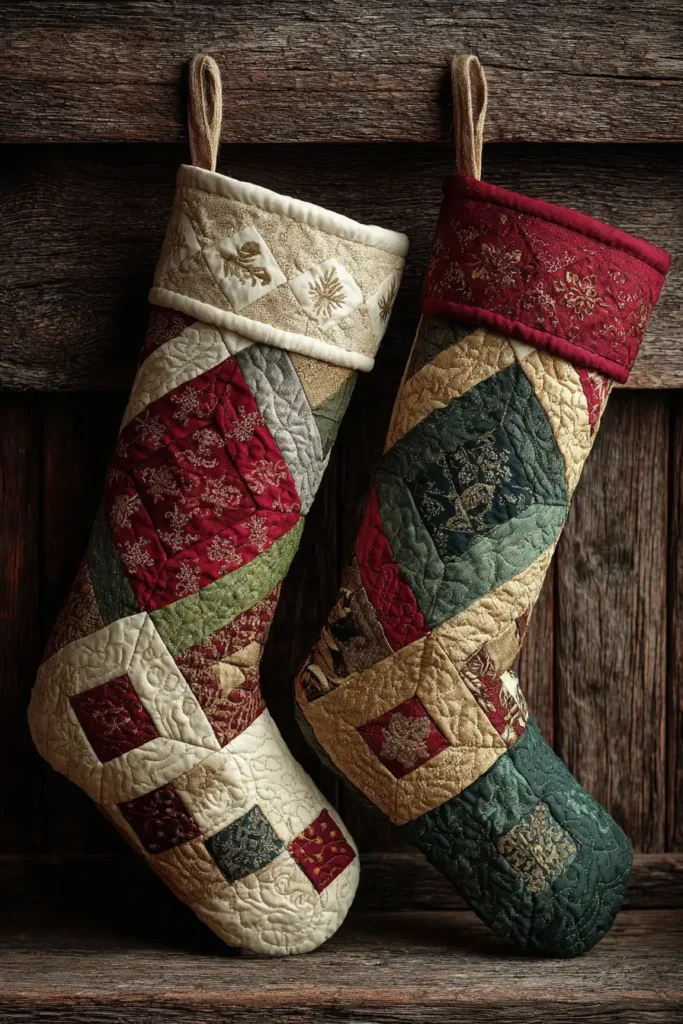
Conclusion
Embracing these Timeless & Elegant Log Cabin Quilt Pattern Ideas allows you to curate a home that is as inviting as it is beautiful. By integrating these designs into your decor, you are weaving a thread of continuity throughout your living spaces, connecting the Cozy Bedroom to the lively dining area with a cohesive visual language. The projects highlighted here, from the grand statement of an Elegant Bed Cover to the subtle charm of Kitchen Linens, demonstrate that the Log Cabin pattern is not just a relic of history but a dynamic tool for modern styling. These quilts serve as soft architecture, defining spaces with their geometric precision while softening edges with their tactile warmth.
The impact of these designs extends beyond their visual appeal; they also enhance your home’s functionality and comfort. A Stylish Sofa Cover protects your furniture while inviting guests to sit and relax, just as a Rustic Table Runner sets the stage for memorable family meals. The inclusion of artistic elements, such as Modern Wall Decor and Decorative Panels, proves that quilting is a legitimate form of fine art that belongs on your walls as much as your beds. These pieces act as focal points, drawing the eye and sparking conversation, all while adding sound-dampening warmth to your rooms.
Ultimately, creating a home filled with these Log Cabin projects is about celebrating the art of living well. Whether you are stitching a DIY Pillow Cover for a quick weekend refresh or committing to a Heirloom-Quality Bedspread, you are investing in the atmosphere of your sanctuary. These patterns stand the test of time because they are adaptable, forgiving, and endlessly creative. Let this collection inspire you to surround yourself with handmade luxury, ensuring every corner of your home—from the entryway to the nursery—radiates peace, style, and enduring comfort.
