
20 Everyday Comfortable and Stylish Ideas: The Perfect Quilt Pattern for Girls
Finding the perfect Quilt Pattern for Girls is about capturing a moment of transition—bridging the gap between childhood wonder and emerging personal style. Unlike nursery bedding, a quilt for a growing girl needs to be a statement piece that reflects her unique personality while providing “everyday comfortable” utility for sleepovers, study sessions, and restful nights. This collection explores designs that evolve with her, from the whimsical magic of Whimsical Mermaid Scale Quilt Patterns and Enchanted Forest Themes for younger dreamers to the sophisticated edge of Boho Chic Patchwork and Modern Geometric Designs for stylish teens. These ideas show that her bedroom can be a sanctuary of self-expression, blending durable materials with a fresh, fun, and undeniably cool aesthetic.
Quilt Pattern for Girls
Contents
- 1 Quilt Pattern for Girls
- 2 1. Soft Pastel Rainbow Quilt Pattern for Girls’ Dreamy Bedrooms
- 3 2. Boho Chic Patchwork Bed Covers for Stylish Teen Rooms
- 4 3. Modern Geometric Quilt Designs for a Stylish Teen Room
- 5 4. Whimsical Mermaid Scale Quilt Patterns for Under-the-Sea Decor
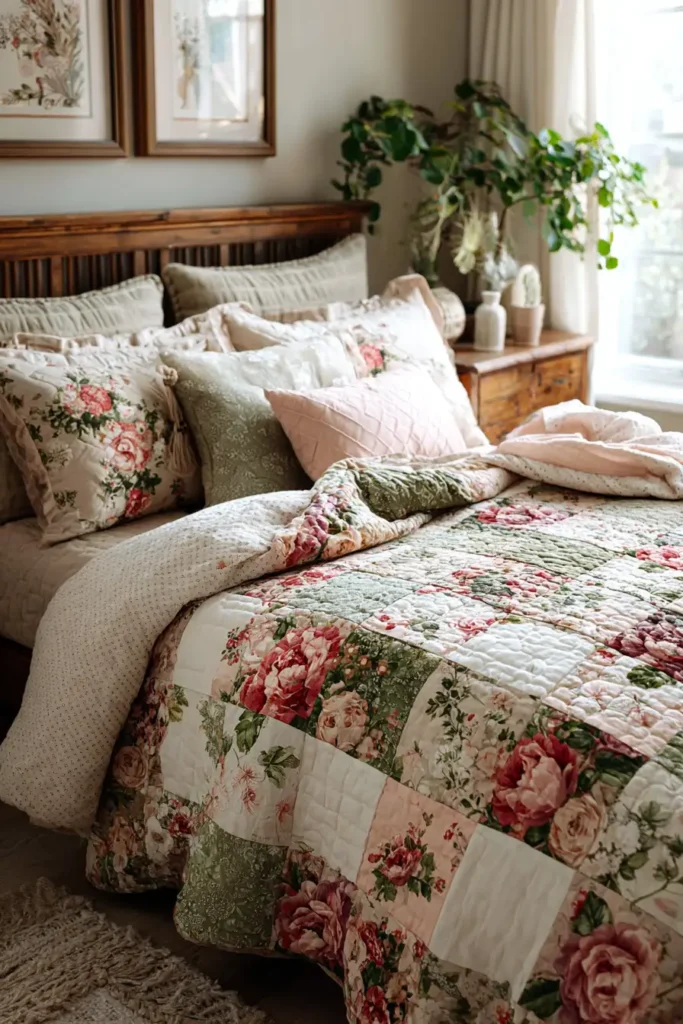
- 6 5. Cozy Floral Quilt Patterns for Girls’ Comfortable Bedrooms
- 7 6. Sweet Heart Patchwork Quilt Patterns for Everyday Comfort
- 8 7. Stylish Unicorn Quilt Ideas for Everyday Girls’ Bed Covers
- 9 8. Starry Night & Celestial Quilt Ideas for Magical Sleep
- 10 9. Fun and Funky Rag Quilt Bedding for Textured Warmth
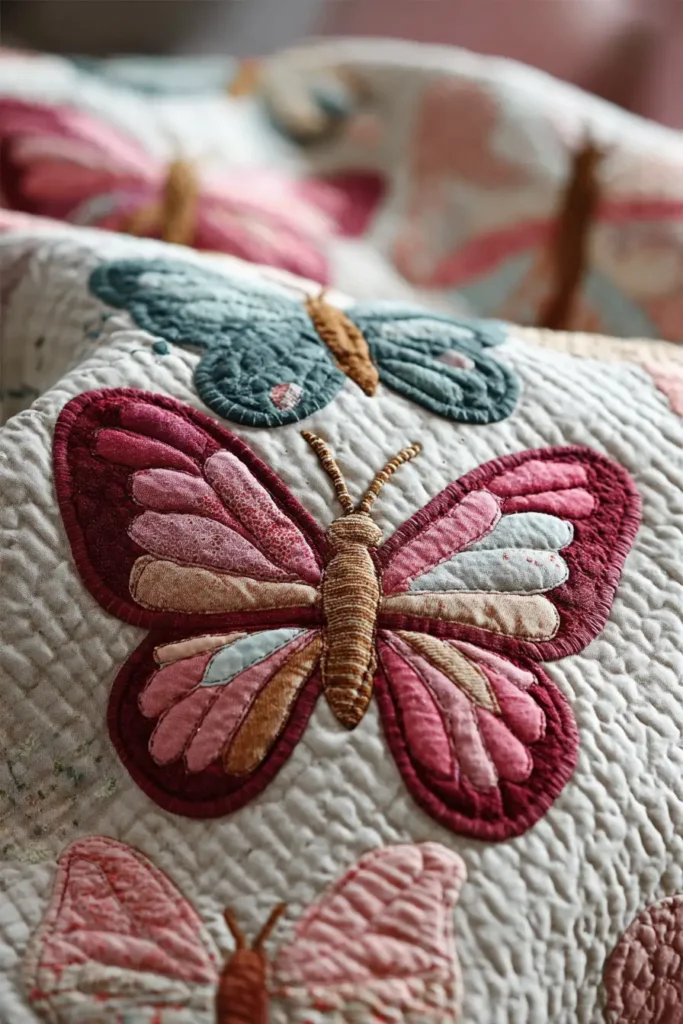
- 11 10. Butterfly Garden Quilt Ideas for Nature-Loving Girls
- 12 11. Upcycled Memory T-Shirt Quilt Ideas for Keepsake Bedding
- 13 12. Plush Minky-Backed Quilt Throws for Sleepover Parties
- 14 13. Enchanted Forest Themed Bed Covers & Pillow Covers
- 15 14. Vibrant Scrappy Star Bed Runners for a Pop of Color
- 16 15. Tropical Palm Quilt Patterns for Comfortable Girls’ Bed Covers
- 17 16. Decorative Cloud and Star Pillow Covers for Cozy Reading Nooks
- 18 17. Princess Crown Quilt Designs for Stylish Girls’ Bedding
- 19 18. Polka Dot Quilt Patterns for Stylish Girls’ Quilts
- 20 19. Animal Print Quilt Ideas for Everyday Girls’ Bed Covers
- 21 20. Bohemian Fringe Quilt Ideas for Cozy Girls’ Bed Runners
- 22 Conclusion
The versatility of these patterns ensures that the bedroom remains a cozy retreat regardless of changing trends. We delve into Soft Pastel Rainbow Quilt Patterns that add a dreamy, calming vibe essential for a good night’s sleep, alongside Vibrant Scrappy Star Bed Runners that inject a pop of energy into the space. The selection moves beyond just the bed, offering functional decor solutions like Decorative Cloud and Star Pillow Covers for reading nooks and Plush Minky-Backed Throws perfect for movie nights with friends. Whether she loves nature, expressed through Butterfly Garden or Tropical Palm motifs, or craves the texture of Fun and Funky Rag Quilt Bedding, each concept is designed to be lived in and loved daily.
Ultimately, these quilt ideas are about creating a space where she feels completely at home. The designs cater to every facet of a girl’s life, from the imaginative play inspired by Princess Crown and Stylish Unicorn patterns to the sentimental value of Upcycled Memory T-Shirt Quilts that preserve her favorite milestones. By incorporating stylish details like Bohemian Fringe or classic Polka Dots, you are not just making a blanket; you are crafting a backdrop for her memories. This guide invites you to sew a source of comfort that supports her growth, offering a warm, stylish hug at the end of every busy school day.
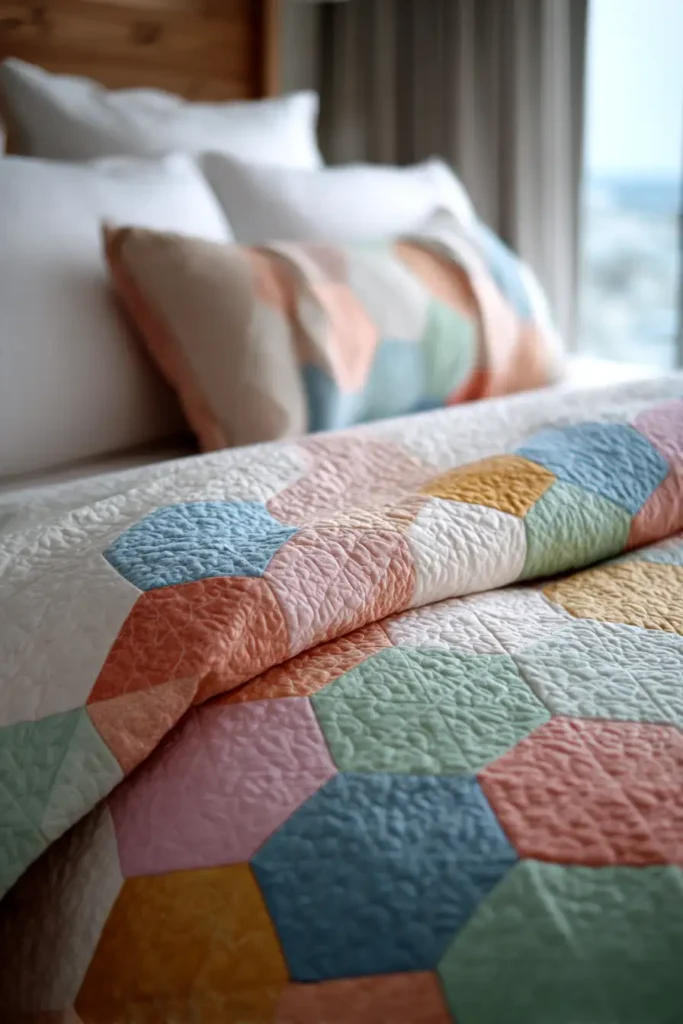
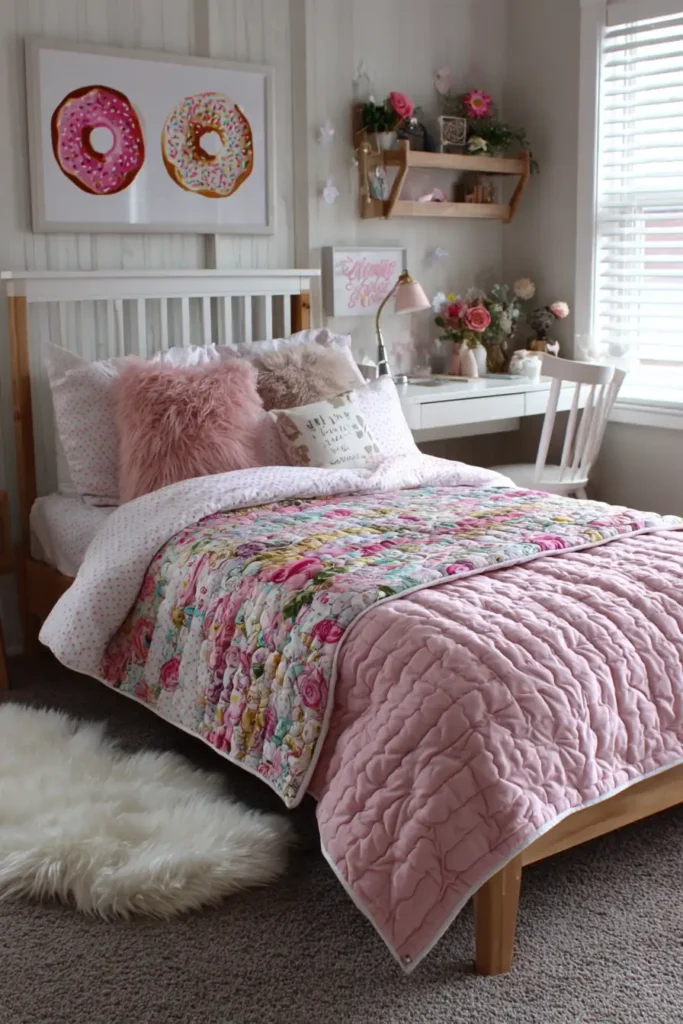
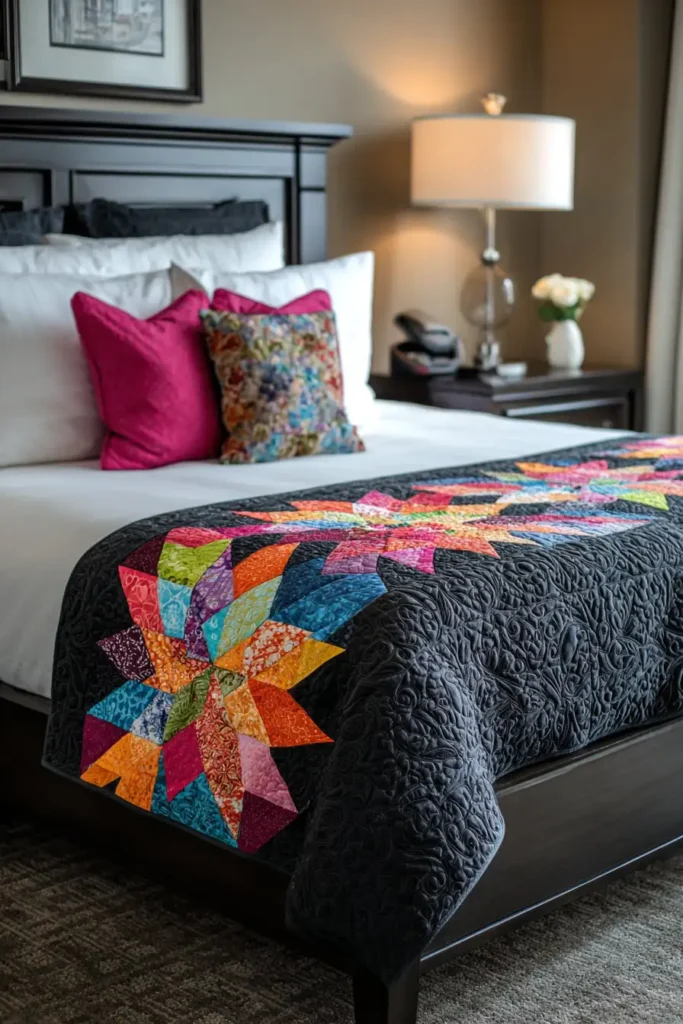
1. Soft Pastel Rainbow Quilt Pattern for Girls’ Dreamy Bedrooms
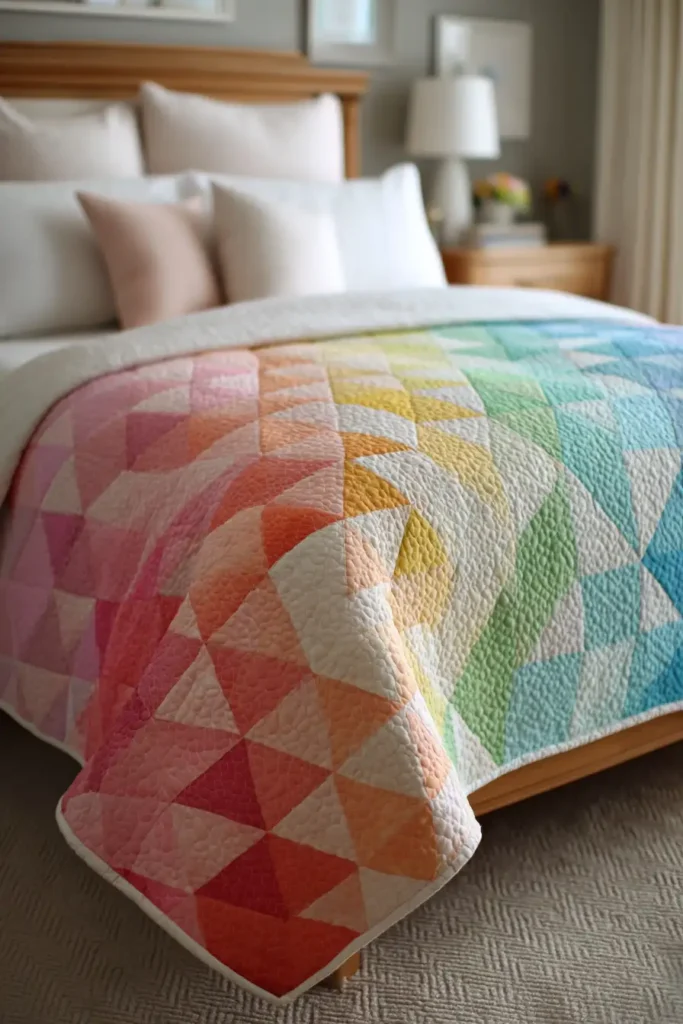
The “Pastel Prism” Ombré Triangle Quilt
For a girl’s bedroom, you often want a design that bridges the gap between “childhood magic” and “sophisticated style.” The Pastel Prism does exactly that. Instead of the stark primary colors of a traditional rainbow, this pattern uses a soft, flowing gradient (ombré) of Half-Square Triangles (HSTs). The colors cascade diagonally across the bed—from Blush Pink to Peachy Coral, Lemon Chiffon, Mint Green, and Periwinkle Blue—floating against a crisp white background. It captures the feeling of a sun-drenched prism or a soft watercolor painting.
Finished Dimensions: Twin Bed Size, 64″ x 88″.
Materials Needed:
- Fabric A (The Rainbow): 12 to 15 Fat Quarters in a spectrum of pastels (Blush, Peach, Buttercup, Mint, Aqua, Lavender).
- Fabric B (Background): 3.5 yards of Bright White or White-on-White Dot (for subtle texture).
- Backing: 5 yards of a soft floral sheet or wide-back quilting cotton.
- Batting: 100% Cotton (keeps it breathable for sleeping).
- Notions: Rotary cutter, large square ruler, design wall (or a clean floor).
Cultural Backstory: The “Charm Quilt” (a quilt made from hundreds of unique fabrics) was a craze in the 1880s, often made from scraps collected from friends and family. This modern version adapts that tradition using “Color Theory” gradients. Studies in color psychology suggest that soft, cool pastels (like mint and lavender) lower heart rates and promote deeper sleep, making this palette scientifically suited for a growing girl’s bedroom.
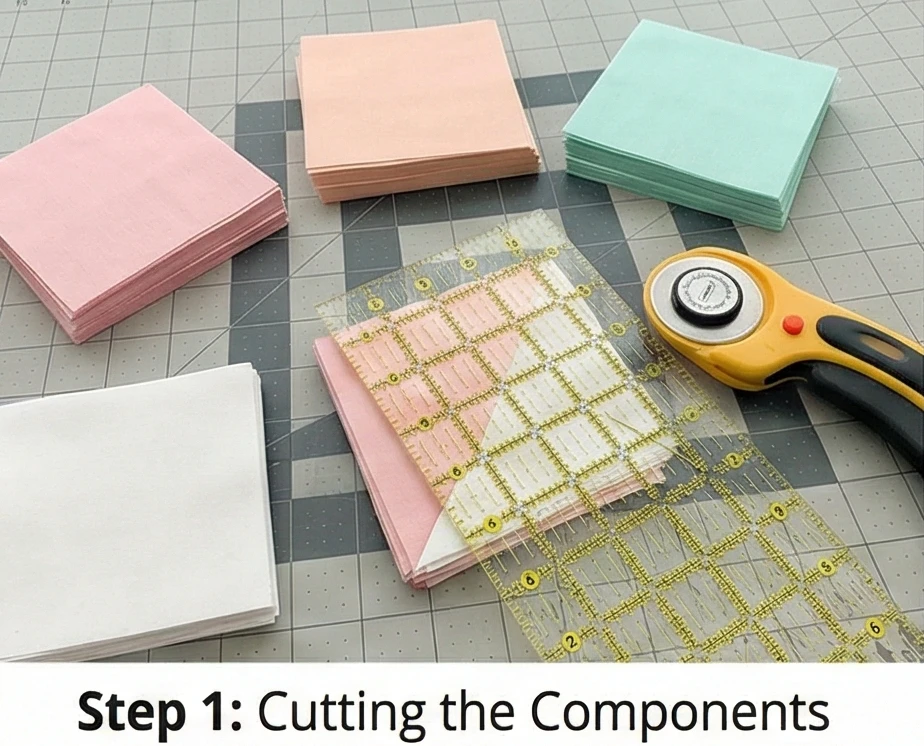
Step 1: Cutting the Components
We are making Half-Square Triangles (HSTs). The finished block size will be 4 inches.
- Cut Color Squares: From each of your Pastel Fat Quarters, cut 8 squares measuring 5″ x 5″. (Total colored squares needed: approx 160).
- Cut Background Squares: From your White fabric, cut 160 squares measuring 5″ x 5″.
- Tip: Starch your fabric before cutting. Triangles have “bias” edges that stretch easily; starch keeps them stiff and square.
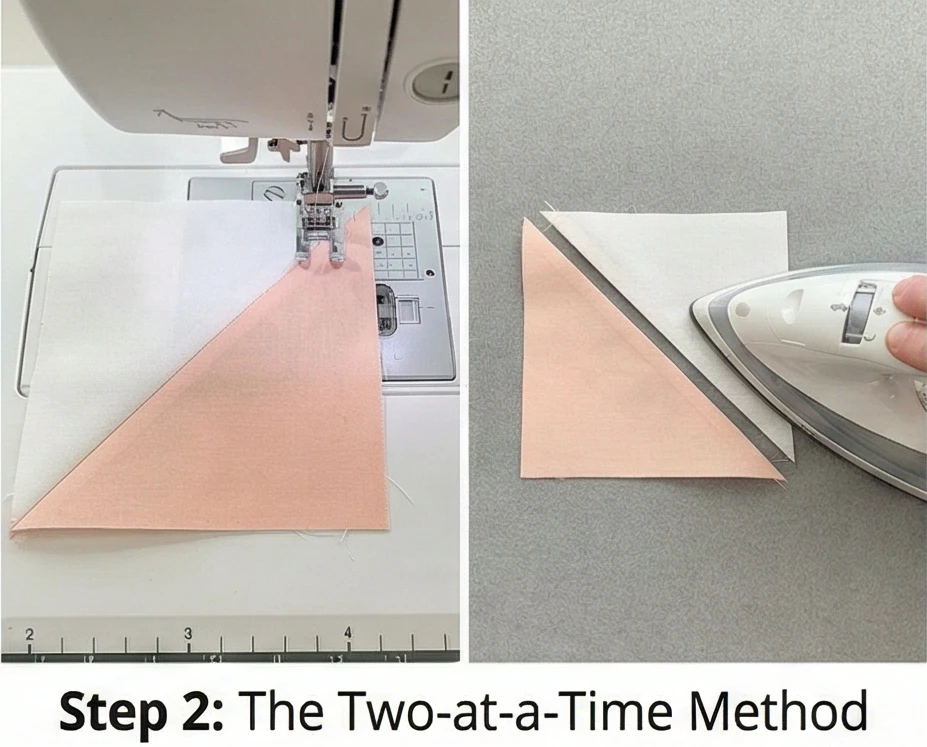
Step 2: The Two-at-a-Time Method
Turning squares into triangles.
- Mark: Draw a diagonal line on the back of every White square.
- Pair: Place a White square on top of a Pastel square (Right Sides Together).
- Sew: Stitch a line 1/4 inch away from the drawn center line on both sides.
- Cut: Cut directly along the drawn center line.
- Yield: You now have 2 HST units.
- Press & Trim: Press the seam toward the colored fabric. Trim the square to exactly 4.5″ x 4.5″.
- Quantity: You need roughly 320 finished HSTs for a Twin-size layout (16 blocks wide x 22 rows long = 352 blocks total. Adjust counts based on desired length.
Step 3: The Gradient Layout (The Art Phase)
This is where the magic happens. You need floor space.
- Grid: Plan for 16 blocks wide by 22 blocks long.
- Sort: Organize your HSTs by color families (Pinks, Oranges, Yellows, Greens, Blues, Purples).
- Arrange: Place the blocks so the colors flow diagonally.
- Top Left: Start with Pinks.
- Middle: Transition to Yellows/Greens.
- Bottom Right: End with Blues/Purples.
- Orientation: Rotate the HSTs so they all point in the same direction (e.g., pointing up like pyramids) OR scatter them for a “confetti” look. The “Pyramid” look is more orderly and elegant.

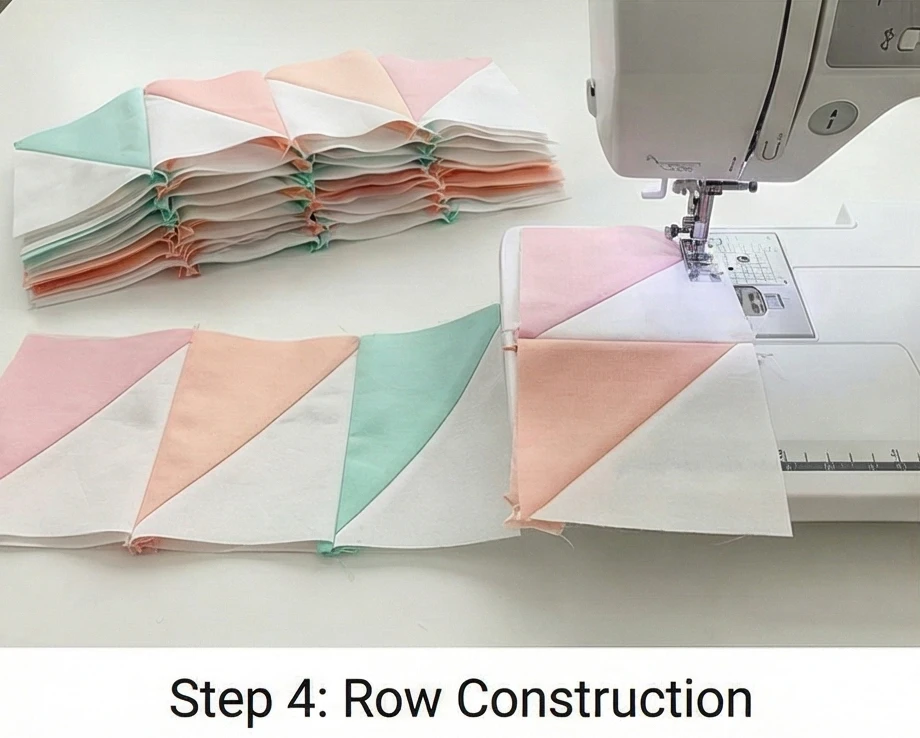
Step 4: Row Construction
- Stack: Once happy with the gradient, stack the blocks for Row 1, label it “Row 1,” and take it to the machine.
- Sew: Stitch the blocks together into a row.
- Pressing Strategy:
- Odd Rows (1, 3, 5…): Press seams to the Left.
- Even Rows (2, 4, 6…): Press seams to the Right.
- Why: When you join the rows later, the seams will “nest” (lock) against each other, giving you perfectly sharp points.
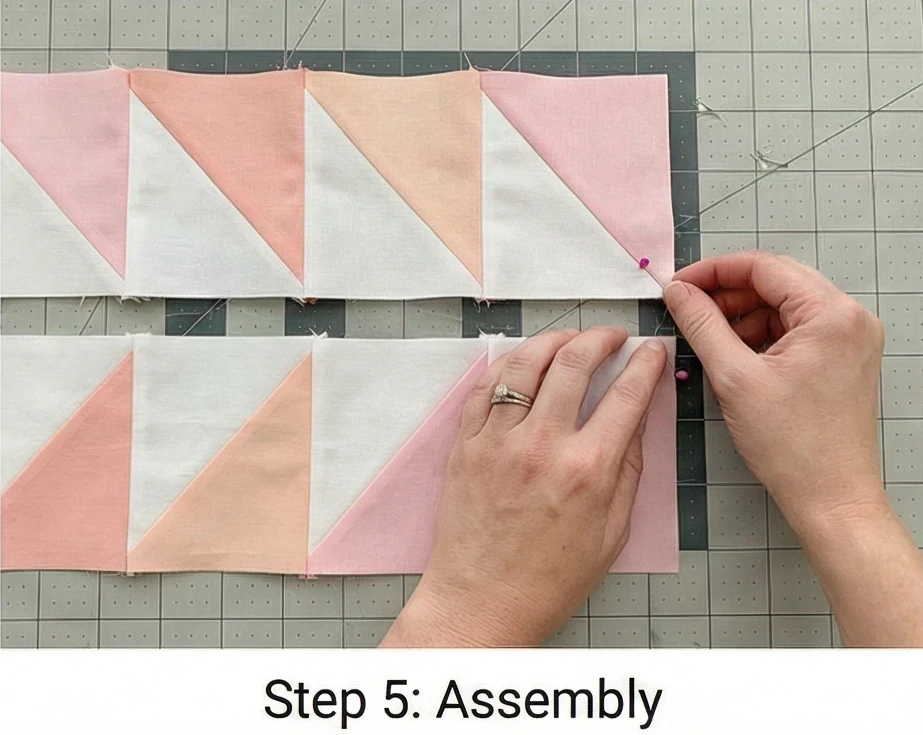
Step 5: Assembly
- Join Rows: Pin Row 1 to Row 2. Match the seams carefully. Stitch.
- Continue: Add each subsequent row, checking to ensure your color gradient doesn’t get mixed.
Step 6: “Cloud” Quilting
Geometric triangles need organic quilting to soften them.
- Baste: Sandwich Backing + Batting + Top.
- Quilt: Use a Free Motion stippling pattern or “Loop-de-Loops.”
- Style: Large, airy loops look like clouds. This texture contrasts beautifully with the triangles’ sharp angles and adds to the “dreamy” vibe.
- Thread: Use a white thread so it blends into the background and sparkles on the colored sections.

Step 7: The Scrappy Binding
A fun finish.
- Scraps: Take the leftover strips from your pastel fat quarters.
- Join: Sew them together end-to-end to create a long, multi-colored rainbow strip.
- Bind: Use this strip to bind the quilt. It creates a frame that summarizes all the colors used inside the quilt.
Usability Note: For a girl’s room, durability is key. This quilt uses standard cotton and dense piecing, making it suitable for weekly washing. As she grows, the pastel palette transitions easily from a “princess” theme to a “preppy/boho” teen room just by changing the throw pillows.
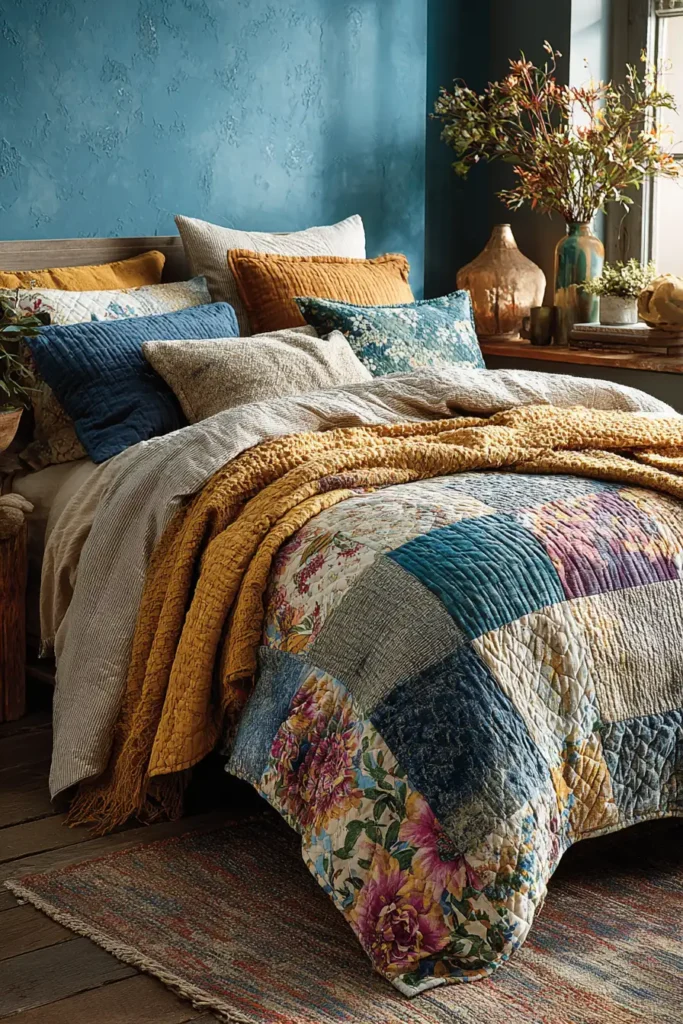
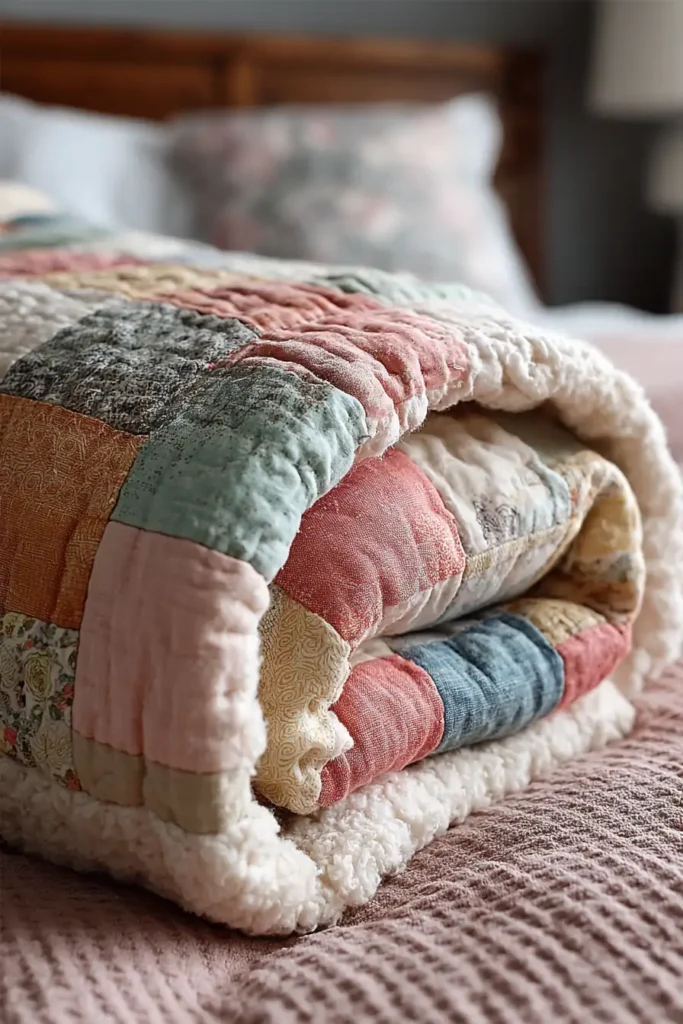
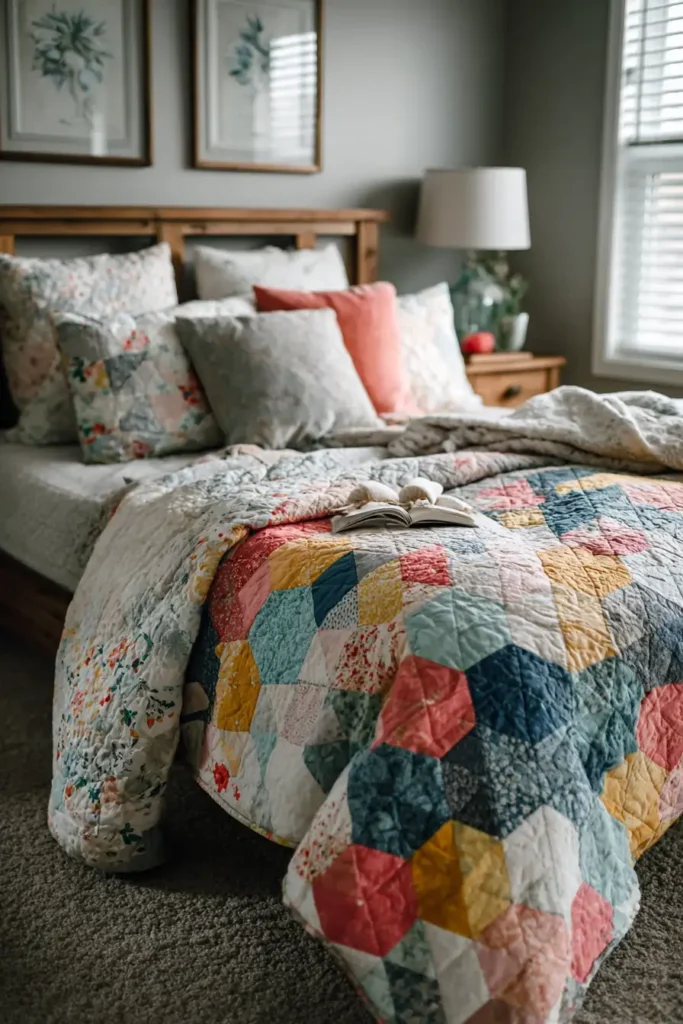
2. Boho Chic Patchwork Bed Covers for Stylish Teen Rooms
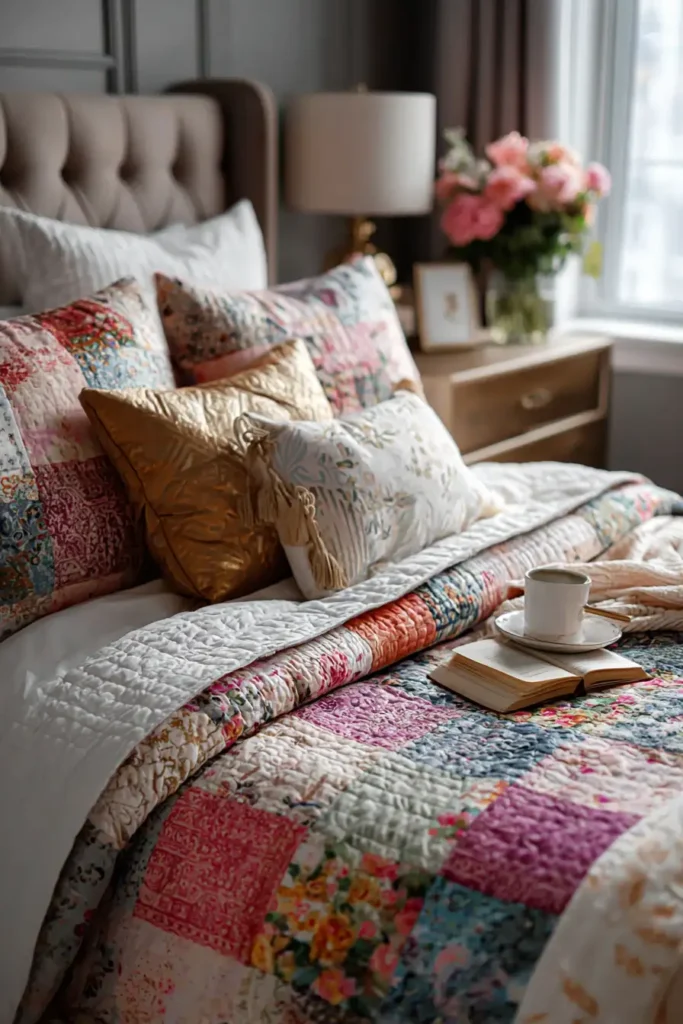

The “Festival Fields” Big Stitch Patchwork
Teenagers often crave a bedroom that feels personal, eclectic, and “lived-in” rather than perfectly coordinated. The “Festival Fields” pattern embraces the “Boho Chic” aesthetic by mixing textures and prints—florals, denim, linen, and velvet—into a simple, large-scale patchwork. The defining feature of this quilt is not the piecing, but the Big Stitch Quilting (Kantha style). Using thick embroidery thread in contrasting colors creates a handmade, visible texture that feels artistic and trendy, perfect for draping over a bed or hanging as a tapestry.
Finished Dimensions: Twin/Full Bed Spread, 70″ x 90″.
Materials Needed:
- Fabric (The Scraps): A total of 5-6 yards of mixed fabrics.
- The Boho Mix: Combine smooth Cotton Florals, sturdy Chambray/Denim, and earthy Linen. (You can even upcycle old flannel shirts or jeans).
- Backing: 5.5 yards of a soft, solid-colored cotton sheet (Mustard or Teal).
- Batting: Cotton (low loft).
- Thread: Perle Cotton (Size 8) in a bright color (like Neon Pink, Gold, or Electric Blue) for the visible quilting.
- Notions: Embroidery needle (large eye), rotary cutter, 10.5″ square ruler.
Cultural Backstory: This style draws inspiration from Kantha Quilts of Bengal (India) and Bangladesh. Traditionally, women would stack old, worn-out saris and stitch them together with running stitches to create new blankets. The beauty lies in the stitch’s visibility—it celebrates the act of making rather than hiding it.
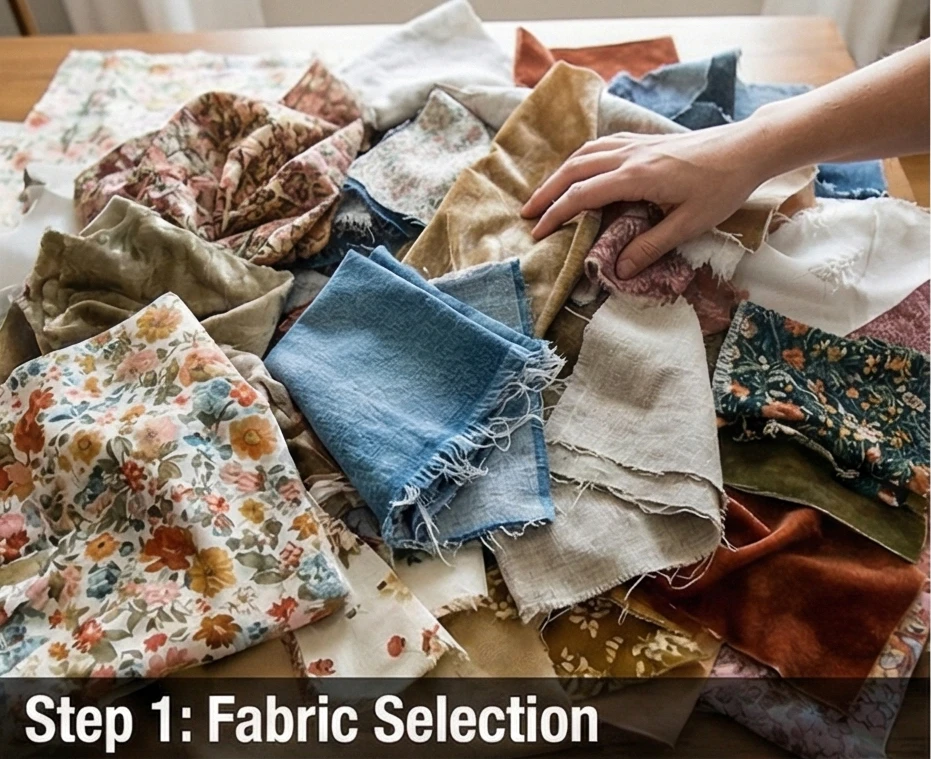
Step 1: The “Vibe Check” (Fabric Selection)
The success of a Boho quilt lies in the contrast.
- Gather: Pull roughly 15-20 different fabrics.
- Edit: Toss them in a pile. Do they look good together?
- Rule of Thumb: Aim for 50% Prints (florals, paisleys), 25% Solids (rust, sage), and 25% Texture (linen, denim).
- Teen Tip: Let the teen pick the fabrics. Even if they clash with you, that “clash” is often the desired aesthetic.
Step 2: Cutting the Giant Squares
We use large blocks to showcase the prints and speed up assembly.
- Cut: Cut your fabrics into 10-inch squares.
- Quantity: You need 63 squares (arranged in a 7-wide x 9-long grid).
- Why 10 inches? It’s a “Layer Cake” size (a standard pre-cut size), but large enough to make the quilt feel modern rather than busy.

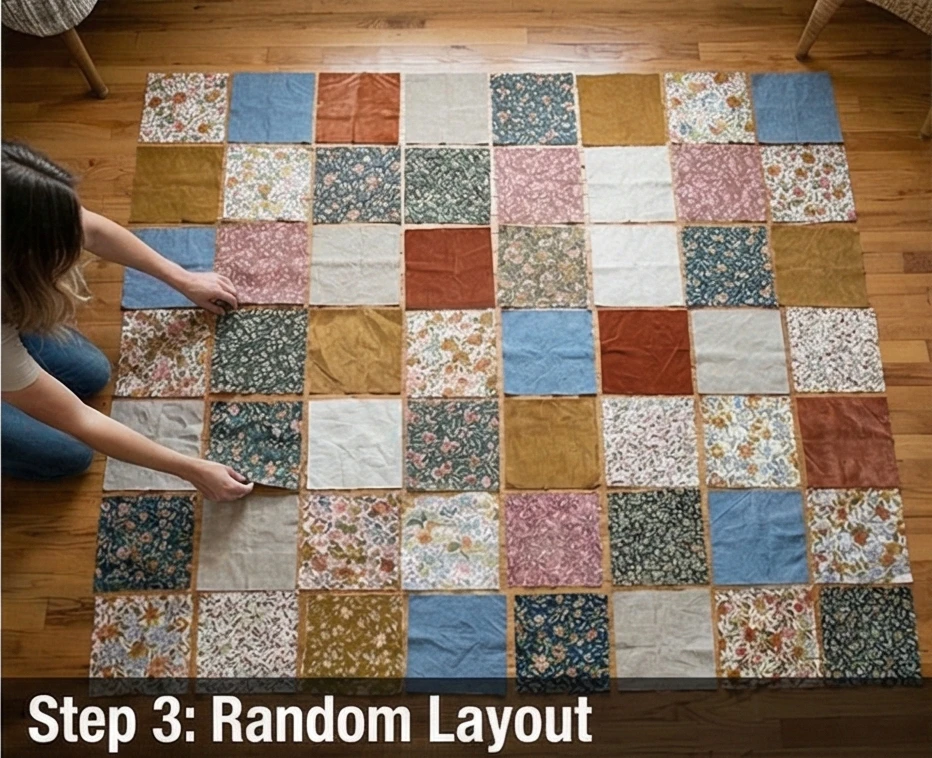
Step 3: The Random Layout
- Floor Space: Clear the floor and lay out the squares in a 7-by-9 grid.
- Shuffle: Move them around until the colors are evenly distributed.
- Avoid Clumps: Don’t let two denim squares sit next to each other.
- Snap a Pic: Take a photo with your phone. It’s easier to spot mistakes in a photo than in real life.
Step 4: Fast Assembly
- Sew Rows: Stitch the squares into horizontal rows with a 1/4-inch seam.
- Press: Press seams open (this reduces bulk, which is important if you used heavier fabrics like denim).
- Join Rows: Pin and sew the rows together to complete the top.

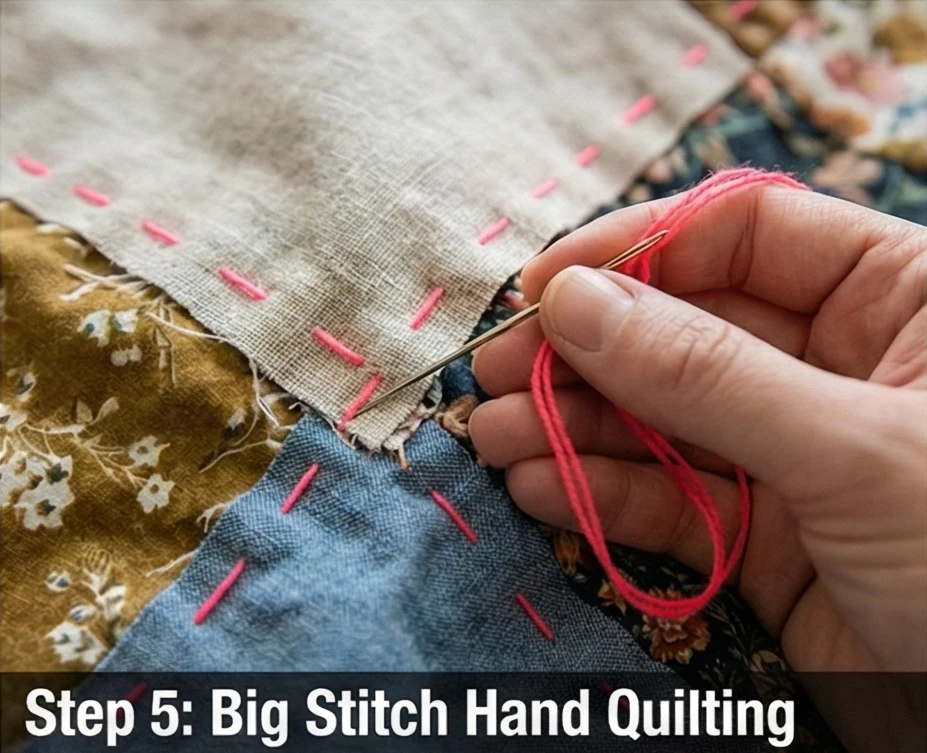
Step 5: “Big Stitch” Hand Quilting
This is the defining Boho element. Do not use a machine.
- Baste: Sandwich the layers (Backing + Batting + Top). Use plenty of safety pins.
- Thread: Thread your needle with a long strand of Perle Cotton (don’t knot it yet).
- The Stitch:
- Start in the center. Take large, running stitches (about 1/4 inch long).
- Design: Stitch vertical lines down the center of every square. Then stitch horizontal lines.
- Imperfection: Don’t worry about straight lines. Wobbly, organic lines add to the charm.
- Tails: Leave 2-inch thread tails at the start and end of your lines. You can knot them and bury them in the batting, or for a true “deconstructed” look, tie them in small bows on the quilt top!
Step 6: The Chunky Binding
- Cut: Cut binding strips 2.5 inches wide from a bold, contrasting fabric (like a black-and-white stripe).
- Machine Finish: Sew the binding to the front. Fold over to the back.
- Hand Finish: Use the same thick Perle Cotton thread to hand-stitch the binding down on the back using a visible whipstitch. This adds one final layer of handmade texture.

Usability Note: Because of the large stitches and mixed fabrics, this quilt becomes softer and drapier with use. It is heavy enough to be comforting but breathable. It doubles perfectly as a picnic blanket for outdoor hangouts.
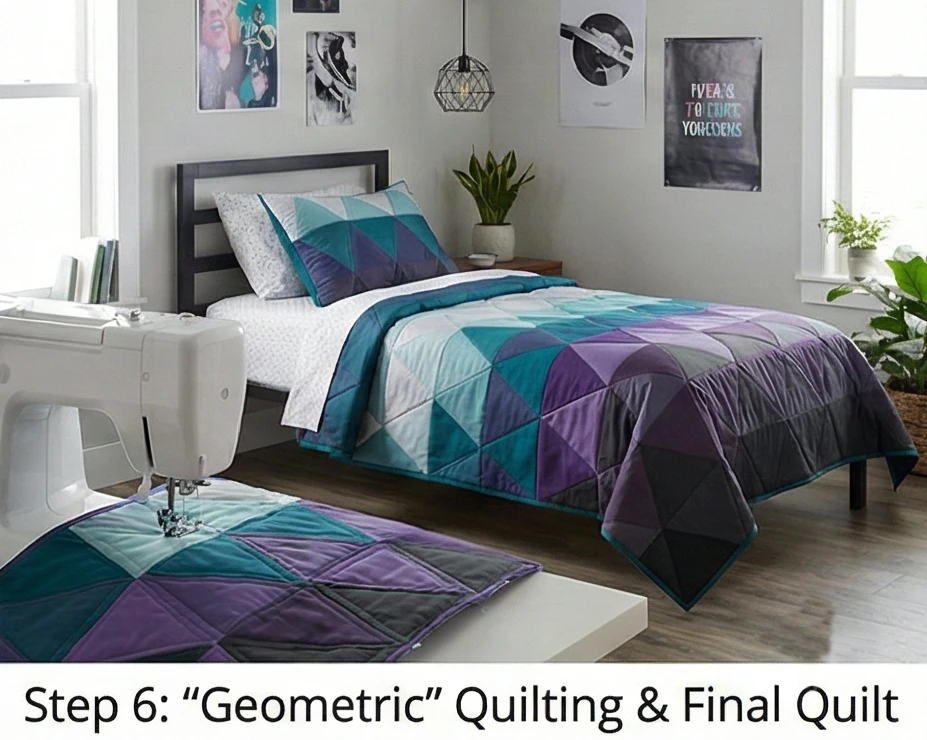
3. Modern Geometric Quilt Designs for a Stylish Teen Room
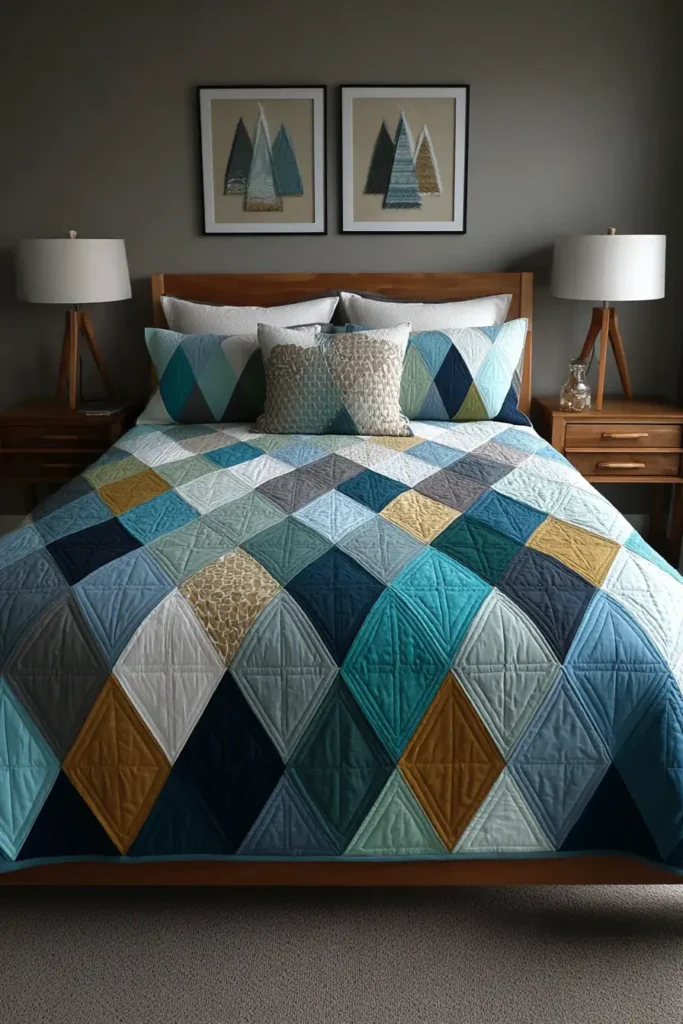

The “Crystal Peaks” Faceted Triangle Quilt
Teen rooms often need a focal point that feels more “adult” than “kid.” The Crystal Peaks pattern uses Equilateral (60-degree) Triangles to create a stunning, faceted effect that looks like cut gemstones or mountain peaks. Unlike squares or rectangles, 60-degree triangles draw the eye in dynamic, diagonal directions. By using a palette of Jewel Tones (Emerald, Sapphire, Amethyst) mixed with Charcoal or Black, you create a moody, sophisticated “dark academia” or “modern glam” vibe that teens love.
Finished Dimensions: Twin/XL Twin (Dorm Ready), 70″ x 90″.
Materials Needed:
- Fabric A (The Gems): 10-12 Fat Quarters in saturated solids (Teal, Navy, Plum, Mustard).
- Fabric B (The Facets/Neutrals): 2 yards of Graphite or Silver Grey to break up the colors.
- Backing: 5.5 yards of a geometric print.
- Batting: Cotton/Bamboo blend (for a sleek, flat drape).
- Notions: A 60-degree triangle ruler (essential for accuracy), spray starch.
Cultural Backstory: The 60-degree equilateral triangle is a shape of perfect balance—all sides and angles are equal. In the mid-20th century, architect Buckminster Fuller popularized this geometry with his Geodesic Domes, representing the strongest structure with the least amount of material. In quilting, it creates a “tessellation” (tiling) effect that feels inherently futuristic and architectural.
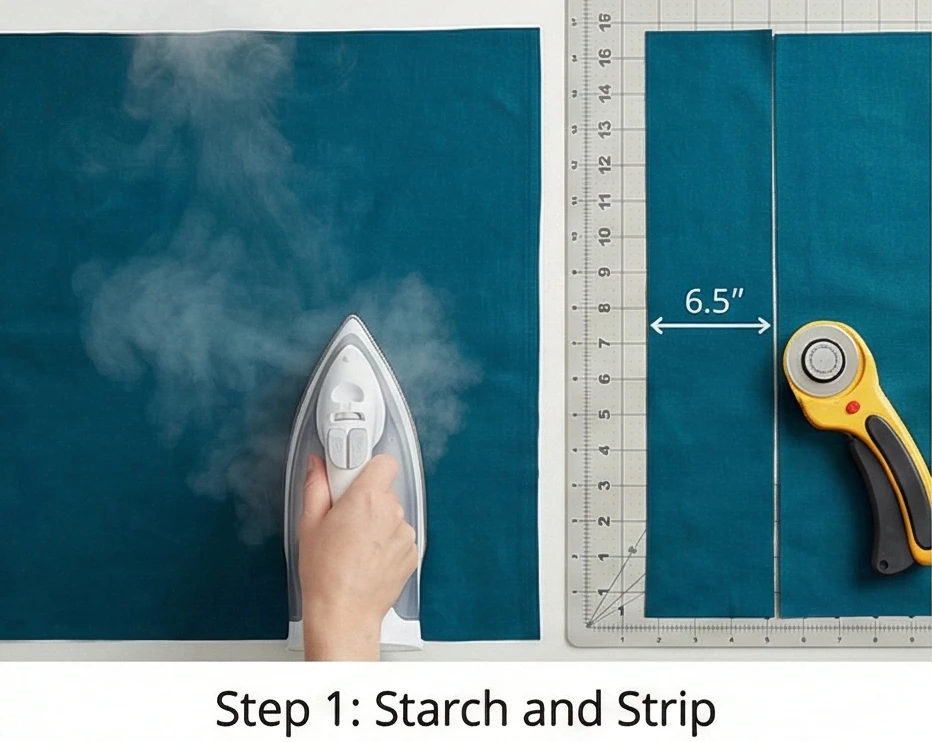
Step 1: Starch and Strip
Triangles have “bias” edges (cut on an angle), which makes them stretchy. Starch is your best friend here.
- Prep: Heavily starch and iron all your fabrics before cutting. This makes the fabric stiff like paper and prevents warping.
- Cut Strips: Cut all your fabrics into strips measuring 6.5 inches wide.
- Why 6.5? This is a standard size for most 60-degree rulers and results in a nice, large triangle.
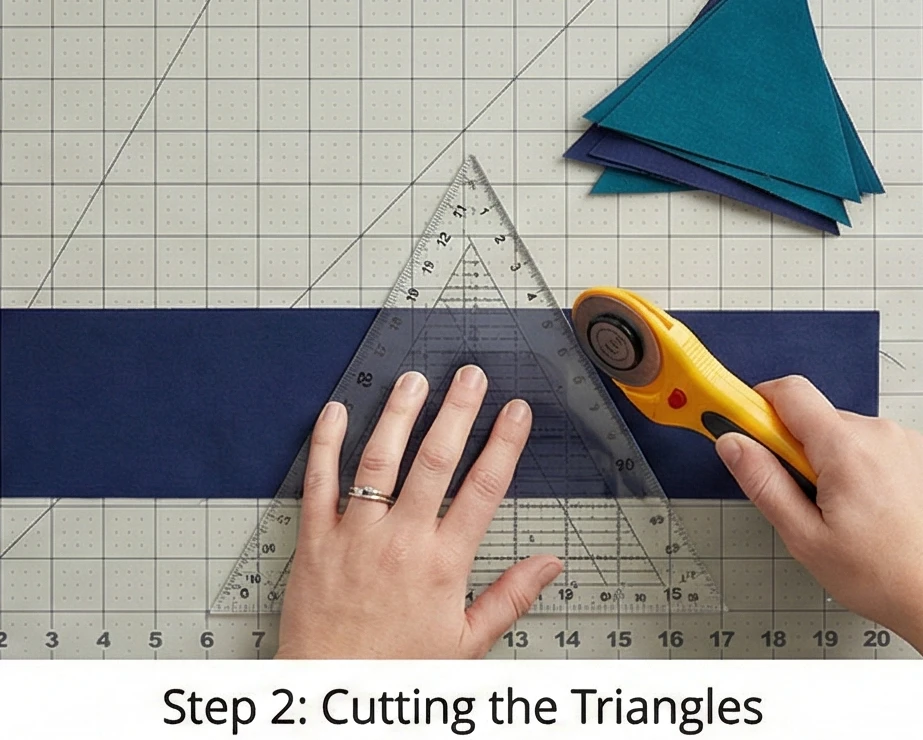
Step 2: Cutting the Triangles
Turning strips into gems.
- Align: Place your 60-degree ruler on the strip.
- First Cut: Align the flat tip of the ruler with the top of the fabric strip and the bottom with the bottom edge. Cut the right side.
- Flip: Rotate the ruler (or the fabric) 180 degrees.
- Second Cut: Align the ruler with the previous cut edge. Cut again.
- Repeat: Continue flipping the ruler back and forth all the way down the strip.
- Yield: You are creating a pile of up-pointing and down-pointing triangles with zero waste.
- Quantity: You need about 280 triangles for a Twin XL.
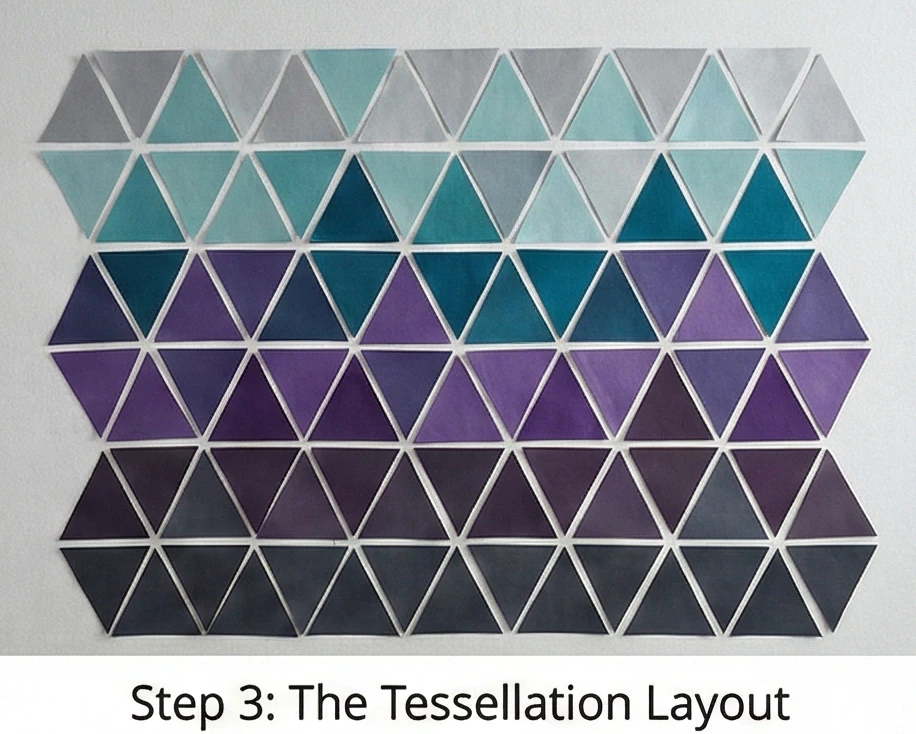
Step 3: The “Tessellation” Layout
This is like a puzzle.
- Design Wall: You need a large surface.
- The Rows: Arrange the triangles in horizontal rows.
- Orientation: Triangle pointing UP, Triangle pointing DOWN, UP, DOWN… alternating across the row.
- The Pattern: You can arrange them randomly for a “confetti” look, or group the colors to form large hexagons or “diamonds” (where 6 triangles meet at a point).
- Teen Style: Try a “Color Wash” gradient—dark colors at the bottom fading to light greys at the top.
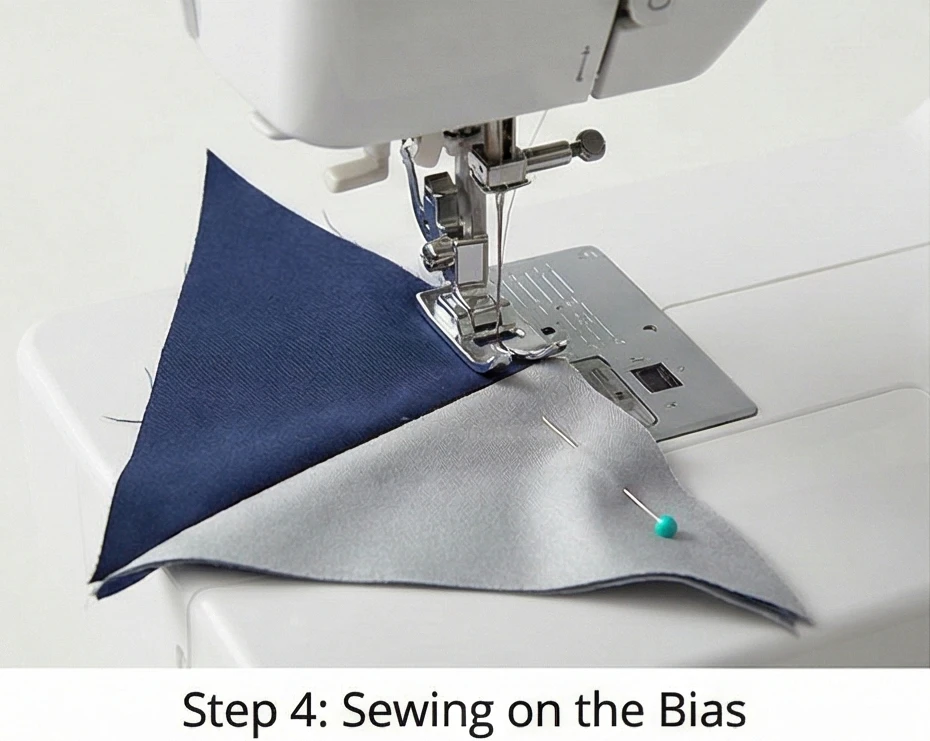
Step 4: Sewing on the Bias
Handle with care.
- Blunt Tips: Most modern 60-degree rulers have a “blunted tip” option. If yours does, trim the tiny dog-ears off the triangle points. This creates a flat edge, making matching easier.
- Sew Rows: Stitch the triangles into horizontal rows.
- Pinning: Match the flat bottom of one triangle with the flat top of the next.
- Feed Dogs: Let the machine feed the fabric. Do not pull or push, or the bias edges will wave.
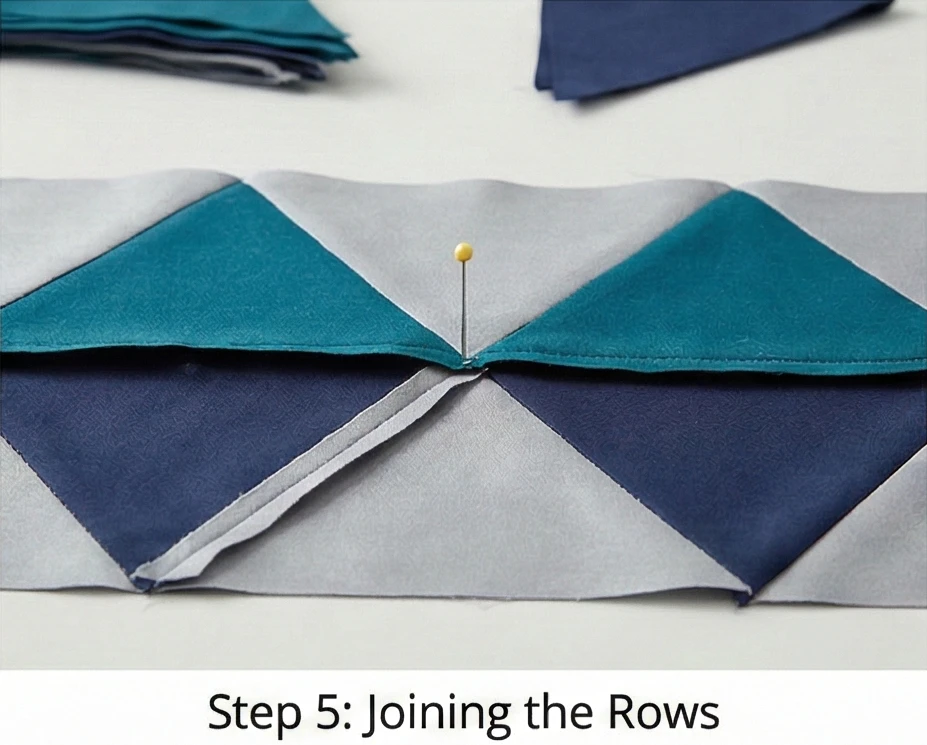
Step 5: Joining the Rows (The Points)
- Offset: When you sew Row 1 to Row 2, the points of the triangles need to match perfectly.
- Pinning: Stick a pin directly through the “V” where two triangles meet on Row 1, and match it into the point of the triangle on Row 2.
- Sew: Stitch carefully.
- Press: Press seams open. This is critical in triangle quilts to reduce the bulk where 6 points come together.
Step 6: “Geometric” Quilting
Follow the lines.
- Baste: Sandwich the layers.
- Quilt: Use a walking foot.
- Straight Lines: Stitch straight lines parallel to the triangle sides. Stitch 1/4 inch away from the seams on both sides (“echoing” the seam).
- Effect: This emphasizes the triangular structure and creates a secondary geometric pattern on the back.
Usability Note: This quilt has “Twin XL” dimensions (extra long), making it perfect for college dorm beds, which are typically 5 inches longer than standard twin beds. It’s a gift that can go with them to university.
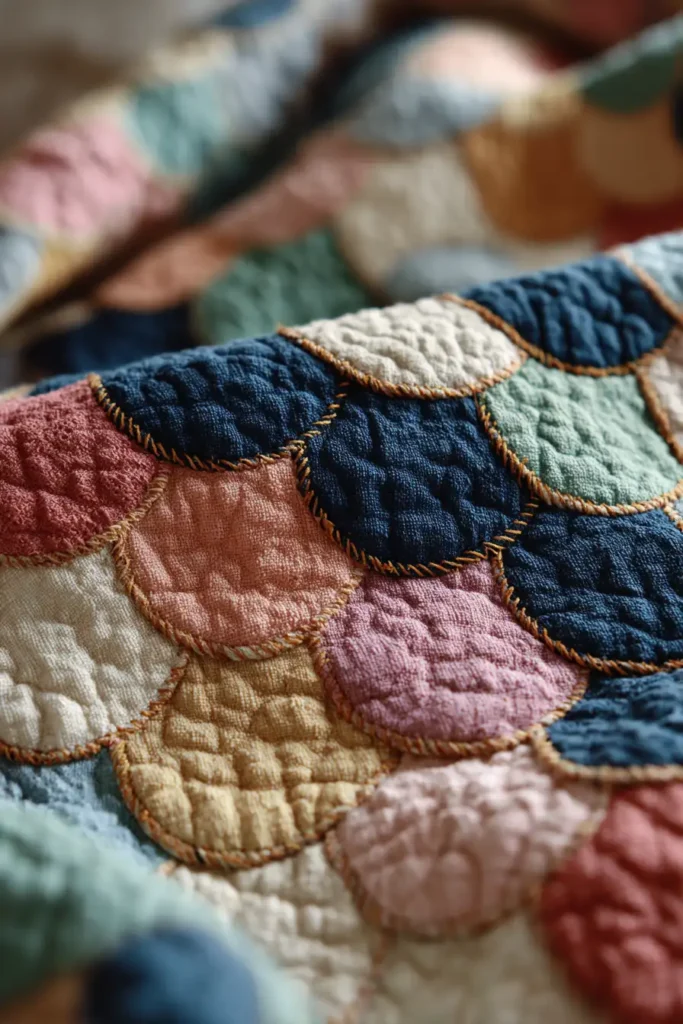
4. Whimsical Mermaid Scale Quilt Patterns for Under-the-Sea Decor

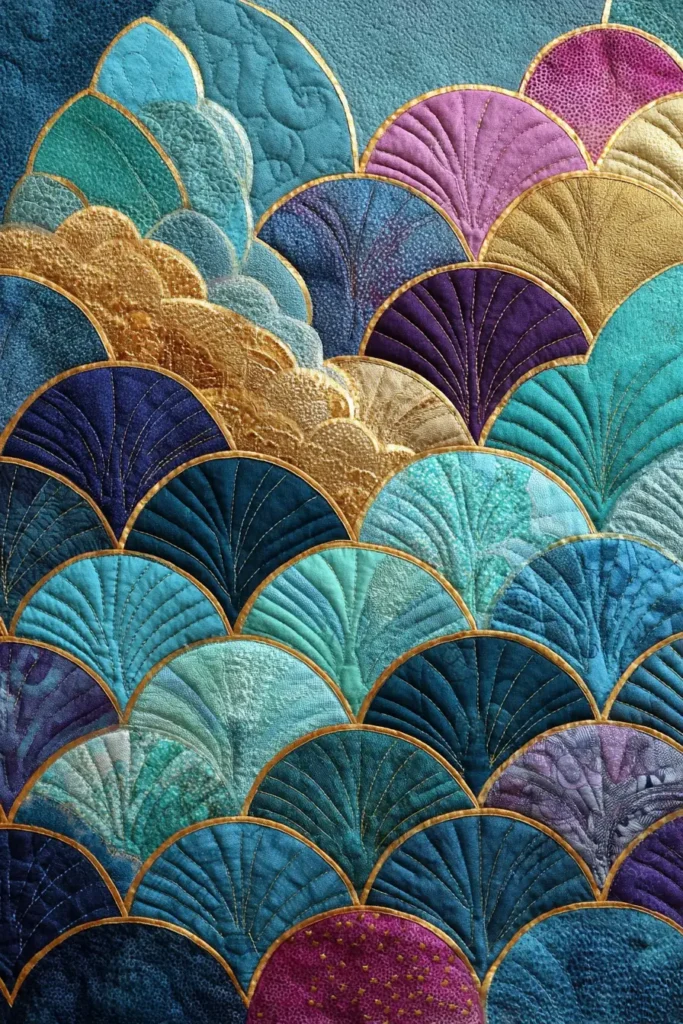
The “Siren’s Song” Clamshell Quilt
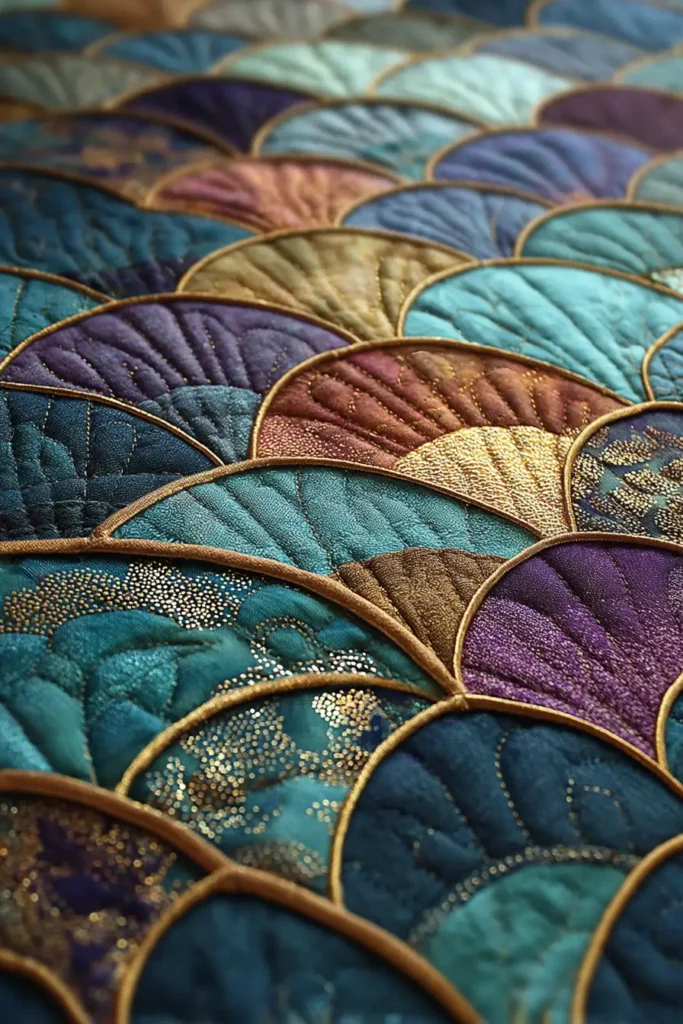
There is no shape more evocative of the ocean than the Clamshell. When layered, these curved shapes perfectly mimic the iridescent scales of a mermaid’s tail. While traditional clamshell quilts are hand-pieced (a slow process), this modern version uses a Layered Machine Appliqué technique. By overlapping the rows of scales, you create a dimensional, textured surface that feels like a costume. Using Batiks, Sateens, or fabrics with metallic gold accents enhances the shimmering, watery effect.
Finished Dimensions: Twin Bed Size, 65″ x 88″.
Materials Needed:
- Fabric A (The Scales): 15-20 Fat Quarters in ocean gradients (Teal, Aqua, Navy, Purple, and Seafoam).
- Texture Tip: Mix in a few “shimmer” cottons or pearlescent fabrics for a touch of sparkle.
- Fabric B (Background/Foundation): A cheap sheet or muslin cut to 65″ x 88″ (This layer won’t be seen; it holds the scales).
- Backing: 5 yards of coral or seashell print.
- Notions: Clamshell Template (8-inch wide), Heat-Resistant Plastic Template or Cardboard, Starch, Fabric Glue Stick.
Cultural Backstory: The Clamshell pattern (often called “Shells” or “Scales”) has deep roots in both Art Deco design and Japanese culture, where the “Seigaiha” (Blue Sea Wave) pattern represents surges of good luck and resilience. In the quilting world, it is one of the few patterns that relies entirely on curves rather than straight lines, symbolizing fluidity and grace.
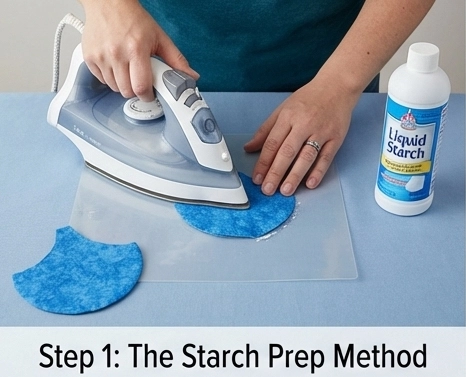
Step 1: The Starch Prep Method
The secret to perfect curves without sewing curved seams is “turning the edge” with starch.
- Make a Heat-Resistant Template: Trace an 8-inch wide clamshell shape onto heat-resistant plastic (or thin cardboard) and cut it out. This is your forming tool.
- Cut Scales: Use a larger template (add 1/4 inch seam allowance to the curved top edge) to cut your fabric scales.
- Quantity: You will need roughly 180 scales for a Twin bed.
- Forming:
- Place your heat-resistant template on the wrong side of a fabric scale.
- Paint a thin layer of liquid starch along the curved seam allowance.
- Press the fabric edge over the template with a hot iron. The starch will “glue” the curve into a perfect, smooth shape.
- Remove the template. The fabric now holds the clamshell shape with a finished edge.
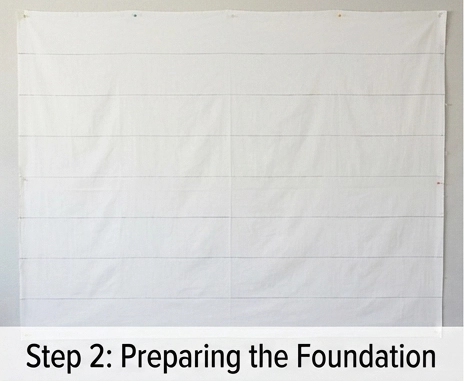
Step 2: Preparing the Foundation
We build this quilt from the bottom up, like shingles on a roof.
- Foundation: Lay your large foundation fabric (muslin) on a flat surface or design wall.
- Marking: Draw a horizontal line 4 inches from the bottom edge. Draw parallel lines every 4 inches up the quilt.
- Why: These lines ensure your rows of scales stay straight.
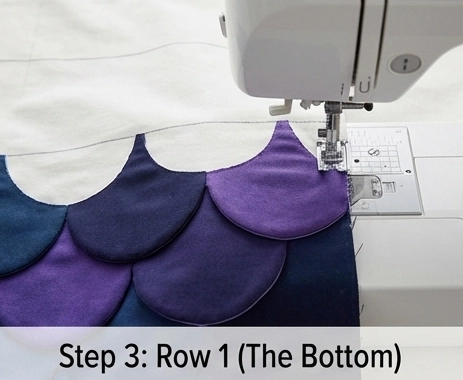
Step 3: Row 1 (The Bottom)
- Placement: Place your first row of scales along the bottom edge of the foundation.
- Note: The raw straight bottom edges of the scales should align with the foundation’s raw bottom edge.
- Secure: Pin or use a dab of fabric glue to hold them in place.
- Sew: Topstitch around the curved top edge of each scale using a decorative thread (silver or variegated blue looks magical). This secures the scale to the foundation.
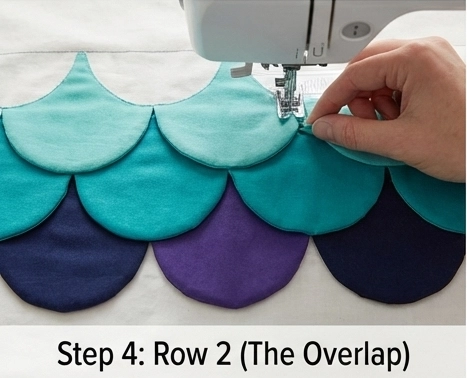
Step 4: Row 2 (The Overlap)
- Offset: Place the second row of scales on the next marked line (4 inches up).
- Alignment: Center each new scale over the seam between the two scales below it (brick-lay pattern). This covers the raw edges of the row below.
- Sew: Topstitch around the curved edges of this new row.
- Texture: Because only the top curve is sewn, the body of the scale remains slightly loose, creating a 3D “fish scale” texture.
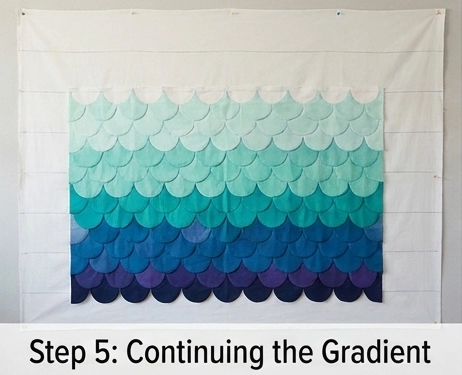
Step 5: Continuing the Gradient
- Build Up: Continue adding rows as you move up the quilt.
- Color Flow: To get the mermaid look, arrange your colors in a gradient.
- Bottom: Dark Navy/Deep Purple (Deep Ocean).
- Middle: Teals and Aquas.
- Top: Pale Seafoam and Shimmer White (Surface foam).
Step 6: The Final Trim & Bind
- Top Edge: When you reach the very top, the final row of scales will have curved tops. You can either leave the quilt edge scalloped (advanced) or trim the tops straight to make a rectangular quilt.
- Bind: Use a Bias Binding (cut at a 45-degree angle).
- Why: Even if you trimmed the quilt square, bias binding is stronger and bends better around the bulk of the layers. Use a contrasting “Coral” color to pop against the blue scales.
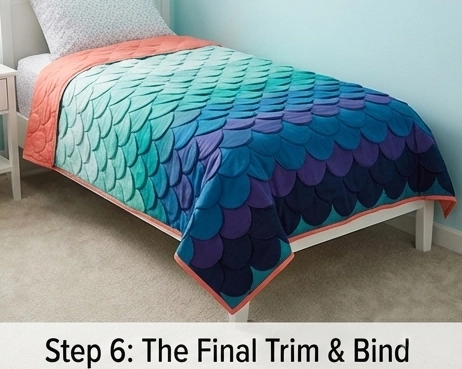
Usability Note: This quilt is heavier than a standard patchwork quilt because of the layered fabric (essentially double thickness everywhere). This weight provides a “weighted blanket” effect that is very comforting for sleeping.
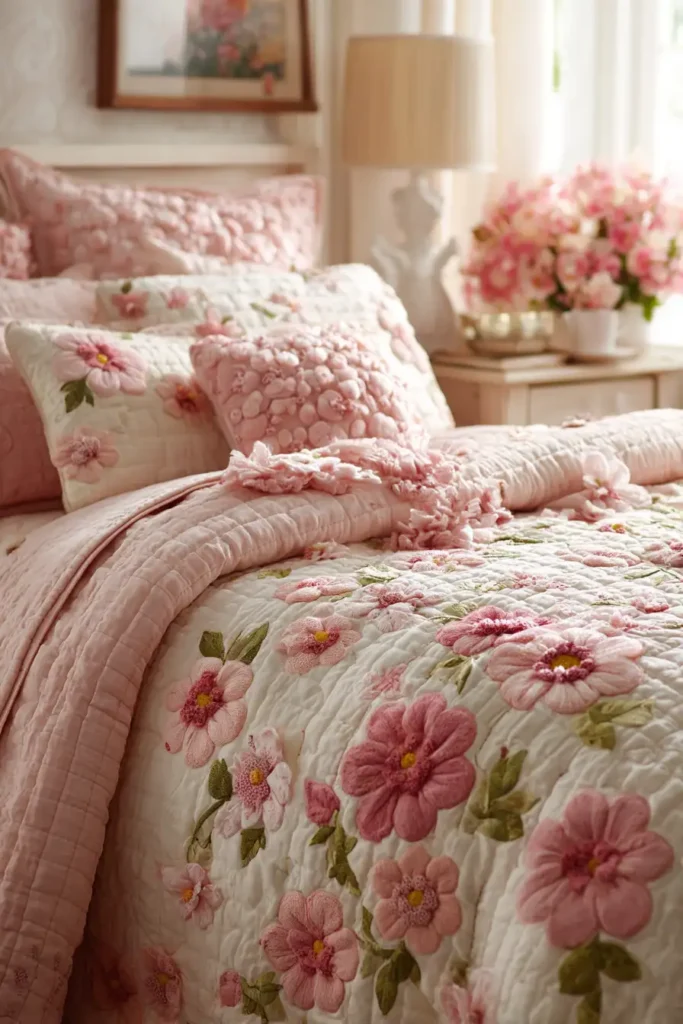
5. Cozy Floral Quilt Patterns for Girls’ Comfortable Bedrooms
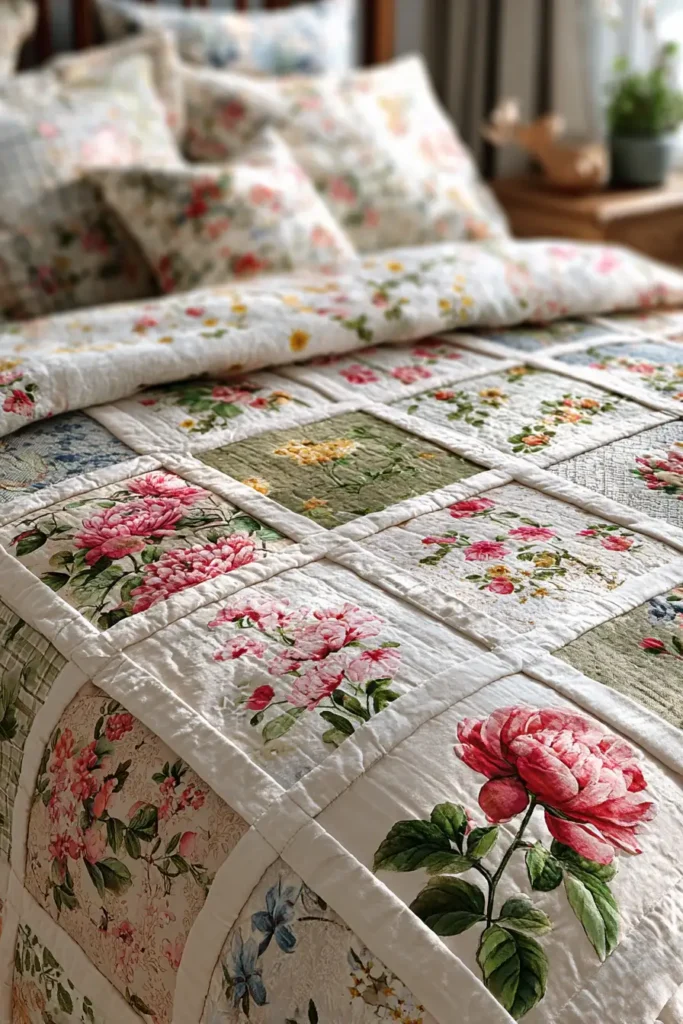
The “Secret Garden” Floral Trellis Quilt
The “Cottagecore” aesthetic—celebrating simple, rural living—is a timeless theme for girls’ bedrooms. This quilt pattern acts as a window into a blooming garden. By using a Diagonal Lattice Layout (setting the blocks “on point”), you create the illusion of a white picket fence or trellis. The open squares are filled with large-scale Floral Prints (peonies, roses, wildflowers) that would be ruined if cut into tiny pieces. This design allows you to showcase beautiful, large-print fabrics in all their glory while keeping the overall look airy and elegant.
Finished Dimensions: Twin Bed Size, 68″ x 88″.
Materials Needed:
- Fabric A (The Garden): 10-12 Fat Quarters of Large Scale Florals. (Look for prints by designers like Tilda or Liberty of London).
- Fabric B (The Trellis): 2.5 yards of Crisp White or Pale Linen.
- Backing: 5.5 yards of a soft gingham check (green or pink).
- Batting: Bamboo/Cotton Blend (for a lovely drape).
- Notions: Rotary cutter, large square ruler.
Cultural Backstory: The concept of the “Trellis” in design dates back to Roman gardens (topiary), but became a staple of Victorian interior design in the 19th century. William Morris, the famous textile designer, championed the idea of “bringing the outside in.” This quilt layout mimics the structure of an English walled garden, providing order (the white strips) to the wild beauty of nature (the florals).
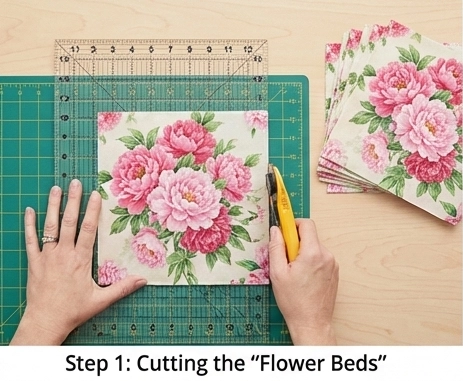
Step 1: Cutting the “Flower Beds”
We are cutting large squares to show off the print.
- Fussy Cutting: If your floral fabric has specific bouquets, center your ruler over the best part of the print.
- Cut Squares: Cut 35 squares measuring 9.5″ x 9.5″ from your floral fabrics.
- Tip: Mix up the scale—some squares with big roses, some with tiny buds—to create visual interest.
Step 2: Cutting the Lattice Strips
These strips frame the flowers.
- Sashing Strips: From Fabric B (White), cut 80 strips measuring 2.5″ x 9.5″.
- Cornerstones: From Fabric A (Scraps) or a contrasting solid color, cut 49 squares measuring 2.5″ x 2.5″.
- Design Choice: Using “cornerstones” (small squares at the intersections of the white strips) lets you avoid long, boring white seams and adds a pop of color to the grid.

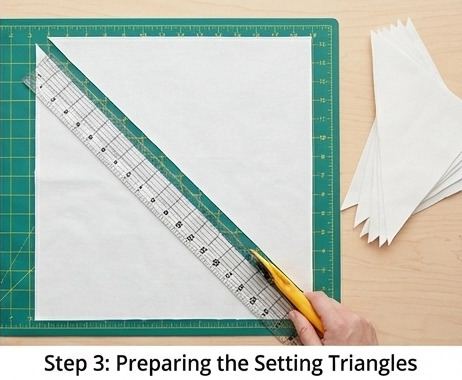
Step 3: Preparing the Setting Triangles
Because the blocks are tilted on their points (diagonally), the quilt’s edges will be jagged unless we fill them with triangles.
- Side Triangles: Cut 3 squares of Fabric B (White) measuring 14 inches. Cut them in half diagonally twice (like an X).
- Yield: 12 Quarter Square Triangles. (You need 10 for the sides).
- Corner Triangles: Cut 2 squares of Fabric B (White) measuring 7 inches. Cut them in half diagonally once.
- Yield: 4 Half Square Triangles (for the quilt’s 4 corners).
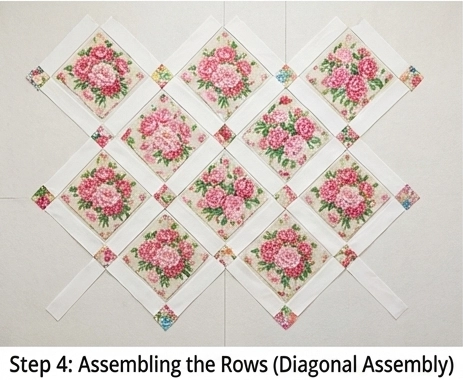
Step 4: Assembling the Rows (Diagonal Assembly)
Quilts set “on point” are assembled in diagonal rows, not horizontal ones.
- Layout: Lay out your floral squares on the floor in a diagonal grid (5 blocks wide by 7 blocks tall). Place the sashing strips and cornerstones between them.
- Row Construction:
- Row 1 (Top Corner): [Corner Triangle] – [Sashing] – [Block] – [Sashing] – [Corner Triangle].
- Wait! That’s confusing. The easiest way is to sew the sashing to the blocks first.
- Better Method: Sew a White Sashing strip to the right side of every Floral block. Then sew the rows together with long sashing strips in between.
- Best Method (Diagonal Rows): Stitch diagonal rows from the top-left corner.
- Row 1: One Floral Block.
- Row 2: Three Floral Blocks.
- (Ensure sashing strips are between every block).
Step 5: Squaring the Garden
- Attach Triangles: Once the main diagonal center is sewn, sew the Side Triangles to the jagged edges to straighten the quilt.
- Corners: Sew the 4 Corner Triangles to the four tips.
- Trim: Trim the outer edge to be perfectly rectangular (68″ x 88″).
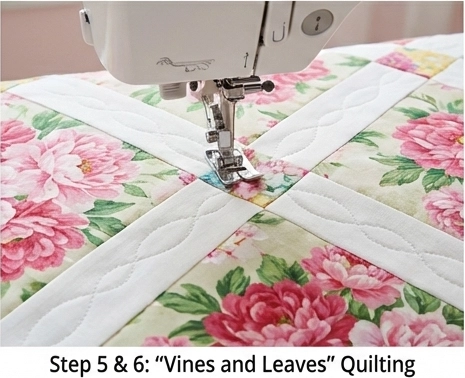
Step 6: “Vines and Leaves” Quilting
Use the quilting to enhance the garden theme.
- Baste: Sandwich layers.
- Quilt:
- In the White Lattice: Quilt a straight line or “Cable” pattern to mimic wood or ironwork.
- In the Floral Squares: Don’t stitch over the flowers! Use Free Motion Quilting to outline the large blooms (tracing the petals). This makes the flowers puff out (trapunto effect) and adds incredible texture.
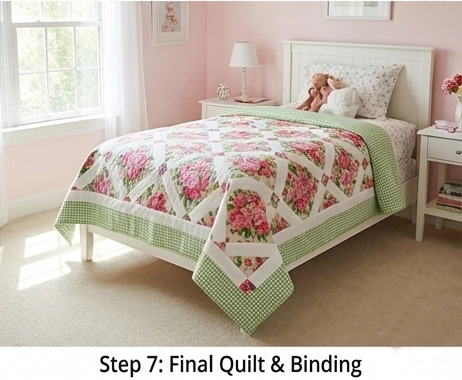
Step 7: The Gingham Binding
- Bias Binding: Use the Gingham backing fabric to make bias binding.
- Effect: The geometric check of the gingham provides a cute, picnic-like contrast to the romantic florals and the stark white lattice.
Usability Note: This quilt is “Pre-Teen Proof.” The large blocks mean fewer seams, making the quilt stronger and less likely to rip during pillow fights or sleepovers. The white lattice makes the room feel brighter and cleaner, even if the bed is unmade!
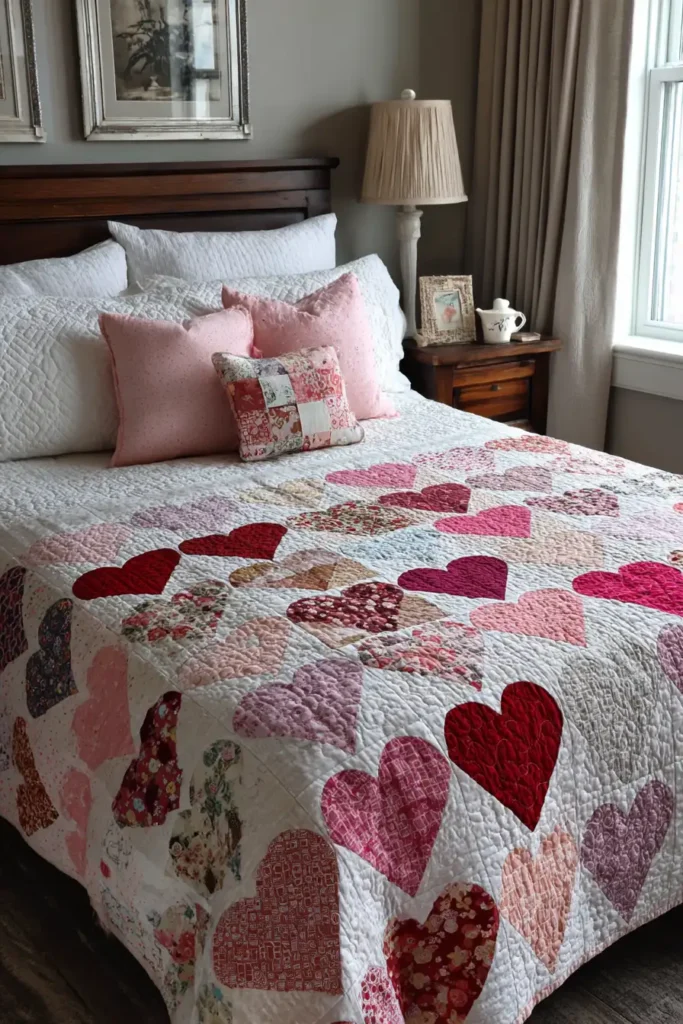
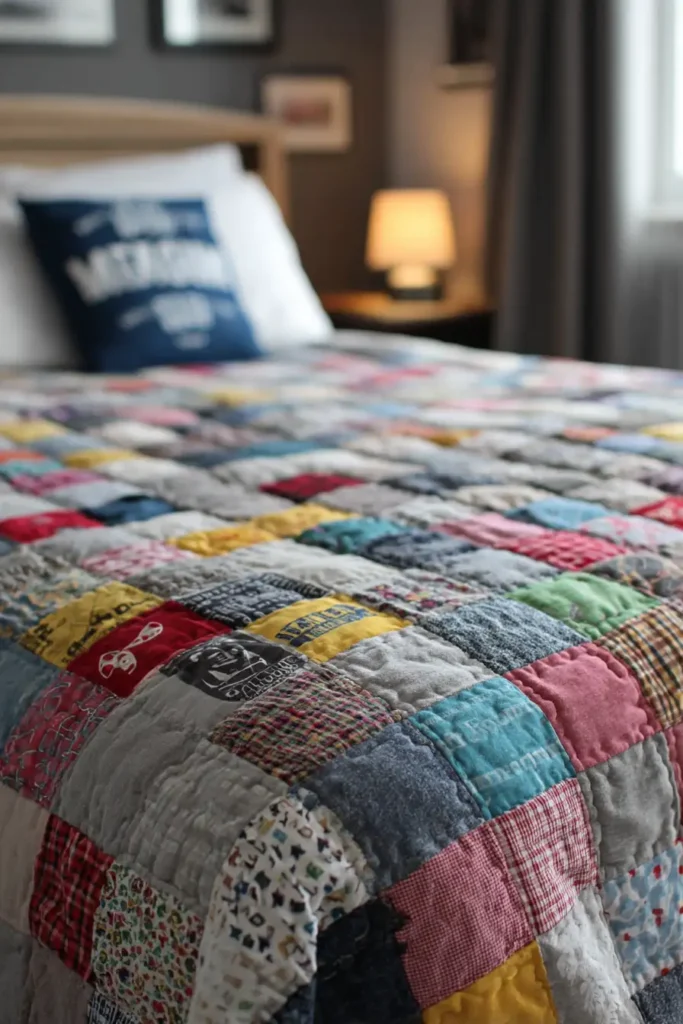
6. Sweet Heart Patchwork Quilt Patterns for Everyday Comfort

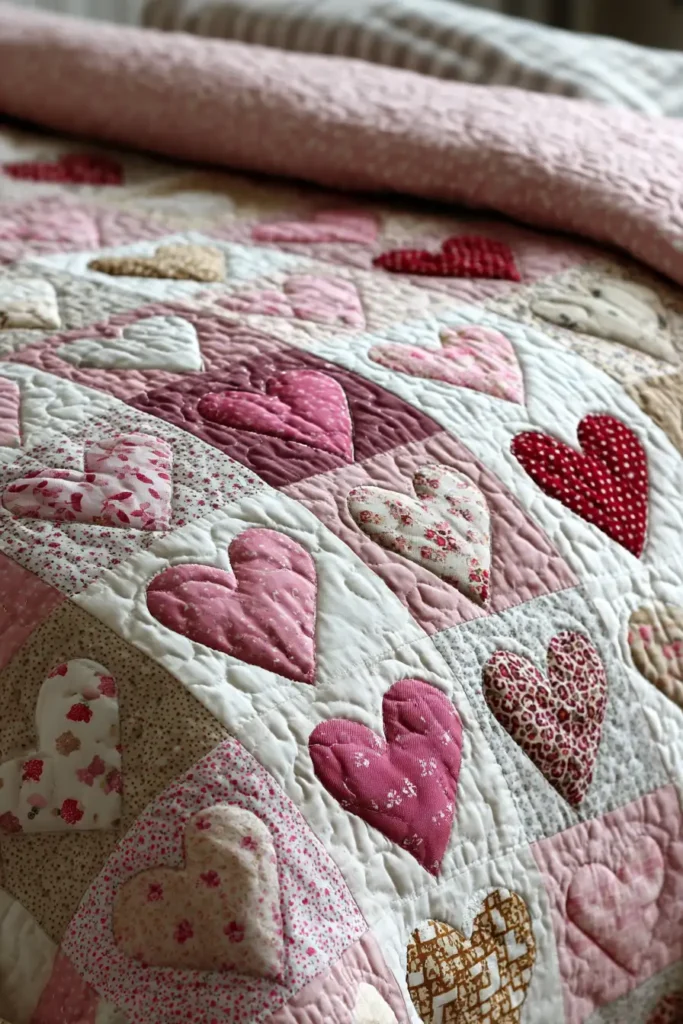
The “Candy Hearts” Scrappy Patchwork Quilt
For a girl’s room, the heart motif is a timeless symbol of warmth and affection. While some heart patterns can look overly cartoonish, the “Candy Hearts” design keeps it elegant by using the “Pixelated” or “Snowball” technique. Instead of difficult curves, we use straight seams to create the illusion of rounded heart lobes. By using a mix of Vintage Florals, Ginghams, and Soft Pinks against a calm Low-Volume background (white with subtle grey text or dots), the quilt feels like a collection of love notes.
Finished Dimensions: Twin Bed Size, 68″ x 88″.
Materials Needed:
- Fabric A (The Hearts): 15-20 Fat Quarters of mixed pinks, corals, reds, and lilacs.
- Fabric B (Background): 4 yards of White or Cream solid.
- Backing: 5.5 yards of a soft flannel (for extra coziness).
- Batting: Cotton (medium loft).
- Notions: Rotary cutter, 5″ square ruler.
Cultural Backstory: Heart quilts have traditionally been associated with “Bridal Quilts” or “Friendship Quilts” in the 19th century. A popular superstition held that if a young girl slept under a heart quilt, she would dream of her future love. Today, we simply see it as a “hug” made of fabric—a visual reminder to the child that they are loved every single night.
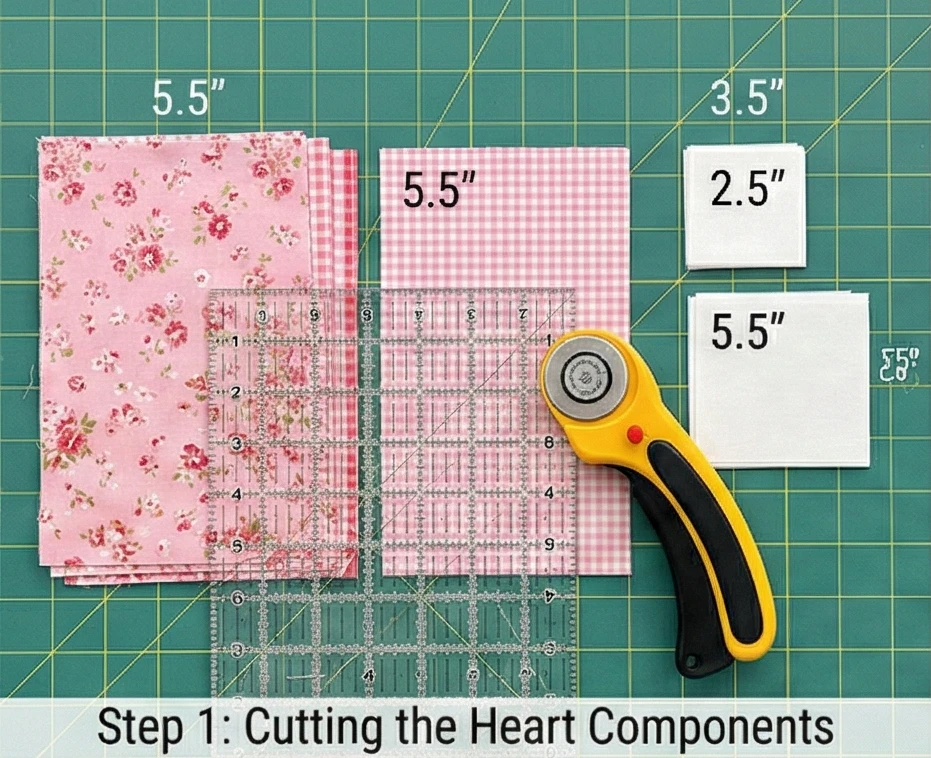
Step 1: Cutting the Heart Components
Each heart block consists of two vertical rectangles. We are making 48 Heart Blocks.
For ONE Block (Repeat 48 times):
- Heart Fabric: Cut 2 rectangles measuring 5″ x 8.5″.
- Heart Fabric: Cut 2 squares measuring 5″ x 5″. (Wait, no—standard method uses background squares on colored rectangles).
- Correction: Let’s use the standard “Snowball” method.
- Colored Fabric: Cut 2 rectangles measuring 5.5″ x 9.5″.
- Background Fabric: Cut 4 squares measuring 2.5″ x 2.5″ (for top bumps).
- Background Fabric: Cut 2 squares measuring 5.5″ x 5.5″ (for bottom point).
Step 2: Making the Heart Lobes (Stitch & Flip)
This technique creates curves using straight lines.
- Mark: Draw a diagonal line on the back of all 2.5″ background squares.
- Place: Place a 2.5″ square on the top left corner of a colored rectangle. Place another in the top-right corner.
- Sew: Stitch directly on the drawn diagonal lines.
- Trim & Flip: Trim the excess corner fabric (1/4 inch past the seam). Flip the background triangle up and press.
- Result: The top of the rectangle is now “rounded” (angled). Make 2 of these units for every heart.

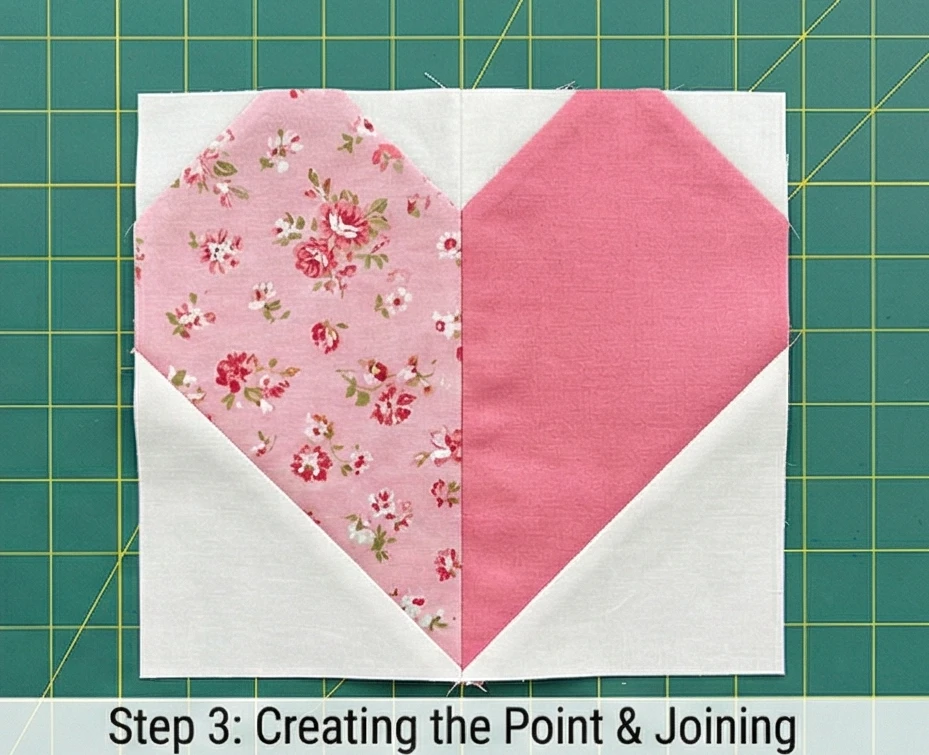
Step 3: Creating the Point
Now we shape the bottom of the heart.
- Mark: Draw a diagonal line on the back of the 5.5″ background squares.
- Place:
- Take Unit Left: Place a 5.5″ square on the bottom left corner. Sew on the line, trim, and flip.
- Take Unit Right: Place a 5.5″ square on the bottom right corner. Sew on the line, trim, and flip.
- Join: Sew Unit Left and Unit Right together down the center vertical seam.
- Result: You have a perfect heart shape floating in a background square.
- Block Size: Trim the finished block to 10.5″ x 10.5″.
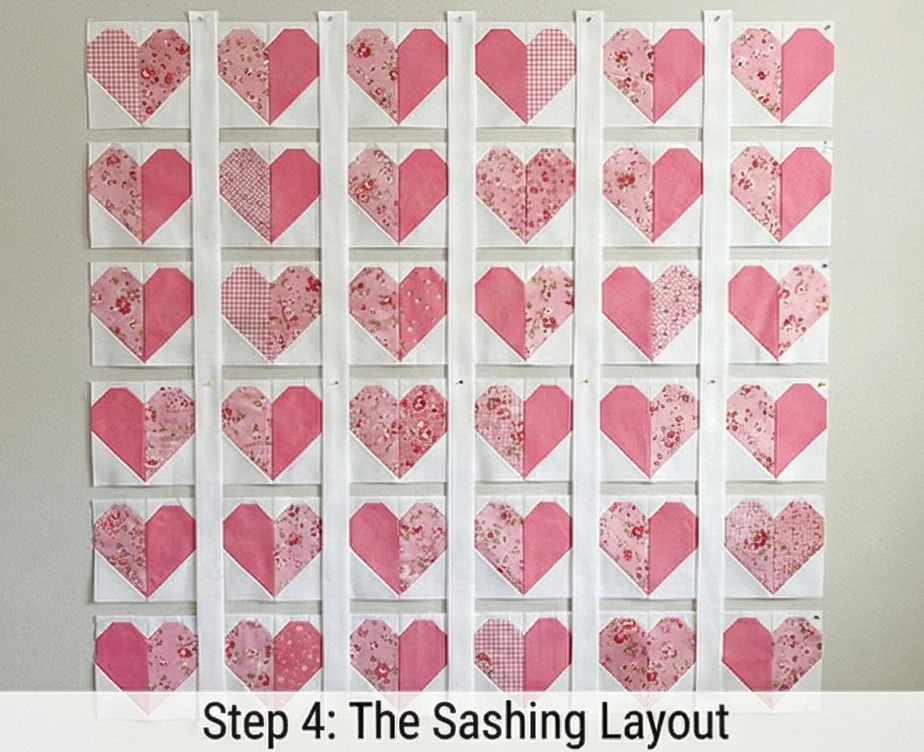
Step 4: The Sashing Layout
Sashing separates the hearts, keeping them from looking crowded.
- Cut Sashing: From background fabric, cut sashing strips measuring 2.5″ x 10.5″.
- Layout: Arrange the hearts in a grid of 6 blocks wide by 8 blocks long.
- Design: Scramble the colors so no two identical pinks are next to each other.
- Sew Rows: Sew a sashing strip between each heart block in the rows.
Step 5: Assembly
- Horizontal Sashing: Cut long sashing strips (or piece them together) to go between the rows.
- Join: Sew the block rows and the long sashing strips together.
- Border: Add a 4-inch-wide border around the entire quilt, using the background fabric to float the design.
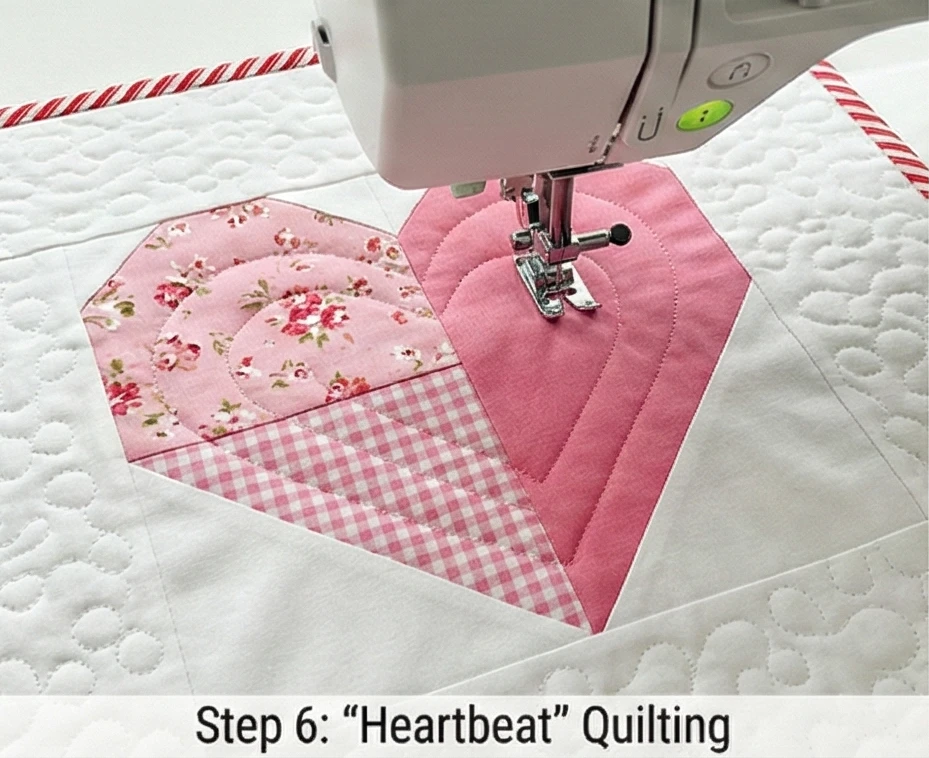
Step 6: “Heartbeat” Quilting
Simple but sweet.
- Baste: Sandwich the layers.
- Quilt:
- Inside the Hearts: Quilt a simple “echo” heart inside the patchwork heart about 1 inch smaller.
- Background: Use a Loop-de-Loop or Stipple stitch to flatten the background, making the hearts puff out.
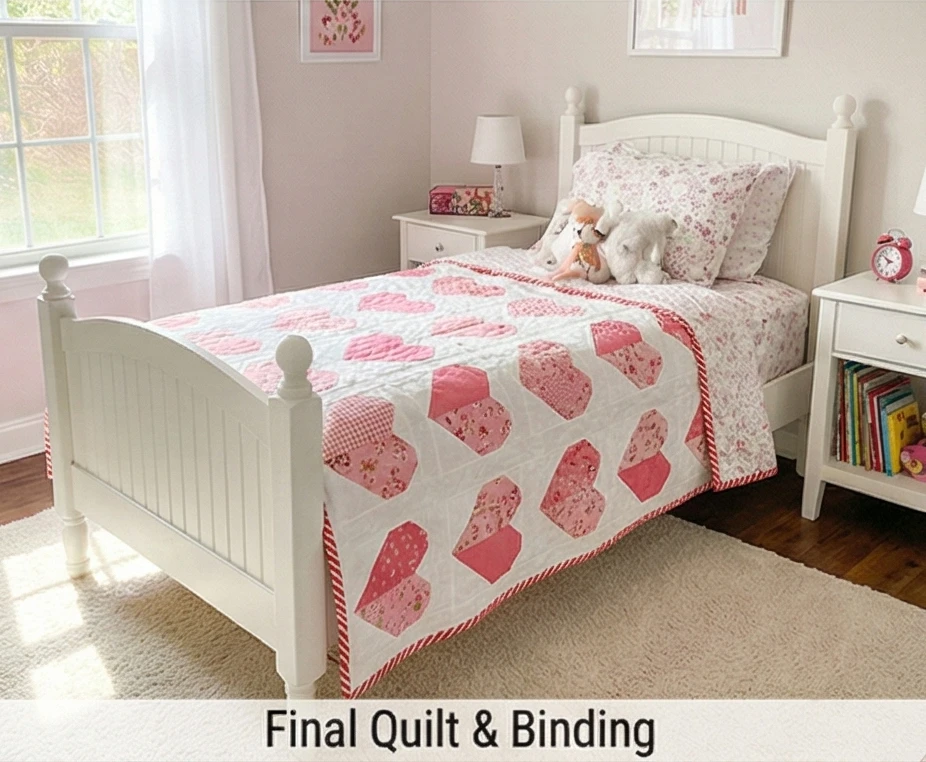
Step 7: The “Candy Stripe” Binding
- Fabric: Choose a Red and White or Pink and White diagonal stripe fabric.
- Bind: Cut bias strips and bind the quilt. The diagonal stripe gives it a classic “candy shoppe” finish that feels playful and energetic.
Usability Note: The flannel backing makes this quilt incredibly snuggly for winter nights. If the child is younger, the “Snowball” corners are sturdy and won’t fray, making it durable enough for fort-building.

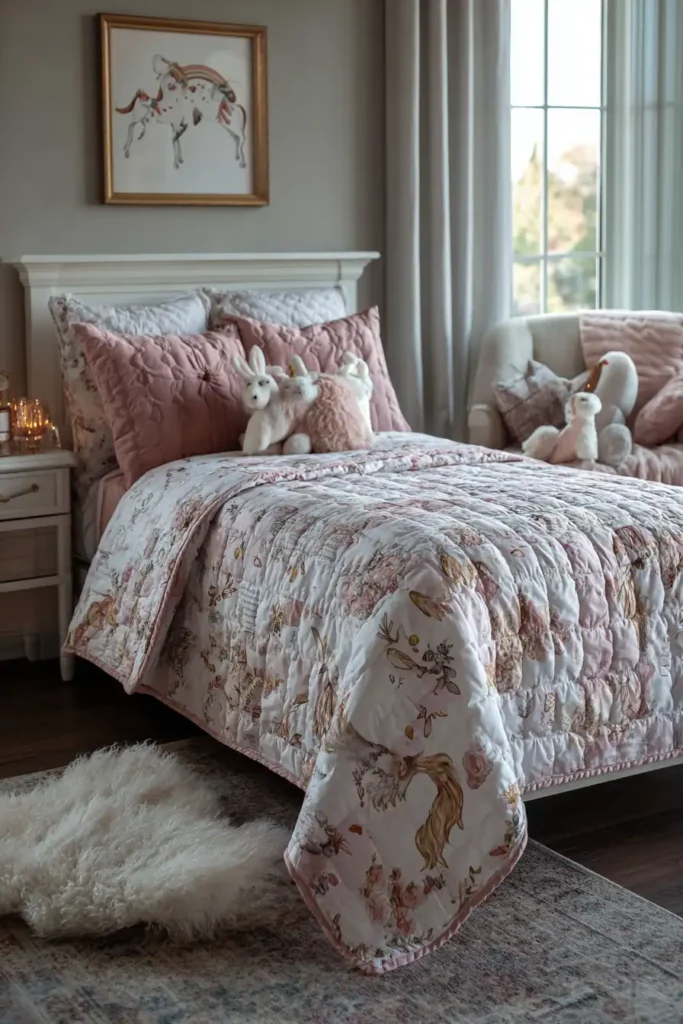
7. Stylish Unicorn Quilt Ideas for Everyday Girls’ Bed Covers
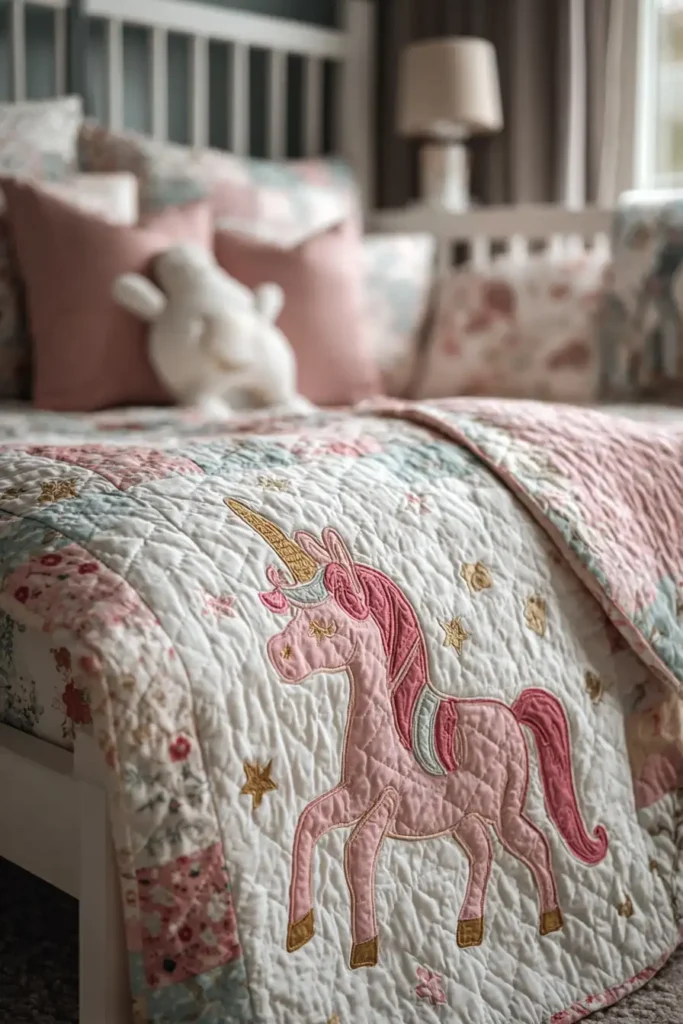
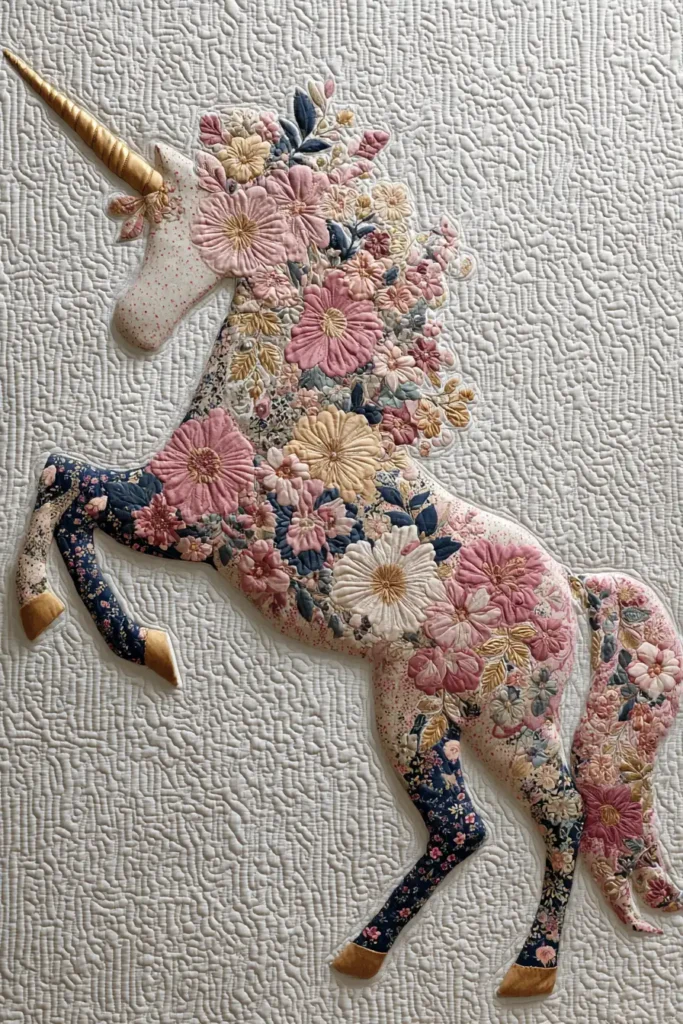
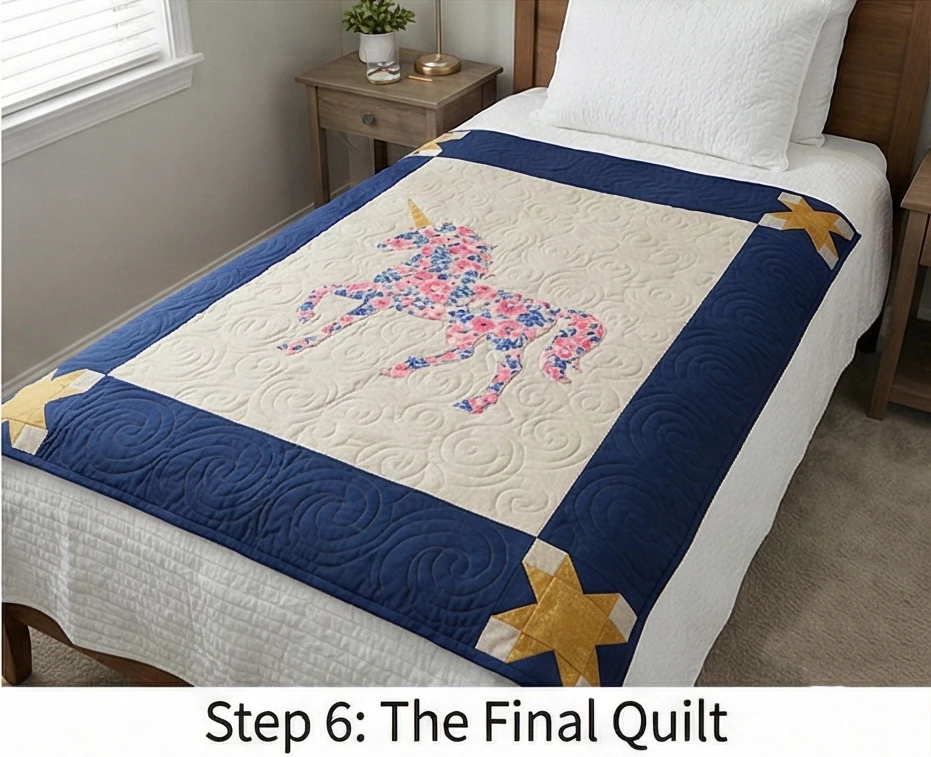
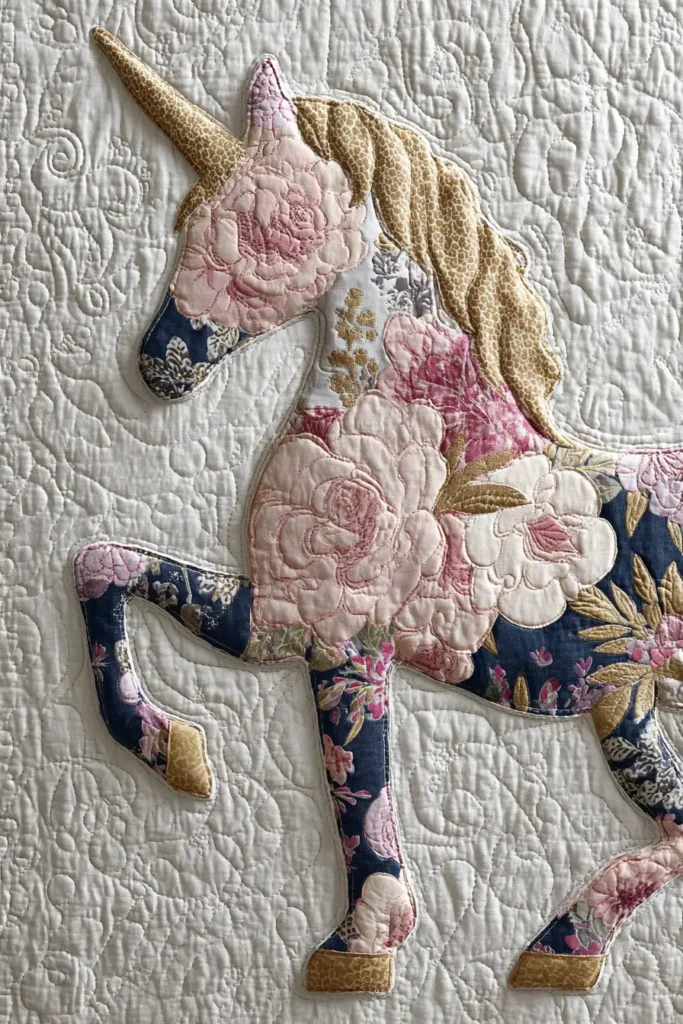
The “Celestial Unicorn” Floral Silhouette Quilt
While many unicorn quilts feature cartoonish characters, a truly stylish “everyday” quilt elevates the motif into art. The “Celestial Unicorn” uses a sophisticated Silhouette Appliqué technique. Instead of a complex face, we use the outline of a rearing or standing unicorn cut from a beautiful Vintage Floral or Liberty of London print. Placed against a neutral Linen or Soft Grey background and accented with a Metallic Gold horn, it creates a “Lady and the Unicorn” tapestry vibe that is elegant enough for a tween or teen room.
Finished Dimensions: Twin Bed Size, 60″ x 80″.
Materials Needed:
- Fabric A (The Unicorn Body): 1.5 yards of a high-quality Small-Scale Floral Print (pinks, sages, and soft blues).
- Fabric B (The Horn): A scrap of Gold Lame, Shimmer Cotton, or Mustard Solid.
- Fabric C (Background): 4 yards of Natural Linen or White Cotton Sateen.
- Fabric D (Borders/Stars): 1 yard of Navy or Deep Purple (for contrast).
- Notions: Paper-Backed Fusible Web (HeatnBond Lite), Unicorn Silhouette Template (printable online), Gold Embroidery Thread.
Cultural Backstory: The unicorn has been a symbol of purity and grace since antiquity. The most famous depiction is the “Lady and the Unicorn” tapestry series (woven around 1500 in Flanders), which portrayed the creature not as a pet, but as a noble, mysterious guardian. This quilt channels that medieval elegance rather than the neon pop-culture version.
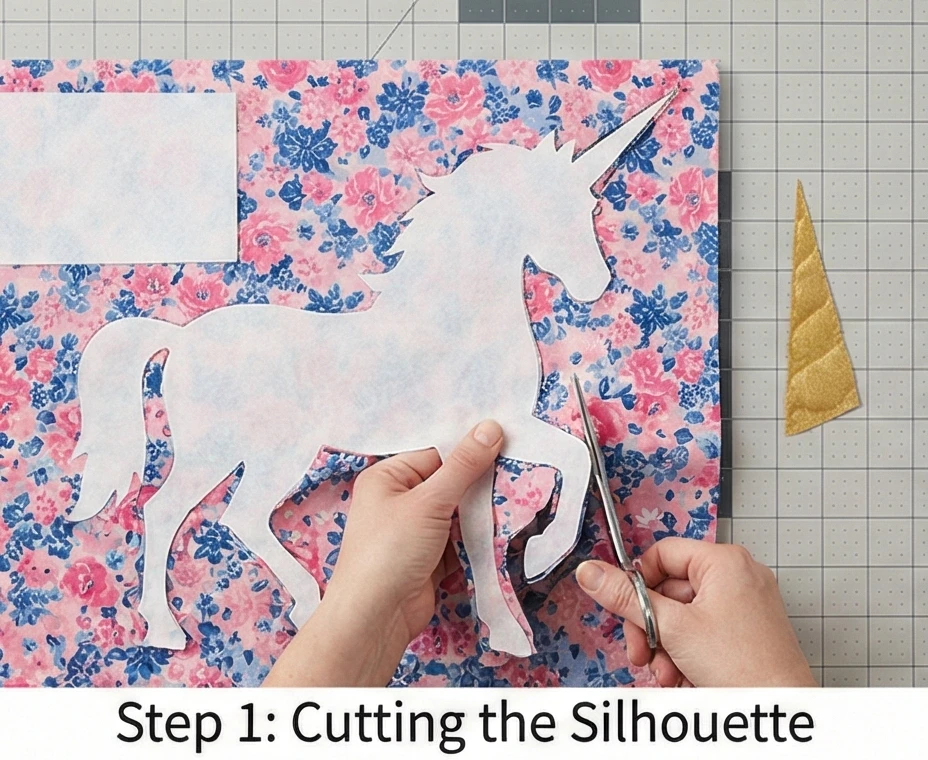
Step 1: Preparing the Silhouette
The silhouette is the focal point. Size matters.
- Template: Print or draw a large unicorn silhouette (profile view works best).
- Scale: The unicorn should be substantial—roughly 24 to 30 inches tall. You may need to tape several pieces of paper together to get the full size.
- Tracing: Trace the unicorn shape (body, head, tail, and legs) onto the paper side of your fusible web.
- The Horn: Trace the horn separately (it will be a different fabric).
- Fuse: Iron the body shape onto the wrong side of your Fabric A (Floral). Iron the horn shape onto Fabric B (Gold).
- Cut: Carefully cut out the floral body and the gold horn.
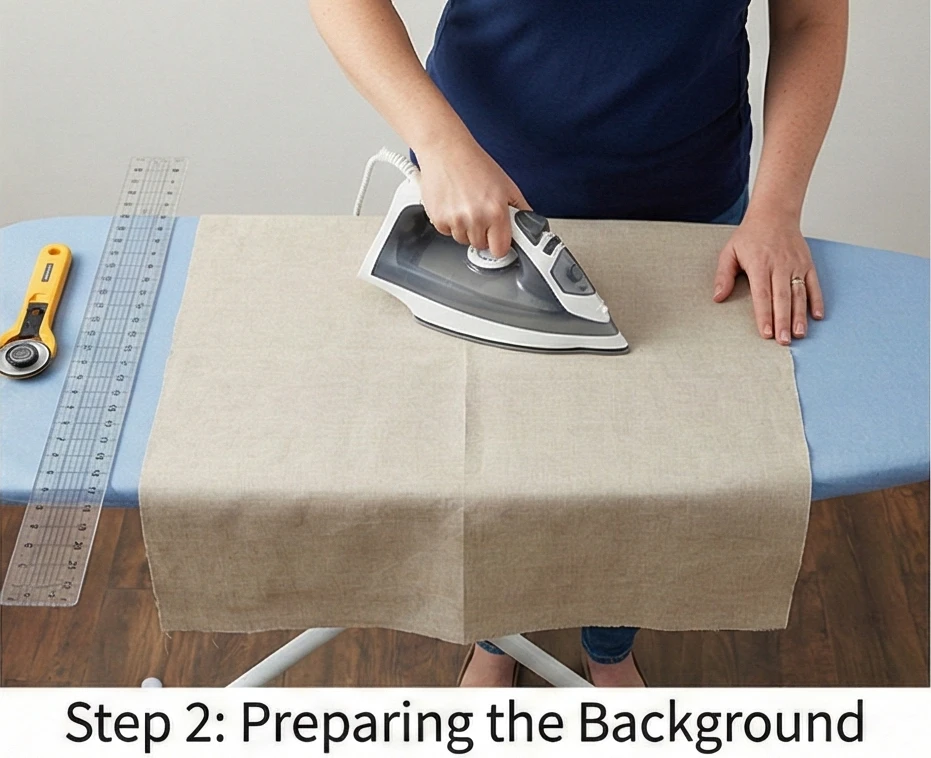
Step 2: Preparing the Background Canvas
We need a large, seamless background for the art.
- Panel: Cut your Fabric C (Linen) into a single large panel measuring 40″ x 60″. (You may need to seam two widths of fabric together; if so, press the seam open and try to hide it horizontally).
- Center: Fold the panel in quarters to lightly crease the center point.
Step 3: Composing the Scene
- Placement: Peel the paper backing off your fabric shapes.
- Arrange: Place the unicorn body in the center of the linen panel.
- Design: Position the unicorn slightly above the centerline so it appears to be rising/rearing.
- Horn: Tuck the base of the Gold Horn slightly beneath the floral forehead to keep the transition clean.
- Fuse: Once happy with the position, press with a hot iron to fuse the appliqué permanently to the background.
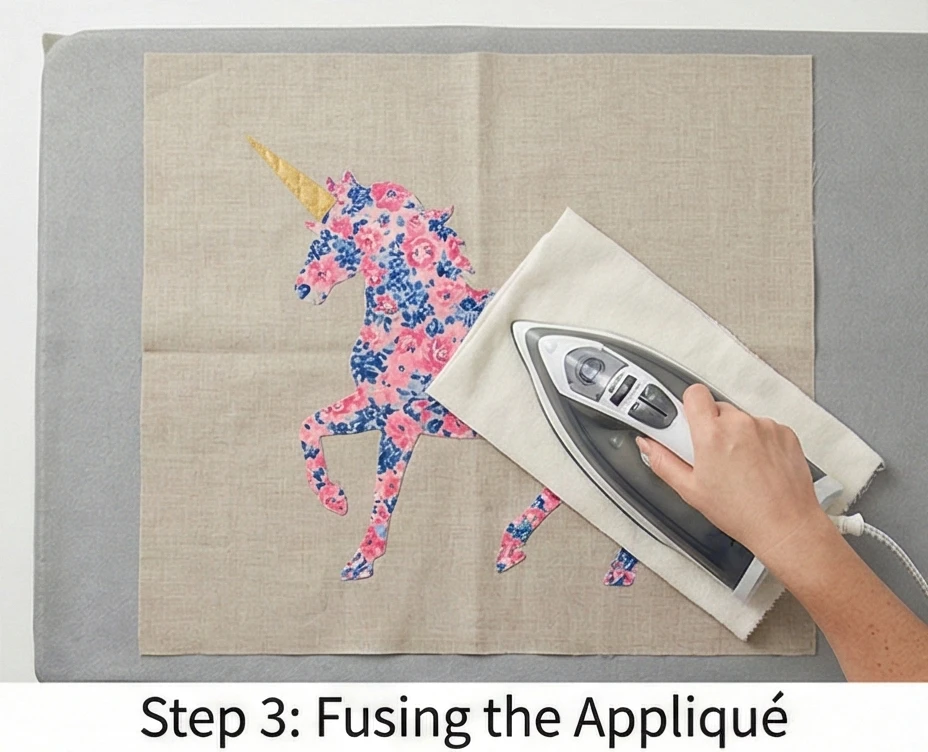
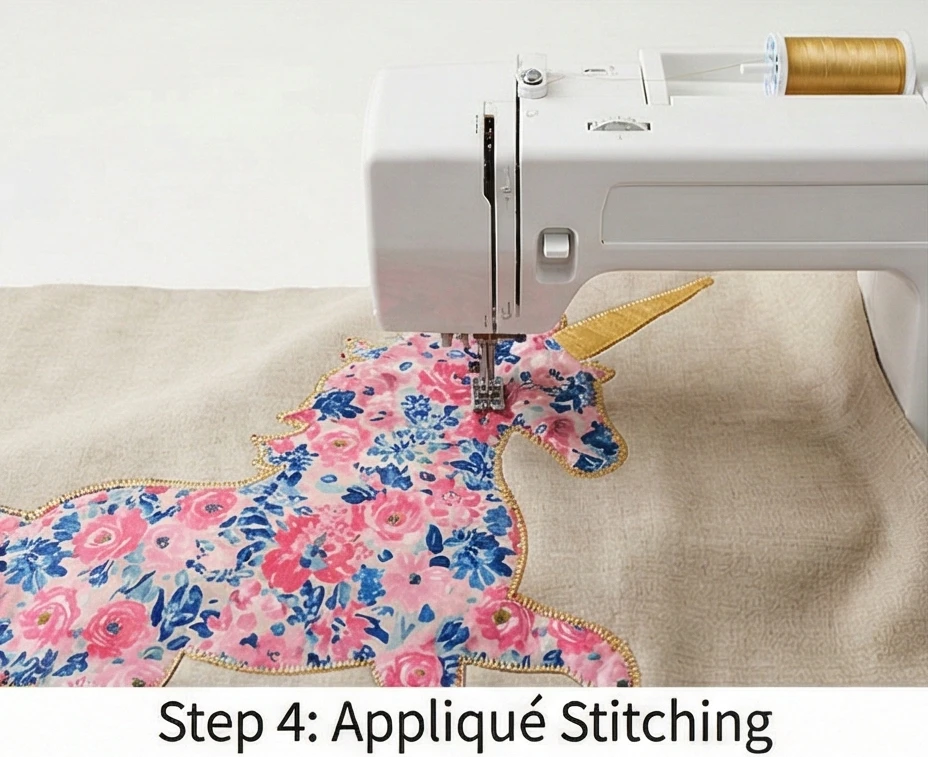
Step 4: Appliqué Stitching
Secure the edges to prevent peeling.
- Thread: Use a thread that blends with the floral print (or a gold metallic thread for extra sparkle).
- Stitch: Use a tight Zig-Zag Stitch or Blanket Stitch around the entire perimeter of the unicorn and horn.
- Detail: If you are artistic, you can free-motion stitch a “mane” and “tail” using embroidery thread to add flowy texture, but the silhouette alone is often chicer.
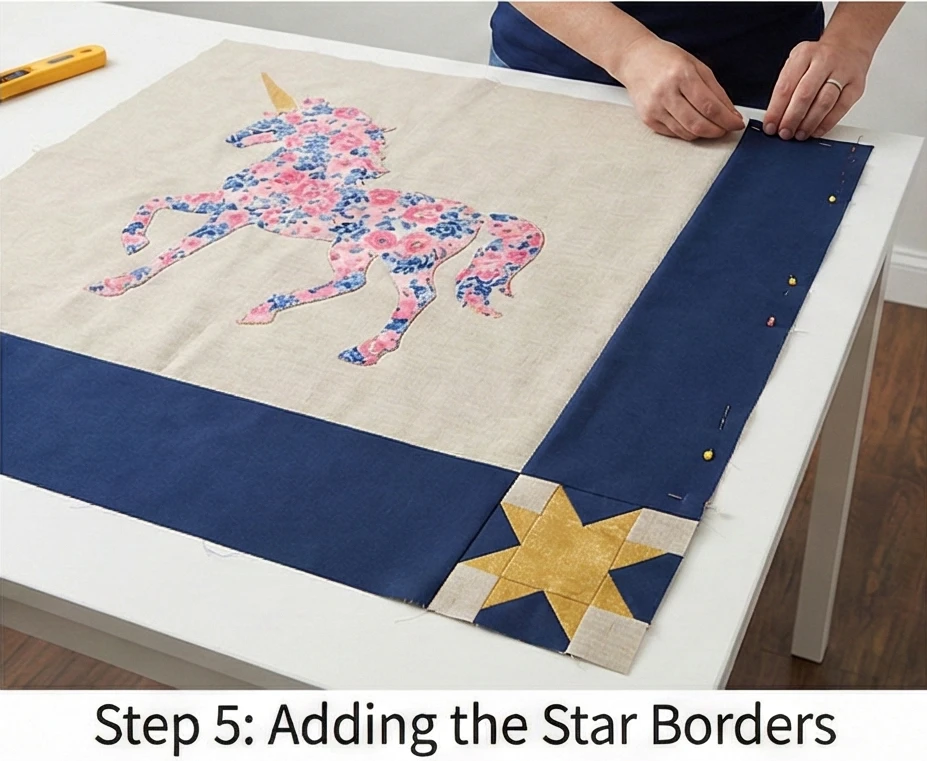
Step 5: The “Starry Night” Border
Frame the center panel to fit a twin bed.
- Cut Borders: Cut two side strips measuring 10.5″ x 60″ and two top/bottom strips measuring 10.5″ x 60″ (wait, math check: top/bottom needs to be 40 + 20 = 60″ wide).
- Star Blocks: Instead of plain solid borders, insert Sawtooth Star Blocks into the border strips.
- Make: Create 4 to 6 simple Star Blocks using Fabric D (Navy) and Fabric B (Gold).
- Insert: Sew these stars into the border strips (e.g., one in each corner and one in the middle of each side).
- Attach: Sew the side borders first, then the top/bottom borders.
- Result: A central art panel framed by a starry navy border.
Step 6: “Magic” Quilting
Use the quilting to add the “magic” dust.
- Baste: Sandwich layers.
- Quilt:
- Inside the Unicorn: Do minimal quilting (maybe just outlining the flower shapes in the print) to keep it puffy.
- Background: Quilt Swirls or Wind Gusts around the unicorn to make it look like it is in motion.
- Horn: Stitch straight spiral lines up the horn to mimic the twisted texture.
Step 7: Binding
- Finish: Bind the quilt using the Fabric B (Gold) or Fabric D (Navy).
- Gold Binding: A gold binding gives the quilt a gilded frame effect, elevating it to the status of a framed picture.
Usability Note: Because this uses a large central linen panel, it softens with each wash. It serves as a lightweight bedspread in summer or a decorative “coverlet” over a duvet in winter.
8. Starry Night & Celestial Quilt Ideas for Magical Sleep
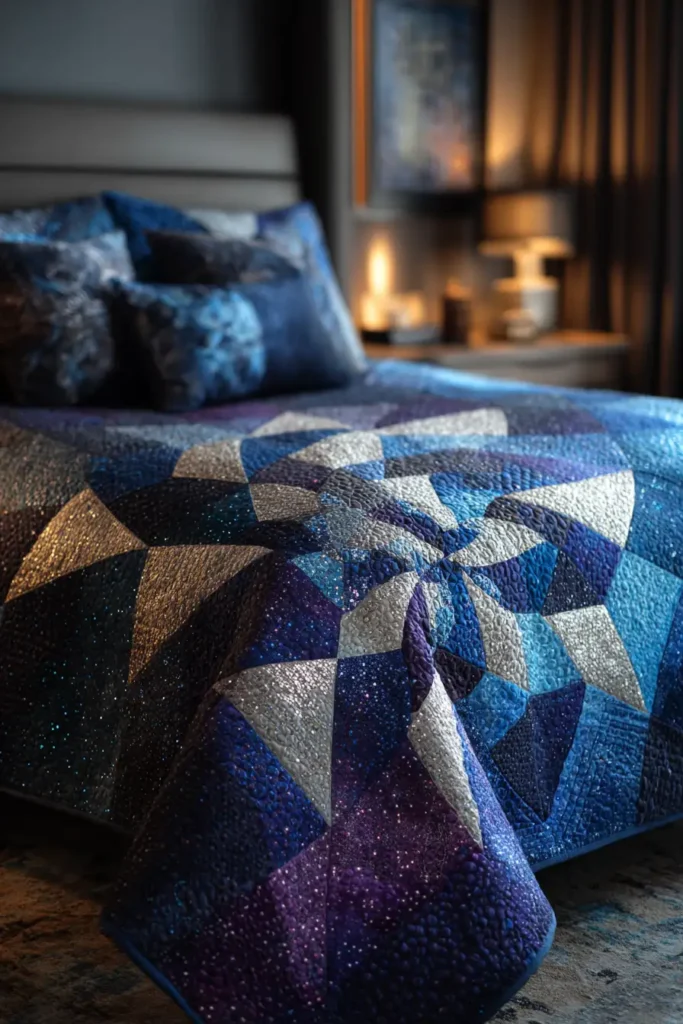

The “Galactic Spin” Spiral Star Quilt
A celestial-themed room doesn’t have to mean dark navy and glow-in-the-dark stars. The “Galactic Spin” pattern captures the feeling of a swirling nebula or galaxy using the Variable Star block variation. By alternating dark, moody blues/purples with bright, shimmering silvers or whites, the spinning stars create an optical illusion of motion. It is mesmerizing, sophisticated, and perfect for stargazing dreams.
Finished Dimensions: Twin Bed Size, 68″ x 92″.
Materials Needed:
- Fabric A (Dark Sky): 3 yards of various Deep Navy, Indigo, Midnight Purple (batiks work beautifully here for a nebulous look).
- Fabric B (Starlight): 3 yards of Silver Grey, White, or Pale Metallic Blue.
- Backing: 5.5 yards of a constellation print.
- Batting: Wool batting (for high loft/puffiness) or Bamboo.
- Notions: Rotary cutter, standard square ruler.
Cultural Backstory: Quiltmakers have looked to the sky for inspiration for centuries, with patterns like “Milky Way,” “North Star,” and “Moon over the Mountain.” The dynamic spinning motion of this pattern mimics the spiral galaxies observed by modern telescopes, bridging the history of pioneers with modern astronomy.
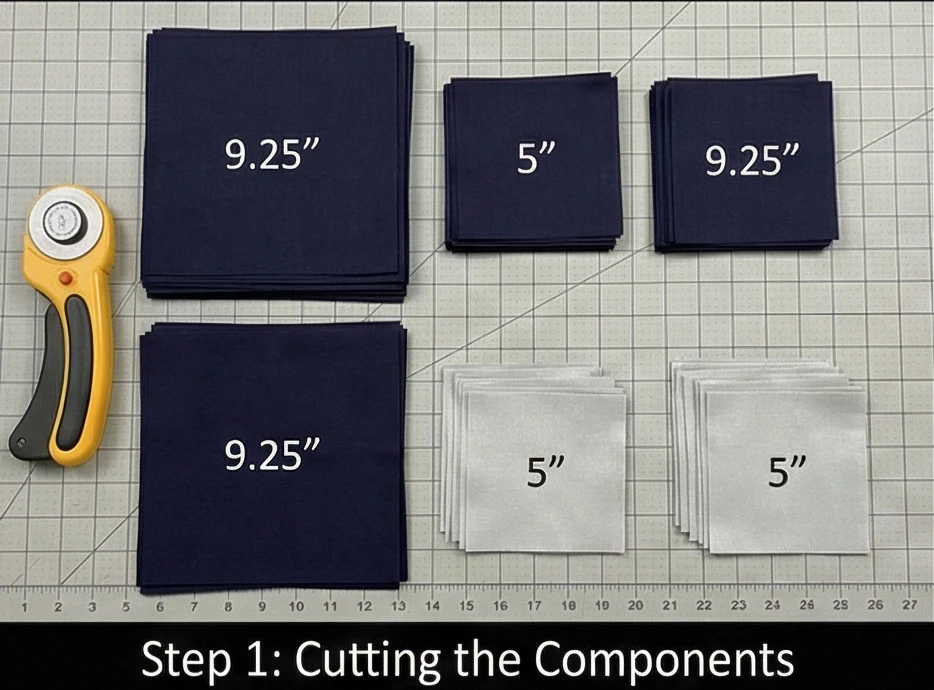
Step 1: Cutting the Components
We will use the “Flying Geese” method to make the star points.
For the Dark Sky (Background):
- Cut Squares: Cut 140 squares measuring 4.5″ x 4.5″ (for the corners of the blocks).
- Cut Large Squares: Cut 35 squares measuring 9.25″ x 9.25″ (This is the “Goose” body).
For the Starlight (Points & Centers):
- Cut Small Squares: Cut 140 squares measuring 5″ x 5″ (These become the star points).
- Cut Center Squares: Cut 35 squares measuring 4.5″ x 4.5″ (The heart of the star).
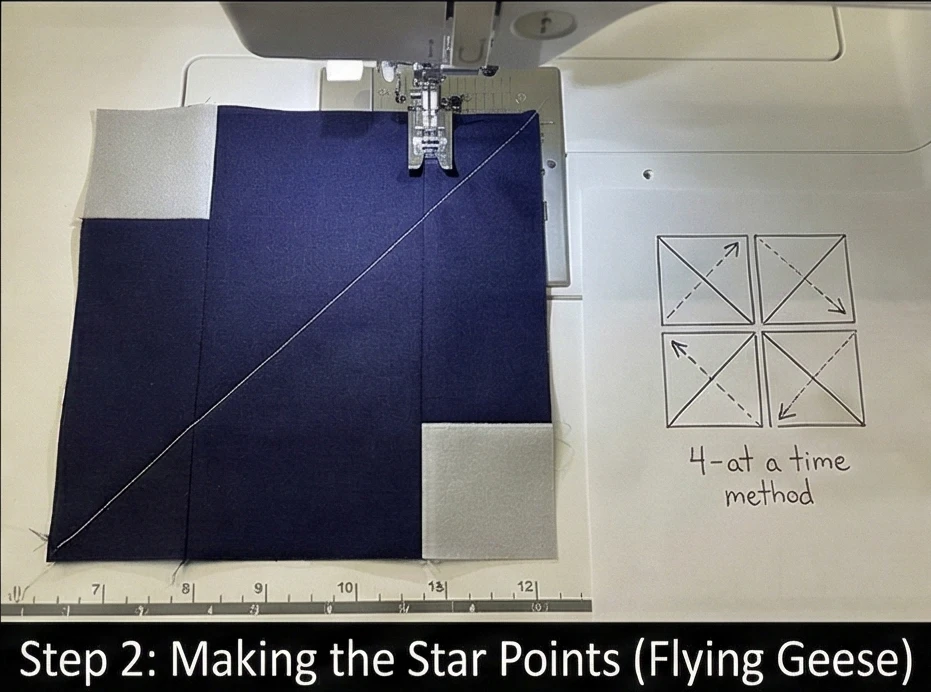
Step 2: Making the Star Points (Flying Geese)
We use the “No-Waste” 4-at-a-time method to speed up the process.
- Mark: Draw a diagonal line on the back of all 5″ Light squares.
- Place: Place two Light squares on opposite corners of a 9.25″ Dark square (Right Sides Together). The small squares will overlap in the middle.
- Sew: Stitch a scant 1/4 inch on both sides of the drawn line.
- Cut: Cut along the drawn center line. You now have two weird heart-shaped units. Press the triangles open.
- Place Again: Place another 5″ Light square on the remaining corner of the “heart” shape. Stitch 1/4 inch on both sides of the line. Cut. Press.
- Yield: This process turns one big dark square and four small light squares into 4 Flying Geese units.
- Trim: Trim all geese units to exactly 4.5″ x 8.5″.
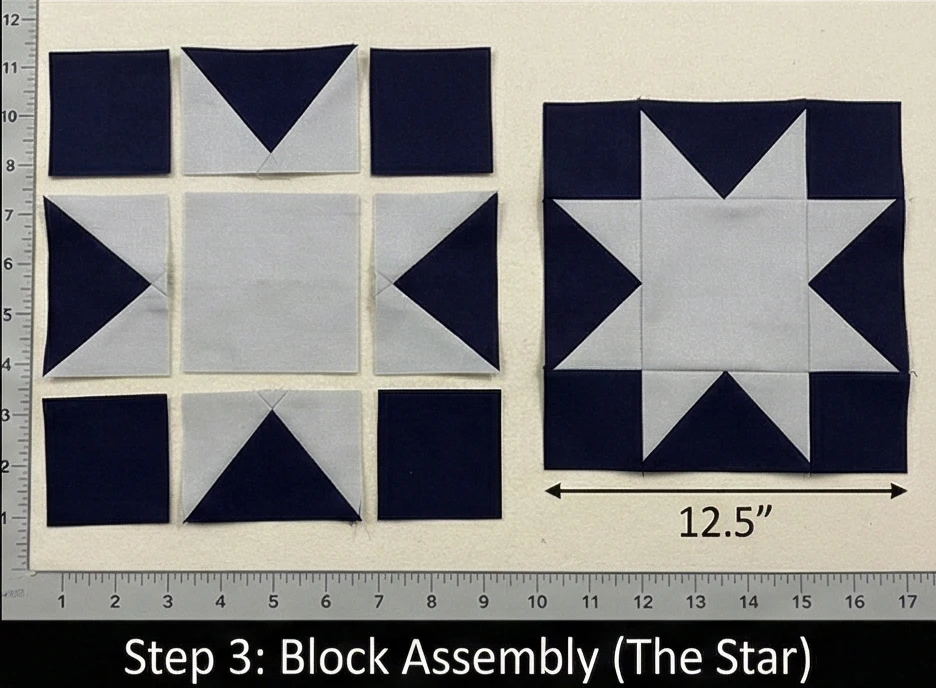
Step 3: Block Assembly (The Star)
We are making 35 Star Blocks.
- Layout: Arrange your pieces in three rows:
- Top Row: Dark Square (4.5″) – Flying Goose (Points pointing OUT) – Dark Square.
- Middle Row: Flying Goose (Points pointing OUT) – Center Light Square (4.5″) – Flying Goose.
- Bottom Row: Dark Square – Flying Goose – Dark Square.
- Sew: Stitch the pieces into rows. Press seams toward the dark squares/geese.
- Join: Stitch the three rows together.
- Result: You have a 12.5″ (unfinished) block with a light center and light star points exploding outward.
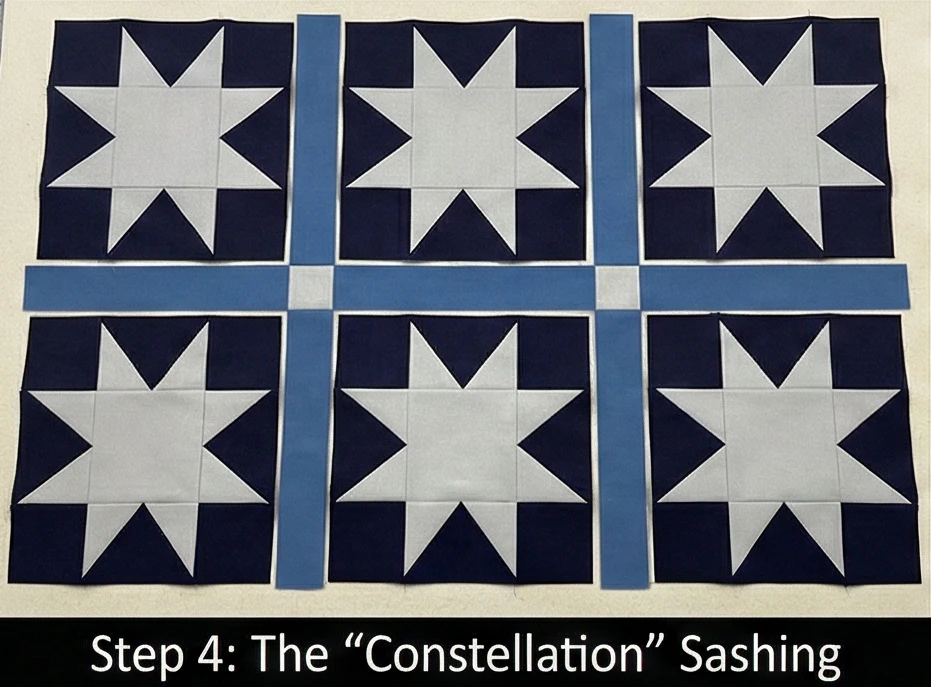
Step 4: The “Constellation” Sashing
To separate the stars and make the quilt larger.
- Sashing Strips: Cut 2.5″ wide strips of a Medium Blue or Teal.
- Why: This middle color softens the transition between the dark blocks and makes the stars look like they are floating.
- Cornerstones: Use 2.5″ Silver squares at the intersections of the sashing strips.
- Effect: These silver cornerstones act as distant “minor stars” connecting the constellations (the big blocks).
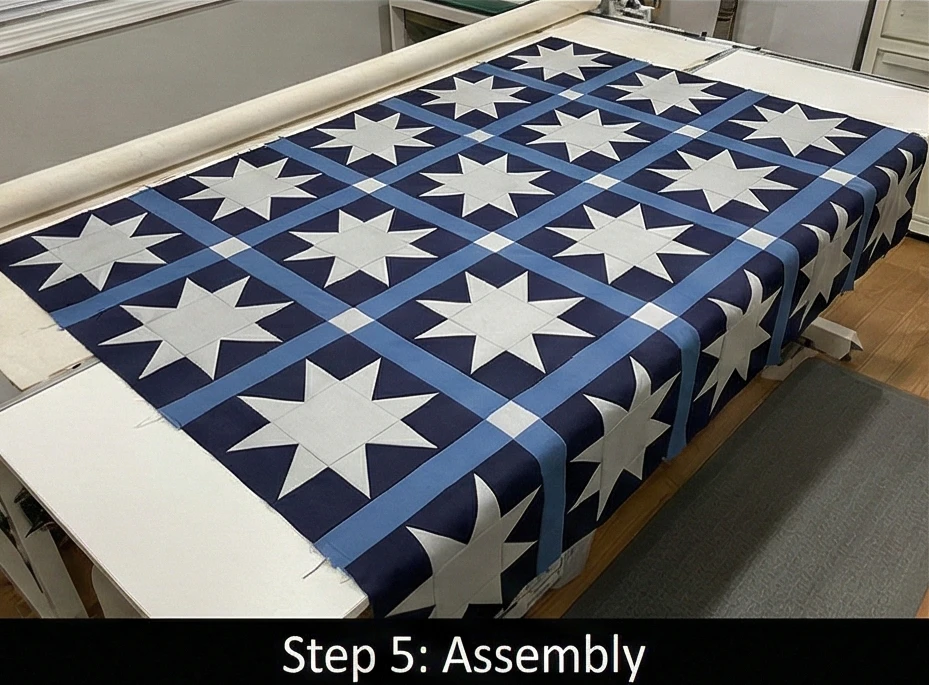
Step 5: Assembly
- Grid: Arrange blocks in a 5-block-wide x 7-block-long grid.
- Sew: Join blocks with vertical sashing strips. Join rows with horizontal sashing strips (incorporating cornerstones).
Step 6: “Orbit” Quilting
Use circular quilting to contrast the sharp points.
- Baste: Sandwich layers.
- Quilt: Ignore the square grid of the blocks. Start in the exact center of the quilt and spiral outward with a simple walking foot spiral or concentric circles spaced 1 inch apart.
- Effect: The circular quilting ripples across the sharp stars, creating a sense of gravity and rotation, enhancing the “Galaxy” feel.
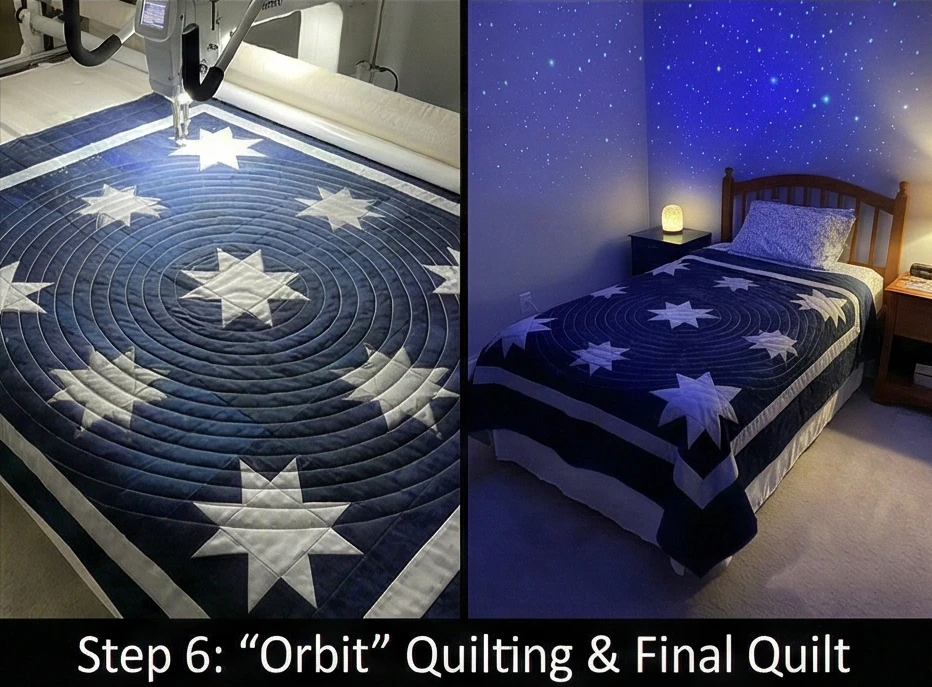
Usability Note: Using high-contrast fabrics (very dark vs. very light) creates a bold visual anchor in a room. Under dim nightlights, the dark fabrics recede into the shadows, leaving only the “stars” visible, which can be very soothing for children afraid of the dark.


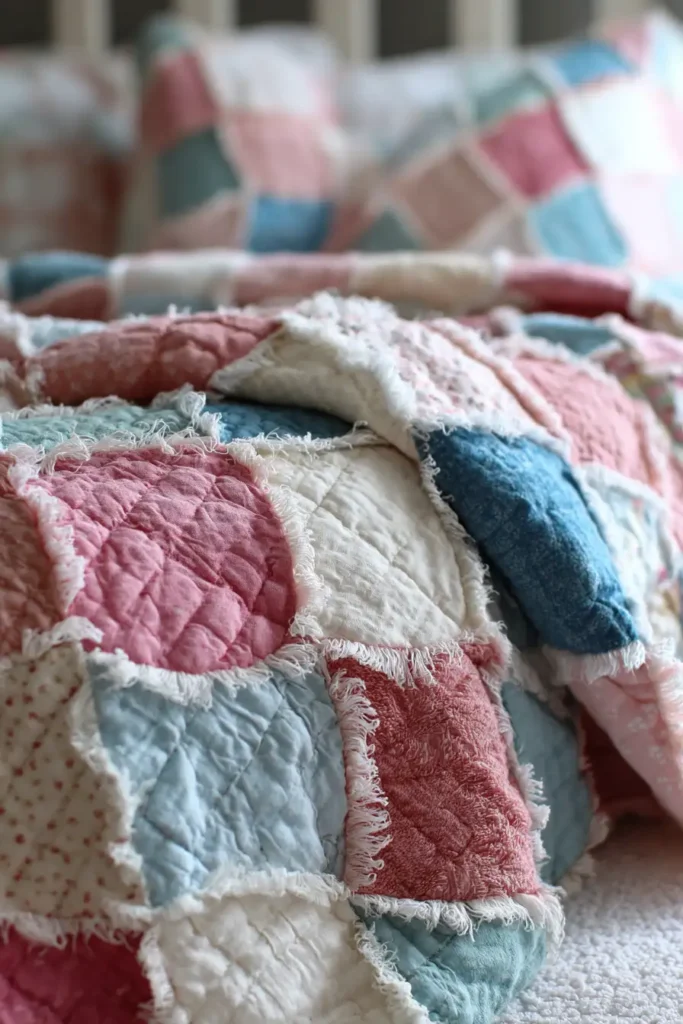
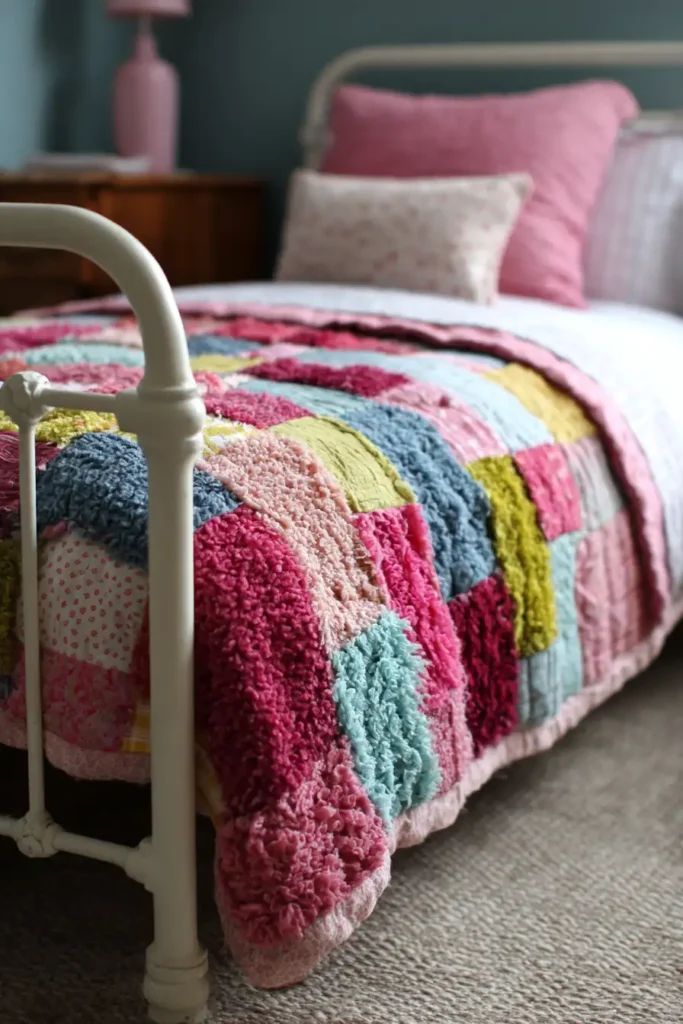
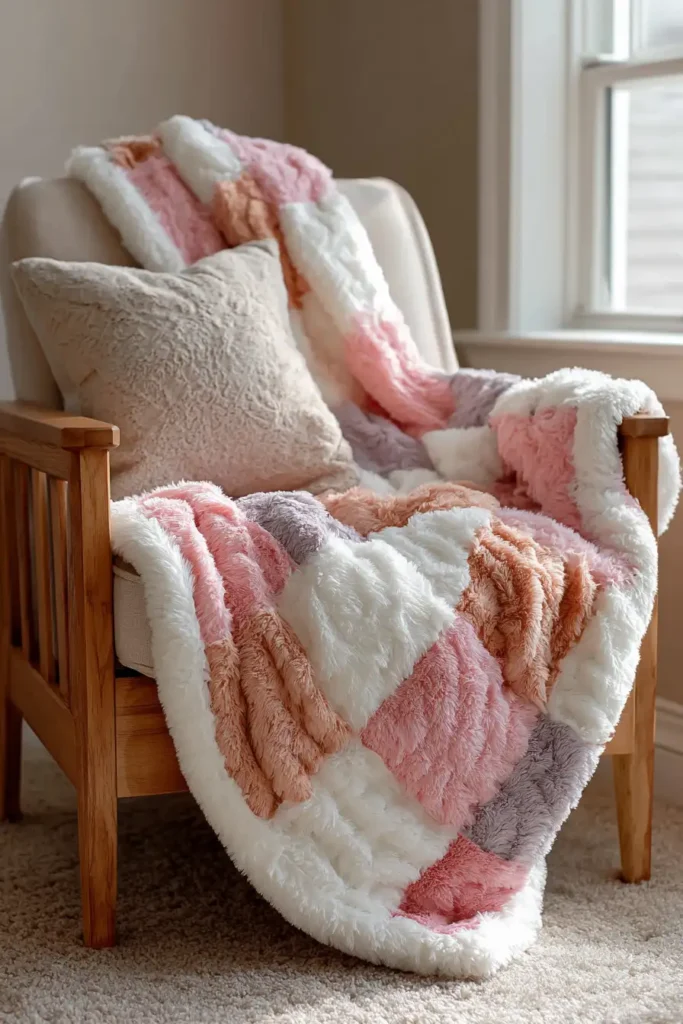
9. Fun and Funky Rag Quilt Bedding for Textured Warmth
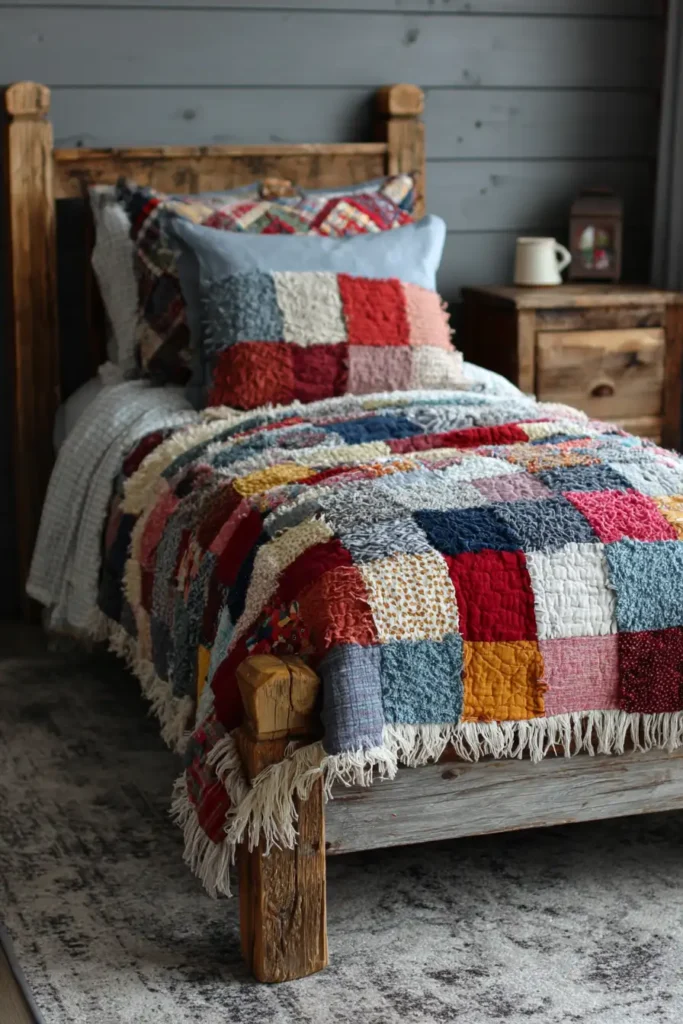
The “Confetti Pop” Scrappy Rag Quilt
For a bedroom that needs a burst of energy and texture, nothing beats a Rag Quilt. Unlike traditional quilts, which hide the raw edges, a Rag Quilt exposes the seams on the front. When snipped and washed, these seams bloom into fluffy, chenille-like caterpillars. This “Confetti Pop” version mixes Bright Flannels (Hot Pink, Lime, Turquoise) with Upcycled Denim or Chambray squares. The contrast between the rugged denim and the fuzzy flannel creates a “funky,” tactile bedspread that is virtually indestructible and heavy enough to feel like a weighted blanket.
Finished Dimensions: Twin Bed Size, 63″ x 84″.
Materials Needed:
- Fabric A (Top Squares): A mix of fabrics. You need roughly 5 yards total.
- The Funky Mix: Use old jeans (cut into squares), bright plaid flannels, and polka dot cottons.
- Fabric B (Backing Squares): 5 yards of soft Solid Flannel (this will touch the skin, so choose a color you love, like bright Purple or Teal).
- Batting: High-loft Cotton or Polyester (cut into squares).
- Notions: Spring-Loaded Rag Snips (Standard scissors will blister your hand—this is essential), Walking Foot.
Cultural Backstory: The Rag Quilt is the ultimate “make-do” textile. Originating in the American frontier and Depression-era households, it was a way to use the smallest scraps of heavy wool or worn-out clothing that were too thick for traditional piecing. Today, it’s a stylistic choice that celebrates the “perfectly imperfect” aesthetic of the Boho and Grunge movements.
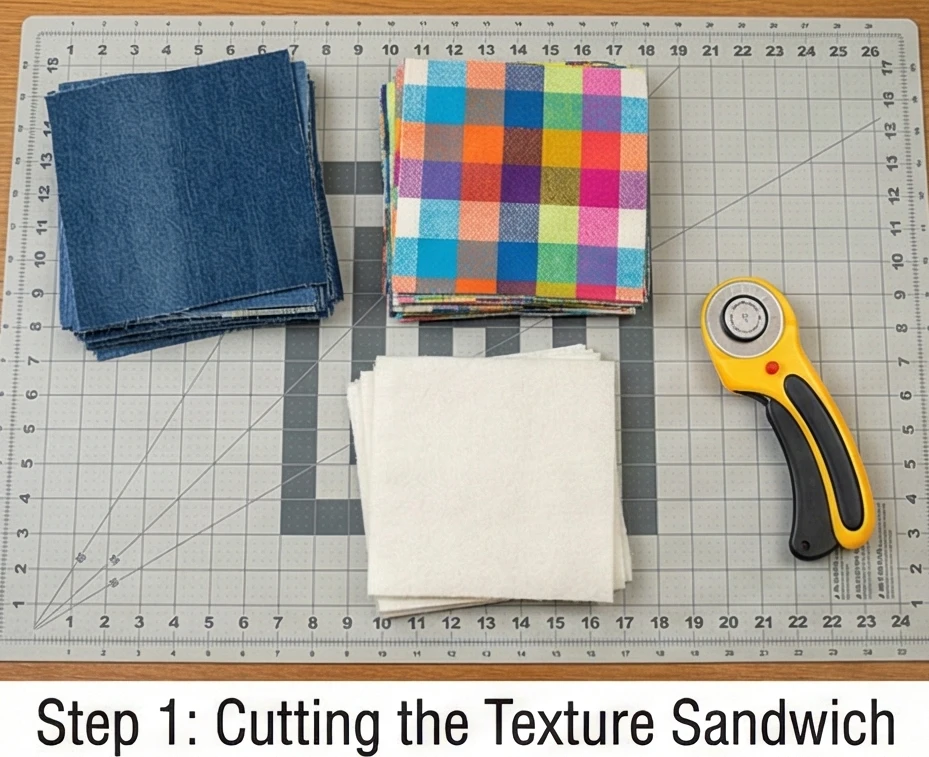
Step 1: Cutting the Texture Sandwich
Rag quilts are built block-by-block, not row-by-row.
- Cut Top Squares: Cut 126 squares measuring 8 inches from your mix of denim/flannel prints.
- Cut Backing Squares: Cut 126 squares measuring 8 inches from your solid flannel backing.
- Cut Batting Squares: Cut 126 squares measuring 6 inches.
- Crucial Detail: The batting must be smaller than the fabric squares. You do not want batting caught in the seam allowance, or the fringe will be lumpy and won’t fray properly.
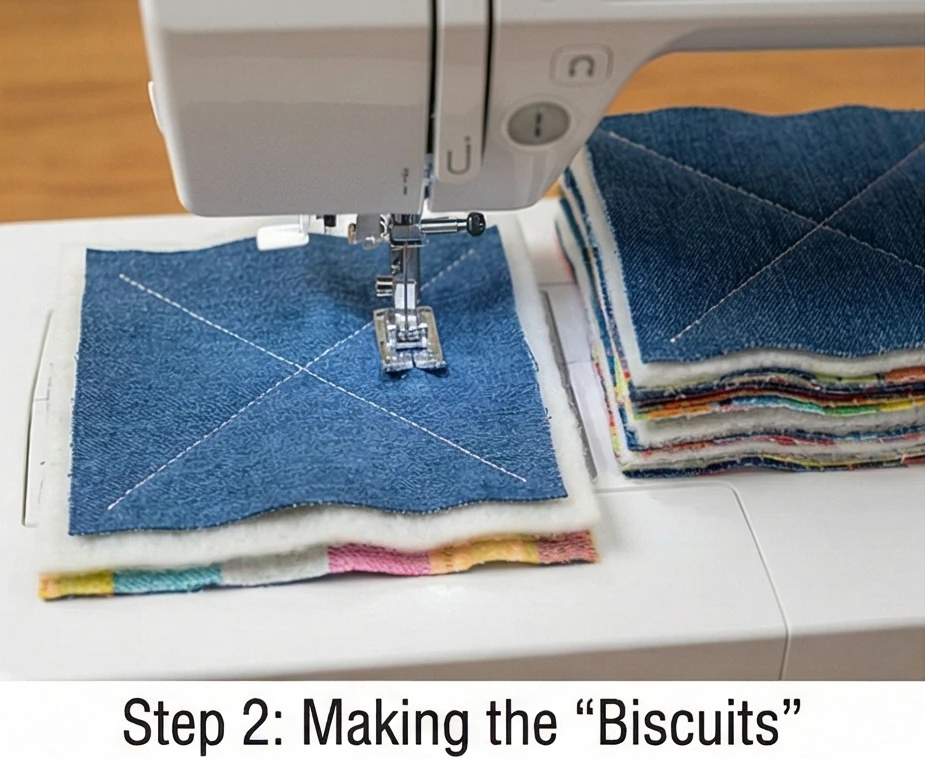
Step 2: Making the “Biscuits”
We assemble the quilt one block at a time.
- Layer:
- Place a Backing Square face down.
- Center a Batting Square on top of it.
- Place a Top Square face up.
- Quilt the X: Sew a diagonal line from corner to corner through all three layers. Then sew the opposite diagonal.
- Why: This “X” holds the batting in place during the violent washing process later.
- Repeat: Do this for all 126 blocks. You now have a stack of quilted “biscuits.”
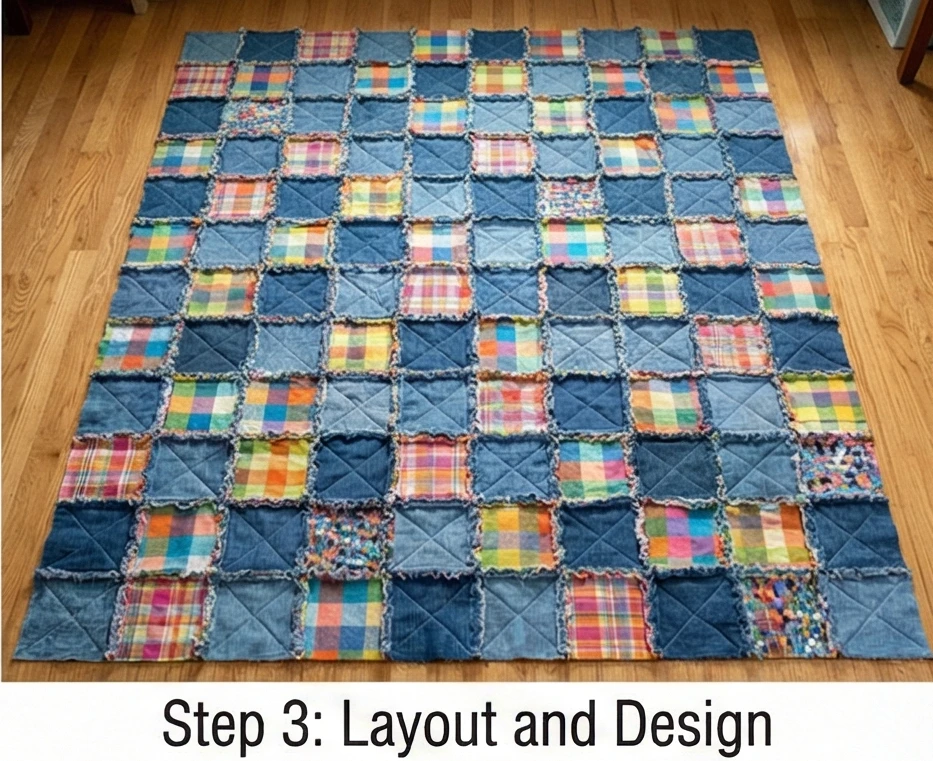
Step 3: Layout and Design
- Grid: Arrange your blocks on the floor in a grid of 9 blocks wide by 14 blocks long.
- Randomize: If using denim and bright prints, scatter them so the heavy denim blocks are evenly distributed. This ensures the quilt’s weight is balanced.
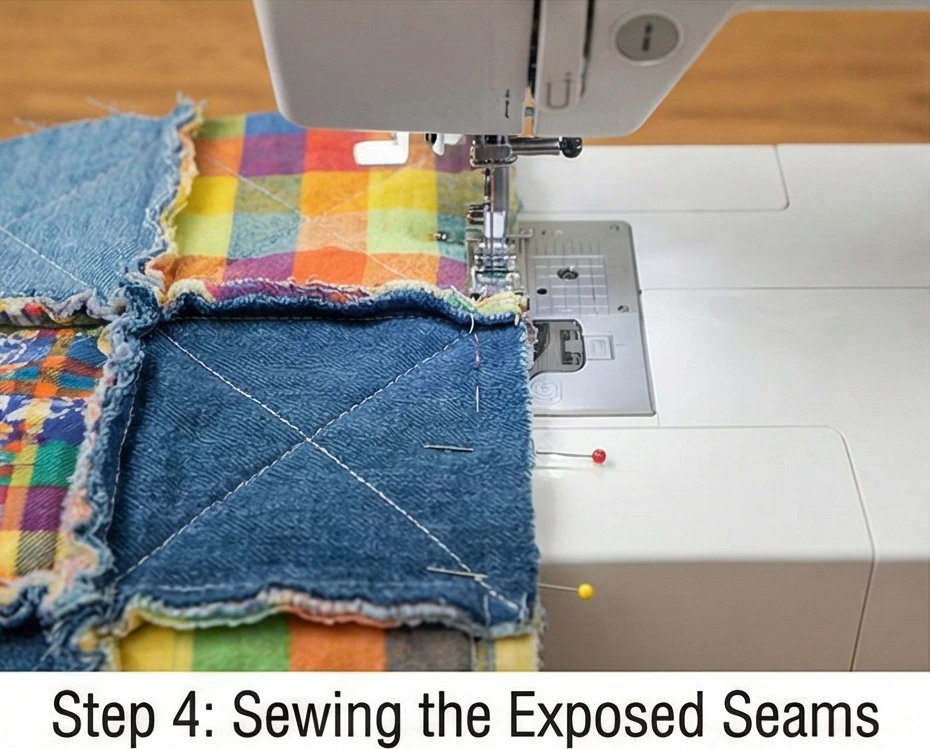
Step 4: Sewing the Exposed Seams
This is the reverse of normal quilting.
- Wrong Sides Together: Pick up two blocks and place them Wrong Sides Together (Backing touching Backing).
- Sew: Stitch them together with a heavy 1-inch seam allowance.
- Note: The seam allowance (the flaps) should be standing up on the TOP (Front) of the quilt.
- Rows: Sew the blocks into rows.
- Join Rows: Sew the rows together. Remember to press the vertical seam allowances open as you sew over them to distribute the bulk.
Step 5: The Perimeter Stitch
- Border: Stitch a line 1 inch away from the raw edge all the way around the outside of the quilt.
- Why: This holds the edges together so you can fringe the border too.
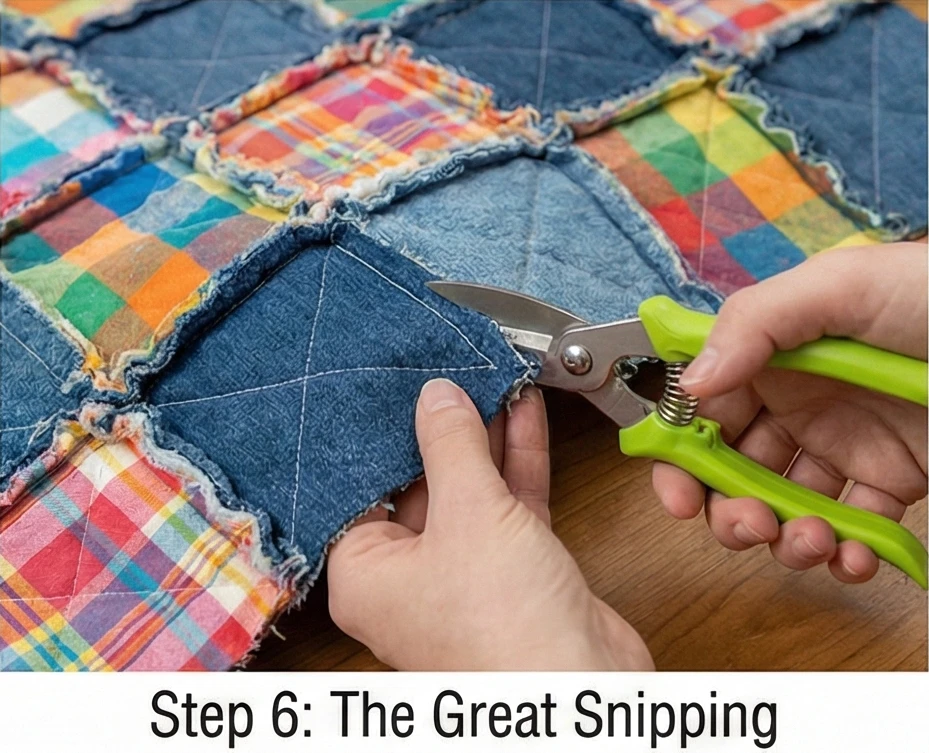
Step 6: The Great Snipping
Put on a movie; this takes time.
- Snip: Using your spring-loaded snips, cut slits into the standing seam allowances perpendicular to the seam.
- Spacing: Snip every 1/4 to 1/2 inch.
- Caution: Snip close to the seam line, but DO NOT cut the thread. If you cut the thread, you will have a hole.
- Where: Snip all vertical seams, all horizontal seams, and the outer border.
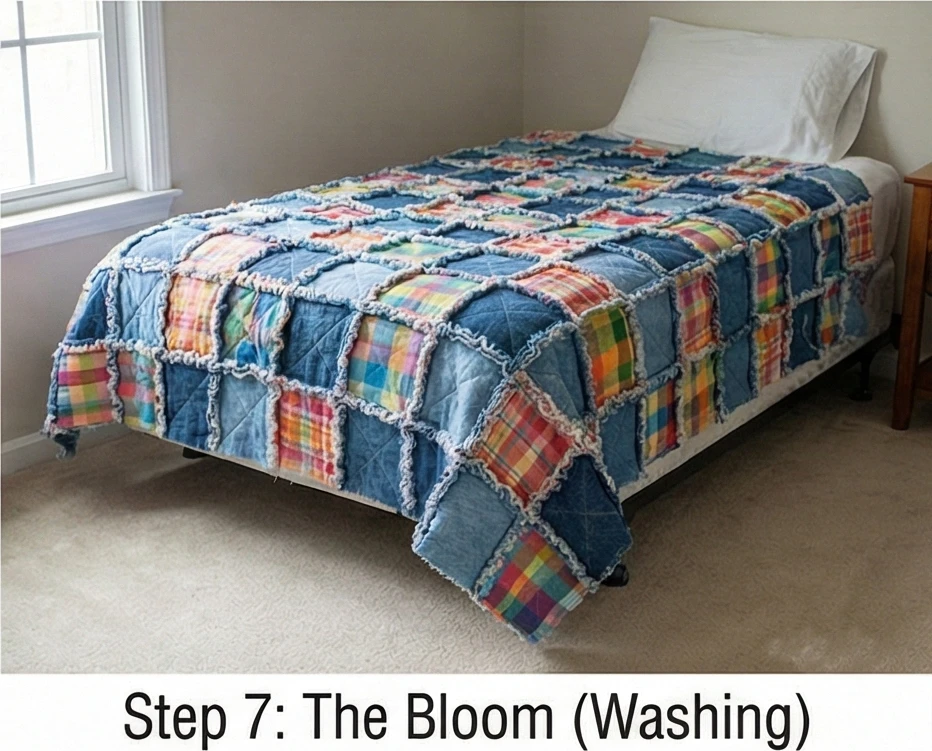
Step 7: The Bloom (Washing)
The quilt isn’t done until it’s washed.
- Laundromat Tip: Take this to a laundromat for the first wash. The amount of lint released is staggering and can clog home filters.
- Wash: Wash on cold with a heavy pair of sneakers or tennis balls (to beat the fabric up).
- Dry: Tumble dry high.
- Result: The snipped edges will fray, curl, and bloom into soft, fuzzy caterpillars. Shake it out vigorously to remove loose threads.
Usability Note: Rag quilts are excellent for “sensory seekers.” The combination of smooth denim, soft flannel, and the ticklish fringe provides multiple tactile inputs that can be very grounding for anxiety or restlessness.
10. Butterfly Garden Quilt Ideas for Nature-Loving Girls
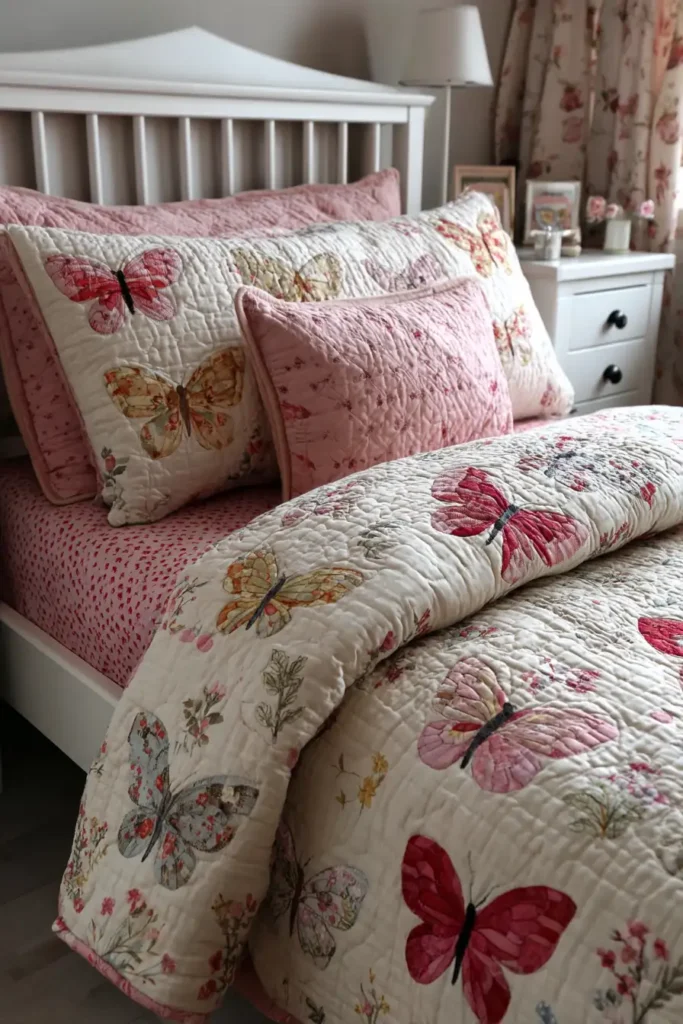
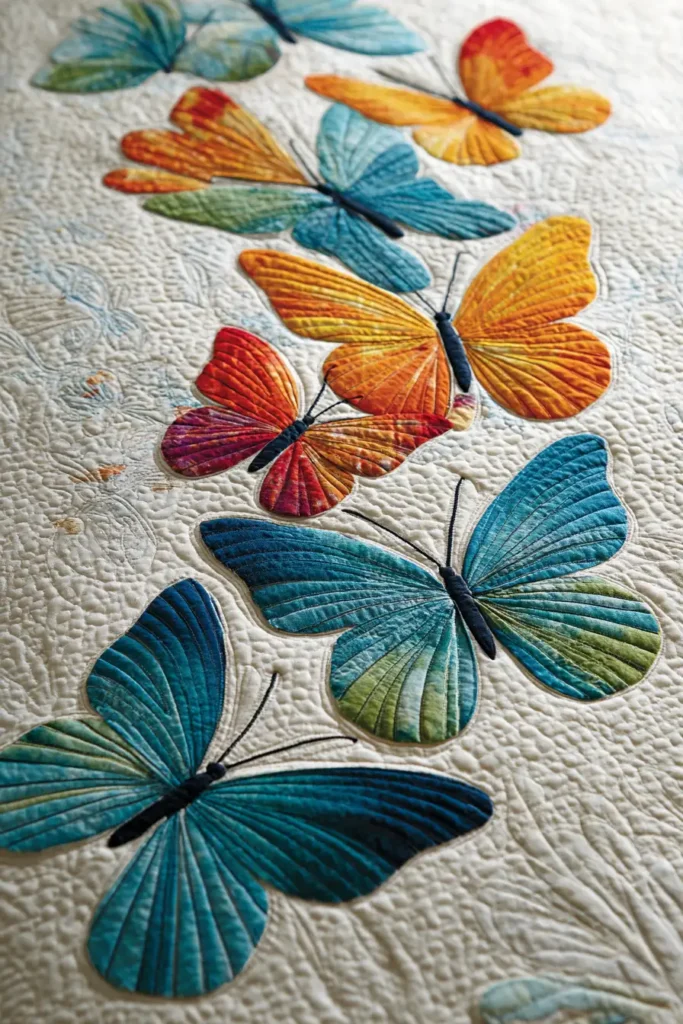
The “Butterfly Waltz” Appliqué Quilt
A butterfly garden theme brings the vibrant energy of nature indoors. While pieced butterfly blocks (made of geometric triangles) are classic, this “Butterfly Waltz” design uses Raw Edge Appliqué to create organic, rounded wing shapes that look like they are fluttering mid-flight. Set against a background of Soft Sky Blue or Pale Grass Green, the colorful butterflies are arranged in a “flight path” that swirls across the quilt, creating movement and whimsy rather than a rigid grid.
Finished Dimensions: Twin Bed Size, 66″ x 86″.
Materials Needed:
- Fabric A (The Wings): 15-20 Fat Eighths or Scraps in bright, happy colors (Berry, Orange, Teal, Yellow).
- Fabric B (The Bodies): 1/4 yard of Charcoal or Black solid.
- Fabric C (Background): 4.5 yards of Cloud White or Pale Aqua.
- Backing: 5.5 yards of a wildflower print.
- Notions: Paper-Backed Fusible Web (HeatnBond Lite), Butterfly Template (printable), Black Thread.
Cultural Backstory: In many cultures, the butterfly represents transformation, hope, and the soul. In the quilting world, the “Butterfly” block became incredibly popular in the 1930s during the Great Depression. Quilters would often use tiny scraps of their brightest, most cheerful fabrics to make the wings, symbolizing optimism during dark times.
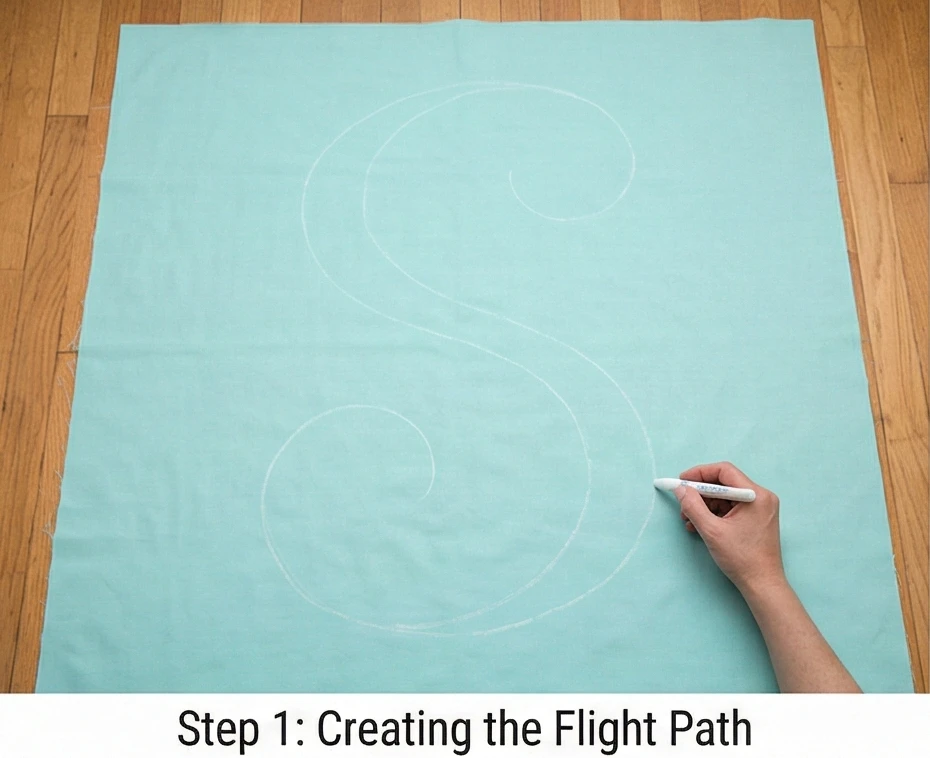
Step 1: Creating the Flight Path
We aren’t using blocks. We are treating the whole quilt top as a canvas.
- Prepare Background: Cut your background fabric into two large panels (approx 33.5″ x 86″ each) and sew them together lengthwise to create a large 66.5″ x 86″ canvas.
- Mark the Path: Lay the background on the floor. Using tailor’s chalk or a disappearing ink pen, lightly draw a swirling “S” curve or a loop-de-loop path starting from the bottom left and ending at the top right. This is the line your butterflies will follow.
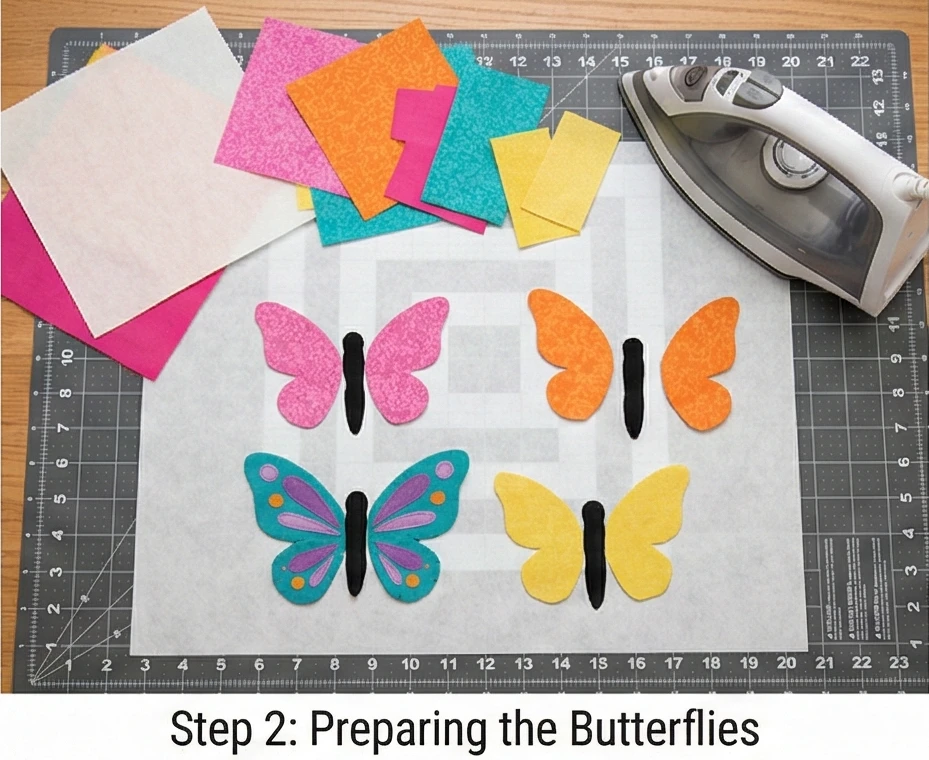
Step 2: Preparing the Butterflies
We need variety in size.
- Templates: Print out butterfly outlines in three sizes: Small (4″), Medium (6″), and Large (8″).
- Trace: Trace the wing shapes onto the paper side of your fusible web. Trace the bodies separately.
- Quantity: You will need roughly 25-30 butterflies to fill the path nicely.
- Fuse: Iron the wing shapes onto the wrong side of your colorful fabrics. Iron the body shapes onto the Black fabric.
- Cut: Cut out all the shapes carefully.
Step 3: Setting the Scene
- Peel & Stick: Peel the paper backing off the wings and bodies.
- Arrange: Place the butterflies along the chalk line you drew on the background.
- Orientation: Rotate them! Have some flying up, some banking left, some banking right.
- Grouping: Cluster a few small ones together behind a large “Leader” butterfly.
- Fuse: Once you are happy with the “Waltz,” press with a hot iron to fuse them permanently to the background.
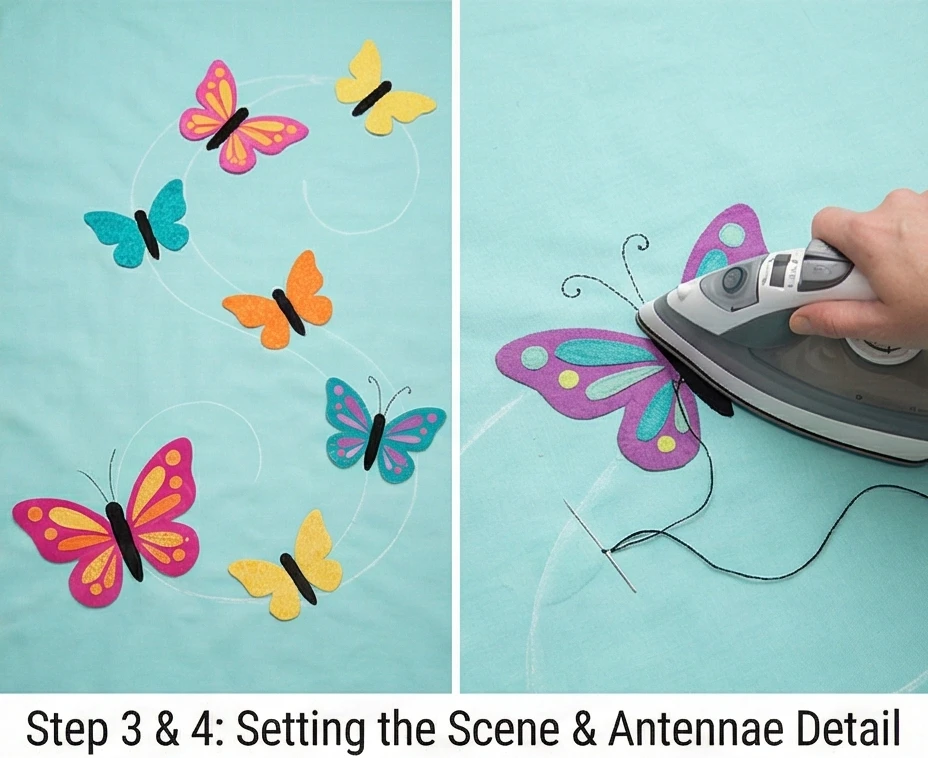
Step 4: The Antennae Detail
The appliqué gives you the body, but the antennae need to be stitched.
- Draw: Using a ruler or freehand, draw two antennae coming off the head of each butterfly directly onto the background fabric.
- Stitch: Use a tight zigzag or a triple straight stitch in black thread to stitch over these lines.
- Tip: Adding a tiny “French Knot” by hand at the tip of each antenna adds a cute, dimensional detail.
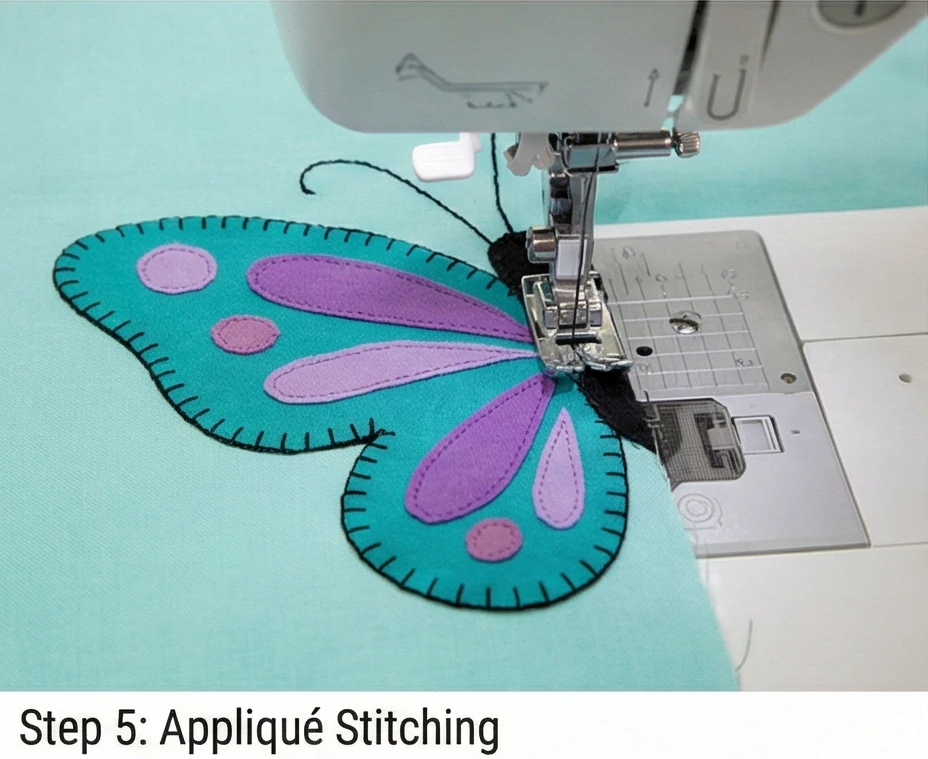
Step 5: Appliqué stitching
- Secure Edges: Use a Blanket Stitch or a simple Straight Topstitch (1/8 inch from the edge) around all the wings and bodies.
- Thread Color: You can match the thread to the wings for a seamless look, or use Black thread everywhere for a “sketchbook” artistic outline.
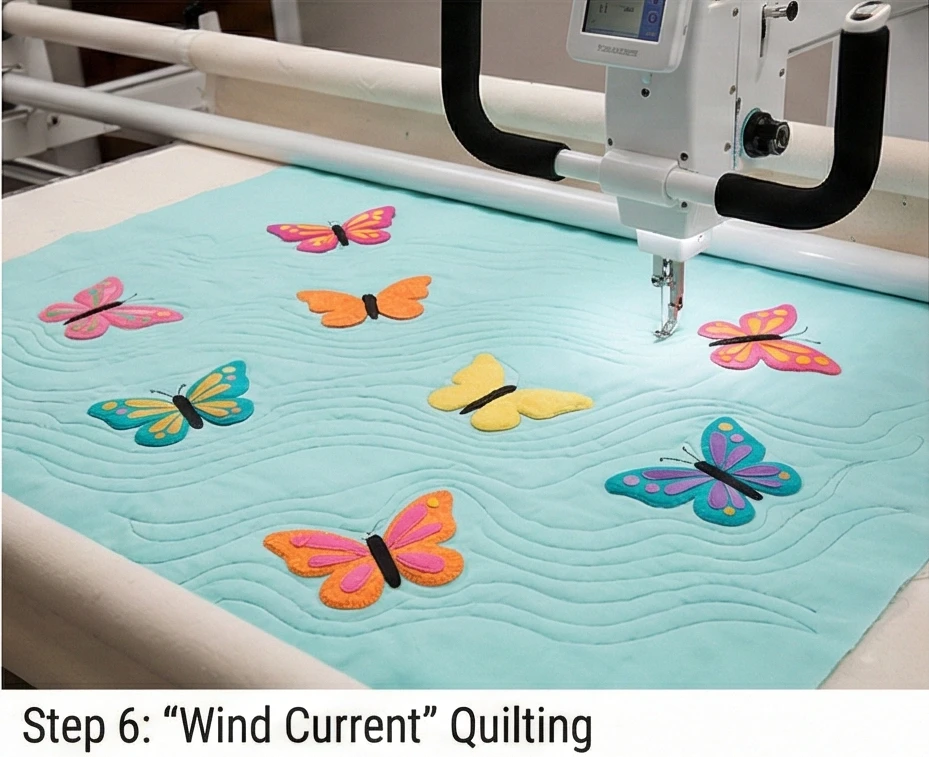
Step 6: “Wind Current” Quilting
The quilting should enhance the feeling of flight.
- Baste: Sandwich the layers (Backing + Batting + Top).
- Quilt:
- The Path: Quilt wavy, flowing lines that follow the direction of the butterflies (horizontal winds).
- Avoid the Bugs: Try not to quilt heavily over the butterflies themselves; let them puff up slightly against the flattened background.
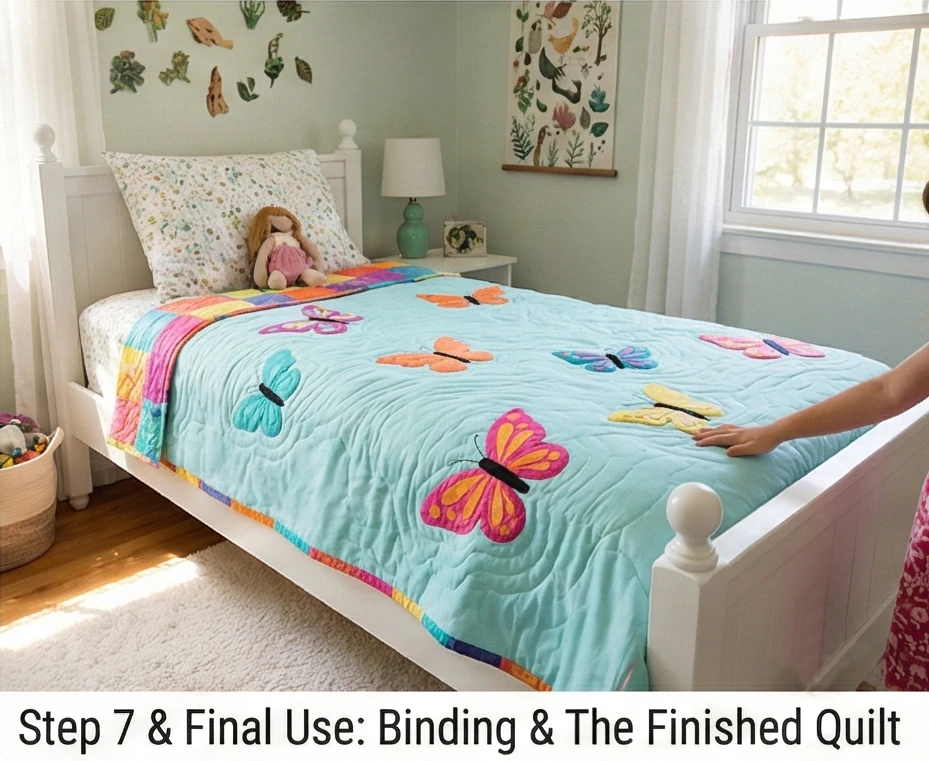
Step 7: Binding
- Binding: Use a Scrappy Binding made from the leftover wing fabrics. This creates a colorful frame that ties together the different butterfly colors.
Usability Note: This quilt grows with the child. In a toddler room, it feels playful and cute. In a teen room, the “specimen” style layout (especially if done on a linen background) feels scientific and boho-chic.
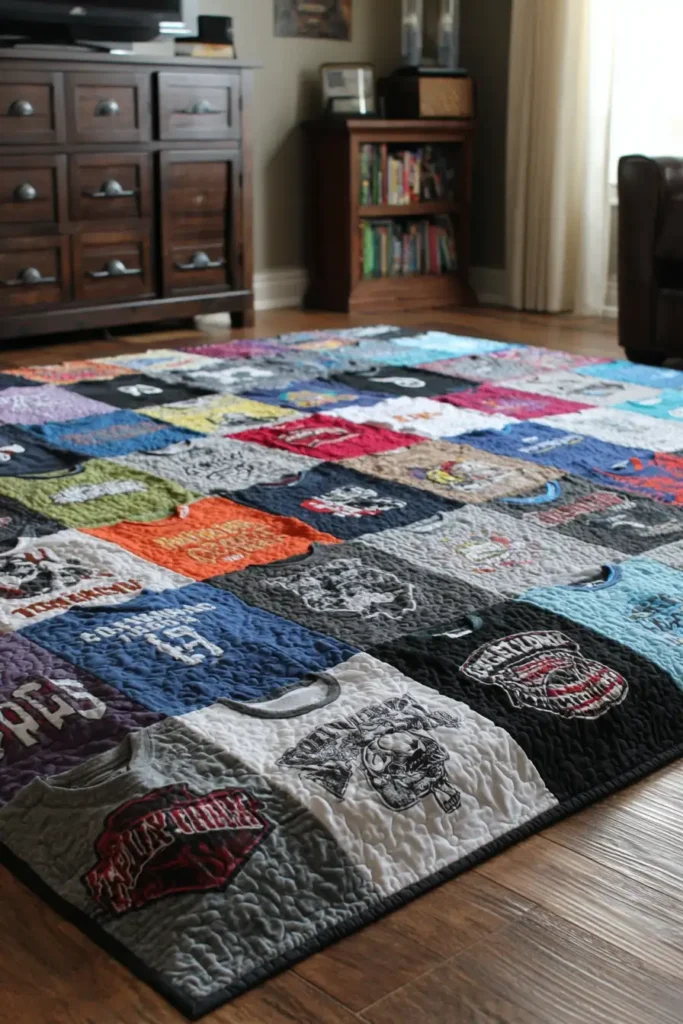
11. Upcycled Memory T-Shirt Quilt Ideas for Keepsake Bedding
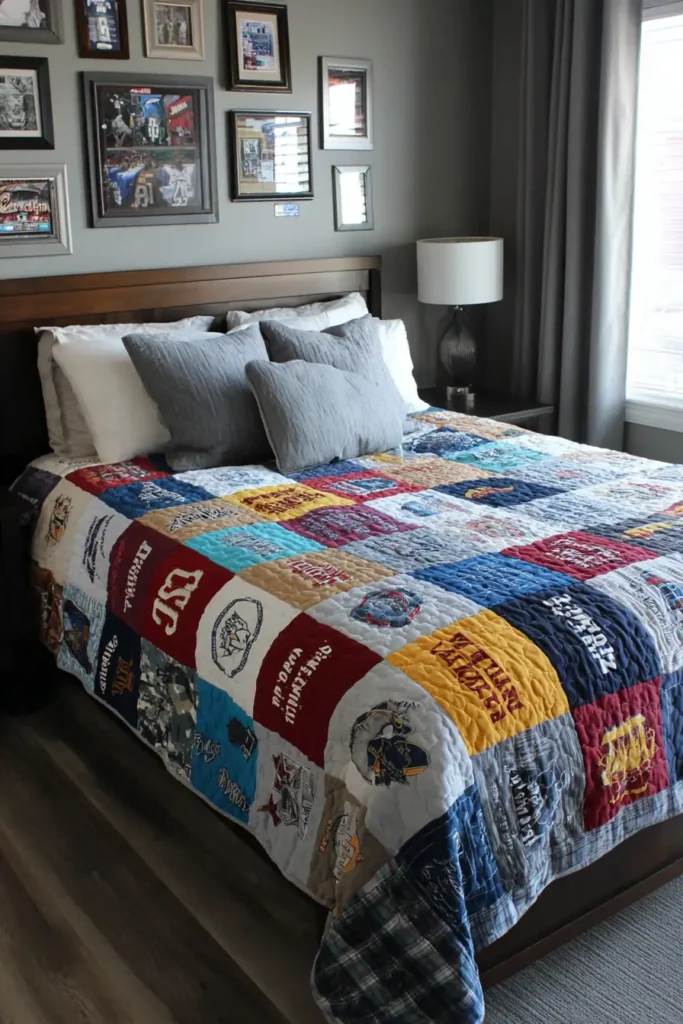
The “Memory Lane” Modern T-Shirt Quilt
As girls grow from childhood into their teenage years, they accumulate a mountain of sentimental t-shirts: sports jerseys, camp shirts, concert tees, and school spirit wear. Instead of letting them gather dust in a drawer, transform them into a Modern Memory Quilt. Unlike the old-fashioned “checkerboard” style (which can look messy because logos are different sizes), this design uses Sashing and Cornerstones to frame each shirt like a piece of art, creating a cohesive, polished grid that looks stylish in a dorm room or first apartment.
Finished Dimensions: Twin/Lap Size, 60″ x 80″. (Adjusts based on number of shirts).
Materials Needed:
- Fabric A (The Shirts): 20 to 30 T-shirts (washed, no fabric softener).
- Fabric B (Sashing/Frames): 2 yards of Black, Navy, or Grey (Cotton). Dark colors frame graphics best.
- Fabric C (Cornerstones): 1/2 yard of a contrasting bright color or print.
- Interfacing: 6-8 yards of Lightweight Fusible Interfacing (Pellon SF101 or P44F). This is non-negotiable. T-shirt knit stretches; quilting cotton does not. You must stabilize the shirts.
- Backing: 4 yards of Fleece or Cotton.
- Notions: 12.5″ square ruler, rotary cutter, press cloth.
Cultural Backstory: The T-shirt quilt is a thoroughly modern American tradition, born in the late 20th century with the explosion of “graphic tees.” It serves the same function as the Victorian “Crazy Quilt”—preserving the literal fabric of a person’s life history. It transforms clothing (ephemeral) into a quilt (heirloom).
Step 1: Prep and Stabilize (The Most Important Step)
You cannot sew stretchy t-shirt material to stable cotton without this step.
- Rough Cut: Cut the fronts (and backs, if used) off the t-shirts. Leave them large—do not cut to the final size yet. Just separate the logo side from the rest.
- Fuse: Iron the Fusible Interfacing onto the wrong side (back) of the t-shirt panel.
- Tip: Use a press cloth (or a scrap of cotton) between your iron and the t-shirt to prevent the rubbery logo ink from melting onto your iron.
- Cool: Let it cool completely. The knit fabric is now stabilized and will behave like regular woven cotton.

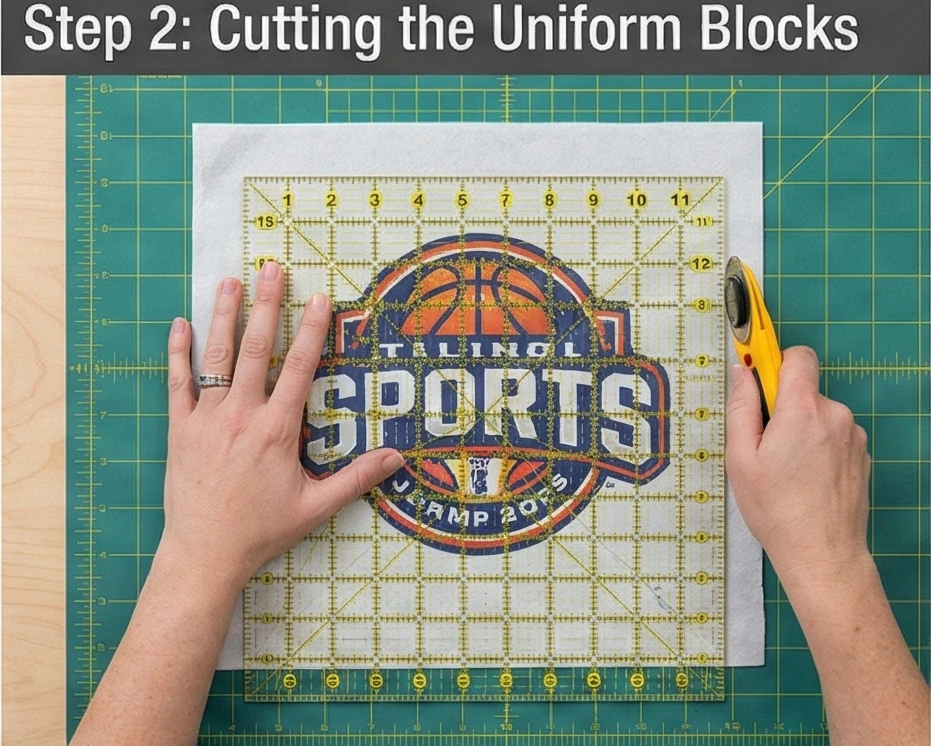
Step 2: Cutting the Uniform Blocks
We need every block to be the same size for a neat grid.
- Select Size: Most t-shirt logos fit well into a 12.5″ x 12.5″ square (finishes at 12″).
- Small Logos: If a logo is small (left chest), center it.
- Big Logos: If a logo is huge, decide which parts to crop.
- Cut: Using your 12.5″ square ruler, center the graphic and cut the stabilized t-shirt block.
- Quantity: You need 20 shirts for a 4×5 grid layout.
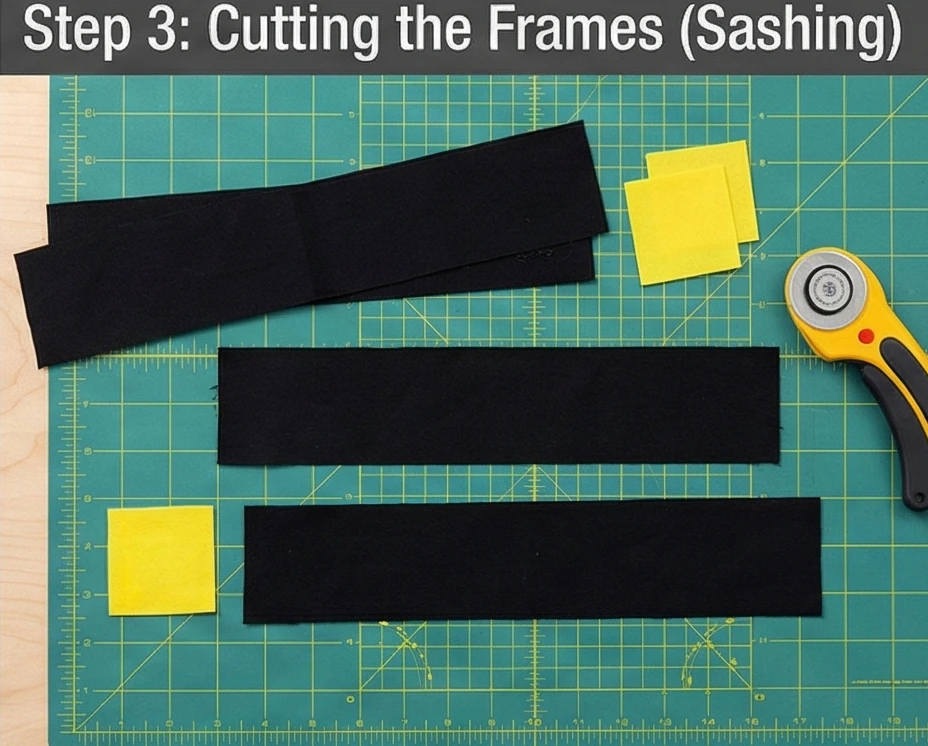
Step 3: Cutting the Frames (Sashing)
Sashing separates the chaotic colors of the shirts.
- Sashing Strips: From Fabric B (Frame), cut 31 strips measuring 2.5″ x 12.5″ (for the vertical dividers).
- Cornerstones: From Fabric C (Accent), cut 12 squares measuring 2.5″ x 2.5″ (these go at the intersections).
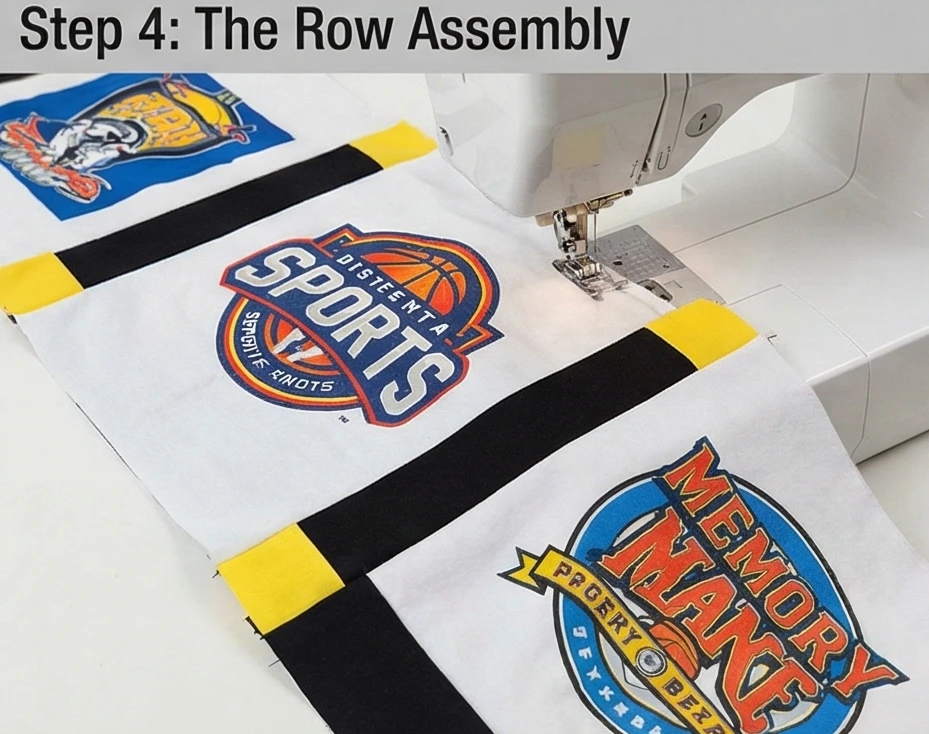
Step 4: The Row Assembly
Let’s build the quilt in horizontal strips.
- Block Rows: Sew 4 T-shirt blocks together with a Sashing Strip (2.5″ x 12.5″) in between each one.
- Pattern: [Shirt] – [Sash] – [Shirt] – [Sash] – [Shirt] – [Sash] – [Shirt].
- Make: Create 5 Block Rows.
- Sashing Rows: Create the divider rows.
- Pattern: [Sash 12.5″] – [Cornerstone 2.5″] – [Sash] – [Cornerstone] – [Sash] – [Cornerstone] – [Sash].
- Make: Create 4 Sashing Rows.
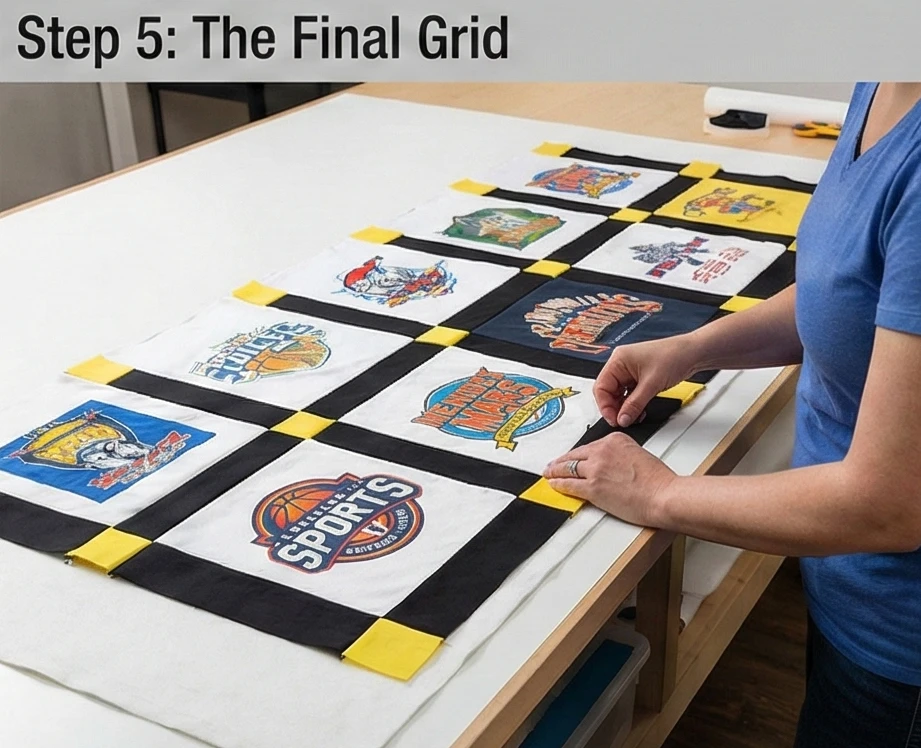
Step 5: The Final Grid
- Join: Sew the Block Rows and Sashing Rows together in alternating order.
- Pinning: You must pin at every intersection. Match the vertical sashing of the block row with the Cornerstone of the sashing row. This alignment makes the grid look professional.
Step 6: “Meander” Quilting
Keep it loose.
- Baste: Sandwich layers.
- Quilt: Use a “Stipple” or “Meander” pattern (puzzle piece shapes) all over.
- Why: Avoid stitching through the thick rubber logos if possible. A wandering stipple allows you to dodge the heavy ink areas while keeping the layers secure.
- Bind: Finish with a durable machine binding using Fabric B (Frame color) to contain the grid.
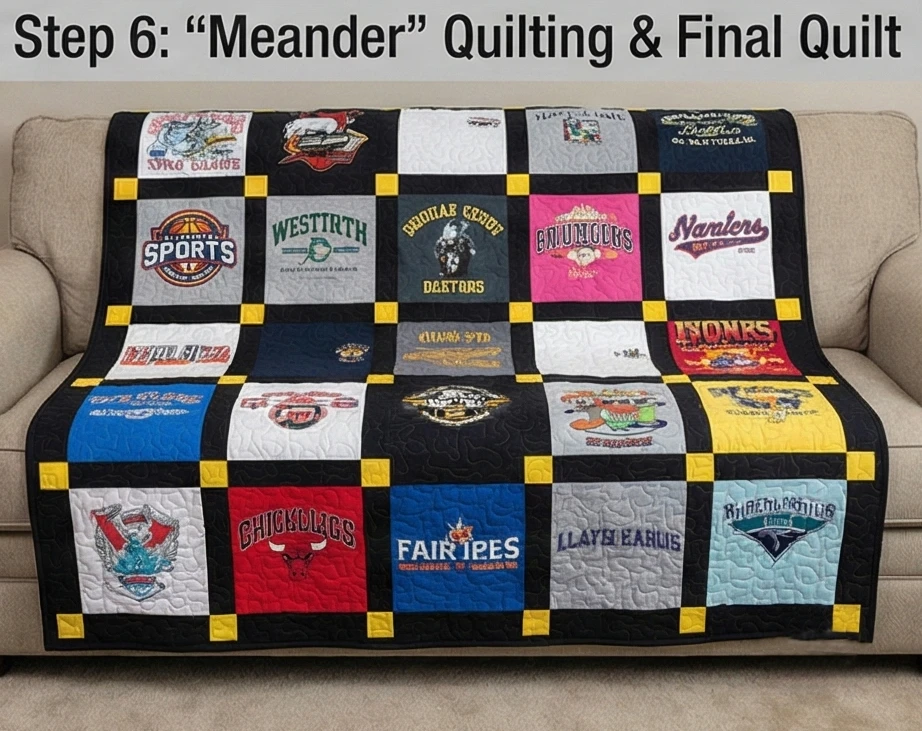
Usability Note: These quilts are heavy and warm. Because they contain interfacing and thick ink, they are stiffer than regular quilts. They are best used as “Stadium Blankets” for cold games or dorm bed toppers, rather than soft swaddling blankets.
12. Plush Minky-Backed Quilt Throws for Sleepover Parties
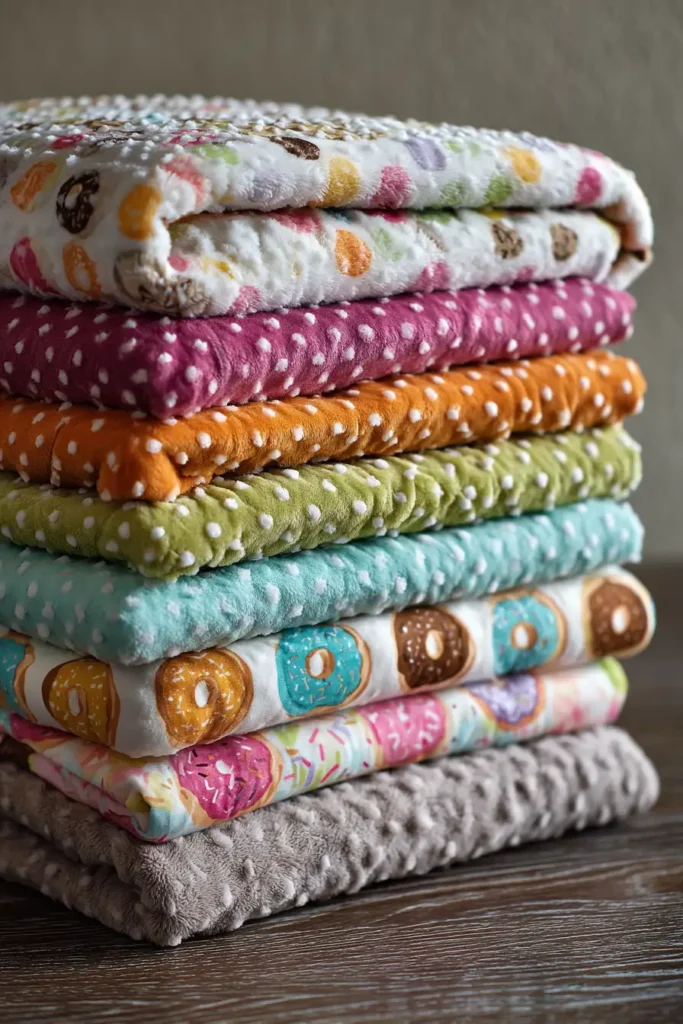
The “Sleepover Snuggle” Minky Strip Quilt
Sleepovers are all about movies, popcorn, and getting cozy on the floor. A standard cotton quilt isn’t always warm enough for sleeping on the carpet, but a Minky-Backed Quilt is the ultimate luxury. “Minky” (or Cuddle fabric) is a high-pile polyester fabric that feels like bunny fur. By pairing a vibrant Cotton Strip top with a luscious Dimple Dot Minky back, you create a throw that is durable on one side and irresistibly soft on the other. It’s the envy of every slumber party.
Finished Dimensions: Large Throw Size, 55″ x 70″.
Materials Needed:
- Fabric A (Top): 10-12 Half-Yards of coordinating prints (bright florals, donuts, or geometric prints).
- Fabric B (Backing): 2 yards of Wide-Width (60″ or 90″) Minky Fabric (e.g., Shannon Cuddle). Note: If using standard 44″ width, you need 4 yards and will have to seam it, which is tricky with fluff.
- Batting: None! (Or very thin bamboo). The Minky is heavy enough that you usually don’t need batting. We will skip it for a drape-y throw.
- Notions: Spray Baste (Essential—pins slide out of Minky), Walking Foot, 90/14 Topstitch Needle.
Cultural Backstory: Minky fabric was originally developed for baby blankets and plush toys due to its incredible softness and ability to hold dyes without fading. In the early 2000s, it crossed over into the quilting world. However, it is notorious for being “slippery” to sew, earning it a reputation as a difficult fabric until the “Spray Baste” technique became standard.
Step 1: Cutting the “Bricks”
We use large rectangular blocks to show off the fun prints and reduce the number of bulky seams.
- Cut Strips: From your cotton fabrics, cut strips measuring 6.5 inches wide by the Width of the fabric (42″).
- Sub-Cut: Cut these strips into rectangles measuring 6.5″ x 12.5″.
- Quantity: You need roughly 50 to 60 bricks, depending on the final length you want.

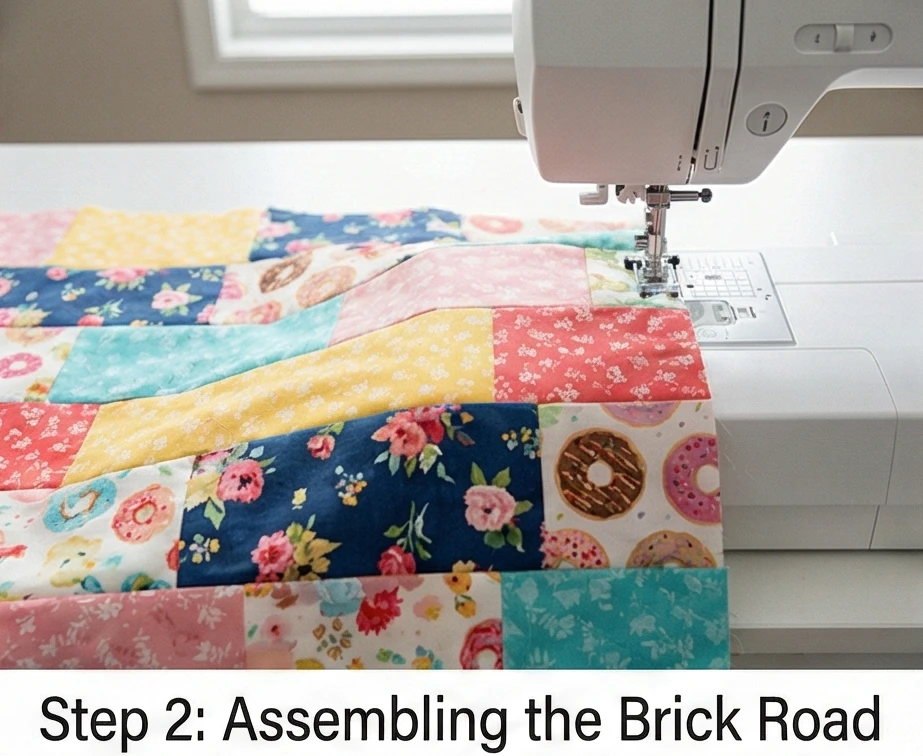
Step 2: Assembling the Brick Road
A staggered layout looks modern and hides imperfect corners.
- Row 1: Sew 5 bricks together end-to-end.
- Row 2: Start with a half-brick (6.5″ x 6.5″), then sew 4 full bricks, then end with a half-brick.
- Why: This staggers the vertical seams so they don’t line up, making the quilt stronger.
- Repeat: Alternate Row 1 and Row 2 patterns until the quilt top is roughly 55″ x 70″.
- Press: Press all seams to one side (open seams can weaken with Minky backing).
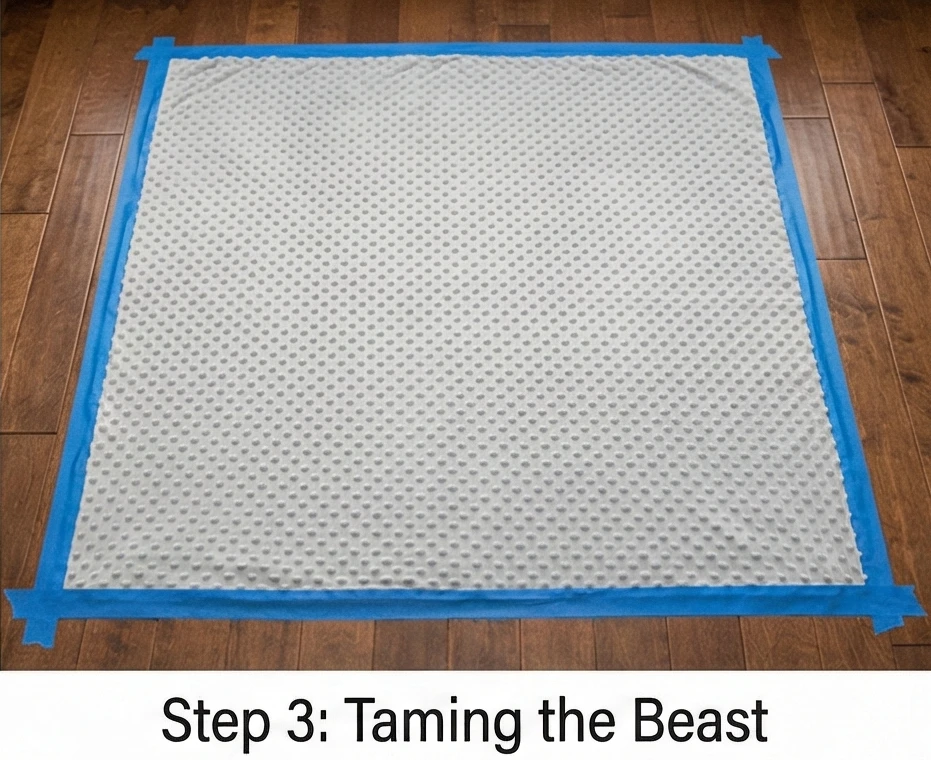
Step 3: Taming the Beast (The Minky Prep)
Minky sheds like a pet when cut. Do this step with a vacuum nearby.
- Shake: Take the Minky outside and shake it vigorously to remove loose fluff from the cut edges.
- Tape Down: Lay the Minky face down on a hard floor. Smooth it out perfectly. Use masking tape to tape the edges to the floor, pulling it slightly taut (but not stretched).
- Why: Minky is knit-based; it stretches. If you don’t tape it, it will warp while you baste.
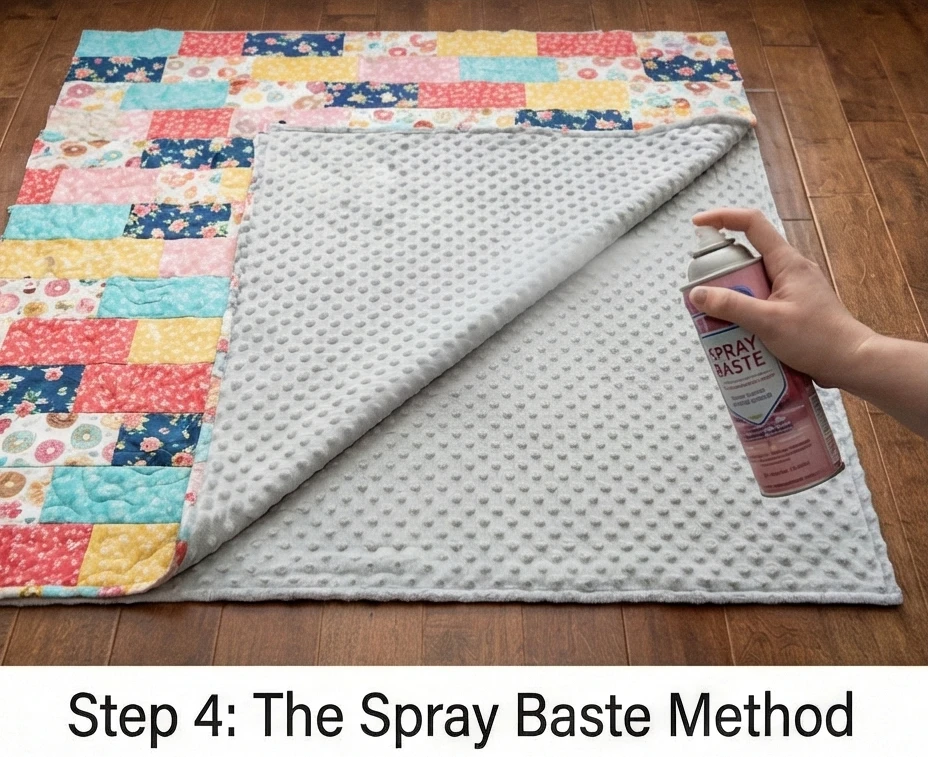
Step 4: The Spray Baste Method
Do not use safety pins. They create lumps in the plush pile.
- Layer: Lay your Cotton Quilt Top face up directly on top of the taped-down Minky. (Remember, we are skipping batting for a floppy throw).
- Fold & Spray: Fold the quilt top back in half. Lightly mist the exposed Minky with Spray Baste (temporary adhesive). Smooth the top back down from the center outward. Repeat for the other half.
- Heat Set: Briefly iron the cotton top (no steam) to help the glue set and bond the two layers.
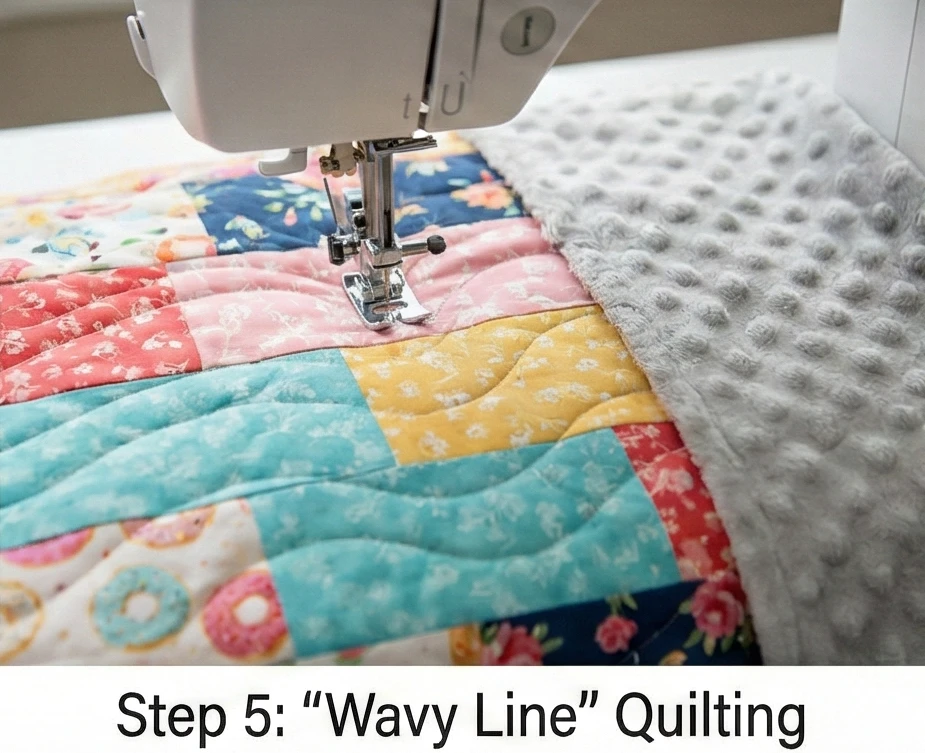
Step 5: “Wavy Line” Quilting
Keep it simple. Dense quilting makes Minky stiff.
- Machine Setup: Install a brand new 90/14 Needle (to punch through the thick poly) and your Walking Foot. Set stitch length to 3.5mm (longer is better).
- Quilt: Stitch simple, gentle, wavy lines or straight lines spaced 4 to 5 inches apart.
- Direction: Sew in one direction only (top to bottom). Do not sew back and forth, or the Minky will twist.
- Goal: stabilize the layers.
Step 6: The Binding
Minky is too bulky to fold over for binding. Use a cotton binding.
- Cut Binding: Cut 2.5-inch cotton strips.
- Attach: Sew the binding to the front (cotton side) of the quilt first.
- Finish: Wrap the binding around to the back (Minky side) and machine-stitch it down (or hand-stitch using a thick thread).
- Clip: Use wonder clips, not pins, to hold the binding in place on the thick edge.
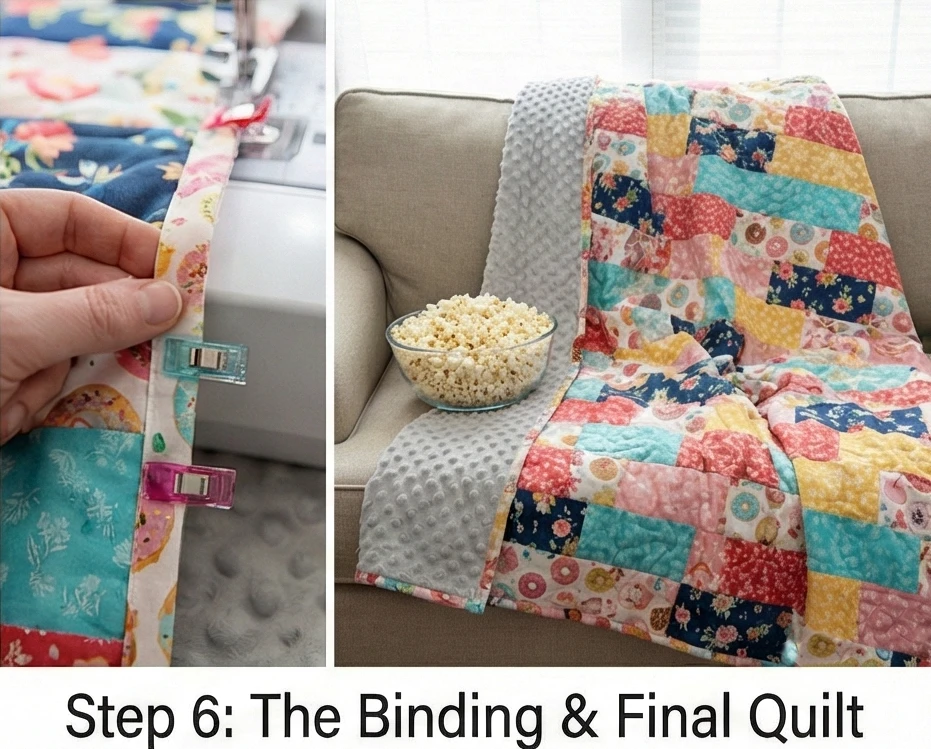
Usability Note: This throw is the “Movie Night” champion. It is heavy, warm, and provides a tactile sensory experience that calms kids after a sugar rush. It is fully machine washable (cold water, low heat), and the Minky actually stays softer if you avoid fabric softener!

13. Enchanted Forest Themed Bed Covers & Pillow Covers
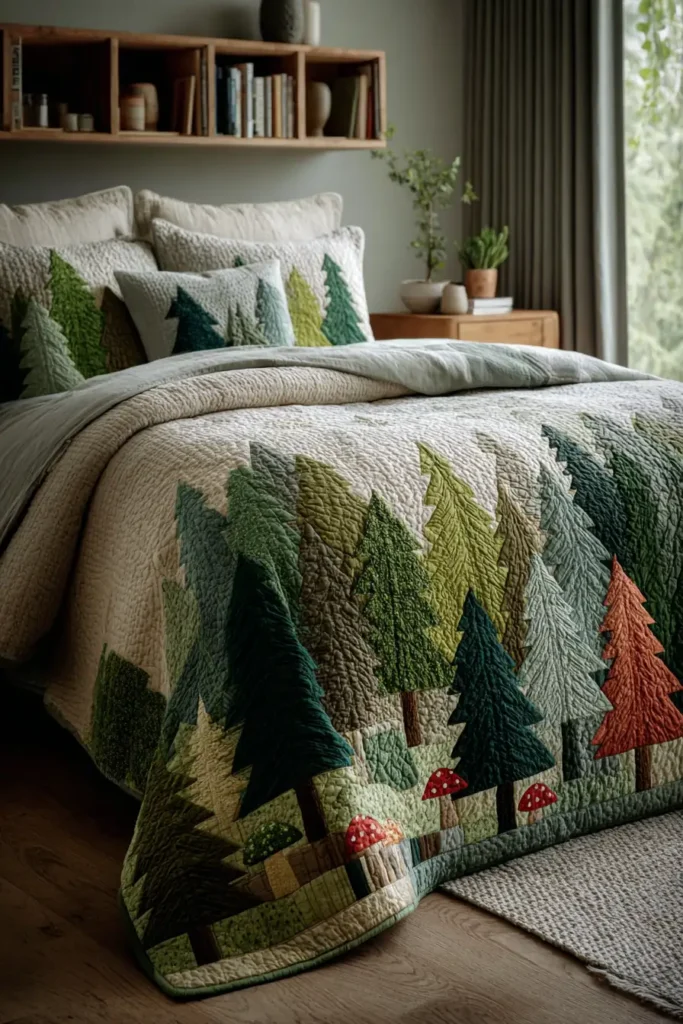
The “Whispering Woods” Tree & Toadstool Quilt
An “Enchanted Forest” theme should feel mysterious, serene, and magical without being overly theatrical. This design creates a serene Pine Forest using modern, minimalist tree blocks in various shades of Moss, Sage, Emerald, and Teal. To add the “enchanted” element, we include a few “Hidden Surprise” blocks—a pieced Toadstool or a small embroidered Fairy Door—tucked among the trees. The layout features a large “negative space” clearing in the center, giving the eye a place to rest and mimicking a secret glade in the woods.
Finished Dimensions: Twin Bed Size, 64″ x 84″.
Materials Needed:
- Fabric A (The Trees): 15-20 Fat Eighths/Scraps in varied Greens (mix solids and subtle prints).
- Fabric B (Tree Trunks): 1/2 yard of Chocolate Brown or Woodgrain Print.
- Fabric C (Background/Mist): 4 yards of Unbleached Linen or Pale Grey (looks like morning fog).
- Fabric D (Toadstool Cap): Scraps of Red and White.
- Notions: Rotary cutter, 60-degree triangle ruler (or template), embroidery floss (optional).
Cultural Backstory: Forests in folklore (from the Brothers Grimm to Studio Ghibli) are liminal spaces—thresholds between the mundane world and the magical one. In quilt history, the “Pine Tree” block represents longevity and eternal life. Combining the two creates a “protective” forest for the sleeper.
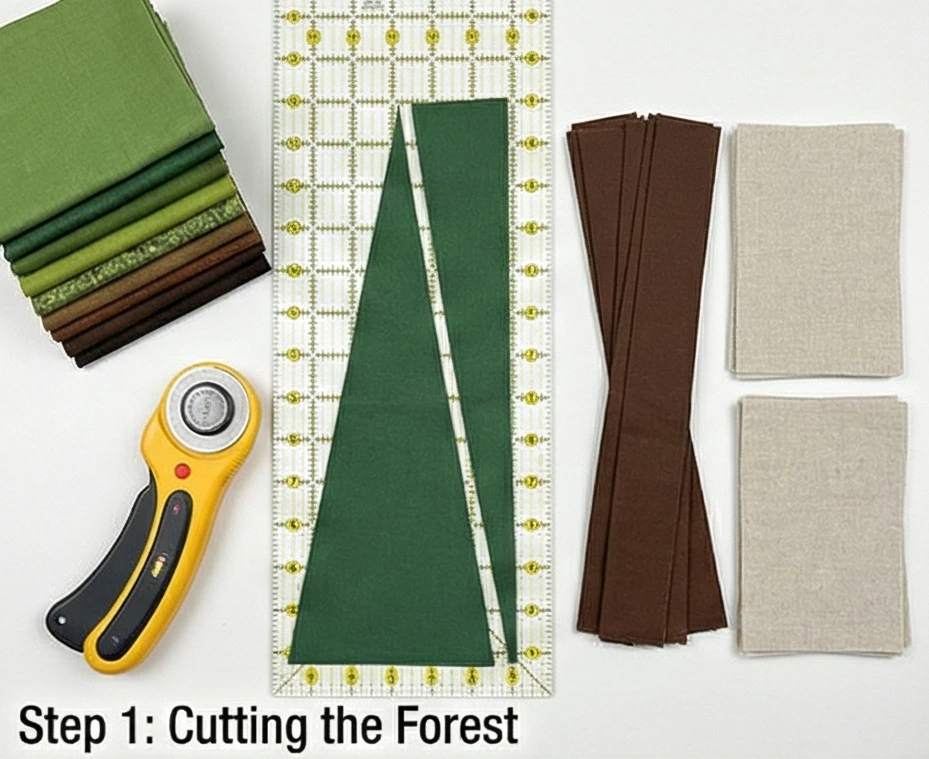
Step 1: Cutting the Forest (Triangle Trees)
We use tall triangles to mimic evergreens.
- Cut Background Rectangles: Cut roughly 50 rectangles of Fabric C (Background) measuring 8.5″ x 10.5″.
- Cut Tree Triangles:
- Take your Green fabrics. Using a template or ruler, cut Tall Isosceles Triangles (Base: 6.5″, Height: 9.5″).
- Quantity: Cut 50 Trees.
- Cut Trunks: Cut 50 strips of Fabric B (Brown) measuring 1.5″ x 2.5″.
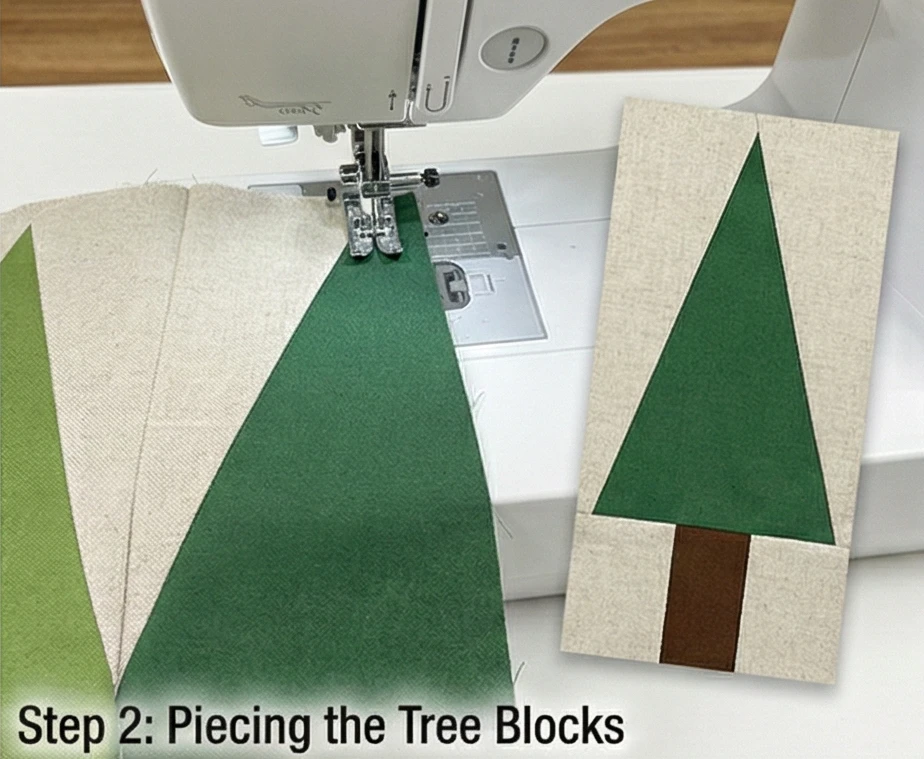
Step 2: Piecing the Tree Blocks
This creates a tree floating in the mist.
- Angle Cutting: Take a Background Rectangle (8.5″ x 10.5″).
- Lay your Green Tree Triangle on top of it, centered.
- Use the side of the tree as a guide to cut the background rectangle into two side pieces (discard the middle or save for scraps).
- Sew: Sew the background side pieces to the left and right sides of the Green Tree Triangle.
- Press: Press seams toward the background.
- Add Trunk: Sew the brown trunk strip to the bottom center of the tree unit. Add background squares to the left and right of the trunk to square off the bottom.
- Result: A finished rectangular block (approx 8.5″ x 12.5″) featuring a tree.
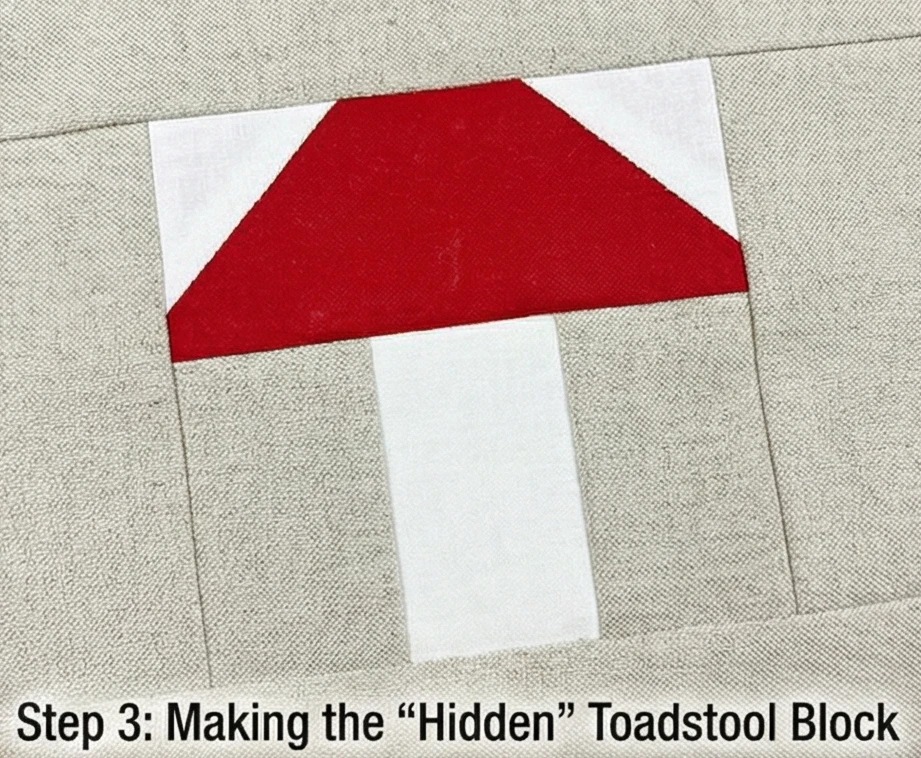
Step 3: Making the “Hidden” Toadstool Block
Let’s make just 3 of these to hide in the forest.
- Cap: Cut a Red Rectangle (4.5″ x 8.5″). Use the “Snowball” method (sew white squares on the top corners and flip) to round off the top.
- Stem: Cut a thick White Rectangle (3.5″ x 4.5″) for the stem.
- Join: Sew the cap to the stem.
- Frame: Add background borders until this block is the same size as your Tree Blocks (8.5″ x 12.5″).
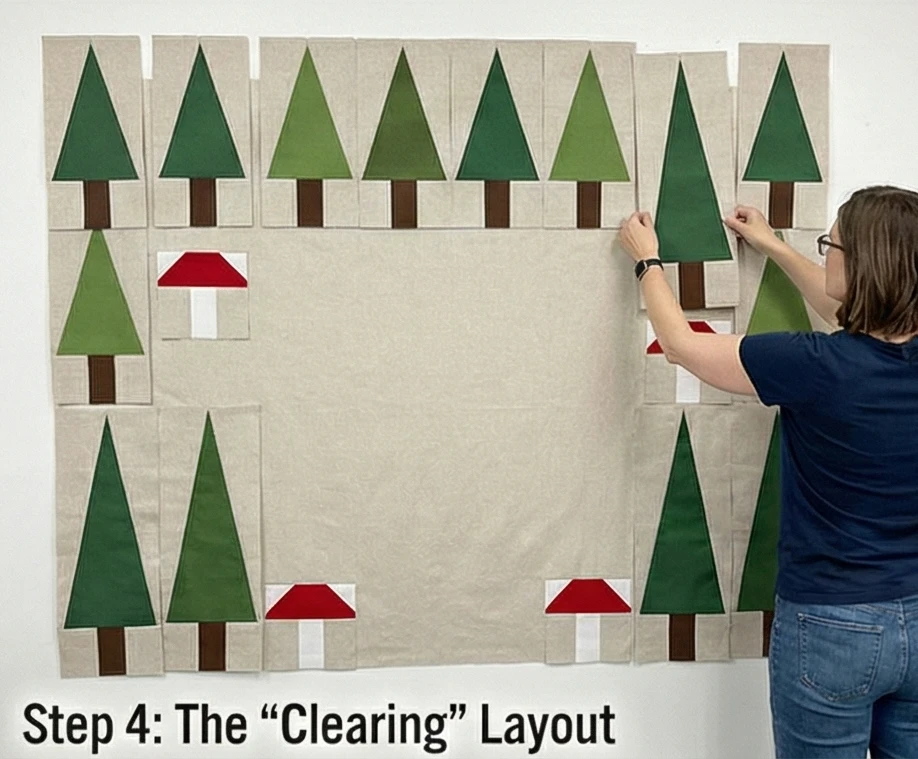
Step 4: The “Clearing” Layout
Don’t just line them up in rows. Create a scene.
- Design Wall: Arrange your blocks.
- Borders: Place dense rows of trees along the top, bottom, and sides of the quilt.
- The Clearing: Leave a large open space in the middle-center. Fill this space with plain Background Fabric rectangles.
- The Secrets: Place your 3 Toadstool blocks randomly near the “ground” (bottom rows) or peeking out from the side woods.
- Assembly: Sew the blocks into vertical columns, then sew the columns together.
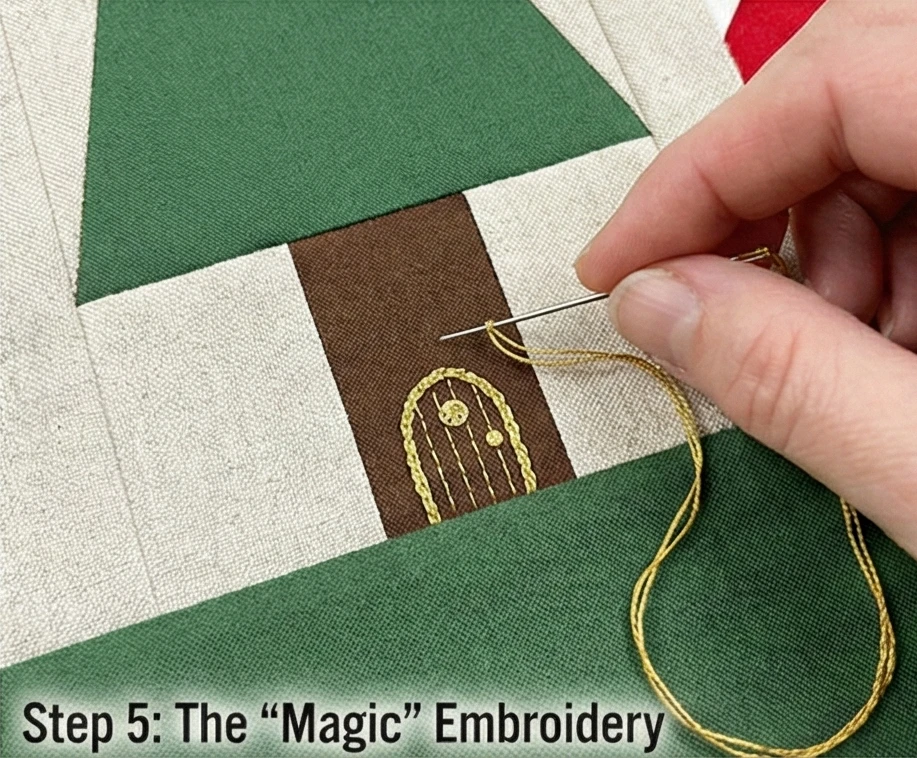
Step 5: The “Magic” Embroidery (Optional)
This detail elevates the quilt to “Heirloom” status.
- Sketch: In the negative space (the clearing), lightly pencil a few tiny details: a small door on one of the tree trunks, a few fireflies, or a snail.
- Stitch: Before quilting, hand-embroider these tiny details.
- Fireflies: Use Metallic Gold Thread to make French knots in the “sky” area.
- Fairy Door: Satin stitch a tiny arched door at the base of a tree.
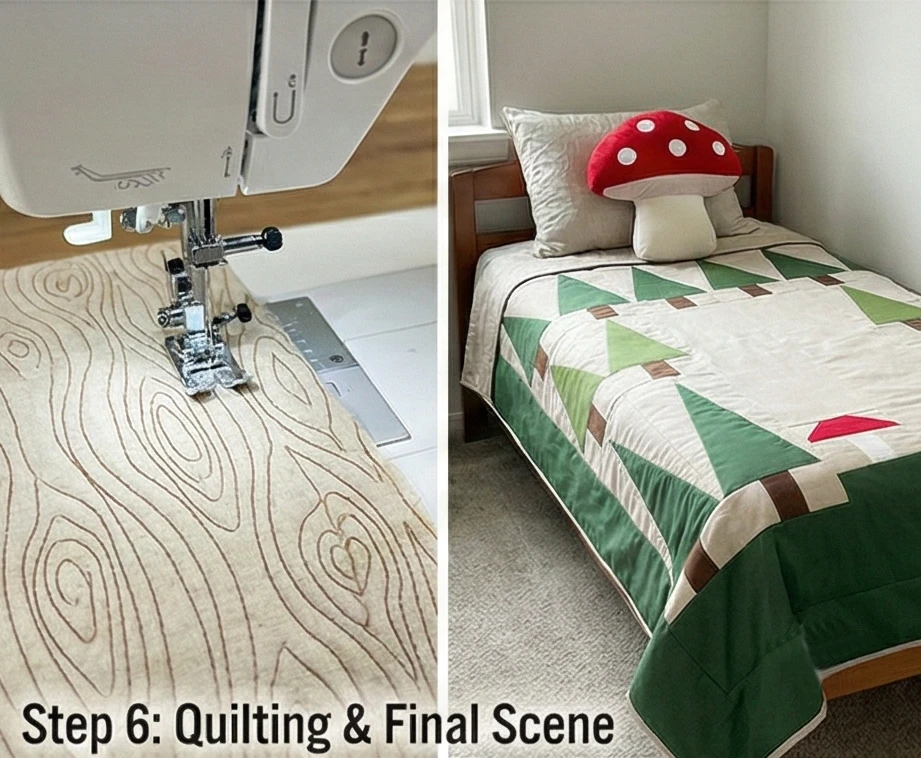
Step 6: “Woodgrain” Quilting
- Baste: Sandwich layers.
- Quilt: Use a Free-Motion foot to quilt a Woodgrain Texture (wavy, flowing lines with occasional knots/ovals) over the entire background.
- Trees: Switch to straight vertical lines inside the green trees to mimic pine needles.
Bonus: The Toadstool Pillow Cover
A 3D accent for the bed.
- Cut: Cut two Red circles (14″ diameter) and two White rectangles (Stem).
- Appliqué: Sew white felt circles onto the Red top for spots.
- Sew: Sew the Red circles right sides together (leave gap), turn, and stuff to make a round cushion.
- Stem: Make a tube for the stem and attach it to the bottom. It looks like a plush mushroom toy sitting on the bed!
Usability Note: The “Clearing” in the center of the quilt isn’t just aesthetic; it’s functional. It provides a flat, un-seamed surface that is softer against the face if the child pulls the quilt up to their chin.
14. Vibrant Scrappy Star Bed Runners for a Pop of Color
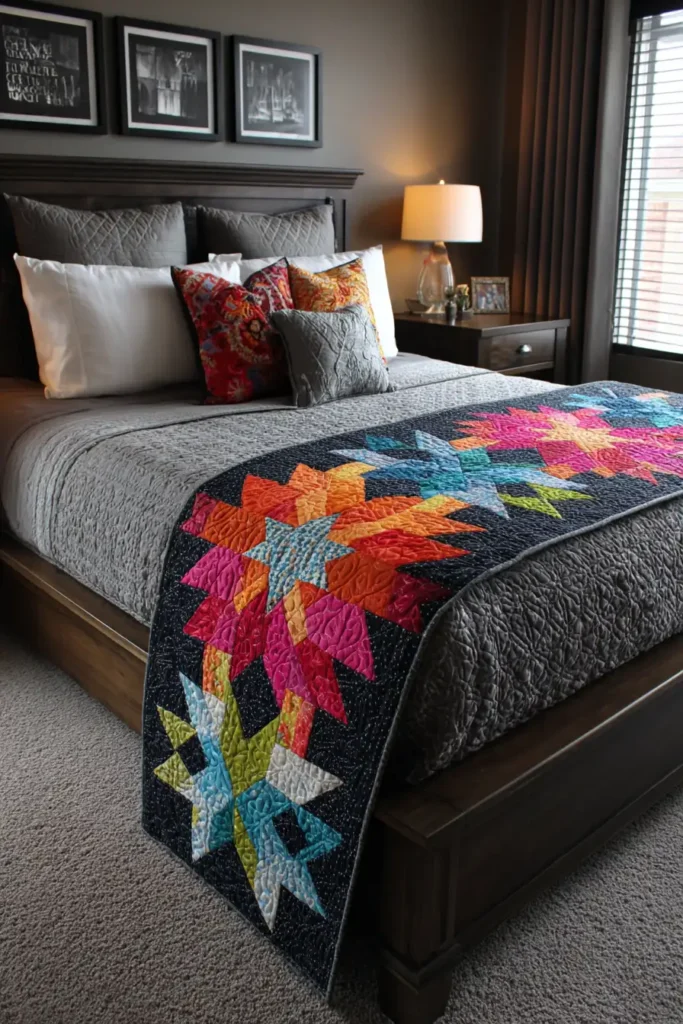
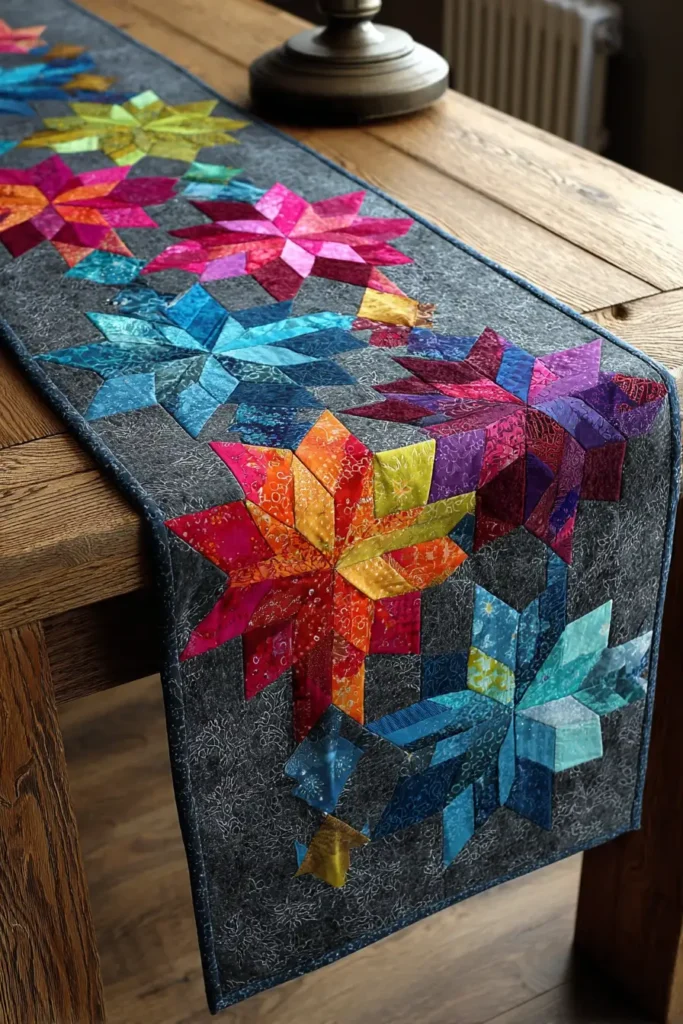
The “Cosmic Burst” Scrappy Star Bed Runner
Sometimes a bedroom needs a massive injection of energy without the commitment of making a full-sized bedspread. The Bed Runner is the perfect solution: a narrow, horizontal mini-quilt that lies across the foot of the bed. This “Cosmic Burst” design uses the classic Sawtooth Star block but modernizes it by using your brightest, boldest scraps—Hot Pink, Electric Blue, Lime, and Tangerine—set against a high-contrast Charcoal or Navy background. It acts like jewelry for the room, instantly updating the decor.
Finished Dimensions: Bed Runner Size, 20″ x 80″ (Fits Twin, Full, or Queen width).
Materials Needed:
- Fabric A (The Stars): A large bag of vibrant scraps. You need enough to cut 25 different sets of star points and centers.
- Fabric B (Background): 1.5 yards of Solid Charcoal, Black, or Midnight Blue (Dark backgrounds make colors glow).
- Backing: 2.5 yards of a fun geometric print.
- Batting: Cotton (low loft).
- Notions: Rotary cutter, 4.5″ square ruler.
Cultural Backstory: The Bed Runner originated in luxury hotels in the early 2000s. Hoteliers realized that white duvets looked crisp and clean, but guests often put suitcases or dirty shoes on the end of the bed. The “runner” was introduced as a stylish “landing strip” to protect the expensive white linens. It has since become a staple of modern interior design.
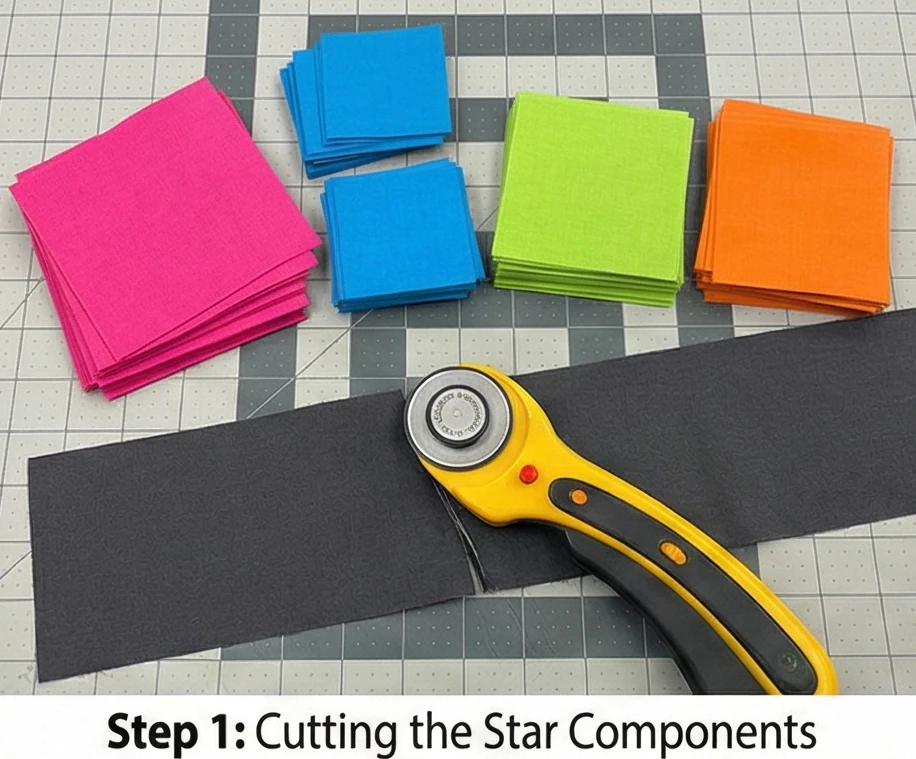
Step 1: Cutting the Star Components
We will make 9 Large Star Blocks (Finished size 8″).
For EACH Block (Repeat 9 times with different colors):
- Star Center: Cut one 4.5″ square from a bright focus fabric.
- Star Points: Cut four 2.5″ x 4.5″ rectangles from a coordinating bright fabric (for the Flying Geese).
- Background Corners: Cut four 2.5″ squares from Fabric B (Charcoal).
- Background Geese: Cut eight 2.5″ squares from Fabric B (Charcoal).
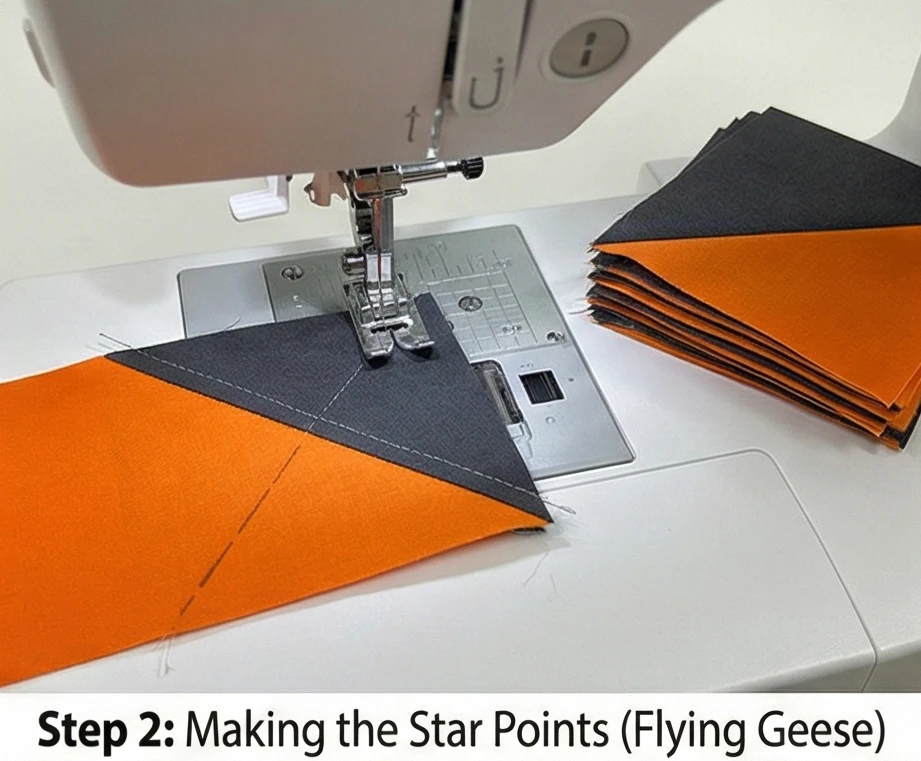
Step 2: Making the Star Points (Flying Geese)
The points are the most dynamic part.
- Mark: Draw a diagonal line on the back of the eight Background Geese squares (2.5″).
- Sew Side 1: Place a Background square on the left side of a Colored Rectangle (2.5″ x 4.5″). Stitch on the diagonal line. Trim the excess corner. Press open.
- Sew Side 2: Place another Background square on the right side of the rectangle. Stitch on the diagonal line. Trim and press.
- Result: You have a rectangular “Flying Goose” unit with a colored triangle in the middle.
- Repeat: Make 4 units per block.
Step 3: Assembling the Cosmic Blocks
- Row 1: Background Corner – Flying Goose (Point IN) – Background Corner.
- Row 2: Flying Goose (Point IN) – Center Square – Flying Goose (Point IN).
- Row 3: Background Corner – Flying Goose (Point IN) – Background Corner.
- Join: Stitch rows together.
- Size: Your block should measure 8.5″ x 8.5″ unfinished.
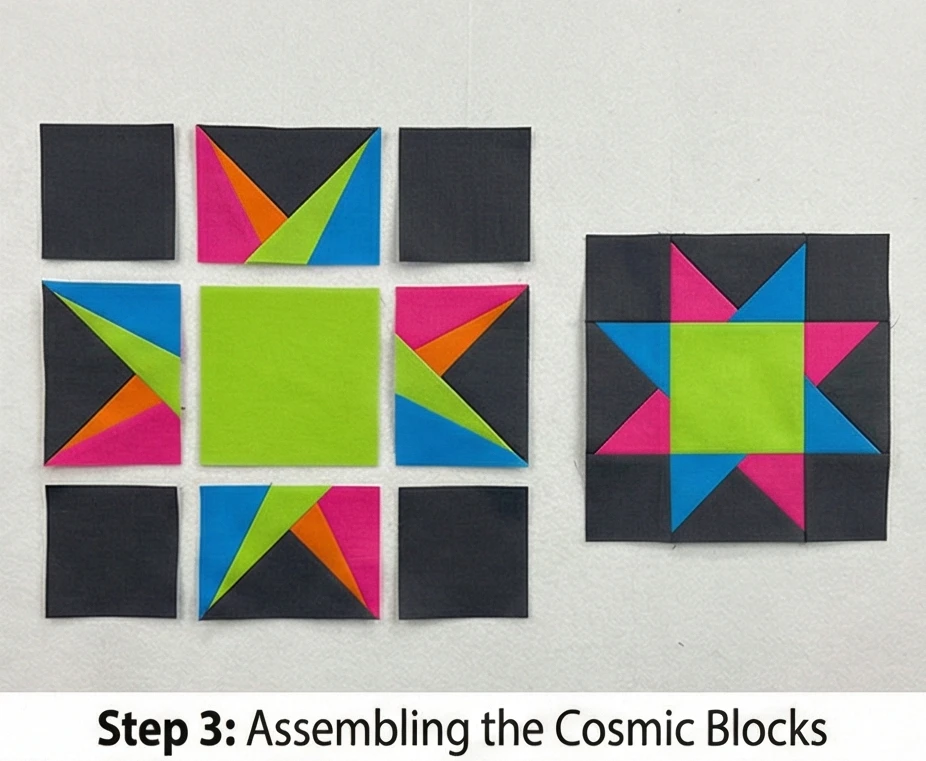
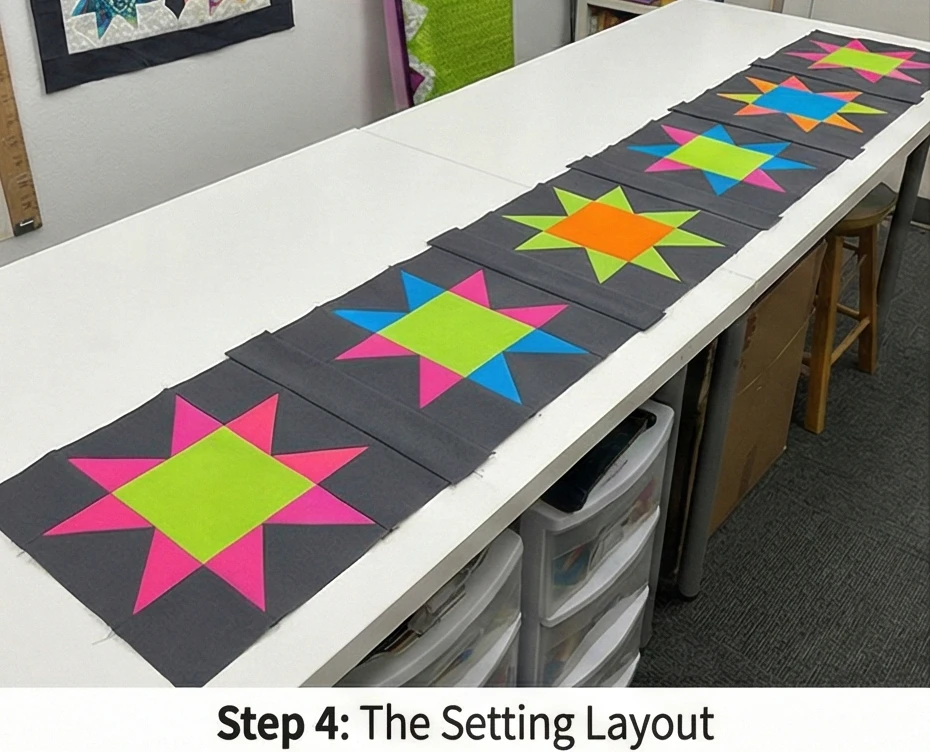
Step 4: The Setting Layout
We use sashing to space the stars out so they don’t look cluttered.
- Cut Sashing: From Fabric B (Charcoal), cut 8 vertical strips measuring 3.5″ x 8.5″.
- Row Assembly: Sew the 9 Star Blocks together in a long horizontal line, placing a sashing strip between each one.
- Pattern: [Star] – [Sash] – [Star] – [Sash]… ending with a Star.
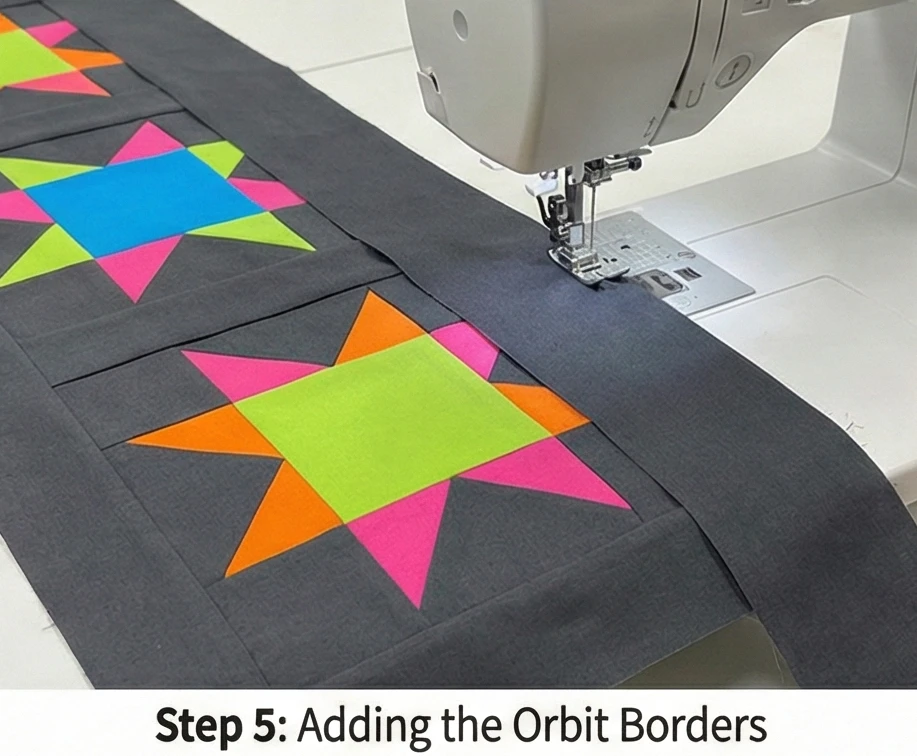
Step 5: Adding the Orbit Borders
To make the runner substantial enough to hang over the edges.
- Top/Bottom Border: Cut strips of Fabric B (Charcoal) measuring 3.5 inches wide. Sew them to the top and bottom of the star row.
- Side Borders: Cut strips measuring 3.5 inches wide. Sew them to the short ends.
- Result: The dark borders float the glowing stars in the center of the “space.”
Step 6: “Shooting Star” Quilting
- Baste: Sandwich layers.
- Quilt: Use a walking foot to quilt straight lines.
- Design: Quilt lines that radiate out from the center of the stars, or simple horizontal straight lines across the whole runner to emphasize the length.
- Thread: Use a variegated thread (multi-colored) or a metallic silver thread to add extra sparkle against the dark background.
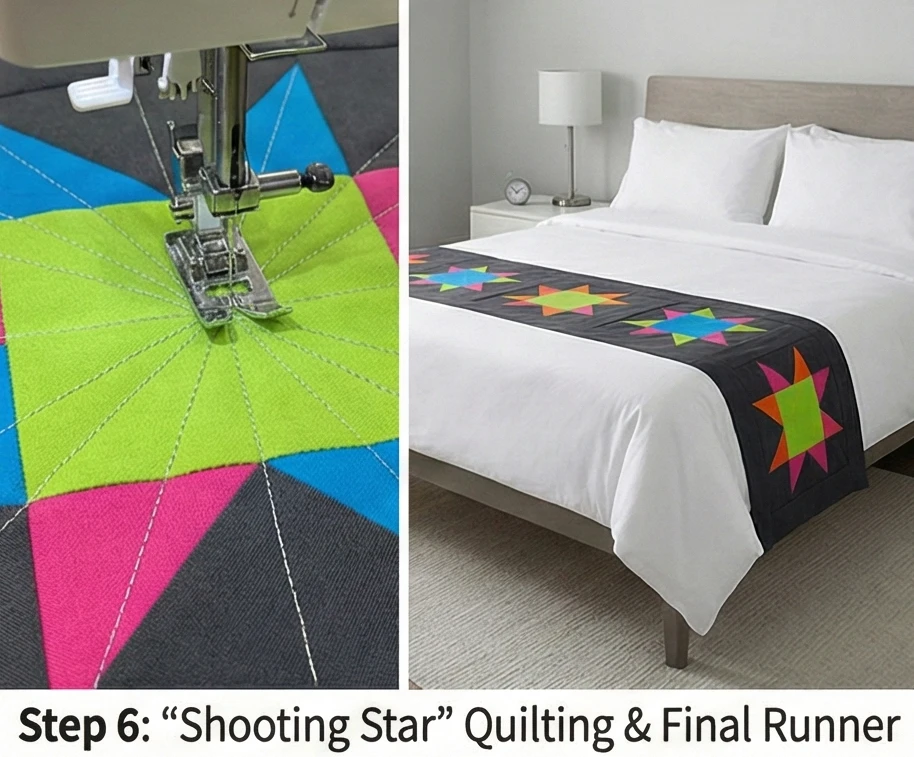
Usability Note: This is the most practical item for a girl’s room. It protects the duvet from pet hair (if the cat sleeps at the foot of the bed) and shoe dirt, but it’s small enough to wash weekly without wrestling a giant quilt into the machine.

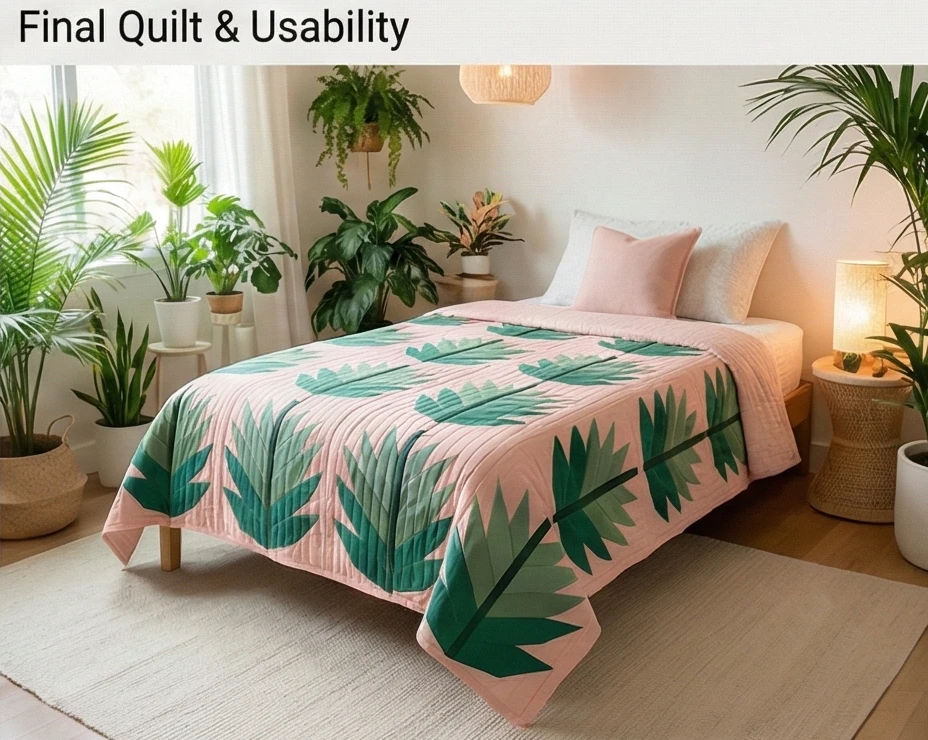
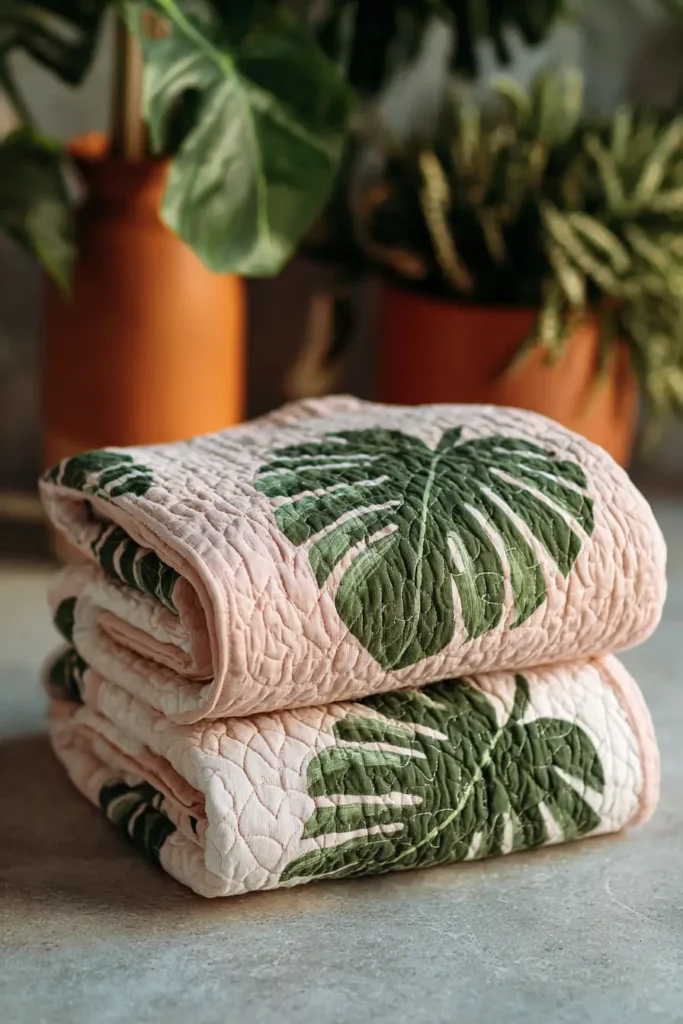
15. Tropical Palm Quilt Patterns for Comfortable Girls’ Bed Covers
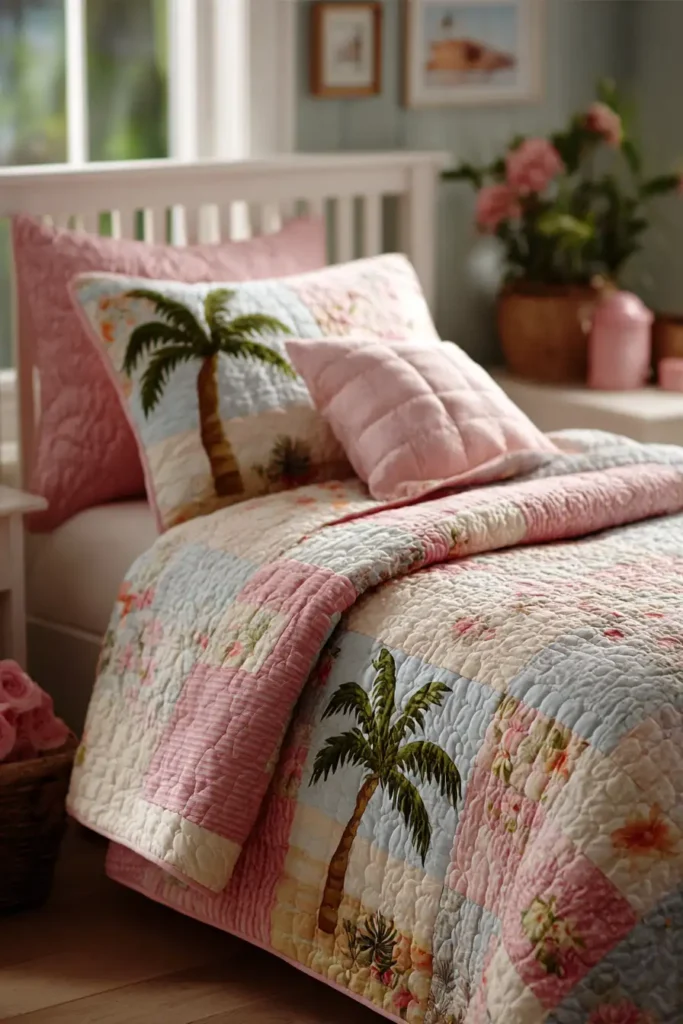
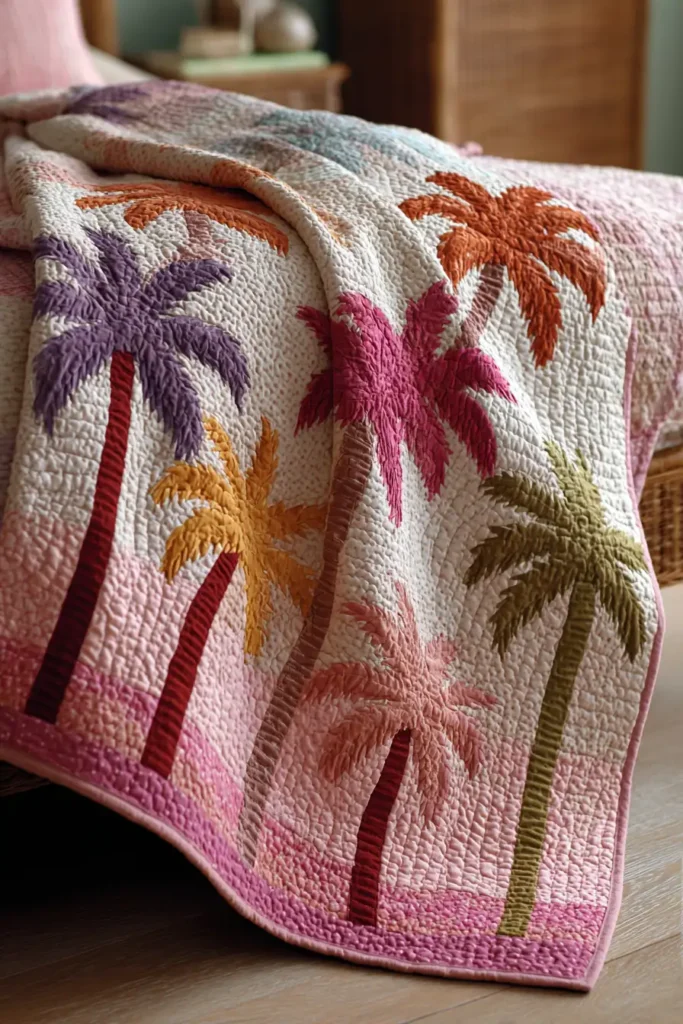
The “Tropical Breeze” Palm Leaf Quilt
The “Jungalow” aesthetic (a mix of jungle plants and bohemian bungalow style) is a massive trend in girls’ and teen bedrooms. This quilt captures that vibe by featuring large, graphic Palm Leaf Blocks set against a soft Blush Pink or Crisp White background. Instead of difficult curves, this pattern uses the “Stitch and Flip” method to create the jagged edges of a palm frond using simple rectangles and squares. It is modern and fresh, instantly transforming a bedroom into a sanctuary.
Finished Dimensions: Twin Bed Size, 64″ x 84″.
Materials Needed:
- Fabric A (The Fronds): 12-15 Fat Quarters in various Greens (Sage, Emerald, Lime, Teal). Tip: A gradient of greens creates a lush, living look.
- Fabric B (The Stems): 1/2 yard of Dark Brown or Deep Green.
- Fabric C (Background): 4 yards of Blush Pink, Peach, or White.
- Backing: 5 yards of a tropical floral or flamingo print.
- Notions: Rotary cutter, standard square ruler.
Cultural Backstory: The palm leaf motif became iconic in the 1940s with the “Martinique” wallpaper designed for the Beverly Hills Hotel (the famous banana leaf print). It represents the glamour of the “Hollywood Regency” style. Today, it has been reclaimed by the Gen Z “Plant Mom” aesthetic, symbolizing growth, nature, and a laid-back lifestyle.
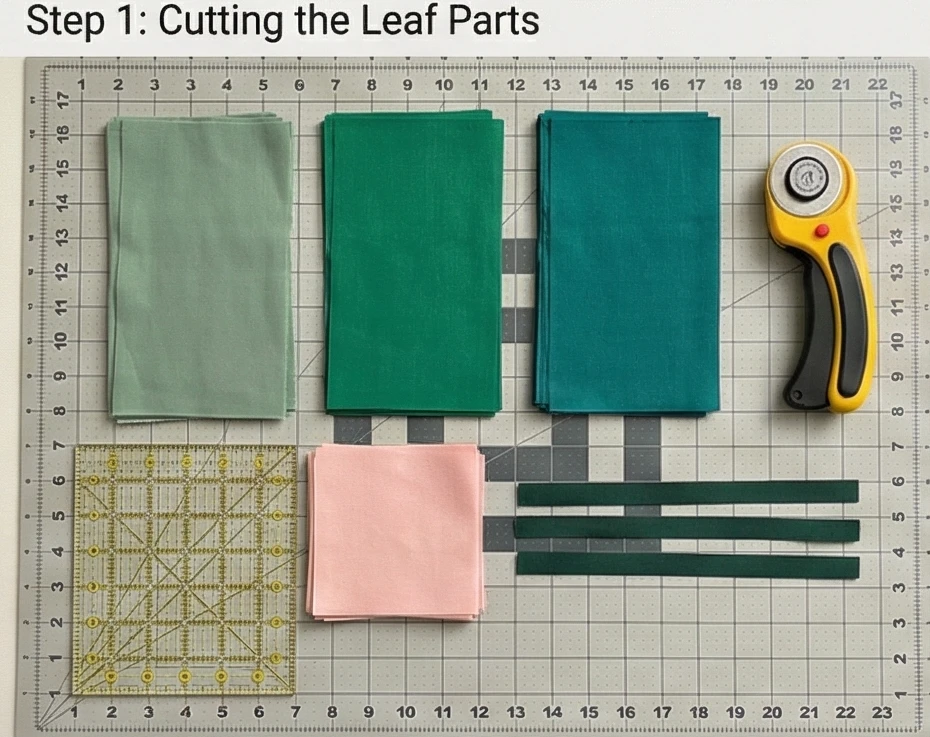
Step 1: Cutting the Leaf Parts
We are making 15 Large Palm Blocks (Finished size 16″ x 16″).
For ONE Block (Repeat 15 times):
- Leaf Blades (Green): Cut 6 rectangles measuring 4.5″ x 8.5″.
- Background Corners (Pink): Cut 12 squares measuring 4.5″ x 4.5″.
- Stem (Brown/Dark Green): Cut 1 strip measuring 1.5″ x 16.5″.
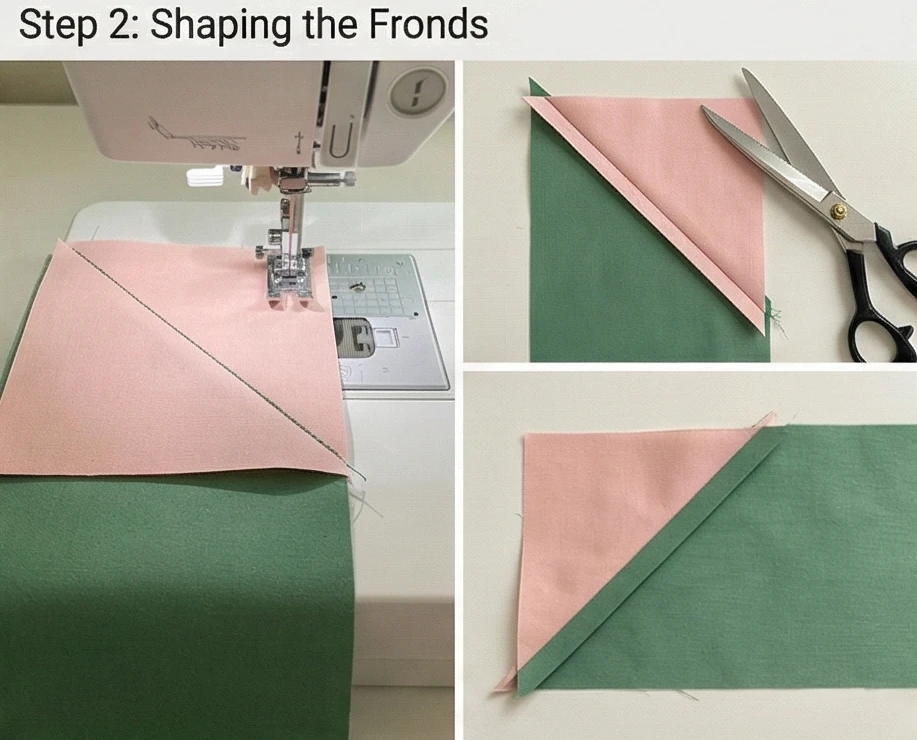
Step 2: Shaping the Fronds (Stitch and Flip)
This technique turns rectangles into angled parallelograms.
- Mark: Draw a diagonal line on the back of all Background Squares (4.5″).
- Top Left: Place a Background square on the top left corner of a Green rectangle. Stitch on the diagonal line. Trim 1/4″ past the seam. Flip and press.
- Bottom Right: Place another Background square on the bottom right corner of the same rectangle. Stitch, trim, flip, and press.
- Result: You have a Green shape that slants upward.
- Make: Make 3 of these slanting Left.
- Make: Make 3 of these slanting Right (by placing background squares on the top right and Bottom Left).
Step 3: Assembling the Leaf Halves
- Left Side: Sew the 3 “Left-Slanting” units together vertically.
- Size: This creates a strip measuring 4.5″ x 24.5″? No, wait.
- Correction: Are we sewing them side by side or stacked?
- Revised Assembly: Stack them vertically.
- Unit 1 (Top)
- Unit 2 (Middle)
- Unit 3 (Bottom)
- Result: You have one side of the palm leaf.
- Right Side: Sew the 3 “Right-Slanting” units together vertically.
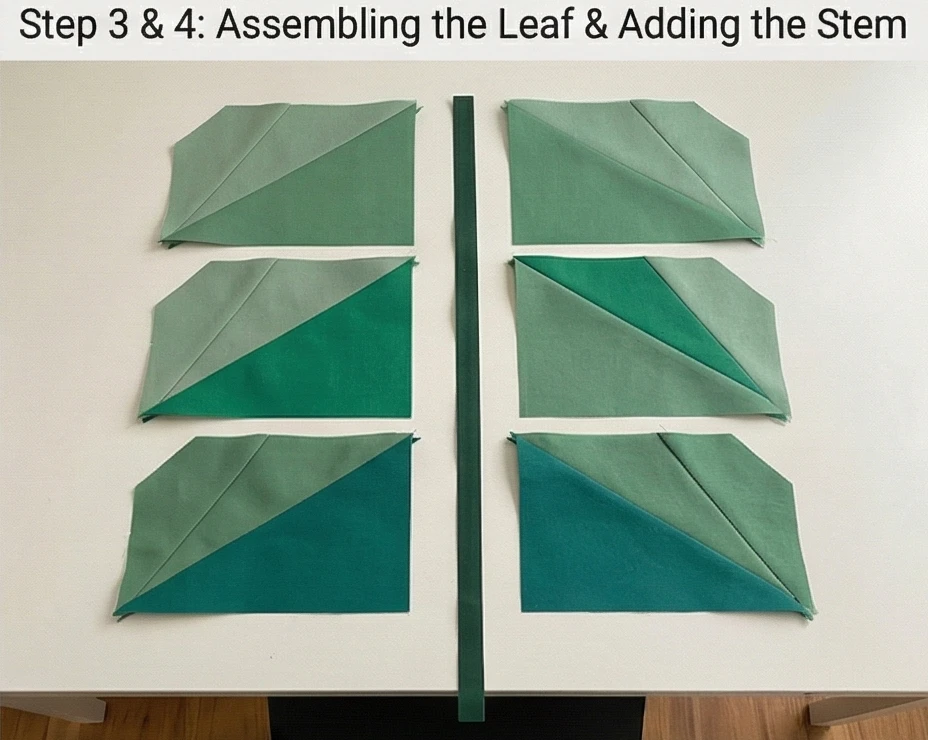
Step 4: Adding the Stem
- Center: Place the thin Stem Strip (1.5″) between the Left Leaf Half and the Right Leaf Half.
- Sew: Stitch the three columns together.
- Left Half – Stem – Right Half.
- Visual: The angled green pieces now look like veins or blades coming off the center stem.
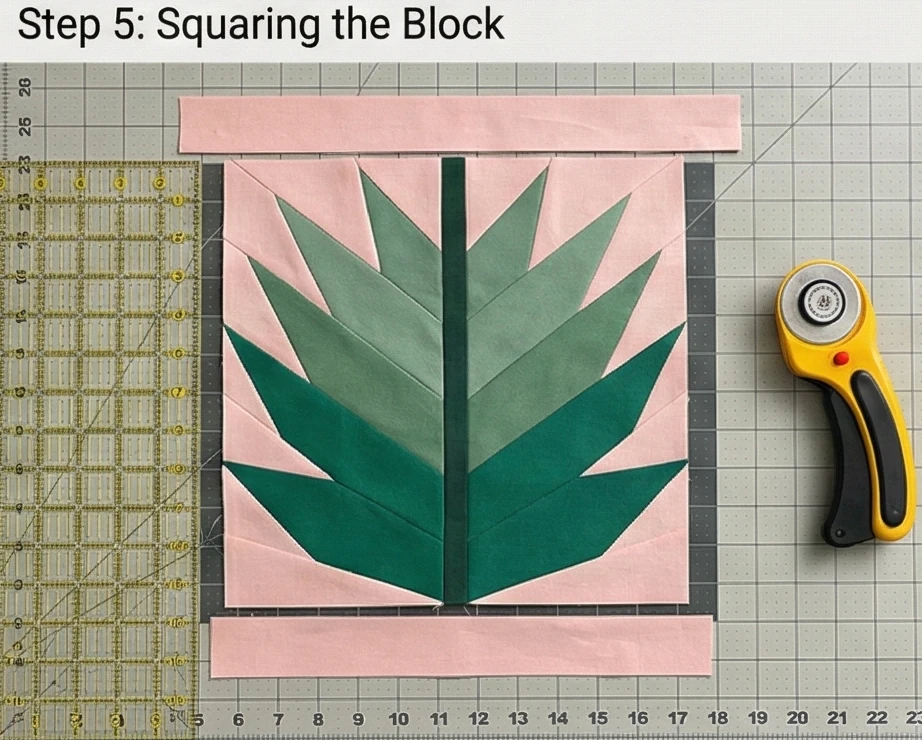
Step 5: Squaring the Block
- Background Borders: The raw block may appear jagged at the top/bottom, depending on your viewing angle.
- Top/Bottom: Add a 2.5″ x 16.5″ strip of Background fabric to the top and bottom to frame the leaf.
- Trim: Trim the final block to exactly 16.5″ x 16.5″.
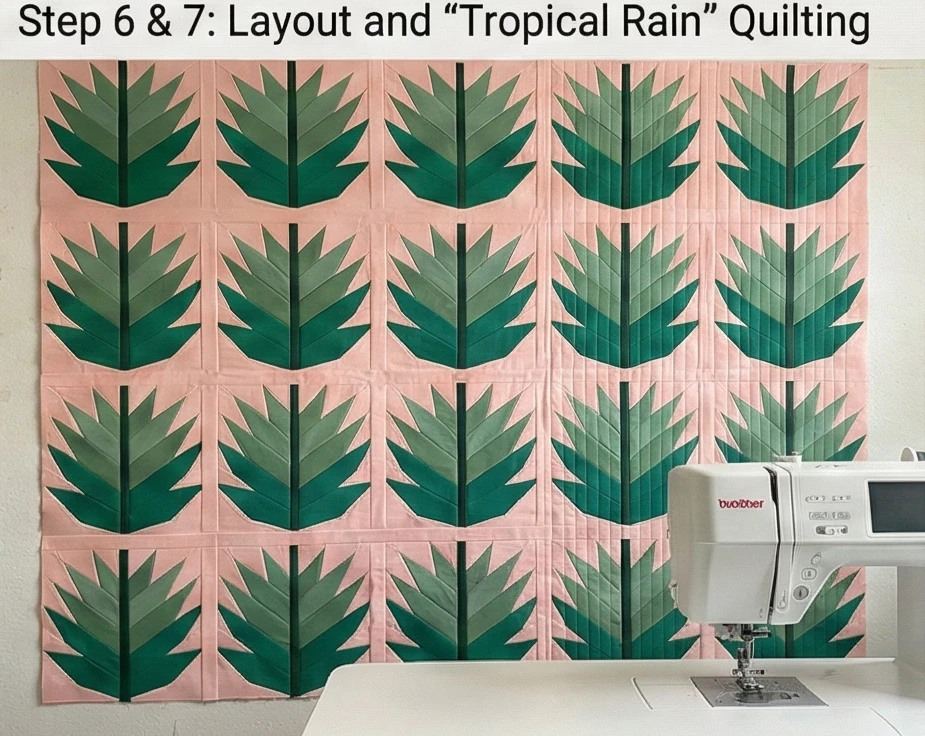
Step 6: Layout and Assembly
- Grid: Arrange the blocks in a grid of 3 blocks wide by 5 blocks long.
- Sashing (Optional): You can sew them directly together for a dense jungle look, or add 2-inch sashing strips between them to space the leaves out.
- Rotate every other block by 90 or 180 degrees so the leaves point in different directions, mimicking a natural canopy.
Step 7: “Tropical Rain” Quilting
Simple vertical lines work best here.
- Baste: Sandwich layers.
- Quilt: Use a walking foot to quilt straight vertical lines from top to bottom, spaced 1/2 inch to 1 inch apart.
- Effect: This looks like tropical rain falling through the leaves and adds a modern, linear texture that contrasts with the angled leaf blades.
Usability Note: Cotton quilts breathe well, which is essential for “hot sleepers.” By using a high-quality cotton batting, this quilt remains cool to the touch—perfect for summer nights or warmer climates.
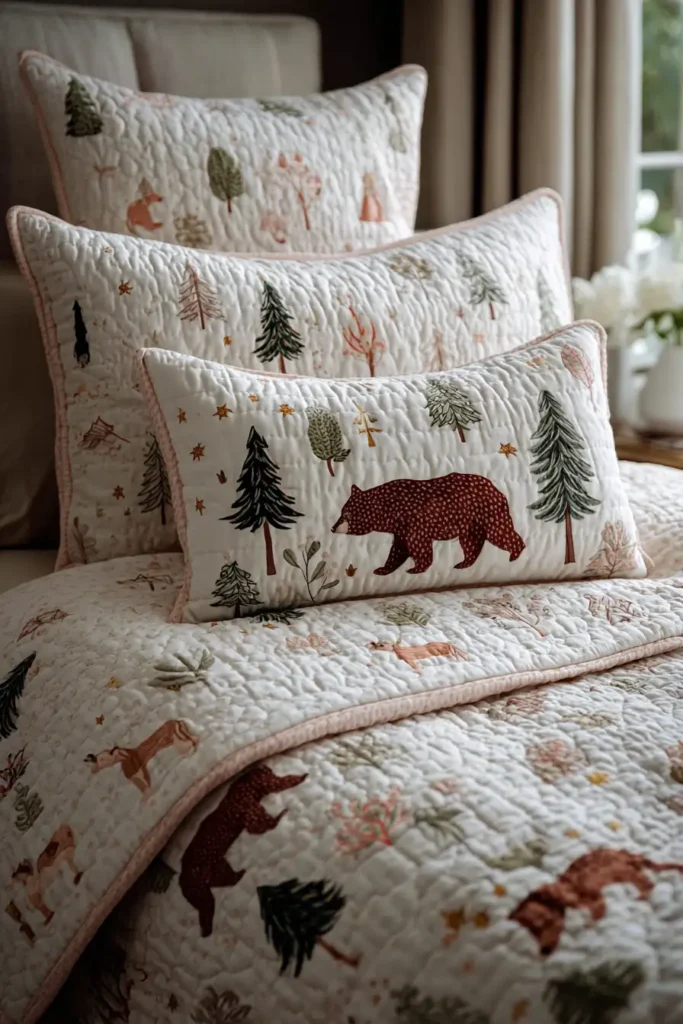
16. Decorative Cloud and Star Pillow Covers for Cozy Reading Nooks

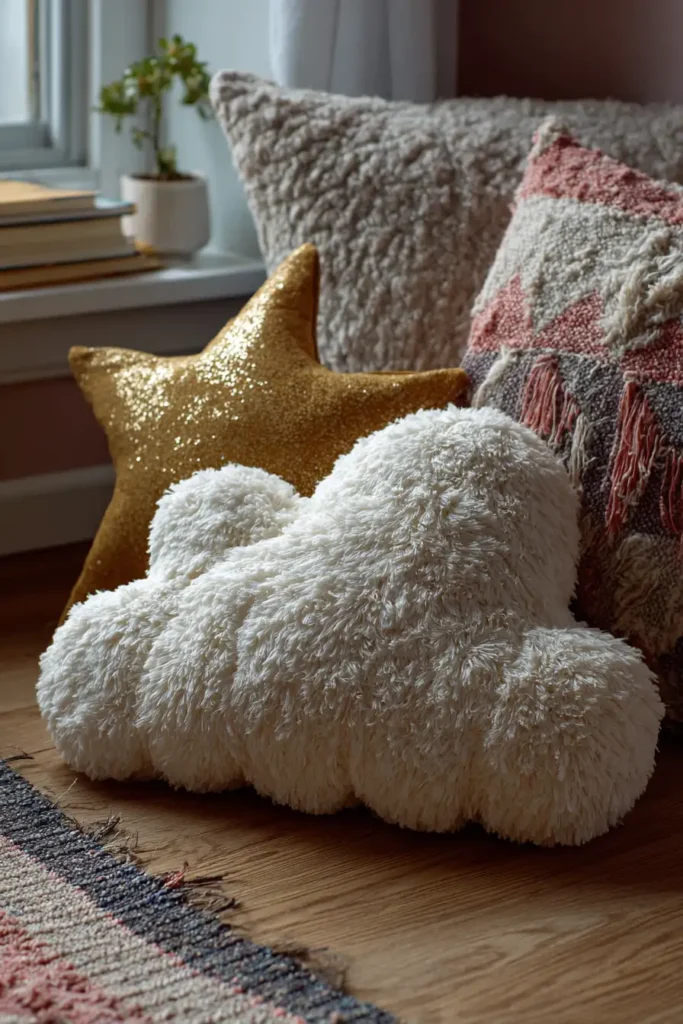
The “Dreamy Drift” Shaped Pillow Set
A reading nook is not complete without a pile of shaped throw pillows to lean against. Unlike standard square pillows, shaped pillows—like a fluffy Cloud and a twinkling Star—add sculptural interest to the room. These are designed with Raw Edge Jersey Appliqué or Sherpa/Fleece fabrics, making them incredibly soft to the touch and requiring no complicated turning or hemming on tight curves. They are the perfect companions for a rainy afternoon with a book.
Finished Dimensions:
- Cloud Pillow: Approx. 22″ x 14″.
- Star Pillow: Approx. 18″ x 18″.
Materials Needed:
- Fabric A (Cloud): 1/2 yard of White Sherpa, Bouclé, or White Fleece (texture is key!).
- Fabric B (Star): 1/2 yard of Gold Velvet, Yellow Minky, or Silver Lame.
- Stuffing: 1 bag of Poly-Fil fiberfill.
- Notions: Needle and thread (for hand closing), sewing machine, paper for templates.
Cultural Backstory: Shaped pillows became a massive trend in the mid-century modern era (1950s) as “novelty cushions.” They moved away from the formal, embroidered square pillows of the Victorian age toward fun, whimsical shapes that reflected the optimism of the atomic age. Today, the cloud and star motifs are staples of “Scandi-Style” nurseries, representing calmness and dreams.
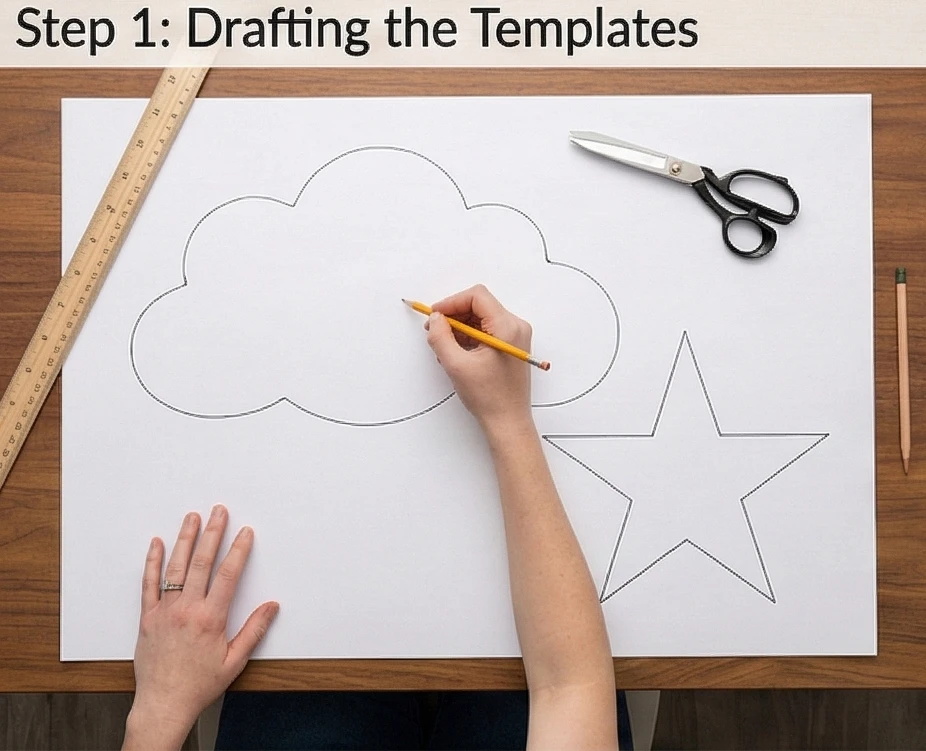
Step 1: Drafting the Templates
Freehand shapes look more organic and whimsical.
- Cloud: On a large piece of paper (or taped-together printer paper), draw a flat-bottomed cloud.
- Shape: Make 3 large bumps on top and a straight-ish bottom. Avoid tiny, tight curves which are hard to sew.
- Size: Aim for roughly 24 inches wide by 16 inches tall.
- Star: Draw a classic 5-point star.
- Trick: Draw a circle first, then mark 5 points on the edge to get the spacing even.
- Size: Aim for roughly 20 inches wide.
- Cut: Cut out your paper templates.
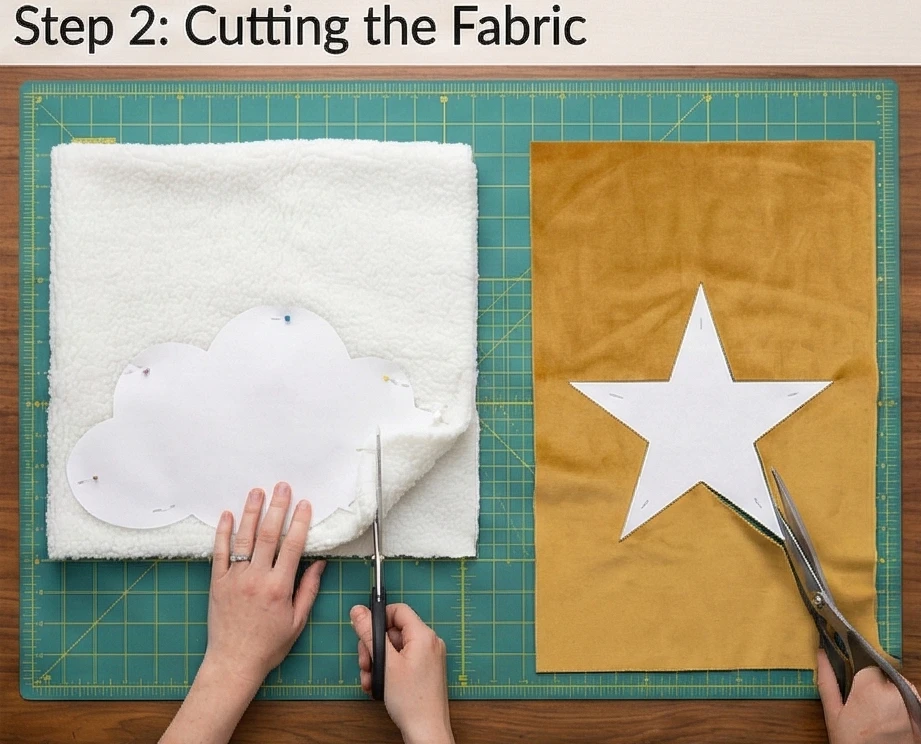
Step 2: Cutting the Fabric
Sherpa and Velvet have a “nap” (direction of the fuzz).
- Fold: Fold your fabric in half, Right Sides Together.
- Trace: Pin the template to the fabric and trace around it.
- Cut: Cut through both layers.
- Allowance: Add a 1/2-inch seam allowance all the way around your tracing line if you want the pillow to match the template size exactly.
- Yield: You now have a Front and a Back for each pillow.
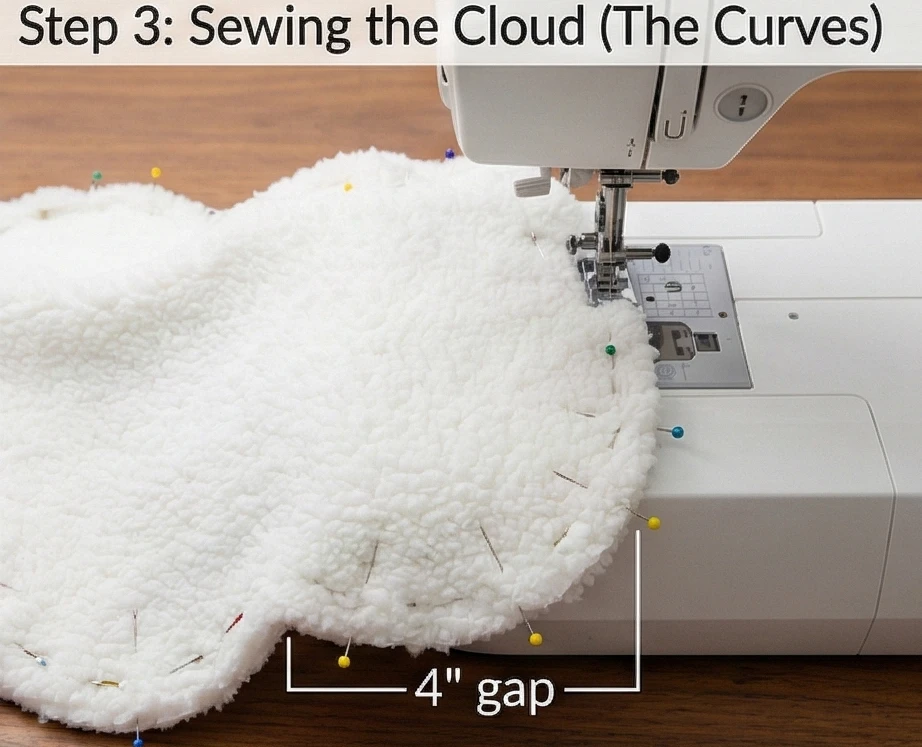
Step 3: Sewing the Cloud (The Curves)
Sewing curves requires patience.
- Pin: Pin the two Cloud pieces Right Sides Together. Use plenty of pins, especially on the curves.
- Sew: Stitch around the perimeter using a 1/2 inch seam allowance.
- The Gap: Leave a 4-inch opening at the bottom straight edge for turning.
- Technique: When sewing the deep “V”s between the cloud bumps, stop the needle down in the fabric, lift the presser foot, pivot the fabric, and continue. This gives you sharp inner corners.
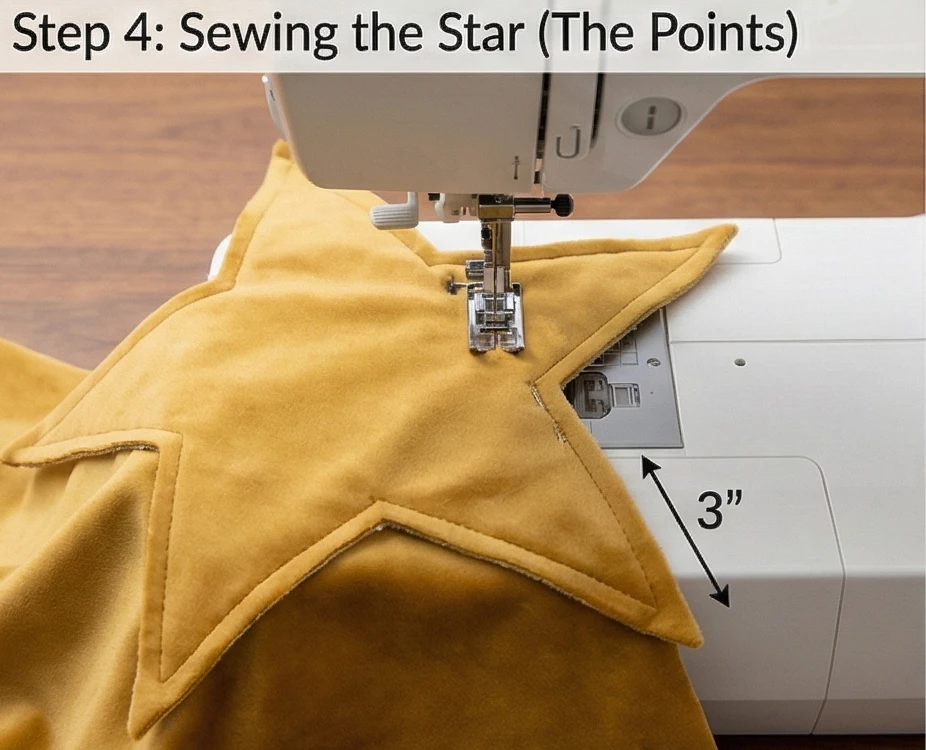
Step 4: Sewing the Star (The Points)
Stars are tricky because of the sharp points.
- Pin: Pin the two Star pieces Right Sides Together.
- Sew: Stitch around the perimeter.
- The Pivot: At every outer point and every inner “V”, stop with the needle DOWN, lift the foot, and pivot. If you curve around the points, your star will look like a blob.
- The Gap: Leave a 3-inch opening on one of the straight sides (not a tip).
Step 5: Clipping and Turning
This is the secret to a professional shape.
- Clip Inner Corners: Anywhere there is an inner “V” (between cloud bumps or star arms), snip a slit into the seam allowance almost to the stitches.
- Why: If you don’t clip, the fabric will pucker when turned inside out.
- Trim Outer Points: On the Star, trim the tips of the points off (don’t cut the thread) to reduce bulk.
- Turn: Reach through the gap and turn the pillows right side out. Use a chopstick or knitting needle to poke the star points out until they are sharp.
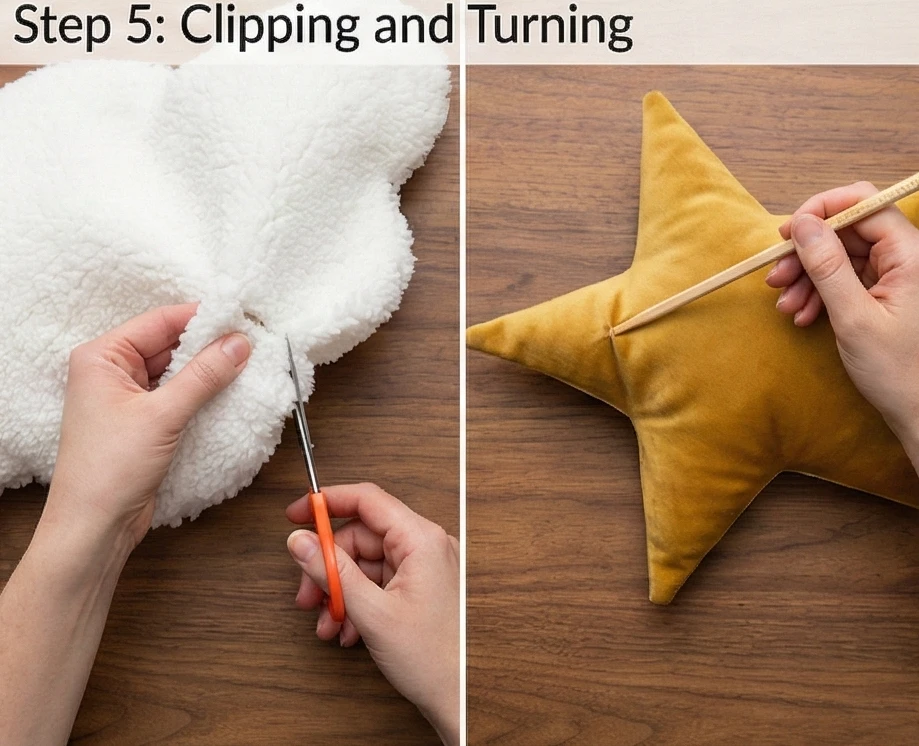
Step 6: Stuffing and Closing
- Stuff: Grab handfuls of Poly-Fil and stuff the pillows.
- Technique: Stuff the furthest corners (star tips) firmly first. Then fill the center.
- Density: Pack it tighter than you think. Stuffing settles over time.
- Ladder Stitch: Thread a hand needle. Fold the raw edges of the opening inward. Use a Ladder Stitch (invisible stitch) to sew the gap closed manually.
- Why Hand Sew? Machine sewing a stuffed pillow is challenging and often results in a messy appearance.
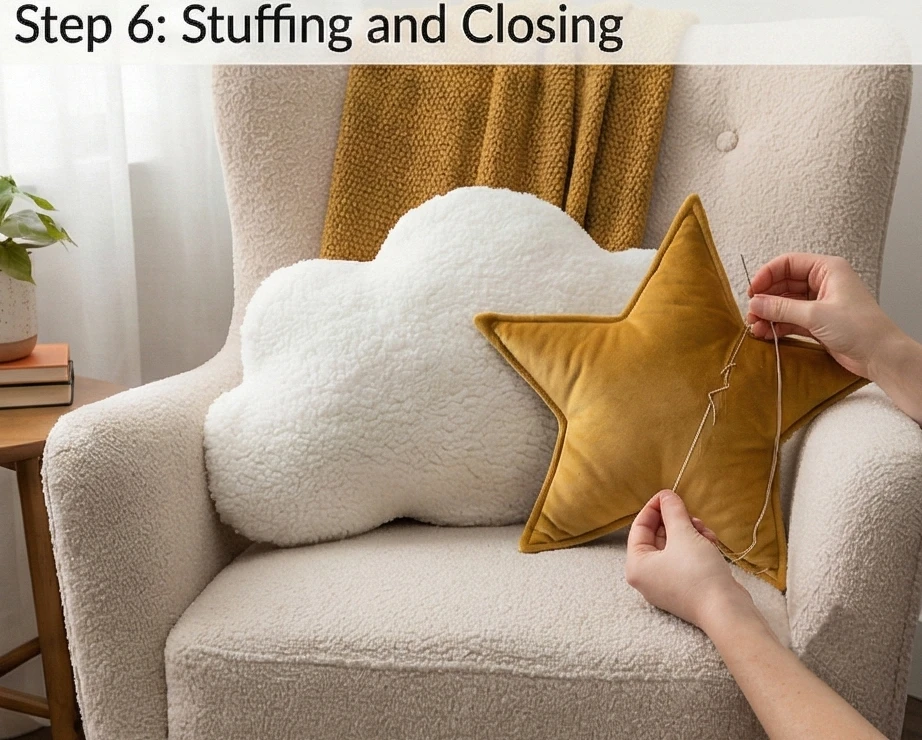
Usability Note: If using Sherpa or Bouclé, these pillows are incredibly tactile and comforting to pet. They work great as “worry pillows” for anxious children to squeeze while reading.
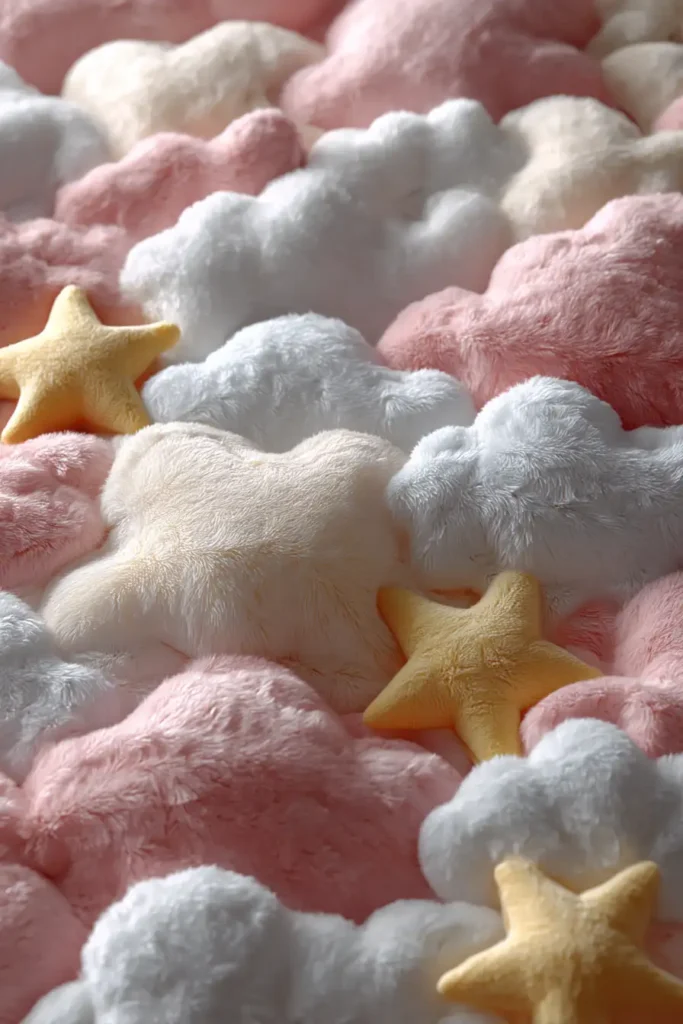
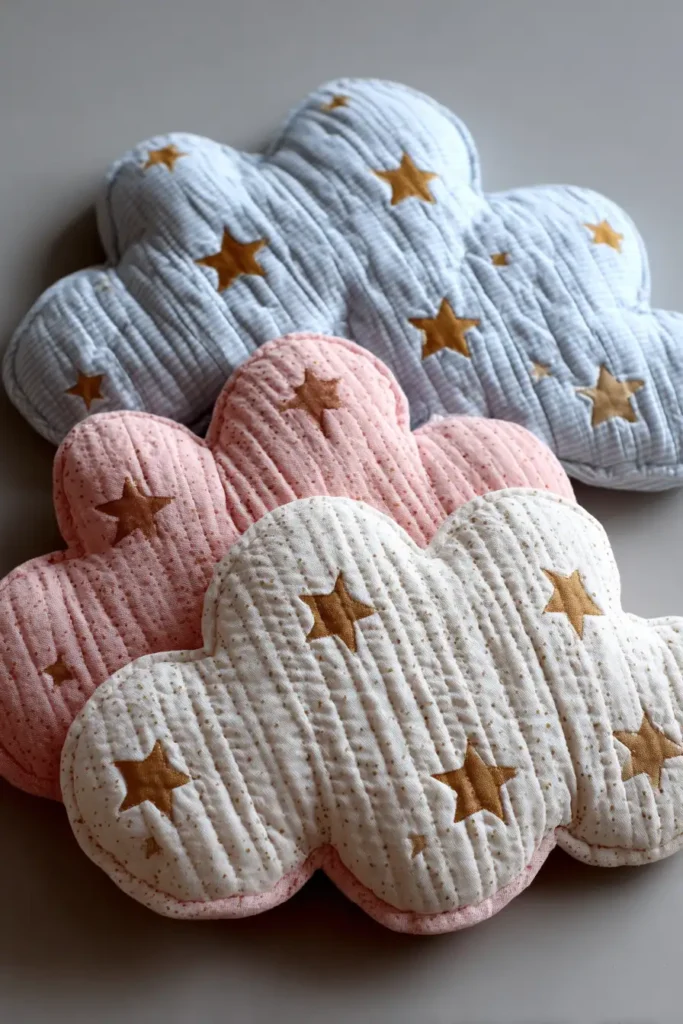
17. Princess Crown Quilt Designs for Stylish Girls’ Bedding


The “Royal Tiara” Silhouette Quilt
For the girl who loves fairy tales but wants a bedroom that feels modern and elegant, the “Royal Tiara” quilt strikes the perfect balance. Rather than a busy print of cartoon princesses, this design features a single, large-scale Crown Block repeated in a minimalist grid or used as a central medallion. Using Metallic Gold or Silver fabric for the crowns against a soft Blush Pink or Lavender background creates a regal effect without being childish. It’s sophisticated enough to grow with her from toddlerhood to tween years.
Finished Dimensions: Twin Bed Size, 64″ x 84″.
Materials Needed:
- Fabric A (The Crowns): 1 yard of Gold Shimmer Cotton, Yellow Solid, or Metallic Linen.
- Fabric B (Background): 4 yards of Pale Pink, White, or Lilac.
- Fabric C (Jewels – Optional): Scraps of brightly colored solids (Emerald, Ruby, Sapphire) for appliqué gems.
- Backing: 5 yards of a castle or carriage print.
- Notions: Rotary cutter, 4.5″ square ruler, marking pen.
Cultural Backstory: The crown has long symbolized sovereignty, but in children’s folklore, it represents personal empowerment and specialness. In quilting, “Crown” blocks (such as “Crown of Thorns”) are traditional, but this specific pictorial block became popular in the “Modern Quilt” era as a way to create themed bedding that complemented the clean lines of contemporary furniture.
Step 1: Cutting the Crown Components
We will make 12 Large Crown Blocks (Finished size 12″ x 12″).
For ONE Block (Repeat 12 times):
- Crown Base (Gold): Cut 1 rectangle measuring 12.5″ x 4.5″.
- Crown Points (Gold): Cut 3 rectangles measuring 4.5″ x 6.5″ (These will become the spikes).
- Background Spacers (Pink): Cut 2 rectangles measuring 2.5″ x 6.5″ (To go between the spikes).
- Simplified Method: We will use “Flying Geese” logic for the points.
- Crown Base: 12.5″ x 4.5″ Gold.
- Side Points: 2 Gold Rectangles (4.5″ x 6.5″).
- Center Point: 1 Gold Rectangle (4.5″ x 8.5″ – taller).
- Background (Sky): 4 Pink Squares (4.5″) and 2 Pink Rectangles (2.5″ x 8.5″).
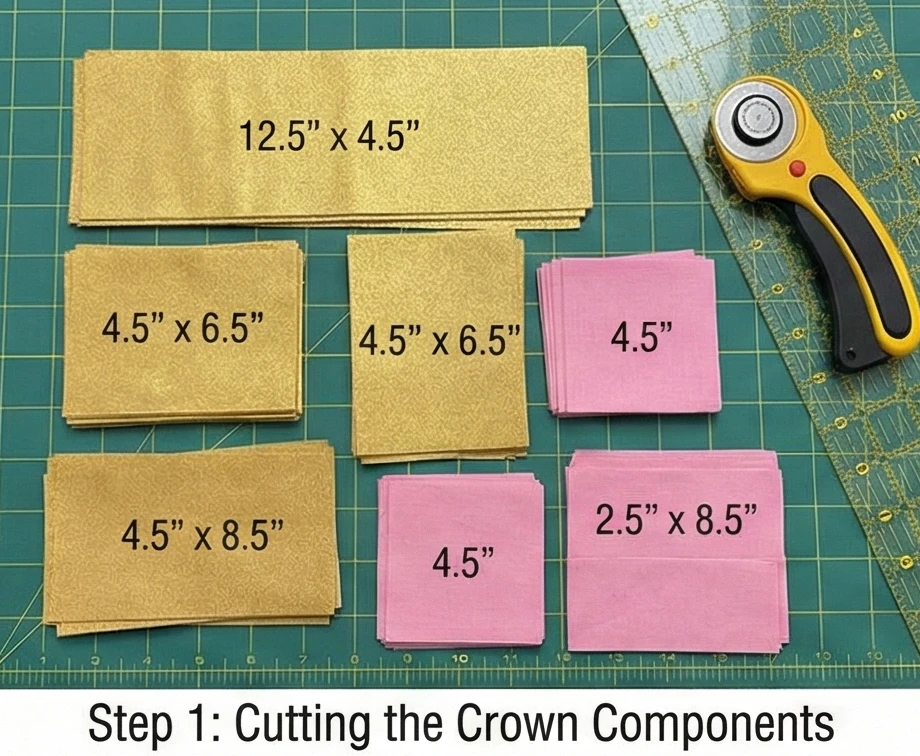
Step 2: Making the Crown Points
We use the “Stitch and Flip” method to create the sharp points.
- Side Points: Take a Gold Rectangle (4.5″ x 6.5″).
- Place a Pink Square (4.5″) on the top left corner. Draw a diagonal line. Stitch. Trim. Flip. (Left side of the spike).
- Place a Pink Square (4.5″) on the top right corner. Stitch. Trim. Flip. (Right side of the spike).
- Result: A gold triangle (flying goose) shape. Make 2 of these.
- Center Point (The Tall One): Take the Tall Gold Rectangle (4.5″ x 8.5″).
- Repeat the stitch-and-flip process on the top corners using Pink Squares.
- Result: A tall gold triangle.
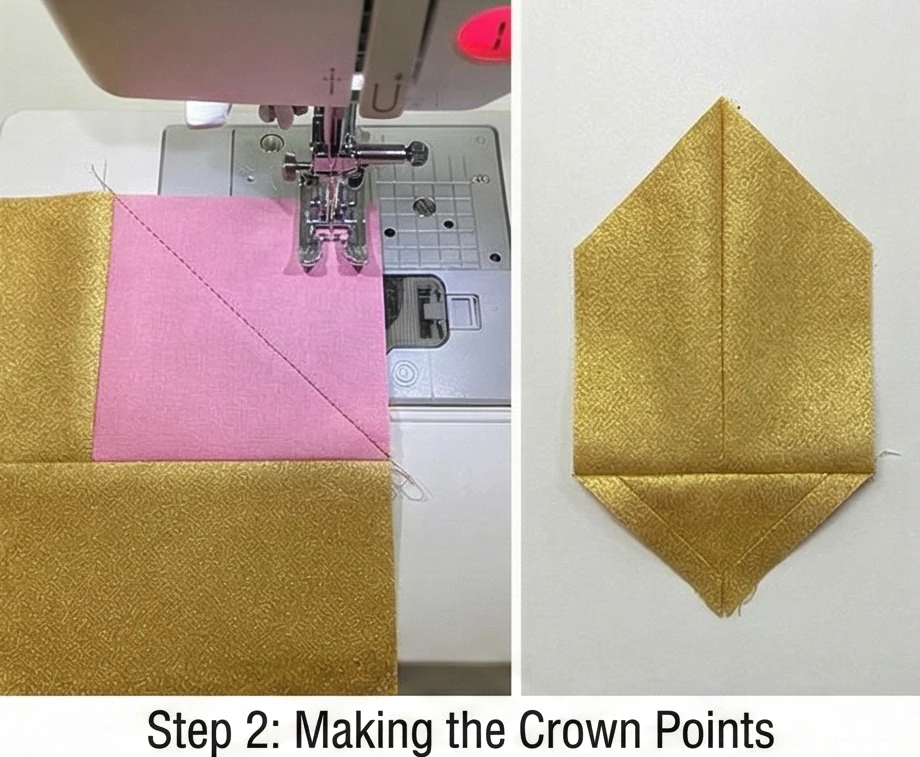
Step 3: Assembling the Block
- Top Row (The Points):
- Sew: [Side Point] – [Pink Spacer Strip (2.5″ wide)] – [Center Point] – [Pink Spacer Strip] – [Side Point].
- Check: This row creates the jagged top of the tiara.
- Bottom Row (The Band):
- Sew the Gold Base Rectangle (12.5″ x 4.5″) to the bottom of the Point Row.
- Visual: Now it looks like a headband with three jewels/spikes sticking up.
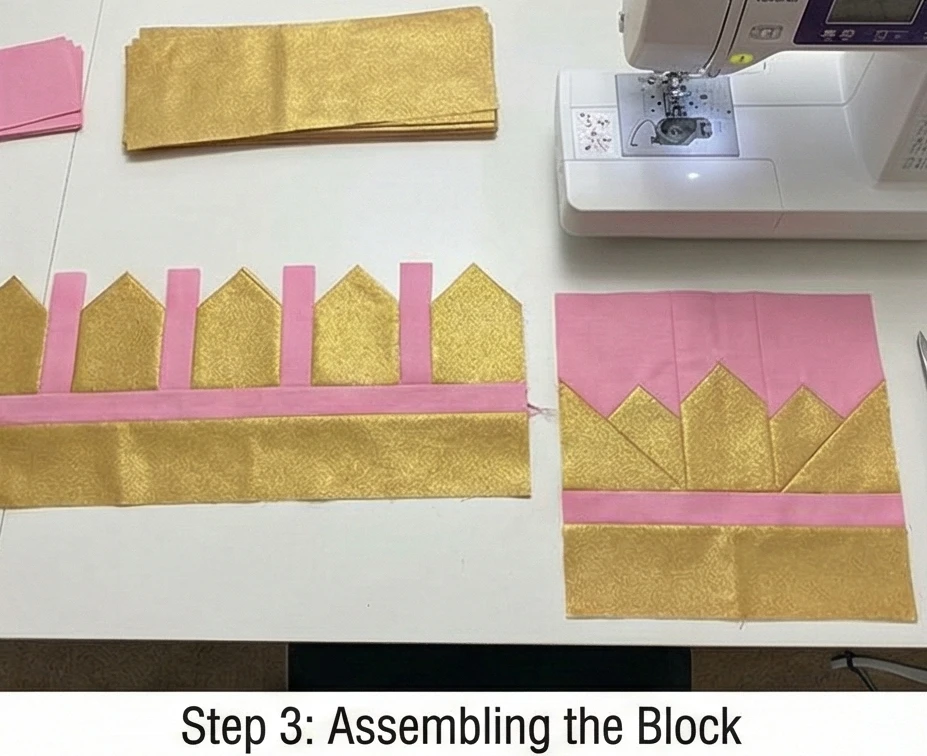
Step 4: Adding the “Jewels” (Optional Appliqué)
If you want sparkle, add it now.
- Fused Appliqué: Cut small diamonds or circles from your Jewel Scraps (Fabric C).
- Fuse: Iron them onto the tips of the crown points or the center of the band using fusible web.
- Stitch: Topstitch around the edges to secure them.
- Alternative: Sew on washable rhinestones or large buttons after the quilt is finished (for older children only, not babies).
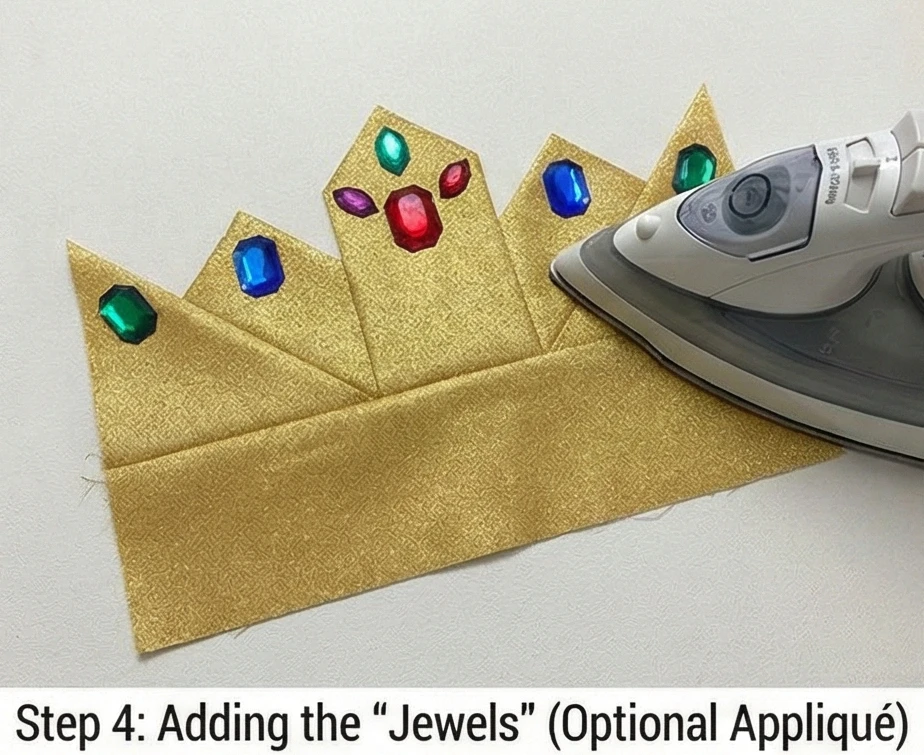
Step 5: The “Throne Room” Layout
- Sashing: Cut vertical sashing strips of Fabric B (Pink) measuring 4.5″ x 12.5″ to separate the crowns.
- Grid: Arrange blocks in a 3-wide x 4-long grid.
- Assembly: Sew rows with sashing between blocks. Sew horizontal sashing strips between rows.
- Negative Space: Use wide borders (6-8 inches) of the Pink background fabric to make the crowns float in the center of the bed.
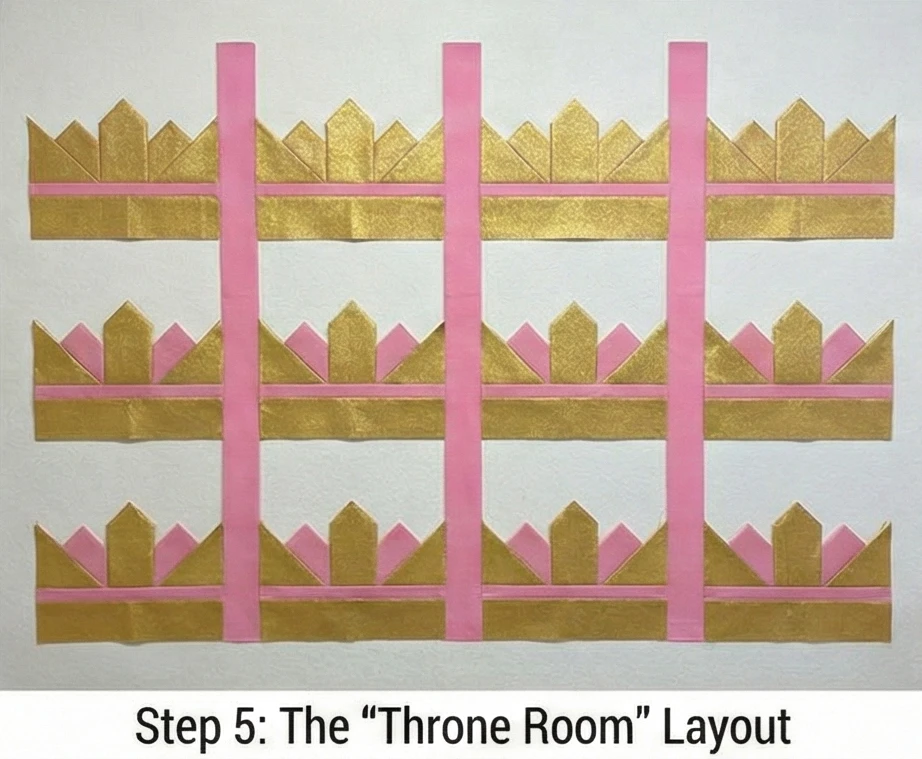
Step 6: “Royal Scroll” Quilting
Elegant quilting softens the blocky shapes.
- Baste: Sandwich layers.
- Quilt: Use a Free Motion quilting pattern of elegant Scrolls or Feathers. These curvaceous lines mimic the filigree of real jewelry and contrast beautifully with the geometric spikes of the crown blocks.
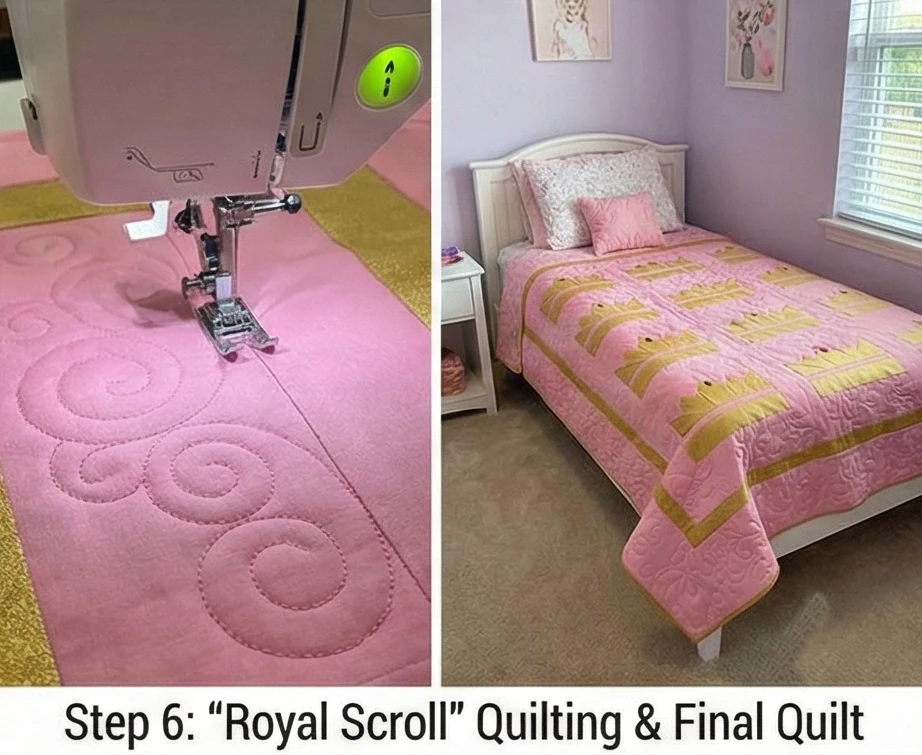
Usability Note: Using “Shimmer Cotton” (cotton with metallic foil printed on it) gives the crown a realistic gold shine while remaining soft and machine-washable. Avoid “Lame” or costume satin, which is slippery and prone to shredding in the wash.

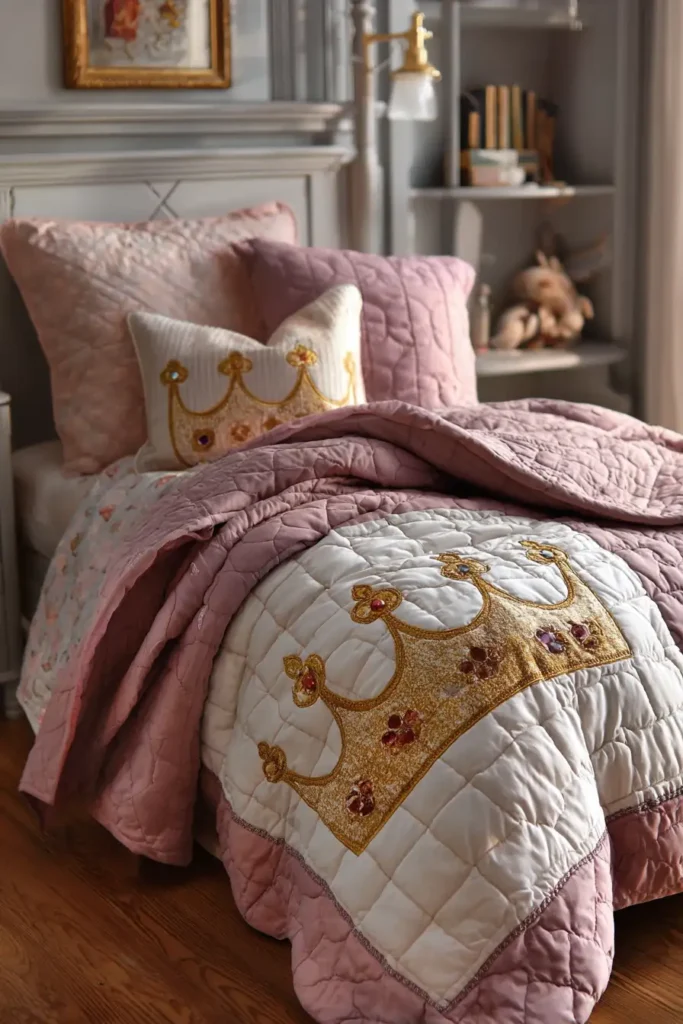
18. Polka Dot Quilt Patterns for Stylish Girls’ Quilts

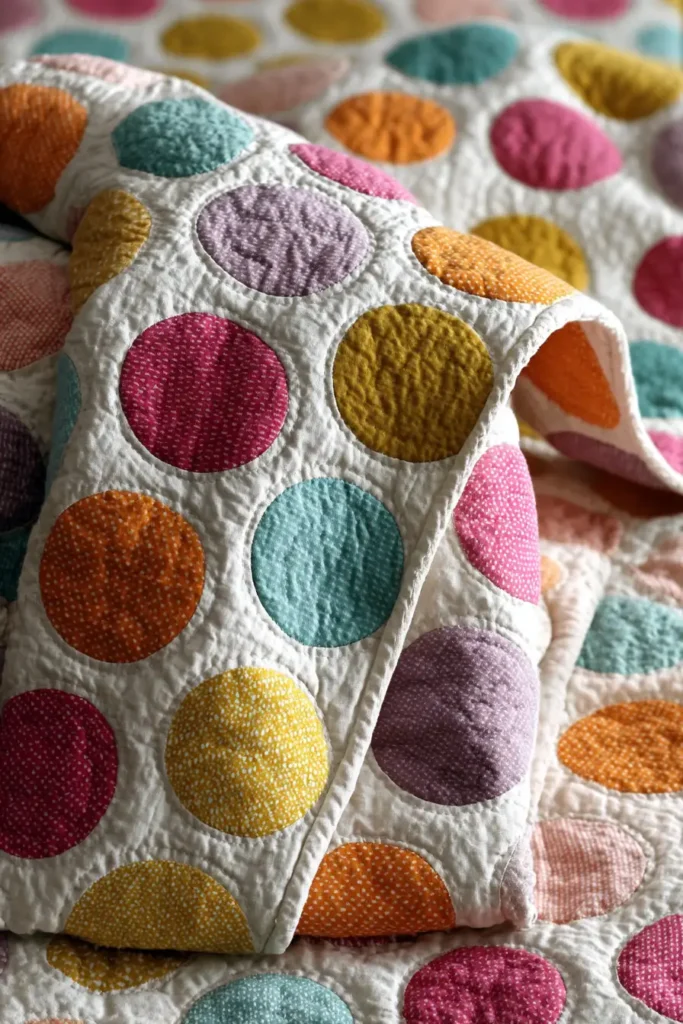
The “Bubble Pop” Snowball Quilt
While appliqué is one way to make dots, it can sometimes be stiff. The “Bubble Pop” pattern creates “Polka Dots” using standard geometric piecing (seams only). We use the classic Snowball Block—an octagon that looks like a circle when floating in a background. This technique uses the “Stitch and Flip” method to trim the corners of a square, rounding it. Using bright, candy-colored fabrics for the “dots” and separating them with white sashing creates a durable, soft, and playful quilt that can handle years of washing.
Finished Dimensions: Twin Bed Size, 66″ x 88″.
Materials Needed:
- Fabric A (The Dots): 15-20 Fat Quarters of bright solids or small prints (Pink, Aqua, Yellow, Lavender).
- Fabric B (Background): 4 yards of White or Pale Grey.
- Backing: 5.5 yards of a fun confetti print.
- Batting: Cotton/Poly blend (medium loft).
- Notions: Rotary cutter, 2.5″ square ruler.
Cultural Backstory: The “Snowball” block is a staple of Amish quilting. Amish quilters often avoided representational images (like flowers or animals) but excelled at geometric abstraction. They used the Snowball block to soften the quilt’s rigid grid, creating visual curves without sewing a curved seam. It remains one of the cleverest optical illusions in quilting history.
Step 1: Cutting the “Bubble” Centers
We are making 80 Blocks (Finished size 8″ x 8″).
- Cut Dot Squares: From your bright Fat Quarters, cut 80 squares measuring 8.5″ x 8.5″.
- Tip: Use a variety of colors so the “bubbles” look like a gumball machine mix.
- Cut Background Corners: From Fabric B (White), cut 320 small squares measuring 2.5″ x 2.5″.
- Why: You need 4 small squares for the corners of every large square.
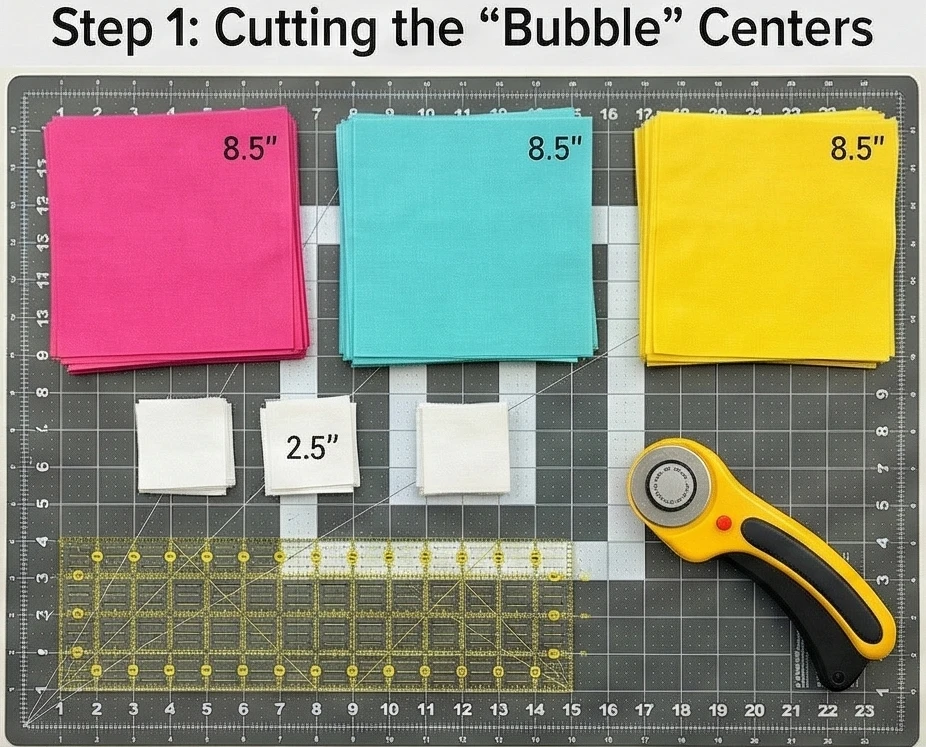
Step 2: The Stitch-and-Flip Technique
This turns a square into an octagon.
- Mark: Draw a diagonal line on the back of every small 2.5″ White square.
- Pin: Place a White square on each of the four corners of a colored 8.5″ Dot square. (Right Sides Together).
- Alignment: Ensure the corners align perfectly.
- Sew: Stitch directly on the drawn diagonal lines.
- Trim: Cut off the excess corner fabric, leaving a 1/4 inch seam allowance past your stitch line.
- Press: Flip the white triangles open and press.
- Result: Your large square now has white corners, making the colored center look like an octagon (or a pixelated circle).

Step 3: Cutting Sashing (The Spacers)
To make the dots appear to float, we separate them.
- Vertical Sashing: Cut 80 strips of Fabric B (White) measuring 2.5″ x 8.5″.
- Horizontal Sashing: Cut long strips (or piece them) measuring 2.5″ x 66″ (width of the quilt). You need 10 long strips.
- Cornerstones (Optional): You can use 2.5″ colored squares at the intersections if you want extra color, but plain white sashing makes the dots pop more.
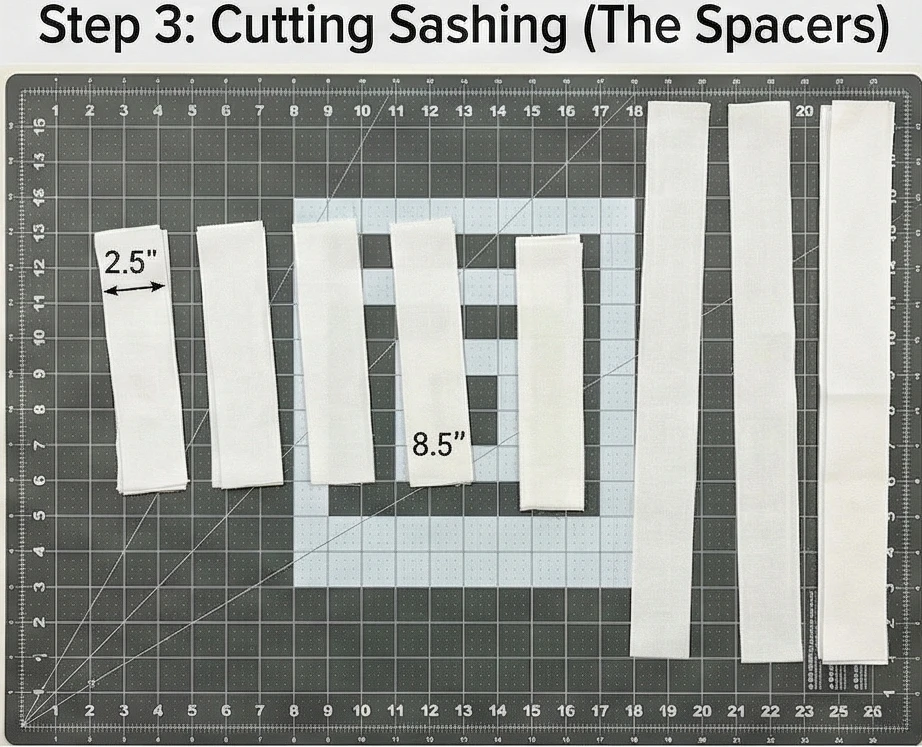
Step 4: Building the Rows
Grid Layout: 8 blocks wide x 10 blocks long.
- Arrange: Lay out your Snowball blocks on the floor. Shuffle the colors until they look balanced.
- Sew Block Rows: Stitch 8 blocks together in a row, placing a Vertical Sashing Strip (2.5″ x 8.5″) between each block.
- Pattern: [Block] – [Sash] – [Block] – [Sash]…
- Make: Build 10 Rows.

Step 5: Assembling the Quilt Top
- Join Rows: Sew the Block Rows together, placing a Long Horizontal Sashing Strip between each row.
- Alignment: Pin carefully so the vertical sashing strips align straight down the quilt.
- Border: Add a final 2.5″ white border around the entire outside edge to frame the bubbles.
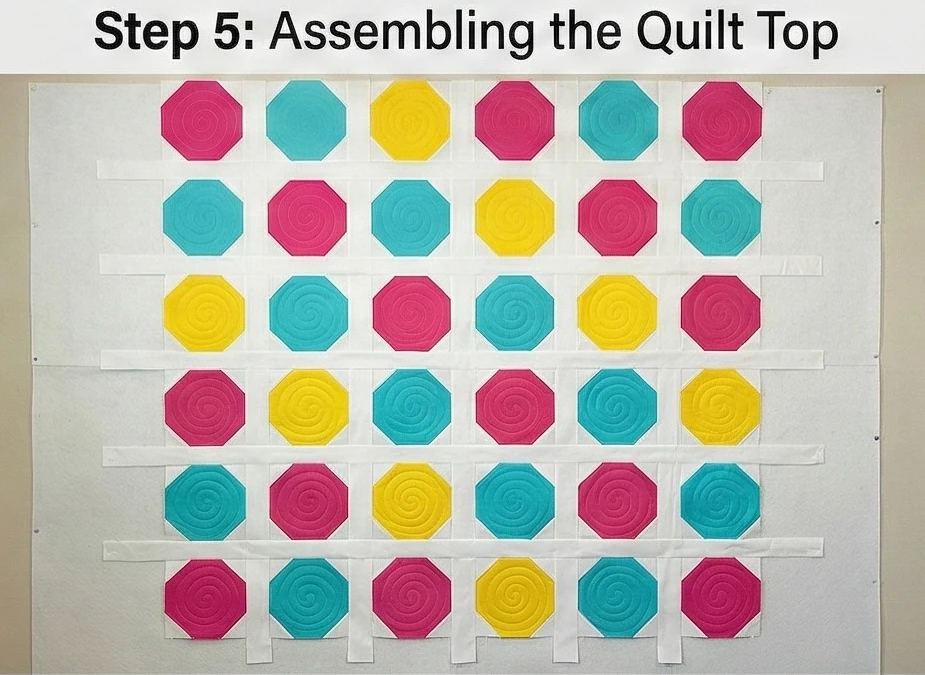
Step 6: “Spiral” Quilting
Use the quilting to enhance the roundness.
- Baste: Sandwich layers (Backing + Batting + Top).
- Quilt:
- The Bubbles: Using a walking foot or free-motion foot, stitch a large spiral inside each colored octagon. This softens the straight edges of the “Snowball” and tricks the eye into seeing a perfect circle.
- The Sashing: Stitch simple straight lines or “X”s in the white spaces.

Usability Note: Because this quilt uses standard piecing (no fusible glue or raw edges), it is softer and more drapable than an appliqué quilt. It’s ideal for children with sensory sensitivities to stiff fabrics.
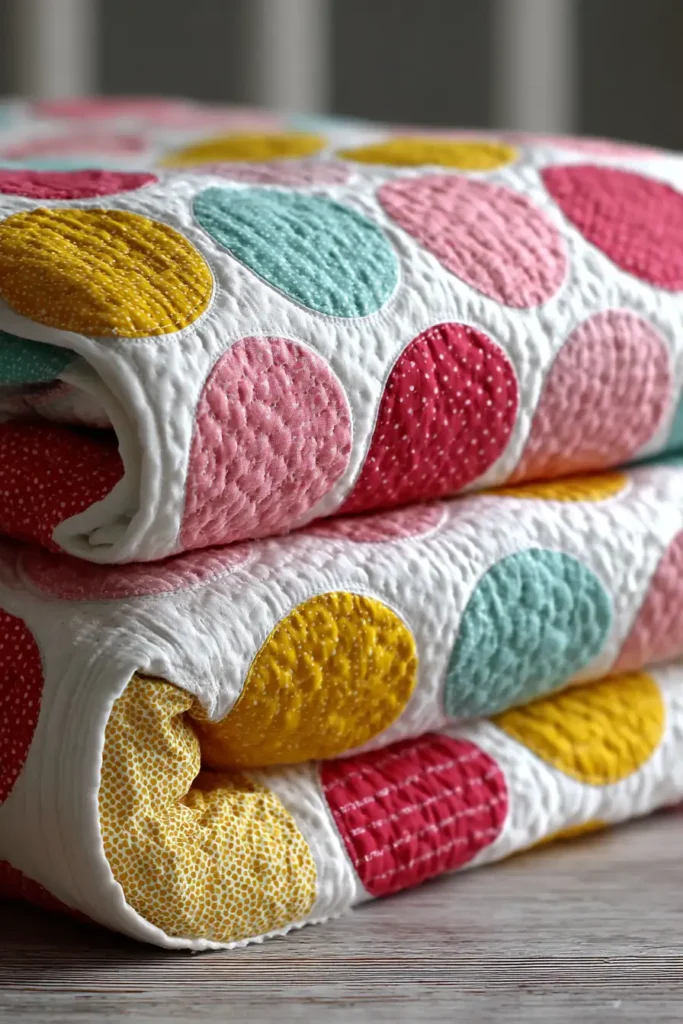

19. Animal Print Quilt Ideas for Everyday Girls’ Bed Covers
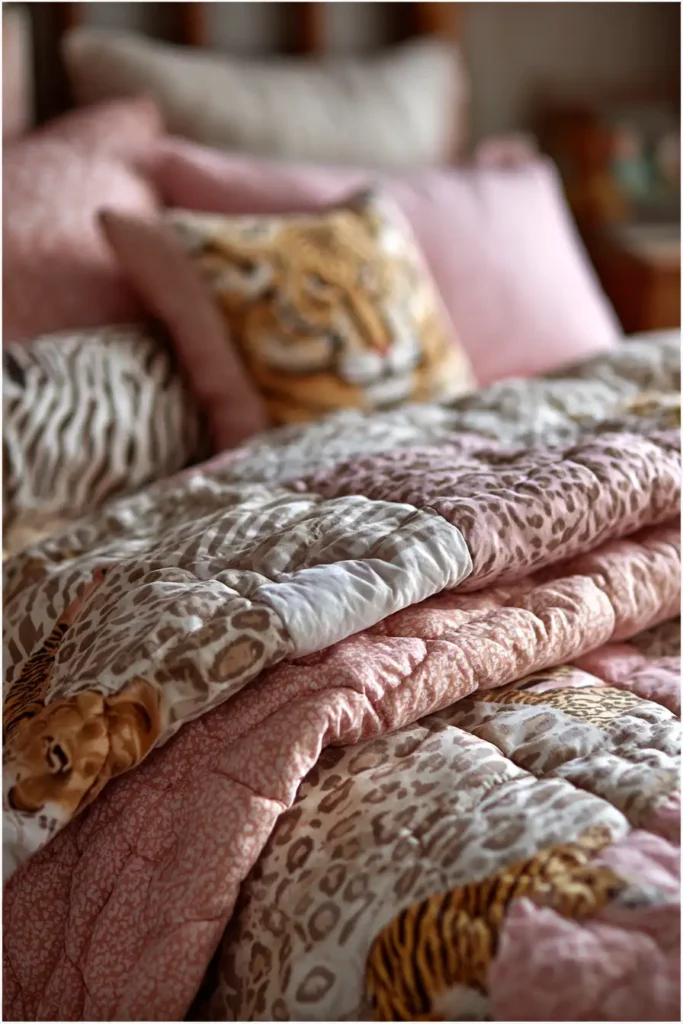
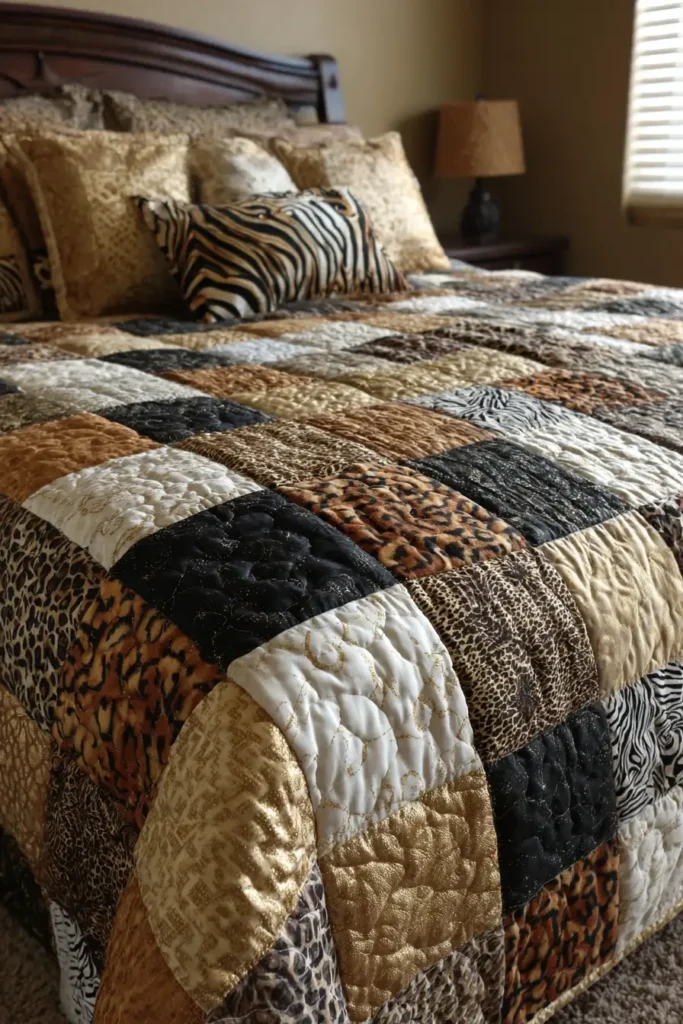
The “Safari Chic” Log Cabin Quilt
Animal prints—leopard, zebra, cheetah—are a perennial favorite for girls and teens, but they can easily become overwhelming if used in large blocks. The key to making them elegant rather than chaotic is to use them in small doses mixed with calming neutrals. The “Safari Chic” quilt uses the traditional Log Cabin block layout. By alternating strips of “wild” animal prints with strips of crisp Cream or White, you create a sophisticated, high-contrast design that feels like a boutique hotel bedspread.
Finished Dimensions: Twin Bed Size, 66″ x 88″.
Materials Needed:
- Fabric A (The Wild Side): 1 Jelly Roll (or 2.5 yards cut into 2.5″ strips) of mixed Animal Prints (Leopard, Zebra, Giraffe).
- Fabric B (The Tame Side): 2.5 yards of Solid Cream, White, or Linen (cut into 2.5″ strips).
- Fabric C (Center Squares): 1/4 yard of Solid Black or Gold.
- Backing: 5.5 yards of a soft Solid Pink or Teal (for a fun surprise pop of color).
- Batting: Cotton (low loft).
- Notions: Rotary cutter, standard quilting ruler.
Cultural Backstory: The Log Cabin block is one of the oldest and most symbolic patterns in American quilting, popular since the Civil War era. Traditionally, the center square was Red (representing the hearth/fire) or Yellow (representing the light in the window). The block is divided diagonally: one half is made of light fabrics (sunshine) and the other of dark fabrics (shadow). In this version, the “Wild” prints act as the shadow, and the solids act as the light.
Step 1: Cutting the “Logs”
We are building 35 Blocks (Finished size 12″ x 12″).
- Center Squares: From Fabric C (Black), cut 35 squares measuring 2.5″ x 2.5″.
- The Strips: Cut all your Animal Print and Cream fabrics into 2.5-inch wide strips.
- Efficiency Tip: You can cut them to exact lengths as you go, or just keep them as long strips and trim after sewing (Chain Piecing method). We will assume exact lengths for clarity below.
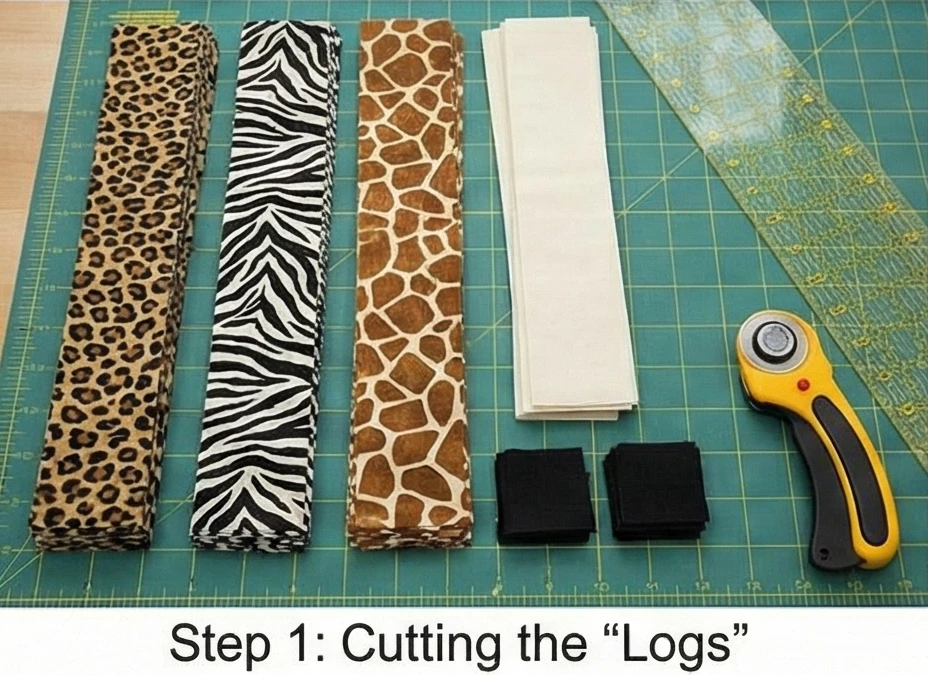
Step 2: The First Round (The Hearth)
We build outward from the center.
- Log 1 (Cream): Sew a 2.5″ Cream square to the right side of the Black Center Square. Press out.
- Log 2 (Cream): Sew a 4.5″ Cream strip to the bottom of the unit.
- Log 3 (Animal): Sew a 4.5″ Animal strip to the left of the unit.
- Log 4 (Animal): Sew a 6.5″ Animal strip to the top of the unit.
- Result: You have a square with a black center. The bottom/right is Cream. The top/left is Animal Print.
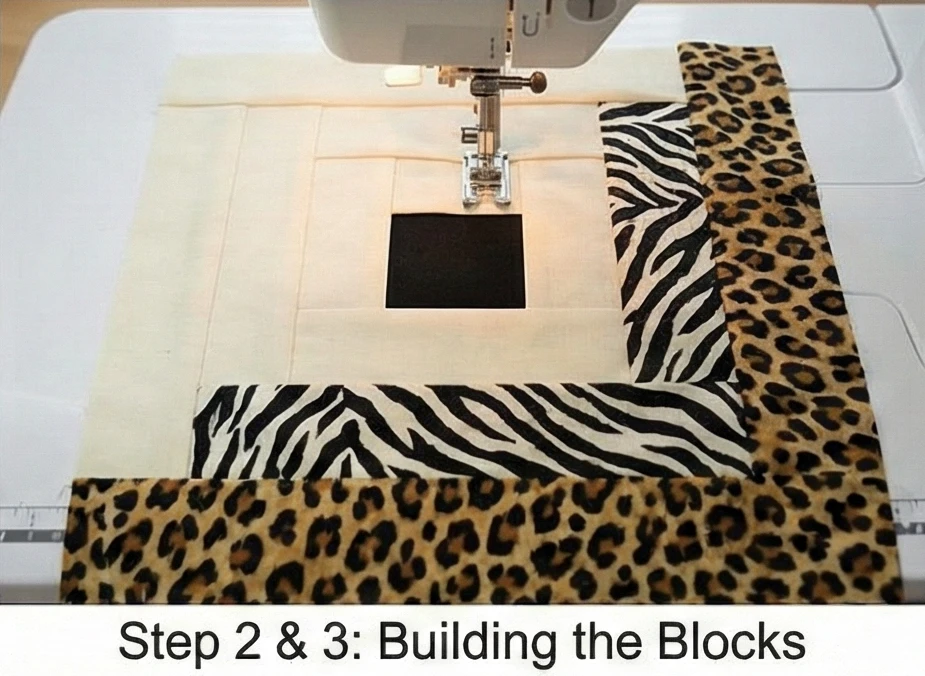
Step 3: Building the Layers
Continue spiraling outward, always keeping lights on one side and darks on the other.
- Round 2:
- Add Cream to Right (6.5″).
- Add Cream to Bottom (8.5″).
- Add Animal to Left (8.5″).
- Add Animal to Top (10.5″).
- Round 3 (Final):
- Add Cream to Right (10.5″).
- Add Cream to Bottom (12.5″).
- Add Animal to Left (12.5″).
- Add Animal to Top (14.5″).
- Trim: Square up the block to exactly 12.5″ x 12.5″.
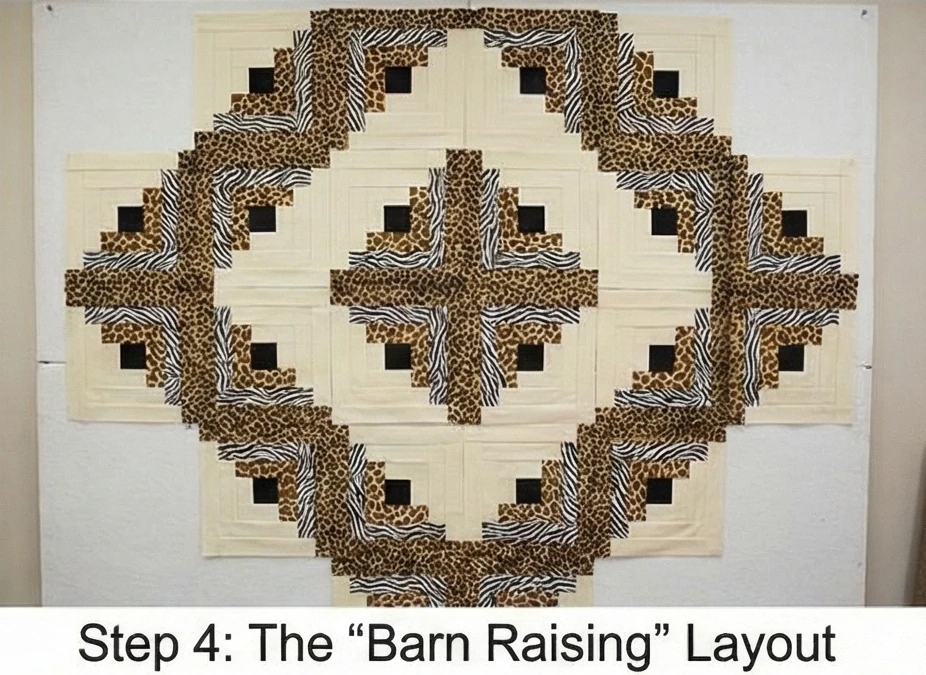
Step 4: The “Barn Raising” Layout
This is where the magic happens.
- Design Wall: Log Cabin blocks can be arranged in dozens of ways. For the most elegant look, use the “Barn Raising” layout.
- Arrange: Place the blocks so the “Dark” (Animal Print) halves form concentric diamonds radiating from the center of the bed.
- Alternative: Use a “Furrows” layout (all diagonals going the same way) for a zigzag tiger-stripe effect.
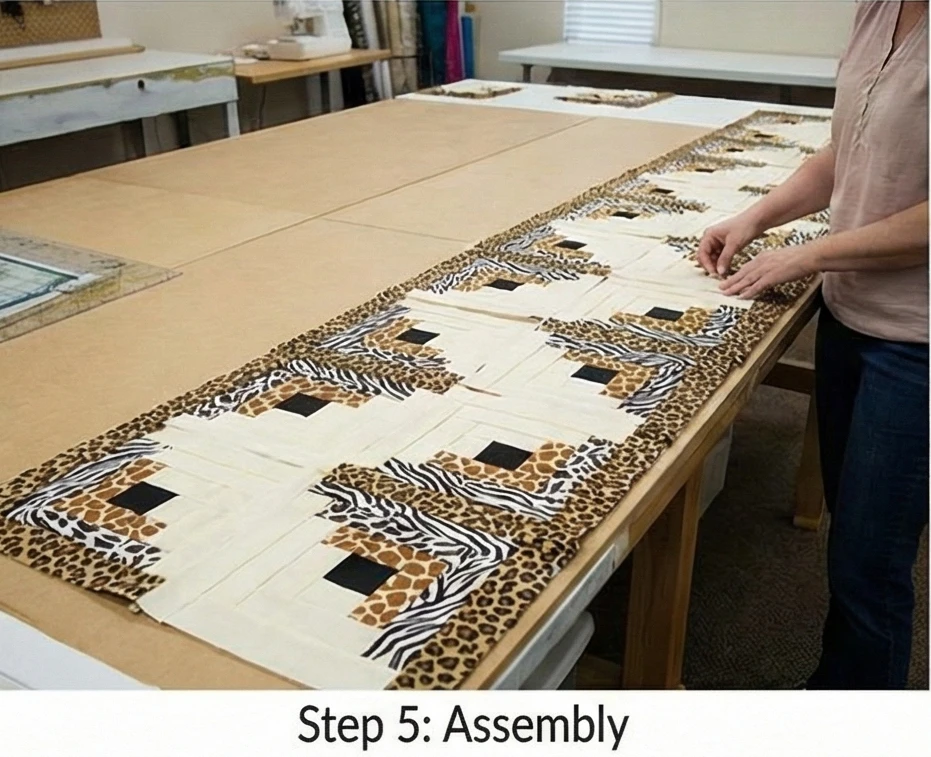
Step 5: Assembly
- Grid: Arrange blocks in a 5 wide x 7 long grid.
- Sew: Stitch blocks into horizontal rows.
- Seams: Because there are many seams in a Log Cabin, press carefully. Press seams away from the center to reduce bulk.
- Join: Stitch the rows together.
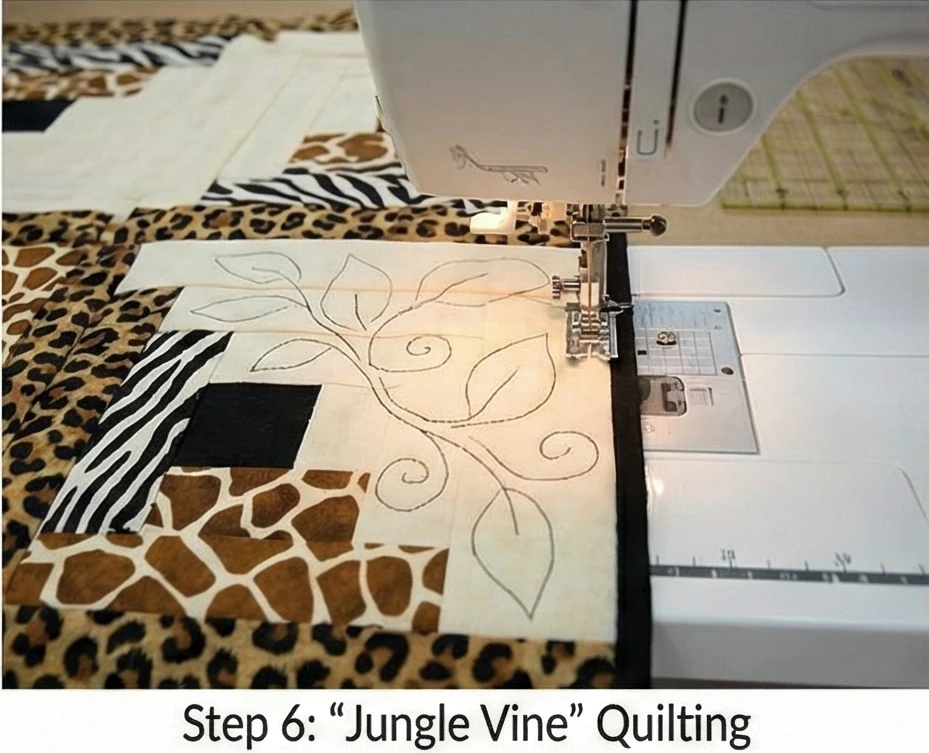
Step 6: “Jungle Vine” Quilting
- Baste: Sandwich layers.
- Quilt:
- Option A (Modern): Quilt large “X”s through the center of every block.
- Option B (Organic): Use a free-motion “Vine” or “Leaf” pattern over the cream sections, and simple straight lines over the animal print sections to let the print shine.
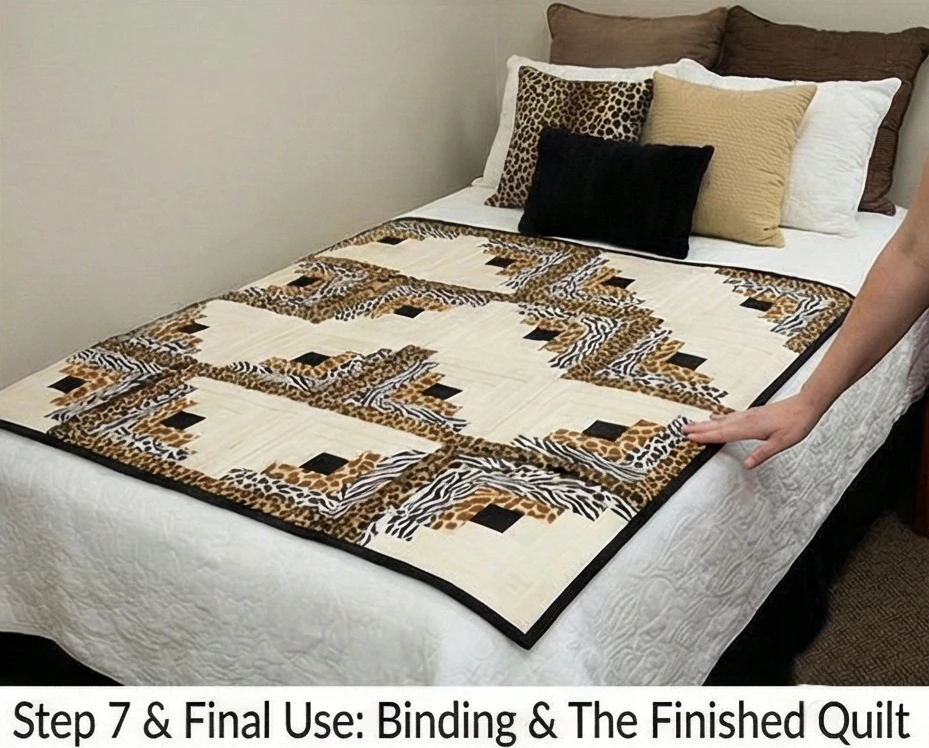
Step 7: The “Frame” Binding
- Binding: Use Solid Black for the binding.
- Effect: A stark black rim acts like a picture frame, containing the busy animal prints and making the whole quilt look tailored and expensive.
Usability Note: Animal print patterns are ideal for everyday use because their busy, organic patterns hide stains (juice spills, pen marks, makeup) better than solid colors. This quilt can handle the rough-and-tumble life of a teenager.
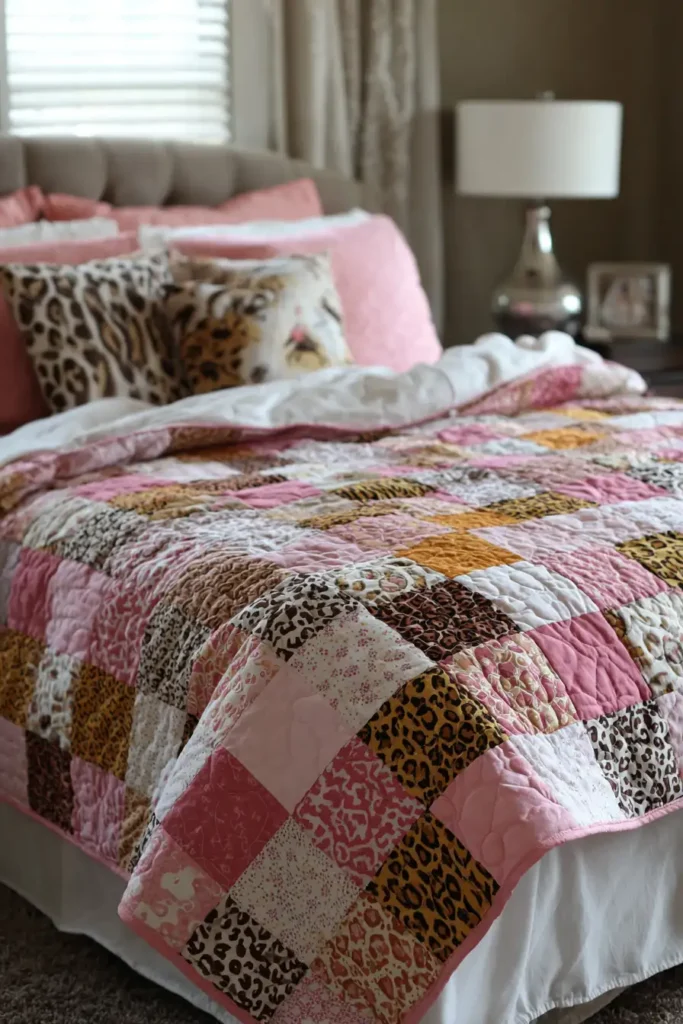
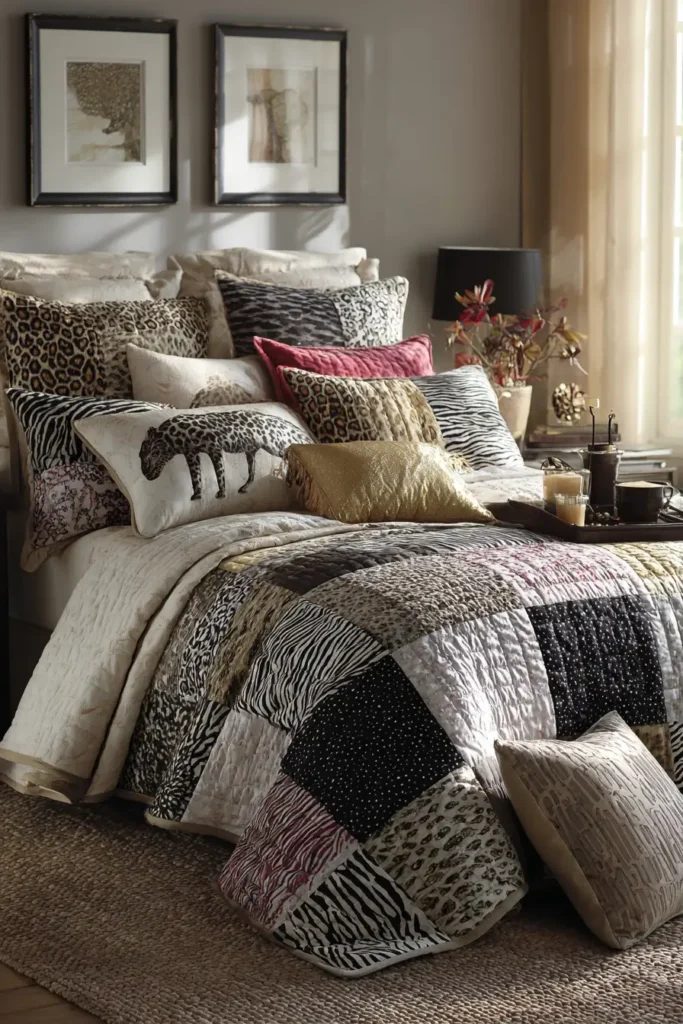
20. Bohemian Fringe Quilt Ideas for Cozy Girls’ Bed Runners
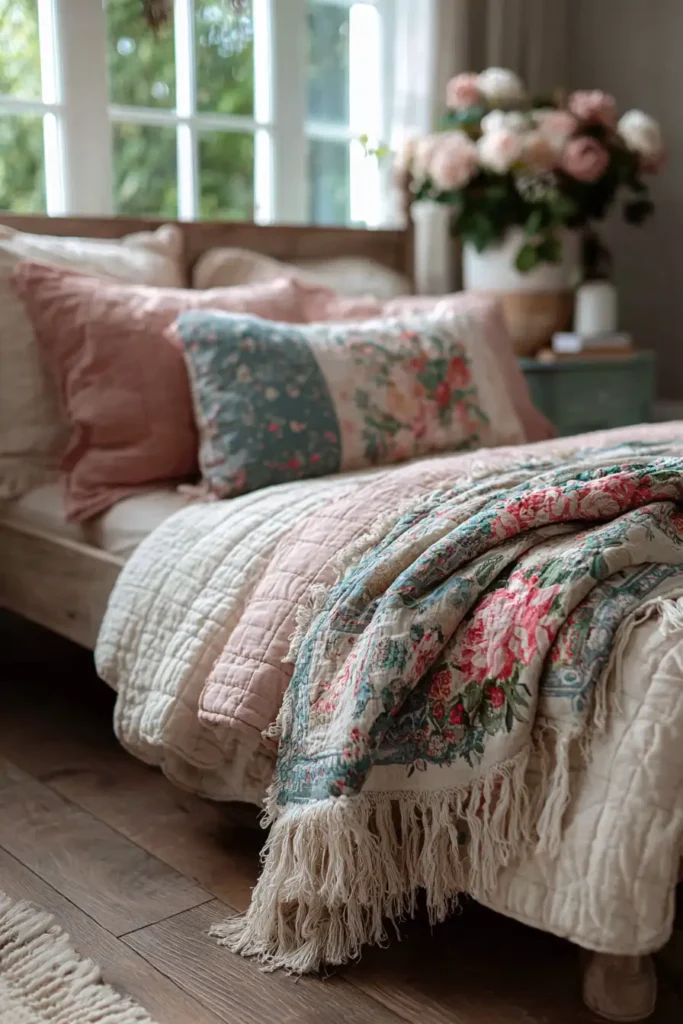
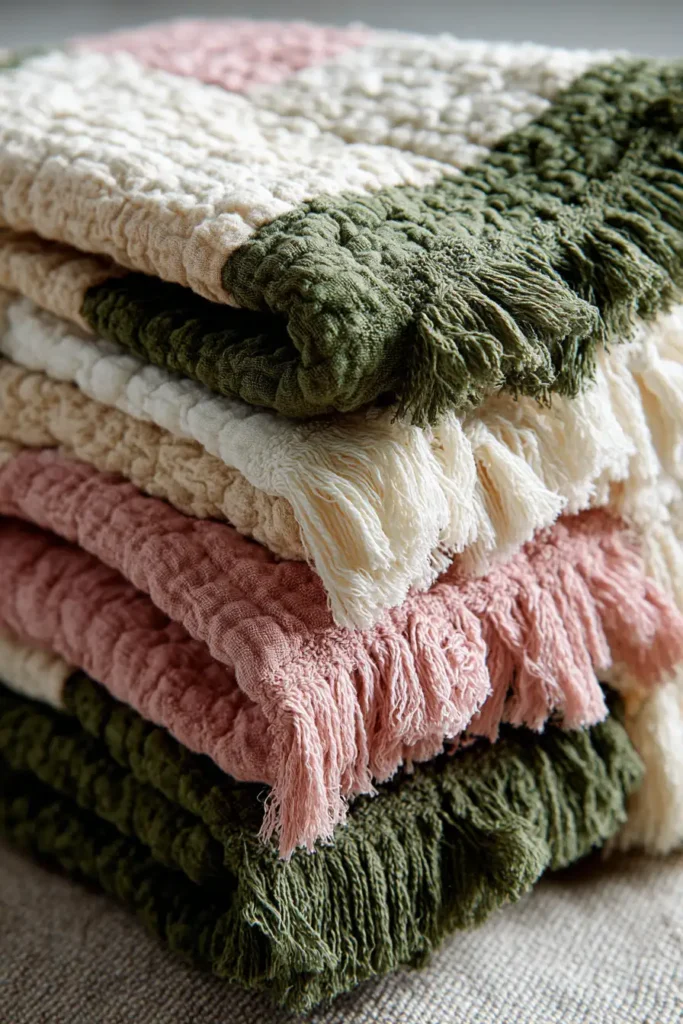
The “Nomad’s Tassel” Textured Bed Runner
The “Boho” aesthetic is all about texture, layering, and a relaxed, globetrotting vibe. While a full quilt with heavy fringe can be a laundry nightmare, a Bed Runner is the perfect canvas for dramatic embellishment. This pattern focuses on Texture Mixing—combining linen, velvet, and cotton in simple wide strips—and finishes with a dramatic Macramé or Tassel Fringe on the short ends. It instantly adds a layer of “cool girl” style to a plain white duvet.
Finished Dimensions: Bed Runner Size, 24″ x 80″ (Fits Twin, Full, or Queen).
Materials Needed:
- Fabric A (Texture 1): 1/2 yard of Natural Linen or Chambray.
- Fabric B (Texture 2): 1/2 yard of Velvet or Corduroy (in a rich color like Rust, Mustard, or Teal).
- Fabric C (Texture 3): 1/2 yard of a Tribal/Mudcloth Print.
- Backing: 2.5 yards of solid cotton.
- Fringe: 2.5 yards of Cotton Bullion Fringe or Jumbo Tassel Trim (natural cream color).
- Batting: Low-loft cotton (you want it to drape, not be stiff).
- Notions: Walking foot, heavy-duty needle (90/14).
Cultural Backstory: Fringe has been used in textiles for thousands of years, originally to prevent the raw edges of a woven rug from unraveling (the warp threads were tied into knots). In the Victorian era, it became decorative. In the 1970s “Bohemian” revival, fringe represented a rejection of stiff, tailored mid-century modernism in favor of something softer, messier, and more organic.
Step 1: Cutting the Texture Strips
We are creating a simple “Rail Fence” look, but running the length of the bed.
- Cut Strips: Cut your fabrics into long strips measuring 6.5 inches wide by the Width of Fabric (WOF) (usually 42″).
- Quantity: You need enough strips to reach a total length of 80 inches. Since fabric is only 40″ wide, you will need to sew two strips together end-to-end to create an 80″ long strip.
- Total: You need 4 long strips (6.5″ x 80″).
- Strip 1: Linen.
- Strip 2: Velvet.
- Strip 3: Tribal Print.
- Strip 4: Linen (repeat).
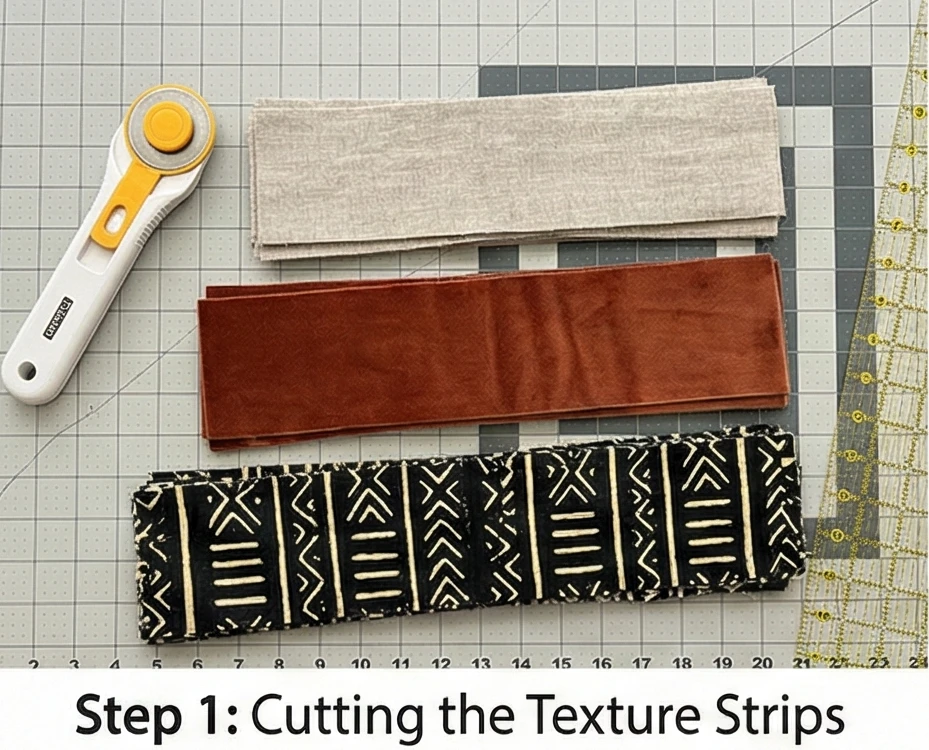
Step 2: Joining the Strips
Sewing different textures requires care.
- Pin heavily: Velvet creeps (moves) when sewn against cotton. Use plenty of pins.
- Sew: Stitch the 4 long strips together side-by-side to create a long panel measuring roughly 24.5″ x 80″.
- Pressing: Press seams away from the velvet (you can’t iron velvet efficiently without crushing the pile). Finger press if needed.
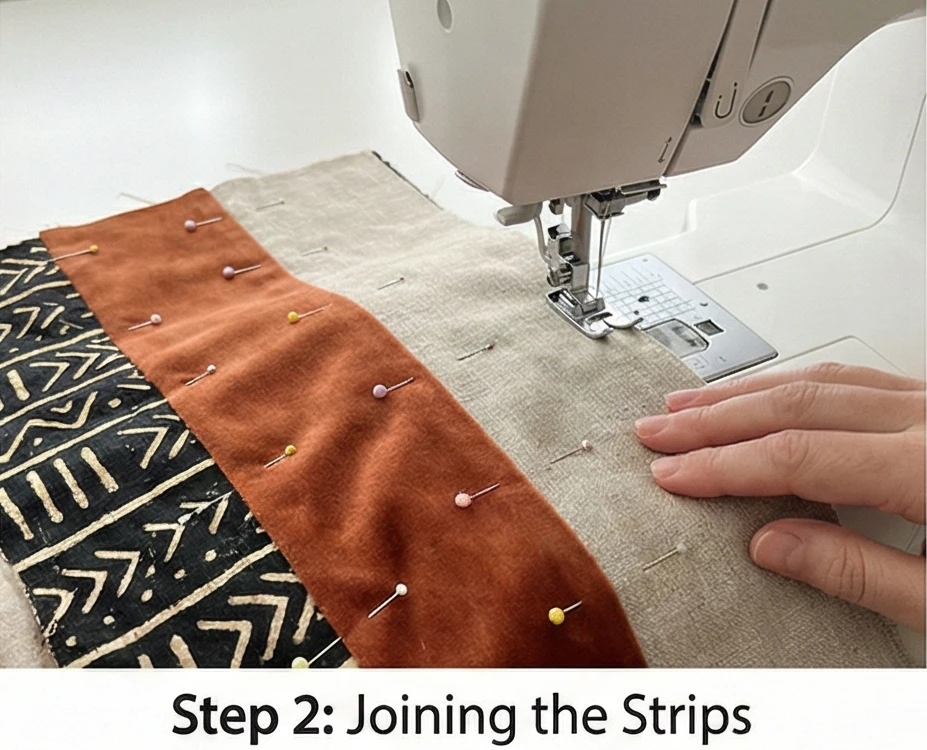
Step 3: Basting and Quilting
- Sandwich: Backing + Batting + Top.
- Quilt: Keep it minimal to let the textures shine.
- The Kantha Stitch: Using a contrasting thread (like sashiko thread or thick quilting thread), sew straight running stitches down the length of the linen strips.
- Skip the Velvet: Don’t quilt heavily over the velvet; let it stay puffy and plush.
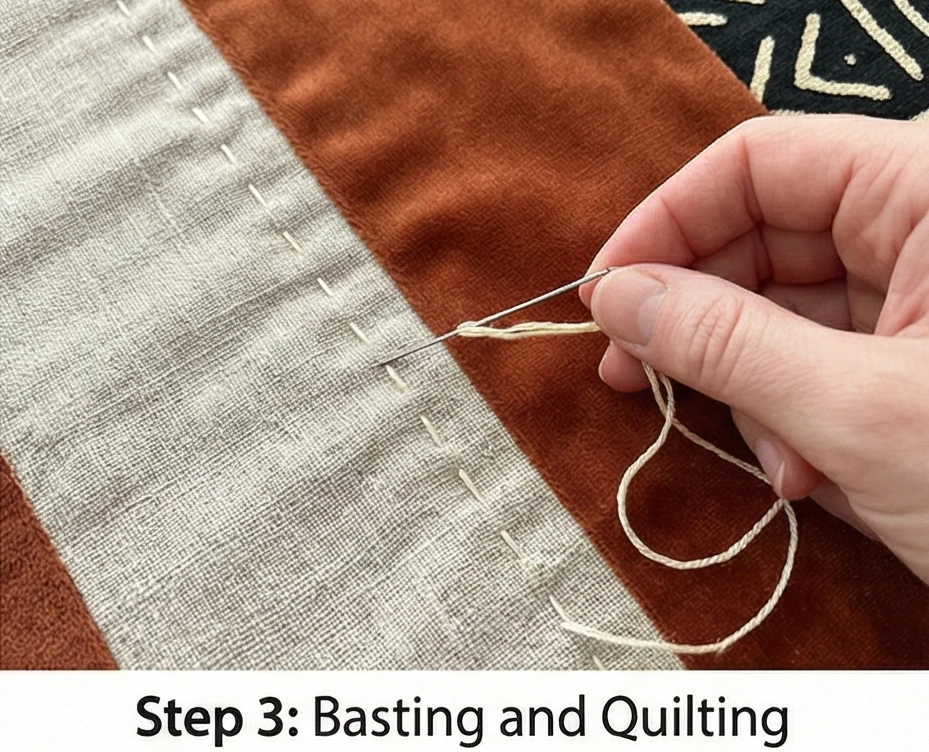
Step 4: Binding the Long Sides
We bind the long sides differently from the short sides.
- Long Sides (80″): Apply a standard fabric binding to the two long edges of the runner only. Leave the short ends raw for now.
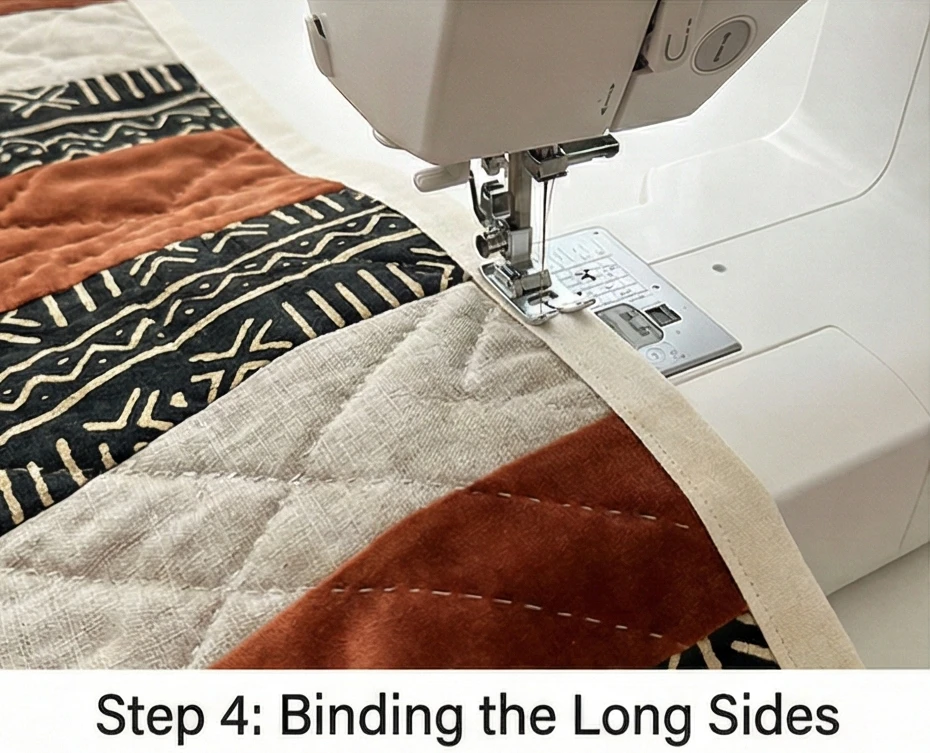
Step 5: Inserting the Fringe (The Short Ends)
This creates the professional “Rug” look.
- Prepare the Sandwich: At the short ends, trim the batting back by 1/2 inch so it’s shorter than the quilt top and backing.
- Insert: Place your Fringe Trim between the Quilt Top and the Backing (facing inward, so the tassels are sandwiched inside the quilt for now).
- Alignment: The “tape” or header of the fringe should align with the raw edge of the fabric.
- Sew: Stitch a heavy seam through all layers (Top + Fringe Header + Backing). Backstitch at the start and end.
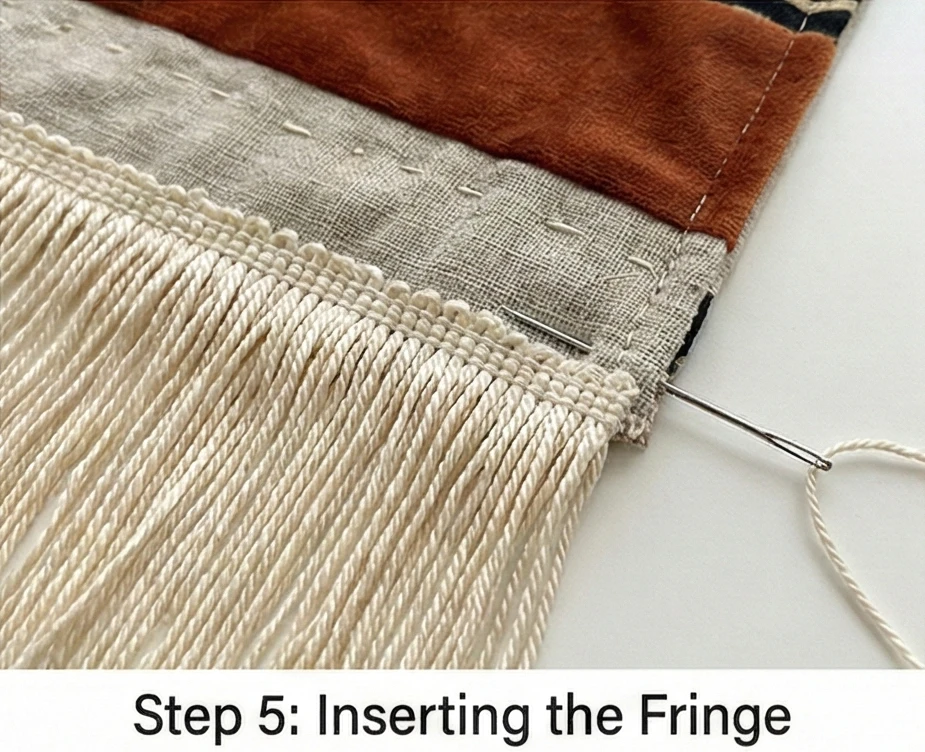
Step 6: The Reveal and Topstitch
- Turn: Flip the fringe outward.
- Topstitch: Press the quilt edge flat (careful of the fringe). Topstitch a line 1/4 inch from the edge to secure the fringe tape in place and close the opening nicely.
- Result: The tassels now hang freely from the ends of the runner like a Moroccan rug.
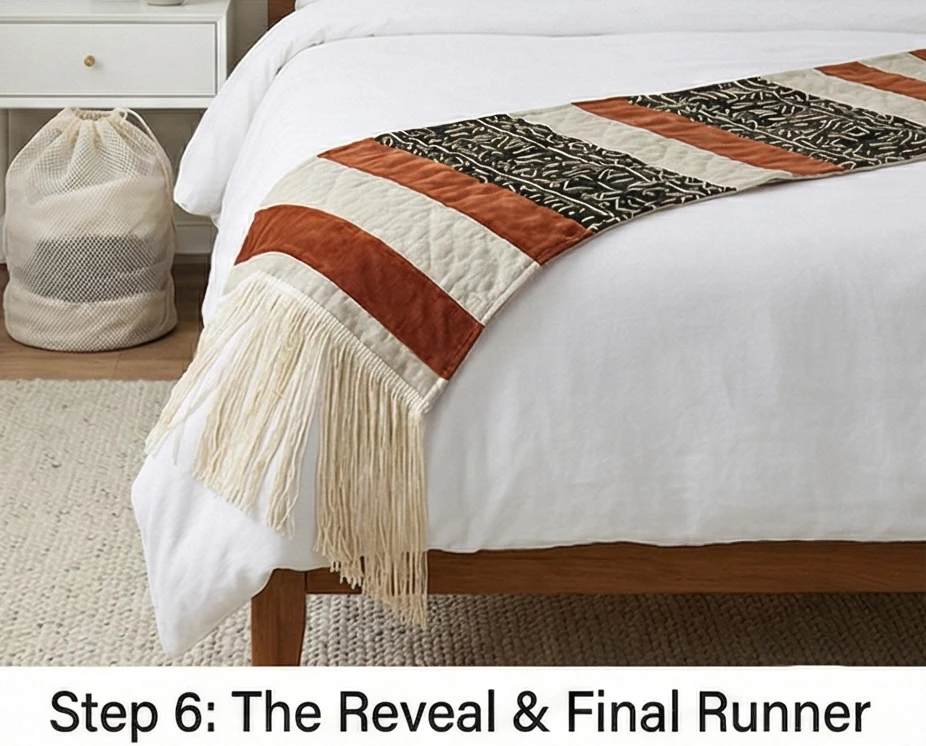
Usability Note: Always use a “Mesh Laundry Bag” when washing anything with fringe or tassels. If you throw this loose into the washing machine, the tassels will tangle into a giant knot that is impossible to undo. Wash on gentle/delicate cycle.
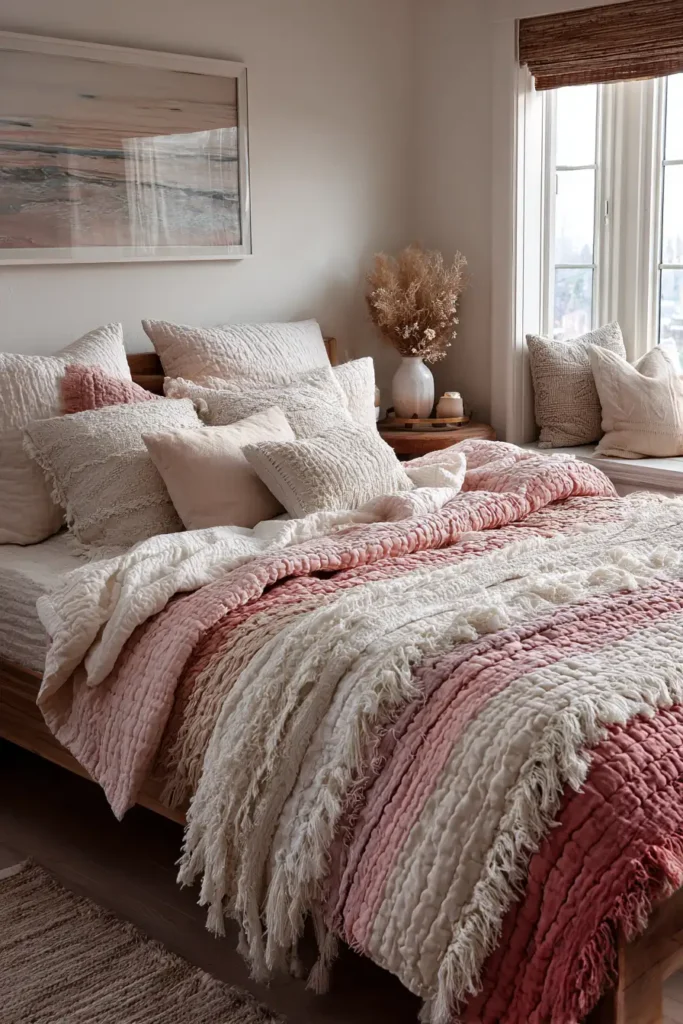
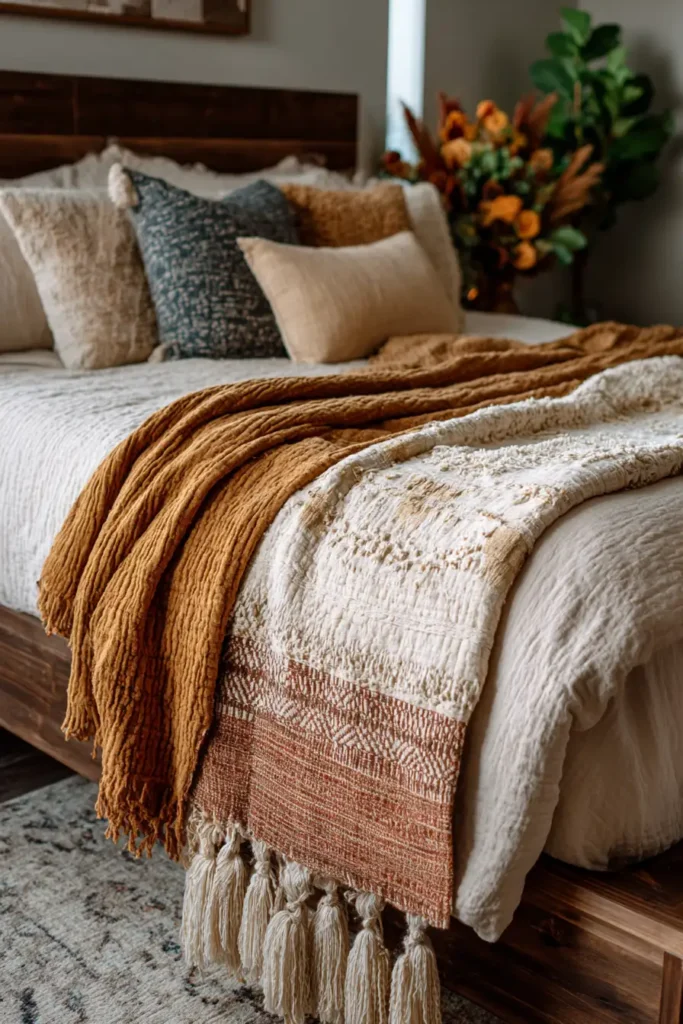
Conclusion
Incorporating these 20 Everyday Comfortable and Stylish Ideas into a girl’s bedroom creates a space as unique and dynamic as she is. Each project, whether it is the refined simplicity of Modern Geometric Quilt Designs or the nostalgic charm of Sweet Heart Patchwork, serves as a testament to her individuality. These quilts transform a standard bedroom into a personal haven; the Cozy Floral Quilt Patterns bring a touch of nature’s calm indoors, while Animal Print Ideas add a layer of bold confidence. They are not merely decorative items but functional art pieces that anchor the room’s decor and provide a constant, tangible sense of security and warmth.
The impact of these designs is felt in the daily moments of relaxation and creativity they inspire. A Decorative Cloud Pillow becomes the perfect companion for a Sunday afternoon of reading, while a Plush Minky-Backed Throw makes every sleepover feel like a luxury event. The variety of textures—from the tactile delight of Fun and Funky Rag Quilts to the smooth finish of Starry Night themes—ensures that comfort is always within reach. Even specific accents like Vibrant Scrappy Star Bed Runners or Bohemian Fringe details allow for quick style updates that keep the room feeling fresh without a complete overhaul.
Let this collection inspire you to create a keepsake that she will cherish through her formative years. By choosing a pattern that speaks to her interests—be it the magic of Whimsical Mermaid Scales or the maturity of Tropical Palm prints—you are investing in her well-being. These quilts stand as durable symbols of love, designed to withstand the rigors of everyday life while offering a soft, stylish landing place. They turn her room into a true sanctuary, reminding her every day that she is surrounded by comfort, creativity, and care.
