
20 Everyday Comfortable and Stylish Quilt Patterns for Boys: Cool & Durable Ideas
Finding the perfect Quilt Patterns for Boys can often feel like a challenge, as the quilting world is frequently dominated by florals and pastels. However, creating a handmade quilt for a growing boy is a unique opportunity to blend rugged durability with cool, modern style. This collection is dedicated to breaking the mold, offering “everyday comfortable” designs built to withstand pillow fights, fort building, and years of wash-and-wear. Whether you are a parent looking to update a bedroom or a grandparent seeking a meaningful gift that won’t be outgrown in a year, these ideas prioritize themes that boys genuinely love—from the adventurous spirit of Outer Space and Rocket Ships to the timeless appeal of Upcycled Blue Jean Denim.
Quilt Patterns for Boys
Contents
- 1 Quilt Patterns for Boys
- 2 1. Upcycled Blue Jean Denim Quilt Patterns for Durable Boys’ Bedding
- 3 2. Modern Geometric Triangle Quilt Patterns for Teen Boys
- 4 3. Outer Space and Rocket Ship Quilt Patterns for Future Astronauts
- 5 4. Rugged Flannel Rag Quilt Patterns for Active Boys
- 6 5. All-Star Sports Theme Quilt Patterns for Little Athletes
- 7 6. Retro Video Game Pixel Quilt Designs for Gamer Bedrooms
- 8 7. Dinosaur Roar Quilt Patterns for Adventurous Boys’ Rooms
- 9 8. Nautical & Pirate Themed Bedding Sets for Coastal Rooms
- 10 9. Woodland Bear and Mountain Quilt Themes for Nature Lovers
- 11 10. Memory T-Shirt Quilt Ideas: The Perfect Grandparent Gift
- 12 11. Cool Camouflage Patchwork Quilt Ideas for Hideout Forts
- 13 12. Transportation Quilt Designs: Trucks, Trains, and Planes
- 14 13. Stylish Race Car Quilt Designs for Boys’ Bed Throws
- 15 14. Ultra-Soft Minky-Backed Quilt Throws for Movie Nights
- 16 15. Cozy Plaid Patchwork Pillow Covers for Boys’ Reading Nooks
- 17 16. Electric Guitar and Music Note Quilts for Teen Rockstars
- 18 17. Cool Ninja Warrior Quilt Patterns for Boys’ Pillow Accents
- 19 18. Modern Robot Quilt Ideas for Comfortable Pillow Covers
- 20 19. Everyday Adventure Map Quilt Ideas for Stylish Bed Covers
- 21 20. Comfortable Soccer Star Quilt Patterns for Pillow Covers
- 22 Conclusion
The beauty of these patterns lies in their ability to transition with a boy as he grows from a playful child into a stylish teen. We explore designs that cater to specific passions, such as Retro Video Game Pixel Art for gamers and All-Star Sports Themes for young athletes, ensuring the quilt feels personal and relevant. For the older demographic (ages 5-15), the focus shifts to sophistication; Modern Geometric Triangle patterns and Minimalist Black and White Grid designs offer a mature aesthetic that fits perfectly in a “cool” teen room. These quilts serve as the anchor for the room’s decor, providing a stylish focal point that is both functional and visually striking.
Beyond just looking good, these quilts are designed for the reality of life with boys. We emphasize cozy textures and sturdy construction, highlighting Rugged Flannel Rag Quilts for warmth and Ultra-Soft Minky-Backed Throws for movie marathons. The collection also touches on the sentimental value of crafting, featuring Memory T-Shirt Quilt Ideas that turn outgrown jerseys and camp shirts into treasured keepsakes. By combining practical materials with imaginative themes like Dinosaur Roar or Everyday Adventure Maps, you can create a bed cover that is not just a blanket, but a durable companion for all of life’s daily adventures.
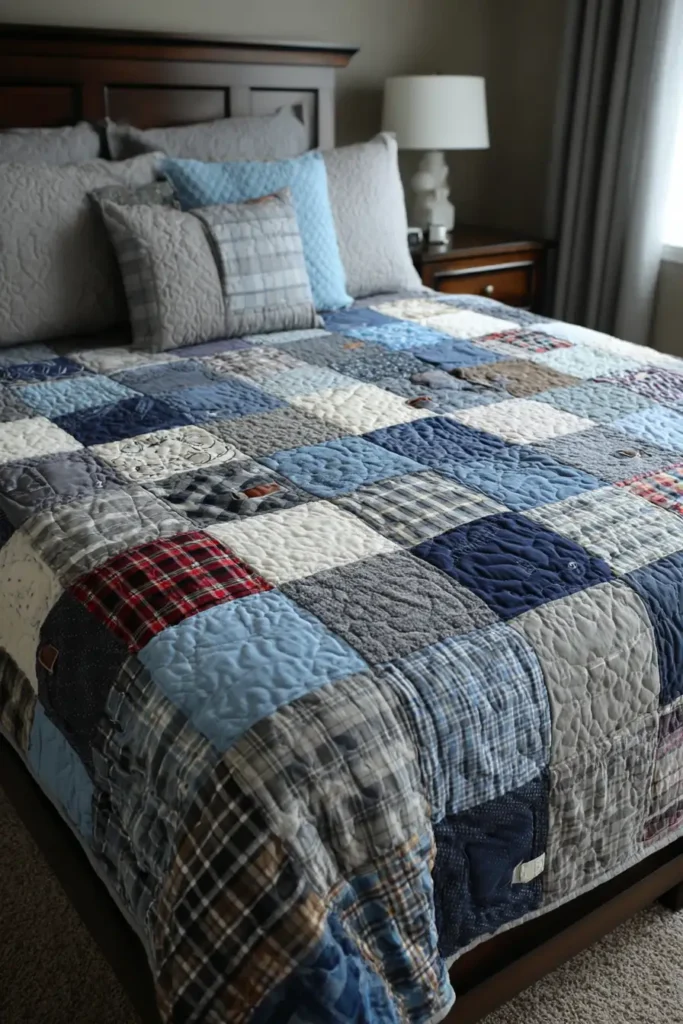
1. Upcycled Blue Jean Denim Quilt Patterns for Durable Boys’ Bedding
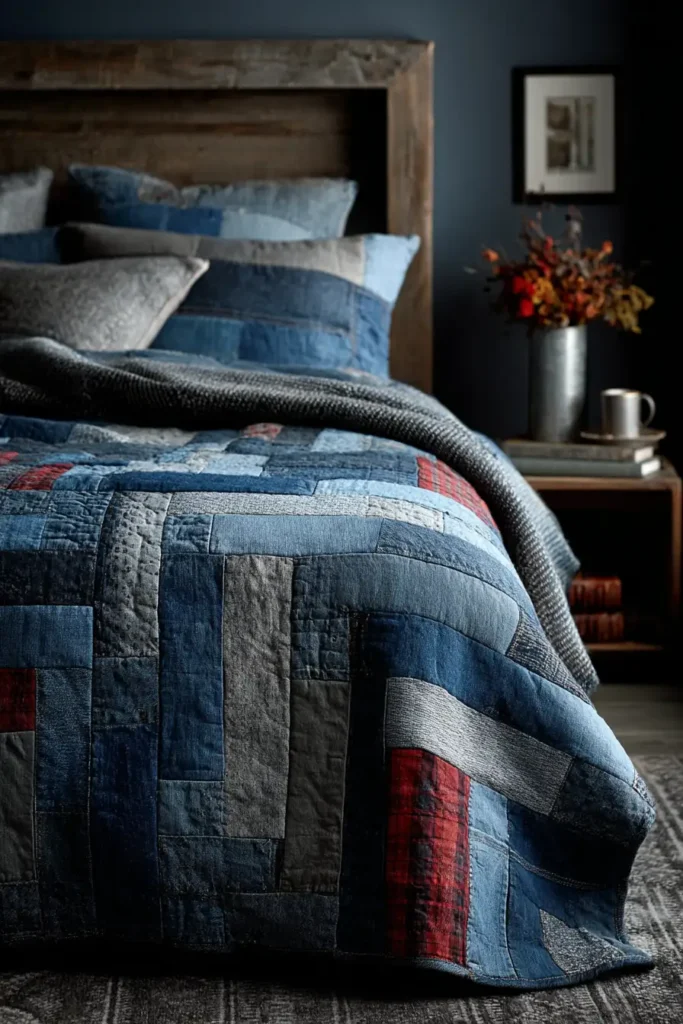
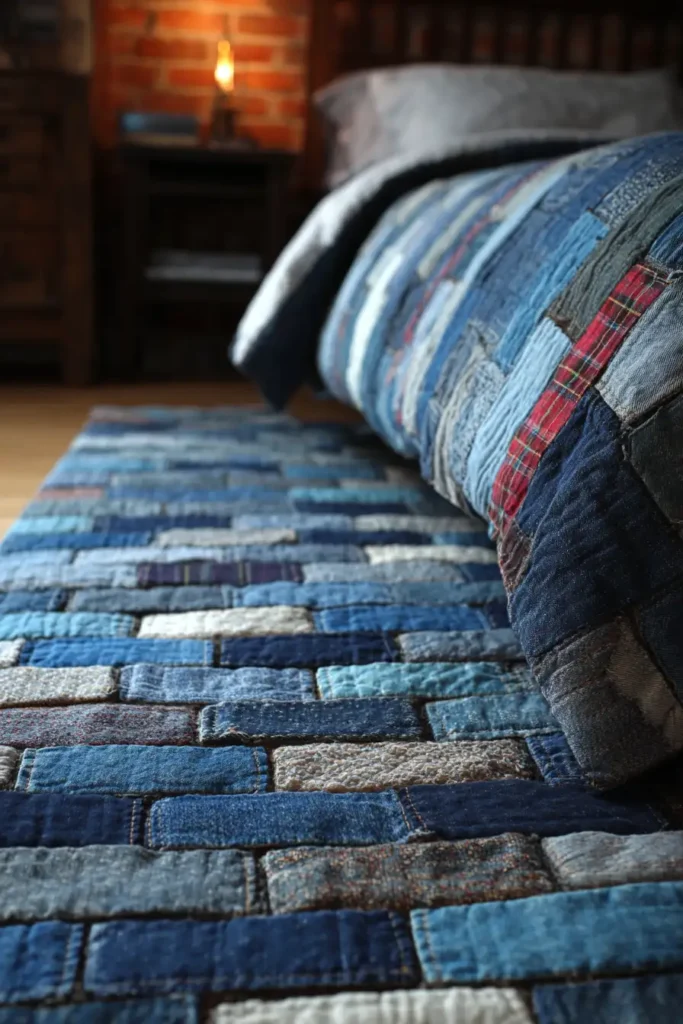
The “Blue Jean Brick Road” Upcycled Denim Quilt
For a boy’s room, durability is often the number one priority. A denim quilt is virtually indestructible—it can survive pillow fights, being dragged across the floor, and muddy dog paws. But “durable” doesn’t have to mean “rough.” The “Blue Jean Brick Road” features a classic staggered brick pattern, creating a textured, indigo gradient that resembles an industrial loft floor. By backing it with ultra-soft Flannel, you create a blanket that is rugged on the outside but cozy on the inside.
Finished Dimensions: Twin Bed Size, 60″ x 84″.
Materials Needed:
- Fabric A (The Denim): 10-15 pairs of old adult jeans. (Ask family for donations or hit the thrift store. Look for varying shades: dark wash, stonewash, and black).
- Fabric B (Backing): 5 yards of Plaid Flannel (Red/Black Buffalo Check looks great).
- Batting: Optional. Denim is heavy. For a summer quilt, skip the batting (the flannel is enough). For winter, use a thin bamboo batting.
- Notions: Denim Needles (Size 100/16 or 110/18), heavy-duty thread (grey or gold), rotary cutter with a fresh blade.
Cultural Backstory: Denim was patented by Levi Strauss in 1873 as a utility fabric for Gold Rush miners who needed pants that wouldn’t rip. Over the last century, it evolved from workwear to a symbol of teenage rebellion (James Dean) to everyday fashion. A denim quilt inherits that history—it starts stiff but breaks in and fades beautifully over time, just like a favorite pair of jeans.
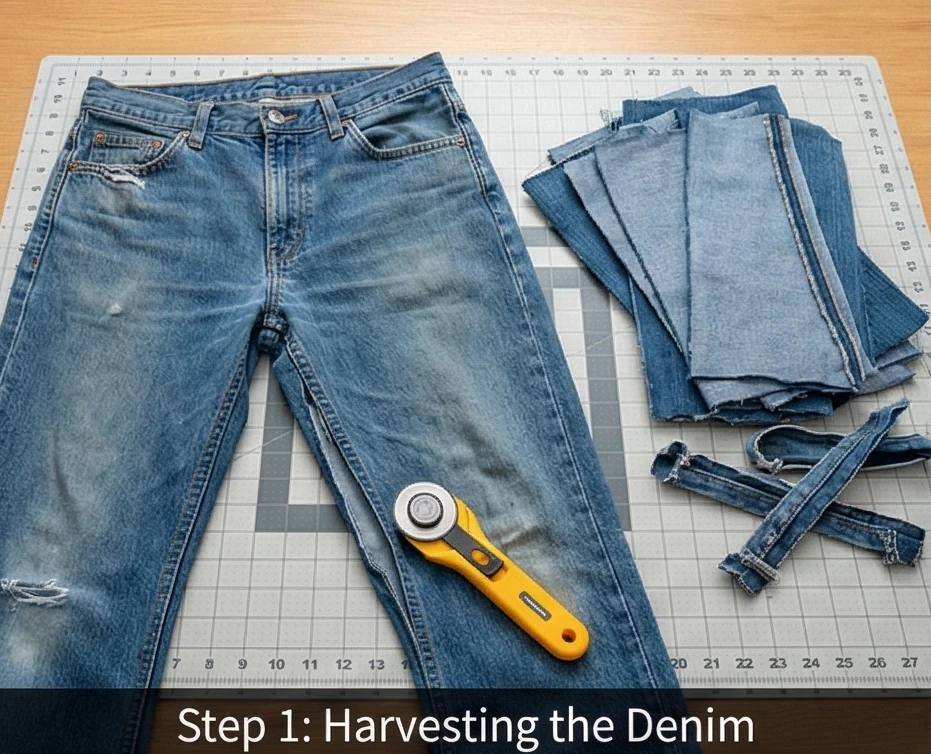
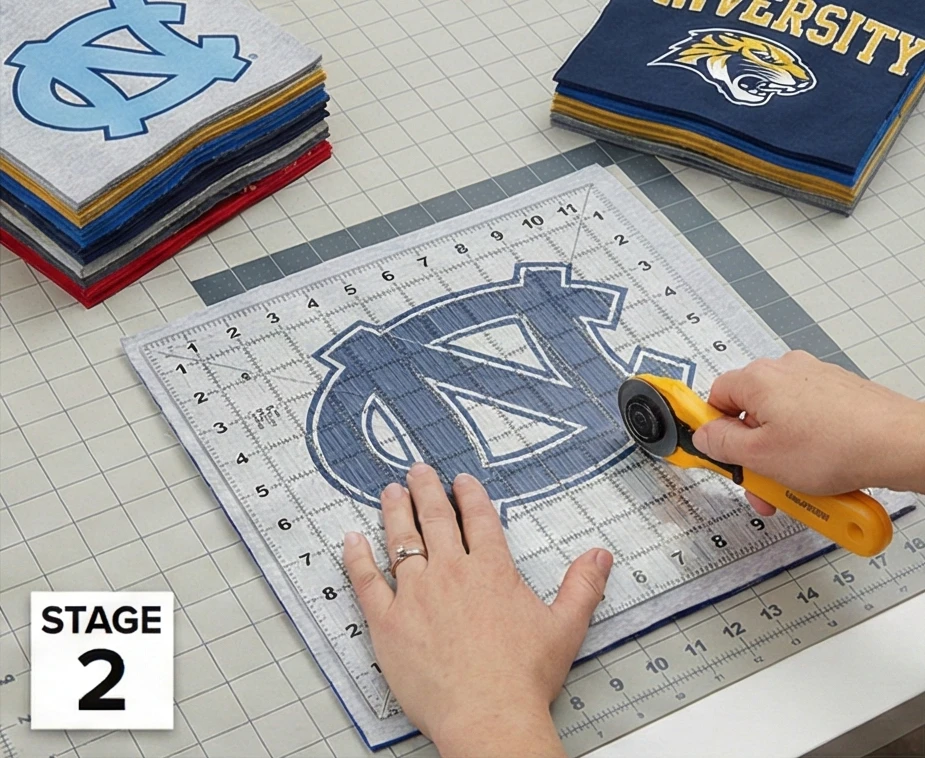
Step 1: Harvesting the Denim
This is the labor-intensive part. Turn on some music.
- Deconstruct: Cut the legs off the jeans. Cut open the inner leg seam to lay the fabric flat.
- Avoid Bulk: Cut away and discard the thick side seams (flat-felled seams), the hems, the fly, and the waistbands. You only want the flat, usable fabric from the legs and seat.
- Save: Save one or two Back Pockets if you want to add a “secret storage” spot to the quilt later.
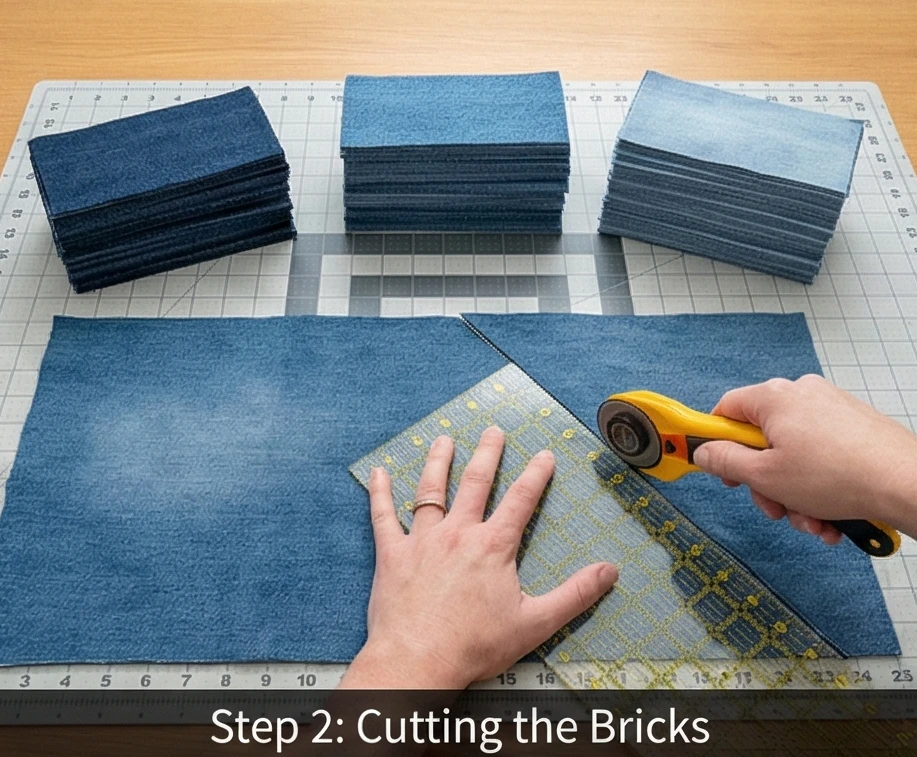
Step 2: Cutting the Bricks
We use a brick shape because it wastes less fabric than squares.
- Cut: Cut the denim into uniform rectangles measuring 4.5″ x 8.5″.
- Quantity: You will need roughly 150 bricks for a twin-size.
- Sort: Separate them into three piles: Dark Wash, Medium Wash, and Light Wash.
Step 3: The “Ombré” Layout
Random is fine, but a gradient is stylish.
- Floor Layout: Arrange the bricks in a Running Bond pattern (like a brick wall), where the vertical seams of one row align with the center of the bricks in the next row.
- Gradient Design: Start with the Dark Wash bricks at the bottom of the quilt (the foot of the bed). Transition to Medium Wash in the middle. Finish with Light/Bleached Wash at the top (near the pillow).
- The Secret Pocket: If you saved a pocket, sew it onto one of the bricks near the top edge before assembling. This is perfect for holding a flashlight or a small toy.

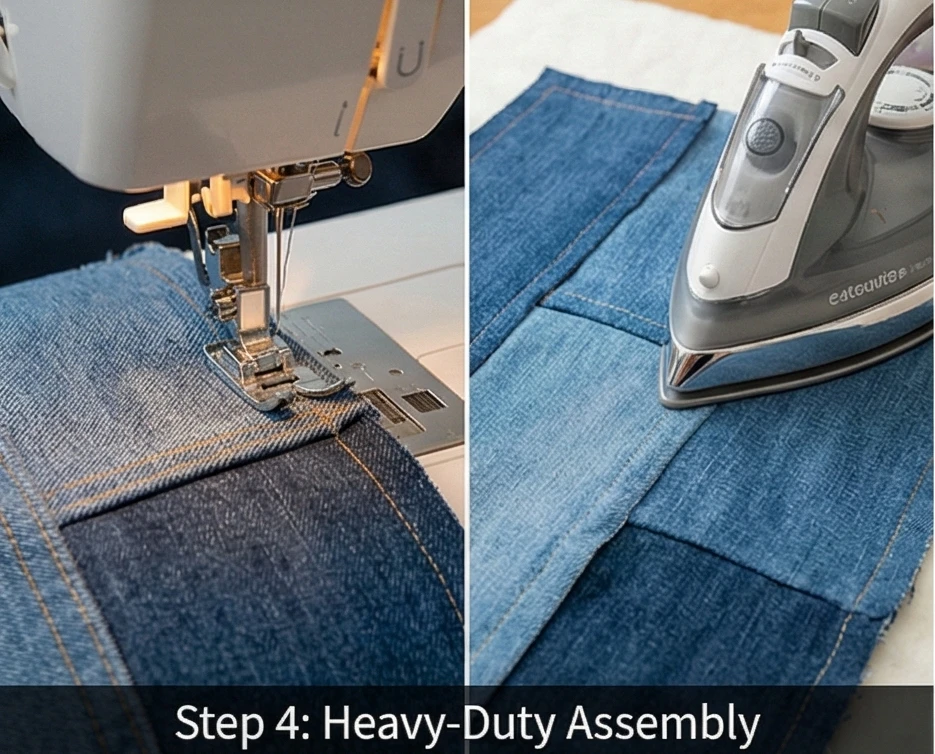
Step 4: Heavy-Duty Assembly
Denim requires respect. Do not rush.
- Needle Check: Install your Denim Needle (100/16). Use a longer stitch length (3.0mm) to prevent the thread from snapping.
- Sew Rows: Stitch the bricks into horizontal rows first.
- Pressing: You MUST press the seams open. If you press them to the side, the layers will be too thick for your machine to sew over later. Use steam and a heavy hand (or a wooden clapper) to flatten them.
- Join Rows: Sew the rows together. When crossing a seam, go slow.
Step 5: Tying the Quilt (Recommended)
Machine quilting thick denim can be a nightmare on a home machine. “Tying” is a classic, rugged alternative.
- Layer: Tape down your backing (flannel), lay down batting (optional), and place the Denim Top on top.
- Tie: Using Perle Cotton or Wool Yarn and a sharp embroidery needle, make a small stitch through all three layers at the center of every other brick.
- Knot: Tie the yarn in a square knot on the denim side. Trim the tails to 1 inch.
- Look: This creates a grid of small tufts that looks masculine and handmade.

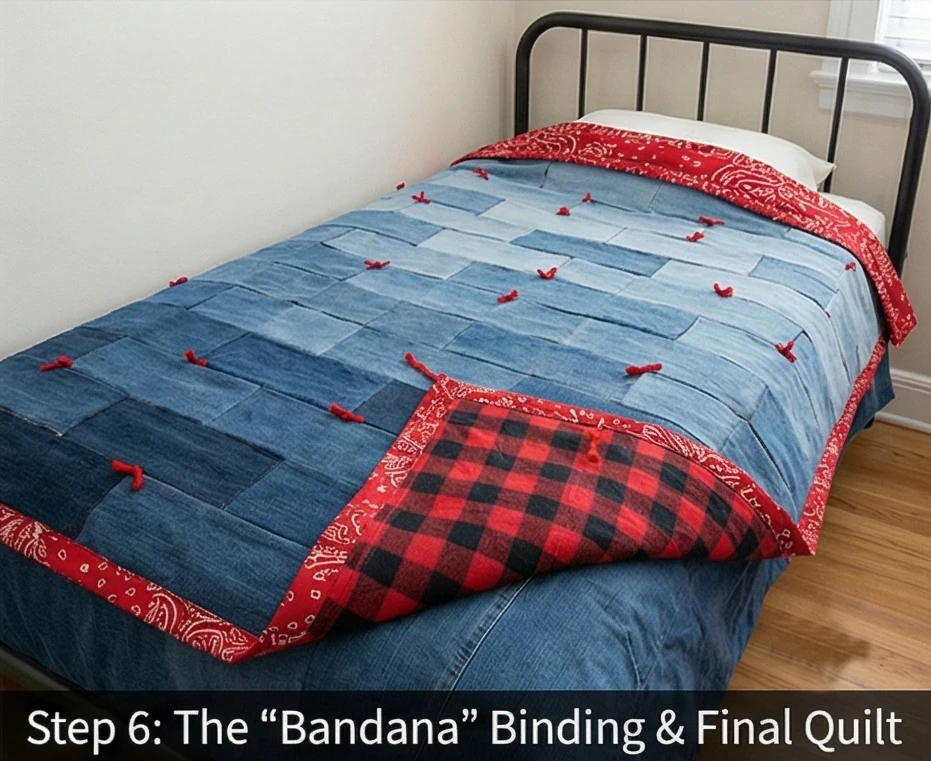
Step 6: The “Bandana” Binding
Denim binding is too thick. Use a contrasting cotton.
- Fabric: Use a Red Bandana Print or a Navy Cotton for the binding.
- Attach: Machine sew the binding to the front and hand-stitch (or machine finish) to the back.
- Note: The pop of red binding against the blue denim gives a classic “Americana” vibe.
Usability Note: This quilt is heavy—literally. It acts like a weighted blanket, which can be very soothing for sleep. However, because it is heavy when wet, it may require an additional spin cycle in the washer and take longer to dry.
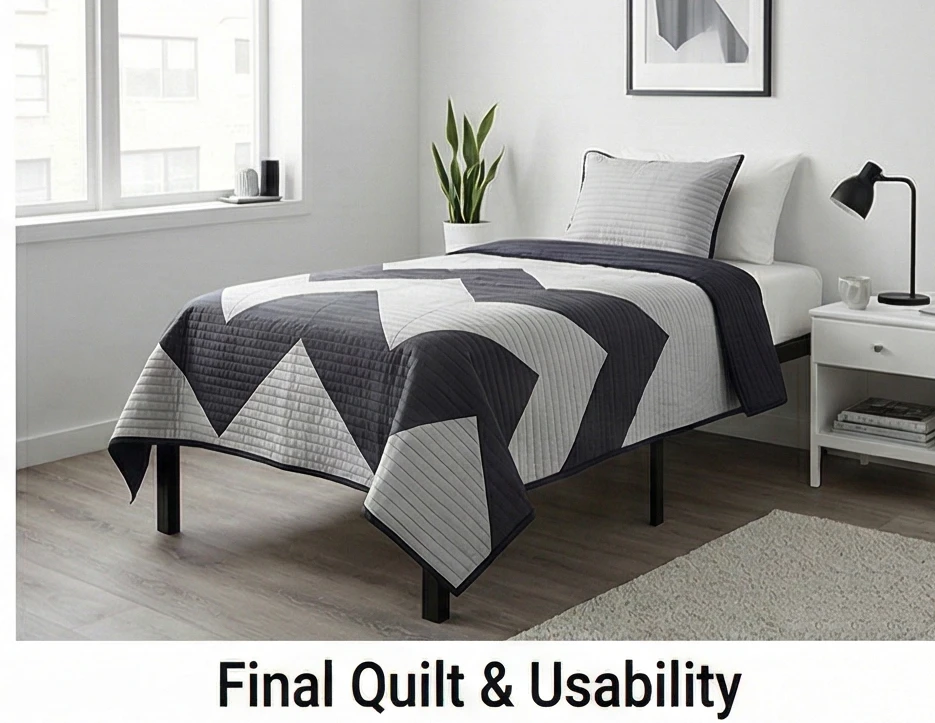
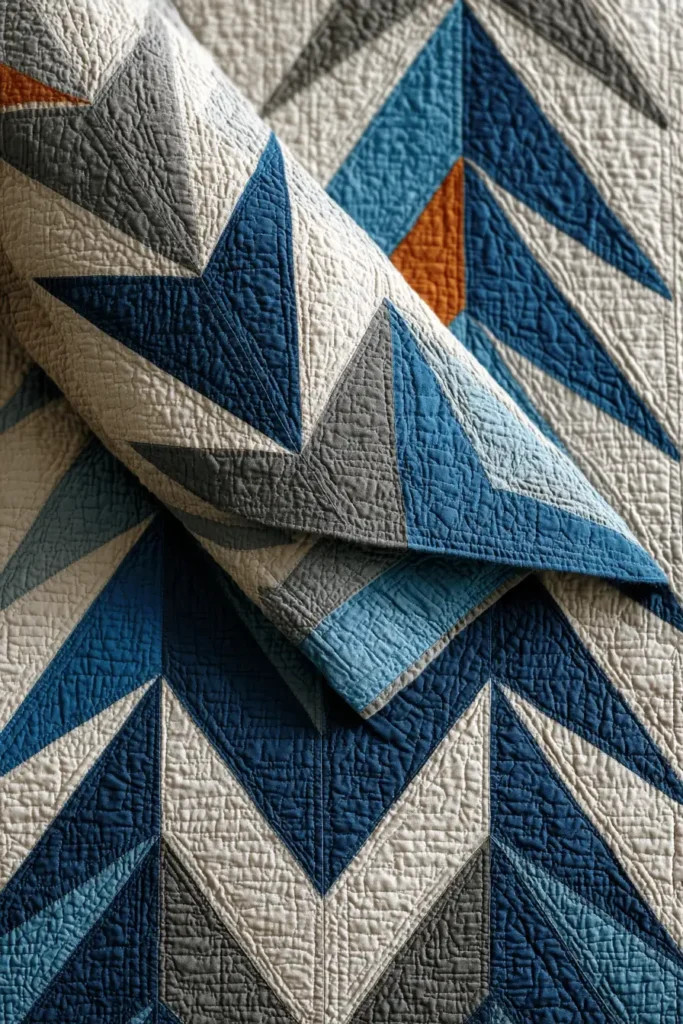
2. Modern Geometric Triangle Quilt Patterns for Teen Boys

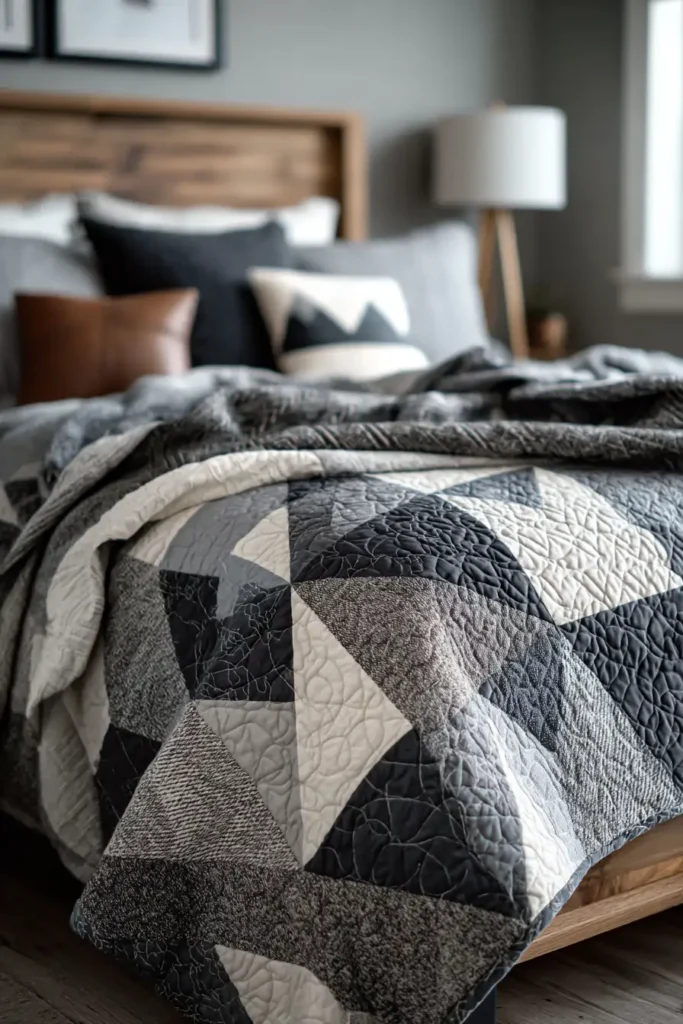
The “Summit” Monochrome Chevron Quilt
Teen boys often gravitate toward graphic, minimalist, high-contrast designs. They tend to dislike “clutter.” The “Summit” quilt uses giant Half-Square Triangles (HSTs) arranged in a bold Chevron (Zig-Zag) pattern. By sticking to a strict palette of Charcoal, Silver Grey, and White (or perhaps a single pop of their favorite color like Orange or Cobalt), you create a design that feels architectural and mature—perfect for a high school bedroom or a college dorm.
Finished Dimensions: Twin XL (Dorm Ready), 70″ x 90″.
Materials Needed:
- Fabric A (Dark/Mountain): 3 yards of Charcoal or Navy Solid.
- Fabric B (Light/Sky): 3 yards of Silver Grey or White.
- Backing: 5.5 yards of a geometric print or wide-back flannel.
- Batting: 100% Cotton (low loft) for a flat, modern look.
- Notions: Rotary cutter, large square ruler (12.5″ is best).
Cultural Backstory: The Chevron motif is among the oldest in human history, appearing on pottery from 1800 BC at Knossos, Crete. It saw a massive resurgence during the Art Deco movement of the 1920s (representing the speed of the machine age) and again in the 1970s with the fashion house Missoni. In heraldry, the chevron represents the “roof of a house” and signifies protection and faithful service.
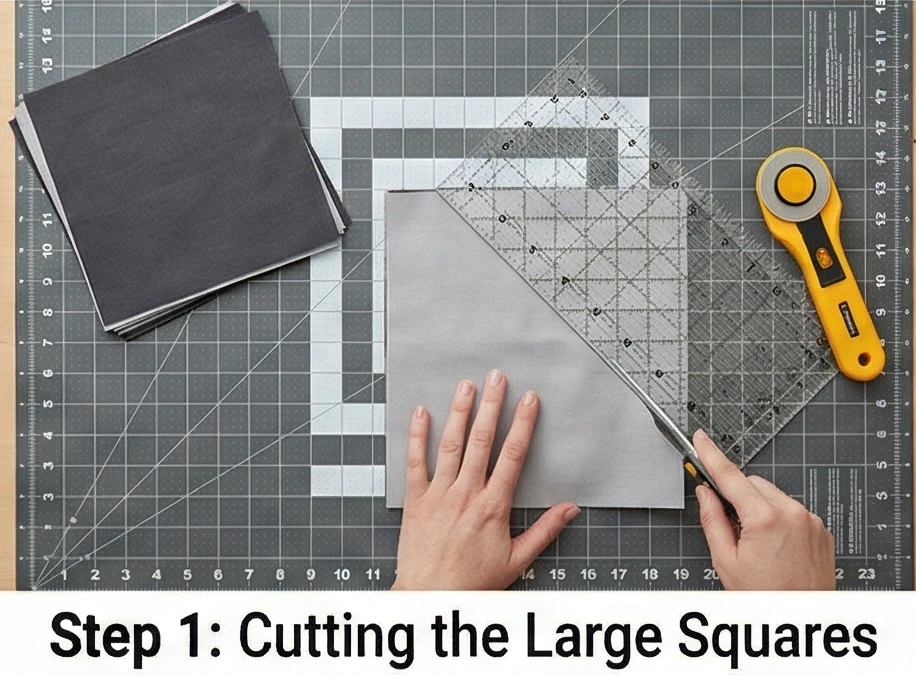
Step 1: Cutting the Large Squares
We are using large blocks to create the quilt graphic and to speed up assembly.
- Cut Dark Squares: Cut 35 squares of Fabric A measuring 10″ x 10″.
- Cut Light Squares: Cut 35 squares of Fabric B measuring 10″ x 10″.
- Note: Using 10-inch squares (often sold as “Layer Cakes”) minimizes cutting time.
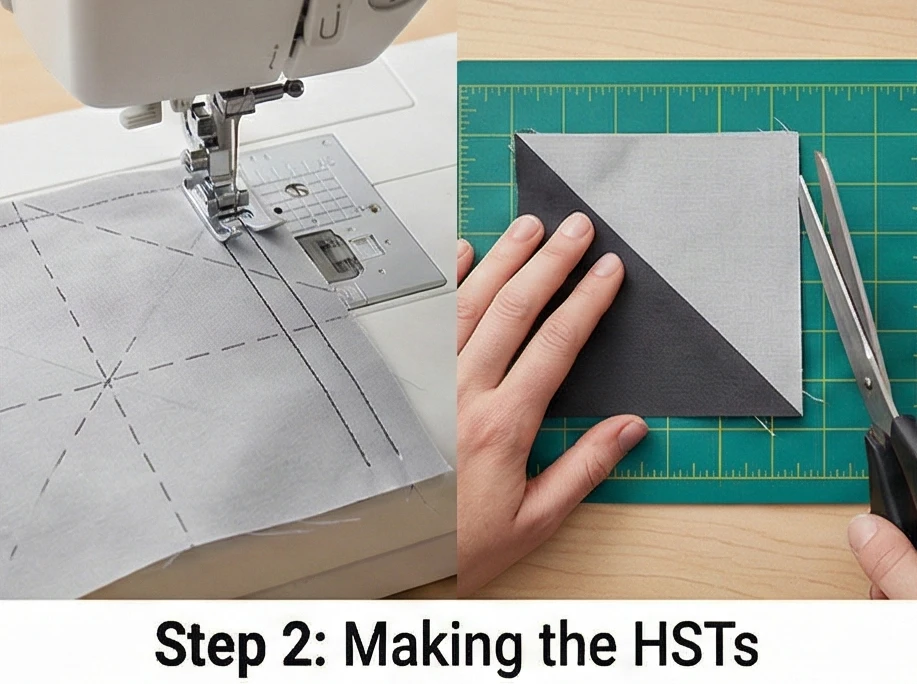
Step 2: Making the HSTs (Half-Square Triangles)
The 2-at-a-time method.
- Mark: Draw a diagonal line on the back of every Light Square.
- Pair: Place a Light Square on top of a Dark Square (Right Sides Together).
- Sew: Stitch a line 1/4 inch away from the drawn center line on both sides.
- Cut: Cut directly along the drawn center line.
- Yield: You now have 2 HST units per pair.
- Total: You need 70 HSTs.
- Press: Press the seam toward the Dark fabric.
- Trim: Trim every HST block to exactly 9.5″ x 9.5″.
- Crucial Step: Do not skip trimming. If the blocks aren’t perfectly square, your chevrons will be crooked.
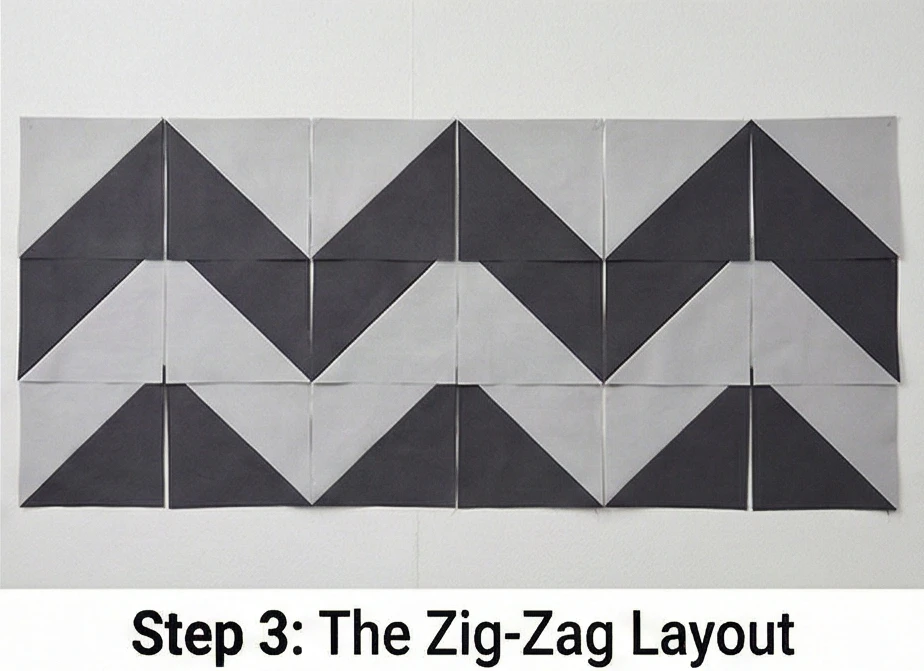
Step 3: The Zig-Zag Layout
Orientation is everything.
- Grid: Plan for a grid of 7 blocks wide by 10 blocks long.
- Row 1: Arrange blocks so the diagonal seams form a “V” shape (Down, Up, Down, Up…).
- Block 1: Dark triangle on Bottom Right.
- Block 2: Dark triangle on Bottom Left.
- Block 3: Dark triangle on Bottom Right.
- …and so on.
- Row 2: Arrange this row to mirror the first row, creating the top half of the “Mountain.”
- Block 1: Dark triangle on Top Right.
- Block 2: Dark triangle on Top Left.
- Visual Check: When you look at Row 1 and Row 2 together, the dark triangles should form a large “V” or mountain peak.
Step 4: Row Construction
- Sew: Stitch the blocks into horizontal rows.
- Pressing:
- Odd Rows: Press seams to the Left.
- Even Rows: Press seams to the Right.
- Why: This allows the seams to “nest” (lock together) when you join the rows, ensuring sharp points at the top of your chevrons.
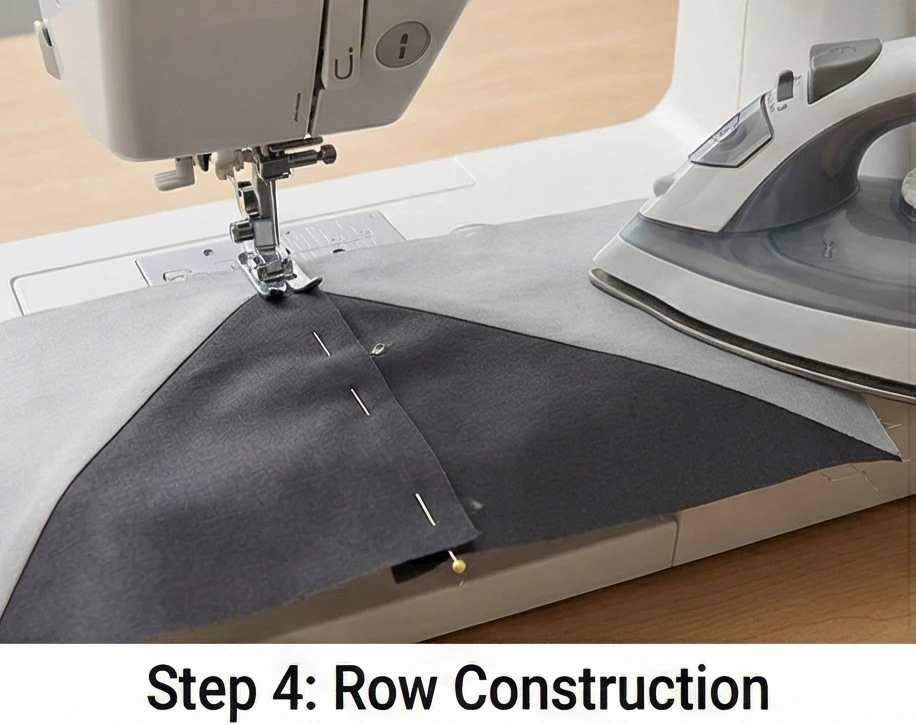
Step 5: Joining the Rows
- Pin: Pin Row 1 to Row 2. Pay special attention to the intersections where the points meet. Stick a pin right through the point to check alignment.
- Sew: Stitch the rows together.
- Tip: Don’t pull on the fabric. HSTs are cut on the bias (diagonal grain) and can stretch into a wavy mess if you tug them.
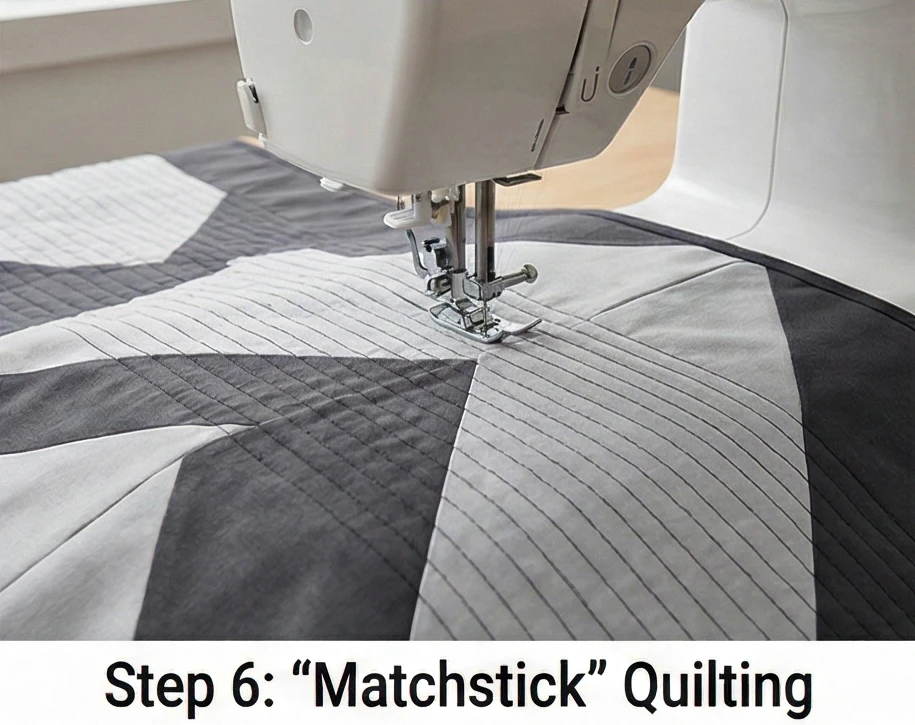
Step 6: “Matchstick” Quilting
Modern quilts look best with dense, straight-line quilting.
- Baste: Sandwich layers.
- Quilt: Use a walking foot to stitch straight lines across the entire quilt horizontally (left to right).
- Spacing: Space the lines about 1/2 inch to 1 inch apart.
- Effect: This “Matchstick” quilting makes the quilt durable and dense, giving it a very high-end, store-bought texture. It looks crisp and tailored, which suits the teen boy aesthetic perfectly.
Step 7: Binding
- Finish: Bind with the Dark Fabric (Charcoal). A dark frame contains the design and hides dirt on the edge.
Usability Note: The “Twin XL” dimensions (90 inches long) are specifically designed for college dorm beds, which are longer than standard home twins. Making this size ensures the quilt remains useful when he moves out for university.
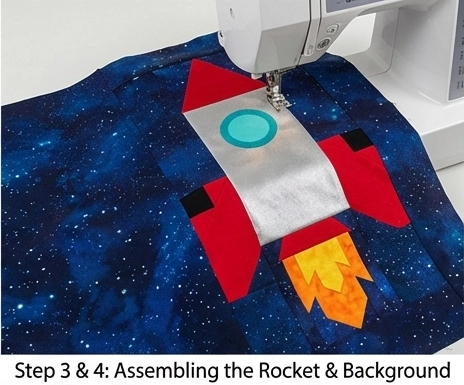
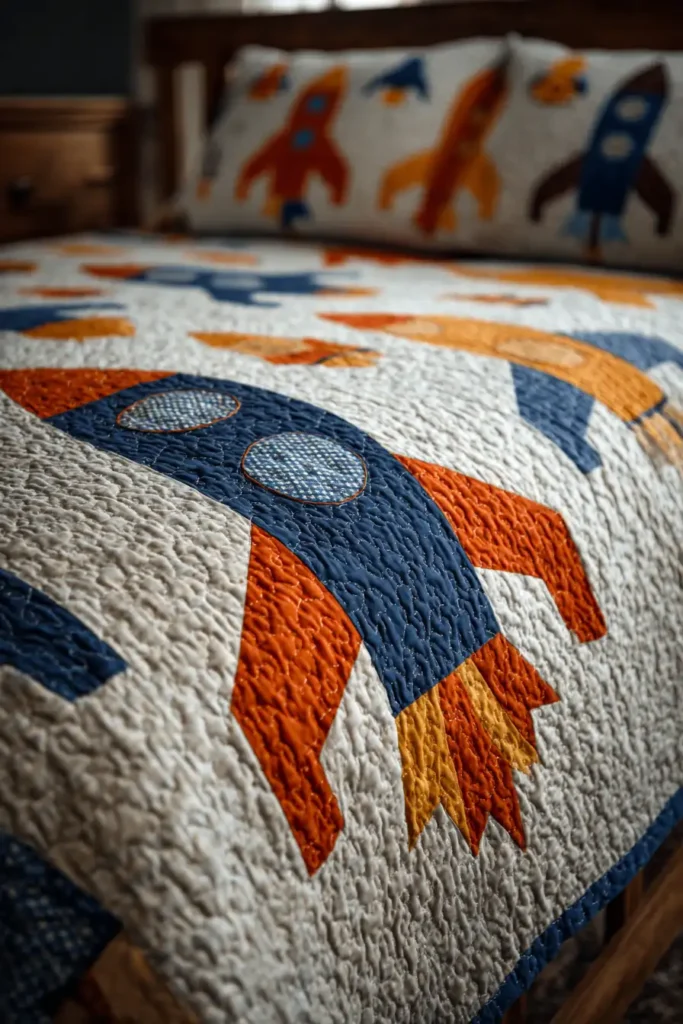
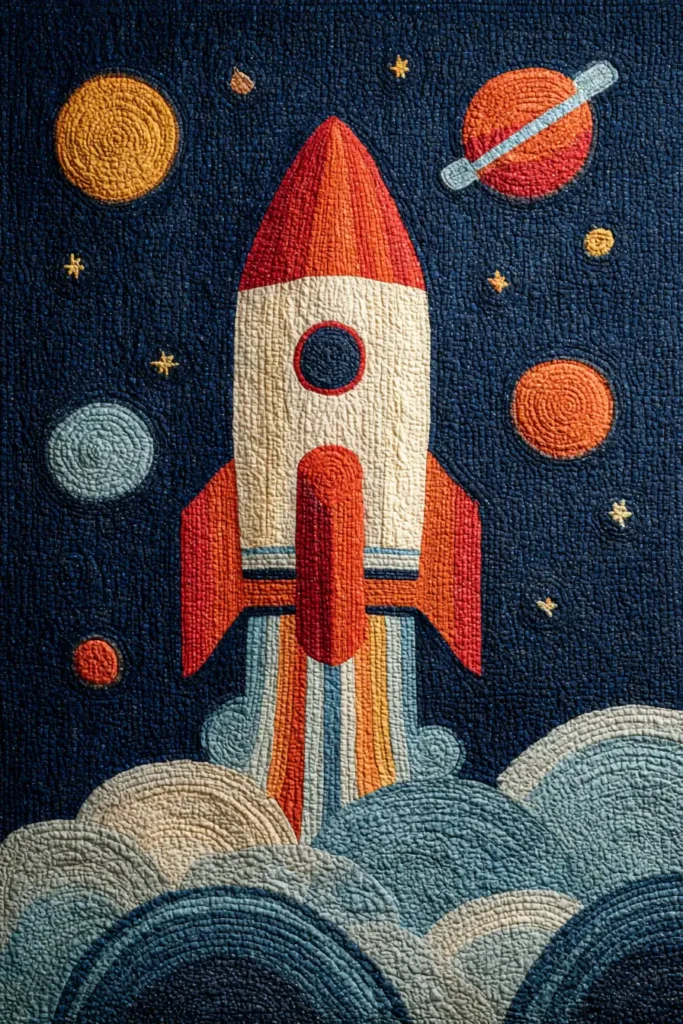
3. Outer Space and Rocket Ship Quilt Patterns for Future Astronauts
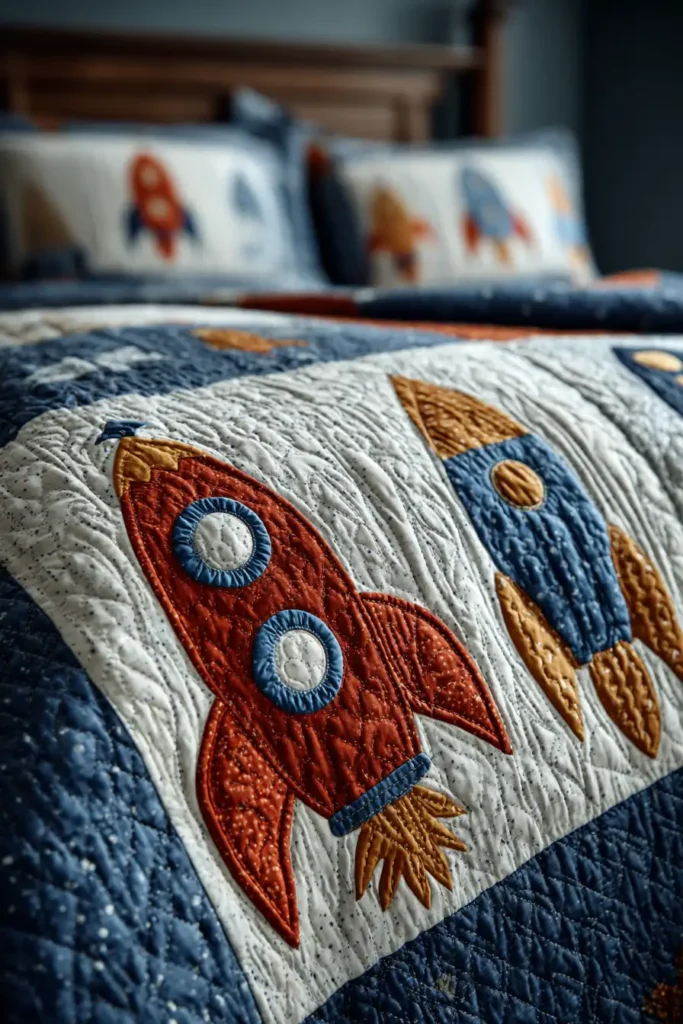
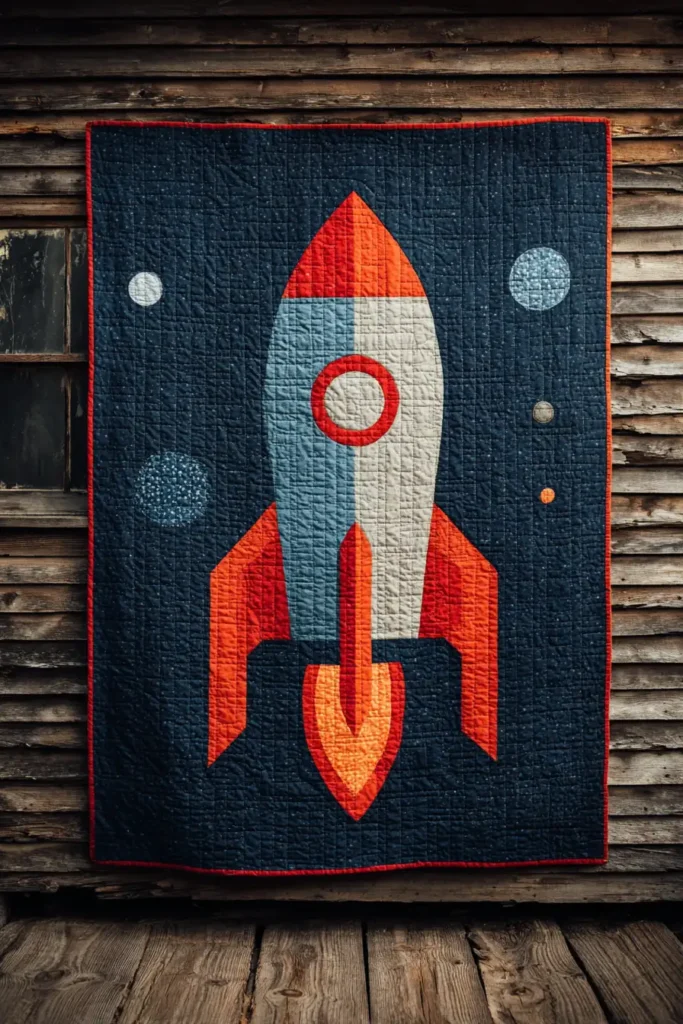
The “Stellar Voyager” Rocket & Planet Quilt
Space themes are a staple for boys’ rooms, but they often rely on busy novelty prints that a child might outgrow by age 10. The “Stellar Voyager” pattern takes a more timeless approach. It features a single, large-scale Pieced Rocket Ship (no complex paper piecing required) soaring through a field of Improv Stars and Appliqué Planets. Set against a background of deep Midnight Blue or Charcoal, the bright rocket stands out, creating a modern graphic look that works just as well for a 16-year-old sci-fi fan as it does for a 6-year-old dreamer.
Finished Dimensions: Twin Bed Size, 64″ x 88″.
Materials Needed:
- Fabric A (Deep Space): 4.5 yards of Navy, Black, or Dark Galaxy Print (background).
- Fabric B (Rocket Body): 1/2 yard of Silver Grey or Metallic Cotton.
- Fabric C (Rocket Fins/Nose): 1/2 yard of Red or Cobalt Blue.
- Fabric D (Thruster Flames): Scraps of Orange and Yellow.
- Fabric E (Planets/Stars): Assorted bright scraps (Lime, Teal, Mustard).
- Notions: Fusible web (for planets), rotary cutter, marking pen.
Cultural Backstory: The “Space Age” aesthetic of the 1950s and 60s (known as Googie design) heavily influenced American home decor. Motifs like starbursts, boomerangs, and atoms appeared on everything from diners to bedspreads, symbolizing optimism and the future. This quilt channels that mid-century modern energy with clean lines and geometric shapes.
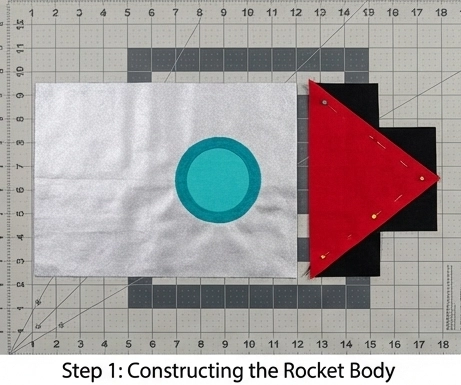
Step 1: Constructing the Rocket Body (The Fuselage)
We build the rocket in sections: Nose, Body, and Fins.
- Cut Body: Cut a rectangle of Fabric B (Silver) measuring 10.5″ x 20.5″.
- Make the Porthole:
- Cut a 5-inch circle from a contrasting fabric (like Teal).
- Fuse it to the upper center of the silver rectangle using fusible web.
- Stitch around the edge with a zig-zag stitch to secure it.
- Cut Nose Cone: Cut a rectangle of Fabric C (Red) measuring 10.5″ x 6.5″.
- Shape: Use the “Stitch and Flip” method. Place a 6.5″ Background square on the top left corner. Stitch diagonally. Trim. Flip. Repeat on the top right corner.
- Result: A red triangle pointing up.
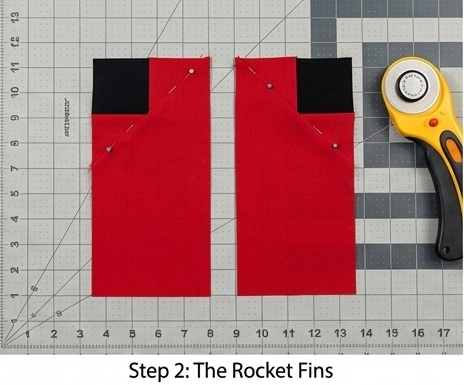
Step 2: The Rocket Fins (Wings)
These give the rocket stability.
- Cut Fins: Cut two rectangles of Fabric C (Red) measuring 5.5″ x 8.5″.
- Shape: Use the “Stitch and Flip” method again. Place a 5.5″ Background square on the top outside corner of each rectangle. Stitch diagonally, trim, and flip to create the angled wing shape.
- Assembly: Sew the Fins to the bottom left and right sides of the Rocket Body (you may need to add a silver spacer strip between the fin and the body if you want them to stick out further).
Step 3: The Engine Blast
Every rocket needs propulsion.
- Cut Strips: Cut random strips of Orange and Yellow varying in length from 4″ to 8″.
- Sew: Sew them together side-by-side to create a jagged “flame” unit measuring 10.5″ wide (matching the width of the rocket body).
- Join: Sew the Nose Cone to the top of the Body. Sew the Flame Unit to the bottom of the Body.
- Result: You now have one giant rocket block (roughly 20″ wide x 40″ tall).
Step 4: The “Deep Space” Background Layout
We float the rocket in a sea of navy.
- Cut Background Panels: Cut large panels of Fabric A (Navy) to surround the rocket.
- Side Panels: Cut two pieces 22.5″ x 40.5″ (adjust based on your rocket height).
- Top/Bottom Panels: Cut two pieces 64.5″ x 24.5″.
- Assembly: Sew the side panels to the rocket first. Then sew the top and bottom panels.
- Offset: Consider placing the rocket slightly off-center (rule of thirds) for a more dynamic, artistic look.

Step 5: Adding the Planets and Stars
Now we populate the galaxy.
- Planets: Use a bowl or plate to trace 3 to 5 circles of varying sizes (Fabric E) onto fusible web.
- Placement: Iron them onto the navy background in the empty “negative space.” Use the Raw Edge Appliqué technique to stitch them down.
- Detail: Add a “Saturn Ring” to one planet using a bias strip of fabric or a line of thick satin stitching.
- Stars: You can either appliqué small yellow stars or, for a subtler look, embroider them later with metallic thread.
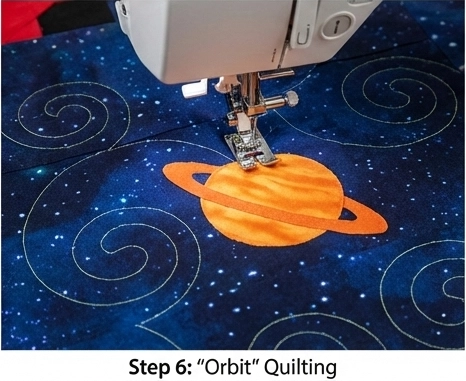
Step 6: “Orbit” Quilting
The quilting adds movement.
- Baste: Sandwich the quilt layers.
- Quilt:
- Trajectory: Quilt vertical “whoosh” lines extending from the rocket flames to the bottom of the quilt to simulate speed.
- Orbits: Quilt large concentric circles or spirals around the planets.
- Background: Use a Swirl or Meander stitch in the navy areas to mimic nebula gas or cosmic dust.
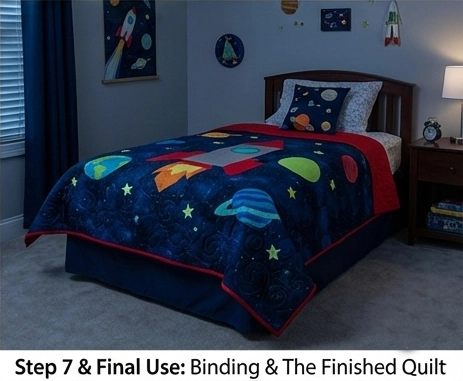
Step 7: Binding
- Finish: Bind the quilt in Fabric C (Red) or Fabric B (Silver). A contrasting binding frames the “window” into space nicely.
Usability Note: The dark Navy background is a parent’s best friend. It hides ink stains, dirt, and general wear and tear better than almost any other color. Plus, if you use “Glow-in-the-Dark” thread for the quilting stars, it becomes a magical night-light experience for the child.
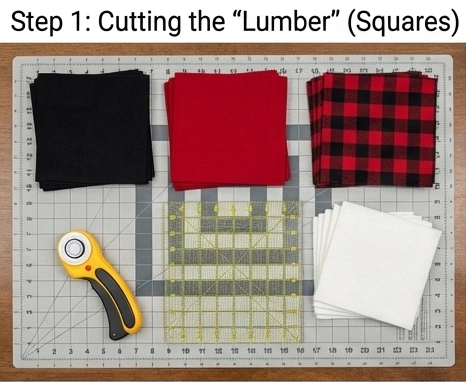
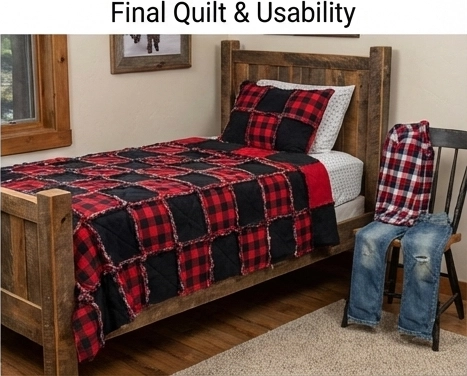
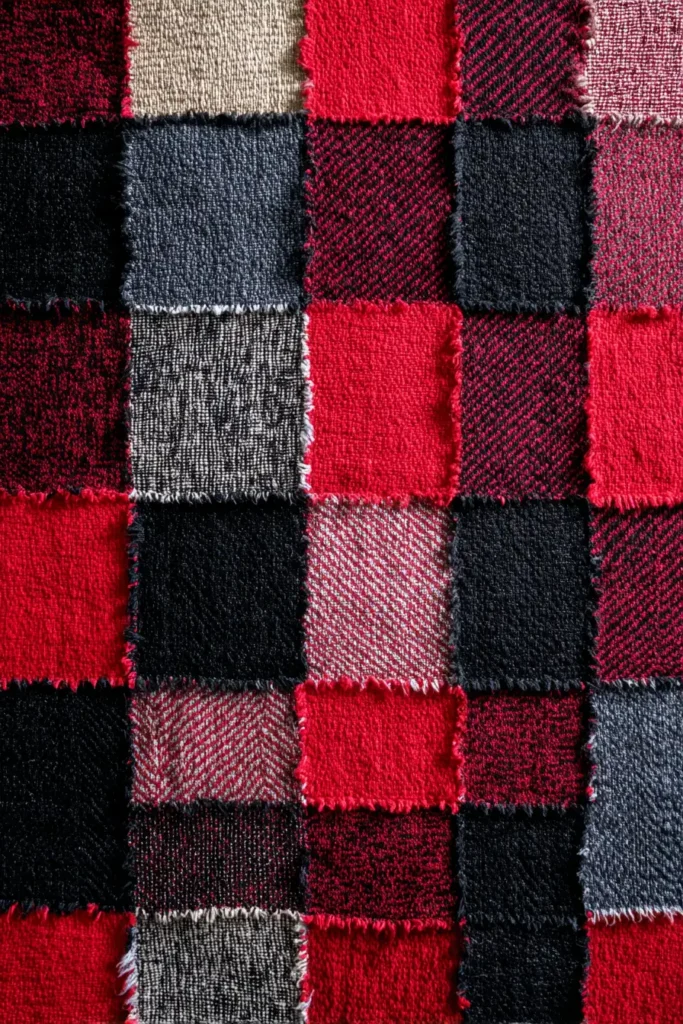
4. Rugged Flannel Rag Quilt Patterns for Active Boys

The “Lumberjack” Buffalo Plaid Rag Quilt
For an active boy’s room, you need bedding that looks good even when it’s rumpled. The “Lumberjack” pattern recreates the iconic Buffalo Plaid (red and black check) using the Rag Quilt technique. By arranging solid red, solid black, and mixed plaid flannel squares in a specific grid, you create the optical illusion of a giant woven tartan. The exposed, frayed seams add a rugged, textured finish that hides dog hair and lint, making it the ultimate low-maintenance, high-comfort gear for a “cabin” or “adventure” themed room.
Finished Dimensions: Twin Bed Size, 64″ x 88″.
Materials Needed:
- Fabric A (The Dark): 3 yards of Solid Black Flannel.
- Fabric B (The Light): 3 yards of Solid Red Flannel (or Navy/Green for a different look).
- Fabric C (The Blend): 3 yards of a Red & Black Plaid Flannel.
- Note: Using these three tones (Dark, Light, Blend) is crucial to creating the Buffalo Check optical illusion.
- Backing: 6 yards of Solid Black Flannel (or a cozy Minky if you are brave).
- Batting: High-loft Polyester or Cotton.
- Notions: Rag Snips (spring-loaded scissors), walking foot, heavy-duty thread.
Cultural Backstory: Buffalo Plaid originated in Scotland as the “MacGregor Red and Black” tartan. It was brought to North America in the 1800s. The name “Buffalo Plaid” was coined by a designer at Woolrich in 1850, who owned a herd of buffalo. It became enshrined in American folklore through the legend of Paul Bunyan, the giant lumberjack, symbolizing strength, outdoor survival, and rugged masculinity.
Step 1: Cutting the “Lumber” (Squares)
We are creating a grid of 8 blocks wide by 11 blocks long (Total: 88 blocks).
- Cut Top Squares: Cut all flannel fabrics into 9-inch squares.
- Fabric A (Black): Cut 22 squares.
- Fabric B (Red): Cut 22 squares.
- Fabric C (Plaid): Cut 44 squares.
- Cut Backing Squares: Cut 88 squares of Backing Flannel measuring 9 inches.
- Cut Batting Squares: Cut 88 squares measuring 7 inches.
- Technical Note: The batting must be 2 inches smaller than the fabric squares. If batting gets caught in the seam allowance, the fringe will not fray properly and will be lumpy.
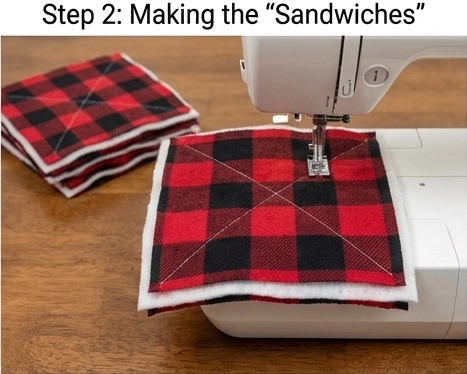
Step 2: Making the “Sandwiches”
Assemble the quilt block by block.
- Layer: Place a Backing Square (wrong side up) -> Center a Batting Square -> Place a Top Square (right side up).
- Quilt: Stitch an “X” from corner to corner through all three layers.
- Tip: You don’t need to backstitch here; the intersecting seams later will lock the thread.
- Repeat: Make all 88 “sandwiches.”
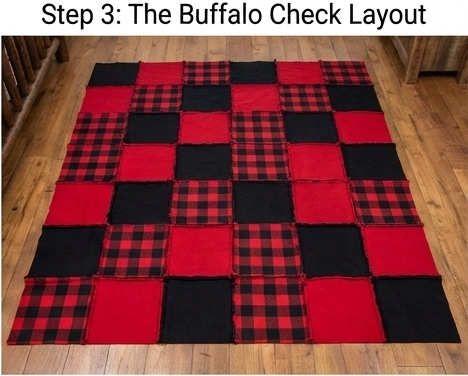
Step 3: The Buffalo Check Layout (The Optical Illusion)
The placement is key to the plaid effect.
- Floor Layout: Arrange the blocks on the floor.
- Odd Rows (1, 3, 5…): Alternate Black and Plaid.
- [Black] – [Plaid] – [Black] – [Plaid]…
- Even Rows (2, 4, 6…): Alternate Plaid and Red.
- [Plaid] – [Red] – [Plaid] – [Red]…
- Visual Check: When you step back, the “Plaid” blocks should connect visually to form the lighter intersecting lines of the tartan pattern.
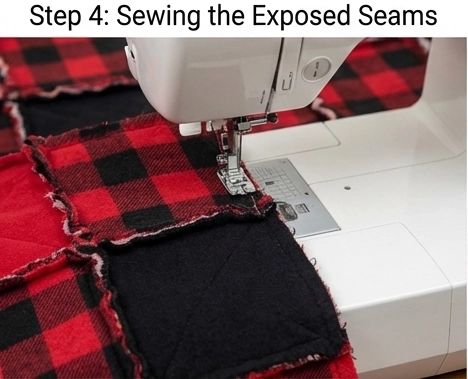
Step 4: Sewing the Exposed Seams
Remember: Seam allowances go on the OUTSIDE (Front).
- Seam Allowance: Use a generous 1-inch seam allowance. (Use the edge of your presser foot as a guide).
- Sew Rows: Place two blocks Wrong Sides Together (Backing touching Backing). Sew them together.
- Result: The raw edges should be standing up on the colored side of the quilt.
- Join Rows: Pin the rows together, matching the vertical seams.
- Pressing: Open the seam allowances flat as you sew over them to distribute the bulk.
Step 5: The Perimeter Stitch
Seal the edges.
- Stay Stitch: Sew a straight line 1 inch away from the raw edge all the way around the perimeter of the quilt. This creates the “border” fringe.
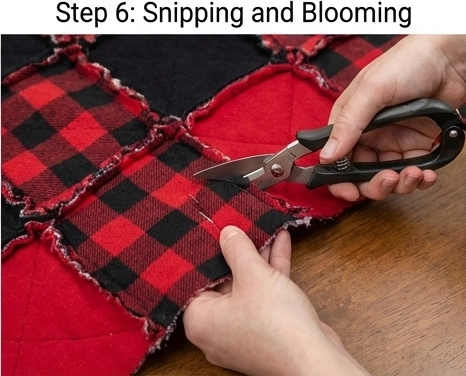
Step 6: Snipping and Blooming
The finish that makes it “Rag.”
- Snip: Using Rag Snips, cut slits into the standing seam allowances every 1/2 inch.
- Caution: Snip close to the seam line, but do not cut the thread.
- Wash: Take the quilt to a laundromat (to save your home machine from lint). Wash on a cold cycle with an old pair of jeans (the friction helps fray the edges).
- Dry: Tumble dry on medium heat. Empty the lint trap every 10-15 minutes—it will fill up fast!
- Result: The snipped flannel edges will curl and fluff up, creating soft, chenille-like caterpillars framing every square.
Usability Note: Flannel is warmer than standard quilting cotton. This quilt is rated for use in “Winter/Cold Climate” conditions. If you live in a warm climate, omit the batting and use only the two layers of flannel for a lighter summer throw.
5. All-Star Sports Theme Quilt Patterns for Little Athletes
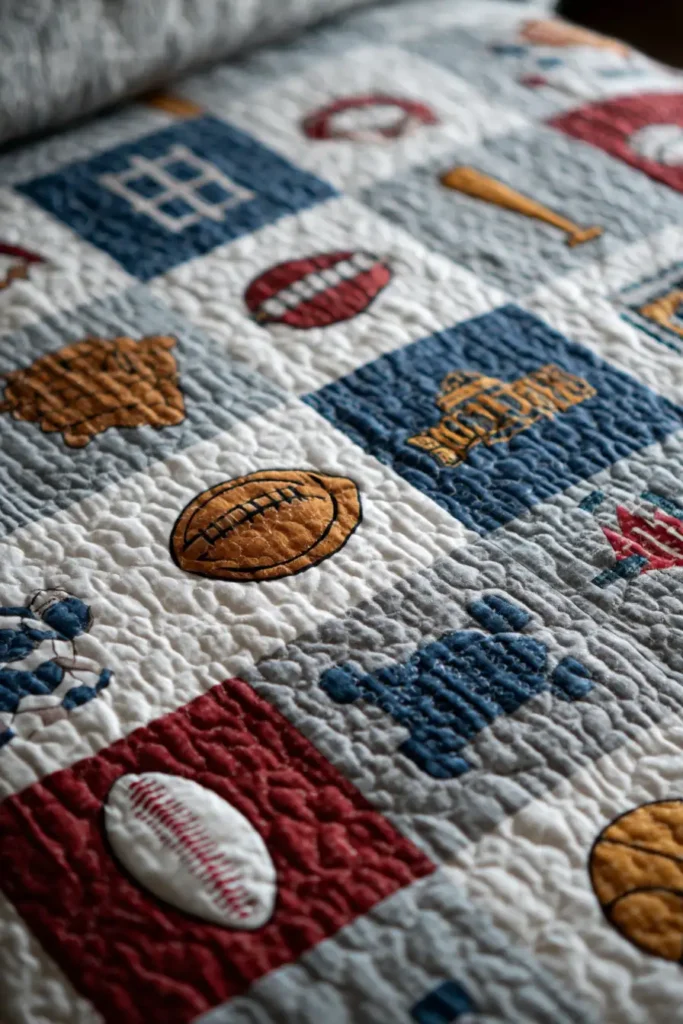
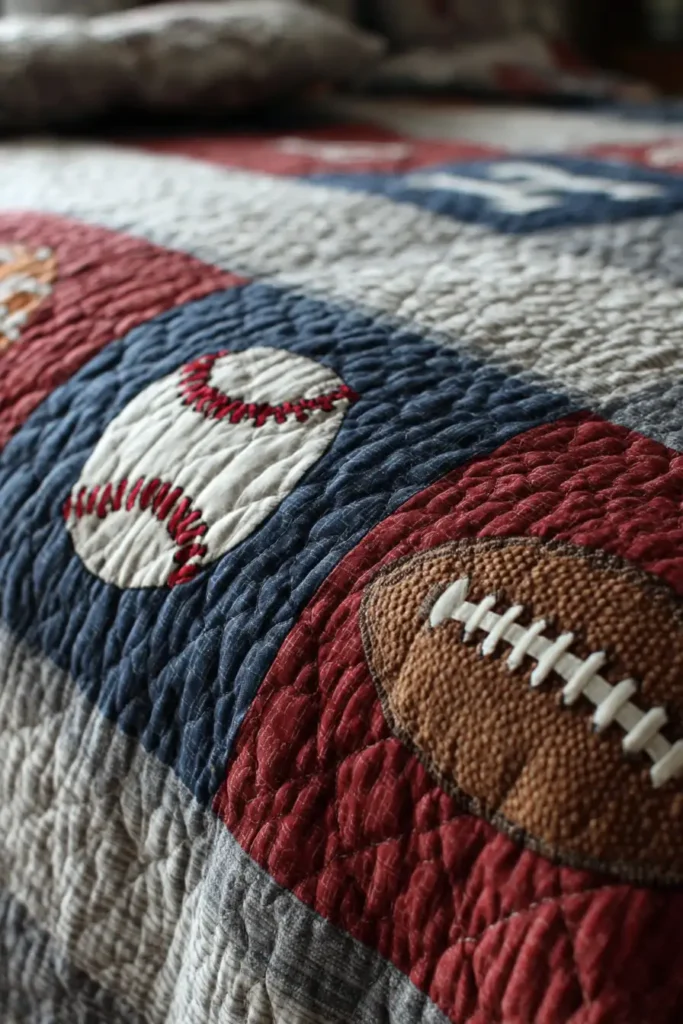
The “Varsity Legend” Jersey Quilt
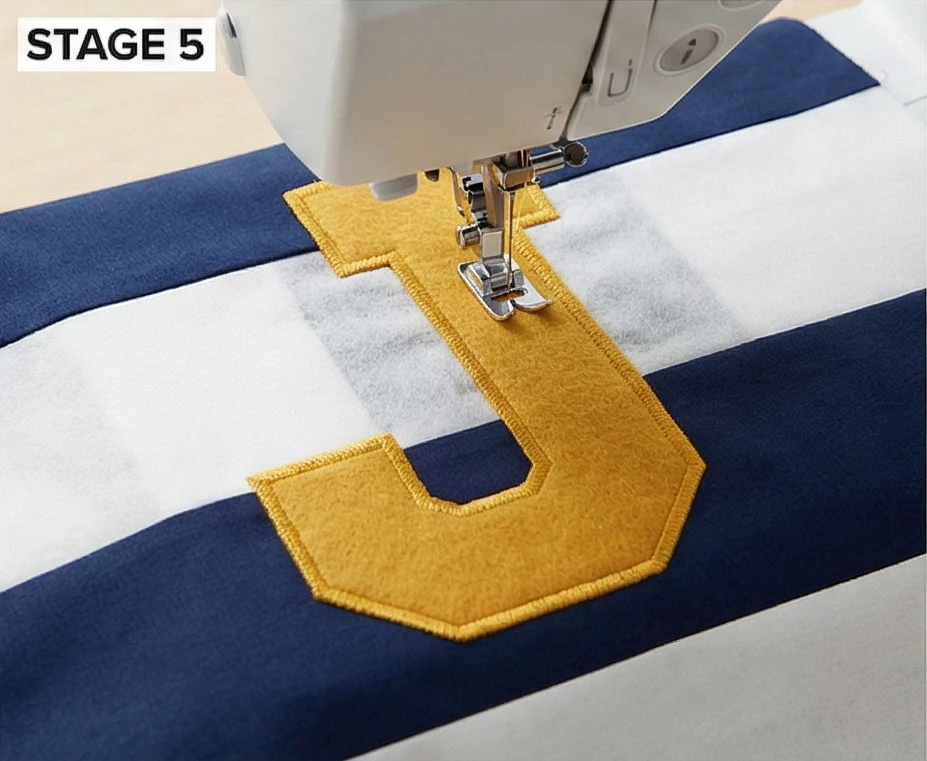
Sports-themed bedding often becomes overly busy with cartoon soccer balls and baseball bats. The “Varsity Legend” pattern elevates the theme by focusing on the classic aesthetics of vintage sportswear: Bold Block Typography and Rugby Stripes. By creating a quilt that looks like a giant collegiate sweater or jersey—complete with the child’s initial or jersey number on the chest—you create a customized heirloom that feels like Americana fashion (think Ralph Lauren or Tommy Hilfiger) rather than a temporary novelty item.
Finished Dimensions: Twin Bed Size, 64″ x 88″.
Materials Needed:
- Fabric A (Main Jersey Color): 3 yards of Navy, Forest Green, or Burgundy Solid.
- Fabric B (Stripe/Accent Color): 2 yards of White, Grey, or Gold Solid.
- Fabric C (The Letter/Number): 1/2 yard of Wool Felt or Chenille (for texture).
- Backing: 5.5 yards of a striped shirting fabric.
- Notions: Paper-Backed Fusible Web (HeatnBond Ultra), tear-away stabilizer, open-toe appliqué foot.
Cultural Backstory: The “Varsity Letter” tradition began at Harvard University in 1865. The baseball team sewed large Old English “H” patches onto their grey flannel uniforms. Originally, you had to earn the letter to keep it. Over the decades, the “Letterman Jacket” became the ultimate symbol of teenage achievement and social status in American high schools.
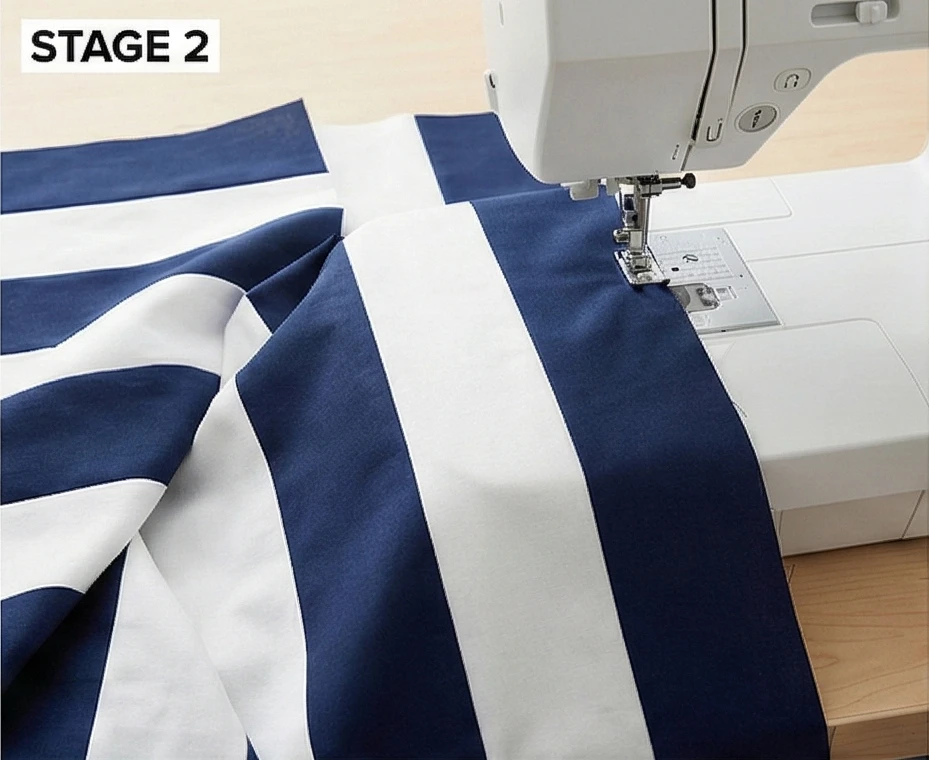
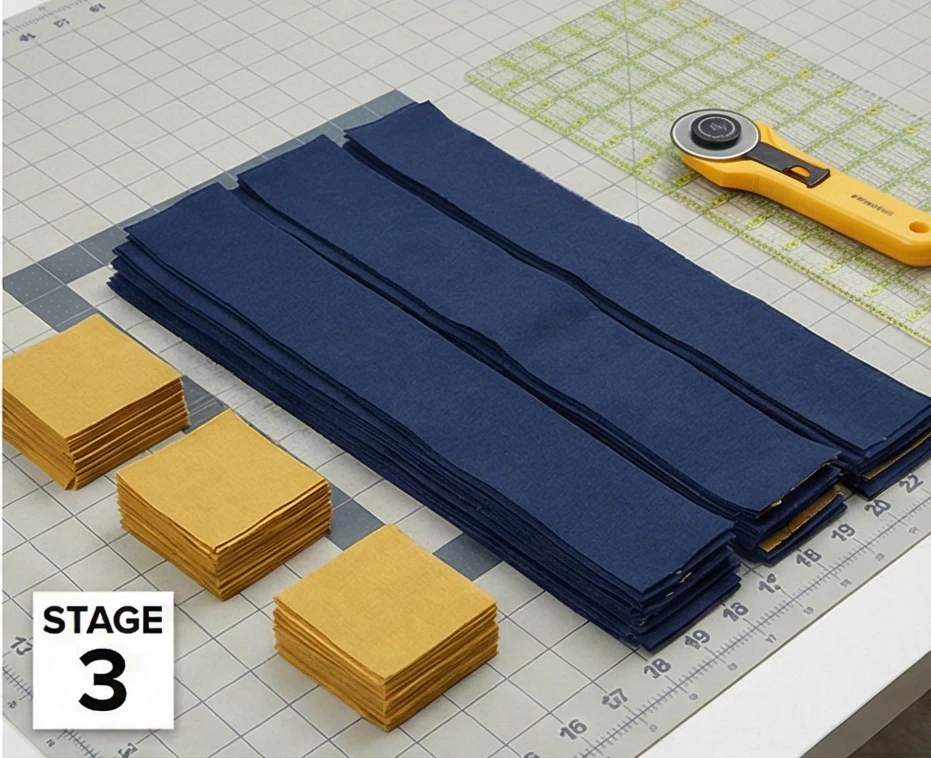
Step 1: Cutting the Rugby Stripes
We will piece the background to look like a striped rugby shirt.
- Main Blocks: From Fabric A (Main Color), cut 6 panels measuring 10.5″ x 64.5″.
- Stripe Blocks: From Fabric B (Stripe Color), cut 5 panels measuring 4.5″ x 64.5″.
- Note: Solid cottons are best for durability, but high-quality flannel provides a softer, fuzzier “sweater” feel.

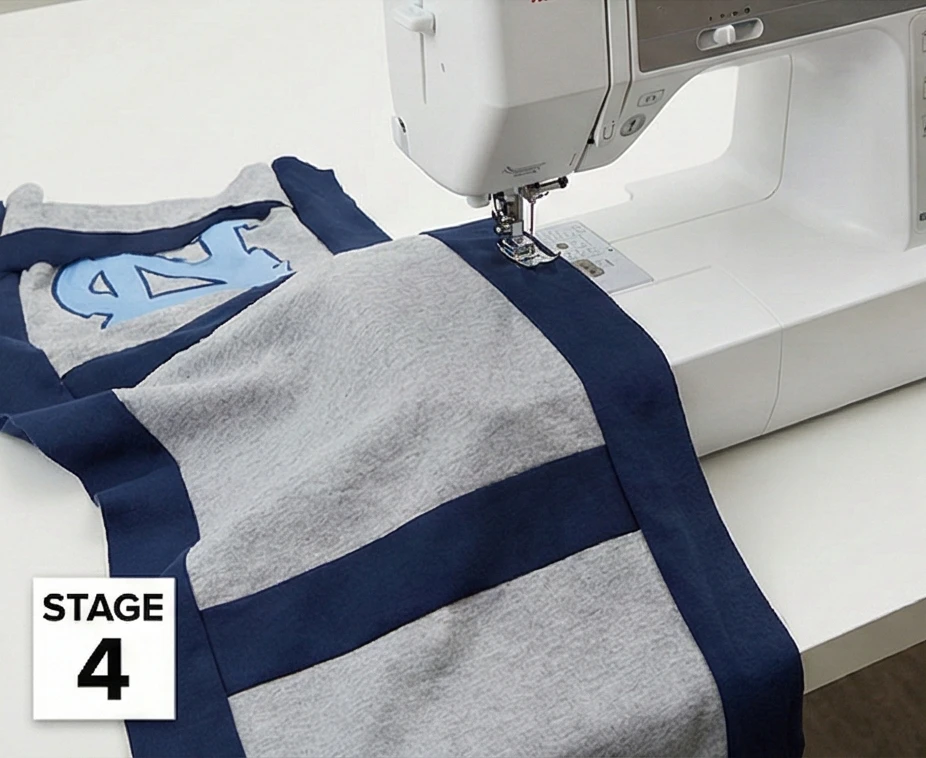
Step 2: Assembling the “Jersey” Background
This creates the canvas for your applique.
- Layout: Arrange the strips horizontally, alternating between the wide Main panels and thin Stripe panels.
- Pattern: Main – Stripe – Main – Stripe… ending with Main.
- Sew: Stitch the long strips together using a 1/4 inch seam allowance.
- Press: Press all seams toward the darker fabric (Fabric A) to prevent the colors from shadowing through the white strips.
- Result: You now have a striped quilt top measuring roughly 64.5″ x 88″.
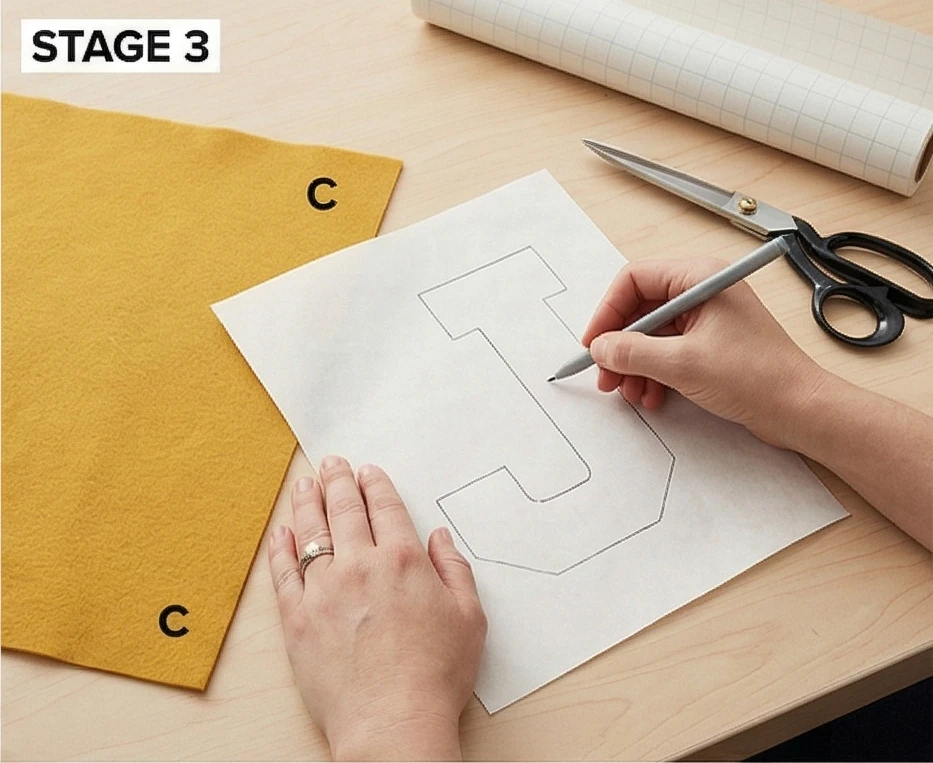
Step 3: Preparing the Varsity Letter
The focal point. Choose his first initial or his team jersey number.
- Draft: Print or draw a large Block Letter or Number (approx. 18 to 20 inches tall) on paper. A simple “Collegiate” font works best.
- Trace: Trace the mirror image of the letter onto the paper side of your Fusible Web.
- Fuse: Iron the fusible web onto the back of Fabric C (Wool Felt or Chenille).
- Cut: Cut out the letter carefully. Peel off the paper backing.
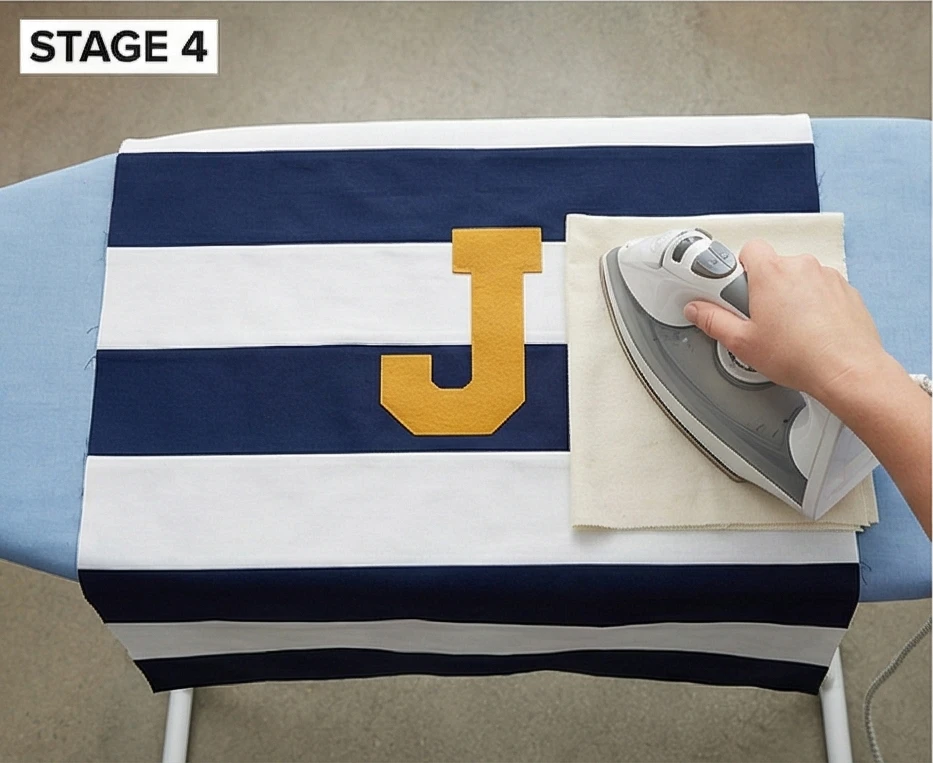
Step 4: Placement and Fusing
The “Chest” placement.
- Position: Place the quilt top on a bed or floor to visualize the placement.
- Rule of Thumb: The letter should sit in the upper third of the quilt (the “chest” area), roughly 12 to 15 inches from the top edge, centered horizontally.
- Fuse: Press with a hot iron (use a pressing cloth if using Wool/Chenille to avoid scorching) to permanently bond the letter to the background.
Step 5: The Satin Stitch Appliqué
This mimics the embroidery on a real patch.
- Stabilize: Pin a sheet of Tear-Away Stabilizer to the back of the quilt top, directly underneath the letter area. This prevents the fabric from puckering while you stitch.
- Stitch: Set your machine to a wide, tight Zig-Zag (Satin Stitch).
- Thread: Use a contrasting thread (like Gold or White) to outline the letter.
- Sew: Stitch slowly around the entire perimeter of the letter.
- Clean Up: Tear away the stabilizer from the back.
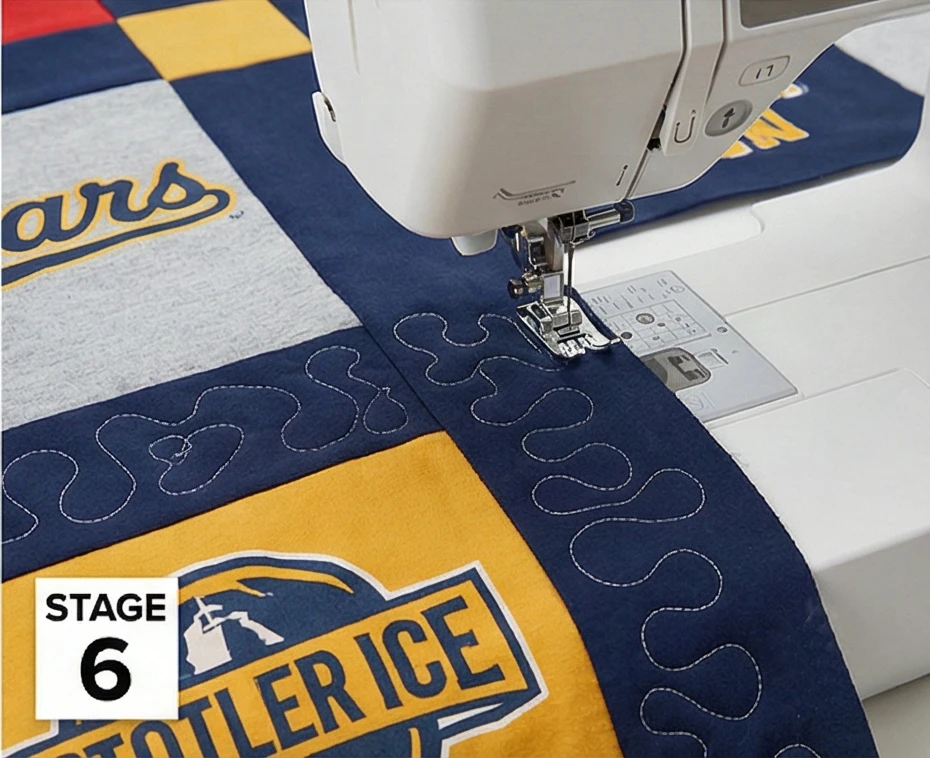
Step 6: “Gridiron” Quilting
Keep the quilting masculine and geometric.
- Baste: Sandwich layers.
- Quilt:
- The Stripes: Stitch “in the ditch” (along the seam lines) of the rugby stripes to anchor the quilt.
- The Main Panels: Quilt a simple Cross-Hatch (Diamond) grid pattern spaced 2 inches apart. This mimics the stitching on padded football gear.
- The Letter: Do not quilt over the letter. Let it puff up.
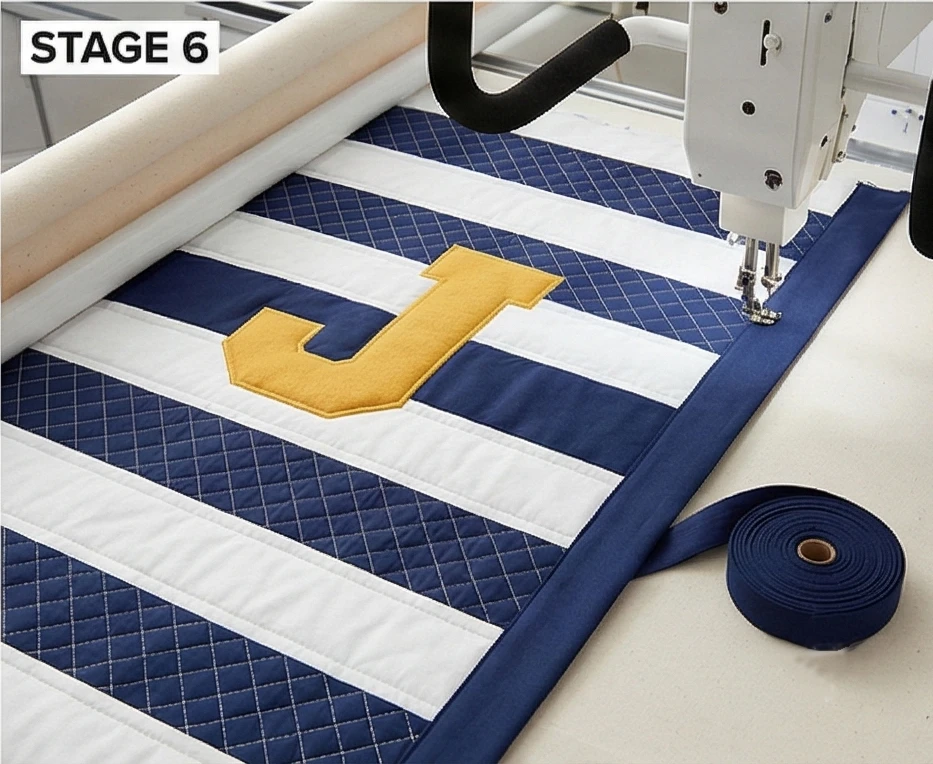
Step 7: Binding
- Finish: Bind with Fabric A (Main Color) to match the top/bottom edges, or use Fabric B for a contrasting frame.
Usability Note: Using Wool Felt or Chenille for the letter adds a tactile sensory element that contrasts with the cool cotton background. If the child picks at things, use a very tight satin stitch (or a double round of stitching) so the letter’s edges don’t peel up over time.
6. Retro Video Game Pixel Quilt Designs for Gamer Bedrooms
The “8-Bit Realm” Pixelated Quilt
For the modern gamer, the “8-Bit” aesthetic—style born of the hardware limitations of 1980s consoles—is cool, retro, and instantly recognizable. Whether it’s a green “Creeper” face, a red plumber, or a pixelated sword, this style translates perfectly to quilting because a pixel is just a fabric square! The “8-Bit Realm” quilt uses simple squares of solid Kona Cotton to create a mosaic image. It is bold, graphic, and because it relies on solids rather than prints, it feels mature and clean rather than cluttered.
Finished Dimensions: Twin Bed Size, 60″ x 88″ (Grid: 15 blocks wide x 22 blocks high).
Materials Needed:
- Fabric A (Main Color): 3 yards of Lime Green (or primary color of choice).
- Fabric B (Shadow/Detail): 1.5 yards of Dark Green or Black.
- Fabric C (Background): 2.5 yards of Grey or White.
- Backing: 5.5 yards of a cozy “Minky” fabric in charcoal (gamers love the soft texture).
- Notions: Graph paper (or a spreadsheet) for planning, a rotary cutter, and masking tape.
Cultural Backstory: Pixel art originated in the 1970s and 80s because early video game consoles (like the NES or Atari) had extremely limited memory. Designers had to convey complex characters using a tiny grid of colored squares. Today, this “low-res” look is a deliberate artistic choice, symbolizing digital nostalgia and the indie game revolution (like Minecraft or Stardew Valley).
Step 1: Mapping the Grid (The Blueprint)
You cannot wing this quilt. You need a map.
- Draft: Use a sheet of graph paper or Excel. Outline a rectangle that is 15 squares wide by 22 squares tall.
- Color: Color in the squares to create your design.
- The “Creeper” Face: Fill the rectangle with Green. Use Black/Dark Green to draw two square eyes and a frowning mouth in the upper center.
- The Sword: Draw a diagonal sword shape using Blue/Grey squares against a White background.
- Count: Count exactly how many squares you need of each color.
Step 2: Cutting the Pixels
Precision is everything here. If your squares are off, the grid won’t line up.
- Cut Strips: Cut your fabric into 4.5-inch wide strips.
- Sub-Cut Squares: Cross-cut those strips into 4.5-inch squares.
- Why this size? A 4.5″ cut square creates a 4.0″ finished pixel.
- Math: 15 squares x 4″ = 60 inches wide. Perfect for a Twin bed.
Step 3: Organizing the “Stack”
Stay organized to avoid sewing the face upside down.
- Label: create a sticky note for every row (Row 1, Row 2… Row 22).
- Stack: Stack the fabric squares for Row 1 in order from left to right. Pin the label “Row 1” to the top square. Repeat for all 22 rows.
- Tip: Do not rely on your memory. Once the squares are cut, they all look the same.
Step 4: Chain Piecing the Rows
- Sew: Take the stack for Row 1. Sew square 1 to square 2. Then sew square 3 to square 2. Continue until the whole strip of 15 squares is joined.
- Press: Press the seams of Row 1 to the Left.
- Row 2: Sew Row 2 together. Press the seams of Row 2 to the Right.
- Why Alternate? Pressing alternating rows in opposite directions allows the seams to “nest” (lock together) perfectly when you join the rows, giving you crisp 4-corner intersections.
Step 5: Joining the Matrix
- Pin: Pin Row 1 to Row 2. Feel the seams with your fingers to ensure they are nested (interlocked) at every intersection.
- Sew: Stitch the rows together.
- Check: Open it up after the first row. Do the corners meet perfectly to form a sharp grid? If yes, keep going.
- Continue: Add Row 3, then Row 4, until the image is complete.
Step 6: “Grid” Quilting
Enhance the pixelated look.
- Baste: Sandwich layers.
- Quilt:
- Vertical Lines: Stitch straight vertical lines “in the ditch” (along the seam lines) between every column of pixels.
- Horizontal Lines: Stitch straight horizontal lines between every row.
- Result: The quilting emphasizes the individual squares, making the quilt look even more like a computer screen.
Usability Note: If creating this for a teen who eats snacks while gaming, choose a darker background color (like Charcoal or Navy) instead of White. It hides Dorito dust much better! Also, using Kona Cotton Solids is recommended as they are thicker and more durable than standard printed cottons.
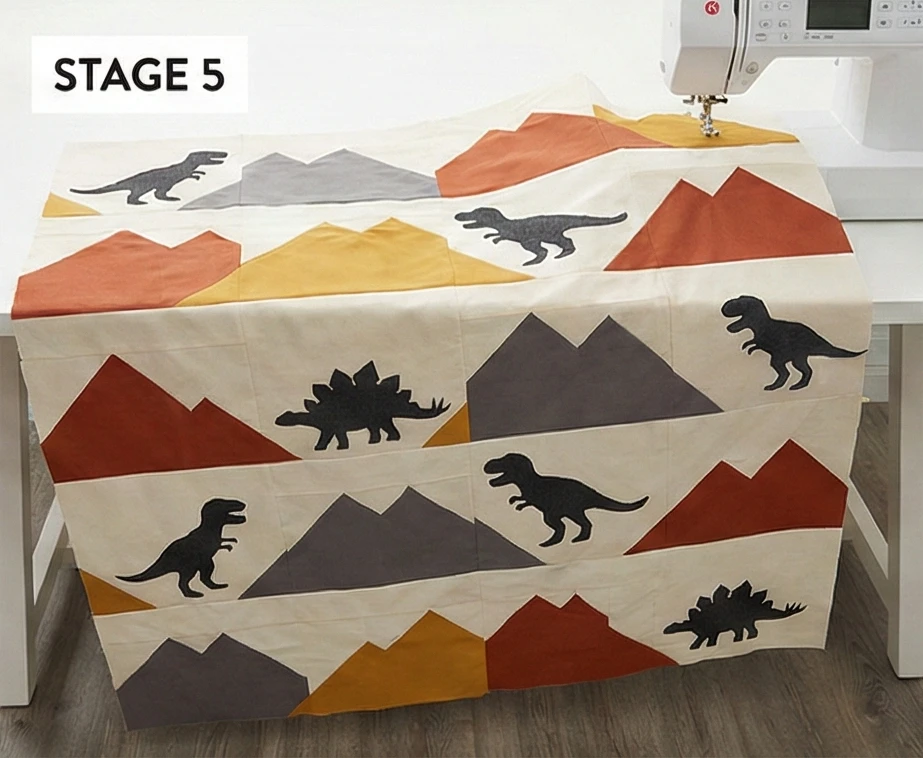
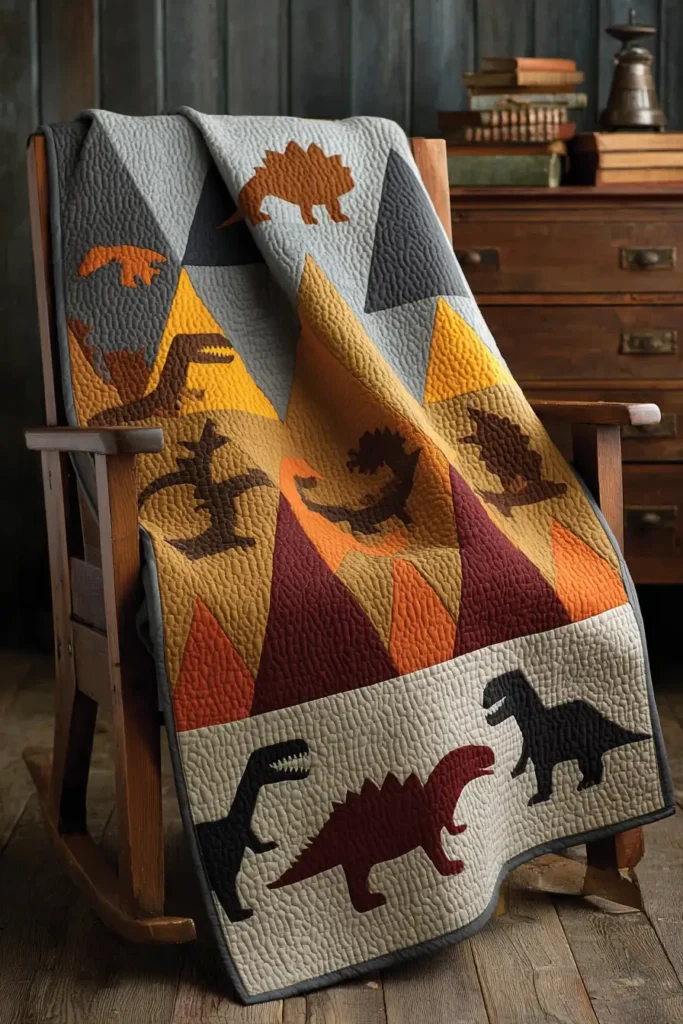
7. Dinosaur Roar Quilt Patterns for Adventurous Boys’ Rooms
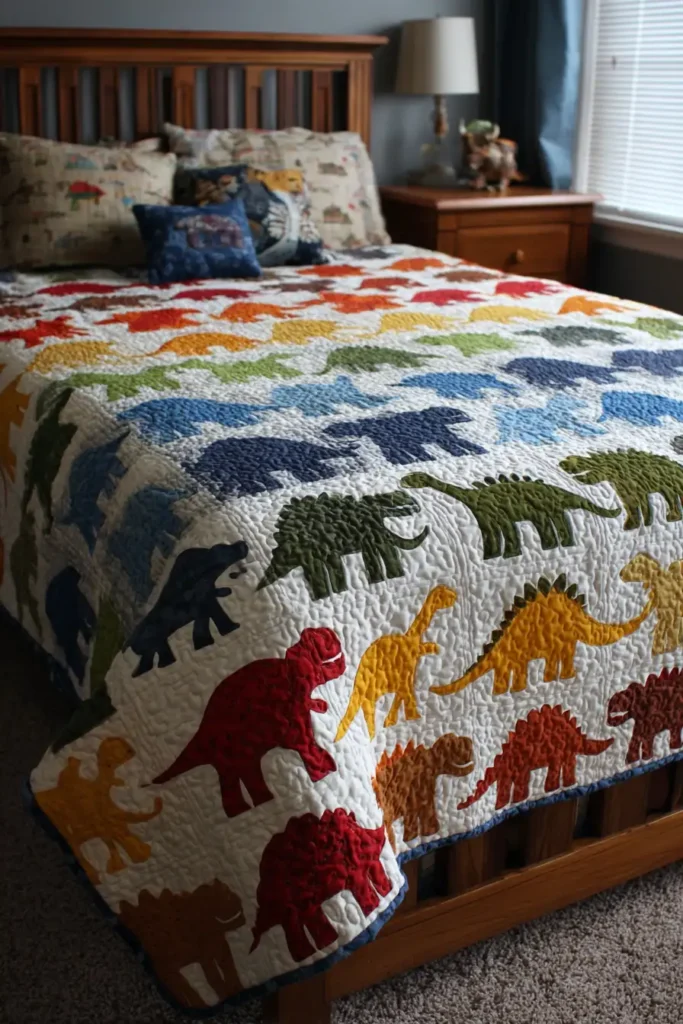

The “Jurassic Peaks” Modern Dino Quilt
Dinosaur quilts are often overly cartoonish, but the “Jurassic Peaks” pattern offers a sophisticated, geometric take suitable for older boys or modern nurseries. Instead of detailed dinosaur illustrations, this design uses Paper Piecing or Appliqué silhouettes to place stylized T-Rexes and Stegosauruses against a backdrop of Triangle Mountains (Volcanoes). Using a palette of Slate Grey, Mustard, Olive, and Rust, the quilt feels prehistoric and earthy rather than neon and plastic.
Finished Dimensions: Twin Bed Size, 64″ x 86″.
Materials Needed:
- Fabric A (The Dinos): 1 yard of Charcoal or Deep Olive Solid.
- Fabric B (The Mountains/Volcanoes): 2 yards of Rust, Grey, and Mustard Solids.
- Fabric C (Background/Sky): 3.5 yards of Pale Stone or Cream.
- Backing: 5.5 yards of a dinosaur bone print or footprint fabric.
- Notions: Paper-Backed Fusible Web (HeatnBond Lite), Dinosaur Silhouette Templates (printable).
Cultural Backstory: The “Dinosaur Renaissance” began in the late 1960s, when paleontologist John Ostrom discovered Deinonychus, demonstrating that dinosaurs were active, warm-blooded animals rather than sluggish lizards. This shifted pop culture’s view of dinosaurs from “monsters” to “magnificent beasts,” fueling the endless fascination boys have with them today.
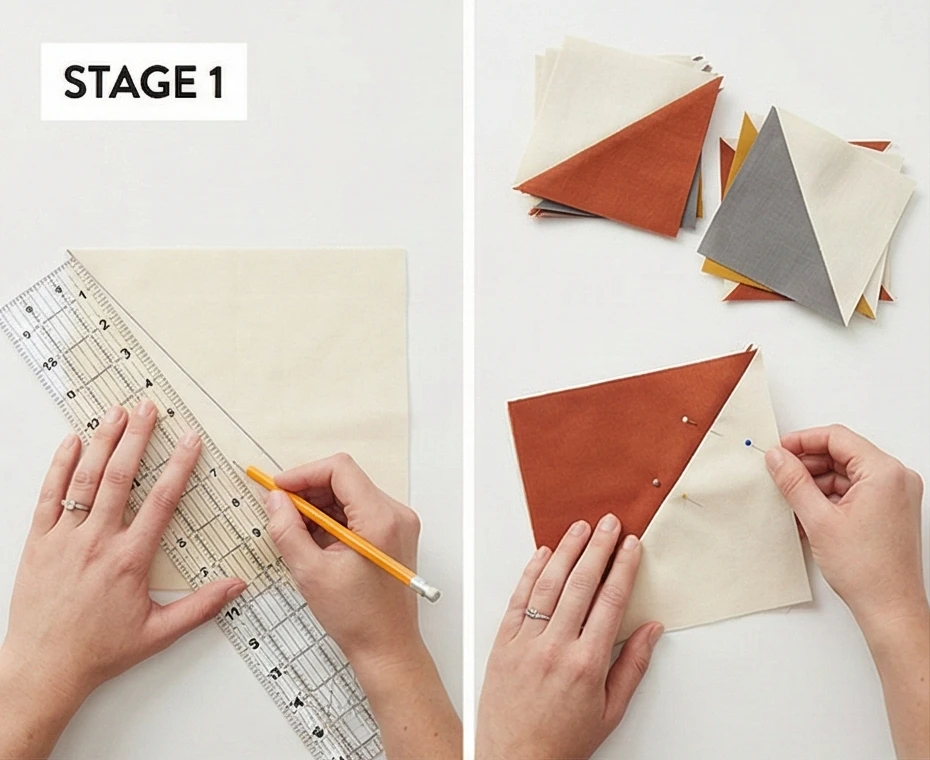
Step 1: Making the Mountain Ranges
We start by building the landscape.
- Cut Squares: Cut 10 large squares (12.5″) from your Mountain Fabrics (Rust, Grey, Mustard). Cut 10 large squares (12.5″) from your Background/Sky Fabric.
- Half-Square Triangles (HSTs):
- Draw a diagonal line on the back of the Sky squares.
- Place a Sky square on a Mountain square (Right Sides Together).
- Sew 1/4″ on both sides of the line. Cut on the line. Press open.
- Result: You now have 20 Mountain Blocks (large triangles).
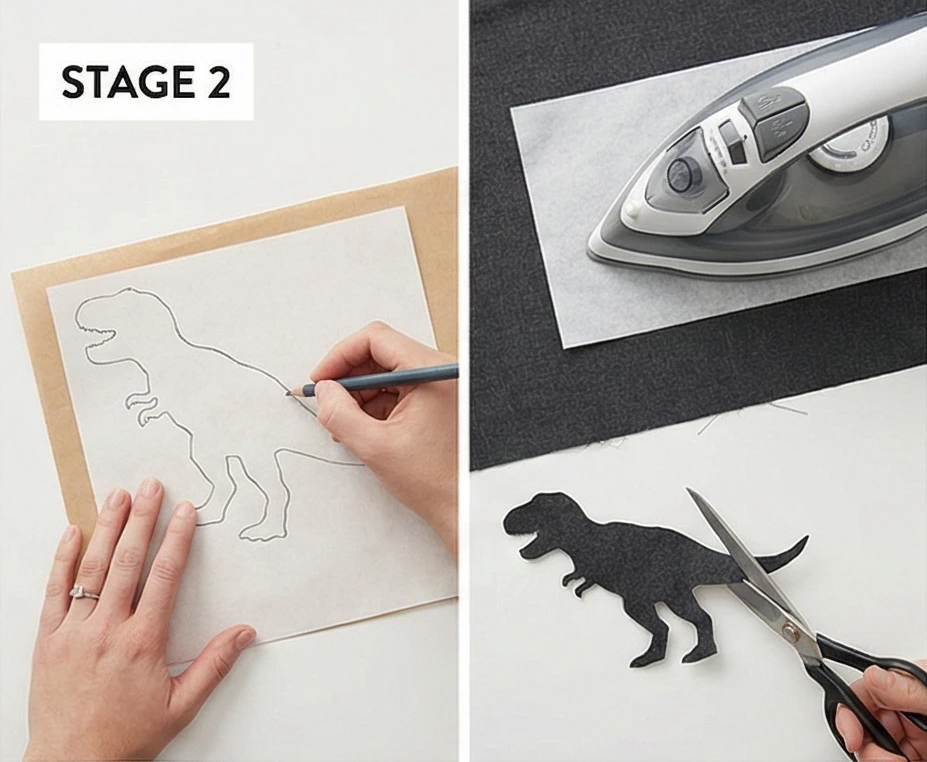
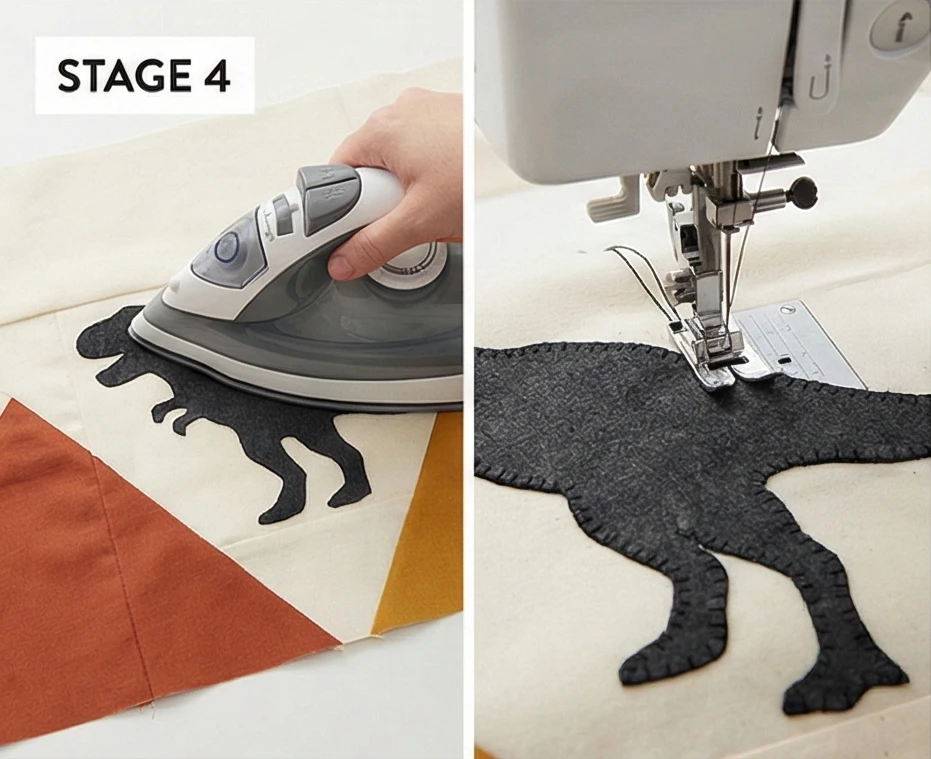
Step 2: Preparing the Dino Appliqués
The inhabitants of the landscape.
- Templates: Print out simple silhouettes of different dinosaurs (T-Rex, Triceratops, Brontosaurus, Stegosaurus).
- Trace: Trace the shapes onto the paper side of your Fusible Web.
- Fuse: Iron the web onto the back of Fabric A (Charcoal).
- Cut: Cut out the dinosaur shapes carefully.
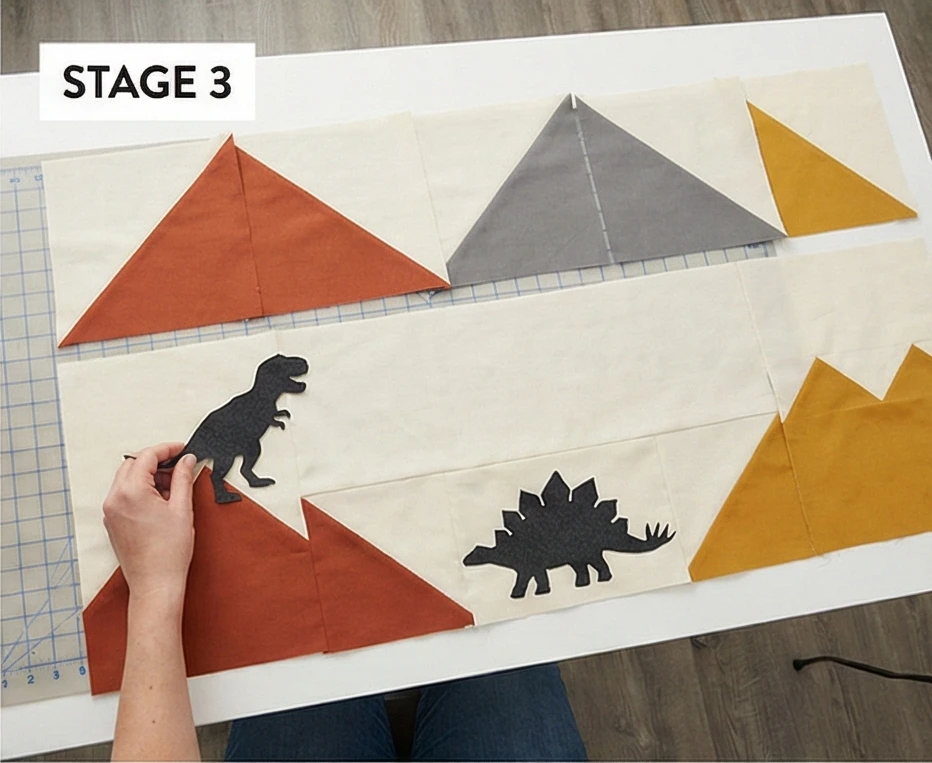
Step 3: Setting the Scene
Placement is key to telling a story.
- Layout: Arrange your Mountain Blocks in 4 horizontal rows to create a jagged horizon.
- Tip: Invert some triangles (point down) to create “Valleys” between the “Peaks.”
- Populate: Peel the backing off your dinosaurs. Place them strategically:
- The Ridge: Place a T-Rex standing on the peak of a Rust mountain.
- The Valley: Place a Brontosaurus walking along the bottom edge of a valley block.
- The Sky: Place a Pterodactyl flying in the open sky area of a block.
Step 4: Fusing and Stitching
- Fuse: Once you are satisfied with the arrangement, press it with a hot iron to bond the dinosaurs to the mountain blocks.
- Appliqué Stitch: Use a Blanket Stitch or Straight Stitch in black thread to outline each dinosaur.
- Detail: Simple silhouettes look best, but you can add a tiny white button for an eye if desired.
Step 5: Assembly
- Sashing (Optional): To make the quilt larger and separate the scenes, add 2.5″ sashing strips between the blocks.
- Join: Sew the blocks into rows, then join the rows.
- Result: A landscape of volcanoes and peaks with dinosaurs roaming across them.
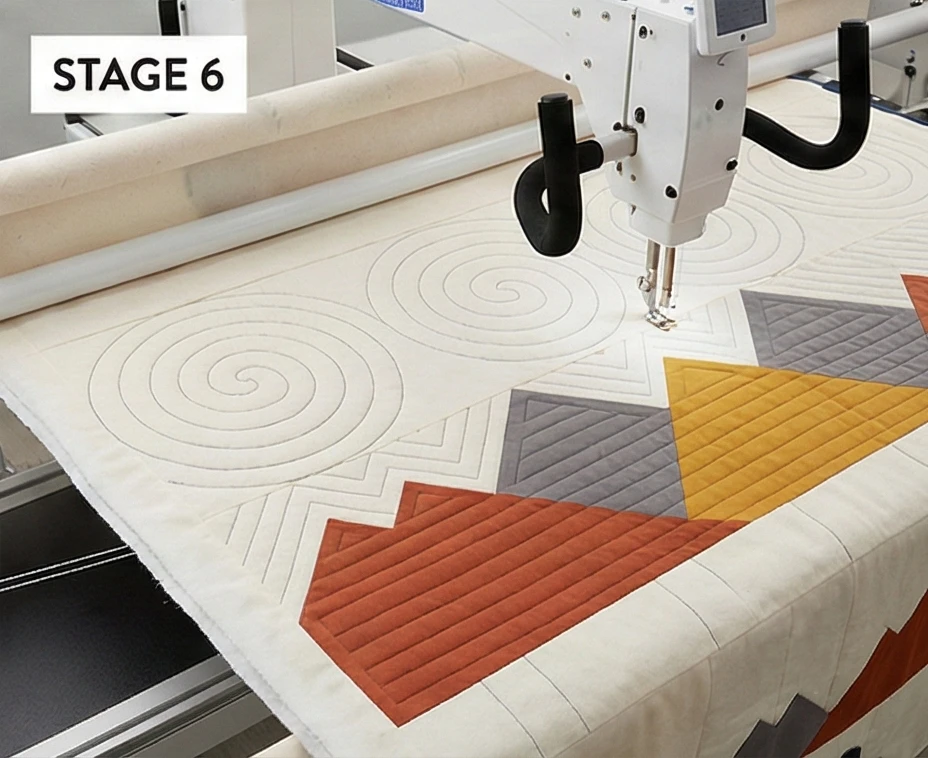
Step 6: “Fossil” Quilting
Add texture that matches the theme.
- Baste: Sandwich layers.
- Quilt:
- The Sky: Quilt Spiral Swirls to look like wind or clouds.
- The Mountains: Quilt straight vertical lines or zig-zags.
- The Ground: If you have plain border space, quilt “Footprint” shapes (three toes) walking across the bottom edge.
Usability Note: Using silhouettes instead of detailed cartoons keeps the quilt “cool” as the child ages. A silhouette T-Rex is graphic and tough; a cartoon T-Rex with a smile is for babies. This ensures the quilt stays on the bed until middle school.
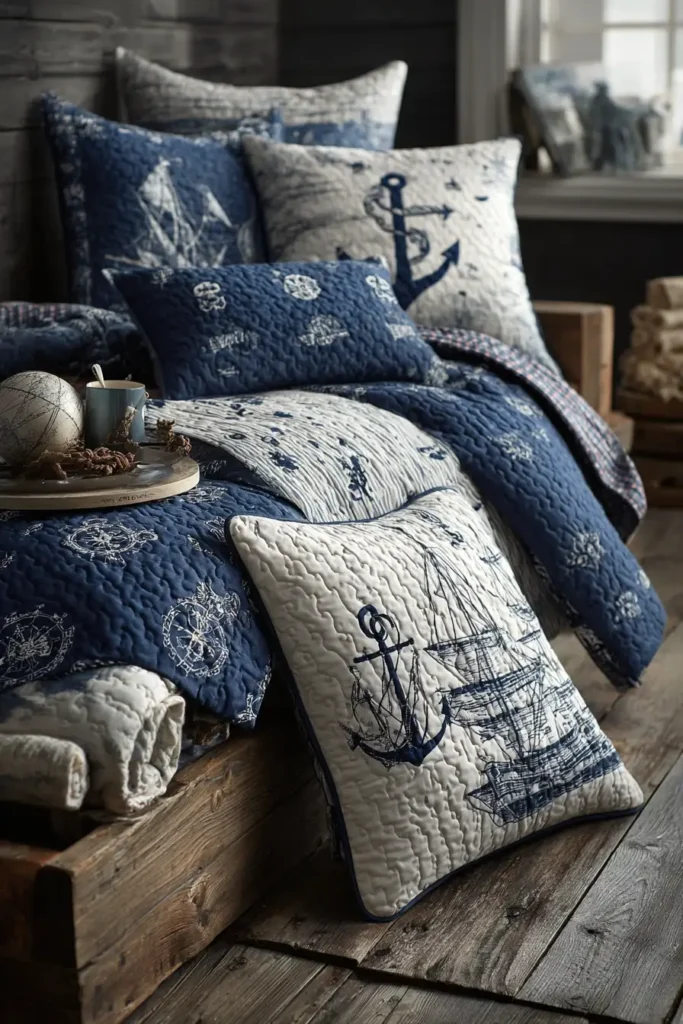
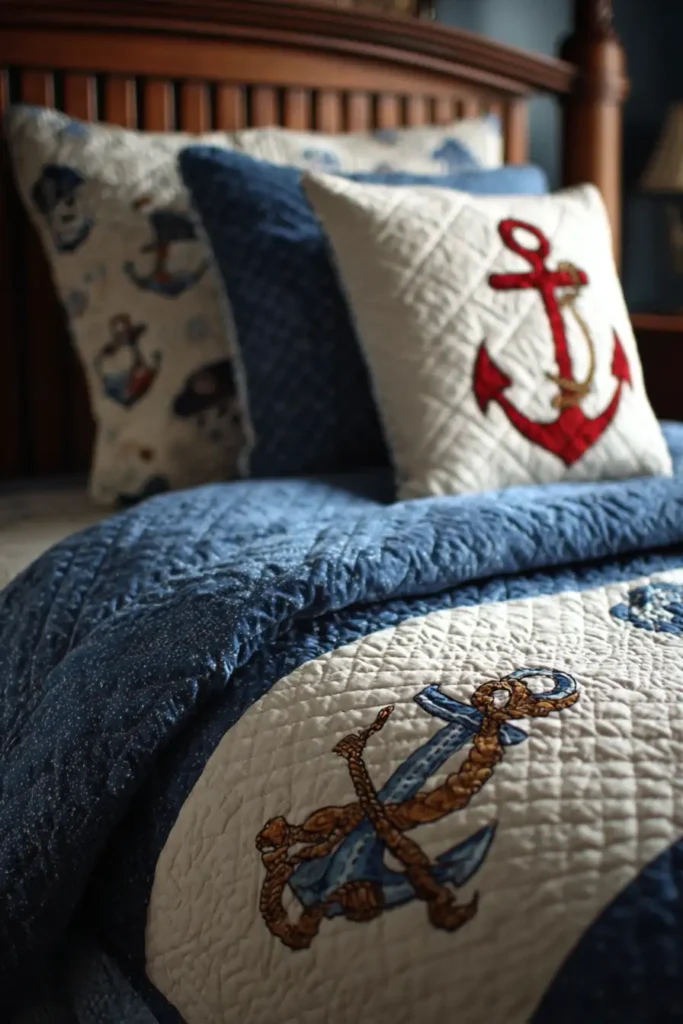
8. Nautical & Pirate Themed Bedding Sets for Coastal Rooms
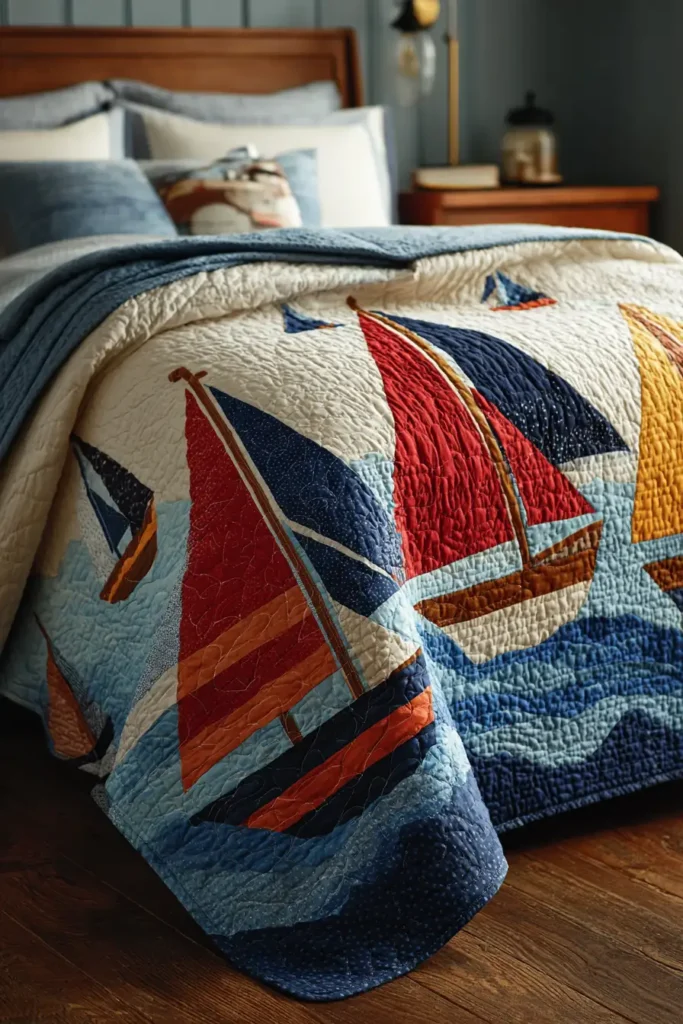
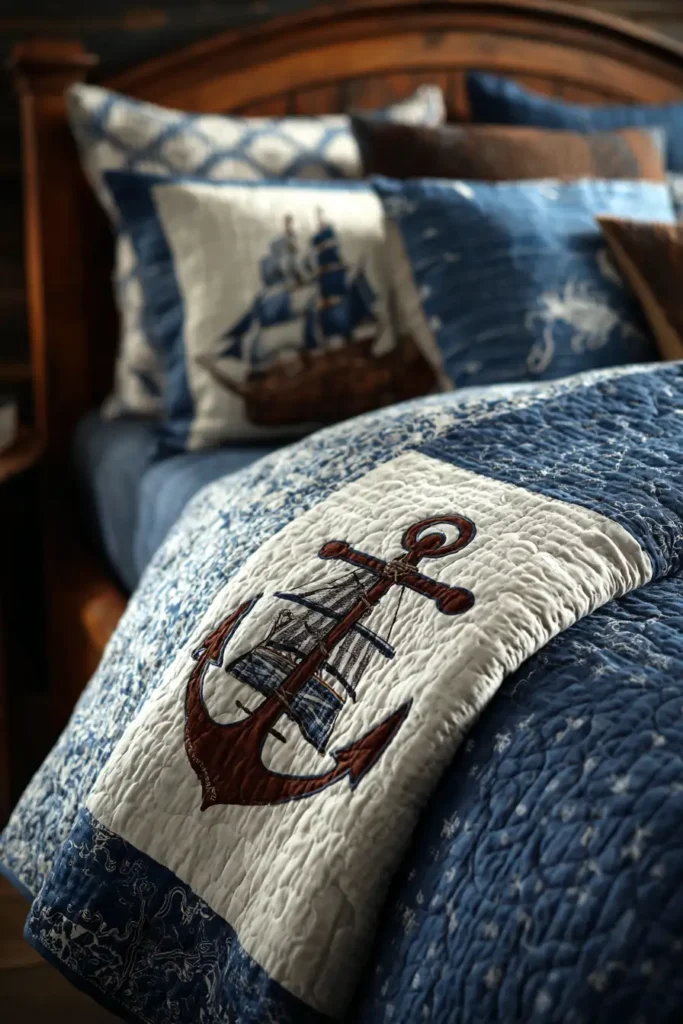
The “Seven Seas” Regatta Quilt
Nautical themes are a timeless choice for boys’ rooms, evoking the spirit of adventure and the calm of the ocean. The “Seven Seas” quilt uses the classic Sailboat Block, but keeps it elegant by avoiding cartoonish pirate skulls. Instead, it relies on a crisp palette of Navy, White, Red, and Chambray Blue to create a fleet of geometric boats. By arranging the boats on “waves” of varying blue strips, the quilt has movement and depth, perfect for a coastal-themed room or a budding sailor.
Finished Dimensions: Twin Bed Size, 64″ x 84″.
Materials Needed:
- Fabric A (Sails): 1.5 yards of White or Cream.
- Fabric B (Hulls): 1 yard of Navy Blue, Red, and Yellow scraps (for the boats).
- Fabric C (Sky/Background): 2.5 yards of Light Blue or Cloud Grey.
- Fabric D (The Water): 2 yards of various Blue Stripes or Teal (for sashing).
- Backing: 5.5 yards of a map print or anchor print.
- Notions: Rotary cutter, 6.5″ square ruler.
Cultural Backstory: Sailors have a long history of quilting and sewing (fancy rope work and canvas repair were essential skills on a ship). The “Storm at Sea” quilt pattern is legendary in maritime culture; biblical in origin, it uses diamonds and triangles to create an optical illusion of rolling waves. This Regatta pattern is a simplified cousin, celebrating the ship itself.
Step 1: Cutting the Components
We will make 20 Sailboat Blocks (Finished size 12″ x 12″).
For ONE Block (Repeat 20 times):
- Sails (White): Cut two squares measuring 4.5″ x 4.5″.
- Sky (Light Blue): Cut two squares measuring 4.5″ x 4.5″ and one rectangle measuring 4.5″ x 12.5″ (for above the boat).
- Hull (Navy/Red): Cut one rectangle measuring 4.5″ x 12.5″.
- Hull Shaping Squares (Sky): Cut two squares measuring 4.5″ x 4.5″.

Step 2: Making the Sails (HSTs)
The sails are made of triangles.
- Mark: Draw a diagonal line on the back of your 4.5″ White (Sail) squares.
- Pair: Place a White square on top of a 4.5″ Sky square (Right Sides Together).
- Sew: Stitch 1/4″ away from the line on both sides.
- Cut: Cut along the center line.
- Yield: You get 2 Half-Square Triangles (HSTs). Press open.
- Trim: Trim each HST to 4″ x 4″.
- Assemble Sail Unit: Sew two HSTs together side-by-side so the white triangles form a large “Double Sail” shape pointing up.
- Add Sky: If needed, add a small sky strip between them to create a mast, but sewing them directly together is easier.

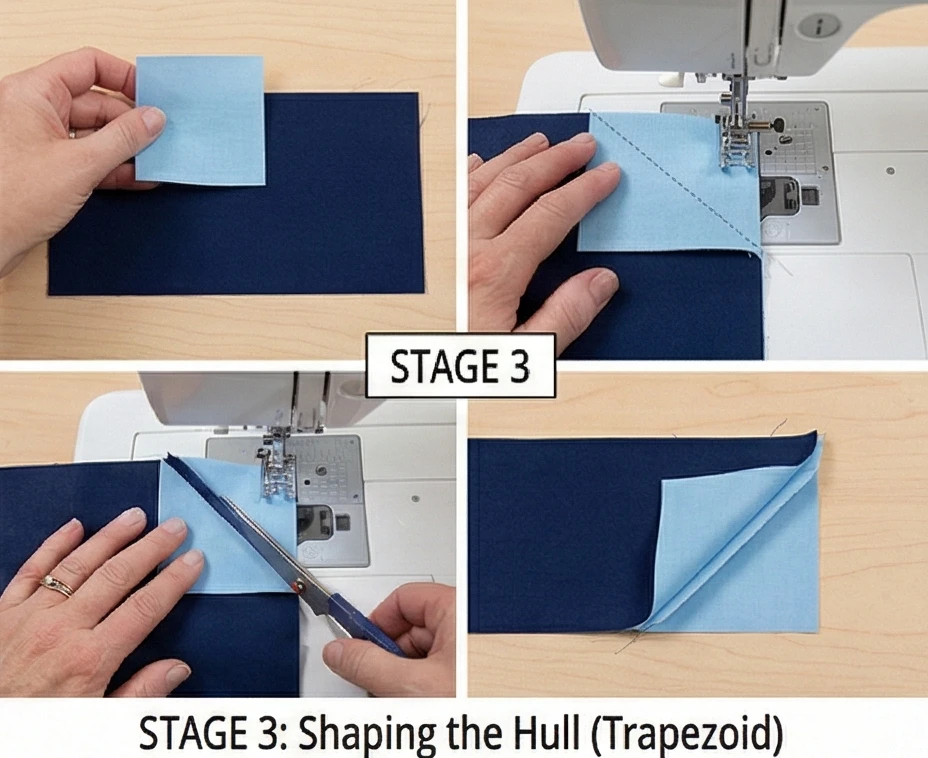
Step 3: Shaping the Hull (Trapezoid)
We need the boat to be angled, not a brick.
- Place: Take your Hull Rectangle (4.5″ x 12.5″). Place a Sky Square (4.5″) on the bottom-left corner.
- Sew: Stitch diagonally across the square (from top-left to bottom-right of the square).
- Trim & Flip: Trim the corner off 1/4″ past the seam. Flip the sky triangle open.
- Result: The hull now angles inward on the left.
- Repeat: Do the same on the bottom-right corner.
- Result: You now have a trapezoid hull shape floating in a sky background.
Step 4: Assembling the Block
- Top Row (Sky): Use the plain 4.5″ x 12.5″ Sky rectangle.
- Middle Row (Sails): Center your Sail Unit. Add sky rectangles to the left and right to make it 12.5″ wide.
- Bottom Row (Hull): Use your Hull Unit.
- Join: Sew the three rows together.
- Finish: You have a 12.5″ square block featuring a sailboat.
Step 5: The “High Seas” Layout
- Grid: Arrange the boats in a grid of 4 boats wide by 5 boats long.
- Sashing (The Waves): Between each row of boats, insert a 4.5″ wide strip of Fabric D (Blue Stripe/Teal).
- Effect: This makes the boats appear to be racing in lanes or bobbing on the ocean.

Step 6: “Stormy” Quilting
- Baste: Sandwich layers.
- Quilt:
- The Sky: Quilt light clouds or wind swirls.
- The Sails: Quilt straight lines to mimic the seams of canvas sails.
- The Water: Quilt wavy, rolling lines in the sashing strips to enhance the water effect.

Usability Note: Nautical quilts are excellent for shared rooms (bunk beds). You can make one quilt with Red boats and one with Navy boats to distinguish them while keeping the room cohesive.
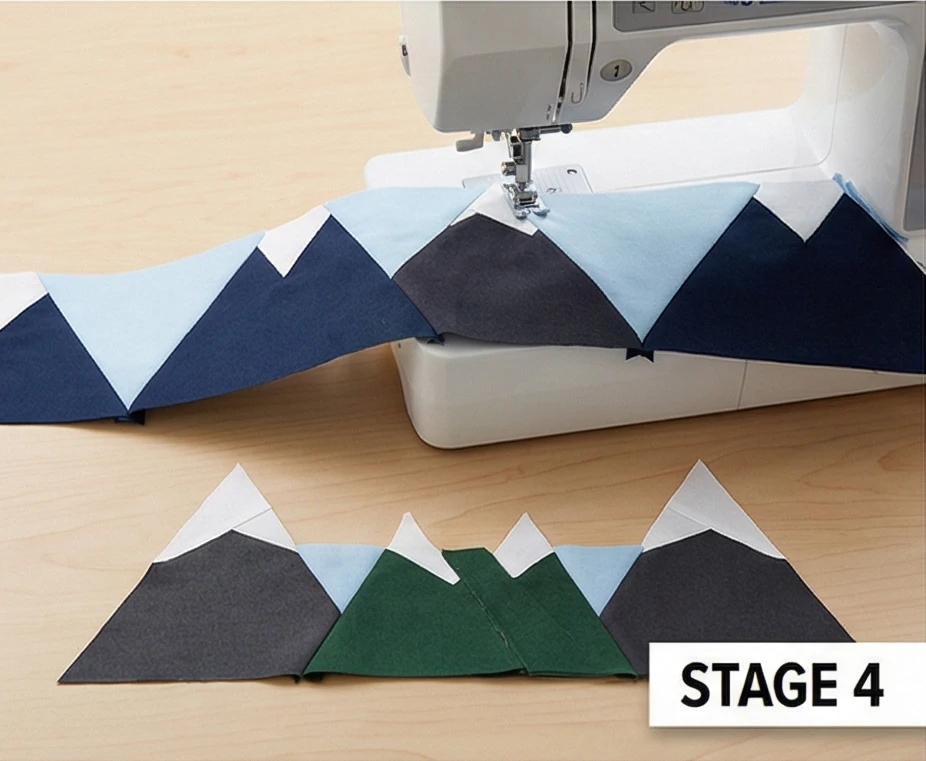
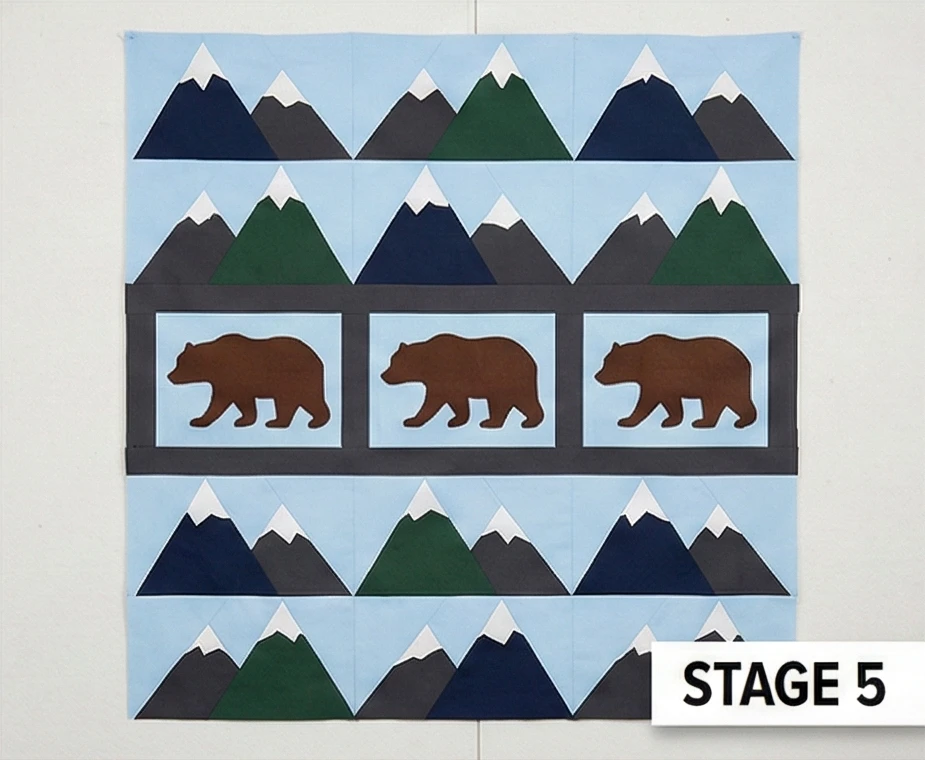
9. Woodland Bear and Mountain Quilt Themes for Nature Lovers
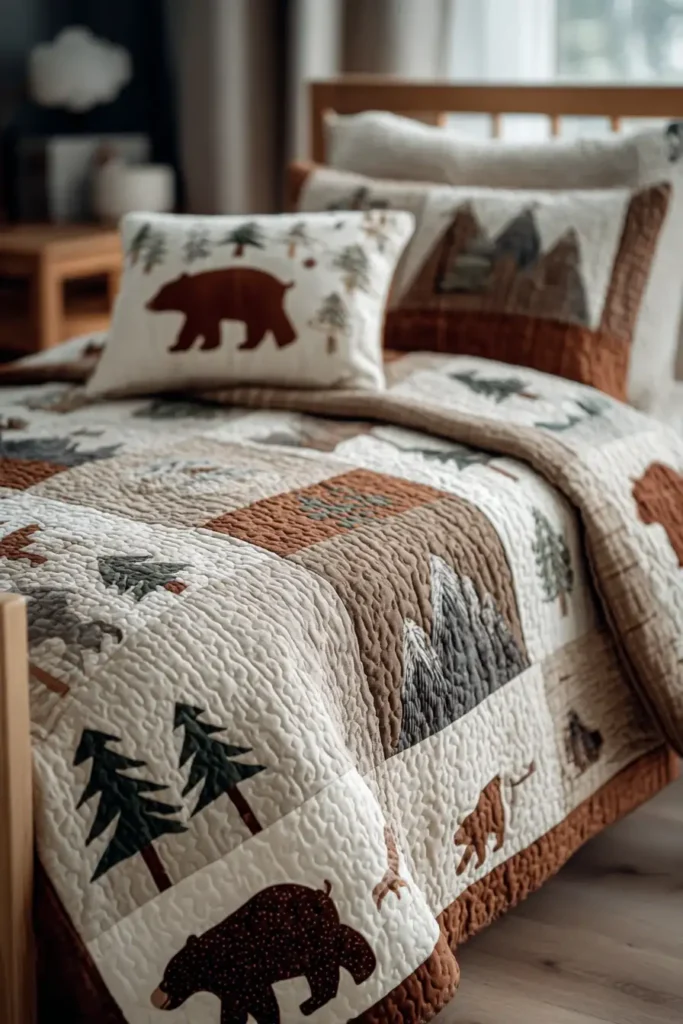
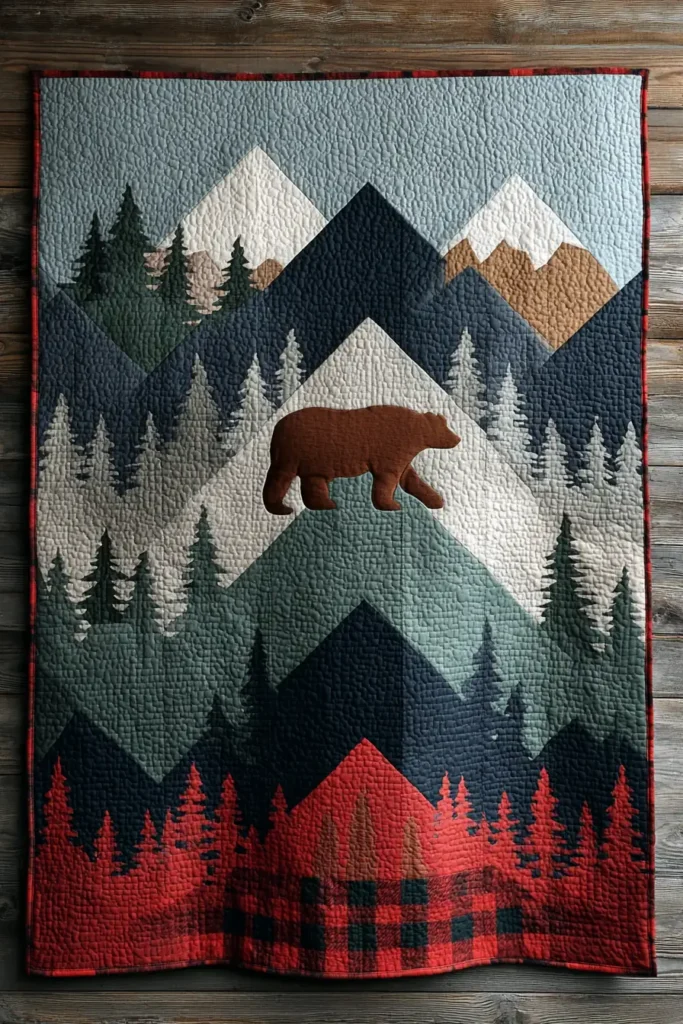
The “Alpine Trek” Bear & Mountain Quilt
For the boy who loves camping, hiking, or just the great outdoors, the “Alpine Trek” quilt brings the wilderness inside. This design creates a panoramic mountain range using large-scale Triangle Blocks, interspersed with silhouetted Bear Blocks. By using a sophisticated palette of Forest Green, Slate Blue, Mist Grey, and Brown, it captures the serenity of a national park lodge. It’s rugged, cozy, and perfect for a “mountain modern” bedroom aesthetic.
Finished Dimensions: Twin Bed Size, 68″ x 88″.
Materials Needed:
- Fabric A (Mountains): 1 yard each of Navy, Forest Green, and Charcoal.
- Fabric B (Snow Caps): 1/2 yard of White or Pale Grey.
- Fabric C (Sky/Background): 3 yards of Light Blue or Linen.
- Fabric D (The Bears): 1/2 yard of Espresso Brown or Black (Solid or subtle texture).
- Backing: 5.5 yards of red-and-black buffalo plaid flannel (for a cabin feel).
- Notions: Paper-Backed Fusible Web (HeatnBond Lite), Bear Silhouette Template.
Cultural Backstory: The bear has long been a symbol of strength and introspection in many cultures. In Native American traditions, the bear is often associated with healing and courage. In the quilting world, the “Bear’s Paw” block is a historic pattern believed to have been used on the Underground Railroad to direct escaping slaves toward food and water in the mountains. This design honors that connection to the wild.
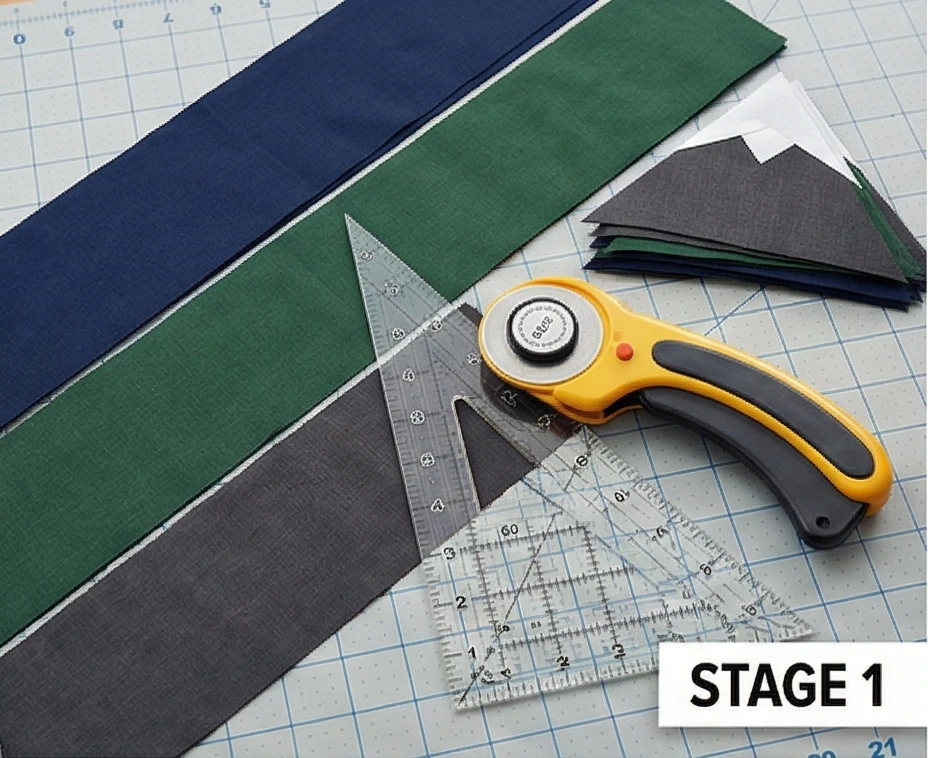
Step 1: Creating the Mountain Peaks
We will use large 60-degree triangles for a dramatic range.
- Cut Strips: Cut your Mountain fabrics (Navy, Green, Charcoal) and Sky fabric into 8.5-inch wide strips.
- Cut Triangles: Using a 60-degree triangle ruler (or a template):
- Cut Mountain Triangles from the dark fabrics.
- Cut Sky Triangles from the light fabric.
- Quantity: You need roughly 30 Mountain Triangles and 30 Sky Triangles.
- Snow Caps (Optional): To add snow, slice the top 2 inches off a Mountain Triangle. Replace it with a White Triangle of the same size. Sew back together.
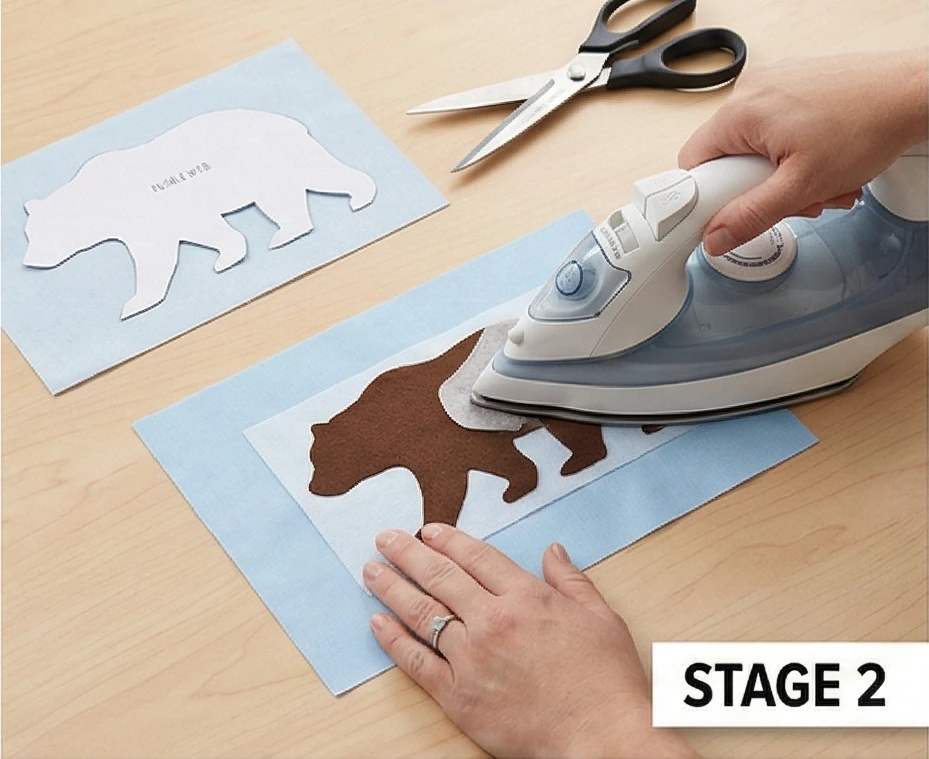
Step 2: The Bear Silhouette Block
Instead of piecing a complex bear, we will use appliqué for a clean, graphic look.
- Cut Base Squares: Cut 3 or 4 large rectangles of Sky Fabric measuring 12.5″ x 16.5″ (these will be the “meadows” where the bears stand).
- Prepare Bears:
- Print a silhouette of a walking bear (approx 8″ wide).
- Trace onto fusible web. Iron onto the back of Fabric D (Brown).
- Cut out the bear shapes.
- Fuse: Iron the bears onto the center of your Sky Rectangles.
- Placement: Place them near the bottom edge so they look like they are walking on the ground, not floating in the sky.
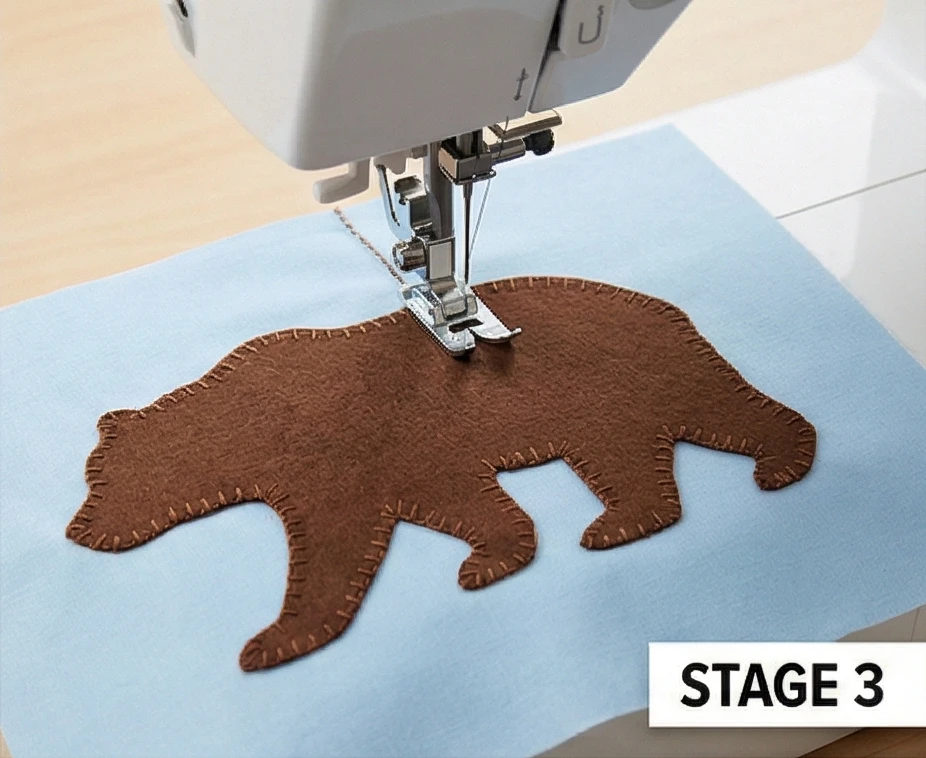
Step 3: Stitching the Appliqué
Secure the bears so they withstand washing.
- Stitch: Use a Blanket Stitch or a Tight Zig-Zag in matching brown thread around the edge of each bear.
- Detail: Keep the outline smooth. You don’t need to stitch individual claws or fur details; the silhouette shape is powerful enough on its own.
Step 4: Assembling the Mountain Ranges
We are building horizontal rows of peaks.
- Sew Rows: Stitch the Mountain Triangles and Sky Triangles together in rows.
- Pattern: [Mountain] – [Sky (inverted)] – [Mountain] – [Sky (inverted)]…
- Result: A jagged strip of peaks.
- Make 3 Mountain Rows: Vary the colors (e.g., a Navy row, a Green row, a Charcoal row).
Step 5: The Scenic Layout
Arrange the quilt like a landscape painting.
- Top Section: Place 1 or 2 rows of Mountains at the top.
- Middle Section: Place your Bear Blocks in a horizontal row. You may need to add vertical sashing between them or extra Sky blocks to make the row width match the mountain rows.
- Bottom Section: Place the remaining Mountain rows at the bottom.
- Join: Sew the sections together.
- Visual: It should look like bears walking through a valley between mountain ranges.
Step 6: “Topography” Quilting
Use the quilting lines to map the terrain.
- Baste: Sandwich layers.
- Quilt:
- Sky: Quilt horizontal wavy lines (wind).
- Mountains: Quilt angular lines that echo the shape of the triangles (chevron style).
- Bears: Do not quilt over the bears; let them pop. Quilt dense “grass” texture (small vertical jagged lines) under their feet.
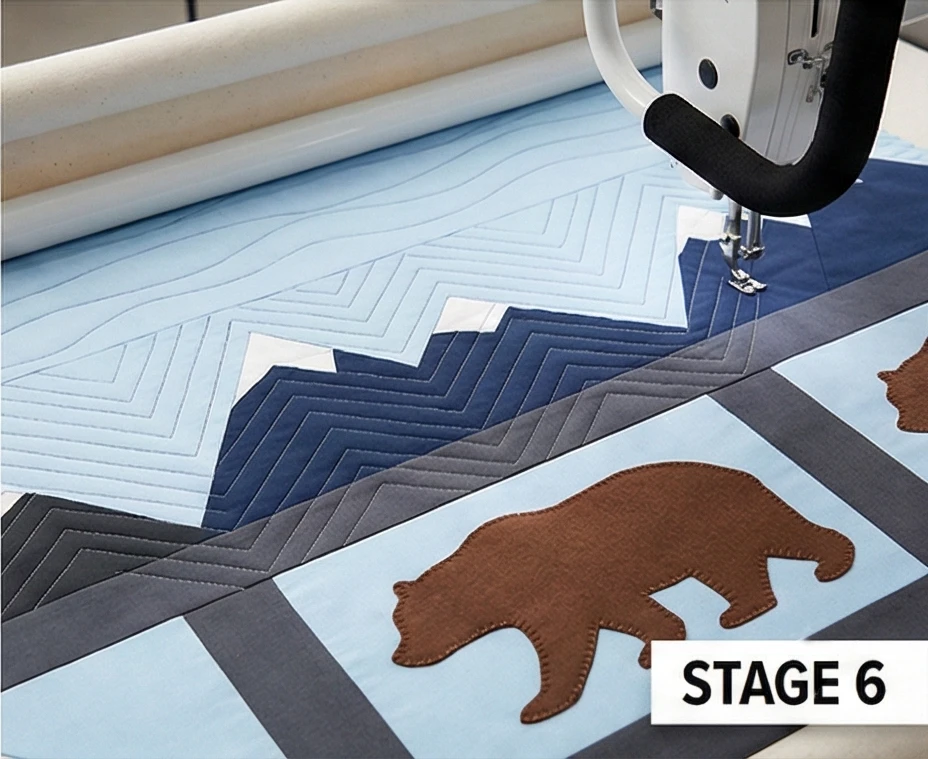
Usability Note: Using a flannel backing makes this quilt significantly warmer. It becomes a “Winter Weight” quilt, ideal for drafty rooms or actual camping trips. If using flannel, remember to pre-wash it, as it shrinks more than the cotton top.
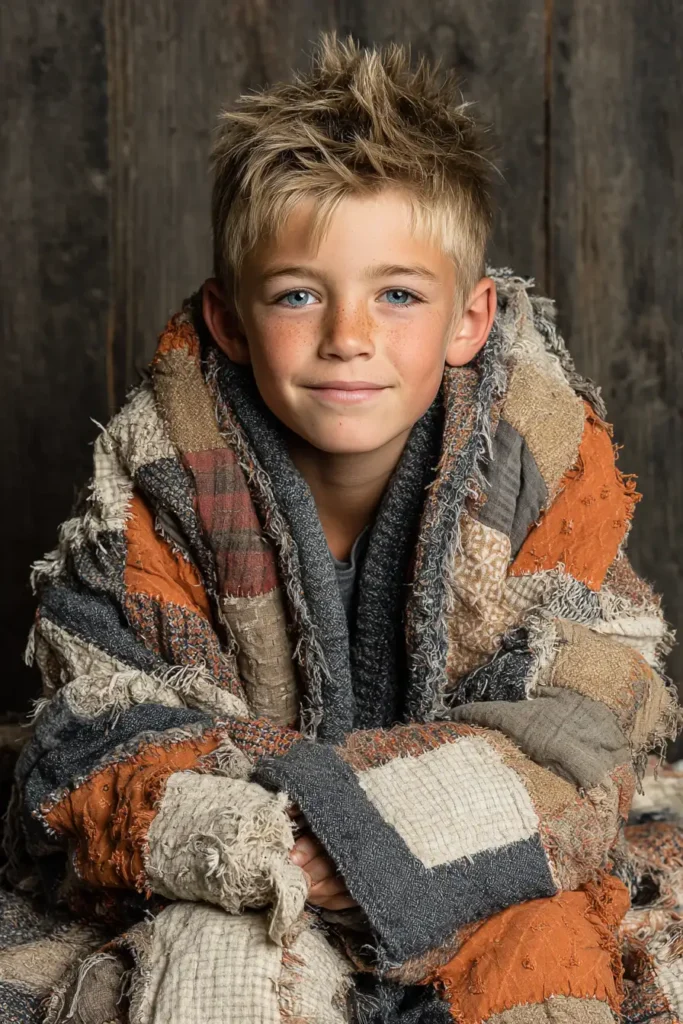
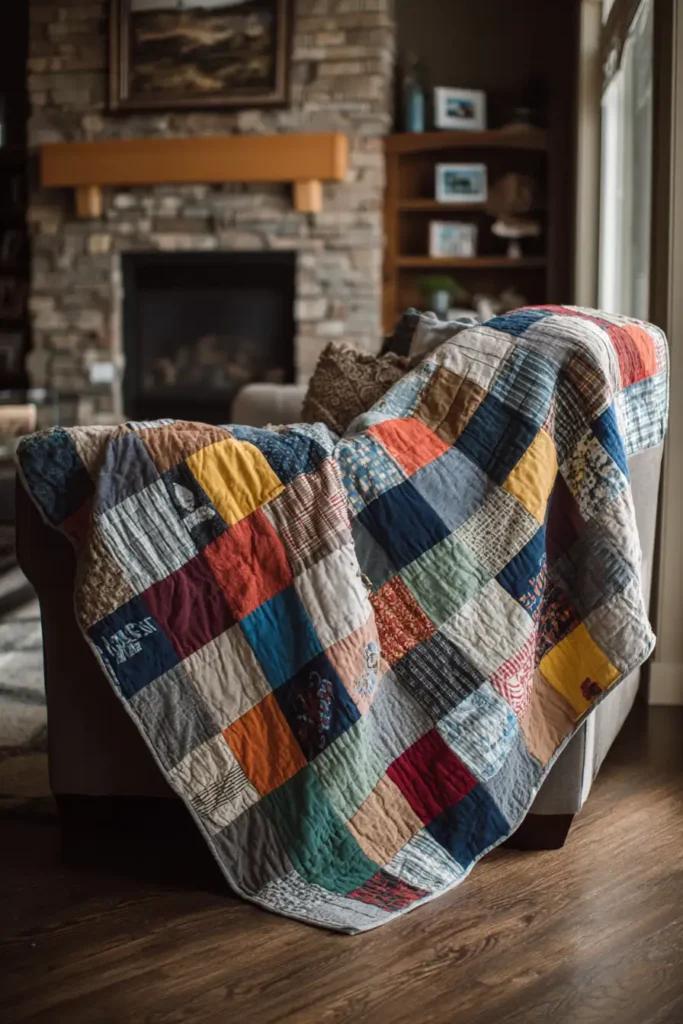
10. Memory T-Shirt Quilt Ideas: The Perfect Grandparent Gift
The “Generations” Grid T-Shirt Quilt
There is no gift more personal for a grandparent than a quilt made from the shirts of their grandchildren. Whether it’s baby onesies, team jerseys, or shirts from family vacations, this quilt wraps them in memories. The “Generations” Grid pattern elevates the standard t-shirt quilt by using Sashing with Cornerstones. This not only stabilizes stretchy t-shirts but also creates a polished, gallery-style layout that prevents the quilt from looking like a chaotic ragbag. It is elegant enough to drape over a living room sofa and durable enough for daily naps.
Finished Dimensions: Lap/Throw Size, 56″ x 70″ (Perfect for a recliner or sofa).
Materials Needed:
- Fabric A (The Shirts): 20 T-shirts (washed, no fabric softener). Tip: Mix shirts from different grandkids to make it a “cousin quilt.”
- Fabric B (Sashing): 1.5 yards of Navy, Charcoal, or Chocolate Brown (Dark colors frame graphics best).
- Fabric C (Cornerstones): 1/4 yard of a contrasting color (Gold, Red, or a sentimental fabric like Grandpa’s old flannel shirt).
- Interfacing: 5 yards of Lightweight Fusible Interfacing (Pellon SF101 or similar). Crucial: Prevents t-shirts from stretching.
- Backing: 4 yards of soft Fleece or Flannel.
- Notions: 12.5″ square ruler, rotary cutter, press cloth.
Cultural Backstory: The T-shirt quilt is a distinctly American folk art that emerged in the late 20th century alongside the rise of the “graphic tee.” Previously, quilts were made from woven scraps. The invention of fusible interfacing allowed quilters to mix stretchy knits with stable cottons, turning drawers full of outgrown clothes into functional family archives.
Step 1: Stabilizing the Memories
You cannot sew stretchy knit fabric to cotton without this step.
- Rough Cut: Cut the logo panel out of each t-shirt. Leave plenty of room around the image (cut it roughly 14″ x 14″). Do not cut to the final size yet.
- Fuse: Iron the Fusible Interfacing onto the wrong side (back) of the t-shirt panel.
- Tip: Use a press cloth (a scrap of cotton) between the iron and the t-shirt ink. Direct heat can melt rubberized logos onto your iron!
- Cool: Let the fabric cool completely. It should now feel like sturdy paper or stiff cotton.
Step 2: Cutting Uniform Blocks
Uniformity creates elegance.
- Trim: Using your 12.5″ square ruler, center the logo and cut the block to exactly 12.5″ x 12.5″.
- Quantity: You need 20 blocks for a 4 x 5 layout.
- Small Logos: If a logo is tiny (e.g., a breast-pocket crest), center it. The negative space around it looks modern and clean.
Step 3: Cutting the Architecture (Sashing)
Sashing separates the busy images, giving the eye a place to rest.
- Sashing Strips: From Fabric B (Dark), cut 31 strips measuring 2.5″ x 12.5″.
- Cornerstones: From Fabric C (Accent), cut 12 squares measuring 2.5″ x 2.5″.
Step 4: Constructing the Block Rows
We build the quilt in horizontal strips.
- Sew: Stitch a Sashing Strip to the right side of Block 1. Then sew Block 2 to the other side of that strip.
- Pattern: [Block] – [Sash] – [Block] – [Sash] – [Block] – [Sash] – [Block].
- Repeat: Make 5 Rows of 4 blocks each.
- Press: Press seams toward the sashing (the dark cotton) to reduce bulk.
Step 5: Constructing the Sashing Rows
These are the horizontal dividers.
- Sew: Stitch a Sashing Strip (12.5″) to a Cornerstone (2.5″).
- Pattern: [Sash] – [Cornerstone] – [Sash] – [Cornerstone] – [Sash] – [Cornerstone] – [Sash].
- Repeat: Make 4 Sashing Rows.

Step 6: The Final Assembly
- Join: Alternate sewing a Block Row and a Sashing Row together.
- Pinning: You must pin at every intersection. Align the vertical sashing of the block row perfectly with the cornerstone of the sashing row. This alignment is what makes the quilt look professional.
- Press: Press long horizontal seams open or to one side.
Step 7: “Meander” Quilting
Avoid the logos.
- Baste: Sandwich layers (Top + Batting + Backing).
- Quilt: Use a Stipple or Meander stitch (puzzle piece shapes).
- Strategy: Quilt heavily in the sashing and plain areas of the t-shirts. Avoid stitching through thick, rubbery logos, as this can damage needles and make the stitching look messy.
- Binding: Finish with a durable machine binding in Fabric B.
Usability Note: Because t-shirt quilts contain interfacing and ink, they can be stiff. Using high-loft polyester batting or a plush fleece backing helps mitigate this, ensuring the quilt remains soft enough for Grandpa to nap under.
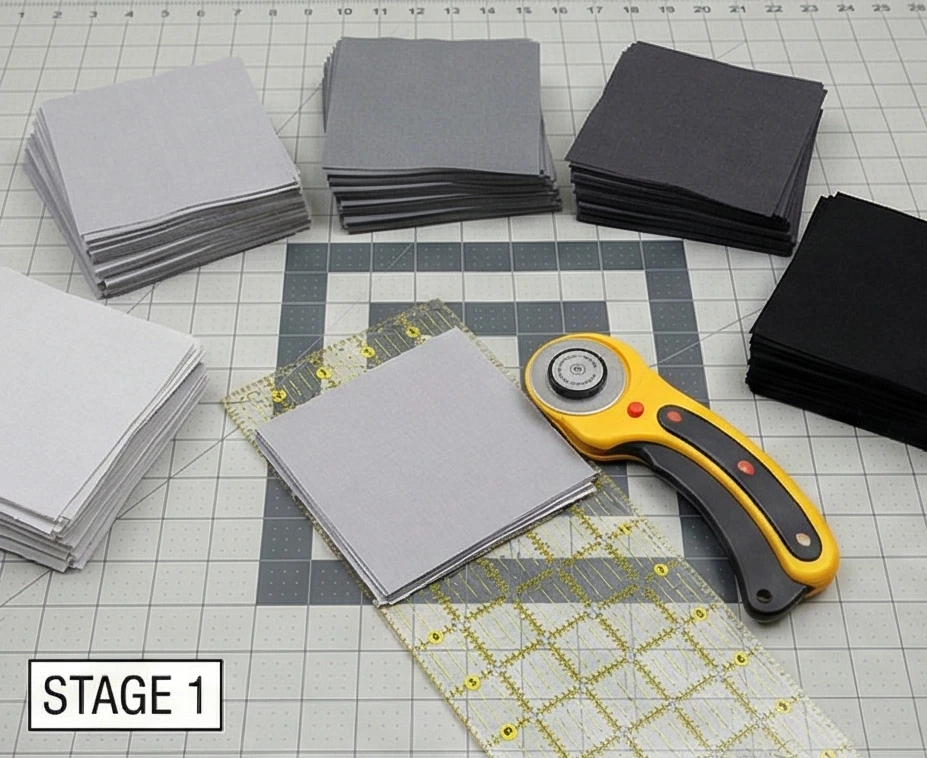
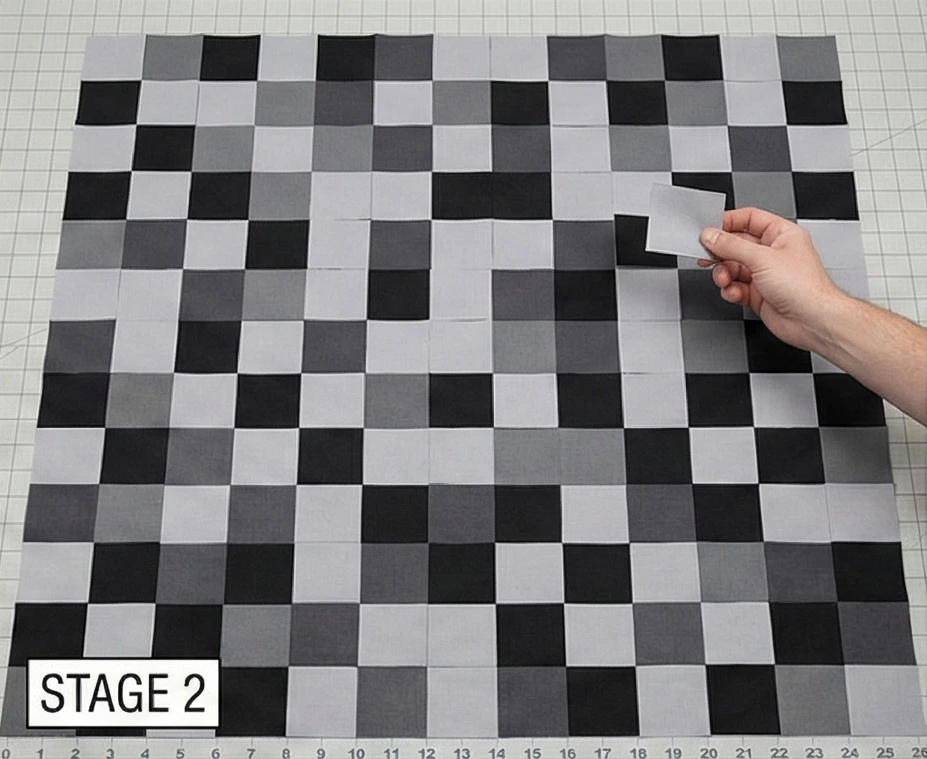
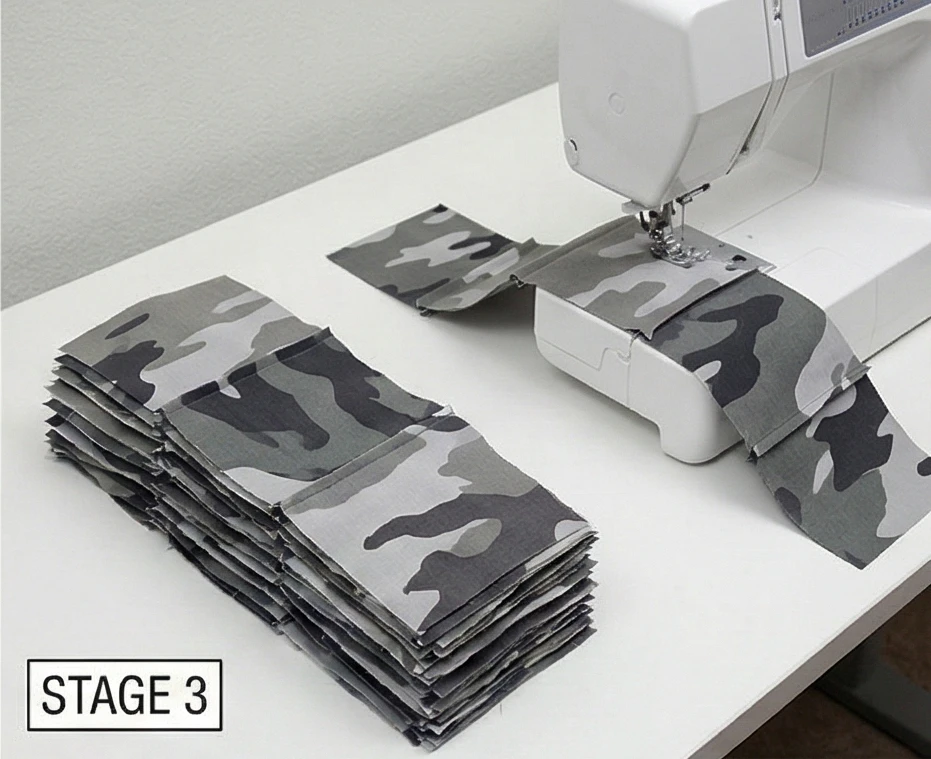
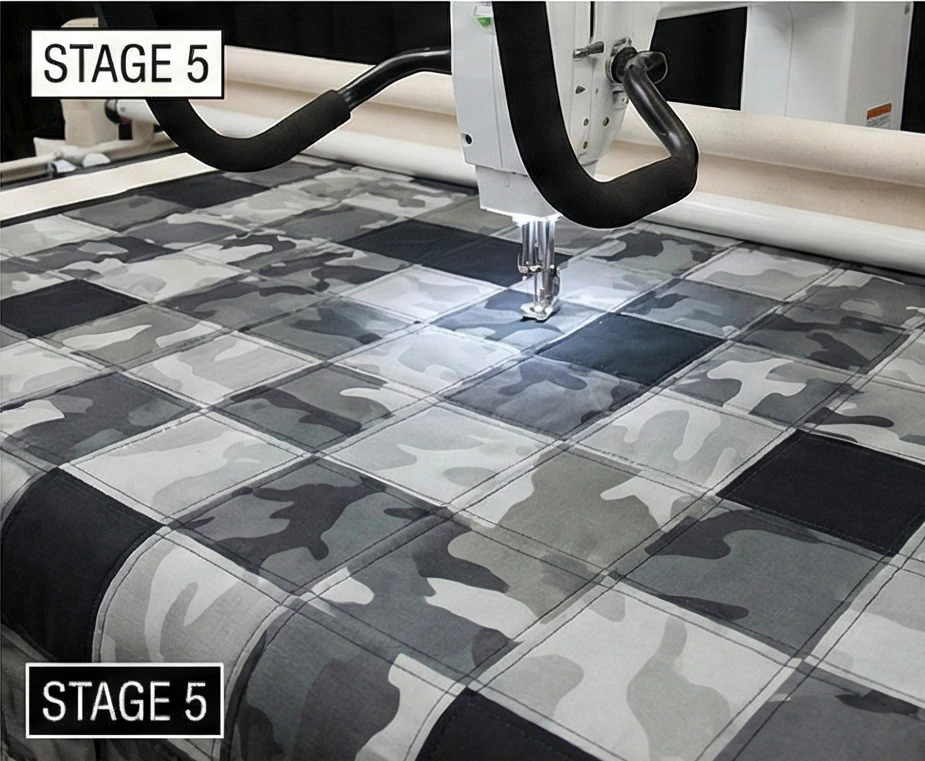
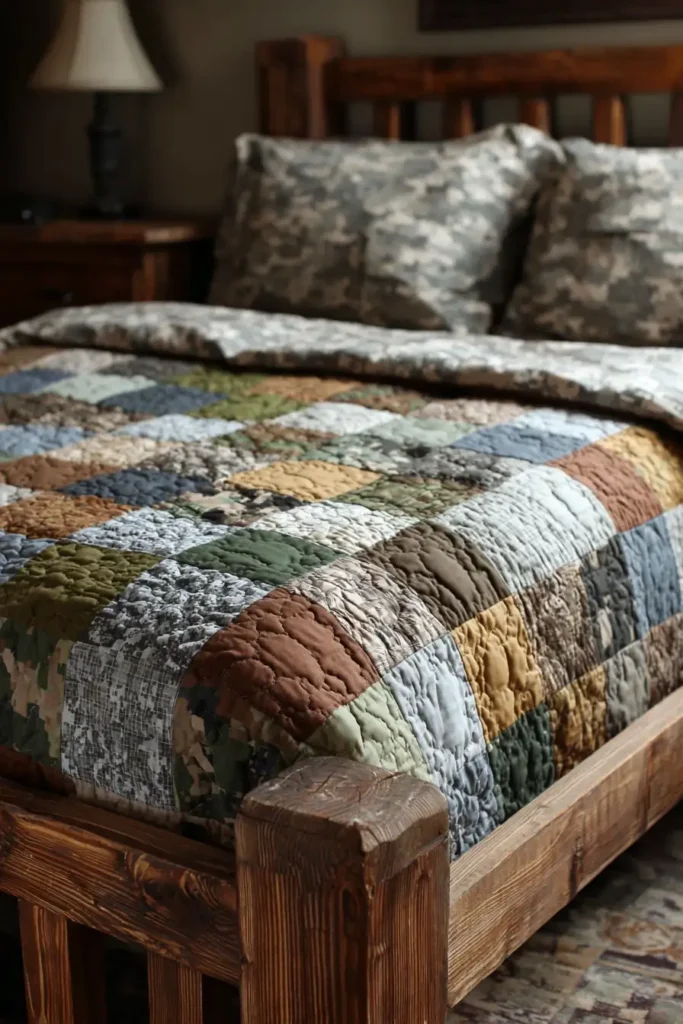
11. Cool Camouflage Patchwork Quilt Ideas for Hideout Forts
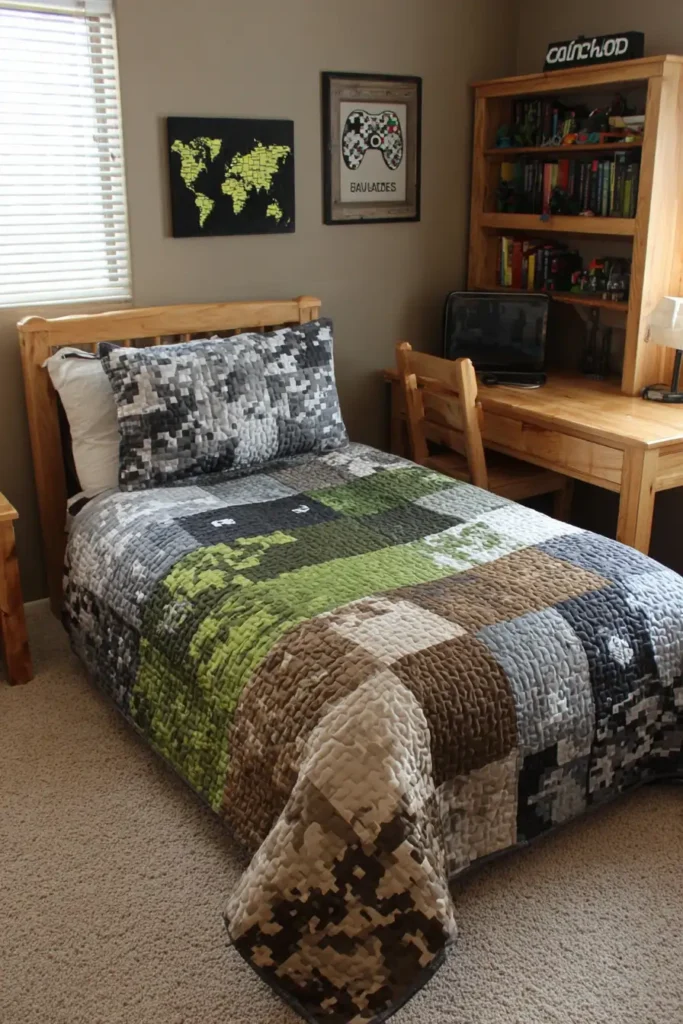
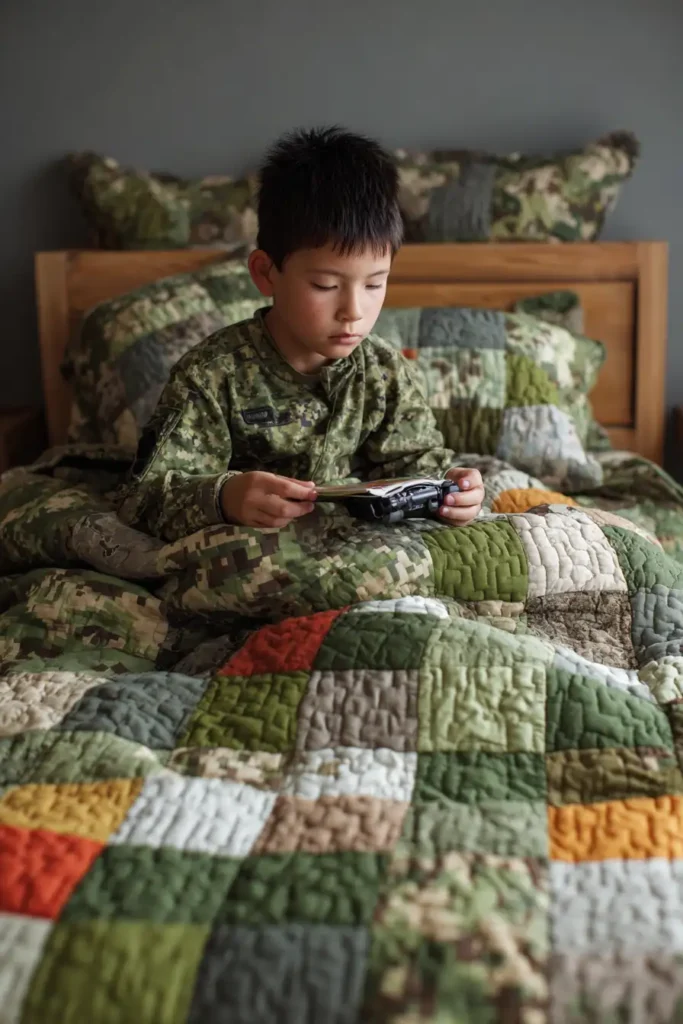
The “Shadow Ops” Digital Camo Quilt
Standard “blob” camouflage can sometimes look dated, but Digital Camo (pixelated camouflage) is geometric, modern, and incredibly cool for boys of all ages. The “Shadow Ops” pattern uses a random arrangement of squares in four shades of Urban Grey (or Woodland Green) to create a disruption pattern. Because this quilt is designed for “Hideout Forts,” it includes a special structural feature: Reinforced Corner Loops. These allow the quilt to be tied to bedposts, chairs, or curtain rods to create a canopy without sliding off.
Finished Dimensions: Twin Bed Size, 66″ x 90″.
Materials Needed:
- The Camo Palette (4 Shades): You need roughly 1.25 yards of each color:
- Light Grey (or Tan).
- Medium Grey (or Olive).
- Charcoal (or Brown).
- Black.
- Backing: 5.5 yards of heavy-duty Cotton Canvas or Denim. Note: Using canvas makes the quilt heavy and opaque—perfect for a dark, secure fort.
- Batting: Low-loft cotton (keeps it flexible for draping).
- Notions: 1 yard of Nylon Webbing or Twill Tape (for the fort loops).
Cultural Backstory: Camouflage was developed during WWI by the French army, who hired artists (called “camoufleurs”) to paint abstract patterns on equipment to hide it from aerial photography. Digital camouflage, used by modern militaries, relies on “dithering”—using pixelated squares to blur edges so the eye cannot focus on the object’s outline.
Step 1: Cutting the Pixels
We need uniform squares to create the digital grid.
- Cut Strips: Cut all four of your fabrics into strips measuring 6.5 inches wide.
- Sub-Cut Squares: Cut those strips into 6.5-inch squares.
- Quantity: You need a total of 165 squares. (Approx 41-42 squares of each of the 4 colors).
- Finished Size: These will sew down to 6-inch finished pixels.
Step 2: The “Random” Layout
True randomness is harder than it looks. Avoid clumps.
- Grid: You are building a grid that is 11 squares wide by 15 squares long.
- Shuffle: Mix all squares in a laundry basket. Pull them out one by one and lay them out.
- The Squint Test: Step back and squint your eyes. If you see a giant “blob” of black or a long diagonal line of light grey, swap a few squares. The goal is “noise”—a balanced, scattered mix that confuses the eye.
Step 3: Chain Piecing the Rows
Speed up the assembly.
- Stack: Stack your layout into 15 piles (one for each horizontal row). Label them “Row 1,” “Row 2,” etc.
- Sew: Sew the 11 squares of Row 1 together using a 1/4 inch seam allowance. Repeat for all 15 rows.
- Pressing:
- Odd Rows (1, 3, 5…): Press seams to the Left.
- Even Rows (2, 4, 6…): Press seams to the Right.
- Why: This allows the seams to “nest” (lock together flat) when you join the rows.
Step 4: Assembling the Field
- Join Rows: Pin Row 1 to Row 2. Match the intersections carefully.
- Sew: Stitch the rows together.
- Tip: Because there are many seams, use many pins. If the intersections drift, the “pixel” effect gets ruined.

Step 5: “Grid Lock” Quilting
Keep it geometric.
- Baste: Sandwich the Top, Batting, and Canvas Backing.
- Quilt: Stitch a simple grid.
- Vertical: Stitch “in the ditch” (in the seam line) between every column.
- Horizontal: Stitch “in the ditch” between every row.
- Diagonal (Optional): For extra durability, stitch a single large “X” across the entire quilt.
Step 6: The “Fort-Ready” Binding (The Special Feature)
This step transforms it from a bed cover to a construction tool.
- Cut Loops: Cut your Nylon Webbing/Twill Tape into four 8-inch pieces. Fold them in half to form loops.
- Baste Loops: Before binding, pin one loop at each of the four corners of the quilt on the back side. Baste them in place 1/8″ from the edge.
- Bind: Apply a sturdy black binding around the quilt.
- Reinforce: When you sew over the corners where the loops are, backstitch 3 times. These loops will take tension when tied to bunk beds or chairs.
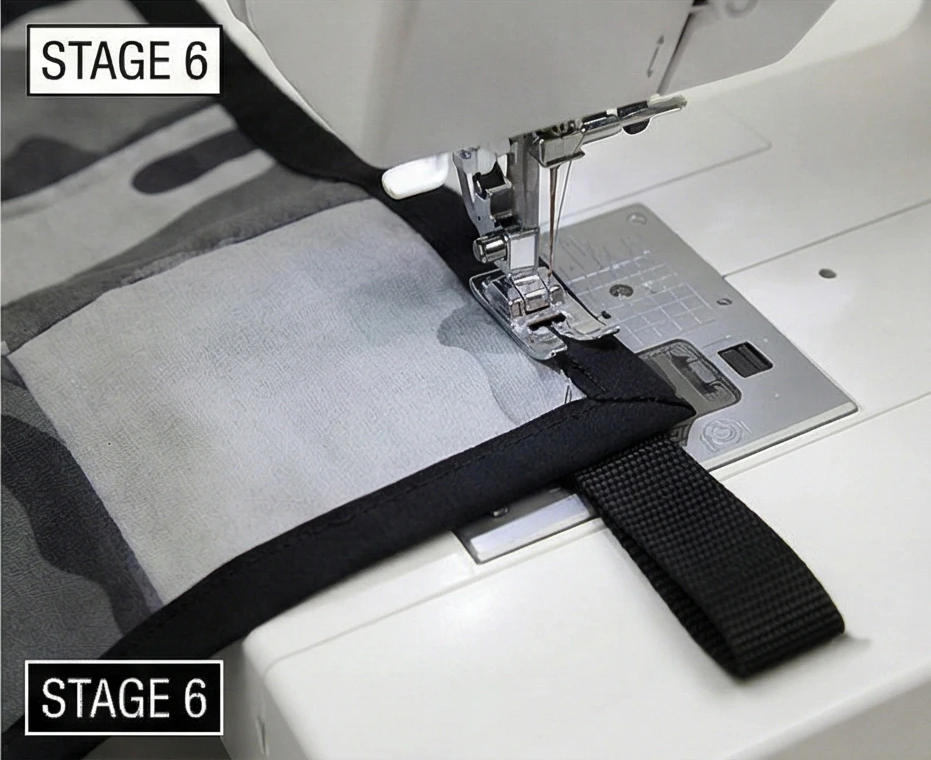
Usability Note: The canvas backing makes this quilt much heavier and stiffer than a normal quilt. This is intentional! A heavy quilt creates a stronger fort because it doesn’t sag in the middle, and the canvas blocks 100% of light for a “blackout” hideout experience.

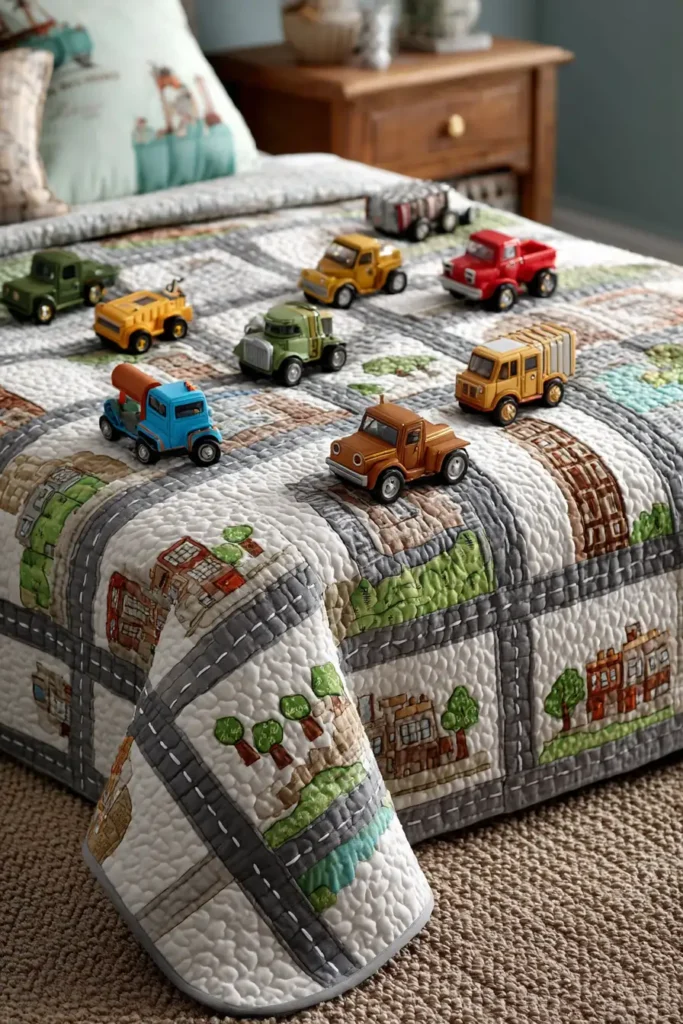
12. Transportation Quilt Designs: Trucks, Trains, and Planes
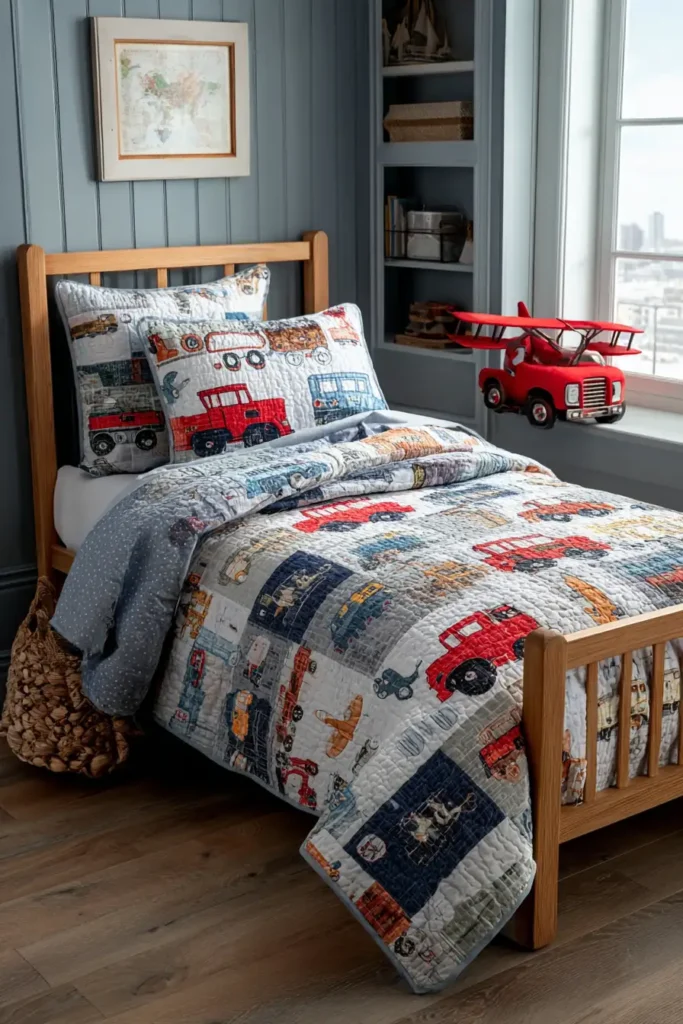
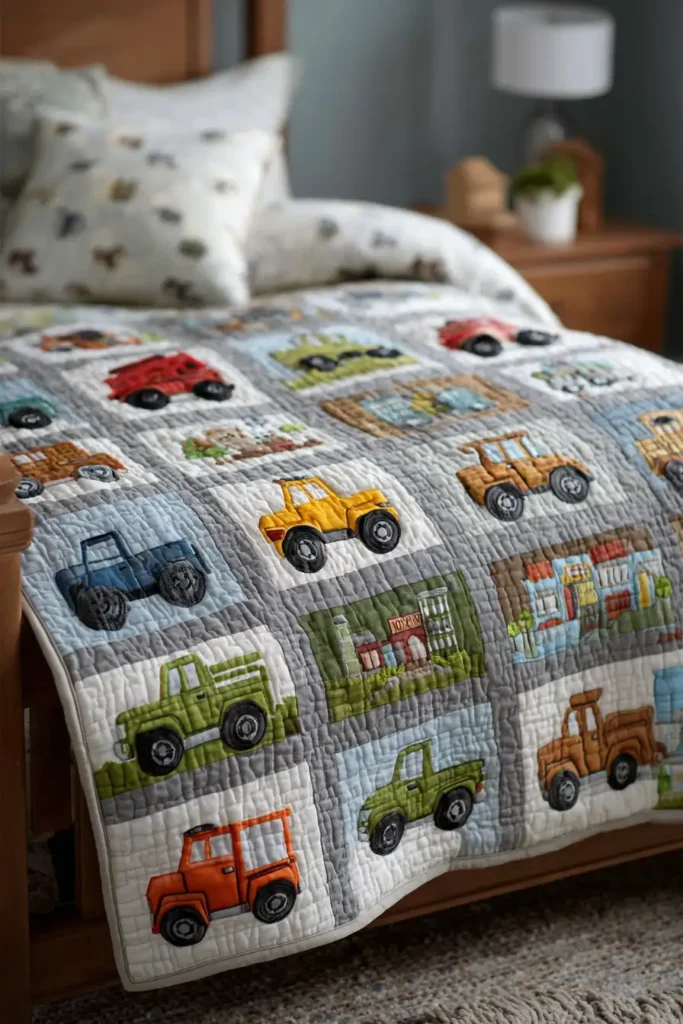
The “Highways & Byways” Interactive Road Map Quilt
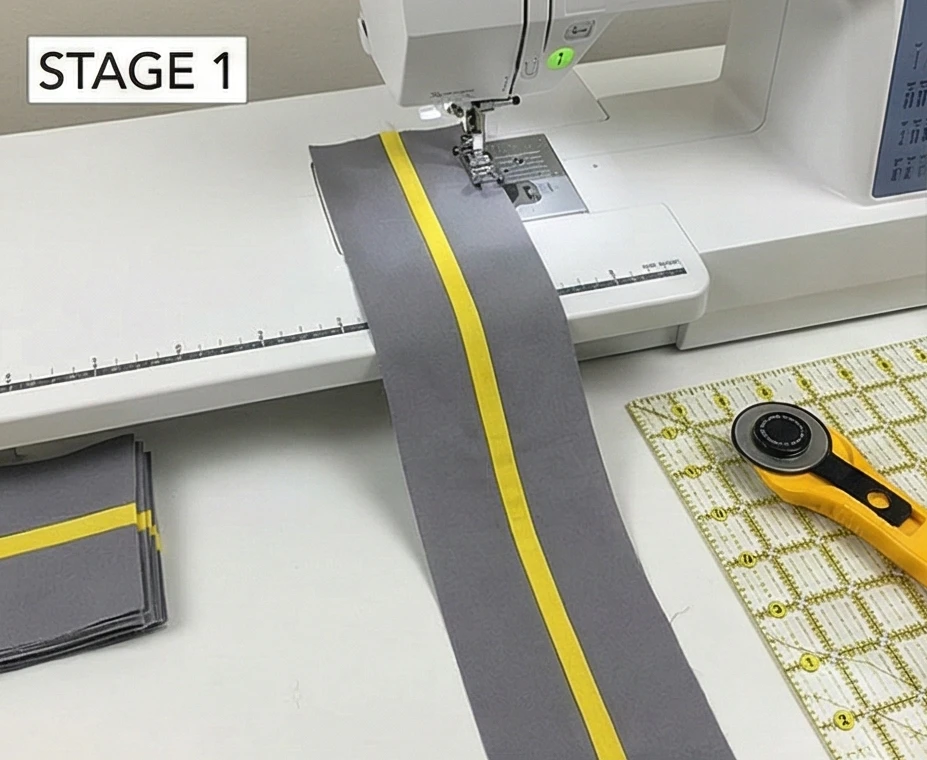
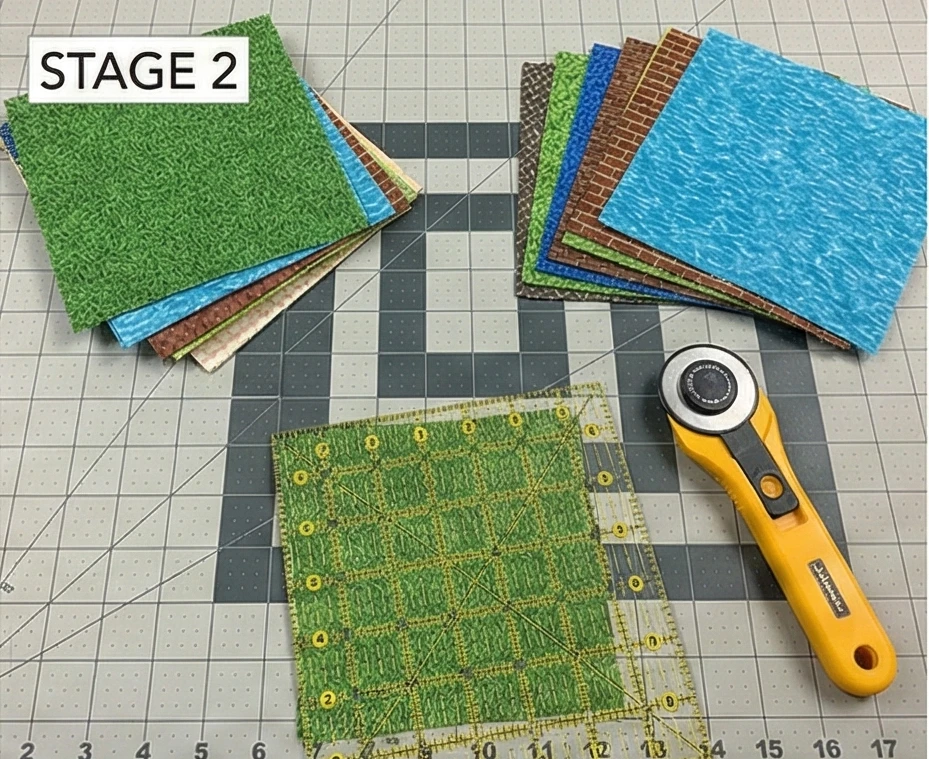
For a little boy, a quilt isn’t just for sleeping—it’s a landscape for play. The “Highways & Byways” pattern transforms the bed into a sprawling city grid. Instead of appliquéing permanent static trucks onto the quilt, this design constructs a literal Road Map using Grey sashing strips with “Dash Line” centers. The blocks between the roads are “City Zones” (Grass, Water, Construction Dirt) where he can drive his actual Hot Wheels or Matchbox toy cars. It is an interactive play mat that doubles as warm bedding.
Finished Dimensions: Twin Bed Size, 60″ x 84″.
Materials Needed:
- Fabric A (The Roads): 2 yards of Solid Grey.
- Fabric B (Road Lines): 1/4 yard of Yellow or White.
- Fabric C (The City Zones): 10-12 Fat Quarters of textural prints (Green for parks, Blue for lakes, Brown brick for buildings, Caution Yellow for construction zones).
- Backing: 5.5 yards of a traffic sign print or tire tread print.
- Batting: Firm Cotton (helps the cars roll better than fluffy poly).
- Notions: Rotary cutter, 6.5″ square ruler.
Cultural Backstory: The “Road Rug” (often called a City Play Mat) is a staple of 20th-century childhood. It taps into the Montessori concept of “Small World Play,” where children act out real-world scenarios in miniature to understand their environment. By translating this concept into a quilt, you create a portable world that can travel to Grandma’s house or fold up instantly.
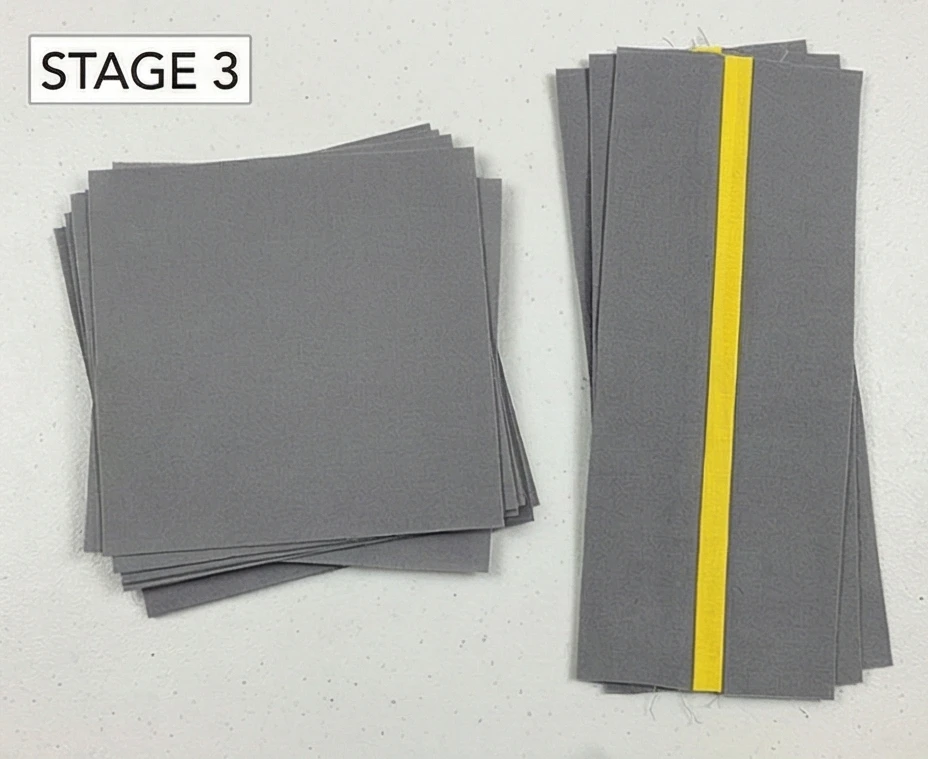
Step 1: Creating the “Dash Line” Strip Sets
We need to make the yellow lines in the middle of the grey roads.
- Cut Strips:
- Cut several long strips of Grey (Fabric A) measuring 2.5 inches wide.
- Cut several long strips of Yellow (Fabric B) measuring 1 inch wide.
- Sew: Sew a Grey strip to the left side of a Yellow strip. Sew another Grey strip to the right side of the Yellow strip.
- Result: A strip set that looks like a road: Grey-Yellow-Grey.
- Sub-Cut: Cut this long strip set into 6.5-inch lengths.
- Yield: These are your vertical road units. You need roughly 30 vertical road units.
Step 2: Cutting the “City Blocks”
The spaces between the roads.
- Cut Squares: From your City Zone fabrics (Fabric C), cut 60 squares measuring 6.5″ x 6.5″.
- Variety: Mix them up! Have a “Park Block” (Green), a “Lake Block” (Blue), and a “Construction Block” (Brown/Caution).
Step 3: Constructing the Intersections (The Roundabouts)
Where roads cross.
- Cut Grey Squares: Cut 30 squares of Solid Grey measuring 6.5″ x 6.5″.
- Why: You could piece a complex 4-way intersection with yellow lines crossing, but a plain grey square acts as a “Town Square” or intersection that is much easier to sew and less busy.
Step 4: The Row Assembly
We are building a grid.
- Block Rows (The City): Sew a City Block (6.5″) to a Vertical Road Unit (6.5″). Repeat across the width.
- Pattern: [City] – [Road] – [City] – [Road] – [City].
- Sashing Rows (The Cross Streets): Sew a Vertical Road Unit (turned sideways to be horizontal) to a Grey Intersection Square.
- Pattern: [Road (Horizontal)] – [Intersection] – [Road (Horizontal)] – [Intersection].
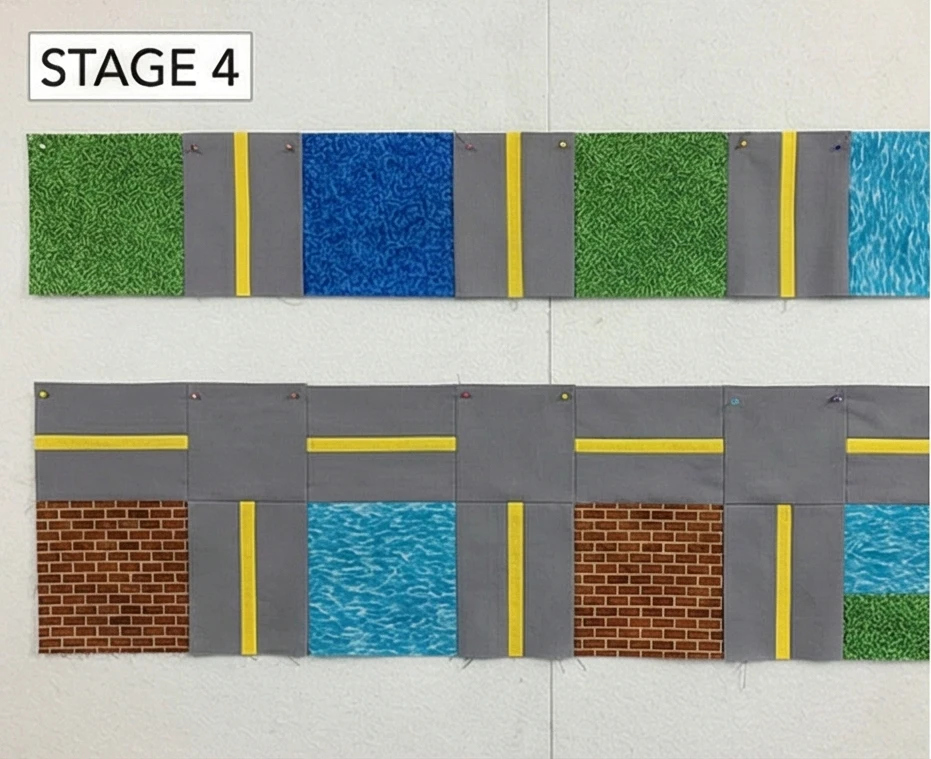
Step 5: Joining the Map
- Join: Sew the Block Rows and Sashing Rows together alternately.
- Alignment: Match the seams carefully. The Yellow lines of the vertical roads won’t touch the horizontal roads (they are interrupted by the intersection squares), creating a clean, realistic city grid look.

Step 6: Appliqué “Traffic Signs” (Optional)
Add detail without clutter.
- Stop Signs: Cut small octagons from Red fabric. Appliqué them near a few intersections.
- Ponds: Appliqué a curvy blue “bean” shape onto a Green block to make a duck pond.
- Note: Do not sew fabric cars onto the quilt. Let the child use their own toys. This keeps the quilt comfortable for sleeping (no hard lumps) and extends the play value.
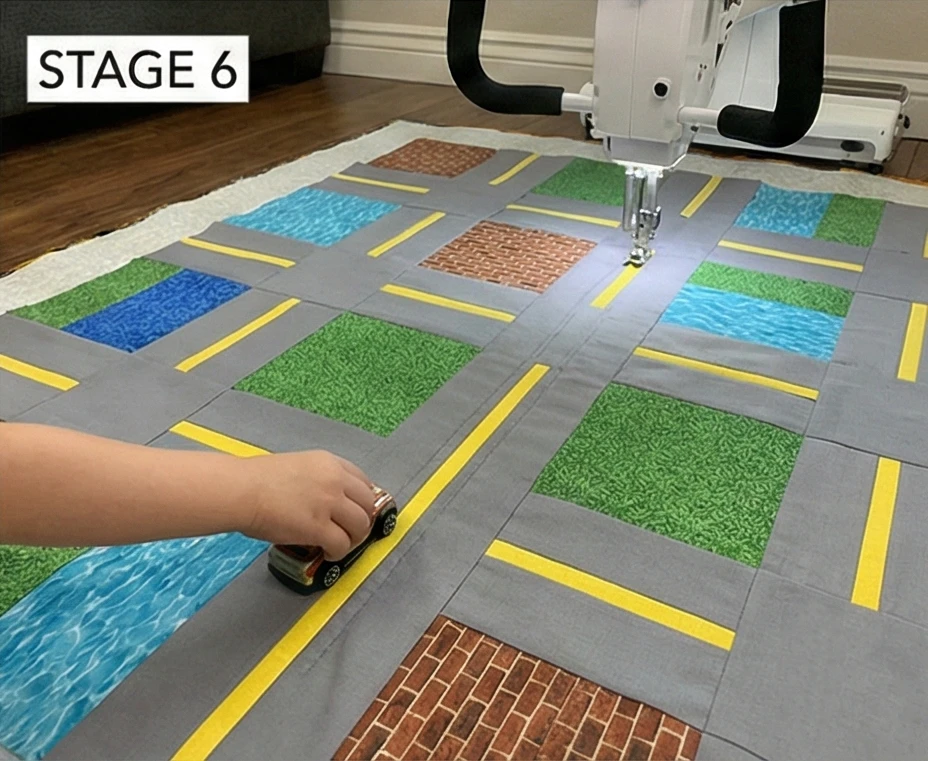
Step 7: “Off-Road” Quilting
- Baste: Sandwich layers.
- Quilt:
- The Roads: Stitch “in the ditch” alongside the yellow center lines to make them pop.
- The City Blocks: Use a free-motion “stipple” or simple “X” across the blocks to keep the batting flat so toy cars don’t tip over.
Usability Note: Because this quilt is meant to be played on with toy cars (which might have dirty wheels), choose a durable cotton batting that can withstand frequent hot washing. Avoid delicate fabrics like silk or loose-weave linen.
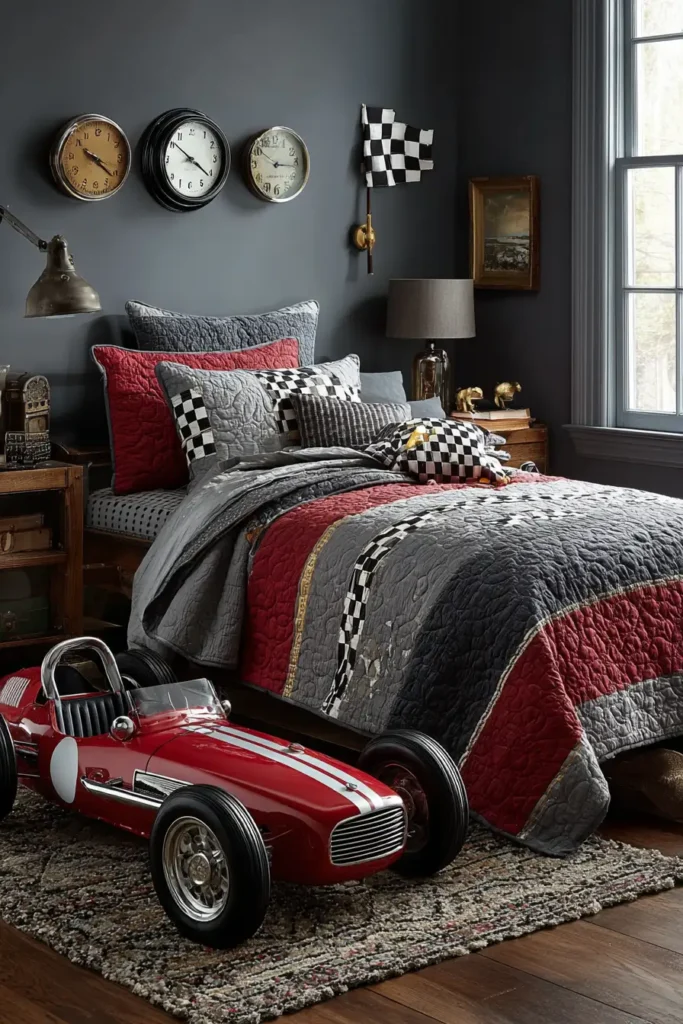
13. Stylish Race Car Quilt Designs for Boys’ Bed Throws


The “Grand Prix” Racing Stripe Quilt
For a boy who loves speed, nothing beats the sleek aesthetic of a vintage race car. Rather than covering the bed in cartoon cars, the “Grand Prix” pattern mimics the livery of a high-performance vehicle (think 1960s Shelby or Ferrari). It features a bold Vertical Racing Stripe flanked by a classic Checkered Flag border, set against a cool Silver Grey or Charcoal background. This design is aerodynamic, masculine, and stylish enough to stay on his bed from his Hot Wheels phase through his driver’s license.
Finished Dimensions: Twin Bed Size, 64″ x 88″.
Materials Needed:
- Fabric A (Background): 3.5 yards of Silver Grey or Charcoal Solid.
- Fabric B (Racing Stripe): 1 yard of Bright Red, Cobalt Blue, or Canary Yellow.
- Fabric C (Checkers Dark): 1/2 yard of Solid Black.
- Fabric D (Checkers Light): 1/2 yard of Solid White.
- Backing: 5.5 yards of a tire tread print or speedometer print.
- Notions: Rotary cutter, quilting ruler.
Cultural Backstory: The “Racing Stripe” (originally called Le Mans stripes) was introduced in the 1950s by the Cunningham racing team to help spectators identify their white cars during the blur of the race. The Checkered Flag, used to signal the end of a race, is an iconic symbol of victory. Combining these two elements creates a design that is universally recognized as “fast.”
Step 1: Making the Checkered Strip (Strip Piecing)
We need two long vertical strips of a checkerboard pattern. Strip piecing makes this fast.
- Cut Strips:
- Cut 5 strips of Fabric C (Black) measuring 2.5″ x WOF (Width of Fabric).
- Cut 5 strips of Fabric D (White) measuring 2.5″ x WOF.
- Sew Strip Sets: Sew a Black strip to a White strip lengthwise. Press the seam toward the Black.
- Result: You have long strips of black-and-white (4.5″ wide). Make 5 of these sets.
- Sub-Cut: Cross-cut these strip sets into 2.5-inch wide segments.
- Yield: You now have many small rectangles made of two squares (one black, one white).
Step 2: Assembling the Checkerboard Columns
- Arrange: Take two segments. Flip one upside down so the colors alternate (Black/White over White/Black).
- Sew: Stitch them together to form a 4-patch unit.
- Continue: Keep sewing segments together until you have two long vertical columns that are roughly 88 inches long.
- Note: You will need to piece multiple 4-patch units together to get the full length.
Step 3: Preparing the Racing Stripe
The bold center line.
- Cut Stripe: From Fabric B (Red), cut 3 strips measuring 6.5″ wide x WOF.
- Join: Sew the strips end-to-end (mitered or straight seam) to create one long strip measuring 6.5″ x 88″.
- Assembly: Sew one Checkered Column to the left side of the Red Stripe. Sew the other Checkered Column to the right side.
- Result: You now have a “Racing Panel” approx. 14.5″ wide (Checker-Red-Checker).
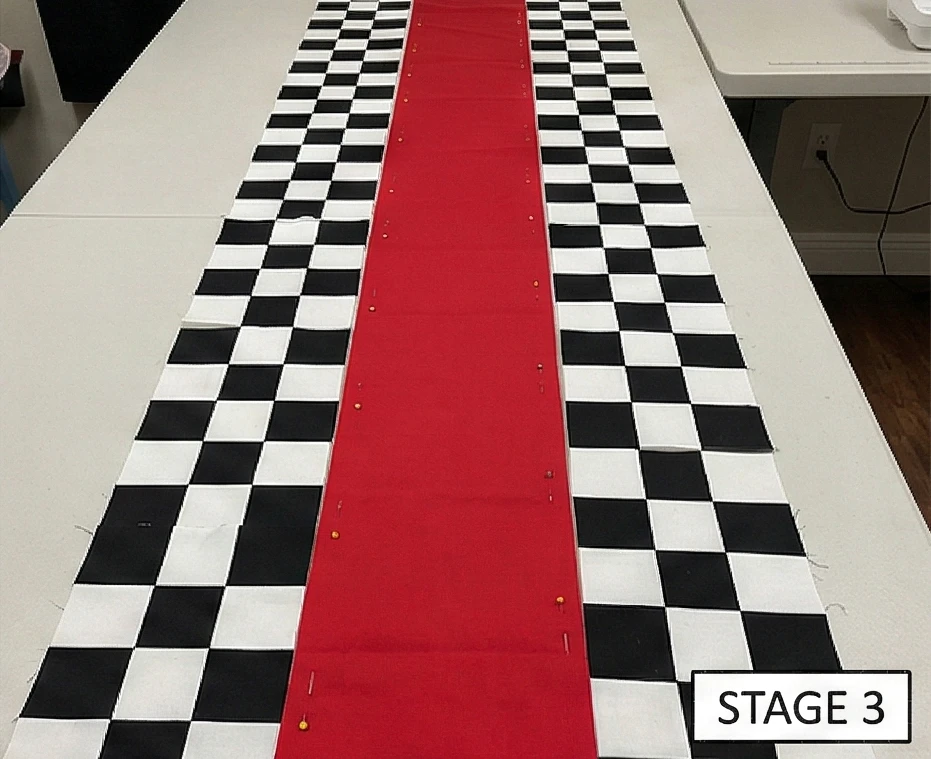
Step 4: Cutting the Background Panels
We will place the stripe off-center for a modern look.
- Left Panel: Cut a piece of Fabric A (Grey) measuring 15.5″ x 88″.
- Construction: You will need to sew WOF strips together to get the 88″ length.
- Right Panel: Cut a piece of Fabric A (Grey) measuring 34.5″ x 88″.
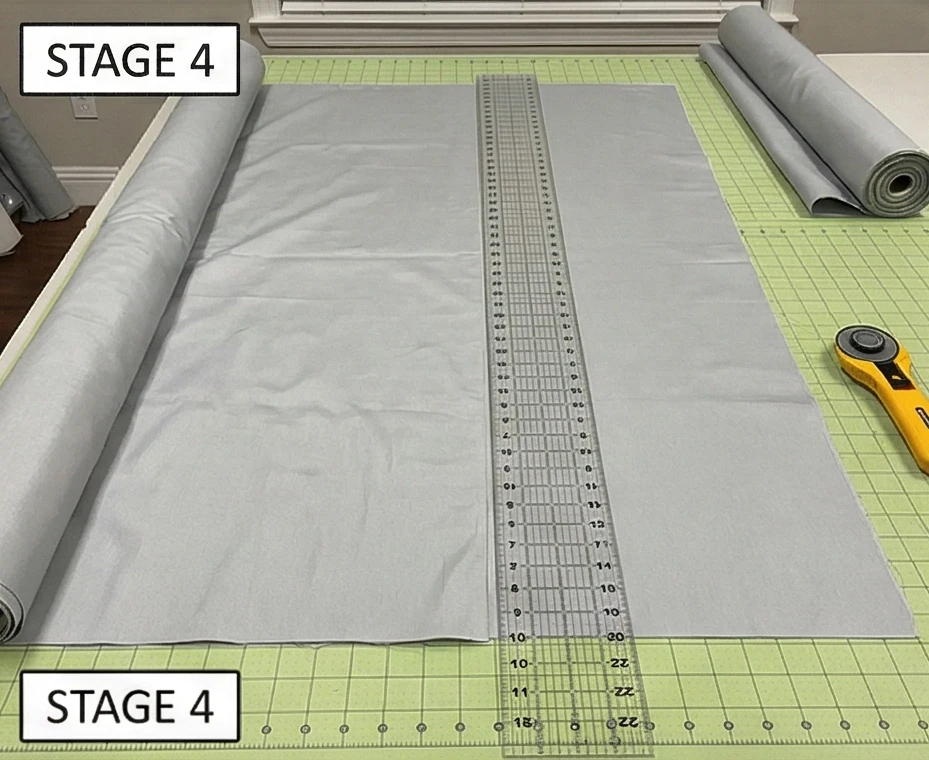
Step 5: Final Assembly (The Finish Line)
- Join: Sew the Left Background Panel to the left side of the Racing Panel.
- Join: Sew the Right Background Panel to the right side of the Racing Panel.
- Visual: The bold stripe runs vertically down the bed, slightly offset to the left, mimicking the paint job on a muscle car hood.
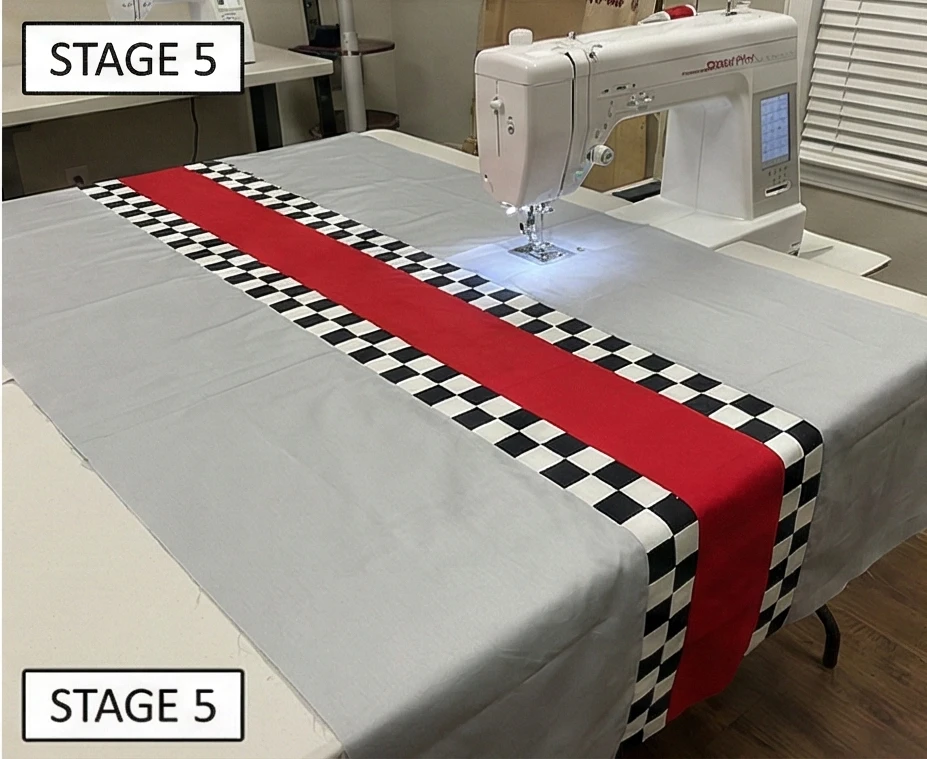
Step 6: “Velocity” Quilting
Use the quilting lines to suggest speed.
- Baste: Sandwich layers.
- Quilt:
- The Stripe: Stitch straight vertical lines “in the ditch” of the checkers and the red stripe.
- The Background: Use your walking foot to quilt straight lines parallel to the racing stripe, spaced 2 inches apart.
- Effect: These long, straight lines look like wind tunnels or motion blur.
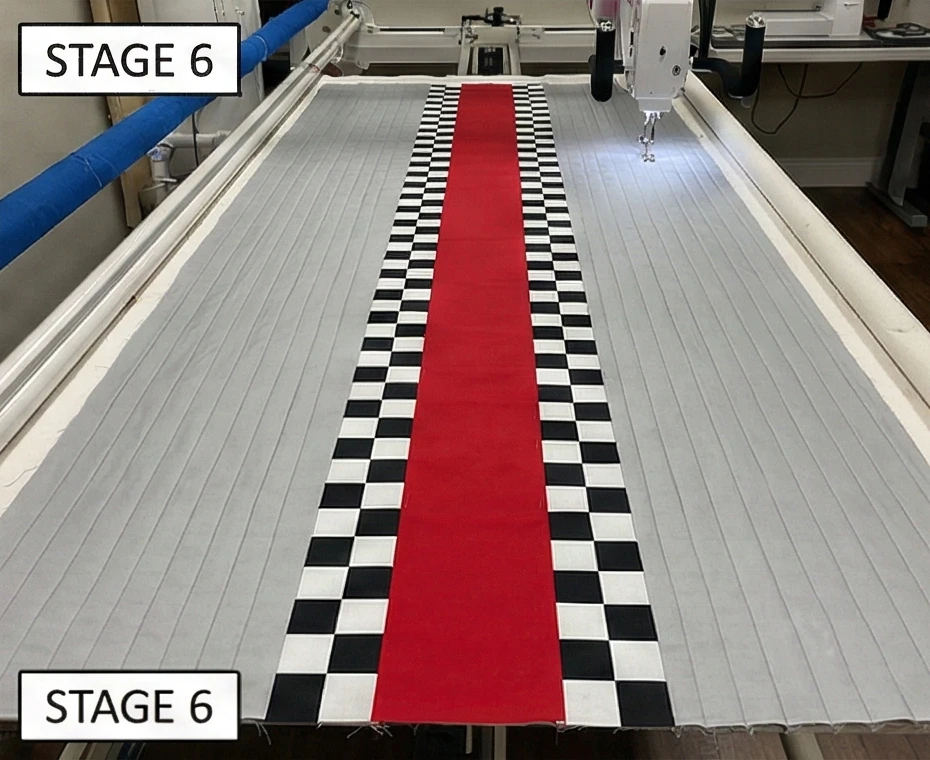
Usability Note: This quilt is designed with “Solids Only” for a reason. Solid cottons are generally softer and hold up better to frequent washing than stiff novelty prints. Plus, without a directional print (like cars that have to be right-side up), you can flip the quilt end-to-end to distribute wear evenly.

14. Ultra-Soft Minky-Backed Quilt Throws for Movie Nights

The “Midnight Matinee” Jumbo Minky Throw
When it comes to movie nights, gaming marathons, or just lounging, boys prioritize one thing above all else: Softness. A Minky-backed quilt (often called “Cuddle” fabric) provides the weight and warmth of a weighted blanket with a sensory-friendly, plush texture. The “Midnight Matinee” pattern features a Jumbo Patchwork design on the front to showcase bold prints without many seams, and a solid sheet of high-quality Minky Dot on the back. It creates a “mullet” quilt: Business (durable cotton) in the front, Party (fuzzy plush) in the back.
Finished Dimensions: Large Throw/Teen Size, 60″ x 72″.
Materials Needed:
- Fabric A (Top Main): 1.5 yards of a thematic print (e.g., Popcorn, Film Reels, or Navy Starfield).
- Fabric B (Top Accent): 1.5 yards of a coordinating solid or geometric print (Grey or Teal).
- Backing (The Minky): 2 yards of Shannon Cuddle 3 or Minky Dot (60″ wide).
- Warning: Buy high-quality Minky. Cheap synthetic fleece pills after one wash; quality Minky stays silky for years.
- Batting: Optional. Minky is warm. For a heavy winter throw, use thin cotton batting. For a lighter throw, skip the batting and just use Top + Minky. We will assume No Batting for maximum drape.
- Notions: 505 Spray Baste (Essential for Minky), walking foot, fresh rotary blade, vacuum cleaner (for the lint).
Cultural Backstory: Minky fabric is a type of microfiber plush originally developed for baby blankets due to its exceptional softness. However, its sensory properties—mimicking the feeling of animal fur without the allergens—have made it a massive hit with teenagers and adults seeking comfort in a high-stress world. It essentially turns a quilt into a giant “security blanket” that is socially acceptable for a teen’s room.
Step 1: Cutting the Jumbo Squares
We use large blocks to reduce the number of seams (Minky is slippery, so fewer seams is better).
- Cut: From both Fabric A and Fabric B, cut strips measuring 10.5 inches wide.
- Sub-Cut: Cross-cut these strips into 10.5-inch squares.
- Quantity: You need 42 squares total (21 of Fabric A, 21 of Fabric B).
- Grid: 6 blocks wide x 7 blocks long.
Step 2: Assembling the Checkerboard Top
- Layout: Arrange the squares in a checkerboard pattern (A-B-A-B-A-B).
- Sew: Stitch the squares into 7 horizontal rows of 6 blocks each.
- Seam Allowance: Use a standard 1/4 inch.
- Press: Press seams open or to the side.
- Note: Since this top is 100% cotton, you can iron it normally. Do not iron the Minky backing yet.
Step 3: Preparing the Minky (The “Snow” Storm)
Minky sheds when cut. Be prepared.
- Shake: Take the Minky fabric outside and shake it vigorously to remove loose fibers from the cut edge.
- Tape: Lay the Minky face down on a hard floor. Tape the edges to the floor with masking tape, pulling it slightly taut to avoid wrinkles.
- Why: Minky stretches. Securing it with tape ensures it stays square while you baste.
Step 4: Spray Basting (Crucial Step)
Pins are not enough for slippery Minky. You need glue.
- Spray: Spray a temporary adhesive (like Odif 505) lightly over the back of the Minky fabric.
- Layer: Carefully roll out your Cotton Quilt Top (Right Side Up) onto the sticky Minky. Smooth it out with your hands, working from the center outward.
- Check: Ensure there are no puckers on the back. The glue will hold the two layers together like a sticker.

Step 5: “Wider-Is-Better” Quilting
Dense quilting makes Minky stiff. Keep it loose.
- Set up: Install a Walking Foot. This is non-negotiable. It feeds the top and bottom layers evenly, preventing the stretchy Minky from bunching.
- Quilt: Stitch a large diagonal grid (an “X” through every block) or simple straight vertical lines spaced 5 inches apart.
- Stitch Length: Increase stitch length to 3.0mm or 3.5mm.
- Tip: Do not quilt too densely. You want the throw to remain floppy and soft.
Step 6: Binding with Cotton
Do not try to use Minky for the binding—it is too bulky.
- Trim: Trim the excess Minky/Batting even with the quilt top.
- Bind: Use stripes or a solid cotton fabric for the binding.
- Method: Sew the binding to the front (cotton side) first, then fold it over to the back (Minky side) and hand stitch or machine finish.
- Texture: The crisp cotton binding provides a nice tactile contrast to the fuzzy Minky edge.
Usability Note: Minky is made of polyester, which means it is sensitive to high heat. NEVER iron Minky directly, or the dots will melt flat. When washing, use cool water and avoid fabric softener, as it can clog the fibers and reduce softness over time.

15. Cozy Plaid Patchwork Pillow Covers for Boys’ Reading Nooks

The “Highland Lodge” Patchwork Reading Pillow
A reading nook requires more than just a quilt; it needs sturdy, comfortable back support. The “Highland Lodge” pillow cover uses upcycled Flannel Shirts or plaid scraps to create a durable, textured surface that feels like a warm hug. Designed with a sleek Envelope Back closure (no zippers to scratch faces) and reinforced with Quilting, this pillow is built to withstand hours of leaning, propping, and pillow fights. The patchwork aesthetic brings a timeless, Ralph Lauren-inspired “library” vibe to any boy’s room.
Finished Dimensions: Standard Square Pillow, 18″ x 18″ (Fits a standard 18-20″ insert).
Materials Needed:
- Fabric A (Plaids): 4-5 different Flannel Shirts (thrifted or old) or 1/2 yard of mixed Plaid Flannel Scraps.
- Tip: Mix scales—use one large buffalo check, one small tartan, and one solid tweed for visual balance.
- Fabric B (Backing/Envelope): 3/4 yard of durable Denim, Canvas, or Corduroy (Navy or Tan).
- Batting: A scrap piece measuring 20″ x 20″.
- Muslin: A scrap piece measuring 20″ x 20″ (for the interior lining).
- Notions: Rotary cutter, 6.5″ square ruler.
Cultural Backstory: Plaid (specifically Tartan) was originally a regional identifier in the Scottish Highlands, with different clans weaving specific patterns using local vegetable dyes. It became a staple of American boys’ wear in the 1950s due to its association with rugged, outdoor masculinity (lumberjacks, cowboys). Using plaid in decor instantly signals “warmth” and “tradition.”
Step 1: Cutting the Patchwork Grid
We are making a simple 9-Patch block.
- Select: Choose 3 different plaid fabrics for contrast.
- Fabric 1 (Dark): Navy/Green Tartan.
- Fabric 2 (Light): Grey/White Check.
- Fabric 3 (Accent): Red/Black Buffalo Plaid.
- Cut Squares: Cut 9 squares measuring 6.5″ x 6.5″.
- Layout: You need 5 squares of your dominant color and 4 squares of your accent color (or mix randomly for a scrappy look).
- Math: A 3×3 grid of 6.5″ squares (with 1/4″ seam allowance) finishes exactly at 18.5″ x 18.5″, perfect for an 18″ pillow form.
Step 2: Assembling the Top
- Row 1: Sew three squares together: [Dark] – [Light] – [Dark].
- Row 2: Sew three squares together: [Light] – [Accent] – [Light].
- Row 3: Sew three squares together: [Dark] – [Light] – [Dark].
- Join: Press seams of Row 1 & 3 to the left, and Row 2 to the right. Sew the rows together.
- Nesting: Because you pressed in opposite directions, the seams will lock together perfectly at the corners.
Step 3: Quilted Reinforcement (The “Sandwich”)
Pillows take a beating. Quilting the front panel makes it practically indestructible.
- Layer: Place your Muslin lining down -> Batting -> Patchwork Top (Right Side Up).
- Baste: Pin the layers together.
- Quilt: Stitch a large “X” through each of the 9 squares.
- Effect: This quilting anchors the flannel (which can be stretchy) to the sturdy muslin, preventing the pillow from warping over time.
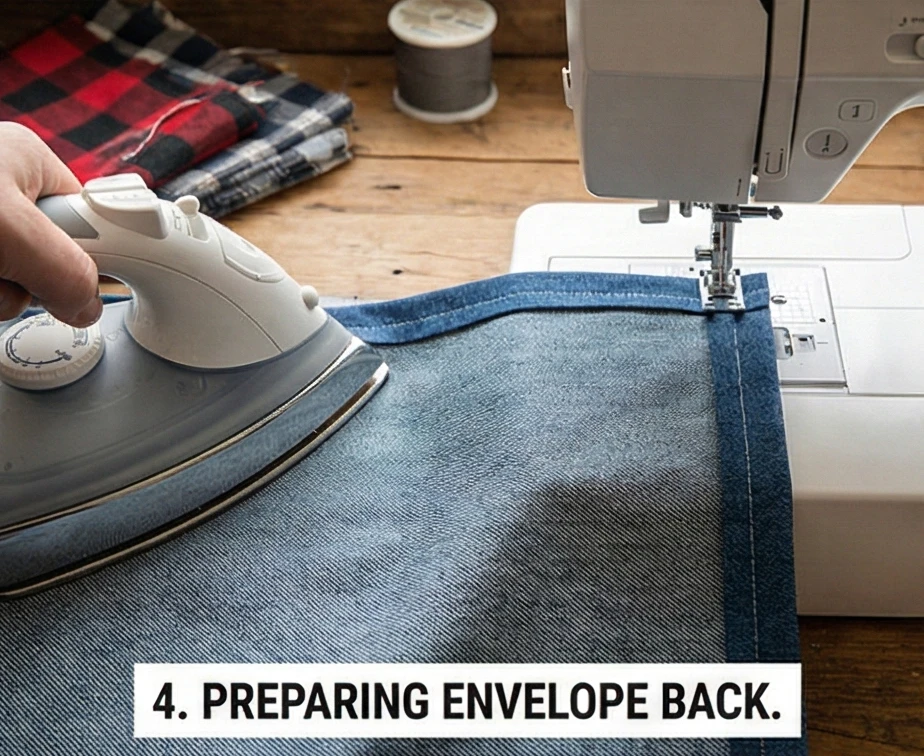
Step 4: Preparing the Envelope Back
No zipper required.
- Cut Panels: From your sturdy Backing Fabric (Denim/Canvas), cut two rectangles measuring 18.5″ x 13″.
- Hem:
- Take ONE of the long edges (18.5″) of the first rectangle. Fold it under 1/2 inch, press. Fold it under another 1/2 inch, press.
- Stitch: Topstitch down the hem to create a clean, finished edge.
- Repeat: Do the same for the second rectangle.
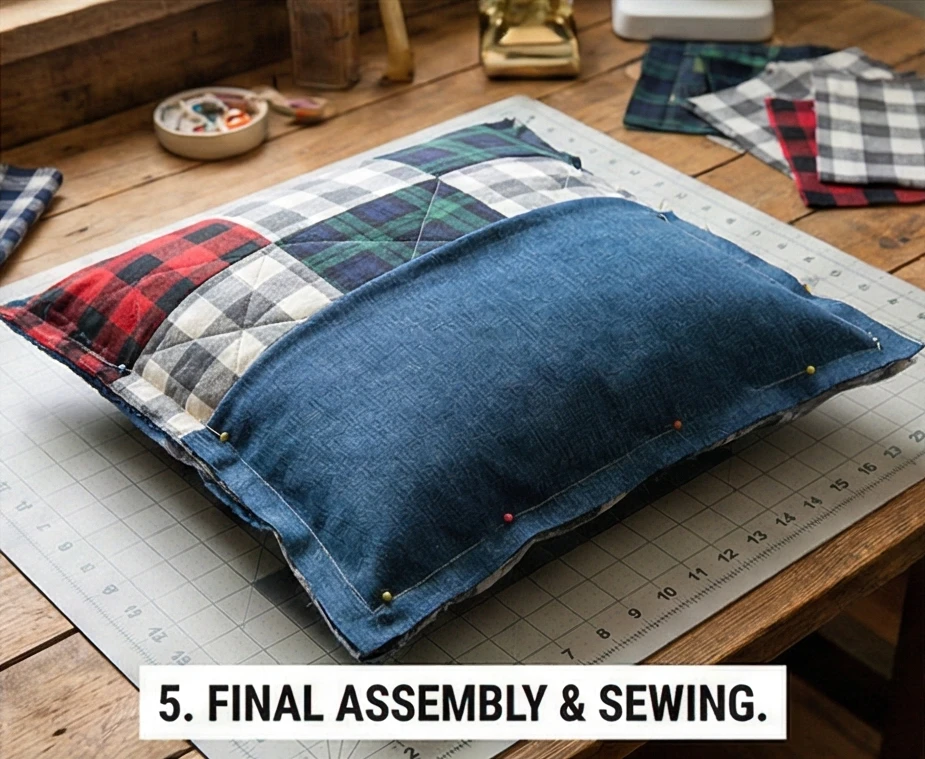
Step 5: Final Assembly
- Stack:
- Place your Quilted Top Right Side Up on the table.
- Place one Backing Panel Right Side Down on top, aligning raw edges with the top of the square (the hemmed edge will be in the middle).
- Place the second Backing Panel Right Side Down, aligning raw edges with the bottom of the square.
- Overlap: The two hemmed edges will overlap in the center by about 4 inches. This overlap ensures the pillow insert doesn’t peek out.
- Sew: Pin the entire perimeter. Sew all the way around the outside square with a 1/4 inch seam allowance.
- Reinforce: Backstitch back and forth over the points where the envelope flaps overlap (the stress points).
Step 6: Turning and Stuffing
- Trim: Clip the four corners (diagonally) to reduce bulk.
- Turn: Turn the pillow cover right side out through the envelope opening. Use a chopstick or turning tool to poke the corners out sharp.
- Press: Give it a final steam press.
- Stuff: Insert an 18″ or 20″ Pillow Form.
- Pro Tip: Use a 20″ insert in an 18″ cover for a firm, plump, “decorator” look that provides better back support for reading.
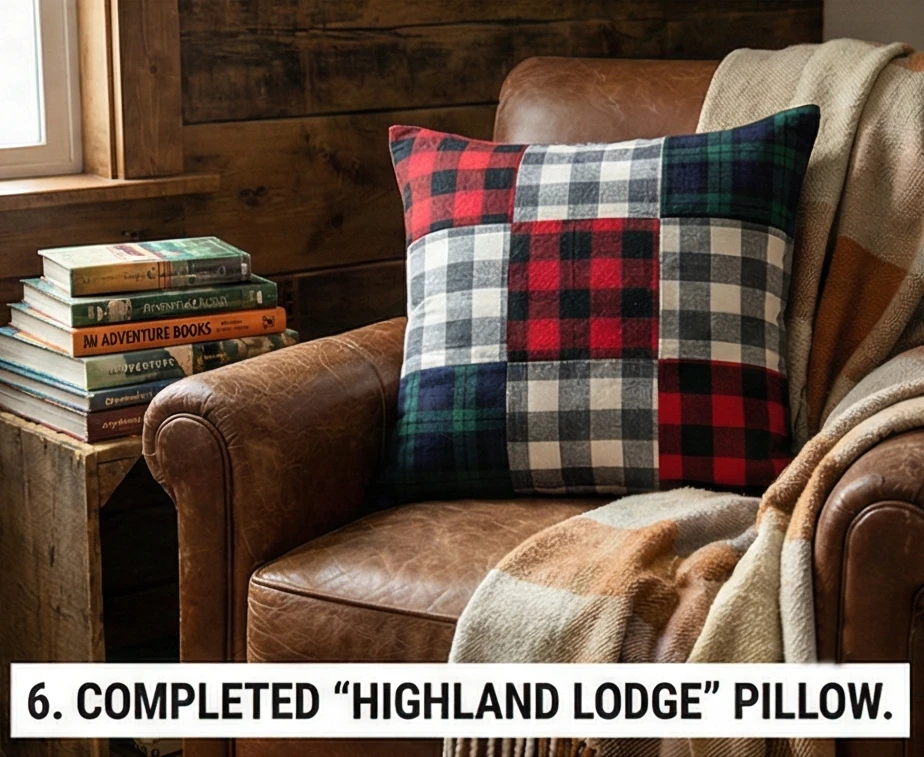
Usability Note: Flannel pills over time. By quilting the top panel, you reduce the friction on individual fibers, keeping the fabric looking newer longer. Using a denim back adds friction so the pillow doesn’t slide off a leather chair or slippery duvet.


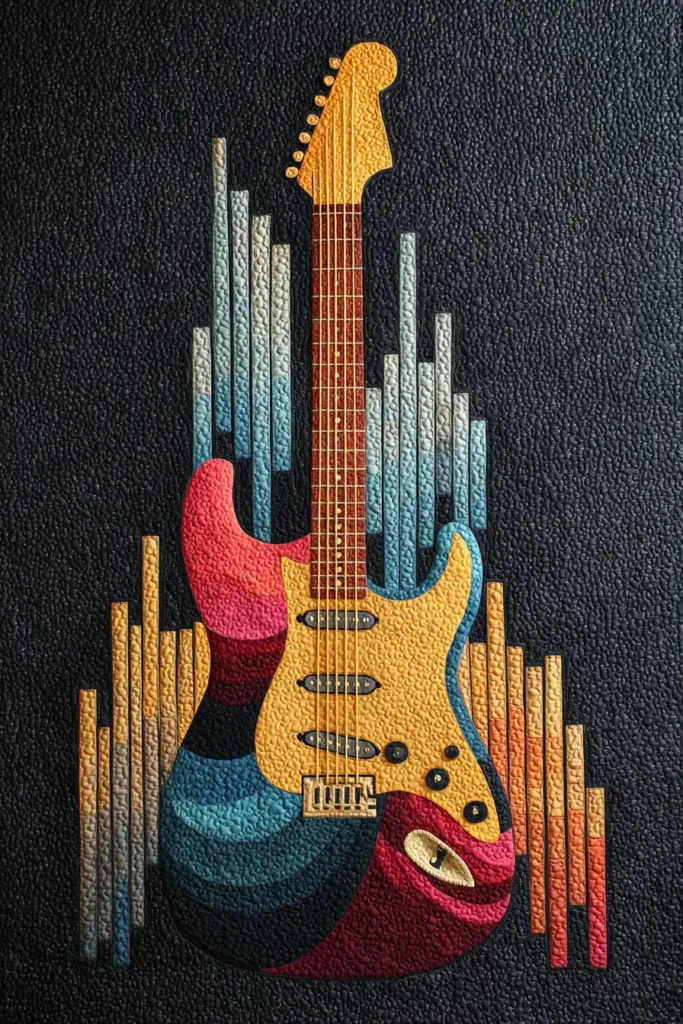
16. Electric Guitar and Music Note Quilts for Teen Rockstars
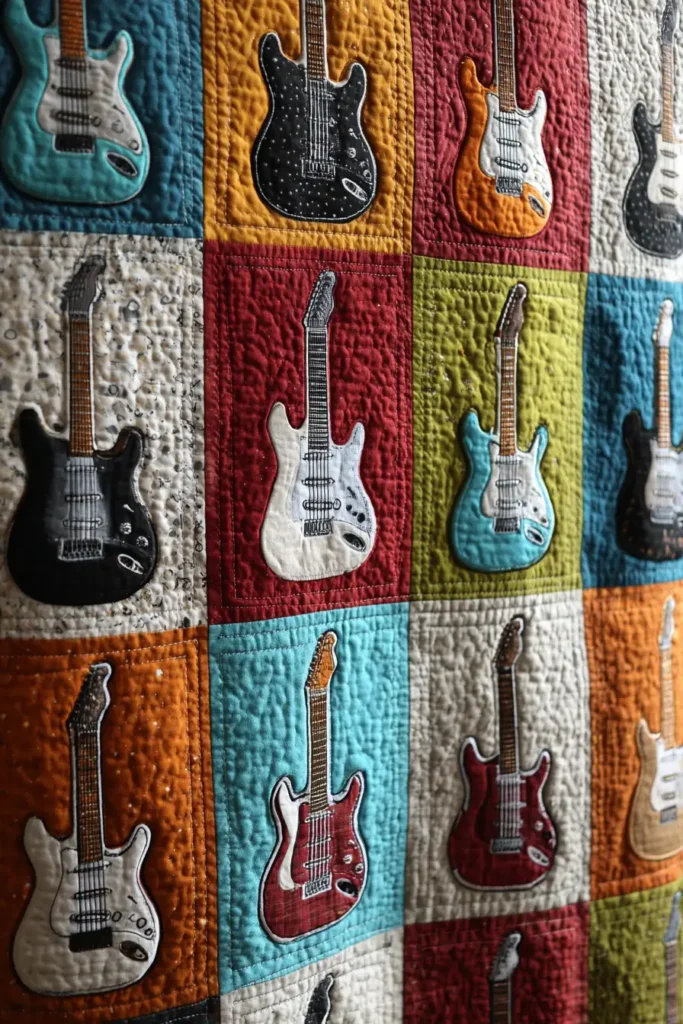
The “Riff & Rhythm” Electric Guitar Quilt
For the teen musician or rock fan, a quilt needs to feel like a gig poster—bold, graphic, and slightly rebellious. The “Riff & Rhythm” pattern features a large, stylized Electric Guitar Appliqué (modeled after the iconic Stratocaster or Les Paul shape) set against a background of “Soundwave” Equalizer Bars. Using a stark Black background with Neon or Metallic accents, the quilt evokes a stage set lit in the dark. It’s edgy, modern, and undeniably cool.
Finished Dimensions: Twin/Full Size, 66″ x 86″.
Materials Needed:
- Fabric A (Background): 4 yards of Solid Black or Charcoal Grey (This makes the colors pop).
- Fabric B (Guitar Body): 1 yard of a bold color (Candy Apple Red, Sunburst Orange, or Metallic Silver).
- Fabric C (Guitar Neck/Headstock): 1/2 yard of Maple (Tan) or Rosewood (Dark Brown).
- Fabric D (Soundwaves/Accents): A Jelly Roll or assorted strips of Neon Blue, Green, and Purple.
- Backing: 5.5 yards of a music note print or amplifier mesh print.
- Notions: Paper-Backed Fusible Web (HeatnBond Ultra), Silver embroidery floss (for strings).
Cultural Backstory: The electric guitar is the defining instrument of the 20th century. When Leo Fender introduced the solid-body Stratocaster in 1954, its contoured shape and futuristic design became a symbol of the youth culture explosion. This quilt honors that history, treating the instrument not just as a tool but as a work of modern art.
Step 1: Constructing the “Equalizer” Background
We want the background to look like a digital sound display.
- Cut Strips: Cut the Black fabric into variable-width vertical strips (4.5″, 6.5″, 8.5″ wide) the length of the quilt (approx. 86″).
- Insert Color: Slice these long black strips horizontally at random heights. Insert short rectangles (2.5″ to 4.5″ tall) of your Neon Fabrics.
- Effect: When sewn back together, these neon blocks will look like the rising and falling bars on a stereo equalizer.
- Assemble: Sew the vertical strips together to form the full background panel (66″ x 86″).
- Result: A dark backdrop with vertical “sound spikes” of color.

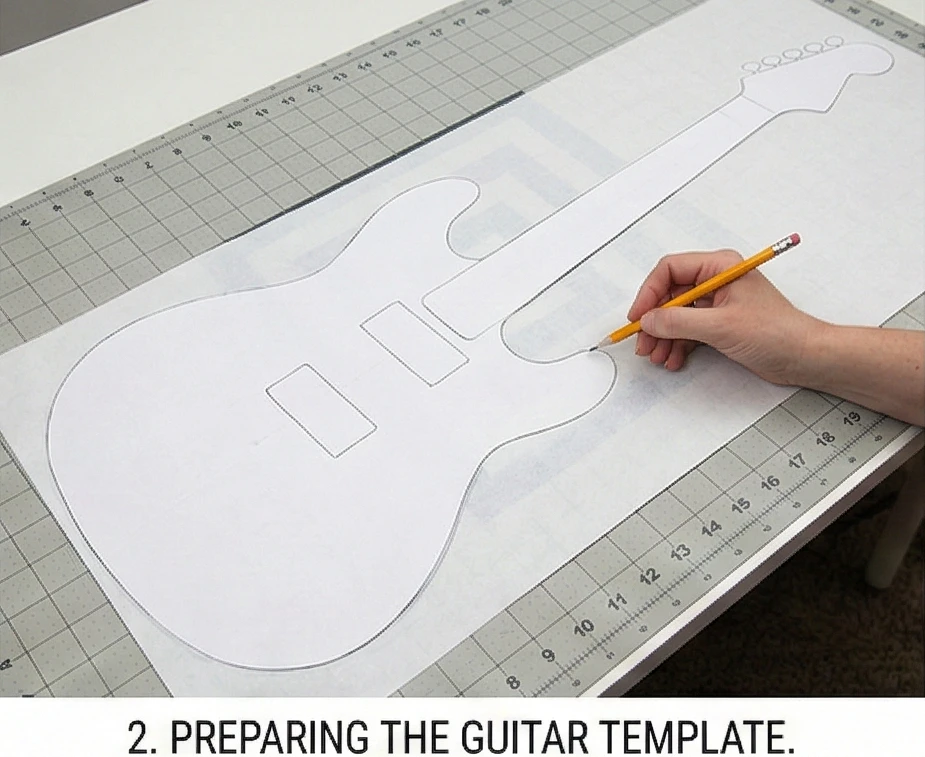
Step 2: Preparing the Guitar Template
Go big or go home.
- Draft: Draw (or print and tape together) a life-size or slightly larger-than-life outline of an electric guitar body, neck, and headstock.
- Scale: The total guitar should be about 50 to 60 inches tall.
- Trace: Trace the three separate components (Body, Neck, Headstock) onto the paper side of your Fusible Web.
- Tip: Remember to trace the mirror image if the guitar shape is asymmetrical.
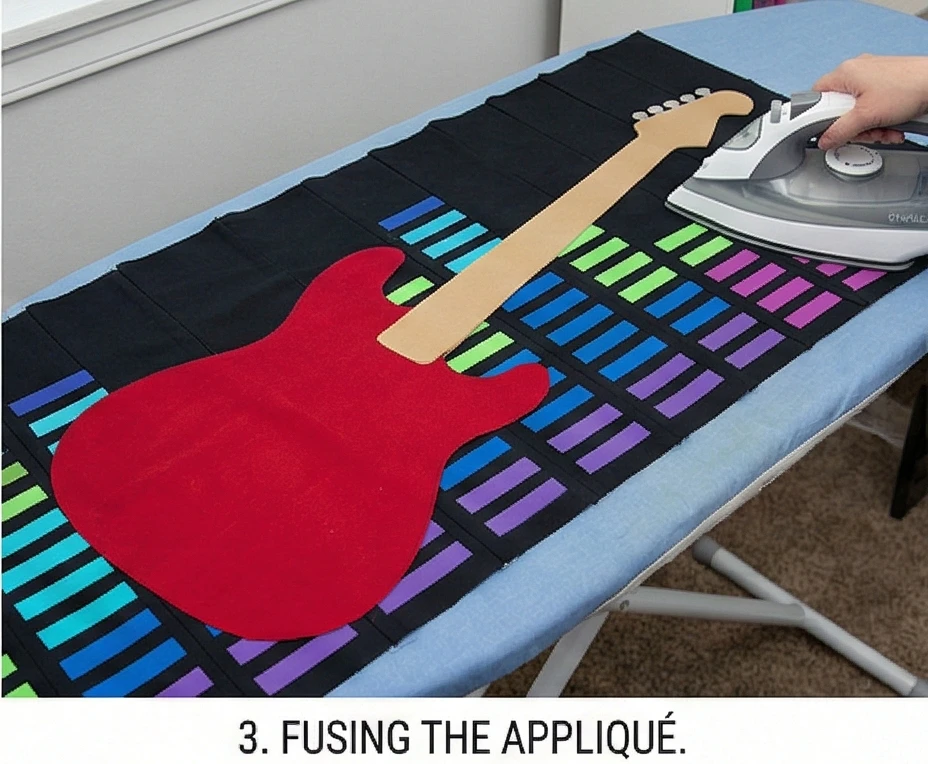
Step 3: Fusing the Appliqué
- Fuse: Iron the fusible web shapes onto the back of your Guitar Fabrics (Red Body, Tan Neck).
- Cut: Cut out the shapes carefully.
- Peel & Stick: Peel off the paper backing. Position the guitar diagonally across the quilt top (the “Slash” pose) for the most dynamic look.
- Overlap: Ensure the neck overlaps the body slightly for a seamless look.
- Iron: Press with a hot iron to fuse the guitar permanently to the background.
Step 4: The Hardware Details (The “Cool” Factor)
A guitar isn’t a guitar without knobs and pickups.
- Pickups & Bridge: Cut small rectangles of Silver/Grey fabric. Fuse them to the body under the strings.
- Knobs: Use real vintage buttons or circles of black felt to create the volume/tone knobs.
- Appliqué Stitch: Use a Satin Stitch (tight zig-zag) in black thread to outline the entire guitar. This makes it look like a cartoon drawing or a patch.

Step 5: The Strings (Embroidery)
This step adds tactile texture.
- Mark: Use a ruler and chalk to draw 6 straight lines running from the bridge (on the body) up the neck to the headstock.
- Stitch: Use thick Silver Embroidery Floss (Perle Cotton #8) or metallic thread. Hand-stitch or machine-stitch over these lines using a Triple Stretch Stitch (which is thicker than a normal stitch).
- Why: Real strings catch the light. Using metallic thread mimics that flash.

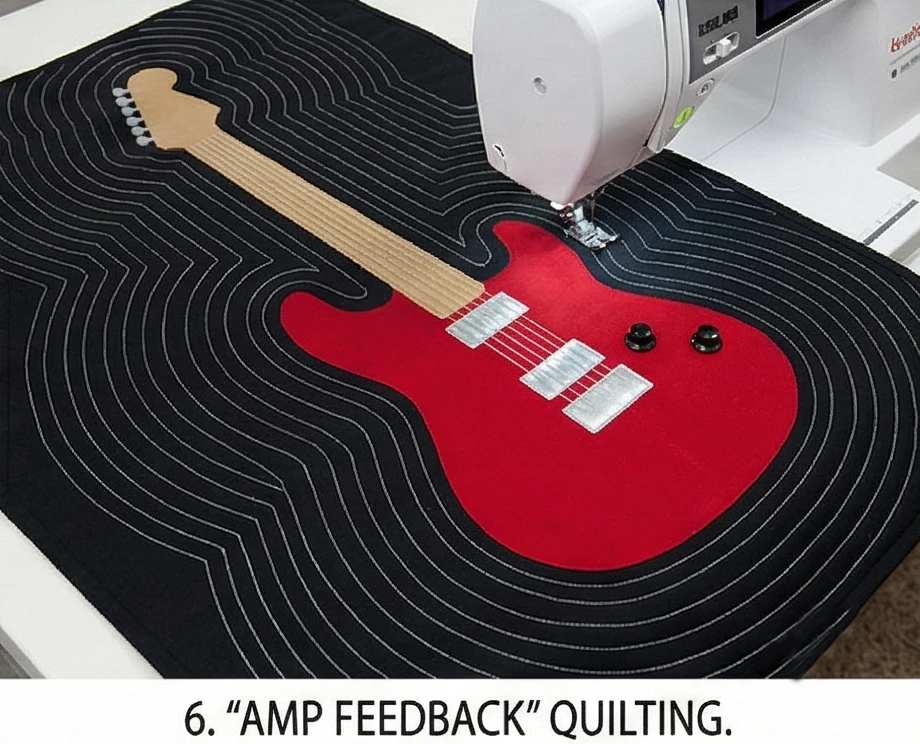
Step 6: “Amp Feedback” Quilting
Visualize the sound.
- Baste: Sandwich layers.
- Quilt:
- Echo Quilting: Start outlining the guitar shape about 1 inch away. Continue echoing that shape outward like ripples in a pond. This represents the sound waves radiating from the instrument.
- The Guitar: Stitch simple outlines on the guitar body to define the pickguard, but leave the main areas puffy.
Usability Note: Since this quilt has a large fused appliqué area (the guitar body), it will be stiffer in that section. This is a benefit for a teen’s bed, as it adds weight and structure, making it easier to get out of bed in the morning. The “stiffness” softens significantly after the first wash.
17. Cool Ninja Warrior Quilt Patterns for Boys’ Pillow Accents
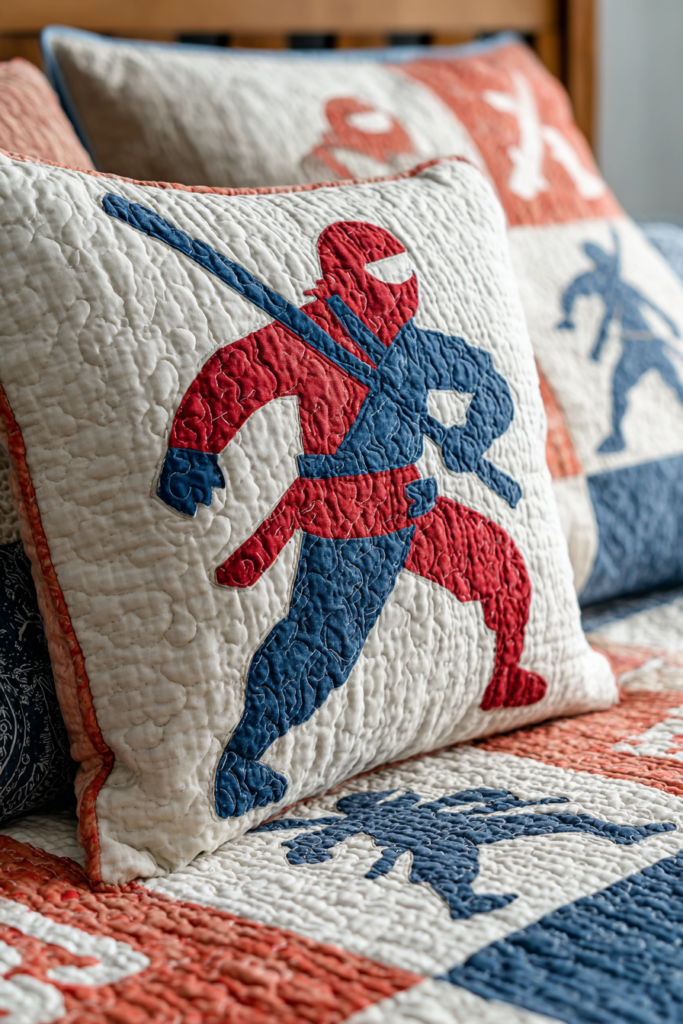
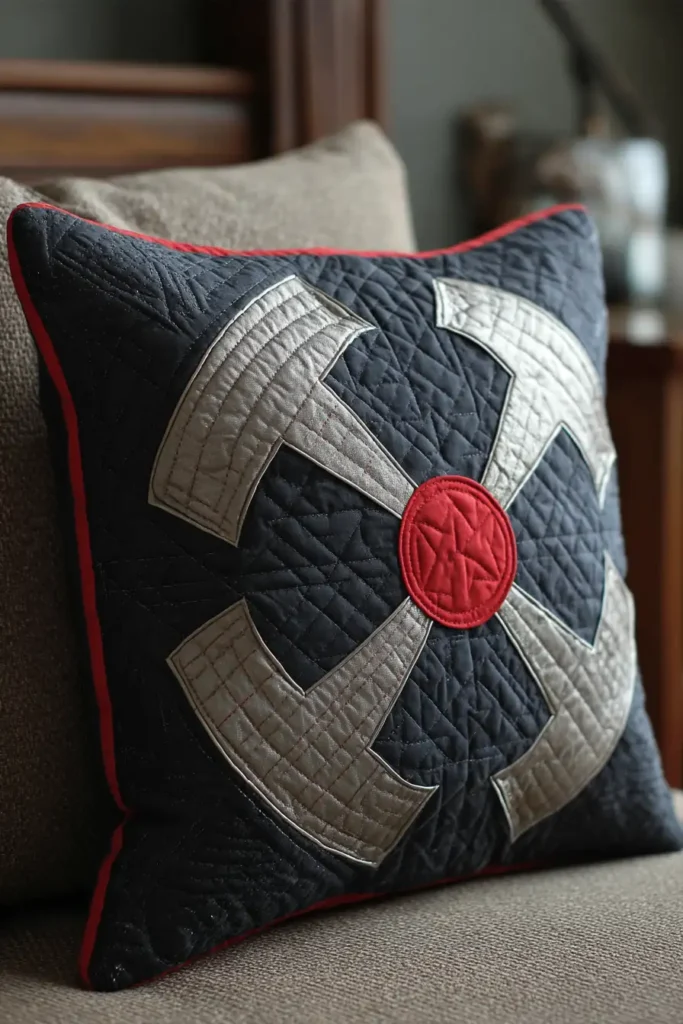
The “Silent Spin” Shuriken Pillow
For the boy fascinated by martial arts, agility, and stealth, a “Ninja” theme can easily veer into cheesy cartoon territory. To keep it stylish, comfortable, and “cool” for older boys, the “Silent Spin” pattern focuses on the geometry of the Shuriken (throwing star). Using a high-contrast palette of Stealth Black, Blade Silver, and a center hit of Danger Red, this patchwork pillow looks like a metallic weapon embedded in a soft surface. It is the perfect edgy accent for a bed or gaming chair.
Finished Dimensions: Standard Square Pillow, 18″ x 18″.
Materials Needed:
- Fabric A (Background/Shadow): 1/2 yard of Solid Black or Charcoal Grey.
- Fabric B (The Blade): 1/4 yard of Silver Grey or Metallic Cotton.
- Fabric C (The Center/Target): A scrap of Red (Solid or subtle print).
- Backing: 1/2 yard of Black Cotton or Minky (for a soft back).
- Pillow Form: 18-inch or 20-inch square insert.
- Notions: Rotary cutter, 6.5″ square ruler.
Cultural Backstory: The Shuriken (Japanese for “sword hidden in user’s hand”) was a supplementary weapon used by the Samurai and Ninja classes of feudal Japan. Contrary to movies, they were rarely used to kill; they were primarily distraction tools, thrown to create a split-second opening for escape or a sword strike. Their geometric shapes have fascinated designers for centuries.
Step 1: Cutting the Components
We will construct the star using a modified 9-Patch grid to ensure sharp points.
- Background Squares (Black): Cut 4 squares measuring 5.5″ x 5.5″ (Corners).
- Blade Rectangles (Black & Silver):
- Cut 4 rectangles of Black measuring 5.5″ x 3″.
- Cut 4 rectangles of Silver measuring 5.5″ x 3″.
- Center Square (Red): Cut 1 square measuring 5.5″ x 5.5″.
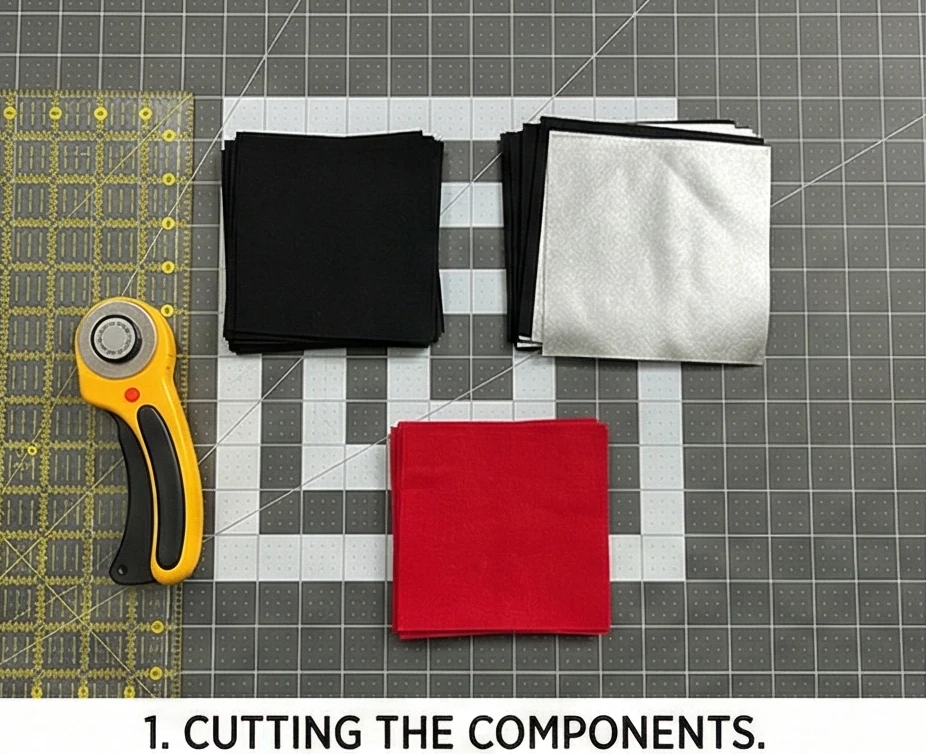
Step 2: Creating the Blade Units (Stitch-and-Flip)
This technique creates the angled “cutting edge” of the star.
- Pair: Take a Black Rectangle (5.5″ x 3″) and a Silver Rectangle (5.5″ x 3″).
- Sew: Stitch them together along the long side to create a 5.5″ square (Black on top, Silver on bottom).
- Make: Repeat to create 4 of these two-tone squares.
- The Angle:
- Draw a diagonal line on the back of a spare 5.5″ Black square (from Step 1? No, we need extra squares for the flip). Correction: Let’s use the Half-Square Triangle (HST) method for better accuracy.
Revised Step 2 (The HST Method):
- Cut (Revised): Cut 4 Squares of Black (6″) and 4 Squares of Silver (6″).
- Mark & Sew: Pair Black and Silver. Draw diagonal. Sew 1/4″ on both sides. Cut.
- Yield: 8 Half-Square Triangles (HSTs).
- Trim: Trim HSTs to exactly 5.5″ x 5.5″.

Step 3: Layout (The Spin)
The orientation creates the motion.
- Center: Place the Red Square in the middle.
- The Points (Middle Row & Column): Place 4 HST units around the center.
- Orientation: Point the Silver triangles inward toward the red square, but rotate them so they look like a pinwheel spinning clockwise.
- The Corners: Place the 4 Solid Black squares in the corners.
- Visual Check: It should look like a silver star exploding from a red center against a black night sky.
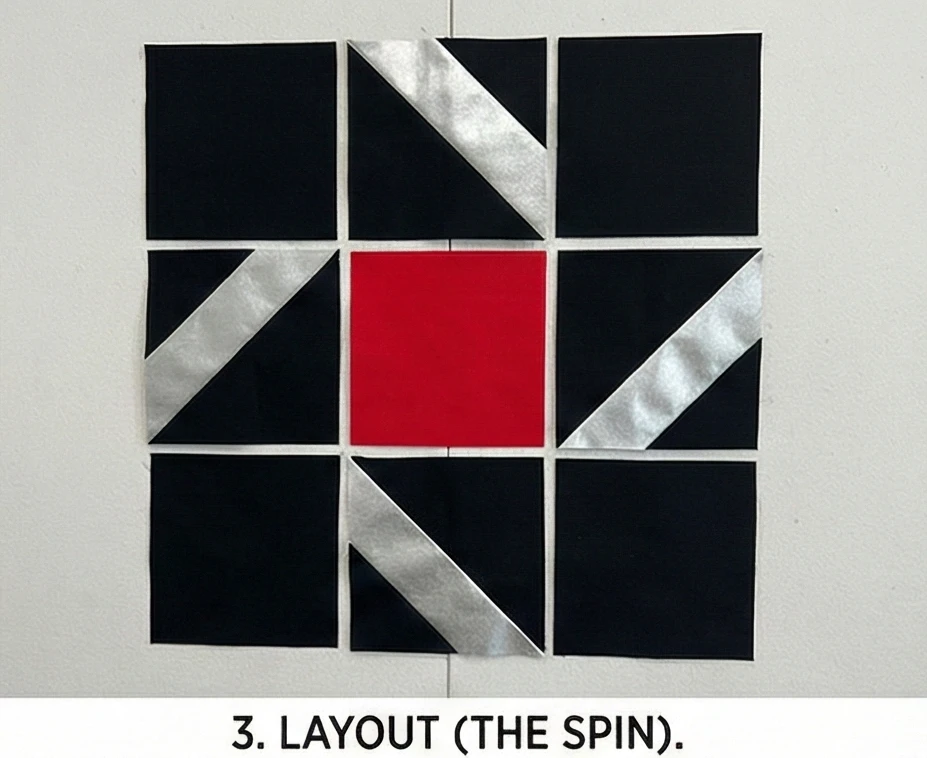
Step 4: Assembling the Grid
- Top Row: Sew [Black Square] – [HST Blade] – [Black Square].
- Middle Row: Sew [HST Blade] – [Red Center] – [HST Blade].
- Bottom Row: Sew [Black Square] – [HST Blade] – [Black Square].
- Join: Sew the three rows together.
- Press: Press seams toward the solid black squares to reduce bulk at the points.
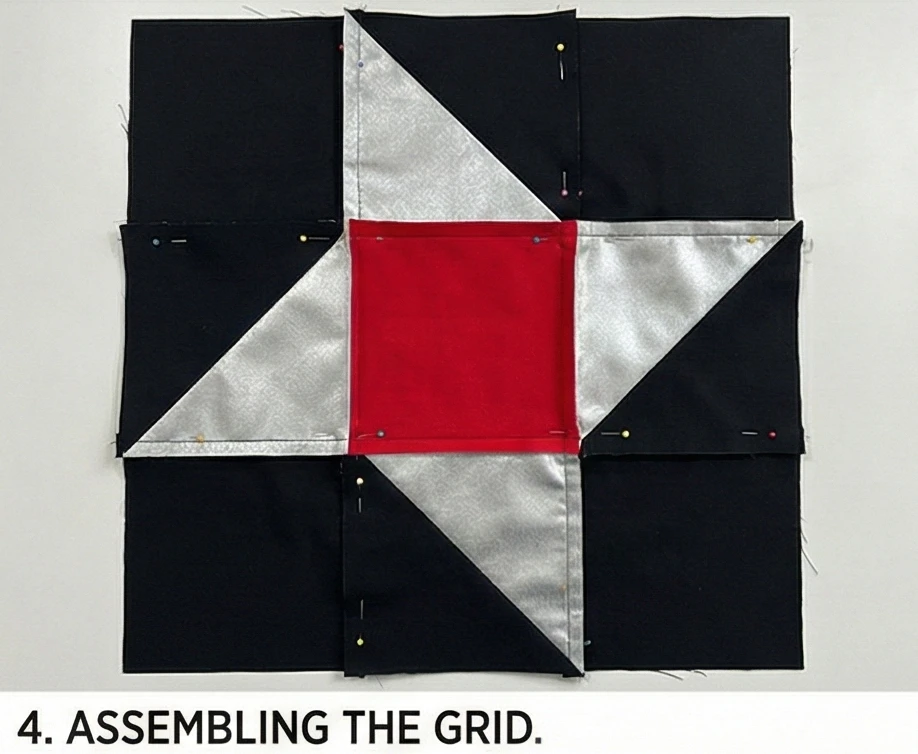
Step 5: “Stealth” Quilting
Add texture without distraction.
- Layer: Place a scrap of batting behind the block and a scrap of muslin behind that.
- Quilt:
- The Blades: Stitch a straight line down the center of each silver blade to simulate a “beveled edge.”
- The Background: Quilt dense parallel lines in the black corners. This flattens the background and makes the star “pop” out visually (trapunto effect).
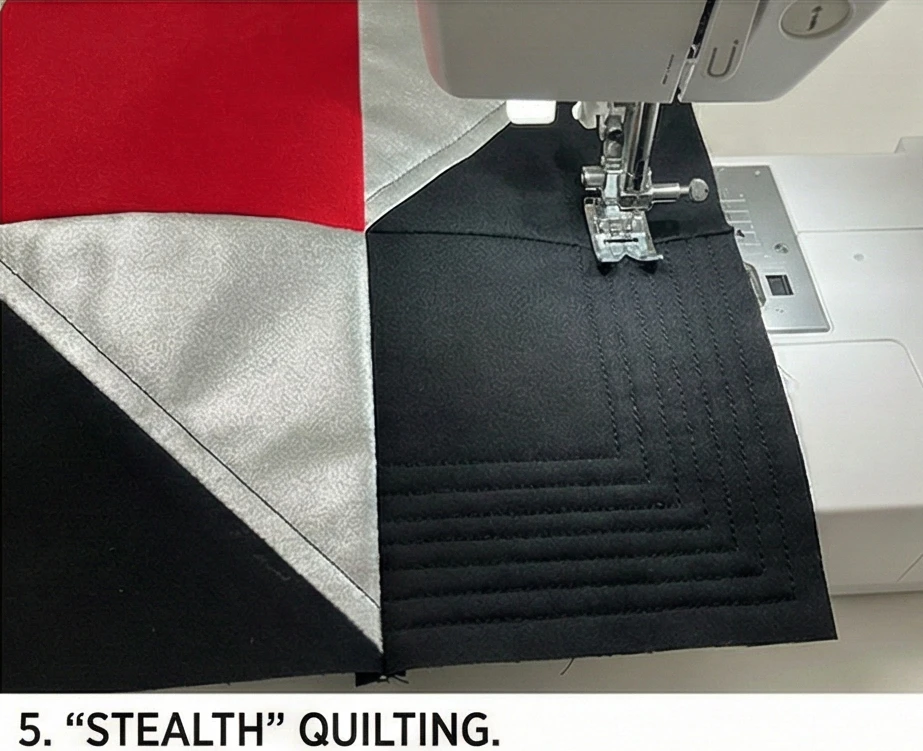
Step 6: The Envelope Finish
- Backing Panels: Cut two pieces of Backing Fabric 18.5″ x 13″.
- Hem: Hem one long edge of each panel.
- Sew: Place the Quilted Top face up. Place backing panels face down, overlapping in the center. Sew around the perimeter.
- Turn: Clip corners and turn right side out.
- Insert: Stuff with a pillow form.

Usability Note: For an extra “Ninja” feature, sew a small Pocket on the back of the pillow (on the envelope flap). This is the perfect secret stash spot for a boy to hide a flashlight, a snack, or his gaming controller.


18. Modern Robot Quilt Ideas for Comfortable Pillow Covers
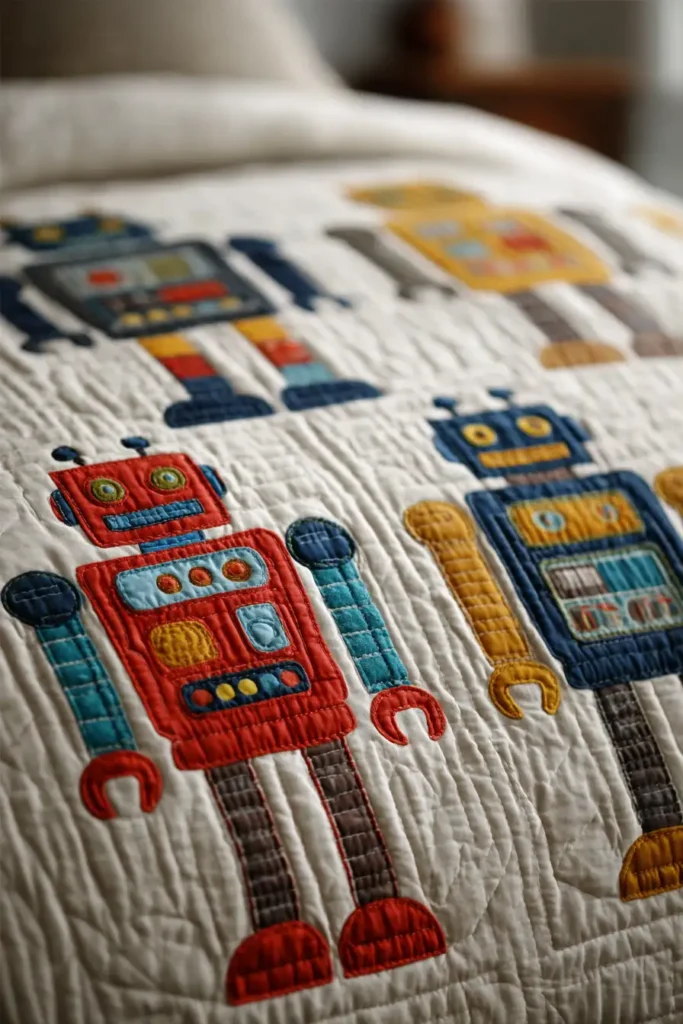
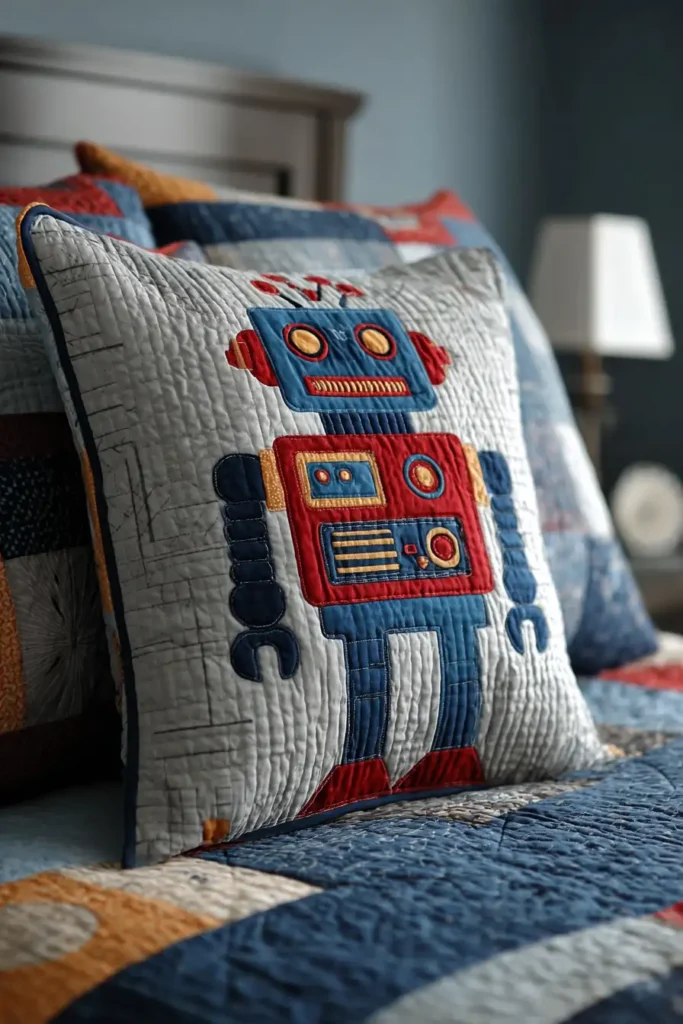
The “Retro-Bot” Geometric Pillow
Robots are a staple of boys’ decor, but they often lean towards chaotic action figures or plastic cartoons. The “Retro-Bot” pattern draws inspiration from mid-century modern design (think 1950s sci-fi or The Iron Giant). It constructs a friendly, blocky robot using simple Solids in a geometric patchwork. By avoiding messy appliqué glue and sticking to clean seams, you create a pillow that is soft against the face and stylish enough for a design-conscious bedroom.
Finished Dimensions: Standard Square Pillow, 18″ x 18″.
Materials Needed:
- Fabric A (Robot Body): Fat Eighth of Silver Grey or Metallic Linen.
- Fabric B (Background): 1/2 yard of Navy Blue, Teal, or Space Black.
- Fabric C (Accents/Eyes/Heart): Scraps of Orange, Lime Green, or Electric Blue.
- Backing: 1/2 yard of a gear or star print.
- Buttons: 2 large buttons for eyes (optional—use felt circles for younger children to avoid choking hazards).
- Notions: Rotary cutter, 6.5″ square ruler.
Cultural Backstory: The friendly robot archetype is rooted in “Retro-Futurism.” In the 1950s, the future was viewed with optimism—a world where tin-toy robots would walk dogs and cook dinner. This design captures that innocent, blocky aesthetic (often called “8-bit” in the digital age), contrasting sharply with the complex, scary robots of modern cinema.
Step 1: Cutting the Robot Components
We will build the robot in three sections: Head, Torso, and Legs.
- The Head: Cut a rectangle of Silver (Fabric A) measuring 6.5″ x 4.5″.
- The Neck: Cut a strip of Silver measuring 2.5″ x 1.5″.
- Background Spacers: Cut two rectangles of Navy (Fabric B) measuring 2.5″ x 1.5″ (to go on either side of the neck).
- The Torso: Cut a square of Silver measuring 6.5″ x 6.5″.
- Heart Panel: If you want a chest detail, replace the center of this square with a 2.5″ strip of Orange (Fabric C).
- The Legs: Cut two rectangles of Silver measuring 2.5″ x 3.5″.
- Leg Spacers: Cut a Navy strip 2.5″ x 3.5″ (for between the legs).

Step 2: Assembling the Robot Block
Use a consistent 1/4 inch seam allowance.
- Neck Row: Sew the Navy spacers to the left and right of the Silver Neck strip.
- Result: A strip measuring 6.5″ wide.
- Leg Row: Sew the Silver Legs to the left and right of the Navy Leg Spacer.
- Result: A strip measuring 6.5″ wide.
- Vertical Assembly: Sew the components in order from top to bottom:
- [Head]
- [Neck Row]
- [Torso]
- [Leg Row]
- Result: You now have a complete Robot Body measuring 6.5″ wide x 14.5″ tall.
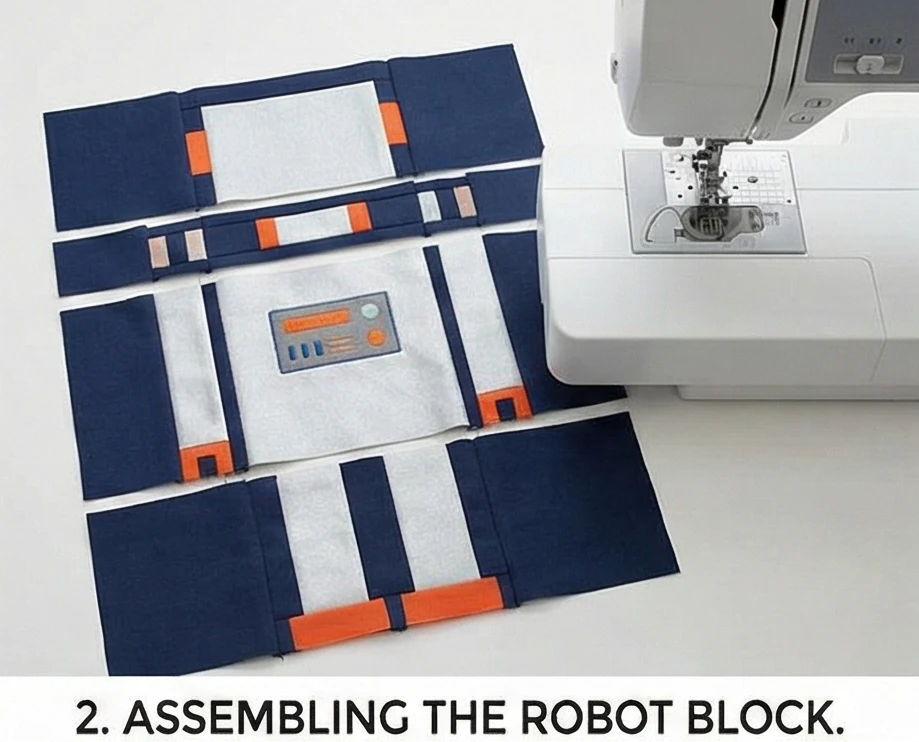
Step 3: Framing the Robot (Sashing)
We need to bring the block up to the pillow size (18.5″).
- Side Borders: Cut two rectangles of Navy (Fabric B) measuring 6.5″ x 14.5″.
- Sew one to the left and one to the right of the robot.
- Current Size: 18.5″ wide x 14.5″ tall.
- Top/Bottom Borders: Cut two rectangles of Navy measuring 18.5″ x 2.5″.
- Sew one to the top and one to the bottom.
- Final Size: 18.5″ x 18.5″.
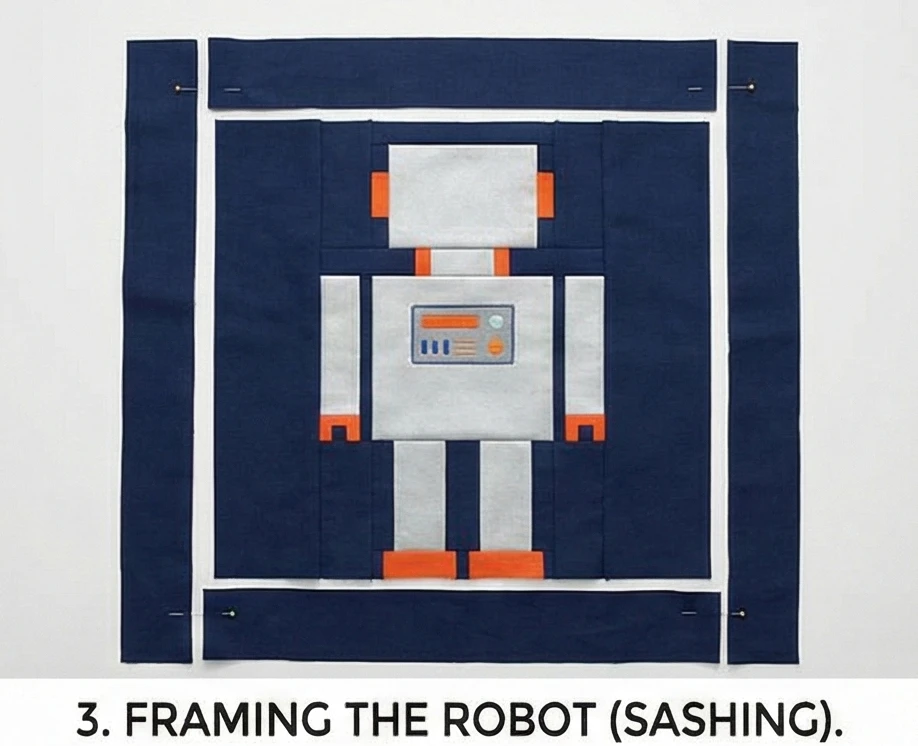
Step 4: Adding the Personality (Details)
This is where the robot comes to life.
- Eyes: Hand-sew two large buttons onto the head rectangle. (Or appliqué felt circles).
- Antenna: Appliqué a small rectangle of Silver and a circle of Orange onto the top border, directly above the head.
- Control Panel: Embroider a few “buttons” or straight lines on the chest panel using black embroidery floss.
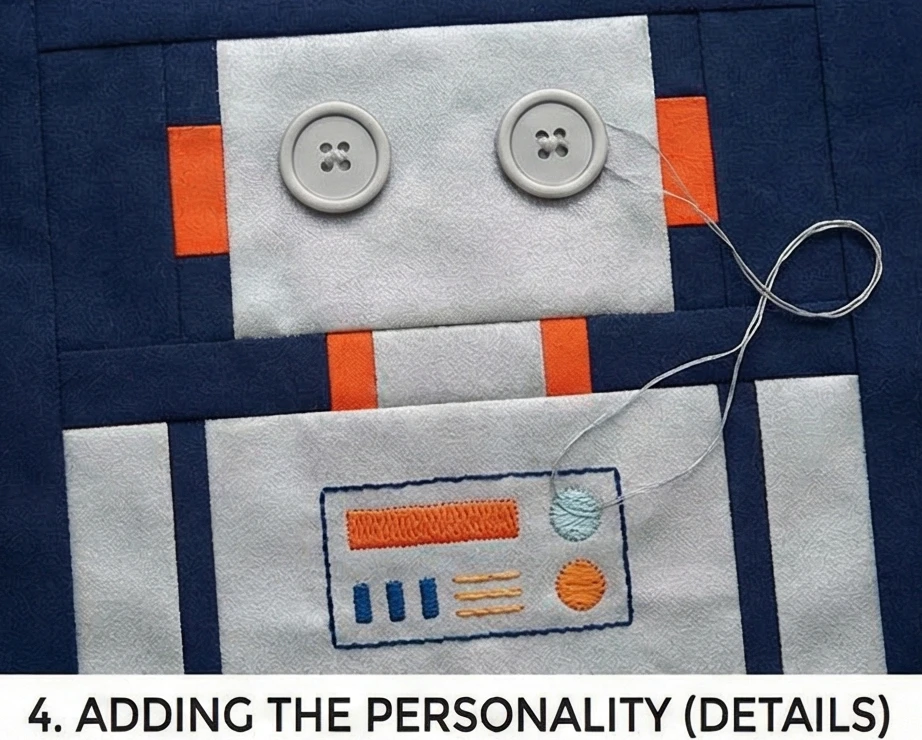
Step 5: “Circuit Board” Quilting
Use angular lines to mimic technology.
- Layer: Muslin + Batting + Robot Top.
- Quilt:
- The Robot: Stitch “in the ditch” around the main body shapes to make them pop.
- The Background: Use a walking foot to quilt a “Circuit Board” pattern. This consists of straight lines that take sudden 90-degree turns and end in small squares or dots.
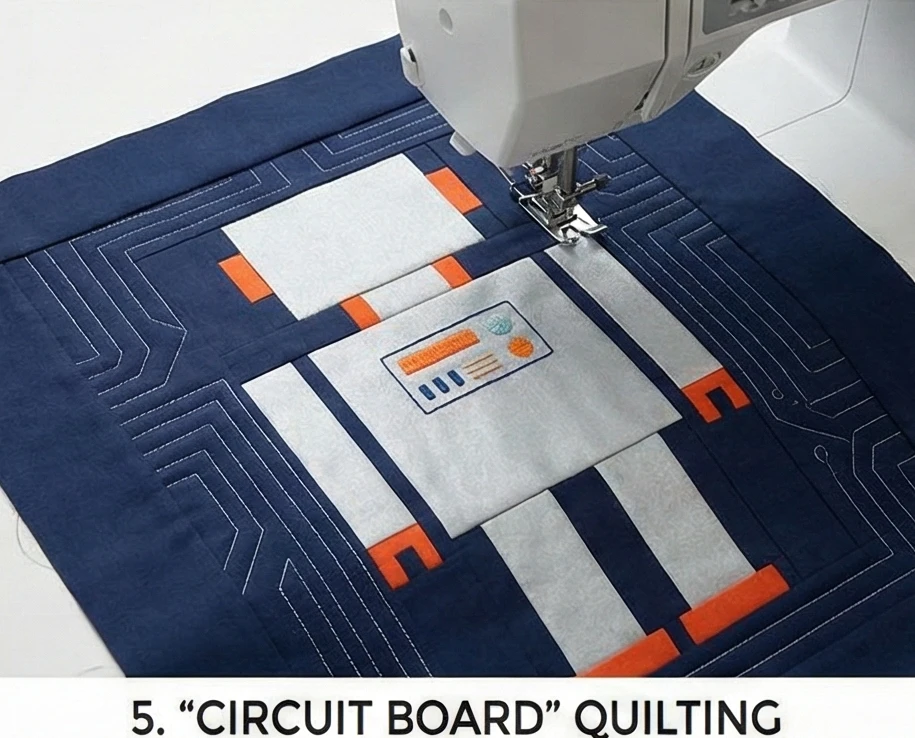
Step 6: The Envelope Finish
- Backing Panels: Cut two pieces of Backing Fabric 18.5″ x 13″.
- Hem: Hem one long edge of each panel (fold under 1/2″, press, fold again, stitch).
- Sew: Place the Quilted Top face up. Place backing panels face down, overlapping in the center. Sew around the perimeter.
- Turn & Stuff: Turn right side out and insert a firm 18″ or 20″ pillow form.
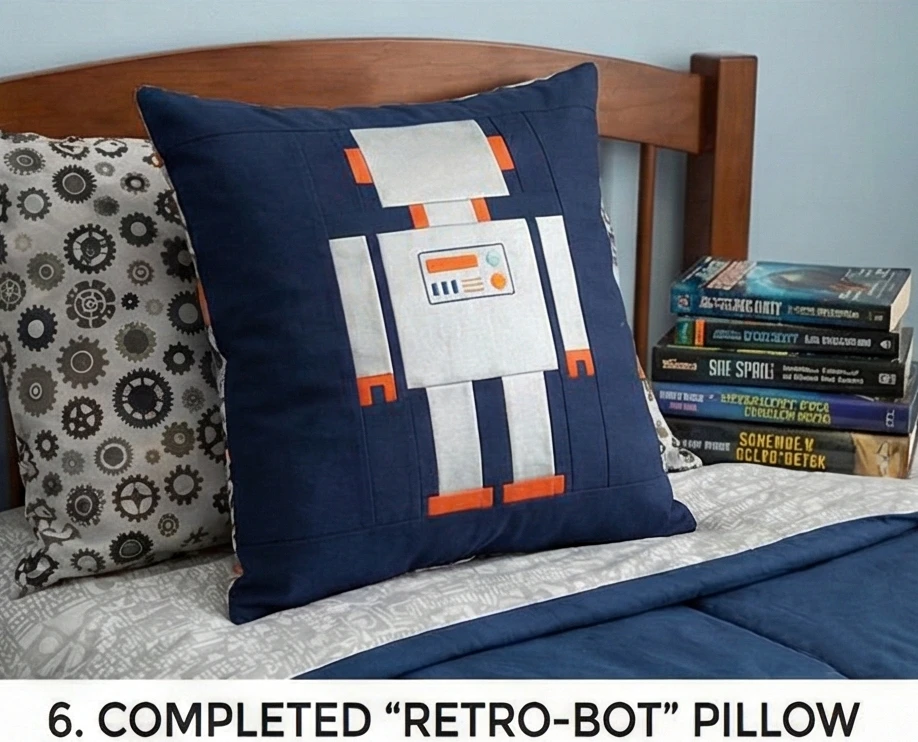
Usability Note: If you use metallic fabric for the robot (like “Grunge” or metallic linen), ensure it is soft to the touch. Avoid stiff, scratchy lamé fabrics, as a pillow is meant for a face to rest on. A soft grey cotton is often the best choice for comfort.
19. Everyday Adventure Map Quilt Ideas for Stylish Bed Covers
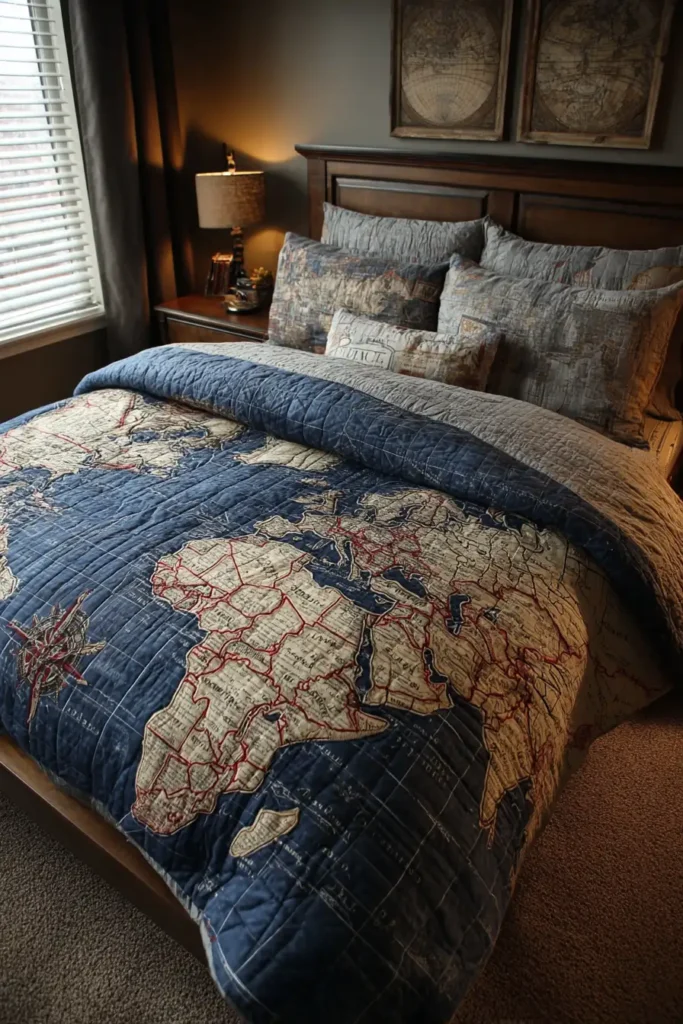
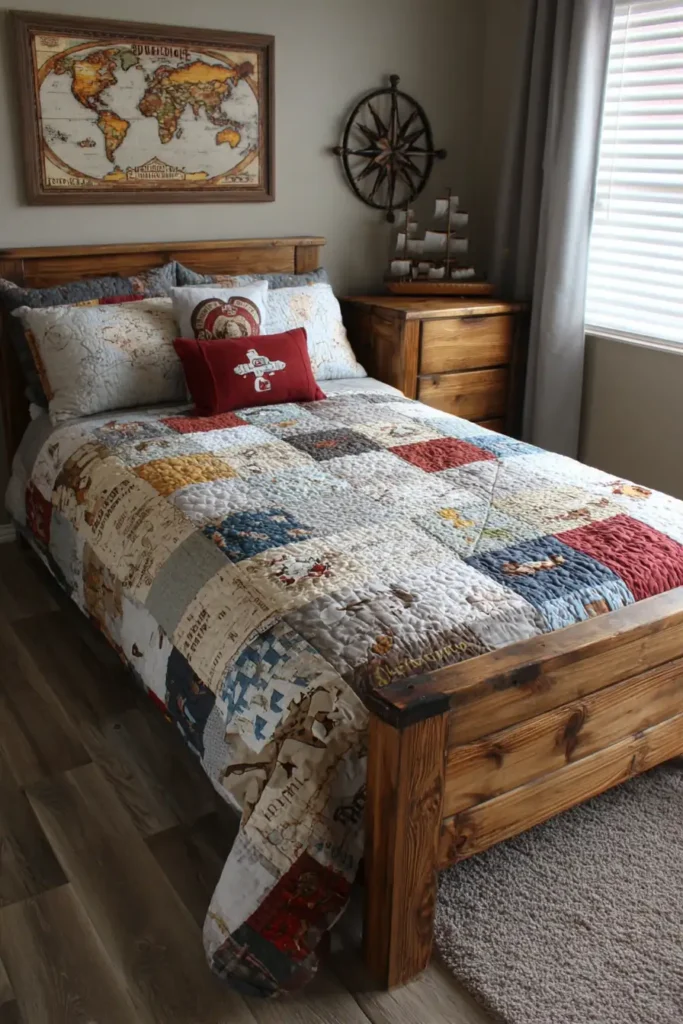
The “Pathfinder” World Map Quilt
A map is more than just geography; it is a promise of adventure. The “Pathfinder” quilt turns a boy’s bed into the whole world. Rather than a literal, scientifically accurate map that can look cluttered, this design uses Raw Edge Appliqué to create a stylized, artistic map of the continents. By using a monochromatic palette—like Indigo Denim for the ocean and Chambray/Linen for the land—you create a sophisticated “Explorer’s Club” aesthetic that looks great in a messy room and ages well into the teen years.
Finished Dimensions: Twin Bed Size, 64″ x 88″.
Materials Needed:
- Fabric A (The Ocean): 4 yards of Indigo Denim, Navy Canvas, or a deep Ocean Blue Solid. (Using denim adds amazing durability).
- Fabric B (The Land): 1.5 yards of Natural Linen, Cork Fabric, or a textural Grey Cotton.
- Fabric C (Compass Rose): Scraps of Red and White.
- Backing: 5.5 yards of a vintage postage stamp print or compass print.
- Notions: Paper-Backed Fusible Web (HeatnBond Ultra), tear-away stabilizer, world map template.
Cultural Backstory: Quilted maps have a rich history. In the 19th century, “Globe Quilts” were often used as teaching tools for children, before mass-produced posters. Today, “map decor” is a major trend in interior design, symbolizing curiosity, travel, and a global mindset. A denim map quilt nods to the rugged materials used by early aviators and explorers.
Step 1: Preparing the Canvas (The Ocean)
We start with a vast, open sea.
- Cut Panels: Denim is rarely 64″ wide. You will likely need to piece the background.
- Cut two lengths of Fabric A measuring 32.5″ x 88″.
- Sew: Stitch them together along the long edge (using a 1/2 inch seam allowance for denim).
- Press: Press the seam open and pound it flat with a mallet/clapper if it’s thick.
- Result: A solid blue field measuring approx 64″ x 88″.

Step 2: Creating the Continents
Don’t worry about tiny islands; keep shapes bold.
- Template: Print a world map outline. Enlarge the continents (North America, South America, Africa, Eurasia, Australia, Antarctica) to scale. You might need to tape multiple sheets of paper together.
- Trace: Trace the continents onto the paper side of your Fusible Web.
- Tip: Remember to trace the mirror image of the map, because you are ironing it onto the back of the fabric.
- Fuse: Iron the fusible web onto the back of Fabric B (Linen/Cork).
- Cut: Cut out the continent shapes. Simplicity is elegance here—smooth out the jagged coastlines to make them easier to sew.
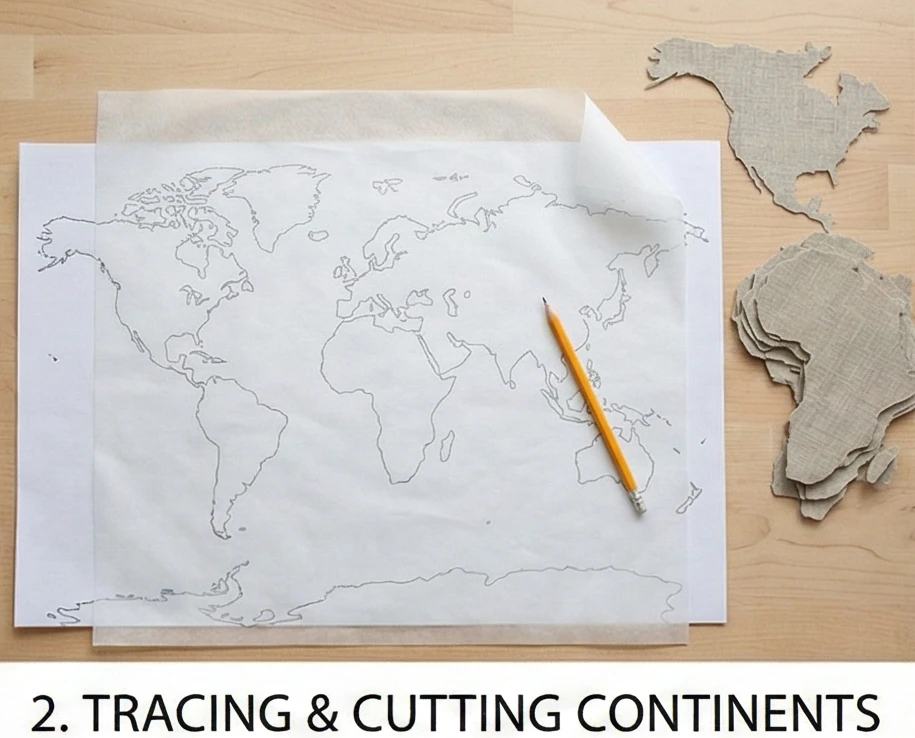
Step 3: Mapping the World
Placement is everything.
- Layout: Lay your Denim Ocean flat on the floor. Peel the paper backing off your linen continents.
- Arrange: Place the continents in their approximate positions.
- Design Choice: You can do a standard Mercator projection, or you can “wrap” the map so the Pacific Ocean is in the center.
- Spacing: Ensure there is at least 4 inches of blue space around the edges for binding.
- Fuse: Once happy, press with a hot iron to bond the land to the ocean.

Step 4: The Stitch-Down
Secure the edges for a lifetime of washes.
- Thread Choice: Use a thread that matches the Land (for a clean look) or a contrasting Dark Brown (for a vintage map look).
- Stitch: Use a Blanket Stitch or a sketchy Triple Straight Stitch to outline every continent.
- Note: If using Denim and Linen, the raw edge will fray slightly over time, adding a nice, rugged texture. If you want no fraying, use a tight Satin Stitch.
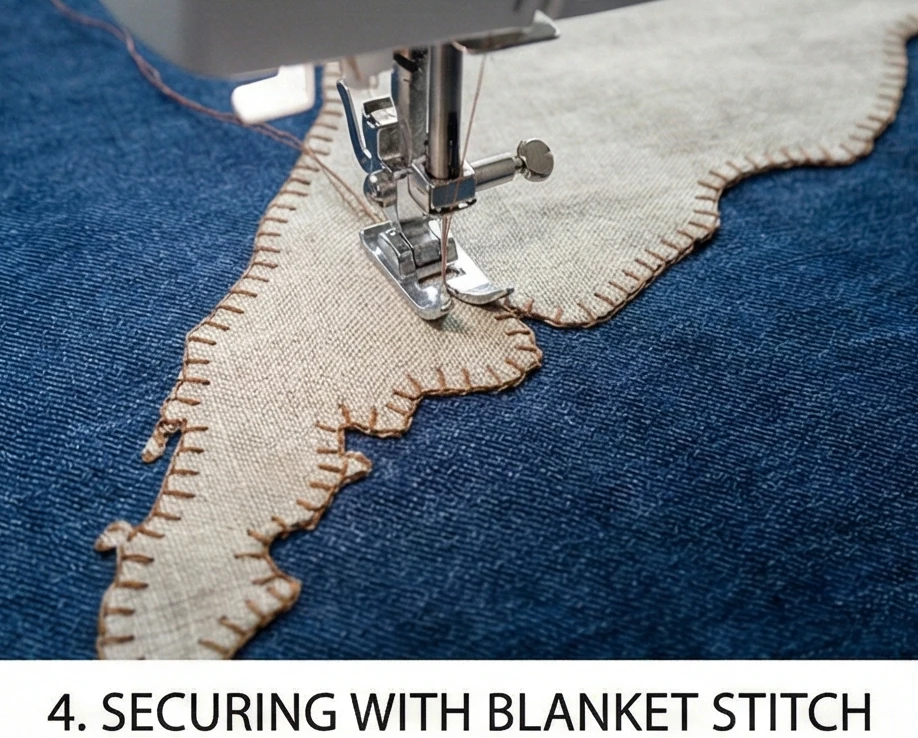
Step 5: The “Compass Rose” Appliqué
Every map needs a North Star.
- Create: Cut a simple 8-point star from Fabric C (Red/White) using the same fusible web method.
- Place: Iron it into a large open area of the ocean (like the Pacific or Indian Ocean). Stitch it down.
- Details: This adds a pop of color and a focal point to the large expanse of blue.
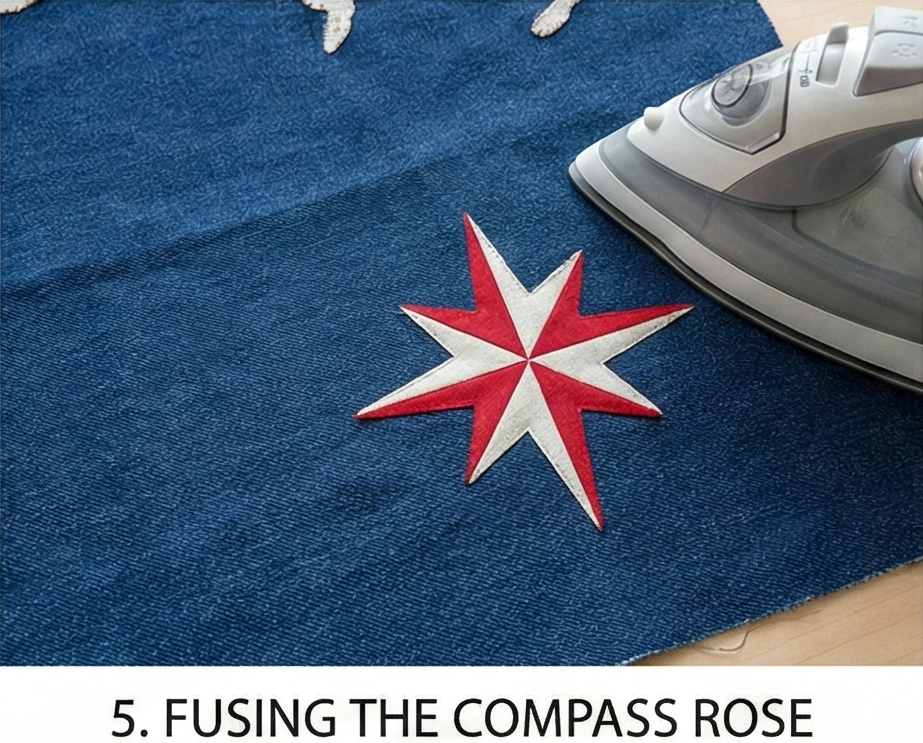
Step 6: “Latitude & Longitude” Quilting
Use the quilting lines to make the map look scientific.
- Baste: Sandwich layers (Denim Top + Batting + Backing).
- Quilt:
- The Grid: Do not do random swirls. Quilt a Grid over the entire quilt surface using straight lines spaced 4 to 6 inches apart.
- Effect: These lines represent the lines of Latitude and Longitude found on navigational charts. It unifies the surface and securely holds the heavy denim layers together.
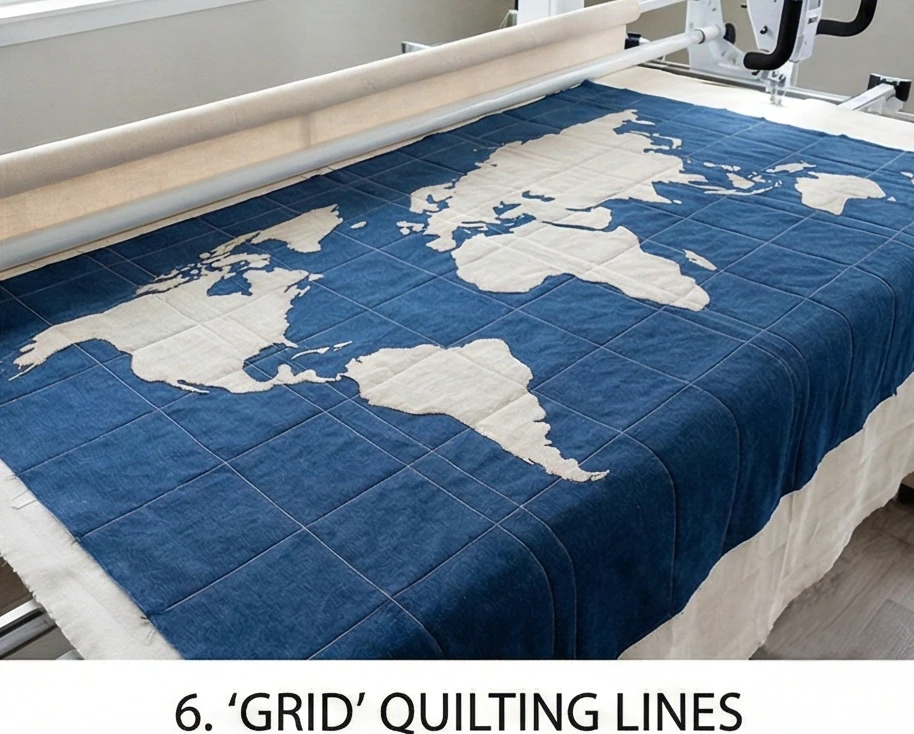
Usability Note: Denim is heavy! If you use a heavy denim for the top, you can skip the batting and just use a flannel backing for a “Summer Weight” coverlet. If you include batting, this will be a very warm, weighted blanket—perfect for winter, but perhaps too hot for summer.
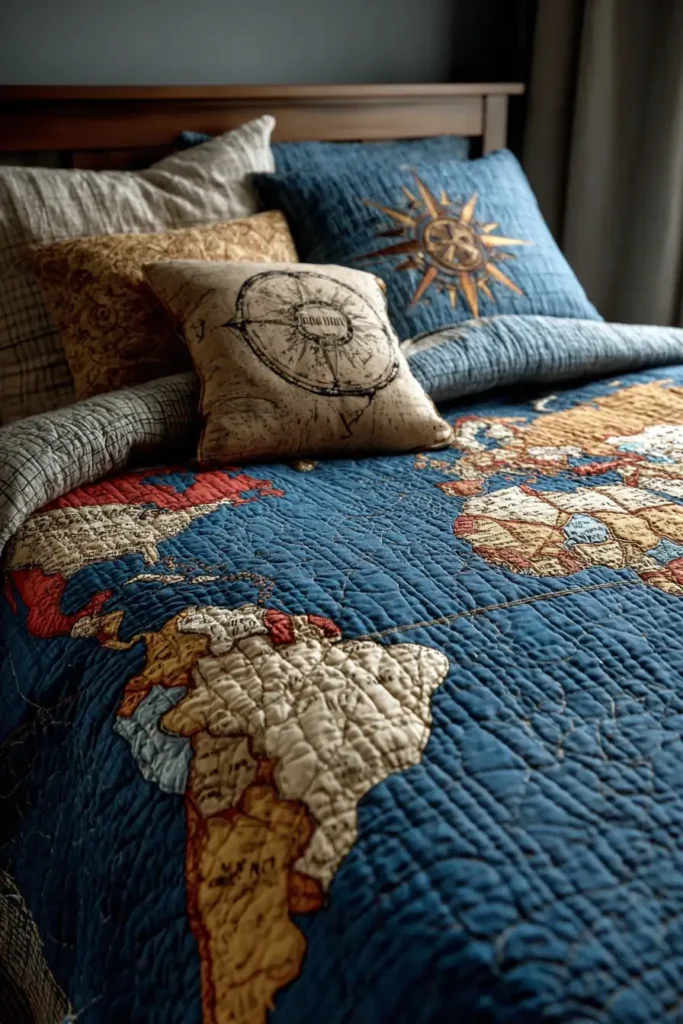
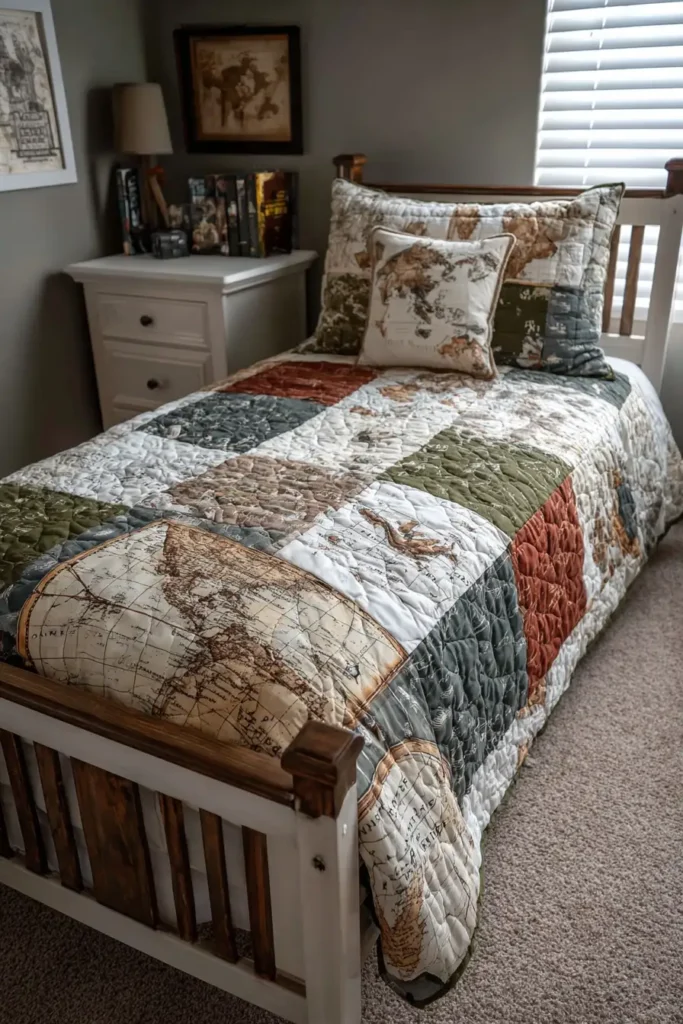
20. Comfortable Soccer Star Quilt Patterns for Pillow Covers
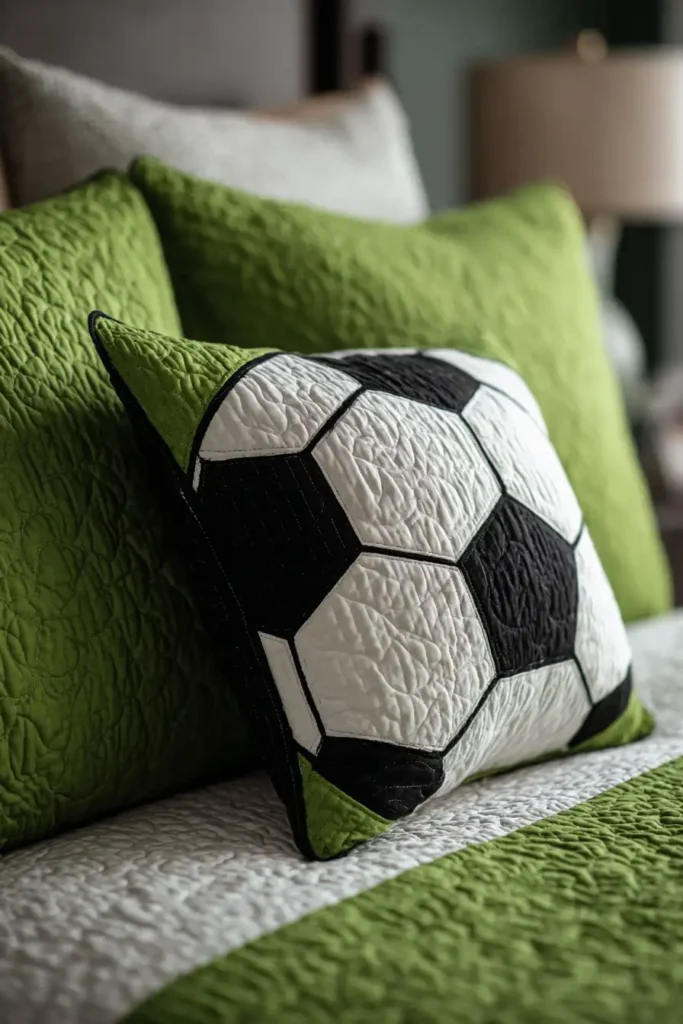
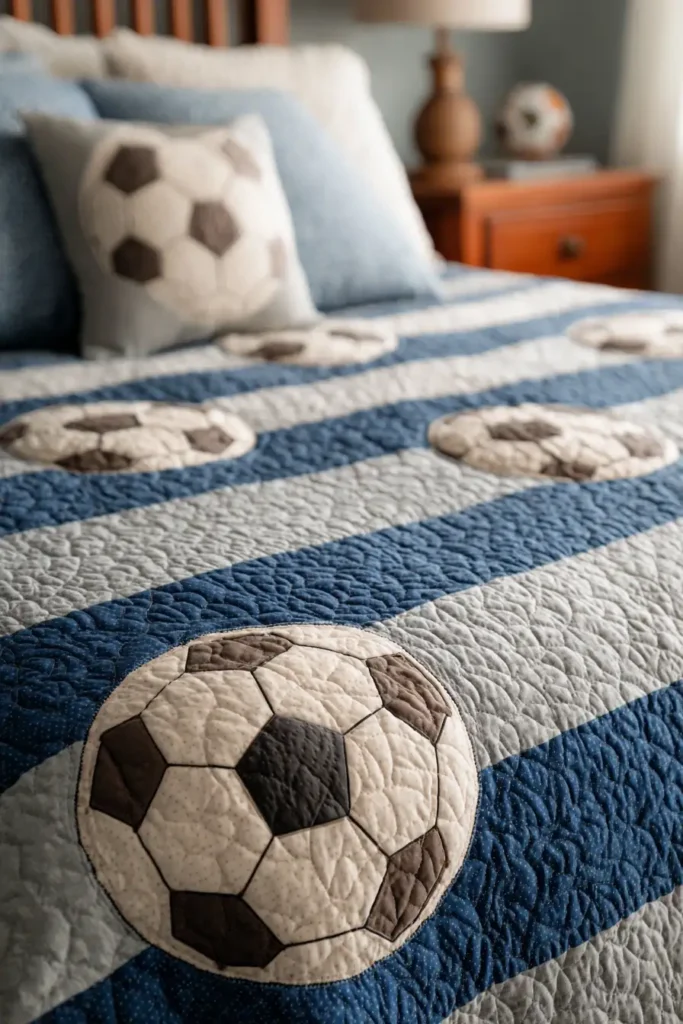
The “Golden Goal” Hexagon Pillow
Soccer creates a passion that lasts a lifetime. For a boy’s room, the challenge is to represent the sport without making the room look like a cheap souvenir shop. The “Golden Goal” pillow focuses on the iconic geometry of the soccer ball—the Truncated Icosahedron (a mix of pentagons and hexagons). By appliquéing a stylized black-and-white “patch” onto a field of Grass Green or Stadium Grey, you create a graphic, modern accent that celebrates the “Beautiful Game” with elegance and tactile comfort.
Finished Dimensions: Standard Square Pillow, 18″ x 18″.
Materials Needed:
- Fabric A (Background/Pitch): 1/2 yard of Kelly Green (solid or grass texture) or Heather Grey (for a neutral look).
- Fabric B (Ball – Black): Scraps of Solid Black or Black Minky (for texture).
- Fabric C (Ball – White): Scraps of Solid White or White Minky.
- Backing: 1/2 yard of a soccer net mesh print or jersey knit.
- Notions: Paper-Backed Fusible Web (HeatnBond Lite), Hexagon/Pentagon templates (printable).
Cultural Backstory: The classic black-and-white soccer ball, known as the Telstar, was introduced by Adidas for the 1970 World Cup in Mexico. It was the first World Cup to be televised live. The design featured 12 black pentagons and 20 white hexagons to make the ball more visible on black-and-white television sets. It instantly became the universal symbol of the sport.
Step 1: Preparing the Shapes
We will create a flat, 2D representation of the ball using the “Telstar” pattern.
- Templates: Print or draw two templates:
- Pentagon (5-sided): 2.5 inches per side.
- Hexagon (6-sided): 2.5 inches per side.
- Fuse: Iron your Fusible Web onto the back of your Black and White fabric scraps.
- Trace & Cut:
- From Black Fabric: Trace and cut 1 Pentagon (Center).
- From White Fabric: Trace and cut 5 Hexagons (Surround).
- Texture Tip: If you use Minky fabric for these shapes, the ball will be fuzzy and tactile, which boys love.

Step 2: Preparing the “Pitch” (Background)
Set the stage.
- Cut Background: From Fabric A (Green/Grey), cut a square measuring 18.5″ x 18.5″.
- Center Mark: Fold the square in half vertically and horizontally to lightly crease the center point.
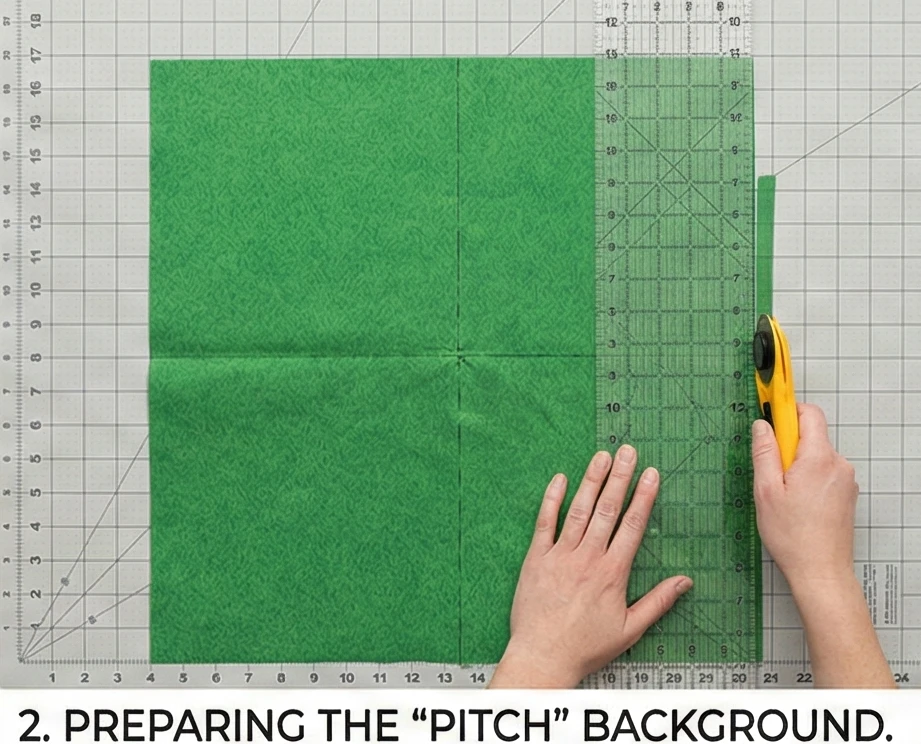
Step 3: Fusing the Ball Layout
Geometry in action.
- Placement: Peel the paper backing off your shapes.
- Center: Place the Black Pentagon exactly in the center of the background square.
- Surround: Arrange the 5 White Hexagons around the pentagon.
- Alignment: One flat side of each hexagon should touch one flat side of the pentagon. Leave a tiny gap (1/16th inch) between them if you want the green background to show through like stitching lines, or butt them up distinctively.
- Fuse: Press with a hot iron to bond the “ball” to the background.
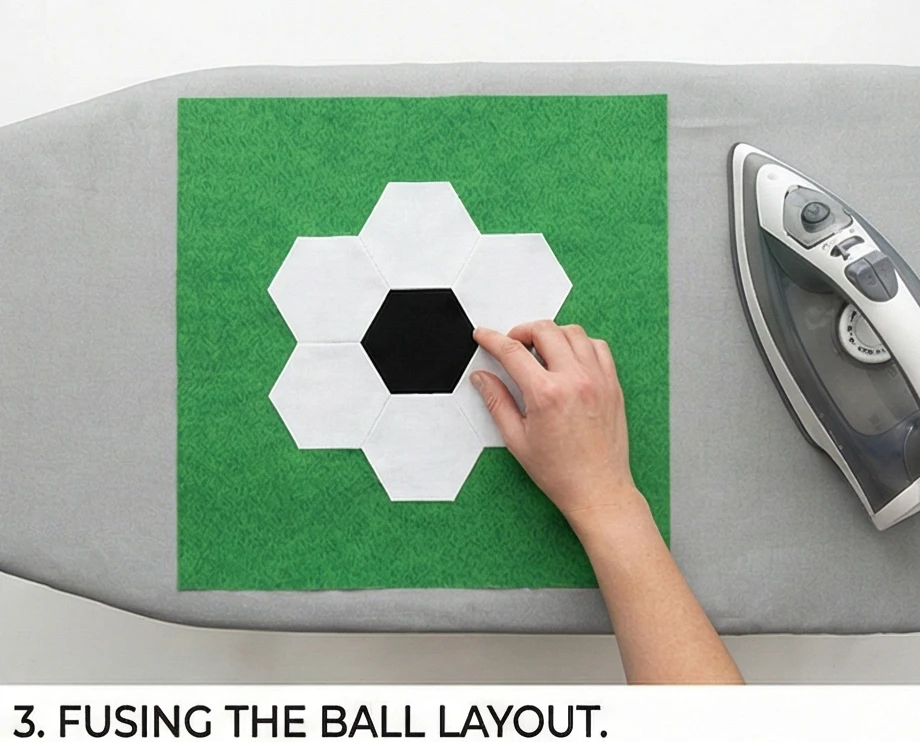
Step 4: The Appliqué Stitch
Secure the edges.
- Stitch: Use a Zig-Zag Stitch or Blanket Stitch to outline every shape.
- Thread: Use Black thread for the pentagon and White (or Silver) thread for the hexagons.
- Durability: Ensure the stitching catches the edge of the appliqué securely so it doesn’t peel up during pillow fights.
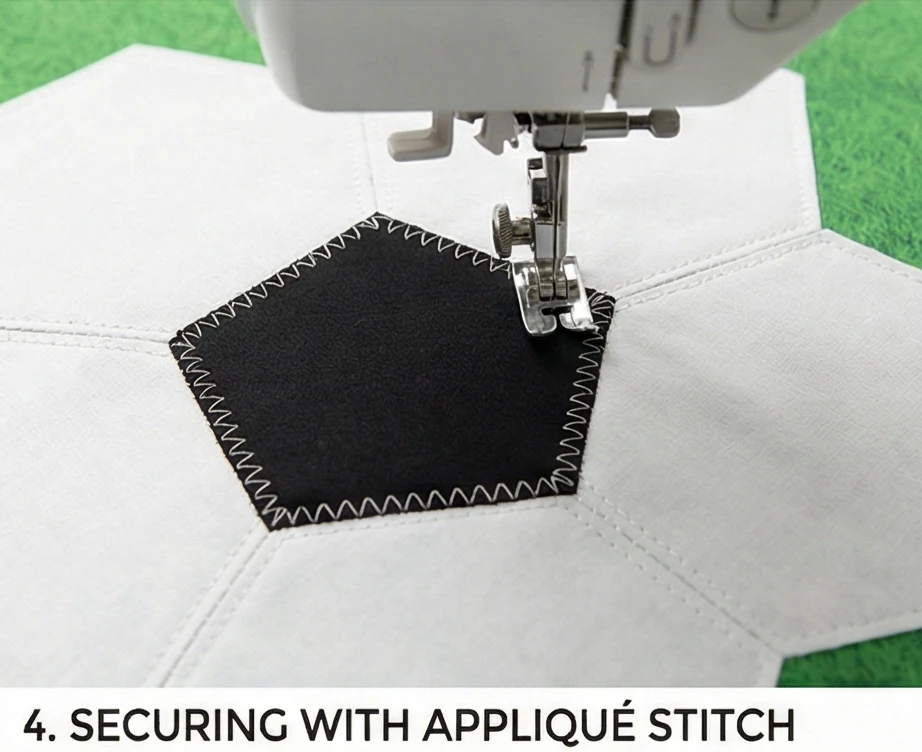
Step 5: “The Net” Quilting
Add context without adding clutter.
- Layer: Place batting and muslin behind the pillow top.
- Quilt the Pitch: On the Green background areas (outside the ball), quilt a Cross-Hatch Grid on the diagonal.
- Spacing: Space the lines about 1.5 inches apart.
- Visual: This diamond grid mimics the look of a Goal Net, subtly reinforcing the soccer theme.
- Quilt the Ball: Stitch a simple spiral or star inside the black pentagon to hold the batting in place.
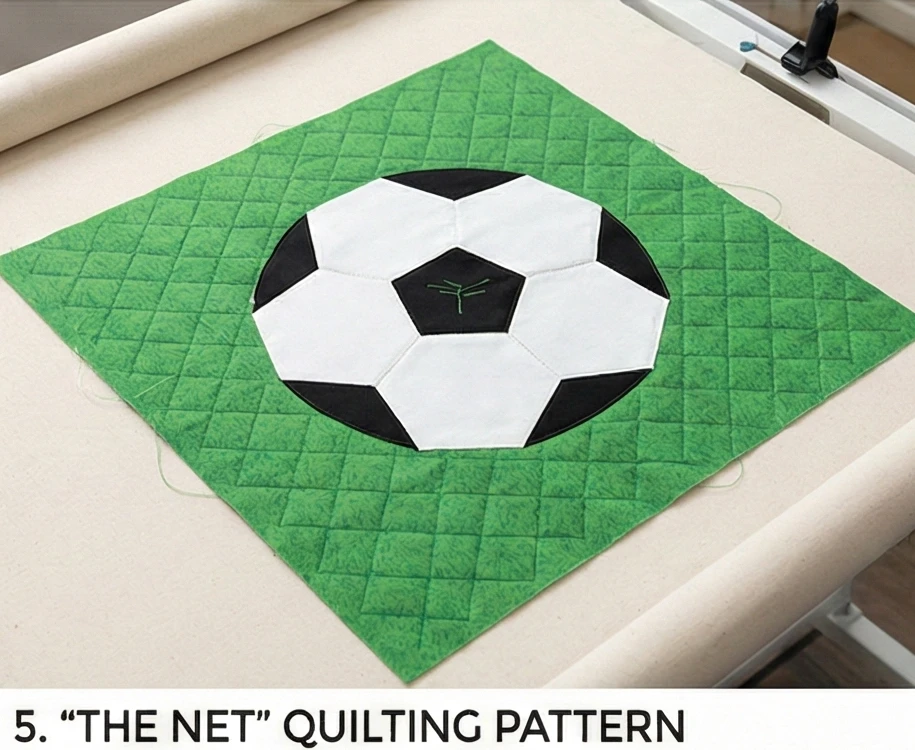
Step 6: The Envelope Back
Easy to remove for washing.
- Cut Panels: Cut two rectangles of Backing Fabric measuring 18.5″ x 13″.
- Hem: Hem one long edge of each rectangle (fold 1/2″, press, fold 1/2″, stitch).
- Assembly: Place the pillow top face up. Layer the backing panels face down, overlapping in the middle.
- Sew: Stitch the perimeter with a 1/4″ seam. Clip corners, turn, and stuff.

Usability Note: If using Minky for the ball, do NOT iron directly on the “dots” or pile, as it will melt. Press from the back side of the pillow top, or use a pressing cloth.
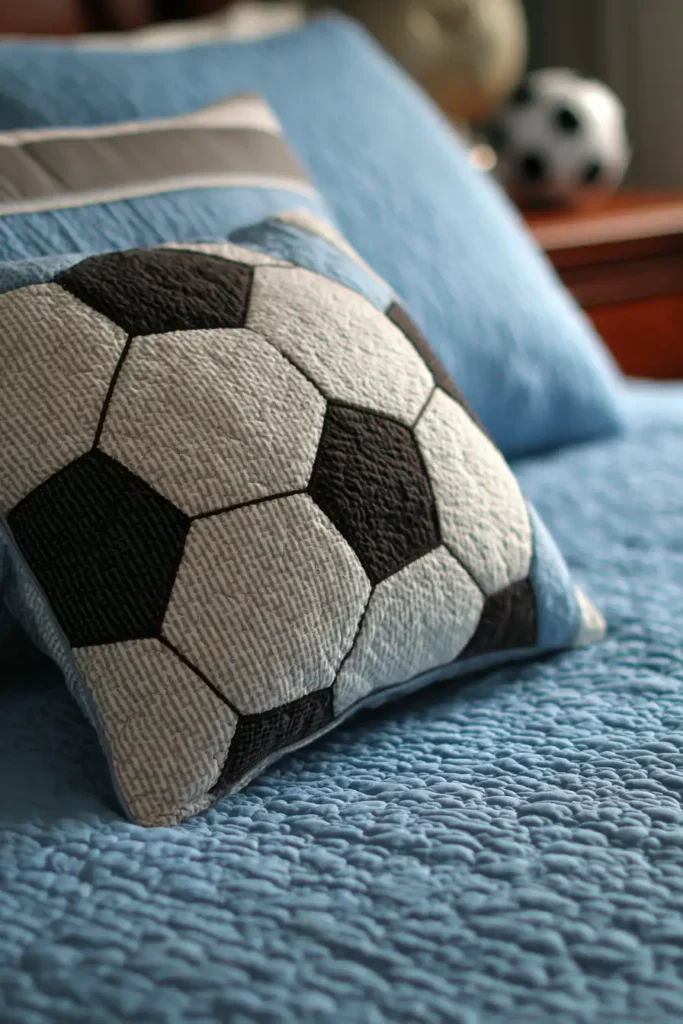

Conclusion
Embracing these 20 Everyday Comfortable and Stylish Quilt Patterns for Boys transforms a standard bedroom into a personalized retreat that celebrates his interests and energy. We have journeyed through the wild landscapes of Woodland Bear and Mountain themes and navigated the high seas with Nautical & Pirate Bedding, proving that “boy” decor can be both imaginative and tastefully designed. These projects demonstrate that durability does not have to come at the expense of style; a Transportation Quilt featuring trucks and trains can be vibrant and fun, while Electric Guitar motifs provide an edgy, rockstar vibe for a budding musician.
The true value of these quilts is found in how they are used every day. A Cool Camouflage Patchwork isn’t just a bedspread; it becomes the roof of a hideout fort on a rainy Saturday. A Cozy Plaid Patchwork Pillow offers a comfortable spot to crash with a comic book or a tablet. By incorporating versatile elements like Striped Jelly Roll Patterns for quick finishes or Superhero Inspired Blocks for wall art, you are curating a space that supports his hobbies and provides a constant layer of physical comfort. These items are meant to be dragged around, snuggled into, and loved thoroughly.
Let this collection inspire you to start your next project with confidence, knowing you are creating something that will last. Whether you are stitching a Modern Robot Pillow for a fun accent or piecing together a massive Memory T-Shirt Quilt as a graduation gift, you are weaving love and warmth into a tangible form. These quilts stand as durable symbols of care, designed to keep him warm through every stage of childhood and adolescence, ensuring his room remains a cool, comfortable haven he is proud to call his own.
