
20 Elegant Hawaiian Quilt Patterns That Add Comfort and Elegance to Any Living Space
Bringing the serene beauty of the tropics into your home requires decor that balances visual warmth with sophisticated artistry, and 20 Elegant Hawaiian Quilt Patterns do just that. Unlike standard patchwork, Hawaiian quilting (Kapa Lau) is a unique art form characterized by its distinctive symmetrical appliqué designs—often cut from a single piece of fabric like a paper snowflake—and the mesmerizing “echo stitching” that ripples across the surface like waves on the ocean. This combination creates a textile that is not only visually stunning but also deeply symbolic, often depicting native flora and fauna. Whether it represents the hospitality of the Classic Pineapple or the royal heritage of the Hawaiian Flag, each pattern carries the “Aloha spirit,” instantly transforming any room into a sanctuary of comfort and elegance.
The versatility of these designs allows them to adapt to various interior styles, from coastal cottages to contemporary city apartments. While traditional designs often feature bold, two-tone contrasts, modern interpretations like Monochromatic White-on-White Hawaiian Quilts offer a subtle, textured elegance perfect for minimalist spaces. The organic shapes of Tropical Palm Leaves or Vibrant Hibiscus blooms introduce a natural softness to hard architectural lines, making spaces feel more inviting. By incorporating these motifs into Bed Covers, Sofa Throws, and even Table Runners, you are not just decorating; you are curating a living space that feels curated, high-end, and deeply relaxing.
In this guide, we explore a curated selection of patterns that promise to elevate your home’s aesthetic. We delve into the luxurious feel of King Size Anthurium Designs for the master suite and the practical charm of Quilted Chair Pads for dining areas. We also look at how these textiles can serve as striking art pieces, such as Rainbow Eucalyptus Wall Decor, which brings a splash of color and culture to your vertical spaces. Whether you are looking for a statement piece like a Lava Rock Floor Quilt or a subtle accent like a Lehua Blossom Pillow Cover, these ideas will inspire you to infuse your daily life with the timeless grace and tranquility of the islands.
1. Classic Pineapple Hawaiian Quilt Patterns for Bed Covers and Runners
Contents
- 1 1. Classic Pineapple Hawaiian Quilt Patterns for Bed Covers and Runners
- 2 2. Luxury King Size Anthurium Quilt Designs
- 3 3. Lava Rock Hawaiian Quilt Pattern for Floor Quilts
- 4 4. Contemporary Hawaiian Quilt Designs for Minimalist Spaces
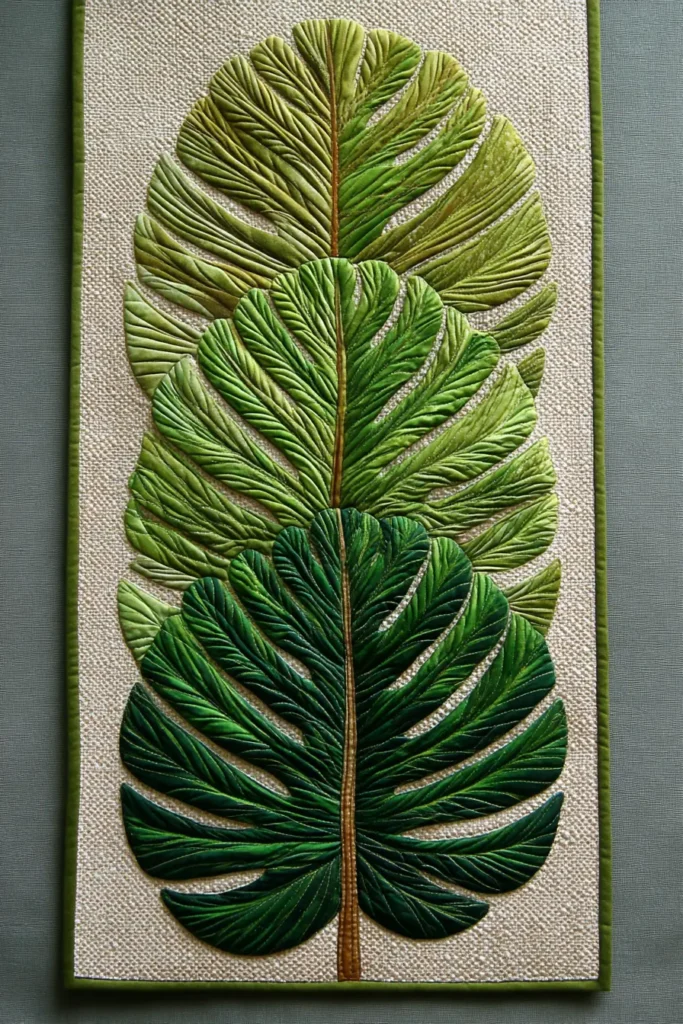
- 5 5. Rainbow Eucalyptus Hawaiian Quilt for Artistic Wall Decor
- 6 6. Sea Turtle Motif Hawaiian Quilt Ideas for Throw Blankets
- 7 7. Elegant Lauhala Weave Hawaiian Quilt for Tabletop Accents
- 8 8. Vibrant Hibiscus Appliqué Quilt Designs for Elegant Sofa Throws
- 9 9. Tropical Palm Leaf Hawaiian Quilt Ideas for Table Runners
- 10 10. Relaxing Ocean Wave Quilt Patterns for Cozy Couch Covers
- 11 11. Floral Lehua Blossom Hawaiian Quilt for Pillow Covers
- 12 12. Island Sunset Hawaiian Quilt Design for Wall Hangings
- 13 13. Elegant Hawaiian Quilt Runners for Coffee Tables
- 14 14. Palm Frond Quilt Motifs for a Relaxing Tropical Ambiance
- 15 15. Quilted Chair Pads Featuring the Hawaiian Heart (Mano) Design
- 16 16. Luxury Hawaiian Sofa Covers with Traditional Quilt Patterns
- 17 17. Hawaiian Pineapple Quilt Ideas for Warmth and Hospitality
- 18 18. The Hawaiian Flag Quilt: A Statement of Island Pride and Comfort
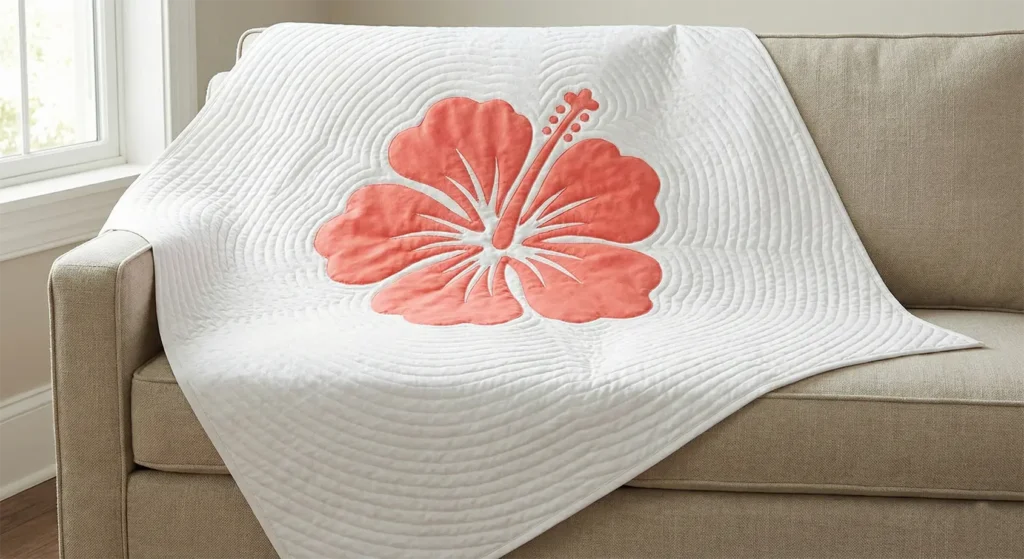
- 19 19. Monochromatic White-on-White Hawaiian Quilts for Subtle Elegance
- 20 20. Sophisticated Orchid Hawaiian Quilt Table Runners
- 21 Conclusion

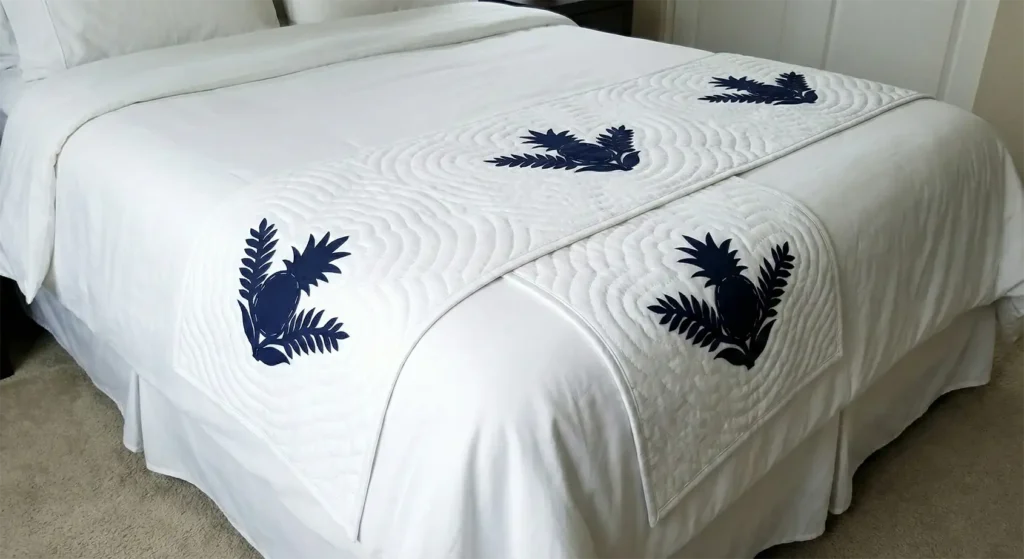
The “Royal Ali’i” Pineapple Bed Runner
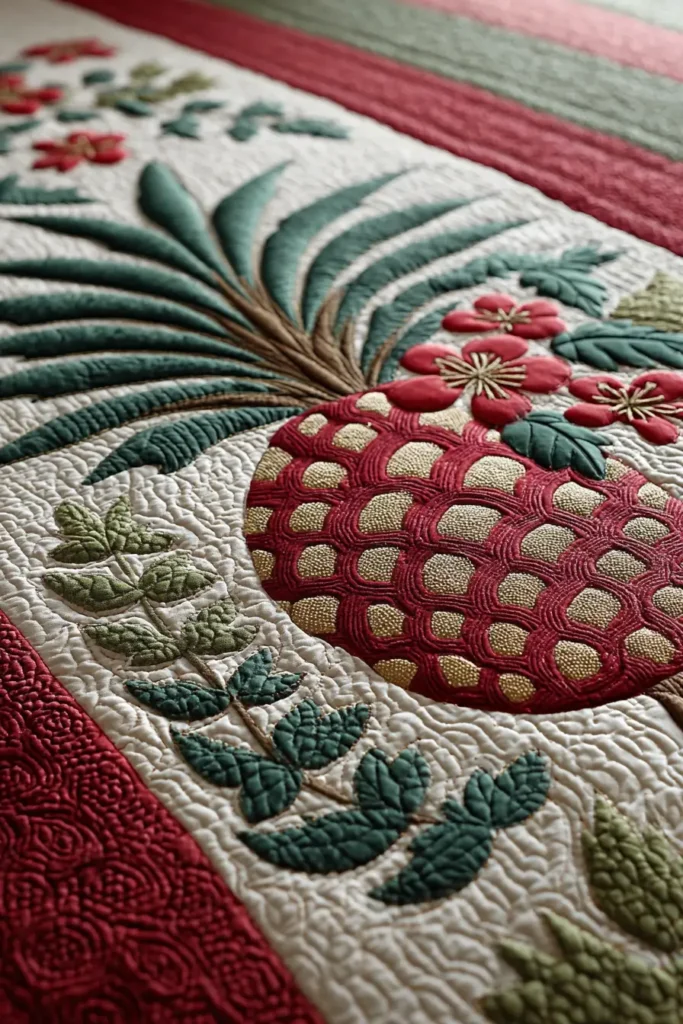
While a full Hawaiian quilt is a masterpiece, taking years to complete, a Bed Runner is a sophisticated, manageable project that adds the same visual impact and elegance to the foot of a bed. This design uses the traditional Hala Kahiki (Pineapple) motif—the universal symbol of welcome and hospitality—arranged in a row of three connected medallions. The two-color palette creates a striking, modern silhouette that fits both tropical and contemporary minimalist interiors.
Finished Dimensions: King/Queen Bed Runner, approximately 24″ x 90″.
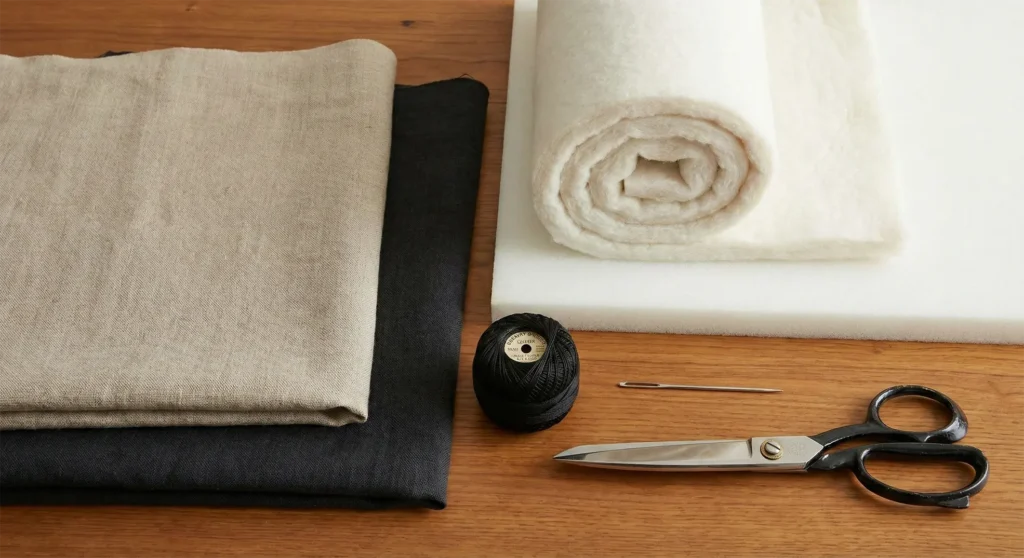
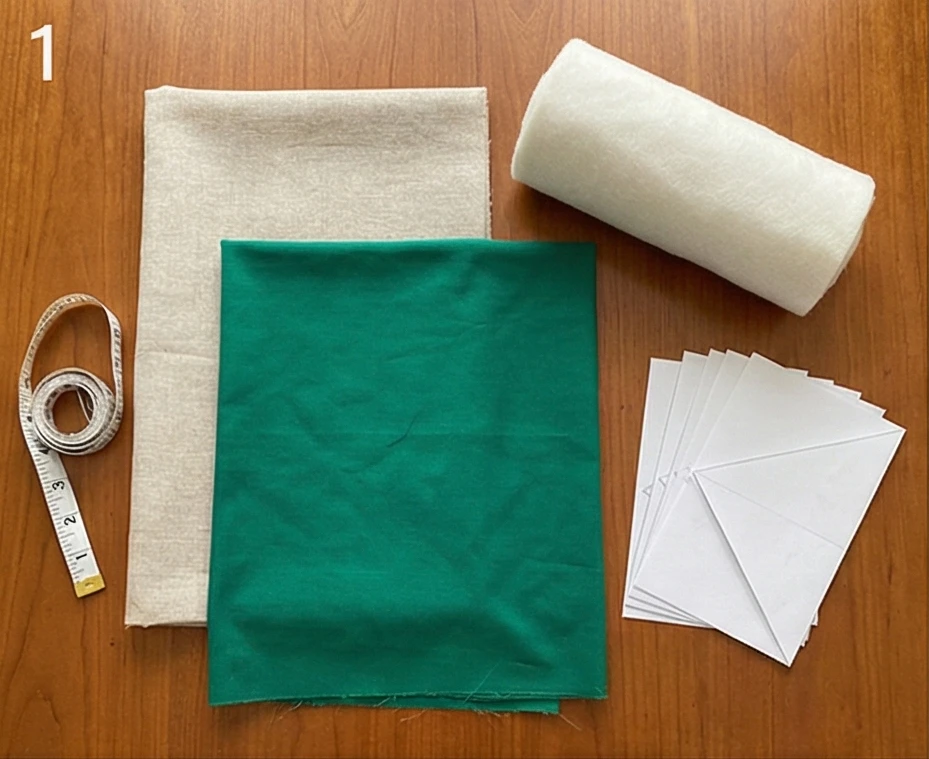
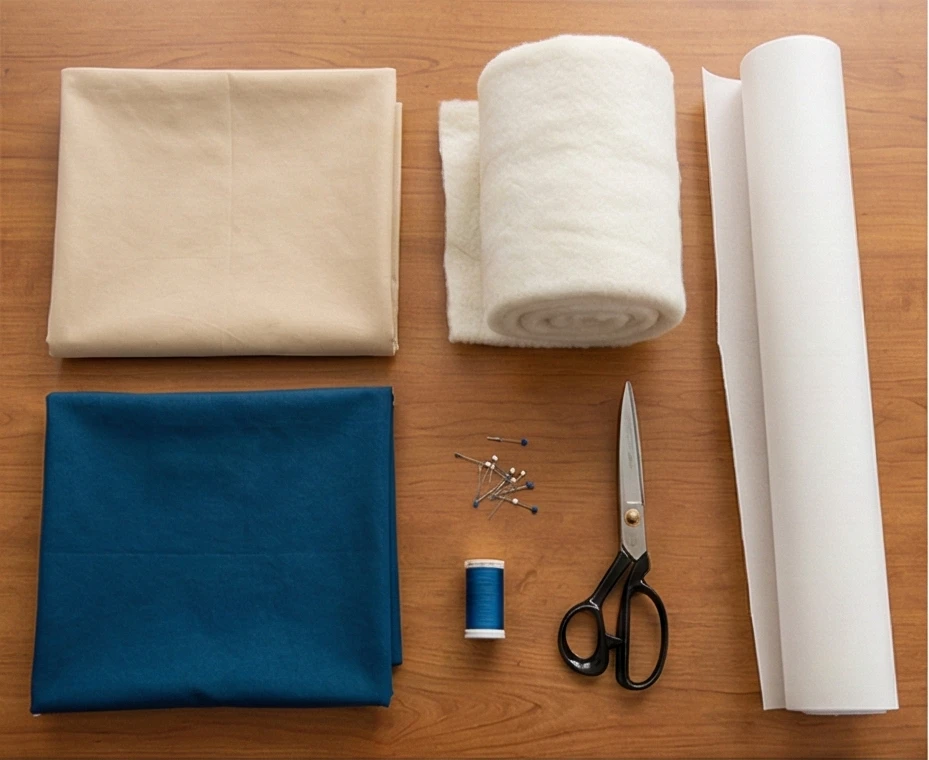
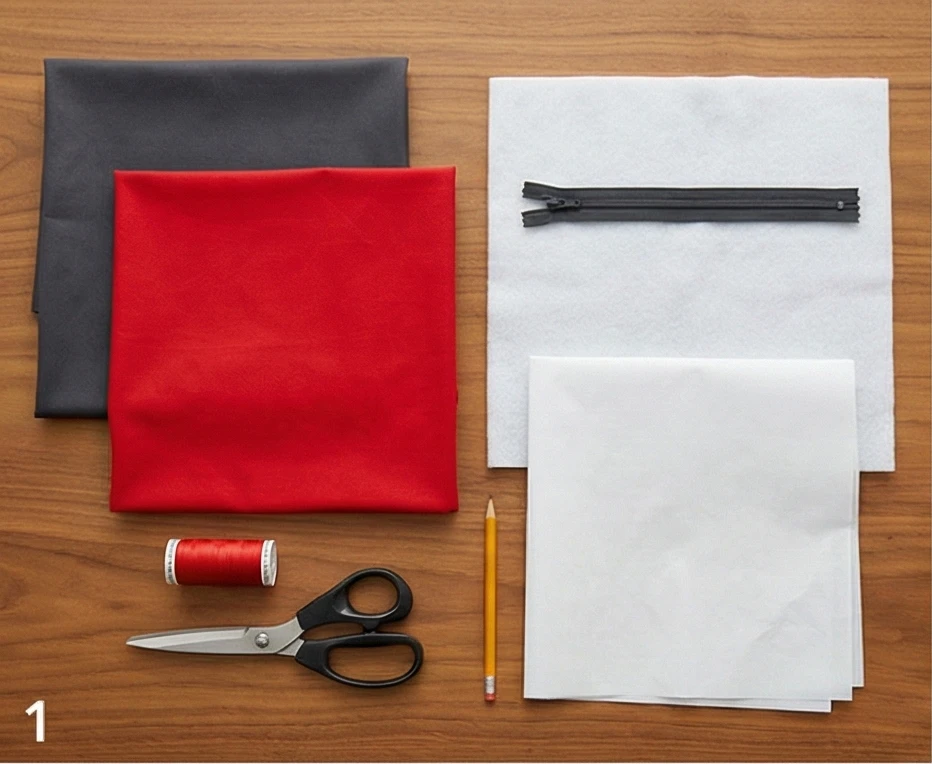
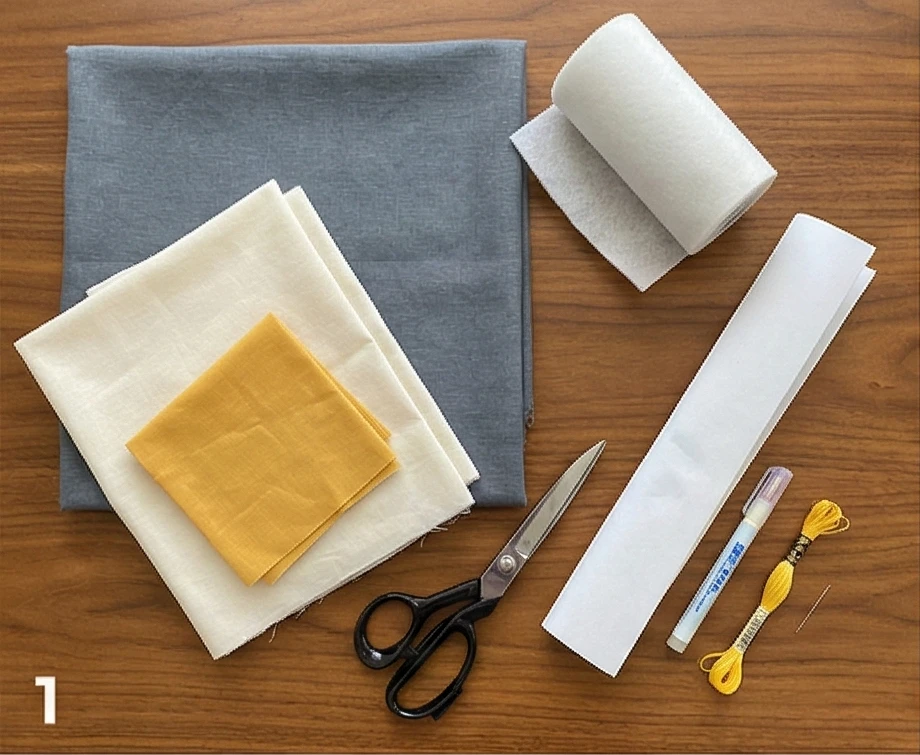
Materials Needed:
- Fabric A (Background): 2.5 yards of High-Thread Count Cotton Sateen in Snow White or Ivory. (Sateen adds a luxurious sheen).
- Fabric B (Appliqué): 1.5 yards of Deep Navy, Sage Green, or Golden Ochre. (Solid colors are traditional and most elegant).
- Backing Fabric: 2.5 yards of matching solid cotton.
- Batting: 100% Cotton Batting (low loft). This ensures the quilt lies flat and elegant, rather than puffy.
- Paper: Freezer paper or heavy butcher paper (20″ wide roll).
- Notions: Milliner’s needles (Size 10 or 11), silk thread (for invisible appliqué), sharp embroidery scissors.
Cultural Backstory: The Hawaiian quilt is a unique evolution of textile art. When missionaries arrived in the 1820s, they taught the native Hawaiians patchwork. The Hawaiians, accustomed to making Kapa (bark cloth) from single sheets, found cutting fabric just to sew it back together illogical. Instead, they adapted the technique to create “Kapa Apana”—cutting large, intricate designs from a single piece of folded fabric, mimicking the shadows of native plants cast on the ground.
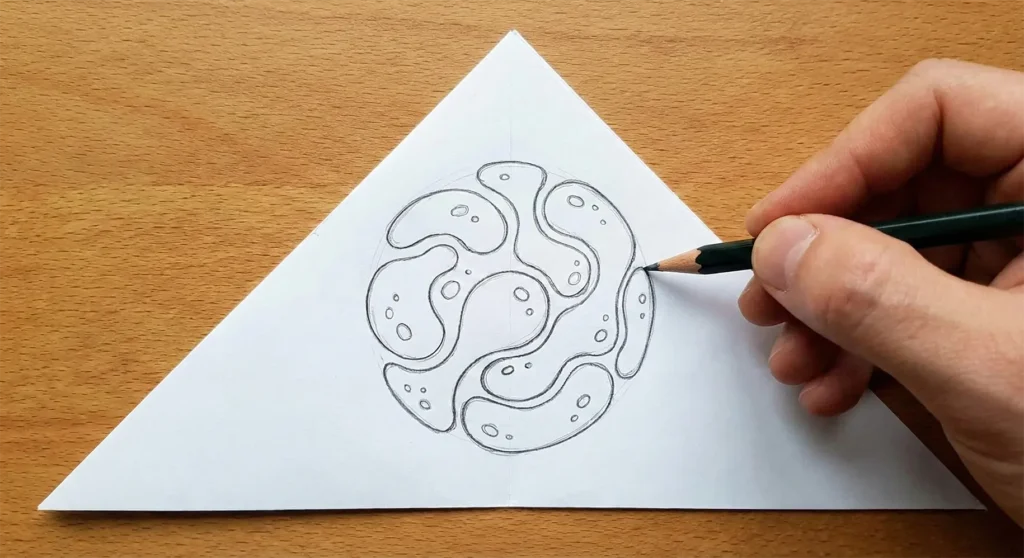
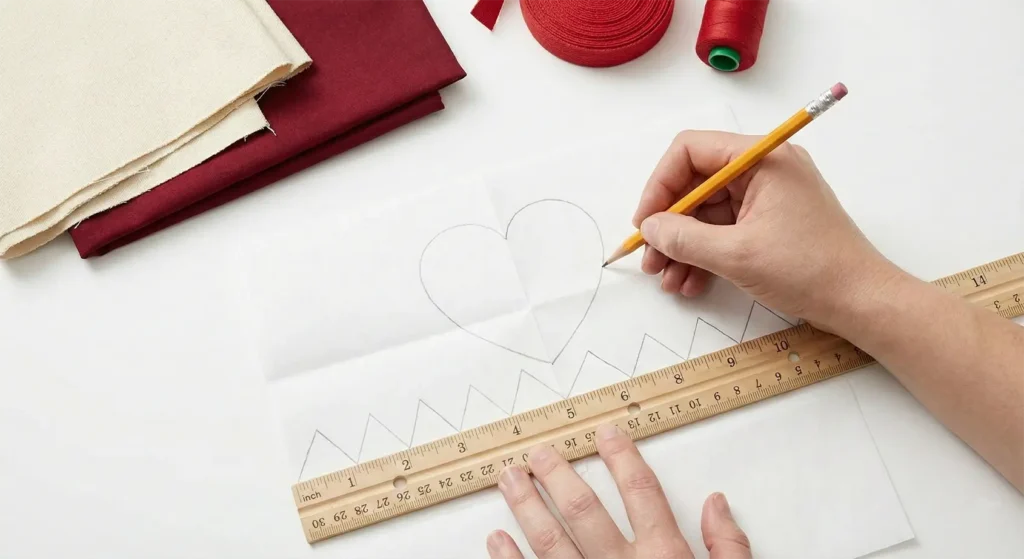
Step 1: The “Paper Snowflake” Fold
Hawaiian designs are symmetrical. We will make three identical pineapple blocks.
- Cut Paper: Cut three squares of paper measuring 18″ x 18″.
- The 1/8th Fold:
- Fold the paper in half (Rectangle).
- Fold in half again (Square).
- Fold in half diagonally (Triangle).
- Result: You have a wedge representing 1/8 of the design.
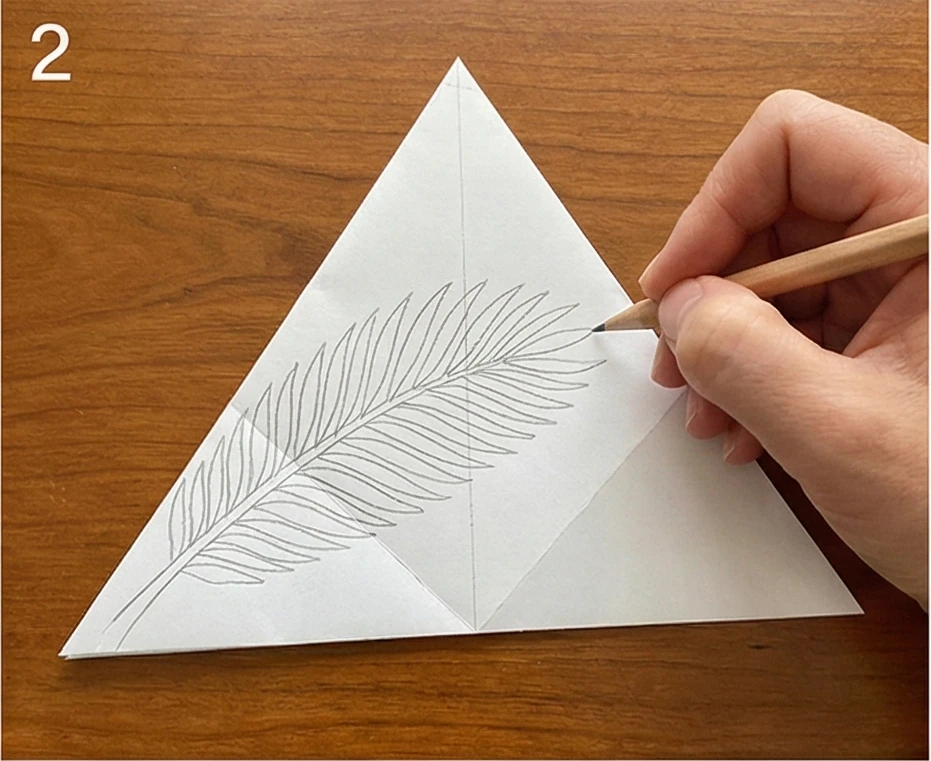
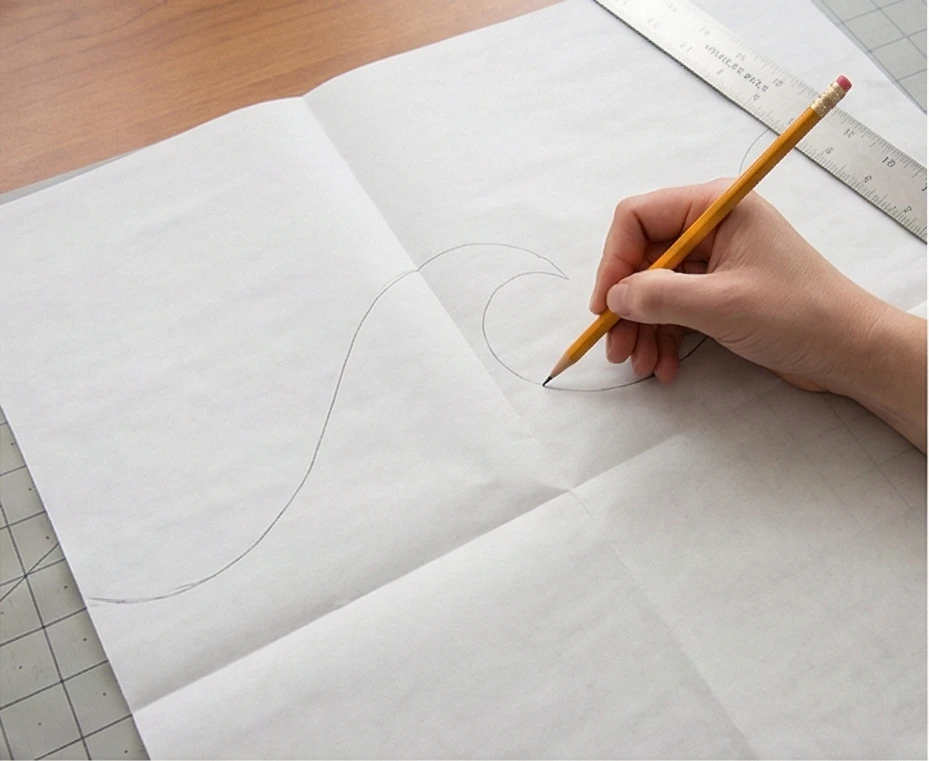
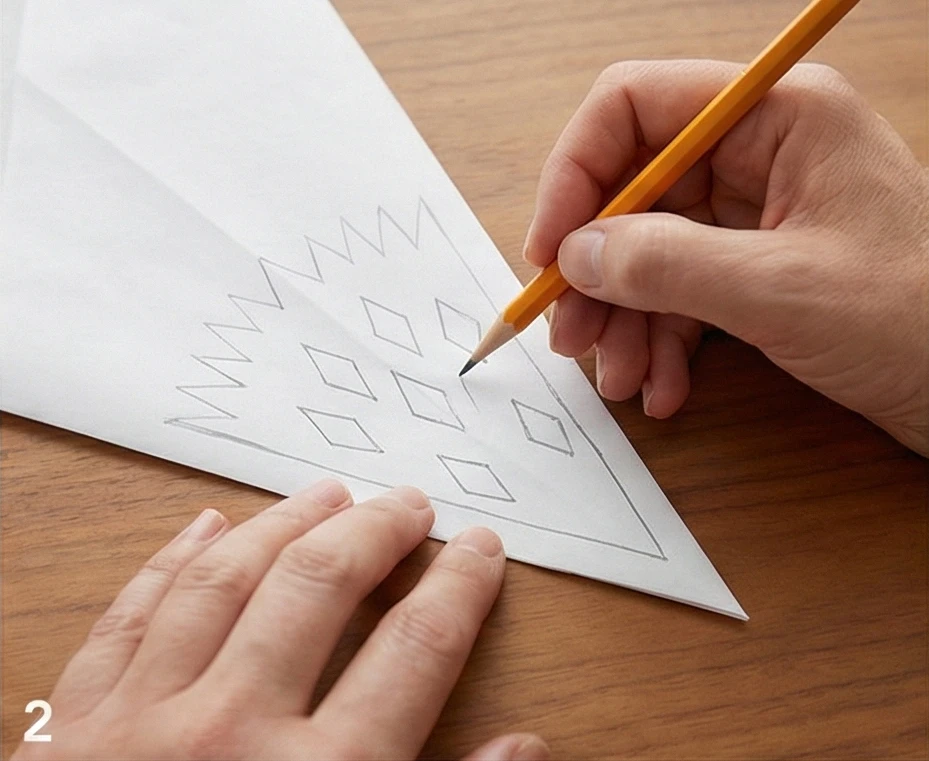
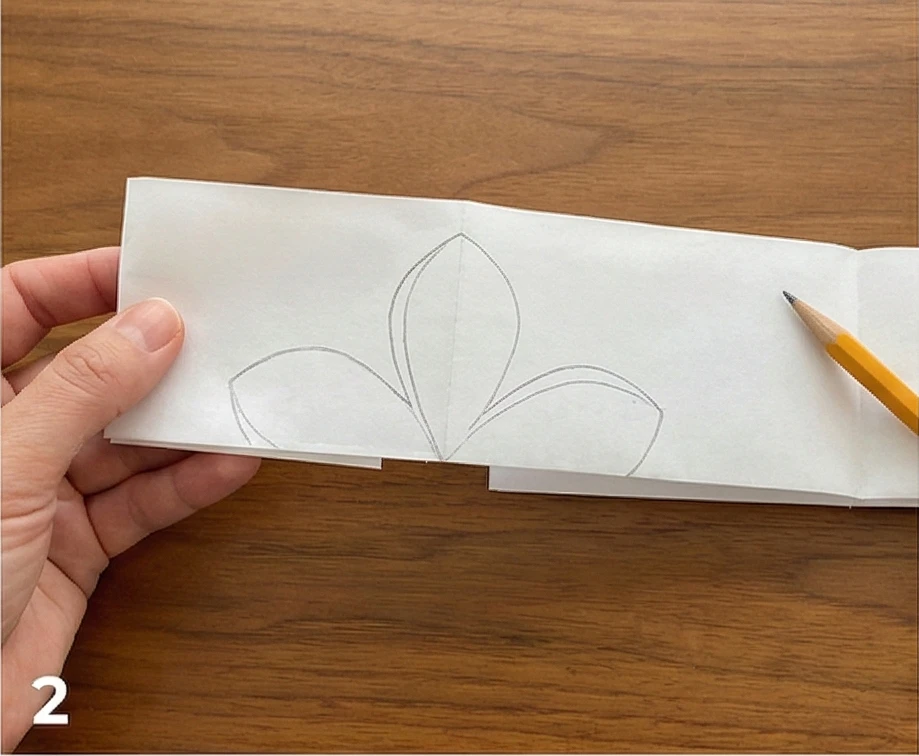
- Drafting: With the point of the triangle at the bottom (center):
- Draw a “stem” rising from the center.
- Draw the curve of the pineapple fruit in the middle.
- Draw sprouting, fern-like leaves at the top (the crown).
- Crucial: Ensure the design touches the folded edges in at least 2 places so the paper doesn’t fall apart when unfolded.

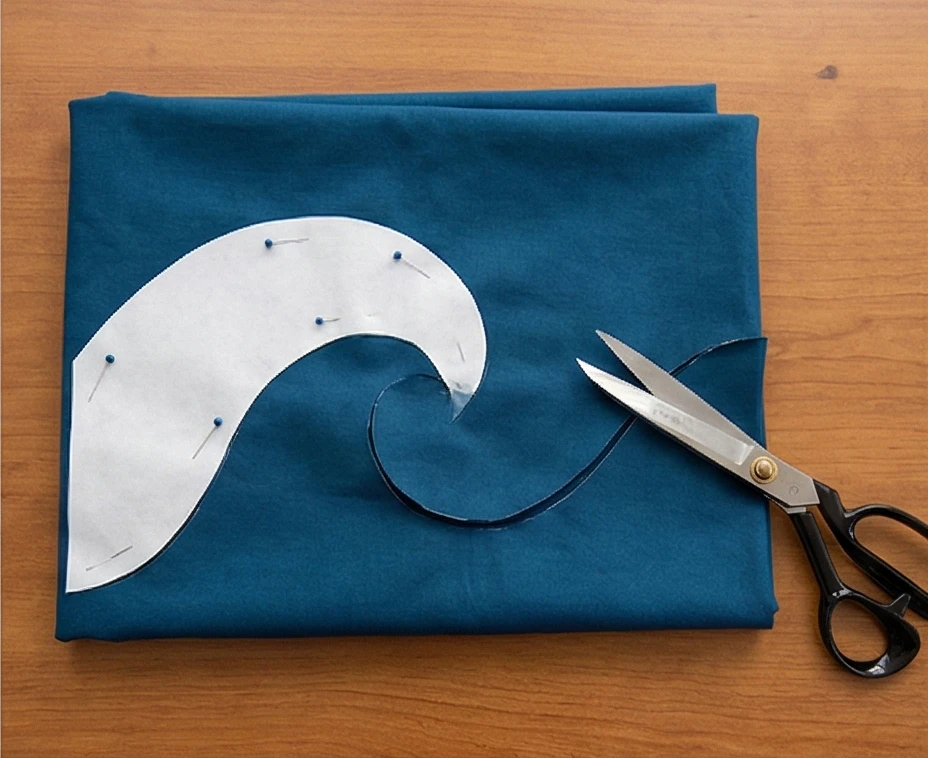
Step 2: Cutting the Appliqué Fabric
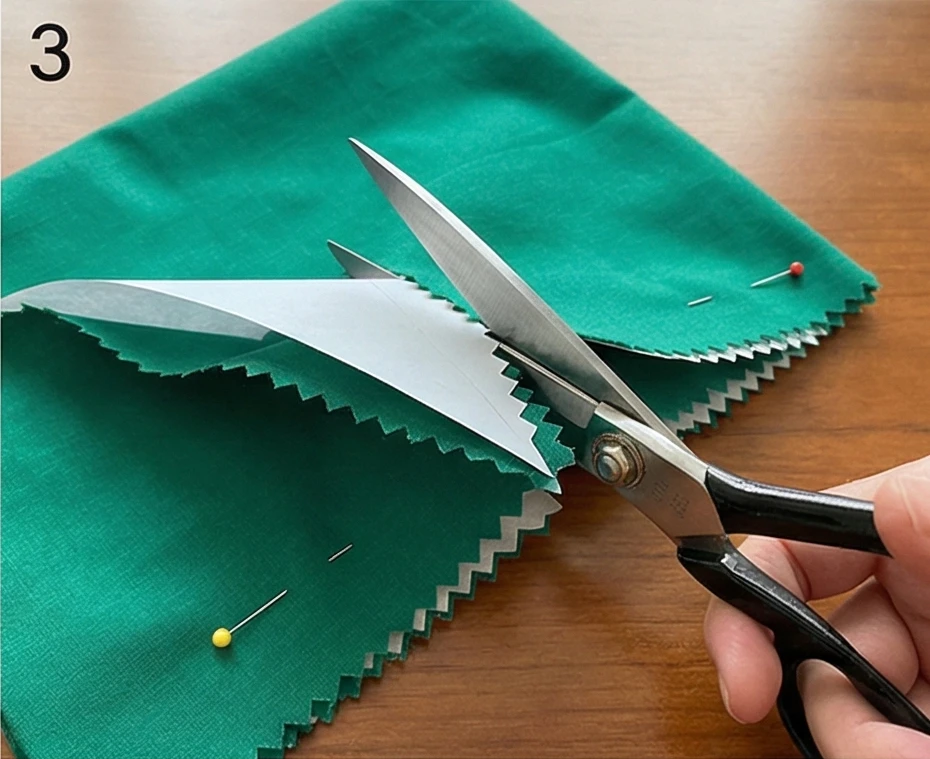
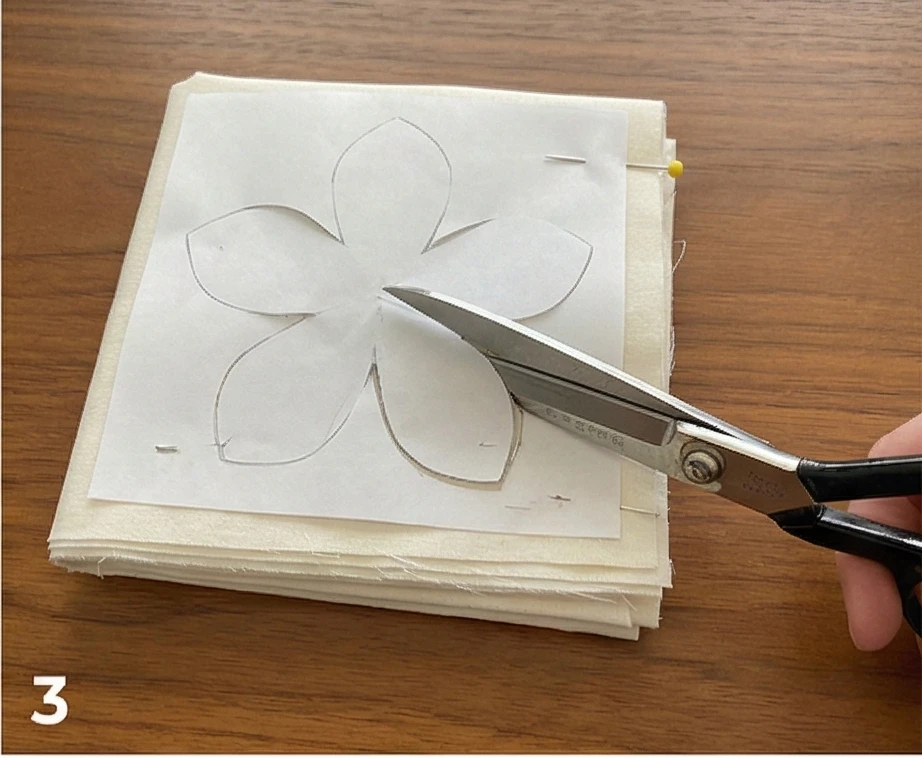
- Prepare Fabric B: Cut three squares of your colored fabric (20″ x 20″).
- Fold: Fold the fabric squares exactly as you folded the paper (into eighths). Press the folds firmly with an iron to create creases.
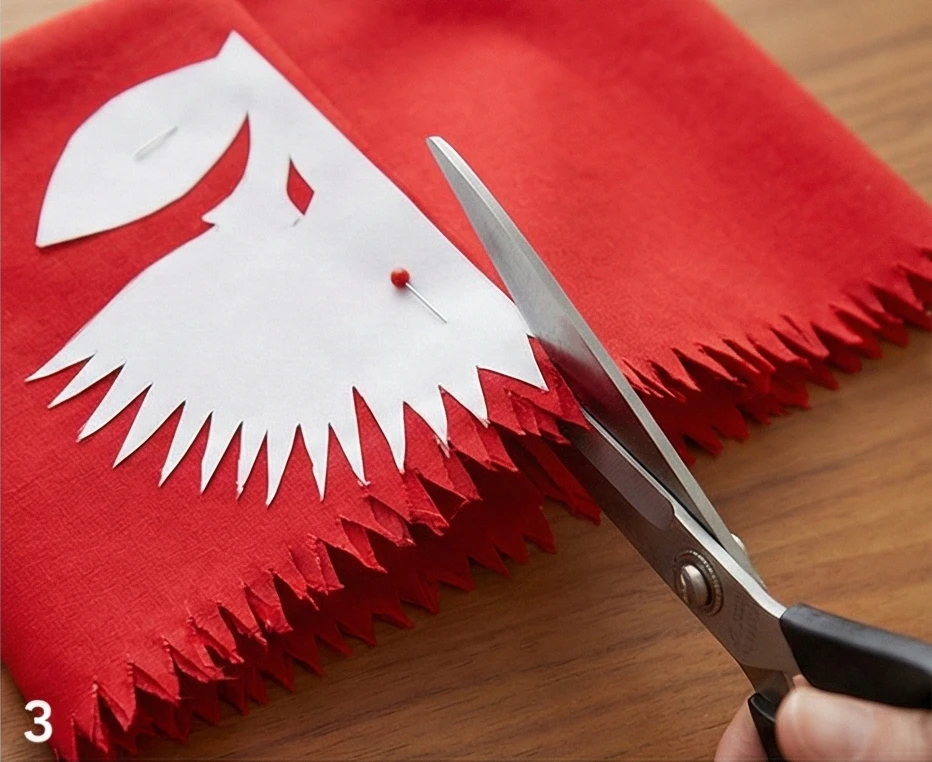
- Secure: Pin your paper template to the folded fabric wedge.
- Cut: Using very sharp scissors, cut through all 8 fabric layers following your template. Do not shift the fabric while cutting.
- Unfold: Open the fabric to reveal three perfect, symmetrical Pineapple Medallions.

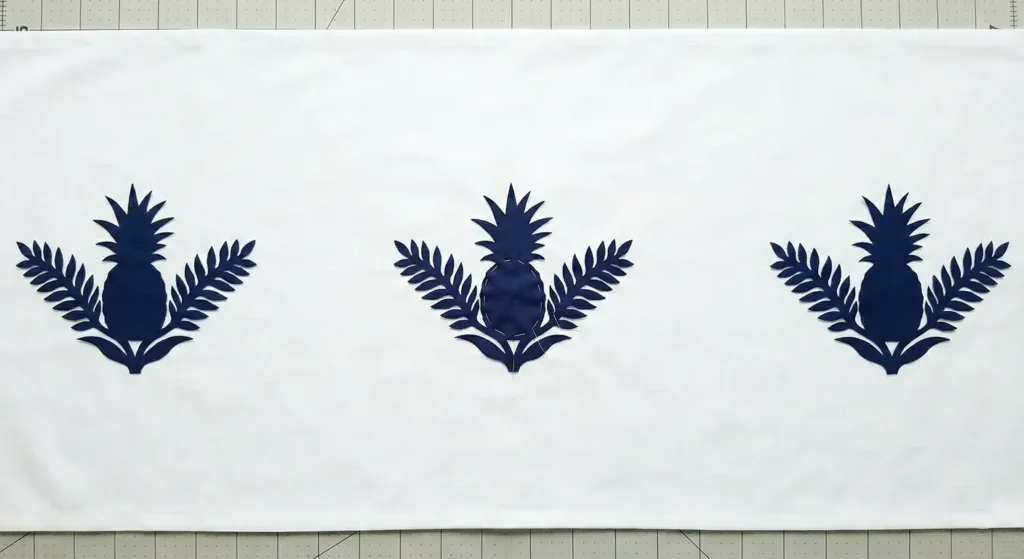
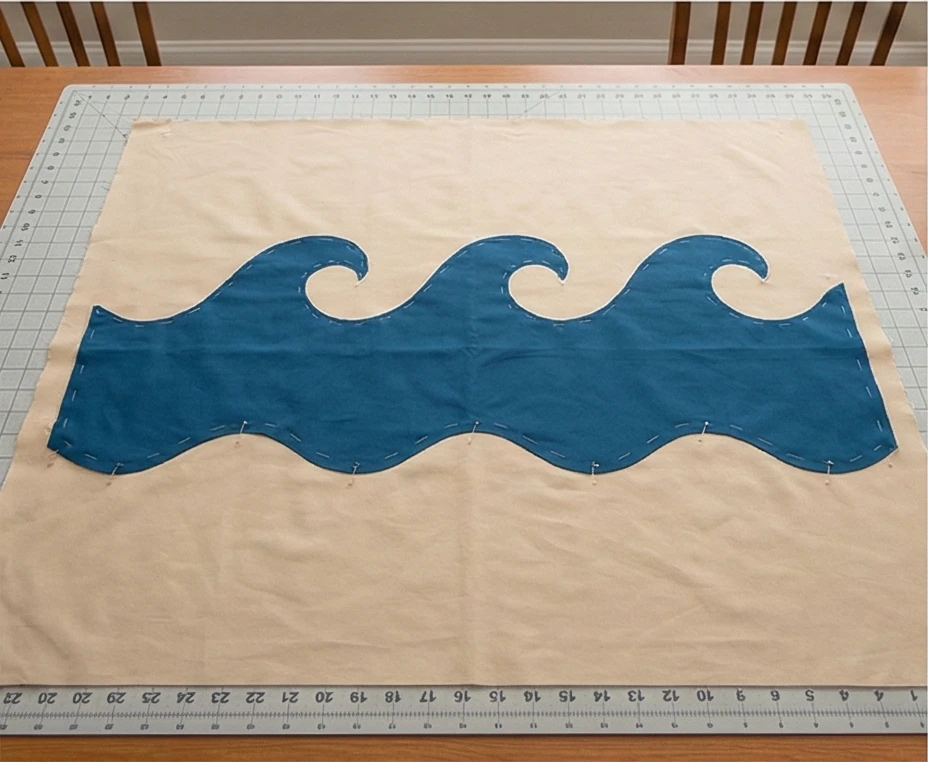
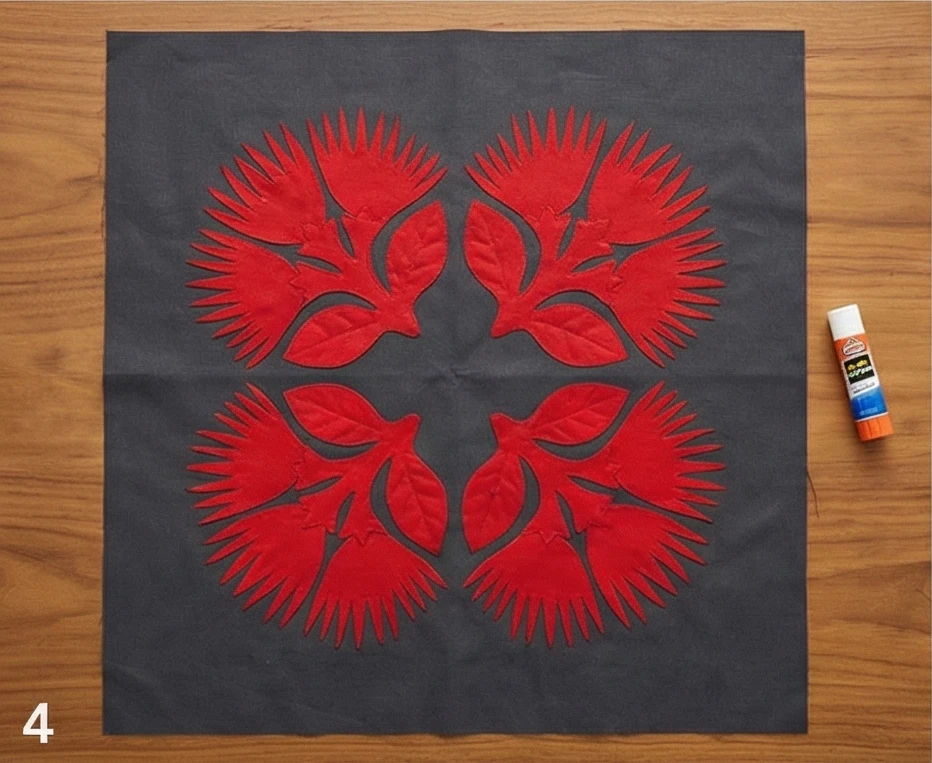
Step 3: Layout and Basting
Precision is key for an elegant finish.
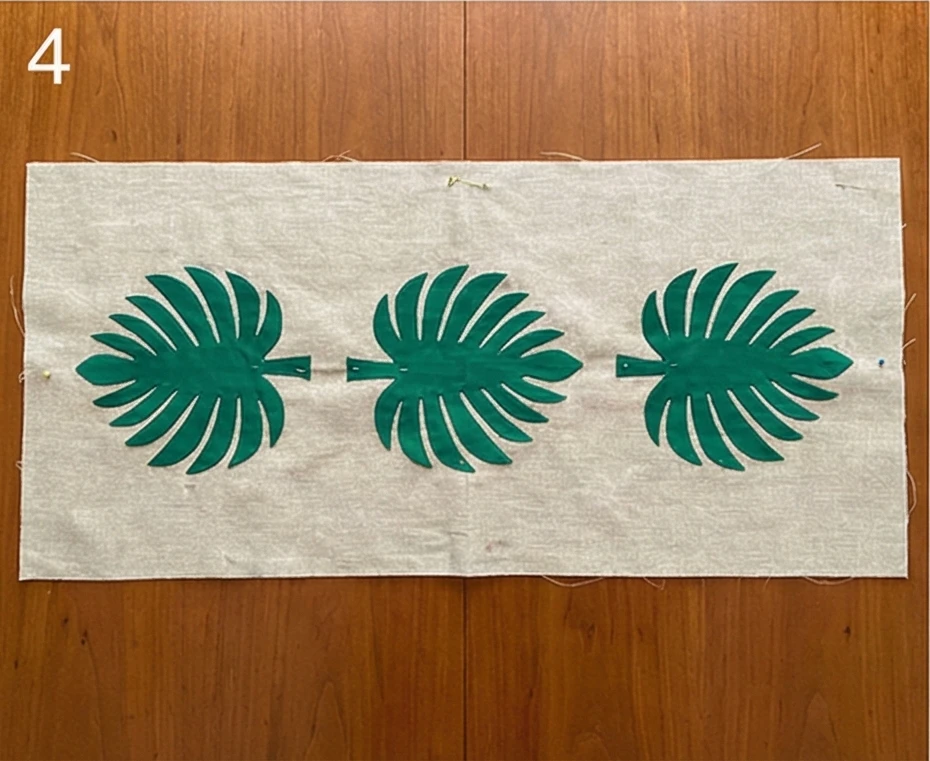
- Background: Cut your Background Fabric (Fabric A) into a long runner shape: 26″ x 92″.
- Placement:
- Fold the background runner in half and quarters to find the center lines.
- Place one pineapple medallion in the exact center.
- Place the other two medallions to the left and right, spacing them evenly (approx 4 inches apart).
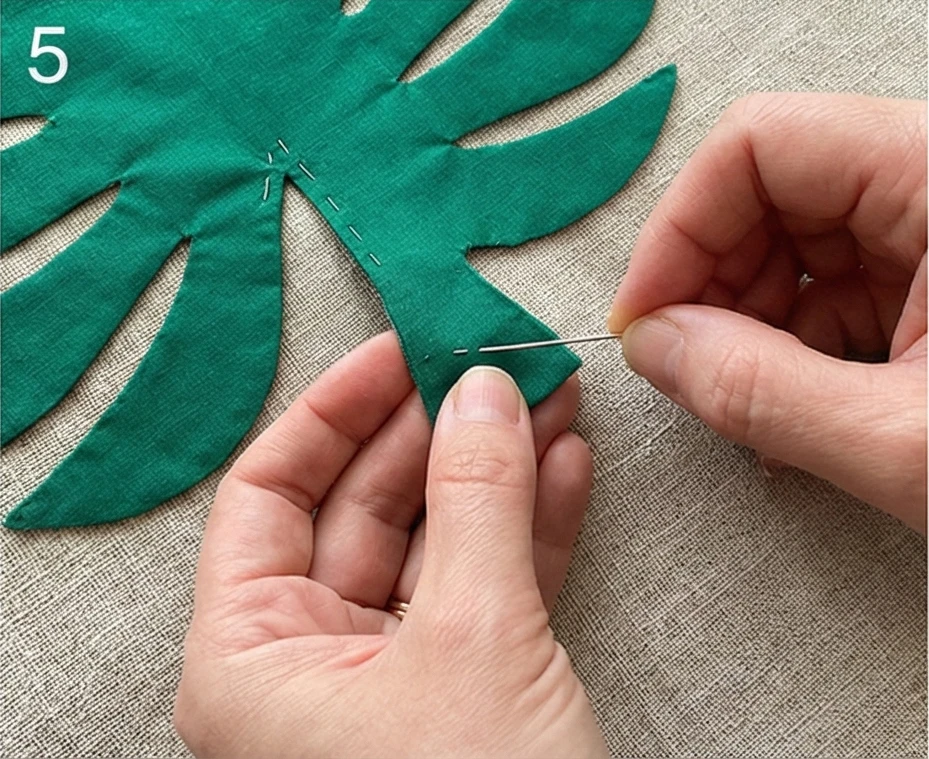
- Basting: Pin the medallions down. Hand-baste with large running stitches through the center of the pineapples and out to the tips of the leaves. This prevents shifting during the intricate sewing process.
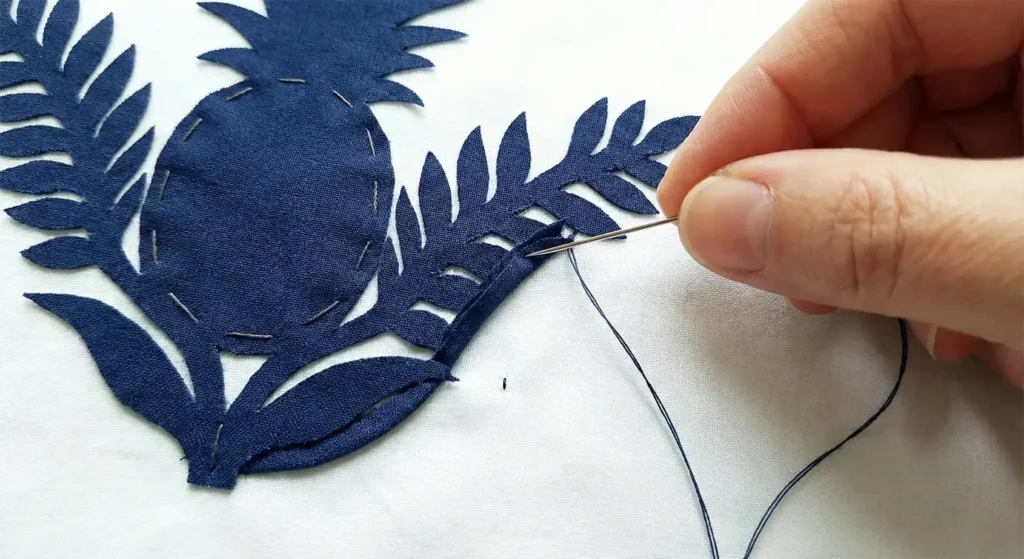
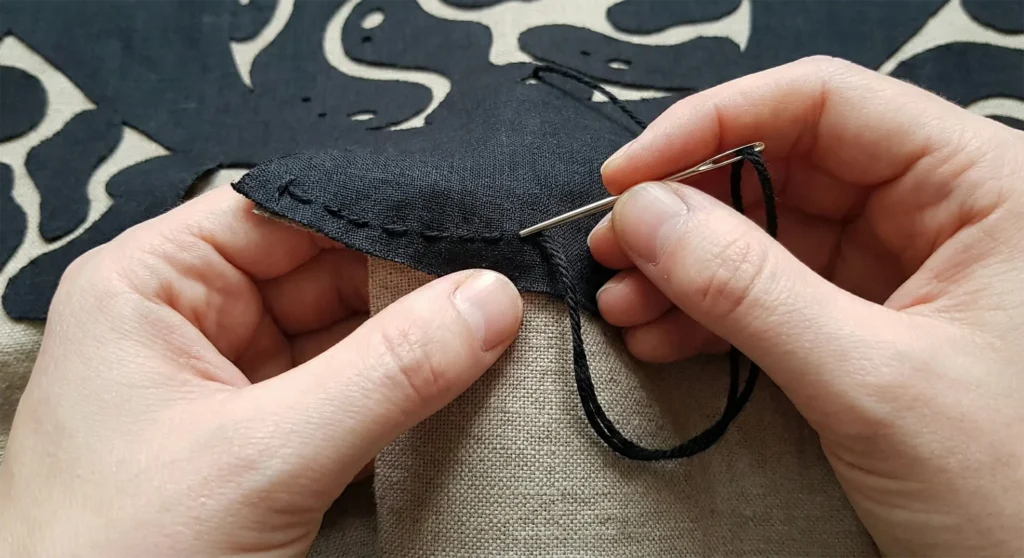
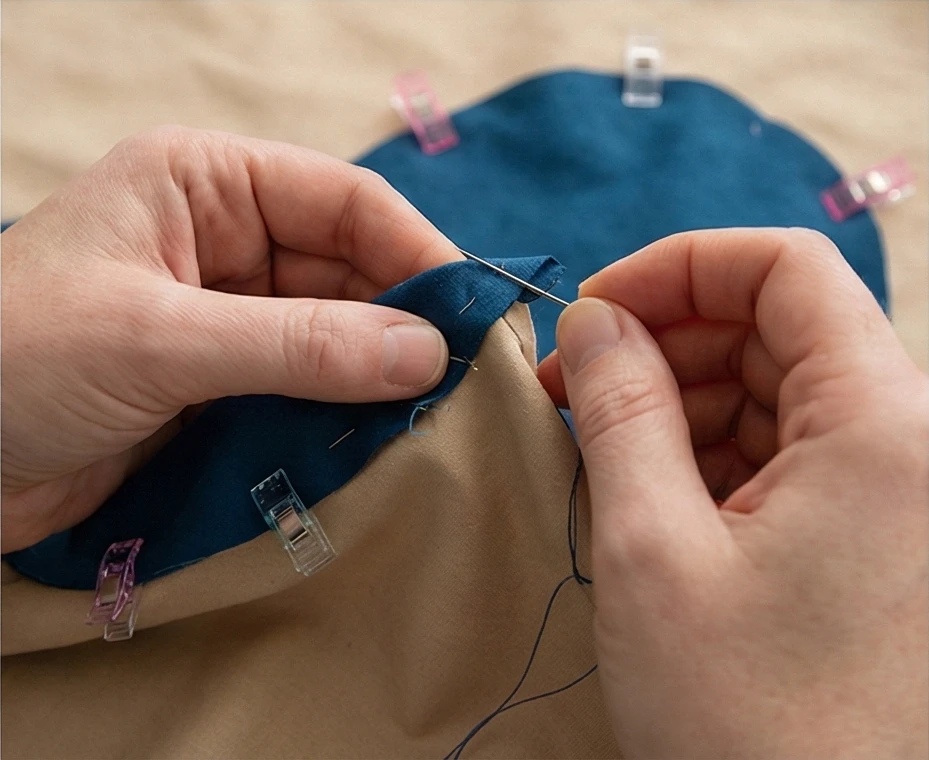
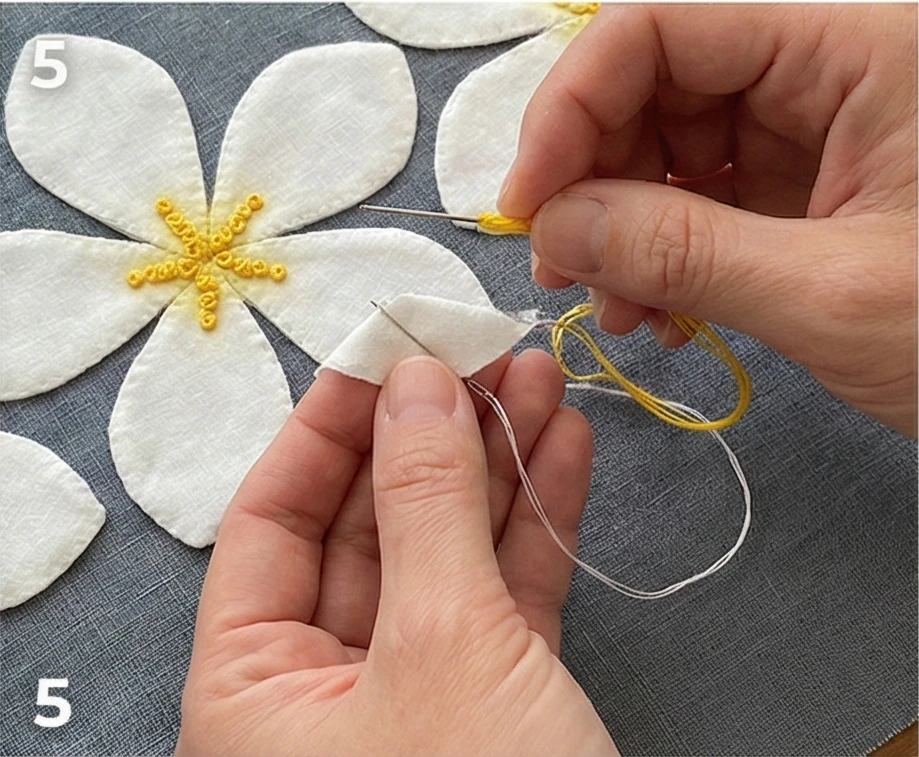
Step 4: Needle-Turn Appliqué (The Art Form)
This technique creates a flawless, raw-edge-free finish.
- Needle & Thread: Use a thin Milliner’s needle and thread that matches the Appliqué Color (Navy/Green/Gold).
- The Sweep: Use the tip of your needle to sweep the raw edge of the pineapple fabric under by 1/8 inch.
- The Stitch: Take a tiny stitch into the background, then come up through the very folded edge of the appliqué.
- The “Invisible” Goal: Your stitches should be barely visible on the front.
- Curves and Points:
- Inner Curves (Valleys): Clip the fabric slightly (a tiny snip) to allow it to turn under smoothly.
- Outer Points (Tips): Fold the tip down, then fold the sides in to create a sharp point.
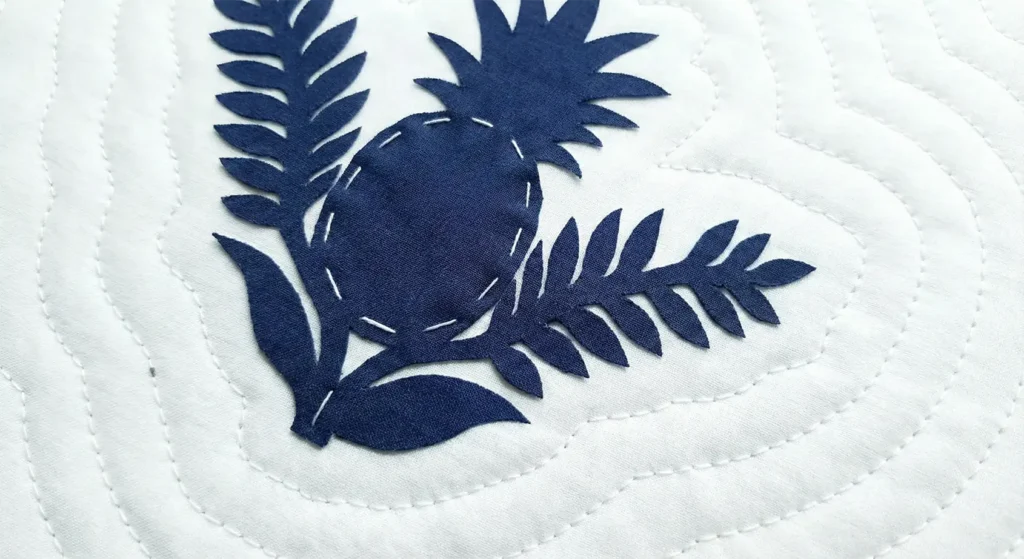
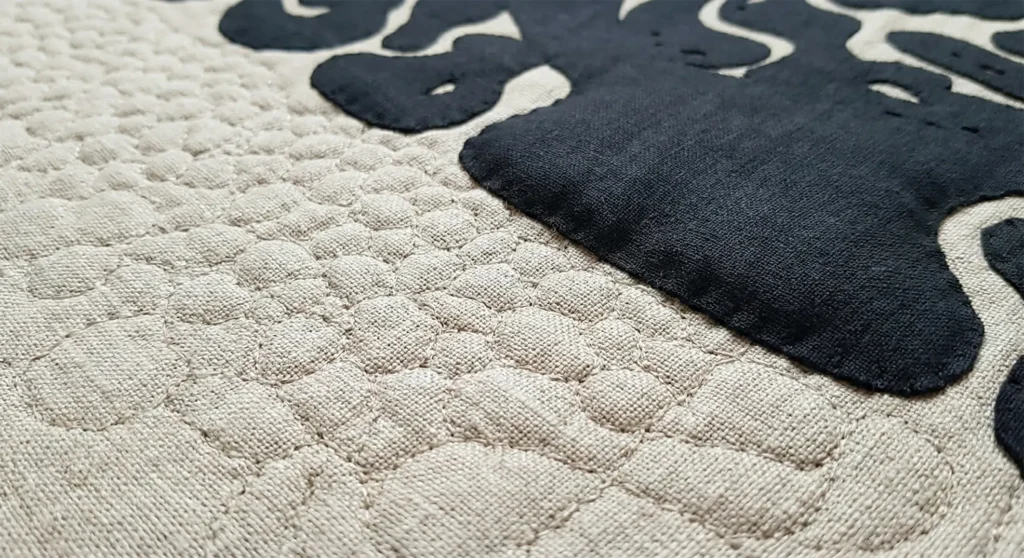
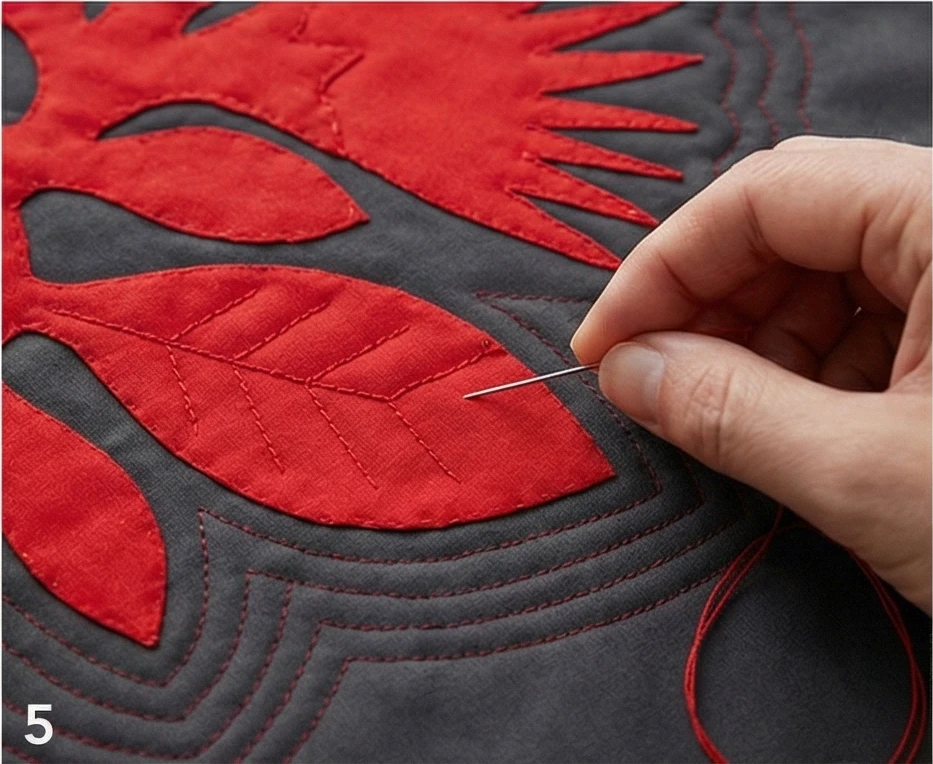
Step 5: Echo Quilting (Kuiki)
The quilting is as important as the appliqué. It represents the “Mana” (spirit) flowing from the design.
- Sandwich: Layer Backing, Batting, and the Appliquéd Top. Baste well.
- The Echo: Using thread that matches the Background (White):
- Quilt a line 1/2 inch away from the edge of the pineapple. Follow every curve, spike, and leaf.
- Quilt a second line 1/2 inch from the first.
- Continue this ripple effect until the entire white background is filled with quilting lines.
- Comfort Tip: This dense but consistent quilting holds the batting firm, making the runner durable enough to sit on or place trays on.
Step 6: Binding and Finishing
- Trim: Square up the runner to 24″ x 90″.
- Bind: Cut binding strips from the Appliqué Color (Fabric B). A matching binding frames the artwork beautifully.
- Label: Traditionally, Hawaiian quilters name their patterns. Embroider the name of the quilt (e.g., “Hala Kahiki Hospitality”) and the date on the back corner.
Interesting Fact: In old Hawaii, it was considered bad luck to speak negatively while quilting, as it was believed the negative energy would be sewn into the bedding and disturb the sleep of the recipient. Conversely, quilting with “Aloha” (love) ensures the quilt brings comfort and peace.
2. Luxury King Size Anthurium Quilt Designs

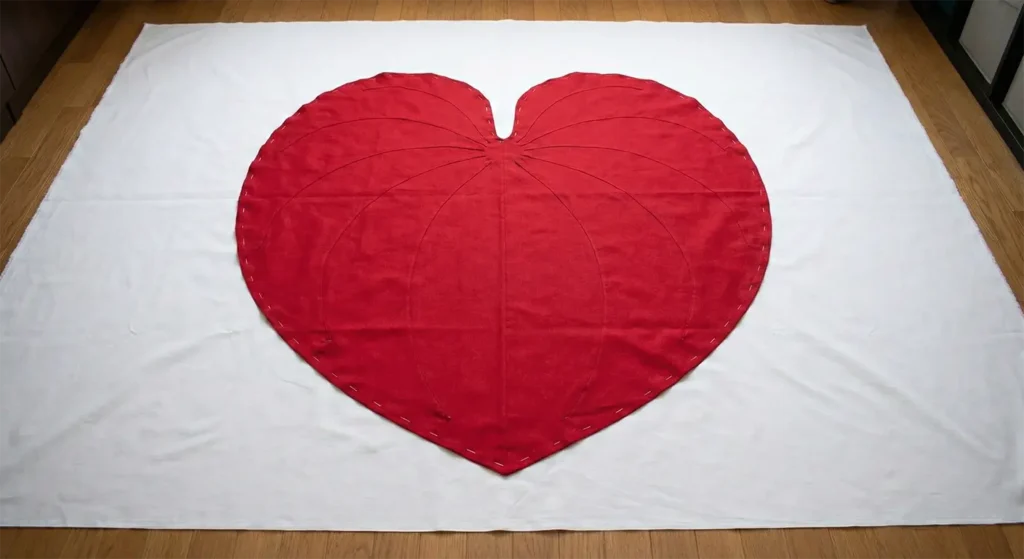
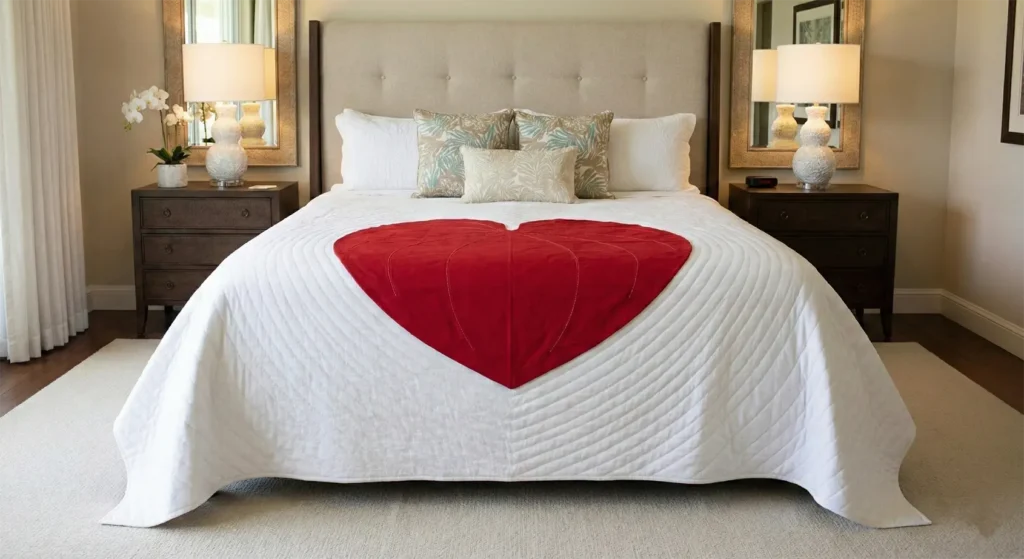
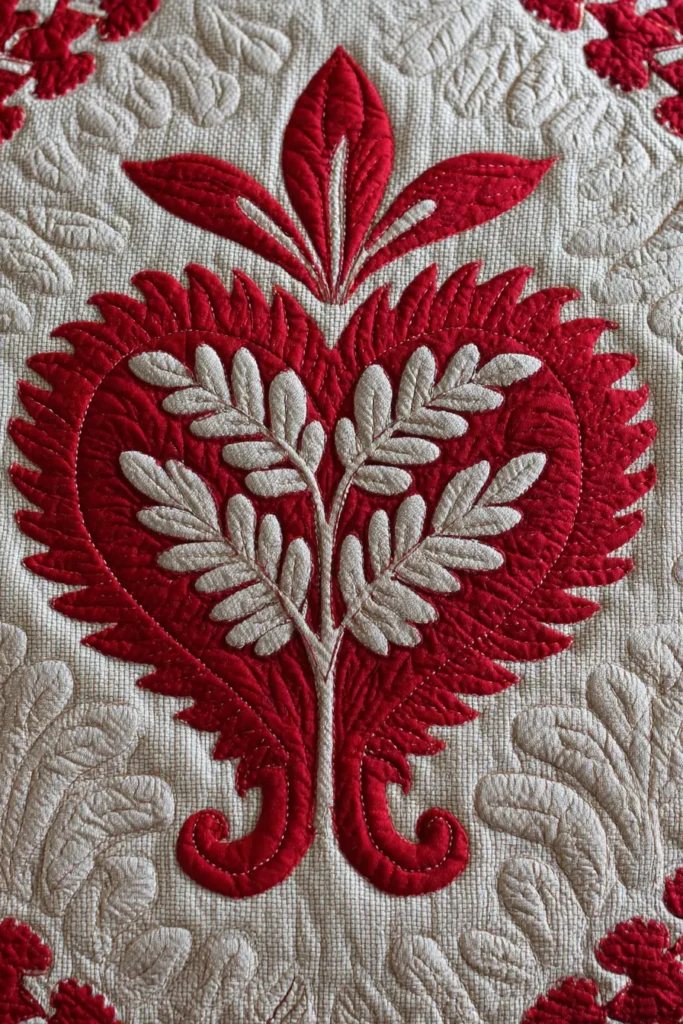
The “Heart of Aloha” Anthurium King Masterpiece
The Anthurium is often called the “Heart of Hawaii” due to its distinct heart-shaped, shiny leaves and waxy red blooms. In Hawaiian culture, it symbolizes hospitality, happiness, and abundance. A King-sized Hawaiian quilt is the pinnacle of textile elegance—a single, massive medallion that covers the entire bed without seams breaking the design. This project uses high-sheen Cotton Sateen to reflect light, giving the quilt a luxurious, shimmering quality that feels cool and soothing against the skin.
Finished Dimensions: King Size, approximately 105″ x 105″.
Materials Needed:
- Fabric A (Background): 3.5 yards of 108-inch Wide Quilt Backing Fabric (Cotton Sateen) in Snow White or Pale Cream. Note: Using extra-wide fabric avoids a seam down the middle of your background, which is crucial for elegance.
- Fabric B (Appliqué): 9 yards of standard 45″ wide fabric in Ruby Red or Burgundy (joined to make a large sheet) OR 3.5 yards of 108″ wide fabric in the contrast color.
- Backing Fabric: 3.5 yards of 108″ wide fabric (Matching Fabric A).
- Batting: 100% Wool Batting (King Size). Wool is recommended for luxury quilts because it is breathable, lightweight, and better showcases the “puff” of the quilting stitches than cotton.
- Notions: Long Appliqué pins, basting thread (bright color), Milliner’s needles (Size 11), thimble.
Cultural Backstory: Hawaiian royalty (Ali’i) favored the color red and large, bold motifs. Historically, it was believed that the spirit of the quilter was sewn into the quilt. Therefore, one must never quilt when angry or sad, only when feeling “Aloha,” ensuring the sleeper is wrapped in love and positive energy.
Step 1: Creating the “Kapa” Canvas
For a King quilt, the canvas must be perfectly square.
- Fabric Prep: Wash all fabrics to remove sizing and pre-shrink. This is vital for Sateen to ensure the sheen remains consistent.
- Square Up: Take your 108″ wide Background Fabric. Trim it to a perfect 108″ x 108″ square.
- Appliqué Sheet: If you are using standard-width fabric for the red Anthuriums, you must sew panels together to create a 108″ x 108″ red sheet. Press the seams open so they are perfectly flat.
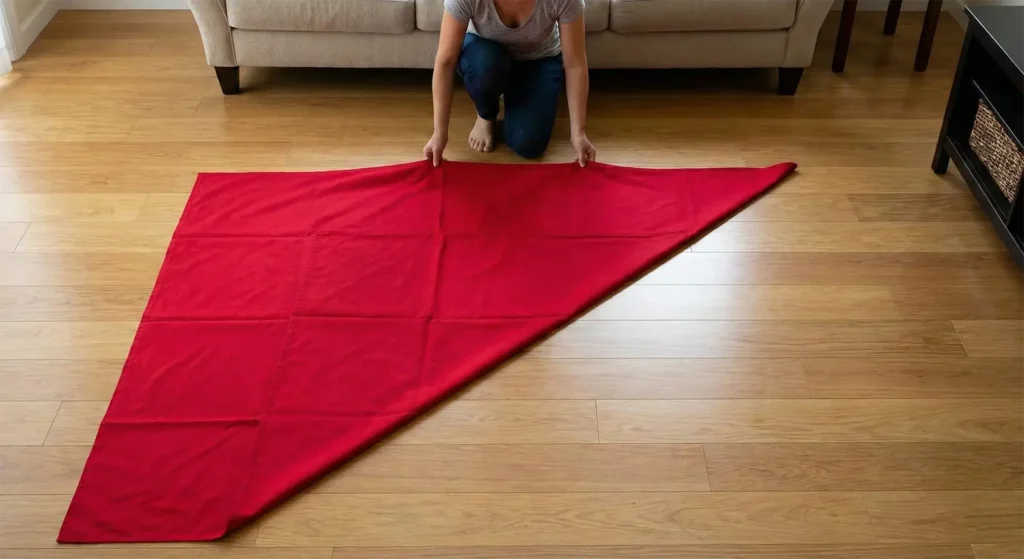
Step 2: The “Grand Fold” (Floor Space Required)
You cannot do this on a table. Clear the living room floor.
- The Fold: Take your Red Appliqué sheet.
- Fold in half (Rectangle).
- Fold in half again (Square).
- Fold in half diagonally (Triangle – 1/8th).
- Optional: For a King size, you might fold one more time into a skinny triangle (1/16th) to make the cutting design smaller and more manageable.
- Creasing: Press the folded edges firmly with an iron. These creases will act as your grid lines later.
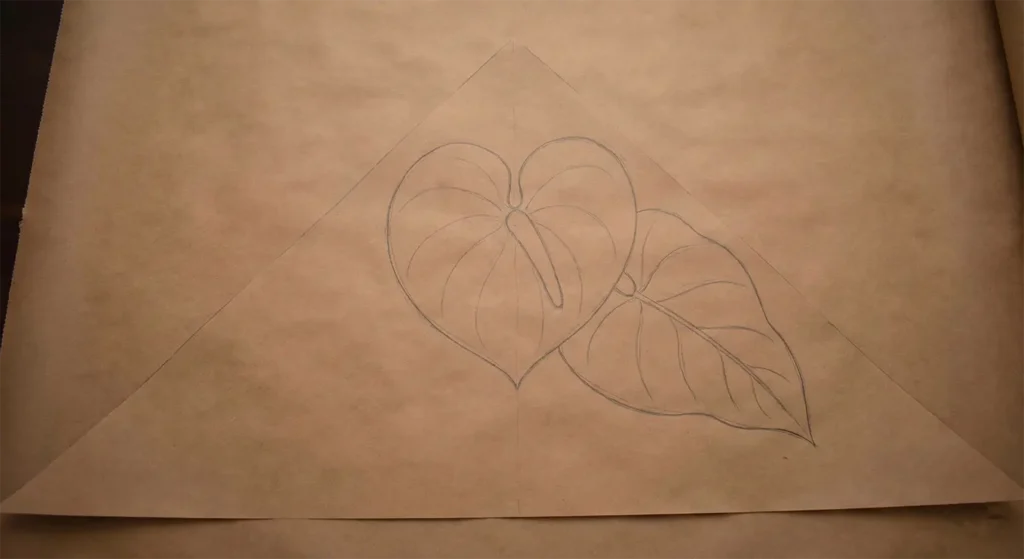
Step 3: Drafting the Anthurium Motif
- The Template: On a large sheet of butcher paper (cut to the size of your folded fabric wedge), draw the design starting from the bottom point (center of the bed).
- The Stem: Create a thick, curving vine rising from the center.
- The Leaf: Draw the iconic heart-shaped leaf. It should be broad and rounded.
- The Flower: Draw the Anthurium bloom—a glossy heart shape with a prominent Spadix (the tail-like center) protruding from the top notch.
- Connections: Ensure the design touches the left and right paper edges in multiple places. This “interlocking” is what holds the quilt top together as one piece.
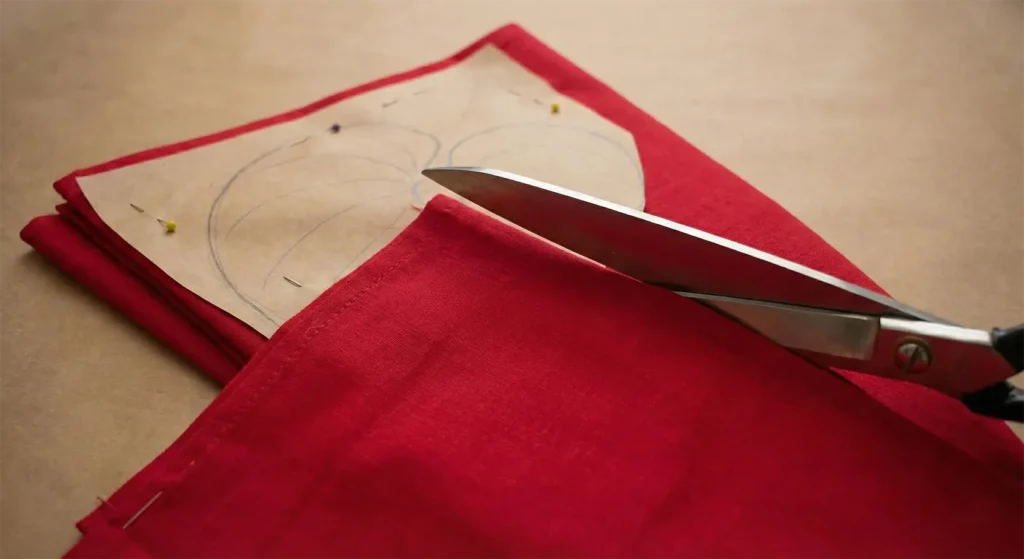
Step 4: Cutting the Medallion
This requires patience and very sharp shears.
- Pin: Pin the paper template securely to your folded Red fabric wedge.
- Cut: Cut through all layers of fabric. Do not lift the fabric off the floor; slide your scissors underneath.
- Tip: Leave about 1/4 inch of extra fabric around the tight curves to give yourself room for turning the edges later.
- Unfold: Carefully unfold the Red fabric to reveal the massive, symmetrical Anthurium wreath.
Step 5: The “Marathon” Basting
If the appliqué shifts on a King quilt, the whole design will ripple.
- Layer: Lay the White Background flat on the floor (taped down). Center the Red Anthurium Medallion on top.
- Match Creases: Align the ironed crease lines of both fabrics to ensure perfect centering.
- Baste: Using a contrasting thread (like Blue), baste a grid starting from the center out.
- Stitch straight lines following the 8 fold lines.
- Then, baste around the edges of the leaves and flowers about 1 inch inside the cut edge.
Step 6: Needle-Turn Appliqué
This process is meditative and may take months. Enjoy the journey.
- Stitch: Use the needle to sweep the 1/8″ seam allowance under. Use a blind stitch (“Honi” or kissing stitch) to secure the red flower to the white background.
- The Spadix: The little tail in the center of the flower can be tricky. Use tiny snips in the cleavage of the heart shape to allow the fabric to turn smoothly.
- Comfort Focus: Because the quilt is so large, do not hold the whole weight in your lap. Sit at a table or use a quilting hoop to support the fabric, preventing strain on your hands.
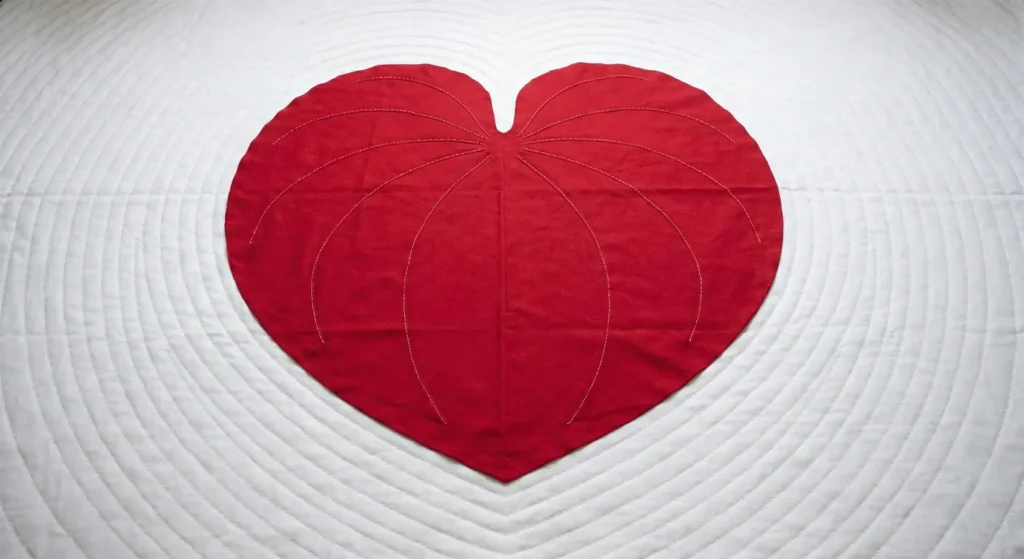
Step 7: The “Ocean Wave” Echo Quilting
Luxury Hawaiian quilts are defined by their “Echo” quilting.
- Sandwich: Batting and Backing.
- Echo: Start quilting inside the Anthurium shapes, outlining the leaf veins.
- Ripple: Move to the white background. Quilt concentric lines 5/8 inch apart radiating outward from the appliqué edges.
- Effect: The quilting lines look like ripples in water. On a King bed, this creates thousands of shadow lines that dance in the bedroom light, adding immense visual texture and elegance.
Usability Note: While this quilt is a work of art, it is designed for use. The dense echo quilting (steps 7) serves a structural purpose: it holds the batting firmly in place, meaning the quilt can be washed (gentle cycle) without lumping. The cotton sateen becomes softer and silkier with age, making it the ultimate comfort cover.
3. Lava Rock Hawaiian Quilt Pattern for Floor Quilts
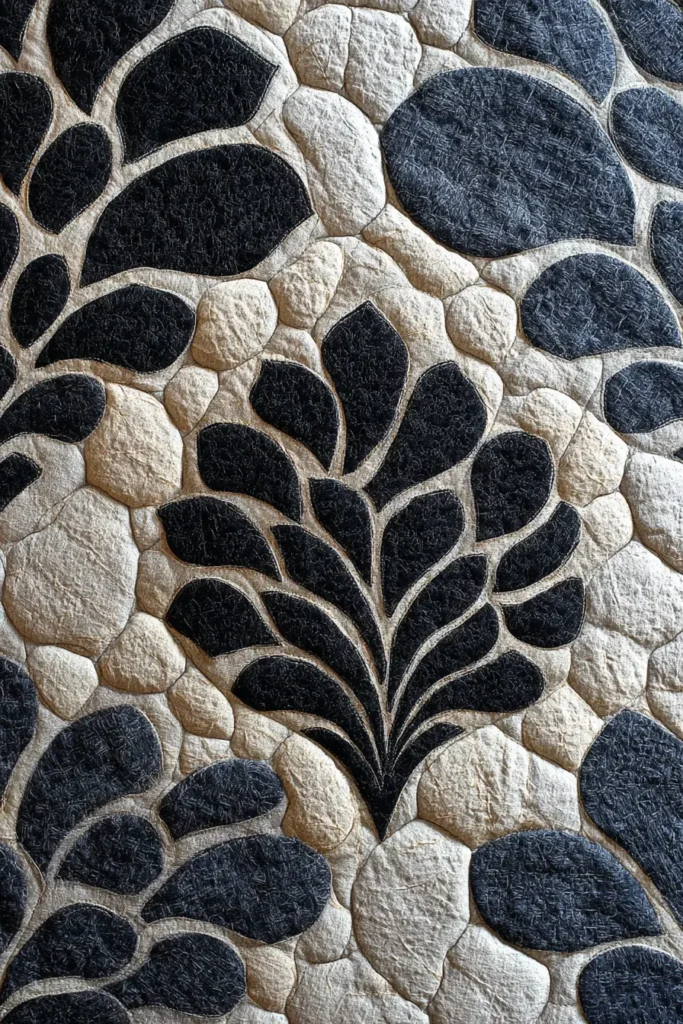

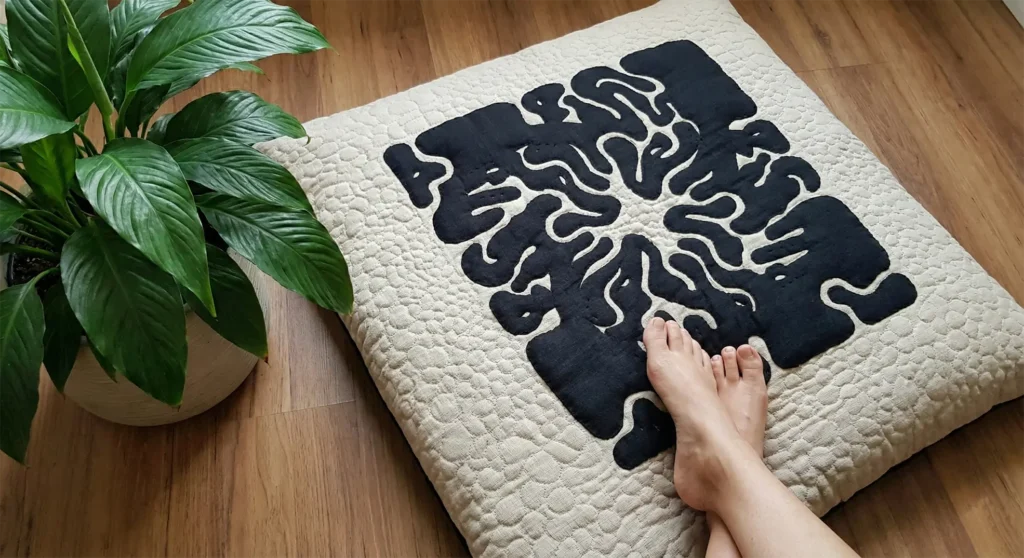
The “Pohaku” (Stone) Grounding Floor Quilt
In Hawaiian culture, stones (Pohaku) are not inanimate objects; they possess Mana (spiritual power). They are the foundation of the islands, born from the volcano goddess Pele. While traditional quilts are draped on beds, the “Floor Quilt” (or Kapa mat) is a functional, heavyweight piece designed for sitting, meditation, or playing with children (“Keiki”). This design departs from floral motifs, using abstract, rounded shapes to mimic the porous, organic look of cooled lava.
Finished Dimensions: Square Floor Cushion/Mat, approximately 48″ x 48″.
Materials Needed:
- Fabric A (Background): 1.5 yards of Heavyweight Linen or Canvas in Sand/Beige or Driftwood Grey. (Needs durability for floor use).
- Fabric B (Appliqué): 1.5 yards of Charcoal or Matte Black Linen. (Represents the lava rock).
- Backing Fabric: 1.5 yards of Heavy Denim or Duck Cloth (for grip and wear-resistance).
- Batting:Double Layer.
- Layer 1: 100% Cotton Batting (for density).
- Layer 2: Nu-Foam or High-Loft Wool (for cushion).
- Thread: Heavy-weight thread (12wt or Pearl Cotton) in Black.
- Notions: Large tapestry needle, thimble, spray baste.
Cultural Backstory: It is considered disrespectful to sit on a traditional Hawaiian bed quilt because the patterns often represent beloved ancestors or royalty. However, creating a specific “Pohaku” quilt for the floor honors the earth. The stone represents permanence and stillness, making this design perfect for a meditation corner or a grounding space in a modern living room.
Step 1: The “Earth” Fold
We use the traditional 8-fold method but aim for a rounded, solid look.
- Cut: Cut your Charcoal Appliqué fabric into a 50″ x 50″ square.
- Fold: Fold into eighths (Rectangle -> Square -> Triangle).
- Press: Iron the folds sharply.
Step 2: Drafting the “Pohaku” Design
Lava rocks are not perfect circles; they are organic and porous.
- Template: On your folded paper triangle:
- The Center: Instead of a stem, draw a solid, rounded base at the tip.
- The Body: Draw interlocking, kidney-bean-like shapes radiating outward. Imagine the flow of magma cooling into stone.
- The Pores: Draw small “floating” circles or ovals inside the main shapes. These represent the air bubbles in lava rock (puka).
- Connectivity: Ensure the shapes connect to the folded edges broadly. You want a massive, solid design, not delicate lace.
Step 3: Cutting Heavy Fabric
- Pin: Pin the template to the folded Charcoal Linen.
- Cut: Linen is thicker than quilting cotton. Use heavy dressmaker shears.
- Tip: If cutting the “pores” (internal holes) through 8 layers is too difficult, unfold the fabric first and cut them individually later with a small pair of embroidery scissors.
- Unfold: Reveal the design. It should look like a bold, dark, abstract medallion against the lighter background.

Step 4: The “Modern Primitive” Appliqué
For a floor quilt, delicate needle-turn appliqué might fray. We will use a visible “Running Stitch” for durability and style.
- Baste: Use spray baste to adhere the Charcoal medallion to the Sand background. (Pins are painful on floor quilts).
- Stitch: Do not turn the edges under (Raw Edge Appliqué) OR turn them under slightly if you prefer.
- The Visible Stitch: Using thick Black Pearl Cotton thread, stitch a Running Stitch (dashed line) about 1/8″ inside the edge of the charcoal fabric.
- Aesthetic: This visible stitching mimics the rough texture of volcanic rock and adds a “hand-crafted” luxury feel.
Step 5: The Double-Stuff Sandwich
This step ensures comfort for sitting.
- Layering:
- Floor: Denim Backing (Face Down).
- Middle 1: Foam or High-Loft Batting.
- Middle 2: Cotton Batting.
- Top: Appliquéd Linen Top (Face Up).
- Secure: Use large curved safety pins or heavy tacking stitches to hold this thick sandwich together.
Step 6: “Pebble” Quilting
The quilting adds traction and texture.
- Thread: Use a thread that matches the background (Sand).
- Motif: Instead of echo quilting, quilt “Pebbling” (small, continuous circles) all over the background areas.
- Why? This creates a dense, flat texture that makes the Charcoal lava rocks puff up in relief, providing a tactile surface for feet or hands.
- The Rocks: Inside the black lava shapes, quilt widely spaced wavy lines to mimic flowing lava.
Step 7: Rug Binding
- Durability: Cut binding strips 3 inches wide from the Backing Denim or Charcoal Linen.
- Attach: Sew with a heavy-duty machine needle (Jeans Needle).
- Finish: Hand-stitch the binding to the back using the heavy Pearl Cotton thread for a secure finish that won’t pop when the quilt is sat upon.
Elegance Tip: Place this floor quilt in a room with wood floors and green plants. The contrast between the organic “Lava Rock” textile and sleek wood creates a sophisticated “Wabi-Sabi” aesthetic that celebrates natural imperfections.
4. Contemporary Hawaiian Quilt Designs for Minimalist Spaces
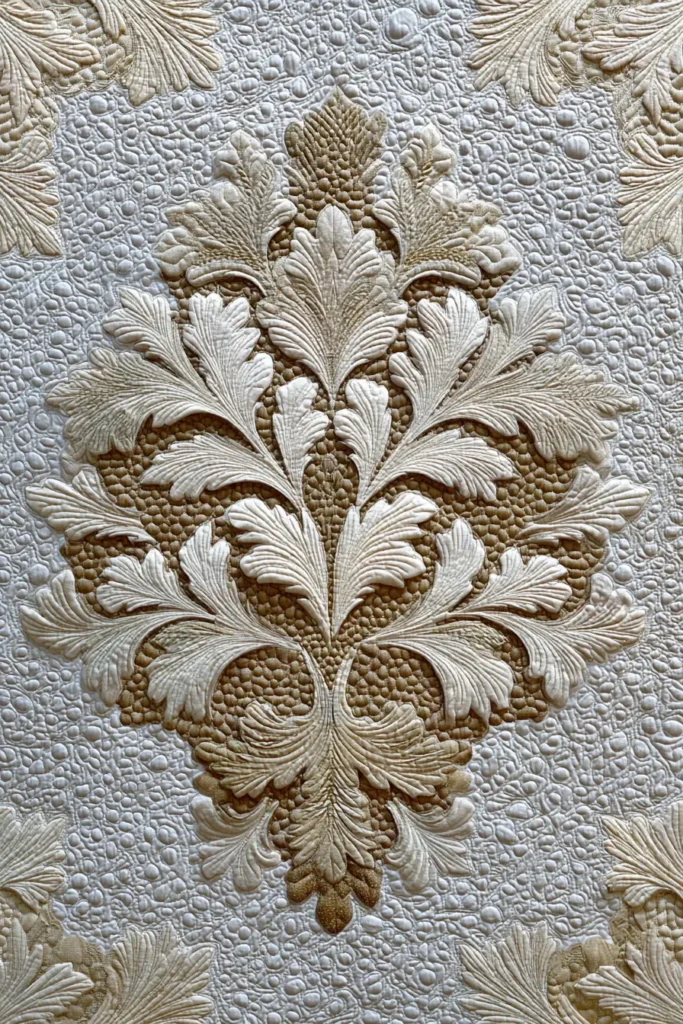

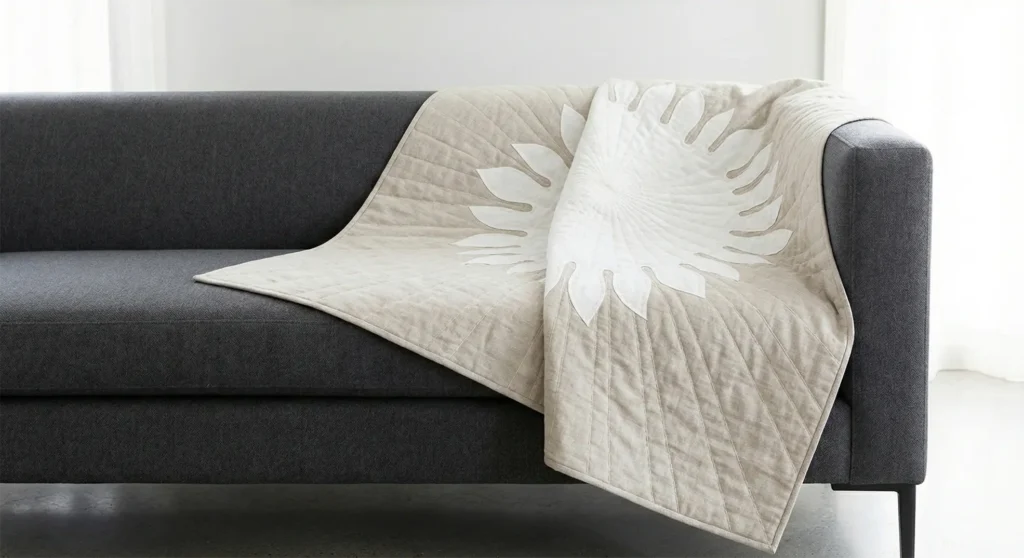
The “Ulu Modern” Negative Space Art Quilt
Modern minimalism celebrates clean lines, neutral palettes, and intentional “negative space” (empty areas that allow the eye to rest). Traditional Hawaiian quilts are often busy and brightly colored. To adapt this for a contemporary home, we use a Tone-on-Tone palette (e.g., White on Sand or Grey on Charcoal) and alter the layout. Instead of a centered square, we place the medallion off-center on a rectangular field, turning the quilt into a modern abstract piece that doubles as a sophisticated sofa throw.
Finished Dimensions: Modern Rectangle Throw, approximately 50″ x 70″.
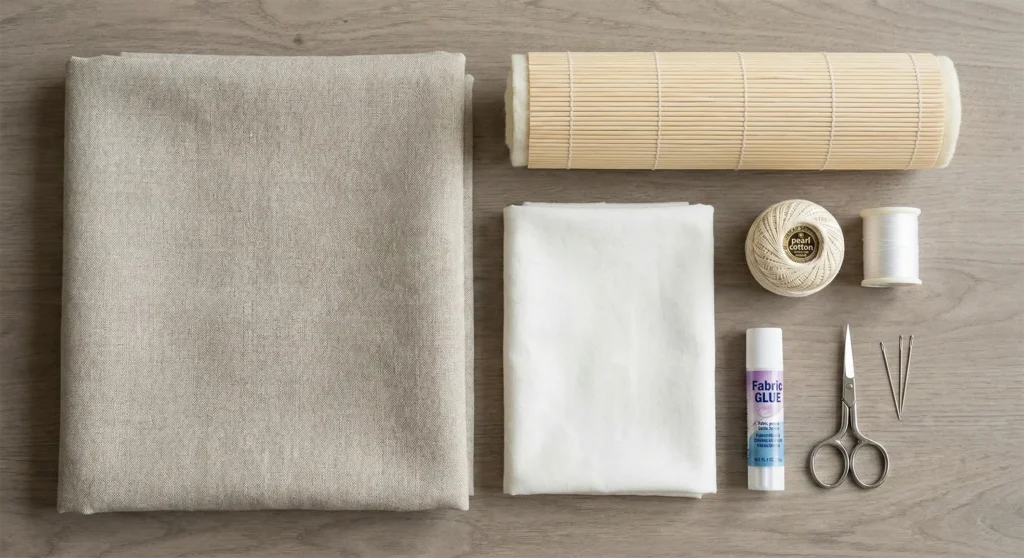
Materials Needed:
- Fabric A (Background): 2.5 yards of Oatmeal Linen or Textured Cotton. (Linen adds an organic, elegant drape preferred in modern design).
- Fabric B (Appliqué): 1.5 yards of Soft White or Ivory Cotton Solids.
- Backing Fabric: 2.5 yards of soft cotton voile or lawn (for a lightweight feel).
- Batting: Bamboo/Cotton Blend. (Bamboo creates a fluid, cool-to-the-touch drape that is thinner and more elegant than puffy polyester).
- Thread:
- Appliqué: Silk thread matching Fabric B (White).
- Quilting: Pearl Cotton Size 8 in Cream (for visible texture).
- Notions: Freezer paper, fabric glue stick, and embroidery needles.
Cultural Backstory: The Ulu (Breadfruit) design is one of the most traditional Hawaiian motifs, symbolizing abundance and growth. Legend has it that the god Ku turned himself into a breadfruit tree to feed his starving family during a famine. In a modern context, placing this symbol in a minimalist home represents a wish for spiritual abundance and gratitude within a simplified life.
Step 1: The “Snowflake” Fold (Simplified)
We will create a classic medallion but keep the shapes bold and chunky to suit a modern aesthetic.
- Cut: Cut a 22″ x 22″ square of your White Appliqué fabric (and a matching piece of freezer paper).
- Fold: Fold the paper into eighths (Rectangle -> Square -> Triangle).
- Draft: Draw a stylized Ulu leaf design.
- Modern Twist: Instead of intricate, lacy cuts, draw broad, sweeping curves. Create a strong, graphic silhouette.
- Ensure the design touches the folded edges firmly to maintain structural integrity.
- Cut: Iron the paper to the fabric and cut out your medallion. Unfold.
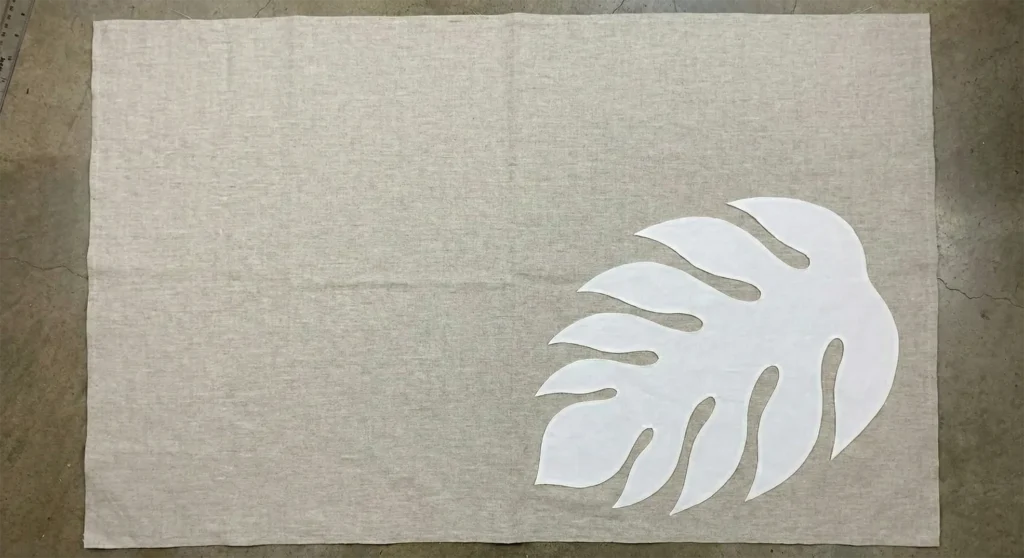
Step 2: Asymmetrical “Rule of Thirds” Layout
This is where we break tradition to achieve the “Modern Art” look.
- Background: Cut your Oatmeal Linen into a rectangle: 52″ x 72″.
- Placement: Do not place the medallion in the center.
- Fold the background into thirds visually.
- Place the White Medallion in the bottom right quadrant or the upper third.
- Effect: This leaves a vast expanse of empty linen (negative space), a hallmark of minimalist design.

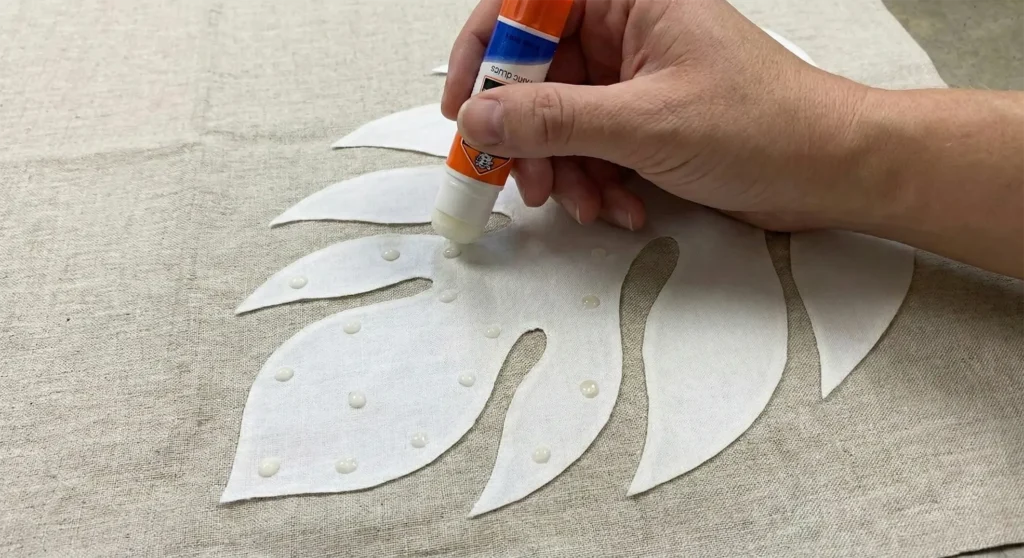
Step 3: Glue-Basting (No Pins)
Pins distort linen. Glue is cleaner.
- Secure: Use a water-soluble fabric glue stick. Apply dots of glue to the back of the White Medallion.
- Press: Press the medallion onto the linen background with a dry iron to set the glue. This ensures it lays perfectly flat for sewing.
Step 4: Needle-Turn Appliqué
- Stitch: Using your silk thread, perform the traditional needle-turn appliqué.
- Technique: Sweep the raw edge under with your needle and blind stitch it down.
- Points: Keep your points sharp. The contrast of sharp leaf tips against the soft linen background is visually striking.
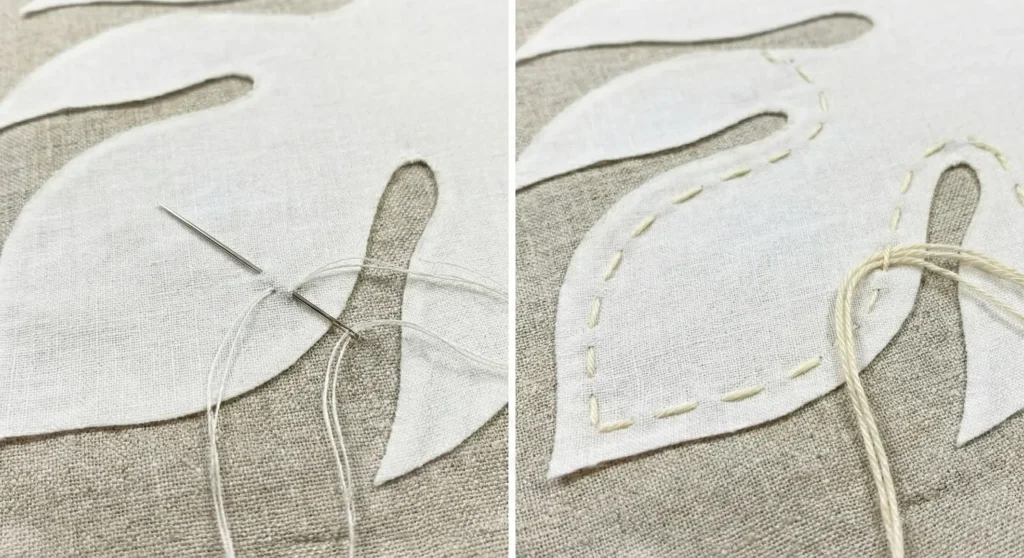
Step 5: “Big Stitch” Sashiko-Style Quilting
Traditional Hawaiian quilting uses tiny, invisible stitches. Modern Hawaiian quilting embraces visible texture.
- Thread: Load a needle with Cream Pearl Cotton.
- Echo: Start quilting 1/2 inch away from the white appliqué.
- Use a running stitch (dash-dash-dash) that is visible.
- The Ripple: Continue quilting concentric echo lines outward.
- The Twist: When the lines hit the vast “negative space” of the linen, continue them all the way to the edges.
- Result: The quilting lines become a texture map, radiating from the off-center motif across the entire empty space, creating movement like ripples in a quiet pond.
Step 6: The “Facing” Finish (No Binding)
A traditional binding creates a frame. Modern art canvases are frameless.
- Cut Facing: Cut 3-inch strips of your backing fabric.
- Sew: Sew the strips to the FRONT of the quilt (Right Sides Together).
- Flip: Turn the strips completely to the BACK of the quilt.
- Press & Stitch: Press the edge so the linen rolls slightly to the back. Hand stitch the facing down.
- Elegance: This creates a “Knife Edge” finish, making the quilt look like a floating tapestry.
Usability Tip: By using Linen and Bamboo batting, this quilt will have a significant “drape” and weight without being hot. It is perfect for modern climate-controlled apartments where you want the comfort of a blanket without the bulk of a duvet.
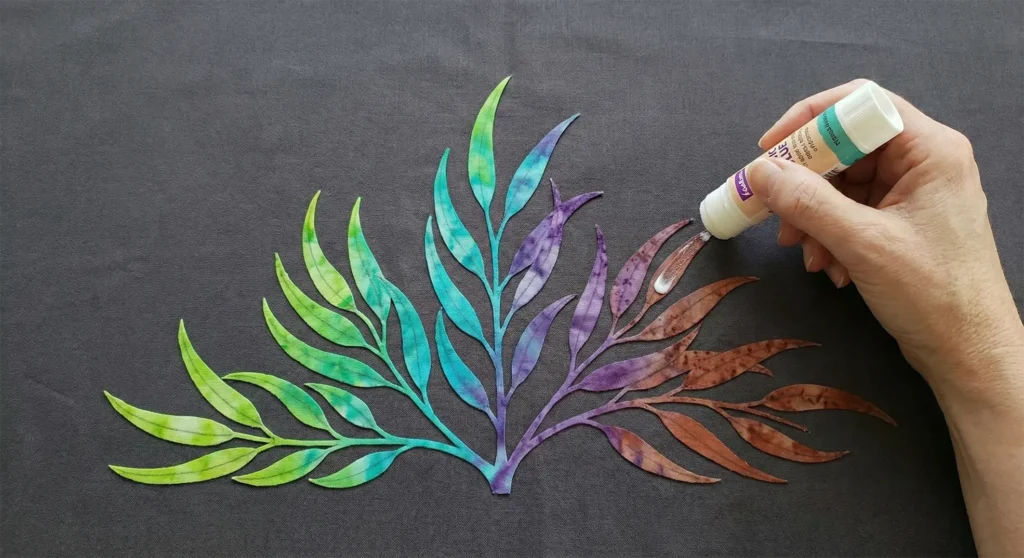
5. Rainbow Eucalyptus Hawaiian Quilt for Artistic Wall Decor
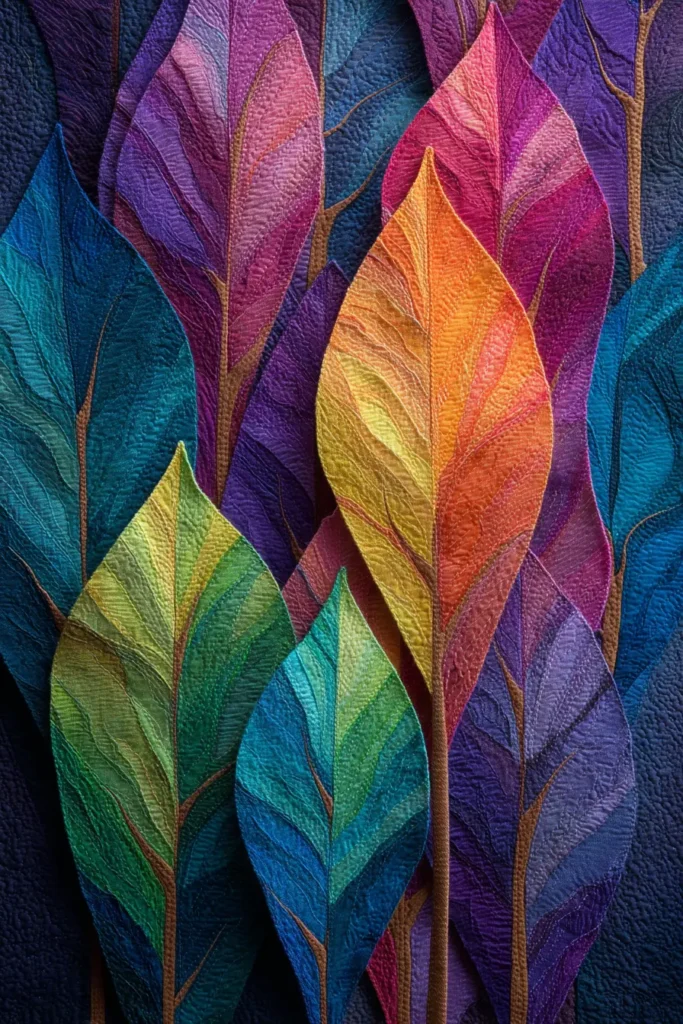
The “Painted Bark” Rainbow Eucalyptus Wall Tapestry
The Rainbow Eucalyptus (Eucalyptus deglupta) is one of Hawaii’s most iconic natural wonders, famous for its peeling bark that reveals neon streaks of green, blue, purple, orange, and maroon. To capture this phenomenon in a traditional Hawaiian quilt—which is typically bi-color—we use a Variegated or Ombré Batik fabric for the appliqué layer. This creates a stunning, shifting color spectrum across the design without breaking the “one-piece” cut tradition. This wall hanging serves as acoustic art, dampening sound while acting as a vibrant focal point.
Finished Dimensions: Large Wall Hanging, approximately 45″ x 45″.
Materials Needed:
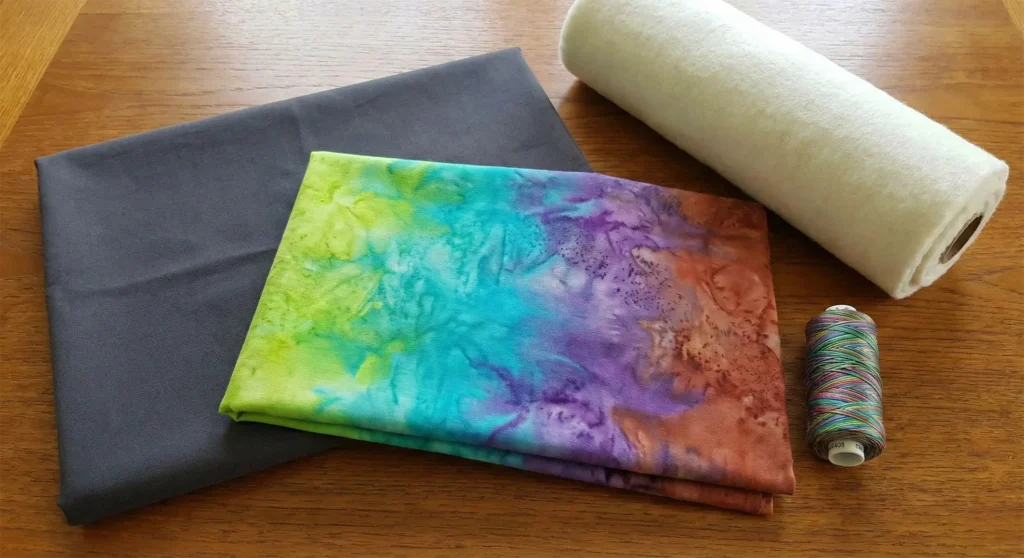
- Fabric A (Background): 1.5 yards of Solid Charcoal or Deep Indigo Cotton. (A dark background makes the “neon” colors of the appliqué vibrate and pop, mimicking the depth of a rainforest).
- Fabric B (The Appliqué): 1.5 yards of Hand-Dyed Batik with a long color run (gradient shifting from lime green to turquoise to violet to rust). Do not use small print; look for “Watercolor” or “Ombré” solids.
- Backing Fabric: 1.5 yards of a coordinating solid.
- Batting: Stiff Cotton Batting or a thin felt. (For wall hangings, you want structure, not drape. It needs to hang flat against the wall).
- Thread: Silk thread that matches the dominant color of your batik, or a translucent monofilament thread.
- Notions: Freezer paper, hanging sleeve material (4″ strip of backing fabric).
Backstory & Fact: While often associated with the Road to Hana on Maui, the Rainbow Eucalyptus is actually native to the Philippines and Indonesia. As the bark peels at different times of the year, the inner bark reveals bright green, which matures to blue, purple, orange, and then maroon tones. A quilt using this motif brings the energy of constant renewal and transformation into the home.
Step 1: The “Color-Map” Fold
Standard folding is blind, but with variegated fabric, we want to control where the colors land.
- Inspect: Open your variegated fabric. Decide which color you want in the center (e.g., the glowing Lime Green) and which at the tips (e.g., the Deep Purple).
- Cut: Cut a 46″ x 46″ square of the Batik fabric.
- Fold: Fold into eighths (Rectangle -> Square -> Triangle).
- Tip: Try to fold so the color gradient radiates outward from the center point, if possible.
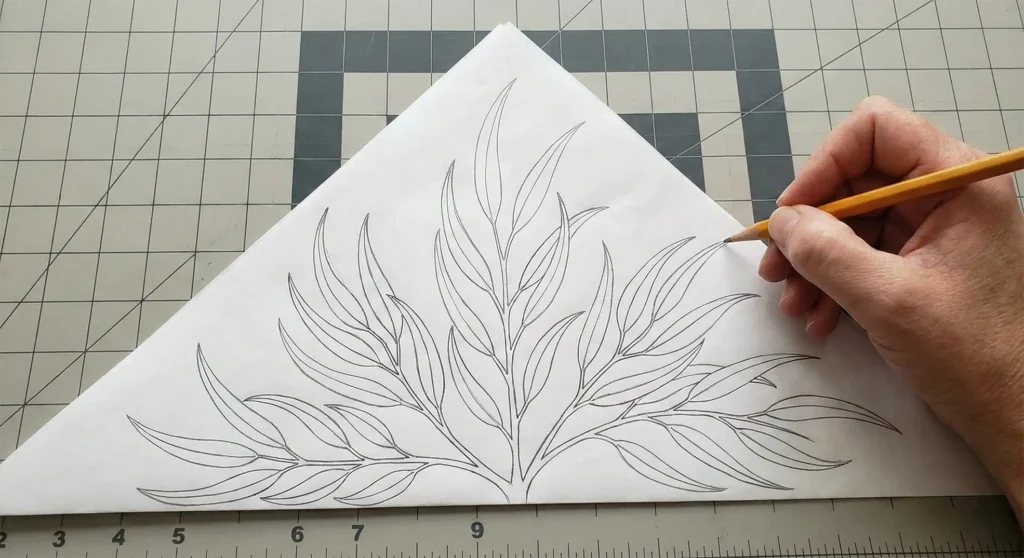
Step 2: Drafting the Lanceolate Leaf
Eucalyptus leaves are long, slender, and curved (lanceolate shape).
- Template: On your folded paper triangle, draft the design.
- Center: Draw a circular base representing the trunk.
- The Branches: Draw long, sweeping curves radiating upward.
- The Leaves: Instead of rounded breadfruit leaves, draw slender, sickle-shaped leaves hanging from the branches.
- Interlocking: Ensure the tips of the leaves or branches touch the folded edges of the paper. This connectivity creates the “medallion” structure.
- Check: Unfold the paper first to ensure the design looks balanced, then refold.
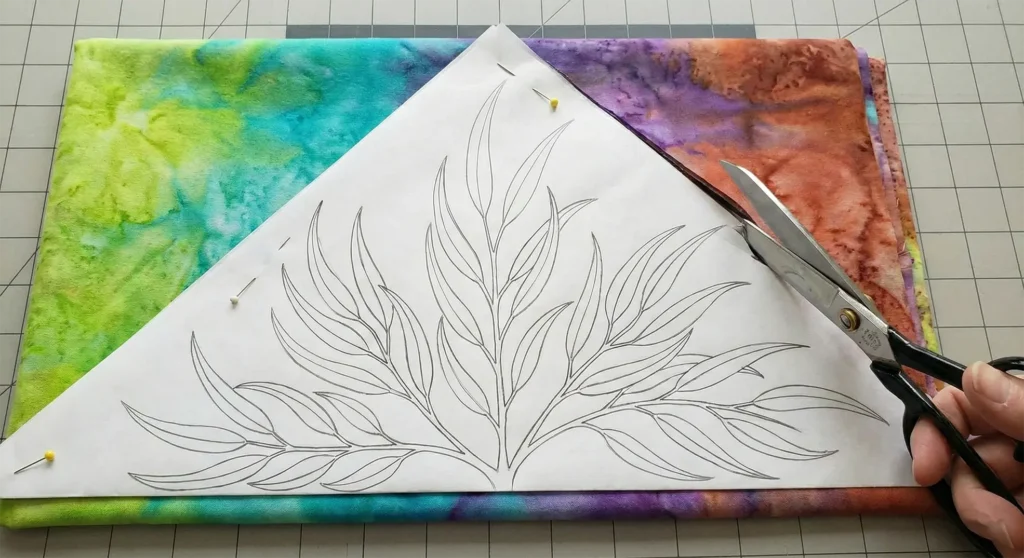
Step 3: Cutting the “Painted” Layer
- Pin & Cut: Pin the template to the folded Batik fabric. Cut carefully through all 8 layers.
- Unfold: This is the “Magic Moment.” As you unfold the batik, you will see the colors shifting around the circle—green leaves in one quadrant blending into blue and purple in the next. It creates the illusion of the peeling bark’s spectrum using only a single piece of fabric.
Step 4: Layout on Dark Ground
- Background: Cut the Charcoal background fabric to 48″ x 48″ (allow extra for squaring up).
- Center: Mark the background center lines.
- Placement: Lay the colorful medallion on the dark background.
- Smooth: Use your hands to smooth the fabric from the center outward.
- Baste: Use Fabric Glue Stick or thread basting to secure the narrow leaves. Since the leaves are slender, glue is often better to prevent them from twisting.
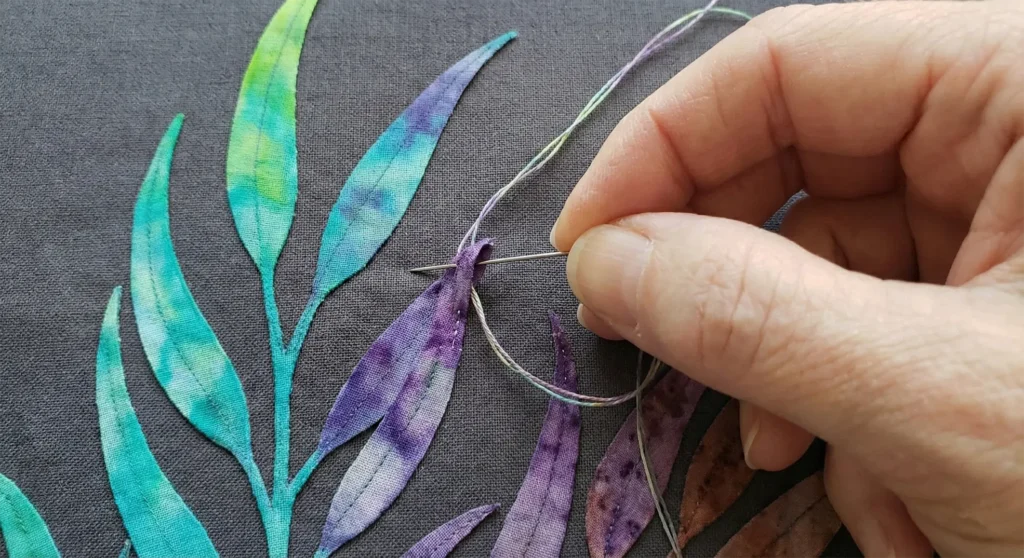
Step 5: Invisible Appliqué
- Needle Turn: Use the needle-turn method to stitch the raw edges down.
- Thread Choice: If your fabric changes color drastically (e.g., Green to Red), you may need to change your thread color as you move around the quilt to keep the stitches invisible. Alternatively, use a fine Smoke/Grey Silk Thread which tends to disappear into most colors.
Step 6: “Rainforest” Echo Quilting
- Sandwich: Backing + Stiff Batting + Top.
- Echo: Quilt the traditional “Echo” lines (ripples) starting from the appliqué.
- Spacing: Keep the lines tight (1/4 inch to 3/8 inch) for wall hangings. Dense quilting stiffens the quilt, helping it hang perfectly flat without rippling.
- Thread: Use a Variegated Thread for the quilting that mimics the colors of the appliqué, or a charcoal thread to create texture without adding color to the background.

Step 7: The Hanging Sleeve
A wall quilt is not complete without a mechanism to display it.
- Sleeve: Before binding, cut a 9-inch-wide strip of fabric matching the backing.
- Fold & Sew: Fold in half lengthwise (wrong sides together). Sew the raw edge into the top binding seam of the quilt.
- Finish: Hand stitch the bottom fold of the sleeve to the quilt backing. Insert a wooden dowel or slat to hang the piece.
- Elegance Tip: Hang this piece in a hallway or entryway and place a spotlight on it. The quilting texture will catch the light, and the “neon” colors will glow against the charcoal background.
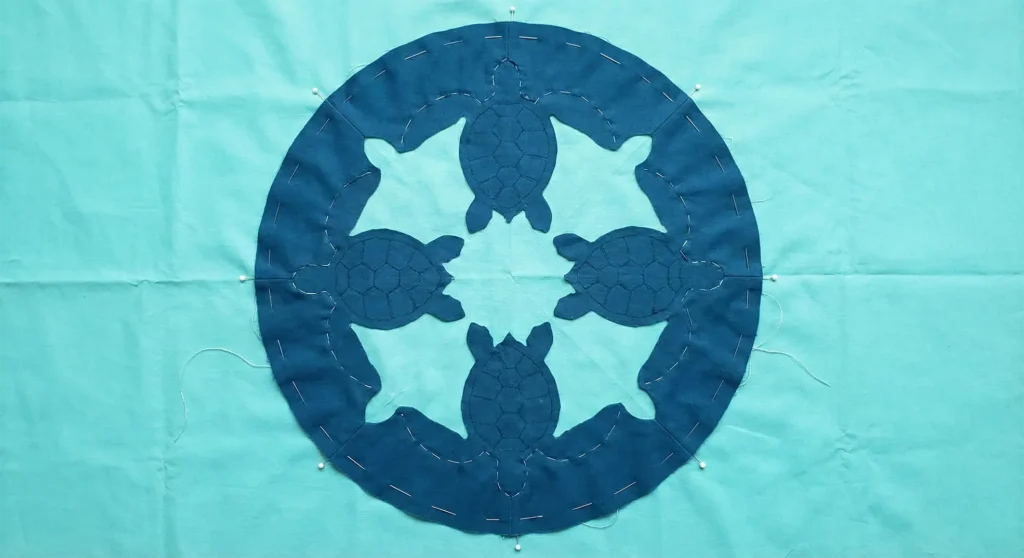
6. Sea Turtle Motif Hawaiian Quilt Ideas for Throw Blankets
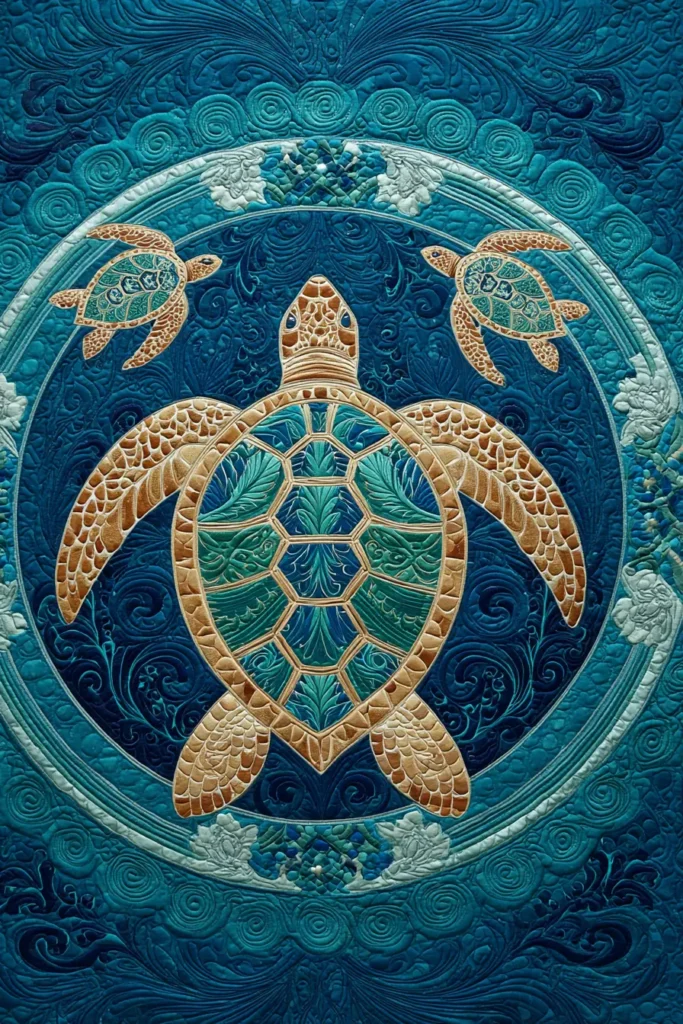
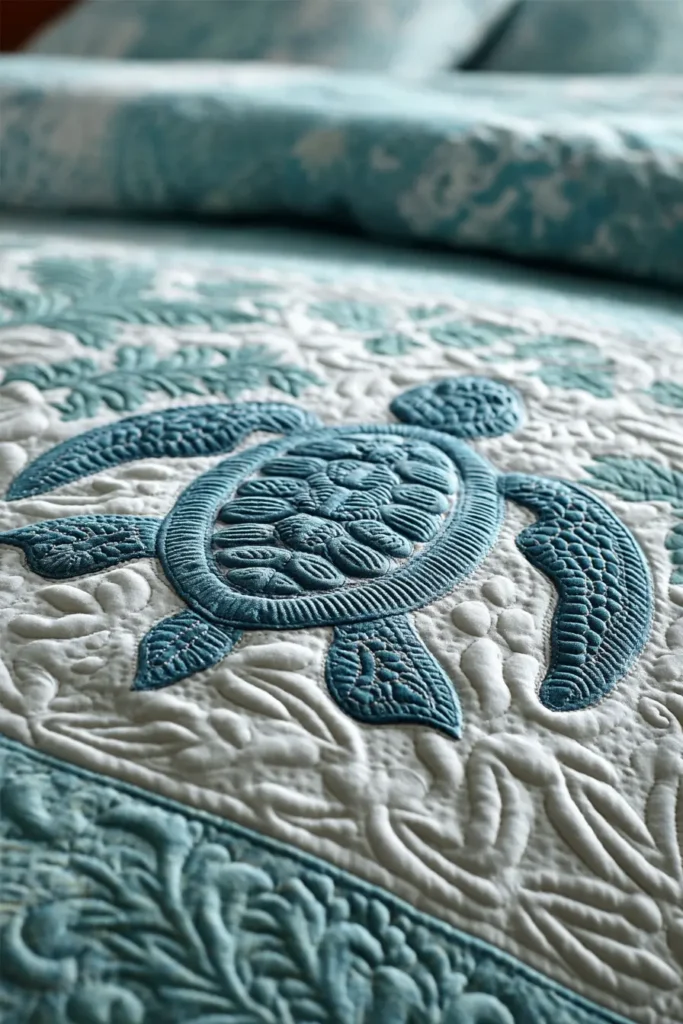
The “Honu Voyager” Sea Turtle Appliqué Throw
In Hawaiian culture, the Green Sea Turtle (Honu) is a symbol of good luck, endurance, and navigation. It represents the link between man, the land, and the sea. The Honu is often considered an Aumakua (ancestral guardian spirit). This throw-sized quilt features a central medallion of swimming turtles, designed to bring a sense of calm protection and the soothing rhythm of the ocean into a living space.
Finished Dimensions: Large Sofa Throw, approximately 60″ x 60″.
Materials Needed:
- Fabric A (Background): 2 yards of Aqua, Teal, or Sand Cotton (representing the water or beach).
- Fabric B (Appliqué): 2 yards of Deep Ocean Blue or Seaweed Green.
- Backing Fabric: 4 yards of coordinating fabric.
- Batting: Bamboo or Cotton/Poly Blend. (Bamboo batting has a lovely drape and is naturally breathable, making it perfect for a cozy throw).
- Paper: Large sheet of freezer paper or butcher paper (30″ x 30″).
- Notions: Appliqué pins, matching thread, sharp fabric scissors, water-soluble marking pen.
Step 1: The “Honu” Fold (Eighths)
Hawaiian quilts rely on radial symmetry. We will create a circle of swimming turtles.
- Cut Paper: Cut a 30″ x 30″ square of paper.
- Fold:
- Fold in half (Rectangle).
- Fold in half again (Square).
- Fold in half diagonally (Triangle – 1/8th).
- Orient: Place the triangle with the folded point at the bottom (this is the center of the quilt).

Step 2: Drafting the Turtle Design
We are drawing “half a turtle” that will connect to its neighbors.
- The Center: Draw a circular or coral-like shape at the bottom point to anchor the design.
- The Turtle Body: In the middle of the paper wedge, draw the shell (carapace). Make it oval and intricate—you can cut small geometric shapes inside the shell to mimic the scutes (scales).
- Flippers: Draw the front and back flippers extending outward.
- Crucial: Make the tip of the front flipper touch the left folded edge, and the back flipper touch the right folded edge (or vice versa). This ensures that when unfolded, the turtles are “holding hands” or connected in a ring.
- The Sea: Add swirling wave shapes or seaweed fronds around the turtle to fill the space and connect the design to the edges.

Step 3: Cutting the Medallion
- Fabric Prep: Cut your Appliqué Fabric (Fabric B) into a 32″ x 32″ square. Fold it exactly as you folded the paper (into eighths). Press the creases.
- Attach Template: Pin the paper template securely to the folded fabric.
- Cut: Carefully cut through all 8 fabric layers. Take your time around the turtle’s head and flippers.
- Tip: If cutting the internal shell detail through 8 layers is too hard, wait until you unfold it, then cut those small holes individually.
- Unfold: Open the fabric to reveal a ring of 4 or 8 turtles swimming in a circle.
Step 4: Basting to the “Ocean”
- Background: Cut your Background Fabric (Fabric A) to 62″ x 62″.
- Center: Mark the background center with creases (fold in quarters).
- Placement: Align the creases of the turtle medallion with the background creases.
- Baste: Use thread basting (long running stitches) to secure the medallion. Start from the center and baste outwards through the turtle bodies to the tips of the flippers. This prevents the fabric from shifting or puckering.

Step 5: The “Needle-Turn” Swim
This step requires patience, like the slow-moving turtle.
- Stitch: Use the needle-turn appliqué method. Use your needle to tuck the 1/8″ raw edge under and blind stitch it down.
- Points & Curves:
- Head: Smooth the curve of the turtle’s head gently. Use small stitches.
- Flippers: If the flippers have sharp points, trim the excess fabric at the tip before turning to reduce bulk.
- Shell: If you cut holes in the shell, clip the inner curves slightly so the fabric turns under smoothly.
Step 6: “Currents” Echo Quilting
The quilting should mimic the movement of water.
- Sandwich: Backing + Batting + Top.
- Echo: Start quilting inside the turtle shells to give them dimension.
- Waves: Move to the background. Quilt concentric lines echoing the shape of the turtles.
- Variation: Instead of perfect echoes, you can quilt gentle, wavy lines across the whole background to look like ocean currents or tides flowing over the turtles.
- Bind: Finish with a binding in the same color as the Appliqué (Fabric B) to frame the seascape.

Usability Note: The Honu throw is perfect for a coastal home or a child’s room. Because it represents protection, it is a thoughtful gift for someone starting a new journey or moving into a new home. The bamboo batting ensures it is light enough for summer naps but warm enough for ocean breezes.
7. Elegant Lauhala Weave Hawaiian Quilt for Tabletop Accents

The “Lauhala Mat” Woven Appliqué Table Runner
In ancient Hawaii, the leaves of the Hala tree (Pandanus tectorius) were dried, stripped, and woven into Lauhala mats. These mats were the original flooring, bedding, and even sails for canoes—the literal foundation of Hawaiian life. While most Hawaiian quilts feature botanical curves, this design honors the geometry of the weave. It uses a sophisticated “Faux-Weave” appliqué technique to mimic the diagonal check pattern of a traditional mat. This pattern is exceptionally elegant for dining tables, as the geometric structure provides a clean, neutral base for place settings.
Finished Dimensions: Table Runner, approximately 16″ x 72″.
Materials Needed:
- Fabric A (The “Weave” – Light): 1 yard of Oatmeal or Golden Sand Linen. (Linen mimics the texture of dried Hala leaves).
- Fabric B (The Background – Dark): 1 yard of Espresso or Dark Taupe Cotton.
- Backing Fabric: 1 yard of matching cotton.
- Batting: Fusible Fleece or very thin Cotton Batting. (Table runners need to lie flat so wine glasses don’t tip over; avoid high-loft batting).
- Fusible Web: 1 yard of double-sided lightweight fusible web (like HeatnBond Lite).
- Notions: Rotary cutter, clear ruler with 45-degree markings, matching thread.
Cultural Backstory: Weaving Lauhala was a highly respected skill. The quality of a mat was judged by the fineness of the strands (koana). A tight weave represented a tight-knit family or community. By translating this texture into a quilt, you bring the symbolism of unity and foundational support to your dining table.
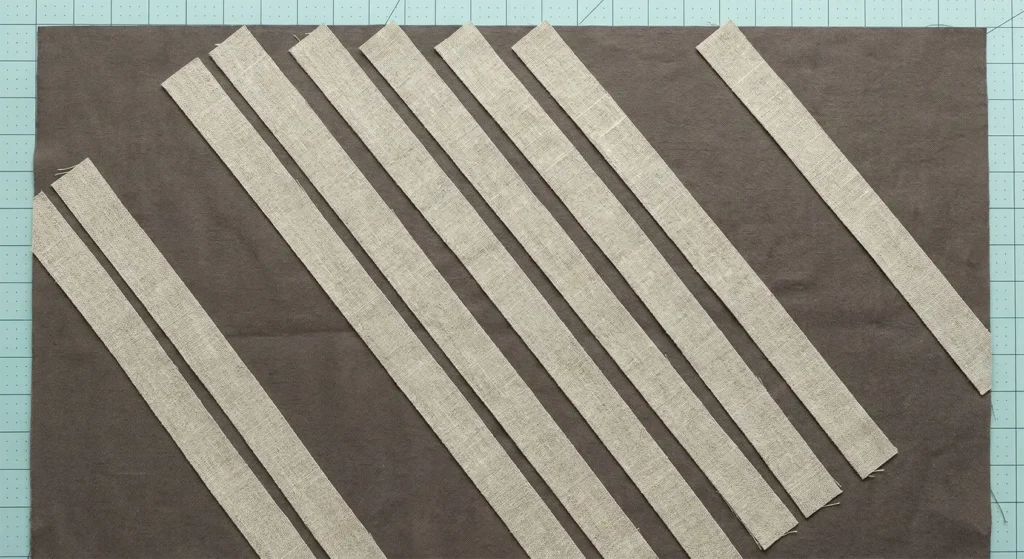
Step 1: Preparing the “Strands”
Instead of weaving actual fabric strips (which creates too much bulk for a table runner), we will create a faux-weave using fused appliqué.
- Fuse: Iron the Fusible Web onto the wrong side of your Fabric A (Light Linen).
- Cut: Cut the fused fabric into strips.
- Width: 1.5 inches.
- Quantity: You need enough strips to cover the runner diagonally.
- Peel: Peel off the paper backing. You now have “iron-on” linen strips.
Step 2: The Background Canvas
- Cut: Cut your Fabric B (Dark Background) into a rectangle measuring 18″ x 74″ (slightly larger than finished size to allow for trimming).
- Marking: Using a chalk liner and a long ruler, draw a 45-degree line across the center of the dark fabric. This is your guide.
Step 3: Laying the First Direction (The Warps)
- Place: Lay your first Light Linen strip along the 45-degree chalk line.
- Spacing: Place the next strip parallel to it, leaving a 1/2-inch gap of dark background between them.
- Tip: Use a spacer (a piece of cardboard cut to 1/2″ wide) to keep the gaps consistent.
- Continue: Fill the entire background with these diagonal parallel strips.
- Fuse: Press lightly with an iron to tack them down (don’t melt them fully yet).
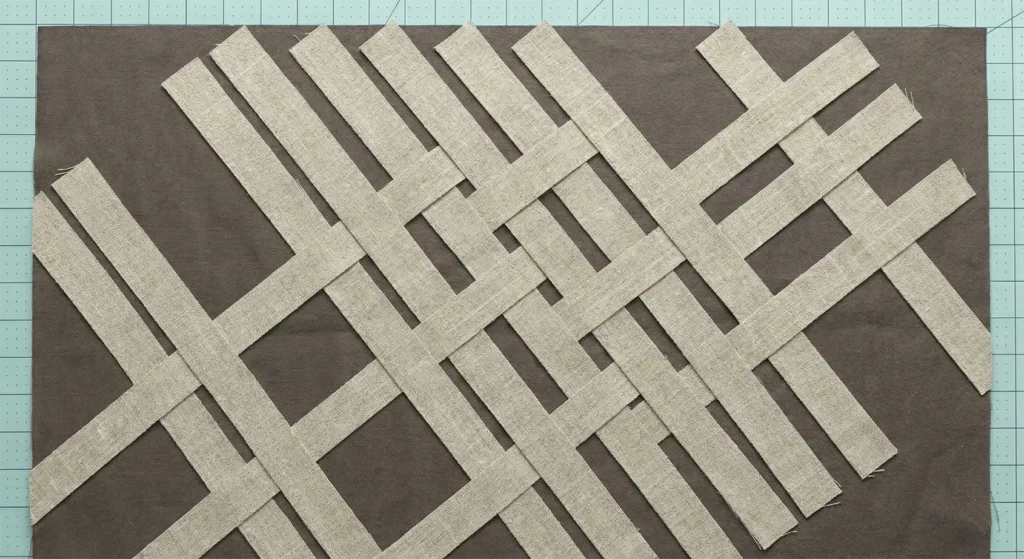
Step 4: The “Interlocking” Illusion (The Wefts)
Now we create the cross-weave. We won’t weave them; we will layer them to fool the eye.
- Cut Short Strips: Cut the remaining Light Linen strips into shorter segments (approx 3-4 inches long).
- Placement: Place these short strips perpendicular (at a 90-degree angle) to the first set of strips.
- The Trick: Place a short strip over Strip 1, spanning the dark gap, and stopping at the edge of Strip 2.
- Visual: You are creating a checkerboard effect. By placing short segments in the “gaps,” you create the illusion that the fabric is going over and under.
- Alternative (Easier): Simply lay long strips in the opposite direction on top of the first set to create a grid (plaid) rather than a weave. This is faster but less authentic to the Lauhala look.
Step 5: Securing the Weave
- Fuse: Once your geometric grid is laid out perfectly, cover it with a pressing cloth and press firmly to permanently fuse everything.
- Stitch: Use a straight stitch or a narrow Zig-Zag stitch in matching thread to sew down the edges of every strip.
- Elegance: Use a thread slightly darker than the linen to add depth to the “weave.”
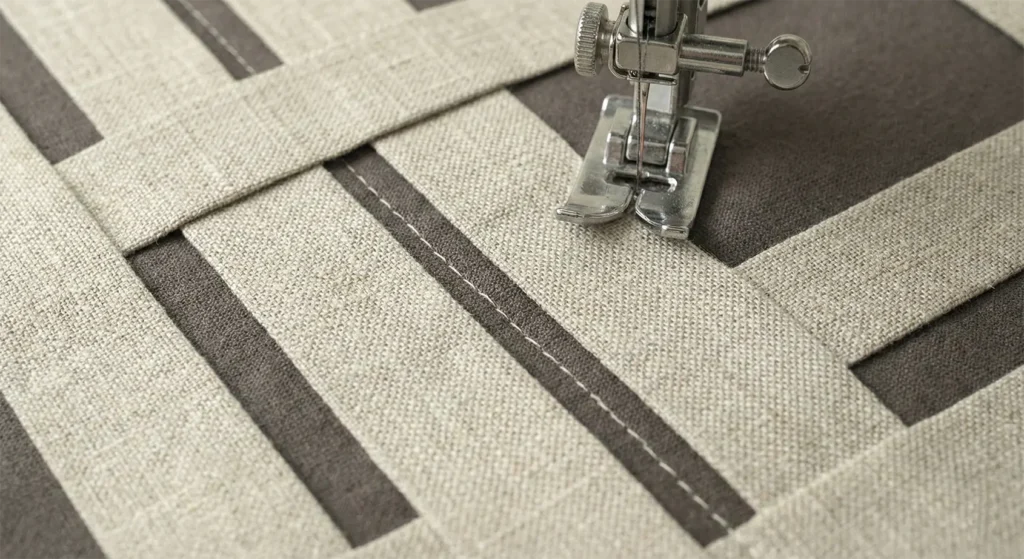
Step 6: “Mat” Quilting
The quilting should reinforce the structural look.
- Sandwich: Backing + Fusible Fleece + Top.
- Stitch in the Ditch: Quilt straight lines in the Dark Gaps between the linen strips.
- Effect: This makes the light linen strips puff up slightly, enhancing the 3D woven texture.
- Trim: Square up the runner to 16″ x 72″.
- Bind: Bind with the Dark Background Fabric to give the runner a crisp, defined edge.
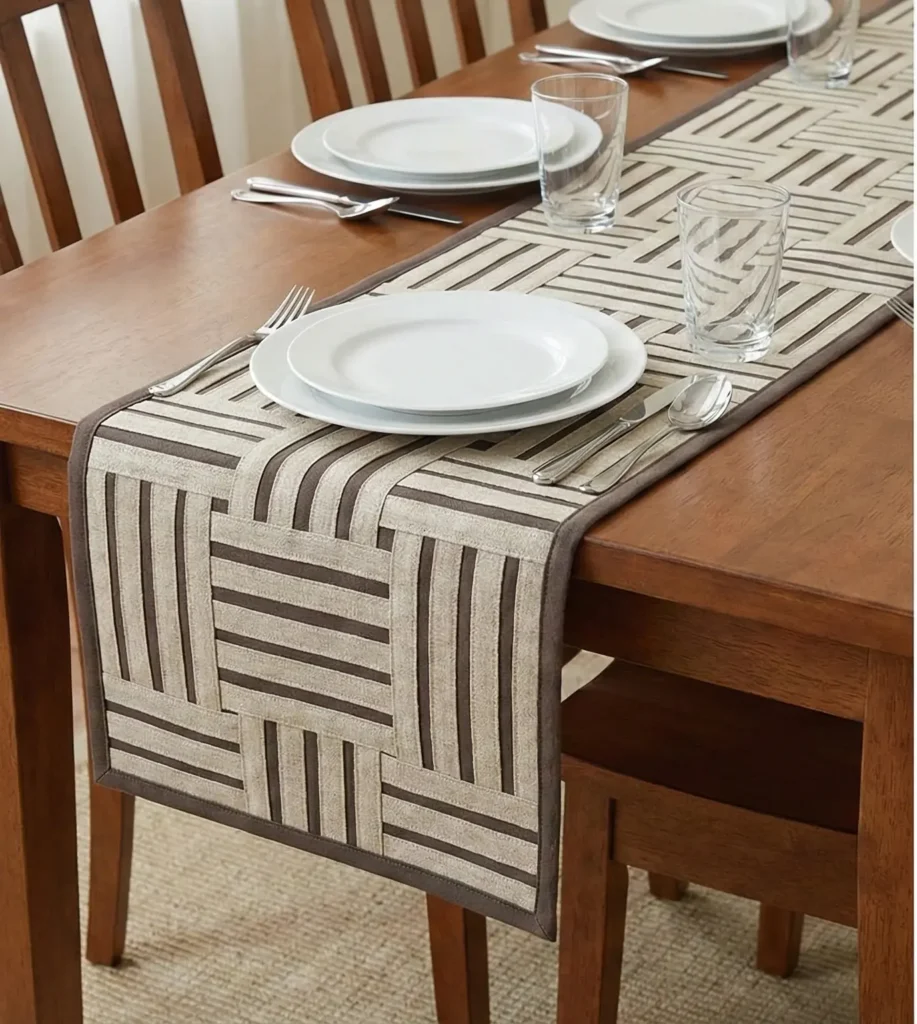
Usability Tip: This runner is machine washable (if fused and stitched correctly) and lies very flat, making it practical for serving dishes. The linen texture effectively hides crumbs and spills, while the geometric pattern adds a modern, architectural touch to a tropical theme.
8. Vibrant Hibiscus Appliqué Quilt Designs for Elegant Sofa Throws

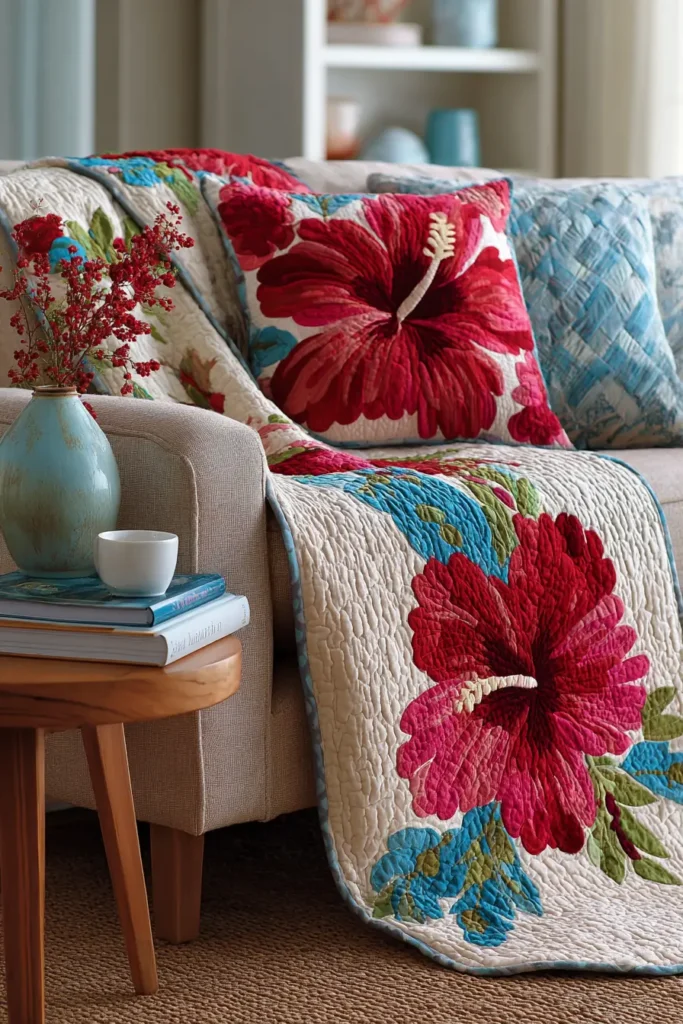
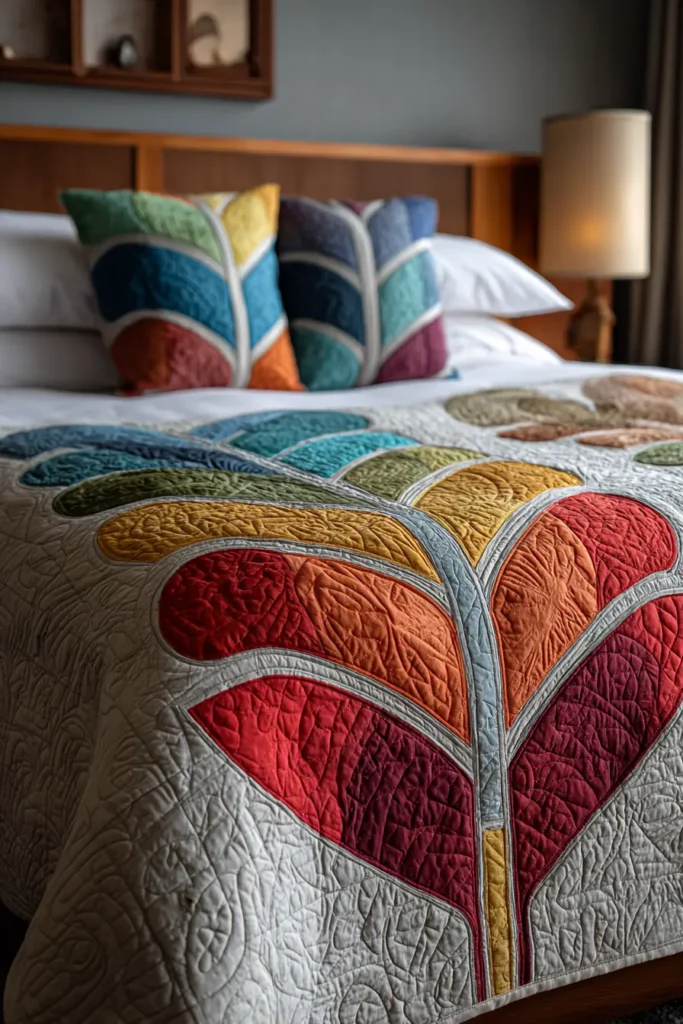
The “Aloha Sunset” Hibiscus Radial Throw
The Hibiscus (Pua Aloalo) is the defining flower of the tropics. While the yellow hibiscus is Hawaii’s state flower, the red and pink varieties are iconic symbols of delicate beauty and fleeting moments. This design centers a massive, vibrant hibiscus bloom on a crisp background. It is sized perfectly as a “Show Piece” throw—draped over the back of a neutral beige or grey sofa, it instantly injects color and elegance, transforming the room’s energy.
Finished Dimensions: Square Sofa Throw, approximately 55″ x 55″.
Materials Needed:
- Fabric A (Background): 2 yards of Crisp White or Navy Blue Cotton Sateen. (White creates a fresh, resort look; Navy creates a dramatic, evening elegance).
- Fabric B (Appliqué): 2 yards of Vibrant Coral, Hot Pink, or Sunset Orange solid cotton.
- Backing Fabric: 3.5 yards of coordinating cotton.
- Batting: Bamboo/Cotton Blend. (This offers a dense, low-loft drape that feels cool and silky, perfect for a luxury throw).
- Thread: Silk thread matching the Appliqué color (for invisible stitching).
- Paper: 30″ square of freezer paper.
Cultural Backstory: In the Victorian era of Hawaii, specific flowers were associated with specific islands. The Hibiscus is universal, but it holds a special place in the culture’s heart because its blooms often last only a single day. Quilting the hibiscus immortalizes its beauty, capturing the “Aloha” spirit forever in fabric.
Step 1: The Radial Fold
We will create a symmetrical wreath of 8 interlocking hibiscus flowers.
- Cut Paper: Cut a 28″ x 28″ square of freezer paper.
- Fold:
- Fold in half (Rectangle).
- Fold in half again (Square).
- Fold in half diagonally (Triangle – 1/8th).
- Crease: Press the folds sharply. Place the triangle with the point at the bottom (center).

Step 2: Drafting the Stamen and Petals
The signature of a hibiscus is the long central stamen.
- The Center: Draw a small circle or star at the bottom tip to connect the wreath.
- The Flower: In the wide part of the triangle, draw a large, five-petaled flower profile.
- Detail: Make the petal edges ruffled or wavy.
- The Stamen: Draw a long, slender pistil rising from the center of the flower, curving gracefully toward the top left or right corner. Add tiny dots at the end for pollen.
- Leaves: Add a jagged-edged leaf near the base to anchor the flower.
- Connection: Ensure the leaves or petals touch the folded paper edges on both sides so the design stays connected when unfolded.

Step 3: Cutting the “Vibrant” Layer
- Prep Fabric: Cut your Vibrant Coral fabric into a 30″ x 30″ square. Fold it into eighths, matching the paper.
- Pin & Cut: Pin the template securely. Cut through all 8 layers.
- Tip: For the delicate stamen, leave a little extra fabric width (slightly fatter than drawn) to make turning the edges easier.
- Unfold: Open the fabric to reveal a stunning ring of 8 hibiscus flowers exploding from the center.

Step 4: Centering and Basting
- Background: Cut your Background Fabric to 58″ x 58″. Fold into quarters to find the center lines.
- Alignment: Match the fold lines of the appliqué medallion with those of the background.
- Baste: Use Thread Basting. Start at the center and stitch large “X” shapes out toward the edges. Then run a basting stitch through the center of every petal and stamen. This is crucial—glue basting often fails on the long, skinny stamens.

Step 5: Needle-Turn Appliqué
- Technique: Use your needle to sweep the 1/8″ raw edge under.
- The Stamen Challenge: When stitching the long, thin stamen:
- Stitch the convex (outer) curve first.
- Then stitch the concave (inner) curve.
- Use the point of your needle to gently stuff stray threads under.
- Points: Keep the leaf tips sharp, but keep the petals soft and rounded.

Step 6: The “Ripple” Quilting
Hawaiian quilting is famous for “Echo Quilting” (Kuiki Lau).
- Marking: You usually don’t need to mark. Use the width of your presser foot or your finger as a guide.
- Stitch: Start quilting inside the flower, outlining the petals.
- Echo: Move to the background. Quilt lines 5/8 inch apart radiate outward from the flowers like ripples in a pond.
- Elegance Tip: Continue the ripple lines all the way to the binding. This creates a mesmerizing texture that makes the flat fabric look like a relief carving.
Step 7: Finishing
- Trim: Trim the quilt to a perfect 55″ x 55″ square.
- Bind: Use the Background Color (White or Navy) for the binding. This makes the colorful flower look like it is floating in infinite space, rather than being “boxed in” by a colored frame.
Usability Note: Cotton Sateen and Bamboo batting make this throw incredibly soft and drapeable. It washes beautifully; in fact, the “crinkle” that develops after washing adds to the piece’s antique charm.
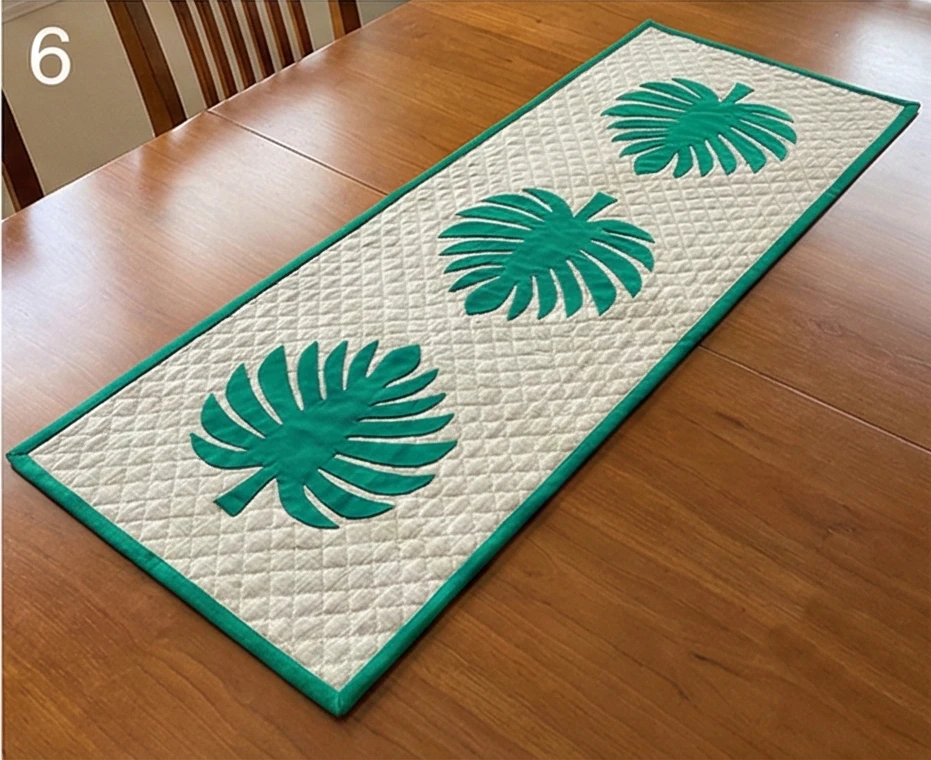
9. Tropical Palm Leaf Hawaiian Quilt Ideas for Table Runners
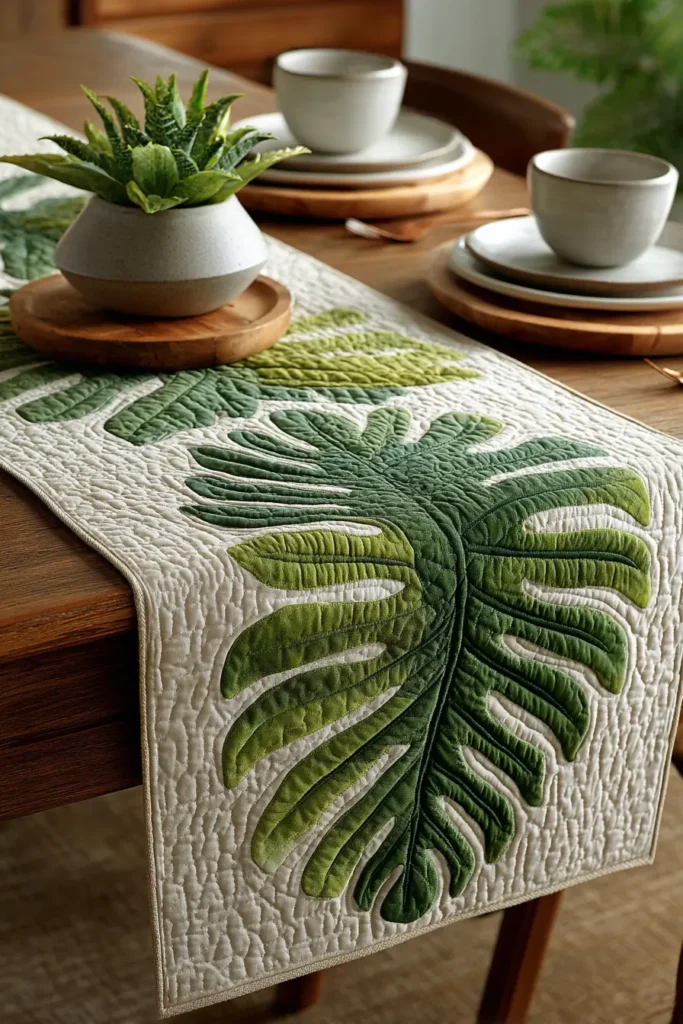
The “Niu Heritage” Coconut Palm Table Runner
The Coconut Palm (Niu) is known as the “Tree of Life” in Hawaii because every part of it—from the fronds for weaving to the nut for food and water—sustained the ancient Hawaiians. This table runner design uses a Repeat Block layout, featuring three distinct palm medallions in a row. This linear arrangement draws the eye down the length of the dining table, creating a sense of grandeur and continuity perfect for formal dinners or daily elegance.
Finished Dimensions: Dining Table Runner, approximately 18″ x 72″.
Materials Needed:
- Fabric A (Background): 1.5 yards of Natural Linen or Crisp White Cotton. (Linen offers a textured, organic elegance that hides dining spills well).
- Fabric B (Appliqué): 1 yard of Emerald Green or Deep Olive. (Dark green contrasts beautifully with china and silverware).
- Backing Fabric: 1.5 yards of matching fabric.
- Batting: Fusible Fleece or very thin Cotton Batting. (Crucial for table runners: high-loft batting makes the surface uneven, causing wine glasses to tip. Thin batting ensures stability).
- Notions: Paper for templates, basting glue or thread, and matching silk thread.
Cultural Backstory: In old Hawaii, a coconut tree was often planted at the birth of a child. The tree would grow alongside the child, providing nourishment and protection throughout their life. Including this motif on a dining runner symbolizes sustenance and the flourishing of the family gathered around the table.
Step 1: The Triple-Block Fold
Instead of one massive cut, we create three smaller, identical medallions.
- Cut Paper: Cut three squares of paper measuring 12″ x 12″.
- Fold: Fold each square into eighths:
- Fold in half (Rectangle).
- Fold in half again (Square).
- Fold in half diagonally (Triangle).
- Crease: Press the folds sharply. Orient the triangle with the point at the bottom.
Step 2: Drafting the Fronds
Palm leaves are defined by their feathery, serrated edges.
- The Trunk: Draw a small circle or diamond at the bottom tip to act as the center of the tree.
- The Fronds: Draw arching lines radiating outward from the center.
- The Detail: Along these arching lines, draw jagged “saw-tooth” cuts or deep V-shapes to mimic the individual leaflets of a palm frond.
- Connectivity: Ensure the frond tips touch the folded paper edges. This is vital so the design doesn’t fall apart into confetti when you unfold it.
Step 3: Cutting the Greenery
- Prep Fabric: Cut three squares of your Emerald Green fabric (14″ x 14″). Fold them to match your paper templates.
- Pin & Cut: Pin a template to each fabric bundle. Cut carefully.
- Tip: Use the very tips of your sharpest scissors for the “V” cuts between the palm leaves.
- Unfold: You will have three identical, circular palm medallions.
Step 4: Linear Layout
- Background: Cut your Background Linen to 20″ x 76″ (allowing for excess to account for quilting shrinkage).
- Marking: Fold the runner in half lengthwise and widthwise to find the center. Then mark the center points for the two side blocks (approx 18 inches away from the center).
- Placement: Place one palm medallion in the exact center. Place the other two on the left and right marks.
- Visual Check: Ensure there is even spacing between the medallions so they look like a deliberate colonnade of trees.
- Baste: Secure with thread basting or small dots of fabric glue.
Step 5: Needle-Turn Appliqué
- Technique: Use the needle-turn method. Sweep the raw edges under with your needle.
- The “V” Cuts: Palm fronds have many deep inner corners (“V” shapes).
- Trick: Clip into the “V” almost to the stitch line. Stitch down one side, take a tiny stitch at the very bottom of the V to anchor it, then stitch up the other side. This keeps the V sharp and prevents fraying.
Step 6: Structural Quilting
- Sandwich: Backing + Thin Batting + Top.
- Echo: Quilt around the palm leaves.
- Grid Work: For the background, instead of ripples, consider quilting a Cross-Hatch Grid (diagonal lines 1 inch apart).
- Why? A grid makes the runner very flat and firm—perfect for setting down bowls and glasses—while the organic palm shapes pop up slightly in relief.
Step 7: The “Mitered” Finish
- Trim: Square up the runner to 18″ x 72″.
- Binding: Apply a binding in the Emerald Green fabric.
- Use Mitered Corners (folding the binding at a 45-degree angle) to give the runner sharp, professional corners that sit perfectly on a rectangular table.
Usability Note: If you are worried about spills, treat the finished runner with a fabric protector (like Scotchgard). The appliqué is durable, but protecting the linen background keeps it elegant for years.
10. Relaxing Ocean Wave Quilt Patterns for Cozy Couch Covers
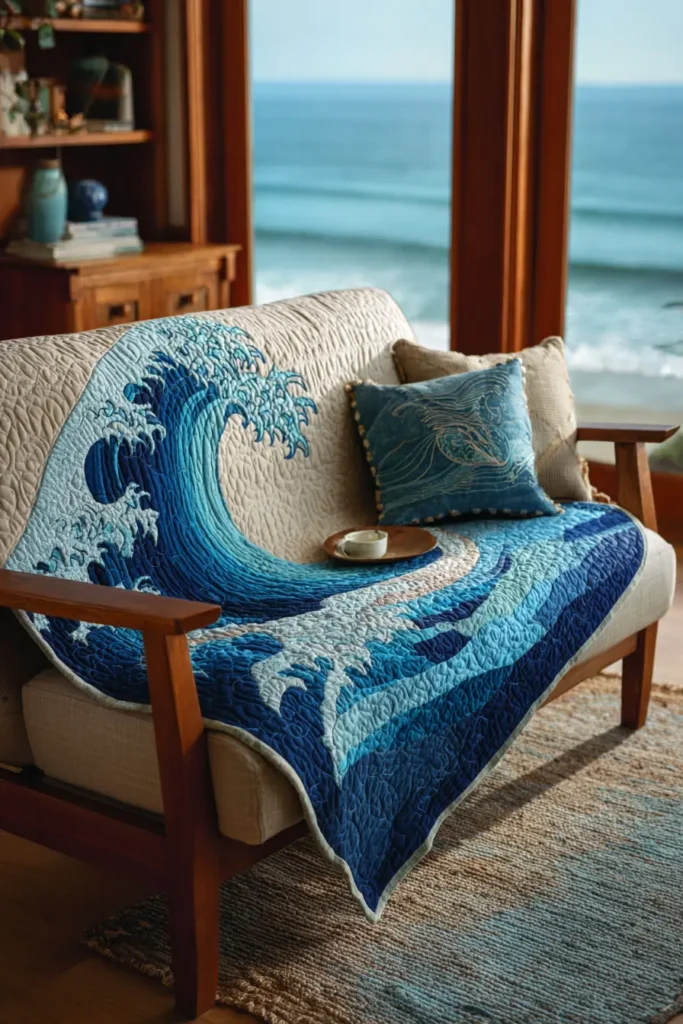
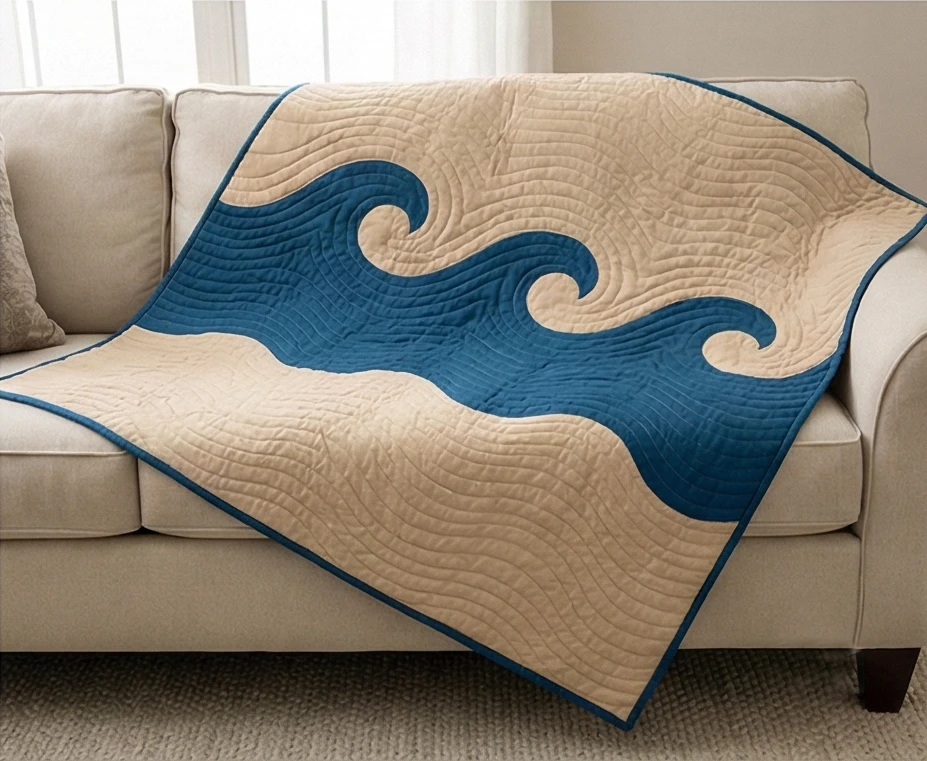
The “Kai Rhythms” Ocean Wave Quilt
The ocean (Kai) is the heartbeat of Hawaii. Its rhythm is constant, powerful, and deeply soothing. While many Hawaiian quilts focus on botanicals, “water” patterns are a distinct sub-genre that evoke the movement of the tides. This design avoids the rigid symmetry of a snowflake. Instead, it uses a border-to-center flow, where the appliqué mimics waves crashing inward from the edges, creating a cozy, enveloping visual effect perfect for curling up on a couch.
Finished Dimensions: Large Couch Cover / Lap Quilt, approximately 60″ x 70″.
Materials Needed:
- Fabric A (Background): 2.5 yards of Sandy Beige or Driftwood Grey Cotton (representing the shore).
- Fabric B (Appliqué): 2.5 yards of Deep Teal, Indigo, or Ocean Blue (representing the water).
- Backing Fabric: 4 yards of soft flannel (for extra coziness).
- Batting: Wool or Bamboo Batting. (Wool is best for temperature regulation, keeping you warm without overheating).
- Template Paper: A large roll of butcher paper (36″ wide).
- Notions: Appliqué pins, basting thread, fabric scissors.
Cultural Backstory: In Hawaiian chant, the ocean is often described as having many moods—from the calm “Kai Malie” to the wild “Kai Ko’o.” This quilt design represents “Kai Hane,” or the murmuring sea—a gentle, repetitive motion that lulls the spirit to rest.
Step 1: The “border-In” Fold
Unlike the radial “snowflake” fold, this design frames the center.
- Cut Paper: Cut a rectangle of paper measuring 30″ x 35″ (1/4 of the finished size).
- Fold: Fold the paper in half lengthwise.
- Drafting:
- The Border: Draw a thick, undulating wave border along the bottom and right edges (the outer edges of the quilt).
- The Crests: Draw large, curling wave crests reaching inward toward the top-left corner (the center of the quilt).
- The Kapa: Ensure the waves connect solidly at the base so the fabric remains one piece.
- Goal: You want a frame of heavy color on the outside that thins out into delicate sprays of water in the center.
Step 2: Cutting the Blue
- Prep Fabric: Cut your Blue Appliqué Fabric into a 62″ x 72″ rectangle.
- Fold: Fold the fabric into quarters (fold in half widthwise, then lengthwise).
- Pin: Pin your paper template to the folded fabric bundle.
- Check: Ensure the “center” of your template aligns with the folded corner of the fabric (the corner with no raw edges).
- Cut: Cut through the 4 layers. Use long, smooth scissor strokes to keep the wave’s curves fluid.
Step 3: Unfolding the Tide
- Unfold: Open the fabric. You should see a large, rectangular “frame” of waves that splash inward toward the center medallion.
- Background: Cut your Sand Background Fabric to 64″ x 74″.
- Layer: Center the Blue Wave appliqué on the Sand background.
- Visual: The heavy blue border grounds the quilt visually, making it feel weighty and secure—perfect for a “comfort object.”
Step 4: Fluid Basting
Because the wave shapes are long and curvy, they can stretch.
- Technique: Use Thread Basting.
- Direction: Baste from the center outward. Baste down the spine of each wave crest first, then baste the edges.
- Tip: Do not pull the thread tight. Keep the fabric relaxed to mimic the fluidity of water.
Step 5: The “Rolling” Needle-Turn
- Stitch: Use the needle-turn method to appliqué the waves.
- The Curves: This pattern is almost entirely composed of convex and concave curves.
- Inner Curves (Troughs of waves): Clip small snips into the seam allowance to ensure a smooth turn.
- Outer Curves (Crests): Ease the fabric under with your needle.
- Meditation: Use a thread that matches the blue perfectly. As you stitch, imagine the rhythm of the waves.
Step 6: “Tidal” Echo Quilting
The quilting brings the water to life.
- Sandwich: Backing + Wool Batting + Top.
- Echo: Quilt 1/2 inch away from the blue appliqué.
- Flow: Instead of stopping, continue the echo lines until they fill the sandy background.
- Effect: The quilting lines will look like the foamy lines left on the sand as the tide recedes.
- Binding: Finish with a binding in the Blue Appliqué fabric to close the frame.
Usability Note: Wool batting is the secret ingredient here. It breathes exceptionally well, meaning this quilt can stay on the couch year-round. It’s heavy enough for winter chill but light enough for a summer nap.
11. Floral Lehua Blossom Hawaiian Quilt for Pillow Covers
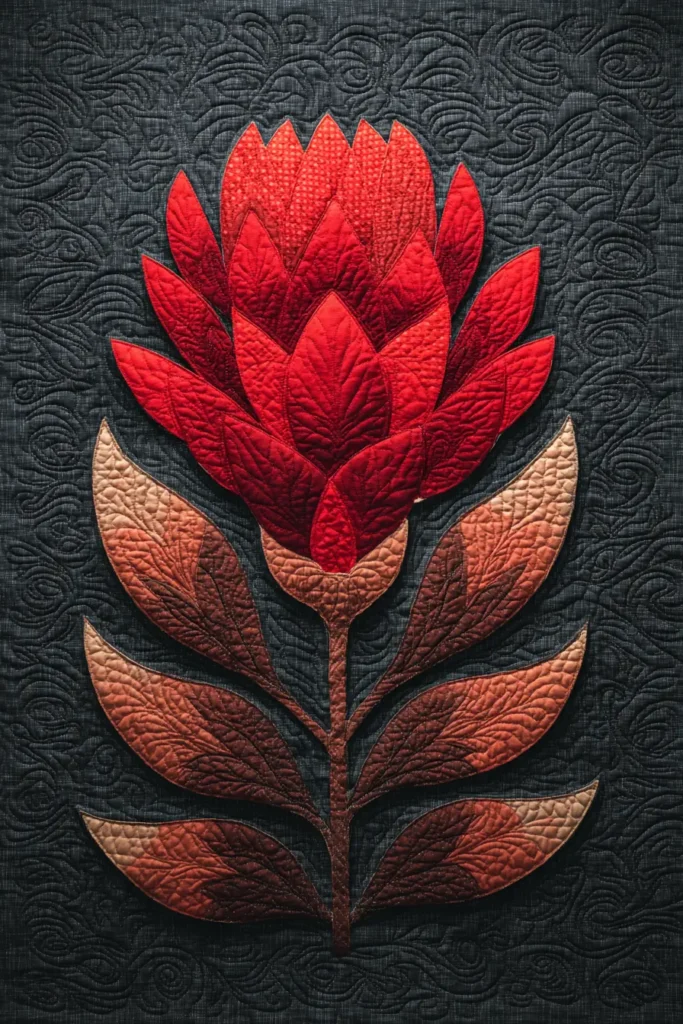
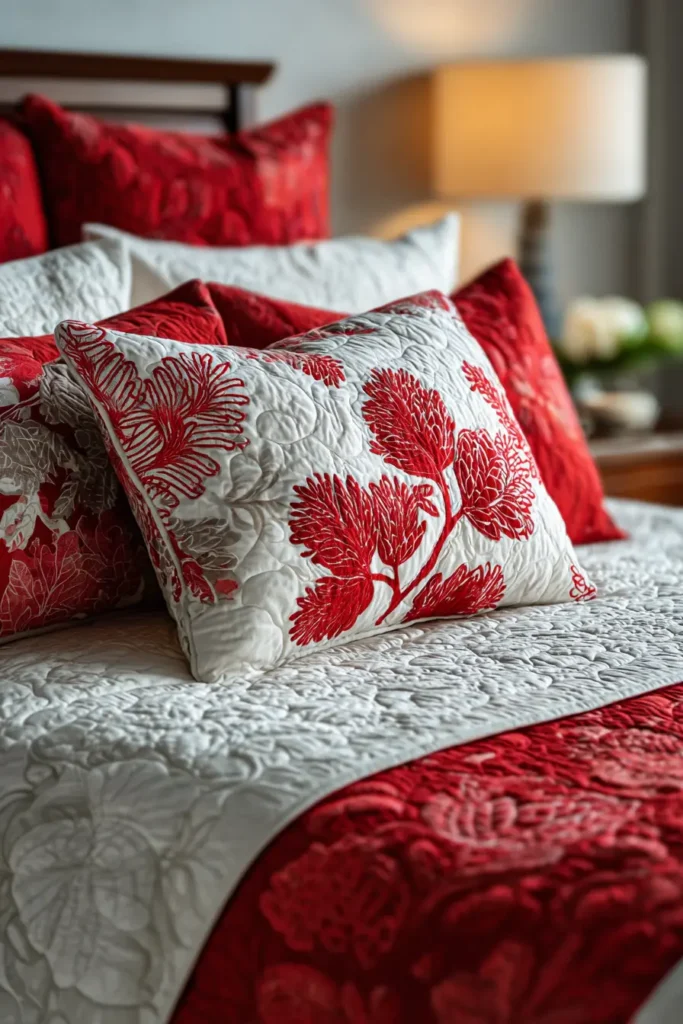
The “Pele’s Fire” Lehua Blossom Pillow
The Ohia Lehua is perhaps the most culturally significant plant in Hawaii, often associated with the volcano goddess Pele. It is one of the first plants to grow on fresh lava flows, symbolizing resilience and rebirth. The flower itself is unique—it has no petals, only a puff of vibrant red stamens. This pillow design captures that fiery elegance, using a bold Red-on-Charcoal or Red-on-Black palette to mimic the stunning contrast of the bright flower blooming against dark volcanic rock. It creates a sophisticated, dramatic accent for a sofa or bed.
Finished Dimensions: Euro Sham (Square), approximately 26″ x 26″ (or adjust for a standard 20″ throw pillow).
Materials Needed:
- Fabric A (Background): 1 yard of Charcoal Grey or Lava Black Cotton Sateen. (Dark backgrounds hide dirt and look incredibly modern).
- Fabric B (Appliqué): 1/2 yard of Scarlet Red or Canary Yellow solid cotton.
- Backing Fabric: 1 yard of matching Charcoal fabric (for the pillow back).
- Batting: Fusible Fleece or thin Cotton Batting (to give the pillow face structure without too much puff).
- Pillow Insert: 26″ x 26″ Feather or Down Alternative insert.
- Notions: 24″ Zipper (invisible preferred), matching red thread.
Cultural Backstory: Legend says that Ohi’a and Lehua were young lovers. The goddess Pele desired Ohi’a, but he rejected her. In a rage, Pele turned Ohi’a into a twisted tree. Lehua was devastated, and the other gods, taking pity, turned her into the beautiful red flower on the tree so the lovers would never be apart. It is said that if you pick a Lehua blossom, the sky will rain—the tears of the separated lovers.
Step 1: The “Puff” Fold
The Lehua is a “pom-pom” flower, so our fold needs to accommodate a rounded shape rather than a pointed star.
- Cut Paper: Cut a 20″ x 20″ square of freezer paper.
- Fold: Fold into eighths (Rectangle → Square → Triangle).
- Orientation: Place the point at the bottom (center).
Step 2: Drafting the Stamens
This is the tricky part—how to make “fluff” out of solid fabric.
- The Branch: Draw a sturdy wood stem coming from the center.
- The Leaves: Draw oval, pointed leaves growing off the stem (Ohi’a leaves are stiff and symmetrical).
- The Flower: At the top of the triangle, draw a semicircle.
- The Edge: Instead of a smooth line, draw a serrated/fringed edge (like saw teeth) along the top of the semi-circle. This mimics the tips of the stamens.
- Internal Cuts: Draw small teardrop or diamond shapes inside the flower head. When cut, these will look like gaps between the stamens, adding airiness to the design.
Step 3: Cutting the Detail
- Prep Fabric: Cut your Red Appliqué fabric to 22″ x 22″. Fold to match the paper.
- Pin & Cut: Pin the template.
- Caution: When cutting the serrated edge, don’t make the points too sharp or thin, or they will fray. Keep them slightly rounded or “chunky.”
- Unfold: Reveal the wreath of Lehua blossoms. The serrated edges should create a vibrant, buzzing energy.
Step 4: Basting on “Lava”
- Background: Cut the Charcoal background to 27″ x 27″.
- Center: Mark the center lines.
- Placement: Center the Red medallion. The contrast should be striking.
- Secure: Use Fabric Glue Stick for the serrated edges. Pins will distort the many small points. Press with a dry iron to set the glue.
Step 5: Needle-Turn (or Raw Edge)
Because the Lehua has many tiny points, traditional needle-turn can be frustrating for beginners.
- Option A (Traditional/Elegant): Needle-turn the stems and leaves. For the serrated flower head, just gently turn under the very tips of the “saw teeth”.
- Option B (Modern/Durable): Use a Raw Edge Appliqué technique. Stitch 1/8″ inside the edge with a straight stitch in matching Red thread. Let the edges fray slightly over time—this actually mimics the fuzzy texture of the real flower!
Step 6: Echo Quilting for Structure
Pillows need to stand up straight. Dense quilting helps.
- Sandwich: Batting + Top (No backing yet—we are just quilting the face).
- Echo: Quilt closely spaced echo lines (1/4 inch apart) around the flowers.
- The Background: Fill the entire black background with echo lines.
- Result: The dense stitching flattens the background, making the Red Lehua blossoms “pop” off the pillow in high relief.

Step 7: Assembly (The Envelope or Zipper)
- Trim: Square up the quilted top to 26.5″ x 26.5″.
- The Back:
- Zipper: Sew the zipper between two pieces of backing fabric.
- Envelope: Overlap two pieces of backing fabric by 4 inches.
- Finish: Sew the Front to the Back (Right Sides Together). Turn right side out, poke corners, and insert the pillow form.
Usability Note: Using a feather insert rather than polyester fill makes the pillow “karate chop” beautifully, adding to the luxury look. The dense quilting ensures the pillow cover is durable enough for daily use on a sofa.
12. Island Sunset Hawaiian Quilt Design for Wall Hangings
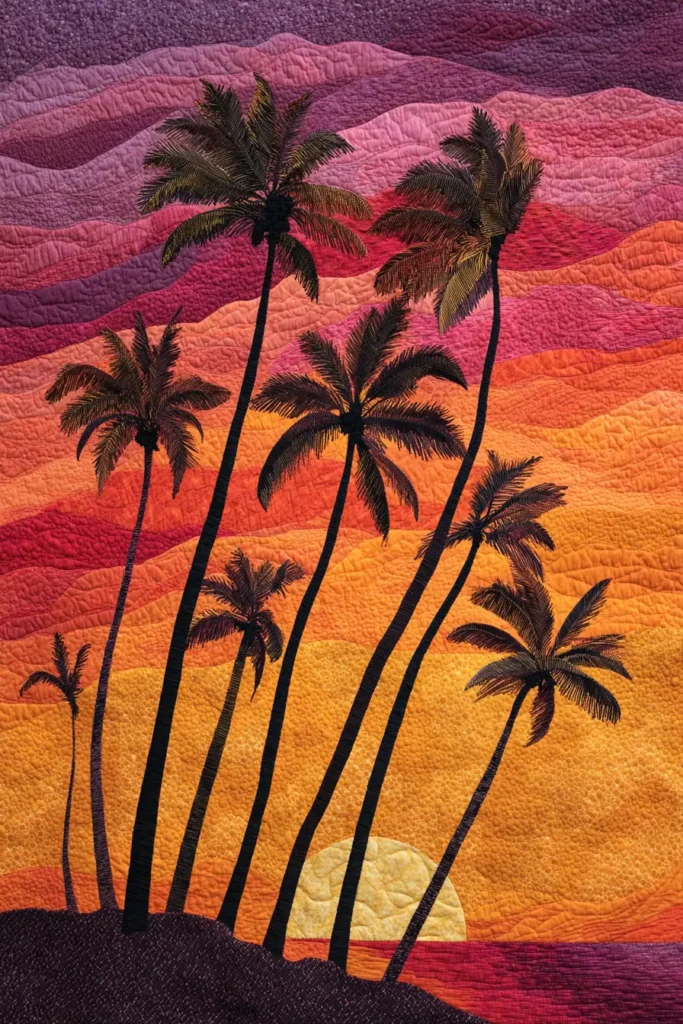

The “Golden Hour” Gradient Wall Hanging
Hawaiian sunsets are legendary, not just for their colors but for the spiritual feeling of transition—the Pō (night) taking over from the Ao (day). This wall hanging captures that fleeting moment with a Gradient/Ombré background fabric paired with a solid-silhouette appliqué. The design features swaying palm trees or birds of paradise silhouetted against a shifting sky of gold, tangerine, and violet. It serves as a dramatic art piece, bringing warmth to any hallway or office space.
Finished Dimensions: Vertical Wall Panel, approximately 30″ x 50″.
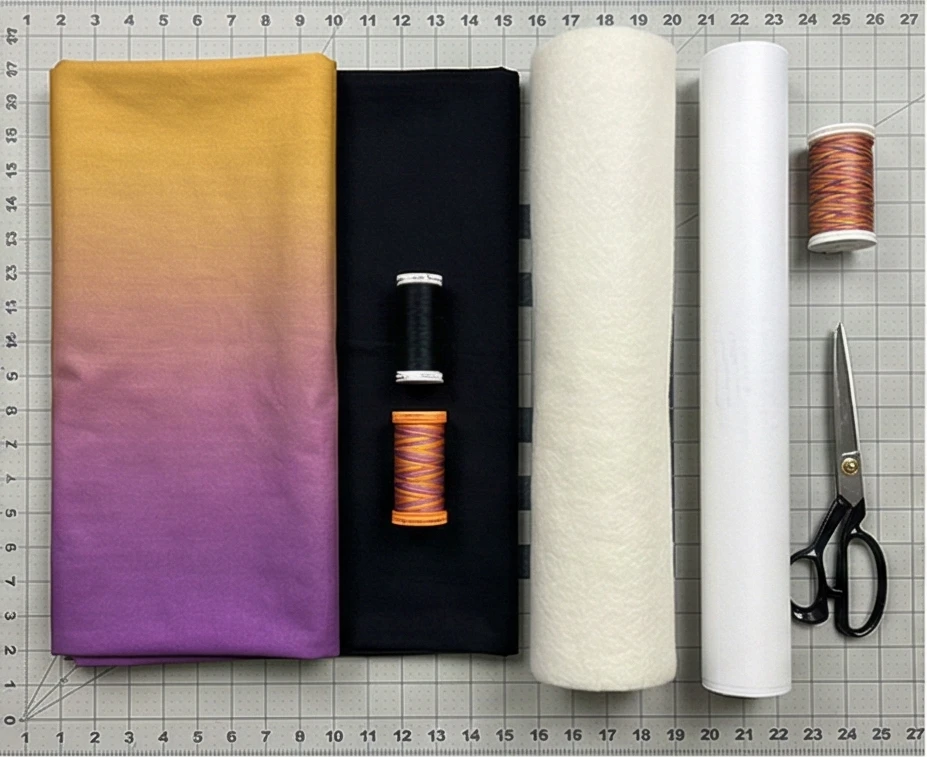
Materials Needed:
- Fabric A (Background): 1.5 yards of Ombré/Gradient Cotton (running vertically from Gold at the bottom to Purple at the top).
- Fabric B (Appliqué): 1.5 yards of Solid Black or Deep Midnight Navy. (The silhouette effect is key to the sunset illusion).
- Backing Fabric: 1.5 yards of coordinating solid.
- Batting: Stiff Cotton Batting or Fusible Fleece (for structure).
- Thread: Black silk thread (for appliqué) and Variegated Sunset thread (for quilting).
- Notions: Paper for template, hanging sleeve rod.
Cultural Backstory: In Hawaiian navigation, sunset was a critical time for wayfinders to align their canoes with the rising stars. The transition of light colors on the water gave clues about the weather and currents. This quilt honors that horizon line where sea meets sky.
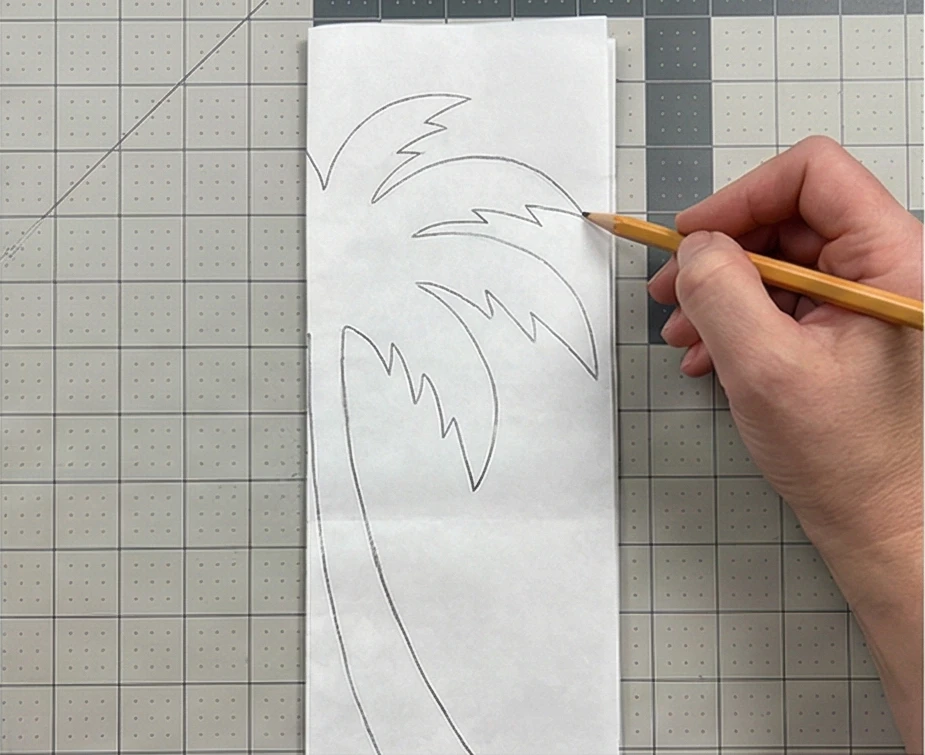
Step 1: The “Asymmetric” Fold
Unlike the radial medallion, this design is often directional (up/down).
- Cut Paper: Cut a rectangle of freezer paper measuring 15″ x 50″ (half the width of the finished quilt).
- Fold: Fold the paper in half lengthwise (hot dog style).
- Drafting:
- The Horizon: At the bottom, draw a solid ground or water line.
- The Silhouette: Rising from the “ground,” draw the trunks of coconut palms or the stalks of Birds of Paradise flowers.
- The Canopy: Near the top, draw the exploding leaves or palm fronds.
- Connection: Ensure the design connects to the center fold and the bottom edge to remain one piece.
- Note: You are drawing half the tree; unfolding it will create the full tree.
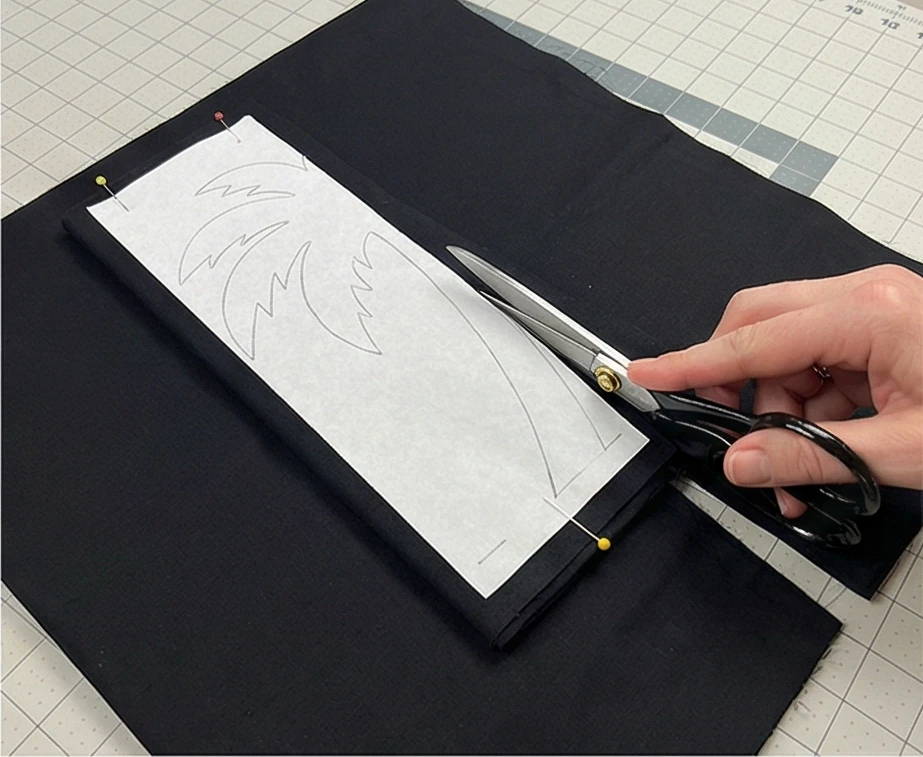
Step 2: Cutting the Silhouette
- Prep Fabric: Cut your Black Appliqué Fabric to 32″ x 52″. Fold it in half lengthwise.
- Pin & Cut: Pin the template to the folded fabric. Cut carefully.
- Unfold: Open the black fabric to reveal a stark, dramatic silhouette of tropical flora.
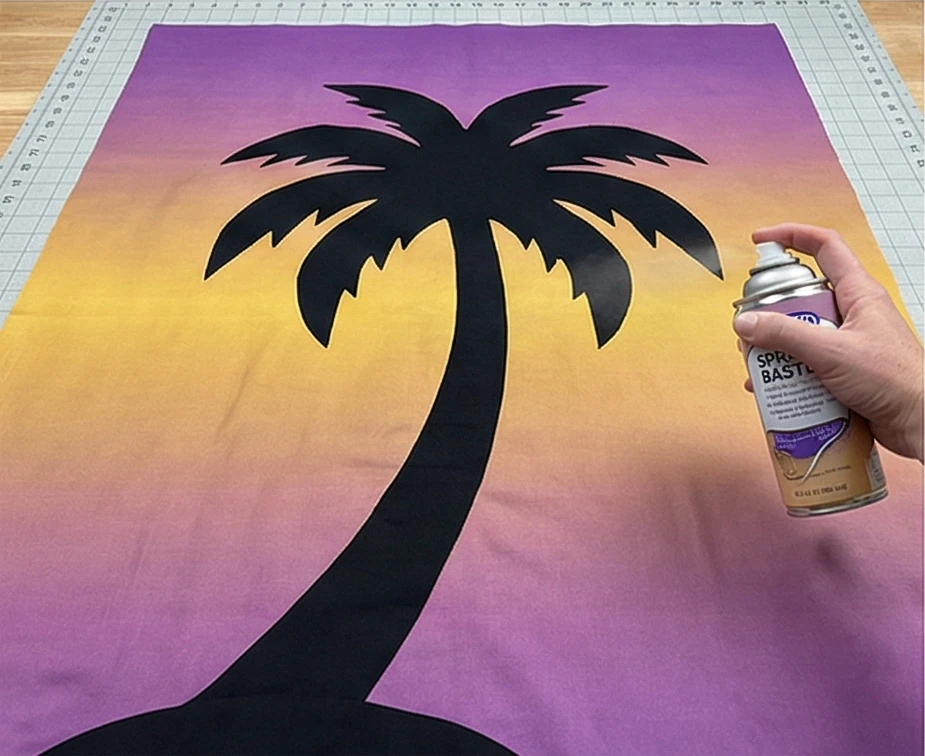
Step 3: The Gradient Canvas
- Background: Lay out your Ombré Background Fabric. Ensure the lighter color (Gold/Orange) is at the bottom, and the darker color (Purple/Navy) is at the top to mimic the sky.
- Layer: Place the black silhouette on top of the gradient background.
- Visual Effect: The black fabric should pop sharply against the glowing colors behind it.
- Baste: Use Spray Baste for this project. Because the silhouette might have long, thin trunks, spray gives an instant, secure hold without pins distorting the lines.
Step 4: Needle-Turn (or Fusible) Appliqué
For wall hangings, precision is more important than softness.
- Option A (Heirloom): Needle-turn the edges using black silk thread. This takes time but looks museum-quality.
- Option B (Crisp Modern): If the stems are very thin, use a lightweight double-sided fusible web before cutting the black fabric. Iron the silhouette onto the background, then stitch around the raw edges with a small blanket stitch or straight stitch. This creates a very sharp, graphic look.
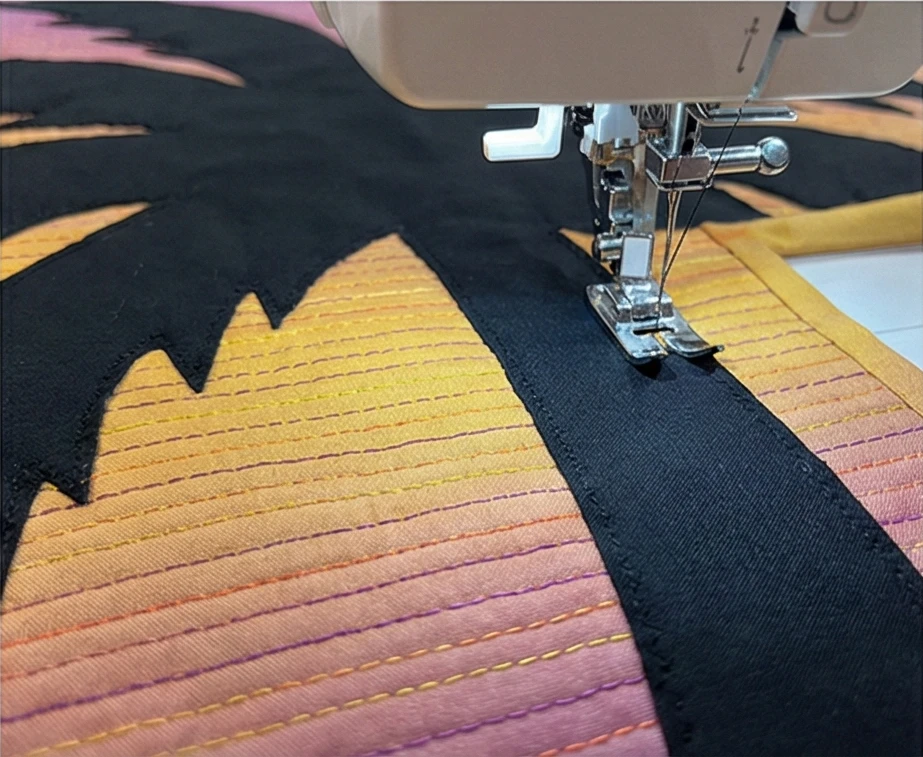
Step 5: “Ray of Light” Quilting
The quilting should enhance the sunset effect.
- Sandwich: Backing + Stiff Batting + Top.
- Thread: Use a Variegated Thread that matches the sunset colors (Yellow/Orange/Purple).
- Design:
- Quilt horizontal or slightly wavy lines across the background.
- The Gradient: As you move up the quilt, the thread will shift colors, blending into the background fabric.
- Inside the Black: Quilt simple vertical lines in black thread inside the tree trunks to give them bark texture.
Step 6: Gallery Finishing
- Square Up: Trim the panel to 30″ x 50″.
- Binding: Bind with the Black Appliqué Fabric. A black frame contains the color and makes the “glowing” center appear even brighter.
- Sleeve: Attach a 4-inch wide hanging sleeve to the top back. Insert a flat wooden slat or curtain rod to hang it flush against the wall.
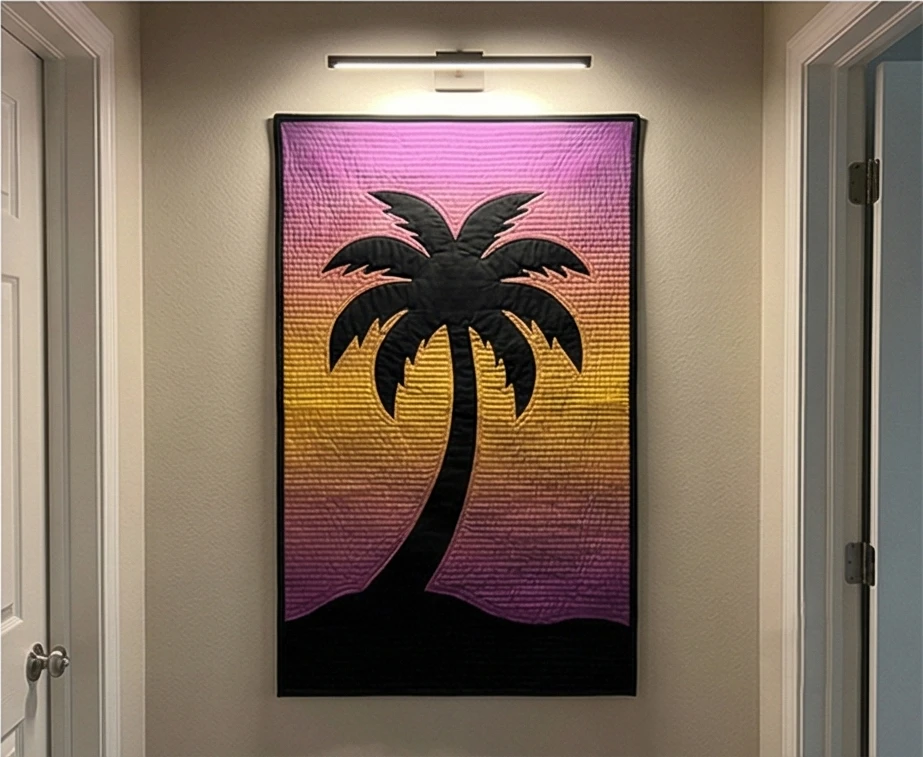
Elegance Tip: Install a small picture light or track light above this quilt. The light will hit the variegated quilting threads and the fabric’s sheen, making the “sunset” actually appear to glow in a dim hallway.
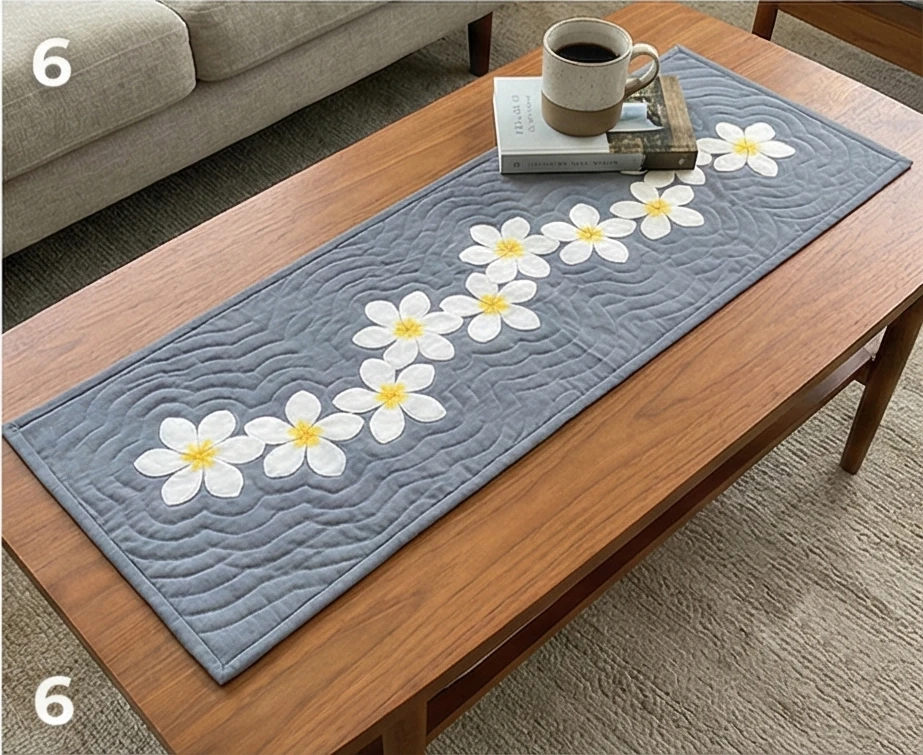
13. Elegant Hawaiian Quilt Runners for Coffee Tables


The “Pua Melia” Plumeria Lei Runner
The Plumeria (Pua Melia) is the most popular flower for making leis in Hawaii due to its sweet fragrance and durability. In Hawaiian culture, a plumeria worn over the right ear means you are single, and over the left means you are taken. This runner mimics the look of a fresh flower lei laid across the center of a coffee table. Unlike the heavy radial medallions of bed quilts, this design features a delicate, interlocking row of blossoms, creating a graceful, linear focal point that doesn’t overcrowd the table surface.
Finished Dimensions: Coffee Table Runner, approximately 14″ x 48″.
Materials Needed:
- Fabric A (Background): 1 yard of Slate Grey, Aqua, or Taupe Linen. (Linen adds a sophisticated texture that contrasts well with smooth wood tables).
- Fabric B (Appliqué): 1/2 yard of Creamy White or Soft Pink Cotton.
- Fabric C (Accents): Small scrap of Golden Yellow (for the flower centers).
- Backing Fabric: 1 yard of matching cotton.
- Batting: Fusible Fleece or very thin Cotton Batting. (Coffee table runners must be flat so vases and cups sit securely).
- Notions: Paper for folding, fabric glue pen, and embroidery floss (Yellow).
Cultural Backstory: The scent of Plumeria is said to welcome spirits and is synonymous with the “Aloha” greeting. Placing a lei-inspired runner on your coffee table is a symbolic gesture of welcoming guests into your conversation space with warmth and beauty.
Step 1: The “Paper Chain” Fold
We want a continuous row of flowers, not just separate spots. We will use an accordion fold.
- Cut Paper: Cut a strip of freezer paper measuring 10″ x 40″.
- Fold: Fold the paper accordion-style (back and forth like a fan) every 5 inches. You should end up with a stack of 8 rectangles (5″ x 10″).
- Drafting:
- Draw half of a five-petaled Plumeria flower on the folded stack.
- The Link: Ensure the flower’s side petals extend beyond the edge of the fold. This ensures that when you cut and unfold, the flowers will be joined “hand-in-hand” like a lei string.
Step 2: Cutting the Lei
- Prep Fabric: Cut a strip of your Cream Appliqué Fabric to match the paper dimensions (11″ x 42″).
- Fold: Fold the fabric accordion-style exactly like the paper.
- Pin & Cut: Pin the template to the stack. Cut carefully through all layers.
- Unfold: Open the strip to reveal a continuous chain of 8 connected Plumeria blossoms.
Step 3: Layout and Spacing
- Background: Cut your Linen Background to 16″ x 50″.
- Center: Mark the center line down the length of the runner.
- Placement: Lay the Plumeria chain down the center.
- Curve Option: If you want a more organic look, gently curve the chain into a slight “S” shape rather than a straight line.
- Baste: Use a Fabric Glue Pen to dab small dots of glue on the back of the flowers and press them onto the linen. This is faster and cleaner than pins for small shapes.
Step 4: Needle-Turn (or Fusible) Appliqué
- Stitch: Appliqué the flowers to the background using white thread.
- Needle Turn: Use the tip of the needle to turn the curves of the petals under for a soft, puffy edge.
- Fusible Option: For a flatter, modern runner, use double-sided fusible web before cutting, iron it down, and machine stitch with a blanket stitch.
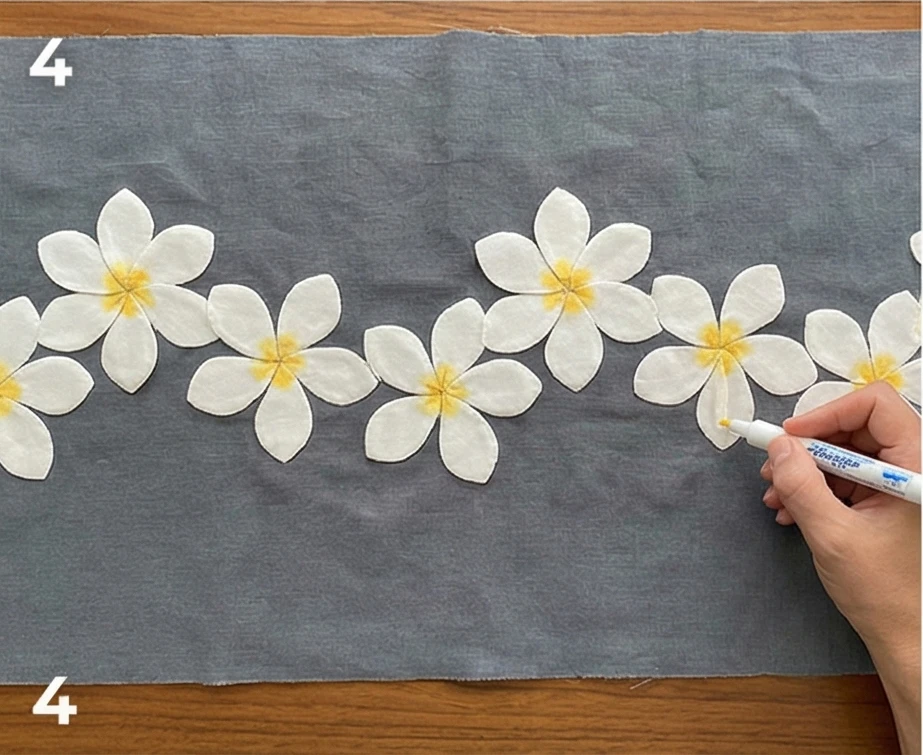
Step 5: The “Pollen” Detail
Plumerias are famous for their yellow centers.
- Paint or Stitch:
- Option A (Textile Paint): Use a small brush to dry-brush a little Golden Yellow fabric paint into the center of each white flower. This creates a realistic, soft glow.
- Option B (Embroidery): Use Yellow Embroidery Floss to stitch a cluster of French Knots or Satin Stitches in the center of each bloom. This adds texture and richness.
Step 6: Echo Quilting
- Sandwich: Backing + Fusible Fleece + Top.
- Echo: Hand- or machine-quilt around the flower shapes.
- Background: Quilt parallel lines or gentle waves running the length of the runner.
- Tip: Keep quilting lines 1 inch apart. If they are too dense, the runner will become stiff. You want it to drape slightly over the edges of the table if it’s long, or sit softly if it’s short.
- Bind: Finish with a binding that matches the Background Linen to keep the look seamless and modern.
Usability Note: Because this runner uses thin batting (or fleece), it lies very flat. You can safely place a coffee mug or a wine glass on the quilted surface without it tipping over, blending elegance with everyday practicality.
14. Palm Frond Quilt Motifs for a Relaxing Tropical Ambiance
The “Hula Palms” Swaying Frond Wall Quilt
While many Hawaiian quilts feature static, symmetrical symmetry, this design captures the movement of the islands. It mimics the gentle swaying of coconut palm fronds (Niu) in the trade winds. By curving the fronds in a single direction rather than radiating them stiffly outward, the quilt creates a sense of flow and relaxation—like watching trees dance in the breeze. This piece is ideal as a wall hanging in a bedroom or reading nook to induce calm.
Finished Dimensions: Large Wall Hanging or Lap Throw, approximately 45″ x 45″.
Materials Needed:
- Fabric A (Background): 1.5 yards of Pale Sky Blue or Soft Sand Cotton. (A light background creates an airy, open feeling).
- Fabric B (Appliqué): 1.5 yards of Sage Green, Moss, or Teal. (Avoid neon greens; muted, natural greens are more elegant and soothing).
- Backing Fabric: 1.5 yards of matching cotton.
- Batting: Bamboo Batting (for a throw) or Stiff Cotton Batting (for a wall hanging).
- Paper: 24″ x 24″ sheet of freezer paper.
- Notions: Basting thread/glue, embroidery scissors, thimble.
Cultural Backstory: In Hawaiian poetry, the movement of palm fronds is often compared to a hula dancer’s swaying hips. The tree represents flexibility—it bends in the hurricane but rarely breaks. Hanging this quilt in your home is a symbolic reminder to move with life’s changes gracefully rather than resisting them.
Step 1: The “Pinwheel” Fold
To create the sense of rotation and movement, we adjust the fold slightly.
- Cut Paper: Cut a 22″ x 22″ square of freezer paper.
- Fold: Fold into eighths (Rectangle → Square → Triangle).
- Orientation: Place the point at the bottom.
Step 2: Drafting the Sway
Standard patterns are straight. We want curves.
- The Spine: Instead of drawing a straight line up the center of the triangle, draw a curved spine (like a parenthesis
() arching from the bottom center toward the top left corner. - The Leaflets: Draw the individual palm leaves growing off this spine.
- Direction: Angle them slightly downwards, as if gravity is pulling them.
- Width: Make the leaves wide at the base and tapering to sharp points.
- The Twist: Ensure the tips of the leaves touch the left folded edge of the paper, but the spine touches the right folded edge (or vice versa).
- Effect: When unfolded, the fronds will look like a swirling pinwheel rather than a static star.
Step 3: Cutting the Canopy
- Prep Fabric: Cut your Green Appliqué Fabric to 24″ x 24″. Fold into eighths.
- Pin & Cut: Pin the curved template securely.
- Technique: Cut deep “V” notches between the leaflets. The deeper the cut, the more airy and realistic the palm will look.
- Unfold: Open the fabric. You should see a dynamic whorl of palm leaves that appears to spin gently.
Step 4: Centering and Basting
- Background: Cut the Background Fabric to 48″ x 48″. Mark the center.
- Placement: Center the green medallion.
- Check: Step back. Does it look like it’s spinning? If the fabric has twisted, smooth the leaves out so they lie flat and curve naturally.
- Baste: Thread baste down the center of each curved spine first, then baste the individual leaflets. This prevents the “swirl” from distorting as you sew.
Step 5: Needle-Turn Points
Palm fronds are all about sharp tips.
- Stitch: Appliqué the leaves using the needle-turn method.
- Sharp Points:
- Stitch to the very tip of a leaf.
- Tuck the excess fabric under with your needle to form a sharp point.
- Take one tiny “locking stitch” at the very tip to hold the point sharp before coming down the other side.
- The “V”s: For the deep V-cuts between leaves, clip almost to the stitching line, sew down one side, take a stitch at the bottom of the V, and sew up the other side.
Step 6: “Trade Wind” Quilting
The quilting should enhance the feeling of a breeze.
- Sandwich: Backing + Batting + Top.
- Echo: Quilt around the leaves as usual.
- Wind Lines: Once you are about 2 inches away from the appliqué, stop following the exact shape of the leaves. Instead, quilt long, swirling currents that sweep across the background fabric.
- Visual: This looks like wind moving through the negative space.
- Finish: Bind with the Green Appliqué Fabric to contain the piece’s energy.
Usability Note: If making this as a wall hanging, the organic curves break up the rigid rectangular lines of bookshelves or windows, softening the room’s architecture. If used as a lap quilt, the bamboo batting makes it cool enough for warm climates.
15. Quilted Chair Pads Featuring the Hawaiian Heart (Mano) Design

The “Pu’uwai Manō” (Protective Heart) Chair Pad
Clarification on Terminology: In Hawaiian, Pu’uwai means “Heart” (the seat of emotion), while Manō means “Shark” (a revered ancestral guardian). A popular and elegant design combines these two: a central Heart motif framed by a Niho Manō (Shark Tooth) border. This combination symbolizes “Protective Love”—making it a meaningful addition to the dining room, where family gathers and is nourished. These chair pads add a layer of soft comfort and visual storytelling to hard wooden dining chairs.
Finished Dimensions: Standard Chair Pad, approximately 16″ x 16″ (adjustable to your chair size).
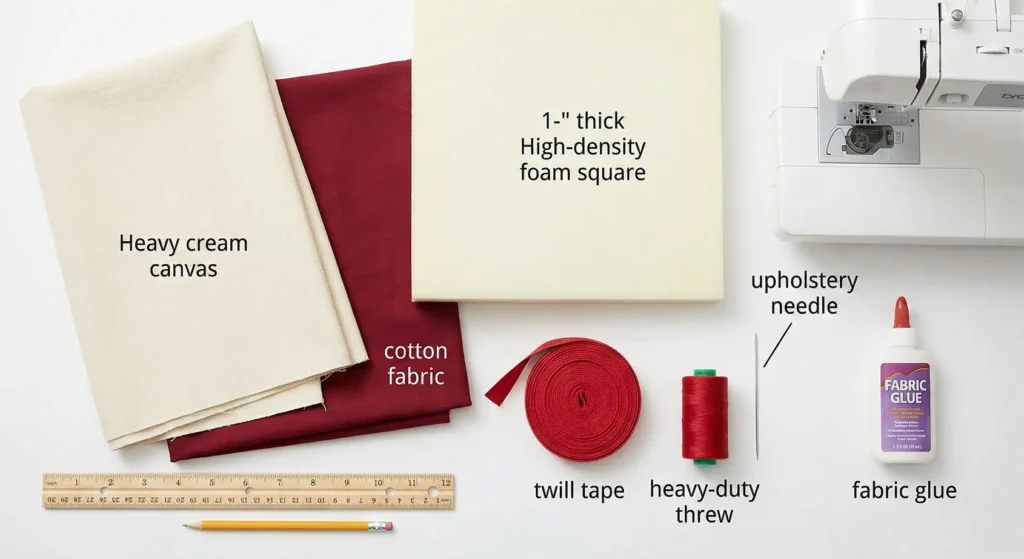
Materials Needed (For a Set of 2):
- Fabric A (Background): 1 yard of Heavyweight Canvas or Duck Cloth in Cream or Sand. (Standard cotton is too thin for seat cushions; canvas wears better).
- Fabric B (Appliqué): 1 yard of Deep Red, Coral, or Fern Green.
- Batting/Insert: 1-inch High-Density Foam or 4 layers of High-Loft Batting. (You need a cushion, not just warmth.)
- Backing Fabric: 1 yard of Canvas (same as background).
- Ties: 2 yards of Twill Tape or matching fabric strips.
- Notions: Fabric glue, heavy-duty thread, long upholstery needle.
Cultural Backstory: The “Niho Manō” (Shark Tooth) border is composed of interlocking triangles. It is one of the oldest and most traditional Hawaiian geometric patterns, representing strength, warrior spirit, and protection. Wrapping a heart in shark teeth implies guarding the love within the home.
Step 1: The Radial Heart Fold
We will create a medallion of 4 hearts meeting in the center, resembling a lucky clover.
- Cut Paper: Cut a square of freezer paper measuring 14″ x 14″.
- Fold: Fold in half (Rectangle), then in half again (Square).
- Drafting:
- Orient the folded corner to the bottom-left.
- Draw a half-heart shape extending from the center corner outward toward the raw edges.
- The Stem: Ensure the heart’s bottom tip connects to the center fold.
- The Frame: Leave about 2 inches of empty space around the outside for the shark tooth border.
- Cut & Unfold: Cut out the heart shape. Unfold to reveal 4 hearts connected at the center.
Step 2: The Shark Tooth Border
This geometric border frames the hearts.
- Prep Fabric: Cut your Appliqué Fabric (Fabric B) into a 15″ x 15″ square. Fold it to match your paper template.
- Pin Template: Iron the heart template to the fabric.
- Draw Border: On the fabric edge (outside the hearts), use a ruler to draw a zigzag line of triangles (Shark Teeth) around the perimeter.
- Cut: Cut out the hearts and the saw-tooth border.
Step 3: Heavy-Duty Basting
Canvas is thick, so pins can be difficult.
- Background: Cut your Canvas Background to 17″ x 17″.
- Center: Place the Heart/Shark Tooth medallion in the center.
- Glue: Use Fabric Glue to secure the entire appliqué to the canvas. Press with a hot iron to set the bond. This prevents shifting when you sit on it later.
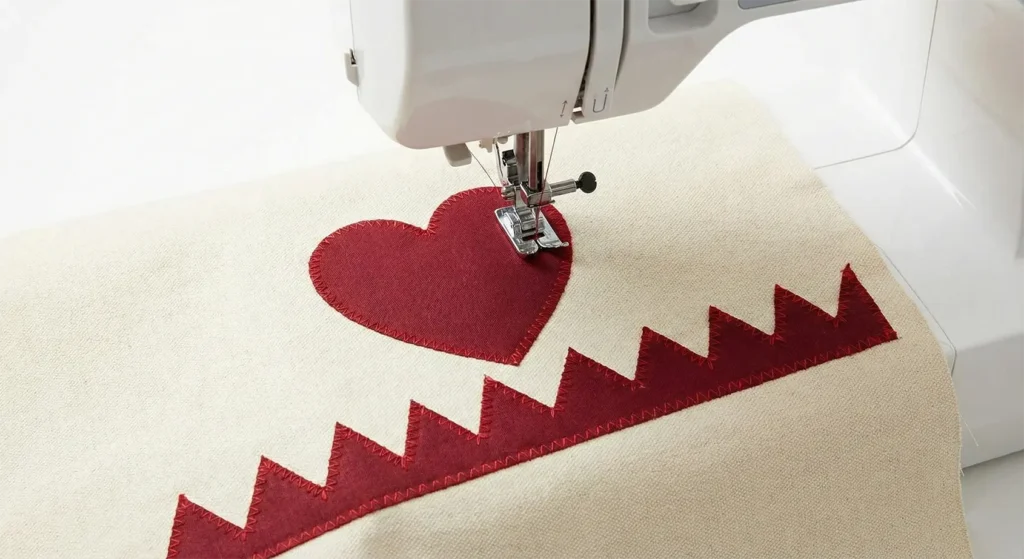
Step 4: Machine Appliqué (Durability Focus)
Because people will slide in and out of these chairs, delicate hand appliqué might snag. Machine appliqué is recommended for usability.
- Stitch: Use a narrow Zig-Zag Stitch or Blanket Stitch on your sewing machine.
- Thread: Use a thread matching the Appliqué color.
- Process: Stitch around the hearts and the outer triangles. Ensure the edges are completely sealed so they don’t fray with friction.
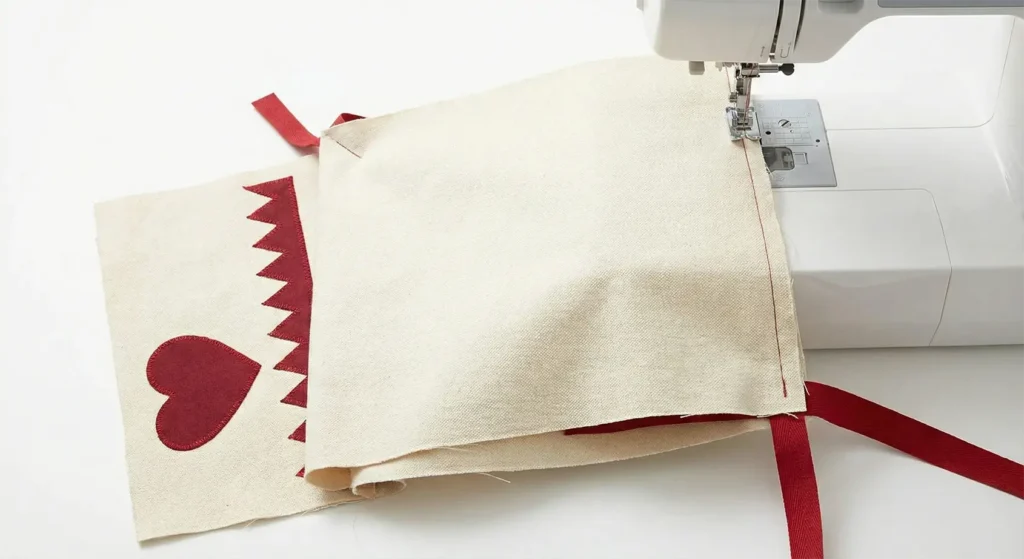
Step 5: The “Envelope” or “Box” Construction
We need to insert the foam.
- Ties: Cut 4 strips of fabric or twill tape (20 inches long each). Fold them in half. Baste the folded centers to the back corners of the pad top (facing inward).
- Sew: Place the Backing Canvas over the Top (Right Sides Together).
- Stitch Perimeter: Sew around the square with a 1/2″ seam allowance, leaving one entire side OPEN.
- Turn: Turn the cover right side out. Poke out the corners.
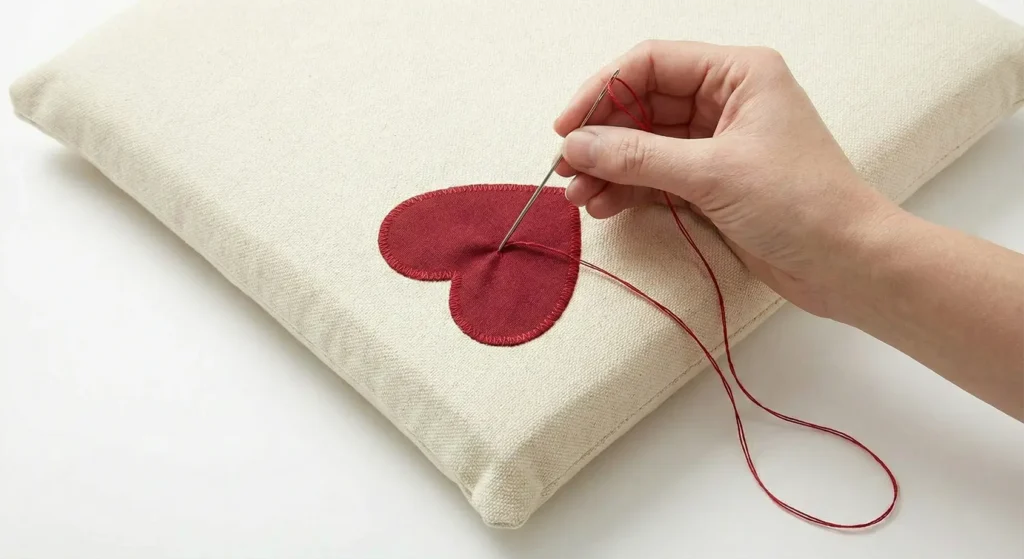
Step 6: Stuffing and Tufting
- Insert: Slide your 1-inch Foam or batting stack into the pocket.
- Close: Fold the raw edges of the opening in and hand-stitch (whip stitch) the final side closed.
- Tufting (Crucial): To keep the foam from bunching up:
- Thread a long upholstery needle with heavy thread (or embroidery floss).
- Take a stitch right through the center of the pad (through all layers of canvas and foam).
- Pull tight and tie a knot.
- Repeat in the center of each of the 4 hearts. This creates “dimples” that hold the foam in place and adds a professional upholstered look.
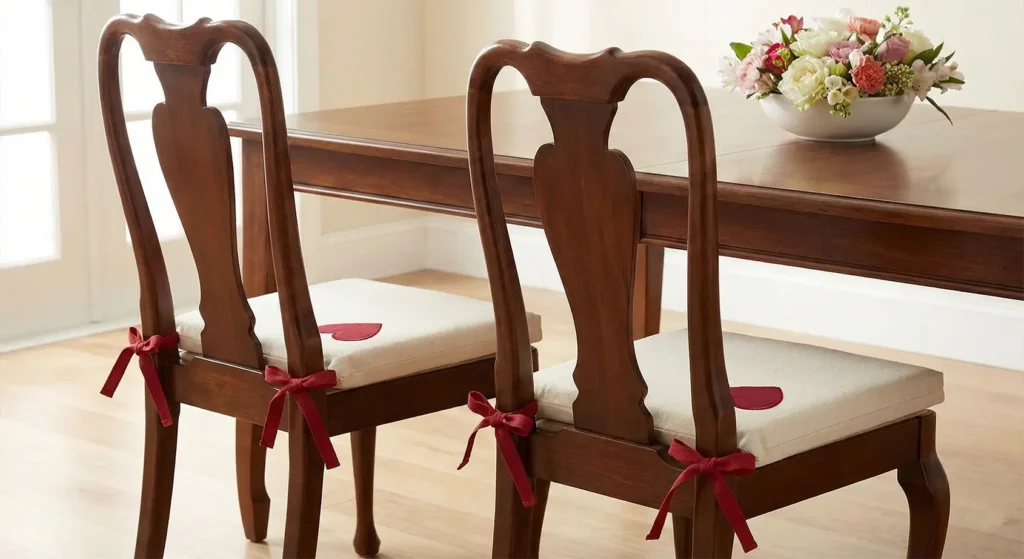
Elegance Tip: For a truly elegant finish, add “Piping” (corded trim) around the edge of the chair pad in the Appliqué color before sewing the front and back together. This gives the pad a structured, furniture-store quality.
16. Luxury Hawaiian Sofa Covers with Traditional Quilt Patterns
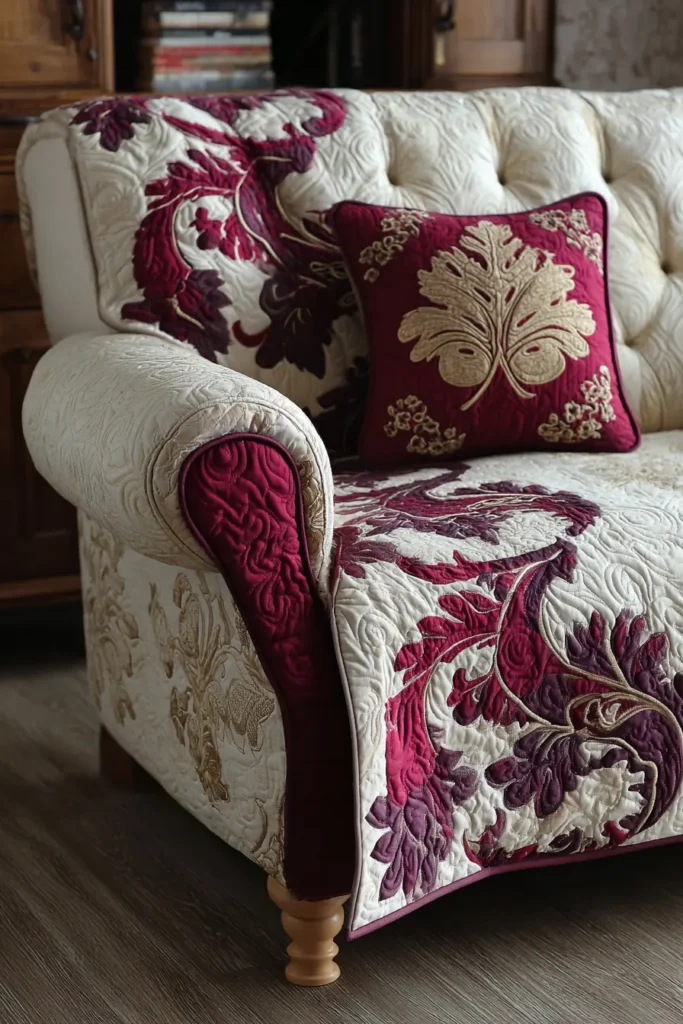
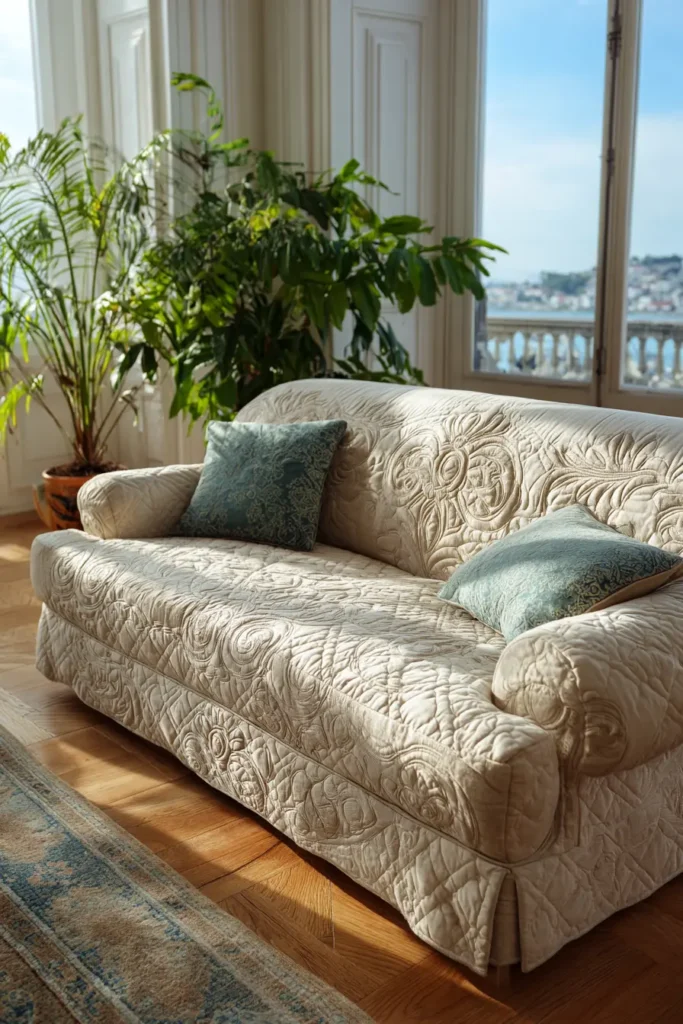
The “Royal Kalo” Waterfall Sofa Protector
While throw blankets are casual, a Waterfall Sofa Protector (also known as a Sofa Runner) is a structured, elegant way to protect luxury furniture while adding island sophistication. This design drapes over the back of the sofa, runs down the seat, and hangs over the front edge. We will use the Kalo (Taro) motif—specifically the regal heart-shaped leaf. By placing the appliqué only on the “Drop” (the back and front overhangs) and leaving the seat area simple, we ensure comfort while sitting and visual impact while the room is at rest.
Finished Dimensions: Customizable, approx 36″ wide x 90″ long (fits a standard 3-seater sofa center).
Materials Needed:
- Fabric A (Base/Background): 3 yards of Heavyweight Linen or Upholstery Canvas in Sand, Oatmeal, or Charcoal. (Must be durable and heavy to stay in place).
- Fabric B (Appliqué): 1.5 yards of Cotton Sateen or Velvet in Deep Forest Green or Royal Purple. (Sateen washes better; Velvet adds immense luxury).
- Backing Fabric: 3 yards of Non-Slip Grip Fabric or heavy canvas.
- Batting: Thin Cotton Batting. (Do not use high-loft; a sofa cover must sit flat).
- Notions: Paper for templates, spray baste, and matching binding tape.
Cultural Backstory: In Hawaiian creation chants, the Kalo plant is the elder brother of the Hawaiian people. It represents the family unit (‘Ohana) and sustenance. Placing Kalo leaves on the sofa—the center of the living room where the family gathers—symbolizes a wish for unity, growth, and nourishment for everyone who sits there.
Step 1: Custom Measuring (The “Tailored” Look)
Luxury lies in the fit. Measure your specific sofa.
- Width: Decide how wide you want the runner. 36 inches creates a generous center panel for a 3-seater.
- Length: Measure from the bottom of the back cushion (tucked in), up over the top of the sofa, and down the back (about 12-18 inches). Then measure from the tuck, across the seat, and down the front (about 12 inches).
- Total Length Calculation: Back Drop + Back Height + Seat Depth + Front Drop + 6 inches for “tuck in” allowance. (Usually totals 90-100 inches).
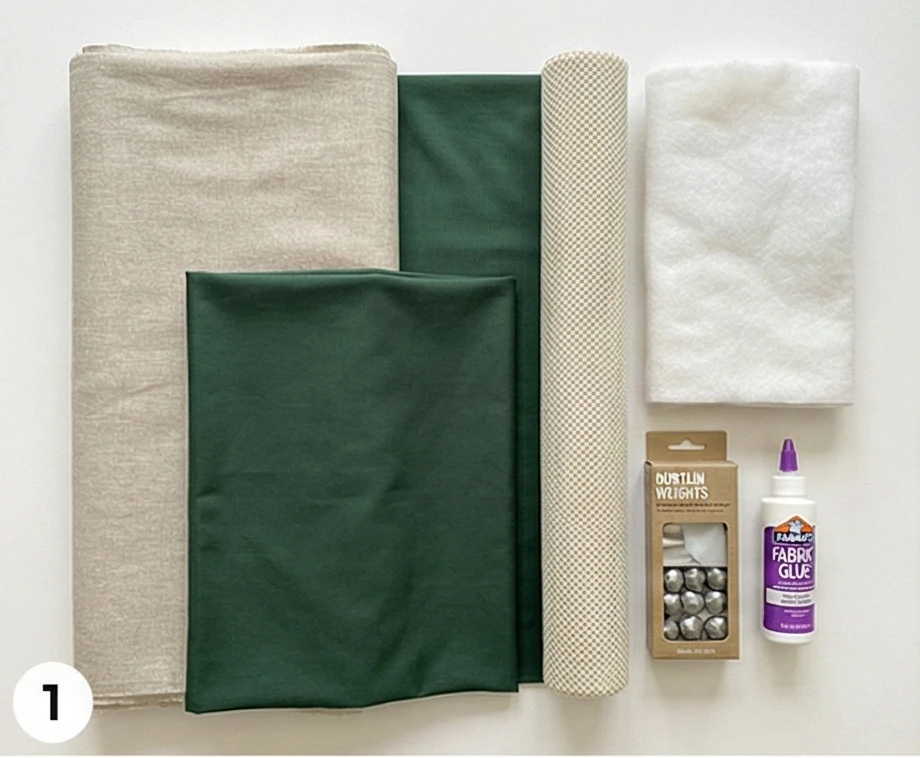
Step 2: Designing the “Border” Leaf
We are not doing a radial medallion. We are creating a repeating border for the top and bottom edges.
- Cut Paper: Cut a strip of freezer paper 10″ x 36″.
- Fold: Fold accordion-style into 3 sections (12 inches each).
- Draft: Draw a large, stately Kalo leaf (heart-shaped with prominent veins).
- Stem: Draw the stems connecting at the bottom.
- Orientation: The leaves should point UP (towards the top of the sofa) on the backdrop, and DOWN (towards the floor) on the front drop.
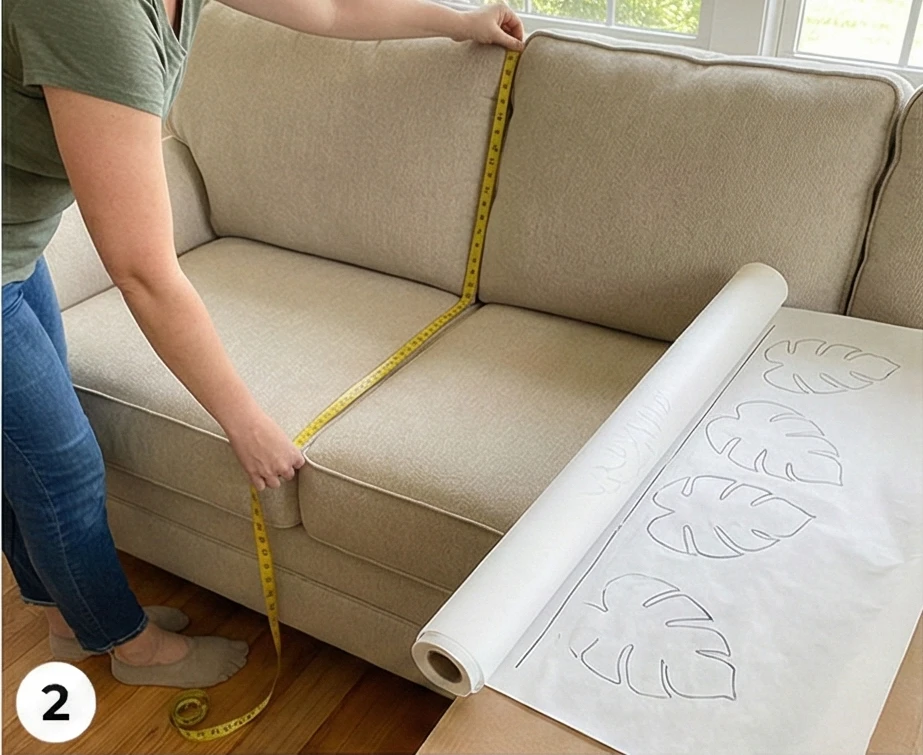
Step 3: Cutting and Placement
- Cut Fabric: Cut your Linen Background to your measured size (e.g., 36″ x 90″).
- Cut Appliqué: Use your template to cut two sets of Kalo borders from the Green fabric.
- Placement:
- Place one set of leaves at the very Top Edge (The Back Drop).
- Place the other set at the very Bottom Edge (The Front Drop).
- Crucial: Leave the middle section (where people sit and lean) free of appliqué. This prevents the appliqué from wearing out due to friction.

Step 4: Secure Appliqué (Durability Focus)
Sofa covers take a lot of abuse. Glue is your friend.
- Adhere: Use Fabric Glue or fusible web to secure the leaves.
- Stitch:
- If using Sateen: Needle-turn or machine satin stitch.
- If using Velvet: Use a machine Zig-Zag stitch around the raw edges. Velvet frays, so raw-edge appliqué with a heavy stitch is best.
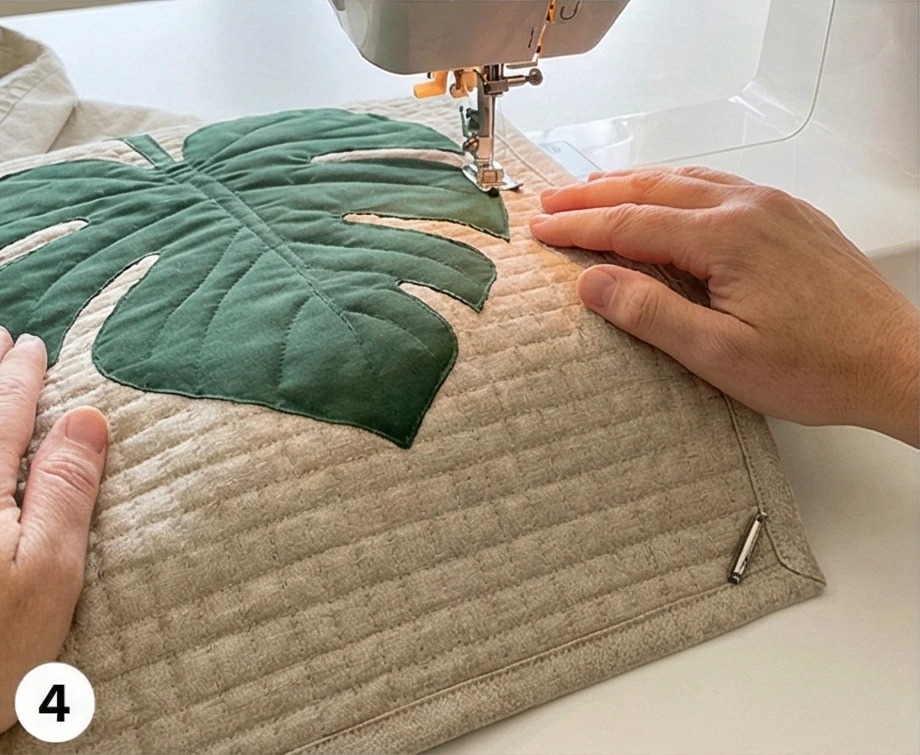
Step 5: “Vein” Quilting
Quilting adds structure so the cover doesn’t wrinkle when sat upon.
- Sandwich: Non-Slip Backing + Thin Batting + Top.
- The Leaves: Quilt prominent veins inside the Kalo leaves.
- The Seat Area: In the blank middle section, quilt a dense Grid or Diamond pattern (1-inch intervals).
- Why? Dense quilting stiffens the fabric, mimicking the feel of upholstery and preventing it from bunching under a person’s weight.
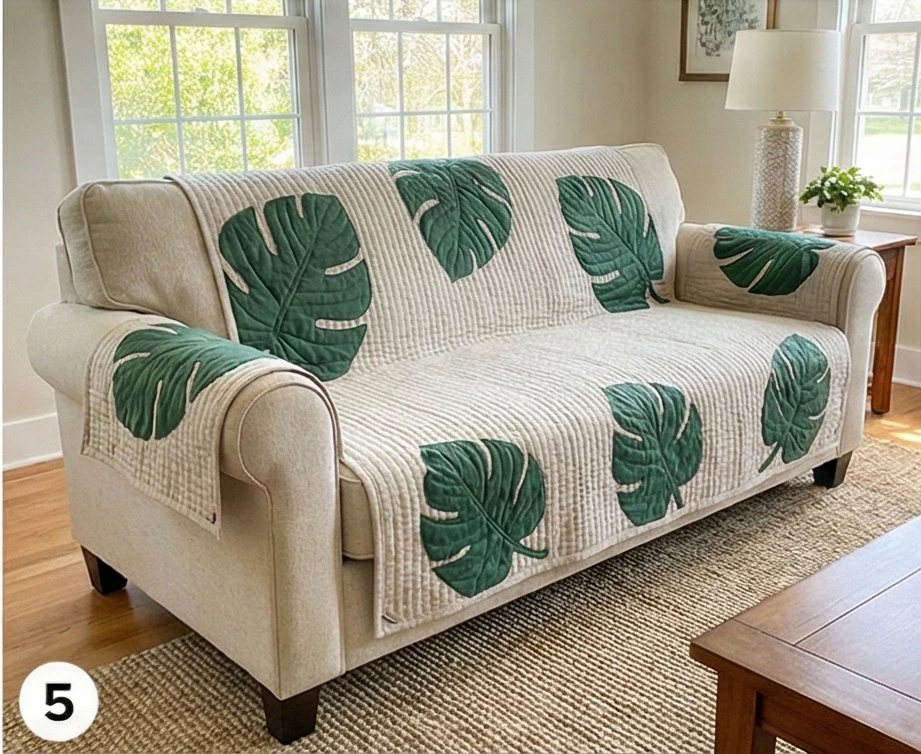
Step 6: The Weighted Hem
To keep the cover looking elegant and not messy, it needs to be weighted.
- Weights: Sew small Curtain Weights or heavy washers into the corners of the hem on the Front and Back drops.
- Bind: Bind the entire perimeter with a matching Linen binding.
- Install: Tuck the excess fabric deep into the crease between the sofa seat and back cushions. The weighted ends will keep the “Waterfall” drapes hanging straight and smooth.

Usability Note: The non-slip backing is the secret to usability. Without it, the quilt will slide off leather or smooth upholstery the moment someone stands up. If you cannot find non-slip fabric, use standard canvas for the backing and place a rubber rug pad underneath the cover.
17. Hawaiian Pineapple Quilt Ideas for Warmth and Hospitality
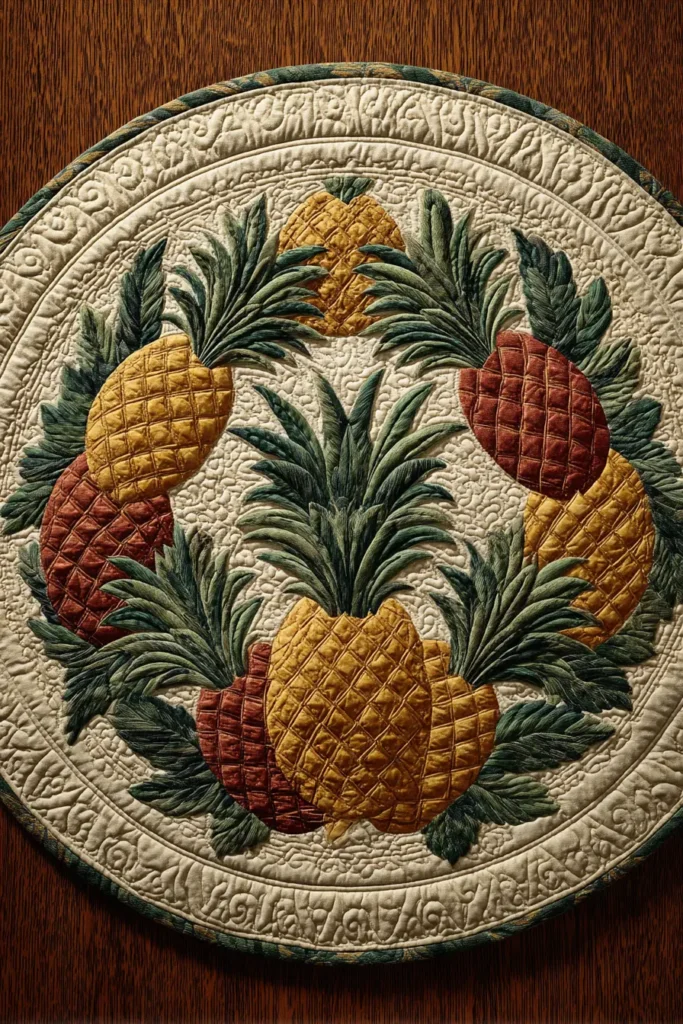
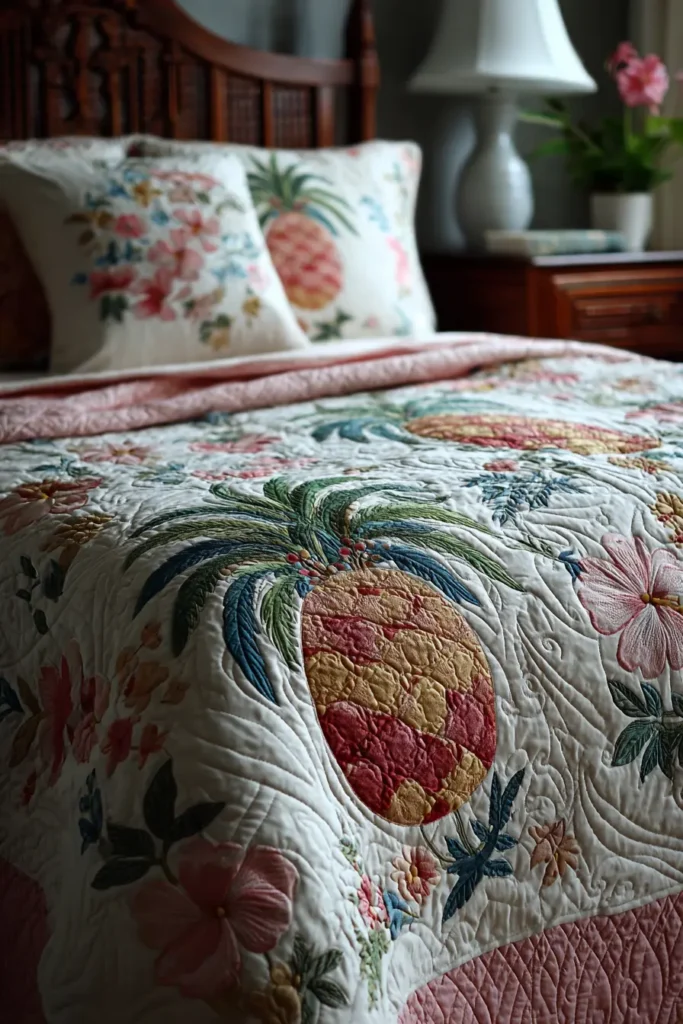
The “Island Welcome” Pineapple Round Table Topper
While bed quilts provide personal warmth, the true spirit of “Hospitality” (Ho’okipa) happens at the dining table. A round table topper is a classic Hawaiian form, designed to sit in the center of a dining or entry table. Unlike rectangular runners, the circular shape represents eternity and inclusion—everyone seated around the circle is equal. This design features a ring of pineapples (Hala Kahiki) facing outward, acting as a sunburst of welcome to any guest who enters the home.
Finished Dimensions: Round Table Topper, approximately 40″ in diameter.
Materials Needed:
- Fabric A (Background): 1.5 yards of Cream or White Cotton Sateen. (A neutral background allows the food and decor to shine).
- Fabric B (Appliqué): 1.5 yards of Golden Yellow, Ochre, or Sage Green (if focusing on the leaves).
- Backing Fabric: 1.5 yards of coordinating cotton.
- Batting: Thin Cotton Batting or Fusible Fleece. (Must lie flat for tableware stability).
- Binding: Bias Tape is mandatory for curved edges. You will need approx 4 yards.
- Notions: String and pencil (to make a compass), freezer paper, appliqué pins.
Cultural Backstory: The pineapple is not native to Hawaii, but after its introduction, it became the universal symbol of “Aloha” and welcome. In plantation days, a fresh pineapple placed on the porch meant “The door is open, come in and eat.” This quilt pattern transfers that sentiment to your interior decor.
Step 1: Cutting the Perfect Circle
Start with a square to create a round canvas.
- Cut: Cut your Background Fabric and Backing Fabric into 42″ x 42″ squares.
- Fold: Fold the background fabric in quarters (Square -> Smaller Square).
- Mark: Tie a string to a pencil or a piece of chalk. Hold the string at the folded corner (center). Measure out 20 inches of string. Swing the pencil in an arc to mark a quarter-circle on the fabric.
- Cut: Cut along the chalk line through all 4 layers. Unfold to reveal a perfect 40-inch circle.
- Repeat for the Backing and Batting.
Step 2: The “Pie Slice” Fold
- Paper: Cut a square of freezer paper approx 38″ x 38″. Cut it into a circle (slightly smaller than the fabric).
- Fold: Fold the paper circle in half, then quarters, then eighths. You will have a narrow pie-wedge shape.
- Orientation: The point of the wedge is the center of the quilt. The curved edge is the outer rim.

Step 3: Drafting the “Crowns Out” Design
- The Base: Start about 2 inches up from the center point. Draw a small ring or star to anchor the design.
- The Fruit: Draw the body of the pineapple in the middle of the wedge.
- Texture: Draw diamond cutouts inside the fruit body to mimic the rough skin.
- The Crown: Draw the spiky leaves of the pineapple crown extending toward the outer curved edge.
- Connectivity: Ensure the pineapple fruit or the lower leaves touch the folded edges of the paper. This ensures that when you unfold it, the 8 pineapples are linked together in a wreath.
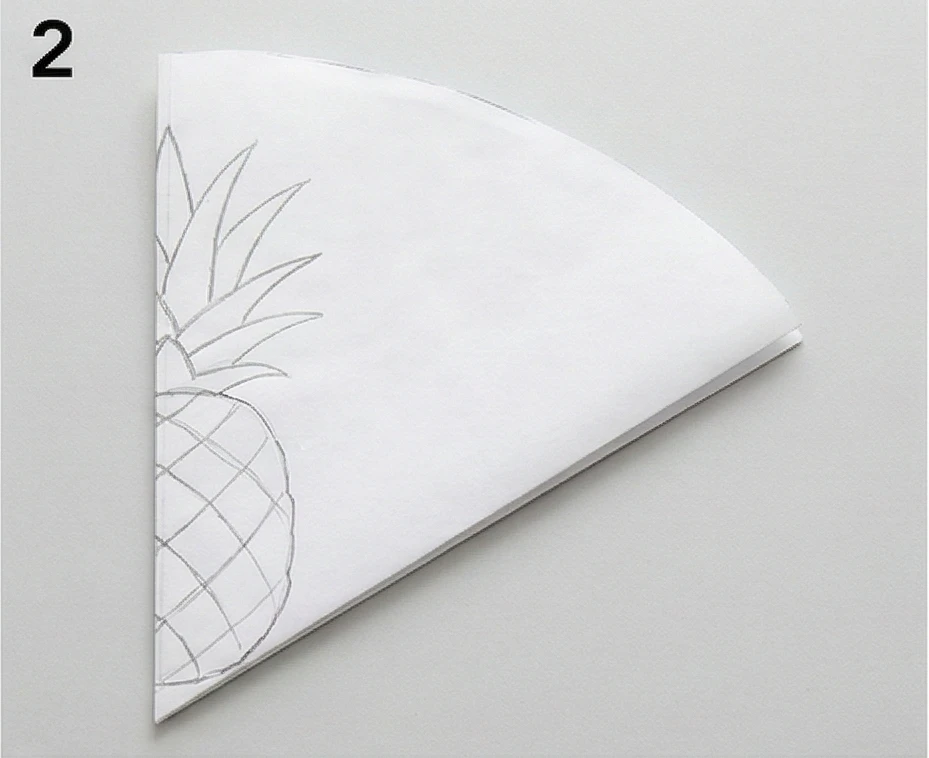
Step 4: Cutting and Centering
- Prep Fabric: Cut your Appliqué Fabric into a 40″ square. Fold it into eighths to match your paper template.
- Pin & Cut: Pin the template securely. Cut through all 8 layers.
- Unfold: Open the fabric to reveal a “sunburst” of pineapples.
- Baste: Center the appliqué on the Background Circle. (Match the fold lines). Baste securely with thread or glue.
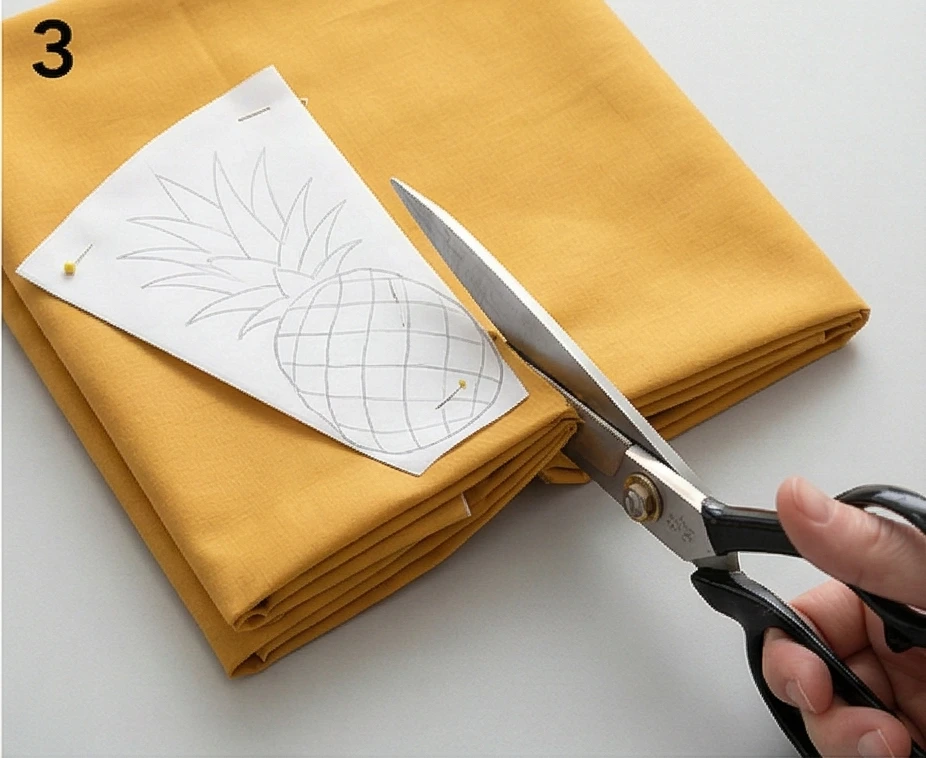
Step 5: Needle-Turn Appliqué
- Stitch: Appliqué the pineapples to the background.
- Points: The pineapple crown has many sharp points.
- Technique: Stitch to the tip, tuck the excess under with your needle, take a locking stitch, and continue.
- Diamonds: If you included diamond cutouts in the fruit, use Reverse Appliqué (cutting away the top fabric to reveal the background) or standard appliqué for these small holes.

Step 6: Echo Quilting
- Sandwich: Backing + Batting + Top.
- Echo: Quilt around the pineapples.
- Ripple: Continue quilting concentric circles outward to the edge.
- Effect: Circular quilting is hypnotic and calming. It emphasizes the table’s round shape and draws the eye to the centerpiece.
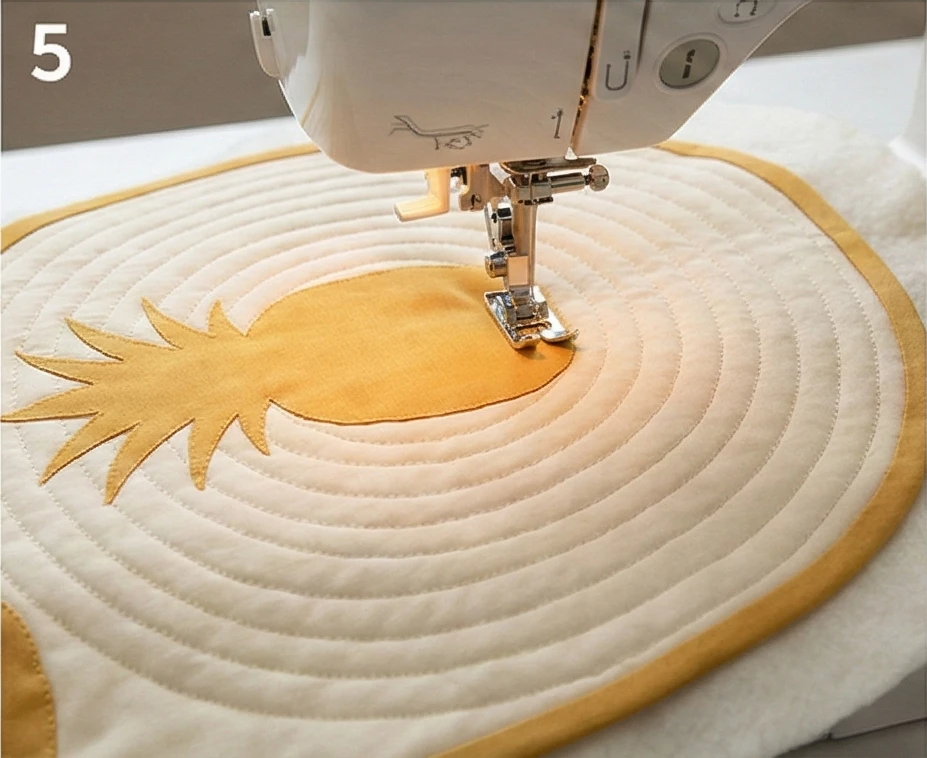
Step 7: The Bias Binding
You cannot use straight-grain binding on a circle; it will pucker.
- Cut Bias: Cut fabric strips on the bias (at a 45-degree angle to the grain). Join them to make a long, flexible strip.
- Apply: Sew the binding to the edge, easing it gently around the curve. Do not pull it tight.
- Finish: Hand-stitch the binding to the back for a smooth, professional finish.

Usability Note: This topper works beautifully under a glass protective top or directly on wood. If using directly on wood, the thin batting protects the table from the heat of serving dishes.
18. The Hawaiian Flag Quilt: A Statement of Island Pride and Comfort
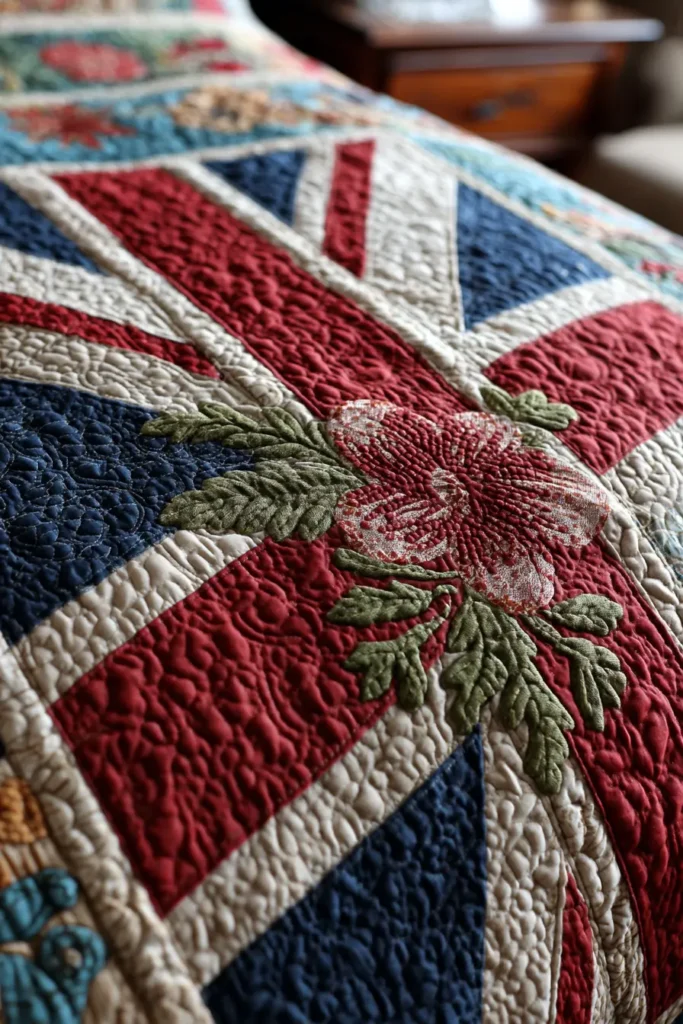

The “Ku’u Hae Aloha” (My Beloved Flag) Quilt
The Hawaiian Flag Quilt (Kapa Hae Hawai’i) is perhaps the most historically significant pattern in the islands. Unlike the botanical radial designs, this quilt is graphic and political. It features the 8 stripes of the Hawaiian flag (representing the 8 major islands) and the Union Jack in the canton (representing Hawaii’s historical relationship with Britain). While originally created as an act of subversion when flying the flag was illegal after the overthrow of the monarchy, today it is a statement of deep pride, history, and Aloha ‘Āina (love of the land).
Finished Dimensions: Large Throw or Queen Bed Topper, approximately 60″ x 90″.
Materials Needed:
- Fabric A (White): 2 yards of Kona Cotton or Sateen (Stripes + Jack).
- Fabric B (Red): 2 yards of Crimson or Scarlet (Stripes + Jack).
- Fabric C (Blue): 2 yards of Royal or Navy Blue (Stripes + Canton Background).
- Backing Fabric: 5 yards of Navy Blue or a Hawaiian Crest print.
- Batting: 100% Cotton Batting (for a flat, traditional drape).
- Notions: Fusible web (for the intricate Union Jack), wide ruler.
Cultural Backstory: In 1893, when Queen Lili’uokalani was overthrown and the Kingdom of Hawaii ended, the new government banned the display of the Hawaiian flag. In response, Hawaiian women began sewing the flag’s image into quilts. Because the flag was “on the bed” and not “flying on a pole,” it technically skirted the law, allowing families to sleep under the protection of their kingdom’s symbol in privacy.
Step 1: Cutting the “Eight Islands” Stripes
The Hawaiian flag has 8 stripes in a specific order: White, Red, Blue, White, Red, Blue, White, Red.
- Calculate: For a 60″ wide throw, your stripes need to be 7.5 inches tall (finished size). Add 0.5″ for seam allowance, so cut strips 8 inches tall.
- The Long Stripes (Bottom 4):
- Cut 1 strip each of Red, Blue, White, and Red measuring 60.5 inches long (width of quilt).
- The Short Stripes (Top 4):
- Cut 1 strip of each White, Red, Blue, and White, measuring 30.5 inches long. (These will sit next to the Union Jack Canton).
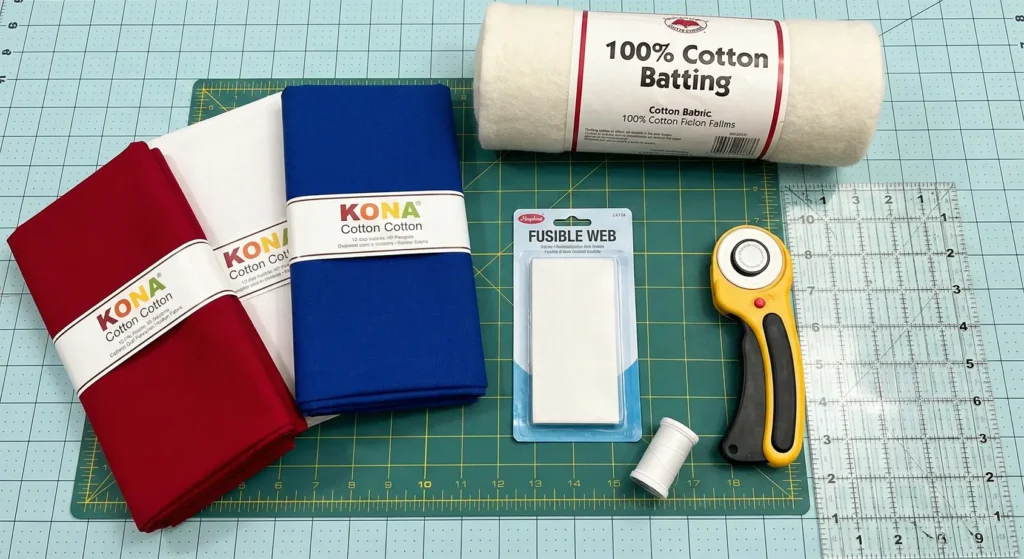
Step 2: Creating the “Piko” (The Union Jack Canton)
The Canton is the blue box in the top left corner. Piecing a Union Jack is complex; appliqué is easier and more precise.
- The Blue Field: Cut a rectangle of Navy Blue fabric measuring 30.5″ x 30.5″.
- The Crosses:
- St. George’s Cross (Red + White Border): Cut a wide white cross and a slightly narrower red cross. Center them on the blue field.
- St. Andrew’s/Patrick’s Cross (Diagonal): Cut diagonal white strips and thinner red strips.
- Appliqué: Fuse the white strips first, then the red strips on top. Satin stitch or zigzag stitch around all edges to secure them permanently.
- Note: Ensure the diagonals intersect correctly behind the central vertical/horizontal cross.
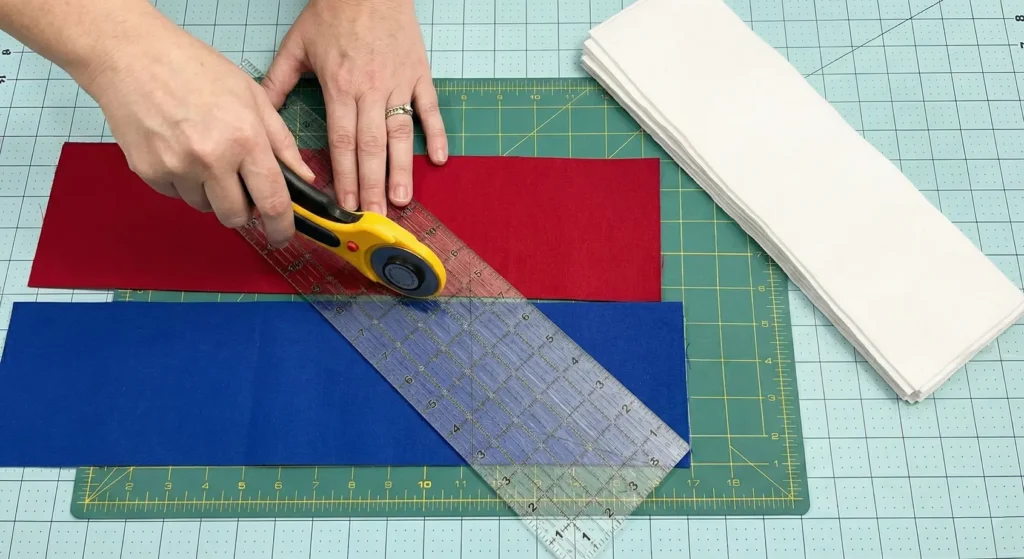
Step 3: Assembling the Top Section
- Layout: Place your Union Jack Canton on the left. Place the 4 Short Stripes (White, Red, Blue, White) on the right.
- Sew: Stitch the Short Stripes together to form a block.
- Join: Sew the Canton to the Stripe Block.
- Press: Press the seam toward the dark Blue Canton.
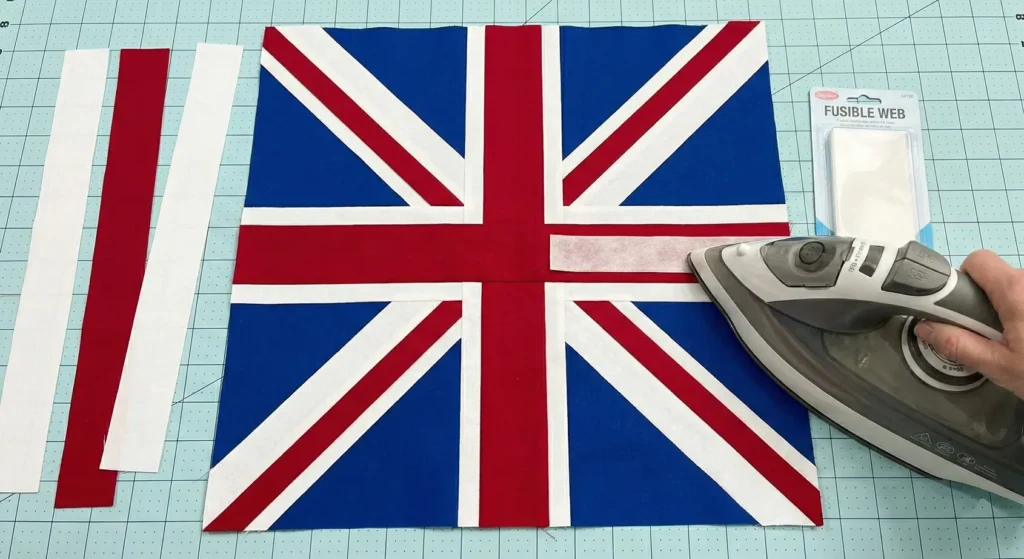
Step 4: Assembling the Bottom Section
- Sew: Stitch the 4 Long Stripes (Red, Blue, White, Red) together lengthwise.
- Press: Press all seams in one direction (downwards).

Step 5: The Final Union
- Join: Sew the Top Section (Canton + Short Stripes) to the Bottom Section (Long Stripes).
- Check: Ensure the stripes align perfectly on the right side. The quilt top is now complete.
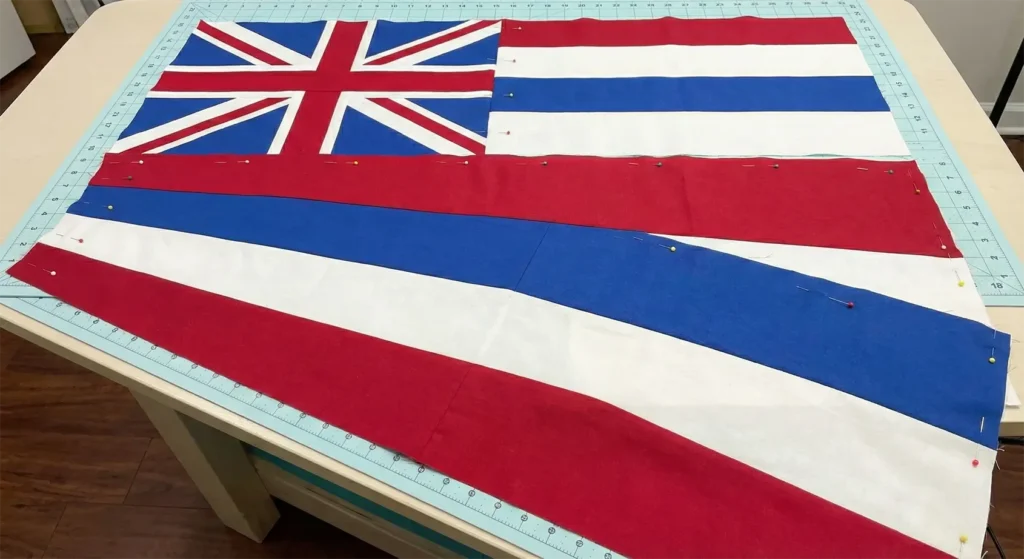
Step 6: “Kingdom” Quilting
The quilting adds the texture that turns a flag into a comforter.
- Sandwich: Backing + Batting + Top.
- The Stripes: Quilt diagonal cross-hatching (lines spaced 2 inches apart) across all the stripes. This represents the “net” of the fisherman and adds durability.
- The Canton: Echo quilt inside the white and red triangles of the Union Jack.
- Binding: Bind the quilt in Red. Traditionally, a red border was believed to keep negative spirits away.

Usability Note: This quilt is bold and graphic. It works best as a “Folded Footboard Quilt” in a modern white bedroom, adding a splash of history and color without overwhelming the space.
19. Monochromatic White-on-White Hawaiian Quilts for Subtle Elegance
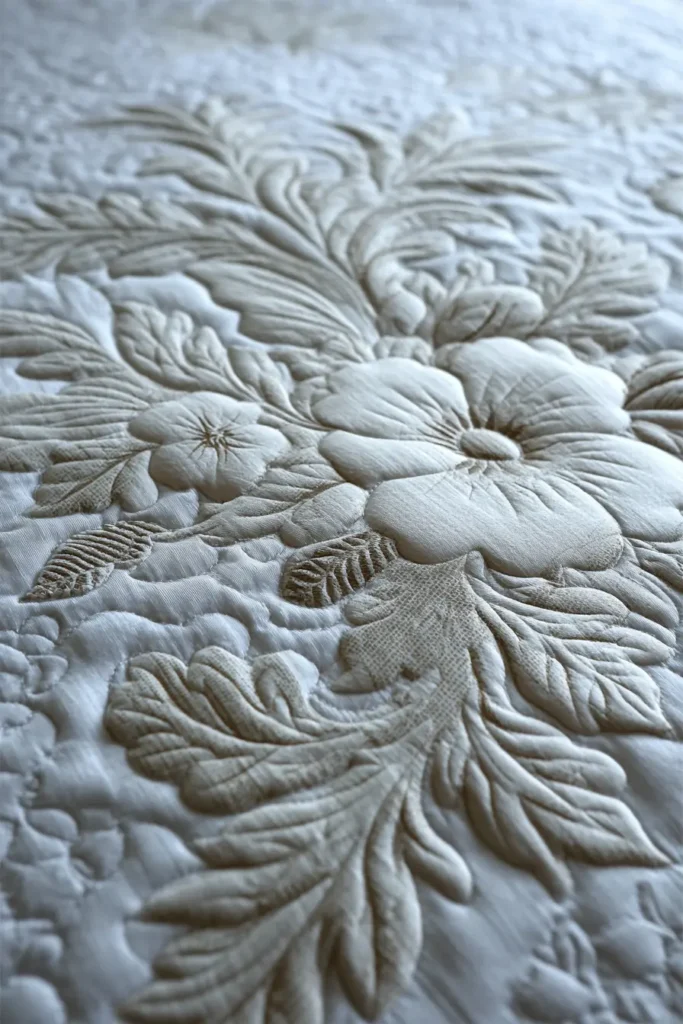
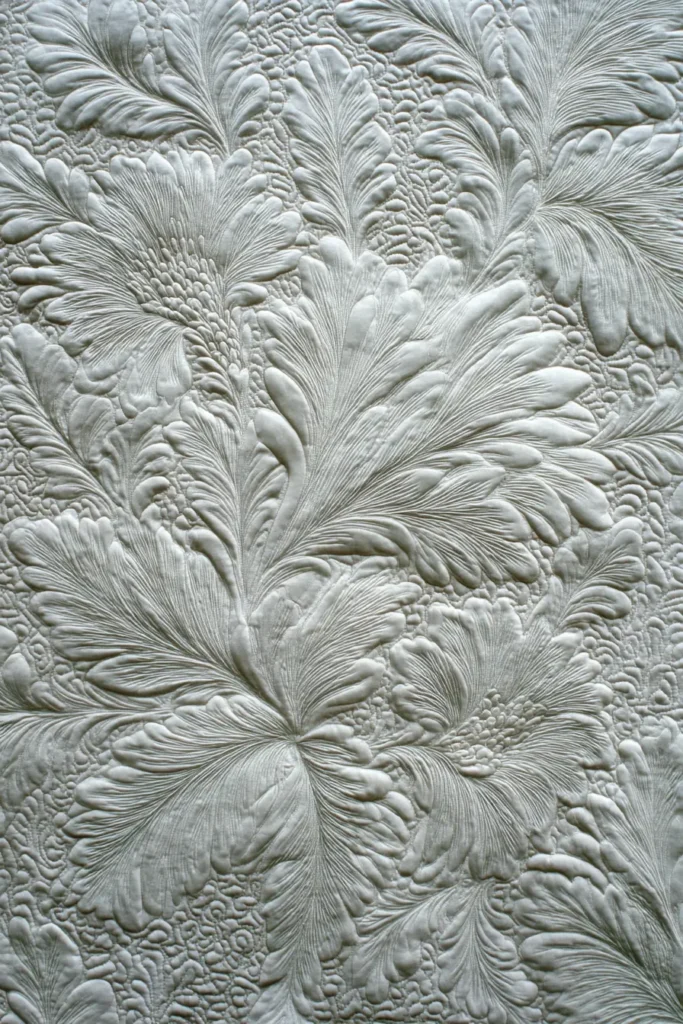
The “Moonlit Cereus” White-on-White Masterpiece
The ultimate expression of elegance in Hawaiian quilting is the “White-on-White” quilt. Without color to distinguish the pattern, the design relies entirely on texture, shadow, and sheen. This style mimics the look of a marble relief carving. The specific motif chosen here is the Night Blooming Cereus (Panini Ookala), a flower that blooms only in the dark under the moon. This pattern is perfect for a master sanctuary, creating a serene, cloud-like atmosphere where the design reveals itself only when the light hits it at an angle.
Finished Dimensions: Queen Size Bedspread, approximately 90″ x 90″.
Materials Needed:
- Fabric A (Background): 6 yards of High-Quality White Cotton Broadcloth (Matte finish).
- Fabric B (Appliqué): 6 yards of White Cotton Sateen (Glossy finish).
- The Secret: Using two different “Whites” (Matte vs. Shiny) creates a subtle visual separation even before quilting.
- Batting: High-Loft Wool Batting. (For white-on-white, you need a “puffy” batting so the quilting stitches create deep shadow valleys).
- Thread: 100% Cotton 50wt in White (for appliqué) and Silk Thread in White (for quilting, to catch the light).
- Notions: Blue water-soluble marker (must wash out completely), fabric weights (pins leave holes in white fabric).
Cultural Backstory: In Hawaiian culture, white (Keʻokeʻo) represents the spiritual world and purity. Historically, white-on-white quilts were reserved for the beds of high-ranking chiefs or used during weddings, symbolizing a new beginning and a blank slate free of past troubles.
Step 1: The “Ghost” Fold
Precision is paramount. Any error in symmetry will glare on a white quilt.
- Cut Paper: Cut a 45″ x 45″ square of heavy butcher paper.
- Fold: Fold into eighths (Rectangle → Square → Triangle).
- Drafting:
- The Flower: Draw the long, trumpet-shaped petals of the Cereus flower exploding from the center.
- The “Puka” (Holes): White-on-white designs need “negative space” inside the appliqué to create definition. Draw many almond-shaped cutouts inside the leaves and petals.
- The Vines: Connect the flowers with thick, winding vines that touch the folded edges.
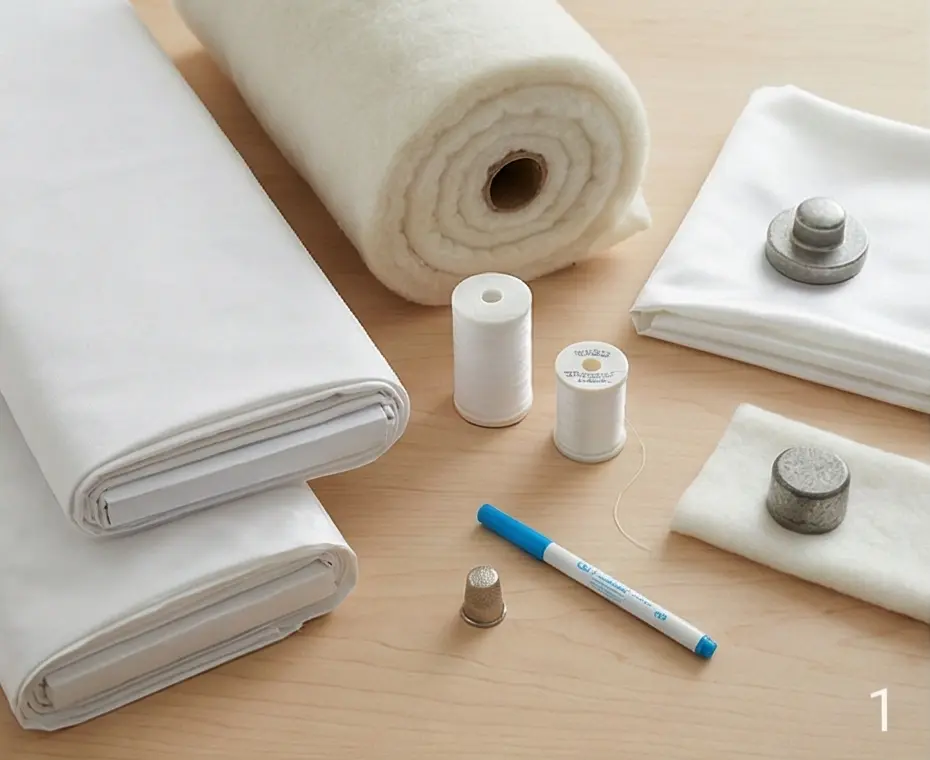
Step 2: Cutting the Sheen
- Prep Fabric: Cut your White Sateen to 92″ x 92″. Fold it carefully into eighths.
- Tip: Press the folds with a steam iron. Sharp creases are your grid lines.
- Weight & Cut: Place heavy weights on the paper template (don’t pin). Cut through the 8 layers of sateen.
- Unfold: Unfold the Sateen medallion. It will look like a giant, shimmering snowflake.

Step 3: Shadow Placement
- Background: Lay the Matte Broadcloth flat on a large surface (e.g., the floor). Tape the edges down.
- Layer: Center the Shiny Sateen medallion on top.
- Smooth: Working from the center out, smooth the appliqué. The difference between the matte background and shiny appliqué should already be visible.
- Baste: Use Blue Water-Soluble Thread for basting. Do not use glue (it can yellow white fabric over time). Baste a grid and then the outline of the flowers.
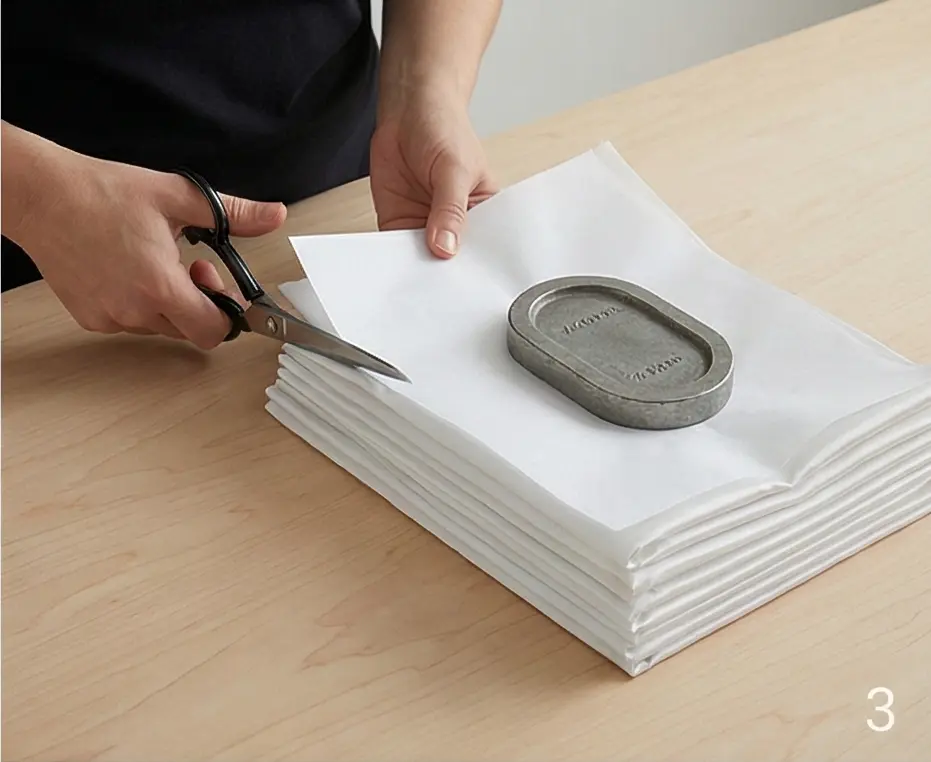
Step 4: Invisible Appliqué
Your stitches must be microscopic.
- Needle: Use a “Sharps” needle (Size 11).
- Thread: Use the cotton thread.
- Stitch: Needle-turn the edges. Because both fabrics are white, you don’t need to worry about “shadowing” (dark fabric showing through), but you do need to worry about fraying. Turn the edges under firmly.

Step 5: “Relief” Quilting (The Most Important Step)
Quilting is what makes the design appear.
- Sandwich: Backing + High Loft Wool + Top.
- Echo: Hand quilt using the White Silk Thread.
- The “Ditch”: Quilt exactly in the ditch (the seam line) of the appliqué first. This sinks the edge and makes the Sateen puff up.
- The Echo: Quilt the first echo line 3/8 inch away.
- The Background: Continue quilting ripples outward.
- Lighting Check: Turn off overhead lights and use a side lamp while quilting. This helps you see the shadows you are creating.

Step 6: The “Gallery” Finish
- Binding: Shiny Sateen fabric. A glossy rim adds a final touch of luxury.
- Washing: Once finished, wash the quilt to remove the blue marker and to “shrink” the cotton slightly around the wool batting.
- Result: The shrinkage creates the famous “Hawaiian texture”—a crinkled, antique look where the white design stands up in high relief like a topographic map.

Usability Note: White quilts are intimidating, but Sateen is surprisingly durable. Use this quilt in a guest room or master suite to create a “spa” atmosphere. To maintain the whiteness, wash once a year with a gentle bluing agent or an optical brightener.
20. Sophisticated Orchid Hawaiian Quilt Table Runners

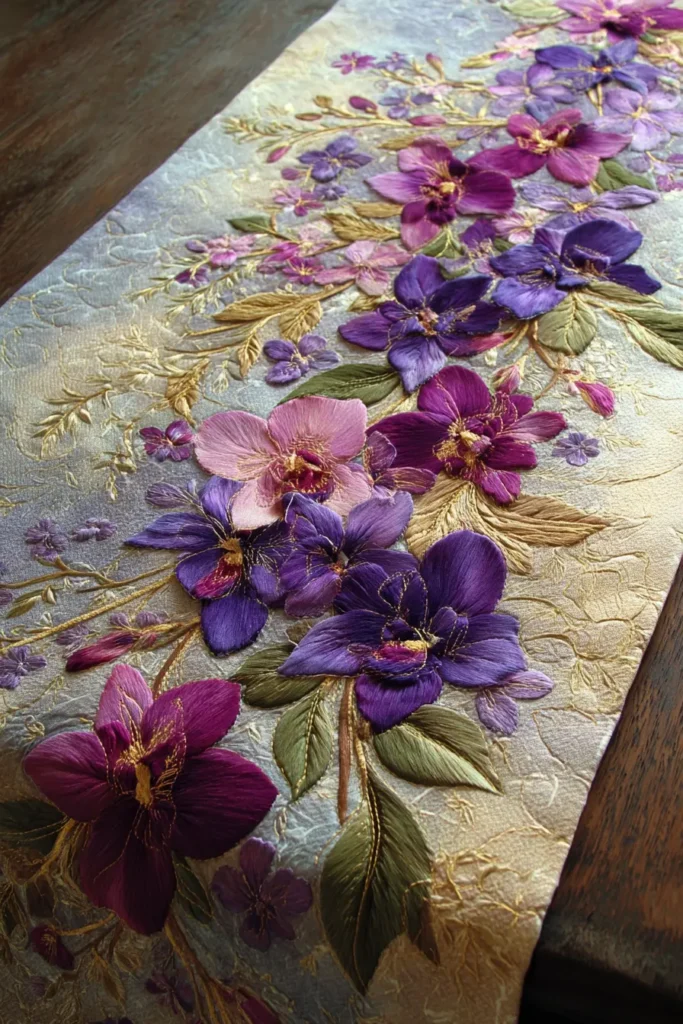
The “Exotic Okika” Trailing Orchid Runner
Orchids (Okika) represent refinement, luxury, and exotic beauty in Hawaii. Unlike the sturdy breadfruit or playful pineapple, the orchid is delicate and complex. This table runner design moves away from the traditional “block” layout and instead features a Trailing Vine composition. The design starts heavy at the ends of the runner (where it hangs over the table edge) and thins out toward the center, creating a frame for your centerpiece without hiding the beautiful appliqué work under a serving bowl.
Finished Dimensions: Formal Dining Runner, approximately 16″ x 90″ (Long enough to drape over the ends of a 6-foot table).
Materials Needed:
- Fabric A (Background): 2 yards of Silver Grey or Champagne Cotton Sateen or Silk Blend. (A metallic sheen mimics the humidity and glimmer of a rainforest).
- Fabric B (Appliqué): 1.5 yards of Deep Violet, Magenta, or Chartreuse. (Jewel tones look best against a metallic background).
- Backing Fabric: 2 yards of matching solid cotton.
- Batting: Fusible Fleece or very thin Cotton Batting. (Table runners must lie flat to support wine glasses).
- Notions: Freezer paper, fabric glue pen, silk thread (matching the appliqué).
Cultural Backstory: While many orchids were introduced to Hawaii, they thrived in the volcanic soil and humid air, becoming a symbol of the islands’ ability to nurture exotic beauty. In Hawaiian quilting, orchid patterns are considered “advanced” due to their complex, twisting petals, often reserved for expert quilters making gifts for special occasions.
Step 1: The “Mirror” Fold
We want the design to flow from both ends toward the middle.
- Cut Paper: Cut two strips of freezer paper measuring 14″ x 30″.
- Fold: Fold each strip in half lengthwise (to 7″ x 30″).
- Drafting:
- The Anchor: At the bottom (the short edge), draw a cluster of large orchid blooms.
- The Vine: Draw a winding stem rising from the flowers, traveling up the paper strip.
- The Trailing Buds: Add smaller buds and leaves along the vine, getting smaller as they reach the top.
- Note: Ensure the design connects to the folded edge frequently to keep the vine stable.
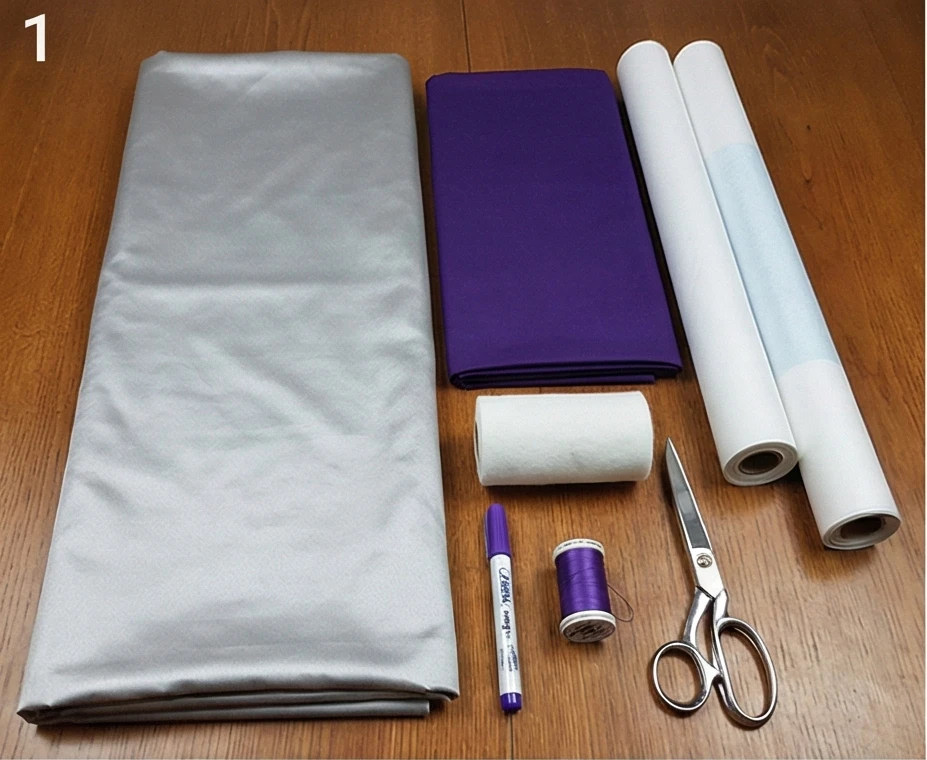
Step 2: Cutting the Jewel Tones
- Prep Fabric: Cut your Violet Appliqué Fabric into two pieces measuring 16″ x 32″.
- Fold: Fold lengthwise to match the paper.
- Pin & Cut: Iron the freezer paper to the fabric (shiny side down) or pin securely. Cut out the intricate petals and stems.
- Unfold: You will have two long, symmetrical orchid vines.

Step 3: Composition on Silver
- Background: Cut your Silver Background to 18″ x 94″.
- Placement:
- Place one orchid vine at the Left End of the runner.
- Place the second orchid vine at the Right End.
- The Center: Leave the middle 30 inches of the runner mostly empty (negative space). This is where your centerpiece or serving dishes will go.
- Secure: Use a Fabric Glue Pen to secure the delicate stems and petals. Pins will distort the long vines.
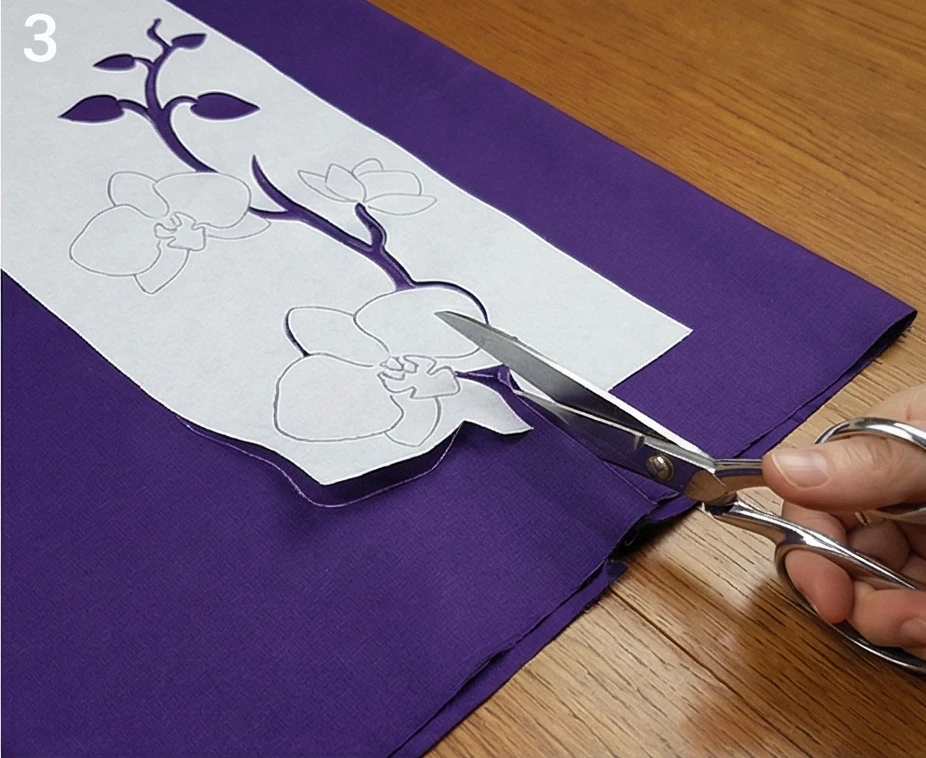
Step 4: Needle-Turn Appliqué (or Machine Satin)
Orchids have complex curves.
- Option A (Hand): Use a needle-turn stitch. Use the point of your needle to turn under the tiny allowances of the orchid “lips” and buds.
- Option B (Machine): For a modern look, use a very narrow, dense Satin Stitch (Zig-Zag) in matching thread. This creates a raised edge that looks like embroidery.
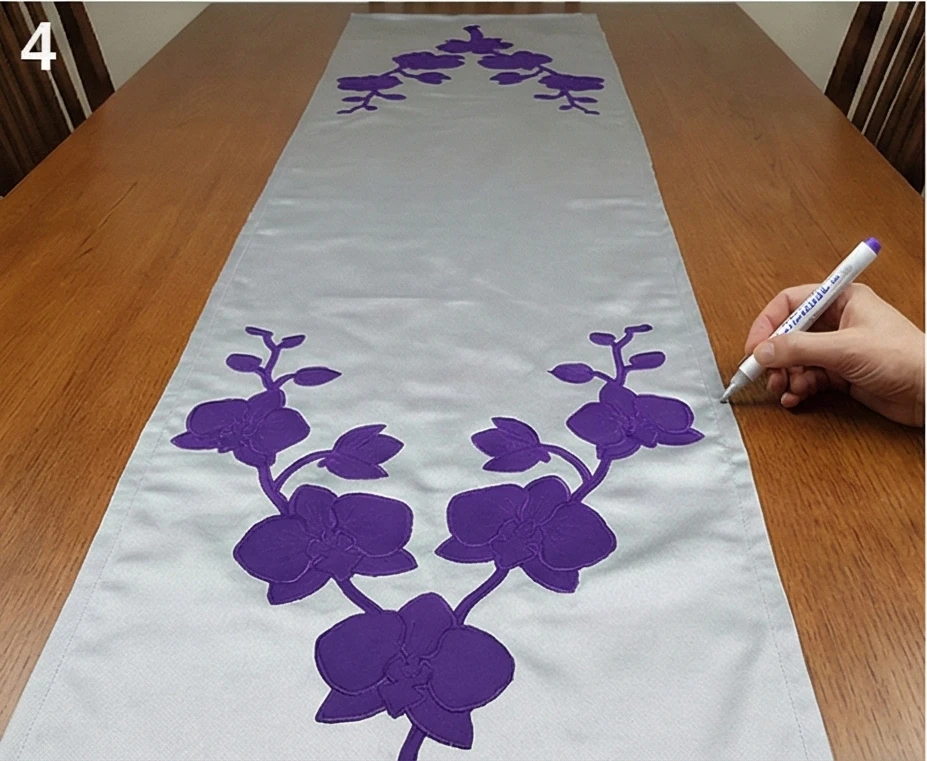
Step 5: “Mist” Quilting
The quilting should look like humid air or mist surrounding the flowers.
- Sandwich: Backing + Fleece + Top.
- Echo: Quilt closely around the flowers to make them pop.
- Background: Instead of standard echo lines, quilt Stippling (meandering puzzle-piece lines) or small Micro-Pebbling in the negative space.
- Why? This dense quilting completely flattens the background, making the satin orchids shine and stand out in high relief.
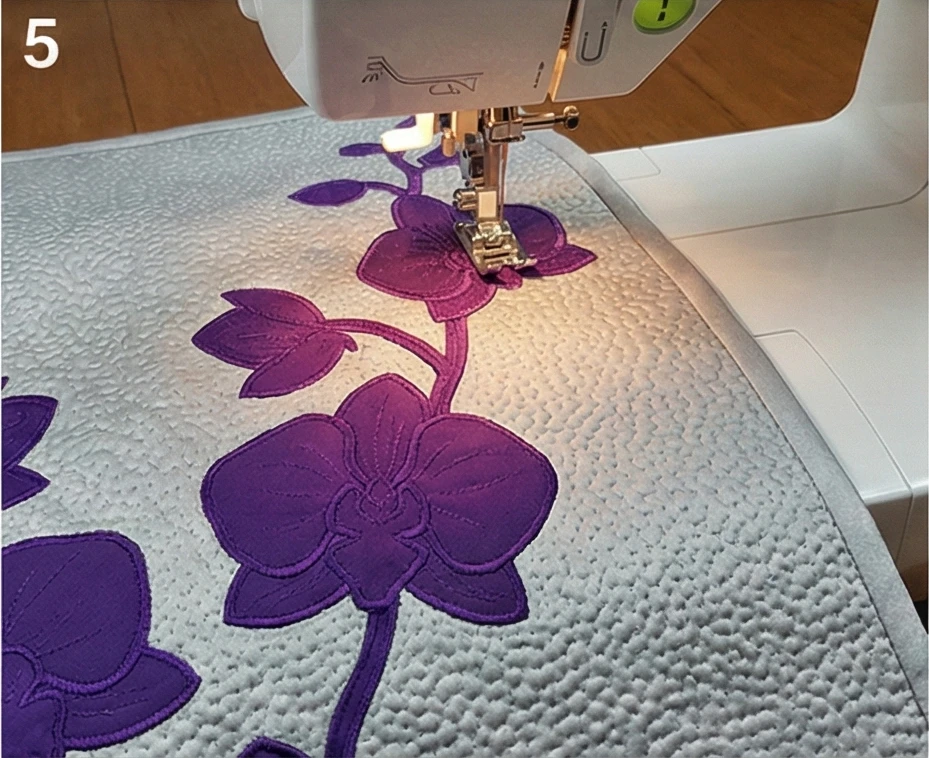
Step 6: The Pointed Finish
A rectangular end can look heavy. A pointed end is more elegant.
- Trim: Trim the ends of the runner into a V-shape (point) or a curved “tongue” shape, following the shape of your orchid cluster.
- Bind: Use Bias Binding in the Appliqué Color (Violet). This frames the silver background and ties the whole color scheme together.
- Tassel (Optional): Sew a silk tassel to the point of the V at each end for ultimate sophistication.
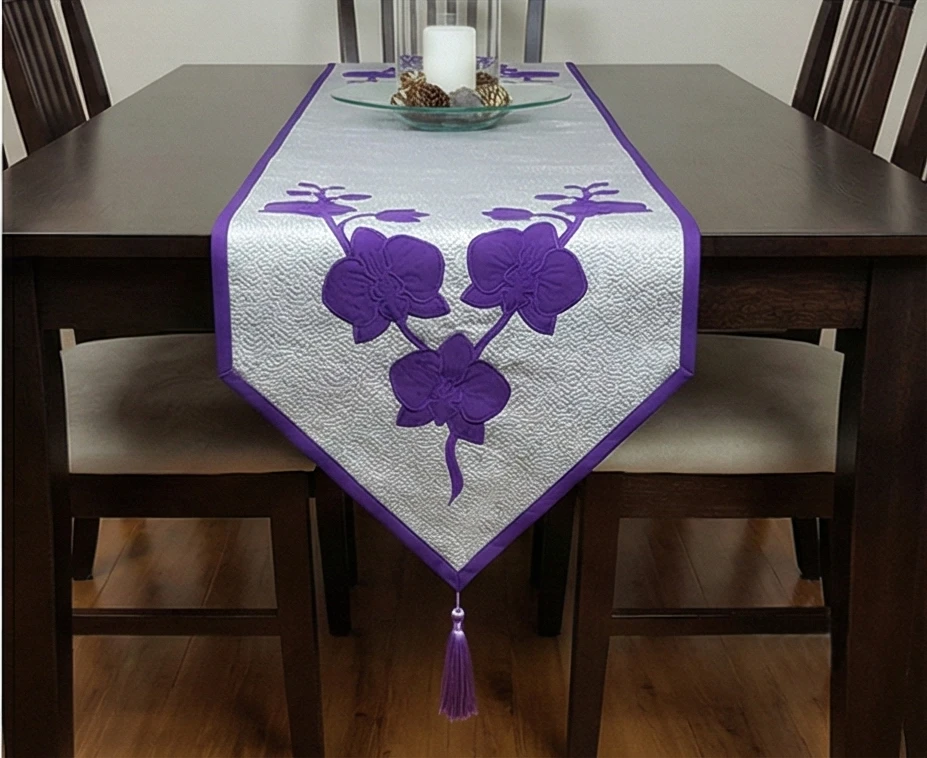
Usability Note: By keeping the center of the runner clear of complex appliqué, you ensure a stable surface for dining. The “drop” (the part hanging off the table) carries the visual weight, making the room look decorated even when the table is set for dinner.
Conclusion
Reflecting on these 20 Elegant Hawaiian Quilt Patterns, it is clear that this textile tradition offers a profound way to enhance both the comfort and sophistication of a living space. We have journeyed through designs that celebrate the natural world, from the slow, steady grace of the Sea Turtle Motif to the rhythmic beauty of Relaxing Ocean Wave patterns. These quilts do more than provide warmth; they act as storytellers, weaving narratives of island legends, botanical beauty, and cultural pride into the very fabric of your home. Whether draped over a sofa or displayed as a Statement Wall Hanging, the craftsmanship involved in these pieces commands attention and respect, serving as a focal point that sparks conversation and admiration.
The enduring appeal of Hawaiian quilting lies in its ability to merge the casual, laid-back vibe of island life with the refined elegance of intricate handwork. A Luxury Hawaiian Sofa Cover does not just protect your furniture; it upgrades the entire room, offering a tactile experience that invites you to sit, relax, and unwind. The variety of applications—from Elegant Coffee Table Runners to Cozy Couch Covers—demonstrates that you can integrate this style in small doses or as a grand gesture. This flexibility ensures that no matter the size of your space, there is a way to welcome the warmth and hospitality symbolized by designs like the Hawaiian Pineapple.
Ultimately, choosing to decorate with Hawaiian quilt patterns is a choice to embrace a lifestyle of beauty and tranquility. These pieces are often heirlooms in the making, durable enough for daily use yet exquisite enough to be treasured for generations. As you select the perfect Hibiscus Appliqué or Lauhala Weave accent for your home, remember that you are adding a layer of soulfulness to your decor. We hope these ideas inspire you to surround yourself with the lush, comforting, and elegant embrace of the islands, creating a home that feels like a permanent vacation.
