
15 Cozy Winter Quilt Designs Using Wool and Flannel Batting
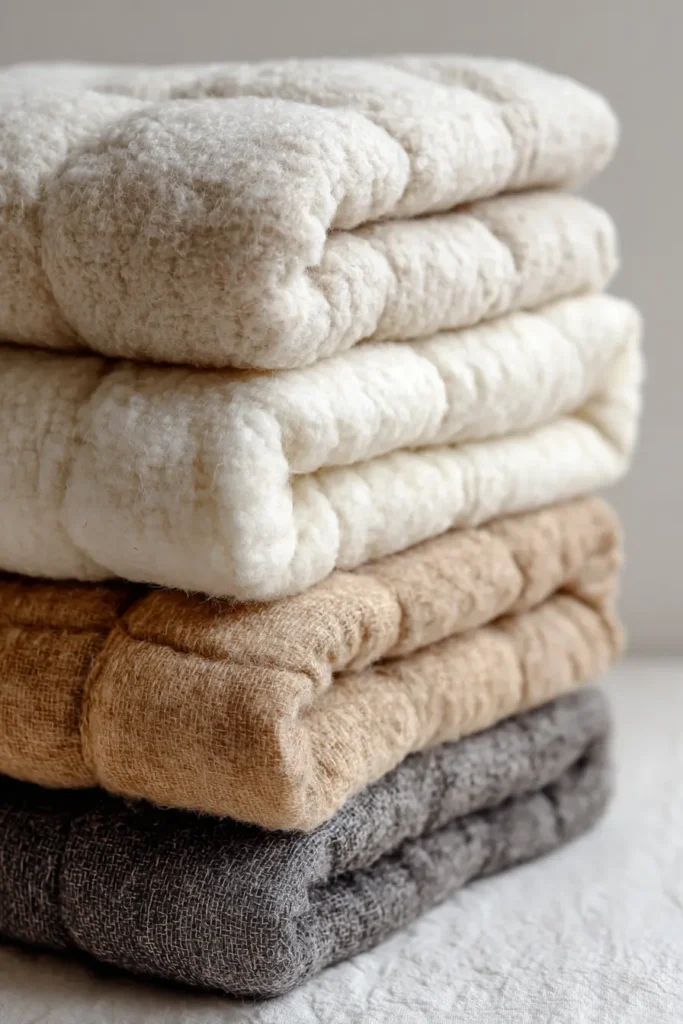
As the temperatures drop and the days grow shorter, the desire to transform our homes into warm, sheltering sanctuaries becomes a top priority. Cozy Winter Quilt Designs Using Wool and Flannel Batting are the ultimate solution for those seeking both superior insulation and timeless seasonal style. Unlike standard cotton batting, the inclusion of wool or heavy flannel adds distinct loft and breathability, efficiently trapping heat without feeling stifling.
This combination creates a drape and weight that feel like a warm hug, making these quilts essential companions for frosty nights. Whether you are looking to create a functional layer for deep sleep or a decorative piece that radiates comfort, choosing the right internal materials is just as critical as the top design.
The versatility of winter quilting extends far beyond simple utility; it is an opportunity to explore rich textures and nostalgic patterns. In this guide, we delve into designs ranging from the rustic charm of Classic Plaid Wool Quilt Patterns, perfect for a cabin retreat, to the refined elegance of Scandinavian-Inspired Wool Quilts, which use soft neutrals to brighten dark winter days. We explore how different techniques, such as the tactile delight of Hand-Tied Flannel Comforters, can enhance the “puff” factor, creating bedding that looks as soft as it feels. For those who love intricate details, Wool Appliqué Folk Art Quilts offer a way to tell stories through fabric, bringing winter scenes to life with dimensional texture.
Beyond the aesthetics, these designs cater to specific climates and needs. We cover rugged options like Heavyweight Denim and Flannel Utility Quilts, built to withstand the harshest cold, as well as Velvet and Wool Mixed Luxury Throws that add a touch of opulence to your living room. From the structural beauty of Log Cabin Quilt Patterns to the artistic expression of Winter Landscape Art Quilts, this collection is curated to inspire you to build a winter wardrobe for your home. Let’s explore how the right combination of batting and fabric can turn a simple sewing project into a masterpiece of warmth and comfort.
1. Classic Plaid Wool Quilt Patterns for Cozy Winter Bedrooms
Contents
- 1 1. Classic Plaid Wool Quilt Patterns for Cozy Winter Bedrooms
- 2 2. Hand-Tied Flannel Comforters for Extra Loft and Warmth
- 3 3. Wool Appliqué Folk Art Quilts with Winter-Inspired Scenes
- 4 4. Elegant Black and Cream Wool Quilt Designs for Timeless Decor
- 5 5. Farmhouse-Style Flannel Quilt Patterns for Cozy Winter Homes
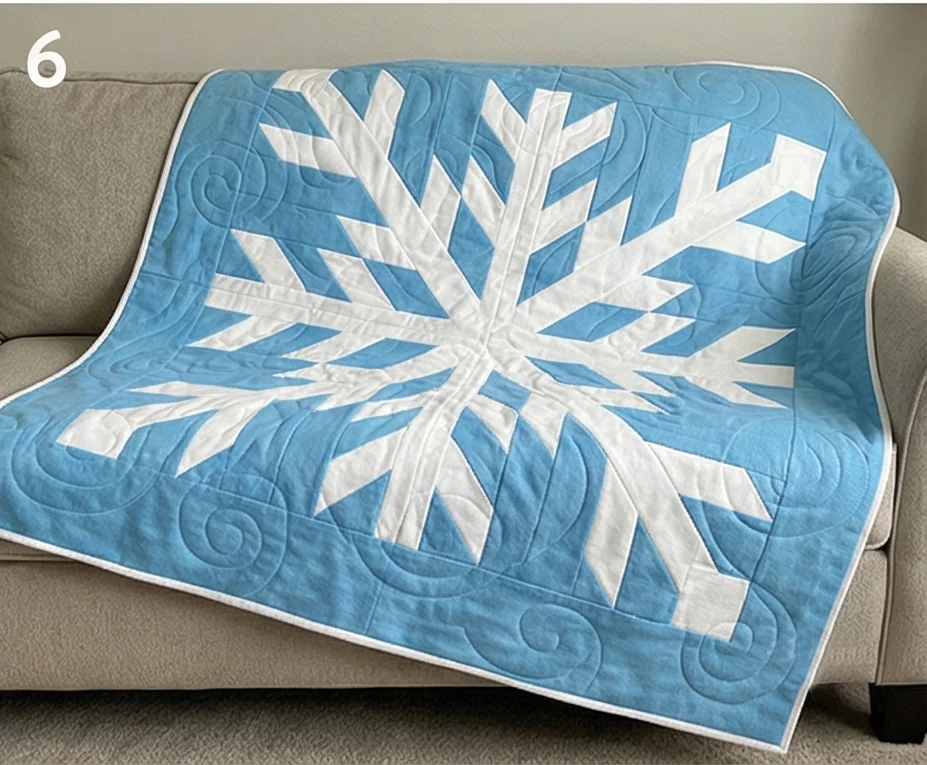
- 6 6. Scandinavian-Inspired Wool Quilts in Soft Neutral Winter Tones
- 7 7. Velvet and Wool Mixed Luxury Throw Quilt Patterns
- 8 8. Winter Landscape Art Quilts with Insulated Batting
- 9 9. Log Cabin Quilt Patterns Using Wool and Flannel Batting
- 10 10. Blended Wool and Cotton Batting Quilts for Perfect Winter Weight
- 11 11. Heavyweight Denim and Flannel Utility Quilts for Cold Climates
- 12 12. Boho Fringe Wool Quilts for Stylish Winter Layering
- 13 13. Minimalist Neutral Wool Quilts for Modern Winter Decor
- 14 14. Snowflake Quilt Patterns with Warm Flannel Batting
- 15 15. Chunky Knit-Look Quilts Using Textured Wool Batting
- 16 Conclusion
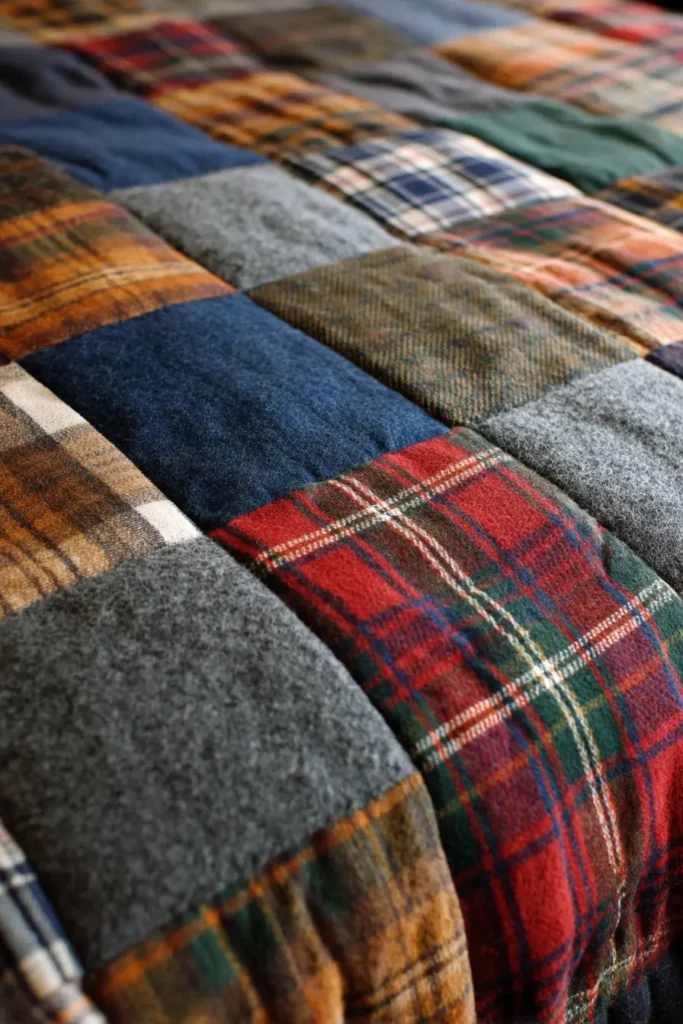
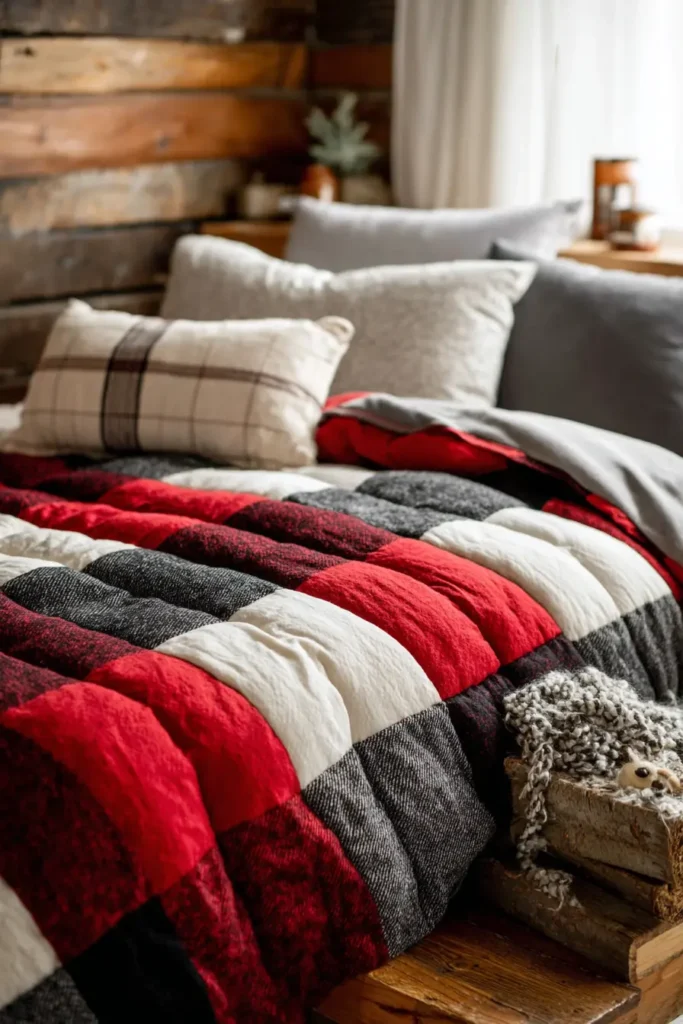
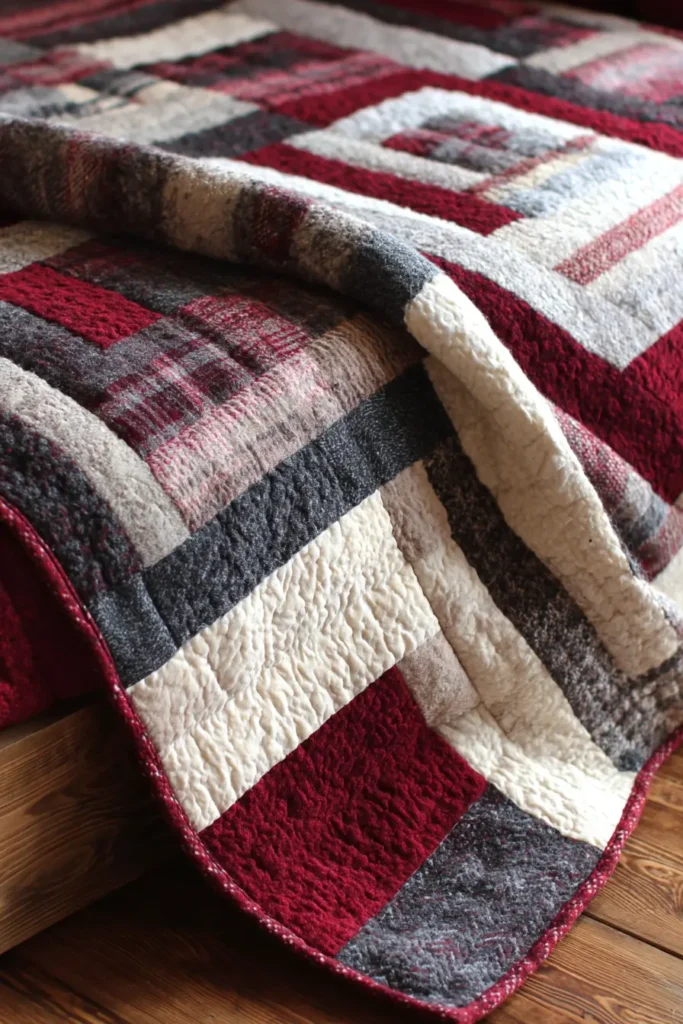
The “Highland Hearth” Sashed Wool Quilt
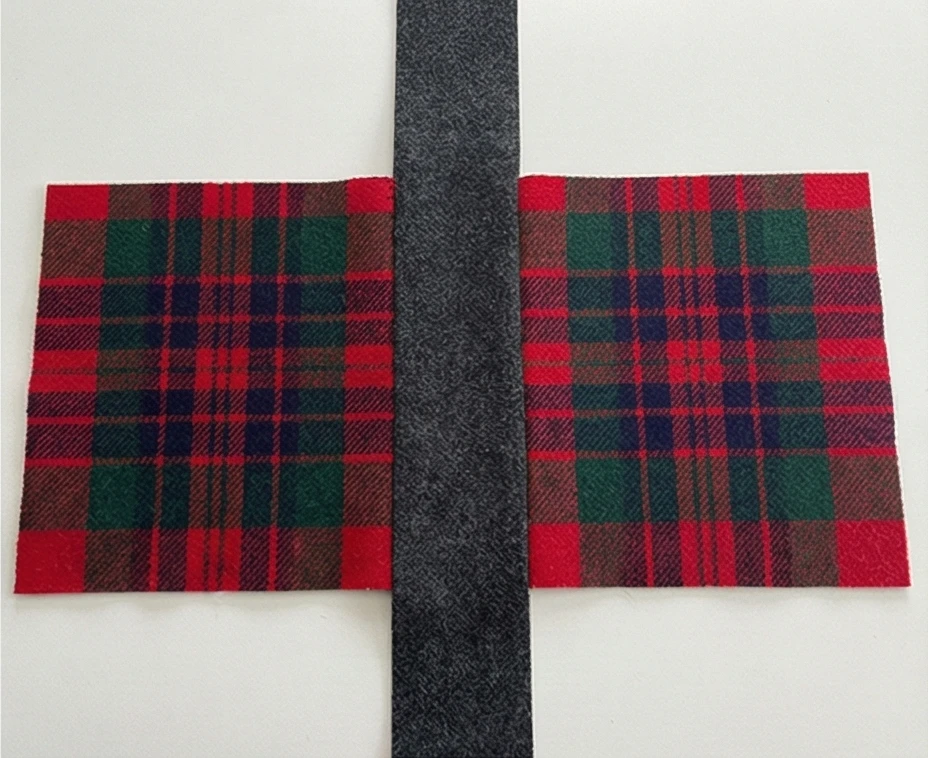
Nothing beats the physical weight and insulating warmth of a wool quilt in the dead of winter. Unlike cotton, wool breathes and regulates temperature, making it the gold standard for cold-weather bedding. This design uses large cuts of Wool Suiting or upcycled Flannel Shirts in various Tartans and Plaids. Because wool is bulky, intricate piecing is difficult; instead, we use a “Sashed Square” layout to frame each beautiful plaid pattern like a picture, separating them with a solid color to prevent visual chaos.
Finished Dimensions: Queen Size, approximately 84″ x 98″.
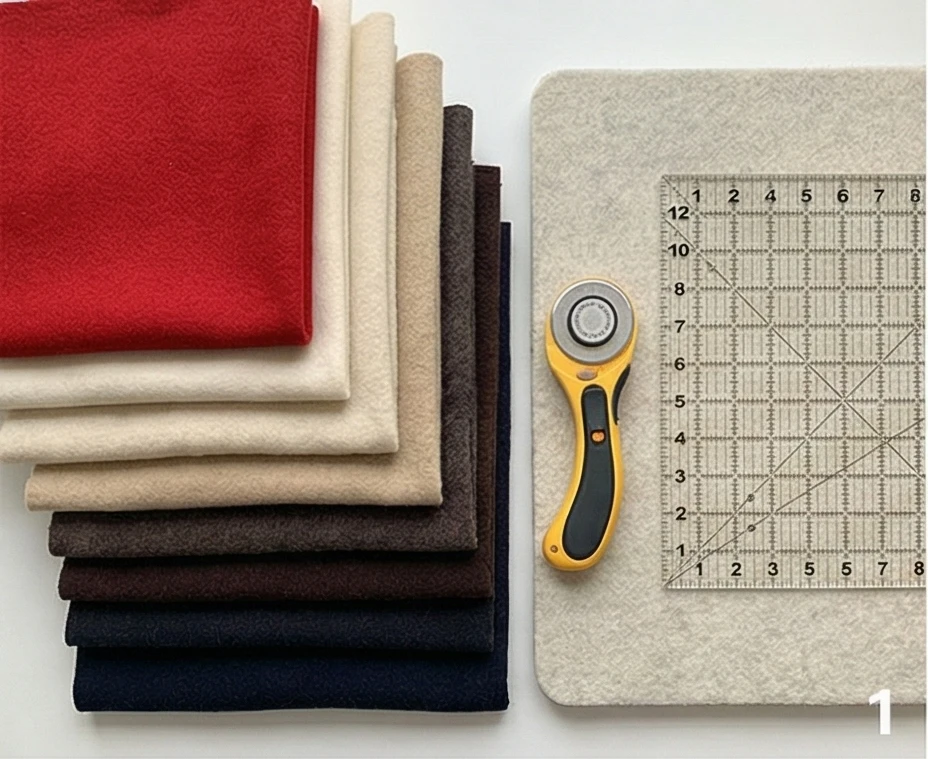
Materials Needed:
- Fabric A (Plaids): A collection of 15-20 different wool or heavy flannel plaids. Total yardage: approx 5 yards (or 10-12 XL men’s shirts).
- Fabric B (Sashing/Solid): 3 yards of Charcoal Grey, Navy, or Forest Green Wool Flannel (Solid color).
- Backing Fabric: 6 yards of heavy Cotton Flannel (for softness against the skin).
- Batting: 100% Wool Batting. (Essential. It creates a high loft and warmth without the weight of heavy cotton batting).
- Binding: 1 yard of the Sashing color.
- Notions: Walking foot, heavy, sharp needles (Jeans size 100/16), starch.
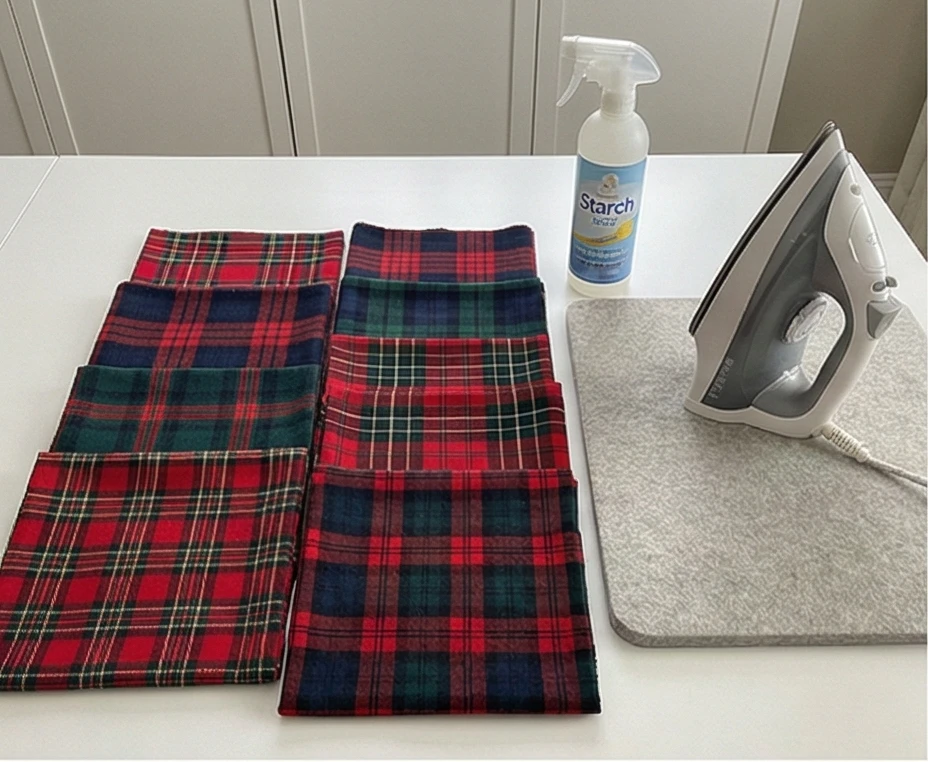
Step 1: Stabilize and Cut
Wool can be stretchy and loosely woven. Preparation is key.
- Wash & Shrink: Pre-wash all wool in hot water and dry on hot to shrink it before sewing. This creates “boiled wool” which is tighter and won’t ravel as much.
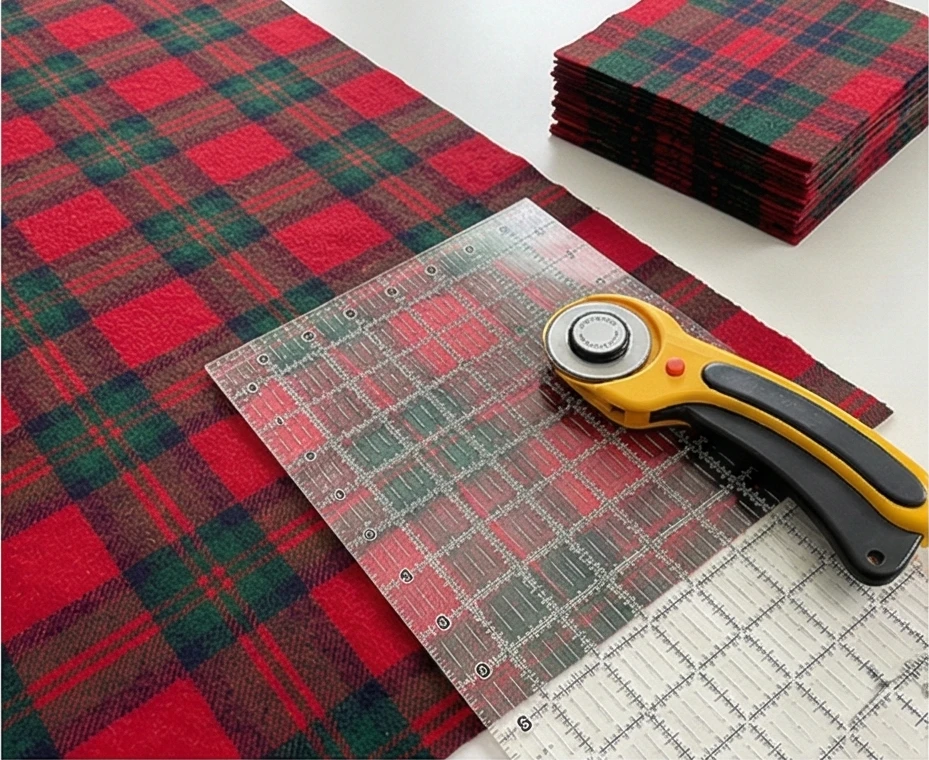
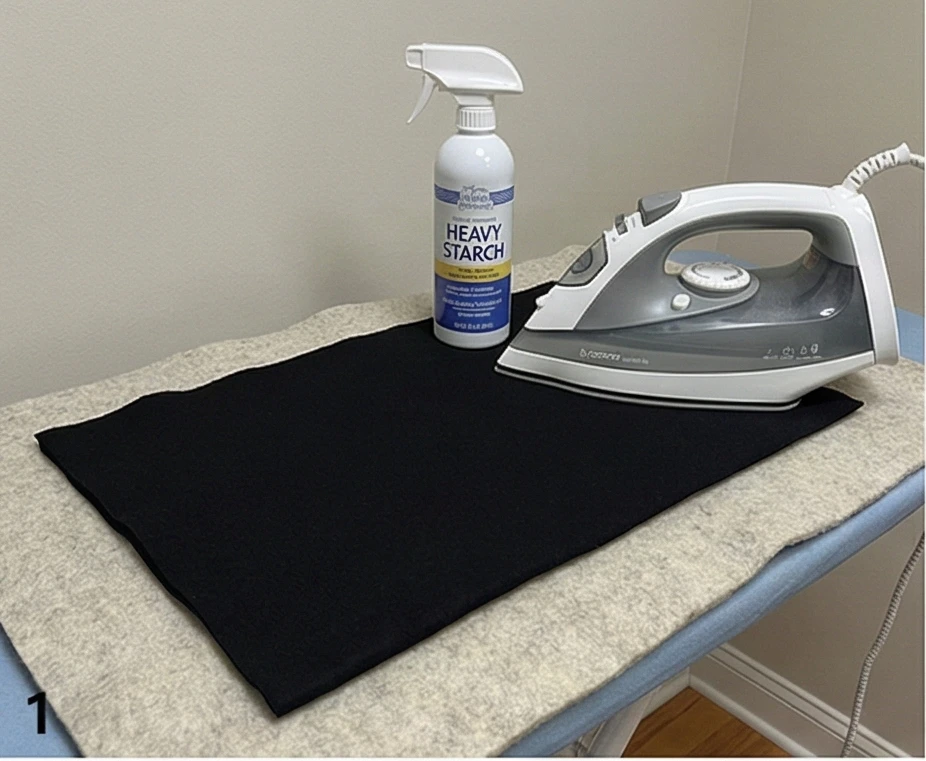
- Starch: Spray the wool heavily with starch and press flat. This makes it stiff like paper and easier to cut.
- Cut Blocks: From your Plaid Fabrics (Fabric A), cut 56 squares measuring 10.5″ x 10.5″.
- Tip: Try to “fussy cut” the plaids so the design is centered in the square.
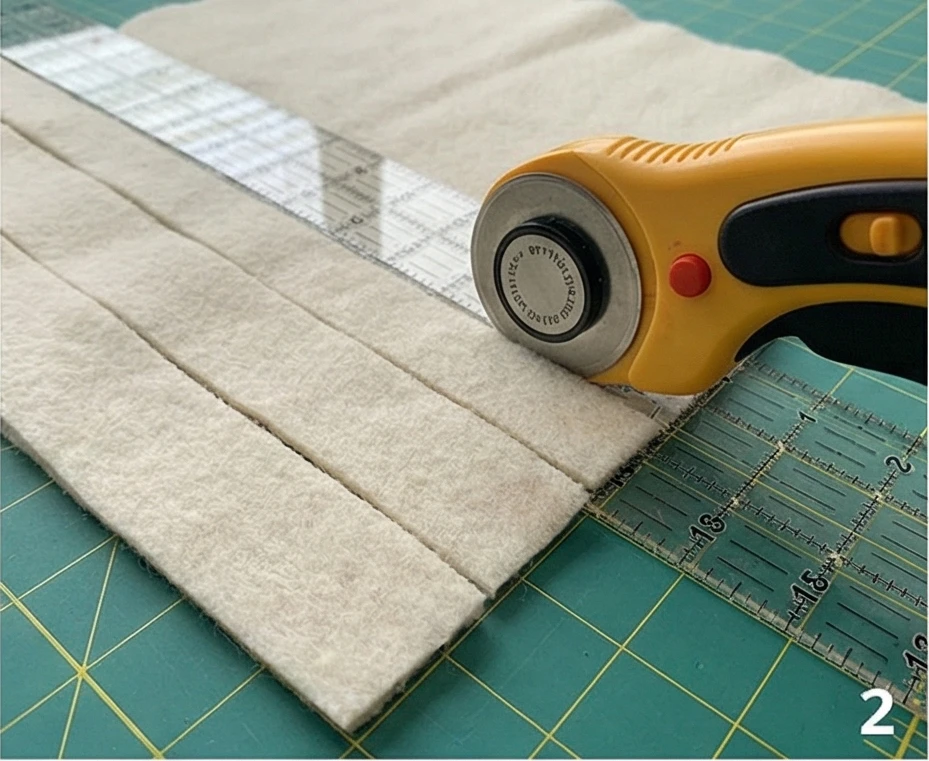
Step 2: Cut the Sashing (The Frame)
The solid frame tames the wild plaids.
- From Fabric B (Solid), cut strips measuring 2.5″ wide.
- Vertical Sashing: Sub-cut 49 strips measuring 2.5″ x 10.5″.
- Horizontal Sashing: You will piece the remaining strips together to create long horizontal rows later.
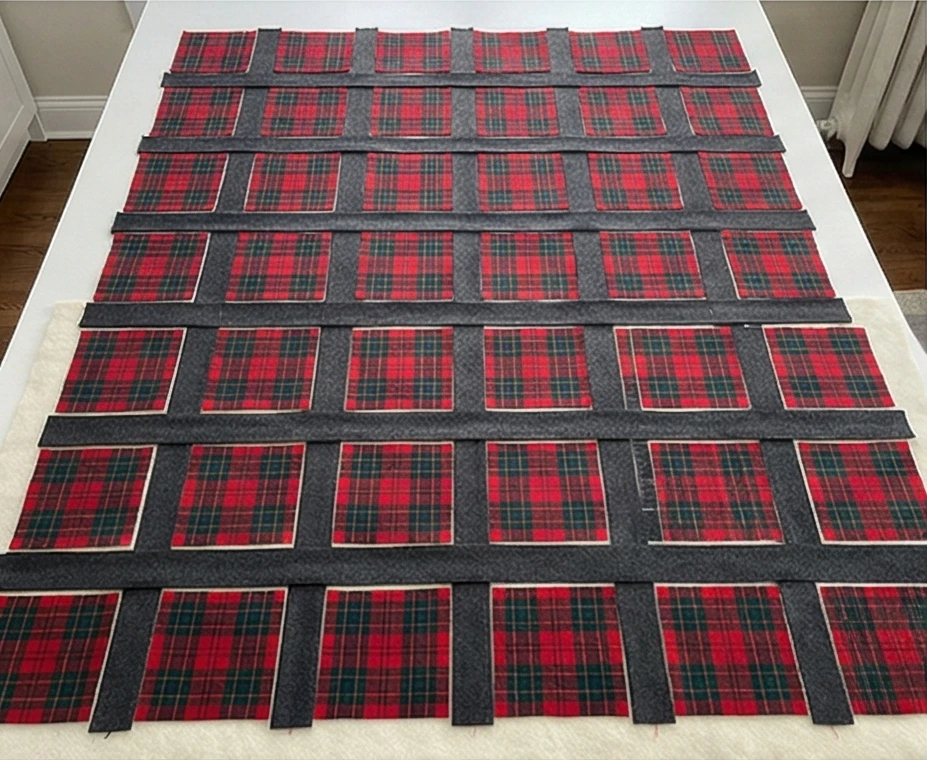
Step 3: Block Rows Assembly
We are building a grid of 7 blocks wide by 8 blocks tall.
- Layout: Arrange your 56 plaid squares on the floor in a 7×8 grid. Balance the colors—don’t put two red tartans next to each other.
- Sew Vertical: Take the first row of 7 blocks. Sew a Vertical Sashing strip (2.5″ x 10.5″) between each block.
- Sequence: Block – Sash – Block – Sash… ending with a Block.
- Pressing: Press all seams OPEN. Wool is too thick to press to the side; open seams distribute the bulk evenly.
- Repeat: Do this for all 8 rows.
Step 4: Horizontal Assembly
- Measure: Measure the width of your completed block rows (should be approx 84.5″).
- Prepare Sashing Rows: Piece together your long, solid strips to make 9 sashing strips that match the width of your block rows.
- Join: Sew the rows together, placing a long horizontal sashing strip between each block row (and at the very top and bottom).
- Pinning: Use many pins. Wool creates “creep” where the top layer stretches faster than the bottom layer. A walking foot is mandatory here.
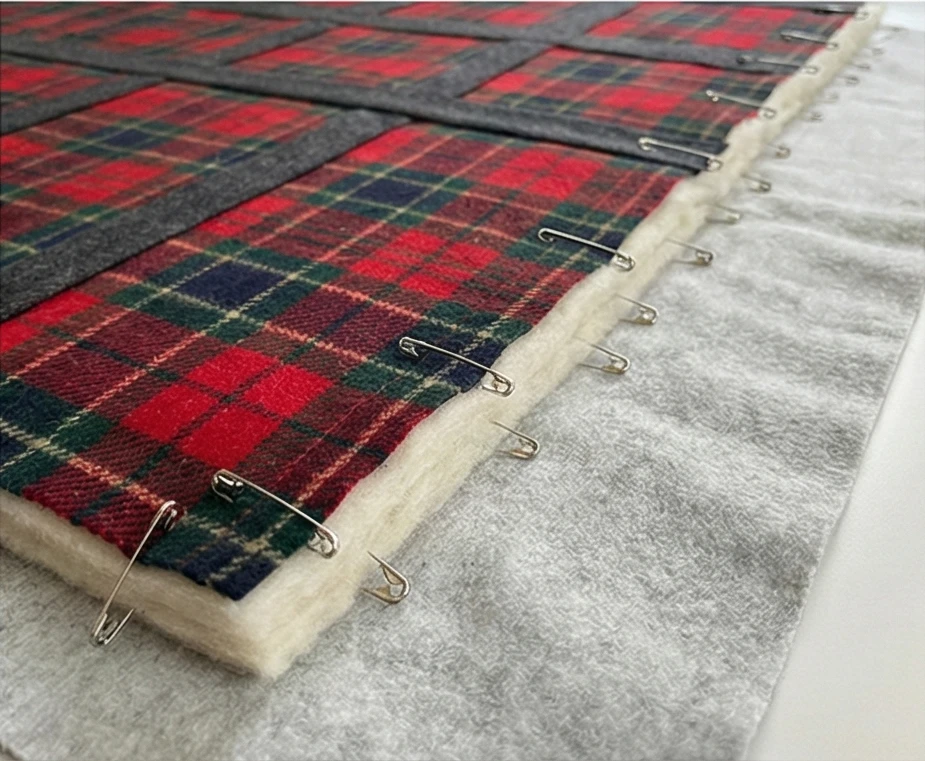
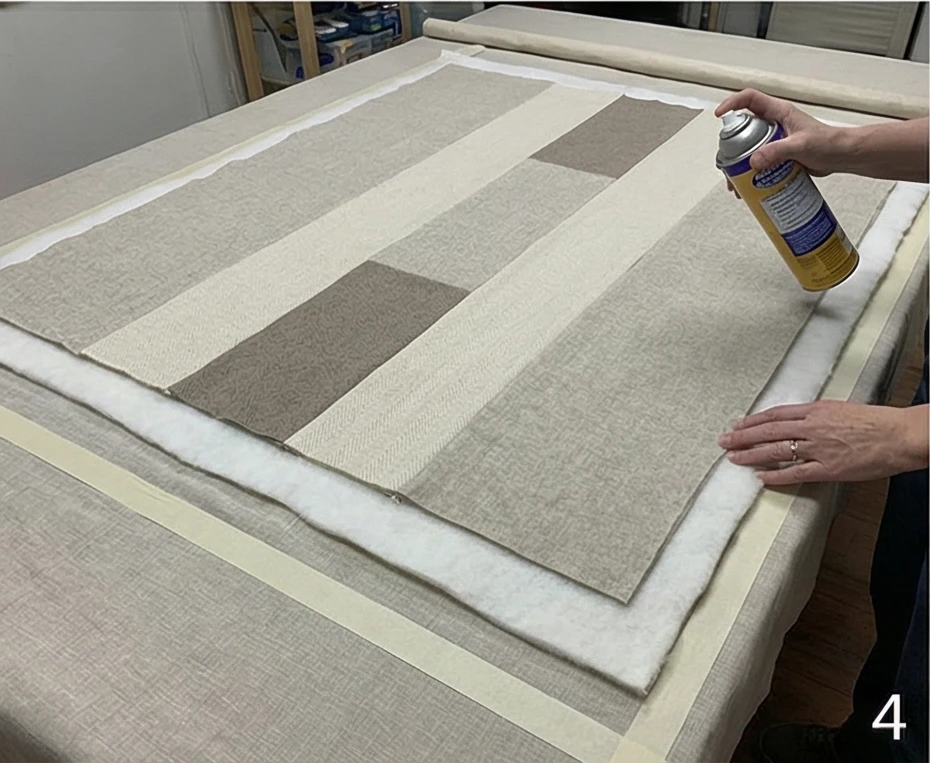
Step 5: The “Wool Sandwich”
- Batting: Lay out your Wool Batting. Note that wool batting is “bearded” (lofty).
- Backing: Lay your flannel backing on top.
- Basting: Do not use spray baste on wool; it doesn’t stick well. Use Curved Safety Pins every 4 inches. The weight of the quilt requires heavy basting.
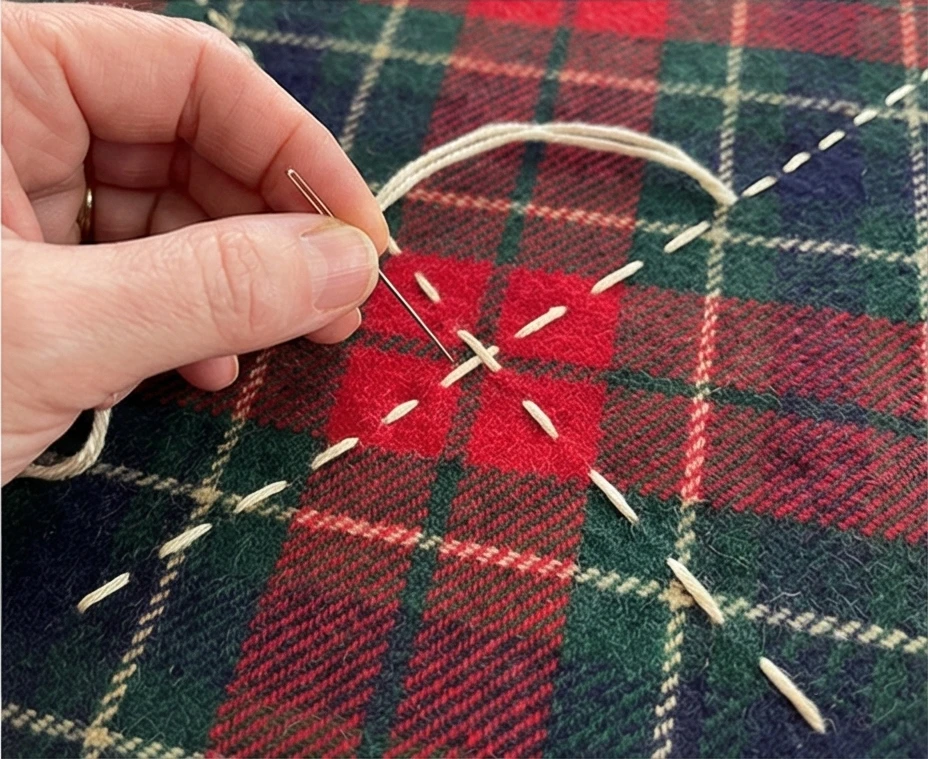
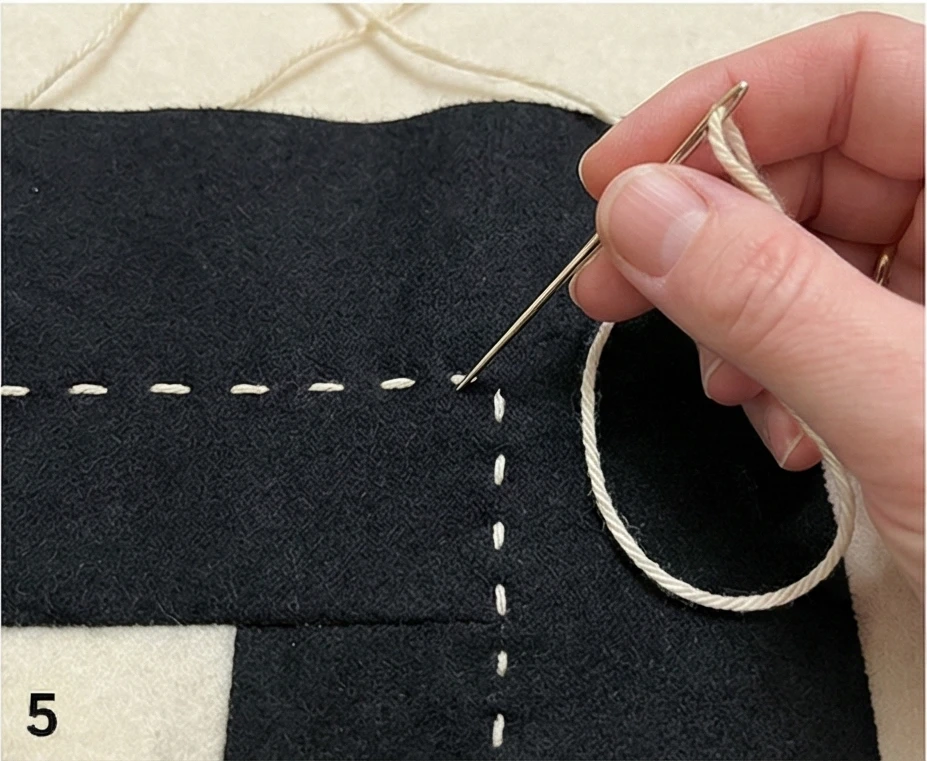
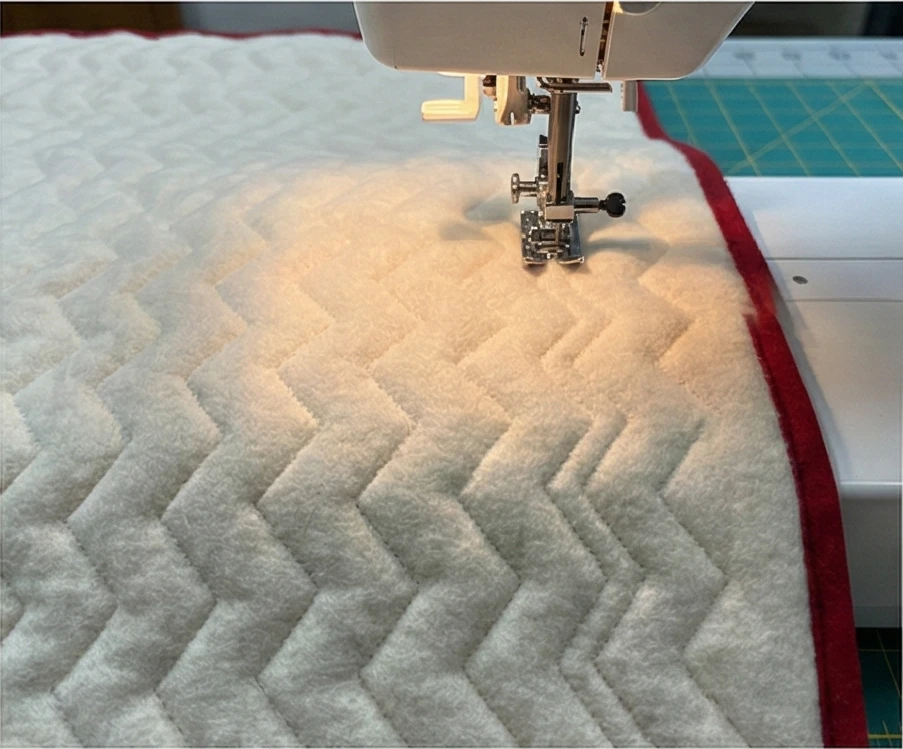
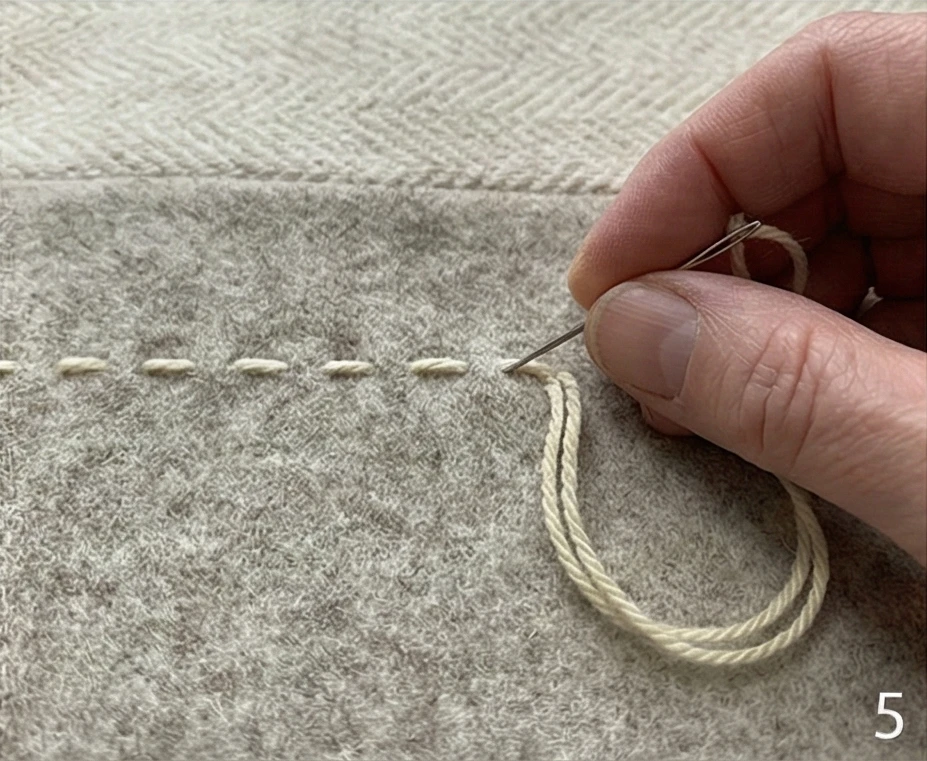
Step 6: “Big Stitch” Quilting
Standard machine quilting compresses wool too much. Hand quilting keeps it fluffy.
- Use Pearl Cotton Size 8 (thick embroidery thread) in a contrasting color, such as Cream or Gold.
- Needle: Use a large-eye embroidery needle.
- Stitch: Quilt large running stitches (about 1/4 inch long) by hand.
- Design: Stitch a simple “X” through every plaid square, or stitch “in the ditch” down the center of the sashing strips.
- The rustic, visible stitches enhance the “cabin” aesthetic.
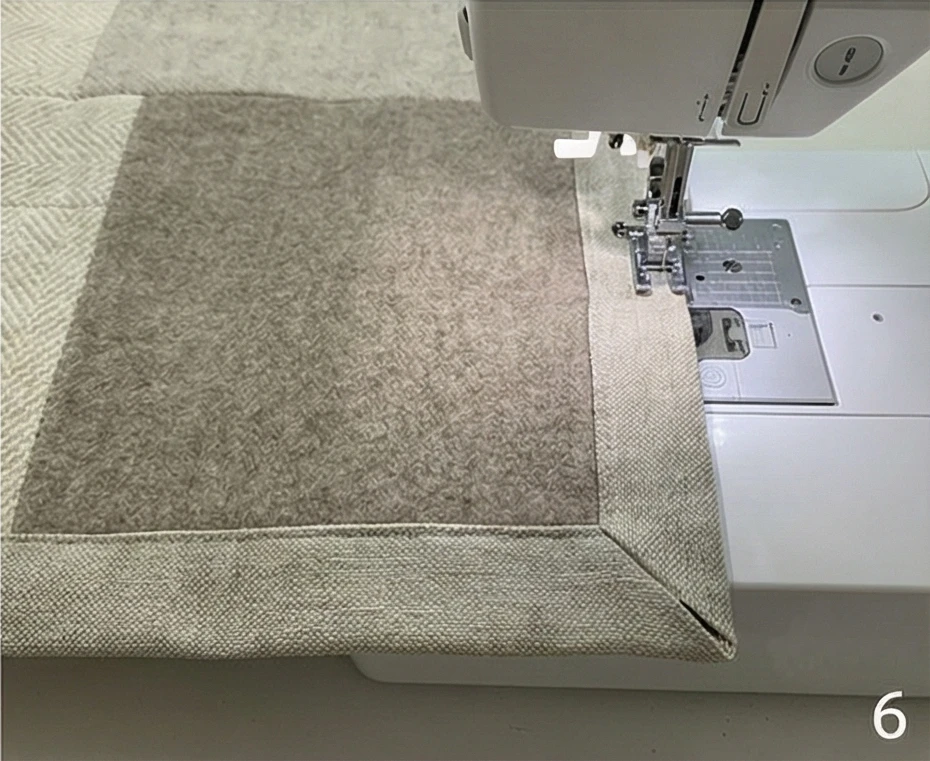
Step 7: Bias Binding
- Cut your binding strips 2.75″ wide (slightly wider than standard to accommodate the thick wool).
- Sew to the front and hand-stitch to the back for a clean finish.
- Care: Wool quilts are heirloom items. Wash only with wool-safe detergent on a gentle/cold cycle and lay flat to dry.
2. Hand-Tied Flannel Comforters for Extra Loft and Warmth
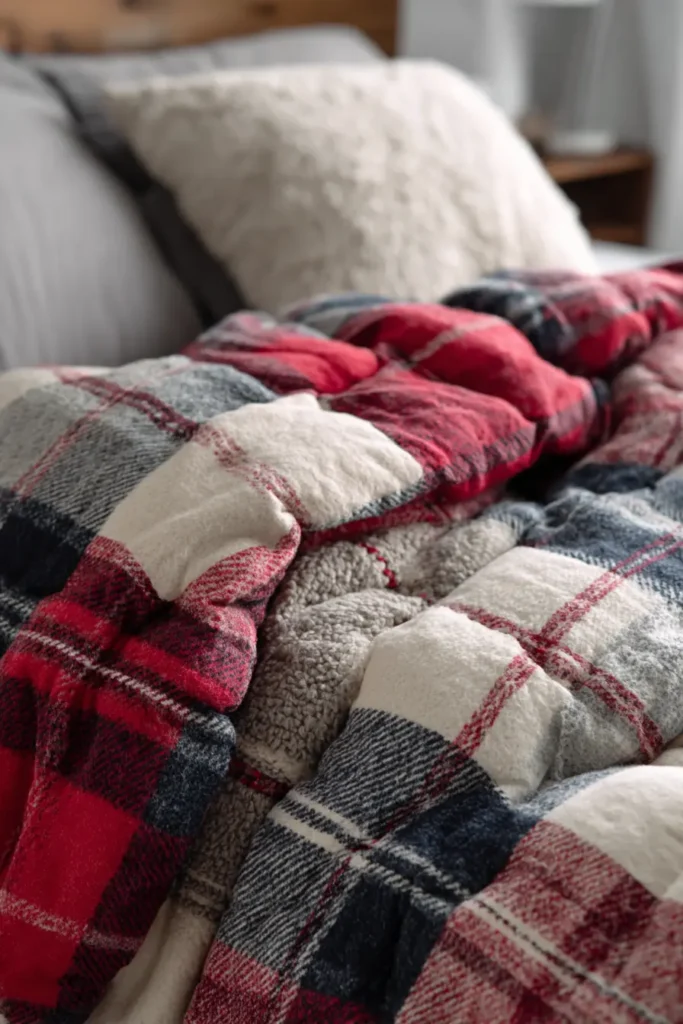
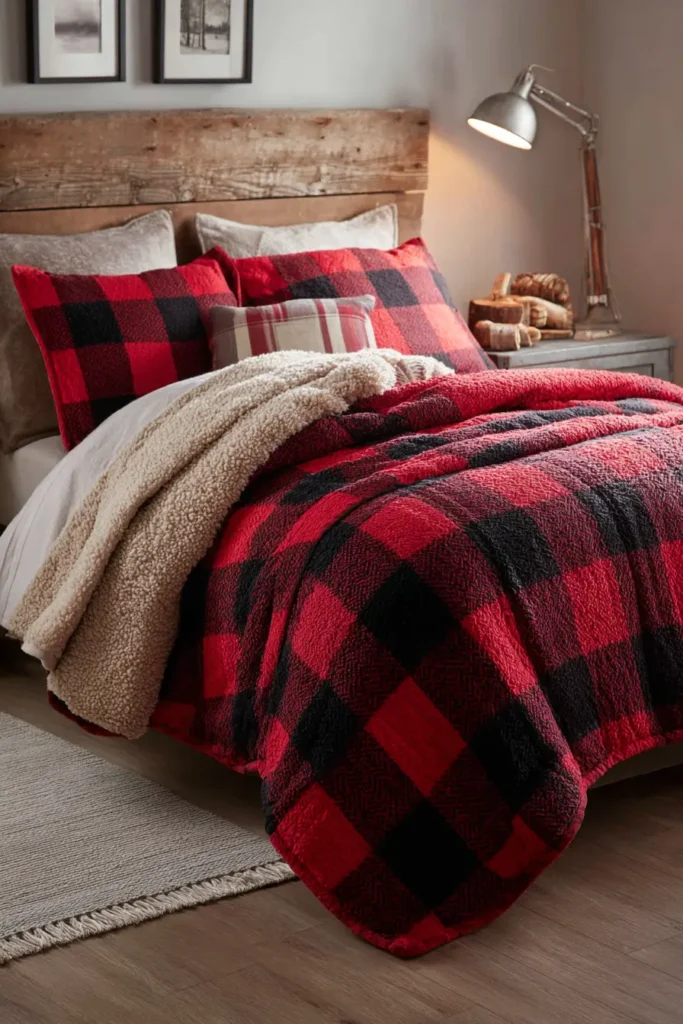
The “Cabin Loft” Hand-Tied Flannel Comforter
Sometimes you don’t want a stiff, dense quilt—you want a fluffy, cloud-like comforter to curl up in while watching movies. The secret to this ultra-cozy project is combining Flannel (for surface softness) with High-Loft Polyester Batting (for air-trapping warmth). Because the batting is so thick, you cannot machine quilt it easily. Instead, we use the traditional method of Hand Tying, using yarn knots to secure the layers. This preserves the “puff” and makes for a very fast weekend project.
Finished Dimensions: Large Sofa Throw, approximately 60″ x 70″.
Materials Needed:
- Fabric A (Top): 2 yards of Mammoth Flannel or Plaid Flannel (Red/Black Buffalo Check is classic).
- Fabric B (Backing): 4 yards of Solid Grey Flannel or Minky (for extra luxury).
- Batting: High-Loft Polyester Batting (approx 1/2″ to 1″ thick). Do not use thin cotton batting; you want the puff.
- Yarn: 1 skein of Worsted Weight Yarn (Black, Cream, or Red) or Pearl Cotton Size 5.
- Binding: 3/4 yard of Black Flannel.
- Notions: Curved safety pins, large Chenille or Tapestry needle (large eye, sharp point).
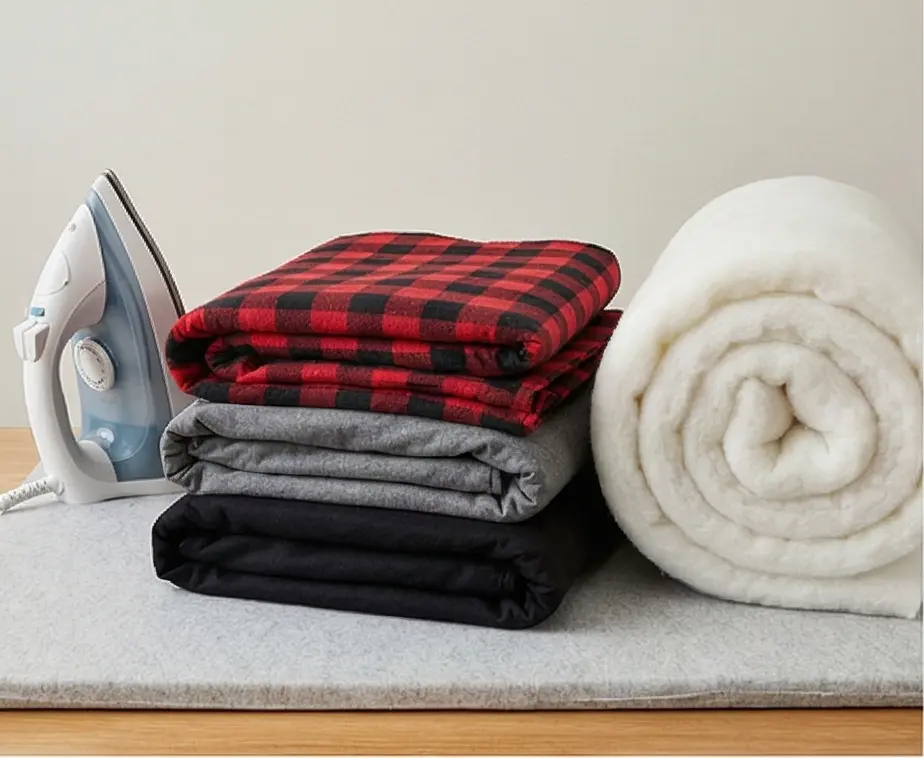
Step 1: The “Pre-Shrink” Ritual (Crucial!)
Flannel shrinks significantly more than standard cotton. If you skip this, your quilt will distort in the first wash.
- Wash & Dry: Wash all flannel fabrics (Top, Backing, and Binding) in hot water and dry on high heat.
- Press: Iron the wrinkled fabric flat with plenty of steam before cutting.
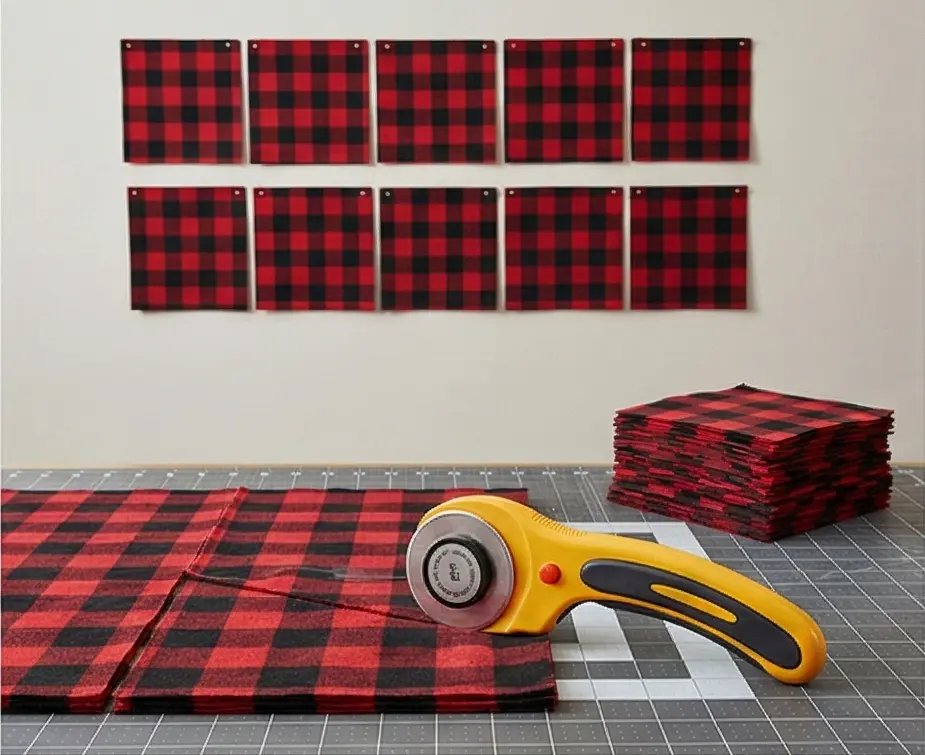
Step 2: Cut Large “Comfort” Blocks
We use large blocks to show off the plaid and minimize seams that reduce softness.
- Cut: Cut your Top Fabric into 35 squares measuring 10.5″ x 10.5″.
- Layout: A grid of 5 blocks wide x 7 blocks tall.
- Assembly:
- Sew the blocks into 7 rows of 5.
- Sew the rows together.
- Pressing: Press all seams Open. (Flannel is thick; pressing to the side creates lumpy ridges).
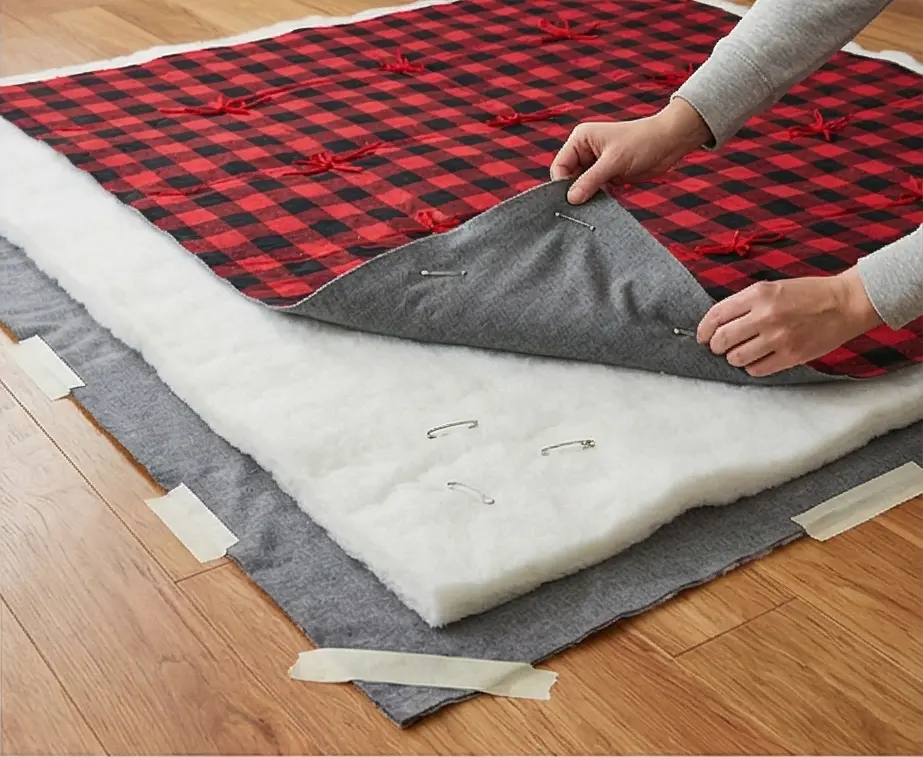
Step 3: The Fluffy Sandwich
- Floor Prep: Clear a large space. Tape your Backing Fabric (face down) to the floor.
- Batting: Lay the High-Loft Batting on top. Smooth it gently—do not stretch it.
- Top: Lay your pieced Flannel Top (face up) on the batting.
- Baste: Use Curved Safety Pins to baste the layers together.
- Placement: Place a pin at the center of each square. You need secure basting because the thick batting can shift.
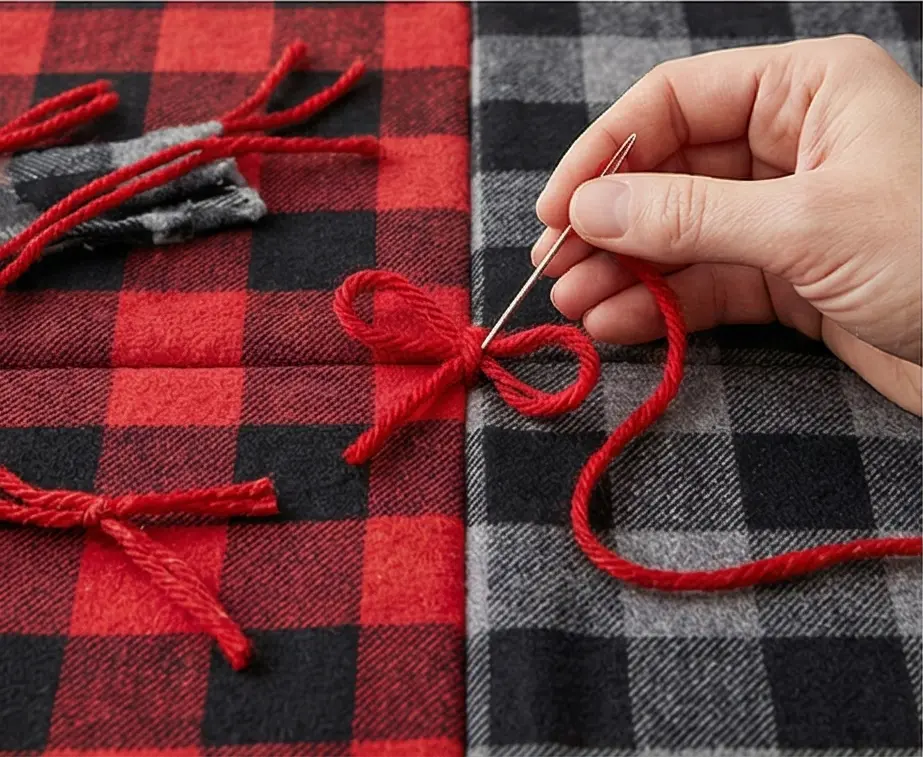
Step 4: The Hand-Tying Process
This replaces the machine quilting.
- Thread: Cut a 24-inch length of Yarn. Thread your Chenille needle. Do not knot the end yet.
- Insert: Insert the needle down through all three layers (Top, Batting, Back) at the intersection of four blocks (the corner).
- Return: Bring the needle back up about 1/4 inch away from where you went down.
- Tie: You now have two yarn tails on top of the quilt. Tie them into a Square Knot (Right over Left, Left over Right).
- Tightness: Pull tight enough to compress the batting slightly (creating a tuft) but not so tight that the fabric puckers.
- Trim: Trim the yarn tails to 1/2 inch long.
- Repeat: Tie a knot at every block intersection across the entire quilt.
- Optional: For extra security, add a tie in the exact center of each block as well.
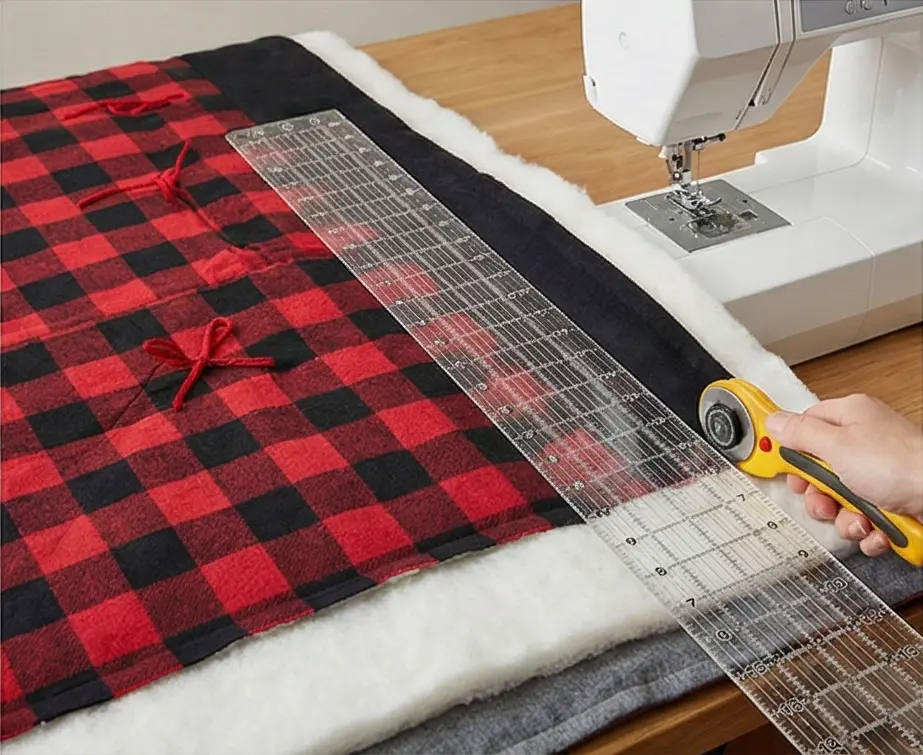
Step 5: Trim and Square
- Because high-loft batting can distort the shape, you need to square up the edges.
- Use a long ruler and rotary cutter to trim the excess batting and backing even with the quilt top.
- Tip: Stitch a “Victory Lap” (a machine stay-stitch) 1/8″ from the edge all the way around to hold the thick layers together before binding.
Step 6: Wide Binding
- Cut Strips: Cut your binding strips 3 inches wide (standard 2.5″ is too tight for thick batting).
- Sew: Sew the binding to the front with a 3/8″ seam allowance (slightly deeper than usual).
- Finish: Fold over to the back and hand-stitch or machine-stitch down.
- Result: A lofty, puffy, cloud-soft comforter that feels like a hug.
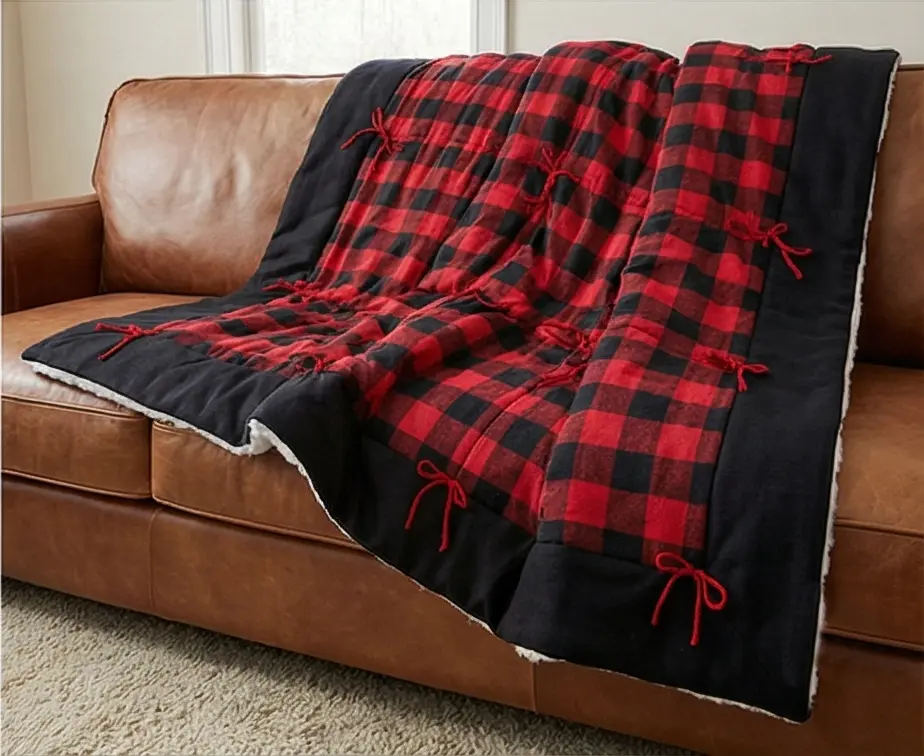
Pro Tip: The “Wool Tie.” If you want the ties to “bloom” (fray and look fuzzy) over time, use 100% Wool Yarn. When washed, the wool yarn felts and locks the knot permanently, creating cute little fuzzy buttons across your quilt.
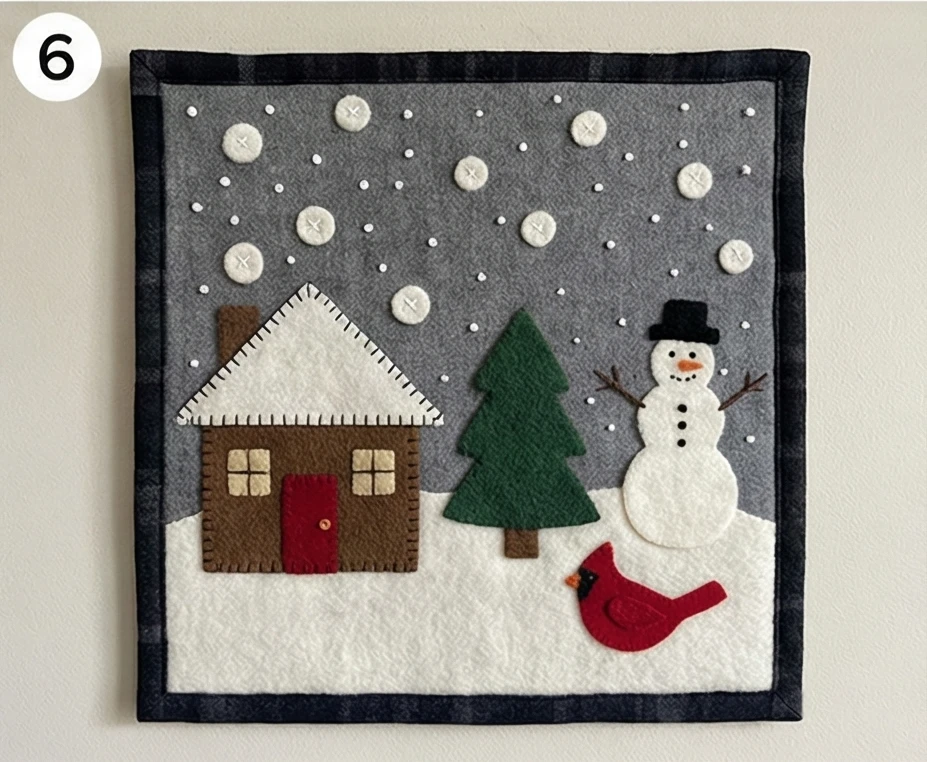
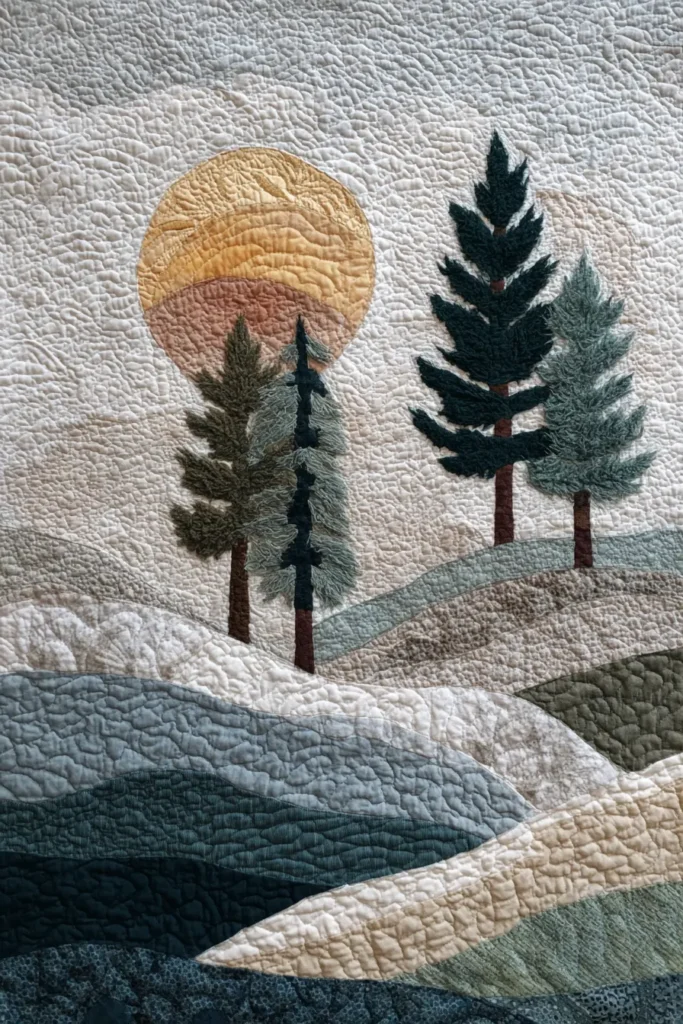
3. Wool Appliqué Folk Art Quilts with Winter-Inspired Scenes
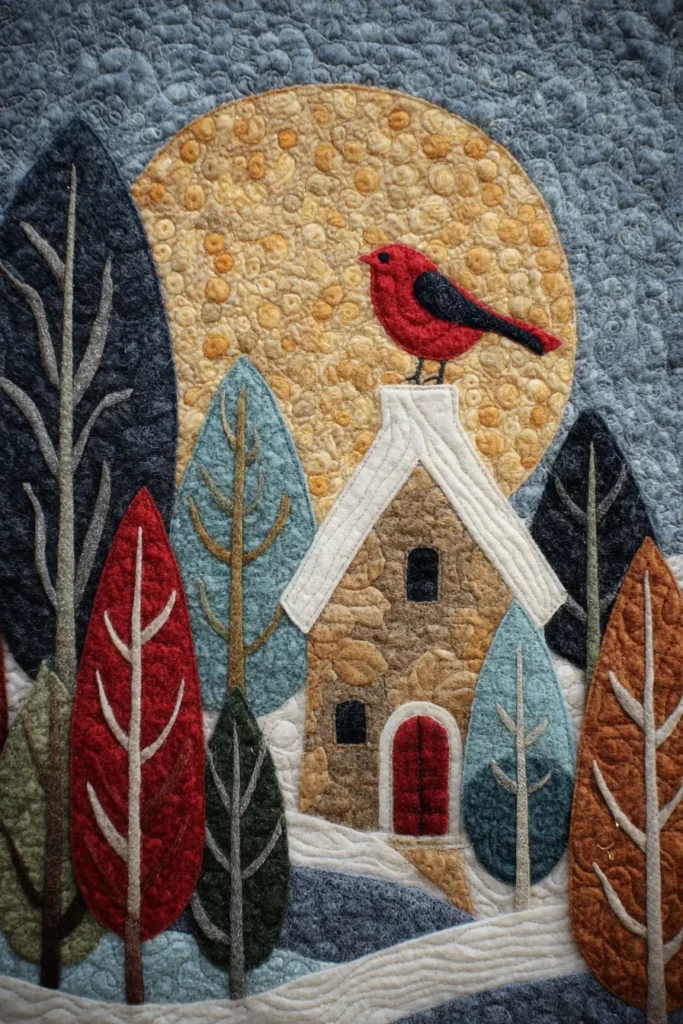

The “Winter Solstice” Wool Appliqué Wall Hanging
Wool appliqué is the cornerstone of “Primitive” or Folk Art quilting. Unlike cotton appliqué, felted wool does not fray, meaning you do not need to turn the edges under. You simply cut the shape and stitch it down. This makes it perfect for intricate winter scenes featuring pine trees, cardinals, and snowy cottages. The texture is thick, velvety, and undeniably warm.
Finished Dimensions: Wall Hanging or Table Topper, approximately 30″ x 30″.
Materials Needed:
- Fabric A (Background): 1 yard of Cotton Flannel (in Mottled Grey, Navy, or Tan). Flannel supports the weight of the wool better than standard cotton.
- Fabric B (Appliqué Scraps): A bundle of 100% Wool scraps (felted) in winter colors: Pine Green, Cardinal Red, Snow White, Bark Brown, Gold.
- Thread: Size 8 or 12 Pearl Cotton or embroidery floss. (Black is traditional for outlining, or use matching colors).
- Freezer Paper: For making precise templates.
- Batting: Thin Cotton or Wool Batting (or just another layer of flannel for a thinner hanging).
- Needles: Chenille #24 or Embroidery needles.
- Glue Stick: Water-soluble fabric glue stick (crucial for holding thick wool in place).
Step 1: “Felting” the Wool (The Prep)
You cannot use wool straight off the bolt. It must be felted to tighten the fibers so it won’t unravel.
- Wash: Wash your wool scraps in a washing machine using Hot Water and a little detergent. Agitation is good here.
- Dry: Dry them in the dryer on High Heat.
- Steam: Press the wool with lots of steam.
- Result: The wool is now thick, dense, and “felted.” The cut edges will remain crisp forever.

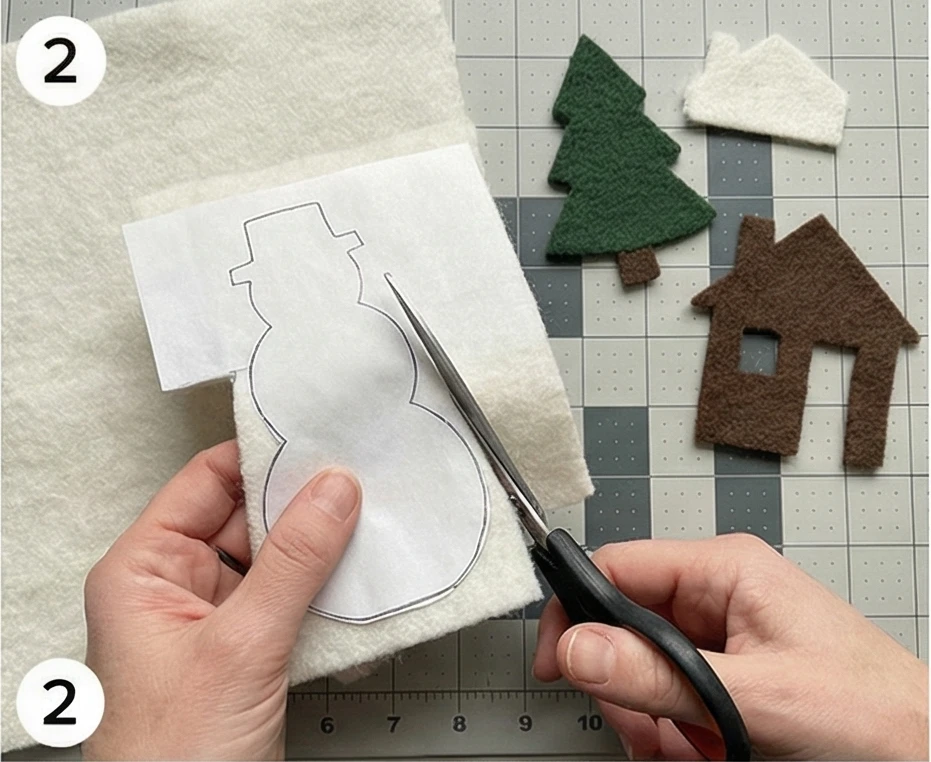
Step 2: Freezer Paper Templates
- Draw: Draw your winter shapes onto the matte side of freezer paper.
- Motifs: A tall pine tree, a round snowman, a red cardinal bird, a simple house, varying sizes of circles (“pennies”) for falling snow.
- Iron: Place the freezer paper (shiny side down) onto the right side of your wool scraps. Iron with a dry iron. The paper will stick firmly.
- Cut: Cut exactly along the drawn line through both paper and wool.
- Peel: Peel off the paper. You now have perfect wool die-cuts.
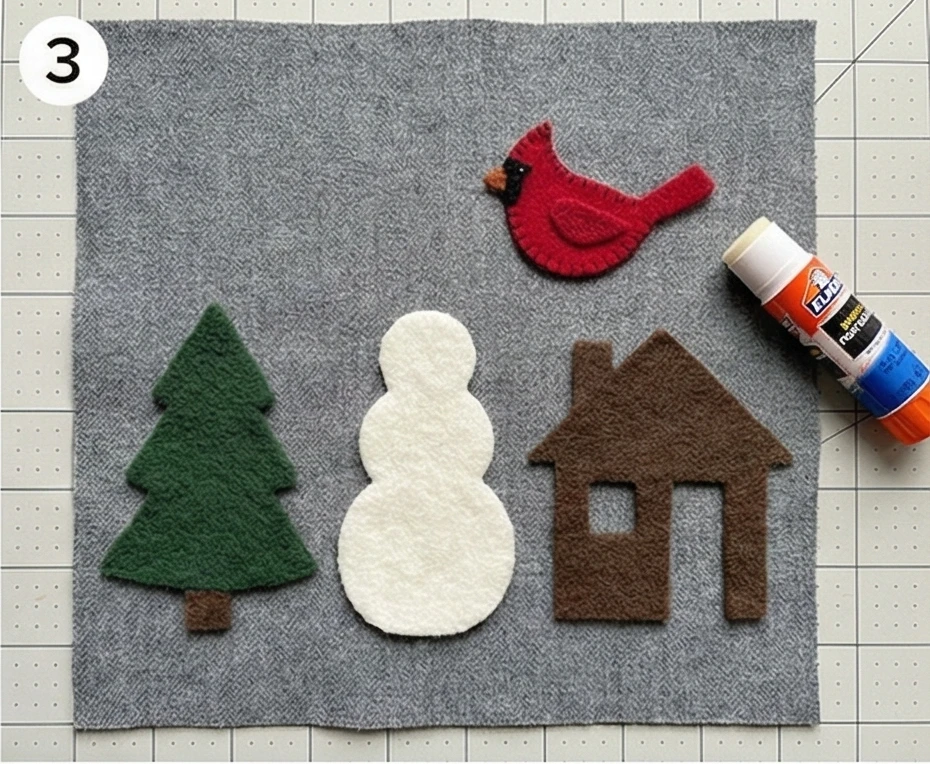
Step 3: Layering the Scene
- Background: Cut your Background Flannel into a 30″ x 30″ square.
- Arrangement: Lay out your scene.
- Layering: Start from the back. Place the snowy hills (white wool) at the bottom. Place the house on the hill. Place the tree next to the house. Place the cardinal on the tree branch.
- Glue Baste: Wool is too thick for pins (the thread will catch on them). Use a dab of Glue Stick on the back of each wool shape and press it onto the background. This holds it securely for stitching.
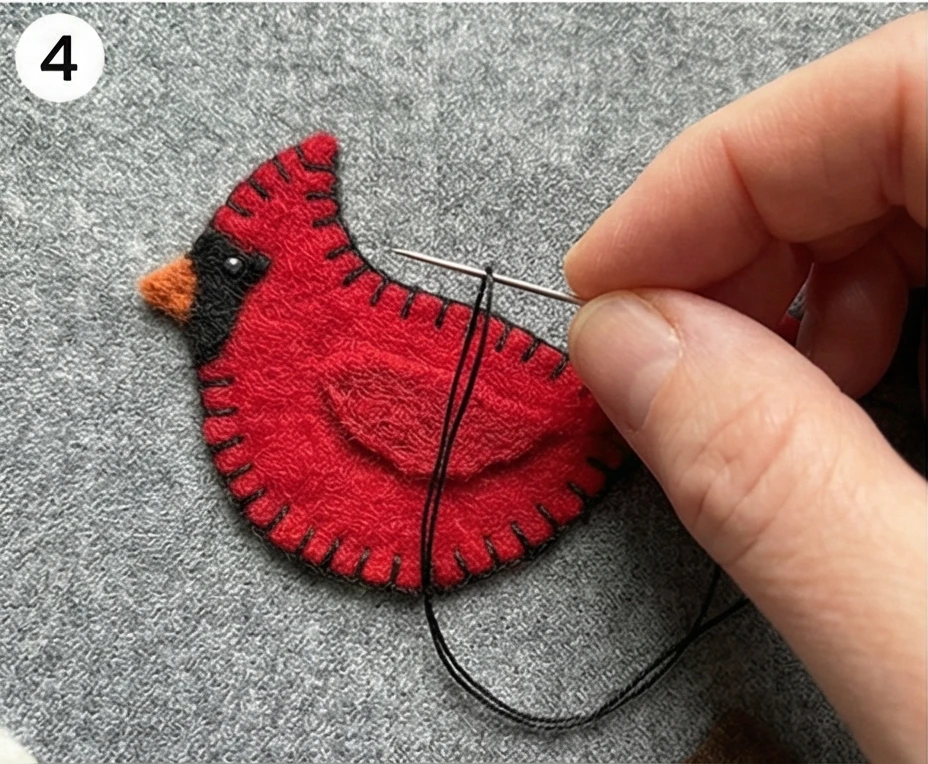
Step 4: The Blanket Stitch
This is the signature stitch of wool folk art.
- Thread: Use a single strand of Size 12 Pearl Cotton (Black is the classic “primitive” look, but you can match the wool color for a modern look).
- Stitch: Work a Blanket Stitch (or Buttonhole Stitch) around the raw edge of every shape.
- Technique: Bring the needle up at the edge of the wool. Insert it into the background fabric just outside the wool, and bring it back up through the wool loop.
- Spacing: Keep stitches about 1/8″ to 1/4″ apart. Uniformity is less important than rhythm; a little “wonkiness” adds to the folk art charm.
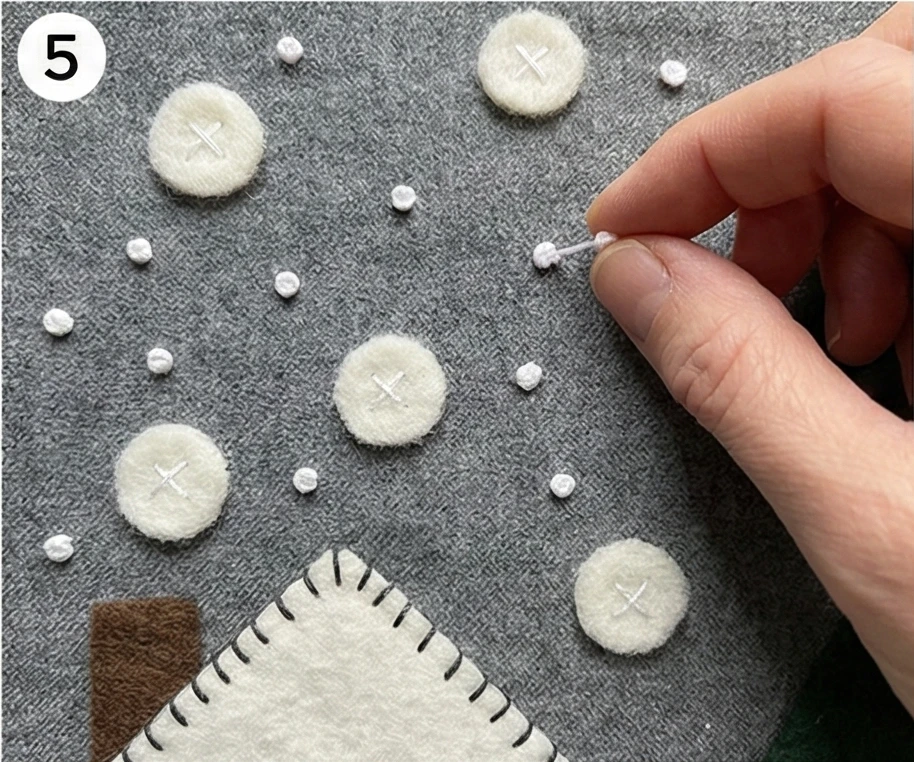
Step 5: Embellishing the “Snow”
Texture is everything in winter quilts.
- French Knots: Use White embroidery floss to stitch French Knots scattered across the grey sky background. This mimics falling snow.
- Stems: Use a Stem Stitch in Brown thread to create twiggy branches for the snowman’s arms or the bird’s perch.
- Penny Circles: If you cut white wool circles, stitch a simple “X” in the center of each one to secure it, rather than blanket-stitching the tiny edges.
Step 6: Finishing
- Sandwich: Lay your Backing (face down), Batting, and your Appliquéd Top (face up).
- Quilting: Keep it minimal. Do not quilt over your wool shapes.
- Quilt simple wavy lines in the background sky only, or stitch “in the ditch” around the main shapes to pop them out.
- Bind: Bind with a Flannel Binding (cut 2.5″ wide) to maintain the soft, cozy feel of the piece.
Cultural Context Note: This style is often called “Penny Rug” quilting, dating back to the US Civil War era. Women would use coins (“pennies”) as templates to cut circles from old wool coats and blankets, stitching them onto backing fabric for warmth and decoration. It is a quintessential art form of making something beautiful out of necessity.
4. Elegant Black and Cream Wool Quilt Designs for Timeless Decor
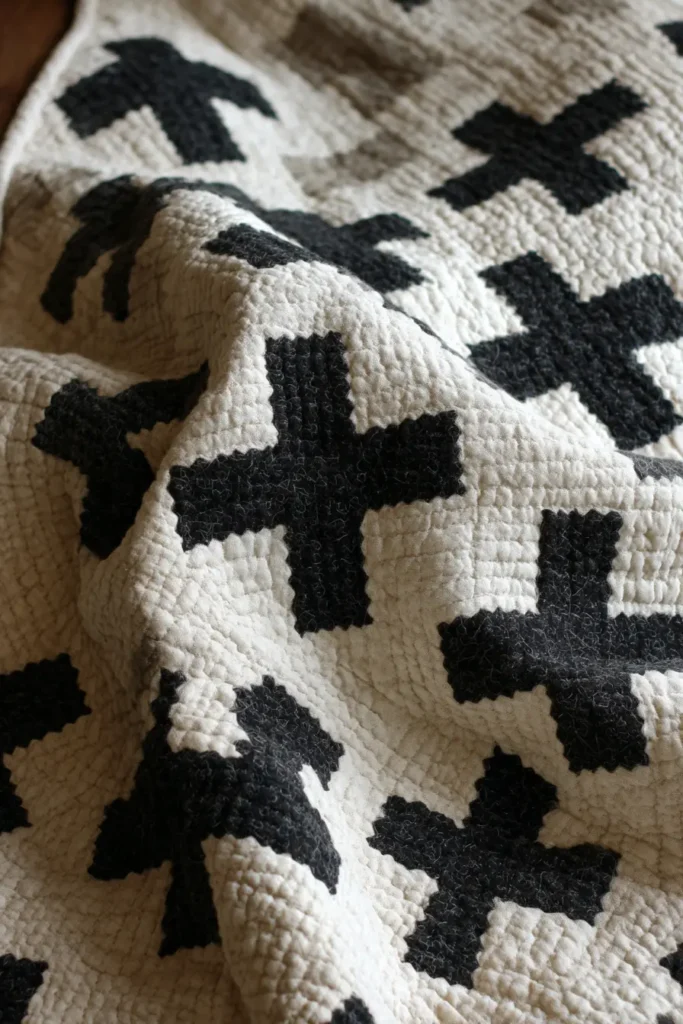
The “Midnight Snow” Courthouse Steps Quilt
While many wool quilts lean towards rustic plaids, a strictly limited palette of Black, Charcoal, and Cream creates a stunningly modern, architectural look. This design uses the “Courthouse Steps” block—a variation of the Log Cabin—to build concentric rectangles. By alternating the high-contrast wools, you create a graphic, vibrating effect that looks sophisticated enough for a formal living room yet offers the heavy warmth of a winter coat.
Finished Dimensions: Elegant Throw, approximately 60″ x 70″.
Materials Needed:
- Fabric A (Dark): 2 yards of Black Wool Suiting or Meltington Wool.
- Fabric B (Medium): 1.5 yards of Charcoal Grey Wool or Herringbone Tweed.
- Fabric C (Light): 2 yards of Cream/Oatmeal Wool Flannel or “Boiled Wool”.
- Center Squares: 1/4 yard of a texture accent (e.g., Black Velvet or Red for a “hearth” center).
- Backing Fabric: 4 yards of heavy Cotton Flannel (Cream or Grey).
- Batting: 100% Wool Batting (for maximum loft and breathability).
- Thread: Cream Pearl Cotton Size 8 (for visible quilting).
- Notions: Rotary cutter, heavy starch.
Step 1: Wool Preparation (The “Fulling”)
To achieve a clean, elegant look, the wool must not fray.
- Wash & Dry: Machine wash all wools on hot and tumble dry hot. This tightens the weave (“fulling”) and creates a dense, felt-like fabric that cuts cleanly.
- Starch: Spray heavily with starch and press flat. This is crucial for maintaining straight lines in a geometric quilt.
Step 2: Cutting the “Logs”
We are building blocks with a 2-inch finished width.
- Strips: Cut all fabrics (Black, Charcoal, Cream) into 2.5″ wide strips.
- Centers: Cut 30 Center Squares measuring 2.5″ x 2.5″ (use your accent fabric, e.g., Red or Velvet).
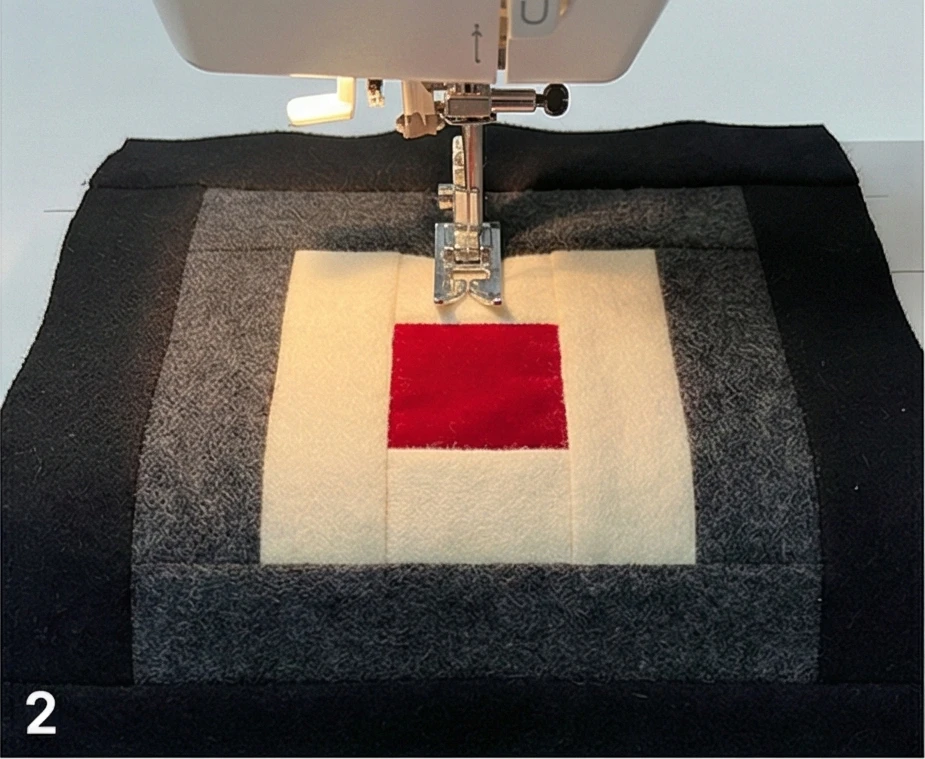
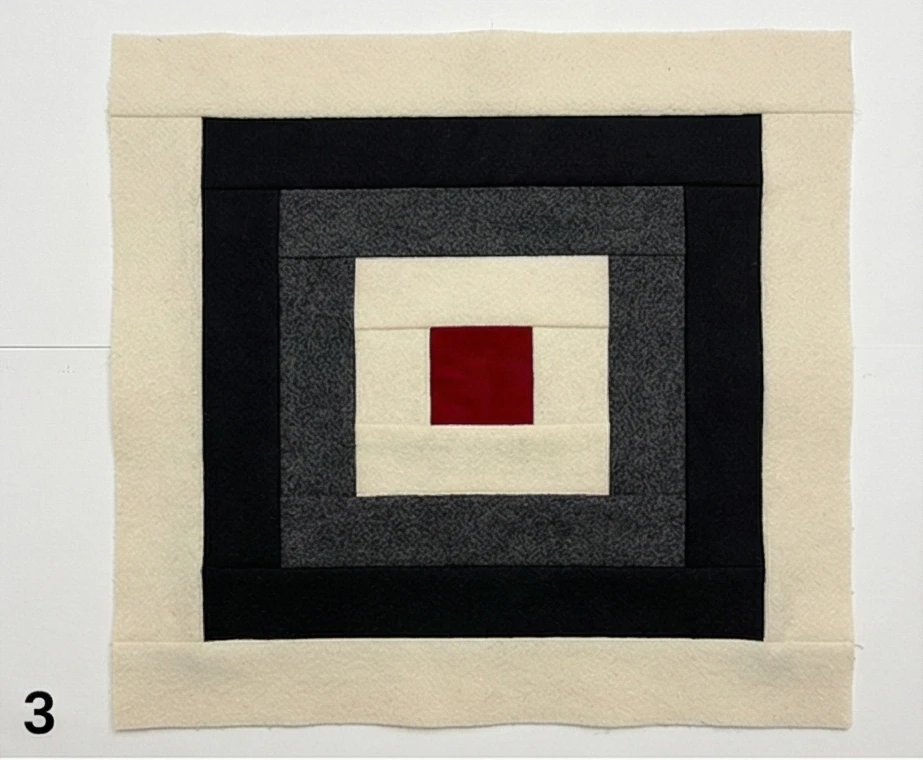
Step 3: Constructing the “Courthouse” Block
Unlike a Log Cabin, which spirals, Courthouse Steps are built in opposing pairs. Make 30 Blocks.
- Round 1 (Cream):
- Sew a Cream strip to the Top and Bottom of the Center Square. Press seams open.
- Trim edges even.
- Round 2 (Black):
- Sew a Black strip to the Left and Right sides of the unit. Press open.
- Round 3 (Charcoal):
- Sew Charcoal strips to the Top and Bottom.
- Round 4 (Cream):
- Sew Cream strips to the Left and Right.
- Continue: Keep adding logs in pairs (Top/Bottom, then Left/Right), alternating Light and Dark rounds until the block measures 12.5″ square.
- Design Note: By keeping the “Lights” on top/bottom and “Darks” on sides (or vice versa), you create strong horizontal or vertical channels.
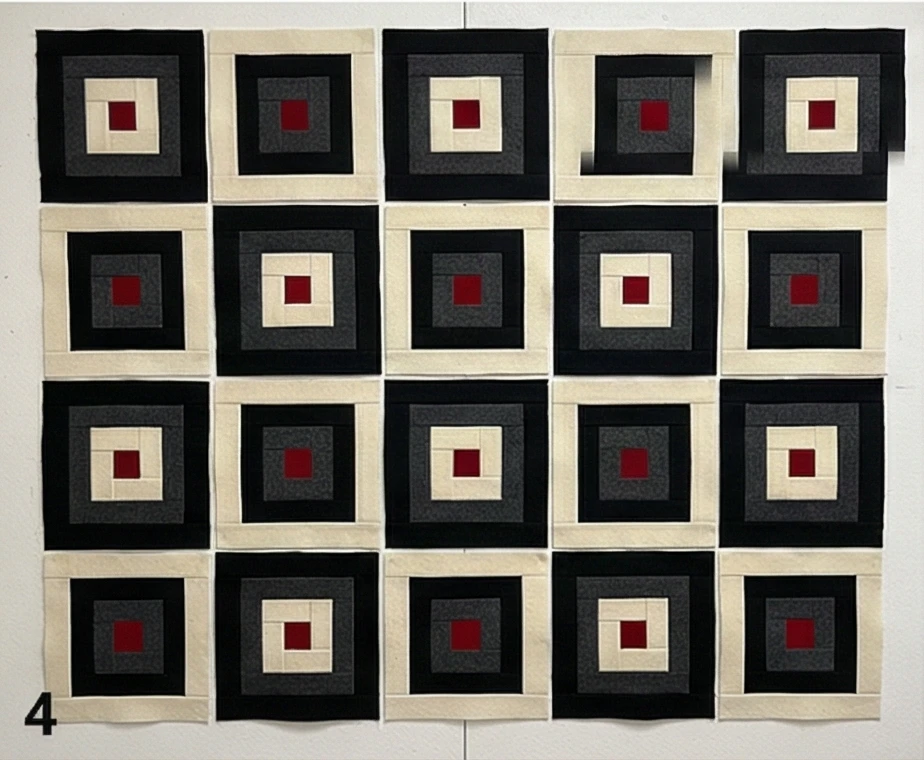
Step 4: The “Optical” Layout
- Grid: Arrange the blocks in a 5 x 6 grid.
- Rotation:
- Option A (Lattice): Rotate every other block 90 degrees. This creates a weaving “over-under” effect.
- Option B (Furrows): Orient all blocks vertically. This creates tall, sophisticated columns of black and cream, elongating the quilt’s look.
- Sew: Stitch the blocks into rows, then join the rows. Use many pins, as wool is heavy and likes to shift.
Step 5: High-Contrast “Big Stitch” Quilting
The quilting stitches are a major design element in this two-tone quilt.
- Sandwich the quilt (Top + Wool Batting + Flannel Backing).
- Thread: Use Cream Pearl Cotton thread.
- The Stitch:
- On the Black wool sections, the Cream thread will pop like stars. Quilt straight lines down the center of the black strips.
- On the Cream wool sections, use Black Pearl Cotton (optional) or keep it subtle with Cream thread.
- Goal: Uniform, large running stitches (approx 4 stitches per inch) that add handmade texture to the sleek design.
Step 6: The “Faced” Binding (Invisible Edge)
For a truly modern, elegant finish, avoid a visible binding strip.
- Facing: Cut 3″ strips of the Backing fabric.
- Sew: Sew these strips to the Front of the quilt (Right Sides Together).
- Turn: Flip the strip entirely to the Back of the quilt.
- Press: Press the edge firmly so no binding shows on the front.
- Hand Stitch: Hem the facing down on the back.
- Result: The black-and-cream design runs all the way to the edge (“infinity edge”), looking like a piece of modern art.
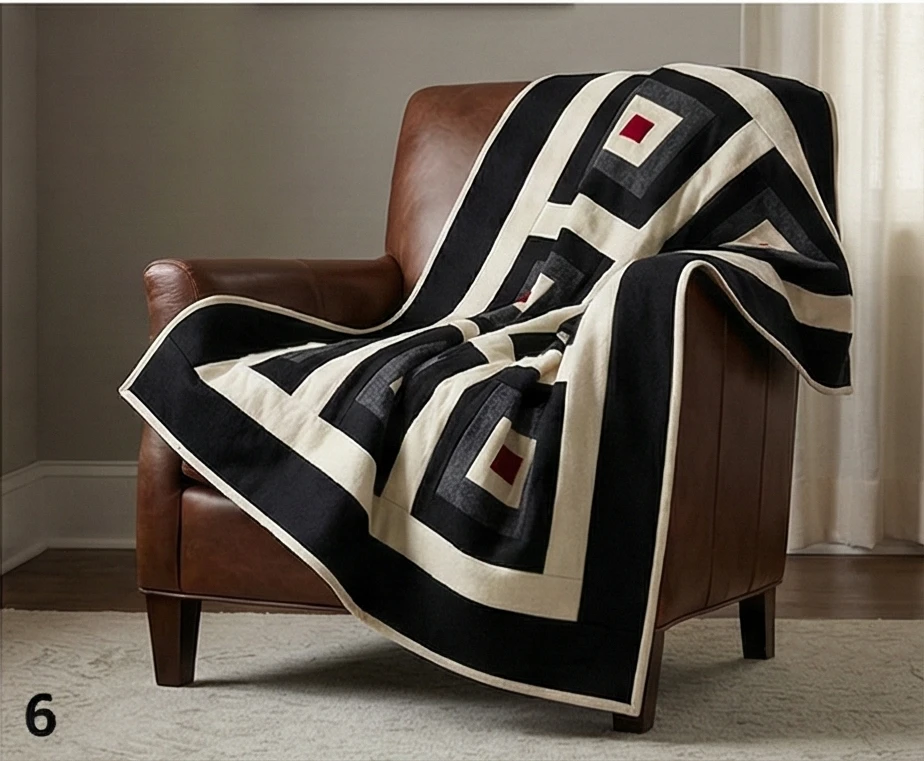
Style Note: This quilt works beautifully draped over a leather armchair or at the foot of a bed with white linens. The wool fibers absorb dye deeply, making the black incredibly rich and light-absorbing, in sharp contrast to the soft, reflective cream wool.
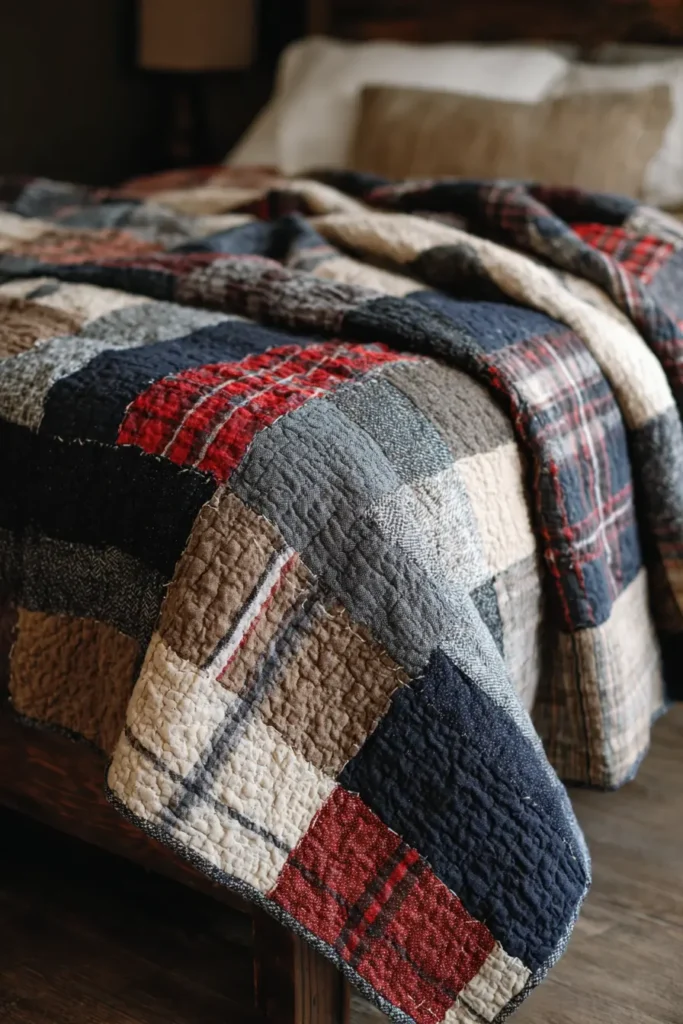
5. Farmhouse-Style Flannel Quilt Patterns for Cozy Winter Homes
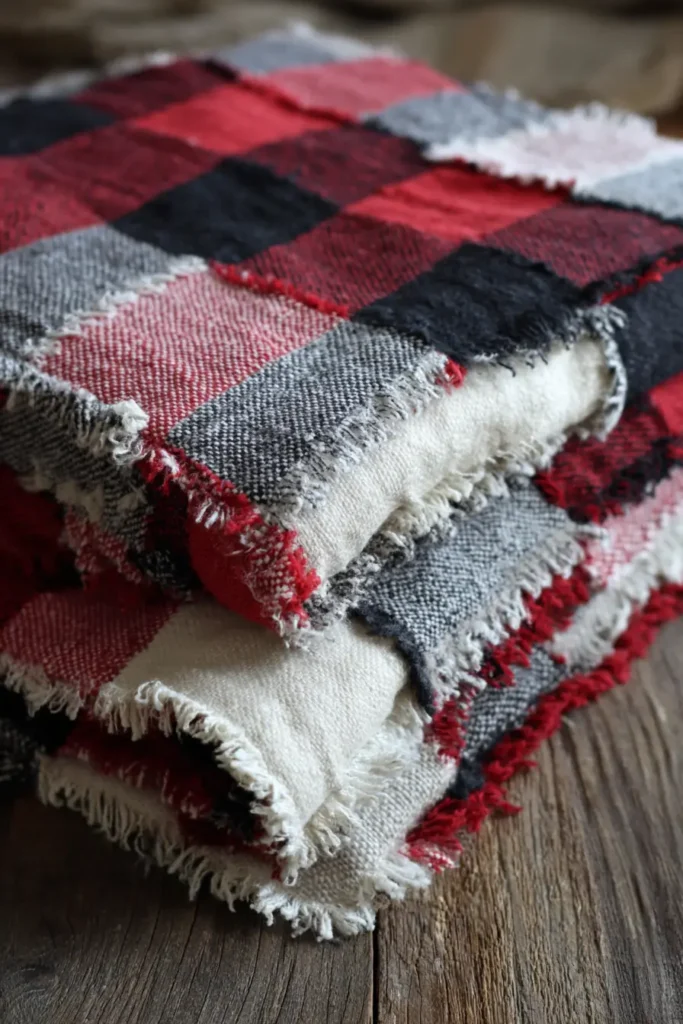
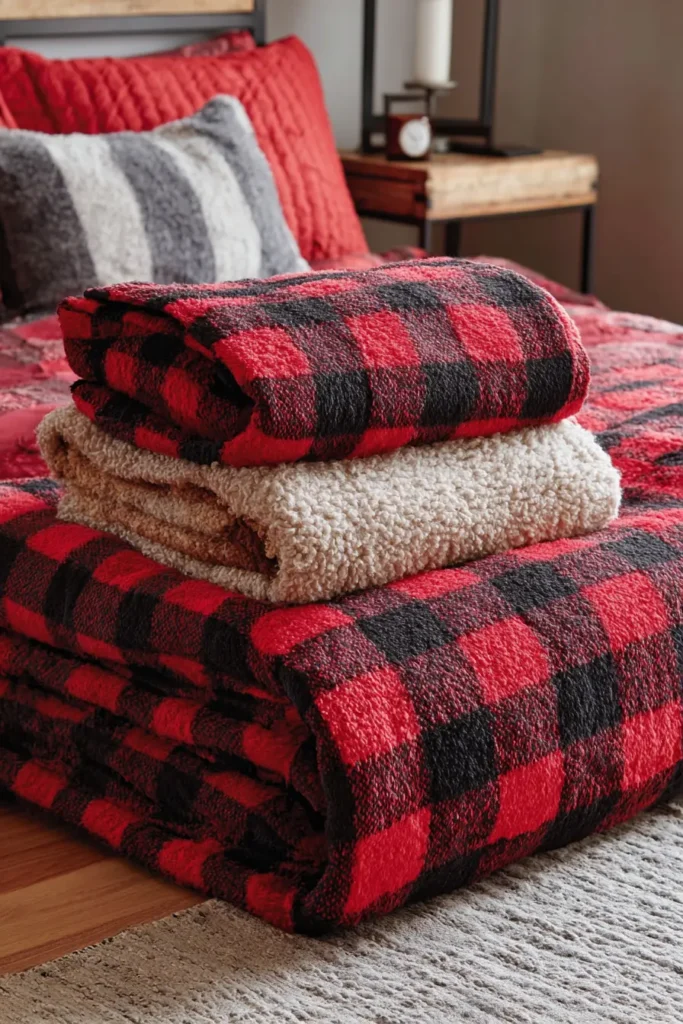
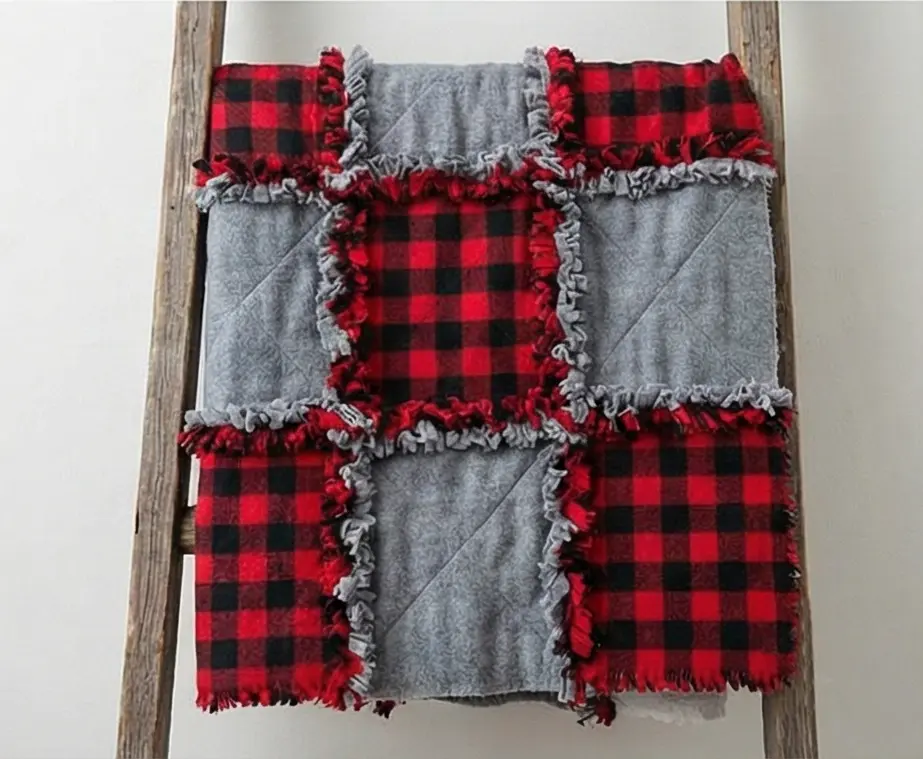
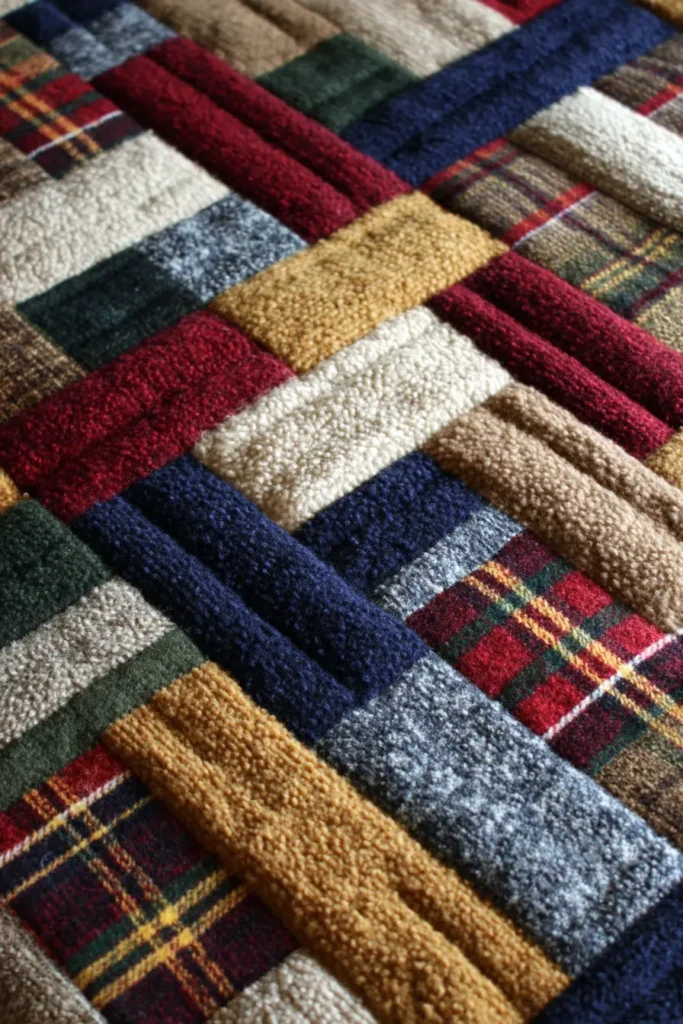
The “Barnside Check” Rag Quilt
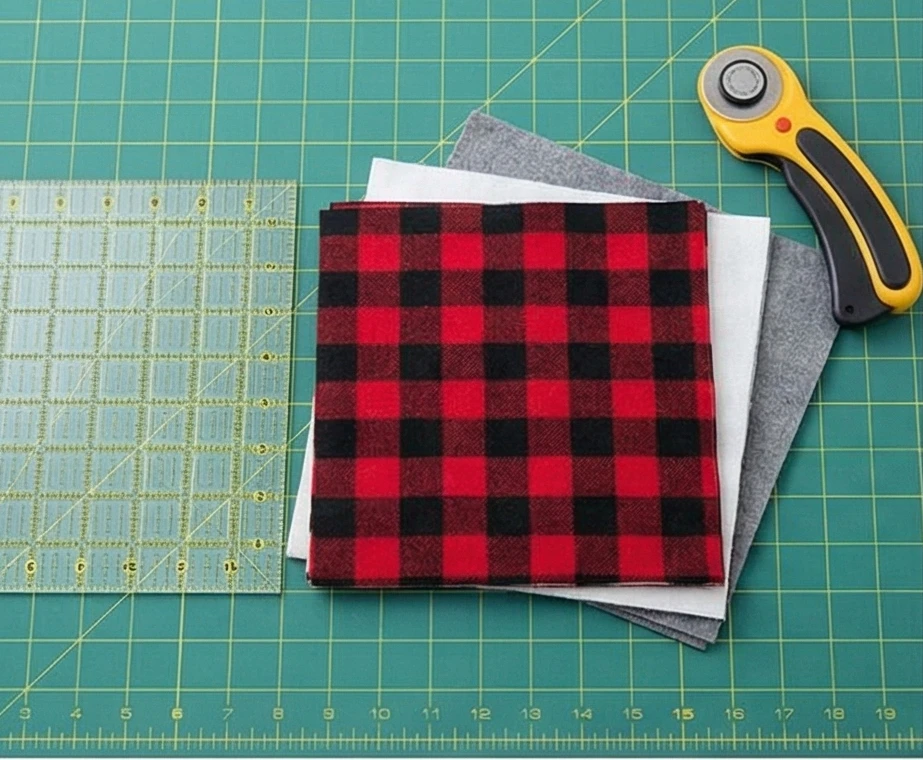
The “Rag Quilt” is the quintessential farmhouse textile. It is casual, incredibly tactile, and designed to look better the more it is washed. Unlike traditional quilts, where seams are hidden inside, a rag quilt exposes the raw seam allowances on the front. When washed, these raw edges fray into soft, fuzzy caterpillars of chenille-like texture. Using distinct Buffalo Plaid flannels creates a rustic, cabin-ready look that adds instant warmth to any room.
Finished Dimensions: Large Throw, approximately 54″ x 63″.
Materials Needed:
- Fabric A (Top – Dark): 2 yards of Red/Black or Grey/White Buffalo Check Flannel.
- Fabric B (Top – Light): 2 yards of Solid Cream or light grey Flannel.
- Fabric C (Backing): 4 yards of a coordinating Flannel (or you can use the same fabrics as the top to make it reversible).
- Middle Layer: Instead of traditional batting, use White Flannel (4 yards) as the middle layer.
- Why? Traditional batting creates too much lint when ragged. Three layers of flannel (Top + Middle + Back) create the perfect weight and drape for a farmhouse throw.
- Thread: Cotton thread in a neutral color (Grey or Cream).
- Notions: Spring-loaded Rag Quilting Snips (Essential! Standard scissors will blister your hands), Walking Foot.
Step 1: Cut the “Sandwich” Ingredients
Rag quilts are built block-by-block, not row-by-row. You are essentially making 42 mini quilts.
- Top Fabrics: Cut 21 squares of Fabric A and 21 squares of Fabric B.
- Size: 10″ x 10″.
- Backing Fabric: Cut 42 squares (10″ x 10″).
- Middle Fabric: Cut 42 squares (10″ x 10″).
- Yield: 42 total stacks, each with three layers.
Step 2: Assemble the Block Stacks
- Clear a table.
- Layer:
- Bottom: Backing Square (Face DOWN).
- Middle: Middle Flannel Square.
- Top: Top Fabric Square (Face UP).
- Repeat: Make all 42 stacks. Keep your Dark (Check) stacks and Light (Solid) stacks separate.
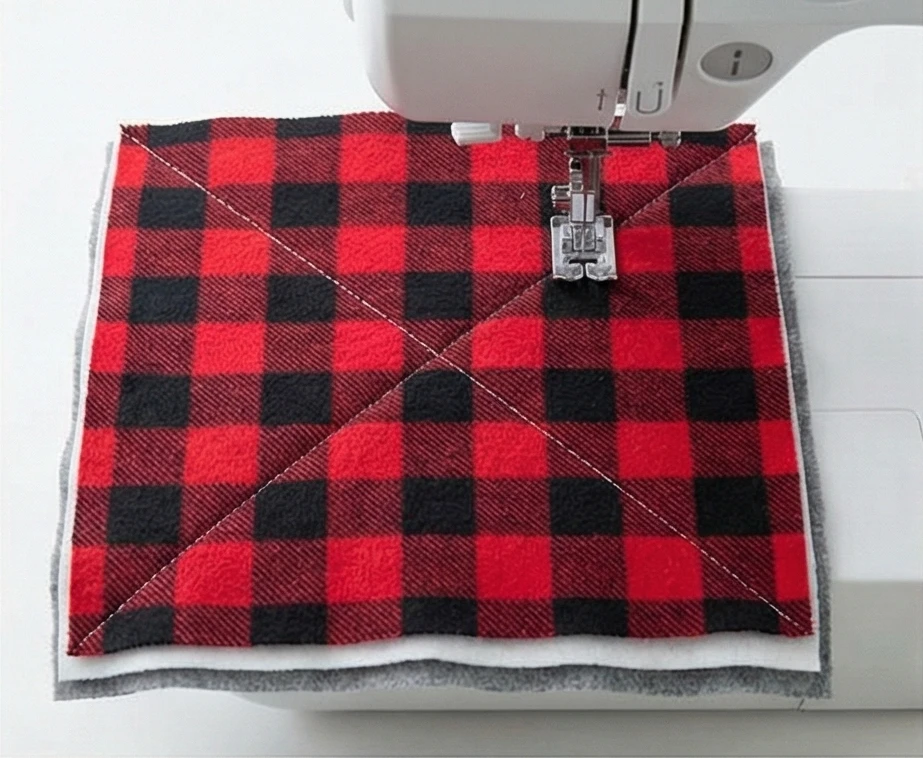
Step 3: Quilt the “X”
You must quilt the layers together before joining the blocks.
- Set your machine to a straight stitch (length 3.0).
- Sew: Sew a simple diagonal line from corner to corner. Lift the needle, rotate, and sew the other diagonal.
- Result: An “X” stitched through the center of every stack.
- Tip: You don’t need to mark the lines; just aim for the corners. This is farmhouse style—perfect is the enemy of good.
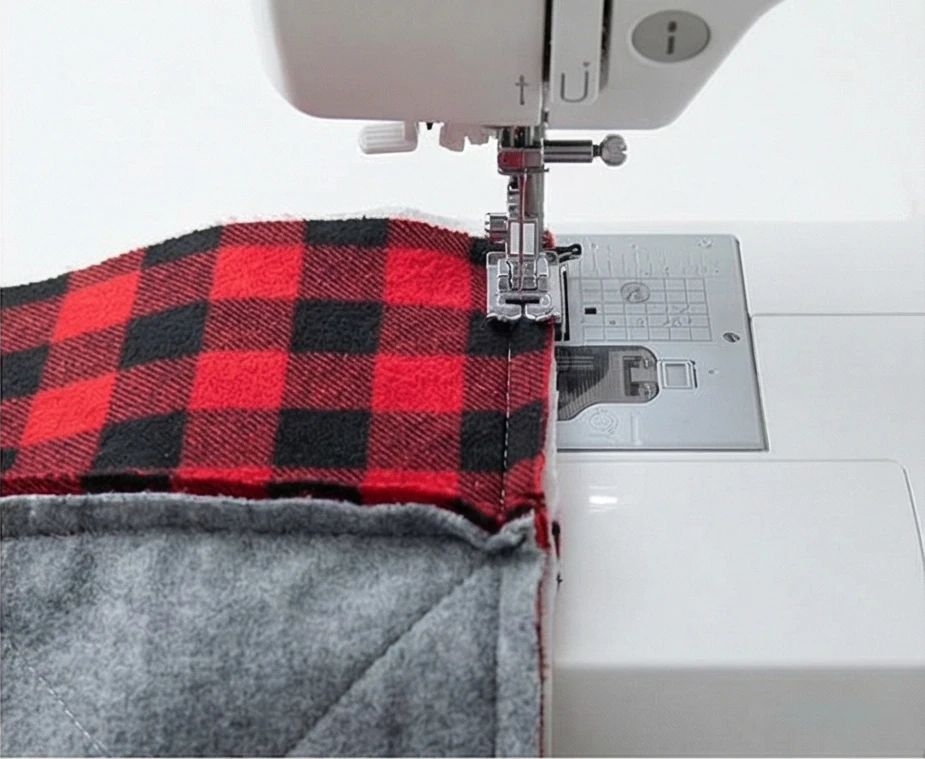
Step 4: Joining Rows (The “Wrong” Way)
This is the most important step. Forget everything you know about standard quilting.
- Layout: Arrange your blocks in a 6 x 7 grid on the floor, alternating Checkerboard style (Dark – Light – Dark).
- Seams: Take the first two blocks. Place them WRONG SIDES TOGETHER (Backing touching Backing).
- The Top fabrics should be facing out.
- Sew: Stitch them together with a 1/2 inch to 3/4 inch seam allowance.
- Crucial: The raw seam allowance must be standing up on the TOP (Front) of the quilt.
- Continue: Sew the blocks into rows. You should have 7 rows of 6 blocks, with vertical ridges of raw fabric standing up between each block.
Step 5: Joining the Grid
- Row to Row: Join Row 1 to Row 2. Again, place Wrong Sides Together and sew with a 1/2″ to 3/4″ seam allowance.
- Intersections: When you hit a bulky intersection (where the vertical seams meet), open the seam allowances flat (butterfly them) so the needle can pass over smoothly.
- Perimeter: Once all rows are joined, sew a straight stitch all the way around the outer perimeter of the quilt, 1/2″ from the edge.
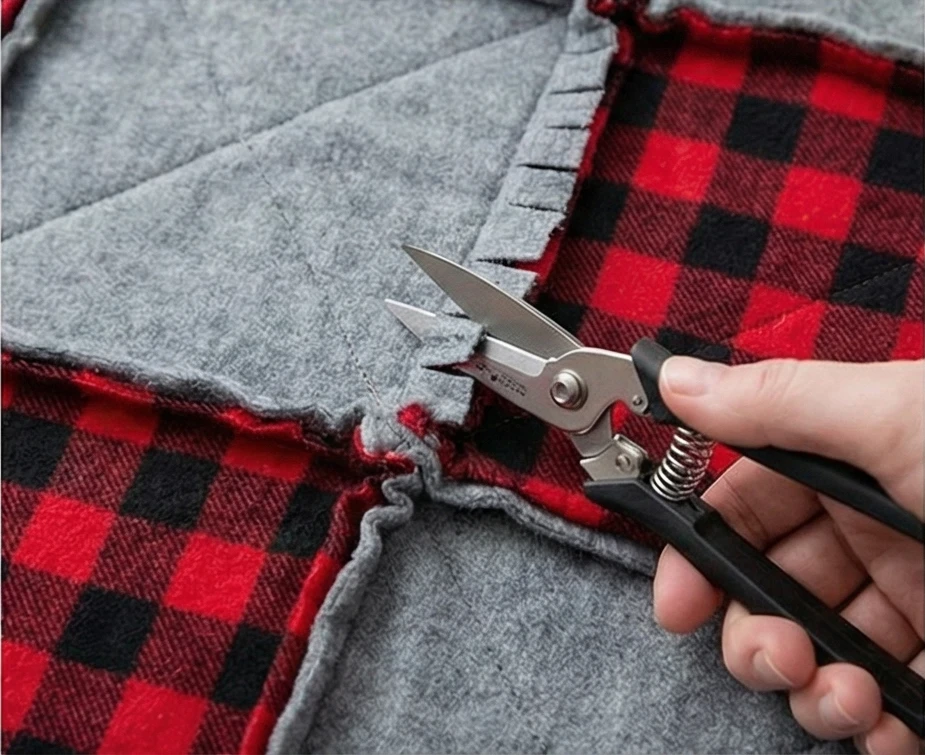
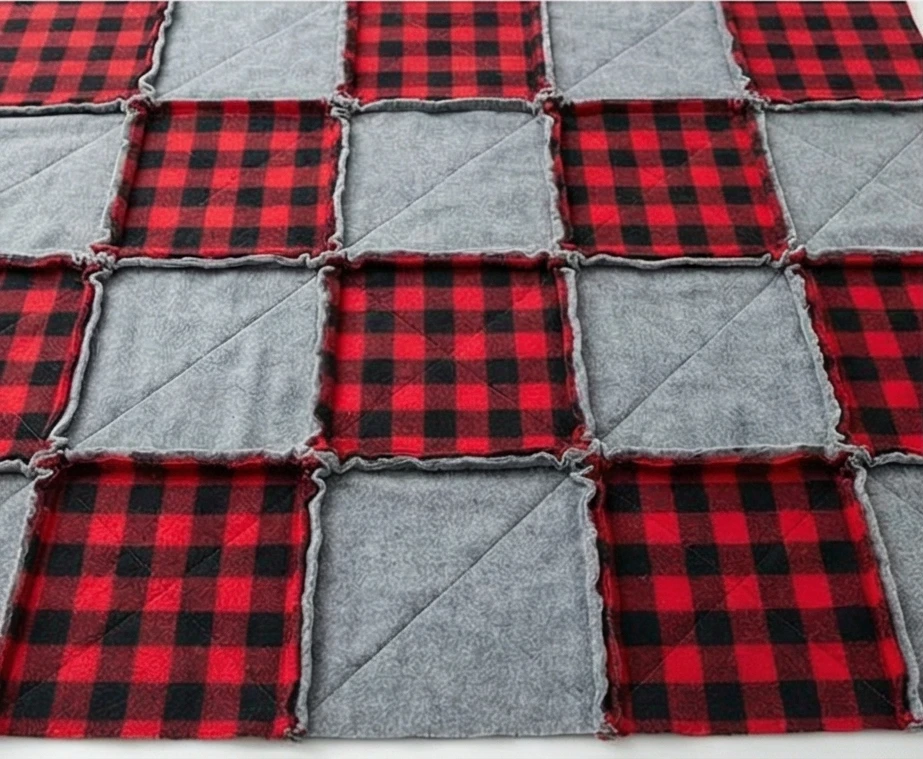
Step 6: The “Ragging” (Snipping)
This creates the texture.
- Tool: Use your spring-loaded snips.
- Snip: Cut perpendicular slits into the standing seam allowances every 1/4 inch to 1/2 inch.
- Caution: Snip close to the seam line, but DO NOT cut the thread. If you cut the thread, you create a hole.
- Perimeter: Snip the outer edges of the quilt as well.
- Time: This step takes a while. Put on a movie.
Step 7: The “Bloom” (Washing)
Right now, it looks messy. The magic happens in the laundry.
- Wash: Take the quilt to a laundromat (or check your machine’s filter frequently) because it produces a lot of lint. Wash on Cold/Gentle with liquid fabric softener.
- Dry: Tumble dry on Medium. Clean the lint trap every 10 minutes.
- Result: As the flannel tumbles, the snipped edges fray and curl, blooming into soft, fluffy caterpillars that frame every block. The more you wash it, the softer it gets.
Style Note: For a true modern farmhouse look, stick to neutral colors (Greys, Creams, Whites) or the classic “Lumberjack” Red and Black. This quilt is heavy, durable, and perfect for draping over a wooden ladder or a leather couch.

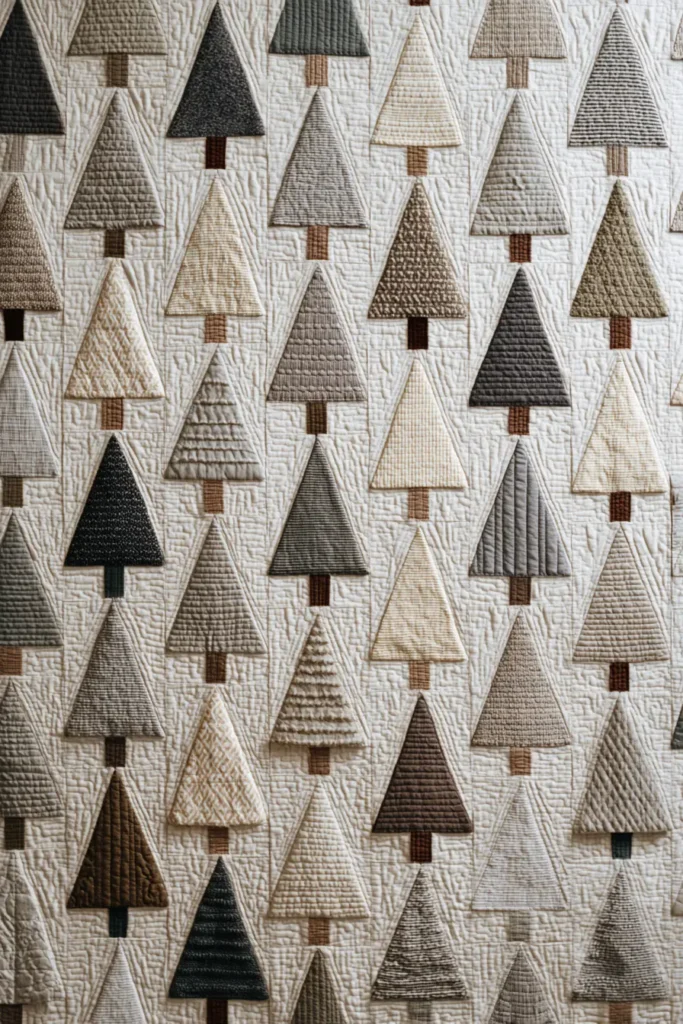
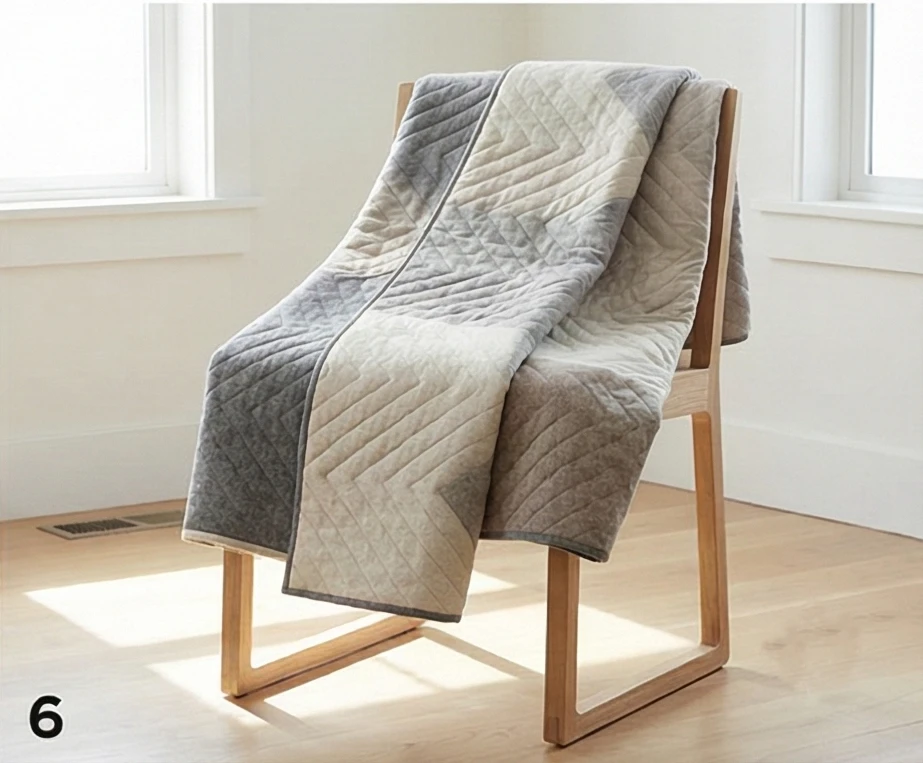
The “Nordic Pine” Minimalist Triangle Quilt
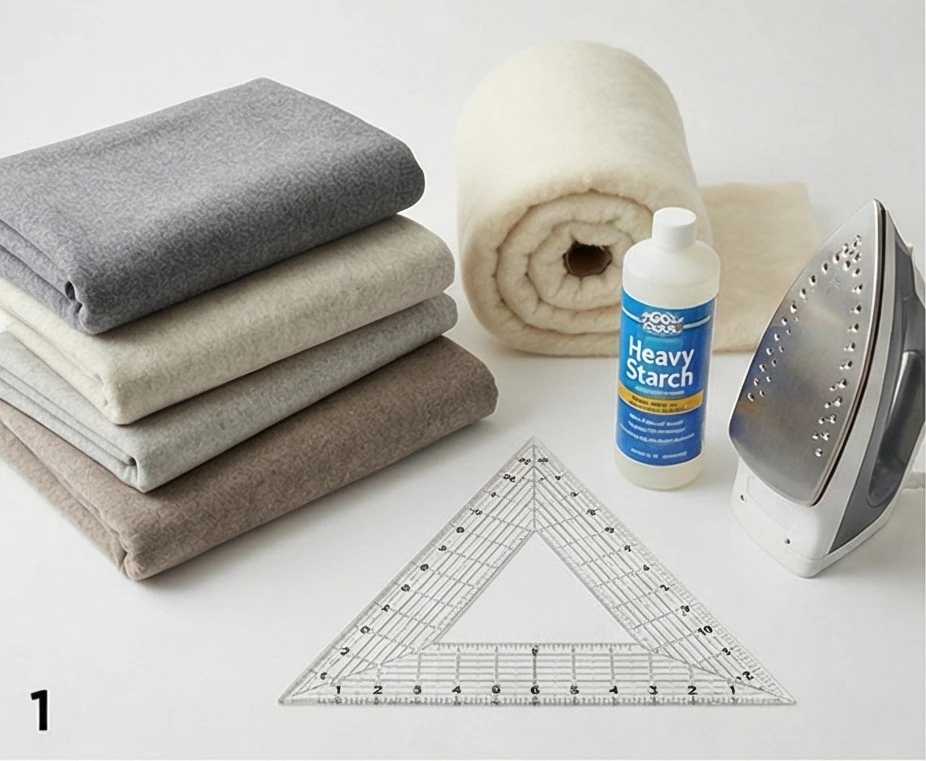
Scandinavian design relies on the concept of Hygge (coziness)—creating a warm sanctuary against the harsh winter. This aesthetic avoids busy patterns, favoring clean lines, muted colors, and incredible textures. This quilt uses a simple 60-degree triangle pattern to represent an abstract forest of pine trees. The “Soft Neutral” palette relies on texture (mixing wool, linen, and flannel) rather than color contrast to create visual interest.
Finished Dimensions: Modern Throw, approximately 50″ x 60″.
Materials Needed:
- Fabric A (The Trees): 1.5 yards total of assorted Grey, Oatmeal, and Taupe Wools/Flannels. (Mix textures: herringbone, tweed, and solids).
- Fabric B (The Snow/Sky): 2 yards of Cream or White Wool Flannel or heavy Linen.
- Backing Fabric: 3.5 yards of soft Brushed Cotton or Flannel in a solid Pale Grey.
- Batting: 100% Wool Batting (This provides the specific “drape” and breathability central to Nordic bedding).
- Template: A 60-Degree Triangle Ruler (or a cardboard template cut to size).
- Notions: Heavy starch, pins, neutral cotton thread.
Step 1: Starch and Stabilize
Triangles have “bias” edges (cut on the diagonal), which makes them stretchy. If you don’t stabilize wool, your quilt will warp.
- Wash & Dry: Pre-shrink all wools and flannels.
- Starch: Spray all fabrics heavily with starch and press with a hot iron (no steam this time) until they feel stiff like cardstock.
- Test: If the fabric still feels too wiggly, starch it again.
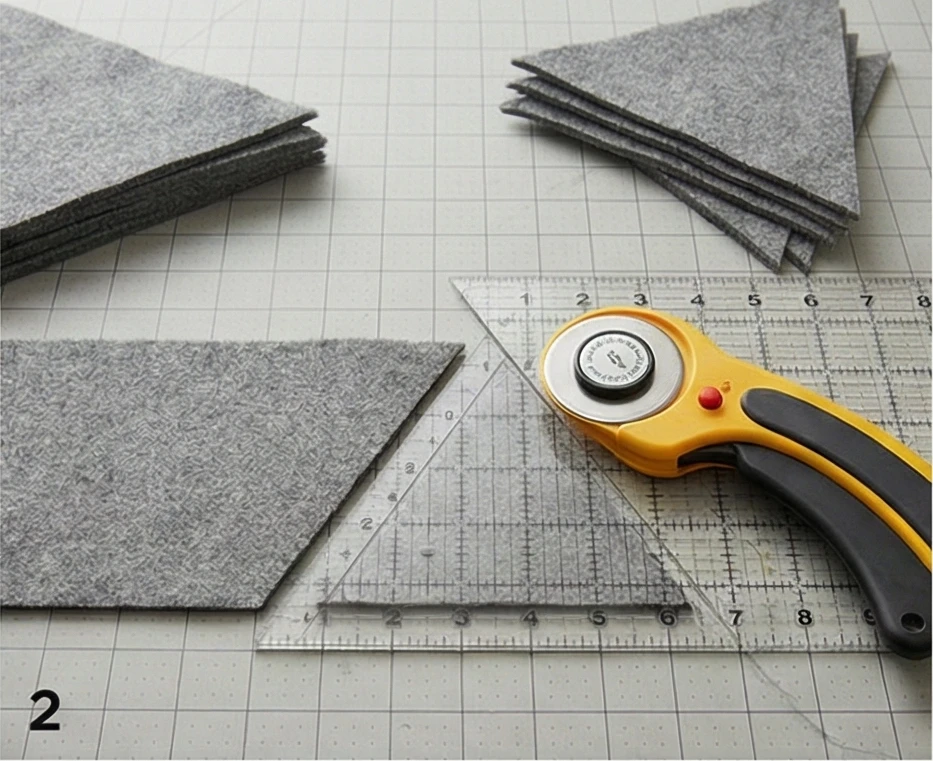
Step 2: Cutting the Triangles
We are creating a forest of equilateral triangles.
- Strip Cutting: Cut your fabrics (Greys and Creams) into 8.5-inch-wide strips.
- Triangle Cutting:
- Place your 60-degree ruler on the strip.
- Cut the first triangle (point up).
- Rotate the ruler/template 180 degrees. Cut the next triangle (point down).
- Yield: Approximately 60 Grey Triangles (Trees) and 60 Cream Triangles (Background).
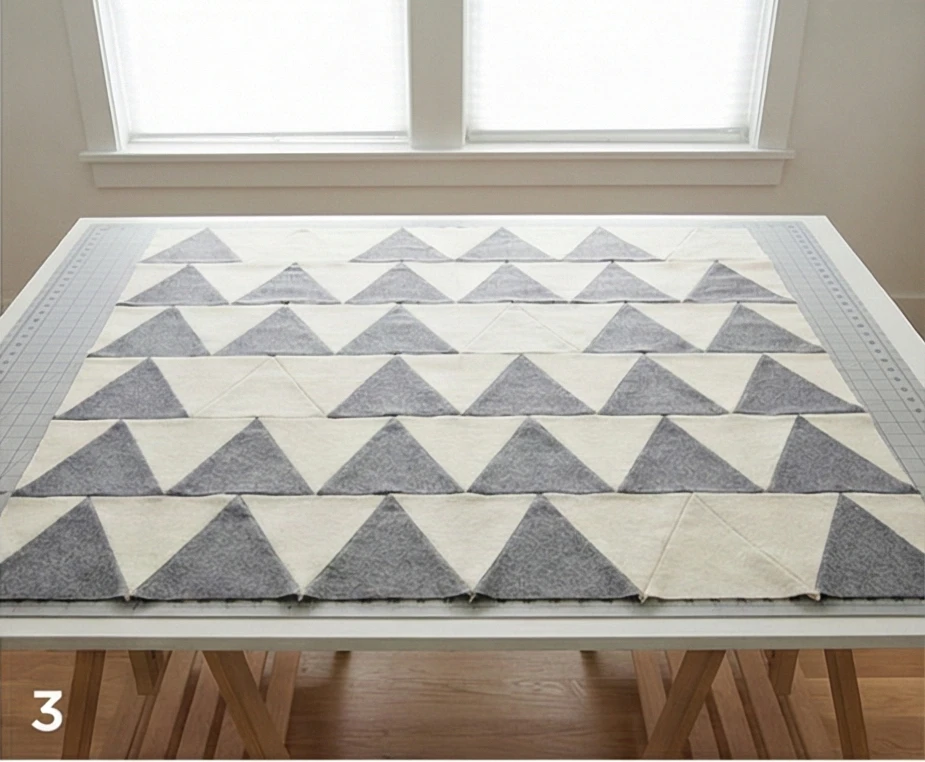
Step 3: Layout “The Forest”
Scandi style embraces negative space and asymmetry.
- The Grid: Plan for rows of triangles.
- Arrange them so the Grey Triangles point UP (Trees) and the Cream Triangles point DOWN (Sky).
- Color Balance: Do not make it a perfect checkerboard. Group some greys together to create “dense forest” areas, and leave some areas mostly cream to represent “open clearings.”
- Tip: Take a photo with your phone and turn it to “Black and White” mode to check the contrast balance.
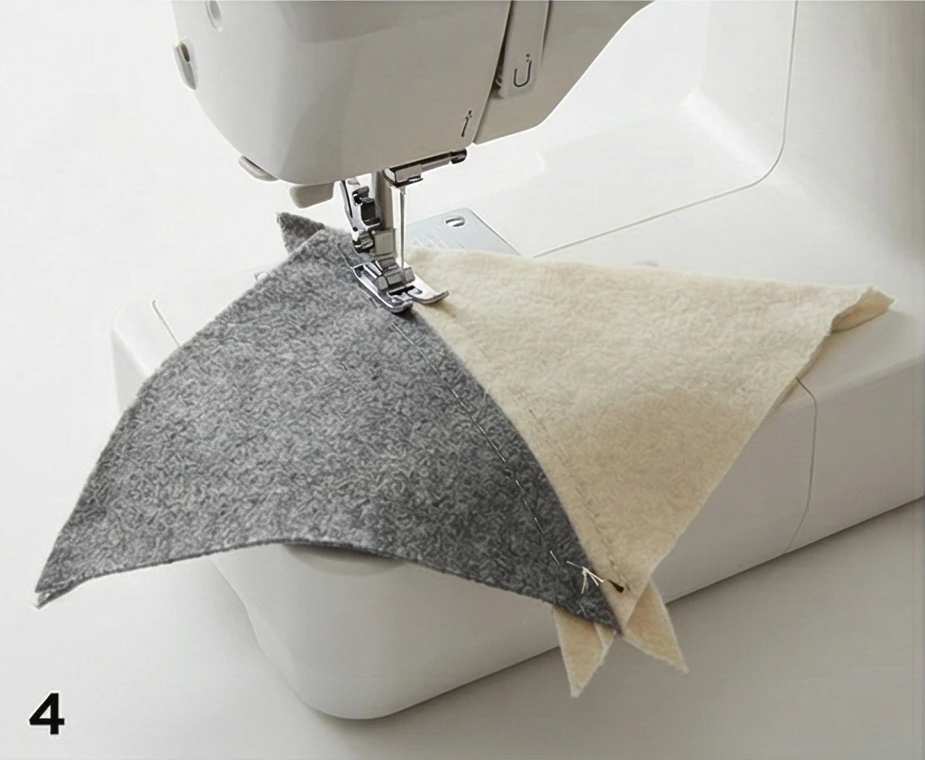
Step 4: Piecing the Rows
- Sewing: Place a Grey and Cream triangle Right Sides Together.
- Alignment: The tips of the triangles should stick out about 1/4 inch at the corners (creating “dog ears”). This ensures the seam line hits the intersection perfectly.
- Stitch: Sew with a scant 1/4″ seam allowance.
- Pressing: Press seams Open. This is vital with heavy wool to prevent lumpy intersections.
- Rows: Assemble all horizontal rows.
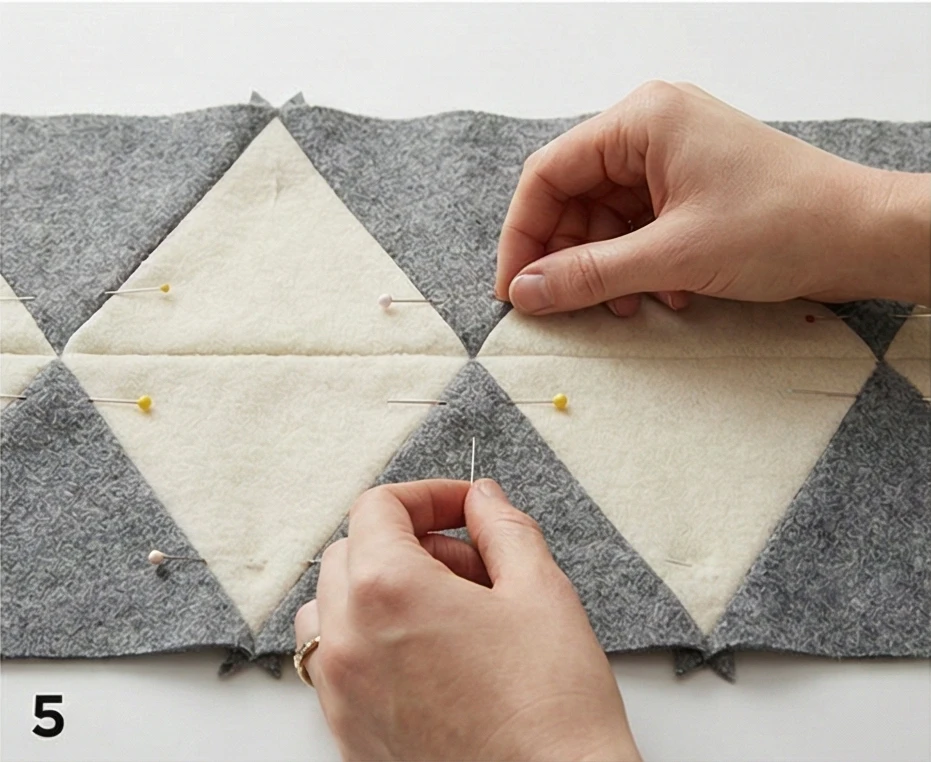
Step 5: Joining the Rows (Pinning the Points)
Precision is key here for that clean Nordic look.
- Place Row 1 on top of Row 2 (Right Sides Together).
- Pinning: You must match the points of the triangles.
- Stick a pin straight through the top triangle’s point and ensure it comes out through the bottom triangle’s point.
- Pin liberally to prevent the bias edges from stretching as you sew.
- Sew: Stitch the rows together. When you open it up, the points of the “trees” should be sharp, not chopped off.
Step 6: “Hygge” Quilting
The quilting should be tactile but minimal.
- Sandwich the quilt with the Wool Batting.
- Straight Line Quilting: Use a walking foot.
- Quilt straight lines that run parallel to the sides of the triangles.
- This creates a zig-zag or chevron quilting pattern that echoes the trees without overpowering them.
- Space the lines about 2 inches apart to keep the quilt soft and drapey.
Step 7: The “Facing” Finish
A visible binding can look too heavy for a minimalist quilt. A “Facing” hides the edge on the back.
- Cut 2.5″ strips of the backing fabric.
- Sew them to the Front of the quilt.
- Turn the entire strip to the Back and press firmly so the edge is crisp and the facing is invisible from the front.
- Hand stitch the facing down on the back.
- Result: A clean, artwork-like edge that lets the design float.
Cultural Context Note: In Scandinavian winters, light is precious. Decor often mimics the shades of nature—birch bark, granite, snow, and pine—to bring the outdoors in. By using wool batting, this quilt will be surprisingly lightweight yet incredibly warm, embodying the practical elegance of Nordic design.
7. Velvet and Wool Mixed Luxury Throw Quilt Patterns
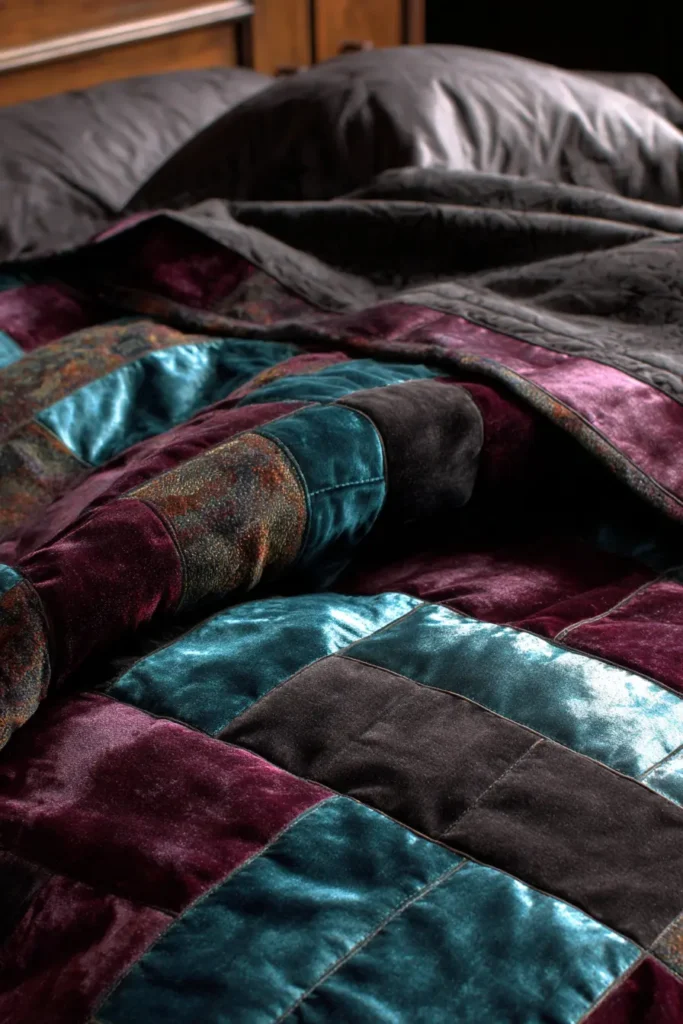

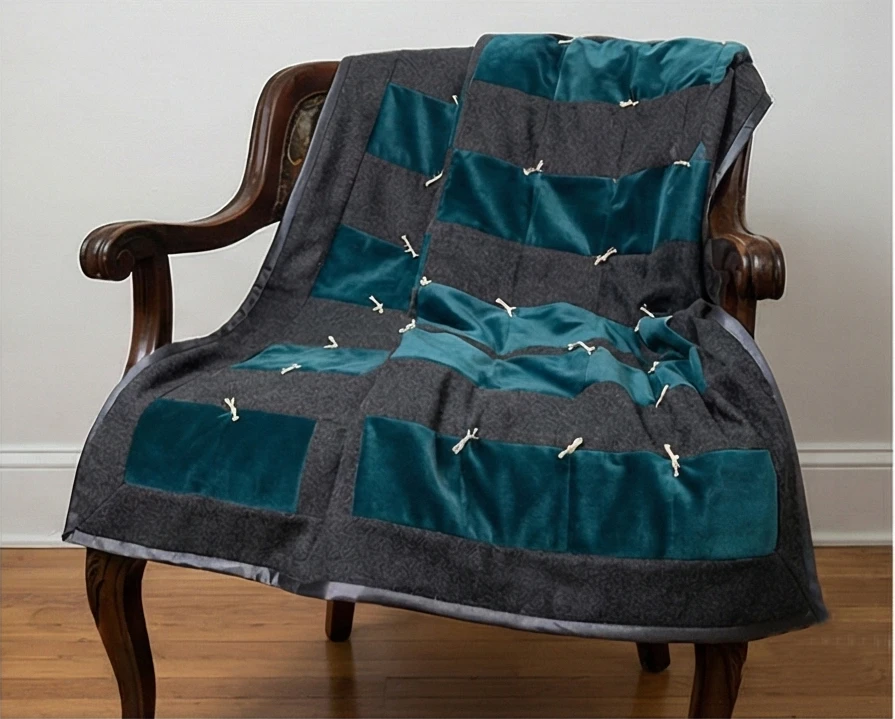
The “Victorian Manor” Velvet & Wool Brick Quilt
This quilt is the epitome of texture. It contrasts the deep, light-absorbing matte finish of Menswear Wool with the shimmering, light-reflecting pile of Cotton or Silk Velvet. Because velvet is slippery and wool is thick, complex patchwork is a nightmare. Instead, we use a classic “Brick Road” layout with large rectangles. This highlights the luxurious fabric while minimizing difficult intersections.
Finished Dimensions: Heavy Luxury Throw, approximately 50″ x 64″.
Materials Needed:
- Fabric A (The Matte): 2 yards of Charcoal Grey or Chocolate Brown Wool Suiting or Tweed.
- Fabric B (The Shine): 2 yards of Deep Teal, Burgundy, or Gold Cotton Velvet. (Avoid stretchy polyester velvet; look for non-stretch upholstery or garment velvet).
- Backing Fabric: 3.5 yards of Satin or high-quality Sateen Cotton (to match the luxury feel).
- Batting: High-Loft Wool Batting. (Wool is resilient and won’t get crushed by the heavy weight of the top fabrics).
- Notions: Walking Foot (Mandatory!), thick pins, a fluffy towel (for pressing).
Step 1: Managing the “Nap”
Velvet has a “nap” (direction of the fuzz). If you sew one piece up and one piece down, they will look like two different colors.
- Pet the Fabric: Run your hand along the velvet. Smooth = “With the Nap.” Rough = “Against the Nap.”
- Marking: Mark the “Up” direction on the back of the velvet with chalk arrows.
- Cutting Rule: When cutting your pieces, ensure that the tops of every rectangle point in the same direction.
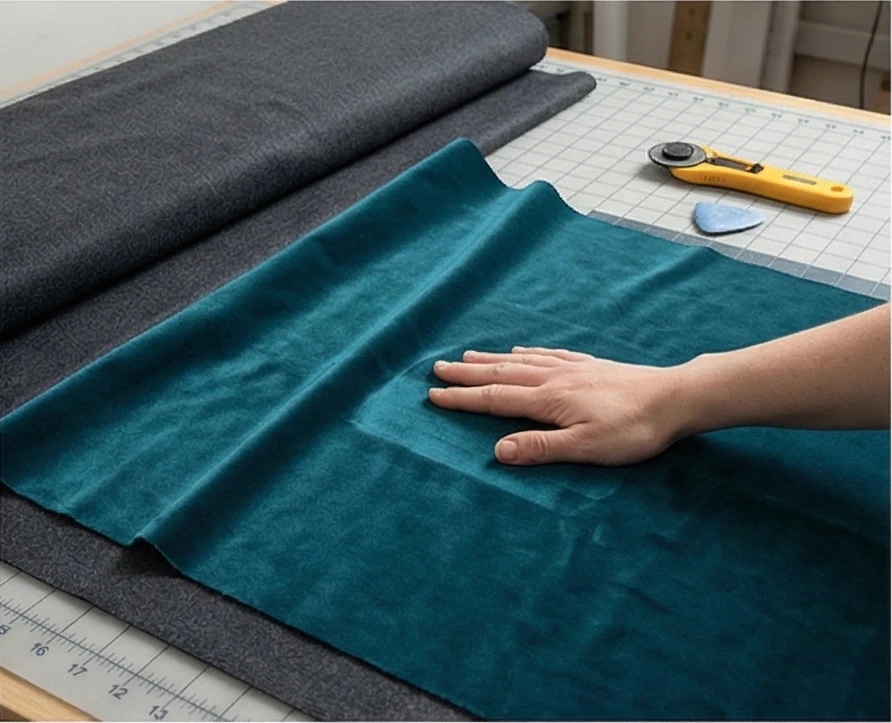
Step 2: Cutting the Bricks
We are using a staggered brick pattern.
- Wool (Fabric A): Cut strips 6.5″ wide. Sub-cut them into rectangles measuring 6.5″ x 12.5″.
- Velvet (Fabric B): Cut strips 6.5″ wide. Sub-cut them into rectangles measuring 6.5″ x 12.5″.
- Yield: You need roughly 22 Wool Bricks and 22 Velvet Bricks.
- Half-Bricks: Cut 4 Wool and 4 Velvet rectangles in half (6.5″ x 6.5″) to use as row starters/enders.
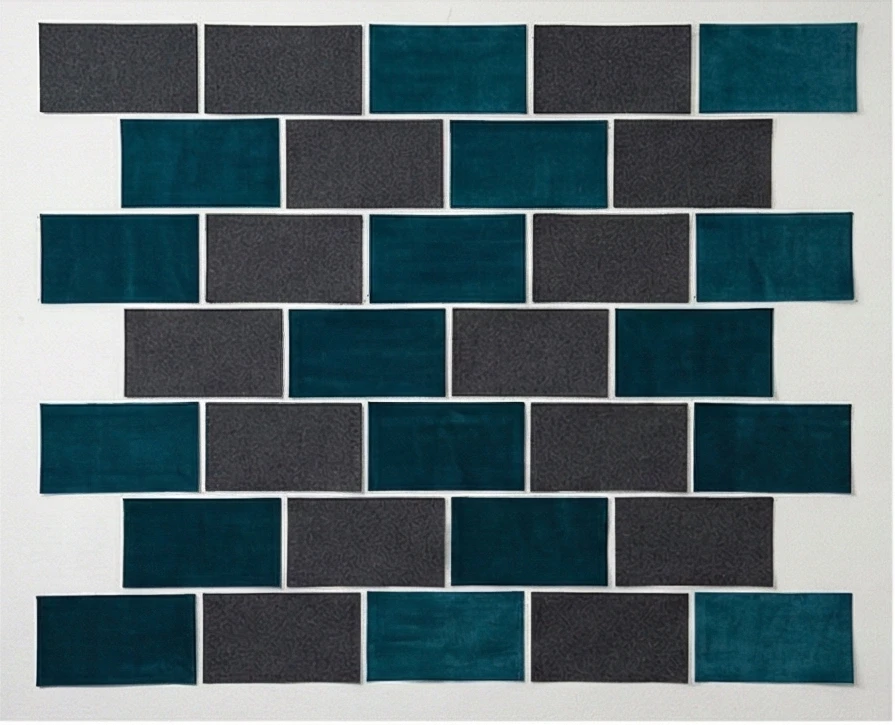
Step 3: Layout the Wall
- Row 1: Alternating Wool – Velvet – Wool – Velvet.
- Row 2: Start with a Half-Brick of Velvet. Then alternate Wool – Velvet. End with a Half-Brick.
- Effect: This offsets the seams so they don’t line up, creating a brick-wall look.
- Visual Check: Ensure the “nap” of all velvet pieces is running down. The color should look rich and uniform.
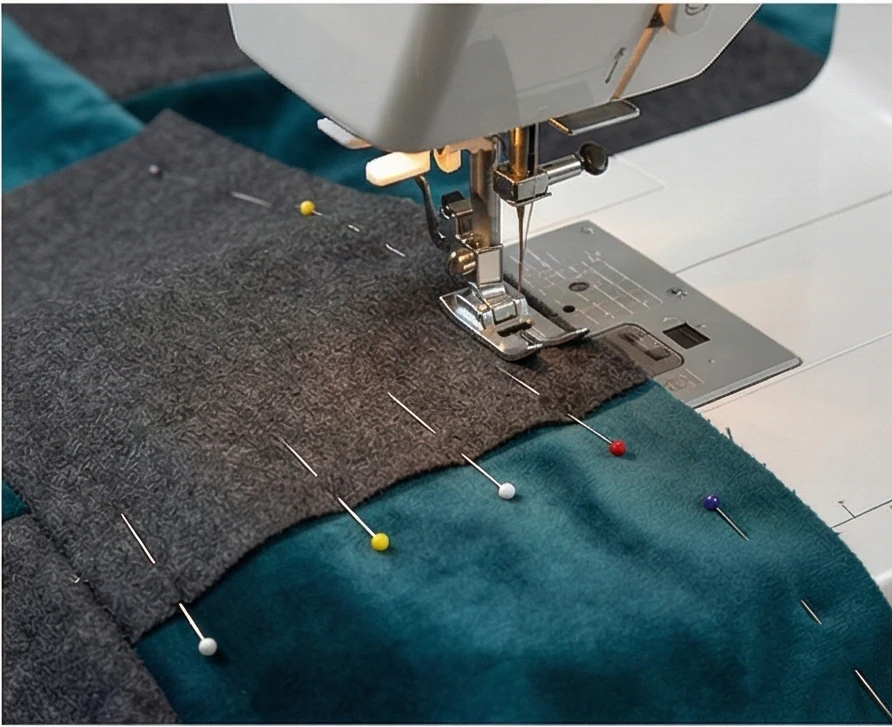
Step 4: Sewing with the “Creep” Factor
Velvet likes to “creep” (move forward) while wool stays put. This creates uneven ends.
- Pinning: Place a Wool and Velvet brick Right Sides Together. Use many pins (every inch).
- Walking Foot: Install your walking foot. This feeds both top and bottom layers evenly.
- Direction: Sew slowly. Do not pull or push the fabric.
- Seam Allowance: Use a generous 1/2 inch seam allowance. Velvet frays easily, so the wider seam prevents it from falling apart later.
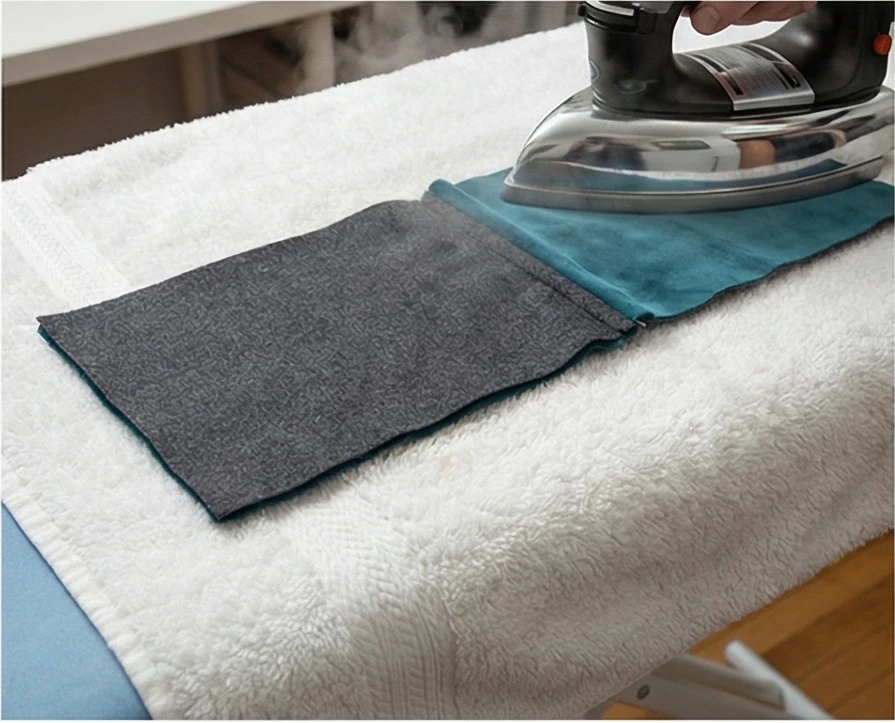
Step 5: The “Towel Trick” Pressing
If you touch an iron directly to velvet, you crush the pile and leave a permanent shiny mark.
- Setup: Place a thick, fluffy towel on your ironing board.
- Face Down: Place your block Velvet-side down onto the towel. The towel loops interlock with the velvet pile to protect it.
- Steam Only: Press the seam allowance open from the back (Wool side). Use lots of steam, but barely touch the iron to the fabric. Hovering is best.
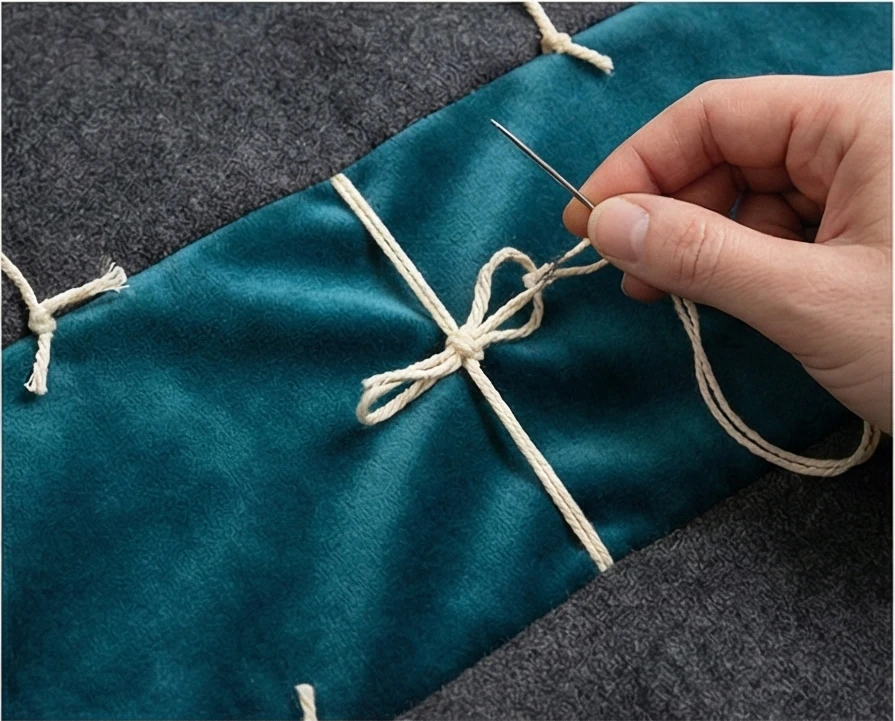
Step 6: Tufting (No Machine Quilting)
Machine quilting tracks can ruin the look of velvet. Hand-tying or “Tufting” is traditional for velvet quilts.
- Sandwich the quilt (Backing + Wool Batting + Top). Baste securely.
- Thread: Use a heavy silk thread or Pearl Cotton.
- Tying: At the center of every “Brick,” insert the needle, bring it up 1/4 inch away, and tie a square knot.
- Alternative: Sew a decorative Button or a Velvet Bow at the intersection of the blocks to hold the layers together. This adds to the opulent “Victorian” vibe.
Step 7: The “Hong Kong” Finish
A standard binding is too bulky for these thick fabrics.
- Use the Backing Fabric (Satin/Sateen) to bind the quilt.
- Cut strips 3 inches wide.
- Sew to the front, wrap around the edge to the back, and hand-stitch down for a smooth, cool-to-the-touch edge.
Style Note: This is a heavy quilt (5+ lbs). It feels like a weighted blanket. It is best used as a “footer” quilt at the end of a bed to pull up on freezing nights, rather than a main bedspread.
8. Winter Landscape Art Quilts with Insulated Batting
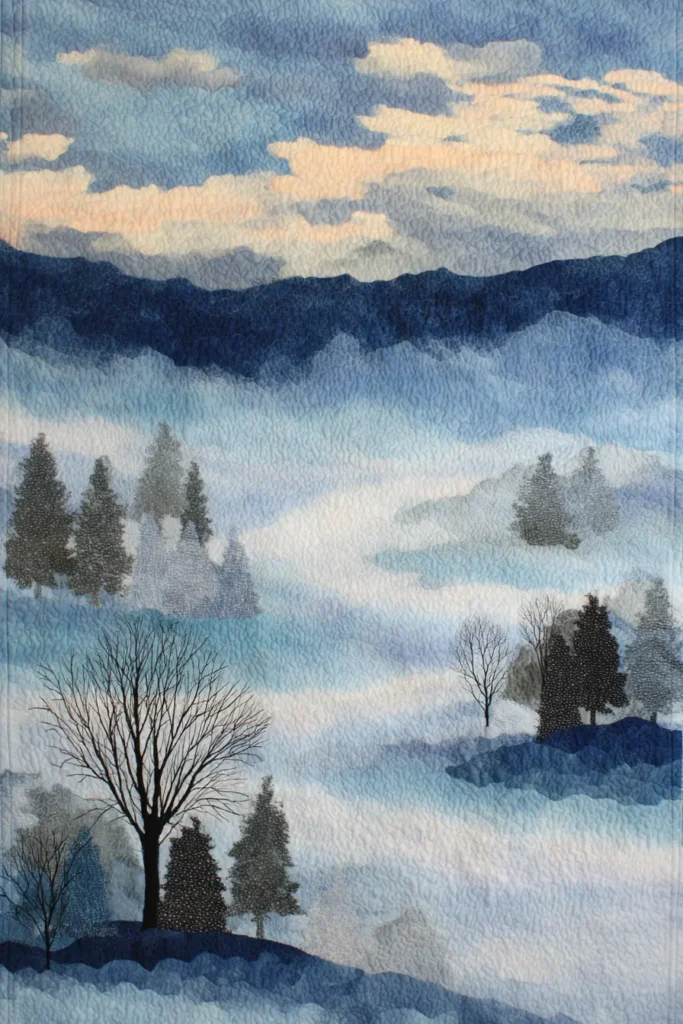
The “Frostline” Thermal Window Art Quilt
This project serves a dual purpose: it is a beautiful piece of art depicting a snowy horizon, and it functions as a thermal barrier. By using Insulated Batting (often containing a reflective mylar layer like Insul-Bright) paired with wool, this quilt is designed to be hung over a drafty window or on a cold exterior wall. The design uses Raw Edge Landscape Layering and Tulle Overlay to create a misty, frozen atmospheric effect.
Finished Dimensions: Window Size or Wall Hanging, approximately 24″ x 36″.
Materials Needed:
- Fabric A (Sky): 1/2 yard of Ombré Blue or hand-dyed Batik (fading from dark navy to pale ice blue).
- Fabric B (Snow): Assorted scraps of White, Silver, and Pale Grey cottons or silks.
- Fabric C (Trees): Scraps of Charcoal Grey or Black Batik (for silhouettes) or White Birch print.
- Overlay: 1 yard of White or Sparkle Tulle (fine netting).
- Batting Layer 1: Insul-Bright (or similar thermal batting with a metallic layer).
- Batting Layer 2: Wool Batting (for loft and sound dampening).
- Backing Fabric: 1 yard of heavy muslin or flannel.
- Adhesive: Spray Baste or Fusible Web (Lite).
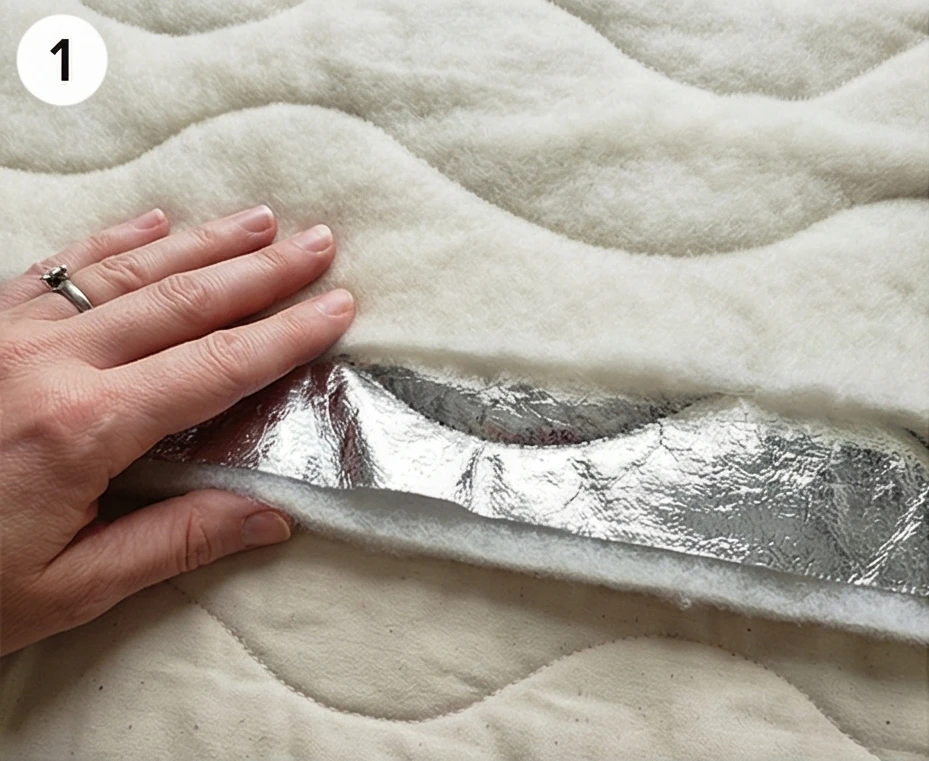
Step 1: Construct the “Thermal Core”
Unlike normal quilts, we build the foundation first to ensure it blocks drafts.
- Cut: Cut your Backing, Insul-Bright, and Wool Batting to 26″ x 38″ (slightly larger than finished size).
- Layer: Place Backing face down. Place Insul-Bright (shiny side down/towards the backing). Place Wool Batting on top.
- Quilt the Base: Roughly quilt these three layers together with large, wavy lines. This creates a stabilized “canvas” for your art.
- Note: We are building the art directly onto this quilted foundation (Quilt-As-You-Go style) so the texture shows through.
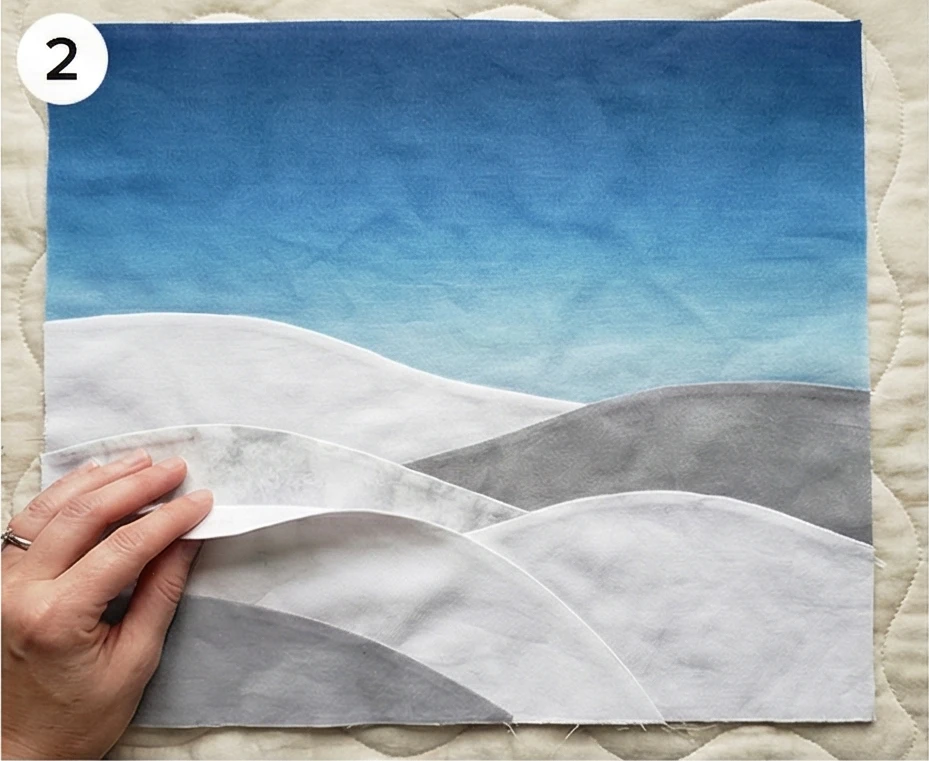
Step 2: Layering the Horizon
Work from the top (farthest away) to the bottom (closest).
- The Sky: Cut your Ombré Sky Fabric to cover the top 2/3rds of the quilt.
- Spray baste the back and smooth it onto the batting foundation.
- The Hills: Cut swooping, curved strips from your White and Grey fabrics.
- Lay the first “hill” overlapping the bottom of the sky.
- Lay the next hill overlapping the bottom of the first one.
- Perspective: Make the hills in the back paler (grey/blue) and the hills in the front brighter (pure white) to create depth.
- Fuse: Iron these layers down (using fusible web or just spray baste) to hold them in place.
Step 3: The “Confetti” Snow
This technique adds texture without precision cutting.
- Chop: Take your tiniest scraps of white, silver, and iridescent fabric. Chop them into tiny “confetti” bits (1/4 inch or smaller).
- Sprinkle: Sprinkle this confetti along the “ground” area of your quilt, concentrating it at the base of the hills to mimic snowdrifts.
- Sparkle: If you have silver thread or angelina fibers, add wisps of them now for ice crystals.
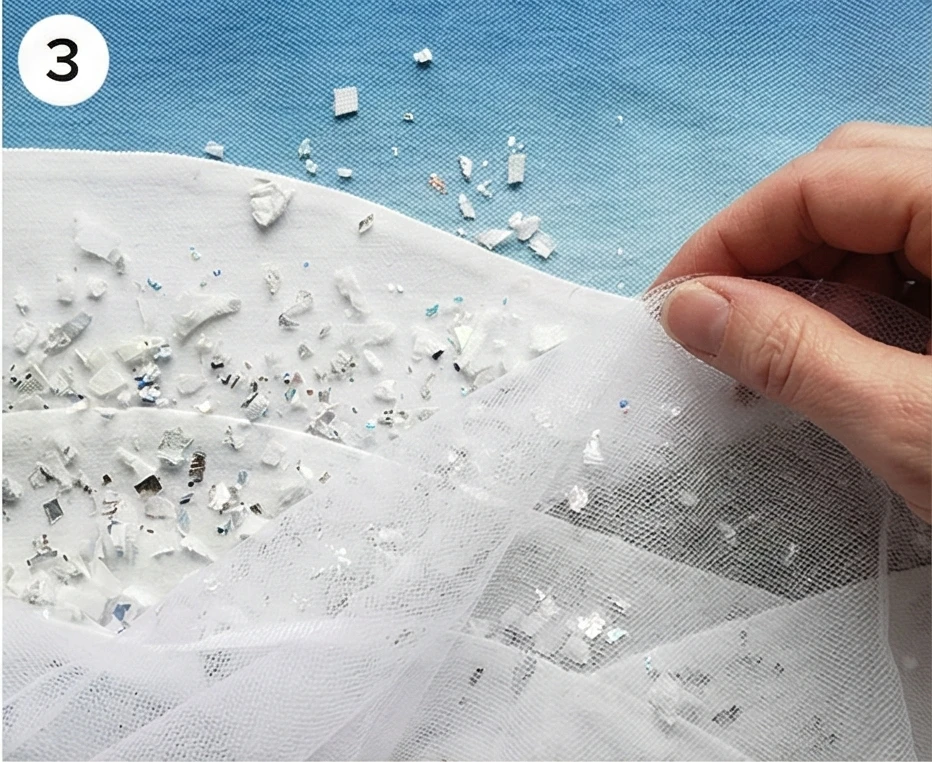
Step 4: The Tulle Overlay
How do you keep the confetti from falling off? You trap it.
- Drape: Lay a single sheet of White Tulle over the entire bottom half of the quilt (covering the snow and confetti).
- Pin: Pin securely around the edges. The tulle is sheer, so you will see the fabric through it, but it adds a “frosty” haze that looks like winter mist.
- Stitch: Using invisible or white thread, stitch wavy lines across the snow area. This quilts the top layers and traps the confetti permanently under the tulle netting.

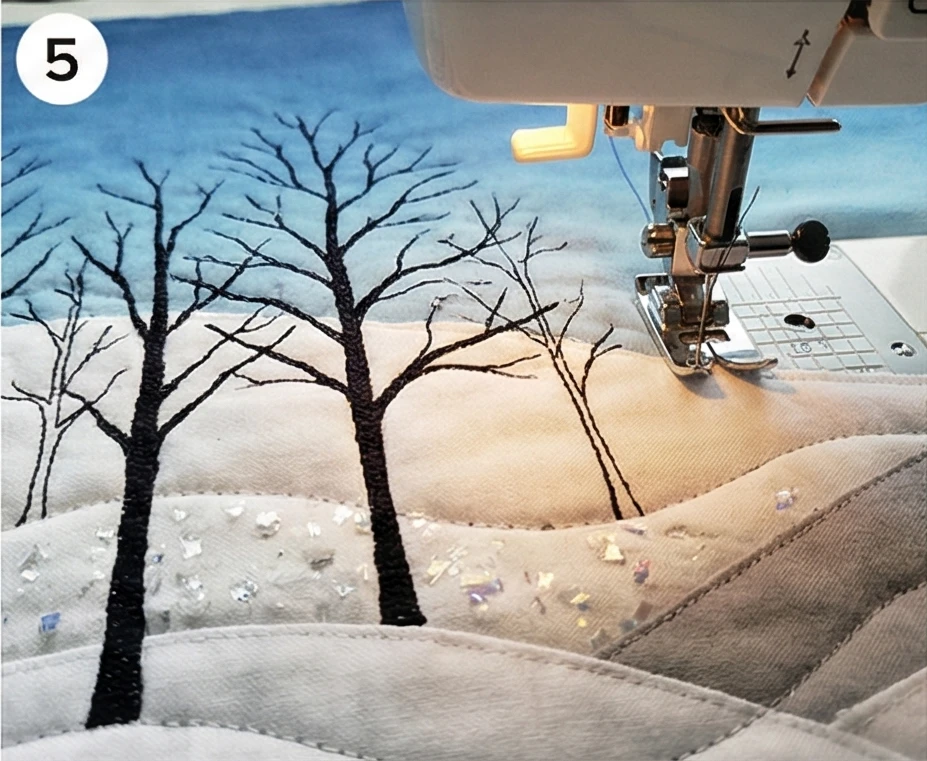
Step 5: Thread Painting the Trees
Now we draw on top of the background.
- Setup: Drop the feed dogs on your machine (Free Motion mode) and use a Darning Foot.
- Thread: Use Black or Dark Grey thread.
- Paint: Stitch vertical lines starting from the snow and reaching up into the sky.
- Go back and forth over the line to thicken the trunk.
- Branch out into “V”- shaped patterns to create bare winter branches.
- Birch Option: Use white fabric strips for thick trunks and thread-paint horizontal black dashes for the bark.
Step 6: The “Draft-Stopper” Binding
- Trim: Square up the quilt to 24″ x 36″.
- Binding: Apply a standard binding.
- Hanging mechanism:
- For a Window: Sew Velcro strips to the top back (and the window frame) for a tight seal against the glass.
- For a Wall: Add a hanging sleeve. The insulated layer will reflect heat back into the room, making this a functional piece of energy-saving art.
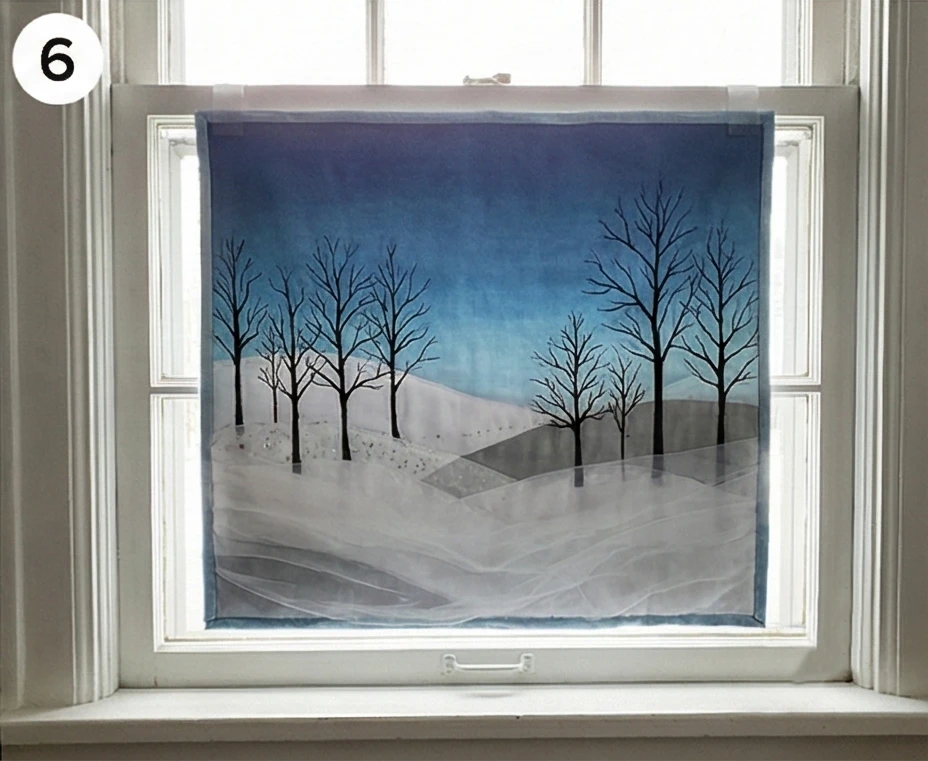
Style Note: This art quilt relies on value (light vs. dark) rather than color. To check your composition, take a photo with your phone and apply a “Noir/Black & White” filter. If you can clearly see the tree silhouettes against the sky, your contrast is perfect.
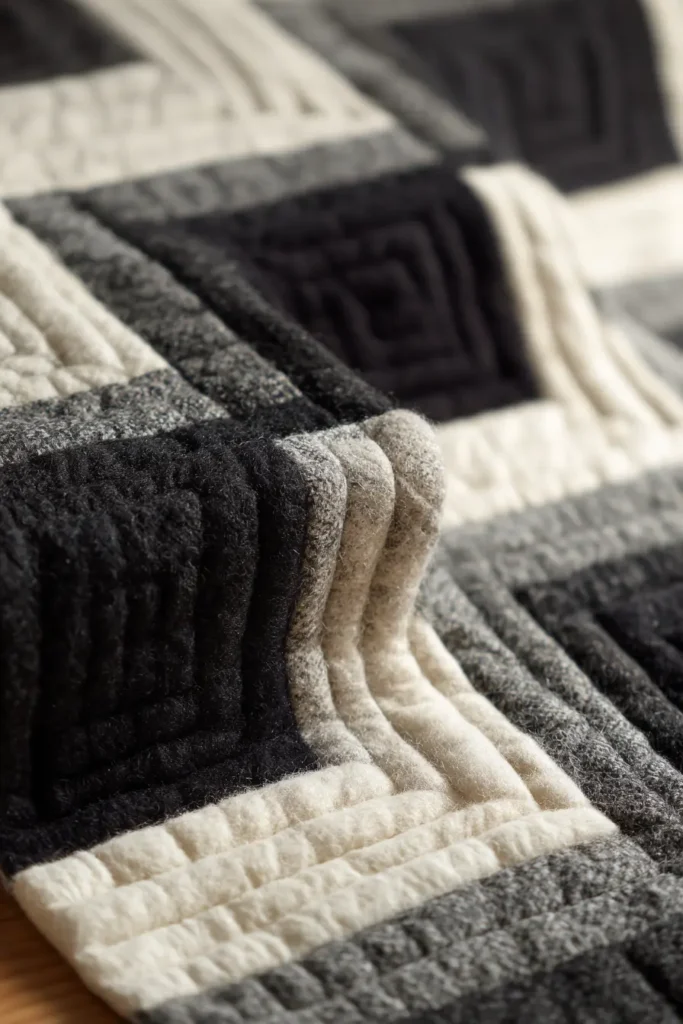
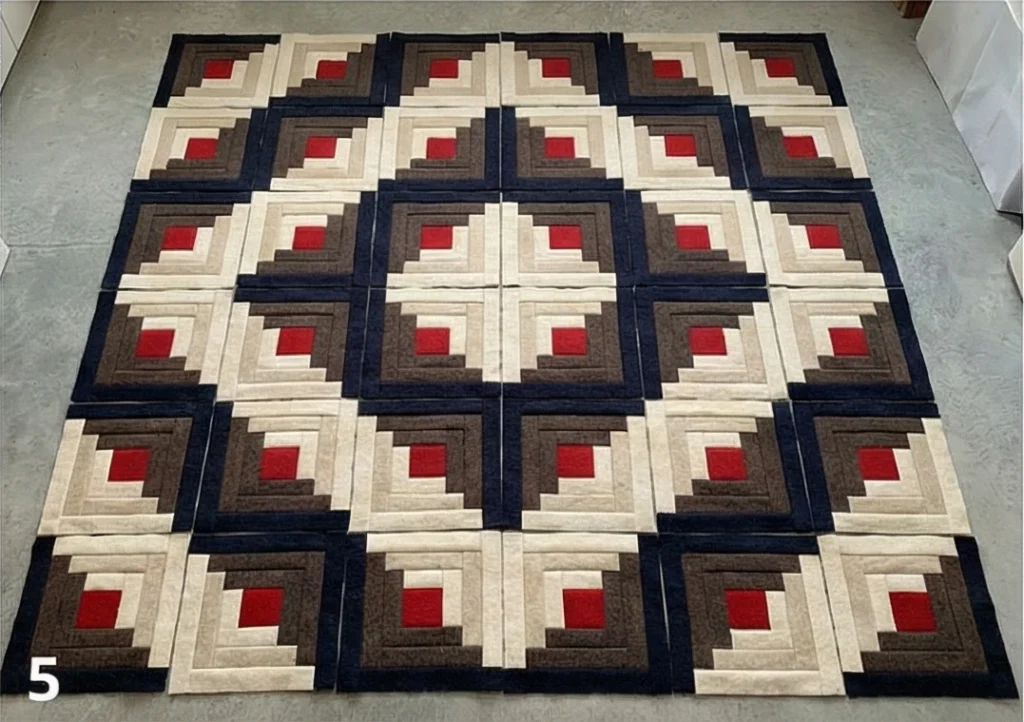
9. Log Cabin Quilt Patterns Using Wool and Flannel Batting
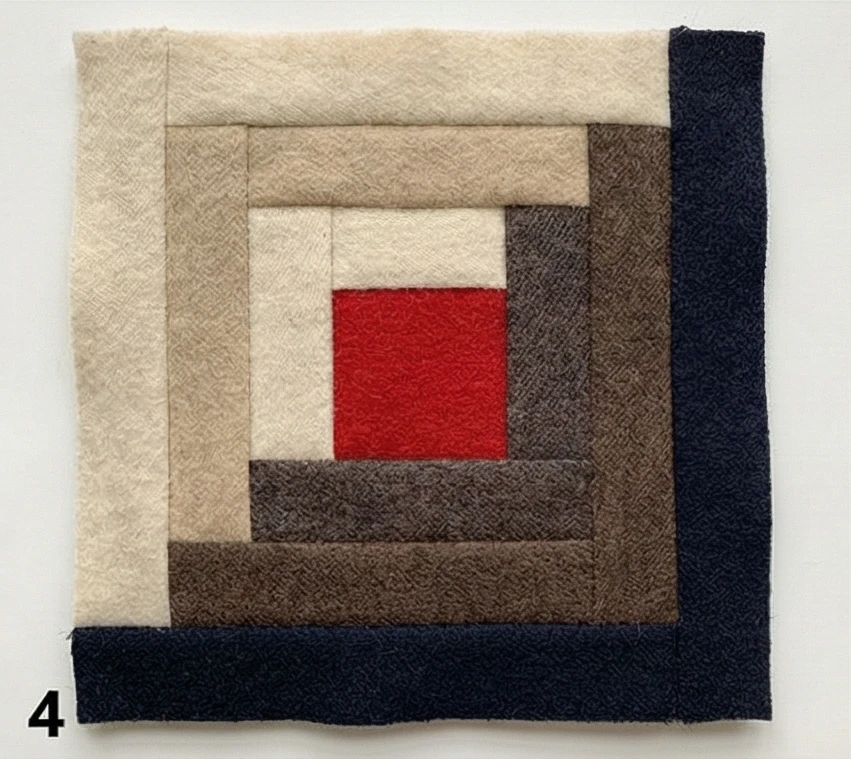
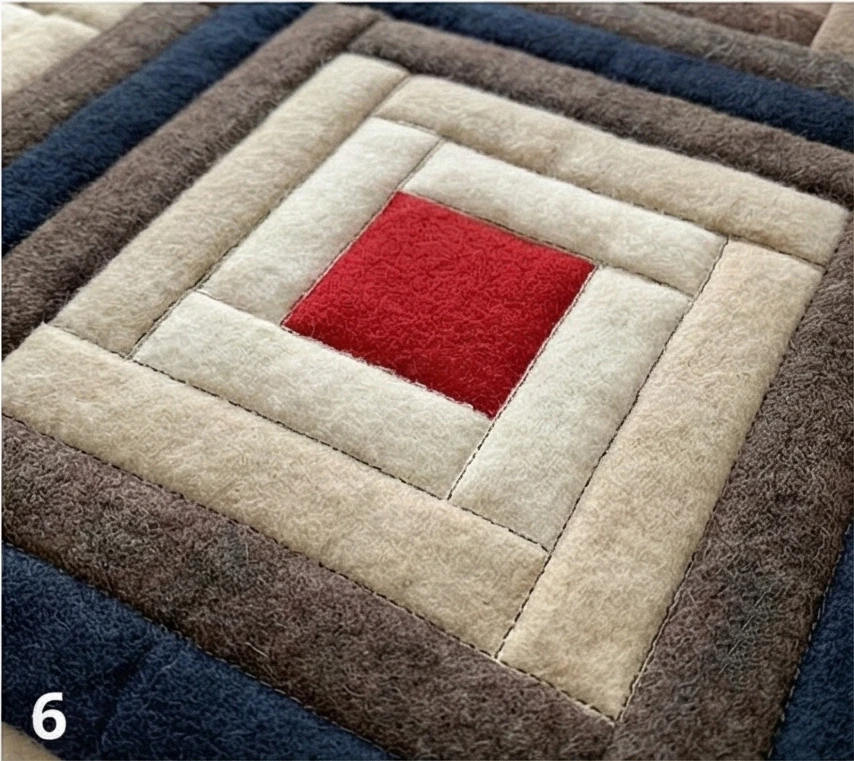
The “Fireside Glow” Chunky Log Cabin Quilt
The Log Cabin is the most iconic American quilt block, symbolizing the pioneer spirit. Traditionally, the center square is Red (representing the hearth/fire) or Yellow (representing the light in the window). For a Wool and Flannel version, we must adapt the pattern. Standard narrow “logs” create too much bulk when using thick wool. Therefore, we use a “Chunky” Log Cabin design with wider strips to show off the wool’s texture and keep the seams manageable.
Finished Dimensions: Large Lap Quilt, approximately 60″ x 72″.
Materials Needed:
- Fabric A (The Hearth/Center): 1/2 yard of Red Wool or Flannel.
- Fabric Group B (The Lights): 2 yards total of Assorted Cream, Beige, and Light Grey Wools/Flannels.
- Fabric Group C (The Darks): 2 yards total of Assorted Brown, Navy, and Charcoal Wools/Flannels.
- Backing Fabric: 4 yards of Heavy Flannel.
- Batting: 100% Wool Batting (This creates a high loft without weight).
- Notions: Rotary cutter, 12.5″ square ruler, heavy starch.
Step 1: Wool Prep and “Strip Management”
Organization is the key to Log Cabins.
- Pre-Shrink & Starch: Wash, dry, and heavily starch all your wools so they are stiff and don’t stretch while sewing long strips.
- Cut Centers: Cut 30 Red Squares measuring 2.5″ x 2.5″.
- Cut Logs: Cut all your Light and Dark fabrics into 2.5″ wide strips.
- Note: Standard cotton log cabins often use 1.5″ strips. We use 2.5″ to accommodate the thickness of the wool seam allowances.
Step 2: Round 1 (Building the Core)
The rule of Log Cabin: Lights on one side, Darks on the other.
- Take a Red Center Square.
- Log 1 (Light): Sew a Light strip to the Top of the red square. Trim to fit (2.5″). Press seam OPEN.
- Log 2 (Light): Sew a Light strip to the Right side. Trim. Press Open.
- Log 3 (Dark): Sew a Dark strip to the Bottom. Trim. Press Open.
- Log 4 (Dark): Sew a Dark strip to the Left. Trim. Press Open.
- Result: A red center surrounded by two light sides and two dark sides.
Step 3: Round 2 (Expanding)
Maintain the Light/Dark orientation.
- Log 5 (Light): Sew to the Top (across logs 4, 1, and 2).
- Log 6 (Light): Sew to the Right.
- Log 7 (Dark): Sew to the Bottom.
- Log 8 (Dark): Sew to the Left.
- Pressing: Always press seams open. This is non-negotiable with wool. If you press to the side, the corners will become lumps of impenetrable fabric.

Step 4: Round 3 (The Final Round)
- Repeat the sequence one last time: Top (Light), Right (Light), Bottom (Dark), Left (Dark).
- Square Up: Your block should now measure 12.5″ x 12.5″.
- Quantity: Make 30 Blocks total.
Step 5: The “Barn Raising” Layout
This is the classic diamond arrangement.
- Grid: Lay out the blocks in a 5 x 6 grid.
- Orientation:
- Find the center point of the quilt layout.
- Arrange the 4 center blocks so their Red Hearts meet in the middle, and the Dark Logs form a diamond shape pointing outward.
- Continue arranging outward rings so the Dark Logs form concentric diamonds radiating from the center.
- Visual: It looks like a large dark diamond rippling out to the edges.
Step 6: “In-the-Ditch” Quilting
Do not attempt complex free-motion quilting on thick wool seams.
- Sandwich the quilt with the Wool Batting.
- Thread: Use a neutral thread (Grey works best to blend with both light and dark).
- Stitch: Quilt “in the ditch” (right inside the seam lines) of the logs.
- Start at the red center and spiral outward.
- This simple grid quilting creates a deep, puffy texture because the wool batting will loft up in the center of the logs.
Step 7: Flannel Binding
- Cut 2.75″ wide strips of a Dark Flannel.
- Use a longer stitch length (3.0mm) to attach the binding, as it must pass through multiple layers of thick wool.
- Hand-stitch the binding to the back for a soft finish.
Style Note: The “Barn Raising” layout symbolizes community building. Because wool and flannel capture heat so efficiently, this quilt is exceptionally warm even though it is relatively lightweight compared to a weighted blanket.
10. Blended Wool and Cotton Batting Quilts for Perfect Winter Weight
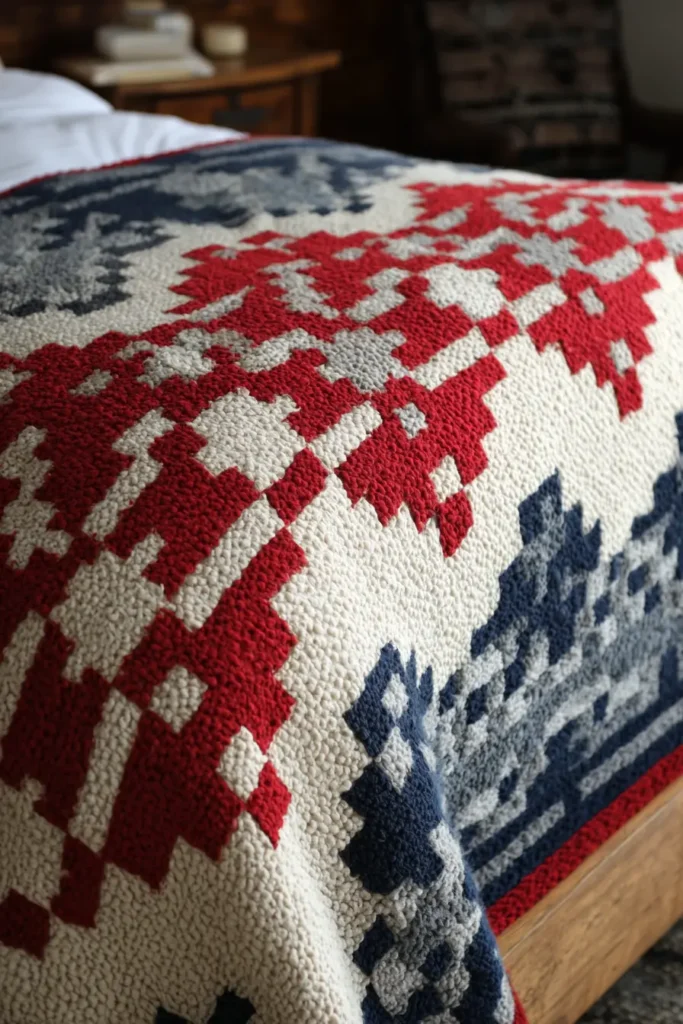
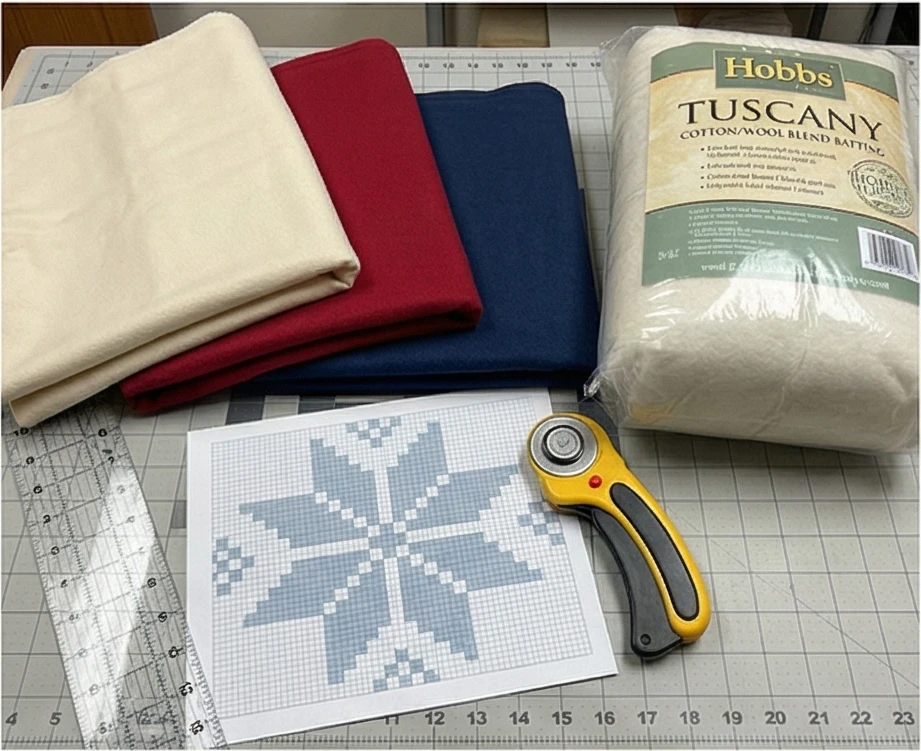
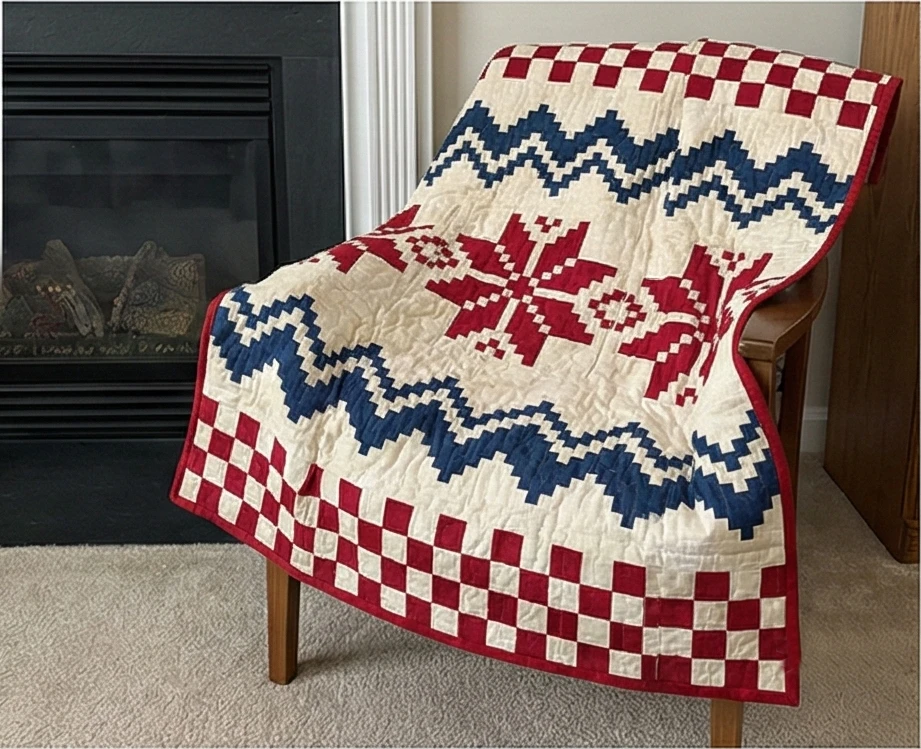
The “Fair Isle Frost” Sweater Quilt
The “Holy Grail” of winter bedding is a quilt that is heavy enough to feel comforting but breathable enough to prevent overheating. The secret lies in the batting: a 50/50 Blend of Cotton and Wool (or an 80/20 Cotton/Wool blend). The cotton provides weight and drape, while the wool provides loft and temperature regulation. To celebrate this perfect warmth, this pattern mimics the look of a classic “Fair Isle” knitted sweater using pixelated squares to create rows of snowflakes and zig-zags.
Finished Dimensions: Large Throw, approximately 60″ x 72″.
Materials Needed:
- Fabric A (Background/Main Yarn): 2.5 yards of Solid Cream or Light Grey Flannel or Kona Cotton.
- Fabric B (Pattern Color 1): 1 yard of Cardinal Red.
- Fabric C (Pattern Color 2): 1 yard of Navy Blue or Forest Green.
- Backing Fabric: 4 yards of high-quality Flannel.
- Batting: Cotton/Wool Blend Batting (e.g., Hobbs Tuscany or similar). This is crucial for the “Sweater” feel.
- Notions: Rotary cutter, graph paper (or a knitting chart), walking foot.
Step 1: Draft the “Knitting Chart”
Since this quilt mimics knitting, we design it on a grid.
- The Grid: Plan a layout that is 24 squares wide x 29 squares tall. (Finished square size: 2.5″).
- The Bands: Fair Isle patterns are horizontal rows. Plan your bands:
- Band 1 (Top/Bottom): Solid Cream (The collar/hem).
- Band 2: A row of “X” shapes (Red).
- Band 3: A zig-zag or chevron row (Blue).
- Band 4 (The Center): Large snowflake motifs or 8-point stars.
- Tip: You can copy an actual cross-stitch or knitting chart pattern!
Step 2: Cutting the “Pixels”
To get the blocky look of a knit stitch, we use simple squares.
- Strip Cutting: Cut all fabrics into 3-inch wide strips across the width of fabric (WOF).
- Sub-Cutting:
- If you are doing a complex, random pattern, cut the strips into 3-inch squares.
- Efficiency Tip: For the solid bands (like the cream top/bottom), keep them as long strips to save sewing time. Only cut individual squares for the patterned areas.
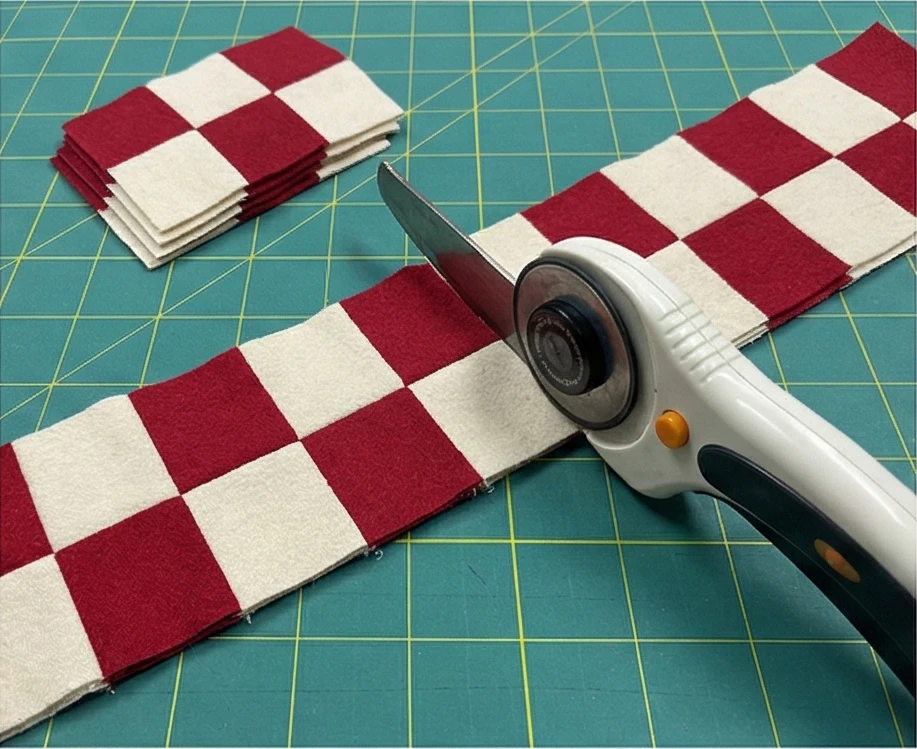
Step 3: Strip Piecing the Pattern Rows
Sewing individual squares takes forever. Use strip piecing for repeating patterns (like a checkerboard row).
- Example (Checkerboard Row):
- Sew a Red Strip to a Cream Strip lengthwise.
- Cut this unit into 3-inch segments.
- Sew the segments back together, flipping every other one.
- Result: A perfect checkerboard row without cutting individual tiny squares.
- Complex Rows: For the Snowflakes, lay out your 3″ squares on a design wall or floor to ensure the pixel image is correct before sewing.
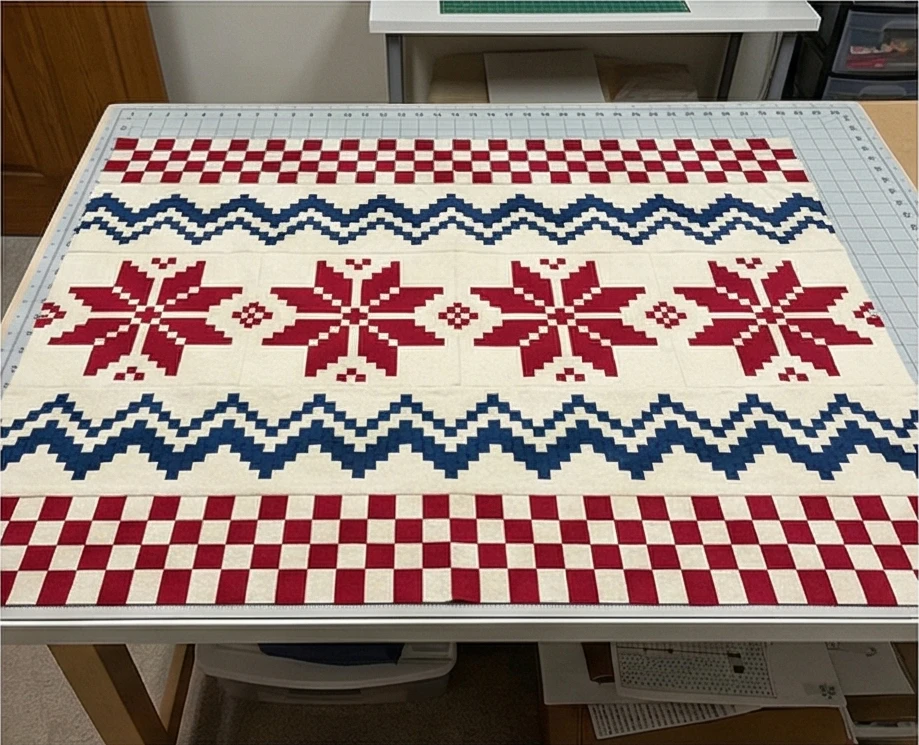
Step 4: Row-by-Row Assembly
- Sewing: Stitch the squares together into horizontal rows first (24 squares across).
- Pressing: Press seams of Row 1 to the Left. Press seams of Row 2 to the Right.
- Nesting: This allows the seams to “lock” or nest together when you join the rows, giving you perfectly matched corners (crucial for the pixel look).
- Joining: Sew all horizontal rows together to build the quilt top.
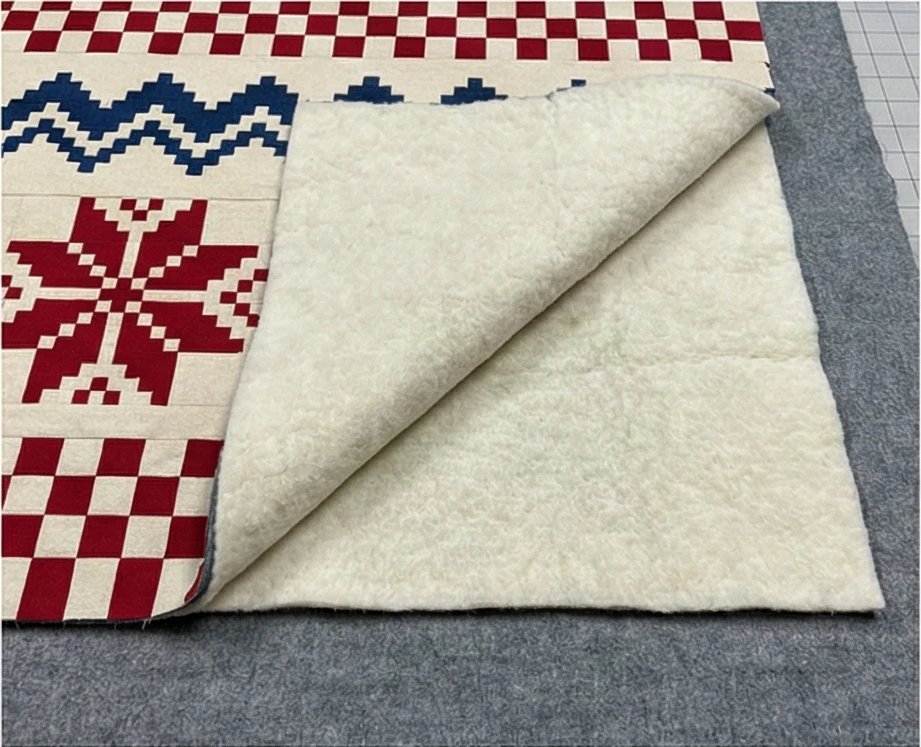
Step 5: The Blended Batting Sandwich
This is where the magic happens.
- Layering: Lay down your Flannel Backing.
- The Blend: Place your Cotton/Wool Blend Batting.
- Why it works: Pure cotton batting is heavy but flat. Pure wool is puffy but expensive. The blend gives you the puffy “sweater” texture (from the wool) with the heavy drape (from the cotton). It resists creases and holds warmth perfectly.
- Top: Place your “Fair Isle” Top. Baste well (spray baste works fine on blended batting).
Step 6: “Knit Stitch” Quilting
We want the quilting to enhance the illusion of knitting.
- Thread: Use a thread that matches your Background (Cream).
- The “V” Stitch: Instead of straight lines or swirls, quilt a Chevron/Zig-Zag pattern vertically.
- Use a walking foot.
- Quilt columns of “V” shapes.
- Visual: This mimics the “Stockinette” stitch (the V-shape of a knit loop) found in real sweaters. It adds incredible texture to the blended batting.
Step 7: Flannel Binding
- Cut 2.5″ binding strips from your Red or Navy fabric.
- Machine-sewn to the front, hand-sewn to the back.
- Wash: Wash immediately to let the blended batting shrink slightly. This creates the “crinkle” look that makes the quilt feel like a well-loved vintage jumper.
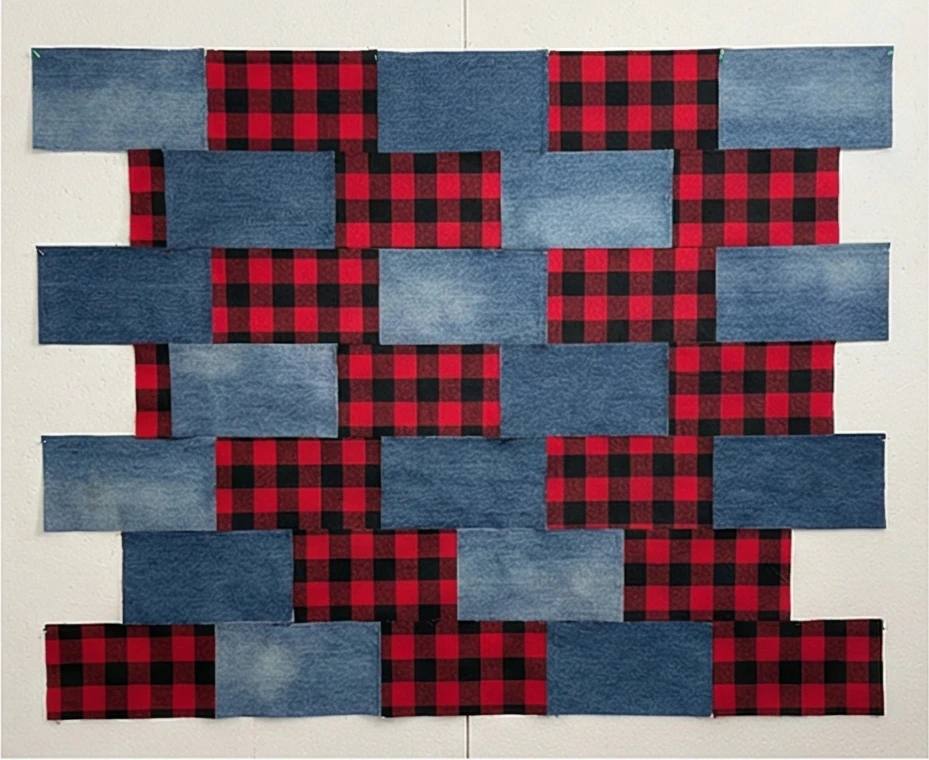
11. Heavyweight Denim and Flannel Utility Quilts for Cold Climates
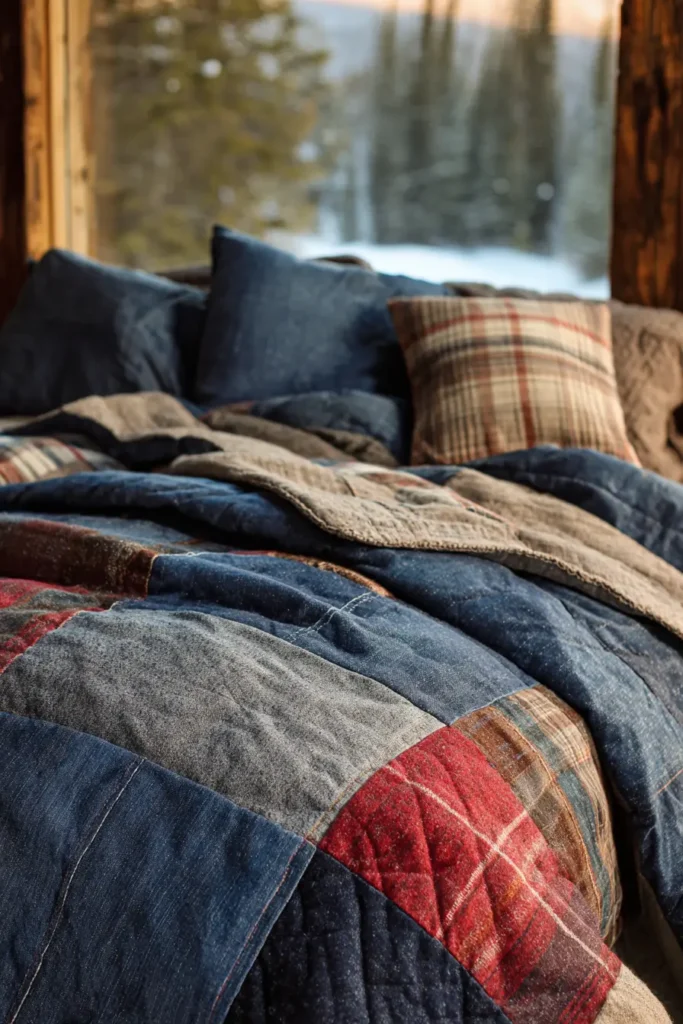
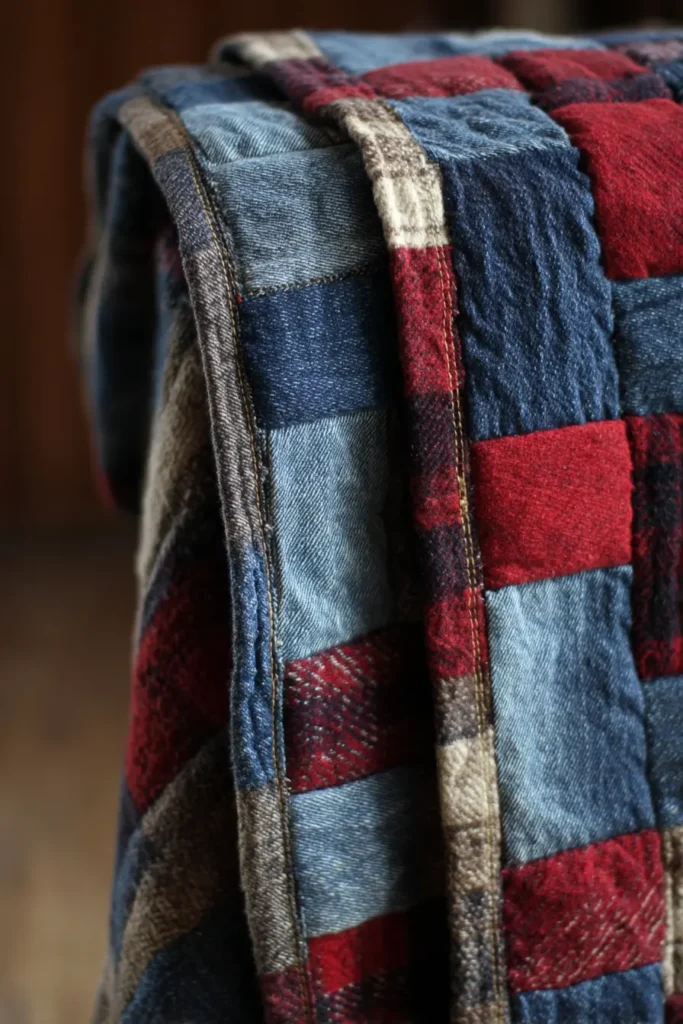
The “Blue Collar” Denim & Flannel Brick Quilt
This is the ultimate utility quilt: nearly indestructible, incredibly heavy, and warmer than almost anything else you can make. It repurposes old denim jeans (or heavy denim yardage) for the top and soft flannel for the backing. Because denim is heavy and hard to sew through if layers get too thick, this pattern uses a “Brick” layout to stagger the bulky seams, ensuring your sewing machine can handle the job. This quilt is perfect for cabins, drafty farmhouses, or as an emergency car blanket for winter driving.
Finished Dimensions: Heavy Utility Throw, approximately 60″ x 72″.
Materials Needed:
- Fabric A (The Muscle): 10-12 pairs of old 100% cotton jeans (legs only) OR 3 yards of 10oz Denim yardage.
- Fabric B (The Softness): 2 yards of Red/Black Buffalo Plaid Flannel (or similar heavy flannel).
- Backing Fabric: 4 yards of thick Flannel or Sherpa fleece (if you want extreme warmth).
- Batting: Wool Batting or a high-loft Poly/Cotton blend. (Denim is heavy; a thin batting will make the quilt stiff. A lofty batting keeps it flexible).
- Needles: Denim/Jeans Needles (Size 100/16 or 110/18). Do not attempt this with a standard needle.
- Thread: Heavy-duty Polyester thread (Cotton thread may snap under the weight of denim).
Step 1: Processing the Jeans
If using old jeans, you must “harvest” the fabric.
- Deconstruct: Cut the legs off the jeans. Cut up the inner seam to open the leg flat.
- Tip: Cut around the thick flat-felled seams. Do not try to include the original thick seams in your quilt; they are too hard to sew through.
- Press: Wash and dry the denim (if used), then press flat with high steam.
- Cut Bricks:
- From the Denim, cut 5.5″ x 10.5″ rectangles. (You need approx 42).
- From the Flannel, cut 5.5″ x 10.5″ rectangles. (You need approx 42).

Step 2: The “Brick Wall” Layout
We stagger the blocks so you never have to sew through four layers of denim at once.
- Row 1: Alternate Denim – Flannel – Denim – Flannel (6 blocks wide).
- Row 2: Start with a Half-Brick (5.5″ x 5.5″) of Flannel. Then alternate Denim – Flannel. End with a Half-Brick.
- Why? This shifts the vertical seams over by 5 inches. When you sew the rows together, your needle only hits one seam intersection at a time, not two.
- Visual Check: Ensure the denim and flannel are evenly distributed for a balanced look.
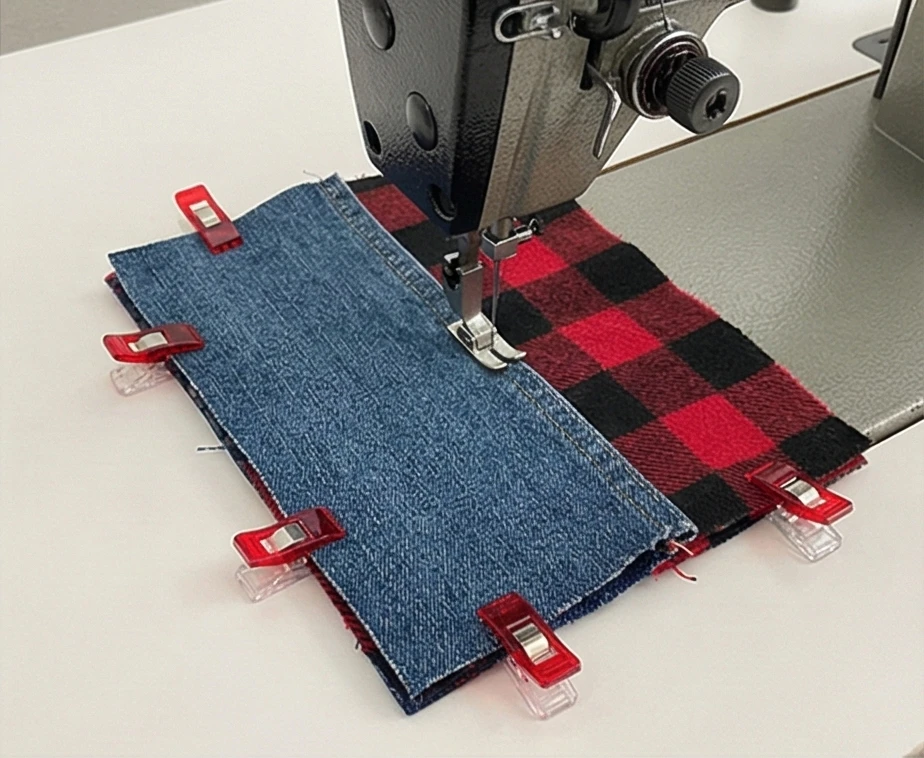
Step 3: Heavy-Duty Construction
- Stitch Length: Increase your stitch length to 3.0mm. (Short stitches perforate denim and make it tear; long stitches are stronger).
- Sewing: Sew the blocks into rows.
- Pressing: Press seams OPEN. This is critical. If you press to the side, you are sewing through 3 layers of denim. Pressed open, it’s only 2. Use steam and a “clapper” (or a block of wood) to pound the seams flat if needed.
- Joining Rows: Use clips (Wonder Clips) instead of pins. Pins will bend. Sew the rows together carefully.
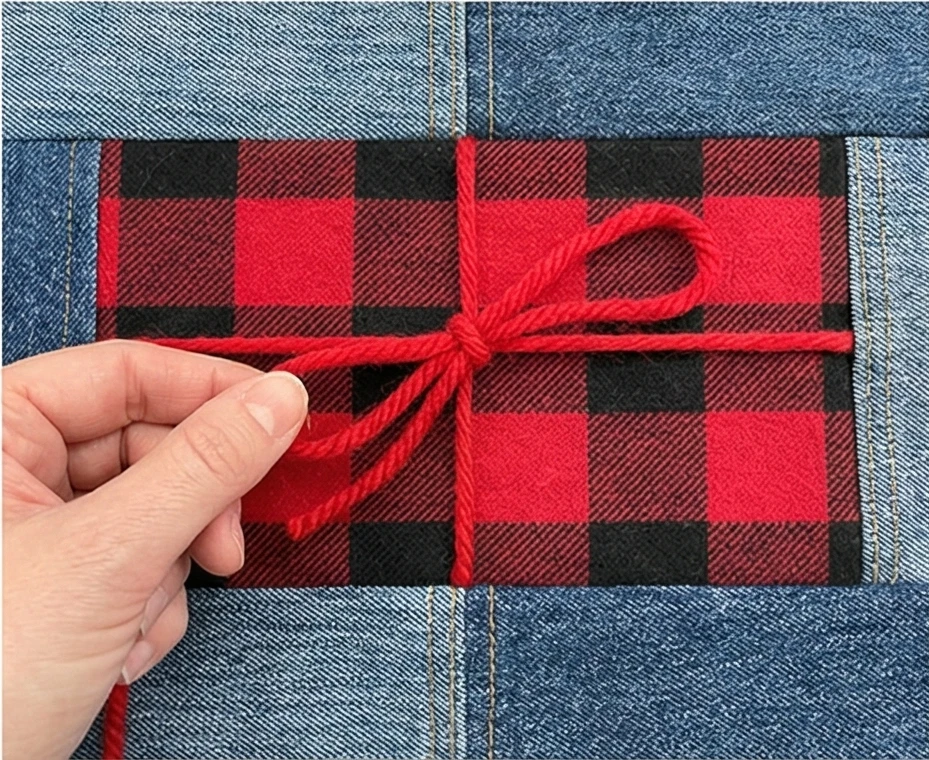
Step 4: The “Tied” Option (Recommended)
Machine quilting heavy denim can burn out a domestic motor. Tying is safer and softer.
- Sandwich: Lay out Backing, Batting, and Top. Baste securely.
- Ties: Use Red Wool Yarn or Embroidery Floss.
- Placement: Tie a square knot in the center of every Flannel Brick.
- Why? It’s easier to push the needle through the flannel blocks than the denim blocks. The flannel blocks will “puff” up around the ties.

Step 5: Machine Quilting Option (Heavy Duty)
If you insist on machine quilting:
- Walking Foot: Absolutely mandatory.
- Path: Stitch diagonal lines through the Flannel blocks only (an “X” in every flannel brick). Avoid stitching across the thick denim intersections if possible.
- Speed: Sew slowly. If you hear the machine thumping, stop and hand-crank the needle over the thick spot.
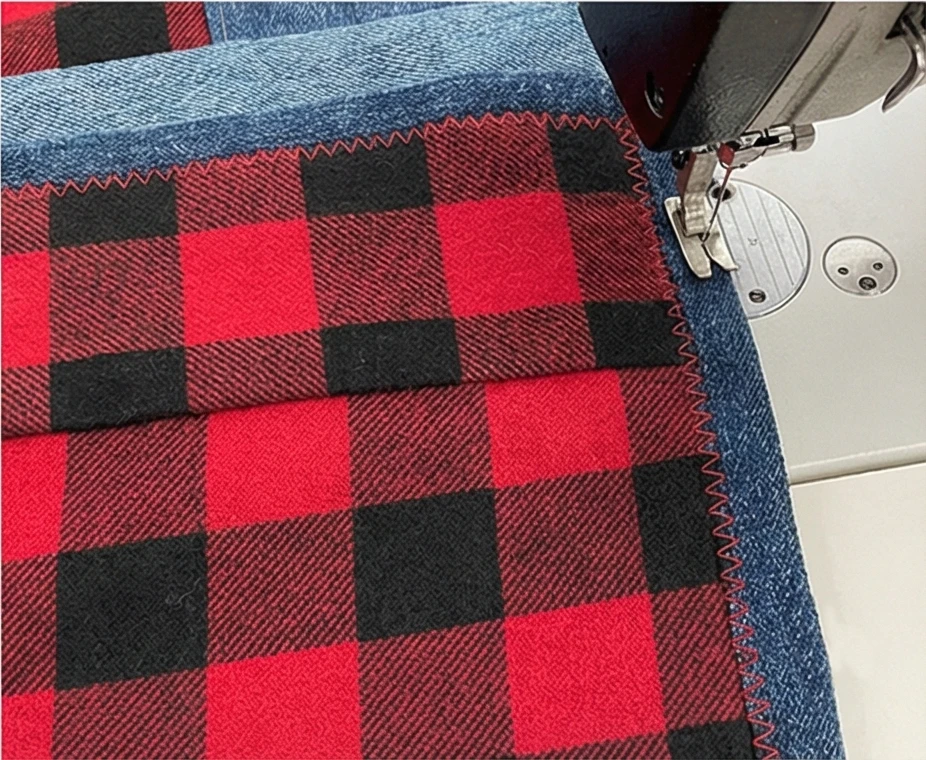
Step 6: The “Fold-Over” Edge (No Binding)
Adding a separate binding strip adds unnecessary bulk.
- Trim: Trim the batting even with the quilt top.
- Backing Excess: Trim the Backing Fabric so it extends 1.5 inches beyond the quilt top on all sides.
- Fold: Fold the backing edge to the front (over the raw denim edge). Fold it under itself to create a clean hem.
- Topstitch: Machine stitch this folded backing down onto the denim front using a heavy Zig-Zag stitch or a double row of straight stitching.
- Result: A soft flannel frame around the rugged denim center.
Style Note: This quilt is built for abuse. It is heavy, warm, and gets softer with every wash. It is the perfect candidate for keeping in a car’s trunk for winter emergencies or for use around a fire pit.
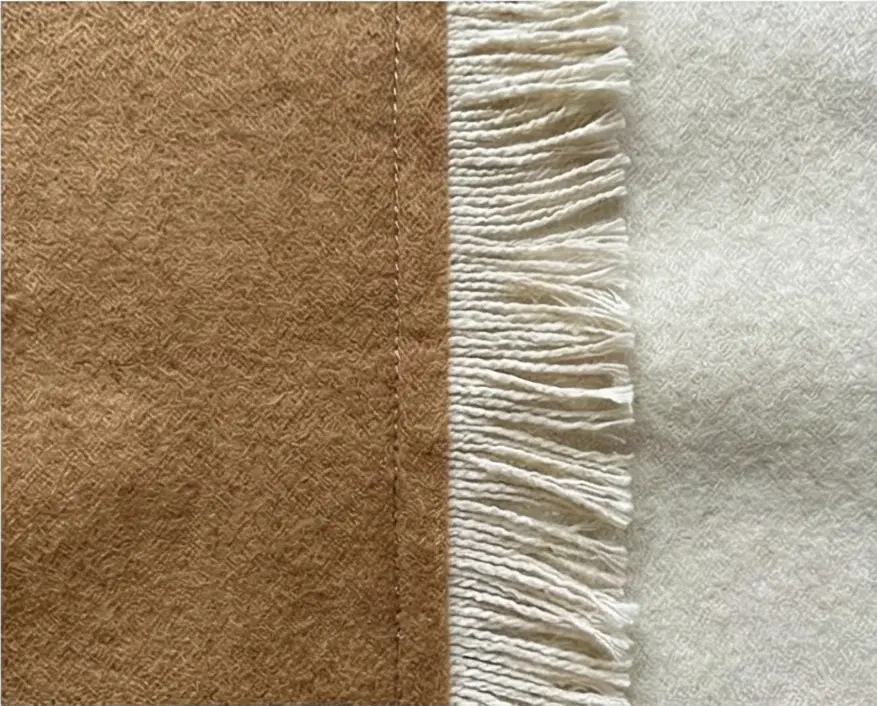
12. Boho Fringe Wool Quilts for Stylish Winter Layering
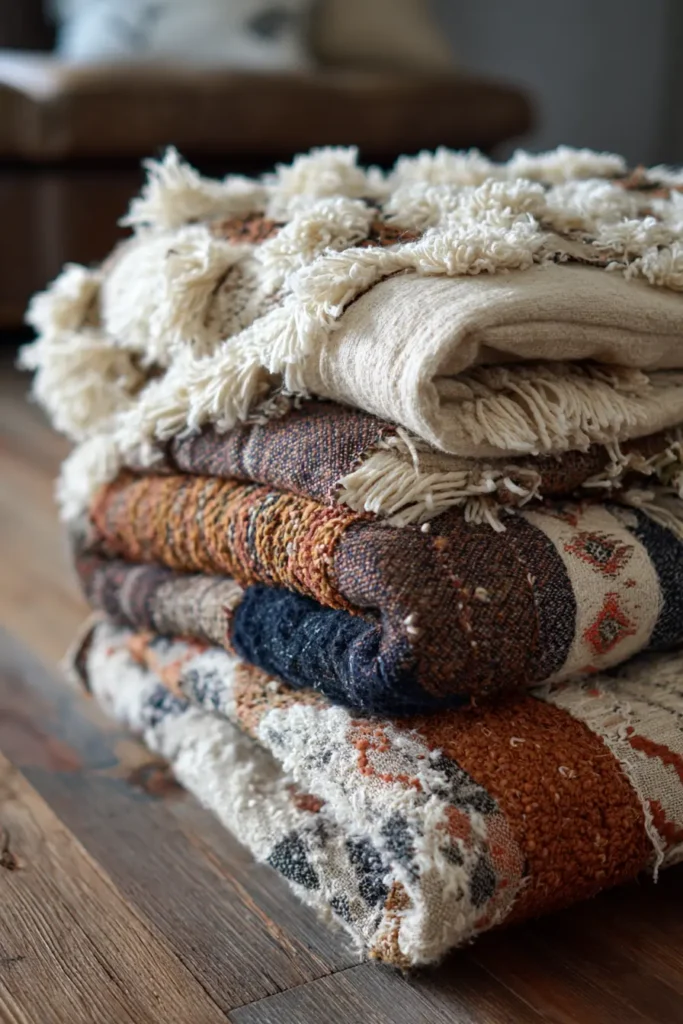

The “Nomad’s Fringe” Textured Wool Stripe Quilt
Boho style is all about “more is more”—more texture, more layers, and more tactile details. This design departs from traditional patchwork by embracing raw texture. It uses wide horizontal bands of Wool Suiting and Tweed, but the secret ingredient is inserting rows of Cotton Fringe or Tassel Trim directly into the seams. Combined with the puff of wool batting, the result is a heavy, eclectic blanket that looks like a high-end Anthropologie find but is warm enough for a winter cabin.
Finished Dimensions: Sofa Throw, approximately 50″ x 70″.
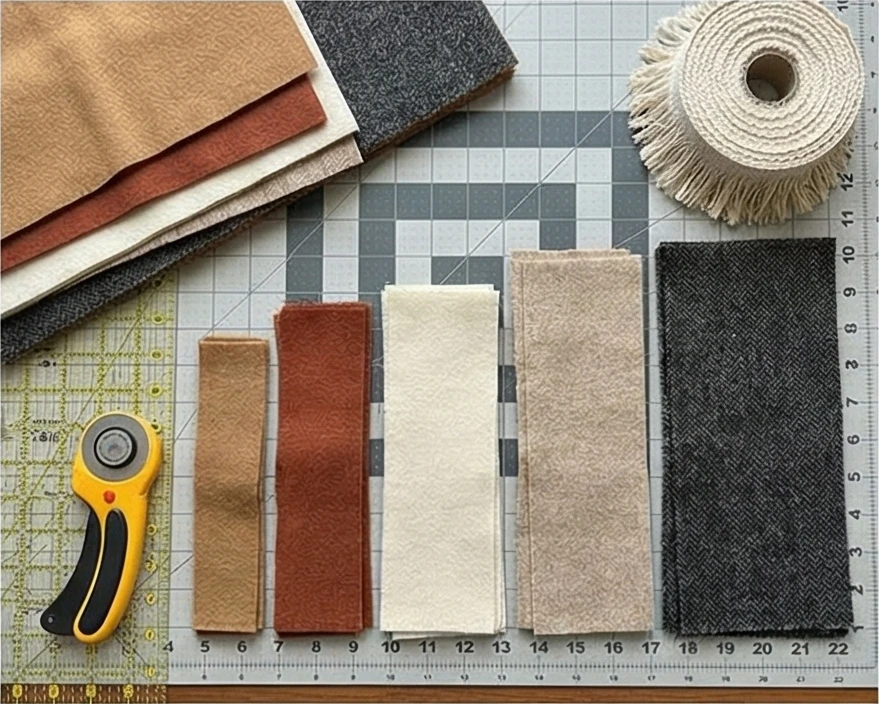
Materials Needed:
- Fabric A (The Wool): 2.5 yards total of assorted Wool Suiting, Tweeds, or Flannels in an eclectic palette (e.g., Camel, Rust, Cream, Charcoal, Olive).
- Fabric B (Backing): 3.5 yards of Soft Double Gauze or Voile (for a soft, drapey finish).
- The Fringe: 8-10 yards of Cotton Brush Fringe or Tiny Tassel Trim (Natural/Cream color). Note: Ensure the trim is washable.
- Batting: 100% Wool Batting (Essential for the drape; cotton batting will make this too stiff).
- Notions: Walking foot, heavy-duty needle (100/16).
Step 1: Curate and Cut the Bands
Boho style thrives on irregularity. We will not cut all strips the same size.
- Prep: Wash and dry your wools to pre-shrink them (“fulling”). Press well.
- Cut Strips: Cut your wool fabrics into strips across the width of the fabric (WOF). Vary the heights:
- Cut some 4.5″ strips.
- Cut some 6.5″ strips.
- Cut some 8.5″ strips.
- Layout: Arrange the strips on the floor to create a pleasing gradient or random mix. Aim for a total length of about 70-75 inches.
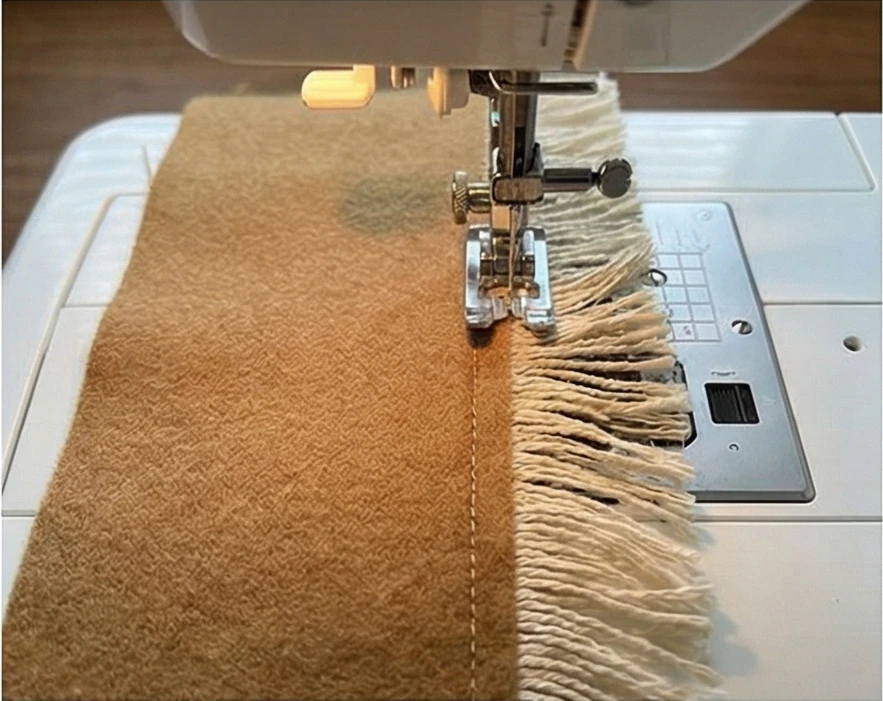
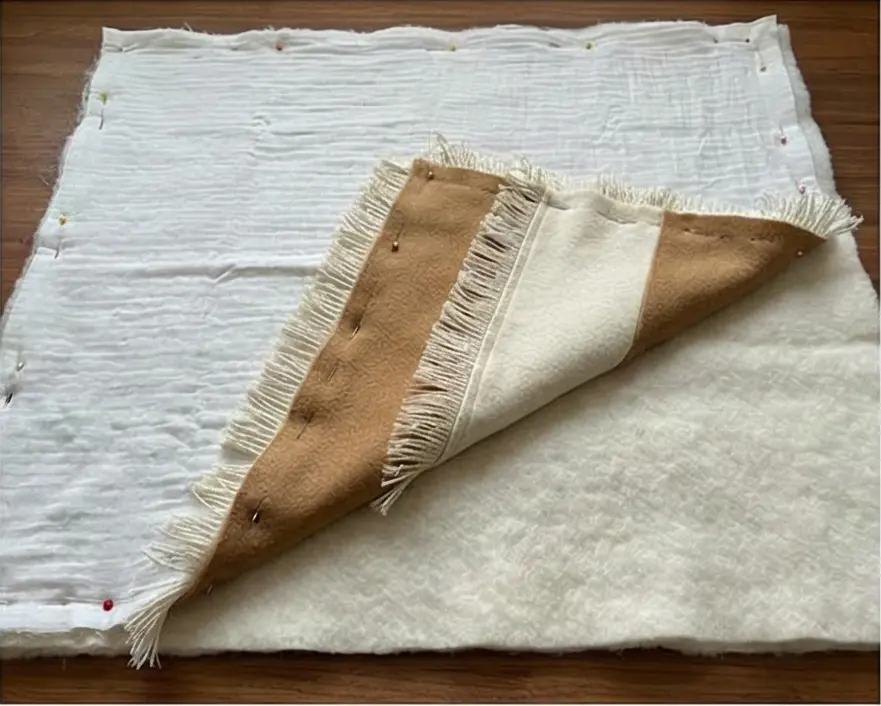
Step 2: Basting the Fringe
It is much easier to attach the fringe to one strip first before sewing the strips together.
- Select a strip where you want a line of texture (e.g., between a Camel strip and a Cream strip).
- Placement: Lay the first wool strip Right Side Up.
- Fringe: Lay your Fringe Trim along the top raw edge.
- Orientation: The fringe/tassels should point INWARD (down towards the body of the strip), and the ribbon tape of the trim should align with the raw edge.
- Baste: Machine-baste the trim in place using a long stitch, about 1/8″ from the edge.
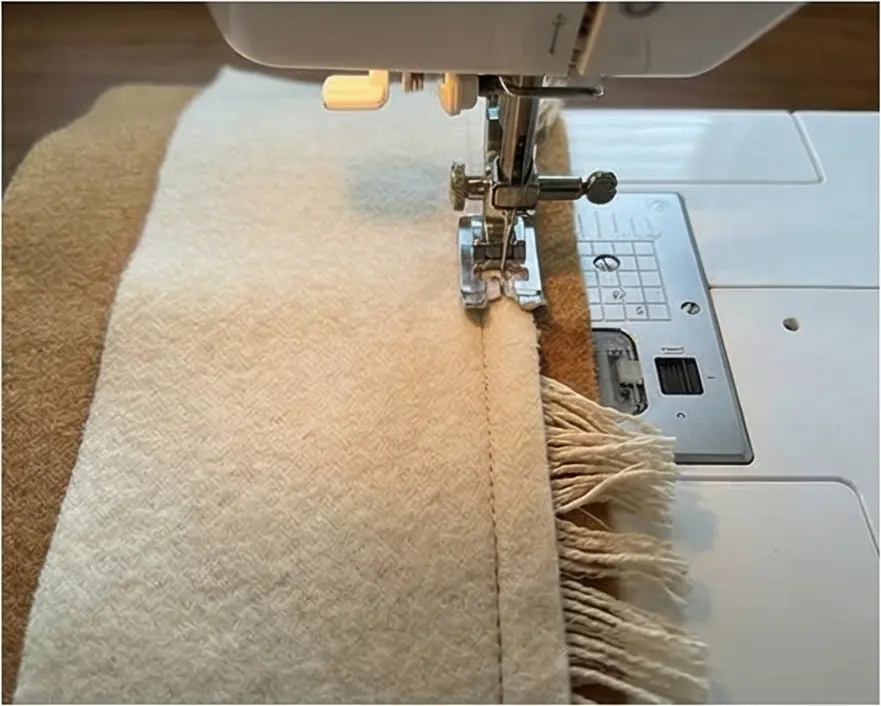
Step 3: Sewing the Seams
- Sandwich: Place the next wool strip Right Side Down on top of the first strip (sandwiching the fringe in the middle).
- Sew: Stitch with a 1/2 inch seam allowance.
- Check: Ensure your stitch line is deeper than the basting line so the basting doesn’t show.
- Press: Open the strips. Press the seam allowance toward the strip without fringe.
- Result: A clean seam with a row of fringe popping out of the ditch.
- Repeat: Continue joining strips, adding fringe to every second or third seam (or every seam if you want maximum texture!) until the top is complete.
Step 4: The “Pillowcase” Finish (No Binding)
A traditional binding looks too stiff for a boho throw. We will use the “Turn and Topstitch” method.
- Layering:
- Lay Batting on the floor.
- Lay Backing on top (Right Side Up).
- Lay the quilt top on top (Right Side Down).
- Pinning: Securely pin around the entire perimeter.
- Sew: Stitch around the outer edge with a 1/2″ seam allowance, leaving a 10-inch gap at the bottom for turning.
- Trim: Trim the excess batting close to the stitching line to reduce bulk in the corners.
Step 5: Turn and Topstitch
- Turn: Turn the quilt right side out through the gap. Poke the corners out with a chopstick to make them square.
- Press: Press the edges flat. Tuck the raw edges of the gap inside.
- Topstitch: Machine stitch around the entire perimeter, 1/4″ from the edge. This closes the gap and gives the quilt a finished edge.
Step 6: “Big Stitch” Kantha Quilting
To finish the boho look, use visible hand stitching.
- Thread: Use Pearl Cotton Size 8 in a contrasting color (like Mustard or Sashiko White).
- Stitch: Hand quilt large running stitches running vertically (perpendicular to your wool strips).
- Spacing: Space the lines about 3 inches apart.
- The vertical stitching contrasts with the horizontal strips and fringe, creating a grid-like texture that keeps the wool batting lofty and warm.
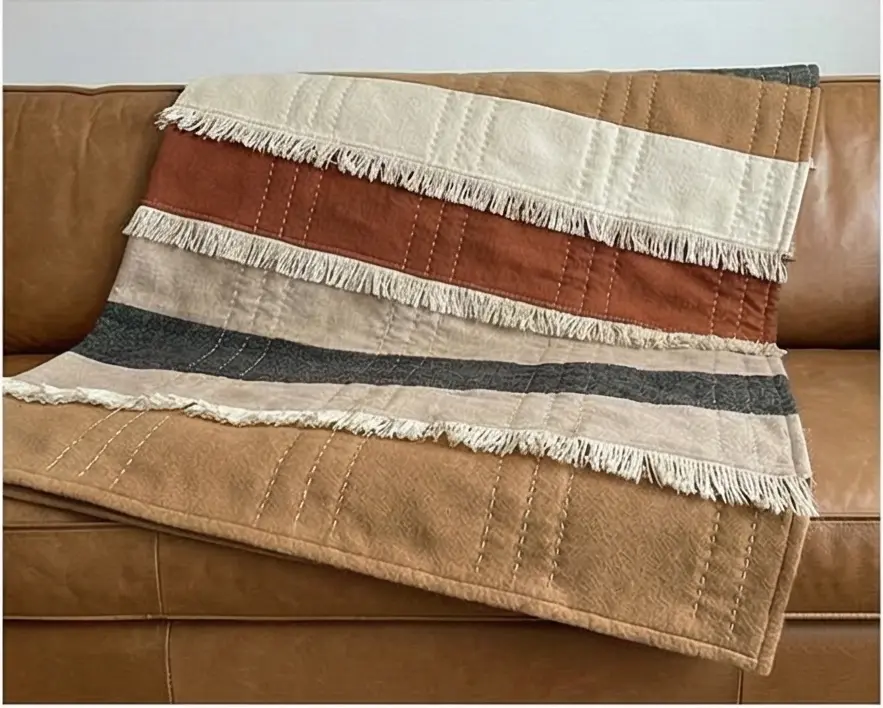
Style Note: This quilt is designed to be imperfect. If the wool stretches slightly or the fringe twists, it adds to the “Nomadic” charm. Layer it over a leather sofa or toss it on the end of a white bed for instant warmth.
13. Minimalist Neutral Wool Quilts for Modern Winter Decor
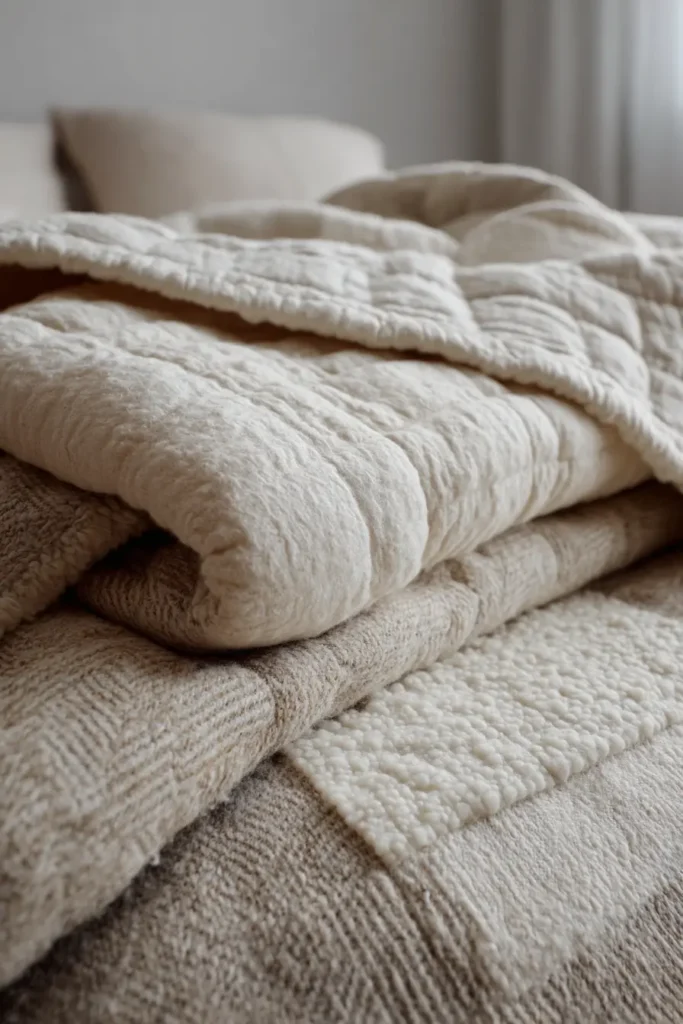
The “Zenith” Monochromatic Texture Quilt
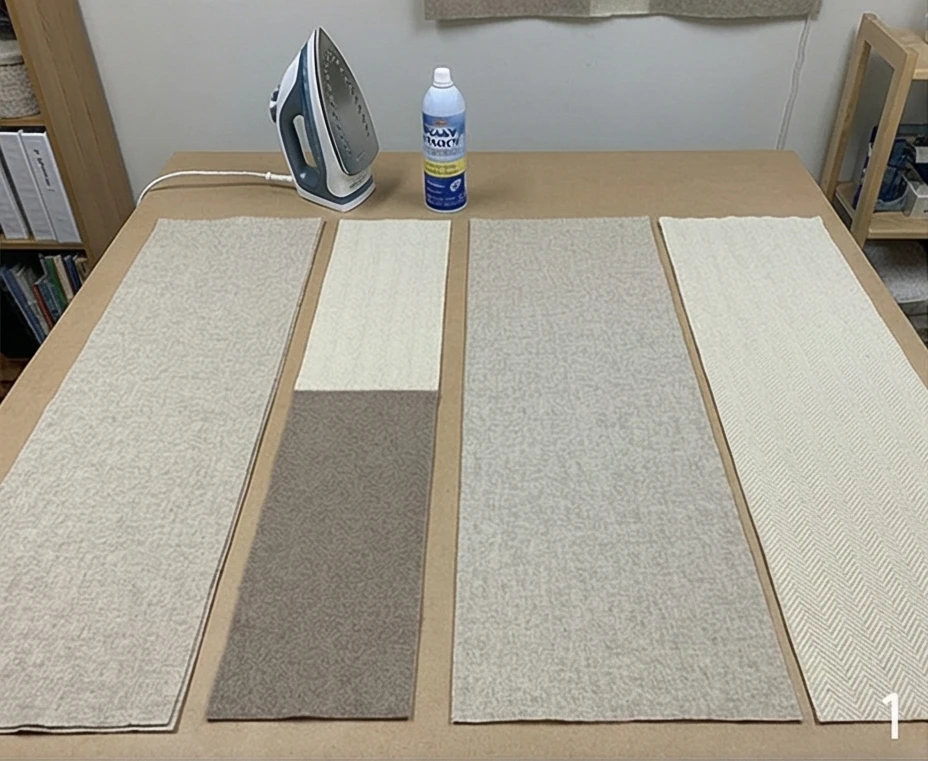
Modern minimalism isn’t about lack of detail; it’s about the subtlety of detail. In a winter wool quilt, this means stripping away bold colors to focus entirely on texture. This design uses a single color palette (e.g., Oatmeal, Sand, and Cream) but mixes different weaves—Herringbone Wool, Boiled Wool, and Brushed Flannel. The layout consists of large, asymmetrical columns that allow the eye to rest, making it perfect for a serene, modern bedroom.
Finished Dimensions: Modern Throw, approximately 60″ x 70″.
Materials Needed:
- Fabric A (Texture 1 – Main): 2 yards of Oatmeal Wool Flannel (smooth texture).
- Fabric B (Texture 2 – Accent): 1.5 yards of Cream Bouclé or Herringbone Wool (rough/nubby texture).
- Fabric C (Texture 3 – Contrast): 1 yard of Taupe Felted Wool (dense/matte texture).
- Backing Fabric: 4 yards of high-quality Linen or Cotton Lawn (to keep it breathable).
- Batting: 100% Wool Batting (Essential for the “drape” and breathability of a modern quilt).
- Thread: 12wt Cotton Petal Signature or Sashiko thread in a matching Cream color.
- Notions: Walking foot, spray starch (heavy).
Step 1: The Texture Prep (Stabilization)
Minimalist quilts have nowhere to hide errors. Your fabric must be stable.
- Steam: Pre-shrink all wools with heavy steam.
- Starch: Apply a heavy coat of starch to the looser weaves (like Bouclé or Herringbone). This turns floppy fabric into stable, sewable sheets.
- Trim: Trim off all selvedges.
Step 2: Cutting “Grand Columns”
We are avoiding tiny patchwork. We want large, architectural shapes.
- Column 1 (The Anchor): Cut a single panel of Fabric A (Oatmeal) measuring 15″ x 70″.
- Column 2 (The Split):
- Cut a strip of Fabric B (Cream Bouclé) 10″ x 40″.
- Cut a strip of Fabric C (Taupe) 10″ x 30″.
- Sew them together end-to-end to create a 10″ x 70″ column.
- Column 3 (The Field): Cut a panel of Fabric A (Oatmeal) measuring 20″ x 70″.
- Column 4 (The Edge): Cut a panel of Fabric B (Cream Bouclé) measuring 15″ x 70″.
- Note: These measurements create an asymmetrical, modern composition.
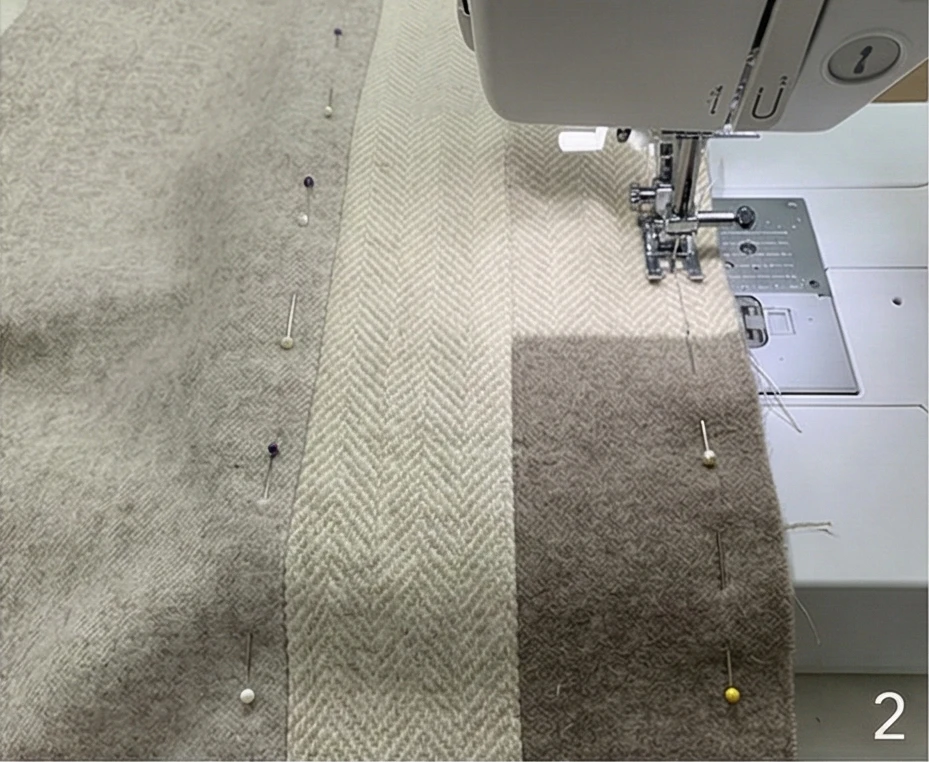
Step 3: Assembling the Minimalist Top
- Pinning: Pin Column 1 to Column 2. Use many pins; wool is heavy and will try to slide.
- Sewing: Stitch with a 1/2 inch seam allowance. (Standard 1/4 inch is too weak for heavy wool).
- Pressing: Press all seams OPEN. Use a “clapper” (a wooden block) to pound the seams flat while they are hot. This ensures the quilt top is perfectly smooth.
- Join: Continue adding Columns 3 and 4 until the top is complete.
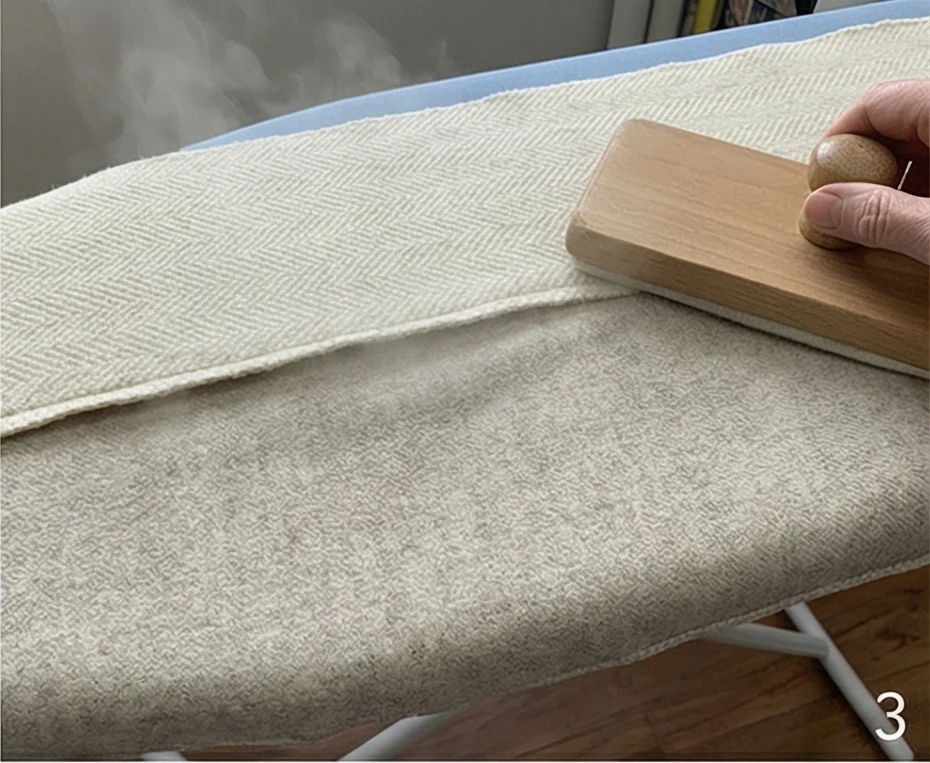
Step 4: The “Wool Sandwich”
- Tape: Tape your Backing Fabric (Linen) to the floor, pulling it taut.
- Batting: Place the Wool Batting on top.
- Top: Center the Wool Top.
- Basting: Do not use pins. Use Spray Baste (temporary adhesive) specifically designed for heavier fabrics. Spray each layer generously to prevent shifting.
Step 5: “Matchstick” or “Big Stitch” Quilting
You have two options for a modern look:
- Option A (Texture): Machine quilt straight vertical lines spaced 1/2 inch apart across the entire quilt (“Matchstick”). This flattens the wool slightly and creates a ridged, architectural texture.
- Option B (Softness): Hand quilt using the 12wt Cream Thread. Stitch large running stitches in vertical lines spaced 3 inches apart. This leaves the wool lofty and soft. Recommended for maximum “hygge.”
Step 6: The “Invisible” Facing Finish
A visible binding strip disrupts the minimalist lines. We use a Facing to hide the edge.
- Cut Strips: Cut 4 strips of Backing Fabric, 3 inches wide.
- Sew to Front: Sew these strips to the FRONT of the quilt, right sides together.
- Turn: Flip the strips completely around to the BACK of the quilt.
- Corner Trick: Before turning, clip the corners at a 45-degree angle to reduce bulk.
- Press & Stitch: Press the edge so the facing pulls the wool top slightly to the back (ensuring no lining shows). Hand stitch the facing down on the back.
- Result: A crisp, rimless edge that looks like a modern canvas.
Style Note: This quilt relies on the interplay of light and shadow on the different wool textures. It looks best thrown casually over a charcoal grey sofa or a white duvet, adding warmth without visual clutter.
14. Snowflake Quilt Patterns with Warm Flannel Batting

The “Nordic Flurry” Giant Snowflake Quilt
Snowflake patterns can be intricate, but for a cozy winter quilt, a “Giant Block” design is often the most striking. This pattern creates one massive, pixelated snowflake that spans the entire quilt top, evoking the look of a Scandinavian sweater. By using Flannel as Batting (instead of polyester), you create a quilt with a magnificent, fluid drape—it wraps around the body like a heavy shirt rather than stiff bedding.
Finished Dimensions: Large Throw, approximately 64″ x 64″.
Materials Needed:
- Fabric A (The Snowflake): 2 yards of White or Cream Flannel (Solid or low-volume print).
- Fabric B (The Background): 3 yards of Ice Blue, Silver Grey, or Red Flannel.
- Backing Fabric: 4 yards of coordinating Flannel.
- The “Batting”: 4 yards of Heavy White Flannel (or a plain white flannel sheet).
- Why? Using a layer of flannel as the middle layer instead of traditional batting makes the quilt thinner, heavier, and floppy—perfect for “burrito” wrapping on the couch.
- Notions: Rotary cutter, square ruler (6.5″ or larger).
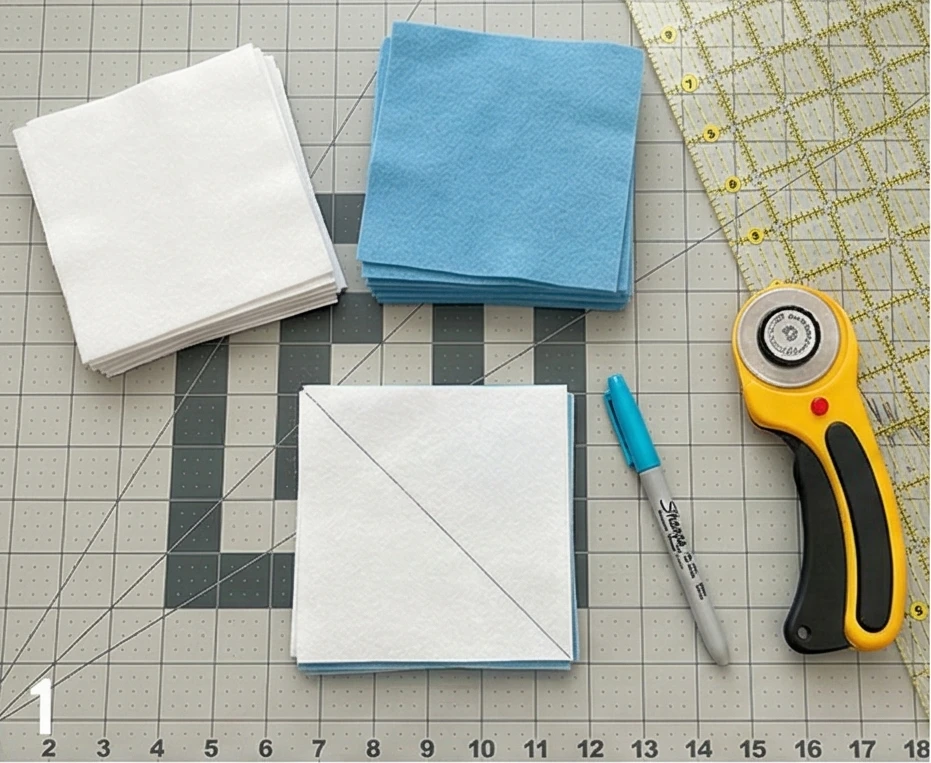
Step 1: Mass Produce Half-Square Triangles (HSTs)
The points of the snowflake are made from HSTs. We need them to finish at 4 inches square.
- Cut Squares:
- Cut 16 squares of Fabric A (White) measuring 5″ x 5″.
- Cut 16 squares of Fabric B (Background) measuring 5″ x 5″.
- Mark & Sew: Draw a diagonal line on the back of the White squares. Place them Right Sides Together with the Background squares. Sew 1/4 inch away from the line on both sides.
- Cut & Press: Cut along the drawn line. Press seams toward the dark background.
- Trim: Trim all units to exactly 4.5″ x 4.5″.
- Yield: 32 HSTs.
Step 2: Cut the Solid Squares
The rest of the snowflake is made of solid blocks.
- Snowflake Body (White): Cut 20 squares measuring 4.5″ x 4.5″.
- Background Field (Blue/Grey): Cut 108 squares measuring 4.5″ x 4.5″.
- Total Grid: You now have 160 units (a 16 x 10 grid if doing a rectangle, but for a square snowflake, we are building a 16 x 16 grid).
- Adjustment: To make the 64″ square, you actually need 256 units total.
- Revised Cutting for 64″ Square:
- HSTs: You need 56 HSTs (Cut 28 pairs).
- White Squares: 52 squares.
- Background Squares: 148 squares.

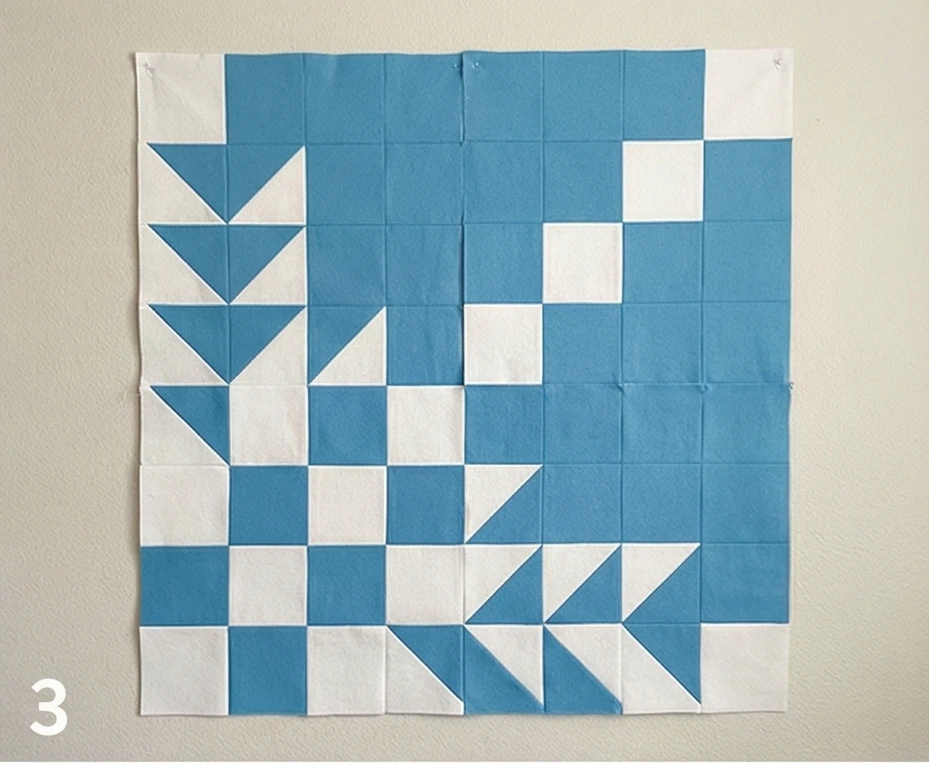
Step 3: Layout the Quadrants
It is easiest to build the snowflake in 4 identical quarters (Quadrants). Each Quadrant is an 8×8 grid of squares.
- The Design:
- Corner (Center of Quilt): A block of 4 White squares.
- Radiating Arms: Arrange the White Squares and HSTs to form a diagonal branch radiating from that center corner out to the opposite corner.
- Visual: The white side of the HSTs should always point inward toward the snowflake arm line to create the “crystal” spikes.
- Arrange: Lay out one quadrant (8 blocks wide by 8 blocks tall).
- Ensure the “spikes” of the snowflake mimic a crystallized star.
- Sew: Stitch the squares into 8 rows. Stitch the rows together to complete Quadrant 1.
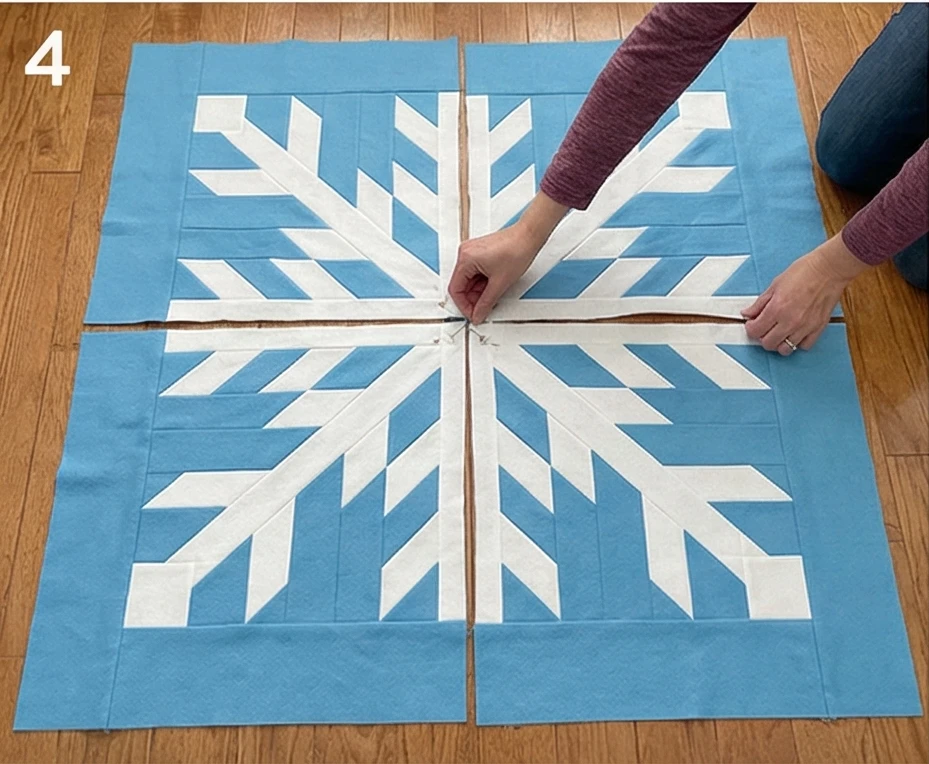
Step 4: Assemble the Giant Snowflake
- Make 4: Repeat Step 3 to create 4 identical Quadrants.
- Rotate: Place the 4 quadrants on the floor. Rotate them so their “White Corners” (from Step 3.1) all meet in the exact center of the quilt.
- Effect: The four diagonal arms will now connect to form a massive “X” or Star shape.
- Join: Sew the top two quadrants together. Sew the bottom two together. Then sew the top half to the bottom half.
- Crucial: Match the center seam perfectly so the snowflake core is solid.
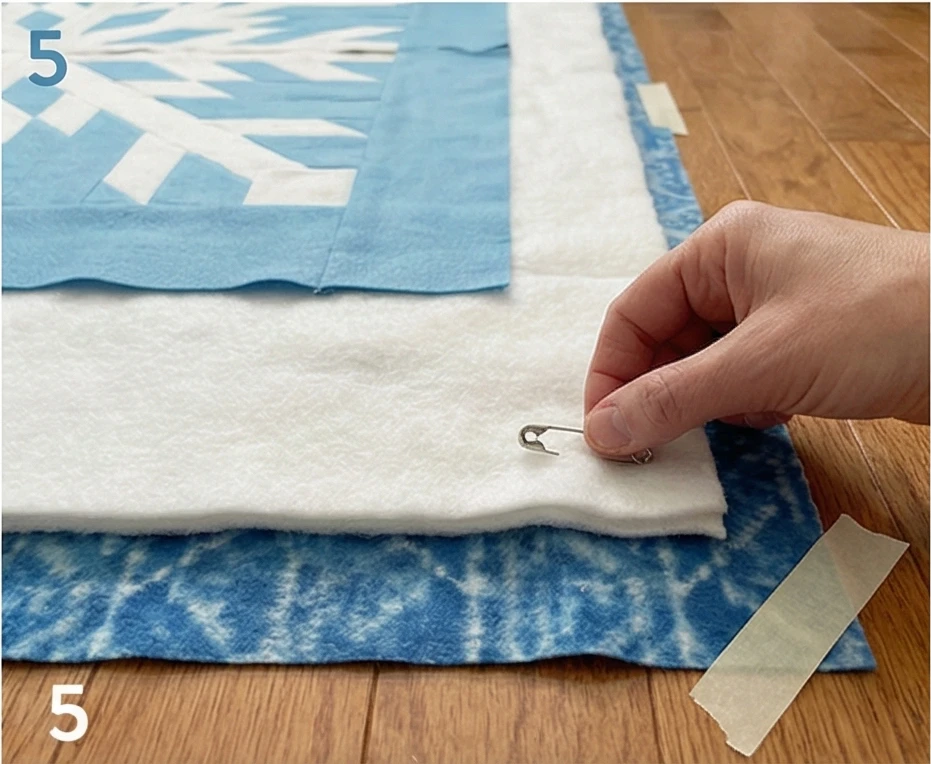
Step 5: The “Flannel Batting” Sandwich
Handling flannel batting is different than poly batting.
- Prep: Wash and dry your “batting” flannel to pre-shrink it. (Do not skip this, or your quilt will pucker).
- Layer: Tape Backing to floor. Lay the Flannel Batting on top (smooth it out; it sticks to itself, which is helpful!). Lay the Top on last.
- Baste: Use curved safety pins every 4 inches. Flannel is heavy and shifts easily.
Step 6: “Wind-Blown” Quilting
- Thread: Use White Cotton Thread.
- Design: Do not stitch complex feathers.
- Option A (Straight): Stitch straight lines radiating from the center of the snowflake out to the edges, like rays of light.
- Option B (Swirls): Quilt loose, large swirls over the entire surface to mimic blowing wind and snow.
- Bind: Finish with a contrasting binding (like a dark Navy or Red) to frame the snowy scene.
15. Chunky Knit-Look Quilts Using Textured Wool Batting
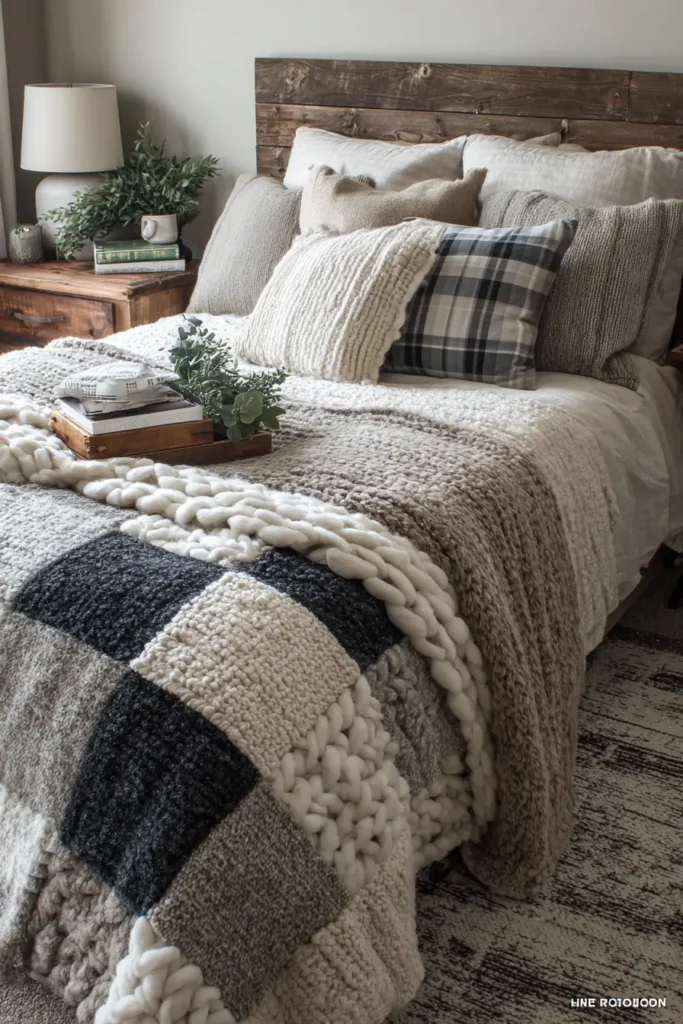

The “Cable Knit” Illusion Quilt
This quilt is designed to trick the eye. It looks exactly like a giant, chunky cable-knit sweater, but it is actually a quilt made from Cotton Jersey (T-shirt fabric) or Sweatshirt Fleece. The “cables” are created not by knitting, but by Trapunto—a technique where you stuff extra batting into specific areas to make them puff out in 3D relief. By combining soft, stretchy jersey fabric with high-loft wool batting, you get a quilt that feels like wearing your favorite oversized sweater.
Finished Dimensions: Cozy Throw, approximately 50″ x 60″.
Materials Needed:
- Fabric A (Top): 2.5 yards of Cream or Grey Sweatshirt Fleece (smooth side up) or Heavy Cotton Jersey. Note: You must use a solid color so the texture shadows show up.
- Fabric B (Backing): 2.5 yards of Matching Jersey or Flannel.
- Main Batting: High-Loft Wool Batting (for the whole quilt).
- Trapunto Stuffing: Extra scraps of wool batting or Polyester Poly-Fil.
- Thread: Matching thread (Cotton or Polyester).
- Marking Tool: Water-soluble fabric marker or chalk wheel.
- Notions: Walking foot, safety pins.
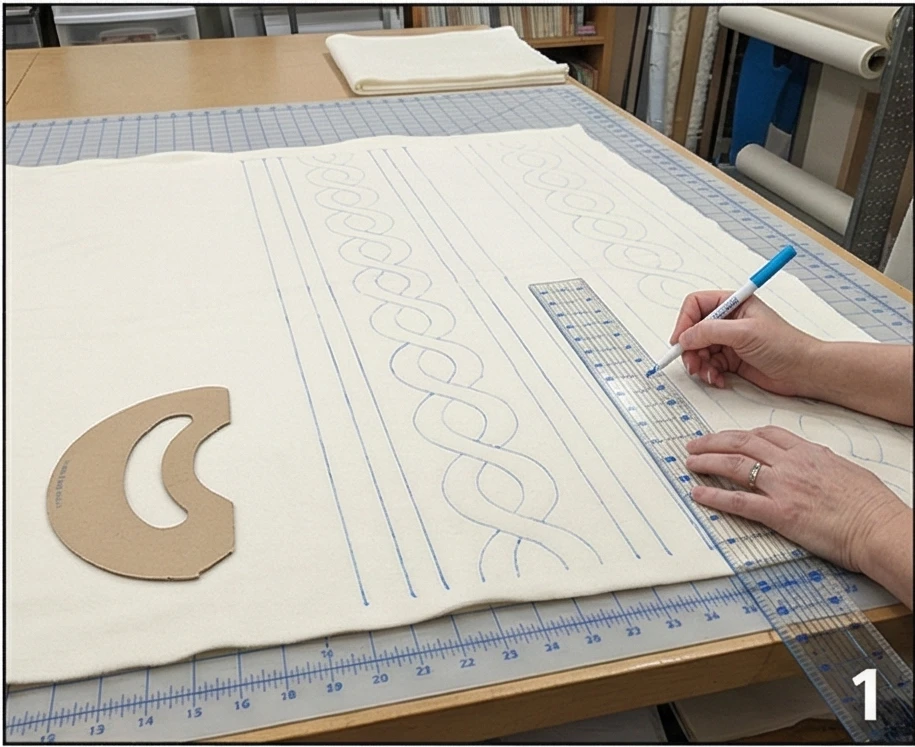
Step 1: Marking the “Cables”
The design relies entirely on the quilting lines. You must draw the map before you sew.
- Prep: Lay your Top Fabric flat on a large table.
- Draw the Grid:
- Draw vertical lines down the entire length of the quilt to divide it into columns.
- Column A (The Cable): 6 inches wide.
- Column B (The Spacer): 2 inches wide.
- Repeat: Cable (6″) – Spacer (2″) – Cable (6″) across the width.
- Draw the Cable Twist: Inside the 6-inch columns, draw the interlocking figure-8 design of a cable knit.
- Tip: Use a cardboard stencil of a “convex” and “concave” curve to keep them uniform. The lines should weave over and under each other.
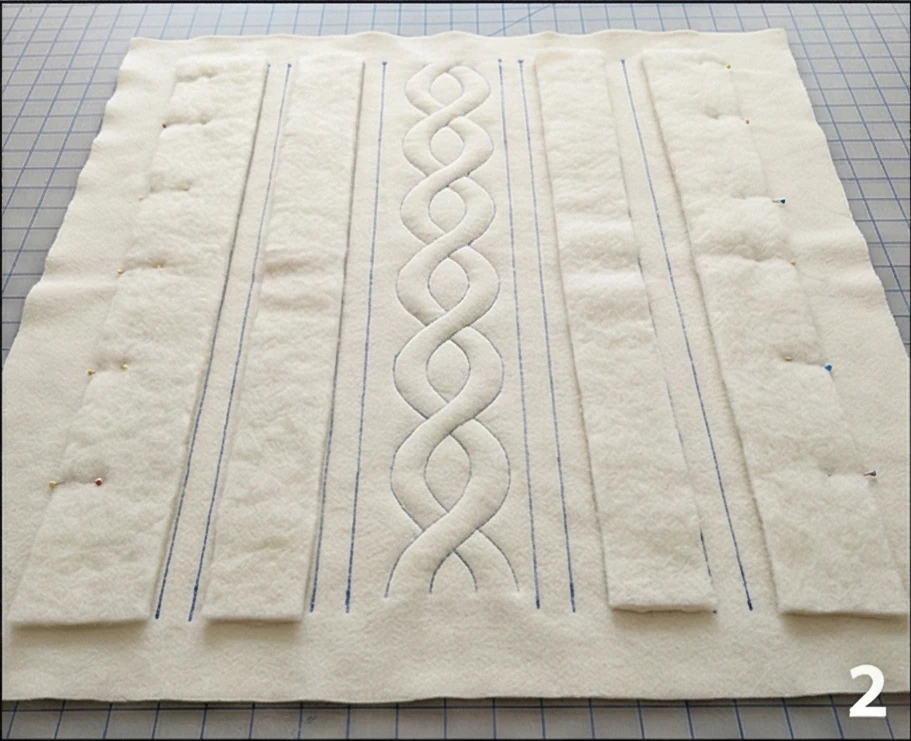
Step 2: The Trapunto Sandwich (The Secret Step)
We are going to stuff the cables before we make the full quilt.
- Under-Layer: Cut strips of Wool Batting slightly narrower than your cable columns (approx. 5.5 inches wide).
- Placement: Place these batting strips on the wrong side (back) of your Top Fabric, directly behind the cable columns you drew.
- Baste: Pin these strips in place or use temporary spray adhesive.
- Result: The quilt top now has “padding” only behind the cable areas.
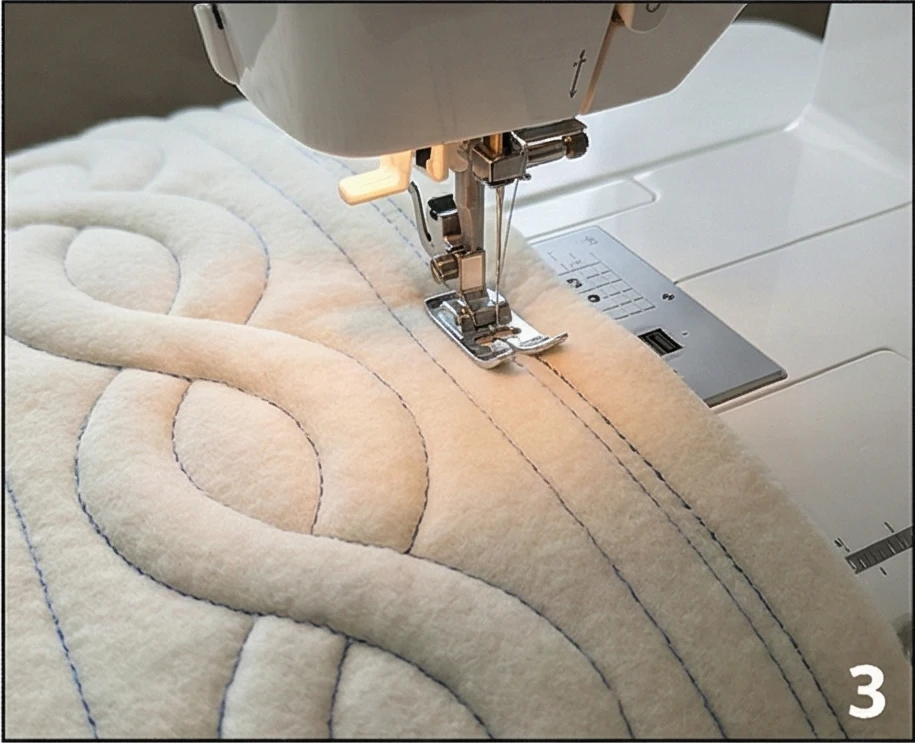
Step 3: Stitching the Cables (Outline)
- Sewing: With the batting strips pinned to the back, take the Top Fabric to your machine.
- Stitch: Sew directly on your drawn lines (the figure-8s and the vertical column dividers).
- Effect: This traps the extra batting inside the cable shapes. The un-sewn areas inside the figure-8s will puff out massively because they are double-stuffed.
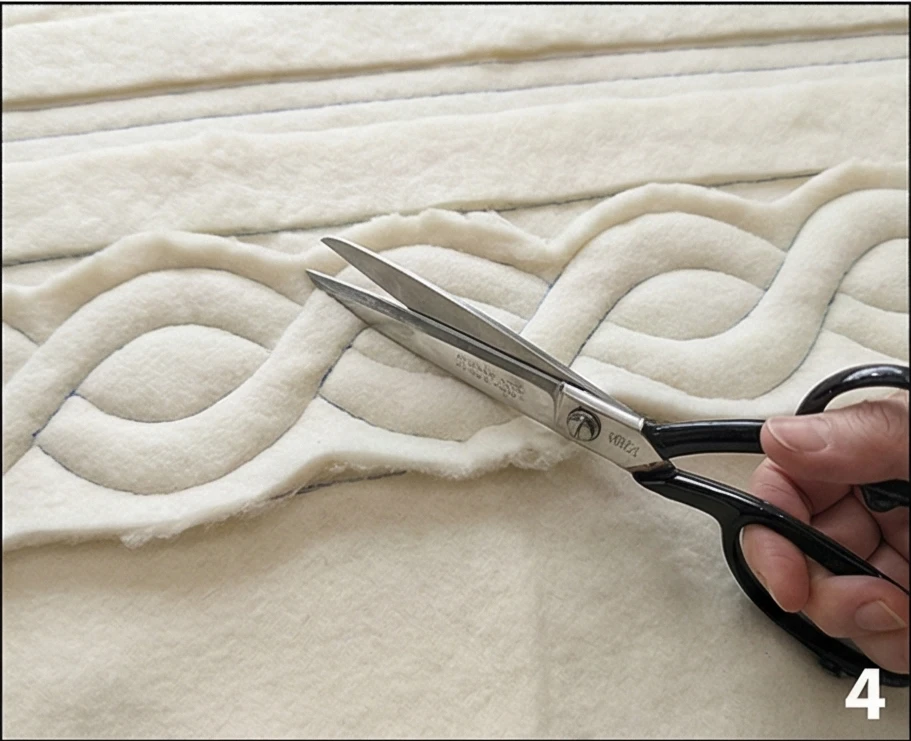
Step 4: Trimming the Trapunto
This reduces bulk in the non-puffy areas.
- Flip: Turn the Top Fabric over to the back.
- Trim: Using sharp scissors, carefully trim away the excess batting from the “Spacer” columns (the 2-inch gaps) and anywhere outside the cable design.
- Goal: You want the extra batting only inside the cable shapes. Be careful not to snip the top fabric!
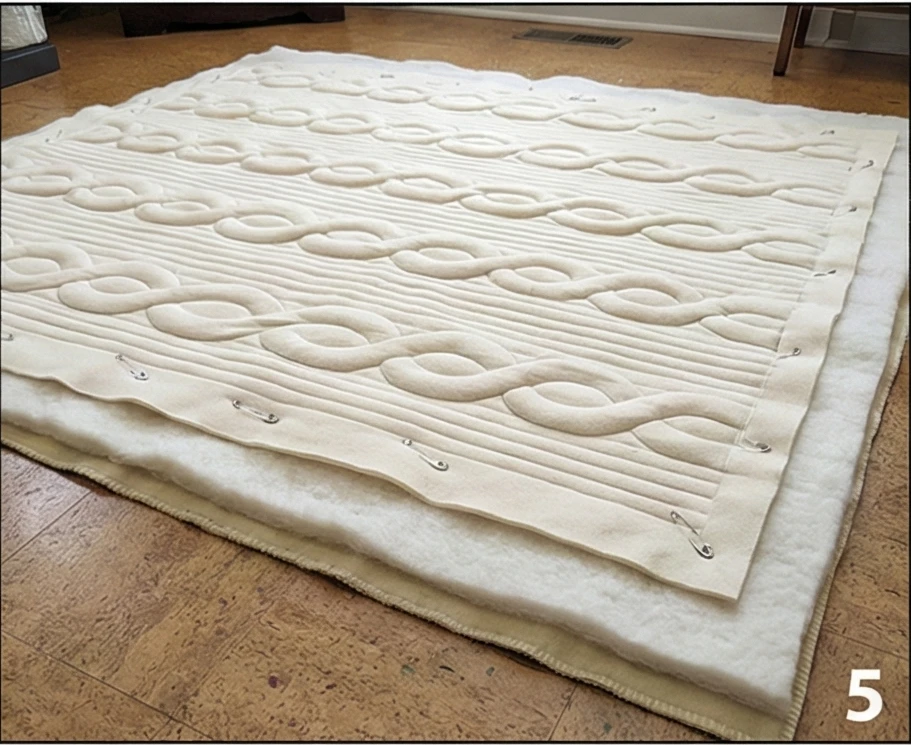
Step 5: The Full Assembly
- The Sandwich: Now assemble the real quilt.
- Layer: Backing Fabric (face down) + Main Wool Batting + Prepared Trapunto Top (face up).
- Baste: Pin securely. You are now sewing through three layers of batting in the cable areas (Trapunto layer + Main layer), so use strong pins.
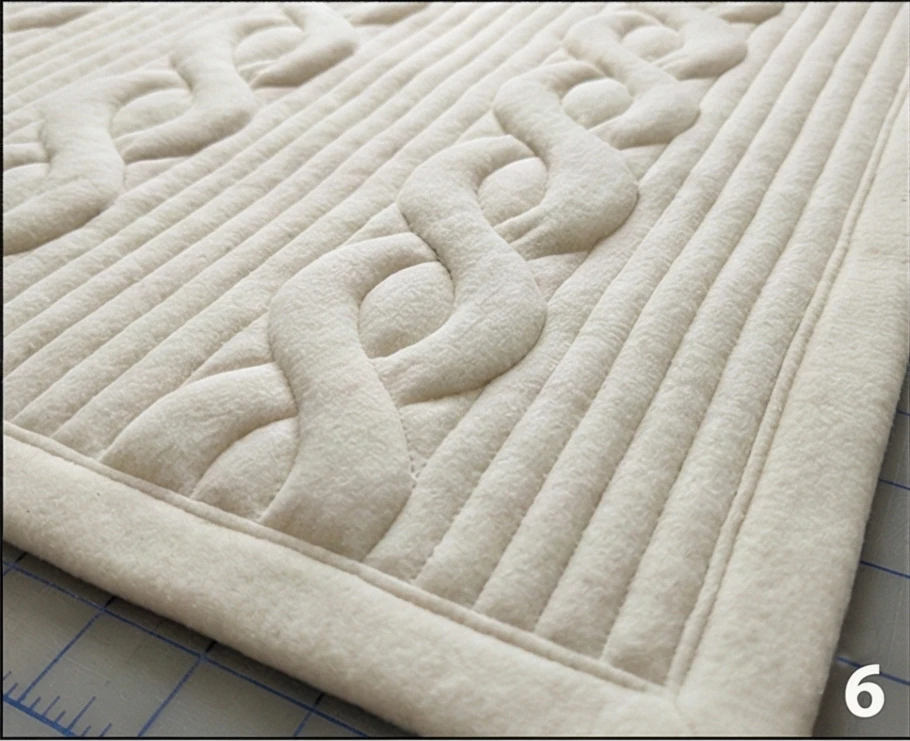
Step 6: Echo Quilting the Texture
- The Ribbing: In the “Spacer” columns (the 2-inch gaps), quilt straight vertical lines spaced 1/2 inch apart.
- Visual: This looks like the “ribbed knit” part of a sweater and flattens this area down, making the puffy cables pop out even more.
- The Cables: Do not quilt inside the puffy cable loops. You want them to remain high and round. You can stitch “in the ditch” of your original outline lines to reinforce them.
Step 7: The “Sweater Hem” Binding
- The Band: Instead of a thin binding, create a wide “cuff.”
- Cut: Cut 5-inch strips of the same Sweatshirt Fleece.
- Fold: Fold in half lengthwise (to 2.5″).
- Attach: Sew to the edge with slightly stretched tension (as if applying a cuff to a sleeve). When you flip it over, it will look like the ribbed hem of a sweater.
Style Note: Using wool batting is essential here because polyester is too springy and cotton is too heavy. Wool has the perfect “memory” to hold the puffy cable shape without becoming stiff. The result is a monochrome masterpiece that invites touch.
Conclusion
Embracing these Cozy Winter Quilt Designs is about more than just fighting the cold; it is about celebrating the season through craftsmanship and comfort. By upgrading your materials to include wool and flannel batting, you elevate the functionality of your quilts, ensuring they perform beautifully when you need them most.
The projects highlighted here, such as the Blended Wool and Cotton Batting Quilts, demonstrate that you can achieve the perfect winter weight—substantial enough to be cozy, yet breathable enough for restful sleep. Whether you choose the tactile richness of a Chunky Knit-Look design or the crisp, clean lines of a Minimalist Neutral Wool Quilt, the result is a piece that serves as a barrier against the chill and a beacon of homey warmth.
The variety in these patterns proves that winter bedding can suit any decor style. A Farmhouse-Style Flannel Quilt brings a sense of heritage and tradition to a family room, while Elegant Black-and-Cream Wool Designs add a sophisticated touch to a modern master suite. The inclusion of Boho Fringe details or Snowflake Appliqué allows for personal expression, turning these functional items into distinct style statements. Furthermore, the durability of materials like denim and wool ensures that these quilts will likely become heirlooms, passed down to warm generations to come.
Ultimately, the act of making a winter quilt is a labor of love and preparation. As you stitch together a Log Cabin block or secure the layers of a Hand-Tied Comforter, you are literally weaving warmth into your environment. We hope these ideas have inspired you to swap out your lightweight summer cottons for the lush, insulating power of wool and flannel. So, gather your heaviest fabrics, prepare your batting, and get ready to create a winter haven that is safe, stylish, and incredibly snug.
