
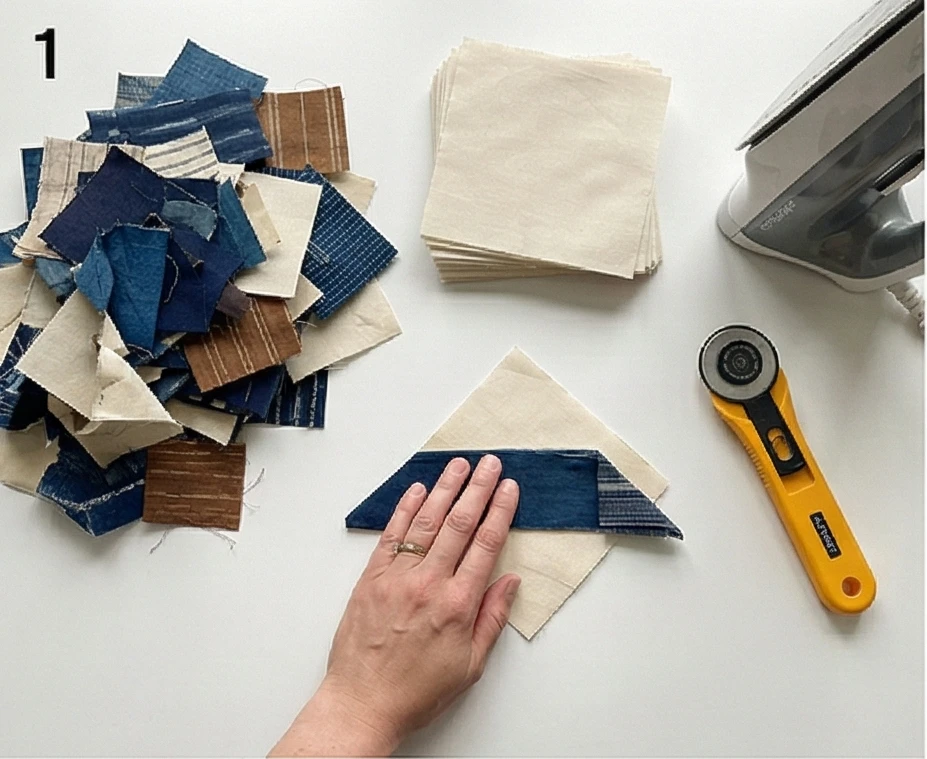
10 Japanese Patchwork Quilt Ideas: Elegant Patchwork for Cozy and Stylish Home Decor
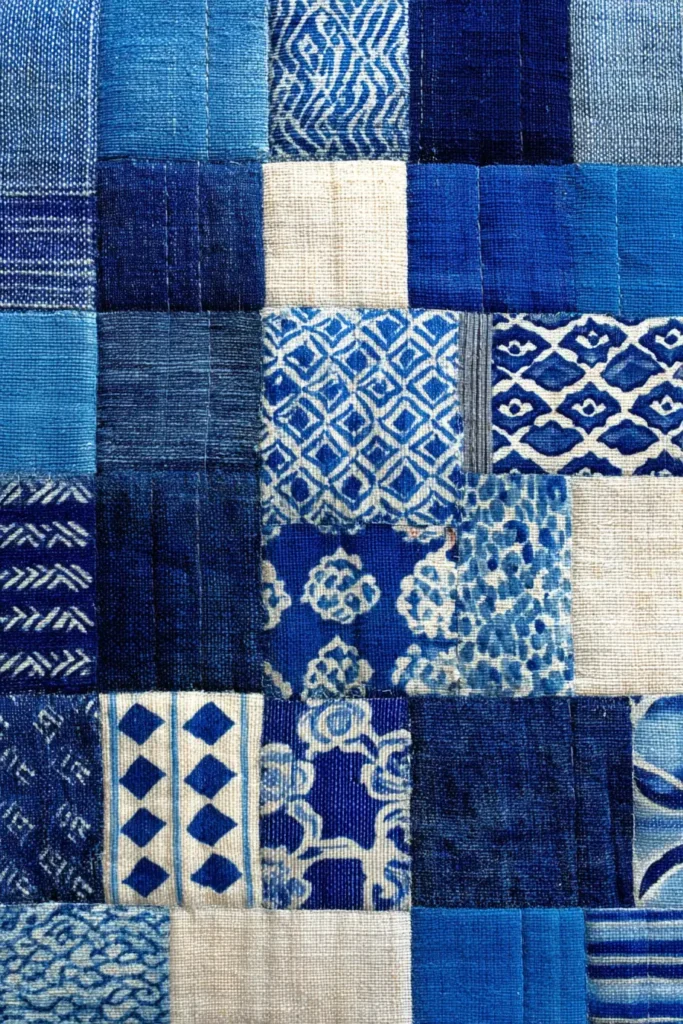
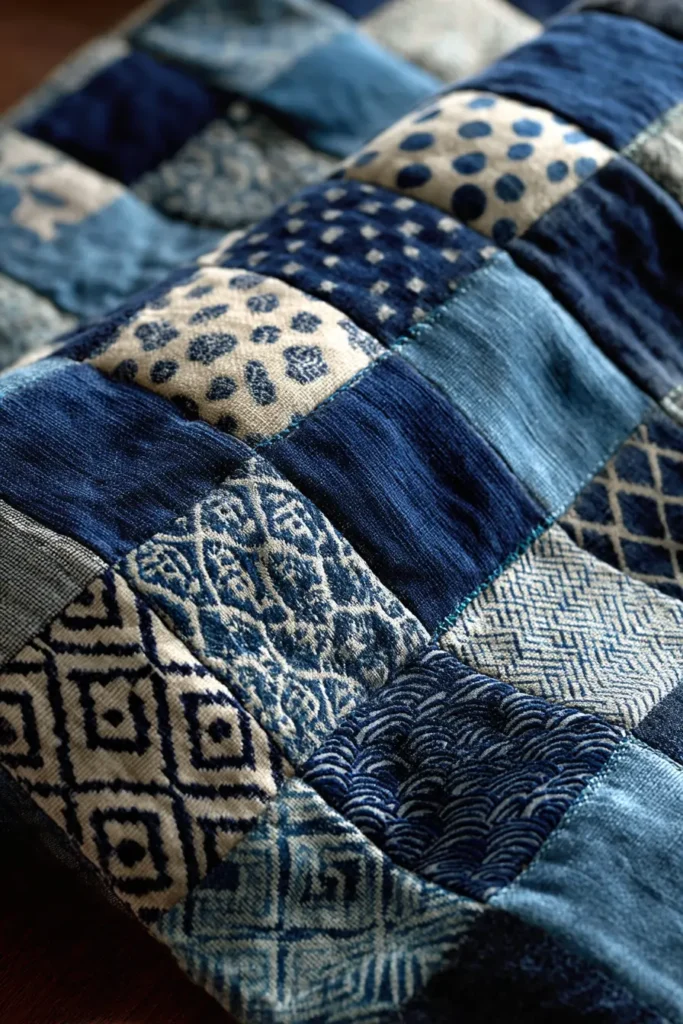
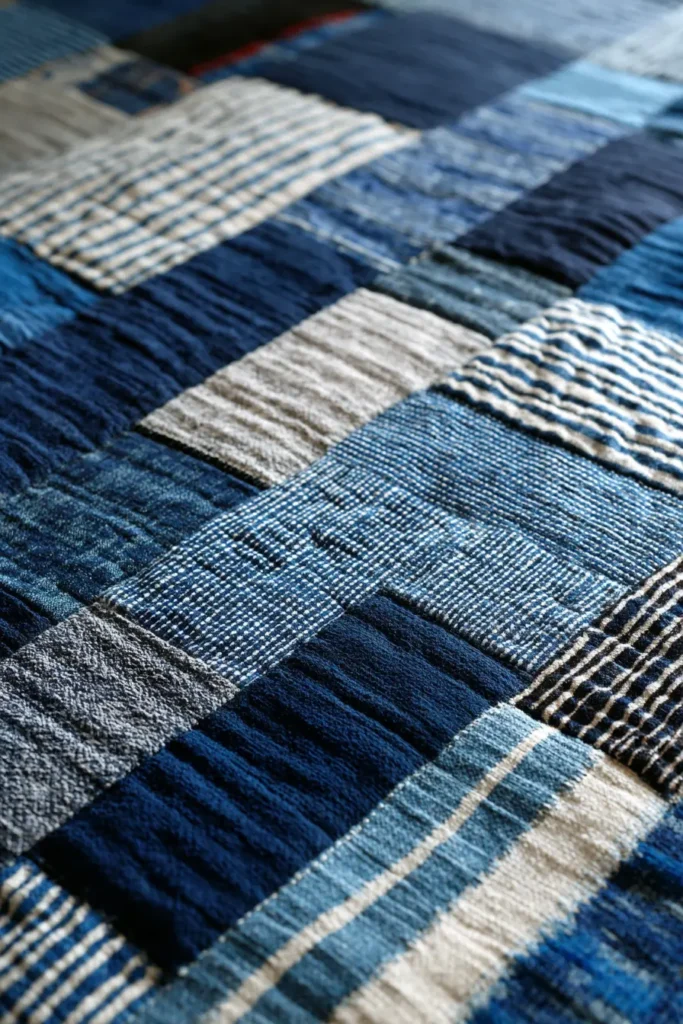
Exploring Japanese Patchwork Quilt Ideas reveals a design ethos in which elegance arises from necessity and comfort is crafted through mindfulness. Unlike the vibrant, often chaotic geometry of Western patchwork, the Japanese tradition—spanning styles like Boro, Shonai, and Yosegire—is deeply rooted in the philosophy of wabi-sabi, finding profound beauty in the imperfect, the mended, and the enduring. This approach transforms the humble act of piecing together fabric scraps into a sophisticated art form. These textiles are not merely decorative layers; they are historical narratives stitched in indigo and cotton, designed to bring grounded serenity and cohesive style to the modern home.
Japanese Patchwork Quilt Ideas
Contents
- 1 Japanese Patchwork Quilt Ideas
- 2 1. Traditional Sashiko Stitch Bed Covers for Zen Bedrooms
- 3 2. Shonai Patchwork Quilts for Elegant Layered Bedding
- 4 3. Cozy Boro-Style Patchwork Quilts: The Art of Beautiful Repair
- 5 4. Scrappy Yosegire Patchwork Throws for Rustic Charm
- 6 5. Artistic Shonai and Patchwork Pillow Covers for Calm Living Spaces
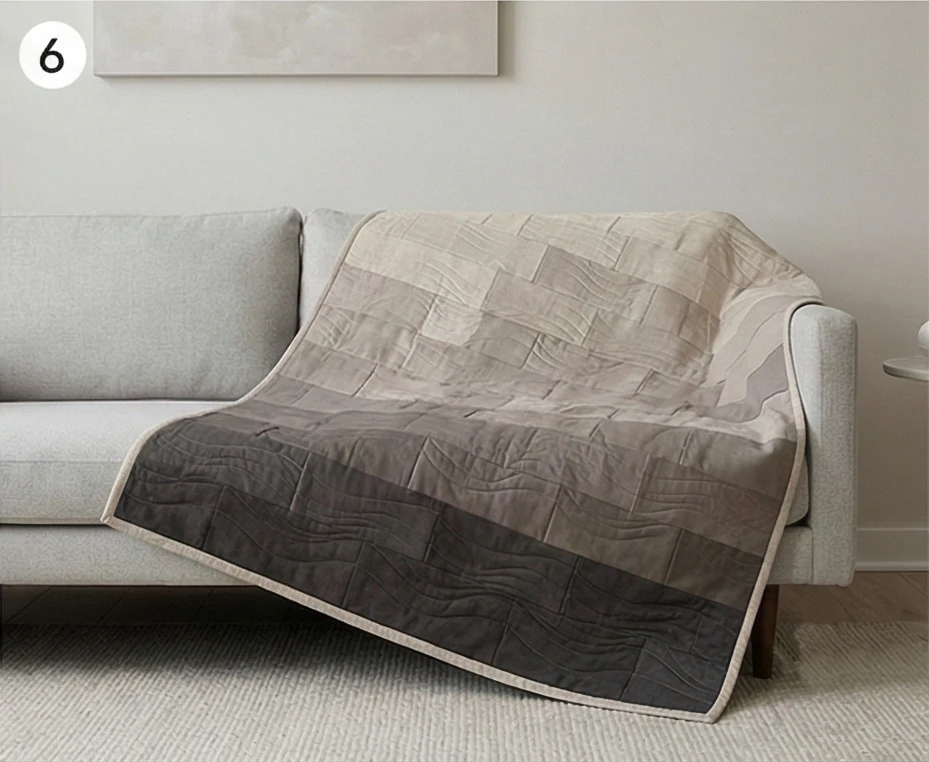
- 7 6. Cozy Indigo Boro Patchwork Sofa Throws
- 8 7. Rustic Japanese Farmhouse Patchwork Couch Covers
- 9 8. Wabi-Sabi Boro Patchwork Wall Hangings
- 10 9. Hishizashi (Dovetail) Stitching for Detailed Quilted Wall Art
- 11 10. Modern Japanese Patchwork Quilts for Balanced Home Styling
- 12 Conclusion
The versatility of these patchwork techniques allows them to redefine the atmosphere of any room. A Traditional Sashiko Stitch Bed Cover does more than provide warmth; its rhythmic white stitches on deep blue fabric create a focal point of Zen tranquility, essential for a restorative bedroom. In living areas, Cozy Indigo Boro Patchwork Sofa Throws and Rustic Japanese Farmhouse Couch Covers offer a tactile richness that invites touch and relaxation. These pieces celebrate the “Art of Beautiful Repair,” where every patch and stitch serves as a testament to resilience and resourcefulness, turning functional furnishings into conversation pieces that exude a rustic, yet refined charm.
Ultimately, integrating these designs is about curating a space that feels balanced and authentically lived-in. Whether it is the intricate detail of Hishizashi (Dovetail) Stitching on a wall hanging that commands attention or the subtle texture of Artistic Shonai Pillow Covers that soften a modern sofa, each element contributes to a harmonious whole. We delve into how Modern Japanese Patchwork Quilts can bridge the gap between heritage craftsmanship and contemporary styling, proving that true luxury lies in the quality of materials and the intention behind the making. This guide invites you to slow down and embrace a decor style that is as comforting to the soul as it is pleasing to the eye.
1. Traditional Sashiko Stitch Bed Covers for Zen Bedrooms
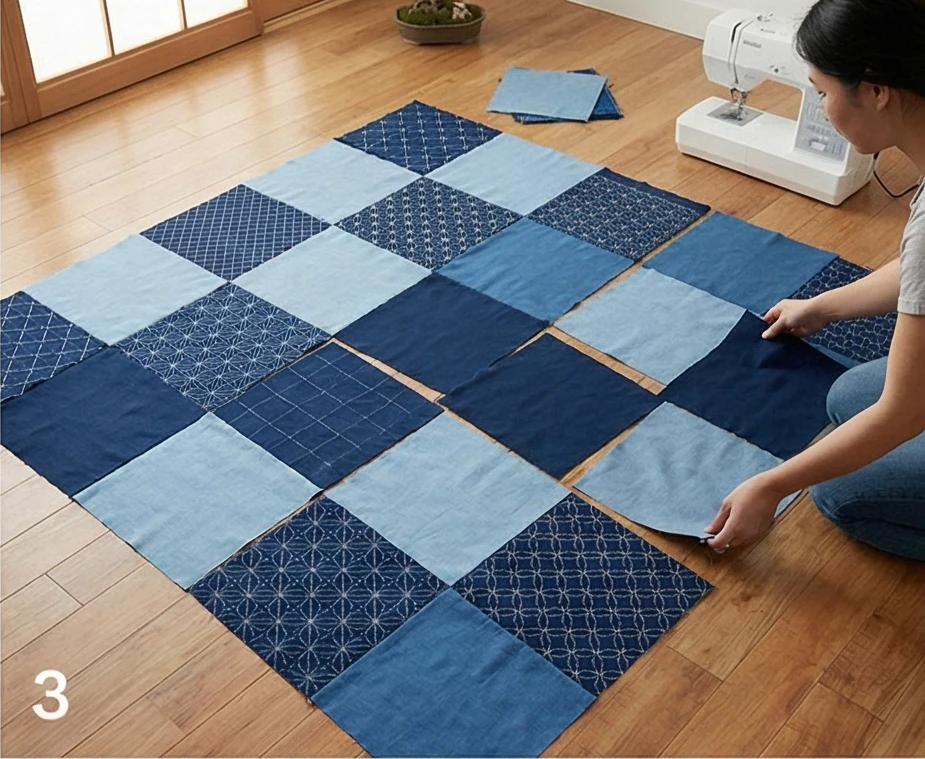
The “Kyoto Grid” Sashiko Sampler Patchwork Quilt
While many Sashiko quilts are “wholecloth” (one single piece of fabric), a Sashiko Sampler Patchwork creates a stunning rhythm of indigo and white that serves as a library of traditional Japanese geometry. This design features large squares of dark indigo and lighter blue linen, pieced together into a simple checkerboard. Instead of hidden quilting, each square is highlighted with a different traditional Sashiko motif—such as Shippo (Seven Treasures), Seigaiha (Waves), and Kagome (Bamboo Basket)—turning the bed cover into a gallery of Zen art.
Finished Dimensions: Queen Size Bed Cover, approximately 90″ x 90″.
Materials Needed:
- Fabric A (Dark Indigo): 3 yards of solid Indigo Cotton or Linen.
- Fabric B (Light Indigo/Chambray): 3 yards of lighter blue or textured grey cotton.
- Backing Fabric: 5 yards of Navy Blue Cotton Sateen (for a smooth feel against skin).
- Batting: Bamboo Batting. (Bamboo is naturally antibacterial, breathable, and drapes heavily, enhancing the “Zen” feeling).
- Thread: White Sashiko Thread (Thick matte cotton).
- Notions: 12.5-inch square ruler, white chalk pencil, long Sashiko needles, thimble.
Cultural Backstory: Sashiko patterns were not just decorative; they were a language. A mother might stitch “Asanoha” (Hemp Leaf) on a child’s quilt to wish for fast, strong growth, or “Kikko” (Tortoise Shell) on an elder’s cushion to wish for longevity. A sampler quilt like this brings all these blessings together in one resting place.
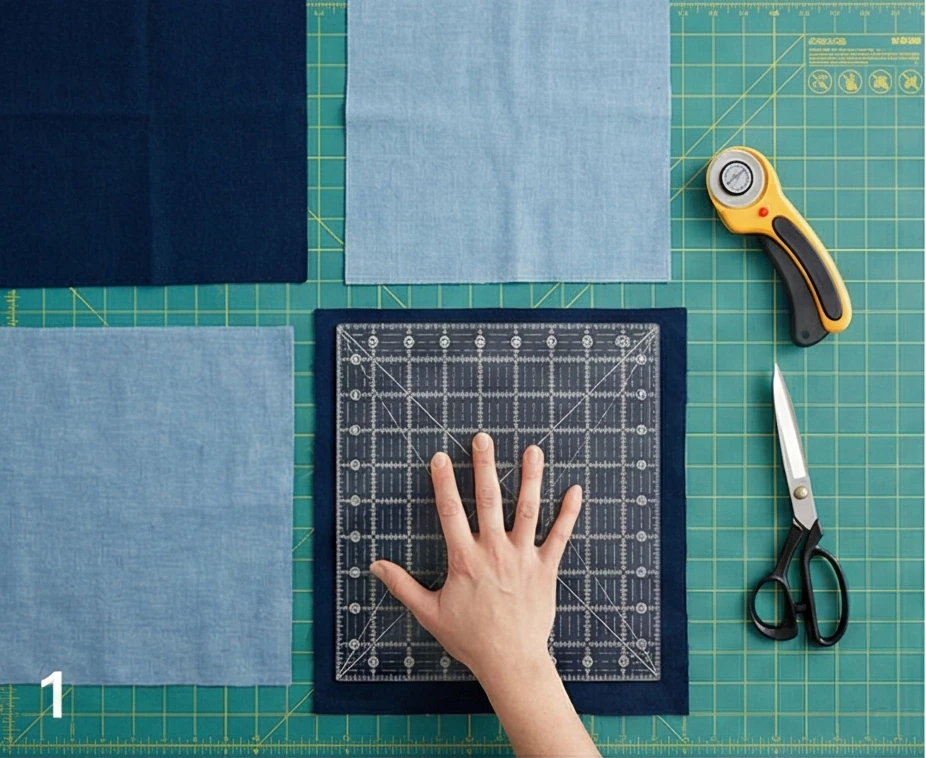
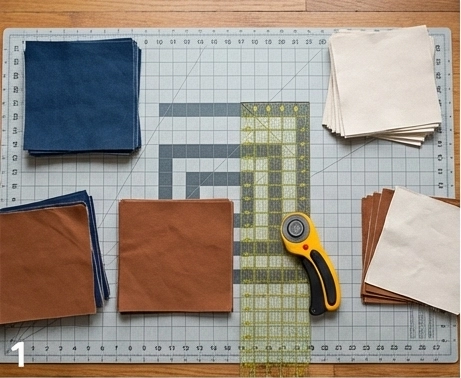
Step 1: The “16-Block” Cut
Elegance often comes from scale. We will use large blocks to let the stitching shine.
- Cut: Cut 13 squares from Fabric A (Dark) and 12 squares from Fabric B (Light).
- Size: Cut them 18.5 inches x 18.5 inches. (They will finish at 18 inches).
- Total: You need 25 squares for a 5×5 grid (90″ x 90″).
- Layout: Arrange them on the floor in a checkerboard pattern (Dark, Light, Dark, Light, Dark).
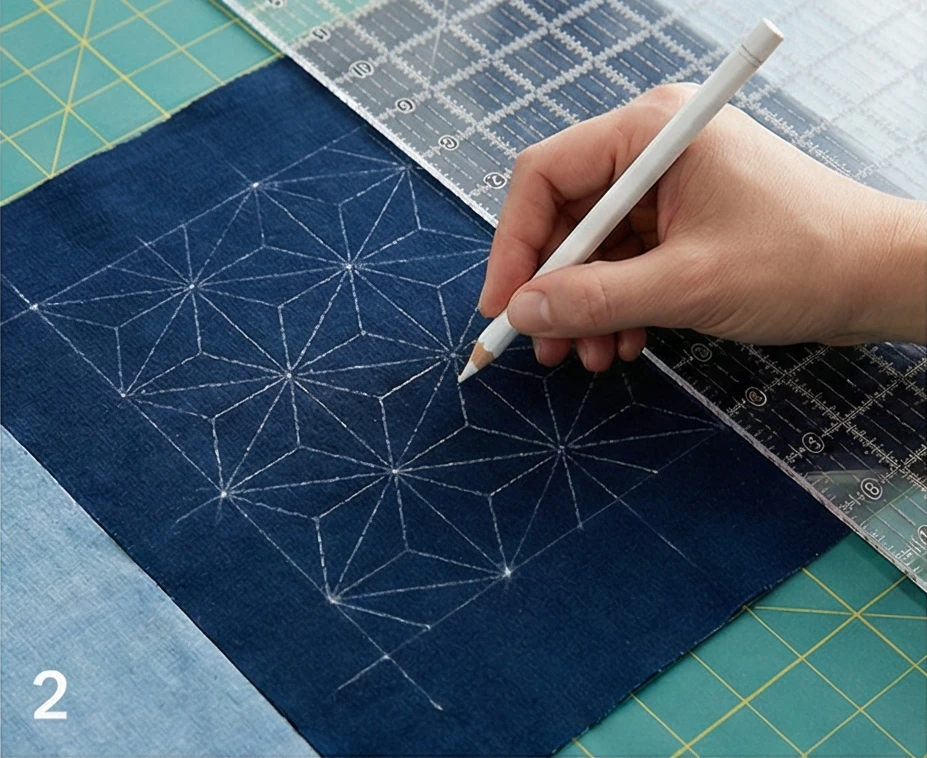
Step 2: Marking the “Sampler” Grids
Before assembling, it is easier to mark the patterns on the flat blocks.
- Select Patterns: Choose 3 or 4 distinct Sashiko patterns.
- Block Type A: Asanoha (Star/Hemp Leaf).
- Block Type B: Seigaiha (Waves).
- Block Type C: Shippo (Interlocking Circles).
- Marking: Use your chalk pencil and grid ruler.
- Draw the grid or circles directly onto the fabric squares.
- Tip: Mark the lines boldly. The chalk will wash out later, but you need to see it clearly while stitching.
Step 3: Piecing the Top
- Sew Rows: Sew the squares together into 5 rows of 5 squares each.
- Use a 1/4 inch seam allowance.
- Join Rows: Sew the 5 rows together to complete the top.
- Press: Press all seams open. This reduces bulk, which is crucial when you are hand-stitching through the seams later.
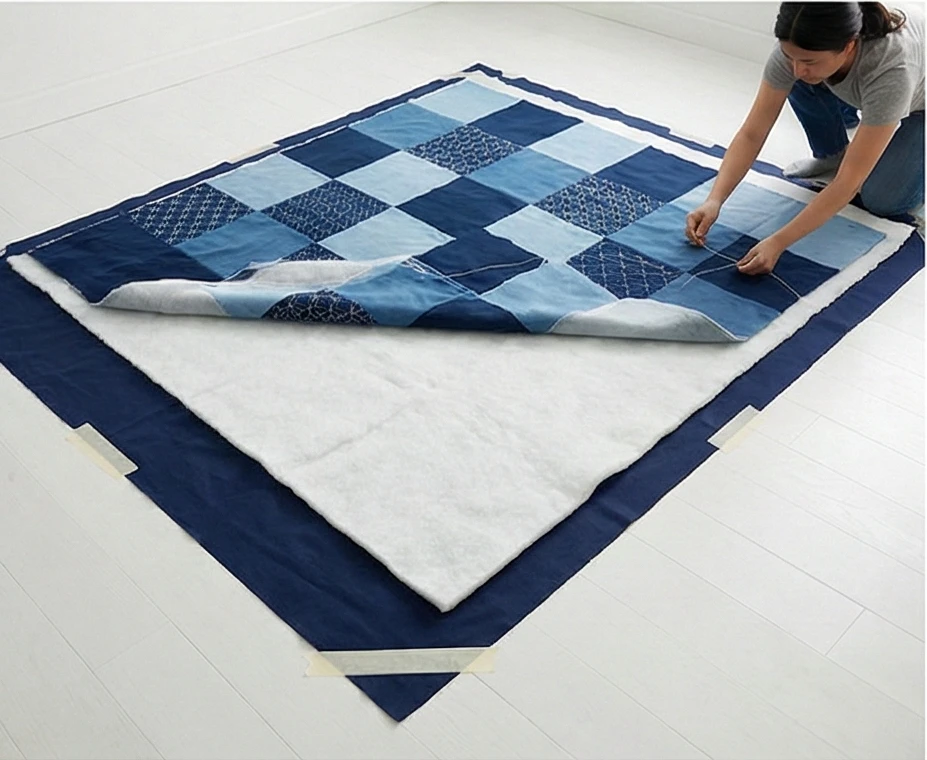
Step 4: The Bamboo Sandwich
- Layer: Tape the Backing (face down) to the floor. Place the Bamboo Batting on top. smooth the Patchwork Top (face up) over it.
- Baste: Thread baste a large grid across the quilt.
- Note: Avoid safety pins in the areas where you plan to do dense Sashiko stitching, as the thread can catch on them.
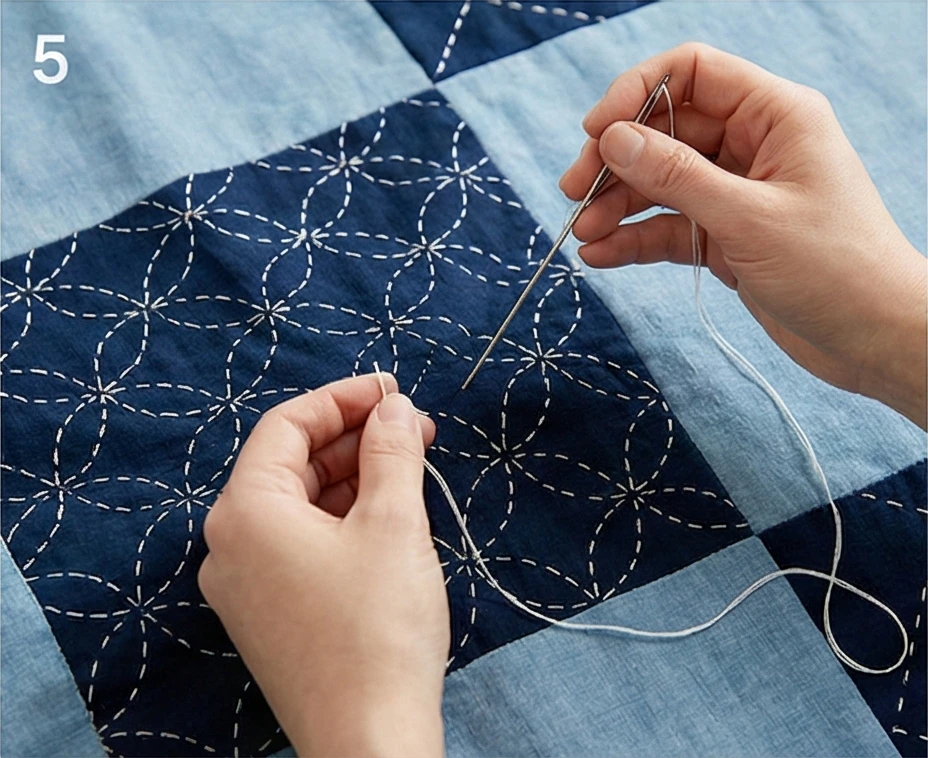
Step 5: The “Running Stitch” Meditation
This is the longest, most peaceful step.
- Thread: Cut a 20-inch length of Sashiko thread. Do not double it; use a single strand.
- Stitch: Stitch over your marked lines using a simple running stitch.
- Ratio: The stitch on top (white) should be the size of a grain of rice. The space between (blue) should be half that size.
- The “Load”: Load several stitches onto the long needle before pulling the thread through. This keeps the lines straighter than stitching one by one.
- Crossings: When lines cross (like in the star pattern), ensure the stitches do not touch in the center. Leave a tiny “Ma” (gap) to keep the intersection flat.
Step 6: The Borderless Finish
To maintain the minimalist Zen aesthetic, avoid a heavy binding strip.
- Trim: Trim the batting and backing even with the quilt top.
- Facing: Cut 2.5-inch strips of the Dark Indigo Fabric.
- Sew: Sew the strips to the front edge of the quilt.
- Turn: Flip the strips completely to the back of the quilt and blind-stitch them down.
- Result: The patchwork pattern runs uninterrupted to the very edge, creating a clean, modern look suitable for a platform bed.

Usability Note: Bamboo batting is the secret to this quilt’s comfort. It is cooler than cotton and drapes like heavy silk, making it perfect for year-round use. The Sashiko texture adds a gentle weight that feels grounding without being stifling.
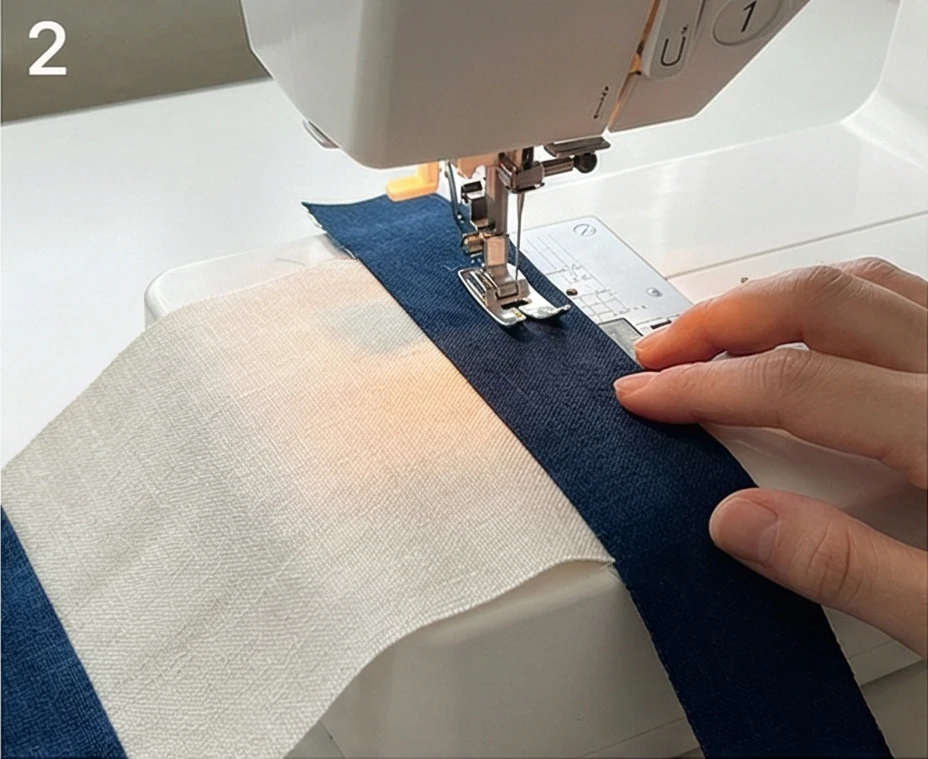
2. Shonai Patchwork Quilts for Elegant Layered Bedding
The “Shonai Shima” (Striped) Patchwork Coverlet
While many Japanese quilts focus on square blocks, the Shonai region has a strong tradition of Strip Patchwork (Shima). Historically, weavers would sew narrow strips of loom-width fabric together to create wider futon covers. This design elevates that utilitarian root into a sophisticated, modern coverlet. By combining various shades of indigo—some solid, some striped, some checked—into long vertical panels, you create a quilt that elongates the bed’s look and adds rich, subtle texture. It is designed to be a “Layering Piece,” folded at the foot of the bed or pulled up on chilly nights.
Finished Dimensions: Queen Size Coverlet, approximately 85″ x 90″.
Materials Needed:
- Fabric A (Solids): 3 yards total of various Solid Indigos (Navy, Slate, Charcoal).
- Fabric B (Prints): 3 yards total of Kasuri Prints (Ikat), Fine Stripes, and Checks.
- Backing: 5.5 yards of a soft, solid Navy Cotton.
- Batting: Thin Cotton Batting (Request “Summer Weight” or “Request” loft). Note: For a layering coverlet, you want drape, not puff.
- Thread: Cream Sashiko Thread (for visibility) or Navy (for subtlety).
- Notions: Rotary cutter, long ruler, safety pins.
Cultural Backstory: The philosophy of “Mottainai” (waste nothing) is deeply embedded in Shonai textiles. Historically, even the smallest strip of cloth was saved. Sewing these narrow strips together created “Shima” (stripe) patterns unique to each family, serving as a visual signature of the household’s history and thrift.
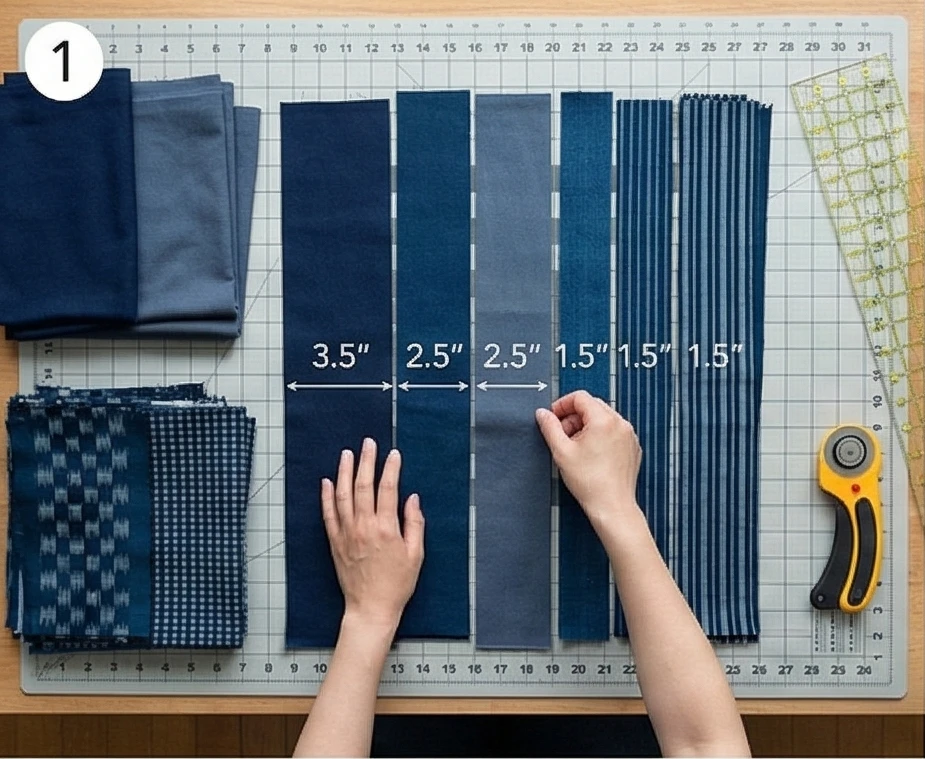
Step 1: Curating the “River” of Strips
The elegance comes from the variation in width.
- Cut: From your assorted fabrics, cut long strips (Width of Fabric, 42″) in varying widths:
- 3.5 inches (Wide)
- 2.5 inches (Medium)
- 1.5 inches (Narrow)
- Sort: Separate them into piles. You want a mix of dark/light and solid/print in each width category.
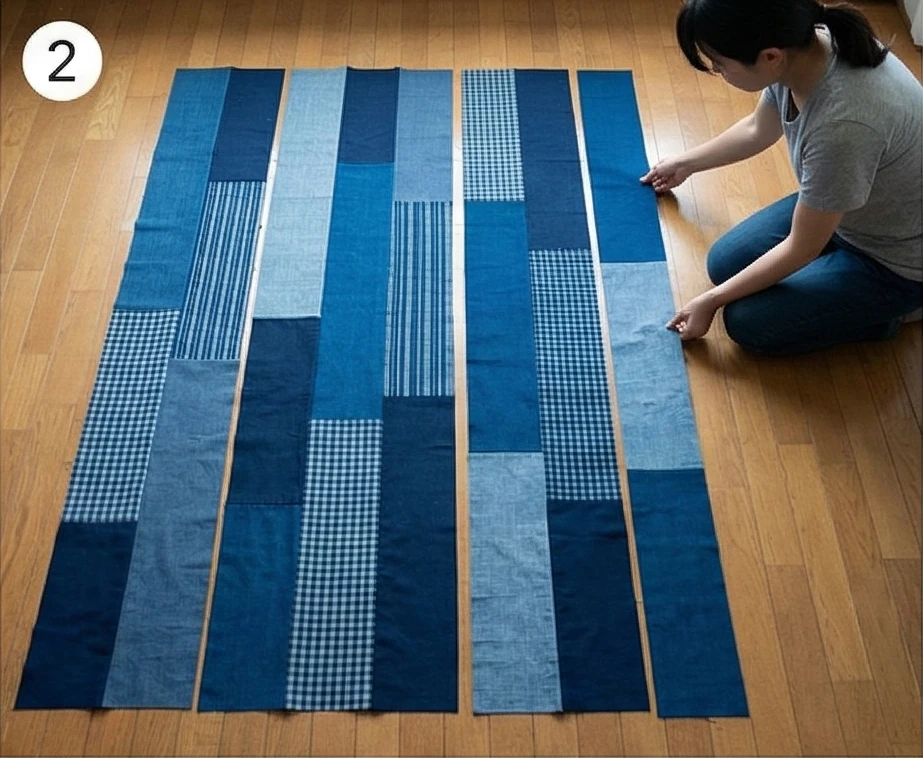
Step 2: Constructing the Panels
We build the quilt in long vertical columns.
- Piece Columns: Sew the 42-inch strips end-to-end to create 95-inch-wide strips.
- Layout: Lay these long strips side by side on the floor.
- Design Rule: Alternate the visual weight. Place a wide, solid strip next to a narrow, checked strip. Avoid placing two identical fabrics next to each other.
- Shuffle: Rearrange until the “flow” looks balanced, like a flowing river of blues.
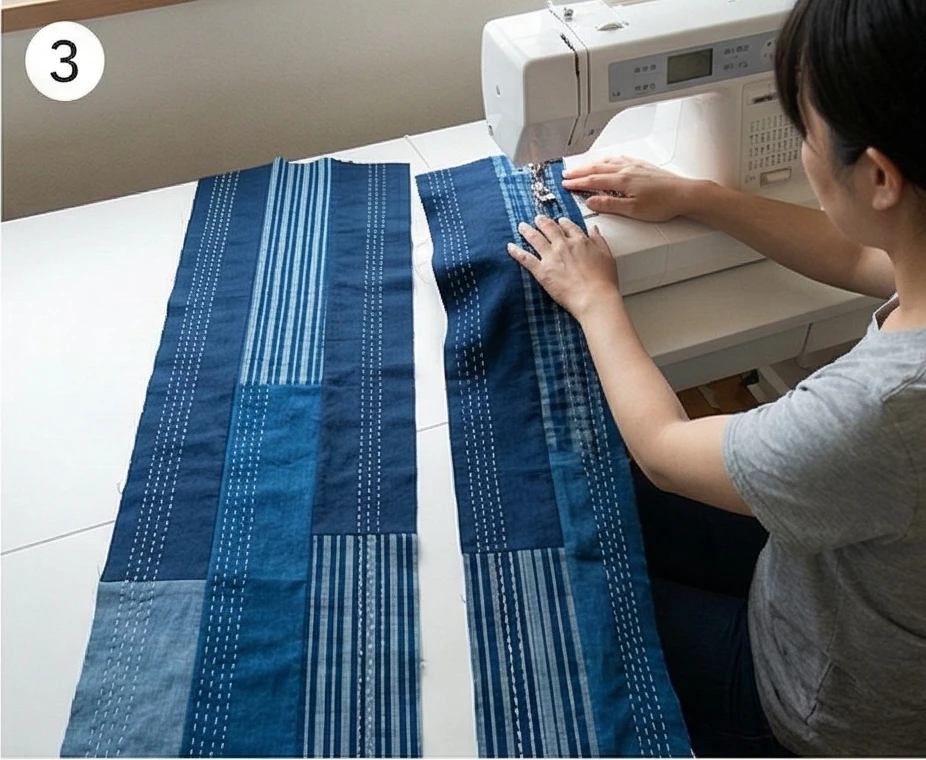
Step 3: The Vertical Assembly
- Sew: Stitch the long columns together lengthwise.
- Seam Allowance: Use a standard 1/4 inch seam.
- Press: Press all seams in one direction (or open, if your fabric is thick).
- Check: The top should measure approximately 85″ wide by 90-95″ long.
Step 4: Minimalist Basting
- Sandwich: Backing + Thin Batting + Strip Top.
- Baste: Use safety pins.
- Alignment: Because the pattern is vertical stripes, ensure your backing is straight so it doesn’t twist when quilted.
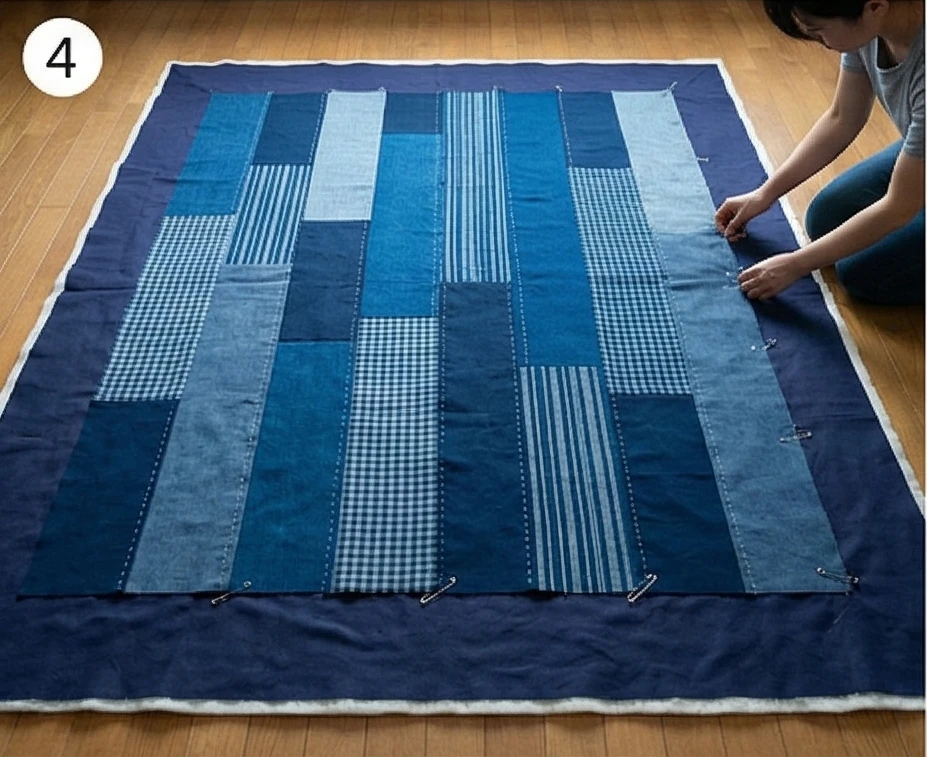
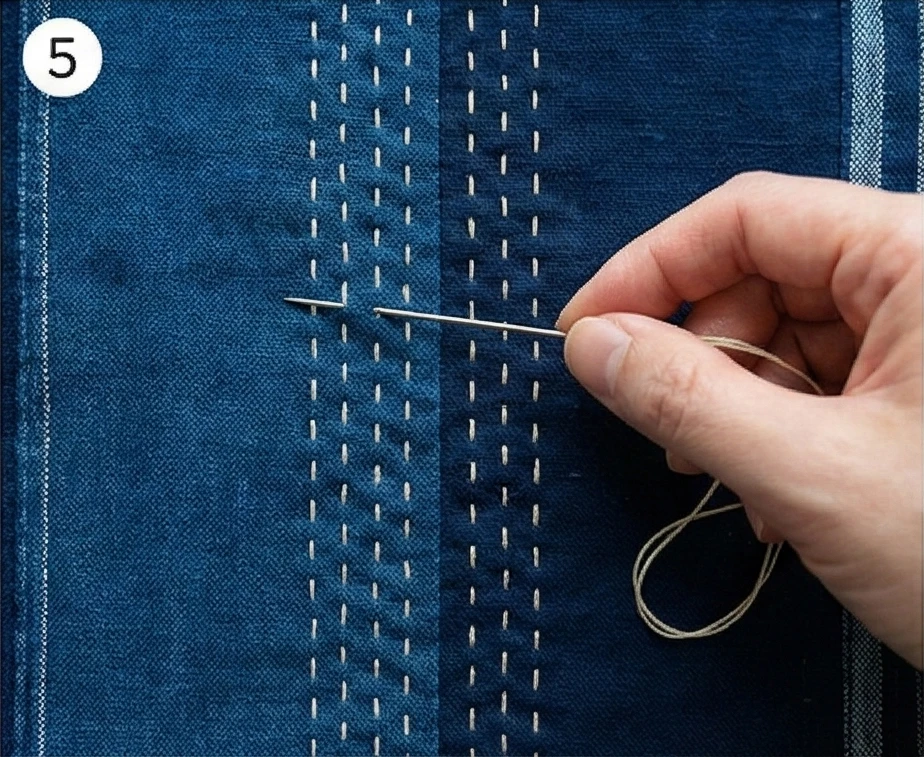
Step 5: “Rain” Quilting (Sashiko)
Machine quilting would look too stiff. Hand stitching softens the look.
- Thread: Load a long sashiko needle with Cream Thread.
- The Path: Stitch long, straight vertical lines running parallel to the seams.
- Placement: Stitch 1/4 inch away from every seam line (on both sides of the seam).
- Rhythm: Use large, relaxed stitches (running stitch).
- Effect: This quilting highlights the design’s verticality and secures the seam allowances on the inside, making the quilt incredibly durable.
Step 6: The “Make-Do” Binding
Traditional Japanese quilts often use a scrap binding to finish the piece.
- Scraps: Sew the leftover cut-off ends of your strips together to make a long, scrappy binding strip (2.5 inches wide).
- Bind: Attach this “piano key” binding to the edges of the quilt.
- Aesthetic: The scrappy binding adds a playful, humble touch to the otherwise elegant, linear quilt, nodding to its “Boro” (patchwork) roots.
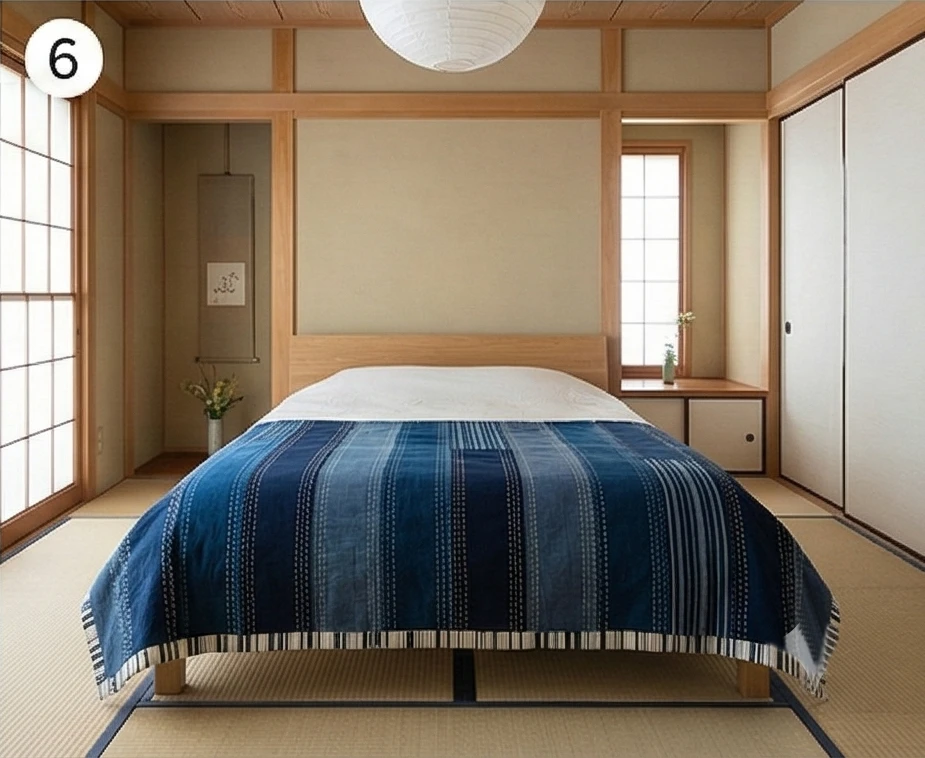
Usability Note: The vertical lines of this quilt create an optical illusion that makes a small bedroom feel larger and the ceiling higher. Because it uses thin batting, it folds down very small, making it easy to store in a closet when summer arrives.
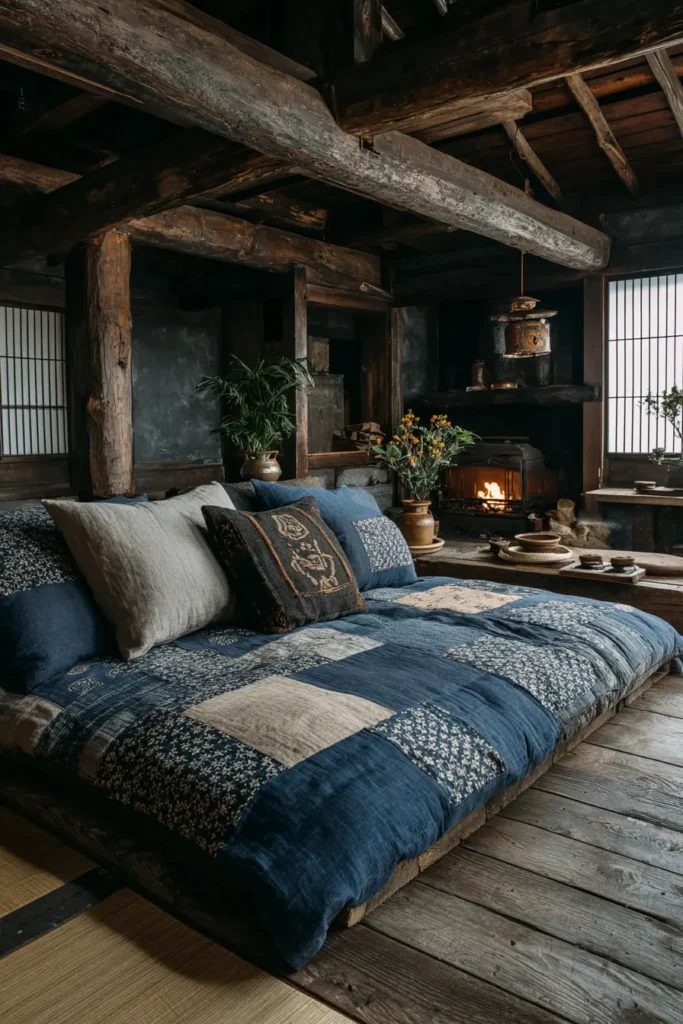
3. Cozy Boro-Style Patchwork Quilts: The Art of Beautiful Repair
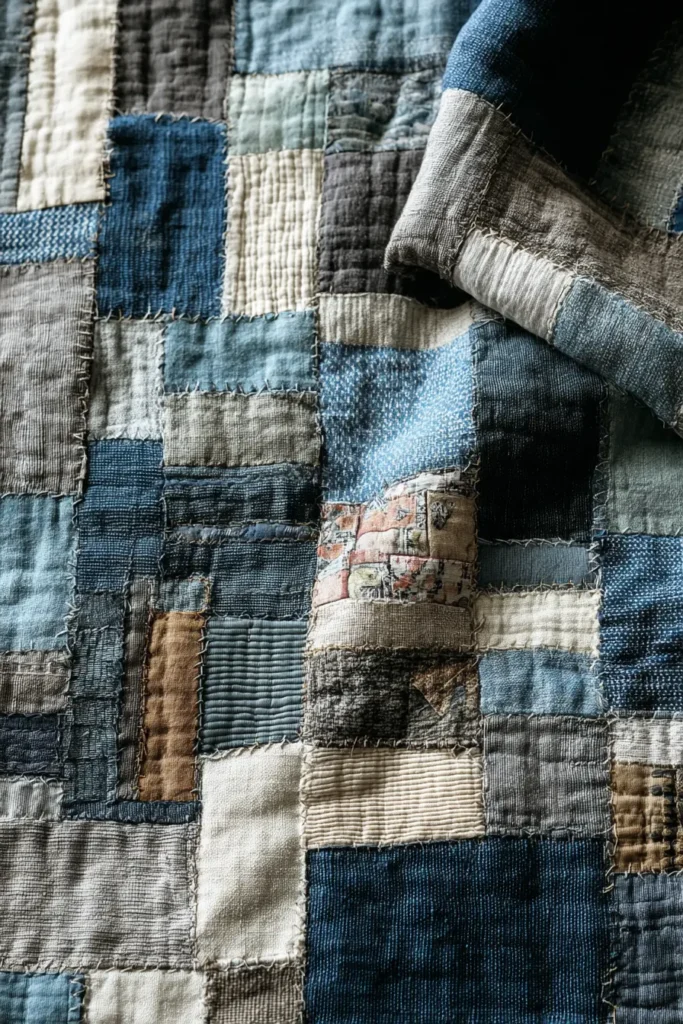
The “Omokage” (Remnant) Boro Throw
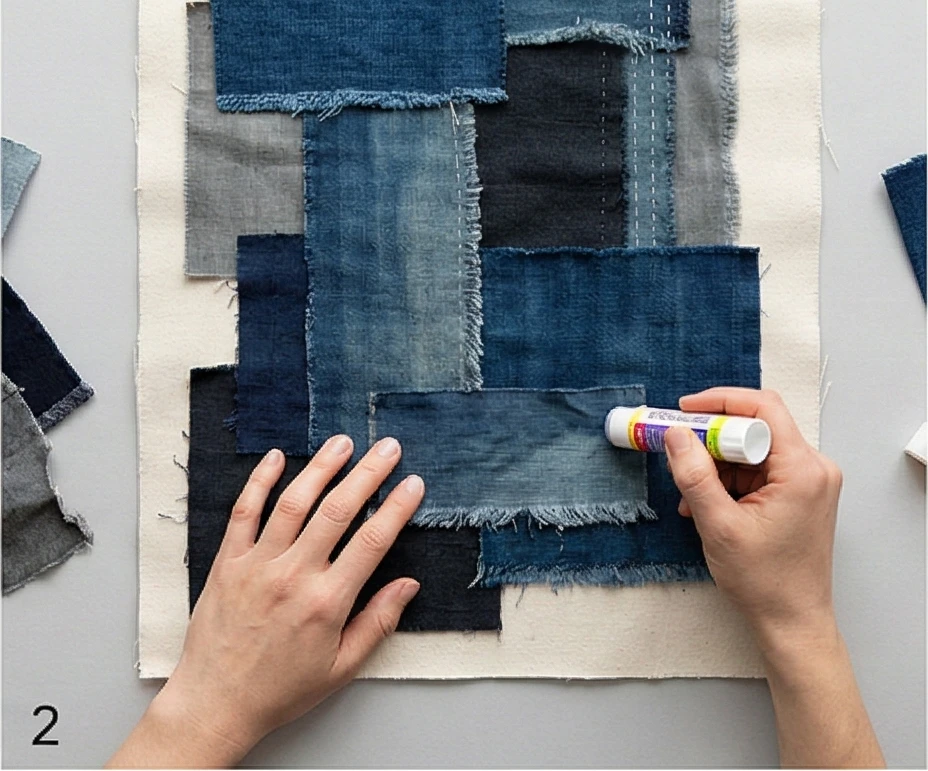
Boro (literally “tattered rags”) is perhaps the most soulful of all Japanese textile traditions. Historically, it was the clothing of the poorest peasants in northern Japan, who patched and re-patched their hemp garments with scraps of precious indigo cotton over generations. Today, Boro is celebrated as a masterpiece of unintentional art. This project creates a modern “Boro-Chic” throw. Instead of using actual dirty rags, we curate high-quality scraps of linen, denim, and kasuri to create a heavy, textured, layered blanket that feels incredibly grounding and warm.
Finished Dimensions: Heavy Sofa Throw, approximately 50″ x 65″.
Materials Needed:
- Fabric A (Foundation): 2 yards of Navy Cotton Flannel or loose-weave Canvas. (This fabric will be completely covered, but it provides a sturdy base.)
- The Scraps: A large collection of Indigo Scraps (Old jeans, linen shirts, Kasuri remnants, checked cottons). You need enough to cover the foundation twice over.
- Backing Fabric: 2 yards of soft Navy Brushed Cotton.
- Batting: Cotton Flannel Sheet (or very thin batting). Traditional Boro has no batting; the layers of fabric provide the warmth.
- Thread: White or Cream Sashiko Thread (Heavy matte cotton).
- Notions: Fabric glue stick, safety pins, thimble.
Cultural Backstory: Boro embodies the spirit of “Mottainai” (meaning “too good to waste”). In the snowy Aomori prefecture, cotton could not grow. Every scrap of imported cotton cloth was precious. A Boro futon might contain the history of a family for 100 years, holding the memories (Omokage) of every person who slept under it.
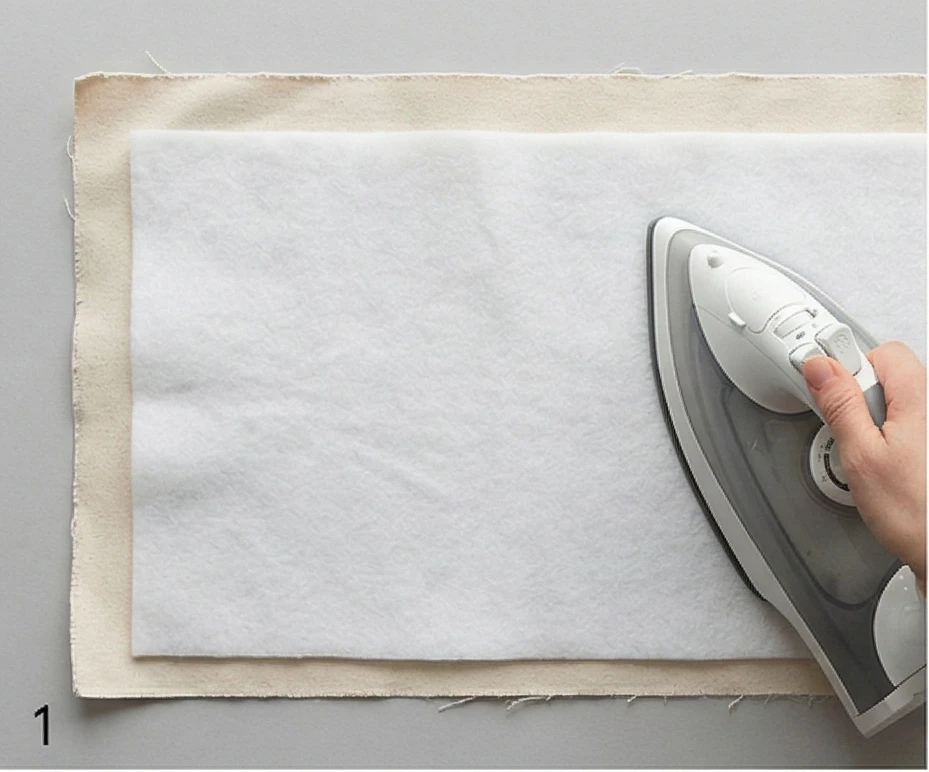
Step 1: Preparing the Foundation Canvas
Unlike normal quilts, where you sew pieces together, here you build ON TOP of a base.
- Cut: Cut your Foundation Fabric (Flannel/Canvas) to 52″ x 67″.
- Spread: Lay it flat on a large surface, such as a floor or table. Tape the corners down so it is taut.
- Note: This layer is the “skeleton” of the quilt.
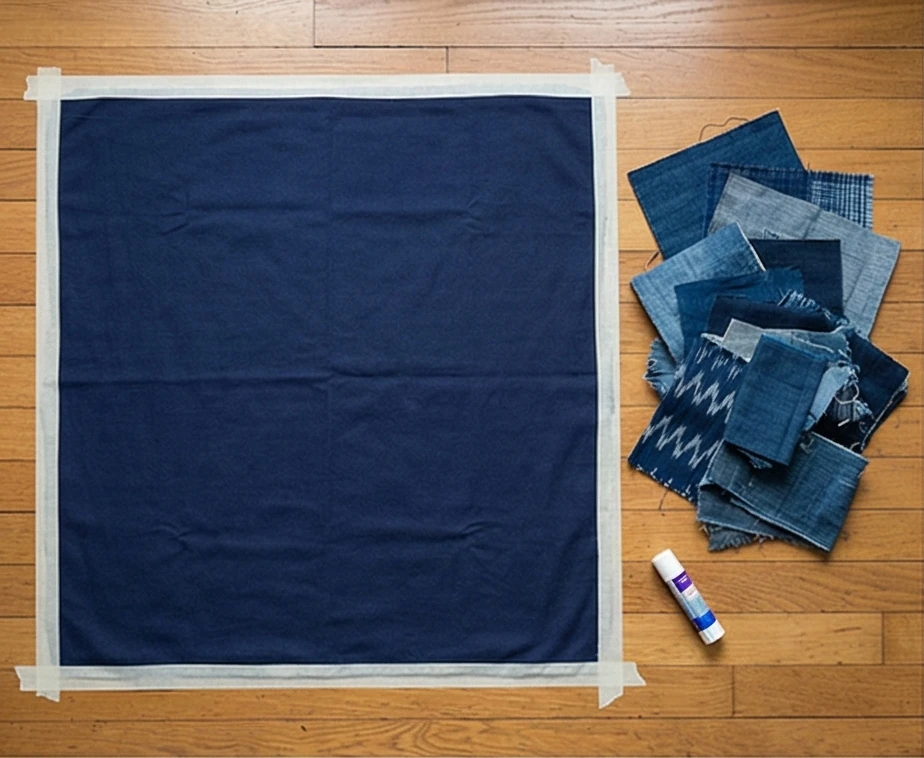
Step 2: The “Collage” Layout
This is an intuitive process. There are no straight lines.
- Sort: Organize your scraps by size. Cut larger pieces into rectangles ranging from 4″ x 4″ to 8″ x 10″. Keep edges raw; do not hem them.
- Layering: Start placing scraps onto the foundation fabric.
- Overlap: Every piece must overlap its neighbor by at least 1 inch.
- Thickness: vary the textures. Place a rough denim piece next to a soft linen piece.
- Focus: Ensure the entire foundation fabric is covered. No “skeleton” should be visible.

Step 3: Tack and Baste
Because there are so many loose pieces, you must secure them well.
- Glue: Lift the corners of the scraps and use a Fabric Glue Stick to tack them down to the layer below. This prevents them from curling up while you sew.
- Safety Pins: Pin through all layers at 5-6-inch intervals.
- Tip: If you have patches that are very frayed, place a sturdier patch slightly over the edge to secure it.

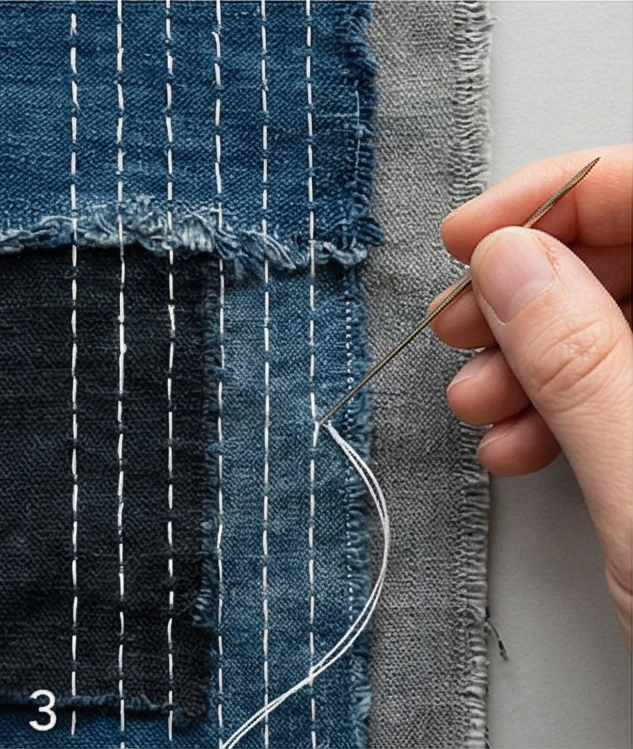
Step 4: The Sashiko “Integration”
The stitching is what turns a pile of scraps into a single, strong fabric.
- Thread: Load a long needle with White Sashiko Thread.
- Direction: Stitch vertical running stitches down the entire length of the quilt.
- Spacing: Space the rows 1/2 inch to 1 inch apart.
- Technique: Stitch right over the raw edges of the patches. The stitches serve as the “nails” that hold the structure together.
- Freedom: The lines do not need to be perfectly straight. A little “wobble” adds to the hand-worked aesthetic.

Step 5: The “Living” Edge
A Boro quilt should not have a perfect binding.
- Trim: Trim the edges square.
- Encase: Cut 3-inch-wide strips from a solid Indigo Linen.
- Fold: Fold the strip over the raw edge (like bias tape) and stitch it down with a heavy, visible running stitch in white.
- Detail: Occasionally, leave the knots visible on the surface to enhance the rustic look.

Step 6: The “Bloom” Wash
The quilt isn’t finished until it’s washed.
- Wash: Wash the quilt in cold water on a gentle cycle.
- Dry: Tumble dry on low heat.
- The Result: The raw edges of the internal patches will fray slightly and “bloom,” creating a soft, fuzzy fringe around each patch. The cotton batting will shrink, giving the quilt a crinkled, antique texture.

Usability Note: This is a heavy, “armored” quilt. It is virtually indestructible. It is perfect for high-traffic living rooms, homes with pets, or for use as a picnic blanket, as it only gets better and softer the more it is used and washed.
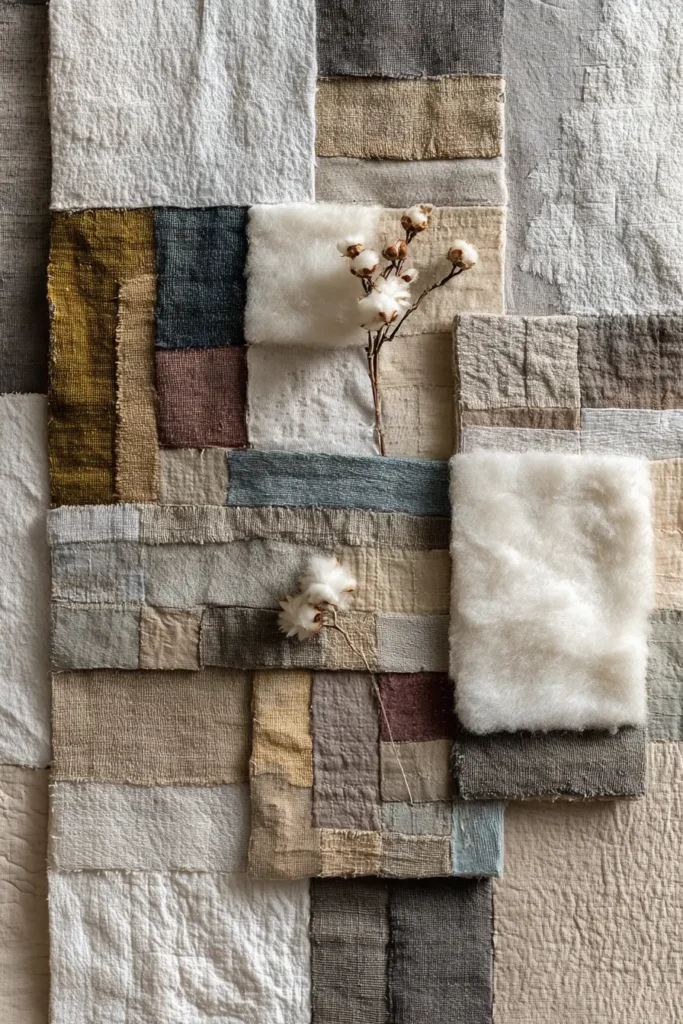
4. Scrappy Yosegire Patchwork Throws for Rustic Charm
The “Yosegire Mosaic” Heirloom Throw
Yosegire (literally “gathering cuts”) is the refined Japanese cousin of the crazy quilt. While Boro was often utilitarian mending for warmth, Yosegire was traditionally used to create beautiful items like tea ceremony bags (Shifuku) or kimono sashes out of small, precious remnants of high-quality silk or cotton. This throw translates that concept into a cozy home accessory. By piecing together small strips of Kasuri, Indigo, and woven cottons onto a foundation, you create a quilt that is thick, durable, and rich with visual history—a true “Memory Mosaic.”
Finished Dimensions: Standard Sofa Throw, approximately 50″ x 60″.
Materials Needed:
- The Scraps: A large bag of cotton scraps. (Stick to a palette: Blues, Creams, Browns, and Greys for a Zen look).
- Foundation Fabric: 3 yards of Muslin or lightweight cotton sheeting. (This will be inside the quilt, so color doesn’t matter).
- Backing Fabric: 3.5 yards of solid Navy Cotton.
- Batting: Cotton Batting. (The quilt will be heavy due to the extra foundation layer, so standard cotton is fine).
- Thread: Neutral Grey thread for piecing, Cream Sashiko Thread for quilting.
- Notions: Rotary cutter, iron.
Cultural Backstory: In Edo-period Japan, fine textiles were incredibly expensive. If a kimono became worn, the good parts were cut out and saved. These “Yosegire” fragments were treated like jewels, pieced together with meticulous seams to create new objects. It is a celebration of the fabric’s intrinsic value.
Step 1: The Foundation Block Strategy
To manage tiny scraps without chaos, we use the “String Piecing” method on a stabilizer.
- Cut Foundation: Cut the Muslin fabric into 80 squares measuring 6.5 inches x 6.5 inches.
- Why? These squares act as a stabilizer. You will sew the scraps directly onto them.
- Layout: You need a 8 x 10 grid for a 48″ x 60″ quilt (approx).
Step 2: Sorting the “Strings”
- Cut Scraps: Trim your scraps into strips. They do not need to be straight or of even width.
- Widths can vary from 1 inch to 2.5 inches.
- Lengths should be at least 7 inches (to cover the block).
- Iron: Press all scraps flat. Crinkled scraps make for crooked quilts.
Step 3: The “Flip and Sew” Method
This is fast, fun, and creates perfectly square blocks every time.
- First Strip: Place one strip Right Side Up diagonally across the center of a Muslin square.
- Second Strip: Place a second strip Right Side Down on top of the first one, aligning the raw edges.
- Sew: Stitch a 1/4 inch seam through all layers (Strip + Strip + Muslin).
- Flip & Press: Flip the second strip open, then press it flat.
- Repeat: Continue adding strips to both sides of the center until the entire white muslin square is covered in fabric.
- Trim: Flip the block over so the muslin side is up. Trim the excess scrap fabric away, using the muslin square as your cutting guide.
- Result: You now have a perfect 6.5-inch-square block made from random strips.
Step 4: The “Tatami” Assembly
Alternating the direction creates a woven look.
- Layout: Arrange the 80 blocks on the floor.
- Block 1: Orient strips vertically.
- Block 2: Orient strips horizontally.
- Pattern: Alternate Vertical/Horizontal in a checkerboard pattern. This is known as a “Rail Fence” or “Tatami” layout.
- Join: Sew the blocks into rows, then sew the rows together.
- Press: Press seams open to reduce the bulk where the strips meet.
Step 5: “Chiku-Chiku” (Sound of Sewing) Quilting
The quilt is thick (Top + Muslin + Batting + Backing). Hand quilting is best.
- Sandwich: Backing + Batting + Pieced Top.
- Thread: Use Cream Sashiko Thread.
- Design: Stitch simple large “X” shapes through the center of every block.
- Why? The blocks are already busy with strips. Minimal quilting prevents the design from looking cluttered while holding the heavy layers together.
Step 6: The Solid Frame
A busy quilt needs a quiet frame.
- Binding: Cut 2.5-inch strips of the Solid Navy Backing Fabric.
- Bind: Bind the quilt using a double-fold binding.
- Elegance Tip: A solid dark binding contains the energy of the scrappy center, making the throw look curated and intentional rather than messy.
Usability Note: Because of the foundation piecing (an extra layer of muslin inside), this quilt is significantly warmer and heavier than a standard quilt. It has a reassuring weight, similar to a weighted blanket, making it excellent for cold winter nights.
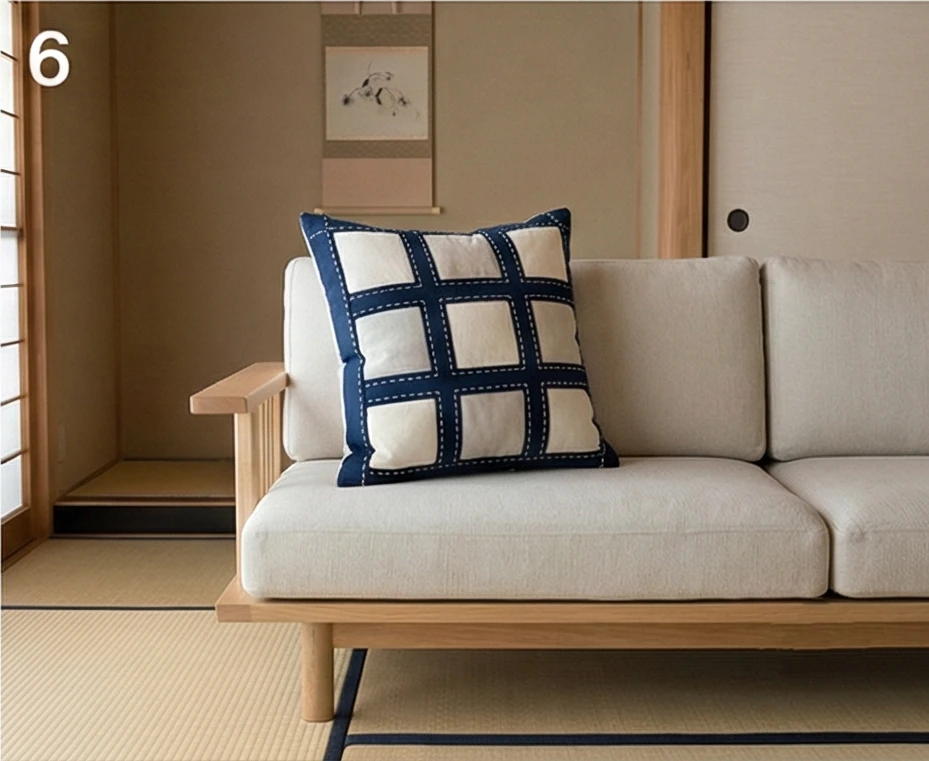
5. Artistic Shonai and Patchwork Pillow Covers for Calm Living Spaces
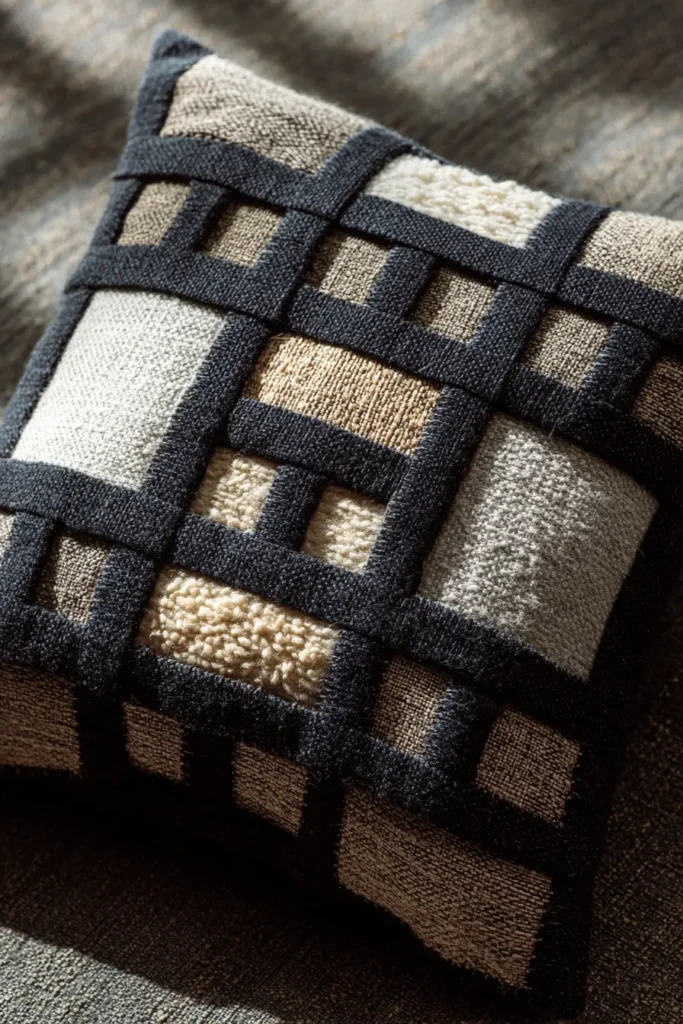

The “Koushi Shadows” Latticework Pillow
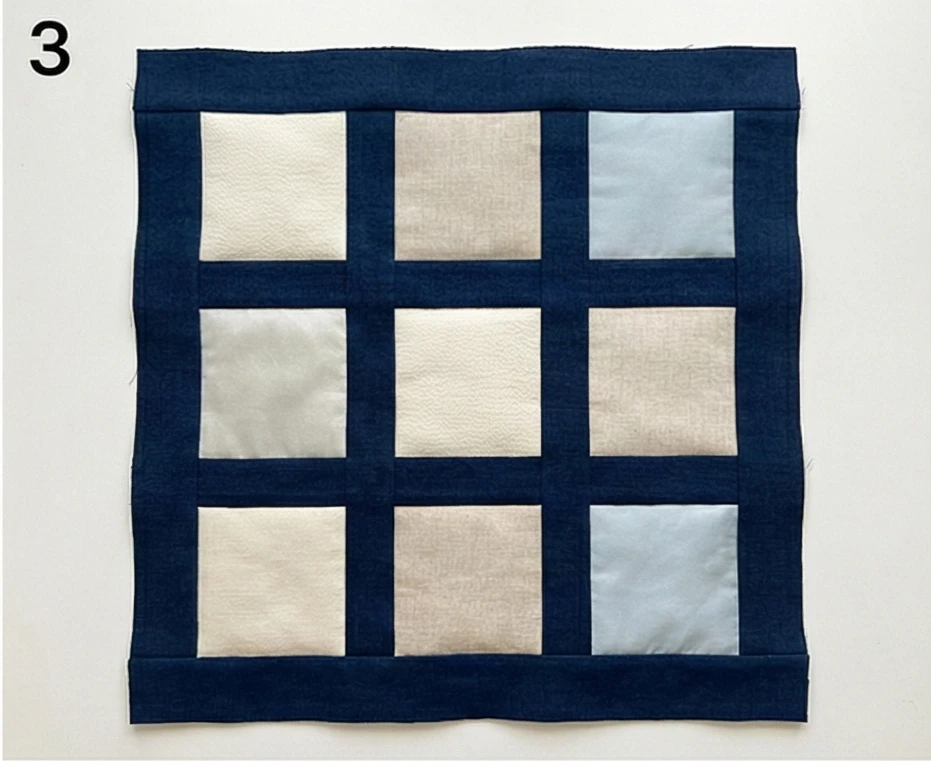
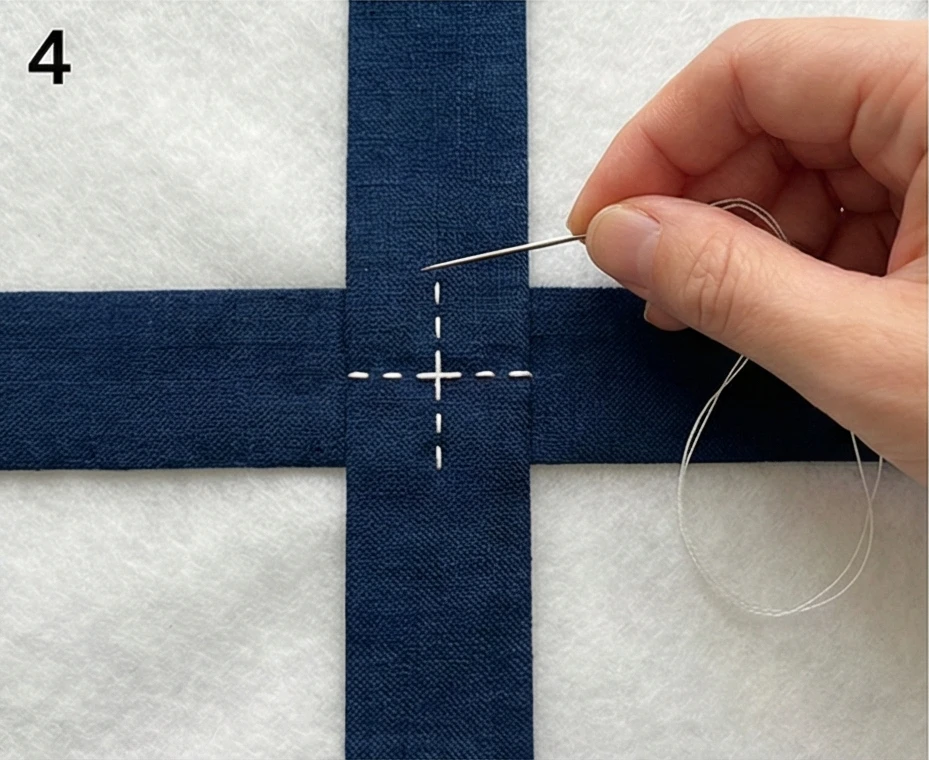
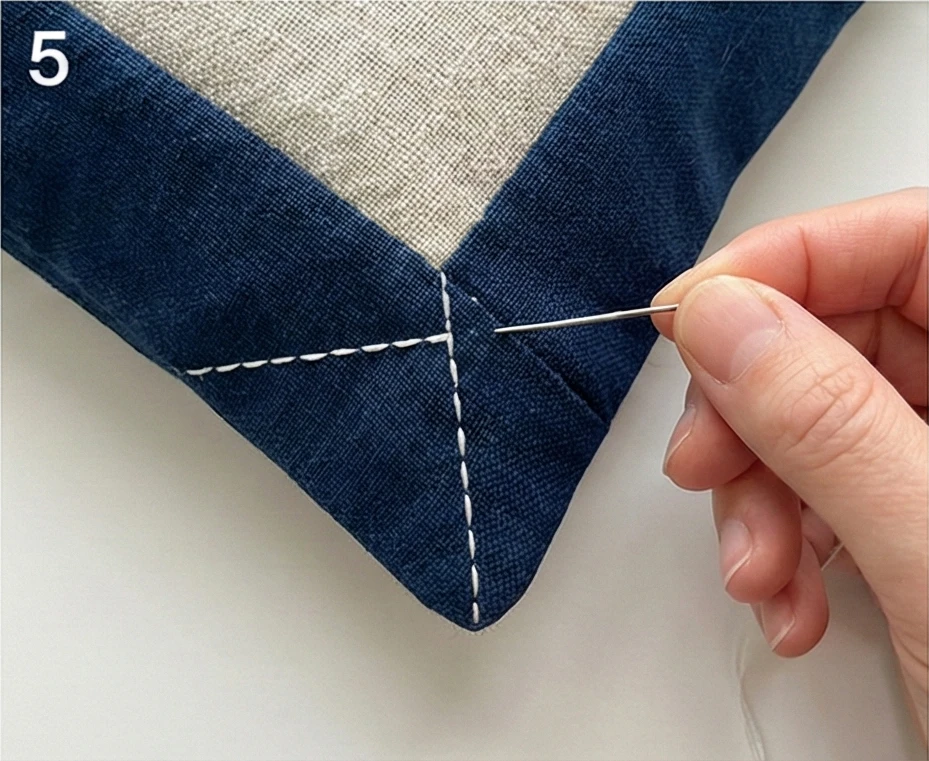
Koushi refers to the traditional wooden lattice screens found in Japanese architecture. They provide privacy while allowing light and air to pass through, creating beautiful geometric shadows. This patchwork pillow translates that architectural element into textiles. It uses a dark indigo framework (the lattice) to surround and frame squares of lighter, textured scraps (the light), creating a “Windowpane” effect. The Sashiko stitching is applied only to the lattice, reinforcing the structure while leaving the “light” squares soft and puffy.
Finished Dimensions: Large Throw Pillow, 20″ x 20″.
Materials Needed:
- Fabric A (Lattice): 1/2 yard of Solid Dark Indigo or Charcoal Linen.
- Fabric B (The Light): Scraps of various Neutrals (Cream, Beige, Light Grey, Pale Blue). Texture is key here: mix nubby silk, smooth cotton, and linen.
- Backing: 1/2 yard of matching Indigo.
- Batting: Fusible Fleece (to give the pillow face structure).
- Thread: White or Silver Sashiko Thread.
- Notions: Rotary cutter, 20″ pillow insert.
Cultural Backstory: In Kyoto machiya (townhouses), the style of the Koushi lattice indicated the profession of the shopkeeper inside. A silk merchant had one style, a thread seller another. This quilt honors that tradition of structural beauty, where the frame is just as important as what is inside it.
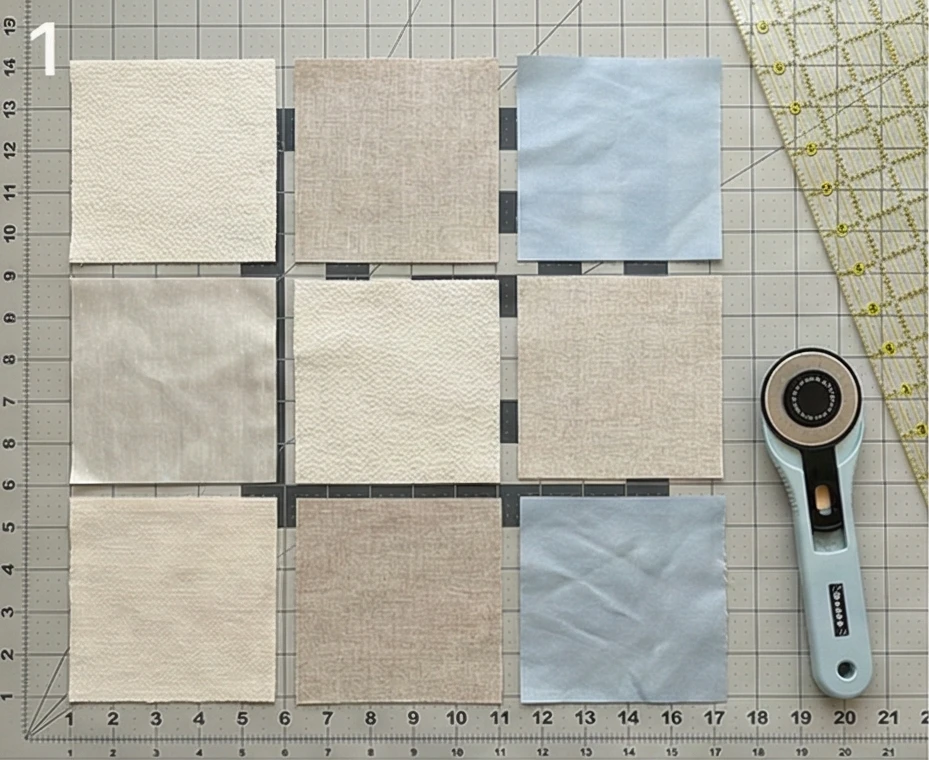
Step 1: Cutting the “Windows”
Precision is required for the lattice to line up.
- Cut Squares: Cut 9 squares from your assorted light fabrics (Fabric B).
- Size: 5.5 inches x 5.5 inches.
- Texture Check: Lay them out in a 3×3 grid. Ensure you don’t have two identical textures next to each other.
Step 2: Cutting the “Timber” (Sashing)
The dark fabric acts as the wood frame.
- Vertical Sashing: Cut 6 strips measuring 2 inches x 5.5 inches.
- Horizontal Sashing: Cut 4 strips measuring 2 inches x 20 inches (approx).
Step 3: Constructing the Grid
- Block Rows: Sew the 5.5″ squares together into rows of 3, placing a Vertical Sashing strip between each square.
- Order: Square – Sashing – Square – Sashing – Square.
- Result: You have 3 rows.
- Join Rows: Sew the three rows together, placing a Horizontal Sashing strip between the rows, and one at the very top and very bottom.
- Sides: Sew the remaining Horizontal strips to the Left and Right sides to complete the frame.
- Trim: Square up the block to exactly 21″ x 21″.
Step 4: The Shadow Stitch (Sashiko)
Here is where Shonai technique meets patchwork.
- Fuse: Iron the Fusible Fleece to the wrong side of the patchwork top.
- Marking: Draw a single line down the exact center of every dark Indigo strip (both horizontal and vertical).
- Stitching: Use the Sashiko thread to stitch along these center lines.
- The Intersection: When you reach a crossing point where vertical meets horizontal, make a distinct “+” (Plus Sign) stitch to lock the grid together.
- Negative Space: Do not stitch into the light squares. Leave them unquilted so they puff out slightly against the tightened lattice.
Step 5: The “Mitered” Corners (Optional)
To make the lattice look like real joinery.
- Detail: At the four corners of the outer frame, instead of stitching straight across, you can stitch a diagonal line from the inner corner to the outer corner.
- Effect: This visual trick looks like a mitered wood joint, adding a high-end architectural finish.
Step 6: The Clean Finish
- Backing: Create an envelope back using the matching Indigo fabric (overlap two hemmed pieces).
- Sew: Pin the Quilted Front to the Envelope Back (Right Sides Together).
- Stitch: Sew around the perimeter with a 1/2 inch seam allowance.
- Turn & Stuff: Turn right side out, push corners out, and insert a down-feather form.
- Result: A pillow that looks like a piece of a traditional Japanese tea house wall, adding structure and calm to a soft sofa.
Usability Note: By concentrating the quilting on the dark fabric, you protect the seams from stress. The unquilted light centers remain soft against your cheek if you lie your head down.
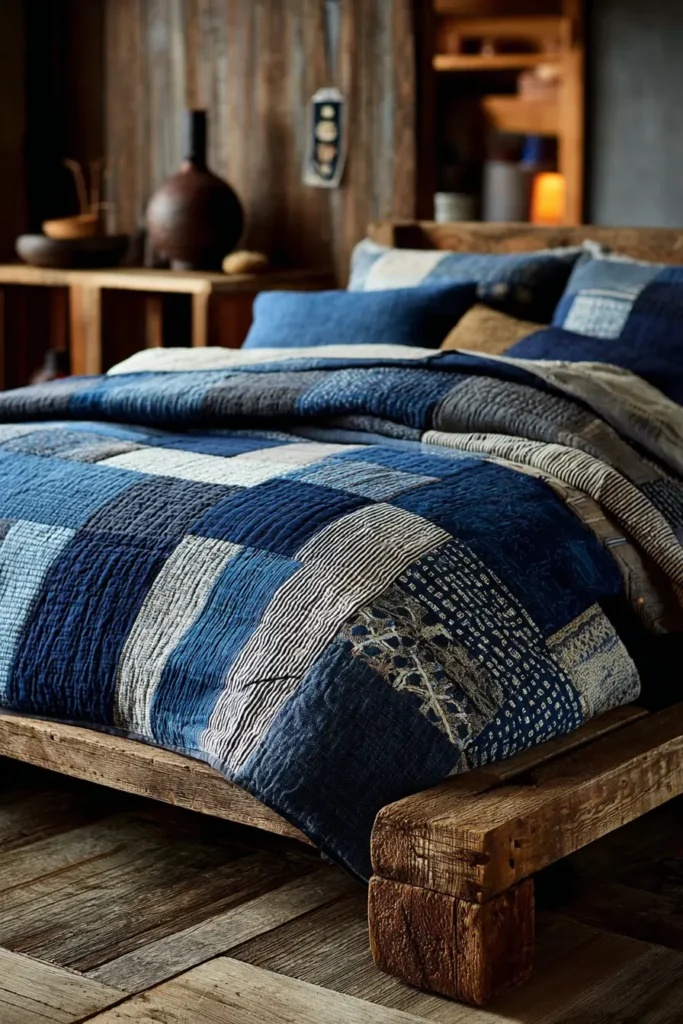
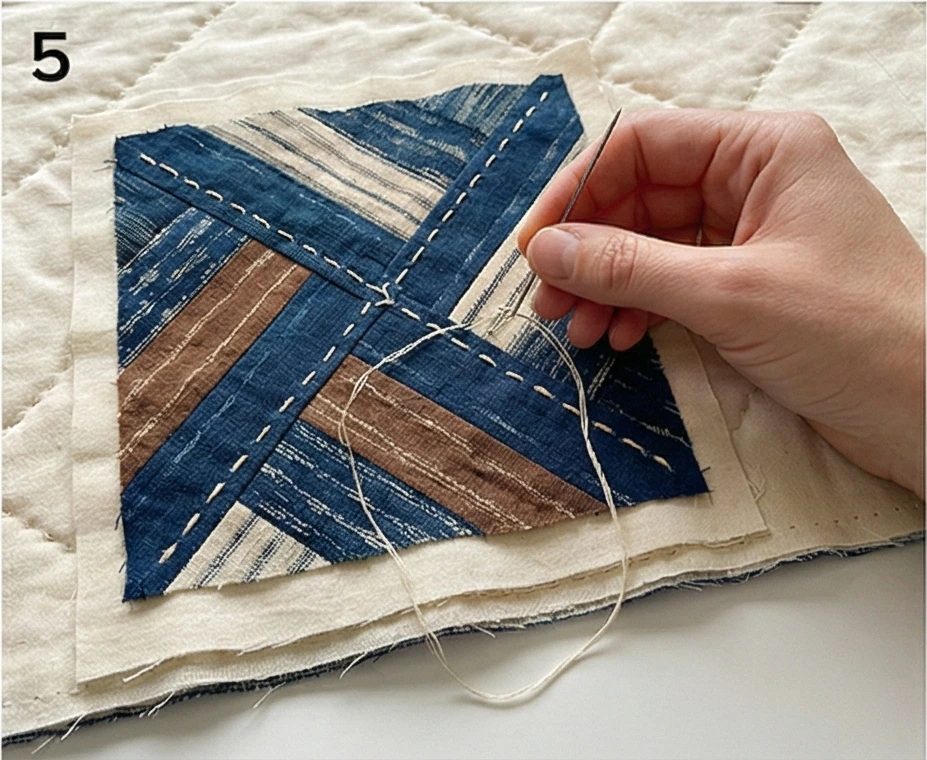
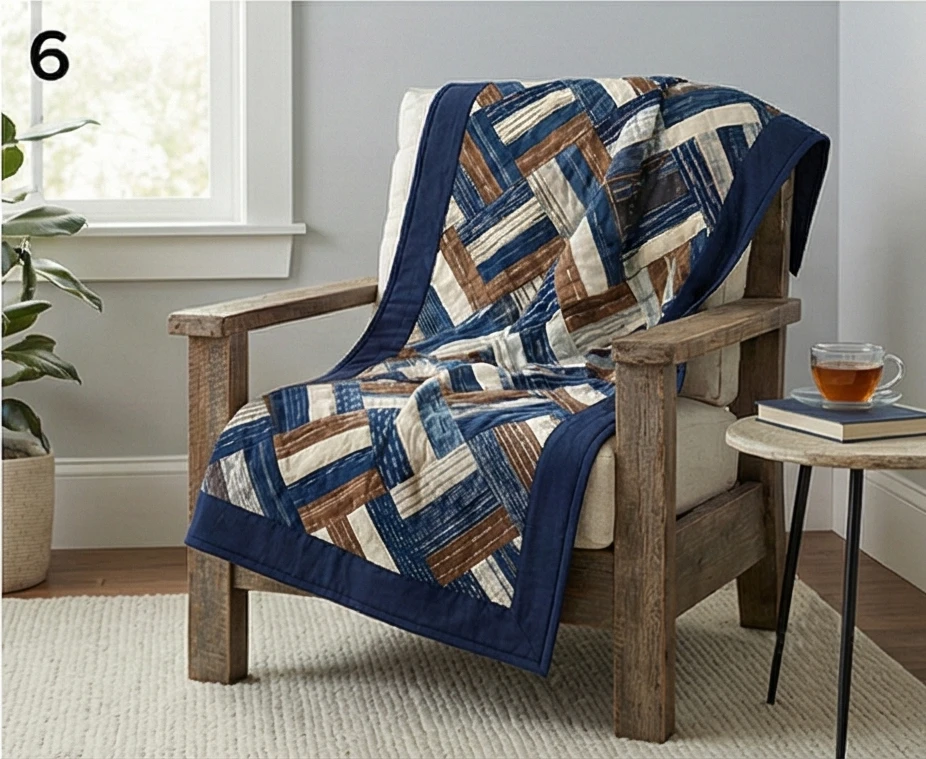
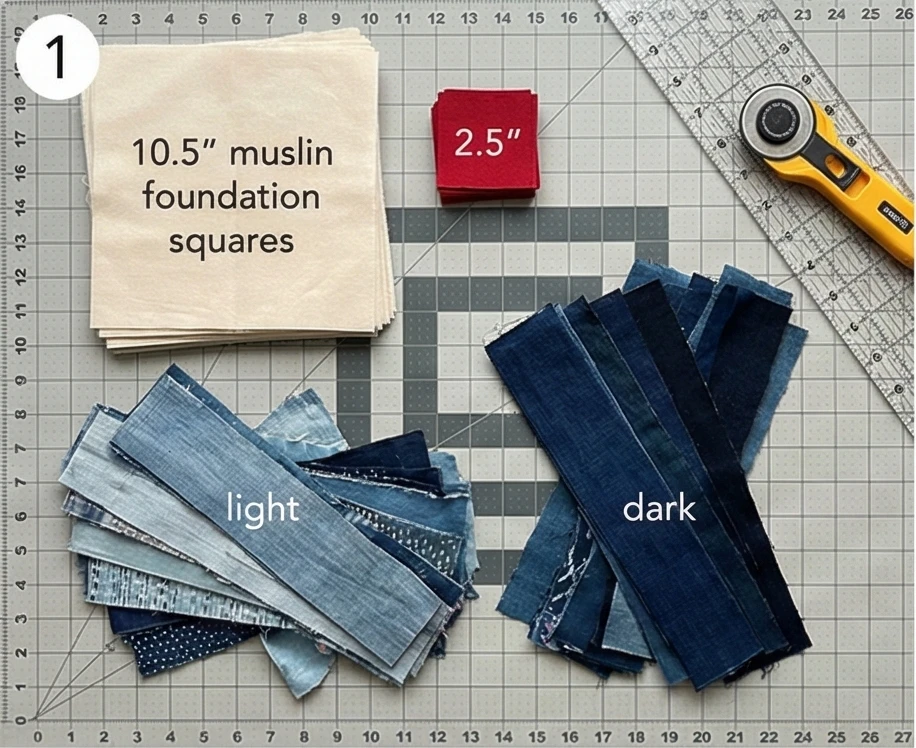
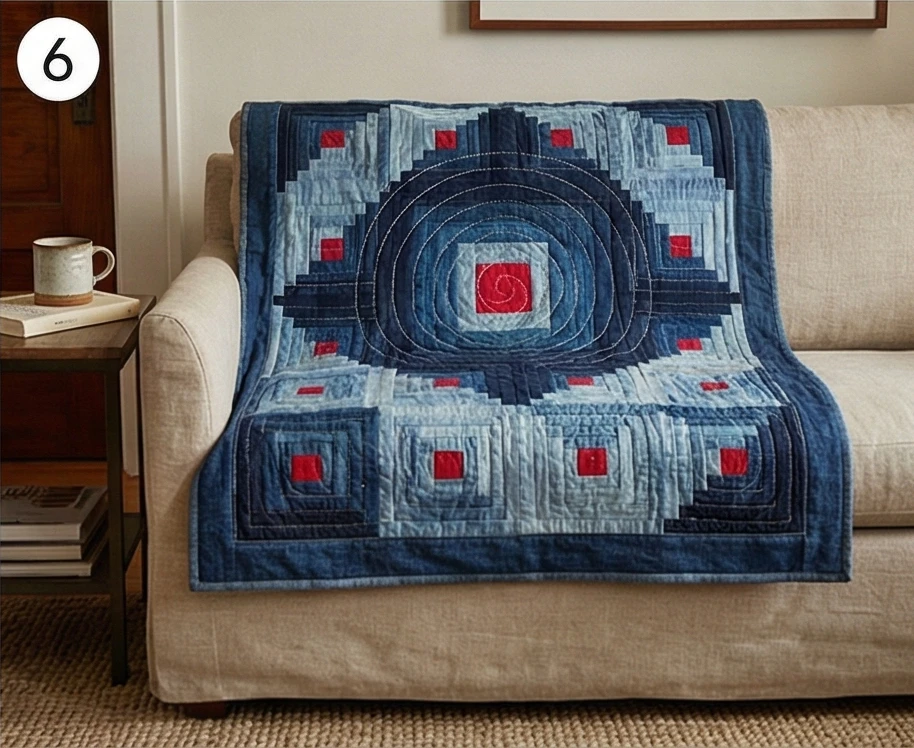
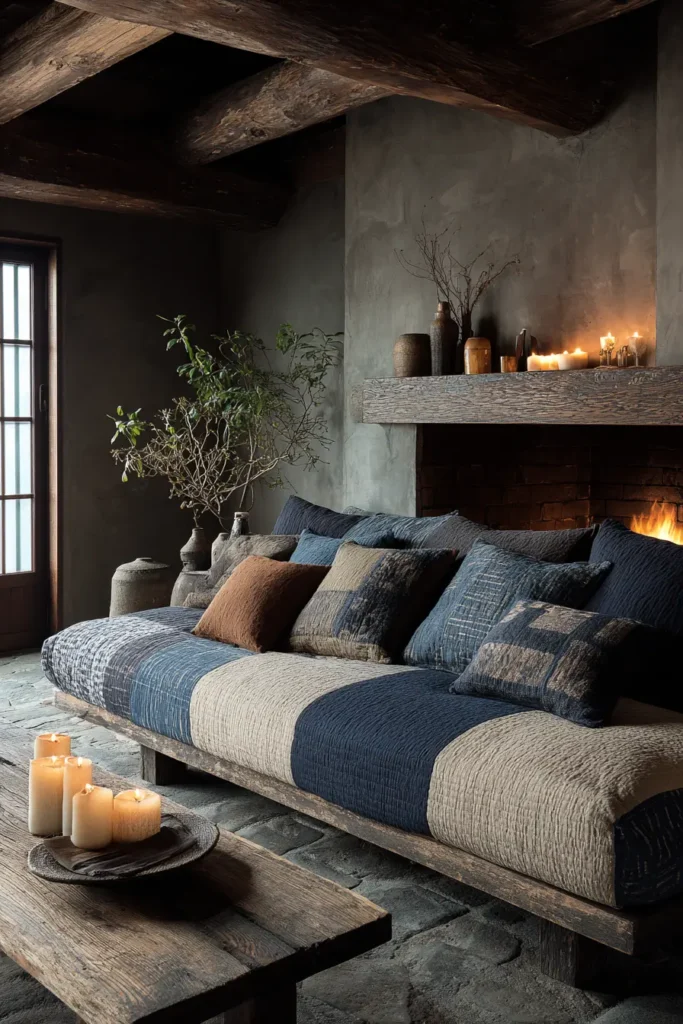
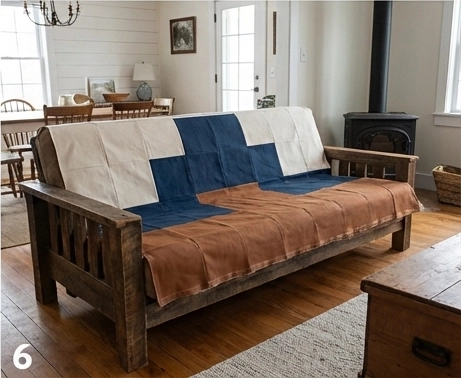
6. Cozy Indigo Boro Patchwork Sofa Throws
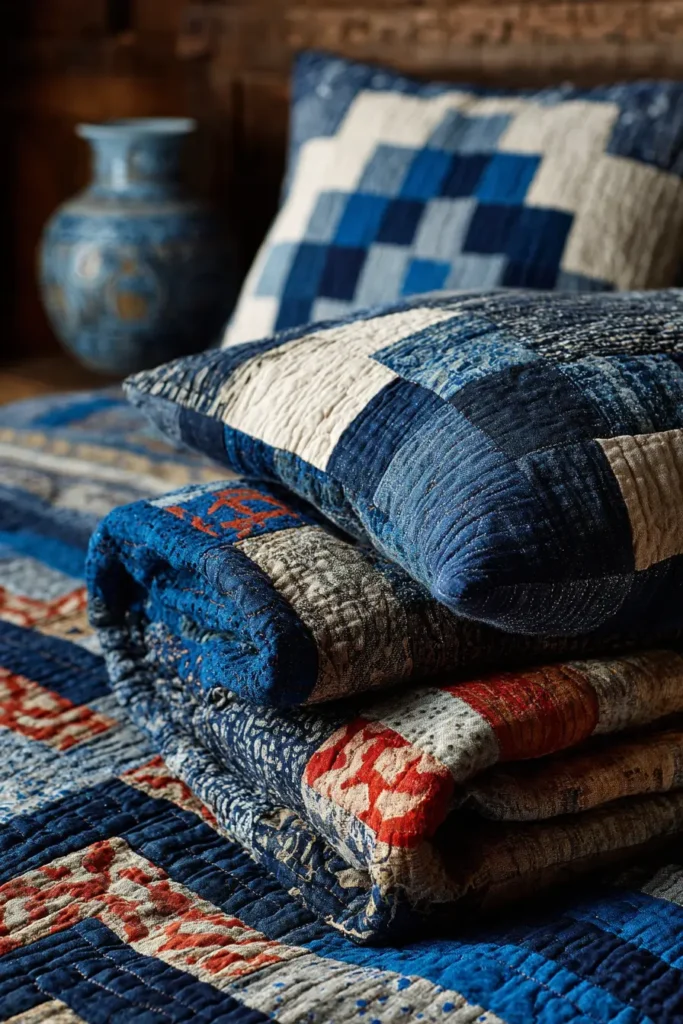
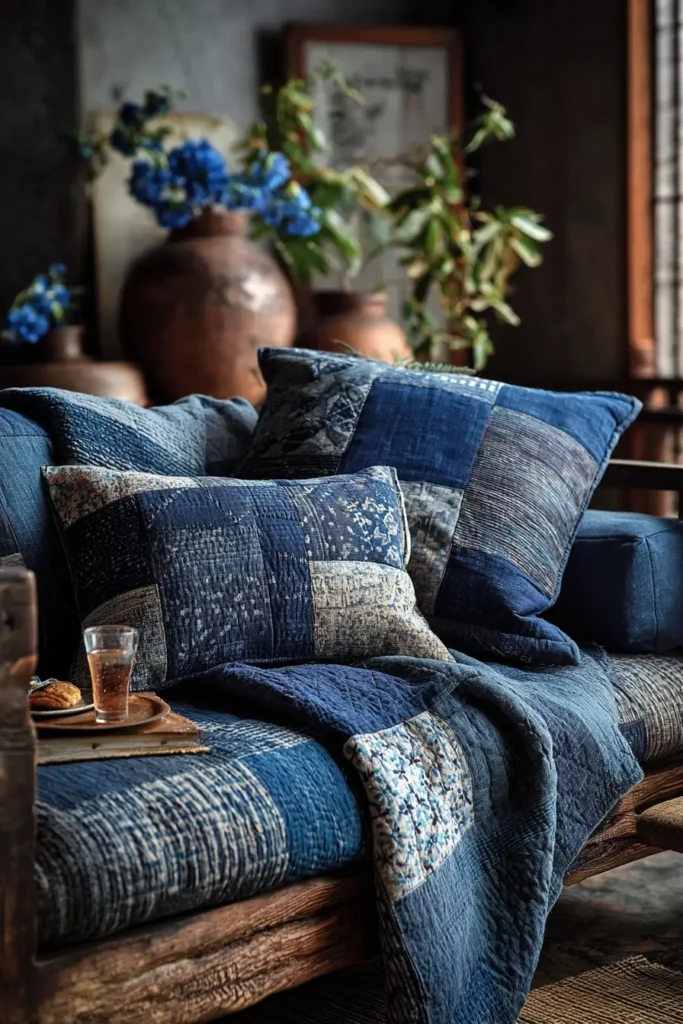
The “Indigo Hearth” (Irori) Log Cabin Boro Throw
This quilt marries two great textile traditions: the Western “Log Cabin” block and the Japanese “Boro” aesthetic. In Japan, the sunken hearth (Irori) is the heart of the home, providing heat and a place for cooking. This throw mimics that warmth visually. It uses a traditional Log Cabin construction—strips of fabric spiraling around a central square—but uses scraps of vintage indigo, denim, and kasuri to create the “logs.” The result is a sophisticated, geometric patchwork that retains the soulful, time-worn texture of Boro.
Finished Dimensions: Square Sofa Throw, approximately 60″ x 60″.
Materials Needed:
- The Scraps: A large collection of Indigo Fabrics (Denim, Navy Linen, Blue Cottons).
- Sort: Separate them into “Lights” (Faded denim, pale blue, white-on-blue prints) and “Darks” (Deep navy, black-blue).
- The Hearts: Small scraps of Red Cotton or Rust Orange (representing the fire).
- Foundation Fabric: 3 yards of Muslin or lightweight cotton (cut into 10.5″ squares).
- Backing: 4 yards of Flannel (for extra coziness).
- Batting: Cotton Batting (Standard Loft).
- Thread: Navy thread for piecing, White Sashiko Thread for quilting.
Cultural Backstory: While the Log Cabin block is often associated with American pioneers, it became incredibly popular in Japan in the late 20th century because it mirrors the Japanese aesthetic of “Notan” (the balance of light and dark). The red center square traditionally represents the hearth fire, the source of life in a home.
Step 1: The Foundation Strategy
Boro fabrics can be stretchy or irregular. Using a foundation square ensures your blocks stay perfectly square.
- Cut Foundation: Cut 36 squares of Muslin measuring 10.5 inches x 10.5 inches.
- Cut Centers: Cut 36 squares of Red Fabric measuring 2.5 inches x 2.5 inches.
- Cut Logs: Cut your Indigo scraps into strips. They do not need to be perfect width, but aim for roughly 1.5 to 2 inches wide.
Step 2: Igniting the Hearth (The Center)
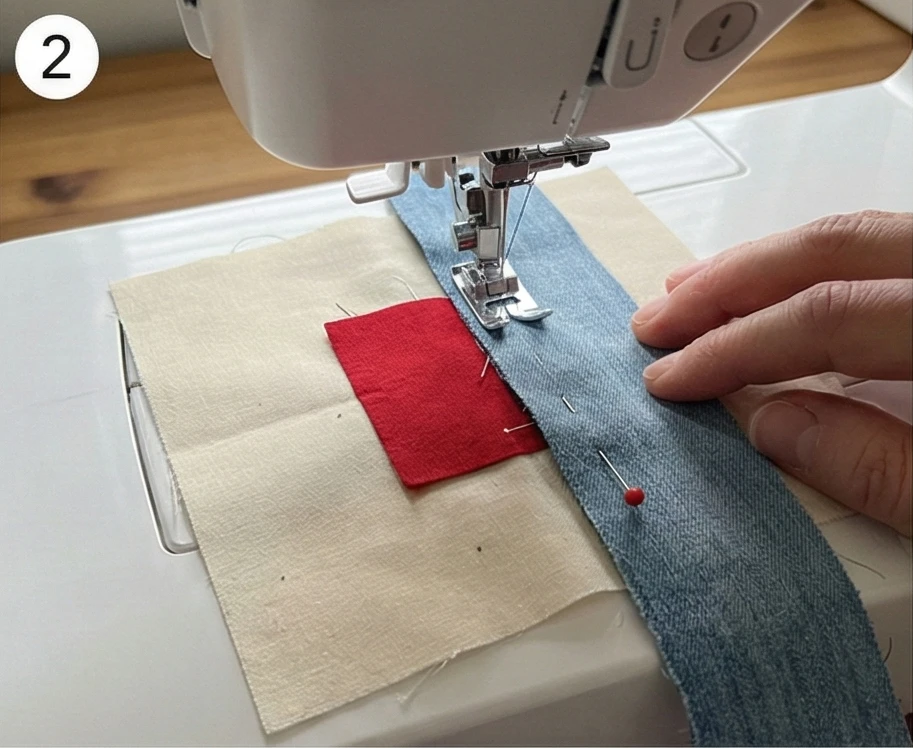
- Place: Place a Red Center square right-side up in the exact center of a Muslin foundation square.
- First Log: Place a “Light” indigo strip face down on the red square (aligning edges). Sew a 1/4 inch seam through the strip, square, and muslin.
- Press: Flip the strip open and press flat.
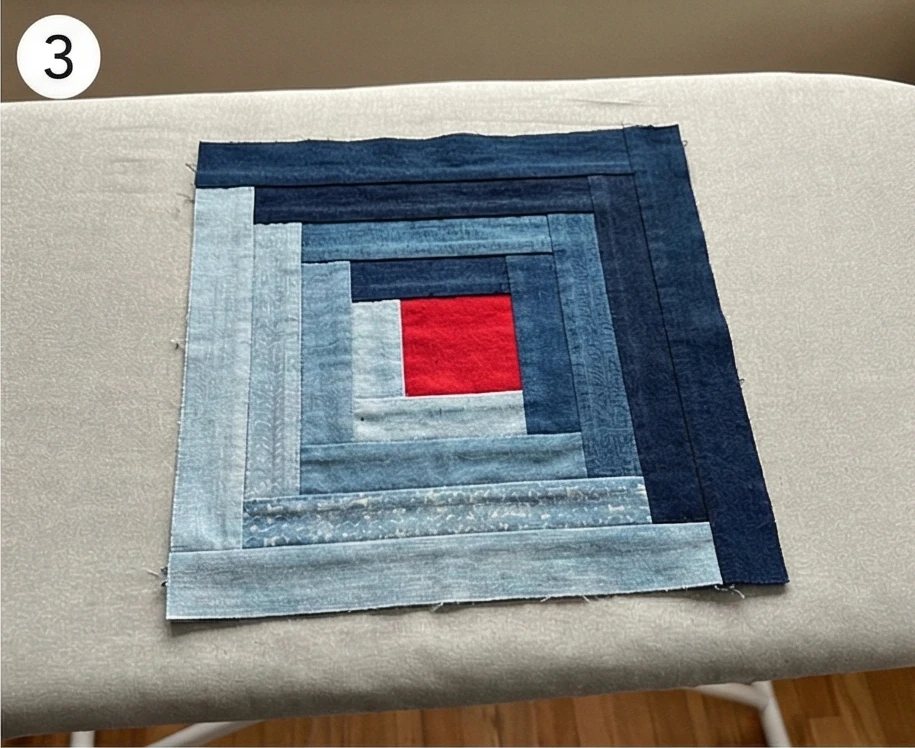
Step 3: Spiraling the Logs (Light and Dark)
The layout relies on contrast.
- Sequence: Add strips in a spiral sequence around the center square.
- Logs 1 & 2: Use Light Indigo fabrics.
- Logs 3 & 4: Use Dark Indigo fabrics.
- Logs 5 & 6: Back to Light.
- Logs 7 & 8: Back to Dark.
- Trim: After sewing each strip, trim the excess length so it aligns with the block.
- Continue: Keep spiraling until the entire 10.5-inch muslin square is covered.
- Result: Half the block is light blue, half is dark navy, divided diagonally.
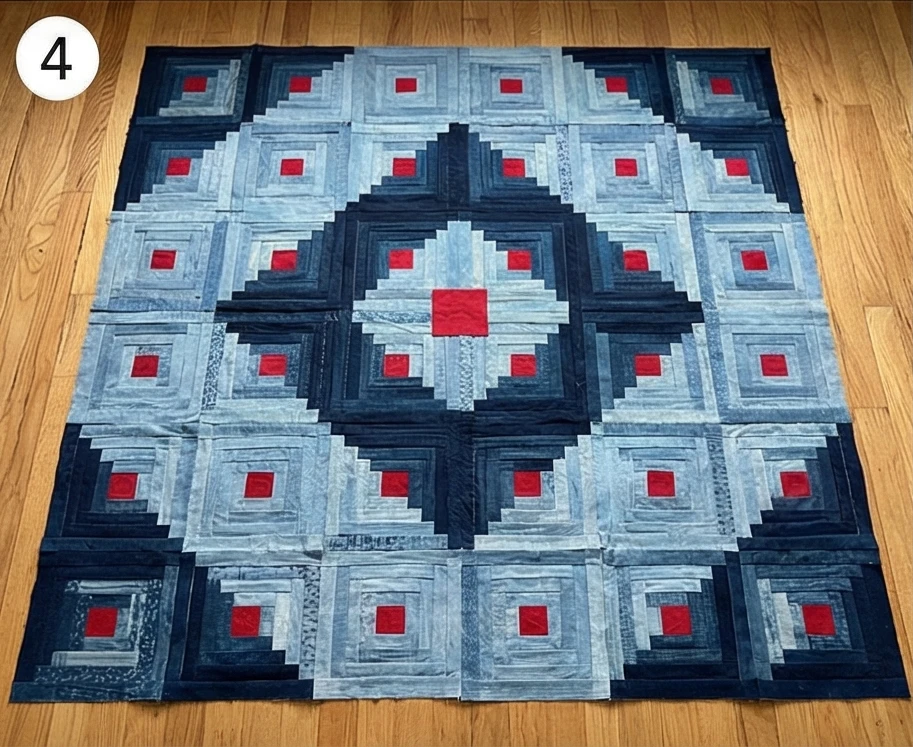
Step 4: The “Barn Raising” Layout
This is where the magic happens.
- Arrange: Lay your 36 finished blocks on the floor in a 6×6 grid.
- Rotate: Arrange the blocks so the “Dark” halves form concentric diamonds radiating from the center of the quilt.
- Visual: It should look like a large dark diamond in a field of light blue (or vice versa). This geometric impact makes the scrappy boro look intentional and elegant.
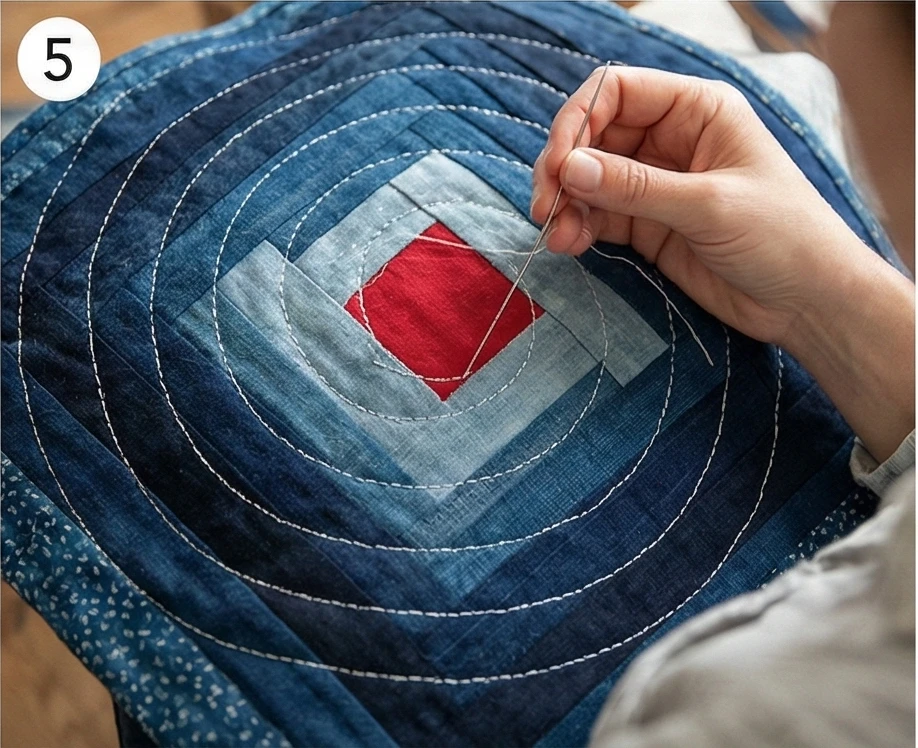
Step 5: Assembly and “Rough” Quilting
- Join: Sew the blocks into rows, then sew the rows together.
- Sandwich: Backing + Batting + Top.
- Quilt: Use White Sashiko Thread.
- Instead of stitching “in the ditch,” hand-quilt a large Spiral starting from the center of the quilt and working outward, crossing over all the seams.
- Aesthetic: The round spiral quilting softens the rigid square blocks, blending the “Zen” circle with the “Structural” square.
Step 6: The Denim Binding
- Cut: Cut 2.5-inch strips from old Denim Jeans (or heavy canvas).
- Join: Sew them together to make a heavy-duty binding strip.
- Bind: Attach to the quilt.
- Texture: The heavy denim edge gives the throw a solid weight, making it drape beautifully over the arm of a sofa.
Usability Note: The multiple layers of fabric in a Log Cabin quilt (Top strips + Foundation + Batting + Backing) make this throw very warm. It is essentially a weighted blanket made of cotton, perfect for reducing anxiety and promoting relaxation.
7. Rustic Japanese Farmhouse Patchwork Couch Covers
The “Satoyama Hearth” Canvas Sofa Cover
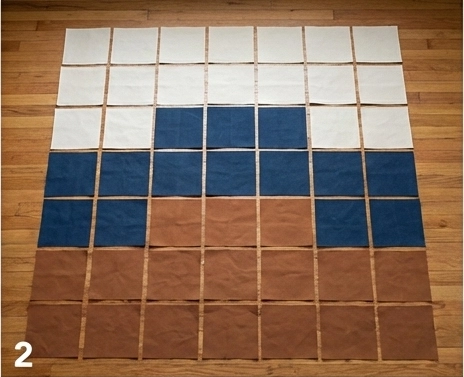
Satoyama refers to the border zone between mountain foothills and arable flat land in Japan—a landscape of sustainable village living. Japanese farmhouses (Kominka) in these regions are defined by dark polished wood beams, open hearths, and sturdy textiles. This couch cover mimics that aesthetic by using heavy-duty Canvas and Duck Cloth in a palette of Indigo, Unbleached Cotton, and Persimmon (Brown). It is designed to be a “workhorse” quilt: heavy enough to protect a sofa from dogs, kids, and everyday wear and tear, yet elegant enough to anchor a room with rustic minimalist charm.
Finished Dimensions: Large Sofa Cover, approximately 70″ x 90″ (Covers the seat and back of a standard 3-seater).
Materials Needed:
- Fabric A (Dark): 2 yards of Indigo Denim or Navy Canvas.
- Fabric B (Earth): 2 yards of Kakishibu (Persimmon) Brown or Espresso Canvas.
- Fabric C (Light): 2 yards of Unbleached Cotton Duck (Canvas).
- Backing: 5 yards of Sturdy Cotton Tickling or heavy muslin.
- Batting: Thin Polyester or Cotton/Poly Blend. (For a couch cover, you want durability and quick drying over softness).
- Thread: Heavy Duty Topstitching Thread (Cream or Brown).
- Notions: 4 yards of cotton twill tape (for ties).
Cultural Backstory: In a traditional Japanese farmhouse, textiles were often dyed with “Kakishibu” (fermented persimmon juice), which turns the fabric a rich reddish-brown, making it water-repellent and antiseptic. Combining this brown with Indigo blue creates the classic “Kominka” color palette found in old Noren curtains and Maekake aprons.
Step 1: The “Jumbo” Block Cut
Farmhouse style is bold, not fiddly. We use large blocks for visual impact and durability.
- Cut: Cut squares measuring 10.5 inches x 10.5 inches.
- Quantity: You need a grid of 7 wide x 9 long (Total 63 squares).
- Cut 21 squares of Fabric A (Indigo).
- Cut 21 squares of Fabric B (Brown).
- Cut 21 squares of Fabric C (Unbleached).
Step 2: The High-Contrast Layout
- Arrange: Lay the squares out on the floor.
- Pattern: Avoid a strict checkerboard. Instead, organize them into “Nine-Patch” clusters or diagonal stripes.
- Satoyama Style: Try grouping the browns at the bottom (Earth), the indigos in the middle (Mountain), and the unbleached at the top (Sky/Clouds) for a subtle landscape effect.
- Balance: Ensure no two identical fabrics touch side-by-side to maintain the “patchwork” look.
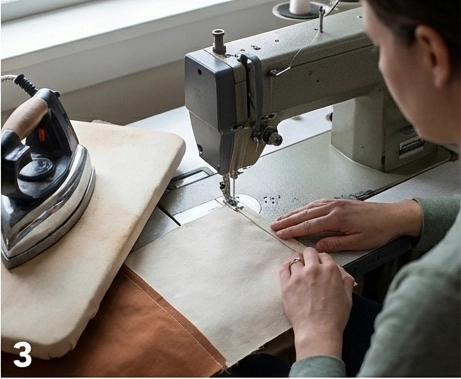
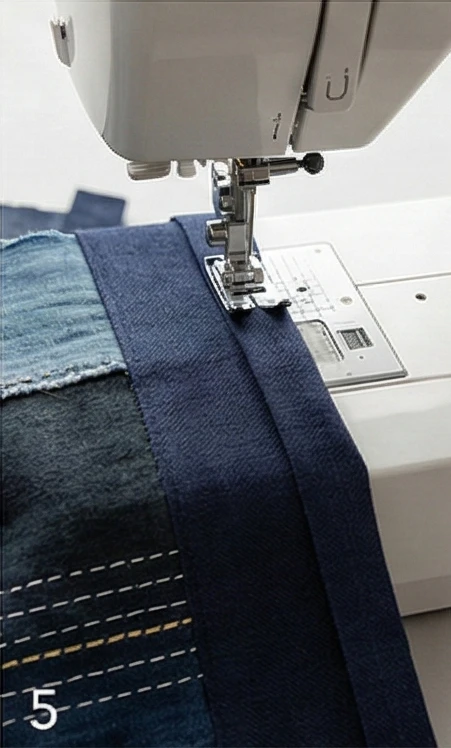
Step 3: Heavy-Duty Assembly
Canvas is thick. You must manage the bulk.
- Needle: Switch to a Jeans Needle (Size 100/16) on your sewing machine.
- Stitch: Sew the squares into rows using a 1/2 inch seam allowance (wider than the standard 1/4 inch to prevent fraying on loose-weave canvas).
- Press: Press all seams open. This is crucial. If you press to the side, the intersection of four canvas squares will be too thick to quilt through.
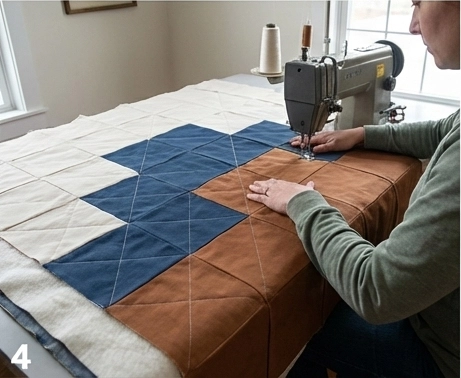
Step 4: The “Utility” Quilt
- Sandwich: Backing + Batting + Top.
- Baste: Use curved safety pins every 5 inches.
- Quilt: Machine quilt using a Walking Foot.
- Design: Stitch straight lines diagonally through the blocks, forming a large “X” in every square.
- Why? Diagonal quilting prevents the fabric from warping or stretching when people sit on it.
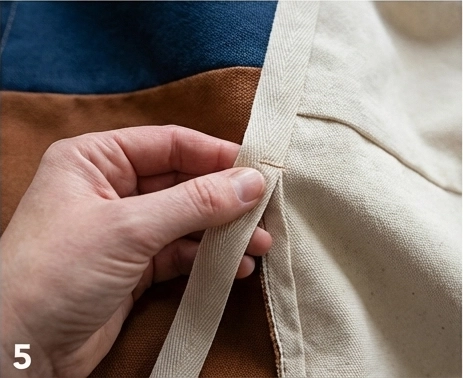
Step 5: The “Maekake” Ties (The Secret Feature)
A couch cover that slips is annoying. We add ties to secure it.
- Cut Tape: Cut the cotton twill tape into four 1-yard lengths.
- Position: Find the spot on the quilt that aligns with the “crease” of your sofa (where the seat meets the back).
- Typically about 20-25 inches down from the top edge.
- Attach: Sew the center of a tape strip securely to the Left and Right edges of the quilt at that height.
- Usage: You will tuck these ties into the sofa crease or tie them around the back legs to keep the cover locked in place.
Step 6: The “Hemmed” Binding
Canvas is too thick for a double-fold binding.
- Trim: Trim the batting and backing so they are 1 inch smaller than the canvas top on all sides.
- Fold: Fold the canvas top over the edge of the batting (1/2 inch), then fold again (1/2 inch) to enclose the raw edges.
- Topstitch: Machine stitch the hem down with a heavy stitch.
- Result: A clean, flat, rugged edge that looks like a heavy canvas tarp or sailcloth.
Usability Note: Canvas softens beautifully over time. While stiff at first, after 3 or 4 washes, this cover will drape like heavy linen. It is virtually immune to dog claws and can be vacuumed right on the sofa.
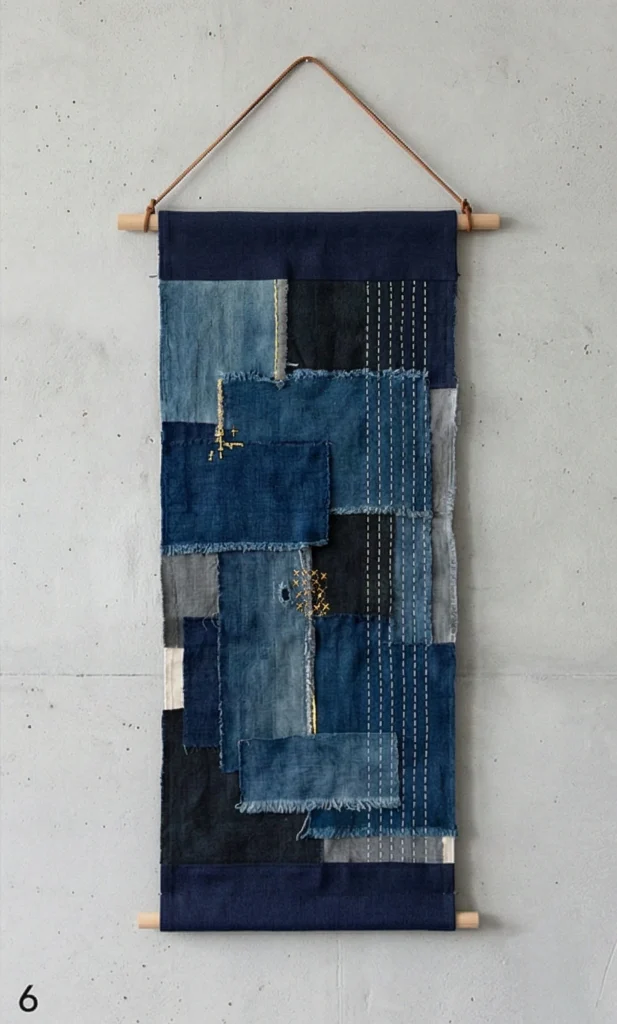
8. Wabi-Sabi Boro Patchwork Wall Hangings
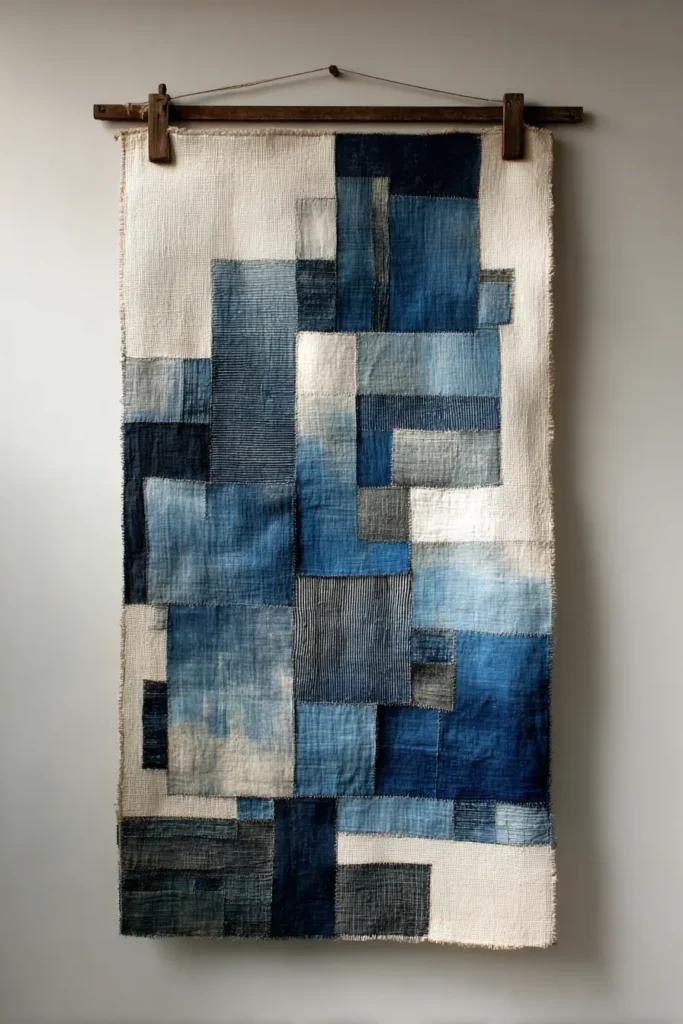
The “Mushin” (No-Mind) Wabi-Sabi Wall Scroll
Wabi-Sabi is the Japanese worldview centered on the acceptance of transience and imperfection. Mushin (“No-Mind”) is a mental state of freedom from thought and emotion, often achieved during repetitive artistic tasks. This wall hanging is designed to be a physical manifestation of these concepts. It is not a perfect grid; it is an abstract composition of frayed edges, overlapping indigo shades, and visible mending. Shaped like a traditional hanging scroll (Kakejiku), it brings a profound, contemplative silence to a hallway or meditation space.
Finished Dimensions: Vertical Wall Scroll, approximately 18″ x 45″.
Materials Needed:
- Fabric A (Base): 1/2 yard of Heavy Canvas or Drop Cloth (Natural/Beige). This provides the rigid structure.
- The Patches: A collection of Indigo Scraps, Vintage Linen, and Textured Cottons. (Aim for a monochrome palette: Blue, Grey, White, Black).
- Fabric B (Mounting): 1/4 yard of solid dark navy linen for the top and bottom binding.
- Batting: Fusible Fleece. (Stiff stabilizer is better than soft batting for wall art).
- Thread: White Sashiko Thread and Metallic Gold Embroidery Floss.
- Notions: Fabric glue stick, wooden dowel, hanging cord.
Cultural Backstory: For decades, Boro textiles were hidden away in Japan, seen as shameful markers of poverty. It is only recently that the world has recognized the stunning beauty in these “rags.” This wall hanging honors that history by framing the “rags” as high art, suggesting that the broken and mended parts of life are the most beautiful.
Step 1: Preparing the Canvas
We build on a stiff foundation so the quilt hangs flat.
- Cut: Cut the Heavy Canvas base to 18″ x 40″.
- Fuse: Iron the Fusible Fleece to the back of this canvas.
- Rough Edges: Do not hem the canvas edges. Let them stay raw. The friction of the patches will cover them, or the fraying will become part of the design.
Step 2: The “Mushin” Arrangement
Do not overthink. Let the hands choose.
- Lay Out: Lay the canvas flat. Start placing your scraps on top.
- Composition Rules:
- Overlap: Every piece must overlap its neighbor.
- Balance: Place heavy dark denims near the bottom for visual weight, and lighter linens near the top to mimic air/sky.
- Imperfection: Allow some raw edges to curl. Don’t fold them under.
- Glue: Once you find a pleasing arrangement, use the fabric glue stick to tack every piece in place.
Step 3: The “Running Water” Stitch
The stitching unifies the chaos.
- Thread: Load a needle with White Sashiko Thread.
- Stitch: Stitch vertical lines down the entire length of the scroll.
- Spacing: Keep lines about 1/2 inch apart.
- Consistency: The stitches don’t need to be of perfectly even lengths. The rhythm of the hand is more important than machine perfection.
- Function: These stitches trap the raw edges of the patches, securing them forever.
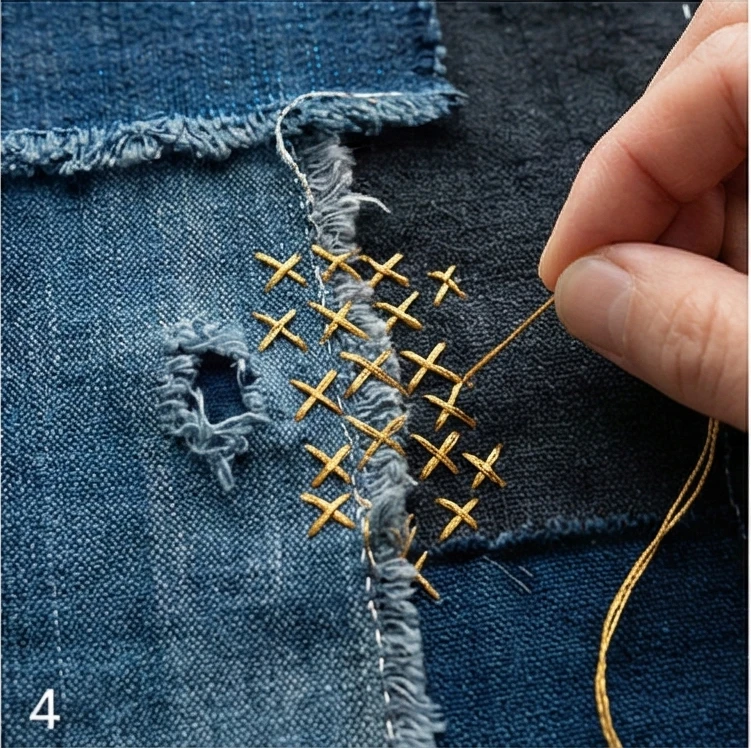
Step 4: The “Kintsugi” Accent (The Golden Repair)
Kintsugi is the art of repairing pottery with gold. We apply this to fabric.
- Identify: Find a place in your composition where two patches meet awkwardly, or where there is a hole or fray.
- Gold Thread: Switch to the Metallic Gold Floss.
- Repair: Stitch a dense cluster of “X” stitches or a thick satin stitch over that specific area.
- Symbolism: You are highlighting the “flaw” with gold, turning the imperfection into the focal point of the art.
Step 5: The Scroll Mounting
Traditional scrolls have distinct top and bottom weights.
- Cut Facings: Cut two strips of Dark Navy Linen: 18″ x 5″ (Top) and 18″ x 8″ (Bottom).
- Attach: Sew these strips to the top and bottom raw edges of your patchwork canvas (Right sides together, then flip open).
- Press: Press the seams flat. The dark navy frames the busy patchwork like a mat board.
Step 6: The Dowel Casing
- Hem: Fold the top raw edge of the Navy strip over by 2 inches to create a tube. Stitch down.
- Hem Bottom: Repeat for the bottom strip.
- Finish: Insert a wooden dowel into the top tube and a heavier wooden slat or metal rod into the bottom tube (the weight pulls the scroll straight).
- Cord: Tie a leather or silk cord to the ends of the top dowel for hanging.
Usability Note: Unlike a glass-framed picture, this textile wall hanging dampens sound, contributing to the acoustic “quiet” of a room. It is perfect for hallways or hard-floored spaces that tend to echo.
9. Hishizashi (Dovetail) Stitching for Detailed Quilted Wall Art
The “Nanbu Frost” Hishizashi Wall Tapestry
Hishizashi (Diamond Stitch) is a counted-thread embroidery technique from the Nanbu district of Aomori Prefecture. While it shares roots with Kogin-zashi, Hishizashi is distinct in its use of even-numbered thread counts (often 2, 4, or 6) and its intricate, interlocking diamond patterns that resemble dovetail joinery. This wall tapestry treats the fabric as a canvas for “Thread Painting.” Using a monochromatic palette of white and pale grey on natural linen, the dense stitching creates a raised, architectural texture that catches the light, bringing a quiet, museum-quality elegance to a living room wall.
Finished Dimensions: Vertical Wall Panel, approximately 16″ x 30″.
Materials Needed:
- Fabric A (Canvas): 1/2 yard of Even-Weave Hemp or Natural Linen (approx. 18-20 count). Critical: You must be able to see the individual warp and weft threads to count them.
- Backing: 1/2 yard of felt or heavy cotton (for stability).
- Thread: Matte Embroidery Floss or Thin Sashiko Thread (White and Silver-Grey).
- Needle: Blunt-tipped Tapestry Needle.
- Notions: Wooden magnetic poster hanger (for a modern display), fusible interfacing.
Cultural Backstory: Hishizashi originated in the Nanbu region, an area notorious for freezing famines. Peasant women were forbidden from wearing cotton for warmth, so they stitched cotton thread into open-weave hemp to close the gaps. Unlike the bold, singular motifs of Kogin, Hishizashi patterns often cover the entire fabric in a continuous, interlocking “skin” of diamonds, making the cloth incredibly warm and durable.
Step 1: Stabilizing the Grid
Because Hishizashi is a counted technique, distortion is the enemy.
- Cut: Cut your Linen to 18″ x 34″.
- Fuse: Iron lightweight Fusible Interfacing to the wrong side of the linen. This prevents the weave from shifting while you count threads.
- Center: Fold the fabric in half lengthwise and widthwise to find the exact center point. Mark it with a pin or a soluble fabric marker.
Step 2: The “Modoko” (Motif) Count
Hishizashi patterns are built on horizontal rows. We will stitch a “Uroko” (Scale) or “Soroban” (Abacus) diamond pattern.
- The Rule: In Hishizashi, you typically stitch over an Even Number of threads (e.g., over 2, over 4).
- Row 1 (Center): Starting at your center mark, stitch a horizontal row:
- Stitch: Over 2 threads.
- Space: Under 2 threads.
- Repeat across the width of the design area (approx 12 inches wide).
- Row 2: Move up one row of weft threads.
- Shift the pattern one warp thread to the right.
- Stitch Over 2, Under 2.
- Result: The stitches will look like bricks stacked in a step formation.

Step 3: Building the Dovetail Diamond
By shifting the count, you create the diamond shape.
- Expansion: Continue shifting the start point outward for 6 rows. The “brick” stack will widen, forming the bottom half of a diamond.
- Contraction: For the next 6 rows, shift the start point inward. The distinct diamond shape (Hishi) will close at the top.
- Interlocking: Because you are repeating this across the row, as one diamond closes, the adjacent one opens. This creates the “Dovetail” effect, where the positive and negative shapes lock together perfectly.

Step 4: The Gradient Fade
To make this a piece of art rather than just a sampler, we use thread color to create depth.
- Bottom Section: Stitch the bottom 10 inches of the tapestry using Pure White thread. The dense stitching will look like heavy snow.
- Middle Section: Switch to a Pale Silver/Grey thread for the middle 10 inches. The pattern remains the same, but the tone softens.
- Top Section: Switch to the Natural Linen color (or a very thin beige thread) or simply leave the top section as negative space with sparse stitching.
- Effect: The heavy diamonds seem to dissolve into the mist at the top of the artwork.

Step 5: Blocking and Mounting
Embroidery distorts fabric tension. You must block it.
- Wet: Lightly mist the finished piece with water.
- Pin: Pin it to a blocking board or ironing board, stretching it until it is perfectly rectangular and the diamonds are square. Let it dry completely.
- Backing: Stitch the felt backing to the wrong side of the tapestry (hand stitch around the perimeter) to hide the knots and thread tails.
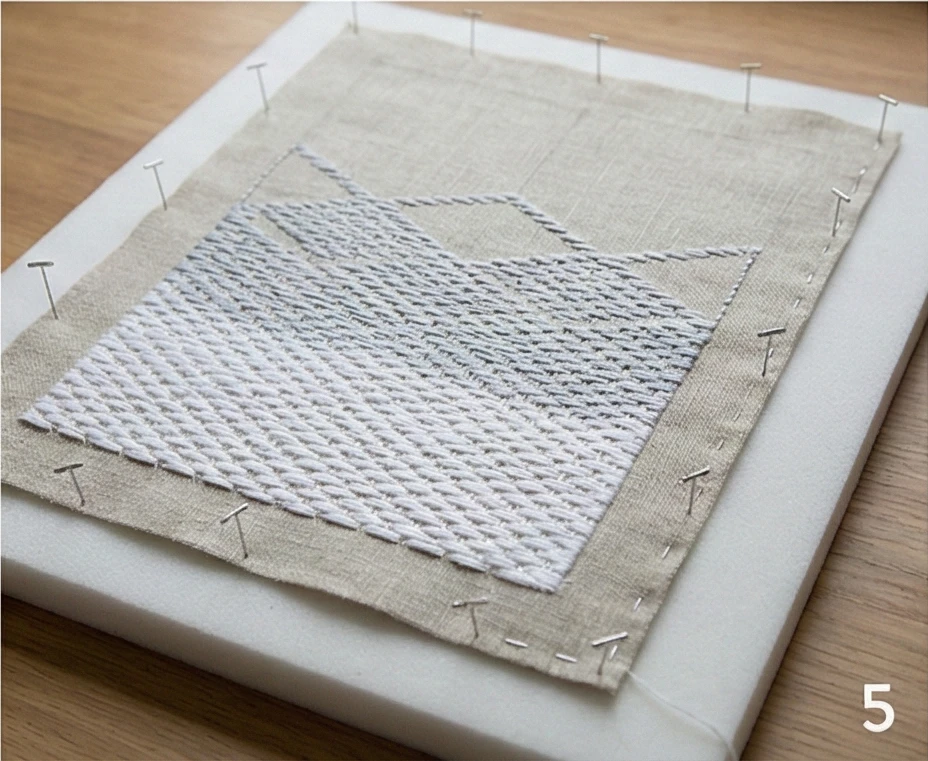
Step 6: The Modern Scroll Finish
- Hang: Clamp the top and bottom edges of the tapestry into a Wooden Magnetic Poster Hanger.
- Why? This modern mounting method mimics the traditional Kakejiku (scroll) but allows the texture of the Hishizashi to float freely without being compressed behind glass.
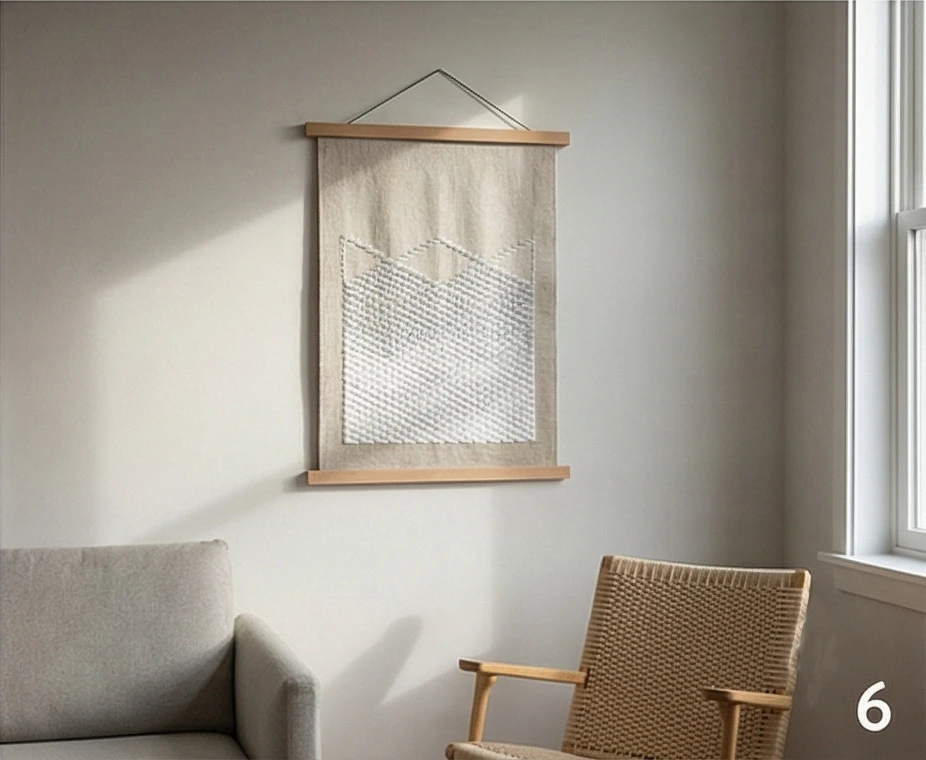
Elegance Note: The beauty of Hishizashi lies in the play of light. Because the stitches sit on top of the fabric (floats), they catch the light differently than the base linen. Hang this piece where side-lighting (from a window or sconce) can graze the surface, highlighting the relief texture.
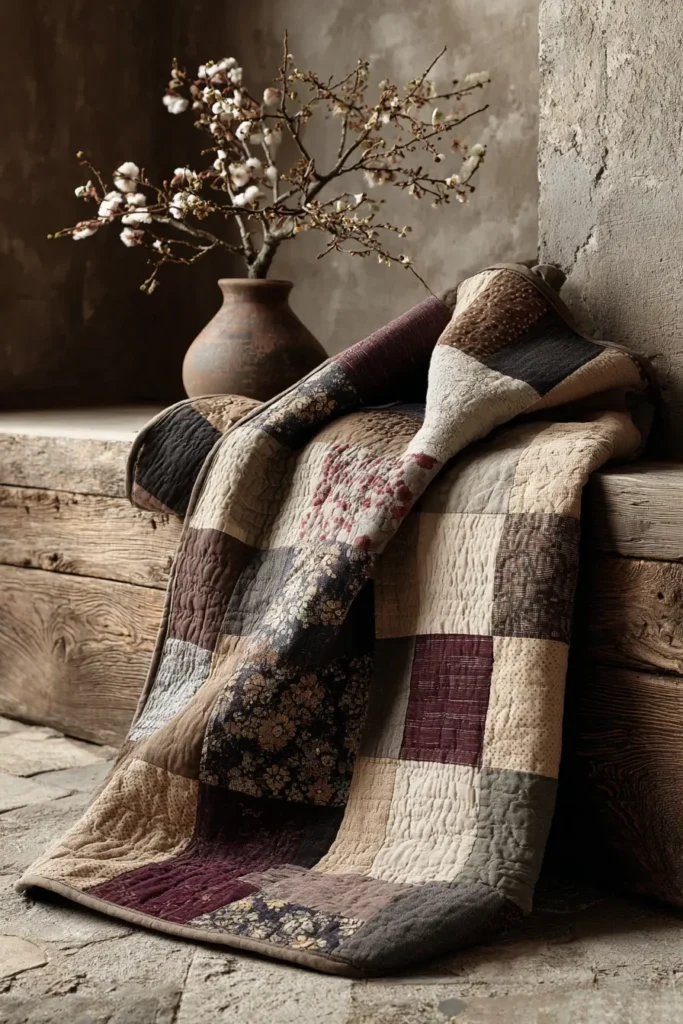
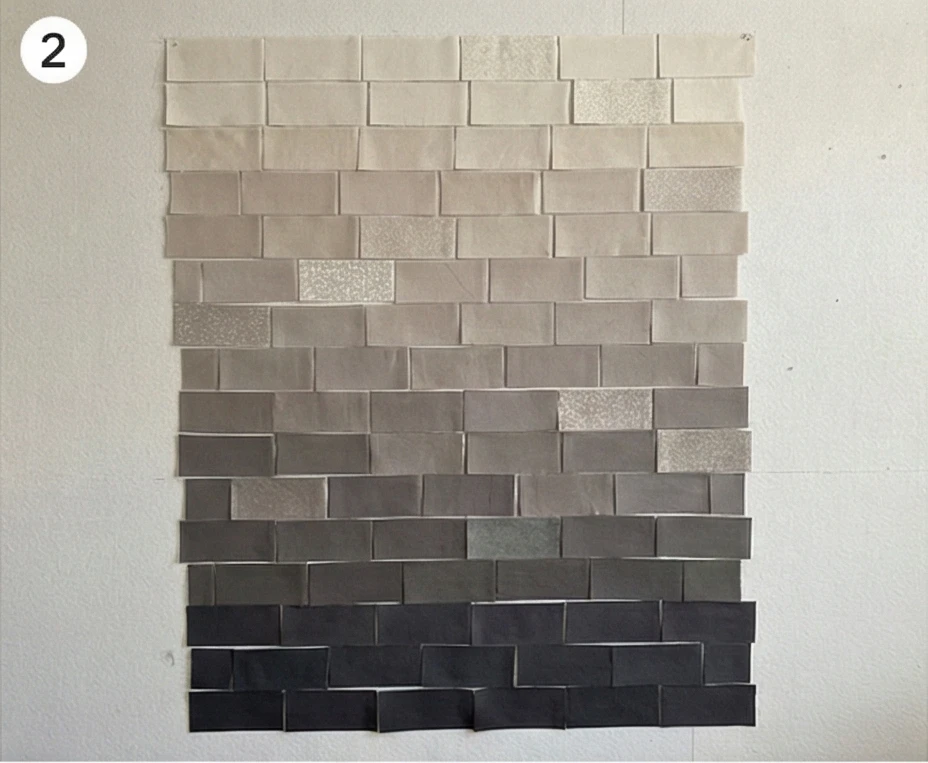
10. Modern Japanese Patchwork Quilts for Balanced Home Styling

The “Taupe Flow” (Nagare) Modern Brick Quilt
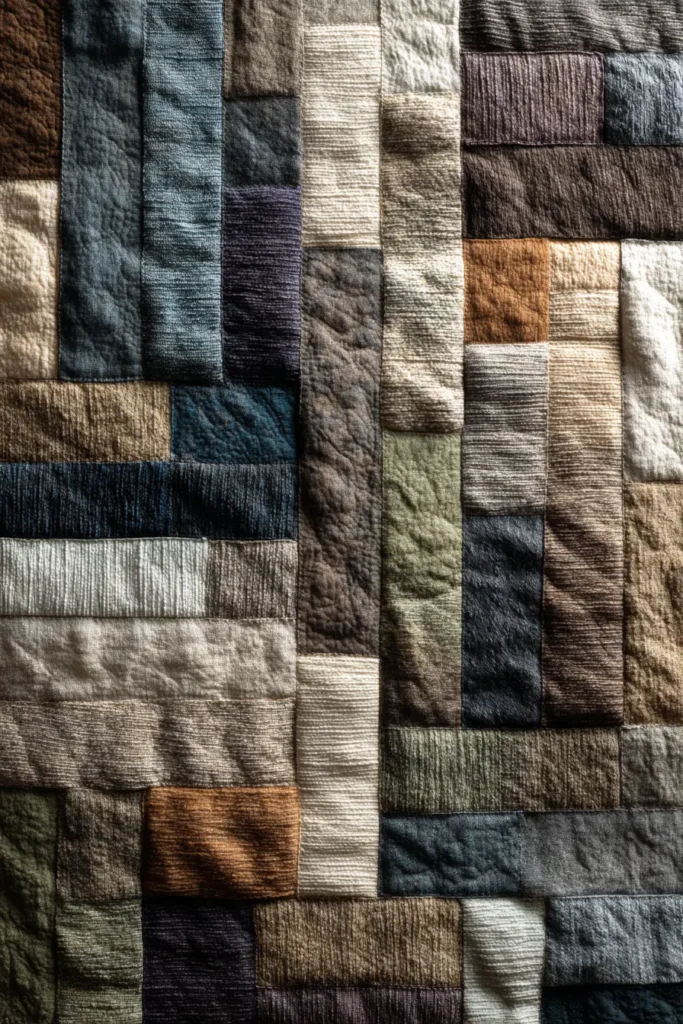
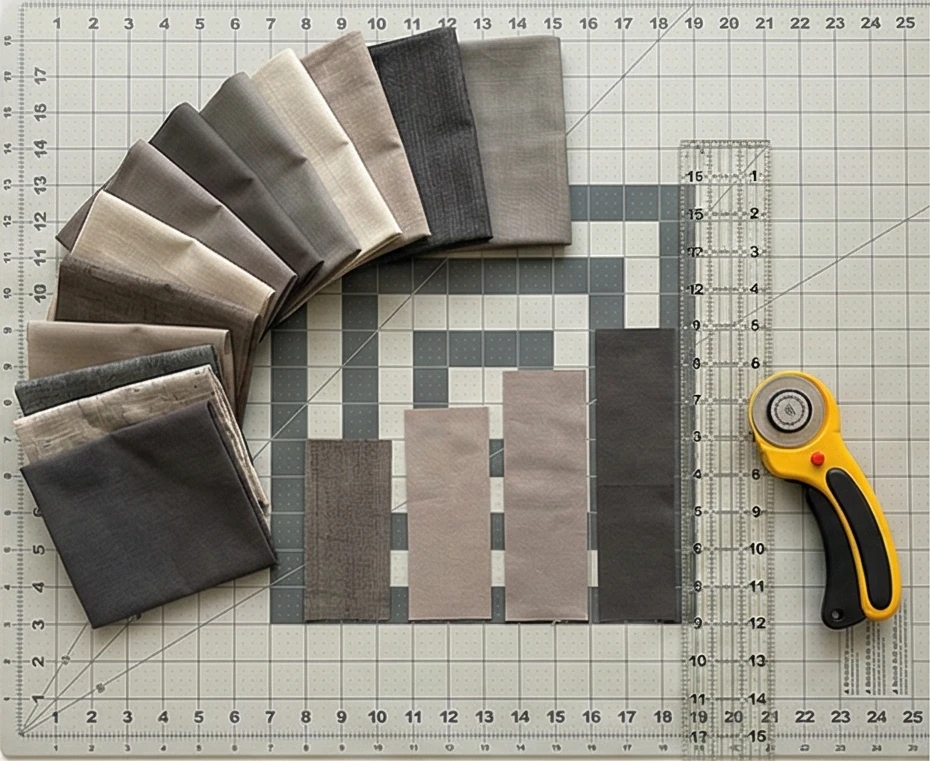
In modern Japanese quilting, there is a massive movement known simply as “Taupe Color Theory,” popularized by master quilter Yoko Saito. It moves away from high-contrast indigo and white, favoring “muddy” or desaturated tones—greys, browns, dusty purples, and olives. This “Taupe” style is the epitome of sophisticated, balanced home styling. This quilt uses a simple Variable Brick pattern in a gradient of taupe fabrics to create a sense of flowing water or shifting earth, perfect for a neutral, calming living space.
Finished Dimensions: Modern Lap Throw, approximately 50″ x 65″.
Materials Needed:
- Fabric Collection: 10 to 12 Fat Quarters of Japanese Taupe Fabrics (yarn-dyed cottons in varying shades of grey-brown, beige, and charcoal).
- Texture: Look for “Daiwabo” style fabrics that look like wool or tweed but are actually cotton.
- Backing: 3.5 yards of a solid Linen in Oatmeal or Flax.
- Batting: Bamboo/Silk Blend. (This blend offers a luxurious drape and is lighter than cotton, enhancing the modern feel).
- Thread: Taupe/Beige Cotton Thread (50wt for piecing, 40wt for quilting).
- Notions: Rotary cutter, design wall (or floor space).
Cultural Backstory: The “Taupe” movement in Japan draws inspiration from the natural world—stones, bark, dried leaves. It reflects a modern interpretation of “Shibui” (astringency/subtlety), where beauty is found in the understated rather than the flashy. A Taupe quilt is designed to recede into a room, providing balance rather than demanding attention.
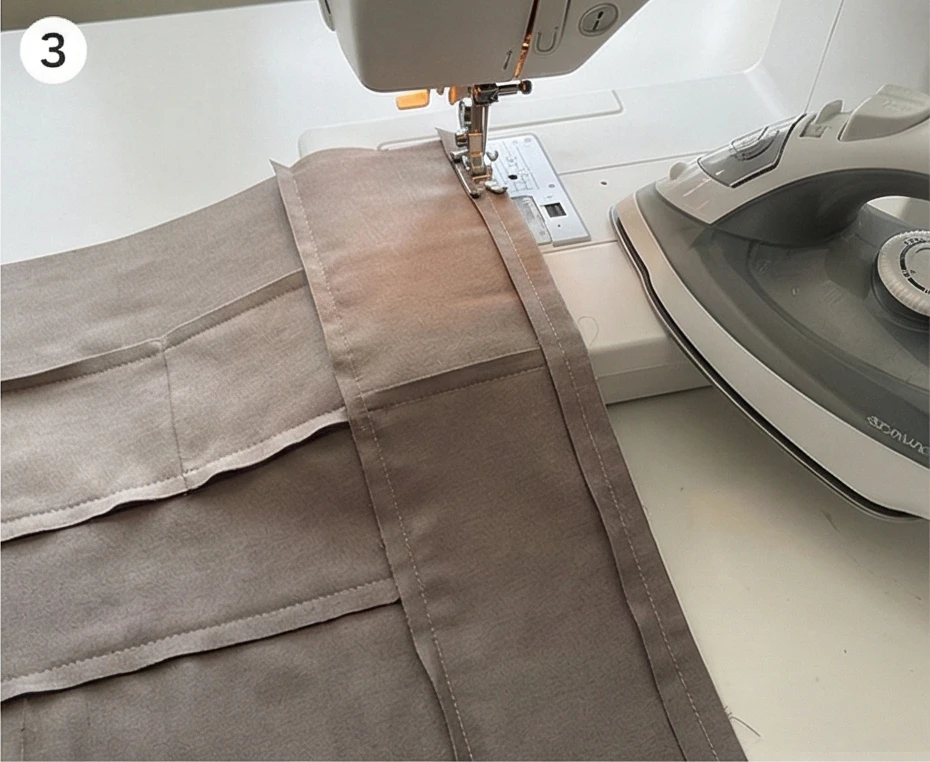
Step 1: The “Variable” Cut
To create a modern look, we avoid uniform bricks.
- Strip Cutting: Cut all your fat quarters into 4.5-inch-wide strips.
- Sub-Cutting: Cut these strips into rectangles of random lengths.
- Range from 4 inches to 12 inches long.
- Tip: Do not measure precisely. The randomness creates the organic “flow.”
Step 2: The Gradient Layout
This is the artistic phase.
- Arrange: Lay your strips out on the floor in vertical columns or horizontal rows (horizontal suggests water/calm).
- Flow: Organize the colors to create a subtle gradient.
- Example: Dark charcoal bricks at the bottom, fading up to medium greys, then to light beiges at the top.
- The “Spark”: Insert a few dark bricks in the light section (and vice versa) to create movement and prevent the gradient from looking too rigid.
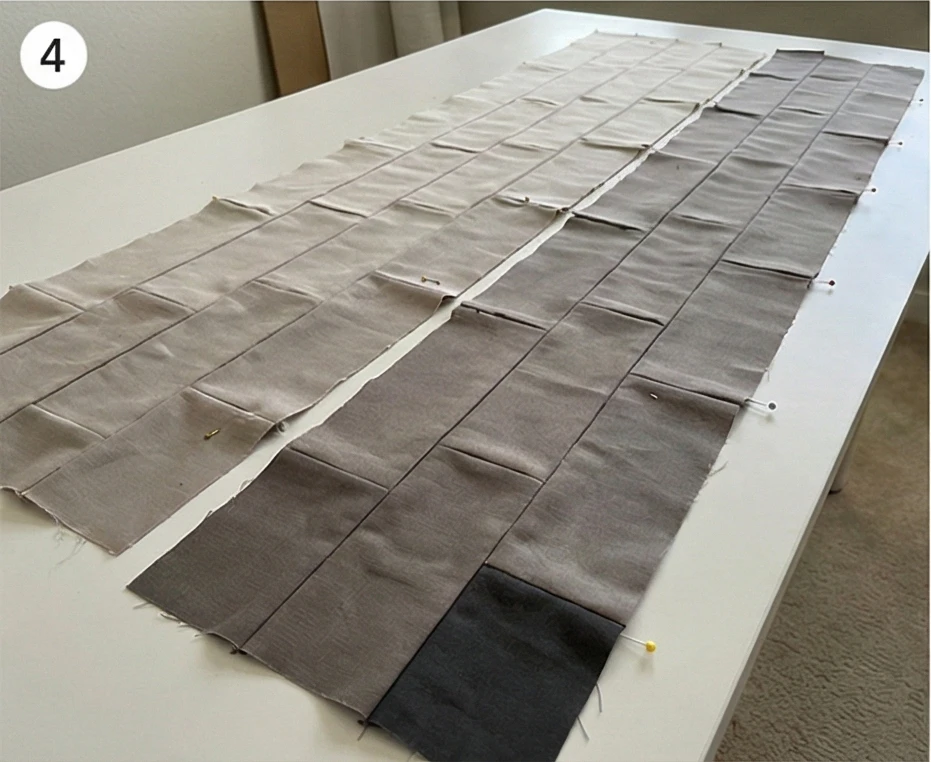
Step 3: Row Construction
- Sew: Stitch the bricks together end-to-end to form long rows (approx 50 inches wide).
- Seam Allowance: Use a 1/4 inch seam.
- Press: Press seams open. Japanese taupe fabrics are often thicker (yarn-dyed), so pressing open reduces bulk and helps the quilt lie flat.
Step 4: Offset Assembly
Avoid lining up the vertical seams.
- Join Rows: Pin two rows together.
- Stagger: Ensure the vertical seams in Row 1 do not match those in Row 2. Shift the rows left or right if necessary.
- Result: This creates a “brickwork” or “ashlar” stone effect.
- Trim: Once all rows are sewn together, trim the uneven left and right edges to square up the quilt to 50″ x 65″.
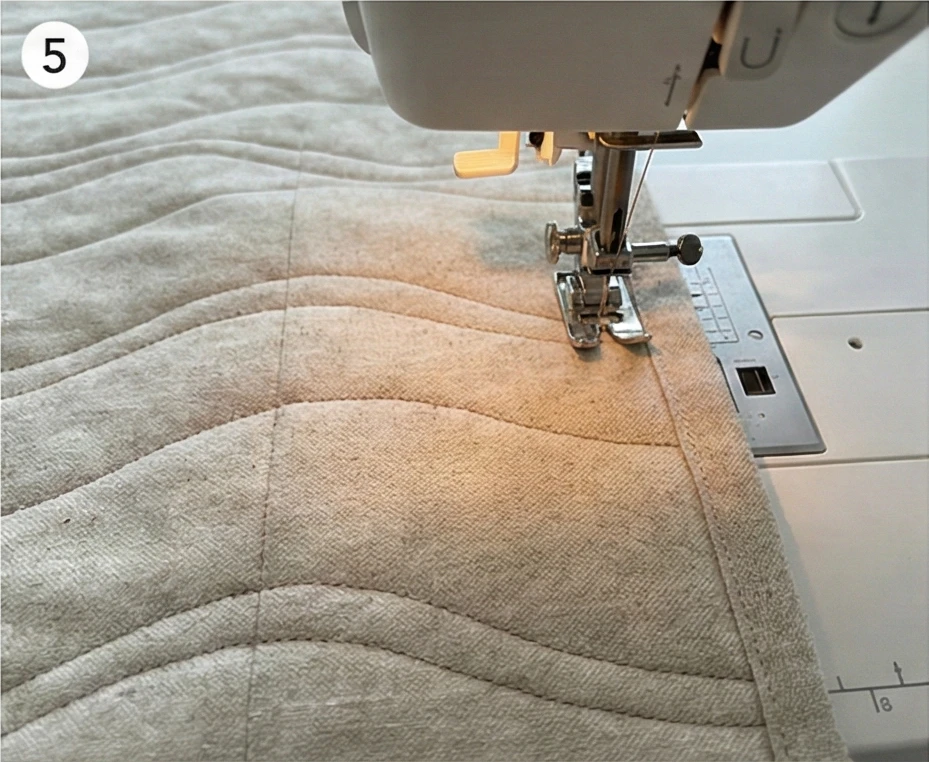
Step 5: “Nagare” (Current) Quilting
Quilting should enhance the flow.
- Sandwich: Backing + Silk Batting + Top.
- Marking: Mark gentle, undulating wave lines horizontally across the quilt.
- Space them widely—about 2 to 3 inches apart.
- Stitch: Hand-quilt or machine-quilt along these lines.
- Modern Touch: If machine quilting, use a “Walking Foot” and slightly lengthen your stitch length (3.0mm) to mimic the look of hand stitching.
Step 6: The Invisible Binding
A heavy frame distracts from the gradient.
- Fabric: Use the same Oatmeal Linen as the backing for the binding.
- Technique: Apply a standard double-fold binding.
- Aesthetic: By matching the binding to the backing (and the lightest tones of the top), the quilt feels edgeless and light, blending seamlessly into modern decor.
Usability Note: Yarn-dyed taupe fabrics are softer and slightly looser-woven than standard quilting cottons. This makes the quilt exceptionally soft and drapeable right away, with no “stiffness” period.
Conclusion
Embracing these 10 Japanese Patchwork Quilt Ideas allows you to weave a thread of tranquility and timeless elegance through the very fabric of your home. By choosing pieces like Shonai Patchwork Quilts for Layered Bedding or Scrappy Yosegire Patchwork Throws, you are not just accessorizing; you are honoring a legacy of craftsmanship that prioritizes integrity and longevity. These textiles serve as anchors in a busy world, their hand-stitched textures and deep indigo hues providing a visual and physical retreat. The seamless blend of the Cozy Boro-Style aesthetic with modern interiors demonstrates that comfort and high style can coexist, rooted in the appreciation of natural materials and human touch.
The impact of these designs extends beyond their visual beauty; they cultivate a feeling of “home” that is deeply personal and restorative. The presence of Wabi-Sabi Boro Patchwork Wall Hangings or Artistic Patchwork Pillow Covers introduces a layer of narrative and soul often missing in mass-produced decor. The intricate Hishizashi Stitching and the resourceful patterns of Japanese Farmhouse styles remind us of the value of slowing down and appreciating the details. These elements work together to create a living environment that is not only stylish but also emotionally resonant, offering a daily reminder of the beauty found in simplicity and repair.
Let this collection inspire you to curate a sanctuary that reflects the peaceful principles of Japanese design. Whether you are draping a Cozy Indigo Boro Sofa Throw over your favorite chair or styling a bed with Traditional Sashiko accents, you are building a space that nurtures well-being. These patchwork quilts stand as enduring symbols of comfort, transforming houses into homes filled with warmth, history, and an undeniable, quiet elegance.
